Vault Customizing Guide 70
User Manual:
Open the PDF directly: View PDF ![]() .
.
Page Count: 344 [warning: Documents this large are best viewed by clicking the View PDF Link!]
- EngageOne™ Vault
- Customizing Guide
- Contents
- The Vault environment
- Customizing the Vault
- Vault Performance & Capacity Planning
- Vault initialization files
- Client initialization file
- Patterns initialization file
- Profiles initialization file
- Server initialization file
- Database initialization file
- Local initialization file
- e2loaderd, e2Renderd, e2Serverd and indexerd initialization files
- On Windows
- Command line switches
- Services commands (e2loaderd,e2serverd,e2renderd)
- Relocating the PID files within e2serverd.ini, e2loaderd.ini, and indexerd.ini (Solaris, AIX, and Linux)
- Installing multiple servers or Rendering Engines
- General settings for the new services
- e2Routerd
- indexerd
- Database rollback
- e2Serverd
- e2Renderd
- Vault Utilities
- Mobile Vault build script
- Advanced ADM Configurations
- Indexing
- Working with fonts
- Emulating paper stock
- About the Rendering Engine
- Developing Vault applications
- Overview
- .NET API (e2NetRender)
- Java API
- Software requirements
- Installing the Java API
- Overview of classes and usage details
- Connection and disconnection
- Connecting to an SSL-enabled Vault server
- Importing the Vault server's SSL certificate into the Java system-wide CA certificates truststore
- On UNIX platforms: cp cacerts cacerts.ORIG
- Importing the Vault server's SSL certificate into a separate/private truststore
- SSL client authentication
- Classes and usage details
- Vault Web Service
- Programming the E2VaultWS web service
- Communicating directly to the Rendering Engine
- Vault and e-Messaging
- Updating unicode indexes
- Index

EngageOne™ Communication Suite
EngageOne™ Vault
Customizing Guide
Version 7.0
Copyright ©2013 Pitney Bowes Software Inc. All rights reserved.
This publication and the software described in it is supplied under license and may only be used or
copied in accordance with the terms of such license. The information in this publication is provided
for information only, is subject to change without notice, and should not be construed as a
commitment by Pitney Bowes Software Inc. To the fullest extent permitted by applicable laws Pitney
Bowes Software Inc. excludes all warranties, representations and undertakings (express or implied) in
relation to this publication and assumes no liability or responsibility for any errors or inaccuracies
that may appear in this publication and shall not be liable for loss or damage of any kind arising from
its use.
Except as permitted by such license, reproduction of any part of this publication by mechanical,
electronic, recording means or otherwise, including fax transmission, without the express permission
of Pitney Bowes Software Inc. is prohibited to the fullest extent permitted by applicable laws.
Nothing in this notice shall limit or exclude Pitney Bowes Software Inc.'s liability in respect of fraud or
for death or personal injury arising from its negligence. Statutory rights of the user, if any, are
unaffected.
*TALO Hyphenators and Spellers are used. Developed by TALO B.V., Bussum, Netherlands
Copyright © 1998 *TALO B.V., Bussum, NL
*TALO is a registered trademark ®
Encryption algorithms licensed from Unisys Corp. under U.S. Patent No. 4,558,302 and foreign counterparts.
Security algorithms Copyright ©
1991 - 1992 R S A D a t a S e c u r i ty I n c .
Base 14 fonts and derivations
Copyright 1981 – 1983, 1989, 1993 Heidelberger Druckmaschinen AG.
All rights reserved.
Datamatrix and PDF417 encoding, fonts and derivations
Copyright © 1999, 2000 DL Technology Ltd.
All rights reserved
Barcode fonts Copyright © 1997 Terrapin Solutions Ltd. with NRB Systems Ltd.
This product includes software developed by the Apache Software Foundation (http://www.apache.org/).
Artifex and the Ghostscript logo are registered trademarks and the Artifex logo and Ghostscript are trademarks of Artifex
Software, Inc.
This product contains the Regex++ library
Copyright © 1998-2000
Dr. John Maddock
PostScript is a trademark of Adobe Systems Incorporated.
PCL is a trademark of Hewlett Packard Company.
Portions of this software are copyright © 2013
The FreeType Project (www.freetype.org).
All rights reserved.
This software contains Ghostscript as licensed by Artifex Software Inc. under the terms of a specific OEM agreement.
The software includes ICU - International Components for Unicode (http://site.icu-project.org/)
Copyright (c) 1995-2013 International Business Machines Corporation and others
This software is based in part on the work of the Independent JPEG Group.
This software contains material from OpenSSL.
Copyright (c) 1998-2013 The OpenSSL Project. All rights reserved.
This software contains material from SSLeay.
Copyright (C) 1995-1998 Eric Young (eay@cryptsoft.com)
This software contains material from zlib (zlib.net)
Copyright (C) 1995-2013 Jean-loup Gailly and Mark Adler
This software contains material from the Apache Xerces project
Licensed under the Apache License, Version 2.0 (the "License")
Otherwise all product names are trademarks or registered trademarks of their respective holders.
Printed in the UK.

5
THE VAULT ENVIRONMENT . . . . . . . . . . . . . . . . . . . . . . . . . . . . . . . . . . . . . . . . . . 14
CUSTOMIZING THE VAULT . . . . . . . . . . . . . . . . . . . . . . . . . . . . . . . . . . . . . . . . . . . 16
Vault performance and capacity planning . . . . . . . . . . . . . . . . . . . . . . . . . . . 16
Vault Initialization files . . . . . . . . . . . . . . . . . . . . . . . . . . . . . . . . . . . . . . . . . . 16
Vault Utilities . . . . . . . . . . . . . . . . . . . . . . . . . . . . . . . . . . . . . . . . . . . . . . . . . . . 17
Advanced ADM Configurations . . . . . . . . . . . . . . . . . . . . . . . . . . . . . . . . . . . . 17
Indexing . . . . . . . . . . . . . . . . . . . . . . . . . . . . . . . . . . . . . . . . . . . . . . . . . . . . . . . 17
Working with Fonts . . . . . . . . . . . . . . . . . . . . . . . . . . . . . . . . . . . . . . . . . . . . . 17
Emulating paper stock . . . . . . . . . . . . . . . . . . . . . . . . . . . . . . . . . . . . . . . . . . . 18
Rendering Engine . . . . . . . . . . . . . . . . . . . . . . . . . . . . . . . . . . . . . . . . . . . . . . . 18
VAULT PERFORMANCE & CAPACITY PLANNING . . . . . . . . . . . . . . . . . . . . . . . . 20
Introduction . . . . . . . . . . . . . . . . . . . . . . . . . . . . . . . . . . . . . . . . . . . . . . . . . . . . 20
Storage Capacity Planning . . . . . . . . . . . . . . . . . . . . . . . . . . . . . . . . . . . . . . . 21
Disk Requirements for Print Streams . . . . . . . . . . . . . . . . . . . . . . . . . . . 21
Job size planning . . . . . . . . . . . . . . . . . . . . . . . . . . . . . . . . . . . . . . . . . . . . . 21
Computing Compression Rates and Ratios . . . . . . . . . . . . . . . . . . . . . . . 22
Finding the Test Results . . . . . . . . . . . . . . . . . . . . . . . . . . . . . . . . . . . . . . . 22
Analyzing the Test Results . . . . . . . . . . . . . . . . . . . . . . . . . . . . . . . . . . . . . 22
Search performance considerations. . . . . . . . . . . . . . . . . . . . . . . . . . . . . . . . 30
Introduction . . . . . . . . . . . . . . . . . . . . . . . . . . . . . . . . . . . . . . . . . . . . . . . . . 30
Mitigating the Search Lock Issues . . . . . . . . . . . . . . . . . . . . . . . . . . . . . . . 31
Implications of Using the Unfiltered Searches . . . . . . . . . . . . . . . . . . . . 31
Contents

Contents
6
VAULT INITIALIZATION FILES . . . . . . . . . . . . . . . . . . . . . . . . . . . . . . . . . . . . . . . . 34
Client initialization file . . . . . . . . . . . . . . . . . . . . . . . . . . . . . . . . . . . . . . . . . . . 35
Patterns initialization file. . . . . . . . . . . . . . . . . . . . . . . . . . . . . . . . . . . . . . . . . 36
Profiles initialization file . . . . . . . . . . . . . . . . . . . . . . . . . . . . . . . . . . . . . . . . . 38
Extracting document information . . . . . . . . . . . . . . . . . . . . . . . . . . . . . . . 49
Resource set assignment . . . . . . . . . . . . . . . . . . . . . . . . . . . . . . . . . . . . . . 51
AFP settings . . . . . . . . . . . . . . . . . . . . . . . . . . . . . . . . . . . . . . . . . . . . . . . . . 53
Metacode settings . . . . . . . . . . . . . . . . . . . . . . . . . . . . . . . . . . . . . . . . . . . . 56
Postscript settings . . . . . . . . . . . . . . . . . . . . . . . . . . . . . . . . . . . . . . . . . . . 59
TIFF settings . . . . . . . . . . . . . . . . . . . . . . . . . . . . . . . . . . . . . . . . . . . . . . . . 64
Working with HTML in XML datastreams . . . . . . . . . . . . . . . . . . . . . . . . . 64
PDF settings . . . . . . . . . . . . . . . . . . . . . . . . . . . . . . . . . . . . . . . . . . . . . . . . . 64
Extracting summary document information from DJDE and DJDELINE
formatted documents . . . . . . . . . . . . . . . . . . . . . . . . . . . . . . . . . . . . . . . . . 66
Server initialization file . . . . . . . . . . . . . . . . . . . . . . . . . . . . . . . . . . . . . . . . . . 69
Database initialization file . . . . . . . . . . . . . . . . . . . . . . . . . . . . . . . . . . . . . . . . 73
Indexer as a Service . . . . . . . . . . . . . . . . . . . . . . . . . . . . . . . . . . . . . . . . . . 75
Unicode indexes . . . . . . . . . . . . . . . . . . . . . . . . . . . . . . . . . . . . . . . . . . . . . . 76
Local initialization file. . . . . . . . . . . . . . . . . . . . . . . . . . . . . . . . . . . . . . . . . . . . 78
e2loaderd, e2Renderd, e2Serverd and indexerd initialization files. . . . . . 79
On Windows . . . . . . . . . . . . . . . . . . . . . . . . . . . . . . . . . . . . . . . . . . . . . . . . . 79
Command line switches . . . . . . . . . . . . . . . . . . . . . . . . . . . . . . . . . . . . . . . 79
Services commands (e2loaderd,e2serverd,e2renderd) . . . . . . . . . . . . . 79
Relocating the PID files within e2serverd.ini, e2loaderd.ini, and
indexerd.ini (Solaris, AIX, and Linux) . . . . . . . . . . . . . . . . . . . . . . . . . . . . 80
Installing multiple servers or Rendering Engines . . . . . . . . . . . . . . . . . 80
General settings for the new services . . . . . . . . . . . . . . . . . . . . . . . . . . . 81
e2Routerd . . . . . . . . . . . . . . . . . . . . . . . . . . . . . . . . . . . . . . . . . . . . . . . . . . . 85
indexerd . . . . . . . . . . . . . . . . . . . . . . . . . . . . . . . . . . . . . . . . . . . . . . . . . . . . 86
Database rollback . . . . . . . . . . . . . . . . . . . . . . . . . . . . . . . . . . . . . . . . . . . . 90

Contents
7
e2Serverd . . . . . . . . . . . . . . . . . . . . . . . . . . . . . . . . . . . . . . . . . . . . . . . . . . . 91
e2Renderd . . . . . . . . . . . . . . . . . . . . . . . . . . . . . . . . . . . . . . . . . . . . . . . . . . 92
VAULT UTILITIES . . . . . . . . . . . . . . . . . . . . . . . . . . . . . . . . . . . . . . . . . . . . . . . . . . 94
afpdecode . . . . . . . . . . . . . . . . . . . . . . . . . . . . . . . . . . . . . . . . . . . . . . . . . . . . . . 95
afpextract . . . . . . . . . . . . . . . . . . . . . . . . . . . . . . . . . . . . . . . . . . . . . . . . . . . . . . 96
afpsubstitute . . . . . . . . . . . . . . . . . . . . . . . . . . . . . . . . . . . . . . . . . . . . . . . . . . . 97
databasecheck . . . . . . . . . . . . . . . . . . . . . . . . . . . . . . . . . . . . . . . . . . . . . . . . . . 98
fileinfo. . . . . . . . . . . . . . . . . . . . . . . . . . . . . . . . . . . . . . . . . . . . . . . . . . . . . . . . 100
indexcheck . . . . . . . . . . . . . . . . . . . . . . . . . . . . . . . . . . . . . . . . . . . . . . . . . . . . 101
metadecode . . . . . . . . . . . . . . . . . . . . . . . . . . . . . . . . . . . . . . . . . . . . . . . . . . . 106
metaextract . . . . . . . . . . . . . . . . . . . . . . . . . . . . . . . . . . . . . . . . . . . . . . . . . . . 108
metaresource. . . . . . . . . . . . . . . . . . . . . . . . . . . . . . . . . . . . . . . . . . . . . . . . . . 109
metasubstitute. . . . . . . . . . . . . . . . . . . . . . . . . . . . . . . . . . . . . . . . . . . . . . . . . 110
metasubstitute -u option . . . . . . . . . . . . . . . . . . . . . . . . . . . . . . . . . . . . . 110
e2util . . . . . . . . . . . . . . . . . . . . . . . . . . . . . . . . . . . . . . . . . . . . . . . . . . . . . . . . . 111
Using flag files . . . . . . . . . . . . . . . . . . . . . . . . . . . . . . . . . . . . . . . . . . . . . . . . . 115
vaultflag.bat . . . . . . . . . . . . . . . . . . . . . . . . . . . . . . . . . . . . . . . . . . . . . . . . . . . 116
vaultflag.sh . . . . . . . . . . . . . . . . . . . . . . . . . . . . . . . . . . . . . . . . . . . . . . . . . 117
vaultservices.bat . . . . . . . . . . . . . . . . . . . . . . . . . . . . . . . . . . . . . . . . . . . . . . 117
MOBILE VAULT BUILD SCRIPT . . . . . . . . . . . . . . . . . . . . . . . . . . . . . . . . . . . . . . 118
ADVANCED ADM CONFIGURATIONS . . . . . . . . . . . . . . . . . . . . . . . . . . . . . . . . 122
ADM Vault replication . . . . . . . . . . . . . . . . . . . . . . . . . . . . . . . . . . . . . . . . . . . 123
Configuring the ADM replication server . . . . . . . . . . . . . . . . . . . . . . . . . 123
ADM Vault Purging / Document Expiry . . . . . . . . . . . . . . . . . . . . . . . . . . . . . 126
Document Kill Script . . . . . . . . . . . . . . . . . . . . . . . . . . . . . . . . . . . 127

Contents
8
Script selections . . . . . . . . . . . . . . . . . . . . . . . . . . . . . . . . . . . . . . . . . . . . 128
Examples . . . . . . . . . . . . . . . . . . . . . . . . . . . . . . . . . . . . . . . . . . . . . . . . . . 129
Media Build script . . . . . . . . . . . . . . . . . . . . . . . . . . . . . . . . . . . . . . . . . . . 130
ODBC export . . . . . . . . . . . . . . . . . . . . . . . . . . . . . . . . . . . . . . . . . . . . . . . . . . . 131
Configuring ODBC Export . . . . . . . . . . . . . . . . . . . . . . . . . . . . . . . . . . . . . 131
Automatic Export . . . . . . . . . . . . . . . . . . . . . . . . . . . . . . . . . . . . . . . . . . . . 132
Manual Export . . . . . . . . . . . . . . . . . . . . . . . . . . . . . . . . . . . . . . . . . . . . . . 133
How to set up ODBC DSN . . . . . . . . . . . . . . . . . . . . . . . . . . . . . . . . . . . . . 133
ADM error e-mail notification . . . . . . . . . . . . . . . . . . . . . . . . . . . . . . . . . . . . 135
ADM Reset notification . . . . . . . . . . . . . . . . . . . . . . . . . . . . . . . . . . . . . . . . . . 137
INDEXING . . . . . . . . . . . . . . . . . . . . . . . . . . . . . . . . . . . . . . . . . . . . . . . . . . . . . . . . 140
Vault Indexer as a Service . . . . . . . . . . . . . . . . . . . . . . . . . . . . . . . . . . . . . . . 140
Enabling the Indexer as a Service . . . . . . . . . . . . . . . . . . . . . . . . . . . . . . 141
Converting an existing database to use the Indexer as a Service . . . . 142
Converting a database back to the legacy database . . . . . . . . . . . . . . . 142
Installation changes . . . . . . . . . . . . . . . . . . . . . . . . . . . . . . . . . . . . . . . . . 142
Log files . . . . . . . . . . . . . . . . . . . . . . . . . . . . . . . . . . . . . . . . . . . . . . . . . . . 143
e2util utility . . . . . . . . . . . . . . . . . . . . . . . . . . . . . . . . . . . . . . . . . . . . . . . . 143
Indexcheck utility . . . . . . . . . . . . . . . . . . . . . . . . . . . . . . . . . . . . . . . . . . . 143
Unsupported Utilities . . . . . . . . . . . . . . . . . . . . . . . . . . . . . . . . . . . . . . . . 143
New initialization file . . . . . . . . . . . . . . . . . . . . . . . . . . . . . . . . . . . . . . . . 143
Trouble shooting . . . . . . . . . . . . . . . . . . . . . . . . . . . . . . . . . . . . . . . . . . . . 144
Using a text file for indexing . . . . . . . . . . . . . . . . . . . . . . . . . . . . . . . . . . . . . 144
Job level information . . . . . . . . . . . . . . . . . . . . . . . . . . . . . . . . . . . . . . . . 145
Document level information . . . . . . . . . . . . . . . . . . . . . . . . . . . . . . . . . . . 145
Section level information . . . . . . . . . . . . . . . . . . . . . . . . . . . . . . . . . . . . . 146
Attribute information . . . . . . . . . . . . . . . . . . . . . . . . . . . . . . . . . . . . . . . . 146
Ignored page information . . . . . . . . . . . . . . . . . . . . . . . . . . . . . . . . . . . . . 147
Custom indexing . . . . . . . . . . . . . . . . . . . . . . . . . . . . . . . . . . . . . . . . . . . . . . . 148

Contents
9
Overview . . . . . . . . . . . . . . . . . . . . . . . . . . . . . . . . . . . . . . . . . . . . . . . . . . 148
Default Indexes . . . . . . . . . . . . . . . . . . . . . . . . . . . . . . . . . . . . . . . . . . . . . 148
Index Settings . . . . . . . . . . . . . . . . . . . . . . . . . . . . . . . . . . . . . . . . . . . . . . 149
Profiles.ini Settings Reference . . . . . . . . . . . . . . . . . . . . . . . . . . . . . . . . 149
Index<N> . . . . . . . . . . . . . . . . . . . . . . . . . . . . . . . . . . . . . . . . . . . . . . . . . . 150
Restrict<N> . . . . . . . . . . . . . . . . . . . . . . . . . . . . . . . . . . . . . . . . . . . . . . . . 151
IndexQueuing . . . . . . . . . . . . . . . . . . . . . . . . . . . . . . . . . . . . . . . . . . . . . . 152
RotationMode . . . . . . . . . . . . . . . . . . . . . . . . . . . . . . . . . . . . . . . . . . . . . . 152
MaxRotations . . . . . . . . . . . . . . . . . . . . . . . . . . . . . . . . . . . . . . . . . . . . . . 152
MaxInstances . . . . . . . . . . . . . . . . . . . . . . . . . . . . . . . . . . . . . . . . . . . . . . 153
IndexingPrescan . . . . . . . . . . . . . . . . . . . . . . . . . . . . . . . . . . . . . . . . . . . . 153
Database.ini Settings Reference . . . . . . . . . . . . . . . . . . . . . . . . . . . . . . . . . 154
Description . . . . . . . . . . . . . . . . . . . . . . . . . . . . . . . . . . . . . . . . . . . . . . . . 154
Index<N> . . . . . . . . . . . . . . . . . . . . . . . . . . . . . . . . . . . . . . . . . . . . . . . . . . 154
Render<N> . . . . . . . . . . . . . . . . . . . . . . . . . . . . . . . . . . . . . . . . . . . . . . . . 155
LanguageDefault . . . . . . . . . . . . . . . . . . . . . . . . . . . . . . . . . . . . . . . . . . . 156
Language<N> . . . . . . . . . . . . . . . . . . . . . . . . . . . . . . . . . . . . . . . . . . . . . . 156
ModeDefault . . . . . . . . . . . . . . . . . . . . . . . . . . . . . . . . . . . . . . . . . . . . . . . 157
Mode<N> . . . . . . . . . . . . . . . . . . . . . . . . . . . . . . . . . . . . . . . . . . . . . . . . . . 157
Index Flags . . . . . . . . . . . . . . . . . . . . . . . . . . . . . . . . . . . . . . . . . . . . . . . . 158
Common Cases . . . . . . . . . . . . . . . . . . . . . . . . . . . . . . . . . . . . . . . . . . . . . 161
Field Reference . . . . . . . . . . . . . . . . . . . . . . . . . . . . . . . . . . . . . . . . . . . . 161
Sample Configurations . . . . . . . . . . . . . . . . . . . . . . . . . . . . . . . . . . . . . . 163
Minimal Index Configuration . . . . . . . . . . . . . . . . . . . . . . . . . . . . . . . . . . 164
Unicode Index Configuration . . . . . . . . . . . . . . . . . . . . . . . . . . . . . . . . . . 164
Indexerd Configuration . . . . . . . . . . . . . . . . . . . . . . . . . . . . . . . . . . . . . . 165
Generic indexing. . . . . . . . . . . . . . . . . . . . . . . . . . . . . . . . . . . . . . . . . . . . . . . 166
Key fields . . . . . . . . . . . . . . . . . . . . . . . . . . . . . . . . . . . . . . . . . . . . . . . . . . 166
Extracting from AFP data . . . . . . . . . . . . . . . . . . . . . . . . . . . . . . . . . . . . 167
Extracting from AFP TLE data . . . . . . . . . . . . . . . . . . . . . . . . . . . . . . . . . 169
Customizing the Metacode indexing process . . . . . . . . . . . . . . . . . . . . 172
Rebuilding a Vault index . . . . . . . . . . . . . . . . . . . . . . . . . . . . . . . . . . . . . . . . 175

Contents
10
WORKING WITH FONTS . . . . . . . . . . . . . . . . . . . . . . . . . . . . . . . . . . . . . . . . . . . .178
Managing fonts in PDF exports . . . . . . . . . . . . . . . . . . . . . . . . . . . . . . . . . . .178
Suppression . . . . . . . . . . . . . . . . . . . . . . . . . . . . . . . . . . . . . . . . . . . . . . . .179
Bitmap Conversion . . . . . . . . . . . . . . . . . . . . . . . . . . . . . . . . . . . . . . . . . . .180
Substitution . . . . . . . . . . . . . . . . . . . . . . . . . . . . . . . . . . . . . . . . . . . . . . . .180
Automatic Embedding . . . . . . . . . . . . . . . . . . . . . . . . . . . . . . . . . . . . . . . .183
Explicit Embedding . . . . . . . . . . . . . . . . . . . . . . . . . . . . . . . . . . . . . . . . . .183
AFP outline fonts . . . . . . . . . . . . . . . . . . . . . . . . . . . . . . . . . . . . . . . . . . . . . . .184
EMULATING PAPER STOCK . . . . . . . . . . . . . . . . . . . . . . . . . . . . . . . . . . . . . . . . .190
Optimizing PDF size . . . . . . . . . . . . . . . . . . . . . . . . . . . . . . . . . . . . . . . . . . . . .194
Font Embedding or Substituting: . . . . . . . . . . . . . . . . . . . . . . . . . . . . . . .194
PDF Compression . . . . . . . . . . . . . . . . . . . . . . . . . . . . . . . . . . . . . . . . . . .194
Configuring PDF background . . . . . . . . . . . . . . . . . . . . . . . . . . . . . . . . . . . . .197
Old mode . . . . . . . . . . . . . . . . . . . . . . . . . . . . . . . . . . . . . . . . . . . . . . . . . . .197
New mode . . . . . . . . . . . . . . . . . . . . . . . . . . . . . . . . . . . . . . . . . . . . . . . . . .198
ABOUT THE RENDERING ENGINE . . . . . . . . . . . . . . . . . . . . . . . . . . . . . . . . . . . .202
Overview . . . . . . . . . . . . . . . . . . . . . . . . . . . . . . . . . . . . . . . . . . . . . . . . . . .202
Algorithm support . . . . . . . . . . . . . . . . . . . . . . . . . . . . . . . . . . . . . . . . . . . . . .204
AFP IOCA compression algorithm support list . . . . . . . . . . . . . . . . . . . .204
PDF stream object filter algorithms support list . . . . . . . . . . . . . . . . . .204
TIFF compression algorithms support list . . . . . . . . . . . . . . . . . . . . . . .205
Sample applications . . . . . . . . . . . . . . . . . . . . . . . . . . . . . . . . . . . . . . . . . . . .207
Perl sample . . . . . . . . . . . . . . . . . . . . . . . . . . . . . . . . . . . . . . . . . . . . . . . .207
Using the Perl Sample . . . . . . . . . . . . . . . . . . . . . . . . . . . . . . . . . . . . . . . .210
Using the Perl Sample with SSL . . . . . . . . . . . . . . . . . . . . . . . . . . . . . . . .211
Sample Java web client application: Vault ServiceWeb2 . . . . . . . . . . .211
Customizing and building ServiceWeb2 from source . . . . . . . . . . . . . .215
Configuring . . . . . . . . . . . . . . . . . . . . . . . . . . . . . . . . . . . . . . . . . . . . . . . . . . . .217
Batch Printing from the web . . . . . . . . . . . . . . . . . . . . . . . . . . . . . . . . . . .220

Contents
11
Printing batches of documents . . . . . . . . . . . . . . . . . . . . . . . . . . . . . . . . 221
Multiple databases . . . . . . . . . . . . . . . . . . . . . . . . . . . . . . . . . . . . . . . . . . 222
Batch reprinting of documents in Vault . . . . . . . . . . . . . . . . . . . . . . . . . . . 222
Triggering the batch Reprint Process . . . . . . . . . . . . . . . . . . . . . . . . . . 222
Submitting documents for Batch Reprinting . . . . . . . . . . . . . . . . . . . . . 223
Batch Reprint Settings . . . . . . . . . . . . . . . . . . . . . . . . . . . . . . . . . . . . . . . 223
DEVELOPING VAULT APPLICATIONS . . . . . . . . . . . . . . . . . . . . . . . . . . . . . . . . . 226
Overview . . . . . . . . . . . . . . . . . . . . . . . . . . . . . . . . . . . . . . . . . . . . . . . . . . . . . 226
Message Protocol . . . . . . . . . . . . . . . . . . . . . . . . . . . . . . . . . . . . . . . . . . . 226
Data input and Render output options . . . . . . . . . . . . . . . . . . . . . . . . . . 228
Render engine connection . . . . . . . . . . . . . . . . . . . . . . . . . . . . . . . . . . . . 228
API sets . . . . . . . . . . . . . . . . . . . . . . . . . . . . . . . . . . . . . . . . . . . . . . . . . . . 228
.NET API (e2NetRender) . . . . . . . . . . . . . . . . . . . . . . . . . . . . . . . . . . . . . . . . 230
Namespaces . . . . . . . . . . . . . . . . . . . . . . . . . . . . . . . . . . . . . . . . . . . . . . . 246
e2NetRender . . . . . . . . . . . . . . . . . . . . . . . . . . . . . . . . . . . . . . . . . . . . 246
e2NetRender.render2 . . . . . . . . . . . . . . . . . . . . . . . . . . . . . . . . . . . . 253
Java API . . . . . . . . . . . . . . . . . . . . . . . . . . . . . . . . . . . . . . . . . . . . . . . . . . . . . . 257
Software requirements . . . . . . . . . . . . . . . . . . . . . . . . . . . . . . . . . . . . . . 257
Installing the Java API . . . . . . . . . . . . . . . . . . . . . . . . . . . . . . . . . . . . . . . 257
Overview of classes and usage details . . . . . . . . . . . . . . . . . . . . . . . . . . 257
Connection and disconnection . . . . . . . . . . . . . . . . . . . . . . . . . . . . . . . . 258
Connecting to an SSL-enabled Vault server . . . . . . . . . . . . . . . . . . . . . 258
Importing the Vault server's SSL certificate into the Java system-wide CA certificates
truststore . . . . . . . . . . . . . . . . . . . . . . . . . . . . . . . . . . . . . . . . . . . . . . . . . 259
On UNIX platforms: cp cacerts cacerts.ORIG . . . . . . . . . . . . . . . . . . . . 259
Importing the Vault server's SSL certificate into a separate/private truststore 260
SSL client authentication . . . . . . . . . . . . . . . . . . . . . . . . . . . . . . . . . . . . . 261
Classes and usage details . . . . . . . . . . . . . . . . . . . . . . . . . . . . . . . . . . . . 262
Vault Web Service. . . . . . . . . . . . . . . . . . . . . . . . . . . . . . . . . . . . . . . . . . . . . . 275
Configurating and setting up your Web Service environment . . . . . . . 275
Programming the E2VaultWS web service . . . . . . . . . . . . . . . . . . . . . . . . . 278

Contents
12
Web Service data types . . . . . . . . . . . . . . . . . . . . . . . . . . . . . . . . . . . . . . . 278
Web service interfaces . . . . . . . . . . . . . . . . . . . . . . . . . . . . . . . . . . . . . . . 286
web service names . . . . . . . . . . . . . . . . . . . . . . . . . . . . . . . . . . . . . . . . . . 288
web service interfaces calling procedures . . . . . . . . . . . . . . . . . . . . . . . 288
Create a web service client of Java console application with NetBeans 6.8
IDE . . . . . . . . . . . . . . . . . . . . . . . . . . . . . . . . . . . . . . . . . . . . . . . . . . . . . . . . 289
Create a web service client of C# console application with Visual Studio
2008: . . . . . . . . . . . . . . . . . . . . . . . . . . . . . . . . . . . . . . . . . . . . . . . . . . . . . . 290
Communicating directly to the Rendering Engine . . . . . . . . . . . . . . . . . . . 292
Creating message formats . . . . . . . . . . . . . . . . . . . . . . . . . . . . . . . . . . . . 292
Page sets . . . . . . . . . . . . . . . . . . . . . . . . . . . . . . . . . . . . . . . . . . . . . . . . . . 292
VAULT AND E-MESSAGING . . . . . . . . . . . . . . . . . . . . . . . . . . . . . . . . . . . . . . . . . 322
Automatic or minimum click indexing . . . . . . . . . . . . . . . . . . . . . . . . . . 322
Folder permissions . . . . . . . . . . . . . . . . . . . . . . . . . . . . . . . . . . . . . . . . . . 330
Retrieving message content from Vault . . . . . . . . . . . . . . . . . . . . . . . . . 330
UPDATING UNICODE INDEXES . . . . . . . . . . . . . . . . . . . . . . . . . . . . . . . . . . . . . . 337
Maintaining your current script character sorting order . . . . . . . . . . . 337
Testing your indexes for sort order changes in non-script characters . .
337
Correcting the sort order . . . . . . . . . . . . . . . . . . . . . . . . . . . . . . . . . . . . . 338
Legacy indexer . . . . . . . . . . . . . . . . . . . . . . . . . . . . . . . . . . . . . . . . . . . . . . 338
Create and test the new index file . . . . . . . . . . . . . . . . . . . . . . . . . . . . . . 338
Indexer as a Service . . . . . . . . . . . . . . . . . . . . . . . . . . . . . . . . . . . . . . . . . 339
INDEX 341

Contents
13

14
The Vault environment
The Vault suite of products support storage, display, management and processing of composed
documents in electronic environments. Many of the Vault components are optional so you
should consider the information in this overview in relation to the licenses you actually own.
The Vaul t is the central document repository and forms the hub of the Vault environment. The
Vault is comprised of two software components: the Vault Server Daemon, which services
incoming index searches and document requests, and the Vault Loader Daemon, which
manages the load or ingestion processes. These software components may be Daemons on
Unix or Linux platforms, or Windows Services.
In versions 5.4 and greater, these modules are no longer started underneath a single “archive”
service, nor controlled by “archive.ini”. Rather, they are each registered with the system and
started individually, and configured via <modulename>.ini e.g. e2loaderd.ini.
Vault supports a wide variety of print streams and non-print stream files. Vault internally splits
all incoming files into logical pages for retrieval purposes, and ordinarily these pages are
grouped into logical documents via the Document Interchange Journal (DIJ), an XML or
Pipe-delimited side-file. End-users ordinarily request these logical documents (e.g. Jane Doe’s
May Statement), rather than the entire print stream (e.g. the May 15th Nightly Print Cycle).
Print Streams that are supported by Vault can be broadly categorized as Natively-Supported
Formats (AFP, Metacode, Line Data, DJDE, DJDELINE, AFPLINE), Library-Supported Formats
(PostScript), and non-renderable formats (Collections, or “BLOBs”, and XML, PDF). In general,
Vault can render any page, or page range, of natively-supported formats as a GIF, PDF, PNG, or
Text, with or without background (Paper Stock) emulation enabled. Library-Supported
Formats are similar, but backgrounds are configured differently. Finally, Non-renderable
formats can only be returned back as their original format, and only PDF supports background
emulation.
The Mobile Vault is supplied with the Vault and is a Windows based component that allows
documents to be read from a local copy of the document Vault.
Vault Service
The Vaul t Service family of products provide a comprehensive range of access and display
mechanisms for documents stored in the Vault. They are primarily aimed at users within the
corporate environment – typically customer service or other front-line personnel.
The Vault Service Client provides an intuitive, high performance Windows based interface to
the documents stored within the Vault. It is a small executable that can be easily rolled-out to
desktops as required. This can be supplemented with Vault Service Reprint Admin which
administrators can use for compressed stream viewing and document export capabilities.

The Vault environment
15
The Rendering Engine allows users to build a customized interface to the Vault and
optionally allow you to integrate the document display function into an existing web server
environment. This is based on a set of API functions that communicate with the Vault server
and return rendered documents as required. Perl and Java sample client applications are
shipped with the Vault distribution material. These can be used to access documents stored
in Vault and can be customized if required. Refer to “Perl sample” on page 207 or “Sample Java
web client application: Vault ServiceWeb2” on page 211 for further information.
Note also that language-specific APIs for Java 6, and Microsoft’s .NET Framework are available
to ease communication with the Rendering Engine

Customizing the Vault
16
Customizing the Vault
Vault environments may be unique from one another. This section lists the topics that are
discussed in this guide.
Vault performance and capacity planning
In order to plan for Vault performance, the administrator needs to consider various
configuration aspects that are specific to their configuration settings. These configuration
settings will affect the storage requirements.
For more information, refer to “Vault Performance & Capacity Planning” on page 20.
Vault Initialization files
There are many optional settings in each of Vault modules. The client software can be
configured for several different views (user interfaces). The mouse and keyboard behavior can
be customized to end user preferences – scroll bars can be disabled, graphical modes changed,
etc.
This chapter explains how to use each initialization file by explaining syntax,
keywords/parameters as well as giving code samples. The initialization files explained in this
chapter are:
• patterns.ini
• profiles.ini
•server.ini
• database.ini
•local.ini
• e2loadered, e2Renderd, e2Serverd, e2Routerd, and indexerd initialization files
For more information, refer to “Vault initialization files” on page 34.

Customizing the Vault
17
Vault Utilities
Diagnostic utilities are provided with the Vault to help manage the operation of data rendered
outside of Generate, assist in troubleshooting and generate statistical data for long term
management of the product.
For more information, refer to “Vault Utilities” on page 94.
Advanced ADM Configurations
This chapter discusses the following topics:
• Advanced ADM configurations
• ADM Vault replication
• ADM Vault purging/document expiry
•ADM ODBC export
• ADM error e-mail notification
For more information, refer to “Advanced ADM Configurations” on page 122.
Indexing
This chapter covers topics assoicated with indexing and providing index information to the
Vault from applications.
For more information, refer to “Indexing” on page 140.
Working with Fonts
This chapter explains methods for:
•Embedding fonts
• Using Unicode fonts when exporting AFP to PDF
• Character translation when exporting AFP to PDF
• PDF background enhancement

Customizing the Vault
18
For more information, refer to “Working with fonts” on page 178.
Emulating paper stock
This chapter explains how to emulate paper stock to be viewed via a vault client.
For more information, refer to“Emulating paper stock” on page 190.
Rendering Engine
The Rendering Engine chapters provides information on configuring the Rendering Engine
using generic modes, load balancing, as well as customizing your applications by using the
available APIs.
For more information, refer to “About the Rendering Engine” on page 202.

Customizing the Vault
19

20
Vault Performance & Capacity Planning
Introduction
There are three things to consider when planning Vault capacity:
• How much storage is required for a fully populated Vault.
• Whether or not the system ingests (or load) incoming documents within the desired time
frame.
• Will the Vault be able to dynamically transform sufficient documents to meet user viewing
requests during peak periods of time.
Overly aggressive settings for performance may have negative aspects for capacity, and likewise
in reverse. For example, one way to optimize disk storage is to enable very aggressive
compression settings. However, this will have an impact on both ingestion speeds, as well as
rendering speeds; as the system will need to do more work to compress and to decompress the
data.
As well, certain erroneous product configurations can cause significant performance problems
in their own right. This document will discuss some of these pitfalls and how to avoid them.

Vault Performance & Capacity Planning
21
Storage Capacity Planning
In order to plan for how much disk storage will be required, the administrator needs to
consider various configuration aspects that are peculiar to their configuration settings. These
configuration settings will affect the storage requirements. Consequently, specific capacity or
performance numbers cannot be universally quoted; they must be made within the context of
the particular installation requirements.
Disk Requirements for Print Streams
Storage of Print Stream data is accomplished by compressing the print streams into an
internal compression format that is Print Stream aware. These are stored in the
Server\PageData folder with the extension .DRP (Document Repository Pages).
Generally, compression is accomplished by identifying repetitious patterns within the file and
typically saving these patterns to a dictionary, and then referencing a dictionary entry instead
of the repetitious data block. Therefore, the more repetitious the print stream is, the more
compression should be attainable at the same levels of “aggressiveness” for the algorithm.
Consequently, the amount of disk space required for Print Streams varies by print stream
format, as well as varying by the amount of non-repetitive information being displayed per
page. A page that is completely covered with small-font random numbers and letters will not
be very compressible, as there is no discernible pattern or dictionary that can be applied. This
will take a lot more space than a print stream that contains a form letter that only changes by
a customer name from page to page, where 99% of any given page is identical to the previous
page.
Since it is usually not possible (or reasonable) to alter the incoming print stream's
repetitiveness, the only option available is to adjust compressor aggressiveness. This is done
by increasing the size of the “window” in which the compressor looks for repetitiveness, and by
adjusting how much work the CPU does to find that repetition within that window.
Job size planning
In Vault, each job that is ingested in the server "download" directory is converted into a
compressed data file. Each indexed page has a pointer to it in the Vault .DRD file. The pointer
stored in the DRD file cannot point to data that is larger than 4 GB compressed. This should
be accommodated by ensuring that the compressed job data file for any given job is less that 4
GB in size. The size of the compressed job data depends on the size of the original job data
and the compression ratio. See “Computing Compression Rates and Ratios” and “Analyzing
the Test Results” for details on how to determine the compression ratio. Once that ratio is
known, then the maximum possible job data can be calculated. Allow for a safety factor by
limiting the maximum uncompressed data to 75 percent of the maximum compressed size as
some datastreams (TIFF and PDF) can actually increase in size after the compression. Jobs that
are larger than the maximum size should split into chunks for loading into Vault with each
chunk being smaller than the maximum job size.

Vault Performance & Capacity Planning
22
A good rule to apply is to limit each job chunk to less than 2 GB of uncompressed data. This
limit will allow for possible expansion of the data and for the occasional job data chunk that is
slightly larger than the target size.
Computing Compression Rates and Ratios
Testing is the only real way to benchmark the effects of the various settings within the system.
For print streams rendered by Generate in an AFP, Metacode or Line Data format, the default
settings provided with the Vault have been tested to show generally good balance between
performance and compression. However, detailed evaluation of the effects of these settings in
a particular setting can only be accomplished by loading a sample print stream into a test
Vault instance.
A sample print stream should be truly representative of the real-world scenarios. It should
have a similar document design, similar amount of variable data, the same fonts and images, as
well as the same variability with images, and so on. Likewise it should have a typical number of
pages per print spool file. A sample file with only a few hundred pages will have much less
ongoing repetition than a print stream with tens of thousands of pages. In PostScript as well,
the ratio between the header versus body pages of the stream will also be significantly
different: If a PostScript header is 50 MB followed by only 10 pages, then the “average bytes
per page” will amortize the header across only 10 pages, versus amortizing that cost over
10,000 p a g es.
Finding the Test Results
There are two main locations to inspect the results of testing. First, inspect the Server\Log
folder for recent files named process*.log. These files contain the results of ingestion tasks.
Looking at this for time-stamp information, compression ratios, and page counts can help you
to evaluate the metrics for a particular test.
The second location to inspect is the data contained within the .DRP file itself - this is
accessed by using the fileinfo utility. This is accomplished through a CMD prompt as follows:
C:\Vault\Server> tools\fileinfo pagedata\somefile.drp
Analyzing the Test Results
Use fileinfo on the sample file and inspect the value for average bytes per page. Next, multiply
this number by the number of pages per month that are planned to be archived. Then,
multiply the result by the number of months to be retained for the long term. The resulting
value should be the number of total bytes (divide by 1 million for “Hard Disk” Megabytes)
planning based on knowing the total number of pages to be loaded per annum.
Delta Bit Size
The compression parameters are adjusted within the profiles.ini file within a particular
[profile] for a job. The settings only apply to new files. Previously loaded files will 'remember'
the settings that were used during their load process for decompression at a later time.

Vault Performance & Capacity Planning
23
[SomeProfile]
DeltaBitSize=17
This parameter can range from 5 to 20, with a default of 17 in modern builds of Vault. Older
builds had a default value of 15. This parameter is very CPU intensive. Each increase of one
number doubles the amount of work that the CPU has to do during compression and during
decompression. However it is useful to note that if your CPU is not at 100% during the
compression phase, then an increase in this value may not actually reduce performance at all;
in fact it may improve performance, as the disk I/O will be reduced - the server will not have to
write as much data back to the disk in the form of the .DRP file.
When tuning this value, change the value by increasing or decreasing by one at a time, and
then benchmark the results both for ingestion speed, as well as compression ratios attained.
Do not simply set it to 20, or 5, and see what happens - often a middle-ground value will result
in the best overall performance vs. compression balance for your environment.
Maximum Page Size (Server.ini)
Some environments (most notably PostScript environments) have extraordinarily large sized
pages. This is due to the fact that Vault treats the entire header of the file as one logical page
which typically includes all fonts, images, and procedures required for the job and needs to be
able to store that 'page' within the buffers allocated within Vault.
Note: Unless there is a specific reason to modify these parameters, the defaults should not be
modified by any significant amount.
[Production]
MaximumPageSize=16777216 (16 MB default)
This is the size of the Page Buffers in the system memory. The largest Uncompressed Page must
fit within this buffer. In PostScript this is usually equal to the size of the header of the file.
Notes:
• Adjusting this parameter will affect the RAM Memory consumption of the e2loaderd and
e2serverd services. Unless this causes your server to begin swapping to pagefile or
running out of virtual memory, this parameter should not affect performance.
• MaximumPageSize in server.ini is no longer required for loading PostScript files under
this version of Vault and higher. The maximum page for any given PostScript file is now
determined automatically. MaximumPageSize may still be required for loading
datastreams other than PostScript. If this is already set and you load datastreams other
than PostScript, you may be able to reduce the values if the value was set to a large value
to acommodate loading of PostScript jobs.

Vault Performance & Capacity Planning
24
Disk Requirements for Print Stream Metadata
Storage of Print Stream MetaData is accomplished by compressing the information provided
via Journal File, whether XML or Pipe-Delimited, as well as storing the exact location for every
page within every document, into files that are stored in the Server\DocData folder with the
extension.DRD - which stands for Document Repository Documents.
Notes:
• The Vault does not store all information from the journal.In general it is not possible to
“reduce” the information that needs to be stored pertaining to documents in the vault.
Consequently the only options are to adjust compression parameters for the DRD files.
The DeltaBitSize is not adjustable, as adjustments have shown it has little effect at any
value other than the internal default.
• Unless your installation utilizes 100,000+ page document records, or hundreds of
kilobytes of Custom-Attribute Data per document, adjusting this value is typically not
beneficial and is not recommended. The fact that a print stream is 100,000+ pages has
no bearing on this; rather only if that whole 100,000 page stream comprises a single
logical document.
Document Block Size (Profiles.ini)
The Document Block Size parameter controls how much document metadata is stored in each
compressed document record. Similarly to the Print Stream Compressed Block Size, this value
must be big enough to hold at the very least a single Document's worth of compressed
metadata, and optionally can be larger to increase compression ratios realized on these stored
files. The same trade off between ingestion and retrieval performance versus compression
ratios exists as above.
Note: To ensure that the settings only affect documents that need the change, set this in the
profiles.ini and not server.ini.
DocumentBlockSize=262144(256 KB default in newer versions)
The Document Record contains all compressed document information provided from the
Journal, as well as the pointers into the .DRD file for each page of the document. Therefore
documents with many hundreds of thousands of pages could require that this value be
increased.
NOTE: Increasing this value can reduce searching performance of the Vault when requests are
made for all document information and/or document information that is not directly stored in
the Indices. This typically affects the standard indices of invlink, guid, iguid, and any custom
index with the "h" flag.
Disk Requirements for Indices
There are two types of Indices within Vault. The first type of index is a “customer linked” index.
Generally speaking this type of index contains information that helps a user to find a
customer. The second type of index is a “document linked” index. These contain information
that points directly to a specific document.

Vault Performance & Capacity Planning
25
Customer Linked Indices
Customer-linked indices typically grow only during the first full period of document loading
(usually a month), and subsequently grow only as new customers are added to the business.
This type of index includes the default indices of Account, Name, and Address. If custom
indices are enabled, customer-linked indices contain the “c” flag in profiles.ini settings.
To calculate the disk requirements for Customer-Linked indices, either load one full month of
customer data and then anticipate for the indices to grow by your business's new customer
rate per annum, or else forecast this value based on the number of customers in the sample file
as compared to your full customer base.
Document Linked Indices
Document-linked indices grow as each new logical document is added into the system. Each
index will grow at approximately the same rate over time as the sample file demonstrates. Note
that the Document-linked index growth rates are not affected by page count.
Impact of Databases
If your vault is configured to load documents into multiple databases simultaneously, plan for
each database to grow independently of each other. If each document is loaded into two
different databases, then anticipate double the storage requirements for this over time.

Vault Performance & Capacity Planning
26
Ingestion Performance
It is important to note that ingestion performance is affected by the cumulative settings that
have been described above, and that each setting can have an impact on performance in
different ways. The elements that affect compression may not affect indexing, and likewise in
reverse.
Step 1: Compression
Compression performance is affected by the settings that control compression ratios as
described above. Compression speeds need to be benchmarked on a particular piece of
equipment in order to reliably determine its rate of ingestion.
Compression is directly affected by the size of the incoming print stream file. Larger files
will take longer to ingest, whereas smaller files should take lesser time to ingest. The
number of pages in the stream (excepting for huge pages that require inordinate block
sizes) should not affect ingestion speed.
In general, compression is CPU and Memory I/O bound, but if the compression settings
are low it can be Disk I/O bound. Finding the right balance is the key to maximizing both
in a particular environment.
Step 2: Document Building
Document building tends to be an insignificant portion of the overall ingestion time
frame. Consequently it is not often very heavily customized. Document Building performs
a decompression of the print stream in order to obtain the vector offsets of each page,
iterates through the Journal File, and outputs to a compressed Document stream (.DRD)
file.
Step 3: Indexing
Indexing can be a significant portion of ingestion time. Indexing time is not affected by
page count; rather it is affected by the number of documents that are referenced by the
print stream. Indexing performance can be significantly affected by the configuration of
Custom Indexing settings, in much the same way as the configuration settings affect the
storage requirements for the index files.
In general, the first Interval (usually one month) of indexing will be significantly slower than
subsequent months as the system will build the Customer-Linked indices. In subsequent
months these files will only be updated as customers move, change their names, or as new
customers are added.
However, Document-linked indices will incur a performance/load time penalty for every
document that is loaded. Normally the Vault is configured for 3 document-linked indices; the
invlink index for “Documents under an Account”, the guid index, and the iguid index.
Indexing time is also affected if documents are loaded into multiple database views
simultaneously. This has a multiplicative effect on the above for both the first-month
customer-linked indices, as well as ongoing document-linked index load operations.

Vault Performance & Capacity Planning
27
From a hardware perspective, Indexing time is generally limited by the number of
simultaneous disk write I/Os per second, and to a lesser extent the number of simultaneous
read I/Os per second, that can be sustained by the Server's disk subsystem. Consequently a
massively parallel SAN will obtain performance many times faster than a single hard disk.
Rendering Performance
Rendering Performance is affected by the CPU speed of the Rendering Engine's host platform,
the memory bandwidth of the host platform, as well as the delays incurred if large compressed
block sizes are utilized on the server side.
In Vault versions 5.3 and prior, the Rendering Engines are each single-thread processes.
However, many processes can be run in parallel to spread the load of a large environment onto
the computing hardware of one or many single or multi-cpu computers. This is accomplished
via the Vault Router (e2Routerd), an application that manages connections to many Rendering
Engines and spreading the transformation load intelligently across the network of Rendering
Engines it knows about. In Vault versions 5.4 and above, the Rendering Engine is now
multi-threaded but similar guidelines should be used in determining load and performance
capabilities (until some experience is gathered insofar as its load and performance behavior in
real world, heavy use applications - at that such time, these metrics explained below may be
adjusted accordingly).
Rendering of documents can also be affected by the print stream format - most notably
PostScript which is significantly slower to render than AFP or Metacode or Line Data formats.
In general, each Rendering Engine can typically transform a certain number of pages per
second. This number must be evaluated for each computing and configuration environment.
After obtaining the number of pages per second that each Rendering Engine can transform
per second, one must configure an adequate number of Rendering Engines to handle the peak
load of the environment.
Computing peak load can be a difficult task. In general, the process works by categorizing
users into different profiles based on their activity levels and usage scenarios. For example,
Customer Service Representatives can be profiled based on the call volume that each CSR can
handle within a period of time. If your CSRs have an average call duration of 5 minutes, and
assuming that each call will require one document look-up on average, and that an average
document is 2 pages in length, it can be concluded that each CSR will incur 2 pages every 5
minutes, or .0066 pages per second. If peak staffing of the Call Centre is 500 staff, then this
works out to 3.33 pages per second for the CSR staff during peak times.
For consumer profiling, the issue becomes more complex; but the same principles apply.
Consider the number of customers. Then factor in the percentage of customers with internet
access. Then factor in the distribution of these customers: Will they all actually want to look at
an image of their document? What percentage will do so per interval of time? Repeat this
process for “heavy” users, “average” users, “light” users, distribute your internet-enabled
customer base into these categories. Next, determine what times of day that these people may
be looking at the documents, again spreading the load out over the various days of the month

Vault Performance & Capacity Planning
28
and hours of the day that this load may exist. Generally speaking, customers tend to
significantly overestimate the amount of load on an Vault from a Customer perspective. But
with good modeling, the load can be fairly well anticipated.
It is important to note that additional rendering engines can be added to the environment in
a very short period of time.
Configuration Pitfalls
Some configuration pitfalls have already been mentioned. These include:
1. Overly large Compressed Block Sizes
2. Unnecessary Additional Databases
3. High DeltaBitSize values
There are certain additional configuration pitfalls that have been encountered from time to
time with the Vault that bear mentioning:
Mass Duplicate Keys in an Index
Each index file is intended to search “from” something, and to point “to” something.
Customer-linked indices search “from” a customer name, for example, and point “to” the
Customer Record, which contains information similar to the address-window on an envelope.
Document-linked indices search “from” something that is relatively document-specific, and
point “to” the document itself. An example might be an Invoice Number that is
system-generated and unique to the particular document.
One of the configuration pitfalls is to configure an index where all of the “from” keys are
actually the same, or there are huge numbers of duplicates for a particular “from” value. One
example would be an index “From” a division code, pointing to a document. Assume that a
company has 3 divisions, DIV1, DIV2, and DIV3. All documents are associated with one of
these divisions. If we build an index pointing from Division_Code pointing to a Document,
then searching for the string "DIV1" would return approximately one third of the documents
in the entire vault as an unsorted hit list.
Such indices tend to be not only significant sources of performance problems over time, but
they are fundamentally useless to a user. No user would ever “browse” through 1/3 of the
entire vault's document list in order to find a particular document.
Such indices should simply be removed from the configuration files, and the index files should
be deleted. This type of requirement can be better solved by the appropriate use of additional
Databases, which would group all “DIV1” documents and customers together, then group all
“DIV2” customers and documents in a separate view, and likewise for “DIV3”. If the
documents each are a member of only one of these databases, then there isn’t even any
performance price for such a configuration.

Vault Performance & Capacity Planning
29
Anti-Virus Software
The Vault server stores large numbers of very large files. If anti-virus software is configured to
scan ALL file types On Read, or On Access, then the Anti-Virus software may introduce delays
of minutes or more before the Vault Server can actually read any data from one of the files in
the system. While the AV scan is taking place, the entire Vault server is “locked up” and no
other user requests can be served. These requests will queue up, and some of them may time
out and/or error out.
Anti-Virus software should be configured to exclude .DRP, .DRD, .DRI, .DRR, and other file
types that are used by the Vault for data storage. These files do not include executable code
and should not be scanned by Real-Time Anti-Virus.
Note: Even when idle, some anti virus programs introduce resource overhead at the kernel
level. If you encounter errors under Windows such as error 1450, consider changing or
uninstalling the anti virus program. You can use a tool such as poolmon.exe to examine what
kernel resource type is dominating.
Full Duplex / Half-Duplex / "Auto-Sense" issues on the LAN
A persistent problem in the I/T industry is the poor implementation of “Auto-Sense” on even
major-brand hardware like HP/Compaq servers, Cisco routers, and other major manufacturers.
Full Duplex is a network optimization that requires a dedicated network cable from end-node
to end-node, such as from a Switch to a Server. It cannot function on a Hub. However, hubs are
virtually extinct in production environments, so many organizations go for full-duplex to
realize the benefits of 100 Mbps or 1000 Mbps in each direction, as opposed to a cumulative
send+receive capacity.
The problem is that Full Duplex disables all flow-control, and Half Duplex has flow control
enabled (CSMA/CD for Ethernet, for example). When flow control is enabled on one end of a
connection and disabled on the other, the end result is huge network delays, network errors,
low throughput, and corrupted packets.
As the Vault is significantly dependent upon Network communications, this problem can
cause a Vault installation to appear slow or non-responsive.

Vault Performance & Capacity Planning
30
Search performance considerations
Introduction
A key part of Vault operation is searching
indexes. Searches are performed on behalf of
users looking for certain accounts or
documents. They are also performed for
various internal reasons such as locating
documents during the rendering process.
Search performance will affect the overall
performance of a Vault installation.
When a search is executing, it locks certain
internal structures to prevent corruption that could otherwise occur as a result of executing
multiple requests simultaneously. In some installations this locking behavior can lead to
significant performance issues.
Environments with one or more of the following conditions might experience search
performance degradation:
• very high search load
• larger than default document block size settings
• requests for large numbers of hits at once
• aggressive time out and retry settings
What happens in cases like these is that a search will hold the index lock for a prolonged
period. This means that subsequent searches must often wait significant amounts of time
before they can acquire the lock and begin to execute. This can lead to slow search
performance.
Internally, the search is using the lock to gain exclusive access to the index structures. It then
scans through an index looking for candidate matches. Part of the process for the standard
search involves filtering on certain fields and populating output columns. These steps may
require the search to fetch account or document properties from disk. In the case of
documents, this means loading and decompressing potentially large blocks of data. If the
number of results is large or the blocks themselves are large this can take a significant amount
of processing time. Since each search is happening on a single thread, it won't take advantage
of multiple cores which might be available. This means the search lock is held for a prolonged
period, blocking other search requests that are waiting to execute.
FOR MORE INFORMATION ON THE SETTINGS
DISCUSSED IN THIS SECTION, REFER TO
“COMMUNICATING DIRECTLY TO THE
RENDERING ENGINE” ON PAGE 292 AND
SCROLL TO THE FOLLOWING MESSAGE
FORMATS:
DATABASE.SEARCH, DATABASE.FILTERED,
DATABASE.UNFILTERED, AND DATABASE.RAW.

Vault Performance & Capacity Planning
31
Mitigating the Search Lock Issues
New functionality has been provided to help relieve search performance issues. New API calls
have been added which allow you to perform some types of searches in a less expensive way. A
configuration switch to make the default search behavior use these less expensive methods has
also been provided.
Searches are normally performed with an API function called database.search. Previously this
mode has quite a bit of functionality and that caused the search lock to be held for a long
time. Two new high level search functions have been added: database.filtered and
database.unfiltered. The filtered search is equivalent to the database.search command from
previous versions. The unfiltered mode has fewer features such as no longer filtering output
results on certain criteria. But doing so helps it reduce the time it needs to hold the search
lock. The unfiltered mode is implemented in terms of a low level function, database.raw, which
provides only the most basic search functionality. The new database.search call is actually an
alias for either database.filtered or database.unfiltered depending on a configuration switch. For
sophisticated applications this might mean changing the way you code searches for the Vault.
But most installations can take advantage of the configuration switch transparently.
To control the new search behavior, edit the e2serverd.ini file and add the following setting:
[database1]
filteredsearch=0
0= do not filter searches (default, mitigation mode)
1= filter searches normally (compatibility mode)
Implications of Using the Unfiltered Searches
The unfiltered search works by performing a basic search using the new raw search function
and then populating the output data outside the search lock. This can drastically reduce the
time the search lock is held which in turn can reduce the queuing effect the search lock has.
You need to be aware of some implications of this.
• Some applications may depend on the filtering features provided by the normal search.
For example installations with e2 Account Management (formerly Present & Pay) should
proceed with caution as it may prevent the proper operation of that product.
• There are significant differences in the way the server will consume system resources.
Only the basic search portion of the request is locked. This means that the stage that
populates the output table executes in parallel.
This can increase:
• memory utilization
• CPU utilization
• the number of CPU threads or cores used

Vault Performance & Capacity Planning
32
• the number of file handles used
• kernel resources (from I/O requests)
You should monitor the installation to ensure it isn't exhausting process memory or file
handle limits.
The number of threads in the thread pool will limit the number of simultaneous searches that
can execute. If you are seeing excessive resource utilization after enabling the search switch,
consider lowering the number of threads in the server's thread pool. Conversely, you might see
that the server is not using enough of a machine's available resources.
For example, SPARC based machines often have large numbers of cores/threads. Typically the
default number of threads in the thread pool won't take full advantage of all the cores. In such
cases, consider carefully increasing the number of threads.

Vault Performance & Capacity Planning
33

34
Vault initialization files
There are many optional settings in each of the Vault modules. The client software can be
configured for several different views (user interfaces).
The majority of options should not need to be changed, and will use the default settings.
There are, however, some user-configurable options that may need to be updated throughout
the life cycle of the product installation, especially when changes are made to the network
infrastructure.

Vault initialization files
35
Client initialization file
In Vault 5.3 and prior, this file contained settings that applied to all Clients of the Vault Server.
However, starting with Vault version 5.4, this configuration file is now only intended to be
used by the Service Client’s Loader application. The Loader application connects to the
e2serverd Server Daemon, synchronizes the server’s distrib\ folder against the locally installed
application files, and then launches the appropriate Service Client software.
For backward compatibility, certain prior settings may still be recognized, but these are not
documented in this version. Please see “uclient.ini”, “e2renderd.ini”, “e2loaderd.ini”, and
“e2serverd.ini” for more details.
Syntax
comments can be on separate lines, starting with a semi colon
[Installer]
InstallPath=c:\client
SplashDelay=5000
Primary=127.0.0.1
Socket=6001
Data types
IP Address TCP/IP address of a machine in the format n.n.n.n.
Number a decimal number with up to three decimal places.
Dnsname the DNS name of a machine.
Pathname is a path/file name or label conforming to the convention required for the host operating
system.
Keywords and parameters
[Installer]
InstallPath This is the destination directory where new clients will be installed. Note that this defaults to
the location of loader.exe so this is rarely needed. This is the same subdirectory on all
workstations in order to ease administration.
SplashDelay approximate duration in ms for loader splash screen to be shown
Primary server address, defaults to 127.0.0.1
Socket server socket, defaults to 6001

Vault initialization files
36
Patterns initialization file
This defines various search patterns that enable the index creation process to find the
information that is required when using the genericafp, generictle, or genericmetacode
document build engines. The file can contain several sections, each one defining the patterns
for a particular datastream. Each Documents setting in the profiles initialization file that
uses the generic…option must have a corresponding section in this file.
Each pattern precedes the required information, for instance, it could be the instructions to
move to the position on the page where that information is placed. This file is in
<drpath>\server\patterns.ini. Note that this file is not created automatically, and
you may have to create a new one.
Syntax
[SectionName]
Pattern=Document
Pattern=Account
Pattern=Date
Pattern=Name
Pattern=Address
Pattern=Section
Pattern=Invoice
Pattern=skip
Pattern=attribute:<attributename>
0
Keywords and parameters
[SectionName]
Document There must be a corresponding section in the profiles initialization file.
Account Pattern is a unique string that identifies where the customer account number will occur.
Date Pattern is a unique string that identifies where the document date will occur.
Name Pattern is a unique string that identifies where the customer name will occur.
Address Pattern is a unique string that identifies where the customer address will occur.
Section This is optional. Pattern is a unique string that identifies the start of a section.
Invoice This is optional. Pattern is a unique string that identifies the where the invoice number will
be.

Vault initialization files
37
Example
[Statements]
C3E4E26DC9C4=Account
E2C5E3E4D76DC4C1E3C5=Date
D7D6D3C9C3E86DD5D6=attribute:POLICY_NO
D8E4D66DC9C4=attribute:QUO_ID
D7D96DC9C4=attribute:PR_ID
C2C1E3C3C86DC9C4=attribute:BATCH_ID
D7F0F0F0F0F0F0F1=skip
D7F0F0F0F0F0F0F2=skip
D7F0F0F0F0F0F0F4=skip
D7F0F0F0F0F0F1F2=skip
D7F0F0F0F0F0F1F4=skip
skip In generictle, Pattern is a unique string that identifies when to skip a page. This is useful for
removing banner pages from a datastream.
Note: Skipped pages are not rendered when the document is presented but are still stored by
Vault and count against the Vault page limit.
attribute In generictle and genericafp, Pattern is a unique string that enables you to specify a custom
attribute.

Vault initialization files
38
Profiles initialization file
This file defines settings specific to individual applications for which documents are being
stored in the Vault.
Note that profiles are centrally stored by the e2serverd and downstream clients do cache
Profile settings that have been previously read. Therefore it may be necessary to restart
e2serverd, e2loaderd, e2renderd, and all clients, for a change to be fully propagated
downstream.
Syntax
[Filemap]
String=ProfileName
…
[ProfileName]
Documents=XMLJournal|GenericAfp|GenericTLE|GenericMetaCode|Journal|Generic
NOP|ujournal|uxmljournal
Format=AFP|Metacode|Postscript|HTML|MPTIFF|SPLITXML|Collection|PDF
Tray=base filename
PageHeight=Number in inches
PageWidth=Number in inches
ResourceSet=drpath
Database=String[,String]
SkipHeaderPages=[0|1]
DocumentBlockSize=Number of bytes
CompressedBlockSize=Number of bytes
Data types
Number a positive number.
Pathname a directory path.
String a string of alphanumeric characters.

Vault initialization files
39
In the example below, the PBBI profile is the catch-all profile that will be applied to an
incoming file if the filename doesn’t contain the string “bank”. The absence of characters
before “=PBBI” indicates that anything regardless of character length will be included here.
[filemap]
bank=McKinley
=PBBI
[PBBI]
Documents=xmljournal
Format=AFP
TapeBlockFormat=1
MarginX=0
MarginY=0
Tray=mckinley.wmf
PageBreak=0
Duplex=1
[McKinley]
Documents=journal
Format=DJDE
CharacterSet=0
Template=blank.txt
FontSelection=1
ChannelSelection=0
CRLF=1
PageBreak=1
MarginX=0.09
MarginY=0.45
PageWidth=11
PageHeight=8.5
Common keywords and parameters for all formats:
[FileMap] This section matches string in the incoming file name and maps to the appropriate
profilename. It is important to note that the order is significant, and will use the first match. It
is therefore good practice to include a 'catch-all' profile at the end of the section.
[ProfileName]The profile defines the properties or attributes of a set of documents. Profile names
should not be longer than 15 characters in length.

Vault initialization files
40
Database This option allows you to select which database(s) to which the documents in the
current file will be added. These may be used to control access to particular documents
in some scenarios. Note that such database references are not retrospectively applied
to documents already loaded in the Vault.
Documents The method of extracting index information. Options are:
XMLJournal - index information is provided in a Document Interface Journal file (DIJ).
GenericAFP - uses Transport Data commands (TRN) within AFPDS files to indicate the
start of a command sequence which completes with the text string required for
indexing.
GeneicNOP - document information is extracted from fixed format NOPs embedded in
AFP pages.
GenericTLE - values within AFP Tag Logical Element (TLE) records provide the index
information.
GenericMetacode - searches for binary patterns within Metacode streams to determine
the start and end of index text.
Journal - index information is provided in a text file.
ujournal - index information is provided in a text file and preserves Unicode data.
uxmljournal - index information is provided in Document Interface Journal file (DIJ)
and preserves Unicode data
Format The format of the datastream. Choose from:
AFP
Metacode
Postscript
MPTIFF
SPLITXML
Collection - collection of arbitrary documents.
DJDELINE - support for Xerox line mode.
PDF - support for PDF documents.
HTML - XML in PAK file format from Generate .
DocumentBlockSize Allows you to define the block size in bytes for document data files stored in the Vault.
Tray/DefaultTray <base file name> this key specifies the base name of the background stock to use. The
DJDE engine uses DefaultTray= while, AFP, Metacode and Postscript use Tray=. The
background files that are used are as follows:
name.pdf single object pdf fragment for use in pdf exports.
name.wmf windows metafile (no placeable headers) background
for use in printing.
name1024.gif backgrounds use by client on screen, and by web for
GIF.

Vault initialization files
41
For AFP, specifying *imm as the tray will cause it to use the name of the current media map
(IMM on the current page) as the base background name.
The DJDE engine will override this setting if it sees a FEED= command on the current page.
It will then use the value of the FEED= command as the base background name.
The Metacode engine will similarly use the FEED= command but will prepend “feed-” to the
beginning of the base background name (because AUX is a common feed name and it turns
out that AUX is a reserved file name under windows)
TrayMode Set the value to Numbered use different pages of a PDF file as background pages for the PDF
being rendered by reading background PDF file name and page numbers from the
Profiles.ini file. For example: TrayMode=Numbered. If TrayMode is not enabled, then the
pages will be rendered as usual. For more information, refer to “Configuring PDF
background” on page 197
TrayDefault The TrayDefault entry will correspond to a page that has to be used as a background for a
rendering page which does not have an entry in the previous parameters (Tray1, Tray2). If
there is neither (Tray-N) nor TrayDefault, then pages will be rendered as usual:
TrayMode=Numbered
Tray1 = 1
Tray2 = 2,3
Tray3 = 4,5,6
Tray4 = 7,8-last
TrayDefault=2
OR
TrayMode=Numbered
Tray1 = last
Tray2 = 1,2-last1
TrayDefault=2
OR
TrayMode=Numbered
Tray1=1-last2
Tray2=last1
Tray3=last
RotationMode When set to 1 it uses word separations to calculate rotations instead of punctuation and
white spaces (the distinction is important for far east applications).

Vault initialization files
42
Duplex When set to 0 (duplex=0), the background specified by tray=/defaulttray= (or the format
specific default) is used.
You can specify two different backgrounds to apply to either front and back pages or to first
and subsequent pages. This option applies to the Postscript, AFP and DJDE formats. For data
whose backgrounds alternate front and back, use duplex=1. When duplex=1, odd page
numbers use the default name and even pages use the default name with “-back” appended.
[someprofile]
tray=customer
duplex=1

Vault initialization files
43
For data where page 1 has a different background, use duplex=2:
[someprofile]
tray=customer
duplex=2
When duplex=2, the first page uses the default name and all subsequent pages use the default
name with “-body” appended.
Note that the Duplex setting does not apply to metacode.
Backgrounds for Odd Pages Backgrounds for Even Pages
customer.pdf customer-back.pdf
customer.wmf customer-back.wmf
c u s t o m e r 512 . g i f c u s t o m e r- b a c k 512 . g i f
customer640.gif customer-back640.gif
customer800.gif customer-back800.gif
customer1024.gif customer-back1024.gif
customer1280.gif customer-back1280.gif
customer1600.gif customer-back1600.gif
Backgrounds for Odd Pages Backgrounds for Even Pages
customer.pdf customer-body.pdf
customer.wmf customer-body.wmf
c u s to m e r 512 . g i f c u s to m e r- b o d y 512 . g i f
customer640.gif customer-body640.gif
customer800.gif customer-body800.gif
customer1024.gif customer-body1024.gif
customer1280.gif customer-body1280.gif
customer1600.gif customer-body1600.gif

Vault initialization files
44
AutoType1ToUnicode When a Type 1 font in an AFP FOCA wrapper is automatically embedded in a PDF
export (*embed), Vault normally depends on the PDF reader being able to deduce the
meaning of each code point from the glyph names inside the Type 1 font.
When set to 0 (AutoType1ToUnicode=0 (default)) it gives you the existing behavior that
relies on the reader to deduce the meaning of each code point.
When set to 1 (AutoType1ToUnicode=1), Vault generates a “ToUnicode” map for the
font based on the AFP code page. GCGID names in the code page are converted to
Unicode using the gcgdiduni.map file in the resource set. The resulting table of
Unicode values is embedded as the ToUnicode map.
Note: If non-standard GCGID names are used, you will need to update or replace the
gcgiduni.map file.
When set to 3 (AutoType1ToUnicode=3), Vault generates a “ToUnicode” map for the
font based on the names of the glyphs in the Type 1 font. In this case glyph names of
the form /uniXXXX are examined. The XXXX being the Unicode code point equivalent
of the named character.
For more information, please refer to “Automatic Embedding” on page 183
reformatdate reformatdate=0 will turn off the default behavior of inserting slashes into the date field
(e.g. 20120213 -> 2012/02/13).
checkdate checkdate=0 will turn off the default behavior of checking that the document date in
the journal is (more or less) valid. This might be needed if the date field is populated
with something other than the expected YYYYMMDD date (e.g. "Invoice - August 15,
2007").
ForwardJournalOnIndex=<path>
ForwardJournalOnUnindex=<path>
These options are used to let an external application know that data has been added or
removed from Vault.
When an index or unindex operation completes successfully, copy the journal
associated with the job to the specified path.
These options differ from PresentJournalPath in the following ways:
• They are profile options instead of server wide settings that affect all profiles.
• They occur after the index operation completes instead of after the document
build step.
•PresentJournalPath has no option for forwarding on unindex operations.

Vault initialization files
45
JobAppendTimeStamp This will add -YYYYMMDDHHMMSS to the final base name of the job when set to 1. The
default is 0 (off).
This setting is used to make the final job file name more unique. This avoids common
issues with naming. If you try to load two jobs with the same name, the second job will
fail to completely load. The final job files (.drp/.drd/.jrn) would be stored in the same
directory so it isn't possible to have them with the same name.
When you unload and reload the same job and you fail to properly un-index the old job,
invalid pointers to the old data may be left in the index. This may not always be
detected. In some cases this could lead to the wrong document data being returned in a
search. With this option, the job names are unique even if reloaded. The worse case
scenario is the out of date pointers link to a non-existent job which will just return an
error.
Example with JobAppendTimeStamp=1:
20011111-tryme-telco-statement-20121015131051.drp
20011111-tryme-telco-statement-20121015131051.jrn
Example with JobAppendTimeStamp=0:
20011111-tryme-telco-statement.drp
20011111-tryme-telco-statement.jrn
CapExplicitEmbeddedTTF=255 Limits the maximum code point used for the explicitly embedded TrueType fonts in PDF
exports. This reduces the size of tables associated with the fonts (saving space in the
output PDF) and the time taken to generate the tables.
Note: Ensure that your data produces the correct output with this setting because it
can affect the use of characters with Unicode code points beyond the value of the
setting.
GuessUnknownCharacters When exporting AFP text to PDF using font substitution, Vault needs to translate the
character codes in the AFP to Unicode using the character names in the AFP code page.
For best results, make sure the code pages use consistent character names all of which
have appropriate mappings in the gcgiduni.map file.
When set to 0 (default), Vault will not allow the substitution if there is no translation of
the character name. This will cause Vault to fall back to rendering the text using bitmap
graphics.
When set to 1 (deprecated), Vault uses a heuristic to guess whether the text is ASCII or
EBCDIC. This mode should be avoided since it won't always guess correctly or
consistently. In addition, it may prevent Vault from generating valid width table
information.
When set to 2, characters with no mapping are assumed to be ASCII encoded.
When set to 3, characters with no mapping are assumed to be EBCDIC encoded.

Vault initialization files
46
PostscriptTimeout Sets the communication timeout between the rendering engine or Windows client and
the e2ps sub-process that is used to execute Postscript rendering requests. On Windows
the processes communicate over named pipes; on Unix, Unix domain sockets.
The default is 120000 (2 minutes). In most cases this should not be changed.
PrintEdgeToEdge
PrintCorrectAspect
The Vault Service Client (including Vault Service Reprint Client) and Mobile Vault
client use these profile parameters to compensate for printers that cannot print the full
width and depth of a physical page. These also control whether printing targets the
printable area or the full extent of the physical page:
PrintToEdge
PrintEdgeToEdge=0 (default) Targets the printable area of the page.
PrintEdgeToEdge=1 Targets the full extent of the physical page. Some printers cannot
print on the entire page surface so some data may be cut off. This mode might be
needed to align page text with preprinted forms.
PrintEdgeToEdge=2 - If background is off, use 1 above otherwise use 0 above.
PrintCorrectAspect
PrintCorrectAspect=1 (default) Correct the scaling so that the aspect ratio of the original
page is preserved.
PrintCorrectAspect=0 - Scale the horizontal and vertical axes independently. If the
original page dimensions do not closely match the physical page, the page content may
appear stretched

Vault initialization files
47
Profile inheritance
inherit A profile can inherit settings from another profile. This allows you to collect common
settings in one place as shown in the example below:
[commonafp]
documents=journal
format=afp
tapeblockformat=1
marginx=0
marginy=0
pagebreak=0
[statement]
inherit=commonafp
tray=statestock
[creditnote]
inherit=commonafp
tray=creditstock
In this example, two profiles: statement and creditnote are standard AFP streams. They both use
the inherit keyword to import common settings and then specify a specific background
stock.
If a key exists in the profile referred to in the inherit key and also exists in the current profile,
the value in the current profile is used:
[commonmeta]
documents=journal
format=metacode
recordreader=RDW
idenprefix=$DJDE$
idenoffset=1
idenskip=7
paper=A4
[meta1]
inherit=commonmeta
idenoffset=5
In the above example [meta] will use idenoffset = 5 since the local version takes precedence
over the inherited version of the key.

Vault initialization files
48
Collections
Vault can store collections of arbitrary documents. It does not need to be able to render the
document types itself. Instead it relies on external viewers registered with the user's
workstation. A common example is a collection of PDF documents, one per file, generated with
a single journal. Documents are not limited to a maximum page or compressed block size
because each file is stored as a series of blocks. The page count is used to store the number of
blocks used to store the file. The actual page count of the document is not exposed to Vault.
The file.block attribute indicates block size (default is 256KB).
The load procedure for collections is different from previous formats. Instead of transferring
files to Server\Download, the uploading program creates a subdirectory in Server\Download
and places all the documents and journals there. Once the uploading program is ready to
submit the collection to Vault, it creates a flag file named ready in the directory.
The Vault periodically scans the Server\Download directory for subdirectories that contain a
ready flag file. When it finds one, it renames the ready flag file to a file named loading. It then
uses the name of the subdirectory and the file map portion of the profiles.ini to determine the
correct profile to use. The profile for collections should include the following:
[profilename]
Format=collection
Documents=journal
At this point the server starts simultaneously compressing the data and building the
document data files. It looks for all journals in the subdirectory and processes each in turn.
The actual journal format is a slight variant of the standard journal. Each document entry
specifies the file to which it corresponds. As it encounters the document records, it stores the
files in the compressed file and a document record in the document data file. Once complete,
it places the compressed file in pagedata, the document data file in docdata and a index
request flag file in process. This will trigger the indexing stage of the load process. The journal
format is as follows:
J|jobname|timestamp
A|key|value
D|account|date|file|name|address
A|key|value
D|account|date|file|name|address
The job name should be an abbreviated description of the job type. Any non-alphanumeric
characters will be translated to dashes. Note that when multiple journals are used, one
arbitrary J record is used to construct the output name. The job timestamp should start with a
date in YYYYMMDD format. It may contain additional data, such as a time. The document data
must also start with a data in YYYYMMDD format and may also contain additional text. What
was previously the page count field is here used to store the file name of the corresponding

Vault initialization files
49
document. The optional name and address follow. Optional custom attributes are specified
using A records as normal. Collection journals do not support I or S records since those
require knowledge of the internal structure of the document files themselves.
Example:
J|TRYME|20120104
D|22648926|20040417|20120104041610000001.pdf|Marie Dixon
D|24084262|20040417|20120104041610000003.pdf|Anne David
D|21538553|20040417|20120104041610000005.pdf|Neil Mann
D|13290398|20040417|20120104041610000007.pdf|Martin Pale
It is important to specify the file extension of the file. The Vault uses the file extension when
displaying collected files. In the Perl sample it is used to map to a MIME type for output. It
tries to display the documents in an IFRAME. For some document types and some browsers
this may not work as expected. In the Windows client, it is used implicitly when launching the
document to locate the correct viewing program. When the client encounters a collection
document, if offers to store it as a temporary file and launch it for you.
There are some important issues to keep in mind when using collections. As a result of the
simultaneous compression and document building, compressed collection files do not work
with manual document build (server -h) or triggered rebuild (.redoc) options. Also note that
the larger size of documents may mean significantly heavier network traffic and commensurate
delays. Files not referenced by journals will be deleted once the compress/build operation
completes.
For those that need to display documents using the Perl sample, note that you may need to
add a MIME type mapping to the funciton render in modules\e2Render.pm. A few common
formats are already listed there. The Perl sample makes use of a new rendering output mode
10 which reassembles the blocks back into its original document.
Extracting document information
Index information can be extracted from the output datastream either by supplying a journal
file together with the output data or, by looking for specific patterns in the output data
(pattern matching). The method you choose is indicated by the Document keyword in your
profile definition.
Journal modes
Journals files are typically used to provide an index for the documents and pages within the
output datastream. A journal file and associated output datastream are copied to the
download directory for ingestion into the Vault. Vault supports various journal formats as
follows:

Vault initialization files
50
XML journals
•XMLJournal – index information is provided in a XML based journal file, typically a
Document Interface Journal file (DIJ).
•UXMLJournal – index information is provided in an XML based journal file, note that
this journal mode uses Unicode which offers greater flexibilty and more comprehensive
language support.
Additional keywords and parameters
XML Journal Parameters
TolerateMissingSignature When set to 1, print stream data signatures are not checked at all.
XML journals provide a GUID that matches a GUID embedded at the start
of each document in the print stream. The load process normally verifies
that these are present and match. This is an additional check that helps
ensure that data for one customer is not viewable by another. If you are
loading XML journals from older versions of Generate, those converted
using dijconvert or from 3rd parties, these signatures may not be present
or may be invalid (prerelease versions of Generate).
TolerateMismatchedSignature When set to 1, mismatched signatures are accepted.
If you are loading XML journals from older versions of Generate, those
converted using dijconvert or from 3rd parties, these signatures may not
be present or may be invalid (pre-release versions of Generate).
Documents=xmljournal
TolerateMissingSignature=1
TolerateMismatchedSignature=1
UMXL Journal Parameters
IgnoreSignatures This option disables page signature checking when using the
UXMLJournal document build mode.
If set to 1, page signature checking is disabled. This is similar to
TolerateMissingSignature=1 for XMLJournals.
Common Parameters
IgnoreResourcePacks If this option is set to 1, ResourceGUIDs appearing in the XML journal are
ignored.

Vault initialization files
51
Text journals
•Journal – index information is provided in a text file.
•UJournal– index information is provided in a text file, , note that this journal mode uses
Unicode which offers greater flexibilty and more comprehensive language support.
Pattern matching modes
The following pattern matching modes are supported by Vault:
•GenericAFP – uses Transport Data commands (TRN) within AFPDS files to indicate the
start of a command sequence which completes with the text string required for indexing.
Refer to “Loading AFP without Journal Metadata” on page 53 for further information.
•GeneicNOP – document information is extracted from fixed format NOPs embedded in
AFP pages.
•GenericTLE – values within AFP Tag Logical Element (TLE) records provide the index
information.
•GenericMetacode – searches for binary patterns within Metacode streams to determine
the start and end of index text.
Resource set assignment
A resource set is used to assign specific resources to a newly compressed file. This keyword is
useful if you have more than one set of fonts/images. You can place each set in its own
resource directory and use this setting to automatically assign the resource set at load time.
A typical scenario where this would be useful would be for customers using different stream
types (AFP vs Metacode), different document types (different fonts), streams of different DPI
(=>different fonts), different stock, etc. Also used in hosting environments so that each
customer could have its own set of resources.
Note: if you are using XML Journals, and a Resource GUID is defined, this will automatically
override the “ResourceSet=” parameter, unless “IgnoreResourcePacks=1” is set in the profile.
The example below illustrates the usage of the ResourceSet setting:
OptimizeResourcePacks If set to 1 the XML journal will not construct a resource set if the
corresponding resource set directory already exists under the
Server/Distrib directory.
When set to 2, the load process tracks each resource GUID that gets
processed. If there are no new resource GUIDs to process, the extraction
step is skipped. The GUIDs are tracked in a file called “resource.ini” in the
resource set under server\distrib.

Vault initialization files
52
[MTC1]
Database=mtc1
Format=metacode
Documents=xmljournal
ResourceSet=res
RecordReader=RDW
IdenPrefix=$DJDE$
IdenOffset=1
IdenSkip=10
Paper=letter

Vault initialization files
53
AFP settings
Loading AFP without Journal Metadata
The following settings are applicable when using generic afp for extracting index information,
i.e setting Documents=genericafp in the appropriate profile section.
Search and replace
In some situations, the data loaded into the Vault must be modified before being used. For
example, in certain countries an official government stamp indicates a legally binding invoice.
This stamp is never to be printed on copies of the original document. One method to correct
this is to search and replace the command generating the stamp and replace it with a
no-operation command.
Syntax:
AFP_Search1=<hex pattern to search for>
AFP_Replace1=<hex pattern to replace it with>
Example
AFP_Search1= D481999285A340C39694948595A38199
AFP_Replace1= 6FC5D5E5D5D66F40D7D7C1C7C5D5D66F
You may specify multiple search-and-replace entries, each with a different number. The
numbers must start at one and be contiguous. The pattern to search for and the pattern to
replace it with must be the same length. Note that the internal representation of the AFP
means there is extra data between structured fields. Patterns that cross structured fields may
not work as expected as a result.
AFP Triggered Messages
Vault supports a set of options that allow you to place a message on a page when it detects a
certain pattern.
Fragmented If this option is set to 1, indexing data is gathered following matching patterns where each
character is individually spaced with Absolute Move Inline (AMI) commands.)
KeepUnknown If this option is set to 1, documents that would normally be suppressed are logged under
account and/or date “unknown”. This option is of particular use when building index
extraction patterns by allowing you to see pages that may have been lost.
JoinLeading If this option is set to 1, documents pages in the output datastream without account or date
information are attached to the next valid document. This can be useful, if for example you
wish to merge an optional cover letter with the next document.

Vault initialization files
54
You might want to use these options to:
• Detect page 1 and have the text "COPY" appear prominently at the top of the page.
• Detect check images on the page and print "VOID" over top of them.
• Add a specific web site URL to the page for a certain class of customer.
Syntax:
Profiles.ini
[profilename]
...
AFP_Trigger1=<hex pattern that triggers the message>
AFP_Message1=<message data in hex>
AFP_Font1=<name of a coded font to write the message in>
AFP_I1=<the inline position of the text>
AFP_B1=<the baseline position of the text>
AFP_CharSet1=<name of the font character set to write the message in>
AFP_CodePage1=<name of the code page to write the message in>
AFP_VertSize1=<vertical size of the text, for outline fonts>
AFP_Color1=<optional, color of text in hex>
AFP_IOrient1=<optional, inline orientation of the text>
AFP_BOrient1=<optional, baseline orientation of the text>
Notes:
• You may specify multiple triggered message entries, each with a different number. The
numbers must start at one and be contiguous.
• To select a font you must specify either AFP_Font1 or both AFP_CharSet1 and
AFP_CodePage1.
• One way to select the message data is to view the decode of the page using one of the
Vault clients. This will include the hex data for the text.
Example 1:
AFP_Trigger1=07DBF2F0F3F4F7
AFP_Message1=E5D6C9C4
AFP_CharSet1=CZG00003
AFP_CodePage1=T1Z01148
AFP_I1=800
AFP_B1=550
AFP_VertSize1=72.0
AFP_Color1=0000FF
AFP_IOrient1=3
AFP_BOrient1=0
Example 2:
AFP_Trigger1=0016D3AF5F000007E2F1C5E7F0C3C5C7000232000897

Vault initialization files
55
AFP_Message1=C9958393A484858440A689A38840C89694
AFP_Font1=X0A0550I
AFP_I1=400
AFP_B1=200
Resource extraction
AFP print streams often contain inline resources such as fonts. Vault provides a way to
automatically extract these resources during the compression step of the load process.
The ExtractResources profile setting lets you specify a target path where the resources should
be extracted. Normally this is a relative path to a resource set in the server\distrib directory. If
this option is not specified, no automatic resource extraction occurs.
The ExtractCollisions profile setting lets you specify how the extraction process deals with
existing resource:
• If a resource with the same name already exists in the target directory and
ExtractCollisions=0, the extraction will be skipped leaving the existing resource.
•If ExtractCollisions=1, the new resource will replace the existing resource.
•If ExtractCollisions=2, the extraction process will compare the new and existing resources.
• If the resources do not match, the extraction process will fail with an error. This is useful
for detecting situations where resources associated with multiple job would conflict at
rendering time.
• The default setting is ExtractCollisions=1.
The ExtractCollisionsIgnoreFormdef profile setting is used in conjunction with
ExtractCollisions=2:
• If the extraction process detects that a resource is a form definition and does not match
an existing resource, normally it will fail the extraction.
•If you set ExtractCollisionsIgnoreFormdef=1, it will ignore the conflict and continue.
•The default is ExtractCollisionsIgnoreFormdef=0.
Example
ExtractResources=distrib\rs201307
ExtractCollisions=2
ExtractCollisionsIgnoreFormdef=1
In this case, resources will be extracted to a resource set labeled “rs201307”. The extraction
process will look for and report conflicts. If conflicting form definitions are found, it will
ignore them.

Vault initialization files
56
Metacode settings
Keywords and parameter
s
RecordReader This setting controls the record format of Metacode output datastreams:
RDW - Xerox style Record Descriptor Word.
BARRPC – Xerox ‘online’ emulation via a BARR server.
CRLF – Carriage Return/Line Feed.
IBMRDW – IBM-style Record Descriptor Word.
IBMBDW – IBM-style block and record data word format.
IdenPrefix Specifies the iden prefix is the specified ASCII string.
IdenPrefixE Specifies the iden prefix is the EBCDIC equivalent of the specified ASCII string.
IdenPrefixH Specifies the iden prefix is the binary equivalent of the specified hexidecimal string
IdenOffset The position from the beginning of the record where the IdenPrefix will be found. The
datatype for this is an integer.
IdenSkip The position from the beginning of the record where the actual DJDE command will be
found. The datatype for this is an integer. The command portion occurs at another
specified position on the line (specified by IdenSkip).
Paper Refers to paper size: Letter, Legal or A4
orientp=,orientl=,
orienti=, orientj=
Used to bias the orientation detection code so that the pages dominated by unusually
oriented text can be forced into the correct orientation.
p – portrait
l – landscape
i – inverse portrait
j – inverse landscape
When the metacode rendering occurs, the engine will increment 4 internal counters for
each orientation. The highest value at the end of rendering will determine which
orientation to use. The value of orientp, orientl, orienti and orientj will be added to the
initial value of these counters.
For example, if 100 characters of landscape text existed on an empty page, you would
normally view the page in landscape. However, if it was supposed to be portrait, the
initial values could be biased by setting orientp=200, which would mean that it would
be displayed as portrait as long as there were less than 200 landscape characters on the
page.
FeedDuplex When FeedDuplex=1, the background prefixed is changed to front for odd numbered
pages and back for even pages.

Vault initialization files
57
Configuring paper stock in MetaCode
RoundGraphic This is used to set block count rounding behavior for inline graphics. The default is 1,
(Set to 0 will not round up. Set to 1 will round up to the nearest 512 byte boundary)0.
Background Mode Setting Names
Use the name of the stock indicated
in the FEED=<feedname> DJDE
command.
none feed-<feedname>512.gi
feed-<feedname>640.gif
etc.
Use the name of the stock indicated
in the FEED=<feedname> DJDE
command but account for the
reverse side of the given stock.
feedduplex=1 front-<feedname>512.gif
back-<feedname>512.gif
front-<feedname>640.gif
back-<feedname>640.gif
etc.
Use fixed background for all pages of
the document.
tray=<trayname>
duplex=0
<trayname>512.gif
<trayname>640.gif
etc.
Background Mode Setting Names
Use one fixed background for odd
numbered pages and another for
even pages
tray=<trayname>
duplex=1
<trayname>512.gif
<trayname>-back512.gif
<trayname>640.gif
<trayname>-back640.gif
etc.
use one fixed background for page 1
and another for all remaining pages
tray=<trayname>
duplex=2
<trayname>512.gif
<trayname>-body512.gif
<trayname>640.gif
<trayname>-body640.gif
etc.
SuppressBlankPages When set to 0, blank page suppression is enabled.
GraphicBlockSize The block size used for inline graphics in your output datastream may differs from the
block size used for inline files. This option allows you specify block size to be used for
inline graphics e.g. 128 bytes, 512 bytes, etc.

Vault initialization files
58
Example
[SampleMeta]
Documents=journal
Format=Metacode
RecordReader=RDW
IdenPrefix=$DJDE$
IdenOffset=1
IdenSkip=10

Vault initialization files
59
Postscript settings
Keywords and parameters
FileMode For use with postscript files that use inline or subsetted resources. FileMode set to 1
(FileMode=1) will strip inline resources out of postscript pages as they are compressed.
The administrator is responsible for creating a resource.ps file containing the complete
form of any resources that were used inline. The resource.ps is a file where the
administrator can place complete copies of inline or subsetted resources. It is a block of
postscript commands. The resource.ps file is only used when FileMode=1. This file
should be placed in the resource set directory for the stream.
FileMode set to 0 is used with data streams where resources are all located in the header.
It is faster than FileMode=1.
SkipHeaderPages Skip the first N pages of the print stream. Set to 1 will ignore the required Postscript
header which is stored as the first page.
Option1/9 In postscript mode, you can pass additional options to the underlying Ghostscript
engine using Option1 or Option2. For example, Option1=-dGraphicsAlphaBits=4, is
adjusting the GraphicsAlphaBits setting. This controls subsample antialiasing which
improves the appearance of graphics at the expense of speed.
For more information on command formats, refer to:
http://ghostscript.com/doc/9.07/Readme.htm
EPS This setting specifies that the postscript stream is actually a set of EPS (encapsulated
postscript) pages. Internally this means no postscript header is used and no inline
resources are stripped at compress time. Use EPS set to 0 for postscript streams. Use
EPS set to 1 for streams of concatenated EPS files (which is a related format).
BeginPage, EndPage and
EndHeader
When Postscript streams do not provide standard page DSC commands, you can specify
lines that mark page beginnings (BeginPage), page endings (EndPage) and header end
(EndHeader). Typically, you would use BeginPage and EndHeader together.
GhostscriptParallel When the Vault rendering engines process Postscript data, it starts a subprocess called
“e2ps” to execute the request. By default, Vault will only start one of these at a time to
prevent any file system conflicts from occurring. However, this won’t occur for many
types of streams.
In this case, you can set the profile option GhostscriptParallel=1 which will allow
multiple instances of e2ps to run on data from the specific profile. This can improve
performance and/or concurrency of Postscript requests.
Note: Ensure that you have enough memory because the subprocesses can consume
additional memory system resources.

Vault initialization files
60
GhostscriptPooled By default, Vault will initialize the Postscript engine by placing the print stream's header
into Ghostscript before rendering pages. In many cases these headers are very large
which means they take considerable time to fetch and process.
One way to improve performance is to keep the engines, in the form of “e2ps”
subprocessess alive so that subsequent operations can run without having to execute
the header again. To enable this behavior, set GhostscriptPooled=1 in the profile.
Note: Use caution with this option. This mode relies on the stream being balanced (e.g.
the stack machine balance on every page must be correct). Like GhostscriptParallel, it
can consume additional resources because multiple “e2ps” processes are kept running.
PSBackgroundMode This option controls how EPS backgrounds are inserted into the page for rendering.
Set to 1 to embed the contents of the EPS background into the start of the page as-is.
This is the default behavior.
Set to 2 to insert a reference to the external background file. The reference is wrapped
in save/restore operators in order to prevent the EPS file from affecting the execution of
the rest of the page. This option also redefines the showpage operator so that if the EPS
file uses it, an extra page won't be generated unintentionally.

Vault initialization files
61
StorePrimaryHeader
StoreSecondaryHeader
StoreExternalHeader
The start of a Postscript file, referred to as the Postscript header in Vault, contains
resources and command definitions used by the pages in the print stream to construct
the output. When Vault renders pages, it needs the information from the header to
properly interpret the page content.
During the compression stage of the load process, Vault processes the Postscript header
for the job. The header is written in a number of places depending on the configuration.
StorePrimaryHeader: The primary header is written as the first compressed page in the
compressed data (.drp) file. It is this page that historically the SkipHeaderPages=1
setting was needed for. It contains the original header with minimal changes.
StoreSecondaryHeader: The secondary header contains the data from the beginning of
the Postscript file plus any inline resources detected and removed from pages during
compression. Vault needs to be able to render pages out of order and that means it
needs a way to access resources declared in pages before those currently being
rendered. The secondary header is stored as the last compressed page in the
compressed data (.drp) file. Vault locates this header by altering the declared size of the
compressed file in the compressed file header.
Note: Some older versions of Vault did not correctly set the header making the
secondary header inaccessible.
StoreExternalHeader: During the compression process Vault will also write the header
data to an external file "resource.ps" in the server directory. This file in intended for use
in manually constructing resource.ps files when using FileMode=1.
By default, all three headers are generated.
To suppress the generation of these headers, set the corresponding setting to 0. You
might do this to save space or time when you know that a particular header is not
needed. When the primary header is suppressed a small place holder compressed page
is written instead.
The rendering process uses the RenderHeaderType setting below in selecting which
header to use.
RenderHeaderType When rendering Postscript pages, the Vault rendering process needs access to the
header of the Postscript file which contains resources and command definitions. The
load process may store a primary and/or secondary header.
By default the secondary header will be used to render the page if present or the
primary header if not.
To force the rendering process to use the primary header, set RenderHeaderType=1.
To force the rendering process to use the secondary header, set RenderHeaderType=2.

Vault initialization files
62
Postscript Backgrounds
Vault can simulate paper stock when rendering Postscript streams. The backgrounds are
supplied as single page EPS (Encapsulated Postscript) files, stored in the job's resource set
with the ".ps" extension.
The background to use for any given page can be selected using the Duplex= and Tray= profile
settings:
HeaderChunk When the a rendering operation fetches the stream's Postscript header, it reads it in
chunks of N bytes defined by this setting. A larger value reduces the number of round
trips to the server needed to retrieve the entire header.
The default value is 4194304 (4 MB). If you set this value to 0, it will try to retrieve the
entire header in one request regardless of size. If the chunk size exceeds the maximum
receive buffer size allowed by the connection component, the operation will fail.
Example
[SamplePost]
Documents=journal
Format=postscript
SkipHeaderPages=1
CompressedBlockSize=32000000
Option1=-sPAPERSIZE=a4
PageHeight=11.69
PageWidth=8.27
GhostscriptParallel=1
GhostscriptPooled=1
Scenario Settings Background
Fixed background Duplex=0
Tray=basename
basename.ps
Specific front and back
backgrounds
Duplex=1
Tray=basename
odd numbered pages: basename.ps
even numbered pages: basename-back.ps
Specific background for first
page and remaining pages
Duplex=2
Tray=basename
1st page: basename.ps
remaining pages: basename-body.ps

Vault initialization files
63
Dynamic background selection
Backgrounds can also be dynamically selected based on the media specified in the content of
the page. Vault will look for /MediaType device settings and %%PageMedia DSC comments and
attempt to select the background based on their arguments. If neither is found, a default
background can be specified using Tray=. Dynamic background selection depends on the
details of the generated stream. Some streams may not be compatible.
Notes:
• Postscript jobs do not use the TrayMode settings used by other formats nor does it use
backgrounds in PDF format.
• Sometimes EPS backgrounds can interfere with the state of the Postscript engine and
cause display issues. Experiementation is sometimes required to get it to work. You can
also try the PSBackgroundMode=2 setting which can insulate the engine from some issues
in background EPS files.
Postscript search and replace
In certain situations, data loaded into the Vault must be modified before being used. The
search and replace function allows you to change data appearing in the output datastream.
The syntax of the search/replace is shown below:
PS_Search<n>=text to search for
PS_Replace<n>=text to replace with
PS_Flags<n>=replacement options<
The example below remaps the resource directory from /var/spool/data/tmp/ to the of the
resource set variable %resourceset%, this value is right justified using the PS_Flags value.
PS_Search1= /var/spool/data/tmp/
PS_Replace1= /%resourceset%/
PS_Flags1=R<
You may specify multiple search-and-replace entries, each with a different number. The
numbers must start at one and be contiguous.
Settings Page Background
(no Duplex=) /MediaType (alpha) alpha.ps
(no Duplex=) %%PageMedia: beta
(no MediaType)
beta.ps
(no Duplex=)
Tray=basename
(no %%PageMedia)
(no MediaType)
basename.ps

Vault initialization files
64
TIFF settings
Vault Service compresses and displays multiple-page TIFF files. Multiple TIFF files with
document information stored in a single journal are not supported. A journal is needed for
each TIFF file. Black and white and Group 4 compressed images are currently supported. Out
of order pages, pages with multiple versions, masks, and etc. are not supported. TIFF supports
reverse bit order encoding, PackBits and Group 3 compression modes.
Example
[PBBI]
Documents=journal
Format=MPTIFF
Working with HTML in XML datastreams
This type of output will typically originate from Generate. HTML output created by Generate
is produced by as a single stream containing all the documents generated by the application.
The output is actually an XML structure known as a PAK file which provides a structured
container for the HTML pages and their associated resources. This type of output data can be
loaded directly into the Vault.
Example
[profilename]
Documents=xmljournal
Format=HTML
PDF settings
It is now possible to configure PDFs to use Background Paper Stock. It uses the
TrayMode=Numbered method, with “normal PDF backers”. For more information, please refer
to “Configuring PDF background” on page 197
Example
[profilename]
Format=PDF
IgnoreResourcePacks=1
PDF version support
When rendering documents as PDF, there are two parameters for outputting the PDF version
number:
•PDFVersionMajor

Vault initialization files
65
• PDFVersionMinor
The values of the parameters can be from PROFILE, ORIGINAL PDF document and
BACKGROUND file.
The process is outlined:
1. PDFVersionMajor/PDFVersionMinor are initialized from the values from PROFILE:
[My-profile]
PDFVersionMajor=1 (default value)
PDFVersionMinor=3 (default value)
2. If there is VERSION info from ORIGINAL PDF, use this INFO to overwrite the output
VERSION
3. If there is BACKGROUND, compare the VERSION info from Background file and the one
from step 2 above, then choose the bigger number as PDF output VERSION.
PDF security settings
When rendering PDF output, Rendering Engine can use PROFILE parameters to set up
user-password/owner-password permission for the output PDF files.
1. Configure the settings from PROFILES.ini
[MY-PROFILE]
PDFEncryption=1
PDFUserPassword=123456
PDFOwnerPassword=abcdef
PDFAllowPrint=0
PDFAllowModifyContents=0
PDFAllowCopy=0
PDFAllowModifyAnnot_Form=1
2. Configure the settings from USER/API:
The Rendering Engine can use user-password/owner-password permission from USER/API.
There are four REQEUST parameters of request.pdfsecuritymode, request.pdfuserpassword,
request.pdfownerpassword, request.pdfpermission.
When PDFEncryption is set to 1 in profiles.ini and request.pdfsecurtitymode is set to 1in the
API call, then the pdf security settings can be set in the API call. For example:
request.pdfsecuritymode=1
request.pdfuserpassword=”111112345”
request.pdfownerpassword=”aaaaabcdef”
request.pdfpermission=-1 #bit00==allow printing, bit01==allow modifying
contents, bit02==allow copying, bit03==allow modifying annotation & forms,
other bits are 1.

Vault initialization files
66
NOTE: If Request.pdfsecuritymode==0, then Rendering Engine will use settings from
PROFILES.INI
Extracting summary document information from DJDE and DJDELINE
formatted documents
The GenericLINE extraction engine provides a User Configurable method for extracting
summary document information from documents with Format=DJDE and Format=DJDELINE.
When a string is found on a page, information is extracted based on (Row, Column, and
Length). For example, when “YOUR STATEMENT” is found, “Account Number” is extracted
from Row 5, Column 7, Length 15. The following steps are required and are further explained:
1. Define rules for page types in the RCL (Row/Column/Length) sections.
2. Provide the RCL mappings.
3. Determine the profile definitions.
Define rules for page types in the RCL section(s)
Since it is possible for many search strings to have the same information (row, column, length)
settings, and it also is possible for each of those search strings to resolve to multiple pieces of
information. This mapping is abstracted by grouping the RCL Information Extraction Settings
together within a [User Named] section as the shown in the example that follows:
[Summary_Page_Information]
; configure each piece of information that exists on the Summary Page
5,7,15=account
4,64,8=date; MM/DD/YY
10,10,40=name
11,10,40=address
Each of these RCL sections is intended to define a certain look and feel of a page whereas all
pages using these RCL Settings should have their Account Numbers and/or other Fields
(name, address and custom attributes) in the same place on the page. You may have as many of
these sections as needed for your environment. The name of the [section] is configurable, but
the name should not be the same name as any profile in Profiles.ini.
Provide the RCL mappings
Once the various rules for a specific type of page have been defined, you need to decide when
to apply these rules. This is done in an RCL MAP Section. An RCL MAP provides the mapping
between (search string) on the page, and the RCL rules themselves. As with the RCL Sections,
an RCL MAP Section has a user-defined [section] name, as shown in the example below:
[My_RCL_MAP]
; provide the mappings from (Search String)s to (RCL Sections)
YOUR STATEMENT=Summary_Page_Information

Vault initialization files
67
You would add as many lines as needed. The pattern on the left will be compared against the
page contents. If it’s found, the RCL settings defined in the named [RCL section] will be used
to extract key document information from the page.
The PatternsList section allows you to define binary patterns for certain types:
Skip Page – do not add it to the current document at all.
Document – when this binary pattern is found, clear the current document and create a new
one. The alternate method of document detection is when the detected account number
changes. The example below illustrates how to use pattern lists:
[My_PatternsList]
C6D6D9D4E27ED6D7C2C1D5D9=SKIP
C6D6D9D4E27ED5D6D5C5=SKIP
4EC24040404040404040404040404040404040404040=DOCUMENT
Locate Profile Definition(s) in Patterns.ini
The final step is deciding when to use these settings. This is controlled by the Profile name.
The Profile name is determined and configured in profiles.ini; again, it is a user configurable
name, so the specific names of profiles in your environment cannot be known by this
document.
The code example below displays a profile called [Report7215A] as LINE or DJDELINE Format,
which is configured to use Documents=GenericLINE. In the Patterns.ini file locate a section
with the same name as that profile. In this case, [Report7215A]. The Profile-derived section of
patterns.ini has the following mandatory settings shown in the example below:
[Report7215A]
PatternsList=My_PatternsList
RCLPatternsMap=My_RCL_MAP
;Optional Settings
Date=1
DateFormat=YYMMDD
ReportSection=1
Keywords and parameters
[SectionName] Name of the profile. There must be a corresponding section in the profiles initialization file.
Date Set to 1, it uses the File Name to determine the default document date.
DateFormat The format of the date within the filename is YYMMDD. They must be the first Numeric
characters.
ReportSection Set to 1, it takes the “FORM=” name from a DJDE entry and uses it as a Section Name.Repeat
this section block as required for each Profile that uses GenericLINE extraction.

Vault initialization files
68
Characterset When using DJDE format, characterset=1 converts the data from EBCDIC to ASCII. The
default 0 does not attempt to translate the data.
FontSelection In DJDE format, this specifies the column the font code is in. Use -1 if the stream does not
have a font column. The default is column 1.
ChannelSelection In DJDE format, this specifies the column the channel control code is in. The default is no
channel control column.
Characterset When using DJDE format, characterset=1 converts the data from EBCDIC to ASCII. The
default 0 does not attempt to translate the data.

Vault initialization files
69
Server initialization file
This is used to store general configuration parameters for the Vault. The file can be found in
<drpath>\server\server.ini.
Note that the file may contain settings other than those listed below but only those listed are
user-configurable. It is recommended that you do not modify any other sections or keywords.
Syntax:
[Server]
ResourceSet=xxx
[Paths]
DownloadPath=path;default installpath\server\download
PresentJournalPath=path
PresentResourcePath=path
PresentInlinePath=path
storagemodel=1
[Log]
Path=c:\e2\log
Data Types
number a positive integer.
path a directory pathname – can be one of the following:
relative – do not start with a drive letter or backslash, e.g. runfiles
absolute – start with a drive letter or a backslash, e.g. e:\app\runfiles
UNC – e.g. \\server\sharename\runfiles).
Note that changing the default is not advisable unless you are certain it is necessary.
Keywords and
parameters
[Production]
[Paths]
DownloadPath This is the location that the Automated Data Manager (ADM) scans for incoming
output data streams and associated files. Default directory: download\.
PageDataPath The file storage location for compressed streams and journals. Default directory:
pagedata\
IndexPath The location for storing indexes and customer records. Default directory: index\
DocDataPath The location for storing document records. Default directory: docdata\

Vault initialization files
70
InfoPath The location where results from .info or audit.adm requests. Default directory: info\
RemovedPath The location where page files, document files and journals are moved to after a
remove request. Default directory: removed\
DistributionPath The image of the client used by loader to keep desktops up to date. Default directory:
distrib\
BackupPath This path is used to store backup of index resulting from an indexbackup.adm
request. Default directory: backup\
ProcessPath This is used to store intermediate ADM load results that need further processing.
Default directory: process\
WorkPath This is used to store files currently being worked on by ADM, compressed files waiting
for their journal or vice versa. Default directory: work\
ResourcePath This is where resource packs, such as .HIP and .HIM files, are stored until needed.
Default directory: resource\
Storagemodel This changes the storage layout of the .drd and .drp files.
0/1: standard drd -> docdata, drp, jrn -> pagedata
2: year drd,drp,jrn -> storage\yyyy
3: month drd,drp,jrn -> storage\yyyy\mm
4: day drd,drp,jrn -> storage\yyyy\mm\dd
When alternate storage model is enabled, data files are stored under the storage path
directory. Like other Vault paths it can be redirected from its default location. For
example:
server.ini:
[Paths]
StoragePath=F:\Vault\Data
ReprintInputPath This is the path where documents, and their resources, flagged for reprint will be
stored temporarily. This will default to the reprintinput subdirectory.
ReprintOutputPath This is the path where the consolidated documents for reprint will be placed. This
will default to the reprintoutput subdirectory.

Vault initialization files
71
PresentJournalPath This is an optional setting that allows you to specify a directory where the Vault
loader will copy the journal during a job load.
This is used with e2 Account Managment which uses these journals to determine
what documents are available in Vault. It can also be used to let other applications
know what documents are loaded in Vault. Another option is using ODBC export on
Windows platforms.
This setting is used with the Documents=xmljournal setting. It forwards the journal
once the document build stage finishes creating or updating the resource set based
on resource packs.
If the resource set update is deferred because of missing resource packs, the journal
forward operation will also be deferred.
If the resource extraction step is disabled with IgnoreResourcePacks=1, the forward will
occur after the document data file is built.
Note: The forward occurs before indexing. This means that the data may not be
available to users yet. If the job fails during indexing, some or all of the documents
may not be available.
[indexer1]
ipcname= This options sets the name of the shared memory file used by e2serverd, e2loaderd,
e2util, and indexcheck to communicate with an indexerd instance. If you are setting
up an environment where more than one indexerd instance will be running (two or
more separate Vault systems on the same platform), then each indexerd instance must
have a unique shared memory filename set.
For Windows, the default shared memory filename is Global\idxreq. An example of an
Windows alternate setting would be: ipcname=Global\indexer1
For AIX, Solaris and Linux, the default shared memory filename is /idxreq.shared. An
example of a Unix alternate setting would be: Ipcname=/indexer1.shared. The “/” for
unix is not optional.

Vault initialization files
72
maxhits The maxhits setting defines the maximum number of hits to return from a search
request when a request.max parameter is not provided.
The default is 30.
Notes:
• Increasing the number of hits can increase the amount of work the server needs
to do to execute a search. In some cases this can have significant performance
implications for the server (see "Search performance considerations").
• By default, Vault will use a specific key to resume a search. If the index contains
duplicate keys (e.g. large numbers of duplicate dates) this may cause the search
to resume in the wrong place (or even cause the caller to loop). Increasing the
default number of hits can reduce the need for this mechanism.
• Older versions have different defaults or internal hard coded values for this
control.
It should also be noted that the current Perl sample provides these two settings in
interface.pl:
my $maxhits=20
This setting controls the maximum number of hits requested in searches.
my $maxdocs=100
This setting controls the maximum number of hits returned for the date drop down
box on the view page.
These set the request.max parameter in search requests sent to the server for their
respective search commands.
maxcap The maxcap setting defines the highest value of the request.max parameter the
database component will allow in a request.
The default is 10000.
Note: Older versions had different defaults or internal hard coded values for this
control.

Vault initialization files
73
Database initialization file
This is used to configure databases. The list of searches available is now configurable on a
database-by-database basis. This allows databases with specialized indexes to show a search
that would not work in another database. This file can be found in
<drpath>\server\database.ini.
Syntax:
[DatabaseName]
description=<label>
Index<N>=<indexfilename>,<keyfield>,<flags>,<label>
Render<N>=<title1>;<title2>;..;<titleM>,<field1>;<field2>;..;<fieldM>
Keywords and parameters
description The database label that users see.
Index<N> Custom search key options for Service Clients.

Vault initialization files
74
Fields supported by both
int.match: the key of the matching index entry
int.pointer: the pointer of the matching index entry
int.empty: an empty string
Default Database Search Configuration
If no IndexN= or RenderN= settings are provided, these values are used:
Index1=account,cust.account,wjctul,Account Numbers
Index2=name,cust.name,jcrtul,Names
Index3=address,cust.address,jcrtul,Addresses
Index4=invlink,doc.date,xdhasb,Dates under this account
Index5=guid,doc.guid+int.null+doc.type,dhi,GUID
Index6=iguid,docInstanceID+int.null+doc.type,dhi,Instance GUID
Render<N> Sets the configurable output columns for search N (defined by the Index<N>= setting).
API clients such as the Perl Sample and the Java Sample use these settings to determine how
to display search output.
Note the following:
- The number of titles and fields must match.
- A title is just a text name for the output column.
- A field is the name of an attribute of the matching search record.
Supported Field Names
If the match is a customer:
cust.account
cust.name
cust.address
If the match is a document:
doc.account
doc.name
doc.address
doc.date
doc.guid
doc.pages
doc.sections
<attribute>: the name of a custom attribute
int.file: the name of the job the document appears in
int.profile: the profile of the job
int.resource: the resource set of the job
int.modes: a bit mask of the supported output modes
profile.<setting>: the value of the profile option <setting>=

Vault initialization files
75
Render1=Account;Name;Address,int.match;cust.name;cust.address
Render2=Name;Account;Address,int.match;cust.account;cust.address
Render3=Address;Account;Name,int.match;cust.account;cust.name
Render4=Date,doc.date
Render5=GUID,doc.guid
Render6=Instance,docInstanceID
Database inheritance
Database settings support the inherit keyword. This allows you to import keys from another
database section.
Example
[common]
Index1=invlink,hint.date,dhasb,Dates under this account
Index2=account,cust.account,wjctul,Account Numbers
Index3=name,cust.name,jcrtul,Names
Index4=address,cust.address,jcrtul,Addresses
Index5=contract,hint.invoice,dh,Invoice Numbers
Index6=guid,hint.guid+int.null+hint.type,dhi,GUID
Render1=Date,hint.date
Render2=Account;Name;Address,cust.account;cust.name;cust.address
Render3=Name;Account;Address,cust.name;cust.account;cust.address
Render4=Address;Account;Name,cust.address;cust.account;cust.name
Render5=Invoice;Date;Account,hint.invoice;hint.date;hint.account
Render6=GUID,hint.guid
[mck]
description=McKinley Financial
inherit=common
[syscp]
description=System Corp
inherit=common
Index7=waybll,WAY,dh,Way Bills
Render7=Way Bill Number;Date,WAY;hint.date
Indexer as a Service
Each database section starts with a name in square brackets (eg "[afp1]" usually followed by a
description= line. Adding the line ModeDefault=2 to the database section will cause that
database to use the Indexer as a Service.

Vault initialization files
76
To enable a database to use the Indexer as a Service for its indexes, the ModeDefault=2 setting
must be added to the definition section of the database.
Alternatively, ModeDefault=2 could be added to a section that gets inherited by a database
definition section. In this situation, the ModeDefault=2 would apply to all databases that use
the inherited section.
Note: The default is to use the legacy indexer for all indexes.
Unicode indexes
There are two parts to a database in Vault, a single customer table and several indexes. Some
indexes, like the account number index, are required for basic Vault operation, others are
optional. Refer to “Custom indexing” on page 148 for more information. The information on
this part of the configuration has not changed. What has changed is the ability to use a
Unicode enabled form of the customer table and/or indexes.
Normal customer table and index formats
To use the normal customer table and index formats, no additional settings are required.
Unicode customer table and index formats
To use the Unicode customer table and index formats, with a single sort order, add the
following database option:
database.ini:
[somedatabase]
LanguageDefault=<sortorder>
Mixed normal and Unicode customer table and index formats
To use a mix of normal and Unicode customer table and index formats or multiple sort orders,
add the following database options:
database.ini:
[somedatabase]
LanguageDefault=* (normal customer table, indexes are normal by default)
or
LanguageDefault=<sortorder> (Unicode customer table, indexes are Unicode
and use the specified sort order by default)
LanguageN=* (index N is normal)
or
LanguageN=<sortorder> (index N is Unicode and uses the specified sort
order)

Vault initialization files
77
Defining the Sort Order
The sort order specification supports a number of options but in most cases you can specify a
minimum of options to get appropriate sort behavior.
The typical form of the sort order is:
L<language>_R<region>_AS
Example
Len_RUS_AS English (United States)
Lzh_RCN_AS Chinese (China)
Lzh_RSG_AS Chinese (Singapore)
Lja_RJP_AS Japanese (Japan)
Lko_RKR_AS Korean (South Korea)
Lth_RTH_AS Thai (Thailand)
(The "_AS" is an option that reduces the significance of white space and punctuation which
makes searching easier.)
For detailed options for collator names you can refer to this link:
http://userguide.icu-project.org/collation/concepts
Note: "e2util -xl" will list the known locales.

Vault initialization files
78
Local initialization file
This is used to override the central profiles.ini settings for a specific client. The Service Client,
Service Reprint Admin and Rendering Engine support the local.ini file. The local.ini file uses
the same settings as profiles.ini; however the only entries that need to be entered into the
local.ini file are those parameters that you need to override.
In the example below, only the Tray= setting is entered in the local.ini because it is the only
setting that needs to be overridden on the Rendering Engine. This would have the effect that
the images produced by the rendering engine would no longer have a background stock while
other clients would continue to have the background stock.
This file is in <drpath>\server\local.ini.
Example
//central profiles.ini file
[filemap]
=PBBI
[PBBI]
Documents=g1afp
Format=AFP
TapeBlockFormat=1
MarginX=0
MarginY=0
Tray=*imm
PageBreak=0
FontDPI=300
//local.ini file on the Rendering Engine
[PBBI]
Tray=

Vault initialization files
79
e2loaderd, e2Renderd, e2Serverd and indexerd initialization files
In versions before 5.4, all processes were started under a single service. The server, loader and
render processes are separate services. They will appear in the services configuration as shown
below.
•Vault Server
• Vault Loader
• Vault Rendering Engine
Separating the processes makes it easier to stop and start individual processes using standard
Windows tools, for example: "net stop e2loaderd" would stop ADM but not server or render.
On Windows
To start each service (or you can use the services applet in administrative tools):
• net start e2serverd
• net start e2loaderd
• net start e2renderd
Command line switches
Please note the following:
• archive.exe is no longer used.
• no monitoring of network port.
• Windows monitors service exit/abort.
• e2loaderd, e2serverd, e2renderd can now be started/stopped independently through the
Windows service tools.
Services commands (e2loaderd,e2serverd,e2renderd)
• -i: install service
• -u: uninstall service
•-f: run in foreground
• (none): run as installed service
FOR FURTHER INFORMATION ON STARTING
THESE SERVICES, REFER TO THE VAULT
INSTALLATION GUIDE.

Vault initialization files
80
Relocating the PID files within e2serverd.ini, e2loaderd.ini, and
indexerd.ini (Solaris, AIX, and Linux)
Vault processes run as root (full access). By default, Vault tries to write the PID files to
/var/opt/vault/run. If it can't write to this directory, it tries to write the to the process log
directory (chosen since it must be writable). If it can't write to either it fails with an error.
You can relocate the PID file if you need to lock down the account Vault runs as or if you want
the files in a different place for organizational reasons.
[Program]
piddirectory=/var/opt/vault/run
pidalternate=/opt/PBBI CCM/Vault/xxxxxx/log
You can set the pidxxxx= option to blank if you want it to skip that stage.
Installing multiple servers or Rendering Engines
The following are steps for installing several vault servers or rendering engines:
| To install multiple vault servers or Rendering Engines:
1. Change the name of the executable (it must be unique, as it becomes the service short
name and base name for the.ini and .log files).
2. Change the service display name (it must be unique, as it becomes the service display
name)
3. Configure ports to separate non-conflicting endpoints (for example server)
e2serverd2.ini:
4. install (register) service
5. Start service
ren e2serverd.exe e2serverd2.exe
e2serverd2.ini
[program]
display=Vault Server 2
[server1]
service=*:7001
e2serverd2 -i
net start e2serverd2

Vault initialization files
81
i. To stop service
ii. To uninstall service
File structure commonalities
• Each of the Vault executables has a corresponding .ini file with the same base name
(e2routerd.exe has e2routerd.ini).
• All of them support the [Program] and [Log] sections. From there, each can have a section
for the components they use.
• The options for a component type are the same no matter which executable they're in
([server1] appears in e2renderd, e2serverd, e2loaderd, e2routerd and they have the same
options). The defaults might be slightly different.
• Some components can appear multiple times (e2routerd might have [connection1],
[connection2], and so on).
• The list of running components is logged at startup:
• a summary of the above.
• a list of which components appear by default in each executable.
• a list of options for [Program] and [Log].
• a list of options for each component type.
General settings for the new services
net stop e2serverd2
e2serverd2 -u
Keywords and
parameters
[program]
Display Optional “Long Service Name” that will be registered with the Service (e2xxxxd.exe –i). It is
only mandatory to change this when multiple copies of the same component are
running on a single machine. The Service Short Name is the executable name, which
also must be unique per computer. The example at the end of this section might
correspond to “e2serverD-2.exe”.
[Server1]
Service Hostname (or IP) and port that this component listens on for incoming connections.
Hostname of ‘*’ listens on all interfaces.

Vault initialization files
82
ignorereset Suppresses certain occurrences of connection reset by peer errors when
ignorereset=1.
When reading data from a connected client socket and the operating system reports a
connection reset by peer error, Vault will log error 71125 with the platform specific
code for this condition (10054 on Windows, 73 on AIX, 131 on Solaris, 104 on Linux)
In some situations, such as an incorrectly coded upstream application, you may not
be able to address the issue immediately. Since this could occur on every connection,
it can fill the logs with errors that make finding other problems harder. In these
situations you may want to hide the errors with the ignorereset=1 setting.
[Connection] Refers to which rendering engine to use: [Connection1] is the first of two rendering
engines to use, [Connection2] is he second of two rendering engines to use.
[ConnectionN] Continue connections until the render count is met.
Service Hostname or IP Address and Port Number of the Upstream Component (usually
e2ServerD).
[Log]
Path Path for this module to log its results. Note that server.ini [Paths] still controls all
OTHER paths as it was in 5.3 and prior.
[pool1]
minthreads The minimum number of threads allowed.
maxthreads The maximum number of threads allowed.
startthreads Number of threads to launch on program start-up.
startinterval If a backlog is detected for this amount of time (in seconds), create a new thread.
stopinterval If an idle thread is detected for this amount of time (in seconds), destroy an idle
thread.
debug Enable debug logging messages
[cache1]
maxagesuccess Maximum cache age for a “hit” to be considered valid instead of re-executing the
command. Setting maxagesuccess=0 effectively disables the cache, which can be
useful in testing or troubleshooting, but should not be used in production for
performance reasons.
maxagefailure Maximum cache age for a cached “failure” message to be considered valid instead of
re-executing the command.
size Size of the cache in Megabytes.
debug Enable debug logging messages.

Vault initialization files
83
Example
[program]
display=Vault Server #2
[Server1]
service=10.117.205.56:6001
AutoFileThreshold=2000000
[Connection1]
Service=127.0.0.1:6001
[Log]
Path=d:\log
[pool1]
minthreads=2
maxthreads=16
startthreads=4
Cache filtering [cache1]
This enables you to control some of the elements that are stored in various Vault cache lists. Cache filtering
allows you to specify which Vault data elements will not be cached for a Vault server, renderer, router, or loader.
filter.storage.docdata if set to 1, results of requests for the report list and properties of a document are not
cached.
filter.storage.docpage if set to 1, the raw internal data for a document page is not cached.
filter.storage.filedata if set to 1, the metadata associated with a compressed file is not cached.
filter.storage.filepage if set to 1, the raw page data from a compressed file is not cached.
filter.render.transform if set to 1, then the results of a render request will not be cached. Examples of this
include PDF output, GIF output and text.
[stat1]
dump # Enable statistical logging to see elapsed time on each request in the log, and
min/max/averages on shutdown of component.
AutoFileThreshold This setting controls the Vault server component's threshold at which it switches its
result working buffer to disk.
It belongs under the server component e.g. [server1] section and can appear in
e2serverd.ini, e2renderd.ini, or e2routerd.ini.
The default is 512k. Keeping the working buffer in memory can improve performance
if the disk is highly contended.
Note: Be careful not to set the value too high as this buffer is allocated per thread (e.g.
50 threads at 2MB is an additional 75MB or so or memory).

Vault initialization files
84
startinterval=5
stopinterval=3600
debug=1
[cache1]
maxagesuccess=1800
maxagefailure=300
size=64
debug=1
[stat1]
dump=1
Minimizing customer data exposure
Vault provides optional settings to reduce the risk of sensitive data being exposed by limiting
the time it exists in memory. These settings cause internal buffers to be cleared before and
after use. By limiting the lifetime of sensitive data, the chance that it could be misused in some
way is reduced. The trade off is that the clearing operations can take up additional CPU
resources, reducing overall performance.
Note: Not all buffers are affected by these settings and problems could theoretically still arise
within the time period the data properly exists in memory.
The following settings have been added:
The Buffers that are currently covered by the “scrub” changes are:
•UInfo
•MemoryFile
• ServerComponent receive buffers
• ConnectionComponent receive buffer
• UtilityCombine send buffer
Those not covered are:
• CompressedFile block decompression buffers
• CompressedFile block cache
scrubacquire=<N> When scrubacquire=1, the affected buffers are cleared before use. Default is 0 (off).
scrubrelease=<N> When scrubrelease=1, the affected buffers are cleared after use. Default is 0 (off).
cap=<N> When set to a number greater than 0, limit the number of bytes cleared with the
scrub settings.
This can be used to lower the performance cost of clearing operations while still
providing some risk mitigation.

Vault initialization files
85
• BaseFile copy buffer (=>AutoFile)
• CacheComponent cache buffers
• Index cache
•Log formatting buffers
•PDF encryption buffer
• PDF compression buffer
•PDF escape buffer
e2Routerd
e2routerd uses an algorithm to distribute requests which is based on 4 weights, in order of
priority:
1. failed requests since last “heartbeat” (~30 sec).
2. hold ticks (holds come from previous “heartbeats” with failures).
3. running commands.
4. completed commands.
Priorities 1 and 2 manage connection failures. Connections that fail during the current
heartbeat are avoided. Connections with failures during the last heartbeat get increased hold
ticks which act as a delay until the connection is retried.
Priority 3 is the main rule, causing commands to be distributed to rendering engines running
the fewest commands. It doesn't know the costs of each command, just the number of
commands that were sent and have not completed.
Priority 4 acts to distribute the load across connections under light load. This helps keep the
“live-ness” information about connections fresh. This actually produces around a robin effect
but only under light load.
Failure modes aside, e2routerd distributes requests based on the number of requests each
rendering engine is currently working on.
e2Routerd.ini Settings
On startup, e2routerd.exe will create connection and authclient components used to
communicate to the services it manages.
Keywords and
parameters
[router1]
count Indicates the number of rendering engines to use.

Vault initialization files
86
Example
[router1]
count=2
debug=1
[connection1]
service=127.0.0.1:6004
[connection 2]
service=127.0.0.1:6005
Other services functions
Information for other functions performed within the e2loaderd.ini, e2renderd.ini, and
e2serverd.ini services are contained in other areas of this document:
Purging: Please refer to “ADM Vault Purging / Document Expiry” on page 126
indexerd
The behavior of the indexer as a service can be customized by creating an initialization file.
The contents of the file are
prefix
authprefix
These settings are related and tell the router the base names of the component to
create.
The Prefix setting automatically creates connections called alpha1 and alpha2. The
default is connection. The authprefix called beta1 and beta2. The default is authclient.
Note: It is recommended to leave the default as “left”.
debug Tells the router to periodically print statistics about each connection managed by
the router component.
Keywords and
parameters
[Indexer1]

Vault initialization files
87
ThreadCount ThreadCount=number
Controls how many concurrent threads are created to process the requests made to
the Indexer as a Service. Additional threads may improve performance of searches
during heavy load times (for example when loading new job data).
The thread count should be at least one and no larger than the number of real CPU
cores less 2. So a quad core system should have one or two threads set. If the platform
is doing additional work besides handling Vault or additional Vault servers and/or
renders have been set up on the same platform as the indexer, then the thread count
should be reduced accordingly.
As each thread can consume the processing power of a processing core, ThreadCount
should be increased if your processing platform has the addition processing capacity
(unused processor core). Increasing the ThreadCount in a system where the
additional capacity does not exist (or is used by other processes) can actually result
in lower indexing throughput due to excess contention for processing capacity.
CacheSize CacheSize=number
Controls how much memory is allocated to the index cache (in MB). A higher cache
will generally speed up index processing but will also consume more of the system’s
memory.
The default setting is 1024 MB and this is the maximum for 32 bit systems. The cache
can be reduced for systems that are short of processor memory but indexer
performance will be affected.
FullFlush FullFlush=number
Controls how often the indexer will write out all the changed indexes in the index
cache to the index file (in minutes). The Indexer as a Service will write out changed
indexes to the index file when it is not servicing requests. A full flush (writing out all
changed indexes before servicing requests to add or change another index) will occur
at every FullFlush interval.
The default value is 1440 minutes.
FullFlush=0 means that a full flush will occur at the end of every Vault job load.
Note: A FullFlush value of 0 can have a large impact on indexing performance when
you are doing an index or reindex operation for a large of number of jobs in a single
batch run.

Vault initialization files
88
FlushPeriod FlushPeriod=number
The FlushPeriod sets the number of seconds an updated (or new) index entry in the
index cache needs to be unchanged for before it is flushed (written from the index
cache to the index file and its cache space made available for reuse).
The default value is 60.
A longer FlushPeriod will mean that it takes longer period for the index file to be
updated with the cache contents.
QueueSize QueueSize=number
QueueSize sets the size of the indexer command queue. If the command is too small
and fills up, this can adversely affect the rate at which indexer events can be
processed. However, increasing the comamnd queuesize will consume more memory
resources within your system. A proper setting will require some experimentation to
adjust for your system memory availability and your usage pattern.
The default value is 200000.
The minimum value is 10000 and the maximum value allowed is 1200000.
oscache oscache=number
An oscache value of 1 will cause the Windows version of the indexer to use unbuffered
writes to update the index file. This setting can be used in low memory environments
where the Windows O/S is caching the index file updates and consuming excessive
system memory due to this caching.
oscache has no effect in AIX/Solaris/Linux versions of the indexer.
Note: Setting oscache=1 may actually slow down the indexer operation if there is
sufficient memory for it to operate correctly without oscache=1 being set.
vaultkeycompression This setting packs legacy keys generated by vault more tightly. This will result in a
smaller and faster datbase.
Set to 1 means “on” (default). This switch should always be configured on. It is not
defaulted for backward/rollback compatibility.
Note: You will not be able to use code older than 6.1M068 once you've enabled this
option.

Vault initialization files
89
Example
[Indexer1]
ThreadCount=1
CacheSize=1024
FullFlush=1440
FlushPeriod=60
QueueSize=200000
oscache=1
vaultcompression=1
readonly default is 0.
readonly mode serves two purposes:
• Opening the database, and disallowing changes. You can do searches, but not
actually add or delete anything. This mode can also run automatically if the
permissions are not sufficient to allow writing to the database file.
• Using readonly involves a parallel machine (connected to the same storage
filesystem running a separate copy from the master indexerd). This must be a
separate physical machine. The second machine must then be readonly (only
one can write to the database at a time). The new machine's indexer will
automatically synchronize when the master machine updates its database. The
secondary indexerd processes cannot load new files, or make other changes to
the database. For a single pc, multiple indexerd's are not needed.
readonly mode can only be used on an existing database. An error will occur if the
database file does not already exist, and readonly is forced.
Indexerd space reuse
configuration
This allows multiple versions of the index to be maintained for backup/rollback
purposes. You can configure the number/period of time these versions are
maintained for.
Note: These views of the database take up some additional space.
versionretentiondays Number of days to maintain version history.
versionretentioncount Number of individual versions to maintain
In addition to this, a new command has been added to indexcheck (mode 2:
-compact). Refer to “indexcheck” on page 101 for more information on this command.

Vault initialization files
90
Database rollback
The indexerd rollback functionality allows you to roll-back the database to a previous point in
time - undoing all changes up to that point, no matter how big or small. Rollbacks require a
special tag that can be found in the indexerd log files found in the log subdirectory (eg.
i n d e x e r d . 2 01310 3 0 . 0 715 43 . 219 2 . l o g ) .
When a database is committed, a tag entry is generated in the form of:
09:11:25 Tree [17], tag [0B2311-0B075273A87D-0B1B02A62D2D-0B17AB330000-B6]
To rollback a database, follow the steps below:
1. Ensure that the loader doesn’t have any jobs to process, and that it is shut down.
2. Shut down indexerd.
3. Under the index directory of the database you wish to rollback (the directory where
index.dr2 resides), create a file called indexerd.rollback, and place the tag (including square
brackets) in the first line.
Example
echo [0B2311-0B075273A87D-0B1B02A62D2D-0B17AB330000-B6] >
index/indexerd.rollback
Note: The path is system specific, forward slash (/) for unix, and backward slash (\) for
windows).
Start up indexerd:
09:19:16 Restoring rollback file [index\indexerd.rollback]
09:19:16 Restoring [0B2312-0B075273A890-0B1B02A62F97-0B17B6BA0000-9D]
The above message indicates a successful rollback. Your rollback versions must be within the
set retention period:
versionretentiondays= day count
versionretentioncount= number of versions to keep
Rolling back beyond what is specified above is not safe, and should never be done.
To verify that your rollback is successful, you can run indexcheck -mode:2 -verify -all to check the
database integrity.
Note: This may take a long time for a large database. At this time, you cannot rollback a
database in read-only mode.

Vault initialization files
91
e2Serverd
Database settings
{auth] and [authdb] settings have been replaced by [authserver] along with its related settings
as described below:
Keywords and
parameters
Authentication settings
[authserver1]
model model=number
The model setting defines how users are authenticated.
When model=1 (default), no authentication is used.
When model=2, users are checked using Windows authentication. This model is not
available on Unix platforms.
databaseN databaseN=<database>:<comma separated list of principals>
This setting controls which users and groups are allowed to access the specified
database.
Database entries must start with 1 and stops at the next missing number (if you have
more than one database entry the numbers must be contiguous starting with 1).
connect connect=<comma separated list of principals>
This setting controls which users and groups are allowed to access the Vault process.
dllname dllname=<security dll>
If needed, this sets the name of the SSPI (Security Support Provider Interface) .dll to
use for authentication when model=2. The default is secur32.dll.
package package=<secuirty package>
If needed, this sets the name of the SSPI (Security Support Provider Interface)
package to use for authentication when model=2. The default is NTLM.

Vault initialization files
92
Example
[authserver1]
model=2
connect=Vault Users
database1=invoice:Accounting,Customer Service
database2=credit:Fraud,Customer Service
e2Renderd
Separating resouces from the base directory
The resource component can redirect the location it uses to store resource sets at the
rendering engine. This is useful if you want to separate resources from the base directory.
The directory can be controlled by setting the subdir= setting on the resource component in
the rendering engine's “.ini” file.
Syntax
e2renderd.ini:
[resource1]
subdir=g:\vault\resources
By default, resource set directories will be created in the same directory as the rendering
engine executable (equivalent to subdir being the empty string).

Vault initialization files
93

94
Vault Utilities
Diagnostic utilities are provided with the Vault to help manage the operation of data rendered
outside of Generate, assist in troubleshooting, and generate statistical data for long term
management of the product.
They are provided in the <drpath>\tools directory and should be run in a command
window. This means that all the output information can be viewed in the window.

Vault Utilities
95
afpdecode
Purpose This converts an AFP datastream into a more English readable form. By default the output is
to the cosole but you can redirect it to a file and since the output can be very large, it is
recommended that it is output to a file.
Preparation Afpdecode is run from a command prompt.
Syntax afpdecode pathname {> outputfile }
Parameters pathname the path and filename of the AFP datastream.
outputfile an optional, but recommended, output file path name.
Example usage
afpdecode accounts.afp > dumpafp.txt
Example output
0008D3A8BB000000 BGR Begin Graphics Object
5A
0008D3A8C7000000 BOG Begin Object Environment Group
5A
001CD3A66B000000034301084B000038 OBD Object Area Descriptor
403840094C02002E820041C6
5A
0020D3AC6B0000000117000000000000 OBP Object Area Position
00002D000000000000000000002D0001
5A
000DD3ABBB0000000005030410 MGO Map Graphics Object
5A
0025D3A6BB000000 GDD Graphics Data Descriptor
F707B0000002000100 Drawing Order Subset
F6120200000038403840000000002E82 Window Specification
000041C6
5A
0008D3A9C7000000 EOG End Object Environment Group

Vault Utilities
96
afpextract
Purpose This extracts resources such as fonts and page segments that are embedded in AFP
datastream and saves them in separate files in the current directory; afpextract also supports
an output path for the resources. Note that print stream resources are automatically handled
via RPK/HIP/HIM transfer when using Generate.
You can automatically enable Resource Extraction during Ingestion, by enabling a Profile
Setting of “ExtractResources=pathname\”. Normally this would be
“extract=distrib\resourceset\”. Such a setting will cause Vault server to automatically ADD
(but not replace) any resources from the currently-loaded print stream into the Folder
specified by the path.
Preparation Afpextract is run from a command prompt.
Syntax afpextract filename [outputpath] [-i]
Parameters pathname the path and filename of the AFP datastream.
outputpath optional output path for resources, if omitted resources will be extracted
to directory from which afpextract was run.
-i check for resources internal to the document -beyond the first begin page
structured field.
Example output
E:\Demo\TryAgain\raw>afpextract trymeDIJ240.afp
AFP Resource Extractor 5.4M2p0078
file: trymeDIJ240.afp
size: 385391 bytes
path: E:\Demo\TryAgain\raw\
wrote [X0HE08R0] size [63]
wrote [C0HE08R0] size [30284]
wrote [T1HEL500] size [2062]
wrote [X0HE08I0] size [63]
wrote [C0HE08I0] size [31248]
wrote [X0HE12B0] size [63]
wrote [C0HE12B0] size [38721]
wrote [X0B128HD] size [63]
wrote [C0B128HD] size [25353]
wrote [T1COD128] size [1232]
wrote [X0HE32B0] size [63]
wrote [C0HE32B0] size [123572]
wrote [X0HE18I0] size [63]
wrote [C0HE18I0] size [57532]

Vault Utilities
97
afpsubstitute
Purpose This will generate a default set of font substitutions for AFP font files. This is used to map
fonts in the original datastream to fonts available for PDF.
Fonts will be embedded/encoded as specified in the resource set’s fonts.ini, or failing that, as
specified in the root, or failing that, will be spot-graphic embedded. For more font
information, refer to “Working with fonts” on page 178.
Preparation Afpsubstitute is run from a command prompt in the same directory as the AFP font files.
Syntax afpsubstitute [-u] [> outputfile]
Parameters outputfile an optional, but recommended, output file path name. The outputfile is
typically fonts.ini.
-u Make the substituted font names unique. This may prevent exactly
matching PDF fonts but can improve spacing because it tends to force the
PDF viewer to use independent width tables.
Example
afpsubstitute > fonts.ini
fonts.ini:
C0FB08NP ARIAL 8.0 0 0 Helvetica 8.0 32
C0FL09NP ARIAL 9.0 0 0 Helvetica 9.0 32
C0FR12BP ARIAL 12.0 0 1 Helvetica-Bold 12.0 262176
X0BPB0 ARIAL 12.0 0 0 Helvetica 12.0 32
X0FB08NP ARIAL 8.0 0 0 Helvetica 8.0 32
X0FL09NP ARIAL 9.0 0 0 Helvetica 9.0 32
X0FR12BP ARIAL 12.0 0 1 Helvetica-Bold 12.0 262176

Vault Utilities
98
databasecheck
Purpose Databasecheck builds a list of all drd/drp/jrn files and drd files mentioned in the index by
scaninng each of the page data files in the Vault to ensure that matching page data, and
document data files exist. It then scans for any sets with missing pieces (e.g. a .drp without a
.drd) Databasecheck checks:
• If a compressed page data file is missing.
• If a document data file is missing.
• If files are present but not indexed.
Databasecheck should be run only to troubleshoot problems.
Preparation Run it in a command prompt from the <drpath>\server directory. The server
initialization file is used to access directory locations of the Vault files.
Note that it can take a significant amount of time to complete the analysis function – it is
therefore advisable to leave the operation running overnight.
Usage
limitations
The databasecheck utility validation of drd/drp files works best with a Vault index model
where all the drd/drp files are indexed into a single index file (either index/invlink.dri or the
index name supplied in the command line).
If your layout spreads out the drd/drp files across multiple index files, the databasecheck
utility will flag all the drd/drp files that are not in the index file being validated against as not
being indexed. In order to get a full validation, you will need to run databasecheck against
each index file and then compare the results for that index file to see if the drd/drp files that
should be part of that index file are flagged as not being indexed.
In the multiple index file environment, databasecheck can still be used to verify that the
drd/drp file pairing is correct. Alternative methods to validate the index file to the drd/drp
file relationship include the .check flag file (refer to Using flag files for more information), the
e2util -ze option (refer to e2util for more information) or the indexcheck -validfile option
(refer to indexcheck for more information).
Notes:
• Databasecheck will not verify indexes if the index file is an index that uses the Indexer as
a Service model.
• Unicode indexes are not supported by databasecheck.
Syntax databasecheck [-v] [indexname]
Parameters -v verbose mode, always print job status even if ok
indexname a standard (.dri) document pointing index to check for job names, you can specify
more than one (defaults to checking index\invlink.dri).

Vault Utilities
99
Example
databasecheck
Database Diagnostic 5.4M2p0078
writing report to report.txt
Output in report.txt:
Document Data Files
Total number of files: 3
Page Data Files
Total number of files: 3
Journal Files
Total number of files: 3
index\invlink.dri Index Entries
Total number of index entries: 1500
Report
-D-I 20011111-tryme-telco-statement
PD-I 20011211-tryme-telco-statement
PDJI 20020111-tryme-telco-statement
Total number of faults: 0
Notes
The Report section provides a summary of the potential problems identified.
A correctly matched set of files would read PDIJ (J occurs only when a journal was used), for 'Page data',
'Document data', 'Index entries' and “Journal”. A fault would be indicated by a - (a missing .drp, .drp, .jrn or index
entry).
P: The page data file is present in \pagedata.
D: The document data file is present in \docdata.
I: The document data file is correctly indexed in the index.
J: Indicates the presence of a journal file.
Note that 20011211-tryme-telco-statement in Report 4 indicates the filename in which the error has
occured.4

Vault Utilities
100
fileinfo
Purpose This is used to view and change the profile or resource set used by page data files or
document data files in the Vault. It reports the following information:
Profile name – defining the download parameters, character set, channels, collation order,
margins, etc.
Resource set – points to a set of fonts, graphical background forms, form definitions, JSLs,
and other generational defining factors for a specific report type.
Block size, original size, compressed size, and compression ratio.
Total number of pages, and the number of bytes per page (compressed).
Note: Profile and resource set names are limited to 15 characters.
Preparation Run fileinfo in a command prompt on any system that has access to the Vault.
Syntax fileinfo pathname [-{p|r|d}value]
Parameters pathname the path and filename of either the page data file (.drp) or the document
data file (.drd).
-{p|r|d}value an optional flag which can be used to change the profile or the resource
set used. Choose from:
- pvalue: change the profile to value.
-rvalue: change the resource set to value, refer to the Font and image
resources section in the Vault User Guide.
-dvalue: set the files timestamp to the date indicated by the name of the
file.
Example output
Show file information:
fileinfo ..\pagedata\filename.drp
filename: pagedata\20021101124616-tryme-5feefd227c3943ffa17f3415732c989e.drp
profile: AFP1
resource set: 19f0d7765cdd42b
block size: 75000000
codec: 3
deltabitsize: 17
original size: 385391
compressed size: 21093
compression ratio: 18.27:1
total number of pages: 13
average bytes per page: 1622

Vault Utilities
101
indexcheck
Purpose Indexcheck searches indexes on a local index file-set and it is used for:
- searching the document list (this is the default). It will display the document list for the
specified account number(s).
- searching for the indexes. Note that not all index types are applicable in all installations.
- performing bulk data export from the index.
- preparing reports and the data-files for batch jobs.
- can work with the Indexer as a Service and the legacy indexer by using the -mode option.
Preparation Indexcheck is run from a command prompt and from the <drpath>\server directory. The
server initialization file is used to access the directory locations of the indexes.
Syntax indexcheck searchkey [index_name] [-p]
Parameters searchkey the index key to be searched for. If the key contains spaces, it must be
enclosed in double quotes.
index_name the name of the index file to be searched.
-p display the pointer address.
_indicates a zero or null which are used to separate fields in a search key.
indexname.dri specify index name, defaults to invlink.dri, also supports legacy .idx index
names.
searchtext text to search for in the key, supports _ to represent the null byte and
{0x3B} syntax for hex byte values.
-copy:toindexname copies the matching index entries to another index.
-pointers shows the pointer for the matching index entries.
-noprint specifies not to print the matches.
-delete deletes the first matching index entry.
-split:n n between 10 and 90, percentage split point when copying keys, defaults
to 90/10 for forward/reverse searches.
Note: This does not appply to the Indexer as a Service.
-reverse lists the keys in reverse order.
-validfile shows an error if a document index entry points to a missing .drd or .drp
file and when copying indexes, does not copy the faulty entry so that you
can clean the index of all such entries.

Vault Utilities
102
-stat displays various state and activity information on the index operation. The
type of information displayed depends on the operation and type of index
involved. Note that Indexer as a Service indexes may report activity from
other requests as well as the current operation
-meta displays index metadata for Unicode indexes. Vault Unicode indexes
contain information about the sort order used to collate index entries,
whether script reordering is enabled, and the version of Vault used to
create the index.
-lang:<order> sets the sort order for the target Unicode index in a -copy operation. The
orders are specified in the same way as the LanguageDefault= setting in
database.ini (e.g. -lang:Len_RUS_AS). You can view the order used by the
existing index using the -meta command.
Indexer as a
Service
parameters
-mode -mode: 2 is optional and indicates that the Indexer as a Service is
controlling this index. This will cause the indexcheck processing to be
applied to an index using the Indexer as a Service.
The default is -mode: 0 and treats the index as a legacy index. .
-copy:toindexname
[,dest_mode]”
allows for copying an index to an index with a different name.
The destination mode (dest_mode) allows the index type of the
destination index to be specified and is optional and overrides the –mode
implied or specified setting.
If the source index is a legacy index, then the default mode of the
destination index will be a legacy index file.
If the source is an Indexer as a Service index (-mode:2), then the default
destination will be the same type.
-dbinfo displays the indexes that are contained in the index.dr2 file created by the
Indexer as a Service. With the legacy indexer, the indexes created can be
determined by examining the files in the index directory. With the Indexer
as a Service, the indexes are not directly visible.
-crc returns the CRC (Cyclic Redundancy Checksum) of the indexes found by
the indexcheck command. This is a validation tool.
-drop
-confirm
deletes a database from the index.dr2 file.
the -confirm option must also appear on the same line as the -drop option
to prevent accidental deletion of a database.
Used with -mode:2.

Vault Utilities
103
-count counts the elements in a given index.
Used with -mode:2.
-status returns internal state counters of the indexerd service. It can be used to
determine what the indexerd service is doing at any give time.
It returns an errorlevel of 1 if a flush/databasecommit is pending, and 0 if
it is not pending.
-history displays a list of previously committed versions of the database. The codes
it provides can be used by the (future) -rollback option to rollback to a
specific version.
Used with -mode:2.
-verify checks the integrity of a specific index running on the new indexerd.
This also supports -all so that indexcheck -mode:2 -verify -all will verify all
indexes stored in the Indexer as a Service.
Syntax:
indexcheck -mode:2 -verify database/indexname
This checks every node of the given index and makes sure that all keys are
valid and within bounds. It will return an error count if any errors are
found.
-repair Repairs any errors that are found.
Syntax
indexcheck -mode:2 -verify -repair database/indexname
If any errors are found it will notify whether or not you should do an
indexcheck -mode:2 -forceflush to commit the changes after the repair is
complete.
-compact This deletes all database versions except the current one and releases the
space for reuse.
Note: This is mostly for legacy customers. If you start off with the version
that supports space reuse currently, you will not need to use this setting.

Vault Utilities
104
Examples
-mode
• If a search is desired on key 123 for a legacy index index\pdf1\invlink.dri, the command line would be:
Indexcheck index\pdf1\invlink.dri 123
• If the index was under the control of the indexer as a service, the command line would be:
indexcheck -mode:2 pdf1/invlink.dri 123
• The indexcheck -copy option has a new destination mode available. The new syntax is: -copy:
destination_index_name, destination_index_mode where destination_mode is optional.
• To copy all index values in legacy index\pdf1\invlink.dri starting with "1" to a new legacy index named
index\pdftest\invlink.dri, the indexcheck command would be:
indexcheck -copy: index\pdftest\invlink.dri index\pdf1\invlink.dri 1
• If index\pdf1\invlink.dri were was controlled by the indexer as a service and the destination is also controlled
by the indexer as a service, the command would be:
indexcheck -mode:2 -copy:pdftest/invlink.dri pdf1/invlink.dri 1
• If the new index was in the Indexer as a Service and the existing index was a legacy index, the command would
look like:
indecheck -copy:pdftest/invlink.dri,2 index\pdf1\invlink.dri
Note: All path separators use the Unix notation style "/" inside Indexer as a Service even if Indexer as a
Service is running in a Windows version of Vault. The separator for legacy indexes will depend on whether it
is a Windows or Unix style OS.

Vault Utilities
105
Example
indexcheck 12323
[123237_2000/05/11_20000511c1__]
[123237_2000/06/11_20000611c1__]
[123237_2000/07/11_20000711c1__]
[123237_2000/08/11_20000811c6__]
[123239_2000/05/11_20000511c4__]
[123239_2000/06/11_20000611c4__]
[123239_2000/07/11_20000711c4__]
[123239_2000/08/11_20000811c6__]
indexcheck 172606_
[172606_2000/01/11_20000111d3__]
[172606_2000/05/11_20000511d3__]
[172606_2000/06/11_20000611d3__]
[172606_2000/07/11_20000711d2__]
[172606_2000/08/11_20000811d6__]
indexcheck "grant w" name.dri
[GRANT WADDELL ]
[GRANT WALTERL]
[GRANT WIANCKO_]
[GRANT WILSON JACK & ]
indexcheck 0063091 contract.dri
[006309113_]
[006309136_]
[006309138_]
[006309141_]
[006309143_]
[006309145_]
indexcheck elmsley address.dri
[ELMSLEY DR. 39 _]
[ELMSLEY ST N 132 _]
[ELMSLEY STREET N. 75 _]

Vault Utilities
106
metadecode
Purpose This converts a Metacode datastream into an English readable form. By default the output is
to the screen, but, since the output can be very large, it is recommended that it is output to a
file.
Note: metadecode is only supported on the Windows version of Vault.
Preparation Metadecode is run from a command prompt.
Syntax
metadecode filename lenoffset lensize lenadjust dataoffset fileheader {> output}
Parameters datastream the path and filename of the metacode datastream.
lenoffset the position of the length field relative to the start of the record.
lensize the number of bytes in the length field.
lenadjust a number to add the length found if it needs adjustment.
dataoffset the beginning of the actual data.
fileheader the amount of data to skip at the start of the file.
output an optional, but recommended, output file path name.
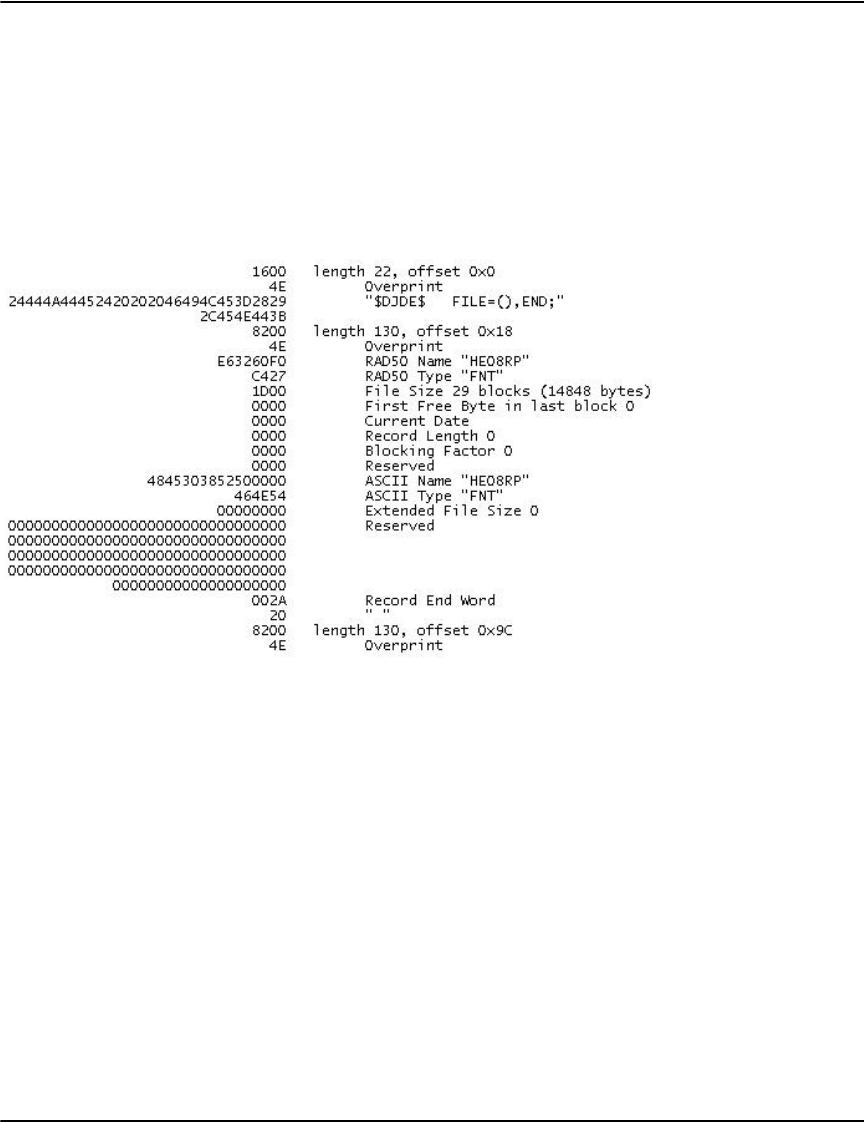
Vault Utilities
107
Example
file: trymeDIJmtc.mtc
size: 329195
lengthoffset: 0
lengthsize: 2
lengthadjust: 0
dataoffset: 2
fileheader: 0

Vault Utilities
108
metaextract
Purpose This extracts resources such as fonts and page segments that are embedded in Metacode
datastream and places them in separate files in the current directory. You can then use the
metaresource utility to decode the resource files.
Note: metaextract is only supported on the Windows version of Vault.
Preparation Metaextract is run from a command prompt in the same directory as a profiles initialization
file that contains the profile used for this datastream. The metacode record parameters are
used from the profile.
Syntax metaextract pathname [profile]
Parameters pathname the path and filename of the Metacode datastream.
profile the name of the profile used for the metacode datastream.
outputpath the output path for resources (metaextract 20040701B-telinvoice.mtc
c:\temp).
There is an optional outputpath: metaextract filename [profile
[outputpath]].
Example
metaextract f:\DemoTS175MTC\raw\ts175mtc.mtc meta
Example output:
using profile [meta] in profiles.ini
[HE12BP.FNT]
[HE08IP.FNT]
[HE32BP.FNT]
[HE18IP.FNT]
[TS175.IMG]
creates the files:
2002-10-25 11:52a 17,408 HE08IP.FNT
2002-10-25 11:52a 29,696 HE12BP.FNT
2002-10-25 11:52a 67,584 HE18IP.FNT
2002-10-25 11:52a 88,576 HE32BP.FNT
2002-10-25 11:52a 2,560 TS175.IMG
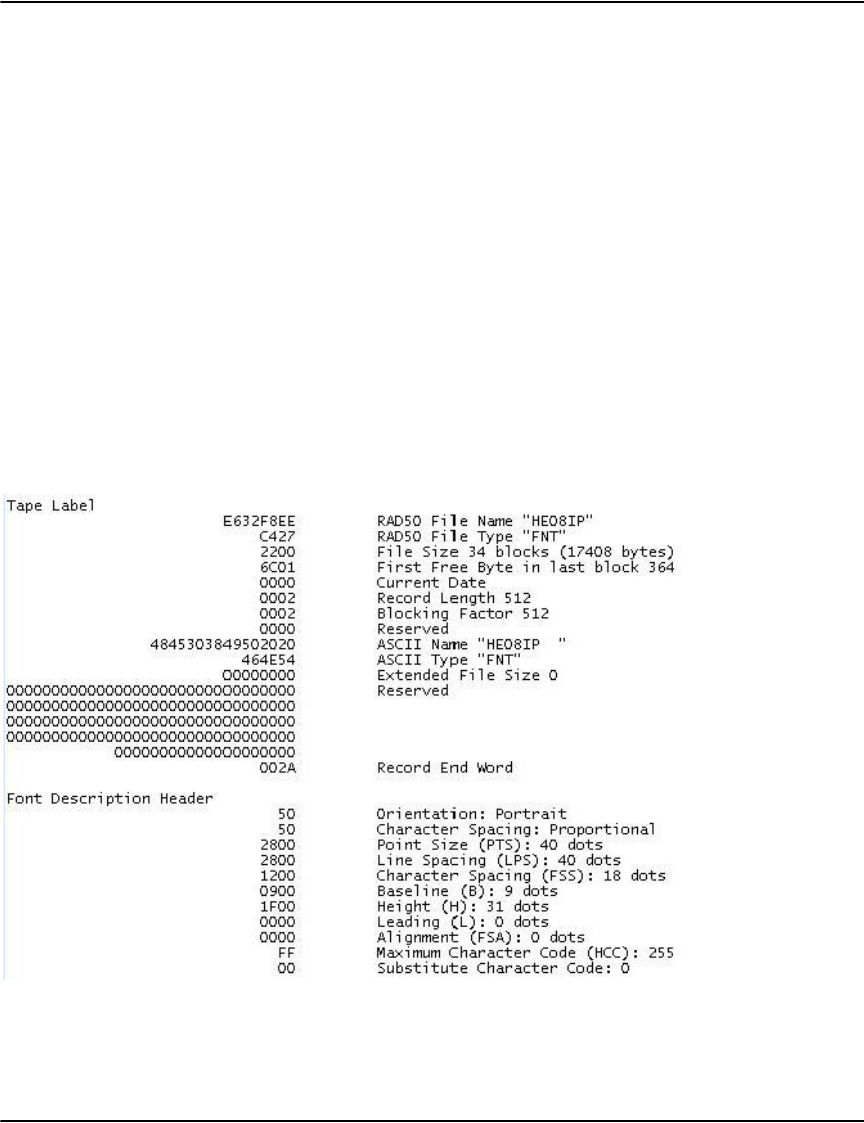
Vault Utilities
109
metaresource
Purpose This decodes metacode font and image files. These may have been extracted from a Metacode
datastream using metaextract.
Note: metaresource is only supported on the Windows version of Vault.
Preparation Metaresource is run from a command prompt. You would normally want to output to a file or
through the more command.
Syntax metaresource pathname
Parameters pathname the path and filename of the Metacode resource file.
Example usage
file: HE08IP.fnt
size: 17920
Example output:

Vault Utilities
110
metasubstitute
metasubstitute -u option
The -u option appends a unique number to the end of the PDF base font name in the
generated font.ini data. This is useful for multiple fonts which use the same base font with
incompatible width tables.
Most PDF viewers typically use a common width table for all fonts derived from a given base
font. In the example above, all the fonts have the same width table. If you have fonts with
significantly different width tables, this will result in odd behavior. In the example below, each
font has its own width table so widths will be correct.
Note that the PDF viewers will no longer be able to identify the font you want by name and
instead matches it by characteristics. This often results in a font with the correct widths but
without the correct bold or italics settings.
Example
F:\Demo\TS175MTC\render\default>metasubstitute -u
HE08IP ARIAL 7.4 0 0 Helvetica1 7.4 32
HE12BP ARIAL 11.5 0 0 Helvetica2 11.5 32
HE18IP ARIAL 16.8 0 0 Helvetica3 16.8 32
HE32BP ARIAL 30.7 0 0 Helvetica4 30.7 32
P06BOB ARIAL 7.0 0 0 Helvetica5 7.0 32
Purpose This will generate a default list of font substitutions for metacode font files. This is used to
map fonts in the original datastream to fonts available for PDF.
Note: metasubstitute is only supported on the Windows version of Vault.
Preparation Run this from a command prompt in the same directory as the metacode font files.
Syntax metasubstitute [> outputfile]
Parameters outputfile an optional, but recommended, output file path name
Example
F:\Demo\TS175MTC\render\default>metasubstitute
HE08IP ARIAL 7.4 0 0 Helvetica 7.4 32
HE12BP ARIAL 11.5 0 0 Helvetica 11.5 32
HE18IP ARIAL 16.8 0 0 Helvetica 16.8 32
HE32BP ARIAL 30.7 0 0 Helvetica 30.7 32
P06BOB ARIAL 7.0 0 0 Helvetica 7.0 32

Vault Utilities
111
e2util
Purpose The commands associated with the e2util utility are the manual equivalent to e2loaderd.exe’s
automatic functions.
Preparation e2util is run from a command prompt in the server directory.
Syntax e2util -command <filename>
Parameters filename the filename of the datastream.
command the command letter
-c: manually
compresses a file.
Example
E:\Demo\Exjourn\server>e2util.exe -c
download\110102-085022-TelcoStatement.xml.afp
09:17:01 Vault Utility 6.0M0p0041
09:17:01 (C) Copyright 1993-2012 Pitney Bowes Software Inc.
09:17:02 compressing
[download\110102-085022-TelcoStatement.xml.afp] profile
[test] format [AFP]
09:17:53 pages: [4095] total read: [34903358] total
written: [9443810] final ratio: [3.70:1]
09:17:53 file
[download\110102-085022-TelcoStatement.xml.afp] has been
compressed
-d: manually
decompresses a file.
Note: The
decompression option
is not supported for
PDF files.
Example
E:\Demo\Exjourn\server>e2util.exe -d
download\110102-085022-TelcoStatement.xml.drp
09:18:35 Vault Utility 6.0M0p0041
09:18:35 (C) Copyright 1993-2012 Pitney Bowes Software Inc.
09:18:35 decompressing
[download\110102-085022-TelcoStatement.xml.drp]
09:18:39 [download\110102-085022-TelcoStatement.xml.afp]
decompressed

Vault Utilities
112
-h: manually builds
documents data.
Example
E:\Demo\Exjourn\server>e2util.exe -h
download\110102-085022-TelcoStatement.xml.drp
09:19:12 Vault Utility 6.0M0p0041
09:19:12 (C) Copyright 1993-2012 Pitney Bowes Software Inc.
09:19:12 build [download\110102-085022-TelcoStatement.xml]
09:19:12 profile [test] method [ujournal]
09:19:13 [500] documents, [4095] document pages, [0]
ignored pages
-i: manually indexes a
file.
Example
E:\Demo\Exjourn\server>e2util.exe -i
download\110102-085022-TelcoStatement.xml.drd
09:19:43 Vault Utility 6.0M0p0041
09:19:43 (C) Copyright 1993-2012 Pitney Bowes Software Inc.
09:19:44 start indexing document file
[download\110102-085022-TelcoStatement.xml.drd]
09:19:44 flushing index cache
<stats list removed for brevity>
09:19:45 finished indexing document file
[download\110102-085022-TelcoStatement.xml.drd], [0] errors
-u: manually unindexes
a file.
Example
E:\Demo\Exjourn\server>e2util.exe -u
download\110102-085022-TelcoStatement.xml.drd
09:20:35 Vault Utility 6.0M0p0041
09:20:35 (C) Copyright 1993-2012 Pitney Bowes Software Inc.
09:20:35 start unindexing document file
[download\110102-085022-TelcoStatement.xml.drd]
09:20:35 flushing index cache
<stats list removed for brevity>
09:20:35 finished unindexing document file
[download\110102-085022-TelcoStatement.xml.drd], [0] errors

Vault Utilities
113
-z[1etcjlin]: manually
dumps the contents of
a document data file.
-1: check only one
record
-e: check only errors.
-t: print as tab
separated values.
-c: print as comma
separated values.
-j: print as journal
record.
-l: print as property list.
-i: print as information
record.
-n: don’t check index
status.
Example
E:\Demo\Exjourn\server>e2util.exe -z
download\110102-085022-TelcoStatement.xml.drd
19169650 2005/03/02 00303402300 624 577 0041 10 AndrT
Stewart 5805 Coxboro Ct 21478-5724 [OK]
11942299 2003/12/31 703 781 6827 4 Murray Herrera 253
Legion Dr 15436-4827 [OK]
05447989 2002/01/11 848 826 7421 9 Mwadi Devilliers 5967
Muzzle Ln 24771-1726 [OK]
30333132 2002/01/11 335 763 9894 12 Mohinder Childs 6968
Prairie Rd 14664-7673 [OK]
08723285 2002/01/11 509 797 2662 3 Jamie Mcdermott 2490
Hatton Ave 37529-9741 [OK]
22648926 2002/01/11 600 530 0106 6 Sarfraz Dixon 5550
Connie Rd 33805-7446 [OK]

Vault Utilities
114
-s: generates a list of
offsets from the drd
files.
Notes:
•This can be time
consuming for
large databases.
• This is used in
combination with
indexcheck
-validoffset to
validate document
offsets in the
index.
This is the first
step in this
process. Once this
step is complete,
use indexcheck
-validoffset to
verfify that the
offsets in the
specified index are
valid.
The -validoffset
option can also be
used with
indexcheck -copy
to make a copy of
the index with the
invalid offsets
removed.
e.g. indexcheck
index\index\invlin
k.dri
-copy:index\index\
new-invlink.dri
-validoffset
-noprint
Example
11:26:28 begin scan
11:26:28 creating offset index [index\_offsets.dri]
11:26:28 scan [20011111-tryme-telco-statement]
0 10 20 30 40 50 60 70 80 90 100
11:26:28 size [98034] documents [501] deleted [0]
11:26:28 scan [20011211-tryme-telco-statement]
0 10 20 30 40 50 60 70 80 90 100
11:26:28 size [98630] documents [501] deleted [0]
11:26:28 scan [20120411-tryme-telco-statement]
0 10 20 30 40 50 60 70 80 90 100
11:26:28 size [98996] documents [501] deleted [0]
11:26:28 flushing index cache
11:26:28 end scan
example searching for invalid entries:
indexcheck index\index\invlink.dri -noprint -validoffset -p
Found:
0x0000005000218BDC 0x0033
[09273902_2001/11/11_20011111-tryme-telco-statement_]
ERROR 14120: entry not found in offset index
1500 matches

Vault Utilities
115
Using flag files
Below is a quick summary of flag files you can drop into the process directory:
jobname.index add the index entries for <jobname>
jobname.unindex remove the index entries of <jobname>
jobname.reindex remove and then add index entries for <jobname>
jobname.redoc unindex job, delete .drd, rebuild .drd, and index new .drd
jobname.remove unindex job, move .drp/.drd/.jrn to removed directory
jobname.reinstate restores .drp/.drd.jrn from removed directory and indexes job
jobname.build builds images for mobile vault
jobname.check performs checks of the job, including testing index keys
jobname.info dumps summary of document records to file
jobname.sql requests that the document records associated with the job be exported to an
external database (Refer to “ODBC export” on page 131).
indexbackup.adm makes a copy of the index directory
logverbose.adm adjust log level
logquiet.adm adjust log level
lognormal.adm adjust log level
shutdown.adm shut down the loader process
suspend.adm loader stops processing files
resume.adm loader resumes processing files
audit.adm scan all jobs and test for licence compliance
reprint.adm generates print file with all documents flagged for reprint

Vault Utilities
116
vaultflag.bat
The vaultflag.bat file is a windows batch file that assists in the creation of Vault flag files. Vault
flag files are placed in the process directory to trigger specific activities within Vault. The
filename and filetype of the file indicate the activity to be done. The file contents are not
important to the processing, just the filename and filetype.
“vaultflag” is intended to run as a command line batch file from the Vault "server" directory as
it creates files for the server\process subdirectory. The vaultflag.bat itself will be in the
server\tools directory.
There are two types of flag files supported by vaultflag: administrator or job related.
Administrator flag files
These flag files create activity that is generally system related:
The administrator flag files are created by issuing:
tools\vaultflag aaaa
where “aaaa” is one of indexbackup, logverbose, logquiet, lognormal, shutdown, suspend,
resume or audit. You can review the operations that occur from the “Using flag files” on
page 115 section of this guide.
The reprint flag file is created by issuing:
tools\vaultflag reprint nnnn
where” nnnn” is the name to be assigned to the consolidated reprint file.
Job related flag files
These files will perform a specific activity on a Vault job. The job name must match a "drd" file
in the docdata or storage directory. The job name must be known although wild cards are
permitted when specifying the job name.
Job name flag files are created by issuing:
tools\vaultflag jjjj nnnn
where “jjjj” is the flag file to be created and must be one of index, unindex, reindex, remove,
reinstate, info, or check. You can review the operations that occur from the “Using flag files”
on page 115 section of this guide.
where “nnnn” is the job name. The job name can be a full job name (the filename of a drd file
in the docdata directory or a storage subdirectory) or can be a pattern that will generate a
result from the DOS dir command.
• If you are using a pattern, you can run:
dir docdata\nnnn

Vault Utilities
117
• if your jobs are stored in docdata:
dir storage\nnnn /s
• if your jobs are stored in storage, check that the pattern used will select the correct files
for processing before issuing vaultflag.
vaultflag.sh
The vaultflag.sh is a script file available in the AIX/Solaris/Linux Vault environments. It
performs the same functions as vaultflag.bat does under Windows. The vaultflag.bat section
above applies to vaultflag.sh with the following changes:
• The command line to invoke vaultflag.sh is "tools/vaultflag.sh"
• All directory paths with "\" should become "/" as the Unix path separatoir is different
from the Windows path separator.
• The '*' standalone wildcard is not supported by vaultflag.sh and will not generate any
matches for creating flag files.
vaultservices.bat
The vaultservices.bat file is a windows batch file that assists in managing Vault window
services.
| To run vaultservices: open a command prompt and cd to the Vault server\tools
subdirectory (The exact path will depend on your systems Vault installation path) and run
vaultservices iiii: where iiii is one of start, stop, info, query, auto or demand.
The functions performed will be:
• start: start the Vault services.
• stop: stop the Vault services.
• info: display information on the configuration of the Vault services.
• query: display information on the status of the Vault services.
• auto: set the Vault services to start automatically when the host platform is booted.
• demand: set the Vault services to not automatically start when the host platform is
booted. An administrator will have to start the services manually.
Note: The userid running the vaultservices batch must have administrator privileges for
vaultservices to perform correctly.

118
Mobile Vault build script
The Mobile Vault build script in intended for the automated building of media images using
ADM. This script is a part of ADM that takes a set of instructions for building a CD or DVD
image and automatically constructs the images. These instructions take the form of a file with
a .build extension.
Note: The Mobile Vault functionality is NOT available when the archived format is PDF or
Postscript.
Purpose The .build file format consists of a preamble followed by a set of document selections.
Typically the .build files will be constructed by a tool. The documentation here is primarily
aimed at those needing to write the .build files manually or those constructing these
automated tools themselves.
Preparation The .build files are placed in Server\Process for execution, which is similar to other flag files
used by ADM. The output is placed in a specified subdirectory under Server\Build.
Parameters T|targetname Specifies the name of the subdirectory under Server\Build to place the
media images in. There is no default, it must be specified. On completion
of the build process the image can be copied to your preferred media,
typically CD or DVD
M|media size Specifies the size of the media in bytes. If the selection set is too large for a
single media, the set will be broken up into multiple media. The media size
is unlimited.
D|database Set current database for searches. Subsequent selections based on indexes
will use the indexes from the specified database.
A|account Add all documents associated with the specified account.
F|file name Add all documents in filename.drp/filename.drd
I|index
name|prefixkey
Add all documents in index beginning with prefixkey (for use with “dh”
flag indexes).
J|indexname|pre
fixkey
Add all documents for accounts in index beginning with prefix (for use
with “c” flag indexes).
X|profiles.new Use this file for the contents of the media’s profiles.ini.
R|indexname|
beginkey|endkey
Add all documents in index between beginkey and endkey (“dh”).

Mobile Vault build script
119
S|indexname|
beginkey|endkey
Add all documents in index between beginkey and endkey (“c”).
Note:
If beginkey does not match and entry as a prefix, no documents will be
found in the range (one reason the batch reprint selection always selects
whole entries).
If endkey < beginkey, no results will be returned.
Y|database.new Use this file for the contents of the media’s database.ini.
Z|distrib.new\ use this directory for the contents of the media’s base image.
U|user|passwor
d
Add this user to the logo list (if none are specified, then U|user|password
assumed).
L|count|months
|days
Set filters in selected documents, leave blank for no filter on that criteria.
Example
; preamble
T|test
M|1500000
D|default
A|20807275
F|20011111-Tryme-Telco-Statement
I|contract|85
J|account|007R|contract|247|252
R|contract|247|252
S|account|0868|101034
; select the 5 most recent documents from account 1234
L|5
A|1234
;Select the first 50 documents from a given compressed file
L|50
F|20020111-Tryme-Telco-Statemen

Mobile Vault build script
120
Build Processing
Here is a sample log from a build session. Below is a description of each build phase.
09:56:11 begin media build for [work\test.build]
09:56:11 selecting documents
09:56:11 [564] documents selected, [41] duplicates removed
09:56:11 extracting documents
09:57:10 extracted [564] documents and [4438] pages to [3] files for a total of [9432453] bytes
09:57:10 indexing documents
09:57:10 compacting indexes
09:57:10 creating client image
09:57:11 splitting data sets
09:57:11 building media images
09:57:11 removing temporary data
09:57:11 end media build
Log Definitions
Selection In this phase ADM processes the build file to extract the
configuration information and creates the output directory under
Server\Build. For each selection request, ADM will search the
indexes and any matching results are added to a temporary index
Server\Index\_mediaselection.dri.
Extraction In this phase, all the pages for all the requested documents are
extracted into new compressed files in the output directory.
Indexing A set of indexes are constructed for the selected documents in the
indexing phase. The indexes that get constructed are the same as
those for the server.
Compact The compact step tries to reduce the space required to store the
indexes. It takes advantage of the assumption that no further index
entries will be added.
Client Image This step copies the base client image from Server\Distrib to the
output directory and alters it to work with the media viewer. The
client executables and help files (client.exe, loader.exe, client.chm)
are replaced with the media viewer equivalents (cdviewer.exe,
cdviewer.chm) stored in the Server directory. The profiles.ini and
database.ini from the Server directory is copied to the media
image. An autorun.inf file is also copied from the Server directory,
if present.
Split The media builder may determine that the size of the client image,
indexes and data will exceed the size of a single media. If so, it tries
to split the data into chunks that will fit. Each data set has its own
numbered media subdirectory.

Mobile Vault build script
121
Media Image For each data set, ADM will copy in the constructed client image
and indexes.
Cleanup At this point the media have been constructed and ADM cleans up
any temporary data from the output directory.
Build output
The output of a successful build process will be one or more media directories located under
your chosen directory under Server\Build.
autorun.inf A file used by Windows to control the behavior of automatic
actions when a removable media is inserted.
cdviewer.exe The media viewer executable.
client.ini The client configuration file.
profiles.ini The print stream configuration file. It describes settings needed to
display each type of print stream loaded.
database.ini The database configuration file. This file describes each database
and the search methods available in each one.
default The resource set directory. It contains images, fonts, over lays, and
etc. needed to display pages from the selected data.
docdata The document data directory. It contains .drd files which record
the properties of each document.
index The index directory. This contains all the indexes used to execute
searches.
pagedata The compressed page data directory. It contains .drp files which
hold all the compressed pages from the selected documents.
For information on the script for automated deletion of documents using ADM and script
selections, please refer to “ADM Vault Purging / Document Expiry” on page 126.

122
Advanced ADM Configurations
The services model allows Windows applications to run under an authenticated user ID when
the console is not logged in, when the console is logged in as a different user than the
service’s user, and can allow the console user to freely log off and not affect the service.

Advanced ADM Configurations
123
ADM Vault replication
ADM provides an automated method of distributing data between document repositories. The
document distribution method is a file 'pull' methodology and can be limited to comparing
and pulling documents with a certain age. However, this configuration setting does not handle
the automatic 'aging out' of expired documents. This is provided in the ADM Document
Purging utility, refer to See “ADM Vault Purging / Document Expiry” on page 126. Note that
replication checks occur hourly by default.
Note: 5.3 and prior settings in Server.ini are discontinued. These are now configured via
“e2loadered.ini”.
For example, by using the ADM Document Distribution utility in conjunction with the ADM
Document Purging facility, you can easily configure a small backup server that synchronizes
the most recent month of documents and purges documents greater than three months old.
In other words, the time constraint parameter simply limits the scope of document retrieval,
reducing the bandwidth consumed when comparing the file lists.
Mirroring allows one vault to copy data files from another vault. The replica loader process
contacts the master server process hourly and the system checks to see if any files are missing
from the replica. It then copies missing data over the network to the replica and the data is
then indexed at the replica.
Note: Mirroring may heavily load the server
processes with transfer requests and produce
a significant load on your network.
Minimizing the bandwidth consumed by
transfers can control this issue.
Configuring the ADM replication
server
The ADM replication parameters are defined
in the [Mirror] section of the e2loaderd.ini
file. Modify these settings at the requesting
side, not on the server providing the
information.
VAULT DATA AND VAULT DOCUMENT REPOSITORY
PAGES FILES SHOULD BE OF THE FORM:
YYYYMM*.DRD AND YYYYMM*.DRP
WHERE:YYYY IS A FOUR-DIGIT YEAR;
MM IS A TWO-DIGIT MONTH NUMBER.
YOU CAN SET UP A PAIR OF SERVERS TO MIRROR
DATA FROM EACH OTHER TO LOAD JOBS ON
EITHER SERVER. THE FILES THAT COMPRISE A JOB
(PRINT FILE AND JOURNAL) MUST STILL BE LOADED
TOGETHER ON ONE OF THE SERVERS.

Advanced ADM Configurations
124
Syntax [Mirror1]
enable=1
Throttle=number
Block=number
months=number
interval=seconds
[connection2]
enable=1
service=someserver:someport
Data Types IPAddress an IP address of a machine in the format n.n.n.n.
number a positive integer.
Keywords and
parameters
Throttle Optional.
Defaults to 100, time to pause in milliseconds between blocks.
Block Optional, defaults to 32768 bytes, maximum number of bytes to send in
each pulse.
Bandwidth (bps) Consumed = Block Size / Throttle (in seconds) * 8
For example, 32768 / 0.2 * 8 = 655,360 bps = 655 Kbps = 0.65 Mbps.
enable enables the mirror component. Ensure that enable=1 (on) or mirroring
won’t work.
months This limits the jobs that get replicated to those within the last ‘N’ months.
Mirrored jobs need to start with 4-digit year and 2-digit month, for
example: “20011111-tryme-telco-statement.drd”.
If set to -1, it will attempt to mirror all files including those that do not
follow the above convention.
The default setting is: months=1
interval The loader will check the remote server for new jobs at startup and every
‘S’ seconds after the last check.
The default setting is: interval=86400 (every 24 hours).
service the connection parameters to the master server

Advanced ADM Configurations
125
Example
[Mirror1]
mirror1]
enable=1
months=12
[connection2]
enable=1
service=someserver:6001

Advanced ADM Configurations
126
ADM Vault Purging / Document Expiry
ADM provides an automated method of removing expired documents from the Vault. The
Document Purging task removes the documents from the 'available documents' list (usually
shows the date and type of the document) from the server’s Vault. Note the following:
• The loader process checks for old data hourly.
• Each profile can specify the maximum retention period.
• There is a global retention default.
• Old files are unindexed and deleted
The current system time and date on the server running ADM is critical. If the clock is set
ahead (i.e. into the future) for some reason, expect it to purge all the data that would be
purged as if that was the real date. If the system clock must be altered, be sure to halt the ADM
Purging Service until the clock can be restored.
Note that Vault data and Vault Document repository pages files should be of the form:
YYYYMM*.DRD and YYYYMM*.DRP
where:
YYYY is a four-digit year
MM is a two-digit month number
DD is a two-digit day number (this is used if a value between 01-31 is present).
Configuring the ADM purging server
Configure the ADM purging parameters in the [Purge] section of the e2loaderd.ini file.
Syntax e2loaderd.ini
[Purge1]
enable=number
Months=number
profiles.ini
[someprofile]
purgemonths=number
Data Types number a positive integer; otherwise if months = -1 then purging is disabled.
Keywords and
parameters
Months Required. This is the number of months of data to KEEP. Anything older
than this number of months will be purged from the Vault and
permanently deleted: -1 (off)

Advanced ADM Configurations
127
Document Kill Script
This is a script for the automated deletion of individual documents using the ADM. Note the
following points:
• Document kill scripts end with the .kill extension.
• Place the kill file in Server\Process for the ADM to execute it.
• The file contains commands similar in form to the standard journal.
• Deletes index entries, document records, and pages
Commands
selections (refer to “Script selections” on page 128
ignored
<blank>
;some comment
Caveats
Please note the following caveats to the document purge function:
• There is no undelete mechanism.
enable Enables the purge component: 0 (off)
purgemonths Sets per profile retention period in months (-1 means no purging for this
profile)
Example
e2loaderd.ini
[purge1]
enable=1
months=12
profiles.ini
[profile1]
purgemonths=-1
[profile2]
purgemonths=6
[profile3]
purgemonths=84

Advanced ADM Configurations
128
• Under certain circumstances document metadata could be recovered from a journal
(document rebuild.)
• Poor prefix or range selection can result in the unintentional mass deletion of document
sets.
• Prefix selection can cause isses where key data can overlap.
• For example, deleting documents for account 1234 would also delete those for
account 12345.
• Residual traces of the document can exist after deletion.
• Logs, journals, internal index data, file system space, page file, etc..
• Deleting a document removes it from all databases in which it was indexed.
• Servers must be shutdown during deletion, otherwise the result could be errors, garbage
data, crashes, and information disclosure.
• Deletion is not transactional, if interrupted it could corrupt the compressed files.
• Deletion does not recover disk space.
• Deletion of PDF format only deletes the primary page object, not referenced objects.
• Might contain sensitive infomration.
Tip:
Selection criteria are similar to .build scripts so you can use those to test selection sets.
Script selections
Limits
Whole jobs
Exact
V|1 enable(1) or disable(0) verbose selection
D|database set current database for searches
L|count|months|days set filters on selected documents
F|filename add all documents in filename.drp/filename.drd
A|account add all documents under a given account.
G|guid add all documents with given master guid.

Advanced ADM Configurations
129
Notes:
• Must be 'ct','dh' and 'sadh' indexes respectively.
• You can add final |indexname to use another index instead of account, guid and invlink
respectively.
Prefix (v2 style)
Notes:
• Must be 'ct','dh' and 'sadh' indexes respectively.
• You Can add final |indexname to use another index instead of account, guid and invlink
respectively.
Prefix (v1 style)
Range
Notes:
•If beginkey does not match any entry as a prefix, no documents will be found in the range
(one reason the batch reprint selection always selects whole entries).
•If endkey<beginkey no results will be returned
•In keys _ represents a zero byte and {0xHH} represents an arbitrary byte in hex.
Examples
Select two documents by master guid:
D|afp1
G|24F48D3139C9501F9C93E4C59A996B59
G|924BBAC2342FC85ACA82D2A4CDCDFF77
P|account|date add all documents with given account and date.
B|accountprefix add all documents under a given account
H|guidprefix add all documents with given master guid
Q|account|dateprefix add all documents with given account and date
I|indexname|prefixkey add all documents in index beginning with prefixkey.
J|indexname|prefixkey add all documents for accounts in index beginning with prefixkey.
R|indexname|beginkey|endkey add all documents in index between beginkey and endkey.
S|indexname|beginkey|endkey add all documents for accounts in index between beginkey and endkey.

Advanced ADM Configurations
130
Select documents under account 32200271:
A|32200271
Select 3 specific documents by account and date:
P|29448287|2002/01/11
P|29926086|2001/12/11
P|28862796|2001/11/11
Select documents from 2001 under account 19124055:
Q | 19124055 | 20 01
Select a document by instance guid instead of master guid:
G|50B99864B9BA45ADA6FA20C5C5F9AE96|iguid
Media Build script
The Media Build script is for the automated building of media images using the ADM. For
more information on the Media Build script, please refer to “Mobile Vault build script” on
page 118.

Advanced ADM Configurations
131
ODBC export
Vault provides an automated method of uploading information to an ODBC-compliant (Open
Data Base Connectivity) database product. It is used to automatically export metadata from
job loads to an ODBC data source. This is normally performed shortly after new documents
are added into the Vault.
The ODBC export function can upload the
Vault information to any ODBC-compliant
server, including Microsoft Access, MS-SQL
Server, Oracle, Sybase, and other such
products.
Configuring ODBC Export
Configuring ODBC export requires several steps:
1. Enable the ODBC export component in the Vault load process. This is done by adding the
following to the e2loaderd.ini file in the server directory:
2. Enable ODBC export for each profile that will export data to the target ODBC database.
To do this, add the following to the profile:
3. Configure the parameters needed to connect to the data source. The source is typically a
machine DSN.
Note: on 64-bit platforms you need to use the 32-bit ODBC Data Sources configuration
tool to create or modify the data source.
(a) Using a data source name, user name and password:
(b) Using a connection string:
THE ODBC EXPORT FEATURE MAKES USE OF
WINDOWS-SPECIFIC FUNCTIONS AND IS
CURRENTLY ONLY AVAILABLE ON WINDOWS
PLATFORMS.
[sql1]
enable=1
[someprofile]
...
ExportEnable=1
[someprofile]
...
ExportSource=Vault
ExportUser=user
ExportPassword=password

Advanced ADM Configurations
132
Consult your database documentation on the options in the connection string. You may
also find information at http://www.connectionstrings.com/ helpful.
Note: The connection string should not have any embedded newline characters.
4. Select the target table to insert records into.
5. Define the fields to export and their mapping in the target table. This table must already
exist. Each field is specified by an ExportFieldN= line in the profile where N is a number
in a contiguous range starting with 1. It consists of the target column name, the Vault
document field name and the data type. The data type is 's' for strings, 'd' for dates and 'n'
for numbers.
Automatic Export
During the load process, jobs are compressed, document metadata is built, and then they are
indexed.
When a profile has ODBC enabled, you'll see a message in the e2loaderd log after the index
operation that indicates that a request to export to ODBC has been triggered:
12:14:36 <sql1> sql.mark request, file [20120411-tryme-telco-statement]
12:14:36 <sql1> sql.mark returned, elapsed [1]
When the actual ODBC export runs, you'll see log messages similar to these:
12:14:46 <sql1> exporting [docdata\20120411-tryme-telco-statement.drd] to
[Vault] table [Documents]
[someprofile]
ExportConnectionSting=DSN=Vault;Uid=user,Pwd=password
...
[someprofile]
...
ExportTable=Documents
[someprofile]
...
ExportField1=Account,doc.account,s
ExportField2=Created,doc.date,d
ExportField3=Pages,doc.pages,n
ExportField4=File,int.file,s
ExportField5=Offset,int.pointer,s
ExportField6=Profile,int.profile,s
ExportField7=Resource,int.resource,s
Exportfield8=Type,doc.type,s
Exportfield9=Name,doc.name,s

Advanced ADM Configurations
133
0 10 20 30 40 50 60 70 80 90 100
| | | | | | | | | | |
XXXXXXXXXXXXXXXXXXXXXXXXXXXXXXXXXXXXXXXXXXXXXXXXXXX
12:14:47 <sql1> export complete, [500] added, [0] errors
Manual Export
You can manually trigger the ODBC export of a particular loaded job by creating a .sql flag file
in the server's process directory. The base name of the flag file should be the name of the job
file to export.
For example, if you have a document data fil e n a m e d “ 2 0 011111 - t r y m e - t e l c o - s t a t e m e n t . d r d ”,
you can have it exported to the ODBC database by creating a flag file at the command line
such as:
Server>echo x > process\20011111-tryme-telco-statement.sql
How to set up ODBC DSN
A Data Source Name (DSN) is the logical name that is used by Open Database Connectivity
(ODBC) to refer to the drive and other information that is required to access data.
The name is used by Vault ODBC export for a connection to an ODBC data source, such as a
Microsoft SQL Server database.
To set this name, use the ODBC tool in the Control Panel.
We are using “SQL Server” as an example but it is similar for other servers.
Create a System DSN in Windows XP
1. Click Start, point to Control Panel, double-click Administrative Tools, and then
double-click Data Sources (ODBC).
2. Click the System DSN tab, and then click Add.
3. Click the database driver that corresponds with the database type to which you are
connecting, and then click Finish.
4. Type the data source name. Make sure that you choose a name that you can remember
because you will need to use this name later.
5. Choose the server to which you want to connect.
6. Continue to click Next until you see Finish.
7. Click Finish

Advanced ADM Configurations
134
8. In the ODBC setup dialog, click Test Data Source for test the configuration to ensure that
the connection was successful.
9. Click OK to finish.

Advanced ADM Configurations
135
ADM error e-mail notification
ADM error e-mail notification enables the system to send alert messages to the system
administrator about ADM any errors that may have occurred (such as compression, document
building and indexing).
Ini file: e2loaderd.ini
Syntax [mail1]
enable=number
loglevel=number
smtpaddr=string
smtpport=number
smtphelo=string
smtpfrom=string
toadmins=string, string, string
Data Types string This is a string of alphanumeric characters or text.
number Zero or a positive integer.
Keywords and
parameters
[mail1] Required. This is the section name for the mail function settings.
enable Required. This enables/disables the mail function.
Default is 0 (disabled), 1 is enabled.
loglevel Optional. This is the logging message to the log file.
This setting enables extra logging for the SMTP protocol to help you to
debug the process of connecting to your mail server and transferring
email.
Note: This setting does not affect the detail in the email message itself.
Instead, the loglevel setting enables additional logging for the SMTP
protocol. You might use this if you were having problems sending the
mail alerts and you needed to debug the process of connecting to your
mail server and transferring email.
Default is 1, where 0=none, 1=begin+end, 2=all steps, 3=includes bulk
data.

Advanced ADM Configurations
136
smtpaddr Required. This is the mail server IP address.
Default is 127.0.0.1
smtpport Optional. This is the mail server port number that is using SMTP
protocol.
Default is 25
smtphelo Required. This is the name of the server sending the messages.
Default is 127.0.0.1
smtpfrom Required. This is the e-mail of the sender for the message.
toadmins Required. This is the list of administrator e-mail addresses, comma
separated.
Example
[mail1]
enable=1
loglevel=2
smtpaddr=127.0.0.1
smtpport=9025
smtphelo=localhost
smtpfrom=notify@mydomain.com
toadmins=admin@mydomain.com,admin1@mydomain.com,admin2@mydomain.com

Advanced ADM Configurations
137
ADM Reset notification
The ADM server will send RESET messages to the Vault Repository servers either after the
ADM server finishes its job or at certain intervals as defined by users. This can be configured
in the e2loaderd.ini file.
Syntax [reset1]
enable=number
service=string
retrycount=number
waittimeout=number
idletimeout=number
interval=number
Data Types string This is a string of alphanumeric characters or text.
number Zero or a positive integer.
Keywords and
parameters
enable Required. This enables/disables the RESET function.
Default is 0 (disabled), 1 is enabled.
service The SERVER list of e2SERVERD, with no spaces between them and
separated by a single comma (see the example below).
retrycount The number of connection attempts to e2SERVERD before a
connection failure is declared.
Default is 3.
waittimeout The wait time (in seconds) between connection retry attempts.
Default is 30 seconds.
ideltimeout When the connection to e2SERVERD is idle for the specified amount of
time, the RESET component will close the connection to e2SERVERD.
Default value is 600 seconds. This value should always be greater than
the interval value.
interval The amount of time (in seconds) between cache flush notifications to
e2SERVRD from the RESET component. If no cache flush is required,
then no notification is sent for the current interval.
Default is 300 seconds.

Advanced ADM Configurations
138
Example
e2loaderd.ini:
[reset1]
enable=1
service=127.0.0.1:6001,127.0.0.1:6002,127.0.0.1:6003
retrycount=3
waittimeout=30
idletimeout=600
interval=300

Advanced ADM Configurations
139

140
Indexing
This chapter covers topics associated with indexing and providing index information to the
Vault from applications.
Vault Indexer as a Service
Indexer as a Service
The Indexer as a Service is a new operational model that runs the indexing as a service within
Vault. In release 6.0, the Indexer as a Service was only available for Vault under Windows
non-unicode databases. With release 6.1, it is available on all supported Vault platforms
(Windows, AIX, Sparc Solaris, and x86 Linux) and supports Unicode databases.
Notes:
• Under Windows, the Indexer as a Service runs as a Windows service.
• Under AIX/Solaris/Linux, the Indexer as a Service runs as a daemon process.
As a service, the indexing activity is performed using a central service (indexerd) that all Vault
components communicate with for their indexing related activity. With the legacy indexers
(standard and Unicode), the access logic for reading and updating the index files was included
in each component.
The Indexer as a Service (indexerd) is installed by default. The default setting for databases is
still the old indexer (referred to as “legacy indexer”). If you set up the correct modedefault for a
database in the database.ini file, then the database will be under the control of the Indexer as
a Service.
Improvements
The Indexer as a Service offers the following improvements to indexing:
• Robustness: The Indexer as a Service is
more tolerant of sudden system failures.
If the indexer is stopped suddenly, the
index.dr2 file will still be valid.
IF THE INDEXER STOPS WHILE ADDING RECORDS,
THEN THE RECORDS ADDED AFTER THE LAST INDEX
FLUSH WILL BE MISSING FROM THE INDEX AND A
RE-INDEX OPERATION FOR THE JOB IN PROGRESS
MAY BE REQUIRED TO RESTORE THE INDEX TO A
COMPLETE STATE.

Indexing
141
• Speed: The Indexer as a Service can achieve a higher throughput rate because the index
activities are now multi-threaded.
Note: A multi-core processing platform is required because little or no speed
improvement may be observed on a single core platform. In addition, the new structure of
the index itself will allow for a more consistent throughput when adding or updating
index record regardless of the index size. The legacy indexers will slow down adding
records as the index grows larger.
• File and Backup changes:
The legacy indexer stores its index information in the index subdirectory. Each database
has a series of files with a file type of dri that represents the index information.
The Indexer as a Service stores all of its
index information for all of the
databases in a single file (index.dr2).
The index.dr2 file will be stored in the
index path (<drpath>\server\index) for
Windows and (<drpath>/server/index) for AIX/Solaris/Linux. If your Vault system index
files are currently backed up, then the backup of the indexer.dr2 file should be added to
the process. If you create a backup directory by using the backup flag file, then the
index.dr2 file will be copied as part of the copying of the index directory.
Resource Requirements
The Indexer as a Service is a heavily multi-threaded and memory intensive service and should
only be enabled on multi-core systems with at least 16 GB of memory (at least 3 GB of free
memory in normal operation). If the platform also hosts other applications than Vault, the
total memory requirement will be higher.
A Vault system that converts an existing database to use the Indexer as a Service can expect to
see the service use a significant amount of memory and processing power while it is indexing.
This may affect the operation of other
components (both Vault and non-Vault) if the
capacity of the underlying system is
insufficient to accommodate the Indexer as a
Service. You should expect the Indexer as a
Service to consume the most resources
during a job loading operation or during a
re-index operation.
Enabling the Indexer as a Service
To enable a database to use the Indexer as a Service, the database.ini file must be modified.
Refer to “Database initialization file” on page 73 for further information.
A -DBINFO OPTION IS NOW AVAILABLE IN THE
INDEXCHECK UTILITY THAT WILL DISPLAY THE
INDEXES STORED IN THE INDEX.DR2 FILE.
IT IS STRONGLY RECOMMENDED THAT
PERFORMANCE TESTING BE PERFORMED BEFORE
CONVERTING AN EXISTING DATABASE TO USE THE
INDEXER AS A SERVICE. THIS ENSURES THAT
THERE IS ENOUGH CAPACITY IN THE SYSTEM TO
ALLOW RENDERING AND SEARCH ACTIVITIES TO
OPERATE REASONABLY WHILE INDEXING IS
OCCURRING.

Indexing
142
Converting an existing database to use the Indexer as a Service
If there is already a database using the legacy indexer, it can be converted to use the Indexer as
a Service by following these steps:
1. Stop Vault (including the Indexer as a Service).
2. Backup the legacy index files (.dri files in the index/name_of_database subdirectory). Note
the name/date/time of the last job added to the legacy database. This can be determined
by examining the .drd files in the docdata directory.
3. Update the database.ini file to mark the database as using the Indexer as a Service
(ModeDefault=2).
4. Restart Vault services (including the Indexer as a Service)
5. Reindex all the jobs that were part of the database using the .reindex flag file. This process
involves creating a flag file in the process directory for each job that was previously placed
in the database.
• Under Windows, the vaultflag.bat file can assist in creating these flag files.
• Under AIX/Solaris, and Linux, the script file vaultflag.sh can be used.
Converting a database back to the legacy database
To convert a database back to using a legacy indexer:
1. Stop Vault (including the Indexer as a Service).
2. Update the database.ini file to mark the database as using the legacy indexer (remove
ModeDefault=2).
3. Restart Vault services.
4. Reindex all the jobs that were submitted since the database was converted to the Indexer
as a Service. This can be determined by examining the .drd files in the docdata directory. A
reindex flag file will need to be created in the process directory for each job that should
be reindexed.
• Under Windows, the flag.bat file can assist in creating these flag files.
• Under AIX/Solaris/Linux, the
vaultflag.sh script file can be used..
Installation changes
The Vault Windows installer will install a
service with a description of Vault Indexer. The service module name is indexerd.exe. If you are
not using the Indexer as a Service, it is recommended that you stop the service and change the
service property that automatically starts the service at boot up.
THE FULL DATABASE WILL NOT BE AVAILABLE UNTIL
ALL OF THE JOBS HAVE BEEN REINDEXED. YOU MAY
CONSIDER RESTRICTING ACCESS TO VAULT UNTIL
THE REINDEXING IS COMPLETED.

Indexing
143
The Vault AIX/Solaris/Linux installer will install a "vault" script that will allow you to start and
stop the Vault components (indexer included). If you are not using the Indexer as a Service in
your AIX/Solaris/Linux system, please use the vault_noindexer script to start and stop the Vault
system.
Specifying "vault_noindexer start" will start Vault without starting the Indexer as Service
daemon.
Log files
The Indexer as a Service will create log files in the server\log directory. The log file names will
be indexerd followed by a date and time stamp. The filetype will be "log" for the Windows
version and “server/log” for the non-Windows versions.. The format of the log files will be the
same as for other Vault services.
An example of the filename is: indexerd.20120131.115528.5300.log
e2util utility
The e2util utility will work with indices controlled by the Indexer as a Service. e2util will
determine if the index is a legacy or an Indexer as a Service index based on the ModeDefault
setting for the database in the database.ini file.
Indexcheck utility
The indexcheck utility can work with the indexer as a service by using the new -mode option.
Refer to “indexcheck” on page 101 for indepth information on the following parameters:
•-mode
•-copy
•-dbinfo
•-crc
Unsupported Utilities
The utilities that will not work with the indexer as a service are:
• Databasecheck
•Scanidx
New initialization file
The Indexer as a Service uses an initialization file named indexerd.ini. which contains two
options to control the indexer as a service thread count and the indexer as a service cache
size. For more information, refer to “Vault initialization files” on page 34.

Indexing
144
Trouble shooting
•What happened: Queries or job loading appears to have stopped.
What to do: Check the status of the Indexer as a Service. Queries and job loading will
start but not progress if the indexer service is not running.
•What happened: indexcheck reports that it cannot find a dri file and the index is
controlled by the Indexer as a Service.
What to do: Ensure that -mode: 2 was specified on the command line.
•What happened: The indexer appears to be using all the processor capacity and not
allowing other work to progress.
What to do: Try reducing the thread count. Specifying more threads than the system can
service can cause overall performance to degrade.
Using a text file for indexing
There are two options for providing the index information to the Vault from applications. The
first is to use a separate text (line) file that is generated by your application and is downloaded
to the Vault along with the datastream. It contains a fixed format of fields and records, which
are used for indexing into the Vault.
The simplest method of providing the document index information is by using a text, or
journal, file. This contains a prescribed set of information, see below, which could be inserted
by your application as it generates the datastream. This information will be used to form the
index.
| To use a text file for indexing: set documents=journal in the appropriate section
of the profiles initialization file.
The text file must include both job level information and document level information as
specified below. Section level information and ignored page information is optional. See below
for details.

Indexing
145
Job level information
Job level information must occur only once in the text file, but can be anywhere within it. Its
purpose is primarily to rename the files ready for input to the Vault. This involves using the
date as part of the name.
The format is:
J|JobName|Date|
where each parameter is separated by a '|' character:
Document level information
The document level entry provides the primary key and up to three secondary key fields which
will provide the index. Fields will be space trimmed. Extra key fields can be specified, see
below. Labels for the key fields are specified in the profiles initialization file.
Important: a document level entry must exist for each document in the data stream. All pages
within each document must be accounted for – failure to account for a page or inaccurate
page counts will cause documents to be incorrectly indexed or the job to fail with an error.
The format is:
D|CustId|Date|PageCount|CustName|CustAddr|
where each parameter is separated by a '|' character:
Parameter Description
J is the capital letter j
JobName is a short job name used as part of the Vault file name. It
should ideally should be 8-10 characters long and conform
to the Windows file-naming convention. Any prohibited
characters will be substituted with an underscore.
Date is the date of the job. Starts with yyyymmdd.
Parameter Description
D is the capital letter d.
CustId is the unique customer id – primary key.
Date is the date from the document. In the format yyyymmdd.
PageCount is the number of pages in the document.
CustName is the customer’s name.
CustAddr is the customer’s address.

Indexing
146
Section level information
Retrieval of a document normally shows the top of the first page. Section level information
allows a particular section of the document to be viewed, for example, the summary of a
telephone bill, or the section detailing long distance calls. The text file entry points to the first
page of a given section. If no section exists then a default 'Start of Document' will be added
automatically. This label 'Start of Document' can be altered, say to 'Telephone bill' by
including a section on the first page.
Important: any section level information must immediately precede the document level
information (D) to which it refers.
The format is:
S|PageNum|Title|
with each parameter is separated by a '|' character:
Attribute information
Specific attributes can be linked to a document which will identify extra index information.
Any number can be specified for each document.
Important: any attribute information must immediately precede the document level
information (D) to which it refers.
Specified as:
A|Name|Value|
with each parameter is separated by a '|' character:0
Parameter Description
S is the capital letter s
PageNum is the page on which the section occurs.
Title is the label of the section.
Parameter Description
A is the capital letter a
Name the attribute name or field name – for internal use only, so it
is recommended that it is kept as short as possible.
Value the field from the attribute to be used in the index.

Indexing
147
Ignored page information
Ignored pages are optional and are usually due to banner pages and job descriptor pages.
Specified as:
I|PageCt|Reason|
with each parameter is separated by a '|'
character
Sample Journal File
J|Mybank Qtr Stmt|20020121Statement|AFP|Mybank Qtr Stmt|Mybank|
S|3|Summary Page|
S|4|Detail Page|
D|5482010630|20020121|6|MICHAEL MATUJI|67 PORTER RD MALDEN MA 02148 0000|
I|1|Form Feed for Back of Full-Duplex Page|
S|1|Summary Page|
S|3|Detail Page|
S|9|Totals|
D|5486202789|20020121|11|EDUARDO FERNANDEZ|22 PINTO AVE SAN JUAN PR 03918 1234|
I|1|Ignored Page|
S|1|First Page|
S|4|Detail Billing|
S|11|Total Amount Due|
D|5324623798|20020121|4|BOB SMITH|11 RIVER ROAD NOWHEREVILLE USA|
Parameter Description
I is the capital letter i
PageCt is the number of pages to skip.
Reason s an optional text string explaining why the page is not used,
for example 'job banner page', 'blank pages', 'paper
alignment’.
IGNORED PAGES ARE STILL STORED AND COUNTED
AS PAGES WITHIN VAULT AND ARE OMITTED WHEN
THE DOCUMENT WITH THE IGNORED PAGE IS
RENDERED. IGNORE HAS NO EFFECT FOR
DOCUMENTS STORED USING THE VAULT
COLLECTION MODE.

Indexing
148
Custom indexing
Overview
The data in Vault can be broken down into several parts:
• A common pool of:
• compressed pages or other content
• document records
• One or more databases consisting of:
• a set of customer records
• a set of indexes that link to customer records
• a set of indexes that link to document records
A database is a logical view of the common pool of document data. A database may link to all
document data or just a subset of it. Each database has a customer table that maintains
properties common to all documents associated with an account number.
Databases are used as a way to organize broad sets of documents. For example, you might
group documents by type of customer (e.g. “residential” and “commercial”) or by type of
document (e.g. “invoices”, “credits”, etc.).
Indexes play an important role in Vault. They are used to enable clients to search for customer
and document records in various ways. They are also used internally for a number of
housekeeping purposes such as linking documents to account numbers.
Default Indexes
Vault defines a default set of indexes that will be created automatically if not otherwise
configured. These are useful for simple installations and test environments. For more complex
needs, the indexes used by Vault can be customized. For example, removing indexes that are
not needed can save space and time during loads. Adding new indexes can enable searches for
data in ways important for specific business needs.
Vault creates the following indexes by default:
Index Required Index Type Purpose
account yes customer links account numbers to customer
records
name no customer links names to customer records
address no customer links addresses to customer records

Indexing
149
Index Settings
The index related settings can be broken down into two groups:
• database settings that define the available searches and their properties
• profile settings that define how index entries for each document record are to be created
If you customize the index settings in an installation, you normally need both types of settings.
Database settings are configured in database.ini in sections representing each database. The
profile settings are configured in profiles.ini in sections corresponding to the profile assigned
to the job.
The following is a sample index configuration showing some of the more common settings. It
sets up 4 indexes (account, name, address and date) in a single database called “statements”.
The meaning of each key is documented in detail in the following sections.
Profiles.ini
[st201204]
Database=statements
Index1=account,cust.account,wjctul,Account Numbers
Index2=name,cust.name,jcrtul,Names
Index3=address,cust.address,jcrtul,Addresses
Index4=invlink,doc.date,xdhasb,Dates under this account
Database.ini
[statements]
Description=Statements
Index1=account,cust.account,wjctul,Account Numbers
Index2=name,cust.name,jcrtul,Names
Index3=address,cust.address,jcrtul,Addresses
Index4=invlink,doc.date,xdhasb,Dates under this account
Render1=Account;Name;Address,int.match;cust.name;cust.address
Render2=Name;Account;Address,int.match;cust.account;cust.address
Render3=Address;Account;Name,int.match;cust.account;cust.name
Render4=Date,doc.date
Profiles.ini Settings Reference
Database
Set the list of databases to which the index entries should be added.
• The parameter is a comma separated list of database names.
invlink yes document links documents to account numbers
guid yes for e2AM document links guids to documents
iguid yes for e2AM document links iguids to documents

Indexing
150
• Database names are typically short words in lowercase without punctuation. This name
will be used to create a subdirectory containing index files and other data. The default
database is simply called “default” and is stored by under server\index.
One of the names in the database setting can be * which tells Vault to retrieve the attribute
DATABASE from the document record and add it to the list of databases.
Format
Database=<dblist>
Default
Database=default
Examples
Database=invoices
Database=statements,credits,requests
Database=*
Database=all,*
Index<N>
Define the index entries to be added for the document records using the profile.The
Index<N> settings need to be numbered from 1 to N without gaps. Each Index<N> parameter
consists of 4 parts separated by commas.
• The first is the name of the index. Index names are typically short words in lowercase
without punctuation.
• For standard indexes, this will refer to a .dri file with the same base name in the
database subdirectory (e.g. the “invlink” index in the “invoices” database will refer to
the file server\index\invoices\invlink.dri).
• For Unicode indexes the extension will be .dru. For indexerd indexes, the data is
stored in a common file, server\index\index.dr2.
• The second is a list of fields used to construct the index key. This can be a single field or
multiple fields separated with "+". Index fields can refer to data from the customer and
document records or can be special fields used to access internal information. For details
on the list of fields available during index creation, see the “Index Key Fields” section
below.
• The third is a list of flags that control the behavior of the index. Normally the flags are
single lower case letters. These flags control the behavior of the index and how keys are
created. For details on each flag, see the “Index Flag” section below.
• The fourth is a text description of the index. This is the text description of the index that
gets presented to users.

Indexing
151
The profiles.ini Index<N> entry format is the same as the format used in the database.ini file.
In some cases you can cut and paste the Index<N> settings from one to the other. However,
the fields are used differently in the two locations. For example, the text description is used in
the database.ini but ignored in the profiles.ini. The reverse is true of the list of fields used to
construct keys.
Note: The numbering in the profiles.ini does not have to match the order in the database.ini.
By default, when a field is used in a custom index configuration, the index entry will not be
added unless the field exists and contains a value other than the empty string. You can make
the field optional by prefixing the field name with a “?” character. If so, the index entry will be
added even if the field is missing or blank. The only exception to this is that if all fields in an
index entry configuration are missing or blank. When an optional field is missing, the empty
string will be used as its value.
Format
Index<N>=<indexfilename>,<keyfield>,<flags>,<description>
Default
see "Default Index Configuration" below
Examples
Index1=account,cust.account,wjctul,Account Numbers
Index2=name,cust.name,jcrtul,Names
Index3=invlink,doc.date,xdhasb,Dates under this account
Index4=guid,doc.guid+int.null+doc.type,dhi,GUID
Index5=invoice,doc.invoice,dh,Invoice
Index6=info,doc.date+int.space+?SRCCODE+int.space+?ORGUNIT,dhas,Document
Information
Restrict<N>
This setting indicates that the Index<N> entry of the same number is only to be added to the
specified database. Normally the keys defined by the Index<N>= settings are added to each
database in the list of databases defined by the Database= setting.
Format
Restrict<N>=<databasename>
Default
Restrict<N>=
Examples
Restrict2=invoices

Indexing
152
IndexQueuing
Index queuing is an option that can reorder the way Vault writes keys to indexes. By grouping
the insertions by index and/or by pre-sorting the keys, the amount of disk traffic can be
decreased in some cases.
• If index queuing is set to 1, keys will be batched in memory. When the job is finished or
the maximum capacity of the buffering is reached, the keys will be pre-sorted and written
to the index.
• If index queuing is set to 2, the buffering still occurs but the keys are no longer pre-sorted
when flushed.
Each index has its own buffer and may flush at different times. Since the flushes are separated,
the cache efficiency of the write operations is improved.
Format
IndexQueuing=<N>
Default
IndexQueuing=0
Examples
IndexQueuing=1
IndexQueuing=2
RotationMode
Sets the method used to determine word boundaries for rotations when using the 'r' index
flag.
• When set to 0, scan character by character and mark a new word boundary after any
group of whitespace or punctuation.
• When set to 1, use the locale specific break iterator provided through the ICU library.
For more information on the ICU library see http://www.icu-project.org.
Format
RotationMode=<N>
Default
RotationMode=0
Examples
RotationMode=1
MaxRotations
Limits the maximum number of rotations added to an index when using the 'r' index flag.

Indexing
153
Format
MaxRotations=<N>
Default
MaxRotations=8
Examples
MaxRotations=2
MaxInstances
Limits the maximum number of instances added to an index when using the 'm' index flag.
Format
MaxInstances=<N>
Default
MaxInstances=8
Examples
MaxInstances=50
IndexingPrescan
Enable a validation scan of the job's document records before the start of index operations.
• If set to 1, the prescan is performed.
• If set to 0, the prescan is not performed.
This option can be used to detect certain types of errors before any index data is altered.
which can be more reliable. The prescan does take additional time however.
Format
IndexingPrescan=<N>
Default
IndexingPrescan=0
Examples
IndexingPrescan=1

Indexing
154
Database.ini Settings Reference
Description
The text name of the database presented to users.
Note: If you are not using the default database, you can remove it from the list of databases
shown to users by setting its description to the empty string.
Format
Description=<description>
Default
Description=
Examples
Description=Monthly Residential Statements
Index<N>
Define the searches available when viewing the specified database.
The Index<N> settings need to be numbered from 1 to N without gaps. Each Index<N>
parameter consists of 4 parts separated by commas.
• The first is the name of the index. Index names are typically short words in lowercase
without punctuation. For standard indexes, this will refer to a .dri file with the same base
name in the database subdirectory (e.g. the “invlink” index in the “invoices” database will
refer to the file server\index\invoices\invlink.dri). For Unicode indexes the extension will
be .dru. For indexerd indexes, the data is stored in a common file, server\index\index.dr2.
• The second is a list of fields used to construct the index key. This can be a single field or
multiple fields separated with "+". Index fields can refer to data from the customer and
document records or can be special fields used to access internal information. For details
on the list of fields available during index creation, see the “Index Key Fields” section
below.
• The third is a list of flags that control the behavior of the index. Normally the flags are
single lower case letters. These flags control the behavior of the index and how keys are
created. For details on each flag, see the “Index Flag” section below.
• The fourth is a text description of the index. This is the text description of the index that
gets presented to users.
The profiles.ini Index<N> entry format is the same as the format used in the database.ini file.
In some cases you can cut and paste the Index<N> settings from one to the other. However,
the fields are used differently in the two locations. For example, the text description is used in
the database.ini but ignored in the profiles.ini. The reverse is true of the list of fields used to
construct keys.

Indexing
155
The numbering in the profiles.ini does not have to match the order in the database.ini.
Format
Index<N>=<indexfilename>,<keyfield>,<flags>,<description>
Default
see "Default Index Configuration" below
Examples
Index1=account,cust.account,wjctul,Account Numbers
Index2=name,cust.name,jcrtul,Names
Index3=invlink,doc.date,xdhasb,Dates under this account
Index4=guid,doc.guid+int.null+doc.type,dhi,GUID
Index5=invoice,doc.invoice,dh,Invoice
Render<N>
Sets the titles and field values used in search output columns presented to users.
Each Render<N> setting corresponds to the Index<N> entry of the same number. Each
Render<N> parameter consists of 2 parts separated by a comma.
The first is a list of one or more titles to display at the top of the search output columns. The
column titles should be separated with a semicolon.
The second is a list of one or more fields to display in search output columns for each hit. The
column fields should be separated with a semicolon.
The number of column titles and the number of column fields needs to match.
See "Output Column Fields" below for a list of allowed field names.
Format
Render<N>=<titlelist>,<fieldlist>
where
<titlelist> is <title>;<title>;<title>...
<fieldlist> is <field>;<field >;<field>...
Default for Customer Indexes
Render<N>=Account;Name;Address,cust.account;cust.name;cust.address
Default for Document Indexes
Render<N>=Account;Date,doc.account;doc.date
Examples
Render1=Name;Account;Address,int.match;cust.account;cust.address
Render2=GUID,doc.guid
Render3=Instance,docInstanceID
Render4=Invoice;Date;Pages,int.match;doc.date;doc.pages
Render5=Document ID;Account;Date,DOCID;doc.account;doc.date

Indexing
156
LanguageDefault
Sets the default type and sort order of a database.
This setting is either a language specification or "*".
• When the setting is "*", the database uses the default customer table format and indexes
are sorted in the default manner unless changed with a Language<N> setting. Unicode
customer tables have the .drr extension.
• When the setting is a language specification, the databases uses a Unicode customer
table. Indexes are Unicode aware unless changed with a Language<N> setting. Default
customer tables have the .drt extension.
The language specification uses the collator naming scheme used by ICU. This normally takes
the form of a series of codes separated with underscores. Each field starts with an uppercase
letter.
For example the specification Len_RUS means language English, region United States.
For details see "Collator naming scheme" at
http://userguide.icu-project.org/collation/concepts.
It is recommended to use the _AS option to reduce the significance of whitespace and
punctuation characters that appear in keys.
The e2util -xl command will list the languages and regions known to Vault.
Format
LanguageDefault=<languagespecification>
Default
LanguageDefault=*
Examples
; English, United States
LanguageDefault=Len_RUS_AS
; Greek, Greece
LanguageDefault=Lel_RGR_AS
Language<N>
Sets the type and sort order of a specific index.
This setting is either a language specification or "*".
• When the setting is "*", the index is sorted in the default manner.
• When the setting is a language specification, the index is Unicode aware.

Indexing
157
If a given index does not have a Language<N> setting, it uses the value set in
LangaugeDefault.
See "LanguageDefault" for a discussion of language specifications.
Format
LanguageDefault=<languagespecification>
Default
LanguageDefault=<languagedefaultvalue>
Examples
; Arabic, Saudi Arabia
Language1=Lar_RSA_AS
; Russian, Russia
Language2=Lru_RRU_AS
; Spanish, Mexico
Language3=Les_RMX_AS
ModeDefault
Sets the default index mode for a database.
• When set to 2, the indexes are stored using the indexerd process.
• When set to 0, the indexes are stored in separate files and do not require the indexerd
process.
The indexerd process allows for faster more reliable index operation.
Format
ModeDefault=<N>
Default
ModeDefault=0
Examples
ModeDefault=2
Mode<N>
Sets the index mode for a specific index.
If this value is not set, the index uses the mode specified by ModeDefault. See "ModeDefault"
above for more details.
Note: In the Format sample code section below, =<N> refers to to any number and does not
have to be equal to Mode<N>.

Indexing
158
Format
Mode<N>=<N>
Format
Mode<N>=<modedefaultvalue>
Examples
Mode1=2
Mode2=0
Index Flags
Reference
Name Flag Description
Link to Customer Record c The keys in this index point to accounts. The
pointer in the index record will be the offset
into the customer record table. Used with the 't'
flag.
Display Newest Document t This flag tells client applications to display the
most recent document associated with the
account indicated by the search result when
selected by the user. Normally used with the 'c'
flag.
Update On Customer Record
Change
uAdd this key only if the customer record
changes. This is an optimization for fields that
use the customer record. It avoids the cost of
adding the index key when it knows it hasn't
changed. Do not use this flag with fields that are
not stored in the customer record since the key
insertion might not be triggered. Normally used
with the 'c' flag.
Leave on Unindex l Do not remove this key when the job is removed
from the Vault. Use this for index keys that
should remain even when the document is
removed. This should only be used with indexes
that point to customer records. Normally used
with the 'c' flag.
Display Document d This flag tells client applications to display the
document indicated by the search result when
selected by the user. Normally used with the 'h'
flag.

Indexing
159
Link to Document Record h The keys in this index point to documents. The
pointer associated with the index entry is the
compressed file offset and block offset of the
document record. The physical index key has
the name of the job appended to the end along
with a null separator byte. Normally used with
the 'd' flag.
Prefix Account a Prefixes the user's search key with the account
number and a null separator byte. This index is
used to search for data associated with a
particular account. For example, the default
invlink index associates document dates with a
given account number. Normally used with the
's' flag.
Account Required s This flag tells client applications that an
account must be selected in order for the search
to appear in the list of searches available to the
user. Normally used with the 'a' flag.
Multiple Values m Add multiple keys if more than one value of the
attribute is present. Each value is added as its
own index key. The maximum number of
instances is limited by the profile setting
MaxInstances.
Rotate Strings r Adds multiple rotations of the key to the index,
each version starting at a new word boundary
within the value. For example key "JOHN
SMITH" would add keys "JOHN SMITH" and
"SMITH JOHN". This can be used to search
within a key field which is useful for names and
addresses. In a name index for example you
could search for first or last name. The
maximum number of rotated values is limited by
the profile setting MaxRotations. The way word
boundaries are selected is controlled by the
profile setting RotationMode.
Search Backwards b Shows the search results in reverse order. The
default invlink index uses dates as text string in
YYYYMMDD form. Sorting in reverse for this
index makes the newest dates appear first in the
list.

Indexing
160
Jump On Single Match j This flag tells client applications to
automatically select a result if it is the only
match returned by a search (e.g. if you enter a
unique matching search, that result will
immediately pop up, otherwise it will wait for
the user to choose a result from the search
results even if there is only one).
Note: Not all clients will support this flag.
Invisible i This flag tells client applications that the search
should not appear in the list of searches
presented to end users. It may still be used
internally by the application however. The
default guid index is marked invisible since
searching by guids is not normally done by
users but is by applications.
Mark Account Index w This flag tells client applications that this
search uses the standard account index and can
be used to check the existence of account
numbers.
Mark Link Index x This flag tells client applications that this
search uses the standard invlink index and can
be used to list documents associated with a
given account number.
Disable Script Reordering o This flag tells Vault to disable script reordering
when creating new Unicode indexes.
Script reordering is a feature of the new version
of the library Vault uses to collate Unicode index
data. Some locales are set to reorder certain
blocks of characters before others in a way
different from the normal Unicode collation
sequence.
For example, the locale for Greece will reorder
Greek characters to sort before Latin characters
(e.g. GREEK CAPITAL LETTER ALPHA before
LATIN CAPITAL LETTER A). This version of Vault
checks the Unicode index metadata for a script
reorder setting and fall back to “disabled” for
maximum compatibility if it is not present.
For new indexes, Vault will enable script
reordering unless this flag is set.

Indexing
161
Common Cases
Field Reference
Index Key Fields
These fields can be used in the Index<N> settings used for creating index keys.
Flags Description
ctul a typical customer index
dh a typical document index
dhas a typical document under account index
wjctul the standard account index
xdhasb the standard invlink index
Field Description
cust.account
cust.name
cust.address
Common customer record fields.
doc.account
doc.name
doc.address
doc.date
doc.pages
doc.sections
doc.type
doc.invoice
Common document record fields.
doc.guid
docInstanceID
Standard DOC1 generated GUIDs from an XML
journal.
<custom attribute> Custom attributes added to the document
records.
int.null Inserts a null byte (0x00) in the key. Null bytes
are used in Vault indexes to separate parts of the
index entry.
int.space Inserts a space character.
int.format The Format= profile setting.
int.documents The Documents= profile setting.
int.offset The offset of the record being indexed.
<text string> A string in double quotes. For example “Invoice “
<hex literal> A byte specified in hex. For example 0xE2.

Indexing
162
Output Column Fields
These fields can be used in the Render<N> settings used for search output columns. Some
fields are only available if the index points to a certain type of record.
Output Modes
Field Index Type Description
cust.account
cust.name
cust.address
customer
customer
customer
Common customer record fields.
doc.account
doc.name
doc.address
doc.date
doc.pages
doc.sections
doc.type
doc.invoice
document
document
document
document
document
document
document
document
Common document record fields.
doc.guid
docInstanceID
document Standard DOC1 generated GUIDs from an XML
journal.
<custom attribute> document Custom attributes added to the document
records.
profile.<setting> document Display the named profile setting. For example
profile.format.
int.match document The matching index entry.
int.pointer document The offset of the record pointed to.
int.file document Job name.
int.empty document An empty string.
int.profile document Job profile name.
int.resource document Job resource set.
int.modes document A decimal number representing a bit mask of
supported output modes. See the mask values in
“Output Modes” below.
int.account document Equivalent to cust.account for customer indexes
and doc.account for document indexes.
Mode Hex Mask Decimal Description
0 0x000001 1GIF
1 0x000002 2HTML
2 0x000004 4PDF

Indexing
163
Sample Configurations
Default Index Configuration
The following is the default Index<N> and Render<N> settings shown explicitly.
Profiles.ini
[credit201107]
Index1=account,cust.account,wjctul,Account Numbers
Index2=name,cust.name,jcrtul,Names
Index3=address,cust.address,jcrtul,Addresses
Index4=invlink,doc.date,xdhasb,Dates under this account
Index5=guid,doc.guid+int.null+doc.type,dhi,GUID
Index6=iguid,docInstanceID+int.null+doc.type,dhi,Instance GUID
Database.ini
[credit]
Description=Credit Notes
Index1=account,cust.account,wjctul,Account Numbers
Index2=name,cust.name,jcrtul,Names
Index3=address,cust.address,jcrtul,Addresses
Index4=invlink,doc.date,xdhasb,Dates under this account
Index5=guid,doc.guid+int.null+doc.type,dhi,GUID
Index6=iguid,docInstanceID+int.null+doc.type,dhi,Instance GUID
Render1=Account;Name;Address,int.match;cust.name;cust.address
Render2=Name;Account;Address,int.match;cust.account;cust.address
3 0x000008 8Raw
4 0x000010 16 P N G
5 0x000020 32 TIFF
6 0x000040 64 CSS
7 0x000080 128 BMP
8 0x000100 256 S trea m
9 0x000200 512 Te x t
10 0x000400 1024 C olle ctio n
11 0x000800 2048 Comment
12 0x001000 4096 Document
Information
13 0x002000 8192 TIFF G4
14 0x004000 16384 X M L
15 0x008000 32768 Print
16 0x010000 65536 Decode
17 0x020000 131072 R e p r i n t

Indexing
164
Render3=Address;Account;Name,int.match;cust.account;cust.name
Render4=Date,doc.date
Render5=GUID,doc.guid
Render6=Instance,docInstanceID
Minimal Index Configuration
The following is an example of configuration that only uses the required indexes.
Profiles.ini
[invoices]
Index1=account,cust.account,wjctul,Account Numbers
Index2=invlink,doc.date,xdhasb,Dates under this account
Database.ini
[all]
Description=All Documents
Index1=account,cust.account,wjctul,Account Numbers
Index2=invlink,doc.date,xdhasb,Dates under this account
Render1=Account;Name;Address,int.match;cust.name;cust.address
Render2=Date,doc.date
Unicode Index Configuration
The following is sample database configuration for Spanish (Argentina) data.
Profiles.ini
[residential]
Index1=account,cust.account,wjctul,Cuenta
Index2=name,cust.name,jcrtul,Nombre
Index3=address,cust.address,jcrtul,Direccion
Index4=invlink,doc.date,xdhasb,Fecha
Database.ini
[invoices]
Description=Facturas
LangaugeDefault=Les_RAR_AS
Index1=account,cust.account,wjctul,Cuenta
Index2=name,cust.name,jcrtul,Nombre
Index3=address,cust.address,jcrtul,Direccion
Index4=invlink,doc.date,xdhasb,Fecha
Render1=Cuenta;Nombre;Direccion,int.match;cust.name;cust.address
Render2=Nombre;Cuenta;Direccion,int.match;cust.account;cust.address
Render3=Direccion;Cuenta;Nombre,int.match;cust.account;cust.name
Render4=Fecha,doc.date

Indexing
165
Indexerd Configuration
The following is a sample configuration using the indexerd service.
Profiles.ini
[afp]
Index1=account,cust.account,wjctul,Account Numbers
Index2=invlink,doc.date,xdhasb,Dates under this account
Database.ini
[statement]
Description=Statements
ModeDefault=2
Index1=account,cust.account,wjctul,Account Numbers
Index2=invlink,doc.date,xdhasb,Dates under this account
Render1=Account;Name;Address,int.match;cust.name;cust.address
Render2=Date,doc.date

Indexing
166
Generic indexing
This method of extracting data is the historical, non-integrated way of extracting information
from a datastream It is less reliable and less flexible than using a text file as it limits the ability
to re-design a document later on.
The datastream is searched for unique patterns within each page of the document which will
identify the required information to be used for indexing, for example, a move instruction to
the position of the customer number.
The type of data extraction performed depends on the format of the datastream.
| To enable generic extraction: specify the documents keyword in the appropriate
section of <drpath>\server\profiles.ini to show the type of datastream.
The value can be:
Key fields
The generic extraction process requires key fields to be defined for use with the index. Up to
four standard keys are defined by default – customer account number, name, address and
date.
The following key fields are required for all documents rendered outside of Generate that are
to be archived in the Vault:
• Account number (or other primary key)
•Customer name
• Customer address
• Document date + name
documents=GenericAFP The AFP key extraction process searches for specific AFP commands within the
page and extracts key information from the text following them. See below for
details.
documents=GenericTLE Tag Logical Element (TLE) records are arbitrary, non-printing tag = value
elements that are embedded in AFP datastream.
The TLE key extraction process allows you to use TLE records when searching
for key information. See “Extracting from AFP TLE data” on page 169 for details.
documents=GenericMetacode The Metacode key extraction process searches for binary patterns within the
page and will extract all textual information that follows the binary pattern up to
the next Metacode command. Typically this would be 0x01, but any Metacode
command will terminate the text. See “Customizing the Metacode indexing
process” on page 172 for details.

Indexing
167
Document length (or detection method for first or last page)
Section name(s) and section length (or detection method for first page of a section)
Extracting from AFP data
The AFP indexing process extracts the key information from pages drawn using the TRN
Transport Data command. Specific commands immediately preceding the TRN command are
searched for, and the key information will be in the field following the TRN command. These
specific commands, or patterns, used for searching are obtained by analyzing the datastream.
| To obtain search patterns from AFP datastream:
1. Prepare the patterns initialization file.
Edit, or create, the patterns initialization file and create a section heading (enclosed in
square brackets) that matches the relevant profile name in the profiles initialization file,
for example: [myprofile].
Note that both these initialization files are in vault\server
2. View the datastream.
In a command prompt run the afpdecode utility on the datastream and output to a file,
for example:
afpdecode file.afp > mydump.txt
This will output the datastream in an English-readable format. See “afpdecode” on
page 95 for further information on the afpdecode utility.
3. Search for the key information records.
Using a standard text editor, open the output file, (e.g. mydump.txt) and search for the
required key information. For instance, if you know that the first account number is
1234567, then search for that.

Indexing
168
4. Add a search string to the initialization
file.
Make a note of the AFP commands (in
hex) that immediately precede the TRN
Transparent Data command just before the required key information. These would
typically be the Move X and Move Y commands.
Add this hex string (which can be one or more commands) to the appropriate section in
the patterns initialization file as:
Pattern=account
Add as many search patterns as required for each field in the following format:
Pattern=document
Pattern=account
Pattern=date
Pattern=name
Pattern=address
Pattern=report(optional)
Pattern=invoice(optional)
The following sample shows a section of AFP datastream relating to a customer’s name – here,
the results of afpdecode were searched for “Warren G. Harding”
In this example, the sequence 04C700C504D3016F are the commands that move the current
position to the location of the customer’s name on the page.
The AFP extraction process will assume that the next two bytes – 19DB – are <length byte>
and <TRN> respectively, and ignoring them will extract the following <length-2> characters of
information.
IT IS VITAL THAT THE SEQUENCE OF BYTES IS
UNIQUE ON ALL PAGES IN THE DATASTREAM AND IS
THE SAME ON ALL PAGES FOR THE DESIRED FIELD.
0D18D3EE9B000000 PTX Presentation Text Data
2BD3 ESC
03F106 SCFL Set Coded Font Local (LID=6)
04C700C5 AMI Absolute Move Inline (Icnew=Io+197)
04D3016F AMB Absolute Move Baseline (Bcnew=Bo+367)
19DB TRN Transparent Data
E6819999859540C74B40C88199848995 Warren G. Hardin
87 g
04C700C5 AMI Absolute Move Inline (Icnew=Io+197)
04D30197 AMB Absolute Move Baseline (Bcnew=Bo+407)
2CDB TRN Transparent Data
F6F6F640D781999240C1A58595A48540 666 Park Avenue

Indexing
169
Thus, the entry in the patterns initialization file for the key field of customer name would be:
…
[myprofile]
04C700C504D3016F=name
…
| To test the extraction process:
1. Ensure that the Vault service is stopped.
2. In a command window run:
e2util -c myfile.afp
This will compress the AFP file into myfile.drp.
3. Then run:
e2util -h -v myfile.drp [> mykeys.txt]
to extract the key fields from the compressed AFP file myfile.drp
4. The key fields will either be displayed on the screen or in a text file mykeys.txt.
5. Check that the key fields – document page lengths, document count, names, addresses,
document dates, account numbers etc. – are what is expected.
Notes:
• The document field is used to specify the start of a new document (a sequence of pages in
the stream). Since it does not need to extract any text, the binary pattern selected to
indicate a 'First Page' does not need to be followed by a TRN.
• Fields are not copied if there is already data in that field (i.e. it would not copy a name
match if the name field is already populated) -- meaning that only the first occurrence is
used.
• Reports are a special case. The text data is added to the list of reports, except when the
name of the report matches the immediately previous report name, in which case it
appends to the existing report.
• If no reports are specified for the first page of the document, a report named 'Start' will
be automatically added for it.
Extracting from AFP TLE data
The TLE indexing process is designed to extract AFP Tag Logical Elements (TLEs) that are
embedded in the datastream. A TLE is a structure that allows the embedding of arbitrary
non-printed information in the stream in the form tag = value.
The binary patterns, that comprise the TLEs used for searching are obtained by analyzing the
datastream.

Indexing
170
| To obtain TLE search patterns from the datastream:
1. Prepare the patterns initialization file.
Edit, or create, the patterns initialization file and create a section heading (enclosed in
square brackets) that matches the relevant profile name in the profiles initialization file,
for example: [myprofile].
Note that both these initialization files are in <drpath>/server
2. View the datastream.
In a command prompt run the afpdecode utility on the datastream and output to a file,
for example:
afpdecode file.afp > mydump.txt
This will output the datastream in a readable format. See “afpdecode” on page 95 for
details of the afpdecode utility.
3. Search for the key information records.
Using a standard text editor, open the output file, (e.g. mydump.txt) and search for the
required key information. For instance, if you know that the first account number is
1234567, then search for that.
4. Add a search string to the initialization file.
Make a note of the relevant TLE name –
a fully qualified triplet – before the key
information, for example, 'Customer
number'.
Add this hex string to the appropriate section in the patterns initialization file as:
Pattern=account
Add as many search patterns as required for each field in the following format:
Pattern=document
Pattern=account
Pattern=date
Pattern=name
Pattern=address
Pattern=report(optional)
Pattern=invoice(optional)
IT IS VITAL THAT THE SEQUENCE OF BYTES IS
UNIQUE ON ALL PAGES IN THE DATASTREAM AND IS
THE SAME ON ALL PAGES FOR THE DESIRED FIELD.

Indexing
171
The following sample shows a section of TLE datastream relating to a customer number and
name – here, the results of afpdecode were searched for “Customer Number” – the TLE tag.
In this example, the sequence C3A4A2A39694859940D5A494828599 is the TLE that
indicates the customer account. The actual key information is obtained from the TLE triplet.
Thus, the entry in the patterns initialization file for the key field of customer account would
be:
…
[myprofile]
C3A4A2A39694859940D5A494828599=account
…
| To test the extraction process:
1. Ensure that the Vault service is stopped.
2. In a command window run:
e2util -c myfile.tle
This will compress the TLE file into myfile.drp.
0031D3A090000000 TLE Tag Logical Element
1302 Fully Qualified Name Triplet
0B FQNType=0x0B
0 FQNFmt=0x00
C3A4A2A39694859940D5A494828599 Customer Number
0C36 Attribute Value Triplet
0 Reserved
F1F2F3F4F5F6F7F8 12345678
0A800000000200000002 Triplet 128
5A
003CD3A090000000 TLE Tag Logical Element
0D02 Fully Qualified Name Triplet
0B FQNType=0x0B
0 FQNFmt=0x00
C3A4A2A340D5819485 Cust Name
1D36 Attribute Value Triplet
0 Reserved
E29489A3884040404040404040404040 Smith
404040404040404040
0A800000000100000001 Triplet 128

Indexing
172
3. Then run:
e2util -h -v myfile.drp [> mykeys.txt]
to extract the key fields from the compressed TLE file myfile.drp
The key fields will either be displayed on the screen or in a text file mykeys.txt.
4. Check that the key fields – document page lengths, document count, names, addresses,
document dates, account numbers etc. – are what is expected.
Notes:
•The account field is used to specify the start of a new document (a sequence of pages in
the stream) so when it appears the previous record is saved (if valid) and it starts a new
document (Note: fields before the account TLE on the same page are considered part of
the NEW account).
• Fields are not copied if there is already data in that field (i.e. it would not copy a name
match if the name field is already populated) -- meaning that only the first occurrence is
used.
• Reports are a special case, the data is added to the list of reports (except when the name
of the report matched the immediately previous report name)
• If no reports are specified for the first page of the document a report named Start will be
added for it.
• TLEs matching the account pattern but having blank values can interfere with the proper
grouping of pages into documents. Vault can check for this case and produce an error
message when the profile option GenericTLERequireAccount=1 is set. In some cases,
generators will produce these empty TLEs on banner pages. In this case you can add the
profile option GenericTLERequireAccount=0 (the default) to disable this check.
Customizing the Metacode indexing process
The Metacode index process will extract text information from a Metacode datastream. It does
this by searching for binary patterns that immediately precede the required field. The field is
terminated by the next Metacode command.
These binary patterns used for searching are obtained by analyzing the datastream.
| To obtain search patterns from Metacode datastream:
1. Prepare the patterns initialization file.
Edit, or create, the patterns initialization file and create a section heading (enclosed in
square brackets) that matches the relevant profile name in the profiles initialization file,
for example: [myprofile].
Note that both these initialization files are in vault\server

Indexing
173
2. View the datastream.
In a command prompt run the metadecode utility on the datastream and output to a
file, for example:
metadecode data.mtc 0 2 0 2 0 > mydump.txt
This will output the datastream in an English-readable format. See “metadecode” on
page 106 for further information on the metadecode utility.
3. Search for the key information records.
Using a standard text editor, open the output file, (e.g. mydump.txt) and search for the
required key information. For instance, if you know that the first account number is
1234567, then search for that.
4. Add a search string to the initialization
file.
Make a note of the metacode commands
(in hex) that immediately precede the
required key information. These would typically be the Absolute Scan and Absolute Dot
(i.e. the x,y positioning) commands. Note that all movement and font commands are
ignored.
Add this hex string (which can be one or more commands to the appropriate section in
the patterns initialization file as:
Pattern=account
Add as many search patterns as required for each field in the following format:
Pattern=document
Pattern=account
Pattern=date
Pattern=name
Pattern=address
Pattern=report(optional)
Pattern=invoice(optional)
The following sample shows a section of Metacode datastream relating to a customer’s name –
here, the results of metadecode were searched for “Ramon Balboa”:
IT IS VITAL THAT THE SEQUENCE OF BYTES IS
UNIQUE ON ALL PAGES IN THE DATASTREAM AND IS
THE SAME ON ALL PAGES FOR THE DESIRED FIELD.
06CB00 Absolute Scan 203
04780A Absolute Dot 2680
0002 Font Selection 2
52616D6F6E2042616C626F61 "Ramon Balboa"
060F05 Absolute Scan 1295

Indexing
174
In this example, the sequence 06CB0004780A0002 is the binary pattern that precedes the
name field.
Thus, the entry in the patterns initialization file for the key field of customer name would be:
…
[myprofile]
06CB0004780A0002=name
…
| To test the extraction process:
1. Ensure that the Vault service is stopped.
2. In a command window run:
e2util -c myfile.mtc
This will compress the Metacode file into myfile.drp.
3. Then run:
e2util -h -v myfile.drp [> mykeys.txt]
to extract the key fields from the compressed Metacode file myfile.drp
4. The key fields will either be displayed on the screen or in a text file mykeys.txt.
5. Check that the key fields – document page lengths, document count, names, addresses,
document dates, account numbers etc. – are what is expected.
Notes:
• When the pattern is found on a page, the data immediately following is copied to the
specified field up to the point where a metacode command is found (typically 0x01 End of
Line, but is could be any command).
• Typically the hex pattern matches the X= and Y= positioning commands.
• The document field is used to specify the start of a new document (a sequence of pages in
the stream) so it ignores any text that may follow the binary pattern.
• Fields are not copied if there is already data in that field (i.e. it would not copy a name
match if the name field is already populated) -- meaning that only the first occurrence is
used.
• Reports are a special case, the data is added to the list of reports (except when the name
of the report matched the immediately previous report name)
• If no reports are specified for the first page of the document a report named Start will be
added for it.

Indexing
175
Rebuilding a Vault index
In the rare case of hardware failure, software
limitations, administration accidents and so
on, it may be necessary to rebuild an Vault
index.
This rebuild process may affect production
ingestion due to the impact on CPU, RAM
and DISK I/O; however users accessing the
Vault will typically not notice any significant degradation while viewing documents in the
Vault.
Rebuild time is dependent on:
• your custom indexing settings (specifically the number of document linked indexes (have
the “h” flag).
• the number of indexes with “Rotation” enabled and the average number of rotations.
• the number of sub-databases in use.
• the number of logical documents (but not the number of pages, nor the number of files)
in the environment.
Typically the indexing time should not be comparable to the existing ingestion rate once the
first months’ worth of data has been rebuilt. In order to perform an index rebuild, you need
enough hard disk space for another copy of the existing index\drpath but you do not need to
have enough space for another copy of PageData or DocData.
To rebuild an Vault index, follow the steps below:
1. Open a CMD prompt.
2. Change Directory to your Vault install path. For example the path maybe: C:\Program
Files\PBBI CCM\e2 Vault or C: Program Files\PBBI CCM\Vault or a user-specific path
(you must know this path).
THIS PROCESS DOES NOT APPLY IF YOU ARE USING
THE INDEXER AS A SERVICE.
THIS PROCESS ONLY APPLIES TO WINDOWS
SUPPORTED VAULT.

Indexing
176
• Copy the Server \ folder (but NOT the subdirectories under Server\) to a folder called:
C:\Program Files\PBBI CCM\Vault> md Rebuild
C:\ProgramFiles\PBBI CCM \Vault> copy Server Rebuild
In Notepad (or other text editor) open Rebuild\Server.ini and add the following lines at
the bottom of the file:
[Paths]
PageDataPath=..\Server\PageData
DocDataPath=..\Server\DocData
Note: Special consideration may need to be taken in the case where a [Paths] section
already exists. In this situation please call Technical Support.
3. Change the directory to Rebuild\ and run e2loaderd -b
C:\Program Files\PBBI CCM\Vault> cd Rebuild
C:\Program Files\PBBI CCM\Vault\Rebuild> e2loaderd -b
You should not see any error messages and it should return to your command prompt
shortly. This command will also build the Rebuild\ folder’s working paths for Index, Work,
Process and so on.
4. Issue the commands to build a fresh index in the rebuild folder. Note: be careful to type
these commands as exactly shown (you should be at a CMD prompt and still at install
path\Rebuild\).
C:\Program Files\PBBI CCM\Vault\Rebuild> for %i in
(...\Server\PageData\*.drp) do echo %~ni > process\%~ni.index
At this point the screen may scroll rapidly now. This is normal. Look in the
Rebuild\Process folder and make sure there are many files ending in..index
5. Begin the Index Rebuild. At this point, take note of the date and time, since you will need
to re-index any new files that are loaded into the production system while the rebuild is
taking place.
C:\Program Files\PBBI CCM\Vault\Rebuild> e2loaderd -b
The rebuild will now begin. Periodically monitor the command prompt to see if the system
has failed (due to bad files). This is a rare case and should not occur. If you do see this,
restart if necessary. To perform a thorough search for errors, search Rebuild\Log files for
the word “ERROR”.
6. Verify that files have been loaded into the production Vault (Server\PageData) with a
time/date stamp that is newer than the time you began the rebuild. Each file will need an
.index semaphore file to be created in the rebuild\Process folder and then re-run steps 5
and 6 to index these new files.

Indexing
177
7. The rebuilt indexes should now be completely up-to-date. Move the new index into the
parent directory in prepartion for putting into production.
C:\Program Files\PBBI CCM\Vault\Rebuild> move Index ..\server\Index.new
Open Windows Explorer to ensure that the Server\Index.new folder contains files (and
possibly subdirectories) in it.
8. Exchange the old and new index. Note: this will leave you a “back out” option in case of
failure. The “Vault” service may take a few minutes to fully re-start the Vault services.
C:\Program Files\PBBI CCM\Vault\Rebuild> cd ..\Server
Stop all your Vault production services. For a typical Vault system, this
would be:
C:\Program Files\PBBI CCM\Vault\Server> net stop e2loaderd
C:\Program Files\PBBI CCM\Vault\Server> net stop e2renderd
C:\Program Files\PBBI CCM\Vault\Server> net stop e2serverd
C:\Program Files\PBBI CCM\Vault\Server> move Index Index.Old
C:\Program Files\PBBI CCM\Vault\Server> move Index.New Index
Restart all your Vault production services. For a typical Vault system,
this would be:
C:\Program Files\PBBI CCM\Vault\Server> net start e2loaderd
C:\Program Files\PBBI CCM\Vault\Server> net start e2renderd
C:\Program Files\PBBI CCM\Vault\Server> net start e2serverd
9. The rebuilt index is now in production. Test this as appropriate.
Note: as a “back out” option, repeat step 10 (except replace the two “move” commands as
follows (the others remain the same):
C:\Program Files\PBBI CCM\Vault\Server> move Index Index.New
C:\Program Files\PBBI CCM\Vault\Server> move Index.Old Index

178
Working with fonts
Managing fonts in PDF exports
The way fonts are handled in print stream formats such as AFP and Metacode differ
significantly from the way fonts are handled in PDF format. This means that special measures
need to be taken when exporting these print streams to PDF to get the best results.
When exporting print streams from Vault to PDF you can specify a number of different
methods or output modes for font handling:
•Suppression
•Bitmap Conversion
• Substitution
• Automatic Embedding
• Explicit Embedding
These options are configured using the fonts.ini file in the job's resource set directory. The
fonts.ini configuration file is a text file consisting of the following fixed columns:
•Font Name
• Printing Font Name (no longer used)
• Printing Font Height (no longer used)
• Printing Font Width (no longer used)
• Printing Font Flags (no longer used)
•PDF Font Name
•PDF Font Size
• PDF Font Flags
• Metacode Translation Table Name (uncommon)
• Metacode Allow Translation Table Name (uncommon)
• Metacode Override Height (uncommon)

Working with fonts
179
The Font Name column is used to match the fonts.ini entry to the font in the print stream. For
AFP this can be the name of a font character set (e.g. C0HE08R0) or a coded font (e.g.
X0B128HD) or even a data resource name (e.g. Calibri) depending on how the font is
referenced in the print stream. Metacode fonts are referenced by the name used in the
FONTS= DJDE command (e.g. HE08RP).
The meaning of the remaining columns will be explained in the context of the output modes
that need them (see below). You can generate default fonts.ini files using the afpsubstitute.exe
and metasubstitute.exe commands. These scan the appropriate fonts in the current directory
and output default substitutions. It is useful to start with a fonts.ini file generated by one of
these utilities even if you expect to heavily customize the results.
Below is a simple, generated example of a fonts.ini file:
fonts.ini:
Suppression
In some cases you may want to prevent text in certain fonts from being saved to the PDF
export. You can do this by setting the PDF Font Name field in the fonts.ini entry to *suppress:
fonts.ini:
X0HE12B0 ARIAL 12.0 0 1 *suppress 12.0 262176
If you need to maintain compatibility with older versions of Vault, suppression can also be
accomplished by setting the PDF Font Size to 0.0:
fonts.ini:
X0HE12B0 ARIAL 12.0 0 1 Helvetica-Bold 0.0 262176
Font Name Printing Font Name Printing Font Height PDF Font Name PDF Font Flag
X040D7 COURIER 7.0 0 0 Courier 7.0 32
X0A0550I ARIAL 10.0 0 0 Helvetica 10.0 32
X0B128HD COURIER 12.0 0 0 Courier 12.0 32
X0HE08I0 ARIAL 8.0 0 2 Helvetica-Oblique 8.0 96
X0HE08R0 ARIAL 8.0 0 0 Helvetica 8.0 32
X0HE12B0 ARIAL 12.0 0 1 Helvetica-Bold 12.0 262176
X0HE18I0 ARIAL 18.0 0 2 Helvetica-Oblique 18.0 96
X0HE32B0 ARIAL 32.0 0 1 Helvetica-Bold 32.0 262176

Working with fonts
180
Bitmap Conversion
Vault can take text from the original print stream and display it in PDF output using inline
bitmaps. You can configure a font to convert to bitmaps by setting the PDF Font Name field in
the fonts.ini entry to *bitmap:
fonts.ini:
X0HE12B0 ARIAL 12.0 0 1 *bitmap 12.0 262176
If you need to maintain compatibility with older versions of Vault, conversion to bitmap can
also be accomplished by removing or commenting out the entry from the fonts.ini file:
fonts.ini:
;X0HE12B0 ARIAL 12.0 0 1 Helvetica-Bold 0.0 262176
Vault defaults to bitmap conversion when you do not have a fonts.ini entry for a font. The
inline images typically do not render clearly in PDF viewers (in part because they don't scale
well). However, they will preserve the characteristics of the original type face.
Note: Use bitmap conversion sparingly because it can take up significant space in the
resulting PDF. Bitmap conversion is a good choice for unusual fonts such as barcodes.
Substitution
Vault lets you specify a substitute font when exporting to PDF. You can configure a substitute
font by setting the PDF Font Name, Size, and Flags fields in the fonts.ini entry:
fonts.ini:
X0HE12B0 ARIAL 12.0 0 1 Helvetica-Bold 12.0 262176
The values generated for these fields by afpsubstitute.exe or metasubstitute.exe are a good
starting point. These utilities use simple heuristics to guess which font to substitute with.
The name of the font should be a well known font name so that PDF viewers can easily
determine which font to use. Keep in mind that your PDFs may be viewed by different viewing
programs on different platforms and they may not have the fonts you'd normally expect to
find.
For best results, use one of the Standard Type 1 Fonts:
• Times-Roman
•Helvetica
•Courier
•Symbol

Working with fonts
181
•Times-Bold
•Helvetica-Bold
• Courier-Bold
• ZapfDingbats
• Times-Italic
•Helvetica-Oblique
• Courier-Oblique
•Times-BoldItalic
• Helvetica-BoldOblique
• Courier-BoldOblique
The PDF Font Flags is a bit mask that describes the properties of the substitute font. You can
think of this a sum of numbers representing each property.
For the example above, Force Bold (262144) and Non-Symbolic (32) have been set to get a
value of 262176 for the PDF Font Flags.
Substituted fonts produce clean, scalable output and tend to produce more compact PDF files.
You need to select a substitute with similar properties and metrics for best results. If you have
an unusual or distinctive font, you should consider using bitmaps or, if available, font
embedding.
Bit Value Meaning
1 1 Fixed Pitch
2 2 Serif
3 4 Symbolic (contains glyphs
outside the Latin character
set)
4 8 Script (font resembles hand
writing)
6 32 Non-Symbolic (contains only
glyphs from the Latin
character set)
7 64 Italic
17 65536 All Caps
18 131072 Small Caps
19 262144 Force Bold

Working with fonts
182
Note that some PDF viewers will merge the width tables used to position the output text. This
can lead to very odd positioning when you use a substitute font multiple times. One option in
these cases is to use a unique name for the PDF Font Name. This has the down side of losing
the type face characteristics but does force the viewer to use separate width tables for the text.
You can use the -u option of afpsubstitute.exe to create some automatically. The table below is
an example.
For substitution to work, the characters must be mapped to Unicode. Vault uses the
gcgiduni.map file in the resource set to map AFP character names to Unicode values (it also
recognizes several Unicode naming conventions). If the characters in a string of text cannot be
mapped it will fall back to using bitmaps.
Note: Some print stream generators automatically generate non-standard character names.
This can interfere with your ability to substitute fonts. If you know the character name
mappings you can put them in the gcgiduni.map file.
Substitution is limited to characters that can be represented in the "WinAnsiEncoding"
character set (also known as Windows code page 1252).
Metacode fonts
For Metacode fonts, you may need additional configuration options. The Metacode
Translation Table Name is a file name (e.g. trans.tt) that is used to map character codes in the
print stream to the proper encoding for PDF. The file consists of a 256-byte file where each
byte is the replacement code for the print stream code corresponding to the position in the
file.
Print Settings
Font Name Print Font Name Print,Wdth,Hgt &
Flags
PDF Font Name PDF size
and Flags
X040D7 COURIER 7.0 0 0 COURIER_LATIN1_X040D7 7.0 32
X0A0550I ARIAL 10.0 0 0 SONORAN_SANS_SERIF_X0A0550I 10.0 32
X0B128HD COURIER 12.0 0 0 CODE128HIGHDENSITY_X0B128HD 12.0 32
X0HE08I0 ARIAL 8.0 0 2 HELVETICA_X0HE08I0 8.0 96
X0HE08R0 ARIAL 8.0 0 0 HELVETICA_X0HE08R0 8.0 32
X0HE12B0 ARIAL 12.0 0 1 HELVETICA_X0HE12B0 12.0
262176
X0HE18I0 ARIAL 18.0 0 2 HELVETICA_X0HE18I0 18.0 96
X0HE32B0 ARIAL 32.0 0 1 HELVETICA_X0HE32B0 32.0
262176

Working with fonts
183
The Metacode Allow Translation Table Name is a similar file (e.g. allow.at) that contains a value
that controls whether the character can be translated (1), cannot be translated (0) or should
be suppressed (2). The Metacode Override Height is a value that overrides the claimed height
of the font. Some fonts do not accurately report their height. Since the height can affect the
spacing calculations, a corrected value may need to be provided.
fonts.ini:
Automatic Embedding
Some AFP print streams have embedded outline fonts. In many cases these fonts can be
automatically embedded in the PDF files generated by Vault to produce high fidelity output.
You can configure automatic font embedding by setting the PDF Font Name to *embed and
the PDF Font Size to -1.0:
CZG00009 COURIER 0.0 0 0 *embed -1.0 32
The value of -1.0 is used to tell Vault to use the font size from the print stream since the same
font may appear at multiple sizes.
Many fonts are subject to usage restrictions. Make sure you are properly licensed to embed
these fonts in your PDF output if you use this option.
The afpsubstitute.exe utility can detect outline fonts and generate these entries for you.
There are many subtle limitations that could prevent automatic embedding from working
properly. Some experimentation may be required.
Explicit Embedding
You may have a font available to you that you want to embed in the PDF output to replace a
font from the original print stream. You can configure explicit font embedding by setting the
PDF Font Name to *embed: followed without spaces by the font to embed:
The font file itself must be placed in the resource set along with the fonts.ini.
As mentioned above, many fonts are subject to usage restrictions. Make sure you are properly
licensed to embed these fonts in your PDF output if you use this option.
The fonts used this way must be either TrueType (.ttf) or Type 1 PFB (.pfb) fonts.
AR10BP ARIAL 9.4 0 0 Helvetica 9.4 0 0 32 euro.tt allowall.at 12
AR11BP ARIAL 10.3 0 0 Helvetica-Bold 10.3 0 0 32 euro.tt allowall.at 14
AR10BP ARIAL 32.0 0 1 *embed:RaconteurNF.ttf 32.0 262176
AR11BP ARIAL 18.0 0 2 *embed:z003034l.pfb 18.0 96

Working with fonts
184
As with font substitution, you want to select a font that is similar in style and spacing to the
font used in the print stream itself.
There are many subtle limitations that could prevent explicit embedding from working
properly. Some experimentation may be required.
Vault does not support vertical fonts, multi-master fonts, multi-section fonts, sliced fonts or
font collections when using explicit embedding.
Embedding a Type 1 PFB is limited to characters that can be represented in the
"WinAnsiEncoding" character set (also known as Windows code page 1252). Embedding a
TrueType font is limited to characters than can be represented in UCS-2 (2-byte Universal
Character Set).
AFP outline fonts
Vault provides partial support for outline fonts in AFP streams.
AFP Outline Fonts
The following AFP outline fonts are supported:
Type 1 PFB
• Wrapped in Begin Font (BFN) / End Font (EFN).
• Mapped by Map Coded Font 2 (MCF-2).
• Single font in Font Patterns (FNG).
• Text mapped to characters:
• from code point in Presentation Text Data (PTX).
• to GCGID using code page's Code Page Index (CPI).
• to character name using the font character set's Font Name Map (FNN).
• Text mapped for pdf substitution:
• from code point in Presentation Text Data (PTX).
• to GCGID using code page's Code Page Index (CPI).
• to Unicode using the gcgiduni.map file.
• Text mapped for pdf automatic embedding:
• from code point in Presentation Text Data (PTX).
• to GCGID using code page's Code Page Index (CPI).

Working with fonts
185
• to character name using the font character set's Font Name Map (FNN).
• PDF reader translates known character names internally.
• single section, single byte.
CID Keyed
• wrapped in Begin Font (BFN) / End Font (EFN).
• mapped by Map Coded Font 2 (MCF-2).
• single font, single character mapin Font Patterns (FNG.)
• text mapped to characters:
• from code point in Presentation Text Data (PTX).
• to character id using the embedded character map (CMAP).
Text mapped for pdf substitution:
• from code point in Presentation Text Data (PTX).
• to GCGID using code page's Code Page Index (CPI).
• to Unicode using the gcgiduni.map file.
• Text mapped for pdf automatic embedding:
• from code point in Presentation Text Data (PTX).
• to character id using the embedded character map (CMAP).
• text is assumed to be Unicode encoded.
• single section, single or double byte.
TrueType
• Wrapped in Begin Object Container (BOC) / End Object Container (EOC).
• Mapped by Map Data Resource (MDR).
• Does not support multiface/multimaster fonts or font collections.
• Font names must be mappable to filesystem names.
• Text mapped to characters:
• from code point in Presentation Text Data (PTX).
• to glyph id using the internal TrueType cmap table.
• Text mapped for pdf substitution:
• from code point in Presentation Text Data (PTX).

Working with fonts
186
• text is assumed to be Unicode encoded.
• Text mapped for pdf automatic embedding:
• from code point in Presentation Text Data (PTX).
• to character id using the font internal cmap table.
• text is assumed to be Unicode encoded.
• single section, single or double byte.
PDF Output Modes
The following PDF Output Modes for outline fonts which are supported are:
Spot Graphics:
• characters are rendered as inline bitmaps.
• poor visual quality.
• consumes a significant amount of space.
• useful for unusual fonts such as barcode fonts.
Font Substitution:
• characters are rendered using another font.
• typically used with reader internal fonts.
• text must be mappable to Unicode.
• code points limited to U+0000 to U+00FF.
• quality is good but replacement font style might not match original.
Unicode Font Substitution:
• similar to attributes in font substitution.
• specified font must support Unicode characters..
• code points limited to U+0000 to U+FFFF (no surrogates).
• must provide an external ToUnicode map.
• requires pdf fragments, difficult to configure.
Explicit Font Embedding:
• characters are rendered using a specified embedded font.
• text must be mappable to Unicode.
• fonts must be licensed for embedding purposes.

Working with fonts
187
• good quality and fidelity.
• requires pdf fragments, very difficult to configure.
Automatic Font Embedding:
• characters are rendered using the original font which get embedded in the output.
• fonts must be licensed for embedding purposes.
• good quality and fidelity.
• fonts must be single section.
• text must be mappable to Unicode
Graphic Character Global IDs (GCGIDs) and PDF Export
Some AFP fonts use character names to translate between text encodings and the glyhphs in a
font character set. IBM has defined a set of standard character names. For example, the name
LA020000 represents the capital letter A. There are also a couple of conventions for
representing Unicode characters using these names (U0000020, UNIC0020, XUNI0020).
Some generators or font converters use non-standard or automatically generated character
names. This can be a problem when exporting AFP data to text or PDF because Vault uses the
character names to translate the text into data the PDF format understands. Vault stores the
name to Unicode translations in a file in the resource set called gcgiduni.map. This can be
edited to add or alter translations. If Vault cannot translate a given block of text completely, it
will fall back to exporting the text using inline graphics.
Internal Tables
Fonts contain internal tables used in performing certain operations. Some of these tables are
considered optional. If a font is used in an unanticipated way, a needed table might not be
available and the operation would fail. This is often subtle and difficult to diagnose and some
font converters and some subsetting logic can contain errors that cause the resulting font to
be damaged in subtle ways.
PDF Text Interpretation
Additional information is often required to interpret the meaning of characters. Being able to
render text in PDF doesn't mean the characters are themselves understood by the PDF reader.
Being able to specify this meaning to the viewer affects things like cut and paste, read aloud
and accessibility. This is why there are sometimes requirements on the font being Unicode
encoded or requiring a ToUnicode map file. Use of non-standard GCGIDs can also prevent
these facilities from working correctly.
White Space Interpretation
When AFP Text objects are converted to PDF using automatically embedded fonts (*embed in
fonts.ini), the standard process is to place each word into the PDF file as its own word on the
page. This is meant to handle cases where the space character is not defined in the embedded

Working with fonts
188
font but is defined in its AFP FOCA wrapper. This can cause PDF readers to display placeholder
characters instead of spaces. By positioning words individually, the spaces are no longer
needed in the PDF output.
Breaking text string into words in PDF output may cause an issue for some documents when
closely spaced text is cut and pasted from the PDF viewer into another document or when the
text is searched. When words are written to the PDF individually, the reader must heuristically
determine the location of spaces in the text based on the font metrics. In some cases reader
may not generate spaces between words.
The profile option AFPForceBreakOnSpace controls the word break behavior. If
AFPForceBreakOnSpace=0 is set, then entire AFP string (as opposed to individual words) will be
placed into the PDF (including the space characters between words). Note that if words or
characters are individually positioned in the original AFP (which may happen for fully justified
text), this setting won't have any effect.
The default is AFPForceBreakOnSpace=1. For AFP text that uses a variable space increment, the
breaking of text strings into words is turned on automatically so that words are correctly
positioned in the PDF output (since the space width in the font metrics would be incorrect in
this case).
PDF Configuration
In fonts.ini, the point size of the font substitution may be set to -1.0 to indicate that the code
should use the specified size of the outline font in the stream, not a fixed size. If this value is
not present, the text is not presented in the PDF.In fonts.ini, the PDF Export Font Name can be
set to *embed to activate automated font embedding.

Working with fonts
189

190
Emulating paper stock
If documents from an application were intended to be printed on pre-printed paper stock you
may want to emulate the relevant stationery when they are displayed via the Vault.
Any set of image files that contain the layout of the original paper stock can be stored in the
appropriate resource set in the vault. The image must be carefully rendered into a number of
pre-set resolutions and formats so that it can be displayed correctly in all circumstances.
You will need to recreate or load the original artwork into graphics tool(s) that can export to
GIF and WMF formats. You will also need to convert the image to PDF if you intend to print
archived documents without the original paper stock. All files related to a particular emulation
must have the same file base prefix.
Be careful to maintain the correct page aspect ratio (for example 8.5" x 11"). A transparent,
borderless rectangle locked behind your page design can help to ensure the correct aspect
ratio is preserved during export.
• Provide GIF (raster) format for screen and graphic format (Thick Client).
• Provide WMF (vector) format for printing documents from the Service Client.
• Provide PDF format if the printing of emulated paper stock is required (“convert to PDF”
from Service Client). Also for web PDF mode.
• Provide EPS for postscript documents.
The table below indicates which background formats are used per source format.
To emulate a particular type of paper stock for presentation from the Vault, you should
perform the following steps:
1. Export to a file format
2. Set up paper stock
3. Adjust paper stock
Note that the sequence in which the steps are performed is important; you should adhere to
the order outlined above. Detailed information on each step follows.
Source Format Background format used
AFP, Metacode, DJDE/line mode GIF, WMF and PDF object
Postscript GIF (display only) or EPS (display, PDF,
print) with .ps extension

Emulating paper stock
191
Export to a file format
There are four different types of file formats to which you can export. Follow the directions for
the appropriate file format(s) then continue to “EPS export for postscript files” on page 192.
Note: These directions assume that you are using Corel Draw 10.
GIF Exports for Vault “Native” View Mode
Follow the steps and guidelines below for exporting your background artwork as a GIF file
format for viewing your documents in a thick client:
1. Launch Corel Draw 10 and export the graphic (document) at the following six GIF Widths
(allow the tool to automatically calculate the correct Height that preserves your aspect
ratio): 1600, 1280, 1024, 800, 640, and 512. The filename must follow the convention
<file><resolution>.gif, such as MyStock1600.gif, MyStock1280.gif, and so on.
2. The Vault will automatically match your colors with the closest entry in its Palette. If your
image uses gradient fills or blended colors, you will need to select the Vault Palette in the
export tool (in this case Corel Draw) in order to prevent unusual colors in the gradient
pattern.
3. If your background or company logo uses a color that is not in the Vault standard palette,
you can help emulate specially desired colors through the process of dithering (an
attempt to approximate a color from a mixture of other colors when the requested color is
not available).
WMF (Vector) Format – used for Printing
Follow the steps and guidelines below for exporting your background artwork as a WMF file
format for printing documents:
1. Launch Corel Draw 10 and export the graphic to WMF format.
2. Ensure that you maintain the correct page aspect ratio (8.5” x 11”). A transparent,
borderless rectangle locked behind your page design can help to ensure the correct
aspect ratio is preserved during export.
3. You must disable the Placeable Header option in your WMF exporter. Placeable Headers
are a Microsoft-Only extension to the WMF standard that is only supported in the Office
Suite.
4. Export the wmf as <stockname>.wmf (for example, MyStock.wmf)
PDF (Vector) Format – used for PDF Export
Follow the steps and guidelines below for exporting your background artwork as a PDF file
format:
1. Launch Corel Draw 10 and select File, then select Publish to PDF
2. Click Settings
3. Under the Objects tab, ensure that the following options are selected:

Emulating paper stock
192
• Compression type: select None
• Export all text as curves: select this check box
• Compress text and line art: do not select this check box
•Encoding: select Binary
4. Using Notepad, edit the PDF File.
5. Delete everything before the word stream
6. Delete all text after the word endstream
7. Place the resulting file MyStock.PDF in your Resource directory.
EPS export for postscript files
Follow the steps and guidelines below for exporting your background artwork as an EPS file
format for printing documents:
1. Launch Corel Draw 10 and export the graphic to EPS format.
2. Select the General tab and make sure that the Include header check box is not selected.
3. Ensure that the following is selected:
• Export text as text
• Include fonts
4. Select the Advanced tab and select Page from the Bounding box section.
5. Accept the remaining defaults and Click OK.
6. Rename the .eps file to a .ps extension using the standard tray naming conventions
outlined in the “Set up paper stock” section that follows.
Set up paper stock
The Paper Stock Emulation files that you created are placed into the Resource directory. Each
profile can enable one default paper stock type by configuring the Tray= option in profiles.ini.
Set the Tray= option to your stock name that you have chosen – to follow through with the
previous examples, Tray=MyStock will enable MyStock as the default paper stock when
displaying documents of this profile.
Adjust paper stock
The positioning of the background may need slight adjustments when actually viewed or
printed. This can be addressed in the appropriate profile in the profiles initialization file.
1. Once the document is rendered and exported to the required names, load the Service
Client desktop to confirm that your filenames are correct and that it can properly display
a background and print the background.

Emulating paper stock
193
2. There may be some minor positioning issues. These are addressed in the appropriate
profile of profiles.ini. Edit the profiles.ini in the root of the server directory, and copy your
changes to the copies of profiles.ini in the vrws and distrib directories before verifying
your changes.
3. Offsets are adjusted in fractions of one inch. You may use positive and negative
adjustment values in order to position the document content correctly onto the
background. Adjust the settings as follows:
• OriginX affects the X (left and right) origin when Viewing.
• OriginY affects the Y (up and down) origin when Viewing.
• PrintOriginX affects the X (left and right) origin when Printing.
• PrintOriginY affects the Y (up and down) origin when Printing.
Note that this is not applicable to all datastream formats.

Emulating paper stock
194
Optimizing PDF size
Below are suggestions for optimizing size of PDFs from Vault.
Font Embedding or Substituting:
By default, Vault draws each character of every AFP print stream as an image. If you use the
same letter more than once, there is no saving it, it embeds that same image twice, or three
times, or three million times. Depending on the amount of text in the PDF to be created, this
can represent a significant amount of space within the PDF, and it might be worth optimizing
this.
For each font, you need to make a decision with various trade-offs:
Option 1
Continue to spot-graphic the text. This may be appropriate for less-often used fonts, such as
barcode fonts, bold-italic, wingdings, and so on. To accomplish this on a font-by-font basis,
simply ensure that these fonts are either “commented out” in the fonts.ini file(s), or simply
delete the lines.
Option 2
Substitute the font to use one of Acrobat’s built-in fonts. Acrobat comes with Times-Roman (a
Serif font), Arial (a Sans Serif font), and Courier (a Fixed Width font). If the fidelity
requirements are not too strict, these might work all right. Note that if your document uses
full justification, these might not work correctly when substituted into the document (the
right-edge of your paragraphs, which should have a straight edge, might ‘wobble’ a bit due to
the characters not being the exactly correct widths).
Option 3
Embed the font. This is the most accurate method, but requires that you do some work in
Corel Draw, as well as configure fonts.ini, and finally has an opportunity cost in the output
PDF – increasing file size by the size of the font (and a bit more). If your fonts are 80KB, and
you embed ten fonts, the output of Vault will be 800 KB before emitting any text or images
into that PDF.
PDF Compression
New builds of Vault compress the Page body in the PDF. This can have a significant
improvement in file size. No parameters are required but a new render executable or
uclient.exe file may be needed. Note that this enhancement was added to 5.4 and 5.3 builds,
but not earlier versions.

Emulating paper stock
195
Tuning Background Sizes
If you are using PDF Background paper-stock emulation, it may be possible to tune this file
size. Obviously the backgrounds have a direct impact on file size of the output PDF. If using
“old mode” PDF backers (where you had to edit a PDF file from Corel Draw), your options are
limited – it may be worth investigating using new PDF background mode. Search the manual
for “TrayMode” for tips on this topic.
When using new PDF backer mode, it may be worthwhile to enable subsetting of fonts, to
reduce image resolution, to increase bitmap compression levels, and so on. The size of the PDF
background will be directly added to Vault’s output PDF file size, so getting this file size
smaller may be a priority.
Font Embedding Tips
1. Choose one document to configure font embedding (e.g. Jane Doe for this month). Look
at this document in the client software.
2. Save a PDF copy as a baseline.
3. Press CTRL+ALT+I from the thick client (lowercase i as in information). Note the
RESOURCE SET and PROFILE. If using the PERL client, note the “DF” variable. This is the
filename. Use FILEINFO against this file to obtain the resource set and profile on the
server side.
4. Save a copy of the document “as a Stream”.
5. Decode it using afpdecode. Keep the decoded version handy. Note: Make sure you have a
gcgiduni.map file in the Resource Set
6. Go to the SERVER\DISTRIB\<ResourceSet> folder.
7. Run AFPSUBSTITUTE in this folder (if Server\Tools is not in your PATH environment
variable, you should add it). Redirect the output to a temporary file. (e.g. “afpsubstitute >
tempfonts.ini).
8. Run AFPSUBSTITUTE –U in this folder (e.g. “afpsubstitute –u > tempfonts-U.ini)
Afpsubstitute without parameters, helps to define a fonts.ini that assumes you will use
font substitution. Afpsubstitute –u is more helpful if you are going to substitute fonts,
where size is more important than font style. It is also useful if you intend to use font
embedding. You may also output either of these directly to fonts.ini (if it does not exist,
make a backup if it exists already).
9. Propagate INI file changes to all Rendering Engines if needed.
10. Restart RENDER and/or your Client software any time you want to see changes. These
will cache settings, so multiple restarts are unfortunately necessary when configuring.
Note that afpsubstitute –U appends a “unique” string to the end of the original TrueType font
name from Designer and Generate. This means that if using Font Embedding, you can remove
that unique string, and change it to .t1 or .ttf, and this will result in a “pre-made” Fonts.ini for
embedding. This also tells you the original font names.

Emulating paper stock
196
Preventing errors
Many errors are made when saving the “.pe” file. If you are using TrueType, many times you can
just rename the original .TTF file to .PE and it should work. Ensure that the /Length
specification has the same size as the TTF file, prior to doing this.
Using UltraEdit is recommended:
1. Go to the beginning of “stream”, then switch to HEX MODE (Ctrl-X).
2. Hold Shift and scroll to endstream, then it’s all selected.
3. Select File / Save Selection As.
It may be hard to tell what font a particular string in your PDF is using. For example, to
configure fonts.ini you may need to know what AFP font “Your Account” is written in. To do so,
refer to your AFPDECODE results, and/or use an older copy of Vault that does not support
PDF compression, and look at the PDF itself in an Editor. The font name is emitted prior to
each string of text.

Emulating paper stock
197
Configuring PDF background
There are two methods for configuring PDF background (referred to as “old mode” and “new
mode”).
The old method (old mode) of configuring trays supports the need of a “normal” PDF
background file to have a single, multi-page PDF file as the master background for all image
backgrounds required for a particular stream. In this method, the PDF would contain one page
for each paper stock loaded into the printer. Therefore, if your printer has 4 physical trays, you
need 4 differently named PDF backgrounds, GIF background sets, WMF files and so on.
The new method (new mode) enables you to have a single PDF file with 4 pages inside it, where
each page maps to one of the physical trays. Because of this new method, the PDF no longer
needs to be edited. As well you can have:
• gradient fills in your background, XObjects (and so on) that were previously not
supported.
• raster (bitmap) objects in the background.
• the PDF can be a compressed PDF, the resulting Vault Rendered PDFs are also smaller by
this amount (there can be 10:1 or more difference).
• custom fonts exist inside the PDF, rather than having to export text as curves (also can
make PDF smaller, especially with sub-setted fonts). This also means that text in the
background pages is selectable as text using Acrobat Reader (previously it was only a
graphic (e.g. not considered to be text)).
Old mode
For the old mode, use "Tray=" for the tray name. This is used for GIFs, PDFs (and so on) if the
files exist (100% old mode).
Note: Do not put a PDF file conforming to this convention (name.pdf) in the ResourceSet\
directory.
Example
Tray=name.wmf
TrayName=realpdf.wmf
TrayMode=numbered
Tray1=1-last
Tray2= <etc>
This will use GIF modes from compatibility mode, and will use normalized PDF mode for
backgrounds in PDF embedding. (It also embeds a zero-length xobject in compatibility mode,
but this does not cause errors). The TrayName parameter for PDF “normal” background can be
PDF as an extension (if preferred).

Emulating paper stock
198
New mode
To use different pages of a PDF file as background pages:
1. Add a TrayMode entry to Profiles.ini.
2. Add values for Tray.
3. Add a default entry to Tray
Add a TrayMode entry to Profiles.ini file
In the Profiles.ini file, add an entry for TrayMode and set the value to Numbered, for example:
TrayMode=Numbered. If TrayMode is not enabled, then the pages will be rendered as usual.
Add values for Tray
The value of Tray will specify the name of the background PDF file. For example,
Tray=PBBI.wmf implies that the background PDF file name is PBBI.pdf. This file should be
present in the \Default directory of the Render folder, where the product is installed. If this is
not available or the file name specified is incorrect, then pages will be rendered without the
background page merged.
Add the parameters for different background pages such as Tray1 for background page 1,
Tray2 for background page 2 and so on. Note that LAST, LAST1 and LAST2 key words can be
used inside parameter definitions. The LAST parameter refers to the last page of document
pages.
LAST can be used as a key word alone (Tray1=last) or as the second parameter in a page range
specification (Tray1=1-last).
LAST1 refers to the (LAST-1)th page (the second page from the last page). LAST1 can be used
as a key word alone, or as the second parameter in a page range specification (Tray1=1-last1).
LAST2 refers to the (LAST-2)th page (the third page from the last page), and cannot be used as
a key word alone. Also it can only be used as the second parameter in a page range
specification (Tray1=1-last2).
Each of these parameters should be assigned values corresponding to page numbers with
which it has to be merged; examples are as follows:
Tray1 = 5,6,7: implies background Page 1 will be merged with page numbers 5,6 and 7 at
the time they are being rendered.
Tray2=8-last:implies background page 2 will be merged for pages 8 until last, at the time of
rendering.
TrayN=even: indicates to use pages of even value. You can also use “odd” to indicate pages of
odd value.

Emulating paper stock
199
Notes:
•Only LAST , LAST1 and LAST2 can be used as keywords and LAST2 can only be used as the
second parameter in a page range specification (Tray1=2-last2).
• For range values (e.g.3-4), the lower value is on the left side of the "-" symbol and the
higher value is on the right side. The lower value should be a number and should be less
than the higher value.
• When rendering document pages, the check order is:
i. numbers or range numbers
ii. alone LAST
iii. range LAST
iv. alone LAST1
v. range LAST1
vi. range LAST2
vii. ODD
viii. EVEN
Add a default entry to Tray
Add a TrayDefault entry which will correspond to a page that has to be used as a background
for a rendering page which does not have an entry in the previous parameters (Tray1, Tray2).
If there is neither (Tray-N) nor TrayDefault, then pages will be rendered as usual.
Note: If you do not want the old (single object) PDF, do not put a file with the required name
in the ResourceSet.
Example
TrayMode=Numbered
Tray1 = 1
Tray2 = 2,3
Tray3 = 4,5,6
Tray4=7,8-last2
Tray5=last1
Tray6=last
TrayDefault=2
or

Emulating paper stock
200
TrayMode=Numbered
Tray1 = last
Tray2=1,2-last2
Tray3=last1
TrayDefault=2

Emulating paper stock
201

202
About the Rendering Engine
The Rendering Engine provides an interface (API) which allows you to create a web based view
of the Vault. It provides web programmers with an easy way to access the documents in the
Vault, from any existing web application server, from a stand alone web environment, or from
any custom-developed application server environment.
Overview
The Vault is a distributed, multi-tiered client/server environment. In a typical Vault web
environment, there are two or three levels of software as follows:
At the top tier is the Vault S erver that stores the archived documents and the indexes to
retrieve them. This server typically has a large hard disk storage subsystem (RAID) and is the
central Vault for many years of archived documents. It is assumed that a working Vault server is
in place.
The second tier is the Rendering engine that provides the API. This software is capable of
converting mainframe documents into GIF, PDF, and optionally HTML.
The third tier is the CGI Interface. An implementation of the CGI interface is available in
many sample web programming languages including PERL, Java Enterprise Bean, C, and C++.
The CGI Interface is designed to be extremely simple and high level in concept – all it needs to
be able to do is to open a TCP/IP socket to the rendering engine and submit and receive
information in a simple high-level query language. This section describes this language
specification. A number of APIs are shipped with the product that allow you to create your
Rendering Engine client application. Refer to “Render engine connection” on page 228 for
further information.
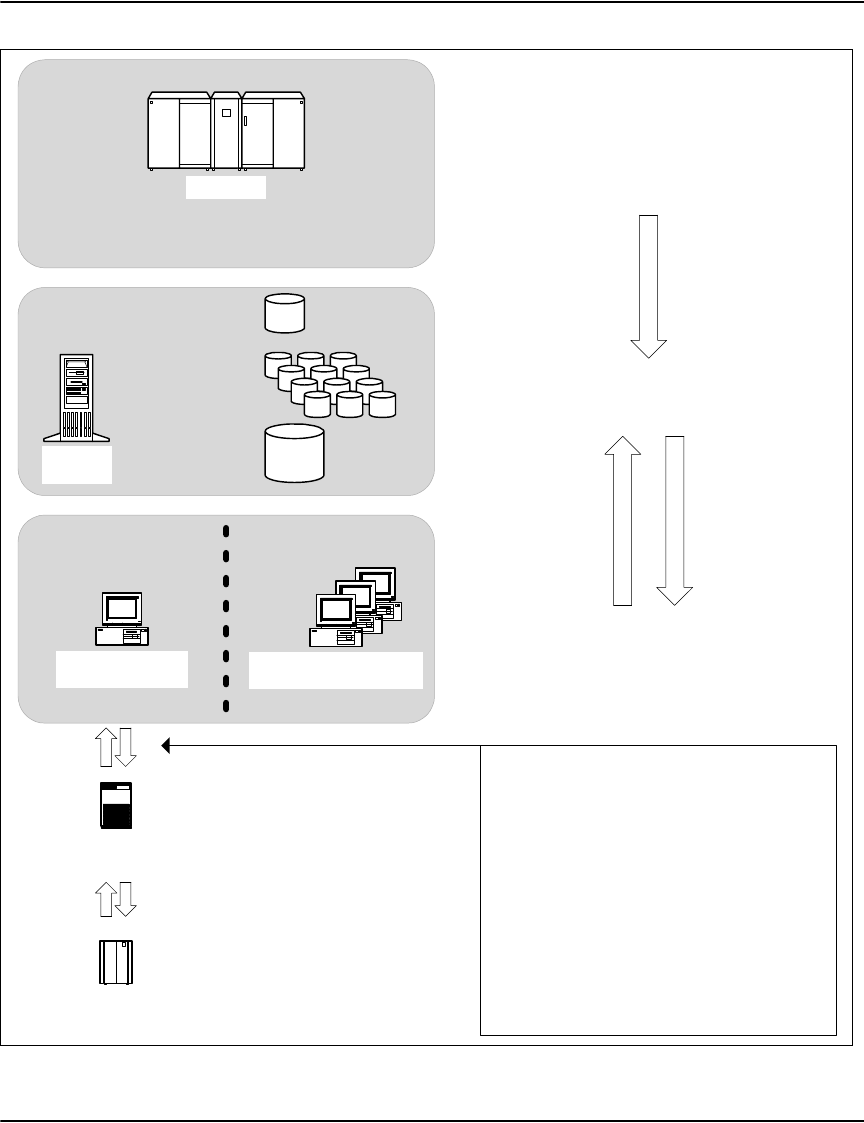
About the Rendering Engine
203
Document
Repository
Mainframe
- periodically prints data to printers (exisitng process)
- will be required to copy (ftp) this data stream to the
document repository.
DOC1
Rendering Engine(s)
Compressed Data
Incoming Folder
(for downloads)
Document Index
Web
Application Server
Web Server
(HTTP, SSL)
- "knows" User info (account & plan #)
- maintains state info (memory per user)
- existing communications
- possible FIREWALL
- delivers HTML to end users
via HTTP over Internet
One of three request/response pairs:
1. Index Lookup : use a partial account number,
name, etc to find a single customer in the
customer index.
2. Get Document List : use a fully qualified
account number and retrieve the list (in tabular
form) of documents, including document info such
as no. of pages, date, document type, and a
document ID for each available document
3. Get Page : Using document ID from above
query, get the document in one of the available
formats: PDF, GIF, HTML. A file name can be
passed or returned.
Typical web installation
DOC1 Archive Clients --
Customer Service Rep PCs
SOURCE OF DATA
DATA ARCHIVE
AND INDEX
DATA USERS
index and page requests
responses
download (ftp)

About the Rendering Engine
204
Algorithm support
AFP IOCA compression algorithm support list
The following algoithms are supported by the Vault Rendering Engine:
• X'01' --> InfoPrintMMR--Modified Modified Read
• X'03' --> no compression;
• X'80' --> G3 MH—Modified Huffman (ITU–TSS T.4 Group 3 one-dimensional coding
standard for facsimile)
• X'81' --> G3 MR—Modified READ (ITU–TSS T.4 Group 3 two-dimensional coding option
for facsimile)
• X'82' --> G4 MMR—Modified Modified READ (ITU–TSS T.6 Group 4 two-dimensional
coding standard for facsimile)
• X'83' --> JPEG algorithms (see the External Algorithm Specification parameter for detail)
The following algoithms are not supported by the Vault Rendering Engine:
• X'08' -->ABIC (Bilevel Q-Coder)
• X'0A' -->Concatenated ABIC
• X'0B'--> Color compression used by OS/2 Image Support, part number 49F4608
• X'0C' -->TIFF PackBits
• X'0D' -->TIFF LZW
• X'20' -->Solid Fill Rectangle
• X'84' -->JBIG2
• X'FE'--> User-defined algorithms (see the External Algorithm Specification parameter for
details)
• Other values -->All other values are reserved.
For more information and related documents, please refer to:
http://www.afpcinc.org/publications/categories/publications/ioca_reference_6-1.pdf
PDF stream object filter algorithms support list
Please refer to the following link for more infomation:
http://www.adobe.com/devnet/pdf/pdf_reference_archive.html

About the Rendering Engine
205
PDF Reference
sixth edition
Adobe® Portable Document Format
Version 1.7
November 2006
TABLE 3.5 Standard filters (total 10 filters).
The following is the entire list of decoding algorithms:
• ASCIIHexDecode : Decodes data encoded in an ASCII hexadecimal representation,
reproducing the original binary data.
• ASCII85Decode : Decodes data encoded in an ASCII base-85 representation, reproducing
the original binary data.
• LZWDecode : Decompresses data encoded using the LZW (Lempel-Ziv-Welch) adaptive
compression method, reproducing the original text or binary data.
• FlateDecode : Decompresses data encoded using the zlib/deflate compression method,
reproducing the original text or binary data.
• RunLengthDecode : Decompresses data encoded using a byte-oriented run-length
encoding algorithm, reproducing the original text or binary data (typically monochrome
image data, or any data that contains frequent long runs of a single byte value).
• CCITTFaxDecode : Decompresses data encoded using the CCITT facsimile standard,
reproducing the original data (typically monochrome image data at 1 bit per pixel).
• JBIG2Decode : Decompresses data encoded using the JBIG2 standard, reproducing the
original monochrome (1 bit per pixel) image data (or an approximation of that data).
• DCTDecode : Decompresses data encoded using a DCT (discrete cosine transform)
technique based on the JPEG standard, reproducing image sample data that approximates
the original data.
• JPXDecode : Decompresses data encoded using the wavelet-based JPEG2000 standard,
reproducing the original image data.
• Crypt : Decrypts data encrypted by a security handler, reproducing the original data as it
was before encryption.
Vault Rendering Engine supports the following decoding algorithm:
• FlateDecode: Decompresses data encoded using the zlib/deflate compression method,
reproducing the original text or binary data.
TIFF compression algorithms support list
The TIFF specification supports images encoded with many different formats, encodings, and
options, but Vault only supports some of them.

About the Rendering Engine
206
The compression parameter indicates how the data in the image is compressed. The
specification allows for the following compression modes:
• 1 - Uncompressed
•2 - CCITT 1-D
•3 - Group 3 Fax
•4 - Group 4 Fax
•5 - LZW
•6 - JPEG
•32773 - PackBits
Note: Vault only supports black and white TIFF images using Group 3 Fax, Group 4 Fax,
PackBits or Uncompressed mode

About the Rendering Engine
207
Sample applications
Perl sample
The Perl sample is a web application that makes use of the Vault protocol to implement a basic
document viewing application. The Perl sample consists of a set of CGI scripts that
communicate to other Vault processes to perform search and document rendering operations.
The scripts are provided in source form and can be modified for your specific needs.
Requirements
You will need a Perl interpreter and a web server capable of hosting CGI applications.
• On Windows, typically the web server would be IIS. You can obtain a Perl interpreter from
ActiveState (www.activestate.com).
• On Unix, typically the web server would be Apache. Most Unix systems come with a Perl
interpreter. Different Perl interpreters will come with different sets of packages. You may
need to download and install additional Perl packages if your installation is missing one.
Installation
The Perl sample can be installed from the Vault installer by choosing a Full Install or by
selecting the Perl sample component during a Custom Install. The Perl sample can be installed
on the same machine as other Vault components or on an entirely separate machine. Once
installed, there will be a sample directory under the vault install that contains the Perl sample.
Web Server Configuration
You will need to configure your web server with the following virtual directories:
There are often significant differences in the way applications are configured between
different web servers and web server versions. You should refer to your web server's
documentation for the precise steps needed to properly configure CGI applications.
Directory Content
sample\images images used by the sample.
sample\modules library modules used by the sample.
sample\scripts CGI scripts that make up the sample
sample\templates Fragments of HTML used by the sample to construct output web pages.
Virtual Directory Physical Directory Access Rights Default Document
/scripts <install>\sample\scripts execute only interface.pl
/image <install>\sample\images read only n/a

About the Rendering Engine
208
Example of Installing the Perl Sample on Windows Server 2008 R2
The following steps give an example of how to configure the Perl sample for use with IIS7 on
Windows Server 2008 R2. You will need an existing vault installation the Perl Sample can
access and a machine running Windows Server 2008 R2.
1. Install and Configure the Perl Sample
Copy or install the Perl Sample to the Windows Server 2008 machine. Use a text editor to edit
interface.pl and image.pl so you can set the address and port of the rendering engine:
my $services="10.1.2.122,6003";
2. Install IIS (Internet Information Server)
1. Start the Server Manager and navigate to Roles.
2. Click Add Roles.
3. Select Web Server (IIS).
4. Select CGI from the Role Services.
3. Run Windows Update
Run Windows update to obtain any patches applicable to the system or IIS.
4. Install ActivePerl
1. Run the ActivePerl installation program. You can get ActivePerl from: www.activestate.com
2. Take note of the installation location, because you'll need it later to set up the script
mapping in IIS.
3. Set up the default environment and extension settings.
4. Allow the installation to complete.
5. Open a command prompt and run perl -v to verify that the Perl interpreter is running
correctly.
5. Configure IIS
1. Run IIS Manager and navigate to the default web site.
2. Add the image virtual directory. It should point to where sample\images was installed.
3. Add the scripts virtual directory. It should point to where sample\scripts was installed.
4. Select the scripts virtual directory.
5. Select Default Document.
6. Remove the existing list of default documents.
7. Add interface.pl to the list of default documents. This is the main CGI script.
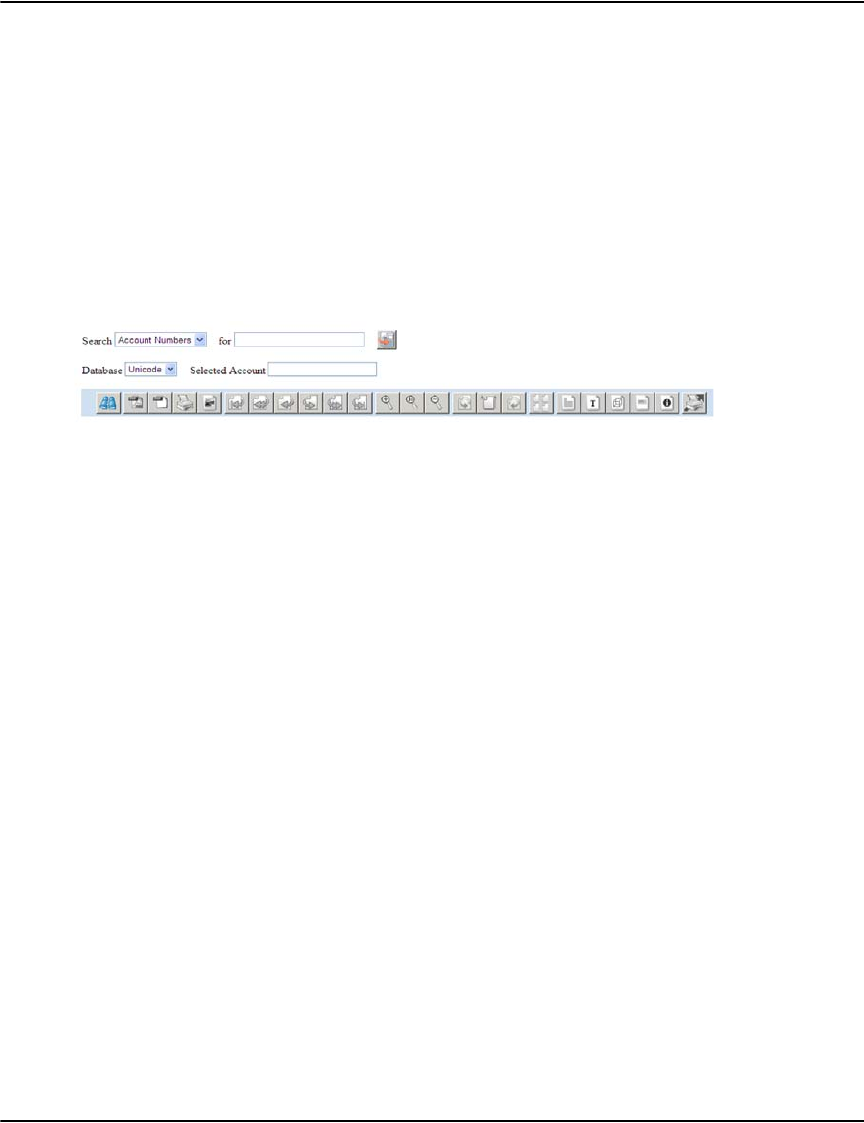
About the Rendering Engine
209
8. Select Handler Mappings. The scripts virtual directory should still be selected.
9. Add the script mapping for Perl Scripts.
10. Use the settings show to the left adjusting for the location where your Perl interpreter was
installed.
11. Click no to the ISAPI extension prompt.
12. Now Perl scripts in the scripts directory should be executable.
6. Test the Result
Browse to the script directory on your web server. The default search screen will launch:
Try submitting a request and viewing a document.
Notes
• You can use a different name for the virtual directories
• If you alter the image virtual directory name, edit interface.pl and update the value for
$imgdirectory to reflect the change
• Previously the Perl Sample was implemented using ActiveState's perlis.dll (.plx). While this
solution can improve performance experience with it showed that some versions were not
always stable under load. As a result we decided to revert to CGI which is much more
stable.
• The Perl Sample is not written for use with mod_perl.
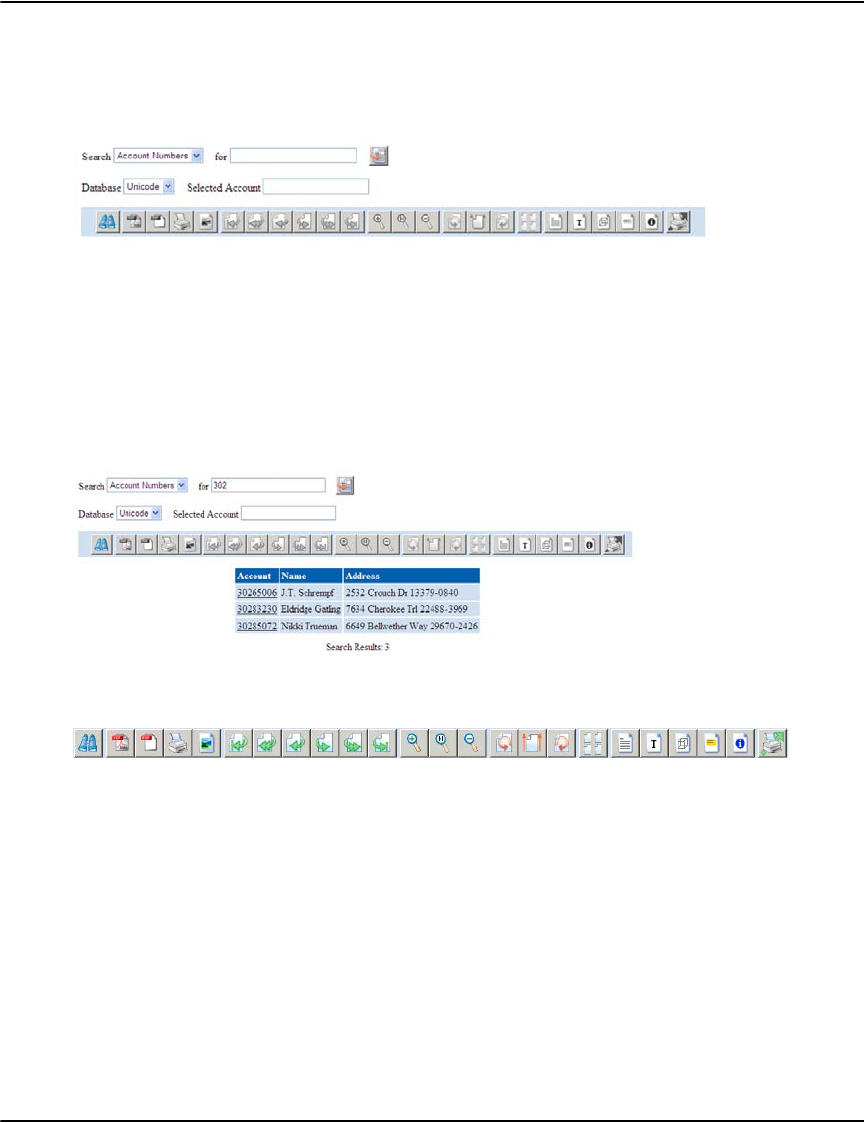
About the Rendering Engine
210
Using the Perl Sample
When you first navigate to the Perl Sample's URL, you are presented with the default search
screen. Select a search type enter a key and submit the search.:
This result from this search will appear and clicking the underlined links will take you to the
document associated with the result. If the search type lists accounts, clicking the link will let
you view the most recent document associated with the account.
At this point you can navigate around the current document, select another document from
this account or start a new search.

About the Rendering Engine
211
Using the Perl Sample with SSL
The Vault servers support the use of SSL between the web application and the rendering
engine to provide improved communications security. It should be noted that this is not
referring to SSL between the browser and the web application itself.
When using SSL with the Perl Sample, you'll need to download and install additional Perl
packages IO-Socket-SSL and Net-SSLeay. Ensure that the version of Perl you are using matches
the version the package was compiled for.
For example, you could go to http://cpan.uwinnipeg.ca and download IO-Socket-SSL.tar.gz and
Net-SSLeay.tar.gz for your particular version of Perl (5.6, 5.8, 5.10). Then, assuming you're
using ActivePerl, you can run the following to install the packages:
ppm install Net-SSLeay.ppd
ppm install IO-Socket-SSL.ppd
Once those packages are installed you will need to modify sample\modules\e2Render.pm to
enable SSL and optionally provide additional configuration options such as client certificates.
To switch the Perl library to SSL change the following two lines:
in Modules\e2Render.pm
from:use IO::Socket;
to:use IO::Socket::SSL;
from:$self->{SOCK}=IO::Socket::INET->new(
to:$self->{SOCK}=IO::Socket::SSL->new(
To enable client certificates, place your certificate and key in the scripts directory and make
these additional changes:
$self->{SOCK}=IO::Socket::SSL->new(
Proto => "tcp",
PeerAddr => $self->{IP},
PeerPort => $self->{PORT},
SSL_use_cert => "1",
SSL_key_file => "e2perl-key.pem",
SSL_cert_file => "e2perl-cert.pem",
);
Sample Java web client application: Vault ServiceWeb2
Vault ServiceWeb2 is a Java Servlets based sample rendering web application that is also
provided with the installation material, which implements a web-browser interface for Vault.

About the Rendering Engine
212
Software Requirements
The software requirements for running the ServiceWeb2 sample application are:
•Sun JRE 6.0 or higher
• A Servlet/JSP container that implements the Servlet 2.5 and JSP 2.1 specifications e.g.
Apache Tomcat 6.0.x
• Compatible web browser e.g. MS Internet Explorer 8 or Firefox 3.6
Note: Apache Tomcat 6.0.26 (or higher) is the recommended Servlet/JSP container to use for
deploying the Vault ServiceWeb2 application.
Installing Vault ServiceWeb2
1. Ensure that the Sun JRE 6.0 (or higher) is installed.
2. Install and setup Apache Tomcat 6.0.
3. Deploy ServiceWeb2.war to your running Tomcat 6.0 instance.
If using the Tomcat Manager web application to deploy, deploy the WAR file as follows:
By default, the ServiceWeb2 application assumes that a Rendering engine is running on the
same host system as the Servlet/JSP container (i.e. localhost) and is listening for incoming
connections on the default Rendering engine port (i.e. 6003).
If your Rendering engine is running on another host and/or listening on a non-standard port,
then deploy the ServiceWeb2 application passing it the following Context Parameters that will
allow it to connect to your Rendering engine:
The context parameters have to be specified in an XML file (e.g. ServiceWeb2.xml) as follows:
Deployment Parameter Deployment Parameter
Value
Required
Context Path /ServiceWeb2 Required
XML Configuration file URLC:\ServiceWeb2.xml Optional: only specify if overriding or
changing context parameters
WAR or Directory URL C:\ServiceWeb2.war Required
Parameter Name Parameter Value
hostname hostname of the Rendering engine
(e.g. somehost.somedomain.com)
port port # of the Rendering engine
(e.g. 8003)

About the Rendering Engine
213
where the “value” attribute of the “Parameter” element should be set to the desired value for
the context parameter being set.
Note: for the Apache Tomcat 6.0.x container, the “override” attribute must be present and set
to the value “false” when a context parameter is being specified at deployment time.
Once correctly configured and deployed as per above, the ServiceWeb2 application is
available at the following URL:
http://localhost:8080/ServiceWeb2/Interface
The hostname “localhost” in the URL above can be replaced with the hostname (or FQDN) of
the host where the Servlet/JSP container is running e.g.:
http://somehost.somedomain.com:8080/ServiceWeb2/Interface
Configuration via Context parameters
Certain aspects of the ServiceWeb2 application can be configured by specifying context
parameters in an XML file at deployment time. Context parameters have to be specified in the
XML file as follows:
The following is a list of the available configuration (i.e. context) parameters.
Note: The context parameter names are case-sensitive and have to be specified exactly as
shown below.
hostname
The hostname for the Rendering Engine that the ServiceWeb2 application will connect to.
Defaults to “localhost”.
<Context>
<Parameter name="hostname" value="somehost.somedomain.com" override="false"/>
<Parameter name="port" value="8003" override="false"/>
</Context>
<Context>
<Parameter name="param_name1" value="param_value1" override="false"/>
<Parameter name="param_name2" value="param_value2" override="false"/>
...
</Context>

About the Rendering Engine
214
Example:
<Parameter name="hostname" value="somehost.somedomain.com"
override="false"/>
port
The port number for the Rendering Engine that the ServiceWeb2 application will connect to.
Defaults to 6003.
Example:
<Parameter name="port" value="8003" override="false"/>
forcepdf
If set to true, all documents viewed in the browser interface will be rendered to and displayed
as PDF. Defaults to false.
Example:
<Parameter name="forcepdf" value="true" override="false"/>
maxresults
The maximum number of search results to display per page. Defaults to 20.
Example:
<Parameter name="maxresults" value="25" override="false"/>
outputformat
The image output format to which documents are rendered to for display in the browser
interface. Defaults to GIF. Valid values are GIF or PNG.
Example:
<Parameter name="outputformat" value="PNG" override="false"/>
log4jconfigfile
If non-null, use this absolute file path (on the same filesystem as the Servlet container) as the
Log4j configuration file. Defaults to null (i.e. unspecified).
Example:
<Parameter name="log4jconfigfile"
value="D:\e2-ServiceWeb2\myLog4jConfig.xml" override="false"/>
ssltruststorepath
If non-null, use this as the SSL truststore for verifying the identity of the SSL-enabled
Rendering Engine that the ServiceWeb2 application will connect to. If this parameter is
specified, then the ssltruststorepassword must also be specified.
Example:
<Parameter name="ssltruststorepath"
value="C:\Some\Path\to\e2vault-server.jks" override="false" />

About the Rendering Engine
215
ssltruststorepassword
If non-null, use this as the password to access the SSL truststore for verifying the identity of
the SSL-enabled Rendering Engine that the ServiceWeb2 application will connect to. If this
parameter is specified, then the ssltruststorepath must also be specified.
Example:
<Parameter name="ssltruststorepassword" value="ChangeThisPassword"
override="false" />
Setting up the SSL truststore for connecting to an SSL-enabled Rendering Engine
The procedure for setting up an SSL truststore to use with the ServiceWeb2 application when
connecting to an SSL-enabled Rendering Engine is identical to the procedure used when
using the Vault Java Rendering API. Please refer to “Java API” on page 257 for more details on
how to do this.
Logging
The ServiceWeb2 application uses Log4j internally for logging. By default, Log4j is initialized
using a default XML configuration file that is present inside ServiceWeb2.WAR (in
theWEB-INF/classes/log4jConfig.xml folder) and log output will be written to:
${catalina.home}/logs/e2ServiceWeb2.log
To change this log file and/or to modify the logging configuration, deploy the ServiceWeb2
application with the "log4jconfigfile" context parameter set to the absolute path of your Log4j
XML configuration file e.g.:
Customizing and building ServiceWeb2 from source
ServiceWeb2 is normally distributed as a pre-compiled binary WAR file but this approach
precludes customizations to the application especially customizations pertaining to custom
Vault configurations and integration with 3rd party systems. For this reason, the complete
source code and project files for the ServiceWeb2 sample application are also provided in the
installation material in addition to the pre-compiled binary WAR file.
To build ServiceWeb2 from source, the following tools are required:
• Sun JDK 6.0 (or higher)
<Context>
<Parameter name="log4jconfigfile"
value="D:\e2-ServiceWeb2\myLog4jConfig.xml" override="false"/>
</Context>

About the Rendering Engine
216
• Netbeans 6.8 IDE (Java Web and EE bundle)
• Apache Tomcat 6.0.x web container
Once the above tools have been installed and set up, the ServiceWeb2 project folder can be
opened up in the Netbeans IDE and modifications can be made to the application.
Notes:
• The ServiceWeb2 application uses the Vault Java RenderAPI for communication to and
from the Rendering engine.
• The ServiceWeb2 application consists of two Servlets:
com.g1.e2.vault.serviceweb2.Interface
com.g1.e2.vault.serviceweb2.RenderDocument
• The Interface servlet is the front controller servlet in the application and handles all
control-flow and page navigation logic.
• The RenderDocument servlet is responsible for rendering a Vault document into a format
suitable for display in the browser interface. Additionally, this servlet handles all the
rendering functionality including rendering to non-image formats (Collection, etc.).

About the Rendering Engine
217
Configuring
The Rendering engine runs as a server and listens for incoming requests from your web
application servers. It is simultaneously a client to the Document Vault server, as it needs to
request documents and document indexes from the Vault.
You must configure both the rendering engine server 'server-mode' settings for communication
to application servers, and the 'client-mode' settings to connect to the Vault.
This section shows how to configure the rendering engine as a client to the Vault; the
following section details the function calls that are available for the communication between
your web application and the rendering engine server.
| To configure the rendering engine as a client: edit the e2renderd.ini file in:
<installpath>\render
and add or change the following keywords in the [Render] section.
Configuring the server listen endpoint
You can change the port the server listen on using the following setting:
e2serverd.ini\e2renderd.ini:
[server1]
service=*:9050
(listen on port 9050 on all interfaces)
If you want to listen only on a specific interface you can:
ListenSocket The TCP/IP port number on which the rendering engine
listens for incoming connections from your application web
server. The default is 6003.
RepositoryList This is a list of document repositories that the rendering
engine will connect to. The default is 127.0.0.1,6001
RepositoryMode This parameter specifies how to handle multiple IP
address/port pairs. Default is Single.
RepositoryRetry Specifies how many times to retry a connection when a socket
error occurs before ‘failing over’ to the backup server (if
provided). Default is 2.
RepositoryRecycle Specifies how many commands to run before switching to an
alternate Vault, when the system is configured in Rotate mode.
Default is 4.

About the Rendering Engine
218
[server1]
service=10.1.100.152:9050
(listen on port 9050 on the interface with the address 10.1.100.152)
Or if you want to listen on multiple interfaces and ports:
[server1]
service=*:6001,10.1.100.152:9050
(listen on port 9050 on the interface with the address 10.1.100.152and
listen on port 6001 on all interfaces)
Enabling SSL
Configuration:
[server1]
ssl=1 (defaults to ssl=0)
sslcertificate=ssl.crt (default)
sslprivatekey=ssl.key(default)
[connection1]
ssl=1(defaults to ssl=0)
Example
e2renderd.ini:
[server1]
ssl=1
sslcertificate=ssl.crt
sslprivatekey=ssl.key
[connection1]
ssl=1
Creating a Self Signed Certificate
http://www.akadia.com/services/ssh_test_certificate.html
C:\Temp\x>openssl genrsa -des3 -out server.key 1024
Generating RSA private key, 1024 bit long modulus
.++++++
...............++++++
e is 65537 (0x10001)
Enter pass phrase for server.key:
Verifying - Enter pass phrase for server.key:

About the Rendering Engine
219
C:\Temp\x>openssl req -new -key server.key -out server.csr
Enter pass phrase for server.key:
You are about to be asked to enter information that will be incorporated
into your certificate request.
What you are about to enter is what is called a Distinguished Name or a DN.
There are quite a few fields but you can leave some blank.
For some fields there will be a default value, If you enter '.', the field
will be left blank.
Country Name (2 letter code) [AU]:CA
State or Province Name (full name) [Some-State]:Ontario
Locality Name (eg, city) []:Toronto
Organization Name (eg, company) [Internet Widgits Pty Ltd]:Pitney Bowes
Organizational Unit Name (eg, section) []:e2
Common Name (eg, YOUR name) []:John
Email Address []:John_Doe@pb.com
Please enter the following 'extra' attributes to be sent with your
certificate request:
A challenge password []:
An optional company name []:
C:\Temp\x>copy server.key server.key.org
1 file(s) copied.
C:\Temp\x>openssl rsa -in server.key.org -out server.key
Enter pass phrase for server.key.org:
writing RSA key
C:\Temp\x>openssl x509 -req -days 365 -in server.csr -signkey server.key
-out server.crt
Signature ok
subject=/C=CA/ST=Ontario/L=Toronto/O=PitneyBowes/OU=e2/CN=John/emailAddres
=john_doe@pb.com
Getting Private key
C:\Temp\x>dir
Volume in drive C has no label.
Volume Serial Number is DCBE-0A05
Directory of C:\Temp\x
05/17/2010 12:32 PM <DIR> .
05/17/2010 12:32 PM <DIR> ..
05/17/2010 12:30 PM 276 server.bat
05/17/2010 12:32 PM 940 server.crt
05/17/2010 12:31 PM 696 server.csr
05/17/2010 12:32 PM 887 server.key

About the Rendering Engine
220
05/17/2010 12:30 PM 963 server.key.org
File(s) 3,762 bytes
2 Dir(s) 1,278,226,432 bytes free
Perl SSL
http://cpan.uwinnipeg.ca/PPMPackages/10xx/
IO-Socket-SSL.tar.gz
Net-SSLeay.tar.gz
ppm install Net-SSLeay.ppd
ppm install IO-Socket-SSL.ppd
use IO::Socket::SSL;
$self->{SOCK}=IO::Socket::SSL->new(
Using OpenSSL Test Client/Server
http://www.openssl.org/docs/apps/s_server.html
openssl s_server -accept 6003 -cert ssl.crt -key ssl.key
http://www.openssl.org/docs/apps/s_client.html
openssl s_client -connect localhost:6003
Configuring the upstream server address
You can change the address for the server the following setting:
client.ini\e2renderd.ini:
[connection1]
service=10.1.100.152:9050
(connect to server at 10.1.100.152 port 9050)
You can also use a DNS name for the address:
[connection1]
service=vault.mycompany.com:9050
Batch Printing from the web
To provide batch printing from the web, follow the steps that are outlined below. Before you
begin, ensure that you have installed the sample rendering scripts provided in the installation.
1. Create the image virtual directory
2. Create the scripts virtual directory
3. Create the controls virtual directory
THE SEQUENCE IN WHICH THE STEPS ARE
PERFORMED IS IMPORTANT; YOU SHOULD ADHERE
TO THE ORDER OUTLINE HERE. DETAILED
INFORMATION ON EACH STEP FOLLOWS.

About the Rendering Engine
221
Create the image virtual directory
1. Start the Internet Information Services manager and select the default web site.
2. Select the Action menu item and then choose New/Virtual Directory. This will start a wizard
that allows you to configure the new virtual directory.
3. Click Next.
4. Specify the location of the virtual directory's contents. Select the image directory in
vault\Samples and click Next.
5. Enter the virtual directory name image in the Alias field and click Next. Note that while
you can use an alternate name, you will need to update it in the interface.plx file.
6. Specify the location of the virtual directory's contents. Select the image directory in
vault\Samples and click Next.
7. Select the permissions for the virtual directory, and ensure that you clear the Run scripts
check box and click Next. The virtual directory is now added
Create the scripts virtual directory
1. Create a virtual directory for the scripts and name it Vault.
2. Point the virtual directory to vault\Sample\Scripts and click Next.
3. Remove all permissions except Execute and click Next.
Create the controls virtual directory
1. Create a directory to store the controls that are used to handle batch printing from the
web. Create a virtual directory and name it controls.
2. Point the virtual directory to vault\Sample\Controls and click Next.
3. Remove all permissions except Read and click Next.
Printing batches of documents
Batches of documents can be printed directly to a local or LAN attached printer.
| To print batches of documents:
1. Start Internet Explorer and browse to the scripts virtual directory with the name
interface.plx appended to the URL, for example: http://localhost/Scripts/interface.plx.
2. Once you have performed a search, the results list will contain a check box beside each
document. Select the check box next to the documents that you want to print. You can
also select all currently visible documents by clicking Select All at the end of the list.
3. Click Print Selected. The Printing Information dialog displays the printing progress and
allows the cancellation of print jobs.

About the Rendering Engine
222
Multiple databases
The Vault you are using may be set up to
support multiple databases. Where this is the
case, a database can be specified in one of
the following ways:
• Use the default database (i.e. not specifying one)
• Use the database(s) as defined in the client initialization file [Server]Database
setting.
• Include an optional parameter in EACH function call:
• DB=dbname&M=50&Index=0&S=p
• This will override any other database setting.
Your web application can either perform one render per database or multiple databases can
be serviced by a single render. In the latter case the databases must be selected by the web
application.
Batch reprinting of documents in Vault
With the release of Vault 5.5, a batch reprint capability for AFPDS data streams was
introduced. This batch reprint capability allows Vault clients (Vault Service Client, Vault
Service Reprint Admin client, the Perl client and the Service Web client) to submit reprint
requests for AFPDS documents via their respective GUI interfaces for documents that are
being viewed. These reprint requests are collected by the server until a Vault reprint.adm flag
file is submitted. The flag file will cause the individual reprint requests to be consolidated into
a single AFPDS output stream.
Triggering the batch Reprint Process
The file reprint.adm is the Vault flag file that triggers the creation of a single AFPDS output data
stream from individual reprint requests that have accumulated since the last time reprint.adm
was processed. As with all flag files, it must be placed in the directory <drpath>\server\process
(or <drpath>/server/process for Unix) for the action to be triggered.
Unlike some other flag files, the contents of reprint.adm are important in that:
• the contents of the first line will be used as the name of the output files created.
• the file should have only one line and the text on that line should not contain any
imbedded blanks or special characters.
NOTE: YOU MAY RECEIVE A WARNING FROM
INTERNET EXPLORER THAT THE PRINTING
CONTROLS ARE TRYING TO MANIPULATE PARTS OF
THE PAGE. CLICK YES TO ALLOW THE CONTROL TO
INTERACT WITH THE PAGE.
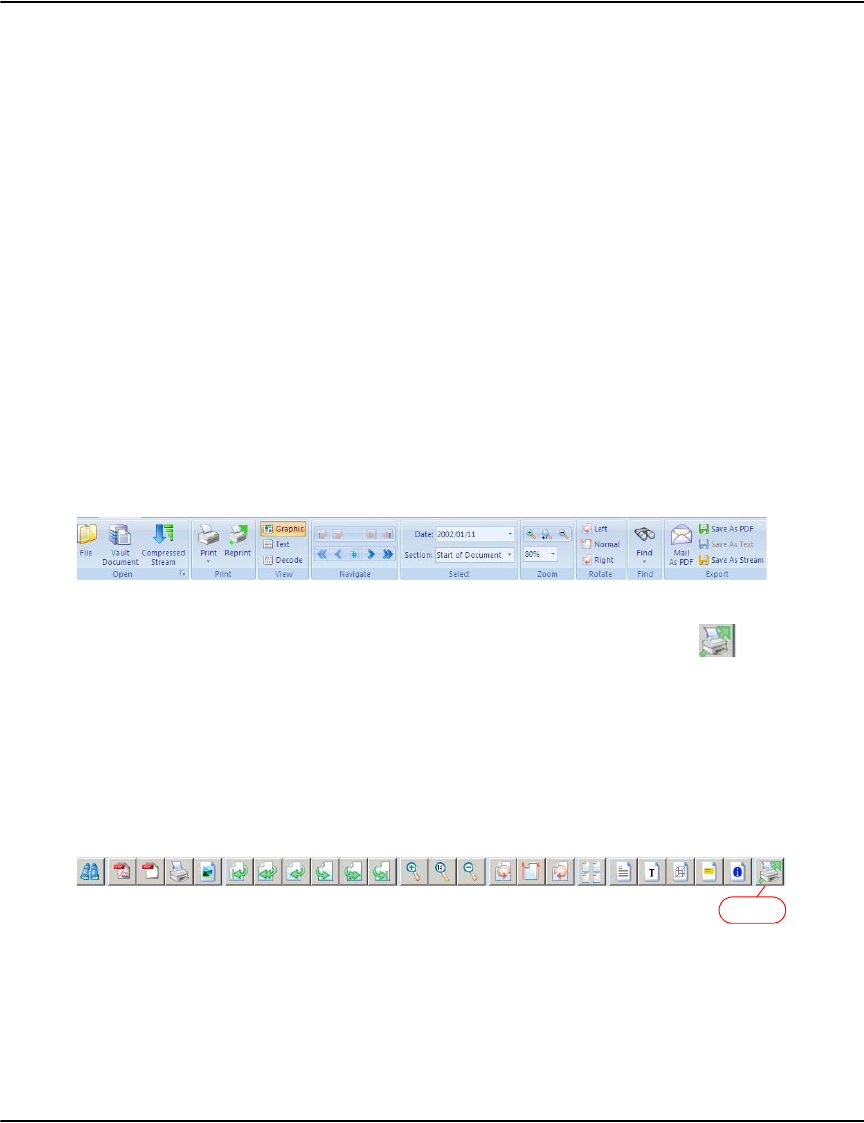
About the Rendering Engine
223
• the text (reprint output filename) should be unique as the reprint batching process will
automatically add a number (1,2,3,…) to the filename of the created files if a file with the
same name already exists. The process will create two files using the name supplied. One
will have a filetype of afp and this will be the file that is sent for printing. The other will
have a filetype of jrn and this is a Vault style journal file for the corresponding AFP file.
The reprintinput directory should be empty after the batch processing is completed.
Note: There is no automatic cleanup of consolidated output files. It is the site’s responsibility
to implement a procedure to delete or move the output files once the batch process is
completed. The processing is complete when the .afp file is created.
Submitting documents for Batch Reprinting
Requests to add documents to the batch reprint list can be done from the Vault Service Client,
Vault Reprint Admin client, Perl web client, and the Vault Service Web client. Each of the
clients has different reprint capabilities.
Vault Service clients
For the Vault Service Client and Vault Service Reprint Admin client, the Reprint icon in the
ribbon bar will only be enabled if you are viewing an AFP document. Selecting the icon will
allow you to either print the entire document, the current page, or a page range.
Service Web client
The Service Web client has a reprint icon but only reprinting of the entire
document is supported. The reprint icon is only enabled when AFP documents
are being viewed.
Perl client
The Perl client has a reprint icon (a printer icon that displays "Reprint Document" when you
hover over it). Only reprinting of the entire document is supported. If the document that is
being viewed is not an AFP document, the request to reprint it will generate an error report.
Otherwise, you will see a "Submitting Reprint Request" message followed by a message
indicating if the reprint succeeded ("Reprint Submitted") or failed ("Error report").
Note: Only clients at release 5.5 and higher will have the reprint capability.
Batch Reprint Settings
There are two batch reprint related settings in the server.ini file.
Reprint

About the Rendering Engine
224
ReprintInputPath: This is the path where documents, and their resources, flagged for reprint
will be stored temporarily. This will default to the reprintinput subdirectory.
ReprintOutputPath: This is the path where the consolidated documents for reprint will be
placed. This will default to the reprintoutput subdirectory.

About the Rendering Engine
225

Developing Vault applications
226
Developing Vault applications
Overview
The primary vault functions are divided across three separate services
• The loader is responsible for automated loading of new data into the vault.
• The server executes database searches and services requests for raw document data.
• The rendering engine converts raw document data into application useful forms.
There are a wide variety of possible custom vault applications you may want to build such as:
custom desktop client or extension to an existing desktop client, custom web site or extension
to an existing web site, automated extraction and conversion and so on. In almost all cases, the
application will communicate directly to the rendering engine. Database searches are relayed
by the rendering engine to the server.
Conversion requests are executed inside the rendering engine and the conversion may make
additional server requests, fetch resources and fetch raw document data. Multiple rendering
engines may be deployed for the same vault and the rendering process is often resource
intensive and additional engines provides additional capacity. Additional rendering engines
can provide additional redundancy, particularly if some are deployed on separate machines.
By default, the services listen on a specific port for all local interfaces:
• the server listens on port 6001 by default
• the loader listens on port 6002 by default
• the rendering engine listens on port 6003 by default
Message Protocol
Applications interact with the rendering
engine using messages. The application
begins by opening a connection to the rendering engine. To initiate a request, the application
sends a request message and some functions will require a second message containing
additional data. When the rendering engine finishes executing the request, it sends a result
message back. Some functions will return an additional data message and some functions do
not return a result. The application can then send more requests as needed. Finally, the
application disconnects from the rendering engine.
Logically, a message can represent several structures:
NOTE THAT IF YOU WANT TO RUN MULTIPLE
SERVICES OF THE SAME TYPE, YOU WILL NEED TO
ALTER THE LISTEN PORT.

Developing Vault applications
227
• A table of data with a certain number of rows and columns. Typically the order of rows is
significant.
• A list of key-value pairs (which looks like a 2 column table). Typically the order of rows is
not significant.
• A binary object such as an image (which looks like a 1x1 table).
• The request and result messages are lists of key-value pairs. The request keys begin with
“request.” The result keys begin with “result”.
• Request messages contain the pair: request.function and <function name>.
Functions are in the format: <component>.<subcommand> typically (e.g.
render.transform) the pair: request.blocks <number of blocks>. Usually 0 but 1 for a
few functions any additional parameters the function needs.
• Result messages contain a copy of the request key value pairs for reference. The pair:
result.status and <status>; the status is 0 if the request succeeded, otherwise is a
non-zero error number.
The pair: result.message and <error message>; if the request failed, error message is
a text description of the fault. The pair: result.blocks and <number of blocks>which
must be either 0 or 1 currently may also contain additional informational key pairs
as defined by the function.
For certain applications it is handy to be able to execute multiple requests at once. The pair:
request.sequence and <unique identifier> causes the server to execute the request even if the
previous request has not completed the results may be returned to the application in any
order. The application uses the sequence number in the result to determine which result is
which. If one of the results is very large, it can block smaller results until it has been sent. Note
that internally the rendering engine may cache results. Cached results will have the pair:
result.cached and <number of seconds the data has been in the cache>. Results over a certain
size (e.g. some images) will not be placed in the cache (it would overwhelm the cache). Results
are only kept in the cache for a certain (configurable) time period. Error results are typically
kept for a shorter period of time. Requests and results are typically logged by the services.
Some functions spawn sub requests that can be logged, can be transmitted upstream to the
server.
Note that the services will disconnect clients that have been idle for a certain (configurable)
time. If the application experiences a communication error do not retry immediately; either
return an error to the caller or delay and retry a certain number of times before returning an
error. You will want to avoid an avalanche of requests at the point where service is restored.

Developing Vault applications
228
Data input and Render output options
The data input and render output options supported by Vault are displayed below.
Render engine connection
The rendering engine tries to keep messages alive. When sending a request with a second,
parameter message, combine them for transmission which helps avoid the Nagle algorithm
issue without disabling it (which should be avoided in general).
It is important to test the connection for read and write-ability and time-out accordingly. For
example, with “select” you don't want to hang on a dead network connection, upstream or
downstream. Consistently check for socket errors and protocol errors (result.status). For
requests with potentially large data blocks (such as PDFs) don't assume a message will fit in
memory. On web servers, relay the data by chunk. For client apps, be prepared to spill large
results to disk.
API sets
The Rendering engine server provides a set of APIs which provides web developer the ability to
access the Vault servers (the Repository server and/or the Rendering Engine), and provides
access to databases, accounts and documents stored in the Vault and also provides rendering
Output Mode
GIF
HTML
PDF
RAW
PNG
TIFF
BMP
Stream
Text
Collection
Comments
DOCINFO
TIFFG4
XML
Print
Decode
Input Type X XXXXXX X XX X XX
AFP X XXXXXX X XX X XX
AFPLine X XXXXXX X X X XX
Metacode X XXXXX X X X XX
DJDE X XXXXX X X X XX
DJDELine X X X X X X X X X X X X
Postscript X X X X X X X X X X X
PDF X X X
MPTIFF X XXXXXX X X X
Collection X X X X
HTML X X X X
SplitXML X X X

Developing Vault applications
229
capabilities so that renderings of documents in the Vault can be requested by client code.
Alternatively you can use Rendering Engine protocols which allow you communicate with
Rendering Engine servers across your network via TCP/IP sockets.
C++ API
This is the package for the Vault C++ API library.
Note that this is not supported for version 6.0 and higher. For the library names, working
environments and other detailed information for versions 5.4 and prior, please contact Pitney
Bowes Software Solutions Technical Support.
COM API
This is the package for the COM API.
Note that this is not supported for version 6.0 and higher. For the library names, working
environments and other detailed information for versions 5.4 and prior, please contact Pitney
Bowes Software Solutions Technical Support.
.NET API
e2NetRender: the latest UNICODE enabled .NET API, refer to the “.NET API (e2NetRender)” on
page 230 section for detailed information on using this API.
Java API
The Java API is a Java class library which encapsulates access to the Vault servers (the
Repository server and/or the Rendering Engine), Refer to “Java API” on page 257. This Java API
is only compatible with the Vault 5.4 servers (and later).
Rendering Engine protocols and message formats
You can build client applications using messages transmitted via TCP/IP sockets on your
network. The Rendering Engine provides protocols (referred to as modes) that perform
different functions which can be incorporated in your application.

Developing Vault applications
230
.NET API (e2NetRender)
Vault is shipped with a system rendering API for the .NET environment. This API is compatible
with the Microsoft .NET Framework 3.5 SP1. It consists of two namespaces, refer to
“e2NetRender” on page 246 and “e2NetRender.render2” on page 253..
The sections that follow are intended to provide guidance required for creating your own
e2Vault .NET programming project. Note that the sample code is based on VCS.net.
Programming procedure
1. Add a reference of e2NetRender.dll
2. Import namespaces
3. Create an object of the class of RenderClient2
4. Get messages
5. Set SSL parameters if SERVERS are working under SSL mode
6. Connect/Disconnect from the server
7. Use RenderClient2.GetMyVersion() to get the version number of the package.
8. Use RenderClient2.GetMyMsg() to get the messages inside RenderClient for every calling
if necessary.
9. Use RenderClient2.SetCharsetName()/SetCodePage() to set a new character encoding.
The default character encoding is UTF8.
10. Set host IP and port number (Vault Repository Server and Vault Rendering Engine).
11. Use RenderClient2.connect()/close() to connect to / disconnect from SERVER/Render.
12. Use RenderClient2.DatabaseList() to get database information of the Vault system.
13. Use RenderClient2.DatabaseInfo() to get index information of a specific database.
14. Use RenderClient2.DatabaseSearch() to search an index for a specific database.
15. Use RenderClient2.documentList() to get document list.
16. Use RenderClient2.DatabaseResolve() to get document file and offset/pointer
i. Use RenderClient2.DocumentData() to get all information of the document.
17. Use RenderClient2.RenderTransform() to get document pages data through memory.
18. Use RenderClient2.GetDocumentPagesByFile() to get document pages data through a
file.
The sections that follow provide detailed information about the above steps.

Developing Vault applications
231
Install CERTIFICATE in local/web machine (using .NET API)
1. Transform CERTIFICATE file into PFX or P12 file:
openssl pkcs12 -in test.crt -inkey test.key -export -out test.pfx
2. Transform PFX file into PEM file (PEM is the format that combines the CERTTIFICATE
and PRIVATE KEY information.):
openssl pkcs12 -in test.pfx -out test.pem
3. Install the PFX format certificate (Windowx XP):
i. Choose start > Control Panel > Internet Options and select the Content tab
ii. Click Certificates and click Trusted Root Certification Authorities and click Import. The
“Certificate Import Wizard” will launch.
iii. Click Next and use Browse... to select a PFX format certificate.
iv. Click Next and select Place all certificate in the following store.
v. Click Browse... and select Trusted Root Certification Authorities and click Next.
vi. Click Finish then OK from the “Import was successful" dialog.
vii. You will now be able to see the CERTIFICATE in the list.
Add a reference of e2NetRender.dll
1. Choose the project that will be using e2NetRender.dll
2. Right click "References" inside the window of "Solution Explorer" ->
3. Choose "Add Reference..." ->
4. Choose the tab of ".NET" ->
5. Click "Browse..." button ->
6. Choose the directory that e2NetRender.dll is installed and choose e2NetRender.dll ->
7. Click "OK" -> return the project.
8. e2NetRender is now visible within your project's References of the Solution Explorer".
Import namespaces
using e2NetRender
using e2NetRender.render2

Developing Vault applications
232
Create an object of the class of RenderClient2
string exmsg="";//will be used later
string msg="";//will be used later
string host="127.0.0.1";//will be used later
int port=6003;//will be used later
e2NetRender.render2.RenderClient2 myClient=new
e2NetRender.render2.RenderClient2();
Get version number
Use RenderClient2.GetMyVersion() to get the version number of the package
Get messages
Use RenderClient2.GetMyMsg() to retrieve RenderClient messages for every calling, as
necessary.
Set a new character encoding
Use RenderClient2.SetCharsetName()/SetCodePage() to set a new character encoding. The
default character encoding is UTF8
Set Rendering Engine IP address and port number (Vault Repository server and Rendering
Engine)
myClient.SetHost(host);
myClient.SetPort(port);
Set up RenderClient2 to use SSL SERVERs
RenderClient2 client=new RenderClient2();
//set other parameters
//...
client.usesslsocket=1; #default value is 0
client.targethostname = targethostname; #server host name
client.certificatefilename = certfilename; #certificate file name (PEM format)
client.clientsslprotocol = Sslprotocols.Tls; #set up Ssl protocol
client.connect();
//....

Developing Vault applications
233
Use OPENSSL to test the certificate/key files
1. Create CERTIFICATE/KEY files:
Refer to "notes-SelfSigned-Certificate.txt"
2. create PFX file:
openssl pkcs12 -in test.crt -inkey test.key -export -out test.pfx
Note: you can leave the password empty
3. Create PEM file:
openssl pkcs12 -in test.pfx -out test.pem"
Notes:
The PFX password is the one entered above command.
You have to enter a password for the PEM file.
4. Run server:
openssl s_server -port 8080 -cert test.crt -key test.key
or
openssl s_server -port 8080 -cert test.pem
5. run client:
openssl s_client -host servermachine -port 8080
or
openssl s_cleint -host servermachine -port 8080 -cert test.crt -key test.key
or
openssl s_client -host servermachine -port 8080 -cert test.pem
Connect/Disconnect from the server
Use RenderClient2.connect()/close() to connect to / disconnect from the
server:
myClient.connect();
//call RenderClient2.DatabaseList();
//...
//call RenderClient2.RenderTransform()
myClient.close();
Use RenderClient2.DatabaseList() to get database information
try
{
myClient.connect();
e2DBList dbl=myClient.DatabaseList();
myClient.close();

Developing Vault applications
234
if(dbl!=null)
{
for(int i=0;i<dbl.Size();i++)
{
e2Database db=(e2Database)dbl.Get(i);
string name=db.name;
string desc=db.desc;
//use name/desc to do something
//...
}
}
else
{
msg="failed to get db list : "+myClient.GetMyMsg();
//do something if failed
//...
}
}
catch(e2Exception ex)
{
exmsg=ex.Message;
msg=myClient.GetMyMsg();
//do something
//...
}
catch(Exception ex)
{
exmsg=ex.Message;
//do something
//...
}
finally
{
//free resources
myClient.close();
}Use RenderClient2.DatabaseInfo() to get index information of a
specific database
string db="default"; //the db is from above call
myClient.connect();
e2IndexList idxl=myClient.GetIndexList(db);
myClient.close();
string msg="";
if(idxl==null)
{
msg="failed to get indexlist : "+myClient.GetMyMsg();

Developing Vault applications
235
//display message
return;
}
for(int i=0;i<idxl.Size();i++)
{
e2Index idx=(e2Index)idxl.Get(i);
int indexno=idx.indexno;
string name=idx.name;
string attr=idx.attributes;
string flags=idx.flags;
string desc=idx.desc;
//use index info to do somethting
...
}
Use RenderClient2.DatabaseInfo() to search an index for a specific database
try
{
string db="default"; //the db is from above call
myClient.connect();
e2IndexList idxl=myClient.DatabaseInfo(db);
myClient.close();
if(idxl!=null)
{
for(int i=0;i<idxl.Size();i++)
{
e2Index idx=(e2Index)idxl.Get(i);
int indexno=idx.indexno;
string name=idx.name;
string attr=idx.attributes;
string flags=idx.flags;
string desc=idx.desc;
//use index info to do somethting
//...
}
}
else
{
msg="failed to get indexlist : "+myClient.GetMyMsg();
//do something
//...
}
}
catch(e2Exception ex)

Developing Vault applications
236
{
exmsg=ex.Message;
msg=myClient.GetMyMsg();
//do something
//...
}
catch(Exception ex)
{
exmsg=ex.Message;
//do something
//...
}
finally
{
//free resourcess
myClient.close();
}
Use RenderClient2.DatabaseSearch() to search an index for a specific database
{
string dbname="default";
e2SearchParameters2 param2=new e2SearchParameters2();
//search solution 1:
int indexno=1;//from RenderClient2.DatabaseInfo()
string indexflags="wjctul";//from RenderClient2.DatabaseInfo()
e2IndexType indextype=e2IndexType.NONE;
indextype=e2Index.getIndexType(indexflags);
param2.searchmode=e2SearchMode.GENERIC;
param2.dbname=dbname;
param2.SetIndex(indexno, indexflags);
param2.prefix="";
param2.first="";
param2.maxresult=e2Consts.MAX_SEARCH;
//search solution 2:

Developing Vault applications
237
//string account="12345";//when search INVLINK index, you should know
ACCOUNT and DATE
//string date="2008/01/01";
//
//param2.searchmode=e2SearchMode.INVLINK;
//param2.dbname=dbname;
//param2.SetAccount_Date(account, date);
//param2.prefix="";
//param2.first="";
//param2.maxresult=e2Consts.MAX_SEARCH;
//search solution 3:
//param2.searchmode=e2SearchMode.GUID;
//param2.dbname=dbname;
//param2.prefix="";
//param2.first="";
//param2.maxresult=e2Consts.MAX_SEARCH;
//search solution 4:
//param2.searchmode=e2SearchMode.IGUID;
//param2.dbname=dbname;
//param2.prefix="";
//param2.first="";
//param2.maxresult=e2Consts.MAX_SEARCH;
//after calling RenderClient2.DatabaseSearch():
//moredata=0, no more data.
//moredata=1, means more data,

Developing Vault applications
238
//then set param.first="last result of MATCHED" to call the function again
to get more.
int moredata=0;
myClient.connect();
e2SearchList2 sl=myClient.DatabaseSearch(param2, out moredata);
//while(moredata==1)
//{
//param2.first=((e2SearchData2)sl.Get(sl.Size()-1)).matched;
//e2SearchList2 sl0=myClient.DatabaseSearch(param2, out moredata);
////using result to do something
////...
//}
myClient.close();
msg="";
if(sl==null)
{
msg="failed to get searchlist : "+myClient.GetMyMsg();
//display message
return;
}
//get title
e2SearchTitle2 title=sl.title;
int extsize=0;
string[] exttitle=title.exttitle;
if(title.exttitle!=null)
{

Developing Vault applications
239
extsize=title.exttitle.Length;
}
//get search data
for(int i=0;i<sl.Size();i++)
{
//
e2SearchData2 sd=(e2SearchData2)sl.Get(i);
if(indextype==e2IndexType.CUSTOMER_RECORD)
{
string match=sd.matched;
string acc=sd.account;
string dat=sd.date;
string type=sd.format;
string file=sd.file;
string offset=sd.pointer;
int pages=sd.pages;
//
//these parameters can be used to get document pages
//
}
else if(indextype==e2IndexType.DOCUMENT_RECORD)
{
string match=sd.matched;
string acc=sd.account;
string offset=sd.pointer;
//
//need to use ACCOUNT to call
//RenderClient2.Resolve()/RenderClient2.DocumentData()

Developing Vault applications
240
//to get more detail information of the document.
//
}
else
{
//unknown index type
msg="unknown index type [ "+indexflags+" ]";
return;
}
//get extended data
string[] extdata=sd.extdata;
extsize=0;
if(sd.extdata!=null)
extsize=sd.extdata.Length;
//use data to do something
//...
}
}
catch(e2Exception ex)
{
exmsg=ex.Message;
msg=myClient.GetMyMsg();
//do something
//...
}
catch(Exception ex)

Developing Vault applications
241
{
exmsg=ex.Message;
//do something
//...
}
finally
{
//free resources
myClient.close();
}
Use RenderClient2.DatabaseResolve() to get document file and offset/pointer
try
{
string db="default";//db name is from GetDBList()
string account="12345";//account number from
RenderClient2.DatabaseSearch() or you already know it
string docdate="2008/01/01";
string docfile="";
string docoffset="";
myClient.connect();
bool bret=myClient.DatabaseResolve(db, account, docdate, out
docfile, out docoffset);
myClient.close();
//
if(!bret)
{
msg="failed to get document info :
"+myClient.GetMyMsg();
//display message
return;
}
}
catch(e2Exception ex)
{
exmsg=ex.Message;
msg=myClient.GetMyMsg();
//do something
//...
}
catch(Exception ex)

Developing Vault applications
242
{
exmsg=ex.Message;
//do something
//...
}
finally
{
//free resources
myClient.close();
}
Use RenderClient2.DocumentData() to get all information of the document
try
{
string docfile="doc_file_name";//from
RenderClient2.DatabaseResolve()
string docoffset="000000000000";//from
RenderClient2.DatabaseResolve()
e2DocumentDataList ddl=null;
myClient.connect();
ddl=myClient.DocumentData(docfile, docoffset);
myClient.close();
//
if(ddl!=null)
{
//string account=
//string docfile=
//string docoffset=
string docdate=ddl.GetDocDate();
string doctype=ddl.GetDocType();
string address=ddl.GetDocAddress();
string name=ddl.GetDocName();
int totalpages=ddl.GetDocPages();
}
else
{
msg="failed to get document information :
"+myClient.GetMyMsg();
//display message
return;
}
}
catch(e2Exception ex)
{
exmsg=ex.Message;
msg=myClient.GetMyMsg();
//do something
//...

Developing Vault applications
243
}
catch(Exception ex)
{
exmsg=ex.Message;
//do something
//...
}
finally
{
//free resources
myClient.close();
}
Use RenderClient2.RenderTransform() to get document pages data through memory
try
{
e2RenderParameters param=new e2RenderParameters();
param.parametertype=e2DocParameterType.NORMAL;
param.dbname="default";//db name from
RenderClient2.DatabaseList()
//get below parameters from
DatabaseSearch()/DatabaseResolve()/DocumentData()
string account="12345";
string docdate="2007/01/01";
string doctype="afp";
string docfile="filename";
string docoffset="00000C00";
param.SetNormalParameters(account, docdate, doctype,
docfile, docoffset);
param.startpage=1;
param.totalpages=1;
param.SetOutputType(0);//0=gif,2=pdf, 3=raw, 4=png, 5=tiff,
9=text
param.resolution=800;//512, 640, 800, 1024, 1280
param.orientation=0;//0=0, 1=90, 2=180, 3=270
//param.transformmode=e2TransformMode.mem; //default mode is
memory mode
//
myClient.connect();
e2RenderPages pages=myClient.RenderTransform(param);
myClient.close();
if(pages==null)
{

Developing Vault applications
244
msg="failed to get document pages by memory :
"+myClient.GetMyMsg();
//display message
return ;
}
//use pages data to do something
byte[] pagesbytes=pages.pagesdatabytes;
int pagessize=pages.pagesdatasize;
//...
}
catch(e2Exception ex)
{
exmsg=ex.Message;
msg=myClient.GetMyMsg();
//do something
//...
}
catch(Exception ex)
{
exmsg=ex.Message;
//do something
//...
}
finally
{
//free resources
myClient.close();
}
RenderClient2.RenderTransformByFile() to get document pages data through a file
try
{
e2RenderParameters param=new e2RenderParameters();
param.parametertype=e2DocParameterType.NORMAL;
param.dbname="default";//db name from
RenderClient2.DatabaseList()
//account/date/type/file/offset are from
RenderClient2.DocumentData()
string account="12345";
string docdate="2008/01/01";
string doctype="Afp";
string docfile="docfilename";
string docoffset="000000000000";
param.SetNormalParameters(account, docdate, docfile,
doctype, docoffset);

Developing Vault applications
245
param.startpage=1;
param.totalpages=1;
param.SetOutputType(0);//0=gif,2=pdf, 3=raw, 4=png, 5=tiff,
9=text
param.resolution=800;//512, 640, 800, 1024, 1280
param.orientation=0;//0=0, 1=90, 2=180, 3=270
param.transformmode=e2TransformMode.file;
string outputfilename="test.gif";
param.outputfilename=outputfilename;
//
myClient.connect();
int filesize=myClient.RenderTransformByFile(param);
myClient.close();
if(filesize<=0)
{
msg="failed to get document pages by a file [
"+outputfilename+" ] : "+myClient.GetMyMsg();
//display message
return ;
}
//use the pagesdata inside the file to do something
//....
}
catch(e2Exception ex)
{
exmsg=ex.Message;
msg=myClient.GetMyMsg();
//do something
//...
}
catch(Exception ex)
{
exmsg=ex.Message;
//do something
//...
}
finally
{
//free resources
myClient.close();
}

Developing Vault applications
246
Namespaces
e2NetRender
Classes
public e2Consts includes the constants used inside the package.
Public Properties
public enum e2IndexType: the index type of a specific database
e2IndexType.NONE
e2IndexType.CUSTOMER_RECORD
e2IndexType.DOCUMENT_RECORD
public enum e2SearchMode: define the search mode when searching an index inside
a specific database
e2SearchMode.GENERIC
e2SearchMode.GUID
e2SearchMode.IGUID
e2SearchMode.INVLINK

Developing Vault applications
247
public enum e2OutputType: output type value. Used in:
RenderClient2.RenderTransform()/RenderClient2.RenderTransformByFile().
e2OutputType.GIF
e2OutputType.PDF
e2OutputType.RAW
e2OutputType.PNG
e2OutputType.TIFF
e2OutputType.BITMAP
e2OutputType.STREAM
e2OutputType.TEXT
e2OutputType.COLLECT
e2OutputType.COMMENTS
e2OutputType.DOCINFO
e2OutputType.TIFFG4
public enum e2TransformMode: used in RenderClient2:RenderTransform() or
RenderClient2:RenderTransformByFile()
e2TransformMode.mem
e2TransformMode.file
public enum e2DocParameterType: used in RenderClient2.RenderTransform() or
RenderClient2.RenderTransformByFile()
e2DocParameterType.DocumentGUID
e2DocParameterType.InstanceGUID
e2DocParameterType.NORMAL
e2DataType the base type of data item classes: e2Database, e2Index, e2Searche, e2SearchTitle2,
e2SearchData2, e2Document, e2DocAttribute, e2RenderPages, e2KeyValue,
e2DocumentPageRecord, e2DocumentPage, e2DocumentData, e2ResourceInfo,
e2StatTitle, e2Stat, e2FileAttr, e2FileStatus.
e2DataList the base of collection classes: e2DBList, e2IndexList, e2SearchList, e2SearchList2,
e2DocumentList, e2DocAttributeList, e2DocPageList, e2KeyValueCollect,
e2DocumentPageArray, e2DocumentDataList, e2ResourceList, e2StatList,
e2FileAttrList, e2FileStatusList.
Public Methods

Developing Vault applications
248
public System.Int32 Add (e2NetRender.e2DataType data): adds data type
public e2NetRender.e2DataType Get (System.Int32 pos): gets the data type at a
specific position.
public System.Int32 Size ( ) get the size of the collection.
e2Database for database in Vault
Public Properties
public string name [ get, set]: database name.
public string desc [ get, set]: database description
e2DBList Vault database collection, see e2DataList.
e2Index index details.
Public Properties
public int indexno [ get, set: the index number.
public string name [ get, set]: the index name.
public string flags [ get, set]: the flag of this index.
public string attributes [ get, set]: the attributes of this index.
public string desc [ get, set]: the description of this index.
e2IndexList for index collection in Vault, see e2DataList.
e2Search, e2SearchTitle, e2SearchData: for search in Vault.
e2SearchTitle Title details.
Public Properties
public string matched [ get, set]: the title name of the matched string
public string account [ get, set]: the title name of the account
public string date [ get, set]: the title name of the document date
public string type [ get, set]: the title name of the document type
public string file [ get, set]: the title name of the document file
public string offset [ get, set]: the title name of the document offset
public string pages {get, set}: the title name of the document pages count
public string[] extendedtitle [ get, set]: the title name of extended columns.
e2SearchData Search details

Developing Vault applications
249
Public Properties
public string matched [ get, set]: the search result of matched data string.
public string account [ get, set]: the search result of the account.
public string date [ get, set]: the search result of the doc-date.
public string type [ get, set]: the search result of the doc-type.
public string file [ get, set]: the search result of the doc-file.
public string offset [ get, set]: the search result of the doc-offset.
public string pages [ get, set]: the search result of the document pages.
public string[] extendeddata [ get, set]: the search result of the extended colum data.
.e2SearchList used for search collection., see e2DataList
e2Document used for document list details
Public Properties
public string account [ get, set]: the document's account.
public string date [ get, set]: the document's date.
public string type [ get, set]: the document's type.
public string file [ get, set]: the document's file.
public string offset [ get, set]: the document's offset.
public in pages [ get, set]: the document's page count.
e2DocumentList used for document collection, see e2DataList;
e2DocAttribute used for document attributes.
Public Properties
public string attrname [ get, set]: the attribute name.
public string attravail [ get, set]: the attribute value.
public string reportlevel [ get, set]: the report level value.
public string reportpages [ get, set]: the report pages.
e2DocAttributeList used for the document attribute collection, see e2DataList
e2RenderPages used for retrieving document pages.
Public Properties
public e2NetRender.e2OutputType outputtype [ get, set]
the output type of the pages data.

Developing Vault applications
250
public byte[] pagesdatabytes [ get, set]: the document pages data bytes.
public int pagesdatasize [ get, set]: the size of the page data.
public int startpage [ get, set]: starting pageno of the page data.
public in totalpages [get, set]: total pages number of the document.
e2SearchParameters
2
parameters for searching a database. Used in e2RenderClient2.DatabaseSearch().
Public Properties
public e2SearchMode [get, set]: database search mode, see e2SearchMode
public string dbname [ get, set]: database name.
public int underindexno [get, set]: under index no.
public int indexno [get]: the no of the index.
public string indexflags [get]: the flags of the index.
public bool SetIndex(int indexno, string flags): set index no and index flags.
public string account [ get]: account number.
public string docdate [ get]: document date.
public bool SetAccount_Date(string account, string date): set the account and date
info.
public string guidstring [get, set]: the GUID string when searching GUID index
public string iguidstring [get, set]: the GUID string when searching IGUID index
public string prefix [get, set]: prefix string when search INVLINK index.
public string fields [get]: the field value
public string titles [get]: the titles
public bool SetFields_Titles(string fields, string titles): set the fields string and titles
string
public string first [ get, set]: the first matched partial string
public int reverse [ get, set]: if search in reverse or not. 1=reverse searching
public int maxresult [ get, set]: the max number of search results
e2RenderParameters parameters of getting document pages. Used in e2RenderClient2.RenderTransform()
or e2RenderClient2.RenderTransformByFile()
Public Methods

Developing Vault applications
251
public e2DocParameterType [get, set] //if using account/date/type/file/offset or
GUID string
public string dbname [get, set]: database name.
public string account [get]: account number.
public string docdate [ get]: document date.
public string docfile [ get]: document file.
public string doctype [get]: document type.
public string docoffset [ge]: document offset.
public SetNormalParameters(string account, string docdate, string doctype, string
docfile, string docoffset): set parameters of account/date/type/file/offset
public string guidstring [get]: get GUID string
public bool SetGUID(string guidstring): set GUID string.
public bool SetIGUID(string guidstring)
set IGUID string.
public string iguidstring [ get ]: get IGUID string.

Developing Vault applications
252
public int startpage [ get, set ]: starting page no.
public int totalpages [ get, set ]: total pages number.
public e2OutputType outputtype [ get, set ]: output type. Can use SetOutputType()
to set the value.
public System.Int32 SetOutputType ( System.Int32 output ): Set the output type of
the page data : 0=GIF, 2=PDF, 3=RAW, 4=TIFF, 5=PNG, 9=TEXT.
public System.Int32 SetOutputType ( System.String outtype ): Set the output type of
the page data : "GIF", "PDF", "RAW", "TIFF", "PNG", "TEXT".
public System.Int32 GetOutputType ( ): return output type.
public int background [ get, set ]: need background ( for PDF )? 1=yes, 0=no.
indicates whether the background should be shown in PDF export mode
public int orientation [ get, set ]: page's orientation : 0=0 degree, 1=90 degree.
2=180, 3=270.
public int resolution [ get, set ]: page's resolution : 512/640/800/1024/1280.
public int cpix [ get, set ]: for text output : the characters per inch horizontally for
text conversion
public int cpiy [ get, set ]: for text output: the characters per inch vertically for text
conversion
public string textencoding [ get, set ]: use the specific text encoding for text output.
public int mark [ get, set ]: start text output with a byte order mark 0/1
public string findtext [ get, set ]: next to highlight
public int findcolour [ get, set ]: colour to highlight the text in
public int findcase [ get, set ]: 0/1, 1 if the match should be case sensitive
public int pdfsecuritymode [ get, set ]: for PDF security settings(user password,
owner Password, permission); only valid when the parameter of PDFEncryption=1 in
PROFILES.INI; otherwise, all parameters will be from PROFILES.INI.
public string pdfuserpassword [ get, set ]: set PDF user password for the purpose of
opening the pdf document.
public string pdfownerpassword [ get, set ]: set PDF owner password for the purpose
of modifying the pdf doucment.
public int pdfpermission [ get, set ]: set PDF permission when opening the PDF
document.

Developing Vault applications
253
e2NetRender.render2
Classes
Base the basic class of the redering functions
Public Methods
public System.String GetMyVersion ( ): get version number of the .NET API.
public System.String GetMyMsg ( ): get message.
public System.StringGetCharsetName: get character set.
public System.String GetCharsetName ( ): get character set.
public System.Boolean SetHost ( System.String host ): set the host name of the
server.
public System.String GetHost ( ): get the host name of the server.
public System.Boolean SetPort ( System.Int32 port ): set the port number of server.
public System.Int32 GetPort ( ): get the port number of SERVER.
public System.Int32 close ( ): close the connection to SERVER.
public System.Int32 connect ( ): connect to the HOST.
public System.Boolean IsConnected ( ): check if connect to SERVER.
public System.Boolean SetCharsetName(String charsetname): Set a new character
encoding.
public System.String GetCharsetName(): get the character encoding name that API
is using .
public System.Boolean SetCodePage(int codepage): Set a new character encoding
name through codepage.
public System.Int32 GetCodePage(): get the codepage that API is using.
public System.Int32 usesslsocket [ get, set ]: when SERVER is using SSL(secured
socket layer) mode, client must set up usesslsocket=1 to connect; default value is 0.
public System.String targethostname [ get, set ]: when usesslsocket=1, use this
parameter to set up server target host name (common name of the certificate on
server side)
public System.Security.Authentication.SslProtocols clientsslprotocol [ get, set ]:
When usesslsocket=1, use this parameter to set up SSL protocol; mush match the
protocol that SERVER is using
Classes

Developing Vault applications
254
e2RenderClient the main rendering class, it's base type is e2BaseClient, see e2BaseClient.
Public Methods
Public e2DBList RenderClient2::DatabaseList ( ): get a list of the databases in a
vault along with their descriptions.
Public e2IndexList RenderClient2:DatabaseInfo ( String dbname ): get a list of
searches available for a specific database.
Public e2SearchList2 RenderClient2:DatabaseSearch ( e2SearchParameters2
param2 , out int moredata ): search an index for matching records.
Public Boolean RenderClient2:DatabaseResolve ( String dbname , String account
,String date , out String file , out String offset ): used to determine if a customer or
document record exists; fetches the file and offset parameters.
Public e2DocumentPageArray RenderClient2:DocumentPageArray ( String file ,
String recordoffset ): fetch the offsets of a document's raw pages in the page data
file.
Public e2DocumentPage RenderClient2:DocumentPage ( String file , String
recordoffset , int pageno ): fetch the raw internal data for a document page.
Public e2DocumentDataList RenderClient2: DocumentData ( String file , String
recordoffset ): retrieve report list and properties of a document.
Public e2RenderPages RenderClient2: RenderTransform (e2RenderParameters
param)
:convert raw data into a application usable form through memory; used to render
pages to GIF, PDF, text, etc.
Public int RenderClient2: RenderTransformByFile ( e2RenderParameters param:
convert raw data into a application usable form through a file; used to render pages
to GIF, PDF, text, etc.
Public e2ResourceList RenderClient2: ResourceList ( String resourcesetname ,
String filenamepattern ): used to recursively enumerate upstream resource files.
Public e2ResourceInfo RenderClient2: ResourceInfo ( String resourcesetname ,
String filename ): Determine if a specified resource exists; fetch some basic
information about it if it does.
Public Byte[] RenderClient2: ResourceData ( String resourcesetname , String
filename , long filesize ): fetch a block of data from a resource.
Public long RenderClient2: ResourceDataByFile ( String resourcesetname , String
filename , long filesize , String outputfilename ).
Public e2StatList RenderClient2: StatList ( ): fetch statistics about function
execution times

Developing Vault applications
255
Public String[] RenderClient2: ProfileList ( ): list the names of all available profiles
known to the server.
Public e2KeyValueCollect RenderClient2: ProfileData ( String profile ): fetch the
key value pairs from a specified profile.
Public e2FileAttrList RenderClient2: FileList ( String filenameprefixpattern )
Public Boolean RenderClient2: FileData ( String filename , out String profile , out
String resource , out String pagedatafile ): retrieve the metadata associated with a
compressed file.
Public Byte[] RenderClient2: FilePage ( String filename , String pageoffset ): fetch
a raw page from a compressed file.
Public Boolean RenderClient2: FileIsOnline ( String filename , out Boolean online
: determine if a compressed file is online.
Public Boolean RenderClient2: FileRecallOffline ( String filename ): request that
an offline compressed file be placed online.
Public long RenderClient2: PostscriptHeaderInfo ( String filename ): return the size
of its Postscript file header.
Public Byte[] RenderClient2: PostscriptHeaderData ( String filename , String
offset , int bytesread ): fetch a block of data from a file's Postscript header.
Public e2FileAttrList RenderClient2: CompressedList ( String
filenameprefixpattern): list the names of compressed files.
Public Boolean RenderClient2: CompressedOpen ( String filename , out long
filehandle ): open a compressed file for access.
Public Boolean RenderClient2: CompressedClose ( long filehandle ): close an open
compressed file handle.
Public e2FileStatusList RenderClient2: CompressedStatus ( long filehandle ): get
the background scanning status for a compressed file.
Public Byte[] RenderClient2: CompressedPage ( long filehandle , int pageno ):
fetch raw page data from a compressed file.
Public e2DocumentDataList RenderClient2: CompressedDocData ( long
filehandle): get the simulated document data for a compressed file.

Developing Vault applications
256
Public Boolean RenderClient2: CompressedFileData ( long filehandle , out String
profile , out String resource , out String pagedatafile ): get the compressed file
information assocated with an open compressed file.
Public Byte[] RenderClient2: CompressedProfileData ( long filehandle ): get the
profile settings assocaited with an open compressed file.
Public Boolean RenderClient2: CompressedPostscriptHeaderInfo ( long filehandle ,
out long headerinfosize ): determine if a given compressed file exists;: and return
the size of its Postscript file header.
Public Byte[] RenderClient2: CompressedPostscriptHeaderData ( long filehandle ,
String offset , int sizeread ): fetch a block of data from a compressed file's
Postscript header.

Developing Vault applications
257
Java API
Software requirements
The software required is: Java 2 Platform, Standard Edition, v 6 (J2SE 6 Java platform/JDK).
Installing the Java API
If using the command line to build and run your custom application: specify the Java API
JAR file using the “-cp” option:
• Compiling your custom application: javac -cp e2Vault.jar and MyCustomApp.java
• Running your custom application: java -cp e2Vault.jar and MyCustomApp.java
For integration into an IDE (Netbeans, Eclipse, etc.) follow your IDE vendor's instructions for
integrating the Java API class library.
Overview of classes and usage details
All classes provided by the Vault Java API are defined in the com.g1.e2.vault package. The
primary class for use by client code is VaultClient and it serves as the main interface class
between the Vault Java API and client code.
Data stored in the Vault is exposed through the following classes:
•Database: represents a database on the Vault server
•SearchIndex: represents one of many search indexes available for a database on the Vault
server
•Account: represents an account (customer account or customer record) on the Vault
server.
• Document and DocumentEx:
Both of these classes are used to return a document list from the server. Depending on
how detailed you need the search to be, you can choose between the following two
classes:
•Document: represents a document (document record) on the Vault server.
Note: This class is used for performing detailed document searches. It needs to open
each DRD file which has a document that matches the search criteria so it can
consume a great deal of server resources generating the search result. Therefore it is
recommended that you only use this when you need to run a detailed search.
Otherwise it is recommended that you use the DocumentEx class if possible because
it is more efficient.
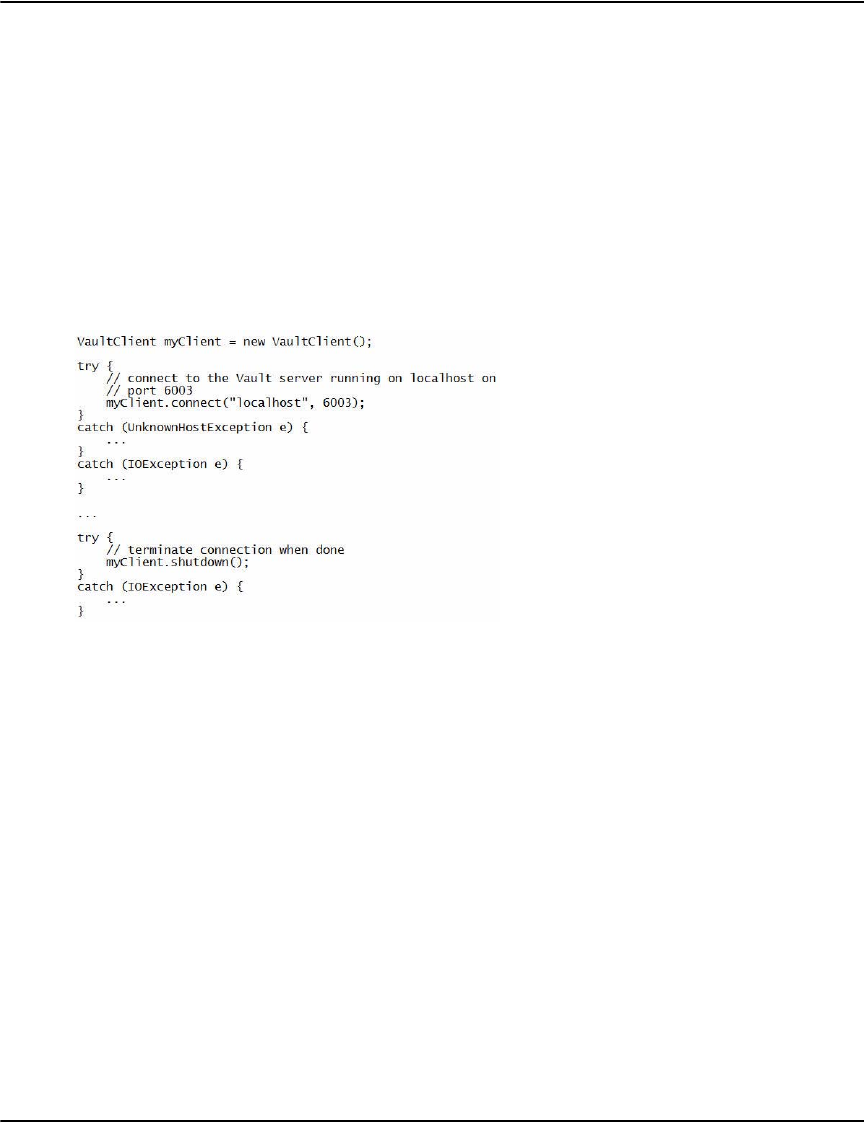
Developing Vault applications
258
•DocumentEx: represents document parameters from the INVLINK index on the Vault
server.
Note: This class is used for performing less detailed but faster document searches.
Because it only uses the INVLINK index for returning documents, it is a more
efficient way of searching for documents. It is recommended that you use this
method of returning the document list whenever possible.
For information on using these classes, please refer to “Classes and usage details” on page 262
Connection and disconnection
Connection to a Vault server can be established as follows:
Connecting to an SSL-enabled Vault server
Connecting to an SSL-enabled Vault server requires the server's SSL certificate in a PEM
format file with a “.crt” extension (e.g. e2vault-server.crt), and the contents of the certificate
file must begin with "-----BEGIN CERTIFICATE-----" and end with "-----END
CERTIFICATE-----" markers.
Connecting to an SSL-enabled Vault server is done using the following API method:
VaultClient.connectSSL(String hostname, int port, TruststoreParams
tsParams, KeystoreParams ksParams)
This can be done in either one of the following two ways:
• VaultClient.connectSSL(String hostname, int port, (TruststoreParams)null,
(KeystoreParams)null)
Use the API method in this manner if you have imported the Vault server's SSL certificate
into the Java system-wide CA certificates truststore (usually
\path\to\jre\lib\security\cacerts).

Developing Vault applications
259
• VaultClient.connectSSL(String hostname, int port, new
TruststoreParams(truststorePath, truststorePasswd), (KeystoreParams)null)
Use this API method if you have imported the Vault server's SSL certificate into a separate,
private truststore file. Refer to the javadocs for more details on the
com.g1.e2.vault.TruststoreParams class.
If the Vault server has enabled SSL Client Authentication, then the ksParams parameter
must be non-null and must contains details of a JKS-format keystore containing the client
applications's SSL credentials which will be used for authenticating it to the Vault server.
Refer to the javadocs for more details on the com.g1.e2.vault.KeystoreParams class.
Importing the Vault server's SSL certificate into the Java system-wide CA
certificates truststore
Before starting:
Make a backup copy of your Java system-wide CA certificates truststore before importing the
Vault server's SSL certificate:
cd /path/to/Java JRE/lib/security
• On Windows platforms: copy cacerts cacerts.ORIG
On UNIX platforms: cp cacerts cacerts.ORIG
If you have a JDK installed as your default Java:
On Windows platforms
keytool -import -v -alias e2VaultServer -file e2vault-server.crt -keystore
"%JAVA_HOME%\jre\lib\security\cacerts"
On UNIX platforms
keytool -import -v -alias e2VaultServer -file e2vault-server.crt -keystore
"$JAVA_HOME/jre/lib/security/cacerts"
If you have a JRE installed as your default Java:
On Windows platforms
keytool -import -v -alias e2VaultServer -file e2vault-server.crt -keystore
"%JAVA_HOME%\lib\security\cacerts"
On UNIX platforms
keytool -import -v -alias e2VaultServer -file e2vault-server.crt -keystore
"$JAVA_HOME/lib/security/cacerts"

Developing Vault applications
260
Importing the Vault server's SSL certificate into a separate/private
truststore
Import the Vault server's SSL certificate into a separate, private JKS-format truststore as
follows:
keytool -import -v -alias e2VaultServer -file e2vault-server.crt -keystore
e2vault-server.jks -storepass <your Truststore password> -storetype JKS

Developing Vault applications
261
SSL client authentication
For SSL Client Authentication, a JKS-format keystore is needed that will contain both the SSL
Certificate and corresponding Private Key of your Java client application.
1. Generate an SSL Certificate and Private Key using OpenSSL that will be used to
authenticate your Java client application to the SSL-enabled Vault server. You should have
two files in PEM format:
2. Convert the SSL Certificate to DER format:
3. Convert the Private Key to the PKCS#8 DER format:
4. Use the supplied ImportKey utility application (in the contrib/ folder of the JavaAPI
distribution) to import both the Private Key and SSL Certificate files in DER format
(created above) into a new JKS-format keystore:
Note that the ImportKey utility application will create a new entry for the SSL Certificate
and Private Key with the same password as for the keystore.
After successfully completing the previous steps, you can now connect to your
SSL-enabled Vault server and supply the necessary credentials (SSL Certificate and
Private Key) for your Java client application to authenticate itself to the Vault server as
follows:
Example
javaclient-cert.crt (SSL Certificate in PEM format)
javaclient-key.pem (Private Key in PEM format)
Example
openssl x509 -inform PEM -in javaclient-cert.crt -outform DER -out
javaclient-cert.der
Example
openssl pkcs8 -topk8 -nocrypt -inform PEM -in javaclient-key.pem
-outform DER -out javaclient-key.der
Example
javac ImportKey.java
java ImportKey javaclient-key.der javaclient-cert.der javaclient
Enter a password for the keystore: password
Creating new keystore file: javaclient-keystore.jks
One certificate, no chain.
Key and certificate stored with alias "javaclient" to keystore file
"C:\temp\javaclient\javaclient-keystore.jks".
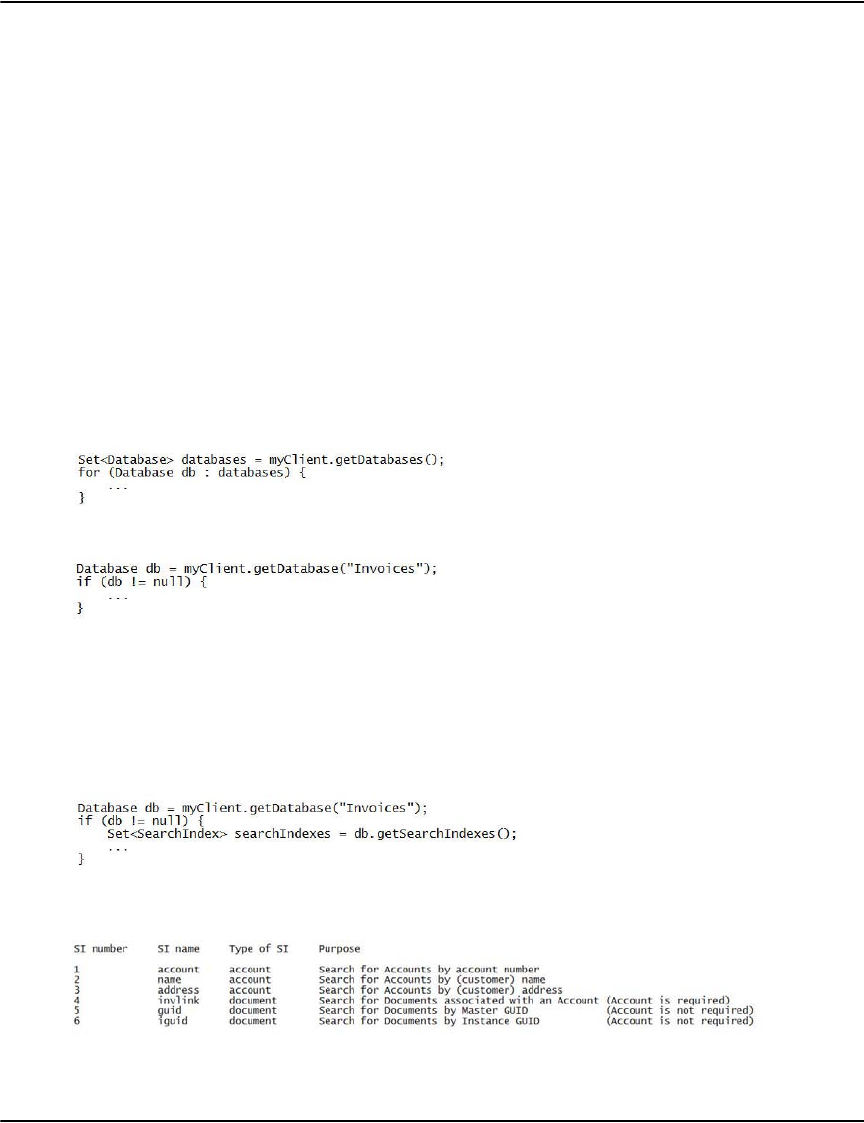
Developing Vault applications
262
Example
final String ksPath = "C:\\temp\\javaclient\\javaclient-keystore.jks";
final String ksPasswd = "password";
final String keyPasswd = ksPasswd;
KeystoreParams ksParams =
new KeystoreParams(ksPath, ksPasswd.toCharArray(),
keyPasswd.toCharArray());
VaultClient vaultClient = new VaultClient();
VaultClient.connectSSL(hostname, port, null, ksParams);
...
Classes and usage details
Database class
The Database class represents a Database on the Vault server. The list of Databases on the Vault
server can be obtained using the VaultClient.getDatabases() method:
A specific Database can also be retrieved by it's name:
SearchIndex class
The SearchIndex class represents one of many search indexes available on the Vault server, and
is used for searching for accounts and documents. Search indexes are associated with each
database and each search index can be used for a specific type of search.
The list of search indexes available for a database can be obtained as follows:
A standard, default Vault configuration defines the following search indexes for each Database
in the Vault:
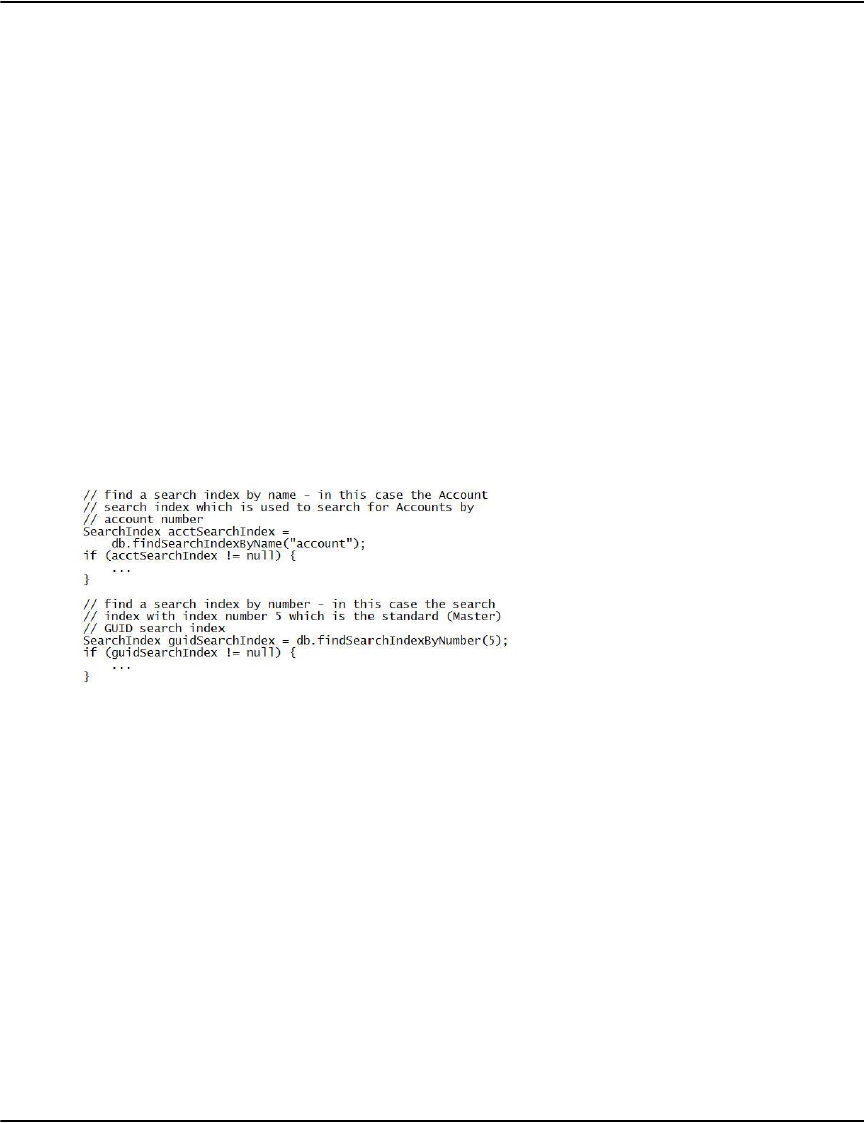
Developing Vault applications
263
An account search index is a search index that returns matching account objects when it is
searched on. A document search index is a search index that returns matching Document
objects when it is searched on.
Various properties of the search indexes can be queried using the
following methods of the SearchIndex class:
SearchIndex.getIndex()
SearchIndex.getName()
SearchIndex.getDescription()
SearchIndex.getFields()
SearchIndex.isAccountIndex()
SearchIndex.isDocumentIndex()
SearchIndex.isAccountRequired()
SearchIndex.isInvisible()
SearchIndex.containsMultipleRotations()
Search indexes can be obtained directly by their name and number using the
VaultClient.Database.findSearchIndexByName() and
VaultClient.Database.findSearchIndexByNumber() methods respectively:
Search indexes can also be obtained by specific pre-defined criteria by using the
VaultClient.Database.findSearchIndexByMatcher() method. A number of pre-defined criteria are
available for use with this method:
SearchIndex.FindsAccountsByAccountNumber: Match against account search indexes using an
account number.
SearchIndex.FindsAccountsByName: Match against account search indexes using a name
SearchIndex.FindsAccountByAddress: Match against account search indexes using an address
SearchIndex.FindsDocumentWithAccounts: Match against document search indexes that require
an account number.
SearchIndex.FindsDocumentsWithoutAccounts: Match against document search indexes that do
not require an account number
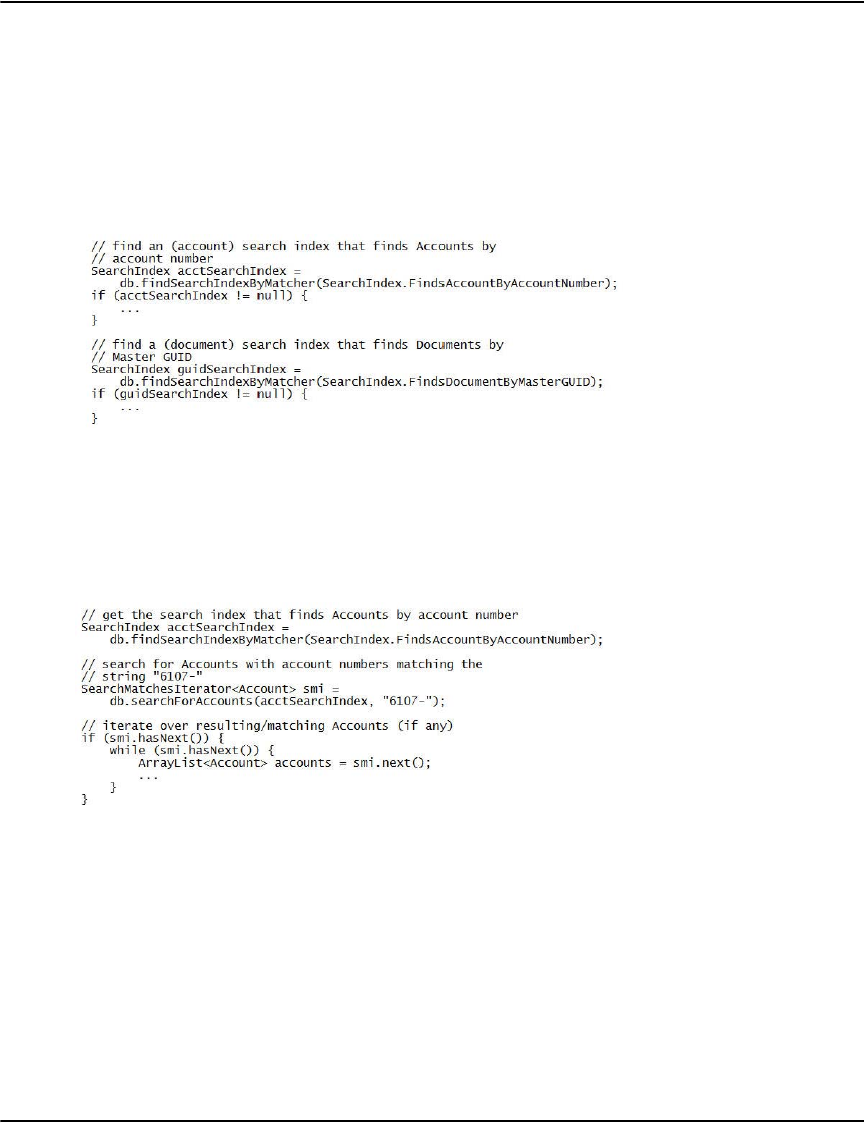
Developing Vault applications
264
SearchIndex.FindsDocumentWithMasterGUID: Match against document search indexes using the
Master GUID
SearchIndex.FindsDocumentWithInstanceGUID: Match against document search indexes using
the Instance GUID
The previous code example can be rewritten as follows to use the pre-defined search index
criteria:
Once a particular search index of interest has been obtained, it can be used to search for
accounts and/or documents.
Account Class
Accounts are contained in databases on the Vault. Searching for accounts in a database
requires an account search index:
The number of matching accounts returned in each iteration by the
SearchMatchesIterator<T>.next() method can be specified if so desired by specifying the
maxResults parameter to VaultClient.Database.searchForAccounts():
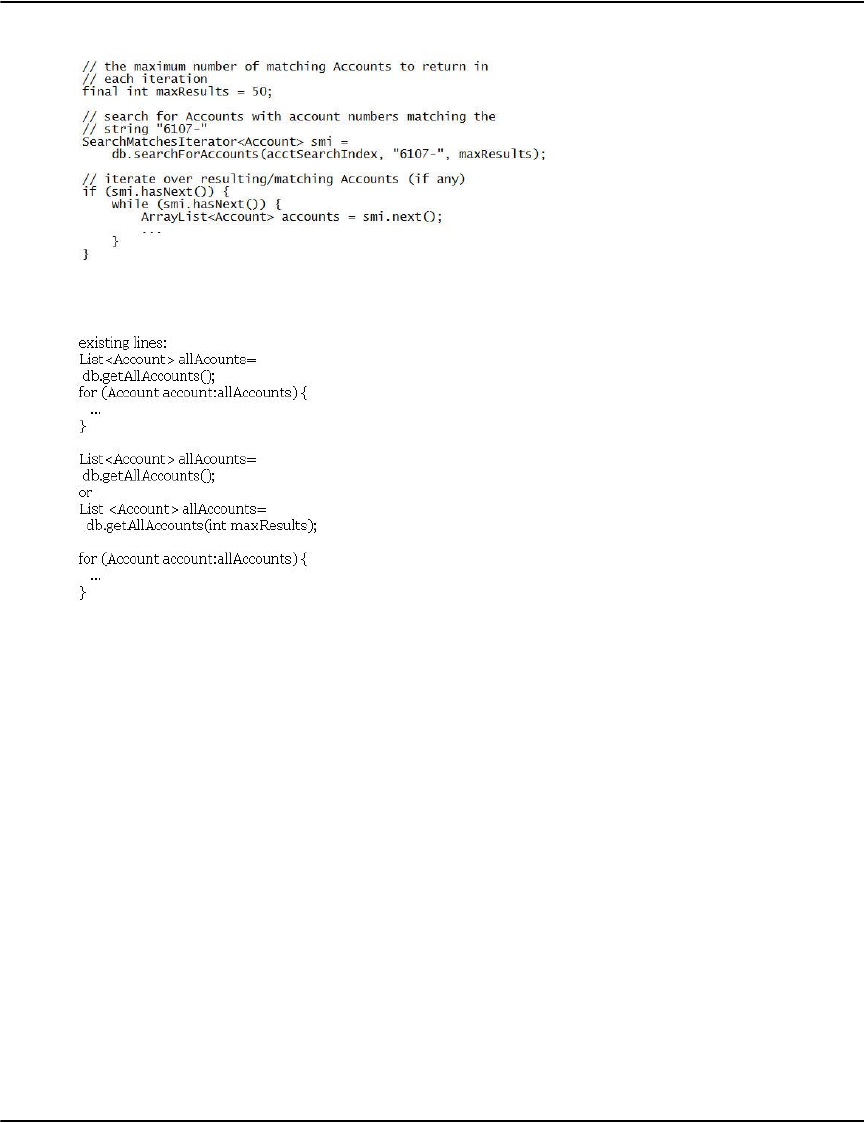
Developing Vault applications
265
Also, all accounts present in a database can be retrieved by the
VaultClient.Database.getAllAccounts() convenience method:
For the getAllAccounts(int maxResults) function, the maxResults parameter is the maximum results
(or window size) returned from the server.
If you have problems with the server looping or too many results, you can process the
problems through catching ServerLoopingException or TooManyResultsException.
When you catch the exception, use the indexcheck utility to check the duplicated size of the
account on the server side, change the maxResult parameter and try again. You can put the
parameter into a configuration file.
Note: Only change the value through the configuration file when needed, as there is no need
to change your code.
Document class
Documents stored in a Vault are always associated with a corresponding account. However,
documents can be searched for with or without the corresponding account.

Developing Vault applications
266
Note: This class is used for performing detailed document searches.It needs to open each DRD
file which has a document that matches the search criteria so it can consume a great deal of
server resources generating the search result. Therefore it is recommended that you only use
this when you need to run a detailed search. Otherwise it is recommended that you use the
DocumentEx class if possible because it is more efficient.
Documents associated with an account can be searched as follows:
All documents associated with an account can be obtained using the
VaultClient.Account.getAllDocuments() convenience method:
For the getAllDocuments(int maxResults) function, the maxResults parameter is the maximum
results (or window size) returned from server
If you have problems with the server looping or too many results, you can process the
problems through catching ServerLoopingException or TooManyResultsException.
When you catch the exception, use indexcheck utility to check the size of the documents for
this account on the server side, change maxResult and try again.
You can put the parameter into a configuration file, only change the value through the
configuration file when needed as there is no need to change your code.
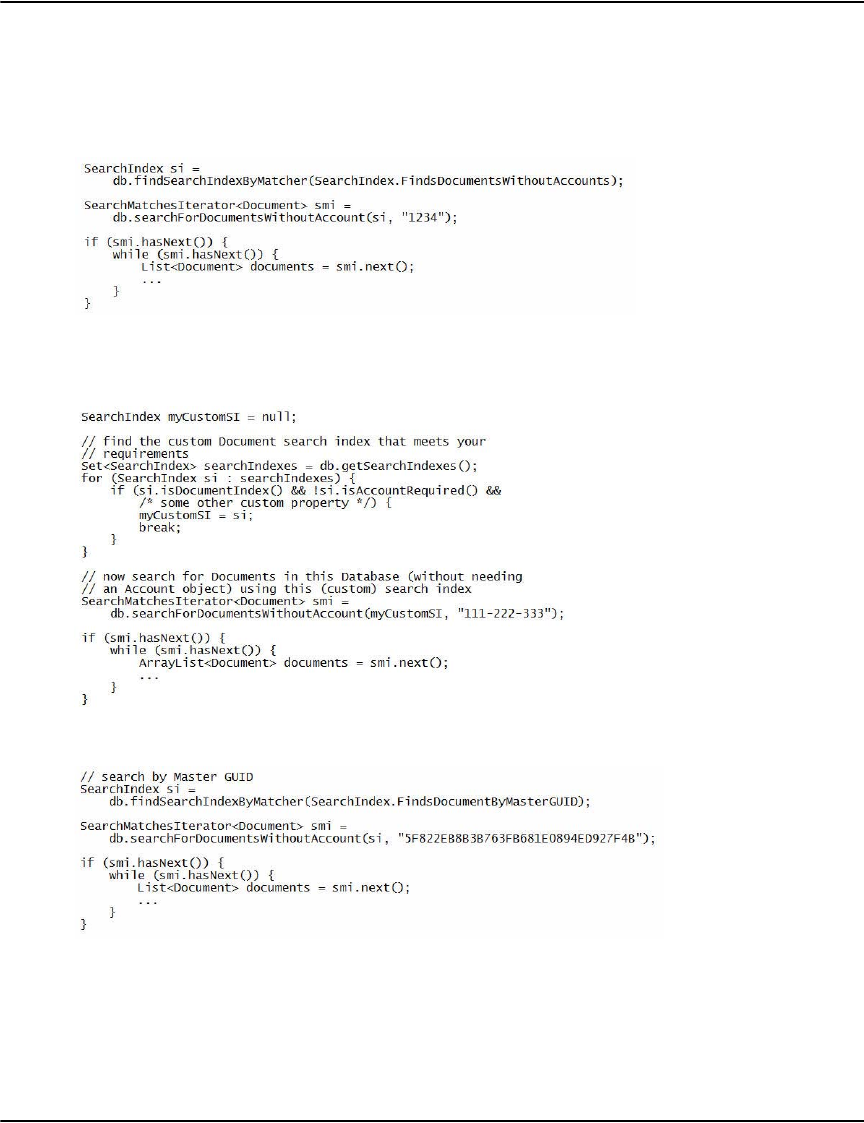
Developing Vault applications
267
Documents can also be searched for without requiring an Account object. This can be done in
one of two ways. The predefined SearchIndex matcher,
SearchIndex.FindsDocumentsWithoutAccounts, can be used to first obtain a search index that
doesn't require an account and then the search for documents can be done using that search
index:
Note that instead of using a matcher to find the document search index that doesn't require
an account, if the Vault has been customized with additional (custom) search indexes you can
use any custom document search index to search for documents:
Documents can be searched for by GUIDs (master or instance) in a similar manner:
Use the SearchIndex.FindsDocumentByInstanceGUID matcher if you wish to search by Instance
GUID.

Developing Vault applications
268
DocID and obtaining a Document by DocID
A DocID (or Document ID) is an identifier associated with every document in the Vault, that
can be used to locate and obtain a document without having to perform all of the intermediate
search steps that are normally required to search for and find a document.
A document's DocID can simply be obtained by calling the VaultClient.Document.getDocID()
method. At a later time, the same document object can be retrieved by its DocID using the
VaultClient.Database.getDocumentByDocID() method:
String docID = document.getDocID();
...
Document doc2 = db.getDocumentByDocID(docID);
Since documents stored in the Vault are always associated with a database, it is necessary to
call the VaultClient.Database.getDocumentByDocID() method on the same database that contains
the document, otherwise the document will not be found.
Please note that this DocID identifier will change if the data files corresponding to a document
are reloaded or reindexed on the Vault server. For this reason a DocID cannot be and should
not be treated as an unchanging, fixed identifier to identify and locate a document.
DocumentEx class
If you know an account number, you can use VaultClient.getAllDocumentEx() to search
documents associated to the account number.
VaultClient client=new VaultClient();
client.connect(host, port);
List<DocumentEx> docexlist=null;
docexlist=client.getAllDocumentEx(dbname, account, date-string,
maxresults);
client.shutdown();
Note: This class is used for performing less detailed but faster document searches. Because it
only uses the INVLINK index for returning documents, it is a more efficient way of searching
for documents. It is recommended that you use this method of returning the document list
whenever possible.
Specifying the number of maximum Document results
For the following Document search methods:
VaultClient.Account.searchForDocuments()
VaultClient.Database.searchForDocumentsWithoutAccount()
an extra "maxResults" parameter can also be specified that will limit the number of matching
documents returned in each iteration to the specified value.

Developing Vault applications
269
Documents and Document Information
The DocumentInfo class contains extended information about a document including custom
attributes (if any) and sections (over and above standard document information such as page
count, format, GUID info, invoice #, etc.) and is obtained by the
VaultClient.Document.getDocumentInfo() method:
DocumentInfo docinfo=client.getDocumentInfo(DocumentEx docex)or you can use
the below method to get the DocumentInfo object, but if possible, it is
recommended that you use this one.
DocumentInfo docInfo = document.getDocumentInfo();
However, the following properties of a document (that are also available directly through the
document class methods) are only available after a call to Document.getDocumentInfo():
•(Customer) Name
•(Customer) Address
•Invoice number
•Master GUID
• Instance GUID
Note that the document properties above are also available through the DocumentInfo class:

Developing Vault applications
270
Note that these 5 properties of a document are optional and may not be available (because
the information was not present when data was loaded into the Vault) and in those instances
the corresponding methods will return the empty String ("").
Rendering Documents
Documents can be rendered into a number of Output Formats depending on the type (i.e.
format) of the document (e.g. AFP, Metacode, Postscript, etc.). The list of supported output
formats for a document can be obtained as follows:
Set<OutputFormat> outputFormats = document.getOutputFormats();
Commonly used output formats include GIF (OutputFormat.GIF) and PDF
(OutputFormat.PDF). The OutputFormat class allows, among other things, checking whether or
not a specific output format:
• supports multiple pages: can a contiguous range of pages be rendered
• supports resolution: can a specific resolution be specified
• supports rotation: can a rotation be specified
Resolution width and rotation parameters (for output formats that support them) are specified
by the ResolutionWidth and Rotation enumeration classes respectively, which enumerate valid
values for both resolution width and rotation since arbitrary values are not supported. A
Document can be rendered into an output format using one of the following methods:
• VaultClient.renderDirect(): for rendering a document through the main class by detail
parameters.
• VaultClient.renderDirectByGUID(): for rendering a document through the main class by
GUID string.
• VaultClient.renderDirectByDocex(): for rendering a document through the main class by
DocumentEx object
Also you can use Document class to render a document like below, but it is not recommended:
• VaultClient.Document.renderPage(): for rendering a single page of a document
• VaultClient.Document.renderPages(): for rendering a contiguous range of pages of a
Document.
• VaultClient.Document.renderAllPages(): for rendering all pages of a document.
For detailed information, please refer to the Javadoc.zip or Javadoc.rar documentation that was
included with the Java API.
Here is a summary of the commonly used output formats and their properties:

Developing Vault applications
271
Example of rendering a single page:
Example of rendering a range of pages:
If you know the parameters of dbname, account, date, file, pointer, it is recommended that you
use:
client.renderDirect(db name, account, date, file, pointer, page-start-no,
page-count, Resolutionwidth.NONE,Rotation.NONE,null,fos);
Output
Format supports Multiple
Pages
Resolution Rotation
G I F n o y e s y e s
H T M L n o n o n o
PDF yes no no
RAW no yes yes
PNG no yes yes
TIFF yes yes yes
BMP no yes yes
TIFF_G4 yes yes yes
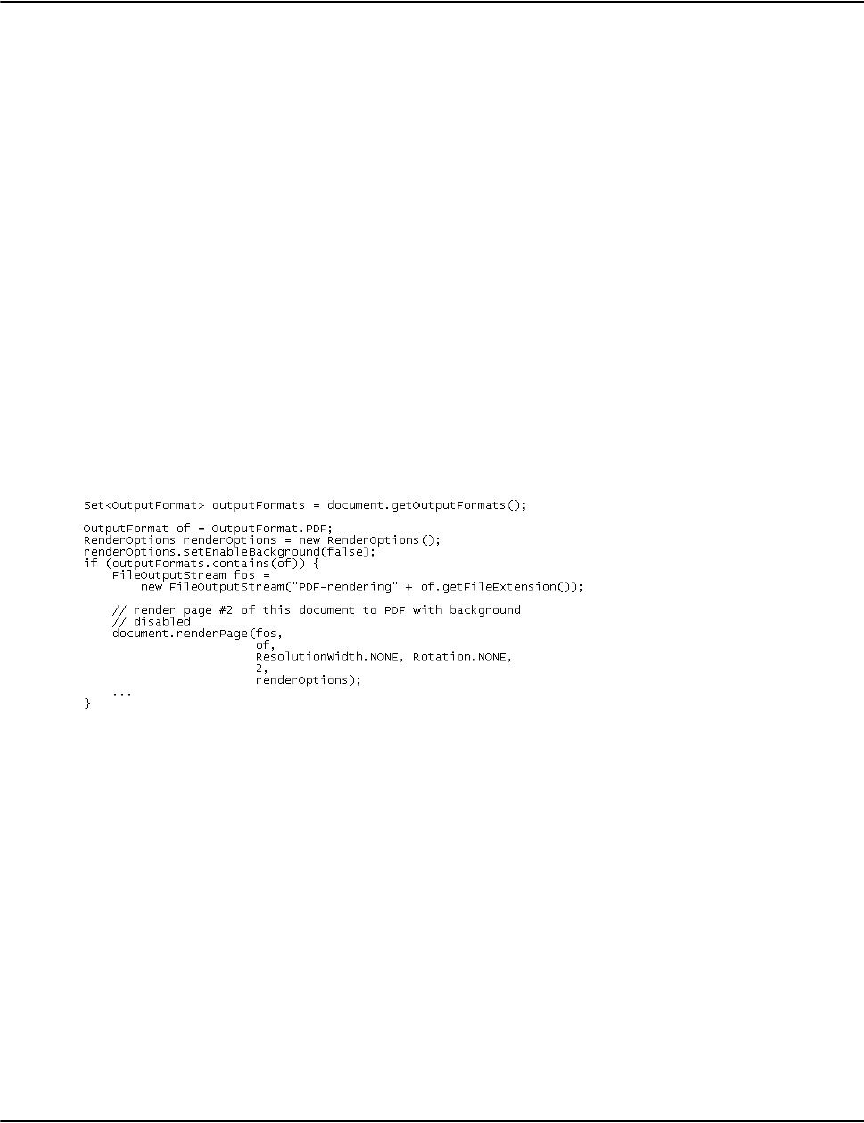
Developing Vault applications
272
or you can use
//docex is an object of DocumentEx
client.renderDirectByDocEx(docex, page-start-no,
page-count,Resolutionwidth.NONE, Rotation.NONE,null,fos);
Optional rendering parameters can be supplied to the Document rendering methods described
above using the RenderOptions class. Currently, the only optional rendering parameter
supported is enableBackground:
enableBackground =
true: enables the background when rendering a page or range of pages to
PDF.
false: disables the background when rendering to PDF.
Backgrounds are enabled by default when rendering to PDF, and in this case nothing extra has
to be done as in the code snippet shown above.
To disable the background image when rendering to PDF:
Notes:
• Error handling and exception handling have been elided from all code snippets shown in
this guide.
For a full example, please contact the Pitney Bowes Technical Support team.
Java API PDF security settings
You can set up PDF output security (user password, owner password, permissions, print,
modify, copy, add/modify, annotation and forms ) from PROFILES.INI. You can also set up the
settings through the Java API.
For your settings take effect, set up PDFEncryption=1 in the profile in profiles.ini on Vault
Repository server side first.

Developing Vault applications
273
The main class for PDF security settings is PDFSecurityParam and the related class is
RenderOption. Refer to the Java API document packages for further details.
Note: the PDF security settings are not for Postscript to PDF by Ghostscript.
The following steps explain how to set up the Java API PDF security settings:
1. Create an object of RenderOption:
RenderOptions opt=new RenderOptions()
2. Enable or disable background settings. The default setting for background is enabled
when creating an object of RenderOption. If you want to disable the background, you need
to call below method:
opt.setEnableBackground(false);//disable the background
3. Set up PDF security parameters:
i. Create an object of PDFSecurityParam:
PDFSecurityParam pdfsec=new PDFSecurityParam();
ii. Set parameters:
pdfsec.setMode(1)//Set up the output pdf security settings from Java API;
default is 0, from PROFILES.ini
pdfsec.setUserPassword("userpassword");
pdfsec.setOwnerPassword("ownerpassword");
pdfsec.setPermissionPrint(true/false); //true means permission, false means no
pdfsec.setPermissionModifyContents(true/false);//true = yes, false =no
pdfsec.setPermissionCopy(true/false);//true = yes, false = no
pdfsec.setPermissionAddModify(true/false);//true = yes, false = no
iii. Set up PDFSecurityParam object in RenderOptions:
opt.setPDFSecurity(pdfsec);
4. Use RenderOptions object as parameter in rendering methods. You can use:
VaultClient::renderDirect(),
VaultClient::renderDirectByGUID(),
VaultClient::renderDirectByDocEx() .
The following code example is just a small sample of what the entire code would look like. For
the full code sample contact support.
Example:
VaultClient client=VaultClient();
FileOutputStream fos=new FileOutputStream("myfilename.pdf");

Developing Vault applications
274
client.connect ("127.0.0.1",6003);
//other code lines
client.renderDirect(
dbname,
account, date, file, pointer,
OutputFormat::PDF,
0, 999999,
ResolutionWidth::none, Rotate::none,
opt,
fos;
//shutdown

Developing Vault applications
275
Vault Web Service
Configurating and setting up your Web Service environment
The following information lists the requirements necessary to setup your Vault Web Service
environment. Web service E2VaultWS is cross platform (Windows, Unix (Linux, …).
The C# sample shown here is only for Windows, all others are for all platforms.
Example setup using Windows and Tomcat
•OS : Windows
• Java: 1.6
• Webservice/Servlet container : Tomcat 6.0.32
• Development IDE : Netbeans IDE 6.8
Files included
• war file package : E2VaultWS.war
• configuration file : E2VaultWS.xml
Installing Web Service
1. Install the war file
To Install the war file package for Apache Tomcat 6.*, you can place the E2VaultWS.war file in
the TOMCAT-DIR/webapps directory.

Developing Vault applications
276
2. Set up the Vault host name and port number
Open TOMCAT-DIR/webapps/E2VaultWS/WEB-INF/web.xml. Add or modify the following
lines:
3. Set up paramters for SSL enabled Vault servers
Open TOMCAT-DIR/webapps/E2VaultWS/WEB-INF/web.xml. Add or modify the following
lines:
<context-param>
<description>the host name of Vault Rendering Engine</description>
<param-name>vaulthostname</param-name>
<param-value>localhost</param-value>
</context-param>
<context-param>
<description>the port number of Vault Rendering Engine</description>
<param-name>vaultport</param-name>
<param-value>6003</param-value>
</context-param>
<context-param>
<description>SSL enable flag</description>
<param-name>sslenabled</param-name>
<param-value>1</param-value>
</context-param>
<context-param>
<description>SSL Keystore Path</description>
<param-name>sslkeystorepath</param-name>
<param-value>C:/demos/SSL/javaclient-keystore.jks</param-value>
</context-param>
<context-param>
<description>SSL Keystore Password</description>
<param-name>sslkeystorepassword</param-name>
<param-value>javaclient</param-value>
</context-param>
<context-param>
<description>SSL Key Password</description>
<param-name>sslkeypassword</param-name>
<param-value>javaclient</param-value>
</context-param>
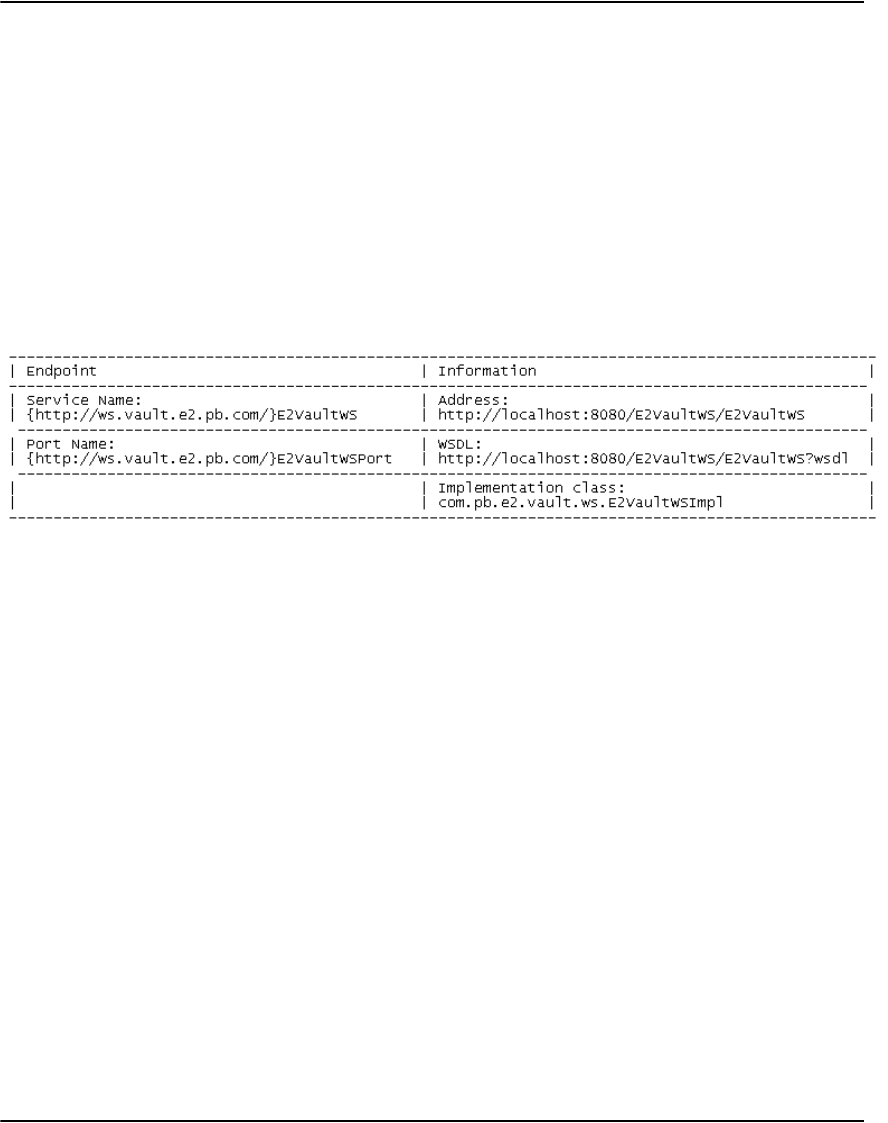
Developing Vault applications
277
4. Test your installation
1. After installing the files (E2VaultWS.war and E2VaultWS.xml):
i. Start Tomcat and check the log /screen messages to see if there are any errors.
ii. If there aren’t any errors, you can check the E2VaultWS web service api:
2. Open your web browser.
3. Enter: "http://localhost:8080/E2VaultWS" and you will see the following message:
"Hello Web Service World!"
4. Enter: "http://localhost:8080/E2VaultWS/E2VaultWS" and you will see the following
message:
5. Click the "WSDL: http://localhost:8080/E2VaultWS/E2VaultWS?wsdl" link and you will
see the WSDL XML content.
Your Web Serice setup is complete.

Developing Vault applications
278
Programming the E2VaultWS web service
The following information will help you to program and customize your Vault Web Service
environment.
Programming notes:
• E2VaultWS is the name of Vault web service.
• E2VaultWS.war is the war file name of Vault Web service API.
• com.pb.e2.vault.ws is the name space of the Vault web service API.
• The name of the web service is case sensitive.
Data types
Data types across different languages can be used in different computer languages.
1. . int : integer type.
2. . String : can be across different languages, such as Java, C#, ...
3. . List : a collection type, can be used in different languages.
Web Service data types
WsIndex
The index information data structure.
WsSearchParam
The index search input data structure.
Keywords and parameters Description
int no index no
string name index name
string fields index fields
string flags index flags
string desc index descritpion
WsIndexAttributes attributes index attributes
Keywords and parameters Description
string dbname database name

Developing Vault applications
279
WsSearchResult
Search result data structure.
WsSearchResultTitle
Search result index fields title data structure.
string index index string, can be index no or index name ( e.g. "1" or
"account").
string account account number associate with the index if applicable.
string date document date string if applicable.
string guidstring GUID string when searching GUID index.
int maxresults max number of results returned from SERVER.
string cursorkey starting string in the index. Use the last value of
WsSearchResult.WsSearchResultData.matched to set up
CURSORKEY for next search.
string searchkey the string that will be search in the index.
WsSearchMode searchmode define which index will be searched(e.g. "generic", "invlink",
"guid", iguid").
Keywords and parameters Description
WsIndexType indextype : return index type of the index that is searched.
WsSearchResultTitle title : the customized titles for the index fields.
WsSearchResultData data : search result data object.
int moredata : any more data, 1=more-data, 0=no-more-data. Use
CURSORKEY in WsSearchParam to start searching again.
Keywords and parameters Description
string matched title nmae of matched string.
string account title name of account.
string date title name of document date.
string format title name of document format
string file title name of document file.
string pointer title name of document offset.
WsKeyValue extended other title names of document info.

Developing Vault applications
280
WsSearchResultData
Index search result data structure.
WsDocumentAttributes
the document attributes data structure.
Keywords and parameters Description
string matched matched search result (e.g. ACCOUNT number when
searching account index).
string account account number.
string date document date string.
string format document format.
string file document file name.
string pointer document offset in the file.
int pages total page number of the document.
string name the customer name related to the document.
string address the customer address related to the document.
WsKeyValue extended other key/value information defined for the document.
Keywords and parameters Description
string dbname database name.
string account account number.
string date document date string.
string format document format.
string file document file name.
string pointer document offset in the file.
int pages total document page number.
int modes document mode combine.
string name the customer name related to the document.
string address the customer address related to the document.
string invoice the customer invoice number related to the document.
string section the report section info.
string type the data type when the document format is COLLECTION.

Developing Vault applications
281
WsKeyValue
the Key/Value pair data structure.
WsDocumentParam
Document input parameter when using the web service method documentList().
WsDocumentResult
document result data structure.
WsDocumentData
document data structure.
WsOutputFormat outputformats the possible output formats for this document.
WsKeyValue customerfields other customer defined fields.
Keywords and parameters Description
string name key name of an item.
string val value of an item.
Keywords and parameters Description
string dbname database name.
string account account nubmer.
string date document date string.
string cursorkey the start string when getting next document list.
int maxresults max number of results.
Keywords and parameters Description
WsDocumentData docdata document data structure.
int moredata any more data, 1=has-more-data, 0=no-more-data.
Keywords and parameters Description
string account account number.
string date document date string.
string format document format.
string file document file name.
string pointer document offset in the file.
int pages the page number of the document.

Developing Vault applications
282
WsDocumentExResult
documentEx result data structure.
WsDocumentExData
documentEx data structure
WsReprintParam
Input parameter for document reprint command.
WsReprintOptions
document reprint option data structure.
Keywords and parameters Description
WsDocumentExData docdata documentEx data structure
int moredata flag of indicating any more data
(1=has-more-data, 0=no-more-data, when used in
DocumentExListAll() function, this parameter is not
meaningful).
Keywords and parameters Description
string dbname database name.
string account account number.
string date document date string.
string file document file name.
string pointer document offset in the file.
Keywords and parameters Description
string dbname database name.
string account : account number.
string date document date string.
string format document format.
string file document file name.
string pointer document offset in the file.
int pagefrom the from page number for the reprint command.
int pagecount the total page number for the reprint command.
WsReprintOptions options other document reprint info.

Developing Vault applications
283
WsReprintResult
data structure of document reprint command.
WsRenderParam
the input parameter of rendering document page data.
Keywords and parameters Description
int none for future use (place holder)
Keywords and parameters Description
int result the result of document reprint command.
Keywords and parameters Description
string dbname : database name.
string account : account number.
string date : document data string.
string format : document format.
string file : document file name.
string pointer : document offset in file.
int pagestart : starting page no.
int pagecount : total page number.
WsOutputFormat outputformat output format for rendering.
int background background flag, 1=need background, 0=no-background.
WsOrientation orientation the orientation parameter.
WsResolution resolution the resolution parameter.
int cpix X value when rendering document as text.
int cpiy Y value when rendering document as text.
string textencoding text encoding.
int mark mark flags.
string findtext text string that will be found in the pages.
int findcolor the hightlight color of found text.
int findcase case sensitive flag for finding text.

Developing Vault applications
284
WsRenderParamBase
the basic input parameters of rendering document page data.
WsRenderPages
document page data structure.
WsIndexAttributes
Index attributes data structure.
Keywords and parameters Description
string dbname database name.
int pagestart starting page no
int pagecount total page number
WsOutputFormat output format for rendering
int background background flag, 1=need background, 0=no-background
WsOrientation the orientation parameter
WsResolution the resolution parameter
int cpix X value when rendering document as text
int cpiy Y value when rendering document as text
string textencoding text encoding
int mark mark flags
string findtext text string that will be found in the pages
int findcolor the hightlight color of found text
int findcase case sensitive flag for finding text
Keywords and parameters Description
WsOutputFormat outputformat : rendering output format.
int pagestart starting page no.
int pagecount total page number.
base64Binary pagedatabytes document page data bytes.
Keywords and parameters Note: (1=set the flag, 0=reset the flag)
int prefixaccount if an index has prefixaccount.
int multiplevalues if an index has multiple values.

Developing Vault applications
285
WsOutputFormat
Output format of enumeration data structure.
Base type: String
Values:
{"GIF", "HTML", "PDF", "RAW", "PNG", "TIFF", "BMP", "STREAM", "TEXT", "COLLECT",
"COMMENTS", "DOCINFO", "TIFF_G4", "XML", "DECODE", "REPRINT", }
WsOrientation
Orientation values of enumeration data structure.
Base type: int
Values: {0, 90, 180, 270}
WsResolution
Resolution values of enumeration data structure.
Base type: int
Values: {512, 640, 800, 1024, 1280, 1600}
WsIndexType
Base type: String
Values: {"none", "cusomter_record", "document_record"}
WsSearchMode
index search mode values of enumeration data structure.
Base type : String
int accountmustbeselected inside an index if account must be selected.
int linkbydocumentrecord if an index is linked by document record.
int linkbycustomerrecord if an index is linked by customer record.
int displaypage if display page.
int displaydocument if display document.
int displaynewestdocument : if display the newes document.
int rotatestrings : if has rotatestrings.
int searchbackwards : if an index is search backwards.
int invisibletouser : if an index is invisible to users.
int updateoncusomter : if an index update on customer.
int leaveonunindex : if leave on unindex.
int jumponsinglematch : if jump on single match when seraching.
int webaccountindex : if web account index.
int weblinkindex : if web link index.

Developing Vault applications
286
Values : {"generic", "invlink", "guid", iguid"}
WsVaultFault
E2VaultWS exception data struture.
string message : exception message.
Parameters:
int id : error id.
string funname : the function name that throws the excetpion.
Web service interfaces
public String getVersion4Lib()
get the version number of Vault Java API that E2VaultWS is based on.
Input paramters:
Return parameters: version of Java API.
public String getVersion4Ws()
Get the version number of E2VaultWS.
Input paramters:
Return parameters: version of E2VaultWS web service API.
public String getServerName()
Get the name ot the server to which E2VaultWS is connecte.
Input paramters:
Return parameters: server name.
public String getServerVersion()
Get the version number of the server to which E2VaultWS is connected.
Input paramters:
Return parameters: server version.
public List<com.pb.e2.vault.ws.WsDB> databaseList()
Retrieve the database list of Vault server.
Input paramters:
Return parameters: the collection of database object of WsDB.
public List<com.pb.e2.vault.ws.WsIndex> databaseInfo(String dbname)
Retrieve index list of a specific database deifned by DBNAME.
Input paramters:
• String dbname : a defined database name.
Return parameters: the collection of index object of WsIndex.

Developing Vault applications
287
public com.pb.e2.vault.ws.WsIndex indexInfo(String dbname, String index)
Retrieve index information for specific INDEX and DBNAME.
Input paramters:
• String dbname : a defined database name.
• String index : a defined index string ( can be number or name, e.g. "1" or "account")
Return parameters: The object of WsIndex.
public com.pb.e2.vault.ws.WsSearchResult databaseSearch(com.pb.e2.vault.ws.WsSearchParam
searchparam)
Search a specific index.
Input paramters: WsSearchParam searchparam : define the search input parameters, such as
dbname, index, ...
Return parameters: the object of WsSearchResult including search result data.
public com.pb.e2.vault.ws.WsDocumentAttributes documentInfo(String dbname, String account,
String date, String format, String file, String pointer)
Retrieve information for a specific document defined in a parameter set.
Input parameters:
• Stirng dbname : database name.
• String account : account number for the document.
• String date : the date string for the document.
• String format : the format string for the document.
• String file : the file nmae for the document.
• String pointer : the file offset for the document in a document file defined above.
Return parameters: the object of WsDocumentAttributes.
public com.pb.e2.vault.ws.WsDocumentResult
documentList(com.pb.e2.vault.ws.WsDocumentParam documentparam)
Retrieve document list.
Input paramters: WsDocumentParam documentparam : define some parameters for a
document.
Return parameters: the object of WsDocumentResult.
public com.pb.e2.vault.ws.WsDocumentExResult
documentExListAll(String dbname, String account, String date, int searchwindowsize)
Retrieve all of documentEx list.

Developing Vault applications
288
Input paramters: String dbname : define database name.
String account : define account number associated with the documentex.
String date : define date string associated with the documentex, can be partially matched.
int searchwindowsize : define the window size for one search.
Return parameters: the object of WsDocumentExResult.
public com.pb.e2.vault.ws.WsReprintResult
documentReprint(com.pb.e2.vault.ws.WsReprintParam param)
Send a command of document REPRINT to the server.
Input paramters: WsReprintParam param : set up some document information.
Return parameters: the object of WsReprintResult.
public com.pb.e2.vault.ws.WsRenderPages
renderTransform(com.pb.e2.vault.ws.WsRenderParam param)
Render document page data.
Input paramters: WsRenderParam param : define parameters for rendering document data.
Return parameters: the object of WsRenderPages.
public com.pb.e2.vault.ws.WsRenderPages renderTransformByGUID(String guidstr,
com.pb.e2.vault.ws.WsRenderParamBase param)
Render document page data through GUID string (from GUID index).
Input paramters: String guidstr : define GUID string from GUID index; WsRenderParam param
: define parameters for rendering document data.
Return parameters: the object of WsRenderPages.
public com.pb.e2.vault.ws.WsRenderPages renderTransformByIGUID(String iguidstr,
com.pb.e2.vault.ws.WsRenderParamBase param)
Render document page data through IGUID string (from IGUID index).
Input paramters: String iguidstr : define GUID string from IGUID index; WsRenderParam
param : define parameters for rendering document data.
Return parameters: the object of WsRenderPages.
web service names
•Service name : E2VaultWS
• port name : E2VaultWSPort
• Binding name : E2VaultWSPortBinding
web service interfaces calling procedures
1. Set up the parameters for Vault servers:

Developing Vault applications
289
•Vault host name
•Vault port number
• SSL parameters if Vault servers are SSL enabled
2. Call the below methods to get version and server information.
• getVersion4Lib();
• getVersion4Ws()
• getServerName()
• getServerVersion()
3. Call databaseList() to get database list if you don't know the databases on server side.
4. Call databaseInfo() to get index list for a specific database.
5. If you don't know an ACCOUNT number, you can call databaseSearch() to search an
index, such as ACCOUNT index, NAME index.
And you can get ACCOUNT list or DOCUMENT list.
6. Call the heavy-weight function of documentList() to get all document list; or call the
light-weight function of documentExListAll() to get all of documentex list.
7. Call renderTransform() / renderTransformByGUID() / renderTransformByIGUID() to get
document pages data.
Create a web service client of Java console application with NetBeans 6.8
IDE
1. Download, install and run Tomcat 6.0.32 on the local machine.
2. Refer related documents to install E2VaultWS web service into Tomcat 6.
3. Download, install and run Netbeans 6.8.
4. Create a java console application.
i. From Netbeans 6.8, choose "File" -> "New Project", a dialog of "New Project" show
up.
ii. Choose "Java" from "Catagories".
iii. Choose "Java Application" from "Projects".
iv. Choose "Next".
v. Input "Project Name" as "e2vaultwsconsole", "Project Location" as
"c:\e2vaultwsconsole", leave others as default.

Developing Vault applications
290
vi. Choose "Finish".
Then IDE will create a java console application in the directory of
c:\e2vaultwsconsole and create a main class named Main.java.
5. import WSDL interfaces.
i. Right click the project of "e2vaultwsconsole" from "Prjects List".
ii. Choose "New" -> "Web Service Client", a dialog of "WSDL and Client Location"
shows up.
iii. Choose "WSDL URL" and input
"http://localhost:8080/E2VaultWS/E2VaultWS?wsdl".
iv. Input package name : e2vaultwsconsole.
v. Choose "Finish"
Then IDE will create all web servivce stub files the client application needs.
6. Write the code to call the E2VaultWS web service interfaces.
The directory for the Java code sample is:
webserivces/E2VaultWS/samples/console-JAVA/.
For the code sample which contains the lines of Main class and calling E2VaultWS web
service interfaces, please refer to the API library along with this sample code from your
Vault installation CD.
Create a web service client of C# console application with Visual Studio
2008:
1. Download, install and run Tomcat 6.0.32 on the local machine.
2. Refer related documents to install E2VaultWS web service into Tomcat 6.
3. Download, install, and run Visual Studio 2008.
4. Create a C# console application named "e2vaultwsconsole".
5. Import WSDL interfaces.
i. Right click the project of "e2vaultwsconsole" from "Solution Explore".
ii. Choose "Add web reference", a dialog of "Add Web Reference" shows up.
iii. Input URL : "http://localhost:8080/E2VaultWS/E2VaultWS?wsdl".
iv. Click "Go";
v. E2VaultWS web service methods show up.
vi. Input "Web Reference Name" as "e2vaultwsconsole".

Developing Vault applications
291
vii. Click "Add reference".
Then IDE will create all web servivce stub files the client application needs.
6. Write the code to call E2VaultWS web service interfaces.
The directory for the C# code sample is: webserivces/E2VaultWS/samples/console-CS/.
For the code sample which contains the lines of Main class and calling E2VaultWS web
service interfaces, please refer to the API library along with this sample code from your
Vault installation CD.
WHEN YOU USE E2VAULTWEB SERVICE FOR THE
FIRST TIME, THE SYSTEM WILL TAKE SOME TIME TO
LOAD THE WHOLE PACKAGE.
HOW LONG IT WILL TAKE DEPENDS ON YOUR
MACHINES AND SYSTEM CONFIGURATION.

Developing Vault applications
292
Communicating directly to the Rendering Engine
Communicating directly with the Rendering Engine via the Vault UINFO protocol is a method
of “last resort”, should none of the programming-language specific APIs be applicable. This
information may also be useful for those who wish to review or analyze log files from the Vault
services such as e2renderd, e2serverd and e2routerd.
Creating message formats
Field symbol key
Requests
• + mandatory
• ? optional
Results
• ! field is always present
• - field is present on error
• + field is present on success
• ^ field is present conditionally
Page sets
You can replace request.page with request.pageset.
Page sets are an alternate way of specifying which pages should appear in rendered output.
Instead of providing request.page and request.pagecount, you can provide request.pageset.
The value for request.pageset is a comma delimited list of pages or page ranges to be included
in the output.
The character * is used to indicate the last page when specifying a page or end of a page range.
The same page may appear more than once in the output if desired.
Example:
1,1,3,5-7,*,10-*
notice.cacheflush
Purpose Tells clients to reset their cache. It is sent by the server to indicate a change in the loaded data.
Render does not send this notification by default.
Request request.function notice.cacheflush
Result none

Developing Vault applications
293
Data none
server.echo
Purpose Tests whether the server is active.
Request ! request.function server.echo
Result ! result.status
! result.blocks
- result.message
0 for success, otherwise error code
number of subsequent blocks, always 0
error message if status not zero
Data none
server.connection
Purpose Gets connection status information
Request ! request.function server.connection
Result ! result.status
! result.blocks
- result.message
+ result.requests
0 for success, otherwise error code
number of subsequent blocks, always 0
error message if status not zero
number of requests made on this connection
+ result.read number of bytes read by the server on this
connection
+ result.written number of bytes written by the server on this
connection
+ result.duration number of seconds this connection has been open
Data none, data returned in result message
server.info
Purpose Gets server information
Request ! request.function server.status

Developing Vault applications
294
Result ! result.status
! result.blocks
- result.message
+ result.program
+ result.version
0 for success, otherwise error code
number of subsequent blocks, always 0
error message if status not zero
name of the server program
version of the server program
Data none, data returned in result message
storage.docdata
Purpose Fetches report list and properties of a document
Request ! request.function
! request.file
! request.offset
storage.docdata
<filename>
<document record offset>
Result ! result.status
! result.blocks
for success, otherwise error code
number of subsequent message blocks, 1 if
successful, 0 if not
- result.message error message if status not zero
Data 4 column hybrid table / key-value pair list
<key1> <value1a> <value1b> <value1c>
<key2> <value2a> <value2b> <value2c>
storage.docpage
Purpose Fetches the raw internal data for a document page
Request ! request.function
! request.file
! request.offset
! request.page
storage.docpage
<filename>
<document record offset>
<page number>
Result ! result.status
! result.blocks
0 for success, otherwise error code
number of subsequent message blocks, 1 if
successful, 0 if not
- result.message error message if status not zero
Data 1x1 table for binary object
<page data>
storage.docarray

Developing Vault applications
295
Purpose Fetches the offsets of a document's raw pages in the page data file.
Request ! request.function
! request.file
! request.offset
storage.docarray
<filename>
<document record offset>
Result ! result.status
! result.blocks
0 for success, otherwise error code
number of subsequent message blocks, 1 if
successful, 0 if not
result.message error message if status not zero
Data 1x1 table for binary object
<document page array>
storage.profiledata
Purpose Fetches the key value pairs from a specified profile.
Request ! request.function
! request.profile
storage.profiledata
<profilename>
Result ! result.status
! result.blocks
0 for success, otherwise error code
number of subsequent message blocks, 1 if
successful, 0 if not
- result.message error message if status not zero
Data two column list of key-value pairs
<key1> <value1>
<key2> <value2>
storage.profilelist
Purpose Lists the names of all available profiles known to the server.
Request request.function storage.profilelist
Result !result.status
!result.blocks-
0 for success, otherwise error code
number of subsequent message blocks, 1 if
successful, 0 if not
result.message error message if status not zero

Developing Vault applications
296
Data 1 column table of values
<profilename1>
<profilename2>
storage.filedata
Purpose Retrieves the metadata associated with a compressed file.
Request ! request.function storage.filedata
Result ! result.status
! result.blocks
- result.message
+ result.profile
+ result.resource
+ result.pagedatafile
0 for success, otherwise error code
number of subsequent blocks, always 0
error message if status not zero
profile name associated with file
resource set name associated with file
the full (local) path to the page data file
Data none, data returned in result message
storage.filepage
Purpose Fetches a raw page from a compressed file.
Request ! request.function
! request.file
! request.offset
storage.filepage
<filename>
<page offset>
Result ! result.status
! result.blocks
0 for success, otherwise error code
number of subsequent message blocks, 1 if
successful, 0 if not
- result.message error message if status not zero
Data 1x1 table for binary object
<page data>
storage.headerinfo
Purpose Determines if a given compressed file exists and returns the size of its Postscript file header.
Request ! request.function
! request.file
storage.headerinfo
<filename>

Developing Vault applications
297
Result ! result.status
! result.blocks
- result.message
+ result.exists
^ result.size
0 for success, otherwise error code
number of subsequent blocks, always 0
error message if status not zero
1 if file exists, 0 if it does not
file size, if file exists
Data none, data returned in result message
storage.headerdata
Purpose Fetches a block of data from a compressed file's Postscript header.
Request ! request.function
! request.file
! request.offset
! request.size
storage.headerdata
<filename>
<offset as pointer>
<size of block in bytes>
Result ! result.status
! result.blocks
0 for success, otherwise error code
number of subsequent message blocks, 1 if
successful, 0 if not
- result.message error message if status not zero
Data 1x1 table for binary object
<block data>
storage.list
Purpose Lists the names of compressed files.
Request ! request.function
? request.file
storage.list
<file name prefix pattern>
Result ! result.status
! result.blocks
0 for success, otherwise error code
number of subsequent message blocks, 1 if
successful, 0 if not
- result.message error message if status not zero
Data 3 column table
<filename1> <format1> <modes1>
<filename2> <format2> <modes2>
storage.online

Developing Vault applications
298
Purpose Lists the names of compressed files.
Request ! request.function
! request.file
storage.online
<filename>
Result ! result.status
! result.blocks
0 for success, otherwise error code
number of subsequent message blocks, 1 if
successful, 0 if not
- result.message
+ result.online
error message if status not zero
0 if offline, 1 if online
Data none, data returned in result message
Note: This is currently supported on Windows platforms only.
storage.recall
Purpose Requests that an offline compressed file be placed online.
Request ! request.function
! request.file
storage.recall
<filename>
Result ! result.status
! result.blocks
0 for success, otherwise error code
number of subsequent message blocks, always 0
- result.message error message if status not zero
Data none, data returned in result message
N
otes: This is currently supported on Windows platforms only. This function
returns before recall operation is completed
mirror.find
Purpose Used internally by mirror functions to list ranges of compressed files.
Request ! request.function
! request.directory
? request.prefix
? request.suffix
? request.start
? request.max
mirror.find
<symbolic name of server directory>
<file prefix>
<file suffix>
<filename to resume search after>
<maximum number of results to return>

Developing Vault applications
299
Result ! result.status
! result.blocks
0 for success, otherwise error code
number of subsequent message blocks, 1 if
successful, 0 if not
- result.message error message if status not zero
Data 1 column table
<filename1>
<filename2>
mirror.info
Purpose Determines the status of a file to be mirrored.
Request ! request.function
! request.directory
! request.file
mirror.info
<symbolic name of server directory>
<compressed filename>
Result ! result.status
! result.blocks
0 for success, otherwise error code
number of subsequent blocks, always 0
- result.message
^ result.exists^
^ result.date
^ result.size
error message if status not zero
1 if file exists
file timestamp if file exists
file size if file exists
Data none, data returned in result message
mirror.data
Purpose Fetches a block of data from a file being mirrored.
Request ! request.function
! request.directory
! request.file
! request.offset
! request.size
mirror.data
<symbolic name of server directory>
<filename with extension>
<offset of block>
<size of block>
Result ! result.status
! result.blocks
0 for success, otherwise error code
number of subsequent blocks, always 0
- result.message error message if status not zero

Developing Vault applications
300
Data 1x1 table for binary object
<block data>
resource.info
Purpose Determines if a specified resource exists and fetches some basic information about it if it does.
Request ! request.function
? request.path
resource.info
<the subdirectory to search>! request.file
<name of the resource file to check>
! request.file <name of the resource file to check
Result ! result.status
! result.blocks
0 for success, otherwise error code
number of subsequent blocks, always 0
- result.message error message if status not zero
^ result.exists
^ result.directory
^ result.date
^ result.size
1 if file exists
1 if this is a directory
file timestamp if file exists
file size if file exists
Data none, data returned in result message
resource.data
Purpose Fetches a block of data from a resource
Request ! request.function
? request.path
! request.file
! request.offset
! request.size
resource.data
<<the subdirectory to search>>
<name of the resource file to check>
<offset of block>
<size of block>
Result ! result.status
! result.blocks
0 for success, otherwise error code
number of subsequent blocks, always 0
- result.message error message if status not zero
Data 1x1 table for binary object
<block data>
resource.list

Developing Vault applications
301
Purpose Used to recursively enumerate upstream resource files
Request ! request.function
? request.path
! request.pattern
? request.recursive
resource.list
<the subdirectory to search>
<file search pattern>
0/1 return results from subdirectories
Result ! result.status
! result.blocks
0 for success, otherwise error code
number of subsequent message blocks, 1 if
successful, 0 if not
- result.message error message if status not zero
^ result.exists
^ result.date
^ result.size
1 if file exists
file timestamp if file exists
file size if file exists
Data 3 column table
if the entry is a directory, the size is -1 and the date is empty
filename1> <isdir1> <size1> <date1>
<filename2> <isdir1> <size2> <date2>
Notes:
- isdir is 0 or 1
- size and date are in hex format
sql.mark
Purpose Used to create a flag file that tells ADM to export metadata for a document data file to an ODBC
source. This is available on Windows platform only.
Request ! request.function
! request.file
sql.mark
<name of the document data file to export>
Result ! result.status
! result.blocks
0 for success, otherwise error code
number of subsequent message blocks, always 0
- result.message error message if status not zero
Data none, data returned in result message
stat.list
Purpose Fetches statistics about function execution times.
Request ! request.function stat.list

Developing Vault applications
302
Result ! result.status
! result.blocks
0 for success, otherwise error code
number of subsequent message blocks, 1 if
successful, 0 if not
- result.message error message if status not zero
Data 7 column table
Function Errors Cached Uncached Min Max Avg
<function1> <errors1> <cached1> <uncached1> <min1> <max1> <avg1>
<function2> <errors2> <cached2> <uncached1> <min2> <max2> <avg2>
compressed.list
Purpose Lists the names of compressed files.
Request ! request.function
? request.file
compressed.list
<file name prefix pattern>
Result ! result.status
! result.blocks
0 for success, otherwise error code
number of subsequent message blocks, 1 if
successful, 0 if not
- result.message error message if status not zero
Data 3 column table
<filename1> <format1> <modes1>
<filename2> <format2> <modes2>
compressed.open
Purpose opens a compressed file for access.
Request ! request.function
! request.file
compressed.open
<file name to open>
Result ! result.status
! result.blocks
+ result.compressed
0 for success, otherwise error code
number of subsequent blocks, always 0
the handle number associated with this open
file
- result.message error message if status not zero
Data none, data returned in result message.
compressed.close
Purpose Closes an open compressed file handle.

Developing Vault applications
303
Request ! request.function
! request.compressed
compressed.close
<file handle to close>
Result ! result.status
! result.blocks
0 for success, otherwise error code
number of subsequent blocks, always 0
- result.message error message if status not zero
Data none, data returned in result message.
compressed.status
Purpose Gets the background scanning status for a compressed file.
Request ! request.function
! request.compressed
compressed.status
<file handle>
Result ! result.status
! result.blocks
0 for success, otherwise error code
n
umber of subsequent blocks, 1 if successful, 0
if not
- result.message error message if status not zero
Data a 7 column table
<handle1> <filename1> <pagecount1> <supportedoutputmodes1> <scancomplete1>
<scanerrorcode1> <scanerrormessage1>
<handle2> <filename2> <pagecount2> <supportedoutputmodes2> <scancomplete2>
<scanerrorcode2> <scanerrormessage2>
compressed.page
Purpose Fetches raw page data from a compressed file.
Request ! request.function
! request.compressed
! request.page
compressed.page
<file handle>
<page number to return>
Result ! result.status
! result.blocks
0 for success, otherwise error code
n
umber of subsequent blocks, 1 if successful, 0
if not
- result.message error message if status not zero
Data 1x1 table for binary object
<page content>
compressed.docdata

Developing Vault applications
304
Purpose Gets the simulated document data for a compressed file.
Request ! request.function
! request.compressed
compressed.docdata
<file handle>
Result ! result.status
! result.blocks
0 for success, otherwise error code
n
umber of subsequent blocks, 1 if successful, 0
if not
- result.message error message if status not zero
Data 4 column hybrid table / key-value pair list
<key1> <value1a> <value1b> <value1c>
<key2> <value2a> <value2b> <value2c>
compressed.filedata
Purpose Gets the compressed file information associated with an open compressed file.
Request ! request.function
! request.compressed
compressed.filedata
<file handle>
Result ! result.status
! result.blocks
0 for success, otherwise error code
n
umber of subsequent blocks, 1 if successful, 0
if not
+ result.profile
+ result.resource
+ result.pagedatafile
- result.message
<profile name>
<resource set name>
<the full (local) path to the page data file>
error message if status not zero
Data none, data returned in result message
compressed.profiledata
Purpose Gets the profile settings associated with an open compressed file.
Request ! request.function
! request.compressed
compressed.profiledata
<file handle>
Result ! result.status
! result.blocks
0 for success, otherwise error code
n
umber of subsequent blocks, 1 if successful, 0
if not
! result.blocks
- result.message
number of subsequent message blocks, 1 if
successful, 0 if not
error message if status not zero

Developing Vault applications
305
Data two column list of key-value pairs
<key1><value1>
<key2><value2>
compressed.headerinfo
Purpose Determines if a given compressed file exists and returns the size of its Postscript file header.
Request ! request.function
! request.compressed
compressed.headerinfo
<file handle>
Result ! result.status
! result.blocks
0 for success, otherwise error code
number of subsequent blocks, always 0
- result.message
+ result.exists
^ result.size
error message if status not zero
1 if file exists, 0 if it does not
file size, if file exists
Data none, data returned in result message
compressed.headerdata
Purpose Fetches a block of data from a compressed file's Postscript header
Request ! request.function
! request.compressed
! request.offset
! request.size
compressed.headerdata
<file handle>
<offset as pointer>
<size of block in bytes>
Result ! result.status
! result.blocks
0 for success, otherwise error code
number of subsequent message blocks, 1 if
successful, 0 if not
- result.message error message if status not zero
Data 1x1 table for binary object
<block data>
local.open
Purpose Opens a local file for access.
Request ! request.function
! request.file
! request.blocks
local.open
<file name to open>
1, the number of subsequent blocks

Developing Vault applications
306
Parameter two column list of
key-value profile pairs
<key1><value1>
<key2><value2>
Result ! result.status
! result.blocks
0 for success, otherwise error code
number of subsequent blocks, always 0
- result.message
+ result.local
error message if status not zero
the handle number associated with this open
file
Data none, data returned in result message
local.close
Purpose Closes an open local file handle.
Request ! request.function
! request.local
local.close
<file handle to close>
Result ! result.status
! result.blocks
0 for success, otherwise error code
number of subsequent blocks, always 0
- result.message error message if status not zero
Data none, data returned in result message
local.status
Purpose Gets the background scanning status for a local file.
Request ! request.function
? request.local
compressed.status
<file handle>
Result ! result.status
! result.blocks
0 for success, otherwise error code
n
umber of subsequent blocks, 1 if successful, 0
if not
- result.message error message if status not zero
Data a 7 column table
<handle1> <filename1> <pagecount1> <supportedoutputmodes1> <scancomplete1>
<scanerrorcode1> <scanerrormessage1>
<handle2> <filename2> <pagecount2> <supportedoutputmodes2> <scancomplete2>
<scanerrorcode2> <scanerrormessage2>
local.page

Developing Vault applications
307
Purpose Fetches raw page data from a local file.
Request ! request.function
! request.local
! request.page
compressed.status
<local file handle>
<page number to return>
Result ! result.status
! result.blocks
0 for success, otherwise error code
n
umber of subsequent blocks, 1 if successful, 0
if not
- result.message error message if status not zero
Data 1x1 table for binary object
<page content>
local.docdata
Purpose Gets the simulated document data for a local file.
Request ! request.function
! request.local
local.docdata
<file handle>
Result ! result.status
! result.blocks
0 for success, otherwise error code
n
umber of subsequent blocks, 1 if successful, 0
if not
- result.message error message if status not zero
Data 4 column hybrid table / key-value pair list
<key1> <value1a> <value1b> <value1c>
<key2> <value2a> <value2b> <value2c>
local.filedata
Purpose Gets the file information associated with an open local file.
Request ! request.function
! request.local
local.docdata
<file handle>
Result ! result.status
! result.blocks
0 for success, otherwise error code
number of subsequent blocks, always 0
+ result.resource
+ result.profile
- result.message
<resource set name>
<profile name>
error message if status not zero
Data none, data returned in result message

Developing Vault applications
308
local.profiledata
Purpose Gets the profile settings associated with an open local file.
Request ! request.function
! request.local
compressed.profiledata
<file handle>
Result ! result.status
! result.blocks
0 for success, otherwise error code
number of subsequent message blocks, 1 if
successful, 0 if not
- result.message error message if status not zero
Data two column list of key-value pairs
<key1><value1>
<key2><value2>
local.headerinfo
Purpose Determines if a given local file exists and returns the size of its Postscript file header.
Request ! request.function
! request.local
local.headerinfo
<file handle>
Result ! result.status
! result.blocks
0 for success, otherwise error code
number of subsequent blocks, always 0
- result.message
+ result.exists
^ result.size
error message if status not zero
1 if file exists, 0 if it does not
file size, if file exists
Data none, data returned in result message
licence.data
Purpose Gets a list of key-value pairs from the licence.
Request ! request.function
! request.module
licence.data
module number to request licence data for
Result ! result.status
! result.blocks
0 for success, otherwise error code
number of subsequent message blocks, 1 if
successful, 0 if not
- result.message error message if status not zero

Developing Vault applications
309
Data 2 columns table of key value pairs
<key1> <value1>
<key2> <value2>
database.list
Purpose Gets a list of the databases in a vault along with their descriptions
Request ! request.function database.list
Result ! result.status
! result.blocks
0 for success, otherwise error code
number of subsequent message blocks, 1 if
successful, 0 if not
- result.message error message if status not zero
Data 2 columns table
<name1> <description1>
<name2> <description2>
database.info
Purpose Gets a list of searches available for a specific database.
Request ! request.function
! request.database
database.info
<database name>
Result ! result.status
! result.blocks
0 for success, otherwise error code
number of subsequent message blocks, 1 if
successful, 0 if not
- result.message error message if status not zero
Data 5 column table
<nunber1> <name1> <field1> <flags1> <description1>
<nunber2> <name2> <field2> <flags2> <description2>
database.resolve
Purpose Used to determine if a customer or document record exists fetches the file and offset
parameters.
Request ! request.function database.resolve
<collection of search key/value pairs>
Result ! result.status
! result.blocks
0 for success, otherwise error code
number of subsequent message blocks, 1 if
successful, 0 if not

Developing Vault applications
310
- result.message
^ result.offset
^ result.file
error message if status not zero
offset of the customer or document record
if a document was found, the file to which the
document belongs
Data none, data returned in result message
Notes
- function returns an error code if the document does not exist
- if more than one match exists, the first is returned
database.search
Purpose Searches an index for matching records.
Request This function maps to one of the following functions:
- database.filtered
- database.unfiltered
The mapping depends on the following setting:
e2serverd.ini:
[database1]
filteredsearch=0
0-do not filter searches (default, mitigation mode)
When filteredsearch=0, database.search is an alias for database.unfiltered.
1-filter searches normally (compatibility mode)
When filteredsearch=1, database.search is an alias for database.filtered.
For detailed information on search performance, please refer to “Search
performance considerations” on page 30.
database.filtered
Purpose Searches an index for matching records.
Request ! request.function database.search
<collection of search key/value pairs>
? request.max limit the number of result rows to the
specified value, otherwise uses an internal
default
? request.fields request specific output columns for
database.search separated by semicolons

Developing Vault applications
311
? request.titles request specific output column titles for
database.search separated by semicolons
Result ! result.status
! result.blocks
0 for success, otherwise error code
number of subsequent message blocks, 1 if
successful, 0 if not
- result.message
^ result.more
^ result.fixed
error message if status not zero
1 if there are more matches, 0 otherwise
the number of fixed (standard) columns
Data a table of results with a title row
<title1> <title2>
<data1,1> <data1,2>
<data2,1> <data2,2>
Notes:
This may contain fixed, configured or specified columns. By default, it
will return the fixed columns and those configured for the search in the
database.ini.
- if request.fields/request.titles is present
- if request.fields starts with a ; the fixed columns will be returned
first
- then the specified columns
- if request.fields ends with a ; the configured columns
will be returned last
- request.fields and request.titles must agree on the number of columns
- the fixed columns returned depend on whether the index points to a
customer record or document record
- for customer records, 3 fixed columns are returned:
int.match;cust.account;int.pointer
- for document records, 9 fixed columns are returned:
int.match;doc.account;doc.date;int.file;int.pointer;doc.pages;int.modes;pro
file.format;doc.type
- the number of fixed columns may increase at a later date so make use of
result.fixed

Developing Vault applications
312
database.unfiltered
Purpose Search an index for matching records without filtering.
Request Same as database.filtered except that filters will not be applied:
request.mode
request.type
request.file
request.offset
database.raw
Purpose Simple index search for matching records.
Same as database.unfiltered except that it output columns cannot be customized using:
request.fields
request.titles
Request
Data For customer indexes, this function returns a 2-column table with the
following fields:
int.match
int.pointer
For document indexes, this function returns a 3-column table with the
following fields:
int.match
int.pointer
int.file
Both types return a title row.
render.transform
Purpose Converts raw data into a application usable form and used to render pages to GIF, PDF, text, etc
.
Request ! request.function
! request.output
? request.profile
? request.resourceset
render.transform
output mode
n
ame of the profile to use instead of the job's
profile.
name of the resourceset to use instead of the
job's profile

Developing Vault applications
313
! <collection of search key/value pairs>
? <collection of rendering key/value pairs>
Result ! result.status
! result.blocks
0 for success, otherwise error code
number of subsequent message blocks, 1 if
successful, 0 if not
- result.message error message if status not zero
Data 1x1 table for binary object
<data>
notes:
GIF (mode 0, mask 1, mime image/gif)
PNG (mode 4, mask 16, mime image/png
BMP (mode 7, mask 128, mime application/octet-stream)
? request.page page or starting page to be rendered
? request.orientation rotate the output bitmap N 90 degree
increments(0-3)
? request.resolution the number of pixels wide the output bitmap
should be (512,640,800,1024,1280,1600)
? request.findtext text to highlight
? request.findcolour colour to highlight the text in
? request.findcase 0/1, 1 if the match should be case sensitive
TIFF (mode 5, mask 32, mime image/tiff)
? request.page page or starting page to be rendered
? request.pagecount
the number of pages to be rendered
NOTE: You can replace request.page and
request.pagecount with request.pageset. See
“Page sets” on page 292 for more information.
? request.background disable background
? request.orientation
r
otate the output bitmap N 90 degree increments
(0-3)
? request.resolution the number of pixels wide the output bitmap
should be (512,640,800,1024,1280,1600)

Developing Vault applications
314
? request.depth 8 for 8-bit paletted colour format (default)
32 for 24-bit RGB colour format
? request.findtext text to highlight
? request.findcolour colour to highlight the text in
? request.findcase 0/1, 1 if the match should be case sensitive
HTML (mode 1, mask 2, mime text/html)
? request.page page or starting page to be rendered
PDF (mode 2, mask 4, mime application/pdf
? request.page page or starting page to be rendered
? request.pagecount the number of pages to be rendered
NOTE: You can replace request.page and
request.pagecount with request.pageset. See
“Page sets” on page 292 for more information.
? request.background disable PDF background
? request.pdfsecuritymode PDF security parameters from API/USER(when
PDFEncryption defined in PROFILES.ini
? request.pdfuserpassword PDF user password (if
request.pdfsecuritymode=1)
? request.pdfownerpassword PDF owner password (if
request.pdfsecuritymode=1)
? request.pdfpermission PDF permission, the default is -1 (for every
bit: 1=allow, 0=disable):
RAW (mode 3, mask 8, mime application/octet-stream)
? request.page page or starting page to be rendered
STREAM (mode 8, mask 256, mime application/octet-stream)
? request.page
? request.pagecount
page or starting page to be rendered
the number of pages to be rendered
NOTE: You can replace request.page and
request.pagecount with request.pageset. See
“Page sets” on page 292 for more information.
TEXT (mode 9, mask 512, mime text/plain)

Developing Vault applications
315
? request.page
? request.pagecount
page or starting page to be rendered
the number of pages to be rendered
NOTE: You can replace request.page and
request.pagecount with request.pageset. See
“Page sets” on page 292 for more information.
? request.cpix
c
haracters per inch in the horizontal direction
in text output grid (e.g. 20)
? request.cpiy characters per inch in the vertical direction
in text output grid (e.g. 10)
? request.textencoding use the specific text encoding for text output
? request.mark start text output with a byte order mark 0/1
COLLECTION (mode 10, mask 1024, mime varies)
(none)
COMMENTS (mode 11, mask 2048, mime text/plain)
request.page page or starting page to be rendered
DOCINFO (mode 12, mask 4096, mime text/plain)
(none)
TIFF G4 (mode 13, mask 8192, mime image/tiff)
? request.page
? request.pagecount
page or starting page to be rendered
the number of pages to be rendered
NOTE: You can replace request.page and
request.pagecount with request.pageset. See
“Page sets” on page 292 for more information.
? request.orientation
r
otate the output bitmap N 90 degree increments
(0-3)
? request.resolution the number of pixels wide the output bitmap
should be (512,640,800,1024,1280,1600)
XML (mode 14, mask 16384, mime text/xml)
? request.page page or starting page to be rendered
DECODE (mode 16, mask 65536, mime text/xml)

Developing Vault applications
316
? request.page
? request.pagecount
? request.textencoding
? request.mark
page or starting page to be rendered
the number of pages to be rendered
NOTE: You can replace request.page and
request.pagecount with request.pageset. See
“Page sets” on page 292 for more information.
use the specific text encoding for text output
start text output with a byte order mark 0/1
Search Parameters Functions taking a set of search parameters:
database.search general purpose search for multiple entries
with customizable output
database.resolve special function to resolve a single record
render.transform implicitly uses database.resolve to verify and
locate documents
Search modes:
guid shortcut
! request.guid
iguid shortcut
! request.iguid
search guid index for specific guid
search iguid index for specific iguid
invlink shortcut
! request.account search invlink for document(s) associated with
account
? request.date document date
Generic prefix search:
! request.index
? request.prefix
? request.under
search number or index name
match entries starting with prefix
for "under x" indexes, the value for x (e.g.
account number)

Developing Vault applications
317
Exact search
! request.index
! request.exact
search number or index name
match entries that are equivalent to the
specified value
? request.under for "under x" indexes, the value for x (e.g.
account number)
range search
! request.index
? request.under
search number or index name
for "under x" indexes, the value for x (e.g.
account number)
? request.lower the lower bound of the search, may be ommitted
to mean there is no lower bound
? request.upper the upper bound of the search, may be ommitted
to mean there is no upper bound
? request.excludelower set to 1 to exclude exact matches of the lower
bound from the results ( <= vs < )
? request.excludeupper set to 1 to exclude exact matches of the upper
bound from the results ( <= vs < )
? request.longupper when set to 1 keys starting with the specified
upper bound should be included in the result
set (the range 200801 to 200810 does not
include 20081031 unless longupper is set)
CAUTION: if you do not specify the required fields (marked with !), the
search may default to the range search thus producing unexpected results
Common modifiers
? request.database
? request.reverse
? request.max
database name, defaults to "default"
if 1, reverse the direction of the search
maximum number of results to return
Continuation modifiers
? request.first partial key to start after when continuing
Filters
? request.output document's format must support the specified
output mode

Developing Vault applications
318
? request.file
? request.type
document must be in specified file
document's type field must match this value
? request.offset account or document record must be have
specified offset
Common Scenarios Looking up the list of databases
request.function database.list
Looking up the list of searches available in a database
request.function
request.database
database.info
default
Search for customers with accounts starting with 45
request.function
request.database
request.index
request.prefix
request.max
database.search
default
1
45
25
Searching for more matching customers
request.function
request.database
request.index
request.prefix
request.max
request.first
database.search
default
1
45
25
451234300
Search for documents under an account
request.function
request.database
request.account
request.max
database.search
default
451234300
25
Render a document as a GIF

Developing Vault applications
319
request.function
request.database
request.account
request.date
request.file
request.offset
request.page
request.resolution
render.transform
default
451234300
2009/10/15
20091015-resi-bill-mail
0000324007434FE
1
1024
Accessing vault using sockets Messages transmitted over the wire to the rendering engine are in INFO
record format
-the INFO record is a binary representation of the logical messages
-logically this is in the form of a two dimensional table of values
The INFO record consists of three basic parts
-the header
-the cell offset table
-the cell data table
The header consists of
- the signature "INFO: in ASCII (0x49 0x4E 0x46 0x4F)
-
the length of the INFO record (as a 32-bit two's complement signed number
in MSB format)
- the number of rows in the INFO record (as a 32-bit two's complement
signed number in MSB format)
- the number of columns in the INFO record (as a 32-bit two's complement
signed number in MSB format)
The cell offset table

Developing Vault applications
320
- is a list of displacements from the start of the cell data
- each entry corresponds to a certain cell in the logical table
- rows appear from lowest to highest
- in each row the columns appear lowest to highest
- normally there are rows*columns+1 cell offset entries. If there are 0
rows and/or 0 columns, no cell offset table or cell data will be present,
just the header (uncommon)
-each displacement is stored as a 32-bit two's complement signed number in
MSB format
- the last entry is the offset 1 past the last byte of the cell data
-
the length of a cell's data is determined from the difference of its cell
Offset and the next cell offset - they will be equal for an empty cell
- there are certain validation properties
- all cell offsets are greater than or equal to zero
- the first cell offset is zero
- the last cell offset is the length of the cell data table
- each cell offset is greater than or equal to the previous cell offset
- each cell offset is less than or equal to the next cell offset
The cell data table
- is a concatenated list of all data values
- text data is stored as UTF-8 encoded code units
- numbers are stored as decimal digits in text form
- offsets are stored as hex digits in text form
- binary data is stored as a sequence of arbitrary bytes
- by convention binary data only appears in 1x1 tables
- cell data appears in the same order as the cell offsets
- cell data may not overlap

Developing Vault applications
321
Sample INFO record -this is a document record
- document records are hydrid tables/key-value pairs
- attributes are stored as key value pairs
- reports are stored in 4 column rows
- raw binary form
0x0B664B40 49 4e 46 4f 00 00 01 64 00 00 00 09 00 00 00 04 INFO...d........
0x0B664B50 00 00 00 00 00 00 00 07 00 00 00 18 00 00 00 19 ................
0x0B664B60 00 00 00 1a 00 00 00 22 00 00 00 33 00 00 00 33 ......."...3...3
0x0B664B70 00 00 00 33 00 00 00 3e 00 00 00 4a 00 00 00 4a ...3...>...J...J
0x0B664B80 00 00 00 4a 00 00 00 55 00 00 00 79 00 00 00 79 ...J...U...y...y
0x0B664B90 00 00 00 79 00 00 00 82 00 00 00 83 00 00 00 83 ...y...?...?...?
0x0B664BA0 00 00 00 83 00 00 00 8f 00 00 00 90 00 00 00 90 ...?.........
0x0B664BB0 00 00 00 90 00 00 00 9b 00 00 00 a3 00 00 00 a3 ......?...£...£
0x0B664BC0 00 00 00 a3 00 00 00 ab 00 00 00 b5 00 00 00 b5 ...£...«...µ...µ
0x0B664BD0 00 00 00 b5 00 00 00 bd 00 00 00 c0 00 00 00 c0 ...µ...½...À...À
0x0B664BE0 00 00 00 c0 ...À
0x0B664BE0 73 65 63 74 69 6f 6e 53 74 61 72 74 sectionStart
0x0B664BF0 20 6f 66 20 44 6f 63 75 6d 65 6e 74 31 30 64 6f of Document10do
0x0B664C00 63 2e 6e 61 6d 65 4b 65 6c 76 69 6e 20 20 20 53 c.nameKelvin S
0x0B664C10 74 6f 63 6b 74 6f 6e 64 6f 63 2e 69 6e 76 6f 69 tocktondoc.invoi
0x0B664C20 63 65 34 34 37 20 36 35 30 20 37 36 35 33 64 6f ce447 650 7653do
0x0B664C30 63 2e 61 64 64 72 65 73 73 35 38 36 35 20 57 65 c.address5865 We
0x0B664C40 61 76 65 72 20 43 65 6d 65 74 65 72 79 20 52 64 aver Cemetery Rd
0x0B664C50 20 20 20 31 34 39 35 33 2d 31 39 33 32 64 6f 63 14953-1932doc
0x0B664C60 2e 70 61 67 65 73 35 64 6f 63 2e 73 65 63 74 69 .pages5doc.secti
0x0B664C70 6f 6e 73 31 64 6f 63 2e 61 63 63 6f 75 6e 74 30 ons1doc.account0
0x0B664C80 30 30 32 30 33 34 37 64 6f 63 2e 64 61 74 65 32 0020347doc.date2
0x0B664C90 30 30 32 2f 30 31 2f 31 31 64 6f 63 2e 74 79 70 002/01/11doc.typ
0x0B664CA0 65 61 66 70 eafp

322
Vault and e-Messaging
The e-Messaging solution can be configured to prepare both inbound and outbound e-mail
and SMS messages for archiving in Vault. Archive preparation functions performed by
e-Messaging include:
• Automatic or minimum click indexing of e-mail and SMS content. Including the
generation of journal files for Vault in the required format.
• Single instance storage of messages addressed to more than one recipient.
• Optional conversion of content including e-mail attachments to PDF or PDF/a prior to
archiving including the following options:
• Extraction of files in ZIP attachments prior to conversion, including nested ZIP files
• Extraction of MS Outlook rich text content (MS-TNEF / winmail.dat files) prior to
conversion
• Conversion of HTML to MHT format – embedding images (already embedded or
externally referenced) to ensure version control of complete content
• Safely batching up content into Vault “collections” for efficient loading, compression,
storage and retrieval.
The rest of this section explains how to configure Vault to work with e-Messaging. Please refer
to Outbound Profiles and Inbound Profiles sections of the e-Messaging Users Guide for instructions
on how to configure e-Messaging to prepare message content for archiving in Vault.
Automatic or minimum click indexing
General
Vault can receive index data in either a plain text or XML journal file. Content archived using
the Vault “collection” format, as is used exclusively by e-Messaging, must use the plain text
journal in order to load correctly.
The e-Messaging solution can be configured to generate the required plain text journal file for
the archiving of both in- and out-bound e-mail and SMS messages which it processes.
Outbound content
The e-Messaging solution indexes outbound content based on the index values provided in
the DIJ.

Vault and e-Messaging
323
Custom index settings in the Vault profiles.ini file instruct Vault as to which settings to apply
to the index values it gets from journal files provided by e-Messaging. The filemap section of
the profiles.ini should map the name of each e-Messaging Outbound Profile (that has archiving
enabled) to a profile that is able to load and index the “collections” and journal files provided
by e-Messaging. See Vault Configuration File Settings section on page 326 for the minimum
profile settings required to load content prepared by e-Messaging into Vault.
It should be noted that besides the e-Messaging specific index keys and values outlined in
Other Custom DIJ Fields section above, you can continue to use any other custom index values
you wish and apply these to e-mail and SMS messages too by simply including them as custom
values in the DIJ that is processed by e-Messaging. The e-Messaging solution passes these
values directly through, as attribute key / value pairs, in the plain text journal it produces.
Inbound content
General
It should be noted that e-Messaging can be configured to archive ad-hoc e-mail messages,
inbound or outbound, by configuring rules on your mail server to forward or copy messages to
a specific e-mail account, sometimes called a journaling account. An e-Messaging Inbound
Profile can then be configured to access these messages as it does any other inbound
messages.
Associating messages with a Vault customer record
The e-Messaging solution indexes inbound messages by performing Vault API look ups.
Depending on the Inbound Profile settings, e-Messaging will take the “To” or “From” header
field from an e-mail or SMS and perform the following Vault API look ups to try and associate
the message content with a specific customer and thereby maintain a customer centric view
with minimum user intervention:
• Request matches for the complete, plain e-mail address, e.g. john.smith@company.com,
by searching the e-mail index in Vault. The index number for the e-mail index is specified
in the Inbound Profile
• If there are multiple matches on the above search, then e-Messaging will request an
operator to select the most appropriate match from a dropdown of options
• If there are zero matches on the above search, e-Messaging will extract the likely surname
from the e-mail address based on the following rules; john.smith@company.com,
john_smith@company.com, or jsmith@company.com, and request matches for, e.g.
“smith”, by searching the name index in Vault. The index number for the name index is
specified in the Inbound Profile

Vault and e-Messaging
324
• If there are multiple matches on the above search, then e-Messaging will request an
operator to select the most appropriate match from a dropdown of options
• If there are zero matches on the above search, then e-Messaging will request an operator
to enter an account number, name and address for the sender (or receiver) of the message
to create a new customer record in Vault. Vault API lookups are available in this operator
interface too to minimize the number of keystrokes required to index messages with zero
matches
In the case of an inbound SMS message, e-Messaging would perform the following Vault API
look ups to try and associate the message content with a specific customer and thereby
maintain a customer centric view with minimum user intervention:
• Request matches for the MSISDN (mobile number), e.g. “447795504506”, by searching
the MSISDN index in Vault. The index number for the MSISDN index is specified in the
Inbound Profile
• If there are multiple matches on the above search, then e-Messaging will request an
operator to select the most appropriate match from a dropdown of options
• If there are zero matches on the above search, then e-Messaging will request an operator
to enter an account number, name and address for the sender (or receiver) of the message
to create a new customer record in Vault. Vault API lookups are available in this operator
interface too to minimize the number of keystrokes required to index messages with zero
matches
The e-Messaging Inbound Profile settings dictate the level of automation and accuracy that is
achieved when indexing inbound messages. Automatic indexing can be configured in an
Inbound Profile to take place in one of the following scenarios:
•Never
• On single match for e-mail address search (or single match for MSISDN search in the case
of SMS)
• On single match for name search
Custom index settings in the Vault profiles.ini file instruct Vault as to which settings to apply
to the index values it gets from journal files provided by e-Messaging. The filemap section of
the profiles.ini should map the name of each e-Messaging Inbound Profile (that has archiving
enabled) to a profile that is able to load and index the “collections” and journal files provided
by e-Messaging. See Vault Configuration File Settings section on page 326 of this guide for the
minimum profile settings that are required to load content prepared by e-Messaging into
Vault.
Single instance storage and message ID
Besides the customer record indexes that are applied to every message to link messages to a
customer centric view, e-Messaging can optionally be configured to ensure single instance
storage of messages that have multiple addressees. This is achieved by creating a unique

Vault and e-Messaging
325
Message ID index for every message stored. When “Delete Duplicates” is enabled in an
Inbound Profile e-Messaging will check if messages with the same Message ID have been
archived previously and skip archiving of duplicates.
The index number of the Message ID index in Vault is specified in an Inbound Profile setting
to enable e-Messaging to perform the above mentioned API look-ups.
It is important to note that even when only a single instance of a message is stored, the
message can still be located and retrieved using any of the e-mail recipient addresses on the
original e-mail header. This is achieved by the configuration of the Content Pointer (Cpointer)
indexes described in the next section.
The Message ID is also used in the workflow XML objects created by e-Messaging to allow
external systems, for example 3rd party workflow solutions, to connect directly to messages
and their related message parts (e.g. attachments) via a URL link or directly through Vault’s
API set.
Content pointer (Cpointer) indexes
A Cpointer is an index that directly locates content that has been archived in Vault by
e-Messaging. A single message can exist of multiple content parts (e.g. body, attachments, etc.)
and each part can have multiple Cpointers for the sender and different recipients of the
message.
Cpointer indexes and their values are
automatically created by the e-Messaging
solution. The format of Cpointer index values
is as follows:
1. From Sender@
d o m ai n . c o m _20 0710 01173425 _ Pa r t _ S ub
part or
2. To recipient@
domain.com_20071001173425_Part_Subpart or
3. CC recipient @ domain.com_20071001173425_Part_Subpart or
4. BCC recipient @ domain.com_20071001173425_Part_Subpart
Additional message metadata
Besides the indexes listed above, e-Messaging also creates the following message attributes.
These are not intended to be searchable indexes but useful values to return with the results of
searches on searchable indexes to, for example, be able to differentiate the different parts of a
message when presented to a user in a list.
MIME
The MIME attribute value is populated with the content-type value of content as it was in the
original (e-mail) message prior to any conversion.
THERE IS A SPACE AFTER [FROM, TO OR CC] AND
A SPACE AFTER THE @ SYMBOL. THIS IS TO
ENABLE ENHANCED SEARCHING IN VAULT, E.G.
FILTERING MESSAGES SENT TO, RECEIVED FROM,
CC’D OR BCC’D TO AN ADDRESS AS WELL AS
SEARCHING FOR E-MAIL EXCHANGED WITH ALL
INDIVIDUALS AT A PARTICULAR COMPANY / DOMAIN
NAME.

Vault and e-Messaging
326
Description
The description attribute value is populated as follows:
• If the entire e-mail message is stored in its raw (RFC-822) format then the description
attribute value equals the contents of the e-mail’s subject line. The option exists to
append the subject with a fixed descriptor, for example “(whole)”.
• If a main e-mail body part (i.e. not an attachment) is stored separately then the description
attribute value equals the contents of the e-mail’s subject line. The option exists to
append the subject with a fixed descriptor, for example “(body)”.
• If an e-mail’s attachment is stored separately then the description attribute value equals
the original name of the attachment, or the original filename within a ZIP file if ZIP
extraction is enabled. The option exists to append the filename with a fixed descriptor, for
example “(attachment)”.
Expire
For future use. This populates an attribute with a content expiry date, formatted YYYYMMDD,
to allow a document repository to purge content at the end of its life. This feature is not
currently supported by Vault. It is currently possible to set the retention in months for all
messages or documents processed by a single profile (Inbound or Outbound profile)
Vault configuration file settings
Profiles.ini
This file has important settings for compressing, decompressing and indexing content that is
loaded into Vault. The following profile settings are recommended to make Vault correctly load
and index content that is prepared by e-Messaging.
[SampleProfile]
Format=collection
Documents=ujournal
JournalCodePage=UTF-8
Database=default
MaxInstances=200
PurgeMonths=84
CustomIndexing=1
IndexQueuing=1
Index1=account,cust.account,jcrtul,Account Number
Index2=name,cust.name,jcrtul,Name
Index3=address,cust.address,jcrtul,Address
Index4=invlink,doc.date,dhasb,Document Date (YYYYMMDD)
Index5=email,email,jctul,Email
Index6=msisdn,msisdn,jcrtul,Mobile Phone Number
Index7=MessageID,MessageID,dhb,Message ID
Index8=Cpointer,Cpointer,dhmrb,Cpointer (Header E-mail_Datetime_Part)
Format=collection allows ad-hoc content of any format to be stored in a combined compressed
file and retrieved in its original format

Vault and e-Messaging
327
Document=ujournal sets the journal file format to Unicode plain text. Plain text journals are
required for archiving content in the “collection” format. The Unicode setting serves two
purposes: 1) support for international characters in the index values and 2) an increased
storage allocation for the storage of document attributes. This can be important when
archiving messages with many recipients where a Cpointer index gets created for each
recipient
JournalCodePage=UTF-8 specifies the codepage used by the journal file.
Database=default a comma separated list of databases in which index tables will be built for
messages indexed by this profile
MaxInstances=200 sets the maximum number of entries for a single index key per message.
Defaults to 8 but a considerably higher number is required if you are planning to archive
messages with many recipients and create Cpointer indexes for each recipient
PurgeMonths=84 specifies the retention period for messages loaded by this profile. This
setting is optional
CustomIndexes=1 enable custom indexing in support of the message indexes created and
provided by e-Messaging
IndexQueuing=1 speeds up index building process
IndexX=… copy these custom index settings directly into your profile. You may change the
last field of the value to a more appropriate description. Some of the indexes have the “r” flag
set to enable rotations. This allows searching for archived content using partial index values,
e.g. searching by phone number commencing with or without International dialling code or
searching for messages using the e-mail username or the domain name part of the address,
etc. Additional custom indexes may also be configured as required. The order of these indexes
does not matter. However, the correct number for each index must be configured in
e-Messaging Inbound and Outbound profiles to allow e-Messaging to perform the necessary
API look-ups.
Please refer to the “Profiles initialization file” chapter for additional details on the profiles.ini
settings.
Database.ini
This file specifies:
• Searches available against different Vault databases and their descriptions
• Settings for the above
• The default values to return in a table, including table column headings, for searches
against the different index keys
• The default language and sort order

Vault and e-Messaging
328
The following database settings are recommended for e-Messaging to correctly perform the
API look-ups it needs against Vault for the successful indexing and retrieval of message
content.
[default]
LanguageDefault=*
LanguageN=*
description=Default Database
Index1=account,cust.account,jcrtul,Account Number
Index2=name,cust.name,jcrtul,Name
Index3=address,cust.address,jcrtul,Address
Index4=invlink,doc.date,dhasb,Document Date (YYYYMMDD)
Index5=email,email,jctul,Email
Index6=msisdn,msisdn,jcrtul,Mobile Phone Number
Index7=MessageID,MessageID,dhb,Message ID
Index8=Cpointer,Cpointer,jdhmrb,Cpointer (Header E-mail_Datetime_Part)
Index9=guid,doc.guid+int.null+int.format,dhi,GUID
Index10=iguid,docInstanceID+int.null+doc.type,dhi,Instance GUID
Index11=DocID,DocID,jdhi,Document ID
Index12=Invoice,Invoice+int.null+int.format,jdhi,Invoice Number - GUID
Render1=Account;Name;Address,cust.account;cust.name;cust.address
Render2=Name;Account;Address,cust.name;cust.account;cust.address
Render3=Address;Account Number;Name,cust.address;cust.account;cust.name
Render4=Date;Content-type;Description,doc.date;mime;Description
Render5=E-mail;Account;Name;Address,int.match;cust.account;cust.name;cust.a
ddress
Render6=Mobile Phone
Number;Account;Name;Address,int.match;cust.account;cust.name;cust.address
Render7=Message
ID;Date;Content-type;Description,MessageID;doc.date;mime;Description
Render8=Cpointer;Date;Content-type;Description,int.match;doc.date;mime;Desc
ription
Additional custom indexes may also be configured as required. The order of these indexes does
not matter. However, the correct number for each index must be configured in e-Messaging
Inbound and Outbound profiles to allow e-Messaging to perform the necessary API look-ups.
Refer to the “Profiles initialization file” section for additional details on the database.ini
settings.
Sample journal file
This section is purely for informational purposes to provide you with an overview of the layout
of a typical journal file created by e-Messaging.

Vault and e-Messaging
329
Text journal file example for single piece of
content, e.g. e-mail with no attachment or
SMS message:
Text journal file example for related pieces of content, e.g. e-mail with one attachment:
NOTE THAT A SINGLE PIECE OF CONTENT CAN
HAVE MULTIPLE CPOINTER INDEXES AND THAT
THERE IS A SPACE AFTER [FROM, TO, CC OR
BCC] AND A SPACE AFTER THE @ SYMBOL. THIS
IS TO ENABLE ENHANCED SEARCHING IN VAULT,
E.G. FILTERING MESSAGES SENT TO, RECEIVED
FROM OR CC’D TO AN ADDRESS AS WELL AS
SEARCHING FOR E-MAIL EXCHANGES WITH ALL
INDIVIDUAL AT A PARTICULAR COMPANY / DOMAIN
NAME.
J|InProfile|datetime (or OutProfile)
A|MessageID|mthomas@comp_a.com_20070110163110_32432452 (mthomas@comp_a.com_datetime_MsgIndexID)
A|Cpointer|From mthomas@ comp_a.com_20070110163110_1 (From mthomas@ comp_a.com_datetime_part)
A|Cpointer|To jsmith@ comp_b.com_20070110163110_1 (To jsmith@ comp_b.com_datetime_part, not for SMS)
A|Cpointer|To m.lee@ comp_c.com_20070110163110_1 (To m.lee@ comp_c.com_datetime_part, not for SMS)
A|Cpointer|CC a.hall@ comp_c.com_20070110163110_1 (CC a.hall@ comp_c.com_datetime_part, not for SMS)
A|email|from (if inbound email), to (if outbound email)
A|MSISDN|FromMobPhoneNo (if inbound SMS), to (if outbound SMS)
A|Description|Description (Email subject header, first 40 characters of SMS, if
SMS)
A|Expire|YYYYMMDD
A|mime|mime
A|Name|Value (for each additional DDSDocValue in DIJ)
D|account|YYYYMMDD|Filename_incl_ext|Full Name|Full Address
J|InProfile|datetime (or OutProfile)
A|MessageID|mthomas@comp_a_20070110163110_32432452 (mthomas@comp_a.com_datetime_MsgIndexID)
A|Cpointer|From mthomas@ comp_a.com_20070110163110_1 (From mthomas@ comp_a.com_datetime_part)
A|Cpointer|To jsmith@ comp_b.com_20070110163110_1 (To jsmith@ comp_b.com_datetime_part, not for SMS)
A|Cpointer|To m.lee@ comp_c.com_20070110163110_1 (To m.lee@ comp_c.com_datetime_part, not for SMS)
A|Cpointer|CC a.hall@ comp_c.com_20070110163110_1 (CC a.hall@ comp_c.com_datetime_part, not for SMS)
A|email|from (if inbound email), to (if outbound email)
A|MSISDN|FromMobPhoneNo (if inbound SMS), to (if outbound SMS)
A|Description|Description (Email subject header, first 40 characters of SMS, if
SMS)
A|Expire|YYYYMMDD
A|mime|mime
A|Name|Value (for each additional DDSDocValue in DIJ)
D|account|YYYYMMDD|Filename_incl_ext|Full Name|Full Address
A|MessageID|mthomas@comp_a.com_20070110163110_32432452 (mthomas@comp_a.com_datetime_MsgIndexID)
A|Cpointer|From mthomas@ comp_a.com_20070110163110_1 (From mthomas@ comp_a.com_datetime_part)
A|Cpointer|To jsmith@ comp_b.com_20070110163110_1 (To jsmith@ comp_b.com_datetime_part, not for SMS)
A|Cpointer|To m.lee@ comp_c.com_20070110163110_1 (To m.lee@ comp_c.com_datetime_part, not for SMS)
A|Cpointer|CC a.hall@ comp_c.com_20070110163110_1 (CC a.hall@ comp_c.com_datetime_part, not for SMS)
A|email|from (if inbound email), to (if outbound email)
A|MSISDN|FromMobPhoneNo (if inbound SMS), to (if outbound SMS)
A|Description|Description (if inbound SMS), to (if outbound SMS)

Vault and e-Messaging
330
Folder permissions
When e-Messaging prepares content and indexes for batching into “collections” and loading
into Vault, it creates subfolders in the Vault Server’s Download folder and writes the content
and indexes requiring loading into this folder. If Vault resides in a server different from where
e-Messaging is hosted, Vault’s download folder will need to be shared (UNC-accessible) to
provide e-Messaging with remote access. You can secure the shared folder by allowing
read-write access only to the remote account running the e-Messaging service. Consult your
e-Messaging administrator to obtain the account information for the logged-in user who
started the e-Messaging web application.
Retrieving message content from Vault
Messages archived in Vault can be retrieved using any of the following interfaces:
• Vault Web View Generic Interface (the sample Perl web application provided with
e2 Web View/Render Server)
• Vault Desktop (Thick) Clients
• Your business systems using the Vault Render API sets
The rest of this section explains how to configure the search and retrieval from Vault for
messages that have been loaded by e-Messaging.
Vault web View
No special settings required other than the profiles.ini and database.ini settings described in
Vault Configuration File Settings section on page 326 of this guide.
Vault desktop (Thick) clients
No special settings required other than the profiles.ini and database.ini settings described in
Vault Configuration File Settings section on page 326 of this guide.
Vault Render API sets
This section describes special considerations and tips when configuring your business
applications to access the Vault Render API to retrieve messages which were prepared for
archiving by e-Messaging. This section is not intended as a comprehensive guide on using the
Vault Render APIs. Refer to “About the Rendering Engine” for further details.
The rest of this section assumes that the Vault profile and database settings have been
configured as described Vault Configuration File Settings section on page 326 of this guide.
A|Description|Description (Filename of attachment)
A|Expire|YYYYMMDD
A|mime|mime
A|Name|Value (for each additional DDSDocValue in DIJ)
D|account|YYYYMMDD|Filename_incl_ext|Full Name|Full Address

Vault and e-Messaging
331
Customer centric searches
Customer centric searches are searches to locate a customer’s virtual folder in Vault. A virtual
folder is presented as scrollable lists of metadata describing all communications that have
been archived for a given customer. Communications are linked to a customer’s virtual folder
by the Account Number index. Virtual folders are easily located by searching against the
Account Number index with a specific or partial Account Number value. If the Account
Number is not known by a user, it and its associated virtual folder can be located by
performing searches against any of the following customer indexes:
• Customer Name (standard index). It is possible to search the name index using the full
name, first name or last name
• Customer Address (standard index). It is possible to search the address index using the
full address, with spaces between the address lines, or using a single address line value
such as ZIP
• E-mail (e-Messaging custom index)
• MSISDN (e-Messaging custom index). To comply with the MSISDN format (see MSISDN),
other 0’s, 1’s or +’s should not be appended to the front of the number. The number must
also not contain any spaces.
Customer centric searches follow the standard Vault behavior, there are no special
considerations to be taken into account, other than the fact that customers and their virtual
folders can be located using a customer’s e-mail or mobile number too.
Whole messages versus message parts
E-mail messages can consist of multiple parts, e.g. a text part, a HTML part and attachments. If
an attachment is a ZIP file then sub-parts will also exist. The ZIP file is considered as the
message part and each of the files inside the ZIP file a sub-part.
Depending on e-Messaging Inbound and Outbound profiles settings, any of the following may
be archived:
•Nothing
• Complete Original Message Only
• Original Parts & Complete Original
• Original Parts – ZIP content extracted & Complete Original
• Converted Parts – PDF & Complete Original
• Original Parts only
• Original Parts – ZIP content extracted only
• Converted Parts – PDF only

Vault and e-Messaging
332
Depending on the archive settings configured in e-Messaging, multiple pieces of content may
be archived for a single message. The purpose being to allow contact center agents to retrieve
and view any part of a message, including its attachments, without the need for any specialized
e-mail client or viewing software.
When the multiple parts of a message are archived separately, they remain associated together
by their Message ID index. In this scenario a search on a unique Message ID could return
multiple results, one for each of the message parts. By default the Vault profile and database
settings recommended above would return:
• MessageID
• Date
• Original Content Type
•Description
•Expiry Date
Certain Vault Render API calls such as Mode 86 (Extended Index Query with Page Count) and
the Unicode “search” function will also return:
• Document type
• Document file (compressed file name)
• Document offset (in the compressed file)
The message parts data listed above should be presented to the user in a tabular format with a
URL for each message part that can be used to submit a subsequent API request to retrieve the
actual content of any of the message parts. The requested display format for any of these parts
should always be set to “collection” (D=10) for any content that has been archived by
e-Messaging. This is the default behavior for the generic Vault Service Web application when
using the profile and database settings provided above.
If you are using your own application to access the Vault Render API then you might need to
modify its behavior to support retrieving single messages that consist of multiple message
parts as outlined above.
Retrieving message content
Actual message content can be retrieved in various ways using the Render APIs.
By Account Number, Date, Document Type, File and Offset Information
If the above information is available from a previous API request, e.g. Mode 86 (Extended
Index Query with Page Count) or the Unicode “search” function, then this can be used to
retrieve the content of a specific message part using Mode 84 (Extended Render Document)
or the Unicode “render” function.

Vault and e-Messaging
333
Remember to set the display format to “collection” (D=10), for the correct display of content
that has been archived by e-Messaging.
By Message ID
When the multiple parts of a message are archived separately, they remain associated together
by their Message ID index. That means that a search on a unique Message ID could return
multiple results, one for each of the message parts. By default the Vault profile and database
settings recommended above in section would return:
• MessageID
• Date
• Original Content Type
•Description
•Expiry Date
Certain Vault Render API calls such as Mode 86 (Extended Index Query with Page Count) and
the Unicode “search” function will also return:
• Document type
• Document file (compressed file name)
• Document offset (in the compressed file)
The message part data listed above should be presented to the user in a tabular format with a
URL for each message part that can be used to submit a subsequent API request to retrieve the
actual content of any of the message parts. The requested display format for any of these parts
should always be set to “collection” (D=10) for any content that has been archived by
e-Messaging. This is the default behavior for the generic Vault Service Web application when
using the profile and database settings provided in here.
If you are using your own application to access the Vault Render API then you might need to
modify its behavior to support retrieving single messages that consist of multiple message
parts as outlined above.

Vault and e-Messaging
334
By Content Pointer (Cpointer)
A Cpointer is an index that directly locates content that has been archived in Vault by
e-Messaging. A single message can exist of multiple content parts (e.g. body, attachments, etc.)
and each part can have multiple Cpointers for the sender and different recipients of the
message.
Cpointer indexes and their values are automatically created by the e-Messaging solution. The
format of Cpointer index values is as follows:
• “From Sender@ domain.com_20071001173425_Part_Subpart” or
• “To recipient@ domain.com_20071001173425_Part_Subpart” or
• “CC recipient @ domain.com_20071001173425_Part_Subpart” or
• “BCC recipient @ domain.com_20071001173425_Part_Subpart”
Note: that there is a space after [From, To or CC] and a space after the @ symbol. This is to
enable enhanced searching in Vault, e.g. filtering messages sent To, received From, CC’d or
BCC’d to an address as well as searching for e-mail exchanges with all individuals at a
particular company / domain name.
Therefore despite only storing a single instance of each message part, the message parts can
be located using the full e-mail address or only the domain part of the e-mail address for any
of the recipients.
Example 1
Searching the Cpointer index for the value “To recipient@domain.com” will return a list of all
message parts of all messages sent to recipient@domain.com and archived by e-Messaging.
Example 2
Searching the Cpointer index for the value “recipient@domain.com” will return a list of all
message parts of all messages sent to, From, cc or bcc recipient@domain.com and archived by
e-Messaging.
Example 3
Searching the Cpointer index for the value “domain.com” will return a list of all message parts
of all messages sent to, From, cc or bcc anyone at domain.com and archived by e-Messaging.
Example 4
Searching the Cpointer index for the value “domain.com_20071011” will return a list of all
message parts of all messages sent to, From, cc or bcc anyone at domain.com, after the date 11
October 2007 and archived by e-Messaging.
Retrieving message metadata
The Vault Render API provides several functions to retrieve all metadata that has been
associated with a specific message or message part. These API calls include Mode 85
(Extended Document Attributes) and the Unicode “list.attributes” API function. These API
calls can be used to retrieve information such as all of the recipients of a specific message or

Vault and e-Messaging
335
message part. Below is an example of the values that a Mode 85 (Extended Document
Attributes) call returns. All the message recipients can be determined from the Cpointer
values.
int.file;20070110-e-mail-39965-39965-schiphol-txt
int.pointer;0000005000000000
doc.account=123456789
doc.date=2007/01/10
doc.name=Michael Thomas
doc.address=1096 High Street, London SW12 7JK
doc.invoice=
doc.type=.jpg
doc.pages=1
file.name=michael.thomas@company_a.com_20070110125434000_1.txt
file.size=59442
file.block=262144
Description=Confirmation
Mime=text/plain
Expire=20070710
MessageID= michael.thomas@company_a.com_20070110125434_324534875
Cpointer=from michael.thomas@ company_a.com_20070110125434_1
Cpointer=to m.lee@ company_d.com_20070110125434_1
Cpointer=to h.harris@ company_d.com_20070110125434_1
Cpointer=cc j.smith@ company_d.com_20070110125434_1
Cpointer=cc s.roberts@ company_d.com_20070110125434_1
Cpointer=cc j.rodriguez@ company_d.com_20070110125434_1
Cpointer=cc p.byrnes@ company_d.com_20070110125434_1
Cpointer=cc a.bennett@ company_d.com_20070110125434_1
doc.sections=0
Workflow URLs – Ensuring that they work
The URL that is inserted in the e-Messaging generated XML workflow objects to allow external
systems to view archived message content uses the Message ID index inserted in the URL as a
HTTP GET parameter.If you are not using the default Web View application but your own, you
must ensure your application responds as required when receiving the MessageID index
number and a specific Message ID value in a URL generated by e-Messaging.
The URL provided by e-Messaging in the XML based workflow objects it generates is
constructed by concatenating the following fields:
•e2_Web_URL (from the Inbound or Outbound profile) e.g
“http://somehost/e2/interface.plx?db=default”

Vault and e-Messaging
336
• “&K=”
MessageID_index (from the Inbound or Outbound profile)
“&Q=”
MessageID constructed from “from” or “to” address, depending on the Inbound Profile
PrimaryIndexingOn setting joined by underscore to datetime joined by underscore with
MD5 hash of Message-ID value in header
For example:
http://somehost/e2/interface.plx?db=default&K=7&Q=michael.thomas@company_a.com_2
0070110163110_1234567890ABCDEF1234567890ABCDEF

337
Updating unicode indexes
The International Components for Unicode (ICU) library used with the Vault system to order
Unicode databases has been upgraded from version 4.0.1 to version 51.2. This has altered the
sort order used to store data in the Vault Unicode index files as follows:
• Some locales take advantage of the new ICU script block reordering feature to move
where the script characters appear in the sort order. For example, the sort order for the
block of Greek script characters like “alpha” have been moved from being after the
standard ASCII characters to being ahead of them.
• ICU 4.0.1 used “Common Locale Repository Data” version 1.6 whereas ICU 51.2 uses
CLDR version 23. This may cause some characters to be treated differently.
As a result, if you use Unicode indexes, you may have to do some sort order processing on your
Unicode index files to have search results sorted according to the new Unicode sort order.
Maintaining your current script character sorting order
If you currently use Unicode indexes and the new ICU sort order for your language has
changed the ordering of the script characters (the Greek alpha symbol is an example), then
your existing indexes will continue to use the sort order for script characters from ICU version
4.0.1.
Any new Unicode indexes will be created using the ICU version 51.2 sort order for script
characters unless you specify the "o" (for order) flag when you specify the index in the
database.ini flag. Specifying the "o" flag will cause the index to use the ICU 4.0.1 sort order for
script characters.
Testing your indexes for sort order changes in non-script characters
You can determine if your index is a Unicode index by examining the filetype of the index file.
Unicode index files will have a filetype of dru. For the legacy indexer, you will need to look in
the index subdirectory tree for matching files. For the Indexer as a Service, use the
"indexcheck -dbinfo -mode:2" command to display the index file paths, names and types.
For example, if you had a legacy index file named “myindex”, you could determine if the
Unicode indexes needs to be resorted by running the release 7.0 version of indexcheck against
the index as follows:
indexcheck -validorder -struct -maxerrors:10 -noprint index\myindex\invlink.dru
Example:
For an Indexer as a Service index named mynewindex, the command would be:

Updating unicode indexes
338
indexcheck -mode:2 -validorder -struct -maxerrors:10 -noprint mynewindex/invlink.dru
This command will check the index for any entries that are not in the sort order compatible
with Vault release 7.0 sort orders for non-script characters. If the command returns results
with "ERROR 14121" then that indicates there is a sort order issue and you will need to correct
the sort order.
Correcting the sort order
You will need to correct the sort order of your Unicode index if the indexcheck "validorder"
test indicates that there is a sort order or the order of the script characters has changed and
you want to use the new script sort order (the ICU 4.0.1 sort order for script characters is
respected for existing Unicode indexes by default).
The simplest approach is to reindex your data using release 7.0. The new indexes created will
have the new sort order. However, if this is not practical, you may use the alternate approach
detailed below.
Note: All uses of the indexcheck command in the example imply that the command should be
run from the Vault server directory so that "indexcheck" is actually "tools\indexcheck".
Legacy indexer
If the sort order needs to be corrected on a Unicode index that uses the legacy default indexer,
the sort order can be corrected by copying the index to a temporary index name and then
replacing the original index file using the indexcheck copy function.
The example below shows the steps for an index named myindex that used locale Len_RUS_AS
on a Windows based Vault system.
Create and test the new index file
Create a new index file with a temporary name using:
With Vault stopped:
1. rename index\myindex\invlink.dru index\myindex\oldinvlink.dru
2. rename index\myindex\newinvlink.dru myindex\invlink.dru
Note: The Vault system should be stopped during the rename operation. Also, to undo the
change, simply restore the names of the original and new index files with Vault stopped.
indexcheck -copy:index\myindex\newinvlink.dru -lang:Len_RUS_AS -struct -noprint index\myindex\invlink.dru

Updating unicode indexes
339
Indexer as a Service
If the sort order needs to be corrected on a Unicode index that uses the Indexer as a Service,
the sort order can be corrected by copying the index from the indexer as a service to a legacy
index file, dropping the current index from the indexer as a service index.dr2 file and then
copying the legacy file back into the indexer as service index.dr2 file. For example, for an index
named mynewindex, do the following (for Windows):
1. Copy out the index file to a legacy version:
2. Stop Vault (including Indexer as a Service).
3. Backup the current indexer as a service index store (index\index.dr2).
4. Restart Vault.
5. Drop the existing myindex invlink.dru by issuing:
indexcheck -drop -confirm -mode:2 mynewindex/invlink.dru
6. Copy the index back from the legacy version and commit the changes:
indexcheck -copy: index\mynewindex\invlink.dru,2 index\mynewindex\invlink.dru
indexcheck -mode:2 -forceflush
7. Re s t a r t Va u l t .
The above change can be reversed by stopping Vault, restoring the file index\index.dr2 from
the backup and then restarting Vault.
Note: Pay special attention to the whether the "\" or "/" is used in the above example. For files
within the indexer as a service (mode 2) , "/" is always used. For legacy indexer files, the use of
"\" or "/" will depend on whether you are using the Windows or non-Windows version of Vault.
indexcheck -mode:2 -struct -lang:Len_RUS_AS - noprint -copy:index\mynewindex\invlink.dru,0 mynewindex/invlink.dru
indexcheck -lang:Len_RUS_AS -copy:mynewindex\invlink.dru,2 index\mynewindex\invlink.dru

Updating unicode indexes
340

341
Index
A
account
patterns initialization file keyword 36, 67
Address
patterns initialization file keyword 36
ADM
configurations 17, 122
document
expiry utility 126
document distribution utility 123
ODBC export utility 131
repository replication utility 123
Vault purging utility 126
advanced ADM configurations 17, 122
AFP
dumping as text with AFPDECODE 95, 167
extracting resources with afpextract 96
AFP extraction process 167
AFPDECODE utility 95
afpdecode utility 95
afpextract utility 96
afpsubstitute utility 97
attribute information for indexing 146
B
background artwork, emulating 18
BackupPath
Server initialization file keyword 70
batch printing from the web 220
Block, ADM replication server keyword 124, 135
C
CGI Interface in the Rendering Engine 202
ChannelSelection
profiles initialization file keyword 68
Characterset
profiles initialization file keyword 68
configuring
rendering engine 212
control
data flow 336
Customizing the Vault 16
D
data flow 336
Database
profiles initialization file keyword 40
database
initialization file 73
Database initialization file 73
database.ini 327
databasecheck utility 98
Date
patterns initialization file keyword 36
DistributionPath
Server initialization file keyword 70
DocDataPath
Server initialization file keyword 69
Document
distribution, ADM utility 123
information for indexing 145
patterns initialization file keyword 36, 67
DocumentBlockSize
profiles initialization file keyword 40
Documents
profiles initialization file keyword 40
DownloadPath
Server initialization file keyword 69, 81
Duplex
profiles initialization file keyword 42
E
e2util 111
Emulating paper stock 190
Configuring PDF background 197
Optimizing PDF size 194
EPS
profiles initialization file keyword 59
exporting
ODBC 131
F
FeedDuplex
profiles initialization file keyword 56
fields, key for indexing 166
FILEINFO utility 100
fileinfo utility 100
FileMap
profiles initialization file keyword 39
FileMode
profiles initialization file keyword 59
Flag files 115
folder permissions 329
Fonts 17
FontSelection
profiles initialization file keyword 68
Format
profiles initialization file keyword 40
Fragmented
profiles initialization file keyword 53
G
GenericAFP 40, 51
GenericAFP indexing engine 166
GenericMetacode 40, 51

Index - I
342
GenericMetacode indexing engine 166
GenericTLE 40, 51
GenericTLE indexing engine 166
GraphicBlockSize
profiles initialization file keyword 57
I
IdenOffset
profiles initialization file keyword 56
IdenPrefix
profiles initialization file keyword 56
IdenPrefixA
profiles initialization file keyword 56
IdenPrefixE 56
IdenSkip
profiles initialization file keyword 56
ignored page information for indexing 146, 147
IgnoreResourcePacks
profiles initialization file keyword 50
Index
Client initialization file keyword 73
searching 101
indexcheck utility 101
Indexer as a Service
Converting a database back to the legacy database 142
Converting an existing database to use the Indexer as a Service
142
e2util utility 143
Enabling the Indexer as a Service 141
Indexcheck utility 143
Installation changes 142
Log files 143
New initialization file 143
Trouble shooting 144
Unsupported Utilities 143
Indexing 17, 140
indexing
custom 148
IndexPath
Server initialization file keyword 69
InfoPath
Server initialization file keyword 70
Information required by the Vault 166
inherit
profiles initialization file keyword 47
InstallPath
client initialization file keyword 35
Invoice
patterns initialization file keyword 36
J
Job level information for indexing 145, 176
JoinLeading
profiles initialization file keyword 53
Journal
profiles initialization file keyword 40, 51
journal file 328
K
KeepUnknown
profiles initialization file keyword 53
key fields 166
L
language
- see also locales
Local initialization file 78
LogPath
Server initialization file keyword 70
M
Metacode
dumping as text with METADECODE 172
dumping as text with metadecode 106
extracting resources with metaextract 108
indexing process 172
metadecode utility 106
metaextract utility 108
metaresource utility 109
metasubstitute utility 110
Months, ADM replication server keyword 124, 136
N
Name
patterns initialization file keyword 36
O
ODBC export utility 131
OptimizeResourcePacks
profiles initialization file keyword 51
Option1/2
profiles initialization file keyword 59
orient
profiles initialization file keywords 56
P
PageDataPath
Server initialization file keyword 69
Paper
profiles initialization file keyword 56
paper stock, emulating 18
ProcessPath
Server initialization file keyword 70
Profile
changing 100
Profiles.ini 326
purge
ADM processing 126

Index - W
343
R
RecordReader
profiles initialization file keyword 56
RemovedPath
Server initialization file keyword 70
Rendering Engine 18, 202
Algorithm support 204
Batch reprinting of documents in Vault 222
Communicationg directly to the Rendering Engine 292
Configuring 217
Developing Vault applications 226
Java API 257
NET API 230
Sample applications 207
Vault Web Service 275
rendering engine
configuring 212
replication of a repository 123
repository replication utility 123
resource sets
changing manually 100
ResourcePath
Server initialization file keyword 70
Resources
extracting from AFP 96
extracting from Metacode 108
ResourceSet
Server initialization file keyword 81
RoundGraphic
profiles initialization file keyword 57
S
sample journal file 328
schedule
data flow 336
search
indexes 101
section level information for indexing 146
Service 14
SkipHeaderPages
Profiles initialization file keyword 59
Storage Capacity Planning 21
SuppressBlankPages
profiles initialization file keyword 57
T
Tag Logical Elements, extracting key fields 169
Throttle, ADM replication server keyword 124
TLE
datastream
dumping as text 169
extraction process 169
TolerateMismatched Signature
profiles initialization file keyword 50
TolerateMissingSignature
profiles initialization file keyword 50
Tray/DefaultTray
profiles initialization file keyword 40
U
UJournal
profiles initialization file keyword 51
Updating unicode indexes 337
Indexer as a Service 339
Using flag files 115
utilities
Vault 94, 118
UXMLJournal
profiles initialization file keyword 50
V
Vault and e-Messaging 322
Vault environment 14
Vault Indexer as a Service 140
Enabling the Indexer as a Sevice 140
Vault Initialization files 16
Vault initialization files
Client initialization file 35
Database initialization file 73
Indexer as a Service 75
Unicode Indexes 75
Unicode indexes 76
e2loadered, e2Renderd, e2Serverd and indexerd initialization
files 79
Command line switches 79
Database rollback 90
e2Renderd 92
e2Serverd 90, 91
General settings... 81
indexerd 86
Installing multiple servers or Rendering engines 80
Relocating the PID files... 80
Services commands 79
Local initialization file 76, 78
Patterns initialization file 36
Profiles initialization file 38
AFP settings 53
Extracting summary document information from DJDE
and DJDELINE... 66
Metacode settings 56
PDF settings 64
Postscript settings 59
TIFF settings 64
Working with HTML in XML datastreams 64
Server initialization file 66, 69
Vault Performance & Capacity Planning 20
Vault performance and capacity planning 16
Vault Query 16
Vault Service, overview 14
Vault Utilities 17
Vault utilities 94, 118
W
Working with fonts 17, 178