How To Guide Power Edge R905 Virtualization Best Practices For SQL Server
User Manual: PowerEdge R905
Open the PDF directly: View PDF ![]() .
.
Page Count: 39
A Principled Technologies report commissioned by Dell
HOW-TO GUIDE: CONSOLIDATING
MULTIPLE SQL SERVER® SYSTEMS
ONTO DELL™ POWEREDGE™ SERVERS
USING MICROSOFT’S
HYPER-V™

Table of contents
Table of contents .......................................................... 2
Introduction ................................................................. 3
Virtualization and consolidation overview ........................ 3
What is virtualization? How can I use it to consolidate, and
what are the benefits? .................................................. 4
Why consolidate? ......................................................... 5
Hyper-V overview ...................................................... 11
Getting ready .............................................................. 16
Evaluating your servers for virtualization and consolidation
............................................................................... 16
Preparing your server ................................................... 19
Defining our environment ........................................... 19
Configuring the physical RAID disk layout ...................... 21
Installing Windows Server 2008 ................................... 23
Configuring the physical system drives ......................... 26
Installing the Hyper-V role .......................................... 27
Summing up ............................................................... 29
Appendix A. Example server and database consolidation
survey ........................................................................ 30
Appendix B. Creating the RAID disk groups ..................... 32
Cabling and storage ................................................... 32
Creating the RAID groups for the PowerEdge R900 or
PowerEdge R905 ....................................................... 32
Appendix C. Installing Windows Server 2008 Enterprise
Edition as the host OS .................................................. 35
Setting IP address, subnet mask, and domain information 36
Configuring data drives ............................................... 37
Adding the Hyper-V role ............................................. 37
About Principled Technologies ........................................ 39
How-to Guide: Consolidating multiple SQL Server systems
onto Dell PowerEdge Servers using Microsoft’s Hyper-V
3
Introduction
Virtualization and consolidation overview
This guide provides concepts and procedures that will help you
successfully consolidate your Microsoft® SQL Server® instances
from multiple machines onto a single Windows Server® 2008
system using Microsoft’s Hyper-V™. In this guide, we use the Dell™
PowerEdge™ R900 and PowerEdge™ R905 as target servers.
Depending on the version of SQL Server you are using (2000,
2005, or 2008), please refer to the accompanying Guide for the
specifics that will help you complete the migration process.
Principled Technologies® (PT) has performed hands-on testing and
research and drawn on real-world experiences to document best
practices and help you take advantage of the features of Hyper-V
to consolidate multiple SQL Server instances onto a single physical
system.
This document covers the key overall concepts and procedures you
need to setup and configure your virtualized Hyper-V platform. It
reviews in detail the approach that PT and Dell recommend for a
tested and validated installation of Windows Server 2008 and
Hyper-V. In accompanying Guides, we cover concepts and
procedures specific to three versions of SQL Server: SQL Server
2000, SQL Server 2005, and SQL Server 2008.
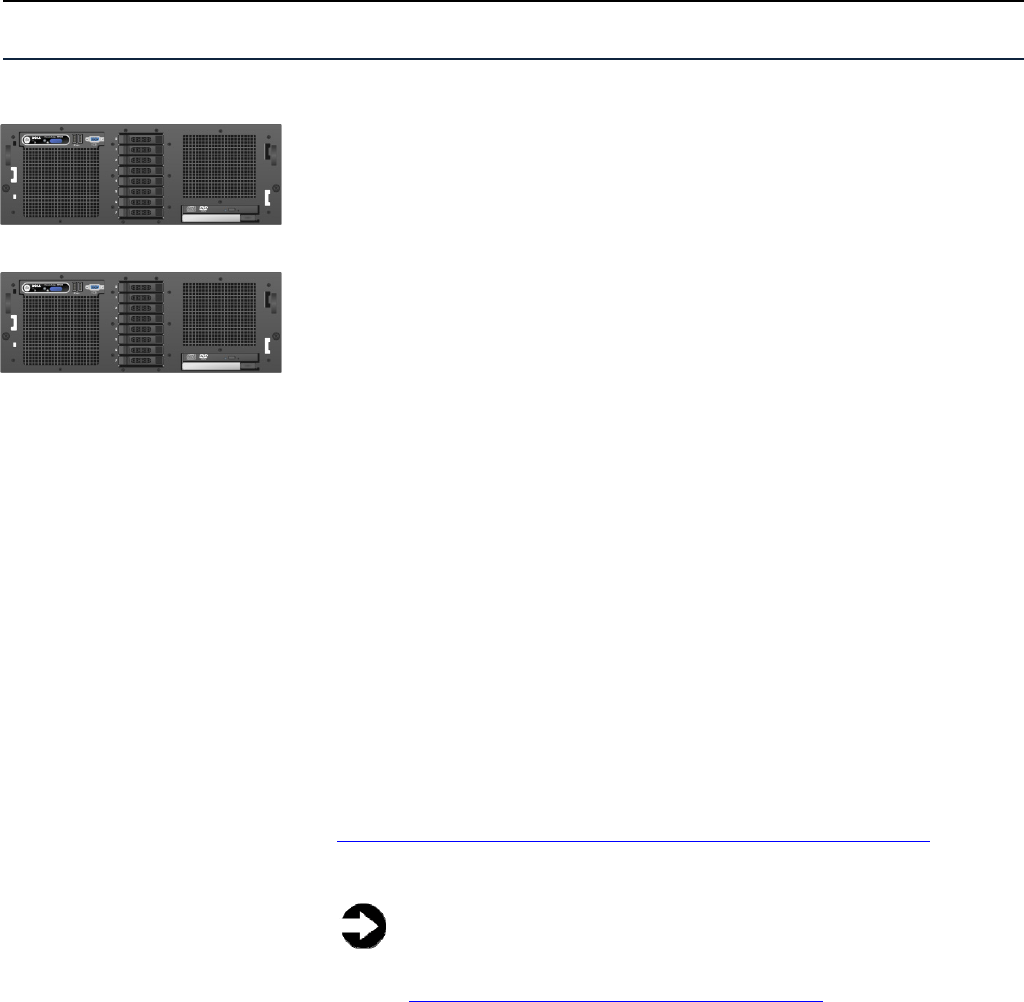
The Dell PowerEdge R900 supports up to 24 logical processors, or
cores, and the Dell PowerEdge R905 supports 16 logical
processors. The release version of Microsoft Hyper-V supports a
maximum of 16 logical processors. See
http://technet.microsoft.com/en-us/library/cc816844.aspx for
more details on Hyper-V hardware considerations.
NOTE: Microsoft released an update in September 2008 to
increase this maximum to 24 logical processors. For more
details, and to download this update, visit
http://support.microsoft.com/kb/956710.
Because we use both the Dell PowerEdge R900 and R905 in this
Guide, we refer to the target server as the PowerEdge, and note
specifics to each platform where they apply.
Dell PowerEdge R900
Dell PowerEdge R905

How-to Guide: Consolidating multiple SQL Server systems
onto Dell PowerEdge Servers using Microsoft’s Hyper-V
4
What is virtualization? How can I use it to consolidate, and what are the
benefits?
Generally speaking, virtualization is the ability to run multiple
operating system environments or machine environments on one
physical system. There are two basic types of virtualization. Type 2
virtualization is a hosted solution, where the virtual machines run
inside another operating system, and thus are several layers above
the hardware. Type 1 virtualization products, such as Microsoft’s
Hyper-V, run much closer to the “bare metal” of the server and
interact with hardware directly through a control program known
as the hypervisor. By working closer to the hardware, Type 1
products typically can provide better performance than Type 2
offerings.
Generally speaking, consolidation refers to the process of
combining multiple things to make a single, more effective unit. In
this Guide, we discuss combining the concepts of virtualization and
consolidation to achieve your overall goals.
In an IT context, you can consolidate several types of things,
including the following:
Physical servers. In this Guide, consolidation typically means
consolidating servers. After a successful consolidation, all
applications should run on fewer servers than before, and those
applications should run at least as well as they did previously. The
other types of consolidation we mention below may happen as a
consequence of consolidating physical servers, but they are not our
primary focus.
Storage. As you follow the procedures in this Guide, you will
consolidate storage to some degree by moving software and data
from a number of servers to a large, locally attached, disk storage
subsystem in a new server in the form of virtual hard drives.
Larger-scale storage consolidations, such as implementing a
storage area network (SAN), are outside the scope of this Guide.
Locations. As you consolidate servers through virtualization, you
may reduce the number of locations you need for servers. Planning
for consolidating geographic locations is also beyond the scope of
this Guide.
This Guide focuses on consolidation via virtualization. For details
about consolidation at the SQL Server instance or database level,
see our earlier Guide, Consolidating SQL Server 2000 and SQL
Server 2005 databases to SQL Server 2008 on Windows Server

How-to Guide: Consolidating multiple SQL Server systems
onto Dell PowerEdge Servers using Microsoft’s Hyper-V
5
2008 Enterprise on Dell Servers
http://www.principledtechnologies.com/Clients/Reports/Dell/Consol
idating_SQLServer_databases_onto_a_Dell_server.pdf.
Why consolidate?
Done well, consolidation yields a more economical environment
with more consistent management practices, better use of
hardware, and all applications performing at least as well as they
did previously. An effective consolidation effort improves reliability
and security while bringing great savings to your organization.
Some of the ways consolidation can stretch your technology dollar
include the following:
Hardware savings. Buying, powering, and supporting fewer
servers brings obvious savings to your organization. Less obvious
are the other significant cost savings that fewer servers mean over
time, such as fewer hardware replacement purchases as these
consolidated servers age out. In other words, your future purchase
growth rate may decrease. Other potential hardware cost savings
areas include racks and network switches; as the number of
servers decreases, these costs decrease as well.
Software license savings. Like traditional consolidation, Hyper-V
virtualization technology allows your organization to reap
significant software licensing savings. While licensing structures
and fees vary by product, the following example illustrates the
possibilities.
Windows Server 2008 Enterprise Edition limits the number of guest
OS instances to four, so this pricing example uses Windows Server
2008 Datacenter Edition (which allows unlimited guest OS
instances) and the per-processor licensing model of SQL Server
2008. Details on licensing Windows Server 2008 are available for
download here, and details on licensing SQL Server 2008 are
available for download here.
NOTE: Each version of SQL Server has its own licensing
specifications, so you should consult with your Microsoft
sales representative on the specifics of licensing SQL
Server in a virtual environment. This example uses SQL
Server 2008 to show cost savings.
Our PowerEdge R900 and PowerEdge R905 each have four physical
quad-core processor sockets. Licensing Windows Server 2008
Datacenter Edition with SQL Server 2008 Enterprise Edition lets us
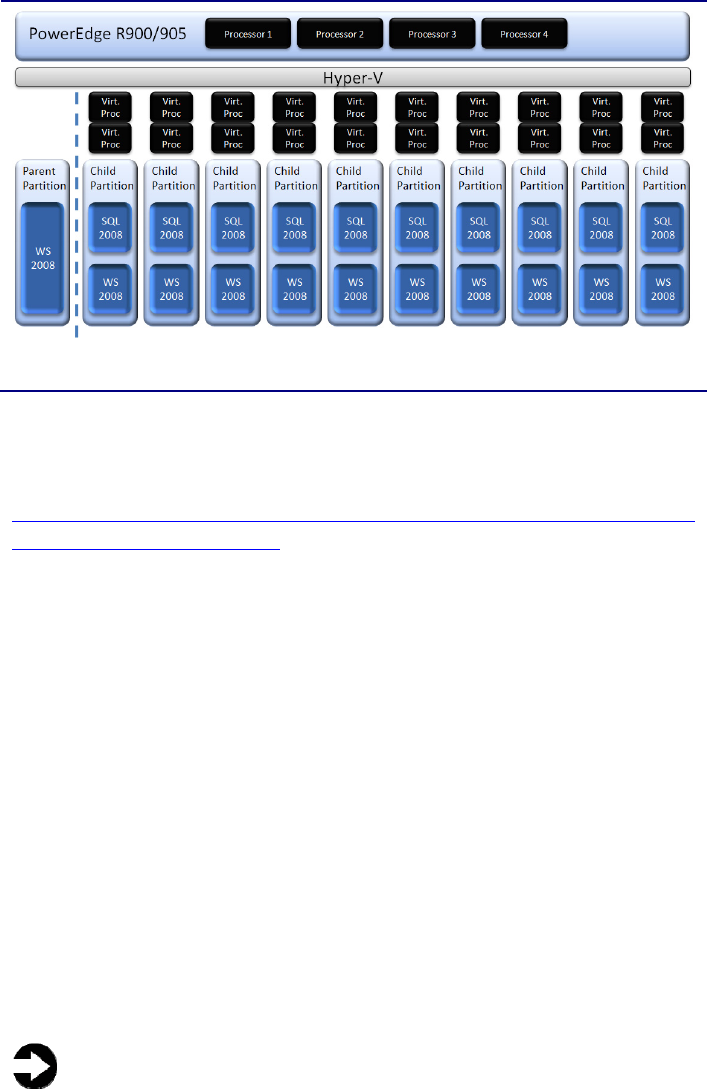
How-to Guide: Consolidating multiple SQL Server systems
onto Dell PowerEdge Servers using Microsoft’s Hyper-V
6
create an unlimited number of virtual environments, all running
SQL Server 2008. Figure 1 shows a possible configuration.
Figure 1. Sample configuration of 10 virtual machines running on
the Dell PowerEdge, each with two virtual processors.
In our previous Guide, Consolidating SQL Server databases from
Dell PowerEdge 2650 servers to a Dell PowerEdge 2950 server
http://www.principledtechnologies.com/Clients/Reports/Dell/Consol
idating_2650_to_2950.pdf, we determined that, without
virtualization, we could successfully consolidate 10 identical
workloads onto a PowerEdge R900 with a PowerVault MD1000
storage array. Each of these 10 workloads on the PowerEdge R900
met or exceeded the performance of the single workload on the
PowerEdge 2650. Therefore, we use 10 as a reasonable
consolidation estimate in the example below.
In our example, we migrated our 10 physical SQL Server
environments to 10 virtualized SQL Server environments running
on a single server and allocated two virtual CPUs to each of the 10
virtualized environments. That is a total of 20 virtual CPUs, but our
new four-socket host machine has only 16 cores. This usage is not
a problem, however, because Hyper-V handles the sharing of
resources among the virtual machines. In this example, because
we have purchased the Datacenter Edition of Windows Server 2008
and Enterprise Edition of SQL Server 2008, we can create as many
virtual environments as we want.
NOTE: The cost analysis below shows only licensing
savings related to SQL Server. Windows Server 2008
licensing is independent of SQL Server, so check with
your Microsoft sales representative about complete costs
of both products.

How-to Guide: Consolidating multiple SQL Server systems
onto Dell PowerEdge Servers using Microsoft’s Hyper-V
7
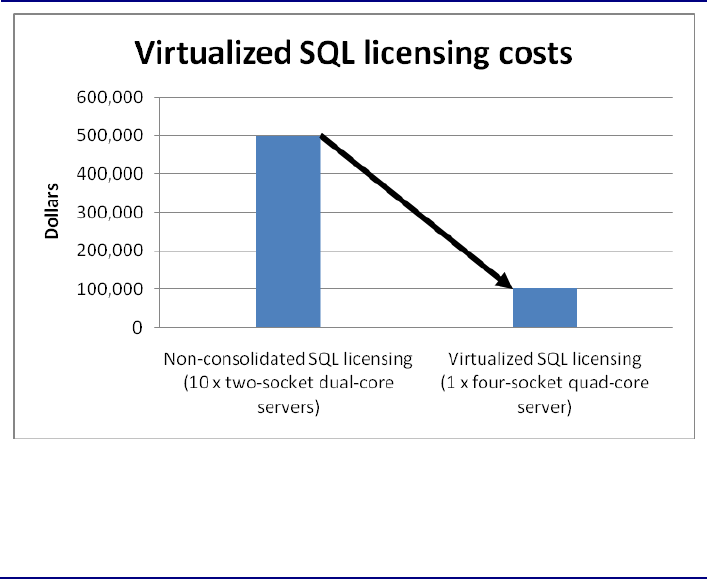
Figures 2 and 3 present a brief cost analysis showing SQL Server
cost savings based on the configuration in Figure 1. The non-
consolidated environment assumes 10 Enterprise Edition SQL
Server instances, each running on a dedicated two-socket server,
and they use list prices. The virtualized environment assumes a
quad-core four-socket machine running SQL Server Enterprise
Edition. Because Microsoft counts each socket as a processor for
licensing purposes, the virtualized environment requires only one-
fifth the numbers of licenses as the non-consolidated environment,
yielding considerable savings.
Virtual
disk
Non-consolidated
environment
Consolidated Hyper-V
environment
Description 10 two-socket dual-core
servers, each running
SQL Server enterprise
1 four-socket quad-core
server, running Hyper-V
and SQL Server
Enterprise; assumes
licenses for 4 physical
processors
Cost 2 sockets x $25,000 per-
processor retail
enterprise license x 10
servers = $500,000 in
SQL Server licensing;
$50,000 per SQL
instance
4 sockets x $25,000 per-
processor retail
enterprise license x 1
server = $100,000 in
SQL Server licensing;
$10,000 per SQL
instance
Figure 2. Comparing SQL Server list licensing costs: 10 non-
virtualized two-socket servers versus a single four-socket server
running 10 dual-processor virtual machines. For licensing purposes,
Microsoft counts one socket as a processor.
How-to Guide: Consolidating multiple SQL Server systems
onto Dell PowerEdge Servers using Microsoft’s Hyper-V
8
Figure 3. Example SQL Server licensing savings when consolidating
from 10 two-socket servers to a single four-socket server running
Hyper-V. For licensing purposes, Microsoft counts one socket as a
processor.
Maintenance and staff savings. A consolidated and virtualized
infrastructure offers many opportunities for staffing, support, and
maintenance cost savings. Less hardware and associated
equipment means fewer servers that require security patches and
monitoring.
Reduced staffing requirements. Regardless of your server-to-
full-time-employee (FTE) administrator ratio, fewer servers mean
fewer system administrators. Also, consolidation efforts often
improve standardization across servers, simplifying administration
for the Windows® system administrator, network engineer, and
SQL Server database administrators (DBAs). Virtualization and
consolidation can also provide greater opportunities for
automation, further reducing the FTE requirements. Because the
growth in the number of servers can slow when you consolidate,
these savings can compound over time.
Reduced support costs. The cost of a given level of support is
usually proportional to the size of the installation. By reducing the
number of servers, the costs of your support agreements go down
as well.
Power and cooling savings. Consolidating servers saves power
in several ways:
How-to Guide: Consolidating multiple SQL Server systems
onto Dell PowerEdge Servers using Microsoft’s Hyper-V
9
• Fewer servers. Obviously, fewer servers consume less
power.
• More efficient servers. Modern servers are typically more
efficient than those of a few years ago, so you are likely to
consume less power per server.
• Less air conditioning. Fewer, more efficient servers
produce less heat. Moreover, you can house them in a
smaller space, thus reducing air conditioning costs even
further.
Rent savings. Consolidation reduces the floor space IT requires.
By reducing the number of servers, you reduce the space required
to hold the racks and the associated space necessary for servicing
and airflow. You require less cooling and so save on the space the
air conditioners would require. Finally, consolidation may allow you
to reclaim space, make more efficient use of the space you have,
and thus delay expansion.
Regulatory compliance savings. With fewer physical devices
storing data and more uniform management, a consolidated
environment can make the process of complying with regulatory
requirements such as Sarbanes-Oxley and the Health Insurance
Portability and Accountability Act (HIPAA) less expensive, easier,
and more secure.
Sizing and baseline performance. Sizing is one key to a
successful consolidation. The process of sizing involves gathering
different performance baselines so you have at least an
approximate set of requirements the new consolidated servers
must meet. You do this by looking at the performance
characteristics of existing hardware during normal business
operations, and then applying growth and scalability estimates. The
performance baselines you gather are useful when setting the
configuration options on your Hyper-V virtual machines when it
comes to the number of virtual processors and the amount of
memory.
Among the characteristics to examine on each server are the
following:
• Processor utilization
• Memory requirements of the OS and applications
• Disk layout
• Database size
• Expected database growth
• Maximum concurrent users
How-to Guide: Consolidating multiple SQL Server systems
onto Dell PowerEdge Servers using Microsoft’s Hyper-V
10
• Types and rates of transactions against the databases
The server you choose for virtualization and consolidation must do
more than match the combined capacity of all the other current
servers today. It must have enough excess capacity to still perform
well at the end of its expected life span. Fortunately, given the
improvements we note below, finding such servers is entirely
possible. Also, given the flexibility that virtualization provides,
future hardware upgrades are easier; you can move virtual
machines from host to host and even migrate them to newer
equipment if you so choose.
Another reason for consolidation is one that plays a role in sizing:
the typical enterprise is not using its servers at anywhere near
capacity. As Ben Pring, Research Vice President for Gartner, noted
at the Gartner Symposium ITxpo 2007, “Server utilization was also
low—at an average 18 percent in large organizations.”
In recent years, server capabilities have greatly increased. Here
are some of the improvements that make it possible to consolidate
multiple servers into a single system:
• More processors. Modern quad-core processors double or
even quadruple the number of processing cores available
per socket without increasing the physical size of the server.
• More processing power per core. While clock speeds
have not changed dramatically, processors have undergone
a generational shift. Industry-standard benchmarks, such as
SPECint, show today’s processors are much faster than their
counterparts of three to five years ago.
• 64-bit address space. Five years ago, many processors
did not support 64-bit addressing. Windows Server 2003 did
not support 64-bit addressing on x64 processors until 2005.
• Faster memory. The memory in a modern system may be
as much as two to three times as fast as that in a three- to
five-year-old system.
• Faster storage. The performance of storage subsystems
have continued to improve.
• Cheaper storage and greater capacity. Disk capacity has
greatly increased, while the cost per GB has decreased.
Moreover, external storage arrays radically increase the
amount of storage available to a server.
We further discuss sizing at a conceptual level in the Getting ready
section.
How-to Guide: Consolidating multiple SQL Server systems
onto Dell PowerEdge Servers using Microsoft’s Hyper-V
11
Hyper-V overview
Microsoft includes its hypervisor, Hyper-V, in certain editions of
Windows Server 2008. Generally speaking, a hypervisor is a Type 1
virtualization product: a thin layer of software enabling virtual
machines to run on one physical machine and allowing direct
access to most hardware.
Requirements for running Hyper-V
The PowerEdge R900 and PowerEdge R905 both support the
features Hyper-V requires, which include the following:
• An AMD64® or Intel® 64-based processor
• A 64-bit Windows Server 2008 version (Standard,
Enterprise, or Datacenter)
• Hardware Data Execution Protection (DEP) enabled
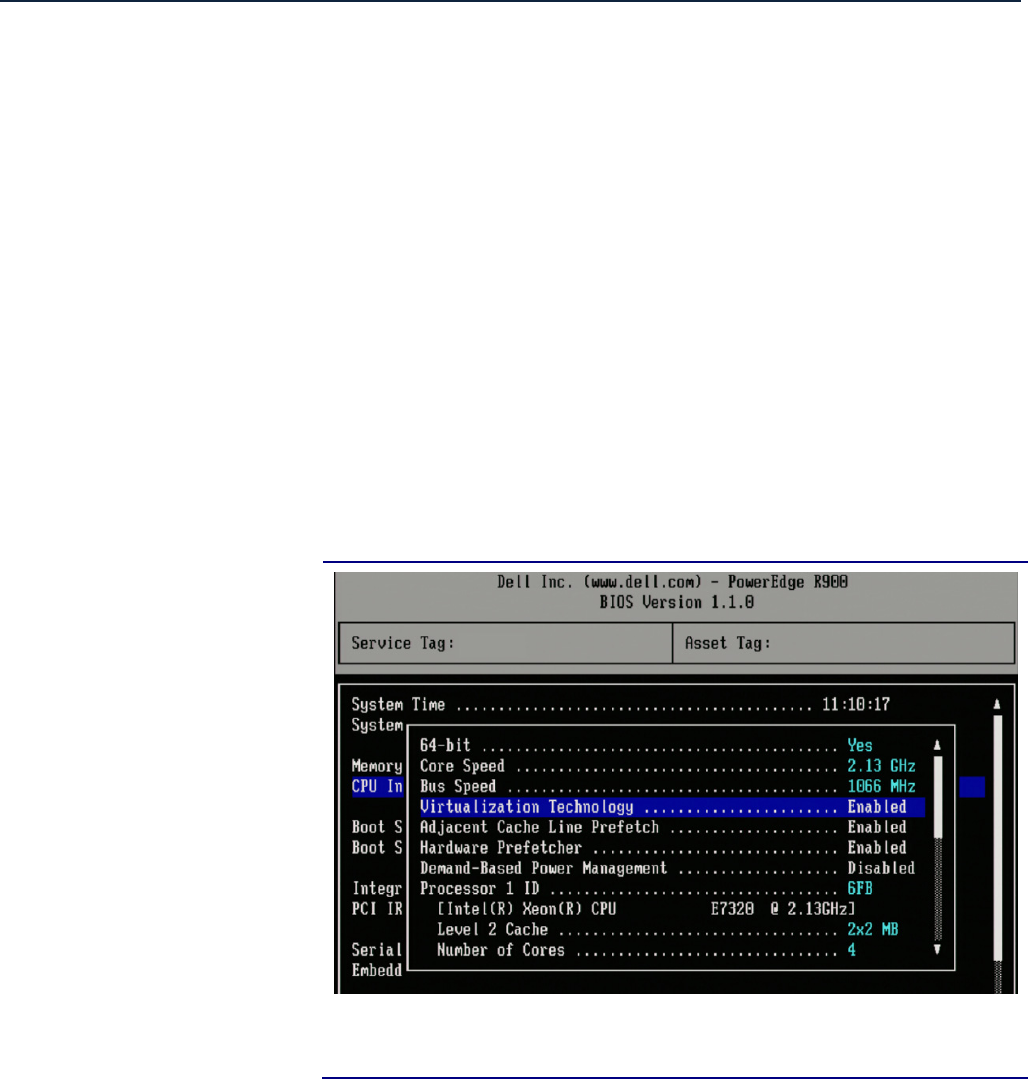
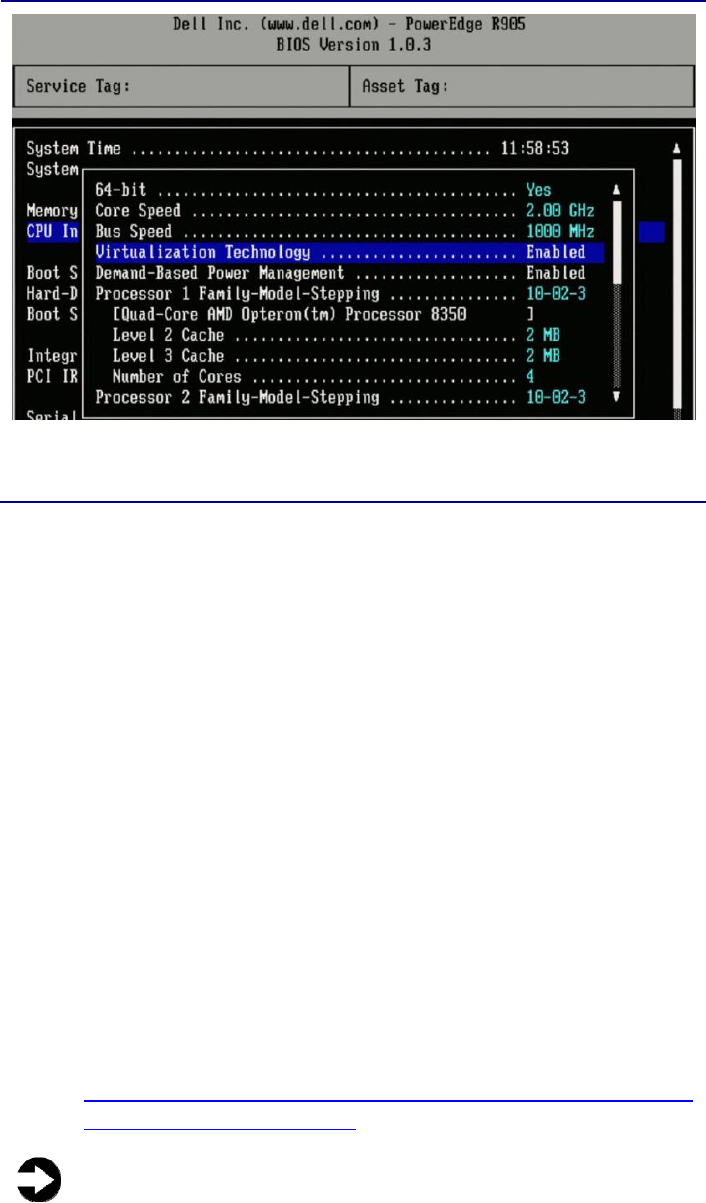
• Hardware-assisted virtualization, specifically processors that
include the Intel-VT or AMD-V features. Figures 4 and 5
show the virtualization feature enabled on our PowerEdge
R900 and PowerEdge R905. Note that the BIOS uses the
term “Virtualization Technology” on both systems.
Figure 4. Example BIOS configuration for the PowerEdge R900
showing virtualization technology enabled.
How-to Guide: Consolidating multiple SQL Server systems
onto Dell PowerEdge Servers using Microsoft’s Hyper-V
12
Figure 5. Example BIOS configuration for the PowerEdge R905
showing virtualization technology enabled.
Features of Hyper-V
Below, we list some of Hyper-V’s noteworthy features.
• High availability and quick migration. You can couple
virtualization with failover clustering to achieve a highly
available virtualization environment. Then, with just a few
clicks, you can quickly migrate virtual machines from host
to host with almost no downtime.
• Installation on Windows Server core. If you so choose,
you can run Hyper-V over just a core Windows Server 2008
installation. This allows you to incorporate all the flexibility
that virtualization provides while keeping your host OS
footprint small. Note: Installing the server core is outside
the scope of this Guide.
• Import/export capabilities. Using the built-in import and
export capabilities, you can easily provision new virtual
machines.
• Linux support. As of this writing, Hyper-V supports SUSE
Linux Enterprise Server as a guest OS. You can find more
information on supported guest operating systems here:
http://www.microsoft.com/windowsserver2008/en/us/hyper
v-supported-guest-os.aspx.
NOTE: Microsoft sells a tool, System Center Virtual
Machine Manager, that provides additional capabilities
such as physical to virtual (P2V) conversion, virtual to
virtual (V2V) conversion, and machine cloning. Use of
How-to Guide: Consolidating multiple SQL Server systems
onto Dell PowerEdge Servers using Microsoft’s Hyper-V
13
the System Center Virtual Machine Manager is outside
the scope of this Guide.
Resource allocation in Hyper-V
Consolidation using Hyper-V allows your organization to save
money on hardware. Consolidation brings competition for physical
resources, such as CPU cycles, RAM, and NIC bandwidth. The
Hyper-V manager allows system administrators to allocate
resources as they see fit to reflect virtual machine workloads.
• Memory allocation. Hyper-V manager allows you to adjust
the memory you allocate to virtual machines. On our
PowerEdge with 64 GB, we could assign from 8 MB to
65,529 MB of memory to a virtual machine.
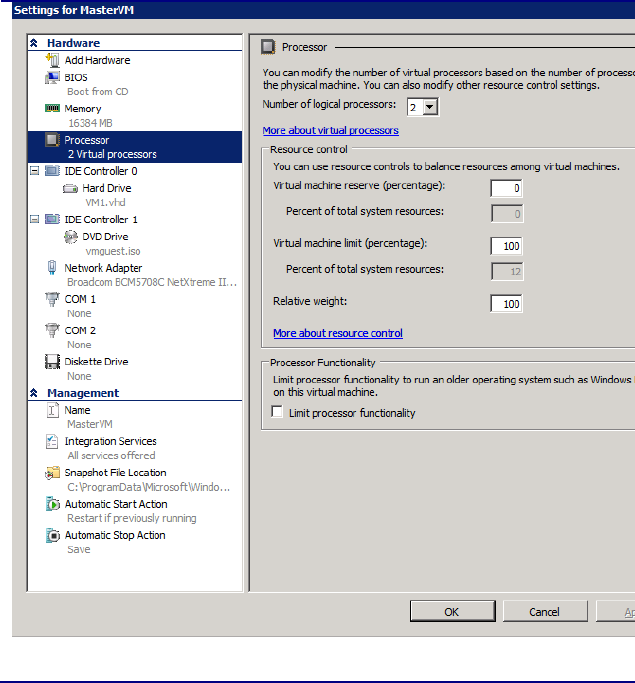
• CPU allocation. You can assign one or more virtual
processors to a virtual machine and then use more granular
resource controls to allocate and balance CPU resources
amongst multiple VMs. Figure 6 shows the Hyper-V
manager settings for the virtual CPUs. You can set the
number of virtual CPUs. Additionally, you can reserve a
percentage of the physical CPU by setting the VM reserve
percentage (minimum). You can also cap the amount of CPU
available to the VM by setting the VM limit percentage
(maximum). Lastly, you can use the relative weight value to
prioritize certain VMs over others. Note: You can assign a
maximum of four virtual CPUs to a VM, but not all guest
OSs support four virtual CPUs.
How-to Guide: Consolidating multiple SQL Server systems
onto Dell PowerEdge Servers using Microsoft’s Hyper-V
14
Figure 6. CPU settings for a sample virtual machine in
Hyper-V Manager.
Monitoring and tuning Hyper-V
When you install the Hyper-V role in Windows Server 2008, the
installation automatically creates Hyper-V-specific performance
counters at the same time. You can use these performance monitor
counters to monitor your VM resource utilization and then adjust
your resource controls as necessary. Note: Do not rely on the
traditional performance counters inside a guest OS. In a virtualized
environment, the utilization numbers may not be completely
accurate. According to Microsoft, this is because of clock timing
issues. Be sure to use the Hyper-V specific counters from the host
OS.
Two sample counter sets are as follows:
• Hyper-V Hypervisor Logical Processor counters. This
set of counters contains information regarding the logical
processors in your system. For our systems, the number of
logical processors is equal to the number of processor cores.
Because we are using a quad-processor quad-core system,
we have 16 logical processors.

How-to Guide: Consolidating multiple SQL Server systems
onto Dell PowerEdge Servers using Microsoft’s Hyper-V
15
• Hyper-V Hypervisor Virtual Processor counters. This
set of counters contains information regarding the virtual
processors specific to each virtual machine in your system.
NOTE: The number of virtual processors is the sum of
the numbers of virtual processors you have allotted to
all currently running VMs. The number often exceeds the
number of logical processors.
Regarding storage, several Microsoft whitepapers show that pass-
through disks will offer optimal performance, with the next best
performance being fixed-size virtual hard disks (VHDs) attached to
the Hyper-V SCSI controller for that virtual machine. The Microsoft
documents also note that the fixed-size VHDs are easier to
administer, so we use fixed-size VHDs in this Guide. For more
information, see the whitepaper here:
http://download.microsoft.com/download/d/9/4/d948f981-926e-
40fa-a026-5bfcf076d9b9/SQL2008inHyperV2008.docx.
How-to Guide: Consolidating multiple SQL Server systems
onto Dell PowerEdge Servers using Microsoft’s Hyper-V
16
Getting ready
Evaluating your servers for virtualization and consolidation
You must be aware of many specific details related to each physical
server you target for consolidation, including the maintenance
window in which you migrate the server to a virtual environment,
the users the move affects, and the configuration tasks necessary
to assimilate the databases into your consolidated environment. A
more comprehensive example survey appears in Appendix A.
Information to gather before consolidation may include the
following:
• Server OS version and patch level
• SQL Server version and patch level
• Number of logins on this SQL Server instance, and what
type of logins these are (Windows or SQL)
• Current backup strategy and schedule for the databases on
this server
• Replication details for this SQL instance, if any
• Detailed information regarding permissions and roles
• SQL Agent jobs on this SQL Server
Just as in a traditional migration, after moving your database to a
virtual machine, you must make sure that any system or
application using the database has updated connection information.
This includes logins, permissions, applications, SQL Agent jobs,
third-party backup solutions, and so on.
Gather baseline performance data
During your research phase, you should use Performance Monitor,
SQL Server Profiler, and other tools to gather data on the typical
query load and performance statistics on the database server you
are considering moving to a virtual environment. This practice
serves two purposes. First, it provides a prime opportunity to
How-to Guide: Consolidating multiple SQL Server systems
onto Dell PowerEdge Servers using Microsoft’s Hyper-V
17
identify potential problems before you move to a Hyper-V based
solution. Second, you can use the information you gather to map
out your resource allocation needs, which you can then use to
configure your Hyper-V virtual machine memory and CPU settings.
Poor candidates for consolidation
Not every database is a good candidate for consolidation. Here, we
present examples of databases that possibly should remain on
dedicated servers.
Databases with critical performance requirements. If your
database has stringent performance requirements, it may be best
to leave it on a dedicated server. On a dedicated server, it is much
easier to find any bottlenecks that might occur. It is also much
simpler to address any problems when you need not worry about
disrupting other work on the same server. If you do decide to
proceed with consolidation, try to avoid consolidating two
performance-critical databases on the same server, because it may
not be possible to achieve acceptable performance for both of
them.
Databases with critical uptime requirements. Avoid
consolidating multiple highly critical databases on a single server.
To do so greatly magnifies the effect of a single server failure.
While high-availability measures such as clustering can help
mitigate this risk, it is often better not to have too many critical
resources vulnerable to a single point of failure.
Databases with critical security requirements. You may need
to isolate databases with highly sensitive data. You may be able to
handle some critical requirements by putting such a database in a
dedicated virtual machine, but you may decide that some
databases are sufficiently sensitive that you need to keep them on
dedicated physical servers.
Databases with specialized requirements. Some databases
may have requirements you cannot fulfill in the new environment,
such as applications that depend on highly specialized file layouts
or direct access to specific hardware.
Of course, you must also be sensitive to circumstances unique to
your organization. Contractual obligations, for example, might
require you to keep a given database on an isolated server.
Finally, you may want to avoid mixing contrasting types of work.
For example, the usage patterns and schema designs for Online
Analytical Processing (OLAP) and Online Transaction Processing
How-to Guide: Consolidating multiple SQL Server systems
onto Dell PowerEdge Servers using Microsoft’s Hyper-V
18
(OLTP) applications differ significantly. Each of these environments
employs different optimization techniques, and those techniques
may not mix well. If you consolidate your OLAP relational data
warehouse files physically alongside your OLTP database files, you
may find that OLTP performance suffers when bulk data loading or
report generation occurs against your data warehouse databases.
How-to Guide: Consolidating multiple SQL Server systems
onto Dell PowerEdge Servers using Microsoft’s Hyper-V
19
Preparing your server
Defining our environment
We used a Windows domain containing a Windows Server 2008
server running the Hyper-V role and an Active Directory® server.
Specifically, our example Hyper-V server was a Dell PowerEdge
R900 or PowerEdge R905 running Windows Server 2008 Enterprise
Edition SP1 x64 and the Hyper-V role. We connected a Dell
PowerVaultTM MD1000 direct-attached storage array to the
PowerEdge. Our Active Directory server was a Dell PowerEdge
1950 running Windows Server 2003 R2 Enterprise Edition SP2. We
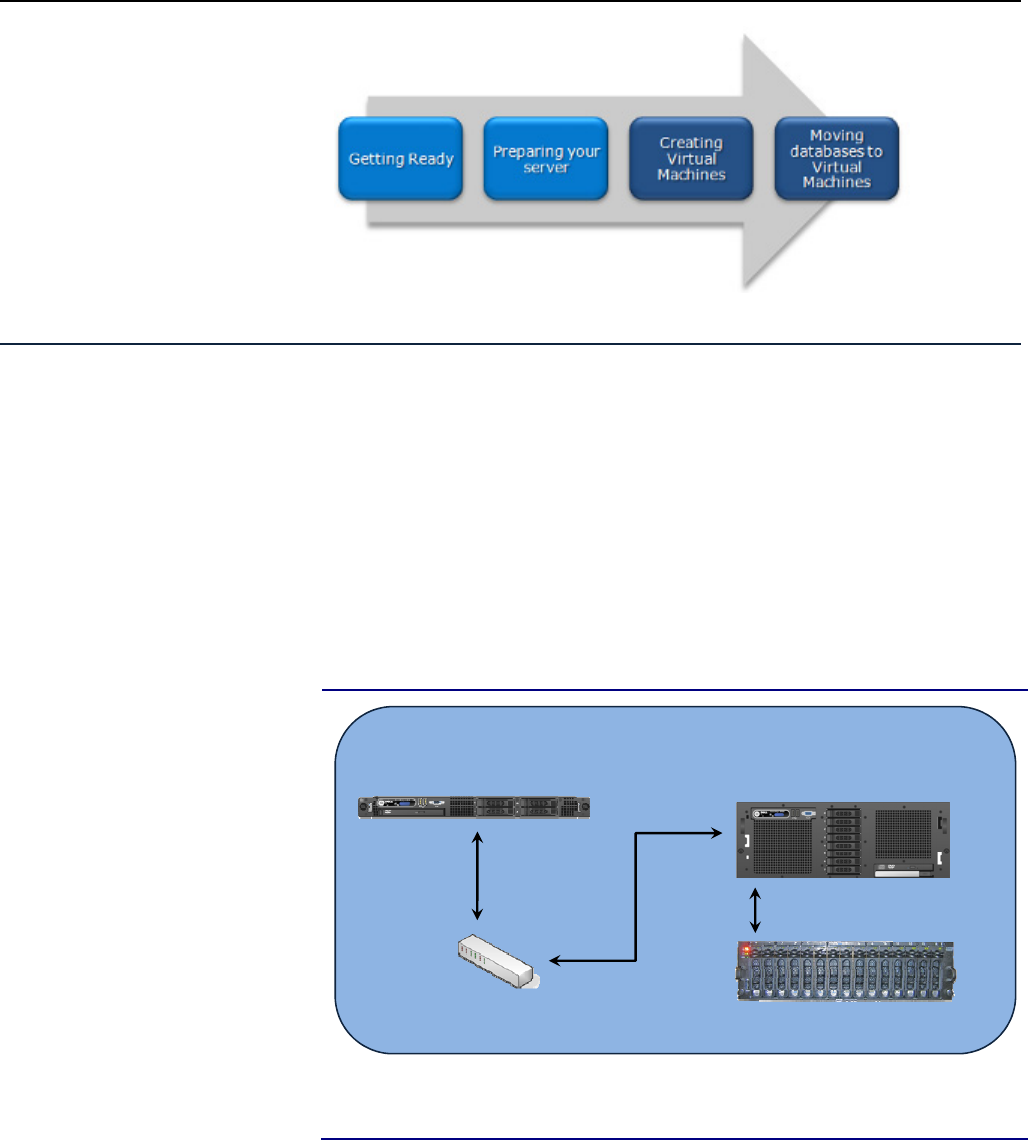
connected all components via a gigabit Ethernet switch. Figure 7
illustrates our setup.
PowerEdge R900/R905
(virtualization server)
PowerVault MD1000
(external storage, unified mode)
SAS cable
ACTIVE DIRECTORY DOMAIN
Switch
PowerEdge 1950
(Active Directory server)
Figure 7. The setup we used in our hands-on testing and research
for this Guide.
Figures 8 and 9 present the hardware and software we used to

How-to Guide: Consolidating multiple SQL Server systems
onto Dell PowerEdge Servers using Microsoft’s Hyper-V
20
simulate an Active Directory domain and Hyper-V consolidation
server.
Server Processor Memory Disk drives
Dell PowerEdge
1950 (Active
Directory server)
2 x Quad-Core
E5440 Intel
Xeon® (2.83
GHz)
16 GB 2 x SAS, 15K
RPM, 146 GB
Dell PowerEdge
R900 (Hyper-V
consolidation
server)
4 x Quad-core
E7320 Intel
Xeon (2.13 GHz)
64 GB 8 x SAS, 15K
RPM, 73 GB
Dell PowerEdge
R905 (Hyper-V
consolidation
server)
4 x Quad-Core
8350 AMD
OpteronTM (2
GHz)
64 GB 8 x SAS, 15K
RPM, 73 GB
Figure 8. Servers we used in our hands-on testing and research for
this Guide.
Server Operating system
Dell PowerEdge
1950 (Active
Directory server)
Windows Server 2003 Enterprise Edition R2
SP2 x86
Dell PowerEdge
R900
Parent partition: Windows Server 2008
Enterprise Edition SP1 x64 (Please see the
relevant accompanying Guide for
instructions on configuring child partitions)
Dell PowerEdge
R905
Parent partition: Windows Server 2008
Enterprise Edition SP1 x64 (Please see the
relevant accompanying Guide for
instructions on configuring child partitions)
Figure 9. Software we used in our hands-on testing and research
for this Guide.
We used the following storage and networking devices:
Dell PowerVault MD1000—15 x SAS, 15K RPM, 146GB disk
drives

How-to Guide: Consolidating multiple SQL Server systems
onto Dell PowerEdge Servers using Microsoft’s Hyper-V
21
Gigabit switch—16-port gigabit Ethernet
BEST PRACTICE: Use the latest tested and validated
software, firmware, and driver versions for NICs,
storage arrays, and other components. You can find
these software components at
http://support.dell.com/support/
downloads/index.aspx?c=us&l=en&s=gen.
Configuring the physical RAID disk layout
Overview
Following Microsoft’s recommended best practices, we planned to
separate our virtualized disk activity, just as we would with a
physical machine. By placing our VHDs on separate physical drives,
we were able to separate the different types of file work, as
Microsoft recommends.
NOTE: Plan on at least 10 minutes for drive
configuration on the server.
A note on virtualized storage
In a Hyper-V environment, you have three options available for
storage: pass-through disks, fixed-size VHDs, and dynamically
sized VHDs. If speed is your primary concern, pass-through disks
are the best option. However, pass-through disks require you to
allocate a dedicated disk to a virtual machine, making pass-
through disks less flexible. We chose to use fixed-size VHDs. This
gave us the flexibility of virtualizing our disks and better
performance over dynamically sized VHDs. You can find more
information on storage performance considerations in the Microsoft
SQL Server and Hyper-V whitepaper here:
http://download.microsoft.com/download/d/9/4/d948f981-926e-
40fa-a026-5bfcf076d9b9/SQL2008inHyperV2008.docx.
BEST PRACTICE: Hyper-V requires that the operating
system VHD be on an IDE controller. For better
performance, you should attach your other virtual hard
disks to a virtual SCSI controller instead of to virtual IDE
controllers.
Tempdb database
SQL Server creates the tempdb system database, which all
databases on the SQL instance share. SQL Server uses the tempdb
database for such purposes as temporary tables, table variables,
work files for hash operations, sorting, building aggregates for

How-to Guide: Consolidating multiple SQL Server systems
onto Dell PowerEdge Servers using Microsoft’s Hyper-V
22
GROUP BY or ORDER BY clauses, index builds, INSERTED and
DELETED tables that triggers use, and cursor processing. We
assumed that our database activity makes heavy use of the
tempdb, and so chose to put our VHD containing the tempdb
database on an isolated set of physical disks. However, if your
tempdb does not experience heavy use, then you may not need
dedicated disks.
Transaction log files
Each database has one or more transaction log files. A transaction
log file stores the details for all transactions in a SQL Server
database. This information is critical for restoring database
consistency in the event of a failure. We chose to put our VHD
containing SQL Server transaction logs on an isolated set of
physical disks.
User database files
These data files contain the data and objects for each user-defined
database. Their contents include database objects that you can
define, such as tables, indexes, and stored procedures. We chose
to put our VHD containing SQL Server user database files on an
isolated set of physical disks.
When possible, group files with similar I/O characteristics. For
example, consolidate all logs. Because heterogeneous workloads
can have very different and even competing I/O characteristics,
combining heterogeneous workloads can hurt overall performance.
In this scenario, by storing the VHDs on separate disks, we have
still grouped the disk activity into heterogeneous groups;
therefore, the system directs sequential log activity to one set of
physical disks, and random database read/write activity to a
different set of physical disks.
BEST PRACTICE: When possible, separate the tempdb,
transaction log files, and user database files onto their
own physical disks on separate disk groups. Doing so
can yield better I/O performance by ensuring that these
files do not share the same physical disks.
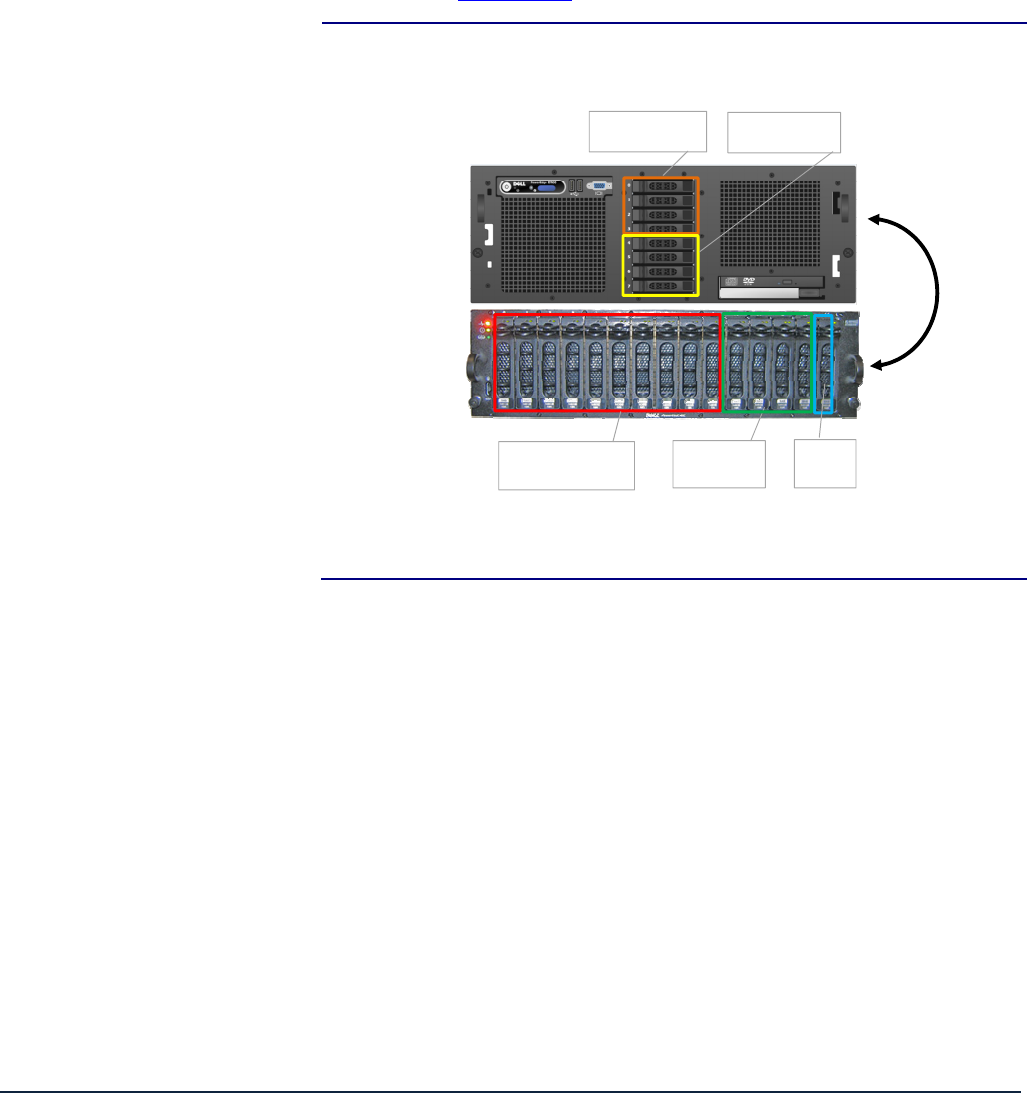
Below, we illustrate the exact drive layout we used (see Figure 10),
and briefly describe each disk group. We cabled the server’s
external RAID controller to the IN port of Enclosure Management
Module (EMM) number one on the PowerVault MD1000. We then
toggled the front switch upward on the MD1000 to indicate that we
were running in unified mode, and turned on the enclosure.
How-to Guide: Consolidating multiple SQL Server systems
onto Dell PowerEdge Servers using Microsoft’s Hyper-V
23
For detailed instructions on how we configured the RAID disk
groups, see Appendix B.
Physical disk configuration – PowerEdge with PowerVault
MD1000
PowerVault MD1000
RAID 10 (Hyper-V,
parent partition,
child partitions)
RAID 10 (Tempdb
VHDs)
RAID 10
(SQL Server
log file VHDs)
Hot
spare
RAID 10 (SQL Server
data files VHDs)
PowerEdge R900/R905
Figure 10. The physical drive configuration we used in the
virtualization consolidated server in our hands-on testing and
research for this Guide.
Internal disk drives
Our PowerEdge servers each contained eight drives. We configured
the first four internal server drives using RAID 10 for both the
parent partition, which holds the host OS, and for the child
partitions, which hold the virtual machines. We also stored the SQL
Server binaries in VHDs on this RAID. We also configured the next
four internal drives as a RAID 10, and dedicated it to the VHD that
would contain the SQL Server tempdb files.
External disk drives
The PowerVault MD1000 contained 15 drives. We allocated 10
drives to a RAID 10 disk group that held the VHDs we assigned to
hold SQL Server user-defined databases. We then created another
RAID 10 disk group, consisting of four drives, to hold the VHD that
contained SQL Server transaction log files. We left one drive
unallocated and assigned it as the hot spare.
Installing Windows Server 2008
Hyper-V requires some form of Windows Server 2008 to be running
in the parent partition—either the full installation or the core
installation. For simplicity and ease of installation, we chose to
install the full version of Windows Server 2008.

How-to Guide: Consolidating multiple SQL Server systems
onto Dell PowerEdge Servers using Microsoft’s Hyper-V
24
This section provides an overview of the Windows Server 2008
installation process on the Dell PowerEdge. We include
approximate wait times for each step. (Appendix C provides
complete, detailed installation instructions.)
NOTE: Plan on at least 60 minutes for installing
Windows Server 2008 Enterprise Edition on the Dell
PowerEdge server. Each step below takes at least 1
minute. We provide the approximate amount of time
each step takes in parentheses. These times exclude
data entry time. The time to install updates—11 minutes
in our setup—will increase over time as Microsoft
releases additional OS updates.
1. Insert the Microsoft Windows Server 2008 Enterprise
Edition DVD into the DVD drive, and reboot the
system. If a message appears telling you to press
any key to boot from CD or DVD, do so. During the
boot, a message that Windows is loading files
appears, followed by a Windows booting loading bar.
(6 minutes)
2. Set the basic location information, and enter your
product key, if applicable. For Hyper-V, you must
install Standard, Datacenter, or Enterprise Edition.
We chose Enterprise Edition. Proceed with
installation, and enter the information the installation
software requires (see Figure 11). (20 minutes,
during which Windows resets the server twice)
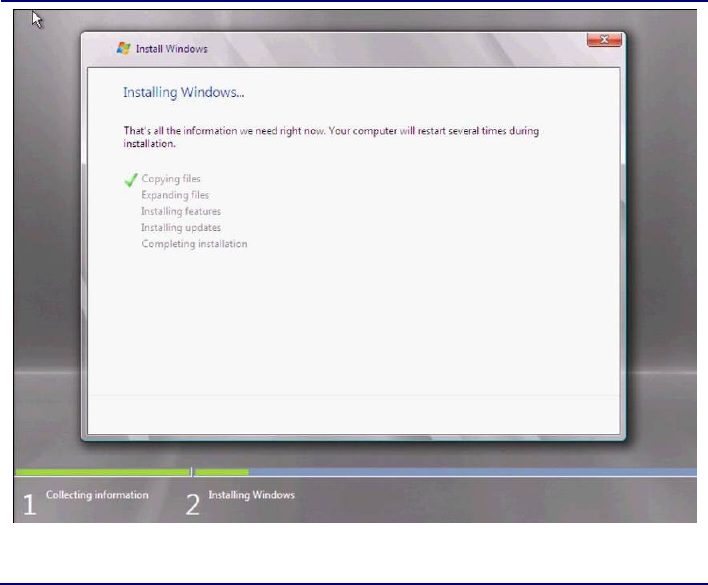
How-to Guide: Consolidating multiple SQL Server systems
onto Dell PowerEdge Servers using Microsoft’s Hyper-V
25
Figure 11. Windows Server 2008 installation progress.
3. Set your password; enter configuration information,
including the IP addresses and domain information;
and reboot the system. (3 minutes)
4. Download and install updates (see Figure 12). It is
critical at this point that you download and install the
update related to Knowledge Base article KB950050,
which updates Hyper-V. (10 minutes; download
times vary)
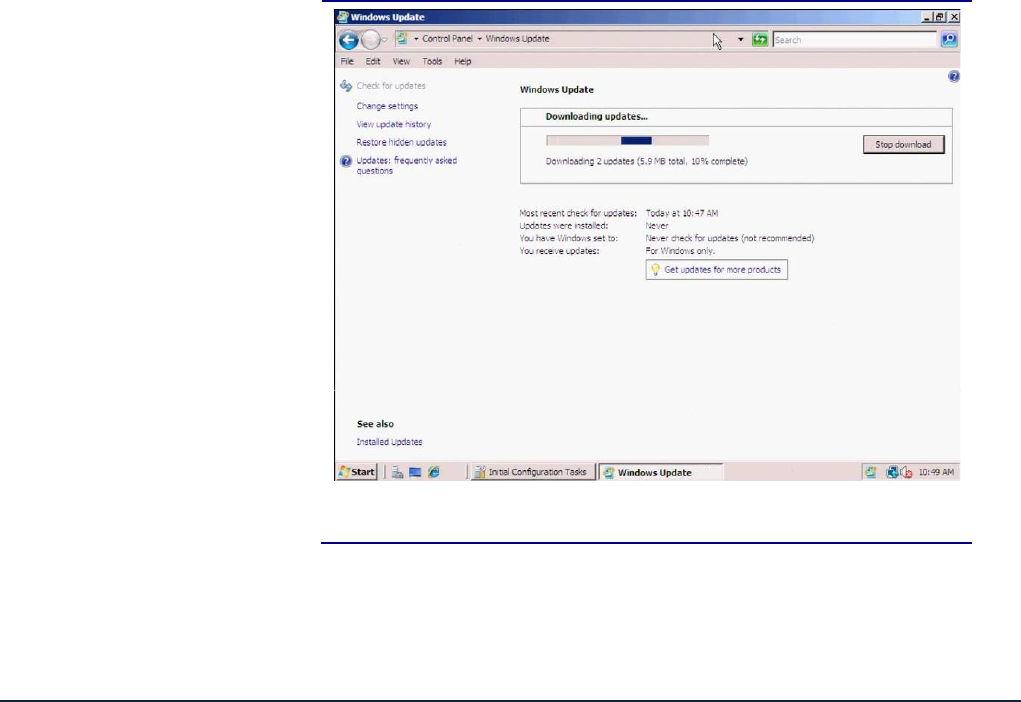
How-to Guide: Consolidating multiple SQL Server systems
onto Dell PowerEdge Servers using Microsoft’s Hyper-V
26
Figure 12. Installing Windows Server 2008 updates.
5. Reboot after the update installation completes. (3
minutes)
Configuring the physical system drives
The next step is to configure the remaining drives in your physical
server using the Disk Management utility that is part of the
Windows Server 2008 Enterprise Edition Administrative Tools.
Format all non-OS volumes as NTFS, including those you will use to
hold your VHDs (see Figure 13).

How-to Guide: Consolidating multiple SQL Server systems
onto Dell PowerEdge Servers using Microsoft’s Hyper-V
27
Virtual
disk
Drive
location
Raid
level
No. of
drives
Contents
1 PowerEdge 10 4 Hyper-V, parent
partition, child
partitions (virtual
machines)
2 PowerEdge 10 4 VHDs for tempdb files
3 PowerVault
MD1000
10 10 VHDs for SQL Server
user data files
4 PowerVault
MD1000
10 4 VHDs for SQL Server
log files
Figure 13. Drive configuration and contents.
In previous Guides, we recommended that you choose a 64KB
allocation unit size for your drives, as Microsoft recommends. This
recommendation remains, even in a virtualized environment.
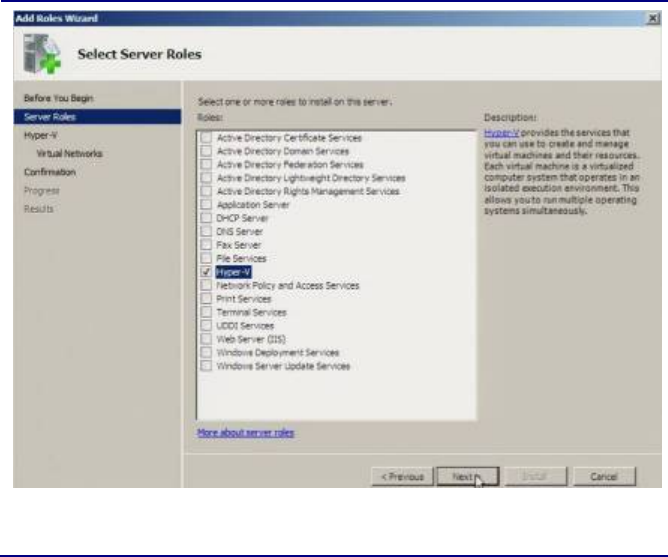
Installing the Hyper-V role
The enabling of Hyper-V on your Windows Server 2008 installation
is very straightforward, and you can do it in just a few short steps.
NOTE: Plan on at least 12 minutes for installing the
Hyper-V role on your Dell PowerEdge server. Each step
below takes at least 1 minute. We provide the
approximate amount of time each step takes in
parentheses. These times exclude data entry time.
1. Click Start, and then click Server Manager. Under
Roles Summary, choose Add Roles.
2. Click Hyper-V (see Figure 14). Configure your
networking as you desire, and then proceed to install
the Hyper-V role. (1 minute)
3. The installation requires a reboot upon completion,
after which the Hyper-V role finishes installing. (11
minutes, including the reboot)
How-to Guide: Consolidating multiple SQL Server systems
onto Dell PowerEdge Servers using Microsoft’s Hyper-V
28
Figure 14. Installing the Hyper-V role in Windows Server 2008.

How-to Guide: Consolidating multiple SQL Server systems
onto Dell PowerEdge Servers using Microsoft’s Hyper-V
29
Summing up
As this Guide has explained, the process of preparing your
Windows Server 2008 server and installing Hyper-V for a virtual
SQL Server environment on a Dell PowerEdge Server is relatively
straightforward; you can perform a basic installation and set up the
Hyper-V role in under a few hours. We still recommend, however,
that you first invest ample time in the pre-consolidation planning
phase, because doing so can help you avoid potential problems
during your consolidation.
For details and procedures on actually creating the child partition,
installing SQL Server, and migrating your databases from your
physical environment to your virtual environment, see our
accompanying Guides.

How-to Guide: Consolidating multiple SQL Server systems
onto Dell PowerEdge Servers using Microsoft’s Hyper-V
30
Appendix A. Example server and database consolidation survey
In this appendix, we give an example survey of detailed
information you may want to gather about the SQL Server
instances and databases you are targeting for consolidation. While
this survey is a good starting point, it may not contain every
relevant detail for your particular environment.
1. Hardware level
a. CPU
i. Vendor
ii. Model
iii. Number of cores per socket
b. Memory
i. Total quantity in GB
ii. Memory speed
c. Storage
i. Quantity, both current and projected data
growth (see database section)
ii. Disk speed
iii. Disk interface (SCSI, SAS, etc.)
2. OS level
a. Server name
b. IP address, subnet, etc.
c. Domain information
d. Operating system version, build number, and
service pack
e. Drive letter information and layout
3. SQL instance level
a. Whether it is clustered, version, edition
(Workgroup, Standard, Enterprise), 64-bit or 32-
bit (and if 32-bit, with or without AWE), and
service pack. Different licensing models apply
depending on what edition you choose as well.
b. Authentication mode (Windows only or mixed
mode?)
c. Instance name (if not a default instance)
d. SQL port number (i.e., is it the default 1433 or
another port? If a named instance, what is the
port?)
e. Communication protocol (named pipes or
TCP/IP?)
How-to Guide: Consolidating multiple SQL Server systems
onto Dell PowerEdge Servers using Microsoft’s Hyper-V
31
f. Service account and all service permission
information (does SQL Agent run under a
different service account?)
g. Are there any non-default master or model
database objects?
h. Are there any linked server objects?
i. Are other SQL modules involved or dependent
on this instance (e.g., Analysis Services,
Reporting Services, etc.)?
j. Default installation directories, data directories,
and log directories
k. Tempdb – Is it highly volatile? Slightly volatile?
Medium usage?
4. Database level
a. Database properties and options
b. Recovery model, auto-shrink, etc.
c. Files and filegroups
i. Size
ii. Location
5. Backups
a. How many full backups, and on what schedule?
b. How many differential backups, and on what
schedule?
c. How many log backups, and on what schedule?
d. Current backup window?
e. Can backup window shift to accommodate the
consolidated backup window?
f. Other backup issues
6. Other issues
a. Is this database in a replication configuration?
b. Do any SQL Server Integration Services
(2005/2008)/Data Transformation Services
(2000) packages reference this database?
c. Do any SQL Agent jobs reference this database?
7. Users/Logins
a. Number of users this database affects
b. Would this database require a login whose name
conflicts with another name on the target
consolidation server? If so, you would need to
create the login and map the database user
using sp_change_users_login.

How-to Guide: Consolidating multiple SQL Server systems
onto Dell PowerEdge Servers using Microsoft’s Hyper-V
32
Appendix B. Creating the RAID disk groups
For our installation, we used four RAID groups, which we allocated
as follows:
• Parent partition operating system files, child partition/virtual
machine operating system files, and SQL Server executable
files
• SQL Server tempdb system database
• SQL Server user database files
• SQL Server transaction log files
We explain below how we configured these four disk groups. The
directions assume you have not configured any virtual disks on
your RAID controllers.
Cabling and storage
Allow at least 3 minutes to connect the PowerVault MD 1000 to the
PowerEdge R900 or PowerEdge R905.
1. Connect the SAS cable from the external PERC 6/E
controller on the PowerEdge to the IN port on EMM 1
on the PowerVault MD1000.
2. If necessary, toggle the switch on the front of the
PowerVault MD1000 upwards so that the PowerVault
MD uses unified mode.
3. Turn on the MD1000.
Creating the RAID groups for the PowerEdge R900 or PowerEdge R905
In these instructions, we use the names and numbers of the
controllers as our test setup displayed them. Thus, on our
PowerEdge, the PERC 6/i showed as Controller 0 and the PERC 6/E
showed as Controller 1. The numbering on your system might
differ.
Allow at least 10 minutes to complete the creation of the RAID
groups on the PowerEdge R900 or PowerEdge R905.
1. Turn on the server.
2. During the boot sequence, the message Press
<Ctrl><R> to Run Configuration Utility appears.
Press <Ctrl><R>. Note: You have only a few
seconds to do this.
How-to Guide: Consolidating multiple SQL Server systems
onto Dell PowerEdge Servers using Microsoft’s Hyper-V
33
3. Configure the RAID 10 for the OS and VMs. Select
the controller for the internal drives, which is the
PERC 6/i, and press Enter.
4. While highlighting Controller 0, press F2, and select
Create New VD.
5. While highlighting the RAID level field, press Enter to
open the drop-down list, and select RAID 10.
6. Using the Tab key to navigate, move to the Physical
Disks section, and use the space bar to select the
first four drives (Drives 0, 1, 2, and 3). Then tab to
highlight OK, and press Enter.
7. A message box appears telling you that initializing
the RAID is highly recommended, but destructive.
Press Enter to clear the message.
8. Configure the RAID 10 disk group for the SQL Server
tempdb database. Highlight Controller 0 again, and
press F2. Select Create New VD.
9. While highlighting the RAID level field, press Enter to
open the drop-down list, and select RAID 10.
10. Using the Tab key to navigate, move to the Physical
Disks section. Use the space bar to select the
remaining four drives (Drives 4, 5, 6, and 7). Then
tab to highlight OK, and press Enter.
11. A message box appears telling you that initializing
the RAID is highly recommended, but destructive.
Press Enter to clear the message.
12. Highlight Virtual Disk 0, and press F2.
13. Select Initialization, then press Enter, and then
select Fast Init. When the system prompts you with
any warnings, highlight OK, and press Enter.
14. Highlight Virtual Disk 1, and press F2.
15. Select Initialization, press Enter, and then select Fast
Init. When the system prompts you with any
warnings, highlight OK, and press Enter.
16. Press F12 to return to the main level of the
configuration utility.
17. Select the controller for the drive array (in our case,
the PERC 6/E), and press Enter.
18. Configure the disk group to hold the SQL Server user
databases. Highlight controller 1, press F2, and
select Create New VD.
19. While highlighting the RAID level field, press Enter to
open the drop-down list, and select RAID 10.
20. Using the Tab key to navigate, move to the Physical
Disks section. Use the space bar to select the first
How-to Guide: Consolidating multiple SQL Server systems
onto Dell PowerEdge Servers using Microsoft’s Hyper-V
34
ten drives (Drives 0, 1, 2, 3, 4, 5, 6, 7, 8, and 9).
Then tab to highlight OK, and press Enter.
21. A message box appears telling you that initializing
the RAID is highly recommended, but destructive.
Make sure to select OK, and press Enter.
22. Configure the RAID 10 disk group to hold SQL Server
transaction log files. Highlight Controller 1 once
again, and press F2. Select Create New VD, and
press Enter.
23. While highlighting the RAID level field, press Enter to
open the drop-down list, and select RAID 10.
24. Using the Tab key to navigate, move to the Physical
Disks section. Use the space bar to select the next
four drives (Drives 10, 11, 12, and 13). (Note that
the drives you allocated earlier no longer appear in
the available list.) Then tab to highlight OK, and
press Enter.
25. A message box appears telling you that initializing
the RAID is highly recommended, but destructive.
Click OK.
26. To use the remaining disk as a hot spare on the
PowerVault MD1000, follow these steps:
a. Press <Ctrl><N> to navigate to the Physical
Disk page of the RAID setup. Press the down
arrow key to select the last disk, which should
have no Disk Group assigned.
b. Press F2, and then select Make Global HS. Press
Enter. If you see a message box asking if you
want the global hot spare to give priority to the
enclosure in which it resides, click Yes. This disk
is now a global hot spare for both Disk Groups
on the external storage array.
27. Press <Ctrl><P> to navigate back to the Virtual Disk
Management screen. Highlight each Virtual Disk, and
press F2. Select Initialization, and then select Fast
Init. Accept OK when the system prompts you with a
warning. After you select Fast Init, a progress bar
appears briefly, and then disappears.
28. Exit the RAID utility, and reboot the server.

How-to Guide: Consolidating multiple SQL Server systems
onto Dell PowerEdge Servers using Microsoft’s Hyper-V
35
Appendix C. Installing Windows Server 2008 Enterprise Edition as the
host OS
Install Microsoft Windows Server 2008 Enterprise Edition by
following these steps. We provide approximate times for each
group of steps in the first step of that group.
To complete the installation of Windows Server 2008, allow 34
minutes on the PowerEdge R900 or 50 minutes on the PowerEdge
R905.
1. Insert the Microsoft Windows Server 2008 Enterprise
Edition DVD into the DVD drive, and reboot the
system.
2. Once the boot process begins, press F2 to enter
setup.
3. In setup, scroll down to CPU Information, and press
Enter.
4. Enable Virtualization Technology, if necessary.
5. After you have checked the BIOS settings, press
Escape to continue the boot. (4 minutes)
6. During the boot, a Windows is loading files message
appears, followed by a Windows booting loading bar.
(2 minutes)
7. At the Install Windows Server 2008 screen, accept
the defaults of English language, English time and
currency format, and US keyboard or input method
by clicking Next.
8. Click Install now. (1 minute)
9. At the Type your product key for activation screen,
enter your activation key, and click Next.
10. At the Select the edition of Windows that you
purchased screen, click Windows Server 2008
Enterprise Edition (Full Installation), check the I
have selected the edition of Windows that I
purchased box, and click Next.
11. At the Please read the license terms screen, check
the I accept the license terms checkbox, and click
Next.
12. At the Which type of installation do you want?
screen, for Type of install, click Custom (Advanced).
13. In the Where do you want to install Windows?
screen, click Drive options (Advanced).

How-to Guide: Consolidating multiple SQL Server systems
onto Dell PowerEdge Servers using Microsoft’s Hyper-V
36
14. Highlight the partition, and click Next to start the
installation. (18 minutes on the PowerEdge R900; 20
minutes on the PowerEdge R905, during which
Windows restarts twice)
15. When the system indicates that you must change the
user’s password before you log on the first time,
click OK.
16. Enter a strong password in both the New password
and Confirm password fields, and click the arrow.
17. At the Your password has been changed prompt,
click OK. Windows then prepares the desktop. (less
than 1 minute)
18. Set the time zone.
19. Set the IP address, subnet mask, and domain
information as per the steps in the next section.
20. Install Windows updates. We installed all updates,
including the optional ones. Depending on your
particular environment, you may need to change the
default firewall settings for Windows update to work.
(8 minutes on the PowerEdge R900; 11 minutes on
the PowerEdge R905, during which Windows restarts
twice; download times vary)
21. Reboot the server. (3 minutes)
Setting IP address, subnet mask, and domain information
After rebooting, set the static IP addresses and subnet mask using
the following process:
1. Click Start.
2. Right-click Network, and select Properties.
3. In the Network Sharing Center, click Manage
network connections.
4. Right-click the Local Area Connection, and select
Properties.
5. In the Local Area Connection Properties dialog,
highlight Internet Protocol Version 4 (TCP/IPv4), and
click Properties.
6. Click the radio button next to Use the following IP
address.
7. Type the IP address you want the server to have, the
Subnet mask, and the Preferred DNS server, and
click OK.
8. Close the Network Connections window.

How-to Guide: Consolidating multiple SQL Server systems
onto Dell PowerEdge Servers using Microsoft’s Hyper-V
37
9. From the Start menu, right-click Computer, select
Properties, and then select Advanced system
settings.
10. Select the Computer Name tab.
11. Click Change.
12. Enter the server name.
13. Click the Member of Domain radio button.
14. Enter the domain name.
15. Enter the user name and password when the system
prompts you to do so. (less than 1 minute)
16. When the Computer Name/Domain Changes window
appears, click OK to close it.
17. Click OK to go past the warning to restart.
18. Click OK to close the System Properties window.
19. Click Restart Now to reboot the server. (3 minutes)
Configuring data drives
Configure each of the three non-operating system RAID drives on
the server using the following steps:
1. Click Start.
2. Expand Administrative Tools, and click Computer
management.
3. In the left panel, expand Storage, and select Disk
Management. If the Initialize Disk dialog box
appears, click OK.
4. Right-click the unallocated disk, and select New
Simple Volume.
5. On the Welcome to the New Simple Volume Wizard
screen, click Next.
6. Leave the volume size at the default, and click Next.
7. Leave the drive letter at the default, and click Next.
8. On the Format Partition screen, do the following:
a. Leave the File System as NTFS.
b. Set the Allocation Unit size to 64 K. (Note:
Windows Server 2008 Enterprise Edition grays
out the option to compress the drive.)
c. Fill in a volume name if you want the disk to
have one.
d. Optionally, select the quick format checkbox.
9. Click Next.
10. On the Completing the New Simple Volume Wizard
screen, click Finish.
Adding the Hyper-V role
Allow at least 12 minutes for adding the Hyper-V role.
How-to Guide: Consolidating multiple SQL Server systems
onto Dell PowerEdge Servers using Microsoft’s Hyper-V
38
1. Click Start.
2. Expand Administrative Tools, and click Server
Manager.
3. Right-click Roles, and select Add Roles.
4. On the Before You Begin page, click Next.
5. On the Select Server Roles page, select Hyper-V.
Click Next.
6. On the Hyper-V page, click Next.
7. On the Create Virtual Networks page, select the
appropriate Local Area Connections, and click Next.
8. On the Confirm Installation Selections page, click
Install. (1 minute)
9. On the Installation results screen, click Close.
10. Click Yes when Windows prompts you to reboot the
server. (3 minutes)
11. After the boot, you will see the Resuming
Configuration window.
12. When you see the Installation Results page, click
Close. (8 minutes)
How-to Guide: Consolidating multiple SQL Server systems
onto Dell PowerEdge Servers using Microsoft’s Hyper-V
39
About Principled Technologies
We provide industry-leading technology assessment and fact-based
marketing services. We bring to every assignment extensive
experience with and expertise in all aspects of technology testing
and analysis, from researching new technologies, to developing
new methodologies, to testing with existing and new tools.
When the assessment is complete, we know how to present the
results to a broad range of target audiences. We provide our clients
with the materials they need, from market-focused data to use in
their own collateral to custom sales aids, such as test reports,
performance assessments, and white papers. Every document
reflects the results of our trusted independent analysis.
We provide customized services that focus on our clients’ individual
requirements. Whether the technology involves hardware,
software, Web sites, or services, we offer the experience,
expertise, and tools to help you assess how it will fare against its
competition, its performance, whether it’s ready to go to market,
and its quality and reliability.
Our founders, Mark L. Van Name and Bill Catchings, have worked
together in technology assessment for over 20 years. As
journalists, they published over a thousand articles on a wide array
of technology subjects. They created and led the Ziff-Davis
Benchmark Operation, which developed such industry-standard
benchmarks as Ziff Davis Media’s Winstone and WebBench. They
founded and led eTesting Labs, and after the acquisition of that
company by Lionbridge Technologies were the head and CTO of
VeriTest.
Principled Technologies, Inc.
1007 Slater Road, Suite 250
Durham, NC, 27703
www.principledtechnologies.com
Principled Technologies is a registered trademark of Principled Technologies, Inc.
All other product names are the trademarks of their respective owners
Disclaimer of Warranties; Limitation of Liability:
PRINCIPLED TECHNOLOGIES, INC. HAS MADE REASONABLE EFFORTS TO ENSURE THE ACCURACY AND VALIDITY OF
ITS TESTING, HOWEVER, PRINCIPLED TECHNOLOGIES, INC. SPECIFICALLY DISCLAIMS ANY WARRANTY, EXPRESSED
OR IMPLIED, RELATING TO THE TEST RESULTS AND ANALYSIS, THEIR ACCURACY, COMPLETENESS OR QUALITY,
INCLUDING ANY IMPLIED WARRANTY OF FITNESS FOR ANY PARTICULAR PURPOSE. ALL PERSONS OR ENTITIES
RELYING ON THE RESULTS OF ANY TESTING DO SO AT THEIR OWN RISK, AND AGREE THAT PRINCIPLED
TECHNOLOGIES, INC., ITS EMPLOYEES AND ITS SUBCONTRACTORS SHALL HAVE NO LIABILITY WHATSOEVER FROM
ANY CLAIM OF LOSS OR DAMAGE ON ACCOUNT OF ANY ALLEGED ERROR OR DEFECT IN ANY TESTING PROCEDURE
OR RESULT.
IN NO EVENT SHALL PRINCIPLED TECHNOLOGIES, INC. BE LIABLE FOR INDIRECT, SPECIAL, INCIDENTAL, OR
CONSEQUENTIAL DAMAGES IN CONNECTION WITH ITS TESTING, EVEN IF ADVISED OF THE POSSIBILITY OF SUCH
DAMAGES. IN NO EVENT SHALL PRINCIPLED TECHNOLOGIES, INC.’S LIABILITY, INCLUDING FOR DIRECT DAMAGES,
EXCEED THE AMOUNTS PAID IN CONNECTION WITH PRINCIPLED TECHNOLOGIES, INC.’S TESTING. CUSTOMER’S
SOLE AND EXCLUSIVE REMEDIES ARE AS SET FORTH HEREIN.
