VisionSDK_NetworkTools_UserGuide Vision SDK User Guide Build System
User Manual:
Open the PDF directly: View PDF ![]() .
.
Page Count: 30
- 1 Introduction
- 2 Basic Usage
- 3 Fast Builds
- 4 Build Configuration
- 5 Make Targets and Command Line Options
- 6 Adding new use-cases, algplugins to build
- 7 Adding new system config parameters to build config
- 8 Adding new library to application
- 9 Changing compiler, linker options
- 10 Build Config Implementation Details (Advanced Users)
- 11 Add and Delete links into links framework
- 12 Revision History

Page 1 of 30
Vision SDK
Build System
User Guide

Page 2 of 30
IMPORTANT NOTICE
Texas Instruments and its subsidiaries (TI) reserve the right to make changes to their products or to
discontinue any product or service without notice, and advise customers to obtain the latest version of relevant
information to verify, before placing orders, that information being relied on is current and complete. All
products are sold subject to the terms and conditions of sale supplied at the time of order acknowledgment,
including those pertaining to warranty, patent infringement, and limitation of liability.
TI warrants performance of its products to the specifications applicable at the time of sale in accordance with
TI’s standard warranty. Testing and other quality control techniques are utilized to the extent TI deems
necessary to support this warranty. Specific testing of all parameters of each device is not necessarily
performed, except those mandated by government requirements.
Customers are responsible for their applications using TI components.
In order to minimize risks associated with the customer’s applications, adequate design and operating
safeguards ought to be provided by the customer so as to minimize inherent or procedural hazards.
TI assumes no liability for applications assistance or customer product design. TI does not warrant or represent
that any license, either express or implied, is granted under any patent right, copyright, mask work right, or
other intellectual property right of TI covering or relating to any combination, machine, or process in which such
products or services might be or are used. TI’s publication of information regarding any third party’s products or
services does not constitute TI’s approval, license, warranty or endorsement thereof.
Reproduction of information in TI data books or data sheets is permissible only if reproduction is without
alteration and is accompanied by all associated warranties, conditions, limitations and notices. Representation
or reproduction of this information with alteration voids all warranties provided for an associated TI product or
service, is an unfair and deceptive business practice, and TI is neither responsible nor liable for any such use.
Resale of TI’s products or services with statements different from or beyond the parameters stated by TI for
that product or service voids all express and any implied warranties for the associated TI product or service, is
an unfair and deceptive business practice, and TI is not responsible nor liable for any such use.
Also see: Standard Terms and Conditions of Sale for Semiconductor Products.
www.ti.com/sc/docs/stdterms.htm
Mailing Address:
Texas Instruments
Post Office Box 655303
Dallas, Texas 75265
Copyright © 2017, Texas Instruments Incorporated

Page 3 of 30
TABLE OF CONTENTS
1 Introduction ................................................................................................. 4
2 Basic Usage .................................................................................................. 5
3 Fast Builds ................................................................................................... 6
4 Build Configuration ...................................................................................... 7
4.1 Modifying Build Configuration Files ..................................................................... 7
4.2 Build Configuration Options ............................................................................... 9
4.3 Adding user specific build config ....................................................................... 13
5 Make Targets and Command Line Options .................................................. 15
5.1 Make Targets ................................................................................................. 15
5.2 Command Line Options ................................................................................... 16
6 Adding new use-cases, algplugins to build ................................................. 17
6.1 Adding new use-cases to build (BIOS ONLY mode) ............................................. 17
6.2 Adding new use-cases to build (Linux + BIOS mode) .......................................... 20
6.3 Adding new alg plugins to build (BIOS side) ...................................................... 22
6.4 Adding new alg plugins to build (Linux side) ...................................................... 22
6.5 Building Algorithm plugins for individual cores ................................................... 23
7 Adding new system config parameters to build config ............................... 25
8 Adding new library to application ............................................................... 26
9 Changing compiler, linker options .............................................................. 26
10 Build Config Implementation Details (Advanced Users) ............................. 27
10.1 Build config generated .h file ........................................................................... 27
10.2 Build config makefiles ..................................................................................... 27
11 Add and Delete links into links framework ................................................. 28
11.1 Adding a link ................................................................................................. 28
11.2 Deleting a link ............................................................................................... 29
12 Revision History ......................................................................................... 30

Page 4 of 30
1 Introduction
This document describes how to use the Vision SDK “make” based build system. It
explains the basic’s on how to compile and link Vision SDK binaries and it also
explains various methods by which build can be customized and made faster for
advanced users.
Section 2 Basic Usage explains the steps first time users or basic users need to
follow to get started
Section 3 Fast Builds gives tips to enable fast builds.
Subsequent sections explain more details about different aspects of build system.
This can be useful for basic and advanced users to help customize their build based
on their specific requirements.

Page 5 of 30
2 Basic Usage
Follow below steps if you are a first time user and are trying to build Vision SDK
1. Identify the build config for which you want to build.
Ex, if you want build for TDA2xx SoC on TI EVM with BIOS on all CPUs
with all default demos, use build config as “tda2xx_evm_bios_all”
TIP: Default build config names are the folder names that are present
in “vision_sdk/$(MAKEAPPNAME)/configs/”
2. Set required build config in “vision_sdk/build/Rules.make” at below line
MAKECONFIG?=tda2xx_evm_bios_all
3. Or alternatively pass the value of make variable MAKECONFIG via command
line when invoking make as shown below
> make –s –j MAKEAPPNAME=apps
MAKECONFIG=tda2xx_evm_bios_all
All subsequent discussion will assume MAKEAPPNAME and
MAKECONFIG value is set in Rules.make
4. When building for first time do below on command prompt. This will setup the
build environment based on selected MAKEAPPNAME and MAKECONFIG, it
will build the drivers in PDK and EDMA3LLD.
> make –s –j depend
TIP: DON’T do this step every time application needs to be built. This
affects build time of the application in next step. This needs to be done
only when building for first time or when there is change in any drivers
(PDK, EDMA3LLD) or when config that is used or parameter values of
current config are changed.
5. To build the Vision SDK link framework and apps do below. This will build the
complete framework, links, algplugins, usecases and finally it will generate
the “CCS” loadable binaries in folder “vision_sdk/binaries/$(
MAKEAPPNAME)/$(MAKECONFIG)/vision_sdk/bin/$(PLATFORM)/”
> make –s –j
6. To make the SD card loadable application image do below. This will create the
“AppImage” and put it in folder “vision_sdk/binaries/$(
MAKEAPPNAME)/$(MAKECONFIG)/vision_sdk/bin/$(PLATFORM)/sbl_boot”
> make –s –j appimage
NOTE: This step is applicable when BIOS runs on all CPUs
7. Refer respective platform userguide on steps to generate the SD card
bootloader and steps to run the generated AppImage on the EVM.
8. In order to “clean” current configuration delete below folder
“vision_sdk/binaries/$( MAKEAPPNAME)/$(MAKECONFIG)/”
Ex, > rm –rf vision_sdk/binaries/apps/tda2xx_evm_bios_all
9. TIP: To see current config parameters do below
> make showconfig

Page 6 of 30
3 Fast Builds
This section lists some tips to enable faster builds in the Vision SDK build system.
It gives the top level tips and refers to relevant sections in this document for exact
details
1. It is recommend to create your own build config (section 4.3 Adding user
specific build config)
2. Customize the build based on your requirements (refer section 4 Build
Configuration for details). Specifically do the below in the config folder
a. Modify PROC_<CPU>_INCLUDE to mark as “no” the CPUs that are not
needed (vision_sdk/config/$(MAKECONFIG)/cfg.mk)
b. Modify vision_sdk/config/$(MAKECONFIG)/uc_cfg.mk to keep only
use-cases you are interested in
c. Use “make showconfig” to confirm the config options that are being
used for the build
3. Use “-s –j” option when invoking make in command line (section 5.1 Make
Targets)
4. When doing incremental build, only invoke make for the targets that are
required. Refer section 5.1 Make Targets for the available make targets which
allow granular compilation of modules
5. When doing incremental build, only build for CPUs that have modifications
(see section 5.2.1 Selecting CPU to build via command line)
6. When one is not sure which modules are modified do “make –s –j depend”
followed by “make –s –j” to allow build system to scan and build all modified
modules.

Page 7 of 30
4 Build Configuration
Build configuration is the means by which various build level parameters are set
depending on SOC, Board, OS, application.
General guidelines used by TI for naming a build config is below
<soc>_<boardname>_<os>_<application>
o <soc>, can be TI TDA SoC like TDA2x, TDA2Ex, TDA3x
o <boardname>, can be name for a board built using one of SoC, eg,
“evm” for TI EVM or “rvp” for RVP board or “mc” for xCAM board
o <os>, can be “bios” for BIOS ONLY OS used on all CPUs or “linux” for
Linux+BIOS OS used across different CPUs
o <application>, can be “all” for all demos in Vision SDK package or
“opencx” for all OpenCV, OpenCL demos.
TIP: User defined build configs can follow naming convenient and logical for the user
4.1 Modifying Build Configuration Files
Build configuration files are present in folder “vision_sdk/$(
MAKEAPPNAME)/configs/$(MAKECONFIG)”, i.e the name of the build config is
the folder name under “vision_sdk/$( MAKEAPPNAME)/configs”
All subsequent discussion assumes MAKECONFIG=tda2xx_evm_bios_all
Build config conists on one mandatory file “cfg.mk” which the build system
expects
o Ex, vision_sdk/apps/configs/tda2xx_evm_bios_all/cfg.mk
In this folder this is also a uc_cfg.mk file, this file is inturn included by
cfg.mk, so in this sense uc_cfg.mk is not required by the build system but is
created to allow modularity in specifying different build options
cfg.mk lists all the selected parameter values for this config.
o Ex, PROC_xxx_INCLUDE specifies if a given CPU is included in this
application
o Ex, VSDK_BOARD_TYPE specifies the HW board for which this config is
valid. This indirectly selects the SoC for which this config is valid
Users can customize the config based on their requirements
o TIP: make the CPUs not required for your application to “no”. Ex, if
IPU1-1 is not required, removed it from build as modifying cfg.mk as
below
PROC_IPU1_1_INCLUDE=no
Uc_cfg.mk specifies the use-cases that are included in the final application.
Use-cases inturn invoke different algplugins. Algplugins that are excluded in
the build if none of the selected use-cases need the algplugin
o Ex, if application needs only framecopy and capture-display usecase it
can comment all lines except the ones shown below in uc_cfg.mk
UC_vip_single_cam_frame_copy=yes
UC_vip_single_cam_view=yes
TIP: Removing use-cases that are not required and CPUs that are not
required will help reduce overall build time as well binary size

Page 8 of 30
When values in cfg.mk or uc_cfg.mk are changed, the build environment
needs to be updated to reflect updated values. This can be done by doing
o > make –s –j depend
TIP: To see what config options are selected by current config do below
o > make showconfig
Page 9 of 30
4.2 Build Configuration Options
Build configuration options are divided into below categories
System level config parameters
Use-case selection config parameters
Alg-plugin selection config parameters
TIP: To see current selected list of config values do “make showconfig”
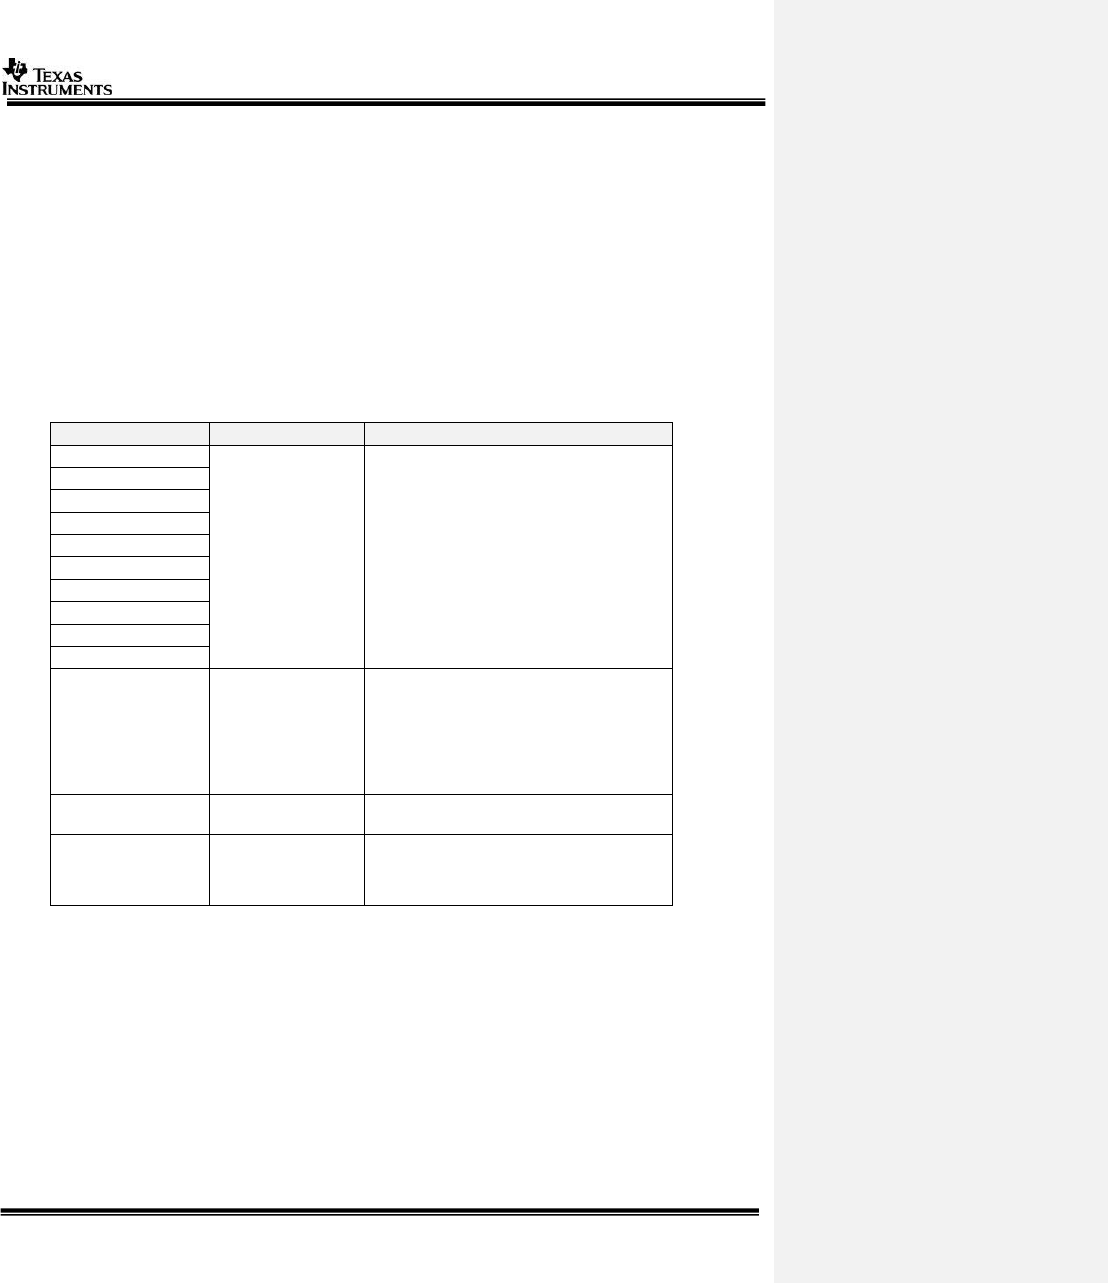
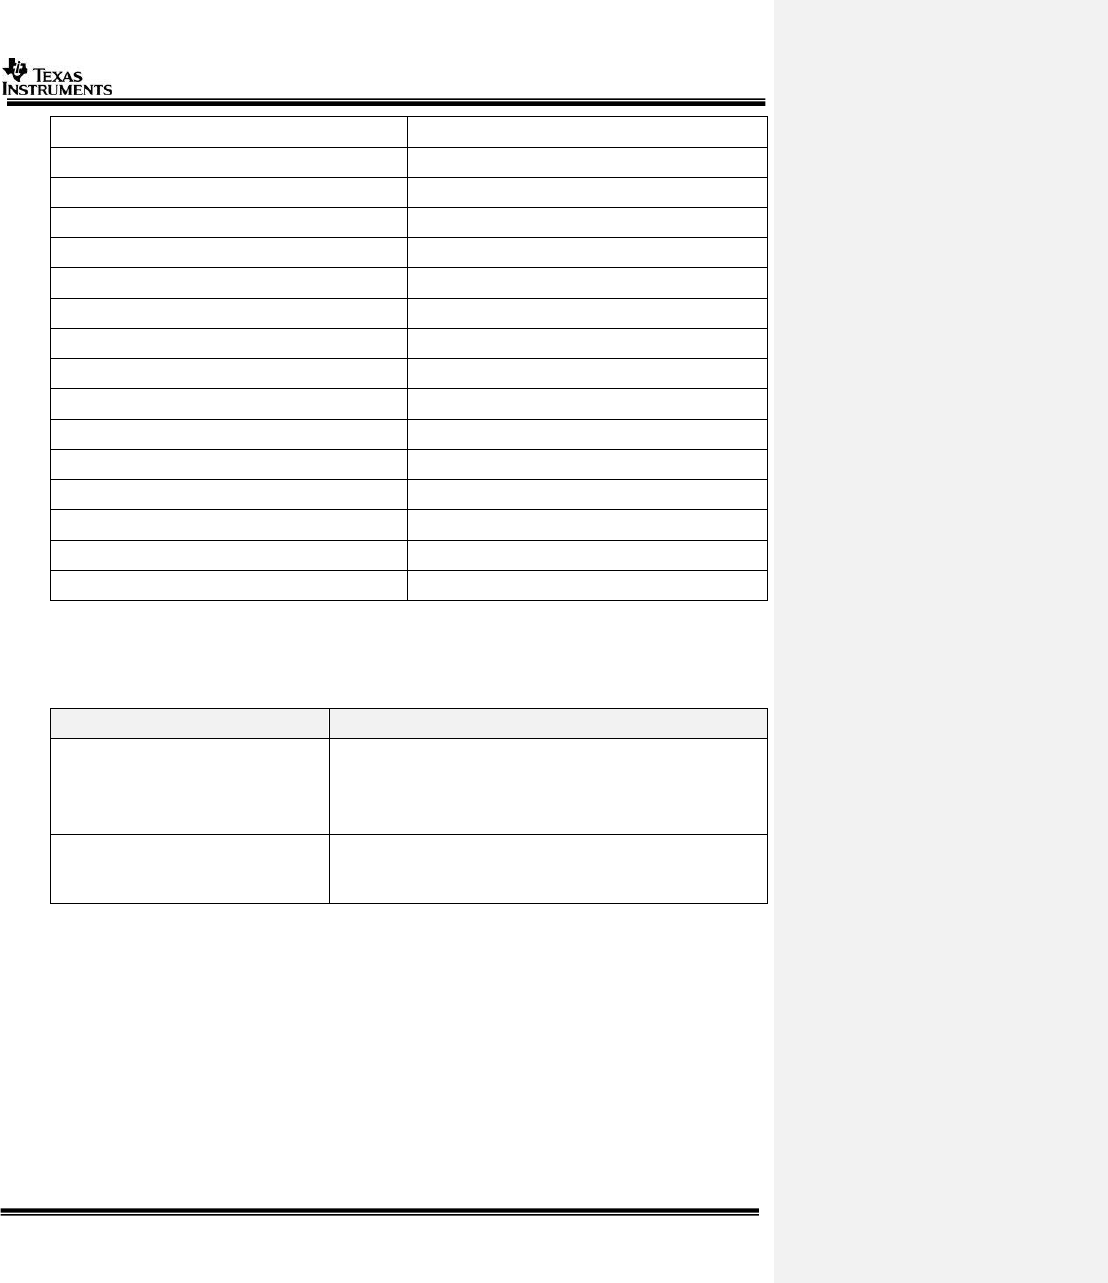
4.2.1 System level config parameters
The list of currently supported system level config parameters are given in below
table.
NOTE: Parameter values are case sensitive.
NOTE: Parameter which take values of “yes” or “no”. All values other than “yes” are
considered as “no”.
Parameter
Valid Values
Description
PROC_IPU1_0_INCLUDE
yes, no
“yes” means the CPU is included in application and will be
built
PROC_IPU1_1_INCLUDE
PROC_IPU2_INCLUDE
PROC_A15_0_INCLUDE
PROC_DSP1_INCLUDE
PROC_DSP2_INCLUDE
PROC_EVE1_INCLUDE
PROC_EVE2_INCLUDE
PROC_EVE3_INCLUDE
PROC_EVE4_INCLUDE
VSDK_BOARD_TYPE
TDA2EX_EVM
TDA2XX_EVM
TDA3XX_EVM
TDA3XX_RVP
TDA2XX_MC
Used to select, the board for which the SDK needs to be
built,
TDA2EX_EVM selects TDA2Ex SoC TI EVM board
TDA2XX_EVM selects TDA2xx SoC TI EVM board
TDA3XX_EVM selects TDA3xx SoC TI EVM board
TDA3XX_RVP selects TDA3xx SoC D3 RVP board
TDA2XX_MC selects TDA2xx SoC xCAM board
DUAL_A15_SMP_BIOS
yes, no
“yes” means A15 runs BIOS in SMP mode.
Only valid for TDA2x SoC
DDR_MEM
DDR_MEM_512M
DDR_MEM_128M
Selects the memory map to use for application.
DDR_MEM_512M means 512MB memory map
DDR_MEM_128M means 128MB memory map (only valid
for TDA3x SoC)
Page 10 of 30
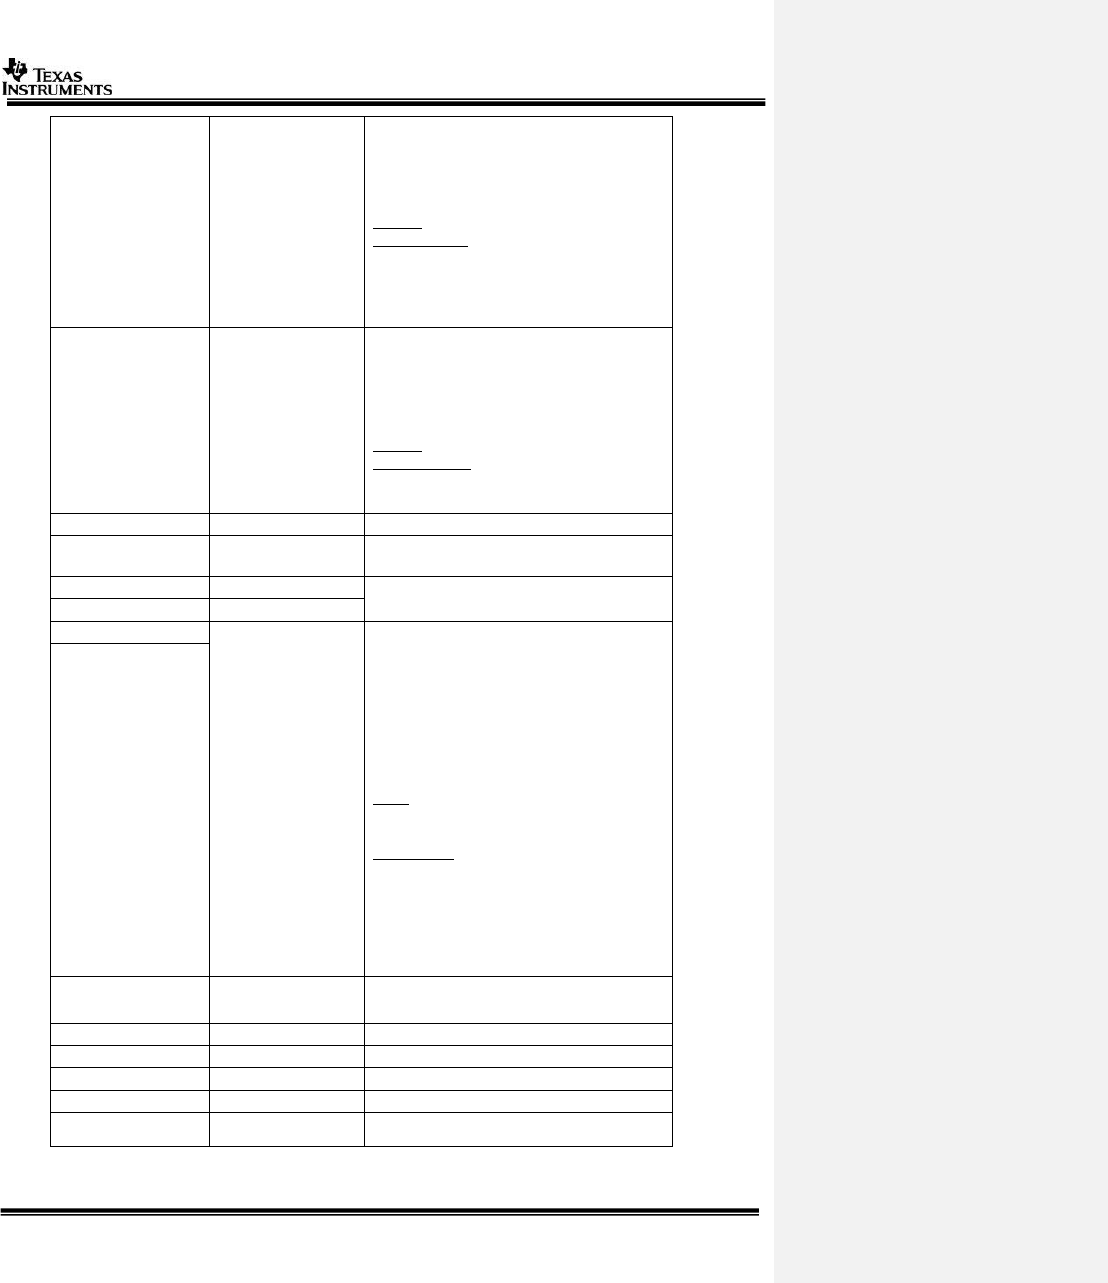
NDK_PROC_TO_USE
ipu1_0
a15_0
ipu1_1
ipu2
none
Selects the CPU on which NDK runs.
“none” means NDK is disabled.
On TDA3x SoC due to pinmux conflict when MMCSD is
enabled (FATFS_PROC_TO_USE != none) NDK is disabled
automatically by build system.
Recommended values,
On TDA3x, ipu1_0
On TDA2x, TDA2Ex
- BIOS ONLY mode and AVB is enabled, ipu1_1
- BIOS ONLY mode and AVB is disabled, a15_0
- Linux+BIOS mode and AVB is enabled, ipu2
- Linux+BIOS mode and AVB is disabled, none
FATFS_PROC_TO_USE
ipu1_0
a15_0
none
Selects the CPU on which FAT filesystem using MMCSD
runs.
“none” means FAT FS and MMCSD is disabled.
On TDA3x SoC due to pinmux conflict when MMCSD is
enabled (FATFS_PROC_TO_USE != none) NDK is disabled
automatically by build system.
Recommended values,
On TDA3x, ipu1_0
On TDA2x, TDA2Ex,
- BIOS ONLY mode, ipu1_0
- Linux+BIOS mode, none
BUILD_ALGORITHMS
yes, no
TI Internal option should be set to “no” by users
BUILD_INFOADAS
yes, no
“yes” means Info ADAS application will be run.
Only valid for TDA2x, TDA2Ex with A15 running Linux
KW_BUILD
yes, no
TI Internal option should be set to “no” by users
CPLUSPLUS_BUILD
yes, no
IPU_PRIMARY_CORE
ipu1_0
ipu2
Selects the IPU which is “primary” core and the IPU which
is secondary core.
“primary” means the IPU on which drivers like VIP, VPE,
DSS etc run
“secondary” means IPU which can be used as general
purpose CPU to run user SW
IPU_PRIMARY_CORE and IPU_SECONDARY_CORE values
cannot be same.
The CPU which is selected as IPU_PRIMARY_CORE MUST
be enabled via PROC_<cpu>_INCLUDE=yes
Recommended values,
TDA3x,
IPU_PRIMARY_CORE=ipu1_0
IPU_SECONDARY_CORE=ipu2 [has no effect]
TDA2x, TDA2Ex,
- BIOS ONLY mode,
IPU_PRIMARY_CORE=ipu1_0
IPU_SECONDARY_CORE=ipu2
- Linux+BIOS Mode,
IPU_PRIMARY_CORE=ipu2
IPU_SECONDARY_CORE=ipu1_0
IPU_SECONDARY_CORE
A15_TARGET_OS
Linux
Bios
Selects the OS which runs on A15. Indirectly this selects
BIOS ONLY mode or BIOS+Linux mode. In BIOS ONLY
mode set this to “Bios” even if PROC_A15_)_INCLUDE=no
IVAHD_INCLUDE
yes, no
“yes” means IVAHD HWA is included in application
VPE_INCLUDE
yes, no
“yes” means VPE HWA is included in application
DSS_INCLUDE
yes, no
“yes” means DSS HWA is included in application
ISS_INCLUDE
yes, no
“yes” means ISS HWA is included in application
ISS_ENABLE_DEBUG_TAPS
yes, no
“yes” means ISS Debug taps to dump intermediate ISS
otuputs is enabled
Page 11 of 30
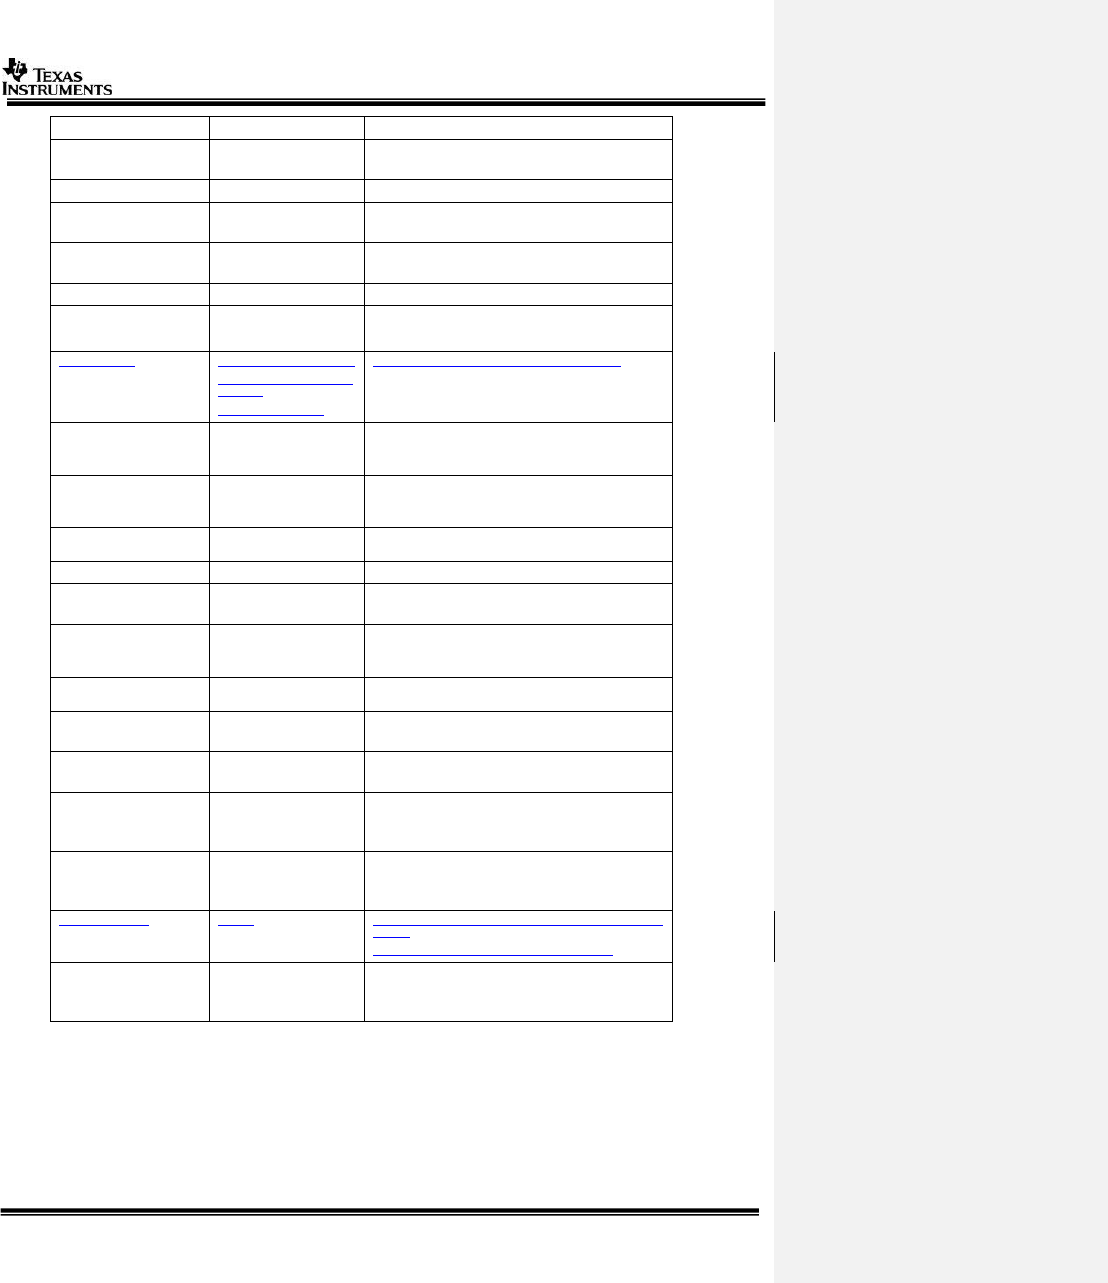
WDR_LDC_INCLUDE
yes, no
“yes” means WDR, LDC feature of ISS is enabled
RTI_INCLUDE
yes, no
“yes” means RTI features are enabled.
Only valid for TDA3x SoC.
ECC_FFI_INCLUDE
yes, no
“yes” means EFF, FFI features are enabled
DCC_ESM_INCLUDE
yes, no
“yes” means DCC, ESM features are enabled.
Only valid for TDA3x SoC.
AVBRX_INCLUDE
yes, no
“yes” means AVBRX features are enabled.
Only valid for TDA2x, TDA2Ex SoC.
DCAN_INCLUDE
yes, no
“yes” means DCAN features are enabled
RADAR_INCLUDE
yes, no
“yes” means Radar related algplugins and use-cases are
enabled. This is top level flag to include or exclude Radar
features.
RADAR_BOARD
none, TDA3XX_AR12_ALPS,
TDA3XX_AR12_VIB_DAB_B
OOSTER,
TDA3XX_RADAR_RVP
Defines what is the board connected to the set up.
FAST_BOOT_INCLUDE
yes, no
“yes” means rear view camera fast boot features are
enabled.
Only valid for TDA3x SoC.
SRV_FAST_BOOT_INCLUDE
yes, no
“yes” means TDA3x surround view fast boot features are
enabled
Only valid for TDA3x SoC.
CPU_IDLE_ENABLED
yes, no
“yes” means, CPU will go to low power state when it is
IDLE.
DATA_VIS_INCLUDE
yes, no
“yes” means, Data Visualization feature is enabled
OPENCL_INCLUDE
yes, no
“yes” means, OpenCL framework is included in application.
Only valid for TDA2x SoC
ENABLE_OPENCV
yes, no
“yes” means, OpenCV framework is included in
application.
Only valid for TDA2x SoC
HS_DEVICE
yes, no
“yes” means “High Security” mode of application is
enabled.
DEFAULT_UBOOT_CONFIG
dra7xx_evm_vision_config
Config file used to build Linux uboot
Only valid when A15_TARGET_OS=Linux
DEFAULT_KERNEL_CONFIG
omap2plus_defconfig
Config file used to build Linux kernel
Only valid when A15_TARGET_OS=Linux
DEFAULT_DTB
dra72-evm-infoadas.dtb
dra7-evm-infoadas.dtb
Device tree file used
dra72-evm-infoadas.dtb is DTB file for TDA2Ex EVM
dra7-evm-infoadas.dtb is DTB file for TDA2x EVM
IPUMM_INCLUDE
yes, no
“yes” means IPUMM framework is included in application.
Only valid when A15_TARGET_OS=Linux
MUST set IVAHD_INCLUDE=no when this is enabled.
IPC_LIB_INCLUDE
yes, no
“yes” means the framework will use IPCLib in the PDK
drivers.
“no” (default) will use the SYSBIOS IPC libraries.
ULTRASONIC_INCLUDE
yes, no
“yes” means Ultrasonic support is included in application.
Valid for TDA2xx Bios only build configuration.
4.2.2 Use-case selection config parameters
These are typically specified in uc_cfg.mk which is included by cfg.mk
These parameters have the format of
o UC_<usecasename>=yes

Page 12 of 30
If a use-case is not required then comment the line or make the value as “no”
or remove the line completely.
o #UC_<usecasename>=yes
OR
o UC_<usecasename>=no
<usecasename> is the name of the folder in which the use-case code is
present
o The folders where use-cases are located in Vision SDK are
BIOS ONLY mode use-cases
“vision_sdk\apps\src\rtos\usecases”
“vision_sdk\apps\src\rtos\radar\src\usecases”
Linux+BIOS mode use-cases
“vision_sdk\apps\src\hlos\adas\src\usecases”
“vision_sdk\apps\src\hlos\infoadas\src\chains”
4.2.3 Algplugin selection config parameters
Algplugins are included based on use-case that is selected
Every use-case folder has a cfg.mk file in which algplugins that are required
for the use-case are marked as “yes”
o Ex, “vision_sdk/apps/src/rtos/usecases/<usecasename>/cfg.mk”
These algplugin parameters have the format of
o ALG_<algpluginname>=yes
If algplugin is not required then comment the line or remove the line
completely.
o #ALG_<algpluginname>=yes
IMPORTANT: Do mark a ALG_<algpluginname>=no if it is not required by a
usecase since some other use-case may need it
<algpluginname> is the name of the folder in which the algplugin code is
present
o The folders where use-cases are located in Vision SDK are
BIOS ONLY mode use-cases
“vision_sdk\apps\src\rtos\alg_plugins”
“vision_sdk\apps\src\rtos\radar\src\alg_plugins”
Linux+BIOS mode use-cases
“vsdk_dev\vision_sdk\apps\src\hlos\adas\src\alg_plugins”
4.2.4 CPUs required in application
Users selected the CPUs they want in their application by marking the CPU as
“yes” via the variable PROC_<cpu>_INCLUDE=yes
The build system gives a hint to user if CPUs selected by user do match the
CPUs required by the use-cases and config options selected by the user
o In this case if user continues, the use-case or application may not run
o The user should enabled these CPUs in their config

Page 13 of 30
The build system also gives a hint to user if the CPUs selected by users are
not used by the use-cases and config options selected by the user
o In this case user can disable these CPUs in their config to save build
time and application size
These hints are told by the build system when “make showconfig” is done. It
is also shown at the beginning of “make –s –j depend”
As example log is shown below, in this log
o it says IPU1_1 is not required in build and can be disabled from build.
o It also EVE1 is required from the build and should be enabled in the
build
#
# CPUs that are NOT required but included in config [ tda2xx_evm_bios_all ],
#
# WARNING: IPU1_1 can be excluded from application
#
# CPUs that are required but NOT included in config [ tda2xx_evm_bios_all ],
#
# ERROR: EVE1 MUST be included in application
#
# Edit D:/vision_sdk/build/configs/tda2xx_evm_bios_all/cfg.mk to include or
exclude CPUs in an application
#
4.3 Adding user specific build config
Other than default build configs users can add their own build configs and
give their own name to it.
This is useful in scenario’s like below
o Scenario 1: User is working on a subset of features and needs only few
use-cases of alg-plugins
o Scenario 2: User is working on features not enabled in default configs
o Scenario 3: User is adding their own algplugin/use-case/feature to
Vision SDK and needs specific features
o Scenario 4: User is working on custom board in which features needed
are different from default features
To add a user specific config, it recommended to first identify a default config
which is closest to user required config, ex, on the same SoC or same OS, or
same board
Identify a name for user config, say, “my_config”
Next create a folder in “vision_sdk/$( MAKEAPPNAME)/configs” called
“my_config”
Copy the cfg.mk and uc_cfg.mk files from the closest default config to
“my_config”
Edit cfg.mk and uc_cfg.mk in user config folder based on user required
features
Set the user config name in vision_sdk/build/Rules.make
o NOTE: config name is the folder name within “vision_sdk/$(
MAKEAPPNAME)/configs” i.e “my_config” in this case

Page 14 of 30
It is recommended to confirm the config settings by doing “make
showconfig”
All output files .o, .lib, .out from build this config will be placed in folder
“vision_sdk/binaries/$( MAKEAPPNAME)/<configname>”
o This way outputs from multiple configs can co-exists simulatenously
o Hence user could be working on multiple indepedant configs on the
same codebase at the same time

Page 15 of 30
5 Make Targets and Command Line Options
5.1 Make Targets
Below table lists the top level makefile targets that can be used by basic and
advanced users
Make targets are invoked on command line as shown below
> make –s –j <maketarget>
TIP: It is recommended to use make options “–s –j” when specifying a target.
“-j” ensures make invokes targets in parallel whenever possible.
“-s” hides detailed info and only shows important info on the console window
5.1.1 Basic User Targets
Target
Description
help
Show targets that can be invoked from top level make.
showconfig
Show current build config.
depend
Generate config, Build PDK, EDMA3LLD, touch dependant files
vision_sdk
Incremental build, build links framework and application specific
targets (alg plug ins, use cases and other necessary modules) based on
the $(MAKEAPPNAME).
When no target is specified this is the target that is invoked.
appimage
Generate bootable application image
sbl
Generate SBL including SBL firmware for SD boot, QSPI_SD and NOR
boot modes (TDA3x, TDA2x, TDA2Ex)
5.1.2 Advanced Targets
These targets give more granular control on the modules to build. Here users known
what part of the system has changed and therefore will build only the required part.
TIP: when in doubt do “make –s –j depend” followed by “make –s –j”. This may will
more time to build but it will ensure all dependencies get built.
Target
Description
makeconfig
Generate config related files. Also invoked internally by
“depend”. Also invoked internally by “depend”. Use this
when it is required to only generate the config header files
pdk
Build PDK. Also invoked internally by “depend”. Use this to
only build the PDK drivers.
edma3lld
Build EDMA3LLD. Also invoked internally by “depend”. Use
this to only build the starterware drivers.
algorithmslib
Build Algorithm libraries. Used by TI for internal
development.
links_fw_libs
Build Vision SDK link framework library
app_alg_plugins
Build Vision SDK algo plugins
apps_libs
Build Vision SDK use cases and other necessary modules.
Page 16 of 30
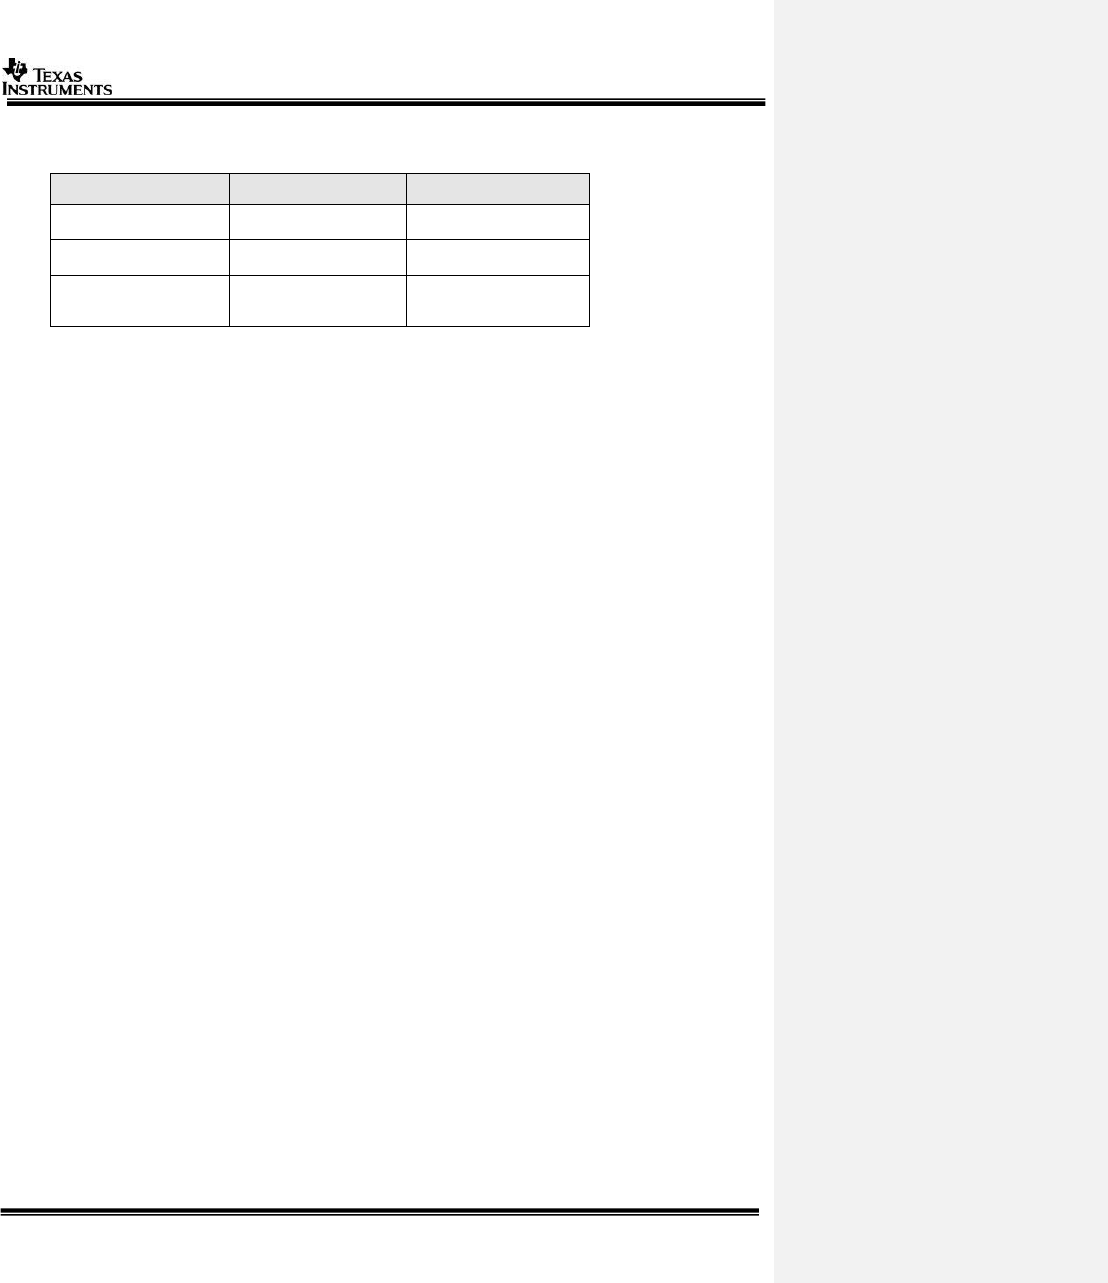
5.1.3 Linux Related Targets
These targets are used when Linux runs on A15.
Target
Description
linux
Build linux kernel, uboot, sgx drivers
linux_install
Install kernel, uboot, sgx files into filesystem.
Typically called after “linux” to copy the output files to
filesystem and boot folder.
vision_sdk_linux
Build Vision SDK linux side library and binaries. Invoked as
part of “vision_sdk” target. Use this when BIOS side code is
build earlier and not modified further.
uboot
Build uboot. Also invoked as part of “linux”
kernel
Build kernel. Also invoked as part of “linux”
sgx
Build sgx drivers. Also invoked as part of “linux”
5.2 Command Line Options
5.2.1 Selecting CPU to build via command line
In many situation user knows which part of the code they have modified and they
know the CPU that needs to built for the new changes to take effect. When “make –s
–j” is invoked it checks against all CPUs included in the application and then
generates the required binaries. This process of checking even though nothing is
changed for the other CPUs takes non-trivial time on some systems. To solve this,
the build system allows user to specify exact CPUs to build for in such cases.
This is specified by passing the list of CPUs to build for via the command line variable
BUILD_CPUS=”<cpu1> <cpu2> ..”
NOTE: An application consists on multiple CPUs. This is specified via the
PROC_<CPU>_INCLUDE=yes in the config file. “BUILD_CPUS” only control if the files
associated with that CPU are built or not. “BUILD_CPUS” is useful in incremental
build context when all CPUs included in application are built atleast once and further
build is required for only select CPUs for which user had done some file
modifications.
Some examples are shown below. Wildcard names can be used to specify CPUs,
multiple CPUs can be specified as shown below.
Example make command
CPUs that get built
make –s –j BUILD_CPUS=”ipu1_0”
Build a single CPU ipu1_0
make –s –j BUILD_CPUS=”dsp*”
Build all DSPs that are included in build
make –s –j BUILD_CPUS=”ipu1_0 eve*”
Build ipu1_0 and all EVEs
make –s –j BUILD_CPUS=”ipu1* dsp1
eve*”
Build ipu1_0, ipu1_1, dsp1 and all EVEs
The detailed list of CPU names that can be passed in the “BUILD_CPUS” string value
are listed below
CPU name
Description
Page 17 of 30
ipu1_0
Build IPU1_0 CPU
ipu1_1
Build IPU1_1 CPU
ipu1*
Build IPU1_0, IPU1_1 CPU
ipu2
Build IPU2 CPU
ipu*
Build IPU1_0, IPU1_1, IPU2 CPU
dsp1
Build DSP1 CPU
dsp2
Build DSP2 CPU
dsp*
Build DSP1, DSP2 CPU
eve1
Build EVE1 CPU
eve2
Build EVE2 CPU
eve3
Build EVE3 CPU
eve4
Build EVE4 CPU
eve*
Build EVE1, EVE2, EVE3, EVE4 CPUs
a15_0
Build A15_0 CPU
a15*
Build for all A15 Core’s
all
Build all CPUs
5.2.2 Additional Command Line Options
Following additional command line options can be used to further control the build
form the make command line
Example Command line option
Description
make –s –j PROFILE=debug
Overides PROFILE value specified on config file and
uses the one specified at command line.
Use this to quickly switch between “debug” and
“release” mode without having to modify config file
make –s –j
MAKECONFIG=”abcd_config”
Overirides MAKECONFIG value specified in
Rules.make. Use this to use user defined config
without modifying Rules.make file
6 Adding new use-cases, algplugins to build
The below section assumes usecases are located in “vision_sdk\$(
MAKEAPPNAME)\src\rtos\usecases” and alg plugins are located in “vision_sdk\$(
MAKEAPPNAME)\src\rtos\alg_plugins”
6.1 Adding new use-cases to build (BIOS ONLY mode)
Follow below steps to add a new use-case to the build system.

Page 18 of 30
1. Create a folder for the use-case, “my_usecase” in folder “vision_sdk\$(
MAKEAPPNAME)\src\rtos\usecases”
2. Add .c files related to this use-case in this folder
3. Create a file “SRC_FILES.MK” in “my_usecase” folder
4. Open file “SRC_FILES.MK” for editing
a. Add below line to include folder name in make build
SRCDIR += $(vision_sdk_PATH)/$( MAKEAPPNAME)/src/rtos/usecases
/my_usecase
b. Add below line to include .c files for this use-case in make build
SRCS_$(IPU_PRIMARY_CORE) += \
file1.c \
file2.c \
5. Create a file “cfg.mk” in “my_usecase” folder
6. Open file ”cfg.mk” for editing
a. Add variables for each ALG plugin required by this use-case and set to
value “yes”. Alg plugin variable name is ALG_<algpluginfoldername>.
i. <algpluginfoldername> is name of folder present under
“vision_sdk\apps\src\rtos\alg_plugins”
b. Add variables for CPUs that are needed inorder to run this use-case
and set value to “yes”. The CPUs needed variable name is
NEED_PROC_<CPU>
i. <CPU> can be IPU1_0, IPU1_1, IPU2, DSP1, DSP2, EVE1,
EVE2, EVE3, EVE4, A15_0
7. Open file “vision_sdk\$( MAKEAPPNAME)\configs\cfg.mk” for editing
a. Add new use-case variable to list of use-cases. UC variable name
format is UC_<usecase_foldername>
i. Ex, UC_LIST = \
UC_avbrx_dec_display \
…
UC_my_usecase
8. Open build config file “vision_sdk\$(
MAKEAPPNAME)\configs\$(MAKECONFIG)\uc_cfg.mk“
a. Enable newly added use-case in build by making usecase variable
name as “yes”
i. Ex, UC_my_usecase=yes
9. Confirm the use-case is added correctly to config by doing “make showconfig”
a. You should see your use-case listed under
# Use-cases included in build,
b. You should see the alg plugins that the use-case needs under,
# Alg plugins included in build,
10. Open file \ vision_sdk\apps\src\rtos\common\chains_main_bios_misc.c
a. We assume use-case will be added to “misc” submenu as an example
b. Add menu-item string as shown below
char gChains_menuMiscTests[] = {
Page 19 of 30
"\r\n "
"\r\n Miscellaneous Test's"
"\r\n --------------------"
"\r\n 1: File IO using MMCSD"
#ifdef UC_my_usecase
“\r\n 2: My usecase”
#endif
"\r\n "
"\r\n x: Exit "
"\r\n "
"\r\n Enter Choice: "
"\r\n "
};
c. Invoke usecase entry point
Function: Void Chains_menuMiscTestRun()
switch(ch)
{
case '1':
Utils_fileTestRun();
break;
#ifdef UC_my_usecase
Case ‘2’:
MY_usecase_run(&gChains_usecaseCfg);
break
#endif
11. Build and run the application which includes the new use-case.

Page 20 of 30
6.2 Adding new use-cases to build (Linux + BIOS mode)
Follow below steps to add a new use-case to the build system.
1. Create a folder for the use-case, “my_usecase” in folder
“vision_sdk\apps\src\hlos\adas\src\usecases”
2. Add .c files related to this use-case in this folder
3. Copy “MAKEFILE.MK” in “my_usecase” folder from an existing usecase folder
under “vision_sdk\apps\src\hlos\adas\src\usecases”. This will setup same
make options as other use-cases.
4. Create a file “cfg.mk” in “my_usecase” folder
5. Open file ”cfg.mk” for editing
a. Add variables for each ALG plugin required by this use-case and set to
value “yes”. Alg plugin variable name is ALG_<algpluginfoldername>.
i. <algpluginfoldername> is name of folder present under
“vision_sdk\apps\src\rtos\alg_plugins” or
“vision_sdk\apps\src\hlos\adas\src\usecases” or
b. Add variables for CPUs that are needed inorder to run this use-case
and set value to “yes”. The CPUs needed variable name is
NEED_PROC_<CPU>
i. <CPU> can be IPU1_0, IPU1_1, IPU2, DSP1, DSP2, EVE1,
EVE2, EVE3, EVE4, A15_0
6. Open file “vision_sdk\$(MAKEAPPNAME)\configs\cfg.mk” for editing
c. Add new use-case variable to list of use-cases. UC variable name
format is UC_<usecase_foldername>
i. Ex, LINUX_TDA2XX_UC_LIST = \
UC_avbrx_dec_display \
…
UC_my_usecase
7. Open build config file
“vision_sdk\$(MAKEAPPNAME)\configs\$(MAKECONFIG)\uc_cfg.mk“
d. Enable newly added use-case in build by making usecase variable
name as “yes”
i. Ex, UC_my_usecase=yes
8. Confirm the use-case is added correctly to config by doing “make showconfig”
e. You should see your use-case listed under
# Use-cases included in build,
f. You should see the alg plugins that the use-case needs under,
# Alg plugins included in build,
9. Open file \vision_sdk\apps\src\hlos\adas\src\common\chains_main.c
g. Add menu-item string as shown below
char gChains_testMenu [] = {
#ifdef UC_my_usecase
“\r\n u: My usecase”
#endif
"\r\n "

Page 21 of 30
"\r\n x: Exit "
"\r\n "
"\r\n Enter Choice: "
"\r\n "
};
h. Invoke usecase entry point
Function: main()
switch(ch)
{
#ifdef UC_my_usecase
Case ‘u’:
MY_usecase_run(&gChains_usecaseCfg);
break
#endif
10. Build and run the application which includes the new use-case.
Page 22 of 30
6.3 Adding new alg plugins to build (BIOS side)
Follow below steps to add a new alg plugin to the build system.
1. Create a folder for the use-case, “my_algplugin” in folder
“vision_sdk\apps\src\rtos\alg_plugins”
2. Add .c files related to this alg plugin in this folder
3. Create a file “SRC_FILES.MK” in “my_algplugin” folder
4. Open file “SRC_FILES.MK” for editing
a. Add below line to include folder name in make build
SRCDIR += my_algplugin
b. Add below line to include .c files for this use-case in make build
SRCS_<cpuname> += \
file1.c \
file2.c \
c. <cpuname>, is the name of the CPU for which the .c file should be
compiled. This depends on the CPU on which the algorithm is supposed
to run.
i. Valid CPU names are arp32_1, c66xdsp_1, ipu1_0, a15_0
ii. NOTE: Algplugins are build once for a given CPU type so CPU
name should refer to first instance of the CPU only
5. Open “vision_sdk\$(MAKEAPPNAME)\configs\cfg.mk” for editing
a. Add new alg plugin variable to list of alg plugins. Alg plugin variable
name format is ALG_<algplugin_foldername>
i. Ex, ALG_LIST = \
ALG_autocalibration \
…
ALG_my_algplugin
6. Enable algplug in a required use-case cfg.mk file (see section 6.1 Adding new
use-cases to build (BIOS ONLY mode))
7. Confirm the alg-plugins is added correctly to config by doing “make
showconfig”
a. You should see your use-case listed under
# Use-cases included in build,
b. You should see the alg plugins that the use-case needs under,
# Alg plugins included in build
6.4 Adding new alg plugins to build (Linux side)
Follow below steps to add a new alg plugin to the build system.
a.1. Create a folder for the use-case, “my_algplugin” in folder
“vision_sdk\apps\src\hlos\adas\src\alg_plugins”
b.2. Add .c files related to this alg plugin in this folder
c.3. Copy “MAKEFILE.MK” in “my_algplugin” folder from an existing
algplugin folder under “vision_sdk\apps\src\hlos\adas\src\alg_plugins”. This
will setup same make options as other algplugins.
d.4. Alg plugins on Linux side are always compiled and granular compile
and selection is not supported for Linux side algplugins.
Formatted: Bullets and Numbering

Page 23 of 30
6.5 Building Algorithm plugins for individual cores
In current build configuration for algorithm plugins, to optimize build time, the plugin
libraries are built only for single core of core family when more than one core is
enabled. For example – only library for DSP1 will be built when both DSP1 & DSP2
are enabled; only EVE1 library will be built when EVE1/2/3/4 are enabled. Once
library is built it is linked to other enabled cores. If first core is not enabled then
library for second core would be built and used for subsequent cores.
ifeq ($(PROC_IPU_BUILD_INCLUDE),yes)
ifeq ($(PROC_IPU1_0_INCLUDE),yes)
$(MAKE) $(TARGET) CORE=ipu1_0
else ifeq ($(PROC_IPU1_1_INCLUDE),yes)
$(MAKE) $(TARGET) CORE=ipu1_1
endif
endififeq ($(PROC_DSP_BUILD_INCLUDE),yes)
ifeq ($(PROC_DSP1_INCLUDE),yes)
$(MAKE) $(TARGET) CORE=c66xdsp_1
else ifeq ($(PROC_DSP2_INCLUDE),yes)
$(MAKE) $(TARGET) CORE=c66xdsp_2
endif
endif
ifeq ($(PROC_EVE_BUILD_INCLUDE),yes)
ifeq ($(PROC_EVE1_INCLUDE),yes)
$(MAKE) $(TARGET) CORE=arp32_1
else ifeq ($(PROC_EVE2_INCLUDE),yes)
$(MAKE) $(TARGET) CORE=arp32_2
else ifeq ($(PROC_EVE3_INCLUDE),yes)
$(MAKE) $(TARGET) CORE=arp32_3
else ifeq ($(PROC_EVE4_INCLUDE),yes)
$(MAKE) $(TARGET) CORE=arp32_4
endif
endif
So in the algorithm plugins SRC_FILES.MK you would need to make sure to add your
plugin sources to SRCS_c66xdsp_1, SRCS_arp32_1 and
SRCS_$(IPU_PRIMARY_CORE). Adding to SRCS_c66xdsp_2 or SRCS_arp32_2/3/4
when first core is enabled would have no effect and plugin wouldn’t be build.
As the main file for DSPs, EVEs is common the algorithm plugin initialization happens
for all enabled cores.
This arrangement is done to save build time as plugin library is built only for one
core. But it has following tradeoffs w.r.t binary size and run-time.

Page 24 of 30
a. The build system doesn’t allow sources to be added to second core but not
one. Also sources should be added to each of cores like c66xdsp_1,
c66xdsp_2.
b. In case you want to build plugin only on one core, you can’t do that.
c. Plugin initiation happens even if plugin is not used on core.
If you want to optimize run-time/size or want to enable plugin only on specified core
you need to change makefile (vision_sdk\apps\src\rtos\alg_plugins\MAKEFILE.MK) to
enable build on each cores like below. In addition to changing makefile you would
need to change individual SRC_FILES.MK to add/remove sources for cores.
ifeq ($(PROC_IPU_BUILD_INCLUDE),yes)
ifeq ($(PROC_IPU1_0_INCLUDE),yes)
$(MAKE) $(TARGET) CORE=ipu1_0
endif
ifeq ($(PROC_IPU1_1_INCLUDE),yes)
$(MAKE) $(TARGET) CORE=ipu1_1
endif
endif
ifeq ($(PROC_DSP_BUILD_INCLUDE),yes)
ifeq ($(PROC_DSP1_INCLUDE),yes)
$(MAKE) $(TARGET) CORE=c66xdsp_1
endif
ifeq ($(PROC_DSP2_INCLUDE),yes)
$(MAKE) $(TARGET) CORE=c66xdsp_2
endif
endif
ifeq ($(PROC_EVE_BUILD_INCLUDE),yes)
ifeq ($(PROC_EVE1_INCLUDE),yes)
$(MAKE) $(TARGET) CORE=arp32_1
endif
ifeq ($(PROC_EVE2_INCLUDE),yes)
$(MAKE) $(TARGET) CORE=arp32_2
endif
ifeq ($(PROC_EVE3_INCLUDE),yes)
$(MAKE) $(TARGET) CORE=arp32_3
endif
ifeq ($(PROC_EVE4_INCLUDE),yes)
$(MAKE) $(TARGET) CORE=arp32_4
endif
endif

Page 25 of 30
7 Adding new system config parameters to build config
In some situation users need to add new config parameters and export them
throughput the make system as well within the .c, .h files. This can be done as
shown below
1. Consider users wants to add a variable MY_CFG_VAR which can take value
“CFG_A”, “CFG_B”
2. Make this config value visible to C code by doing below
a. Open and edit file “\vision_sdk\build\rtos\makerules\component.mk”
b. Add lines for each value the config option can take
ifeq ($(MY_CFG_VAR), CFG_A)
vision_sdk_CFLAGS += -DMY_CFG_VAR_CFG_A
endif
ifeq ($(MY_CFG_VAR), CFG_B)
vision_sdk_CFLAGS += -DMY_CFG_VAR_CFG_B
endif
3. Export this variable throughout the make system by doing below.
a. Add export MY_CFG_VAR in file
\vision_sdk\$(MAKEAPPNAME)\configs\autorules_footer_cfg.mk
4. Set default value for this variable in file
\vision_sdk\$(MAKEAPPNAME)\configs\defaults.mk
a. Ex, MY_CFG_VAR=CFG_A
5. Set value for this config variable in config required file
\vision_sdk\$(MAKEAPPNAME)\configs\$(MAKECONFIG)\cfg.mk
6. Now #ifdef MY_CFG_VAR_CFG_A or #ifdef MY_CFG_VAR_CFG_B can be used
in .c, .h file to control C code based on this config value
7. Now MY_CFG_VAR can be used in make system to control the make build

Page 26 of 30
8 Adding new library to application
User may have separate build system to compile and make libraries for a specific
CPU. This section shows how to make the Vision SDK application link to these
libraries
1. Identify the CPU type to which the library belongs. Assume name of the
library is “mylib.lib” and is present in folder “vision_sdk/mylibs”
2. Open and edit file \vision_sdk\build\rtos\makerules\rules_<cputype>.mk
a. <cputype>, can be m4, a15, arp32 (for EVE), 66 (for DSP)
b. Goto position file where LIB_PATHS += is used to link to libraries
c. Add your library to this list
LIB_PATHS += $(vision_sdk_PATH)/mylibs/mylib.lib”
9 Changing compiler, linker options
User may want to add or check CPU specific compiler, linker options. This section
shows how to do the same
1. Identify the CPU type for which compiler, linker options needs to be reviewed,
modified.
2. Open and edit file \vision_sdk\build\rtos\makerules\rules_<cputype>.mk
a. <cputype>, can be m4, a15, arp32 (for EVE), 66 (for DSP)
b. CFLAGS_INTERNAL variable holds the compiler flags. Modify this as
required.
c. LNKFLAGS_INTERNAL_PROFILE variables holds the linker flags. Modify
this as required.

Page 27 of 30
10 Build Config Implementation Details (Advanced Users)
10.1 Build config generated .h file
The process of applying make config generates a .h file at below location
“vision_sdk\links_fw\include\config\$(MAKEAPPNAME)\$(MAKECONFIG)\syste
m_cfg.h”.
Users need to include the file #include < system_cfg.h > to get access to
config options in their C code
10.2 Build config makefiles
Build config makefiles are located at path “vision_sdk\$(MAKEAPPNAME)\configs”
and below table list the purpose of each file
File
Description
cfg.mk
Top level config file which further includes the user
specified config file.
Also lists all the possible algplugins, use-cases in the
system. This list is used to pick the algplugins, use-
cases based on values set by user in config files
defaults.mk
Default values for config variables
autorules_header_cfg.mk
Derived variables or rules that are applied before
including build tools
autorules_footer_cfg.mk
Derived variables or rules that are applied after
including build tools
build_makeconfig.mk
Build config related make targets. Invoked from top
level makefile via “makeconfig” and “showconfig”
targets

Page 28 of 30
11 Add and Delete links into links framework
The links framework is highly modularized. Each link is treated as a module and a
library is created for it. This makes addition and deletion of the links very
convenient.
11.1 Adding a link
Each link source folder has the following 3 files present along with the link source *.c
files.
component.mk
makefile
SRC_FILES.MK
The ‘component.mk’ file defines the Module Name (MODNAME) for the link, the name
of the library created will have the same name.
It adds the link to the list of links framework libs (linksfw_LIB_LIST) and defines the
following parameters for the link:
$(MODNAME)_PATH : Absolute path of the link source
$(MODNAME)_BOARD_DEPENDENCY : yes/no
$(MODNAME)_CORE_DEPENDENCY : yes/no
$(MODNAME)_PLATFORM_DEPENDENCY : yes/no
$(MODNAME)_SOCLIST : list of supported SoCs
$(MODNAME)_$(SOC)_CORELIST : list of supported Cores
The ‘makefile’ includes the list of internal and external dependencies and includes the
link’s SRC_FILES.MK file.
The SRC_FILES.MK file populates the SRC_COMMON and SRC_$(CORE) make rules
variables with the link’s *.c files which are required to be compiled.
After the above files are created for the link an entry for the link should be made into
the top level ‘linksfw_component.mk’ file:
For eg,
-include
$(vision_sdk_PATH)/links_fw/src/rtos/links_common/algorithm/component.m
k
The ‘-include’ option doesn’t throw error even when the link folder is not present.
Now open the
‘\vision_sdk\links_fw\src\rtos\links_common\system\system_initDeinitLinks.c’ file,
add link init and deInit calls in the System_initLinks() and System_deInitLinks()
functions respectively under ‘#define <MODNAME>’ as shown below:
Void System_initLinks(void)
{
Vps_printf(" SYSTEM: Initializing Links !!! \r\n");

Page 29 of 30
/* Links init based on the links which are part of the build
*/
#ifdef links_common_avb_rx
AvbRxLink_init();
#endif
.
.
Vps_printf(" SYSTEM: Initializing Links ... DONE !!! \r\n");
}
Void System_deInitLinks(void)
{
Vps_printf(" SYSTEM: De-Initializing Links !!! \r\n");
/* Links de init based on the links which are part of the build
*/
#ifdef links_common_avb_rx
AvbRxLink_deInit();
#endif
.
.
Vps_printf(" SYSTEM: De-Initializing Links ... DONE !!! \r\n");
}
11.2 Deleting a link
The link can be deleted from the links framework by
Deleting the link source code.
Removing the entry for the link from the linksfw_component.mk file
NOTE:
Whenever a link is added or deleted ‘make –s –j depend’ should be
run so that system cfg files are regenearated.
Page 30 of 30
12 Revision History
Version
Date
Revision History
0.1
02nd Oct 2016
First Draft
0.2
05th July 2017
Updated for Vision SDK
release 3.0
0.3
18th Dec 2017
Updated with algorithm
plugin build support for
individual cores.
