VisionSDK_NetworkTools_UserGuide Vision SDK User Guide Network Tools
User Manual:
Open the PDF directly: View PDF ![]() .
.
Page Count: 27

Page 1 of 27
Vision SDK
Network Tools
User Guide
Document Revision v1.07

Page 2 of 27
IMPORTANT NOTICE
Texas Instruments and its subsidiaries (TI) reserve the right to make changes to their products or to
discontinue any product or service without notice, and advise customers to obtain the latest version of relevant
information to verify, before placing orders, that information being relied on is current and complete. All
products are sold subject to the terms and conditions of sale supplied at the time of order acknowledgment,
including those pertaining to warranty, patent infringement, and limitation of liability.
TI warrants performance of its products to the specifications applicable at the time of sale in accordance with
TI’s standard warranty. Testing and other quality control techniques are utilized to the extent TI deems
necessary to support this warranty. Specific testing of all parameters of each device is not necessarily
performed, except those mandated by government requirements.
Customers are responsible for their applications using TI components.
In order to minimize risks associated with the customer’s applications, adequate design and operating
safeguards ought to be provided by the customer so as to minimize inherent or procedural hazards.
TI assumes no liability for applications assistance or customer product design. TI does not warrant or represent
that any license, either express or implied, is granted under any patent right, copyright, mask work right, or
other intellectual property right of TI covering or relating to any combination, machine, or process in which such
products or services might be or are used. TI’s publication of information regarding any third party’s products or
services does not constitute TI’s approval, license, warranty or endorsement thereof.
Reproduction of information in TI data books or data sheets is permissible only if reproduction is without
alteration and is accompanied by all associated warranties, conditions, limitations and notices. Representation
or reproduction of this information with alteration voids all warranties provided for an associated TI product or
service, is an unfair and deceptive business practice, and TI is neither responsible nor liable for any such use.
Resale of TI’s products or services with statements different from or beyond the parameters stated by TI for
that product or service voids all express and any implied warranties for the associated TI product or service, is
an unfair and deceptive business practice, and TI is not responsible nor liable for any such use.
Also see: Standard Terms and Conditions of Sale for Semiconductor Products.
www.ti.com/sc/docs/stdterms.htm
Mailing Address:
Texas Instruments
Post Office Box 655303
Dallas, Texas 75265
Copyright © 2014, Texas Instruments Incorporated

Page 3 of 27
TABLE OF CONTENTS
1 Introduction ................................................................................................. 4
1.1 Building the PC side tools .................................................................................. 4
1.2 Finding IP address of the target EVM .................................................................. 4
2 Network Control Tool ................................................................................... 7
2.1 Tool Summary ................................................................................................. 7
2.2 Tool Usage ...................................................................................................... 7
2.3 Extending the tool .......................................................................................... 11
2.4 Communication Protocol .................................................................................. 13
3 Network TX Tool ......................................................................................... 15
3.1 Tool Summary ............................................................................................... 15
3.2 Tool Usage .................................................................................................... 15
4 Network RX Tool ........................................................................................ 17
4.1 Tool Summary ............................................................................................... 17
4.2 Tool Usage .................................................................................................... 17
5 Network CONS Tool .................................................................................... 19
5.1 Tool Summary ............................................................................................... 19
5.2 Tool Usage .................................................................................................... 19
5.3 Tool Internal Implementation Details ................................................................ 19
6 Networking with TI Fast Data Transfer Protocol (TFDTP) .......................... 21
6.1 TFDTP/TCP tradeoffs ....................................................................................... 22
6.2 Enabling TFDTP .............................................................................................. 22
6.3 Tools Summary for TFDTP ............................................................................... 23
6.4 Tools Usage ................................................................................................... 23
6.5 TFDTP/TCP Performance.................................................................................. 26
6.6 TFDTP FAQs ................................................................................................... 26

Page 4 of 27
1 Introduction
This document describes the various networking tools that are available on PC side
to interface with Vision SDK network use-cases running on target (TDA2x or TDA3x
or TDA2px EVM).
Following tools are available
Network Control tool to send user defined commands and parameters to the
target. Target will do a user defined action on receiving the command and can
optionally return results to the PC.
Network TX tool to send MJPEG compressed frames and RAW/YUV frames
from PC to EVM. This tool can be used to feed pre-recorded test data to
algorithms on target side
Network RX tool to receive MJPEG compressed frames, RAW/YUV frames,
meta-data buffers from EVM to PC. This tool can be used to send algorithm
results to PC
Network CONS (Console) tool to redirect Vps_printf() string from EVM over
network to the tool and to redirect “getchar” from network CONS tool to the
EVM
NOTE: These tools can be used for both BIOS and Linux usecases. For BIOS
usecases, make sure that the NDK/NSP is enabled and runs on the target. For Linux
usecases, make sure that Ethernet is enabled and correct ip address is provided in u-
boot boot arguments.
1.1 Building the PC side tools
Windows
o Install GCC compiler for Windows (ex, http://www.codeblocks.org/)
o Install GNU Make for Windows (ex, “gmake” is available as part XDC
install at $(xdc_PATH)/gmake)
o Install bash shell in Windows via tool like https://msysgit.github.io/ or
Cygwin
o Edit RULES.MK and change BUILD_OS to “Windows_NT”
Linux
o Make sure build tools like GCC and make are part of installation.
o Edit RULES.MK and change BUILD_OS to “Linux”
Edit RULES.MK at vision_sdk\apps\tools\network_tools\build to point to
installed path of GCC compiler (CGTOOLS_PATH=xxx ) and installed path of
GNU make (MAKE=xxx )
Edit RULES.MK to add path of NSP directory.
Open bash shell prompt and goto vision_sdk\apps\tools\network_tools\build
Invoke GNU make to build the tools (“gmake” if XDC path is in your system
path)
Binaries are generated at vision_sdk\apps\tools\network_tools\bin
1.2 Finding IP address of the target EVM
All the networking tools uses TCP/IP to exchange data with EVM.

Page 5 of 27
For Linux, use ‘ifconfig’ Linux command to know the IP address of the target.
For Bios,
o NDK needs to be enabled on EVM to support TCP/IP & TFDTP
communication.
o All the networking tools need to know the IP address of the EVM in
order to exchange information with it.
o By default NDK is enabled in Vision SDK
To make sure NDK is enabled, open command prompt at path
“$(VISION_SDK_INSTALL)\vision_sdk” and type “gmake
showconfig”
Make sure “NDK_PROC_TO_USE” is NOT “none”
By default for TDA2x or TDA2px, NDK_PROC_TO_USE=a15_0
By default for TDA3x, NDK_PROC_TO_USE=ipu1_1
You can edit “cfg.mk” (in
“vision_sdk\links_fw\src\rtos\bios_app_common
/<configname>”) to change the CPU on which NDK runs. NDK
can run on a15_0 or ipu1_0 or ipu1_1
When transferring large data it is recommended to run
networking on a15_0 (TDA2x or TDA2px) to get better network
throughput. Also TFDTP can be used for better throughput on
M4 using optimized patch.
IMPORTANT NOTE: When FATFS (FATFS_PROC_TO_USE != none) is
enabled in TDA3x, networking is DISABLED by the build system.
By default IP address is set to DHCP mode
This can be changed to static IP by editing below file
vision_sdk\links_fw\src\rtos\bios_app_common\<soc>\cfg\ND
K_config.cfg
Change at lines
var enableStaticIP = 1;
if (enableStaticIP)
{
/* Settings for static IP configuration */
Ip.address = "192.168.1.200";
Ip.mask = "255.255.255.0";
Ip.gatewayIpAddr = "192.168.1.1";
Ip.ifIdx = 1;
}
o Build and boot the Vision SDK on EVM as mentioned in Vision SDK user
guide. Make sure network cable is connected. If DHCP mode is
selected make sure the network can give a IP address to the EVM via
DHCP.
o After boot note the IP address as mentioned in the main menu
[IPU1-0] 23.294372 s: Current System Settings,
[IPU1-0] 23.294403 s: ========================
[IPU1-0] 23.294464 s: Display Type : HDMI 1920x1080 @ 60fps
[IPU1-0] 23.294494 s: Capture Source : Sensor OV10635 1280x720 @30fps - VIP,
YUV422
[IPU1-0] 23.294555 s: My IP address : 172.24.190.226

Page 6 of 27
o The IP address is also printed on the CCS console window.
o This IP address will be used as input when running the PC side tools
o Ping the EVM from PC side to make sure its accessible on the network
Ex, $ ping 172.24.190.226
Make sure you see reply from EVM
If ping is not able to succeed then there is some issue in your
network connectivity
o IMPORTANT NOTE: Make sure “ping” is successful before trying
any of the network tools

Page 7 of 27
2 Network Control Tool
This tool can be used to send user defined commands with parameters from PC side
to the target. The target will respond with appropriate results. Users can extend this
tool define their own set of commands, parameters and responses.
2.1 Tool Summary
Tool name
network_ctrl.exe
Tool source code (PC side)
vision_sdk\apps\tools\network_tools\network_ctrl
Tool source code (target
side)
vision_sdk\apps\src\rtos\modules\network_ctrl
2.2 Tool Usage
Make sure you know the IP address of the EVM
Invoke the tool as shown below, it will print the supported options
o $ network_ctrl.exe
#
# network_ctrl --ipaddr <ipaddr> [--port <server port>] --cmd <command string>
<command parameters>
#
# (c) Texas Instruments 2014
#
# Supported commands,
# -------------------
# echo <string to echo>
# mem_rd <memory address in hex> <size of memory to read in units of 32-bit
words>
# mem_wr <memory address in hex> <value to be written in units of 32-bit words>
# mem_save <memory address in hex> <size of memory to read in bytes>
<filename in which data is saved>
# iss_raw_save <filename in which data is saved>
# iss_yuv_save <filename in which data is saved>
# iss_send_dcc_file <dcc file name to be sent>
# iss_save_dcc_file <Sensor ID> <dcc file name to be sent>
# Supported sensors IDs are 140, 10640, 132 and 224
# iss_clear_dcc_qspi_mem <Sensor ID>
# Supported sensors IDs are 140, 10640, 132 and 224
# iss_write_sensor_reg <chan num> <RegAddr> <RegVal>
# iss_read_sensor_reg <chan num> <RegAddr>
# iss_read_2a_params
# iss_write_2a_params <AE Mode> {Digital Gain} {Analog Gain} {Exposure Time}
<AWB Mode> {Red Gain} {Green Gain} {Blue Gain} {Color Temparature}
# stereo_calib_image_save <filename prefix in which data is saved>

Page 8 of 27
# stereo_set_params <numDisparities> <disparityStepSize> <disparitySearchDir>
<disparitySupportWinWidth> <disparitySupportWinHeight> <leftRightCheckEna>
<censusWinWidth> <censusWinHeight> <censusWinHorzStep>
<censusWinVertStep> <pp_colormap_index>
[EXAMPLE] stereo_set_params 128 4 0 11 11 0 9 9 2 2 0
#stereo_set_dynamic_params <pp_cost_max_thresh> <pp_conf_min_thresh>
<pp_texture_lumalothresh> <pp_texture_lumahithresh> <pp_texture_thresh>
<pp_leftright_thresh> <pp_maxdisp_dissimilarity> <pp_minconf_nseg_thresh>
#stereo_set_dynamic_params <pp_cost_max_thresh> <pp_conf_min_thresh>
<pp_texture_lumalothresh> <pp_texture_lumahithresh> <pp_texture_thresh>
<pp_leftright_thresh> <pp_maxdisp_dissimilarity> <pp_minconf_nseg_thresh>
[EXAMPLE] stereo_set_dynamic_params 95 98 0 100 85 255 2 2
The “port” option need not be specified
By default when NDK is enabled on target, a task is started on target side to
listen to commands from this tool
#stereo_calib_lut_to_qspi <rectMapRight_int_converted.bin>
<rectMapLeft_int_converted.bin>
2.2.1 Supported commands
Current commands mentioned below are supported
Command
Description
echo
Takes a string as input and on successful execution, this string
is printed on target side console
mem_rd
Reads specified memory contents from target and prints its
value on PC side. Useful for dumping HW registers when JTAG
is not connected
mem_wr
Writes a value to user defined memory location on target.
Useful for writing a HW register when JTAG is not connected
mem_save
Reads specified memory contents from target and write to a
file on PC. Useful to dump a chunk of memory like buffer data
to a file on PC
mem_load
Reads data from a file on PC side and writes to specified
memory location on target.
qspi_wr
Writes SBL/TESOC/AppImage into QSPI memory. It accepts
Image name and address where image to be written. SBL
need to flash at 0x0 and AppImage_BE at 0x80000. For
TDA3xx TESOC image need to be written at 0x60000
mmc_wr_appimage
Writes AppImage into MMC SD card.
mmc_wr_sbl
Writes MLO into MMC SD card.
sys_reset
EVM will receive command for COLD RESET

Page 9 of 27
iss_raw_save
Dumps a frame of ISS raw data to a file on PC. Applicable only
when ISS use-case with ISS capture link is running on target.
Applicable to TDA3x ONLY.
iss_yuv_save
Dumps ISS simcop output frame in yuv format to a file on PC.
Applicable only when ISS use-case with ISS simcop link is
running on target. Applicable to TDA3x ONLY.
iss_send_dcc_file
Send DCC tuning file from PC to target and apply the settings
to ISS HW. It applies the settings to the ISS HW immediately,
so old settings will get overwritten with the new settings. But
this will not save the new settings, so when the use case is
rerun, it will rerun with the old settings. To save the new
settings, use iss_save_dcc_file command which will save the
settings in the QSPI or save the settings in the sensor specific
driver (refer to the BSP driver user guide to get more
information).
Applicable only when ISS use-case with ISS capture link and
ISS ISP link are running on target. Applicable to TDA3x ONLY.
iss_save_dcc_file
Send DCC tuning file from PC to target and target saves DCC
tuning file to QSPI. Currently it is supported only for AR0140,
OV10640 and AR0132 sensors. The QSPI offset for each
sensor is fixed. If this is changed in network tool, it requires
change in the target application also.
Applicable only when ISS use-case with ISS capture link and
ISS ISP link are running on target. Applicable to TDA3x ONLY.
Iss_clear_dcc_qspi_
mem
Erases contents of the QSPI for the given sensor id. DCC
profile is stored in the QSPI at a fixed location for the sensors
AR0140, OV10640, AR0132 and IMX224. This API is used to
erase this memory.
Applicable only when ISS use-case with ISS capture link and
ISS ISP link are running on target. Applicable to TDA3x ONLY.
Iss_write_sensor_re
g
Writes the 16bit value to the given sensor registers. Channel
id is used to select the sensor. For single sensor usecase,
channel id must be set to 0. For multiple sensor usecase,
appropriate channel id should be used.
Used by the DCC (Dynamic Camera Configuration Tool) to
write to sensor registers.
Applicable only when ISS use-case with ISS capture link is
running on target. Applicable to TDA3x ONLY.
Iss_read_sensor_re
g
Reads a value of the given sensor register and prints it on PC
side. Channel id is used to select the sensor. For single sensor
usecase, channel id must be set to 0. For multiple sensor
usecase, appropriate channel id should be used.
Used by the DCC (Dynamic Camera Configuration Tool) to
read sensor registers.
Applicable only when ISS use-case with ISS capture link is
running on target. Applicable to TDA3x ONLY.
iss_read_2a_param
Used to read AEWB algorithms current output parameters.

Page 10 of 27
s
This includes AEWB algorithm mode, analog/digital gains,
exposure time and color temperature.
Applicable only when ISS use-case with ISS capture link is
running on target. Applicable to TDA3x ONLY.
iss_write_2a_param
s
Used to set the AEWB mode to manual and set the output
parameters to fixed value. This includes AEWB algorithm
mode, analog/digital gains, exposure time and color
temperature.
Applicable only when ISS use-case with ISS capture link is
running on target. Applicable to TDA3x ONLY.
stereo_calib_image
_save
This command saves a frame each from left and right sensor
into pgm files. The final filename for the left image will be
composed by the strings ‘left_’+’ <filename_prefix> + ‘.pgm’.
Similarly, the filename for the right image will be composed by
the strings ‘right_’+’ <filename_prefix> + ‘.pgm’ It is used
during stereo calibration process.
stereo_set_params
This command sets stereo parameters. It should be
sent before any stereo usecase is started. All the
parameters are configured together and there is no
means of changing specific items.
It takes following parameters : <numDisparities>
<disparityStepSize> <disparitySearchDir>
<disparitySupportWinWidth>
<disparitySupportWinHeight> <leftRightCheckEna>
<censusWinWidth> <censusWinHeight>
<censusWinHorzStep> <censusWinVertStep>
<pp_colormap_index>whose default values are 128 4
0 11 11 0 9 9 2 2 0 respectively.
Please refer to the StereoVision_DSP_UserGuide.pdf inside the
ti_components\algorithms_codecs\REL.200.V.ST.C66X.00.XX.
XX.XX\modules\ti_stereovision\docs directory, for details on
each parameter.
stereo_set_dynamic
_params
This command sets stereo parameters on the fly. It can be
sent after any stereo use-case is started. All the parameters
are configured together and there is no means of changing
specific items.
It takes following parameters : <pp_cost_max_thresh>
<pp_conf_min_thresh> <pp_texture_lumalothresh>
<pp_texture_lumahithresh> <pp_texture_thresh>
<pp_leftright_thresh> <pp_maxdisp_dissimilarity>
<pp_minconf_nseg_thresh>whose default values are 95 98 0
100 85 255 2 2 respectively.
Please refer to the StereoVision_DSP_UserGuide.pdf inside the
ti_components\algorithms_codecs\REL.200.V.ST.C66X.00.XX.
XX.XX\modules\ti_stereovision\docs directory, for details on
each parameter.
stereo_calib_lut_to
This commands writes into NAND flash memory the lookup

Page 11 of 27
_qspi
tables generated by the camera automatic calibration tool for
use by the remap algorithm running on EVE.
It takes following parameters:
<rectMapRight_int_converted.bin>
<rectMapLeft_int_converted.bin>
These are files generated by the camera automatic calibration
tool. Please see the
VisionSDK_MultiSensorFusionStereoCalibrationGuide.pdf for
further details.
On the PC side, the following output should be displayed:
# NETWORK: Connected to Server (172.24.190.212:5000)!!!
# FILE: Reading file [rectMapRight_int_converted.bin] ...
Done. [1136472 bytes]
# FILE: Reading file [rectMapLeft_int_converted.bin] ...
Done. [1136472 bytes]
# Writing the QSPI tags
# Command stereo_calib_lut_to_qspi: Sent 2272960 bytes
# Command stereo_calib_lut_to_qspi: Received reponse
(status = 0, prmSize = 0)
Whereas on the target’s side, the console window should show
something similar to:
[HOST ] 119.827209 s: NETWORK_CTRL: Received command
[stereo_calib_lut_to_qspi], with 2100032 bytes of
parameters
[HOST ] 119.903656 s: NETWORK_CTRL: qSpiOffset =
30408704, size = 2100032
[HOST ] 119.903686 s: QSPI Init Started
[HOST ] 119.903808 s: MID - 1
[HOST ] 119.903808 s: DID - 18
[HOST ] 119.903808 s: QSPI Init Completed Sucessfully
[HOST ] 119.903839 s: QSPI Write Started, please
wait!
[HOST ] 120.003295 s: QSPI Erase Block Started,
please wait!
[HOST ] 123.427154 s: QSPI Erase Block Completed
Sucessfully
[HOST ] 126.839233 s: QSPI Write Completed
Sucessfully
[HOST ] 126.840728 s: NETWORK_CTRL: Sent response for
command [stereo_calib_lut_to_qspi], with 0 bytes of
parameters
Note that due to the size of the tables, it will take a long time
before seeing the text output ‘QSPI Write Completed’.
2.3 Extending the tool
NOTE: Users needs to read this section only if they plan to extend the tool
by adding their own commands and command handlers, others can ignore
this section.

Page 12 of 27
This tool can be extended by users to add more commands from PC side and “plugin”
different actions on target side when the command is received.
TIP: The easiest way to extend the tool is see an existing command implementation
and customize it
On PC side do the below
o Create your own file for the command, ex, network_ctrl_handle_echo.c
(vision_sdk\apps\tools\network_tools\network_ctrl\src)
o Write a function that will send the command and receive the results,
ex, handleEcho
o A command is string of characters
o Use below API to send the command, “params” point to the user
specific parameters of “size” bytes
SendCommand(char *command, void *params, int size);
Command line parameters are available inside the user handler
in the below structure fields
gNetworkCtrl_obj.params[x]
o Use below API to receive results, “prmSize” is size of result parameters
RecvResponse(char *command, UInt32 *prmSize);
o If “prmSize” is not zero then read the parameters using below API into
user pointer
RecvResponseParams(char *command, UInt8 *pPrm, UInt32
prmSize);
o Register this handler using below API in function Init()
void RegisterHandler(char *command, void (*handler)(), int
numParams)
o Now build and run the tool with the new command and command
specific parameters
On target side do the below
o Create your own file for handling the command, ex,
network_ctrl_handle_echo.c
(vision_sdk\apps\src\rtos\modules\network_ctrl)
Void NetworkCtrl_cmdHandlerEcho(char *cmd, UInt32 prmSize)
o This handler is called, when the “cmd” is received, “prmSize” is size of
parameters that accompany this command
o Use below API to read the received parameters
Int32 NetworkCtrl_readParams(UInt8 *pPrm, UInt32 prmSize)
o Based on the parameters handle the command
o Use below API to send reply for the command
Int32 NetworkCtrl_writeParams(UInt8 *pPrm, UInt32 prmSize,
UInt32 returnStatus)
o Register the handler in NetworkCtrl_init()
(vision_sdk\apps\src\rtos\modules\network_ctrl\network_ctrl_tsk.c)
using below API

Page 13 of 27
Int32 NetworkCtrl_registerHandler(char *cmd,
NetworkCtrl_Handler handler)
Ex, NetworkCtrl_registerHandler("echo",
NetworkCtrl_cmdHandlerEcho);
Once handler are registerd on PC side and target side, recompile and run the
binaries
On PC side call the tool with the new command and parameters as input
o Ex, network_ctrl --ipaddr 192.168.1.200 --cmd echo “hello,
world !”
2.4 Communication Protocol
NOTE: Users needs to read this section only if they plan to implement their
own tool on PC side to interface with the target side, others can ignore this
section.
The tool uses TCP/IP as underlying communication protocol. On top of this a thin
application layer protocol is added as described below.
This protocol needs to be used in case other tools are made on PC which need to
interface to the target side.
See also vision_sdk\apps\tools\network_tools\common\inc\networkCtrl_if.h
NOTE: All fields are specified in little-endian order
2.4.1 Command protocol
Fields
Bytes
Description
Header TAG
(0x1234ABCD)
4
HEADER TAG to make sure
this is not a spurious data
on the network port
Command
64
Command to be sent.
Represented as a string of
NULL terminated
characters
returnValue
4
Set to 0 when sending
command, filled by
response
Flags
4
Flags for specific status
control
prmSize
4
Size of parameters that
follow. Can be set to 0
when no parameters are
present
Params
“prmSize”
Stream of bytes
representing parameters,
MUST be equal to
“prmSize” that is specified
earlier

Page 14 of 27
2.4.2 Response protocol
The response protocol format is exactly same as command protocol with the
following differences
“Command” is set to same value as the command that was received
“returnValue” is set based result of command execution. Value itself depends
on command. Typically value of 0 indicates successful command execution
“Flags” is set with value of 0x00000001 to indicate that this response is ACK
to earlier command
“prmSize” is set to parameter of results, i.e parameter sent as response are
different from parameters sent as command
“Params” is the response / result parameters

Page 15 of 27
3 Network TX Tool
Network TX tool is used to send MJPEG compressed frames and RAW/YUV frames from PC to
EVM. This tool can be used to feed pre-recorded test data to algorithms on target side.
IMPORTANT NOTE:
On TDA3x, though MPJEG frames can be sent to TDA3x, there is no MJPEG decode on
TDA3x to decode the frames. Hence on TDA3x, typically one would use RAW/YUV frame
for network TX
When sending RAW/YUV frames
o When NDK runs on M4 CPU, one can achieve a data rate of about 2 MB/s (16Mbps)
o When NDK runs on A15 CPU (TDA2x or TDA2px), one can achieve a data rate of
about 60 MB/s (480Mbps)
o Make sure to select the appropriate CPU to run the NDK depending on the SoC that
is used.
o For higher throughput on M4, TFDTP can be enabled. Please refer to benchmarking
numbers for each core in section 6.5.
3.1 Tool Summary
Tool name
network_tx.exe
Tool source code (PC side)
vision_sdk\apps\tools\network_tools\network_tx
Tool source code (target
side)
vision_sdk\links_fw\src\rtos\links_common\network_rx
Example usage (target
side)
vision_sdk\apps\src\rtos\usecases\network_rx_tx
chains_networkRxDecDisplay*.*
chains_networkRxDisplay*.*
3.2 Tool Usage
Make sure you know the IP address of the EVM (see 1.2 Finding IP address of the
target EVM)
Target side: Create a Vision SDK use-case on target side
Specify the source of data as “Network_rx” link.
o IMPORANT: Make sure “Network_rx” is on the same CPU that NDK is
enabled
Set NetworkRxLink_CreateParams.dataRxMode as
NETWORK_RX_LINK_DATA_RX_MODE_NETWORK
Set NetworkRxLink_CreateParams.networkServerPort, if specified default
value is not used.
o This value needs to match the “—port” value specified in PC tool
o Typically when only single “Network_rx” link exists in use-case no
need to specify this value
o When more than one “Network_rx” link is present in use-case then
each “Network_rx” link MUST have unique networkServerPort. In this
case, “network_tx.exe” is invoked multiple times on PC with matching
“—port” value
o Set other “Network_rx” create parameters like data type, MJPEG or
RAW/YUV and frame resolution, like width, height

Page 16 of 27
o Set NetworkRxLink_CreateParams.timerPeriodMilliSecs to specify the
rate as which data should be sent, ex, set to 33 for approx. 30fps
receive frame-rate
Some examples which use the “Network_rx” link to receive data over network
can be found at below path
o vision_sdk\apps\src\rtos\usecases\network_rx_tx
chains_networkRxDecDisplay*.*
chains_networkRxDisplay*.*
Compile and run the use-case as usual. Once the use-case is running on the
target side …
PC Side: Invoke the tool as shown below, it will print the supported options
Network PC tools are supported on both Windows and Linux PCs. Pre-built binaries
are located in /bin/ folder for both platforms.
$ network_tx.exe or network_tx.out
#
# .\network_tx --host_ip <ipaddr> --target_ip <ipaddr> [--port <server
port>] --usetfdtp --verbose --no_loop --delay <delay in secs>] --files <CH0
file> <CH1 file> ...
#
# (c) Texas Instruments 2014
#
The “port” option when not specified default port is used.
Multiple “channels” of data can be sent by specifying multiple files.
No need to specify the data type, frame resolution etc on the PC side,
this is specified on the target side
When use-case runs on the target, target will request frames from PC
side, PC side will read from the input files and send the data over
network
“network_tx.exe” can be invoked multiple times, each invocation
feeding different “Network_rx” links in the use-case on target
Once the input file reaches “end of file”, input is read again from start
of the file, i.e it will continuously stream the data until either the use-
case stops or tool exit by doing “Ctrl-C”
For ‘Network + stereo + Display’ use-case, <Ch0 file> corresponds to
the left camera and <Ch1 file> corresponds to the right camera.
IMP Note: Make sure to close PC tools first before stopping VSDK use-case from
console. On Windows PC it is observed that if network tool from PC is not closed
VSDK use-case doesn’t stop.

Page 17 of 27
4 Network RX Tool
Network RX tool is used to receive MJPEG compressed frames and RAW/YUV/Meta data frames
from EVM to PC. This tool can be used to save data from algorithms on PC side.
IMPORTANT NOTE:
On TDA3x, MPJEG frames can not sent to PC, since there is no MJPEG encoder on
TDA3x
IMPORTANT NOTE:
When sending RAW/YUV frames
When NDK runs on M4 CPU, one can achieve a data rate of about 2 MB/s (16Mbps)
When NDK runs on A15 CPU (TDA2x or TDA2px), one can achieve a data rate of
about 60 MB/s (480Mbps)
Make sure to select the appropriate CPU to run the NDK depending on the SoC that
is used
For higher throughput on M4, TFDTP can be enabled. Please refer to benchmarking
numbers for each core in section 6.5.
4.1 Tool Summary
Tool name
network_rx.exe
Tool source code (PC side)
vision_sdk\apps\tools\network_tools\network_rx
Tool source code (target
side)
vision_sdk\links_fw\src\rtos\links_common\network_tx
Example usage (target
side)
vision_sdk\apps\src\rtos\usecases\network_rx_tx
chains_networkTxEncDisplay*.*
chains_networkTxDisplay*.*
4.2 Tool Usage
Make sure you know the IP address of the EVM (see 1.2 Finding IP address of the
target EVM)
Target side: Create a Vision SDK use-case on target side
Connect the output of the algorithm or link for which data needs to be saved
to PC to a “Network_Tx” link
o IMPORANT: Make sure “Network_rx” is on the same CPU that NDK is
enabled
Set NetworkTxLink_CreateParams. dumpDataType as
NETWORK_TX_LINK_TRANSMIT_TYPE_TCPIP
Set NetworkTxLink_CreateParams.networkServerPort, if not specified default
value is used.
o This value needs to match the “—port” value specified in PC tool
o Typically when only single Network_Tx link exists in use-case no need
to specify this value
o When more than one “Network_Tx” link is present in use-case then
each “Network_Tx” link MUST have unique networkServerPort. In this
case, “network_rx.exe” is invoked multiple times on PC with matching
“—port” value
Set other “Network_Tx” create parameters as usal

Page 18 of 27
Some examples which use the “Network_Tx” link to receive data over network
can be found at below path
vision_sdk\apps\src\rtos\usecases\network_rx_tx
o chains_networkTxEncDisplay*.*
o chains_networkTxDisplay*.*
Compile and run the use-case as usual. Once the use-case is running on the
target side …
PC side: Invoke the tool as shown below, it will print the supported options
#
# network_rx --ipaddr --target_ip <ipaddr> --host_ip <ipaddr> [--port <server port>] –usetfdtp --files <CH0
file> <CH1 file>
#
# (c) Texas Intruments 2014
#The “port” option when not specified default port is used.
o Multiple “channels” of data can be saved by specifying multiple files.
o No need to specify the data type, frame resolution etc on the PC side, PC side
will just save whatever is sent by target side
o When use-case runs on the target, target will send frames to PC side via the
“Network_Tx” link, PC side will write the received frames to files specified by the
user
o “network_rx.exe” can be invoked multiple time, each invocation receiving data
from different “Network_Tx” links in the use-case on target
o Once the use-case on target is stooped, the tool on PC exits and saved file can
be viewed/analysed as required. Alternatively “Ctrl-C” can be used to stop the
tool and close the file which is being written
IMP Note: Make sure to close PC tools first before stopping VSDK use-case from console.
On Windows PC it is observed that if network tool from PC is not closed VSDK use-case
doesn’t stop.

Page 19 of 27
5 Network CONS Tool
Network CONS (Console) tool is used to,
1. Redirect Vps_printf() formatted strings from EVM over network to the tool
2. And to redirect “getchar” from network CONS tool on PC to the EVM
This can used to replace the UART console in cases when UART is not available on the EVM or
HW board.
5.1 Tool Summary
Tool name
network_cons.exe
Tool source code (PC side)
vision_sdk\apps\tools\network_tools\network_cons
Tool source code (target
side)
vision_sdk\apps\src\rtos\modules\network_cons
Example usage (target
side)
Chains_readChar() in file chains_main_bios.c
(vision_sdk\apps\src\rtos\common)
RemoteLog_clientRun() in file utils_remote_log_client.c
(vision_sdk\links_fw\src\rtos\utils_common\src)
5.2 Tool Usage
Make sure you know the IP address of the EVM (see 1.2 Finding IP address of
the target EVM)
Set ENABLE_NETWORK_LOG=yes in your cfg.mk file
(vision_sdk/apps/configs/<configname>)
Confirm that networking is enabled and ENABLE_NETWORK_LOG is “yes” by
doing “gmake –s –j showconfig”
Build and run Vision SDK application by following steps as mentioned in the
user guide
On the PC invoke the network console tool as shown below from PC command
prompt
# network_cons.exe –ipaddr <ipaddr>
The Vps_printf’s from EVM will now be visible in PC command prompt
windows
Any key input to this window will result in the key value being sent to the
EVM
5.3 Tool Internal Implementation Details
This section is meant for developers who want to understand and expand the tool. Simple users
of the tool can skip this section.
5.3.1 Print Redirection
The flow of formatted string data when a Vps_printf is called with network log enabled is as
mentioned below
1. Vps_printf takes a formatted string as input, similar to “printf” in stdio.h
2. Vps_printf can be called by any CPU in the system (A15, DSP, EVE, M4)
3. Vps_printf copies this string to a shared memory area called “RemoteLog”. Each CPU
has its own area within the “RemoteLog” shared memory.
a. This allows multiple CPUs to output formatted strings to the shared memory

Page 20 of 27
b. See utils_remote_log_server.c (vision_sdk\links_fw\src\rtos\utils_common\src)
for implementation of Vps_printf
4. Remote Log Client (a low priority thread) running on IPU1-0 then reads the string from
the shared memory and then outputs them over one of below interfaces
a. UART interface (via UART driver)
b. Network interface (via Network CONS)
c. CCS JTAG interface (via System_printf)
5. See utils_remote_log_client.c (vision_sdk\links_fw\src\rtos\utils_common\src) for
implementation of this read logic
6. When the string needs to be output over network, NetworkCons_txWriteString() is called
from within RemoteLog_clientRun() (Thread main for Remote Client)
7. The networking itself can be enabled on a different core on which the Remote Client
runs, ex, IPU1-1 by default in TDA3x. Due to this one cannot make direct networking
socket API calls from within Remote Client thread
8. Hence NetworkCons_txWriteString() copies the string to another shared memory area
“NetworkCons_TxShm networkConsTxShm” defined in system_ipc_if.h
(vision_sdk\links_fw\include\link_api)
9. A network console reader thread running on the core on which networking is enabled
reads from this shared region and then outputs over the network using TCP/IP sockets.
10. See NetworkConsTx_tskMain () in network_cons_tsk.c
(vision_sdk\apps\src\rtos\modules\network_cons)
11. See network_cons_ipc.c (vision_sdk\apps\src\rtos\modules\network_cons) for
implementation of NetworkCons_txWriteString() and NetworkCons_txReadString
12. On PC side within network_cons.exe a thread is created which reads from the network
socket and writes to stdout
5.3.2 GetChar Redirection
The flow of character input from getchar() on PC via network CONS tool to EVM with network log
enabled is as mentioned below
1. When network_cons.exe runs on PC a thread is created which calls getchar() in a loop.
When user types a character in the console, the character is sent via TCP/IP to the
connected EVM
2. On the EVM side, a network RX thread receives this char and puts the char into a shared
memory.
a. See NetworkConsRx_tskMain () in network_cons_tsk.c
(vision_sdk\apps\src\rtos\modules\network_cons) for implementation of the RX
thread.
b. “NetworkCons_RxShm networkConsRxShm” in system_ipc_if.h
(vision_sdk\links_fw\include\link_api) defines the shared memory
3. This character copy to shared memory is done since the CPU on which networking runs
and CPU on which UI “getchar” is called can be different. Ex, networking is enabled on
IPU1-1, and Chains_getChar() is called from IPU1-0
4. When Chains_getChar() is called it can read input from one of below interfaces
a. UART interface (via UART driver)
b. Network interface (via Network CONS)
c. CCS JTAG interface (via fscanf)
5. When reading input via network CONS, NetworkCons_rxReadChar() API is
called which reads from the shared memory and gives the character to the UI.
6. See network_cons_ipc.c (vision_sdk\apps\src\rtos\modules\network_cons) for
implementation of NetworkCons_rxWriteChar() and NetworkCons_rxReadChar()
Page 21 of 27
6 Networking with TI Fast Data Transfer Protocol (TFDTP)
TI Fast Data Transfer Protocol (TFDTP) is a light weight application layer protocol which
implements standard UDP/IP based packet RX/TX using direct NSP APIs bypassing NDK.
TFDTP sits on the top of NSP to aggregate UDP packets into larger logical frames for taking
advantages of SoC resources like EDMA, Caching etc. For more details about TFDTP and its
implementation refer to TFDTP user/design guide in NSP package.
The VSDK 2.12 and later support TFDTP in Network_Tx and Network_rx links with new data
transmit/receive mode. For Network_rx, NETWORK_RX_LINK_DATA_RX_MODE_NETWORK is
used as data receive mode whereas for Network_tx link
NETWORK_TX_LINK_TRANSMIT_TYPE_TFDTP is added as data dump type.
The Network_tx and Network_rx links are modified to support TFDTP based receive and transmit
with existing PC tools. The underlying framework has not changed and earlier data flow is kept
same. The existing TCP/IP server is used as command server for TFDTP to synchronize data
transfer between client and EVM.
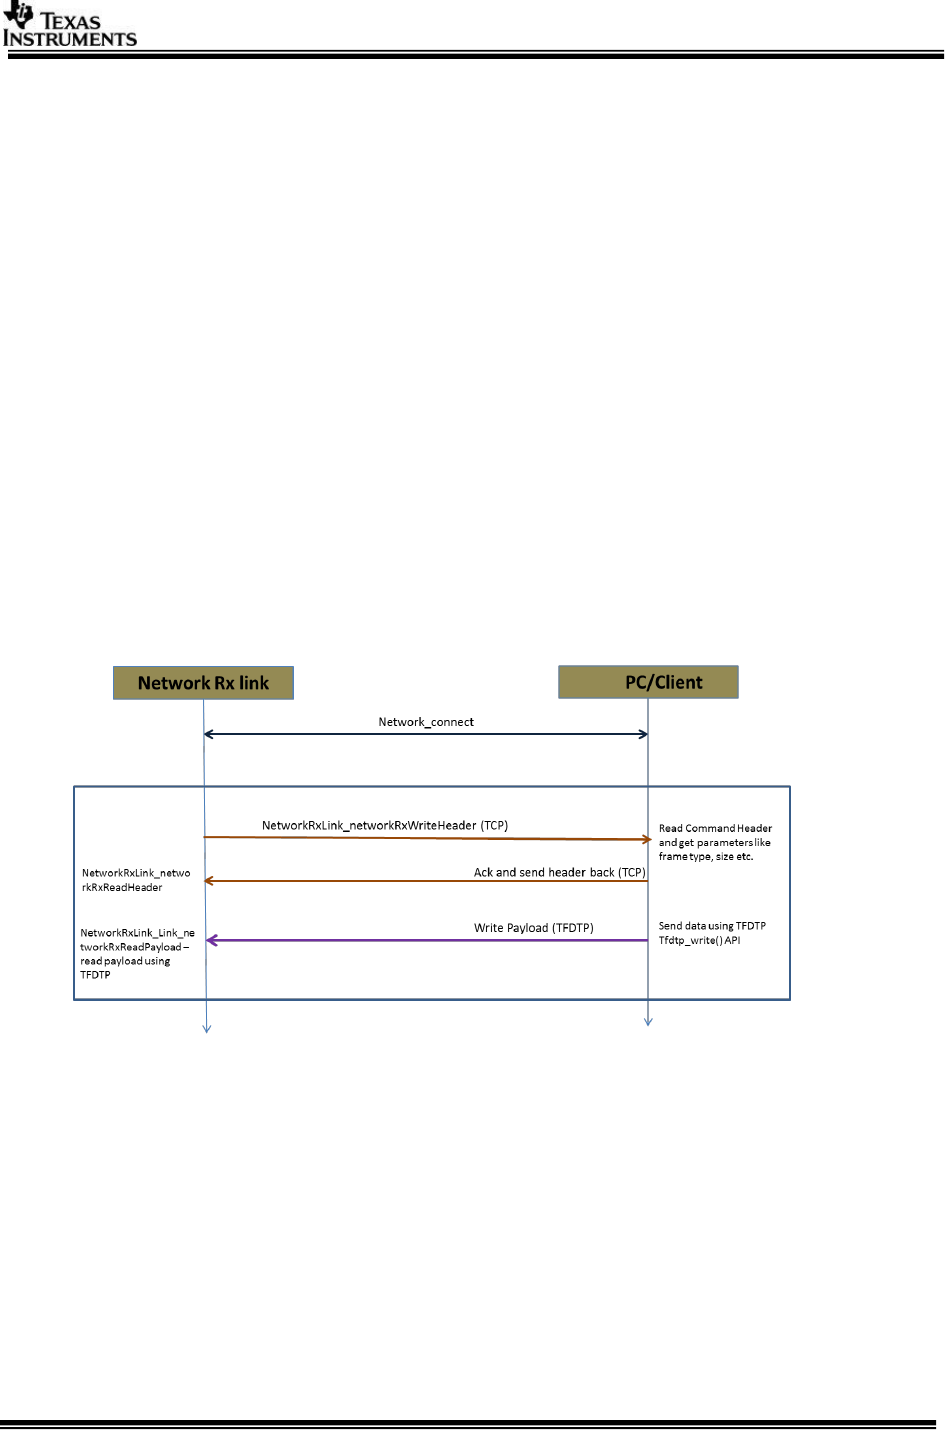
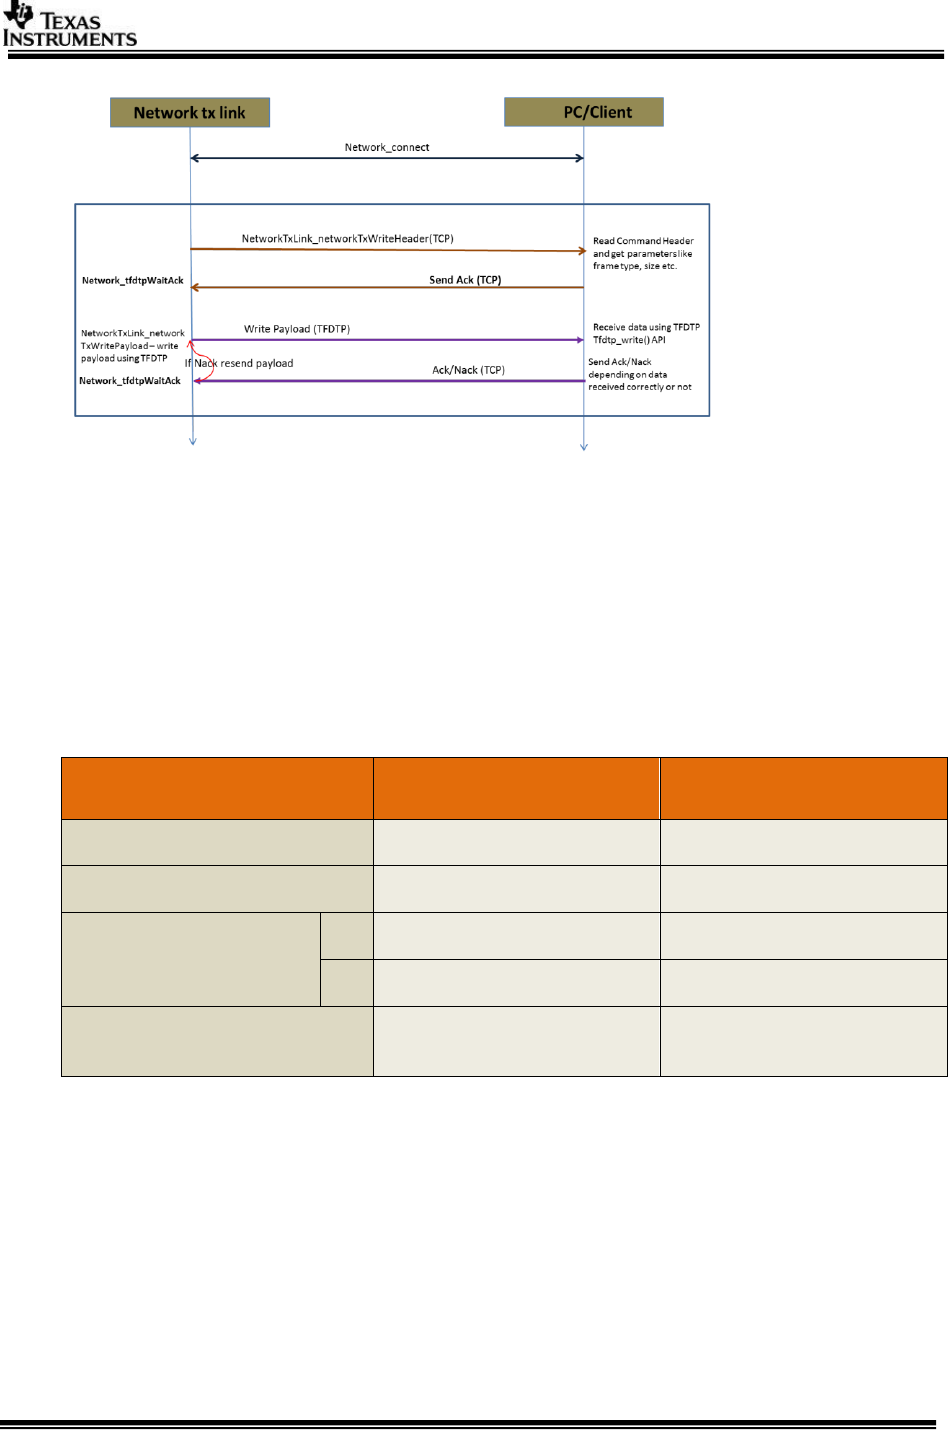
Figure below shows data flow for Network_rx link with TFDTP enabled. As shown the for data
synchronization, existing reliable TCP/IP channel is used as sync channel to send/receive ACKs,
command headers etc. and TFDTP is only used for data transfer. Only difference between
existing TCP/IP based Network use-case and TFDTP is that in TFDTP data is transferred using
TFDTP instead of TCP/IP. Similarly data flow is shown in Figure 6-2 for Network_tx link.
Figure 6-1 Network Source Network Receive using TFDTP
Page 22 of 27
Figure 6-2 Network_tx Network Transmit using TFDTP
6.1 TFDTP/TCP tradeoffs
When running any of Network_tx and Network_rx based use-cases, menu option is
given to select Network Rx and Tx mode resp. This selects dataRxMode for
Network_rx & dumpDataType for Network tx link. Depending on mode selected make
sure you use correct command line argument in Network PC tools.
Below are TCP/IP and TFDTP network mode comparison to choose between these
two.
Network_rx/Network_tx
mode
TCP/IP
TFDTP
Underlying Protocol
TCP
UDP
Protocol stack used
TCP/IP (NDK)
TFDTP (NSP)
Throughput/CPU Load
On Cortex M4 running
@212MHz
RX
10Mbps@50%
320Mbps@80%
TX
40Mbps@80%
320Mbps@42%
Packet drop/Out of order
support
Yes
No for RX
Yes for TX
Note:
When networking is enabled on IPU1-1, TFDTP is recommended to be used
for high throughput with Network_tx, Network_rx links.
When networking is enabled on A15, NDK with TCP/IP is recommended to be
used for high throughput with Network_tx, Network_rx links.
6.2 Enabling TFDTP
To enable TFDTP stack in VSDK build, set NSP_TFDTP_INCLUDE=yes in the
vision_sdk\apps\configs\$configfile. Make sure NDK is enabled via

Page 23 of 27
NDK_PROC_TO_USE in the same file. Also as TFDTP is not supported on cores other
than ipu1_1, to use TFDTP build, NDK_PROC_TO_USE should be set to ipu1_1.
6.3 Tools Summary for TFDTP
For using TFDTP, the existing PC tools are used with added option to choose between
TFDTP or TCP/IP based receive/transmit. To use TFDTP both address of server and
host needed to be given through command line arguments. You should use --
usetfdtp option to use network tools with TFDTP enabled on Network_tx source and
Network_tx links. The other options like file path, verbose mode etc. are unchanged
for using network tools.
Tool name
network_tx.exe --tfdtp argument
Tool source code (PC side)
vision_sdk\apps\tools\network_tools\network_tx
Tool source code (target
side)
vision_sdk\links_fw\src\rtos\links_common\network_rx
vision_sdk\links_fw\src\rtos\links_common\tfdtp_rx
Example usage (target
side)
vision_sdk\apps\src\rtos\usecases\network_rx_tx
chains_networkRxDecDisplay*.*
chains_networkRxDisplay*.*
Tool name
network_rx.exe
Tool source code (PC side)
vision_sdk\apps\tools\network_tools\network_rx
Tool source code (target
side)
vision_sdk\links_fw\src\rtos\links_common\Network_tx
Example usage (target
side)
vision_sdk\apps\src\rtos\usecases\network_rx_tx
chains_networkTxEncDisplay*.*
chains_networkTxDisplay*.*
6.4 Tools Usage
Follow section 3.2 for using TFDTP with Network_rx link and section 4.2 for using
TFDTP with Network_tx link. All other configuration like server port, data format etc.
remains same with TFDTP except mentioned in below sections.
IMP Note: It is recommended to use Linux machine when using PC tools
with TFDTP use-cases. We have observed issues when running on windows.
o Make sure you are using PC with good configuration (Ex - 8GB RAM,
i5@3.40GHz)
o Make sure system is not fully loaded. Restart PC to have clean slate.
o Make sure ports used by networks tools are not used by other application.
You can use tools like port scanner to identify all used ports.
o For receive, network rx tool writes received data to file which may cause
slowdown of use-case and receive. Also as file size grows the fie write may
slowdown.

Page 24 of 27
6.4.1 TFDTP Receive with Network_rx and tfdtp_rx
Target side: Create a Vision SDK use-case on target side - Network Rx
using TFDTP with Network_rx
o Specify the source of data as “Network_rx” link.
o Set NetworkRxLink_CreateParams.dataRxMode as
NETWORK_RX_LINK_DATA_RX_MODE_NETWORK_TFDTP
o TFDTP Rx supports only single channel receive so it can’t be used
when multiple Network_rx link are used in parallel. Also parameters
like TFDTP receive/transmit port no., data rate etc. are not user
configurable and set in networkCtrlIntf.h
PC tool: Invoke the tool as shown below, it will print the supported
options
$ network_tx.exe or network_tx.out
# network_tx --host_ip <ipaddr> --target_ip <ipaddr> [--port
<server port> --usetfdtp --verbose --no_loop --delay <delay in
secs>] --files <CH0 file>
#
# (c) Texas Instruments 2014
#
The “port” option when not specified default port is used.
IMP: Multiple “channels” of data is not supported for TFDTP
for sending multiple files
IMP: --usetfdtp option should be given when invoking
network_tx.exe utility for using TFDTP receive on PC.
6.4.2 TFDTP Transmit with Network_tx link
Target side: Create a Vision SDK use-case on target side
o Connect the output of the algorithm or link for which data needs to be
saved to PC to a “Network_Tx” link
o Set NetworkTxLink_CreateParams. dumpDataType as
NETWORK_TX_LINK_TRANSMIT_TYPE_TFDTP
o Set NetworkTxLink_CreateParams.networkServerPort, if not specified
default value is used. Port values in needed when more than one
Network_tx links are used in application.
PC tool: Invoke the tool as shown below, it will print the supported
options
#
# network_rx --ipaddr --target_ip <ipaddr> --host_ip <ipaddr> [--port <server port>] --
usetfdtp --files <CH0 file> <CH1 file>
#
# (c) Texas Instruments 2014
#
The “port” option when not specified default port is used.
IMP: Multiple “channels” of data is supported but not tested
for TFDTP for sending multiple files.

Page 25 of 27
o Multiple “channels” of data can be saved by specifying
multiple files.
o “network_rx.exe” can be invoked multiple time, each
invocation receiving data from different “Network_Tx”
links in the use-case on target
IMP: --usetfdtp option should be given when invoking
network_rx.exe utility for using TFDTP receive on PC.
IMP: For TFDTP TX it is recommended to have both receiver
(EVM) and transmitter (PC app) on the same network switch.
As UDP, by design, doesn’t employ flow control packet
drop/miss can be seen if both operate in different speeds,
configuration.
Page 26 of 27
6.5 TFDTP/TCP Performance
* Run from Linux machine
6.6 TFDTP FAQs
Q. I see lot of drops when running network tx tool on Windows for Network_rx use-
case
The flow control is not supported on Windows so when using network tx on Windows
it sends data at maximum possible rate and causes packet drop at receive target.
Please use Linux machine for flow control support in tool.
Q. I don’t see any data traffic when running my PC tools application
Make sure to network mode selected on EVM and PC tool matches. Use option --
usetfdtp only when TFDTP mode is enabled in use-case.
Q. Why TFDTP build is supported only on IPU1_1? Can I use it on A15 or IPU1_0?
This is because of EDMA PaRAMs requirements for the TFDTP. By default TFDTP
needs 256 EDMA PaRAMs which in VSDK2.12 are allocated statically only for IPU1_1.
To enable TFDTP on other cores, change EDMA PaRAMs allocation in
src\utils_common\src\dma_cfg\utils_dma_cfg_sys_edma_tdaxx.c and add PaRAMs
for A15 or IPU1_0.
Q. My use-case doesn’t stop even issues stop command through console when
running Network_rx TFDTP receive use-case
You need to stop PC/Client transmitter application for stopping use-case. When
transmitter app is not stopped it will keep sending data at faster rate and overload
IPU.
Q. I see packet drops and/or data corruption when running Network_rx TFDTP Rx
This issue can be due to Network_rx data (TFDTP) sent at maximum possible wire
rate to EVM. Currently max. rate supported for TFDTP Rx is 350Mbps. If data-rate
crosses this, packet drop can be seen.
On Linux Network_tx tool implements flow control to send data at rate which TDA
can handle. This is not implemented on Windows. Please see TFDTP user guide in
Core Config No Config TCP/IP TFDTP Mb/S FPS CPU Load Mb/S FPS CPU Load NDK Send NDK Recv
1TCP/IP = En, TFDTP = En Select 140 12 23.80% 160 (34%)
2TCP/IP = En, TFDTP = En Select 112 10 5.50% 368 30 23.80% 160 (34%)
3TCP/IP = En, TFDTP = Dis Select 115 10 17.20% 140 12 26.60% 125 (20%) 150 (30%)
4TCP/IP = En, TFDTP = En Select 40 3.65 96% 50 4.3 100% 65 (100%) 15 (45%)
5TCP/IP = En, TFDTP = En Select 112 10 30.4%* 368 30 46.50% 65 (100%) 15 (45%)
6TCP/IP = En, TFDTP = Dis Select 40 3.65 96% 48 4.1 100% 60 (100%) 15 (45%)
A15
IPU1
Null Src
Null

Page 27 of 27
NSP package for more details about this issue.
Q. I see data-rate drop in debug build
~30Mbps difference is seen with debug and release build. For debugging purpose,
reduce input fps in debug build when packet drop is seen.
Q. My network throughput doesn’t exceed 100Mbps
This can be due to either server or client on 100Mbps network.
Also some of WindowsTM PC it is seen that it is not crossing 100Mbps throughput. It
is possibly Winsock or PCAP issue. It is advised to use Linux PC.
Q. How to Enable/Disable TFDTP functionality. How is it advantages using TFDTP
over TCP/IP.
To enable TFDTP set NSP_TFDTP_BUILD=yes in the config file. Please see TCP,
TFDTP comparison table for TCP/TFDTP tradeoffs.
