Sterling Selling And Fulfillment Foundation WMS_User_Guide WMS User Guide
User Manual: WMS_User_Guide user guide pdf - FTP File Search (13/20)
Open the PDF directly: View PDF ![]() .
.
Page Count: 432 [warning: Documents this large are best viewed by clicking the View PDF Link!]
- Contents
- Chapter 1. Warehouse Management System Overview
- Chapter 2. Accessing Multiple Nodes
- Chapter 3. Performing Inbound Tasks
- About Performing Inbound Tasks
- Create a Purchase Order
- Add Items to a Draft Purchase Order
- Confirm a Draft Purchase Order
- About Creating an Advance Ship Notice
- Searching for Inbound Order Shipments
- View the Audit Trail for Shipment Modifications
- About Creating a Load
- Print Documents or Labels
- Receiving Inventory
- Receiving Inventory using High Speed Data Entry Screens
- Navigate to the Receive Details Screen For Receiving Inventory Using High Speed Data Entry Screens
- Receive Expected Containers For Receiving Inventory Using High Speed Data Entry Screens
- Build Cases or Pallets For Receiving Inventory Using High Speed Data Entry Screens
- Receive Blind Receipts For Receiving Inventory Using High Speed Data Entry Screens
- Over-Receive For Receiving Inventory Using High Speed Data Entry Screens
- List of defined over-receipt quantity attributes
- Capture an Item’s Extended Attributes For Receiving Inventory Using High Speed Data Entry Screens
- Receiving Inventory Using Paper and Recording on System Later
- Navigate to the Inbound Order Shipment Details Screen for Receiving Inventory Using Paper and Recording on System Later
- Start a Receipt for Receiving Inventory Using Paper and Recording on System Later
- Record Paper-Based Receipts for Receiving Inventory Using Paper and Recording on System Later
- Receive Expected Containers for Receiving Inventory Using Paper and Recording on System Later
- Build Cases or Pallets for Receiving Inventory Using Paper and Recording on System Later
- Over-Receive for Receiving Inventory Using Paper and Recording on System Later
- Capture an Item’s Extended Attributes for Receiving Inventory Using Paper and Recording on System Later
- Receiving Inventory using High Speed Data Entry Screens
- Inspecting Receipts in Multiple Steps
- Close a Receipt
- Adjust a Receipt
- Manage Discrepancies in Receiving an Inbound Order's Shipment
- Chapter 4. Managing Inventory
- About Managing Inventory
- Searching for Inventory
- View an Inventory Audit Trail
- Managing Count
- Put an Item or Item Category on Count
- Manage Count Requests
- Invoke Count Service
- Manage Count Tasks
- Put Tasks on Hold
- Report Count Task Completion
- Creating Move Requests
- Adjusting Inventory
- Changing Inventory Attributes
- Clean Out Accounting Bin
- Print Stock Keeping Unit Labels
- About Reset Zone Pend-In Quantities
- Chapter 5. Performing Value-Added Services
- Chapter 6. Performing Outbound Tasks
- About Performing Outbound Tasks
- Managing Outbound Shipment Tasks
- Outbound Execution
- Pick Planning
- Picking
- Packing and Unpacking Containers
- Navigate to the Pack Details Screen for Packing Containers
- Pack System-Suggested Containers
- Pack User-Defined Containers
- Pack a Container with Unknown Contents
- Pack Single Item Shipments
- Pack Containers for Single Item Shipments
- Capturing an Item’s Extended Attributes
- Add Items into a Container
- Remove Items from a Container
- Add Inner Packs for an Item
- Remove Inner Packs for an Item
- Pack Containers for a Shipment
- Unpack Containers for a Shipment
- Managing Manifests
- Navigate to the Weigh Station Screen
- Record the Container’s Weight from a Weigh Station Screen
- Capture the Item’s Serial Number for a Serial-Tracked Item
- Convert an Inventory Container into an Outbound Container
- Create a Load for Outbound Containers
- Search for Loads using the Load Console Screen
- Add Holds to a Load for Outbound Containers
- Add Shipments to a Load for Outbound Containers
- Scheduling Dock Appointments
- Planning Resources for Outbound Tasks
- Chapter 7. Managing Tasks
- About Managing Tasks
- Searching for Tasks
- To navigate to the Search Screens for Searching Tasks
- View Task Details using the Task Detail Screen
- Assign Tasks to a User using the Assign to User Screen
- Reprioritize Tasks Using the Reprioritize Screen
- Put Tasks on Hold using the Hold Reason Screen
- Release a Task that is Put on Hold
- Cancel a Task using the Task List Screen
- Confirm a Batch after Completing the Paper-Based Tasks
- Record Count using the Recording Count Results Screen
- Manual Logging of Productivity for a Completed Task
- Search for Productivity Logs using the Productivity Search by Productivity Type
- Deriving Labor Standards
- View User Time Sheet using the Time Sheet Screen
- Chapter 8. Inbound Shipment Console Screens
- Inbound Order Shipment Search By Status
- Inbound Order Shipment Search By Date
- Inbound Order Shipment Search By Carrier
- Inbound Order Shipment Search By Item
- Inbound Order Shipment List
- Inbound Order Shipment Details
- Modify Address
- Charges for Inbound Shipment Console Screens
- Shipment Line Details
- Loads for Inbound Shipment Console Screens
- Ship Node Detail
- Organization Details for Inbound Shipment Console Screens
- Organization Primary Contact Address Details for Inbound Shipment Console Screens
- Organization Corporate Address Details for Inbound Shipment Console Screens
- Containers for Inbound Shipment Console Screens
- Inbound Order Shipment Instructions
- Shipment Status Audits for Inbound Shipment Console Screens
- Shipment Audits for Inbound Shipment Console Screens
- Shipment Dates for Inbound Shipment Console Screens
- Shipment Alerts for Inbound Shipment Console Screens
- Additional Attributes for Inbound Shipment Console Screens
- Shipment Receipt Discrepancy for Inbound Shipment Console Screens
- Manage Receiving Discrepancies for Inbound Shipment Console Screens
- Receipts for Inbound Shipment Console Screens
- Receipt Summary for Inbound Shipment Console Screens
- Receipt Details for Inbound Shipment Console Screens
- Receipt Line Details for Inbound Shipment Console Screens
- Receipt Instructions for Inbound Shipment Console Screens
- Receipt Status Audits for Inbound Shipment Console Screens
- Receipt Container for Inbound Shipment Console Screens
- Inspect Inbound Receipt for Inbound Shipment Console Screens
- Activity Demand for Inbound Shipment Console Screens
- Record Container Details for Inbound Shipment Console Screens
- Start Receipt for Inbound Shipment Console Screens
- Receive Screen for Inbound Shipment Console Screens
- Print for Inbound Shipment Console Screens
- Create Picklist for Inbound Shipment Console Screens
- Create Alerts for Inbound Shipment Console Screens
- Receive (Report or Record Receipt) for Inbound Shipment Console Screens
- Add Delivery Plan for Inbound Shipment Console Screens
- Inbound Order Container Search By All Attributes for Inbound Shipment Console Screens
- Inbound Order Container List for Inbound Shipment Console Screens
- Container Details for Inbound Shipment Console Screens
- Container Serial Details for Inbound Shipment Console Screens
- Container Status Audits for Inbound Shipment Console Screens
- Pack or Unpack for Inbound Shipment Console Screens
- Delete Container for Inbound Shipment Console Screens
- Dock Appointment Search By All Attributes for Inbound Shipment Console Screens
- Dock Schedule Details for Inbound Shipment Console Screens
- Dock Appointment for Inbound Shipment Console Screens
- Dock Group Details for Inbound Shipment Console Screens
- View Holds for Inbound Shipment Console Screens
- Add Holds for Inbound Shipment Console Screens
- View History for Inbound Shipment Console Screens
- Chapter 9. Receipt Console Screens
- Chapter 10. Create Inbound Shipment Screens
- Chapter 11. Receive Console Screens
- Chapter 12. Inspect Inbound Receipts Screens
- Chapter 13. Inspect Return Receipts Screens
- Chapter 14. Create Move Request Screens
- Chapter 15. Create Count Request Screens
- Chapter 16. Count Console Screens
- About the Count Console Screens
- Count Request Search By Count Request Attributes
- Count Request Search By Count Criteria
- Count Request Search By Location Range
- Count Request List
- Count Request Details
- Count Result List
- Acceptance Variance Reason
- Create Count Request using the Count Console Screen
- Cancellation Reason for Count Console Screen
- Record Count Result Details
- Count Result Search By Variance
- Count Result Details
- Invoke Count Service using the Count Console Screens
- Chapter 17. Create Physical Count Screens
- Chapter 18. Physical Count Console Screens
- Chapter 19. Move Request Console Screens
- About Move Request Console Screens
- Move Request Search By Item
- Move Request Search By Location
- Move Request Search By Date
- Move Request Search By References
- Move Request Search By Tag Attributes
- Move Request List
- Move Request Details
- Move Request Alerts
- Status Audit Details
- Cancellation Reason for Cancelling a Move Request
- Move Request Line Details
- Move Request Line Activi ty Demand
- Activity Demand for a Selected Location
- Chapter 20. Location Inventory Console Screens
- About Location Inventory Console Screens
- Location Inventory Search By Item
- Location Inventory Search By Container
- Location Inventory Search By Additional Attributes
- Location Inventory Search By Segment
- Location Inventory Search By Tag Attributes
- Location Inventory List
- Location Inventory Details Screen
- Location Inventory Serial Details
- Location Details
- Location SKU Dedications
- Item Details
- Location Inventory Tag Details
- Change Location Inventory Attributes Criteria
- Change Location Inventory Attributes
- Node Level Inventory
- Container Details for Location Inventory Console Screens
- Container Serial Details for Location Inventory Console Screens
- Create Count Request for Location Inventory Console Screens
- Create Move Request for Location Inventory Console Screens
- Break License Plate Number
- Chapter 21. Adjust Location Inventory Screens
- Chapter 22. Accounting Bin Adjustment Screens
- Chapter 23. Transfer Inventory Ownership
- Chapter 24. Print Stock Keeping Unit Labels Screens
- Chapter 25. Receipt Adjustment Screens
- Chapter 26. Create Work Order Screens
- Chapter 27. Work Order Console Screens
- About Work Order Console Screens
- Work Order Search By Item
- Work Order Search By Container
- Work Order Search By Date
- Work Order Search By Activity
- Work Order Search By Components
- Work Order List
- Work Order Details for Work Order Console Screens
- Work Order Status Audits
- Work Order Activity Demand
- Work Order Holds
- Add Holds for Work Order Console Screens
- View History for Work Order Console Screens
- Cancellation Reason for Work Order Console Screens
- Appointment Details
- Chapter 28. Value-Added Services Station Screens
- Chapter 29. Outbound Shipment Console Screens
- About Outbound Shipment Console Screens
- Outbound Shipment Search By Status
- Outbound Shipment Search By Date
- Outbound Shipment Search By Carrier
- Outbound Shipment Search By Item
- Outbound Shipment Search By Wave
- Outbound Shipment Search By Profiling
- Shipment List
- Shipment Details for Outbound Shipment Console Screens
- Special Services List
- Modify Shipment for Outbound Shipment Console Screens
- Address Details for Outbound Shipment Console Screens
- Charges for Outbound Shipment Console Screens
- Shipment Loads
- Shipment Containers
- Shipment Instructions for Outbound Shipments
- Shipment Status Audits for Outbound Shipments
- Shipment Dates for Outbound Shipments
- Alerts for Outbound Shipments
- Additional Attributes for Outbound Shipment
- Shipment Activity Demand for Outbound Shipment
- Shipment Audits for Outbound Shipment
- Logical Kits for Outbound Shipment
- Pack Containers for Outbound Shipment
- Packing a Container for Outbound Shipment
- Print for an Outbound Shipment
- Cancel Selected Outbound Shipments
- Split Outbound Shipment
- Split Shipment Lines
- Create Alerts for the Selected Outbound Shipments
- Ship Node Detail for Outbound Shipment
- Organization Details for Outbound Shipment Console Screens
- Select Delivery Plan for an Outbound Shipment
- Shipment Line Details for Outbound Shipment
- Add Release
- Create Wave for Selected Shipment Group
- Containers for Outbound Shipment
- Container Search By All Attributes
- Container Search By Status
- Container List for Outbound Shipment
- Container Details for Outbound Shipment
- Container Return Tracking Numbers
- Serial Details for Outbound Shipment Console Screens
- Container Status Audits for Outbound Shipment Console Screens
- Container Activity List
- Pack or Unpack for Outbound Shipment Console Screens
- Delete Selected Containers
- Modify Containerization
- Resolve Short Picked Containers
- Dock Appointment Sea rch By All Attributes for Outbound Shipment
- Dock Schedule Details for Outbound Shipment
- Dock Appointment for Outbound Shipment
- Dock Group Details for Outbound Shipment
- View Holds for Outbound Shipment
- Add Holds for Outbound Shipment
- View History for Outbound Shipment
- Chapter 30. Create Outbound Shipment Screens
- Chapter 31. Wave Console Screens
- Chapter 32. Create Wave Screens
- Chapter 33. Pack Station Screens
- Chapter 34. Manifest Console Screens
- Chapter 35. Create Load Screens
- Chapter 36. Load Console Screens
- Chapter 37. Add To Manifest Screens
- Chapter 38. Remove From Manifest Screens
- Chapter 39. Weigh Station Screens
- Chapter 40. Location Inventory Audit Console Screens
- Location Inventory Audit Search By Item
- Location Inventory Audit Search By Container
- Location Inventory Audit Search By Transaction References
- Location Inventory Audit Search By Inventory Attributes
- Performing a Location Inventory Audit Search By Count Reference
- Location Inventory Audit List
- Location Inventory Audit Details for Items
- Location Inventory Audit Details for Containers
- Chapter 41. Task Console Screens
- About Task Console Screens
- Task Search By Task Type
- Task Summary
- Task Summary By Zone
- Open Task Summary
- User List (selection)
- Task Search By Zone
- Task Search By Inventory
- Task Search By Reference
- Task Search By Exception
- Task Search By Date
- Task Search By At Risk Tasks
- Task List for Task Management Console Screens
- Task Detail
- Complete Task
- Modification Reason for Task Management Console Screens
- Summary Task Detail
- Task Status Details
- Task Status Audits
- Assign to User
- User Search By All Attributes
- User List Selection
- Reprioritize
- Hold Reason
- Cancel Task Reason
- User Detail
- Batch Search By All Attributes
- Batch List
- Batch Detail
- Complete Batch for Task Management Console Screens
- Print Batch
- Chapter 42. Confirm Batch Screens
- Chapter 43. Record Count Screens
- Chapter 44. Log Productivity Screens
- Chapter 45. Productivity Console Screens
- Chapter 46. Derive Labor Standards Screens
- Chapter 47. User Time Sheet Screens
- Chapter 48. Resource Planning Screens
- Chapter 49. Sterling Warehouse Management System Prints
- Chapter 50. Understanding the Execution Console Framework
- Notices
- Index
Sterling Selling and Fulfillment Foundation
Warehouse Management System User
Guide
Release 9.1
Sterling Selling and Fulfillment Foundation
Warehouse Management System User
Guide
Release 9.1

Note
Before using this information and the product it supports, read the information in “Notices” on page 409.
Copyright
This edition applies to the 9.1 Version of IBM Sterling Selling and Fulfillment Foundation and to all subsequent
releases and modifications until otherwise indicated in new editions.
© Copyright IBM Corporation 1999, 2011.
US Government Users Restricted Rights – Use, duplication or disclosure restricted by GSA ADP Schedule Contract
with IBM Corp.

Contents
Chapter 1. Warehouse Management
System Overview...........1
About Warehouse Management System .....1
Understanding Sterling Warehouse Management
System User Interface Icons .........3
Chapter 2. Accessing Multiple Nodes . . 7
About Accessing Multiple Nodes .......7
Access Multiple Nodes ...........7
Chapter 3. Performing Inbound Tasks . . 9
About Performing Inbound Tasks .......9
Create a Purchase Order ..........9
Add Items to a Draft Purchase Order ......9
Confirm a Draft Purchase Order ........9
About Creating an Advance Ship Notice.....10
Create an Advance Ship Notice.......10
Set Up Shipment Supervisory Overrides ....10
Searching for Inbound Order Shipments .....11
About Searching for Inbound Order Shipments 11
View the Audit Trail for Shipment Modifications . . 11
About Creating a Load ..........11
Create a Load ............12
Print Documents or Labels .........12
Receiving Inventory ...........12
Receiving Inventory using High Speed Data
Entry Screens .............12
Receiving Inventory Using Paper and Recording
on System Later ............15
Inspecting Receipts in Multiple Steps ......18
Inspect a Receipt ...........19
Inspect Receipt Lines ..........19
Close a Receipt .............19
Adjust a Receipt .............20
Manage Discrepancies in Receiving an Inbound
Order's Shipment ............20
Chapter 4. Managing Inventory ....23
About Managing Inventory .........23
Searching for Inventory ..........23
To navigate to the search screens to Search for an
Inventory ..............23
View an Inventory Audit Trail ........24
Managing Count ............24
Put an Item or Item Category on Count .....24
Manage Count Requests ..........25
Invoke Count Service ...........25
Manage Count Tasks ...........25
Put Tasks on Hold ............26
Report Count Task Completion ........27
Creating Move Requests ..........27
Create Move Requests For Moving Inventory to a
Specified Location ...........27
Create Move Requests For Moving Inventory that
Exists in a Location...........28
Adjusting Inventory ...........28
Adjust Inventory for a New Product .....28
Adjust Inventory for an Existing Product . . . 28
Changing Inventory Attributes ........29
Find Specific Inventory to Change an Inventory
Attribute ..............29
Change Attributes Across Locations to Change an
Inventory Attributes ..........29
Clean Out Accounting Bin .........30
Print Stock Keeping Unit Labels .......30
Hazmat SKU Label ...........31
About Reset Zone Pend-In Quantities .....31
Run the Reset Zone Pend-In Quantities ....31
Chapter 5. Performing Value-Added
Services ..............33
About Performing Value-Added Services ....33
Create a Work Order for a Value-Added Service . . 33
Searching for Work Orders in Value-Added Service 34
To navigate to the search screens for a
Value-Added Service: ..........34
View Work Order Details .........34
View Work Order Tasks .........34
View Move Requests ..........35
Confirm Work Orders ..........35
Cancel Work Orders ..........35
Confirm Activities Included in the Work Order . . 35
Capture the Extended Attributes of Multiple
Serial-Tracked and Serialized Kits in a VAS
Station ...............36
Chapter 6. Performing Outbound Tasks 39
About Performing Outbound Tasks ......39
Managing Outbound Shipment Tasks......39
Create an Outbound Shipment .......39
Searching for Outbound Shipments .....40
To navigate to the search screens for Outbound
Shipments ..............40
Modify an Outbound Shipment.......40
Add Holds to an Outbound Shipment ....41
Outbound Execution ...........41
Pick Planning.............41
Picking ...............43
Packing and Unpacking Containers .....43
Managing Manifests ...........52
Navigate to the Add to Manifest screen ....52
Convert an Inventory Container into an
Outbound Container ..........52
Add Containers to a Manifest .......53
View the Container’s Contents .......57
Remove Containers from a Manifest .....57
Close a Manifest............57
Record the Weight of Containers in a Manifest . 58
Navigate to the Weigh Station Screen ......58
© Copyright IBM Corp. 1999, 2011 iii
Record the Container’s Weight from a Weigh
Station Screen ............58
Capture the Item’s Serial Number for a
Serial-Tracked Item ...........59
Convert an Inventory Container into an
Outbound Container ..........59
Create a Load for Outbound Containers ....59
Search for Loads using the Load Console Screen 60
Add Holds to a Load for Outbound Containers 60
Add Shipments to a Load for Outbound
Containers..............60
Scheduling Dock Appointments .......61
Search for a Dock Appointment ......61
Viewing Dock Schedule Details .......62
Take a New Dock Appointment ......62
Modify a Dock Appointment .......62
Cancel a Dock Appointment ........63
Manage Docks ............63
Remove a Dock Group Constraint ......64
Planning Resources for Outbound Tasks .....64
Define Standard Capacity.........64
View Capacity Details for Various Resource Pools 65
View Demand Details for a Resource .....66
Confirm a Plan ............67
Chapter 7. Managing Tasks ......69
About Managing Tasks ..........69
Searching for Tasks ............69
To navigate to the Search Screens for Searching
Tasks ...............69
View Task Details using the Task Detail Screen 69
Assign Tasks to a User using the Assign to User
Screen...............70
Reprioritize Tasks Using the Reprioritize Screen 70
Put Tasks on Hold using the Hold Reason Screen 70
Release a Task that is Put on Hold......70
Cancel a Task using the Task List Screen....71
Confirm a Batch after Completing the Paper-Based
Tasks ................71
Record Count using the Recording Count Results
Screen................71
Manual Logging of Productivity for a Completed
Task.................72
Search for Productivity Logs using the Productivity
Search by Productivity Type .........72
View Productivity Log Records using the
Productivity Details Screen ........73
Delete a Productivity Log using the Productivity
List Screen..............73
Deriving Labor Standards .........73
Activities Search by Date Range ......73
View Productivity Summary using the
Productivity List Screen .........74
Derive Labor Standards for a Productivity Type 74
View User Time Sheet using the Time Sheet Screen 74
Chapter 8. Inbound Shipment Console
Screens ..............75
Inbound Order Shipment Search By Status ....75
Inbound Order Shipment Search By Date ....76
Inbound Order Shipment Search By Carrier . . . 76
Inbound Order Shipment Search By Item ....77
Inbound Order Shipment List ........78
Inbound Order Shipment Details .......79
Modify Address .............83
Charges for Inbound Shipment Console Screens . . 83
Shipment Line Details ...........84
Loads for Inbound Shipment Console Screens . . . 85
Ship Node Detail ............86
Organization Details for Inbound Shipment Console
Screens ................87
Organization Primary Contact Address Details for
Inbound Shipment Console Screens ......87
Organization Corporate Address Details for Inbound
Shipment Console Screens .........88
Containers for Inbound Shipment Console Screens 89
Inbound Order Shipment Instructions .....90
Shipment Status Audits for Inbound Shipment
Console Screens .............91
Shipment Audits for Inbound Shipment Console
Screens ................92
Shipment Dates for Inbound Shipment Console
Screens ................93
Shipment Alerts for Inbound Shipment Console
Screens ................94
Additional Attributes for Inbound Shipment
Console Screens .............95
Shipment Receipt Discrepancy for Inbound
Shipment Console Screens .........96
Manage Receiving Discrepancies for Inbound
Shipment Console Screens .........96
Receipts for Inbound Shipment Console Screens . . 97
Receipt Summary for Inbound Shipment Console
Screens ................98
Receipt Details for Inbound Shipment Console
Screens ................99
Receipt Line Details for Inbound Shipment Console
Screens ...............101
Receipt Instructions for Inbound Shipment Console
Screens ...............102
Receipt Status Audits for Inbound Shipment
Console Screens ............102
Receipt Container for Inbound Shipment Console
Screens ...............102
Inspect Inbound Receipt for Inbound Shipment
Console Screens ............102
Activity Demand for Inbound Shipment Console
Screens ...............103
Record Container Details for Inbound Shipment
Console Screens ............104
Start Receipt for Inbound Shipment Console
Screens ...............105
Receive Screen for Inbound Shipment Console
Screens ...............106
Print for Inbound Shipment Console Screens . . . 106
Create Picklist for Inbound Shipment Console
Screens ...............106
Create Alerts for Inbound Shipment Console
Screens ...............106
Receive (Report or Record Receipt) for Inbound
Shipment Console Screens .........106
iv Sterling Selling and Fulfillment Foundation: Warehouse Management System User Guide
Add Delivery Plan for Inbound Shipment Console
Screens ...............108
Inbound Order Container Search By All Attributes
for Inbound Shipment Console Screens .....108
Inbound Order Container List for Inbound
Shipment Console Screens .........109
Container Details for Inbound Shipment Console
Screens ...............110
Container Serial Details for Inbound Shipment
Console Screens ............111
Container Status Audits for Inbound Shipment
Console Screens ............112
Pack or Unpack for Inbound Shipment Console
Screens ...............112
Delete Container for Inbound Shipment Console
Screens ...............113
Dock Appointment Search By All Attributes for
Inbound Shipment Console Screens ......113
Dock Schedule Details for Inbound Shipment
Console Screens ............114
Dock Appointment for Inbound Shipment Console
Screens ...............114
Dock Group Details for Inbound Shipment Console
Screens ...............116
View Holds for Inbound Shipment Console Screens 117
Add Holds for Inbound Shipment Console Screens 118
View History for Inbound Shipment Console
Screens ...............118
Chapter 9. Receipt Console Screens 119
About Receipt Console Screens .......119
Receipt Search By Receipt .........119
Receipt Search By Item ..........120
Receipt Search By Container ........120
Receipt List ..............121
Return Order Receipt Summary .......122
Receipt Line Details ...........124
Order Receipt Container..........125
Receipt Line Details (Container) .......126
Receipt Instructions ...........127
Receipt Status Audits...........128
Receipt Details .............129
Receive ...............130
Chapter 10. Create Inbound Shipment
Screens ..............133
About Create Inbound Shipment Screens ....133
Shipment Entry to Create an Inbound Shipment 133
Shipment Supervisory Overrides for an Inbound
Shipment ...............134
Chapter 11. Receive Console Screens 135
About Receive Console Screens .......135
Receive Details .............135
Serial Entry for Receive Console Screens ....137
Tag Entry for Receive Console Screens .....138
Expiration Date Entry for Receive Console Screens 138
Chapter 12. Inspect Inbound Receipts
Screens ..............139
About Inspect Inbound Receipt Screens.....139
Chapter 13. Inspect Return Receipts
Screens ..............141
About Inspect Return Receipts Screens .....141
Inspect Receipt .............141
Inspect Return Receipt Details ........142
Chapter 14. Create Move Request
Screens ..............145
Create Move Request...........145
Chapter 15. Create Count Request
Screens ..............149
Create Count Request using the Create Count
Request Screen .............149
Access Count Request Details Screen ....150
Create Count Requests for Location Group . . . 151
Access Location List Details .......152
Chapter 16. Count Console Screens 153
About the Count Console Screens ......153
Count Request Search By Count Request Attributes 153
Count Request Search By Count Criteria ....153
Count Request Search By Location Range ....155
Count Request List ...........155
Count Request Details ..........156
Count Result List ............157
Acceptance Variance Reason ........159
Create Count Request using the Count Console
Screen................160
Cancellation Reason for Count Console Screen . . 160
Record Count Result Details ........161
Count Result Search By Variance .......163
Count Result Details ...........164
Invoke Count Service using the Count Console
Screens ...............165
Chapter 17. Create Physical Count
Screens ..............167
About Create Physical Count Screens .....167
Create Physical Count Plan.........167
Chapter 18. Physical Count Console
Screens ..............169
Physical Count Plan Search.........169
Physical Count Plan List..........170
Physical Count Plan Details ........170
Chapter 19. Move Request Console
Screens ..............173
About Move Request Console Screens .....173
Move Request Search By Item ........173
Move Request Search By Location ......174
Move Request Search By Date ........174
Move Request Search By References ......175
Contents v
Move Request Search By Tag Attributes ....176
Move Request List............176
Move Request Details ..........177
Move Request Alerts ...........179
Status Audit Details ...........180
Cancellation Reason for Cancelling a Move Request 181
Move Request Line Details .........181
Move Request Line Activi ty Demand .....182
Activity Demand for a Selected Location ....183
Chapter 20. Location Inventory
Console Screens ..........185
About Location Inventory Console Screens . . . 185
Location Inventory Search By Item ......185
Location Inventory Search By Container ....186
Location Inventory Search By Additional Attributes 186
Location Inventory Search By Segment .....187
Location Inventory Search By Tag Attributes . . . 188
Location Inventory List ..........188
Location Inventory Details Screen ......190
Location Inventory Serial Details .......191
Location Details ............192
Location SKU Dedications .........194
Item Details ..............195
Location Inventory Tag Details .......196
Change Location Inventory Attributes Criteria . . 197
Change Location Inventory Attributes .....198
Node Level Inventory ..........199
Container Details for Location Inventory Console
Screens ...............200
Container Serial Details for Location Inventory
Console Screens ............201
Create Count Request for Location Inventory
Console Screens ............202
Create Move Request for Location Inventory
Console Screens ............202
Break License Plate Number ........203
Chapter 21. Adjust Location Inventory
Screens ..............205
Adjust Location Inventory Criteria ......205
Adjust Location Inventory Details ......205
Adjustment Cost Details..........207
Chapter 22. Accounting Bin
Adjustment Screens ........209
Accounting Bin Adjustment Details Criteria . . . 209
Accounting Bin Adjustment Details ......209
Location Inventory Details for Accounting Bin
Adjustment Screens ..........209
Accounting Bin Adjustment Reasons ....210
Chapter 23. Transfer Inventory
Ownership.............211
Transfer Inventory Ownership Attributes ....211
Chapter 24. Print Stock Keeping Unit
Labels Screens ..........213
Print Stock Keeping Unit Search By Item ....213
Item List ...............213
Print SKU Labels ............214
Chapter 25. Receipt Adjustment
Screens ..............215
Receipt Adjustment ...........215
Adjust Receipt .............216
Modification Reason for Receipt Adjustment
Screens ...............217
Chapter 26. Create Work Order
Screens ..............219
About Create Work Order Screens ......219
Create Work Order ...........219
Additional Item Details ..........220
Work Order Details Screen .........221
Chapter 27. Work Order Console
Screens ..............225
About Work Order Console Screens ......225
Work Order Search By Item ........225
Work Order Search By Container .......226
Work Order Search By Date ........226
Work Order Search By Activity .......227
Work Order Search By Components ......228
Work Order List ............229
Work Order Details for Work Order Console
Screens ...............230
Work Order Status Audits .........233
Work Order Activity Demand ........233
Work Order Holds ...........234
Add Holds for Work Order Console Screens . . . 235
View History for Work Order Console Screens . . 235
Cancellation Reason for Work Order Console
Screens ...............235
Appointment Details ...........236
Chapter 28. Value-Added Services
Station Screens ..........237
VAS Station ..............237
Serial Entry for VAS Station Console Screens . . . 239
Expiration Date Entry for VAS Station Console
Screens ...............240
Chapter 29. Outbound Shipment
Console Screens ..........241
About Outbound Shipment Console Screens . . . 241
Outbound Shipment Search By Status .....241
Outbound Shipment Search By Date......242
Outbound Shipment Search By Carrier .....243
Outbound Shipment Search By Item......243
Outbound Shipment Search By Wave .....244
Outbound Shipment Search By Profiling ....245
Shipment List .............246
Shipment Details for Outbound Shipment Console
Screens ...............247
Special Services List ...........252
Modify Shipment for Outbound Shipment Console
Screens ...............252
vi Sterling Selling and Fulfillment Foundation: Warehouse Management System User Guide
Address Details for Outbound Shipment Console
Screens ...............252
Charges for Outbound Shipment Console Screens 253
Shipment Loads ............254
Shipment Containers ...........254
Shipment Instructions for Outbound Shipments 255
Shipment Status Audits for Outbound Shipments 256
Shipment Dates for Outbound Shipments ....257
Alerts for Outbound Shipments .......258
Additional Attributes for Outbound Shipment . . 259
Shipment Activity Demand for Outbound
Shipment ...............260
Shipment Audits for Outbound Shipment ....261
Logical Kits for Outbound Shipment .....262
Pack Containers for Outbound Shipment ....263
Packing a Container for Outbound Shipment . . . 266
Print for an Outbound Shipment .......266
Cancel Selected Outbound Shipments .....266
Split Outbound Shipment .........266
Split Shipment Lines ...........268
Create Alerts for the Selected Outbound Shipments 268
Ship Node Detail for Outbound Shipment ....268
Organization Details for Outbound Shipment
Console Screens ............268
Select Delivery Plan for an Outbound Shipment 269
Shipment Line Details for Outbound Shipment . . 269
Add Release..............271
Create Wave for Selected Shipment Group....271
Containers for Outbound Shipment ......271
Container Search By All Attributes ......271
Container Search By Status .........272
Container List for Outbound Shipment .....273
Container Details for Outbound Shipment....273
Container Return Tracking Numbers .....276
Serial Details for Outbound Shipment Console
Screens ...............277
Container Status Audits for Outbound Shipment
Console Screens ............277
Container Activity List ..........278
Pack or Unpack for Outbound Shipment Console
Screens ...............279
Delete Selected Containers .........279
Modify Containerization..........280
Resolve Short Picked Containers .......282
Dock Appointment Sea rch By All Attributes for
Outbound Shipment ...........282
Dock Schedule Details for Outbound Shipment . . 283
Dock Appointment for Outbound Shipment . . . 283
Dock Group Details for Outbound Shipment . . . 285
View Holds for Outbound Shipment .....285
Add Holds for Outbound Shipment ......286
View History for Outbound Shipment .....287
Chapter 30. Create Outbound
Shipment Screens .........289
About Create Outbound Shipment Screens . . . 289
Shipment Entry for Outbound Shipment ....289
Shipment Supervisory Overrides for Outbound
Shipment ...............290
Chapter 31. Wave Console Screens 291
About Wave Console Screens ........291
Wave Search Screen ...........291
Wave List Screen ............291
Release Wave Screen ...........292
Cancel Wave .............292
Wave Summary ............293
Shipment Profile Summary .........294
Shipment Summary ...........294
Batch Summary ............294
Work Order Summary ..........295
Item Task Summary ...........295
Shipping Containers Summary .......296
Prioritize Wave .............296
Print Wave ..............296
Alert List ...............297
Wave Audit ..............297
Chapter 32. Create Wave Screens. . . 299
Create Wave Screen for a Shipment Group . . . 299
Chapter 33. Pack Station Screens . . 301
About Pack Station Screens.........301
Pack Details Screen ...........301
Container Contents for Pack Station Console
Screens ...............305
Select SKU for Pack Station Console Screens . . . 306
Serial Entry for Pack Station Console Screens. . . 306
Chapter 34. Manifest Console Screens 309
Manifest Search By All Attributes.......309
Manifest List .............309
Manifest Details ............310
Summary By Carrier Service ........311
Print a Manifest Using the Console Screens . . . 311
Open Manifest .............311
Close Manifest .............312
Chapter 35. Create Load Screens . . . 313
Create Load Screens ...........313
Chapter 36. Load Console Screens 315
About Load Console Screens ........315
Chapter 37. Add To Manifest Screens 317
Add To Manifest ............317
Container Contents for Packaged Items.....319
Chapter 38. Remove From Manifest
Screens ..............321
About Remove from Manifest Screens .....321
Remove From Manifest ..........321
Container Contents for Remove from Manifest
Console Screens ............323
Chapter 39. Weigh Station Screens 325
About Weigh Station Screens ........325
Weigh Station Screen ...........325
Contents vii
Serial Entry Screen for Weigh Station Console
Screens ...............327
Container Contents Screen for Weigh Station
Console Screens ............327
Chapter 40. Location Inventory Audit
Console Screens ..........329
Location Inventory Audit Search By Item ....329
Location Inventory Audit Search By Container . . 329
Location Inventory Audit Search By Transaction
References ..............330
Location Inventory Audit Search By Inventory
Attributes ..............331
Performing a Location Inventory Audit Search By
Count Reference ............331
Location Inventory Audit List ........332
Location Inventory Audit Details for Items . . . 333
Location Inventory Audit Details for Containers 335
Chapter 41. Task Console Screens 337
About Task Console Screens ........337
Task Search By Task Type .........337
Task Summary .............337
Task Summary By Zone ..........339
Open Task Summary ...........339
User List (selection) ...........340
Task Search By Zone ...........340
Task Search By Inventory .........341
Task Search By Reference .........342
Task Search By Exception .........343
Task Search By Date ...........343
Task Search By At Risk Tasks ........344
Task List for Task Management Console Screens 345
Task Detail ..............346
Complete Task .............347
Modification Reason for Task Management Console
Screens ...............348
Summary Task Detail...........349
Task Status Details ...........350
Task Status Audits............350
Assign to User .............351
User Search By All Attributes ........351
User List Selection............351
Reprioritize ..............351
Hold Reason .............352
Cancel Task Reason ...........352
User Detail ..............352
Batch Search By All Attributes........353
Batch List ..............353
Batch Detail ..............354
Complete Batch for Task Management Console
Screens ...............354
Print Batch ..............355
Chapter 42. Confirm Batch Screens 357
Confirm Batch Screen...........357
Access Complete Batch Screen........357
Complete Batch for Confirm Batch Console Screens 357
Modification Reason for Confirm Batch Console
Screens ...............358
Chapter 43. Record Count Screens 359
About Record Count Screens ........359
Recording Count Results .........359
Chapter 44. Log Productivity Screens 361
About the Log Productivity Screens ......361
Log Productivity Screen ..........361
Chapter 45. Productivity Console
Screens ..............363
Productivity Search By Productivity Type ....363
Productivity List ............363
Productivity Details ...........364
Chapter 46. Derive Labor Standards
Screens ..............367
About Derive Labor Standards Screens .....367
Activities Search By Date Range .......367
Productivity Type List ..........368
Productivity Summary ..........368
Derive Labor Standards Screen .......369
Chapter 47. User Time Sheet Screens 371
About User Time Sheet Screens .......371
User Time Sheet Search By User .......371
Time Sheet ..............371
Chapter 48. Resource Planning
Screens ..............373
About Resource Planning Screens ......373
Defining Standard Capacity ........373
Resource Pool Current Standard Capacity
Details ..............373
Planning Resources ...........375
Resource Planning Capacity Search .....375
Resource Planning Screen ........375
Capacity Details ...........376
Demand Details for Resource Pool .....378
Planning Summary ..........380
Chapter 49. Sterling Warehouse
Management System Prints .....381
About Sterling WMS Prints.........381
Packing Slip ..............381
UCC-128 Container Shipping Label ......383
Container Label Single SKU .......383
Container Label Multi SKU........385
Task List for Printing ...........386
Item Pick Task List Simple ........387
Cart Manifest Task List (Requires Sorting of
Inventory During Pick) .........388
Bill Of Lading .............389
VICS Bill Of Lading for Shipment .....389
VICS Bill Of Lading for Load .......392
Hazmat Bill Of Lading .........395
LTL Manifest Label ...........397
Shipper's Certification For Hazardous Materials 398
FedEx Carrier Label ...........400
viii Sterling Selling and Fulfillment Foundation: Warehouse Management System User Guide
FedEx Shipping Label .........400
FedEx Return Shipping Label .......401
Reprint Carrier Label ...........402
Count Sheet ..............402
Wave Release for Prints ..........403
Hazmat Stock Keeping Unit Labels ......404
Chapter 50. Understanding the
Execution Console Framework ....407
About Understanding the Execution Console
Framework ..............407
Tab Ordering .............407
Automatic Pop-Ups for Additional Data Capture 407
Hot Keys ...............407
Field Level Validations ..........407
Populating Fields ............408
Barcode Handling Capabilities........408
Notices ..............409
Index ...............413
Contents ix
xSterling Selling and Fulfillment Foundation: Warehouse Management System User Guide

Chapter 1. Warehouse Management System Overview
About Warehouse Management System
The IBM®Sterling Warehouse Management System enables you to manage
inventory and processes in your warehouse. The Sterling Selling and Fulfillment
Foundation: Warehouse Management System Concepts Guide provides an overview of
various processes in a warehouse for diverse enterprises.
This manual explains how to use the Sterling Warehouse Management System
consoles that contains the following components:
vExecution Console Framework - enables you to capture data on the screen by
entering the data using the keyboard and pressing the Tab key, or by scanning
the barcode using a wedge scanner. The various features of the execution
console framework are explained in the Appendix, "Understanding the
Execution Console Framework".
vInbound Shipment Console - enables you to view information about inbound
order shipments and shipment containers. The screen level information is
explained in the chapter, "Inbound Shipment Console Screens".
vReceipt Console - enables you to view receipt details. The screen level
information is explained in the chapter, "Receipt Console Screens".
vCreate Inbound Shipment - enables you to manually create inbound shipments
from fax, e-mail messages, or telephone conversations, as well as for trailers that
arrive with no prior notice. The screen level information is explained in the
chapter, "Create Inbound Shipment Screens".
vReceive Inventory - enables you to receive an expected container, build cases or
pallets, receive blind receipts, and receive over-receipt quantity. This console is
designed to support scanning of information utilizing available barcodes. The
screen level information is explained in the chapter, "Receive Console Screens".
vReceipt Adjustments - enables you to adjust errors in the receipt quantity
caused during receiving. The screen level information is explained in the
chapter, "Receipt Adjustment Screens".
vInspect Inbound Receipts - enables you to inspect inbound receipts. The
procedure for inspecting an inbound receipt is similar to inspecting a return
receipt. See the chapter, "Inspect Inbound Receipts Screens".
vInspect Return Receipts - enables you to record inspection details and provides
visibility to item level inspection details for a receipt. The screen level
information is explained in the chapter, "Inspect Return Receipts Screens".
vLocation Inventory - enables you to manage inventory in a warehouse and
provides comprehensive visibility to inventory at both enterprise and node
levels. The screen level information is explained in the chapter, "Location
Inventory Console Screens".
vCreate Count Request - enables you to create count requests. A count process in
a warehouse allows you to verify the system's inventory against the actual
inventory that is available in a specific location. The screen level information is
explained in the chapter, "Create Count Request Screens".
vCount Console - provides comprehensive visibility to the count request status
and the count results that are recorded. The screen level information is explained
in the chapter, "Count Console Screens".
© Copyright IBM Corp. 1999, 2011 1
vCreate Move Request - enables you to create ad hoc move requests. The screen
level information is explained in the chapter, "Create Move Request Screens".
vMove Request Console - enables you to manage all processes for a move
request, including the abilities to view and modify move requests. The screen
level information is explained in the chapter, "Move Request Console Screens".
vAdjust Location Inventory - enables you to adjust inventory in the system for a
location to reflect the physical inventory. The screen level information is
explained in the chapter, "Adjust Location Inventory Screens".
vPrint SKU Labels - enables you to print the SKU labels. The screen level
information is explained in the chapter, "Print Stock Keeping Unit Labels
Screens".
vCreate Work Order - enables you to create work orders. The screen level
information is explained in the chapter, "Create Work Order Screens".
vWork Order Console - provides work order visibility at both enterprise and
node levels. The screen level information is explained in the chapter, "Work
Order Console Screens".
vVAS Station - enables you to scan an outbound container number or a work
order number to identify the work order. This component also provides the
ability to confirm the work order at an activity level. The screen level
information is explained in the chapter, "Value-Added Services Station Screens".
vOutbound Shipment Console - enables you to modify the outbound shipment
instruction. This component also provides visibility to discrepancies found in the
outbound shipments. The screen level information is explained in the chapter,
"Outbound Shipment Console Screens".
vCreate Outbound Shipment - enables you to manually create outbound
shipments from fax, e-mail messages, or telephone conversations, as well as for
trailers that arrive with no prior notice. The screen level information is explained
in the chapter, "Create Outbound Shipment Screens".
vWave Console - enables you to match all shipments with the appropriate
shipment groups and create waves for those groups. The screen level
information is explained in the chapter, "Wave Console Screens".
vCreate Wave - enables you to manually create waves. The screen level
information is explained in the chapter, "Create Wave Screens".
vPack Station - enables you to pack containers for system defined and user
defined containerization processes. The screen level information is explained in
the chapter, "Pack Station Screens".
vManifest Console - enables you to view manifest details. You can also open a
new manifest, close a manifest, and print a manifest. The screen level
information is explained in the chapter, "Manifest Console Screens".
vAdd To Manifest - enables you to add containers to a manifest. The screen level
information is explained in the chapter, "Add To Manifest Screens".
vRemove From Manifest - enables you to remove containers from a trailer or
manifest before closing the manifest. The screen level information is explained in
the chapter, "Remove From Manifest Screens".
vWeigh Station - enables you to record a container's weight that belongs to a TL,
LTL, or parcel shipment. The screen level information is explained in the
chapter, "Weigh Station Screens".
vLocation Inventory Audit Console - enables you to view an item's or a
container's inventory audit details. The screen level information is explained in
the chapter, "Location Inventory Audit Console Screens".
vTask Console - enables you to optimize warehouse throughput and maximize
worker efficiency. You can:
2Sterling Selling and Fulfillment Foundation: Warehouse Management System User Guide
– assign tasks
– reprioritize tasks
– modify task location and quantity
– complete a task
– cancel certain types of tasks
– view summary level information across all tasks for a node.
The screen level information is explained in the chapter, "Task Console
Screens".
vConfirm Batch - enables you to confirm a batch or confirm a batch with
exceptions, if applicable. The screen level information is explained in the chapter,
"Confirm Batch Screens".
vRecord Count - enables you to record count task results to indicate the
completion of the count task that was assigned. The screen level information is
explained in the chapter, "Record Count Screens".
vLog Productivity - enables you to record additional productivity information.
The screen level information is explained in the chapter, "Log Productivity
Screens".
vProductivity Console - provides visibility to activities performed at a process
level. Allows you to modify the productivity details. The screen level
information is explained in the chapter, "Productivity Console Screens".
vPrints - provides documents that are printed daily in a warehouse, as and when
requested, or when initiated by the occurrence of specific events. The documents
that can be printed are explained in Appendix A, "Sterling WMS Prints".
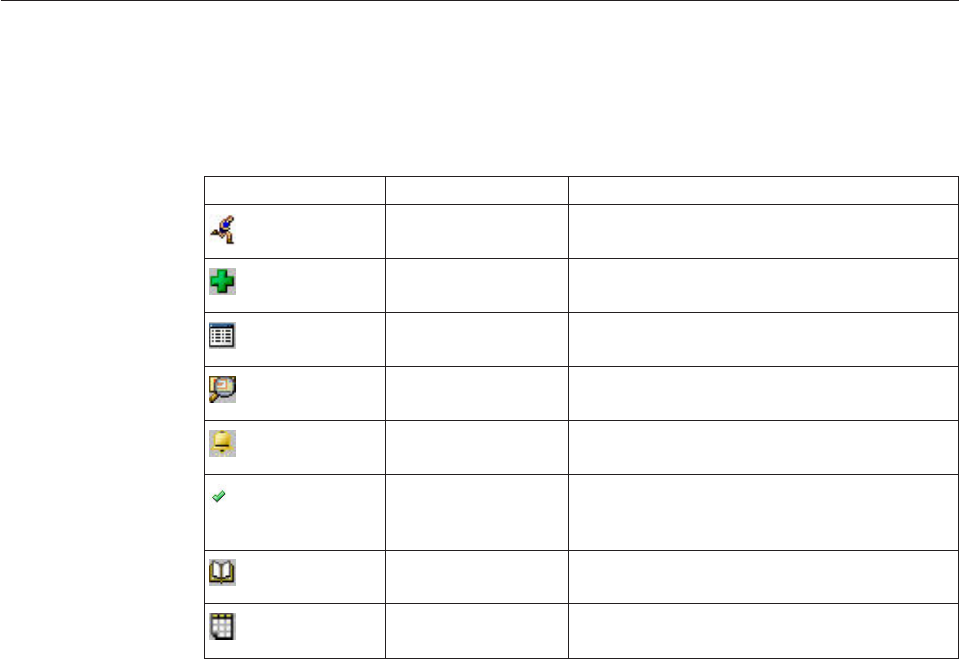
Understanding Sterling Warehouse Management System User Interface
Icons
The following table describes the icons used in the Sterling Warehouse
Management System user interface.
Table 1. Sterling Warehouse Management System User Interface Icons
Icon Name Description
Activity Demand Enables you to view the activity demand for a
shipment, container and so on.
Add Enables you to add an instruction line,
charges, and so on.
Additional
Attributes
Enables you to specify additional attributes
for identification, shipping and so on.
Address Details Enables you to view, modify, or add an
address.
Alert Enables you to view the alerts for a move
request, shipment and so on.
Appointment Enables you to view appointment details, or
plan an appointment for a work order of a
provided service item group.
Audit Enables you to view the list of audits for the
container, wave and so on.
Calendar Enables you to select a date from the calendar.
Chapter 1. Warehouse Management System Overview 3

Table 1. Sterling Warehouse Management System User Interface Icons (continued)
Capacity Indicates the capacity in the Resource
Planning screen.
Charges and Taxes Enables you to view, add, or modify the
charges and discounts for a container,
shipment and so on.
Containers Enables you to view all packed containers
included in the shipment.
Demand Indicates the demand in the Resource
Planning screen.
Instructions Enables you to view, modify, or add
instructions for a service request, shipment
and so on.
Kit Components Enables you to view the kit components for
the shipment line.
Load Enables you to view the loads that are
carrying the shipment.
Lookup Enables you to search for shipments, wave
number and so on.
Move Shipments Enables you to push demands to the
appropriate date.
Plus Enables you to alternatively view and hide
details about the selected object, such as tag
details or count details.
Return Receipt Enables you to view information about
receipts.
Return Receipt
History
Enables you to view the details of the receipt
and manage discrepancies for receipts.
Select Node Enables you to select a node.
Save Enables you to save the settings in the screen.
Serial Enables you to view serial details for location
inventory or containers.
Shipment Data
Types
Enables you to view, add, or modify shipment
dates and delivery dates.
Shipments Enables you to view the shipment or
container details.
Summary Task Indicates summary tasks for all types of
searches.
Toggle Enables you to enter the serial range of the
items for pack containers.
View History Enables you to view the history of the
selected hold.
Work Order Hold Enables you to view holds applied to the
work order, shipment and so on.
The following table describes the color icons used in the Dock Appointment
Calendar.
4Sterling Selling and Fulfillment Foundation: Warehouse Management System User Guide

Table 2. Color Icons in the Dock Appointment Calendar
Icon Name Description
Blue Indicates an appointment for the searched
criteria.
Click a slot to modify an existing
appointment.
Cyan Indicates appointments that do not match the
searched criteria.
Click a slot to modify an existing
appointment.
Gray Indicates free slots for which new
appointments can be taken.
Click a slot to create a new dock appointment.
Black Indicates the unavailable slots due to the
calendar constraints.
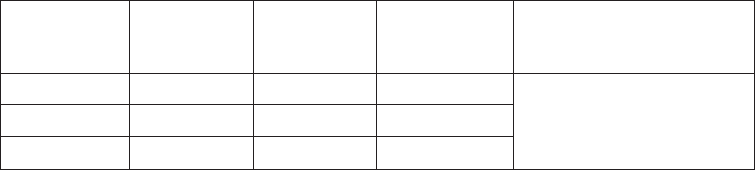
The following table describes the color icons used in the Time Sheet screen.
Table 3. Color Icons in the Time Sheet screen.
Icon Name Description
Black Indicates unavailable time slots.
Green Indicates time slots for put away.
Yellow Indicates time slots for replenishment.
Blue Indicates time slots for retrieval.
Orange Indicates time slots for picking.
Cyan Indicates time slots for receipt.
Pink Indicates time slots for count.
Light Pink Indicates time slots for VAS.
Peach Indicates time slots for packing.
Purple Indicates time slots for outbound inventory
container build.
Aqua Indicates time slots for shipping container
build.
Red Indicates time slots for shipping.
Chapter 1. Warehouse Management System Overview 5
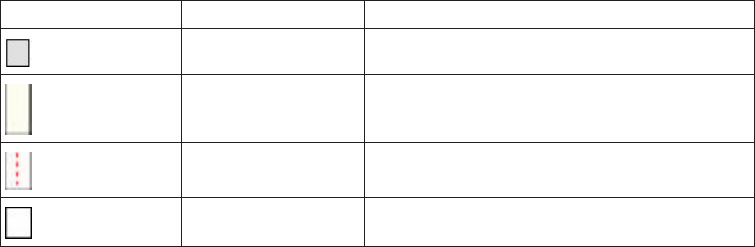
Table 3. Color Icons in the Time Sheet screen. (continued)
Icon Name Description
Gray Indicates time slots for inspection.
Off-White Indicates time slots for transportation.
Login Indicates time slots for login.
White Indicates idle time slots.
6Sterling Selling and Fulfillment Foundation: Warehouse Management System User Guide
Chapter 2. Accessing Multiple Nodes
About Accessing Multiple Nodes
A warehouse user can work in the context of one node. However, the user may
have to switch between warehouses and access multiple nodes. The Sterling
Warehouse Management System enables the user to access multiple nodes and
perform various warehouse operations. After the user switches to a different node,
all the transactional data displayed and recorded will be in the context of the node
the user is working on.
Permission to access multiple nodes is based on the teams assigned to the users in
the Applications Manager. For more information about defining teams, refer to the
Sterling Selling and Fulfillment Foundation: Application Platform Configuration Guide.
Access Multiple Nodes
About this task
Perform the following steps to switch between multiple nodes:
Procedure
1. Log in to the Application Console. From the navigation bar, select
Configuration > Select Node.
2. The Select Node window is displayed. Select the node from the Select Node
drop-down list or Lookup icon. Depending on the configuration, one of the
following is displayed for Select Node:
vSelect Node drop-down list - This list displays all the nodes you have access
to, based on the team configured for you. Select the appropriate node from
the list.
vSelect Node lookup icon - Click the Lookup icon to display the Node lookup
screen, and click Search. The nodes that are accessible to you are displayed
in the Node List dialog box. Click the Select Node icon adjacent to the node
you want to access. The selected node will be displayed in the Select Node
window.
3. Click OK. For all subsequent warehouse operations, the node you have selected
will be used as the default node.
Results
In order to access a different node, repeat Step 1 through Step 3. If you do not
want to select any node, either select the blank option in the Select Node
drop-down list or delete the current node displayed in the Select Node field.
vIf you log in to the Application Console without selecting a node, and attempt to
view any of the Details screens such as Create Move Request, Create Count
Request, and so on, in which it is mandatory to enter a value in the Node field,
the Select Node dialog box is displayed. After you select a node from the Select
Node drop-down list in this dialog box, the relevant screen is displayed.
vYou must select a node before performing the pack operations and manifest
operations.
© Copyright IBM Corp. 1999, 2011 7
vIf you log in to the Application Console without selecting a node, and attempt to
view any of the Search screen such as the Location Inventory Console, in the
Search Console screen, the Node drop-down list automatically displays all the
nodes that you have permission to access. If you select a node from this
drop-down list, the resultant values for the new node will be reflected only for
that particular search. It will not change the default node of the user.
8Sterling Selling and Fulfillment Foundation: Warehouse Management System User Guide

Chapter 3. Performing Inbound Tasks
About Performing Inbound Tasks
The Inbound Shipment Console provides information on inbound shipments and
containers. This console provides sellers, node users, and carriers with information
necessary to coordinate and ensure on-time delivery of shipments.
You can either include a purchase order release into an existing inbound shipment
or create an inbound shipment for a set of orders.
An inbound shipment as an entity can be used in a delivery plan by attaching it to
a load. For more information about configuring delivery plans and loads, see the
Sterling Selling and Fulfillment Foundation: Logistics Management Configuration Guide.
Create a Purchase Order
Procedure
1. From the navigation bar, choose Supply > Create Inbound Order. The Inbound
Order Entry screen displays. For more information about the Inbound Order
Entry screen, see the Sterling Selling and Fulfillment Foundation: Supply
Collaboration User Guide.
2. In Document Type, select Purchase Order.
3. In Enterprise, select the enterprise that handle the inbound order
4. In Buyer, enter the buyer placing the inbound order.
5. In Seller, enter the seller that the inbound order is being placed from.
6. Enter other information in the applicable fields.
7. Click Create Order. The Inbound Order Detail screen displays. For more
information about the Inbound Order Detail screen, see the Sterling Selling and
Fulfillment Foundation: Supply Collaboration User Guide.
Add Items to a Draft Purchase Order
About this task
Changes can be made to a Purchase Order at any time while it is in Draft status. A
Draft Purchase Order does not enter the Created status until it is confirmed.
To add items to a Draft Purchase Order, in the Inbound Order Detail screen:
Procedure
1. Enter details in the Order Lines panel.
2. Click Save. You can now confirm the order.
Confirm a Draft Purchase Order
About this task
To confirm a Purchase Order:
© Copyright IBM Corp. 1999, 2011 9

Procedure
1. Search for, or create, an open Purchase Order in the Draft status.
2. From the Inbound Order action bar, click Confirm. The Inbound Order now
displays in Created status.
Note: The Bill To address and order lines must be entered before a draft order
can be confirmed.
About Creating an Advance Ship Notice
Shipments (ASNs) are transmitted to warehouses through EDI downloads, fax, or
e-mail, and also when a trailer arrives with no prior notice.
The shipment entry console lets you manually create shipments from fax, e-mail or
telephone conversations. ASNs can also be created for those trailers that arrive
with no prior notice.
Create an Advance Ship Notice
About this task
To create an inbound shipment:
Procedure
1. From the navigation bar, choose Inbound > Create Inbound Shipment. The
Shipment Entry screen displays.
2. In Document Type, select the document type associated with the shipment you
are creating. Valid values are 'Purchase Order' or 'Transfer Order'.
3. In Ship Node, enter the shipping node associated with the shipment. This
represents the seller's ship node.
4. In Buyer, enter the buyer associated with the shipment you want to create, if
applicable.
5. In Seller, enter the seller associated with the shipment you want to create.
6. In Order #, enter the purchase order number associated with the shipment.
7. Enter other information in the applicable fields.
8. Click Create Shipment to create the Advance Ship Notice.
Set Up Shipment Supervisory Overrides
About this task
To set the supervisory overrides, in the Shipment Entry screen:
Procedure
1. From the action bar, click Supervisory Overrides. The Shipment Supervisory
Overrides screen displays.
2. Select the check boxes of the applicable overrides.
3. Click OK.
10 Sterling Selling and Fulfillment Foundation: Warehouse Management System User Guide

Searching for Inbound Order Shipments
About Searching for Inbound Order Shipments
The following Inbound Shipment Search screens let you search for shipments to
receive based on different criteria:
vInbound Order Shipment Search By Status screen
vInbound Order Shipment Search By Date screen
vInbound Order Shipment Search By Carrier screen
vInbound Order Shipment Search By Item screen
To navigate to the Search Screens in the Inbound Order
Shipments
Procedure
1. From the navigation bar, choose Inbound > Inbound Shipment Console.
Initially, the Inbound Order Shipment Search By Status screen displays. Select
the applicable search view from the Views drop-down list.
2. Enter information in the applicable fields.
3. Click Search. The search results display in the Inbound Order Shipment List
screen.
View the Audit Trail for Shipment Modifications
About this task
In addition to shipment status audits, you can view the audit trail for
modifications made to an inbound shipment, shipment lines, or both. This section
provides instructions for viewing shipment modifications, such as modifying a
carrier or service, ship-to address, adding or removing a shipment from a load, or
adding or deleting shipment instructions.
To view a shipment audit trail:
Procedure
1. From the navigation bar, click Inbound > Inbound Shipment Console. The
Inbound Order Shipment Search By Status screen displays.
2. Enter the applicable search parameters, and click Search. The Shipment List
screen displays.
3. Select the shipment number for which you want to view details.
4. From the action bar, click View Details. The Inbound Order Shipment Details
screen displays.
5. From the Shipment action bar, click the Audit icon. The Shipment Audits
screen displays, which provides complete visibility to modifications made to an
inbound shipment, shipment lines, or both.
About Creating a Load
IBM Sterling Selling and Fulfillment Foundation enables you to create a load
containing one or more complete shipments. The load must have a set origin and
destination, but it can have multiple intermediate stops. Shipments can be added
to a load at its origin or at any intermediate stop. The shipments contained in the
load can be delivered to any stop between the origin and destination and can
belong to multiple Enterprises. Partial shipments cannot be included in a load.
Chapter 3. Performing Inbound Tasks 11

Create a Load
About this task
To create a load:
Procedure
1. From the navigation bar, choose Inbound > Create Load. The Create Load
Screens screen displays.
2. Enter information in the applicable fields.
3. Click Save. The Load Details screen displays. For more information about the
Load Details screen, see the Sterling Selling and Fulfillment Foundation: Logistics
Management User Guide.
Print Documents or Labels
About this task
To print a document or label:
Procedure
1. Search for the applicable shipments or containers. For more information about
searching for inbound order shipments, see Searching for Inbound Order
Shipments.
2. From the inbound shipment list or inbound container list, select the check
boxes of the applicable shipment or container.
3. Do any of the following:
vFrom the action bar, click Print. The Print screen displays.
vFrom the action bar, click View Details. The Inbound Order Shipment Details
or Container Details screen displays. From the action bar, click Print. The
Print screen displays.
Receiving Inventory
The Sterling Warehouse Management System lets you control the receipt process in
a warehouse. It supports the least automated warehouse through paper-based
processes. It also supports the most automated warehouses that use MHEs for
receipts. A warehouse can configure its own receiving preferences to characterize
the flow of inventory from the receiving dock to other departments and zones of a
warehouse.
A receipt in the Sterling Warehouse Management System is made against a
purchase order or shipment. The Sterling Warehouse Management System tracks
cases or pallets with contents at a shipment level, if available. It also supports
blind receipts. A warehouse may use any or all of these methods to receive its
inventory. The Sterling Warehouse Management System places constraints for each
of these methods.
Receiving Inventory using High Speed Data Entry Screens
This section explains how to receive inventory in the Sterling Warehouse
Management System using the Receive HSDE.
The following use-cases are explained in detail:
vNavigating to the Receive Details Screen
12 Sterling Selling and Fulfillment Foundation: Warehouse Management System User Guide
vReceiving Expected Containers
vBuilding Cases or Pallets
vReceiving Blind Receipts
vOver-Receiving
vCapturing an Item’s Extended Attributes
Navigate to the Receive Details Screen For Receiving Inventory
Using High Speed Data Entry Screens
About this task
To access the Receive Details screen, from the navigation bar of the Warehouse
Management System module, click Inbound > Receive. The Receive Details screen
displays.
Receive Expected Containers For Receiving Inventory Using
High Speed Data Entry Screens
About this task
To receive expected containers:
Procedure
1. Open the Receive Details screen. For more information about navigating to the
Receive Details screen, see the section, "Navigate to the Receive Details Screen
For Receiving Inventory Using High Speed Data Entry Screens".
2. In Shipment #, enter or scan the shipment number.
3. In Pallet ID/Case ID, enter the pallet SCM or case SCM. If the Do Not Verify
Case Contents option is disabled, and in the Applications Manager, under
Receiving Preferences, if the "Force Case Content entry" option is selected,
verification of the contents packaged into the case is forced. For more
information, see the Sterling Selling and Fulfillment Foundation: Warehouse
Management System Configuration Guide.
4. Enter other information in the applicable fields.
5. Do any of the following:
vClick Close Pallet or press Alt+P.
vClick Close Case or press Alt+C.
Build Cases or Pallets For Receiving Inventory Using High Speed
Data Entry Screens
About this task
To build cases or pallets out of loose SKUs that are available in the shipment:
Procedure
1. Open the Receive Details screen. For more information about navigating to the
Receive Details screen, see the section, "Navigate to the Receive Details Screen
For Receiving Inventory Using High Speed Data Entry Screens".
2. In Shipment #, enter or scan the shipment number.
3. In Pallet ID/Case ID, enter the new pallet SCM or case SCM.
4. Enter other information in the applicable fields.
5. Do any of the following:
vClick Close Pallet or press Alt+P.
vClick Close Case or press Alt+C.
Chapter 3. Performing Inbound Tasks 13
Receive Blind Receipts For Receiving Inventory Using High
Speed Data Entry Screens
About this task
When you receive loose items in a warehouse for a shipment which has no order
and shipment line, you are receiving a blind receipt.
To receive a blind receipt:
Procedure
1. Create an inbound shipment with no shipment lines. For more information
about creating an inbound shipment, see the section, "About Creating an
Advance Ship Notice".
2. Open the Receive Details screen. For more information about navigating to the
Receive Details screen, see the section, "Navigate to the Receive Details Screen
For Receiving Inventory Using High Speed Data Entry Screens".
3. In Shipment #, enter or scan the shipment number.
4. Enter other information in the applicable fields.
5. Do any of the following:
vClick Close Pallet or press Alt+P.
vClick Close Case or press Alt+C.
Over-Receive For Receiving Inventory Using High Speed Data
Entry Screens
About this task
The process of receiving excess quantity is based on the shipment attributes. For a
list of defined over-receipt quantity attributes, see the table, "List of defined
over-receipt quantity attributes."
To over-receive:
Procedure
1. Open the Receive Details screen. For more information about navigating to the
Receive Details screen, see the section, "Navigate to the Receive Details Screen
For Receiving Inventory Using High Speed Data Entry Screens".
2. In Shipment #, enter or scan the shipment number.
3. Enter other information in the applicable fields.
4. Do any of the following:
vClick Close Pallet or press Alt+P.
vClick Close Case or press Alt+C.
List of defined over-receipt quantity attributes
Table 4. Over-Receipt Quantity Attributes
Order Exists
on the
System
If Manual
Shipment
Does
Shipment
have Lines
Is Suppress
Overage
Check set Over-Receipt Quantity
Y Y Y Y Receive any quantity for the
existing shipment lines.
YNYY
NNYY
14 Sterling Selling and Fulfillment Foundation: Warehouse Management System User Guide
Table 4. Over-Receipt Quantity Attributes (continued)
Order Exists
on the
System
If Manual
Shipment
Does
Shipment
have Lines
Is Suppress
Overage
Check set Over-Receipt Quantity
Y Y Y N Receive up to receiving
preference overage limit
against the order line.
YYNN
YNYN
Y NNN
N Y Y N Receive up to receiving
preference overage limit
against the shipment line.
N N Y N Receive up to receiving
preference overage limit
against the shipment line.
Y Y N Y Receive any quantity for the
existing order lines.
N Y N Y Receive any item, any
quantity.
Capture an Item’s Extended Attributes For Receiving Inventory
Using High Speed Data Entry Screens
About this task
Note: You can capture the tag and serial attributes only if the node that is
receiving inventory is configured to capture tags and has serial tracking enabled,
when receiving inventory, or when performing all operations within the node. For
more information about capturing the tag and serial attributes, see the Sterling
Selling and Fulfillment Foundation: Application Platform Configuration Guide.
To capture the extended attributes for an item:
Procedure
1. Open the Receive Details screen. For more information about navigating to the
Receive Details screen, see the section, "Navigate to the Receive Details Screen
For Receiving Inventory Using High Speed Data Entry Screens".
2. In the Item ID field, scan an item. If the item is serial-tracked, tag-tracked, or
time sensitive, then capture the item’s extended attributes.
For more information about capturing the extended attributes, see the section,
"Capturing an Item’s Extended Attributes".
Receiving Inventory Using Paper and Recording on System
Later
This section explains how to receive inventory in the Sterling Warehouse
Management System using paper, and record the receipt on the system later.
The following use-cases are explained in detail:
vNavigate to the Inbound Order Shipment Details Screen for Receiving Inventory
Using Paper and Recording on System Later
vStart a Receiptfor Receiving Inventory Using Paper and Recording on System
Later
Chapter 3. Performing Inbound Tasks 15
vRecord Paper-Based Receipts for Receiving Inventory Using Paper and
Recording on System Later
vReceive Expected Containers for Receiving Inventory Using Paper and
Recording on System Later
vBuild Cases or Pallets for Receiving Inventory Using Paper and Recording on
System Later
vOver-Receive for Receiving Inventory Using Paper and Recording on System
Later
vCapture an Item’s Extended Attributes for Receiving Inventory Using Paper and
Recording on System Later
Navigate to the Inbound Order Shipment Details Screen for
Receiving Inventory Using Paper and Recording on System Later
About this task
To navigate to the Inbound Order Shipment Details screen:
Procedure
1. Search for the required inbound order shipments. For more information about
identifying the inbound order shipment, see the section, "Searching for Inbound
Order Shipments".
2. From the shipment list, select the check boxes of the applicable shipments.
3. From the action bar, click View Details. The Inbound Order Shipment Details
screen displays.
Start a Receipt for Receiving Inventory Using Paper and
Recording on System Later
About this task
To start a receipt:
Procedure
1. Navigate to the Inbound Order Shipment Details screen for the applicable
shipments. For more information about navigating to the Inbound Order
Shipment Details screen, see the section, "Navigate to the Inbound Order
Shipment Details Screen for Receiving Inventory Using Paper and Recording on
System Later".
2. From the action bar, click Start Receipt. The Start a Receipt for Receiving
Inventory Using Paper and Recording on System Later screen displayed.
3. Enter information in the applicable fields.
4. Click Save.
Record Paper-Based Receipts for Receiving Inventory Using
Paper and Recording on System Later
About this task
To record paper-based receipt details:
Procedure
1. Navigate to the Inbound Order Shipment Details screen for the applicable
shipments. For more information about navigating to the Inbound Order
16 Sterling Selling and Fulfillment Foundation: Warehouse Management System User Guide
Shipment Details screen, see the section, "Navigate to the Inbound Order
Shipment Details Screen for Receiving Inventory Using Paper and Recording on
System Later".
2. From the action bar, click Report/Record receipt. The Receive screen displays.
vIf receipts are not available, the Start a Receipt for Receiving Inventory Using
Paper and Recording on System Later screen displays. For more information
about starting a receipt, see section, "Start a Receiptfor Receiving Inventory
Using Paper and Recording on System Later".
vIf multiple receipts are available, the Receive screen displays. Select the check
boxes of the applicable receipts you want to receive and click Proceed. The
Receive screen displays.
3. In the Lines to Receive table, enter the quantity you want to receive against
each shipment line.
4. Click Save.
Receive Expected Containers for Receiving Inventory Using
Paper and Recording on System Later
About this task
To receive expected containers:
Procedure
1. Open the Receive screen. For more information about navigating to the Receive
screen, see the section, "Record Paper-Based Receipts for Receiving Inventory
Using Paper and Recording on System Later".
2. To receive expected pallets, in the Lines To Receive area, click Pallet ID and
enter the pallet SCM.
To receive expected cases, in the Lines To Receive area, click Case ID and enter
the case SCM.
Note: If the Do Not Verify Case Contents box is checked, and in the
Applications Manager, under Receiving Preferences, if the Force Case Content
entry box is checked, verification of the contents packaged into the case is not
necessary. For more information, see the Sterling Selling and Fulfillment
Foundation: Warehouse Management System Configuration GuideSterling Warehouse
Management System: Configuration Guide. Also, you need not enter other
information to receive the container, after scanning the case or pallet.
3. Enter other information in the applicable fields.
4. If receiving a pallet, check Pallet Completely Received to close the pallet.
If receiving a case, check Case Completely Received to close the case.
Build Cases or Pallets for Receiving Inventory Using Paper and
Recording on System Later
About this task
To build cases or pallets out of loose SKUs that are available in the shipment:
Procedure
1. Open the Receive screen. For more information about navigating to the Receive
screen, see the section, "Record Paper-Based Receipts for Receiving Inventory
Using Paper and Recording on System Later".
2. If receiving an expected pallet, in Pallet ID, enter the new pallet SCM.
If receiving an expected case, in Case ID, enter the new case SCM.
Chapter 3. Performing Inbound Tasks 17

3. Enter other information in the applicable fields.
4. If building a pallet, check Pallet Completely Received to close the pallet.
If building a case, check Case Completely Received to close the case.
Over-Receive for Receiving Inventory Using Paper and
Recording on System Later
About this task
The process of receiving excess quantity is based on the shipment attributes. For a
list of defined over-receipt quantity attributes, see the table, "Over-Receipt Quantity
Attributes".
To over-receive:
Procedure
1. Open the Receive screen. For more information about navigating to the Receive
screen, see the section, "Record Paper-Based Receipts for Receiving Inventory
Using Paper and Recording on System Later".
2. Enter other information in the applicable fields.
3. If receiving a pallet, check Pallet Completely Received to close the pallet.
If receiving a case, check Case Completely Received to close the case.
Capture an Item’s Extended Attributes for Receiving Inventory
Using Paper and Recording on System Later
About this task
To capture the extended attributes for an item:
Procedure
1. Open the Receive screen. For more information about navigating to the Receive
screen, see the section, "Record Paper-Based Receipts for Receiving Inventory
Using Paper and Recording on System Later".
2. In the Lines To Receive area > Shipment Line list search for the appropriate
Item ID. If the item is serial-tracked, tag-tracked, or time sensitive, then enter
the item’s extended attributes.
Inspecting Receipts in Multiple Steps
Once inventory is received, it is inspected. Inspecting receipts involves:
vRecording inspection details
vViewing next disposition suggestions based on the current disposition status
vEntering appropriate inspection comments while inspecting an item
vViewing item inspection details for a receipt
vSearching for receipts by disposition code
vInspecting receipts from receipt summary screen
Note: The screens mentioned in these section appear while inspecting return
receipts. However, since the steps required for inspecting receipts are the same
for both Inbound Orders and Returns, the fields in the screen are the same.
18 Sterling Selling and Fulfillment Foundation: Warehouse Management System User Guide

Inspect a Receipt
About this task
To inspect a receipt:
Procedure
1. From the navigation bar, select Inbound> Inspect Receipt to inspect inbound
receipts and Returns > Inspect Receipt to inspect return receipts. The Inspect
Receipt screen displays.
2. Enter information in the applicable fields.
3. Click Proceed. The Inspect Return Receipt Details screen displays.
Inspect Receipt Lines
About this task
You can view the receipt item details and receipt lines that are already inspected
and also enter the inspection details for receipts that are not inspected.
To inspect a receipt line:
Procedure
1. In the Inspect Receipt screen, click Proceed. The Inspect Return Receipt Details
screen displays.
2. In New Disposition, select the disposition code from the list.
3. In Disposition Qty, enter the disposition quantity.
4. Click Save.
5. Click Close.
vTo inspect an item, receive the item with non-final disposition code. For more
information about creating disposition codes, see the Sterling Selling and
Fulfillment Foundation: Warehouse Management System Configuration Guide.
vYou can inspect receipts that are closed.
Close a Receipt
About this task
To close an inbound order's shipment receipt:
Procedure
1. Search for the applicable shipments. For more information about searching for
inbound order shipments, see Searching for Inbound Order Shipments.
2. From the list, select the check boxes of the applicable shipments.
3. From the action bar, click View Details. The Inbound Order Shipment Details
screen displays.
4. From the Shipment action bar, click the Return Receipt icon. The Receipts
window displays.
5. From the list, select the check boxes of the applicable receipts.
6. Click Close Receipt.
Chapter 3. Performing Inbound Tasks 19

Adjust a Receipt
About this task
To make adjustments to shipment receipts:
Procedure
1. From the navigation bar, select Inbound > UnReceive. The Receipt Adjustment
screen displays.
2. Enter information in the applicable fields.
3. Click Proceed. The Adjust Receipt screen displays, which enables you to
validate the criteria you entered in the Receipt Adjustment screen against the
receipt number, for filtering the results.
4. In the Adjust Receipt screen, click Adjust. The Modification Reason screen
displays, which enables you to enter appropriate reasons for adjusting the
received quantity.
5. In the Modification Reason screen, click OK.
Note: The unreceive option can also be used to unreceive a complete case or
pallet and loose SKUs.
Manage Discrepancies in Receiving an Inbound Order's Shipment
About this task
You can manage discrepancies found while receiving inbound shipments.
To manage the receiving discrepancies of an inbound shipment:
Procedure
1. Search for the applicable shipments. For more information about searching for
inbound order shipments, see Searching for Inbound Order Shipments.
2. From the shipment list, select the check boxes of the applicable inbound
shipments.
3. From the action bar, click View Details. The Inbound Order Shipment Details
screen displays.
4. From the action bar, click the Return Receipt History icon. The Shipment
Receipt Discrepancy screen displays.
5. Click Manage Receiving Discrepancies. The Manage Receiving Discrepancies
screen displays.
6. If the Discrepancy Reason and Reason Quantity fields are greyed out, click
Reopen Reason Entry to enable you to make changes as needed.
7. Adjust Discrepancy Reason and Reason Quantity so that the sum of the
Discrepancy Reasons and Reason Quantities add up to the Discrepancy
Quantity.
8. When you have finished the adjustments, click Save.
9. Click Reason Entry Complete. If your adjustments add up correctly, then the
fields are grayed out. If the adjustments do not add up correctly but you need
to close the window, you can finish working with the receiving discrepancies
later.
You can mark the reason entry as complete only after entering the discrepancy
reason for the entire discrepancy quantity.
20 Sterling Selling and Fulfillment Foundation: Warehouse Management System User Guide
10. Click Close.
Note: Use the recordReceivingDiscrepancy API to record discrepancies while
receiving an inbound shipment. For more information about the
recordReceivingDiscrepancy API, see the Sterling Selling and Fulfillment
Foundation: Javadocs.
Chapter 3. Performing Inbound Tasks 21
22 Sterling Selling and Fulfillment Foundation: Warehouse Management System User Guide

Chapter 4. Managing Inventory
About Managing Inventory
Operations in a warehouse are broken into different processes such as receiving,
picking, packing, VAS, and returns. It is critical to capture and track inventory at
granular levels for these processes. Visibility is required at a granular level to
provide comprehensive management of inventory in a warehouse. Various reports
are generated to track inventory movement across an enterprise.
The Sterling Warehouse Management System provides comprehensive functionality
to track, monitor, and maintain inventory in a warehouse. Inventory visibility is
provided through the Location Inventory Details screen to provide granular
information, such as:
vComprehensive visibility of inventory at both enterprise and node level.
vExtensive search capabilities using granular level information such as serial
number or lot number at a warehouse location.
vThe ability to alter inventory at a location.
vThe ability to modify granular inventory attributes at a location.
vVisibility of audits of inventory changes at the location level.
This chapter explains in detail the following use cases:
vSearching for Inventory
vManaging Count
vAdjusting Inventory
vChanging Inventory Attributes
vClean Out Accounting Bin
vCreating Move Requests
vView an Inventory Audit Trail
vPrint Stock Keeping Unit Labels
Searching for Inventory
Using the inventory search screens, you can perform:
vLocation Inventory Search By Item
vLocation Inventory Search By Container
vLocation Inventory Search By Additional Attributes
vLocation Inventory Search By Segment
vLocation Inventory Search By Tag Attributes
To navigate to the search screens to Search for an Inventory
Procedure
1. From the navigation bar, select Inventory > Location Inventory Console.
Initially, the Location Inventory Search By Item screen displays. Select the
applicable search view from the Views drop-down list.
2. Enter information in the applicable fields.
3. Click Search. The search results display in the Location Inventory screen.
© Copyright IBM Corp. 1999, 2011 23

View an Inventory Audit Trail
About this task
A comprehensive inventory audit trail is provided to view item or container audit
details that occur in a warehouse. Audits are written for each transaction along
with the appropriate reference values and item attributes for tracking purposes. To
view inventory audits:
Procedure
1. From the navigation bar, select Inventory > Location Inventory Console.
2. From the Entities menu, select Location Inventory Audit. The Location
Inventory Audit Search By Item screen displays.
3. Enter information in the applicable fields and click Search. The Location
Inventory Audit List screen displays.
4. From the Location Inventory Audit List, Item Information or Location
Inventory Audit List, Container Information panel, select the checkboxes of the
items or containers whose audit trail you want to view.
5. Click View Details. The Location Inventory Audit Details screen displays.
Managing Count
Products or product categories may be counted on a regular or on an ad hoc basis
to validate the accuracy of the product inventory.
The following use cases are explained in detail here:
vPut an Item or Item Category on Count
vManage Count Requests
vInvoke Count Service
vManage Count Tasks
vPut Tasks on Hold
vReport Count Task Completion
Put an Item or Item Category on Count
About this task
To put an Item or Item Category on Count from the Create Count Request screen:
Procedure
1. From the navigation bar, choose Inventory > Create Count Request. The Create
Count Request screen displays.
2. Enter the information in the applicable fields.
Note: An item or item classification may be put on count only if an enterprise
has been specified.
3. Choose the item or item category that you want to put on count:
vTo put an item on count: Choose By Item, and enter relevant item
information.
vTo put an item classification on count: Choose By Item Classification, and
enter relevant item classification information.
24 Sterling Selling and Fulfillment Foundation: Warehouse Management System User Guide

4. Choose Create Count Request. The new count request displays in the Count
Request Details screen.
Manage Count Requests
About this task
To manage the existing count requests from the Count Request List screen:
Procedure
1. From the navigation bar, choose Inventory > Count Console.
2. Navigate to the Count Request Search By Count Request Attributes screen OR
the Count Request Search By Count Criteria screen.
3. Enter the applicable search parameters, and choose Search. The Count Request
List screen displays.
4. Select the relevant Count Requests and choose the appropriate action:
vChoose View Details to view the details of the selected Count Requests. The
Count Request Details screen displays. From this screen, you can Accept
Variance in the inventory.
vChoose Cancel to cancel the selected Count Requests. The Cancellation
Reason screen displays to capture the reason for cancelling the request.
Invoke Count Service
About this task
You can use the Invoke Count Service screen to create additional count requests.
To create additional count requests:
Procedure
1. From the navigation bar, choose Inventory > Invoke Count Service. The Invoke
Count Service screen displays.
2. Enter information in the applicable fields.
3. Click Proceed.
Manage Count Tasks
About this task
To manage existing count tasks from the Task List or Task Detail screen.
Procedure
1. From the navigation bar, choose Tasks > Task Console.
2. You can search for Tasks by:
a. Zone (See Task Search By Zone screen)
b. Inventory attributes (See Task Search By Inventory screen)
c. References (See Task Search By Reference screen)
d. Exception (See Task Search By Exception screen)
e. Date (See Task Search By Date screen)
Chapter 4. Managing Inventory 25

3. Enter the applicable search parameters, and choose Search. The Task List screen
displays.
4. Alternatively, you can navigate to the Task List screen by choosing View Count
Tasks from the Count Request Details screen.
5. Select the relevant Count Tasks and choose the appropriate action:
vChoose View Details to view the details of the selected Count Tasks. The
Task Detail screen displays. From this screen, you can Hold,Release,Cancel,
or Complete count tasks.
vChoose Assign To User to assign the selected count tasks to a user. The
Assign to User screen displays.
vChoose Reprioritize to update the priority of the selected count tasks. The
Reprioritize screen displays.
vChoose Hold to put the selected count tasks on hold. The Hold Reason screen
displays.
vChoose Release to release the selected a count tasks, which had been put on
hold.
vChoose Cancel to cancel the selected count tasks. The Cancel Task Reason
screen displays.
Put Tasks on Hold
About this task
To put a count task on hold or release a count task that has been on hold from the
Task List OR the Task Detail screen:
Procedure
1. From the navigation bar, choose Tasks > Task Console.
2. You can search for Tasks by:
a. Zone (See Task Search By Zone screen)
b. Inventory attributes (See Task Search By Inventory screen)
c. References (See Task Search By Reference screen)
d. Exception (See Task Search By Exception screen)
e. Date (See Task Search By Date screen)
3. Enter the applicable search parameters, and choose Search. The Task List screen
displays.
4. Alternatively, you can navigate to the Task List screen by choosing View Count
Tasks from the Count Request Details screen.
5. Select the relevant Count Tasks and choose the appropriate action:
vChoose View Details to view the details of the selected Count Task. The Task
Detail screen displays. From this screen, you can Hold,Release,Cancel,or
Complete a count task.
vChoose Hold to put a count task on hold. The Hold Reason screen displays.
vChoose Release to release a count task that has been put on hold.
26 Sterling Selling and Fulfillment Foundation: Warehouse Management System User Guide

Report Count Task Completion
About this task
You can report the completion of a count task either though the console or the
mobile terminal. In the console, you can mark a count task as complete from the
Task Detail screen:
Procedure
1. From the navigation bar, choose Tasks > Task Console.
2. You can search for Tasks by:
a. Zone (See Task Search By Zone screen)
b. Inventory attributes (See Task Search By Inventory screen)
c. References (See Task Search By Reference screen)
d. Exception (See Task Search By Exception screen)
e. Date (See Task Search By Date screen)
3. Enter the applicable search parameters, and choose Search. The Task List screen
displays.
4. Alternatively, you can navigate to the Task List screen by choosing View Count
Tasks from the Count Request Details screen.
5. Select the relevant count task and choose View Details. The Task Detail screen
displays.
6. Choose Complete to record the completion of the count task. The Record Count
Result Details screen displays.
Creating Move Requests
Move requests can be automated or created manually. Whenever there is a demand
for a certain product or quantity, move requests are created and released to the
appropriate department. When released, tasks are generated for the move requests.
For example, when a customer requests shipments with serial numbers, move
requests are created for those shipments and released to the pack station. Move
requests can be created:
vCreate Move Requests For Moving Inventory to a Specified Location
vCreate Move Requests For Moving Inventory that Exists in a Location
Create Move Requests For Moving Inventory to a Specified
Location
About this task
To create a move request to move inventory to a specific location:
Procedure
1. From the navigation bar, select Inventory > Create Move Request. The Create
Move Request screen displays.
2. On the Create Move Request screen, Create Move Request, Move Request Items
panel, enter the item and quantity that you want to move.
3. Click Save.
Chapter 4. Managing Inventory 27

Create Move Requests For Moving Inventory that Exists in a
Location
About this task
To create a move request for inventory existing in a location:
Procedure
1. Search for inventory. For more information about performing an inventory
search, see the section, "Searching for Inventory".
2. Select checkboxes of the applicable locations. The Location Inventory Details
screen displays.
3. In the Location Inventory Details screen, select the checkboxes for the inventory
you want to move.
4. Click Create Move Request. The Create Move Request screen displays.
5. Enter information in the applicable fields.
6. Click OK.
Adjusting Inventory
From time-to-time, it may be necessary to adjust inventory. For example, a spot
location count (separate from scheduled inventory counts) may reveal shrinkage. In
this case, the easiest method for correcting inventory at that location is to perform
an inventory adjustment. You can adjust the item quantity at the location level or
on a license plate. You can adjust inventory:
vAdjust Inventory for a New Product
vAdjust Inventory for an Existing Product
Adjust Inventory for a New Product
About this task
To create inventory for a new product at a specific location and adjust the quantity:
Procedure
1. From the navigation bar, select Inventory > Adjust Location Inventory. The
Adjust Location Inventory Criteria screen displays.
2. Enter information in the applicable fields.
3. Click Proceed. The Adjust Location Inventory Details screen displays.
4. Adjust the item quantity as needed.
Adjust Inventory for an Existing Product
About this task
To adjust the quantity for an existing product:
Procedure
1. Search for inventory. For more information about performing an inventory
search, see the section, "Searching for Inventory".
2. Select the checkboxes for the applicable locations. The Location Inventory
Details screen displays.
28 Sterling Selling and Fulfillment Foundation: Warehouse Management System User Guide

3. In the Location Inventory Details screen, select the checkboxes for the inventory
you want to adjust.
4. Click Adjust Location Inventory. The Adjust Location Inventory Details screen
displays.
5. In the Quantity panel, enter the new quantity for the item.
6. In the Modification Reasons panel, enter the applicable adjustment reason code.
7. Click Save.
Changing Inventory Attributes
You can change an item's inventory attributes, such as product class, inventory
status, country or region of origin, ship by date, FIFO number, or tag number
without changing the on hand quantity. To change inventory attributes for an item,
you:
vFind Specific Inventory to Change an Inventory Attribute
vChange Attributes Across Locations to Change an Inventory Attributes
Find Specific Inventory to Change an Inventory Attribute
About this task
To find specific inventory for an item:
Procedure
1. From the navigation bar, select Inventory > Change Location Inventory
Attributes. The Change Location Inventory Attributes (Criteria) screen displays.
2. Enter information in the applicable fields and click Proceed. The Change
Location Inventory Attributes screen displays.
3. In the Change Location Inventory Attributes, Location Inventory Attributes
panel, enter the new attributes.
4. In the Change Location Inventory Attributes, Audit Reason panel, enter the
reasons why the inventory was adjusted.
5. Click Save.
Change Attributes Across Locations to Change an Inventory
Attributes
About this task
To change an item's inventory attributes across locations:
Procedure
1. Search for inventory. The Location Inventory screen displays.
For more information about performing an inventory search, see the section,
"Searching for Inventory".
2. Do any of the following:
a. Select a checkbox for which you want to enter the new attributes. Click
Change Inventory Attributes. The Change Location Inventory Attributes
screen displays.
b. Select checkboxes of the applicable locations.
c. Click View Details. The Location Inventory Details screen displays.
Chapter 4. Managing Inventory 29

d. In the Location Inventory Details, Location Inventory Details panel, select
checkboxes of the applicable inventory for which you want to change
attributes.
e. Click Change Inventory Attributes. The Change Location Inventory
Attributes screen displays.
3. In the Change Location Inventory Attributes, Location Inventory Attributes
panel, enter the new attributes.
4. In the Change Location Inventory Attributes, Audit Reason panel, enter
modification reasons for adjusting the inventory.
5. Click Save.
Clean Out Accounting Bin
About this task
Warehouses clean out the inventory in accounting bin locations at the end of a
physical or cycle count process.
Note: Before cleaning the inventory at an accounting bin location, you need to
understand the functionality of the ZEROOUT_LOCATION_INV transaction. For more
information about this transaction, see the Sterling Selling and Fulfillment Foundation:
Warehouse Management System Configuration Guide.
To clean out the inventory at an accounting bin location:
Procedure
1. From the navigation bar, select Inventory > Accounting Bin Adjustment. The
Accounting Bin Adjustment Details Criteria screen displays.
2. Enter information in the applicable fields.
3. Click Proceed. The Accounting Bin Adjustment Details screen displays.
4. In the Accounting Bin Adjustment Reasons panel, enter the applicable
adjustment reason code.
5. Click Save.
Print Stock Keeping Unit Labels
About this task
The SKU labels are applied on hazardous items.
To print SKU labels:
Procedure
1. From the navigation bar, select Inventory > Print SKU Labels.
2. The Print Stock Keeping Unit Search By Item screen displays.
3. Enter information in the applicable fields and click Search. The Item List screen
displays.
4. Select the checkbox of an item for which you want to print the SKU label.
5. Click Print. The Print SKU Labels screen displays.
30 Sterling Selling and Fulfillment Foundation: Warehouse Management System User Guide
Hazmat SKU Label
Table 5. Hazmat SKU Label
Fields
DOT SHIPPING NAME The proper shipping name.
ITEM The item identifier.
HAZARD CLASS The item's hazard class.
IDENTIFICATION
NUMBER
The four-digit number that identifies the hazardous items
(such as explosives and poisonous materials) of commercial
importance. This is widely used in international commerce,
such as when labelling the contents of the shipment
containers.
PACKING GROUP Indicates the degree of danger of a hazardous item within its
hazard class or division and the type of packaging required
for the item. The valid values are: Packing Group I - high
danger, Packing Group II - medium danger, Packing Group
III - Low danger.
DOT LABEL CODE Indicates the label code of the hazardous item.
About Reset Zone Pend-In Quantities
There may exist incorrect pend-in quantities against tasks in some locations that
must corrected. An ANT-based script, ResetZonePendInQuantities.xml is provided
that allows you to fix the incorrect pend-in quantities.
The ResetZonePendInQuantities.xml script takes EnterpriseCode, Node, ZoneId,
and Action as input that are read from the input file,
inputForClearPendInLocationInventory.xml. The valid values for Action attribute
are 'Info' or 'Update'. If no value is passed for Action, it is defaulted as 'Info'. If the
value passed for Action is 'Info', the script will provide the incorrect quantities for
location inventory and LPN pend-move. If this script is run with Action set to
'Update', incorrect quantities of Location inventory and LPN pend-move will be
corrected.
In case of a multi-schema deployment, set up connection parameters in the
ConnectionInfo Element for each Task Element in the
inputForClearPendInLocationInventory.xml input file. For example, to correct
pend-in quantities for a location that exists in a non-default colony, you must
provide ColonyId in the ConnectionInfo element.
Run the Reset Zone Pend-In Quantities
About this task
To run the ResetZonePendInQuantities.xml script, perform the following steps:
Procedure
1. Prepare the input file inputForClearPendInLocationInventory.xml that is located
at <INSTALL_DIR>/bin, by providing the details of EnterpriseCode, Node,
ZoneId and Action, and so on. Incase of multi-schema deployment, specify the
connection information.
2. Go to <INSTALL_DIR>/bin.
3. Set the YFS_HOME variable to <INSTALL_DIR>.
Chapter 4. Managing Inventory 31
4. Run any one of the following commands as needed:
On Windows
sci_ant.cmd -f ResetZonePendInQuantities.xml
On Unix
./sci_ant.sh -f ResetZonePendInQuantities.xml
32 Sterling Selling and Fulfillment Foundation: Warehouse Management System User Guide
Chapter 5. Performing Value-Added Services
About Performing Value-Added Services
The Sterling Warehouse Management System supports VAS operations, which
include creating work orders for services.
A work order captures activities and the completion status of each activity that is
required to perform services such as:
vKitting–assembling components for a kit item.
vDe Kitting–disassembling a kit item. This may be done to acquire an individual
component to complete another order.
vCompliance–value-added service that is performed to supply an item to a
specific buyer for made-to-customer orders.
vInventory Change–converting inventory from one UOM to another.
vProvided Service–service performed at a customer site.
vDelivery Service–service performed for a product delivery to the customer site.
You can include one or more service activities such as assembling components,
applying logos, or packing components in a work order. You can assign a sequence
number to indicate the order in which you want to perform the activities.
This chapter explains the various VAS processes and how you can perform them. It
covers the following use cases:
vCreate a Work Order for a Value-Added Service
vSearching for Work Orders in Value-Added Service
vConfirm Activities Included in the Work Order
Create a Work Order for a Value-Added Service
About this task
You can create a work order for a service.
To create a work order:
Procedure
1. From the navigation bar, choose VAS > Create Work Order. The Create Work
Order screen displays.
2. In Service Item Group, select the appropriate service item group associated
with the work order.
3. In Service Item ID, enter the identifier of the service item.
4. In Item ID, enter the identifier of the parent item or kit item.
5. In Unit Of Measure, select the appropriate UOM.
6. In Product Class, select the appropriate product class.
7. In Requested Quantity, enter the quantity of parent items required.
8. Enter other information in the applicable fields.
9. Click Proceed. The Create Work Order screen displays.
© Copyright IBM Corp. 1999, 2011 33

10. Enter information in the applicable fields.
11. Click Save. The Work Order Details screen displays.
Searching for Work Orders in Value-Added Service
The following Work Order Search screens let you search for work orders based on
different criteria:
vWork Order Search By Item screen
vWork Order Search By Container screen
vWork Order Search By Date screen
vWork Order Search By Activity screen
vWork Order Search By Components screen
To navigate to the search screens for a Value-Added Service:
Procedure
1. From the navigation bar, choose VAS > Work Order Console. Initially, the Work
Order Search By Item screen displays. Select the applicable search view from
the Views drop-down list.
2. Enter information in the applicable fields.
3. Click Search. The search results display in the Work Order List screen.
View Work Order Details
About this task
You can view the details of the work order you created in the Work Order Details
screen.
To view the details of a work order:
Procedure
1. From the Work Order List screen, select the check boxes of the applicable work
orders.
2. From the action bar, click View Details. The Work Order Details screen
displays.
View Work Order Tasks
About this task
You can view the tasks associated with a work order in the Work Order Details
screen.
To view the tasks associated with a work order:
Procedure
1. From the Work Order List screen, select the check boxes of the applicable work
orders.
2. From the action bar, click View Tasks. The Task List screen displays.
34 Sterling Selling and Fulfillment Foundation: Warehouse Management System User Guide

View Move Requests
About this task
You can view the move requests associated with a work order in the Move Request
List screen.
To view the move requests associated with a work order:
Procedure
1. From the Work Order List screen, select the check boxes of the applicable work
orders.
2. From the action bar, click View Move Requests. The Move Request List screen
displays.
Confirm Work Orders
About this task
To confirm a work order, you must confirm all service activities included in the
work order.
To confirm a work order:
Procedure
1. From the Work Order List screen, select the check boxes of the applicable work
orders.
2. From the action bar, click Confirm. The VAS Station screen displays.
For more information about confirming activities included in a work order, see
Section 5.4, "Confirm Activities Included in the Work Order".
Cancel Work Orders
About this task
You can cancel a work order.
To cancel a work order:
Procedure
1. From the Work Order List screen, select the check boxes of the applicable work
orders.
2. From the action bar, click Cancel. The Cancellation Reason screen displays.
3. In Cancellation Reason Code, enter the applicable cancellation reason code.
4. Click Ok.
Confirm Activities Included in the Work Order
About this task
To confirm or complete the work order, you must confirm all activities included in
the work order.
To confirm activities included in a work order:
Chapter 5. Performing Value-Added Services 35
Procedure
1. From the navigation bar, click VAS > VAS Station. The VAS Station screen
displays.
2. In Scan, enter or scan the work order number or container number.
3. In Location, select the VAS station where you want to perform the activity.
4. In Activities panel, the activities associated with the service displays. Select the
activity that you want to confirm.
5. In Qty To Process, provided in the Quantity panel, enter the item quantity you
want to process.
6. Click Save.
If the item or any of its components is serial-tracked, tag-tracked, or time
sensitive, capture the extended attributes of the item. For more information
about capturing an the extended attributes of the item, see the appropriate
section in this guide.
Note: You can capture the tag attributes for a tag-controlled item only if the
node confirming the work order is configured to capture the tag attributes in
all operations performed within the node. For more information about
capturing the tag attributes, refer to the Sterling Selling and Fulfillment
Foundation: Application Platform Configuration Guide.
7. To confirm or complete the work order, repeat Step 4 through Step 6 until the
item's quantity to be confirmed for all activities equals to zero.
Capture the Extended Attributes of Multiple Serial-Tracked and
Serialized Kits in a VAS Station
About this task
You can confirm or complete a work order that includes more than one kit at a
time if all the kits are serial-tracked and the components are serial-tracked,
tag-tracked, or normal items.
The procedure to capture the extended attributes of multiple quantities of
serial-tracked kits with serial-tracked, tag-tracked, or normal components is as
follows:
Procedure
1. In the Qty To Process field provided in the Quantity panel in the VAS Station
screen, enter the number of serial-tracked kits you want to process.
For more information about performing activities in the VAS Station screen, see
Section 5.4, "Confirm Activities Included in the Work Order".
2. Click Save.
3. In the Serial Entry screen that is displayed, enter the serial number of the first
serial-tracked kit in the Serial # field.
4. If a tag-tracked or tag-controlled item is present, the Tag Entry screen is
displayed. Enter the Batch #, Lot #, and so on as applicable, and click Close.
Note: You can capture the tag attributes for a tag-controlled item only if the
node confirming the work order is configured to capture the tag attributes in
all the operations performed within the node. For more information about
capturing the tag attributes, refer to the Sterling Selling and Fulfillment
Foundation: Application Platform Configuration Guide.
36 Sterling Selling and Fulfillment Foundation: Warehouse Management System User Guide
5. In the Serial Entry screen that is displayed, you can either enter the serial
numbers of the components of the first serial-tracked kit one after the other in
the Serial # field, or click the Enter Serial Range button to enter the serial
numbers of the start and end components.
Note: For a serial-tracked or serialized item, if secondary serials are defined,
but secondary information is not provided, the Enter Serial Range button is not
displayed.
For more information about the fields available in the Serial Entry screen, see
Section 6.3.3.6, "Capturing an Item’s Extended Attributes", and Section 35.2,
"Serial Entry".
Note: If the first serial-tracked kit contains different types of components,
perform step 5 for all the components.
6. To confirm or complete the work order, repeat steps 3-6 for the remaining
serial-tracked kits until the value in the Qty Completed field in the Quantity
panel in the VAS Station screen equals the number of serial-tracked kits entered
in step 1.
Note: The Enter Serial Range button is available only for the serial-tracked
items in a serial-tracked kit, and not for the serial-tracked kit.
Chapter 5. Performing Value-Added Services 37
38 Sterling Selling and Fulfillment Foundation: Warehouse Management System User Guide
Chapter 6. Performing Outbound Tasks
About Performing Outbound Tasks
The Outbound Shipment Console provides information about outbound shipments
and shipment containers. This console provides details about sellers, node users,
and carriers necessary to coordinate and ensure on-time delivery of shipments.
You can either include a sales order release into an existing outbound shipment or
create an outbound shipment for a set of orders.
An outbound shipment can be included in a delivery plan by attaching it to a load.
For more information about managing delivery plans and loads, see the Yantra 7x
Logistics Management User Guide.
This chapter explains the various outbound tasks and how you can perform them.
It covers the following use cases:
vManaging Outbound Shipment Tasks
vOutbound Execution
vManaging Manifests
vScheduling Dock Appointments
vPlanning Resources for Outbound Tasks
Managing Outbound Shipment Tasks
This section provides instructions to complete the following tasks using the
Application Console:
vCreate an Outbound Shipment
vSearching for Outbound Shipments
vModify an Outbound Shipment
vAdd Holds to an Outbound Shipment
Create an Outbound Shipment
About this task
You can use the Shipment Entry screen to manually create an outbound shipment
for a sales order or transfer order.
To create an outbound shipment:
Procedure
1. From the navigation bar, choose Outbound > Create Outbound Shipment. The
Shipment Entry screen displays.
2. In Enterprise, select the enterprise associated with the shipment.
3. In Shipment #, enter a number to identify the shipment, if applicable.
If you do not specify the number, the system generates a unique shipment
number.
4. In Buyer, enter the buyer associated with the shipment you are creating, if
applicable.
© Copyright IBM Corp. 1999, 2011 39
5. In Seller, enter the seller associated with the shipment you are creating.
6. Enter other information in the applicable fields.
7. Click Create Shipment. The Shipment Details screen displays.
8. In the Shipment Lines panel, enter the details of the items you want to add as
part of the shipment.
9. Enter other information if applicable.
10. Click Save.
Set Up Shipment Supervisory Overrides for Outbound Shipment
About this task
You can set up supervisory overrides for a shipment.
To set up supervisory overrides for a shipment, in the Shipment Entry screen:
Procedure
1. From the action bar, click Supervisory Overrides.
2. Check the Allow Overage box of the applicable overrides.
3. Click OK.
Searching for Outbound Shipments
The following Outbound Shipment Search screens let you search for outbound
shipments based on different criteria:
vOutbound Shipment Search By Status
vOutbound Shipment Search By Date
vOutbound Shipment Search By Carrier
vOutbound Shipment Search By Item
vOutbound Shipment Search By Wave
To navigate to the search screens for Outbound Shipments
Procedure
1. From the navigation bar, choose Outbound > Outbound Shipment Console.
Initially, the Outbound Shipment Search By Status screen displays. Select the
applicable search view from the Views drop-down list.
2. Enter information in the applicable fields.
3. Click Search. The search results display in the Shipment List screen.
Modify an Outbound Shipment
About this task
You can modify certain attributes of a shipment. For example, you can modify the
carrier service for any shipment that has not been shipped.
To modify an outbound shipment:
Procedure
1. Search for an outbound shipment. The Shipment List screen displays.
For more information about searching for shipments, see the section, "Searching
for Outbound Shipments".
2. Select the check box of the shipment that you want to modify.
40 Sterling Selling and Fulfillment Foundation: Warehouse Management System User Guide

3. From the action bar, click Modify Shipment. The Modify Shipment screen
displays.
4. Enter information in the applicable fields.
5. Click OK to save the changes.
Add Holds to an Outbound Shipment
About this task
You can add holds to a shipment to prevent it from being processed by
transactions or to prevent certain modifications on it.
To add holds to a shipment:
Procedure
1. Search for an outbound shipment. The Shipment List screen displays.
For more information about shipment search, see the section, "Searching for
Outbound Shipments".
2. Select the check boxes of the applicable shipments.
3. From the action bar, click View Holds. The View Holds screen displays.
4. From the Shipment Holds inner panel, click Add Holds. The Add Holds screen
displays.
5. In Hold Type, select the appropriate hold type that you want to add to the
shipment.
6. Click Save.
Outbound Execution
This section provides instructions to complete the following tasks using the
Application Console:
vPick Planning
vPicking
vPacking and Unpacking Containers
vCreate a Load for Outbound Containers
vAdd Holds to a Load for Outbound Containers
vAdd Shipments to a Load for Outbound Containers
Pick Planning
You can create waves to pick inventory for a shipment, specify a pick strategy for
each wave to determine the best process and locations to use to pick inventory,
thus optimizing the labor cost. For more information about configuring a pick
strategy, see the Sterling Selling and Fulfillment Foundation: Warehouse Management
System Configuration Guide.
Create a Wave in Pick Planning
About this task
You can create a wave either manually or automatically by the system. When
waves are created, the system determines the shipments to be picked. The
shipments picked are assigned to a particular shipment group such as parcel, LTL,
and TL shipments. After you assign a shipment group to each shipment, you can
create waves for those groups.
Chapter 6. Performing Outbound Tasks 41
To create a wave:
Procedure
1. From the navigation bar choose Outbound > Outbound Shipment Console.
2. The Shipment Search By Status screen displays. For more information about
shipment search, see the section, "Searching for Outbound Shipments".
3. Enter information in the applicable fields.
4. Click Search. The search results display in the Shipment List screen.
5. Select the check boxes of the applicable shipments for which you want to create
a wave.
6. From the action bar, click Create Wave. The Create Wave for Selected Shipment
Group screen displays.
7. Click Create New Wave With Shipment Group and select the applicable
shipment group from the drop-down list.
8. Click Save.
Auditing a Wave in Pick Planning
About this task
When you create a wave, the system allows you to audit the created wave.
To audit a wave:
Procedure
1. From the Navigation bar, choose Outbound > Wave Console. The Wave Search
By Status screen displays
2. Enter information in the applicable fields.
3. Click Search. The search results are displayed in the Wave List Screen screen.
4. Click the wave number hyperlink. The Wave Summary screen is displayed.
5. From the Action bar, click the Audit icon. The Wave Audit screen is displayed.
Accepting a Wave
Warehouses can choose to monitor waves that are created and decide to manually
release them. This manual decision is called "accepting a wave".
Shipments that are not accepted can be included in new waves. You can accept a
wave manually or configure to automatically accept it.
To manually accept a wave, in the Wave Summary screen, click Accept from the
action bar.
Note: An accepted wave has to be assigned a lane based on the destination or
carrier before releasing it. To assign a lane to the wave, run the ASSIGN_LANE
agent on the trigger agent.
Releasing a Wave
About this task
A warehouse specifies the release time for waves. Shipments that do not have
sufficient inventory are removed from the wave.
42 Sterling Selling and Fulfillment Foundation: Warehouse Management System User Guide
You can define a schedule to release waves for picking in a warehouse for a given
day. The release schedule considers waves that are accepted and ready for release.
You can define different times and days to release a wave that belong to a
particular shipment group.
To release a wave, in the Wave Summary screen, click Release from the action bar.
Cancel a Wave
About this task
When you cancel a wave, the pick tasks associated with the wave get cancelled.
To cancel a wave:
Procedure
1. In the Wave Summary screen, click Cancel from the action bar. The Cancel
Wave screen displays.
2. Select the Cancellation Code Reason associated with the wave.
3. Enter appropriate reasons for canceling the wave.
4. Click Save.
Picking
You can pick inventory using the Mobile Application. For more information about
picking, see the Sterling Selling and Fulfillment Foundation: Mobile Application User
Guide.
Packing and Unpacking Containers
Packing operations are performed after completing picking or VAS operations.
Certain pick methods including "sort while pick" and "pick and pack" combine
packing activities along with picking.
This section describes the packing process to be followed at the pack station.
The pack station is designed for a high-speed operation through a web browser
with minimal mouse usage. This can also be used for data entry operations where
barcodes are not readable or available.
The Pack Station console supports packing of shipment containers for both
system-defined and user-defined containers. For a system-defined containers, the
system automatically closes the shipment or container after packing the items.
However, in a user-defined packing process, the user has to manually close the
shipment or container.
Note: When the shipment is packed, a
"ON_SHIPMENT_PACK_PROCESS_COMPLETE" event that is associated with the
"ADD_TO_CONTAINER" transaction is raised (if enabled). You can use this event
to print shipping labels, container labels, or both. Similarly, when the container is
packed, a "ON_CONTAINER_PACK_PROCESS_COMPLETE" event that is
associated with the "ADD_TO_CONTAINER" transaction is raised (if enabled). You
can use this event to print container labels.
For more information about the Execution Console Framework, see Appendix B,
"Understanding the Execution Console Framework".
Chapter 6. Performing Outbound Tasks 43
You can pack cartons, pallets, or both after picking the items. The packing process
can either be system-defined or user-defined.
Note: The Pack HSDE menu provided out of the box in Sterling Selling and
Fulfillment Foundation does not prompt for COO (Country or Region Of Origin)
during packing. In order to record COO on packing from Pack HSDE console,
create a new a resource from the resource corresponding to the Pack HSDE
resource, set CaptureCOO=Y in the JSP parameter, and use the new resource for
packing.
For more information about the pack planning process, see the Sterling Selling and
Fulfillment Foundation: Warehouse Management System Configuration Guide.
This chapter explains in detail the following use cases:
vNavigate to the Pack Details Screen for Packing Containers
vPack System-Suggested Containers
vPack User-Defined Containers
vPack a Container with Unknown Contents
vPack Single Item Shipments
vCapturing an Item's Extended Attributes
vAdd Items into a Container
vRemove Items from a Container
vAdd Inner Packs for an Item
vRemove Inner Packs for an Item
vPack Containers for a Shipment
vUnpack Containers for a Shipment
Navigate to the Pack Details Screen for Packing Containers
About this task
To access the Pack Details Screen screen, do one of the following:
Procedure
1. From the navigation bar, click Outbound > Pack Station.
2. From the Container Details screen, click Pack/Unpack.
3. From the Shipment Details screen, click Pack Container.
Pack System-Suggested Containers
About this task
In this process, the system suggests the container to use to pack the items. The
Pack Details, Items panel provides a clear snapshot of items that you need to pack
into the container.
To pack system-suggested containers:
Procedure
1. Open the Pack Details Screen screen. See the section, "Navigate to the Pack
Details Screen for Packing Containers".
2. Select the pack location where you are performing the pack operation.
3. Enter or scan the container SCM.
44 Sterling Selling and Fulfillment Foundation: Warehouse Management System User Guide
4. Scan the item you want to pack. If the item is serial tracked, the Serial Entry
screen displays where you enter the item’s serial number. See the section,
"Capturing an Item’s Extended Attributes".
5. In the Add Quantity field, enter or scan the item quantity you want add to the
container:
a. If the item is tag tracked, the Tag Entry screen displays where you enter the
item’s tag attributes. See the section, "Capturing an Item’s Extended
Attributes".
b. If the item is time sensitive, the Expiration Date Entry screen displays
where you enter the item’s expiration date. See the section, "Capturing an
Item’s Extended Attributes".
6. Click Weigh or press Alt+W. The container’s weight displays in the Actual
Weight field. You can modify the weight, if necessary.
Note: You cannot convert an inventory LPN into an outbound container.
Note: If an inventory LPN is picked into a system-suggested outbound
container, the LPN ID is not retained as the child container of the outbound
container. Only SKU and quantity are updated.
Pack User-Defined Containers
About this task
This process allows you to select the container to pack the items.
To pack the items into the selected container:
Procedure
1. Open the Pack Details Screen screen. See the section, "Navigate to the Pack
Details Screen for Packing Containers".
2. Select the pack location where you are performing the pack operation.
3. Scan the container SCM or select New Case or New Pallet.
4. Scan the item you want to pack. If the item is serial tracked, the Serial Entry
screen displays where you capture the item's serial number. See the section,
"Capturing an Item's Extended Attributes".
5. Scan the number of items you want to add to the container:
a. If the item is tag tracked, the Tag Entry screen displays where you capture
the item's tag attributes. See the section, "Capturing an Item's Extended
Attributes".
b. If the item is time sensitive, the Expiration Date Entry screen displays
where you enter the item's expiration date. See the section, "Capturing an
Item's Extended Attributes".
6. Click Weigh or press Alt+W. The container's weight displays in the Actual
Weight field. You can modify the weight, if necessary.
7. After you finish packing the container, click Close Container or press Alt+C.
You can scan the next container, if available.
Note: Before you scan the next container, clear the display information on the
Pack Details screen by clicking Reset or pressing Alt+R.
vIf the inventory LPN is picked into a user-suggested outbound container, the
LPN ID is retained as a child container of the outbound container.
Chapter 6. Performing Outbound Tasks 45
vAfter you finish packing for a shipment, click Reset or press Alt+R to clear
the information before you start packing for the next shipment.
vIn the Pack Station, you cannot convert an inventory LPN into an outbound
container.
vIf an empty row displays between line items, it indicates that you cannot mix
attributes. For more information about mixing attributes, see the section
Defining Pack Planning in the chapter Configuring Packing in the Sterling
Selling and Fulfillment Foundation: Warehouse Management System Configuration
Guide.
Note: Problem: You cannot pack or unpack shipments.
Cause:
The Shipment Modification Rules for the Pack Shipment
and Unpack Shipment modification types are not set to
"Allow Modification".
Resolution:
Ensure that the Shipment Modification Rules for the Pack
Shipment and Unpack Shipment modification types are set
to "Allow Modification".
For more information about modification rule types, see
the Order Document Modification Types table in the Order
Modification Types appendix of the
Sterling Selling and Fulfillment Foundation:
Distributed Order Management Configuration Guide.
Note: Problem: You cannot print packing slips when packing cartons.
vThe "ON_SHIPMENT_PACK_COMPLETE" event check box is not selected.
vThe printer may not be connected, the printer power or green light may not
be on, or the printer that you want to print to is incorrectly selected.
Resolution:
vSelect the "ON_SHIPMENT_PACK_COMPLETE" event check box.
vMake sure your printer is connected, the printer power or green light is on,
and select the correct printer that you want to use.
vEnsure that custom services that are used on the event to print the labels are
correctly implemented and configured.
Pack a Container with Unknown Contents
About this task
You can pack a container with unknown contents.
To pack a container with unknown contents:
Procedure
1. Open the Pack Details Screen screen. See the section, "Navigate to the Pack
Details Screen for Packing Containers".
2. On the Pack Details, Scan panel, in the Scan Identifier field:
a. Enter or scan the shipment number.
b. Enter or scan the container SCM you want to add to the shipment. The
container you scanned is automatically closed.
3. Click Save.
46 Sterling Selling and Fulfillment Foundation: Warehouse Management System User Guide
4. After you finish scanning all containers that you want to add to the shipment,
click Close Shipment or press Alt+S.
Pack Single Item Shipments
About this task
Using the Pack HSDE screen, you can perform item-driven pack process and pack
shipments that have a single item.
In the Pack Details screen, when you scan a barcode in the Scan Identifier field, the
system identifies the shipment to pack based on the following sequence:
Procedure
1. Shipment Number, Batch Number, or Outbound Container
2. Serial number (derives the identifier of the item)
3. Identifier of the item
4. Inventory LPN
a. Single SKU LPN
b. Multi-SKU LPN
Note: When you scan the identifier of an item, the system considers only
loose SKUs present at the pack station. When you scan an inventory LPN,
the system suggests shipments whose total quantity is less than or equal to
inventory LPN quantity.
Pack Containers for Single Item Shipments
About this task
Based on the information scanned in the Scan Identifier field, the system first
searches for shipments that have a single item and suggests the shipment with the
earliest ship date that can be fulfilled. However, if multiple shipments are found
with the same criteria, the system suggests the shipment that has the highest
quantity. Later, the system suggests the container in which to pack the items.
The Pack Details, Items panel provides a clear snapshot of items that you need to
pack into the container.
To pack containers for single item shipments:
Procedure
1. Open the Pack Details Screen screen. For more information about opening the
Pack Details Screen screen, see the section, "Navigate to the Pack Details Screen
for Packing Containers".
2. Select the pack station from the drop-down list where you want to pack the
items.
3. In Scan Identifier, enter or scan the shipment number, serial number, inventory
LPN, or identifier of the item, as applicable. The system suggests the shipment
to pack.
Note:
Problem: When you scan the identifier of a pallet or item in the Scan Identifier
field, an "Task type for Pack process is not configured" error message displays.
Chapter 6. Performing Outbound Tasks 47
Cause: A task type is not configured under the "Packing" activity group.
Resolution: Configure at least one task type under the "Packing" activity group.
Note: When you scan the serial number, inventory LPN (single level
container), or item identifier, the item details display in the Products panel, and
the focus is in the Quantity field.
If you scan an inventory LPN, the Select SKU screen displays. Select the item
you want to pack. For more information about selecting the items to pack, see
the section, "Capture Item Details from an Inventory LPN".
4. Scan the item you want to pack. If the item is serial tracked, the Serial Entry
screen displays where you capture the item's serial number. For more
information about capturing an item's serial number, see the section, "Capturing
an Item's Extended Attributes".
5. Scan the number of items you want to add to the container:
a. If the item is tag tracked, the Tag Entry screen displays where you capture
the item's tag attributes. For more information about capturing an item's tag
attributes, see the section, "Capturing an Item's Extended Attributes".
b. If the item is time sensitive, the Expiration Date Entry screen displays
where you enter the item's expiration date. For more information about
capturing an item's expiration date, see the section, "Capturing an Item's
Extended Attributes".
6. Click Weigh or press Alt+W. The weight of the container displays in the Actual
Weight field. You can modify the weight, if necessary.
Capturing an Item’s Extended Attributes
You can capture the extended attributes for serial tracked, tag tracked, and time
sensitive items.
Capture an Item’s Serial Numbers:
About this task
To capture an item’s serial number:
Procedure
1. In the Remaining Serials field, the remaining number of serials to be scanned is
displayed.
2. In the Scanned Serials field, the total number of serials scanned is displayed.
3. The Item ID, Unit of Measure, and Requested Serial Number for the item are
automatically populated by the system in the corresponding fields.
4. In the Serial # field, enter the primary and secondary serial numbers of the
item.
5. In the From Serial # and To Serial # fields, enter the serial range of the item.
Note: The fields displayed in the Serial Entry window vary depending on the
item scanned.
Capturing an Item’s Tag Attributes:
Note: You can enter the tag details for an item:
vIf the node is configured to capture the tag attributes in all operations within the
node, or,
vIf the buyer on a shipment mandates it as a part of the inbound compliance.
48 Sterling Selling and Fulfillment Foundation: Warehouse Management System User Guide
For more information about capturing tag attributes, see the Sterling Selling and
Fulfillment Foundation: Application Platform Configuration Guide.
Enter the item’s tag attributes, such as Lot number, Batch number, and Revision
number associated with a tag-tracked item.
Note: The fields displayed in the Tag Entry window vary depending on the item
scanned.
Note: If the item scanned has inventory information such as tag number, serial
number, expiration date, or quantity from the barcode translation, you are not
prompted to capture the inventory information.
For example, if a tag-tracked item with lot number "L" has tag information from
the barcode translation that the item belongs to lot "L", the Tag Entry screen does
not display.
Capturing an Item’s Expiration Date:
About this task
Enter the item’s expiration date. To change this date, choose the Calendar lookup
and specify a new expiration date or press Alt+L.
Capture Item Details from an Inventory LPN:
About this task
You can capture the item details from an inventory LPN.
To capture the item details from an inventory LPN:
Procedure
1. In Item ID, enter the identifier of the item to pack, or select the item identifier
from the list.
2. Click OK.
Note: By default this flag is set to "Y". If you set this flag to "N", the Select
SKU screen displays when you scan a Multi-SKU LPN.
Add Items into a Container
About this task
You can add items into a container.
To add items into a container:
Procedure
1. Open the Pack Details Screen screen. See the section, "Navigate to the Pack
Details Screen for Packing Containers".
2. In Add Quantity, enter the item quantity you want to add to the container.
a. If the item you want to pack already exists in the location in one or more
inventory containers (case or pallet), the Select Inventory Container screen
displays. Enter or select the Pallet or Case LPN from the list. The Location
Id is automatically populated by the system.
Chapter 6. Performing Outbound Tasks 49
b. If the item is tag tracked, the Tag Entry screen displays, where you capture
the item's tag attributes. See the section, "Capturing an Item's Extended
Attributes".
c. If the item is time sensitive, the Expiration Date Entry screen displays,
where you enter the item's expiration date. See the section, "Capturing an
Item's Extended Attributes".
d. Click Close Container or press Alt+C to indicate that the pack operation is
complete.
Note:
Problem: You cannot print packing slips on packing cartons.
Cause:
vThe "ON_SHIPMENT_PACK_COMPLETE" event check box is not
selected.
vThe printer may not be connected, the printer power or green light may
not be on, or the printer that you want to print to is incorrectly selected.
Resolution:
vSelect the "ON_SHIPMENT_PACK_COMPLETE" event check box.
vMake sure your printer is connected, the printer power or green light is
on, and select the correct printer that you want to use.
vEnsure custom services that are used on the event to print the labels are
correctly implemented and configured.
Remove Items from a Container
About this task
You can remove items from a container.
To remove the items from a container:
Procedure
1. Open the Pack Details Screen screen. See the section, "Navigate to the Pack
Details Screen for Packing Containers".
2. In Remove Qty, enter the item quantity you want to remove from the container.
a. If the item is tag tracked, the Tag Entry screen displays, where you enter the
item’s tag attributes. See the section, "Capturing an Item’s Extended
Attributes".
b. If the item is time sensitive, the Expiration Date Entry screen displays,
where you enter the item’s expiration date. See the section, "Capturing an
Item’s Extended Attributes".
Add Inner Packs for an Item
About this task
To add inner packs for an item:
Procedure
1. Open the Pack Details Screen screen. See the section, "Navigate to the Pack
Details Screen for Packing Containers".
50 Sterling Selling and Fulfillment Foundation: Warehouse Management System User Guide
2. In the Location field, select the location where you are performing the pack
operation.
3. In the Scan Identifier field, enter or scan the container SCM.
4. In the Pack Details, Items panel, select the item for which you want to record
the inner packs and click INNER PACKS.
5. In the Selected Container Details, Quantity Breakup panel, enter the inner pack
quantity and number of inner packs.
Remove Inner Packs for an Item
About this task
To remove inner packs for an item:
Procedure
1. Open the Pack Details Screen screen. See the section, "Navigate to the Pack
Details Screen for Packing Containers".
2. On the Pack Details, Container Properties panel, click Unpack Container.
3. In the Container Contents panel, select the item for which you want to remove
inner packs.
4. In the Selected Container Details, Quantity Breakup panel, in Remove Inner
Packs field, enter the number of inner packs you want to remove. Depending
on this, the value in the Remove Quantity field is automatically populated.
5. Click Save.
Pack Containers for a Shipment
About this task
Once you create a shipment, you can pack all the items in a container for the
shipment.
To pack a container:
Procedure
1. Search for an outbound shipment. The Shipment List screen displays. For
more information about shipment search, see the section, "Searching for
Outbound Shipments".
2. Check the box of the shipment number for which you want to pack
containers.
3. From the action bar, click View Details. The Shipment Details screen displays.
4. From the action bar, select Pack Container. The Pack Details Screen screen
displays.
5. Select the appropriate pack station from the drop-down list.
6. Click New Case. The item ID and corresponding details get filled
automatically.
7. In SKU, enter or scan the item identifier and press Tab.
The item’s unit of measure and the inventory status display automatically.
8. In Add Quantity, enter the item quantity to be packed in one container.
9. Enter other information in the applicable fields.
10. Click Save.
Chapter 6. Performing Outbound Tasks 51

Unpack Containers for a Shipment
About this task
You can unpack any packed container to remove inventory from a container.
To unpack a container:
Procedure
1. Search for an outbound shipment. The Shipment List screen displays. For
more information about shipment search, see the section, "Searching for
Outbound Shipments".
2. Check the box of the shipment number for which you want to unpack the
containers.
3. From the action bar, click View Details. The Shipment Details screen displays.
4. From the action bar, click the Containers icon. The Shipment Containers
screen displays.
5. Check the boxes of the applicable containers you want to unpack.
6. Click View Details. The Container Contents screen displays.
7. From the action bar, click Pack/Unpack. The Pack Details Screen screen
displays.
8. In the Container Properties panel, click Unpack Container. The Container
Contents screen displays.
9. Enter the quantity you want to remove from the container.
10. Click Save.
Managing Manifests
This section explains in detail the following use cases:
vNavigate to the Add to Manifest screen
vConvert an Inventory Container into an Outbound Container
vAdd Containers to a Manifest
vView the Container’s Contents
vRecord the Weight of Containers in a Manifest
vRemove Containers from a Manifest
vClose a Manifest
Navigate to the Add to Manifest screen
About this task
To access the Add To Manifest screen, from the navigation bar, click Outbound >
Add To Manifest.
Convert an Inventory Container into an Outbound Container
About this task
Note: LPNs picked for shipments with requested serials cannot be converted into
an outbound container.
You can use the manifest station to convert an inventory container to an outbound
container.
52 Sterling Selling and Fulfillment Foundation: Warehouse Management System User Guide
To convert an inventory container into an outbound container:
Procedure
1. Open the Add To Manifest screen. See the section, "Navigate to the Add to
Manifest screen".
2. In Station, select the station from the drop-down list where you are manifesting
the containers.
3. In Scan Identifier:
a. Enter or scan the shipment number.
b. Enter or scan the inventory container.
If the item is serial-tracked and the serial number is not captured during the
pick or pack process, capture the item’s serial number. For more
information about capturing the item’s serial number, see the section,
"Capturing the Item’s Serial Number". Click Close.
The system automatically converts the inventory container into an outbound
container.
Note: Do not scan the shipment number if you use the Sterling Warehouse
Management System Task Framework to move the inventory container.
Add Containers to a Manifest
About this task
You can add containers to an existing manifest or add to a new manifest after
packing it.
To add containers to a manifest:
Procedure
1. From the navigation bar, select Outbound > Add to Manifest. The Add To
Manifest screen is displayed.
2. In Station, select the station from the drop-down list where you are manifesting
the containers.
3. In Scan Identifier, enter or scan the container SCM that you want to add to the
manifest.
If the item is serial-tracked or if the serial number is not captured during the
pick or pack process, capture the item's serial number. For more information
about capturing the serial number, See the section, "Capturing the Item's Serial
Number".
4. Enter other information in the applicable fields.
5. Click Add to Manifest.
Note: Save the container's information and packing notes entered (if any)
before manifesting.
Note: You can customize the manifest station to perform generic status changes
on a container.
To customize the manifest station:
Chapter 6. Performing Outbound Tasks 53
vDefine the custom pipeline by extending the default pipeline associated with
a transaction ID. For more information about configuring process models, see
the Sterling Selling and Fulfillment Foundation: Application Platform
Configuration Guide.
vExtend the existing resource and modify the JSP to contain
JSP=/wms/wmsmanifest/detail/exuimanifest_detail_anchor.
jsp?TransactionId=<TransactionId>. For more information about defining or
extending resources, see the Sterling Selling and Fulfillment Foundation:
Application Platform Configuration Guide.
vCreate a Menu Entry for the newly created resource and use the new screen
to perform a generic status change. For more information about defining
menus, see the Sterling Selling and Fulfillment Foundation: Application Platform
Configuration Guide.
Note: The Tracking Number and Freight Charges are not getting generated
while manifesting
Problem
The system does not automatically generate the tracking number and freight
charges for a manifested container.
Cause
No records are found for parcel carrier preferences pertaining to the node.
Resolution
In the Applications Manager, add parcel carrier preferences to a node, and also
enter the node's shipping account number associated with the carrier. For more
information about parcel carrier preferences, see the Defining a Node's Parcel
Carrier Preferences in the Sterling Selling and Fulfillment Foundation: Application
Platform Configuration Guide.
Note: An error message, "YDM00166 - No record found in
YFS_FREIGHT_TERMS table" pops up
Problem
An error message, "No record found in YFS_FREIGHT_TERMS table" occurs.
Cause
The freight term is not configured for your Enterprise.
Resolution
Configure the freight terms for the Enterprise. For more information about
configuring freight terms, see the section Creating a Freight Term in the Sterling
Selling and Fulfillment Foundation: Logistics Management Configuration Guide.
Note: Problem
You cannot add containers to a manifest that is in "Closed" or "Requested for
Closure" status.
54 Sterling Selling and Fulfillment Foundation: Warehouse Management System User Guide
Cause
The system does not allow to add containers to a manifest that is in "Closed" or
"Requested for Closure" status.
Resolution
Add containers to a manifest that is in "Closure Failed" or "Open" status.
Note: An error message "YCS00006 - NMFC data is not set up for the item"
pops up
Problem
An error message, "NMFC data is not set up for the item" occurs.
Cause
The NMFC code does not exist for the item.
Resolution
Enter the item's NMFC code. For more information about defining product
item's classifications, see the Defining a Product Item's Classifications in the
Catalog Management: Configuration Guide.
Note: An error message, "YDM00171 - Shipping Account No not set up for the
carrier" pops up
Problem
An error message, "Shipping Account No not set up for the carrier" occurs.
Cause
A. The Shipping Account number is not configured for the Parcel Carrier of the
shipping node, OR
B. The Shipping Account number is not configured for the Carrier of the Buyer.
Resolution
A. If the Freight Terms on the shipment is Prepaid, configure the Shipping
Account number for the Parcel Carrier of the shipping node. For more
information about defining the parcel carrier preferences of the node, see the
section Defining a Node's Parcel Carrier Preferences in the Sterling Selling and
Fulfillment Foundation: Application Platform Configuration Guide.
B. If the Freight Terms on the shipment is Collect, configure the Billing Account
number for the Carrier of the Buyer. For more information about defining the
carrier preferences of the buyer, see the section Defining Carrier Preferences
Parameters in the Sterling Selling and Fulfillment Foundation: Application Platform
Configuration Guide.
Note: An error message, "Class not found exception" pops up
Chapter 6. Performing Outbound Tasks 55
Problem
An error message, "Class not found exception" occurs.
Cause
The ycsbe.jar file is not included in the classpath environment variable.
Resolution
Include the ycsbe.jar file in the classpath and restart the Application Server.
Note: Capturing Weight using the Weighing Scale
Problem
Using a weighing scale you cannot capture the package's weight.
Cause
The weighing scale is not integrated with the system, the weighing scale's
power is off, or the weighing scale is configured incorrectly.
Resolution
Make sure that the weighing scale is integrated with the system, the weighing
scale's power is on, and the weighing scale is configured correctly.
Note: Problem
You cannot print a FedEx label for a package that is manifested.
Cause
The printer may not be connected, the printer power or green light may not be
on, or the printer that you want to print to is selected incorrectly.
Resolution
Make sure your printer is connected, the printer power or green light is on, and
select the correct printer that you want to use.
Note: Error while Manifesting
Problem
While scanning a package to manifest, an error message pops up.
Cause
The problem is related to FedEx Powership limitations.
Resolution
See the FedEx Powership guide for a list of error codes and their descriptions.
56 Sterling Selling and Fulfillment Foundation: Warehouse Management System User Guide
Capturing the Item’s Serial Number for a Serial-Tracked Item
About this task
To capture a serial number for a serial-tracked item, enter or scan the item’s serial
number and component serial numbers. Click Close or press Alt+O to return to the
Add To Manifest screen.
Note: The fields displayed in the Serial Entry window vary depending on the item
scanned.
View the Container’s Contents
About this task
You can view the details of all items packed in a container. On the Container
Contents for Packaged Items screen you can view the item’s product class, unit of
measure, quantity to be packed, and the actual quantity packed in the container.
Procedure
1. Open the Add To Manifest screen. For more information about navigating to
the Add to Manifest screen, see the section, "Navigate to the Add to Manifest
screen".
2. In Station, select the station from the drop-down list where you are manifesting
the containers.
3. In Scan Identifier, enter or scan the container SCM to view the contents packed
in the container.
4. Click View Contents.The Container Contents for Packaged Items screen
displays.
Remove Containers from a Manifest
About this task
You can remove packed containers from a manifest before closing the manifest.
To remove packed containers from a manifest:
Procedure
1. From the navigation bar, select Outbound > Remove from Manifest. The
Remove From Manifest screen is displayed.
2. In Station, select the station from where you want to remove the container from
the manifest.
3. In Scan Identifier, enter or scan the container SCM of the container you want to
remove from the manifest.
4. Enter other information in the applicable fields.
5. Click Remove from Manifest.
Close a Manifest
About this task
After all the containers are added to a manifest, you can close the manifest.
To close a manifest:
Chapter 6. Performing Outbound Tasks 57

Procedure
1. From the navigation bar, select Outbound > Manifest Console. The Manifest
search window is displayed.
2. Enter information in the applicable fields and click Search. The Manifest List
screen is displayed.
3. Select the check box adjacent the manifest you want to close.
4. Click Close Manifest. The Close Manifest screen is displayed.
5. Enter information in the applicable fields.
6. Click OK.
Note: If a trailer number is not already associated with a manifest, the Close
Manifest dialog box is displayed. A user can use this to associate a trailer with
a manifest before closing the manifest. Otherwise, the manifest is closed
automatically.
Record the Weight of Containers in a Manifest
About this task
You can record the weight of a container.
To record the weight of a container:
Procedure
1. Open the Add To Manifest screen. For more information about navigating to
the Add to Manifest screen, see the section, "Navigate to the Add to Manifest
screen".
2. In Station, select the station from the drop-down list where you are manifesting
the containers.
3. In Scan Identifier, enter or scan the container SCM.
4. Click Weigh. The Weigh Station Screen screen displays where you can record
the container’s weight.
Navigate to the Weigh Station Screen
About this task
To access the Weigh Station Screen screen, from the navigation bar, click Outbound
> Weigh Station.
Record the Container’s Weight from a Weigh Station Screen
About this task
To record the container’s weight:
Procedure
1. Open the Weigh Station Screen screen. See the section, "Navigate to the Weigh
Station Screen".
2. In the Location ID field, select the manifest location.
3. In the Scan Identifier field, enter or scan the container SCM to check weight. If
the item is serial tracked and the serial number is not captured during the pick
or pack process, capture the item’s serial number. See the section, "Capture the
Item’s Serial Number for a Serial-Tracked Item".
58 Sterling Selling and Fulfillment Foundation: Warehouse Management System User Guide
4. Enter other information in the applicable fields.
5. Click Weigh or press Alt+W. The container’s weight is recorded.
Capture the Item’s Serial Number for a Serial-Tracked Item
About this task
To capture the serial number for a serial-tracked item, enter or scan the item’s
serial number and component serial numbers. Click Close or press Alt+O to return
to the Weigh Station Screen screen.
Note: The fields displayed in the Serial Entry window vary depending on the item
scanned.
Convert an Inventory Container into an Outbound Container
About this task
Note: LPNs picked for shipments with requested serial numbers cannot be
converted into an outbound container.
To convert an inventory container into an outbound container:
Procedure
1. Open the Weigh Station Screen screen. See the section, "Navigate to the Weigh
Station Screen".
2. In the Location ID field, select the manifest location.
3. In the Scan Identifier field:
a. Enter or scan the shipment number.
b. Enter or scan the inventory container.
If the item is serial tracked, and the serial number is not captured during
the pick or pack process, capture the item’s serial number. See the section,
"Capture the Item’s Serial Number for a Serial-Tracked Item". Click Close.
The system automatically converts the inventory container into an outbound
container.
Note: Do not scan the shipment number if you use the Sterling Warehouse
Management System Task Framework to move inventory LPN.
Create a Load for Outbound Containers
About this task
You can create a load.
To create a load:
Procedure
1. From the navigation bar, choose Outbound > Create Load. The Create Load
Screens screen displays.
2. Enter information in the applicable fields.
3. Click Save.
Chapter 6. Performing Outbound Tasks 59
Search for Loads using the Load Console Screen
About this task
You can search for loads using the Load Console screen. For more information
about load search, see the Yantra 7x Logistics Management User Guide.
Add Holds to a Load for Outbound Containers
About this task
You can add holds to a load to prevent it from being processed by transactions or
to prevent certain modifications to be applied to it.
To add holds to a load:
Procedure
1. From the navigation bar, choose Outbound > Load Console. The Load Search
by Summary screen displays. For more information about load search, see the
Yantra 7x Logistics Management User Guide. Select the applicable search view
from the Views drop-down list.
2. Enter information in the applicable fields.
3. Click Search. The search results display in the Load Console Summary screen.
For more information about the Load Console Summary screen, see the Yantra
7x Logistics Management User Guide.
4. Check the boxes of the applicable shipment mode and click View Details. The
Load List screen displays. For more information about the Load List screen, see
the Yantra 7x Logistics Management User Guide.
5. Check the boxes of the applicable load number for which you want to view the
details.
6. From the action bar, click View Holds. The View Holds screen displays. For
more information about the View Holds screen, see the Yantra 7x Logistics
Management User Guide.
7. From the Load Holds inner panel, click Add Holds. The Add Holds screen
displays. For more information about the View Holds screen, see the Yantra 7x
Logistics Management User Guide.
8. Click Save.
Add Shipments to a Load for Outbound Containers
About this task
You can add shipments to an existing load that are shipped to the same delivery
address.
To add shipments to a load:
Procedure
1. From the navigation bar, choose Outbound > Load Console. The Load Search
by Summary screen displays. For more information about load search, see the
Yantra 7x Logistics Management User Guide. Select the applicable search view
from the Views drop-down list.
2. Enter information in the applicable fields.
60 Sterling Selling and Fulfillment Foundation: Warehouse Management System User Guide

3. Click Search. The search results display in the Load Console Summary screen.
For more information about the Load Console Summary screen, see the Yantra
7x Logistics Management User Guide.
4. Check the boxes of the applicable shipment mode and click View Details. The
Load List screen displays. For more information about the Load List screen,
see the Yantra 7x Logistics Management User Guide.
5. Check the boxes of the applicable load number for which you want to view
the details.
6. From the action bar, click View Details. The Load Details screen displays. For
more information about the Load Details screen, see the Yantra 7x Logistics
Management User Guide.
7. From the action bar, click Add Shipments. The Outbound Shipment Search By
Status screen displays. For more information about shipment search, see the
section, "Searching for Outbound Shipments".
8. Enter the applicable search parameters and click Search. The Shipment
Lookup List screen displays. For more information about the Shipment
Lookup List screen, see the Yantra 7x Logistics Management User Guide.
9. Select the check boxes of the applicable shipments that you want to add to the
load.
10. From the action bar, click Add to Load.
Scheduling Dock Appointments
The dock scheduling functionality allows you to manage appointments for
locations in a warehouse to receive inbound shipments and ship outbound
shipments. The dock scheduling rules enable you to specify number of days in
advance to take a dock appointment. Scheduling of docks is based on the
warehouse calendar associated with the dock and takes into consideration the
working days, holidays, and shifts that are valid for receiving or shipping
operations. Each dock can have its own calendar and specify the shifts when it is
available.
For more information about dock appointments, see the Sterling Selling and
Fulfillment Foundation: Warehouse Management System Concepts Guide.
Scheduling dock appointments may involve a combination of any of the following
tasks which are explained in detail in this section:
vSearch for a Dock Appointment
vViewing Dock Schedule Details
vTake a New Dock Appointment
vModify a Dock Appointment
vCancel a Dock Appointment
vManage Docks
vRemove a Dock Group Constraint
Search for a Dock Appointment
About this task
You can search for a dock appointment.
To search for a dock appointment:
Chapter 6. Performing Outbound Tasks 61
Procedure
1. From the navigation bar, select Inbound > Dock Delivery Appointments or,
select Outbound > Dock Pickup Appointments. The Dock Appointment Search
By All Attributes screen displays.
2. Enter the search criteria for the dock appointment as applicable. For more
information about the search criteria, see the table, "Dock Appointment Search
By All Attributes."
3. Click Search. The Dock Schedule Details screen displays where you can view
the dock appointments for each dock that meets your search criteria.
Viewing Dock Schedule Details
About this task
To view dock schedule details, perform a search for the docks meeting your
desired criteria. See the section, "Search for a Dock Appointment" for information
about conducting this search. The Dock Schedule Details screen displays, which
provides visibility to the dock appointment calendar. This screen displays the
inbound, outbound, and both inbound and outbound docks with their:
vAvailable time slots for creating new appointments.
vUnavailable time slots due to calendar constraints.
vUnavailable time slots due to appointments already taken.
For more information about the Dock Schedule Details screen, see the table, "Dock
Schedule Details, Dock Availability".
Take a New Dock Appointment
About this task
You can take a new dock appointment.
To take a new dock appointment:
Procedure
1. Perform a search for the docks meeting your desired criteria. See the section,
"Search for a Dock Appointment" for information about conducting this search.
2. In the Dock Schedule Details screen, Dock Availability panel, select the desired
free time slot which is indicated by the Gray icon. The Dock Appointment
screen displays.
3. Enter the applicable information in the Appointment Details panel.
4. Click Save.
For specific information about the field requirements for taking a dock
appointment, see the table, "Dock Appointment, Appointment Details".
Modify a Dock Appointment
About this task
You can modify a dock appointment.
To modify a dock appointment:
62 Sterling Selling and Fulfillment Foundation: Warehouse Management System User Guide
Procedure
1. Perform a search for the docks meeting your desired criteria. See the section,
"Search for a Dock Appointment" for information about conducting this search.
2. In the Dock Schedule Details screen, Dock Availability panel, select the time
slot of the appointment you want to modify which is indicated by clicking one
of these two shaded blocks: the Cyan icon or the Blue icon.
3. Enter the appointment details in the Appointment Details panel.
4. Click Save.
For specific information about the field requirements when modifying a dock
appointment, see the table, "Dock Appointment, Appointment Details".
Note: In the Selling and Fulfillment Foundation Applications Manager when
performing the task of Defining the Node's Attributes, if the Dock Schedules
are Managed By field is set to Sterling TMS, the Dock Schedule Details Screen
is non-editable. For more information about Dock Schedule, see the Sterling
Selling and Fulfillment Foundation: Application Platform Configuration Guide.
Cancel a Dock Appointment
About this task
You can cancel a dock appointment.
To cancel a dock appointment:
Procedure
1. Perform a search for the docks meeting your desired criteria. See the section,
"Search for a Dock Appointment" for information about conducting this search.
2. In the Dock Schedule Details screen, Dock Availability panel, select the dock
appointment that you want to delete which is indicated by clicking theCyan
icon. The Dock Appointment screen displays.
3. Click Cancel.
Manage Docks
About this task
You can enter additional constraints for the maximum number of appointments
that can be taken for a group of docks in the Dock Group Details screen.
To enter additional constraints for a group of docks:
Procedure
1. Perform a search for the docks meeting your desired criteria. See the section,
"Search for a Dock Appointment" for information about conducting this search.
2. In the Dock Schedule Details screen, Dock Availability panel, select Manage
Dock Groups action. The Dock Group Details screen displays.
3. Enter the details in the Dock Group Max No. of Appointments.
4. Click Save to save the maximum number of dock group appointment
constraints.
For more information about the field requirements for managing docks, see the
table, "Dock Group Details, Dock Group Max No. of Appointments".
Chapter 6. Performing Outbound Tasks 63

Remove a Dock Group Constraint
About this task
You can remove a dock appointment constraint.
To remove a dock appointment constraint:
Procedure
1. Perform a search for the docks meeting your desired criteria. See the section,
"Search for a Dock Appointment" for information about conducting this search.
2. In the Dock Schedule Details screen, Dock Availability panel, select Manage
Dock Group action. The Dock Group Details screen displays.
3. Check the boxes of the dock appointment constraints you want to remove.
4. From the Dock Group Max No. of Appointments action bar, click Remove.
Planning Resources for Outbound Tasks
The Resource Planning tool provides warehouses with the ability to plan for
expected workload and determine the number of resources required to complete
the activity. Having visibility to expected resources enables a warehouse to
accurately plan for overtime, temporary staffing, and so forth, thus optimizing the
resource costs.
For more information about resource planning, see the Sterling Selling and
Fulfillment Foundation: Warehouse Management System Concepts Guide.
Resource Planning may involve a combination of the following tasks which are
explained in detail in this section:
vDefine Standard Capacity
vView Capacity Details for Various Resource Pools
– Transfer Resources Temporarily using the Capacity Details Screen
– Assign Shifts within their Resource Pools
vView Demand Details for a Resource
– Perform a Demand Search using the Demand Details Screen
– Move Shipments to an Appropriate Date
vConfirm a Plan
Define Standard Capacity
About this task
You can define the standard capacity for each resource pool.
To define the standard capacity for resource pools:
Procedure
1. From the navigation bar, choose Outbound > Define Standard Capacity. The
Defining Standard Capacity screen displays.
2. Select the appropriate resource pool and click Standard Capacity. The Resource
Pool Current Standard Capacity Details screen displays.
3. Enter information in the applicable fields.
4. Click Save.
64 Sterling Selling and Fulfillment Foundation: Warehouse Management System User Guide
View Capacity Details for Various Resource Pools
About this task
You can view the capacity details for various resource pools.
To view the capacity details for various resource pools:
Procedure
1. From the navigation bar, choose Outbound > Resource Planning. The Resource
Planning Capacity Search screen displays.
2. In the start date field, enter the date for which you want to begin planning
resources.
3. In the #of days field, enter the total number of days for which you want to
plan resources.
4. Next to the Show Demand and Capacity Data in field, choose the unit of
measure in which you want the capacity and demand to be displayed.
5. Check the box "Consider Pending Task", if you want to consider the pending
tasks to be completed as a backlog for the chosen date.
6. Click Search. The Resource Planning Screen displays.
7. Within the Plan Resources Panel, when a capacity is chosen for a resource pool
on a specific date, the Capacity Details screen displays.
Transfer Resources Temporarily using the Capacity Details
Screen
About this task
Use the Capacity Details screen to move resources between various resource pools.
To move resources between resource pools:
Procedure
1. Open the Capacity Details screen. For more information about navigating to the
Capacity Details screen, see the section, "View Capacity Details for Various
Resource Pools".
2. Within the Other Resource Pools panel, choose the resources you want to move
and click Pull Resources. The Transfer Resources Screen displays.
3. Enter information in the applicable fields.
4. Click Save.
Assign Shifts within their Resource Pools
About this task
You can assign shifts to resources within their resource pools.
To assign shifts to resources within resource pools:
Procedure
1. Open the Capacity Details screen. For more information about navigating to the
Capacity Details screen, see the section, "View Capacity Details for Various
Resource Pools".
2. Within the Member Resources panel, choose the resource you want to assign to
the shifts and click Assign Shifts. The Assign Shift Screen displays.
Chapter 6. Performing Outbound Tasks 65
3. Click the Add icon to add new shifts and enter information in the applicable
fields.
4. Click Save.
View Demand Details for a Resource
About this task
You can view the resource demand details.
To view the resource demand details:
Procedure
1. From the navigation bar, choose Outbound > Resource Planning. The Resource
Planning Capacity Search screen displays.
2. In the start date field, enter the date for which you want to begin planning
resources.
3. In the # of days field, enter the total number of days for which you want to
plan resources.
4. Next to the Show Demand and Capacity Data in field, choose the unit of
measure in which you want the capacity and demand to be displayed.
5. Check the box "Consider Pending Task", if you want to consider the pending
task to be completed as a backlog for the chosen date.
6. Click Search. The Resource Planning Screen displays.
7. Choose the demand for a selected date against an appropriate resource pool,
the Demand Details for Resource Pool screen displays.
Perform a Demand Search using the Demand Details Screen
About this task
You can search for demands based on the specified criteria.
To search for demand restricted to a constraint:
Procedure
1. Open the Demand Details for Resource Pool screen. For more information
about navigating to the Demand Details screen, see the section, "View Demand
Details for a Resource".
2. Within the Demand panel, enter information in the appropriate fields to restrict
the search.
3. Click Search. The demand break-up by the appropriate choice of fields displays.
Move Shipments to an Appropriate Date
About this task
You can move shipments to an appropriate date.
To move shipments to a later date:
Procedure
1. Click the Move Shipments icon against the appropriate date. The Move
Shipments screen displays.
2. Enter information in the applicable fields.
66 Sterling Selling and Fulfillment Foundation: Warehouse Management System User Guide
3. Click Move.
Confirm a Plan
About this task
You can confirm a plan for resources.
To confirm the plan:
Procedure
1. From the navigation bar, choose Outbound > Resource Planning. The Resource
Planning Capacity Search screen displays.
2. In the start date field, enter the date for which you want to begin planning
resources.
3. In the # of days field, enter the total number of days for which you want to
plan resources.
4. Next to the Show Demand and Capacity Data in field, choose the unit of
measure in which you want the capacity and demand to be displayed.
5. Check the box "Consider Pending Task", if you want to consider the pending
tasks to be completed as a backlog for the chosen date.
6. Click Search. The Resource Planning Screen displays.
7. Click on the View Details action. The Planning Summary screen displays.
8. Click Confirm Plan.
Chapter 6. Performing Outbound Tasks 67
68 Sterling Selling and Fulfillment Foundation: Warehouse Management System User Guide
Chapter 7. Managing Tasks
About Managing Tasks
You can use the Task Console to manage paper-based tasks such as pick and count.
The Task Console provides task-related information to node users.
This chapter explains the various task-related activities and how you can perform
them. It covers the following use cases:
vSearching for Tasks
vConfirm a Batch after Completing the Paper-Based Tasks
vRecord Count using the Recording Count Results Screen
vManual Logging of Productivity for a Completed Task
vSearch for Productivity Logs using the Productivity Search by Productivity Type
vDeriving Labor Standards
vView User Time Sheet using the Time Sheet Screen
Searching for Tasks
The following Task Search screens let you search for tasks based on different
criteria:
vTask Search By Task Type screen
vTask Search By Zone screen
vTask Search By Inventory screen
vTask Search By Reference screen
vTask Search By Exception screen
vTask Search By Date screen
vTask Search By At Risk Tasks screen
To navigate to the Search Screens for Searching Tasks
Procedure
1. From the navigation bar, choose Task > Task Console. Initially, the Task Search
By Task Type screen displays. Select the applicable search view from the Views
drop-down list.
2. Enter information in the applicable fields.
3. Click Search. The search results display in the Task List screen.
View Task Details using the Task Detail Screen
About this task
You can view task details using the Task Detail screen.
To view task details:
Procedure
1. From the Task List screen, select the check boxes of the applicable tasks.
2. From the action bar, click View Details. The Task Detail screen displays.
© Copyright IBM Corp. 1999, 2011 69
Assign Tasks to a User using the Assign to User Screen
About this task
You can manually assign tasks to a user using the Assign to User screen.
To assign tasks to a user:
Procedure
1. From the Task List screen, select the check boxes of the applicable tasks.
2. From the action bar, click Assign To User. The Assign to User screen displays.
3. In Assign To User, enter the identifier of the user to whom you want to assign
the tasks.
4. Click Ok.
Reprioritize Tasks Using the Reprioritize Screen
About this task
You can manually reprioritize tasks using the Reprioritize screen.
To reprioritize tasks:
Procedure
1. From the Task List screen, select the check boxes of the applicable tasks.
2. From the action bar, click Reprioritize. The Reprioritize screen displays.
3. Select the appropriate value from the Task Priority drop-down list.
4. Click Ok.
Put Tasks on Hold using the Hold Reason Screen
About this task
You can manually put tasks on hold using the Hold Reason screen.
To put tasks on hold:
Procedure
1. From the Task List screen, select the check boxes of the applicable tasks.
2. From the action bar, click Hold. The Hold Reason screen displays.
3. Enter information in the applicable fields.
4. Click Ok.
Release a Task that is Put on Hold
About this task
You can manually release tasks that are put on hold.
To release a task that is put on hold:
Procedure
1. From the Task List screen, select the check boxes of the applicable tasks.
2. From the action bar, click Release.
70 Sterling Selling and Fulfillment Foundation: Warehouse Management System User Guide

Cancel a Task using the Task List Screen
About this task
You can cancel tasks using the Cancel action in the Task List screen. You can use
the Cancel Task Reason screen to enter a reason for cancelling a task.
To cancel a task:
Procedure
1. From the Task List screen, select the check boxes of the applicable tasks.
2. From the action bar, click Cancel. The Cancel Task Reason screen displays.
3. Enter information in the applicable fields.
4. Click Ok.
Confirm a Batch after Completing the Paper-Based Tasks
About this task
You can confirm a batch after completing the paper-based tasks.
To confirm a batch:
Procedure
1. From the navigation bar, choose Task > Confirm Batch. The Confirm Batch
screen displays.
2. In Batch #, enter the batch number associated with the task you want to
complete.
3. In Total Minutes Taken to Complete Tasks, enter the total time taken to
complete the task.
4. Enter other information in the applicable fields.
5. Click Confirm to complete the paper-based task.
6. Click Confirm with Details to complete the task with more detailed
information. The Complete Batch screen displays.
7. Enter other information in the applicable fields.
8. Click Save to confirm the batch.
Record Count using the Recording Count Results Screen
About this task
You can record the results of paper-based count using the Recording Count Results
screen.
To record count results:
Procedure
1. From the navigation bar, choose Task > Record Count. The Recording Count
Results screen displays.
2. In Task ID, enter the identifier of the task associated with the count task you
want to complete.
3. In Location, enter the location where you performed the count.
Chapter 7. Managing Tasks 71

4. Click Proceed. The Record Count Result Details screen displays.
5. In the Items panel, enter the quantity of inventory you counted.
6. Enter other information in the applicable fields.
7. Click Save.
Manual Logging of Productivity for a Completed Task
About this task
You can manually log productivity for a completed task that is associated with a
productivity type.
To manually log productivity:
Procedure
1. From the navigation bar, choose Task > Log Productivity. The Log Productivity
Screen screen displays.
2. In Productivity Type, enter the productivity type against which you want to log
productivity.
You cannot manually log productivity for productivity types that are associated
with certain task types. Such task types are associated with tasks and are
suggested to a user. For example, putaway, retrieval, and outbound picking.
3. In User, enter the node user’s identifier.
4. Enter other information as applicable.
5. Click Create Productivity. The Productivity Details screen displays.
6. In Productivity Metrics panel, enter the number of cases.
7. Enter other information in the applicable fields.
8. Click Save.
Search for Productivity Logs using the Productivity Search by
Productivity Type
About this task
The Productivity Search By Productivity Type screen lets you search for
productivity logs.
To navigate to the search screen:
Procedure
1. From the navigation bar, choose Task > Productivity Console. The Productivity
Search By Productivity Type screen displays.
2. Enter information in the applicable fields.
3. Click Search. The search results display in the Productivity List screen.
72 Sterling Selling and Fulfillment Foundation: Warehouse Management System User Guide

View Productivity Log Records using the Productivity Details
Screen
About this task
You can view productivity type details using the Productivity Details screen.
To view productivity type details:
Procedure
1. From the Productivity List screen, select the check boxes of the applicable
productivity log records.
2. From the action bar, click View Details. The Productivity Details screen
displays. For more information about logging productivity details, see the
section, "Manual Logging of Productivity for a Completed Task".
Delete a Productivity Log using the Productivity List Screen
About this task
To manually delete a productivity type:
Procedure
1. From the Productivity List screen, select the check boxes of the productivity
types you want to delete.
2. From the action bar, click Delete.
Deriving Labor Standards
Sterling Selling and Fulfillment Foundation provides the ability to automatically
derive labor standards or Standard Allowable Minutes (SAM) based on the
historical data of tasks or activities performed by warehouse users over a period of
time. The Derive Labor Standards console allows you to derive labor standards for
one activity at a specified time. You can identify this activity by productivity
characteristics defined for a productivity type associated with the task.
This chapter provides the navigation path to the Derive Labor Standards screens.
Deriving Labor Standards involves the following tasks:
vActivities Search by Date Range
vView Productivity Summary using the Productivity List Screen
vDerive Labor Standards for a Productivity Type
Activities Search by Date Range
About this task
You can search for activities performed during the selected date range.
To search for activities:
Procedure
1. From the navigation bar, choose Task > Derive Labor Standards. The Activities
Search By Date Range screen displays.
2. Enter information in the applicable fields.
3. Click Search. The search results display in the Productivity Type List screen.
Chapter 7. Managing Tasks 73

View Productivity Summary using the Productivity List Screen
About this task
You can view productivity summary.
To view productivity summary:
Procedure
1. From the navigation bar, choose Task > Derive Labor Standards. The Activities
Search By Date Range screen displays.
2. Enter information in the applicable fields.
3. Click Search. The Productivity Type List screen displays.
4. Select the appropriate productivity type from the list and click View Summary.
The Productivity Summary screen displays.
Derive Labor Standards for a Productivity Type
About this task
You can derive labor standards for a productivity type.
To derive labor standards:
Procedure
1. From the Productivity Summary screen, choose the appropriate user name and
click Compute SAM. The Derive Labor Standards screen displays.
2. Enter SAM values in the applicable fields.
3. Click Save.
View User Time Sheet using the Time Sheet Screen
About this task
The Time Sheet screen allows you to view activities performed by node users, and
utilization for a node user, based on a date range.
To view the User Time Sheet:
Procedure
1. From the navigation bar, choose Task > User Time Sheet. The User Time Sheet
Search By User screen displays.
2. Enter information in the applicable fields.
3. Click Search. The search results display in the Time Sheet screen.
74 Sterling Selling and Fulfillment Foundation: Warehouse Management System User Guide
Chapter 8. Inbound Shipment Console Screens
Inbound Order Shipment Search By Status
Use this screen to search for inbound order shipments that fall under a specified
status.
Table 6. Inbound Order Shipment Search By Status
Fields Description
Document Type Select the appropriate document type for which you want to
search.
Enterprise Select the enterprise for which you want to search.
Across Enterprises Select this option to search across all enterprises.
Shipment # Enter the shipment number for which you want to search, if
applicable.
PO # Enter the purchase order number for which you want to
search, if applicable.
Customer PO# Enter the customer's purchase order number for which you
want to search, if applicable.
Plan # Enter the plan number of the inbound shipment for which
you are searching, if applicable.
Origin Node Enter the origin node under which you want to search for
inbound shipments, if applicable.
Destination Node Enter the destination node under which you want to search
for inbound shipments, if applicable.
Status Select the status range of the inbound shipments for which
you want to search, if applicable.
Include Closed Shipments Select this if you want to search for inbound shipments that
have been closed, as well as those that are open.
Held Shipments Check this box if you want to search for inbound shipments
that are held.
Max Records Enter the maximum number of records to be listed as a result
of your search.
Do not use spaces before or after any text you enter in the search fields, as this
may result in inconsistent or inaccurate results.
The Inbound Order Shipment List screen displays as a result of your inbound
shipment search by status.
© Copyright IBM Corp. 1999, 2011 75

Inbound Order Shipment Search By Date
Use this screen to search for inbound order shipments that fall within a particular
date range.
Table 7. Inbound Order Shipment Search By Date
Fields Description
Document Type Select the appropriate document type for which you want to
search.
Enterprise Select the enterprise for which you want to search.
Across Enterprises Select this option to search across all enterprises.
Carrier/Service Select the carrier or service for which you are searching, if
applicable.
Status Select the shipment status for which you are searching, if
applicable
Enter Shipment Dates Select this check box to enter the shipment date range for
which you want to search.
Enter Delivery Dates Select this check box to enter the delivery date range for
which you want to search.
Max Records Enter the maximum number of records to be listed as a result
of your search.
Do not use spaces before or after any text you enter in the search fields, as this
may result in inconsistent or inaccurate results.
The Inbound Order Shipment List screen displays as a result of your inbound
shipment search by date.
Inbound Order Shipment Search By Carrier
Use this screen to search for inbound order shipments that belong to a specific
carrier.
Table 8. Inbound Order Shipment Search By Carrier
Fields Description
Document Type Select the appropriate document type for which you want to
search.
Enterprise Select the enterprise for which you want to search.
Across Enterprises Select this option to search across all enterprises.
Shipment Mode Select the shipment mode of transportation for which you
want to search, if applicable
Carrier/Service Select the carrier or service for which you want to search, if
applicable.
BOL # Enter the bill of lading number for which you want to search,
if applicable.
Pro # Enter the Pro number for which you want to search, if
applicable.
Trailer # Enter the trailer number for which you want to search, if
applicable.
76 Sterling Selling and Fulfillment Foundation: Warehouse Management System User Guide
Table 8. Inbound Order Shipment Search By Carrier (continued)
Fields Description
Status Select the shipment status for which you want to search, if
applicable.
Requires Routing Select this check box if the shipment requires dynamic
routing.
Max Records Enter the maximum number of records to be listed as a result
of your search.
Do not use spaces before or after any text you enter in the search fields, as this
may result in inconsistent or inaccurate results.
The Inbound Order Shipment List screen displays as a result of your inbound
shipment search by carrier.
Inbound Order Shipment Search By Item
Use this screen to search for inbound order shipments based on the item
information such as product class, unit of measure, item ID and so on.
Table 9. Inbound Order Shipment Search By Item
Fields Description
Document Type Select the appropriate document type for which you want to
search.
Enterprise Select the enterprise for which you want to search.
Across Enterprises Select this option to search across all enterprises.
Item ID Enter the item ID of the item for which you want to search, if
applicable.
Click the Lookup icon to find the specific item you want to
use.
Product Class Select the item's product class for which you want to search,
if applicable.
Unit Of Measure Select the item's unit of measure for which you want to
search, if applicable.
Buyer Enter the buyer of the shipment for which you want to
search, if applicable.
Click the Lookup icon to find the specific buyer you want to
use.
Seller Enter the seller of the shipment for which you want to search,
if applicable.
Click the Lookup icon to find the specific seller you want to
use.
Status Select the shipment status for which you want to search, if
applicable.
Include Closed Shipments Select this check box to search for closed shipments, if
applicable.
Has Hazardous Items Select check box to search for inbound shipments that contain
hazardous items.
Chapter 8. Inbound Shipment Console Screens 77
Table 9. Inbound Order Shipment Search By Item (continued)
Fields Description
Max Records Enter the maximum number of records to be listed as a result
of your search.
Do not use spaces before or after any text you enter in the search fields, as this
may result in inconsistent or inaccurate results.
The Inbound Order Shipment List screen displays as a result of your inbound
shipment search by item.
Inbound Order Shipment List
The Inbound Order Shipment List window displays the results of an inbound
order shipment search. You can perform actions on a single shipment or multiple
shipments by selecting the check boxes next to the shipments you want to perform
an action on and then choosing the applicable action from the action bar.
Table 10. Inbound Order Shipment List
Actions Description
View Details This action takes you to the Inbound Order Shipment Details
screen where you can view the shipment details.
Start Receipt This action takes you to the Start Receipt screen where you
can create a receipt to receive the shipment.
Receive This action takes you to the Receive in a Warehouse screen
where you can enter the items that you received in to a
warehouse, such as a pallet, case, or SKU.
Print This action takes you to the Print Capabilities screen where
you can print the shipment's documents or labels.
Delete Shipment This action allows you to delete the selected shipments.
Add To Delivery Plan This action takes you to the Add Delivery Plan screen where
you can add shipments to a delivery plan.
Create Pick List This action takes you to the Create Picklist screen where you
can create a picklist for the selected shipments, if applicable.
Report/Record receipt This action takes you to the Receive (Report or Record
Receipt) screen where you can record paper-based receipt
details.
View Holds This action takes you to the View Holds for Selected
Shipments screen where you can view the holds applied to
the shipment.
Fields
Shipment # The shipment number. Click this link to go to the Inbound
Order Shipment Details screen. Click this link to view the
shipment details.
Status The current status of the shipment.
Expected Ship Date The date the shipment is expected to ship.
Actual Ship Date The actual date of shipment.
Expected Delivery Date The date the shipment is expected to be delivered.
Actual Delivery Date The actual date the shipment was delivered.
78 Sterling Selling and Fulfillment Foundation: Warehouse Management System User Guide
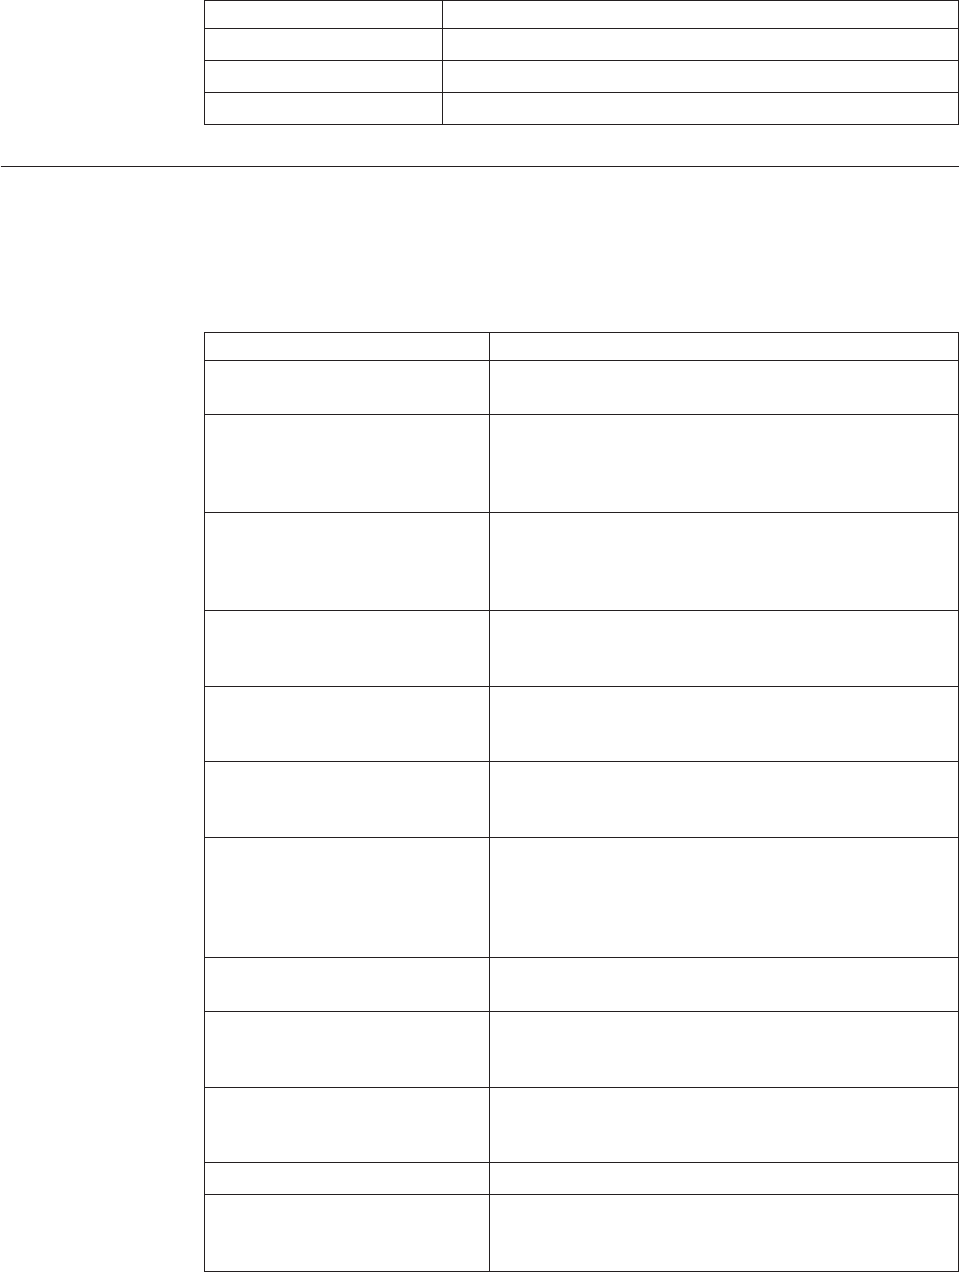
Table 10. Inbound Order Shipment List (continued)
Actions Description
Origin The shipment's origin node.
Destination The shipment's destination node.
Mode The mode of transportation used to ship the shipment.
Inbound Order Shipment Details
The Inbound Order Shipment Details screen provides various information about a
single shipment. The actions that can be performed in the Inbound Order
Shipment Details screen are explained in the following tables.
Table 11. Inbound Order Shipment Details
View Icons Description
Load Loads - This icon takes you to the Loads screen where
you can view the loads that are carrying the shipment.
Containers Containers - This icon takes you to the “Containers for
Inbound Shipment Console Screens” on page 89 screen
where you can view all packed containers included in
the shipment.
Instructions Instructions - This icon takes you to the Inbound Order
Shipment Instructions screen where you can view
special instructions pertaining to an inbound shipment,
such as handling instructions.
Audit Shipment Audits - This icon takes you to the Shipment
Audits screen where you can view audit trail for
shipment modifications.
Shipment Data Types Shipment Dates - This icon takes you to the Shipment
Dates screen where you can modify inbound shipment
dates and delivery dates for the selected shipment.
Alert Alerts - This icon takes you to the Shipment Alerts
screen where you can view the alerts for the selected
shipments.
Return Receipt History Receiving Discrepancies - This icon takes you to the
Shipment Receipt Discrepancy screen where you can
view discrepancies, if any, for the received shipment.
Valid values include Over Receipt, Under Receipt, and
Damaged Receipt.
Return Receipt Receipts - This icon takes you to the Receipts screen
where you can view a list of shipment receipts.
Activity Demand Activity Demand - This icon takes you to the Activity
Demand screen where you can view the shipment's
activity demand.
Additional Attributes Additional Attributes - This icon takes you to the
Additional Attributes for a Shipment screen where you
can view additional attributes for a shipment.
Actions Description
Record Container Details This action takes you to the Record Container Details
screen where you can record container details for a
container that is to be received.
Chapter 8. Inbound Shipment Console Screens 79
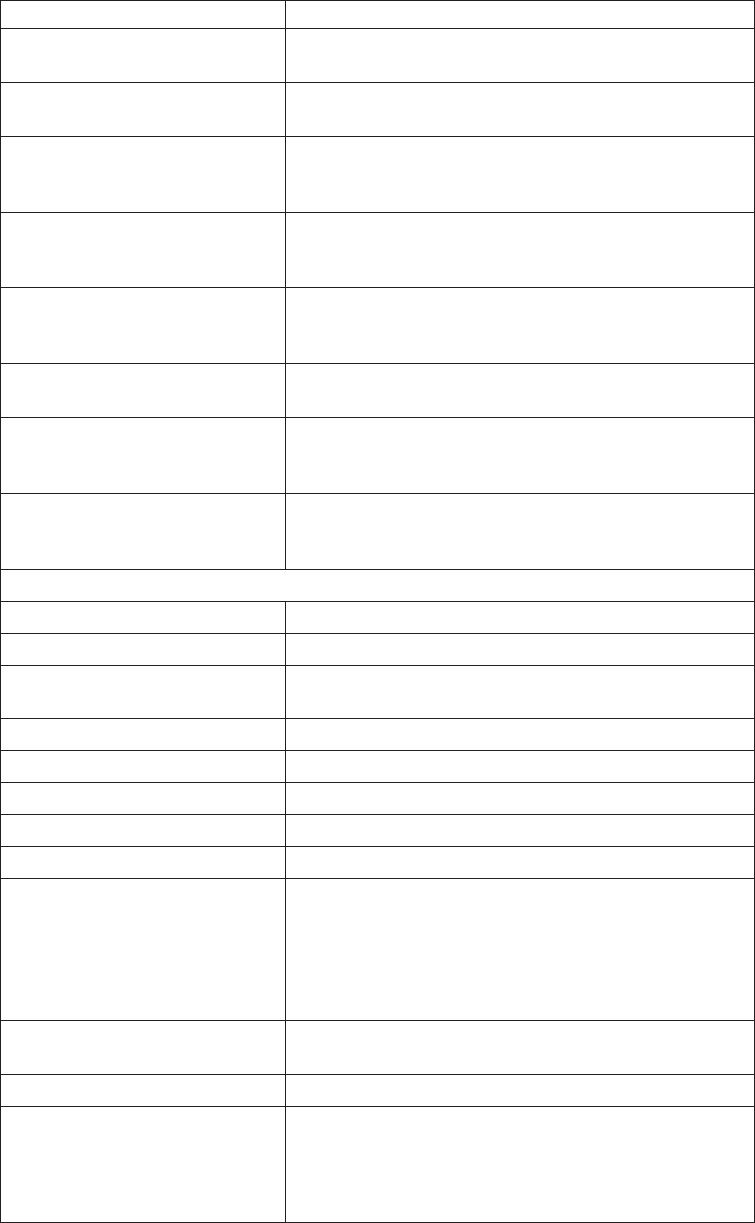
Table 11. Inbound Order Shipment Details (continued)
View Icons Description
Confirm Shipment This action allows you to confirm the selected
shipment.
Start Receipt This action takes you to the Start Receipt screen where
you can create a receipt to receive the shipment.
Receive This action takes you to the Receive in a Warehouse
screen where you can enter the items that you received
in a warehouse, such as a pallet, case, or SKU.
Print This action takes you to the Print Capabilities screen
where you can print the shipment's documents or
labels.
Create Pick List This action takes you to the Create Picklist screen where
you can create a picklist for the selected shipments, if
applicable.
Create Alert This action takes you to the Create Alerts screen where
you can alerts for the selected shipment.
Report/Record Receipt This action takes you to the Receive (Report or Record
Receipt) screen where you can record paper-based
receipt details.
View Holds This action takes you to the View Holds for Selected
Shipments screen where you can view the holds
applied to the shipment.
Fields
Shipment # The inbound shipment number.
Shipper's Ref. # The inbound shipment reference number.
Plan # The number of the delivery plan with which the
inbound shipment is associated, if applicable.
Enterprise The Enterprise associated with the shipment.
Buyer The Buyer's identifier.
Seller The Seller's identifier.
Ship Node The node from which the inbound shipment ships.
Receiving Node The node that is receiving the shipment.
Status The inbound shipment status. Click this link to go to
the Shipment Status Audits screen and view the
shipment's status audits. Click the Work Order Hold
icon to go to the View Holds for Selected Shipments
screen where you can view holds that are applied to the
inbound shipment.
PO # The purchase order number associated with the
shipment.
Has Hazardous Items Indicates if the shipment contains any hazardous item.
Break Bulk Node This field displays only if the shipment belongs to a
break bulk load.
The break bulk node that is receiving the break bulk
load displays.
80 Sterling Selling and Fulfillment Foundation: Warehouse Management System User Guide
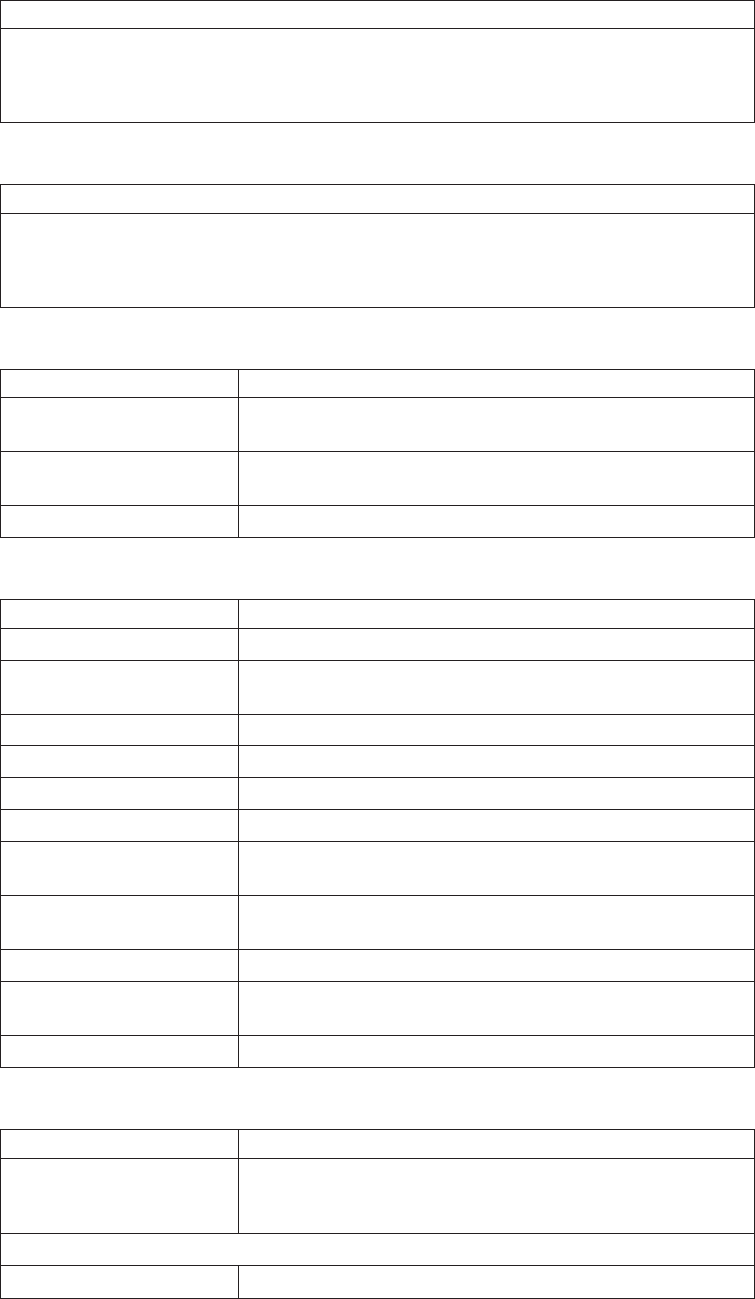
Table 12. Inbound Order Shipment Details Screen, Ship From
Description
The address from which the shipment is shipped.
Click the Address Details to go to the Modify Address screen where you can change the
ship from address.
Table 13. Inbound Order Shipment Details Screen, Ship To
Description
The address to which the shipment is shipped.
Click the Address Details icon to go to the Modify Address screen where you can change
the ship to address.
Table 14. Inbound Order Shipment Details Screen, Totals
Fields Description
Weight The total weight of the inbound shipment. This field can be
modified.
Volume The total volume of the inbound shipment. This field can be
modified.
No. of Containers The number of packed containers in an inbound shipment.
Table 15. Inbound Order Shipment Details, Carrier Info
Fields Description
Delivery Method The delivery method for the shipment.
Ship Mode Select the mode of transportation for the shipment. Values
include 'LTL', 'TL', and 'PARCEL'.
Carrier/Service Select the carrier service for the outbound shipment.
Trailer # Enter the outbound shipment's trailer number.
BOL # Enter the outbound shipment's bill of lading number.
Seal # Enter the outbound shipment's seal number.
Pro # Enter the PRO number assigned by the carrier to track the
shipment.
Routing Source Indicates if routing was pre-assigned by the system or
specified through an external system.
Load # The outbound shipment's load number.
Routing Error Code The routing error code automatically displays by the system,
if applicable.
Requested Carrier Service The requested carrier service for the outbound shipment.
Table 16. Inbound Order Shipment Details, Charges
View Icon Description
Charges and Taxes Charges - This icon takes you to the Charges screen where
you can enter or modify additional charges imposed to the
shipment or container.
Fields
Carrier Account # Indicates the carrier account number for the shipment.
Chapter 8. Inbound Shipment Console Screens 81
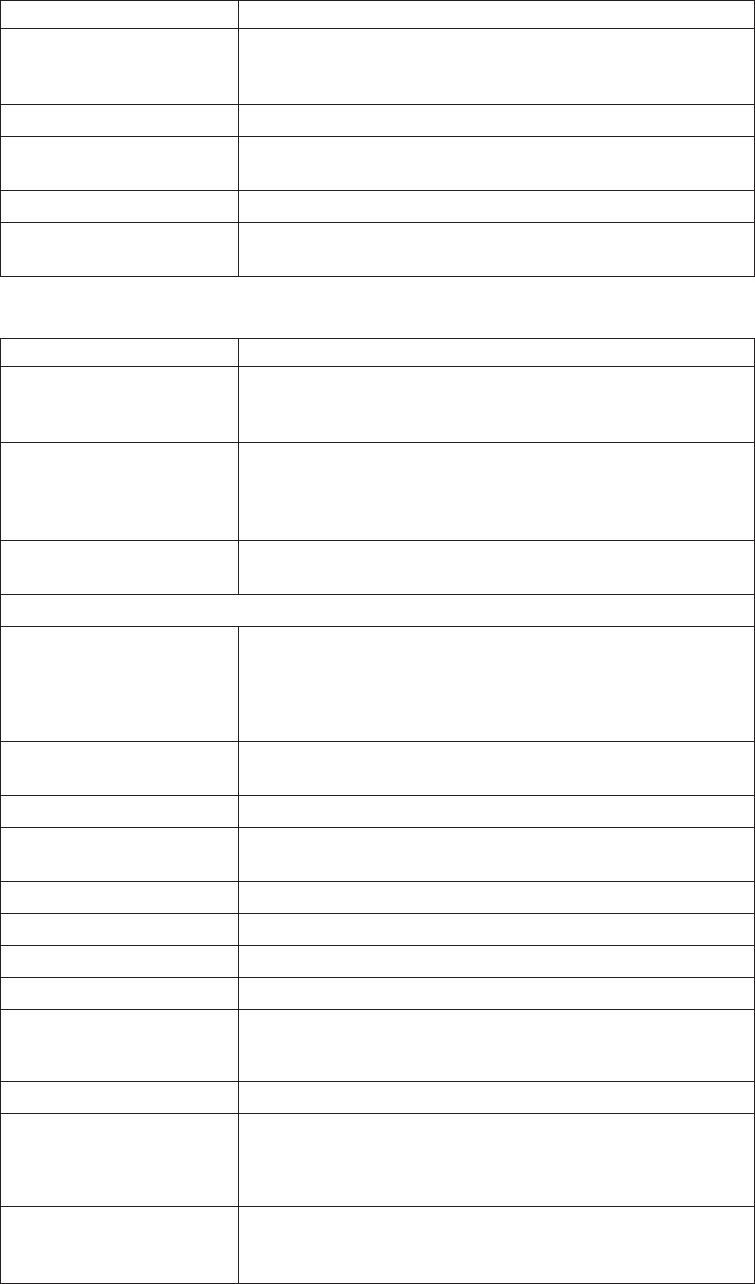
Table 16. Inbound Order Shipment Details, Charges (continued)
View Icon Description
Freight Terms Indicates the freight terms used for the shipment. Valid
values include COLLECT, PREPAID, TP-COLLECT, and
TP-PREPAID.
COD Pay Method Select the COD payment type for the carrier.
Estimated Shipment
Charges
The estimated charge for shipping the outbound shipment.
Actual Shipment Charges The actual charge for shipping the outbound shipment.
Freight Charge The charge applied by the carrier for shipping the outbound
shipment.
Table 17. Shipment Details, Shipment Lines
Actions Description
View Details This action takes you to the Inbound Order Shipment Details
screen where you can view the shipment line attributes for
the selected shipments.
Add Release This action allows you to add an order release to the
shipment. For more information, see the Sterling Selling and
Fulfillment Foundation: Distributed Order Management User
Guide.
Remove Line This action enables you to remove the selected shipment lines
from the shipment.
Fields
Shipment Line # Enter the outbound shipment line number.
Click this link to go to the “Shipment Line Details” on page
84 screen and view the shipment line attributes for the
selected shipment line number.
PO # The purchase order number to which the inbound shipment
line belongs.
Line # The inbound shipment line number.
Release # The order release number to which the inbound shipment
line belongs.
Item ID The inbound shipment line item's item identifier.
Description The inbound shipment line item's description.
PC The inbound shipment line item's product class.
UOM The inbound shipment line item's unit of measure.
Expected Serial # The expected serial number for the order.
Editable if the order is not available on the system.
Mark For The mark for address associated with the item.
Quantity The shipment line's expected quantity.
If a receipt is made against the order, quantity is displayed as
0.
Received Quantity Indicates the quantity received for the item in this shipment.
If the receipt is against an order, it indicates the quantity
received for the order.
82 Sterling Selling and Fulfillment Foundation: Warehouse Management System User Guide
Note: To receive inventory for a Level 1 node, choose the Report/Record Receipt
button.
Modify Address
Use this screen to modify the address.
Table 18. Shipment Address Details
Field Description
First Name The first name of the person receiving the shipment.
Middle Name The middle name of the person receiving the shipment.
Last Name The surname of the person receiving the shipment.
Company The name of the company where the shipment is sent.
Day Time Phone The daytime phone number for the person receiving the
shipment.
Evening Phone The evening phone number for the person receiving the
shipment.
Mobile Phone The mobile phone number for the person receiving the
shipment.
Fax The facsimile number for the person receiving the shipment.
E-Mail The electronic mailing address for the person receiving the
shipment.
Address Line 1 The first line of the mailing address for the shipment.
Address Line 2 The second line of the mailing address for the shipment.
Address Line 3 The third line of the mailing address for the shipment.
Address Line 4 The fourth line of the mailing address for the shipment.
Address Line 5 The fifth line of the mailing address for the shipment.
Address Line 6 The sixth line of the mailing address for the shipment.
City The city of the mailing address for the shipment.
State The state of the mailing address for the shipment.
Postal Code The postal code of the mailing address for the shipment.
Country/Region The country or region of the mailing address for the
shipment.
Charges for Inbound Shipment Console Screens
This screen provides visibility to any additional charges pertaining to the inbound
shipment.
Table 19. Charges Screen, Shipment
Fields
Shipment # The inbound shipment number.
Shipper's Ref. # The inbound shipment reference number.
Plan # The number of the delivery plan with which the inbound
shipment is associated, if applicable.
Enterprise The Enterprise associated with the shipment.
Buyer The Buyer's identifier.
Chapter 8. Inbound Shipment Console Screens 83
Table 19. Charges Screen, Shipment (continued)
Fields
Seller The Seller's identifier.
Ship Node The node from which the inbound shipment ships.
Destination The inbound order's shipment destination.
Status The inbound shipment status.
Order # The order associated with the shipment.
Table 20. Charges Screen, Shipment Charges
Fields
Charge Category/Charge
Name
The name of the additional inbound shipment charge.
Estimated Charge The estimated additional charge for the inbound shipment.
Actual Charge The actual additional inbound shipment charge.
Table 21. Charges, Container Charges
Fields
Container # The container number.
Actual Freight Charge The carrier's freight charge for shipping the container.
Shipment Line Details
This screen provides visibility to the shipment line details for the selected
shipment line number.
Table 22. Shipment Line Details Screen, Shipment Line
Fields Description
Shipment Line # The shipment line number.
Shipment # The inbound shipment number.
Enterprise The Enterprise associated with the shipment.
PO # The purchase order number to which the inbound shipment
line belongs.
Order Line # The order line number to which the inbound shipment line
belongs.
Release # The order release number to which the inbound shipment
line belongs.
Item ID The inbound shipment line item's item ID.
Description Description of the item.
Is Hazardous Item Displays 'Y' if the item is a hazardous item, or 'N' if it is not a
hazardous item.
Product Class The inbound shipment line item's product class.
Unit of Measure The inbound shipment line item's unit of measure.
Expected Serial # The serial number expected on the order.
84 Sterling Selling and Fulfillment Foundation: Warehouse Management System User Guide
Table 22. Shipment Line Details Screen, Shipment Line (continued)
Fields Description
Quantity The shipment line's expected quantity.
If a receipt is made against an order, quantity is displayed as
0.
Received Quantity Indicates the quantity received for the item in this shipment.
If the receipt is against an order, it indicates the quantity
received for the order.
Original Qty Indicates the original quantity on the order for the item.
Table 23. Shipment Line Details Screen, Line Attributes
Fields Description
Segment Type The segment type of the item. A segment type indicates an
inventory category. Typical values are MTC (Made To
Customer) or MTO (Made To Order).
Segment The segment number of the item. A segment holds either the
specific buyer or specific order number that requires
dedication.
COO The country or region of origin.
FIFO # FIFO number is a date-based inventory attribute that helps
understand the order for which stock arrived at the node.
This is used to send items in the same order in which they
were received into the warehouse (First In - First Out).
Net Weight The net weight of the item.
Net Weight UOM The unit of measure used for the net weight.
Wave # The wave number.
Customer PO # The customer purchase order number.
Department Code The department code associated with the shipment line.
Loads for Inbound Shipment Console Screens
This screen helps you view loads carrying the shipments.
Table 24. Loads Screen, Shipment
Fields
Shipment # The inbound shipment number.
Shipper's Ref. # The inbound shipment reference number.
Plan # The delivery plan number with which the inbound shipment
is associated, if applicable.
Enterprise The Enterprise associated with the shipment.
Buyer The Buyer's identifier. Click this link to go to the
Organization Details screen and view the buyer organization
details.
Seller The Seller's identifier. Click this link to go to the Organization
Details screen and view the seller organization details.
Ship Node The node from which the inbound shipment ships. Click this
link to go to the Ship Node Detail screen where you can view
the node details for the shipment.
Chapter 8. Inbound Shipment Console Screens 85
Table 24. Loads Screen, Shipment (continued)
Fields
Destination The inbound order's shipment destination.
Status The inbound shipment status. Click this link to go to the
Shipment Status Audits screen and view the shipment's status
audits.
PO # The inbound shipment purchase order number.
Table 25. Loads Screen, Loads
Actions
View Details This action allows you to view the details of the load. For
more information, see the Sterling Selling and Fulfillment
Foundation: Logistics Management User Guide.
Fields
Load # The load number to which the inbound shipment belongs.
Load Type The load type as defined by your business practices.
Carrier/Service The Carrier or Carrier service that is transporting the load.
Origin The location of the load's origin.
Destination The location of the load's destination.
Status The load status.
Ship Node Detail
This screen provides visibility to the ship node details for the shipment.
Table 26. Ship Node Detail Screen, Ship Node
Fields Description
Ship Node The ship node associated with the shipment.
Description A brief description of the ship node.
Interface The interface that the node uses to communicate with the
IBM Sterling Warehouse Management System.
Parent Organization The identifier of the organization that owns the ship node.
Parent Organization Name The name of the organization that owns the ship node.
Identified By Parent As The node identifier as it is seen by the parent organization.
GLN The Global Location Number used to identify the ship node
as a legal entity.
Table 27. Ship Node Detail Screen, Ship Node Address
Description
The street address of the ship node sending the shipment.
Table 28. Ship Node Detail Screen, Contact Address
Description
The street address for the contact person at the ship node.
86 Sterling Selling and Fulfillment Foundation: Warehouse Management System User Guide
Organization Details for Inbound Shipment Console Screens
This screen provides visibility to an organization's details.
Table 29. Organization Details
Field Description
Organization Information
Organization Code The code that identifies the organization.
Organization Name The name of the organization.
DUNS Number The unique nine-digit sequence recognized as the universal
standard for identifying and keeping track of over 92 million
businesses worldwide. The Dun and Bradstreet (D&B) unique
nine-digit identification sequence used to identify and keep
track of single business entity. The Sterling Warehouse
Management System does not associate any logic with the
DUNS number.
Account Number With Hub If the organization is not the Hub, this is the account number
that the organization has with the Hub organization.
Primary Enterprise The primary enterprise of the organization.
Primary URL Enter the URL of the organization's Internet address, if
applicable.
Primary Contact Address
This inner panel displays the current street address for the primary contact for this
organization. Click the Address Details icon to view the Primary Contact Address Details.
For more information about the Primary Contact Address Details window, see
Organization Primary Contact Address Details.
Corporate Address
This inner panel displays the current corporate street address for this organization. Click
the Address Details icon to view the Corporate Address Details. For more information
about the Corporate Address Details window, see Organization Corporate Address Details.
Organization Primary Contact Address Details for Inbound Shipment
Console Screens
This screen provides visibility to the address details for an organization's primary
contact.
Table 30. Primary Contact Address Details
Field Description
First Name The first name of the organization's primary contact.
Middle Name The middle name of the organization's primary contact.
Last Name The surname of the organization's primary contact.
Company The name of the company where the organization's primary
contact can be reached.
Day Time Phone The phone number where the organization's primary contact
can be reached.
Evening Phone The phone number where the organization's primary contact
can be reached in the evening.
Mobile Phone The mobile phone number for the organization's primary
contact
Chapter 8. Inbound Shipment Console Screens 87
Table 30. Primary Contact Address Details (continued)
Field Description
Fax The facsimile number for the organization's primary contact.
E-Mail The electronic mailing address for the organization's primary
contact.
Address Line 1 The first line of the street address for the organization's
primary contact.
Address Line 2 The second line of the street address for the organization's
primary contact.
Address Line 3 The third line of the street address for the organization's
primary contact.
Address Line 4 The fourth line of the street address for the organization's
primary contact.
Address Line 5 The fifth line of the street address for the organization's
primary contact.
Address Line 6 The sixth line of the street address for the organization's
primary contact.
City The city for the street address for the organization's primary
contact.
State The state for the street address for the organization's primary
contact.
Postal Code The postal code for the street address for the organization's
primary contact.
Country/Region The country or region for the street address for the
organization's primary contact.
Organization Corporate Address Details for Inbound Shipment Console
Screens
This screen provides visibility to the corporate address details for an organization.
Table 31. Corporate Address Details
Field Description
First Name The first name of the person you are addressing at the
organization's corporate site.
Middle Name The middle name of the person you are addressing at the
organization's corporate site.
Last Name The surname name of the person you are addressing at the
organization's corporate site.
Company The organization's corporate name.
Day Time Phone The day-time phone number for the person you are
contacting at the organization's corporate site.
Evening Phone The evening phone number for the person you are contacting
at the organization's corporate site.
Mobile Phone The mobile phone number for the person you are contacting
at the organization's corporate site.
Fax The facsimile number for the person you are contacting at the
organization's corporate site.
88 Sterling Selling and Fulfillment Foundation: Warehouse Management System User Guide
Table 31. Corporate Address Details (continued)
Field Description
E-Mail The electronic mailing address for the person you are
contacting at the organization's corporate site.
Address Line 1 The first line of the organization's corporate street address.
Address Line 2 The second line of the organization's corporate street address.
Address Line 3 The third line of the organization's corporate street address.
Address Line 4 The fourth line of the organization's corporate street address.
Address Line 5 The fifth line of the organization's corporate street address.
Address Line 6 The sixth line of the organization's corporate street address.
City The city of the of the organization's corporate street address.
State The state of the of the organization's corporate street address.
Postal Code The postal code of the of the organization's corporate street
address.
Country/Region The country or region of the of the organization's corporate
street address.
Containers for Inbound Shipment Console Screens
This screen provides visibility to packed containers included in an inbound
shipment.
Table 32. Shipment Containers Screen, Shipment
Fields
Shipment # The inbound shipment number.
Shipper's Ref. # The inbound shipment reference number.
Plan # The delivery plan number with which the inbound shipment
is associated, if applicable.
Enterprise The Enterprise associated with the shipment.
Buyer The Buyer's identifier. Click this link to go to the
Organization Details screen and view the buyer organization
details.
Seller The Seller's identifier. Click this link to go to the Organization
Details screen and view the seller organization details.
Ship Node The node from where the inbound shipment is sent. Click this
link to go to the Ship Node Detail screen and view the node
details for the shipment.
Destination The inbound order's shipment destination.
Status The inbound shipment status. Click this link to go to the
Shipment Status Audits screen and view the shipment's status
audits.
PO # The inbound shipment purchase order number.
Table 33. Shipment Containers Screen, Containers
Actions
View Details This action takes you to the Container Details screen where
you can view the container details.
Chapter 8. Inbound Shipment Console Screens 89
Table 33. Shipment Containers Screen, Containers (continued)
Delete Containers This action takes you to the Delete Container screen where
you can remove the container from the shipment.
Fields
Container # The container number.
Tracking # The container's tracking number used to track the status and
location of the container.
Container SCM The shipment container marking.
Net Weight The weight of the container's content.
Net Weight UOM The net weight unit of measure associated with the shipment.
Gross Weight The weight of the container plus its contents.
Gross Weight UOM The unit of measure used for the gross weight.
Freight Charge The charge applied by the Carrier for shipping the container.
Received Indicates whether the shipment was received.
Inbound Order Shipment Instructions
This screen provides visibility to special instructions for an inbound shipment,
such as handling instructions.
Table 34. Inbound Order Shipment Instructions Screen, Shipment
Fields Description
Shipment # The inbound shipment number.
Shipper's Ref. # The inbound shipment reference number.
Plan # The delivery plan number with which the inbound shipment
is associated, if applicable.
Enterprise The Enterprise associated with the shipment.
Buyer The Buyer's identifier. Click this link to go to the
Organization Details screen and view the buyer organization
details.
Seller The Seller's identifier. Click this link to go to the Organization
Details screen and view the seller organization details.
Ship Node The node from where the inbound shipment is sent. Click this
link to go to the Ship Node Detail screen and view the node
details for the shipment.
Receiving Node The node where the inbound shipment is received. Click this
link to go to the Ship Node Detail screen and view the node
details for the shipment.
Status The inbound shipment status. Click this link to go to the
Shipment Status Audits screen and view the shipment's status
audits.
Has Hazardous Items Indicates whether or not the shipment contains hazardous
items.
Table 35. Inbound Order Shipment Instructions Screen, Instructions
Actions Description
Delete Instruction This action allows you to delete the selected instructions.
90 Sterling Selling and Fulfillment Foundation: Warehouse Management System User Guide
Table 35. Inbound Order Shipment Instructions Screen, Instructions (continued)
Actions Description
Fields
Instruction Type The type of instruction, such as Gift, Pick, Pack, Ship, or
Other. This field can be modified.
Text The specific instructions to be performed on the order line.
This field can be modified.
Shipment Status Audits for Inbound Shipment Console Screens
This screen provides visibility to status modification details performed against an
inbound shipment.
Table 36. Shipment Status Audits, Shipment
Fields
Shipment # The inbound shipment number.
Shipper's Ref. # The inbound shipment reference number.
Plan # The delivery plan number with which the inbound shipment
is associated, if applicable.
Enterprise The Enterprise associated with the shipment.
Buyer The Buyer's identifier. Click this link to go to the
Organization Details screen and view the buyer organization
details.
Seller The Seller's identifier. Click this link to go to the Organization
Details screen and view the seller organization details.
Ship Node The node from where the inbound shipment is sent. Click this
link to go to the Ship Node Detail screen and view the node
details for the shipment.
Receiving Node The node where the inbound shipment is received. Click this
link to go to the Ship Node Detail screen and view the node
details for the shipment.
Status The inbound shipment status. Click this link to go to view
the shipment's status audits.
Has Hazardous Items Indicates whether or not the shipment contains hazardous
items.
Table 37. Shipment Status Audits, Shipment Status Audits
Fields
Modified By The user who performed the modification.
Old Status The inbound shipment status before the status modification.
Old Status Date The date the inbound shipment entered the old status.
New Status The inbound shipment status after the status modification.
New Status Date The date the status modification was made.
Reason Code The assigned code for the modification reason.
Reason Text Additional information as to why the modification was made.
Chapter 8. Inbound Shipment Console Screens 91
Shipment Audits for Inbound Shipment Console Screens
This screen provides visibility to status modification details performed against an
inbound shipment.
Table 38. Shipment Audits, Shipment
Fields
Shipment # The inbound shipment number.
Shipper's Ref. # The inbound shipment reference number.
Plan # The delivery plan number with which the inbound shipment
is associated, if applicable.
Enterprise The Enterprise associated with the shipment.
Buyer The Buyer's identifier. Click this link to go to the
Organization Details screen and view the buyer organization
details.
Seller The Seller's identifier. Click this link to go to the Organization
Details screen and view the seller organization details.
Ship Node The node from where the inbound shipment is shipped. Click
this link to go to the Ship Node Detail screen and view the
node details for the shipment.
Receiving Node The node where the inbound shipment is received. Click this
link to go to the Ship Node Detail screen and view the node
details for the shipment.
Status The inbound shipment status. Click this link to go to the
Shipment Status Audits screen and view the shipment's status
audits.
Has Hazardous Items Indicates whether or not the shipment contains hazardous
items.
Table 39. Shipment Audits, Shipment Audits
Fields
Date The date and time on which the shipment was modified.
Modified By The user who performed the modification.
Context The modifications carried out against the shipment.
Modification The attribute that was modified for the shipment.
Old Value The attribute value before making the modifications.
New Value The attribute value after it was modified.
Reason Code The reason for the modification.
Reason Text Additional information as to why the modification was made.
Table 40. Shipment Audits, Shipment Line Audits
Fields
Date The date and time on which the shipment line was modified.
Modified By The user who performed the modification.
Context The modifications carried out against the shipment line.
Line # The shipment line number that was modified.
Modification The attribute that was modified for the shipment line.
92 Sterling Selling and Fulfillment Foundation: Warehouse Management System User Guide
Table 40. Shipment Audits, Shipment Line Audits (continued)
Fields
Old Value The attribute value before making the modifications.
New Value The attribute value after it was modified.
Reason Code The reason for the modification.
Reason Text Additional information as to why the modification was made.
Shipment Dates for Inbound Shipment Console Screens
This screen allows you to modify inbound shipment dates and delivery dates for
the selected shipment.
Table 41. Shipment Dates Screen, Shipment
Fields
Shipment # The inbound shipment number.
Shipper's Ref. # The inbound shipment reference number.
Plan # The delivery plan number with which the inbound shipment
is associated, if applicable.
Enterprise The Enterprise associated with the shipment.
Buyer The Buyer's identifier. Click this link to go to the
Organization Details screen and view the buyer organization
details.
Seller The Seller's identifier. Click this link to go to the Organization
Details screen and view the seller organization details.
Ship Node The node from where the inbound shipment is sent. Click this
link to go to the Ship Node Detail screen and view the node
details for the shipment.
Destination The inbound order's shipment destination.
Status The inbound shipment status. Click this link to go to the
Shipment Status Audits screen and view the shipment's status
audits.
PO # The inbound shipment purchase order number.
Table 42. Shipment Dates Screen, System Dates
Fields
Requested Shipment Date The requested shipment date associated with the shipment.
Expected Shipment Date The expected shipment date associated with the shipment.
Actual Shipment Date The actual shipment date associated with the shipment.
Requested Delivery Date The requested delivery date associated with the shipment.
Expected Delivery Date The expected delivery date associated with the shipment.
Actual Delivery Date The actual delivery date associated with the shipment.
Table 43. Shipment Dates Screen, New Dates
Fields
Date Type The date type. For example, Shipment or Delivery.
Chapter 8. Inbound Shipment Console Screens 93
Table 43. Shipment Dates Screen, New Dates (continued)
Fields
Requested The Buyer requested date for the specified date type. This
field can be modified.
Expected The expected date for the specified date type. This field can
be modified.
Actual The actual date for the specified date type. This field can be
modified.
Shipment Alerts for Inbound Shipment Console Screens
This screen provides visibility to alerts for the selected shipments.
Table 44. Alert List Screen, Shipment
Fields
Shipment # The inbound shipment number.
Shipper's Ref. # The inbound shipment reference number.
Plan # The delivery plan number with which the inbound shipment
is associated, if applicable.
Enterprise The Enterprise associated with the shipment.
Buyer The Buyer's identifier. Click this link to go to the
Organization Details screen and view the buyer organization
details.
Seller The Seller's identifier. Click this link to go to the Organization
Details screen and view the seller organization details.
Ship Node The node from where the inbound shipment is sent. Click this
link to go to the Ship Node Detail screen and view the node
details for the shipment.
Destination The inbound order's shipment destination.
Status The inbound shipment status. Click this link to go to the
Shipment Status Audits screen and view the shipment's status
audits.
PO # The inbound shipment purchase order number.
Table 45. Alert List Screen, Alert List
Actions
View Details This action allows you to view alert details. For more
information about alerts, see the Sterling Selling and Fulfillment
Foundation: Application Platform User Guide.
Fields
Alert ID The alert identifier.
Type The type of alert raised. For example, ON_FAILURE or
FAILED_AUTH. For more information about alerts, see the
Sterling Selling and Fulfillment Foundation: Application Platform
User Guide.
Description A brief description of the alert.
Queue The message queue to which the alert has been assigned to.
Priority The priority of the alert.
94 Sterling Selling and Fulfillment Foundation: Warehouse Management System User Guide
Table 45. Alert List Screen, Alert List (continued)
Owner The user who is handling the alert.
Raised On The date the alert was raised.
Additional Attributes for Inbound Shipment Console Screens
This screen provides visibility to additional attributes for a shipment.
Table 46. Additional Attributes Screen, Shipment
Fields
Shipment # The inbound shipment number.
Shipper's Ref. # The inbound shipment reference number.
Plan # The delivery plan number with which the inbound shipment
is associated, if applicable.
Enterprise The Enterprise associated with the shipment.
Buyer The Buyer's identifier. Click this link to go to the
Organization Details screen and view the buyer organization
details.
Seller The Seller's identifier. Click this link to go to the Organization
Details screen and view the seller organization details.
Ship Node The node from where the inbound shipment is sent. Click this
link to go to the Ship Node Detail screen and view the node
details for the shipment.
Receiving Node Indicates the node that is receiving the inbound shipment.
Status The inbound shipment status. Click this link to go to the
Shipment Status Audits screen and view the shipment's status
audits.
Has Hazardous Items Indicates if the inbound shipment contains hazardous items.
Table 47. Additional Attributes Screen, Additional Attributes
Fields
Overage Allowed Indicates whether a shipment overage is allowed.
For outbound shipments, overage means shipping more than
was initially intended in a shipment.
For inbound shipments, overage means receiving more than
the expected quantity in a shipment.
Manually Entered Indicates whether the shipment was manually entered, or
generated automatically.
Order Available On System Indicates whether the order that is associated with the
shipment is available in Sterling Selling and Fulfillment
Foundation, or if it only exists in an external system.
Case Content Verification
Not Required
Indicates whether the case content verification is required for
this shipment.
Pallet Content Verification
Not Required
Indicates whether the pallet content verification is required
for this shipment.
Shipment Entry Overridden Indicates whether the shipment entry override is allowed.
Gift Indicates if the shipment has gift items.
Chapter 8. Inbound Shipment Console Screens 95
Shipment Receipt Discrepancy for Inbound Shipment Console Screens
This screen provides visibility to view discrepancies for the received shipment.
Table 48. Shipment Receipt Discrepancy Screen, Shipment
Actions
Manage Receiving
Discrepancies
This action takes you to the Manage Receiving Discrepancies
screen where you can manage any discrepancies found in the
shipments.
Fields
Shipment # The inbound shipment number.
Shipper's Ref. # The inbound shipment reference number.
Plan # The delivery plan number with which the inbound shipment
is associated, if applicable.
Enterprise The Enterprise associated with the shipment.
Buyer The Buyer's identifier. Click this link to go to the
Organization Details screen and view the buyer organization
details.
Seller The Seller's identifier. Click this link to go to the Organization
Details screen and view the seller organization details.
Ship Node The node from where the inbound shipment is sent. Click this
link to go to the Ship Node Detail screen and view the node
details for the shipment.
Destination The inbound order's shipment destination.
Status The inbound shipment status. Click this link to go to the
Shipment Status Audits screen and view the shipment's status
audits.
PO # The inbound shipment purchase order number.
Table 49. Shipment Receipt Discrepancy Screen, Receipt Discrepancy
Fields
PO # The purchase order number.
Line The purchase order's line number.
Item ID The item identifier.
Product Class The product class of the item.
Unit of Measure The unit of measure in which the item is measured.
Discrepancy Type The type of discrepancy.
Discrepancy Quantity The quantity of discrepancy.
Manage Receiving Discrepancies for Inbound Shipment Console
Screens
This screen provides management functionality for any discrepancies found in the
inbound shipments.
Table 50. Manage Receiving Discrepancies Screen, Shipment
Actions
96 Sterling Selling and Fulfillment Foundation: Warehouse Management System User Guide
Table 50. Manage Receiving Discrepancies Screen, Shipment (continued)
Reason Entry Complete Click this action to adjust the Discrepancy Reason and Reason
Quantity, if the fields are grayed out. The sum of the
Discrepancy Reasons and Reason Quantities add up to the
Discrepancy Quantity.
Reopen Reason Entry Click this action if your adjustments add up correctly, then
the fields get grayed out. If the adjustments do not add up
correctly but you need to close the window, you can finish
working with the receiving discrepancies later.
Fields
PO # The purchase order number.
Line The purchase order's line number.
Item ID The item identifier.
Product Class The product class of the item.
Unit of Measure The unit of measure in which the item is measured.
Discrepancy Type The type of discrepancy.
Discrepancy Quantity The quantity of discrepancy.
Discrepancy Reason The reason for the discrepancy.
Reason Quantity The reason for the discrepancy quantity.
Receipts for Inbound Shipment Console Screens
This screen provides visibility to receipt details for the selected shipment.
Table 51. Inbound Order Receipt List Screen, List
Actions
View Summary This action takes you to the Receipt Summary screen where
you can view the receipt's summary details.
View Details This action takes you to the Receipt Details screen where you
can view the receipt details.
Receive This action allows you to view containers that are expected to
be received in the Receipt Details screen.
Close Prereceipt This action allows you to close prereceipts.
Close Receipt This action allows you to close receipts.
Report/Record Receipt This action takes you to the Receive (Report or Record
Receipt) screen where you can record paper-based receipt
details.
Fields
Receipt # The receipt number.
Shipment # The shipment number associated with the receipt.
Order # The order number associated with the receipt.
Enterprise The Enterprise associated with the receipt.
Buyer The Buyer associated with the receipt.
Seller The Seller associated with the receipt.
Receipt Start Date The receipt start date.
Receiving Node The receiving node associated with the receipt.
Chapter 8. Inbound Shipment Console Screens 97
Table 51. Inbound Order Receipt List Screen, List (continued)
Receipt Open Indicates if the receipt is open.
Receipt Status The receipt status.
Receipt Summary for Inbound Shipment Console Screens
This screen provides visibility to the receipt's summary for the selected receipts.
Table 52. Receipt Summary
View Icons Description
Additional Attributes Details - This icon takes you to the Receipt Details screen
where you can view receipt details for the shipment.
Instructions Instructions - This icon takes you to the Receipt Instructions
screen where you can view special instructions for an
inbound shipment, such as handling instructions.
Audit Status Audits - This icon takes you to the Receipt Status
Audits screen where you can view a list of status audits for
the selected receipt.
Actions
Inventory View Click this action to go to the location inventory screen and
view inventory details at a location in the warehouse. For
more information about this screen, see the Sterling Selling and
Fulfillment Foundation: Warehouse Management System User
Guide.
Close Prereceipt This action allows you to close prereceipts that you selected.
Close Receipt This action allows you to close receipts that you selected.
Receive This action allows you to view containers that are expected to
be received in the Receipt Details screen.
Report/Record Receipt This action takes you to the Receive (Report or Record
Receipt) screen where you can record paper-based receipt
details.
Fields
Receipt # The identifying number of the receipt.
Shipment # The identifying number of the shipment.
Enterprise The Enterprise associated with the order.
Buyer The buyer organization that placed the order. Click this link
to go to the Organization Details screen where you can view
the seller organization details.
Seller The seller organization that placed the order. Click this link to
go to the Organization Details screen and view the seller
organization details.
Receipt Start Date The receipt start date.
Receiving Node The receiving node. This takes you to the Ship Node Detail
screen where you can view the ship node details.
Receiving Dock The dock location that received the receipt.
Receipt Status The current status of the receipt. Click this link to go to the
Shipment Status Audits screen and view a list of status audits
for the selected receipt.
Receipt Open Indicates whether the receipt is open or not.
98 Sterling Selling and Fulfillment Foundation: Warehouse Management System User Guide
Table 52. Receipt Summary (continued)
No Of Expected Pallets The number of pallets expected to receive.
No Of Expected Cartons The number of cartons expected to receive.
Table 53. Receipt Summary Screen, Items
Actions
View Containers Click this action to go to the Order Receipt Container screen
and view the receipt's container details. For more
information, see the appropriate section in this guide.
Adjust Receipt Click this action to go to the Adjusting a Receipt screen and
adjust a receipt. For more information, see the appropriate
section in this guide.
Inspect Click this link to go to the Inspect Inbound Receipts screens
and inspect items you received. For more information, see the
appropriate section in this guide.
Fields
Item ID The item identifier.
Item Description The item's description.
PC The product classification such as first quality, second quality,
or finished good.
UOM The line item's unit of measure.
Disposition Code The disposition code to determine the product classification
and inventory status.
Order # The return associated with the inbound order.
Line # The inbound shipment order line number.
Release # The release number to which the inbound shipment line
belongs.
Tag This column displays only if the item is tag-controlled, and if
the receiving node is configured to capture tags when
receiving inventory into a warehouse or in all operations
performed within the node. For more information about
capturing the tag attributes, see the Sterling Selling and
Fulfillment Foundation: Application Platform Configuration Guide.
Click this link to go to the Container Serial Details and view
a container's serial details.
Net Weight The item's net weight.
Net Weight UOM The unit of measure used for the net weight.
Quantity The number of items.
Receipt Details for Inbound Shipment Console Screens
This screen provides visibility to receipt details for the inbound shipment.
Table 54. Inbound Order Receipt Details Screen, Receipt
Fields
Receipt # The identifying number for the receipt.
Shipment # The identifying number for the shipment.
Chapter 8. Inbound Shipment Console Screens 99
Table 54. Inbound Order Receipt Details Screen, Receipt (continued)
Fields
Enterprise The Enterprise associated with the shipment.
Buyer The Buyer organization that placed the order.
Seller The Seller organization that is handling the order.
Receipt Start Date The start date of the receipt.
Receiving Node The node that received the order.
Receiving Dock The location where the order was received.
Receipt Status The status of the receipt.
Receipt Open Indicates if the receipt is still open.
No Of Pallets Indicates the number of pallets.
No Of Cartons Indicates the number of cartons.
Table 55. Inbound Order Receipt Details Screen, Receipt Lines
Fields
Item ID The inbound shipment line item identifier.
Item Description The description of the receipt line item.
PC The inbound shipment line item's product class.
UOM The inbound shipment line item's unit of measure.
Disposition Code The disposition code to determine the product classification
and inventory status.
Order # The order number to which the inbound shipment line
belongs.
Line # The inbound order shipment line number.
Release # The release number to which the inbound shipment line
belongs.
Ship By Date The date by which the inbound shipment line must ship by.
COO The container's country or region of origin.
Serial # The container's serial number.
Tag This column displays only if the item is tag-controlled, and if
the receiving node is configured to capture tags when
receiving inventory into a warehouse or in all operations
performed within the node. For more information about
capturing the tag attributes, see the Sterling Selling and
Fulfillment Foundation: Application Platform Configuration Guide.
Click this link to go to the Container Serial Details and view
a container's serial details.
Quantity The number of items received.
100 Sterling Selling and Fulfillment Foundation: Warehouse Management System User Guide
Receipt Line Details for Inbound Shipment Console Screens
This screen provides visibility to inbound order's shipment receipt line details.
Table 56. Receipt Line Details Screen, Container
Fields
Receipt # The inbound order receipt number associated with the
receipt.
Shipment # The inbound order shipment number associated with the
receipt.
Order # The inbound order number associated with the receipt.
Enterprise The enterprise that received the receipt.
Receiving Node The node that received the receipt.
Receiving Dock The dock location that received the receipt.
Receipt Status The status of the receipt that was received.
Case ID Case LPN that was received.
Pallet ID Pallet LPN that was received.
Table 57. Receipt Line Details Screen, Container Details
Fields
Item ID The item identifier of the line item packaged in the container.
Item Description The description of the item received.
PC The product classification of the line item packaged in the
container such as first quality, second quality, or finished
good.
UOM The unit of measure of the line item packaged in the
container.
Disposition Code The disposition code to determine the product classification
and inventory status.
Order # The order number to which the line item packaged in the
container belongs.
Line # The order line number to which the line item packaged in the
container belongs to.
Release # The order release number to which the line item packaged in
the container belongs.
Ship By Date The date by which the container must be shipped.
COO Country or region of origin associated with the item.
Serial # The serial number associated with the item.
Tag This column displays only if the item is tag-controlled, and if
the receiving node is configured to capture tags when
receiving inventory into a warehouse or in all operations
performed within the node. For more information about
capturing the tag attributes, see the Sterling Selling and
Fulfillment Foundation: Application Platform Configuration Guide.
Click this link to go to the Container Serial Details and view
a container's serial details.
Quantity The quantity of the line item packaged in the container.
Chapter 8. Inbound Shipment Console Screens 101
Receipt Instructions for Inbound Shipment Console Screens
This screen provides visibility to special instructions for an inbound shipment,
such as handling instructions. For more information, see the appropriate section in
this guide.
Receipt Status Audits for Inbound Shipment Console Screens
This screen provides visibility to a list of status audits for the selected receipt. For
more information, see the appropriate section in this guide.
Receipt Container for Inbound Shipment Console Screens
This screen provides visibility to items packaged in an inbound order shipment
receipt's container. For more information, see the appropriate section in this guide.
Inspect Inbound Receipt for Inbound Shipment Console Screens
This screen provides visibility to inspect inbound receipts.
Table 58. Inspect Inbound Receipt
Fields
Node Select the node where the receipt has been received.
Enterprise Select the enterprise associated with the inbound receipt.
Location Enter the location where the receipt has been received.
Choose lookup option to find the specific Location you want
to search for.
Pallet ID Enter the pallet LPN associated with the container.
Case ID Enter the case LPN associated with the container.
Item ID Enter the item ID you want to inspect associated with the
receipt.
Choose lookup option to find the specific Item ID you want
to search for.
Product Class Select the product class. Product class indicates the item’s
inventory categorization.
Orders are placed for an item and product class.
Unit Of Measure Select the unit of measure you want to inspect.
Receipt # Enter the inbound receipt number you want to inspect.
Choose lookup option to find the specific Receipt Number
you want to search for.
Serial # Enter the item’s serial number you want to inspect, if
applicable.
Inventory Status Select the inventory status of the receipt you want to inspect.
Click Proceed to view the Inspect Inbound Receipt Details screen.
102 Sterling Selling and Fulfillment Foundation: Warehouse Management System User Guide
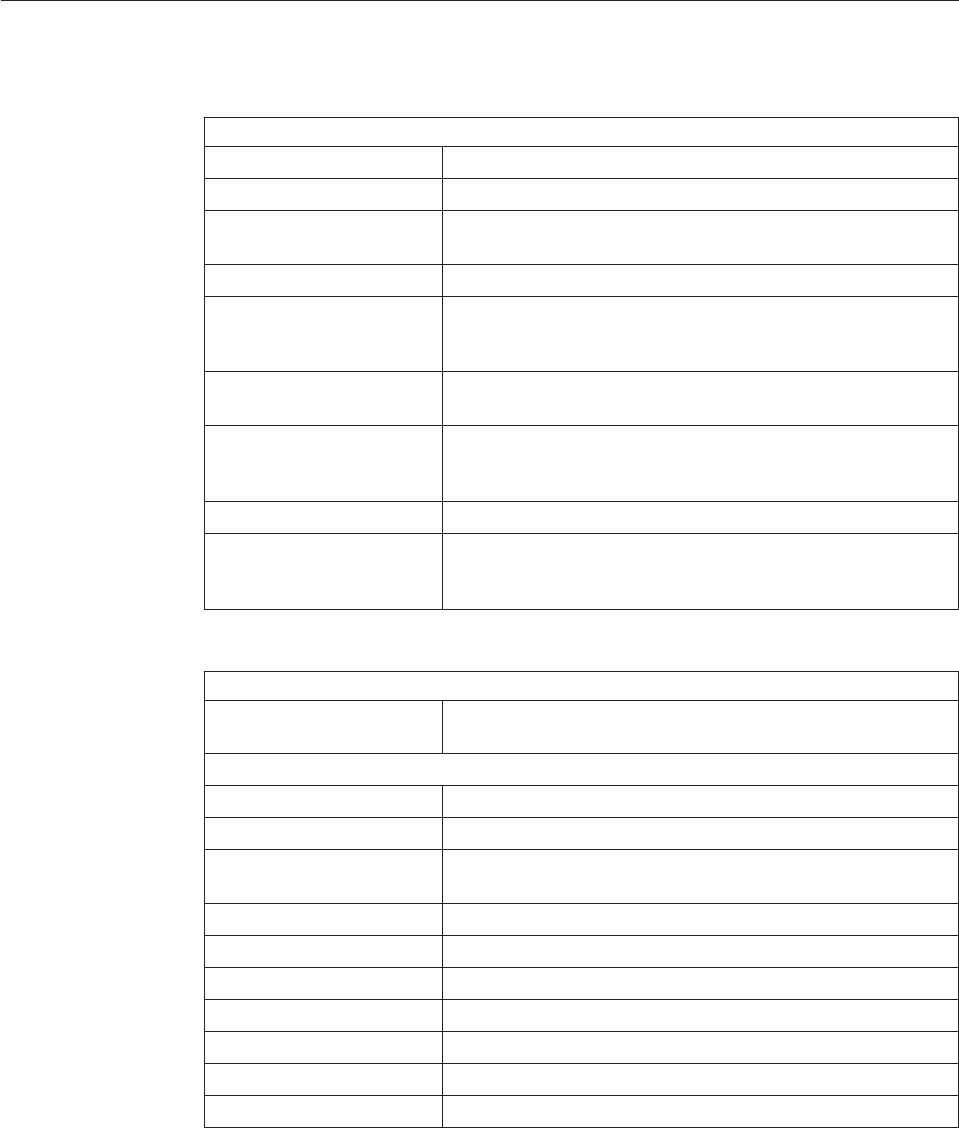
Activity Demand for Inbound Shipment Console Screens
This screen provides visibility to the shipment's activity demand.
Table 59. Shipment Activity Demand Screen, Shipment
Fields
Shipment # The inbound shipment number.
Shipper's Ref. # The inbound shipment reference number.
Plan # The delivery plan number with which the inbound shipment
is associated, if applicable.
Enterprise The Enterprise associated with the shipment.
Buyer The Buyer's identifier. Click this link to go to the
Organization Details screen and view the buyer organization
details.
Seller The Seller's identifier. Click this link to go to the Organization
Details screen and view the seller organization details.
Ship Node The node from where the inbound shipment is sent. Click this
link to go to the Ship Node Detail screen and view the node
details for the shipment.
Destination The inbound order's shipment destination.
Status The inbound shipment status. Click this link to go to the
Shipment Status Audits screen and view the shipment's status
audits.
Table 60. Shipment Activity Demand Screen, Activity Demand List
Actions
Delete This action allows you to delete the selected activity
demands.
Fields
Shipment Line # The outbound shipment line number.
Location ID The item location in the node.
Activity Code The activity to be performed on items belonging to the work
order.
Pallet Id The pallet LPN that belong to the work order.
Case Id The case LPN that belong to the work order.
Item ID The items that belong to the work order.
Priority Indicates the priority of the demand.
Demand Quantity The quantity of the order that was demanded.
Satisfied Quantity The extent to which the demand is satisfied.
Demand Satisfied Indicates whether the demand is satisfied or not.
Chapter 8. Inbound Shipment Console Screens 103
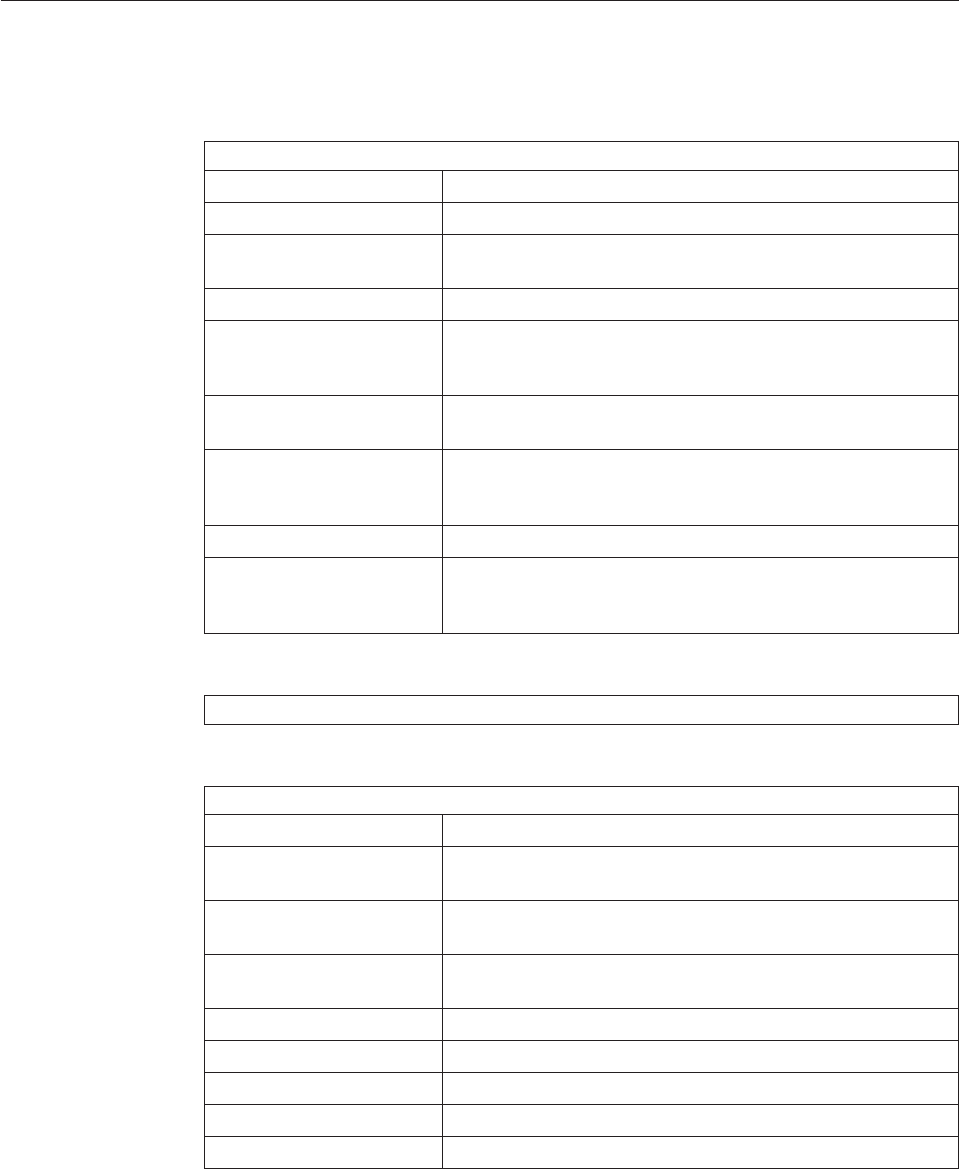
Record Container Details for Inbound Shipment Console Screens
This screen provides the ability to record container details for a container that is to
be received.
Table 61. Pack Container Screen, Shipment
Fields
Shipment # The inbound shipment number.
Shipper's Ref. # The inbound shipment reference number.
Plan # The delivery plan number with which the inbound shipment
is associated, if applicable.
Enterprise The Enterprise associated with the shipment.
Buyer The Buyer's identifier. Click this link to go to the
Organization Details screen and view the buyer organization
details.
Seller The Seller's identifier. Click this link to go to the Organization
Details screen and view the seller organization details.
Ship Node The node from where the inbound shipment is sent. Click this
link to go to the Ship Node Detail screen and view the node
details for the shipment.
Destination The inbound order's shipment destination.
Status The inbound shipment status. Click this link to go to the
Shipment Status Audits screen and view the shipment's status
audits.
Table 62. Pack Container Screen, Ship To
The address to where the container is shipped.
Table 63. Pack Container Screen, Inbound Order Container Details
Fields
Container Type Select whether the container is a pallet or a case.
Container SCM Enter the shipment container marking number of the pallet or
carton.
Tracking # Enter the container's tracking number used to track the
container's status and location.
Declared Value Enter the value used to calculate customs charges. This field
is only applicable for international shipments.
Gross Weight Enter the weight of the container plus its contents.
Net Weight Enter the weight of the container's contents.
Height Enter the height of the container.
Width Enter the width of the container.
Length Enter the length of the container.
104 Sterling Selling and Fulfillment Foundation: Warehouse Management System User Guide
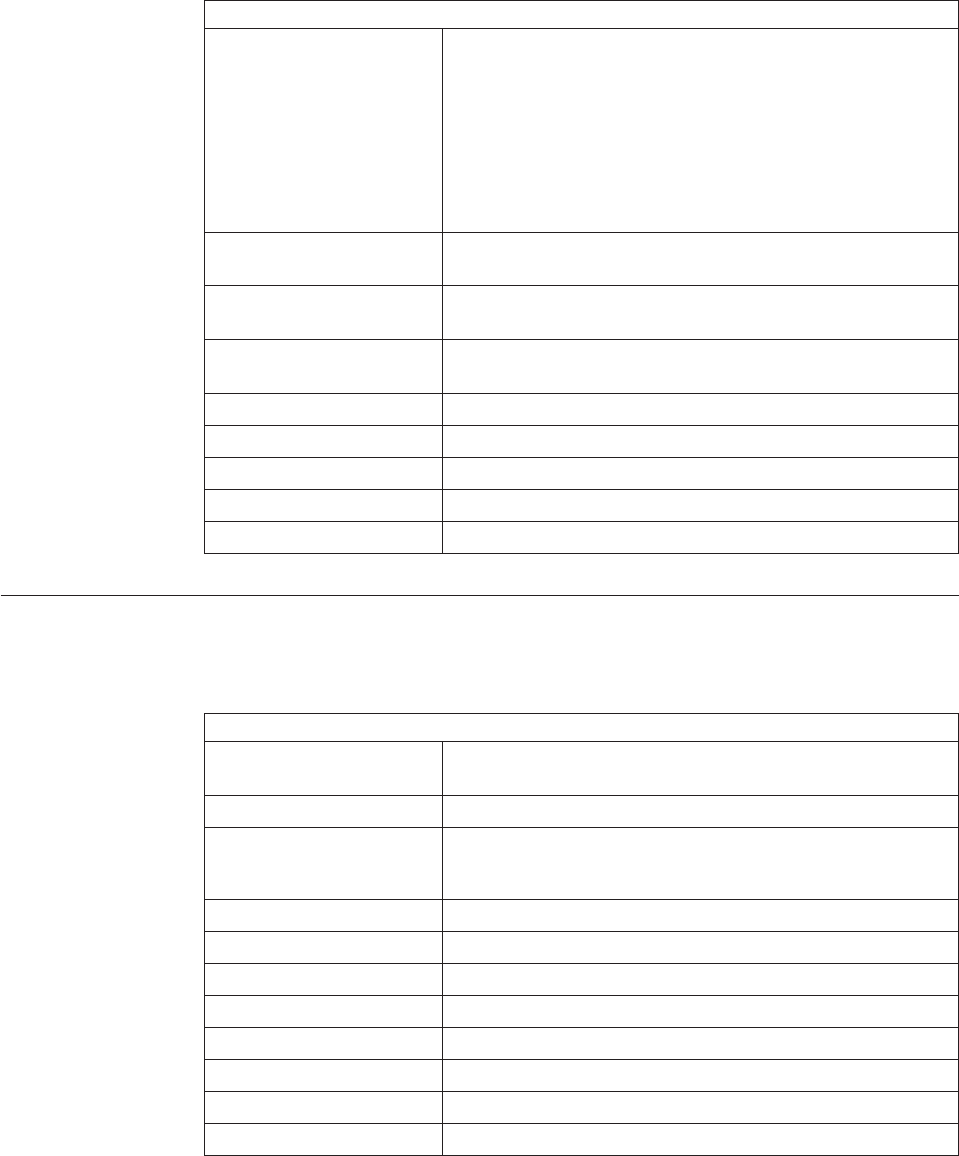
Table 64. Pack Container Screen, Unpacked Items
Fields
Tag Details This column displays only if the item is tag-controlled, and if
the receiving node is configured to capture tags when
receiving inventory into a warehouse or in all operations
performed within the node. For more information about
capturing the tag attributes, see the Sterling Selling and
Fulfillment Foundation: Application Platform Configuration Guide.
Click this link to go to the Container Serial Details and view
a container's serial details.
PO # The purchase order number associated with the unpacked
items.
Line # The order line number to which the line item packaged in the
container belongs.
Release # The order release number to which the unpacked line item
belongs.
Item ID The item identifier of the unpacked line item.
PC The product classification of the unpacked line item.
UOM The unit of measure of the unpacked line item.
Quantity The quantity associated with the unpacked items.
Pack Quantity The quantity of the line item that remains unpacked.
Start Receipt for Inbound Shipment Console Screens
This screen provides the ability to create a new receipt to receive a shipment.
Table 65. Start Receipt
Fields
Receipt # Enter the inbound shipment receipt number associated with
the receipt.
Receiving Dock The dock location that received the receipt.
Receipt Date The date you create a receipt.
To change this date, you can use the Calendar lookup.
Shipment # The inbound order shipment number.
Enterprise The Enterprise associated with the shipment.
Expected Delivery Date The date the shipment is estimated to arrive.
Receiving Node The node that received the shipment.
Buyer The buyer associated with the receipt.
Seller The seller associated with the receipt.
No Of Expected Pallets The number of pallets in the receipt.
No Of Expected Cartons The number of cartons in the receipt.
Click Save to save the receipt information.
Chapter 8. Inbound Shipment Console Screens 105
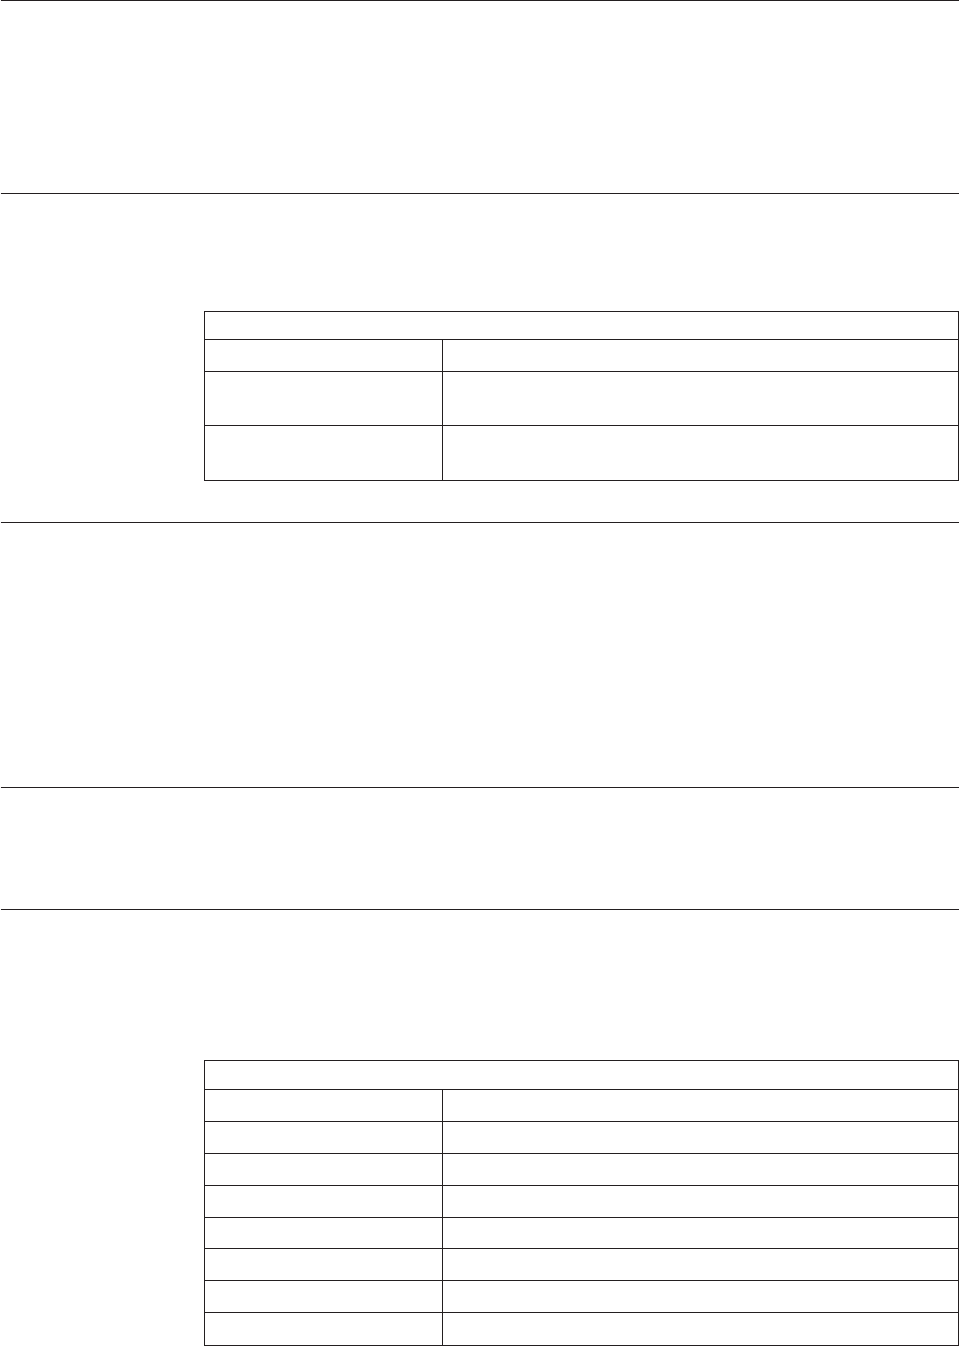
Receive Screen for Inbound Shipment Console Screens
This Receipt Details (Execution Console Framework) screen provides the ability to
enter items that you received in a warehouse, such as pallet, case, and SKU.
For more information about Execution Console Framework, see the appropriate
section in this guide.
Print for Inbound Shipment Console Screens
This screen provides print capabilities.
Table 66. Print
Fields
Print Service Name Choose the applicable document or label you want to print.
Printer Name Choose the printer from which you want to print the
document or label.
No. of Copies Enter the total number of copies of the document or label you
want to print.
Create Picklist for Inbound Shipment Console Screens
This screen provides the ability to create picklist for the selected shipments. When
you create a picklist, the status changes to "Shipment Being Picked". For more
information, see the Inbound Order Shipment Details screen.
Note: You can create a picklist only if the PRINT_PICK_LIST transaction is valid
for the shipment at its current status in the shipment pipeline. For more
information about transaction details, see the Sterling Selling and Fulfillment
Foundation: Warehouse Management System Configuration Guide.
Create Alerts for Inbound Shipment Console Screens
This screen provides the ability to create alerts for the selected shipment in this
screen. For field value descriptions, see the appropriate section in this guide.
Receive (Report or Record Receipt) for Inbound Shipment Console
Screens
This screen provides the ability to record paper-based receipt details.
Table 67. Receive, Receipt
Field
Receipt # The receipt number associated with the receipt.
Shipment # The shipment number associated with the receipt.
Enterprise The enterprise associated with the receipt.
Buyer The buyer associated with the receipt.
Seller The seller associated with the receipt.
Receipt Start Date The receipt start date.
Receiving Node The node that received the shipment.
Receipt Status The receipt status.
106 Sterling Selling and Fulfillment Foundation: Warehouse Management System User Guide
Table 67. Receive, Receipt (continued)
Field
Receipt Open Indicates if the receipt is open.
No Of Pallets The number of pallets.
No Of Cartons The number of cartons.
Table 68. Receive, Lines to Receive
Field
Pallet ID This field is displayed only if you are using the Sterling
Warehouse Management System.
Click this option button to enter the Pallet ID.
vPallet ID - Enter the Pallet ID.
vPallet Completely Received - Select this check box if the
pallet is completely received.
Case ID This field is displayed only if you are using the Sterling
Warehouse Management System.
Click this option button to enter the Case ID.
vCase ID - Enter the Case ID.
vCase Completely Received - Select this check box if the
case is completely received.
None This field is displayed only if you are using the Sterling
Warehouse Management System.
Click this option button if neither a pallet nor a case is
received.
Shipment Line # The shipment line number.
Click the Add icon to add unexpected items in the shipment.
PO # The purchase order number to which the shipment belongs
to.
Release # The order release number to which the shipment belongs.
Item ID The item you are receiving is displayed.
Unit Of Measure The item's unit of measure.
Product Class The shipment line item's product class.
Total Quantity The total quantity contained in the shipment line or order
line.
Received Quantity The quantity that has been received in the shipment line or
order line.
Quantity To Be Received The total quantity to be received in the shipment line, or the
quantity of released items in the order line.
Disposition Code The disposition code is automatically populated by the
system from the receiving rules. Modify the disposition code,
if applicable.
Receiving Quantity Enter the quantity being received in the shipment line.
Note: If the item is tag-controlled, additional fields are displayed, depending
upon the item's tag attributes. If the item is serial-controlled, an additional field is
displayed to let you enter the serial number.
Chapter 8. Inbound Shipment Console Screens 107
Table 69. Receive, Serial Range
Field Description
Serial # Enter the serial number of the item.
Click the Add icon to add a new serial number.
Click the Toggle icon to go to the serial range panel, where
you can enter the serial range of the items.
From Serial # Enter the start serial number.
To Serial # Enter the end serial number.
Click the Add icon to add a new serial range.
Add Delivery Plan for Inbound Shipment Console Screens
This screen provides the ability to add shipments to a delivery plan.
Table 70. Select Delivery Plan Screen, Delivery Plan
Fields
Enterprise The Enterprise associated with the shipment.
Plan # Enter the delivery plan number to which you want to add the
inbound shipment.
Choose the field and lookup option to find the specific plan
number you want to use.
Plan Name Enter the delivery plan name to which you want to add the
inbound shipment.
Plan Date Enter the delivery plan date and time through which the
delivery plan you are adding the inbound shipment to is
valid.
Inbound Order Container Search By All Attributes for Inbound
Shipment Console Screens
This screen helps you search inbound containers by all attributes.
Table 71. Inbound Order Container Search by All Attributes
Fields
Document Type Select the appropriate document type for which you want to
search.
PO # Enter the purchase order number for which you are
searching, if applicable.
Shipment # Enter the inbound shipment number for which you are
searching, if applicable.
Container # Enter the container number for which you are searching, if
applicable.
Container Type Enter the type of containers for which you are searching, if
applicable.
Tracking # Enter the tracking number under which you want to search
for containers, if applicable.
108 Sterling Selling and Fulfillment Foundation: Warehouse Management System User Guide
Table 71. Inbound Order Container Search by All Attributes (continued)
Fields
Item ID Enter the item ID included in the containers for which you
are searching, if applicable.
Container SCM Enter the container SCM for which you are searching, if
applicable.
Containers With Logical
Kits Only
Select the check box to search for containers only with logical
kits, if applicable.
Max Records Enter the maximum number of inbound shipments you want
returned from your search.
Note: Do not use spaces before or after any text you enter in the search fields, as
this may result in inconsistent or inaccurate results.
Inbound Order Container List for Inbound Shipment Console Screens
The Container List window displays the results of a container search. You can
perform actions on a single container or multiple containers by selecting the check
boxes of the containers you want to perform an action on and choosing the
applicable action from the action bar.
Table 72. Inbound Order Container List
Actions
View Details This action takes you to the Container Details screen where
you can view the container details.
Pack/Unpack This action takes you to the Pack or Unpack screen where
you can pack or unpack a container.
Print This action takes you to the Print screen where you can print
the container's documents or labels.
Delete This action takes you to the Delete Container screen where
you can delete an inbound container.
Fields
Container # The container number.
Shipment # The inbound shipment to which the container belongs.
Status The container status.
Manifested Indicates if the container was manifested.
Container Type The type of container used. For example, Carton or Pallet.
Tracking # The container's tracking number used to track the container's
status and location.
Container SCM The shipment container marking.
Ship Date The date by which the container must ship.
Received Indicates whether the shipment has been received.
Chapter 8. Inbound Shipment Console Screens 109
Container Details for Inbound Shipment Console Screens
The Container Detail screen provides various information about an inbound
container. The actions that can be performed in the Container Detail screen are
explained in the following tables.
Table 73. Inbound Order Container Details Screen, Container
View Icon Description
Audit Status Audits - This icon takes you to the Container Status
Audits screen where you can view a list of status audits that
you modified for an inbound container.
Actions
Print This action takes you to the Print screen where you can print
the container's documents or labels.
Fields
Container # The container number.
Shipment # The inbound shipment to which the container belongs.
Container Type The type of container used. For example, Carton or Pallet.
Ship Date The date by which the container must ship.
Container Group The container group to which the container belongs. Valid
values are: SHIPMENT, LOAD, or INVENTORY.
Received Indicates whether the shipment has been received.
Ship To The address to where the container is shipped.
Table 74. Inbound Order Container Details Screen, Ship To
The address to where the shipment is shipped.
Click the Address Details icon to go to the Modify Address screen and change the ship to
address.
Table 75. Inbound Order Container Details Screen, Container Info
Fields
Carrier/Service The Carrier or Carrier service shipping the container.
Tracking # The container's tracking number used to track the container's
status and location.
Pallet/Carton SCM The shipment container marking number of the pallet or
carton.
Declared Value The value used to calculate customs charges. This field is
only applicable for international shipments.
Gross Weight The weight of the container plus the contents.
Actual Weight The weight of just the container.
Size The size of the container.
Length The length of the container.
Width The width of the container.
Height The height of the container.
Net Weight The weight of the container's content.
110 Sterling Selling and Fulfillment Foundation: Warehouse Management System User Guide
Table 76. Inbound Order Container Details Screen, Container Line Details
Fields
Tag Details This column displays only if the item is tag-controlled, and if
the receiving node is configured to capture tags when
receiving inventory into a warehouse or in all operations
performed within the node. For more information about
capturing the tag attributes, see the Sterling Selling and
Fulfillment Foundation: Application Platform Configuration Guide.
Click this link to go to the Container Serial Details and view
a container's serial details.
Order # The order number to which the line item packaged in the
container belongs.
Line # The order line number to which the line item packaged in the
container belongs.
Release # The order release number to which the line item packaged in
the container belongs.
Item ID The item identifier of the line item packaged in the container.
PC The product classification of the line item packaged in the
container.
UOM The unit of measure of the line item packaged in the
container.
Description The description of the item.
Ship By Date The date by which the container line must be shipped by.
Quantity The quantity of the line item packaged in the container.
Table 77. Inbound Order container Details Screen, Child Containers
Fields
Container # The container number.
Status The container status.
Container Type The type of container used. For example, Carton or Pallet.
Tracking # The container's tracking number used to track the container's
status and location.
Container SCM The shipment container marking.
Container Serial Details for Inbound Shipment Console Screens
You can view a container's serial details with the help of this screen.
Table 78. Serial Details
Fields
Node Node associated with the item.
Location Location associated with the item.
Case ID Case LPN associated with the container.
Pallet ID Pallet LPN associated with the container.
Serial # The serial number associated with the container items.
Chapter 8. Inbound Shipment Console Screens 111
Table 79. Serial Details Screen, Child Serials
Fields
Secondary Serial #1 Component serial number of the item.
Secondary Serial #2 Component serial number of the item.
Secondary Serial #3 Component serial number of the item.
Secondary Serial #4 Component serial number of the item.
Secondary Serial #5 Component serial number of the item.
Secondary Serial #6 Component serial number of the item.
Secondary Serial #7 Component serial number of the item.
Secondary Serial #8 Component serial number of the item.
Secondary Serial #9 Component serial number of the item.
Container Status Audits for Inbound Shipment Console Screens
This screen provides visibility to a list of status audits that you modified for a
inbound container.
Table 80. Container Status Audits Screen, Container
Fields
Container # The inbound container number.
Shipment # The inbound shipment number.
Container Type The inbound container type.
Ship Date The date by which the container must ship.
Container Group The container group to which the container belongs. Valid
values are: SHIPMENT, LOAD, or INVENTORY.
Table 81. Container Status Audits Screen, Container Status Audits
Fields
Modified By The user who performed the modification.
Old Status The inbound shipment status before the status modification.
Old Status Date The date the inbound shipment entered the old status.
New Status The inbound container status after the status modification.
New Status Date The date the status modification was made.
Reason Code The reason for the modification.
Reason Text Additional information as to why the modification was made.
Pack or Unpack for Inbound Shipment Console Screens
This Pack Details (Execution Console Framework) screen provides the ability to
pack or unpack containers.
For more information about the Execution Console Framework, see the appropriate
section in this guide.
112 Sterling Selling and Fulfillment Foundation: Warehouse Management System User Guide
Delete Container for Inbound Shipment Console Screens
This screen provides the ability to delete an inbound container.
Table 82. Delete Container
Fields
Remove quantity from
shipment line
Choose this option to remove the quantity from the shipment
line.
Backorder removed
quantity
Choose this option to backorder the removed quantity.
Click OK.
Dock Appointment Search By All Attributes for Inbound Shipment
Console Screens
Use this screen to search for dock appointments by all attributes.
Table 83. Dock Appointment Search By All Attributes
Fields
Node The node associated with the docks displays.
Start Date The start date is defaulted to the current date.
Enter the start date of the appointment for which you are
searching, if applicable.
Choose the calendar lookup to change the date.
Number of Days To
Display
Enter the maximum number of days to be displayed on the
dock schedule calendar as a result of your search, if
applicable. By default, the value displayed is 5.
Location Enter the dock location, if applicable.
Choose the lookup option to search for dock locations.
Inbound Delivery Check this checkbox to search for inbound docks, if
applicable.
Outbound Pickup Check this checkbox to search for outbound docks, if
applicable.
Appointment # Enter the appointment number for which you are searching,
if applicable.
Shipment # Enter the shipment number for which you are searching for
the dock appointment, if applicable.
Order # Enter the order number for which you are searching for the
dock appointment, if applicable.
Load # Enter the load number for which you are searching for the
dock appointment, if applicable.
Carrier Enter the carrier for which you are searching for the dock
appointment, if applicable.
BOL # Enter the bill of lading number for which you are searching
for the dock appointment, if applicable.
Chapter 8. Inbound Shipment Console Screens 113
The Dock Schedule Details screen displays as a result of your dock appointment
search by all attributes.
Dock Schedule Details for Inbound Shipment Console Screens
This screen provides visibility to the dock appointment calendar. It displays the
inbound, outbound, and both inbound and outbound docks with their:
vAvailable time slots for creating new appointments.
vUnavailable time slots due to calendar constraints.
vUnavailable time slots due to appointments already taken.
Table 84. Dock Schedule Details, Dock Availability
Actions
Manage Dock Group This action button takes you to the Dock Group Details
screen.
Zoom In Click this action button to view more definitive details of the
appointment calendar. Two levels of Zoom In are supported.
Zoom Out Click this action button to view a larger area of the
appointment calendar. Two levels of Zoom Out are
supported.
Displays the dock locations for the nodes that are of the dock type INBOUND,
OUTBOUND, and BOTH.
Table 85. Dock Schedule Details, Legend
Blue Indicates an appointment for the searched criteria.
Click a slot to modify an existing appointment. The Dock
Appointment screen displays.
Cyan Indicates appointments that do not match the searched
criteria.
Click a slot to modify an existing appointment. The Dock
Appointment screen displays.
Gray Indicates free slots for which new appointments can be taken.
Click a slot to create a new dock appointment. The Dock
Appointment screen displays.
Black Indicates the unavailable slots due to the calendar constraints.
Dock Appointment for Inbound Shipment Console Screens
You can create new appointments or modify existing appointments with the help
of this screen.
Table 86. Dock Appointment, Appointment Details
Actions
Cancel Click this action button to cancel an appointment.
Fields
114 Sterling Selling and Fulfillment Foundation: Warehouse Management System User Guide
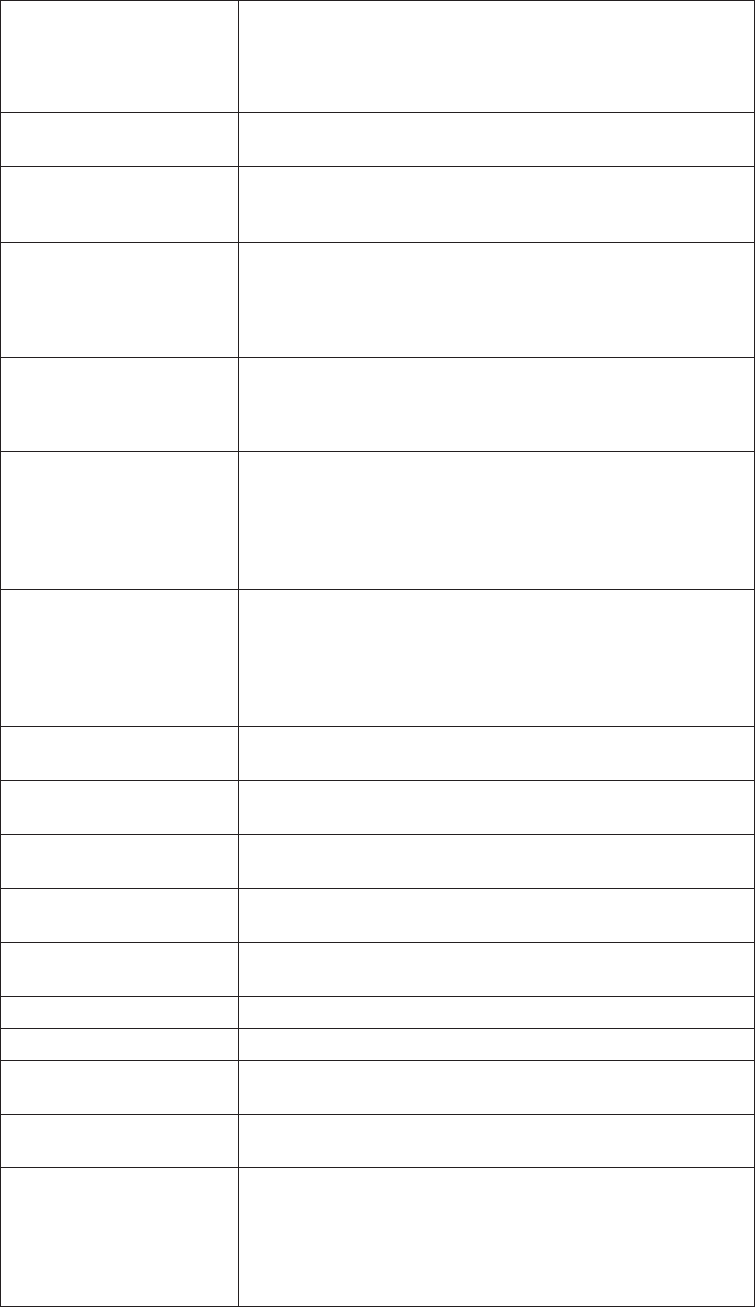
Table 86. Dock Appointment, Appointment Details (continued)
Appointment # The appointment number associated with the dock displays,
if applicable.
The appointment number displays only for existing
appointments.
Location The dock location for which you chose to take an
appointment displays here.
Appointment Type By default, the Outbound Pickup appointment type is
selected for outbound dock locations, and Inbound Delivery
for inbound and both inbound and outbound dock locations.
Start Date This start date is defaulted with the date of the selected slot.
Enter the start date on which you want to take an
appointment or choose the calendar lookup to change the
date.
Start Time This start time is defaulted with the time of the selected slot.
Enter the start time of the appointment or choose the time
lookup to change the time.
Shipment # Enter the shipment number you want to associate with the
dock appointment, if applicable.
Choose the Lookup icon to search for shipments. The
shipment's weight, volume, number of cases and number of
pallets automatically displays.
Load # Enter the load number you want to associate with the dock
appointment, if applicable.
Choose the Lookup icon to search for loads. The number of
cases and number of pallets associated with the load
automatically displays.
Order # Enter the order number you want to associate with the dock
appointment, if applicable.
BOL # Enter the bill of lading number you want to associate with
the dock appointment, if applicable.
PRO # Enter the PRO number you want to associate with the dock
appointment, if applicable.
Carrier Select the carrier for which you want to take an appointment,
if applicable.
Notes Enter any additional information associated with the dock
appointment, if applicable.
Weight Enter the weight of the shipment, if applicable.
Volume Enter the volume of the shipment, if applicable.
No Of Cases Enter the number of cases contained in the shipment or load,
if applicable.
No Of Pallets Enter the number of pallets contained in the shipment or
load, if applicable.
Estimate End Time Click this button to calculate and display the estimated end
time in the End Time field.
The estimated end time is calculated based on SAM defined
in the productivity type, which is associated with the task
type for trailer loading and unloading activities.
Chapter 8. Inbound Shipment Console Screens 115
Table 86. Dock Appointment, Appointment Details (continued)
End Time To specify a pre-determined end time, enter the end time.
Choose the time lookup to change the time.
Click Save to save the dock appointment.
Dock Group Details for Inbound Shipment Console Screens
You can enter constraints on the maximum number of appointments that can be
taken for the group of docks associated with a node.
Table 87. Dock Group Details, Dock Group
Fields
Node The node associated with the docks displays.
Table 88. Dock Group Details, Dock Group Max No. of Appointments
Action
Remove Click this action button to remove the selected appointment
constraints.
Fields
Start Time Indicates the start time of the time slot for which the
maximum number of appointment constraint needs to be
created.
Click the Add icon to create an appointment constraint.
End Time Indicates the end time of the time slot for which the
maximum number of appointment constraint needs to be
created.
Sunday Enter the maximum number of appointments you can take on
this day in the time window across dock locations.
Monday Enter the maximum number of appointments you can take on
this day in the time window across dock locations.
Tuesday Enter the maximum number of appointments you can take on
this day in the time window across dock locations.
Wednesday Enter the maximum number of appointments you can take on
this day in the time window across dock locations.
Thursday Enter the maximum number of appointments you can take on
this day in the time window across dock locations.
Friday Enter the maximum number of appointments you can take on
this day in the time window across dock locations.
Saturday Enter the maximum number of appointments you can take on
this day in the time window.
Click Save to save the maximum number of dock group appointment constraints.
116 Sterling Selling and Fulfillment Foundation: Warehouse Management System User Guide
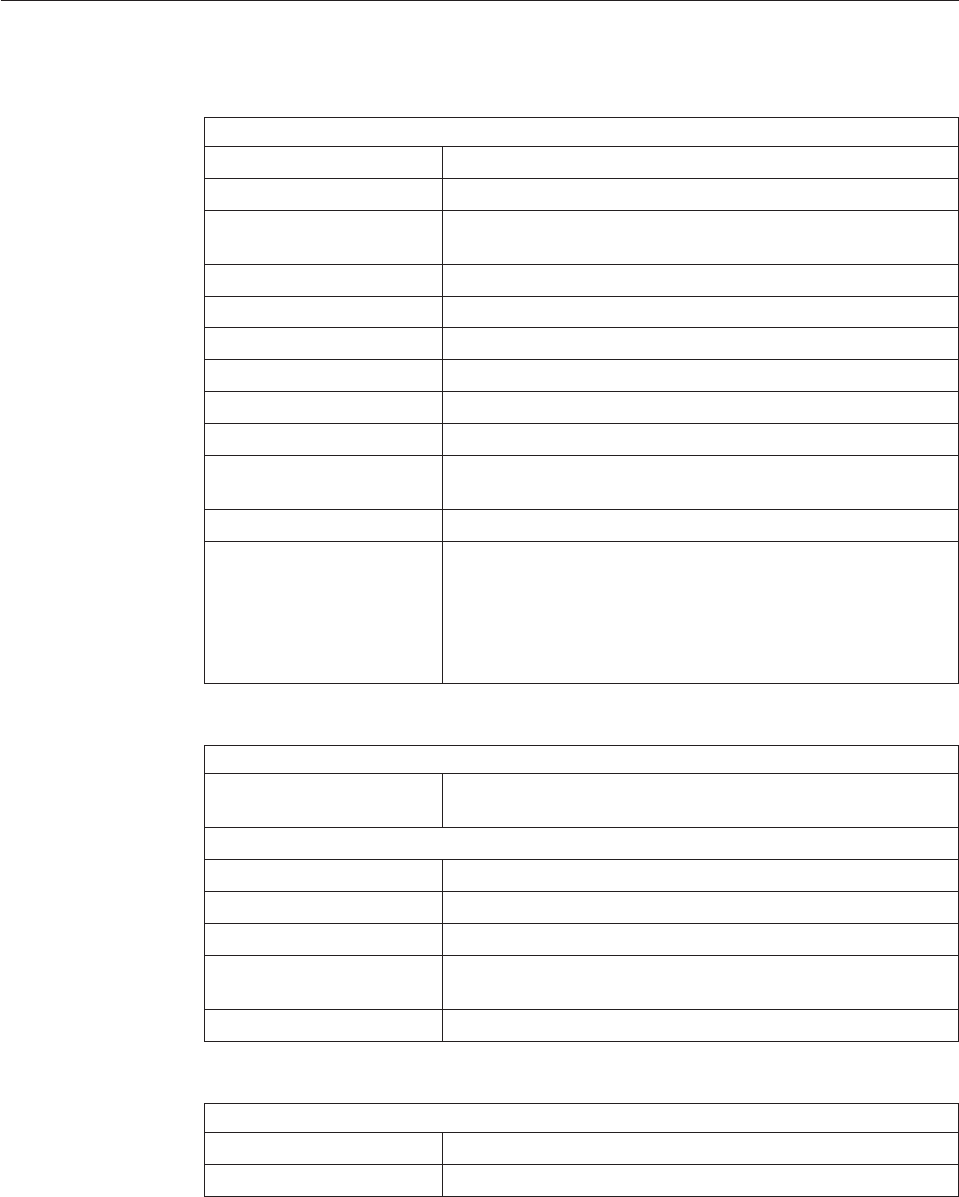
View Holds for Inbound Shipment Console Screens
You can view holds that are applied to the selected shipments in this screen.
Table 89. View Holds, Inbound Order Shipment
Fields
Shipment # The inbound shipment number.
Shipper’s Ref. # The inbound shipment reference number.
Plan # The delivery plan number the inbound shipment is associated
with.
Enterprise The enterprise associated with the inbound shipment.
Buyer The identifier for the buyer.
Seller The identifier for the seller.
Ship Node The node from where the inbound shipment is shipped.
Receiving Node The node that is receiving the inbound shipment.
Status The inbound shipment status.
Release # The order release number to which the inbound shipment
line belongs.
Has Hazardous Items Indicates if the inbound shipment contains hazardous items.
Merge Node If you have order lines coming from multiple nodes and want
to consolidate them into one load, enter a node at which you
want all of the dependent order lines to be consolidated with
the parent order line.
Note: Merge Node is only relevant in a Deliver Together
dependency.
Table 90. View Holds, Shipment Holds
Actions
Add Holds This action takes you to the Add Holds screen where you can
add holds to the selected inbound shipment.
Fields
Hold Description A brief description of the hold.
Hold Status The current status of the hold.
Hold Comment Any additional comments for the hold.
Action Select the action that you want to apply to the hold from the
drop-down list.
Reason Enter the reason for the hold.
Table 91. View Holds, Resolved Holds
Fields
Hold Description A brief description of the hold.
Reason The reason for changing this hold to resolved status.
Chapter 8. Inbound Shipment Console Screens 117
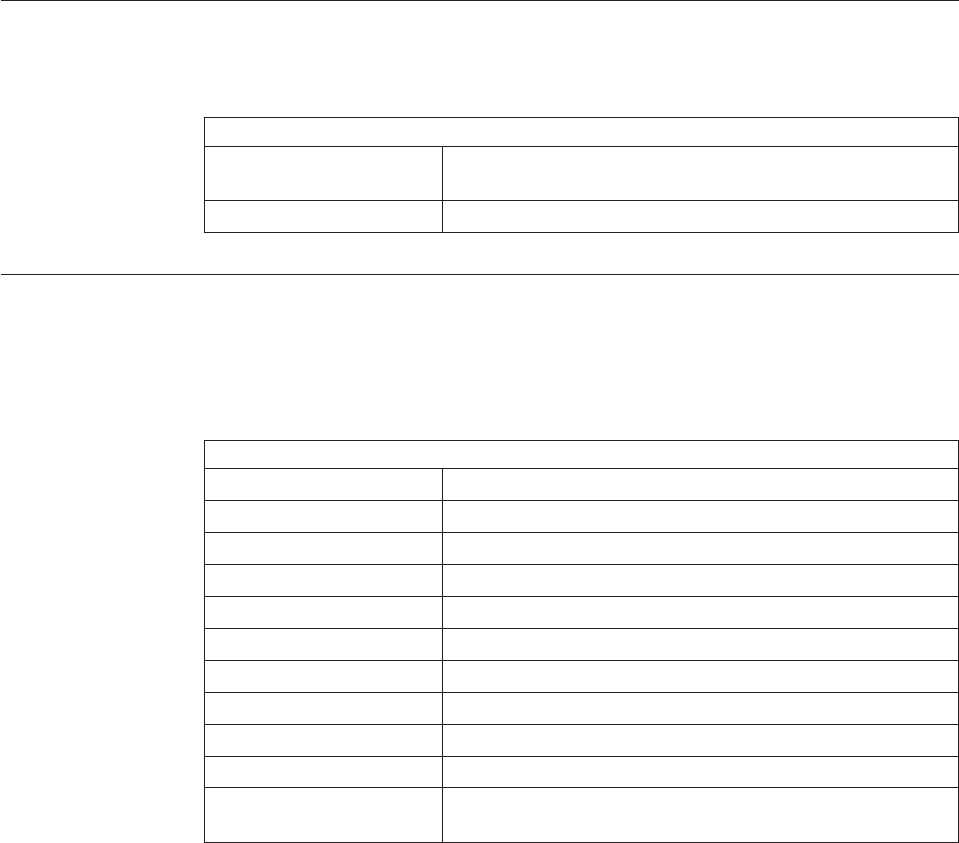
Add Holds for Inbound Shipment Console Screens
You can add holds to the inbound shipment on this screen.
Table 92. Add Holds, Shipment Holds
Fields
Hold Type Select the hold type associated with the inbound shipment
from the drop-down list.
Reason Enter the reason for the hold.
View History for Inbound Shipment Console Screens
Every time the status of an order hold changes, useful information regarding the
status change is recorded in Sterling Selling and Fulfillment Foundation. In this
screen, you can view the history of an order hold.
Table 93. View History, Primary Information
Fields
Shipment# The outbound shipment number.
Shipper's Ref. # The outbound shipper's reference number.
Plan # The outbound shipment's plan number
Enterprise The Enterprise associated with the shipment
Buyer The Buyer's identifier.
Seller The Seller's identifier.
Ship Node The node from which the outbound shipment ships.
Receiving Node The node which receives the outbound shipment
Status The status of the outbound shipment.
Has Hazardous Items Indicates if the shipment contains any hazardous item.
Merge Node The node that has multiple order lines and is consolidated
into one shipment.
118 Sterling Selling and Fulfillment Foundation: Warehouse Management System User Guide
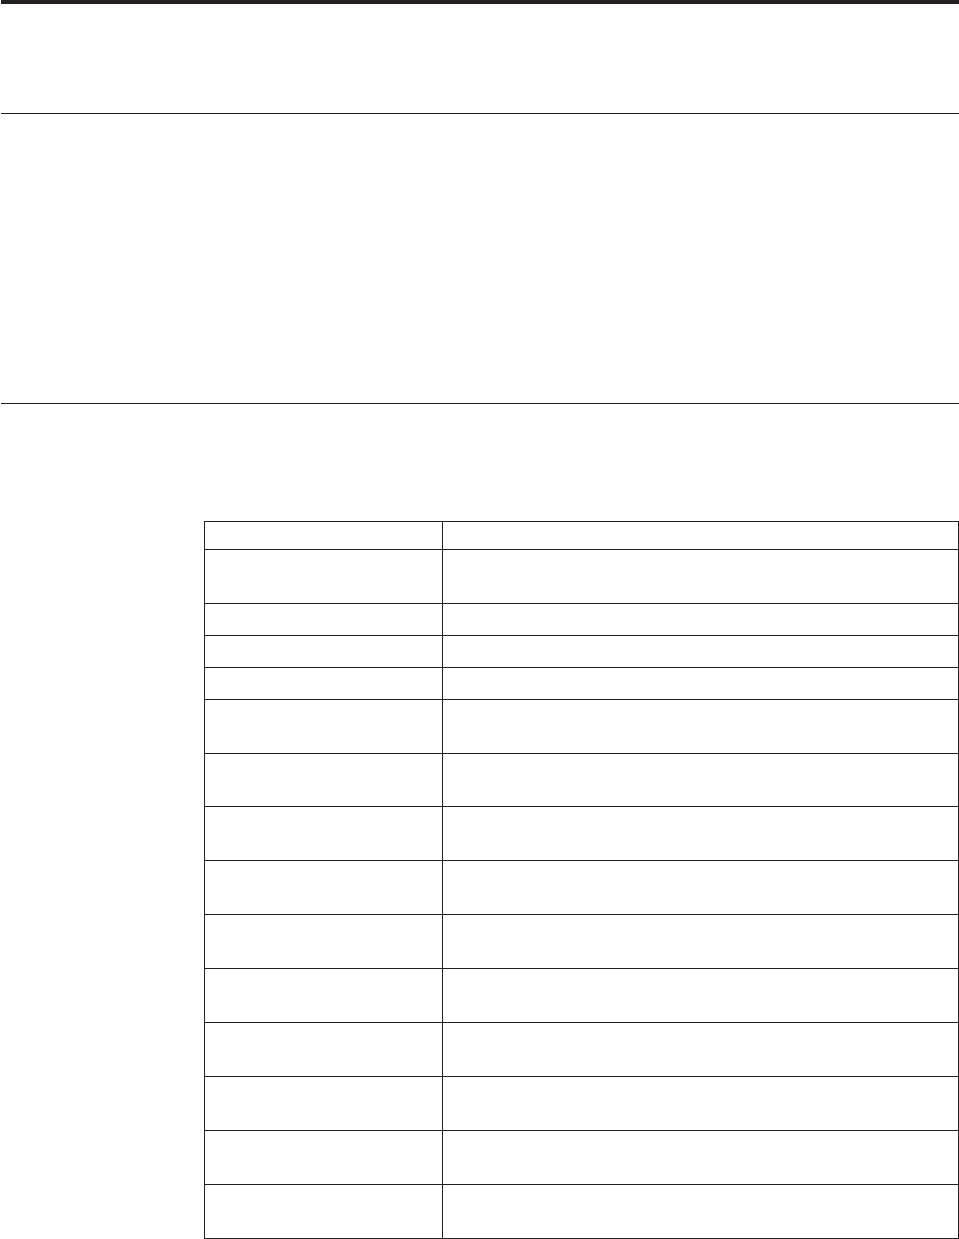
Chapter 9. Receipt Console Screens
About Receipt Console Screens
The Receipt Console provides:
vExtensive search capabilities using granular level information such as order
number, shipment number.
vVisibility to receipt summary.
vVisibility to receipt details and receipt line details.
vClosure of receipts and prereceipts.
This chapter provides screen and field descriptions for the Receipt Console.
Receipt Search By Receipt
The Receipt Search By Receipt screen lets you perform a receipt search by receipt.
Table 94. Receipt Search By Receipt
Fields Description
Document Type Select the document type associated with the receipt you
want to search for.
Enterprise Select the enterprise you are searching for.
Across Enterprises Select this option if you are searching across all enterprises.
Receiving Node The node associated with the receipt displays.
Receiving Dock Enter the receiving dock associated with the receipt you are
searching for, if applicable.
Receipt # Enter the receipt number associated with the receipt you are
searching for, if applicable.
Buyer Enter the buyer associated with the receipt you want to
search for, if applicable.
Seller Enter the seller associated with the receipt you want to search
for, if applicable.
Order # Enter the order number associated with the receipt you are
searching for, if applicable.
Shipment # Enter the shipment number associated with the receipt you
are searching for, if applicable.
Receipt Date Enter the date range through which you want to search for
the receipts, if applicable.
Receipt Status Select the status of the receipt you want to search for, if
applicable.
Closed Receipts Only Select Closed Receipts Only if the search is applicable only
for the closed receipts.
Max Records Enter the maximum number of records you want listed as a
result of the search.
Choosing Search displays the search results in the Receipt List screen.
© Copyright IBM Corp. 1999, 2011 119
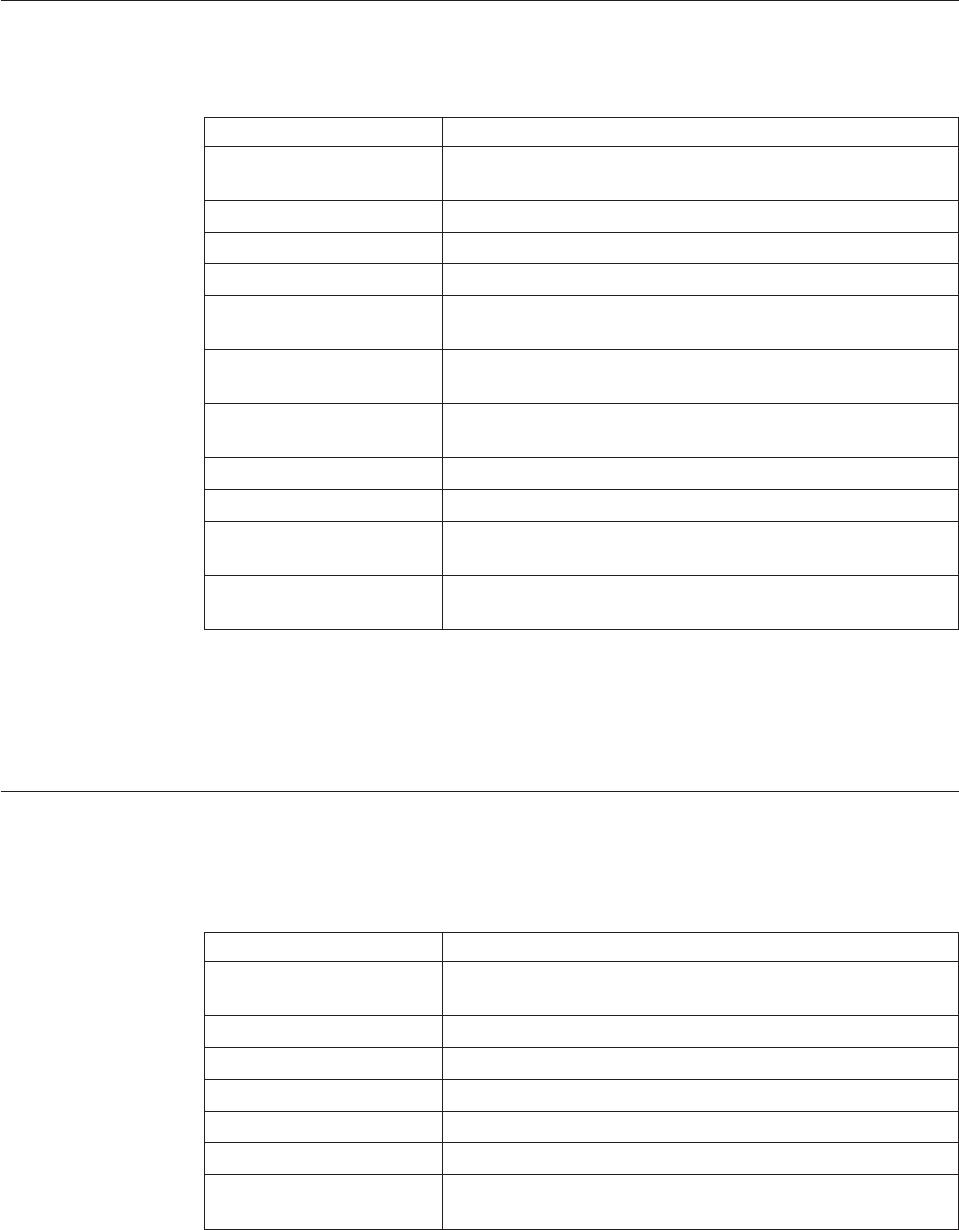
Note: It is recommended that you do not use spaces before or after any text you
enter in the search fields, as this may result in inconsistent or inaccurate results.
Receipt Search By Item
The Receipt Search By Item screen lets you perform a receipt search by item.
Table 95. Receipt Search By Item
Fields Description
Document Type Select the document type associated with the receipt you
want to search for.
Enterprise Select the enterprise you are searching for.
Across Enterprises Select this option if you are searching across all enterprises.
Receiving Node The node associated with the receipt displays.
Item ID Enter the item ID of the item you want to search for, if
applicable.
Product Class Select the product class of the item you are searching for if
applicable.
Unit Of Measure Select the unit of measure of the item you are searching for, if
applicable.
Serial # Enter the serial number you are searching for, if applicable.
Disposition Code Select the disposition code you are searching for, if applicable.
Inspection Pending Select this option if you are searching for inspection pending
receipts.
Max Records Enter the maximum number of records you want listed as a
result of your search.
Choosing Search displays the search results in the Receipt List screen.
Note: It is recommended that you do not use spaces before or after any text you
enter in the search fields, as this may result in inconsistent or inaccurate results.
Receipt Search By Container
The Receipt Search By Container screen lets you perform a receipt search by
container.
Table 96. Receipt Search By Container
Fields Description
Document Type Select the document type associated with the receipt you
want to search for.
Enterprise Select the enterprise you are searching for.
Across Enterprises Select this option if you are searching across all enterprises.
Receiving Node The node associated with the receipt displays.
Pallet ID Enter the pallet LPN you are searching for.
Case ID Enter the case LPN you are searching for.
Max Records Enter the maximum number of records you want listed as a
result of your search.
120 Sterling Selling and Fulfillment Foundation: Warehouse Management System User Guide
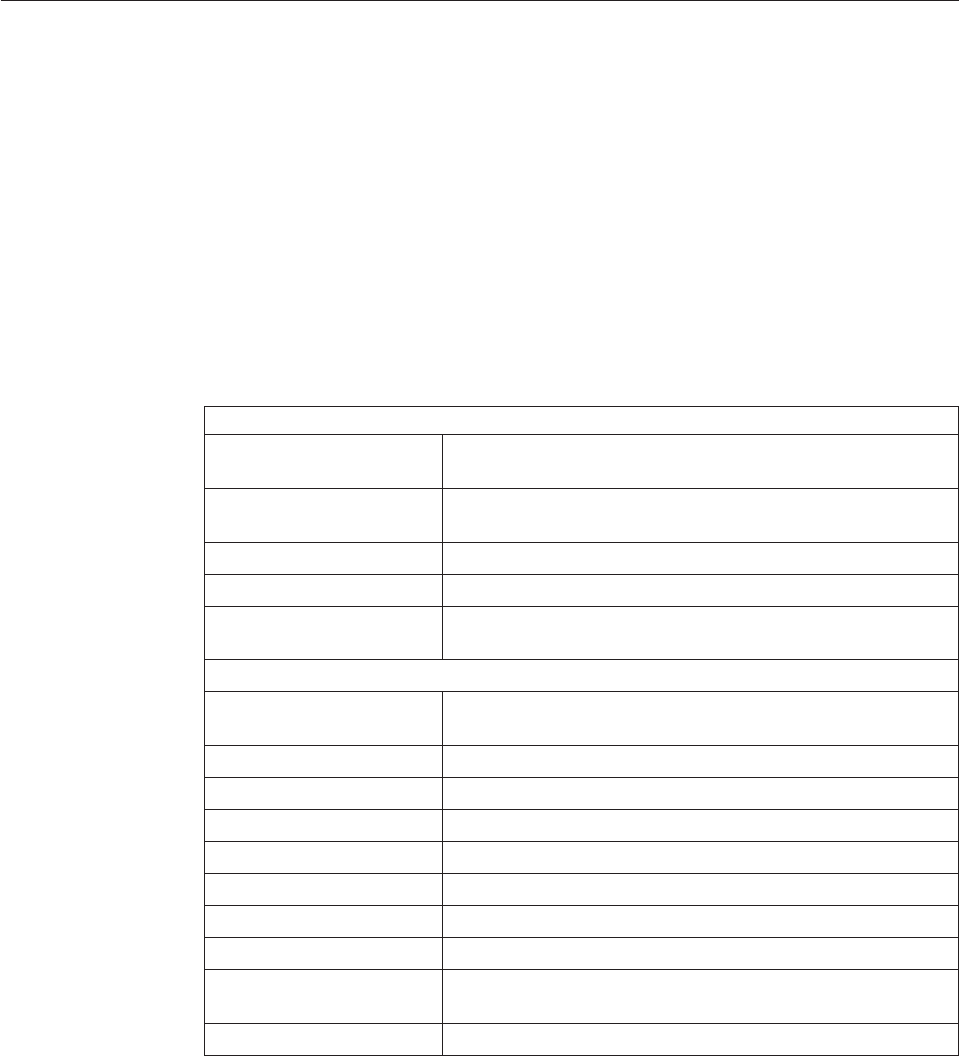
Choosing Search displays the search results in the Receipt List screen.
Note: It is recommended that you do not use spaces before or after any text you
enter in the search fields, as this may result in inconsistent or inaccurate results.
Receipt List
The Receipt List screen displays the result of a receipt search. You can perform
actions on a single receipt or on multiple receipts by selecting the check boxes of
the relevant receipts and choosing the applicable action from the action bar.
The fields in the Receipt List screen are always the same, irrespective of whether
you are searching for a Receipt in the Inbound Order Console (using the Supply
Collaboration module), the Inbound Receipt Console or the Return Receipt Console
(using the Warehouse Management System module), or in the Return Console
(using the Reverse Logistics module).
This chapter describes the screens in terms of the Return Receipt Console.
However, the field descriptions hold true in all similar scenarios, across all
consoles mentioned above.
Table 97. Return Receipt List
Actions
View Summary This action takes you to the Return Order Receipt Summary
screen, which lets you view a receipt summary.
View Details This action takes you to the Receipt Details screen, which lets
you view the return receipt details.
Close Prereceipt This action closes a prereceipt.
Close Receipt This action closes a receipt.
Report/Record receipt. This action takes you to the Receive screen, which lets you
record paper based receipt details.
Fields
Receipt # Receipt number associated with the receipt. Click this link to
view the receipt details.
Shipment # Shipment number associated with the receipt.
Order # Order Number associated with receipt.
Enterprise Enterprise associated with the receipt.
Buyer Buyer associated with the receipt.
Seller Seller associated with the receipt
Receipt Start Date The start date of the receipt.
Receiving Node The node where inventory was received.
Receipt Open Indicates if the receipt is open. If open, you can receive the
receipts.
Receipt Status Status of the receipt.
Chapter 9. Receipt Console Screens 121
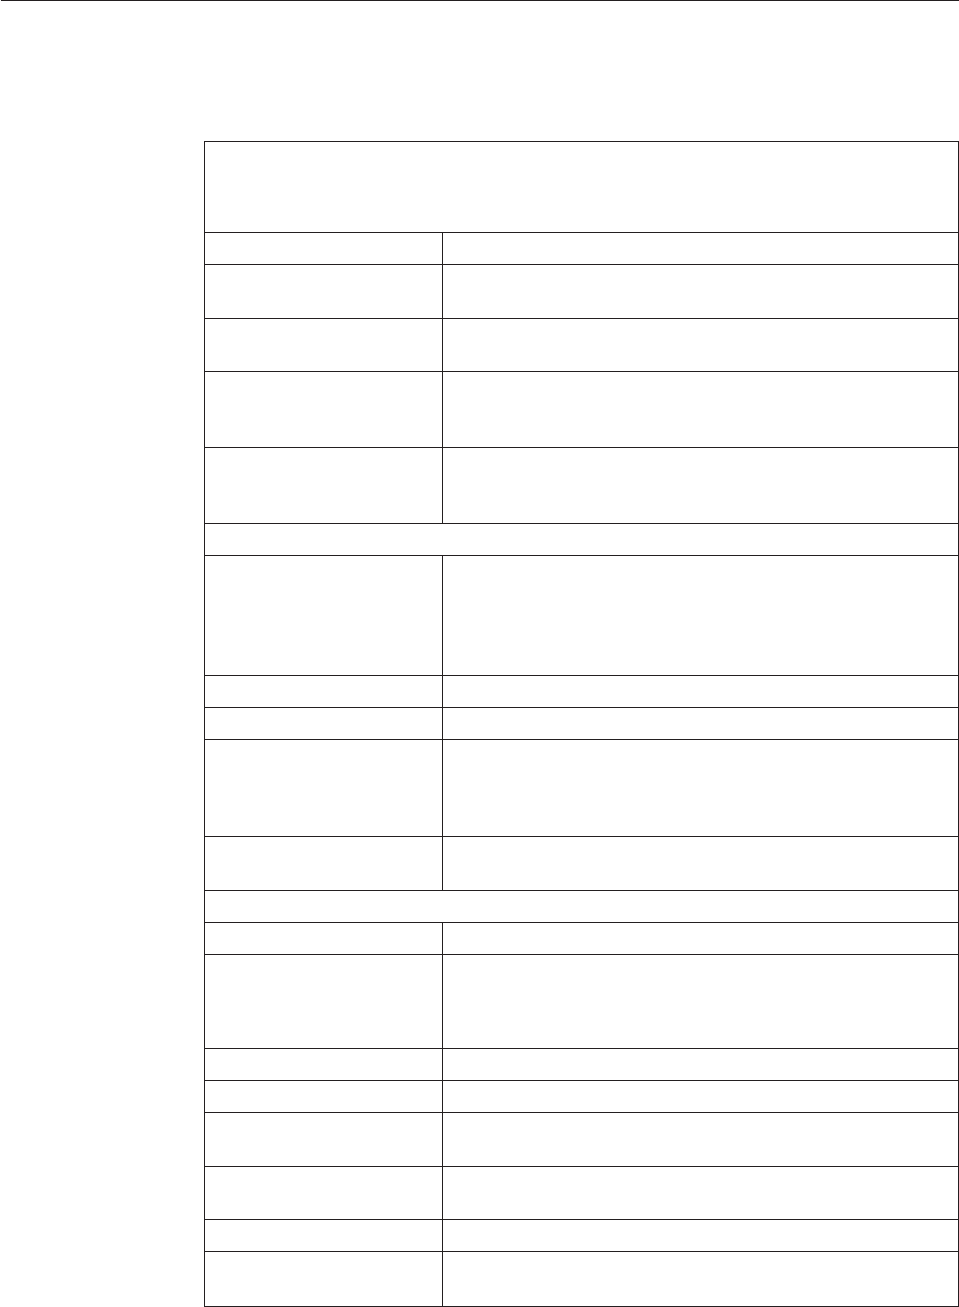
Return Order Receipt Summary
The Return Order Receipt Summary screen provides visibility of a receipt's
summary.
Table 98. Return Order Receipt Summary, Return Receipt
Return Receipt
This panel contains basic information about a receipt.
Note: You can choose receipt actions by selecting the view icon in the title bar.
View Icons Description
Additional Attributes Details - This icon takes you to the Receipt Details screen,
which lets you view receipt details.
Instructions Instructions - This icon takes you to the Receipt Instructions
screen, which lets you view a receipt's summary instruction
Audit Status Audits - This icon takes you to the Receipt Status
Audits screen, which lets you view a receipt's summary
status audit list.
Return Receipt History Expected Receipt - This icon takes you to the Expected
Receipt screen, which lets you view the details of the
expected receipt.
Actions
Inventory View This action takes you to the Location Inventory screen, which
lets you view location inventory details for a receipt. For
more information about the Location Inventory screen, see
the Sterling Selling and Fulfillment Foundation: Warehouse
Management System User Guide.
Close Prereceipt This action closes a prereceipt.
Close Receipt This action closes a receipt.
Receive This action takes you to the Receive Details screen, which lets
you record receipt details. For more information about the
Receive Details screen, see the Sterling Selling and Fulfillment
Foundation: Warehouse Management System User Guide.
Report/Record Receipt This action takes you to the Receive screen, which lets you
record paper based receipt details.
Fields
Receipt # The receipt number associated with the receipt.
Shipment # The shipment number associated with the receipt.
Choose the Shipment # link to view the shipment detail for
the particular shipment.
Order # The order number associated with the receipt.
Enterprise The enterprise associated with the receipt.
Buyer The buyer associated with the receipt. Click this link to view
buyer details.
Seller The seller associated with the receipt. Click this link to view
seller details.
Receipt Start Date The start date of the receipt.
Receiving Node The node where inventory was received. Click this link to
view the receiving node details.
122 Sterling Selling and Fulfillment Foundation: Warehouse Management System User Guide
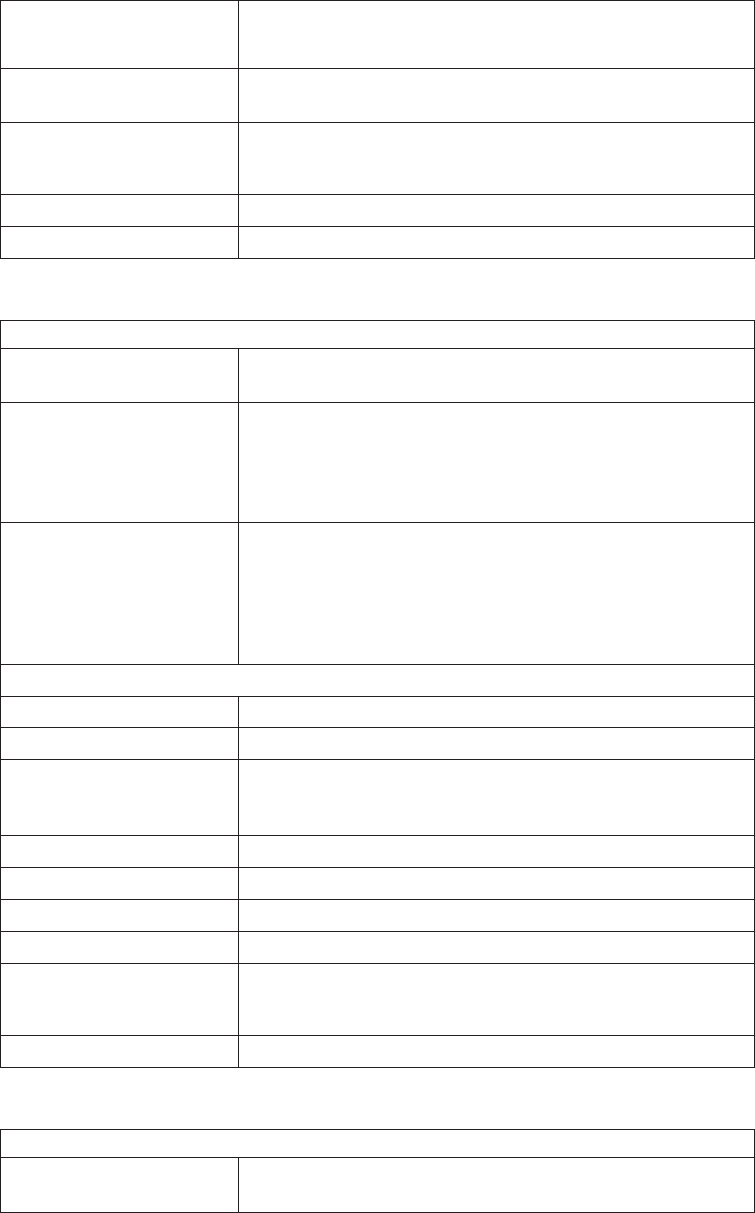
Table 98. Return Order Receipt Summary, Return Receipt (continued)
Receiving Dock The dock location that received the receipt.
Important: You can receive receipts into multiple locations.
Receipt Open Indicates if the receipt is open. If open, you can receive the
receipts.
Receipt Status The status of the receipt.
Click this link to view the status audits for a receipt.
No Of Expected Pallets The number of expected pallets in the receipt.
No Of Expected Cartons The number of expected cartons in the receipt.
Table 99. Return Order Receipt Summary, Items
Actions
View Details This action takes you to the Receipt Line Details screen,
which lets you view a receipt's item line details.
Adjust Receipt This action takes you to the Adjust Receipt screen, which lets
you adjust the receipt of an item. For more information about
the Adjust Receipt screen, see the Sterling Selling and
Fulfillment Foundation: Warehouse Management System User
Guide.
Inspect This action takes you to the Inspect Return Receipt Details
screen, which lets you view the return receipt items and the
receipts that are already inspected. For more information
about how to inspect return receipts, see the appropriate
section in this guide or the Sterling Selling and Fulfillment
Foundation: Reverse Logistics User Guide.
Fields
Item ID The item ID.
Description A brief description of the item.
PC Product Class: Indicates the item's inventory categorization.
Orders are placed for an item and product class. Typical
examples are IRREGULAR, FD (Factory Defects).
UOM The item's unit of measure.
Disposition Code The disposition of the item.
Order # The order number associated with the receipt.
Release # The release number associated with the receipt.
Tag # The tag number.
Clicking this link lets you view the tag details for an item.
Quantity The number of units in UOM on the receipt.
Table 100. Return Order Receipt Summary, Containers
Actions
View Details This action takes you to the Receipt Line Details (Container)
screen, which lets you view a receipt's container line details.
Chapter 9. Receipt Console Screens 123
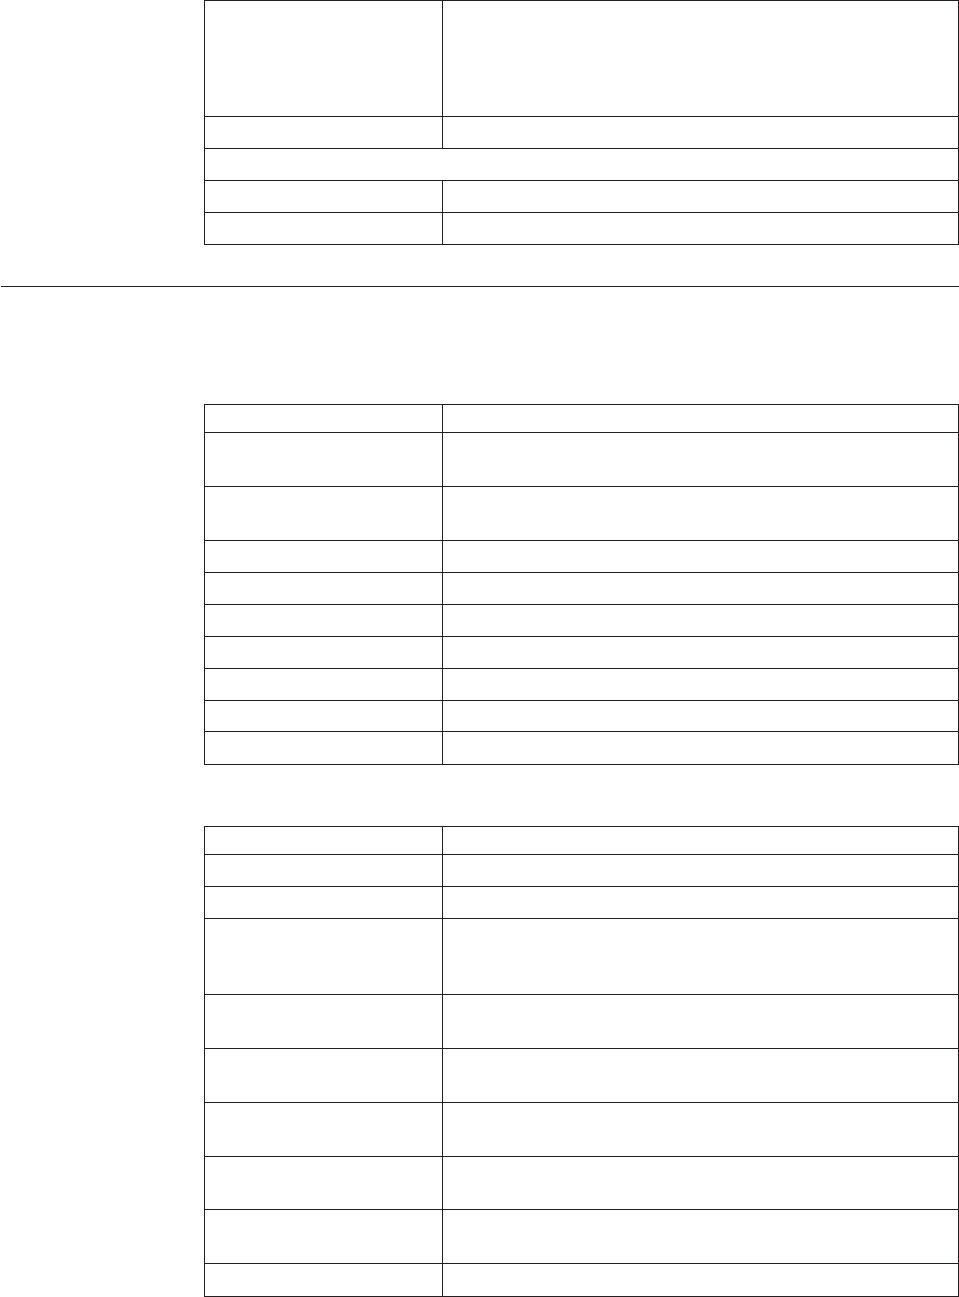
Table 100. Return Order Receipt Summary, Containers (continued)
Adjust Receipt This action takes you to the Adjust Receipt screen, which lets
you adjust the receipt of an item. For more information about
the Adjust Receipt screen, see the Sterling Selling and
Fulfillment Foundation: Warehouse Management System User
Guide.
UnReceive Container This action lets you unreceive the selected containers.
Fields
Pallet ID The pallet LPN associated with the container.
Case ID The case LPN associated with the container.
Receipt Line Details
This screen provides visibility to inbound order's shipment receipt line details.
Table 101. Receipt Line Details Screen, Container
Fields Description
Receipt # The inbound order receipt number associated with the
receipt.
Shipment # The inbound order shipment number associated with the
receipt.
Order # The inbound order number associated with the receipt.
Enterprise The enterprise that received the receipt.
Receiving Node The node that received the receipt.
Receiving Dock The dock location that received the receipt.
Receipt Status The status of the receipt that was received.
Case ID Case LPN that was received.
Pallet ID Pallet LPN that was received.
Table 102. Receipt Line Details Screen, Container Details
Fields Description
Item ID The item identifier of the line item packaged in the container.
Item Description The description of the item received.
PC The product classification of the line item packaged in the
container such as first quality, second quality, or finished
good.
UOM The unit of measure of the line item packaged in the
container.
Disposition Code The disposition code to determine the product classification
and inventory status.
Order # The order number to which the line item packaged in the
container belongs.
Line # The order line number to which the line item packaged in the
container belongs to.
Release # The order release number to which the line item packaged in
the container belongs.
Ship By Date The date by which the container must be shipped.
124 Sterling Selling and Fulfillment Foundation: Warehouse Management System User Guide
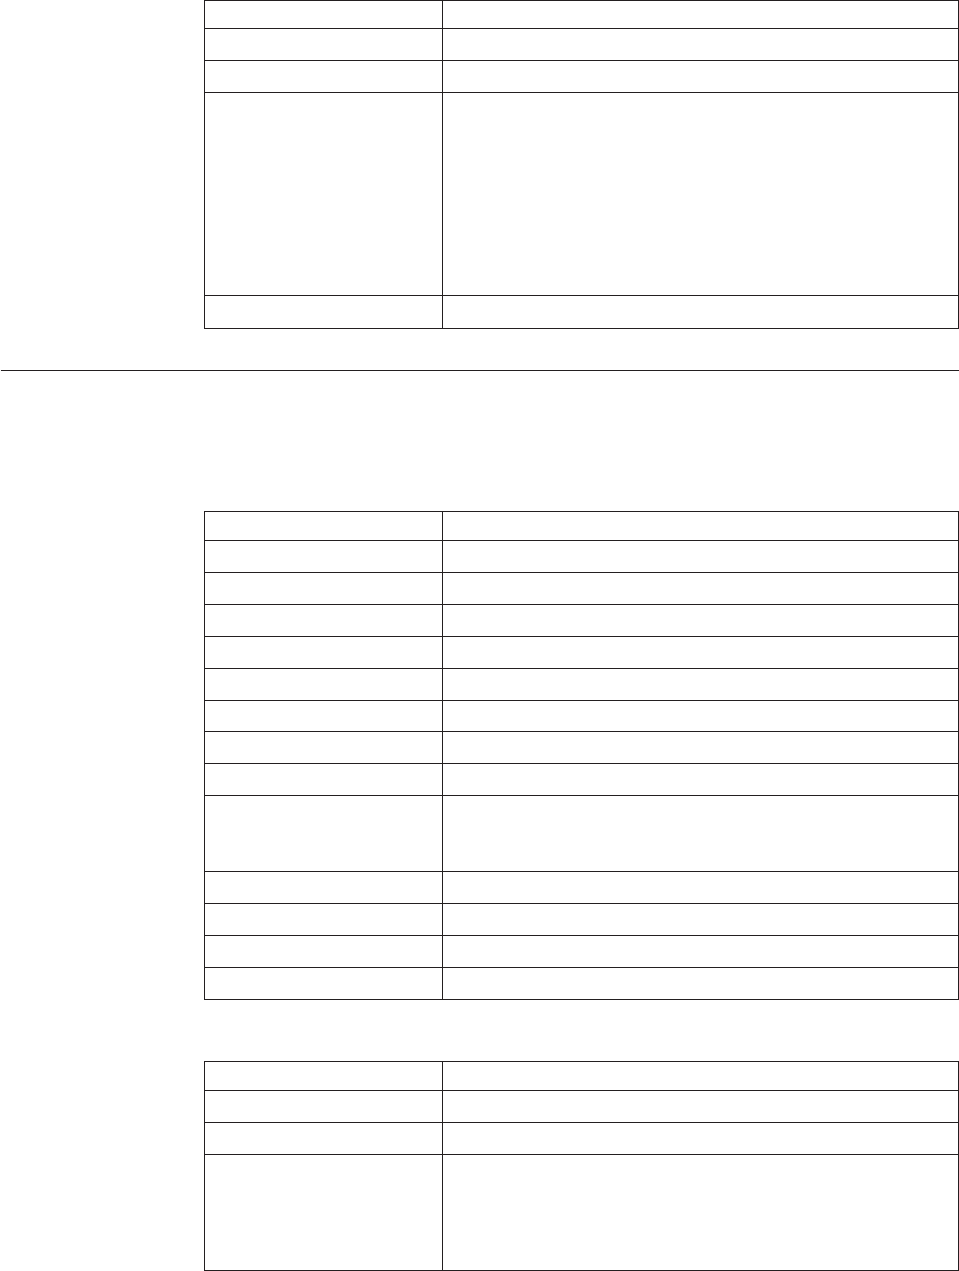
Table 102. Receipt Line Details Screen, Container Details (continued)
Fields Description
COO Country or region of origin associated with the item.
Serial # The serial number associated with the item.
Tag This column displays only if the item is tag-controlled, and if
the receiving node is configured to capture tags when
receiving inventory into a warehouse or in all operations
performed within the node. For more information about
capturing the tag attributes, see the Sterling Selling and
Fulfillment Foundation: Application Platform Configuration Guide.
Click this link to go to the Container Serial Details and view
a container's serial details.
Quantity The quantity of the line item packaged in the container.
Order Receipt Container
The Order Receipt Container screen lets you view an order receipt’s container
details.
Table 103. Order Receipt Container, Item Header
Fields Description
Receipt # Receipt number associated with the receipt.
Shipment # Shipment number associated with the receipt.
Enterprise Enterprise associated with the receipt.
Receiving Node The node where inventory was received.
Receiving Dock Location where the shipment is received.
Receipt Status The status of the receipt.
Item ID The item ID.
Item Description A brief description of the item.
PC Product Class: Indicates the item's inventory categorization.
Orders are placed for an item and product class. Typical
examples are IRREGULAR, FD (Factory Defects).
UOM The item’s unit of measure.
Order # The order number associated with the receipt.
Line # The order line number associated with the receipt.
Release # The release number associated with the receipt.
Table 104. Order Receipt Container, Item Containers
Fields Description
Pallet ID The pallet LPN associated with the container.
Case ID The case LPN associated with the container.
Segment Type The segment type associated with the receipt.
Segment type of the item. A segment type indicates an
inventory category. Typical values are MTC - Made To
Customer or MTO - Made to Order.
Chapter 9. Receipt Console Screens 125
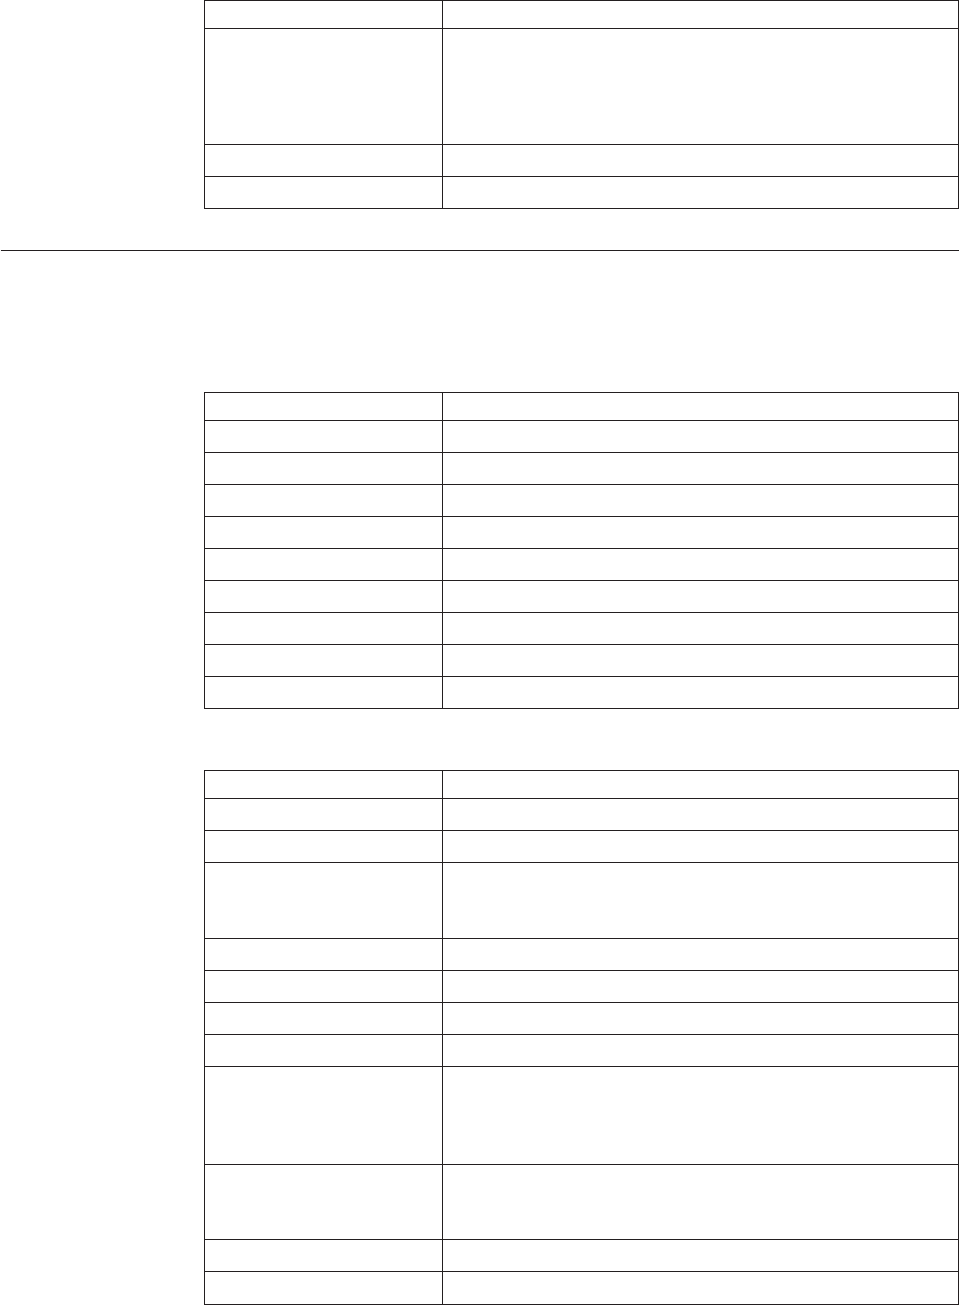
Table 104. Order Receipt Container, Item Containers (continued)
Fields Description
Segment # The segment number associated with the receipt.
Segment number of the item. A segment holds either the
specific buyer or specific order number that requires
dedication.
Serial The serial number associated with the receipt.
Quantity The number of units in UOM on the receipt.
Receipt Line Details (Container)
The Receipt Line Details (Container) screen lets you view a receipt's container
details.
Table 105. Receipt Line Details (Container), Container
Fields Description
Receipt # The receipt number associated with the receipt.
Shipment # The shipment number associated with the receipt.
Order # The order number associated with the receipt.
Enterprise The enterprise associated with the receipt.
Receiving Node The node associated with the receipt.
Receiving Dock The location where the shipment is being received.
Receipt Status The status of the receipt.
Case ID The case LPN associated with the container.
Pallet ID The pallet LPN associated with the container.
Table 106. Receipt Line Details (Container), Container Details
Fields Description
Item ID The item ID.
Item Description Description of the item.
PC Product Class: Indicates the item's inventory categorization.
Orders are placed for an item and product class. Typical
examples are IRREGULAR, FD (Factory Defects).
UOM The item's unit of measure.
Disposition Code The item's disposition code.
Order # The order number associated with the receipt.
Release # The release number associated with the receipt.
Segment Type The segment type associated with the receipt.
Note: A segment type indicates an inventory category.
Typical values are MTC - Made To Customer or MTO - Made
to Order.
Segment # The segment number associated with the receipt.
Note: A segment holds either the specific buyer or specific
order number that requires dedication.
Ship By Date The date reflecting the time sensitivity of the inventory.
COO The country or region of origin associated with the receipt.
126 Sterling Selling and Fulfillment Foundation: Warehouse Management System User Guide
Table 106. Receipt Line Details (Container), Container Details (continued)
Fields Description
Serial # The serial number associated with the receipt.
Tag # The tag number associated with the receipt.
Quantity The number of units in UOM on the receipt.
Receipt Instructions
The Receipt Instructions screen lets you view a receipt's summary instruction.
Table 107. Receipt
Fields Description
Receipt # The receipt number associated with the
receipt.
Shipment # The shipment number associated with the
receipt. Click this link to view shipment
details.
Order # The order number associated with the
receipt.
Enterprise The enterprise associated with the receipt.
Buyer The buyer associated with the receipt. Click
this link to view buyer details.
Seller The seller associated with the receipt. Click
this link to view seller details.
Receipt Start Date The start date of the receipt process.
Receiving Node The node where inventory was received.
Click this link to view the receiving node
details.
Receiving Dock The location where the shipment was
received.
Receipt Open Indicates if the receipt is open. If open, you
can receive the receipts.
Receipt Status The status of the receipt. Click this link to
view a receipt's status audits.
No Of Expected Pallets The number of expected pallets associated
with the receipt.
No Of Expected Cartons The number of expected cartons associated
with the receipt.
Table 108. Receipt Summary Instructions, Instructions
Actions
Delete Instruction This action deletes the selected instruction
Fields
Instruction Type Select the type of instruction.
Text Enter the Instruction text.
Click the Add icon to add a new instruction.
Chapter 9. Receipt Console Screens 127
Receipt Status Audits
The Receipt Status Audits screen lets you view a receipt's summary status audit
list.
Table 109. Receipt
Fields Description
Receipt # The receipt number associated with the
receipt.
Shipment # The shipment number associated with the
receipt. Click this link to view shipment
details.
Order # The order number associated with the
receipt.
Enterprise The enterprise associated with the receipt.
Buyer The buyer associated with the receipt. Click
this link to view buyer details.
Seller The seller associated with the receipt. Click
this link to view seller details.
Receipt Start Date The start date of the receipt process.
Receiving Node The node where inventory was received.
Click this link to view the receiving node
details.
Receiving Dock The location where the shipment was
received.
Receipt Open Indicates if the receipt is open. If open, you
can receive the receipts.
Receipt Status The status of the receipt. Click this link to
view a receipt's status audits.
No Of Expected Pallets The number of expected pallets associated
with the receipt.
No Of Expected Cartons The number of expected cartons associated
with the receipt.
Table 110. Receipt Summary Status Audits, Status Audit List
Fields Description
Modified By The user associated with the modification of
the record.
Old Status The receipt status before the status
modification.
Old Status Date The date the receipt entered the old status.
New Status The status of the receipt after the status
change.
New Status Date The status date recorded on the receipt at
the most recent status change.
Reason Code The reason code indicating the reason for
the status change.
Reason Text The text reason entered against audit.
128 Sterling Selling and Fulfillment Foundation: Warehouse Management System User Guide
Receipt Details
The Receipt Details screen lets you view receipt details.
Table 111. Receipt
Fields Description
Receipt # The receipt number associated with the
receipt.
Shipment # The shipment number associated with the
receipt. Click this link to view shipment
details.
Order # The order number associated with the
receipt.
Enterprise The enterprise associated with the receipt.
Buyer The buyer associated with the receipt. Click
this link to view buyer details.
Seller The seller associated with the receipt. Click
this link to view seller details.
Receipt Start Date The start date of the receipt process.
Receiving Node The node where inventory was received.
Click this link to view the receiving node
details.
Receiving Dock The location where the shipment was
received.
Receipt Open Indicates if the receipt is open. If open, you
can receive the receipts.
Receipt Status The status of the receipt. Click this link to
view a receipt's status audits.
No Of Expected Pallets The number of expected pallets associated
with the receipt.
No Of Expected Cartons The number of expected cartons associated
with the receipt.
Table 112. Receipt Details, Receipt Lines
Action
Adjust Receipt This action takes you to the Adjust Receipt
screen, which lets you adjust the receipt of
an item. For more information about the
Adjust Receipt screen, see the Sterling
Warehouse Management System: User
Guide.
Fields
Item ID The item ID.
Description A brief description of the item.
PC Product Class: Indicates the item's inventory
categorization. Orders are placed for an item
and product class. Typical examples are
IRREGULAR, FD (Factory Defects).
UOM The item's unit of measure.
Disposition Code The disposition of the item.
Chapter 9. Receipt Console Screens 129
Table 112. Receipt Details, Receipt Lines (continued)
Action
Case ID The case LPN associated with the container.
Pallet ID The pallet LPN associated with the
container.
Order # The order number associated with the
receipt.
Line # The line number associated with the receipt.
Note: Problem: An error message, "There is no inventory for put away at the
SourceLocation" occurs. Cause: When multiple inbound shipments are received
into the same location, and the inventory being received is not an LPN. Resolution:
To resolve this issue, do one of the following: Manually create move requests for
receipts that you already received. For more information about creating move
requests, see Create Move Request. For receipts that are expected to be received,
ensure that the inventory is license plated and that you don't receive inbound
shipments and inventory for put away into the same location.
Receive
The Receive screen lets you record paper-based receipt details.
Table 113. Receive, Receipt
Fields Description
Receipt # The receipt number associated with the receipt.
Shipment # The shipment number associated with the receipt.
Enterprise The enterprise associated with the receipt.
Buyer The buyer associated with the receipt.
Seller The seller associated with the receipt.
Receipt Start Date The receipt start date.
Receiving Node The node that received the shipment.
Receipt Status The receipt status.
Receipt Open Indicates if the receipt is open.
No Of Pallets The number of pallets.
No Of Cartons The number of cartons.
Table 114. Receive, Lines to Receive
Fields Description
Pallet ID Select this to receive an expected pallet and enter the pallet
identifier.
Check the Pallet Completely Received box to close the pallet.
Case ID Select this to receive an expected case and enter the case
identifier.
Check the Case Completely Received box to close the case.
None Select this to receive loose inventory.
130 Sterling Selling and Fulfillment Foundation: Warehouse Management System User Guide
Table 114. Receive, Lines to Receive (continued)
Fields Description
Tag Details Click on the Plus icon, to view and hide tag details.
The lot number associated with the tag displays, if applicable.
Shipment Line # The shipment line number.
Order # The order number to which the shipment belongs.
Release # The order release number to which the shipment belongs.
Item ID The item you are receiving displays.
UOM The item's unit of measure.
PC The item's product class.
Total Quantity The total quantity contained in the shipment line.
Received Quantity The total quantity received in the shipment line.
Quantity To Be Received The quantity available for receiving in the shipment line.
Disposition Code The disposition code is automatically populated by the
system from the receiving rules. Modify the disposition code,
if applicable.
Receiving Quantity Enter the quantity you want to receive in the shipment line.
Tag Identifiers Enter the identifier for the tag, such as, Lot #, Batch #, etc.
Chapter 9. Receipt Console Screens 131
132 Sterling Selling and Fulfillment Foundation: Warehouse Management System User Guide
Chapter 10. Create Inbound Shipment Screens
About Create Inbound Shipment Screens
Shipments (ASN) are transmitted to warehouses through EDI downloads, fax, or
e-mail, and also when a trailer arrives with no prior notice.
The shipment entry console enables you to manually create shipments from fax,
e-mail or telephone conversations, and also for those trailers that arrive with no
prior notice.
The Shipment Entry screen enables you to create an inbound shipment.
Shipment Entry to Create an Inbound Shipment
Use this screen to create an inbound shipment.
Table 115. Shipment Entry
Actions
Supervisory Overrides This action takes you to the Shipment Supervisory Overrides
screen where you can set up supervisory overrides for an
inbound shipment.
Fields
Document Type Select the document type associated with the shipment you
are creating for.
Valid values are 'Purchase Order' or 'Transfer Order'. For an
outbound shipment, valid value is 'Sales Order'
Receiving Node The receiving node where the receipt is being performed.
This is automatically populated by the system based on the
user profile.
Enterprise Select the enterprise associated with the shipment you are
creating for, if applicable.
Shipment # Enter the shipment number for the shipment you are creating,
if applicable. A unique number is automatically generated by
the system, if number is not specified.
Ship Node Enter the shipping node associated with the shipment. This
represents the seller's ship node.
Buyer Enter the buyer associated with the shipment you want to
create, if applicable.
Seller Enter the seller associated with the shipment you want to
create.
PO # Enter the purchase order number associated with the
shipment.
Release# Enter the release number of the order against which the
shipment is being created, if applicable.
Pro# Enter the PRO number assigned by the carrier to track the
shipment you are creating, if applicable.
© Copyright IBM Corp. 1999, 2011 133
Table 115. Shipment Entry (continued)
Carrier/Service Select the carrier service availed for transporting the
shipment, if applicable.
BOL# Enter the bill of lading number of the shipment you are
creating, if applicable.
Trailer# Enter the trailer number of the shipment you are creating, if
applicable.
Click Create Shipment to create an inbound order shipment. For more information,
see the appropriate section in this guide.
Shipment Supervisory Overrides for an Inbound Shipment
Use this screen to set up supervisory overrides for an inbound shipment.
Table 116. Shipment Supervisory Overrides
Fields
Override Shipment Entry Select this check box to override shipment entry.
Do not verify Pallet
Content
Select this check box to skip pallet content verification for the
shipment.
Do not verify Case Content Select this check box to skip case content verification for the
shipment.
Suppress Overage Check Select this check box to suppress overage check.
Allow receiving unexpected
Items on Shipment
Select this check box to allow receiving of unexpected items
in the shipment.
Click OK.
134 Sterling Selling and Fulfillment Foundation: Warehouse Management System User Guide
Chapter 11. Receive Console Screens
About Receive Console Screens
The Receive console enables you to receive expected containers, build cases or
pallets, receive blind receipts, and receive over-receipt quantity. This console is
designed to support scanning of information, utilizing the available barcodes. You
can also enter information manually.
This chapter provides screen and field descriptions for the Receive Console.
Receive Details
The Receive Details screen provides a detailed information about a receipt.
Table 117. Receive Details, Receive
Actions
Close Pallet This action closes the pallets received. Alternatively, press
Alt+P.
Close Case This action closes the pallets received. Alternatively, press
Alt+C.
Save This action saves the information entered.
Reset This action clears the information entered. Alternatively, press
Alt+P.
Fields
Shipment # Enter the shipment number associated with the receipt.
Choose the field and Lookup icon or press Alt+L to find the
specific shipment number you want to use.
Receipt # Enter the receipt number for the shipment associated with the
receipt.
Choose the field and Lookup icon or press Alt+L to find the
specific receipt number you want to use.
Enterprise The enterprise is automatically populated by the system.
Order # The order number is automatically populated by the system,
if applicable.
For shipments received without order, the order number is
not available.
Seller This value is automatically populated by the system.
Ship Node The ship node is automatically populated by the system.
Pallet ID/Case ID Enter the pallet or case LPN, if applicable.
This value is required only if pallets or case LPNs are being
associated to inventory during receipt or for a Pallet LPN
pre-associated with the shipment. For case LPNs
pre-associated with the shipment, use the 'Item ID/Case ID'
field.
© Copyright IBM Corp. 1999, 2011 135
Table 117. Receive Details, Receive (continued)
Location Enter the location where inventory is being received.
Choose the field and Lookup icon or press Alt+L to find the
specific location you want to use.
If an open receipt exists for a shipment, the location
corresponding to the receipt's receiving location automatically
displays.
Item ID/Case ID Enter the item ID or case LPN.
The case LPN, if entered, could be an existing LPN or a new
pre-printed LPN. Once the receipt of the case LPN is
completed, scan the next item or case LPN, if applicable.
Case ID The case LPN corresponding to the last item scanned
displays.
Disposition Code The disposition code is automatically populated by the
system from the receiving rules. Modify the disposition code,
if necessary.
Choose the field and Lookup icon or press Alt+L to find the
specific disposition code you want to use.
Item ID The item ID corresponding to the last item scanned displays,
if applicable.
vIf the item is serial tracked, the Serial Entry screen
displays, which lets you capture the serial number.
vIf the item is tag tracked, the Tag Entry screen displays,
which lets you capture the tag details.
vIf the item is time sensitive, the Expiration Date Entry
screen displays, which lets you capture the expiration date.
vIf the item is serial-tracked and if you are performing
Returns Receiving, the Serial Entry screen displays, which
lets you capture the serial number.
COO The country or region of origin associated with the item is
automatically populated by the system.
Choose the field and Lookup icon or press Alt+L to find the
specific country or region of origin you want to use.
Description The item's description.
Quantity Enter the quantity received in the UOM, if applicable. The
quantity for a UPC Code, UPC Case Code or valid Case LPN
scanned is automatically recognized by the system.
UOM Select the UOM corresponding to the quantity.
UOM Quantity The UOM quantity is automatically populated by the system.
Total Quantity The total quantity is automatically populated by the system.
Inspection Comments Enter any additional comments, if applicable.
Note: If you select "Do Not Verify Pallet Contents" or "Do Not Verify Case
Contents" check-boxes, you need not enter or scan the item details.
Table 118. Receive Details, Receive Instructions
The item's receiving instructions code and text displays, if available.
136 Sterling Selling and Fulfillment Foundation: Warehouse Management System User Guide
Table 119. Receive Details, Activity Demand Instruction
Activity Demand Instruction
The activity demand instructions for the inventory received displays, if available.
Fields
Activity Code The activity to be performed on items belonging to the receipt.
Examples of activities during a receipt include Cross-Dock, QC,
VAS for repacking.
Demand Quantity The current demand for the item.
Demand Satisfied Indicates whether the demand is satisfied.
Is Infinite Demand Indicates whether the demand is infinite.
Table 120. Receive Barcode Types
Fields
Pallet/Case ID ShippingOrInventoryContainer
Location Location
Item ID/Case ID ItemOrShippingContainer
Item ID Item
Serial Entry for Receive Console Screens
The Serial Entry screen enables you enter or scan the item’s serial number.
The Serial Entry screen also enables you enter the serial number range of an item.
Table 121. Serial Entry
Field
Count The total count of items scanned is automatically populated
by the system.
Serial # The component serial number of the item.
Note: The fields displayed in the Serial Entry window vary depending on the item
scanned.
Table 122. Serial Entry, Serial Range
Field
Count The total count of items scanned is automatically populated
by the system.
From Serial # The start serial number of the item.
To Serial # The end serial number of the item.
Note: For a serial tracked or serialized item, if secondary serials are defined and
secondary information is not provided, then in such scenario the 'Entry Serial
Range’ button is not provided in the screen.
Chapter 11. Receive Console Screens 137
Tag Entry for Receive Console Screens
Note: You can enter the item’s tag attributes when receiving inventory in a
warehouse that is configured to capture the tag details, or when performing
operations within the node. For more information about capturing the tag
attributes, see the Sterling Selling and Fulfillment Foundation: Application Platform
Configuration Guide.
The Tag Entry screen enables you capture the tag numbers, such as, Lot# and
Batch#, associated with the tag tracked SKU.
Table 123. Tag Entry
Field
Batch # Enter the batch number associated with the tag.
Note: The fields displayed in the Tag Entry window vary depending on the item
scanned.
Expiration Date Entry for Receive Console Screens
The Expiration Date Entry screen enables you capture the expiration date.
Table 124. Expiration Date Entry
Field
Expiration Date The item’s expiration date. To change this date, choose the Calendar
lookup or press Alt+L.
138 Sterling Selling and Fulfillment Foundation: Warehouse Management System User Guide

Chapter 12. Inspect Inbound Receipts Screens
About Inspect Inbound Receipt Screens
The Inspect Inbound Receipt Console lets you inspect inbound receipts. The
procedure for inspecting an inbound receipt is similar to inspecting a return
receipt. For more information about screen and field description, see the chapter,
"Inspect Return Receipts Screens".
© Copyright IBM Corp. 1999, 2011 139
140 Sterling Selling and Fulfillment Foundation: Warehouse Management System User Guide
Chapter 13. Inspect Return Receipts Screens
About Inspect Return Receipts Screens
The Inspect Return Receipt console enables you to:
vRecord inspection details
vView next disposition suggestions based on the current disposition status
vEnter appropriate inspection comments while inspecting an item
vView item inspection details for a receipt
vSearch for receipts by disposition code
vInspect receipts from receipt summary screen
Inspect Receipt
You can enter the return receipt criteria in this screen.
Table 125. Inspect Receipt
Fields
Node Select the node where the receipt has been received.
Location Enter the location where the receipt has been received.
Choose lookup option to find the specific Location you want
to search for.
Item ID Enter the item ID you want to inspect associated with the
receipt.
Choose lookup option to find the specific Item ID you want
to search for.
Receipt # Enter the return receipt number you want to inspect.
Choose lookup option to find the specific Receipt Number
you want to search for.
Enterprise Select the enterprise associated with the return receipt.
Pallet ID Enter the pallet LPN associated with the container.
Product Class Select the product class. Product class indicates the item's
inventory categorization.
Orders are placed for an item and product class. Typical
examples are Irregular, FD (Factory Defects).
Serial # Enter the item's serial number you want to inspect, if
applicable.
Case ID Enter the case LPN associated with the container.
Unit Of Measure Select the unit of measure you want to inspect.
Inventory Status Select the inventory status of the receipt you want to inspect.
Click Proceed. The Inspect Return Receipt Details screen is displayed and you can
view the return receipt's item details.
© Copyright IBM Corp. 1999, 2011 141
Inspect Return Receipt Details
This screen provides visibility to return receipt item details and receipt lines that
are already inspected. You can also inspect receipts that are not inspected.
Table 126. Inspect Return Receipt Details, Return Receipt Item
Fields
Receipt # The return receipt number associated with the item.
Shipment # The shipment number associated with the return receipt.
Return # The return order number.
Item ID The item ID.
Product Class The product class indicating the item's inventory
categorization.
Orders are placed for an item and product class. Typical
examples are Irregular, FD (Factory Defects).
Unit Of Measure The item's unit of measure.
Receipt Status The status of the receipt.
Receiving Node The receiving node.
Receiving Dock The dock location that received the receipt.
Location The location.
Inventory Status The inventory status of the receipt.
Location Quantity The return receipt quantity currently available in the location.
Table 127. Inspect Return Receipt Details, Receipt Lines to be Inspected
Fields
Line The receipt line number.
Serial # The item's serial number.
Pallet ID The pallet LPN associated with the container.
Case ID The case LPN associated with the container.
Ship By Date The date by which the inventory must be shipped.
Disposition The disposition entered while accepting the return against the
quantity.
Remaining Qty The quantity against the disposition.
Comments Enter any additional comments, if necessary.
New Disposition Select the new disposition receipt details.
Disposition Qty Enter the disposition quantity for the receipt.
Disposition Comments Enter any additional comments for the disposition.
Table 128. Inspect Return Receipt Details, Receipt Lines Already Inspected
Fields
Line The receipt line number that has already been inspected.
Serial # The receipt serial number that has already been inspected.
Ship By Date The date by which the inventory must be shipped.
Quantity The receipt quantity that has already been inspected.
142 Sterling Selling and Fulfillment Foundation: Warehouse Management System User Guide
Table 128. Inspect Return Receipt Details, Receipt Lines Already Inspected (continued)
Fields
Disposition Code The disposition code associated with the receipt quantity.
Inspection Date The inspection date when the receipt was inspected.
User The user that inspected the receipt.
Comments The inspection comments for the receipt, if available.
Chapter 13. Inspect Return Receipts Screens 143
144 Sterling Selling and Fulfillment Foundation: Warehouse Management System User Guide
Chapter 14. Create Move Request Screens
Create Move Request
The Create Move Request console enables you to create ad-hoc move requests.
You can create a move request with the help of this screen. For more information
about Move Request Console screens, see Move Request Console Screens.
Table 129. Create Move Request, Move Request Header
Fields
Node Select the node associated with move request.
Enterprise Select the enterprise you are creating the request for.
Activity Group Select the activity group for the move request you are
creating.
This is a mandatory field and corresponds to a group that
performs work at a station.
For Activity Code Select the activity code associated with the activity group.
Move Request # Enter the move request number you want to move.
Source Location Enter the source location for the move request you want to
create. A source location is typically given when creating
move requests for putaway.
This field is mandatory if Target Location is not given.
Target Location Enter the target location for the move request you want to
create. A target location is typically given, when creating
move requests for retrieval.
This field is mandatory if Source Location is not given.
Requested By Enter the user who requested the move.
Receipt # Enter the receipt number for the move request you want to
create, if applicable.
The receipt number is used to limit the move request to a
specific inbound shipment.
Segment Type Select the segment type for the move request you want to
create, if applicable.
The segment type is used to limit the move request to specific
inventory.
Segment # Enter the segment number for the move request you want to
create, if applicable.
Start No Earlier Than Enter the start date and time of the tasks for the move
requests, if applicable.
The system defaults the values to the current date and time.
Finish No Later Than Enter the date and time by which the task is expected to be
completed, if applicable.
The start and finish times provides resource planning
capabilities by determining the shift that performs the tasks.
© Copyright IBM Corp. 1999, 2011 145
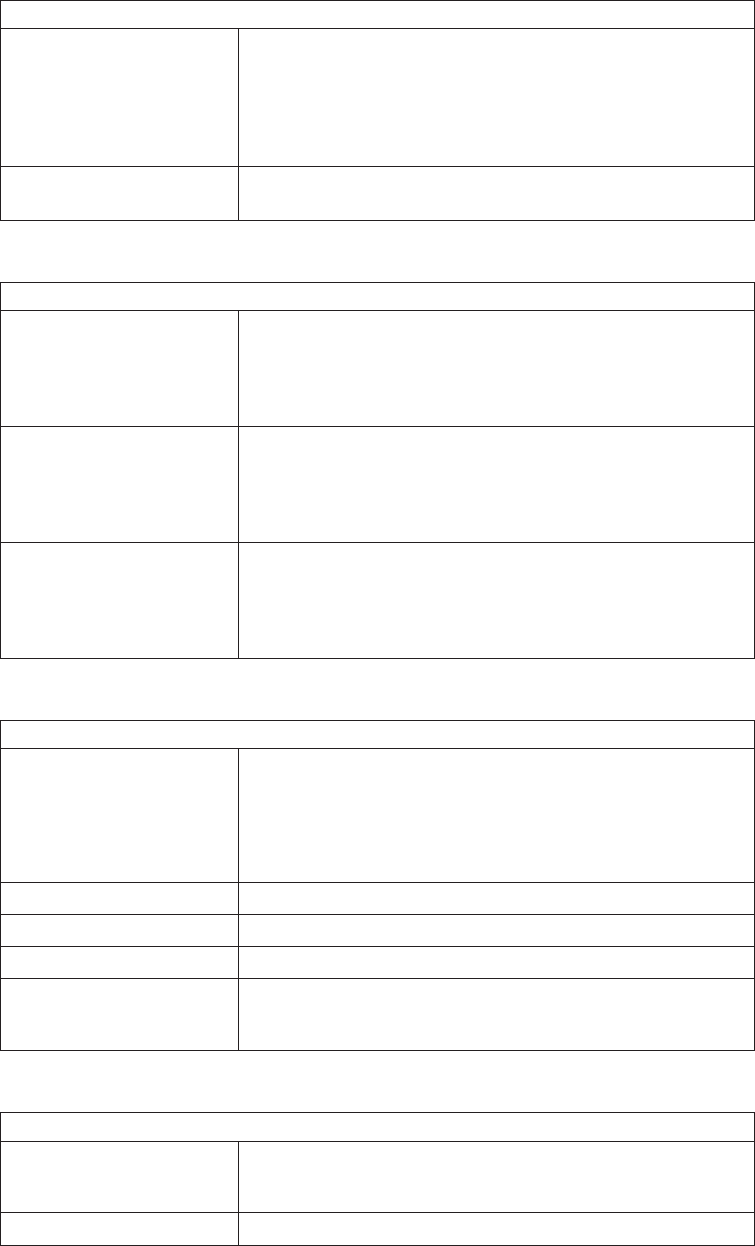
Table 129. Create Move Request, Move Request Header (continued)
Fields
Priority Select the priority for the move request you are creating.
Valid values are Urgent, High, Normal, Low. This is used to
group and sequence tasks for users. A task with 'Urgent'
priority is assigned to the next available user. The default
value is 'Normal'.
Lookup iconRelease
Immediately
Select the check box if the move request is to be released
immediately.
Table 130. Create Work Order, Move Request References
Lookup icon/Fields
Shipment # Enter the shipment number associated with the move request,
if applicable
Choose the Lookup icon to find the specific shipment number
you want to use.
Wave # Enter the wave number associated with the move request you
want to search for, if applicable.
Choose the Lookup icon to find the specific wave number
you want to use.
Work Order # Enter the work order associated with the move request you
want to search for, if applicable.
Choose the Lookup icon to find the specific work order
number you want to use.
Table 131. Create Move Request, Move Request Items
Fields
Item ID Enter the item you want to move.
This is required if target location is specified and none of
Receipt #, Segment Type and Segment# is specified.
Click on the Add icon to add item details.
Product Class Select the product class of the item you want to move.
UOM Select the unit of measure of the item you want to move.
Inventory Status Select the inventory status of the item you want to move.
Quantity Enter the quantity of the item you want to move.
This is mandatory if item is specified.
Table 132. Create Move Request, Move Request Containers
Fields
Pallet ID Enter the pallet LPN of the container you want to move.
Click on the Add icon to add container details.
Case ID Enter the case LPN of the container you want to move.
146 Sterling Selling and Fulfillment Foundation: Warehouse Management System User Guide
Note: The move request criteria entered can be provided in part or complete. The
following examples provides a better understanding of such combinations.
vExample 1: To putaway inventory at a location, specify only the Source Location.
vExample 2: To retrieve inventory to a location, specify the Target Location along
with Item or Quantity, or a receipt number, segment type and number.
vExample 3: To putaway inventory at a container level, specify only the pallet
and/or case LPN.
Note: Problem: Not able to release Move Request created for a Pallet containing
Multi-SKU or Multi-level Containers with the ‘Putaway each SKU separately for
Multi-SKU' check box selected in ‘Putaway Preference For Multi-level Containers'.
Cause: The Putaway each SKU separately for Multi-SKU check box is selected.
Resolution: Define the Putaway Strategy Rule from the Source Zone to a blank
Target Zone. For more information about the Shipment Selector Details screen, see
the section Setting Up Activity Constraints for Multi-Level Container in the chapter
Configuring Quality Control in the Sterling Selling and Fulfillment Foundation:
Warehouse Management System Configuration Guide.
Chapter 14. Create Move Request Screens 147
148 Sterling Selling and Fulfillment Foundation: Warehouse Management System User Guide
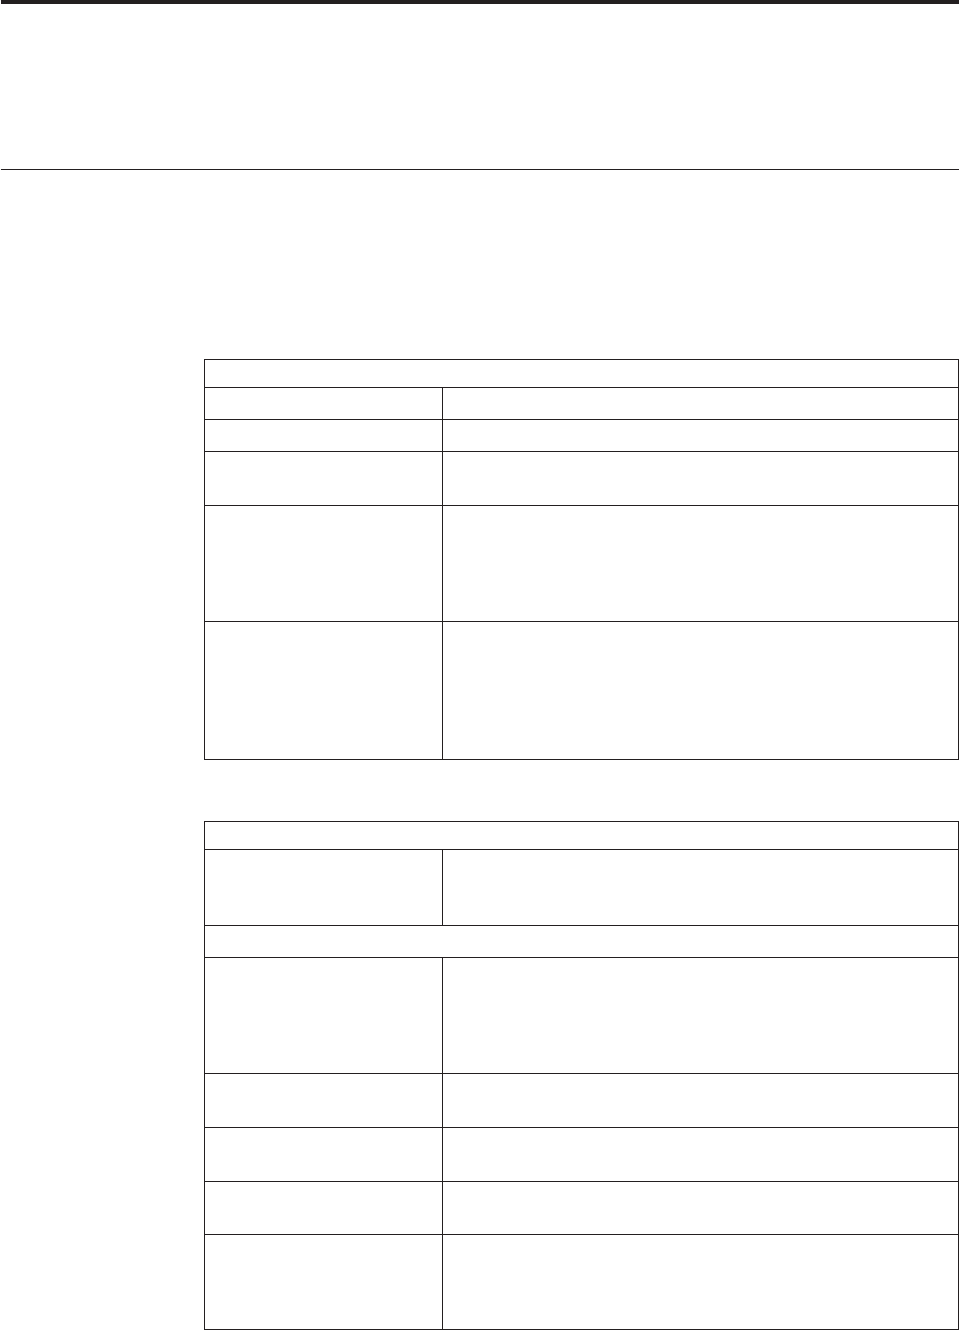
Chapter 15. Create Count Request Screens
The Create Count Request screen enables you to create count requests.
Create Count Request using the Create Count Request Screen
The Create Count Request screen enables you to create count requests.
Use the Create Count Request screen to create a count request. For more
information about Count Console, see Count Console Screens.
Table 133. Create Count Request, Primary Information Panel
Field
Node Select the node associated with the count request.
Enterprise Select the enterprise you are creating the count request for.
Across Enterprises Choose this option if you are creating the count request
across enterprises.
Count Request # Enter the count request number associated with the count
request you are creating, if applicable.
The system generates a unique request number, if a value is
not specified.
Request Type Select the request type associated with the count request, if
applicable.
For more information about setting a request type, see the
Sterling Selling and Fulfillment Foundation: Warehouse
Management System Configuration Guide.
Table 134. Create Count Request, Count Request Criteria
Actions
Get Number Of Locations This action takes you to the Number Of Locations screen
where you can view the total number of locations for count
within the specified range.
Fields
Zone Enter the zone associated with the count request you want to
create, if applicable.
When all locations in a zone are to be counted, only zone is
entered.
Pallet ID Enter the container’s pallet LPN associated with the count
request you are creating, if applicable.
Receipt # Enter the specific receipt number associated with the count
request you want to create, if applicable.
Location Enter the specific location identifier associated with the count
request you want to create, if applicable.
Case ID Enter the container’s case LPN associated with the count
request you are creating, if applicable.
Either Case or Pallet LPN can be entered.
© Copyright IBM Corp. 1999, 2011 149
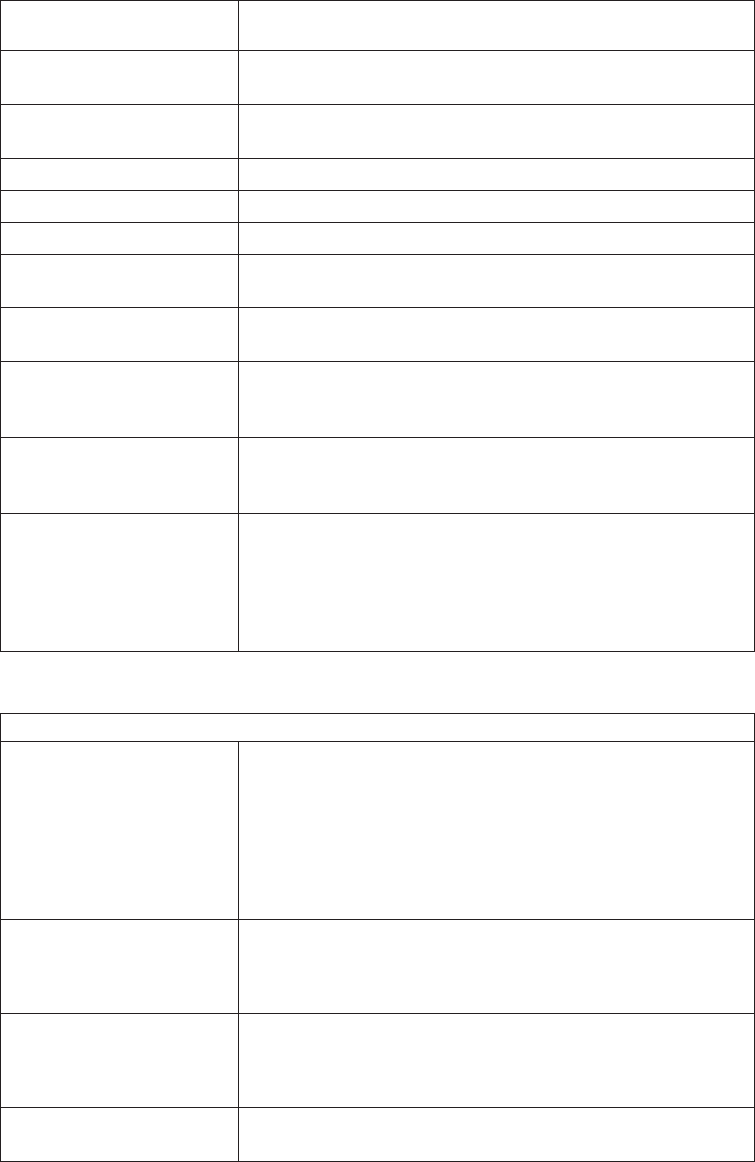
Table 134. Create Count Request, Count Request Criteria (continued)
Product Class Select the product class of the item associated with the count
request you are creating, if applicable.
From Location Enter the start location, if you are counting a range of
locations.
To Location Enter the end location, if you are counting a range of
locations.
Aisle Number Enter the number of the aisle at the location.
Bay Number Enter the number of the bay at the location.
Level Number Enter the number of the level at the location.
By Item Choose this option if you are creating the count request for
an item.
By Item Classification Choose this option if you are creating the count request for
an item classification.
Item ID Enter the item ID of the item associated with count request
you are creating, if applicable. This is applicable only when
count request is created for items.
Unit Of Measure Select the unit of measure of the item associated with the
count request you are creating, if applicable. This is
applicable only when count request is created for items.
Item Classification Enter the classification of the item associated with count
request you are creating, if applicable. This is applicable only
when count request is created for item classification.
Note: A maximum of three item classifications displays based
on the count classifications configurations.
Table 135. Create Count Request, Count Request Information
Fields
Priority Select the priority for the count request you are creating, if
applicable.
Valid values are Urgent, High, Normal, Low. This is used to
group and sequence tasks for users. A task with 'Urgent'
priority is assigned to the next available user.
The default value is 'Normal'.
Requesting User ID The current user id is automatically populated by the system.
Enter the requesting user ID associated with the count
request, if applicable.
Start No Earlier Than The current system date is automatically populated.
Enter a different start date and time for the count request, if
applicable.
Finish No Later Than Enter the end date and time for the count request, if
applicable.
Access Count Request Details Screen
Procedure
1. After entering the relevant information in the above fields, the count request is
created upon clicking the Create Count Request button.
150 Sterling Selling and Fulfillment Foundation: Warehouse Management System User Guide
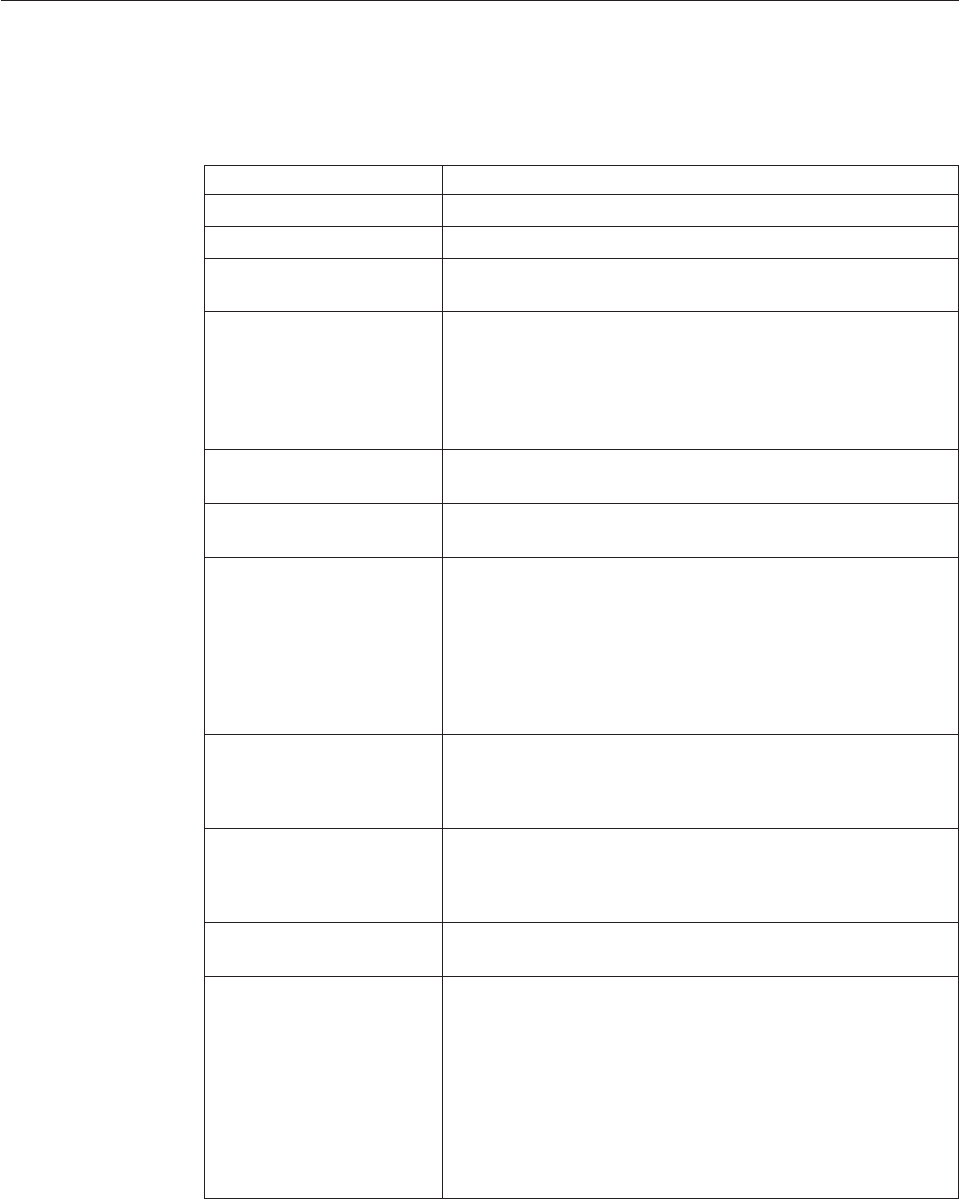
2. The Count Request Details screen displays.
Create Count Requests for Location Group
Use the Create Count Requests for Location Group to create a count request based
on location level. For more information about Count Console, see Count Console
Screens.
Table 136. Create Count Requests for Location Group, Count Request Criteria
Field Description
Node Select the node associated with the count request.
Enterprise Select the enterprise you are creating the count request for.
Across Enterprises Choose this option if you are creating the count request
across enterprises.
Request Type Select the request type associated with the count request, if
applicable.
For more information about setting a request type, see the
Sterling Selling and Fulfillment Foundation: Warehouse
Management System Configuration Guide.
From Location Enter the start location, if you are counting a range of
locations.
To Location Enter the end location, if you are counting a range of
locations.
Priority Select the priority for the count request you are creating, if
applicable.
Valid values are Urgent, High, Normal, Low. This is used to
group and sequence tasks for users. A task with 'Urgent'
priority is assigned to the next available user.
The default value is 'Normal'.
Requesting User ID The current user id is automatically populated by the system.
Enter the requesting user ID associated with the count
request, if applicable.
Start No Earlier Than The current system date is automatically populated.
Enter a different start date and time for the count request, if
applicable.
Finish No Later Than Enter the end date and time for the count request, if
applicable.
Zone Enter the zone name.
When creating the count request, the Zone field's value can
be combined with the values of either the By Location option
or the By Aisle/Bay/Level option.
However, if a value is provided for only Zone, and values are
not specified for either the By Location radio button or the By
Aisle/Bay/Level radio button, the count request will be
created for all the locations under the specified zone.
Chapter 15. Create Count Request Screens 151

Table 136. Create Count Requests for Location Group, Count Request Criteria (continued)
Field Description
By Location Select this option to create the count request for all the
locations in the location range specified.
If you select this option, the From Location field and the To
Location field are enabled.
From Location - Enter the start location of the location range.
To Location - Enter the end location of the location range.
By Aisle/Bay/Level Select this option to create the count request for all the
locations in an aisle, bay, or level, or a combination of these.
If you select this option, the Aisle Number, Bay Number, and
Level Number fields are enabled.
Aisle Number - Enter the aisle number. The count request
will be created for all the locations that have the specified
Aisle number.
Bay Number - Enter the bay number.The count request will
be created for all the locations that have the specified Bay
number.
Level Number - Enter the level number. The count request
will be created for all the locations that have the specified
Level number.
Access Location List Details
Procedure
1. After entering the relevant information in the above fields, the count request is
created upon clicking the Create Count Request button.
2. Click Get Number Of Locations In Range, the Location List Detail screen is
displayed.
Note: When you select Aisle/Bay/Level option to create the count request for
all the locations in an aisle, bay, or level and when you click Get Number Of
Locations In Range, it calculates the number of locations within a selected
Aisle/Bay/Level.
When a From Location and To Location range is specified, the Location List
Detail screen displays all the locations starting with the From Location ID, but
within the numerical range specified. If, for example, the From Location is L1
and the To Location is L2, all the locations starting with L1*(where * is any
numeric value) are displayed.
152 Sterling Selling and Fulfillment Foundation: Warehouse Management System User Guide
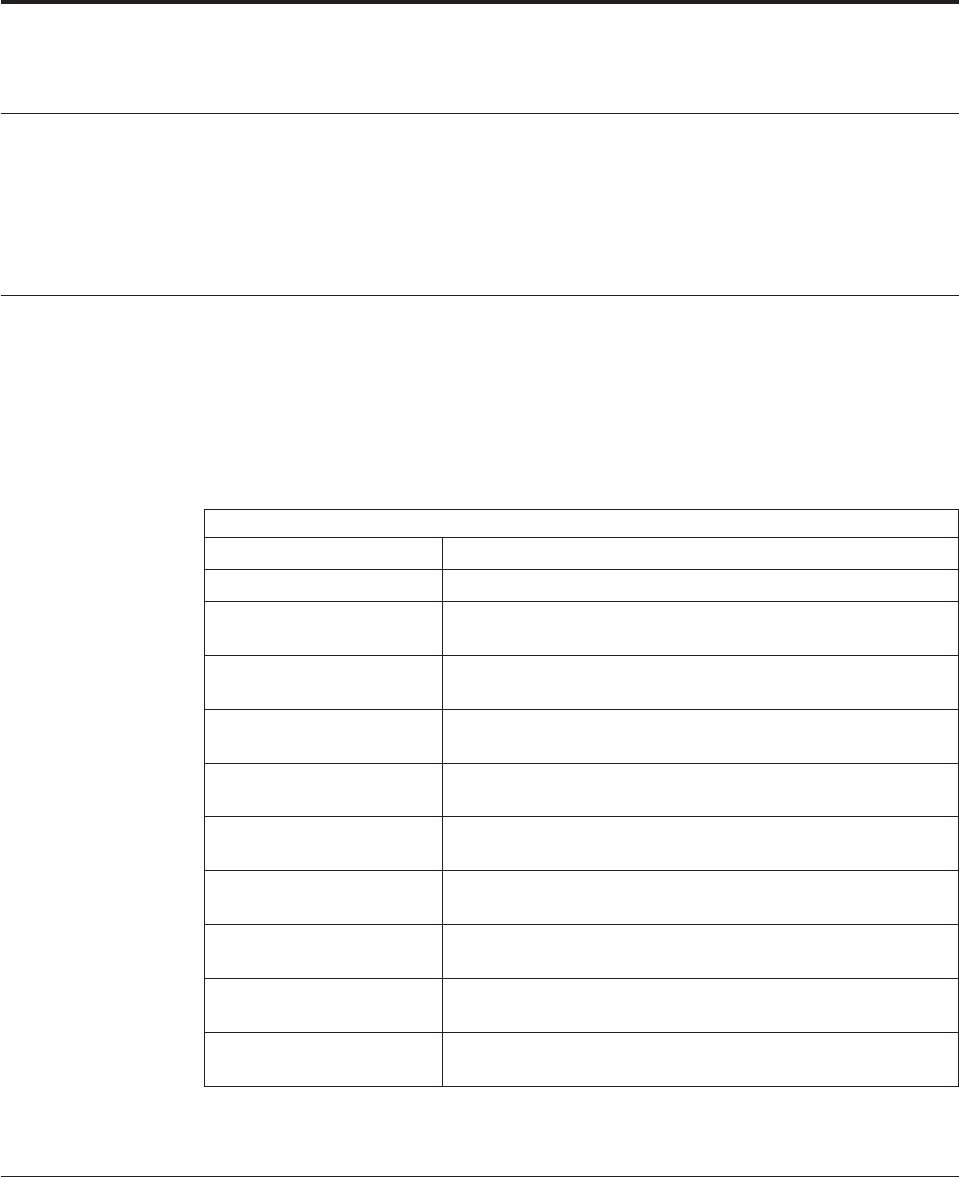
Chapter 16. Count Console Screens
About the Count Console Screens
The Count Console provides:
vComprehensive visibility into count request status and count results that are
recorded.
vExtensive search capabilities using granular level information.
Count Request Search By Count Request Attributes
You can search for count requests by count request attributes with the help of this
screen.
Note: Do not use spaces before or after any text you enter in the search fields, as
this may result in inconsistent or inaccurate results.
Table 137. Count Request Search By Count Request Attributes
Fields
Node Select the node associated with the count request.
Enterprise Select the enterprise associated with the count request.
Across Enterprise Choose this option if you are searching for the count requests
across enterprises.
Request Type Select the request type associated with the count request you
want to search for, if applicable.
Count Request # Enter the count request number you are searching for, if
applicable.
Requesting User ID Enter the requesting user ID associated with the count
request, if applicable.
Priority Select the priority associated with the count request you are
searching for, if applicable
Start No Earlier Than Enter the start date and time range for the count request, if
applicable.
Finish No Later Than Enter the date and time range by which the count request is
expected to be complete, if applicable.
Status Select the status range of the count request you are searching
for, if applicable.
Max Records Enter the maximum number of records to be listed as a result
of your search.
The Count Request List screen displays as a result of this search.
Count Request Search By Count Criteria
You can search for count requests by count criteria with the help of this screen.
© Copyright IBM Corp. 1999, 2011 153
Note: Do not use spaces before or after any text you enter in the search fields, as
this may result in inconsistent or inaccurate results.
Table 138. Count Request Search By Count Criteria
Fields
Node Select the node associated with the count request.
Enterprise Select the enterprise associated with the count request.
Across Enterprises Choose this option if you are searching for count requests
across enterprises.
Request Type Select the request type associated with the count request you
want to search for, if applicable.
Count Request # Enter the count request number you are searching for, if
applicable.
Count Program Name Enter the count program name you are searching for, if
applicable.
Zone Enter the zone associated with the count request you are
searching for, if applicable.
Location Enter the location associated with the count request you want
to search for, if applicable.
From Location Enter the start location associated with the count request you
want to search for, if applicable.
To Location Enter the end location associated with the count request you
want to search for, if applicable.
Aisle Number Enter the aisle number, if you are counting a range of
locations for the specified aisle number.
Bay Number Enter the bay number, if you are counting a range of
locations for the specified bay number.
Level Number Enter the level number, if you are counting a range of
locations for the specified level number.
Pallet ID Enter the container’s pallet LPN associated with the count
request you are searching for.
Case ID Enter the container’s case LPN associated with the count
request you are searching for.
Note: Either the Case ID or Pallet ID may be specified.
Receipt # Enter the receipt number associated with the count request
you are searching for, if applicable.
Item ID Enter the item’s item ID associated with the count you want
to search for, if applicable.
Product Class Select the item’s product class associated with the count
request you are searching for if applicable.
Unit Of Measure Select the item’s unit of measure associated with the count
request you are searching for, if applicable.
Physical Count Plan Enter the particular physical count plan name you are
searching for, if applicable.
Status Select the status range of the count request you are searching
for, if applicable.
Max Records Enter the maximum number of records to be listed as a result
of your search.
154 Sterling Selling and Fulfillment Foundation: Warehouse Management System User Guide
The Count Request List screen displays as a result of this search.
Count Request Search By Location Range
You can search for Count Requests for Location Range with the help of this screen.
Table 139. Count Request Search By Location Range
Field Description
Node Select the node associated with the count request.
Enterprise Select the enterprise associated with the count request.
Across Enterprises Choose this option if you are searching for count requests
across enterprises.
Request Type Select the request type associated with the count request you
want to search for, if applicable.
From Location Enter the start location, if you are counting a range of
locations.
To Location Enter the end location, if you are counting a range of
locations.
Status Select the status range of the count request you are searching
for, if applicable.
Max Records Enter the maximum number of records to be listed as a result
of your search.
Count Request List
The Count Request List window displays the results of a count request search. You
can perform actions on a single count request or multiple count requests by
selecting the check boxes of the count requests you want to perform an action on
and choosing the applicable action from the action bar.
Table 140. Count Request List
Actions
View Details This action takes you to the Count Request Details screen
where you can view count request details for the selected
count requests.
Cancel This action takes you to the Cancellation Reason screen where
you can enter appropriate reasons for cancelling the select
count requests.
Fields
Count Request # The count request number associated with the count request.
Click this link to view count request details.
Count Program Name Enter the count program name you are searching for, if
applicable.
Location The location identifier.
Enterprise The enterprise associated with the count request.
Item ID The Item ID associated with the count request.
Description The item's description.
Priority The count request priority.
Start No Earlier Than The date and time after which the count task is suggested.
Chapter 16. Count Console Screens 155
Table 140. Count Request List (continued)
Requesting User The user who placed the count request.
Status The count request status.
Count Request Details
You can view count request details with the help of this screen.
Table 141. Count Request Details, Primary Information
Actions
Cancel This action takes you to the Cancellation Reason screen where
you can enter appropriate reasons for cancelling the select
count requests.
Fields
Node The node associated with the count request.
Enterprise The enterprise associated with count request.
Count Request # The count request number associated with the count request.
Count Program Name Enter the count program name you are searching for, if
applicable.
Request Type The request type associated with the count request.
Pipeline ID The pipeline identifier that the count request goes through.
Status The count request status.
Table 142. Count Request Details, Count Request Criteria
Fields
Zone The zone associated with the count request.
Pallet ID The container's Pallet LPN associated with the count request.
Receipt # The receipt Number associated with the count request.
Location The location Identifier associated with the count request.
Case ID The container's Case LPN associated with the count request.
Product Class The item's product class.
Indicates the item's inventory categorization. Orders are
placed for an item and product class. Typical examples are
IRREGULAR, FD (Factory Defects).
Item ID The Item ID associated with the count request.
Description The item's description.
Unit Of Measure The item's unit of measure.
Table 143. Count Request Details, Count Request Information
Fields
Priority The count request priority.
Requesting User The user for whom the count request is placed.
Start No Earlier Than The date and time after which the count task is suggested.
Finish No Later Than The date and time before which the count task is expected to
be complete.
156 Sterling Selling and Fulfillment Foundation: Warehouse Management System User Guide

Table 144. Count Request Details, Count Result Summary
Actions
Accept Variance This action takes you to the Acceptance Variance Reason
where you can enter appropriate reasons for accepting the
variance.
Fields
# of count results The number of count results associated with the count
iteration.
# of variances Number of variances associated with the count iteration.
This link is enabled only if the number of count variances is
less than the maximum records displayed. Click this link to
go to the Count Result List screen where you can view a list
of count results for which you want to accept variance.
Count Accuracy The percentage of the count result accuracy.
Count Result List
You can view a list of count results with the help of this screen.
Table 145. Count Result List, Count Request Results
Actions
Accept Variance This action takes you to the Acceptance Variance Reason
where you can enter appropriate reasons for accepting the
variance.
View Audit This action enables you to view the audits for all the
inventory adjustments relating to this count request. For more
information, see the Location Inventory Audit Console
Screens.
Fields
Count Request # The count request number associated with the count result.
Count Iteration The number of times a count request has undergone
iterations.
# Of Locations In Variance The number of locations in variance associated with the count
iteration.
# Of Items In Variance The number of items in variance associated with the count
iteration.
Item ID The item ID associated with the count iteration.
Net Variance Quantity The net quantity in variance associated with the count
iteration.
Net Variance Value The net value associated with the net quantity in variance.
This is computed as the VARIANCE_QUANTITY *
UNIT_COST where the variance quantity is for the Inventory
UOM.
Currency The currency code associated with the net variance value.
Table 146. Count Result List, Item Details
Actions
Chapter 16. Count Console Screens 157
Table 146. Count Result List, Item Details (continued)
Create Count Request This action takes you to the Create Count Request screen
where you can create count requests.
Fields
Details Click on the Plus icon to alternatively hide and display the
count result details.
Organization The organization associated with the count request.
Location The location identifier.
Original Location The location where the LPN or serial-tracked item was
present before the count is performed.
Parent Case ID The case LPN that contains child LPNs, which were counted.
Pallet ID The container's pallet LPN associated with the count request.
Case ID The container's case LPN associated with the count request.
Item ID The item ID associated with the count request.
Description The item's description.
PC The item's product class.
Indicates the item's inventory categorization. Orders are
placed for an item and product class. Typical examples are
IRREGULAR, FD (Factory Defects).
UOM The item's unit of measure.
Net Variance Quantity The net quantity in variance associated with the count
iteration.
Net Variance Value The net value associated with the net quantity in variance.
This is computed as the VARIANCE_QUANTITY *
UNIT_COST where the variance quantity is for the Inventory
UOM.
Currency The currency code associated with the net variance value.
Inventory Status The item's inventory status.
An inventory status indicates an inventory sub-classification.
Typical values are ONHAND or HELD.
Tag # The item's tag number.
You can view the tag number, if the node being counted is
configured to capture the tag attributes in all operations
performed within the node. For more information about
capturing the tag attributes, see the Sterling Selling and
Fulfillment Foundation: Application Platform Configuration Guide.
Segment Type The item's segment type.
A segment type indicates an inventory category. Typical
values are MTC - Made To Customer or MTO - Made to
Order.
Segment The item's segment number.
A segment number indicates either the specific buyer or
specific order number that requires dedication.
Ship By Date The date the item must be shipped by.
Serial # The item's serial number.
158 Sterling Selling and Fulfillment Foundation: Warehouse Management System User Guide
Table 146. Count Result List, Item Details (continued)
System Quantity The system reported quantity for the count criteria.
Count Quantity The quantity counted physically for the count criteria.
Variance Quantity The difference of Count quantity and System quantity.
Variance Value The value associated with the quantity in variance.
This is computed as VARIANCE_QUANTITY * UNIT_COST
where the variance quantity is for the Inventory UOM.
Currency The currency code associated with the variance value.
Last Variance Quantity The variance quantity prior to the present variance quantity.
Last But One Variance
Quantity
The variance quantity prior to the previous variance quantity.
Variance Type The variance type can be:
v'New' if new inventory (not on system) is counted at the
location.
v'Missing' if inventory expected at the location by the
system is not counted.
v'No Variance' if there is no discrepancy.
Variance Accepted Indicates if the variances was accepted.
Note: The information contained in the Item Details panel in the Count Result
Details Screen cannot be sorted because it has a cascaded table structure, that is, a
table within another table.
Table 147. Count Result List, Container Details
Fields
Location The location identifier associated with the count request.
Organization The organization associated with the count request.
Parent Case ID The case LPN that contains child LPNs, which were counted.
Pallet ID The container's Pallet LPN associated with the count request.
Case ID The container's Case LPN associated with the count request.
Variance Type The variance type can be:
v'New' if new inventory (not on system) is counted at the
location.
v'Missing' if inventory expected at the location by the
system is not counted.
v'No Variance' if there is no discrepancy.
Acceptance Variance Reason
Use this screen to enter appropriate reasons for accepting the variance.
Table 148. Acceptance Variance Reason
Fields
Reason Code Enter the reason code to associate with the variance being
accepted.
Reason Text Enter text to associate with the variance being accepted.
Chapter 16. Count Console Screens 159
Click OK to accept variance at the selected location. The variance quantity is
deposited into a bin for verification, if the adjustment reason code is associated
with a virtual bin location during warehouse configuration. For more information
about variance acceptance, see the Sterling Selling and Fulfillment Foundation:
Warehouse Management System Configuration Guide.
Create Count Request using the Count Console Screen
You can create count requests with the help of this screen. For more information
about creating count requests, see Create Count Request Screens.
Table 149. Create Count Request, Count Request Information
Fields
Count Request # Enter the count request number for the count request you are
creating.
Priority Select the priority for the count request you are creating, if
applicable.
Valid values are Urgent, High, Normal, Low. This is used to
group and sequence tasks for users. A task with 'Urgent'
priority is assigned to the next available user.
The default value is 'Normal'.
Requesting User ID The current user id is automatically populated by the system.
Enter the requesting user ID associated with the count
request, if applicable.
Start No Earlier Than The current system date is automatically populated.
Enter a different start date and time for the count request, if
applicable.
Finish No Later Than Enter the end date and time for the count request, if
applicable
Click OK. A new count request is initiated for the entered criteria.
Cancellation Reason for Count Console Screen
You can cancel a count request with the help of this screen.
Table 150. Cancellation Reason
Fields
Cancellation Reason Code Select the reason code for cancellation of the count request.
Reason Text Enter the reason for the count request cancellation.
160 Sterling Selling and Fulfillment Foundation: Warehouse Management System User Guide
Record Count Result Details
Use this screen to record count results to indicate the completion of a count task
operation.
Table 151. Record Count Result Details, Count Request Details
Fields
Task ID The task's ID. Click this link to go to the Summary Task
Detail where you can view summary task details.
Task Type The name of a task type.
Count Iteration The number of iterations performed in executing the count
request.
Node The node where count is performed.
Enterprise The enterprise whose product is counted.
Count Request # The count request number against which the count result is
recorded.
Zone The zone where count is performed.
Location The location that is counted.
User The user performing the count.
Case ID The case LPN.
Pallet ID The pallet LPN.
Receipt # The receipt number to which the inventory being counted
belongs.
User The user associated with the count.
Item ID The Item ID associated with the count.
UOM The item's unit of measure.
Product Class The item's product class.
Indicates the item's inventory categorization. Orders are
placed for an item and product class. Typical examples are
IRREGULAR, FD (Factory Defects).
Item Classification The classification of the item associated with count request
you are creating, if applicable. This is applicable only when
count request is created for item classification.
Note: A maximum of three item classifications displays based
on the count classifications configurations.
Status The count request status.
Table 152. Record Count Result Details, Items
Fields
Click on the Add icon to add a new item details.
Tag/Serial Click the Plus icon to enter the tag or serial details.
You can view the tag details, if the node being counted is
configured to capture the tag attributes in all operations
performed within the node. For more information about
capturing the tag attributes, see the Sterling Selling and
Fulfillment Foundation: Application Platform Configuration Guide.
Serial # Enter the serial number of the item.
Chapter 16. Count Console Screens 161

Table 152. Record Count Result Details, Items (continued)
Fields
Count Quantity Enter the count quantity for an item tag.
Enterprise The enterprise associated with the item.
Parent Case ID The case LPN that contains child LPNs, which were counted.
Pallet ID The container's pallet LPN containing the item or case LPN.
Case ID The container's case LPN containing the item.
Item ID The item's ID.
PC Product Class: Indicates the item's inventory categorization.
Typical examples are IRREGULAR, FD (Factory Defects).
UOM The unit of measure: The item's unit of measure.
Inventory Status The item's inventory status.
An inventory status indicates an inventory sub-classification.
Typical values are ONHAND or HELD.
System Quantity The system quantity for the count criteria.
Count Quantity Enter the count quantity for the item.
Serial #
From_Serial_# The start serial number of the serial range.
End_serial_# The end serial number of the serial range.
Table 153. Record Count Result Details, Serial
Field Description
Serial # Enter the serial number of the item.
Count Quantity Enter the count quantity for the item.
Click the Add icon to add a new serial number.
Click the Toggle icon to go to the serial range panel where you can enter the serial range
of the items.
From Serial # Enter the start serial number.
To Serial # Enter the end serial number.
Click the Add icon to add a new serial number.
Note: For a serial tracked or serialized item, if secondary serials are defined and
secondary information is not provided, then in such scenario the 'Entry Serial
Range' button is not provided in the screen.
Table 154. Record Count Result Details, Containers
Fields
Click on the Add icon to add new container details.
Enterprise The enterprise associated with the container.
Parent Case ID The case LPN that contains child LPNs, which were counted.
Pallet ID The pallet LPN associated with the container.
Case ID The case LPN associated with the container.
162 Sterling Selling and Fulfillment Foundation: Warehouse Management System User Guide
Table 154. Record Count Result Details, Containers (continued)
Fields
Variance Type The variance type can be:
v'New' if new inventory (not on system) is counted at the
location.
v'Missing' if inventory expected at the location by the
system is not counted.
v'No Variance' if there is no discrepancy.
Click Save to record the count results.
Count Result Search By Variance
The count requests result in task creation, which can be completed through RF or
batch sheets. You can view the count request results in the Count Result Console.
The Count Result Search window provides extensive search capabilities using
granular level information such as variance value, variance quantity and provides
a list of count results having variances.
You can search for count results by variance with the help of this screen.
Note: Do not use spaces before or after any text you enter in the search fields, as
this may result in inconsistent or inaccurate results.
Table 155. Count Result Search By Variance
Fields
Node Select the node associated with the count result.
Enterprise Select the enterprise whose count result you are searching for.
Across Enterprises Select this option if you are searching across all enterprises.
Count Request # Enter the count request number associated with the count
result you are searching for.
Item ID Enter the item ID you want to search for, if applicable.
Product Class Select the product class of the item you are searching for if
applicable.
Unit Of Measure Select the unit of measure of the item you are searching for, if
applicable.
Variance Quantity Enter the variance quantity of the count result you are
searching for, if applicable.
This limits the search to count results that comply with the
variance quantity. For example, show all count results for
variance quantity greater than 10 for the UOM specified.
Variance Value Enter the variance value of the count result you are searching
for, if applicable.
This limits the search to count results that comply with the
variance value. For example, show all count results for
variance value greater than 100.
Chapter 16. Count Console Screens 163
Table 155. Count Result Search By Variance (continued)
Fields
Latest summary Task Check this option to limit the results to the last summary task
for the criteria entered. Summary task represents the grouped
tasks by reference value. For example, by count request
number.
Variance Value Choose either 'Negative', 'Positive' or 'Any' to limit results
based on the variance value.
'Negative' - limits result to all variances, which has reduced
inventory.
'Positive' - limits results to all variances, which has
incremented inventory.
'Any' - shows results for all variances
Max Records Enter the maximum number of records to be listed as a result
of your search.
The Count Result Details screen displays as a result of this search.
Count Result Details
You can view the count result details with the help of this screen.
Table 156. Count Result Details, Item Details
Fields
Details Click on the Plus icon, to alternatively view and hide the
count result details.
Count Request # The count request number associated with the count result.
Count Iteration The number of iterations performed in executing the count
request.
Organization The organization associated with the count request.
Location The location identifier.
Item ID The Item ID.
Description The item's description.
Product Class The item's product class
Indicates the item's inventory categorization. Orders are
placed for an item and product class. Typical examples are
IRREGULAR, FD (Factory Defects).
UOM The item's unit of measure.
Net Variance Quantity The net quantity in variance associated with the count
iteration.
Net Variance Value The net value associated with the net quantity in variance.
This is computed as the VARIANCE_QUANTITY *
UNIT_COST where the variance quantity is for the Inventory
UOM.
Currency The currency code associated with the net variance value.
164 Sterling Selling and Fulfillment Foundation: Warehouse Management System User Guide
Table 157. Count Result Details, Container Details
Fields
Count Request # The count request number associated with the count result.
Count Iteration The number of iterations performed in executing the count
request.
Location The location identifier associated with the count request.
Organization The organization associated with the count request.
Pallet ID The container's Pallet LPN associated with the count request.
Case ID The container's Case LPN associated with the count request.
Variance Type The variance type can be:
v'New' if new inventory (not on system) is counted at the
location.
v'Missing' if inventory expected at the location by the
system is not counted.
v'No Variance' if there is no discrepancy.
Invoke Count Service using the Count Console Screens
You can create count requests with the help of this screen.
Table 158. Invoke Count Service, Invoke Service
Fields
Document Type The count document type displays.
Node The node for which additional count requests are created
displays.
Agent Criteria Enter the agent criteria to invoke the create count request
service. Use the Lookup icon to choose the agent criteria from
the Agent Criteria List screen.
Chapter 16. Count Console Screens 165
166 Sterling Selling and Fulfillment Foundation: Warehouse Management System User Guide
Chapter 17. Create Physical Count Screens
About Create Physical Count Screens
Physical count in a warehouse is the process of counting all items in storage at
once to verify the accuracy of inventory records. All warehouse operations are shut
down until the operation is complete.
The Create Physical Count Plan screen enables you to create a physical count plan.
The activities of the following activity groups should be stopped before starting a
physical count:
vPutaway
vReplenishment
vRetrieval
vOutbound Picking
vReceipt
vCount
vValue-Added Service
vPacking
vOutbound Inventory Container Build
vShipping Container Build
vShipping
vInspection
After the physical count is completed, all the activities should be enabled again.
Create Physical Count Plan
The Create Physical Count Plan screen is used to create a plan for the physical
count.
Table 159. Create Physical Count Plan
Fields
Node The node for which you want to create the physical count.
Enterprise Select the enterprise for which you want create the physical
count.
Plan Name Enter the plan name for which you want create the physical
count.
Plan Date Enter the date and time on which to create the physical
count.
Duration Select the duration of the physical count (you can select the
appropriate number of days from the drop- down list).
Click Create Plan, to go to the Plan for Physical Count Details screen. For more
information about the screen, see the section, "Physical Count Plan Details" in the
chapter, "Physical Count Console Screens".
© Copyright IBM Corp. 1999, 2011 167
168 Sterling Selling and Fulfillment Foundation: Warehouse Management System User Guide
Chapter 18. Physical Count Console Screens
Physical Count Plan Search
The Physical Count Console provides the capability to view the physical count
plans.
The Physical Count Details screen displays all the categories that are available in
the YFS_PHY_CNT_CATEGORY table. The 12 categories that are provided out of
the box and available in the YFS_PHY_CNT_CATEGORY table have the same
name as that of activities.These categories can be stopped before starting a physical
count. You can group the activities, and provide each group with a logical name.
After the grouping, the YFS_PHY_ CNT_CATEGORY table will contain only a
single entry, which is the logical name you provided to the grouping you created,
instead of individual entries for each of the activities.
Let us consider an example. If you want to group PUTAWAY, RECEIPT, and
RETREIVAL into a logical group name, and you call this group
InWarehouseMovements, the YFS_PHY_CNT_CATEGORY table will have a single
entry, that is, InWarehouseMovements, instead of individual entries for PUTAWAY,
RECEIPT, and RETREIVAL.
However, the YFS_PHY_CNT_CAT_ACT_GRP table will contain three entries
corresponding to InWarehouseMovements against each of the three activities
grouped under it, for example, InWarehouseMovements is the category name and
PUTAWAY is the activity name, InWarehouseMovements is the category name and
RECEIPT is the activity name, and InWarehouseMovements is the category name
and RETREIVAL is the activity name.
In the Physical Count Details screen, when you hover the mouse over the logical
name, in this case, InWarehouseMovements, the list of activities under that group
is displayed.
To stop an activity that is available in the YFS_ACTIVITY table, the activity should
be present in the YFS_PHY_CNT_CAT_ACT_GRP table, and you should have a
corresponding relationship with the YFS_PHY_CNT_CAT_ACT_GRP table and
YFS_PHY_CNT_CATEGORY table. Henceforth, the name to which the activity has
been mapped in the YFS_PHY_CNT_CATEGORY table will be shown in the
Physical Count Plan Details screen.
You can search for a planned physical count, based on the enterprise, plan name,
status, and date range.
Table 160. Physical Count Plan Search
Fields
Enterprise The enterprise for which you want to search.
Across Enterprise Select this option if you are searching across all enterprises.
Plan Name Enter the plan name you are searching.
© Copyright IBM Corp. 1999, 2011 169
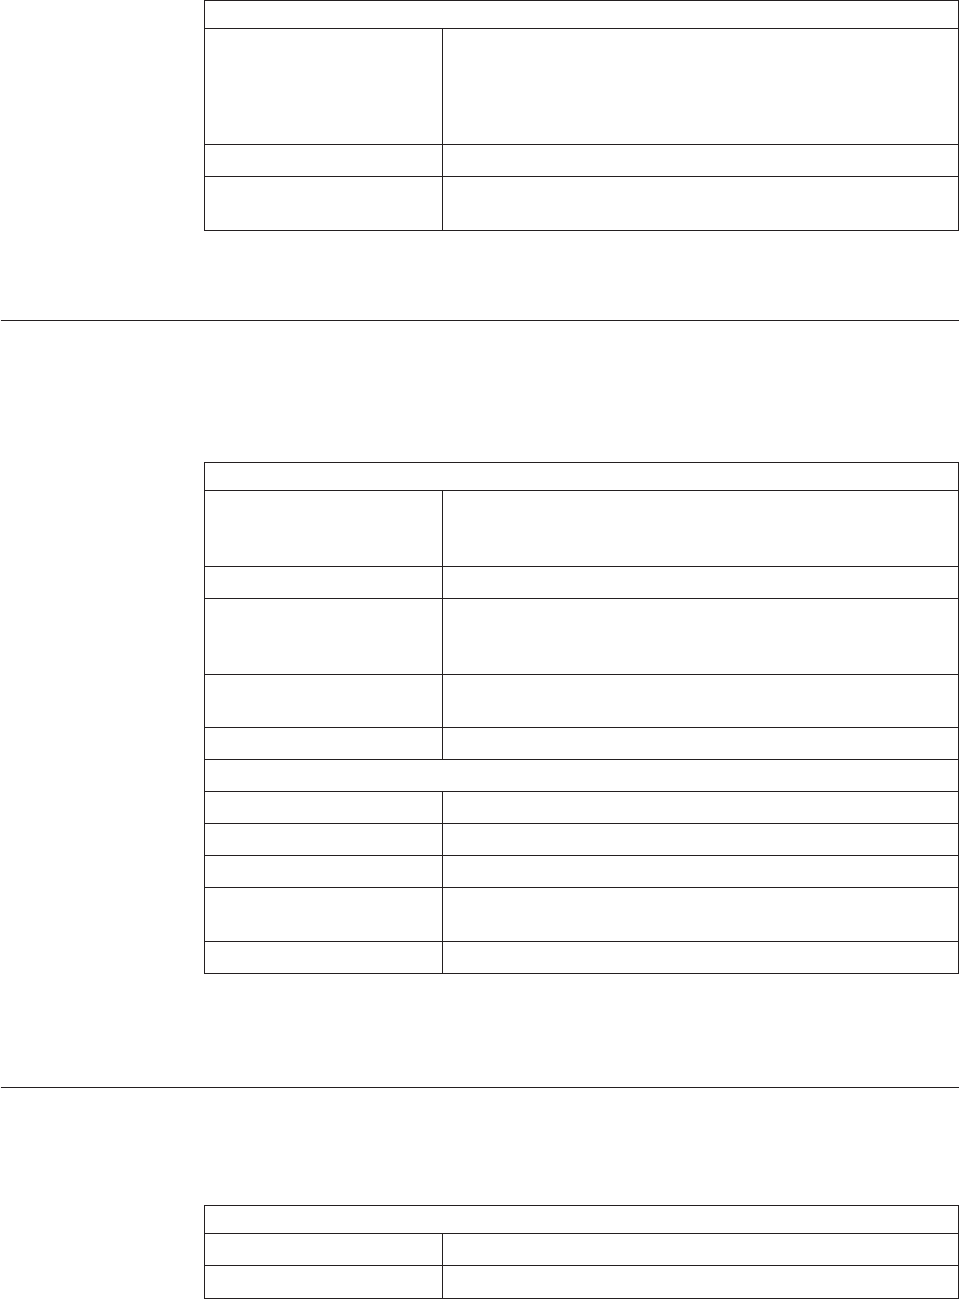
Table 160. Physical Count Plan Search (continued)
Fields
Plan Date Enter the start date and time associated with the plan name
you are searching.
To - Enter the end date and time associated with the plan
name you are searching.
Status The status associated with the plan name you are searching.
Max Records Enter the maximum number of records that you want listed
as search result.
The Physical Count Plan List screen displays the search results.
Physical Count Plan List
The Physical Count Plan List screen displays the search results, based on the plan
name search.
Table 161. Physical Count Plan List
Actions
View Details This takes you to the Physical Count Plan Details screen,
where you can view the details of the physical count plan
and perform various actions on the physical count plan.
Start This takes you to the beginning of the plan.
End This changes the status of the physical count plan to
’Completed’. This can be used only when the physical count
status is ’In Progress’.
Cancel This displays a Cancellation Reason screen for cancelling a
selected plan.
Delete This action deletes the physical count plan.
Fields
Plan Name The plan name of the physical count plan.
Start Date The start date associated with the plan name.
Duration The duration of the physical count plan.
Duration UOM The Unit Of Measure for the duration of the physical count
plan.
Plan Status The status of the plan.
Note: When the user clicks the 'Start' button, the system overrides the date and
time in the 'Start Date' field with the current date and time.
Physical Count Plan Details
You can view the physical count plan details with the help of this screen.
Table 162. Physical Count Plan Details
Fields
Node The node for which the physical count was created.
Enterprise The enterprise for which the physical count was created.
170 Sterling Selling and Fulfillment Foundation: Warehouse Management System User Guide
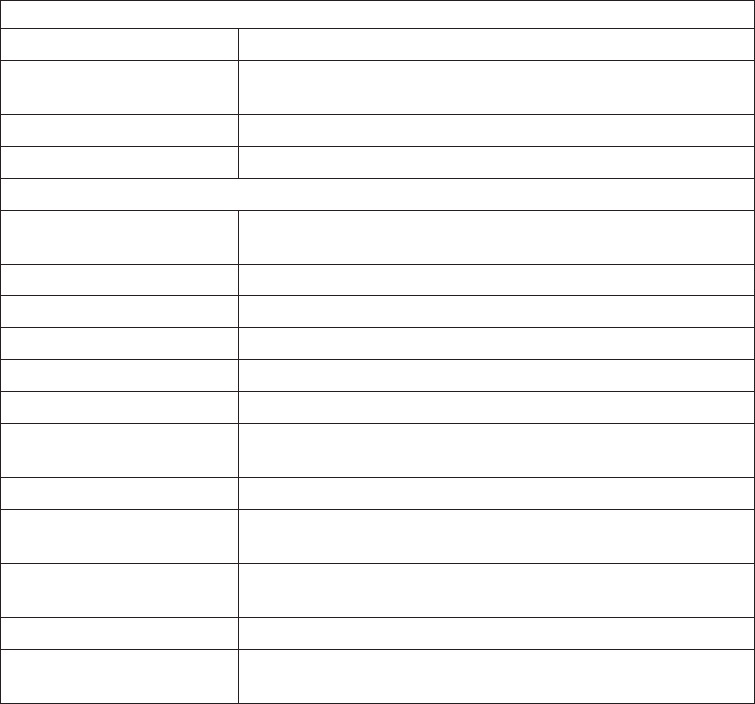
Table 162. Physical Count Plan Details (continued)
Fields
Plan Name The plan name for which the physical count was created.
Start Enter the date and time for which the physical count was
created.
Duration The duration for physical count.
Status The status of the physical count plan.
Enter the duration before which the following activities need to be stopped
Putaway Enter the appropriate duration to stop putting an item (pallet,
case, single) into storage.
Replenishment Enter the appropriate duration to stop replenishing.
Retrieval Enter the appropriate duration to stop retrieving.
Outbound Picking Enter the appropriate duration to stop outbound picking.
Receipt Enter the appropriate duration to stop receiving.
Count Enter the appropriate duration to stop cycle count.
Value Added Services Enter the appropriate duration to stop confirmation of value
added service.
Packing Enter the appropriate duration to stop packing.
Outbound Inventory
Container Build
Enter the appropriate duration to stop the outbound
inventory container build.
Shipping Container Build Enter the appropriate duration to stop the shipping container
build.
Shipping Enter the appropriate duration to stop shipping.
Inspection Enter the appropriate duration to stop inspection of received
items.
Note: At the time of configuration if you check the 'Allow other inventory
operations during Physical count' box at the node level, then in such scenario none
of the activities can be stopped before creating the physical count. In such case, if
you create the Physical Count the 'Inventory Operations are allowed during
Physical Count Planning cannot be done at activity group level' message displays
in the Physical Count Plan Details screen.
Note: If you want to remove the duration of an activity that you have entered in
the Physical Count Plan Details screen, in such scenario you need to enter the
duration as 0 days/hours.
Note: You can cancel a physical count plan, thereby canceling the tasks associated
with that physical count plan. However, when you cancel only the individual tasks
associated with a physical count plan, the individual tasks get canceled, but the
corresponding physical count plan does not get canceled.
Note: When the user clicks the 'Start' button, the system overrides the date and
time in the 'Start' field with the current date and time.
Chapter 18. Physical Count Console Screens 171
172 Sterling Selling and Fulfillment Foundation: Warehouse Management System User Guide
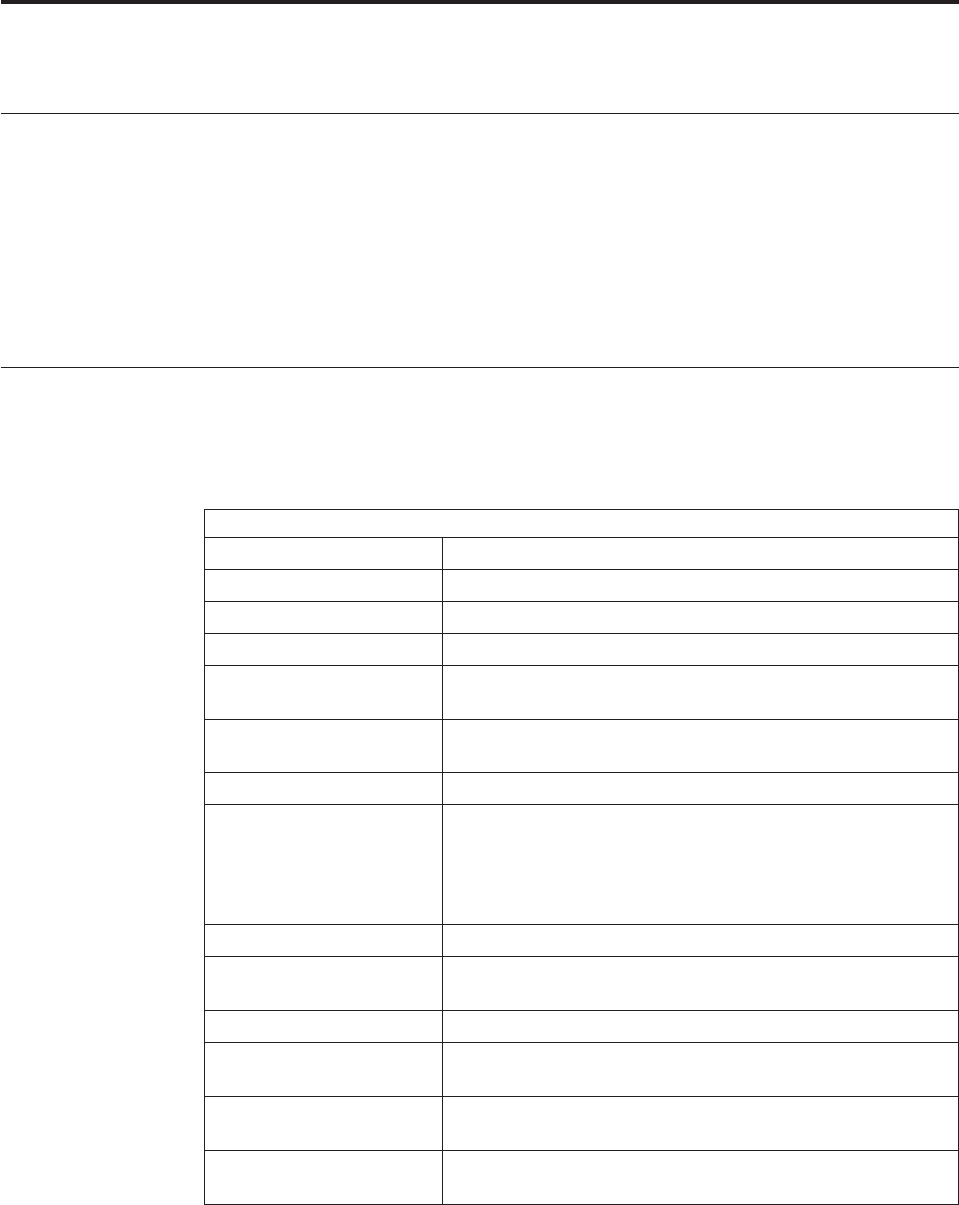
Chapter 19. Move Request Console Screens
About Move Request Console Screens
The Move Request Console is used to manage all processes for a move request,
including the abilities to view and modify the move requests.
The Move Request Console provides:
vComprehensive visibility of move request details in addition to move request
line details.
vExtensive search capabilities using granular level information.
Move Request Search By Item
You can search for move requests based on the item information such as product
class, unit of measure, item ID and so on.
Table 163. Move Request Search By Item
Fields
Node Select the node associated with move request.
Enterprise Select the enterprise you are searching for.
Across Enterprise Choose this option if you are searching across enterprise.
Activity Group Select the activity group you are searching for, if applicable.
For Activity Code Select the activity code associated with the activity group you
are searching for, if applicable.
Move Request # Enter the move request number you are searching for, if
applicable.
Item ID Enter the item ID you want to search for, if applicable.
Priority Select the move request priority you are searching for. Valid
values are Urgent, High, Normal, Low. This is used to group
and sequence tasks for users. A task with 'Urgent' priority is
assigned to the next available user. The default value is
'Normal'.
Segment Type Enter the segment type you are searching for, if applicable.
Segment # Enter the segment number you are searching for, if
applicable.
Receipt # Enter the receipt number you want to search for, if applicable.
Move Request Status Enter the move request status you are searching for, if
applicable.
Has Exceptions Choose Has Exceptions, if you want to search for move
requests that have exceptions.
Max Records Enter the maximum number of records to be listed as a result
of your search.
Note: Do not use spaces before or after any text you enter in the search fields, as
this may result in inconsistent or inaccurate results.
The Move Request List screen displays as a result of move request search by item.
© Copyright IBM Corp. 1999, 2011 173
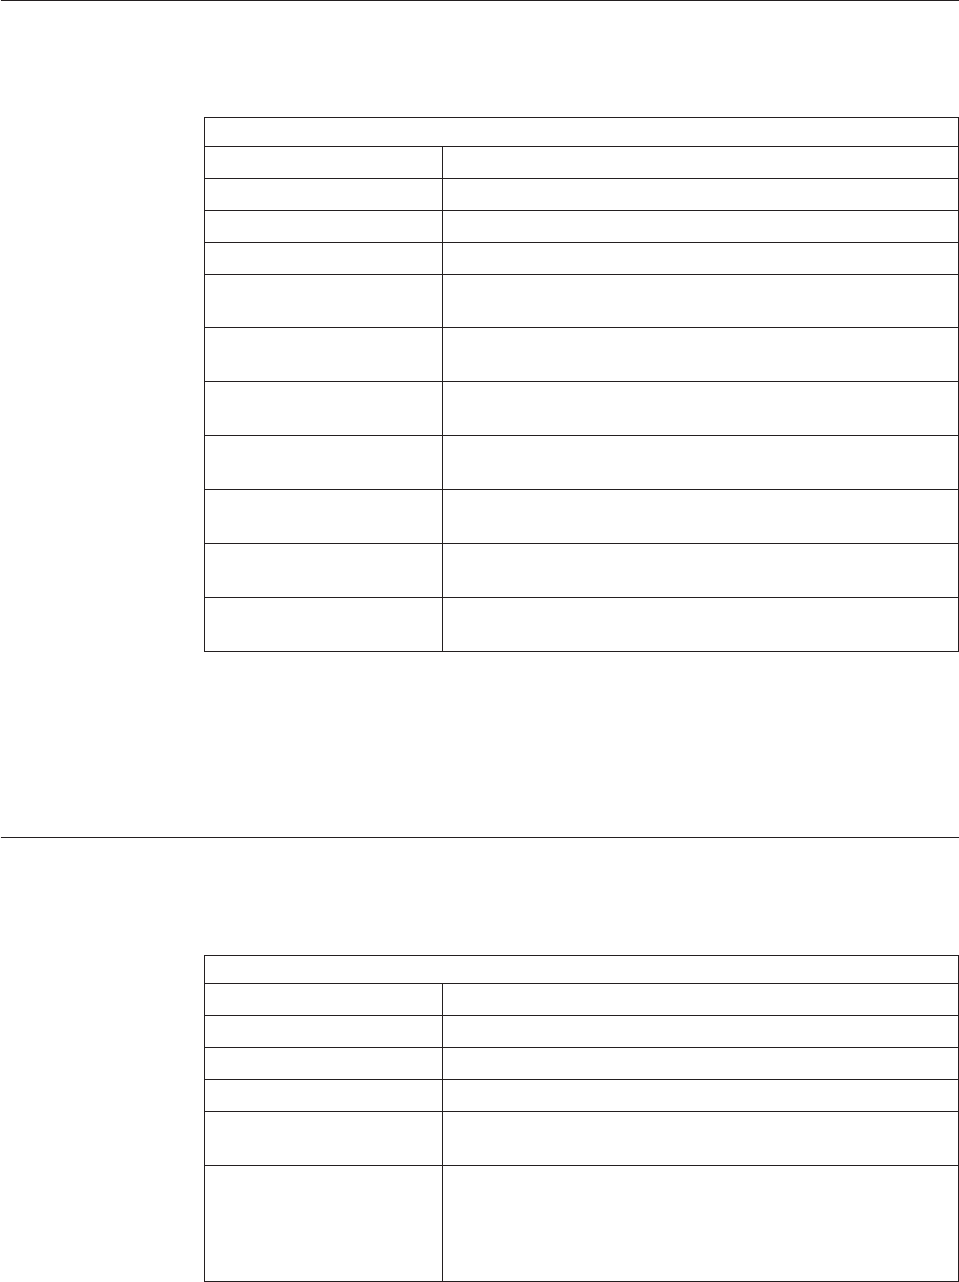
Move Request Search By Location
You can search for move requests based on the location in this screen.
Table 164. Move Request Search By Location
Fields
Node Select the node associated with move request.
Enterprise Select the enterprise you are searching for.
Across Enterprise Choose this option if you are searching across enterprise.
Activity Group Select the activity group you are searching for, if applicable.
For Activity Code Select the activity code associated with the activity group you
are searching for, if applicable.
Source Location Enter the source location associated with the move request
you are searching for, if applicable.
Target Location Enter the target location associated with the move request
you are searching for, if applicable.
Pallet ID Enter the pallet LPN associated with the container, you are
searching for.
Case ID Enter the case LPN associated with the container you are
searching for.
Move Request Status Enter the move request status you are searching for, if
applicable.
Max Records Enter the maximum number of records to be listed as a result
of your search.
Note: Do not use spaces before or after any text you enter in the search fields, as
this may result in inconsistent or inaccurate results.
The Move Request List screen displays as a result of move request search by
location.
Move Request Search By Date
You can search for move requests based on the dates in this screen.
Table 165. Move Request Search By Date
Fields
Node Select the node associated with move request.
Enterprise Select the enterprise you are searching for.
Across Enterprise Choose this option if you are searching across enterprise.
Activity Group Select the activity group you are searching for, if applicable.
For Activity Code Select the activity code associated with the activity group you
are searching for, if applicable.
Requesting User ID The current user id is automatically populated by the system.
Choose the field and Lookup icon to find the specific
Requesting User ID associated with the move request you
want to use.
174 Sterling Selling and Fulfillment Foundation: Warehouse Management System User Guide
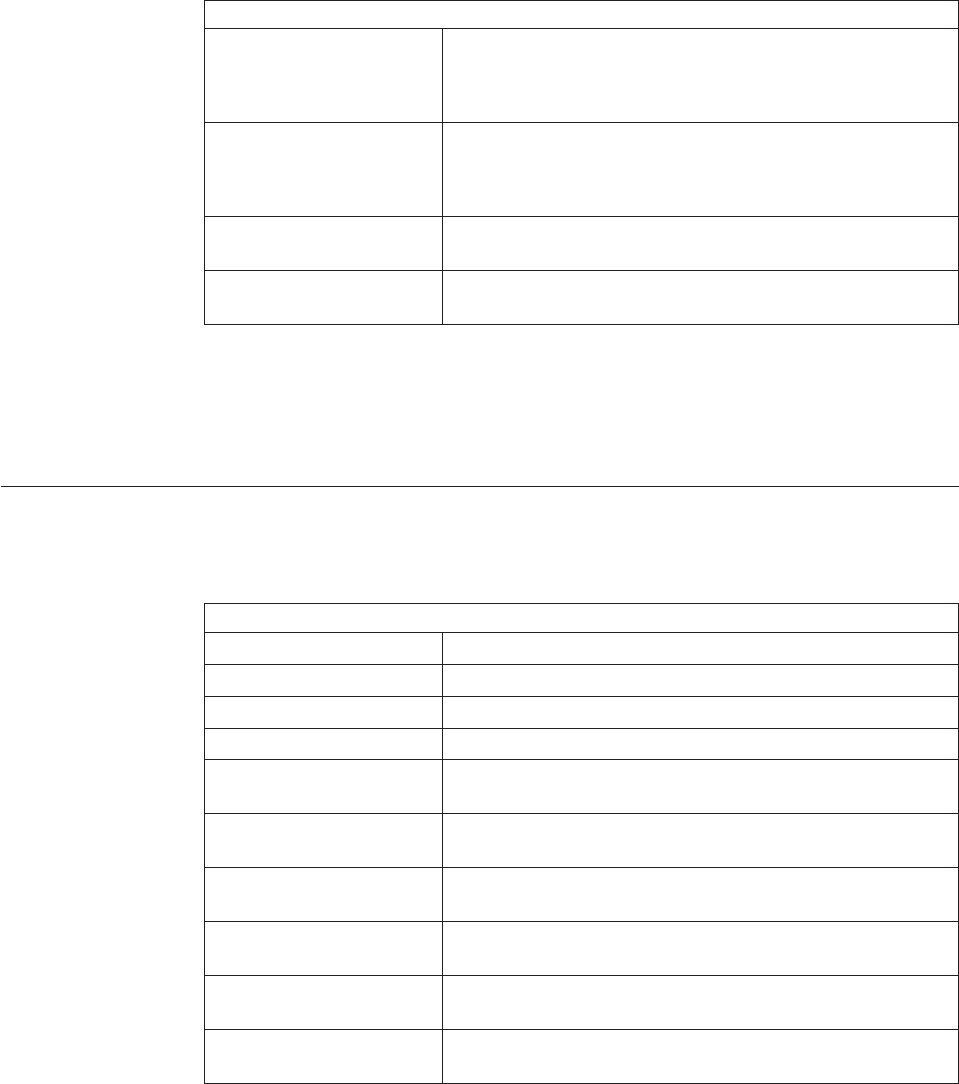
Table 165. Move Request Search By Date (continued)
Fields
Start No Earlier Than The current system date and time is automatically populated.
Enter different start date and time for the move request, if
applicable.
Finish No Later Than The current system date and time is automatically populated.
Enter the different finish date and time for the move request
you are searching for, if applicable.
Priority Select the priority associated with the request you are
searching for, if applicable.
Max Records Enter the maximum number of records to be listed as a result
of your search.
Note: Do not use spaces before or after any text you enter in the search fields, as
this may result in inconsistent or inaccurate results.
The Move Request List screen displays as a result of move request search by date.
Move Request Search By References
You can search for move requests based on the references in this screen.
Table 166. Move Request Search By References
Fields
Node Select the node associated with move request.
Enterprise Select the enterprise you are searching for.
Across Enterprise Choose this option if you are searching across enterprise.
Activity Group Select the activity group you are searching for, if applicable.
For Activity Code Select the activity code associated with the activity group you
are searching for, if applicable.
Requesting User ID Choose the field and Lookup icon to find specific Requesting
User ID associated with the move request you want to use.
Wave # Enter the wave number associated with the move request you
want to search for, if applicable.
Shipment # Enter the shipment number associated with the move request
you want to search for, if applicable.
Work Order # Enter the work order number associated with the move
request you want to search for, if applicable.
Max Records Enter the maximum number of records to be listed as a result
of your search.
Note: Do not use spaces before or after any text you enter in the search fields, as
this may result in inconsistent or inaccurate results.
The Move Request List screen displays as a result of move request search by
references.
Chapter 19. Move Request Console Screens 175
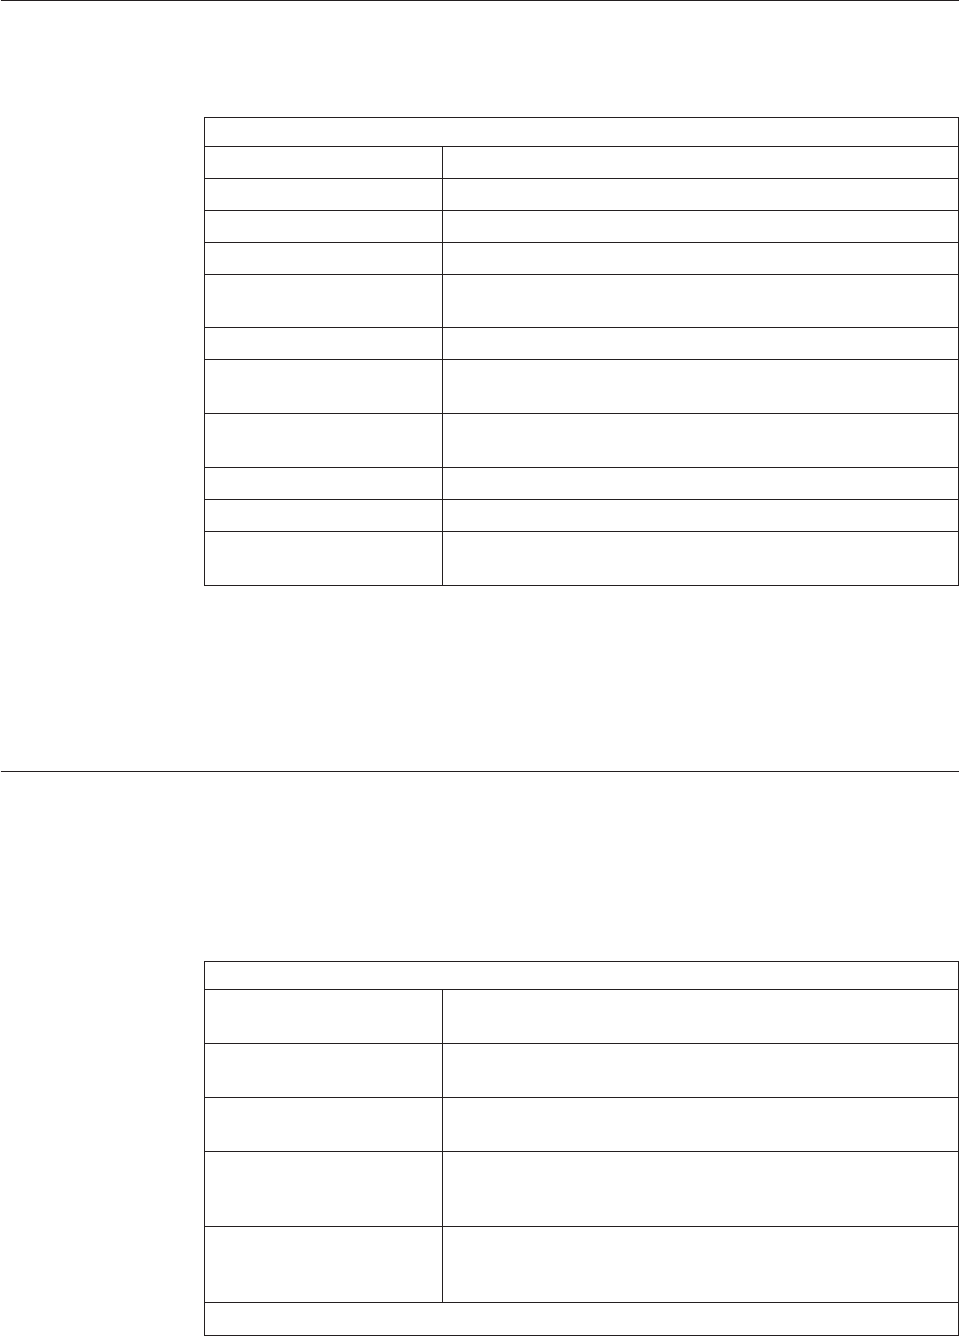
Move Request Search By Tag Attributes
You can search for move request based on tag attributes in this screen.
Table 167. Move Request Search By Tag Attributes
Fields
Node Select the node associated with move request.
Enterprise Select the enterprise you are searching for.
Across Enterprise Choose this option if you are searching across enterprise.
Activity Group Select the activity group you are searching for, if applicable.
For Activity Code Select the activity code associated with the activity group you
are searching for, if applicable.
Item ID Enter the item ID you want to search for, if applicable.
Product Class Select the product class of the item you are searching for if
applicable.
Unit Of Measure Select the unit of measure of the item you are searching for, if
applicable.
Tag # Enter tag number corresponding to item.
Serial # Enter the serial number you are searching for, if applicable.
Max Records Enter the maximum number of records to be listed as a result
of your search.
Note: Do not use spaces before or after any text you enter in the search fields, as
this may result in inconsistent or inaccurate results.
The Move Request List screen displays as a result of move request search by tag
attributes.
Move Request List
The Move Request List window displays the results of a move request console
search. You can perform actions on a single move request or multiple move
requests by selecting the check boxes of the move requests you want to perform an
action on and choosing the applicable action from the action bar.
Table 168. Move Request List
Actions
View All Lines This action takes you to the Move Request Details screen
where you can view move request details for all lines.
Release This action lets to release a move request. On releasing a
move request, tasks get created.
View T asks This action takes you to the Task List screen where you view
a list of tasks associated with the move request.
Cancel This action takes you to the Cancellation Reason screen where
you can enter appropriate reasons for cancelling the move
request.
View Lines With Exceptions This action takes you to the Move Request Details screen
where you can view move request details for lines with
exceptions.
Fields
176 Sterling Selling and Fulfillment Foundation: Warehouse Management System User Guide
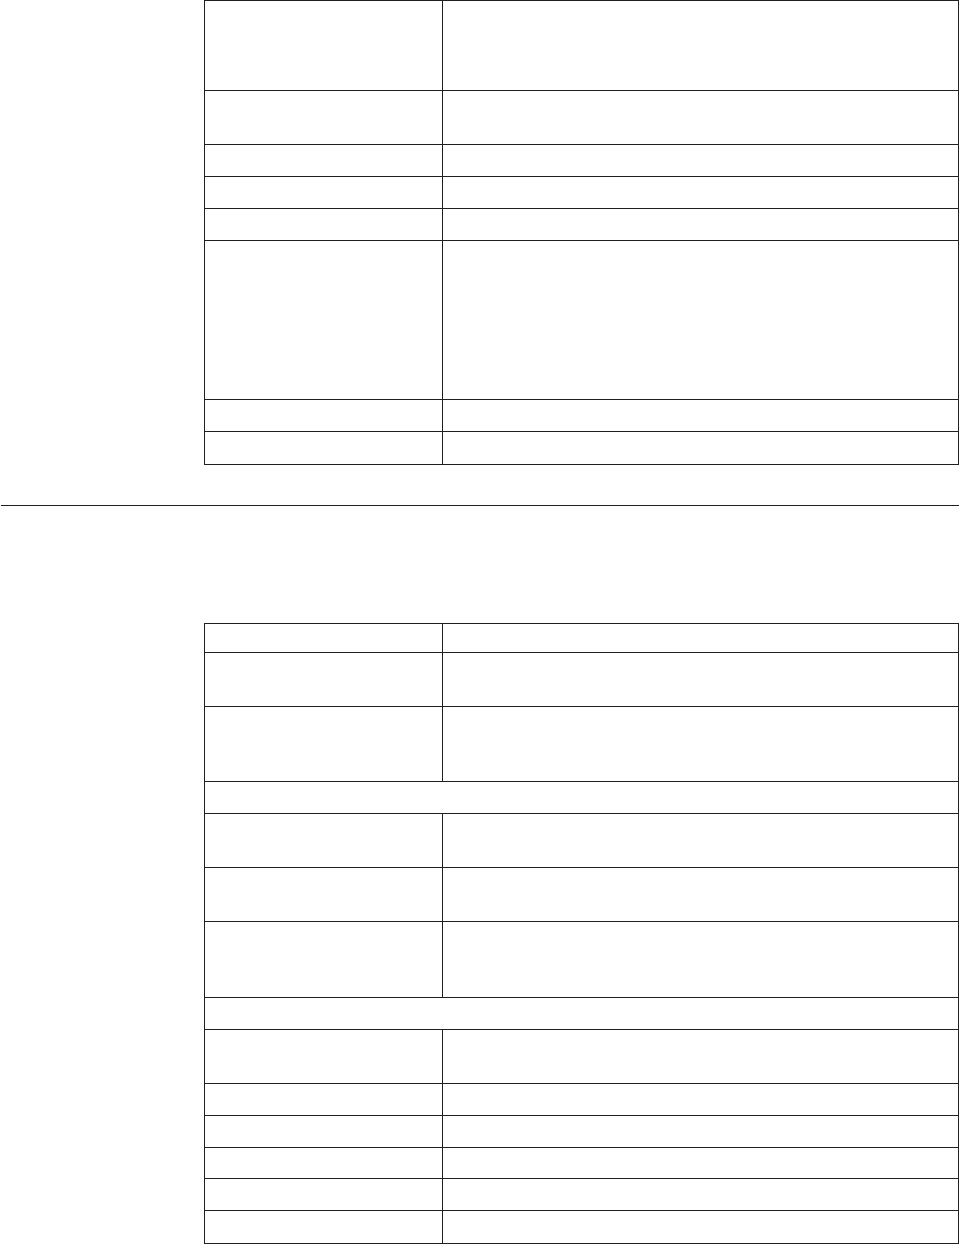
Table 168. Move Request List (continued)
Move Request # Move request number associated with the move request.
Click this link to go to the Move Request Details screen to
view lines having exceptions for the selected move request.
Activity Group The requesting department. Valid values include RECEIPT,
SHIPPING, VAS, PACKING and QC.
For Activity Code The activity code associated with the activity group.
Priority The priority of the move request.
Requesting User ID The user who requested the move.
Has Exceptions Indicates if exceptions are found while releasing a move
request.
You can view exceptions associated with a move request in
the Alert Detail window. For more information, see the
Sterling Selling and Fulfillment Foundation: Application Platform
User Guide.
Start No Earlier Than Enter the earliest date and time a task should be started.
Status The current status of the move request.
Move Request Details
You can view move request details in this screen.
Table 169. Move Request Details, Move Request
View Icons Description
Alert Alerts - This icon takes you to the Move Request Alerts
screen where you can view alerts for the move request.
Audit Status Audits - This icon takes you to the Status Audit
Details where you can view a list of status audits for the
move request.
Actions
Release This action lets to release a move request. On releasing a
move request, tasks get created.
View Tasks This action takes you to the Task List screen where you view
a list of tasks associated with the move request.
Cancel This action takes you to the Cancellation Reason screen where
you can enter appropriate reasons for cancelling the move
request.
Fields
Activity Group The requesting department. Valid values include RECEIPT,
VAS, PACKING and QC.
For Activity Code The activity code associated with the activity group.
Node Node associated with the move request.
Move Request # Move request number associated with the move request.
Requested By The user who requested the move
Status Indicates status of the move request.
Chapter 19. Move Request Console Screens 177
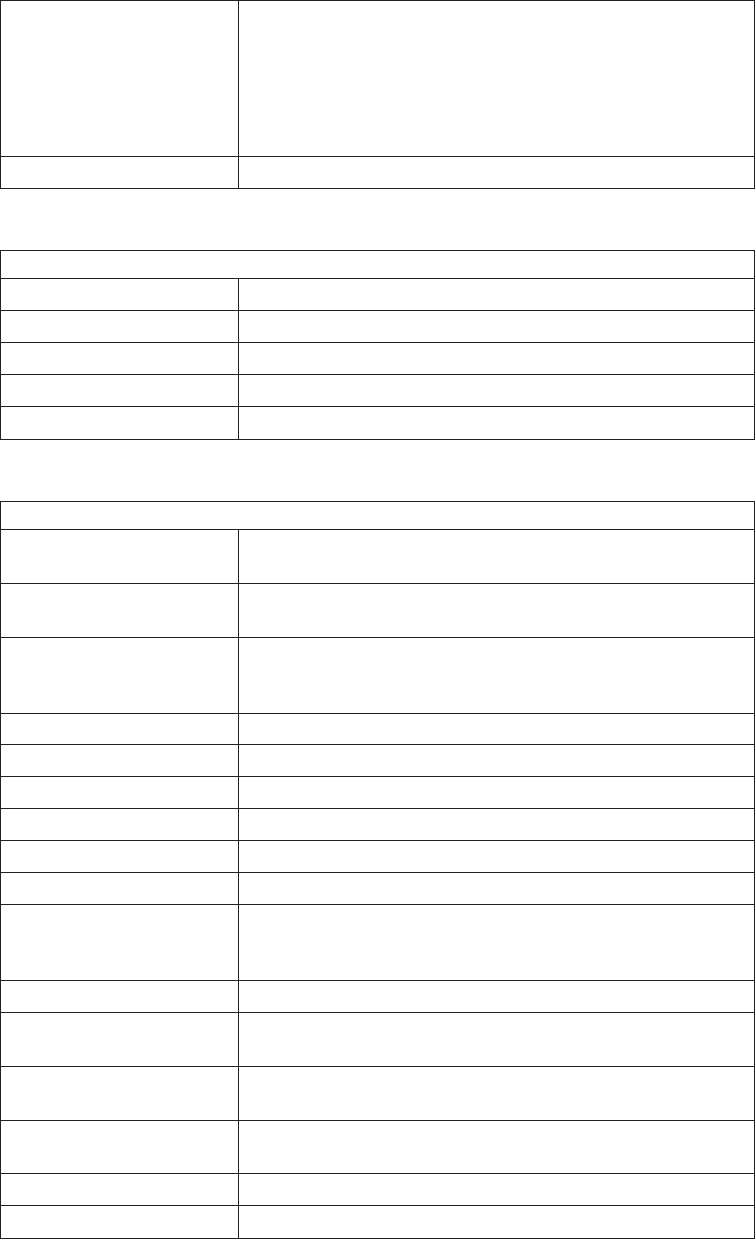
Table 169. Move Request Details, Move Request (continued)
Has Exceptions Indicates if exceptions are found while releasing a move
request.
You can view exceptions associated with a move request in
the Alert Detail window. For more information, see the
Sterling Selling and Fulfillment Foundation: Application Platform
User Guide.
Priority The priority of the move request.
Table 170. Move Request Details, Task References
Fields
Shipment # Shipment number associated with the request.
Wave # Wave number to which a request belongs
Work Order # Work order number associated with the request.
Start No Earlier Than Enter the earliest date and time a task should be started.
Finish No Later Than Enter the latest date and time a task should be completed.
Table 171. Move Request Details, Move Request Items
Actions
View Details This action takes you to the Move Request Line Details screen
where you can view move request line details.
View Tasks This action takes you to the Task List screen where you view
a list of tasks associated with the move request.
Cancel This action takes you to the Cancellation Reason screen where
you can enter appropriate reasons for cancelling the move
request.
Source Location Location where the task starts.
Target Location Location where the task ends.
Enterprise Enterprise associated with the request.
Pallet ID Pallet LPN associated with the container.
Case ID Case LPN associated with the container.
Item Id The Item ID
Product Class Indicates the item's inventory categorization. Orders are
placed for an item and product class. Typical examples are
IRREGULAR, FD (Factory Defects).
UOM The item's unit of measure.
Inventory Status Refers to an inventory sub classification based on the results
of the inventory control processes within the warehouse.
Requested Quantity Quantity in the Item's unit of measure that is required to be
moved.
Released Quantity Quantity in the Item's unit of measure for which tasks have
been created.
Released Indicates whether a line is fully tasked.
Is Cancelled Indicates whether the request has been cancelled.
178 Sterling Selling and Fulfillment Foundation: Warehouse Management System User Guide
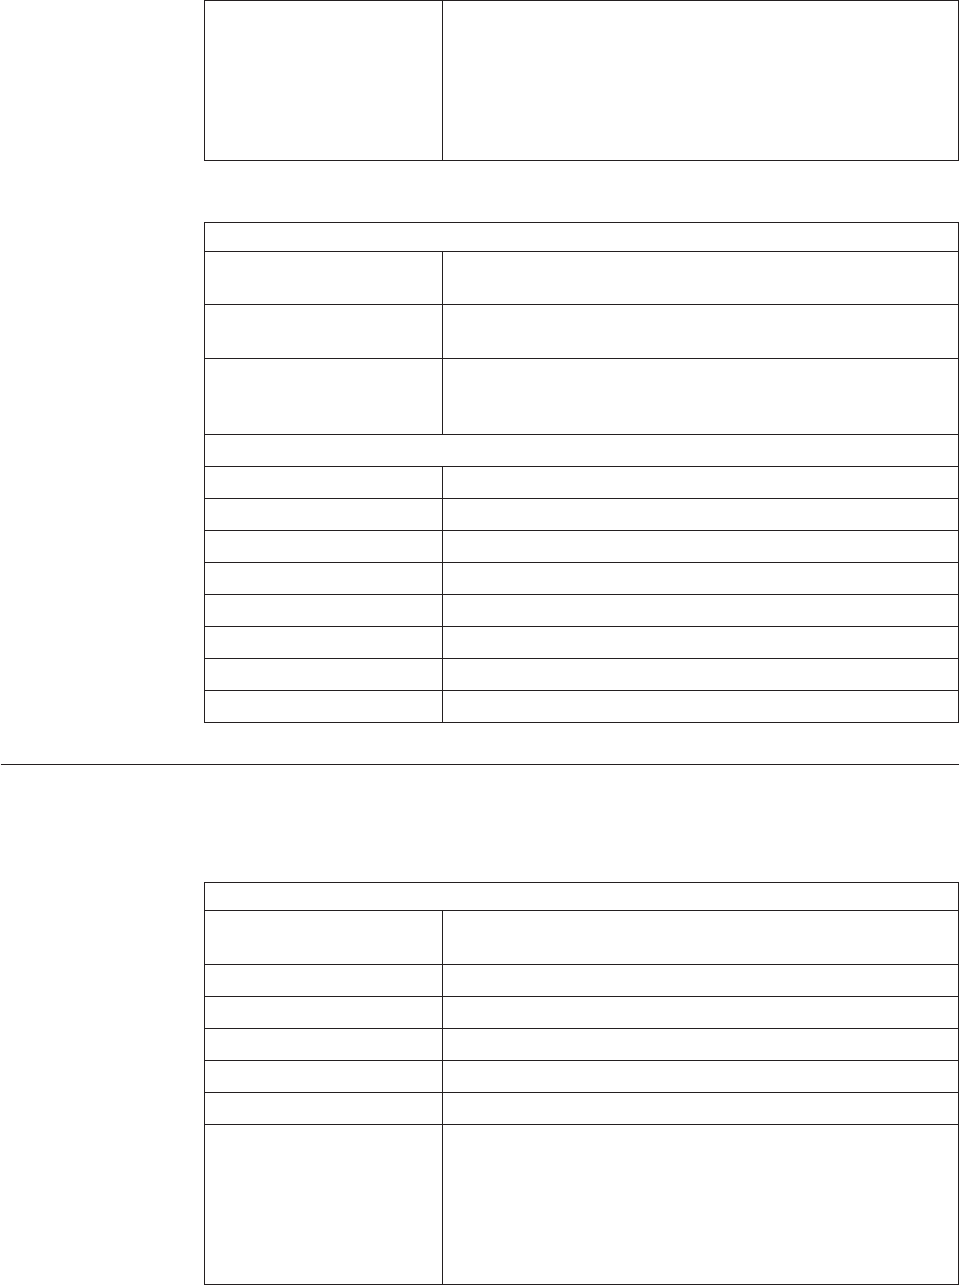
Table 171. Move Request Details, Move Request Items (continued)
Tag # The tag number associated with a tag-controlled item.
Note: The tag number displays only when the node
performing the move request is configured to capture the tag
attributes in all operations within the node. For more
information about capturing the tag attributes, see the Sterling
Selling and Fulfillment Foundation: Application Platform
Configuration Guide.
Table 172. Move Request Details, Move Request Containers
Actions
View Details This action takes you to the Move Request Line Details screen
where you can view move request line details.
View Tasks This action takes you to the Task List screen where you view
a list of tasks associated with the move request.
Cancel This action takes you to the Cancellation Reason screen where
you can enter appropriate reasons for cancelling the move
request.
Fields
Source Location Location where the task starts.
Target Location Location where the task ends.
Enterprise Enterprise associated with the request.
Pallet ID Pallet LPN associated with the container.
Case ID Case LPN associated with the container.
Receipt # The receipt number associated with the request.
Released Indicates whether a line is fully tasked.
Is Cancelled Indicates whether the request is cancelled.
Move Request Alerts
You can view alters for the move request in this screen.
Table 173. Move Request Alerts, Move Request
Fields
Activity Group The requesting department. Valid values include RECEIPT,
VAS, PACKING and QC.
Node Node associated with the move request.
Move Request # Move request number associated with the move request.
Priority Priority of the move request.
Requested By User who requested the move
Status Indicates status of the move request.
Has Exceptions Indicates if exceptions were found while releasing a move
request.
You can view exceptions associated with a move request in
the Alert Detail window. For more information, see the
Sterling Selling and Fulfillment Foundation: Application Platform
User Guide.
Chapter 19. Move Request Console Screens 179
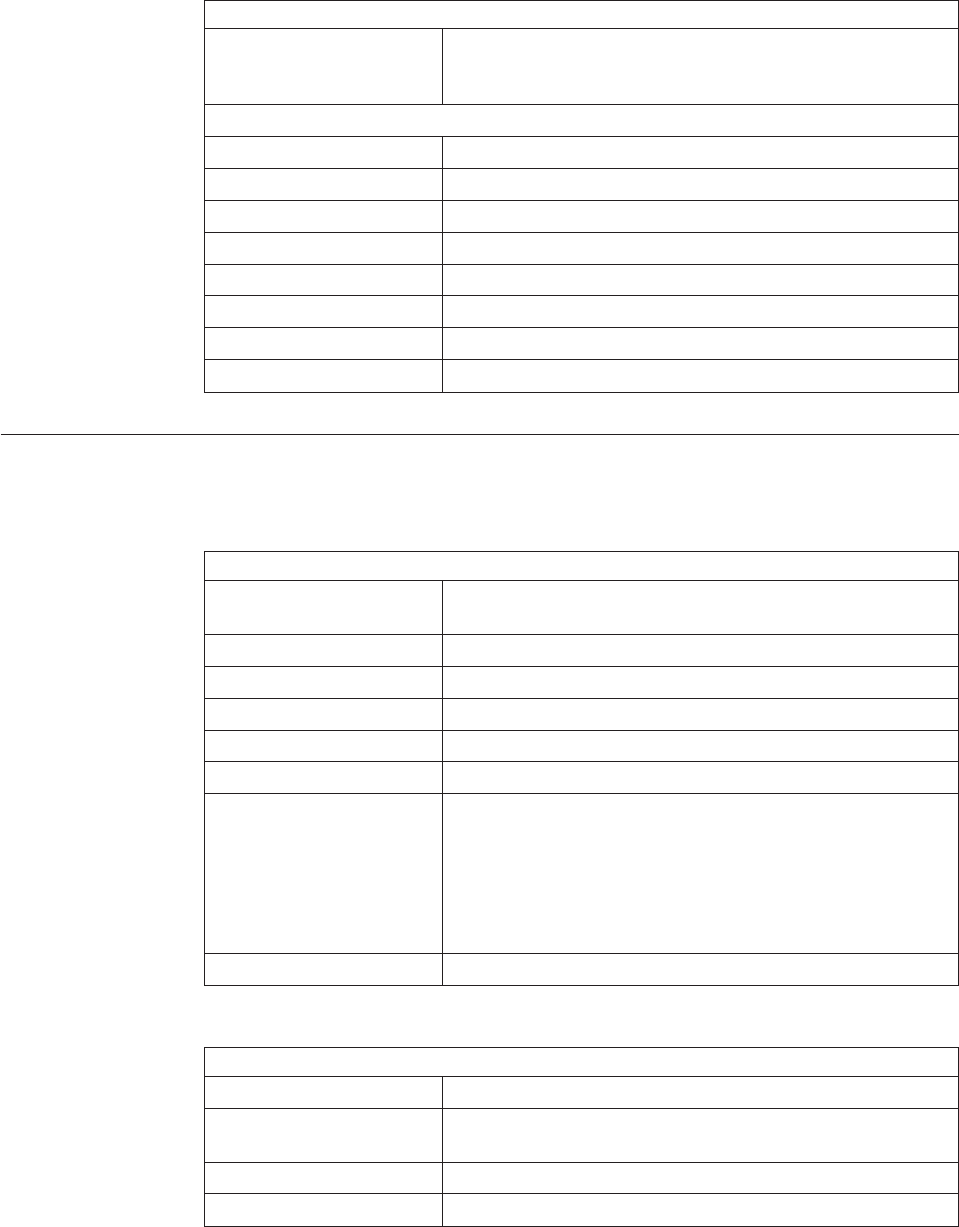
Table 174. Move Request Alerts, Alerts
Actions
View Details This action provides visibility to alert details. For more
information, see the Sterling Selling and Fulfillment Foundation:
Application Platform User Guide.
Fields
Alert ID The alert identifier associated with the alert.
Type Indicates the alert type.
Description A brief description of the alert.
Queue The queue associated with the alert.
Priority Indicates the priority of the alert.
Status The alert status.
Owner The user who raised the alert.
Raised On The date and time the alert was raised.
Status Audit Details
You can view a list of status audit for the move request in this screen.
Table 175. Status Audit Details, Move Request
Fields
Activity Group The requesting department. Valid values include RECEIPT,
VAS, PACKING and QC.
For Activity Code The activity code associated with the activity group.
Node Node associated with the move request.
Move Request # Move request number associated with the move request.
Requested By User who requested the move.
Status Indicates status of the move request.
Has Exceptions Indicates if exceptions are found while releasing a move
request.
You can view exceptions associated with a move request in
the Alert Detail window. For more information, see the
Sterling Selling and Fulfillment Foundation: Application Platform
User Guide.
Priority Priority of the move request.
Table 176. Status Audit Details, Status Audit List
Fields
Old Status Old status of the move request.
Old Status Date Previous date on which status of the move request was
changed.
New Status New status of the move request.
New Status Date Date on which move request was changed to new status.
180 Sterling Selling and Fulfillment Foundation: Warehouse Management System User Guide
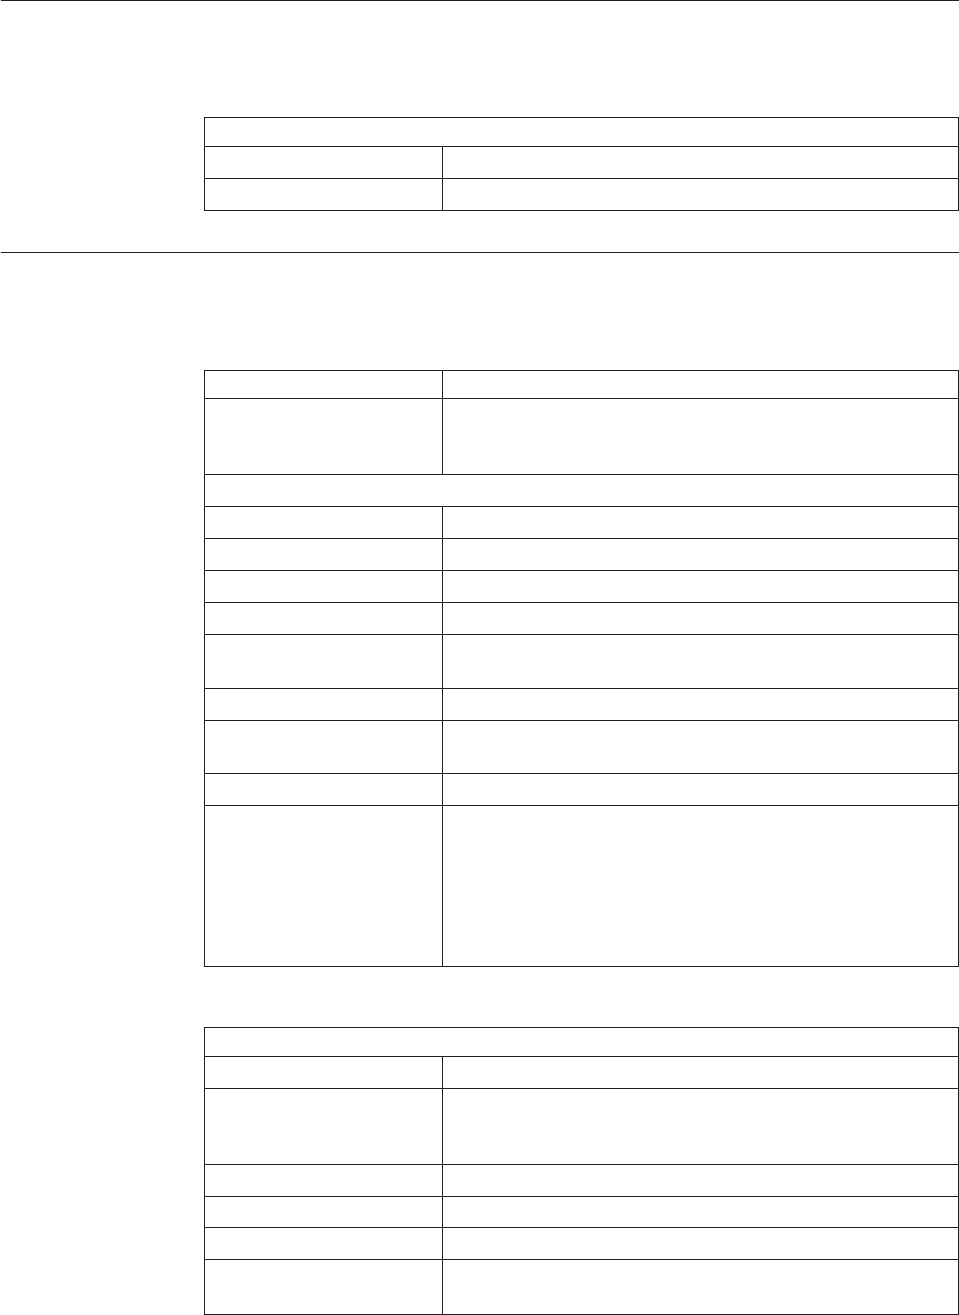
Cancellation Reason for Cancelling a Move Request
You can enter appropriate reason for cancelling a move request in this screen.
Table 177. Cancellation Reason
Fields
Reason Code Select the applicable reason for the cancellation.
Reason Text Enter any additional comments for the cancellation.
Move Request Line Details
You can view move request line details for items or containers in this screen.
Table 178. Move Request Line Details, Move Request Line Header
View Icon Description
Activity Demand This action takes you to the Move Request Line Activity
Demand where you can view a list of activity demands for
the move request line.
Fields
Move Request # Move request number associated with the move request.
Target Location Location where the task ends.
Source Location Location where the task starts.
Enterprise Enterprise associated with the request.
Requested Quantity Quantity in the Item's unit of measure that is required to be
moved.
Is Cancelled Indicates whether the request is cancelled.
Released Quantity Quantity in the Item's unit of measure for which tasks have
been created.
Released Indicates whether a line is fully tasked.
Has Exceptions Indicates if exceptions are found while releasing a move
request.
You can view exceptions associated with a move request in
the Alert Detail window. For more information, see the
Sterling Selling and Fulfillment Foundation: Application Platform
User Guide.
Table 179. Move Request Line Details, Move Request Line Details
Fields
Item Id The Item ID
Product Class Indicates the item's inventory categorization. Orders are
placed for an item and product class. Typical examples are
IRREGULAR, FD (Factory Defects).
UOM The item's unit of measure.
Pallet ID Pallet LPN associated with the container.
Case ID Case LPN associated with the container.
Ship By Date The date by which the item must be shipped so that it is
usable.
Chapter 19. Move Request Console Screens 181
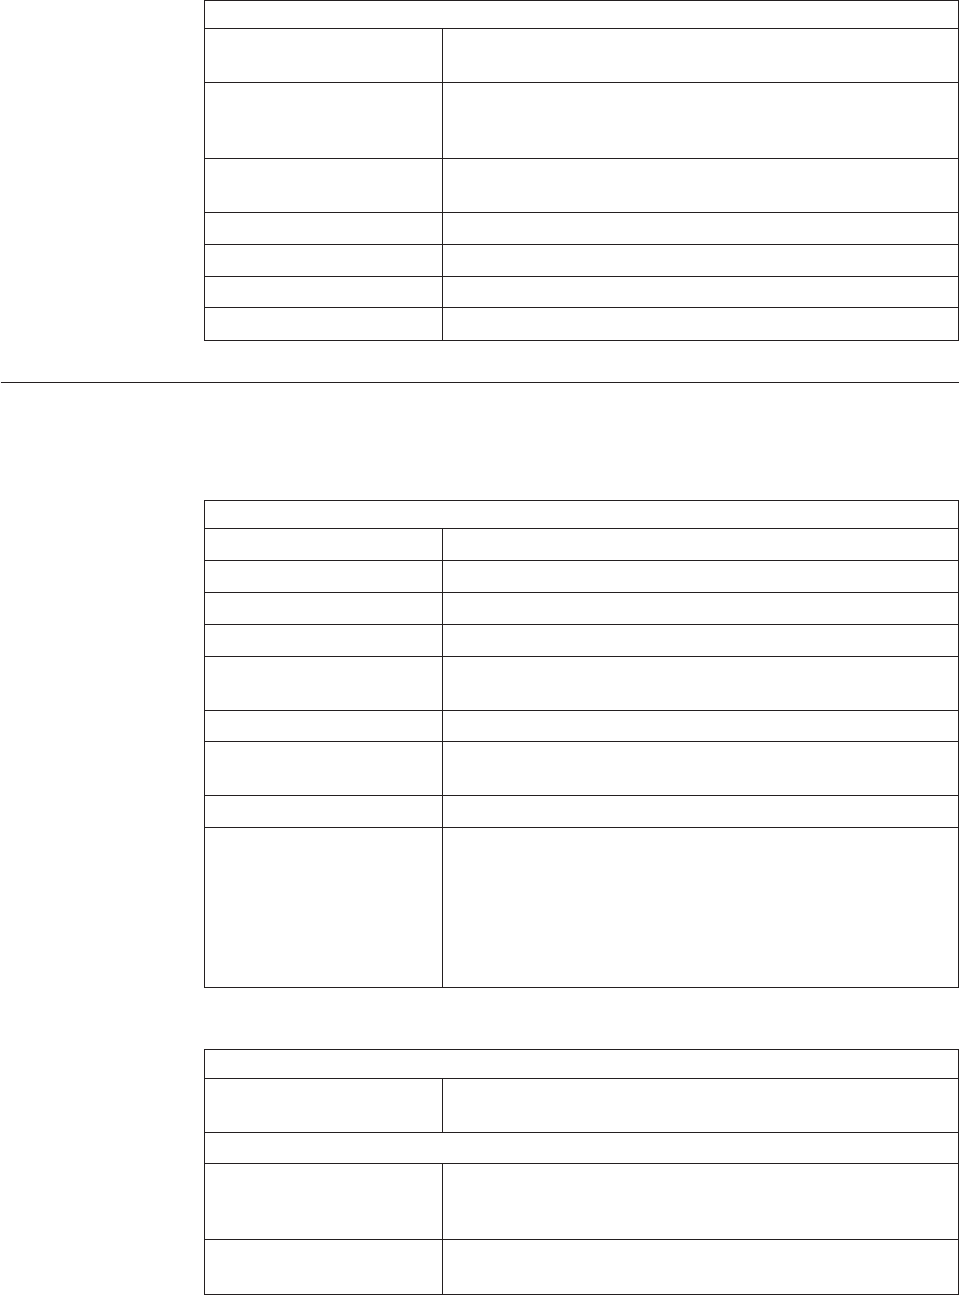
Table 179. Move Request Line Details, Move Request Line Details (continued)
Fields
Inventory Status Refers to an inventory sub classification based on the results
of the inventory control processes within the warehouse.
Segment Type A segment type indicates an inventory category. Typical
values are MTC – Made to Customer, and MTO - Made to
Order.
Segment A segment holds either the specific buyer or specific order
number.
Country/Region Of Origin The manufacturing country or region code.
Receipt # The receipt number associated with the request.
Serial # The serial number associated with the request.
Target Location The location where the task ends.
Move Request Line Activi ty Demand
You can view a list of activity demand for the move request line in this screen.
Table 180. Move Request Line Activity Demand, Move Request Line Header
Fields
Move Request # Move request number associated with the move request.
Target Location Location where the task ends.
Source Location Location where the task starts.
Enterprise Enterprise associated with the request.
Requested Quantity Quantity in the Item's unit of measure that is required to be
moved.
Is Cancelled Indicates whether the request is cancelled.
Released Quantity Quantity in the Item's unit of measure for which tasks have
been created.
Released Indicates whether a line is fully tasked.
Has Exceptions Indicates if exceptions are found while releasing a move
request.
You can view exceptions associated with a move request in
the Alert Detail window. For more information, see the
Sterling Selling and Fulfillment Foundation: Application Platform
User Guide.
Table 181. Move Request Line Activity Demand, Activity Demand List
Actions
Delete This action allows you to delete the selected activity
demands.
Fields
Location ID The item location in the node. Click this link to go to the
Activity Demand screen where you can view the activity
demand details for the selected location.
Activity Code The activity to be performed on items belonging to the work
order.
182 Sterling Selling and Fulfillment Foundation: Warehouse Management System User Guide
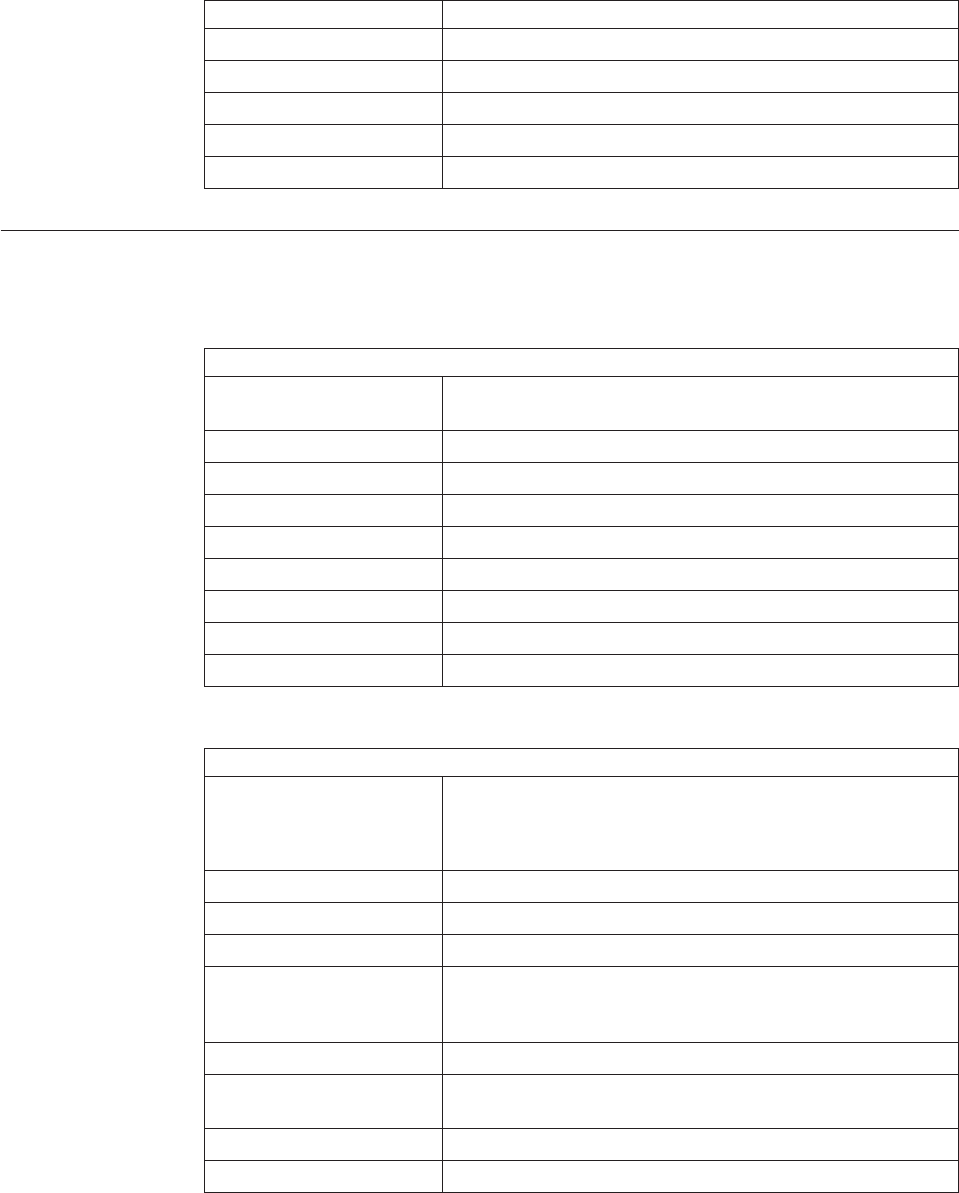
Table 181. Move Request Line Activity Demand, Activity Demand List (continued)
Pallet Id The pallet LPN that belong to the work order.
Case Id The case LPN that belong to the work order.
Item ID The items that belong to the work order.
Demand Quantity The current demand for the item.
Satisfied Quantity The extent to which the demand is satisfied.
Demand Satisfied Indicates whether the demand is satisfied or not.
Activity Demand for a Selected Location
You can view the activity demand details for the selected location in this screen.
Table 182. Activity Demand, Activity Demand
Fields
From Activity Group The requesting department. Valid values include RECEIPT,
SHIPPING, VAS, PACKING and QC.
From Activity Code The activity code associated with the activity group.
Node The node associated with the activity demand.
Enterprise The Enterprise associated with the activity demand.
Priority The priority of the demand.
Is Infinite Demand Indicates if the demand is infinite.
Demand Quantity The current demand for the item.
Satisfied Quantity The extent to which the demand is satisfied.
Demand Satisfied Indicates whether the demand is satisfied or not.
Table 183. Activity Demand, Activity Demand Details
Fields
Demand Location Id The location where demand exists.
Choose the Lookup icon to find the specific location you
want to use.
Pallet Id The pallet LPN associated with the container.
Case Id The case LPN associated with the container.
Item ID The items associated with the activity demand.
Product Class Indicates the item's inventory categorization. Orders are
placed for an item and product class. Typical examples are
IRREGULAR, FD (Factory Defects).
Unit Of Measure The item's unit of measure.
Inventory Status Refers to an inventory sub classification based on the results
of the inventory control processes within the warehouse.
Segment Type The segment type associated with the activity demand.
Segment The segment number associated with the activity demand.
Chapter 19. Move Request Console Screens 183
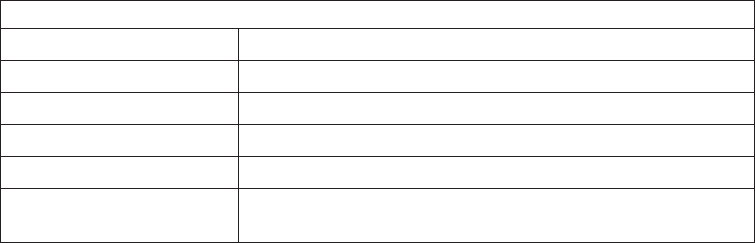
Table 184. Activity Demand, Activity Demand References
Fields
From Shipment No Indicates inventory associated with the shipment.
For Shipment No The shipment number associated with the shipment line.
For Shipment Line No The shipment line number for which the demand exists.
From Work Order # The work order number associated with the activity demand.
For Work Order # The work order number for which the demand was placed.
Move Request # The move request number associated with the activity
demand.
184 Sterling Selling and Fulfillment Foundation: Warehouse Management System User Guide
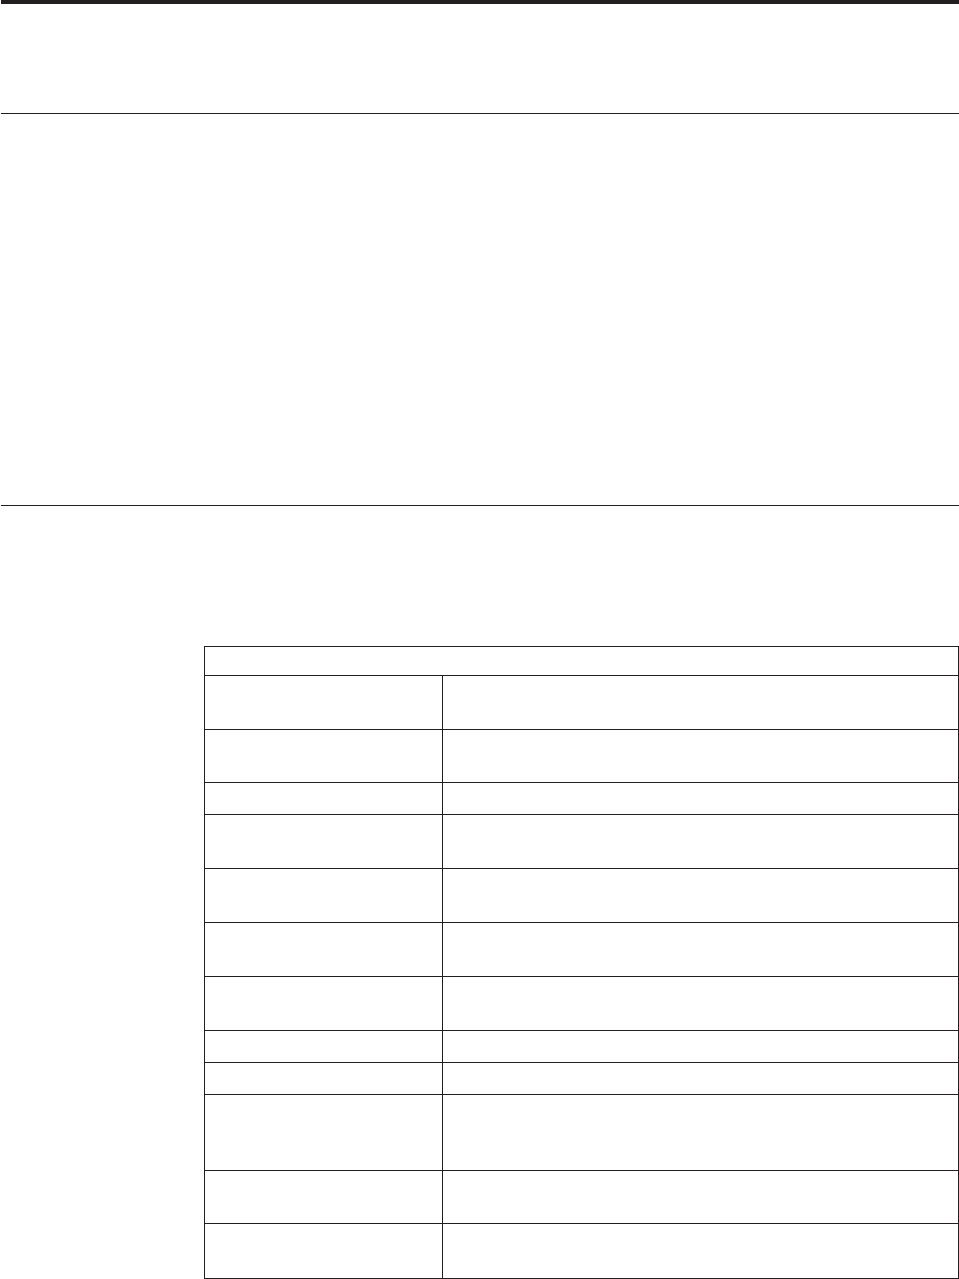
Chapter 20. Location Inventory Console Screens
About Location Inventory Console Screens
The operations in a warehouse are broken into different processes such as
receiving, picking, packing, VAS, returns. It is critical to capture and track
inventory at granular levels for these processes. Visibility is required at the
granular level to provide comprehensive management of inventory in a warehouse.
Location Inventory Console provides:
vComprehensive visibility to inventory at an enterprise and node level.
vExtensive search capabilities using granular level information such as serial
number, lot number at a warehouse location.
vAbility to alter inventory at a location level.
vAbility to modify granular inventory attributes at a location.
vVisibility to audits of inventory changes at a location level.
Location Inventory Search By Item
You can search for location inventory for a particular item with the help of this
screen.
Table 185. Location Inventory Search By Item
Fields
Node Select the node associated with the Item you want to search
for.
Enterprise Select the enterprise associated with the item you want to
search for.
Across Enterprise Choose this option if you are searching across enterprise.
Item ID Enter the item ID of the item you want to search for, if
applicable.
Product Class Select the product class of the item you are searching for if
applicable.
Unit Of Measure Select the item’s unit of measure you are searching for, if
applicable.
Inventory Status Select the inventory status of the item you are searching for, if
applicable.
Zone Enter the zone you want to search for, if applicable.
Location Enter the location ID you want to search for, if applicable.
Locations Frozen Select the appropriate check boxes to search for locations that
are frozen for pick, and/or due to count variance, if
applicable.
Show Inventory From
Consumable Organizations
Select to include a consumable organization’s inventory as
part of the search.
Max Records Enter the maximum number of records to be listed as a result
of your search.
© Copyright IBM Corp. 1999, 2011 185
Note: When Inventory Organizations, say E1, V1 and V2 have items with the same
GTIN but different Item ID in different catalogs, then the following needs to be
selected as a search criteria to search for an inventory by item:
vConsuming inventory organization (E1) should be specified as an Enterprise
vItem Id
vUOM
vSelect Show Inventory From Consumable Organizations.
Note: Do not use spaces before or after any text you enter in the search fields, as
this may result in inconsistent or inaccurate results.
Note: If you want to view the entire inventory of an item across enterprises with
the same GTIN for different catalogs, select the Show Inventory From Consumable
Organizations box, enter the UOM, Enterprise associated with the item, and the
Item ID.
The Location Inventory screen displays as a result of location inventory search by
item.
Location Inventory Search By Container
You can search for location inventory for a particular container with the help of
this screen.
Table 186. Location Inventory Search By Container
Fields
Node Select the node associated with the Item you want to search
for.
Enterprise Select the enterprise associated with the item you want to
search for.
Across Enterprise Choose this option if you are searching across enterprise.
Pallet ID Enter the pallet LPN associated with the container.
Case ID Enter the case LPN associated with the container.
Note: Do not use spaces before or after any text you enter in the search fields, as
this may result in inconsistent or inaccurate results.
The Location Inventory screen displays as a result of location inventory search by
container.
Location Inventory Search By Additional Attributes
You can search for location inventory by additional attributes with the help of this
screen.
Table 187. Location Inventory Search By Additional Attributes
Fields
Field Description
Node Select the node associated with the Item you want to search
for.
186 Sterling Selling and Fulfillment Foundation: Warehouse Management System User Guide
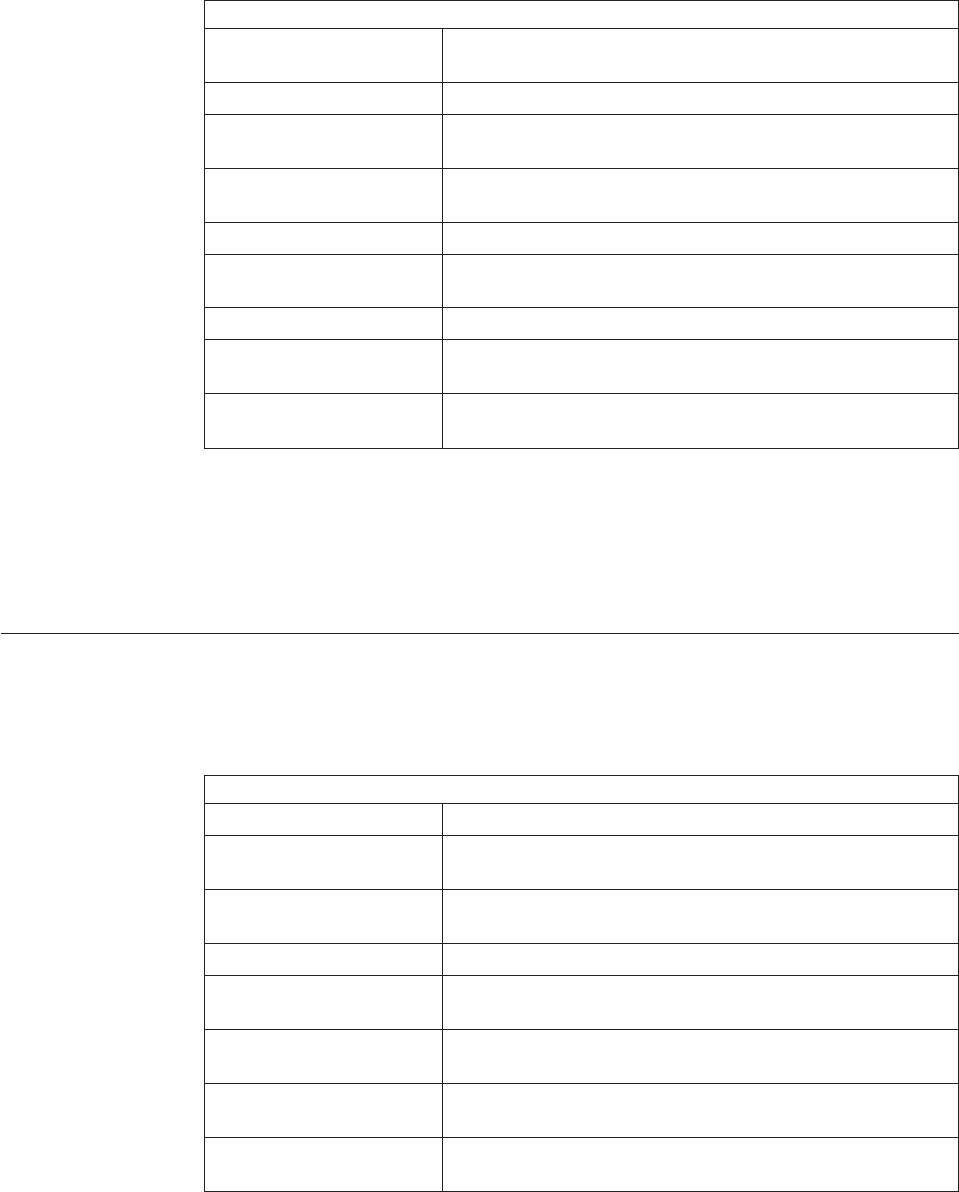
Table 187. Location Inventory Search By Additional Attributes (continued)
Fields
Enterprise Select the enterprise associated with the item you want to
search for.
Across Enterprise Choose this option if you are searching across enterprise.
Item ID Enter the item ID of the item you want to search for, if
applicable.
Serial # Enter the serial number associated with the item you are
searching for, if applicable.
Country/Region Of Origin Enter the manufacturing country or region code, if applicable.
Ship By Date Enter the date by which the item must be shipped, if
applicable.
Receipt # Enter the receipt number, if applicable.
Inventory Age (days) Enter the number of days that inventory has been in the
node, if applicable.
Max Records Enter the maximum number of records to be listed as a result
of your search.
Note: Do not use spaces before or after any text you enter in the search fields, as
this may result in inconsistent or inaccurate results.
The Location Inventory screen displays as a result of location inventory search by
additional attributes.
Location Inventory Search By Segment
You can search for location inventory that fall within a particular segment with the
help of this screen.
Table 188. Location Inventory Search By Segment
Fields
Field Description
Node Select the node associated with the Item you want to search
for.
Enterprise Select the enterprise associated with the item you want to
search for.
Across Enterprise Choose this option if you are searching across enterprise.
Item ID Enter the item ID of the item you want to search for, if
applicable.
Segment Type Select the segment type of the item you are searching for, if
applicable.
Segment # Enter the segment number of the item you are searching for,
if applicable.
Max Records Enter the maximum number of records to be listed as a result
of your search.
Note: Do not use spaces before or after any text you enter in the search fields, as
this may result in inconsistent or inaccurate results.
Chapter 20. Location Inventory Console Screens 187
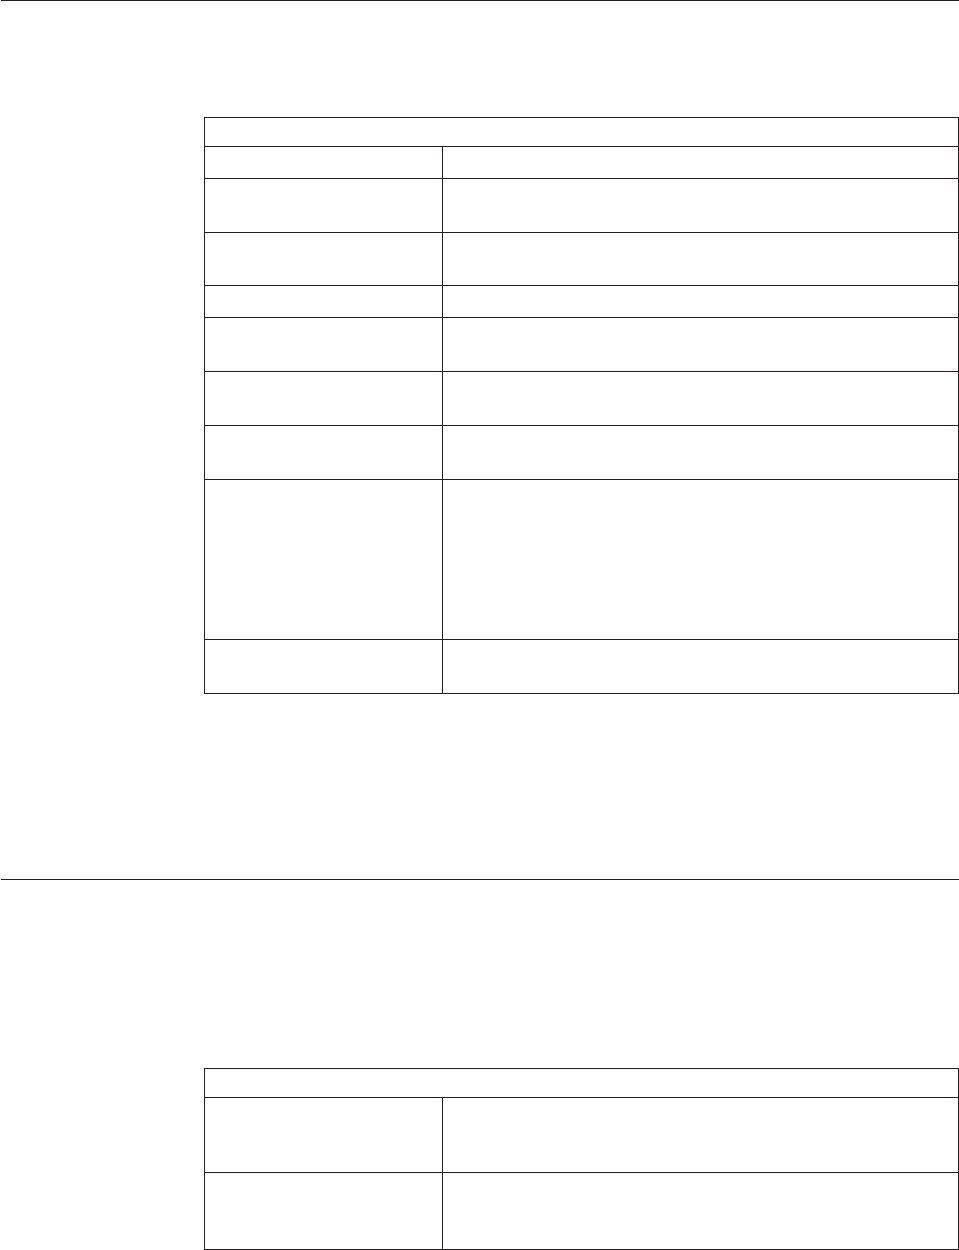
The Location Inventory screen displays as a result of location inventory search by
segment.
Location Inventory Search By Tag Attributes
You can search for location inventory by tag attributes with the help of this screen.
Table 189. Location Inventory Search By Tag Attributes
Fields
Field Description
Node Select the node associated with the Item you want to search
for.
Enterprise Select the enterprise associated with the item you want to
search for.
Across Enterprise Choose this option if you are searching across enterprise.
Item ID Enter the item ID of the item you want to search for, if
applicable.
Product Class Select the product class of the item you are searching for if
applicable.
Unit Of Measure Select the item’s unit of measure you are searching for, if
applicable.
Tag # Select the tag number associated with the tag-controlled item.
The tag number displays only when the node that is tracking
inventory is configured to capture the tag attributes in all
operations performed within the node. For more information
about capturing the tag attributes, see the Sterling Selling and
Fulfillment Foundation: Application Platform Configuration Guide.
Max Records Enter the maximum number of records to be listed as a result
of your search.
Note: Do not use spaces before or after any text you enter in the search fields, as
this may result in inconsistent or inaccurate results.
The Location Inventory screen displays as a result of location inventory search by
tag attributes.
Location Inventory List
The Location Inventory list window displays the results of a location inventory
search. You can perform actions at a single location or multiple locations by
selecting the check boxes of the locations you want to perform an action on and
choosing the applicable action from the action bar.
Table 190. Location Inventory, Items
Actions
View Details This action takes you to the Location Inventory Details screen
where you can view location inventory details for the selected
items.
Change Inventory
Attributes
This action takes you to the Change Location Inventory
Attributes (Criteria) screen where you can modify inventory
attributes for an item.
188 Sterling Selling and Fulfillment Foundation: Warehouse Management System User Guide
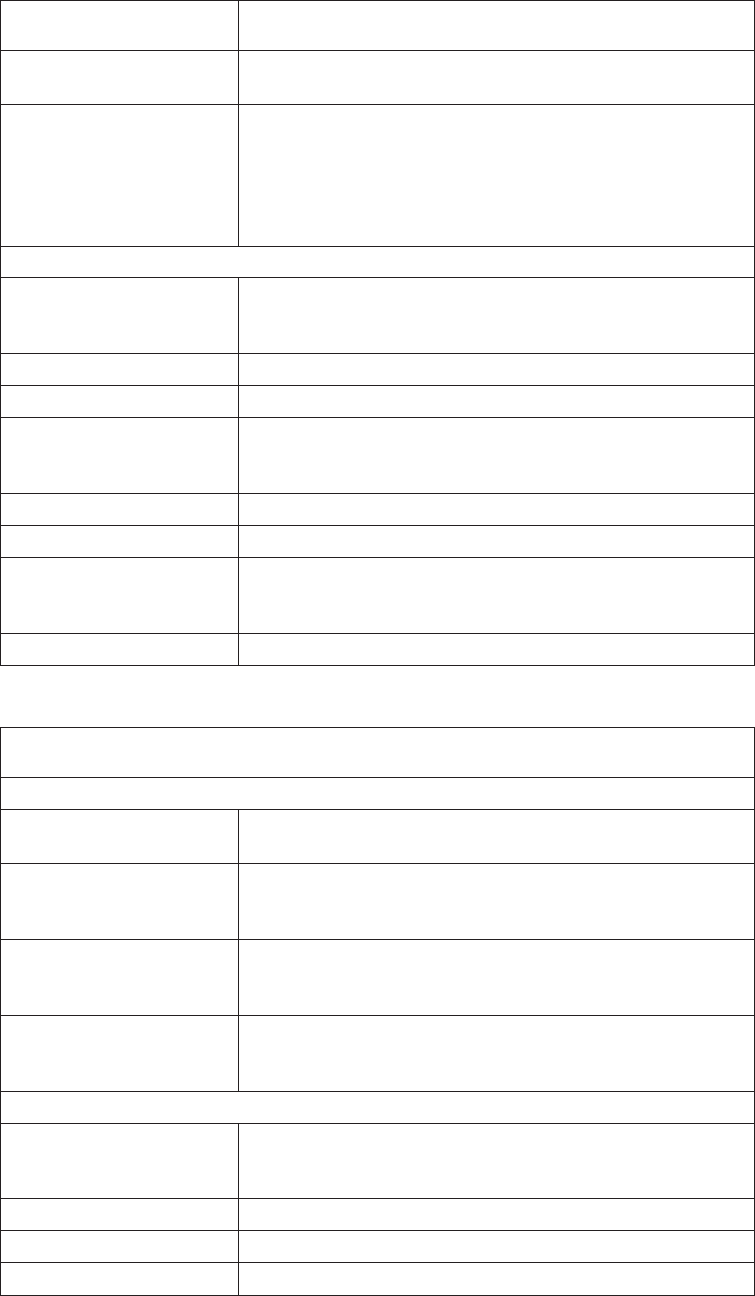
Table 190. Location Inventory, Items (continued)
Node Level Inventory This action takes you to the Node Level Inventory screen
where you can view item's inventory at a node level.
Create Count Request This action takes you to the Create Count Request screen
where you can create count requests for the selected items.
Create Move Request This action takes you to the Create Move Request screen
where you can create a move request for the selected
containers.
Note: If you have multiple inventories at a location, you
cannot create a move request. Instead, go to the Location
Inventory Details screen to create a move request.
Fields
Location The location associated with the item. Click this link to go to
the Location Details screen where you can view location
details.
Enterprise The enterprise associated with the item.
Item ID The item ID.
PC Product Class: Indicates the item's inventory categorization.
Orders are placed for an item and product class. Typical
examples are IRREGULAR, FD (Factory Defects).
UOM The item's unit of measure.
Description A brief description of the item.
Status Inventory Status: Refers to an inventory sub classification
based on the results of the inventory control processes within
the warehouse.
Quantity The item quantity that exists in the location.
Table 191. Location Inventory, Containers
A case or pallet with LPNs that are directly associated with the criteria displays. Given
an LPN as a criteria, the next level of LPNs associated with the criteria LPN displays.
Actions
View Details This action takes you to the Container Details screen where
you can view container details.
Create Count Request This action takes you to the Create Count Request screen
where you can create a count request for the selected
containers.
Create Move Requests This action takes you to the Create Move Request screen
where you can create a move request for the selected
containers.
Break LPN This action takes you to the Break License Plate Number
screen where you can break an LPN to remove contents from
the LPN.
Fields
Location The location associated with the container. Click this link to
go to the Location Details screen where you can view location
details.
Enterprise The enterprise associated with the container.
Pallet ID Pallet LPN associated with the container.
Case ID Case LPN associated with the container.
Chapter 20. Location Inventory Console Screens 189
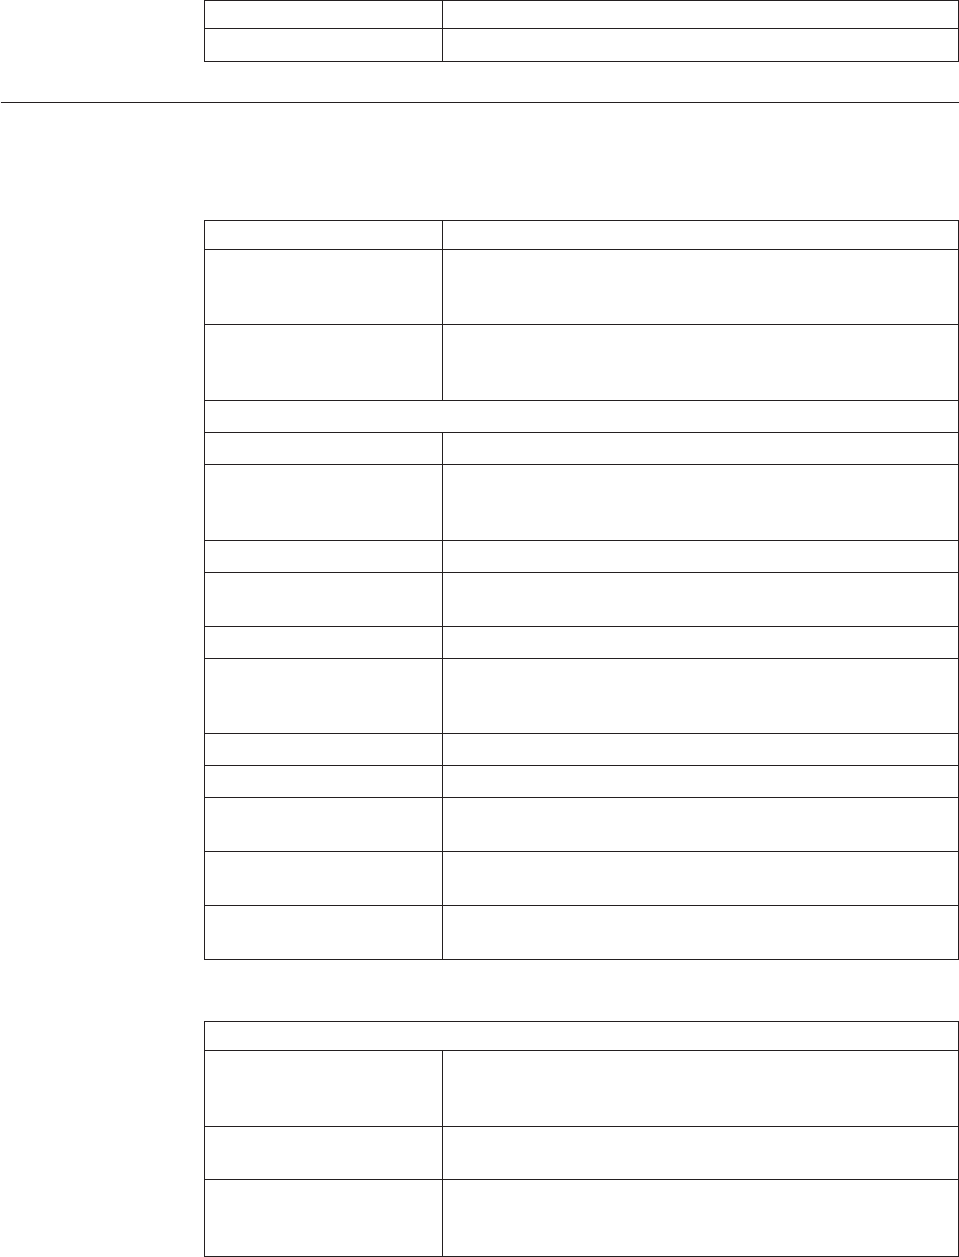
Table 191. Location Inventory, Containers (continued)
Receipt # The number used to identify all stock attached to a receipt.
Is Outbound Container Displays 'Y' if the container is an outbound container.
Location Inventory Details Screen
This screen provides visibility to item inventory details at a location.
Table 192. Location Inventory Details, Location Inventory
View Icons Description
Audit Audit - This icon provides visibility to location inventory
audits at a node. For more information, see the Location
Inventory Audit List.
Serial Serials - This icon takes you to the Location Inventory Serial
Details screen where you can view location inventory serial
details at a node.
Fields
Node The node associated with the item.
Location The location associated with the item. Click this link to go to
the Location Details screen where you can view location
details.
Enterprise The enterprise associated with the item.
Item ID The item ID. Click this link to go to the Item Details screen
where you can view item details.
Item Description Description of the item.
Product Class Indicates the item's inventory categorization. Orders are
placed for an item and product class. Typical examples are
IRREGULAR, FD (Factory Defects).
Unit Of Measure The item's unit of measure.
On Hand Quantity Number of units of the item this location.
Pend In Quantity Number of units of the item having open tasks to move into
the location.
Pend Out Quantity Number of units of this item having open tasks to move out
of the location.
Net Quantity Total number of units of the item available, calculated as
OnHand Qty + PendIn Qty - PendOut Qty.
Table 193. Location Inventory Details, Location Inventory Details
Actions
Adjust Location Inventory This action allows you to adjust inventory at a location. For
more information, see the Adjust Location Inventory Details
screen.
Transfer Inventory
Ownership
The actions takes you to the Transfer Inventory Ownership
screen.
Change Inventory
Attributes
This action takes you to the Change Location Inventory
Attributes (Criteria) screen where you can modify inventory
attributes for an item.
190 Sterling Selling and Fulfillment Foundation: Warehouse Management System User Guide
Table 193. Location Inventory Details, Location Inventory Details (continued)
Create Move Requests This action takes you to the Create Move Request screen
where you can create a move request for the selected
containers.
Fields
Status Inventory Status: Refers to an inventory sub classification
based on the results of the inventory control processes within
the warehouse.
Pallet ID Pallet LPN associated with the criteria.
Case ID Case LPN associated with the criteria.
Quantity Number of units of the item on-hand at the location
Pend Out Quantity Number of units of this item waiting to move out of the
location.
Pend In Quantity Number of units of this item waiting to move into the
location.
Segment Type Segment type of the item. A segment type indicates an
inventory category. Typical values are MTC - Made To
Customer or MTO - Made to Order.
Segment # Segment number of the item. A segment holds either the
specific buyer or specific order number that requires
dedication.
COO Country or Region of Origin: Manufacturing country or
region code
Ship By Date Date by which the item must be shipped so that it is usable.
FIFO # FIFO number is a date based inventory attribute that helps
understand the order in which stock arrived at the node. This
is used to send out items that arrived first than the ones that
arrived later.
Receipt # The number used to identify all inventory attached to a
receipt.
Tag # The tag number associated with the serial number.
The tag number displays only when the node that is tracking
inventory is configured to capture the tag attributes in all
operations performed within the node. For more information
about capturing the tag attributes, see the Sterling Selling and
Fulfillment Foundation: Application Platform Configuration Guide.
Go to the Location Inventory Tag Details screen where you
can location inventory tag details.
Location Inventory Serial Details
You can view location inventory serial details for the selected item with the help of
this screen.
Table 194. Item Serial Details, Item
Fields
Node The node associated with the item.
Location Location Identifier.
Enterprise The enterprise associated with the item.
Chapter 20. Location Inventory Console Screens 191
Table 194. Item Serial Details, Item (continued)
Fields
Item ID The item ID.
Product Class Product Class: Indicates the item's inventory categorization.
Orders are placed for an item and product class. Typical
examples are IRREGULAR, FD (Factory Defects).
Unit Of Measure The item's unit of measure
Item Description Description of the item
On Hand Quantity Number of units of the item on-hand at this location.
Pend In Quantity Number of units of the item having open tasks to move into
the location.
Pend Out Quantity Number of units of this item having open tasks to move out
of the location.
Net Quantity Total number of units of the item available, calculated as On
Hand Quantity + Pend In Quantity - Pend Out Quantity.
Table 195. Location Inventory Serial Details, Serial List
Actions
Create Move Requests This action takes you to the Create Move Request screen
where you can create a move request for the selected
containers.
Fields
Serial # Serial number of the item.
Secondary Serial # 1 Component serial numbers of the item.
Secondary Serial # 2 Component serial numbers of the item.
Secondary Serial # 3 Component serial numbers of the item.
Location Details
You can view location details at a node with the help of this screen.
Table 196. Location Details, Location Information
Actions
Dedications This action takes you to the Location SKU Dedications screen
where you can view location SKU dedications at node.
Fields
Location Location Identifier.
Location Type Type of location in the warehouse. Valid values are
INTRANSIT (Mobile locations), STAGING (drop-off, sorting),
VIRTUAL, REGULAR and DOCK.
Zone Zone to which the location belongs.
Velocity Code Velocity code associated to the location.
The velocity code associates the location to a SKUs
throughput. Typically, fast moving items are stored in the
lower level locations, or locations reachable by hand, in the
bulk zone.
192 Sterling Selling and Fulfillment Foundation: Warehouse Management System User Guide
Table 196. Location Details, Location Information (continued)
Freeze Move In Displays 'Y' if the location is frozen for putaway, else displays
'N'.
Freeze Move Out Displays ’Y’ if the location is frozen for pick, else displays 'N'.
Storage Code Storage code associated with the location.
Location storage code allows the warehouse to store items
that match the storage profile of a location. For example,
hazardous inflammable items need locations close to fire
extinguishers.
In Staging Location Displays the staging location for inventory being putaway to
the location.
Out Staging Location Displays the staging location for inventory being retrieved
from the location
Dedicated Location Displays 'Y', if location is dedicated to a SKU. Displays 'N', if
location is not dedicated to any SKU.
Table 197. Location Details, Location Size Information
Fields
Location Size Code Defines the capacity of a location.
Infinite Capacity Display a checked box, if the size code is marked as
INFINITE
Maximum Weight The maximum weight that a location can hold in the UOM.
The weight UOM is populated automatically from the node's
locale.
Length The length measurement of the location in the UOM.
The length UOM is populated automatically from the node’s
locale.
Width The width measurement of the location in the UOM.
The width UOM is populated automatically from the node’s
locale.
Height The height measure of the location in the UOM.
The height UOM is populated automatically from the node’s
locale.
Table 198. Location Details, Location Transactional Attributes
Fields
Freeze On Variance Indicates if the location is frozen due to count variance.
Fill Code Fill code indicates if the location is Empty, Partially Full or
Full. These values are automatically updated during
inventory updates at the location.
Available Volume Available volume indicates unoccupied physical volume of
the location.
Available Weight Available weight indicates the additional physical weight the
location can hold.
Chapter 20. Location Inventory Console Screens 193
Location SKU Dedications
You can view location SKU Dedications at a node with the help of this screen.
Table 199. Location SKU Dedications, Locations
Fields
Location Location Identifier.
Location Type Type of location in the warehouse. Valid values are
INTRANSIT (Mobile locations), STAGING (drop-off, sorting),
VIRTUAL, REGULAR and DOCK.
Zone Zone to which the location belongs
Velocity Code Velocity code associated to the location.
The velocity code associates the location to a SKUs
throughput. Typically, fast moving items are stored in the
lower level locations, or locations reachable by hand, in the
bulk zone.
Freeze Move In Displays 'Y' if the location is frozen for putaway, else displays
'N'.
Freeze Move Out Displays ’Y’ if the location is frozen for pick, else displays 'N'.
Storage Code Storage code associated with the location.
Location storage code allows the warehouse to store items
that match the storage profile of a location. For example,
hazardous inflammable items need locations close to fire
extinguishers.
In Staging Location Displays the staging location for inventory being putaway to
the location.
Out Staging Location Displays the staging location for inventory being retrieved
from the location
Dedicated Location If 'Y' if the location is dedicated to a SKU. If 'N', if the
location is not dedicated to a SKU.
Table 200. Location SKU Dedications, SKU Dedications
Fields
Enterprise The enterprise associated with the item.
Item ID The item ID.
PC Indicates the item's inventory categorization. Orders are
placed for an item and product class. Typical examples are
IRREGULAR, FD (Factory Defects).
UOM The item’s unit of measure
Status The current inventory status.
Refers to an inventory sub classification based on the results
of the inventory control processes within the warehouse.
Segment Type Segment type of the item. A segment type indicates an
inventory category. Typical values are MTC - Made To
Customer or MTO - Made to Order.
Segment # Segment number of the item. A segment holds either the
specific buyer or specific order number that requires
dedication.
194 Sterling Selling and Fulfillment Foundation: Warehouse Management System User Guide
Table 200. Location SKU Dedications, SKU Dedications (continued)
Fields
Minimum Quantity The minimum SKU quantity that should be maintained in the
location.
The inventory monitor uses this value to trigger
replenishments from the bulk area.
Maximum Quantity Enter the maximum SKU quantity that the location can hold.
The inventory monitor uses this value to estimate the
quantity to be replenished from the bulk area. The quantity
replenished is the difference between the maximum quantity
and the minimum quantity, considering the demand at the
location and inventory UOM for the SKU.
Item Details
You can view location inventory item details at a node with the help of this screen.
Table 201. Item Details, Item Attributes
Fields
Item ID The item ID.
Organization The organization code associated with the Item.
Unit Of Measure The item's unit of measure.
Unit Cost The cost of one unit of the item.
GTIN The item's Global Trade Item Number.
Is Hazardous Item Displays 'Y' if the item is a hazardous item, or 'N' if it is not a
hazardous item.
Item Description A brief description of the item.
Table 202. Item Details, Inventory Tracking Attributes
Fields
Serial Tracked Displays 'Y' if the item is serial-tracked, else displays 'N'.
Tag Tracked Displays 'Y' if the item is tagged, else displays 'N'.
Time Sensitive Displays 'Y' if the item is time sensitive, else displays 'N'.
Table 203. Item Details, Standard Quantities
Fields
Alternate UOM The item's alternate unit of measure.
Units Units of the item for the alternate UOM.
Table 204. Item Details, Hazmat Information
Fields
Proper Shipping Name The proper shipping name or description of the hazardous
item.
Hazard Class The item's hazard class.
Chapter 20. Location Inventory Console Screens 195
Table 204. Item Details, Hazmat Information (continued)
Fields
UN Number The four-digit number that identifies the hazardous items
(such as explosives and poisonous materials) of commercial
importance. This is widely used in international commerce.
For example, the contents packaged in the shipping
containers.
Packing Group Indicates the degree of danger of a hazardous item within its
hazard class or division, and the type of packaging required
for the item. The valid values are: Packing Group I - high
danger, Packing Group II - medium danger, Packing Group
III - Low danger.
Label Code The label code of the hazardous item.
Special Provisions Special provisions to be provided for shipping the hazardous
item.
Symbol Indicates the hazmat symbol of the hazardous item.
Sort Order A unique number assigned to identify a hazardous item.
Exception The packing exception for shipping the hazardous item.
Packing Instructions
NonBulk Indicates additional requirements for non-bulk packaging.
Bulk Indicates additional requirements for bulk packaging.
Passenger Air Indicates the maximum quantity that can be shipped when
shipping on a passenger aircraft or rail.
Cargo Air Indicates the maximum quantity that can be shipped when
shipping on a cargo aircraft.
Vessel The vessel stowage location code used to identify where the
cargo is stowed on a vessel.
Vessel SP The other vessel stowage plans.
Location Inventory Tag Details
You can view location inventory tag details at a node with the help of this screen.
Table 205. Location Inventory Tag Details, Location Inventory
Fields
Node The node associated with the item.
Location Location Identifier.
Enterprise The enterprise associated with the item.
Item ID The item ID.
Item Description Description of the item.
Product Class Indicates the item's inventory categorization. Orders are
placed for an item and product class. Typical examples are
IRREGULAR, FD (Factory Defects).
Unit of Measure The item’s unit of measure.
Inventory Status inventory Status: Refers to an inventory sub classification
based on the results of the inventory control processes within
the warehouse.
196 Sterling Selling and Fulfillment Foundation: Warehouse Management System User Guide
Table 205. Location Inventory Tag Details, Location Inventory (continued)
Fields
Tag Details The tag details are restricted to a container level or at an item
level at the location based on the appropriate action chosen.
Table 206. Location Inventory Tag Details, Tag Details
Fields
The item’s tag information displays only when the node that is tracking inventory is
configured to capture the tag attributes in all operations performed within the node. For
more information about capturing the tag attributes, see the Sterling Selling and Fulfillment
Foundation: Application Platform Configuration Guide.
Revision # Revision number associated with the tag.
Lot # Lot number associated with the tag.
Batch # Batch number associated with the tag.
Table 207. Location Inventory Tag Details, Tag Attributes
Fields
Manufacturing Date Lot manufacturing date
Lot Attribute 1 Other lot attribute
Lot Attribute 2 Other lot attribute
Lot Attribute 3 Other lot attribute
Lot Key Reference Stores reference information for the lot number.
Lot Expiration Date Expiry date of Lot associated with the tag.
Change Location Inventory Attributes Criteria
You can enter the criteria to modify location inventory attributes for an item with
the help of this screen.
Table 208. Change Location Inventory Attributes, Location Inventory
Fields
Node The node associated with the item.
Enterprise The enterprise associated with the item.
Location Location Identifier.
Pallet ID Pallet LPN associated with the criteria.
Case ID Case LPN associated with the criteria, if applicable
Item ID The item ID.
Unit of Measure The item’s unit of measure.
Click Proceed. The Change Location Inventory Attributes screen displays.
Chapter 20. Location Inventory Console Screens 197

Change Location Inventory Attributes
You can modify location inventory attributes for an item with the help of this
screen.
Table 209. Change Location Inventory Attributes, Location Inventory
Fields
Node The node associated with the item.
Location Location Identifier.
Pallet ID Pallet LPN associated with the criteria.
Case ID Case LPN associated with the criteria, if applicable
Enterprise The enterprise associated with the item.
Item ID The item ID.
Unit of Measure The item's unit of measure.
Item Description A brief description of the item.
Table 210. Change Location Inventory Attributes, Location Inventory Attributes
Fields
Product Class Select the product class of the item.
Inventory Status Select the inventory status of the item.
Country/Region Of Origin Select the manufacturing country or region code
Ship By Date Enter the date by which the item must be shipped.
Segment Type Segment type of the item. A segment type indicates an
inventory category. Typical values are MTC - Made To
Customer or MTO - Made to Order.
Segment # Segment number of the item. A segment holds either the
specific buyer or specific order number that requires
dedication.
Serial # The item's serial number displays if there is only one quantity
at the location.
Receipt # The number used to identify all stock attached to a receipt.
FIFO # Enter the FIFO number.
Revision # Revision Number
Lot # The lot number of the line item packaged in the container.
Quantity Number of units of the item on-hand at this location.
Table 211. Change Location Inventory Attributes, Audit Reason
Fields
Adjustment Reason Code Reason for the inventory transaction. Filled in typically when
user does an inventory adjustment.
Reason Text Description of the adjustment status.
Table 212. Change Location Inventory Attributes, References
Fields
Reference#1 Generic references.
Reference#2 Generic references.
198 Sterling Selling and Fulfillment Foundation: Warehouse Management System User Guide
Table 212. Change Location Inventory Attributes, References (continued)
Fields
Reference#3 Generic references.
Reference#4 Generic references.
Reference#5 Generic references.
Node Level Inventory
You can view node level inventory for an item with the help of this screen.
Table 213. Node Level Inventory, Item Information
Fields
Node The node associated with the item.
Enterprise The enterprise associated with the item.
Item ID The item ID.
Product Class Indicates the item's inventory categorization. Orders are
placed for an item and product class. Typical examples are
IRREGULAR, FD (Factory Defects).
Unit Of Measure The item's unit of measure.
Description A brief description of the item.
Table 214. Node Level Inventory, Supply
Fields
Supply Type Indicates the supply type associated with the inventory
status. The supply type indicates classification of the
inventory. This value is populated automatically by the
Sterling Warehouse Management System from the inventory
status configuration. Typical values include ONHAND,
INTRANSIT.
Quantity The total quantity for the supply type against an item at the
node.
On Hand Supply Number of units of the item on-hand at this location.
Table 215. Node Level Inventory, Demand
Fields
Demand Type Indicates the type of demand against the inventory. A
demand type is associated with events against an order
including order create, order release and the supply type for
available inventory. Typical values include ALLOCATED,
FORECAST.
Quantity The total quantity for the demand type against an item at the
node.
Promised Demand Displays 'Y', if the demand is a promised demand, else
displays 'N'. A demand is promised if placed against an
outbound order or work order
Allocated Demand Displays 'Y', if the demand is an allocated demand, else
displays 'N'. A demand is allocated upon release against an
outbound order or work order.
Chapter 20. Location Inventory Console Screens 199
Container Details for Location Inventory Console Screens
You can view container details at a location with the help of this screen.
Table 216. Container Details, Container
View Icons Description
Audit Audit - This icon provides visibility to location inventory
audits at a node. For more information, see the Location
Inventory Audit List.
Serial Serials - This icon takes you to the Container Serial Details
screen where you can view container's serial details at a node.
Fields
Pallet ID Pallet LPN associated with the criteria, if applicable.
Case ID Case LPN associated with the criteria, if applicable.
Enterprise The enterprise associated with the Container.
Node The node associate with the container.
Location The location associated with the container. Click this link to
go to the Location Details screen where you can view location
details.
Receipt # The number used to identify all stock attached to a receipt.
Parent Container ID The parent container ID of the case LPN displays, if
applicable.
Outer Most Case ID The outermost case LPN of the case LPN displays, if
applicable
Is Outbound Container Indicates whether the container is an outbound container.
Table 217. Container Details, Container Details
Actions
View Item Details This action takes you to the Item Details screen where you
can view the item details.
Adjust Container Inventory This action allows you to adjust inventory at a location. For
more information, see the Adjust Location Inventory Details
screen.
Change Inventory
Attributes
This action takes you to the Change Location Inventory
Attributes (Criteria) screen where you can modify inventory
attributes for an item.
Create Move Requests This action takes you to the Create Move Request screen
where you can create a move request for the selected
containers.
Fields
Case Id Case LPN associated with the criteria.
Item ID The item ID.
PC Product Class: Indicates the item's inventory categorization.
Orders are placed for an item and product class. Typical
examples are IRREGULAR, FD (Factory Defects).
UOM The item's unit of measure.
Description A brief description of the item.
200 Sterling Selling and Fulfillment Foundation: Warehouse Management System User Guide
Table 217. Container Details, Container Details (continued)
Status Inventory Status: Refers to an inventory sub classification
based on the results of the inventory control processes within
the warehouse.
Quantity Number of units of the item on-hand at this location.
Pend Out Quantity Number of units of this item having open tasks to move out
of the location.
Segment Type Segment type of the item. A segment type indicates an
inventory category. Typical values are MTC - Made To
Customer or MTO - Made to Order.
Segment # Segment number of the item. A segment holds either the
specific buyer or specific order number that requires
dedication.
COO Country or Region of Origin: Manufacturing country or
region code.
Ship By Date Date by which the item must be shipped so that it is usable.
FIFO # FIFO number is a date based inventory attribute that helps
understand the order in which stock arrived at the node. This
is used to send out items that arrived first than the ones that
arrived later.
Receipt # The number used to identify all stock attached to a receipt.
Tag # Tag associated with the serial number.
The tag number displays only when the node that is tracking
inventory is configured to capture the tag attributes in all
operations performed within the node. For more information
about capturing the tag attributes, see the Sterling Selling and
Fulfillment Foundation: Application Platform Configuration Guide.
Go to the Location Inventory Tag Details where you can view
the tag details.
Container Serial Details for Location Inventory Console Screens
You can view container's serial details at a node with the help of this screen.
Table 218. Container Serial Details, Container
Fields
Pallet ID The pallet LPN associated with the container.
Case ID The case LPN associated with the container.
Enterprise The enterprise associated with the container.
Node The node associated with the item.
Location The location associated with the item.
Receipt # The receipt number associated with the container items.
Table 219. Container Serial Details, Serial List
Actions
Create Move Requests This action takes you to the Create Move Request screen
where you can create a move request for the selected
containers.
Chapter 20. Location Inventory Console Screens 201
Table 219. Container Serial Details, Serial List (continued)
Fields
Serial # The item's serial number.
Item ID The items' item ID.
PC The product class of the item.
UOM The item's unit of measure.
Description A brief description of the item.
Create Count Request for Location Inventory Console Screens
You can create a count request for the selected items or containers in this screen.
Table 220. Create Count Request, Count Request Information
Fields
Priority Select the priority for the count request you are creating, if
applicable.
Valid values are Urgent, High, Normal, Low. This is used to
group and sequence tasks for users. A task with 'Urgent'
priority is assigned to the next available user.
The default value is 'Normal'.
Requesting User ID The current user id is automatically populated by the system.
Enter the requesting user ID associated with the count
request, if applicable.
Start No Earlier Than The current system date is automatically populated.
Enter a different start date and time for the count request, if
applicable.
Finish No Later Than Enter the end date and time for the count request, if
applicable.
Click OK.
Create Move Request for Location Inventory Console Screens
You can create a move request for the selected items or containers in this screen.
Table 221. Create Move Request, Move Request Header
Fields
Activity Group Select the activity group for the move request you are
creating.
For Activity Code Select the activity code associated with the activity group.
Move Request # Enter a move request number, if applicable.
The system generates a unique request number automatically,
if you do not enter any value.
202 Sterling Selling and Fulfillment Foundation: Warehouse Management System User Guide
Table 221. Create Move Request, Move Request Header (continued)
Fields
Priority Select the priority for the move request you are creating.
Valid values are Urgent, High, Normal, Low. This is used to
group and sequence tasks for users. A task with 'Urgent'
priority is assigned to the next available user. The default
value is 'Normal'.
Target Location Enter the target location for the move request you want to
create. A target location is typically entered when creating
move requests for retrieval.
This field becomes mandatory if you do not specify the
Source Location.
Requested By Enter the user that requested for move request creation.
The system automatically displays the current user.
Start No Earlier Than Enter the start date and time of the tasks for the move
requests, if applicable.
The system automatically displays the current date and time.
Finish No Later Than Enter the date and time by which the task is expected to be
completed, if applicable.
The start and finish times provides resource planning
capabilities by determining the shift that performs the tasks.
Release immediately Check the check box if you want to immediately release the
move request being created.
Click OK.
Break License Plate Number
When you break an LPN, all contents from the LPN are removed and placed
directly into the current location. On breaking an LPN, the LPN is deleted from
inventory. Use this screen to enter appropriate reasons for breaking an LPN.
Note: You cannot remove contents from LPNs for an outbound containers.
Table 222. Break LPN Reason, Break LPN Reason Code
Fields
Reason Code Enter the applicable reason for breaking LPN or search for
the reason code.
Click the Lookup icon to select the adjust reason code from
the list.
All reason codes not associated with the bin location are
displayed.
Reason Text Enter additional information as to why the LPN was broken.
Click OK. The system places all the contents of the LPN into the location and
removes the LPN from inventory. On removing the LPN from inventory, the LPN
cannot be built again.
Chapter 20. Location Inventory Console Screens 203
204 Sterling Selling and Fulfillment Foundation: Warehouse Management System User Guide
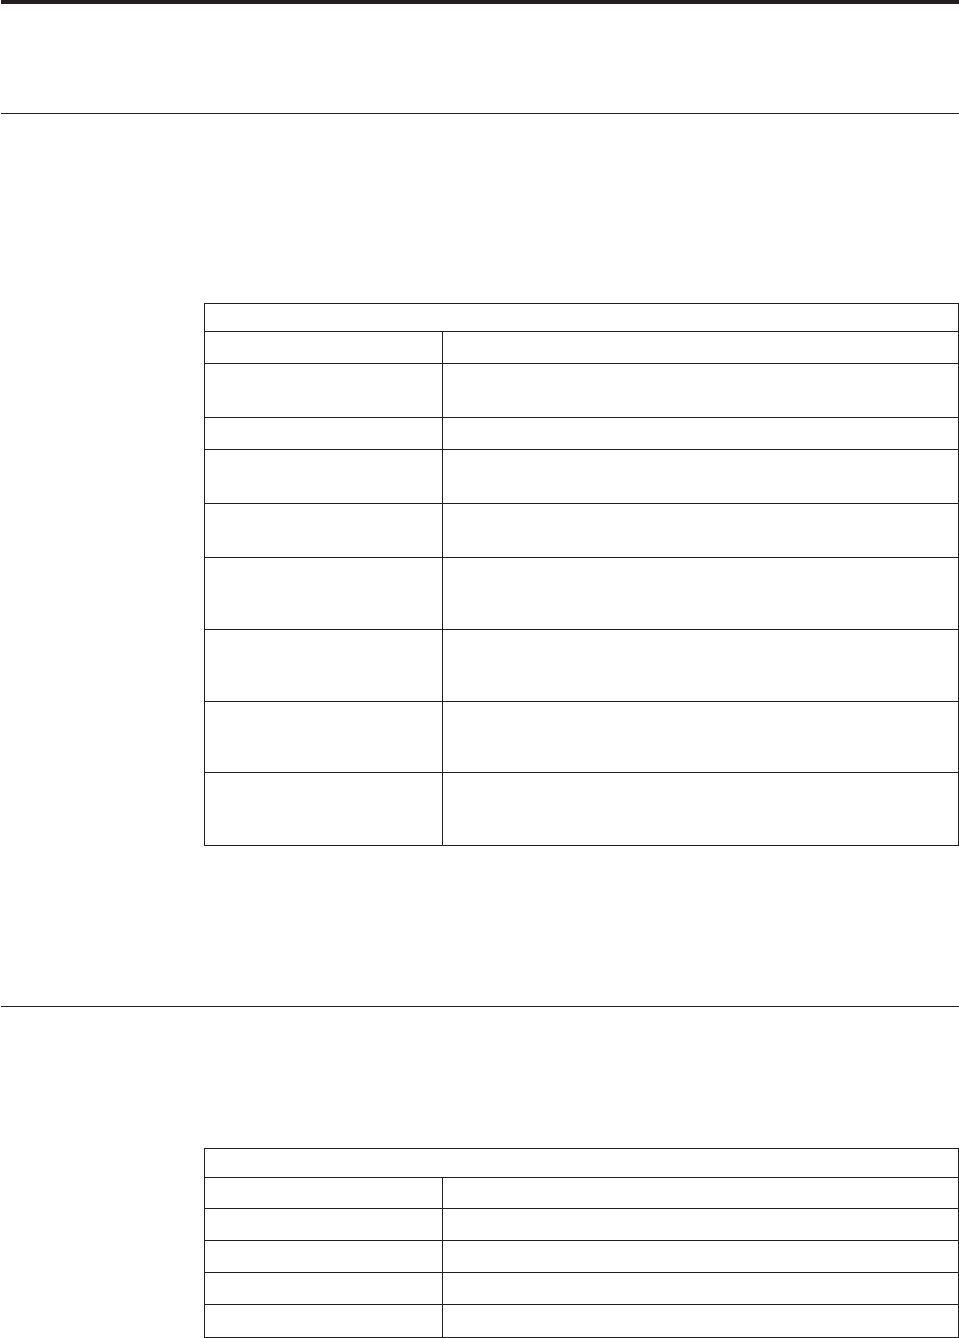
Chapter 21. Adjust Location Inventory Screens
Adjust Location Inventory Criteria
This chapter provides the field descriptions for the Adjust Location Inventory
screens.
You can enter the adjust location inventory criteria in this screen.
Table 223. Adjust Location Inventory, Adjust Location Inventory
Fields
Node Select the node associated with the Item, if applicable.
Enterprise Select the enterprise you are adjusting the inventory for, if
applicable.
Location Enter the location ID you want to adjust inventory for.
Pallet ID Enter the pallet LPN you are adjusting inventory for.
Note: You can also enter a non-existing pallet LPN.
Case ID Enter the case LPN you are adjusting inventory for.
Note: You can also enter a non-existing case LPN.
Item ID Enter the item ID for which you want to adjust the quantity.
This field is mandatory.
Product Class Select the product class for the item you are adjusting for.
This field is mandatory.
Unit Of Measure Select the unit of measure of the item you are adjusting for.
This field is mandatory.
Inventory Status Select the inventory status of the item you are adjusting for.
This field is mandatory.
Click Proceed. The Adjust Location Inventory Details screen displays where you
can view location inventory details and adjust the quantity appropriately.
Note: Location ID is mandatory if case ID or pallet ID is not entered.
Adjust Location Inventory Details
You can view the location's inventory details and adjust the quantity appropriately
in this screen.
Table 224. Adjust Location Inventory Details, Adjust Location Inventory
Fields
Node The node associated with the item.
Enterprise The enterprise associated with the item.
Location Location identifier.
Pallet ID Pallet LPN to be adjusted.
Case ID Case LPN to be adjusted.
© Copyright IBM Corp. 1999, 2011 205
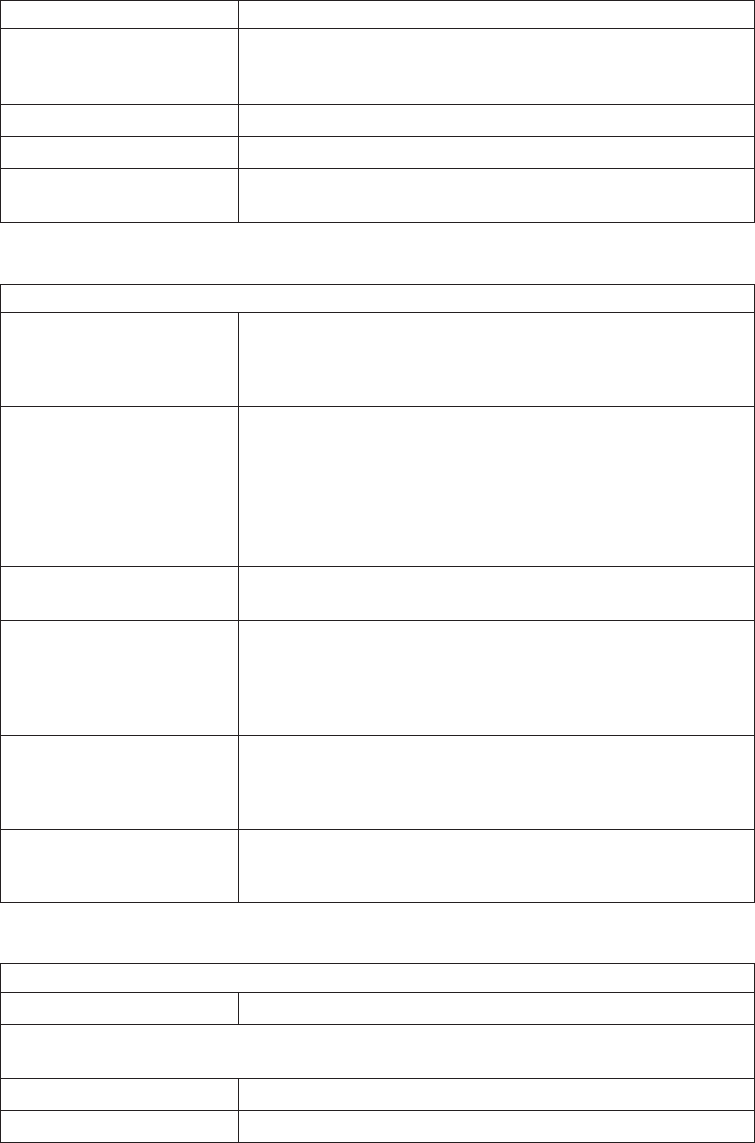
Table 224. Adjust Location Inventory Details, Adjust Location Inventory (continued)
Item ID The item ID.
Product Class Product Class: Indicates the item's inventory categorization.
Orders are placed for an item and product class. Typical
examples are IRREGULAR, FD (Factory Defects).
Unit Of Measure The item's unit of measure.
Item Description A brief description of the item.
Inventory Status Refers to an inventory sub classification based on the results
of the inventory control processes within the warehouse.
Table 225. Adjust Location Inventory Details, Additional Inventory Attributes
Fields
Receipt # Enter the receipt number for the inventory, if applicable.
The number used to identify all inventory attached to a
receipt.
FIFO # Enter the FIFO number to associate with the inventory, if
applicable.
FIFO number is a date based inventory attribute that helps
understand the order in which inventory arrived at the node.
This is used to send out inventory that arrived first than the
ones that arrived later.
Country/Region Of Origin Enter the manufacturing country or region code to associate
with the inventory.
Segment Type Enter the segment type to associate with the inventory.
A segment type indicates an inventory category. Typical
values are MTC - Made To Customer or MTO - Made to
Order.
Segment # Enter the segment number to associate with the inventory.
Typically, a segment holds either the specific buyer or specific
order number that requires dedication.
Ship By Date Enter date by which the item must be shipped, if applicable.
Used for products with shelf life or perishables.
Table 226. Adjust Location Inventory Details, Add Serials
Fields
Serial # Enter the serial number of the items.
Click the Toggle icon to go to the serial range panel, where you can enter the serial range
of the items.
From Serial # Enter the start serial number.
To Serial # Enter the end serial number.
Note: For a serial tracked or serialized item, if secondary serials are defined and
secondary information is not provided, then in such scenario the 'Entry Serial
Range' button is not provided in the screen.
206 Sterling Selling and Fulfillment Foundation: Warehouse Management System User Guide
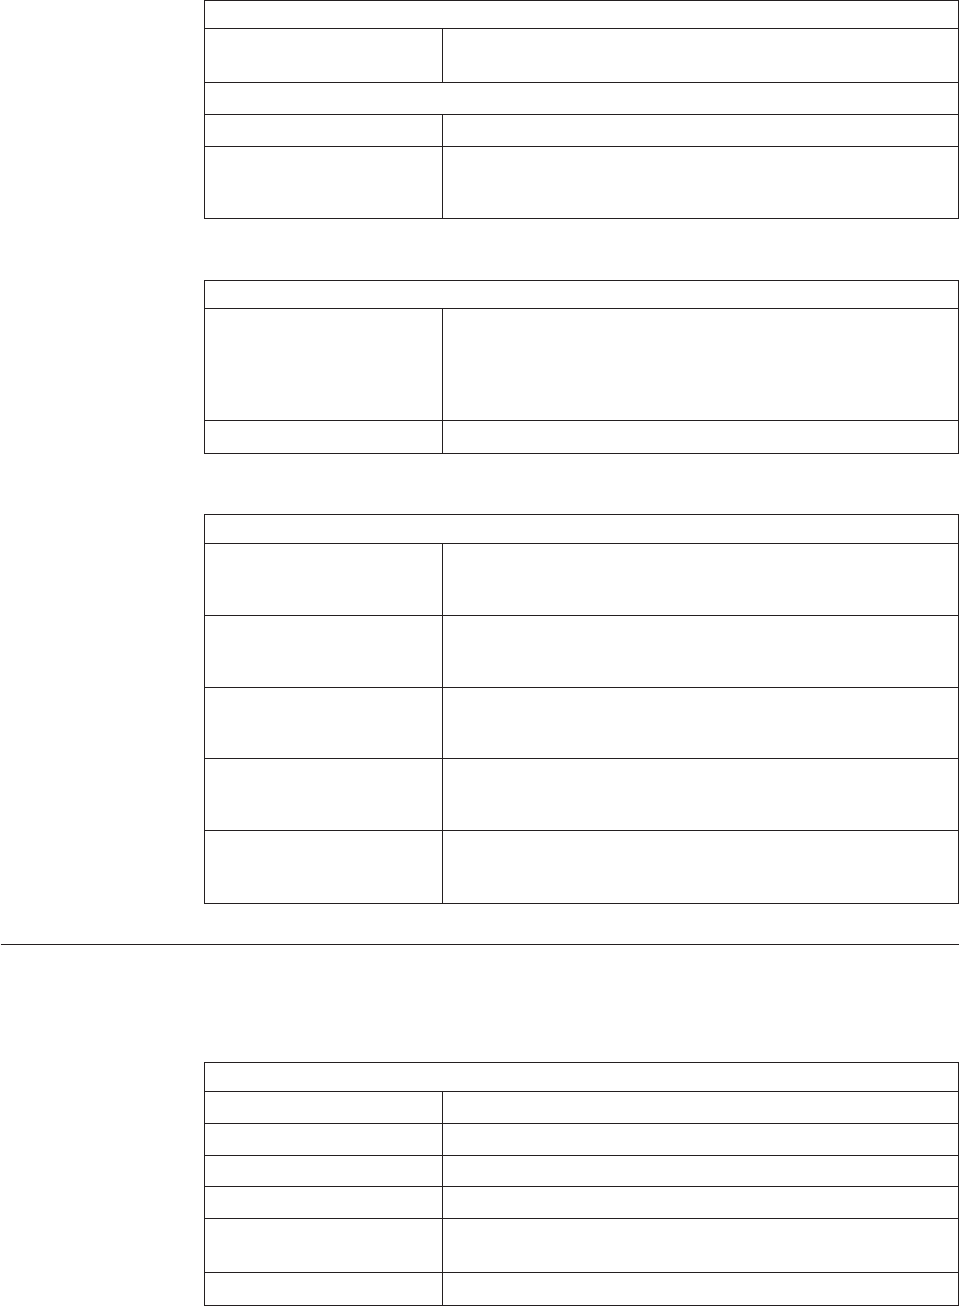
Table 227. Adjust Location Inventory Details, Quantity
Actions
Adjustment Cost This action takes you to the Adjustment Cost Details where
you can view an item's adjustment cost details.
Fields
Current Quantity Number of units of the item on-hand at the location.
Adjust Quantity Enter the quantity you want to adjust.
Use '-' sign before entering quantity to reduce inventory.
Table 228. Adjust Location Inventory Details, Modification Reason
Fields
Reason Code This field is mandatory.
Select the reason code associated with adjustment.
This is used for tracking and reporting purposes.
Reason Text Enter text to indicate the reason for the adjustment.
Table 229. Adjust Location Inventory Details, References
Fields
Reference #1 Enter any other references to be used.
Typical values are order #, count request #.
Reference #2 Enter any other references to be used.
Typical values are order #, count request #.
Reference #3 Enter any other references to be used.
Typical values are order #, count request #.
Reference #4 Enter any other references to be used.
Typical values are order #, count request #.
Reference #5 Enter any other references to be used.
Typical values are order #, count request #.
Adjustment Cost Details
You can view the adjustment cost details for an item in this screen.
Table 230. Adjustment Cost Details, Adjustment Cost
Fields
Item ID The item ID.
Item Description Description of the item.
Current Quantity Number of units of the item on-hand at the location.
Adjustment Quantity Number of adjusting units of the item at the location.
Quantity After Adjustment Number of units of the item on-hand after making the
adjustments.
Unit Cost The unit cost of an item.
Chapter 21. Adjust Location Inventory Screens 207

Table 230. Adjustment Cost Details, Adjustment Cost (continued)
Fields
Adjustment Cost The adjustment cost for an item.
208 Sterling Selling and Fulfillment Foundation: Warehouse Management System User Guide

Chapter 22. Accounting Bin Adjustment Screens
Accounting Bin Adjustment Details Criteria
You can enter the accounting bin adjustment details criteria in this screen.
Table 231. Accounting Bin Adjustment Details, Accounting Bin Adjustment Details
Fields
Node The node to which you need to empty the accounting bin.
Enterprise Select the enterprise for which you want to empty the
accounting bin from the drop-down list, if applicable.
Location Enter the identifier of the location to which you want to
empty the accounting bin.
Click Proceed. The Accounting Bin Adjustment Details screen displays.
Accounting Bin Adjustment Details
You can view the inventory details for a location and empty the accounting bin
appropriately.
Table 232. Accounting Bin Adjustment Details, Accounting Bin Adjustment Details
Fields
Node The node to which you need to empty the accounting bin.
Enterprise The enterprise for which the accounting bin needs to be
emptied.
Location The identifier of the location to which the accounting bin
needs to be emptied.
Location Inventory Details for Accounting Bin Adjustment
Screens
You can view the inventory details for a particular location.
Table 233. Accounting Bin Adjustment Details, Location Inventory Details
Fields
# of Inventory Items Displays number of inventory items in the accounting bin.
Total Value Displays the total cost of all items in the accounting bin.
Note: Depending on the adjustments made in the count location, the inventory in
the bin location may be positive or negative. The total number of units and the
total value of all items in the accounting bin depends on the positive or negative
inventory that is present in the bin location. For example, if the bin location has:
ITEM01 = +10 units
ITEM02 = -15 units
© Copyright IBM Corp. 1999, 2011 209
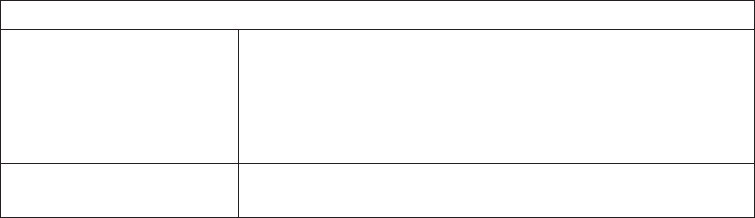
The total number of units present in the bin location is -5 units and not +25 units.
Accounting Bin Adjustment Reasons
You can select the reason for cleaning out the accounting bin.
Table 234. Accounting Bin Adjustment Details, Accounting Bin Adjustment Reasons
Fields
Reason Code Select the appropriate reason code for cleaning out the
accounting bin.
This field is used for tracking and reporting purposes.
This field is mandatory.
Reason Text Enter the reason for cleaning out the accounting bin, if
applicable.
Note: When you click the Save button, the system raises the
ZEROOUT_LOC_IS_INITIATED event on the ZEROOUT_LOCATION_INV
transaction, which is triggered externally. For more information about externally
triggered transactions, see the Sterling Selling and Fulfillment Foundation: Warehouse
Management System Configuration Guide.
210 Sterling Selling and Fulfillment Foundation: Warehouse Management System User Guide
Chapter 23. Transfer Inventory Ownership
Transfer Inventory Ownership Attributes
You can transfer the inventory ownership for an item at a particular location with
the help of the Transfer Inventory Ownership screen.
Table 235. Transfer Inventory Ownership Attributes, Inventory
Field Description
Node The node associated with the item.
Location Location identifier.
Pallet ID Pallet LPN associated with the criteria.
Case ID Case LPN associated with the criteria, if applicable
Enterprise The enterprise associated with the item.
Item ID The item ID.
Unit of Measure The item's unit of measure.
Item Description A brief description of the item.
Table 236. Transfer Inventory Ownership Attributes, Inventory Detail
Field Description
Product Class The product class of the item.
Inventory Status The inventory status of the item.
Country/Region Of Origin The manufacturing country or region code.
Ship By Date The date by which the item must be shipped.
Segment Type Segment type of the item. A segment type indicates an
inventory category. Typical values are MTC - Made To
Customer or MTO - Made to Order.
Segment # Segment number of the item. A segment holds either the
specific buyer number or specific order number that requires
dedication.
Serial # The item's serial number is displayed if there is only one
quantity at the location.
Receipt # The number used to identify all the stock attached to a
receipt.
FIFO # The FIFO number.
Table 237. Transfer Inventory Ownership Attributes, Transfer Detail
Field Description
Inventory Organization
Code
Organization code of the consumable inventory organization.
Quantity Number of units of the item on-hand at this location.
© Copyright IBM Corp. 1999, 2011 211
Table 238. Transfer Inventory Ownership Attributes, Audit Reason
Field Description
Reason Code Reason for the inventory transaction. Filled in typically when
a user carries out an inventory adjustment.
Reason Text Description of the adjustment status.
Table 239. Transfer Inventory Ownership Attributes, References
Field Description
Reference#1 Generic references.
Reference#2 Generic references.
Reference#3 Generic references.
Reference#4 Generic references.
Reference#5 Generic references.
212 Sterling Selling and Fulfillment Foundation: Warehouse Management System User Guide
Chapter 24. Print Stock Keeping Unit Labels Screens
Print Stock Keeping Unit Search By Item
Use this screen to search items for which you want to print the SKU labels.
Table 240. Print SKU Labels Search By Item
Fields
Enterprise Select the enterprise for which you want to search, if
applicable.
Choose Across Enterprises to search across all enterprises in
the system.
Item ID Enter the item identifier for which you want to search.
Default Product Class Select the item’s product class for which you want to search,
if applicable.
Unit Of Measure Select the item’s unit of measure for which you want to
search, if applicable.
Short Description Select the item’s short description for which you want to
search, if applicable.
Master Catalog ID Select the item’s identifier in the master catalog for which
you want to search, if applicable.
GTIN Select the item’s Global Trade Item Number for which you
want to search, if applicable.
Max Records Enter the maximum number of records to be listed as a result
of your search.
Note: Do not use spaces before or after any text you enter in the search fields, as
this may result in inconsistent or inaccurate results.
The Item List screen displays as a result of your print SKU label search by item.
Item List
The Item List window displays the results of an item search. You can perform an
action on a single item by selecting the checkbox corresponding to the item you
want to print the label and choosing the Print action from the action bar.
Table 241. Item List
Action
Print This action takes you to the Print SKU Labels screen where
you can print the item's documents or labels.
Fields
Item ID The item identifier.
Default PC The item's default product class.
UOM The item's unit of measure.
Short Description A brief description of the item.
Master Catalog ID The item's identifier in the catalog it belongs to.
© Copyright IBM Corp. 1999, 2011 213
Table 241. Item List (continued)
Action
Catalog Organization The organization that owns the catalog containing the item.
Print SKU Labels
You can print the SKU labels for hazardous items with the help of this screen.
Table 242. Print
Fields
Print Service Name Choose the applicable label you want to print.
Printer Name Choose the printer to print the label from.
No. of Copies Enter the total number of copies of the label you want to
print.
214 Sterling Selling and Fulfillment Foundation: Warehouse Management System User Guide
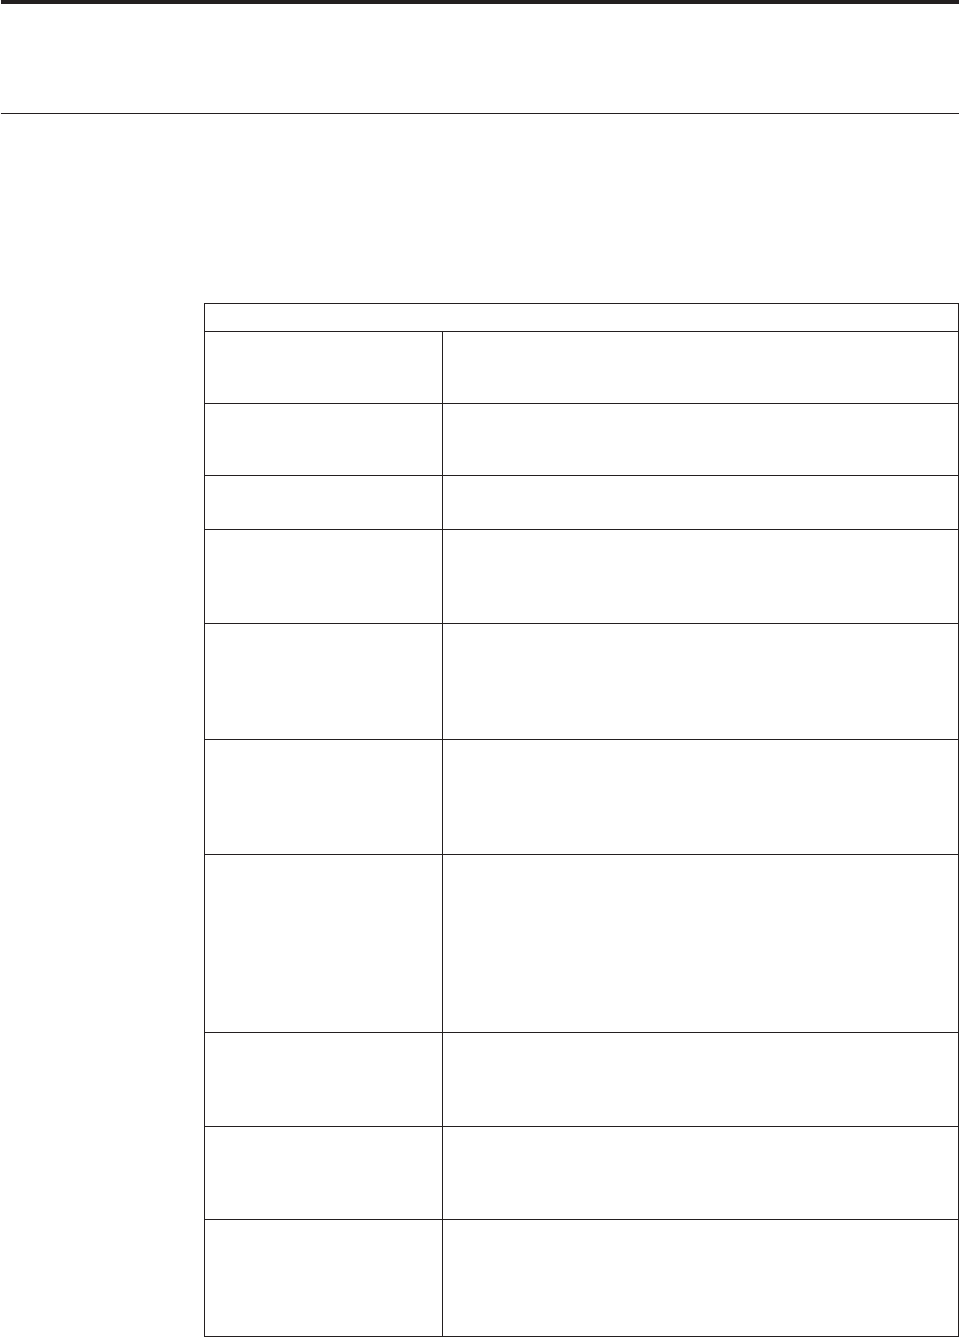
Chapter 25. Receipt Adjustment Screens
Receipt Adjustment
Use the Receipt Adjustment screen to adjust the receipt quantity for inventory that
you have already received.
Use this screen to enter the inventory adjustment criteria.
Table 243. Receipt Adjustment
Fields
Document Type Select the appropriate document type.
Valid values include Purchase Order and Transfer Order.
Node Select the node associated with the receipt.
The node automatically populates based on the user.
Enterprise Select the enterprise associated with the receipt you are
adjusting.
Receipt # Enter the receipt number to adjusting receipt against.
Choose the field and lookup option to find the specific
Receipt you want to use.
Pallet ID Enter the LPN corresponding to the pallet that you want to
adjust receipt of, if applicable.
This filters the receipt details in the Adjust Receipt window.
For more information, see the Adjust Receipt screen.
Case ID Enter the LPN corresponding to the case that you want to
adjust receipt of, if applicable.
This filters the receipt details in the Adjust Receipt window.
For more information, see the Adjust Receipt screen.
Item ID Enter the item associated with the receipt that you are
adjusting receipt of, if applicable.
This filters the receipt details in the Adjust Receipt window.
For more information, see the Adjust Receipt screen.
Choose the field and lookup option to find the specific Item
you want to use.
Product Class Select the product class associated with the receipt, if
applicable.
This filters the receipt details in the adjustment details panel.
Unit of Measure Select the UOM associated with the receipt, if applicable.
This filters the receipt details in the Adjust Receipt window.
For more information, see the Adjust Receipt screen.
Serial # Enter the serial number associated with the receipt, if
applicable.
This filters the receipt details in the Adjust Receipt window.
For more information, see the Adjust Receipt screen.
© Copyright IBM Corp. 1999, 2011 215
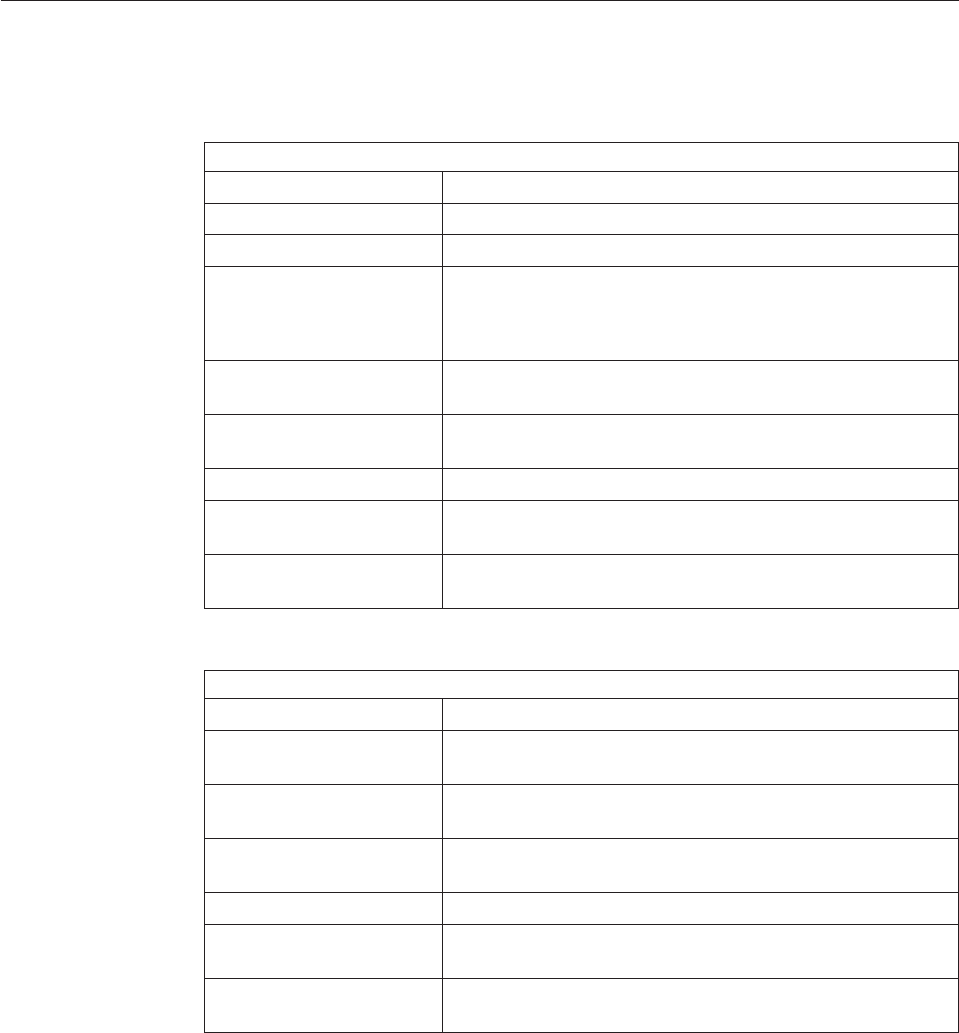
Click Proceed. The Adjust Receipt screen is displayed where you can validate the
criteria you entered against the receipt number for filtering the results.
Adjust Receipt
This screen enables you to validate the criteria you entered in the Receipt
Adjustment screen against the receipt number for filtering the results.
Table 244. Adjust Receipt, Receipt
Fields
Enterprise Code The enterprise you are adjusting for is displayed.
Node The node you are adjusting for is displayed.
Receipt # The receipt number you are adjusting for is displayed.
Location The dock location.
Choose the field and lookup option to find the specific
location you want to use.
Pallet ID The LPN corresponding to the pallet you are adjusting for is
displayed, if applicable.
Case ID The LPN corresponding to the case you are adjusting for is
displayed, if applicable.
Item ID The item you are adjusting for is displayed, if applicable.
Product Class The product class of the item you are adjusting for is
displayed, if applicable.
Unit of Measure The UOM of the item you are adjusting for is displayed, if
applicable.
Table 245. Adjust Receipt, Receipt Lines
Fields
Item ID The item you are adjusting for is displayed, if applicable.
Product Class The product class of the item you are adjusting for is
displayed, if applicable.
Unit of Measure The UOM of the item you are adjusting for is displayed, if
applicable.
Serial # The serial number of the item that you are adjusting for is
displayed, if applicable.
Inventory Status Select the inventory status that you are adjusting for.
Quantity The quantity received for the item, product class and UOM
for the receipt is displayed.
UnReceive Quantity Enter the quantity that you are removing from the receipt for
the item, product, class, UOM and inventory status.
Click Adjust. The Modification Reason screen is displayed where you enter
appropriate reasons for adjusting the received quantity.
216 Sterling Selling and Fulfillment Foundation: Warehouse Management System User Guide
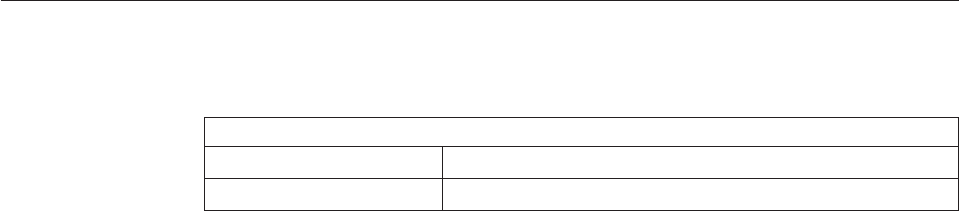
Modification Reason for Receipt Adjustment Screens
You can enter appropriate reasons for adjusting the received quantity.
Table 246. Modification Reason
Fields
Reason Code Select the applicable reason for the modification.
Reason Text Enter any additional comments for the modification.
Click OK.
Chapter 25. Receipt Adjustment Screens 217
218 Sterling Selling and Fulfillment Foundation: Warehouse Management System User Guide
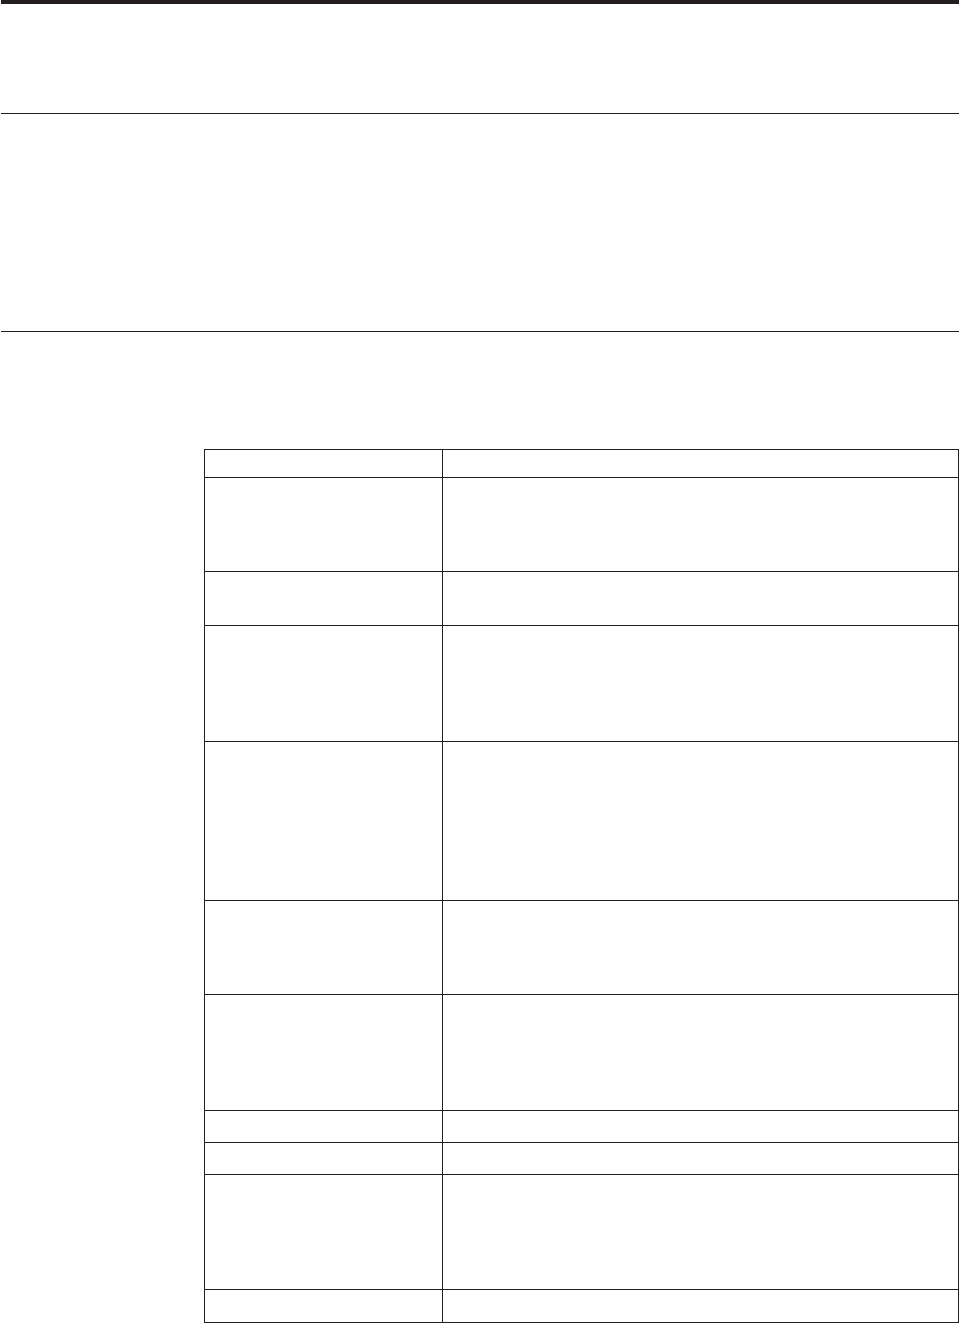
Chapter 26. Create Work Order Screens
About Create Work Order Screens
Work orders are generated in a warehouse to support VAS activities. These work
orders may be generated automatically from an order, based on min/max levels
configured for an item (using events) or created manually.
The Create Work Order console allows you to create work orders for the selected
service.
Create Work Order
You can create a work order for VAS related activities with the help of this screen.
Table 247. Create Work Order Screen, Primary Information
Fields Description
Node Select the node associated with the work order you are
creating.
The node is automatically populated based on the user.
Enterprise Select the enterprise associated with the work order you are
creating.
Work Order # Enter the work order number for the work order you are
creating.
The system automatically generates a unique number if a
value is not entered.
Service Item Group Select the appropriate service item group for the work order
you are creating.
Valid values are KITTING, DEKITTING, INVENTORY
CHANGES, INVENTORY COMPLIANCE.
Note: You can create work orders for the "KITTING" service
item group without specifying the components.
Purpose Select the purpose associated with the work order you are
creating.
Valid values are Order, Stock, Ship.
Priority Select the priority for the work order you are creating, if
applicable. Appropriate priority Is assigned to all tasks for the
work order.
Valid values are Urgent, High, Normal, Low.
Start No Earlier Than Enter the start date and time for the work order, if applicable.
Finish No Later Than Enter the end date and time for the work order, if applicable
Service Item ID Enter the service item ID associated with the item you want
to create.
If not entered the service associated with the parent item in
the catalog based on service item group chosen is populated.
Ignore Run Quantity Select this check box to ignore the run quantity.
© Copyright IBM Corp. 1999, 2011 219
Table 247. Create Work Order Screen, Primary Information (continued)
Fields Description
Release Immediately Select this check box if work order is released immediately on
completion of allocation process.
Table 248. Create Work Order Screen, Work Order Item Data
Fields
Item ID Enter the item created as a result of the work order. Also
referred to as 'Kit Item' or 'Parent Item'.
This is mandatory for service item groups of
KITTING,DE-KITTING, INVENTORY CHANGE,
INVENTORY COMPLIANCE.
Unit Of Measure Select the unit of measure of the item associated with the
work order you are creating.
Product Class Select the product class of the item associated with the work
order you are creating
Segment Type Select the segment type of the item associated with the work
order you are creating, if applicable.
Typical values include 'MTO' - Made to Order or 'MTC' -
Made To Customer.
Segment Enter the specific order number or customer number
associated with the work order you are creating.
This is applicable only if Segment Type is chosen.
Requested Quantity Enter the quantity of the item being created on the work
order.
After entering the relevant information in the above fields, the work order is
created upon clicking the Proceed button. The Work Order Details screen displays.
Additional Item Details
You can enter additional tag details pertaining to the item selected for the work
order in the Work Order Details screen.
Table 249. Additional Item Details Screen, Tag Details
Fields Description
Tag Identifiers Enter the unique tag identifiers you have specified for the
item. For example, Lot #.
vLot # - Enter the Lot number associated with this tag
identifier.
vBatch # - Enter the Batch number associated with this tag
identifier.
vRevision # - Enter the Revision number associated with this
tag identifier.
220 Sterling Selling and Fulfillment Foundation: Warehouse Management System User Guide
Table 249. Additional Item Details Screen, Tag Details (continued)
Fields Description
Tag Attributes Enter any descriptive identifiers specified for the item. For
example, Manufacture Date.
vLot Key Reference - Enter the Lot key reference associated
with this tag attribute.
vManufacturing Date - Enter the manufacturing date for this
tag attribute.
vLot Attribute 1 - Enter the lot attribute 1 with this tag
attribute.
Click OK to return to the Work Order Details screen.
Work Order Details Screen
This screen lets you enter some more information related to the work order
creation process such as Component Items, Activities and Additional Item Data.
Table 250. Work Order Details Screen, Primary Information
Fields
Node The node associated with the work order displays.
Enterprise The enterprise associated with the work order displays.
Work Order # The work order number for the work order displays.
Service Item Group The service item group associated with the work order is
automatically populated.
Status The of the work order displays.
Service Item ID The identifier of the service item displays.
Purpose The purpose associated with the work order displays.
Table 251. Work Order Details Screen, Work Order Item Data
Actions
Additional Item Details This action takes you to the Additional Item Details screen to
enter tag details for the item.
You can enter the tag details only when the node fulfilling
the work order is configured to capture the tag attributes in
all operations performed within the node. For more
information about capturing tag attributes, see the Sterling
Selling and Fulfillment Foundation: Application Platform
Configuration Guide.
Fields
Item ID The item created as a result of the work order. Also referred
to as 'Kit Item' or 'Parent Item'.
This is mandatory for service item groups of
KITTING,DE-KITTING, INVENTORY CHANGE,
INVENTORY COMPLIANCE.
Unit Of Measure The unit of measure of the item associated with the work
order you created displays.
Product Class The product class of the item associated with the work order
you are creating displays.
Chapter 26. Create Work Order Screens 221
Table 251. Work Order Details Screen, Work Order Item Data (continued)
Description The description of the item displays.
Segment Type The segment type of the item associated with the work order
you created displays.
Typical values include 'MTO' - Made to Order or 'MTC' -
Made To Customer.
Segment The specific order number or customer number associated
with the work order you created displays.
This is applicable only if Segment Type is chosen.
Requested Quantity The quantity of the item being created on the work order.
Table 252. Work Order Details Screen, Quantity
Fields
Requested The requested quantity of items displays.
Confirmed The confirmed quantity of items displays.
Allocated The allocated quantity of items displays.
Cancelled The cancelled quantity of items displays.
Released The released quantity of items displays.
The container details appear only for the Dekitting service item group.
Table 253. Work Order Details Screen, Container Details
Fields
Pallet ID Enter the pallet LPN associated with the container.
Case ID Enter the case LPN associated with the container.
Serial # Enter the serial number.
Table 254. Work Order Details Screen, Component Items
Actions
Delete This action allows you to delete the selected tag details.
Fields
Tag Details You can view the tag details only when the node fulfilling the
work order is configured to capture the tag attributes in all
operations performed within the node. For more information
about capturing tag attributes, see the Sterling Selling and
Fulfillment Foundation: Application Platform Configuration Guide.
Item ID The component item details display.
Product Class The product class associated with component item displays.
Unit Of Measure The unit of measure of the item associated with the work
order displays.
Description The component item's description displays.
Qty Per Kit The component item quantity required for the parent item
displays.
Segment Type The segment type for the component inventory displays, if
applicable.
222 Sterling Selling and Fulfillment Foundation: Warehouse Management System User Guide
Table 254. Work Order Details Screen, Component Items (continued)
Segment The order number or customer name for the component
inventory displays, if applicable.
Activities are populated from the service item associated with the work order or
the item. All activities to be associated with the item being created are specified for
the component quantity.
Table 255. Work Order Details Screen, Activities
Actions
Delete This action allows you to delete the selected tag details.
Fields
Instructions Enter any additional instructions for the activity.
Location Details The location where the activity is performed displays.
Click on the Plus icon, to view and hide location details.
vPreferred Location: Click on the Add icon to add new
location.
vRequested Quantity: Enter the quantity you want to move
into the location.
Inv Upd Activity Inventory updated for the activity.
Seq # Enter a sequence for the activity being performed.
Activity Code Select the activity code to associate with the location and
quantity.
Choose the field and Lookup icon to find the specific activity
code you want to use.
The following note is essential if you want to view the inventory compliance for an
item.
Note: The screen that displays when you select Inventory Compliance as the
service group code, depends on the Service Involves Segment Change field
configuration. For more information about configuring the Service Involves
Segment Change field, see the Sterling Selling and Fulfillment Foundation: Warehouse
Management System Configuration Guide.
Chapter 26. Create Work Order Screens 223
224 Sterling Selling and Fulfillment Foundation: Warehouse Management System User Guide
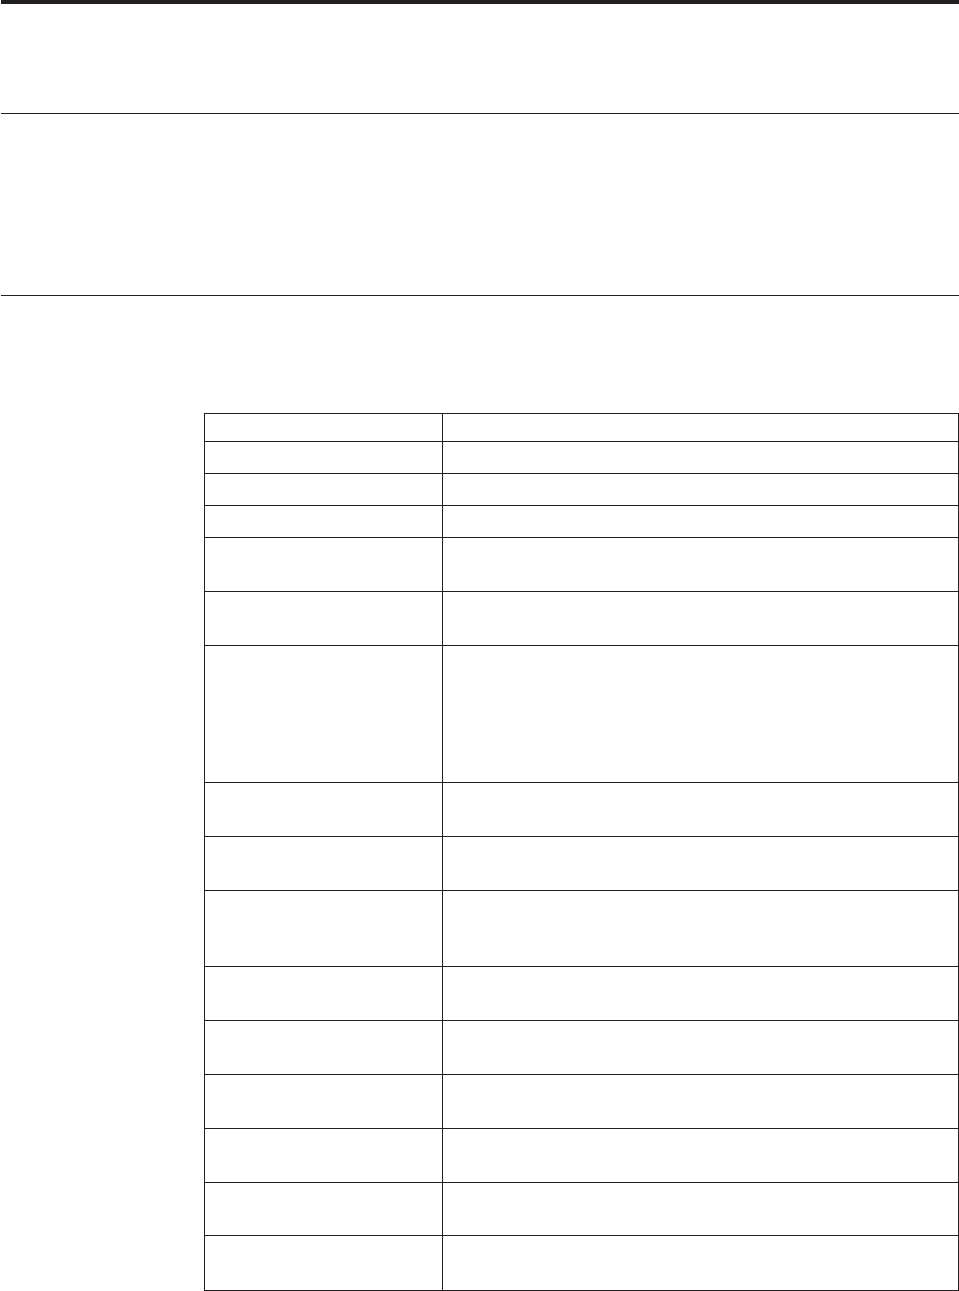
Chapter 27. Work Order Console Screens
About Work Order Console Screens
Work Order Console provides:
vExtensive search capabilities using granular level information such as work
order number, segment type, segment number.
vComprehensive visibility at an enterprise and node level.
Work Order Search By Item
You can perform work order search by a service item or a product item ID.
Table 256. Work Order Search By Item
Fields Description
Node Select the node for which you want to search.
Enterprise Select the enterprise for which you want to search.
Across Enterprise Select this option if you are searching across all enterprises.
Allocated Select the appropriate allocation level for the work order you
are searching.
Released Select the appropriate released level for the work order you
are searching for.
Service Item Group Select the appropriate service item group for the work order
you are searching.
Valid values are KITTING, DEKITTING,PROVIDED
SERVICE,INVENTORY CHANGE,INVENTORY
COMPLIANCE.
Service Item ID Select the appropriate service item ID for the work order for
which you want to search.
Work Order Status Range Select the status range associated with the work order you are
searching of, if applicable.
Held Work Orders With
Hold Type
Select the check box and select the hold type from the list
that you want to search for work orders with that hold type,
if applicable.
Work Order # Enter the work order number associated with the work order
you are searching for, if applicable.
Segment Type Select the segment type associated with the work order you
are searching for, if applicable.
Segment # Enter the segment number associated with the work order
you are searching for, if applicable.
Priority Select the priority associated with the work order you are
searching for, if applicable.
Item ID Enter the item ID associated with work order you want to
search for, if applicable.
Max Records Enter the maximum number of records you want listed as a
result of your search.
© Copyright IBM Corp. 1999, 2011 225
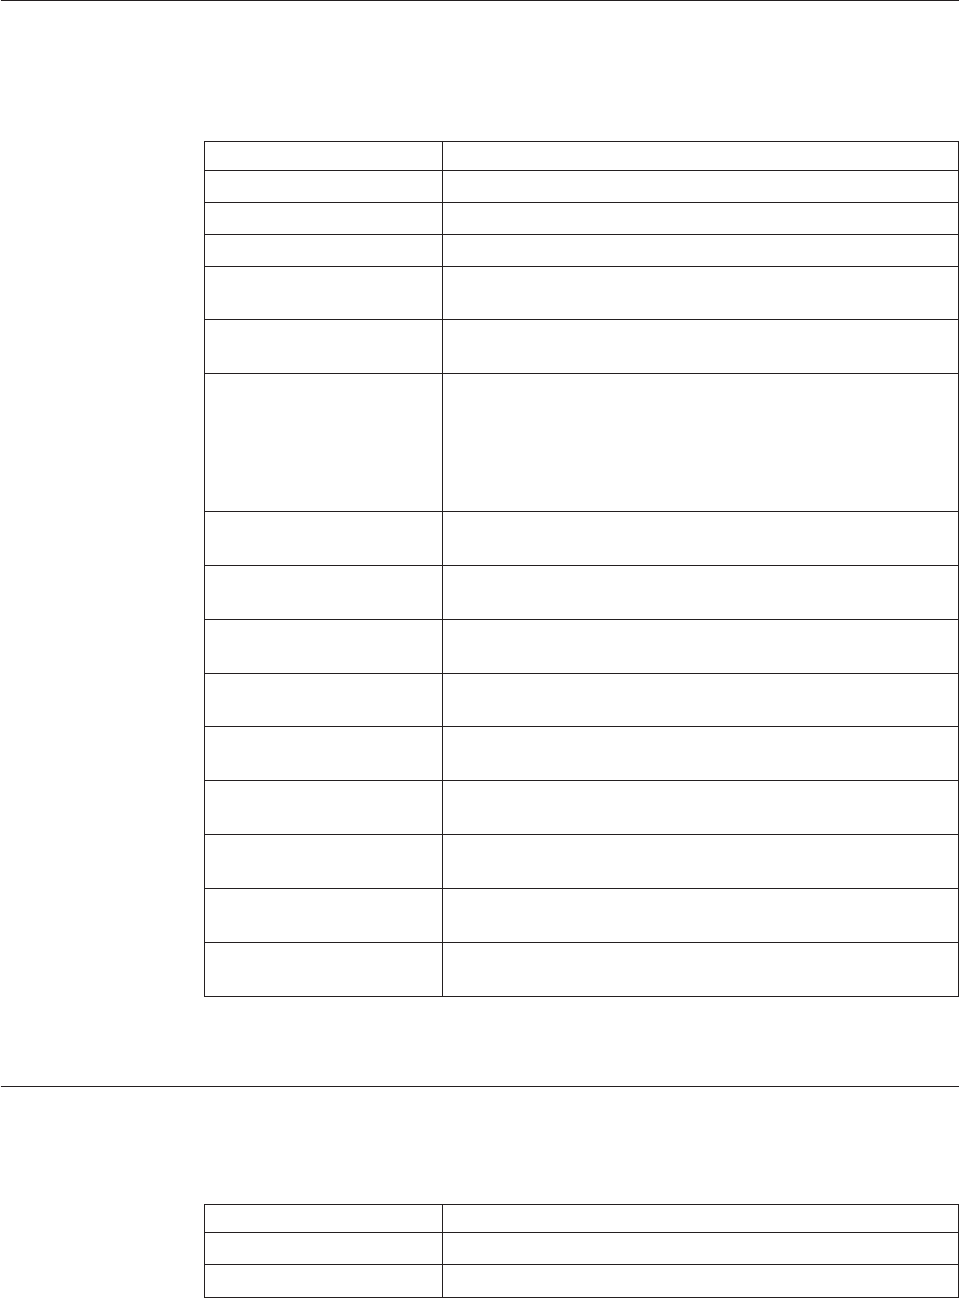
The Work Order List screen displays the search results.
Work Order Search By Container
You can perform work order search by the pallet or case IDs or the serial number
of the container.
Table 257. Work Order Search By Container
Fields Description
Node Select the node for which you want to search.
Enterprise Select the enterprise for which you want to search.
Across Enterprise Select this option if you are searching across all enterprises.
Allocated Select the appropriate allocation level for the work order you
are searching.
Released Select the appropriate released level for the work order you
are searching for.
Service Item Group Select the appropriate service item group for the work order
you are searching.
Valid values are KITTING, DEKITTING,PROVIDED
SERVICE,INVENTORY CHANGE,INVENTORY
COMPLIANCE.
Status Range Select the status range associated with the item you are
searching of, if applicable.
Work Order # Enter the work order number associated with the work order
you are searching for, if applicable.
Segment Type Select the segment type associated with the work order you
are searching for, if applicable.
Segment # Enter the segment number associated with the work order
you are searching for, if applicable.
Priority Select the priority associated with the work order you are
searching for, if applicable.
Pallet ID Enter the pallet LPN associated with the container, if
applicable.
Case ID Enter the case LPN associated with the container, if
applicable.
Serial # Enter the serial number associated with the container you are
searching for, if applicable
Max Records Enter the maximum number of records you want listed as a
result of your search.
The Work Order List screen displays the search results.
Work Order Search By Date
You can perform work order search by the start and finish dates of the work order.
Table 258. Work Order Search By Date
Fields Description
Node Select the node for which you want to search.
Enterprise Select the enterprise for which you want to search.
226 Sterling Selling and Fulfillment Foundation: Warehouse Management System User Guide
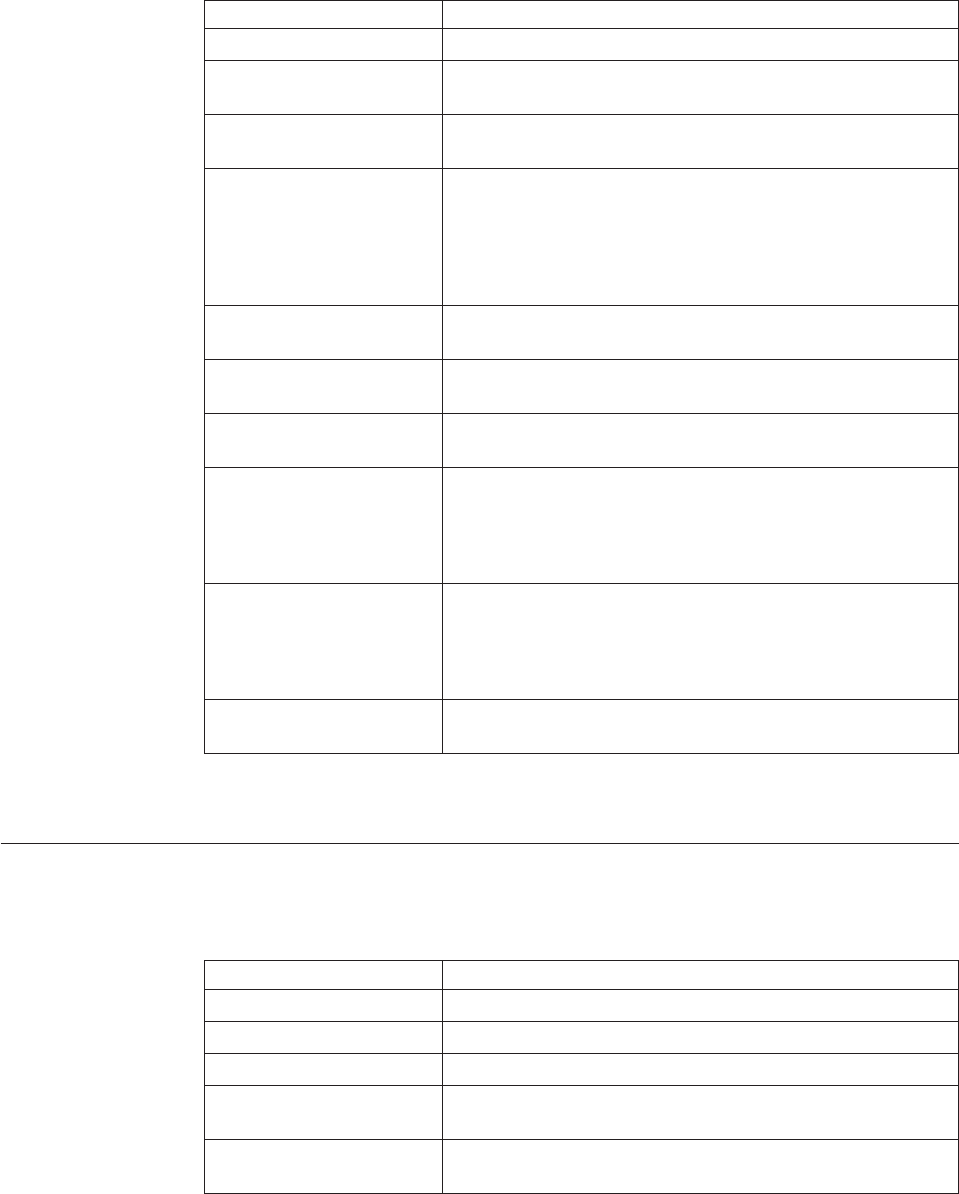
Table 258. Work Order Search By Date (continued)
Fields Description
Across Enterprise Select this option if you are searching across all enterprises.
Allocated Select the appropriate allocation level for the work order you
are searching.
Released Select the appropriate released level for the work order you
are searching for.
Service Item Group Select the appropriate service item group for the work order
you are searching.
Valid values are KITTING, DEKITTING,PROVIDED
SERVICE,INVENTORY CHANGE,INVENTORY
COMPLIANCE.
Service Item ID Select the appropriate service item ID for the work order for
which you want to search.
Status Range Select the status range associated with the work order you are
searching for, if applicable.
Priority Select the priority associated with the work order you are
searching for, if applicable.
Start No Earlier Than By default, the system displays Start No Earlier Than date
and time.
Enter the Start No Earlier Than date and time associated with
the work order for which you want to search.
Finish No Later Than By default, the system displays Finish No Later Than date
and time.
Enter the Finish No Later Than date and time associated with
the work order for which you want to search.
Max Records Enter the maximum number of records you want listed as a
result of your search.
The Work Order List screen displays the search results.
Work Order Search By Activity
You can perform work order search by an activity code.
Table 259. Work Order Search By Activity
Fields Description
Node Select the node for which you want to search.
Enterprise Select the enterprise for which you want to search.
Across Enterprise Select this option if you are searching across all enterprises.
Allocated Select the appropriate allocation level for the work order you
are searching.
Released Select the appropriate released level for the work order you
are searching for.
Chapter 27. Work Order Console Screens 227
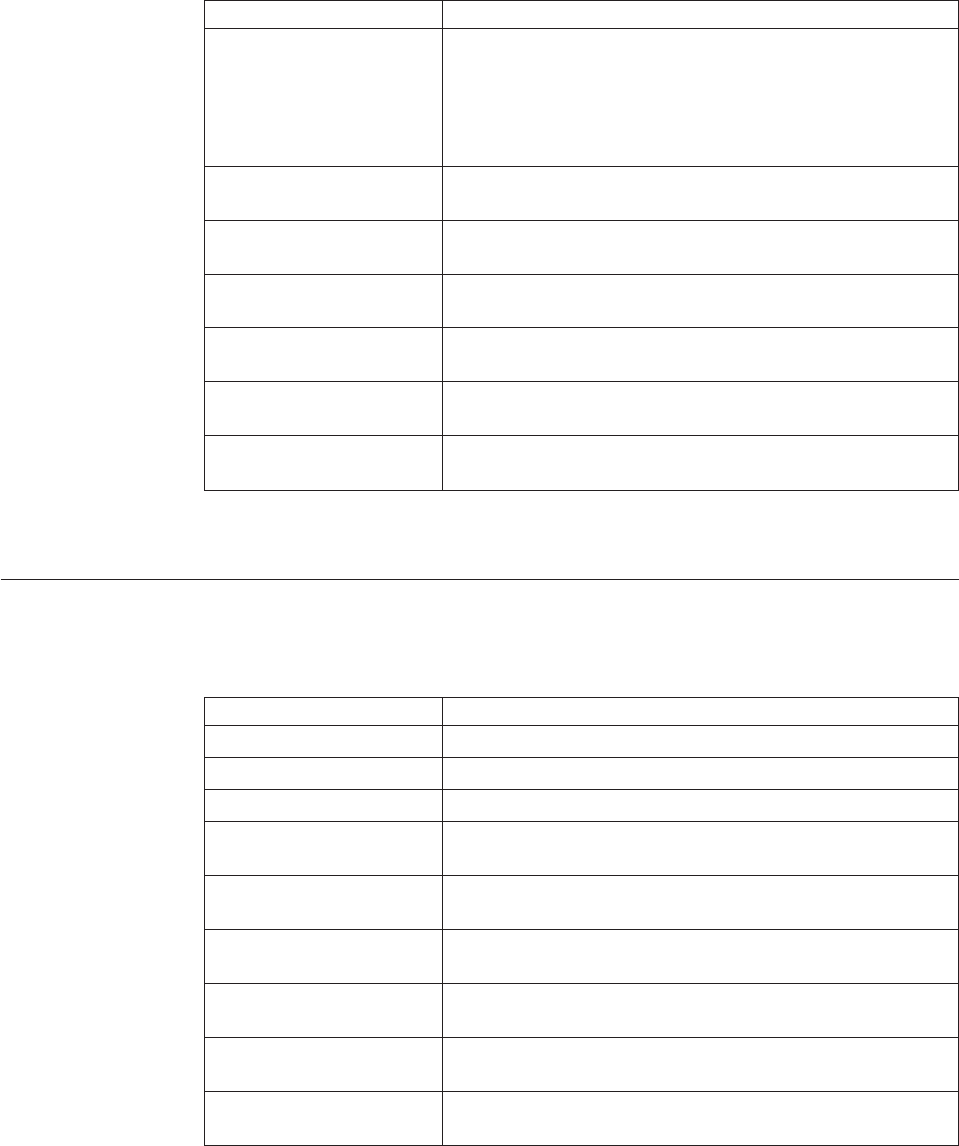
Table 259. Work Order Search By Activity (continued)
Fields Description
Service Item Group Select the appropriate service item group for the work order
you are searching.
Valid values are KITTING, DEKITTING,PROVIDED
SERVICE,INVENTORY CHANGE,INVENTORY
COMPLIANCE.
Item ID Enter the service item ID associated with the work order you
want to search for, if applicable.
Status Range Select the status range associated with the work order you are
searching for, if applicable.
Activity Code Enter the activity code associated with the work order for
which you want to search.
Activity location Enter the activity location associated with the work order for
which you want to search.
Is Complete Select this option if you are searching for only completed
work orders.
Max Records Enter the maximum number of records you want listed as a
result of your search.
The Work Order List screen displays the search results.
Work Order Search By Components
You can perform work order search by an component item ID.
Table 260. Work Order Search By Components
Fields Description
Node Select the node for which you want to search.
Enterprise Select the enterprise for which you want to search.
Across Enterprise Select this option if you are searching across all enterprises.
Allocated Select the appropriate allocation level for the work order you
are searching.
Released Select the appropriate released level for the work order you
are searching for.
Product Class Select the product class of the item you are searching for, if
applicable.
Status Range Select the status range associated with the work order you are
searching for, if applicable.
Component Item ID Enter the component item ID associated with the work order
you want to search for, if applicable.
Max Records Enter the maximum number of records you want listed as a
result of your search.
The Work Order List screen displays the search results.
228 Sterling Selling and Fulfillment Foundation: Warehouse Management System User Guide
Work Order List
The Work Order List window displays the results of an work order search. You can
perform actions on a single work order line or multiple work order lines by
selecting the check boxes of the work order lines you want to perform an action on
and choosing the applicable action from the action bar.
Table 261. Work Order List
Actions
View Details This action takes you to the Work Order Details screen where
you can view the details of the work order and perform
various actions on the work order.
View Tasks This action takes you to the task search screen. For more
information about viewing the tasks, see the Sterling Selling
and Fulfillment Foundation: Warehouse Management System User
Guide.
Note: You can view tasks only for a single work order at a
time.
View Move Request This action takes you to the move request search screen. For
more information about viewing the move requests, see the
Sterling Selling and Fulfillment Foundation: Warehouse
Management System User Guide.
Note: You can view tasks only for a single work order at a
time.
Confirm This action lets you confirm the work order by taking you to
the VAS station. For more information about viewing VAS
stations, see the Sterling Selling and Fulfillment Foundation:
Warehouse Management System User Guide.
Cancel This action pops up a Cancellation Reason screen for
cancelling the selected work orders.
Fields
Work Order # The work order number associated with the work order. Click
this link to view the work order details.
Enterprise The Enterprise associated with the work order.
Service Item Group The service item group associated with the work order.
Item ID The Item ID of the item associated with the work order.
UOM The UOM code of the item associated with the work order.
Priority The work order priority.
Segment Type Segment type of the item. A segment type indicates an
inventory category. Typical values are MTC - Made To
Customer or MTO - Made to Order.
Segment # Segment number of the item. A segment holds either the
specific buyer or specific order number that requires
dedication.
Order # The order number of the item.
Status The work order status.
This Work Order Hold icon displays only if the work order is
put on hold.
Chapter 27. Work Order Console Screens 229
Work Order Details for Work Order Console Screens
The work order detail screen enables you to perform certain actions such as
confirm, cancel or allocate a work order. You can also view the status audits and
outbound shipments from this screen.
Table 262. Work Order Details Screen, Primary Information
View Icons Description
Shipments This icon takes you to the shipments screen where you can
view the outbound shipment details.
Audit This icon takes you to the Work Order Status Audits screen
which displays audit activity information pertaining to the
specific work order.
Activity Demand Activity Demand - This icon takes you to the Work Order
Activity Demand screen where you can view the work order's
activity demand.
Actions
Confirm This action lets you confirm the work order by taking you to
the VAS station. For more information about viewing VAS
stations, see the Sterling Selling and Fulfillment Foundation:
Warehouse Management System User Guide.
Allocate This action enables you allocate a work order.
Release This action enables you to release a work order.
Note: You cannot create retrieval move requests when
releasing work orders for the "KITTING" service item group
that does not have components.
Cancel This action pops up a Cancellation Reason screen where you
can cancel the selected work orders.
View Holds This action takes you to the Work Order Holds screen where
you can view holds that are applied to the work order.
Fields
Node The node associated with the work order.
Enterprise The enterprise associated with the work order.
Work Order # The work order number associated with the work order.
Service Item Group The service item group associated with the work order.
Status The work order status.
Click on the Work Order Hold to go to the Work Order
Holds where you can view various holds that are applied to
the work order.
Priority Select the priority for the work order you are creating, if
applicable. Appropriate priority is assigned to all tasks for the
work order.
Valid values are Urgent, High, Normal, Low.
Start No Earlier Than Work order date to start no earlier than.
Finish No Later Than Work date to finish no later than.
Service Item ID The service item ID associated with the item.
Purpose The purpose associated with the work order.
230 Sterling Selling and Fulfillment Foundation: Warehouse Management System User Guide
Table 263. Work Order Details Screen, Work Order Item Data
Action
Additional Item Details This action takes you to the Additional Item Details screen to
enter tag details for the item.
You can enter the tag details, if you have selected the option,
When performing any node operation during the ship node
tag capture configuration. For more information about
capturing tag attributes, see the Sterling Selling and Fulfillment
Foundation: Application Platform Configuration Guide.
Fields
Item ID Enter the item created as a result of the work order. Also
referred to as 'Kit Item' or 'Parent Item'.
This is mandatory for service item groups of KITTING,
DE-KITTING, INVENTORY CHANGE, INVENTORY
COMPLIANCE.
Unit Of Measure Select the unit of measure of the item associated with the
work order you are creating.
Product Class Select the product class of the item associated with the work
order you are creating
Segment Type Select the segment type of the item associated with the work
order you are creating, if applicable.
Typical values include 'MTO' - Made to Order or 'MTC' -
Made To Customer.
Segment Enter the specific order number or customer number
associated with the work order you are creating.
This is applicable only if Segment Type is chosen.
Requested Quantity Enter the quantity of the item being created on the work
order.
Table 264. Work Order Details Screen, Quantity
Fields
Requested Quantity requested by the work order.
Confirmed Quantity confirmed by the work order.
Allocated Quantity allocated to the work order.
Cancelled Quantity cancelled from the work order.
Released Quantity released by the work order.
Table 265. Work Order Details Screen, Container Details
Fields
Pallet ID Enter the pallet LPN associated with the container.
Case ID Enter the case LPN associated with the container.
Serial # Enter the serial number.
Table 266. Work Order Details Screen, Component Items
Action
Delete This action deletes the selected tag details.
Chapter 27. Work Order Console Screens 231
Table 266. Work Order Details Screen, Component Items (continued)
Fields
Tag Details Click on the Add icon to view the tag details.
You can view the tag details only if the inventory tag
attributes are captured in all operations performed within the
node. For more information about capturing the tag
attributes, see the Sterling Selling and Fulfillment Foundation:
Application Platform Configuration Guide.
Item ID Enter the component associated with parent item you want to
create.
Click on the Add icon to add component item details.
PC Select the product class associated with component item.
UOM Select the unit of measure of the item associated with the
work order you are creating.
Qty Per Kit Enter the component item quantity required for the parent
item.
Segment Type Select segment type for the component inventory, if
applicable.
Segment Enter order number or customer name for the component
inventory, if applicable.
Activities are populated from the service item associated with the work order or
the item. All activities to be associated with the item being created are specified for
the component quantity.
Table 267. Work Order Details Screen, Activities
Action
Delete This action deletes activities that you have selected.
Fields
Instructions Enter any additional instructions for the activity.
Location Details The location where the activity is performed displays.
Click on the Plus icon, to view and hide location details.
vPreferred Location: Click on the Add icon to add new
location.
vRequested Quantity: Enter the quantity you want to move
into the location.
Inv Upd Activity Inventory updated for the activity.
Seq # Enter a sequence for the activity being performed.
Activity Code Select the activity code to associate with the location and
quantity.
Choose the field and Lookup icon to find the specific activity
code you want to use.
232 Sterling Selling and Fulfillment Foundation: Warehouse Management System User Guide
Work Order Status Audits
You can view any status modifications performed against a work order.
Table 268. Work Order Status Audits Screen, Primary Information
Fields
Node The node associated with the work order.
Enterprise The enterprise associated with the work order.
Work Order # The work order number associated with the work order.
Service Item Group The service item group associated with the work order.
Status The work order status.
Start No Earlier Than Work order date to start no earlier than.
Finish No Later Than Work date to finish no later than.
Service Item ID The service item ID associated with the item.
Work Order Activity Demand
This screen provides visibility to the work order's activity demand.
Table 269. Work Order Activity Demand, Primary Information
Fields Description
Node The node associated with the work order.
Enterprise The enterprise associated with the work order.
Work Order # The work order number associated with the work order.
Service Item Group The service item group associated with the work order.
Status The work order status.
Click on the Work Order Hold icon to go to the Work Order
Holds where you can view holds that are applied to the work
order.
Priority Select the priority for the work order you are creating, if
applicable. Appropriate priority is assigned to all tasks for the
work order.
Valid values are Urgent, High, Normal, Low.
Start No Earlier Than Work order date to start no earlier than.
Finish No Later Than Work date to finish no later than.
Service Item ID The service item ID associated with the item.
Purpose The purpose associated with the work order.
Table 270. Work Order Activity Demand, Activity Demand List
Action Description
Delete This action allows you to delete the selected activity
demands.
Fields
Location ID The item location in the node.
Activity Code The activity to be performed on items belonging to the work
order.
Chapter 27. Work Order Console Screens 233

Table 270. Work Order Activity Demand, Activity Demand List (continued)
Action Description
Pallet Id The pallet LPN that belong to the work order.
Case Id The case LPN that belong to the work order.
Item ID The items that belong to the work order.
Demand Quantity Indicates whether the demand is satisfied or not.
Satisfied Quantity The extent to which the demand is satisfied.
Demand Satisfied Indicates whether the demand is satisfied or not.
Work Order Holds
You can view the various types of holds that are applied to the work order.
Table 271. Work Order Holds Screen, Primary Information
Fields Description
Node The node associated with the work order.
Enterprise The enterprise associated with the work order.
Work Order # The work order number associated with the work order.
Service Item Group The service item group associated with the work order.
Status The work order status.
Start No Earlier Than Work order date to start no earlier than.
Finish No Later Than Work date to finish no later than.
Service Item ID The service item ID associated with the item.
Table 272. Work Order Holds Screen, Work Order Holds
Actions Description
Add Holds This action takes you to the Add Holds screen where you can
add holds for the selected work order.
Fields/Icons
View History Click this icon to go to the View History screen where you can
view the hold history for the selected hold.
Hold Description A brief description of the hold.
Hold Status The current status of the hold.
Hold Comment Any additional comments for the hold.
Action Select the action from the list that you want to apply for the
hold.
Reason Enter the reason for the hold.
Table 273. Work Order Holds Screen, Approved Holds
Fields/Icons Description
View History Click this icon to go to the View History screen where you
can view the hold history for the selected hold.
Hold Description A brief description of the hold.
Reason The reason for the hold.
234 Sterling Selling and Fulfillment Foundation: Warehouse Management System User Guide
Add Holds for Work Order Console Screens
You can add holds for the work order with the help of this screen.
Table 274. Add Holds Screen, Work Order Holds
Fields
Hold Type Select the work order hold type from the list.
Reason Enter the reason for the hold.
View History for Work Order Console Screens
In this screen you can view the hold history for the selected hold.
Table 275. View History Screen, Primary Information
Fields
Node The node associated with the work order.
Enterprise The enterprise associated with the work order.
Work Order # The work order number associated with the work order.
Service Item Group The service item group associated with the work order.
Status The work order status.
Start No Earlier Than Work order date to start no earlier than.
Finish No Later Than Work date to finish no later than.
Service Item ID The service item ID associated with the item.
Table 276. View History Screen, Work Order Holds
Fields
Hold Type The hold type.
Date/Time The date and time at which the hold was created.
User ID The user who created the hold.
Status The current status of the hold.
Comment Any additional comments for the hold.
Hold Transaction The hold transaction.
Cancellation Reason for Work Order Console Screens
You can cancel a work order from the Work Order List screen by selecting the
appropriate work orders or from the Work Order Details screen for cancelling a
particular work order.
Table 277. Cancellation Reason
Fields
Cancellation Reason Code Select the reason code associated with cancellation. This field
is mandatory.
Reason Text Enter any additional comments for the cancellation.
Chapter 27. Work Order Console Screens 235
Appointment Details
You can plan an appointment for a work order of provided service item group. In
Appointment, click on the Appointment icon. The Plan Appointment window
displays.
Table 278. Appointment Details
Fields Description
Currently Chosen
Appointment Slot
Appointment Slot chosen for the work order.
Start Date The start date of the work order. Click on the Calender to
view the calendar.
Delay Window The days to be delayed for the work order.
236 Sterling Selling and Fulfillment Foundation: Warehouse Management System User Guide
Chapter 28. Value-Added Services Station Screens
VAS Station
VAS activities are performed in their appropriate locations. For example,
monogramming is done in a different location from packaging. Each individual
location is a VAS Station.
This screen provides:
vThe ability to scan outbound container number or work order number to
identify work order.
vThe ability to confirm at an activity level in the appropriate station.
Table 279. VAS Station, Work Order
Actions
Save This action confirms that a certain activity specified in the
Activities panel is complete for the quantity specified.
Clicking Save after the completion of the last activity
confirms the work order.
Reset This action clears all the entries in the Work Order Panel.
Scan Enter or scan container number or work order number.
Container number represents an outbound container for
which the work order is created.
Serial number may also be scanned to determine the work
order, if the work order was created for a specific serial
number.
If the work order is being completed into a pallet or case
with LPN, the LPN to be associated with is scanned here for
an activity. For all subsequent activities the LPN may be
scanned here as well.
Location Select the location associated with the station.
Work Order # The work order number associated with the work order.
Enterprise The enterprise associated with the work order.
Service Item Group The item service group associated with the work order.
Note: To be able to confirm a Work Order you should have an Inventory Status
Transition Rule setup for the Zone that the VAS location belongs. This Inventory
Status Transition Rule should be defined from Blank to an Inventory Status that
is associated with an ONHAND Supply Type.
Table 280. VAS Station, Work Order Item Data
Fields
Item ID The item on the work order displays, if applicable.
Unit Of Measure The unit of measure on the work order displays, if applicable.
Product Class The product class on the work order displays, if applicable.
Service Item ID The service item identifier on the work order displays.
© Copyright IBM Corp. 1999, 2011 237
Table 280. VAS Station, Work Order Item Data (continued)
Segment Type The segment type for the item on the work order displays, if
applicable. Typical values are MTO - Made To Order, MTC -
Made To Customer.
Segment The segment number for the item on the work order displays,
if applicable. Typical values are the order number or the
customer number corresponding to the Segment Type.
Table 281. VAS Station, Container/Serial #
Fields
Pallet ID The pallet LPN into which the work order quantity being
built displays.
Case ID The case LPN into which the work order quantity being built
displays.
Serial # The serial number displays.
Table 282. VAS Station, Activities
Displays the activities corresponding to the service item.
Table 283. VAS Station, Quantity
Fields
Qty Completed Quantity completed on the work order displays.
Qty Remaining Quantity remaining to be completed on the work order
displays.
Qty To Process Enter the quantity to process for the corresponding activity.
Start Time Stamp By default, the system's date and time displays.
Enter the work order activity's start date and time, if
applicable.
End Time Stamp By default, the system's date and time displays.
Enter the work order activity's end date and time, if
applicable.
Table 284. VAS Station, Activity Instructions
Fields
Instruction Text Instruction corresponding to the activity selected displays.
Instruction Usage Instruction Usage corresponding to the activity selected
displays.
Table 285. VAS Station, Component Items
Fields
Item The component item for the work order, if applicable.
Description The component item description.
Quantity Number of units of the item in inventory UOM.
238 Sterling Selling and Fulfillment Foundation: Warehouse Management System User Guide
Serial Entry for VAS Station Console Screens
The Serial Entry screen lets you capture the item's serial number.
Table 286. Serial Entry
Action
Close This action closes the Serial Entry screen.
Fields
Count The total count of items scanned is automatically populated
by the system.
Item ID The item's item ID is automatically populated by the system.
Unit Of Measure The item's unit of measure is automatically populated by the
system.
Requested Serial # The serial number requested in the work order.
Serial # The serial number of the item.
Secondary Serial #1 The component serial number of the item.
Secondary Serial #2 The component serial number of the item.
Secondary Serial #3 The component serial number of the item.
Note: The fields displayed in the Serial Entry screen vary depending on the item
scanned.
Note: In the Serial Entry screen when you click on Toggle Serial Range button, you
can enter the serial range.
Table 287. Serial Entry, Serial Range
Fields
Count The total count of items scanned is automatically populated
by the system.
Item ID The item's identifier is automatically populated by the
system.
Unit Of Measure The item's unit of measure is automatically populated by the
system.
Requested Serial # The serial number requested in the work order.
From Serial # The start serial number of the item.
To Serial # The end serial number of the item.
Note: For a serial tracked or serialized item, if secondary serials are defined and
secondary information is not provided, then in such scenario the 'Entry Serial
Range' button is not provided in the screen.
Note: You can enter the tag attributes only when the node that is confirming the
work order is configured to capture the tag attributes in all operations performed
within the node. For more information about capturing the tag attributes, see the
Sterling Selling and Fulfillment Foundation: Application Platform Configuration Guide.
The Tag Entry screen lets you capture the tag numbers associated with the tag
tracked SKU. You can use the Tag Entry screen to track Lot#, Batch#, and so on.
Chapter 28. Value-Added Services Station Screens 239
Table 288. Tag Entry
Action
Close This action closes the Tag Entry screen.
Fields
Item ID The item ID of the item.
Unit Of Measure The unit of measure of the item.
Batch # Enter the batch number associated with the tag.
Revision # Enter the revision number.
Note: The fields displayed in the Tag Entry screen vary depending on the item
scanned.
Expiration Date Entry for VAS Station Console Screens
The Expiration Date Entry screen lets you capture the expiration date.
Table 289. Expiration Date Entry
Action
Close This action closes the Expiration Date Entry screen.
Fields
Item ID The item ID of the item.
Expiration Date Enter the item's expiration date.
Choose the field and Lookup icon to find the specific
expiration date you want to use.
Note: The fields displayed in the Expiration Date Entry screen vary depending on
the item scanned.
240 Sterling Selling and Fulfillment Foundation: Warehouse Management System User Guide
Chapter 29. Outbound Shipment Console Screens
About Outbound Shipment Console Screens
The Outbound Shipment Console provides:
vExtensive search capabilities using granular level information such as plan #,
customer PO#.
vAbility to modify outbound shipment instruction.
vAbility to view discrepancies found in the outbound shipments.
Outbound Shipment Search By Status
You can search for shipments that fall under a particular status with the help of
this screen.
Table 290. Shipment Search By Status
Fields Description
Document Type Select the appropriate document type to search for, if
applicable.
Enterprise Choose the field and lookup option to find the specific
Enterprise you want to use.
Choose Across Enterprises to search across all Enterprises in
the system.
Note: If you belong to a team, the system only searches
across the Enterprises allowed by that group. For more
information about teams, see the section Defining Teams in
the chapter Configuring User Security of the Sterling Selling
and Fulfillment Foundation: Application Platform Configuration
Guide.
Shipment # Enter the shipment number to search for, if applicable.
Order # Enter the order number you are searching for, if applicable.
Customer PO # Enter the number of the customer's purchase order number
you are searching for, if applicable.
Plan # Enter the plan number the outbound shipment you are
searching for belongs to, if applicable.
Origin Node Enter the origin node you want to search for outbound
shipments under, if applicable.
Destination Node Enter the destination node you want to search for outbound
shipments under, if applicable.
Status Select the status range of the outbound shipments you want
to search for, if applicable.
Include Closed Shipments Select this if you want to search for outbound shipments that
have been closed, as well as those that are open, if applicable.
Pack And Hold Shipment Select this if you want to search for outbound shipments that
are packed and kept on hold, if applicable.
Held Shipments Check this box if you want to search for outbound shipments
that are held.
© Copyright IBM Corp. 1999, 2011 241
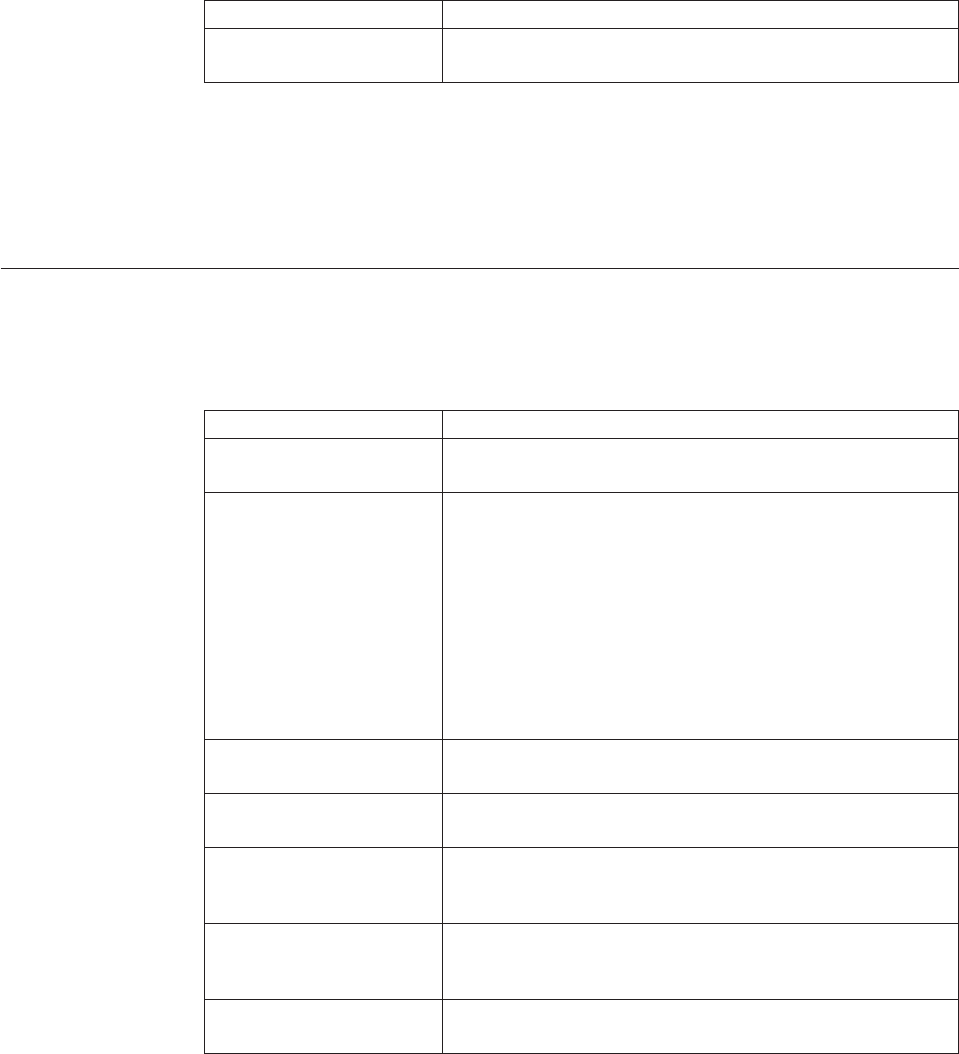
Table 290. Shipment Search By Status (continued)
Fields Description
Max Records Enter the maximum number of outbound shipments you
want returned from your search.
Do not use spaces before or after any text you enter in the search fields, as this
may result in inconsistent or inaccurate results.
The “Shipment List” on page 246 screen displays as a result of outbound shipment
search by status.
Outbound Shipment Search By Date
You can search for shipments that fall within a particular date range with the help
of this screen.
Table 291. Shipment Search By Date
Fields Description
Document Type Select the appropriate document type to search for, if
applicable.
Enterprise Choose the field and lookup option to find the specific
Enterprise you want to use.
Choose Across Enterprises to search across all Enterprises in
the system.
Note: If you belong to a team, the system only searches
across the Enterprises allowed by that group. For more
information about teams, see the section Defining Teams in
the chapter Configuring User Security of the Sterling Selling
and Fulfillment Foundation: Application Platform Configuration
Guide.
Carrier/Service Choose the Carrier/Service you want to search for outbound
shipments under, if applicable.
Status Choose the shipment status you are searching for, if
applicable.
Enter Shipment Dates Enter the requested ship date range, expected ship date
range, actual ship date range you want to search for
outbound shipments through, if applicable.
Enter Delivery Dates Enter the requested delivery date range, expected delivery
date range, actual delivery date range you want to search for
outbound shipments through, if applicable.
Max Records Enter the maximum number of outbound shipments you
want returned from your search.
Do not use spaces before or after any text you enter in the search fields, as this
may result in inconsistent or inaccurate results.
The “Shipment List” on page 246 screen displays as a result of outbound shipment
search by date.
242 Sterling Selling and Fulfillment Foundation: Warehouse Management System User Guide
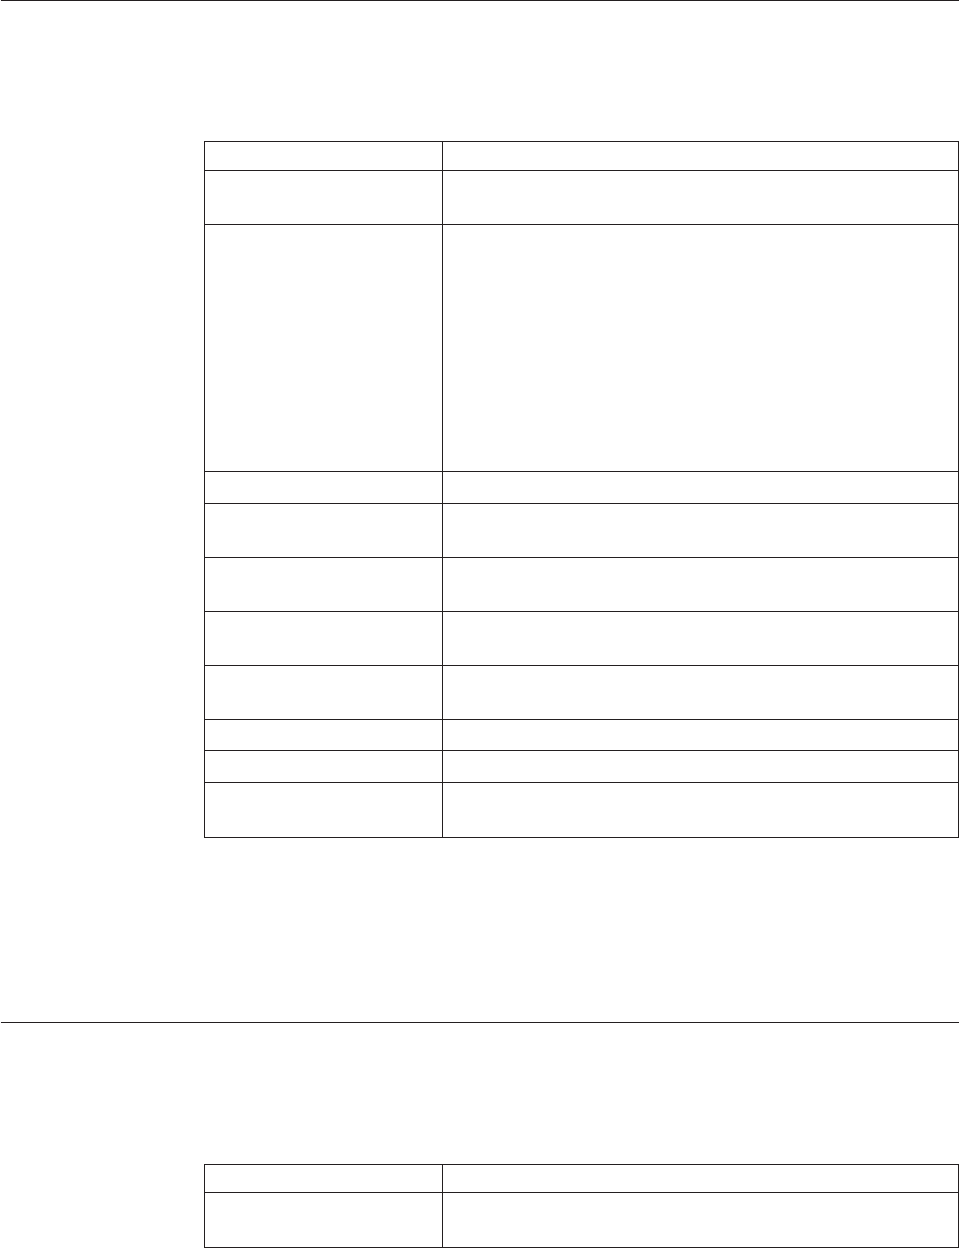
Outbound Shipment Search By Carrier
You can search for shipments that belong to a particular carrier with the help of
this screen.
Table 292. Shipment Search By Carrier
Fields Description
Document Type Select the appropriate document type to search for, if
applicable.
Enterprise Choose the field and lookup option to find the specific
Enterprise you want to use.
Choose Across Enterprises to search across all Enterprises in
the system.
Note: If you belong to a team, the system only searches
across the Enterprises allowed by that group. For more
information about teams, see the section Defining Teams in
the chapter Configuring User Security of the Sterling Selling
and Fulfillment Foundation: Application Platform Configuration
Guide.
Shipment Mode Select the shipment mode, if applicable
Carrier/Service The Carrier/Service you want to search for outbound
shipments under, if applicable.
BOL # The bill of lading number of the outbound shipments you are
searching for, if applicable.
PRO # The PRO number of the outbound shipments you are
searching for, if applicable.
Trailer # The trailer number of the outbound shipments you are
looking for, if applicable.
Status Select the shipment status you are searching for, if applicable.
Requires Routing Choose this option if the shipment requires dynamic routing.
Max Records The maximum number of outbound shipments you want
returned from your search.
Do not use spaces before or after any text you enter in the search fields, as this
may result in inconsistent or inaccurate results.
The “Shipment List” on page 246 screen displays as a result of outbound shipment
search by carrier.
Outbound Shipment Search By Item
You can search for shipments based on the item information such as product class,
unit of measure, item ID and so on.
Table 293. Shipment Search By Item
Fields Description
Document Type Select the appropriate document type to search for, if
applicable.
Chapter 29. Outbound Shipment Console Screens 243
Table 293. Shipment Search By Item (continued)
Fields Description
Enterprise Choose the field and lookup option to find the specific
Enterprise you want to use.
Choose Across Enterprises to search across all Enterprises in
the system.
Note: If you belong to a team, the system only searches
across the Enterprises allowed by that group. For more
information about teams, see the section Defining Teams in
the chapter Configuring User Security of the Sterling Selling
and Fulfillment Foundation: Application Platform Configuration
Guide.
Item ID The item ID.
Product Class The item's product class.
Unit of Measure The item's unit of measure.
Buyer The identifier for the Buyer.
Seller The identifier for the Seller.
Status Select the shipment status you are searching for, if applicable.
Include Closed Shipments Select this if you want to search for outbound shipments that
have been closed, as well as those that are open, if applicable.
Has Hazardous Items Select this check box to search for outbound shipments that
contain hazardous items, if applicable.
Max Records The maximum number of outbound shipments you want
returned from your search.
Do not use spaces before or after any text you enter in the search fields, as this
may result in inconsistent or inaccurate results.
The “Shipment List” on page 246 screen displays as a result of outbound shipment
search by item.
Outbound Shipment Search By Wave
You can search for outbound shipment that fall within a particular wave in this
screen.
Table 294. Shipment Search By Wave
Fields Description
Document Type Select the document type to you want to search for, if
applicable.
Enterprise Select the enterprise for which you are searching.
Across Enterprise Select this option if you are searching across all enterprises.
Shipment # Enter the shipment number you are searching for, if
applicable.
Wave # Enter the wave number you are searching for, if applicable.
Load # Enter the load number you are searching for, if applicable.
Carrier/Service Select the carrier/service you are searching for, if applicable.
Buyer Enter the buyer associated with the shipment you want to
search for, if applicable.
244 Sterling Selling and Fulfillment Foundation: Warehouse Management System User Guide
Table 294. Shipment Search By Wave (continued)
Fields Description
Status Select the shipment status you are searching for, if applicable.
Shipment In Wave Choose this option if you are searching for the shipments in
wave.
Shipment Not In Wave Choose this option if you are searching for the shipments not
in wave.
Ignore Cancelled Shipment
Lines
Select this check box if you are considering only Shipment
Lines with quantity greater than zero. This check box displays
only when "Shipment Not In Wave" is selected.
All Choose this option if you are searching for all the shipments.
Has Shortage Choose this option
Enter Shipment Dates Choose to enter shipment date range you want to search for
outbound shipments, if applicable.
Enter Delivery Dates Choose to enter delivery date range you want to search for
outbound shipments, if applicable.
Max Record Enter the maximum number of records you want listed as a
result of your search.
Do not use spaces before or after any text you enter in the search fields, as this
may result in inconsistent or inaccurate results.
The “Shipment List” on page 246 screen displays as a result of outbound shipment
search by wave.
Outbound Shipment Search By Profiling
The warehouse supervisor can choose the pick strategy based on the profile
identifier density of the shipments. Usually, large shipments are picked
individually and small shipments are group together and picked together, and
sorted later.
You can search for shipments based on their profile identifiers.
Table 295. Shipment By Profile Search
Fields Description
Enterprise Select the enterprise.
Profile ID Select the profile ID from the drop down list.
You can also click the Lookup icon to select the Profile ID.
Consider Profiles Select this to view the shipment's state There are three
options:
Already In Wave - Select this to view the shipments that are
in wave.
Not In Wave - Select this to view the shipments that are not
in wave.
All - Select this to view all the shipments.
Chapter 29. Outbound Shipment Console Screens 245
Table 295. Shipment By Profile Search (continued)
Fields Description
Show Profiles Select to view the More number of Shipment First and Less
number of Shipment First. There are two options:
More number of Shipment First - Select this to view high-
density profile ID shipments first.
Less number of Shipment First - Select this to view
low-density profile ID shipments first.
Max Records Enter the number to display the maximum records.
You can view the shipment profile list based on the profile identifiers.
Table 296. Shipment Profile List
Actions Description
Create Wave This takes you to the Create Wave screen, where you can
create a wave for the selected shipment group.
Fields
ProfileId The identifier of a shipment.
No of shipments The number of shipments.
No of shipments in the
wave
The number of waved shipments.
No of shipments not in the
wave
The number of shipments that are not waved.
Shipment List
The Shipment List window displays the results of a shipment search. You can
perform actions on a single shipment or multiple shipments by selecting the check
boxes of the shipments you want to perform an action on and choosing the
applicable action from the action bar.
Table 297. Shipment List
Actions Description
View Details This action takes you to the Shipment Details screen where
you can view the shipment details.
Modify Shipment This action takes you to the Modify Shipment screen where
you can modify a shipment.
Print This action takes you to the Print screen where you can print
the shipment's documents or labels.
Cancel This action takes you to the Cancel Selected Shipments screen
where you can cancel an outbound shipment.
Create Wave This action takes you to the Create Wave screen where you
can create wave for the selected shipment group.
Add To Delivery Plan This action takes you to the Select Delivery Plan screen where
you can add shipment to a delivery plan.
Delete Shipment This action allows you to delete the selected shipments.
Remove From Wave This action allows you to remove the selected shipments from
a wave.
246 Sterling Selling and Fulfillment Foundation: Warehouse Management System User Guide
Table 297. Shipment List (continued)
Actions Description
View Holds This action takes you to the View Holds screen where you
can view the holds applied to the outbound shipment.
Fields
Shipment # The shipment number.
Status The shipment status.
Buyer The identifier for the buyer.
Carrier/Service The Carrier and Carrier service use to ship the outbound
shipments.
Expected Ship Date The date the shipment is estimated to ship on.
Origin The shipment's origin node.
Destination The shipment's destination node.
Total Weight The total weight of the outbound shipment.
Total Volume The total volume of the outbound shipment.
Tag/Serial Requested Indicates if tag or serial details exist for the outbound
shipment.
Note: The tag details for a tag-controlled item displays, if the
ship node is configured to capture tags in all operations
performed within the node, or if the buyer on a shipment
mandates it as a part of their inbound compliance. For more
information about capturing tag attributes, see the Sterling
Selling and Fulfillment Foundation: Application Platform
Configuration Guide.
Shipment Details for Outbound Shipment Console Screens
The Shipment Details screen provides shipment information for the selected
shipments. The actions that you can perform in the Shipment Details screen are
explained in the following tables.
Table 298. Shipment Details, Shipment
View Icons Description
Load Loads - This icon takes you to the Shipment Loads screen
where you can view any load carrying an outbound
shipment.
Containers Containers - This icon takes you to the Shipment Containers
screen where you can view all packed containers included in
the outbound shipment.
Instructions Instructions - This icon takes you to the Shipment
Instructions screen where you can add, modify or delete the
instructions for a shipment.
Audit Shipment Audits - This icon takes you to the Shipment
Audits screen where you can view audit trail for shipment
modifications.
Shipment Data Types Shipment Dates - This icon takes you to the Shipment Dates
screen where you can view and modify outbound shipment
dates and delivery dates.
Alert Alerts - This icon takes you to the Alerts screen where you
can view the alerts for an outbound shipment.
Chapter 29. Outbound Shipment Console Screens 247
Table 298. Shipment Details, Shipment (continued)
Additional Attributes Additional Attributes - This icon takes you to the Additional
Attributes screen where you can view additional attributes for
the selected shipment.
Activity Demand Activity Demand - This icon takes you to the Shipment
Activity Demand screen where you can view the shipment's
activity demand.
Actions
Confirm Shipment This action allows you to manually confirm an outbound
shipment, if the shipment is not automatically confirmed.
Pack Containers This action takes you to the Pack Containers screen where
you can pack any unpacked items into containers for
shipping.
Print This action takes you to the Print for an Outbound Shipment
screen where you can print the shipping documents or labels.
Cancel This action takes you to the Cancel Selected Outbound
Shipments screen where you can cancel an outbound
shipment.
Create Pick List This action enables you to create a picklist for the selected
shipments, if applicable.
Split Shipment This action takes you to the Split Outbound Shipment screen
where you can split an outbound shipment.
Create Alert This action takes you to the Create Alerts for the Selected
Outbound Shipments screen where you can create an alert for
the shipment.
Release From ESP Hold This action allows you to release a shipment from the ESP
Hold.
Remove From Wave This action allows you to remove the shipment from a wave.
View Holds This action takes you to the View Holds screen where you
can view the holds applied to the outbound shipment.
Fields
Shipment # The outbound shipment number.
Shipper's Ref. # Enter the outbound shipment reference number.
Plan # The delivery plan number the outbound shipment is
associated with, if applicable.
Enterprise The Enterprise associated with the shipment.
Buyer Indicates the buyer associated with the shipment. Click this
link to go to the Organization Details to view the buyer
organization details.
Seller Indicates the seller associated with the shipment. Click this
link to go to the Organization Details to view the seller
organization details.
Ship Node The node from where the outbound shipment ships. Click
this link to go to the Ship Node Detail screen to view the
node details for the shipment.
Receiving Node Indicates the node that is receiving the outbound shipment.
Click this link to go to the Ship Node Detail screen to view
the shipment's receiving node details.
248 Sterling Selling and Fulfillment Foundation: Warehouse Management System User Guide
Table 298. Shipment Details, Shipment (continued)
Status The outbound shipment status. Click this link to go to the
Shipment Status Audits to view shipment status audits. Click
the Work Order Hold icon to go to the View Holds screen
where you can view holds that are applied to the outbound
shipment.
Has Hazardous Items Indicates if the outbound shipment contains hazardous items.
Break Bulk Node This field displays only if the shipment belongs to a break
bulk load.
The break bulk node that is receiving the break bulk load
displays.
Table 299. Shipment Details, Execution Attributes
Actions
View Tasks This action takes you to the Task List screen where you can
view a list of tasks associated with the shipment. For more
information about this, see the section, "Task List".
Fields
Execution Status The status of wave corresponding to the shipment.
Pack And Hold Select the check box to pack and hold the outbound
shipment, if applicable.
Shipment Sort Lane The lane where containers are sorted by shipment, when 'Sort
by Shipment' option is chosen.
Carrier Sort Lane The lane where containers are sorted by carrier, when 'Sort by
Carrier' option is chosen.
Wave # The wave number to which the outbound shipment belongs
to.
Has Shortage Indicates if the outbound shipment has inventory shortage
when included in the wave.
Packed Quantity Indicates the total quantity packed.
Table 300. Shipment Details, Ship To
View Icon
Address Details Address Details - Choose this icon to view or modify the
Ship To addresses. For more information about the screen, see
Address Details.
The name and address of the person or organization where the shipment is shipped.
Table 301. Shipment Details, Totals
Fields
Weight Enter the total weight associated to the shipment in the
appropriate UOM.
Volume Enter the total volume associated to the shipment in the
appropriate UOM.
No. of Containers Displays the total number of containers available in the
shipment.
Chapter 29. Outbound Shipment Console Screens 249

Table 302. Shipment Details, Carrier Info
Actions
Manage Special Services This action takes you to the Special Services List screen where
you can select special services for the carrier.
Fields
Delivery Method The delivery method for the shipment.
Ship Mode Select the shipment mode for the shipment. Values include
'LTL', 'TL', 'PARCEL'
Carrier/Service Select the carrier service for the outbound shipment.
Trailer # Enter the outbound shipment's trailer number.
BOL # Enter the outbound shipment's bill of lading number.
Seal # Enter the outbound shipment's seal number.
Pro # Enter the PRO number assigned by the carrier to track the
shipment.
Routing Source Indicates if the routing was either pre-assigned, by the system
or through an external system.
Load # The outbound shipment's load number.
Routing Error Code The system automatically displays the routing error code, if
applicable.
Requested Carrier Service The requested carrier service for the outbound shipment.
Airway Bill # Indicates the airway bill number for tracking the shipment.
The airway bill is a document of carriage which is issued by
airlines to shippers of cargo. The airway bill number:
vIs an evidence of a contract of carriage.
vProves receipt of goods for shipment.
vIs a freight bill.
Is Revised Indicates whether the Ship To address has changed since the
creation of the outbound shipment.
Return Carrier Service Select the carrier service for the return shipment from the
drop-down list.
Note: If you do not select the carrier service for the return
shipment from the drop-down list, the carrier service used for
an outbound shipment is used for the return shipment.
Table 303. Shipment Details, Charges
View Icon
Charges and Taxes Charges - This icon takes you to the Charges screen where
you can enter or modify additional charges imposed to the
shipment and/or container.
Fields
Carrier Account # Indicates the carrier account # for the shipment.
Freight Terms Indicates the freight terms used for the shipment. Valid
values include COLLECT, PREPAID, TP-COLLECT and
TP-PREPAID.
COD Pay Method Select the COD payment type for the carrier.
Estimated Shipment
Charges
The estimated charge for shipping the outbound shipment.
Actual Shipment Charges The actual charge for shipping the outbound shipment.
250 Sterling Selling and Fulfillment Foundation: Warehouse Management System User Guide
Table 303. Shipment Details, Charges (continued)
Freight Charge The charge applied by the carrier for shipping the outbound
shipment.
Table 304. Shipment Details, Shipment Lines
Actions
View Details This action takes you to the Shipment Line Details for
Outbound Shipment screen where you can view the shipment
line attributes for the selected shipments.
Add Release This action takes you to the Add Release screen where you
can add an order release line to include in the shipment.
Remove Line This action allows you remove the selected shipment lines
from the shipment.
Fields
Shipment Line # Enter the outbound shipment line number.
Click this link to go to the Shipment Line Details for
Outbound Shipment screen to view the shipment line
attributes for the a shipment.
Kit Components icon - This icon takes you to the Logical
Kits screen where you can view the item kit components for
the shipment line.
Order # Enter the order number being received on the shipment, if
applicable.
Line # Enter the order line number being received on the shipment,
if applicable.
Release # Enter the release number, if applicable
Item ID Enter the item ID for the SKU.
Description The item's description
PC Select the product class for the item.
UOM Select the unit of measure for the item.
Requested Serial # The serial number requested in the order.
Editable if the order is not available on the system.
Mark For The mark for address associated with the item.
Quantity Number of requested units of the item included in the
shipment.
Over Ship Quantity Indicates quantity of an item over shipped.
Shortage Qty Indicates the shortage quantity on the order for the item.
Original Qty Indicates the original quantity on the order for the item.
Chapter 29. Outbound Shipment Console Screens 251
Special Services List
You can select the applicable special services for a carrier.
Table 305. Special Services List
Fields Description
Special Services Check the applicable special services for the carrier and click
Save. Valid values are:
vDeclared Value Insurance
vShip Notification
vAdult Signature Required
vDelivery Confirmation
vSaturday Delivery
vSignature Required
vSaturday Pickup
vTagless COD
vReturn Shipping Label Required
Modify Shipment for Outbound Shipment Console Screens
You can modify a shipment in this screen.
Table 306. Modify Shipment
Fields
Carrier/Service Select the carrier and carrier service used to ship the
outbound shipment.
Expected Ship Date The date the shipment is estimated to ship on.
Shipment Sort Lane The lane where containers are sorted by shipment, when 'Sort
by Shipment' option is chosen.
Carrier Sort Lane The lane where containers are sorted by carrier, when 'Sort by
Carrier' option is chosen.
Address Details for Outbound Shipment Console Screens
You can modify an outbound shipment or container ship to address in this screen.
Table 307. Address Details
Fields
Address Line 1 The first address line.
Address Line 2 The second address line, if applicable.
Address Line 3 The third address line, if applicable.
Address Line 4 The fourth address line, if applicable.
Address Line 5 The fifth address line, if applicable.
Address Line 6 The sixth address line, if applicable.
City The city.
State The state.
Postal Code The postal code.
Country/Region The country or region.
252 Sterling Selling and Fulfillment Foundation: Warehouse Management System User Guide
Table 307. Address Details (continued)
Fields
First Name The first name.
Middle Name The middle name.
Last Name The surname.
Company The company.
Day Time Phone The day time phone number.
Evening Phone The evening phone number.
Mobile Phone The mobile phone number.
Fax The fax number.
E-Mail The e-mail address.
Charges for Outbound Shipment Console Screens
You can modify additional charges imposed to the shipment and/or container in
this screen.
Table 308. Charges, Shipment
Fields
Shipment # The outbound shipment number.
Shipper's Ref. # The outbound shipment reference number.
Plan # The delivery plan number the outbound shipment is
associated with, if applicable.
Enterprise The Enterprise associated with the shipment.
Buyer The identifier for the Buyer.
Seller The identifier for the Seller.
Ship Node The node from where the outbound shipment ships.
Receiving Node Indicates the node that is receiving the outbound shipment.
Click this link to go to the Ship Node Detail screen to view
the shipment's receiving node details.
Status The outbound shipment status. Click this link to go to the
Shipment Status Audits to view shipment status audits.
Has Hazardous Items Indicates if the outbound shipment contains hazardous items.
Table 309. Charges, Shipment Charges
Fields
Charge Category/Charge
Name
The name of the additional outbound shipment charge.
Estimated Charge The estimated additional charge for the outbound shipment.
Actual Charge The actual additional outbound shipment charge.
Table 310. Charges, Container Charges
Fields
Container # The container number.
Actual Freight Charge The Carrier's freight charge for shipping the container.
Chapter 29. Outbound Shipment Console Screens 253
Shipment Loads
You can view any load carrying an outbound shipment with the help of this
screen.
Table 311. Loads, Shipment
Fields Description
Shipment # The outbound shipment number.
Shipper's Ref. # The outbound shipment reference number.
Plan # The delivery plan number the outbound shipment is
associated with, if applicable.
Enterprise The Enterprise associated with the shipment.
Buyer The identifier for the Buyer.
Seller The identifier for the Seller.
Ship Node The node from where the outbound shipment ships.
Receiving Node The node that is receiving the outbound shipment.
Status The outbound shipment status.
Has Hazardous Items Indicates if the outbound shipment contains any hazardous
item.
Table 312. Loads, Loads
Actions Description
View Details The actions lets you view the load details.
Fields
Load # The load number the outbound shipment belongs to.
Load Type The load type as per your business practices.
Carrier/Service The Carrier and Carrier service transporting the load.
Origin The load's origin location.
Destination The load's destination location.
Status The load status.
Shipment Containers
You can view the packed containers included in an outbound shipment in this
screen.
Table 313. Shipment Containers, Shipment
Fields Description
Shipment # The outbound shipment number.
Shipper's Ref. # The outbound shipment reference number.
Plan # The delivery plan number the outbound shipment is
associated with, if applicable.
Enterprise The Enterprise associated with the shipment.
Buyer The identifier for the Buyer.
Seller The identifier for the Seller.
Ship Node The node from where the outbound shipment ships.
254 Sterling Selling and Fulfillment Foundation: Warehouse Management System User Guide
Table 313. Shipment Containers, Shipment (continued)
Fields Description
Receiving Node The node that is receiving the outbound shipment.
Status The outbound shipment status.
Has Hazardous Items Indicates if the outbound shipment contains any hazardous
item.
Table 314. Shipment Containers, Containers
Actions Description
View Details This action takes you to the Container Details screen where
you can view the container details.
Delete Containers This action takes you to the Delete Selected Containers where
you can delete the selected containers from the shipment.
Modify Containerization This action takes you to the Modify Containerization screen.
Fields
Container # The container number.
Tracking # The container's tracking number used to track the status and
location of the container.
Container SCM The shipment container marking.
Net Weight The net weight.
Gross Weight The container's total weight (including packaging).
Freight Charge The charge applied by the Carrier for shipping the container.
Status The outbound shipment status. Click this link to go to the
Shipment Status Audits screen where you can view the
shipment's status audits.
Manifested Indicates whether the container is manifested.
Shipment Instructions for Outbound Shipments
You can view special instructions pertaining to an outbound shipment, such as
handling instructions in this screen.
Table 315. Shipment Instructions, Shipment
Fields
Shipment # The outbound shipment number.
Shipper's Ref. # The outbound shipment reference number.
Plan # The delivery plan number the outbound shipment is
associated with, if applicable.
Enterprise The Enterprise associated with the shipment.
Buyer The identifier for the Buyer.
Seller The identifier for the Seller.
Ship Node The node from where the outbound shipment ships.
Receiving Node Indicates the node that is receiving the outbound shipment.
Click this link to go to the Ship Node Detail screen to view
the shipment's receiving node details.
Chapter 29. Outbound Shipment Console Screens 255
Table 315. Shipment Instructions, Shipment (continued)
Fields
Status The outbound shipment status. Click this link to go to the
Shipment Status Audits to view shipment status audits.
Has Hazardous Items Indicates if the outbound shipment contains hazardous items.
Table 316. Shipment Instructions, Instructions
Actions
Delete Instruction This actions lets you delete the selected shipment instructions.
Fields
Instruction Type The type of instruction, such as Gift, Pick, Pack, Ship, or
Other. This field can be modified.
Text The specific instructions to be performed on the order line.
This field can be modified.
Shipment Status Audits for Outbound Shipments
You can view any status modifications performed against an outbound shipment
status in this screen.
Table 317. Shipment Status Audits, Shipment
Fields
Shipment # The outbound shipment number.
Shipper's Ref. # The outbound shipment reference number.
Plan # The delivery plan number the outbound shipment is
associated with, if applicable. Click this link to go to the
Select Delivery Plan for an Outbound Shipment screen where
you can add an outbound shipment to a delivery plan.
Enterprise The Enterprise associated with the shipment.
Buyer The identifier for the Buyer. Click this link to go to the
Organization Details screen where you can view the buyer
organization details.
Seller The identifier for the Seller. Click this link to go to the
Organization Details screen where you can view the seller
organization details.
Ship Node The node from where the outbound shipment ships. Click
this link to go to the Ship Node Detail screen where you can
view the node details for the shipment.
Destination The outbound shipment's destination.
Status The outbound shipment status. Click this link to go to the
Shipment Status Audits screen where you can view the
shipment's status audits.
Table 318. Shipment Status Audits, Shipment Status Audits
Fields
Modified By The user who performed the modification.
Old Status The outbound shipment status before the status modification.
Old Status Date The date the outbound shipment entered the old status.
256 Sterling Selling and Fulfillment Foundation: Warehouse Management System User Guide
Table 318. Shipment Status Audits, Shipment Status Audits (continued)
Fields
New Status The outbound shipment status after the status modification.
New Status Date The date the status modification was made.
Reason Code The reason for the modification.
Reason Text Additional information as to why the modification was made.
Shipment Dates for Outbound Shipments
You can change dates pertaining to the outbound shipment, such as shipment
dates and delivery dates in this screen.
Table 319. Shipment Dates, Shipment
Fields
Shipment # The outbound shipment number.
Shipper's Ref. # The outbound shipment reference number.
Plan # The delivery plan number the outbound shipment is
associated with, if applicable. Click this link to go to the
Select Delivery Plan for an Outbound Shipment screen where
you can add an outbound shipment to a delivery plan.
Enterprise The Enterprise associated with the shipment.
Buyer The identifier for the Buyer. Click this link to go to the
Organization Details screen where you can view the buyer
organization details.
Seller The identifier for the Seller. Click this link to go to the
Organization Details screen where you can view the seller
organization details.
Ship Node The node from where the outbound shipment ships. Click
this link to go to the Ship Node Detail screen where you can
view the node details for the shipment.
Receiving Node The node that is receiving the outbound shipment.
Status The outbound shipment status. Click this link to go to the
Shipment Status Audits screen where you can view the
shipment's status audits.
Has Hazardous Items Indicates if the outbound shipment contains any hazardous
item.
Table 320. Shipment Dates, System Dates
Fields
Requested Shipment Date The requested shipment date.
Expected Shipment Date The expected shipment date.
Actual Shipment Date The actual shipment date.
Requested Delivery Date The requested delivery date.
Expected Delivery Date The expected delivery date.
Actual Delivery Date The actual delivery date.
Chapter 29. Outbound Shipment Console Screens 257
Table 321. Shipment Dates, New Dates
Fields
Date Type The date type. For example, Shipment or Delivery.
Requested The Buyer requested date for the date type. This field can be
modified.
Expected The expected date for the date type. This field can be
modified.
Actual The actual date for the date type. This field can be modified.
Alerts for Outbound Shipments
You can view shipment alerts in this screen.
Table 322. Shipment Alerts, Shipment
Fields
Shipment # The outbound shipment number.
Shipper's Ref. # The outbound shipment reference number.
Plan # The delivery plan number the outbound shipment is
associated with, if applicable. Click this link to go to the
Select Delivery Plan for an Outbound Shipment screen where
you can add an outbound shipment to a delivery plan.
Enterprise The Enterprise associated with the shipment.
Buyer The identifier for the Buyer. Click this link to go to the
Organization Details screen where you can view the buyer
organization details.
Seller The identifier for the Seller. Click this link to go to the
Organization Details screen where you can view the seller
organization details.
Ship Node The node from where the outbound shipment ships. Click
this link to go to the Ship Node Detail screen where you can
view the node details for the shipment.
Receiving Node The node that is receiving the outbound shipment.
Status The outbound shipment status. Click this link to go to the
Shipment Status Audits screen where you can view the
shipment's status audits.
Has Hazardous Items Indicates if the outbound shipment contains any hazardous
item.
Table 323. Shipment Alerts, Alert List
Actions
View Details This action allows you to view alert details. For more
information about alerts, see the Sterling Selling and Fulfillment
Foundation: Application Platform User Guide.
Fields
Alert ID The alert ID.
Type The type of alert raised. For example, ON_FAILURE or
FAILED_AUTH. For more information about alerts, see the
Sterling Selling and Fulfillment Foundation: Application Platform
User Guide.
258 Sterling Selling and Fulfillment Foundation: Warehouse Management System User Guide
Table 323. Shipment Alerts, Alert List (continued)
Description A brief description of the alert.
Queue The queue the alert has been assigned to.
Priority The alert priority.
Owner The user who is handling the alert.
Raised On The date the alert was raised.
Additional Attributes for Outbound Shipment
You can view shipment additional attributes in this screen.
Table 324. Additional Attributes, Shipment
Fields
Shipment # The outbound shipment number.
Shipper's Ref. # The outbound shipment reference number.
Plan # The delivery plan number the outbound shipment is
associated with, if applicable. Click this link to go to the
Select Delivery Plan for an Outbound Shipment screen where
you can add an outbound shipment to a delivery plan.
Enterprise The Enterprise associated with the shipment.
Buyer The identifier for the Buyer. Click this link to go to the
Organization Details screen where you can view the buyer
organization details.
Seller The identifier for the Seller. Click this link to go to the
Organization Details screen where you can view the seller
organization details.
Ship Node The node from where the outbound shipment ships. Click
this link to go to the Ship Node Detail screen where you can
view the node details for the shipment.
Receiving Node Indicates the node that is receiving the outbound shipment.
Status The outbound shipment status. Click this link to go to the
Shipment Status Audits screen where you can view the
shipment's status audits.
Has Hazardous Items Indicates if the outbound shipment contains hazardous items.
Table 325. Additional Attributes, Additional Attributes
Fields
Overage Allowed Indicates whether the overage is allowed.
For outbound shipments, overage means shipping more than
was initially intended in a shipment.
For inbound shipments, overage means receiving more than
the expected quantity in a shipment.
Manually Entered Indicates whether the shipment was manually entered, or
generated automatically.
Order Available On System Indicates whether the order that is associated with the
shipment is available in Sterling Selling and Fulfillment
Foundation, or if it only exists in an external system.
Chapter 29. Outbound Shipment Console Screens 259
Table 325. Additional Attributes, Additional Attributes (continued)
Fields
Case Content Verification
Not Required
Indicates whether the case content verification is required for
this shipment.
Pallet Content Verification
Not Required
Indicates whether the pallet content verification is required
for this shipment.
Shipment Entry Overridden Indicates whether the shipment entry is allowed.
Gift Indicates whether the shipment line is a gift.
Shipment Activity Demand for Outbound Shipment
You can view activity demand for the selected outbound shipments in this screen.
Table 326. Shipment Activity Demand
Fields
Shipment # The outbound shipment number.
Shipper's Ref. # The outbound shipment reference number.
Plan # The delivery plan number the outbound shipment is
associated with, if applicable. Click this link to go to the
Select Delivery Plan for an Outbound Shipment screen where
you can add an outbound shipment to a delivery plan.
Enterprise The Enterprise associated with the shipment.
Buyer The identifier for the Buyer. Click this link to go to the
Organization Details screen where you can view the buyer
organization details.
Seller The identifier for the Seller. Click this link to go to the
Organization Details screen where you can view the seller
organization details.
Ship Node The node from where the outbound shipment ships. Click
this link to go to the Ship Node Detail screen where you can
view the node details for the shipment.
Receiving Node Indicates the node that is receiving the outbound shipment.
Status The outbound shipment status. Click this link to go to the
Shipment Status Audits screen where you can view the
shipment's status audits.
Has Hazardous Items Indicates if the outbound shipment contains hazardous items.
Table 327. Shipment Activity Demand, Activity Demand List
Actions
Delete This action allows you to delete the selected activity
demands.
Shipment Line # The outbound shipment line number.
Location ID The item location in the node.
Activity Code The activity to be performed on items belonging to the work
order.
Pallet Id The pallet LPN that belong to the work order.
Case Id The case LPN that belong to the work order.
Item ID The items that belong to the work order.
260 Sterling Selling and Fulfillment Foundation: Warehouse Management System User Guide
Table 327. Shipment Activity Demand, Activity Demand List (continued)
Priority Indicates the priority of the demand.
Demand Quantity Indicates whether the demand is satisfied or not.
Satisfied Quantity The extent to which the demand is satisfied.
Demand Satisfied Indicates whether the demand is satisfied or not.
Shipment Audits for Outbound Shipment
You can view any modifications performed by the user through the Application
Console against an outbound shipment in this screen.
Table 328. Shipment Audits, Shipment
Fields
Shipment # The outbound shipment number.
Shipper's Ref. # The outbound shipment reference number.
Plan # The delivery plan number with which the outbound
shipment is associated, if applicable. Click this link to go to
the Select Delivery Plan for an Outbound Shipment screen
where you can add an outbound shipment to a delivery plan.
Enterprise The Enterprise associated with the shipment.
Buyer The identifier for the Buyer. Click this link to go to the
Organization Details screen where you can view the buyer
organization details.
Seller The identifier for the Seller. Click this link to go to the
Organization Details screen where you can view the seller
organization details.
Ship Node The node from where the outbound shipment ships. Click
this link to go to the Ship Node Detail screen where you can
view the node details for the shipment.
Receiving Node The node that is receiving the outbound shipment.
Status The outbound shipment status. Click this link to go to the
Shipment Status Audits screen where you can view the
shipment's status audits.
Has Hazardous Item Indicates if the shipment has any hazardous item.
Table 329. Shipment Audits, Shipment Audits
Fields
Date The date and time on which the shipment was modified.
Modified By The user who performed the modification.
Context The modifications carried out against the shipment.
Modification The attribute that was modified for the shipment.
Old Value The attribute value before making the modifications.
New Value The attribute value after it was modified.
Reason Code The reason for the modification.
Reason Text Additional information as to why the modification was made.
Chapter 29. Outbound Shipment Console Screens 261
Table 330. Shipment, Shipment Line Audits
Fields
Date The date and time on which the shipment line was modified.
Modified By The user who performed the modification.
Context The modifications carried out against the shipment line.
Line # The shipment line number that was modified.
Modification The attribute that was modified for the shipment line.
Old Value The attribute value before making the modifications.
New Value The attribute value after it was modified.
Reason Code The reason for the modification.
Reason Text Additional information as to why the modification was made.
Logical Kits for Outbound Shipment
You can view the kit components for a logical kit in this screen.
Table 331. Shipment Line Details, Shipment Line
Fields
Shipment Line # The shipment line number.
Shipment # The outbound shipment number.
Enterprise The Enterprise associated with the shipment.
Order # The order number to which the outbound shipment line
belongs.
Order Line # The order line number to which the outbound shipment line
belongs.
Release # The order release number to which the outbound shipment
line belongs.
Item ID The outbound shipment line item's item ID.
Description The item's description.
Is Hazardous Item Displays 'Y' if the item is a hazardous item, or 'N' if it is not a
hazardous item.
Product Class The outbound shipment line item's product class.
Unit of Measure The outbound shipment line item's unit of measure.
Requested Serial # The serial number requested in the order.
Quantity Number of requested units of the item included in the
shipment.
Over Ship Quantity Indicates quantity of an item over shipped.
Original Qty Indicates the original quantity on the order for the item.
Table 332. Shipment Line Details, Line Attributes
Fields
Segment Type Segment type of the item. A segment type indicates an
inventory category. Typical values are MTC - Made To
Customer or MTO - Made to Order.
262 Sterling Selling and Fulfillment Foundation: Warehouse Management System User Guide
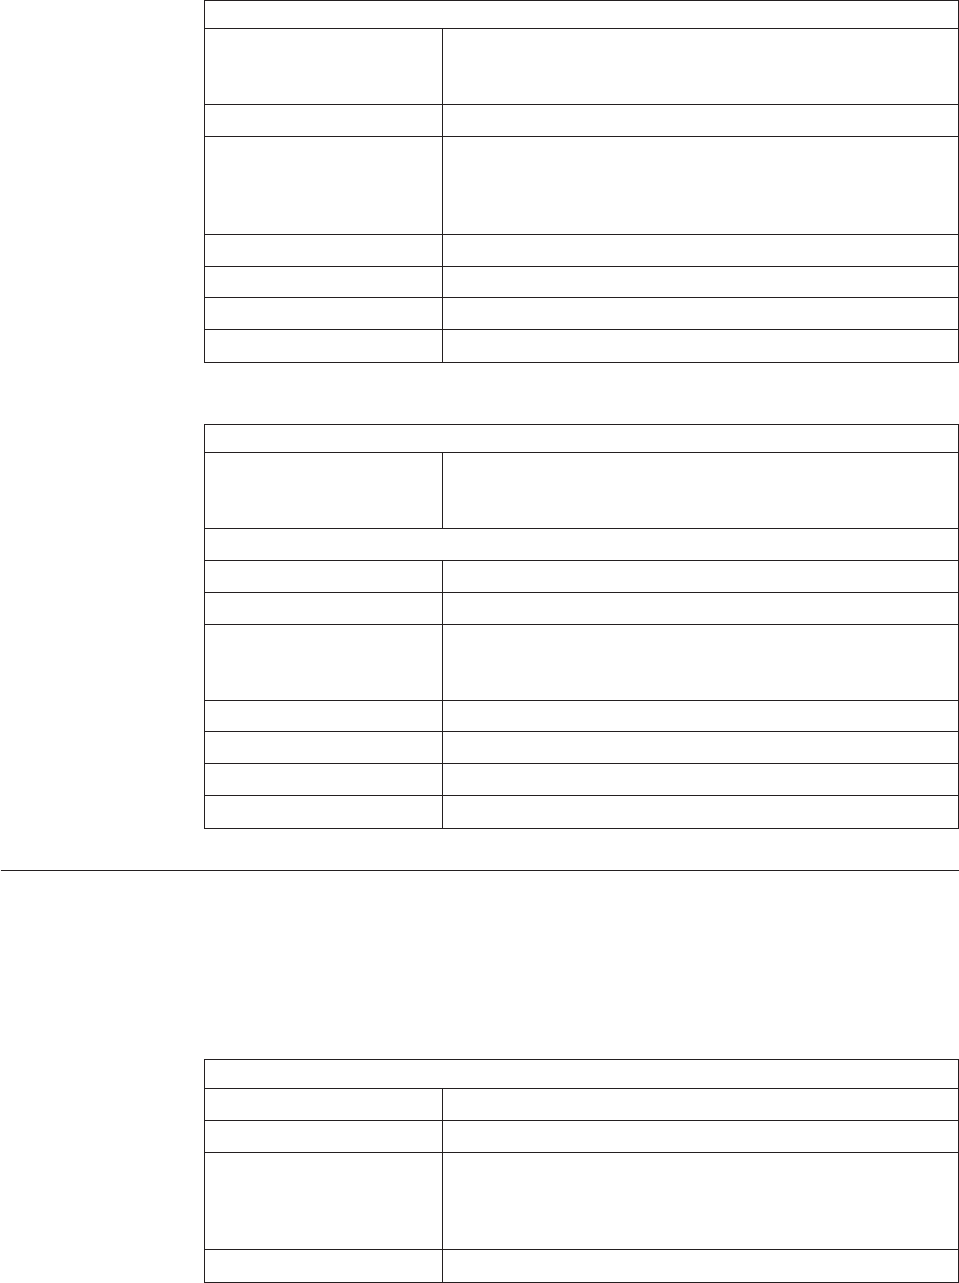
Table 332. Shipment Line Details, Line Attributes (continued)
Fields
Segment # Segment number of the item. A segment holds either the
specific buyer or specific order number that requires
dedication.
COO The country or region of origin.
FIFO # FIFO number is a date based inventory attribute that helps
understand the order in which stock arrived at the node. This
is used to send out items that arrived first than the ones that
arrived later.
Net Weight The net weight.
Net Weight UOM The net weight unit of measure.
Wave # The wave number.
Customer PO # The customer's purchase order number.
Table 333. Shipment Line Details, Kit Components
Actions
View Details This action takes you to the Shipment Line Details for
Outbound Shipment screen where you can view the shipment
line details.
Fields
Item ID The item ID for the SKU.
Description Description of the item.
PC Indicates the item's inventory categorization. Orders are
placed for an item and product class. Typical examples are
IRREGULAR, FD (Factory Defects).
UOM The item's unit of measure.
Qty Per Kit Number of units of the item included in the kit.
Wave # The wave number associated with the shipment line.
Quantity Number of units of the item included in the shipment.
Pack Containers for Outbound Shipment
(Applicable only for IBM Sterling Distributed Order Management, IBM Sterling
Supply Collaboration, and IBM Sterling Reverse Logistics)
You can pack any unpacked items into containers for shipping in this screen.
Table 334. Pack Container, Shipment
Fields
Shipment # The outbound shipment number.
Shipper's Ref. # The outbound shipment reference number.
Plan # The delivery plan number the outbound shipment is
associated with, if applicable. Click this link to go to the
Select Delivery Plan for an Outbound Shipment screen where
you can add an outbound shipment to a delivery plan.
Enterprise The Enterprise associated with the shipment.
Chapter 29. Outbound Shipment Console Screens 263
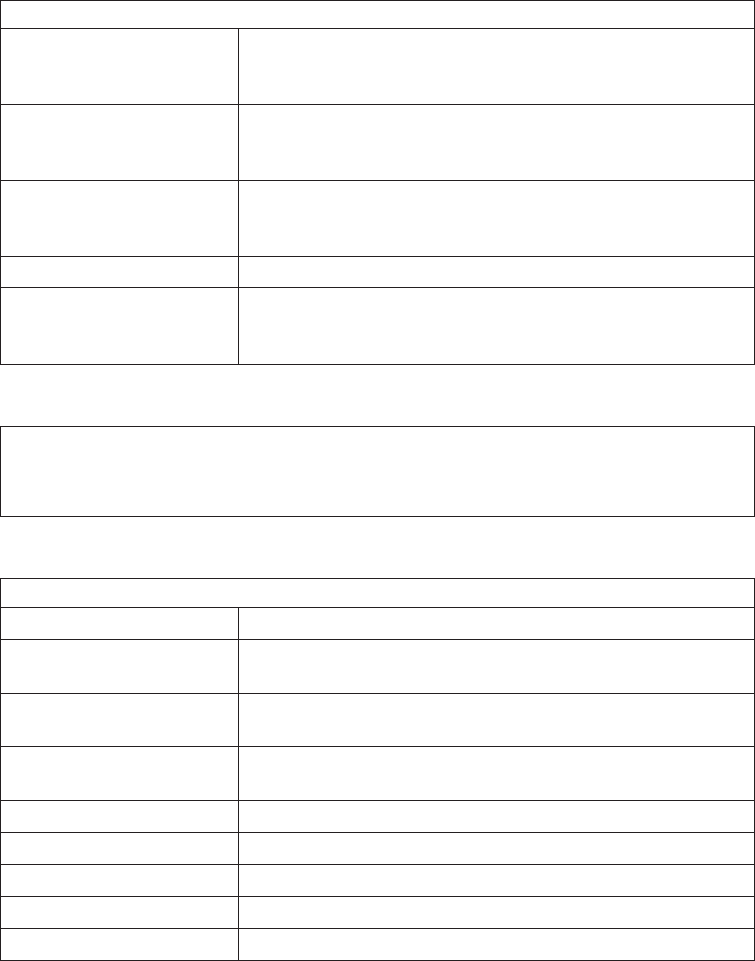
Table 334. Pack Container, Shipment (continued)
Fields
Buyer The identifier for the Buyer. Click this link to go to the
Organization Details screen where you can view the buyer
organization details.
Seller The identifier for the Seller. Click this link to go to the
Organization Details screen where you can view the seller
organization details.
Ship Node The node from where the outbound shipment ships. Click
this link to go to the Ship Node Detail screen where you can
view the node details for the shipment.
Destination The outbound shipment's destination.
Status The outbound shipment status. Click this link to go to the
Shipment Status Audits screen where you can view the
shipment's status audits.
Table 335. Pack Container, Ship To
The address the shipment is shipped to.
Click the Address Details icon to go to the Address Details screen where you can modify
the ship to address.
Table 336. Pack Container, Container Details
Fields
Container Type Select whether the container is a case or pallet.
Container SCM Enter the shipment container marking number of the case or
pallet.
Tracking # Enter the container's tracking number used to track the
container's status and location.
Declared Value Enter the declared value used to calculate customs charges.
This field is only applicable to international shipments.
Gross Weight Enter the weight of the container plus its contents.
Net Weight Enter the net weight of the container.
Height Enter the height of the container.
Width Enter the width of the container.
Length Enter the length of the container.
264 Sterling Selling and Fulfillment Foundation: Warehouse Management System User Guide
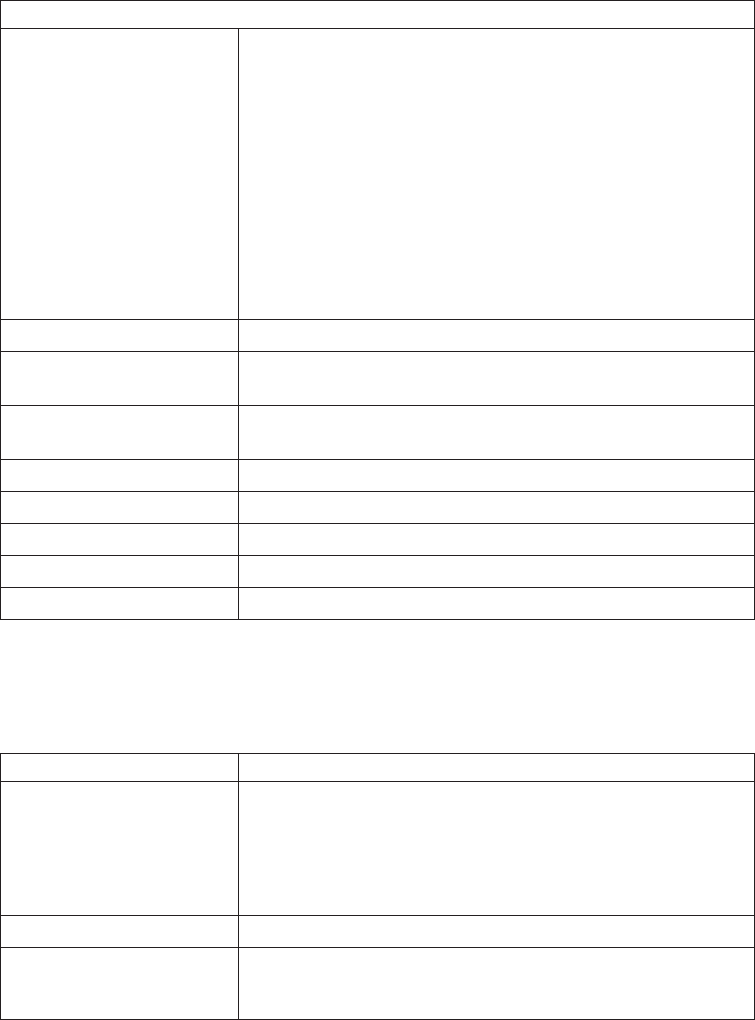
Table 337. Pack Container, Unpacked Items
Fields
Tag/Serial This column displays only if the item is tag-controlled or
serial tracked. The column label that displays is the name of
the unique identifier you have defined (for example, Lot #). If
you have defined more than one unique identifier, the label
that displays is Tag #. To view the details associated with the
container line, click the hypertext link.
The tag details for a tag-controlled item displays, if the ship
node is configured to capture tags in all operations performed
within the node, or if the buyer on a shipment mandates it as
a part of their inbound compliance. For more information
about capturing tag attributes, see the Sterling Selling and
Fulfillment Foundation: Application Platform Configuration Guide.
Order # The order number associated with the unpacked items.
Line # The order line number to which the line item packaged in the
container belongs to.
Release # The order release number to which the unpacked line item
belongs.
Item ID The item ID of the unpacked line item.
PC The product class of the unpacked line item.
UOM The unit of measure of the unpacked line item.
Quantity The quantity associated with the unpacked items.
Pack Quantity Enter the item quantity you can pack in the container.
If the item is serial-controlled, an additional field is displayed to let you enter the
serial number.
Table 338. Pack Container, Serial Range
Field Description
Serial # Enter the serial number of the item.
Click the Add icon to add a new serial number.
Click the Toggle icon to go to the serial range panel, where
you can enter the serial range of the items.
From Serial # Enter the start serial number.
To Serial # Enter the end serial number.
Click the Add icon to add a new serial range.
Note: While packing whenever there is requested serial defined in shipment lines
of the outbound shipment, the 'Enter serial range' button is not displayed in the
screen.
Note: For a serial tracked or serialized item, if secondary serials are defined and
secondary information is not provided, then in such scenario the 'Entry Serial
Range' button is not provided in the screen.
Chapter 29. Outbound Shipment Console Screens 265
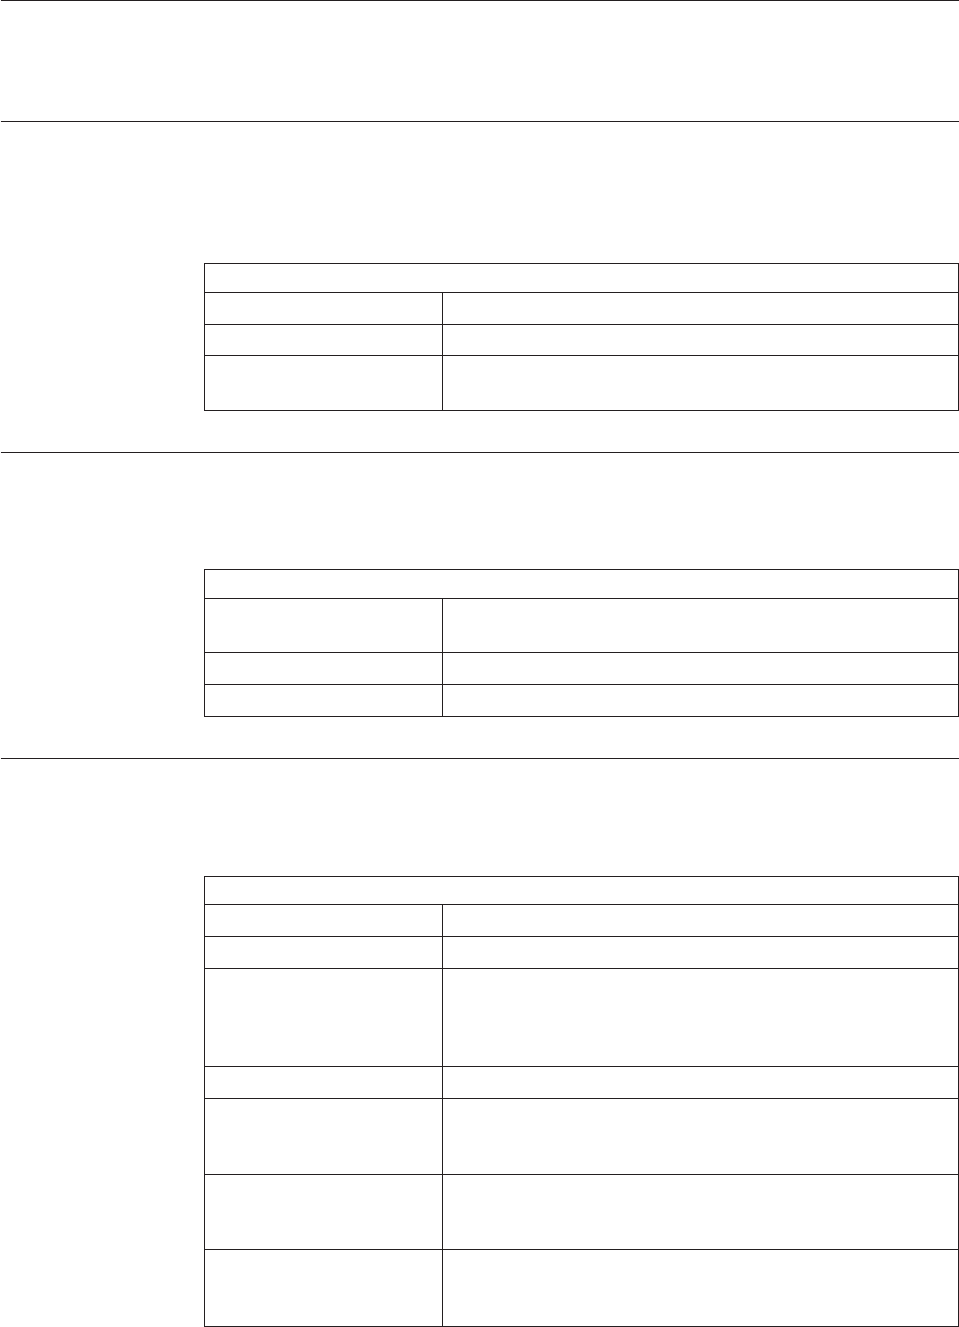
Packing a Container for Outbound Shipment
You can pack any unpacked items into containers for shipping in this screen. For
more information on this, see the section "Pack or Unpack".
Print for an Outbound Shipment
You can print documents or labels and apply to an outbound shipment with the
help of this screen.
Table 339. Print
Fields
Print Service Name Choose the applicable document or label you want to print.
Printer Name Choose the printer to print the document or label from.
No. of Copies Enter the total number of copies of the document or label to
print.
Cancel Selected Outbound Shipments
This screen allows you to cancel the selected outbound shipments.
Table 340. Cancel Selected Shipments
Fields
Backorder cancelled
quantity
Select if the quantity that was cancelled from a shipment
must be backordered.
Cancellation Reason Code Select the applicable reason code for cancellation.
Reason Text Enter reason for cancellation of the outbound shipment.
Split Outbound Shipment
Use this screen to split an outbound shipment.
Table 341. Split Shipment, Shipment
Fields
Shipment # The outbound shipment number.
Shipper’s Ref. # The outbound shipment reference number.
Plan # The delivery plan number the outbound shipment is
associated with, if applicable. Click this link to go to the
Select Delivery Plan for an Outbound Shipment screen where
you can add an outbound shipment to a delivery plan.
Enterprise The Enterprise associated with the shipment.
Buyer The identifier for the Buyer. Click this link to go to the
Organization Details screen where you can view the buyer
organization details.
Seller The identifier for the Seller. Click this link to go to the
Organization Details screen where you can view the seller
organization details.
Ship Node The node from where the outbound shipment ships. Click
this link to go to the Ship Node Detail screen where you can
view the node details for the shipment.
266 Sterling Selling and Fulfillment Foundation: Warehouse Management System User Guide
Table 341. Split Shipment, Shipment (continued)
Fields
Destination The outbound shipment’s destination.
Status The outbound shipment status. Click this link to go to the
Shipment Status Audits screen where you can view the
shipment’s status audits.
Table 342. Split Shipment, Shipment Lines
Actions
Split Lines This action takes you to the Split Shipment Lines where you
can split the selected shipment line or container lines.
Fields
Shipment Line # The line number on the shipment for the item.
Order # The order number to which the shipment line belongs
Line # The line number to which the shipment line belongs.
Release # The order release number to which the shipment line belongs.
Item ID The item ID for the SKU.
Description The item’s description.
PC Indicates the item's inventory categorization. Orders are
placed for an item and product class. Typical examples are
IRREGULAR, FD (Factory Defects).
UOM The item’s unit of measure.
Mark For The net weight of item expected
Quantity Number of units of the item included in the shipment.
Split Qty Enter the number of units of the item to be split.
Table 343. Split Shipment, Shipment Containers
Actions
Split Containers This action takes you to the Split Shipment Lines where you
can split the selected shipment line or container lines.
Fields
Container # The container number.
Tracking # The tracking number used to track a container during the
shipment process.
Container SCM The shipment container marking.
Net Weight The container’s net weight.
Gross Weight The container’s total weight (including packaging).
Freight Charge The charge applied by the Carrier for shipping the container.
Chapter 29. Outbound Shipment Console Screens 267
Split Shipment Lines
Use this screen to split a shipment or container lines in this screen.
Table 344. Split Shipment, Shipment
Fields Description
Shipment # The shipment number associated with the outbound
shipment is automatically generated and populated by the
system.
Enter the outbound shipment number, if applicable.
Create Alerts for the Selected Outbound Shipments
You can create alerts for the selected outbound shipments in this screen. For field
value descriptions, see the Shipment Alerts, Shipment and Shipment Alerts, Alert
List tables.
Ship Node Detail for Outbound Shipment
You can view the ship node details for an inbound shipment in this screen.
Table 345. Ship Node Details, Ship Node
Fields
Ship Node The node from where the outbound shipment ships.
Description A brief description of the ship node.
Interface The interface the node uses to communicate with the system.
Parent Organization The organization that owns the ship node.
Parent Organization Name The name of the parent organization.
Identified By Parent As The node ID as it is seen by the parent organization.
GLN The GLN number.
Table 346. Ship Node Detail, Ship Node Address
The ship node's address.
Table 347. Ship Node Detail, Contact Address
The contact address for the ship node.
Organization Details for Outbound Shipment Console Screens
You can view an organization's details in this screen.
Table 348. Organization Details
Field Description
Organization Information
Organization Code The code that identifies the organization.
Organization Name The name of the organization.
268 Sterling Selling and Fulfillment Foundation: Warehouse Management System User Guide
Table 348. Organization Details (continued)
Field Description
DUNS Number The unique nine-digit identification sequence which provides
unique identifiers of single business entities. Sterling Selling
and Fulfillment Foundation does not associate any logic with
the DUNS number.
Account Number With Hub If the organization is not the Hub, the account number that
the organization has with the Hub.
Primary Enterprise The primary enterprise of the organization.
Primary URL Enter the URL of the organization's Internet address, if
applicable.
Primary Contact Address
This inner panel displays the current primary contact address for this organization. Click
the Address Details icon to view the Primary Contact Address Details. For more
information about the Primary Contact Address Details window, see Address Details.
Corporate Address
This inner panel displays the current corporate address for this organization. Click Address
Details icon to view the Corporate Address Details. For more information about the
Corporate Address Details window, see Address Details.
Select Delivery Plan for an Outbound Shipment
You can add an outbound shipment to a delivery plan in this screen.
Table 349. Select Delivery Plan
Fields
Plan # Enter the plan number of the delivery plan you want to add
the outbound shipment to.
Plan Name Enter the name of the delivery plan you want to add the
outbound shipment to.
Plan Date Enter the date range through which the delivery plan you are
adding the outbound shipment to is valid.
Shipment Line Details for Outbound Shipment
You can view an outbound shipment line details in this screen.
Table 350. Shipment Line Details, Shipment Line
Fields
Shipment Line # The shipment line number.
Shipment # The outbound shipment number.
Enterprise The Enterprise associated with the shipment.
Order # The order number to which the outbound shipment line
belongs.
Order Line # The order line number to which the outbound shipment line
belongs.
Release # The order release number to which the outbound shipment
line belongs.
Item ID The outbound shipment line item's item ID.
Chapter 29. Outbound Shipment Console Screens 269

Table 350. Shipment Line Details, Shipment Line (continued)
Fields
Description The item's description.
Is Hazardous Item Displays 'Y' if the item is a hazardous item, or 'N' if it is not a
hazardous item.
Product Class The outbound shipment line item's product class.
Unit of Measure The outbound shipment line item's unit of measure.
Requested Serial # The serial number requested in the order.
Quantity Number of requested units of the item included in the
shipment.
Over Ship Quantity Indicates quantity of an item over shipped.
Original Qty Indicates the original quantity on the order for the item.
Table 351. Shipment Line Details, Line Attributes
Fields
Segment Type The item's segment type. A segment type indicates an
inventory category. Typical values are MTC - Made To
Customer or MTO - Made to Order.
Segment The item's segment number. A segment holds either the
specific buyer or specific order number that requires
dedication.
COO The country or region of origin.
FIFO # The FIFO number is a date based inventory attribute that
helps understand the order in which stock arrived at the
node. This is used to send out items that arrived first than
the ones that arrived later.
Net Weight The net weight.
Net Weight UOM The net weight unit of measure.
Wave # The wave number.
Customer PO # The customer's purchase order number.
Table 352. Shipment Line Details, Requested Tag
Fields
Tag Identifiers The requested tag identifiers for this shipment line.
Tag Attributes The requested tag attributes for this shipment line.
Table 353. Shipment Line Details, Actual Tag
Actions
Delete This action deletes the specified tag quantity from the
shipment line.
Fields
The attributes shown here depend on the tag identifiers and attributes configured.
Quantity Indicates the quantity on the order with this tag criteria.
270 Sterling Selling and Fulfillment Foundation: Warehouse Management System User Guide
Add Release
You can add an order release line to be included in an outbound shipment in this
screen. For more information, see the Sterling Selling and Fulfillment Foundation:
Distributed Order Management User Guide.
Create Wave for Selected Shipment Group
You can create wave for the selected shipment group in this screen.
Table 354. Create Wave
Fields
Node Node associated with the wave.
Create New Wave With
Shipment Group
Select the shipment group for the wave.
Add To Wave # Choose this option to add shipment to an existing wave
number.
You can also click the Lookup icon to select a wave number.
Consider Select one of the following options:
All Eligible Shipments - Choose this to select all the
shipments.
First Shipments based on Expected Ship Date - Choose this to
select the first shipments based on the expected ship date.
Containers for Outbound Shipment
A container is the physical packaging of outbound shipment line items included in
a shipment. Cartons and pallets are examples of containers. You can use the
Outbound Shipment Console to search for individual containers and view details
such as container dimensions and line items packed in the container.
Container Search By All Attributes
You can search for containers by all attributes with the help of this screen.
Table 355. Container Search By All Attributes
Fields Description
Document Type Select the appropriate document type to search for, if
applicable
Order # Enter the order number you are searching for, if applicable.
Shipment # Enter the outbound shipment number you are searching for,
if applicable.
Container # Enter the container number you are searching for, if
applicable.
Container Type Enter the type of containers you are searching for, if
applicable.
Tracking # Enter the tracking number you want to search for containers
under, if applicable.
Item ID Enter the item ID included in the containers you are
searching for, if applicable.
Chapter 29. Outbound Shipment Console Screens 271
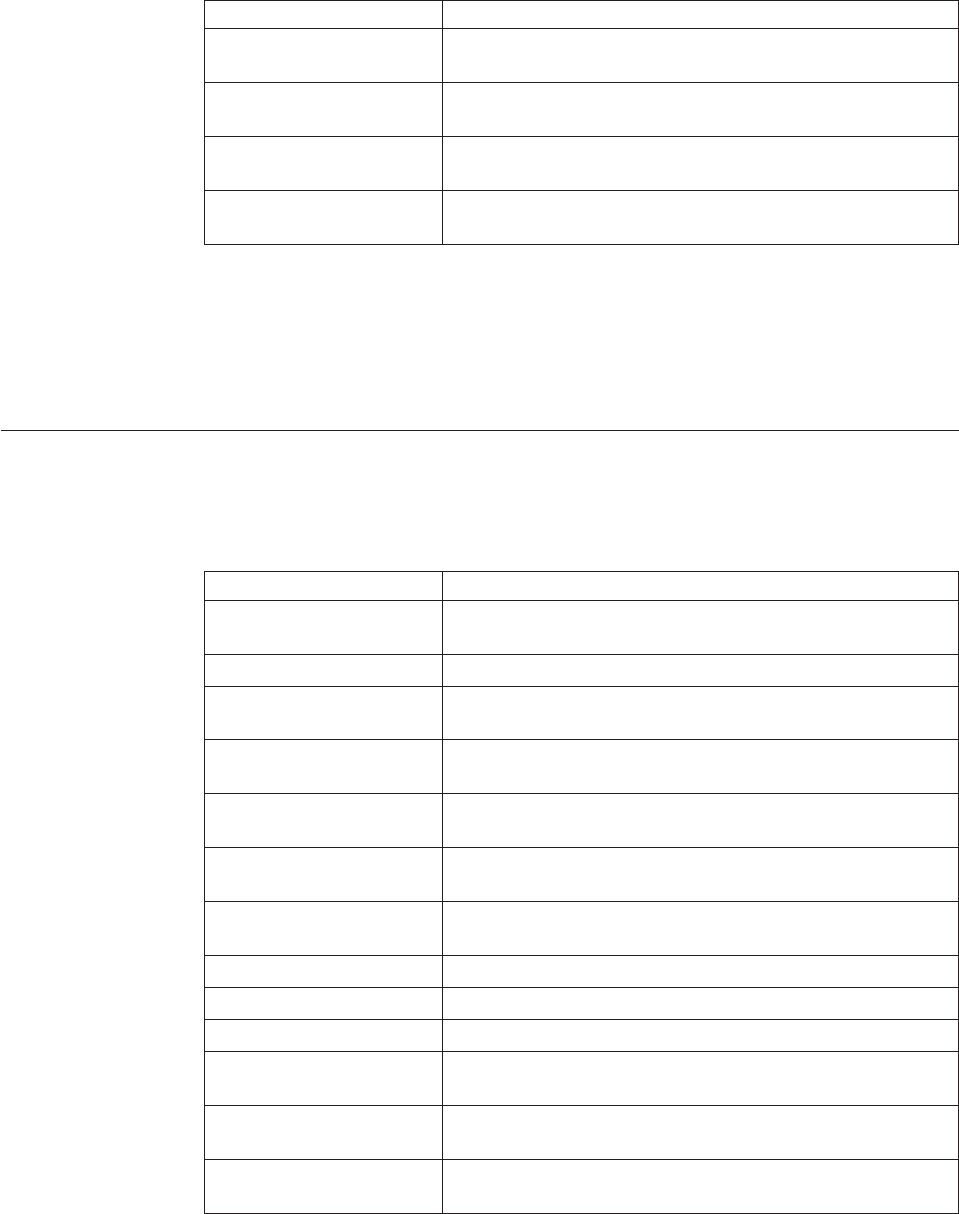
Table 355. Container Search By All Attributes (continued)
Fields Description
Container SCM Enter the container SCM number you are searching for, if
applicable.
Has Hazardous Items Select this check box to search for containers containing
hazardous items, if applicable.
Containers With Logical
Kits Only
Select this if you want to search for containers only with
logical kits, if applicable.
Max Records Enter the maximum number of outbound shipments you
want returned from your search.
Do not use spaces before or after any text you enter in the search fields, as this
may result in inconsistent or inaccurate results.
The Container List screen displays as a result of outbound container search by all
attributes.
Container Search By Status
You can search for containers that fall within a particular status with the help of
this screen.
Table 356. Container Search By Status
Fields Description
Document Type Select the appropriate document type to search for, if
applicable.
Node Select the node for which you want to search.
Shipment # Enter the outbound shipment number you are searching for,
if applicable.
Container # Enter the container number you are searching for, if
applicable.
Container Type Enter the type of containers you are searching for, if
applicable.
Container Contains Select the container quantity you are searching for, if
applicable.
Status Select the status range of the container you want to search
for, if applicable.
Carrier/Service Select the carrier/service you are searching for, if applicable.
Container Group Select the container group you are searching for, if applicable.
Wave # Enter the wave number you are searching for, if applicable.
Outermost Containers Only Select check box to search for outermost containers only, if
applicable.
Unmanifested Containers
Only
Select check box to search for unmanifested containers only, if
applicable.
Max Records Enter the maximum number of outbound shipments you
want returned from your search.
Do not use spaces before or after any text you enter in the search fields, as this
may result in inconsistent or inaccurate results.
272 Sterling Selling and Fulfillment Foundation: Warehouse Management System User Guide

The Container List screen displays as a result of outbound container search by
status.
Container List for Outbound Shipment
The Container List window displays the results of a container search. You can
perform actions on a single container or multiple containers by selecting the check
boxes of the containers you want to perform an action on and choosing the
applicable action from the action bar.
Table 357. Container List
Actions
View Details This action takes you to the Container Details screen where
you can view the container details.
Pack/Unpack This action takes you to the Pack or Unpack screen where
you can pack or unpack a container.
Print This action takes you to the Print for an Outbound Shipment
screen where you can print the container's documents or
labels.
Delete This action lets you delete an inbound container.
Void Tracking# This action lets you void a container's tracking number.
Fields
Container # The container number.
Shipment # The shipment number of the shipment the container belongs
to.
Status The container status.
Manifested Indicates whether the container is manifested.
Container Type Indicates whether it is a Pallet or Carton.
Tracking # The tracking number used to track a container during the
shipment process.
Container SCM The shipment container marking.
Ship Date The date the container ships on.
Container Details for Outbound Shipment
The Container Details screen provides container information associated with the
shipment. The actions that can be performed in the Container Details screen are
explained in the following tables.
Table 358. Container Details, Container
View Icon Description
Audit Status Audits - This icon takes you to the Container Status
Audits where you can view the container's status audits.
Activity Demand Container Activity List - This icon takes you to the Container
Activity List where you can view activities performed against
an outbound container.
Actions
Pack/Unpack This action takes you to the Pack or Unpack screen where
you can pack or unpack a container.
Chapter 29. Outbound Shipment Console Screens 273
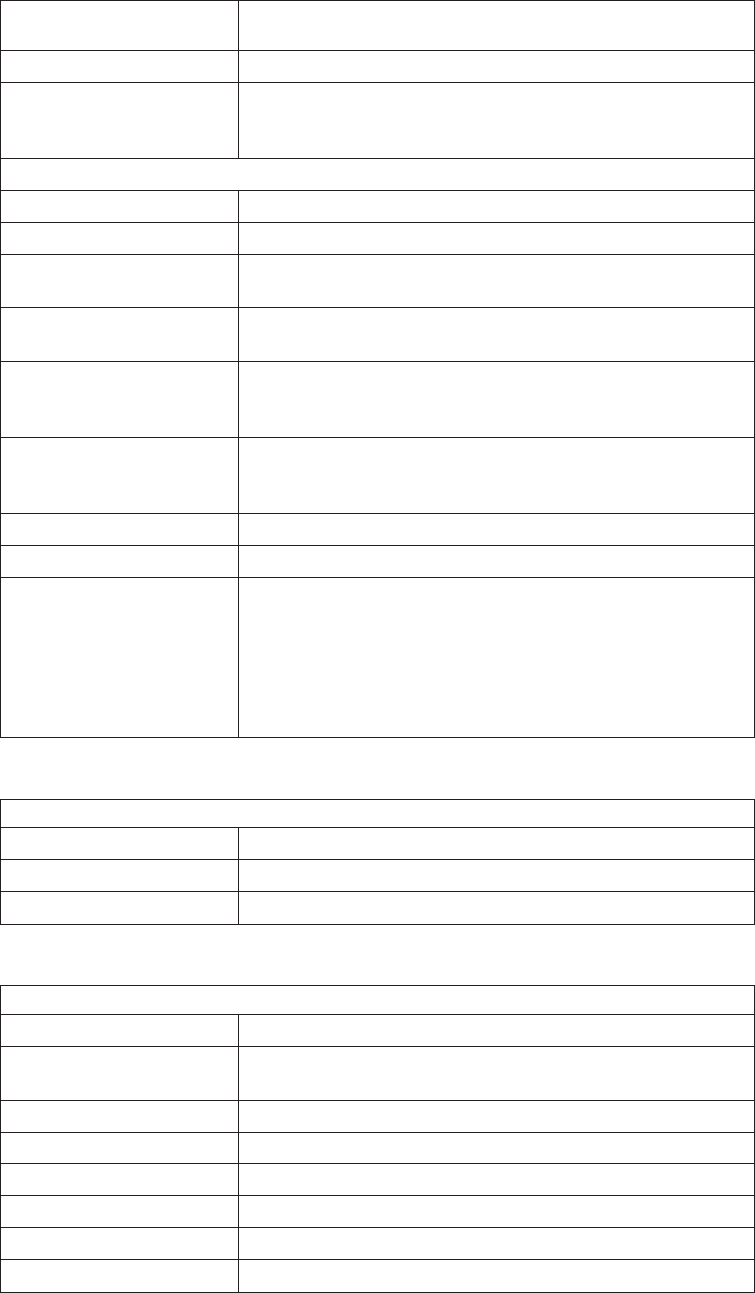
Table 358. Container Details, Container (continued)
Print This action takes you to the Print for an Outbound Shipment
screen where you can print the shipping documents or labels.
Void Tracking # This action takes lets you void a container's tracking number.
View Return Tracking
Numbers
This action takes you to the Container Return Tracking
Numbers screen where you can view the list of return
tracking numbers associated to a container.
Fields
Container # The container number.
Container Type The type of container used. For example, Carton or Pallet.
Container Group The container group to which the container belongs to. Valid
values are: SHIPMENT, LOAD, or INVENTORY.
Parent Container # The parent container #. This field displays only if the
container is a child container.
Parent Container Type # The type of parent container used. For example, Carton or
Pallet. This field displays only if the container is a child
container.
Parent Container Group # The container group to which the container belongs to. Valid
values are: SHIPMENT, LOAD, or INVENTORY. This field
displays only if the container is a child container.
Container SCM The shipment container marking number of the case or pallet.
Shipment # The outbound shipment number.
Load # The load number associated with the container. This field
displays only if the container belongs to a load.
Click this link to go to the Load Details screen to view the
load details associated with the container. For more
information, see the Sterling Selling and Fulfillment Foundation:
Logistics Management User Guide.
Table 359. Container Details, Execution Details
Fields
Container Location Indicates the location where the container is available.
Container Status Indicates the current status of the container.
Is Manifested Indicates whether the container is manifested.
Table 360. Container Details, Container Info
Fields
Carrier/Service The Carrier and Carrier service shipping the container.
Tracking # The container's tracking number used to track the container's
status and location.
Gross Weight The weight of the container plus its contents.
COD Pay Method The COD payment type.
Return Tracking # The return tracking number associated with the container.
Net Weight The container's content's weight.
COD Amount The COD amount.
Size The size of the container.
274 Sterling Selling and Fulfillment Foundation: Warehouse Management System User Guide

Table 360. Container Details, Container Info (continued)
Fields
Actual Weight The actual weight of the container.
Actual Freight Charge The actual freight charges for the carrier or service
Length The length of the container.
Billed Weight The billed weight.
Special Services Surcharges The special services surcharges.
Width The width of the container.
Has Hazardous Items Indicates if the container contains hazardous items.
Declared Insurance Value The value used to calculate customs charges. This field is
only applicable to international shipments.
Height The height of the container.
Table 361. Container Details, Container Line Details
Fields
Tag Details This column displays only if the item is tag-controlled or
serial tracked. The column label that displays is the name of
the unique identifier you have defined (for example, Lot #). If
you have defined more than one unique identifier, the label
that displays is Tag #.
The tag details for a tag-controlled item displays, if the ship
node is configured to capture tags in all operations performed
within the node, or if the buyer on a shipment mandates it as
a part of their inbound compliance. For more information
about capturing tag attributes, see the Sterling Selling and
Fulfillment Foundation: Application Platform Configuration Guide.
Click this link to go to the Serial Details screen to the serial
details for the container line.
Order # The order number to which the line item packaged in the
container belongs.
Line # The order line number of the line item packaged in the
container.
Release # The order release number to which the line item packaged in
the container belongs.
Item ID The item ID of the line item packaged in the container.
PC The product class of the line item packaged in the container.
UOM The unit of measure of the line item packaged in the
container.
Description The item's description.
Quantity The quantity of the line item to be packaged into the
container.
Packed Quantity The actual quantity of the line item packaged into the
container.
Chapter 29. Outbound Shipment Console Screens 275
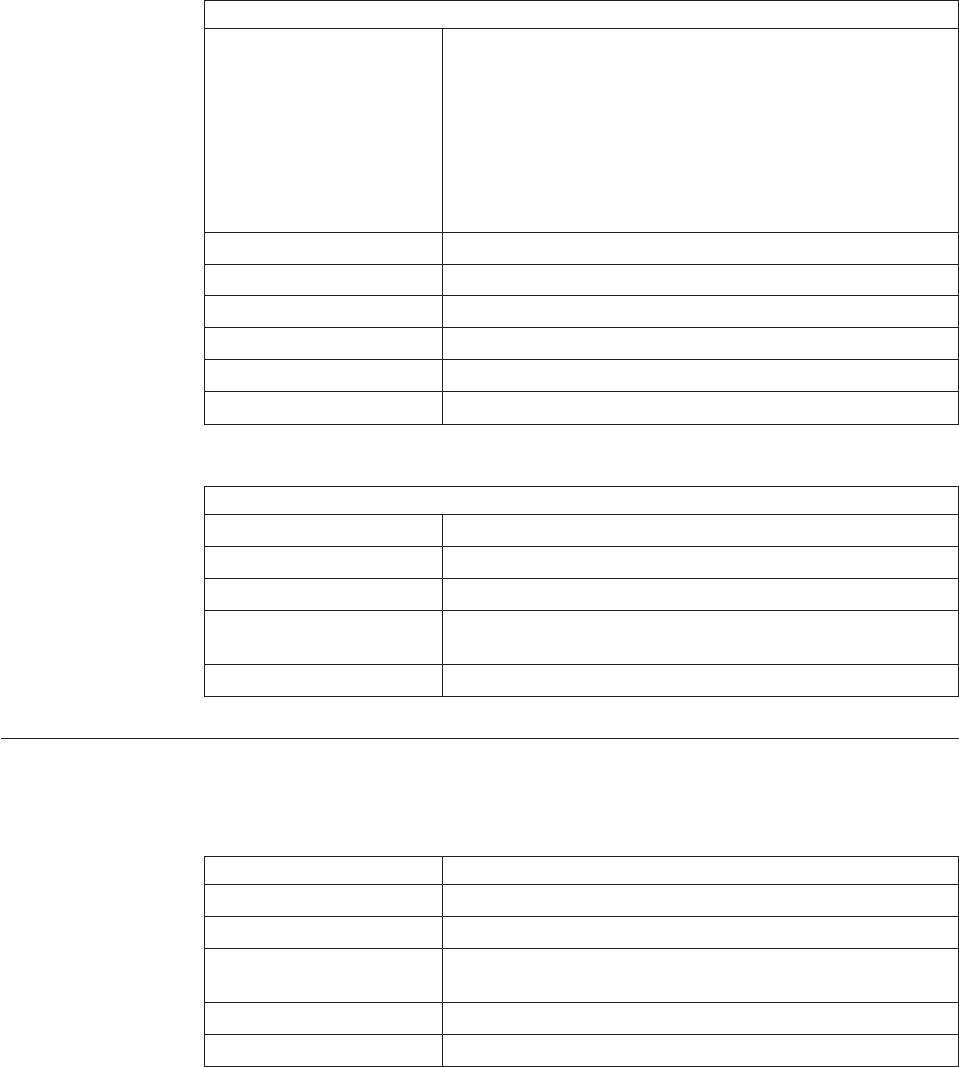
Table 362. Container Details, Inner Pack Details
Fields
Tag Details Click the Plus icon to view and hide tag information of an
inner pack.
The tag details for a tag-controlled item displays, if the ship
node is configured to capture tags in all operations performed
within the node, or if the buyer on a shipment mandates it as
a part of their inbound compliance. For more information
about capturing tag attributes, see the Sterling Selling and
Fulfillment Foundation: Application Platform Configuration Guide.
Item ID The item's item ID.
PC The item's product class.
UOM The item's unit of measure.
Description A brief description of the item.
Inner Pack Quantity The item quantity contained in each inner pack.
No Of Inner Packs The total number of inner packs packaged into the container.
Table 363. Container Details, Child Containers
Fields
Container # The container number.
Status The container status.
Container Type The type of container used. For example, Carton or Pallet.
Tracking # The container's tracking number used to track the status and
location of the container.
Container SCM The shipment container marking.
Container Return Tracking Numbers
You can view the outbound container return tracking nu
Table 364. Container Return Tracking Numbers, Container
Fields Description
Container # The container number.
Container Type The type of container used. For example, Carton or Pallet.
Container Group The container group to which the container belongs to. Valid
values are: SHIPMENT, LOAD, or INVENTORY.
Container SCM The shipment container marking number of the case or pallet.
Shipment # The outbound shipment number.
276 Sterling Selling and Fulfillment Foundation: Warehouse Management System User Guide
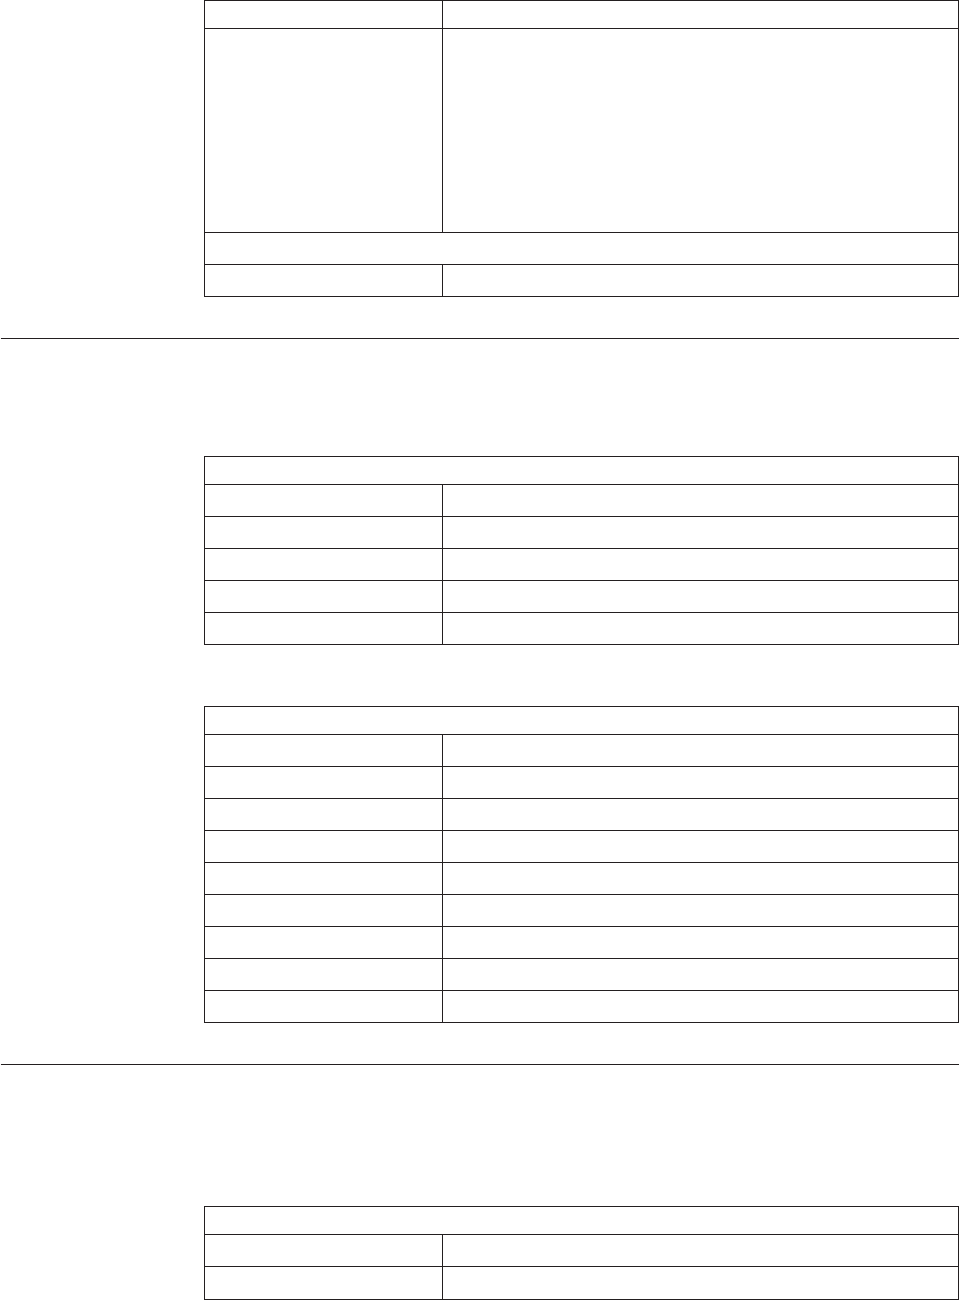
Table 365. Container Return Tracking Numbers, Container Return Tracking Numbers
Actions Description
Print This action takes you to the Print screen where you can print
the return labels corresponding to the return tracking
numbers.
You must select the Return Tracking Number and click Print.
If you select the ReprintCarrierLabel service, the return label
will be reprinted.
Note: You must select the Return Tracking Numbers one at a
time.
Fields
Return Tracking Number Displays the outbound container return tracking numbers.
Serial Details for Outbound Shipment Console Screens
You can view an outbound container serial details in this screen.
Table 366. Serial Details, Serial Information
Fields
Node Node associated with the item.
Location Location associated with the item.
Case ID Case LPN associated with the container.
Pallet ID Pallet LPN associated with the container.
Serial # The serial number associated with the container items.
Table 367. Serial Details, Child Serials
Fields
Secondary Serial #1 Component serial number of the item.
Secondary Serial #2 Component serial number of the item.
Secondary Serial #3 Component serial number of the item.
Secondary Serial #4 Component serial number of the item.
Secondary Serial #5 Component serial number of the item.
Secondary Serial #6 Component serial number of the item.
Secondary Serial #7 Component serial number of the item.
Secondary Serial #8 Component serial number of the item.
Secondary Serial #9 Component serial number of the item.
Container Status Audits for Outbound Shipment Console Screens
You can view any status modifications performed against an outbound container
status in this screen.
Table 368. Container Status Audits, Container
Fields
Container # The outbound container number.
Container Type The outbound container type. Valid values are: Pallet or Case.
Chapter 29. Outbound Shipment Console Screens 277
Table 368. Container Status Audits, Container (continued)
Fields
Container Group The container group to which the container belongs to. Valid
values are: SHIPMENT, LOAD, or INVENTORY.
Parent Container # The parent container number.
This field displays only if the container is a child container.
Parent Container Type The type of parent container used. For example, Case or
Pallet.
This field displays only if the container is a child container.
Parent Container Group The container group to which the container belongs. Valid
values are: SHIPMENT, LOAD, or INVENTORY.
This field displays only if the container is a child container.
Container SCM The shipment container marking number of the case or pallet.
Shipment # The outbound shipment number.
Click this link to go to the Shipment Details screen and view
the outbound shipment details.
Table 369. Container Status Audits, Container Status Audits
Fields
Modified By The user who performed the modification.
Old Status The outbound shipment status before the status modification.
Old Status Date The date the outbound shipment entered the old status.
New Status The outbound shipment status after the status modification.
New Status Date The date the status modification was made.
Reason Code The reason for the modification.
Reason Text Additional information as to why the modification was made.
Container Activity List
You can view details about the outbound container activities in this screen.
Table 370. Container Activity List, Container
Fields Description
Container # The outbound container number.
Container Type The outbound container type. Valid values are: Pallet or Case.
Container Group The group to which the container belongs. Valid values are:
SHIPMENT, LOAD, or INVENTORY.
Parent Container # The parent container number.
This field displays only if the container is a child container.
Parent Container Type The type of parent container used. For example, Case or
Pallet.
This field displays only if the container is a child container.
278 Sterling Selling and Fulfillment Foundation: Warehouse Management System User Guide
Table 370. Container Activity List, Container (continued)
Fields Description
Parent Container Group The group to which the parent container belongs. Valid
values are: SHIPMENT, LOAD, or INVENTORY.
This field displays only if the container is a child container.
Container SCM The shipment container marking number of the case or pallet.
Shipment # The outbound shipment number identifying the shipment to
which this container belongs.
Click this link to go to the Shipment Details screen and view
the details about this outbound shipment.
Table 371. Container Activity List, Container Activities
Fields Description
Date The date and time when the activity was performed for this
container.
Recorded By The user who performed the activity.
Activity Code Identifies the activity that was performed.
Location ID Indicates the location where the activity was performed in the
node.
Node Indicates the node where the activity was performed.
Address Indicates the address where the activity was performed.
Is An Exception Indicates if the activity recorded is an exception to typically
performed activities.
Notes Any additional information about the activity execution.
Pack or Unpack for Outbound Shipment Console Screens
You can pack or unpack a container in this screen. For more information about
packing a container, see the section, "Pack or Unpack".
Delete Selected Containers
You can delete selected container from the shipment in this screen.
Table 372. Delete Selected Containers, Delete
Fields Description
Remove quantity from
shipment line
Select the check box to remove the quantity from shipment
line.
Backorder removed
quantity
Select the check box to remove backorder quantity.
Chapter 29. Outbound Shipment Console Screens 279
Modify Containerization
You can modify the containerized quantity in this screen.
Table 373. Modify Containerization, Container
View Icon Description
Audit This icon takes you to the Container Status Audits screen
where you can view a list of status audits that you modified
for an outbound container.
Fields
Container # The container number.
Shipment # The outbound shipment the container belongs to.
Container Type The type of container used. For example, Carton or Pallet.
Ship Date The date by which the container must ship.
Container Group The container group to which the container belongs to. Valid
values are: SHIPMENT, LOAD, or INVENTORY.
Manifested Indicates whether the container is manifested.
Remove quantity from
shipment line
Select check box to remove quantity from the shipment line.
Ship To The address the container is shipped to.
Table 374. Modify Containerization, Ship To
Description
The address the shipment is shipped to.
Click the Address Details icon to go to the Address Details screen where you can modify
the ship to address.
Table 375. Modify Containerization, Container Info
Fields Description
Carrier/Service The Carrier and Carrier service used to ship the container.
Tracking # The container's tracking number used to track the container's
status and location.
Pallet/Carton SCM The shipment container marking number of the pallet or
carton.
Declared Value The value used to calculate customs charges. This field is
only applicable to international shipments as it is insured.
Gross Weight The gross weight of the container.
Actual Weight The actual weight of the container.
Size The size of the container.
Length The length of the container.
Width The width of the container.
Height The height of the container.
Net Weight The net weight of the container.
280 Sterling Selling and Fulfillment Foundation: Warehouse Management System User Guide

Table 376. Modify Containerization, Container Line Details
Fields Description
Tag Details This column displays only if the item is tag-controlled or
serial tracked. The column label that displays is the name of
the unique identifier you have defined (for example, Lot #). If
you have defined more than one unique identifier, the label
that displays is Tag #. To view the details associated with the
container line, click the hypertext link.
The tag details for a tag-controlled item displays, if the ship
node is configured to capture tags in all operations performed
within the node, or if the buyer on a shipment mandates it as
a part of their inbound compliance. For more information
about capturing tag attributes, see the Sterling Selling and
Fulfillment Foundation: Application Platform Configuration Guide.
Order # The order number to which the line item packaged in the
container belongs.
Line # The container line number and the order line number of the
line item packaged in the container.
Release # The order release number to which the line item packaged in
the container belongs.
Item ID The item ID of the line item packaged in the container.
PC The product class of the line item packaged in the container.
UOM The unit of measure of the line item packaged in the
container.
Description Description of the item.
Ship By Date The date by which the container line must be shipped.
Containerized Quantity Enter or modify the containerized quantity. If containers are
short picked, you can resolve short pick by modifying the
containerized quantity. For more information, see the Resolve
Short Picked Containers screen.
Packed Quantity The quantity of the line item packaged in the container.
Table 377. Modify Containerization, Execution Details
Fields Description
Location The outbound container present in location.
Status The outbound container execution status.
Table 378. Modify Containerization, Child Containers
Fields Description
Container # The container number.
Status The container status.
Container Type The type of container used. For example, Carton or Pallet.
Tracking # The container's tracking number used to track the status and
location of the container.
Container SCM The shipment container marking.
The Modify Container action is only available when that container belongs to a
Sterling Warehouse Management System Node.
Chapter 29. Outbound Shipment Console Screens 281
Resolve Short Picked Containers
About this task
Short picked containers can be resolved manually by requesting the system to pack
additional inventory into the containers or modifying the containerization quantity
on the container and backordering due to inadequate inventory.
Procedure
1. Click Short Picked link in the Container Details screen.
2. Modify the Containerized Quantity.
3. Click Save. The status changes to Short Pick Resolved.
Dock Appointment Sea rch By All Attributes for Outbound Shipment
Use this screen to search for dock appointments by all attributes.
Table 379. Dock Appointment Search By All Attributes
Fields
Node The node associated with the docks displays.
Start Date The start date is defaulted to the current date.
Enter the start date of the appointment for which you are
searching, if applicable.
Choose the calendar lookup to change the date.
Number of Days To
Display
Enter the maximum number of days to be displayed on the
dock schedule calendar as a result of your search, if
applicable. By default, the value displayed is 5.
Location Enter the dock location, if applicable.
Choose the lookup option to search for dock locations.
Inbound Delivery Check this checkbox to search for inbound docks, if
applicable.
Outbound Pickup Check this checkbox to search for outbound docks, if
applicable.
Appointment # Enter the appointment number for which you are searching,
if applicable.
Shipment # Enter the shipment number for which you are searching for
the dock appointment, if applicable.
Order # Enter the order number for which you are searching for the
dock appointment, if applicable.
Load # Enter the load number for which you are searching for the
dock appointment, if applicable.
Carrier Enter the carrier for which you are searching for the dock
appointment, if applicable.
BOL # Enter the bill of lading number for which you are searching
for the dock appointment, if applicable.
The Dock Schedule Details screen displays as a result of your dock appointment
search by all attributes.
282 Sterling Selling and Fulfillment Foundation: Warehouse Management System User Guide
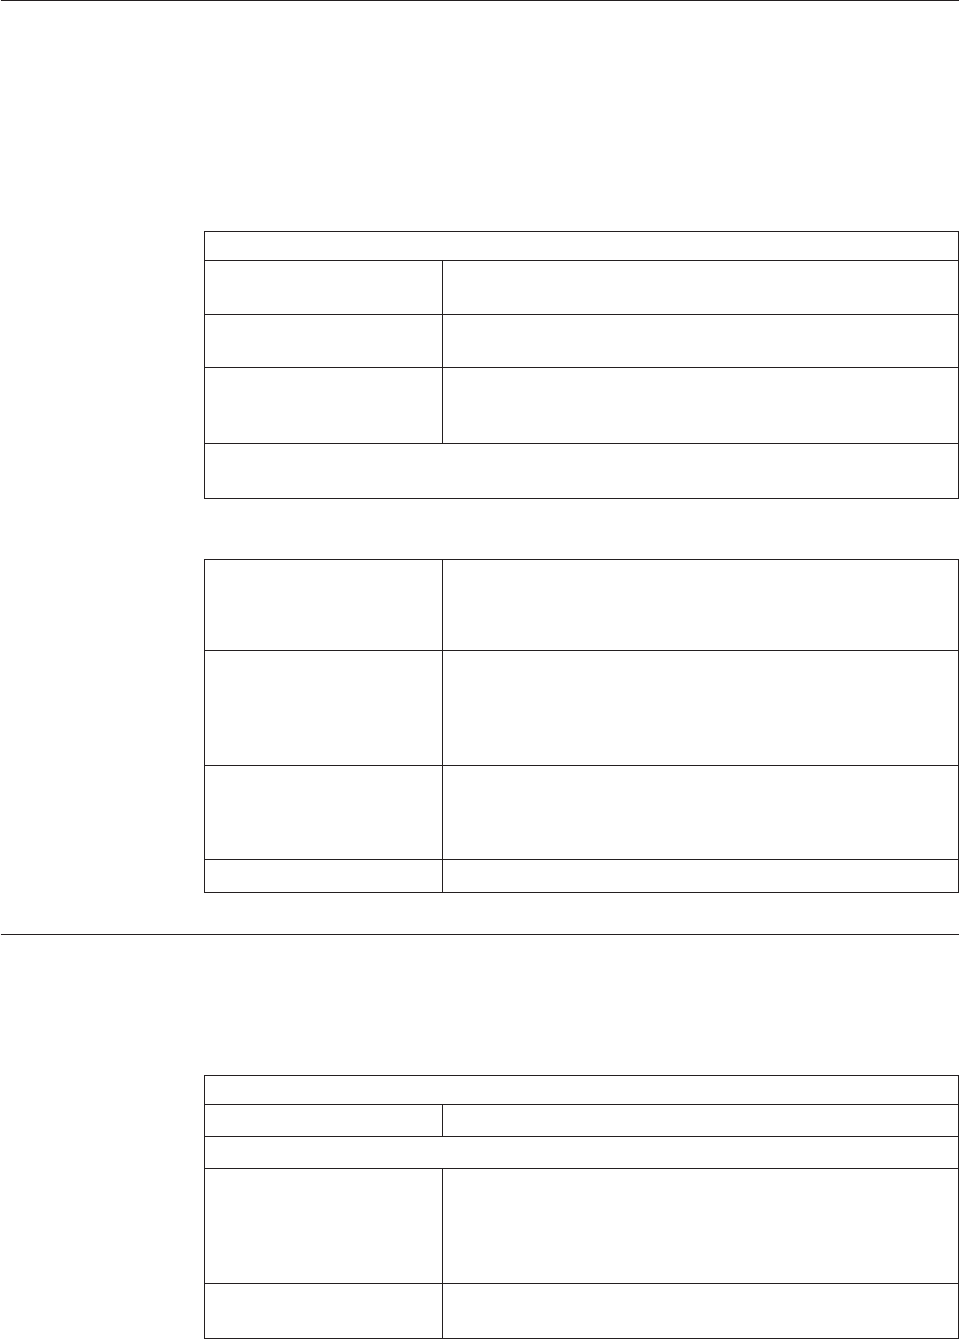
Dock Schedule Details for Outbound Shipment
This screen provides visibility to the dock appointment calendar, and displays
inbound, outbound, and both inbound and outbound docks with their:
vAvailable time slots for creating new appointments.
vUnavailable time slots due to calendar constraints.
vUnavailable time slots due to appointments already taken.
Table 380. Dock Schedule Details, Dock Availability
Actions
Manage Dock Group This action button takes you to the Dock Group Details
screen.
Zoom In Click this action button to view more definitive details of the
appointment calendar. Two levels of Zoom In are supported.
Zoom Out Click this action button to view a larger area of the
appointment calendar. Two levels of Zoom Out are
supported.
Displays the dock locations for nodes that are of the dock type INBOUND, OUTBOUND,
and BOTH.
Table 381. Dock Schedule Details, Legend
Blue Indicates an appointment for the searched criteria.
Click a slot to modify an existing appointment. The Dock
Appointment screen displays.
Cyan Indicates appointments that do not match the searched
criteria.
Click a slot to modify an existing appointment. The Dock
Appointment screen displays.
Gray Indicates free slots for which new appointments can be taken.
Click a slot to create a new dock appointment. The Dock
Appointment screen displays.
Black Indicates the unavailable slots due to the calendar constraints.
Dock Appointment for Outbound Shipment
You can create new appointments or modify existing appointments with the help
of this screen.
Table 382. Dock Appointment, Appointment Details
Actions
Cancel Click this action button to cancel an appointment.
Fields
Appointment # The appointment number associated with the dock displays,
if applicable.
The appointment number displays only for the existing
appointments.
Location The dock location for which you chose to take an
appointment displays here.
Chapter 29. Outbound Shipment Console Screens 283
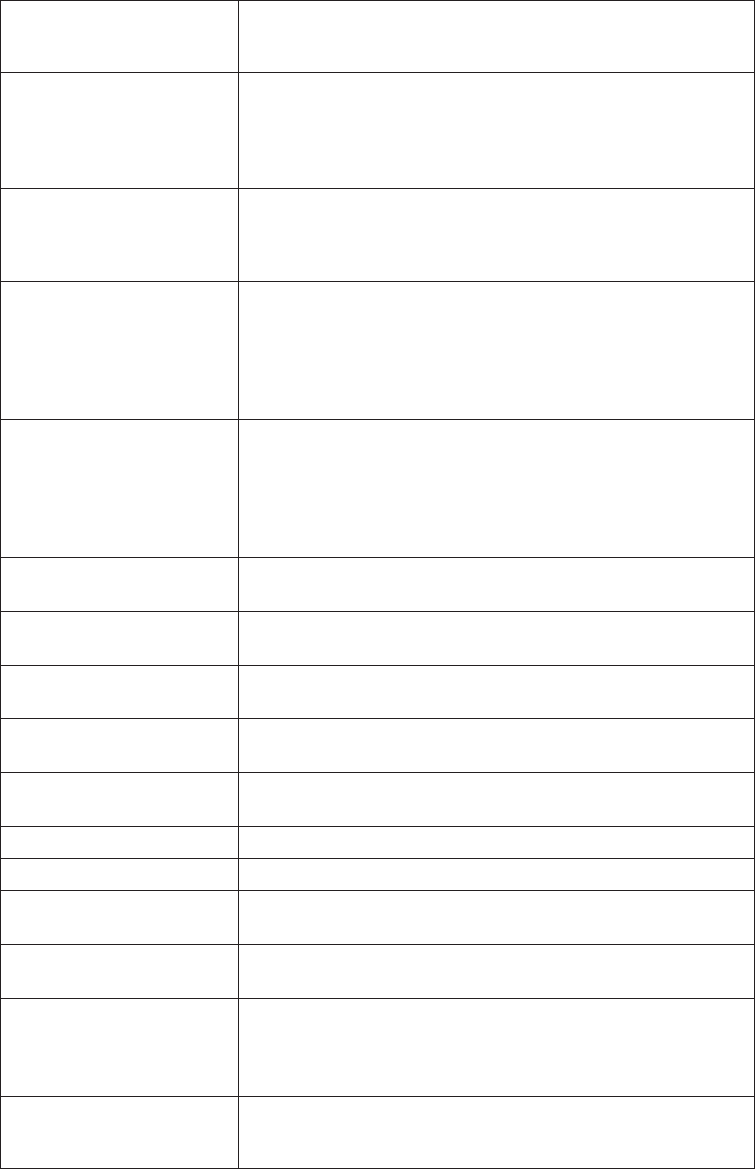
Table 382. Dock Appointment, Appointment Details (continued)
Appointment Type By default, the Outbound Pickup appointment type is
selected for outbound dock locations, and Inbound Delivery
for inbound and both inbound and outbound dock locations.
Start Date This start date is defaulted with the date of the selected slot.
Enter the start date on which you want to take an
appointment or choose the calendar lookup to change the
date.
Start Time This start time is defaulted with the time of the selected slot.
Enter the start time of the appointment or choose the time
lookup to change the time.
Shipment # Enter the shipment number you want to associate with the
dock appointment, if applicable.
Choose the Lookup icon to search for shipments. The
shipment's weight, volume, number of cases and number of
pallets automatically displays.
Load # Enter the load number you want to associate with the dock
appointment, if applicable.
Choose the lookup icon to search for loads. The number of
cases and number of pallets associated with the load
automatically displays.
Order # Enter the order number you want to associate with the dock
appointment, if applicable.
BOL # Enter the bill of lading number you want to associate with
the dock appointment, if applicable.
PRO # Enter the PRO number you want to associate with the dock
appointment, if applicable.
Carrier Select the carrier for which you want to take an appointment,
if applicable.
Notes Enter any additional information associated with the dock
appointment, if applicable.
Weight Enter the weight of the shipment, if applicable.
Volume Enter the volume of the shipment, if applicable.
No Of Cases Enter the number of cases contained in the shipment or load,
if applicable.
No Of Pallets Enter the number of pallets contained in the shipment or
load, if applicable.
Estimate End Time Click this button to calculate and display the estimated end
time in the End Time field. The estimated end time is
calculated based on SAM definition for the productivity type,
LOADING/UNLOADING
End Time To specify a pre-determined end time, enter the end time.
Choose the time lookup to change the time.
Click Save to save the dock appointment.
284 Sterling Selling and Fulfillment Foundation: Warehouse Management System User Guide
Dock Group Details for Outbound Shipment
You can enter constraints on the maximum number of appointments that can be
taken for the group of docks associated with a node.
Table 383. Dock Group Details, Dock Group
Fields
Node The node associated with the docks displays.
Table 384. Dock Group Details, Dock Group Max No. of Appointments
Action
Remove Click this action button to remove the selected appointment
constraints.
Fields
Start Time Indicates the start time of the time slot for which the
maximum number of appointment constraint needs to be
created.
Click the Add icon to create an appointment constraint.
End Time Indicates the end time of the time slot for which the
maximum number of appointment constraint needs to be
created.
Sunday Enter the maximum number of appointments you can take on
this day in the time window across dock locations.
Monday Enter the maximum number of appointments you can take on
this day in the time window across dock locations.
Tuesday Enter the maximum number of appointments you can take on
this day in the time window across dock locations.
Wednesday Enter the maximum number of appointments you can take on
this day in the time window across dock locations.
Thursday Enter the maximum number of appointments you can take on
this day in the time window across dock locations.
Friday Enter the maximum number of appointments you can take on
this day in the time window across dock locations.
Saturday Enter the maximum number of appointments you can take on
this day in the time window.
Click Save to save the maximum number of dock group appointment constraints.
View Holds for Outbound Shipment
You can view holds that are applied to the selected outbound shipments in this
screen.
Table 385. View Holds, Shipment
Fields
Shipment # The outbound shipment number.
Shipper's Ref. # The outbound shipment reference number.
Plan # The delivery plan number the outbound shipment is
associated with.
Chapter 29. Outbound Shipment Console Screens 285
Table 385. View Holds, Shipment (continued)
Fields
Enterprise The enterprise associated with the outbound shipment.
Buyer The identifier for the buyer.
Seller The identifier for the seller.
Ship Node The node from where the outbound shipment is shipped.
Receiving Node The node that is receiving the outbound shipment.
Status The outbound shipment status.
Release # The shipment release number to which the outbound
shipment line belongs.
Has Hazardous Items Indicates if the outbound shipment contains hazardous items.
Merge Node If you have shipment lines coming from multiple nodes and
want to consolidate them into one load, enter a node at
which you want all dependent shipment lines to be
consolidated with the parent shipment line.
Note: Merge Node is only relevant in a Deliver Together
dependency.
Table 386. View Holds, Shipment Holds
Actions
Add Holds This action takes you to the Add Holds screen where you can
add holds to the selected outbound shipment.
Fields
Hold Description A brief description of the hold.
Choose the View History icon to View History of the
shipments that are held.
Hold Status The current status of the hold.
Hold Comment Any additional comments for the hold.
Action Select the action that you want to apply to the hold from the
drop-down list.
Reason Enter the reason for the hold.
Table 387. View Holds, Resolved Holds
Fields
Hold Description A brief description of the hold.
Reason The reason for changing this hold to resolved status.
Add Holds for Outbound Shipment
You can add holds to the outbound shipment on this screen.
Table 388. Add Holds, Shipment Holds
Fields
Hold Type Select the hold type associated with the outbound shipment
from the drop-down list.
Reason Enter the reason for the hold.
286 Sterling Selling and Fulfillment Foundation: Warehouse Management System User Guide
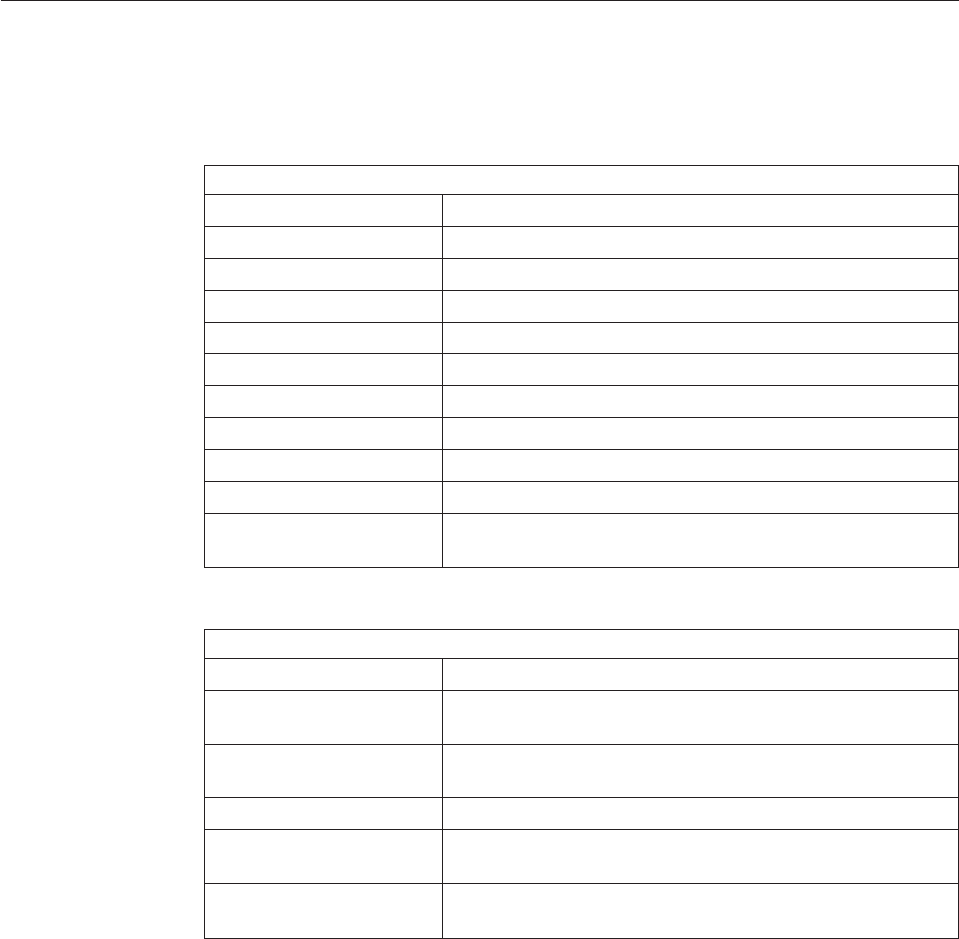
View History for Outbound Shipment
Whenever the status of a shipment hold changes, the information regarding the
status change is recorded in Sterling Selling and Fulfillment Foundation. In this
screen, you can view the history of a shipment hold.
Table 389. View History, Primary Information
Fields
Shipment# The outbound shipment number.
Shipper's Ref. # The outbound shipper's reference number.
Plan # The outbound shipment's plan number
Enterprise The Enterprise associated with the shipment
Buyer The Buyer's identifier.
Seller The Seller's identifier.
Ship Node The node from which the outbound shipment ships.
Receiving Node The node which receives the outbound shipment
Status The status of the outbound shipment.
Has Hazardous Items Indicates if the shipment contains any hazardous item.
Merge Node The node that has multiple shipment lines and is
consolidated into one shipment.
Table 390. View History, Shipment Holds
Fields
Hold Type The hold type that is associated with the outbound shipment.
Date/Time The date and time at which the status was changed for the
selected hold type.
User ID The ID of the user who was responsible for changing the
status.
Status The changed status for the selected hold type.
Comment The comment added by the user who changed the status for
the selected hold type.
Hold Transaction The transaction that changed the status for the selected hold
type.
Chapter 29. Outbound Shipment Console Screens 287
288 Sterling Selling and Fulfillment Foundation: Warehouse Management System User Guide
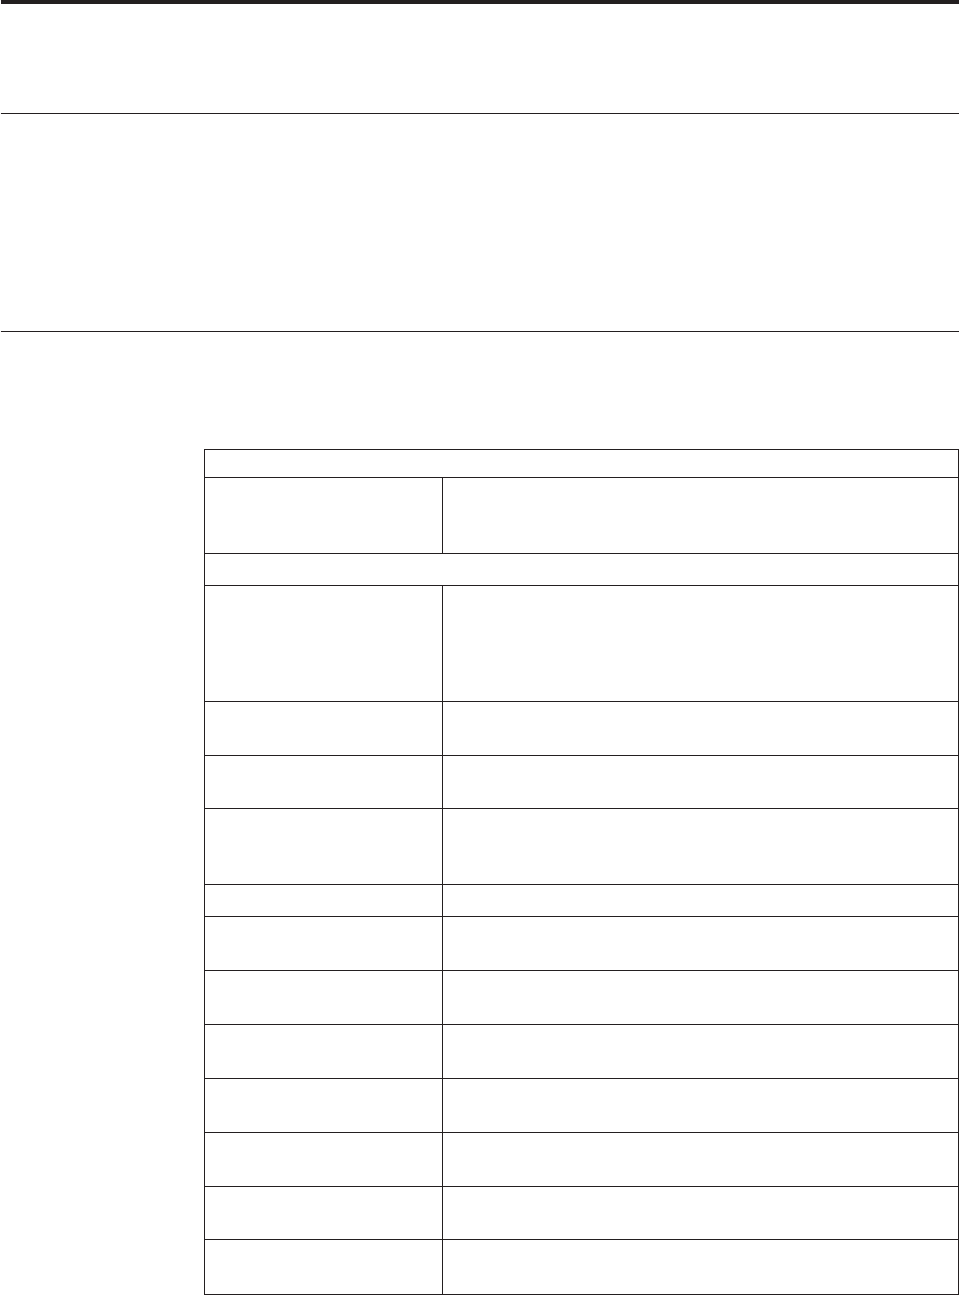
Chapter 30. Create Outbound Shipment Screens
About Create Outbound Shipment Screens
Shipments (ASN) are transmitted to warehouses through EDI downloads, fax, or
e-mail, and also when a trailer arrives with no prior notice.
The shipment entry console enables you to manually create shipments from fax,
e-mail or telephone conversations, and also for those trailers that arrive with no
prior notice.
Shipment Entry for Outbound Shipment
You can create outbound shipments for a sales or transfer order in this screen.
Table 391. Shipment Entry
Action
Supervisory Overrides This action takes you to the Shipment Supervisory Overrides
screen where you can specify whether the shipment can have
overages.
Fields
Document Type Select the document type associated with the shipment you
are creating.
Valid values are 'Sales Order' or 'Transfer Order'. For an
outbound shipment, valid value is 'Sales Order'
Ship Node The shipping node associated with the shipment. This
represents the seller's ship node.
Enterprise Select the enterprise associated with the shipment you are
creating for, if applicable.
Shipment # Enter the shipment number for the shipment you are creating,
if applicable. A unique number is automatically generated by
the system, if number is not specified.
Receiving Node Select node where the receipt is being performed.
Buyer Enter the buyer associated with the shipment you want to
create, if applicable.
Seller Enter the seller associated with the shipment you want to
create.
Order # Enter the order number, if there is only order on the
shipment.
Release# Enter the release number of the order against which the
shipment is being created, if applicable.
Pro# Enter the PRO number assigned by the carrier to track the
shipment you are creating, if applicable.
Carrier/Service Select the carrier service availed for transporting the
shipment, if applicable.
BOL# Enter the bill of lading number of the shipment you are
creating, if applicable.
© Copyright IBM Corp. 1999, 2011 289
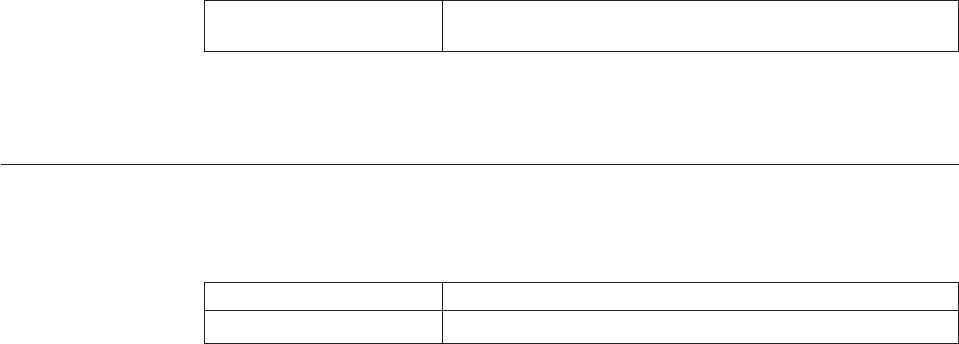
Table 391. Shipment Entry (continued)
Trailer# Enter the trailer number of the shipment you are creating, if
applicable.
After entering the relevant information in the fields a shipment is created and you
are taken to the Shipment Details screen.
Shipment Supervisory Overrides for Outbound Shipment
This screen allows you to create overages for the shipment being created.
Table 392. Shipment Supervisory Overrides
Field Description
Allow Overage Select to allow overage for the outbound shipment.
290 Sterling Selling and Fulfillment Foundation: Warehouse Management System User Guide
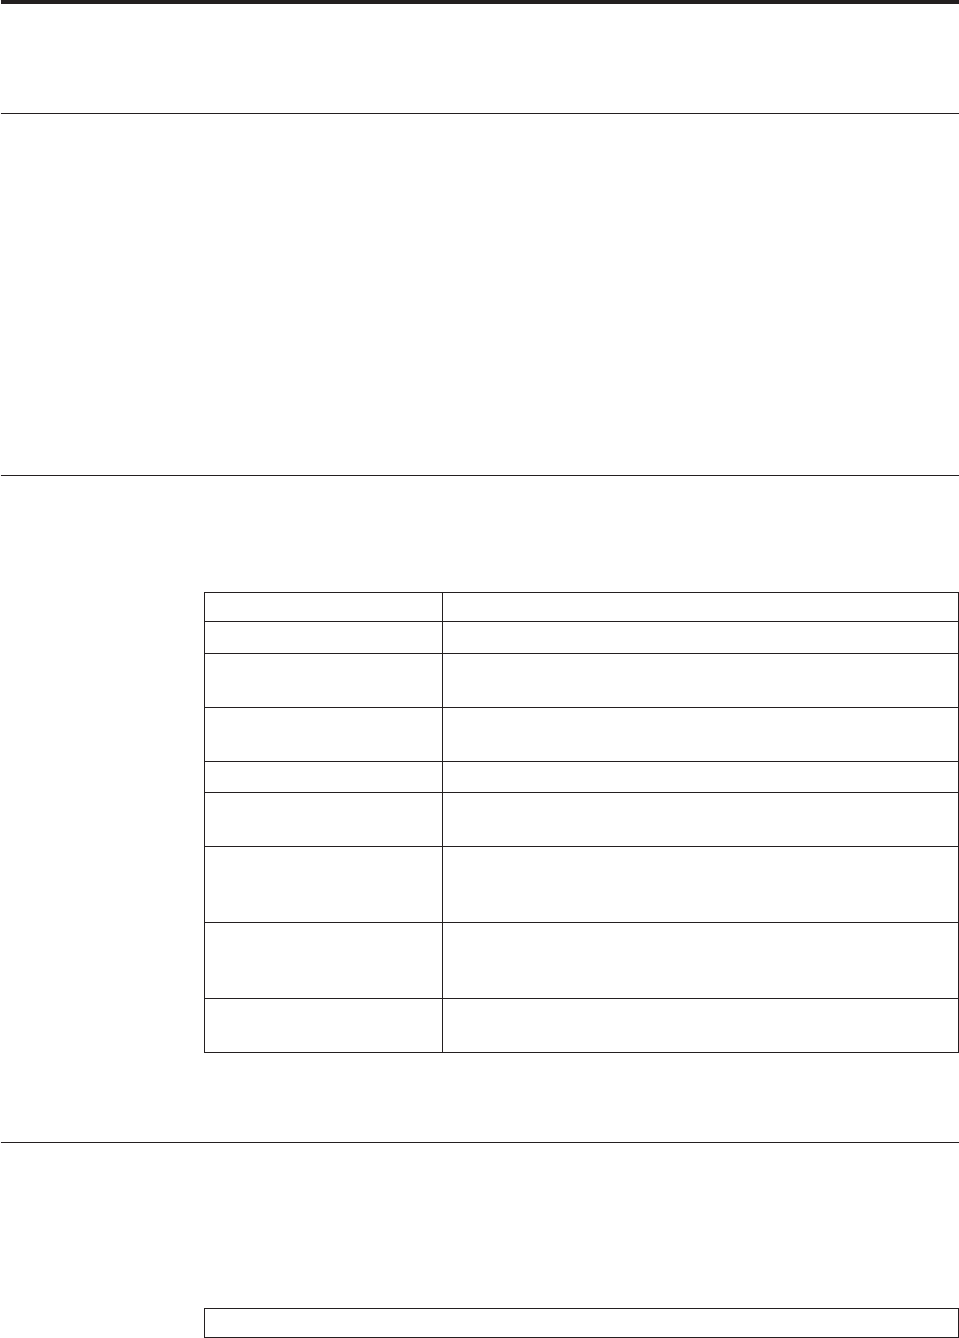
Chapter 31. Wave Console Screens
About Wave Console Screens
During the normal course of the day, the system automatically generates waves
based on parameters defined by the system administrator. The waves are generated
based on shipment groups that have been given a sequence and a defined set of
selector criteria. When waves are created, the system analyzes the shipments in
need of picking and evaluates them against a shipment group's selector criteria
based on the group's sequence. If the shipment does not match up with the group's
selector criteria, the shipment is then evaluated by the next shipment group in the
sequence, until a match has been found. The shipment is then added to that
shipment group. Once all shipments have been matched up with the appropriate
shipment groups, waves are created for those groups.
This chapter provides screen and field descriptions for the Wave Console.
Wave Search Screen
The Wave Search screen lets you enter the criteria to search for waves.
Table 393. Wave Search
Fields Description
Node Select the node you want to search for waves in.
Shipment # Enter the shipment number of the shipment that belongs to
the wave you are searching for, if applicable.
Wave # Enter the wave number of the wave you are searching for, if
applicable.
Wave Status Select the status of the waves you are searching for.
Shipment Group Enter the shipment group that the waves you are searching
belong to.
Release No Earlier Than Enter the Release No Earlier Than date range that you want
to search for waves in. Only waves with a Release No Earlier
Than date that falls within the range you specify considered.
Release No Later Than Enter the Release No Later Than date range that you want to
search for waves in. Only waves with a Release No Later
Than date that falls within the range you specify considered.
Max Records Enter the maximum number of waves you want returned
from your search.
Click Search to view the search results in the Wave List Screen screen.
Wave List Screen
The Wave List screen displays the result of a wave search. This screen lets you
perform actions on a single wave or on multiple waves by selecting the check
boxes of the relevant waves and choosing the applicable action from the action bar.
Table 394. Wave List
Actions
© Copyright IBM Corp. 1999, 2011 291
Table 394. Wave List (continued)
Accept This action button moves the wave to the accepted status.
Release This action button takes you to the Release Wave Screen
screen.
Cancel This action button takes you to the Cancel Wave screen.
View Summary This action button takes you to the Wave Summary screen.
Print Wave This action button takes you to the Print Wave screen.
View Alerts This action button takes you to the Alert List screen.
Fields
Wave # The wave number.
Shipment Group The shipment group that the wave belongs to.
Status The status of the wave is in.
Sequence # The sequence number associated with the wave.
Release No Earlier Than The wave is not released for picking before this date.
Release No Later Than The wave is not release for picking after this date.
Note:
Problem: The shipment is getting excluded from the wave, and therefore cannot
ship the shipment.
Cause: The Shipment Selector Details are defined incorrectly, or shipments are not
serialized, or the pick strategy to pick inventory is not defined for a wave.
Resolution: Make sure that the Shipment Selector Details are defined correctly,
shipments are serialized, and the pick strategy to pick inventory is defined for a
wave. For more information about Shipment Selector Details screen, see the section
Defining Shipment Selectors in the chapter Configuring Picking chapter in the
Sterling Selling and Fulfillment Foundation: Warehouse Management System
Configuration Guide.
Release Wave Screen
The Release Wave screen lets you request the release of a wave for picking.
Table 395. Release Wave
Field Description
Override Concurrent Wave
Constraint
Select Override Concurrent Wave Constraint to override any
existing wave constraints that may keep the wave from being
released, if applicable.
Cancel Wave
Table 396. Cancel Wave
Field Description
Cancellation Reason Code The code of the reason for cancelling the wave.
Reason Text The description of the reason for cancelling the wave
292 Sterling Selling and Fulfillment Foundation: Warehouse Management System User Guide

Wave Summary
The Wave Summary screen lets you view the details associated with a wave.
Table 397. Wave Summary, Wave
Actions
View Task Summary This action button takes you to the Task Summary screen.
Accept This action button moves the wave to the accepted status.
Release This action button takes you to the Release Wave Screen
screen.
Cancel This action button takes you to the Cancel Wave screen.
Fields
Wave # The wave number.
Shipment Group The shipment group to which the wave belongs.
Status The current status of the wave.
Priority The wave's priority.
Release No Earlier Than The wave is not released for picking before this date.
Release No Later Than The wave is not release for picking after this date.
Table 398. Wave Summary, Overall Summary
Fields Description
# Shipments The number of shipments included in the wave.
Click this link to view the Shipment Summary screen.
# Shipment Lines The number of shipment lines included in the wave.
# Batches The number of batches included in the wave.
Click this link to view the Batch Summary screen.
# Work Orders The number of work orders included in the wave.
Click this link to view the Work Order Summary screen.
# SKUs The number of individual SKUs included in the wave.
Click this link to view the Item Task Summary screen.
# Shipment Profiles The number of shipment profiles included in the wave.
Click this link to view the Shipment Profile Summary screen.
Volume The total volume of the shipments in the wave.
Case Type The types of cases included in the wave.
Quantity The quantity that the case type holds.
Estimated Cases The estimated number of cases for the case type needed to
fulfill the wave.
Click this link to view the Shipping Containers Summary
screen.
Table 399. Wave Summary, Task Types
Fields Description
Task Type The task type name performed during the wave.
Chapter 31. Wave Console Screens 293
Table 399. Wave Summary, Task Types (continued)
Fields Description
Description A brief description of the task type.
Open quantity The task quantity that are currently open for a task type.
Held quantity The task quantity that are held.
Suggested quantity The task suggested quantity that have been assigned but not
accepted.
In Progress quantity The task quantity that are currently in progress.
Complete quantity The task quantity that have been completed.
Cancelled quantity The task quantity that have been cancelled.
Total quantity The total task quantity that were generated for the wave for a
task type.
Shipment Profile Summary
The Shipment Profile Summary screen enables you to view a wave's shipment
profile summary based on the profile identifier.
Table 400. Shipment Profile Summary
Fields Description
Profile Id The profile identifier for a shipment.
Status The shipment status.
# Shipments in Wave # Wave
Number
The number of shipments included in the wave for a
profile identifier.
Click this link to view the shipments list.
Total The total number of shipments in a wave.
Shipment Summary
The Shipment Summary screen enables you to view a wave's shipment summary.
Table 401. Shipment Summary
Fields Description
Carrier The carrier code for the shipment displays.
Status The shipment status.
# Shipments in Wave # 1 The number of shipments included in the wave.
Click this link to view the shipment list.
Total The total number of shipments.
Batch Summary
The Batch Summary screen enables you to view the summary of batches created
for a wave.
Table 402. Batch Summary, Batch List
Actions
294 Sterling Selling and Fulfillment Foundation: Warehouse Management System User Guide
Table 402. Batch Summary, Batch List (continued)
View Details This action button takes you to the Batch Detail screen.
Fields
Batch # The number associated with a task batch.
Task Type The task type associated with a task batch.
Batch Status The status associated with a task batch.
Equipment Type The equipment type associated with a task batch.
No. of Items The number of items included in a task batch.
No. of Containers The number of containers included in a task batch.
First Pick Location The first pick location for a task batch.
Last Pick Location The last pick location for a task batch.
No. Of Locations The number of pick locations in a task batch.
Total Quantity The total quantity associated with a task batch.
Work Order Summary
You view the work order summary for a wave.
Table 403. Work Order Summary
Field
Activity The activity performed on items belonging to the work order.
Pending Work Orders Total work orders still pending for the activity.
Completed Work Orders Total work orders completed for the activity.
Item Task Summary
You view a summary of tasks created for an item and each task type from a
location for the wave.
Table 404. Item Task Summary, Item Task List
Fields Description
Item Id The identifier of the item associated with a task type.
Click this link to view the Task List screen.
Item Description A brief description of the item.
Task Type The name of the task type.
Source Location The origin location of the task.
Open quantity The task quantity that is currently open for an item for a
specific task type in the source location.
Held quantity The task quantity that is held for an item for a specific task
type in the source location.
Completed quantity The task quantity that is completed for an item for a specific
task type in the source location.
Total Quantity The total task quantity for an item for a specific task type in
the source location.
Chapter 31. Wave Console Screens 295
Shipping Containers Summary
The Shipping Containers Summary screen lets you view a summary of the wave's
shipping containers.
Table 405. Shipping Containers Summary
Fields Description
Status The shipment status.
Wave # The wave number associated with the shipment.
# Cases The number of cases in the shipment.
# Pallets The number of pallets in the shipment.
Click this link to view the container list.
Prioritize Wave
The Prioritiz e Wave screen lets you prioritize a wave.
Table 406. Prioritize Wave
Fields Description
Priority The priority to be applied to the wave.
Release No Earlier Than The time and date before which the wave cannot be released.
Release No Later The time and date after which the wave cannot be released.
Print Wave
The Print Wave screen lets you print wave information. This can be used by the
pickers.
Table 407. Print Wave
Fields Description
Print Service Name Choose the print service name you want to print.
Printer Name Select the printer name you want to print from.
No. of Copies Enter the total number of copies of waves you want to print.
Note:
Problem: After releasing a wave, you cannot print batch sheets and shipping labels.
Cause: The printer may not be connected, printer power or green light may not be
on, and/or printer that you want to print to is not selected.
Resolution: Make sure your printer is connected, printer power or green light is on,
and/or select the correct printer that you want to use. Problem
296 Sterling Selling and Fulfillment Foundation: Warehouse Management System User Guide
Alert List
The Alert List screen lets you view a wave's alerts.
Table 408. Alert List, Wave
Fields Description
Wave # The wave number.
Description A brief description of the wave.
Shipment Group The shipment group that the wave belongs to.
Status The status the wave is in.
Priority The wave's priority.
Release No Earlier Than The wave is not released for picking before this date.
Release No Later Than The wave is not released for picking after this date.
Table 409. Alert List, Alert List
Action
View Details This action button displays the details of the selected alerts.
For more information about alert details, see the "Viewing
Alert Details" chapter of the Sterling Selling and Fulfillment
Foundation: Application Platform User Guide.
Fields
Alert ID The alert ID.
Choose this link to view alert details. For more information
about alert details, see the "Viewing Alert Details" of the
Sterling Selling and Fulfillment Foundation: Application Platform
User Guide.
Type The type of alert raised. For example, ON_FAILURE or
FAILED_AUTH. For more information about alerts, see the
Sterling Selling and Fulfillment Foundation: Application Platform
User Guide.
Description A brief description of the alert.
Queue The queue the alert has been assigned to.
Priority The alert priority.
Status Indicates if the alert is open or closed.
Owner The user who is handling the alert.
Raised On The date the alert was raised.
Wave Audit
The Wave Audits screen allows you to audit the details of a wave.
Table 410. Wave Audits Screen
Action Description
Audit Click this action to go to the Wave Audit screen, where you
can view the wave audits.
Fields
Wave
Chapter 31. Wave Console Screens 297
Table 410. Wave Audits Screen (continued)
Wave # The wave number.
Shipment Group The shipment group to which the wave belongs.
Status The current status of the wave.
Ship Node The node from which the wave was created.
Wave Audit
Date The date on which the wave was modified.
Modified By The name of the user who modified the wave.
Modification The old and new statuses of the wave.
Reason Code The reason code associated with the wave modification.
Reason Text Additional information about why the wave was modified.
No of Shipments in Wave The total number of shipments included in the wave.
Exception Audits
Exception Audit Details Click this hyperlink to view the exception audit details.
Modification Indicates the reasons for exception.
There are two types of modification, Removed from Wave
and Split in Shipment.
Exception Audits Detail
Date The date on which the exception occurred.
Modified By The name of the user who modified the wave.
Reason Code The reason code associated with the wave modification.
Reason Text Additional information about why the wave was modified.
Old Shipment No The old shipment number of the shipment that is split from
the shipment.
This field is populated if the Modification Type is Split in
Shipment.
New Shipment No The new shipment number of the shipment that is created
after splitting the shipment.
This field is populated if the Modification Type is Split in
Shipment.
298 Sterling Selling and Fulfillment Foundation: Warehouse Management System User Guide
Chapter 32. Create Wave Screens
Create Wave Screen for a Shipment Group
You can request for a wave creation for a shipment group in this screen.
Table 411. Create Wave, Create Wave
Field Description
Shipment Group Select the shipment group for which you want to request for
a wave creation.
Click Create Wave to request for a wave creation.
© Copyright IBM Corp. 1999, 2011 299
300 Sterling Selling and Fulfillment Foundation: Warehouse Management System User Guide
Chapter 33. Pack Station Screens
About Pack Station Screens
The Pack Station screen enables you to pack cartons and/or pallets after picking
the items.
For more information about Execution Console Framework, see the chapter,
"Understanding the Execution Console Framework".
Pack Details Screen
This screen enables you to pack cartons and/or pallets after picking the items. The
inner pack quantity breakup for the selected item also displays. You can add or
modify the inner pack quantity and the inner packs packaged into the container.
Note: To extend the Pack HSDE functionality in the Applications Manager, under
HSDE_Pack (exuipack) in the application rules side panel, right-click Pack_Details
resource, and select the Save As option. In the Resource Details: Pack Details
dialog box that is displayed, enter a prefix in the Resource Prefix field, and click
the Save icon. In the Resource Details: Pack Details window, in the Detail View
panel, the following attribute is displayed in the Java™Server Page field:
exuipack_pack_container.jsp?AutoDetectInventoryAttributes=
vIf you set the value of this attribute to "N", in the Pack HSDE screen of the
Console, a dialog box is displayed depending on the type of item you are
packing. Enter the appropriate inventory attributes in the corresponding fields.
vIf you set the value of this attribute to “Y”, the inventory attributes are
automatically copied based on the location inventory information available with
the Sterling Warehouse Management System.
For more information about setting the attributes, refer to the information provided
in the table, "Pack Details, Attributes."
Table 412. Pack Details, Scan
Actions
Close Shipment This action allows you to manually close the shipment after
the packing process is complete. You can also press Alt+S to
close the shipment.
Close Container This action allows you to manually close the container after
the packing process is complete. You can also press Alt+C to
close the container.
Weigh This action enables you to enter the actual weight of the
container. You can also press Alt+W to record the container's
weight.
Fields
Location Select the pack location.
The pack station uniquely identifies devices including
printers and weighing scales attached.
© Copyright IBM Corp. 1999, 2011 301
Table 412. Pack Details, Scan (continued)
Scan Identifier Enter or scan the container SCM, shipment number, batch
number, LPN identifier, serial number, or item identifier. In
the Instructions panel, shipment or container level
instructions displays. For more information, see the
Instructions table.
In situations where containerization is performed by the
system during wave release, scanning of the container SCM
identifies the shipment.
During post-pick containerization, the shipment number and
the container SCM identifying the container must be scanned.
The information entered above is used to populate the Items
panel to indicate item and quantities to be packed into the
container.
New Case Click this button to generate a new container SCM for the
case, if applicable.
New Pallet Click this button to generate a new container SCM for the
pallet, if applicable.
Table 413. Pack Details, Products
Fields
SKU Enter or scan barcode that identifies the item to be packed
into the container for the shipment. In the Instructions panel,
item level instructions displays. For more information, see the
Instructions table.
The "Last Scanned Item Id" field populates with the item ID.
Scan Quantity The item quantity scanned during the pack process is
automatically populated by the system.
UOM Select the appropriate item's unit of measure, if applicable.
This value is automatically populated when UPC code, UPC
Case Code, case with LPN is scanned in the SKU field.
Add Quantity Enter the quantity to add to the container, if applicable.
In the SKU field, when you scan the UPC Code, UPC Case
Code or a case LPN, the system automatically populates the
"Add Quantity" value, which is editable.
Inventory Status Select the appropriate inventory status.
Remove Quantity Enter the quantity to remove from the container.
This field is used to correct errors, if any, during the packing
process.
Last Scanned Item Id The item's Id that was last packed is automatically populated.
UOM The item's unit of measure corresponding to the item Id is
automatically populated.
Quantity The item quantity that was last packed is automatically
populated.
Table 414. Pack Details, Container Properties
Actions
302 Sterling Selling and Fulfillment Foundation: Warehouse Management System User Guide
Table 414. Pack Details, Container Properties (continued)
View Details This action takes you to the Container Details screen where
you can view the inner pack details.
Unpack Container This action takes you to the Container Contents screen where
you can remove contents for the selected item from the
shipment container.
Fields
Shipment # The shipment number is automatically populated by the
system from the values scanned into the scan identifier field.
Container # The container number is automatically populated by the
system from the values scanned into the scan identifier field.
This number uniquely identifies a container in a warehouse.
Typically, this is different from the SCM number.
Enterprise The enterprise associated with the shipment.
Ship Mode The shipment mode for the shipment. Values include 'LTL',
'TL', 'PARCEL'
Container SCM The container SCM is automatically populated by the system
from the values scanned into the scan identifier field.
SCM is an industry standard which identifies the container
and the enterprise.
Container Size Select the size to be associated with the container.
This value is automatically populated, if containerization is
performed by the system
Computed Weight The computed weight is automatically populated by the
system, if containerization is performed by the system.
Actual Weight Click on the Weigh button or press Alt+W to capture the
actual weight of the container.
Select the unit of measure from the list.
Table 415. Pack Details, Items
Fields
Show Items Containing Enter search criteria to search for specific items, if applicable.
Item ID The item to be packaged in the container.
Description The item description.
Product Class The product class of the line item packaged in the container.
UOM The unit of measure of the line item packaged in the
container.
Inventory Status The item quantity that is currently available.
Quantity To Pack The quantity to be packed into the container.
Pack Quantity Enter the actual quantity that can be packed into the
container.
Chapter 33. Pack Station Screens 303
Table 415. Pack Details, Items (continued)
Fields
Requested Tag The item's tag details, such as lot number or batch number
associated with the tag displays.
You can view the tag details only if the node that is
performing the pack operations is configured to capture the
tag attributes in all operations performed within the node, or
if the buyer on the shipment mandates it as a part of the
inbound compliance. For more information about capturing
the tag attributes, see the Sterling Selling and Fulfillment
Foundation: Application Platform Configuration Guide.
Table 416. Instructions
This panel displays the shipment, container, or item level instructions.
Table 417. Packing Notes
Actions
Delete This action allows you to delete selected packing notes that
you captured during the packing process.
Fields
Notes Displays additional notes being captured during the packing
process.
Table 418. Container Routing Information
Fields
Activity The next activity associated with the container packed is
automatically populated by the system.
For example, special packaging done for the container as a
VAS activity.
Description The activity description is automatically populated by the
system.
Table 419. Pack Details, Barcode Types
Fields
Scan Identifier Pack Scan Initiation
SKU Pack SKU Initiation
Table 420. Pack Details, Attributes
AutoDetectInventory
Attributes Behavior
Y Inventory attributes will be automatically copied based on the
location inventory information available with the Sterling
Warehouse Management System.
N Inventory attributes must be entered during packing.
304 Sterling Selling and Fulfillment Foundation: Warehouse Management System User Guide
Container Contents for Pack Station Console Screens
You can view all items packaged into the container. You can also remove inner
packs from the shipment container, if necessary.
Table 421. Container Contents
Fields
Item ID The item’s item ID.
Description A brief description of the item.
Product Class The item’s product class.
UOM The item’s unit of measure.
Packed Quantity The quantity packed into the container.
Remove Quantity Enter the inner pack quantity that you want to remove from
the container.
Requested Tag The item’s tag information, such as lot number or batch
number associated with the tag displays.
You can view the tag details only if the node that is
performing the pack operations has configured to capture the
tag attributes if the buyer on a shipment mandates it as a
part of the inbound compliance. For more information about
capturing the tag attributes, see the Sterling Selling and
Fulfillment Foundation: Application Platform Configuration Guide.
Click Save.
Table 422. Container Contents, Selected Container Details
Fields
Item ID The item ID that you selected for which you want to remove
the inner packs.
UOM The item’s unit of measure.
Product Class The item’s product class.
Requested Tag The item’s tag details.
You can view the tag details only if the node that is
performing the pack operations has configured to capture the
tag attributes if the buyer on a shipment mandates it as a
part of the inbound compliance. For more information about
capturing the tag attributes, see the Sterling Selling and
Fulfillment Foundation: Application Platform Configuration Guide.
Table 423. Selected Container Details, Quantity Breakup
Fields
Inner Pack Quantity The item quantity contained in each inner pack.
No Of Inner Packs The item’s identifier displays.
Unit Of Measure The item’s primary unit of measure displays.
Product Class The product class of the item displays.
Total The total quantity contained in the container.
Chapter 33. Pack Station Screens 305

Select SKU for Pack Station Console Screens
You can select the items to pack into a container.
Table 424. Container Contents
Fields
LPN # Displays the identifier of the LPN.
Item ID Enter the identifier of the item.
Item ID Displays the identifier of the item.
Unit Of Measure Displays the unit of measure of the item.
Product Class Displays the product class of the item.
Inventory Status Displays the status of inventory in the LPN.
System Quantity Displays the system-reported quantity of items available in
the LPN.
Actual Quantity Enter the actual quantity of items available in the LPN.
Note: Adjusting the Actual Quantity can be performed only
for items that are not tag controlled, time sensitive, or serial
tracked.
Reason Code Mandatory. Enter the reason code for the corresponding
inventory transaction.
Serial Entry for Pack Station Console Screens
The Serial Entry screen enables you enter or scan the item’s serial number.
The Serial Entry screen also enables you enter the serial number range for an item.
Table 425. Serial Entry
Field
Count The total count of items scanned is automatically populated
by the system.
Item ID The identifier of the item.
Unit Of Measure The unit of measure of the item.
Serial # The component serial number of the item.
Table 426. Serial Entry, Serial Range
Field
Item ID The identifier of the item.
Unit Of Measure The unit of measure of the item.
From Serial # The start serial number of the item.
To Serial # The end serial number of the item.
Table 427. Serial Number BarCode Type
Fields
Serial # PickedSerialCapture.
306 Sterling Selling and Fulfillment Foundation: Warehouse Management System User Guide
Note: For a serial tracked or serialized item, if secondary serials are defined and
secondary information is not provided, then in such scenario the 'Entry Serial
Range’ button is not provided in the screen.
Chapter 33. Pack Station Screens 307
308 Sterling Selling and Fulfillment Foundation: Warehouse Management System User Guide
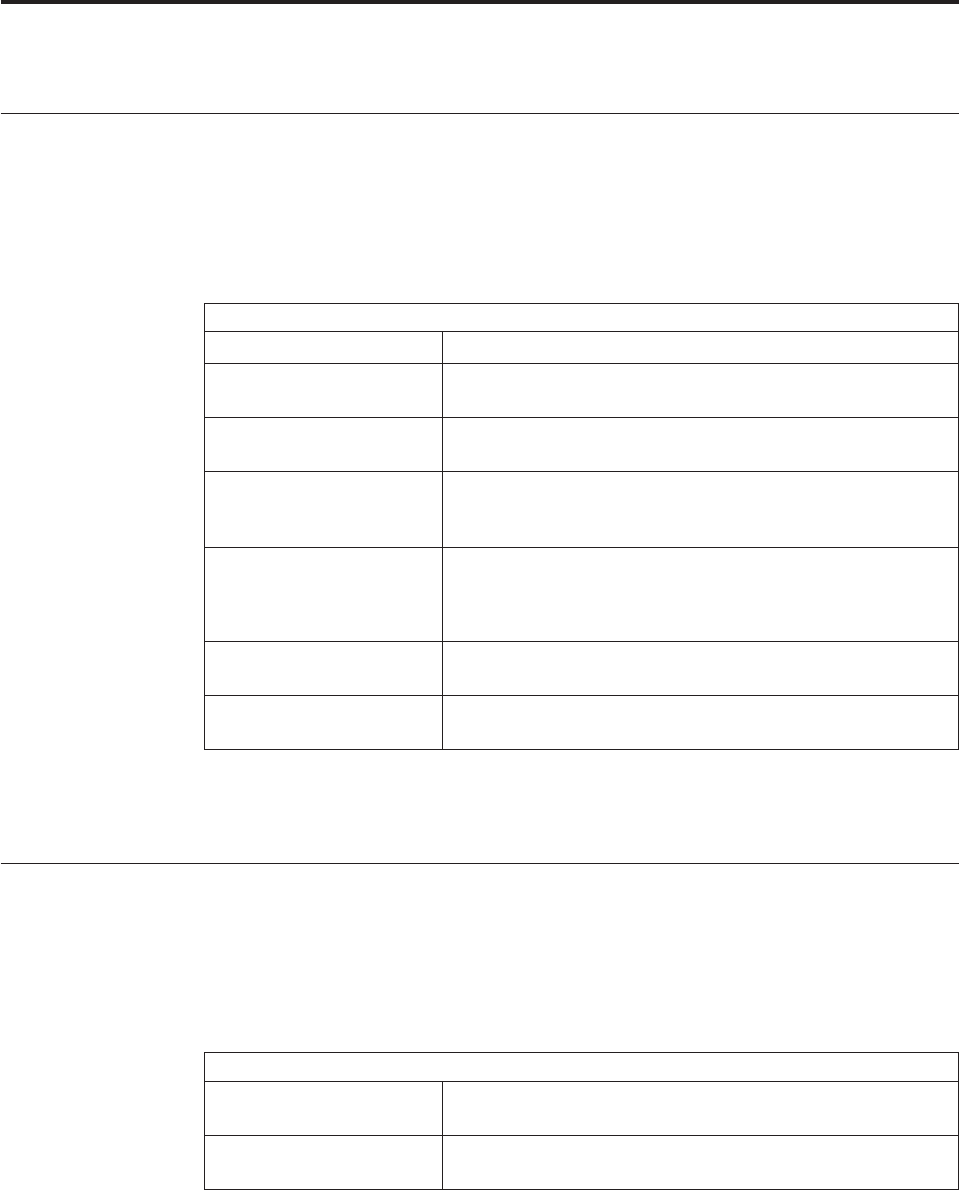
Chapter 34. Manifest Console Screens
Manifest Search By All Attributes
The Manifest Console provides field value descriptions for all the Manifest Console
screens.
You can search for manifests by all attributes.
Table 428. Manifest Search By All Attributes
Fields
Node The node associated with the manifest.
Carrier Select the carrier associated with the manifest you are
searching for.
Manifest # Enter the manifest number associated with the manifest you
are searching for.
Manifest Date By default, the system date and time displays. Enter the date
range associated with the manifest you are searching for, if
applicable.
Manifest Status Select the status of the manifest.
Valid values are: Open, Closure Requested, Closure Failed,
and Closed.
Has Hazardous Items Select this checkbox to search for manifests that contain
hazardous items.
Max Records Enter the maximum number of records you want listed as a
result of your search.
Note: Do not use spaces before or after any text you enter in the search fields, as
this may result in inconsistent or inaccurate results.
Manifest List
The manifest list window displays the results of a manifest search. You can
perform actions on a single manifest or multiple manifests by selecting the
checkboxes of the manifests you want to perform an action on and choosing the
action from the action bar.
Table 429. Manifest List
Actions
View Details This action takes you to the Manifest Details screen where
you can view the details for the selected manifests.
Print This action takes you to the Print a Manifest Using the
Console Screens screen where you can print a manifest.
© Copyright IBM Corp. 1999, 2011 309
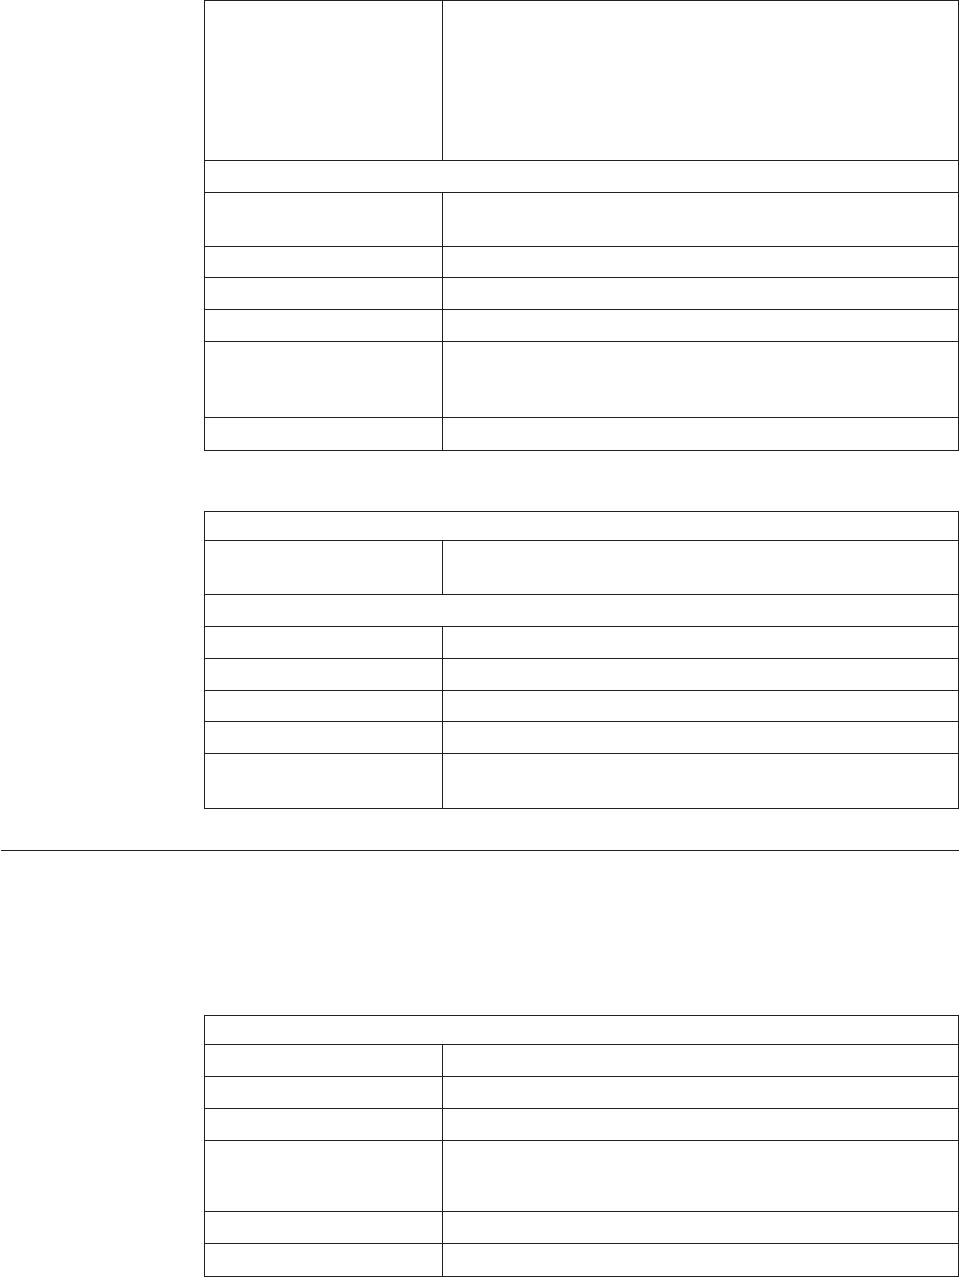
Table 429. Manifest List (continued)
Close Manifest This action takes you to the Close Manifest screen where you
can close a manifest.
Note: If a trailer number is not already associated with a
manifest, the Close Manifest dialog box is displayed. A user
can use this to associate a trailer with a manifest before
closing the manifest. Otherwise, the manifest is closed
automatically.
Fields
Manifest # The manifest number associated with the manifest. Click this
link to view manifest details.
Manifest Date The date on which the manifest was created.
Carrier The carrier service availed to transport the load.
Trailer # The trailer number associated with the manifest.
Manifest Closed Indicates that the manifest has been closed. All shipments
included in the shipment are confirmed, and you cannot add
any new shipments to this manifest.
Manifest Status Indicates the current status of the Manifest.
Table 430. Manifest List, Carrier Summary
Actions
Open Manifest This action takes you to the Open Manifest screen where you
can open a new manifest.
Fields
Carrier The carrier service availed to transport the load.
Description A brief description of the carrier.
Date The date associated with the open manifests.
Open Manifests Total number of manifests open.
Total Packages to be
Manifested
Total number of packages associated with the manifest.
Manifest Details
The Manifest Details screen provides manifest information for the selected
manifests. The actions that you can perform in the Manifest Details screen are
explained in the following tables.
Table 431. Manifest Details, Details
Fields
Manifest # The manifest number associated with the manifest.
Manifest Date The manifest date on which the manifest was created.
Carrier The carrier associated with the manifest.
Manifest Status The current status of the manifest.
Valid values are: 'Open' or 'Closed'.
Trailer # The manifest's trailer number.
Has Hazardous Items Indicates if the manifest contains hazardous items.
310 Sterling Selling and Fulfillment Foundation: Warehouse Management System User Guide
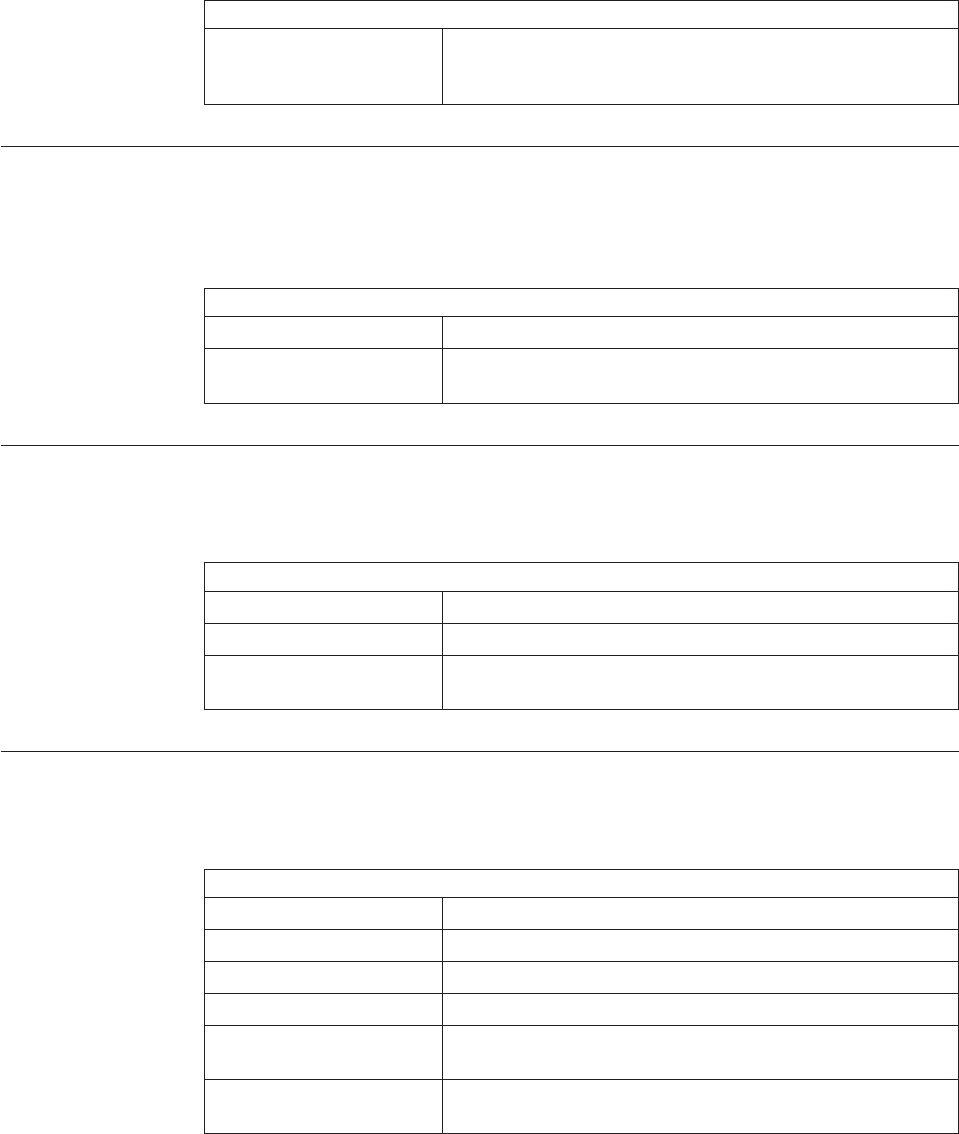
Table 431. Manifest Details, Details (continued)
Fields
Summary Only when the manifesting process is configured at the
Container level will the field "Total Packages Manifested" be
displayed.
Summary By Carrier Service
This screen provides the total number of packages manifested for the used carrier
service.
Table 432. Summary By Carrier Service
Fields
Carrier/Service The carrier service associated with the container.
Total Packages The total number of packages manifested for the carrier
service.
Print a Manifest Using the Console Screens
Use this screen to print a manifest.
Table 433. Print
Fields
Print Service Name Choose the manifest print service name you want to print.
Printer Name Select the printer name you want to print from.
No. of Copies Enter the total number of copies of manifests you want to
print.
Open Manifest
Use this screen to open a new manifest.
Table 434. Open Manifest
Fields
Node Node associated with the manifest.
Manifest # Enter the manifest number you want to open.
Manifest Date Enter the date on which the manifest was created.
Trailer # Enter the trailer number associated with the manifest.
Enterprise Select the enterprise for which you want to open the
manifest.
Shipper Account # For The
Selected Enterprise
The shipper's account number for the selected enterprise
displays.
Chapter 34. Manifest Console Screens 311
Close Manifest
Use this screen to close a manifest.
Table 435. Close Manifest
Fields
Trailer # Enter the trailer number associated with the
manifest.
312 Sterling Selling and Fulfillment Foundation: Warehouse Management System User Guide
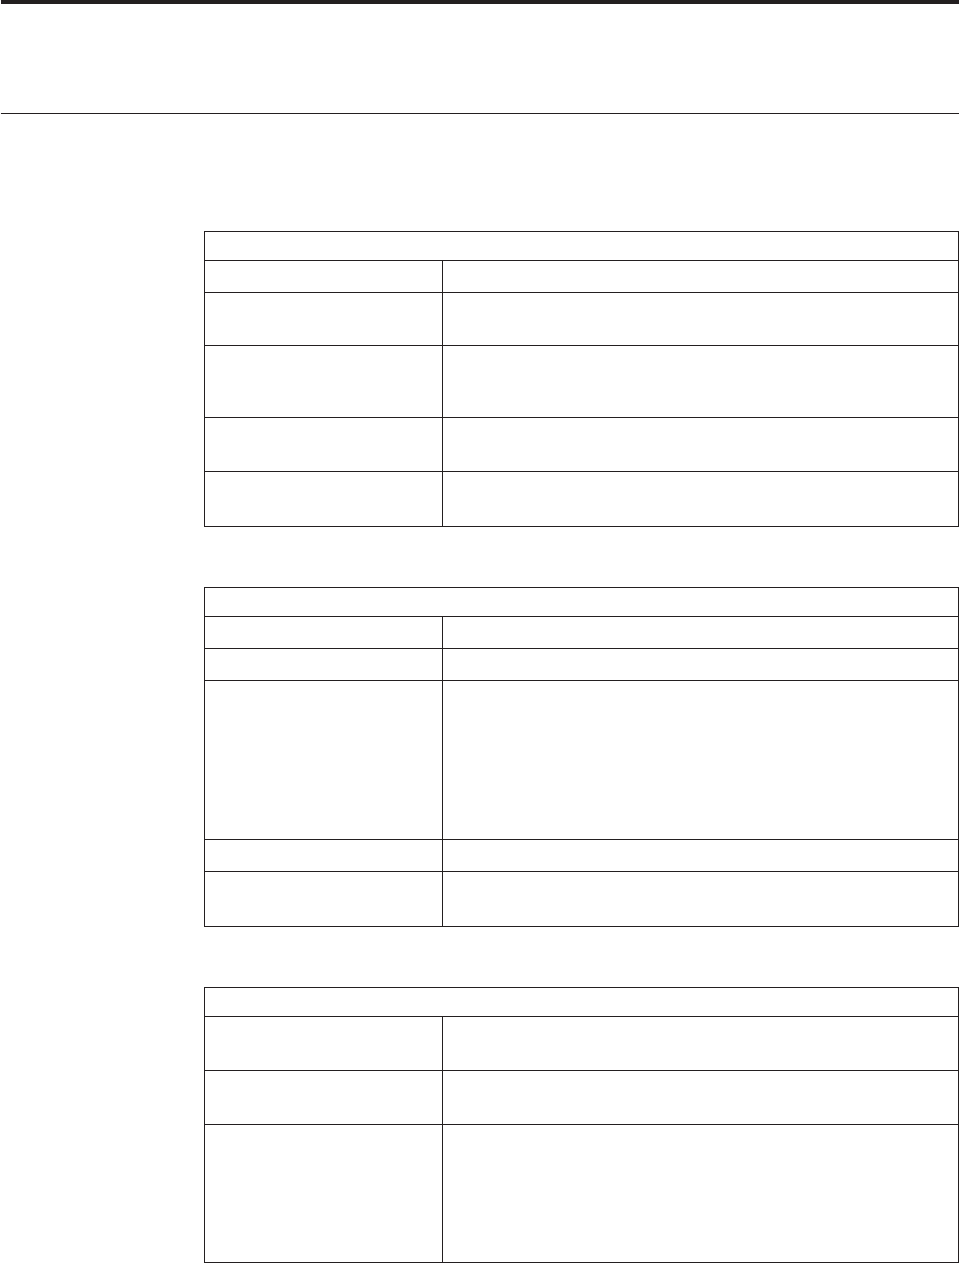
Chapter 35. Create Load Screens
Create Load Screens
Use the Create Load screen to create loads.
Table 436. Create Load, Load
Fields
Load # Enter the load number.
Enterprise Select the enterprise which maintains the ownership of the
load during the delivery process.
Load Type Select the load type.
You can customize this filed as per your business practices.
Shipment Mode Select the shipment mode for the shipment. Values include
'LTL', 'TL', 'PARCEL'
Carrier Service Code Select the Carrier service you want to use to transport the
load.
Table 437. Create Load, Additional Info
Fields
BOL # Enter the load's bill of lading number.
Seal # Enter the load's seal number.
PRO # Enter the load's PRO number, if applicable.
This value is populated automatically by Sterling Warehouse
Management System based on the PRO Number Generation
settings. For more information about PRO number generation
settings, see the Sterling Selling and Fulfillment Foundation:
Warehouse Management System Configuration Guide.
Trailer # Enter the trailer number of the vehicle used to carry the load.
POD # Enter the Proof Of Delivery (POD) number to indicate the
date on which the load was delivered.
Table 438. Create Load, Origin
Fields
At Shipment Origin Select At Shipment Origin to designate the load's origin node
to be same as the shipment contained in the load.
At Node Select At Node and enter the applicable node to designate
this node as the load's origin.
At Address Select At Address and enter the address to designate this
address as the load's origin.
Choose the Address Details icon to add the address. For
more information, see the Sterling Selling and Fulfillment
Foundation: Logistics Management User Guide.
© Copyright IBM Corp. 1999, 2011 313

Table 439. Create Load, Destination
Fields
At Shipment Destination Select At Shipment Destination to designate the load's
destination node to be same as the shipment contained in the
load.
At Node Select At Node and enter the applicable node to designate
this node as the load's destination.
At Address Select At Address and enter the address to designate this
address as the load's destination.
Choose the Address Details icon to add the address. For
more information, see the Sterling Selling and Fulfillment
Foundation: Logistics Management User Guide.
Click the Save button. This takes you to the Load Details screen. For more
information, see the Sterling Selling and Fulfillment Foundation: Logistics Management
User Guide.
314 Sterling Selling and Fulfillment Foundation: Warehouse Management System User Guide

Chapter 36. Load Console Screens
About Load Console Screens
The Load Console screens lets you:
vSearch using granular level information such as Shipment Mode, Destination,
etc.
vModify granular load attributes at a location.
The Load Console screens also lets you search for loads in various ways, such as:
vSearch by summary
vSearch by status
vSearch by location
For more information about loads, see the Sterling Selling and Fulfillment Foundation:
Logistics Management User Guide.
© Copyright IBM Corp. 1999, 2011 315
316 Sterling Selling and Fulfillment Foundation: Warehouse Management System User Guide
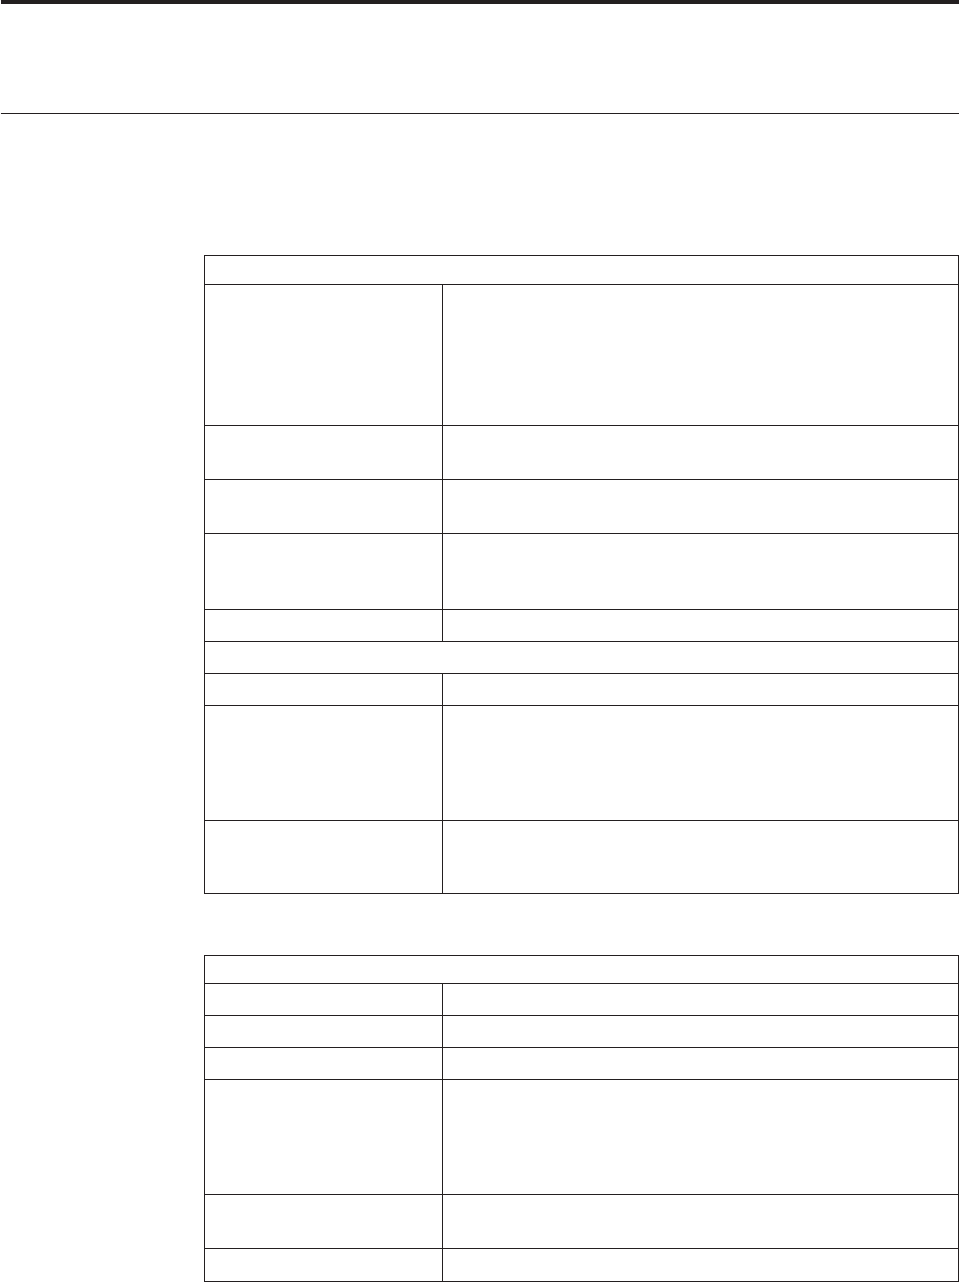
Chapter 37. Add To Manifest Screens
Add To Manifest
The Add To Manifest screen can be used to add containers to a manifest. The
following table provides field level descriptions of the add to manifest screen.
Table 440. Add To Manifest, Scan
Actions
Add To Manifest This action allows you to add container to a manifest.
Note: If the container has shipment level integration with
FedEx, a message "m of n package(s) manifested" displays.
Here, "m" indicates the number of containers manifested and
"n" indicates the total number of containers present in the
shipment or load.
View Contents This action takes you to the Container Contents for Packaged
Items to view all items packaged into the container.
Save This action allows you to save the container details that you
entered.
Weigh This action takes you to the Weigh Station Screens where you
can record the container's weight belonging to TL, LTL, or
parcel shipments.
Reset This action clears all container information that you entered.
Fields
Station The manifest station identifier.
Scan Identifier The container SCM, shipment, or LPN identifier.
If you scan a load container, the Load # displays in the Add
To Manifest, Container Attributes panel instead of the
Shipment #.
Manifest # Select the manifest number.
Displays any manifest that is open for the carrier.
Table 441. Add To Manifest, Container Attributes
Fields
Shipment # The shipment number displays.
Container # The container number displays.
Container SCM The shipment container marking number displays.
Container Size Enter the size of the container.
This is automatically populated when containerization is
performed by the system or when the size is associated
during the pack process.
Computed Weight The computed weight is automatically populated by the
system if containerization is performed by the system.
Actual Weight Enter the actual weight of the container
© Copyright IBM Corp. 1999, 2011 317
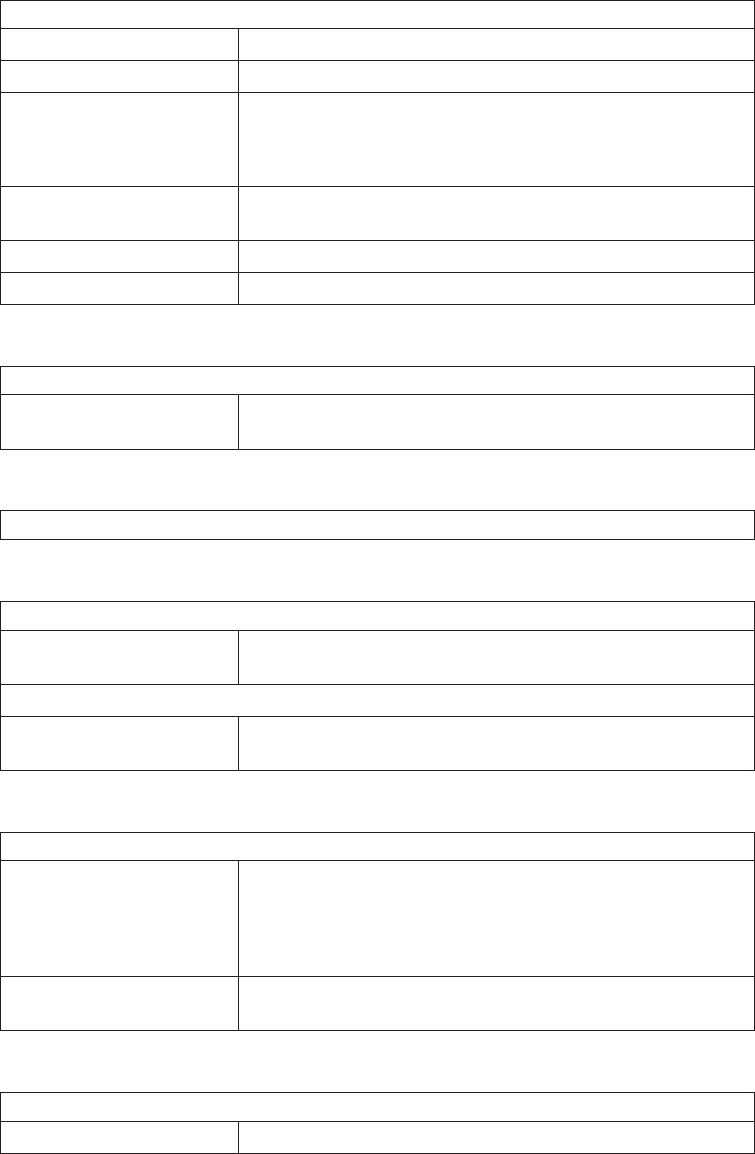
Table 442. Add To Manifest, Carrier Information
Fields
Carrier/Service The carrier service associated with the container displays.
Billed Weight Enter the container's billed weight.
Tracking # The tracking number associated to the container displays.
Enter or scan the tracking number, if association is at the
manifest station.
Special Service Surcharge Enter the special service surcharges associated with the
container, if applicable.
Return Tracking # Enter the return tracking number of the container.
Actual Freight Charge Enter the total cost of shipping the manifested package.
Table 443. Special Services
Fields
Special Services This panel displays the carrier special services for shipping
the container.
Table 444. Instructions
This panel displays manifest instructions and the items being packed.
Table 445. Packing Notes
Actions
Delete This action allows you to delete selected packing notes that
you captured during the packing process.
Fields
Notes Displays additional notes being captured during the packing
process.
Table 446. Container Routing Information
Fields
Activity The next activity associated with the container packed is
automatically populated by the system.
For example, special packaging done for the container as a
VAS activity.
Description The activity description is automatically populated by the
system.
Table 447. Add To Manifest, Barcode Types
Fields
Container ManifestContainer
318 Sterling Selling and Fulfillment Foundation: Warehouse Management System User Guide
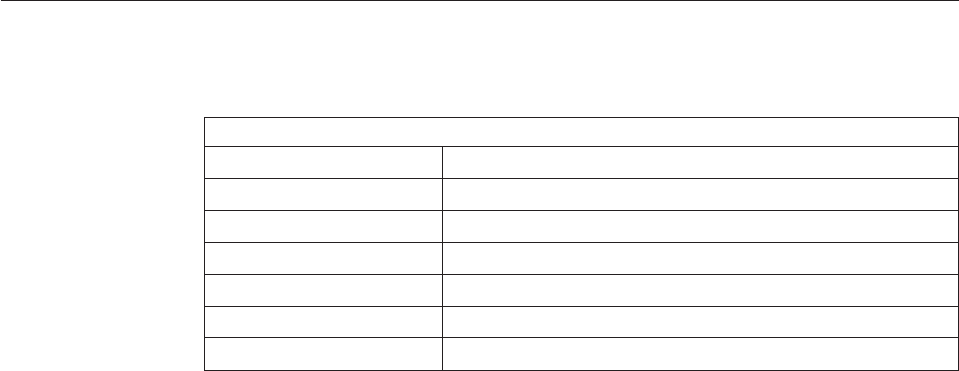
Container Contents for Packaged Items
You can view all items packaged into the container.
Table 448. Add To Manifest, Container Contents
Fields
Child Container SCM The child container marking number.
Item ID The item identifier.
Description A brief description of the item.
Product Class The item’s product class.
UOM The item’s unit of measure.
Quantity The item quantity is automatically populated by the system.
Packed Quantity The quantity packed in the container.
Chapter 37. Add To Manifest Screens 319
320 Sterling Selling and Fulfillment Foundation: Warehouse Management System User Guide
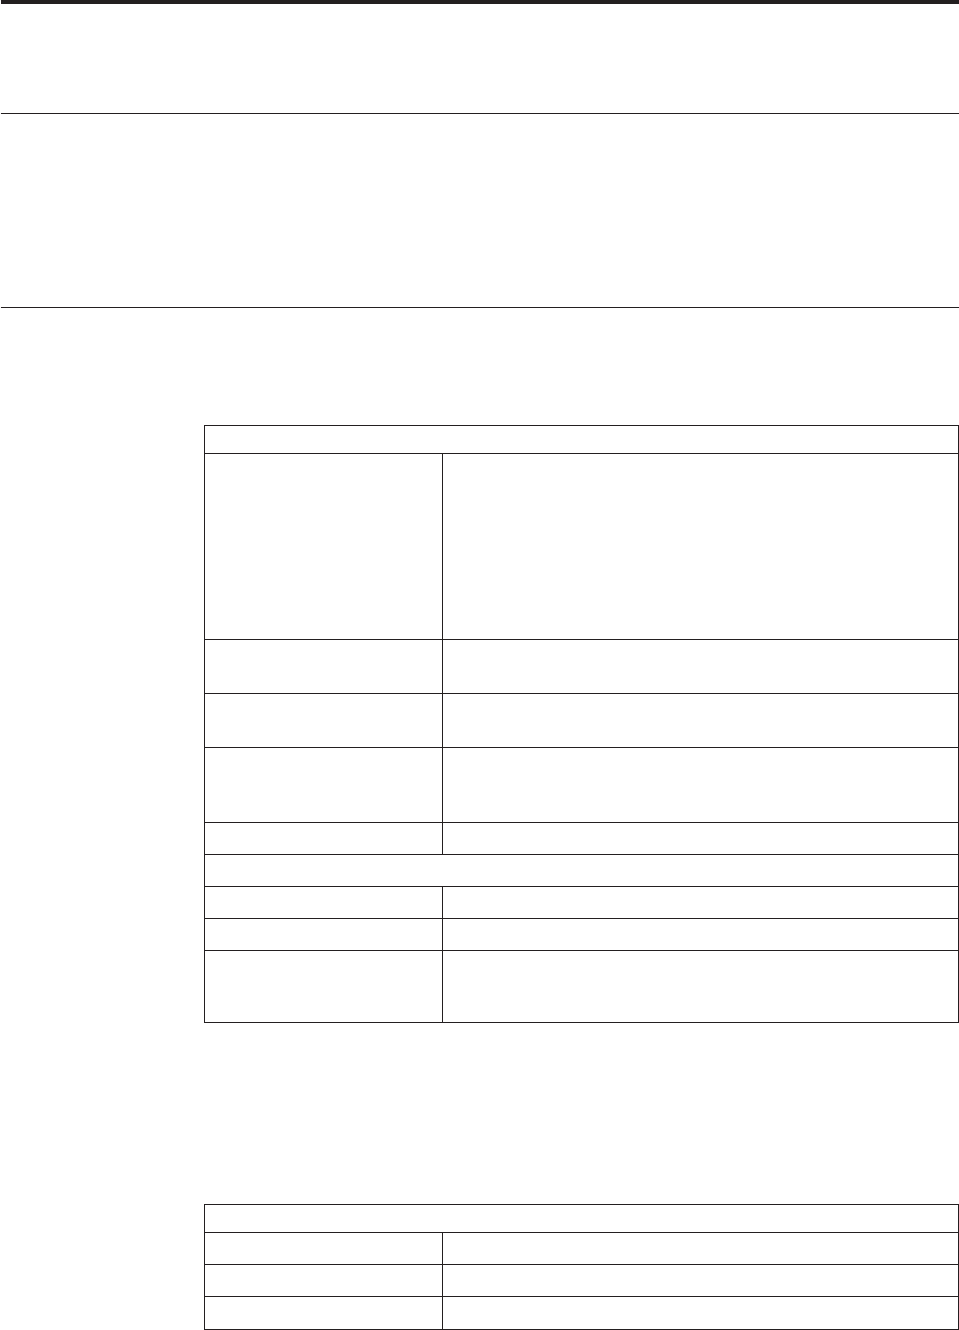
Chapter 38. Remove From Manifest Screens
About Remove from Manifest Screens
The Remove From Manifest screen enables you to remove containers from the
trailer, or manifest the container before closing the manifest.
For more information about Execution Console Framework, see the chapter,
"Understanding the Execution Console Framework".
Remove From Manifest
You can remove packed containers from manifest in this screen.
Table 449. Remove From Manifest, Scan
Actions
Remove From Manifest This action allows you to remove a container from the
manifest.
Note: When you remove any container from the manifest, a
confirmation message displays only if the container is
manifested using shipment level integration, and all
containers in the shipment or load are manifested. On
clicking the OK button, all containers included in the
shipment or load are removed.
View Contents This action takes you to the Container Contents to view all
items packaged into the container.
Save This action allows you to save the container details that you
entered.
Weigh This action takes you to the Weigh Station Screens to record
the container's weight belonging to TL, LTL, or parcel
shipments.
Reset This action clears all container information that you entered.
Fields
Station The manifest station identifier.
Scan Identifier The container, shipment, or LPN identifier.
Manifest # Select the manifest number.
Any manifest that are open for the carrier displays.
Note: If the container is manifested using shipment level integration, and all
containers on the shipment or load are manifested, if you attempt to remove any
container from the manifest, a confirmation message displays. On clicking the OK
button, all containers included in the shipment or load are removed.
Table 450. Remove From Manifest, Container Attributes
Fields
Shipment # The shipment number displays.
Container # The container number displays.
Container SCM The shipment container marking number displays.
© Copyright IBM Corp. 1999, 2011 321
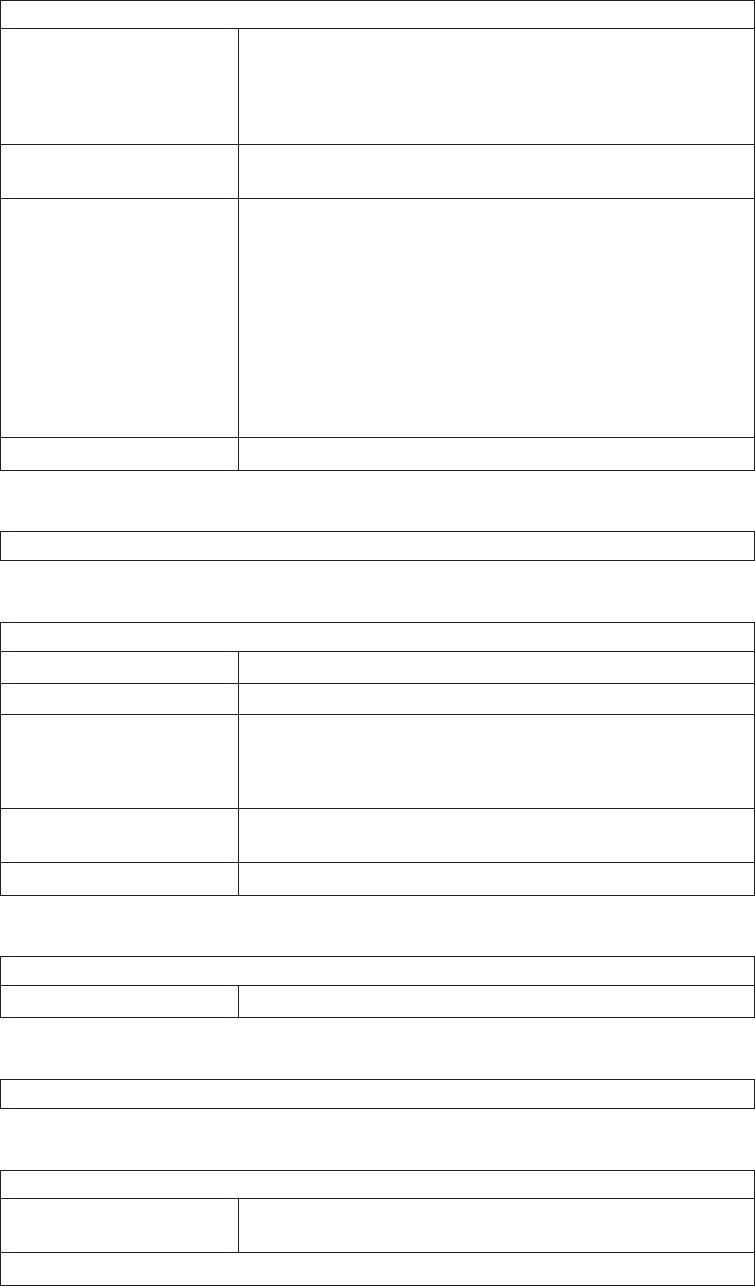
Table 450. Remove From Manifest, Container Attributes (continued)
Fields
Container Size Enter the size of the container.
This is automatically populated when containerization is
performed by the system or when the size is associated
during the pack process.
Computed Weight The computed weight is automatically populated by the
system, if containerization is performed by the system.
Actual Weight The actual weight of the container is either automatically
populated by the system from the weighing scale attached
upon closure of container or when Weigh action is selected.
Enter the actual weight of the container, if necessary.
Select the unit of measure for the weight, if different from the
value displayed.
The system checks whether the difference between actual
weight and computed weight is greater than the tolerance.
Ship To Address The address the container is shipped to.
Table 451. Remove From Manifest, Ship To
The address the container is shipped to.
Table 452. Remove From Manifest, Carrier Information
Fields
Carrier/Service The carrier service associated with the container displays.
Billed Weight Enter the container's billed weight.
Tracking # The tracking number associated to the container displays
Enter or scan the tracking number, if association is at the
manifest station.
Special Service Surcharge Enter the special service surcharges associated with the
container, if applicable.
Return Tracking # Enter the return tracking number of the container.
Table 453. Special Services
Fields
Actual Freight Charge Enter the actual freight charges for shipping the container.
Table 454. Instructions
This panel displays the instructions and items being packed.
Table 455. Packing Notes
Actions
Delete This action allows you to delete selected packing notes that
you captured while packing the container.
Fields
322 Sterling Selling and Fulfillment Foundation: Warehouse Management System User Guide

Table 455. Packing Notes (continued)
Notes Displays additional notes, if captured while packing the
container.
Table 456. Container Routing Information
Fields
Activity The next activity associated with the container packed is
automatically populated by the system.
For example, special packaging done for the container as a
VAS activity.
Description The activity description is automatically populated by the
system.
Container Contents for Remove from Manifest Console Screens
You can view all items packaged into the container.
Table 457. Remove From Manifest, Container Contents
Fields
Child Container SCM The child container marking number.
Item ID The item ID.
Description The item’s description.
Product Class The item’s product class.
UOM The item’s unit of measure.
Quantity The item quantity is automatically populated by the system.
Packed Quantity The quantity packed in the container.
Chapter 38. Remove From Manifest Screens 323
324 Sterling Selling and Fulfillment Foundation: Warehouse Management System User Guide
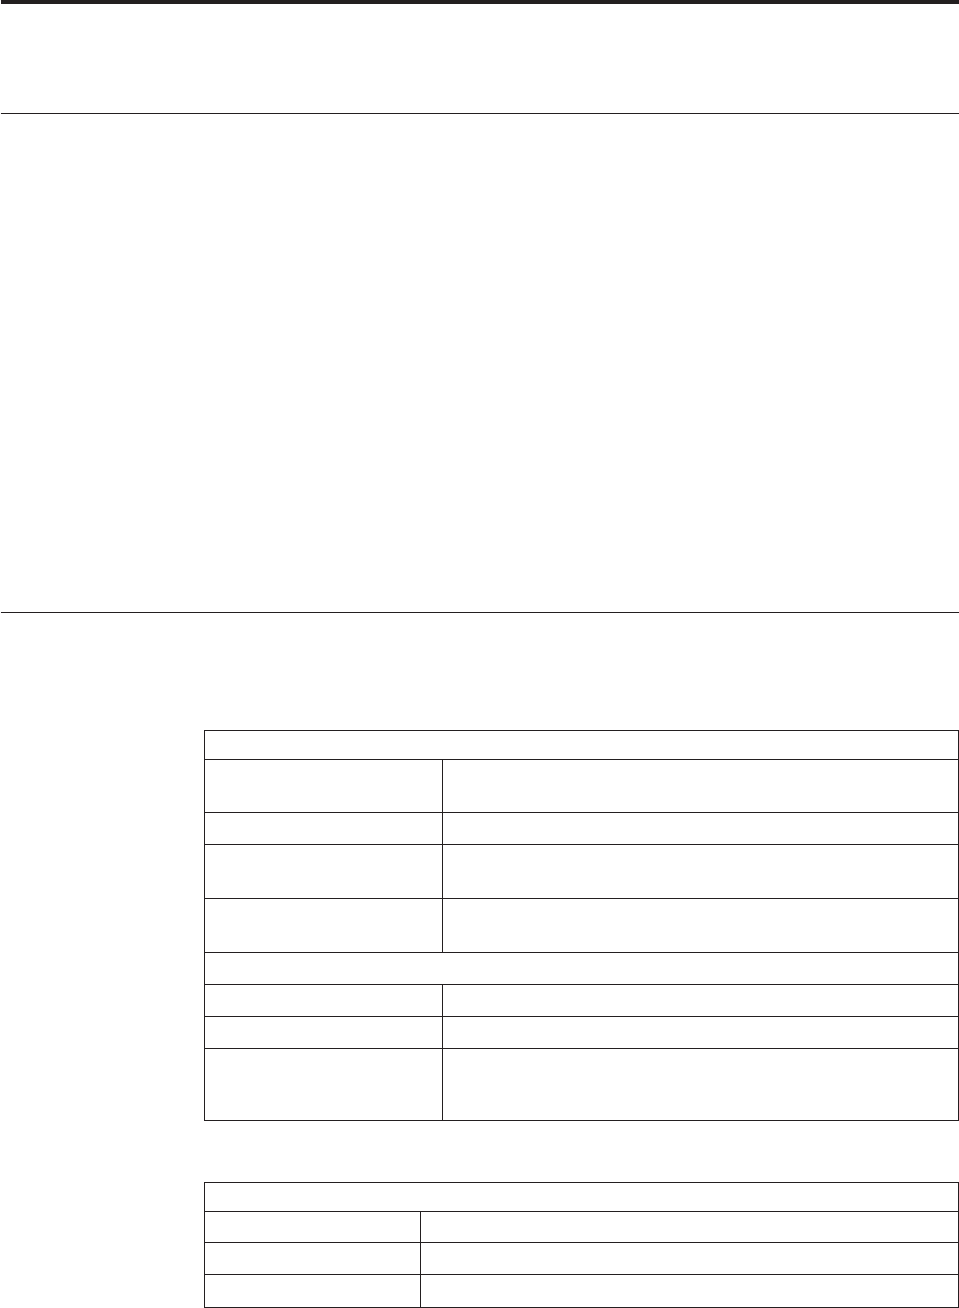
Chapter 39. Weigh Station Screens
About Weigh Station Screens
The Weigh Station console lets you record the weight of a container that belongs to
TL, LTL, or parcel shipments.
This chapter provides screen and field descriptions for the Weigh Station console.
Note: To perform generic status change in the Weigh Station:
vDefine the custom pipeline by extending the default pipeline associated with a
transaction ID. For more information about configuring process models, see the
Sterling Selling and Fulfillment Foundation: Application Platform Configuration Guide.
vExtend the existing resource and modify JSP to contain JSP=/wms/wmsmanifest/
detail/exuimanifest_detail_anchor. jsp?TransactionId=<TransactionId>. For more
information about defining or extending resources, see the Sterling Selling and
Fulfillment Foundation: Application Platform Configuration Guide.
vCreate a Menu Entry for the newly created resource and use the new screen to
perform generic status change. For more information about defining menus, see
the Sterling Selling and Fulfillment Foundation: Application Platform Configuration
Guide.
Weigh Station Screen
The Weigh Station screen lets you record a container's weight.
Table 458. Weigh Station, Scan
Actions
View contents This action button takes you to the Container Contents Screen
screen.
Save This action button saves the details entered.
Weigh If a weighing scale is connected, this action button captures
the weight on the weighing scale.
Reset This action button resets the screen. It clears all the details
entered into the screen.
Fields
Location Id The manifest location Id.
Scan Identifier The container SCM, shipment, or LPN identifier.
Manifest # Select the manifest number.
Any manifest that are open for the carrier displays.
Table 459. Weigh Station, Container Attributes
Fields
Shipment # The shipment number displays.
Container # The container number displays.
Container SCM The shipment container marking number displays.
© Copyright IBM Corp. 1999, 2011 325

Table 459. Weigh Station, Container Attributes (continued)
Fields
Container Size Enter the size of the container.
This is automatically populated when containerization is
performed by the system or when the size is associated during
the pack process.
Computed Weight The computed weight is automatically populated by the system,
if containerization is performed by the system.
Actual Weight The actual weight of the container is either automatically
populated by the system from the weighing scale attached upon
closure of container or when Weigh action is selected.
Enter the actual weight of the container, if necessary.
Select the unit of measure for the weight, if different from the
value displayed.
The system checks whether the difference between actual weight
and computed weight is greater than the tolerance.
Ship To Address The address the container is shipped to.
Table 460. Weigh Station, Carrier Information
Fields
Carrier The carrier associated with the container displays.
Carrier/Service The carrier service associated with the container displays.
Tracking# The tracking number associated to the container displays.
Enter or scan the tracking number, if association is at the
manifest station.
Special Services This panel shows carrier special services associated with the
container.
Table 461. Weigh Station, Packing Instructions
Fields
Displays instructions for the shipment and the specific item being packed.
Instruction Code The type of instruction, such as Gift, Pick, Pack, Ship, or Other.
Instruction Text The specific instructions to be performed corresponding to the
text.
Table 462. Weigh Station, Packing Notes
Actions
Delete This action button deletes the selected packing note.
Fields
Notes Additional notes captured during the packing process
displays.
Click the Delete button to delete notes, if applicable.
Container Routing
326 Sterling Selling and Fulfillment Foundation: Warehouse Management System User Guide
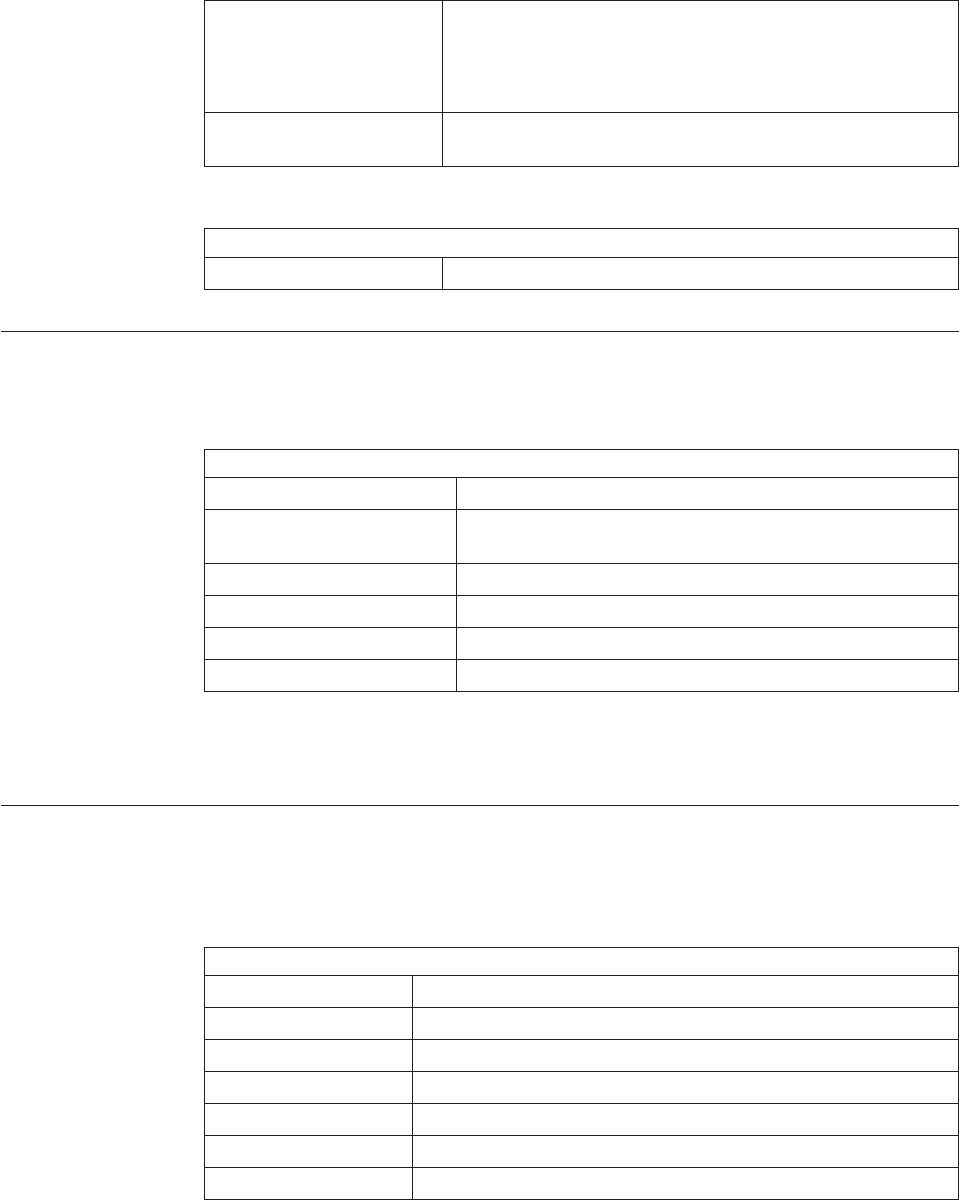
Table 462. Weigh Station, Packing Notes (continued)
Activity The next activity associated with the container packed is
automatically populated by the system.
For example, special packaging for container done as a VAS
activity.
Description The description of the activity is automatically populated by
the system.
Table 463. Weigh Station Barcode Type
Field
Container ManifestContainer
Serial Entry Screen for Weigh Station Console Screens
The Serial Entry screen lets you capture the serial number for a serial-tracked item.
Table 464. Serial Entry
Fields
Item ID The item Id is automatically populated by the system.
Unit Of Measure The unit of measure associated with the item is
automatically populated by the system.
Serial # Enter or scan the item’s serial number.
Secondary Serial #1 Enter or scan the component serial number of the item.
Secondary Serial #2 Enter or scan the component serial number of the item.
Secondary Serial #3 Enter or scan the component serial number of the item.
Note: The fields displayed in the Serial Entry window vary depending on the item
scanned.
Container Contents Screen for Weigh Station Console Screens
The Container Contents screen provides visibility to all items packaged into the
container.
Table 465. Container Contents
Fields
Child Container SCM The child container marking number.
Item ID The item’s ID.
Description The item’s description.
Product Class The item’s product class.
UOM The item’s unit of measure.
Quantity The quantity is automatically populated by the system.
Packed Quantity The quantity packed in the container.
Chapter 39. Weigh Station Screens 327
328 Sterling Selling and Fulfillment Foundation: Warehouse Management System User Guide
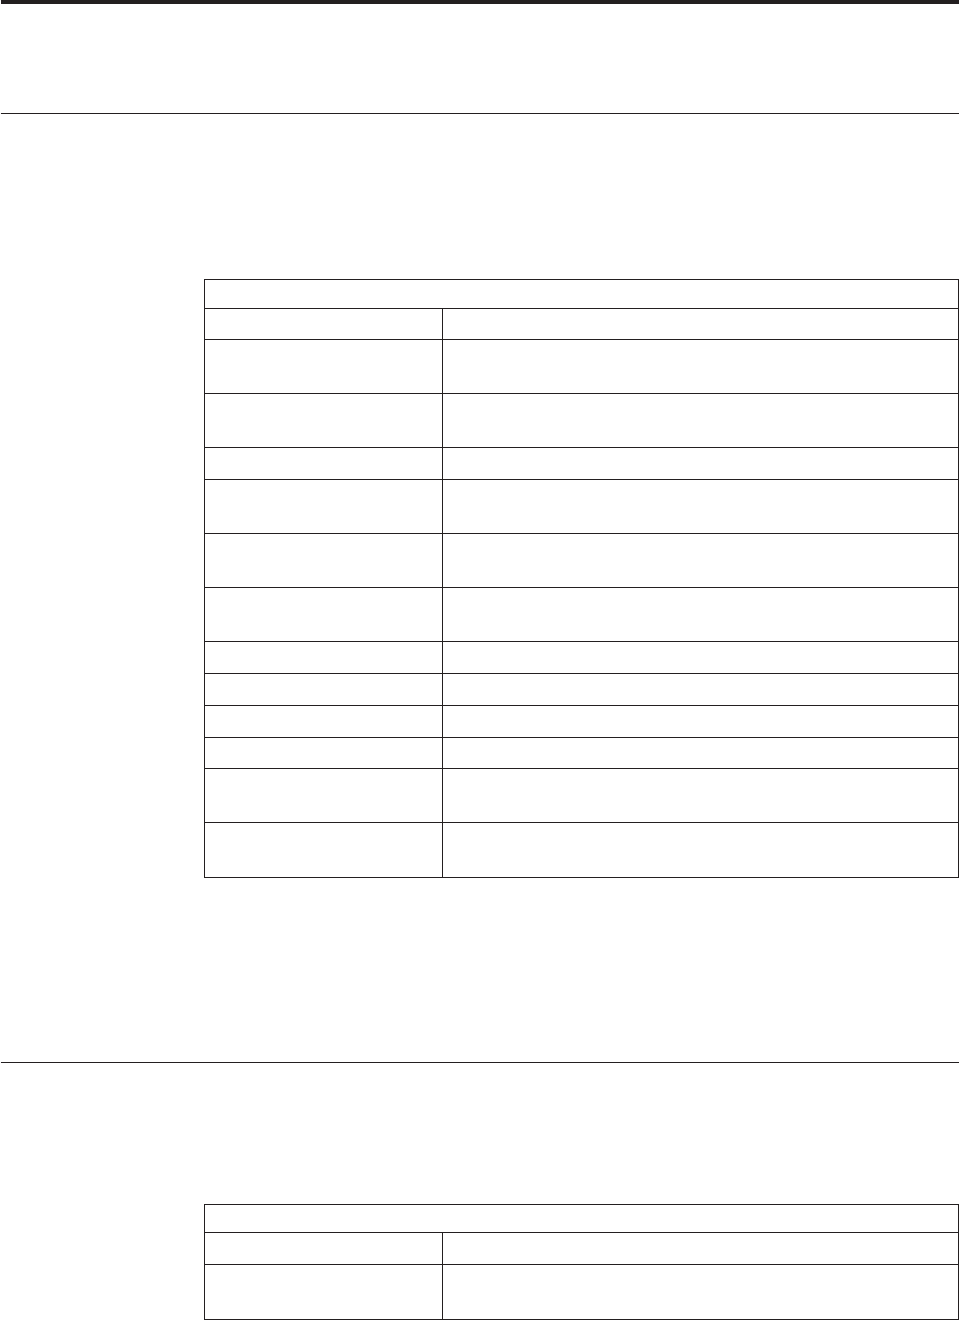
Chapter 40. Location Inventory Audit Console Screens
Location Inventory Audit Search By Item
Location Inventory Audit console enables you to view item’s and/or container’s
inventory audit details. You can search for location inventory audits by item with
the help of this screen.
Table 466. Location Inventory Audit Search By Item
Fields
Field Description
Node Select the node associated with the Item you want to search
for.
Enterprise Select the enterprise associated with the item you want to
search for.
Across Enterprise Choose this option if you are searching across enterprise.
Item ID Enter the item ID of the item you want to search for, if
applicable.
Product Class Select the product class of the item you are searching for if
applicable.
Unit Of Measure Select the unit of measure of the item you are searching for, if
applicable.
Location Enter the location ID you want to search for, if applicable.
Audit Type Select the audit type, if applicable.
Task Type Select the task type if applicable.
User ID Enter the user ID.
Activity Date Enter the date range through which you want to search for if
applicable.
Max Records Enter the maximum number of records to be listed as a result
of your search.
Note: Do not use spaces before or after any text you enter in the search fields, as
this may result in inconsistent or inaccurate results.
The Location Inventory Audit List screen displays as a result of location inventory
audit search by item.
Location Inventory Audit Search By Container
You can search for location inventory audits by container with the help of this
screen.
Table 467. Location Inventory Audit Search By Container
Fields
Field Description
Node Select the node associated with the Item you want to search
for.
© Copyright IBM Corp. 1999, 2011 329
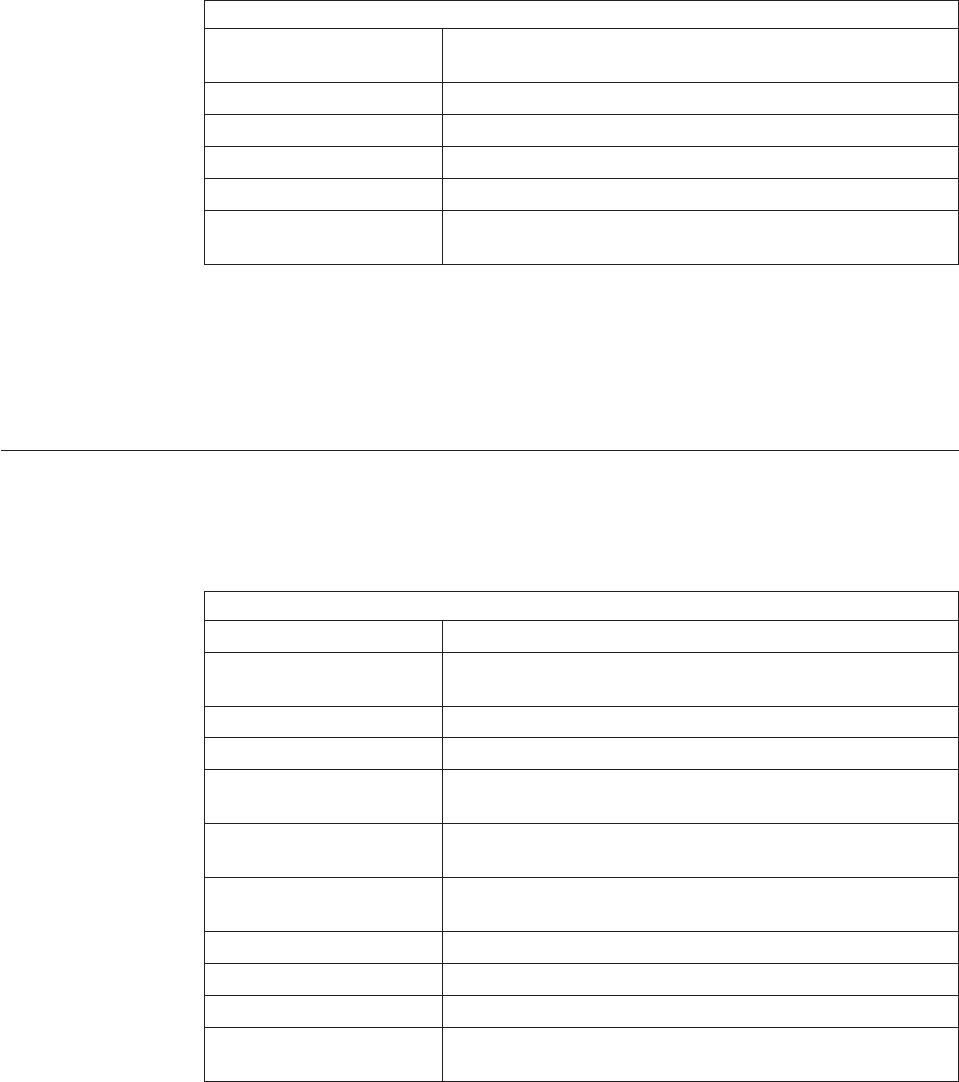
Table 467. Location Inventory Audit Search By Container (continued)
Fields
Enterprise Select the enterprise associated with the item you want to
search for.
Across Enterprise Choose this option if you are searching across enterprise.
Pallet ID Enter the pallet LPN you are searching for.
Case ID Enter the case LPN you are searching for.
Activity Date Enter the date range you are searching for, if applicable.
Max Records Enter the maximum number of records to be listed as a result
of your search.
Note: Do not use spaces before or after any text you enter in the search fields, as
this may result in inconsistent or inaccurate results.
The Location Inventory Audit List screen displays as a result of location inventory
audit search by container.
Location Inventory Audit Search By Transaction References
You can search for location inventory audits by transaction references with the help
of this screen.
Table 468. Location Inventory Audit Search By Transaction References
Fields
Node The node associated with the Item you want to search for.
Enterprise Select the enterprise associated with the item you want to
search for.
Across Enterprise Choose this option if you are searching across enterprise.
Order # Enter the order number you are searching for, if applicable.
Order Line # Enter the order line number you are searching for, if
applicable.
Shipment # Enter the shipment number you are searching for, if
applicable.
Container # Enter the container number you are searching for, if
applicable.
Reference Enter the reference you are searching for, if applicable.
Adjustment Reason Code Select the reason code associated with the adjustment.
Activity Date Enter the date range you are searching for, if applicable.
Max Records Enter the maximum number of records to be listed as a result
of your search.
Note: Do not use spaces before or after any text you enter in the search fields, as
this may result in inconsistent or inaccurate results.
The Location Inventory Audit List screen displays as a result of location inventory
audit search by transaction references.
330 Sterling Selling and Fulfillment Foundation: Warehouse Management System User Guide
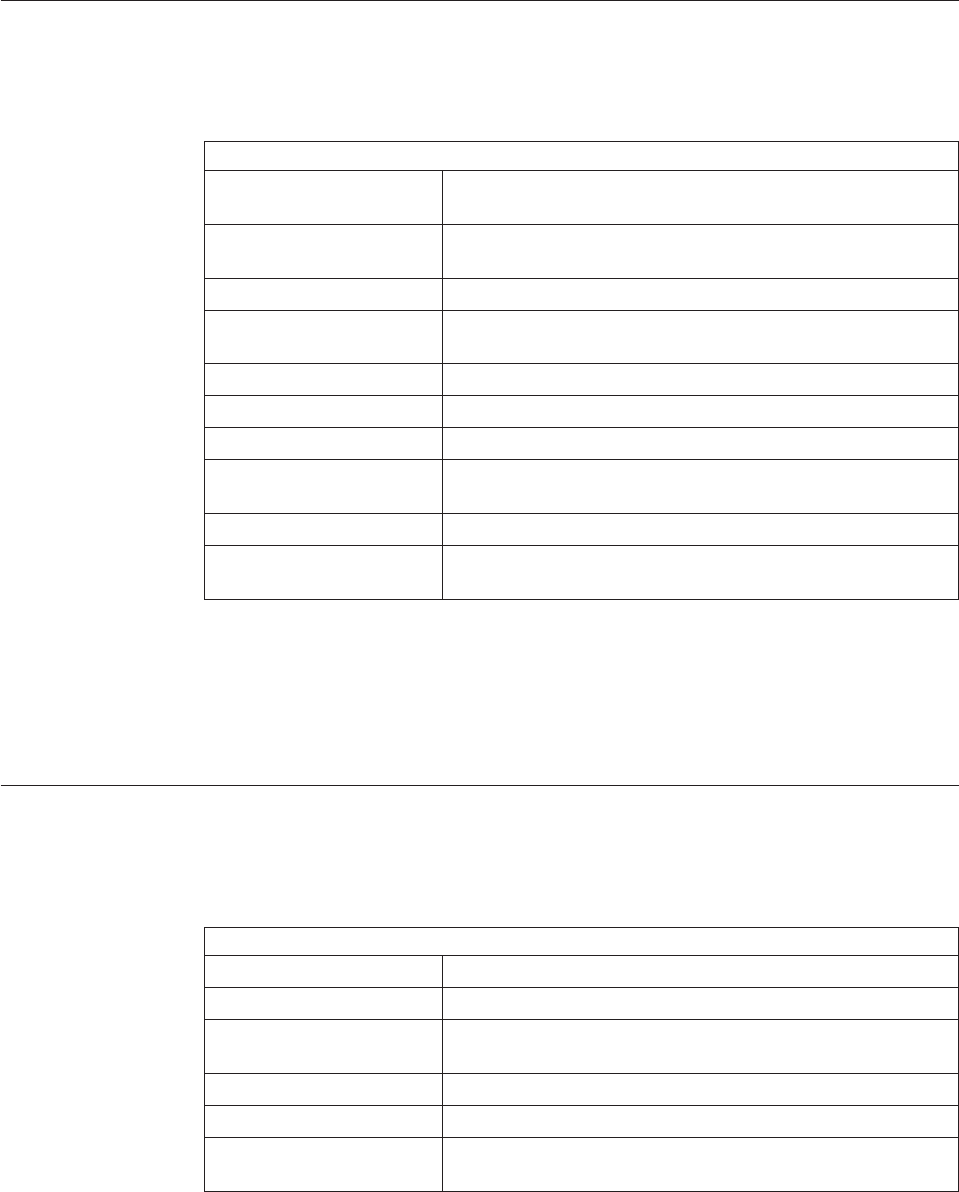
Location Inventory Audit Search By Inventory Attributes
You can search for location inventory audits by inventory attributes with the help
of this screen.
Table 469. Location Inventory Audit Search By Inventory Attributes
Fields
Node Select the node associated with the Item you want to search
for.
Enterprise Select the enterprise associated with the item you want to
search for.
Across Enterprise Choose this option if you are searching across enterprise.
Inventory Status Select the inventory status of the item want to search for, if
applicable.
Receipt # Enter the receipt number you are searching for, if applicable.
Tag # Enter the tag number you are searching for, if applicable.
Serial # Enter the serial number you are searching for, if applicable.
Ship By Date Enter the date by which the item must be shipped you are
searching for, if applicable.
In Activity Date Enter the date range you are searching for, if applicable.
Max Records Enter the maximum number of records to be listed as a result
of your search.
Note: Do not use spaces before or after any text you enter in the search fields, as
this may result in inconsistent or inaccurate results.
The Location Inventory Audit List screen displays as a result of location inventory
audit search by inventory attributes.
Performing a Location Inventory Audit Search By Count Reference
You can search for location inventory audits by count reference with the help of
this screen.
Table 470. Location Inventory Audit Search By Count Reference
Fields
Document Type The system automatically displays the document type.
Node Select the node you want to search for.
Enterprise Select the enterprise associated with the item you want to
search for.
Across Enterprise Choose this option if you are searching across enterprise.
Count Request # Enter the count request you are searching for, if applicable.
Max Records Enter the maximum number of records to be listed as a result
of your search.
Note: Do not use spaces before or after any text you enter in the search fields, as
this may result in inconsistent or inaccurate results.
Chapter 40. Location Inventory Audit Console Screens 331
The Location Inventory Audit List screen displays as a result of location inventory
audit search by count reference.
Location Inventory Audit List
The Location Inventory Audit List window displays the results of a location
inventory audit search. You can perform actions on a single item or on multiple
items by selecting the check boxes of the required audits and choosing the action
from the action bar.
Table 471. Location Inventory Audit List, Item Information
Actions
View Details This action button takes you to the Location Inventory Audit
Details for the selected inventory items.
Fields
Activity Date The date on which any activity was performed on the
inventory. Click this link to view Location Inventory Audit
Detail.
Location The location identifier.
Enterprise The enterprise associated with the audit.
Item ID The item ID.
PC The item's product class. Indicates the item's inventory
categorization. Orders are placed for an item and product
class. Typical examples are IRREGULAR, FD (Factory
Defects).
UOM The item's unit of measure.
Description Description of the item
Status Refers to an inventory sub classification based on the results
of the inventory control processes within the warehouse.
Adjustment Type The type of adjustment for the audit. Valid values are:
RECEIPT, ADJUSTMENT, SHIPMENT, RETURN.
Reason Code The reason identifier for the adjustment.
User ID The identifier of the user who performed the adjustments.
Quantity Quantity incremented (+) or decremented (-) in this
transaction
Table 472. Location Inventory Audit List, Container Information
Actions
View Details This action button takes you to the Location Inventory Audit
Details for the selected inventory containers.
Fields
Activity Date The date on which any activity was performed on the
inventory. Click this link to view Location Inventory Audit
Detail.
Enterprise The enterprise associated with the container.
Pallet ID Pallet LPN associated with the container.
Case ID Case LPN associated with the container.
Location The location identifier.
332 Sterling Selling and Fulfillment Foundation: Warehouse Management System User Guide
Table 472. Location Inventory Audit List, Container Information (continued)
Parent Pallet ID The parent pallet LPN of the container.
Parent Case ID The parent case LPN of the container.
Adjustment Type The type of adjustment for the audit. Valid values are:
RECEIPT, ADJUSTMENT, SHIPMENT, RETURN.
Reason Code The reason identifier for the adjustment.
User ID The identifier of the user who performed the adjustments.
Audit Type Indicates the type of audit. The Audit Type is either "In" or
"Out". The Audit Type "In" indicates that the LPN was
created in or moved into a location. Audit Type "Out"
indicates that the LPN was removed from or moved out of a
location.
Location Inventory Audit Details for Items
The item level Location Inventory Audit Details screen lets you view item
inventory audit details.
Table 473. Location Inventory Audit Detail, Item Information
Fields
Enterprise The enterprise associated with the item.
Item ID The item ID. Click this link to view item details.
Product Class Indicates the item's inventory categorization. Orders are
placed for an item and product class. Typical examples are
IRREGULAR, FD (Factory Defects).
Unit Of Measure The item's unit of measure.
Item Description Description of the item.
Quantity Number of units of the item at this location.
Table 474. Location Inventory Audit Detail, Audit Information
Fields
Location The location identifier. Click this link to view location details.
Date The date on which the audit was performed.
User ID The user associated with the audit.
Task Type The task type associated with the audit.
Pallet ID Pallet LPN associated with the container.
Case ID Case LPN associated with the container.
Adjustment Type The type of adjustment for the audit. Valid values are:
RECEIPT, ADJUSTMENT, SHIPMENT, RETURN.
Table 475. Location Inventory Audit Detail, Transaction Reference
Fields
Order # The order number associated with the audit.
Release # The order release number associated with the audit.
Order Line # The order line number associated with the audit.
Shipment # The shipment number associated with the audit.
Chapter 40. Location Inventory Audit Console Screens 333
Table 475. Location Inventory Audit Detail, Transaction Reference (continued)
Fields
Container # The container number associated with the audit.
Program ID The identifier of the program that created the audit.
Adjustment Reason Code The reason code associated with the adjustment.
Reason Text Additional information as to why the adjustment was made.
Table 476. Location Inventory Audit Detail, Additional Inventory Attributes
Fields
Serial # The serial number associated with the audit.
FIFO # The FIFO number associated with the audit.
FIFO number is a date based inventory attribute that helps
understand the order in which stock arrived at the node. This
is used to send out items that arrived first than the ones that
arrived later.
Segment # The segment number associated with the audit.
Segment number of the item. A segment holds either the
specific buyer or specific order number that requires
dedication.
Segment Type The segment type associated with the audit.
Segment type of the item. A segment type indicates an
inventory category. Typical values are: MTC - Made To
Customer or MTO - Made to Order.
Ship By Date The ship by date associated with the audit.
Receipt # The receipt number associated with the audit.
Inventory Status The inventory status associated with the audit.
Refers to an inventory sub classification based on the results
of the inventory control processes within the warehouse
Country/Region Of Origin The manufacturing country or region code associated with
the audit.
Table 477. Location Inventory Audit Detail, Other References
Fields
Reference #1 Reference values captured for the audit
Reference #2 Reference values captured for the audit
Reference #3 Reference values captured for the audit
Reference #4 Reference values captured for the audit
Reference #5 Reference values captured for the audit
334 Sterling Selling and Fulfillment Foundation: Warehouse Management System User Guide
Location Inventory Audit Details for Containers
The container level Location Inventory Audit Details screen lets you view container
inventory audit details.
Table 478. Location Inventory Audit Details, Container Information
Fields
Enterprise The enterprise associated with the container.
Pallet ID The pallet LPN associated with the container.
Case ID The case LPN associated with the container.
Audit Type The type of audit. The Audit Type is either "In" or "Out". The
Audit Type "In" indicates that the LPN was created in or
moved into a location. Audit Type "Out" indicates that the
LPN was removed from or moved out of a location.
Table 479. Location Inventory Audit Details, Audit Information
Fields
Location The location identifier. Click this link to view location details.
Date The date on which the audit was performed.
User ID The user id associated with the audit.
Task Type The task type associated with the audit.
Parent Pallet ID The parent pallet LPN of the container.
Parent Case ID The parent case LPN of the container.
Adjustment Type The type of adjustment for the audit. Valid values are:
RECEIPT, ADJUSTMENT, SHIPMENT, RETURN.
Table 480. Location Inventory Audit Details, Transaction Reference
Fields
Order # The order number associated with the audit.
Release # The order release number associated with the audit.
Order Line # The order line number associated with the audit.
Shipment # The shipment number associated with the audit.
Container # The container number associated with the audit.
Program ID The identifier of the program that created the audit.
Adjustment Reason Code The reason code associated with the adjustment.
Reason Text Additional information as to why the adjustment was made.
Table 481. Location Inventory Audit Details, Other References
Fields
Reference #1 Reference values captured for the audit.
Reference #2 Reference values captured for the audit.
Reference #3 Reference values captured for the audit.
Reference #4 Reference values captured for the audit.
Reference #5 Reference values captured for the audit.
Chapter 40. Location Inventory Audit Console Screens 335
336 Sterling Selling and Fulfillment Foundation: Warehouse Management System User Guide
Chapter 41. Task Console Screens
About Task Console Screens
The Task Console lets you to optimize warehouse throughput and maximize
worker efficiency. It enables you to perform the following task management tasks:
vAssign tasks
vReprioritize tasks
vModify task location and quantity
vComplete a task
vCancel certain types of tasks
vView summary level information across all tasks for a node
This chapter provides screen and field descriptions for the Task Console.
Task Search By Task Type
The Task Search By Task Type screen lets you enter the criteria for the search.
Table 482. Task Search By Task Type
Fields
Node Displays the node you are logged in as.
Enterprise Choose the field and lookup option to find the specific
Enterprise you want to use. Or choose Across Enterprises to
use of all the Enterprises.
Task Type Choose one or more task types to search for. This is
mandatory.
Start No Earlier Than Enter a time range to search for tasks that should be started
within the time range specified, if applicable.
Note: Do not use spaces before or after any text you enter in the search fields, as
this may result in inconsistent or inaccurate results.
Click Search to view the search results in the Task Summary screen.
Task Summary
The Tasks Summary screen displays the tasks that are to be completed within a
specific time frame, which is typically the current day, or the time selected in your
search criteria. If there are tasks that are not yet complete, these tasks also display.
This screen enables you to quickly determine what work is being done and which
tasks are at risk. The details display as data within a graph and also within a table
as more granular details.
© Copyright IBM Corp. 1999, 2011 337
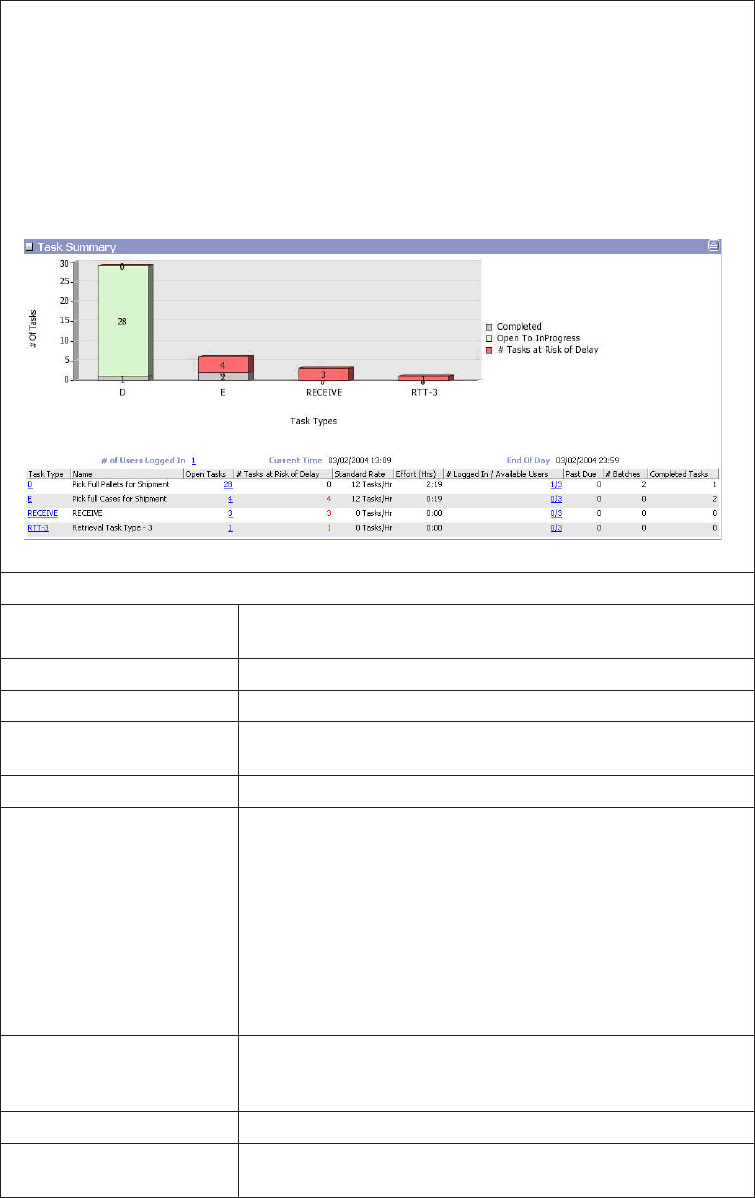
Table 483. Task Summary
Task Summary
The Task Summary graph displays a summary of all the available tasks. The graph
displays the following information:
vCompleted - The number of tasks completed. Completed tasks display as gray boxes in
the graph.
vOpen To InProgress - The number of tasks that are either open or in progress. These
tasks display as green boxes in the graph.
v# Tasks at Risk of Delay - The number of tasks that are at a risk of getting delayed.
These tasks display as red boxes in the graph.
Fields
# Of Users Logged In The number of users currently logged in. Click this link to
view the User List, which displays a list of available users.
Current Time The current time.
End Of Day Midnight of the present day.
Task Type The task type. Click this link to view the Task Summary By
Zone screen.
Name The name of a task type.
Open Tasks The number of tasks that are open, which includes the
following states:
vOpen
vHeld
vSuggested
vIn Progress
Click this link to view the Task Summary By Zone screen,
which displays a breakdown of open task summaries.
# Tasks At Risk Of Delay The number of tasks at risk of delay. This is estimated based
on finish time of tasks, the number of users working on the
task type, standard rate, and current time.
Standard Rate The standard rate of work, or the number of tasks per hour.
Effort (Hrs) The amount of effort in hours. Effort equals the Open Tasks
divided by the Standard Rate.
338 Sterling Selling and Fulfillment Foundation: Warehouse Management System User Guide
Table 483. Task Summary (continued)
# Logged In / Available
Users
The number of people logged in who possess the skills
required to perform the task at hand. The first number
indicates how many people are currently performing the task.
The second number indicates the total number of people
capable of performing the task, including those who are
currently performing the task.
For example, 3/5 indicates that five people are capable of
performing a specific task type; three of those five people are
currently performing that task type. Click this link to view
the User List screen, which displays a list of available users.
Past Due The number of tasks that should have been completed but are
still open.
# Batches The number of batches open for this task type.
Completed Tasks The number of completed tasks.
Task Summary By Zone
The Task Summary By Zone screen lets you view task summaries by zone. Tasks
are grouped by type and listed with information about the zones where a specific
task is performed.
Table 484. Task Summary By Zone
Fields
Zone The name of the zone where a specific task is performed.
# Of Tasks Originating
Here
The number of tasks that originate in the zone specified.
# Of Tasks Terminating
Here
The number of tasks that end in the zone specified.
Open Task Summary
The Open Task Summary screen lets you view an open task summary breakdown.
Tasks are grouped by type and listed with information about the users performing
a task, tasks open, tasks at risk, and estimated time length to perform those tasks.
Table 485. Open Task Summary
Fields
Task Type The name of the zone that has a specific task.
# Of Users Logged In
Performing This Task
The number of users logged in who are performing the task
specified.
Scheduled Start Time The time at which a specific task is scheduled to begin.
Scheduled End Time The time at which a specific task is scheduled to finish.
Open Tasks The number of tasks specified that are currently open.
# Of Tasks At Risk Of
Delay
The number of tasks specified that are currently at risk of
being delayed.
Estimated Start Time The time at which a specific task is estimated to begin.
Estimated End Time The time at which a scheduled task is estimated to finish.
Chapter 41. Task Console Screens 339
User List (selection)
The User List screen lets you view a list of available users.
Table 486. User List
Fields
Node The node to which the user belongs.
User ID The ID of the person to perform tasks within the node.
User Name The name of the person that corresponds with a specific User
ID.
Logged In An icon displays to show that the user is logged in.
Most Recent Task The most recent task a user has worked on.
Activity Date The date and time of the activity.
Task Search By Zone
The Task Search By Zone screen lets you perform a task search by zone.
Table 487. Task Search By Zone
Fields
Node Select the appropriate node to search for. This is mandatory.
Enterprise Choose the field and lookup option to find the specific
Enterprise you want to use. Or choose Across Enterprises to
use of all the Enterprises.
Activity Group Select an activity group to search for, if applicable.
Task Type Choose one task type to search for. The search results are
populated based on Activity Group, if applicable.
Task Status Select a task status range to search for, if applicable.
Task ID Enter a task ID to search for, if applicable.
Start Task After Enter a time range to search for tasks that should be started
after the time range specified, if applicable.
Assigned To User Enter a user name to search for, if applicable. Or choose the
Lookup icon to find the user name you want to search for, if
applicable.
Only Unassigned Tasks Choose this to search for only tasks that are not assigned to a
user.
Show Hierarchy Choose this to show a hierarchical list of results, if applicable.
This option is most appropriate when you are searching for
both Summary Tasks and Detail Tasks at the same time, but
not individually.
Search History Choose this to search history records, if applicable. If selected,
only history records are shown.
Show Only Choose Summary Tasks to list only task summaries, if
applicable.
Choose Detail Tasks to show a list of detail tasks, if
applicable.
Choose All Tasks to show both summaries and details, if
applicable.
340 Sterling Selling and Fulfillment Foundation: Warehouse Management System User Guide
Table 487. Task Search By Zone (continued)
Fields
Source Zone Enter the source zone to search for, if applicable.
Source Location Enter the source location to search for, if applicable.
Target Zone Enter the target zone to search for, if applicable.
Target Location Enter the target location to search for, if applicable.
Max Records Enter the maximum number of tasks you want returned from
your search.
Note: Do not use spaces before or after any text you enter in the search fields, as
this may result in inconsistent or inaccurate results.
Click Search to view the search results in the Task List screen.
Task Search By Inventory
The Task Search By Inventory screen lets you perform a task search by inventory.
Table 488. Task Search by Inventory
Fields
Node Select the appropriate node to search for. This is mandatory.
Enterprise Choose the field and lookup option to find the specific
Enterprise you want to use. Or choose Across Enterprises to
use of all the Enterprises.
Activity Group Select an activity group to search for, if applicable. This
search criteria displays the activity group specified and any
task types that belong to it.
Task Type Choose one task type to search for. The search results are
populated based on Activity Group, if applicable.
Task Status Select a task status range to search for, if applicable.
Start Task After Enter a time range to search for tasks that should be started
after the time range specified, if applicable.
Show Only Choose Summary Tasks to list only task summaries, if
applicable.
Choose Detail Tasks to show a list of task details, if
applicable.
Choose All Tasks to show both summaries and details, if
applicable.
Item ID Enter an item ID to search for or choose the Lookup icon to
find an item ID to search for, if applicable.
Product Class Select a product class to search for, if applicable.
UOM Select a unit of measure to search for, if applicable.
Item Classification Enter the item classification to search for, if applicable.
Note: A maximum of three item classifications displays based
on the Count Classifications configurations. This displays
only when the Activity Group is ‘Count'.
Inventory Status Select an inventory status to search for, if applicable.
Chapter 41. Task Console Screens 341
Table 488. Task Search by Inventory (continued)
Fields
Max Records Enter the maximum number of tasks you want returned from
your search.
Note: Do not use spaces before or after any text you enter in the search fields, as
this may result in inconsistent or inaccurate results.
Click Search to view the search results in the Task List screen.
Task Search By Reference
The Task Search By Reference screen lets you perform a task search by reference.
Table 489. Task Search By Reference
Fields
Node Select the appropriate node to search for. This is mandatory.
Enterprise Choose the field and lookup option to find the specific
Enterprise you want to use. Or choose Across Enterprises to
use of all the Enterprises.
Activity Group Select an activity group to search for, if applicable.
Task Type Choose one task type to search for. The search results are
populated based on Activity Group, if applicable.
Task Status Select a task status range to search for, if applicable.
Start Task After Enter a time range to search for tasks that should be started
after the time range specified, if applicable.
Show Only Choose Summary Tasks to list only task summaries, if
applicable.
Choose Detail Tasks to show a list of task details, if
applicable.
Choose All Tasks to show both summaries and details, if
applicable.
Batch # Enter the batch number to search for, if applicable.
Wave # Enter the wave number to search for, if applicable.
Shipment # Enter the shipment number to search for, if applicable.
Container # Enter the container number to search for, if applicable.
Order # Enter the order number to search for, if applicable.
Carrier Enter the carrier to search for, if applicable.
Load # Enter the load number to search for, if applicable.
Move Request # Enter the move request number to search for, if applicable.
Count Request # Enter the count number to search for, if applicable.
Work Order # Enter the work order number to search for, if applicable.
Max Records Enter the maximum number of tasks you want returned from
your search.
Note: Do not use spaces before or after any text you enter in the search fields, as
this may result in inconsistent or inaccurate results.
342 Sterling Selling and Fulfillment Foundation: Warehouse Management System User Guide
Click Search to view the search results in the Task List screen.
Task Search By Exception
The Task Search By Exception screen lets you perform a task search by exception.
Table 490. Task Search By Exception
Fields
Node Select the appropriate node to search for. This is mandatory.
Enterprise Choose the field and lookup option to find the specific
Enterprise you want to use. Or choose Across Enterprises to
use of all the Enterprises.
Activity Group Select an activity group to search for, if applicable.
Task Type Choose one task type to search for. The search results are
populated based on Activity Group, if applicable.
Task Status Select a task status range to search for, if applicable.
Start Task After Enter a time range to search for tasks that should be started
after the time range specified, if applicable.
Tasks With All Following
Holds
Choose one or more of the following check boxes, as
applicable:
vException - to search for all tasks on hold due to an
exception.
vDependency - to search for all tasks on hold because a
prerequisite task has not yet been completed.
vBatch - to search for all tasks that are on hold because they
have not yet been added to a batch.
Hold Reason If you have chosen to search only tasks marked "Held", select
the hold reason, if applicable.
Show Only Choose one of the following types of tasks to display:
vSummary Tasks - to list only task summaries, if applicable.
vChoose Detail Tasks - to show a list of task details, if
applicable.
vChoose All Tasks - to show both summaries and details, if
applicable.
Max Records Enter the maximum number of tasks you want returned from
your search.
Note: Do not use spaces before or after any text you enter in the search fields, as
this may result in inconsistent or inaccurate results.
Click Search to view the search results in the Task List screen.
Task Search By Date
The Task Search By Date screen lets you perform a task search by date.
Table 491. Task Search By Date
Fields
Node Select the appropriate node to search for. This is mandatory.
Chapter 41. Task Console Screens 343
Table 491. Task Search By Date (continued)
Fields
Enterprise Choose the field and lookup option to find the specific
Enterprise you want to use. Or choose Across Enterprises to
use of all the Enterprises.
Activity Group Select an activity group to search for, if applicable.
Task Type Choose one task type to search for. The search results are
populated based on Activity Group, if applicable.
Task Status Select a task status range to search for, if applicable.
Start Task After Enter a time range to search for tasks that should be started
after the time range specified, if applicable.
Finish Task Before Enter a task completion time range to search within, if
applicable.
Max Records Enter the maximum number of tasks you want returned from
your search.
Note: Do not use spaces before or after any text you enter in the search fields, as
this may result in inconsistent or inaccurate results.
Click Search to view the search results in the Task List screen.
Task Search By At Risk Tasks
The Task Search By At Risk Tasks screen lets you perform a task search by at risk
tasks.
Table 492. Task Search By At Risk Tasks
Fields
Node Select the appropriate node to search for, if applicable. This is
mandatory.
Enterprise Choose the field and lookup option to find the specific
Enterprise you want to use. Or choose Across Enterprises to
use of all the Enterprises.
Activity Group Select an activity group to search for, if applicable.
Task Type Choose one task type to search for. The search results are
populated based on Activity Group, if applicable.
Task Status Select a task status range to search for, if applicable.
Start Task After Enter a time range to search for tasks that should be started
after the time range specified, if applicable.
Tasks With All Following
Holds
Exception—choose this to only search for tasks marked
"Held" due an exception, if applicable.
Dependency—choose this to only search for tasks marked
"Held" due to a dependency, if applicable.
Batch—choose this to only search for tasks marked "Held"
due to batching, if applicable.
Max Records Enter the maximum number of tasks you want returned from
your search.
344 Sterling Selling and Fulfillment Foundation: Warehouse Management System User Guide
Note: Do not use spaces before or after any text you enter in the search fields, as
this may result in inconsistent or inaccurate results.
Click Search to view the search results in the Task List screen.
Task List for Task Management Console Screens
The Task List screen displays the results of a task search. This screen lets you
perform actions on a single task or on multiple tasks by selecting the check boxes
adjacent to the relevant tasks and choosing the applicable action from the action
bar.
Table 493. Task List
Actions
View Details This action button takes you to the Task Detail screen.
Task Assign to User This action button takes you to the Assign to User screen.
Reprioritize This action button takes you to the Reprioritize screen.
Hold This action button takes you to the Hold Reason screen.
Release This action button releases the specified tasks.
To specify tasks for release, select the check boxes adjacent to
the relevant tasks.
Cancel This action button takes you to the Cancel Task Reason
screen.
Fields
Task ID The task ID.
For all types of searches, Summary tasks are indicated by a
Summary Task icon. If you select the Show Hierarchy check
box in the search window, Summary tasks displays as bold
text.
Task Type The task type.
Priority The priority assigned to a task type.
Item Classification The item classification of a task.
Note: A maximum of three item classifications displays based
on the Count Classifications configurations. This displays
only when the Activity Group is ‘Count'.
Task Status The status of a task.
Source Location The origin location of a task.
Target Location The destination location of a task.
Primary Reference The primary reference of a task.
Predecessor Task Link to the task that must be completed before the task that
is displayed can be started.
Assigned To User Link to the user profile.
Chapter 41. Task Console Screens 345
Task Detail
The Task Detail screen lets you view task summary details.
Table 494. Task Detail, Task
Actions
Hold This action button takes you to the Hold Reason screen.
Release This action button releases the task.
Cancel This action button takes you to the Cancel Task Reason
screen.
Complete This action button takes you to the Record Count Result
Details screen.
Fields
Node The node where a task takes place.
Enterprise The Enterprise that owns a task.
Task Type The name of a task type.
Task ID The task's ID.
Task Status The status of a task.
Task Priority The priority of task.
Parent Task ID The task ID of the task's parent.
Created On The date the task request was created.
Pick For Enterprise Perform a picking operation for the enterprise.
Table 495. Task Detail, Inventory
Fields
Item ID The item ID of an item in inventory associated with a task.
Product Class The product class of an item in inventory associated with a
task.
UOM The unit of measure of an item in inventory associated with a
task.
Quantity The quantity of an item in inventory associated with a task.
Serial # The serial number of an item in inventory associated with a
task.
Ship By Date The date to ship an item in inventory associated with a task.
Segment The segment an item in inventory belongs to that is
associated with a task.
Segment Type The segment type of an item in inventory associated with a
task.
Inventory Status The condition of an item in inventory associated with a task.
Case ID The case ID.
Pallet ID The pallet ID.
Item Classification The item classification of a task.
Note: A maximum of three item classifications displays based
on the Count Classifications configurations. This displays
only when the Activity Group is ‘Count'.
346 Sterling Selling and Fulfillment Foundation: Warehouse Management System User Guide
Table 496. Task Detail, Location
Fields
These columns list information that pertains to the Source (or origin) and the Target (or
destination) locations.
Zone The zone within the location associated with a task.
Aisle The aisle within the location associated with a task.
Location The identifier of the location associated with a task.
Sort Sequence The sorting sequence within the location associated with a
task.
Shipment # The shipment number associated with a task, if applicable.
Wave # The wave number associate with a task, if applicable.
Table 497. Task Detail, More Attributes
Fields
Start No Earlier Than The earliest date and time a task should be started.
Finish No Later Than The latest date and time a task should be completed.
Assigned To User ID The identifier of the user assigned to complete a task.
Predecessor Task ID The identifier of a task that must be completed before the
task that is displayed can be started.
Equipment ID The identifier of the equipment associated with a task.
Table 498. Task Detail, References
Fields
The references that are displayed vary according to the Activity Group utilized.
Batch # The batch number associated with a task, if applicable.
Container # The container number associated with a task, if applicable.
Shipment # The shipment number associated with a task, if applicable.
Wave # The wave number associate with a task, if applicable.
Complete Task
The Complete Task screen lets you mark a task as completed.
Table 499. Complete Task, Task
Fields
Node The node where a task takes place.
Enterprise The Enterprise that owns a task.
Task Type The name of a task type.
Completed By The name of the user who completed the task.
Choose the field and Lookup icon to find the user name that
you want to use.
Table 500. Complete Task, Task List
Fields
Chapter 41. Task Console Screens 347
Table 500. Complete Task, Task List (continued)
Source Location Enter the source location where a task originates.
Target Location Enter the target location where a task originates.
Item ID The item ID associated with a specific task.
Product Class The item's product class.
UOM The item's unit of measure.
Item Description The description of the item.
Quantity Enter the quantity of inventory associated with a task.
Serial No For serial-controlled items, enter the serial number.
From Serial # The start serial number for the serial range.
To Serial # The end serial number for the serial range.
Note: You can enter the tag details for a tag-tracked item only if the node that is
performing the task is configured to capture the tag attributes in all operation performed
within the node or if the buyer on a shipment mandates it as a part of the inbound
compliance. For more information about capturing the tag attributes, see the Sterling Selling
and Fulfillment Foundation: Application Platform Configuration Guide.
Lot # For tag-controlled items, enter the lot number.
Batch # For tag-controlled items, enter the batch number.
Revision # For tag-controlled items, enter the revision number.
Quantity For tag-controlled items, enter the quantity of inventory
associated with the task.
Inventory Status Select the condition of the inventory associated with a specific
task.
Source Pallet Id Enter the source pallet ID associated with a specific task.
Source Case Id Enter the source case ID associated with a specific task.
Target Pallet Id Enter the target pallet ID associated with a specific task.
Click Save to record the exception reason. Clicking Save after modifying the Target
Location and Quantity fields displays the Modification Reason screen.
Note: In the Serial Entry screen when you click on Toggle Serial Range button, you
can enter the serial range.
Modification Reason for Task Management Console Screens
The Modification Reason screen lets you enter the modification reason code and
reason text.
Table 501. Complete Task Fields
Fields
Reason Code The code of the reason for modification.
Reason Text The description of the reason for modification.
348 Sterling Selling and Fulfillment Foundation: Warehouse Management System User Guide
Summary Task Detail
The Summary Task Detail screen displays task summary details.
Table 502. Summary Task Detail, Summary Task
Actions
Hold This action button takes you to the Hold Reason screen.
Release This action button releases the task.
Cancel This action button takes you to the Cancel Task Reason
screen.
Complete This action button takes you to the Record Count Result
Details screen.
Update Count This action button takes you to the Record Count Result
Details screen where you can modify the count result.
Fields
Node The node where a task takes place.
Enterprise The Enterprise that owns a task.
Task Type The name of a task type.
Task ID The task's ID.
Task Status The status of a task.
Task Priority The priority of task.
Parent Task ID The task ID of the task's parent.
Created On The date the task request was created.
Table 503. Summary Task Detail, Inventory
Fields
Case ID The case ID.
Pallet ID The pallet ID.
Table 504. Summary Task Detail, Location
Fields
These columns list information that pertains to the Source (or origin) and the Target (or
destination) locations.
Zone The zone within the location associated with a task.
Aisle The aisle within the location associated with a task.
Location The identifier of the location associated with a task.
Sort Sequence The sorting sequence within the location associated with a
task.
Table 505. Summary Task Detail, More Attributes
Fields
Start No Earlier Than The earliest date and time a task should be started.
Finish No Later Than The latest date and time a task should be completed.
Assigned To User ID The identifier of the user assigned to complete a task.
Chapter 41. Task Console Screens 349
Table 505. Summary Task Detail, More Attributes (continued)
Fields
Predecessor Task ID The identifier of a task that must be completed before the
task that is displayed can be started.
Equipment ID The identifier of the equipment associated with a task.
Task Status Details
The Task Status Details screen lets you view the status of a task on hold.
Table 506. Task Status Details
Fields
Exception Hold Indicates that a task is on hold due to an exception.
Dependency Hold Indicates that a task is on hold due to a prior dependency
that must be completed.
Batch Hold Indicates that a task is on hold due to batching reasons.
Hold Reason Code Displays the code associated with putting a task on hold, if
applicable.
Hold Reason Text Displays the description of why a task is on hold, if
applicable.
Task Status Audits
The Task Status Audits screen lets you view the status audit trail of a task.
Table 507. Task Status Audits, Task
Fields
Node The node where a task takes place.
Enterprise The Enterprise that owns a task.
Task Type The name of a task type.
Task ID The task's ID.
Task Status The status of a task.
Task Priority The priority of task.
Parent Task ID The ID of the parent task.
Created On The date a task request was created.
Table 508. Task Status Audits, Task Status Audit
Fields
Modified On The date and time a task status changed.
User ID The ID of the user who changed a task status.
Old Status The status of a task before it was changed.
New Status The status a task was changed to.
Reason Code The reason code associated with the status change.
Reason Text The reason text associated with the status change.
350 Sterling Selling and Fulfillment Foundation: Warehouse Management System User Guide
Assign to User
The Assign to User screen lets you assign a task to a user.
Table 509. Task Status Audits, Task Status Audit
Field
Assign To Enter the identifier of the user to whom the task is assigned.
User Search By All Attributes
The User Search By All Attributes lets you find a task user.
Table 510. User Search By All Attributes
Fields
Node Choose a node to search for, if applicable.
Task Type Choose a task type to search for, if applicable.
User ID Enter a user ID to search for, if applicable.
User Name Enter a user name to search for, if applicable.
Only Logged In Users Check this if you want to narrow your search to display only
users that are currently logged in, if applicable.
Zone Enter a zone to search for, if applicable.
Aisle Enter an aisle to search for, if applicable.
Source / Target / Either For the zone and aisle you are searching for, choose Source to
specify an originating point, choose Target to specify a
destination point, or choose Either to specify that they are
either the source or target (or both).
Max Records Enter the maximum number of users you want returned from
your search.
User List Selection
This User List screen lets you select a user to whom a task is assigned.
Table 511. User List (selection)
Fields
Node The node to which the user belongs.
User ID The ID of the person to perform tasks within the node.
User Name The name of the person that corresponds with a specific User
ID.
Login Status An icon displays if the user is logged in.
Reprioritize
The Reprioritize screen lets you reprioritize a task.
Table 512. Reprioritize
Fields
Priority Enter the new priority of the task.
Chapter 41. Task Console Screens 351
Hold Reason
The Hold Reason screen lets you put a task on hold.
Table 513. Hold Reason
Fields
Hold Reason Code Enter the code of the reason for putting the task on hold.
Hold Reason Text Enter the reason for putting the task on hold.
Cancel Task Reason
The Cancel Task Reason screen lets you cancel a task.
Table 514. Cancel Task Reason
Fields
Reason Code Enter the code of the reason for cancelling the task.
Hold Reason Text Enter the reason for cancelling the task.
User Detail
The user Detail screen lets you view the tasks assigned to a user.
Table 515. User Detail, User
Fields
Organization The organization to which a user belongs.
User ID The ID of a person who performs tasks within the node.
User Name The name of the person that corresponds with a specific User
ID.
Login Status The login status of a user.
Table 516. User Detail, User Task Types
Fields
Activity Group The activity groups to which a user belongs.
Task Type The task types associated with a user.
Priority The priority of tasks associated with a user.
Table 517. User Detail, User Zones
Fields
Zone The zones associated with a user.
Aisle The aisle associated with a user.
Type The type associated with a user.
Note:
Problem: While performing replenishment, if minimum and/or maximum
replenishment tasks are not available.
352 Sterling Selling and Fulfillment Foundation: Warehouse Management System User Guide
Cause: The Inventory Below Min and Inventory Below Current Demand alerts are
not selected. Also, all dedicated locations are below minimum and non-dedicated
locations are below current demand.
Resolution: Ensure that the Inventory Below Min and Inventory Below Current
Demand alerts are selected. Additionally, all dedicated locations should be above
minimum and non-dedicated locations above current demand.
Batch Search By All Attributes
The Batch Search By All Attributes screen lets you perform a batch search.
Table 518. Batch Search By All Attributes
Fields
Node Select the appropriate node to search for. This is mandatory.
Enterprise Choose the field and lookup option to find the specific
Enterprise you want to use. Or choose Across Enterprises to
use of all the Enterprises.
Activity Group Choose an activity group to search for, if applicable.
Task Type Choose the task type to search for, if applicable.
Batch # Enter the batch number to search for, if applicable.
Batch Status Choose a batch status to search for, if applicable.
Equipment Type Enter an equipment type to search for, if applicable.
Request # Enter a request number to search for, if applicable.
Wave # Enter a wave number to search for, if applicable.
Shipment # Enter a shipment number to search for, if applicable.
Search History Select this to search only history tasks, if applicable.
Max Records Enter the maximum number of task batches you want
returned from your search.
Note: Do not use spaces before or after any text you enter in the search fields, as
this may result in inconsistent or inaccurate results.
Click Search to view the search results in the Batch List screen.
Batch List
The Batch List screen displays the results of a task batch search.
Table 519. Batch List
Actions
View Details This action button takes you to the Batch Detail screen.
Print This action button takes you to the Print Batch screen.
Fields
Batch # The number associated with the batch.
Task Type The task type associated with the batch.
Batch Status The completion status of the batch.
Equipment Type The equipment associated with the batch.
Chapter 41. Task Console Screens 353
Batch Detail
The Batch Detail screen lets you view batch details.
Table 520. Batch Detail, Batch
Actions
Complete This action button takes you to the Complete Batch screen.
Print This action button takes you to the Print Batch screen.
Fields
Node The node associated with a task batch.
Task Type The task type associated with a task batch.
Batch # The number associated with a task batch.
Batch Status The status associated with a task batch.
Equipment Type The equipment type associated with a task batch.
Created On The date a batch was created.
User ID The ID of the person who created the batch.
Table 521. Batch Detail, Task List
Actions
View Details This action button takes you to the Task Detail screen.
Fields
Task ID The task ID of a specific task.
Task Type The task type of a specific task.
Task Status The current status of a task
Source Location The origin location of a specific task.
Target Location The destination location of a specific task.
Primary Reference The primary reference of a task.
Item ID The item ID associated with a specific task.
Product Class The item's product class.
UOM The item's unit of measure.
Quantity The item quantity associated with a specific task.
Complete Batch for Task Management Console Screens
The Complete Batch screen lets you mark a batch as completed.
Table 522. Complete Batch
Fields
Source Location Enter the source location where a task originates.
Target Location Enter the target location where a task originates.
Item ID The item ID associated with a specific task.
Product Class The item’s product class.
UOM The item’s unit of measure.
Item Description The description of the item.
354 Sterling Selling and Fulfillment Foundation: Warehouse Management System User Guide
Table 522. Complete Batch (continued)
Fields
Quantity Enter the quantity of inventory associated with a task.
Serial No For serial-controlled items, enter the serial number.
From Serial # The start serial number for the serial range.
To Serial # The end serial number for the serial range.
You can enter the tag details for a tag-tracked item only if the node that is performing the
task is configured to capture the tag attributes in all operation performed within the node
or if the buyer on a shipment mandates it as a part of the inbound compliance. For more
information about capturing the tag attributes, see the Sterling Selling and Fulfillment
Foundation: Application Platform Configuration Guide.
Lot # For tag-controlled items, enter the lot number.
Batch # For tag-controlled items, enter the batch number.
Revision # For tag-controlled items, enter the revision number.
Quantity For tag-controlled items, enter the quantity of inventory
associated with the task.
Inventory Status Select the condition of the inventory associated with a specific
task.
Source Pallet Id While picking a pallet, enter the pallet ID of the pallet that is
picked.
While picking an item enter the pallet ID of the pallet from
which the item is picked.
Source Case Id While picking a case, enter the case ID of the case that is
picked.
While picking an item enter the case ID of the case from
which the item is picked.
Target Pallet Id Enter the pallet ID of the pallet into which the item is
deposited.
Note: In the Serial Entry screen when you click on Toggle Serial Range button, you
can enter the serial range.
Print Batch
The Print Batch screen lets you print batch details.
Table 523. Print Batch
Fields
Print Service Name Choose the print service name you want to print.
Printer Name Select the printer name you want to print from.
No. of Copies Enter the number of copies of batch list you want to print.
Chapter 41. Task Console Screens 355
356 Sterling Selling and Fulfillment Foundation: Warehouse Management System User Guide
Chapter 42. Confirm Batch Screens
Confirm Batch Screen
You can confirm a batch with the help of this screen.
Table 524. Confirm Batch
Fields
Batch # Enter the batch number associated with the batch you are
confirming.
Target Location Enter the location where the batch is dropped off. Choose the
field and lookup option to find the specific target location
you want to use.
Target LPN No Enter the LPN number if the batch has been picked onto an
LPN.
User ID Enter the user ID associated with the batch you are
confirming.
This is automatically populated to the current user by the
system.
Start No Earlier Than The current system date and time is automatically populated.
Enter different start date and time when the batch was
started, if applicable.
Finish No Later Than The current system date and time is automatically populated.
Enter different finish date and time when the batch was
finished, if applicable.
Access Complete Batch Screen
Procedure
1. Click the Confirm button to confirm the batch.
2. Click the Confirm with Details button to complete a batch with details. This
takes you to the Complete Batch screen.
Complete Batch for Confirm Batch Console Screens
The Complete Batch screen allows you to complete a batch that is confirmed with
details.
Table 525. Complete Batch
Fields
Source Location Enter the source location where a task originates.
Target Location Enter the target location where a task originates.
Item ID The item ID associated with a specific task.
Product Class The item's product class.
UOM The item's unit of measure.
Item Description The description of the item.
© Copyright IBM Corp. 1999, 2011 357
Table 525. Complete Batch (continued)
Fields
Quantity Enter the quantity of inventory associated with a task.
Serial No For serial-controlled items, enter the serial number.
You can enter the tag details for a tag-controlled item, if the node that is confirming a
batch is configured to capture the tag attributes in all operations performed within the
node, or if the buyer on a shipment mandates it as a part of the inbound compliance. For
more information about capturing the tag attributes, see the Sterling Selling and Fulfillment
Foundation: Application Platform Configuration Guide.
Lot # For tag-controlled items, enter the lot number.
Batch # For tag-controlled items, enter the batch number.
Revision # For tag-controlled items, enter the revision number.
Quantity For tag-controlled items, enter the quantity of inventory
associated with the task.
Inventory Status Select the condition of the inventory associated with a specific
task.
Source Pallet Id While picking a pallet, enter the pallet ID of the pallet that is
picked.
While picking an item enter the pallet ID of the pallet from
which the item is picked.
Source Case Id While picking a case, enter the case ID of the case that is
picked.
While picking an item enter the case ID of the case from
which the item is picked.
Target Case Id Enter the Case ID of the case into which the item is
deposited.
Target Pallet Id Enter the pallet ID of the pallet into which the item is
deposited.
Click the Save button to enter appropriate reasons for adjusting the quantity. This
takes you to the Modification Reason screen.
Modification Reason for Confirm Batch Console Screens
Enter the appropriate reasons for adjusting the quantity.
Table 526. Modification Reason
Fields
Reason Code Select the applicable exception reason code for the
modification.
Reason Text Enter any additional comments for the modification.
358 Sterling Selling and Fulfillment Foundation: Warehouse Management System User Guide
Chapter 43. Record Count Screens
About Record Count Screens
A warehouse operator records count task results to indicate the completion of the
count task that was assigned. During the process of recording the count task
results, the system automatically computes and records the count variance.
The Record Count Results screen provides information about recording the count
results.
Recording Count Results
You can record count results to indicate the completion of a count task operation
with the help of this screen.
Table 527. Record Count Results
Fields
Task ID The count task ID.
Location The location where the count was performed.
Click Proceed. The Record Count Result Details screen displays where you can
record the count task results.
© Copyright IBM Corp. 1999, 2011 359
360 Sterling Selling and Fulfillment Foundation: Warehouse Management System User Guide
Chapter 44. Log Productivity Screens
About the Log Productivity Screens
The Sterling Warehouse Management System provides the ability to record
additional productivity information. The manual entry of productivity is done for
activities that are done outside of the system but reflect the work done by the user.
Examples include stacking of shipping cartons, checking for consolidation
opportunities and physical check of aisles and locations for cleanliness.
The Log Productivity screen enables you to create productivity.
Log Productivity Screen
Use this screen to create productivity.
Table 528. Log Productivity
Fields
Node Node associated with the productivity.
Enterprise Enter or select the enterprise associated with the productivity.
Productivity Type Enter the productivity type associated with the productivity.
Choose the field and Lookup icon to go search for the
productivity type. For more information, see the Sterling
Selling and Fulfillment Foundation: Application Platform User
Guide.
User Enter the user ID associated with the productivity
Execution Date Enter the date on which the tasks were performed.
Click Create Productivity to create productivity. The Productivity Details screen
displays. For more information about productivity details, see the section,
"Productivity Details".
© Copyright IBM Corp. 1999, 2011 361
362 Sterling Selling and Fulfillment Foundation: Warehouse Management System User Guide
Chapter 45. Productivity Console Screens
Productivity Search By Productivity Type
You can search for productivity that fall within a particular productivity type with
the help of this screen.
Table 529. Productivity Search By Productivity Type
Fields
Node The node associated with productivity.
Enterprise Select the enterprise you are searching for.
Across Enterprises Select this option if you are searching across all enterprises.
Productivity Type Enter the productivity type you want to search for, if
applicable.
User ID Enter the user ID associated with the productivity you want
to search for, if applicable.
Date of Execution Enter the date range of productivity execution, if applicable.
Max Records Enter the maximum number of records to be listed as a result
of your search.
Note: Do not use spaces before or after any text you enter in the search fields, as
this may result in inconsistent or inaccurate results.
The Productivity List screen displays as a result of this search.
Productivity List
The Productivity List window displays the results of a productivity search. You can
perform actions on a single productivity type or multiple productivity types by
selecting the check boxes of the productivity types you want to perform an action
on and choosing the applicable action from the action bar.
Table 530. Productivity List
Actions
View Details This action takes you to the Productivity Details screen where
you can modify the productivity details.
Delete This action allows you to delete the selected productivity.
Fields
Productivity Type The productivity type associated with the productivity.
Description A brief description of the productivity type.
User ID The user associated with the productivity.
Enterprise The enterprise associated with the productivity.
Execution Date The date on which the tasks were performed.
Start Time The start time of the task included in the productivity batch.
End Time The end time of the task included in the productivity batch.
© Copyright IBM Corp. 1999, 2011 363
Table 530. Productivity List (continued)
Credited Time Time credited to the user to perform the task.
This value is based on the calculations from the Standard
Allowable Minutes (SAM) details for the productivity type.
Productivity Details
You can modify the productivity details with the help of this screen.
Table 531. Productivity Details, Productivity
Fields
Node The node associated with the productivity.
Enterprise Code The enterprise associated with the productivity.
Productivity Type The productivity type associated with the productivity.
User ID The user who performed the tasks.
Execution Date The date on which the tasks were performed.
Credited Time The time credited to the user to perform the tasks.
Table 532. Productivity Details, Productivity Metrics
Fields
No. of Pallets Number of pallets handled by the user.
No. of Cases Number of cases handled by the user.
No. of Items Number of items handled by the user.
No. of Units Number of units handled by the user.
No. of Tasks Number of tasks handled by the user.
No. of Source Aisles Visited Number of source aisles visited by the user.
No. of Target Aisles Visited Number of target aisles visited by the user.
No. of Source Location
Visited
Number of source locations visited by the user.
No. of Target Location
Visited
Number of target locations visited by the user.
Start Time The start time of the task included in the productivity batch.
End Time The end time of the task included in the productivity batch.
Table 533. Productivity Details, Productivity References
Fields
Request # The request number associated with the productivity
reference.
Order # The order number associated with the productivity reference.
Receipt # The receipt number associated with the productivity
reference.
Shipment # The shipment number associated with the productivity
reference.
Batch # The batch number associated with the productivity reference.
Carrier The carrier code associated with the productivity reference.
364 Sterling Selling and Fulfillment Foundation: Warehouse Management System User Guide
Table 533. Productivity Details, Productivity References (continued)
Fields
Load # The load number associated with the productivity reference.
Bol # The bill of lading number associated with the productivity
reference.
Trailer # The trailer number associated with the productivity reference.
Manifest # The manifest number associated with the productivity
reference.
Item Classification code The classification code associated with the productivity
reference.
Release # The release number associated with the productivity
reference.
Prime Line # The order line number associated with the productivity
reference.
Sub Line # The order-sub-line number associated with the productivity
reference. For example, kit components have the same prime
line number, but different sub line numbers for each of the
components.
Wave # The wave number associated with productivity reference.
Wave Date The date on which the wave was released.
Container # The container number associated with the productivity
reference.
Note: The field values displayed vary depending on the productivity type
selected.
Chapter 45. Productivity Console Screens 365
366 Sterling Selling and Fulfillment Foundation: Warehouse Management System User Guide

Chapter 46. Derive Labor Standards Screens
About Derive Labor Standards Screens
Sterling Selling and Fulfillment Foundation provides the ability to automatically
derive labor standards or Standard Allowable Minutes (SAM) based on the
historical data of tasks or activities performed by warehouse users over a period of
time. The Derive Labor Standards console enables you to derive labor standards
for a productivity type at a specified time.
Some of the parameters taken into account when deriving the labor standards are:
vTime spent by the user to complete the task
vNumber of tasks completed in the given period of time
vDistance covered by the user when executing the task
vNumber of source and/or target locations visited by the user
vThe weight borne by the user when executing the task
vNumber of cases or pallets picked
vNumber of items picked
This chapter provides the screen and field descriptions for the Derive Labor
Standards screens.
Activities Search By Date Range
You can search for activities that fall within a particular productivity type on this
screen.
Table 534. Activities Search By Date Range
Fields Description
Node The node associated with the productivity.
Productivity Type Enter the productivity type for which you want to search, if
applicable.
Start Date Enter the start date for the time period to be considered for
calculating the productivity.
This field is mandatory.
End Date Enter the end date for the time period to be considered for
calculating the productivity.
This field is mandatory.
Max Records Enter the maximum number of records to be listed as a result
of your search.
Note: Do not use spaces before or after any text you enter in the search fields as
this may result in inconsistent or inaccurate results.
The Productivity Type List screen displays as a result of this search.
© Copyright IBM Corp. 1999, 2011 367
Productivity Type List
The Productivity Type List window provides visibility to productivity types
associated with the activity.
Table 535. Productivity Type List
Actions
View Summary This action takes you to the Productivity Summary screen
where you can view the productivity details.
Fields
Productivity Type The productivity type.
Click the Plus icon to view the productivity types associated
with this equipment type.
SAM Defined On The date and time when SAM was last modified.
SAM Defined By The user who last modified SAM.
Equipment Type The equipment type associated with the productivity type.
Description A brief description of the productivity type.
SAM Defined On The date and time when the SAM for the productivity type
was last modified.
SAM Defined By The user who last modified the SAM for the productivity
type.
Productivity Summary
You can view the productivity details on this screen.
Table 536. Productivity Summary, Productivity Type
Actions
Compute SAM This action takes you to the Derive Labor Standards,
Compute SAM Action screen, which enables you to compute
the SAM for the productivity type.
Fields
Node The node associated with the productivity.
Productivity Type The productivity type.
Description A brief description of the productivity type.
Equipment Type The equipment type associated with the productivity type.
Start Date The start date for the time period to be considered for
calculating the productivity.
End Date The end date for the time period to be considered for
calculating the productivity.
Table 537. Productivity Summary, User List
Fields Description
User Name The identifier of the user who performed the tasks.
Credited Minutes The time (in minutes) credited to the user.
368 Sterling Selling and Fulfillment Foundation: Warehouse Management System User Guide
Table 537. Productivity Summary, User List (continued)
Fields Description
Efficiency % The percentage of the user's efficiency. The user efficiency is
calculated by dividing the time (in minutes) credited to the
user by the total time (in minutes) taken to complete the task.
The credited time is computed based on the old SAM values.
Estimated Efficiency % The percentage of the user's estimated efficiency. The user
efficiency is calculated by dividing the time (in minutes)
credited to the user by the total time (in minutes) taken to
complete the task. The credited time is computed based on
derived SAM values.
Table 538. Productivity Summary, Execution SAM Estimates
Fields Description
SAM Indicates the standard allowable minutes associated with the
productivity type.
Current Value The current SAM value of the productivity type.
Estimated Value The estimated SAM value of the productivity type.
Table 539. Productivity Summary, Planning SAM Estimates
Fields Description
SAM Indicates the standard allowable minutes associated with the
productivity type.
Current Value The current SAM value of the productivity type.
Estimated Value The estimated SAM value of the productivity type.
Derive Labor Standards Screen
This screen aids you in deriving the labor standards.
Table 540. Derive Labor Standards, Compute SAM Action
Fields Description
Derive Execution Standards Check this box to derive execution standards.
Derive Planning Standards Check this box to derive planning standards.
Consider Selected User(s)
% Efficient
Enter the values of efficiency percentages for the selected
users.
Chapter 46. Derive Labor Standards Screens 369
370 Sterling Selling and Fulfillment Foundation: Warehouse Management System User Guide

Chapter 47. User Time Sheet Screens
About User Time Sheet Screens
Sterling Selling and Fulfillment Foundation provides the ability to view
productivity information based on the amount of time spent by users on the
various tasks they performed during a given period of time.
This chapter provides the screen and field descriptions for the User Time Sheet
screens.
User Time Sheet Search By User
The User Time Sheet Search By User screen lets you enter the criteria to search for
a specific user’s time sheet.
Table 541. User Time Sheet Search By User
Field Description
Node The node to which the user belongs.
User ID Enter the identifier of the user.
Note: If you do not enter the user ID, the time sheet displays
all users for the selected date.
Date Enter the date for which you want to calculate the time sheet.
Enter Date Range Click to enter the date range for which you want to view the
user time sheet.
Date of Execution Enter the date range for which you want to complete the time
sheet, if applicable.
Max Records Enter the maximum number of records to be listed as as a
result of your search.
Note: Do not use spaces before or after any text you enter in the search fields, as
this may result in inconsistent or inaccurate results.
The Time Sheet screen displays as a result of your search.
Time Sheet
The Time Sheet screen provides visibility to the time spent by users to perform
various tasks during the selected date range. This screen displays the time slot in
colored boxes in a table based on the activity group to which the task belongs.
Table 542. Time Sheet,
Field Description
User Displays the identifier of the user associated with the time
sheet.
Date (s) The date for which the time sheet is calculated.
© Copyright IBM Corp. 1999, 2011 371
Table 542. Time Sheet, (continued)
Field Description
Utilization % The percentage of the user's utilization. This is calculated as:
Utilization% = The amount of time spent by the user
performing the tasks/ the number of hours defined per day *
100.
Table 543. Time Sheet, Legend
Black Indicates unavailable time slots.
Green Indicates time slots for put away.
Yellow Indicates time slots for replenishment.
Blue Indicates time slots for retrieval.
Orange Indicates time slots for picking.
Cyan Indicates time slots for receipt.
Pink Indicates time slots for count.
Light Pink Indicates time slots for VAS.
Peach Indicates time slots for packing.
Purple Indicates time slots for outbound inventory container build.
Aqua Indicates time slots for shipping container build.
Red Indicates time slots for shipping.
Gray Indicates time slots for inspection.
Off-White Indicates time slots for transportation.
Login Indicates time slots for login.
White Indicates idle time slots.
372 Sterling Selling and Fulfillment Foundation: Warehouse Management System User Guide
Chapter 48. Resource Planning Screens
About Resource Planning Screens
The Resource Planning tool provides a warehouse with the ability to plan for
expected workload and determine the number of resources that is required to
complete all activities. Having provided visibility to the expected resources,
warehouse personnel can accurately plan for overtime, temporary staffing, and so
forth thus optimizing the resource costs.
Resource planning console provides:
vComprehensive visibility to standard capacities.
vAbility to foresee demand and capacity.
vAbility to recognize the availability of resources on selected dates.
vAbility to move resources between various resource pools depending on the
viability.
vAbility to assign extended shifts to various resources based on demand.
vAbility to push demands to a further date depending on resources and
requested ship dates.
Defining Standard Capacity
You can define a standard capacity for different resource pools based on the
effective start and end dates, units of measure, and so forth.
Table 544. Defining Standard Capacity
Fields
Resource Pool Select the resource pool from the drop-down list for which
you want to define the standard capacity.
Resource Pool Current Standard Capacity Details
You can view and override the standard capacity details.
Table 545. Resource Pool Current Standard Capacity Details, Resource Pool
Fields
Resource Pool The resource pool for which the standard capacity is defined.
Resource Pool Description The description of the resource pool.
Node The ship node associated with the resource pool.
Capacity Organization The capacity organization defined for the selected resource
pool.
Supervisor ID The identifier of the supervisor.
Table 546. Resource Pool Current Standard Capacity Details, Current Standard Capacity
Fields
Effective Start Date Enter the start date for which you want to define the
standard capacity.
© Copyright IBM Corp. 1999, 2011 373
Table 546. Resource Pool Current Standard Capacity Details, Current Standard
Capacity (continued)
Fields
Effective End Date Enter the end date for which you want to define the standard
capacity.
Slot The name of the slots available in a warehouse.
Start Time The time at which the slot begins.
End Time The time at which the slot ends.
Copy From Enter the value of capacities you want to copy to the selected
days of the week.
Days of the Week The capacity of each slot on all days of the week.
Table 547. Resource Pool Current Standard Capacity Details, Standard Capacity Periods
Actions
View Standard Capacity This action takes you to the Resource Pool Standard Capacity
Details.
Create New This action takes you to the Resource Pool Standard Capacity
Period.
Delete This action deletes the selected standard capacity periods.
Fields
Start Date Enter the date on which you want to begin the period for
standard capacity.
End Date Enter the date on which you want to end the period for
standard capacity.
Resource Pool Standard Capacity Details
You can view the standard capacity details.
Table 548. Resource Pool Standard Capacity Details, Resource Pool
Fields
Resource Pool The resource pool for which the standard capacity is defined.
Resource Pool Description The description of the resource pool.
Node The node associated with the resource pool.
Capacity Organization The capacity organization defined for the selected resource
pool.
Supervisor ID The identifier of the supervisor of the resource pool.
Table 549. Resource Pool Standard Capacity Details, Standard Capacities
Actions
Copy Capacity This action copies the capacity entered in the "copy from"
field to the selected days of the week.
Fields
Effective Start Date Enter the date on which you want to begin the standard
capacity period.
Effective End Date Enter the date on which you want to end the standard
capacity period.
374 Sterling Selling and Fulfillment Foundation: Warehouse Management System User Guide
Resource Pool Standard Capacity Period
You can view the standard capacity period details.
Table 550. Resource Pool Standard Capacity Period, Resource Pool
Fields
Resource Pool The resource pool for which the standard capacity is defined.
Resource Pool Description The description of the resource pool.
Node The node associated with the resource pool.
Capacity Organization The capacity organization defined for the selected resource
pool.
Supervisor ID The identifier of the supervisor.
Table 551. Resource Pool Standard Capacity Period, Standard Capacity Period
Fields
Effective Start Date Enter the date on which you want to begin the standard
capacity period.
Effective End Date Enter the date on which you want to end the standard
capacity period.
Planning Resources
You can use the screens described in the following sections to view and deploy
resources optimally to meet the demand.
Resource Planning Capacity Search
You can search for resource demand and capacity and view an overview by date.
Table 552. Capacity Search
Fields
Node Enter the ship node.
Start Date Enter the date for which you want to view the capacity.
# of Days Displays the number of days for which you can view the
capacity details based on the start date.
By default, the system displays 7 days.
Show Demand and
Capacity Data in
Choose the appropriate unit of measure in which you want
the demand and capacity details to display.
Based on the configuration, the default unit of measure
displays.
Work Hours The unit of measure of the capacity in hours.
Work Day The unit of measure of the capacity in days.
Consider Pending Task Check this box if you want to consider all pending tasks to be
completed and included as backlog demands for the selected
day.
Resource Planning Screen
You can view the details of capacity and demand for various resource pools.
Chapter 48. Resource Planning Screens 375
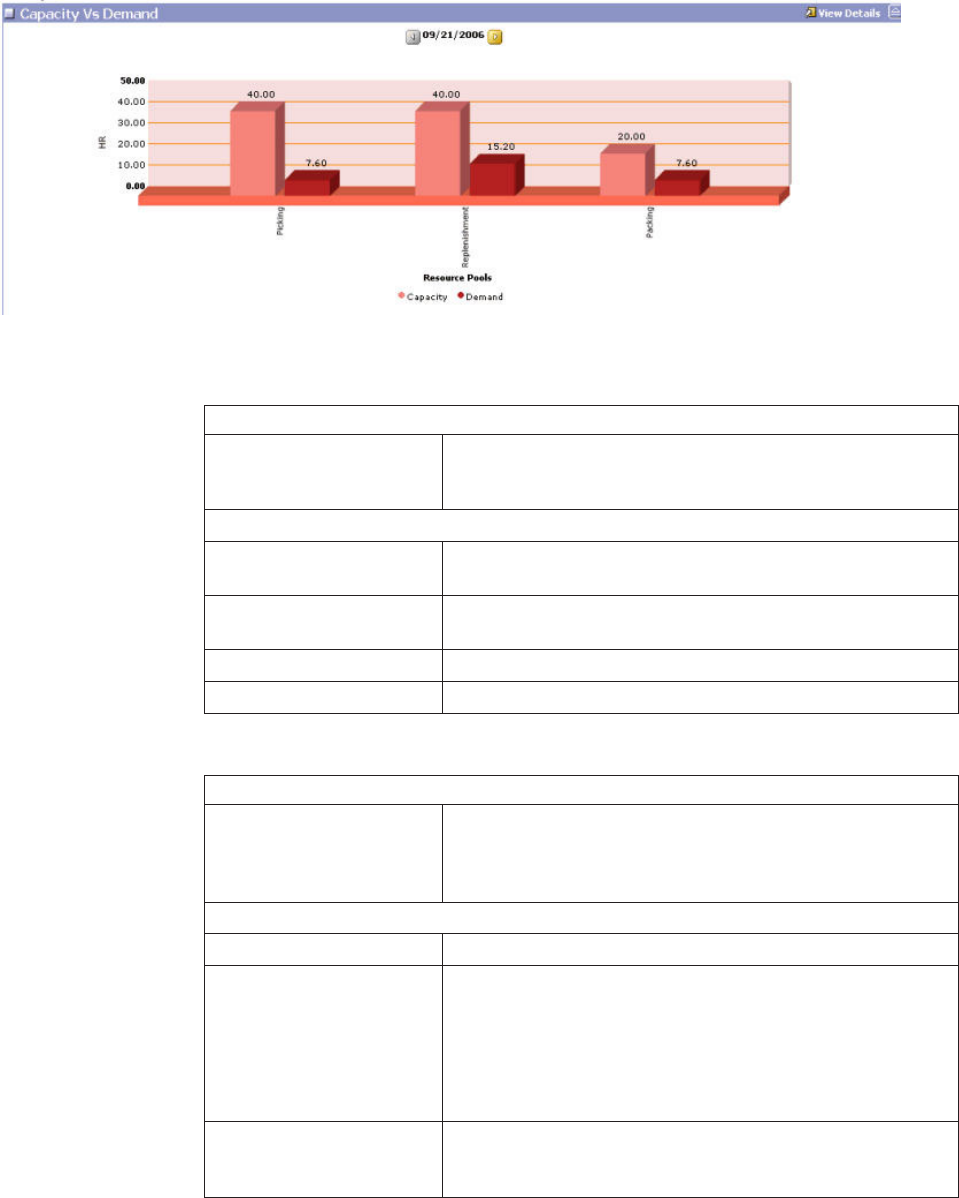
Table 553. Resource Planning, Capacity vs Demand
Action
View Details This action takes you to the Planning Summary screen where
you can view the overridden default deployment of the
resources and confirm your plan.
Fields
HR Displays the capacity and demand in hours for the selected
date.
Resource Pools Displays the capacity and demand of different resource pools
for the selected date.
Capacity The capacity is displayed in this color.
Demand The demand is displayed in this color.
Table 554. Resource Planning, Plan Resources
Action
Standard Capacity This action takes you to the Resource Pool Current Standard
Capacity Details screen when you choose the appropriate
resource pool for which you want to define the standard
capacity.
Fields
Resource Pool The list of different resource pools for a node.
Measure The measure of demand and capacity.
When you select the capacity for a day, the capacity details
screen displays for the selected day.
When you select the demand for a day, the demand details
screen displays for the selected day.
Days of the Week The demand and capacity measures for the selected days of
the week.
Note: The selected days of the week are highlighted.
Capacity Details
You can view the capacity details for the selected date. You can also move
resources from other resource pools depending on the capacity.
Figure 1. Capacity vs Demand
376 Sterling Selling and Fulfillment Foundation: Warehouse Management System User Guide
Table 555. Capacity Details Screen, Resource Pool Details
Fields
Resource Pool The resource pool for which you want to view the capacity
details.
Date The date on which you want to view the capacity details.
Demand The demand for a selected resource pool on a chosen date.
Planned Capacity The capacity planned for a selected resource pool.
Allocated Capacity The sum of capacities for resources within a resource pool.
Table 556. Capacity Detail Screen, Capacity Distribution
Fields
Shift The name of the shift defined for the warehouse.
Planned Capacity The capacity planned for a selected resource pool during a
particular shift.
Allocated Capacity The sum of capacities for resources within a resource pool
during a particular shift.
Excess The excess capacity when the allocated capacity is higher
than the planned capacity.
Shortage The capacity shortage when the allocated capacity is lower
than the planned capacity.
Table 557. Capacity Detail Screen, Other Resource Pools
Action
Pull Resources This action takes you to Transfer Resources Screen that
displays the source and target resource pools for the selected
resources.
You can transfer resources from the current resource pool to
the target resource pool.
Fields
Pool Name The name of the resource pool from where you want to pull
the resources.
Allocated Capacity The allocated capacity of resources within the selected
resource pool.
Planned Capacity
(Demand)
The planned capacity and the existing demand for the
resource pool on the selected date.
Excess Capacity The capacity in excess within the resource pool on the
selected date.
Table 558. Capacity Detail Screen, Member Resources
Action
Assign Shift This action takes you to Assign Shift Screen where you can
assign shifts to each resource.
Fields
Resource The list of resources within the current resource pool.
Start Time The time when the resource begins the work.
End Time The time when the resource ends the work.
Chapter 48. Resource Planning Screens 377
Table 558. Capacity Detail Screen, Member Resources (continued)
Total Hours The total hours of the resource capacity within the resource
pool.
Transfer Resources Screen
This screen enables you to move resources between various resource pools.
Table 559. Capacity Detail Screen, Pull Resources Action, Transfer Resources
Fields
Current Resource Pool The resource pool from where you want to move resources.
Target Resource Pool The resource pool to where you want to move resources.
Override Shifts Check this box if you want to override the time range for a
shift.
Table 560. Capacity Detail Screen, Transfer Resources, Assign Shift
Fields
Shift Displays the shift to which the user belongs.
Start Time The time when the shift begins.
End Time The time when the shift ends.
Assigned Check this box to assign shifts to resources.
Assign Shift Screen
This screen enables you to assign shifts to resources.
Table 561. Capacity Detail Screen, Assign Shift Action
Fields
Shift Displays the capacity for each shift.
Start Time The time when the shift begins.
End Time The time when the shift ends.
Assigned Check this box to assign shifts to resources.
Demand Details for Resource Pool
You can view demands for each resource pool. You can also move demands to
further dates based on the resource and requested ship date.
Table 562. Demand Details Screen, Resource Pool Details
Fields
Resource Pool The resource pool for which you want to view the demand
details.
Date The date chosen to view the demand details.
Planned Capacity The standard capacity defined for a resource pool.
Allocated Capacity The sum of capacities of the resources within a resource pool.
Today's Demand Details
#Shipments The number of shipments.
#Shipments Lines The number of shipment lines.
Total Hours The total effort required in hours.
378 Sterling Selling and Fulfillment Foundation: Warehouse Management System User Guide
Table 562. Demand Details Screen, Resource Pool Details (continued)
Fields
Total Days The total effort required in days.
Demand Search Panel
You can search for demand based on your required constraints.
Table 563. Resource Availability, Hours vs Days
Fields
Hours The availability of a resource in hours.
Days The availability of a resource on various days.
Table 564. Demand Search Screen
Fields
Document Type Select the appropriate document type.
Valid values include: Sales Order and Transfer Order.
Node The node associated with the resource pool.
Enterprise Select the enterprise to which you want to move demands
from the drop-down list.
Buyer Enter the organization of the buyer.
Ship Mode Select the mode of shipment from the drop-down list.
$Value The cost of the shipment in dollars.
Service The service used to ship the shipment.
Pack and Hold Only Check this box to search for demands considering only pack
and hold shipments.
Requested Delivery Date Enter the requested delivery date for which you want search
the demands.
To Enter the requested delivery date on which you want to end
the search for demand.
Status Select the from status of the task for demand search from the
drop-down list.
To Select the to status of the task for performing a demand
search from the drop-down list.
Held Shipments With Hold
Type
Check this box to view demands for shipments that are held
with hold type.
Order Type The type of the order.
You can customize this field, if applicable.
Only Planned Shipments Choose this option to search for demands considering only
planned shipments.
Only Unplanned Shipments Choose this option to search for demands considering only
unplanned shipments.
All Shipments Choose this option to search for demands considering all
shipments.
Chapter 48. Resource Planning Screens 379
Table 565. Demand Search Screen, Demand Break-up by Requested Ship Date
Fields
Measure The different measures across requested ship dates.
Total The total demand across requested ship dates.
Backlog The demand that was not fulfilled on the previous date and
is carried over.
High Date Because the date for the demand is not determined, this field
is used to indicate an unspecified date in the future.
Days of the week The demand across each day of the week.
Move Shipments This icon takes you to the Move Shipments screen. You can
push demands to appropriate date.
Move Shipments
This screen enables you to move the shipments on a chosen date.
Table 566. Move Shipments
Fields
For Shipments with
Requested Ship Date
This displays the date chosen to move the demands.
Move Choose the appropriate task you want to move.
vPick Tasks: Choose this option to move pick tasks on the
selected date.
vShip Tasks: Choose this option to move ship tasks on the
selected date.
vAll Tasks: Choose this option to move all tasks on the
selected date.
amounting to... Enter the number of hours or shipments that is to be moved
to a chosen date.
To Date Enter the date to which you want to move the shipments.
Planning Summary
This screen aids in confirming your plan after viewing the edits that are made to
the resources.
Table 567. Planning Summary Screen
Action
Confirm Plan This action enables you to confirm a plan.
Field
Show Only Overridden
Resources
Check this box if you want to see the resources that are
overridden.
vResource Pool: The resource pool that is overridden.
vShift: The shift that is overridden.
vResource: The resource that is overridden.
vTotal Working Hours: The total working hours that are
overridden.
Note: The overridden fields are highlighted.
380 Sterling Selling and Fulfillment Foundation: Warehouse Management System User Guide

Chapter 49. Sterling Warehouse Management System Prints
About Sterling WMS Prints
This appendix describes the various documents (labels or reports) that are printed
daily in a warehouse as and when requested or when initiated by the occurrence
of specific events. For more information about prints, see the Sterling Selling and
Fulfillment Foundation: Warehouse Management System Configuration Guide.
The Sterling Warehouse Management System provides the following prints:
vPacking Slip
vUCC-128 Container Shipping Label
vTask List
vBill Of Lading
vFedEx Carrier Label
vReprint Carrier Label
vCount Sheet
vWave Release
vHazmat Stock Keeping Unit Labels
Note: Problem
– When you configure Sterling Selling and Fulfillment Foundation to print on
Loftware in TCP/IP sockets - WAIT mode, the following error message
displays: An unexpected error has occurred on the LPS: The maximum
allowable clients have been exceeded! Rejecting login!
– When you configure Sterling Selling and Fulfillment Foundation to print on
Loftware in TCP/IP sockets - NOWAIT mode, the screen from which you
requested for a print hangs.
Cause: Loftware Client Licenses have exceeded.
Resolution: Restart the Loftware Print Server ensuring that the Loftware Print
Server client licenses are not exceeded. Note that every instance of Sterling
Selling and Fulfillment Foundation communicating with the Loftware Print
Server consumes one Loftware Client License.
Packing Slip
A Packing Slip displays packed shipment lines that are ready to be shipped. On
packing the last carton, the system automatically prints the packing slip.
On selecting the "PrintPackList" service, you can print the packing slip from
Outbound Shipment Console.
The default packing slip that the Sterling Warehouse Management System print
displays here:
© Copyright IBM Corp. 1999, 2011 381
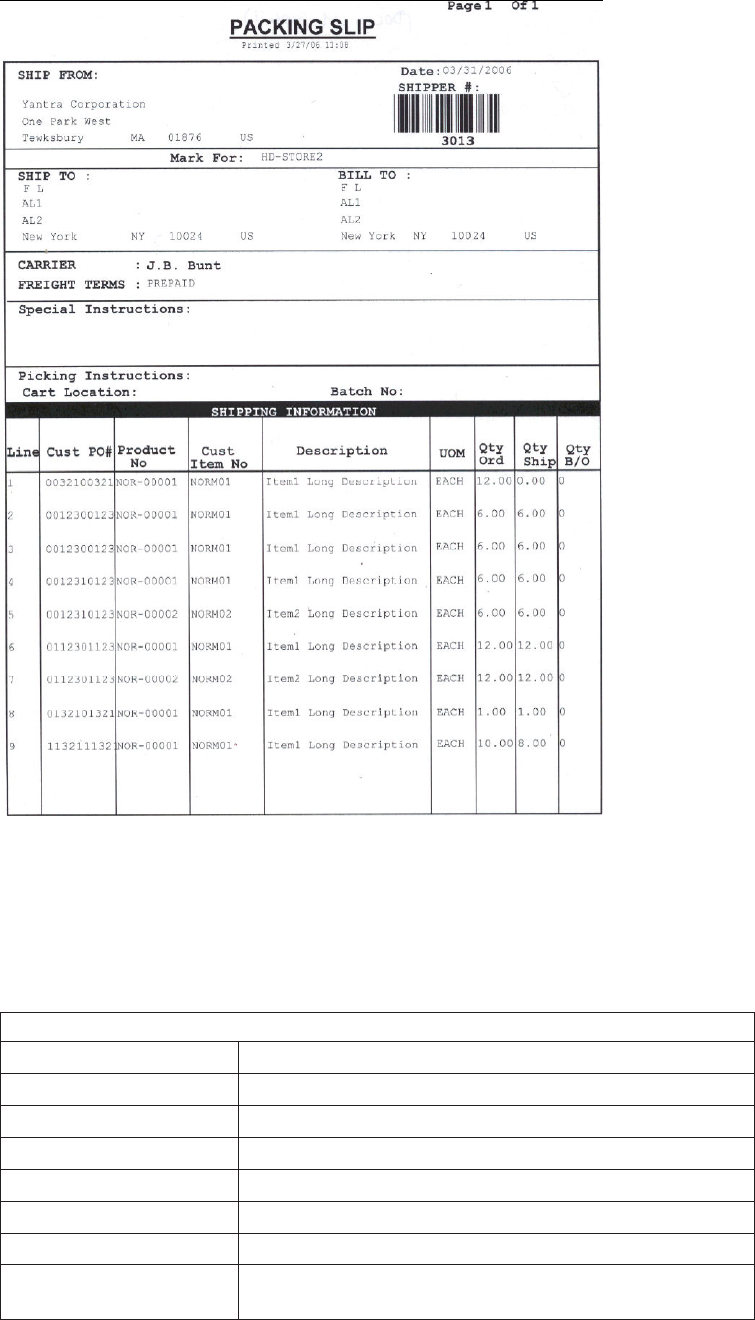
The Sterling Warehouse Management System allows the configuration of the
Packing Slip custom label format for an Enterprise, Seller Organization, and Buyer
Organization. For more information about print preferences, see the section
Defining Participant Print Preferences in the Sterling Selling and Fulfillment
Foundation: Warehouse Management System Configuration Guide.
Table 568. Packing Slip
Fields
SHIP FROM The ship from address.
Date The ship by date.
SHIPPER # The barcode associated with the shipment number is printed.
Mark For The mark for address associated with the shipment.
SHIP TO The address to which the shipment is to be shipped to.
BILL TO The address to which the shipment is to be billed to.
CARRIER The carrier used to ship the containers.
FREIGHT TERMS The freight terms used for the shipment. Valid values include
TPB-Third Party Billing, COL-Collect and PRE-Prepaid.
382 Sterling Selling and Fulfillment Foundation: Warehouse Management System User Guide
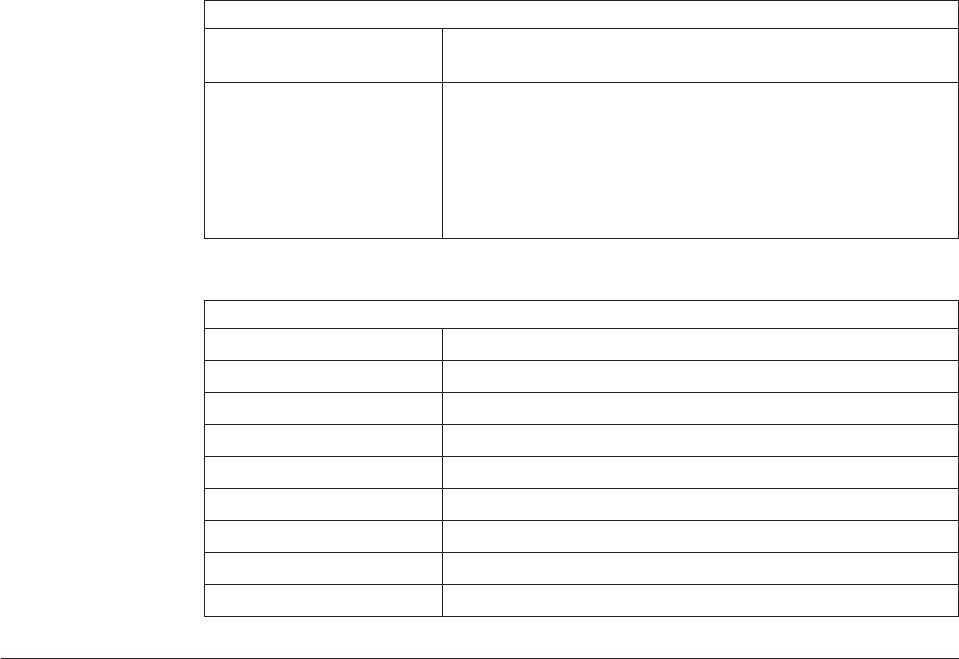
Table 568. Packing Slip (continued)
Fields
Special Instructions Special instructions associated with the SHIP type is printed,
if any.
Picking Instructions Picking instructions specify the cart location and batch
number for a shipment that is not containerized. The
shipment is directly loaded onto a cart.
Cart Location: The location assigned to a shipment in the cart.
Batch No: The batch number to which the shipment belongs.
Table 569. Packing Slip, SHIPPING INFORMATION
Fields
Line The item's line number.
Cust PO# The customer's purchase order number.
Product No The item ID.
Cust Item No The customer's item ID.
Description The item's description.
UOM The item's unit of measure.
Qty Ord The ordered quantity.
Qty Ship The shipped quantity.
Qty B/O The backordered quantity.
UCC-128 Container Shipping Label
The UCC-128 Container Shipping Label provides visibility into the container
contents and enables to track the container status.
The UCC-128 Container Shipping Label is printed during:
vPacking
vWave Release
On selecting the "PrintShippingLabel" service, you can request for a UCC-128
Container Shipping Label print from:
vOutbound Shipment Console
vOutbound Container Console
Using Sterling Warehouse Management System you can print container labels for a
single and multiple SKU containers.
The Sterling Warehouse Management System allows the configuration of the
UCC-128 Container Shipping custom label format for a Buyer Organization. For
more information about print preferences, see the section Defining Participant Print
Preferences in the Sterling Selling and Fulfillment Foundation: Warehouse Management
System Configuration Guide.
Container Label Single SKU
The default UCC-128 Container Label format for a single SKU container is
displayed below:
Chapter 49. Sterling Warehouse Management System Prints 383
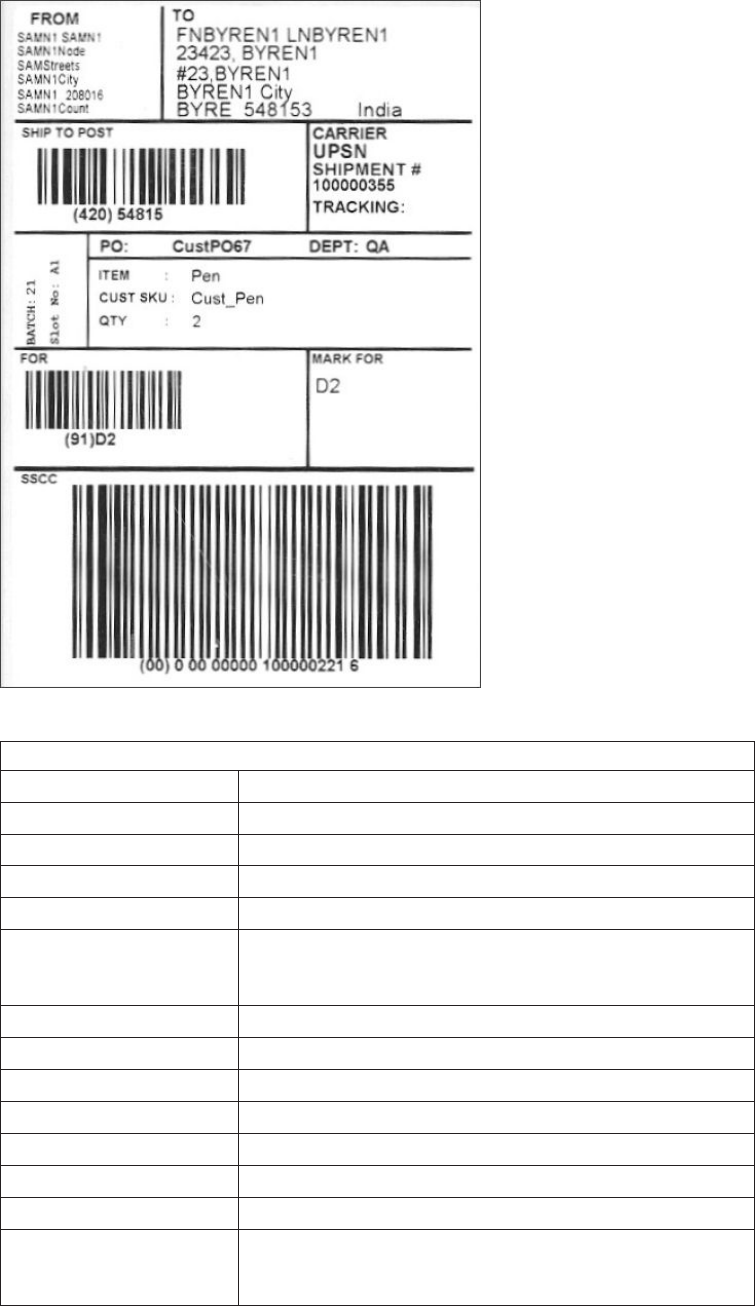
Table 570. Container Label Single SKU
Fields
FROM The ship from address.
TO The ship to address.
SHIP TO POST The carrier routing bar code.
CARRIER The carrier used to ship the container.
SHIPMENT # The shipment number to which the container belongs.
TRACKING The tracking number assigned to the container to track the
container status and location of the container.
Note: The tracking number is used for Parcel Shipments.
BATCH The batch number to which the container belongs.
Slot No The slot in which the container is placed.
PO The purchase order number to which the shipment belongs.
DEPT The department code associated with the shipment, if any.
ITEM The item ID.
CUST SKU The customer's ID for the item.
QTY The item quantity contained in the container.
FOR The FOR - Barcode associated with any sorting done at or for
the destination address. Typically, this has the store number
when the ship-to address is a merge point for the customer.
384 Sterling Selling and Fulfillment Foundation: Warehouse Management System User Guide
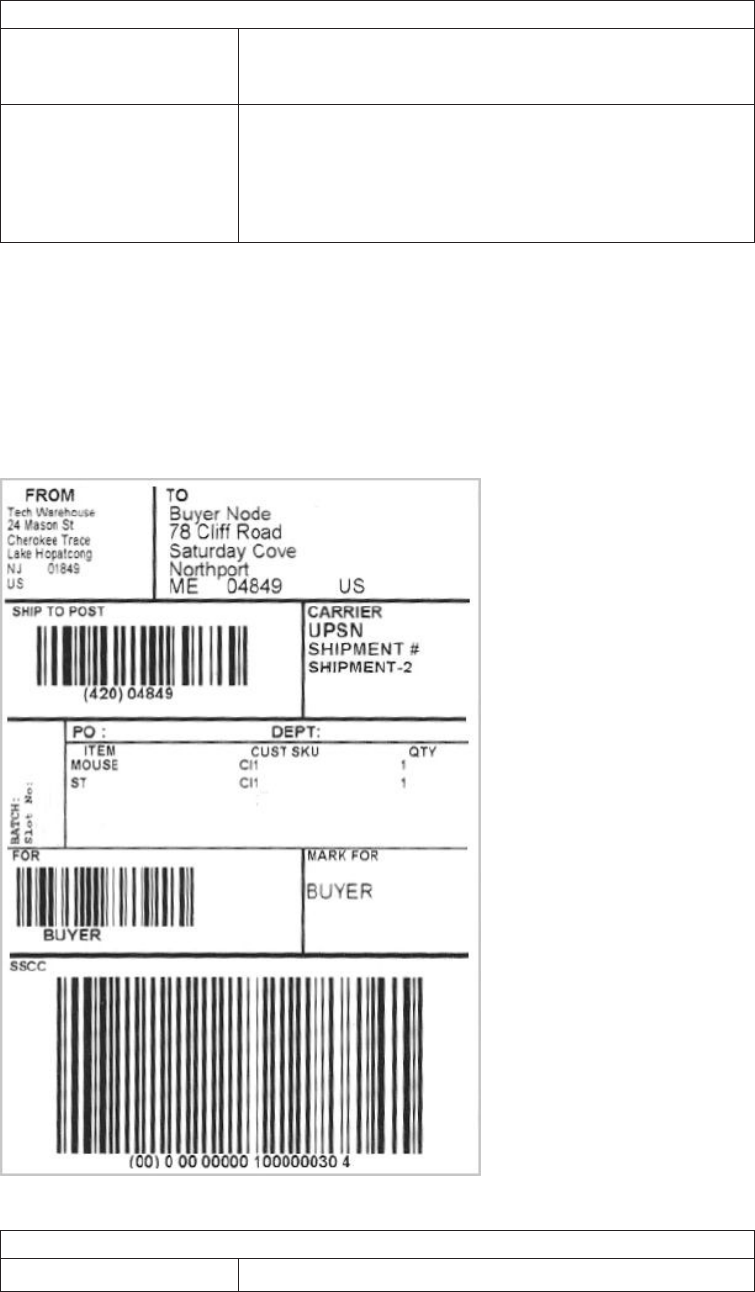
Table 570. Container Label Single SKU (continued)
Fields
MARK FOR This is in human readable format indicating the sort
performed for or at the destination address. Typically, store
number, or name of the person, or department is printed.
SSCC The Serial Shipping Container Code (SSCC) bar code used to
track the container and its contents.
The SSCC is a 20 digit code comprising of the sellers
EAN/UCC number and a sequence number. It is a
mandatory field for UCC/EAN compliance.
Note: Depending on the carrier used, the TRACKING, PRO and TRAILER field
values are printed on the shipping label.
Container Label Multi SKU
The default Container Label format for multiple SKU containers is displayed
below:
Table 571. Container Label Multi SKU
Fields
FROM The ship from address.
Chapter 49. Sterling Warehouse Management System Prints 385
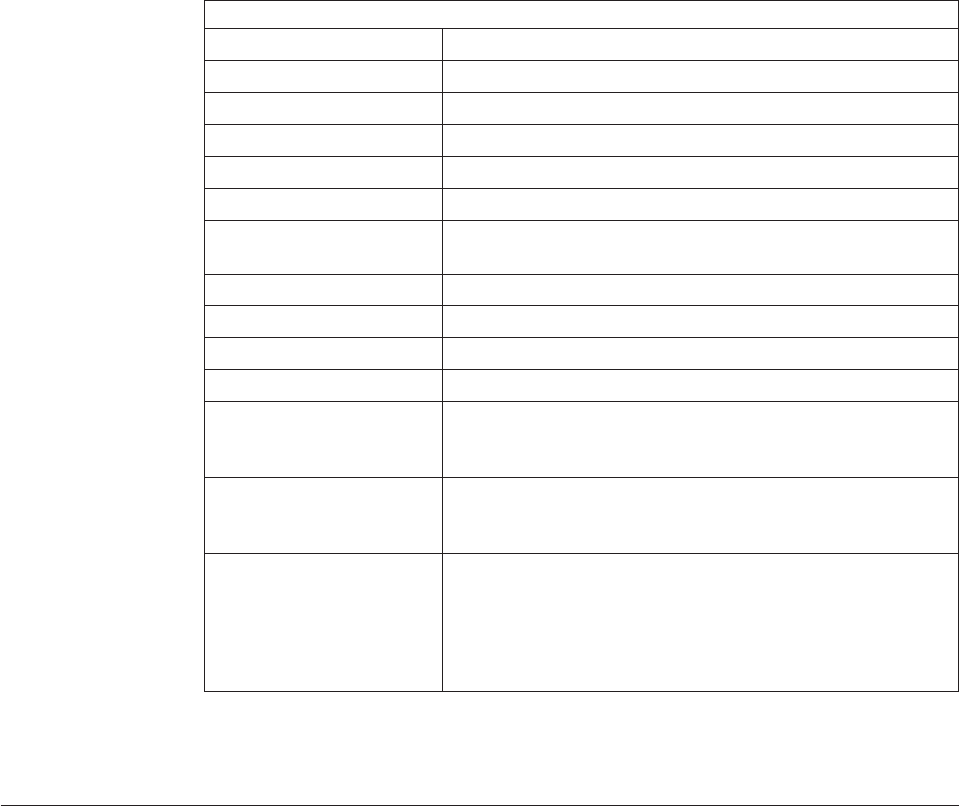
Table 571. Container Label Multi SKU (continued)
Fields
TO The ship to address.
SHIP TO POST The carrier routing bar code.
CARRIER The carrier used to ship the container.
SHIPMENT # The shipment number to which the container belongs.
BATCH The batch number to which the container belong.
Slot No The slot in which the container is placed.
PO The purchase order number to which the shipment belongs
to.
DEPT The department code associated with the shipment, if any.
ITEM The item ID.
CUST SKU The customer's ID for the item.
QTY The item quantity contained in the container.
FOR The FOR - Barcode associated with any sorting done at or for
the destination address. Typically, this has the store number
when the ship-to address is a merge point for the customer.
MARK FOR This is in human readable format indicating the sort
performed for or at the destination address. Typically, store
number, or name of the person, or department is printed.
SSCC The Serial Shipping Container Code (SSCC) bar code used to
track the container and its contents.
The SSCC is a 20 digit code comprising of the sellers
EAN/UCC number and a sequence number. It is a
mandatory field for UCC/EAN compliance.
Note: Depending on the carrier used, the TRACKING, PRO and TRAILER field
values get printed in the shipping label.
Task List for Printing
The Task List provides a list of tasks that the user needs to complete in one trip.
The Sterling Warehouse Management System can be configured to automatically
print the Task List during putaway, replenishment and batch pick. You can print
the Task List from the Batch Console.
The Sterling Warehouse Management System has two types of task list formats
pre-packaged:
vItem Pick Task List (Simple)
vCart Manifest Task List (Requires Sorting of Inventory During Pick)
The Sterling Warehouse Management System allows the configuration of the Task
List custom label format for an Equipment Type. For more information about print
preferences, see the section Defining Print Format Preferences in the Sterling Selling
and Fulfillment Foundation: Warehouse Management System Configuration Guide.
386 Sterling Selling and Fulfillment Foundation: Warehouse Management System User Guide
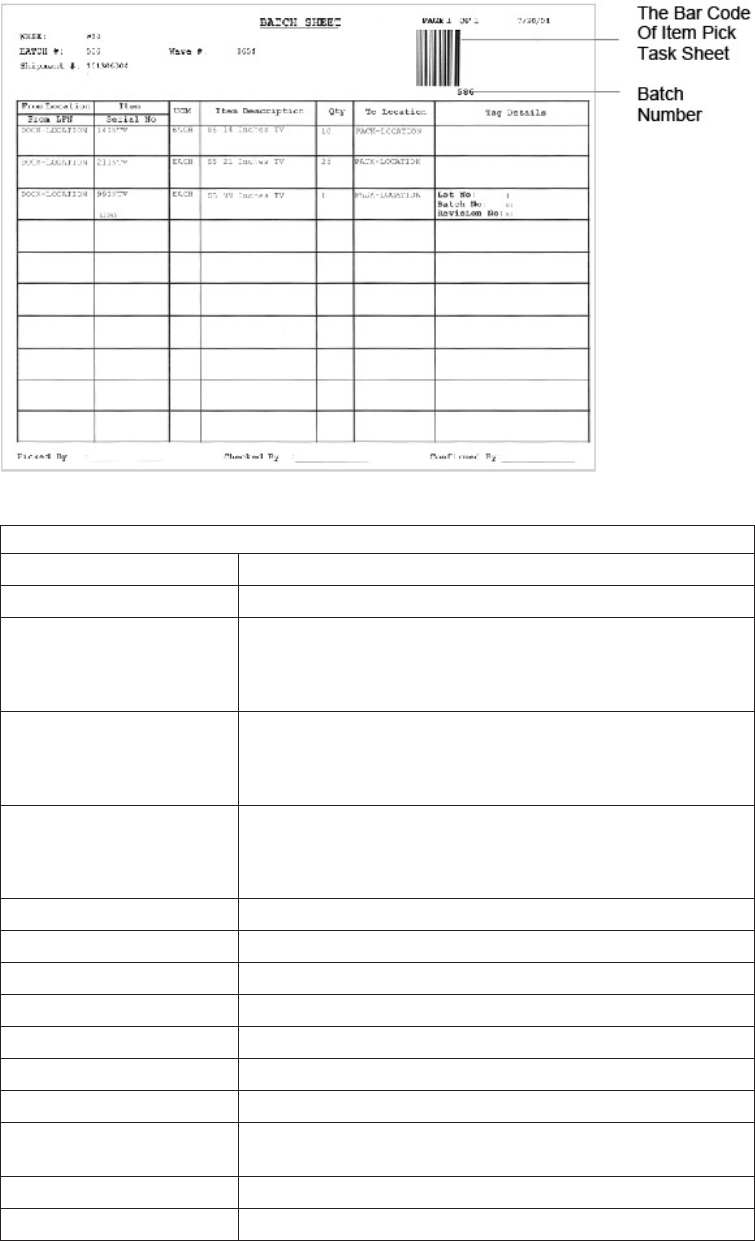
Item Pick Task List Simple
The default Item Pick Task List label format is displayed below:
Table 572. Item Pick Task List
Fields
WHSE The warehouse where tasks were performed.
BATCH # The batch number associated with the task.
Wave # The wave number associated with the task.
The wave number gets printed if the batch is associated with
a wave.
Shipment # The shipment number associated with the task.
The shipment number gets printed if the batch belongs to a
single shipment.
Request # The move request number.
The request number gets printed if the batch is associated
with a move request.
Pallet ID The pallet LPN from which the item is picked.
From Location/ From LPN The location or LPN from where the item is picked.
Item/Serial No The item's item ID or serial number.
UOM The item's unit of measure.
Item Description The item's description.
Qty The total item quantity to be picked.
To Location The location where the items should be deposited.
Tag Details The item's tag details, such as lot number, batch number, and
revision number.
Picked By The user who performed the tasks.
Checked By The user who inspected the items.
Chapter 49. Sterling Warehouse Management System Prints 387
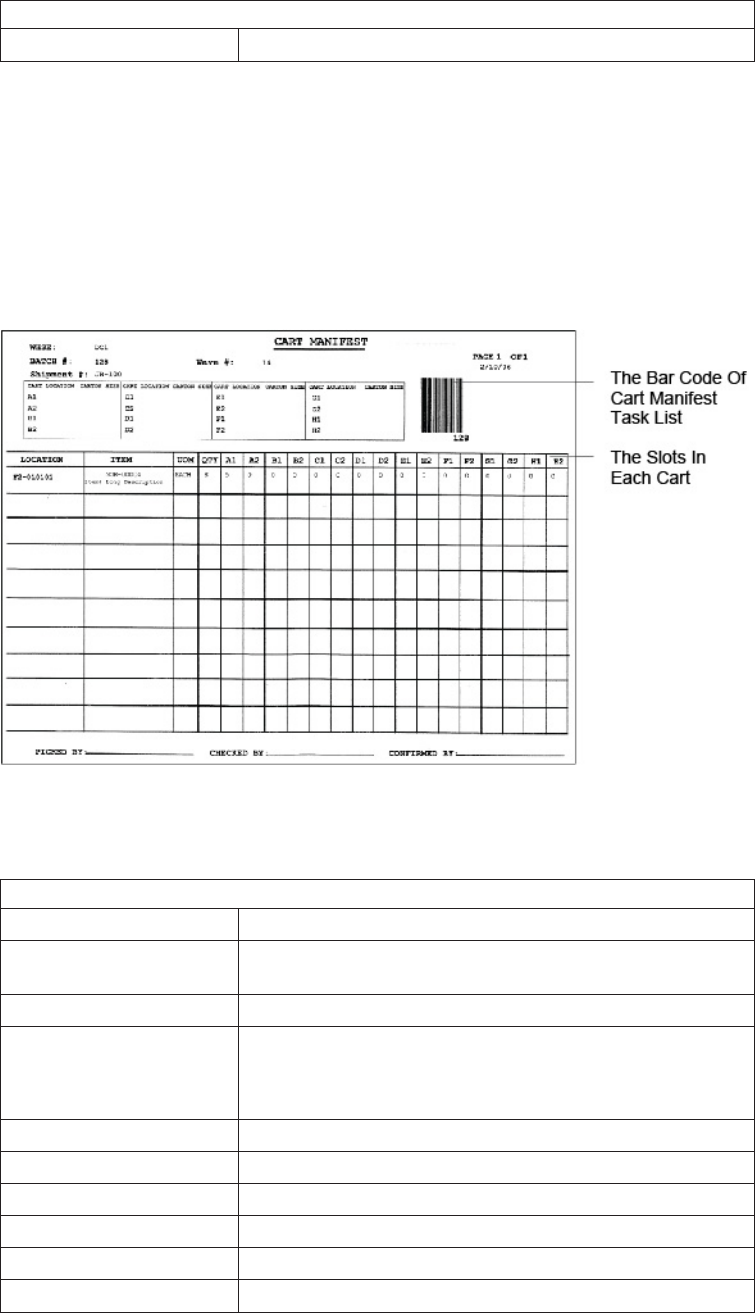
Table 572. Item Pick Task List (continued)
Fields
Confirmed By The user who confirmed the tasks.
Cart Manifest Task List (Requires Sorting of Inventory During
Pick)
The Cart Manifest Task List is printed if the equipment type associated with the
batch contains multiple locations.
The default Cart Manifest Task List label format is displayed below:
Note: If the cart locations are less than or equal to eight slots, configure two slots
for each location. Otherwise, configure one slot per location.
Table 573. Cart Manifest Task List
Fields
WHSE The warehouse where tasks were performed.
BATCH # The batch number associated with the cart manifest batch
sheet.
Wave # The wave number associated with the cart manifest batch.
Shipment # The shipment number associated with the cart manifest batch.
The shipment number gets printed if the batch belongs to a
single shipment.
Cart Location The slot in which the item should be placed.
Carton Size The size of the carton in the current slot.
Location The pick location from where the items have to be picked.
Item The item's description.
UOM The item's unit of measure.
QTY The total item quantity to be picked.
388 Sterling Selling and Fulfillment Foundation: Warehouse Management System User Guide

Table 573. Cart Manifest Task List (continued)
Fields
Picked By The user who performed the tasks.
Checked By The user who inspected the items.
Confirmed By The user who confirmed the tasks.
Bill Of Lading
The Bill Of Lading (BOL) provides inventory processing information through
supply chain to a shipper, carrier and customer.
The Sterling Warehouse Management System allows the configuration of the BOL
custom label format for a carrier, shipper and consignee. By default, the system
prints 3 copies of BOL labels every time you print the label. If the copy is meant
for the carrier, Carrier Copy is printed on the label. Similarly, for shipper, Shipper
Copy is printed, and for a consignee, Consignee Copy is printed.
For more information about print preferences, see the Defining Participant Print
Preferences section in the chapter Configuring System Administration in the
Sterling Selling and Fulfillment Foundation: Warehouse Management System
Configuration Guide.
Using the Sterling Warehouse Management System you can print:
vVICS Bill Of Lading for Shipment and/or Hazmat Bill Of Lading
vVICS Bill Of Lading for Load and/or Hazmat Bill Of Lading
The VICS Standard Bill Of Lading document can be found at:
www.vics.org
VICS Bill Of Lading for Shipment
On selecting the "PrintShipmentBOL" service, you can print the VICS BOL for
Shipment from the Outbound Shipment Console.
For example, the default carrier copy of VICS BOL for Shipment label format is as
follows:
Chapter 49. Sterling Warehouse Management System Prints 389
Table 574. VICS Bill Of Lading for Shipment, SHIP FROM
Fields
Name The company that is shipping the product.
Address The shipper's street address.
City/State/ZIP The shipper's city, state, and zip code.
SID# The shipment ID number applied by the shipper to this
shipment.
FOB Indicates the FOB freight term used for the shipment.
Bill of Lading Number The bill of lading number created by the shipper to identify
the shipment.
Table 575. VICS Bill Of Lading for Shipment, SHIP TO
Fields
Location # The location number assigned to the consignee's ship to
address.
Name The company where the product has to be shipped to.
Address The company's address.
City/State/ZIP The company's city, state, and zip code.
CID# The consignee ID number applied by the consignee to this
shipment.
390 Sterling Selling and Fulfillment Foundation: Warehouse Management System User Guide
Table 575. VICS Bill Of Lading for Shipment, SHIP TO (continued)
Fields
FOB Indicates the FOB freight term used for the shipment.
CARRIER NAME The carrier picking up the shipment.
Trailer number The shipment's trailer number.
The trailer number is used if the truckload carrier hauls the
shipment.
Seal numbers The shipment's seal number.
The seal number is used if the shipment is full truckloaded
from the origin to destination.
SCAC The Standard Carrier Alpha Code (SCAC) assigned to
identify the carrier.
Pro number The Pro number assigned by the carrier to track the
shipment.
The pro number is used if a LTL carrier hauls the shipment.
Table 576. VICS Bill Of Lading for Shipment, THIRD PARTY FREIGHT CHARGES BILL TO
Fields
Name The third party to whom the charges are billed to, if
applicable.
Address The third party's address.
City/State/ZIP The third party's city, state, and zip code.
SPECIAL INSTRUCTIONS Special instructions associated with the carrier. For example,
appointment number, date and delivery instructions.
Note: Only four underlying BOL numbers are printed.
Freight Charge Terms Indicates which third party is invoiced and is responsible for
payment of the freight invoice.
Prepaid The prepaid charges for the freight paid by the shipper from
origin to the consignee's dock.
Collect The charges collected for the freight from the consignee from
origin to the consignee's dock.
3rd Party The freight charges paid by the third party from origin to the
consignee's dock.
Master Bill of Lading Indicates if BOL is attached.
Table 577. VICS Bill Of Lading for Shipment, CUSTOMER ORDER INFORMATION
Fields
CUSTOMER ORDER
NUMBER
The number generated by the customer to identify the order.
CUST# PKGS The number of individual packages or cartons on the
shipment that has quantity associated with the customer
order.
WEIGHT The weight associated with the CUST# PKGS.
PALLET Indicates if the product is palletized for the customer order.
ADDITIONAL SHIPPER
INFO
Any additional information, if any, associated with the
customer order.
Chapter 49. Sterling Warehouse Management System Prints 391
Table 577. VICS Bill Of Lading for Shipment, CUSTOMER ORDER
INFORMATION (continued)
Fields
GRAND TOTAL The grand total and weight across all customer orders.
Table 578. VICS Bill Of Lading for Shipment, CARRIER INFORMATION
Fields
HANDLING UNIT
QTY The quantity associated with the type of package being
handled. This refers to the pallet or carton being shipped.
TYPE The type of handling unit. For example, pallets or cartons.
PACKAGE
QTY The number of packages in the handling unit. This refers to
number of cartons in a pallet (handling unit) or number of
units in a carton (handling unit).
TYPE The unit type associated with the package. For example,
cartons in a pallet or units (EACH) in a carton.
WEIGHT The weight associated with the package quantity.
H.M (X) Indicates if there is any hazardous material (HM) in the
package.
LTL ONLY
NMFC # The National Motor Freight Classification (NMFC) number
associated with the commodity classification.
CLASS The freight class associated with the commodity classification.
COD Amount The amount to be collected when shipment is delivered,
referred to as COD - Collect (Cash) on Delivery.
Fee Terms The fee terms associated with the shipment. For example,
collect or prepaid.
Customer check acceptable Indicates if checks are accepted for collect or COD shipments.
VICS Bill Of Lading for Load
On selecting the "PrintLoadBOL" service, you can print the VICS BOL for Load
from the Outbound Shipment Console.
For example, the default carrier copy of VICS BOL for Shipment label format is as
follows:
392 Sterling Selling and Fulfillment Foundation: Warehouse Management System User Guide

Table 579. VICS Bill Of Lading for Shipment, SHIP FROM
Fields
Name The company that is shipping the product.
Address The shipper's street address.
City/State/ZIP The shipper's city, state, and zip code.
SID# The shipment ID number applied by the shipper to this load.
FOB Indicates the FOB freight term used for the shipment.
Bill of Lading Number The bill of lading number created by the shipper to identify
the load.
Table 580. VICS Bill Of Lading for Shipment, SHIP TO
Fields
Location # The location number assigned to the consignee's ship to
address.
Name The company where the product has to be shipped to.
Address The company's address.
City/State/ZIP The company's city, state, and zip code.
CID# The consignee ID number applied by the consignee to this
load.
FOB Indicates the FOB freight term used for the load.
Chapter 49. Sterling Warehouse Management System Prints 393
Table 580. VICS Bill Of Lading for Shipment, SHIP TO (continued)
Fields
CARRIER NAME The carrier picking up the load.
Trailer number The load's trailer number.
The trailer number is used if the truckload carrier hauls the
load.
Seal numbers The load's seal number.
The seal number is used if the load is full truckloaded from
the origin to destination.
SCAC The Standard Carrier Alpha Code (SCAC) assigned to
identify the carrier.
Pro number The Pro number assigned by the carrier to track the
shipment.
The pro number is used if an LTL carrier hauls the load.
Table 581. VICS Bill Of Lading for Shipment, THIRD PARTY FREIGHT CHARGES BILL TO
Fields
Name The third party to whom the charges are billed to, if
applicable.
Address The third party's address.
City/State/ZIP The third party's city, state, and zip code.
SPECIAL INSTRUCTIONS Special instructions associated with the carrier. For example,
appointment number, date and delivery instructions.
Note: Only four underlying BOL numbers are printed.
Freight Charge Terms Indicates which third party is invoiced and is responsible for
payment of the freight invoice.
Prepaid The prepaid charges for the freight paid by the shipper from
origin to the consignee's dock.
Collect The charges collected for the freight from the consignee from
origin to the consignee's dock.
3rd Party The freight charges paid by the third party from origin to the
consignee's dock.
Master Bill of Lading Indicates if BOL is attached.
Table 582. VICS Bill Of Lading for Shipment, CUSTOMER ORDER INFORMATION
Fields
CUSTOMER ORDER
NUMBER
The number generated by the customer to identify the order.
CUST# PKGS The number of individual packages or cartons on the
shipment that has quantity associated with the customer
order.
WEIGHT The weight associated with the CUST# PKGS.
PALLET Indicates if the product is palletized for the customer order.
ADDITIONAL SHIPPER
INFO
Any additional information, if any, associated with the
customer order.
GRAND TOTAL The grand total and weight across all customer orders.
394 Sterling Selling and Fulfillment Foundation: Warehouse Management System User Guide
Table 583. VICS Bill Of Lading for Shipment, CARRIER INFORMATION
Fields
HANDLING UNIT
QTY The quantity associated with the type of package being
handled. This refers to the pallet or carton being shipped.
TYPE The type of handling unit. For example, pallets or cartons.
PACKAGE
QTY The number of packages in the handling unit. This refers to
number of cartons in a pallet (handling unit) or number of
units in a carton (handling unit).
TYPE The unit type associated with the package. For example,
cartons in a pallet or units (EACH) in a carton.
WEIGHT The weight associated with the package quantity.
H.M (X) Indicates if there is any hazardous material (HM) in the
package.
LTL ONLY
NMFC # The National Motor Freight Classification (NMFC) number
associated with the commodity classification.
CLASS The freight class associated with the commodity classification.
COD Amount The amount to be collected when shipment is delivered,
referred to as COD - Collect (Cash) on Delivery.
Fee Terms The fee terms associated with the shipment. For example,
collect or prepaid.
Customer check acceptable Indicates if checks are accepted for collect or COD shipments.
Hazmat Bill Of Lading
On selecting the "PrintShipmentBOL" service, you can print the VICS BOL for
Shipment from the Outbound Shipment Console.
In addition to printing the Shipment or Load BOL, the Hazmat Bill of Lading is
always printed when shipping hazardous items. The Hazmat BOL provides
information about the hazardous materials being shipped.
The default Hazmat BOL label format is shown below:
Chapter 49. Sterling Warehouse Management System Prints 395
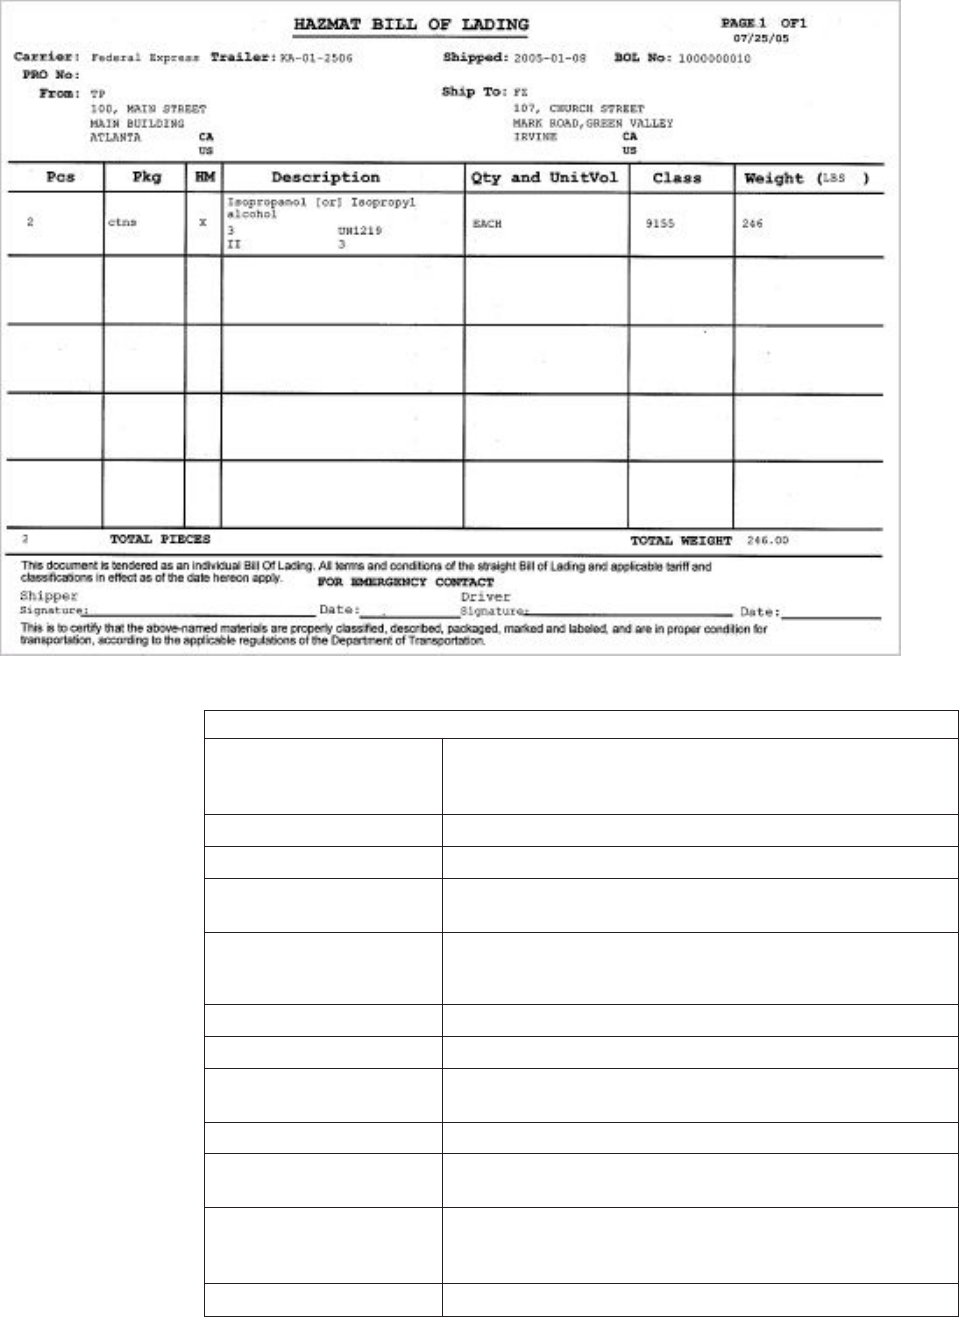
Table 584. Hazmat Bill Of Lading
Fields
Carrier The Standard Carrier Alpha Code (SCAC) assigned to
identify the carrier that is used to ship the hazardous
material.
Trailer The trailer number associated with the carrier.
Shipped The date on which the shipment was shipped.
BOL No The bill of lading number created by the shipper to identify
the shipment or load.
PRO No The PRO number assigned by the carrier to track the load.
The PRO number is used if an LTL carrier hauls the load.
From The address the shipment or load is shipped from.
Ship To The address the shipment or load is shipped to.
Pcs The total number of containers that contains the hazardous
material.
Pkg Indicates the carton type.
HM Indicates that the material packaged into the container is a
hazardous material (HM).
Description A brief description of the hazardous material information,
such as the proper shipping name, hazard class, identification
number, packing group, and label code.
Qty and UnitVol The item's unit of measure.
396 Sterling Selling and Fulfillment Foundation: Warehouse Management System User Guide

Table 584. Hazmat Bill Of Lading (continued)
Fields
Class The item's hazardous material class.
Weight The total weight of the containers that contain the hazardous
material.
Total Pieces The total number of containers.
Total Weight The total weight of all containers.
For Emergency Contact
The shipper's contact details for you to contact in case of any emergency.
Shipper Signature The shipper's signature.
Date The date on which the shipper signed the document.
Driver Signature The driver's signature.
Date The date on which the driver signed the document.
LTL Manifest Label
Note: If a single carrier provides both LTL and Parcel services, create two different
organizations to separately handle LTL and Parcel services.
On selecting the "PrintLTLManifest" service, you can print the manifest label for
LTLs from the Manifest Console.
The default LTL Manifest label format is shown below:
Chapter 49. Sterling Warehouse Management System Prints 397
Table 585. LTL Manifest
Fields
Manifest # The manifest number associated with the LTL.
Carrier The carrier (such as UPS, and FedEx) picking up the LTL.
Manifest Date The date on which the manifest was created.
Trailer # The trailer number associated with the LTL manifest.
Shipping Warehouse The address from which the LTL manifest is shipped to.
BOL # The BOL number associated with the load.
PRO # The PRO number associated with the load.
Customer The customer name to whom the package is shipped to.
Address The customer's address where the package is to be shipped.
Total Weight The total weight of all packages.
# of Cartons The total number of cartons shipped to the customer.
# of Pallets The total number of pallets shipped to the customer.
TOTAL The total weight of the packages, cartons and pallets
associated with LTL manifest.
Shipper's Certification For Hazardous Materials
In addition to printing the LTL Manifest label, when a manifest has hazardous
items, a shipper's certification is also required where the shipper provides
information about all the hazardous materials being shipped.
When you print the LTL Manifest label, the Sterling Warehouse Management
System also provides the ability to print the Shipper's Certification if the manifest
contains hazardous materials. The default Shipper's Certification For Hazardous
Materials label format is shown below:
398 Sterling Selling and Fulfillment Foundation: Warehouse Management System User Guide
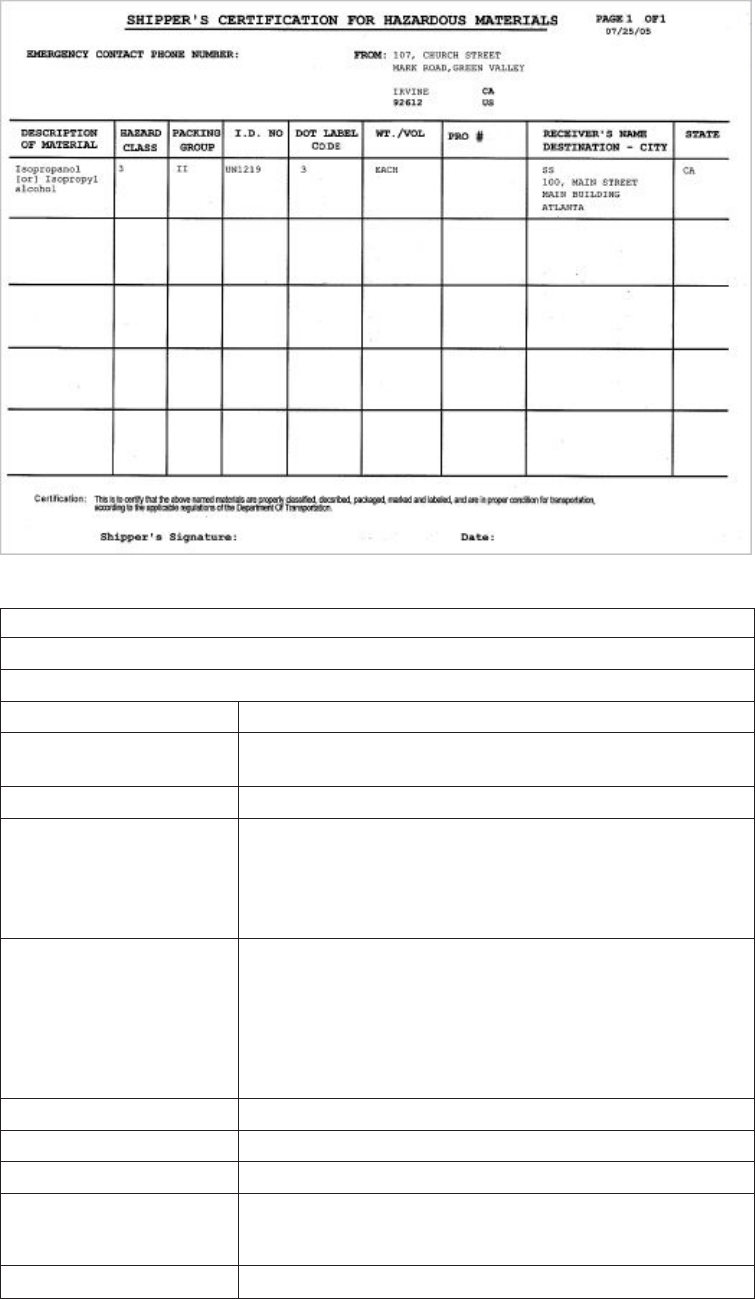
Table 586. Shipper's Certification For Hazardous Materials
Fields
EMERGENCY CONTACT PHONE NUMBER
The shipper's contact details for you to contact in case of any emergency.
FROM The address the manifest is shipped from.
DESCRIPTION OF
MATERIAL
The proper shipping name of the hazardous material.
HAZARD CLASS The item's hazard class.
PACKING GROUP Indicates the degree of danger of a hazardous item within its
hazard class or division, and the type of packaging required
for the item. The valid values are: Packing Group I - high
danger, Packing Group II - medium danger, Packing Group
III - Low danger.
I.D. NO The four-digit number that identifies hazardous items (such
as explosives and poisonous materials) of commercial
importance.
This numbering scheme is widely used in international
commerce. For instance, to label the contents of the shipping
containers.
DOT LABEL CODE Indicates the label code of the hazardous item.
WT. /VOL The item's unit of measure.
PRO # The PRO number associated with the load.
RECEIVER'S NAME
DESTINATION - CITY
The receiver's name, address, and city where the package is
shipped.
STATE The state to where the package is shipped.
Chapter 49. Sterling Warehouse Management System Prints 399

Table 586. Shipper's Certification For Hazardous Materials (continued)
Fields
Shipper's Signature The shipper's signature.
Date The date on which the shipper signed the document.
FedEx Carrier Label
The FedEx Carrier Label is a container label shipped by the FedEx carrier. The
FedEx Carrier Label is printed when the container is manifested for FedEx carrier.
For International FedEx shipments, the FedEx server automatically prints
international shipment specific labels and commercial invoice.
The Sterling Warehouse Management System automatically prints the FedEx
Carrier Label after adding a container to the manifest.
Note: To print FedEx Carrier Label, ensure to set the Eltron printer as the default
printer.
Using the Sterling Warehouse Management System, you can print:
vFedEx Shipping Label
vFedEx Return Shipping Label
FedEx Shipping Label
The FedEx Shipping Label format may be different for different services. For more
information about defining label formats, see the Sterling Selling and Fulfillment
Foundation: Application Platform Configuration Guide.
The FedEx Shipping Label format for FedEx Express®is shown below:
400 Sterling Selling and Fulfillment Foundation: Warehouse Management System User Guide
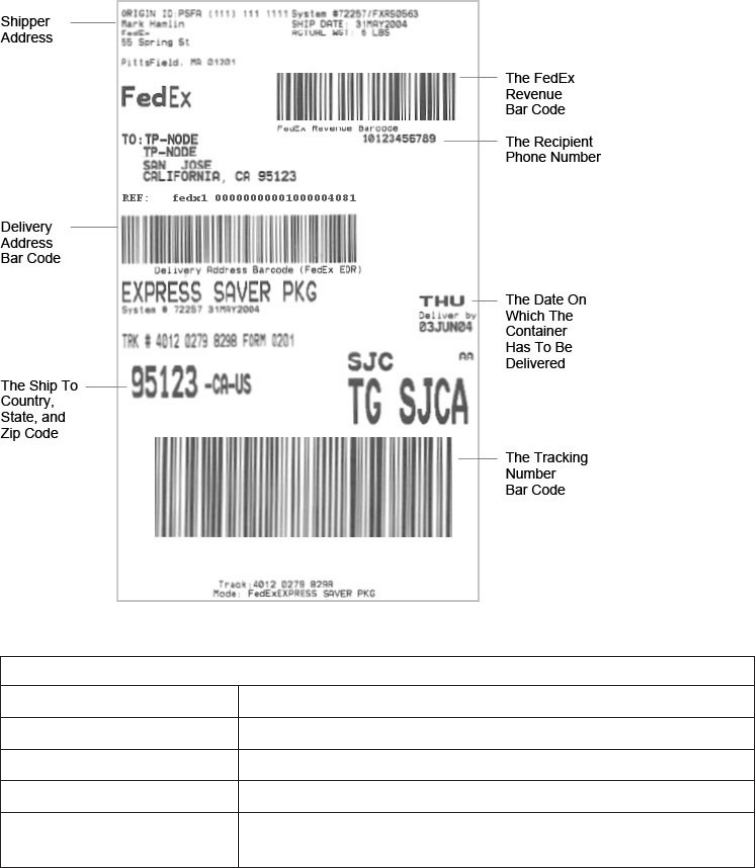
Table 587. FedEx Shipping Label
Field
SHIP DATE The date on which the container should be shipped.
ACTUAL WGT The actual weight of the container.
TO The ship to address.
REF The container's shipment reference number.
TRK# The tracking number assigned to the container to track the
container's status and location.
FedEx Return Shipping Label
The FedEx Return Shipping Label format may be different for different services.
For more information about defining label formats, see the Sterling Selling and
Fulfillment Foundation: Application Platform Configuration Guide.
The following is the default FedEx Return Shipping Label format for FedEx
Ground:
Chapter 49. Sterling Warehouse Management System Prints 401
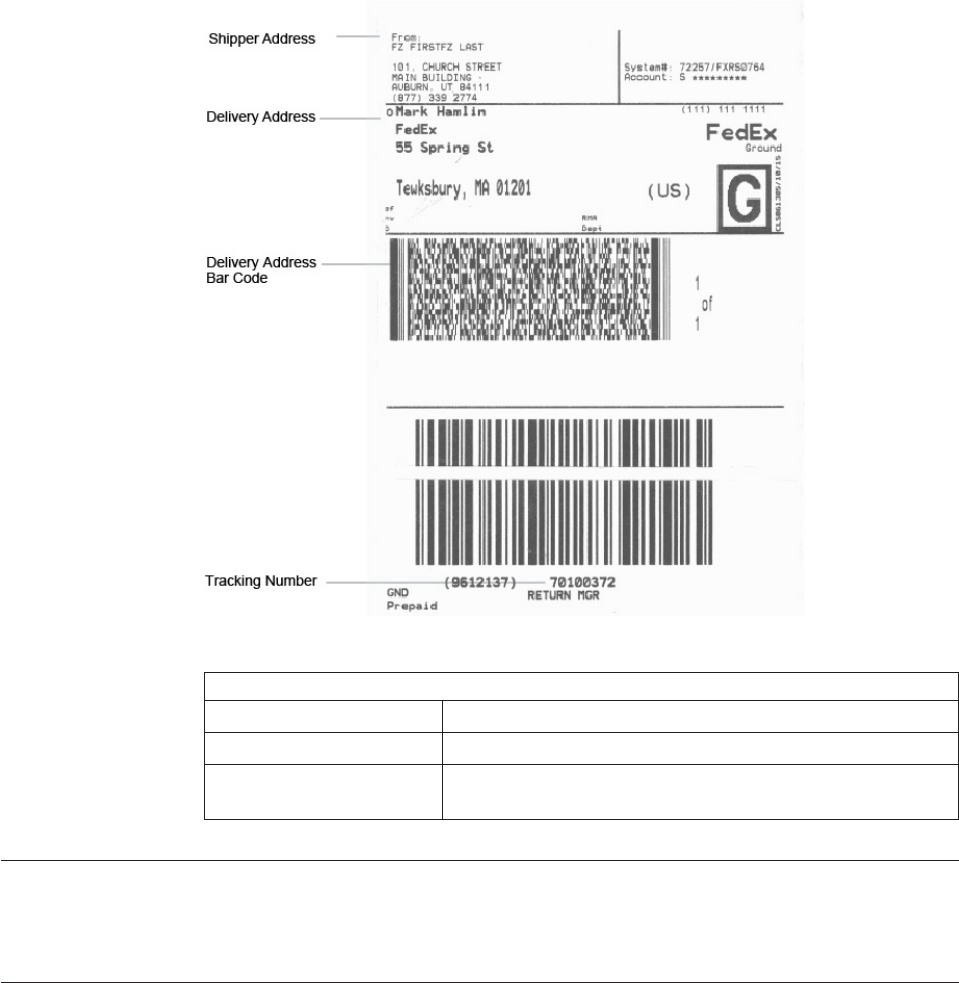
Table 588. FedEx Return Shipping Label (FedEx Ground)
Field
From The address from where the shipment is shipped.
Delivery Address The address to where the shipment needs to be shipped.
RETURN MGR The tracking number assigned to the container to track the
status and location of the container.
Reprint Carrier Label
On selecting the Reprint Carrier Label service for FedEx and UPS carriers you can
reprint a carrier label from the Container List and Container Details screens.
Count Sheet
A count sheet displays all locations and items that are to be included for the cycle
count. On selecting the "PrintTaskList" service, you can print the Count Sheet from
the Batch Console for batches associated with the "Count" activity group.
402 Sterling Selling and Fulfillment Foundation: Warehouse Management System User Guide
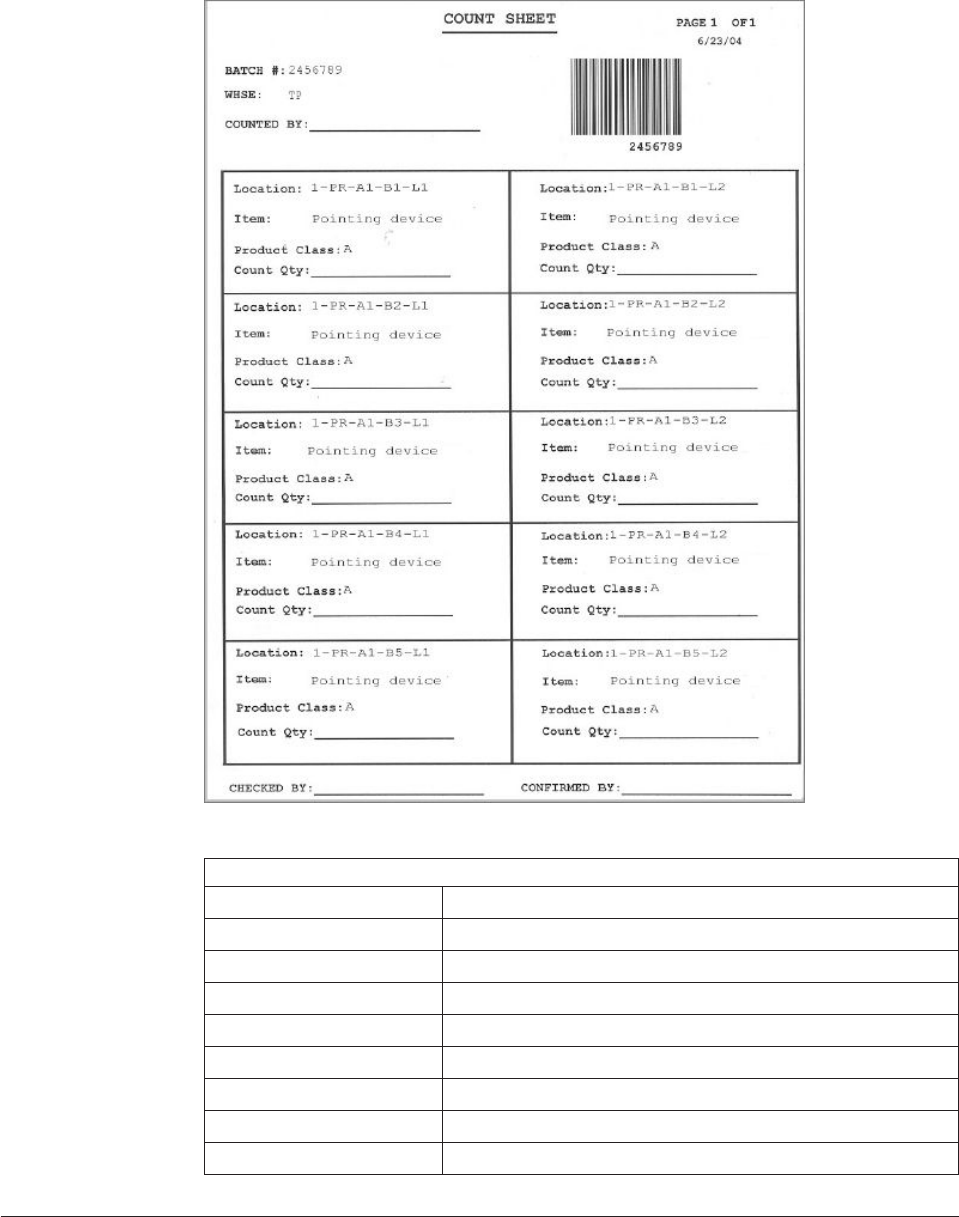
Table 589. Count Sheet
Fields
Batch # The batch number associated with the cycle count.
WHSE The warehouse where the count tasks were performed.
Counted By The user who performed the count.
Location The location where the items were counted.
Item The items that were counted.
Product Class The item's product class.
Count Qty Enter the item quantity counted at the location.
Checked By The user who inspected the items.
Confirmed By The user who confirmed the task.
Wave Release for Prints
During the Wave Release process, the Sterling Warehouse Management System
prints the following documents:
Chapter 49. Sterling Warehouse Management System Prints 403

vBatch sheets (Task List) for each batch in the wave. For more information about
batch sheets, see the section, "Task List".
vUCC-128 Container Shipping labels for each container in the batch. For more
information about container shipping labels, see the section, "UCC-128 Container
Shipping Label".
vPacking Slip for each shipment in the wave. Initially, the packing slip prints to a
file and later sent to the printer after packing all containers. For more
information packing slip, see the section, "Packing Slip".
On selecting the "PrintWave" service, you can print the Wave Release document
from the Wave Console.
By customizing prints, you can print additional documents as a part of Wave
Release. For more information about customizing prints, see the Sterling Selling and
Fulfillment Foundation: Integration Guide.
Hazmat Stock Keeping Unit Labels
The Hazmat SKU labels are applied on hazardous items.
On selecting the "PrintHazmatSKULabel" service, you can print the Hazmat SKU
label. For more information about printing the SKU labels, see the section, "Print
Stock Keeping Unit Labels".
The default Hazmat SKU label format is shown below:
Table 590. Hazmat SKU Labels
Fields
DOT SHIPPING NAME The proper shipping name.
ITEM The item identifier.
HAZARD CLASS The item's hazard class.
IDENTIFICATION
NUMBER
The four-digit number that identifies the hazardous items
(such as explosives and poisonous materials) of commercial
importance. This is widely used in international commerce.
For example, the contents packaged in the shipping
containers.
404 Sterling Selling and Fulfillment Foundation: Warehouse Management System User Guide
Table 590. Hazmat SKU Labels (continued)
Fields
PACKING GROUP Indicates the degree of danger of a hazardous item within its
hazard class or division and the type of packaging required
for the item. The valid values are: Packing Group I - high
danger, Packing Group II - medium danger, Packing Group
III - Low danger.
DOT LABEL CODE Indicates the label code of the hazardous item.
Note: Hazmat SKU labels are printed on 2" X 4" sheet.
Chapter 49. Sterling Warehouse Management System Prints 405
406 Sterling Selling and Fulfillment Foundation: Warehouse Management System User Guide
Chapter 50. Understanding the Execution Console Framework
About Understanding the Execution Console Framework
The Execution Console Framework in the Sterling Warehouse Management System
supports the execution of high-speed data entry oriented transactions. The
framework presents execution specific functionality through web-based consoles.
The transactions are designed to be performed using only the keyboard and a
wedge scanner.
You can capture data on to the screen by typing it using a keyboard and pressing
the Tab key, or by scanning the barcode using a wedge scanner.
Note: You CANNOT extend the Execution Console Framework screens.
The features of Execution Console Framework include:
vTab Ordering
vAutomatic Pop-Ups for Additional Data Capture
vHot Keys
vField Level Validations
vPopulating Fields
vBarcode Handling Capabilities
Tab Ordering
When scanning data the related values are populated in the current field and the
cursor is redirected to the next appropriate field for scanning. The next appropriate
field to be scanned is determined by the system based on the process you are
following.
Automatic Pop-Ups for Additional Data Capture
Certain data values are dynamically requested by the system based on item
properties. These values include the serial number for serial-tracked items or for
items that require outbound tracking by serial number. Tag controlled items in
inventory also require tag values to be specified.
Hot Keys
Hot keys are keyboard shortcuts to help you work more efficiently. For example,
the hotkey sequence for Save is Alt+A and for Reset it is Alt-R.
Field Level Validations
Data is validated at an individual field level against the form level. Information
based fields like notes are not validated. Errors are reported during scanning or
manual entry, after pressing the Tab key.
© Copyright IBM Corp. 1999, 2011 407

Populating Fields
Scanning a barcode or identifier populates related fields in the console. For
example, shipment and container attributes (including item and carrier, if
applicable) are automatically populated when you scan a shipment or container in
the pack station. Another common example is the item description being
automatically populated when any barcode identifying the item is scanned.
The web-based consoles supported by the Execution Framework include:
vReceive Purchase Order
vReceive Return Order
vVAS Station
vPack Station
vManifest Station
Barcode Handling Capabilities
Field level validation for Mobile Terminal use includes the ability to translate
barcode information and transfer it to the appropriate data field. Fields are tied
into Bar Code Types that are used to validate against the appropriate sources. For
example, a location field validates against the Location ID and a unique barcode.
An item field can have the Item ID, UPC Code, LPN, or UPC Case Code scanned.
For more information about bar code types, see the Sterling Selling and Fulfillment
Foundation: Warehouse Management System Configuration Guide.
408 Sterling Selling and Fulfillment Foundation: Warehouse Management System User Guide

Notices
This information was developed for products and services offered in the U.S.A.
IBM may not offer the products, services, or features discussed in this document in
other countries. Consult your local IBM representative for information on the
products and services currently available in your area. Any reference to an IBM
product, program, or service is not intended to state or imply that only that IBM
product, program, or service may be used. Any functionally equivalent product,
program, or service that does not infringe any IBM intellectual property right may
be used instead. However, it is the user's responsibility to evaluate and verify the
operation of any non-IBM product, program, or service.
IBM may have patents or pending patent applications covering subject matter
described in this document. The furnishing of this document does not grant you
any license to these patents. You can send license inquiries, in writing, to:
IBM Director of Licensing
IBM Corporation
North Castle Drive
Armonk, NY 10504-1785
U.S.A.
For license inquiries regarding double-byte character set (DBCS) information,
contact the IBM Intellectual Property Department in your country or send
inquiries, in writing, to:
Intellectual Property Licensing
Legal and Intellectual Property Law
IBM Japan Ltd.
19-21, Nihonbashi-Hakozakicho, Chuo-ku
Tokyo 103-8510, Japan
The following paragraph does not apply to the United Kingdom or any other
country where such provisions are inconsistent with local law:
INTERNATIONAL BUSINESS MACHINES CORPORATION PROVIDES THIS
PUBLICATION "AS IS" WITHOUT WARRANTY OF ANY KIND, EITHER
EXPRESS OR IMPLIED, INCLUDING, BUT NOT LIMITED TO, THE IMPLIED
WARRANTIES OF NON-INFRINGEMENT, MERCHANTABILITY OR FITNESS
FOR A PARTICULAR PURPOSE. Some states do not allow disclaimer of express or
implied warranties in certain transactions, therefore, this statement may not apply
to you.
This information could include technical inaccuracies or typographical errors.
Changes are periodically made to the information herein; these changes will be
© Copyright IBM Corp. 1999, 2011 409
incorporated in new editions of the publication. IBM may make improvements
and/or changes in the product(s) and/or the program(s) described in this
publication at any time without notice.
Any references in this information to non-IBM Web sites are provided for
convenience only and do not in any manner serve as an endorsement of those Web
sites. The materials at those Web sites are not part of the materials for this IBM
product and use of those Web sites is at your own risk.
IBM may use or distribute any of the information you supply in any way it
believes appropriate without incurring any obligation to you.
Licensees of this program who wish to have information about it for the purpose
of enabling: (i) the exchange of information between independently created
programs and other programs (including this one) and (ii) the mutual use of the
information which has been exchanged, should contact:
IBM Corporation
J46A/G4
555 Bailey Avenue
San Jose, CA 95141-1003
U.S.A.
Such information may be available, subject to appropriate terms and conditions,
including in some cases, payment of a fee.
The licensed program described in this document and all licensed material
available for it are provided by IBM under terms of the IBM Customer Agreement,
IBM International Program License Agreement or any equivalent agreement
between us.
Any performance data contained herein was determined in a controlled
environment. Therefore, the results obtained in other operating environments may
vary significantly. Some measurements may have been made on development-level
systems and there is no guarantee that these measurements will be the same on
generally available systems. Furthermore, some measurements may have been
estimated through extrapolation. Actual results may vary. Users of this document
should verify the applicable data for their specific environment.
Information concerning non-IBM products was obtained from the suppliers of
those products, their published announcements or other publicly available sources.
IBM has not tested those products and cannot confirm the accuracy of
performance, compatibility or any other claims related to non-IBM products.
Questions on the capabilities of non-IBM products should be addressed to the
suppliers of those products.
All statements regarding IBM's future direction or intent are subject to change or
withdrawal without notice, and represent goals and objectives only.
All IBM prices shown are IBM's suggested retail prices, are current and are subject
to change without notice. Dealer prices may vary.
410 Sterling Selling and Fulfillment Foundation: Warehouse Management System User Guide
This information is for planning purposes only. The information herein is subject to
change before the products described become available.
This information contains examples of data and reports used in daily business
operations. To illustrate them as completely as possible, the examples include the
names of individuals, companies, brands, and products. All of these names are
fictitious and any similarity to the names and addresses used by an actual business
enterprise is entirely coincidental.
COPYRIGHT LICENSE:
This information contains sample application programs in source language, which
illustrate programming techniques on various operating platforms. You may copy,
modify, and distribute these sample programs in any form without payment to
IBM, for the purposes of developing, using, marketing or distributing application
programs conforming to the application programming interface for the operating
platform for which the sample programs are written. These examples have not
been thoroughly tested under all conditions. IBM, therefore, cannot guarantee or
imply reliability, serviceability, or function of these programs. The sample
programs are provided "AS IS", without warranty of any kind. IBM shall not be
liable for any damages arising out of your use of the sample programs.
Each copy or any portion of these sample programs or any derivative work, must
include a copyright notice as follows:
© IBM 2013. Portions of this code are derived from IBM Corp. Sample Programs. ©
Copyright IBM Corp. 2013.
If you are viewing this information softcopy, the photographs and color
illustrations may not appear.
Trademarks
IBM, the IBM logo, and ibm.com®are trademarks or registered trademarks of
International Business Machines Corp., registered in many jurisdictions worldwide.
Other product and service names might be trademarks of IBM or other companies.
A current list of IBM trademarks is available on the Web at “Copyright and
trademark information” at http://www.ibm.com/legal/copytrade.shtml.
Adobe, the Adobe logo, PostScript, and the PostScript logo are either registered
trademarks or trademarks of Adobe Systems Incorporated in the United States,
and/or other countries.
IT Infrastructure Library is a registered trademark of the Central Computer and
Telecommunications Agency which is now part of the Office of Government
Commerce.
Intel, Intel logo, Intel Inside, Intel Inside logo, Intel Centrino, Intel Centrino logo,
Celeron, Intel Xeon, Intel SpeedStep, Itanium, and Pentium are trademarks or
registered trademarks of Intel Corporation or its subsidiaries in the United States
and other countries.
Linux is a registered trademark of Linus Torvalds in the United States, other
countries, or both.
Notices 411
Microsoft, Windows, Windows NT, and the Windows logo are trademarks of
Microsoft Corporation in the United States, other countries, or both.
ITIL is a registered trademark, and a registered community trademark of the Office
of Government Commerce, and is registered in the U.S. Patent and Trademark
Office.
UNIX is a registered trademark of The Open Group in the United States and other
countries.
Java and all Java-based trademarks and logos are trademarks or registered
trademarks of Oracle and/or its affiliates.
Cell Broadband Engine is a trademark of Sony Computer Entertainment, Inc. in the
United States, other countries, or both and is used under license therefrom.
Linear Tape-Open, LTO, the LTO Logo, Ultrium and the Ultrium Logo are
trademarks of HP, IBM Corp. and Quantum in the U.S. and other countries.
Connect Control Center®, Connect:Direct®, Connect:Enterprise®, Gentran®,
Gentran®:Basic®, Gentran:Control®, Gentran:Director®, Gentran:Plus®,
Gentran:Realtime®, Gentran:Server®, Gentran:Viewpoint®, Sterling Commerce™,
Sterling Information Broker®, and Sterling Integrator®are trademarks or registered
trademarks of Sterling Commerce®, Inc., an IBM Company.
Other company, product, and service names may be trademarks or service marks
of others.
412 Sterling Selling and Fulfillment Foundation: Warehouse Management System User Guide

Index
Special characters
$ Value field 379
# Batches field 339
# Logged In / Available Users field 339
# Of count results field 157
# Of Days field 375
# Of Items In Variance field 157
# Of Locations In Variance field 157
# Of Tasks At Risk Of Delay field 339
# Of Tasks Originating Here field 339
# Of Tasks Terminating Here field 339
# Of Users Logged In Performing This
Task field 339
# of variances field 157
# Shipments in Wave # 1 field 294
# Tasks At Risk Of Delay field 338
A
Accept Variance action. See also
Managing Count Requests 157
Accept Wave action 293
Activity Code field 137
Activity Date field 340
activity demand 260
Activity field 318
Actual Weight field 322, 326
Add To Manifest action. See also Adding
Containers To a Manifest. 317
Additional Item Details action 221, 231
addresses 252
Adjust Cost action 207
Adjust Location Inventory 205
Adjust Receipt action 123
Adjusting Inventory 28
Existing Product 28
New Product 28
adjusting the quantity 358
Adjustment Cost Details 207
Adjustment Type field 332
Aisle field 347
Alert ID field 180
alerts
creating 268
shipments 258
All Shipments field 379
Allocated Capacity field 377, 378
Allocated Demand field 199
Allow Overage action 290
Allow Receipt of Unexpected Items on
Shipment field 134
Appointment Type field 115, 284
appointments
planning 236
assign a task to a user 351
Assign Shift field 377
Assigned field 378
Assigned To User ID field 347
At Address field 313
At Node field 313
At Shipment Destination field 314
At Shipment Origin field 313
Audit Type field 329, 333
audits 256
Automatically populating field
values 408
B
Backlog field 380
barcode translation 408
Batch # field 347, 357
batch search
screen 353
Bill Of Lading
definition 389
Break LPN 203
Break LPN action 189
Buyer field 379
C
Cancel
Count Request 25
cancel a task
screen 352
Cancel action 155
Capacity Organization field 374, 375
Capturing item's expiration date 138
Capturing item's serial number 137
Capturing item's tag number 138
Carrier Service Code field 313
Carrier Sort Lane field 249
Carrier/Service field 326
Cart Manifest Task List
definition 388
Case Content Verification Not Required
field 260
Case Type field 293
Catalog Organization field 214
Change Inventory Attributes action 188
Changing Inventory Attributes 29
Across Locations 29
charges 253
Checked By field 389
CID# field 390
Close Case action 135
Close Pallet action 135
Close Prereceipt action 122
COD Amount field 392
Collect field 391
Comment field 287
Complete Batch 357
Complete quantity field 294
Completed Tasks field 339
Completed Work Orders field 295
Computed Weight field 326
Confirm Batch. 357
Confirmed By field 389
Confirming Activities Performed for the
Work Order 35
Consider Pending Task field 375
container
viewing details 57
Container barcode type 318
container routing 326
Container SCM field 321
containers 254
packing 263, 266
recording weight 58
unpacking 113
COO (Country/Region Of Origin) 126
Copy Capacity field 374
Count 153
putting an item category on count 24
putting an item classification on
count 24
putting an item on count 24
record count results 359
Count Accuracy field 157
Count Iteration field 157, 165
Count Quantity field 159
count request
searching 153
Count Request 149
Count Request for Location Range 151
Count Request Search By Location
Range 155
Count Requests
managing 25
count result
searching 163
Count sheet
definition 402
Count Sheet 381
Count Task
Assign Count Tasks to a User 26
Cancel Count Task 26
Complete 27
Put a Count Task on Hold 26
Put Count Tasks on Hold 26
putting a count task on hold 26
Release a Count Task Put on
Hold 26
Release Count Tasks Put on Hold 26
releasing a count task put on hold 26
reporting completion 27
Reprioritize Count Tasks 26
View Count Task Details 26
Count Tasks
managing 25
country/region of origin. See COO 126
Create Count Request 149
creating 160
Create Count Request action 158
Create Count Request action. See also
Managing Count 189
Create Count Request button. 150
Create Load 313
Create move request 145
© Copyright IBM Corp. 1999, 2011 413
Create Move Request 27, 145
Create Move Requests action. See also
Managing Inventory 189
Create New field 374
create outbound shipments 289
Create Wave button 299
Create Work Order 219
Credited Time field 364
Current Resource Pool field 378
Currently Chosen Appointment Slot
field 236
Cust Item No field 383
CUST# PKGS field 391
Customer check acceptable field 392
D
Date field 378
Date/Time field 287
dates 257
Days of the week field 380
Days of the Week field 376
Dedicated Location field 193
Dedications action 192
Delay Window field 236
Delete action 222, 318
Delete field 374
delivery dates 242
demand details
viewing 66
Demand field 377
Demand Location Id field 183
Demand Quantity field 183
Demand Satisfied field 183
Dependency Hold field 350
display task summary details
screen 349
display tasks to be completed within a
specific time frame
screen 337
Disposition Qty field 142
Do not verify Case Content field 134
Do not verify Pallet Content field 134
Dock Appointment Scheduling
managing docks 116, 285
searching for an appointment 113,
282
taking a new appointment 114, 283
viewing dock schedule details 114,
283
dock appointments
additional constraints
adding 63
canceling 63
constraints
removing 64
modifying 62
scheduling 61
searching 61
dock schedule
details
viewing 62
Document Type field 133, 379
E
Effective End Date field 375
Effective Start Date field 375
Effort (Hrs) field 338
End Time Stamp field 238
enter the criteria for the search
screen 337
entering the modification reasons 20,
216
Enterprise 205, 209, 213
Enterprise field 337, 379
Estimate End Time field 115, 284
Estimated Cases field 293
Estimated End Time field 339
Estimated Start Time field 339
Exception Hold field 350
Excess Capacity field 377
Excess field 377
Execution Console Framework 407
hot keys 407
Execution Status field 249
F
FedEx Carrier label
definition 400
FIFO # field 206
Fill Code field 193
Finish No Later Than field 347, 357
FOB field 390
For Activity Code field 173
FOR field 384
For Shipments with Requested Ship Date
field 380
Freeze Move In field 193, 194
Freeze Move Out field 193, 194
Freeze On Variance field 193
Freight Charge Terms field 391
FRIEGHT TERMS field 382
From Activity Code field 183
From Activity Group field 183
From Location/ From LPN field 387
G
Global Trade Item Number. See
GTIN 195
GTIN (Global Trade Item Number) 195
H
H.M (X) field 392
HANDLING UNIT fields 392
Has Exceptions field 173
Has Hazardous Item(s) field 77
Has Shortage field 249
Hazard Class field 399
HAZMAT BOL
definition 395
Hazmat SKU Labels
definition 404
Hazmat Stock Keeping Unit Labels 381
Held Shipments With Hold Type
field 379
High Date 380
Hold Reason Code field 350
Hold Reason task search field 343
Hold Reason Text field 350
Hold Transaction field 235, 287
Hold Type field 235
Hold Type marker 287
holds
adding 235
Holds
viewing 285
I
I.D. No field 399
IDENTIFICATION NUMBER field 31,
404
Ignore Run Quantity field 219
In Progress quantity field 294
In Staging Location field 193
inbound shipments
creating 133
Infinite Capacity field 193
Inspect action 123
Inspect Return Receipt 141
Instructions 318
Inv Upd Activity field 232
Inventory Age (days) field 187
Inventory Audit Trail 24
Inventory Status field 206, 358
Inventory View action 122
Is Infinite Demand field 137, 183
Is Outbound Container field 200
Item Classification task list field 345
Item Classification task search field 341
Item ID field 213
Item Pick Task List
definition 387
L
Last But One Variance Quantity
field 159
Last Variance Quantity field 159
Latest summary Task field 164
load
creating 59
holds
adding 60
shipments
adding 60
loads 254
Location Inventory
searching 185
Location Inventory Audit
searching 329
Location Size Code field 193
Location SKU Dedications 194
Logged In field 340
logical kits 262
See Also kit components 262
Lot Key Reference field 197
LTL manifest document
definition 397
414 Sterling Selling and Fulfillment Foundation: Warehouse Management System User Guide
M
Manage Dock Group field 114, 283
Managing Count Requests 25
managing count tasks 25
manifest
closing 57
containers
adding 53
removing 57
searching 309
Manifest
carrier service summary 311
opening manifests 311
printing manifest 311
remove packed containers screen. See
also removing containers from a
manifest 321
Manifest # field 317, 321, 365
manifest status field 309
mark a batch as completed
screen 354
mark a task as completed
screen 347
Mark For field 382
MARK FOR field 385
Master Bill of Lading field 391
Master Catalog ID field 213
Max Records 330
Measure field 376, 380
Modified On field 350
Most Recent Task field 340
Move field 380
move request
searching 173
Move Request 173
alerts 179
Move Request Line
Activity Demand 182
Multiple SKU containers label
definition 385
N
Name field 338
Net Variance Quantity field 157
Net Variance Value field 157
New Disposition field 142
New Status field 350
NMFC # 395
NMFC # field 392
No. of Source Aisles Visited field 364
No. of Source Location Visited field 364
No. of Target Aisles Visited field 364
No. of Target Location Visited field 364
Node field 337, 340, 375, 379
Node Level Inventory 199
Node Level Inventory action 189
nodes 268
Number of Days To Display field 113,
282
O
Old Status field 350
On Hand Quantity field 192
Only Logged In Users user search
field 351
Only Planned Shipments field 379
Only Unassigned Tasks task search
field 340
Only Unplanned Shipments field 379
Open Manifest action 310
Open Tasks field 338, 339
Order Available On System field 259
Order Type field 379
organizations 268
Out Staging Location field 193
outbound shipments
creating 39
holds
adding 41
modifying 40
Outer Most Case ID field 200
Over Ship Quantity field 251
Overage Allowed field 259
overages 134
Override Shifts field 378
Override Shipment Entry field 134
P
Pack And Hold flag 249
Pack and Hold Only field 379
Pack Container action 263
Packed Quantity field 249, 319
packing
adding items 49
removing inner packs 51
removing items 50
system-suggested containers 44, 47
unknown contents 46
user-defined containers 45
packing adding inner packs 50
Packing Group field 399
Packing Slip 381
definition 381
Pallet ID field 156
Parent Task ID field 349
Past Due field 339
Pend In Quantity field 191
Pend Out Quantity field 191
Pending Work Orders field 295
Performing VAS activities 237
Picked By field 389
Pipeline ID field 156
Planned Capacity field 377, 378
plans
selecting 269
POD # field 313
Pool Name field 377
Predecessor Task task list field 345
Prepaid field 391
Primary Reference task list field 345
Prime Line # field 365
printing 266
printing SKU labels 30
Priority task list field 345
Pro number field 391
Product Class field 213
Product No field 383
productivity 361
searching 363
Productivity Type field 363
Promised Demand field 199
Pull Resources field 377
put an item classification on count 24
put an item on count 24
putting a task on hold
screen 352
Q
Qty and UnitVol field 396
Qty Completed field 238
Qty Per Kit field 232
Qty Remaining field 238
Qty To Process field 238
Quantity After Adjustment field 207
Quantity field 319, 348, 355, 358
Queue field 180
queues 94
R
Reason Code field 350, 358
Reason Text field 350, 358
receipt
searching 119
Receipt 206
Receipt Adjustment
entering receipt adjustment
criteria 215
validating receipt adjustment
criteria 20, 216
Receive action 122
Receive Details console 135
Receive Inventory
build cases or pallets 13
expected containers 13
paper-based
adjusting a receipt 20
build cases or pallets 17
expected containers 17
receiving excess 18
receive loose items 14
receiving excess 14
Receiving Dock field 123
Reference 335
Release action 176, 293
Release From ESP Hold action 248
Release Wave
screen 292
Released Quantity field 178
releases
adding 271
Remove From Manifest action 321
Removing shipments from wave 246
Reprint Carrier Label 381, 402
reprioritize a task
screen 351
Request Type field 153
Requested Delivery Date field 379
Requested Quantity field 178
Requesting User ID 150
Reset action 237
reset zone pend-in quantities 31
resource demands
searching 66
Index 415
resource demands (continued)
shipments
moving 66
Resource field 377
Resource Pool Description field 374, 375
Resource Pool field 376, 377, 378
resource pools
assigning shifts 65
capacity details
viewing 65
resources
moving 65
standard capacity
defining 64
Routing Error Code field 250
S
SAM (Standard Allowable Minutes) 364
Satisfied Quantity field 183
Save action 237, 317
SCAC (Standard Carrier Alpha
Code) 391
Scan field 237
Scan Identifier field 317
Scheduled End Time field 339
Scheduled Start Time field 339
Search History task search field 340
Segment field 158
Segment Type field 125, 158
serial number
capturing 57
serial shipping container code. See
SSCC 385
Service field 379
Service Item Group field 219, 227, 237
Service Item ID field 219, 227
Shift field 378
Ship By Date 206
Ship By Date field 158
Ship Mode field 379
SHIP TO POST field 384
Shipment 335
shipment audits 261
Shipment Audits 89, 92
shipment dates 242
Shipment Sort Lane field 249
shipments 133, 247
cancelling 266
deleting 246
modifying 252
outbound 241
searching 241
splitting 266
splitting lines 268
supervisory overrides 290
Shipper's Certification For Hazardous
Materials 398
shipper's certification for shipping
hazardous materials 398
Short Description field 213
Shortage field 377
Show Demand and Capacity Data in
field 375
Show Hierarchy task search field 340
Show Only Overridden Resources
field 380
Show Only task search field 340, 341,
342
SID# field 390, 393
Slot No field 386
Sort Sequence field 347
Source Case Id 348, 358
Source Location task search field 341
Source Pallet Id 358
Source Pallet Id field 348
Source Zone task search field 341
Special Service Surcharge field 318, 322
special services 252
Special Services 326
SSCC (Serial Shipping Container
Code) 385
standard allowable minutes. See
SAM 364
Standard Capacity field 376
Standard Carrier Alpha Code. See
SCAC 391
Standard Rate field 338
Start Date field 375
Start No Earlier Than field 337, 347, 357
Start Task After task search field 341,
343
Start Time Stamp field 238
Status field 287, 379
Storage Code field 193
Sub Line # field 365
Supervisor ID field 374, 375
supervisory overrides 290
Supervisory Overrides action 133, 289
Suppress Overage Check field 134
T
Target Location task search field 341
Target Pallet Id 348, 358
Target Resource Pool field 378
Target Zone task search field 341
Task
searching 337
Task ID field 345
Task List 381, 386
definition 386
task list screen 345
task search
by risk 344
task search by date
screen 343
task search by exception
screen 343
task search by inventory
screen 341
task search by reference
screen 342
task search by zone
screen 340
Task Status task list field 345
Task Summary field 338
Task Type field 338, 339
Tasks With All Following Holds
field 343
To field 379
Today's Demand Details field 378
Total field 380
Total Hours field 378
TRACKING field 384
Trailer # field 365
U
UCC-128 container label
definition 383
UCC-128 container shipping label
definition 383
UCC-128 Container Shipping Label 381
unit of measure 99
unit of measurement. See UOM 237, 357
UnReceive Quantity field 216
UOM (Unit Of Measure) 237, 357
UOM field 213
User ID field 287, 340
User Name field 340
User Time Sheet
user
searching 371
V
Variance Type field 159
Variance Value field 164
VAS
work order
creating 33
VAS Station
Performing Value-Added Services
operations. See Also Confirming
Activities Performed for the Work
Order 237
Velocity Code field 192
VICS Bill Of Lading 381
VICS BOL for load
definition 392
VICS BOL for shipment
definition 389, 395
View
Count Request Details 25
View All Lines action 176
View Audit action 157
view batch details
screen 354
View Contents action 321
View Contents action. See also Viewing
the Container's Contents. 317
View Details action 155
View Details field 376
View Lines With Exceptions action 176
View Move Request action 229
View Standard Capacity field 374
view task summaries by zone
screen 339
View Task Summary action 293
view task summary details
screen 346
View Tasks action 229
view the results of a task batch search
screen 353
view the status audit trail of a task 350
view the status of a task on hold
screen 350
view the tasks assigned to a user
screen 352
416 Sterling Selling and Fulfillment Foundation: Warehouse Management System User Guide
viewing a list of available users 340
viewing an open task summary
breakdown 339
Viewing Hold History 235
W
Wave # field 249
Wave Date field 365
Wave Release 381
definition 403
Wave Summary
screen 293
waves 244
accepting 42
canceling 43
creating 42, 271
releasing 43
viewing batch summary 294
Waves
release 292
searching 291
Weigh action. See also Recording the
Container's Weight 317
Weigh Station
converting inventory container into an
outbound container 59
recording container's weight 325
WHSE field 387
Work Order
searching 167, 225
Work Order Cancellation 235
Z
Zone field 339
Index 417
418 Sterling Selling and Fulfillment Foundation: Warehouse Management System User Guide
Printed in USA
