WSS Swift Connectivity Guide
User Manual:
Open the PDF directly: View PDF ![]() .
.
Page Count: 294 [warning: Documents this large are best viewed by clicking the View PDF Link!]
- Preface
- Chapter 1 Overview
- Chapter 2 ESIAdapter configuration
- 2.1 Introduction
- 2.2 Using a service bureau
- 2.3 Installation
- 2.4 Configuration
- 2.4.1 Required interfaces
- 2.4.2 Fixed Parameters
- 2.4.2.1 Introduction
- 2.4.2.2 esiadapter.properties
- 2.4.2.3 esiadapter-finswift.xml
- 2.4.2.3.1 Interface names
- 2.4.2.3.2 Properties for esiadapterFinFileType
- 2.4.2.3.3 Properties for esiadapterFinFileMervaType
- 2.4.2.3.4 Properties for esiadapterFinMQAllianceType and esiadapterFinMQMervaType
- 2.4.2.3.5 Properties for esiadapterFinCasMFType
- 2.4.2.3.6 Properties for esiadapterFinWSType
- 2.4.2.3.7 Properties for esiadapterFinMQHAXMLType
- 2.4.2.3.8 Properties for esiadapterFinMQHAType
- 2.4.2.4 fileact.properties
- 2.4.3 ESIAdapter FINSwift API Rule Editor
- 2.4.4 Esiadapter Module Name Rule Editor
- 2.4.5 Additional Connectivity to SWIFT Alliance Access
- 2.4.6 MQSeries and SSL
- 2.5 Environment variables
- 2.6 Statuses
- 2.7 ESIAdapter Client Relationship Editor
- 2.8 RAHA
- 2.9 Starting ESIAdapter with Process Monitor
- 2.10 File Simulation Mode
- 2.11 ESIAdapter simulator
- Chapter 3 CASmf configuration
- Chapter 4 FIN messaging configuration
- Chapter 5 SWIFTnet Accord
- Chapter 6 SWIFT package overview
- 6.1 Data Integration
- 6.2 SWIFT message scenarios
- 6.3 SWIFT message details
- 6.3.1 MT103 - Single Customer Credit Transfer
- 6.3.2 MT192 - Request for Cancellation
- 6.3.3 MT200 - Financial Institution Transfer for its Own Account
- 6.3.4 MT202 - General Financial Institution Transfer
- 6.3.5 MT203 - Multiple General Financial Institution Transfer
- 6.3.6 MT210 - Notice to Receive
- 6.3.7 MT292 - Request for Cancellation
- 6.3.8 MT300 - Foreign Exchange Confirmation
- 6.3.9 MT305 - Foreign Currency Option Confirmation
- 6.3.10 MT320 - Fixed Loan/Deposit Confirmation
- 6.3.11 MT330 - Call/Notice Loan/Deposit Confirmation
- 6.3.12 MT340 - Forward Rate Agreement Confirmation
- 6.3.13 MT341 - Forward Rate Agreement Settlement Confirmation
- 6.3.14 MT350 - Advice of Loan/Deposit Interest Payment
- 6.3.15 MT362 - Interest Rate Reset/Advice of Payment
- 6.3.16 MT392 - Request for Cancellation
- 6.3.17 MT395 - Queries
- 6.3.18 MT396 - Answers
- 6.3.19 MT399 - Free Format Messages
- 6.3.20 MT515 - Client Confirmation of Purchase or Sale
- 6.3.21 MT518 - Market-Side Securities Trade Confirmation
- 6.3.22 MT535 Statement of Holdings
- 6.3.23 MT540 - Receive Free
- 6.3.24 MT541 - Receive Against Payment
- 6.3.25 MT542 - Deliver Free
- 6.3.26 MT543 - Delivery Against Payment
- 6.3.27 MT592 - Request for Cancellation
- 6.3.28 MT599 - Free Format Message
- 6.3.29 MT604 - Precious Metal Transfer/Delivery Order
- 6.3.30 MT692 - Request for Cancellation
- 6.3.31 MT699 - Free Format Message
- 6.3.32 MT900 - Confirmation of Debit
- 6.3.33 MT910 - Confirmation of Credit
- 6.3.34 MT950 - Statement Message
- 6.3.35 MT992 - Request for Cancellation
- Chapter 7 SWIFT package configuration
- Chapter 8 TRMSwift and CMM setup after installation
- Chapter 9 TRMSwift environment setup
- Chapter 10 TRMSwift security and permissions setup
- Chapter 11 TRMSwift routine maintenance
- Chapter 12 TRMSwift message configuration
- 12.1 Creating a new message
- 12.2 Configuring existing messages
- 12.3 Constructed XML
- 12.4 Rules
- 12.5 Actions
- Chapter 13 TRMSwift workflow configuration
- 13.1 Using flags within the workflow
- 13.2 Configuring the workflow
- 13.2.1 Defining workflow elements
- 13.2.2 Defining workflow deciders
- 13.2.3 Defining each of the workflow elements
- 13.3 Connection Pooling
- Chapter 14 TRMSwift adapter configuration
- 14.1 Processes
- 14.2 Defining an adapter
- 14.3 Implemented connectors
- 14.3.1 Incoming SWIFT messages connector
- 14.3.2 comKIT connector factory
- 14.3.3 Settlement queue factory
- 14.3.4 Queue adapter TBA
- 14.3.5 SQL connector factory
- 14.3.6 Internet connector factory
- 14.3.7 Printer connector factory
- 14.3.8 File connector factory
- 14.3.9 FIX connector factory
- 14.3.10 HTTP connector factory
- 14.3.11 Tomcat connector factory
- 14.3.12 MQSeries connector factory
- 14.3.13 JMS connector factory
- Chapter 15 TRMSwift monitor configuration
- Chapter 16 TRMSwift debugging
- 16.1 Using System Monitor
- 16.2 Triggering actions
- 16.3 Toolbar menu items
- 16.4 Logging components
- 16.5 Obtaining the full XML of a business event or message
- 16.6 Performing actions on Workflow Elements or the Encoder
- 16.7 Inbound Message Handler
- 16.8 Plain XML tools
- 16.9 Validating custom transformation scripts
- 16.10 TestFeeder
- 16.11 Troubleshooting
- Chapter 17 TRMSwift Message Monitor
- Chapter 18 ESIAdapter File Interface
- Appendix A Properties files
- Appendix B Time zones
- Appendix C Configuration data
- Appendix D Connecting to TRM components
- Appendix E Reading passwords from memory

2
Information in this document is subject to change without notice and does not represent a commitment on the part
of Wall Street Systems. The software and documentation, which includes information contained in any databases,
described in this document is furnished under a license agreement or nondisclosure agreement and may only be
used or copied in accordance with the terms of the agreement. It is against the law to copy the software or
documentation except as specially allowed in the license or nondisclosure agreement. No part of this publication
may be reproduced, stored in a retrieval system, or transmitted, in any form or by any means, electronic, mechanical,
photocopying, recording, or otherwise, without the prior written permission of Wall Street Systems.
Although Wall Street Systems has tested the software and reviewed the documentation, Wall Street Systems
makes herein no warranty or representation, either expressed or implied, with respect to software or
documentation, its quality, performance, marketability, or fitness for a particular purpose. As a result, this
software is provided "as is", and in no event will Wall Street Systems be liable for direct, indirect, special,
incidental, or consequential damages from any defect in the software or by virtue of providing this
documentation, even if advised of the possibility of such damages. The documentation may contain technical
inaccuracies and omissions.
The mention of an activity or instrument in this publication does not imply that all matters relating to that activity or
instrument are supported by Wallstreet Suite, nor does it imply that processing of or by that activity or instrument is
carried out in any particular way, even if such processing is customary in some or all parts of the industry.
The windows and screen images shown herein were obtained from prototypes during software development. The
actual windows and screen images in the software may differ.
Wall Street Systems, WSS, WALLSTREET, WALLSTREET SUITE and the Wall Street Systems logos are
trademarks of Wall Street Systems Delaware, Inc.
Finance KIT, Trema and Trema logo are trademarks of Wall Street Systems Sweden AB.
Microsoft and Windows are either registered trademarks or trademarks of Microsoft Corporation in the United States
and/or other countries.
Adobe, Acrobat, and Acrobat Reader are either registered trademarks or trademarks of Adobe Systems
Incorporated in the United States and/or other countries.
All other products mentioned in this book may be trademarks or service marks of their respective companies or
organizations.
Company names, people names, and data used in examples are fictitious unless otherwise noted.
This edition applies to Wallstreet Suite version 7.3.16 and to all later releases and versions until indicated in new
editions or Wall Street Systems communications. Make sure you are using the latest edition for the release level of
the Wall Street Systems product.
© Copyright 2011 Wall Street Systems IPH AB. All rights reserved.
First Edition (August 2011)
SWIFT Connectivity Guide 3
Contents
Preface ...........................................................................................................................15
1 Overview ....................................................................................................................17
1.1 Introduction ........................................................................................................................... 17
1.2 SWIFT interface components ............................................................................................... 17
1.2.1 Enterprise Swift Integration Adapter ............................................................................... 18
1.2.2 WebSuite ........................................................................................................................ 18
1.2.3 TRMSwift ........................................................................................................................ 18
1.2.4 FIN messaging components ........................................................................................... 19
1.3 Confirmation matching using SWIFTNet Accord ............................................................... 19
2 ESIAdapter configuration .........................................................................................21
2.1 Introduction ........................................................................................................................... 21
2.1.1 Send ................................................................................................................................ 21
2.1.2 Status .............................................................................................................................. 21
2.1.3 Receive ........................................................................................................................... 22
2.1.4 Polling SWIFTNet Accord ............................................................................................... 22
2.1.5 Message sequencing ...................................................................................................... 22
2.2 Using a service bureau ......................................................................................................... 22
2.3 Installation ............................................................................................................................. 22
2.4 Configuration ......................................................................................................................... 22
2.4.1 Required interfaces ......................................................................................................... 23
2.4.1.1 Incoming Message Routing .................................................................................. 23
2.4.2 Fixed Parameters ............................................................................................................ 23
2.4.2.1 Introduction ........................................................................................................... 23
2.4.2.2 esiadapter.properties ............................................................................................ 24
2.4.2.3 esiadapter-finswift.xml .......................................................................................... 31
2.4.2.4 fileact.properties ................................................................................................... 37
2.4.3 ESIAdapter FINSwift API Rule Editor ............................................................................. 37
2.4.3.1 Introduction ........................................................................................................... 37
2.4.3.2 Usage ...................................................................................................................38
2.4.4 Esiadapter Module Name Rule Editor ............................................................................. 38
2.4.4.1 Introduction ........................................................................................................... 38
2.4.4.2 Usage ...................................................................................................................38
2.4.4.3 Fields .................................................................................................................... 39
2.4.5 Additional Connectivity to SWIFT Alliance Access ......................................................... 39
2.4.5.1 Introduction ........................................................................................................... 39
4 © Wall Street Systems IPH AB - Confidential
2.4.5.2 MQHA with MQ-MT .............................................................................................. 39
2.4.5.3 MQHA with XML ................................................................................................... 39
2.4.5.4 SOAP ....................................................................................................................39
2.4.6 MQSeries and SSL ......................................................................................................... 39
2.4.6.1 Encryption modes ................................................................................................. 40
2.4.6.2 Creating the Java client's certificate ..................................................................... 40
2.4.6.3 SSL setup for ESIAdapter .................................................................................... 41
2.4.6.4 ssl.properties ........................................................................................................ 41
2.4.6.5 Debugging ............................................................................................................ 42
2.4.6.6 credential.properties ............................................................................................. 42
2.5 Environment variables .......................................................................................................... 43
2.6 Statuses ................................................................................................................................. 43
2.7 ESIAdapter Client Relationship Editor ................................................................................ 44
2.7.1 FIN Swift page ................................................................................................................ 44
2.7.2 FileAct page .................................................................................................................... 44
2.7.3 Accord page .................................................................................................................... 46
2.8 RAHA ...................................................................................................................................... 46
2.9 Starting ESIAdapter with Process Monitor ......................................................................... 47
2.9.1 Processes in PMM ..........................................................................................................47
2.9.2 Assumptions ................................................................................................................... 47
2.9.3 ESIAdapter and PMM configuration procedure .............................................................. 47
2.9.3.1 RAHA ....................................................................................................................48
2.10 File Simulation Mode .......................................................................................................... 48
2.10.1 FileAct simulation .......................................................................................................... 48
2.10.2 FIN simulation ............................................................................................................... 48
2.10.3 Changing from simulation mode ................................................................................... 49
2.11 ESIAdapter simulator .......................................................................................................... 49
2.11.1 Simulating sending a FIN message .............................................................................. 49
2.11.2 Simulating sending a FileAct message ......................................................................... 49
3 CASmf configuration ................................................................................................51
3.1 Installing CASmf ................................................................................................................... 51
3.2 Configuring CASmf ............................................................................................................... 51
3.2.1 Modifying the dmapid.dat file .......................................................................................... 51
3.2.2 Setting environment variables ......................................................................................... 52
3.3 Configuring SWIFTAlliance .................................................................................................. 52
3.3.1 SWIFTAlliance Security .................................................................................................. 52
3.3.2 Receiving a failure (NACK) from SWIFTAlliance ............................................................ 53
3.3.2.1 NACK received from a transmission or delivery report ......................................... 53
3.4 Configuring TRMSwift .......................................................................................................... 54
3.5 Debugging ............................................................................................................................. 55
4 FIN messaging configuration ...................................................................................57
4.1 FIN messaging components ................................................................................................ 57
SWIFT Connectivity Guide 5
4.1.1 FIN Messaging flow diagram .......................................................................................... 58
4.1.1.1 FINWriter saves the message in the database ..................................................... 59
4.1.1.2 FINsend sends message to adapter ..................................................................... 59
4.1.1.3 TRMSWIFT Receiver receives status for sent messages .................................... 59
4.1.1.4 Receiver receives new messages ........................................................................ 59
4.1.1.5 Responder responds with status updates ............................................................ 59
4.1.1.6 CMM FIN messages monitored on FIN Message Manager ................................. 60
4.2 FIN message administration (TRM) ..................................................................................... 61
4.2.1 Previewing changes to FIN messages ............................................................................ 62
4.2.2 FIN message administration (WebSuite) ........................................................................ 62
4.2.2.1 FIN message label mapping ................................................................................. 65
4.3 FIN Message Rule Editor ...................................................................................................... 65
4.3.1 Rules versus finmessage.py ........................................................................................... 68
4.3.1.1 Straight through processing .................................................................................. 68
4.3.1.2 finmessage.py ...................................................................................................... 68
4.4 FIN Message Action Editor ...................................................................................................68
4.4.1 Rules ............................................................................................................................... 68
4.4.2 Actions ............................................................................................................................ 69
5 SWIFTnet Accord ......................................................................................................71
5.1 Confirmation matching ......................................................................................................... 71
5.1.1 Accord simulator ............................................................................................................. 71
5.1.2 Polling the Accord API ....................................................................................................72
5.1.3 Reconciling of results ...................................................................................................... 73
5.1.4 Updating the FIN Message ............................................................................................. 73
5.1.5 Multiple messages .......................................................................................................... 73
5.1.6 Updating the transaction ................................................................................................. 74
5.1.7 Backdated trades and ESIAdapter .................................................................................. 74
6 SWIFT package overview .........................................................................................75
6.1 Data Integration ..................................................................................................................... 75
6.2 SWIFT message scenarios ................................................................................................... 75
6.2.1 Money market and foreign exchange confirmations ....................................................... 76
6.2.2 Payments ........................................................................................................................ 77
6.2.3 Private client confirmation ...............................................................................................77
6.2.4 Security movements ....................................................................................................... 78
6.2.5 Statement messages ...................................................................................................... 78
6.2.6 Transaction Generation .................................................................................................. 79
6.3 SWIFT message details ........................................................................................................ 79
6.3.1 MT103 - Single Customer Credit Transfer ...................................................................... 79
6.3.2 MT192 - Request for Cancellation .................................................................................. 80
6.3.3 MT200 - Financial Institution Transfer for its Own Account ............................................ 80
6.3.4 MT202 - General Financial Institution Transfer ............................................................... 80
6.3.5 MT203 - Multiple General Financial Institution Transfer ................................................. 80
6.3.6 MT210 - Notice to Receive ............................................................................................. 80
6 © Wall Street Systems IPH AB - Confidential
6.3.7 MT292 - Request for Cancellation .................................................................................. 81
6.3.8 MT300 - Foreign Exchange Confirmation ....................................................................... 81
6.3.9 MT305 - Foreign Currency Option Confirmation ............................................................. 81
6.3.10 MT320 - Fixed Loan/Deposit Confirmation ................................................................... 81
6.3.11 MT330 - Call/Notice Loan/Deposit Confirmation ........................................................... 81
6.3.12 MT340 - Forward Rate Agreement Confirmation .......................................................... 81
6.3.13 MT341 - Forward Rate Agreement Settlement Confirmation ........................................ 82
6.3.14 MT350 - Advice of Loan/Deposit Interest Payment ...................................................... 82
6.3.15 MT362 - Interest Rate Reset/Advice of Payment .......................................................... 82
6.3.16 MT392 - Request for Cancellation ................................................................................ 82
6.3.17 MT395 - Queries ........................................................................................................... 82
6.3.18 MT396 - Answers ..........................................................................................................82
6.3.19 MT399 - Free Format Messages .................................................................................. 82
6.3.20 MT515 - Client Confirmation of Purchase or Sale ........................................................ 82
6.3.21 MT518 - Market-Side Securities Trade Confirmation .................................................... 83
6.3.22 MT535 Statement of Holdings ...................................................................................... 83
6.3.23 MT540 - Receive Free .................................................................................................. 83
6.3.24 MT541 - Receive Against Payment .............................................................................. 83
6.3.25 MT542 - Deliver Free .................................................................................................... 83
6.3.26 MT543 - Delivery Against Payment .............................................................................. 83
6.3.27 MT592 - Request for Cancellation ................................................................................ 84
6.3.28 MT599 - Free Format Message .................................................................................... 84
6.3.29 MT604 - Precious Metal Transfer/Delivery Order ......................................................... 84
6.3.30 MT692 - Request for Cancellation ................................................................................ 84
6.3.31 MT699 - Free Format Message .................................................................................... 84
6.3.32 MT900 - Confirmation of Debit ...................................................................................... 84
6.3.33 MT910 - Confirmation of Credit ..................................................................................... 84
6.3.34 MT950 - Statement Message ........................................................................................ 84
6.3.35 MT992 - Request for Cancellation ................................................................................ 85
7 SWIFT package configuration ..................................................................................87
7.1 Configuring swift.properties ................................................................................................87
7.1.1 MT515 ............................................................................................................................. 87
7.2 Pre-defined confirmation adapters ...................................................................................... 87
7.2.1 FXConfirmation ............................................................................................................... 88
7.2.2 MMConfirmation .............................................................................................................. 88
7.2.3 BAConfirmation ............................................................................................................... 88
7.2.4 FixingConfirmation .......................................................................................................... 88
7.2.5 CancelConfirmation ........................................................................................................89
7.2.6 Payments ........................................................................................................................ 89
7.3 Instrument groups ................................................................................................................ 89
8 TRMSwift and CMM setup after installation ...........................................................91
8.1 Introduction ........................................................................................................................... 91
8.2 Setting up TRMSwift environment variables ...................................................................... 91
8.3 Updating tables ..................................................................................................................... 91
SWIFT Connectivity Guide 7
8.3.1 Visualizing the configuration ........................................................................................... 91
8.4 Setting up the CMM environment ........................................................................................ 92
8.4.1 Technical setup ............................................................................................................... 92
8.4.2 Communication protocol and interchange setup ............................................................. 93
8.4.2.1 Communication protocol for FIN ........................................................................... 93
8.4.2.2 Communication protocol for FileAct ...................................................................... 94
8.4.2.3 Interchange setup ............................................................................................... 100
8.5 Starting WSS processes ..................................................................................................... 103
8.6 Renaming TRMSwift tables ................................................................................................ 103
8.7 Windows services ............................................................................................................... 103
8.7.1 Using Process Monitor .................................................................................................. 103
8.7.2 Using the Wrapper tool ................................................................................................. 103
9 TRMSwift environment setup ................................................................................105
9.1 Accessing the database ..................................................................................................... 105
9.2 TRMSwift XML tag structure .............................................................................................. 105
9.2.1 Editing XML files ........................................................................................................... 105
9.2.2 <datasetup> .................................................................................................................. 106
9.2.2.1 <action> .............................................................................................................. 106
9.2.2.2 <rule> ................................................................................................................. 107
9.2.2.3 <ruleset> ............................................................................................................. 107
9.2.2.4 <setupelement> .................................................................................................. 107
9.3 Setting environment variables ........................................................................................... 108
9.4 Setting package properties ................................................................................................ 109
9.4.1 Feeder ........................................................................................................................... 110
9.4.2 Printer ........................................................................................................................... 111
9.4.3 Email ............................................................................................................................. 111
9.5 Setting SWIFT properties ................................................................................................... 111
9.5.1 CASmf .......................................................................................................................... 112
9.5.2 SWIFT header .............................................................................................................. 112
9.5.3 MT515 ........................................................................................................................... 112
9.6 Setting TRMSwift properties .............................................................................................. 113
9.6.1 Ports .............................................................................................................................. 113
9.6.2 Static data refresh and TRMSwift-comKIT communication .......................................... 113
9.7 Setting up TRM .................................................................................................................... 113
9.7.1 Configuring the transaction flow .................................................................................... 114
9.7.1.1 Getting the data .................................................................................................. 114
9.7.1.2 Success or failure ............................................................................................... 115
9.7.1.3 Modes ................................................................................................................. 115
9.7.1.4 Cancelling transactions ...................................................................................... 115
9.7.1.5 Creating transaction rules ................................................................................... 115
9.7.2 Configuring the payment flow ....................................................................................... 115
9.7.2.1 Creating settlement transfer methods and rules ................................................. 116
8 © Wall Street Systems IPH AB - Confidential
10 TRMSwift security and permissions setup .........................................................117
10.1 Guaranteeing security across the network .................................................................... 117
10.1.1 Implementing encryption over the network ................................................................. 117
10.1.2 Identifying network objects .......................................................................................... 117
10.1.3 File system security .................................................................................................... 118
10.2 Audit Manager ................................................................................................................... 118
10.3 TRMSwift data workflow ................................................................................................... 118
10.3.1 Verifying messages ..................................................................................................... 118
10.4 Database security ............................................................................................................. 119
10.4.1 Identification and authentication ................................................................................. 119
10.4.1.1 Logging into TRMSwift ..................................................................................... 119
10.4.1.2 Entering passwords .......................................................................................... 119
10.4.2 Division of roles in TRMSwift ...................................................................................... 119
10.4.2.1 Privileged user "trmswift" .................................................................................. 120
10.4.2.2 Defining non-privileged users ........................................................................... 120
11 TRMSwift routine maintenance ...........................................................................121
11.1 Overview ............................................................................................................................ 121
11.2 Scheduling actions ........................................................................................................... 121
11.3 Displaying the current TRMSwift configuration ............................................................. 123
12 TRMSwift message configuration .......................................................................125
12.1 Creating a new message .................................................................................................. 125
12.1.1 Obtaining data ............................................................................................................. 125
12.1.1.1 Modifying an existing adapter ........................................................................... 125
12.1.1.2 Creating a new adapter .................................................................................... 125
12.1.2 Understanding data ..................................................................................................... 125
12.1.3 Deciding on message(s) ............................................................................................. 126
12.1.4 Verifying the message(s) ............................................................................................ 126
12.1.4.1 Setting up the workflow .................................................................................... 126
12.1.4.2 Previewing the messages ................................................................................. 126
12.1.4.3 Adding columns to the Message Monitor ......................................................... 126
12.1.5 Formatting the message(s) ......................................................................................... 126
12.1.6 Sending the message(s) ............................................................................................. 127
12.1.7 Notifying TRM of success or failure ............................................................................ 127
12.2 Configuring existing messages ....................................................................................... 127
12.2.1 Adding a new field to a message ................................................................................ 127
12.2.2 Changing a value ........................................................................................................ 127
12.2.3 Removing a value ....................................................................................................... 128
12.3 Constructed XML .............................................................................................................. 128
12.3.1 Business event ............................................................................................................ 128
12.3.1.1 Administrative data ........................................................................................... 128
12.3.1.2 Keys and values ............................................................................................... 130
12.3.1.3 Original data received from the adapter ........................................................... 130
SWIFT Connectivity Guide 9
12.3.1.4 Relationship to other business events .............................................................. 131
12.3.1.5 Related messages ............................................................................................ 131
12.3.2 Message ..................................................................................................................... 132
12.3.2.1 Administrative data ........................................................................................... 132
12.3.2.2 Keys and values ............................................................................................... 133
12.3.2.3 Message failure received from CASmf ............................................................. 134
12.3.2.4 Original data of the message ............................................................................ 134
12.3.2.5 Sequence data ................................................................................................. 134
12.4 Rules .................................................................................................................................. 135
12.4.1 XPath expressions ...................................................................................................... 135
12.4.2 XPath rules ................................................................................................................. 135
12.5 Actions ............................................................................................................................... 137
12.5.1 Encoder actions .......................................................................................................... 137
12.5.2 Multiple actions ........................................................................................................... 138
12.5.2.1 Template lists ................................................................................................... 138
12.5.2.2 XSLT actions .................................................................................................... 139
12.5.2.3 Fixed result actions ........................................................................................... 139
12.5.2.4 Template list hooks ........................................................................................... 140
12.5.3 Template list example ................................................................................................. 140
12.5.4 Working with rules and actions ................................................................................... 143
12.5.5 SWIFT Tagifyer ........................................................................................................... 144
13 TRMSwift workflow configuration .......................................................................147
13.1 Using flags within the workflow ...................................................................................... 147
13.1.1 Defining your own flags ............................................................................................... 147
13.1.2 Applying flags to a business event or message .......................................................... 148
13.1.3 Checking the flags of a business event or message ................................................... 149
13.2 Configuring the workflow ................................................................................................. 149
13.2.1 Defining workflow elements ........................................................................................ 150
13.2.2 Defining workflow deciders ......................................................................................... 152
13.2.3 Defining each of the workflow elements ..................................................................... 153
13.2.3.1 Inbound Message Handler ............................................................................... 153
13.2.3.2 BusinessEventSplitter ....................................................................................... 157
13.2.3.3 Waiter ............................................................................................................... 159
13.2.3.4 OutboundMessageHandler ............................................................................... 161
13.2.3.5 Reconciliator ..................................................................................................... 164
13.2.3.6 BusinessEventNotifyer ..................................................................................... 166
13.2.3.7 KeyLoader ........................................................................................................ 167
13.2.3.8 Message Merger ............................................................................................... 170
13.2.3.9 Relationship Maker ........................................................................................... 174
13.3 Connection Pooling .......................................................................................................... 176
14 TRMSwift adapter configuration ..........................................................................179
14.1 Processes .......................................................................................................................... 179
14.2 Defining an adapter ........................................................................................................... 179
10 © Wall Street Systems IPH AB - Confidential
14.2.1 Configuration ............................................................................................................... 180
14.2.1.1 Feeder resource specification .......................................................................... 180
14.2.1.2 Connector specification .................................................................................... 181
14.2.1.3 Filter specification ............................................................................................. 181
14.2.1.4 Joiner specification ........................................................................................... 182
14.2.1.5 Feeder component instance ............................................................................. 183
14.3 Implemented connectors .................................................................................................. 184
14.3.1 Incoming SWIFT messages connector ....................................................................... 185
14.3.2 comKIT connector factory ........................................................................................... 185
14.3.2.1 Transaction connector ...................................................................................... 186
14.3.2.2 Data connector ................................................................................................. 192
14.3.2.3 Static Data connector ....................................................................................... 193
14.3.2.4 Parameters ....................................................................................................... 196
14.3.3 Settlement queue factory ............................................................................................ 197
14.3.4 Queue adapter TBA .................................................................................................... 199
14.3.5 SQL connector factory ................................................................................................ 199
14.3.5.1 Parameters ....................................................................................................... 200
14.3.6 Internet connector factory ........................................................................................... 202
14.3.6.1 Email connector ................................................................................................ 202
14.3.6.2 TCP/IP connector ............................................................................................. 205
14.3.7 Printer connector factory ............................................................................................. 206
14.3.7.1 Parameters ....................................................................................................... 206
14.3.8 File connector factory .................................................................................................. 206
14.3.8.1 Parameters ....................................................................................................... 206
14.3.9 FIX connector factory .................................................................................................. 208
14.3.9.1 Parameters ....................................................................................................... 208
14.3.10 HTTP connector factory ............................................................................................ 208
14.3.10.1 Parameters ..................................................................................................... 208
14.3.11 Tomcat connector factory ......................................................................................... 210
14.3.11.1 TomcatConnectorIn connector ....................................................................... 210
14.3.11.2 Parameters ..................................................................................................... 210
14.3.11.3 TomcatConnectorOut connector .................................................................... 210
14.3.11.4 Parameters ..................................................................................................... 210
14.3.12 MQSeries connector factory ..................................................................................... 211
14.3.12.1 Message delivery ............................................................................................ 211
14.3.12.2 Parameters ..................................................................................................... 212
14.3.12.3 MQ descriptor: FORMAT parameter ............................................................... 214
14.3.13 JMS connector factory .............................................................................................. 214
14.3.13.1 Parameters ..................................................................................................... 214
15 TRMSwift monitor configuration .........................................................................217
15.1 Starting the user interfaces with TRM variables ............................................................ 217
15.2 Configuring the trusted connection ................................................................................ 217
15.3 Setting the user interface permissions ........................................................................... 217
15.4 Configuring System Monitor ............................................................................................ 217
15.4.1 Columns ...................................................................................................................... 218
SWIFT Connectivity Guide 11
15.4.1.1 Defining system components ........................................................................... 219
15.4.1.2 Defining a Log event ......................................................................................... 220
15.5 Configuring Message Monitor ......................................................................................... 221
15.5.1 General layout and default values .............................................................................. 221
15.5.2 Previewers .................................................................................................................. 223
15.5.3 Columns ...................................................................................................................... 224
15.5.4 Modes and actions ...................................................................................................... 227
15.5.5 Modes and Permissions .............................................................................................. 230
15.5.6 Filter Editor .................................................................................................................. 231
16 TRMSwift debugging ............................................................................................233
16.1 Using System Monitor ...................................................................................................... 233
16.1.1 Accessing TRMSwift System Monitor ......................................................................... 233
16.1.2 The System Monitor window ....................................................................................... 234
16.1.3 Using the System Component tab .............................................................................. 234
16.1.4 Viewing the Workflow Log ........................................................................................... 235
16.1.5 Viewing the System Log ............................................................................................. 236
16.1.6 Viewing the Error Log ................................................................................................. 237
16.1.7 Entering search criteria in the log panels .................................................................... 238
16.2 Triggering actions ............................................................................................................. 238
16.3 Toolbar menu items .......................................................................................................... 238
16.3.1 File menu .................................................................................................................... 238
16.3.2 View menu .................................................................................................................. 238
16.3.3 Filter menu .................................................................................................................. 239
16.3.4 Command menu ......................................................................................................... 239
16.3.5 Action menu ................................................................................................................ 239
16.3.6 Help menu ................................................................................................................... 239
16.4 Logging components ........................................................................................................ 240
16.4.1 Log files ....................................................................................................................... 240
16.4.1.1 FileAct logging at startup .................................................................................. 242
16.4.2 Logging manipulated data ........................................................................................... 243
16.4.3 TRMSwift event logs ................................................................................................... 243
16.5 Obtaining the full XML of a business event or message ............................................... 243
16.6 Performing actions on Workflow Elements or the Encoder ......................................... 243
16.7 Inbound Message Handler ............................................................................................... 244
16.8 Plain XML tools ................................................................................................................. 244
16.9 Validating custom transformation scripts ...................................................................... 244
16.10 TestFeeder ....................................................................................................................... 244
16.11 Troubleshooting .............................................................................................................. 246
17 TRMSwift Message Monitor .................................................................................249
17.1 Accessing TRMSwift Message Monitor .......................................................................... 249
17.2 The Message Monitor window ......................................................................................... 250
12 © Wall Street Systems IPH AB - Confidential
17.2.1 Toolbar ........................................................................................................................ 250
17.2.2 Message panel ............................................................................................................ 251
17.2.3 Preview panel ............................................................................................................. 251
17.2.3.1 Text previewer .................................................................................................. 252
17.2.3.2 Tree previewer .................................................................................................. 253
17.2.3.3 XML previewer .................................................................................................. 254
17.2.3.4 Fax previewer ................................................................................................... 255
17.2.4 Related and Sequence panel ...................................................................................... 255
17.2.4.1 Related tab ....................................................................................................... 255
17.2.4.2 Sequence tab ................................................................................................... 256
17.3 Using Filter Editor ............................................................................................................. 256
17.3.1 Keys panel .................................................................................................................. 257
17.3.2 Flags panel ................................................................................................................. 259
17.3.2.1 Flags ................................................................................................................. 259
17.4 Toolbar menu items .......................................................................................................... 260
17.4.1 File menu .................................................................................................................... 260
17.4.2 Edit menu .................................................................................................................... 260
17.4.3 View menu .................................................................................................................. 260
17.4.4 Mode menu ................................................................................................................. 260
17.4.5 Command menu ......................................................................................................... 261
17.4.6 Filter menu .................................................................................................................. 262
17.4.7 Option menu ............................................................................................................... 262
17.4.8 Update menu .............................................................................................................. 263
17.4.9 Help menu ................................................................................................................... 263
18 ESIAdapter File Interface ......................................................................................265
18.1 Introduction ....................................................................................................................... 265
18.2 Requirements and features .............................................................................................. 265
18.3 How it works ...................................................................................................................... 267
18.3.1 Startup ........................................................................................................................ 267
18.3.2 Processing .................................................................................................................. 267
18.3.3 Recovery and errors ................................................................................................... 268
18.3.4 Logging ....................................................................................................................... 268
18.4 Configuration ................................................................................................................... 268
18.4.1 Bank connection configuration .................................................................................... 268
Appendix A: Properties files .................................................................................................271
A.1 environment.properties ..................................................................................................... 271
A.2 jms.properties ..................................................................................................................... 271
A.3 oracle.properties ................................................................................................................ 271
A.3.1 General properties ........................................................................................................ 272
A.3.2 Hibernate properties ..................................................................................................... 272
Appendix B: Time zones........................................................................................................275
SWIFT Connectivity Guide 13
Appendix C: Configuration data ...........................................................................................279
C.1 Configuration ...................................................................................................................... 279
C.1.1 Setup ............................................................................................................................ 279
C.1.2 Actions .......................................................................................................................... 279
C.1.3 Rules ............................................................................................................................ 280
C.2 Permissioning ..................................................................................................................... 281
C.3 Logs ..................................................................................................................................... 281
C.3.1 Workflow log ................................................................................................................. 281
C.3.2 System log .................................................................................................................... 282
C.3.3 Error log ........................................................................................................................ 282
C.4 Business data ..................................................................................................................... 282
C.4.1 State elements (business events and messages) ........................................................ 283
C.4.2 Element sequences ...................................................................................................... 284
C.4.3 Search keys .................................................................................................................. 284
C.4.4 Specification ................................................................................................................. 285
C.4.5 State element timeout (for waiters) .............................................................................. 285
C.4.6 State element eyes (for 4-eyes verification) ................................................................. 286
C.4.7 Delivery element ........................................................................................................... 286
C.4.8 Counter element ........................................................................................................... 287
C.4.9 Safe store ..................................................................................................................... 288
C.5 Entity Diagram .................................................................................................................... 289
Appendix D: Connecting to TRM components....................................................................291
D.1 Running comKIT services ................................................................................................. 291
D.2 Using ActiveMQ and Serviced ........................................................................................... 291
Appendix E: Reading passwords from memory .................................................................293
E.1 Using Shared Memory ........................................................................................................ 293
E.1.1 UNIX ............................................................................................................................. 293
E.1.2 Windows ....................................................................................................................... 293
E.2 Starting processes without entering a password ............................................................ 293
14 © Wall Street Systems IPH AB - Confidential
SWIFT Connectivity Guide 15
Preface
This guide describes how Wallstreet Suite uses SWIFT. It includes information on how to configure
TRM and WebSuite to meet your business needs. For convenience, it includes information on system
administration.
This guide is intended for Wallstreet Suite system administrators and developers. You should have
an good knowledge of XML, XSL configuration, and the UNIX environment. A good knowledge of
TRM, transaction processing, and cash management is also essential. You should also have
experience with databases and SQL.
Terminology
CMM refers to the Cash Management Module of WebSuite.
Associated documents
•TRM User Guide
•TRM System Administration Guide
•WebSuite Cash Management Connectivity Guide
•Wallstreet Suite System Administration Guide
16 © Wall Street Systems IPH AB - Confidential

SWIFT Connectivity Guide 17
Chapter 1 Overview
1.1 Introduction
TRM and CMM (the Cash Management part of WebSuite) can both interface with the SWIFT network,
using SWIFT’s FIN, FileAct, and InterAct SWIFT protocols.
FIN
FIN is SWIFT's core store-and-forward messaging service that enables financial institutions to
exchange financial data securely.
FileAct
FileAct allows secure and reliable transfer of files and is typically used to exchange batches of
structured financial messages and large reports.
InterAct
InterAct is SWIFT's interactive messaging service supporting the exchange of messages between
two parties. It enables the Accord matching application (see below).
Accord
Accord is a fail-safe matching and exception handling solution for foreign exchange, money market
and OTC derivative confirmations.
Note: For more information about SWIFT services, go to http://www.swift.com.
1.2 SWIFT interface components
The relationship between the SWIFT interface components is shown here:
These components are described briefly in this chapter, and in details of configuration are given in
later chapters.
S W I F T
FIN FileAct InterAct
TRM WebSuite
(Cash Management)
WebSuite
(Cash Management)
Accord
(TRM and FIN)
SWIFT interface components
18 © Wall Street Systems IPH AB - Confidential
1.2.1 Enterprise Swift Integration Adapter
The Enterprise Swift Integration Adapter (ESIAdapter) is responsible for communicating with various
SWIFT applications. It is made up of four parts that are responsible for:
•Sending messages to SWIFT
•Providing status updates coming from SWIFT
•Providing new incoming messages received from SWIFT
•Polling SWIFTNet Accord for getting matching status updates.
1.2.2 WebSuite
WebSuite is a fully web-enabled software application that allows you to deploy optimal centralized or
decentralized treasury and cash management. Its Cash Management Module uses SWIFT
messaging. Technical details are provided in the WebSuite Cash Management Connectivity Guide.
1.2.3 TRMSwift
TRMSwift is a stand-alone module that can interface with TRM, or any other compatible financial
application, by means of its plug-and-play architecture. Asset managers, corporates, banks and
central banks can use TRMSwift to connect internal financial applications to exchange messages with
external systems such as SWIFTAlliance, electronic mail systems, fax, FIX engine or telex.
TRMSwift sends notification and instruction messages across a communications network. It provides
a gateway to thousands of SWIFT members through a fast, highly reliable, and secure network.
Increasingly, non-banking organizations are taking advantage of SWIFT, which is widely used in the
banking community.
TRMSwift enables two-way, real-time communication between financial applications and payment
networks. It provides a highly customizable framework that supports multi-network connections,
and is compatible with your in-house applications or third-party systems through the use of
dedicated components.
You can modify TRMSwift’s configuration to meet changing business needs. An TRMSwift message
can be any message that is assembled and formatted using rules defined within the TRMSwift
environment. The message can then be delivered to its recipient through an TRMSwift delivery
channel.
With TRMSwift you can:
•Transfer and confirm messages between integrated systems.
•Control the content of messages sent to counterparties following a business action or set of
actions.
•Configure message generation and define additional delivery channels.
•Offer a secure and reliable interface to external systems.
•Manage and monitor fallback processes generated upon error handling, failure notification, retry
and abort operations.
TRMSwift supports the SWIFT, Fax, SQL, FIX, e-mail, printer, file- or socket-based delivery channels
and includes documentation to help implement other channels.
TRMSwift is capable of handling the automatic flow of business events between systems across the
organization without any manual intervention. This is achieved through a seamless information flow
that does not affect the operation of the systems connected to TRMSwift.
Interoperability is ensured by TRMSwift’s ability to:
•Process different data formats and transaction formats.
•Handle exception conditions without impacting the business.
•Audit and report on relevant events.
Confirmation matching using SWIFTNet Accord
SWIFT Connectivity Guide 19
TRMSwift supports various packages. Each of these packages includes the business logic and
template messages required for connecting the respective applications. They include:
•SWIFT message templates
•Order Management Module for connectivity to brokers via a FIX engine
•Fax message templates for confirmation of collateralized transactions
•Confirmation matching using CityNet Matching
•Cash Management Module integration.
1.2.4 FIN messaging components
The components between TRMSwift and ESIAdapter are responsible for updating the FINMessage
Manager, as well as for facilitating communication with TRMSwift and ESIAdapter. These
components are not apparent to users.
Use of the components is driven by the FINMessage flow, either because they are triggered from
there (e.g. sending a message or responding to TRMSwift with a status update) or because they
trigger the flow (e.g. receiving a new message to send, receiving a new message that has been
received or receiving a status update from ESIAdapter about a message that has been received).
1.3 Confirmation matching using SWIFTNet Accord
SWIFTNet Accord is a service provided by SWIFT (on the SWIFT network), where messages are
copied to the Accord service for any business entity that subscribes to the service. SWIFTNet Accord
then either performs the confirmation matching automatically, or allows users to perform manual
matching. TRM retrieves the matching status from Accord and updates itself with the relevant
information.
Confirmation matching using SWIFTNet Accord
20 © Wall Street Systems IPH AB - Confidential
SWIFT Connectivity Guide 21
Chapter 2 ESIAdapter configuration
2.1 Introduction
The Enterprise Swift Integration Adapter (ESIAdapter) is the common component that is shared by
TRM (via TRMSwift) and CMM. It is responsible for sending FIN, FileAct and InterAct messages to the
SWIFT network or receiving messages from the SWIFT network.
ESIAdapter is responsible for communicating with various SWIFT applications. It is made up of four
parts that are responsible for:
•Sending messages to SWIFT
•Providing status updates coming from SWIFT
•Providing new incoming messages received from SWIFT
•Polling SWIFTNet Accord for getting matching status updates.
How communication occurs with the SWIFT application depends on the application, as well as the
type of the message (FIN, FileAct, or InterAct). Communication can be via File, MQSeries, RAHA or
CASmf. It contains the components described in this section (See 4.1.1 FIN Messaging flow diagram
on page 58 for references to queue numbers).
2.1.1 Send
The Send component receives FIN or FileAct messages from TRM (FIN) or CMM and passes them
either to SWIFTAlliance Access (SAA) or to SWIFTAlliance Gateway (SAG). These message types are
received on a queue (Q09) from either TRMSwiftFINSend or CMM, processed, and then sent to the
relevant SWIFT application (Q07 or Q10). Data is fetched from the ESIAdapter Client Relationship
Editor to find out things like which type of compression to use, or which test BIC code to use.
The component also performs some basic validation, such as check that a sender and receiver have
been provided. If the validation fails, an immediate failure reply is generated.
2.1.2 Status
After an initial message has been sent, the Status component receives various statuses back from
the SWIFT application. Each of these statuses is provided back to the originating application (either
TRMSwiftFINReceive or CMM) with an indication of success, failure or time-out, a final indicator
which indicates that no more updates are expected, and an error message if relevant. The following
statuses are supported.
•API: The Send component was able to validate the basic information and pass the message to
the SWIFT application's interface (either CASmf or MQSeries, or save it to a file). This status is
the immediate status that is returned by the send component (see above)
•SEND: The message was able to be sent to the SWIFT application and that it has received it.
•TRANSFER: ACK or NACK has been received (FIN only; does not exist for FileAct).
•DELIVERY: The final delivery notification has been received back from the SWIFT counterparty.
Each of these statuses is updated in the originating application.
Using a service bureau
22 © Wall Street Systems IPH AB - Confidential
2.1.3 Receive
The Receive component is responsible for passing messages (including FIN, FileAct) to either
TRMSwift (FINReceive) or CMM. The destination is based on configuration within ESIAdapter,
typically based on the message type and whether either TRM or CMM is installed standalone.
ESIAdapter performs no processing on FIN messages. On FileAct messages it performs unzipping if
required.
2.1.4 Polling SWIFTNet Accord
Polling of SWIFTNet Accord is done directly in ESIAdapter and the polling interval can be configured.
When status updates are received back after such a poll, they are passed to the confirmation
matching components for further processing. See 5.1 Confirmation matching on page 71 for more
details.
2.1.5 Message sequencing
A SWIFT MT535, MT940 or MT950 message can be broken up into multiple messages by the SWIFT
network because of SWIFT restrictions on the maximum message size. If this happens, these
messages can arrive out of sequence.
ESIAdapter assembles in sequence all MT940 messages to do with a particular bank statement into
a single FIN message which it passes to CMM.
ESIAdapter resequences MT950 or MT535 messages to do with a particular bank statement so that
TRMSwift receives the parts in the correct order.
2.2 Using a service bureau
You may wish to use a Service Bureau for your connection to SWIFT. Service bureaus mainly
support FTP/SFTP as a communication mechanism, and ESIAdapter supports this.
2.3 Installation
ESIAdapter is an Onyx service, and is installed as part of TRM. For more information about Onyx,
see the WSS System Administration Guide.
RAHA must be installed on the same computer that the Onyx service running ESIAdapter is to be
installed on. The installation assumes that you have a licensing agreement with SWIFT and should
be installed using the instructions from SWIFT. The TRM client must be installed before configuring
ESIAdapter.
2.4 Configuration
There are three aspects to consider in the configuration of ESIAdapter:
•Interfaces required for the particular site
•Fixed parameters needed by the interfaces
•Counterpart-specific parameters.

Configuration
SWIFT Connectivity Guide 23
2.4.1 Required interfaces
There are three interfaces currently available, FIN messages via SAA (FIN), Fileact via SAG (Fileact)
and Accord via SAG (Accord).
Normally a banking client requires FIN and maybe Accord, and a corporate requires all three
interfaces. The interfaces are predefined and the one to use is determined by the environment
variable MODULES_ESIADAPTER_SYSTEM. Possible values are:
The default is all. Normally file would not be used as now the actual interface to deliver via is
specified in esiadapter.properties, see the properties:
•esiadapter.fileact.api
•esiadapter.interact.api
The environment variable MODULES_ESIADAPTER_SYSTEM is declared in the file 15_esiadapter.bat
which also contains variables that point to the location where RAHA is installed. See 2.9.3
ESIAdapter and PMM configuration procedure on page 47 for details.
Important: You should set the value of MODULES_ESIADAPTER_SYSTEM only in the file
15_esiadapter.bat and not in onyx.bat.
2.4.1.1 Incoming Message Routing
Depending on the value of the environment variable MODULES_ESIADAPTER_SYSTEM, incoming
messages (with data not status) are routed to either the TRM or CMM queues.
•all and fin-fileact will route FileAct and FIN 100 and 200 and 940/2 messages to CMM.
•fin-match and saa will route all FIN messages to TRM.
•Match messages are always routed to the match queue.
This behavior can be overridden by the setting one of the following properties in
esiadapter.properties:
•esiadapter.destination.cmm
•esiadapter.destination.trm
2.4.2 Fixed Parameters
2.4.2.1 Introduction
The fixed parameters are included with the Onyx installation in the etc/onyx/properties directory.
The parameters are in the file esiadapter.properties except for the MQSeries FIN interface
parameters, which are in esiadapter.finswift.xml in the same directory.
Note: Database connectivity and passwords may also need to be addressed in some of the other
files in the same directory.
all FIN, Fileact and Accord
fin-fileact FIN and Fileact
fin-match FIN and Accord
saa FIN
file A file-based setup for both FIN and Fileact. This should only be used when the File
Transfer module of SAG is being used.
Configuration
24 © Wall Street Systems IPH AB - Confidential
2.4.2.2 esiadapter.properties
Depending on which interfaces are being used, some information in this file may be redundant, but
it must be left in the file as the configuration procedure requires that all values are set, even when
not used.
2.4.2.2.1 Naming Convention
All parameters are named as esiadapter.interface.key. The esiadapter part unambiguously
defines the parameter for ESIAdapter. The interface is a mnemonic that indicates a common part
of the setup that the parameter is used for. The key is an interface-specific identifier. Note that the
interfaces can be low level or high level. The available interface identifiers are:
2.4.2.2.2 Parameter descriptions
esiadapter.accord.backdays
How far back in time to look for Accord confirmation information. Expressed as a positive number of
days. On a test system, this value might be considerably more than on the production system.
esiadapter.accord.bic
Specifies for which BIC code in the ESIAdapter Client Relationship Editor to run Accord.
Use a BIC code that has been specified in the Editor and that has the Accord page filled in.
esiadapter.accord.timeout
The time between pools for additional matching status items from the accord server. The value is set
in seconds.
accord Information pertaining to the Accord interface.
cleanup Global information.
destination Information about the API activemq queues.
environment Global information about the whole setup.
famq Information for the MQSeries fileact transport interface.
famqfile Information for the MQSeries fileact file transfer transport interface.
fileact Information that is associated with the high level message interface for fileact.
fileactfile Information associated with the file interface for fileact.
fileactmq Information needed for the fileact interface using mqseries.
fincas Information for the CASmf interface for FIN messages.
finfile Information for the basic file interface for writing FIN messages.
finmq Information for the MQSeries interface for FIN messages.
finswift Information for the FIN interface.
iamq Information about the transport interact interface using MQSeries.
interact Generic interact information. Note this is currently only used with Accord.
mq.clientchannel Global information for MQSeries.
sag Information that is associated with SAG.
Configuration
SWIFT Connectivity Guide 25
esiadapter.cleanup.days
Specifies the number of days during which the history of a message should be stored in the
database.
Integer field representing the number of days. Special values are 0 (zero) and -1.
0 = not to be deleted.
-1 = never stored.
esiadapter.environment
Specifies whether this is a test environment or a production environment.
test environment: true
production environment: false
You should not change this value.
esiadapter.cachedir
Specifies a top level directory for persistence caching (ESIAdapter uses the file system to cache
ongoing processing in the event of a database failure for example). Normally this is below the same
starting point of directories used by ESIAdapter. Note that normally this is the starting point for all
caching directories. The value itself is not used anywhere except to specify the starting point.
All caching directories are created on startup if they do not already exist.
esiadapter.cachedir.bus
Specifies the cache directory used for ActiveMQ message persistence. The default is
${esiadapter.cachedir}/bus.
This directory contains multiple subdirectories that are used for queues.
esiadapter.cachedir.db
Specifies the subdirectory for caching database updates.
The default is ${esiadapter.cachedir}/db.
esiadapter.cachedir.api
Specifies the subdirectory for caching actions for a particular API. For example, FileAct or SWIFT
FIN.
The default is ${esiadapter.cachedir}/api.
esiadapter.cachedir.plugins
Specifies the directory for caching sequenced messages, for example MT940.
The default is ${esiadapter.cachedir}/plugins.
esiadapter.alliance.is-version7
specifies which version of SWIFT Alliance you are using.
Version 7: true, otherwise false.
esiadapter.finswift.logical-terminal
The value to use for the ninth character in the sender's BIC code in block one of the FIN message. In
pilot and test systems this is X; in a normal production system it is X; but for production system end
to end connectivity verification it is A.
Configuration
26 © Wall Street Systems IPH AB - Confidential
esiadapter.finswift.api-list
The list of FIN message interfaces that need to be available. The list is colon (:) separated and the
names in the list must correspond to names specified in esiadapter.finswift.xml. There must
also be an entry in the ESIAdapter FINSwift Rules Editor for the interface, see 2.4.3 ESIAdapter
FINSwift API Rule Editor on page 37.
esiadapter.sag.security.context
The distinguished name associated with the user that can log into SAG.
Use a correctly formatted distinguished name, for example cn=pascal,o=ptsggbee,o=swift
The SAG system administrator decides this.
If strict mode is used (esiadapter.rahaapi.strict=true) then this value will be determined
internally from the user and password information and can be unset. If a value is supplied in this
situation, it will be replaced.
esiadapter.fileactfile.topdirectory
Specifies the top level directory where FileAct files are located. FileAct needs one directory for
outgoing files and one for incoming.
Use the absolute path directory in Unix format. Example: /tmp/fileact
The directory must exist. This ensures that the correct directory is used.
esiadapter.fileactfile.pickupdirectory
When performing FileAct transfers using the FTP mode in SAG, this is the top-level directory in which
to look for files. The directory of the sender/receiver needs to be created below this directory, and
the SAG File Transfer setup should place the incoming file in this directory. Example: /tmp/sag
To use this interface requires access to a file system on the SAG server.
esiadapter.rahasimulatorapi.dir
Specifies the directory for using the RAHA Simulator for FileAct messages.
esiadapter.fileact.system
The system where the FileAct files are being sent; either via Swift Alliance Access (value is saa) or
Swift Alliance Gateway (value is sag).
esiadapter.fileact.drop-subdirectory
Specifies the relative path of the directory for where FileAct files are stored for transfer to SAG.
The absolute path is generated using the value for esiadapter.fileactfile.topdirectory and
this relative path. The directory must exist.
esiadapter.fileact.suffix
Specifies the file ending for non-compressed files. For compressed files, the ending is normally the
name of the compression used.
Use a suffix that complies with operating system naming conventions.
This property is not relevant to ESIAdapter itself, but exists for the benefit of ESIAdapter’s
environment.
esiadapter.fileact.check-transfer
A flag to indicate that the control of the starting of the swfa_handler process is either under the
control of ESIAdapter or is started and controlled externally. It has an effect only if RAHA is being
used for FileAct transfers.
Configuration
SWIFT Connectivity Guide 27
esiadapter.fileact.service
The service name used for FileAct requests. The security and access must be available to the user.
For FileAct real-time the service name is swift.generic.fa
esiadapter.fileact.environment
To specify if the environment is production, training, or testing.
Production: empty
Test and Training: !p
Integrated Test Bed: !x
esiadapter.fileact.username
The default value is the RAHA connection user name.
esiadapter.fileact.password
The default value is the RAHA connection user password (encrypted).
esiadapter.fileact.instance
The name of the message partner in SWIFT Alliance Gateway.
esiadapter.fileact.timeout
How long until RAHA disconnects. Expressed in milliseconds.
esiadapter.fileact.security.context
esiadapter.fileact.strict
Specifies if the SAG interface for FileAct is set up to be strict (true) or relaxed (false).
esiadapter.fileact.file
The name of the service to use for the file transfer part of Fileact. Allowed values are:
•esiadapterFileactFileFileLowLevel when using RAHA or file-based RAHA simulator.
•esiadapterFileactMQFileLowLevel when using MQSeries.
•esiadapterChannelFileactMQFileLowLevel when using MQSeries with a channel definition file.
esiadapter.fileact.api
The name of the API to use for the FileAct request/response messages. This enables using the same
setup for everything by the communication medium. Allowed values are:
esiadapterFAFileLowLevel
Uses a file based simulation of RAHA. this is useful for the initial setup and testing of all components
independent of SWIFT and counterparties.
esiadapterFARahaLowLevel
RAHA interface connecting via SAG/Swift network to counterparties.
esiadapter.famq.hostname
The resolvable hostname or IP address of the MQSeries Server for FileAct connectivity.
esiadapter.famq.port
The port to use on the MQSeries server machine. This equates to the port number for the listener of
the named queue manager.
Configuration
28 © Wall Street Systems IPH AB - Confidential
esiadapter.famq.queue-manager
The name of the queue manager for FileAct services via the MQSeries server. This must be the same
queue manager that is set up in SAG.
The SAG system administrator decides this.
esiadapter.famq.channel
The name of the MQSeries channel to use for the FileAct MQSeries low level interface.
esiadapter.famq.sslcipher
The name of the cipher to use if SSL communication is used between esiadapter and MQSeries
server. See esiadapter.finmq.sslcipher for details.
esiadapter.famq.client
The name of the queue for sending FileAct requests from ESIAdapter to SAG via an MQSeries server.
This must be the same queue name that is set up in SAG.
esiadapter.famq.client_ack
The name of the queue to receive responses from SAG relating to the requests sent via the
MQSeries server. This must be the same queue name that is set up in SAG.
esiadapter.famq.server
The name of the queue to receive incoming fileact requests from SAG via MQSeries server. This
must be the same queue name that is setup in SAG.
esiadapter.famq.server_ack
The name of the queue to send responses to SAG for requests from SAG. This must be the same
queue name that is setup in SAG.
esiadapter.famqfile.queue-manager
The queue manager used for the file transfer part of the MQSeries FileAct interface. Note that this
needs to be the same queue manager that is used for the request/response part of MQSeries
FileAct.
esiadapter.famqfile.putQ
The queue name for receiving file data from the SAG server.
esiadapter.famqfile.getQ
The queue name for sending the file data to the SAG server.
esiadapter.famqfile.commandQ
The queue name for the file transfer commands. This must be the same queue name that is set up
in SAG.
esiadapter.famqfile.commandAckQ
The queue name to receive acknowledgements from the commands sent on
esiadapter.famqfile.commandQ. This must be the same queue name that is set up in SAG.
esiadapter.finfile.dropdirectory
When writing files with FIN content, this directory must be created, and is where the files are
written. Example: /tmp/finfile
Configuration
SWIFT Connectivity Guide 29
esiadapter.finfile.pickupdirectory
When reading FIN content files, this directory must be created, and is where the files are read.
Example: /tmp/
esiadapter.mq.clientchannel.dir
The other MQ setup uses a configuration file that is named from the directory. For example:
/tmp/mq/clientchannel. The directory name must start with a '/'and use the Unix naming
convention.
esiadapter.destination.cmm
The name of the queue that CMM is listening to. Normally this would not need to be changed but if it
were necessary to redirect incoming messages that would normally go to CMM then changing this
value will change the name of the CMM queue. In a normal setup CMM will receive all FileAct,
MT101, and MT940 messages.
esiadapter.destination.trm
The name of the queue that TRM is listening to. Normally this would not need to be changed but if it
were necessary to redirect messages that would normally go to CMM, then changing this value will
change the name of the TRM queue. In a normal setup TRM receives all MT3XX messages. Note that
Accord messages are sent to a queue reserved for only accord messages.
esiadapter.fileact.transferep
The instance of swfa_handler to use for file transfer between the ESIAdapter server and the SAG
server.
The value can be anything, but it must match the command line arguments for the RAHA process
swfa_handler.exe. If this property is the default (=${wss.env.name}-WSS) and wss.env.name is
test1 then swfa_handler must be started as swfa_handler host:port:ssl test1-WSS.
esiadapter.fileactmq.remote-directory
The name of the directory on the SAG Server where files should be read and written when using the
MQSeries FileAct interface.
esiadapter.interact.username
The default value is the RAHA connection user name.
esiadapter.interact.password
The default value is the RAHA connection user password (encrypted).
esiadapter.interact.instance
The name of the message partner in SWIFT Alliance Gateway.
esiadapter.interact.strict
Specifies if the SAG interface for InterAct is set up to be strict (true) or relaxed (false).
esiadapter.interact.security.context
Specifies the distinguished name of the user that can log in to SAG for ACCORD's InterAct
application service.
If the FileAct and Interact user is the same, you can use the same distinguished name.
The SAG system administrator decides this.
If strict mode is used (esiadapter.rahaapi.interact.strict=true) then this value is determined
by ESIAdapter using the user and password information. This value can be left unset. If it is set,
then the value will be replaced by the one determined by ESIAdapter.
Configuration
30 © Wall Street Systems IPH AB - Confidential
esiadapter.interact.service
Specifies the service to be used with this InterAct interface.
Currently there is only one allowed value: SWIFT.ACCORD
esiadapter.interact.environment
Specifies if the environment is production, training, or testing.
Production: empty
Test and Training: !P
Integrated Test Bed: !X
esiadapter.interact.timeout
How long until RAHA disconnects. Expressed in milliseconds.
esiadapter.iamq.hostname
The resolvable hostname or IP address of the MQSeries server for InterAct MQSeries connectivity.
esiadapter.iamq.port
The port number of the listener for the queue manager used for InterAct connectivity with SAG.
esiadapter.iamq.queue-manager
The the name of the queue manager used to communicate InterAct traffic between ESIAdapter and
SAG. This must have the same name as the setup in SAG for the application interface.
esiadapter.iamq.channel
The name of the channel to use when connecting to the queue manager setup for connecting to an
application interface used for InterAct connectivity in SAG.
esiadapter.iamq.sslcipher
Name of cipher to use if SSL communication is enabled on the MQSeries channel.
esiadapter.iamq.client
The queue name for sending InterAct requests to SAG.
esiadapter.iamq.client_ack
The queue name for receiving responses to InterAct requests.
esiadapter.iamq.server
The queue name to receive requests from SAG.
esiadapter.iamq.server_ack
The queue name to send responses in reply to server requests.
esiadapter.interact.api
Which adapter to use for the InterAct message transport: RAHA - esiadapterIARahaLowLevel,
MQSeries - esiadapterIAMQLowLevel, MQSeries using a channel definition file -
esiadapterChannelIAMQLowLevel.
Configuration
SWIFT Connectivity Guide 31
esiadapter.trusted.hosts
The property is needed if SSL connectivity is being used. This may be the case with SWIFT Alliance
web services connectivity and if SSSL is used with MQSeries. If the property is empy then the host
name of the server that is being connected is not checked. A comma-separated list of host names
means that only hosts with these names are allowed to connect.
esiadapter.xmlverify.directory
(Syntactic checking of XML documents sent via the FileAct interface.)
The directory where all or additional XSD schema files are stored.
esiadapter.xmlverify.requesttype-pattern
(Syntactic checking of XML documents sent via the FileAct interface.)
If the request type sent with the Fileact request does not match the style of ISO20022:
(pain|camt|pacs|semt|setr|trea|)\\.\\d{3}\\.\\d{3}\\.\\d{2}.* then a matching regular
expression can be provided. For a list of supported schemas, see Appendix E ISO20022 supported
XSDs on page 281.
esiadapter.xmlverify.multi-message
(Syntactic checking of XML documents sent via the FileAct interface.)
Normally this value is set to false meaning that there is only one XML document per message. If
there could be more than one XML document, set this to true.
2.4.2.3 esiadapter-finswift.xml
All low level interfaces for FIN messages are specified in an XML format in the file
esiadapter.finswift.xml in the etc/onyx/properties directory.
2.4.2.3.1 Interface names
<key><value>finalliance-1</value></key>
The first key specifies the name of the interface. This name will used in the
esiadapter.finswift.api-list property and there will be an entry in the ESIAdapter FINSwift
Rules Editor with the same name.
Currently the following interface types are supported:
•esiadapterFinFileType - basic file interface with raw FIN Message format.
•esiadapterFinFileMervaType - basic file interface with EBCDIC and Merva file size at the
beginning.
•esiadapterFinMQAllianceType - MQ Series interface to Swift Alliance Access via MQSA.
•esiadapterFinMQMervaType - MQ Series interface to Merva Swift.
•esiadapterFinCasMFType - CasMF interface to Swift Alliance Access.
•esiadapterFinWSType - Web Services (SOAP) interface to Swift Alliance Access.
•esiadapterFINMQHAXMLType - MQ Series interface to Swift Alliance Access via MQHA using
SWIFT XML V2 format.
•esiadapterFINMQHAType - MQ Series interface to Swift Alliance Access via MQHA using MQ-MT
format.
•esiadapterFileHBVType - basic file interface with HBV Message Format.
•esiadapterACSHBVType - client-specific ACS interface delivering HBV Format messages.
•esiadapterACSMervaType - client-specific ACS interface delivering Merva FIN Messages.
Configuration
32 © Wall Street Systems IPH AB - Confidential
2.4.2.3.2 Properties for esiadapterFinFileType
Example:
<prop key="drop">${suite.installer.esiadapter.finfile.dropdirectory}</prop>
<prop key="pickup">${suite.installer.esiadapter.finfile.pickupdirectory}</prop>
<prop key="error">${suite.installer.esiadapter.finfile.errordirectory}</prop>
<prop key="ack-count">2</prop>
drop: the name of the directory where files containing fin messages will be written to when sent
from ESIAdapter. Note that there is no automatic cleanup of this directory.
pickup: the name of the directory where files containing fin messages will be read in by ESIAdapter.
Note that the file is deleted once the cycle is finished.
error: the name of the directory where rejected files are moved to. If this directory does not exist,
rejected files are deleted.
ack-count: the number of acknowledgements required. This depends on the setup.
2.4.2.3.3 Properties for esiadapterFinFileMervaType
Example:
<prop key="drop">${suite.installer.esiadapter.finfilemerva.dropdirectory}</prop>
<prop key="pickup">${suite.installer.esiadapter.finfilemerva.pickupdirectory}</prop>
drop
The name of the directory where files containing fin messages will be written to when sent from
ESIAdapter. Note that there is no automatic cleanup of this directory.
picku
The name of the directory where files containing fin messages will be read in by ESIAdapter. Note
that the file is deleted once the cycle is finished.
2.4.2.3.4 Properties for esiadapterFinMQAllianceType and esiadapterFinMQMervaType
Example:
<prop key="uri">mqseries://swifthost:1415/SYSTEM.DEF.SVRCONN</prop>
<prop key="queue-manager">QMSAA</prop>
<prop key="receive-queue">QL.WSS.RCV</prop>
<prop key="send-queue">QL.WSS.SEND</prop>
<prop key="ack-queue">QL.WSS.ACK</prop>
<prop key="timeout-period">-1</prop>
<prop key="ack-count">3</prop>
<prop key="sslcipher"></prop>
uri
The URI can take two forms.
The first uses the key word mqseries and indicates that the connection should use the host, port
and channel specified. Its format is mqseries://hostname:port number/channel name for example
mqseries://swifthost:1415/SYSTEM.DEF.SVRCONN.
The second form is for using a channel definition file and is of the standard MQSeries schema for a
channel definition file specification i.e. file://directory/file for example
file://c:/mqseries/channeldefs/QMSAA.tab.
In more detail:
•swifthost
Example of the name or IP address of the MQSeries server with which the connection to SAA is
made. Use a legal machine name or IP address that is resolvable to the MQSeries Server
machine. The SAA system administrator decides this value.
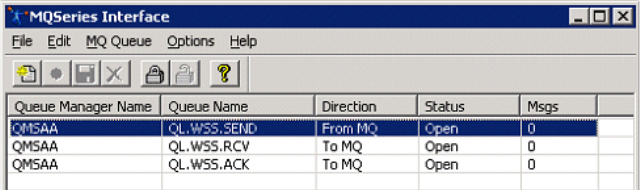
Configuration
SWIFT Connectivity Guide 33
•1415
Example of the port number for the listener for the Queue Manager by which the communication
to SAA is made. Must be the port number specified in the listener. Legal values are between 1024
and 65536. The SAA system administrator decides this value.
•SYSTEM.DEF.SVRCONN
Example of the name of the channel used for FIN messaging to SAA. The channel is specified in
the Queue Manager specification in MQSeries as the server channel. It has a default value of
SYSTEM.DEF.SVRCONN. The SAA system administrator decides this value.
queue-manager
The name of the Queue Manager being used to communicate with SAA. Use the name of the queue
manager set up in MQSeries Server by which the communication to SAA is made. The SAA system
administrator decides this value.
The following shows the SAA window where the Queue Manager and Queues are set up for MQSeries
communication. The values used in ESIAdapter must reflect these:
receive-queue
The name of the queue that FIN Messages are received from SAA to ESIAdapter. The value must
reflect the name set up in SAA (and MQSeries Server) for outgoing messages. The SAA system
administrator decides this value. If messages are not to be received then this value can be left
empty. (No incoming messages will be received.)
send-queue
The name of the queue on which ESIAdapter sends FIN messages to SAA. The value must reflect the
name setup in SAA (and MQSeries Server) for the inward messages. The SAA system administrator
decides this value.
ack-queue
The name of the queue on which ESIAdapter listens for acknowledgement messages associated with
FIN messages sent from ESIAdapter to SAA. The value must reflect the name set up for
acknowledgement messages in SAA. The name of the acknowledgement queue can be the same as
the receive queue, but it must be specified.
timeout-period
The amount of time to wait for an initially sent FIN message to receive some acknowledgement
before considering that the SAA is not going to respond. The value is a number expressed in
milliseconds. This should be a large as possible without impinging on business requirements.
ack-count
The number of acknowledgements that will be arriving for a particular message. This number does
not include the delivery notification which is set in the ESIAdapter Client Relationship Editor. Allowed
values:
For the file simulator interface it must be 1 and delivery notifications turned off in ESIAdapter Client
Relationship Editor.
For MQ and Casmf interfaces it must be 3 and delivery notification can be either on or off depending
on the client preference.
sslcipher

Configuration
34 © Wall Street Systems IPH AB - Confidential
This specifies the SSL communication is to be used between ESIAdapter and MQSeries Server, and
the cipher to use. From the following table the Client Setting shows the value to use for sslcipher
for the assigned server side setting.
An empty value indicates that SSL communication should not be used. For further information see
2.4.6.4 ssl.properties on page 41.
2.4.2.3.5 Properties for esiadapterFinCasMFType
Example:
<prop key="partner">CASmfInOut1</prop>
<prop key="max-outstanding">5</prop>
<prop key="log-level">0</prop>
<prop key="access-send-pass"></prop>
<prop key="access-receive-pass"></prop>
<prop key="data-send-pass"></prop>
<prop key="data-receive-pass"></prop>
partner
The same value as for l_mapid in the DMAPID.DAT file.
max-outstanding
The maximum number of sent FIN messages allowed before some feedback is received. The value
must be less than or equal to the value of sess_wind in the DMAPID.DAT file.
log-level
The logging level for the C-code interface to CASmf. The value can be between 0 (log nothing) and 7
(log everything). This value should be set only if instructed to do so by Wall Street personnel.
MQSeries server esiadapter.finmq.sslcipher property
NULL_MD5 SSL_RSA_WITH_NULL_MD5
NULL_SHA SSL_RSA_WITH_NULL_SHA
RC4_MD5_EXPORT SSL_RSA_EXPORT_WITH_RC4_40_MD5
RC4_MD5_US SSL_RSA_WITH_RC4_128_MD5
RC4_SHA_US SSL_RSA_WITH_RC4_128_SHA
RC2_MD5_EXPORT SSL_RSA_EXPORT_WITH_RC2_CBC_40_MD5
DES_SHA_EXPORT SSL_RSA_WITH_DES_CBC_SHA
RC4_56_SHA_EXPORT1024 SSL_RSA_EXPORT1024_WITH_RC4_56_SHA
DES_SHA_EXPORT1024 SSL_RSA_EXPORT1024_WITH_DES_CBC_SHA
TRIPLE_DES_SHA_US SSL_RSA_WITH_3DES_EDE_CBC_SHA
TLS_RSA_WITH_AES_128_CBC_SHA SSL_RSA_WITH_AES_128_CBC_SHA
TLS_RSA_WITH_AES_256_CBC_SHA SSL_RSA_WITH_AES_256_CBC_SHA
AES_SHA_US2
TLS_RSA_WITH_DES_CBC_SHA SSL_RSA_WITH_DES_CBC_SHA
TLS_RSA_WITH_3DES_EDE_CBC_SHA SSL_RSA_WITH_3DES_EDE_CBC_SHA
FIPS_WITH_DES_CBC_SHA SSL_RSA_FIPS_WITH_DES_CBC_SHA
FIPS_WITH_3DES_EDE_CBC_SHA SSL_RSA_FIPS_WITH_3DES_EDE_CBC_SHA
Configuration
SWIFT Connectivity Guide 35
The following values are optional and need to be set only if authentication has been set up in SWIFT
Alliance Access. Note that there are two places where it is setup in SWIFT Alliance Access: the first
is for access and is on the Profile tab; the second is for data and is on the Authentication tab.
access-send-pass
The Send Key from the Profile tab. Note this is all 32 characters.
access-receive-pass
The Receive Key from the Profile tab. Note this is all 32 characters.
data-send-pass
The Send Key from the Authentication tab. Note this is all 32 characters.
data-receive-pass
The Receive Key from the Authentication tab. Note this is all 32 characters.
2.4.2.3.6 Properties for esiadapterFinWSType
endpoint
The URL to connect to the SWIFT Alliance Access http server. Normally this would be an https URL
with the name of the host, port number 48200 (unless the port has been changed), and the path is
soapha.For example: https://<host name>:48200/soapha.
partner
The name of the Application Interface given in SWIFT Allience Access.
user
The login for the user to login into the interface as.
password
The password of the user.
lau
If local authentication of SOAP traffic is required, this is the 32-character value that is set in the
Application Interface Authentication screen.
ack-count
The number of acknowledgements expected, not including Delivery Notification. The default value is
3 and depends upon the SAA setup.
2.4.2.3.7 Properties for esiadapterFinMQHAXMLType
connection-uri
A URI to specify all of the connection properties. See 2.4.2.3.4 Properties for
esiadapterFinMQAllianceType and esiadapterFinMQMervaType on page 32 for an explanation of the
styles that this URI can take.
queue-manager
The name of the queue manager as setup in MQ Series Server.
ccsid
The character code set identifier for character mapping. Normally 819 is a useable value but it may
need to be tuned for special cases.
receive-queue
The name of the queue which incoming FIN messages are received.
send-queue
The name of the queue to send FIN messages on.
Configuration
36 © Wall Street Systems IPH AB - Confidential
ack-queue
The name of the queue on which to receive acknowledgement messages. Note that this may be the
same as the receive queue depending on the setup.
cipher-suite
If specified forces the use of ssl connectivity. The list of ciphers is the same as for the MQSA
interface as this is an MQSeries feature.
user
If there is a user setup for the MQSeries connection, this is the user name.
password
The corresponding password for the above user.
send-lau
The local authentication for the Application Interface for the sending of messages to SWIFT.
receive-lau
The local authentication for the Application Interface for the receiving of normal messages from
SWIFT.
ack-lau
The local authentication for the Application Interface for the receiving of acknowledgement
messages from SWIFT.
ack-count
The number of acknowledgements expected not including Delivery Notification. The default value is
3 and depends on the SAA setup.
2.4.2.3.8 Properties for esiadapterFinMQHAType
uri
A URI to specify all of the connection properties. See 2.4.2.3.4 Properties for
esiadapterFinMQAllianceType and esiadapterFinMQMervaType on page 32 for an explanation of the
styles that this URI can take.
queue-manager
The name of the queue manager as set up in MQ Series Server.
receive-queue
The name of the queue which incoming FIN messages are received.
send-queue
The name of the queue to send FIN messages on.
ack-queue
The name of the queue on which to receive acknowledgement messages. Note that this may be the
same as the receive queue depending on the setup.
sslcipher
If specified, this forces the use of SSL connectivity. The list of ciphers is the same as for the MQSA
interface as this is an MQSeries feature.
timeout-period
How long to wait (in milliseconds) for any acknowledgement before assuming that the message has
been lost. A value of -1 means to wait forever.
ack-count
Configuration
SWIFT Connectivity Guide 37
The number of acknowledgements expected not including Delivery Notification. The default value is
3 and depends on the SAA setup. A value of 2 is used when using a MINT MQSeries interface, as
there is no initial "local" acknowledgement.
use-system-id
(Use only with the MINT MQSeries interface.) Can be either true or false. True means use the ID
from the actual FIN message (see tag 20 or 20C) as the correlation id does not contain any
information.
2.4.2.4 fileact.properties
This file can be found in the saa directory where SWIFT Alliance Access is installed. Here are the
properties in this file and their descriptions.
esiadapter.fileact.archive
If this property is used, it is the top level directory for archiving all sent and received data via the ftp
interface.
esiadapter.fileact.control.send
Directory where the sending control file is placed.
esiadapter.fileact.transport.send
Directory where the sending data file is placed.
esiadapter.fileact.control.receive
Directory where the receiving control file is to be picked up.
esiadapter.fileact.transport.receive
Directory where the receiving data file is to be picked up.
esiadapter.fileact.ftp.url
The URL of the ftp server. This may contain the port number and top level directory, for example
ftp://swifthost7/aft. Leave blank for the file interface.
esiadapter.fileact.ftp.user
The login user name for the ftp server. Leave blank for file interface.
esiadapter.fileact.ftp.password
The login password for the ftp server. Leave blank for file interface.
esiadapter.fileact.control.type
Can be either FTP or File. Note that this is case-sensitive.
esiadapter.fileact.transport.type
Can be either FTP or File. Note that this is case-sensitive.
2.4.3 ESIAdapter FINSwift API Rule Editor
2.4.3.1 Introduction
This editor enables users to determine which FIN messages should go to which FINSwift API.

Configuration
38 © Wall Street Systems IPH AB - Confidential
2.4.3.2 Usage
For each FINSwift API specified in the list associated with the property
esiadapter.finswift.api-list there should be an associated entry in this editor.
2.4.3.2.1 Fields
All fields, except for API Name and Priority are optional. Normally, the row with the least number of
filled-in fields will have the lowest priority (i.e. the largest numerical value).
2.4.4 Esiadapter Module Name Rule Editor
2.4.4.1 Introduction
This editor allows you to specify to which module (TRM, CM, MATCH) particular incoming messages
should be sent. In a Wallstreet Suite installation, the main concern is how FIN messages should be
directed between CMM and TRM. There are also messages that are of no interest, for example
MT0xx informational messages, that neither system can act upon but may be sent by SWIFT or
counterparts.
2.4.4.2 Usage
In a TRM only environment, the CMM entry can be deleted and the field Matchable Request Types
updated to include any other MT messages that are expected to be received.
The default data found in this editor should be sufficient for all operations.
Information Description
API Name The name of the API exactly as specified in esiadapter.finswift.api-list.
Priority The smaller the number, the higher the priority. The highest priority should have
the most restrictive matching.
Matchable Senders A regular expression that matches the Sender BIC. For example if the system has
multiple portfolio owners with their own BIC which need to send the FIN messages
via different interfaces then this would be the field to use to distinguish the cases.
Matchable Receivers A regular expression that matches the Receiver BIC. In the case where different
receivers use different interfaces.
Matchable Request Types A regular expression to match the FIN message type (MTxxx) for the case where it
is necessary to send different messages via different interfaces.
Matchable Target System A regular expression to match site specific data that needs to be generated via
TRMSwift (field target_system).
Message Priority (U or N) If urgent messages need to go via a particular interface indicate by U, normal
priority by N.

Configuration
SWIFT Connectivity Guide 39
2.4.4.3 Fields
2.4.5 Additional Connectivity to SWIFT Alliance Access
2.4.5.1 Introduction
With the introduction of SWIFT Allience Access(SAA) there has been a shift away from using the
MQSA interface for connecting applications to SAA. ESIadapter now offers three alternatives to
MQSA. The first is an MQHA interface using the MQ-MT format (see Application Interface for the
available content formats); the second is an MQHA interface using an XML format; the third uses the
SOAP (or Web Services) interface.
2.4.5.2 MQHA with MQ-MT
This interface is similar to MQSA: messages are sent in Network Dependent Format (NDF). The
problem with this interface is that Delivery Notifications are not automatically associated with the
original message sent. This interface is best used where Delivery Notifications are not required.
2.4.5.3 MQHA with XML
This interface uses a Network Independent Format (NIF) with an XML wrapper implemented in
SWIFT Version 2 format XML. This handles Delivery Notifications in a more sophisticated manner
than the MQ-MT format. Local authentication is also supported on this interface.
Note: Because the interface can be spread over three different Application Interfaces, it is
necessary to specify Local Authentication separately for each interface.
2.4.5.4 SOAP
The SOAP interface is similar to MQHA with XML in that the messages are sent in NIF format with a
SWIFT Version 2 XML format wrapper. The Application Interface setup is simpler, because only one
Application Interface is required. Similarly, if local authentication is required, both directions can be
handled by a single specified lau.
2.4.6 MQSeries and SSL
When using MQSeries as the interconnection for FIN message communication and where a VPN is
not used, it is necessary to enable SSL on the connection between the ESIAdapter MQSeries client
and the MQSeries server.
On the client side, the implementation of SSL in MQSeries Client uses the standard Java SSL
libraries, and handshaking verification is done using X509 certificates.
Information Description
Module Name The name of the Wallstreet Suite component that the message will be sent to.
Currently there are three: CMM, TRMSWIFT, MATCH.
Default Module If this is switched on, all unmatched messages are sent to this Module Name.
Interface Name Internal name for the interface dealing with the particular message type.
Currently the value can only be FINSWIFT, FILEACT, or MATCH.
Matchable Senders Regular expression to match the BIC of the sender (counterparty).
Matchable Receivers Regular expression to match the BIC of the receiver. This is the user BIC of
Wallstreet Suite.
Matchable Request Types List of FIN message types related to the selected module (TRMSWIFT, CM, or
MATCH). This can also be a regular expression.

Configuration
40 © Wall Street Systems IPH AB - Confidential
On the server side, you should see the MQSeries documentation for the SSL configuration.
2.4.6.1 Encryption modes
The MQSeries Server setup determines the SSL encryption. There are three modes:
•No encryption
•Server verification
•Client and Server verification.
With server verification, the client needs sufficient information in order to accept the server's
certificate. With client-side verification, the client needs to have a certificate that is signed by a
certificate that is acceptable to the server.
2.4.6.2 Creating the Java client's certificate
The following describes the steps to create the client side "store" for both the key and the trust side
using Java's keytool. You can use other programs such as openssl for creating the certificate
stores; however, the approach and the provisos are the same as those detailed here.
Note: In the examples below, modify names and passwords as required.
1. Create the Java client's personal certificate private key.
This step automatically generates the keystore.
keytool -genkey -dname "CN=JavaClientPersCert,O=Organisation,OU=OrgUnit,C=GB"
-alias MyJavaClient -storepass passw0rd -keypass passw0rd -keystore keyStore
-keyalg RSA -keysize 2048
Notes:
–keyalg must be RSA
–keysize must be 2048
–There may need to be agreement with the server setup for dname.
–dname should reflect your own organization.
2. Create the certificate request.
(A certificate from a Certificate Authority may be used instead of following this step.)
keytool -certreq -keystore keyStore -storepass passw0rd -keypass passw0rd -alias
MyJavaClient -file Client.req
Copy MyJavaClient.req to the machine that has the UNIX queue manager (and therefore the
key.kdb database).
Notes:
–The file client.req must be signed with the private key of the certificate that the server has
the public key of.
3. Sign the certificate request.
Either a signed certificate is supplied by a Certificate Authority, or you copy the file client.req
to the server to be signed by the server's private key. The server, if local, can also sign the
certificate.
Whichever approach is used, the signed certificate and the public certificate of the signer must
be available to load into the store.
4. Import the CA certificate into the Java key store, keyStore
keytool -import -keystore keyStore -storepass passw0rd -alias TheCA -import -file
ca.cer
Configuration
SWIFT Connectivity Guide 41
Notes:
–ca.cer is the public certificate of the signer.
5. Receive/import the signed certificate request back into the Java store keyStore
keytool -import -keystore keyStore -storepass passw0rd -alias MyJavaClient
-import -file MyJavaClient.sig
Notes:
–The alias must be the same as used in step 1.
For further information see
http://www-01.ibm.com/support/docview.wss?uid=swg21168234&loc=en_US&cs=utf-8&lang=en
2.4.6.3 SSL setup for ESIAdapter
For ESIAdapter to use SSL, the property esiadapter.finmq.sslcipher must be set to a value.
Note that the server controls which value to use, but the naming conventions are different.
Therefore if the server specifies TRIPLE_DES_SHA_US, then the value to use is
SSL_RSA_WITH_3DES_EDE_CBC_SHA.
2.4.6.4 ssl.properties
The ssl.properties file controls the location of key and trust stores for the whole onyx service.
There are two areas where the SSL may be used. First is the internal communication via ActiveMQ,
and the second communication from ESIAdapter via MQSeries to SAA.
This section discusses the settings needed for MQSeries. It is assumed that the process of
generating a certificate file has been undertaken.
javax.net.debug
Java network extensions debug flag.
Values: { help, all, ssl [, record, handshake, keygen, session, defaultctx, sslctx,
sessioncache, keymanager, trustmanager, pluggability, handshake, data, verbose,
record, plaintext, packet] }
See http://java.sun.com/j2ee/1.4/docs/tutorial/doc/Security6.html and
http://setmpos.ykb.com/PosnetF1/yardim_tr/programlama/java/SunSSL/INSTALL.txt
javax.net.ssl.keyStoreType
The type of the KeyStore object that you want the default TrustManager to use. The default value is
the value returned by the KeyStore.getDefaultType method.
Value: PKCS12
Do not modify this property. However, if all certificates are in a single file, remove this property.
javax.net.ssl.keyStore
The name of the file that contains the KeyStore object that you want the default TrustManager to
use. The default value is jssecacerts, or cacerts (if jssecacerets does not exist).
Value: ${jupiter.certificates.dir}/onyx/onyx.p12
Do not modify this property.
javax.net.ssl.keyStorePassword
The password for the KeyStore object that you want the default TrustManager to use.
Value: ${ssl.connection.keyStorePassword}
See file credentials.properties.
Do not modify this property.
Configuration
42 © Wall Street Systems IPH AB - Confidential
javax.net.ssl.trustStoreType
The type of KeyStore object that you want the default TrustManager to use. The default value is the
value returned by the KeyStore.getDefaultType method.
Value: JKS
Do not modify this property. However, if all certificates are in a single file, remove this property.
javax.net.ssl.trustStore
The name of the file that contains the KeyStore object that you want the default TrustManager to
use. The default value is jssecacerts, or cacerts (if jssecacerets does not exist).
Value: ${jupiter.certificates.dir}/onyx/onyx.ts
Do not modify this property.
javax.net.ssl.trustStorePassword
This configures the trusted certificates database (trustStore) for the HTTPS connection.
Value: ${ssl.connection.trustStorePassword}
Do not modify this property. See 2.4.6.6 credential.properties on page 42.
2.4.6.5 Debugging
As SSL requires a complimentary setup on both the server and the client, the initial setup normally
takes more than one attempt. There are actions that can help ensure that the certificate file is
correct before starting the software. It is recommended that you run ESIAdapter in debug mode to
ensure that the output from debugging runs can be displayed and analyzed.
2.4.6.6 credential.properties
2.4.6.6.1 The encrypt application
All passwords entered into the credentials.properties file must be encrypted first. The
application encrypt is used for the task.
Example:
C:\WSS-Suite\v7216\envs\esitest1\bin>encrypt
Secret key load failed - Defaulting to static secret key
====================================
Password Encrypter
Commands:
'1' -> Encrypt password
'2' -> Generate secret key
'3' -> Show current secret key
'0' -> Quit
Key Store debugging A useful command to run on the key store is:
Keytool -list.
Connection Debugging With javax.net.debug set to ssl then a verbose version of the
handshaking is displayed. This information can be used to isolate which
aspect of the handshake is failing and so point to where the problem
lies.
Environment variables
SWIFT Connectivity Guide 43
Your choice:
1
Enter password :
abcqwerty
Encrypted password : 'DQ8Q7LsRj4PwXQkA'
The encrypted password within the quotes is the one that you enter in the file.
2.4.6.6.2 Properties
database.connection.username
The name of the database user. This user may be shared with other Onyx services. For ESIAdapter,
this user must have privileges to select, update, insert and delete on the tables:
•ESIRequestEntry
•ESISentEntry
•ESILogEntry
The encrypted password for the user.
database.connection.password
The encrypted password for the database.connection.username above.
raha.connection.username
SWIFT Remote API Host Adapter (RAHA): this allows ESIAdapter to log into SAG via the RAHA
interface.
The user name must be the one supplied by the SAG system administrator.
raha.connection.password
The encrypted password for the raha.connection.username above.
ssl.connection.keyStorePassword / ssl.connection.trustStorePassword
SSL connection passwords: the passwords used for opening key store and trust store files for SSL.
Use the encrypted password that was used when creating the key store and trust store files.
2.5 Environment variables
ESIAdapter uses standard Onyx features for JMS and database connectivity. Normally the script for
starting the service will supply this information. ESIAdapter interfaces such as RAHA or CASmf can
have particular requirements for environment variables: refer to the relevant product
documentation for details.
2.6 Statuses
ESIAdapter stores the status of every payment/confirmation send to the SWIFT world in the
AdapterRequestEntry table.

ESIAdapter Client Relationship Editor
44 © Wall Street Systems IPH AB - Confidential
The two columns used to stores this status information are: current_state_id and max_state_id.
The current_state_id for FileAct messages can have the following values:
2.7 ESIAdapter Client Relationship Editor
This editor supplies information that is needed by ESIAdapter. Everything is associated with the BIC
code (also known as the SWIFT Code in the Client Editor). The three pages contain information for
the supported SWIFT interfaces:
2.7.1 FIN Swift page
2.7.2 FileAct page
Depending on the request type, there can be multiple entries here.
1The message passed ESIAdapter and has been sent and accepted by the MQ series API or RAHA and
CASmf.
2The message reached the SAA or SAG application.
3ESIAdapter received an ACK Message from the SAA application (Message type F21).
4ESIAdapter received a delivery notification from the counterparty (MT011 message).
-1 The message passed ESIAdapter and has been rejected by the MQSeries API.
-2 The message did not reach the SAA or SAG application.
-3 ESIAdapter received a NACK Message from the SAA application (Message type F21).
-4 ESIAdapter received a non-delivery notification from the counterparty (MT010 message).
Description
Test BIC Code Allows changing to a test setup without changing information in the editor.
Note: The Test BIC Code is currently not used.
Delivery Notification Switched on means that final verification of the successful arrival of a FIN
message is required. This is a service for which SWIFT charges.
Description
User Name Name for describing this entry.
Request Type For an outgoing FileAct request, this is the request type that is supplied by
application (CMM). The BIC code/Request Type Name are used for looking up the
correct instance of the correct instance. The data included in the request is from
Request Type, Distinguished Name and File Information.
For an incoming FileAct request, this is the value for Request Type that is passed
to the application (CMM) after a reverse lookup of Request Type, Distinguished
Name and File Information (on the specified File Information Keys).
Request Type Name Optional. The value could look like this example: pain.fin.mt101 or
camt.xxx.cfonb120.stm
Distinguished Name The value that is to be used for either receiver or responder (depending on
whether the client is sending or receiving). Its format is like the example below,
but can be more complicated.
Example: o=ptsggbee,o=swift

ESIAdapter Client Relationship Editor
SWIFT Connectivity Guide 45
Service Name Value to set the service name field in the fileact request if the default
(swift.corp) is not the correct one to use. Note that this is very rarely used.
File Information This is the information that is expected in the fileinfo field of the Fileact
Request. It should contain at least SwCompression=None (or Gzip) but may
require more information depending on the bank’s requirements. All key value
pairs must be specified with an equals sign (=) and separated by a semi-colon (;
). For example:
SwCompression=None;FileType=XXXX;CustomerId=100000.
File Information Keys This determines which fileinfo keys should be compared with the contents of
the File Information field when there is an incoming FileAct request. This is used
to determine the Request Type and BIC code. The complete comparison takes
into account:
• The Request Type Name, which is compared to the requesttype field in the
request,
• The Distinguished Name, which is compared to the requestor.
• The values in File Information, which is compared to the fileinfo field, but
only for the key(s) specified in this field. If there should be more than one
key, separate them with commas.
For example, if
File Information: SwCompression;FileType=XXXX;CustomerId=10000
and
File Information Keys: FileType
then the value XXXX would be compared to the same value from the fileinfo field.
Transfer Information This is the data that the counterpart requires in the TransferInfo field of the
Fileact Request. The field is optional; if left blank, it will be filled with data.
It should only be filled if the counterpart specifically requests pecific information
to be provided in this field. Unlike File Information, there are no formatting
requirements.
Transfer Information Keys Similarly to File Information Keys, the Transfer Information Keys field specifies
which keys to use if the TransferInfo field data is used to supplement the
information received in the RequestType field for an incoming FileAct request.
Logical File Name Format (Optional)
The logical name included in the FileAct request. You can include wildcards like
this:
<name>%ns or <name>%nd
Where:
<name> is the filename
% means the start of the wildcard part
n is a number that represents the width of the variable portion
s means that the unique ID of the request should be used
d means that an internal numeric value that is incremented should be used.
Compression Algorithm The actual compression algorithm to select and use. Values include NONE, GZIP
or ZIP.
Note: Bank A may have Compression Name ABC and compression algorithm
GZIP and bank B have Compression Name XYZ and compression algorithm
GZIP but normally they would have Name Gzip and algorithm GZIP.
NR Indicator Non-repudiation indicator. Should always be switched on for a corporate, but is
optional for a bank.
Need Crypto Should always be switched on. Indicates that SSL is needed.
Description

RAHA
46 © Wall Street Systems IPH AB - Confidential
2.7.3 Accord page
There can be multiple entries here, but the normal case is one entry.
2.8 RAHA
RAHA has its own environment variable which points to the configuration directory for the instance
being used. More than one instance may be necessary, depending upon the setup used for test and
production.
The path environment variable must include the shared library directory of RAHA. For example, if
RAHA is installed in C:\SWIFTAlliance\RA, and the instance is called RA1, then the following actions
are required:
Example using Windows:
SET SWNET_CFG_PATH=C:\SWIFTAlliance\RA\RA1\cfg
SET PATH=%PATH%;C:\SWIFTAlliance\RA\lib
To start the Ra1 Remote API:
C:\WINDOWS\system32\cmd.exe /K C:\SWIFTAlliance\RA\bin\swiftnet.bat init -S Ra1
If necessary, you can test the SAG connection as follows:
cd C:\SWIFTAlliance\RA\bin
sag_test_connect.exe
C:\SWIFTAlliance\RA\bin>sag_test_connect.exe
Enter the SWIFTNet user name: Sbei-fileact-myusrname
Enter the password for SWIFTNet user Sbei-fileact-myusrname: ******************
Sending InitRequest
Received InitResponse
Sending CreateContextRequest
Received CreateContextResponse
Sending ConnectivityRequest
Acknowledgement Request Switched on if there should be an acknowledgement received for the outgoing
message. For corporates this must be switched on, but is optional for banks.
Description
Description
Query BIC Code The BIC code that the Accord system understands (typically the same but it might
be with or without XXX at the end).
Test Query BIC Code The test BIC code is so that the test system could be used but it may have a
different BIC code without needing to change the setup.
Distinguished Name The Distinguished Name of the requestor. This can be different to the one used for
FileAct.
Message Types The relationship to the MT confirmation message that is used in the comparison.
300,320 would be the norm at the moment but it will grow with time.
Need Crypto Should always be switched on.
NR Indicator Should always be switched on.

Starting ESIAdapter with Process Monitor
SWIFT Connectivity Guide 47
Received ConnectivityResponse
Sending DestroyContextRequest
Received DestroyContextResponse
Sending TermRequest
Received TermResponse
SWIFTAlliance Gateway connectivity test completed successfully.
Important: All directories specified in the configuration should be created and access
permissions verified for the user that will be running the esiadapter process. If you
use Process Monitor (PMM), then the user running the process is called SYSTEM.
2.9 Starting ESIAdapter with Process Monitor
If WSS Suite is installed using the Suite Installer, there is a setup that enables the launching of
ESIAdapter as an Onyx service, and the anciliary process needed by SAG/RAHA if using the FileAct
interface. Setting the properties in esiadapter.properties is not covered by the Suite Installer,
and so this procedure must be done before attempting to start the processes using Process Monitor
(PMM).
2.9.1 Processes in PMM
This description is for the esiadapter_onyx process as seen in the Process Monitor screen.
2.9.2 Assumptions
It is assumed that the setup is for ESIAdapter using RAHA for FileAct. In all other cases the
raha_handler does not need to be configured.
2.9.3 ESIAdapter and PMM configuration procedure
After in installation made with the Suite Installer, you should complete these steps:
1. Install RAHA and note both the installation directory and the installation instance (normally Ra1).
2. Adjust the envs/$env-name/etc/environment/parts/15_esiadapter.bat so that the following
parameters are set using the information you noted above.
SET PATH=C:\SWIFTAlliance\ra\lib;%PATH%
Ensure that c:\SWIFTAlliance\ra is the same as the installation directory from above.
SET SWNET_CFG_PATH=C:\SWIFTAlliance\RA\Ra2\cfg
Ensure that C:\SWIFTAlliance\RA is the same as your installation directory (from above) and
that Ra2 is changed to your installation instance (from above). Ensure that the directories
specified in the file are in a suitable location for both capacity and redundancy.
3. Edit esiadapter.properties, credential.properties, and ssl.properties as necessary.
4. Create a command window using envs/$env-name/bin/trm-$env-name-shell.bat.
In this command window verify that ESIAdapter will start by typing
onyx.bat esiadapter
If there is a failure, a error message will appear in the output.
5. Fix any failures. Here are problems you may encounter:
–Can't load library because PATH is incorrect.

File Simulation Mode
48 © Wall Street Systems IPH AB - Confidential
Set correctly in 15_esiadapter.bat
–Can't find configuration file because SWNET_CFG_PATH is incorrect.
Set correctly in 15_esiadapter.bat
–Can't open directories because of no existence.
Verify that the path is the one required and create directories as necessary.
2.9.3.1 RAHA
With RAHA, the next level of problems normally relate to incorrect passwords, application interfaces,
and strict/relaxed setup. An incorrect database user/password will also cause a failure as does lack
of permissions on the database tables.
Once the ESIAdapter Onyx process can start and run continuously in the command window, this
proves that it is possible to run it from PMM.
2.10 File Simulation Mode
To help with system setup and debugging the setup of other modules, ESIAdapter is supplied by
default in file simulation mode for both FileAct and FIN. This is useful for the initial installation and
testing as it replaces some third party software. However, there is still a need for connectivity via
RAHA and MQSeries.
2.10.1 FileAct simulation
The FileAct simulation requires a directory called esiadapter.rahasimulatorapi.dir in the
esiadapter.properties file. Under this directory are two directories: in and out, each of these
containing two directories props and data.
When a FileAct message is sent via ESIAdapter, the data is written to unique-id.txt in the
out/data directory. The relevant properties are written to unique-id.props in the out/props
directory.
To simulate a FileAct request coming from a counterparty, the data file unique-id.txt is put in
in/data and a properties file unique-id.props is placed in in/props. The properties that must be
supplied are:
requestor=o\=socgenfr,o\=swift
responder=o\=veolfree,o\=swift
service=swift.corp!p
requesttype=pain.xxx.cfonb120
fileinfo=SwCompression\=None;FileType\=xxx
Note: The ACK Indicator must be turned off for senders.
2.10.2 FIN simulation
The FIN file interface uses two directories; it also writes and expects a well-formed MT message
without additional characters (for example Alliance, MERVA demarcation markers). It expects only
one message per incoming file, and writes only one message per outgoing file.
The directories used are:
/tmp/finfile for the drop directory
/tmp for the pickup directory

ESIAdapter simulator
SWIFT Connectivity Guide 49
These directories must exist.
Note: Delivery Notification must be turned off for senders.
2.10.3 Changing from simulation mode
When changing from the file simulation mode to third party interface mode, the number of ACKs
needs to be updated.
For FIN, the parameter to change is in the esiadapter-finswift.xml file:
<prop key="ack-count">3</prop>
where the value should be set to 1 for simulation mode, otherwise it should be 3.
The value of delivery notification in the ESIAdapter Client Relationship Editor for senders is
important; in file simulation mode, if you do not receive the final acknowledgement then this switch
should be checked, otherwise it should be unchecked.
Currently the SWIFT Accord interface is always associated with RAHA or MQSeries and so will cause
problems if a default ESIAdapter is started. This can be overcome by setting the environment
variable MODULES_ESIADAPTER_SYSTEM=fin-fileact.
2.11 ESIAdapter simulator
There is an ESIAdapter simulator for sending incoming messages to either CMM or TRM. The
program requires a file with the data that is to be sent.
Note: In the case of FileAct, the file must be uncompressed before sending.
The simulator can also be used for sending messages to the SWIFT network via ESIAdapter.
The program is a python script called esiadapter-simulator.py in the %FK_HOME%\bin directory.
2.11.1 Simulating sending a FIN message
To simulate a FIN message, use the following syntax:
python esiadapter-simulator.py -a true|false cmm|trm fin <filename> <Rec BIC code>
<Sender BIC code> <FIN msg type>
Where:
2.11.2 Simulating sending a FileAct message
To simulate a FileAct message, use the following syntax:
-a Required only in a Windows environment
true or false true: send to ESIAdapter. false: send to CMM/TRM.
cmm|trm Specifies to which module you wish to send the message.
fin Specifies a FIN message (as opposed to a FileAct message).
<filename> The name of the FIN file that contains the content to send.
Note: Remove blocks 1 and 2 from the original FIN message.
<Rec BIC code> BIC code of the recipient (CMM or TRM).
<Sender BIC code> BIC code of the sender (the bank).
<FIN message type> The message type, for example 101, 300, 320, 940, 950 and so on.
ESIAdapter simulator
50 © Wall Street Systems IPH AB - Confidential
python esiadapter-simulator.py -a true|false cmm|trm fin <filename> <Rec BIC code>
<Sender BIC code> <area> <msg syntax> [<description>]
Where:
-a Required only in a Windows environment.
true or false true: send to ESIAdapter. false: send to CMM/TRM.
cmm|trm Specifies to which module you wish to send the message.
fileact Specifies a FileAct message (as opposed to a FIN message).
<filename> The name of the file that contains the content to send.
<Rec BIC code> BIC code of the recipient (CMM or TRM).
<Sender BIC code> BIC code of the sender (the bank).
<area> The business area, for example pain or camt.
<msg syntax> [<description>] The message syntax and format used, for example xxx.confb120,
followed by an optional description, for example stmt.
SWIFT Connectivity Guide 51
Chapter 3 CASmf configuration
CASmf is made up of a number of background processes and an API library. The background
processes interact with the API and subsequently with SWIFTAlliance via sockets-based
communication.
The API supplied with CASmf has been repackaged as a shared library with an additional layer of
software that conforms to the JNI standard. This enables Java software to interact with external
C-based libraries.
Calls to the CASmf API from TRMSwift use the native interface.
3.1 Installing CASmf
CASmf must be installed on the same server as the TRMSwift CASmf adapter. See the CASmf
documentation for full details on installing CASmf.
The TRMSwift superuser must have permissions to write to all files in the CASmf directories. It is
recommended but not essential that you use the same user for TRMSwift and CASmf.
3.2 Configuring CASmf
3.2.1 Modifying the dmapid.dat file
Once you have installed CASmf, you must modify the file dmapid.dat which is stored in the dat
directory. This directory is typically created in Program Files\SWIFT\CASmf on Windows NT and in
/usr/casmf/SunOS on Solaris.
Here is an example of how the contents of this file should appear:
cas_version2
app_typ MXA
l_mapid CASmfInOut1
r_mapid AllianceMXSCASmfInOut1
enable 1
net_protocolTCP
net_laccess5101 (Example port number from SWIFTAlliance machine)
net_raccess5101
net_rhost SWIFTAlliance computer IP Address
sess_flow 2
Configuring SWIFTAlliance
52 © Wall Street Systems IPH AB - Confidential
sess_wind 1
end yes
check_bic8BANK'S BIC CODE
check_pass1Security number 1.
check_pass2Security number 2.
Note the following points:
•r_mapid must be AllianceMXS + l_mapid.
•l_mapid is the name of the interface setup in SWIFTAlliance.
•net_raccess is the port number from the services file. This is associated with the name used in
the setup of the named interface.
•net_raccess must be the same as net_laccess if CASmf and SWIFTAlliance are running on
machines with different IP addresses.
•net_raccess is the port that SWIFTAlliance listens on for connections.
•net_laccess is the port that CASmf listens on for replies.
•The security officers must supply check_pass1 and check_pass2.
3.2.2 Setting environment variables
You must set the following variables:
•CUS
•CUSSYS
•DATTOP
•LOGTOP
•CUSCFG
•DMAPID.
See the CASmf User Guide for information about these variables.
3.3 Configuring SWIFTAlliance
You must set up a SWIFTAlliance interface. This procedure is explained in the CASmf
documentation, however you should note the following points:
•The interface name must be the same as that specified in the file dmapid.dat (see previous
section). The default name used by TRMSwift is CASmfInOut1.
•The flow must be bi-directional.
•The connection must be initiated by the application and not by SWIFTAlliance.
3.3.1 SWIFTAlliance Security
SWIFT's CASmf protocol does not support encryption but it does support authentication when
sending data between TRMSwift and SWIFTAlliance Access.
There are three basic levels of authentication:
•None (AUTH_NONE)

Configuring SWIFTAlliance
SWIFT Connectivity Guide 53
•Authentication upon opening the connection (AUTH_ACCESS)
•Authentication when data is sent (AUTH_BOTH).
The CASmf API remembers the authentication keys supplied with the required level of
authentication. The level of authentication is automatically determined by the passwords provided.
Authentication keys can be passed as environment variables on startup.
There are four authentication keys:
•ACCESS_SEND_PASS: calculates the authentication on the data to be sent during session
opening. Mandatory if access authentication is used (AUTH_ACCESS or AUTH_BOTH)
•ACCESS_RECEIVE_PASS: verifies the authentication on the data received during session
opening. Mandatory if access authentication is used (AUTH_ACCESS or AUTH_BOTH)
•DATA_SEND_PASS: calculates the authentication on the data to be sent during session opening.
Mandatory if data authentication is used (AUTH_BOTH)
•DATA_RECEIVE_PASS: verifies the authentication on the data received during the current
session. Mandatory if data authentication is used (AUTH_BOTH).
If ACCESS_SEND_PASS is passed but DATA_SEND_PASS is left empty, authorization is only done
upon opening the connection between TRMSwift and SWIFTAlliance Access.
If ACCESS_SEND_PASS and DATA_SEND_PASS are provided, the authentication level is set to the
sending of data on opening the connection (AUTH_BOTH).
If none of the authentication keys are provided, no authentication is done.
You must set up the corresponding authentication keys in SWIFTAlliance Access.
For more information, see the CASmf Programmers Guide and the SWIFTAlliance Access Security
Guide.
3.3.2 Receiving a failure (NACK) from SWIFTAlliance
When receiving a failure (or NACK) from SWIFTAlliance via CASmf, various fields are included in the
feederfeedback section of the message. The data in these fields depends on whether the reply
comes from a logical reply or a transmission/delivery report. Each type is shown in the examples
below:
3.3.2.1 NACK received from a transmission or delivery report
<feederfeedback>
<CASmfSwift>
<other>
<msg>
<message_type>REPORT</message_type>
<report_success>fail</report_success>
<report_type>TRANSMIS_REP</report_type>
<failure_reason>3</failure_reason>
<failure_reason_text>Network Nacknowledged</failure_reason_text>
</msg>
</other>
</CASmfSwift>
</feederfeedback>

Configuring TRMSwift
54 © Wall Street Systems IPH AB - Confidential
3.3.2.1.1 NACK received from a reply
<feederfeedback>
<CASmfSwift>
<other>
<msg>
<message_type>REPLY</message_type>
<report_success></report_success>
<report_type></report_type>
<failure_reason>2</failure_reason>
<failure_reason_text>2</failure_reason_text>
</msg>
</other>
</CASmfSwift>
</feederfeedback>
The table below describes the XML items in these two examples.
3.4 Configuring TRMSwift
Although TRMSwift is supplied with a default adapter configuration for CASmf, this is not activated
by default. Likewise, the rules for sending SWIFT messages are not configured to include the CASmf
interface.
To activate the CASmf adapter configuration:
1. Activate the library file.
–On Windows, the files cus.2.2.dll and cus.6.0.dll are in [ROOT]\bin. Rename the file
for your CASMF version to cus.dll.
–On Unix, the files libcus.2.2.so and libcus.6.0.so are in [ROOT]\lib. Rename the file
for your CASMF version to libcus.so.
2. Include this directory in the PATH environment variable (Windows) or the LD_LIBRARY_PATH
(Solaris).
3. Edit the custom.properties file to include the word CASMF on the line where
ikit.feeder.component is specified.
Item Description
message_type Contains the type of message that indicated that a failure
happened. Possible values: REPORT or REPLY.
report_success Indicates that a failure has occurred. Contains data only for the
message type REPORT.
report_type Contains the type of report that was received. Contains data only
for the message type REPORT. Possible values include:
• TRANSMIS_REP: Transmission Report.
• DELIVERY_REP: Delivery Report.
•PROCESSI_REP: Processing (Information) Report. When
sending an Information Report to TRMSwift from
SWIFTAlliance, the message is considered as a failure; this
indicates that the message should be rejected.
failure_reason Indicates the message failure reason code (as supplied by
CASmf).
failure_reason_text Indicates in plain language the reason why the message failed.

Debugging
SWIFT Connectivity Guide 55
4. Start TRMSwift.
The rules for sending SWIFT messages must be modified to include the CASmf interface. In
rules.xml the OMH_Swift action should include:
<sendto name="CASmfSwift">
<addflags><SentToMervaFile /></addflags>
<removeflags></removeflags>
</sendto>
Note that a more specialized flag can be setup in setup.xml and applied to the action.
3.5 Debugging
The CASmf log contains details of errors that may occur. This file is stored in the log directory of the
CASmf installation and is called cuslog.log.
Some possible errors are:
•If the values for check_pass1 or check_pass2 are incorrect, you will receive an error message
that only 100 messages will be passed.
•TRMSwift produces error messages if the connection with shared library has failed or if the
library cannot be found.
•Messages are successfully delivered to SWIFTAlliance but fail to be accepted on formatting
grounds. The problem may be with the sender's SWIFT code as it often has an incorrect value in
field 9.
Note: When initiating a connection, CASmf reports an error about an incorrect APDU header. You
can ignore this error.
If you are using a test environment, you can set the SWIFT_TRAINING environment variable to
ensure that messages are not sent as live messages.
Debugging
56 © Wall Street Systems IPH AB - Confidential
SWIFT Connectivity Guide 57
Chapter 4 FIN messaging configuration
4.1 FIN messaging components
The components between TRMSwift and the Enterprise Swift Integration Adapter (ESIAdapter) are
responsible for updating the FIN Message Manager, as well as for facilitating communication with
TRMSwift and ESIAdapter. These components are not apparent to users.
Use of the components is driven by the FINMessage flow, either because they are triggered from
there (e.g. sending a message or responding to TRMSwift with a status update) or because they
trigger the flow (e.g. receiving a new message to send, receiving a new message that has been
received or receiving a status update from ESIAdapter about a message that has been received).
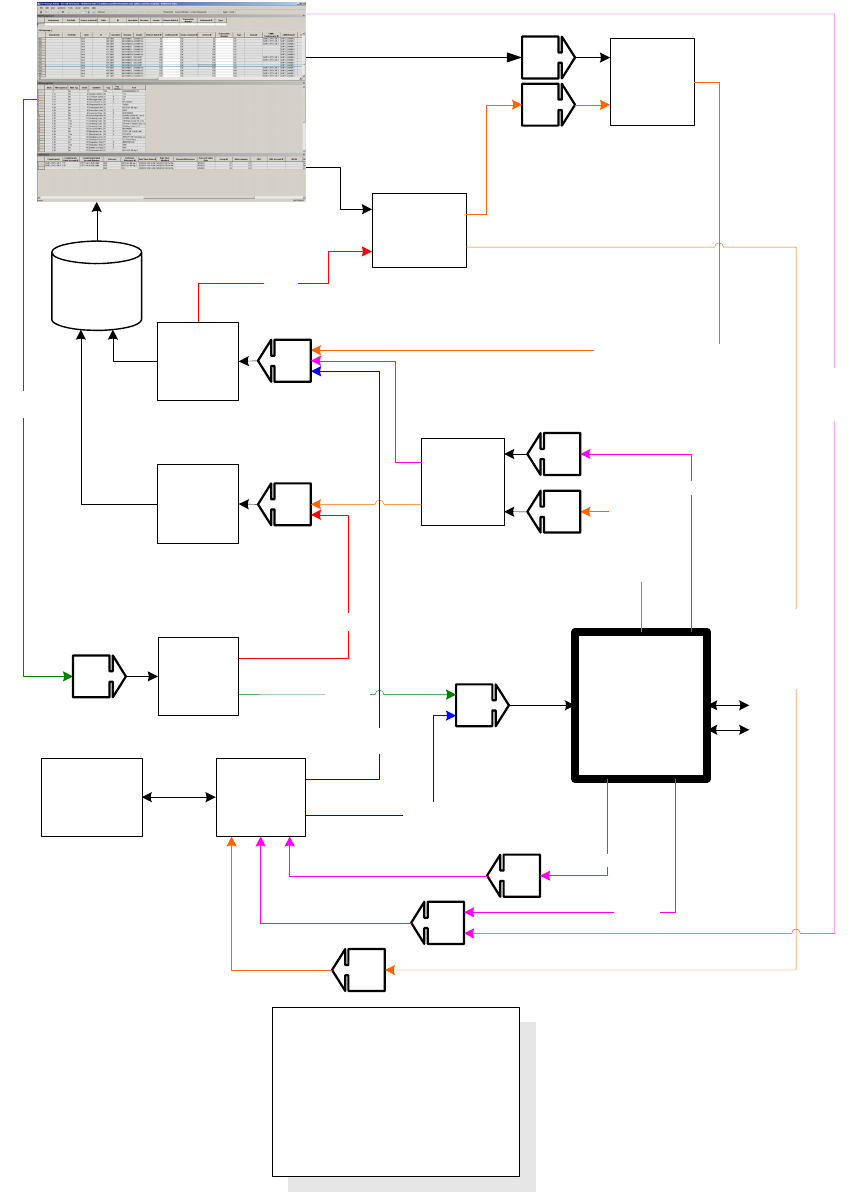
FIN messaging components
58 © Wall Street Systems IPH AB - Confidential
4.1.1 FIN Messaging flow diagram
TRMSWIFT
Responder
Q03
TRMSwift
Queue
Adapter
FIN Message status update
Q04
TRMSWIFT
Receiver
FIN
Message
Writer
Failure
Q06
TRMSWIFT
Sender
Entity
DoAction
Failure
ESI
Adapter
Q09
Outgoing
FIN
Q07
Delivery
Notification
ACK/NACK
received
Local Report
received
Sending
FIN
Database
CMM
(WebSuite)
XML
Framework FIN/FileAct
Outgoing
Q10
Incoming
FileAct
serviced
serviced
Processing driven
by TRM Entity
Flow and FIN
Message Admin
Q08
SAA
SAG
Incoming
FIN
For
CMM
FIN
Outgoing
Q05
FileAct Status
Incoming FIN
Q01
FIN
Message
Response
on
Outgoing
FIN
Q11
Queue names:
Q01 $(wss.env.name).finmessage.cm.status
Q02 $(wss.env.name).finmessage.to.trmswift
Q03 $(wss.env.name).finmessage.status
Q04 $(wss.env.name).finmessage.writer
Q05 $(wss.env.name).esiadapter.cm-status
Q06 $(wss.env.name).match.finmessage
Q07 $(wss.env.name).esiadapter.trm
Q08 $(wss.env.name).finmessage.send
Q09 $(wss.env.name).esiadapter.in
Q10 $(wss.env.name).finmessage.cm
Q11 $(wss.env.name).esiadapter.trm-status
Q02
FIN Message Admin
FIN messaging components
SWIFT Connectivity Guide 59
4.1.1.1 FINWriter saves the message in the database
The FIN Message Writer component receives FIN messages formatted by TRMSwift, and saves them
(on Q04) to the database as FIN messages in a format that can be manipulated easily. The header is
saved in the FINMessage table and the content (blocks 3 and 4) is saved in the FINMessageField
table.
It creates the FINMessage entity and saves it to the database via the COMMIT action (in the FIN
message flow).
This would also typically be the point where the FINFormat rules and actions are run for updating
the message with any changes that need to be made (see 4.3 FIN Message Rule Editor on page 65
and 4.4 FIN Message Action Editor on page 68.)
If the message cannot be processed or the FIN Message Writer is not running, a failure status is
returned to TRMSwift via the TRMSwift Responder.
4.1.1.2 FINsend sends message to adapter
The TRMSwift FINSend component (Sender) passes the FIN message to the adapter. This happens
when a user accepted the message in the flow, or the flow is configured for Straight Through
Processing. The flow puts it on Q08.
The Sender does the following:
1. Creates the formatted message before passing it on (Q09). This is done based on the content of
the FINMessage and FINMessageField tables which it receives on Q08.
2. Receives an immediate response back (Q06) from the adapter framework after it performs some
validatation.
3. If the response is OK, then further status updates are received.
4. If the response is not OK, it pushes it onto Q06 with a failure, where the REJECT action is called
on the FINMessage object.
The rest of the processing depends on the FINMessage flow.
4.1.1.3 TRMSWIFT Receiver receives status for sent messages
The TRMSWIFT Receiver component is used to receive statuses about messages already sent, or to
receive new messages from the ESIadapter.
1. If a status update is received (Q07), the database is updated accordingly by putting an XSD
message on the EntityDoAction serviced provider’s queue (Q06).
2. It then updates the database by setting the status of the FINMessage entity and calling the
appropriate entity broker action.
3. In a typical flow setup, the message will be pushed to the next state if the received status
indicates success, or reject if it indicates a failure. If it is a failure, no further updates are
expected.
4.1.1.4 Receiver receives new messages
The TRMSWIFT Receiver is also used to receive new messages from ESIAdapter.
1. If a new message is received (Q07), an XSD structure is populated with the relevant data and is
passed on to the fin-message/writer serviced provider (Q04).
2. This saves it to the database by calling the (FIN message) entity broker COMMIT action.
3. A new ID is generated using NewOrderNumber, starting at and counting down from -1.
4.1.1.5 Responder responds with status updates
In the FINMessage flow, when a message has been sent completely or when it has been rejected (or
failed), the TRMSwiftResponder returns an success or failure status back to TRMSwift, so that the
corresponding transaction or settlement can be updated. The decision of success or failure is based

FIN messaging components
60 © Wall Street Systems IPH AB - Confidential
on the flow configuration. In a typical flow, reaching the Sent state indicates success, while being
rejected indicates a failure.
4.1.1.6 CMM FIN messages monitored on FIN Message Manager
Outgoing FIN messages from CMM (WebSuite) are sent to ESIAdapter via FIN Message Manager
(Q04, Q08, Q09), or directly using SwiftNet Adapter communication protocol (Q09).
In order for the outgoing messages to be managed (from both TRM and WebSuite) they must go
through FIN Message Admin.
Incoming FIN messages now come from ESIAdapter via FIN Message Manager (Q07,Q04,Q10). This
means that users can monitor CMM-related FIN messages as well as TRM-related ones from FIN
Message Manager (TRM users) or a web-based FIN Message Manager (WebSuite users).
Note: FileAct flows remain unchanged: direct connection between ESIAdapter and CMM.
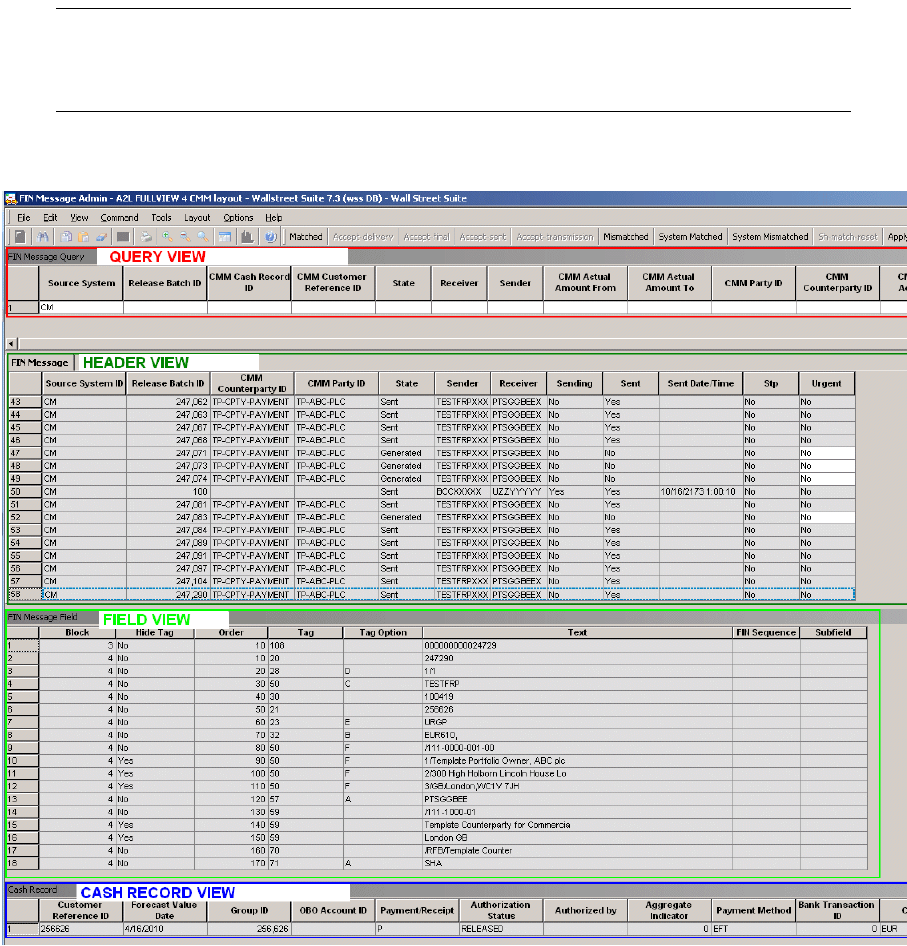
FIN message administration (TRM)
SWIFT Connectivity Guide 61
4.2 FIN message administration (TRM)
You can view and manage FIN messages to and from SWIFT using the FIN Message Admin
application, available from Application Manager. This manages the flow of FIN messages between
TRMSwift, CMM, and ESIAdapter. The application has the same look and feel as a Wallstreet Suite
transaction board, with standard features including flow control (accept, reject, etc), layouts, queue
capabilities, and modes.
Note: Most of the non-FIN specific fields are lookups on the underlying transactions, not the
settlement, so appear to be updated when the underlying transaction's values are
updated. The values correspond to what is in Query view, where you can also query based
on transaction values.
You can configure straight-through processing or multiple verification, and manage it from this
application.
The application has these views:
•Query view
Used for querying FIN messages based on limited transaction information, on limited cash
management cash record related information or on the FIN message header itself. Note that
cash management-related information is prefixed with CMM.
•Header view
Displays information from block 1 and 2 of the FIN message. Most of these fields can be queried.

FIN message administration (TRM)
62 © Wall Street Systems IPH AB - Confidential
•Field view
Displays the various fields that make up blocks 3 and 4 of the FIN message. For each block the
information is shown as a table to make it easier to work with. Each row that appears in this
view corresponds to a line in the formatted FIN message.
Block 5 fields contain the User or System Trailers in the column Tag and the content of the
Trailer is stored in the Text column.
If the FIN Message is re-sequenced from several incoming messages, then block 2 from the last
message received is parsed into the Header view and block 5 is not parsed.
If a field (for example, :72:) has multiple lines, each line appears as a separate row with a
different order id.
The Block, Tag and Tag Option fields are the same, but from the second line onwards the "hide
tag" flag is set to Yes to indicate that from the second line onwards the tag and tag option should
be hidden.
The Block and Order id columns are used to determine where in the final formatted FIN message
the information is placed. The "modify tag" field indicates if the field can be modified in the FIN
Message Manager (provided that it has not yet been sent).
Where a message has a field with multiple lines or has repeating tags, the optional Fin Sequence
and Subfield columns may be used as an identifier rather than relying on the order id (Order
column in the Field view). The Fin Sequence displays the name of the SWIFT sequence where
the field exists, or is blank where the type of message contains no sequences (MT202 for
example). The Subfield contains text that describes the purpose of the field to help identify it.
This enables users to easily identify which values they want to override.
•Cash Record view
Shows cash record cash management elements. Elements shown directly correspond to the cash
record(s) making up the body of the selected FIN messages. The Release Batch ID or to the
Cash Record ID itself makes it easy to find the corresponding FIN message and to know the
actual status of the cash record(s) after it has been released from CMM.
Changes that are made to FIN messages (including verification, receiving of ACK/NACK,
matching/unmatching) are logged for the header, and made available via a report (the TRMSwift FIN
Message Log Report). The header of the FIN message is logged, but not the individual field changes.
4.2.1 Previewing changes to FIN messages
You can preview changes to FIN Messages before saving the changes. You use the Process Actions
action on a FIN message to see what changes will be made to the message if the FIN Format Rules
and Actions were to be applied. The changes can be Reset, the rules and actions modified, and
previewed again to refine what the actions should do.
4.2.2 FIN message administration (WebSuite)
WebSuite also has its own web-based FIN message administration. The web-based version offers all
the functionality of the rich client FIN Message Admin application except for real time, and the
normal constraints of web pages (no flexible layouts).
To launch it, select Payment Factory - Processing - Message Admin
Query pages are dedicated either to cash management-related queries or to treasury-related
queries. Queries run from these pages are equivalent to queries run from the rich client FIN
Message Admin (Query view).
Hint:
In the FIN Message Cash Management Search below, the difference between Release
Batch ID and CMM Release Batch ID is as follows:
Release Batch ID: Auto-generated by CMM upon release of a cash record. It uniquely
identifies each FIN message released to TRMSwift. Typically, where the cash record release
results in the creation of two messages, each of them will share the same CMM Release
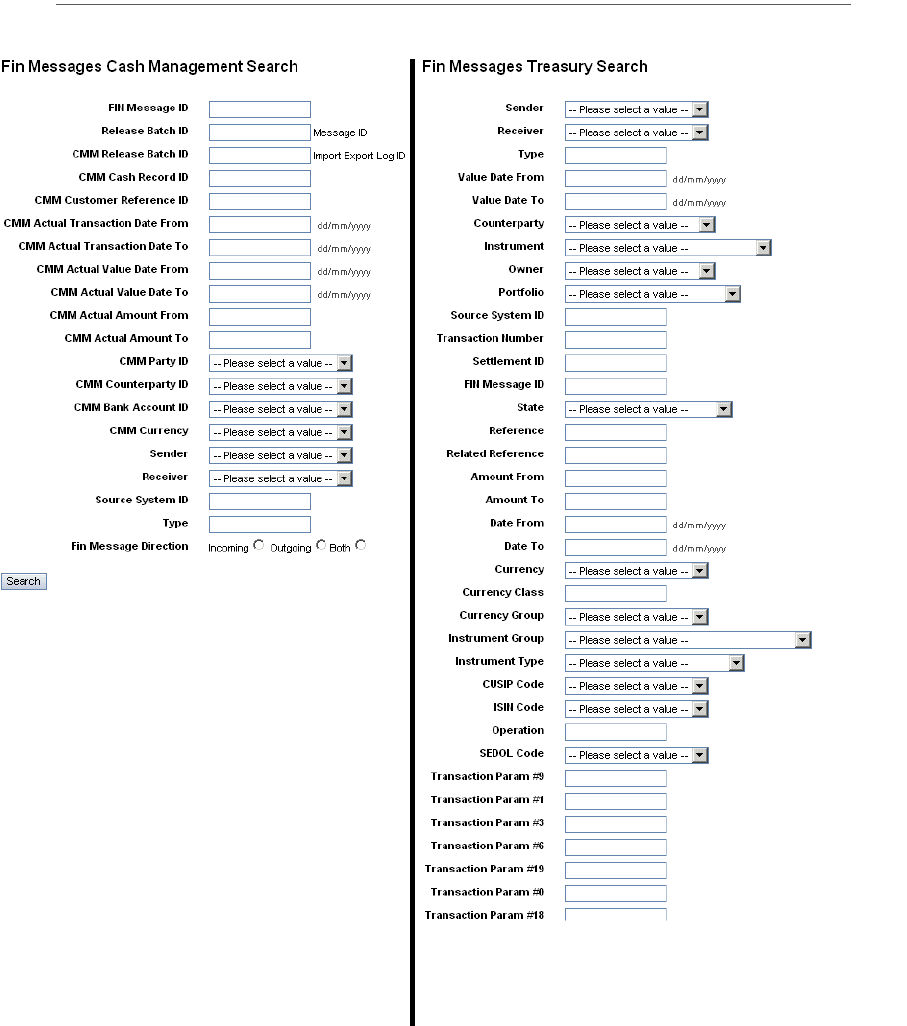
FIN message administration (TRM)
SWIFT Connectivity Guide 63
Batch ID but will have a different Release Batch ID or Message ID. Message IDs can be
viewed in the job details.
CMM Release Batch ID: Aauto-generated by CMM upon release of one or more cash
records. It corresponds to the ID of the CMM release job. Typically if several cash records
are released as part of the same batch/job, they share the same CMM Release Batch ID or
Import Export Log ID.
Treasury and cash management result pages are different. However, both result pages present the
same information as far as the corresponding FIN message is concerned. Information displayed in
the WebSuite version is equivalent to the information displayed in the rich client FIN Message Admin
(FIN Message View).
In results pages, you can push messages into the entity flow. To do that, you need to select an
action to perform from the Action column and click Apply. Note that the actions available vary from
one message to another, depending on the type of message and its state in the flow.
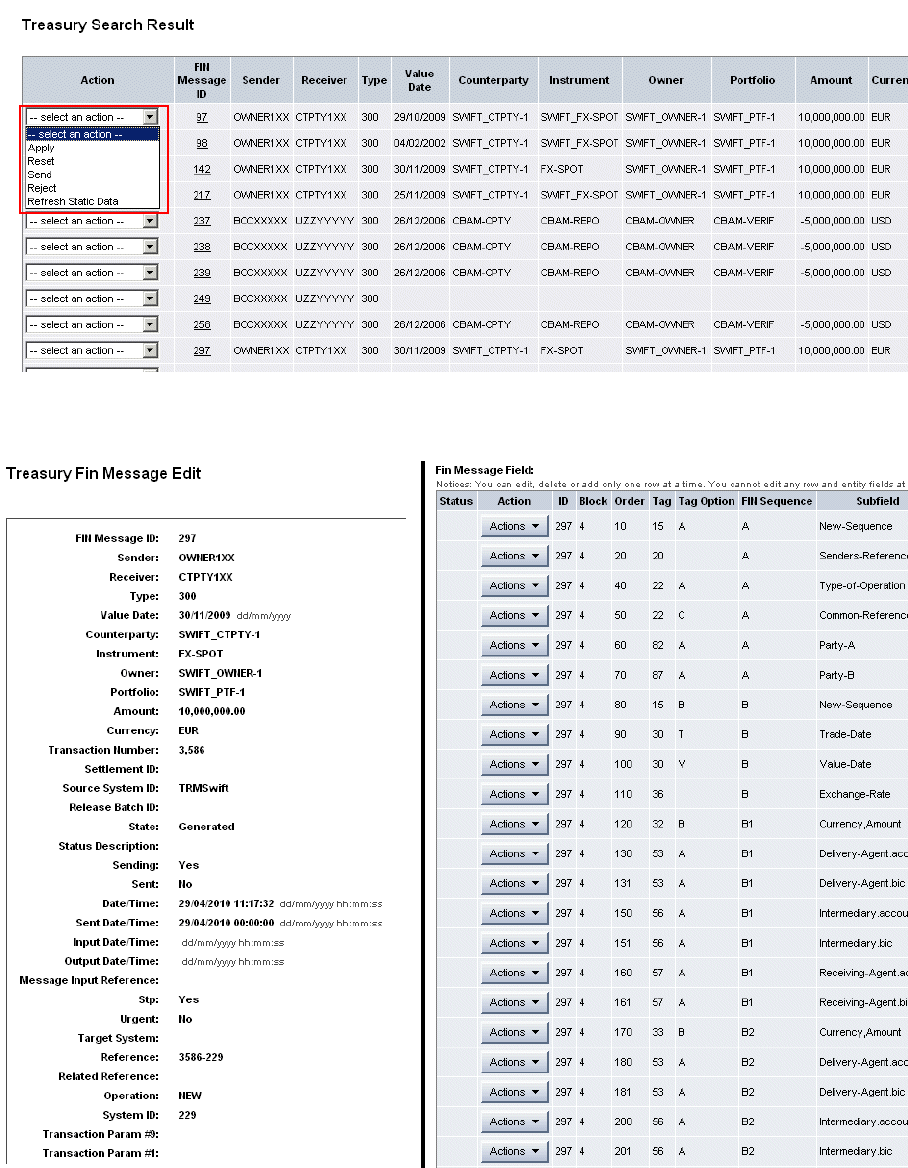
FIN message administration (TRM)
64 © Wall Street Systems IPH AB - Confidential
By clicking the ID of the message (link in the FIN Message ID column), you can view the details of
the corresponding FIN message. This is similar to the rich client FIN Message Admin (Fin Message
Field view).
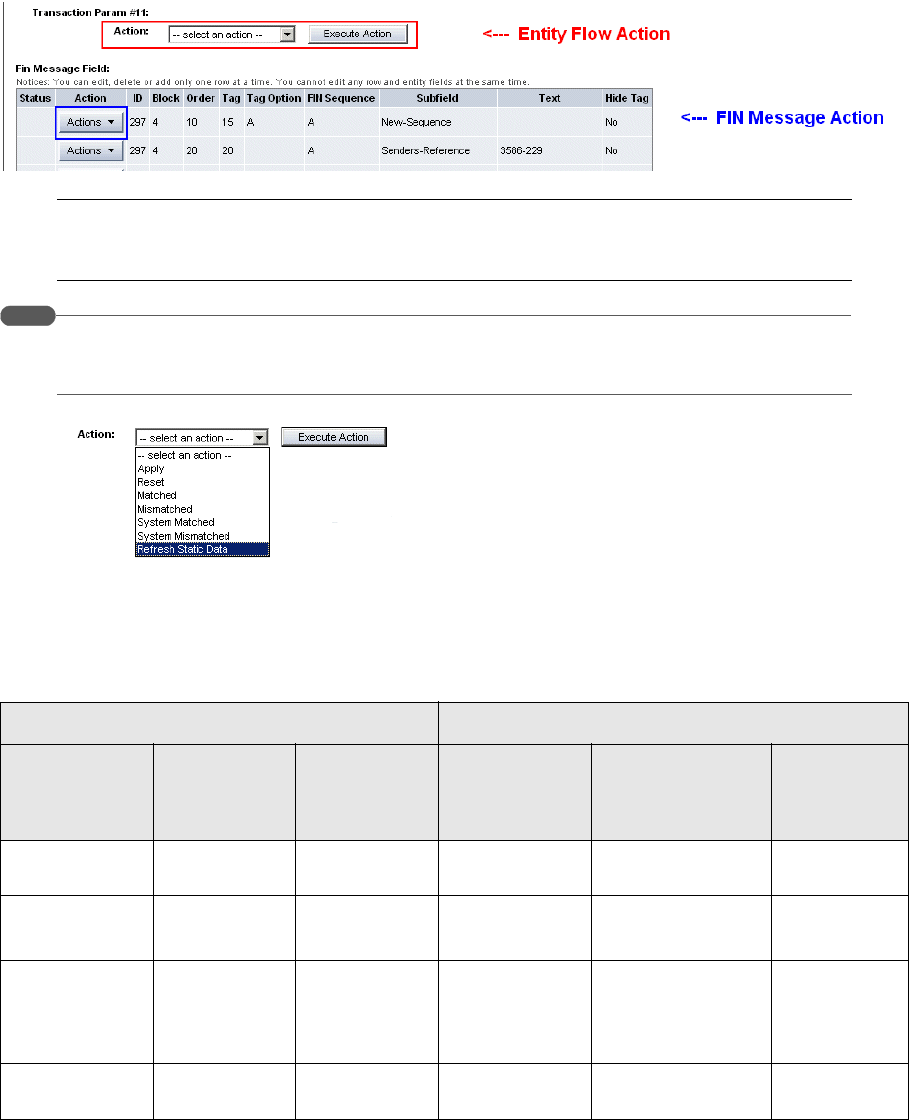
FIN Message Rule Editor
SWIFT Connectivity Guide 65
Note: If a FIN message results from CMM initiated payments, related cash record details will
show at the bottom of the result/detailed page (like in the Cash Record view of the rich
client FIN Message Admin).
Hint:
There is no real time updating. Where the application of an entity flow action results in the
messages going through several states, it might be necessary to execute the Refresh Static
Data to display the latest available state for this message. See the screenshot below.
4.2.2.1 FIN message label mapping
This table summarizes the FIN message label correspondence among different areas of the
Wallstreet Suite:
4.3 FIN Message Rule Editor
Use this editor to set up the rules to select all incoming and outgoing flows so that they can be
pushed in the TRM flow as STP messages. This means that they do not get "stuck" waiting for
Application screen Database table elements
FIN Message
Admin (TRM)
Message
Admin
(WebSuite)
Review Job
Log
(WebSuite)
CASHRECORD EXPORTMESSAGE FIN Message
CMM Cash
Record ID
CMM Cash
Record ID
N/A ID N/A Related
Reference
Release Batch ID Release Batch
ID
JobLogID ImportExportID/
ReleaseBatchID
ImportExportID Reference
CMMRelease
BatchID
Not available Message ID
(in
Communication
Log Details)
N/A ID ReleaseBatch
ID
ID FIN Message
ID
N/A N/A N/A ID

FIN Message Rule Editor
66 © Wall Street Systems IPH AB - Confidential
manual validation in the FIN Message Admin application. This may be crucial in the case of
CMM-related FIN messages (Source System in FIN Message Admin is CM).
The editor has the following fields:
Information Description
ID Identifies the rule being set up and is used to refer to the rule either from the FIN
Message flow or from the FIN Message Action Editor. More than one rule can have
the same ID: the condition between such rules is an "OR". This is similar to
transaction rules.
In the case of CMM:
• FMFLO-FROM-CMM enables selection of all outgoing CMM payments and
messages.
• FMFLO-TO-CMM enables selection of all incoming flows so that they are
imported STP into CMM.
Note: These rules are used in the TRM flow (finmessage.py). The name is hard
coded in finmessage.py therefore it is best to set them to the exact name
(unless you are modifying the finmessage python file). See 4.3.1 Rules
versus finmessage.py on page 68.
Rule Rule name.
Comment Free format comment field.
Message type Contains the message type (MT type) number.
Operation This field contains the function that is being performed on the messages (typically
NEW, AMEND or CANCEL), and is defined by the SWIFT standard.
Sender BIC The BIC code of the sender of the message.
Receiver BIC The BIC code of the receiver of the message.
Transaction Rule ID The transaction rule to be used to match if a transaction number is present. If the
FIN message has a transaction number, then the transaction is checked to see if it
matches the transaction rule. If it matches, then the condition is considered to be
met.
Settlement Rule ID The settlement rule to be used to match if a settlement ID is present. If the FIN
message has a settlement ID, then the settlement is checked to see if it matches
the settlement rule. If it matches, then the condition is considered to be met.
Source System This identifies the module of the Suite from where a particular message was
initiated. The two most commonly used module codes are:
TRMSwift for TRM and CM for CMM. Entering CM for example will filter all FIN
messages going from CMM.
Target System This identifies the Suite module where a message should go to. Possible values
depend on the configuration of ESIAdapter: see what is defined in ESIAdapter
Module Name Rule Editor and ESIAdapter FINSwift API Rule Editor.
CMM Bank ID This enables filtering on banks and can come as a complement to the selection of
Sender or Receiver BIC.
CMM Payment Method This enables the filtering on a particular Payment Method. This element is
particularly interesting to relate to bank-specific payment method that would
correspond to generic ones defined in CMM.
CMM Bank Account ID This enables filtering of FIN messages for one account in particular. This is
intended primarily for incoming messages. Note that CMM already has very
flexible enrichment rules to serve that purpose.
CMM Currency This relates to the currency available in CMM.
CMM Actual Amount From This enables the creation of a rule, based on a minimum amount value.
CMM Actual Amount To This enables the creation of a rule, based on a maximum amount value.
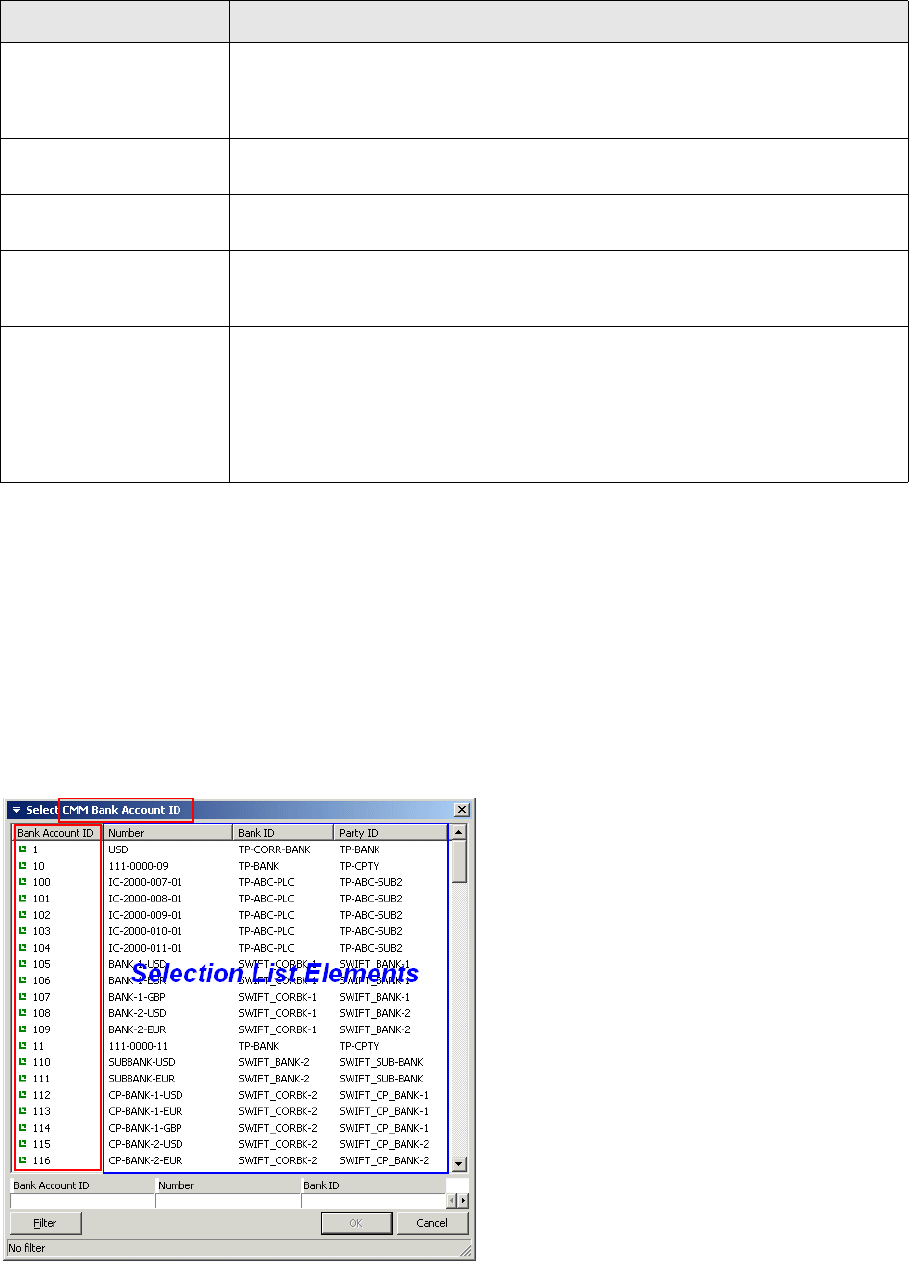
FIN Message Rule Editor
SWIFT Connectivity Guide 67
If a field is empty, then it is not included in the rule. Each field that contains a value must match.
For the Transaction Rule ID and Settlement Rule ID, the underlying transaction or settlement (for
which the number or ID is saved in the FIN Message) is compared to see if it matches the rule. If
there is a rule that matches, but no Number or ID, then there is no match.
Selection lists
Most of the Information shown in the table above is associated with other relevant static data
elements that makes the user's choice easier. For example the Bank Account ID can be selected
from a list that also shows the Bank Account Number, the Bank ID and the Bank D and the Party ID.
These are called selection lists. A right click on the top of the column shows available elements that
can be added to that selection list. Note that these supplementary elements can also be filtered to
make a value's selection even easier.
When selecting Bank Account ID, other related static data elements are displayed as well so that it
is easier to choose from the Bank Account ID list the one that will be effectively used in the database
query.
CMM Payment Priority This corresponds to the urgent or normal flag put on the cash record constituting
the FIN message. Therefore it relates to the clearing priority (tag 23E of an MT101
for example) not to the priority (in block 2) with which the message is posted on
the SWIFT Network.
CMM On Behalf Of This relates to CMM's On Behalf Of indicator. Available values are either Yes or No.
Yes indicates that the payment has been made on behalf of another entity.
CMM Aggregate Payment
Indicator
This enables the filtering of messages that contain payments resulting from
aggregated cash records. Available values are Yes or No.
CMM Intercompany This relates to CMM's cash records 'intercompany' characteristic. It can be used to
filter(or not) intercompany payments from other releasable payments. Available
values are Yes or No.
CMM Originating System
Code
This relates to the process that has been creating the cash record constituting the
related FIN message. Examples of commonly used values are:
•AP Import (meaning that cash record(s) were created from Account Payable
Import)
•Man (meaning that the cash record(s) was created manually (compare with
CMM's Payment Factory - Capture - Enter Single Transaction)
Information Description

FIN Message Action Editor
68 © Wall Street Systems IPH AB - Confidential
In this example, Number, Bank ID and Party ID can be filtered as well, in order to reduce the list of
available values further down.
4.3.1 Rules versus finmessage.py
In order for a FIN Message rule to be taken into account in the entity flow, it is necessary to make
sure this rule is referenced in the relevant python entity file: finmessage.py. This file is usually
found under …ws-suite\components\trm\share\python\entity-flow\
4.3.1.1 Straight through processing
Several rules are available at installation time.
FMFLO-STP, FMFLO-TO-CMM, FMFLO-TO-TRM, FMFLO-FROM-CMM, and FMFLO-FROM-TRM are
specifically dedicated to the Straight Through Processing of FIN messages in general: of FIN
messages coming and going to CMM or TRM.
The default configuration in finmessage.py is such that FIN messages are released or received
using STP. (Wall Street recommend that you leave the configuration in this state.) However, by
configuring the relevant rules and flow, you can hold this messages in a defined state for manual
review, amendment, or release.
4.3.1.2 finmessage.py
You should use serviced logs to find out which rule is applied. In finmessage.py, where several
rules have been set to match a particular event, the first rule that is matched (from the top of the
file) will be the one that is applied.
4.4 FIN Message Action Editor
Use this Editor to select the rules that identify the right FIN messages, and select the actions to be
performed on either the FIN Message header or FIN Message fields for identified messages. A set of
actions is delivered with the product, and additional actions can be implemented on site.
4.4.1 Rules
The main part of the FIN Format Action Editor has the following fields:
Information Description
Rule ID The ID of the rule that was set up in the FIN Message Rule Editor.
Not Rule ID The ID of the Not rule that was set up in the FIN Message Rule Editor.
Group ID The name of a group of rules. For each of the groups that have been defined in the
Group field, the rules are matched according to their priority. If all the required
conditions of the rule are met for any of the rules defined with the given rule id,
then the top part is considered to have been met. If this is the case, then the
changes (actions) indicated by the bottom half of the editor are made before the
next group can be considered.
Rules are first evaluated according to priority. Rules from different groups can
overlap in priority, but the top priority in each group is the rule that is met.
Processing is in group name order, so typically the group is prefixed by a number
to make sure the order is correct (e.g. 001-START, 014-CLIENTS, 044-END).
Priority The priority of the selected rule which determines the order in which rules are
checked: lowest numbers have highest priority.
Rule Name Name of the rule.
Not Rule Name Name of the Not rule.

FIN Message Action Editor
SWIFT Connectivity Guide 69
4.4.2 Actions
The Actions tab is where you define one or more actions to perform when the rule is met. The actions
are performed in the order specifed by the order field.
The fields are:
Information Description
Action Type The type of action to be performed. These are:
ADD-PREFIX: takes Block, Order ID, Tag, Tag Option, FIN Sequence and Subfield
as search criteria. Adds a prefix to the first line (lowest Order ID) that was found
with the search criteria.
ADD-SUFFIX: takes Block, Order ID, Tag, Tag Option, FIN Sequence and Subfield
as search criteria. Adds a suffix to the last line (highest Order ID) that was found
with the search criteria.
REMOVE-FIELD: takes Block, Order ID, Tag, Tag Option, FIN Sequence and
Subfield as search criteria. Removes all lines that were found with the search
criteria.
SET-URGENT: sets the Urgent flag of the message header to Yes. If the value was
already "Yes", then the Yes value is kept. The Yes value results in the message
being sent with U3003 in header 2 (instead of N2020).
COPY-FIELD: takes Block, Order ID, Tag, Tag Option, FIN Sequence and Subfield
as search criteria. Makes a copy of all lines that match the search criteria, sets the
Order ID and Subfield of the copied lines according to Destination Order ID and
Destination Subfield values.
UPDATE-FIELD: takes Block, Order ID, Tag, Tag Option, FIN Sequence and
Subfield as search criteria. Keeps the first line of all lines found, the rest of the
lines are removed. The line that is kept is modified with values given by
parameters New Block, New Order ID, New Tag, New Tag Option, New FIN
Sequence, New Subfield, New Value, Modify and Hide Tag.
REPLACE-SENDER-RECEIVER: replaces the FIN message Sender BIC and
Receiver BIC with the values in the New Sender and New Receiver fields. If they
are blank then nothing is replaced. Useful when testing message content prior to
sending the message.
SEARCH-REPLACE-TEXT: Takes Block, Order ID, Tag, Tag Option, FIN Sequence
and Subfield as query criteria. Searches in all found fields the text given in the
"Search For" parameter and replaces it with the "Replace With" parameter. If
"Modify First Only" is supplied, only the first occurrence of text is replaced.
Note: The user should be aware that information might be lost if the search
criteria is not granular enough, since only the first line is kept and the rest is
removed.
ADD-FIELD: takes Destination Block, Destination Tag, Destination Tag Option,
Destination FIN Sequence and Destination Subfield as search criteria. Chooses the
first line that was found with the search criteria and add a new line either before
or after it according to the Destination Indicator value. The newly added line will
get its values updated with the parameters New Tag, New Tag Option, New Fin
Sequence, New Subfield and New Value.
MOVE-FIELD: takes Source Block, Source Order ID, Source Tag, Source Tag
Option, Source FIN Sequence and Source Subfield as search criteria to find the
lines to move. Destination Block, Destination Tag, Destination Tag Option,
Destination FIN Sequence and Destination Subfield are used as search criteria to
find the place where the source lines will be moved. Similar to ADD-FIELD,
Destination Indicator is used to decide if the movement will be before or after the
destination line.
FORMAT-TEXT: takes Block, Order ID, Tag, Tag Option, FIN Sequence and
Subfield as search criteria. Concatenates the text of matched lines, replacing the
carriage return character with a space character. The resulting string is distributed
over the lines based on the parameters Max Characters per Line, Max Number of
Lines, First Line Prefix and Remaining Lines Prefix. Having the parameter Word
Wrap set to NO would indicate that a word can be split between two lines.

FIN Message Action Editor
70 © Wall Street Systems IPH AB - Confidential
Order If there is more than one action associated with this rule, the Order number
determines the order in which the actions are performed.
Remaining fields The fields below the Order field change their function, depending on the selected
Action Type.
Information Description
SWIFT Connectivity Guide 71
Chapter 5 SWIFTnet Accord
5.1 Confirmation matching
SWIFTNet Accord is a service provided by SWIFT (on the SWIFT network), where messages are
copied to the Accord service for any business entity that subscribes to the service. SWIFTNet Accord
then either performs the confirmation matching automatically, or allows users to perform manual
matching. TRM retrieves the matching status from Accord and updates itself with the relevant
information.
The matching status is fetched from SWIFTNet Accord for confirmation messages that have been
sent over the SWIFT network and the FIN Message and correspondent transaction in TRM are
updated with the matching status.
•The fetching of the matching status according to the SWIFTNet Accord API provided by SWIFT is
performed by the Enterprise Swift Integration Adapter (ESIAdapter).
•The transaction in TRM is updated by performing a (transaction flow) action, typically pushing it
forward in the flow if it has been matched successfully, or rejecting it in the flow if it has failed
matching.
•The FIN Message in TRM is also updated by performing a (FIN Message flow) action, typically
pushing it forward/backwards in the flow. Only confirmation (FIN) messages that have been sent
via the FIN Message Manager can be automatically updated by ESIAdapter.
5.1.1 Accord simulator
To simulate receiving a confirmation matching status coming from Accord, the following command
can be used:
python %FK_HOME%\bin\match-simulator.py -a -r <reference> -b
<matched|unmatched|mismatched>
Where:
The FIN message is then updated with the status and moved in the flow, and the corresponding
transaction is potentially also moved in the flow.
-a Required only in a Windows environment
-r <reference> is the value from the reference field in the Fin Message Manager, normally
<number>-<number>.
-b <matched|unmatched|mismatched> is one of three match statuses (case insensitive).
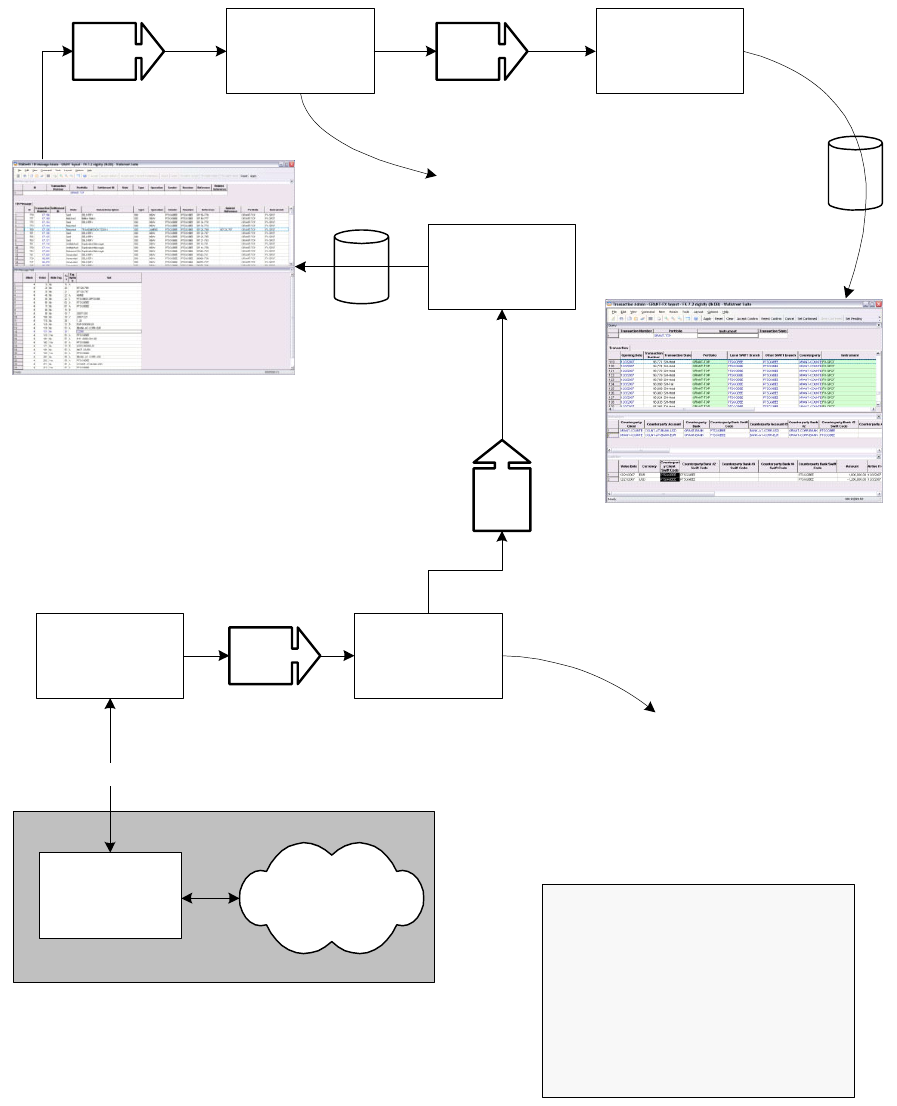
Confirmation matching
72 © Wall Street Systems IPH AB - Confidential
5.1.2 Polling the Accord API
ESIadapter compiles a query for the BIC in question according to the ESICRM Editor, and sends the
request for information to Accord. This request (query) and matching status (query result) are
based on the API definition. Once a matching status is returned from Accord, it is made available for
further processing on an incoming queue (Q04). At this point, the references in the matching status
are the references used in the FIN messages that had previously been sent to SWIFT.
SWIFT System
Q01
FIN Message Admin
Q03
TRM Matcher
Processing
driven by the
Flow and FIN
Message
Admin Transaction Admin
Q02 Transaction
DoAction
Entity
DoAction
Match
Reconciliator
Q04ESI Adapter
Uses references
to find the IDs.
Uses transaction number to find other
messages and determine matching status.
SAG
(SWIFT Alliance
Gateway)
SWIFT Network
including
Accord
InterAct
Queue names:
Q01 $(wss.env.name).match.checker
Q02 $(wss.env.name).match.transaction
Q03 $(wss.env.name).match.finmessage
Q04 $(wss.env.name).esiadapter.match
Confirmation matching
SWIFT Connectivity Guide 73
Note that there can be references for more than one confirmation message in the matching status
(result). Different confirmation messages represented by the references within the matching status
can also have different matching status outcomes (matched, unmatched, or mismatched).
5.1.3 Reconciling of results
For each of the references to confirmation messages within the matching status, the Match
Reconciliator service looks up the FINMessage to determine the FIN Message id corresponding to the
confirmation message. It is assumed the FIN message ids are unique.
Each of the FIN Messages must be updated in a specific way, based on its match status. This is
done by making each FIN Message id (on Q03) available for further processing along with an entity
action to perform (based on the matching outcome) and a comment in case of errors.
5.1.4 Updating the FIN Message
For each of the FIN Messages to be updated, a FIN Message id, an action to perform (based on the
matching outcome) and a failure comment (if applicable) are provided to an EntityDoAction
(serviced) service. This service updates the status_description column on the FINMessage and
call the action (as defined in the FIN Message flow) via the entity broker.
A typical FIN Message flow setup includes Sent, Matched, and Mismatched states. Based on the
matching status received for the particular confirmation message, the FIN Message flow facilitates
the FIN Message’s movement between these different states. Further processing on the transaction
is triggered for these state transitions.
•Sent indicates that the FIN Message has successfully been sent over the FIN network and all
acknowledgements have been received. The matching status is still unmatched (i.e. it is not yet
considered matched, and there are no known problems regarding the matching). In Accord
terms, this is for Deal Status "P".
•Matched indicates that a matching status has been received and that we consider the FIN
Message matched. Basically it mean we and the counterparty agree on the details of the deal
(to the level defined by the Accord matching rules). In Accord terms, this is for Deal Status "M"
and "A".
•Mismatched indicates that we know there is a problem regarding the matching. Something
needs to be done to ensure that we and the counterparty agree on the details of the deal. In
Accord terms, this is for Deal Status "U", "S", and "D".
It is also possible to manually trigger the subsequent processing by manually accepting or rejecting
the FIN Message from within FIN Message Admin.
5.1.5 Multiple messages
Where there are multiple confirmation messages for a single transaction, the transaction is not
considered agreed with the counterparty until all confirmation messages have been matched. The
TRMMatcher component receives the FIN Message id for each of the confirmation messages when
the match status is changed (on Q01).
•If status is changed to Mismatched, then the transaction is considered mismatched. To achieve
this, the transaction number is passed on for further processing along with the fact that the
match has failed.
•If status is changed to Matched and this is the last confirmation message for which a matched
status is needed (i.e. was outstanding) and all other confirmation messages were considered
matched, then the transaction number is passed on for further processing along with the fact
that the match has succeeded.
To determine if this is the last outstanding message and all other messages are considered
matched, the FIN Message id is used to look up all the transaction numbers. The transaction
number is then used to look up all outgoing FIN Messages and their match status is checked. When
multiple messages are linked, only the last message is considered. For transactions with multiple
legs (such as FX Swaps having two MT300 messages), both legs are checked.
Confirmation matching
74 © Wall Street Systems IPH AB - Confidential
Once again the matching status of all the FIN Messages for the transaction is used for further
processing to know which transaction action to call (on Q02).
5.1.6 Updating the transaction
For each of t he transactions where the match status is changed, the transaction number, the action
to perform (based on the outcome of the match status for all confirmation messages for the
transaction) and the comment (error message) are received by the TransactionDoAction (serviced)
service on Q02. This service updates a comment field with the error message (if there is one) and
calls the transaction action. The action taken is configurable on site by changing the transaction
flow definition. The name of the action is determined by the previous service and is limited to:
•SH-MATCH-ACCEPT: This indicates that the confirmation message was successfully matched
with a counterparty message. This would typically result in the transaction being pushed
forward in the flow.
•SH-MATCH-REJECT: This indicates that the confirmation message was not matched and
considered incorrect. This would typically result in the transaction being rejected in the flow.
•SH-MATCH-RESET: This indicates the status of the message is unkown. This would typically
result in no action being taken, but if a transaction was previous considered matched, it should
no longer be considered matched.
The action can result in the transaction being pushed forward or backward in the flow, or in a status
being set.
5.1.7 Backdated trades and ESIAdapter
When polling for Matching status updates from SWIFTNet Accord, ESIAdapter takes into
consideration backdated deals entered within the last ten days.

SWIFT Connectivity Guide 75
Chapter 6 SWIFT package overview
TRMSwift is an Enterprise Application Integration (EAI) tool based on messaging technology. This
tool provides a highly customizable, powerful and flexible interface for exchanging business events
with your financial counterparties through dedicated network and system connections.
TRMSwift is part of the WSS connectivity product solutions and enables you to interface your
financial applications with banks, settlement and payment systems, as well as with your proprietary
applications. The TRMSwift solution also operates with the comKIT API, enabling you to access and
manipulate TRM data and business logic.
TRMSwift includes various packages which add new functionality to the overall framework. The
SWIFT package is used to add SWIFT messaging capabilities. This includes both messages that are
sent to or received from the SWIFT network. The SWIFT package contains configurations for:
•Formatting
•Internal routing
•Enriching data received (generally from TRM)
•External routing to various adapters
6.1 Data Integration
TRMSwift automatically decides if a transaction should generate a new message or whether an
adjustment should be made to a previous operation (AMEND, CANCEL or ROLLOVER). TRMSwift
stores a list of transactions that have entered the system and compares each new incoming
transaction with the stored transactions. To make a decision to amend, cancel, or generate a
rollover you must have a copy of the previous message in the TRMSwift database.
Note: Transactions that have been settled manually and migrated into the TRMSwift database
should be sent back in the TRM transaction flow (the state is decided locally). When these
transactions re-enter TRMSwift they generate a dummy history record and a dummy
SWIFT message. These dummy records do not impact limit management or accounting
functionality in TRM.
6.2 SWIFT message scenarios
The following sections list the scenarios in which specific SWIFT messages are transmitted.

SWIFT message scenarios
76 © Wall Street Systems IPH AB - Confidential
6.2.1 Money market and foreign exchange confirmations
Instrument
Type Trade Date Value
Date Rollover Change
Deal
Change
Counterparty Cancellation Matching
FX Spot MT300 Amended
MT300
Cancel
previous
message and
New MT300
MT392 or
MT300 with a
CANC in field
22A
Accord
FX NOF MT300
(fixing)
Amended
MT300
Cancel
previous
message and
New MT300
MT392 or
MT300 with a
CANC in field
22A
Accord
FX Forward MT300 Amended
MT300
Cancel
previous
message and
New MT300
MT392 or
MT300 with a
CANC in field
22A
Accord
FX Swap MT300 x2
(One per
leg)
Amended
MT300x2
(one per leg)
Cancel
previous
message and
New MT300 x 2
2 x MT392
(One per leg) or
2 x MT300 (one
per leg) with a
CANC in field
22A
Accord
FX OTC
Option
MT305 Amended
MT305
Cancel
previous
message and
New MT305
MT392 or
MT305 with a
CANC in field
22A
Accord
Fixed
Deposit
MT320 MT320 Amended
MT320
Cancel
previous
message and
New MT320
MT392 or
MT320 with a
CANC in field
22A
Accord
Floating
Deposit
MT320 MT320
(fixing)
Amended
MT320
Cancel
previous
message and
New MT320
MT392 or
MT320 with a
CANC in field
22A
Accord
BIS/FED
cash
transfer
MT330 Amended
MT330
Cancel
previous
message and
NEW MT330
MT330 with
CANC in field
22A
Accord
FRA MT340 MT341
(upon
fixing)
Amended
MT340 /
MT341
Cancel
previous
message and
New MT340 /
MT341
MT392 or
MT340 / MT341
with a CANC in
field 22A
Manual
Bond or
Repo
MT518 Cancel
previous
message
and New
MT518
Cancel previous
message and
New MT518
Manual
IR Swap Fixing Date: MT362 Accord
BIS Medium
Ter m
Instrument
MT599 MT592 Manual
BIS
Discount
FIXBIS
MT599 MT592 Manual

SWIFT message scenarios
SWIFT Connectivity Guide 77
6.2.2 Payments
6.2.3 Private client confirmation
Gold
Deposit
Provisional
or Final
confirmatio
n
MT699 MT699 MT692
Instrument
Type Trade Date Value
Date Rollover Change
Deal
Change
Counterparty Cancellation Matching
Event Payment / Value
Date Cancellation Comments
Payment of Cash (to a non
financial institution)
MT103 MT192 Generally used in conjunction with an
MT202.
Transfer for own account MT200 MT292
Payment of Cash MT202 MT292
Payment of Cash MT203 MT292 Merged within TRMSwift by merging
two MT202 or an MT202 and MT203.
Can also be split within the Message
Monitor.
Receipt of Cash MT210 MT292
Interest Payment MT350 MT350 (with CANC
in field 22A)
Payment of precious metal. MT604 MT692 The precious metal must be
configured as the currency of the
transaction.
Event Payment / Value
Date Cancellation Comments
Debit of private client MT900 MT992 Based on payments generated in
Settlement Manager and not on Call
Money / Call Account.
Credit of private client MT910 MT992 Based on payments generated in
Settlement Manager and not on Call
Money / Call Account.

SWIFT message scenarios
78 © Wall Street Systems IPH AB - Confidential
6.2.4 Security movements
6.2.5 Statement messages
Instrument
Type
Value
Date
Rollover /
Coupon
Payment
Margin
Call Amendment Cancellation
Repo MT543 MT210 or
MT202
MT541
NEWM
MT540
Or MT542
MT292
MT54n CANC if
field 23G
MT54n NEWM
MT210 or MT202
MT543 CANC in field 23G
MT292
Repo-Reverse MT541 MT202 or
MT210
MT543
NEWM
MT540
Or MT542
MT292
MT54n CANC if
field 23G
MT54n NEWM
MT202 or MT210
MT541 CANC if field 23G
MT292
Collateral
Substitution
MT541
MT543
MT54n CANC if
field 23G
MT54n NEWM
MT541 CANC in field 23G
MT543 CANC in field 23G
MT292
Buy Security
FoP
MT540
MT202
MT292
MT540 CANC if
field 23G
MT540 NEWM
MT202
MT540 CANC in field 23G
MT292
Sell Security
FoP
MT542
MT210
MT292
MT542 CANC if
field 23G
MT542 NEWM
MT210
MT542 CANC in field 23G
MT292
Buy Security
DvP
MT541 MT541 CANC if
field 23G
M7T 541 NEWM
MT541 CANC in field 23G
Sell Security
DvP
MT543 MT543 CANC if
field 23G
MT543 NEWM
MT543 CANC in field 23G
Received
Message Action Comments
MT535 Insert into custody balance statement for
reconciliation in TRM.
This message is received from SWIFT.
Note that limited fields are used to create
the transaction.
MT950 Insert into state of accounts for reconciliation in
TRM
This message is received from SWIFT.

SWIFT message details
SWIFT Connectivity Guide 79
6.2.6 Transaction Generation
6.3 SWIFT message details
This section describes the supported SWIFT messages. (For further information, please see the
SWIFT documentation.)
6.3.1 MT103 - Single Customer Credit Transfer
The MT103 message is used to exchange single customer credit transfers. It can be used in 3
different ways:
•The message can be sent by itself to your own bank and follows up the chain to the beneficiary
bank.
•The message can be sent to your counterparty’s bank in conjunction with sending an MT202 to
your own bank. This is achieved by using the transfer method SWIFT-MT103202.
•The message can be sent to the bank of your counterparty’s bank in conjunction with sending an
MT202 to your own bank. This is achieved by using the transfer method SWIFT-MT103202-AWI.
In each of the cases mentioned above, the account information is changed correspondingly. You
should note the following settlement transfer methods.
Received
Message Action Comments
MT515 Create a Treasury Bill or Cash movement
transactions based on the data in the SWIFT
message.
This message is received from SWIFT.
Note that limited fields are used to create
the transaction.
Settlement Transfer
Method Settlement Chain Conditions Message Sender Receiver
MT103 Our Bank
Client Bank
Our Bank = Client Bank
(This is not
mandatory.)
MT103 Us Our Bank
MT103 Our Bank
Client Bank
Our Bank has an
account at the Client
Bank
(This is not
mandatory.)
MT103 Us Our Bank
MT103202AWI Our Bank
Client’s
Correspondent
Bank
Client Bank
Our Bank has an
account at the Client’s
Correspondent Bank
MT103
MT202
Us
Us
Client’s
Correspondent
Bank
Our Bank
MT103202 Our Bank
Client Bank
There is no relation
between Our Bank and
the Client Bank
MT103
MT202
Us
Us
Client Bank
Our Bank
MT103202 Our Bank
Client’s
Correspondent
Bank
Client Bank
There is no relationship
between Our Bank and
the Client’s
Correspondent Bank.
MT103
MT202
Us
Us
Client Bank
Our Bank

SWIFT message details
80 © Wall Street Systems IPH AB - Confidential
6.3.2 MT192 - Request for Cancellation
This is a normal cancellation message for any MT1xx message. When the cancelling message is
sent, the fields from the original message are placed within the cancelling message. The related
reference is determined by the reference number of the previously sent message.
6.3.3 MT200 - Financial Institution Transfer for its Own Account
The MT200 is used to transfer funds (for your own account) from one bank to another. In such a
case, the portfolio owner is the counterpart. The message is sent from you to your bank asking to
transfer funds to your other bank.
6.3.4 MT202 - General Financial Institution Transfer
The MT202 is used to transfer funds to another institution. The message is sent from you to your
bank asking to transfer funds to your counterpart via all banks in between.
Various fields change depending on whether this message is sent alone or in conjunction with the
MT103 message.
6.3.5 MT203 - Multiple General Financial Institution Transfer
The MT203 message is created by merging various MT202 or MT203 messages. You do this using
the TRMSwift Message Merger functionality. Messages can also be split within the Sequence panel of
the Message Monitor. Note that certain criteria must be matched before any messages can be
merged. For each message that is merged, a new sequence is created, up to a maximum of 10
sequences.
Default configuration allows only MT203 messages to be merged. Merging with MT202 can be
enabled.
6.3.6 MT210 - Notice to Receive
The MT210 message is sent by you to your bank to inform it that you will be receiving funds. It is
also possible to merge various MT210 messages into a single MT210. Note that there is a maximum
of 10 sequences.
To enable automatic or manual merging of this message type, there has to be a decider for
MessageMerger updated in the WorkflowController element.
MT103202 Our Bank
Our Correspondent
Bank
Client’s
Correspondent
Bank
Client Bank
There is no relationship
between Our
Correspondent Bank
and the Client’s
Correspondent Bank.
MT103
MT202
Us
Us
Client Bank
Our Bank
MT103202 Our Bank
Our Correspondent
Bank
Client’s
Correspondent
Bank
Client Bank
There is no relationship
between Our
Correspondent Bank
and the Client’s
Correspondent Bank.
MT103
MT202
Us
Us
Client Bank
Our Bank
Settlement Transfer
Method Settlement Chain Conditions Message Sender Receiver
SWIFT message details
SWIFT Connectivity Guide 81
6.3.7 MT292 - Request for Cancellation
This is a normal cancellation message for any MT2xx message. When the cancelling message is
sent, the fields from the original message are placed within the cancelling message. The related
reference is determined by the reference number of the previously sent message.
6.3.8 MT300 - Foreign Exchange Confirmation
The MT300 confirmation message is to your counterparty to confirm the details of an FX transaction.
It can be used for Spot, Forward, Swaps, or non-deliverable Forward (Confirmation or Fixing). For a
Swap transaction, two MT300 messages are generated.
An MT300 message can also be used to amend the details of a previously sent MT300 message.
Instead of sending an amend message, both a cancel and a new message may also be sent.
Generally, the cancellation message is sent when the transaction is rejected back to the TRM
workflow and the new message is sent when it is accepted again.
An MT300 message can also be used to cancel the confirmation of a previously sent MT300
message.
Optional sequences C (Optional General Information) & D (Split Settlement Details) are currently
not supported.
Confirmation matching can be done with SWIFTnet Accord.
6.3.9 MT305 - Foreign Currency Option Confirmation
The MT305 confirmation message is sent from you to your counterpart to confirm the details of an
FX Option transaction. Cancellations and amendments work in a similar way to the MT300
messages. Confirmation matching can be done with SWIFTnet Accord.
6.3.10 MT320 - Fixed Loan/Deposit Confirmation
The MT320 confirmation message is sent from you to your counterpart to confirm the details of an
FX Deposit or Loan transaction. Cancellation and amendments work in a similar way to the MT300
messages.
Option sequences G (Tax Information) and H (Additional Information) are currently not supported.
This message is also sent for rollovers of FX Deposit or Loan transactions or for the fixing of a
floating-rate loan.
Confirmation matching can be done with SWIFTnet Accord.
6.3.11 MT330 - Call/Notice Loan/Deposit Confirmation
The MT330 confirmation message is sent to your counterpart to confirm agreed changes of a
Load/Deposit. The confirmation is sent in order to confirm changes to the principal amount.
Cancellation and amendments work in a similar way to the MT300 messages.
Optional sequences E (Settlement Instructions for Interests Payable by Party A), F (Settlement
Instructions for Interests Payable by Party B), G (Tax Information) and H (Additional Information)
are currently not supported.
Confirmation matching can be done with SWIFTnet Accord.
6.3.12 MT340 - Forward Rate Agreement Confirmation
The MT340 confirmation message is sent to your counterpart to confirm the details of a Forward
Rate Agreement (FRA) transaction. Cancellation and amendments work in a similar way to the
MT300 messages.
Optional sequence E (Additional Information) currently only supports the 72 (Sender to Receiver
Information) field.
Confirmation matching can be done with SWIFTnet Accord.
SWIFT message details
82 © Wall Street Systems IPH AB - Confidential
6.3.13 MT341 - Forward Rate Agreement Settlement Confirmation
The MT341 confirmation message is sent from you to your counterpart to confirm the fixing of the
rate of a Forward Rate Agreement (FRA) transaction. This message should only be sent once the
corresponding MT340 message has been sent. This can be ensured by placing it in the correct place
in the TRM workflow. Cancellation and amendments work in a similar way to the MT300 messages.
Confirmation matching can be done with SWIFTnet Accord.
6.3.14 MT350 - Advice of Loan/Deposit Interest Payment
You send an MT350 message to your bank informing them that an interest amount has been paid to
the account of the beneficiary with the receiving agent specified in the message. The message is
based on a payment.
6.3.15 MT362 - Interest Rate Reset/Advice of Payment
NEW and AMEND confirmation messages are sent from transactions with one leg floating and one
leg fixed. With the default setup, the instrument group of the instrument used on the transaction
must be /IR/SWAP/IR. This setup can be changed by updating the property irs.instrument.group
in %FK_HOME%\etc\trmswift\package\SWIFT\swift.properties.
Confirmation matching can be done with SWIFTnet Accord.
6.3.16 MT392 - Request for Cancellation
This is a normal cancellation message for any MT3xx message. When the cancelling message is
sent, the fields from the original message are placed within the cancelling message. The related
reference is determined by the reference number of the previously sent message.
Generally the MT392 message is not used. Instead, the original MT3xx message is cancelled by
sending a similar message (of the same MT type), using the correct operation code (typically CANC).
6.3.17 MT395 - Queries
SWIFT standards scope definition: It is used to request information or clarification relating to a
previous SWIFT or non-SWIFT message or to one or more transactions contained therein.
Message text can be entered in FIN Message Admin.
6.3.18 MT396 - Answers
SWIFT standards scope definition: It is used to respond to an MT 395 Queries or MT 392 Request for
Cancellation and other messages where no specific message type has been provided for the
response.
Message text can be entered in FIN Message Admin.
6.3.19 MT399 - Free Format Messages
SWIFT standards scope definition: This message type is used by financial institutions to send or
receive information for which another message type is not applicable.
Message text can be entered in FIN Message Admin.
6.3.20 MT515 - Client Confirmation of Purchase or Sale
The MT515 message is received from a counterparty and is used to create either a Treasury Bill or
Cash Movement transaction in TRM. Details are based on the actual content of the message.
Additional configuration in TRM is required to define the portfolio, counterparty, and instrument
used in the transaction.
SWIFT message details
SWIFT Connectivity Guide 83
6.3.21 MT518 - Market-Side Securities Trade Confirmation
The MT518 message is sent to a counterparty to confirm details of a bond or repo transaction on the
opening date. For a Buy/Sell Back or Sell/Buy Back transaction there are two messages created.
Amendments to the trade cancel the original message and send a new one.
6.3.22 MT535 Statement of Holdings
This message is received from your custodian to indicate the movements on a particular custody
account. The message can be broken into several balances per instrument before being inserted in
TRM for reconciliation. Sequencing of the message received in multiple pages is done in ESIAdapter,
see 2.1.5 Message sequencing on page 22.
6.3.23 MT540 - Receive Free
The MT540 message is sent from you to your bank or custodian to advise of the receipt of financial
instruments free of payment, physically or by book-entry received from your counterparty. ISIN or
CUSIP security identifiers (as configured in the Instrument Editor) can be used to identify the
instrument.
Place of Settlement (PSET in E1) is supported by entering the corresponding data in Client Editor.
Optional sequence F (Other Parties) is currently not supported. Pre-advice of receipt (Function of
message equals PREA) is currently not supported.
6.3.24 MT541 - Receive Against Payment
The MT541 message is sent from you to your bank or custodian to advise of the receipt of financial
instruments against payment, physically or by book-entry received from your counterparty. ISIN or
CUSIP security identifiers (as configured in the Instrument Editor) can be used to identify the
instrument.
Place of Settlement (PSET in E1) is supported by entering the corresponding data in Client Editor.
Optional sequence F (Other Parties) is currently not supported. Pre-advice of receipt (Function of
message equals PREA) is currently not supported.
6.3.25 MT542 - Deliver Free
The MT542 message is sent from you to your bank or custodian to order the delivery of financial
instruments free of payment, physically or by book-entry received from your counterparty. ISIN or
CUSIP security identifiers (as configured in the Instrument Editor) can be used to identify the
instrument.
Place of Settlement (PSET in E1) is supported by entering the corresponding data in Client Editor.
Optional sequence F (Other Parties) is currently not supported. Pre-advice of delivery (Function of
message equals PREA) is currently not supported.
6.3.26 MT543 - Delivery Against Payment
The MT542 message is sent from you to your bank/custodian to instruct the delivery of financial
instruments against payment, physically or by book-entry received to your counterparty. ISIN or
CUSIP security identifiers (as configured in the Instrument Editor) can be used to identify the
instrument.
Place of Settlement (PSET in E1) is supported by entering the corresponding data in Client Editor.
Optional sequence F (Other Parties) is currently not supported. Pre-advice of delivery (Function of
message equals PREA) is currently not supported.
SWIFT message details
84 © Wall Street Systems IPH AB - Confidential
6.3.27 MT592 - Request for Cancellation
This is a normal cancellation message for any MT5xx message. When the cancelling message is
sent, the fields from the original message are placed within the cancelling message. The related
reference is determined by the reference number of the previously sent message.
Generally the MT592 message is not used. Instead, the original message is cancelled by sending a
similar message (of the same MT type), using the correct type of operation code.
6.3.28 MT599 - Free Format Message
This message is sent from you to your counterpart to confirm the details of the following trades:
•Buying or Selling of a US Bank of International Settlements (BIS) Treasury Bill.
•Buying or Selling of Medium Term interest notes issued by BIS.
The message can either be sent as a NEW or an AMEND message. It is always cancelled by using a
MT592 message.
6.3.29 MT604 - Precious Metal Transfer/Delivery Order
This message is sent from you to the Bank of England. It instructs unallocated gold to be delivered
to your counterpart.
It is also possible to merge various MT604 messages into a single MT604. To enable automatic or
manual merging of this message type, there has to be a decider for MessageMerger updated in the
WorkflowController element.
The message cannot be amended once sent. You should cancel it using a MT692 message and send
a new MT604 message.
6.3.30 MT692 - Request for Cancellation
This is a normal cancellation message for any MT6xx message. When the cancelling message is
sent, the fields from the original message are placed within the cancelling message. The related
reference is determined by the reference number of the previously sent message.
6.3.31 MT699 - Free Format Message
This message is sent to your counterpart to confirm a gold deposit provisional confirmation, a gold
deposit final confirmation, or a gold deposit rollover confirmation.
6.3.32 MT900 - Confirmation of Debit
The MT900 message is sent to your counterpart to confirm a debit of their account. This is used in
conjunction with having private clients as portfolio owners for which you service an account
(generally used with TRM). It is based on a payment as generated in the Settlement Manager and
not on the Call Account/Call Money functionality. To cancel such a message an MT992 must be used.
6.3.33 MT910 - Confirmation of Credit
The MT900 message is sent to your counterpart to confirm a credit of their account. This is used in
conjunction with having private clients as portfolio owners for which you service an account
(generally used with TRM). It is based on a payment as generated in the Settlement Manager and
not on the Call Account / Call Money functionality. To cancel such a message an MT992 must be
used.
6.3.34 MT950 - Statement Message
The MT950 message is received from your bank to indicate the cash movements on a particular
account. The message is broken up into various movements before being inserted in TRM for
reconciliation.
SWIFT message details
SWIFT Connectivity Guide 85
6.3.35 MT992 - Request for Cancellation
This is a normal cancellation message for any MT9xx message. When the cancelling message is
sent, the fields from the original message are placed within the cancelling message. The related
reference is determined by the reference number of the previously sent message.
SWIFT message details
86 © Wall Street Systems IPH AB - Confidential

SWIFT Connectivity Guide 87
Chapter 7 SWIFT package configuration
This chapter provides technical information on how to install and configure the SWIFT package.
7.1 Configuring swift.properties
You need to set additional properties, based on the SWIFT messages you are using. These
properties are listed in the following sections.
7.1.1 MT515
When using the MT515 message to create transactions in TRM, you must specify the following
properties:
7.2 Pre-defined confirmation adapters
The following sections list all the TRMSwift adapters used to obtain confirmation or payment
business events from TRM. All these adapters use the comkit.command.parameters property as
defined in the general.properties file.
Property name Description
MT515.incoming.cp_client_id The client id of the counterpart for which this should be done. The
transaction will be created with this client id.
MT515.incoming.market_id The market id of the transaction to create.
MT515.incoming.repo.instrumentId ID of the instrument that is used for the transaction creation.
MT515.incoming.repo.portfolioId ID of the portfolio in which the transaction is created.

Pre-defined confirmation adapters
88 © Wall Street Systems IPH AB - Confidential
7.2.1 FXConfirmation
7.2.2 MMConfirmation
7.2.3 BAConfirmation
7.2.4 FixingConfirmation
Adapter Type Property
FXSpotForward Pickup Mode SH-FX-SPOT-FWD
Reference Mode SH-HOLD
MT type MT300
FXSpotForwardNDF Pickup Mode SH-FX-SPOT-NDF
Reference Mode SH-HOLD
MT type MT300
FXSwap Pickup Mode SH-FX-SWAP
Reference Mode SH-HOLD
MT type MT300 (two legs)
FXOption Pickup Mode SH-FX-OPTION
Reference Mode SH-HOLD
MT Type MT305
Adapter Type Property
IRLOAN Pickup Mode SH-IR-LOAN
Reference Mode SH-HOLD
MT type MT320
IRFRA Pickup Mode SH-IR-FRA
Reference Mode SH-HOLD
MT type MT340
IRBILLBIS Pickup Mode SH-IR-BILL-BIS
Reference Mode SH-HOLD
MT type MT599 (MT599-FIXBIS)
IRMTNBIS Pickup Mode SH-IR-MTN-BIS
Reference Mode SH-HOLD
MT type MT599 (MT599-MTIBIS)
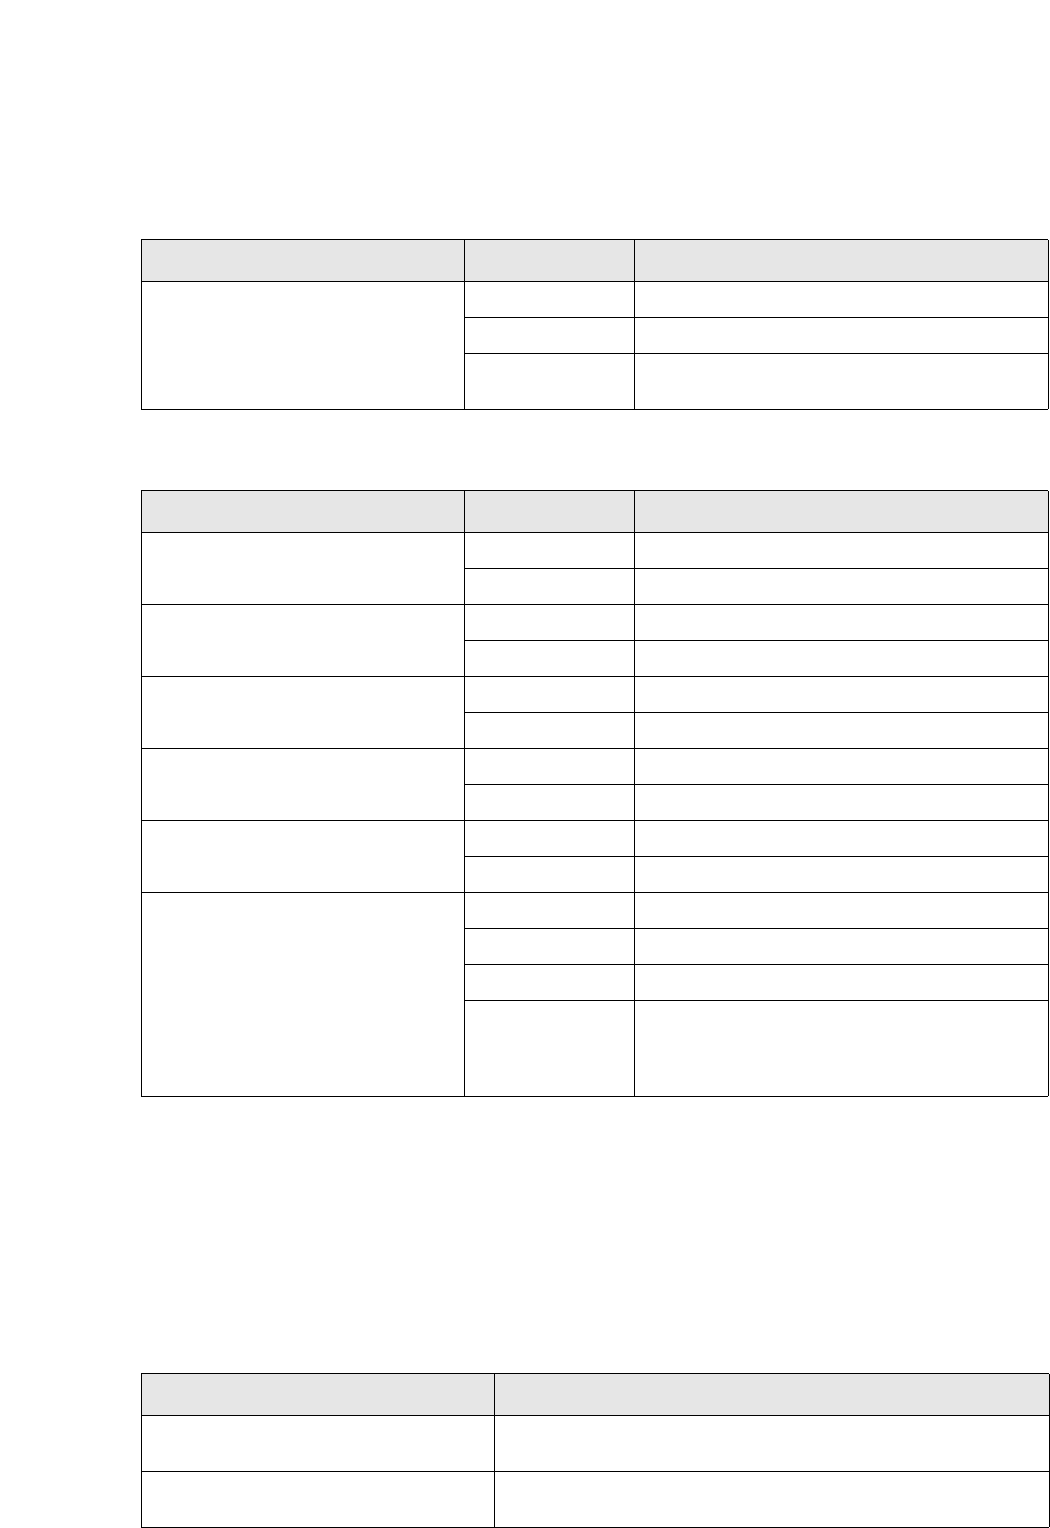
Instrument groups
SWIFT Connectivity Guide 89
7.2.5 CancelConfirmation
7.2.6 Payments
7.3 Instrument groups
The two properties below are used as part of the query parameters for the feeders
FXSpotForwardNDF and IRFRAFixingConfirmation to ensure that transactions of the correct
instrument group are retrieved.
They need to be set only when the client installation does not use the standardized instrument group
hierarchy supplied with the Factory setup. (This is what the default values supplied are based on.)
Adapter Type Property
CancelConfirmation Pickup Mode SH-CANC-GET
Reference Mode SH-CANC-HOLD
MT type MT392 or MT3xx
(with CANC in field 22A)
Adapter Type Property
SettlementQueueFactory - MT1 Rule SFLO-SWIFT-MT1
MT type MT103
SettlementQueueFactory - MT2 Rule SFLO-SWIFT-MT2
MT type MT200, MT202, MT203 or MT210
SettlementQueueFactory - MT3 Rule SFLO-SWIFT-MT3
MT type MT350
SettlementQueueFactory - MT5 Rule SFLO-SWIFT-MT5
MT type MT540-MT543
SettlementQueueFactory - MT6 Rule SFLO-SWIFT-MT6
MT type MT604
CancelPayment Pickup Mode 8SH-CANCEL
Reference Mode 9SH-CANCELED
Transfer type SH-SWIFT%
MT type MTn92
(the same as the transfer type) or
MT54n
(with a CANC - if cancelling an MT54n message)
Property name Description
fxforwardndf.instrument.group Set to the common instrument group for NDF FX Forwards (as
seen in the Instrument Editor).
iffra.instrument.group Set to the common instrument group for FRAs (as seen in the
Instrument Editor).
Instrument groups
90 © Wall Street Systems IPH AB - Confidential
SWIFT Connectivity Guide 91
Chapter 8 TRMSwift and CMM setup after
installation
8.1 Introduction
TRMSwift and WebSuite are installed with Wallstreet Suite Installer. By default, the Suite Installer
sets up environment variables and tables.
8.2 Setting up TRMSwift environment variables
These variables are defined with SuiteInstaller framework in file
<SI_INSTALLER_DIR>/envs/<ENV>/etc/environment/parts/60_trmswift.bat/.sh:
The values are as follows:
TRMSWIFT_USER=<TRMSwift user>
TRMSWIFT_PASSWORD=<TRMSwift Password>
TRMSWIFT_COMKIT_SERVICE=<comkit service: e.g. TRMSwift>
TRMSWIFT_COMPONENT=<list of components to launch
<e.g.COMKIT:OTHER:SYSTEM:FILTER:SWIFTFILE>
8.3 Updating tables
Update the tables before first use of TRMSwift or after a change in configuration. Open a Suite
Installer Shell, (<SUITE_INSTALLER_DIR>/envs/<ENV>/bin/xxx-shell.bat/.sh) and enter the
following command:
UNIX:
rc.trmswift update
Windows:
bin\trmswift.bat update
This command can also process a single subdirectory within the whole configuration tree:
trmswift update <package sub-directory name>
Example: rc.trmswift update FAX
8.3.1 Visualizing the configuration
Use the command trmswift dump IKITSetupElement to log the content of the IKITSetupElement
configuration table. For more information see 11.3 Displaying the current TRMSwift configuration on
page 123.
Setting up the CMM environment
92 © Wall Street Systems IPH AB - Confidential
8.4 Setting up the CMM environment
The Cash Management (CMM) part of WebSuite must be configured to communicate with the
Enterprise Swift Integration Adapter (ESIAdapter).
8.4.1 Technical setup
1. Check that the file actformatmapping.xml is correct for the type of file for export or import.
2. Check in poststatushandling.xml. This is used for TIMEOUT and REJECTS.
3. Check the swift-adaptor-jmsconfig.xml file. This file tells CMM where ActiveMQ is located,
and the queue that CMM should use for communicating with ESIAdapter:
<?xml version="1.0" encoding="UTF-8"?>
<beans xmlns="http://www.springframework.org/schema/beans"
xmlns:xsi="http://www.w3.org/2001/XMLSchema-instance"
xmlns:aop="http://www.springframework.org/schema/aop"
xmlns:util="http://www.springframework.org/schema/util"
xsi:schemaLocation="http://www.springframework.org/schema/beans
http://www.springframework.org/schema/beans/spring-beans-2.0.xsd
http://www.springframework.org/schema/aop
http://www.springframework.org/schema/aop/spring-aop-2.0.xsd
http://www.springframework.org/schema/util
http://www.springframework.org/schema/util/spring-util-2.0.xsd">
<bean id="properties"
class="org.springframework.beans.factory.config.PropertyPlaceholderConfigurer">
<property name="properties">
<value>
<!--replace "localhost" to the server name or IP address where the ActiveMQ
host of onyx server points to-->
<!-- jms.broker.host=localhost -->
jms.broker.host=10.35.0.130
<!--replace "61616" with the proper ActiveMQ port number-->
<!-- jms.broker.port=61616 -->
jms.broker.port=20460
<!--no change on this property unless you have a good reason-->
<!--optional, prefix with "failover:" to continuely look up the ActiveMQ URL
if it is down-->
jms.broker.url=tcp://${jms.broker.host}:${jms.broker.port}?trace=true
<!--replace ${wss.env.name} variable with the real property value configured
in the adaptor side-->
<!--ensure the queue name is same as the queue name configured in esiadaptor
side-->
<!-- jms.send.queue=${wss.env.name}.esiadapter.in -->
jms.send.queue=${wss.env.name}.esiadapter.in
<!--replace ${wss.env.name} variable with the real property value configured
in adaptor side-->
<!--ensure the queue name is same as the queue name configured in esiadaptor
side-->
<!-- jms.receive.queue=${wss.env.name}.esiadapter.cm -->
jms.receive.queue=${wss.env.name}.esiadapter.cm
</value>
</property>
</bean>
</beans>
4. When the CMM configuration for ESIAdapter is finished, restart WebSuite.
Once the technical setup is done, set up of the communication protocol and the interchange.
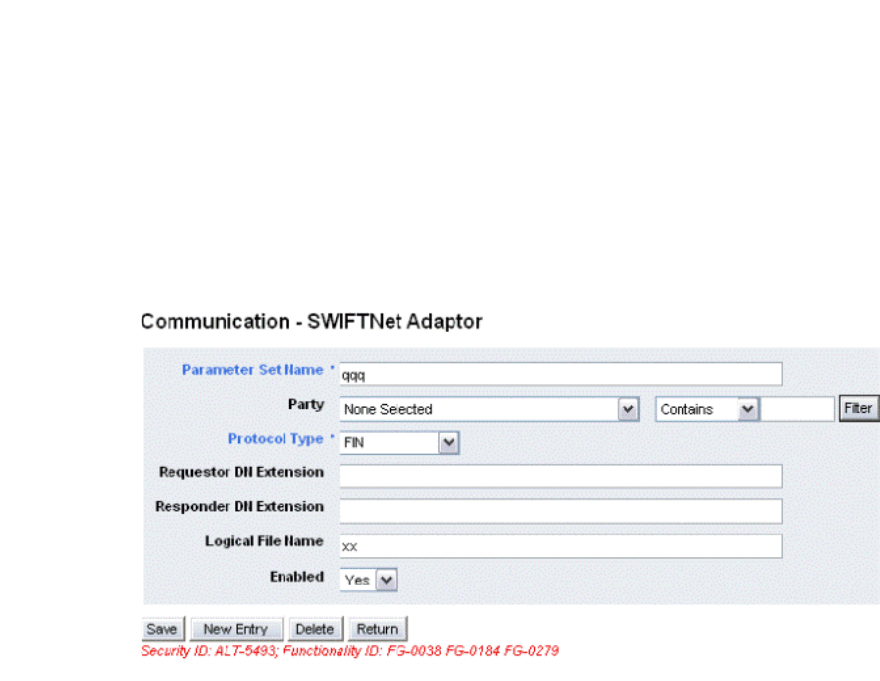
Setting up the CMM environment
SWIFT Connectivity Guide 93
8.4.2 Communication protocol and interchange setup
8.4.2.1 Communication protocol for FIN
8.4.2.1.1 Outbound FIN format messages from CMM to ESIAdapter
Message types:
•MT101 - Payments
•MT104 - Direct Debits
•MT210 - Preadvice
ESIAdapter does not replace block 1 and block 2 headers for messages generated from CMM. CMM
sends the complete FIN message to ESIAdapter including blocks 1 and 2. This in turn means the
Test BIC code in ESICRM is not used at all.
For FIN messages leaving CMM there are three critical configuration items.
Configuration in the Suite
The BIC codes (also known as "SWIFT Codes") must be configured for either Production or Test.
There is no full Suite support for switching between the two.
This means that
•The Swift Code setup in the Client Editor must be configured once for testing with the test BIC
codes, and reconfigured again when the client moves to production with the production BIC
codes.
•The BIC codes must be configured for both the receiving Bank and the sending entity.
Configuration in ESICRM
ESICRM needs to be configured with exactly the same BIC code. In ESICRM, if the setup is for a test
environment, then the BIC code in ESICRM needs to be the Test BIC code for both the BIC Code and
the Test BIC Code.
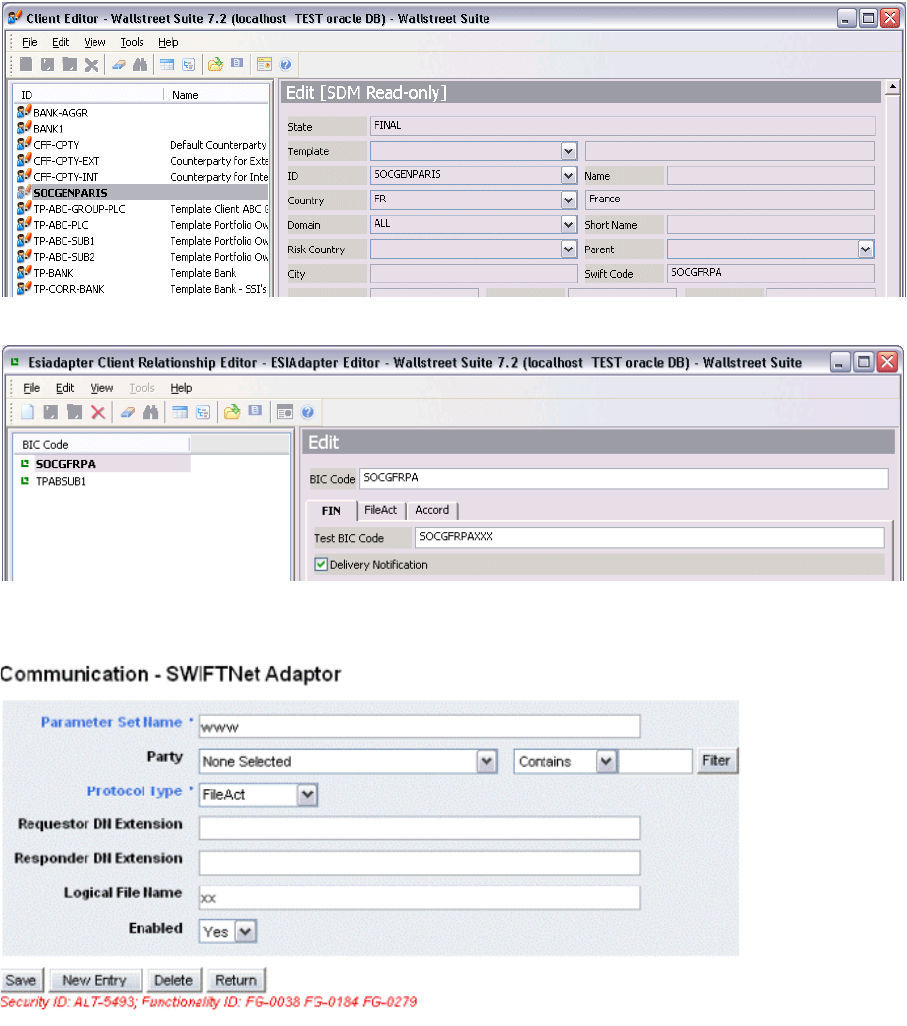
Setting up the CMM environment
94 © Wall Street Systems IPH AB - Confidential
Client Editor Showing a sample BIC code for the receiver:.
Corresponding ESICRM showing the BIC code for the receiver:
8.4.2.2 Communication protocol for FileAct
8.4.2.2.1 Outbound FileAct format messages from CMM to ESIAdapter
Message types: non-SWIFT messages, for example AFB160.
For FileAct messages leaving CMM, there are three important fields that ESIAdapter uses to
translate the internal message to one acceptable for FileAct. This means determining:
•Sender and Receiver Distinguished Names (DNs)
•Request Type Name
•File Information
which are then placed on the outgoing message to SWIFT.

Setting up the CMM environment
SWIFT Connectivity Guide 95
The values of the fields Request Type Name, File Information, Sender DN, Receiver DN,
Compression Algorithm, etc. are all bank dependent.
Sender and Receiver DN
ESIAdapter uses the two BIC codes, sent in the requestor_d_n and the responder_d_n from CMM
to map to the BIC codes defined in the ESICRM. These BIC codes are taken from the Client and the
Bank SWIFT Code fields.
The combination of area and syntax_and_format are combined to match a Request Type defined in
ESICRM. These are defined in the:
•Request Type Name
Same process as above, but the Request Type Name is selected for the outbound message to
SWIFT.
•FileInfo
•Same process as above, but the Request Type Name is selected for the outbound message to
SWIFT.
The traffic between CMM and ESIAdapter can be seen using the Communication log group in CMM.
Here is a sample Request from CMM to ESIAdapter:
1224516070615… Communication … CaSWIFTNetAdaptor Verbose
FileAct message is generated: [FileactRequestType]
module_name:CM
unique_id:41
header:[HeaderType]
action:PUT
requestor_d_n:[DNType]
bic:TPABSUB1
extension:
common_name:null
responder_d_n:[DNType]
bic:SOCGFRPA
extension:ppe,cn=0001
common_name:null
request_type:[RequestTypeType]
area:pain
syntax_and_format:xxx.cfonb160.pay
description:
ack_indicator:true
request_crypto:true
nr_indicator:true
logical_name:afb160
compression:None
item_count:1
body:[BodyType]
content:
0302 000000 22108TEMPLATE …
The second aspect is the Logical Filename. This is transferred to SWIFT and used internally by the
bank’s systems. This Logical Filename is configured in the CMM Communication Protocol.
Note: The final value is bank dependent, with some banks accepting only names without .
characters. For example: AFB120 and not pain.xxx.cfonb160.pay. It is important to
note that this value is sent directly to the bank and is not used for any internal processing
in Wallstreet Suite.
Setting up the CMM environment
96 © Wall Street Systems IPH AB - Confidential
Configuration in Suite
•Configuring the CMM Swift Fileact: syntax_and_format
The aim is to have CMM send the correct area, and syntax_and_format to ESIAdapter for
mapping to the request type.
For example:
area:pain
syntax_and_format:xxx.cfonb160.pay
Only the part after xxx needs to be configured in the CMM file
<suite install dir>\envs\<env
name>\etc\wss-web\cmm\ConfigurationData\installation\interfaces\swiftadaptor\fil
eactformatmapping.xml:
<mapping cmm_format ="CFONB_PAY" fileact_format = "cfonb160.pay"/>
•Configuring the CMM Communication Protocol Parameters for Logical Filename
Open the SWIFTNet Adaptor communication protocol parameters, and create a new protocol:
–Parameter set name: is used to configure the bank-specific interchange
–Party: none selected
–Protocol: FileAct
–Requestor DN Extension: specified by the bank
–Responder DN Extension: specified by the bank
–Logical Filename: specified by the bank, typically a short description without any
punctuation. For example for AFB160 formats: afb160
–Enabled: Yes.
•Configuring the CMM Interchange for FileAct
Create the interchange with the bank, and select the Format, and Communication Protocol
Parameter previously defined. The following must be set up in the sender and receiver BICs
using the ESICRM FileAct page:
–BIC code must match the Swift Code in the Client Editor
–Request Type
–Must match the 'area', and syntax_and_format from CMM
–DN: Provided by the BANK
–Request Type Name: Correct SWIFT request type, provided by SWIFT
–File Information: Provided by the BANK
–Compression: Provided by the BANK
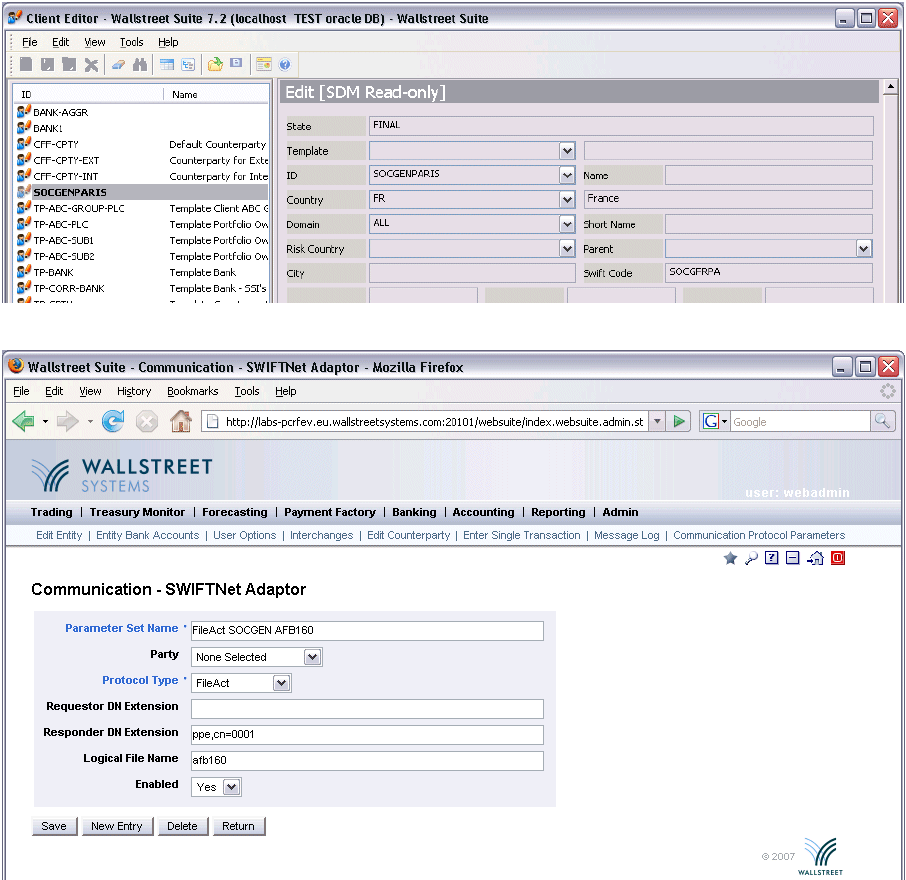
Setting up the CMM environment
SWIFT Connectivity Guide 97
Client Editor Showing a sample BIC code for the receiver:
CMM Communication Protocol Parameters example:
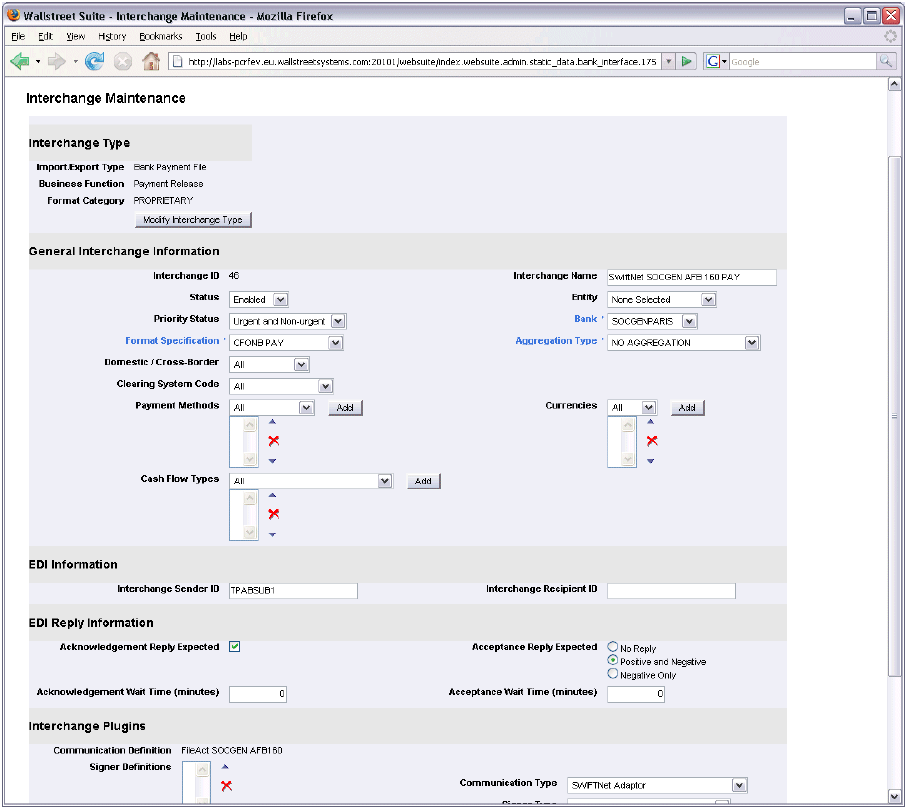
Setting up the CMM environment
98 © Wall Street Systems IPH AB - Confidential
Sample CMM Interchange setup
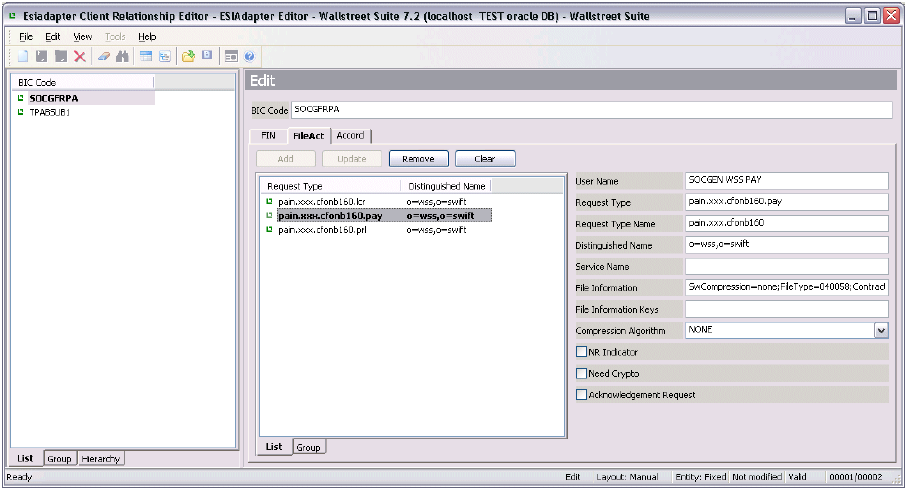
Setting up the CMM environment
SWIFT Connectivity Guide 99
Sample ESICRM setup for FileAct:
8.4.2.2.2 Inbound FileAct format messages from ESIAdapter
Message types concerned: non-Swift Messages, for example, AFB120.
As CMM does not understand DN names, it is up to ESIAdapter to map the incoming message from
SWIFT to a BIC code. This applies for both the Sender and Receiver BIC codes.
This is approximately the reverse process of the outbound messages from CMM. The content of the
FileAct page is used to find the corresponding BIC codes, which are sent to CMM.
The inbound FileAct message from SWIFT is parsed, and the header information used to determine
both the sender and receiver BIC codes. The following headers are parsed from the FileAct message
and their corresponding values searched for in the FileAct setup in ESICRM.
•FileAct request type maps to Request Type Name.
•FileAct DN maps to DN, either send or receiver.
Once the correct record is found, it is used to determine the information to be sent to CMM, which
expects the following components to be populated by ESIAdapter:
•Sender BIC (Taken from the BIC Code field in ESICRM)
•Receiver BIC (Taken from the BIC Code field in ESICRM)
•Area (Split from the Request Type, for the record the BANK
•Syntax And Format (Split from the Request Type, for the record the BANK
The traffic between CMM and ESIAdapter can be seen using the Communication log group in CMM.
Example request sent From ESIAdapter to CMM:
1224760613056 … Communication … CaSWIFTNetAdaptor Verbose
Incoming Message Received From Adaptor:[FileactRequestType]
module_name:TEST
unique_id:1224760612900
header:[HeaderType]
action:PUT
requestor_d_n:[DNType]
bic:SOCGFRPA
extension:null
common_name:null
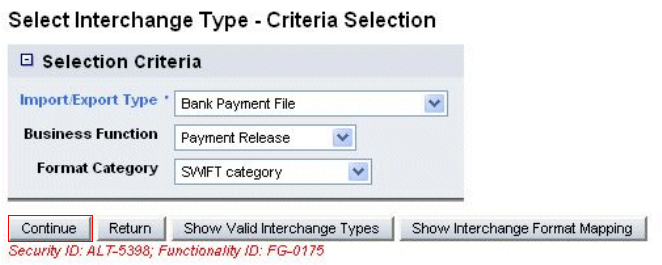
Setting up the CMM environment
100 © Wall Street Systems IPH AB - Confidential
responder_d_n:[DNType]
bic:TPABSUB1
extension:null
common_name:null
request_type:[RequestTypeType]
area:camt
syntax_and_format:xxx.cfonb120.stm
description:null
ack_indicator:false
request_crypto:true
nr_indicator:true
logical_name:CM-1224760612900
compression:None
item_count:1
body:[BodyType]
content:0130004 00898EUR2 00010290739 …
8.4.2.3 Interchange setup

Setting up the CMM environment
SWIFT Connectivity Guide 101

Setting up the CMM environment
102 © Wall Street Systems IPH AB - Confidential
Example:
On the CMM-hosted server, the following setup has been done in the directory
/WSS/wss7211a_rea5/envs/rea5/etc/wss-web/cmm/ConfigurationData/installation/appserve
r/spring/interfaces:
<beans xmlns="http://www.springframework.org/schema/beans"
xmlns:xsi="http://www.w3.org/2001/XMLSchema-instance"
xmlns:aop="http://www.springframework.org/schema/aop"
xmlns:util="http://www.springframework.org/schema/util"
xsi:schemaLocation="http://www.springframework.org/schema/beans
http://www.springframework.org/schema/beans/spring-beans-2.0.xsd
http://www.springframework.org/schema/aop
http://www.springframework.org/schema/aop/spring-aop-2.0.xsd
http://www.springframework.org/schema/util
http://www.springframework.org/schema/util/spring-util-2.0.xsd">
<bean id="properties"
class="org.springframework.beans.factory.config.PropertyPlaceholderConfigurer">
<property name="properties">
<value>
<!-- ActiveMQ host server name or IP address where the of onyx server points
to-->
jms.broker.host=10.35.0.130
<!--replace "61616" with the proper ActiveMQ port number-->
jms.broker.port=20560
<!--no change on this property unless you have a good reason-->
<!--optional, prefix with "failover:" to continuely look up the ActiveMQ URL
if it is down-->
jms.broker.url=tcp://${jms.broker.host}:${jms.broker.port}?trace=true
<!--replace ${wss.env.name} variable with the real property value configured
in the adaptor side-->
<!--ensure the queue name is same as the queue name configured in esiadaptor
side-->
jms.send.queue=rea5.esiadapter.in
<!--replace ${wss.env.name} variable with the real property value configured
in adaptor side-->
<!--ensure the queue name is same as the queue name configured in esiadaptor
side-->
jms.receive.queue=rea5.esiadapter.cm
</value>
</property>
</bean>
</beans>

Starting WSS processes
SWIFT Connectivity Guide 103
8.5 Starting WSS processes
To run TRMSwift, start the following server processes:
1. TRMSwift core
2. TRMSwift adapters
Note: comKIT, ActiveMQ and the associated services must be running before you start TRMSwift
adapters.
On an MSSQL installation, you can start the TRMSwift services using the Windows trusted
connection, with the following environment variable:
FK_TRUSTED_CONNECTION=1
And the following java properties (to modify in rc.trmswift or trmswift.bat)
-Dtrmswift.database.type=mssql_with_trusted_connection
8.6 Renaming TRMSwift tables
If your TRMSwift tables are not prefixed by IKIT (normal table) or IKAR (archive table), run this
command:
ant rename -Ddbms_type=[sybase|mssql|oracle] -Dold.prefix=<old.prefix>
-Dold.archive.prefix=<old.archive.prefix>
where <old_prefix> and <old_archive_prefix> are the prefixes used in your previous installation.
Example: ant rename -Ddbms_type=oracle -Dold.prefix=SH -Dold.archive.prefix=SHS
The following files will be created in the upgrade directory which you should run to rename the
tables:
rename_archivetables.sql
rename_tables.sql
8.7 Windows services
You can manage Windows services in one of the following ways:
8.7.1 Using Process Monitor
To use Process Monitor, see the TRM System Administration Guide.
8.7.2 Using the Wrapper tool
You can use TRMSwift processes as Windows processes, using the Wrapper tool. The files are
available on %FK_HOME%\etc\trmswift\windows_service.
Proceed as follows:
1. Make sure that the naming service is running
2. Make sure that TRMSwift environment variables are correctly set (they are defined in
config.bat). You can modify core.service.properties and feeder.service.properties to
give your Windows service a relevant name.
Windows services
104 © Wall Street Systems IPH AB - Confidential
3. Launch the services like a console ( to check that they are working):
Wrapper -c core.service.properties
Wrapper -c feeder.service.properties
To install services:
Wrapper -i core.service.properties
Wrapper -i feeder.service.properties
To remove services:
Wrapper -r core.service.properties
Wrapper -r feeder.service.properties
To activate services: Control Panel -> Administration Tool -> Component Services ->Services
Start | Stop
You can use the dependencies properties of the wrapper. For details, see the description on
wrapper.sourceforge.net.

SWIFT Connectivity Guide 105
Chapter 9 TRMSwift environment setup
This chapter describes the basic default setup. This setup enables you to start using TRMSwift
without any changes to the Workflow or Messages. The detailed configuration of TRMSwift is
described in later chapters.
9.1 Accessing the database
TRMSwift uses the TRM database to maintain consistency and for user verification. The TRMSwift
tables are prefixed by IKIT and IKAR.
There are two methods of accessing the TRM data:
•Via comKIT. All data that is used to enhance a message is obtained by this method, using the
data adapter. Examples are SWIFT BIC codes, ISIN codes, and so on. When a comKIT service
does not provide all the data, and the data service cannot be used in conjunction with custom
search/stored procedures, an SQL Stored Procedure adapter can be used to access the database
directly via JDBC. comKIT hides permissioning from TRMSwift, and verifies permissioning (user
and mode) when it executes any action.
•Using the Stored Procedure adapter for inserting State of Account entries into TRM. This method
is generally avoided because it makes upgrading more difficult. The general concept remains the
same even if comKIT changes or adds additional services.
comKIT is also used for updating TRM. After obtaining data, such as a transaction, TRM needs to be
updated with the fact that TRMSwift has received the data and, later, that messages were sent
correctly. This update is done using comKIT. In certain cases comKIT is used for creating
transactions directly in TRM, for example receiving an MT515 message.
9.2 TRMSwift XML tag structure
You can edit most of the TRMSwift XML configuration files. These files have a common content
structure, although the content will differ from file to file.
All XML configuration files within TRMSwift contain a root element of <database> or <datasetup>.
The database root element must not be modified as it defines the database schema.
Note: Sybase does not work correctly with JDBC unless you run an SQL script which is provided
by Sybase. If this script has not been installed, the XML data is truncated when written to
the database. You should also ensure that you are using jconnect5.5.jar or a later version
of JConnect.
9.2.1 Editing XML files
The TRMSwift configuration is usually contained in the files located in the dbms/xml directories. You
can also define configuration in the CSD
(Custom Specific Development) package. CSD settings are located in the package/CSD/xml

TRMSwift XML tag structure
106 © Wall Street Systems IPH AB - Confidential
directories. The <datasetup> settings in the CSD package take precedence over settings in files
located in the dbms/xml directories, as the CSD package is loaded last.
The configuration described in this guide assumes the general TRMSwift configuration. The following
sections outline the different XML elements.
9.2.2 <datasetup>
The <datasetup> element identifies the content of a file. In all cases it is used as the root element
of the XML and exists only for information purposes (not for configuration). There should be only
one such tag within a file. The content of the <datasetup> element is determined by the type of
configuration.
This element contains two attributes: file and name. The file attribute contains the name of the file
in which the <datasetup> element exists. The name attribute contains a description of the file:
<datasetup file="encoderMT5.xml" name="EncoderMT5">
The <datasetup> element can contain any of the following elements: <action>, <rule>,
<ruleset>, <dtdelement> and <setupelement>.
9.2.2.1 <action>
The <action> element is used to define a particular action. An <action> element always contains a
<rule> element.
The content of the <action> element is a single <data> element which in turn wraps the XSLT
stylesheet containing the action. Anything within the <data> element is stored in the database as
part of the XSLT stylesheet.
The <action> element takes three attributes as described in the following table:
The following is an example of an action:
$
Data Setup and Action
1: <datasetup
2: file="rulesBESPayments.xml"
3: name="Rules For BusinessEventSplitter (Payments)">
4: <action
Attribute Description
name The unique name of the action. When a rule evaluates to true, the unique name identifies
the action to be performed. This attribute is mandatory.
template_list Indicates if the action is a simple action or a multiple part action (template list). This
attribute is optional:
•yes: multiple part action
•no (default): simple action.
cacheable_list Multiple part actions usually contain an action that is run to determine the template list. If
the template list is cacheable, this evaluating action is only run once. This attribute is
optional:
•yes: cacheable
•no (default): not cacheable.
fixed_result Indicates that the action is not an XSLT script, but rather the resulting XML that is
produced if an XSLT script is run. If a particular XSLT script always produces the same
result, irrespective of the input XML, you can use a fixed result. The fixed result must be
enclosed in the data element and it must be valid XML. Possible values are:
•yes: fixed result
•no (default): not a fixed result.

TRMSwift XML tag structure
SWIFT Connectivity Guide 107
5: name="BES_MT100202"
6: template_list="no"
7: cacheable_list="no">
8: <data>
9: <xsl:stylesheet
10: version="1.0"
11: xmlns:xsl="http://www.w3.org/1999/XSL/Transform">
12: <xsl:template match="/businessevent">
13: .
14: .
15: </xsl:template>
16: </xsl:stylesheet>
17: </data>
18: </action>
19: .
20: .
21:</datasetup>
The example above indicates the <datasetup> element with the two attributes as described in
section 9.2.2 <datasetup> on page 106.
It also contains an <action> element with its attributes. In this example, the action is a simple
action that is performed directly. Simple actions are cached irrespective of the cacheable_list
value.
The <data> element of the <action> element (line 8 to 17) wraps the XSLT stylesheet of the action.
Lines 19 and 20 are left open to indicate that further action, rules, rulesets or setup elements could
be defined.
The version of XSLT (on line 10) and the name space (xsl on line 11) are defined. This is standard
XSLT. See http://www.w3c.org for further details on the XSLT specification.
Whenever an action is described elsewhere in the file, it is placed within an <action> element in
one of the configurable XML files.
9.2.2.2 <rule>
A <rule> element can be defined within a <datasetup> element (similar to the <action> element).
In the previous example lines 19 and 20 were left open to indicate where these elements can be
placed.
See 12.4.2 XPath rules on page 135 for further details on defining a <rule> element.
9.2.2.3 <ruleset>
A <ruleset> element can be defined within a <datasetup> element (similar to the <action> and
<rule> elements). In the previous example lines 19 and 20 were left open to indicate where these
elements can be placed.
See 12.4.2 XPath rules on page 135 for further details on defining a <ruleset> element.
9.2.2.4 <setupelement>
A <setupelement> element is used for any configuration required by a component. This excludes
the actions, rules (or rule sets) and permissions. The <setupelement> element has various
attributes to define what it is used for as well as a single <data> element to wrap the XML for the
configuration.

Setting environment variables
108 © Wall Street Systems IPH AB - Confidential
Below is a list of the attributes available for the <setupelement> element. All the attributes are
mandatory:
The name, type and component_name attributes uniquely identify a particular configuration.
$9.2.2.4.1 setupelement
1: <datasetup
2: .
3: .
4: <setupelement
5: name="SETUP"
6: type="GENERAL"
7: component_name="Workflow">
8: <data>
9: <Workflow wait="1000">
10: <onerror state="DeadLetterBin" />
11: .
12: .
13: </Workflow>
14: </data>
15: </setupelement>
16: </datasetup>
Lines 2 and 3 indicate that this is where other actions, rules, rule sets or setupelements can be
placed. The <setupelement> element contains all three attributes. It also contains a single <data>
element that defines the XML configuration.
Whenever a component’s configuration is described elsewhere in the file, it is placed within a
<setupelement> element in one of the configurable XML files.
9.3 Setting environment variables
Environment variables enable TRMSwift to:
•Process data within a given environment.
•Communicate with the database.
•Communicate with TRM.
•Identify which user id to use when starting up the system.
The TRMSwift environment variables are defined in the following files:
•Windows: share/environments/config.bat
Attribute Description
name This is the name of the configuration.
type This is the type of configuration.
component_name Typically, this is the unique name of the component to which the configuration
belongs.

Setting package properties
SWIFT Connectivity Guide 109
•Unix: share/environments/trmswift_config.pl
9.4 Setting package properties
Depending on the package you want to use, you should define and modify certain variables. These
are defined in a properties file located in the package/<PACKAGE_NAME> directory.
Property Name Description
TRMSWIFT_USER The name of the user that is used to connect to the database when running all
components.
TRMSWIFT_PASSWORD The password that corresponds to the user name which is defined in
trmswift.user.name.
TRMSWIFT_SERVICE The "service" of the TRM naming service where comKIT is registered. The
service must correspond to the FK_COMKIT_SETUP variable as defined in the
TRM environment.
TRMSWIFT_COMPONENT he trmswift.feeder.component property is used to determine the parts of
the Adapter framework to be activated. It allows various read and write
adapter groups to be enabled. The values are colon-separated and can be any
of those listed in the component_type attribute of an adapter's XML
configuration file.
Example 1. This example activates comKIT and SWIFT file adapters for TRM,
all filters, all system adapters (like email, etc) and OTHER.
trmswift.feeder.component=OTHER:FILTER:COMKIT:SWIFTFILE:SYSTE
M
It is also possible to enable only only certain read or write sections of the
adapter. The list should contain the name of the read or write section (as
specified by <io-detail-name> in the XML configuration) along with whether it
is the read or write section. Only these sections listed will be activated. If no
sections are listed as in this example, all read and write sections of the listed
adapter groups will be activated. If any the read or write sections do not
exist, they are ignored.
Example 2: As Example 1, except that only the FX-SpotConfirmation read
section will be activated for the COMKIT adapter group. The "R|" indicates it
is a read section. This is the default, so it can be left out. No write sections
will be activated for the COMKIT adapter group.
trmswift.feeder.component=OTHER:FILTER:COMKIT(R|FX-SpotConfir
mation):SWIFTFILE:SYSTEM
or
trmswift.feeder.component=OTHER:FILTER:COMKIT(FX-SpotConfirma
tion):SWIFTFILE:SYSTEM
Example 3: As Example 2, except that the FX-SwapConfirmation read section
will also be activated. No write sections will be activated for the COMKIT
adapter group. Note that different sections must be separated by a pipe (|)
sign.

Setting package properties
110 © Wall Street Systems IPH AB - Confidential
9.4.1 Feeder
In the package/GENERAL/general.properties file:
Property Name Description
filefeeder.output.path This is the directory where output message files are placed. This is generally
the parent directory. The adapter configuration determines the full path.
Use the question mark symbol (?) to define path separators and not forward
(/) or backward (\) slashes. You do not need to place a separator at the end
of the property.
comkit.result.mode This property permits to specify the result mode used by comkit. (by default
the value is AS-LOCAL)
comkit.command.parameters Parameters that are used when fetching transactions via comKIT. This
applies to all confirmation adapters. Generally it also applies to any
transaction adapters. However, you can apply these parameters to specific
transaction adapters only.
The XML definition is as follows:
<parameter>
<key>name_of_field</key>
<value>value_of_field</value>
</parameter>
The name of the field is derived from the Transaction field in the comKIT
interface. You can view the possible values in the comKIT metadata.
For example, to find transactions within a portfolio (or sub-portfolio) called
DEMO, you would define the following:
<parameter>
<key>portfolio_id</key>
<value>DEMO</value>
</parameter>
trmswift.feeder.component=OTHER:FILTER:COMKIT(R|FX-SpotConfi
rmation|R|FX-SwapConfirmation):SWIFTFILE:SYSTEM
or
trmswift.feeder.component=OTHER:FILTER:COMKIT(FX-SpotConfirm
ation|FX-SwapConfirmation):SWIFTFILE:SYSTEM
Example 4: As Example 3, except that the (fictitious) write section named
FX-Writer will also be activated. The "W|" indicates the last section is a
write section. As "R|" is the default, "W|" must be specified.
trmswift.feeder.component=OTHER:FILTER:COMKIT(R|FX-SpotConfi
rmation|R|FX-SwapConfirmation|W|FX-Writer):SWIFTFILE:SYSTEM
or
trmswift.feeder.component=OTHER:FILTER:COMKIT(FX-SpotConfirm
ation|FX-SwapConfirmation|W|FX-Writer):SWIFTFILE:SYSTEM
Example 5: As Example 4, except that neither of the two read sections will
be activated.
trmswift.feeder.component=OTHER:FILTER:COMKIT(W|FX-Writer):S
WIFTFILE:SYSTEM
Setting SWIFT properties
SWIFT Connectivity Guide 111
9.4.2 Printer
In the package/GENERAL/general.properties file:
9.4.3 Email
In the package/GENERAL/general.properties file:
9.5 Setting SWIFT properties
These are in the file etc/trmswift/package/SWIFT/swift_properties:
Below is a list of valid (standard) values. When creating a CSD, you can
extend this list as desired.
• CASMF: connects to SWIFTAlliance Access for the CASmf API
• COMKIT: used for Payments, Cancel Payments, BA- FX-
MM-Confirmations, Cancel Confirmations, Cashflow Fixing Confirmations,
Fax Confirmations, Statement of Accounts (MT950), and creating TRM
transactions for TRM
• COMKIT-CALL: used for the Call adapter for TRM 5.1
• FIX: used for sending FIX messages in conjunction with OMM
• OMM: used to connect to OMM
• RTGS: used for the Bank of Finland’s system
• SWIFTFILE: used for creating SWIFT files for TRM 5.0
• SWIFTLOAN: used for incoming loans
• SYSTEM: used for email, printers, files and by packages. This value
should always be included
• TRAM: used to connect TRM 5.0 to CityNet Matching
• FILTER: indicates which filters are used, typically used for SWIFT, FAX,
CMM or TRAM.
• OTHER: defines various connectors, filters, and factories. See
package/GENERAL//feeder/feeder_conf.xml for more details.
Property Name Description
Property Name Description
feeder.printer.name • UNIX: the printer IP address and type.
For example: 127.0.0.1:raw
• Windows: path to the device.
For example: \\machine\name\device
Property Name Description
feeder.smtpserver.server The IP address of the mail server.
feeder.email.to The email address of the recipient.
feeder.email.from The email address of the sender.
feeder.email.subj The subject of the email.

Setting SWIFT properties
112 © Wall Street Systems IPH AB - Confidential
9.5.1 CASmf
9.5.2 SWIFT header
9.5.3 MT515
Property Name Description
feeder.casmf.mapid The mapid setup in the DMAPID.DAT file in CASmf.
feeder.casmf.acknack A boolean value:
•true: the TRMSwift adapter waits for an acknowledgement
from CASmf before determining the success or failure of a
message
•false (default): the TRMSwift adapter does not wait.
Property Name Description
swift.decoder.field_1 The field that is created when parsing the header 1 in a SWIFT
message. The default value is sender. This value must be set to
receiver when using CASmf.
swift.decoder.field_2 The field that is created when parsing the header 2 in a SWIFT
message. The default value is receiver. This value must be set to
sender when using CASmf.
swift.decoder.field_2_extra Captures additional characters when using CASmf. It should be set
to .{10} when using CASmf.
swift.fk.version The version of TRM joiners to use:
• for TRM 5.0 set to blank
• for TRM 5.1 set to 51
• for TRM 6.0 set to 60
swift.header.terminal The SWIFT Terminal code to use when sending SWIFT messages.
Set this value to the code of your logical SWIFT terminal. Empty
values result in a BIC code which is too short.
Property Name Description
MT515.incoming.cp_client_id The counterparty client id for T-BILLS and REPOS. The default
value is FRNYNYC.
MT515.incoming.market_id The market id for T-BILLS and REPOS. The default value is MM.
MT515.incoming.repo.instrumentId The instrument id for REPOS. The default value is REPO-AUTO.
portfolio.property.t-bill The portfolio property for T-BILLS which specifies the
corresponding account number. The default value is
MT515-ACCOUNT-BILL.
portfolio.property.repo The portfolio property for REPOS which specifies the
corresponding account number. The default value is
MT515-ACCOUNT-REPO.

Setting TRMSwift properties
SWIFT Connectivity Guide 113
9.6 Setting TRMSwift properties
Some properties are hidden and can be used to modify the behavior of TRMSwift. These properties
are defined in trmswift.properties, supplied in the TRMSwift library (JAR).
They can be overwritten in trmswift.bat and rc.trmswift.shf adding the java parameter
Dtrmswift.properties=value. They can also be defined in the TRMSWFT_PROPERTIES environment
variable.
9.6.1 Ports
Among the internal properties, the four listed in the table below allow TRMSwift to control the TCP
ports that are allocated to CORBA communications:
9.6.2 Static data refresh and TRMSwift-comKIT communication
9.7 Setting up TRM
You need to configure TRM to enable TRMSwift to obtain data from TRM and to update TRM with the
results (successful or otherwise) of messages.
All communication to TRM is done via comKIT. All data that is used to enhance a message is
obtained by this method, using the data adapter. Examples are SWIFT BIC codes, ISIN codes, and
Property Name Description
trmswift.orb.port Remote port opened by the ORB naming service. Syntax:
trmswift.orb.port = <port>
trmswift.client.port Outgoing communication port range. Syntax:
trmswift.client.port = <min port>:<max port>
Example TRMSwift Message Monitor using local ports from 5550 to 5559.
Bi-directional GIOP is implicitely enabled:
set TRMSWIFT_PROPERTIES=-Dtrmswift.client.port=5550:5559
trmswift.bat mmo
trmswift.server.port Incoming communication port range. Syntax:
trmswift.server.port = <min port>:<max port>
Example TRMSwift core allowing client connections on ports from 6550 to 6559.
Bi-directional GIOP is implicitely enabled:
set TRMSWIFT_PROPERTIES=-Dtrmswift.server.port=6550:6559
trmswift.bat core
trmswift.orb.bidir.giop Activation of bi-directional GIOP (General Inter-ORB Protocol).
This forces a request (sent by a client) and its response (returned by a server) to use
the same connection. It limits the number of connections and ports opened.
This property is internally enabled whenever the trmswift.client.port or
trmswift.server.port is defined. Syntax:
trmswift.orb.bidir.giop = true|false
Property name Description
trmswift.comkit.heart.beat.period The period of heartbeats (in seconds) sent to comKIT. Its default
value is 600 seconds (10 minutes).

Setting up TRM
114 © Wall Street Systems IPH AB - Confidential
so on. When a comKIT service does not provide all the data, and the data service cannot be used in
conjunction with custom search/stored procedures, an SQL Stored Procedure adapter can be used to
access the database directly via JDBC.
comKIT is also used for updating TRM. After obtaining data, such as a transaction, TRM needs to be
updated with the fact that TRMSwift has received the data and, later, that the message(s) was sent
correctly. This update is done using comKIT. In certain cases comKIT is used for creating
transactions directly in TRM, for example receiving an MT515 message.
9.7.1 Configuring the transaction flow
To send various confirmation messages, you must modify the transaction flow of TRM. Below is an
example of a transaction state flow that has been modified for TRMSwift (the dotted parts indicate
the configuration which has been added for TRMSwift):
TRMSwift uses two modes to process a business event. The first mode indicates which transaction is
picked up for processing (SH-GET in the example). The second mode is used to find the transaction
again so that it can be updated with the status of the sending of messages (SH-HOLD in the
example).
9.7.1.1 Getting the data
Before the transaction becomes available within the TRMSwift mode, it must be accepted by a user
of TRM. The underlying transaction flow then accepts the transaction to the next state (1).
When TRMSwift (one of its adapters) determines that a transaction exists (using the mode SH-GET),
the adapter uses comKIT to copy data from the transaction and creates a block of XML (8). This
block of XML is passed to TRMSwift (via the Inbound Message Handler) and safe stored within the
TRMSwift database (10).
TRMSwift informs the adapter that the business event has been created and safe stored successfully
(also 10). The adapter then uses comKIT to accept the transaction (7, 5 and 3). The underlying
configuration of what the mode does, does not matter to TRMSwift. The only condition is that the
transaction is no longer visible within the given mode (SH-GET in this case).
If the business event cannot be safe stored within TRMSwift, the Inbound Message Handler notifies
the adapter that it should not accept the transaction (using the mode), but rather reject it (7, 5 and
Open Verify
SH-CONF SH-WAIT
Final
SH-GET SH-HOLD
Adapter
Inbound
Message
Handler
Business
Event
Notifyer
1
3
4
5
2
6 7
89
10 11
Transaction
state flow
Transaction
modes
Integration KIT
adapter
Integration KIT
core
Setting up TRM
SWIFT Connectivity Guide 115
2). Depending on the configuration of the mode and transaction state flow, the transaction reverts
to a state earlier in the transaction flow.
In the example above, the SH-GET mode picks up transactions that are in the SH-CONF state (6).
Once they are picked up, they are moved to the SH-WAIT state (3). If they are not picked up
correctly, they are rejected to the Verify state (2).
The adapter uses the mode together with any other additional criteria specified by the adapter
configuration to determine which transactions to pick up. For example, several adapters may use
the same mode to pick up transactions. However, one adapter may only be interested in one type of
transaction. You would therefore specify additional criteria to identify the required transactions.
9.7.1.2 Success or failure
When TRMSwift has finished processing the business event (and creating the associated messages),
the Business Event Notifyer indicates to the adapter that the business event was successful (11).
The adapter in turn uses comKIT to accept the transaction using the mode SH-HOLD (9).
The Business Event Notifyer uses the mode and the transaction number to identify the transaction
that is accepted or rejected.
In the example, if the status is a success (message(s) are sent correctly), the transaction is
accepted to the Final state (4). However, if the status is a failure, the transaction is rejected to the
Verify state (5).
9.7.1.3 Modes
Modes enable transactions to be selected and identified. It does not matter whether a mode is a
state or a status, so long as it identifies a transaction.
In the example, the modes use states to identify the transactions that are selected as well as the
transactions that are marked as successful or as failed. The modes could have been configured as
statuses.
9.7.1.4 Cancelling transactions
When a transaction is cancelled by TRM, it undergoes a similar process to when a transaction is
accepted within the transaction state flow. A transaction can be accepted (or rejected) to a state
with a corresponding mode that identifies the transaction for processing within TRMSwift.
However, if a transaction is cancelled (using the cancel functionality) and is not rejected (using the
accept/reject functionality), the transaction is not made available to such a mode and is therefore
not processed by TRMSwift.
9.7.1.5 Creating transaction rules
There are two conditions under which you must create rules within TRM:
•Transaction flow
You must determine the flow of a transaction within the transaction state flow. For example, only
FX Spot/Forward transactions are sent to TRMSwift. If a user accepts a transaction that is in
state Verify (as in the example on page 114), the rules determine if the transaction is sent to
SH-CONF or to Final. You could also configure that only those transactions that require a
confirmation message are sent to TRMSwift.
•Pickup criteria
You must determine the criteria that an adapter uses to identify the transactions to pick up (via
the mode). For example, you can specify rules to which a transaction must adhere. If you define
a rule to identify FX Spot/Forward transactions and the adapter is configured to only pick up
transactions that adhere to this rule, the adapter only picks up FX Spot/Forward transactions.
9.7.2 Configuring the payment flow
The payment flow works in the same way as the transaction state flow. You use adapters, modes,
states and flags in the payment flow in the same way as you use them in the transaction flow.
Setting up TRM
116 © Wall Street Systems IPH AB - Confidential
However, the criteria that you define is different, as different data is provided for a payment. See
the comKIT description in the TRM System Administration Guide for a description of the data that is
provided for payments.
9.7.2.1 Creating settlement transfer methods and rules
When generating payments (using Settlement Manager or Activity Manager), the payment’s transfer
type (method) is determined according to the Settlement Transfer Methods and Rules. These rules
are evaluated in order of priority to determine the transfer method for a payment. TRMSwift uses
the transfer type of the payment to determine which type of message to create.
The transfer type is prefixed with SWIFT- to identify that it is picked up by TRMSwift. This prefix is
required by adapters that pick up payments. If the payment is an MT202, the transfer type is
SWIFT-MT202. The flattener of the adapter removes the SWIFT- prefix so that the business event
has the correct method. The Business Event Splitter uses the updated transfer type. In this way, the
Business Event Splitter can overrule decisions made in the Settlement Manager (within TRM).

SWIFT Connectivity Guide 117
Chapter 10 TRMSwift security and permissions
setup
TRMSwift offers a solid protection model with tools for authentication, auditing, and access control.
This chapter describes the security features of TRMSwift.
10.1 Guaranteeing security across the network
TRMSwift communicates with remote objects, applications and network nodes through CORBA.When
interconnecting systems involve proprietary applications or closed systems, such environments do
not offer a means to automatically upload messages generated by an external application. These
environments may also impose security policies such as isolation of sensitive systems.
In such cases, TRMSwift uses temporary files to store messages. These files are stored for an
indefinite amount of time until they are manually loaded or sent by ftp to the proprietary systems by
an authorized Administrator.
10.1.1 Implementing encryption over the network
TRMSwift does not provide encryption of data sent to local or remote applications. This task is
delegated to the specific adapters that reside above TRMSwift. For example, SWIFTAlliance CASmf
provides an encryption and authentication means between the CASmf based adapter and the
SWIFTAlliance CBT.
If encryption is required to deliver secure communication with secure systems, WSS recommends
implementing hardware encryption between network nodes where the communicating applications
run.
10.1.2 Identifying network objects
Any application or system that interconnects and communicates with the TRMSwift Core module
must be defined in the TRMSwift Core environment.
The following exceptions apply to processing and accepting connection requests:
•Incoming information is only accepted from adapters with a valid identification registered in the
TRMSwift core database.
•Outgoing information is only sent to adapters with a valid identification registered in the
TRMSwift core database.
•Unregistered adapters may connect to TRMSwift but the TRMSwift core does not truly
communicate with them until their identification has been provided within the TRMSwift context.
The System and Message Monitors are implemented as dedicated servers embedded in the
TRMSwift core. Embedded servers refuse connection requests issued by modules other than the
System or the Message Monitor.
Note: All modules that are connected to the TRMSwift core can be monitored and manipulated by
the System Monitor even if they are not defined in the core environment.
Audit Manager
118 © Wall Street Systems IPH AB - Confidential
10.1.3 File system security
You should place TRMSwift scripts on a secure file system to avoid the following:
•Impersonation
Replacement of an image or an executable script by another file that acts in the same way (Java
is interpreted to a certain degree and can be decompiled)
•Message tampering
Modification of a message stored in an unprotected temporary file by an unauthorized user
•Uncontrolled change of setup
Unauthorized change of a parameter in a unprotected script and uploading of the setup in the
central database by an authorized user.
10.2 Audit Manager
Audit Manager is a process that interacts between each of the TRMSwift components and the
database.
Auditing functions are built in to the modules in the workflow and are triggered as soon as a
business event or message enters or leaves a workflow state or predefined module. There are three
auditing functions:
•Add to error log
•This enables you to track any processing errors for the message.
•Add to workflow log
•This enables you to track the workflow of the message; that is, the components that have
processed the message.
•Add to system log
•This enables you to track system level events. Logged system events are the activation,
configuration, suspension or shutdown of a component, the failure of those actions due to
missing permissions, and the registration of a component with the core.
10.3 TRMSwift data workflow
The process of handling and controlling messages from initial entry as a business event to final
delivery is referred to as the workflow. The workflow requires a number of predefined states to
manipulate data and translate it into a format that can easily be dispatched to a third party. The
Workflow Controller manages these states and is responsible for the movement of messages from
one state to another.
TRMSwift enables you to define the workflow for different payments, confirmations and custody
transfers. TRMSwift also enables you to define states to include in the workflow to suit your own
message management and verification business requirements. States are defined at setup time in
the database.
Modes define the action to apply to a message after it enters a particular state in the workflow. A
mode can be attached to one or more states. Modes determines the actions that are available to
you; these actions are configured at setup time. You can restrict user access to certain modes only.
10.3.1 Verifying messages
Within TRMSwift, you use Message Monitor to review messages associated with a particular mode.
To enforce TRMSwift's four-eyes principle, you can configure modes for message verification with
authorization capabilities.

Database security
SWIFT Connectivity Guide 119
Four-eyed principle auditors must be granted specific rights at application level (in the Permission
Manager) to access messages in the verification states.
10.4 Database security
The database system centrally enforces integrity and security. Data integrity and security cannot be
circumvented by other applications.
Some of the main features implemented to enforce security at the database level are as follows:
•TRMSwift core objects, tables, user definitions and passwords are safe stored in the database at
installation time. Any modification to this data is either performed by an TRMSwift module with
the required authorization, or requires the help of a Database Administrator (DBA). The DBA
must import system parameters and definitions used by the TRMSwift modules. The TRMSwift
Administrator is responsible for starting a reconfigure operation enabling the modules requiring
such parameters to extract them from the database.
•Data encryption is handled by the underlying database system.
•Data access control is partially handled at the database level.
10.4.1 Identification and authentication
Every user or entity (including TRMSwift daemons and background processes) is provided with a
password-protected unique ID to access or manipulate TRMSwift data and its graphical user
interface. Identification and authentication is mandatory to access TRMSwift data.
10.4.1.1 Logging into TRMSwift
A default user is defined in TRM:trmswift.
You can enable re-use of TRM user IDs and passwords by setting up the TRMSwift database to share
the TRM database. You do not need to replicate the TRM database or the users’ table. TRM and
TRMSwift are fully compatible when addressing the same database space.
Upon successful login to TRMSwift, the user ID is checked against the database to verify the user's
access rights. Identification ensures that activities performed by TRMSwift users can be audited.
10.4.1.2 Entering passwords
TRMSwift modules recognize passwords when they are presented at the command line level.
Otherwise a login window is presented to the user to enter the appropriate user IDs and passwords.
Presenting passwords at the command line ensures that TRMSwift can be started according to a
defined schedule and without manual intervention. However, entering user IDs and passwords by
using the login window is recommended as it prevents password eavesdropping, which can occur
when listing processes at the command line level on specific operating systems (UNIX based
systems).
10.4.2 Division of roles in TRMSwift
The use of roles provides accountability for users performing system administration and
business-related tasks. The division of roles is implemented at both the database level and the
software level.

Database security
120 © Wall Street Systems IPH AB - Confidential
10.4.2.1 Privileged user "trmswift"
The privileged database user is required to run the TRMSwift core. This user has to be granted
SELECT, INSERT, UPDATE and DELETE rights for all tables and records in the TRMSwift database.
The default installation creates the user trmswift with all the above privileges.
Note: You may also use the user fk on Sybase and MSSQL, or the user dbo on Oracle to run the
TRMSwift core. This user has all the privileges described above.
10.4.2.2 Defining non-privileged users
TRMSwift users accessing TRMSwift data through one of the TRMSwift GUIs or some of the adapters
also require a password-protected database user. These users do not however require RDBMS
privileges because their rights are defined in Permission Editor (available from Security Center).
TRMSwift-related permission objects can be found in the permission hierarchy under SWIFT /
TRMSwift.
Note: A privileged user ID is required to run an adapter if the adapter needs to fetch data from a
database. All the adapters residing between TRM and the TRMSwift core have, for security
reasons, their own configuration scheme stored in the database and run under the same ID
as the core.
SWIFT Connectivity Guide 121
Chapter 11 TRMSwift routine maintenance
11.1 Overview
TRMSwift should be stopped each day so that normal maintenance tasks can be performed. These
maintenance tasks should adhere to the customer’s IT standards, and should include the following
tasks at least:
•Taking backups of the database
•Performing archiving of data
•Rebuilding of database indexes/statistics
These maintenance tasks should normally be carried out at the same time that TRM maintenance
(similar to above) is performed.
TRMSwift should be stopped before comKIT is stopped, and started after comKIT has been started.
This avoids unnecessary warning messages of not being able to contact comKIT.
Note: TRMSwift process log files are generated in %FK_HOME%\var\log\trmswift. They are
automatically backed up in %FK_HOME%\var\log\trmswift\backup.
11.2 Scheduling actions
The Scheduler component triggers actions on workflow elements at specified times. For example,
the InboundMessageHandler may have an action which polls specific adapters for new business
events or messages.
Scheduler configuration is defined in setup.xml.
You use a setupelement with the following attributes:
The component_name (shown here and in the following example) corresponds to the unique name
of the Scheduler as defined in the property trmswift.sc.name in ikit.properties. The default
value is Scheduler.
Scheduler
<component_name>
<Job name="queryFilesUS">
<scheduleDate>
<minutes>15,45</minutes>
<hours>8-18</hours>
<daysOfMonth>*</daysOfMonth>
Attribute Description/Value
name SETUP
type GENERAL
component_name component_name

Scheduling actions
122 © Wall Street Systems IPH AB - Confidential
<months>6</months>
<daysOfWeek>1-5</daysOfWeek>
<timezone>America/New_York</timezone>
</scheduleDate>
<action component_name="InboundMessageHandler" name="FILE">
</action>
</Job>
<Job name="queryFiles">
<scheduleDate>
<minutes>00</minutes>
<hours>10</hours>
<daysOfMonth>*</daysOfMonth>
<months>*</months>
<daysOfWeek>1-5</daysOfWeek>
<timezone></timezone>
</scheduleDate>
<action component_name="InboundMessageHandler" name="FILE">
</action>
</Job>
</ component_name >
You can schedule several jobs, each one containing a schedule date and an action. The action is
wrapped in an <action> element and contains two attributes component_name and name. The
component_name specifies on which component this action is performed and the name specifies
the name of the action for that component.
The definition of the schedule date is wrapped in a <scheduleDate> element and contains the
sub-elements that are described below (similar to the cron command in Unix). With the exception of
the time zone, you should use a comma between multiple values, a hyphen to indicate a range, and
an asterisk to indicate all possible values. Leaving the element empty indicates all possible values.
The job is executed every year at the scheduled date.
Note: You cannot configure the Scheduler to check if a day is a bank holiday.
You can re-configure the Scheduler while it is running, using the Re-configure option in the System
Monitor.
Element Valid range Example
<minutes> 0-59 <minutes>*</minutes>
Occurs every minute
<hours> 0-23 <hours>8-18, 23</hours>
Occurs every hour from 8.00 to 18.00 and once at
23.00
<daysOfMonth> 1-31 <daysOfMonth>1</daysOfMonth>
Occurs on the first of the month
<months> 1-12 <months>4</months>
Occurs in April
<daysOfWeek> 0-6
where 0 = Sunday
<daysOfWeek>1-5</daysOfWeek>
Occurs every day from Monday to Friday
<timezone> Valid time zones are listed in
Appendix B Time zones on page
275.
If no time zone is specified, the
default time zone is used.
<timezone>America/New_York </timezone>
Uses the New York time zone

Displaying the current TRMSwift configuration
SWIFT Connectivity Guide 123
11.3 Displaying the current TRMSwift configuration
You can display the IKITSetupElement, and/or IKITXPathRule, and/or IKITAction tables in an
easy-to-read log file by using the trmswift dump command.
In a TRM-evaluated environment, open a shell (or Windows Command Prompt) and enter this
command at the command line:
Unix:
rc.trmswift dump IKITSetupElement, IKITXPathRule, IKITAction
Windows:
trmswift dump IKITSetupElement, IKITXPathRule, IKITAction
Note: The upload_* columns in these tables enable you to identify the machine and file that each
row was loaded from.
Displaying the current TRMSwift configuration
124 © Wall Street Systems IPH AB - Confidential
SWIFT Connectivity Guide 125
Chapter 12 TRMSwift message configuration
This chapter explains how to create new messages and configure existing ones.
12.1 Creating a new message
The following steps outline how to create a new message:
•Obtain data: ensure that the correct data is being obtained in the business event. You can
either create a new adapter or modify an existing adapter.
•Understand data: ensure that TRMSwift understands the business event data that is received
from the adapter. You do this by changing the rules and actions of the Inbound Message Handler.
•Decide on message(s): decide which message(s) to send for the business event. You do this
by changing the rules and actions of the Business Event Splitter.
•Verify the message(s): you do this by configuring the workflow.
•Format the message(s): you do this by changing the rules and actions of the Encoder.
•Send the message(s): define the adapter(s) to which message(s) are sent and send them.
You do this by changing the rules and actions of the Outbound Message Handler.
•Notify TRM: inform the adapter to update TRM on whether the business event was received.
You do this by configuring the Business Event Reconciliator and Business Event Notifyer.
12.1.1 Obtaining data
You obtain data from business events in the originating system (TRM) by configuring adapters. You
can modify an existing adapter or create a new one. For more information on adapters, see Chapter
14 TRMSwift adapter configuration on page 179.
12.1.1.1 Modifying an existing adapter
You can add the required fields to the business event being fetched or you can add the required
fields to existing joins. You can also add joins that pick up data from additional sources. The fields
become available within the flattener and are passed to TRMSwift.
12.1.1.2 Creating a new adapter
When you create a new adapter, it is likely that you must do some additional configuration within
TRM. For example, some adapters use data such as a rule to which a transaction must adhere. You
specify this data within the adapter as parameters. If the corresponding rules do not exist within
TRM, you must also create them in TRM.
The required data must be contained in the fields that are picked up by the adapter or in any joins
which have been created.
12.1.2 Understanding data
The Inbound Message Handler expects XML received from an adapter to be in a particular format.
The Inbound Message Handler changes the received XML, using rules and actions, so that it is easier
to work with.
Creating a new message
126 © Wall Street Systems IPH AB - Confidential
For more information on the Inbound Message Handler, see 13.2.3.1 Inbound Message Handler on
page 153.
12.1.3 Deciding on message(s)
The Business Event Splitter determines the message(s) that are created from a business event. You
configure the Business Event Splitter by:
•Defining rules in the Business Event Splitter
Rules are Xpath expressions that are pattern matched in the XML provided by the Inbound
Message Handler. Rules are evaluated according to priority and determine the actions that are
performed on the business event. For more information, see 12.4.2 XPath rules on page 135.
•Using actions to copy business event data
Actions determine the type of message that is created. Data is copied from the business event to
message(s) and sequence(s). Some actions require further logic to determine the message type.
This logic is provided by XSLT actions. XSLT actions create blocks of XML. For an example, see
12.5.2.2 XSLT actions on page 139.
12.1.4 Verifying the message(s)
•To enable users to verify messages, you need to configure the following:
•The workflow for the business event or message
•What the user can preview
•Message Monitor columns.
12.1.4.1 Setting up the workflow
Depending on your requirements, you can either add new elements (states) to the workflow or
enable the business event or message to take a different route through the workflow.
To change the routing capabilities of a business event or message, you can either configure the
Message Monitor actions (see 15.5.4 Modes and actions on page 227) or the workflow deciders (see
13.2.2 Defining workflow deciders on page 152).
12.1.4.2 Previewing the messages
Encoder actions determine what the user can preview. The Message Monitor previewer takes the
output from the Encoder and displays it. For information on configuring previewers, see 15.5.2
Previewers on page 223.
12.1.4.3 Adding columns to the Message Monitor
Users verify or accept messages using Message Monitor. Messages can be verified when a user
previews a message or views column data.
For information on adding columns see 15.5.3 Columns on page 224. For information on extracting
data to be displayed in a column, see 12.3 Constructed XML on page 128.
12.1.5 Formatting the message(s)
When you create a new message, you need to define rules and actions for that message in the
Encoder. The new rules are slotted into the existing rule set with the relevant priority. The action
defines the structure and content of the message. To facilitate configuration of SWIFT messages,
you can use the SWIFT_TAGIFIER (see 12.5.5 SWIFT Tagifyer on page 144).
Each Encoder section is split over two files. The first file contains the standard format in which a
message is encoded, such as encoderMT2.xml. The second file contains the rules defining which

Configuring existing messages
SWIFT Connectivity Guide 127
encoder to use. The second file also contains the template list of actions to perform to generate the
message (for example encoderMT2-rules.xml).
Note: Do not edit the distribution file if you want to change the encoding of a message. You must
create an additional file containing the new action. For example, to modify MT202, do not
edit encoderMT2.xml; create a new file, such as encoderMT2-site.xml, containing an action
XMLEF_MT202 _SITE. Edit the encoderMT2-rules.xml file, by adding the XMLEF_MT202
_SITE action in the template list (generally after the XMLEF_MT202 action but before the
SWIFT_TAGIFYER action). See also 12.5.2.4 Template list hooks on page 140.
12.1.6 Sending the message(s)
When you create a new message, it can either be sent to the same list of adapters or a new adapter.
If a message is sent to a new adapter, you must change the actions of the Outbound Message
Handler. You can either change existing actions within the Outbound Message Handler or add a new
action. If you add a new action, you also need to define the rules that select the action.
For more information, see 13.2.3.4 OutboundMessageHandler on page 161.
12.1.7 Notifying TRM of success or failure
When you add a new message, success or failure may be determined in a different way. You may
need to create new conditions for the Reconciliator and Business Event Notifyer. See 13.2.3.5
Reconciliator on page 164 and 13.2.3.6 BusinessEventNotifyer on page 166, for more information.
12.2 Configuring existing messages
12.2.1 Adding a new field to a message
In the example below, when a root message element /message is found, the <message> element
is created and its contents are copied by applying templates. A new field, called new_field is added
to the message with the value New fields value.
Adding a new field to the message
1:<xsl:template match="/message">
2: <message>
3: <xsl:apply-templates />
4: <new_field>New fields value</new_field>
5: </message>
6:</xsl:template>
Instead of configuring a hard-coded value, you could use various XSLT methods to obtain a value
from other sources.
12.2.2 Changing a value
In the example below, when the amount in a sequence sequence/amount is matched, its value is
replaced by finding the value of other_amount.
Changing the amount value
1: <xsl:template match="sequence/amount">
2:<amount><xsl:value-of select="../other_amount" /></amount>
3: </xsl:template>

Constructed XML
128 © Wall Street Systems IPH AB - Confidential
12.2.3 Removing a value
In the example below, when sequence/account_id is matched, the value is not copied and is
therefore removed.
1: <xsl:template match="sequence/account_id" />
12.3 Constructed XML
The XML that is produced by adapters and subsequently transformed by the Inbound Message
Handler is not the same as the XML used by components. XML produced by adapters and the
Inbound Message Handler only includes business-related data. It does not include related data, such
as the history of a transaction, related messages or sequences.
Constructed XML is composed from the related business events, messages and sequences. This is
the XML that is used by components.
Constructed XML is composed differently depending on whether it is being constructed for a
business event or a message.
12.3.1 Business event
A business event has various sets of related data that are included in the constructed XML. The
related data is specified within a single <businessevent> element.
12.3.1.1 Administrative data
The administrative data for the business event is created from the database table StateElement. The
data is specified as attributes within the top level <businessevent> element:
Attribute Description
id Uniquely identifies the business event or message in TRMSwift. It is also
used to access the base XML related to the business event (see 12.3.1.3
Original data received from the adapter on page 130).
context Determines the element on which rules or actions are performed. See
the table on page 129 for more information.
context_type The type of the context, for example, workflow. See the table on page
129 for more information.
owner The owner of the business event. This is the unique name of the adapter
from which the business event was received.
ownertype The owner type of the business event. This is the content of the
<ownertype> tag as produced by the Inbound Message Handler.
reference The reference with which the business event was received.
If the adapter picks up transactions from TRM, the reference number is
the transaction number (from the transaction table).
If the adapter picks up payments from TRM, the reference number is
the transaction number (from the payment table) or 0 if it is a netted
payment. This is followed by a minus sign (-) together with the
payment id (id from the payment table).
stamp A string representation of the timestamp of the business event.
elementtype The type of state element:
•businessevent
•message.

Constructed XML
SWIFT Connectivity Guide 129
Constructed XML for administrative data
<businessevent
id=”123”
owner=”FXSpotForward”
ownertype=”CONFIRMATION”
reference=”12590”
state=”BusinessEventReconciliator”
stamp=”0x00012426374de34”
elementtype=”businessevent”
systemflagsi=”1”
userflagsi=”1”
systemflags=”BusinessEvent”
userflags=”HasBeenSplit”
allflags=”BusinessEvent, HasBeenSplit”
creationdate=”2002-03-28 09:02:39”
modificationdate=”2002-03-28 12:00:17”
context=”InboundMessageHandler”
context_type=”Workflow”
>
<flags>
<IsBusinessEvent />
<HasBeenSplit />
</flags>
.
.
</businessevent>
The context and context_type attributes enable messages to be formatted according to the
adapter to which the message is being sent, for example SWIFT or Telex.
The following table describes the various contexts and context types:
systemflagsi,
userflagsi,
systemflags,
userflags,
allflags and
<flags>
The various system or user flags that are set at the time that the XML is
constructed:
•systemflagsi and userflagsi: represent the integer value
•systemflags and userflags: represent a comma separated string of
the unique name of the flags
•allflags: represents a comma separated string of all the flags from
either set (system or user)
•<flags> sub-tag: each flag (system or user) is represented as a
sub-tag of <flags> so that it can be used for XPath expressions.
state The state of the current workflow element for the business event.
creationdate The date the business event was created.
modificationdate The date of the last modification.
Component context_type context
InboundMessageHandler Workflow Unique name of the component
BusinessEventSplitter Workflow Unique name of the component
KeyLoader Workflow Unique name of the component
BusinessEventNotifyer Workflow Unique name of the component
MessageMerger Workflow Unique name of the component
Attribute Description

Constructed XML
130 © Wall Street Systems IPH AB - Confidential
12.3.1.2 Keys and values
Keys and values enable the encoder or Message Monitor to extract values from a business event.
Constructed XML for keys and values
<businessevent
.
.
>
<flags/>
<keyset>
<reference>123-456</reference>
<number type='long'>2243</number>
<amount type='money'>100000.00</amount>
<valuedate type='date'>2002-04-28 00:00:00</value_date>
<currency>USD</currency>
</keyset>
<businessevent>
.
.
</businessevent>
The <keyset> tag contains a list of keys and their associated values. Each key may contain a type
attribute to indicate the data type. Possible types are:
•Long: integer numbers (such as ID)
•Money: currency values (such as amount, rate or fraction)
•Date: date/time values in the format yyyy-MM-dd hh:mm:ss.
If type is not specified, the default setting is Text.
12.3.1.3 Original data received from the adapter
The XML that was originally received from the adapter is also included. The Inbound Message
Handler wraps the original data its own <businessevent> element as shown in line 9 below:
Constructed XML for original data (base data)
Waiter Workflow Unique name of the component
OutboundMessageHandler
(safe storing the delivery
element before sending it)
Workflow Unique name of the Outbound Message
Handler
OutboundMessageHandler
(sending the delivery
element)
Feeder Name of the delivery component
WorkflowDecider WorkflowDecider Unique name of the component
MessageMonitor MessageMonitor Unique name of the component
Previewer Previewer Name of previewer
PurgeManager PurgeManager PurgeManager
ActionDoer Workflow Unique name of the component
ElementExtractor Debug ElementExtractor
DatabaseLib Extension DatabaseLib
Component context_type context
Constructed XML
SWIFT Connectivity Guide 131
<businessevent
id=”123”
.
.
>
<keyset/>
<businessevent>
<ownertype>CONFIRMATION</ownertype>
<betype>FXSpotForward</betype>
<number>12590</number>
<opening_date>2001-02-03</opening_date>
.
.
</businessevent>
.
.
</businessevent>
12.3.1.4 Relationship to other business events
The Inbound Message Handler retrieves related business events and includes these in the
constructed XML. The Inbound Message Handler does not retrieve the business events recursively,
so previous business events are not included.
Constructed XML for related business events
<businessevent
id=”123”
.
.
</businessevent>
<history>
<businessevent
id=”110”
.
.
</businessevent>
<businessevent
id=”120”
.
.
</businessevent>
</history>
.
.
</businessevent>
Related business events are defined using the <history> tag. In the example, business event 123
has two related business events. Business events with a different relationship, for example rollover,
would be constructed after line 18, using a <rollover> tag.
12.3.1.5 Related messages
Messages that are related to the business event via a sequence are also included in the constructed
XML.
Constructed XML for related messages
<businessevent
id=”123”

Constructed XML
132 © Wall Street Systems IPH AB - Confidential
.
.
</history>
<message
id=”124”
.
.
</message>
<message
id=”126”
.
.
</message>
</businessevent>
The example shows two messages that are related to the business event (see below for more
information on message data).
12.3.2 Message
A message has various sets of related data that are assigned by the Business Event Splitter when
the message is created. The related data is specified in the constructed XML within a single
<message> element.
12.3.2.1 Administrative data
The administrative data for the message is created from the database table StateElement.
The following table describes the various attributes and sub-tags:
Attribute Description
id Uniquely identifies the business event or message in TRMSwift. It is
also used to access the base XML related to the message (see
12.3.2.4 Original data of the message on page 134).
context Determines the element on which rules or actions are performed.
context_type The type of the context, for example, workflow.
owner The owner of the message. This is the unique name of the adapter
from which the message was received.
ownertype The owner type of the message. This is the content of the
<ownertype> tag as produced by the Inbound Message Handler.
reference The reference with which the message was received.
If the adapter picks up transactions from TRM, the reference
number is the transaction number (from the transaction table).
If the adapter picks up payments from TRM, the reference number is
the transaction number (from the payment table) or 0 if it is a
netted payment. This is followed by a minus sign (-) together with
the payment id (id from the payment table).
state The state of the message (this is the same as the state of the
workflow element).
stamp A string representation of the timestamp of the message.
elementtype The type of state element:
• businessevent
• message.

Constructed XML
SWIFT Connectivity Guide 133
Constructed XML for administrative data
<message
id=”124”
state=”Verify1”
stamp=”0x000475336ebc343”
elementtype=”message”
systemflagsi=”0”
userflagsi=”6”
systemflags=””
userflags=”HasBeenSent, SentToMerva”
allflags=”HasBeenSent, SentToMerva”
creationdate=”2002-03-01 10:23:15”
modificationdate=”2002-04-05 12:03:58”
context=”MessageMerger”
context_type=”Workflow”
>
<flags>
<HasBeenSent />
<SentToMerva />
</flags>
.
.
</message>
The context and context_type attributes enable messages to be formatted according to the
adapter to which the message is being sent, for example SWIFT or Telex. See the table on page 129
for more information on context and context types.
12.3.2.2 Keys and values
Keys and values enable the encoder or Message Monitor to extract values from a message.
Constructed XML for keys and values
<message
.
.
>
<flags/>
<keyset>
<reference>123-456</reference>
<number type='long'>2243</number>
<amount type='money'>100000.00</amount>
<valuedate type='date'>2002-04-28 00:00:00</value_date>
<currency>USD</currency>
systemflagsi,
userflagsi,
systemflags,
userflags,
allflags and <flags>
The various system or user flags that are set at the time that the
XML is constructed:
•systemflagsi and userflagsi: represent the integer value
•systemflags and userflags: represent a comma separated string
of the unique name of the flags
•allflags: represents a comma separated string of all the flags
from either set (system or user)
•<flags> sub-tag: each flag (system or user) is represented as a
sub-tag of <flags> so that it can be used for XPath expressions.
creationdate The date the message was created.
modificationdate The date of the last modification.
Attribute Description
Constructed XML
134 © Wall Street Systems IPH AB - Confidential
</keyset>
<businessevent>
.
.
</message>
See 12.3.1.2 Keys and values on page 130 for more information on the <keyset> tag.
12.3.2.3 Message failure received from CASmf
When a NAK is received from CASmf, data is placed in the feederfeedback section of the message.
Feederfeedback
<message>
.
<feederfeedback>
<CASmfSwift>
<other>
<msg>
<message_type>REPORT</message_type>
<report_success>fail</report_success>
<report_type>TRANSMIS_REP</report_type>
<failure_reason>0</failure_reason>
<failure_reason_text/>
</msg>
</other>
</CASmfSwift>
</feederfeedback>
.
</message>
12.3.2.4 Original data of the message
When the Business Event Splitter splits a business event into various messages, it creates data that
is assigned to the message and data that is assigned to the sequence. Administrative data, such as
sender, receiver, and message type is stored with the message. Business data is kept in the
sequence (see below for information on sequence data).
Constructed XML for original data (base data)
<message
id=”124”
.
.
</flags>
<type>MT300</type>
<kind>SWIFT</kind>
<function>NEW</function>
<sender>PORTOWNR</sender>
<receiver>CNTRPRTY</receiver>
.
.
</message>
12.3.2.5 Sequence data
A sequence represents the relationship between a message and its associated business event. The
sequence contains business data which is assigned by the Business Event Splitter.
Constructed XML for sequence data

Rules
SWIFT Connectivity Guide 135
<message>
id=”124”
.
.
<receiver>CNTRPRTY</receiver>
<sequence
sequenceID=”125”
businessEventID=”123”
messageID=”124”
>
<keyset>
<reference>123-456</reference>
<number type='long'>2243</number>
<amount type='money'>100000.00</amount>
<valuedate type='date'>2002-04-28 00:00:00</value_date>
<currency>USD</currency>
</keyset>
<payment_date>2001-02-03</payment_date>
<payment_amount>1000000</payment_amount>
.
.
</sequence>
.
.
</message>
Each sequence is identified by the <sequence> tag. The sequence attributes contain the ids to the
sequence (sequenceID), the related business event (businessEventID), and message (messageID).
Sequence data is defined after the <keyset> tag.
The <keyset> tag contains a list of keys and their associated values. See 12.3.1.2 on page 130 for
more information on the <keyset> tag.
Additional <sequence> tags define sequences for merged messages.
Important: A value for SequenceID must always be supplied. A NULL value is not permitted, and
will adversely affect TRMSwift’s internal processing.
12.4 Rules
As TRMSwift uses XML to store data, it cannot use rules in the same way as TRM. TRMSwift uses
XPath expressions to determine if a business event or message adheres to a particular condition.
12.4.1 XPath expressions
XPath expressions extract a subset of data from the XML. This XML is pattern matched with a
condition, resulting in a boolean value. The XML is often used in conjunction with either the state or
flags of the business event or message. For example, Workflow Deciders check the state, flags and
XPath expression to determine whether a condition is satisfied.
12.4.2 XPath rules
XPath rules are prioritized according to their order ids. When a component needs to perform an
action, it evaluates the rules according to the priority until a rule is matched. The matched rule
indicates which action is performed.

Rules
136 © Wall Street Systems IPH AB - Confidential
Each component in TRMSwift has its own unique set of rules. When the action is performed, it
normally uses the constructed XML. The following components use the constructed XML:
•Message Monitor
•Outbound Message Handler
•Encoder
•Reconciliator
•Business Event Notifyer
•Business Event Splitter (even though parts of the constructed XML are not defined)
The adapter and Inbound Message Handler do not use constructed XML.
The definition of a rule is the same, irrespective of whether it is constructed XML. Rules are defined
using the <rule> tag.
Rule Definition
<rule>
<name>BES_MT100202</name>
<order_id>100</order_id>
<xpath>/businessevent/businessevent[betype="Payment"]
[transfer_type="MT100202"]</xpath>
<action>BES_MT100202</action>
<component_name>BusinessEventSplitter</component_name>
<active_from>2001-01-01</active_from>
<active_to>2001-12-31</active_to>
</rule>
The following table describes the <rule> sub-tags:
You can define more than one rule to perform the same action and specify different conditions for
each of the rules. This is equivalent to a logical OR condition for rules. However, you cannot define
rules with a logical AND condition but you may define rules that contain multiple AND, OR and NOT
conditions. The logic must adhere to the XPath standard.
You do this using the <ruleset> element. You define data that is common to the rules as attributes
of the ruleset element, rather than repeating the data for each rule. This applies to action and
component_name.
The following example shows one rule that is valid indefinitely and another that is valid indefinitely
but only from 1st January 2004.
Tag Description
name The unique name of the rule.
order_id Determines the priority of the rule.
xpath The XPath expression for the rule. The expression is automatically
replaced with XML by an editor.
action The action that is performed if the rule is true. A rule can only
enable a single action to be performed.
component_name The name of the component to which the rule belongs.
active_from The date from which the rule is valid. Used in conjunction with the
active_to date. For a rule to be valid, the current date must be
within the range specified. The range is inclusive, so the current
date can be equal to the active_from or active_to date.
active_to The date from which the rule is active.
Actions
SWIFT Connectivity Guide 137
Ruleset Definition
<ruleset
action="BES_NEW_AMEND_1_LEGGED_PAYMENT"
component_name="BusinessEventSplitter">
<rule>
<name>BES_NEW_AMEND_1_LEGGED_PAYMENT</name>
<order_id>100</order_id>
<xpath>...</xpath>
<active_from />
<active_to />
</rule>
<rule>
<name>BES_NEW_AMEND_1_LEGGED_PAYMENT_SECURITIES</name>
<order_id>100</order_id>
<xpath>...</xpath>
<active_from>2004-01-01</active_from>
<active_to />
</rule>
</ruleset>
12.5 Actions
Actions determine the set of instructions that an TRMSwift component performs on a business event
or message. Each TRMSwift component requires a different set of instructions. For example, the
Business Event Splitter needs to establish which messages to create for a business event and what
data to put in those messages. Similarly, the Encoder needs to create well-formatted messages and
determine message data.
The input and output for an action is different for each component. The input for an action is
described in the sections that follow. For more information on output from actions, see Chapter 13
on page 147.
12.5.1 Encoder actions
Encoder actions transform constructed XML from a business event or message into:
•data that is required to send the message
•a well-formatted message.
The resulting XML is used by the Outbound Message Handler to send the message to an adapter or
by Message Monitor to preview the message.
The encoded XML is placed in a single <output> element. The data used to send the message is
placed in a <message> element and the well-formatted message is placed in a <formatted>
element.
The XML below shows an example of the final output:
Encoded XML with a well-formatted message
<output>
<message>
<type>MT300</type>
<kind>SWIFT</kind>
<function>NEW</function>
<sender>PORTOWNR</sender>
<receiver>CNTRPRTY</receiver>
<header number="1">F01PRTFOWNRABCX0000000000</header>
<header number="2">I300CNTRPRTYABCXN2020</header>

Actions
138 © Wall Street Systems IPH AB - Confidential
<sequence sequenceID="123">
<tag id="20" order="10">1234-34</tag>
<tag id="21" order="20">NOREF</tag>
<tag id="35B" order="30">20010203USD1000000,</tag>
.
.
</sequence>
.
.
</message>
<formatted>{1:F01PRTFOWNRABCX0000000000}
{2:I300CNTRPRTYABCXN2020}
{4:
:20:1234-34
:21:NOREF
:35B:20010203USD1000000,
.
.
-}
</formatted>
.
.
</output>
The <message> element contains information about the message, for example, sender, receiver,
and fax number to which the message must be sent. The message element also contains a
<sequence> element. The sequenceID and message data is used by the Outbound Message
Handler to update the message and sequence with the data to be sent to an adapter. The
sequenceID is also used to create a preview of the message in Message Monitor. Additional preview
data can be placed in a <preview> element. The order attribute identifies particular fields. In a
free-format message, the order id determines the position of a field.
The <formatted> element contains the well-formatted message. The well-formatted message is a
text string used as the final message. It is correctly formatted, for example line breaks in the right
place, and only contains permitted characters.
Important: A value for SequenceID must always be supplied. A NULL value is not permitted, and
will adversely affect TRMSwift’s internal processing.
12.5.2 Multiple actions
Generally, XML blocks are only transformed once. Within TRMSwift, there are occasions when XML is
transformed more than once, such as when an action is used in more than one situation. For
example, when encoding an action for MT202 and MT210, the first transformation determines the
receiver (here the logic is the same) and the second transformation creates the required payment
message (here the logic is different).
With the standard Xalan transformers this re-transformation is not possible. Instead, TRMSwift uses
template lists for re-transforming XML blocks.
12.5.2.1 Template lists
A template list is an action that produces a block of XML rather than transforming the XML. The
template list enables multiple action to be run against the XML.
Template List
<template_list>
<template>XMLEF_MT210</template>
<template>SWIFT_TAGIFYER</template>

Actions
SWIFT Connectivity Guide 139
</template_list>
The <template_list> element identifies the list of actions to perform. The <template> element
indicates the action names. Each of the <template> elements transforms the original XML. For
example:
•The first action may be used to transform the XML into new XML.
•The second action transforms the new XML into a newer block of XML.
•A third would then transform the latest block of XML into a more recent block of XML and so
forth.
Once all the actions in the list have been completed, the final block of XML is the one produced by
the last action.
Note: A template list cannot be used within another template list. If a template list action elects
an action, the action itself cannot be a template list.
12.5.2.2 XSLT actions
XSLT actions transform one block of XML into another block of XML.
Template List XSLT stylesheet
<?xml version='1.0' encoding='UTF-8'?>
<xsl:stylesheet
xmlns:xsl='http://www.w3.org/1999/XSL/Transform'
version='1.0'>
<xsl:template match='*'>
<template_list>
<template>XMLEF_MT210</template>
<template>SWIFT_TAGIFYER</template>
<xsl:if test="@state != ‘OutboundMessageHandler’">
<template>XMLEF_SWIFT_PREVIEW</template>
</xsl:if>
</template_list>
</xsl:template>
</xsl:stylesheet>
In the example, the XML is passed to the XMLLEF_MT210 and SWIFT_TAGIFYER actions. If the
message is not in the OutboundMessageHandler state, it must be transformed by the
XMLEF_SEIFT_PREVIEW action to produce a readable format for Message Monitor.
Note: To enable template lists, set the flag to 1 (not 0) for the action in the Action table.
12.5.2.3 Fixed result actions
Instead of using an XSLT action to determine a template list or the final XML, you can use a fixed
result action. A fixed result action is a predefined action that does not require XSLT to determine the
action. A fixed result action states what the result of XSLT processing would have been if it were
performed.
The following example shows a fixed action result that is a template list:
Template List Fixed Action
<template_list>
<template>XMLEF_MT210</template>
<template>SWIFT_TAGIFYER</template>
</template_list>

Actions
140 © Wall Street Systems IPH AB - Confidential
If the fixed action result is a template list, the list of actions is still run in sequence. If the fixed
action result is not a template list, no additional processing is required.
You can use fixed result actions to create additional template lists on an ad-hoc basis. To do this,
you would also create a new rule with a higher priority to ensure the new action is run.
Note: You must set the template_list and fixed_action attributes to yes, otherwise TRMSwift
interprets it as an XSLT action instead of a fixed result action.
12.5.2.4 Template list hooks
A hook is treated in the same way as an action. Hooks enable you to dynamically add actions to
template lists. You do not need to specify hooks or change the template list, as TRMSwift
automatically searches for hooks before and after executing each action. You need only specify the
hook name for your action, such as XMLEF_MT210_AFTER_HOOK. Hook names are determined by
whether they occur before or after an action. The suffixes _BEFORE_HOOK and _AFTER_HOOK are
appended to the action name.
In the example shown for the fixed action result, the template list would perform the following
actions:
Template List Fixed Action
<template_list>
<template>XMLEF_MT210_BEFORE_HOOK</template>
<template>XMLEF_MT210</template>
<template>XMLEF_MT210_AFTER_HOOK</template>
<template>SWIFT_TAGIFYER_BEFORE_HOOK</template>
<template>SWIFT_TAGIFYER</template>
<template>SWIFT_TAGIFYER_AFTER_HOOK</template>
</template_list>
You can view the XML of message after each template has been run (hooks are also considered as
templates). You do this by viewing the log information. For more information, see Chapter 16
TRMSwift debugging on page 233.
Note: Hooks are not part of the standard distribution as they are intended for customer-specific
development. Hook configuration is placed in the package/CSD directories. For more
information on the CSD package, see 9.2.1 Editing XML files on page 105.
12.5.3 Template list example
In a template list, generally more than one XSLT transformation is run to produce the final block of
XML. XSLT scripts can be chained together to perform a series of conversions on an XML source.
For example, XML block A is transformed by XSLT script B to produce XML block C. Block C is then
transformed by XSLT script D to produce XML block E1, and so on. Each of the XSLT scripts expects
a particular style or standard of XML and produces its own style or standard of XML; this is similar to
a programming API that has a specific set of commands which it can interpret.
XML block A contains some initial data. XSLT script B converts this data into a form where each field
in a SWIFT message is represented by a particular XML tag. The output of B is XML block C which
contains tags that represent the various fields that are placed in the final SWIFT message. XSLT
B A C E1 D
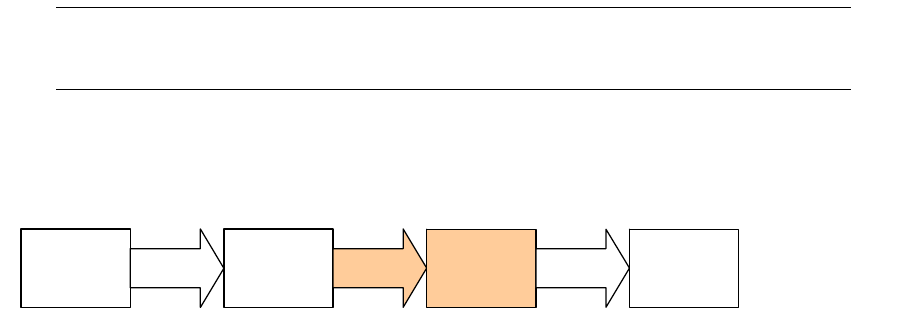
Actions
SWIFT Connectivity Guide 141
script D requires various XML tags as input, which represent each of the fields in the SWIFT
message. XSLT script D produces a corresponding SWIFT message as part of XML block E1.
Note: XSLT script B also copies the original data contained in XML block A, so XSLT script D not
only has access to the tags created by XSLT script B, but also to the original XML of block
A.
An additional script, XSLT script F could take the original block A as input, and produce a different
version of the tags representing the SWIFT message fields. This XML, could in turn, be taken as
input by XSLT script D, which is only concerned with the format of the XML input and not the
previous transformations which the block has undergone.
If XML block C contains tags that can easily be identified, modified, added or removed, then XSLT
script F can produce a modified version of C called XML block G. XSLT script F also has access to the
original data contained in block A, because it was copied from block A to block C by XSLT script B.
Blocks C and G are similar. Even if the data contained within the XML is different, it must still be of
the same style or standard of XML. Placing XSLT script F in the template list causes a change in the
intermediate results. This in turn has the effect of modifying the final result and ultimately the final
message.
Here is some sample XML for this scenario:
Block A
<xml version='1.0'>
<data>
<number>12345</number>
<amount>10000.00</amount>
<currency>USD</currency>
<payment_date>20020327</payment_date>
<account_number>345-45634</account_number>
<counterpart_id>ABNALON</counterpart_id>
<counterpart_swift>ABNAGBLN</counterpart_swift>
<portfolio_swift>TREMALAB</portfolio_swift>
</data>
</xml>
Block C
<xml version='1.0'>
<data>
<number>12345</number>
<amount>10000.00</amount>
<currency>USD</currency>
<payment_date>20020327</payment_date>
<account_number>345-45634</account_number>
<counterpart_id>ABNALON</counterpart_id>
<counterpart_swift>ABNAGBLN</counterpart_swift>
<portfolio_swift>TREMALAB</portfolio_swift>
</data>
<message>
<tag id='20' order='10'>12345</tag>
<tag id='32B' order='20'>20020327USD10000,</tag>
<tag id='82A' order='30'>TREMALAB</tag>
B A C G F D E2
Actions
142 © Wall Street Systems IPH AB - Confidential
<tag id='87A' order='40'>ABNAGBLN</tag>
</message>
</xml>
Block E1
<xml version='1.0'>
<data>
<number>12345</number>
<amount>10000.00</amount>
<currency>USD</currency>
<payment_date>20020327</payment_date>
<account_number>345-45634</account_number>
<counterpart_id>ABNALON</counterpart_id>
<counterpart_swift>ABNAGBLN</counterpart_swift>
<portfolio_swift>TREMALAB</portfolio_swift>
</data>
<message>
<tag id='20' order='10'>12345</tag>
<tag id='32B' order='20'>20020327USD10000,</tag>
<tag id='82A' order='30'>TREMALAB</tag>
<tag id='87A' order='40'>ABNAGBLN</tag>
</message>
<formatted>
:20:12345
:32B:20020327USD10000,
:82A:TREMALAB
:87A:ABNAGBLN
</formatted>
</xml>
Block G
<xml version='1.0'>
<data>
<number>12345</number>
<amount>10000.00</amount>
<currency>USD</currency>
<payment_date>20020327</payment_date>
<account_number>345-45634</account_number>
<counterpart_id>ABNALON</counterpart_id>
<counterpart_swift>ABNAGBLN</counterpart_swift>
<portfolio_swift>TREMALAB</portfolio_swift>
</data>
<message>
<tag id='20' order='10'>12345</tag>
<tag id='32B' order='20'>USD10000,</tag> (Altered)
<tag id='32C' order='24'>20020327</tag> (Inserted)
<tag id='80' order='26'>345-45634</tag> (Inserted)
<tag id='82A' order='30'>TREMALAB</tag>
<tag id='87A' order='40'>ABNAGBLN</tag>
</message>
</xml>
Block E2
<xml version='1.0'>
<data>
<number>12345</number>
<amount>10000.00</amount>
Actions
SWIFT Connectivity Guide 143
<currency>USD</currency>
<payment_date>20020327</payment_date>
<account_number>345-45634</account_number>
<counterpart_id>ABNALON</counterpart_id>
<counterpart_swift>ABNAGBLN</counterpart_swift>
<portfolio_swift>TREMALAB</portfolio_swift>
</data>
<message>
<tag id='20' order='10'>12345</tag>
<tag id='32B' order='20'>USD10000,</tag>
<tag id='32C' order='24'>20020327</tag>
<tag id='80' order='26'>345-45634</tag>
<tag id='82A' order='30'>TREMALAB</tag>
<tag id='87A' order='40'>ABNAGBLN</tag>
</message>
<formatted>
:20:12345
:32B:USD10000, (Altered)
:32C:20020327 (Inserted)
:80:345-45634 (Inserted)
:82A:TREMALAB
:87A:ABNAGBLN
</formatted>
</xml>
Looking at blocks E1 and E2, you can see that field 32B has been changed by removing the date.
XSLT script F can either modify an existing field or it can replace the field entirely with a different
value. Field 32C in block E2 is new and placed in order attribute 24. XSLT script D always takes the
order attribute of the <tag> element into consideration before placing it in the correct position.
The id attribute is wrapped in colons (:) and placed before the actual content of the <tag> element.
The value is obtained from the <data> element of the input block of XML. Even though XSLT script
D receives different values, it still performs the same actions.
12.5.4 Working with rules and actions
To configure rules and actions, you define the rule(s) first and then you define the actions that are
run when a rule is satisfied.
Rule Example
<rule>
<name>XMLEF_MT100-Templates</name>
<order_id>100</order_id>
<xpath>/message[type="MT100"]</xpath>
<action>XMLEF_MT100-Templates</action>
<component_name>XMLEncoderFactory</component_name>
</rule>
Typically you create a template list for the action. Template lists identify multiple actions to be
performed in succession. The rule in the example above identifies the action to be performed as
XMLEF_MT100-Templates.
Template List
<action name="XMLEF_MT100-Templates"
template_list="yes"
cacheable_list="yes"
fixed_result="yes"
active_from=""
active_to="">
<data>
<template_list>
Actions
144 © Wall Street Systems IPH AB - Confidential
<template>XMLEF_MT100</template>
<template>SWIFT_TAGIFYER</template>
</template_list>
</data>
</action>
The action list identifies two actions: XMLEF_MT100 and SWIFT_TAGIFYER. The example above is a
fixed result action. Alternatively, you could use an XSLT script to dynamically determine which
action is included in the list.
The next step is to define the XSLT scripts (actions). This is the XSLT script (action) which
corresponds to XSLT script F on 12.5.3 Template list example on page 140.
Standard XSLT action to copy input XML
<action
name="XMLEF_MT202_BEFORE_HOOK"
template_list="no"
active_from="NULL"
active_to="">
<data>
<xsl:stylesheet
xmlns:xsl="http://www.w3.org/1999/XSL/Transform"
xmlns:bfext="java://com.trema.babelfish.extensions"
version="1.0">
.
.
.
<xsl:template match="@*|node()">
<xsl:copy>
<xsl:apply-templates select="@*|node()"/>
</xsl:copy>
</xsl:template>
</xsl:stylesheet>
</data>
</action>
In this example, the action is run just before the XMLEF_MT202 action as it is a BEFORE_HOOK.
Lines 8 to 21 contain the XSLT script. Lines 15 to 19 contain a standard template that is used to
copy all the input XML.
12.5.5 SWIFT Tagifyer
The SWIFT_TAGIFYER is responsible for copying the data from a message to the output message
(like the sender and receiver). The SWIFT_TAGIFYER action is currently used for all SWIFT
messages. This is because preceding templates only provide the basic structure of the message and
its content.
The following is an example of the XML that is passed from the XMLEF_MT210 action to the
SWIFT_TAGIFYER action:
SWIFT Tagifyer XML
<message>
<type>MT300</type>
<kind>SWIFT</kind>
<sender>PRTFOWNRABC</sender>
<receiver>CNTRPRTYABC</receiver>
Actions
SWIFT Connectivity Guide 145
<function>NEW</function>
<header number="1">F01PRTFOWNRABCX</header>
<header number="2">I300CNTRPRTYABCXN2020</header>
.
.
<sequence sequenceID="126">
<tag id="20" order="10">1234-34</tag>
<tag id="21" order="20">NOREF</tag>
<tag id="35B" order ="30">20010203USD1000000,</tag>
.
.
</sequence>
.
.
</message>
The SWIFT_TAGIFYER action takes a copy of the content of the <message> element and places
it within an <output> element. The formatted element contains the well-formatted text of the
SWIFT message. It constructs the message using the header data. It also converts each <tag>
element to a SWIFT field separated by colons (:) and appends the tag value of the element to the
end of the line. For example:
<tag id='35B' order="30">20010203USD1000000,</tag>
is converted to:
:35B:20010203USD1000000, (followed by a CrLf).
Each of the <tag> elements is processed according to the value of its order attribute. If the order
values are non-contiguous, you can easily insert new SWIFT fields into a message.
Actions
146 © Wall Street Systems IPH AB - Confidential

SWIFT Connectivity Guide 147
Chapter 13 TRMSwift workflow configuration
You can configure TRMSwift to route business events or messages according to the conditions which
the business event or message satisfies.
For example, you may decide that confirmation messages do not need to be verified, but that
payment messages must always be verified. Similarly, you may decide that only high value payment
messages get verified.
13.1 Using flags within the workflow
Flags indicate that a business event or message has undergone a particular action or that it adheres
to a particular condition. You can define your own flags and use them within TRMSwift for routing or
formatting business events or messages.
For example, you might want to verify a high value payment according to the 4 eyes principle.
Similarly, when a SWIFT message is sent from your organization, you might send it as Urgent
instead of Normal.
You can use flags within the TRMSwift workflow in the following ways:
•Assign or remove flags to or from a particular business event or message
•Route business events or messages by checking predefined conditions.
13.1.1 Defining your own flags
Flags are defined within the FlagMapping configuration contained in the
dbms/xml/setup/setup.xml file.
You use a setupelement with the following attributes:
There are two types of flags:
•system flags: for internal use, used by specific parts of the system
•user flags: these can be added or removed according to business requirements
System flags are pre-configured with the distribution of TRMSwift. Some user flags may also be
pre-configured as part of a “best practice” installation.
Flagmapping Code
<FlagMapping>
<flag name="IsBusinessEvent" system="yes" value="1" />
<flag name="MustBeArchived" system="yes" value="2" />
Attribute Description/Value
name SETUP
type FLAGMAPPING
component_name FLAGMAPPING

Using flags within the workflow
148 © Wall Street Systems IPH AB - Confidential
<flag name="Mergeable" system="yes" value="4" />
<flag name="NotCompleted" system="yes" value="8" />
<flag name="PossibleDuplicate" system="yes" value="16" />
<flag name="UnknownStatus" system="yes" value="32" />
<flag name="STP" system="yes" value="64" />
<flag name="FastTrack" system="yes" value="128" />
<flag name="NoRelationships" system="yes" value="256" />
<flag name="HasNotBeenSplit" system="no" value="1" />
<flag name="HasBeenSplit" system="no" value="2" />
<flag name="HasNotBeenMerged" system="no" value="4" />
<flag name="HasBeenMerged" system="no" value="8" />
<flag name="NotPassedToDC" system="no" value="16" />
<flag name="HasBeenSent" system="no" value="32" />
<flag name="HasNotBeenSent" system="no" value="64" />
<flag name="SentToDatabase" system="no" value="128" />
<flag name="SentToFile" system="no" value="256" />
<flag name="SentToFile2" system="no" value="512" />
<flag name="NotEncoded" system="no" value="1024" />
<flag name="NoPreviousMessage" system="no" value="2048" />
<flag name="Amendment" system="no" value="4096" />
<flag name="Replaced" system="no" value="8192" />
<flag name="NotUpdatedInFK" system="no" value="16384" />
<flag name="NoReceiver" system="no" value="32768" />
<flag name="Urgent" system="no" value="65536" />
<flag name="SentToMervaFile" system="no" value="131072" />
<flag name="NoArchive" system="no" value="262144" />
<flag name="SentToFopFile" system="no" value="524288" />
<flag name="ParsingError" system="no" value="1048576" />
<flag name="SentToFK" system="no" value="2097152" />
<flag name="ToSendToTram" system="no" value="4194304" />
<flag name="SentToTRAM" system="no" value="8388608" />
<flag name="TimeOutExpired" system="no" value="16777216" />
<flag name="NoMessageNeeded" system="no" value="134217728" />
</FlagMapping>
The following table describes the attributes of the <flag> element:
13.1.2 Applying flags to a business event or message
Flags indicate a Yes/No or On/Off state within TRMSwift. Flags can be added to or removed from
business events or messages. When a flag is added, it is set (Yes or On). When a flag is removed, it
is unset or deselected (No or Off).
Attribute Name Description Possible Value
name The unique name of the flag.
system A boolean that indicates
whether the flag is a system or
user flag.
•yes: system flag
•no (default): user flag
value A numeric value by which the
flag is known internally.
Indicates which part within the
flag to set when the flag is
updated.
2n where n is a whole number greater
than or equal to 0.
The values of system and user flags can
overlap, for example, you can have a
system flag with a value of 4, and you
can also have a user flag with a value of
4. However, you can only have one user
flag with a value of 4.

Configuring the workflow
SWIFT Connectivity Guide 149
Flags are added using the <addflags> element and removed using the <removeflags> element.
The names of the flags that are being added or removed must be specified in the Flagmapping
configuration (see 13.1.1 Defining your own flags on page 147).
Adding and Removing Flags
<some tag>
<addflags>
<Flag1toAdd />
<Flag2toAdd />
</addflags>
<removeflags>
<Flag1toRemove />
<Flag2toRemove />
</removeflags>
</some tag>
In the example above, Flag1toAdd and Flag2toAdd are added, and Flag1toRemove and
Flag2toRemove are removed.
13.1.3 Checking the flags of a business event or message
TRMSwift provides a standard test to determine whether a particular flag (or flags) is set. In various
parts of the system, this test forms part of a condition to determine the next action. For example,
the Workflow Deciders test for certain flags (together with state information and XPath rules) to
determine where to route the business event or message in the workflow.
The <musthaveflags> element tests whether a business event or message has the required flag.
If the flag is present, the flag part of the condition is true and the rest of the condition can be tested.
If the flag is not present, the condition is false.
The <maynothaveflags> element tests whether a business event or message does not have the
given flag. If the flag is not present, the flag part of the condition is true and the rest of the
condition can be tested. If the flag is present, the condition is false.
Checking Flags
<some tag>
<musthaveflags>
<Flag1toBePresent />
<Flag2toBePresent />
</musthaveflags>
<maynothaveflags>
<Flag2notToBePresent />
<Flag2notToBePresent />
</maynothaveflags>
</some tag>
The condition tested by <some tag> is only true if the business event or message has both the
<Flag1toBePresent> and <Flag2toBePresent> flags, and neither the
<Flag1notToBePresent> nor the <Flag2notToBePresent> flags.
13.2 Configuring the workflow
TRMSwift contains a number of workflow elements. A workflow element is a process that preforms
an action on a business event or message. For example, an action may split a business event into
one or more messages, or verify a message when a user accepts it. Each of these actions is

Configuring the workflow
150 © Wall Street Systems IPH AB - Confidential
performed by a particular type of workflow element. You can configure workflow elements, for
example, defining the flags to add when business events cannot be split.
The logical flow that a business event or message follows is defined using Workflow Deciders.
Workflow Deciders determine the workflow element to which a business event or message is routed.
13.2.1 Defining workflow elements
Workflow elements identify the state to which a business event or message can be sent. Workflow
elements are defined using the <WorkflowController> element.
You use a setupelement with these attributes:
Workflow Elements
<WorkflowController numberOfThreads="20">
<onerror state="DeadLetterBin" />
<element
class="com.trema.babelfish.workflow.InboundMessageHandler"
name="InboundMessageHandler" />
<element
class="com.trema.babelfish.workflow.OutboundMessageHandler"
name="OutboundMessageHandler" />
<element
class="com.trema.babelfish.workflow.BusinessEventSplitter"
name="BusinessEventSplitter" />
<element
class="com.trema.babelfish.workflow.MessageMerger"
name="MessageMerger" />
<element
class="com.trema.babelfish.workflow.Waiter"
name="DeadLetterBin" />
<element
class="com.trema.babelfish.workflow.Waiter"
name="ManualIntervention" />
<element
class="com.trema.babelfish.workflow.Waiter"
name="Verify1" />
<element
class="com.trema.babelfish.workflow.Waiter"
name="Verify2" />
<element
class="com.trema.babelfish.workflow.Waiter"
name="Completed" />
<element
class="com.trema.babelfish.workflow.Waiter"
name="DeadLetterBinTooManyTries" />
<element
class="com.trema.babelfish.workflow.BusinessEventNotifyer"
name="BusinessEventNotifyer" />
<element
class="com.trema.babelfish.workflow.Reconciliator"
name="BusinessEventReconciliator" />
Attribute Description/Value
name SETUP
type GENERAL
component_name WorkflowController
Configuring the workflow
SWIFT Connectivity Guide 151
<element
class="com.trema.babelfish.workflow.Reconciliator"
name="BusinessEventReconciliator" />
.
.
</WorkflowController>
The <WorkflowController> element takes a single attribute called numberOfThreads that
defines the number of threads to carry out the workflow element tasks. The number of threads to
use depends on the processing power of the server on which the TRMSwift core is running. The
default value is 20 which has been proven to be the optimum value for machines with 1, 2 or 4
CPUs.
The <WorkflowController> element contains a <onerror> sub-element that defines the workflow
element to which a business event or message is sent, if there is a problem routing it to a particular
state. Typically, a business event or message is sent to the defined workflow element if none of the
workflow deciders have been elected to route it. The <onerror> element has a single attribute
called state that specifies the workflow element to which the business event or message is sent.
The <WorkflowController> element contains a number of <element> tags. Each <element>
tag defines a workflow element. The <element> tag takes two attributes:
•class: defines the type of workflow element (see table below). Each value is a java class name
that begins with com.trema.babelfish.workflow. followed by the class name
•name: defines a unique name (across the whole system) for the workflow element.
The following table describes valid classes:
Note: The names of each of the workflow elements correspond to a state that the business event
or message can be in. Each state has a workflow element. The workflow element that
processes the business event or message is the workflow element together with the state
name of the current business event or message.
Class Description
InboundMessageHandler Accepts a business event from an adapter and safe stores it
in the database.
BusinessEventSplitter Splits a single business event into one or more messages.
The messages are safe stored within the database.
MessageMerger Merges two messages together based on certain conditions.
KeyLoader Reads and stores specific keys with their values for a
particular message.
Waiter Keeps a business event or message either for a
predetermined period or until it has been accepted by a valid
user (using the Message Monitor).
OutboundMessageHandler Sends a message to a defined adapter. It also facilitates
acceptance of a delivery confirmation from an external
system (via the adapter).
Reconciliator Reconciles business events and messages.
BusinessEventNotifyer Notifies an adapter that a particular business event has been
completed (successfully or otherwise).
RelationshipMaker Creates relationships between business events.

Configuring the workflow
152 © Wall Street Systems IPH AB - Confidential
13.2.2 Defining workflow deciders
Workflow Deciders route a business event or message from one workflow element to another.
A workflow decider uses the following parts of a business event or message to determine if it should
route it:
•flags
•state
•XPath expression
•search keys.
If these parts are tested as True, the workflow decider determines the next workflow element to
which the business event or message is routed. This is done by using the unique name of the
workflow element. The decider also has the capability to add or remove flags.
Workflow Deciders
<WorkflowController numberOfThreads="20">
.
.
<decider
fromelement="BusinessEventSplitter"
movetoelement="BusinessEventNotifyer"
musthaverule=""
name="BES to BEN">
<musthaveflags>
<IsBusinessEvent />
<HasNotBeenSplit />
<NoPreviousMessage />
</musthaveflags>
<maynothaveflags />
<keyset>
<sender>PTSBFRKK</sender>
<amount type='money'>-2320000</amount>
<rate type='double'>1.16</rate>
<expiry_date type='date'>
<from>2001-05-14</from>
<to>2001-05-16</to>
</expiry_date>
</keyset>
<addflags>
<HasBeenSent />
</addflags>
<removeflags />
</decider>
</WorkflowController>
In the example above, the business event must match the following criteria:
•It must come from the BusinessEventSplitter workflow element
•It must have the IsBusinessEvent, HasNotBeenSplit, and NoPreviousMessage flags. Other
flags are not considered as the maynothaveflags element is empty.
•It must have the following search keys:
Key Type Value
sender PTSBFRKK
amount money -2320000

Configuring the workflow
SWIFT Connectivity Guide 153
If all the criteria are met, the business event is sent to the BusinessEventNotifyer workflow
element and The HasBeenSplit flag is added.
Workflow deciders are defined using the <decider> element within the <WorkflowController>
element.
The following table describes the <decider> attributes and sub-tags:
13.2.3 Defining each of the workflow elements
The following sections describe the configuration for each type of workflow element. Each workflow
element has its own setup.
13.2.3.1 Inbound Message Handler
The Inbound Message Handler is used to:
• Receive business events from the various adapters and safe store them in the database.
• Perform actions triggered by the Scheduler or by a user selecting a menu item in System Monitor. These
actions query business events from selected adapters.
• Convert the XML of a business event into a format that can be read by TRMSwift.
Inbound Message Handler
<InboundMessageHandler>
<completed>
<addflags>
<IsBusinessEvent></IsBusinessEvent>
</addflags>
</completed>
rate double 1.16
expiry_date date between 2001-05-14 and 2001-05-16 inclusive
Name Description
name A unique name for the workflow decider. This is the name that is
displayed in the workflow log.
fromelement The unique name of the workflow element (or state) at the current
location of the business event or message. If the fromelement does
not match, the decider is not used.
musthaverule An XPath expression that is evaluated against the business event or
message. If this evaluation does not match, the decider is not used.
keyset Checks if keys are set for the business event of a message or its
sequence. Possible types:
•money
•double
•long
•date: the format is YYYY-MM-DD or YYYY-MM-DD HH:MM:SS.
If these keys are not matched, the decider is not used.
musthaveflags
maynothaveflags
Determines which flags must be present and which flags must not be
present. If these are not matched, the decider is not used.
movetoelement The unique name of a workflow element (or state). Determines where
to send the business event or message.
Key Type Value

Configuring the workflow
154 © Wall Street Systems IPH AB - Confidential
<msg maxlength="100">Imported into TRMSwift (as ID <find>
/businessevent/@id</find>)</msg>
<action name="DEFAULT" caption="Fetch Everything" default="yes">
<feederlist>
<feeder name="MervaSwiftFile" fetchPerPoll="1" retry="10000"></feeder>
retry="10000"></feeder>
<feeder name="FixingConfirmation" fetchPerPoll="100"
retry="10000"></feeder>
<feeder name="FixingConfirmation51" fetchPerPoll="100"
retry="10000"></feeder>
<feeder name="FixingConfirmation60" fetchPerPoll="100"
retry="10000"></feeder>
<feeder name="FXConfirmation" fetchPerPoll="100"
retry="10000"></feeder>
<feeder name="FXConfirmation51" fetchPerPoll="100"
retry="10000"></feeder>
<feeder name="FXConfirmation60" fetchPerPoll="100"
retry="10000"></feeder>
<feeder name="MMConfirmation" fetchPerPoll="100"
retry="10000"></feeder>
<feeder name="OMMMarketOrder" fetchPerPoll="100"
retry="10000"></feeder>
<feeder name="OMMMarketTrade" fetchPerPoll="100"
retry="10000"></feeder>
<feeder name="CancelPayment" fetchPerPoll="100"
retry="10000"></feeder>
<feeder name="Payment" fetchPerPoll="100" retry="20000"></feeder>
<feeder name="FaxConfirmation" fetchPerPoll="10"
<feeder name="BAConfirmation" fetchPerPoll="20"
retry="10000"></feeder>
retry="10000"></feeder>
<feeder name="TREMA-BROKER" fetchPerPoll="5"
retry="10000"></feeder>
</feeder>
</feederlist>
</action>
<action name="FILE" caption="Fetch Files">
<feederlist>
<feeder name="MervaSwiftFile" fetchPerPoll="5"
retry="10000"></feeder>
</feederlist>
</action>
</InboundMessageHandler>
The InboundMessageHandler is defined using a setupelement with these attributes:
The InboundMessageHandler configuration is defined using the <InboundMessageHandler> tag.
Attribute Description/Value
name SETUP
type GENERAL
component_name InboundMessageHandler

Configuring the workflow
SWIFT Connectivity Guide 155
The following table describes the <InboundMessageHandler> sub-tags:
Name Description
completed Defines the flags that are added to the business event once it is safe
stored in the database. The IsBusinessEvent flag must always be
present; it indicates that this is a business event. You can also specify
flags that are added or removed by feeders.
msg Defines the message that is used when updating a transaction or
payment within TRM. The message is placed in a field that is defined
by the adapter. You can configure the maxlength attribute to match
the maximum length defined for messages in external systems.
You can also define an XPath expression to extract values from the
business event to be included in the message. The XPath expression is
placed within a <find> element.
action InboundMessageHandler actions poll the adapters (feeders) in their
respective feederlists. The <action> element contains the following
attributes:
•name: used by the Scheduler and System Monitor to trigger the
action.
•caption: specifies the text displayed in the System Monitor Action
menu.
•default: if the default attribute is present and set to yes, this action
is the default action for the InboundMessageHandler. Only the first
action whose default attribute is set to yes is run as the default
action.
The InboundMessageHandler repeatedly performs a query on the
adapters (feeders) listed for the default action. This query is
performed even if a Scheduler has not been set up and a user has
not selected an action in System Monitor.
feederlist A list of adapters defined as feeder elements. An action can contain
only one feederlist.
feeder The feeder element contains the following attributes:
•name: the name of the adapter.
•maximum: the maximum number of business events that can be
fetched when an action is performed. Typically, this value is 1; this
ensures static data is fetched once only.
•fetchPerPoll: determines how many elements the feeder receives
at once. This value depends on the capabilities of the feeder. For
some feeders, for example Payment, performance can be improved
by fetching many elements at once rather than repeatedly polling
the feeder for each element.
If the maximum and fetchPerPoll attributes are both set, data is
fetched according to the fetchPerPoll until the maximum value is
reached.
•retry: determines how long the InboundMessageHandler must wait
before polling a feeder to see if there are any new messages.
•doaction: determines an action to perform on the business event
(see Actions below). The default value is yes; the action is
performed. When the value is no, the action is not performed for
business events read in by this feeder.
query-parameters Defines the parameters that are passed from the TRMSwift core to the
feeder in a query call. These parameters can overwrite the parameters
that are specified in the feeder factory.

Configuring the workflow
156 © Wall Street Systems IPH AB - Confidential
13.2.3.1.1 Actions
The Inbound Message Handler takes the XML received from an adapter as input and converts it into
the following format (unless the business event is processed by an adapter whose doaction is set to
no):
Inbound Message Handler resulting XML
<businessevent>
<ownertype>PAYMENT</ownertype>
<betype>Payment</betype>
<value_date>2001-02-03</value_date>
<payment_amount>1000000</payment_amount>
<payment_date>2001-02-03</payment_date>
.
.
</businessevent>
The resulting XML is contained within a <businessevent> element. The data must be in the format
of <fieldname>value</fieldname>. Technically, it is possible for TRMSwift to work with more
complex data, but the rest of TRMSwift must be configured to be compatible.
An example of the XSLT to convert the XML is given below:
Inbound Message Handler XSLT
<xsl:stylesheet
version="1.0"
xmlns:xsl="http://www.w3.org/1999/XSL/Transform">
<xsl:template match="/businessevent">
<businessevent>
<xsl:apply-templates />
</businessevent>
</xsl:template>
<xsl:template match="de">
<xsl:element name="{@name}">
<xsl:value-of select="." />
</xsl:element>
</xsl:template>
</xsl:stylesheet>
The example keeps the <businessevent> tag and changes the <de name="xyz">value</de>
tags into <xyz>value</xyz>. An example of the resulting XML is shown in 13.2.3.2.2 Creating
message(s) on page 158.
read Read elements correspond to a read section in the feeder factory. If
there are fewer read elements specified than in the feeder factory, the
last read sections of the feeder factory are retained.
In the code example, in the first <read> element, the worksheet_id
and value_date parameters are overwritten. In the second <read>
element, no parameters are overwritten. In the third <read> element,
the worksheet_id parameter is overwritten.
Name Description

Configuring the workflow
SWIFT Connectivity Guide 157
Once the data has been transformed into a format that TRMSwift can work with, it is safe stored in
the database and the relationships with other business events are determined. The business event is
then passed to the Workflow Controller so that it can be processed within the workflow.
13.2.3.2 BusinessEventSplitter
The Business Event Splitter splits a single business event into zero, one, or more messages. The
resulting messages are safe stored within the database.
The BusinessEventSplitter configuration defines the flags that are added to, or removed from, the
business event or message(s), based on whether the business event could be split correctly.
Business Event Splitter
<BusinessEventSplitter>
<completed>
<addflags>
<HasBeenSplit />
</addflags>
<removeflags />
</completed>
<failure>
<addflags>
<HasNotBeenSplit />
</addflags>
<removeflags>
<HasBeenSplit />
</removeflags>
</failure>
<newmessage>
<addflags />
</newmessage>
</BusinessEventSplitter>
The BusinessEventSplitter is defined using a setupelement with these attributes:
The BusinessEventSplitter configuration is defined using the <BusinessEventSplitter> tag.
The following table describes the <BusinessEventSplitter> sub-tags:
Attribute Description/Value
name SETUP
type GENERAL
component_name BusinessEventSplitter.
Name Description
completed Defines the flags to be changed after a business event has been
successfully split into its messages. Flags are added or removed using
the <addflags> and <removeflags> tags.
failure Defines the flags to be changed when a business event cannot be split
into its messages. Flags are added or removed using the <addflags>
and <removeflags> tags.
newmessage Defines the flags that are added to new messages. The
<removeflags> tag is not used with the <newmessage> element as
the message is new and therefore does not contain any flags. Flags
are added using the <addflags> tag.

Configuring the workflow
158 © Wall Street Systems IPH AB - Confidential
13.2.3.2.1 Actions
The Business Event Splitter creates XML, from the constructed XML of a business event, that
indicates which message(s) to create with which sequence(s) and what data to put in the
message(s) and sequence(s).
The Business Event Splitter can also update the flags of any other business events or messages, if
required. For example, a related (historical) business event’s flags could be updated to indicate that
it has been amended. The order in which these parts are placed does not matter.
13.2.3.2.2 Creating message(s)
The following code is an example of the XML that creates a message with a sequence:
Business Event Splitter – Creating message(s)
<messages>
<newmessage reference="123-456" owner="ABC"
ownertype="confirmation">
<type>MT300</type>
<kind>SWIFT</kind>
<function>NEW</function>
<sender>PORTOWNR</sender>
<receiver>CNTRPRTY</receiver>
<sequence>
<amount>1000000</amount>
<payment_date>2001-02-03</payment_date>
.
.
</sequence>
</newmessage>
.
.
</messages>
In XML there can only be one root element, therefore the <newmessage> elements are wrapped
in a single element, which can take any name (in the example it is called <messages>). The
Business Event Splitter searches for XML that adheres to the /*/newmessage[type][sequence]
XPath expression. Therefore, each <newmessage> element requires a type and sequence. A
message is created for each <newmessage> element.
The <newmessage> element takes reference, owner and ownertype attributes that are used to
update the reference, owner and ownertype of the message that is about to be created. In some
cases, this is not useful, as the message might be merged with another message and these
attributes can only contain a single value. The values (as created by the action) are extracted from
the XML and stored in the database (StateElement table).
The following table describes the <newmessage> sub-tags:
Name Description
type Identifies the message format. If this tag is not present, the message
is not created.
Note: There may be other conditions which determine the message
format.

Configuring the workflow
SWIFT Connectivity Guide 159
13.2.3.2.3 Updating flags
The Business Event Splitter outputs a block of XML to update the flags of a business event or
message.
The following code is an example of the XML block:
Business Event Splitter – Updating Flags
<messages>
.
.
<updateflags id="124">
<addflags>
<Amendment />
</addflags>
</updateflags>
<addflags>
<Mergeable/>
</addflags>
</messages>
Flags are updated using the <updateflags> element and the <Amendment> sub-element. Flags
are added or removed using the <addflags> and <removeflags> tags. The <updateflags> and
<addflags> must be on the first level (child) of the <newmessage> tag and adhere to the
/*/updateflags[@id] and /*/addflags XPath expressions. The ID of the business event or
message is obtained from the action by referring to the history of the business event.
You can also add flags directly with the <addflags> element. This creates a new message with a
particular property, independent of the previous message. In this example, the new message has a
<Mergeable> tag, which applies to a message that can be merged.
13.2.3.3 Waiter
The configuration for a Waiter workflow element defines:
•whether the waiter is a timed waiter
•the flags that are added or removed before returning the business event or message to the
Workflow Controller (optional)
•the amount of time that the business event or message is kept before returning it to the
Workflow Controller (optional).
The following code is an example of the Waiter workflow element configuration:
Waiter
sequence Determines the data to be placed in the sequence. The data for the
sequence is copied from the data of the business event, as is.
The XPath expression *[name()!='sequence' and name()!='addflags']
is used to identify the fields that are added to the sequence. Sequence
and addflags elements are not added to the message. All data in the
sequence element is added to the actual sequence.
See 12.3.2.4 Original data of the message on page 134 for more
information.
other elements Other elements contained within the <newmessage> element (lines 3
to 7 in the example) are copied to the XML of the message itself. This
includes the type element.
Name Description

Configuring the workflow
160 © Wall Street Systems IPH AB - Confidential
<MergerWaiter redistribute="yes">
<completed>
<addflags>
<MergingFinished />
</addflags>
<removeflags />
</completed>
<time
maxtime="3600000"
expireon="16:00:00"
expireonoffset="0"
retrytime="60000"
>
<xpath format="yyyy-MM-dd">/message/keyset/delay/text()</xpath>
</time>
</MergerWaiter>
The Waiter is defined using a setupelement with these attributes:
The Waiter is defined within a tag which has the same name as the unique name of the workflow
element (in the example it is MergerWaiter).
The following table describes the <MergerWaiter> attributes and sub-tags:
Attribute Description/Value
name SETUP
type GENERAL
component_name MergerWaiter
Name Description
redistribute Possible values:
•yes: used when the waiter is a timed waiter that performs actions
that are not user-related. The Workflow Controller passes the
business event or message to the workflow element whenever
TRMSwift is started up.
•no.
Waiters that are used for User Verification do not require a value of
yes.
completed Defines the flags which are added or removed from the business event
or message once it is passed back to the Workflow Controller. If a user
performs an action using Message Monitor, the action determines
which flags are added or removed.

Configuring the workflow
SWIFT Connectivity Guide 161
13.2.3.4 OutboundMessageHandler
The configuration for the Outbound Message Handler workflow element defines:
•the flags that can be added or removed in four different cases
•which parts of the message are stored in the <sentdata> tag when a message is sent
•a list of adapters (feeders) with which the Outbound Message Handler communicates. Only these
adapters can be used to send a message.
Flags are added or removed using the <addflags> and <removeflags> elements. These tags can
be empty.
The following code is an example of the Outbound Message Handler workflow element configuration:
Outbound Message Handler
<OutboundMessageHandler replyFinderWait="5000">
<notsenttodc>
<addflags>
<NotPassedToDC />
</addflags>
<removeflags />
</notsenttodc>
<sentfromdc>
<addflags>
<HasBeenSent />
</addflags>
time Defines how long the business event or message is kept before
returning it to the Workflow Controller. The <time> tag indicates a
Timed Waiter. If there is no <time> tag, the business event or
message is kept indefinitely. Users can select the business event or
message in Message Monitor and move it to another workflow element
using the Action menu.
This element contains four attributes:
•maxtime: the maximum period in milliseconds that a business
event or message is kept.
•expireon: the date and/or time at which the business event or
message is returned to the Workflow Controller.
This attribute adopts one of the following formats:
- yyyy-MM-dd hh:MM:dd (the state element expires on the
given date and time)
- yyyy-MM-dd (the state element expires on the given date at
23:59:59)
- hh:MM:dd (the state element expires at the given time on the
date when it enters the Waiter, plus the number of days
defined for expireonoffset.
•expireonoffset: used in conjunction with the expireon attribute. If
no date is defined for expireon, the number of days is added to the
date when the state element enters the Waiter. For example, if the
value is 1, the expiry date is tomorrow. If the value is 0, the expiry
date is today.
•xpath: an XPath expression to determine the date/time on which
the element expires. Its format attribute specifies the date/time
format. The XPath can be used for a key (for information about
date or datetime keys, see 13.2.3.7 KeyLoader on page 167). The
default format is yyyy-mm-dd hh:mm:ss.
If one of these attributes indicates that the state element expires, the
state element is moved to the next state in the workflow.
Name Description

Configuring the workflow
162 © Wall Street Systems IPH AB - Confidential
<removeflags>
<HasNotBeenSent />
</removeflags>
</sentfromdc>
<notencoded>
<addflags>
<NotEncoded />
</addflags>
<removeflags />
</notencoded>
<noreceiver>
<addflags><NoReceiver /></addflags>
<removeflags />
</noreceiver>
<savedatalist>
<savedata key='formatted_data'>/output/formatted/text()</savedata>
</savedatalist>
<feederlist>
<feeder name="Fax"></feeder>
<feeder name="FopFaxFile"></feeder>
<feeder name="MervaSwiftFile"></feeder>
<feeder name="SimpleFile"></feeder>
<feeder name="SimpleFile2"></feeder>
<feeder name="StatementOfAccount"></feeder>
<feeder name="OMMMarketTrade"></feeder>
<feeder name="OMMMarketOrder"></feeder>
<feeder name="Email"></feeder>
<feeder name="Email-PS"></feeder>
<feeder name="NT-Printer"></feeder>
<feeder name="UNIX-HEL"></feeder>
<feeder name="UNIX-LABS-PS"></feeder>
<feeder name="CASmfSwift" maxNumberOfAllowedSend="1"></feeder>
<feeder name="TREMA-BROKER"></feeder>
<feeder name="createFKTransaction"></feeder>
</feederlist>
</OutboundMessageHandler>
The OutboundMessageHandler is defined using a setupelement with these attributes:
The OutboundMessageHandler configuration is defined using the <OutboundMessageHandler>
tag.
The following table describes the <OutboundMessageHandler> attributes and sub-tags:
Attribute Description/Value
name SETUP
type GENERAL
component_name OutboundMessageHandler
Name Description
replyFinderWait Defines how long (in milliseconds) the Outbound Message Handler must
wait after polling the feeders that have outstanding messages. An
outstanding message is one that has been sent to the feeder but has not
yet received a SUCCESS or FAILURE status.
notsenttodc Flags are added or removed when the message is not sent to one of the
adapters.

Configuring the workflow
SWIFT Connectivity Guide 163
13.2.3.4.1 Actions
The message is sent to a list of adapters according to the content of the message, or the message
type.
The following code is an example of the output from the Outbound Message Handler:
Destination XML
<destination>
<sendto name="MervaSwiftFile">
<addflags><SentToMervaFile /></addflags>
<removeflags />
</sendto>
<sendto name="SimpleFile">
<addflags><SentToFile /></addflags>
<removeflags />
</sendto>
<sendto name="SimpleFile2" encode="no">
<addflags><SentToFile2 /></addflags>
<removeflags />
</sendto>
</destination>
The <destination> element determines the destinations to which the message can be sent.
A <sendto> element is used to define each of the adapters. Its name identifies the unique name of
the adapter. Flags can be added or removed using the <addflags> and <removeflags> tags,
provided that the message is sent successfully to the adapter.
Generally, the Outbound Message Handler does not use XSLT actions to determine the destination of
a message. Instead it uses a fixed result action (see 12.5.2.3 Fixed result actions on page 139 for
sentfromdc Flags are added or removed when the message is sent to one of the
adapters and the adapter returns a SUCCESS status.
notencoded Flags are added or removed when the message cannot be formatted due
to:
• the Encoder not running
• the XSLT script being incorrect
•missing data.
noreceiver Flags are added or removed when the Outbound Message Handler cannot
determine the adapter to which the message must be sent. This may be
due to a problem in the Outbound Message Handler rules and actions.
savedatalist Defines the parts of the message that are added to the <sentdata> tag.
Each part of the message is contained in a <savedata> tag. The
<savedata> tag contains a key attribute which specifies the tag that
wraps this part of the saved data. The key default value is
formatted_data. This enables you to check and archive the format of the
data before sending it.
The XPath expression in the <savedata> tag specifies which part of the
message to save. Its default value is output/formatted/text().
feederlist A list of feeders contained within <feeder> elements. The <feeder>
element may contain a maxNumberOfAllowedSend attribute that defines
the number of outstanding messages a feeder is allowed. When this
number is reached, no more messages are sent to the feeder until the
feeder returns a reply (SUCCESS or FAILURE) for one of the outstanding
messages. If this attribute is not set, there is no limit.
Name Description

Configuring the workflow
164 © Wall Street Systems IPH AB - Confidential
more information on fixed result actions). If XSLT is used to determine destination, it is derived from
the constructed XML of the message.
It is not mandatory to encode the message. In some instances, the Encoder may simply make a
copy of the message, for example when an adapter expects an XML input and the message is
already represented in XML. In this case, the XML generated by the rules and actions of the
Outbound Message Handler can indicate that the encoding is skipped for particular message and
adapter combinations. This is done using the attribute encode="no" in the <sendto> element, as
illustrated in line 10.
13.2.3.5 Reconciliator
The configuration for a Reconciliator defines how a business event is reconciled with its messages (if
it is a Business Event Reconciliator) or how a message should be reconciled with its business events
(if it is a Message Reconciliator).
If the reconciliator is a Business Event Reconciliator, it keeps a business event until all the messages
associated with it have been received. The item (either a business event or message) being
reconciled against is the business event and the items being reconciled with are the messages.
If the Reconciliator is a Message Reconciliator, it keeps a message until all the business events
associated with it have been received. The item (either a business event or message) being
reconciled against is the message and the items being reconciled with are the business events.
The following code is an example of the Reconciliator workflow element configuration:
Reconciliator
<BusinessEventReconciliator type="BusinessEvent">
<condition status="Success">
<musthaveflags>
<HasBeenSent />
</musthaveflags>
<maynothaveflags />
</condition>
<condition status="Failure">
<musthaveflags />
<maynothaveflags>
<IsBusinessEvent />
</maynothaveflags>
</condition>
<completed>
<addflags>
<HasBeenSent />
</addflags>
<removeflags />
</completed>
<failure>
<addflags>
<NotUpdatedInFK />
</addflags>
<removeflags />
</failure>
</BusinessEventReconciliator>
The Reconciliator is defined using a setupelement with these attributes:
Attribute Description/Value
name SETUP
type GENERAL
component_name BusinessEventReconciliator

Configuring the workflow
SWIFT Connectivity Guide 165
The Reconciliator configuration is defined using the same name as the unique name of the workflow
element.
The following table describes the Reconciliator attributes and sub-tags:
13.2.3.5.1 Defining multiple reconciliators
To use more than one Reconciliator workflow element, you need to specify three additional
attributes in the Reconciliator configuration. These attributes indicate the bits within a flag that are
unique to each reconciliator. To indicate the bit, an integer is defined. To use the first bit, you
specify 1 (1=(1-1)^2); the second bit has a value of 2 (2=(2-1)^2), and the third bit is represented
by 4 (4=(3-1)^2).
The bit values identify which bits to update in the ber_flags field of the ElementSequence table.
Each reconciliator must update the three flags in the table. If you have specified 1, 2 and 4 for the
first reconciliator, these values cannot be re-used in a second reconciliator; you should use 8, 16
and 32.
The following example illustrates normal flag usage by explicitly specifying the default values. When
you add another reconciliator, the values 1, 2 and 4 are overwritten.
Multiple Reconciliators
<BusinessEventReconciliator
type=’BusinessEvent’
reconciliatepresent=’1’
otherpresent=’2’
issuccess=’4’>
<condition status=’Success’>
.
The following table describes the three attributes:
Name Description
type The type of reconciliator:
• BusinessEvent
• Message.
condition The conditions that determine success or failure. Only when all the
conditions are met, is the item considered a success. The conditions are
determined using the <musthaveflags> and <maynothaveflags> elements.
The status attribute can be set to:
• Success
•Failure.
completed Determines the flags that are added or removed if the item is considered
successful. Flags are updated using the <addflags> and <removeflags>
tags.
failure Determines the flags that are added or removed if the item is not
considered successful. Flags are updated using the <addflags> and
<removeflags> tags.
Attribute Name Description
reconciliatepresent Indicates that the state element being reconciled has been
received. If no value is specified, a default of 1 is used.
otherpresent Indicates that the state element that is being waited for has been
received. If no value is specified, a default of 2 is used.
Configuring the workflow
166 © Wall Street Systems IPH AB - Confidential
13.2.3.6 BusinessEventNotifyer
The configuration for the BusinessEventNotifyer defines various conditions to determine whether a
success or failure is returned to the originating system (TRM). If all the parts of a condition are met,
certain flags may be added to or removed from the business event before returning it to the
Workflow Controller. A message may also be specified for updating the comment field in TRM for the
transaction or payment. You can configure the message element to match the maximum length
defined for messages in external systems. This is handled in a similar way to the
InboundMessageHandler workflow element (see the table on page 155).
The following code is an example of the BusinessEventNotifyer workflow element configuration:
Business Event Notifyer
1: <BusinessEventNotifyer>
2: <!-- Element retrying parameters -->
3: <toomanytries>
4: <!-- max: Maximum number of retries -->
5: <!-- expiration: Number of seconds the element retries counter is kept in memory -->
6: <max count="50" expiration="1800" />
7: <addflags>
8: <TooManyTries/>
9: </addflags>
10: </toomanytries>
11: <nonefound>
12: <addflags />
13: <removeflags />
14: </nonefound>
15: <condition status="Success">
16: <msg>Sent correctly (as ID
17: <find>/businessevent/@id</find>)
18: </msg>
19: <addflags><HasBeenSent /></addflags>
20: <removeflags />
21: <musthaveflags><HasBeenSent /></musthaveflags>
22: <maynothaveflags />
23: <xpath />
24: </condition>
25: <condition status="Failure">
26: <msg>Not Sent Correctly (as ID
27: <find>/businessevent/@id</find>) Failure
28: <find>/businessevent/message/feederfeedback/*/*/msg/text()</find>
29: </msg>
30: <addflags><HasNotBeenSent /></addflags>
31: <maynothaveflags><HasBeenSent /></maynothaveflags>
32: </condition>
33: </BusinessEventNotifyer>
Line 28 shows how to notify the reason for the failure by searching the <feederfeedback> block in
the message XML. See 12.3.2.3 Message failure received from CASmf on page 134.
The BusinessEventNotifyer is defined using a setupelement with these attributes:
issuccess Indicates that the state element that is being waited for is
considered a success. This success is based on the rest of the
configuration. If no value is specified, a default of 4 is used.
Attribute Name Description
Attribute Description/Value
name SETUP
type GENERAL
component_name BusinessEventNotifyer

Configuring the workflow
SWIFT Connectivity Guide 167
The BusinessEventNotifyer configuration is defined using the same name as the unique name of the
workflow element.
The following table describes the BusinessEventNotifyer sub-tags:
13.2.3.7 KeyLoader
The KeyLoader takes a business event or message and extracts a set of keys and values. These keys
and values can be used as search criteria or as normal values for message formatting or for display
in Message Monitor. The keys and values form part of the constructed XML (see 12.3.1.2 Keys and
values on page 130). A user apply Message Monitor filtering to locate the event using these keys
and values.
Constructed XML of a Message
<message id="571" state="Verify1" stamp="611" systemflagsi="4"
userflagsi="8"
creationdate="2002-03-28 09:28:10"
modificationdate="2002-03-28 09:28:24"
allflags="Mergeable, HasBeenMerged"
systemflags="Mergeable" userflags="HasBeenMerged"
elementtype="message">
<flags>
<Mergeable/>
<HasBeenMerged/>
</flags>
<keyset>
<number>416, 416</number>
<receiver>ABNAGB2L</receiver>
<reference>218-571</reference>
<sender>PTSBFRKK</sender>
<type>MT203</type>
</keyset>
<sender>PTSBFRKK</sender>
<receiver>ABNAGB2L</receiver>
<type>MT203</type>
Name Description
nonefound This tag does not include any criteria but specifies the action to take if none
of the conditions are met. It always returns a failure status and can add or
remove flags.
condition Defines the conditions that determine which status to return to the
originating system. Conditions are tested using the <musthaveflags> and
<maynothaveflags> tags. The condition may also include an XPath
expression using the <xpath> tag.
Note: Conditions are evaluated in the same order as they are defined in the
configuration.
The status attribute can be set to:
•Success: the transaction or payment is accepted in the TRM workflow
and the appropriate action is taken
•Failure: the transaction or payment is rejected in the TRM workflow and
the appropriate action is taken.
The <msg> element defines the message with which the transaction or
payment is updated. See the InboundMessageHandler for more
information.
Flags are added or removed using the <addflags> and <removeflags>
tags.

Configuring the workflow
168 © Wall Street Systems IPH AB - Confidential
The KeyLoader is defined using a setupelement with these attributes:
The KeyLoader configuration is defined using the same name as the unique name of the workflow
element.
The wait attribute defines how long (in milliseconds) the KeyLoader must wait before checking to
see if there are more messages or business events to process.
The values defined for the <keyset> tags are loaded from the database. These values can then be
used in several parts of the workflow. Using Message Monitor, you can search directly for the
message using these values. You can also use these values with the Encoder to facilitate encoding.
For each message there is a key called <reference> which is used in all encoded messages.
The XML files which define the keys and values that should be used are in the dbms/xml/keys
directory.
As no further values need to be set for the KeyLoader, the <KeyLoader> tag is not needed.
The <failure> tag is used when the KeyLoader fails to load a key. Flags between the <addflags>
tags are added and those between the <removeflags> tags are removed.
13.2.3.7.1 KeyLoader Mapping
KeyLoader needs mapping information. The SearchKey table contains one line for each element (id,
and flags). Each column (there are more than 40) corresponds to a particular key.
All the keys used (‘sender’, ‘receiver’) must be declared in the keysMapping section in setup.xml:
<setupelement name="SETUP"
type="GENERAL"
component_name="SearchKeyMapping">
<data>
<keysMappings>
<column name="value_1">number</column>
<column name="value_2">sender</column>
<column name="value_3">receiver</column>
<column name="value_4">type</column>
(…)
<column name="value_39"></column>
<column name="value_40"></column>
<column name="double_value_1">rate</column>
(…)
<column name="double_value_5"></column>
<column name="long_value_1"></column>
(…)
<column name="long_value_10"></column>
<column name="money_value_1">amount</column>
(…)
<column name="money_value_10"></column>
<column name="date_value_1">value_date</column>
(…)
<column name="date_value_10"></column>
Attribute Description/value
name SETUP
type GENERAL
component_name KeyLoader

Configuring the workflow
SWIFT Connectivity Guide 169
</keysMappings>
</data>
</setupelement>
For each key used with KeyLoader, you must have one entry in this setup. (e.g ‘type’ is mapped to
the column called ‘value_4’). Each name corresponds to a column name in the SearchKey Table.(e.g
the data of the key ‘type’ are stored in column ‘value_4’ of the SearchKey table).
For each new key, add a new entry in this configuration file. By default, this setup is done using the
existing and used keys.
You cannot define more than the existing columns, as follows:
13.2.3.7.2 Actions
Various keys and values need to be loaded for a business event, message or any sequence relating
to a business event and message. When either a business event or message is sent to the
KeyLoader, the element's constructed XML is used to run rules and actions. When a message is
received, the sequence's keys and values must also be loaded.
The following code illustrates the output an action produces:
Resulting Keys and Values
<output>
<keyset id='123'>
<key name='sender'>SENDERBC</key>
<key name='receiver'>RECIEVER</key>
<key name='type'>MT300</key>
</keyset>
<keyset id='124'>
<key name='amount' type='money'>1000000</key>
<key name='valuedate' type='date'>2002-04-28 00:00:00</key>
<key name='number' type='long'>2246</key>
</keyset>
.
.
</output>
Each <keyset> element represents the keys for either a business event, message or sequence. The
TRMSwift ID is given in the id attribute (lines 2 and 7). Each keyset contains various keys. In the
example above, the message (with ID 123) has the keys: sender, receiver and type. The sequence
has keys: amount, valuedate and number.
The type attribute can have the following values:
Attribute Description/value
Tex t 40
Double 5
Long 10
Money 10
Date 10
Type Description
text, string, or no value Indicates value is a text value.
long Indicates that the value is a long value, for example the business
event or message id.

Configuring the workflow
170 © Wall Street Systems IPH AB - Confidential
The constructed XML is also copied (line 13 onwards) so that it can be used in a further KeyLoader
action.
13.2.3.8 Message Merger
The Message Merger merges two messages into a single message. When TRMSwift receives a
message, it determines if that message can be merged with another message. It does this by
considering criteria that have been defined using flags, message states, message fields and keys.
Message Merger attempts to merge messages that match the criteria. During the merging process,
a number of additional constraints are checked, which means that not all messages that match the
initial criteria may be merged. For messages that are merged, a new message is created from the
two merged messages.
MessageMerger
<MessageMerger>
<completed>
<addflags><HasBeenMerged /></addflags>
</completed>
<mergestate state='KeyLoader' />
</MessageMerger>
The MessageMerger is defined using a setupelement with these attributes:
The MessageMerger configuration is defined using the same name as the unique name of the
workflow element.
The following table describes the MessageMerger sub-tags:
13.2.3.8.1 Actions
Messages can only be merged if they are similar in a particular way (from the same sender, to the
same receiver, the same currency, the same value date and for the same counterparty).
money Indicates that the value is a currency amount. The format is either
numeric or text. Numeric values can be up to 18 digits before the
decimal point and up to ten digits after the decimal point. You
should truncate or round values that exceed the maximum number
of digits. Alternatively, bigger values can be entered as text.
double Indicates that the value is a floating point value.
date or datetime Indicates that the value is date or a date and time. For a date, the
format is yyyy-MM-dd. For a date and time, the format is
yyyy-MM-dd hh:mm:ss.
Type Description
Attribute Description/value
name SETUP
type GENERAL
component_name MessageMerger
Name Description
completed Defines the flags that are added or removed from the message when it is
passed back to the Workflow Controller, if the message was merged.
mergestate Defines the state to apply to the message when the message is returned to
the Workflow Controller.
Configuring the workflow
SWIFT Connectivity Guide 171
13.2.3.8.2 Pre-selecting messages
Message Merger uses rules and actions to find messages to merge. These rules and actions are
based on the full XML of the message. The component_name for the rule is Pre followed by the
unique name of the Message Merger, usually PreMessageMerger.
An example of the actions is shown below:
Message Merger pre-selection
<matches>
<!-- merge MT210 with MT210 -->
<matchtype name="type_210">
<mustbeinstate>Verify1</mustbeinstate>
<musthaveflags><Mergeable/></musthaveflags>
<!-- type constraint -->
<matchfield>
<current kind="fixed">MT210</current>
<other kind="key">type</other>
</matchfield>
<!-- swift constraints -->
<matchfield>
<current kind="key">kind</current>
<other kind="key">kind</other>
</matchfield>
<matchfield>
<current kind="key">function</current>
<other kind="key">function</other>
</matchfield>
<matchfield>
<current kind="key">sender</current>
<other kind="key">sender</other>
</matchfield>
<matchfield>
<current kind="key">receiver</current>
<other kind="key">receiver</other>
</matchfield>
<!-- MT210 constraints -->
<matchfield>
<current kind="key">currency_id</current>
<other kind="key">currency_id</other>
</matchfield>
<matchfield>
<current kind="key" type="date">payment_date</current>
<other kind="key" type="date">payment_date</other>
</matchfield>
</matchtype>
</matches>
The action in the example above finds messages (called other) for a MT210 message (called
current). The other message must be in state Verify1 and have the flag Mergeable. It must also
have a key with the same type, set to MT210. Both messages must contain the following keys with
the same value for both messages: kind, function, sender, receiver, currency_id and payment _date
(where the key type of payment_date is date).
Each <matches> element must have at least one <matchtype> element. The <matchtype>
element is used in the same way as the <relationshiptype> element described in the
RelationshipMaker section of this guide (see the description on page 175 for more information).
13.2.3.8.3 Merging messages
When the Message Merger finds potential messages to merge, it tries to merge them one by one
until a merge succeeds or all messages have failed. If the merged message needs to be merged
again, it must be routed through the KeyLoader to obtain the keys that are required to find potential
Configuring the workflow
172 © Wall Street Systems IPH AB - Confidential
messages for the merging process. Once it has passed through the KeyLoader, it is re-routed to the
MessageMerger, using the flags in the workflow. The final state of a merged message is defined by
the Message Merger setup (see 13.2.3.8 Message Merger on page 170).
During the merge, the constructed XML for two messages is combined into a single block of XML and
wrapped in a <messages> element. Once this is done the rules and actions are run on the block of
XML.
A number of additional checks may be run to evaluate criteria not checked by the pre-selection
process. The pre-selection process uses keys which only apply to fields that are mandatory. If a key
does not exist for both messages, the messages cannot be matched, so a check is performed on the
optional fields. The check determines if the fields exist for both messages and if the values are the
same, or that the fields do not exist for both messages. If the resulting message is empty, this
means that the merge has failed and the next potential message is tried. Up to 10 messages can be
merged into a single message.
The result of the action is similar to the following XML block:
Merged Message XML
<newmessage reference='123' owner='ABC' ownertype='confirmation'>
<addflags>
<Mergable>
</addflags>
<sender>SENDERBC</sender>
<receiver>RECEIVER</receiver>
<type>MT203</type>
.
</newmessage>
The resulting XML determines how to create the newly merged message. The sequence of the old
messages is merged into the new message. The keys and flags are removed. The keys can be
re-loaded by sending the new message to the KeyLoader again (see 13.2.3.8 Message Merger on
page 170). The flags can be added by using the <addflags> element (lines 2 to 4). Any
<sequence>, <flags>, <keyset> or <addflags> elements within the <newmessage> are not
included in the new messages. All other child elements are included within the XML of the message
itself (not just the constructed XML).
The reference, owner and ownertype attributes of the <newmessage> tag are used to insert the
values into the database for the new message. This is similar to the functionality of the Business
Event Splitter.
13.2.3.8.4 Alternative workflow
The solution described above, is optimized for the case where there are many messages, but only a
few are actually merged. If there are not many messages and most of them can be merged, you can
achieve better performance if most of the checks to determine whether the messages can be
merged are carried out during the merge process itself. In this way, no keys are required and the
merged message is routed directly back to the Message Merger, thus bypassing the KeyLoader.
To use the alternative workflow, you must perform the following configuration:
1. In the keysMT2-rules.xml file, remove the template KEYS_MessageMerger from the
template_list for action KEYS-Reference-Payments-Templates.
This enables the KeyLoader to be bypassed.
2. Replace the rules and actions with a single rule and action that is valid for all mergeable
message types.
This ensures that only the state and flags of the message are considered when pre-selecting
messages for merging.
For example:
<action name="MM_Pre_MT202_MT203_MT210_MT640" template_list="no"
cacheable_list="yes" fixed_result="yes" active_from="" active_to="">
Configuring the workflow
SWIFT Connectivity Guide 173
<data>
<matches>
<!—check state and flags -->
<matchtype name="state_and_flags">
<mustbeinstate>Verify1</mustbeinstate>
<musthaveflags><Mergeable/></musthaveflags>
</matchtype>
</matches>
</data>
</action>
<rule>
<name>MM_Pre_MT202_MT203_MT210_MT640</name>
<order_id>100</order_id>
<xpath>/message/type[text()="MT202" or
text()="MT203" or
text()="MT210" or
text()="MT604"]</xpath>
<action>MM_Pre_MT202_MT203_MT210_MT640</action>
<component_name>PreMessageMerger</component_name>
<type/>
<active_from/>
<active_to/>
</rule>
3. Create a new template to check additional criteria. The template must ensure that both
messages have the same function, kind, sender, receiver, currency id, and payment date.
This enables fields to be compared during the merging process using actions.
You can add the following template to the rules.MM.xml file:
<!-- =====[ MM_Merge Common Constraints]================= -->
<action name="MM_Merge Common Constraints" template_list="no" active_from="NULL"
active_to="">
<data>
<!--
Ensures the following:
1. They are both of the same kind (e.g. SWIFT)
2. They are both the same function
3. They have the same sender
4. They have the same receiver
5. They have the same currency id
6. They have the same payment date
-->
<xsl:stylesheet version="1.0"
xmlns:xsl="http://www.w3.org/1999/XSL/Transform">
<xsl:template match="messages">
<!-- Make sure both are of same kind -->
<xsl:if test="/messages/message[1]/kind =
/messages/message[2]/kind">
<!-- Make sure both are using same functionality -->
<xsl:if test="/messages/message[1]/function =
/messages/message[2]/function">
<!-- Make sure both have the same sender -->
<xsl:if test="/messages/message[1]/sender =
/messages/message[2]/sender">
<!-- Make sure both have the same receiver -->
<xsl:if test="/messages/message[1]/receiver =
/messages/message[2]/receiver">
Configuring the workflow
174 © Wall Street Systems IPH AB - Confidential
<!-- Make sure both are using same currency -->
<xsl:if test="/messages/message[1]/sequence[1]/currency_id =
/messages/message[2]/sequence[1]/currency_id">
<!-- Make sure both have the same payment date -->
<xsl:if test="/messages/message[1]/sequence[1]/payment_date =
/messages/message[2]/sequence[1]/payment_date">
<!-- Send the entire DOM to the next step if constraints -->
<!-- not violated else a NULL DOM -->
<xsl:copy-of select="." />
</xsl:if>
</xsl:if>
</xsl:if>
</xsl:if>
</xsl:if>
</xsl:if>
</xsl:template>
</xsl:stylesheet>
</data>
</action>
Add the following template at the beginning of the template_list for each action in the rules.MM.xml
file:
<template>MM_Merge Common Constraints</template>
13.2.3.9 Relationship Maker
The Relationship Maker defines relationships between business events. The Relationship Maker uses
rules and actions to define these relationships. The business event ID is used to create a relationship
type. Typical relationship types include history and related. History is used when the same
transaction or payment is received again. Related is used when a transaction is rolled over and a
new business event is generated.
Relationships are determined by the business event that has been passed to the Relationship Maker
and existing business events. The output from the Relationship Maker impacts the constructed XML
for the business event (see 12.3.1.4 Relationship to other business events on page 131).
13.2.3.9.1 Actions
Rules and actions are based on the full XML of the business event. The resulting XML (an example is
given below) defines potential relationship types. Each relationship type determines its own criteria
that enable business events to be linked.
Relationship Maker
<relationships>
<relationshiptype name="history">
<mustbeinstate>Completed</mustbeinstate>
<musthaveflags><HasBeenSent/></musthaveflags>
<matchfield>
<current kind="system">reference</current>
<other kind="system">reference</other>
</matchfield>
<matchfield>
<current kind="system">ownertype</current>
<other kind="system">ownertype</other>
</matchfield>
</relationshiptype>
<relationshiptype name="related">
Configuring the workflow
SWIFT Connectivity Guide 175
<matchfield>
<current kind="xpath">
/businessevent/businessevent/reference_number/text()
</current>
<other kind="system">reference</other>
</matchfield>
<matchfield>
<current kind="system">ownertype</current>
<other kind="system">ownertype</other>
</matchfield>
</relationshiptype>
</relationships>
Each <relationships> element must have at least one <relationshiptype> element. The
relationshiptype name attribute defines the name of the relationship type.
A relationshiptype element may contain <mustbeinstate> elements. In the example, the
existing business events must be in the Completed state. The <mustbeinstate> element only
applies to existing business events.
A relationshiptype element may contain <musthaveflags> and <maynothaveflags> elements.
In the example, the existing business events must have the HasBeenSent flag set. The
musthaveflags and maynothaveflags only apply to the existing business events.
A relationshiptype element may also contain the tag <onlyMaxId>. If it is set to yes, the
relationship is only created for the highest id of all elements that meet the criteria for the
relationship. In this way, only a relationship with the latest id is created.
The <matchfield> element defines the criterion for establishing a relationship. Each field that is
matched requires its own matchfield element.
matchfield elements and flag elements work as AND conditions. If one of the conditions is not met,
the relationship is not created.
The matchfield element has two parts: current and other. Current indicates the lookup fields for
the business event that has been passed to the Relationship Maker. Other indicates the lookup fields
for existing business events. Each <current> element is matched with an <other> element.
In the example above, a history relationship is created for all business events that have the same
reference and ownertype as the business event being processed. A related relationship is created
for all business events that have the same ownertype as the current business event AND which
have the same reference number as determined by the XPath expression (specified on line 17).

Connection Pooling
176 © Wall Street Systems IPH AB - Confidential
The current element contains a kind attribute that defines the method of extracting the value from
the business event which is passed to the Relationship Maker.
The other element also contains a kind attribute. Valid values are indicated below:
13.3 Connection Pooling
The Connection Pool manages access to the TRMSwift database.
The ConnectionPool is defined using a setupelement with these attributes:
Attribute
name Value
system A system value for the business event. Possible values are:
• id: the ID created by the InboundMessageHandler
• reference: the reference received from the adapter
• owner: the name of the adapter from which the business event was
received
• ownertype: the type of adapter
• state: the state of the business event
• flags: an integer indicating the system flags that are set for the business
event
• uflags: an integer indicating the user flags that are set
• creation_date: the creation date (yyyy-MM-dd HH:mm:ss)
• modification_date: the modification date (yyyy-MM-dd HH:mm:ss)
• xml: the XML of the business event
• stamp: the database time stamp of the business event.
key The name of a loaded search key (as loaded by a KeyLoader) for the business
event. The name of the search key is always returned as a string.
xpath An XPath expression that extracts a value from the full XML of the business
event. The XPath expression must point to a single value.
fixed A fixed string specified by the content of the <current> element.
Attribute
name Value
system A system value for the business event. Possible values are:
• id: the ID created by the InboundMessageHandler
• reference: the reference received from the adapter
• owner: the name of the adapter from which the business event was
received
• ownertype: the type of adapter.
key The name of a loaded search key for the business event. The type of key to be
used must also be specified in the type attribute of the <other> element.
Attribute Description/value
name SETUP
type GENERAL

Connection Pooling
SWIFT Connectivity Guide 177
A connection element contains two attributes:
•wait: defines the time interval, in milliseconds, for which Connection Pool waits when attempting to
close unused connections
•min: defines the minimum number of unused connections that must be kept open.
The following example shows a Connection Pool element that attempts to close a connection every
minute if the number of unused open connections is greater than 3.
<ConnectionPool wait="60000" min="3">
component_name ConnectionPool
Attribute Description/value
Connection Pooling
178 © Wall Street Systems IPH AB - Confidential
SWIFT Connectivity Guide 179
Chapter 14 TRMSwift adapter configuration
Adapters are used to obtain data from external systems (such as a business event coming from
TRM) or to provide external systems with data (such as a message that is sent to SWIFTAlliance).
Adapters allow external interfaces to be mapped onto a common internal structure, enabling
interaction with the TRMSwift core. All adapters created for TRMSwift can be run as a single process
or on different platforms.
The adapter subsystem performs the following functions:
•Implements the IDL (interface definition language) specified in Feeder.idl.
•Interfaces to any external system.
•Enables the configuration of the interface to an external system.
•Enables multiple instances of external system interfaces.
•Provides a methodology and programmatic interface for the addition of new external systems.
•Enables configuration in a networked environment.
This chapter describes how interfaces are produced and how adapters may be configured.
14.1 Processes
One adapter process can have many interfaces running internally. Each interface runs in its own
thread and is essentially distinct from any other interface.
Typically, all interfaces that are operational on one computer are configured to run in the same
process space. Adapter processes may need to be operational on more than one computer, for
example when a particular interface requires that the software is run on the same computer as the
interface.
14.2 Defining an adapter
The DTD (document type definition) of the XML used within the adapter component is:
<!ELEMENT businessevent (business-object)* >
<!ELEMENT business-object (de*, business-object*) >
<!ELEMENT de (#PCDATA) >
<!ATTRLIST de name >
where business-object is the name of the business object supplied by the interface.
All configurations are stored in the TRMSwift database. The list of component names supplied to the
component variable determines the configuration.
There are four aspects to adapters:
•Configuration

Defining an adapter
180 © Wall Street Systems IPH AB - Confidential
Controls the loading of common definitions and then produces each interface by creating the
class with the appropriate configuration definition. Configuration also determines the meaning of
the specification.
•Device-independent top part.
This part of the interface is common for all interfaces and implements the interface to the
TRMSwift core via the specification in feeder.idl. It also adds value to the basic data supplied by
an interface by conversion to XML, joining with data from other interfaces, and applying XSLT
and data reduction to the XML sent to or received from the TRMSwift core.
•Device-specific bottom part.
Each interface implements two interface descriptions. The first is for a factory to produce the
individual interfaces. The second defines the actions which may be carried out on an interface.
Depending on the type of interface it may not be necessary to implement all interface actions.
•Filtering-specific bottom part.
Filtering is considered a separate part of an interface as many interfaces can share the same
filter. The process of creating and adding filtering capability follows the same path.
14.2.1 Configuration
There are five DTDs which are used to control the configuration:
•feeder-resource-specification
•connector-specification
•filter-specification
•joiner-specification
•feeder-component-instance.
14.2.1.1 Feeder resource specification
The feeder-resource specification enables you to name interface resources with user-friendly names
and to supply any additional parameters that an interface factory may require. TRMSwift is supplied
with a core set of available resources.
<!ELEMENT feeder-resource-specification (connector-factory-list,
filter-factory-list) >
<!ELEMENT connector-factory-list (factory-specification)* >
<!ELEMENT filter-factory-list (factory-specification)* >
<!ELEMENT factory-specification (factory-name, path, parameter-list) >
<!ELEMENT factory-name (#PCDATA) >
<!ELEMENT path (#PCDATA) >
<!ELEMENT parameter-list (parameter*) >
<!ELEMENT parameter (key, value) >
<!ELEMENT key (#PCDATA) >
<!ELEMENT value (#PCDATA) >
The following table describes the feeder-resource specification fields:
Field Description
connector-factory-list A list of interface type factories.
filter-factory-list A list of filter type factories.
factory-name The user friendly name for the interface factory, for example
comKIT.
path The location of the specific class, for example
com.trema.babelfish.feeder.connector.ComkitConnectoryFactory.
Defining an adapter
SWIFT Connectivity Guide 181
14.2.1.2 Connector specification
The connector specification provides reusable connector components thus avoiding repetition. You
can override some of the values.
<!ELEMENT connector-specification (factory-name,
service-type,
service-name,
service-subname?,
query-setup-parameters,
update-setup-parameters?,
field-list?) >
<!ELEMENT factory-name (#PCDATA) >
<!ELEMENT service-type (#PCDATA) >
<!ELEMENT service-name (#PCDATA) >
<!ELEMENT service-subname (#PCDATA) >
<!ELEMENT parameter (key, value) >
<!ELEMENT key (#PCDATA) >
<!ELEMENT value (#PCDATA) >
<!ELEMENT query-setup-parameters (parameter*) >
<!ELEMENT update-setup-parameters (parameter*) >
<!ELEMENT field-list (field)* >
<!ELEMENT field (business-object, field-specifier) >
<!ELEMENT business-object (#PCDATA) >
<!ELEMENT field-specifier (key-list?, not-key-list?) >
<!ELEMENT key-list (key*) >
<!ELEMENT not-key-list (key*) >
The following table describes the connector-specification fields:
14.2.1.3 Filter specification
Filter specifications enable you to define reusable filters. The filter specification allows multiple filters
to be used in a single pass. Multiple filters enable recursive parsing.
<!ELEMENT filter-specification (base-filter,
(pipeline-filter | hierarchy-filter)?)>
parameter-list A list of key/value pairs for a particular factory.
Field Description
Field Description
factory-name The name of the factory that produces the instance.
service-type The subset of interfaces within the control of the factory,
for example, transaction within the comKIT factory.
service-name Further breakdown of the particular factory interface
specification.
service-subname Extra level of breakdown if required.
query-setup-parameters Key/value pairs used when querying for the next object
from the interface.
update-setup-parameter
s
Key/value pairs used when querying for a specific object
from the interface.
field-list An optional list of fields used when querying for an object.
The syntax allows for hierarchical objects to be queried.
You use the business-object field to specify which object
in the hierarchy to adjust. It must also be implemented in
the interface.

Defining an adapter
182 © Wall Street Systems IPH AB - Confidential
<!ELEMENT parameter-list (parameter*) >
<!ELEMENT parameter (key, value) >
<!ELEMENT key (#PCDATA) >
<!ELEMENT value (#PCDATA) >
<!ELEMENT factory-name (#PCDATA) >
<!ELEMENT base-filter (factory-name, parameter-list)>
<!ELEMENT hierarchy-filter (key-filter+)>
<!ELEMENT key-filter (match, (base-filter|pipeline-filter)) >
<!ELEMENT pipeline-filter (base-filter|hierarchy-filter)+ >
<!ELEMENT match (key) >
The following table describes the filter specification fields:
14.2.1.4 Joiner specification
You can use joiners to add additional data to the data returned from an interface query. You can also
concatenate message data from multiple interfaces. Joiners can be reused by a separate
specification.
You can apply filters to joiners by including the filter within the joiner specification. Filtering within
joiners is optional.
A number of fields within the joiner specification are XPath expressions. The format of the XPath
expression is: businessevent/businessobject/de[@name="field id"].
<!ELEMENT joiner-definition-specification (if?,
from-key-list,
service,
query-parameters,
to-key,
filter?,
tag-list?) >
<!ELEMENT if (#PCDATA) >
<!ELEMENT from-key-list (key+) >
<!ELEMENT to-key (#PCDATA) >
<!ATTLIST to-key
replace-type (to-parent | rename | use-tag) #IMPLIED >
<!ELEMENT tag-list (tag-specifier+) >
<!ELEMENT tag-specifier (xpath,(tag-key-pair+)) >
<!ELEMENT tag-key-pair (tag, key) >
<!ELEMENT xpath (#PCDATA) >
<!ELEMENT tag (#PCDATA) >
<!ELEMENT service (connector-name,
query-setup-parameters-overide?,
update-setup-parameters-overide?) >
<!ELEMENT connector-name (#PCDATA) >
<!ELEMENT query-setup-parameters-overide (parameter*) >
<!ELEMENT update-setup-parameters-overide (parameter*) >
<!ELEMENT query-parameters (parameter*) >
<!ELEMENT parameter (key, value) >
<!ELEMENT key (#PCDATA) >
<!ELEMENT value (#PCDATA) >
Field Description
base-filter This filter is the first to run and is mandatory.
pipeline-filter A list of filters, all of which are called.
hierarchy-filter A list of filters where each filter has a key to match. The match
determines whether the filter is called.
key-filter A key filter is used to specify the key and which type of filter to use.

Defining an adapter
SWIFT Connectivity Guide 183
The following table describes the joiner specification fields:
14.2.1.5 Feeder component instance
A feeder component instance is the actual definition of a working interface.
<!ELEMENT feeder-component-instance (type,
description,
service,
read*,
write?) >
<!ELEMENT type (#PCDATA) >
<!ELEMENT description (name?, information?) >
<!ELEMENT name (#PCDATA) >
<!ELEMENT information (#PCDATA) >
<!ELEMENT service (connector-name,
query-setup-parameters-overide?,
update-setup-parameters-overide?) >
<!ELEMENT connector-name (#PCDATA) >
<!ELEMENT query-setup-parameters-overide (parameter*) >
<!ELEMENT update-setup-parameters-overide (parameter*) >
<!ELEMENT read (io-detail) >
<!ELEMENT write (io-detail) >
<!ELEMENT io-detail (io-detail-name,
additional-information?,
query-parameters,
filter?,
join-list,
flattener?,
export-list) >
<!ELEMENT join-name (#PCDATA) >
<!ELEMENT io-detail-name (#PCDATA) >
Field Description
if An XPath expression that defines an ‘if’ condition. This field is
optional.
from-key-list An XPath expression that defines a list of fields within a
message to which the join is applied.
service The name of the connector specification. Query setup
parameters can be overridden.
query-parameters Parameters other than the variable key that may be required to
perform the query.
to-key The variable in the joiner to which the value from each from-key
is applied. The value of the replace-type attribute determines
where to put the data resulting from the query.
to-parent Leaves the data in its current XML form and attaches it to the
parent XML structure as a sub-element of the to-key element.
rename Renames all of the resulting fields with the name of the parent
element as the first part of the name. Puts the entries at the
same level as the parent.
use-tag Optional tag-list information which is used to add fields at the
same level as the parent.
tag-list Specifies that a particular name is used from a value within the
underlying XML. The XPath field specifies the parent level value
as there may be multiple return sets. The key is the value
associated with the name attribute and the tag is the name
required for the field.

Implemented connectors
184 © Wall Street Systems IPH AB - Confidential
<!ELEMENT additional-information (parameter*) >
<!ELEMENT query-parameters (parameter*) >
<!ELEMENT parameter (key, value) >
<!ELEMENT key (#PCDATA) >
<!ELEMENT value (#PCDATA) >
<!ELEMENT filter (#PCDATA) >
<!ELEMENT flattener (component, type, name) >
<!ELEMENT component (#PCDATA) >
<!ELEMENT join-list (join*) >
<!ELEMENT join (join-name, from-keys-overide?) >
<!ELEMENT from-keys-overide (key+) >
<!ELEMENT tag (#PCDATA) >
<!ELEMENT export-list (all | key-list) >
<!ELEMENT all EMPTY>
<!ELEMENT key-list (key*) >
The following table describes the feeder-component instance fields:
14.3 Implemented connectors
This section describes each of the implemented connectors, in particular:
•A description of the connector
•Available parameters for the factory init() method
Field Description
type A short description of the interface, such as
CONFIRMATION or PAYMENT.
description A name and a description of the interface.
service The service from the available connector specifications.
Query and update setup parameters can be overridden.
read Specification of the query side of the interface. There may
be zero or more read interfaces.
write Specification of the creation side of the interface. There
may be zero or one write interface.
io-detail Specifies the interface in detail.
name The name of the io-detail.
additional-information Specifies additional information to be supplied with the
outgoing XML. Typical data includes ownertype and
betype.
query-parameters Additional parameters to use for a query.
Note: Query parameters can be overwritten by the
InboundMessageHandler.
filter The name of a prespecified filter. This field is optional.
join-list A list of pre-specified joiners.
flattener The name, type and component name of a flattener. A
flattener is an XSLT script.
export-list Specification of all the fields to be included in the final
message. The key word ‘all’ is used to specify all fields.

Implemented connectors
SWIFT Connectivity Guide 185
•Available parameters for the factory create() method.
The parameters for the init() method are specified in the parameter-list tag of
factory-specification xml (contained in feeder-resource-specification) as the key and value tags
to a parameter.
The parameters for the create() method are specified in the connector-specification xml using
the service-type, service-name and service-subname tags and the parameter lists
query-setup-parameters and update-setup-parameters.
14.3.1 Incoming SWIFT messages connector
TRMSwift uses a specific connector to process incoming SWIFT messages. The process of receiving
and processing incoming SWIFT messages works as follows:
•When new messages arrive from SWIFT through the Enterprise Swift Integration Adapter
(ESIAdapter), they appear in FIN Message Admin with state RECEIVED.
•The FINMessage flow ($FK_HOME/share/python/entity-flow/finmessage.py) is configured by
default so that when user clicks Accept for this message, it is moved to state
INTEGRATED-TRANS, and is sent to the message broker in the finmessage.to.trmswift queue.
•There is special queue connector called InDBFinQueueConnector which listens on this queue
($FK_HOME/etc/trmswift/package/SWIFT/feeder/dbfinmessagein/connector.xml) and
sends messages for processing to the TRMSwift core.
•When the message is processed, TRMSwift moves the SWIFT message in FIN Message Admin
either to state INTEGRATED if successful, or to state INTEGRATED-ERROR if the processing of
the message fails.
To activate a connector, add three components to the TRMSWIFT_COMPONENT environment variable
(see 8.2 Setting up TRMSwift environment variables on page 91):
•INDBFIN_QUEUE
•ISWIFTLOAN
•FILTER
INDBFIN_QUEUE is needed to activate the connector and the other two are used by it.
14.3.2 comKIT connector factory
The comKIT connector factory is used to interact with TRM. The following types of connector are
available:
•transaction: receiving and sending (creating) transactions in TRM
•payment: receiving payments from TRM
•call: receiving call money transactions from TRM
•data: receiving data from TRM
•static data: receiving and sending (creating) actions on TRM static data.
Note: To avoid feeder errors when running the comKIT payment service, you must run the
cash_mod.sql script in your TRM database during the TRMSwift installation process. The
cash_mod.sql file contains the configuration for payment flow and is located in the
[FK_HOME]/dbms/sybase/setup/modules directory.
comKIT connectors do not require separate feeder-resource-specifications; a shared resource is
sufficient for all comKIT connectors.
The following example shows a feeder-resource-specification:
comKIT Feeder-resource-specification
Implemented connectors
186 © Wall Street Systems IPH AB - Confidential
<feeder-resource-specification>
<connector-factory-list>
<factory-specification>
... other factory specs ...
</factory-specification>
<factory-specification>
<factory-name>comkit</factory-name>
<path>com.trema.babelfish.feeder.connector.comkit.
ComkitConnectorFactory</path>
<parameter-list>
<parameter>
<key>host</key>
<value>@comkit.orb.host@</value>
</parameter>
<parameter>
<key>port</key>
<value>@comkit.orb.port@</value>
</parameter>
<parameter>
<key>context</key>
<value>@comkit.context@</value>
</parameter>
<parameter>
<key>user</key>
<value>@comkit.user.name@</value>
</parameter>
<parameter>
<key>password</key>
<value>@comkit.user.password@</value>
</parameter>
<parameter>
<key>version</key>
<value>FK</value>
</parameter>
</parameter-list>
</factory-specification>
The factory-name is used by the connector configuration to determine the required
factory specification.
The parameter-list contains tokens as values. These tokens are replaced with text values when the
update operation in the database is executed.
14.3.2.1 Transaction connector
The Transaction connector is used to create transactions, and to read or update transaction data via
comKIT.
The following example shows a Transaction connector specification:
$
comKIT Transaction connector specification
<connector-specification>
<factory-name>comkit</factory-name>
<service-type>transaction</service-type>
<service-name>@comkit.service@transaction</service-name>
<query-setup-parameters>
<parameter>
<key>mode</key>
<value>TRADING</value>
</parameter>
Implemented connectors
SWIFT Connectivity Guide 187
</query-setup-parameters>
<field-list>
<field>
<business-object>transaction</business-object>
<field-specifier>
<key-list>
<key>market_id</key>
<key>instrument_id</key>
<key>opening_date</key>
<key>currency_id</key>
<key>currency_2_id</key>
<key>cp_client_id</key>
<key>portfolio_id</key>
<key>spot_date</key>
<key>value_date</key>
<key>nominal_rate</key>
<key>base_amount</key>
<key>quote_amount</key>
<key>param_8</key>
<key>comment</key>
</key-list>
</field-specifier>
</field>
</field-list>
</connector-specification>
The <factory-name> tag instantiates the connector and points to the
feeder-resource-specification.
Query-setup-parameters are used to specify the modes that have been defined for the TRM
Transaction Board.
There are two <business-objects> that are used to set columns: transaction and cashflow. All
columns are defined within the <key-list> tag. The values contained in the <key> tag are
combined using the pipe symbol ( | ) to create a single expression. This expression is applied
against each column to check match conditions. When a column name matches the expression, the
Transaction connector is able to access data stored for that column. You can also define filters, using
the <not_key_list> tag, to narrow down the selection by excluding columns.
When accessing transaction data, especially when creating transactions, columns are set one by one
according to a defined order. The order used by the Transaction connector is specified in the Java
class ComkitComparator implemented in java.util.Comparator. The order is as follows:
1. instrument_id
2. type_id
3. keep_amounts
4. Any field containing the string currency
5. Any field containing the string instrument_id
6. Any field containing the string date
7. fx_spot_rate
8. deal_rate.
The format of the XML created by the Transaction connector is specific to it. Business events
represented as XML in TRMSwift are generated using a complex algorithm which may use joiners
and flatteners. The basic version of the XML resembles a hash table of data columns and their
values.
The following is an example of a Transaction connector:
Implemented connectors
188 © Wall Street Systems IPH AB - Confidential
<connector-specification>
<factory-name>comkit</factory-name>
<service-type>transaction</service-type>
<service-name>@comkit.service@transaction</service-name>
<query-setup-parameters>
<parameter>
<key>mode</key>
<value>SH-GET</value>
</parameter>
<parameter>
<key>accept-name</key>
<value>ACCEPT</value>
</parameter>
<parameter>
<key>reject-name</key>
<value>REJECT</value>
</parameter>
</query-setup-parameters>
<update-setup-parameters>
<parameter>
<key>mode</key>
<value>SH-HOLD</value>
</parameter>
</update-setup-parameters>
<field-list>
<field>
<business-object>transaction</business-object>
<field-specifier>
<key-list>
<key>local_corr_bank_id_1</key>
<key>price</key>
<key>rate</key>
<key>portfolio_name</key>
...
<key>other_custody_account_id</key>
<key>roll_over_method</key>
<key>collateral.*</key>
<key>logical_number</key>
</key-list>
</field-specifier>
</field>
<field>
<business-object>cashflow</business-object>
<field-specifier>
<key-list>
<key>currency_id</key>
<key>value_date</key>
<key>amount</key>
<key>fixing.*</key>
...
<key>accrual_date_basis</key>
<key>date_basis</key>
<key>affect_number</key>
<key>attributes</key>
</key-list>
</field-specifier>
</field>
</field-list>
</connector-specification>
The Transaction connector generates input similar to the following:
Implemented connectors
SWIFT Connectivity Guide 189
<businessevent>
<de name="ownertype">confirmation</de>
<de name="betype">FXSpotForward</de>
<transaction>
<de name="accrual_date_basis"/>
<de name="accrued_interest">0.0000</de>
<de name="amount">1212133.0000</de>
<de name="base_amount">1212133.0000</de>
...
<de name="collateral_market_price"/>
<de name="collateral_market_rate"/>
<de name="collateral_rate_2"/>
<de name="collateral_number"/>
<cashflow>
<de name="accrual_date_basis"/>
<de name="affect_number"/>
<de name="amount">1212133.0000</de>
<de name="attributes"/>
...
<de name="spread">0.0</de>
<de name="subcategory_id"/>
<de name="type_id">FX Settlement</de>
<de name="value_date">20040108</de>
</cashflow>
<cashflow>
<de name="accrual_date_basis"/>
<de name="affect_number"/>
<de name="amount">-1337346.3400</de>
<de name="attributes"/>
...
<de name="spread">0.0</de>
<de name="subcategory_id"/>
<de name="type_id">FX Settlement</de>
<de name="value_date">20040108</de>
</cashflow>
</transaction>
</businessevent>
The output format accepted by the Transaction connector is similar to the example below.
Depending on your configuration, this data may be modified by flatteners or joiners.
<output>
<message>
<!--This is an encoded THUB:FXSpot/FWD message-->
<de name="action">create</de>
<de name="market_id">FX</de>
<de name="opening_date">20020326</de>
<de name="value_date">20020328</de>
...
<de name="instrument_id">Spot</de>
<de name="cp_client_id">BMW</de>
<de name="currency_id">EUR</de>
<de name="currency_2_id">USD</de>
</message>
<formatted/>
</output>
With this output format, you can specify the fparameter use_default_order (1 or 0). The arguments
are then passed to comkitConnector in the order defined in the formatted xml.
<output>
<message>
<!--This is an encoded THUB:FXSpot/FWD message-->
Implemented connectors
190 © Wall Street Systems IPH AB - Confidential
<de name="action">create</de>
<de name="user_default_order">1</de>
<de name="market_id">FX</de>
<de name="opening_date">20020326</de>
...
</message>
</output>
14.3.2.1.1 Support for multi-collateral transactions
The Transaction connector enables access to data in the Multi Collateral Board in TRM. You can
specify the actions and fields supported by comKIT in the XML which is passed to the adapter.
The XML uses de and ds tags, representing fields in the top part and the bottom part of the board
respectively. The ds tags can also take a de sub-element to represent various fields in the bottom
part of the board. You need to define only the fields in which you can enter data or update data in
the Multi Collateral Board. The order of the fields is the same as the order in which they are
displayed in the board.
The following example shows the encoded XML for a split repo transaction:
Split repo with collateral
<output>
<message>
<de name="action">split_repo_collateral</de>
<de name="number">12345</de>
<de name="total_collateralised_amount">9000000</de>
<ds>
<de name="collateral_instrument_id">INST1</de>
<de name="collateral_amount">1000000</de>
</ds>
<ds>
<de name="collateral_instrument_id">INST2</de>
</ds>
</message>
</output>
The action splits transaction 12345 into INST1 and INST2. The amount for INST1 is 1000000. It also
modifies the total collateral amount to 9000000.
The following example shows the encoded XML for a collateral substitution:
Collateral substitution
<output>
<message>
<de name="action">collateral_substitution</de>
<de name="number">12346</de>
<de name="substitution_opening_date">20040128</de>
<de name="substitution_value_date">20040129</de>
<de name="total_collateralised_amount">1</de>
<ds>
<de name="collateral_amount">-5000000</de>
</ds>
<ds>
<de name="collateral_instrument_id">INST3</de>
</ds>
</message>
</output>
In the example, 5000000 of transaction 12346 is substituted with INST3 on 29 January 2004
(opening date 28 January 2004).
Implemented connectors
SWIFT Connectivity Guide 191
14.3.2.1.2 Support for schedules
The transaction connector enables you to call some transaction actions: for example, you can create
or update schedules as in the following examples:
Example 1 : Create schedule
<output>
<message>
<!--This is an encoded THUB:FXSpot/FWD message-->
<de name="action">create</de>
<de name="market_id">FX</de>
<de name="opening_date">20020326</de>
<de name="maturity_date">20020326</de>
<de name="settlement_date">20020326</de>
<de name="value_date">20020328</de>
<de name="instrument_id">LOAN</de>
<de name="cp_client_id">CLIENT2</de>
<de name="currency_id">EUR</de>
<de name="portfolio_id">SH TEST</de>
<de name="amount">100</de>
<de name="sign_id">Buy</de>
<de name="type_id">Collateral</de>
<subentity name="Cap">
<entity>
<de name="rate">1</de>
</entity>
<entity>
<de name="rate">2</de>
</entity>
</subentity>
</message>
<formatted/>
</output>
This XML code creates a new transaction and calls the action Cap .This action creates two schedules
and sets their rates to 1 and 2. The action Cap must be accessible in TRM Transaction Manager.
Example 2: Update an existing schedule :
<output>
<message>
<!--This is an encoded THUB:FXSpot/FWD message-->
<de name="action">update</de>
<de name="number">32</de>
<de name="market_id">FX</de>
<de name="opening_date">20020326</de>
<de name="maturity_date">20020326</de>
<de name="settlement_date">20020326</de>
<de name="value_date">20020328</de>
<de name="instrument_id">LOAN</de>
<de name="cp_client_id">CLIENT2</de>
<de name="currency_id">EUR</de>
<de name="portfolio_id">SH TEST</de>
<de name="amount">100</de>
<de name="sign_id">Buy</de>
<de name="type_id">Collateral</de>
<subentity name="Schedule">
<entity>
<de name="rate">1111</de>
Implemented connectors
192 © Wall Street Systems IPH AB - Confidential
</entity>
<entity>
<de name="rate">22222</de>
</entity>
</subentity>
</message>
<formatted/>
</output>
This XML code updates transaction number 32, changing the rates of the two existing schedules to
1111 and 22222.
14.3.2.2 Data connector
The Data connector is used to retrieve data from the TRM database, via comKIT. It is generally
implemented as a joiner-connector, that is a connector used by a joiner of a main connector.
The following example shows a data connector specification:
comKIT Data connector specification
<connector-specification>
<factory-name>comkit</factory-name>
<service-type>data</service-type>
<service-name>@comkit.service@data</service-name>
<service-subname>PropertyMap</service-subname>
<query-setup-parameters>
</query-setup-parameters>
<field-list>
<field>
<business-object>PropertyMap</business-object>
<field-specifier>
<key-list>
<key>value</key>
<key>type_id</key>
<key>key_id</key>
</key-list>
</field-specifier>
</field>
</field-list>
</connector-specification>
The <factory-name> tag instantiates the connector and points to the
feeder-resource-specification.
The <service-subname> parameter specifies a TRM database object. ComKIT uses this value to
determine the name of the stored procedure to call, as follows:
Search + </service-subname>
In the example, the resulting procedure name is SearchPropertyMap.
The <key-list> extracts only a proportion of the specified fields. The final XML is similar to the
following:
<source>
<PropertyMap>
<de name="key_id">FX-SPOT</de>
<de name="type_id">T-HUB-INSTRUMENT-CURRENEX</de>
<de name="value">Spot</de>
</PropertyMap>
<PropertyMap>
<de name="key_id">FX-SPOT/FWD</de>
Implemented connectors
SWIFT Connectivity Guide 193
<de name="type_id">T-HUB-INSTRUMENT-CURRENEX</de>
<de name="value">SP-FW</de>
</PropertyMap>
...
...
</source>
14.3.2.2.1 Joiner
The following code shows an example of a joiner:
Joiner
<joiner-definition-specification>
<from-key-list>
<key>//de[@name="instrument_id_to_join"]</key>
</from-key-list>
<service>
<connector-name>THUB_AGENT_PROPERTIES</connector-name>
</service>
<query-parameters>
<parameter>
<key>object_id</key>
<value>FXInstrument</value>
</parameter>
</query-parameters>
<to-key replace-type="use-tag">value</to-key>
<tag-list>
<tag-specifier>
<xpath>source/PropertyMap[de[@name="type_id"] =
T-HUB-INSTRUMENT-CURRENEX] ]</xpath>
<tag-key-pair>
<tag>instrument_id</tag>
<key>key_id</key>
</tag-key-pair>
</tag-specifier>
</tag-list>
</joiner-definition-specification>
The joiner passes additional parameters to the stored procedure using the query-parameters. In the
example, the parameter is object_id and its value is FXInstrument.
The XPath expression in the <tag-specifier> is evaluated against the XML, resulting in the
following code:
<PropertyMap>
<de name="key_id">FX-SPOT</de>
<de name="type_id">T-HUB-INSTRUMENT-CURRENEX</de>
<de name="value">Spot</de>
</PropertyMap>
The value of the tag element in <tag-key-pair> is used as a tag which is subsequently created. In
the example, this is instrument_id. This tag replaces the element found in the XPath expression
de[@name="instrument_id_to_join"] in the original XML created by the main
connector.
14.3.2.3 Static Data connector
The Static Data connector requires additional configuration to enable TRMSwift to receive or send
static data. When sending data, TRMSwift is able to perform a number of actions on static data
within TRM.
Implemented connectors
194 © Wall Street Systems IPH AB - Confidential
14.3.2.3.1 Receiving static data
You can define a hierarchy of objects using the <business-object> tag. The <business-object>
node is a sub-node of the <field-list> node (for more information on the <field-list> node, see
14.2.1.2 Connector specification on page 181).
For example, you could define a main entity, such as client, with a sub-entity such as account. Main
entities are defined by the value main in the <business-object> tag.
The following example defines Instrument as a main entity and InstrumentCashflow as a sub-entity:
Static data connector specification
<connector-specification>
<factory-name>comkit</factory-name>
<service-type>static-data</service-type>
<service-name>@comkit.service@static-data</service-name>
<service-subname>Instrument</service-subname>
<query-setup-parameters/>
<field-list>
<field>
<business-object>MAIN</business-object>
<field-specifier>
<key-list>
<key>id</key>
<key>maturity_date</key>
</key-list>
</field-specifier>
</field>
<field>
<business-object>InstrumentCashflow</business-object>
<field-specifier>
<key-list>
<key>currency_id</key>
</key-list>
</field-specifier>
</field>
</field-list>
</connector-specification>
You define the required fields for the entities using the <key-list> tag. In the example, we require id
and maturity_date for the instrument. For the instrument cashflow sub-entity, we require the
currency_id field.
14.3.2.3.2 Creating actions on static data
You can enable TRMSwift to perform a number of actions on TRM entities and sub-entities. For
example, you can create, update or remove data. You can also perform commands, such as
generating cashflows when importing an instrument into TRM.
The Static Data connector receives messages from TRMSwift to determine which actions to perform.
Static data output
<output>
<message>
<action context="main" actionname="create">
<main>
<de name="id">SCAL42</de>
<de name="maturity_date">20050101</de>
<de name="issue_date">20020101</de>
<de name="domain_id">ALL</de>
<de name="type_id">Bond</de>

Implemented connectors
SWIFT Connectivity Guide 195
<de name="date_basis_sid">Actual/Actual</de>
<de name="spot_days">3</de>
<de name="currency_id">EUR</de>
</main>
<subentity name="InstrumentCashflow" >
<de name="currency_id">EUR</de>
<de name="value_date">20050101</de>
<de name="type_sid">Coupon</de>
<de name="id">SCAL42</de>
</subentity>
</action>
</message>
<output>
The following table describes the <action> attributes:
You use the <main> tag to define values for main entities and the <subentity> tag to define
values for sub-entities. You define a <de> element for each field for which you are sending data.
The name attribute corresponds to the name of the field. To define values for date fields, use the
format YYYYMMDD. For example, a value date for 1st January 2005 is 20050101.
Some <de> elements require a <parameters> tag. The <parameters> tag is used when the
actionname attribute is set to update or is a reserved word such as generate_cashflow.
The following example illustrates updating a sub-entity. The USD value is used to find the
InstrumentCashflow sub-entity that requires updating. In the currency_id field, USD is replaced with
EUR.
Updating a sub-entity
<output>
<message>
<action context="subentity" >
<main>
<de name="id">SCAL50</de>
<de name="maturity_date">20050101</de>
<de name="issue_date">20020101</de>
<de name="domain_id">ALL</de>
<de name="type_id">Bond</de>
<de name="date_basis_sid">Actual/Actual</de>
<de name="spot_days">3</de>
</main>
Name Description
context Determines the part of the object on which to perform the
action. Possible values are:
•main
•subentity.
actionname Determines the required action. Only used when the context is
set to main. The action is also performed for any sub-entities.
Possible values are:
•create
•remove
• update.
The actionname may also be a reserved word. Reserved words
are interpreted as commands. The commands that are available
depend on the entity. For example generate_cashflows is used
to generate cashflows on instruments.

Implemented connectors
196 © Wall Street Systems IPH AB - Confidential
<subentity name="InstrumentCashflow" actionname="update">
<de name="currency_id">USD</de>
<parameters>
<de name="currency_id">EUR</de>
</parameters>
</subentity>
</action>
</message>
</output>
In some cases, you may need to specify more than one field (using the <de> element) to find the
instance of a sub-entity.
14.3.2.4 Parameters
The following parameters are set during the call to init():
The following parameters are set during the call to create():
Name Description Mandatory Values
host Host name of the naming
service that comKIT is using.
Yes Can be either the host
name known to the
address resolution
system or the IP address
port Port number of the naming
service that comKIT is using
Yes A number between 1025
and 65536
user The user name of the TRM user.
(The user must have query and
update rights on the required
portfolios.)
Yes
password The password for TRM user. Yes
version The version of TRM. Yes Two-digit.
Minor version numbers
are not required.
context The context of the TRM being
used.
Yes Either the TRM
environment variable
FK_IDENT (5.0)
or;
FK_ORB_CONTEXT (5.1).
For static-data, use
FK_ORB_CONTEXT (6.0).
Name Connector Description Mandatory Values
service-
type
All The comKIT service. Yes • transaction
•payment
•data
• position
• call (not available
in 5.0)
• static-data (only
available from TRM
6.0 or higher)

Implemented connectors
SWIFT Connectivity Guide 197
14.3.3 Settlement queue factory
The settlement queue factory allows you to connect on this queue and retrieve the corresponding
datas. The factory configuration is similar to comKIT’s, except that only a queueName parameter is
required:
<setupelement name="SettlementQueueFactory-MT1" type="factory"
component_name="SETTLEMENT_QUEUE">
<data>
<feeder-component-instance>
<type>QUEUE</type>
<description>
<name>Queue factory</name>
<information>Queue test</information>
</description>
<service>
<connector-name>SettlementQueueConnector</connector-name>
<query-setup-parameters-overide>
<parameter>
<key>queueName</key><value>settlement.trmswift.mt1</value>
</parameter>
</query-setup-parameters-overide>
</service>
<read>
<io-detail>
service-
name
All The instance of the
comKIT service.
Yes The name of the
service. Use a prefix
and underscore, for
example,
sh_transaction.
service-
subname
•data
• static-data
For the data service,
identifies the database
tables.
For the static-data
service, identifies the
entity, such as
instrument.
Only for the
static-data
service
mode • transaction
•payment
•call
Specifies the type of
transaction board,
payment board or call
board.
Only for
transaction,
payment
and call
services
Must be a valid mode
that has been
pre-configured in TRM.
comment • transaction
•payment
•call
Overrides the default use
of the comment field with
another column.
No The column name has
to be a valid string
accepting column. You
may need to adjust the
mode setup to allow
for column updates.
searchsto
redprocu
edure
•transpayme
nt
•Transaction
Overrides the default
stored procedure used
when querying comKIT
and using the SQL
optimization stored
procedure.
No Name of the stored
procedure. If this is
omitted, uses
SearchPaymentsForIkit
or
SearchTransactionsFor
Ikit
Name Connector Description Mandatory Values

Implemented connectors
198 © Wall Street Systems IPH AB - Confidential
<io-detail-name>CASH-PAYMENT-MT1</io-detail-name>
<additional-information>
<parameter>
<key>betype</key><value>Payment</value>
</parameter>
<parameter>
<key>ownertype</key><value>payment</value>
</parameter>
</additional-information>
<query-parameters>
</query-parameters>
<join-list>
<join>
<join-name>SWIFT-CODES</join-name>
<from-keys-overide>
<key>businessevent/payment/cash/de[@name="local_client_id"]</key>
<key>businessevent/payment/cash/de[@name="local_bank_1_id"]</key>
<key>businessevent/payment/cash/de[@name="local_bank_2_id"]</key>
<key>businessevent/payment/cash/de[@name="other_bank_2_id"]</key>
<key>businessevent/payment/cash/de[@name="other_bank_1_id"]</key>
<key>businessevent/payment/cash/de[@name="other_client_id"]</key>
</from-keys-overide>
</join>
</join-list>
<flattener>
<component>SETTLEMENT_QUEUE</component>
<type>Payment</type>
<name>simple-clean-payment</name>
</flattener>
<export-list>
<all></all>
</export-list>
</io-detail>
</read>
</feeder-component-instance>
Set the following parameter:
The configuration files corresponding to this feeder are in the directory
etc/trmswift/package/swift/feeder/settlement. To activate the feeder, add
SETTLEMENT_QUEUE to the TRMSWIFT_COMPONENT list by one of the following methods:
•Set
TRMSWIFT_COMPONENT=SETTLEMENT_QUEUE:%TRMSWIFT_COMPONENT%
•Export
TRMSWIFT_COMPONENT=SETTLEMENT_QUEUE:$TRMSWIFT_COMPONENT
Name Description Mandatory Values
queueName Name of queue from which
settlement is read.
Yes A queue name used and
defined in settlement
flow.
Implemented connectors
SWIFT Connectivity Guide 199
14.3.4 Queue adapter TBA
14.3.5 SQL connector factory
The SQL connector factory supports two connector types:
•counter connector: retrieves the next incremented number
•stored procedure connector: supports query, next state, previous state and send actions if the
stored procedures for these actions are supplied.

Implemented connectors
200 © Wall Street Systems IPH AB - Confidential
14.3.5.1 Parameters
The following parameters are set during the call to create():
Name Description Mandatory Values
service-type The type of connector. Yes • stored-procedure
• counter
service-name The connector name. Yes Note: For the counter
connector this name is
used as one of the keys
in the counter object
naming and must be
unique if multiple
counters are being
used.
query-procedure The stored procedure to call
for querying data.
No
create-procedure The stored procedure to call
when sending data to the
database.
No
next-state-procedur
e
The stored procedure to call
that indicates data has been
successfully processed in
TRMSwift.
No
previous-state-
procedure
The stored procedure to call
that indicates data has not
been successfully processed in
TRMSwift
No
object-key-name Indicates a key field. Used in
conjunction with
next-state-procedure and
previous-state-procedure,
when the stored procedure is
stateful.
No
status-result Used for the return values of
stored procedures. The send
action has failed if the result
status does not match the
status-result value.
No
The following parameters are required for setting up the connection, for stored procedure
connectors only:
user The database user id. Yes
password The user's password Yes
database The name of the database (or
catalog).
Yes
databasetype The type of database. Yes • sybase
•oracle
•mssql
port The port number used by the
database server.
Yes
server The database server name or
IP address.
Yes

Implemented connectors
SWIFT Connectivity Guide 201
Note: When using Oracle, stored procedure names must begin with ORA in the Oracle database.
The following is an example of an encoded message to be sent to a stored procedure:
<message>
<type>ISOA</type>
<kind>StoredProc</kind>
<ds>
<de name="account_id">123 456/789</de>
<de name="client_swift_code">ABNANL2A</de>
<de name="bank_swift_code">PTSBFRKK</de>
<de name="currency_id">EUR</de>
<de name="payment_date">20020528</de>
<de name="amount">-1.2</de>
<de name="reference">494935/DEV//67914</de>
</ds>
<ds>
<de name="account_id">123 456/789</de>
<de name="client_swift_code">ABNANL2A</de>
<de name="bank_swift_code">PTSBFRKK</de>
<de name="currency_id">EUR</de>
<de name="payment_date">20020528</de>
<de name="amount">-30.2</de>
<de name="reference">78911//123464</de>
</ds>
</message>
For each <ds> block, the stored procedure is called and the input parameters are specified within
the <ds> blocks.
If there is a problem during the sending of a message, or if the returned value is different from the
status-result, the <feederfeedback> block of the sent message contains further information.
•Problem during the send, the error message is contained in the <feedback> tag.
•Stored procedure returns a value that is different from the specified status-result, the sent
message contains the parameters that were used to call the stored procedure. In that case, the
<feederfeedback> block is similar to the following:
url The url of the JDBC driver. You
can specify a number of
parameters in the url; these
parameters overwrite other
properties (such as port or
server) and are database
dependent.
No If no value is set,
TRMSwift uses the
default driver.
use-transaction Indicates whether calls to the
database are to be done as a
single transaction or as
separate transactions.
No • true: a single
transaction. If an
exception occurs, all
the calls are rolled
back.
•false: separate
transactions.
Transactions are
committed after
each call.
rows-as-one-object Indicates whether a query
returns data as a single object
or as separate business
events.
No False: multiple objects,
otherwise a single
object.
Name Description Mandatory Values
Implemented connectors
202 © Wall Street Systems IPH AB - Confidential
<feederfeedback>
<StatementOfAccount60>
<error>
<msg>
<stored_procedure>InsertStatementOfAc count</stored_procedure>
<expected_return_value>0</expected_return_value>
<returned_value>1</returned_value>
<parameters>
<de name="client_swift_code">ABNANL2A</de>
<de name="amount">-1.2</de>
<de name="payment_date">20020528</de>
<de name="currency_id">EUR</de>
<de name="account_id">123 456/789</de>
<de name="bank_swift_code">PTSBFRKK</de>
<de name="reference">494935/DEV//67914</de>
</parameters>
</msg>
</error>
</StatementOfAccount60>
</feederfeedback>
14.3.6 Internet connector factory
The Internet connector factory supports two connector types:
•email
•TCP/IP.
14.3.6.1 Email connector
The Email connector is used to send email messages from TRMSwift. The message data can be sent
inline or as a file attachment to the email such as .PDF or .PS.
You must define a number of properties, such as the receiver and the mail server. There are two
ways of passing parameters into the Email connector:
•using query-setup-parameters
•using a flattener.
The following example shows a valid Email connector specification using query-setup-parameters:
Email connector specification
<connector-specification>
<factory-name>internet</factory-name>
<service-type>email</service-type>
<service-name>email</service-name>
<query-setup-parameters>
<parameter>
<key>smtp-server</key>
<value>@feeder.smtpserver.server@</value>
</parameter>
<parameter>
<key>to</key>
<value>@feeder.email.to@</value>
</parameter>
<parameter>
<key>mime-type</key>
<value>application/octet-stream</value>
</parameter>
<parameter>
<key>extension</key>
<value>pdf</value>
</parameter>
<parameter>

Implemented connectors
SWIFT Connectivity Guide 203
<key>encoding</key>
<!-- Encoding of the stream produced by the FOP (Formatting Objects Processor) -->
<!-- library to generate Portable Document Format (PDF) data. Defaulted to the -->
<!-- 'file.encoding' System property if undefined. -->
<value>ISO-8859-1</value>
</parameter>
<!-- Default subject -->
<parameter>
<key>subject</key>
<value>@feeder.email.subj@</value>
</parameter>
</query-setup-parameters>
</connector-specification>
In the example, the query-setup-parameters define the SMTP server that is used to send the email,
the recipient (‘to’ field), the mime-type, and a filename and its associated extension.
The following example shows the structure of a flattener:
Flattener structure
<xsl:stylesheet
xmlns:xsl="http://www.w3.org/1999/XSL/Transform" version="1.0">
<xsl:output method="xml" />
<xsl:template match="message">
<formatted>
<de name="to">@feeder.email.to@</de>
<de name="from">@feeder.email.from@</de>
<de name="subject">
<xsl:value-of select="receiver_contact_fax"/>
</de>
<de name="filename">FlattenerFileName</de>
</formatted>
</xsl:template>
</xsl:stylesheet>
After the message has passed through the flattener, it must consist of an outer tag and a list of
parameters. In the example, the outer tag is <formatted> but it can be defined using any name.
The parameters within the outer tag use the format:
<de name="parameter name">value</de>.
You can set the following parameters in general.properties:
•feeder.smtpserver.server
•feeder.email.to
•feeder.email.from
•feeder.email.subj
Note: Some parameters can only be set in the connector, some can only be set in the flattener,
and others can be set in the connector or the flattener. Flattener parameters take
precedence over connector parameters.

Implemented connectors
204 © Wall Street Systems IPH AB - Confidential
14.3.6.1.1 Parameters
The following parameters are set using the connector:
The following parameters are set using the flattener:
Name Description Mandatory Values
service-type The type of connector. Yes email
service-name The connector name. Yes
smtp-server The name or IP address
of the mail server.
Yes You can set this parameter using the
feeder.smtpserver.server property in
general.properties.
to The email address of the
recipient.
Yes You can set this parameter using the
feeder.email.to property in
general.properties.
This value can be overwritten by the ‘to’ field in the
flattener.
mime-type Indicates the content
type of an attachment.
No Defaults to:
application/octet-stream.
This value can be overwritten by the mime-type field
in the flattener.
filename The filename of the
attachment if the
message is sent as an
attachment.
The filename is
appended with the
extension value.
No This value can be overwritten by the filename field in
the flattener.
If the extension is set and the filename has not been
set in the connector or flattener, the reference is used
as the filename.
extension The filename extension
of the attachment if the
message is sent as an
attachment.
No This value can be overwritten by the extension field in
the flattener.
Data is assumed to be inline if this value is not
supplied.
encoding Encoding of FAX
document to send
No http://java.sun.com/j2se/1.5.0/docs/guide/i
ntl/encoding.doc.html
But it is strongly recommended not to change the
default value.
subject Mail subject No Any character string or reference to Java property
(@property name@).
Name Description Mandatory Values
to The recipient of the
email.
Yes You can also set this parameter using the
feeder.email.to property in general.properties.
cc The cc field of the email. No
bcc The bcc field of the
email.
No
from The sender of the email. No You can also set this parameter using the
feeder.email.from property in
general.properties.
subject The subject field of the
email.
No You can also set this parameter using the
feeder.email.subject property in
general.properties.

Implemented connectors
SWIFT Connectivity Guide 205
14.3.6.2 TCP/IP connector
The TCP/IP connector queries and sends data. It has a login sequence that checks whether login was
successful and a query parameter sequence used when queries require conversion.
14.3.6.2.1 Parameters
There are no initialization parameters.
The following parameters are set during the call to create():
filename The filename of the
attachment if the
message is sent as an
attachment.
The filename is
appended with the
extension value.
No If the extension is set and the filename has not been
set in the connector or flattener, the reference is used
as the filename.
extension The filename extension
of the attachment if the
message is sent as an
attachment.
No Data is assumed to be inline if this value is not
supplied.
Name Description Mandatory Values
Name Description Mandatory Values
service-type The type of connector. Yes tcpip
service-name The connector name. Yes
host The host name or IP
address of the TCP/IP
server.
Yes
port The port that the TCP/IP
server is listening on.
Yes
login A comma separated list
of login instructions.
Used only if the server
requires a login
sequence.
No
listener Determines whether the
connection should be
stateful or stateless.
No Defaults to stateless.
timeout The time limit to wait for
the results of a query.
No Defaults to 30 seconds.
query The query string that is
sent to the server to
obtain data. Used when a
query requires
conversion.
No Parameters are denoted by @variable_name@.
Example:
GetRate currency=
@currency_id@
Where currency_id is supplied as a query parameter.
response Defines the character
sequence to be checked
with the login reply
message.
No If the response is blank/empty, it is assumed that
login has failed.
If this parameter is not present, the response is not
checked and processing continues even if login fails.
response-
offset
Defines where to search
for the response.
No

Implemented connectors
206 © Wall Street Systems IPH AB - Confidential
14.3.7 Printer connector factory
The Printer connector factory enables printing by specifying a command that pipes data to a device
or by directly writing to the device.
14.3.7.1 Parameters
There are no initialization parameters.
The following parameters are set during the call to create():
14.3.8 File connector factory
The File connector factory produces connectors that are associated with file systems. There are two
connector types:
•simple file (no interpretation): reading and writing of blob (binary large object) data to and from
files in the file system
•compound file (with interpretation): reads single files containing many messages and splits the
messages into separate business events based on a splitting key.
14.3.8.1 Parameters
The following parameter is set during the call to init():
The following parameters are set during the call to create():
Name Description Mandatory Values
printer-command The command for issuing
printing requests.
No • Under UNIX, set to lpr or lp.
• Under Windows, no value is required.
select-option The parameter that
determines which printer to
use. Used under UNIX, to
specify a printer other than
the default printer.
No
printer-name The name of the printer
resource. Used under
Windows.
No You can override the value by inserting the
printer-name key in the structured data.
Name Description Mandatory Values
parent The name of the parent
directory for all connectors.
No Defaults to /tmp. Use the following format:
?directory_name?
Name Connector Description Mandatory Values
service-type both The type of connector. Yes • simple
•compound
service-nam
e
both The connector name.
Used for the name of
the sub-directory.
Yes Must be unique for each connector.
extension simple The file name
extension.
No Defaults to dat.

Implemented connectors
SWIFT Connectivity Guide 207
The following parameters can be defined to specify destination directories according to the TRMSwift
workflow:
•sub-directory-hold: destination directory when the file is sent to TRMSwift
•sub-directory-completed: destination directory when the file is sent back by TRMSwift.
For example:
<setupelement name="SIMPLE-FILE" type="connector" component_name="SYSTEM">
<!-- @header@ -->
<data>
<connector-specification>
<factory-name>file</factory-name>
<service-type>simple</service-type>
<service-name>simple</service-name>
<query-setup-parameters>
</query-setup-parameters>
<update-setup-parameters>
<parameter>
<key>filename</key>
<value>reference_file_name</value>
</parameter>
<parameter>
<key>sub-directory-hold</key>
<value>hold_new</value>
</parameter>
<parameter>
<key>sub-directory-completed</key>
<value>completed_new</value>
</parameter>
</update-setup-parameters>
</connector-specification>
</data>
</setupelement>
validate-xml simple Validates XML
contained within a file.
If a file does not
contain valid XML, the
adapter is set to
suspended and the file
remains in place. The
adapter attempts to
activate itself so that
the file can be fixed and
processing is
automatically resumed.
No • true: the content of the file is
validated to check that it contains
valid XML
splitter compound A delimiter used to split
file contents.
No Defaults to newline.
key-finder compound Identifies data within a
message that is to be
used as reference.
No The default reference is the file name and
its path and the offset within the
message.
Name Connector Description Mandatory Values

Implemented connectors
208 © Wall Street Systems IPH AB - Confidential
14.3.9 FIX connector factory
The FIX (Financial Information Exchange) connector factory produces connectors which send and
receive messages in a FIX format. The FIX protocol defines a message connection structure and a
limited communication structure.
The FIX connector enables you to read and write FIX format messages when sending to or receiving
from a counterparty. Connections with multiple-parties are supported. The data is sent and received
as key/value pairs using the field naming scheme rather than the field numbering scheme that is
used in the transported message.
14.3.9.1 Parameters
There are no initialization parameters.
The following parameters are set during the call to create():
14.3.10 HTTP connector factory
The HTTP connector factory enables TRMSwift to be used as an HTTP server or as an HTTP client.
When used as an HTTP server, data can be posted to TRMSwift or data can be fetched from
TRMSwift by a web client. When used as an HTTP client, TRMSwift can fetch data from a web server
or post data to a web server. The HTTP connector factory uses Secure Socket Layer (SSL)
technology to implement security.
14.3.10.1 Parameters
There are no initialization parameters.
Name Description Mandatory Values
session-config-file Determines the session
setup. Usually includes IP
address, port, broker name
and client name.
Yes An example file is supplied with the
Attoparsek package. See the Attoparsek
documentation when modifying this file.
broker A name given on the
counterparty’s side of the
connection.
No If not specified, the value is determined
from the session configuration file.
reset-time The time when the sequence
numbers are reset. Usually
negotiated with the
counterparty.
No
online-reset Determines whether the
counterparty is capable of an
online reset—as opposed to
an offline reset.
No Defaults to false.

Implemented connectors
SWIFT Connectivity Guide 209
The following parameters are set during the call to create():
Name Description Mandatory Values
keyStoreFileName The name of the file which is
the key store that contains a
private key.
No • Under UNIX: path adopts the forward
slash ( / ) convention.
• Under Windows: path adopts the
backward slash ( \ ) convention.
keyStorePassword The password to the key
store file.
No
trustStoreFileName The name of the file which is
the trust store that contains
trusted certificates.
No • Under UNIX: path adopts the forward
slash ( / ) convention.
• Under Windows: path adopts the
backward slash ( \ ) convention.
trustStorePassword The password to the trust
store file.
No
proxyHost The host name of the proxy
server.
No
proxyPort The port number that the
proxy server is listening on.
No
proxyAuthString The proxy server
authentication string. Used in
conjunction with proxy host
and proxy port parameters.
No Adopts the format:
username:password
baseurl A URL that determines the
base directory on the server.
No
svrdatadir A relative path to the baseurl.
This value appended to the
baseurl determines where the
client polls for new messages.
No
basegeturl A URL used to download a
message. This value together
with the message id enables
the client to download the
message.
No
fileNamePattern A string used to extract
message ids from HTML
output received from the
server.
No
retryPeriod_millis The time in milliseconds for
which the client waits before
polling for new messages.
No
backupurl The server notification URL. It
is called with the following
parameter:
FILE=<message id>
No
notifyServerWhenD
one
Determines the mode of
notification.
Used in conjunction with the
server parameter called
waitForClientToNotifyWhenDo
ne.
No False: one-phase
True: two-phase.

Implemented connectors
210 © Wall Street Systems IPH AB - Confidential
Note: The parameter values are mandatory when a proxy server is used.
14.3.11 Tomcat connector factory
The Tomcat connector factory produces two types of connector:
•TomcatConnectorIn: enables messages to be uploaded to a server
•TomcatConnectorOut: enables messages to be downloaded from a server.
14.3.11.1 TomcatConnectorIn connector
The TomcatConnectorIn connector reads data from external systems. It is implemented using the
SafeStoreConnector. Its device independent part is a Web server servlet which runs under a Tomcat
engine. To use this connector, you must also configure Tomcat and the Secure Socket Layer.
14.3.11.2 Parameters
The following parameters are set:
14.3.11.3 TomcatConnectorOut connector
The TomcatConnectorOut connector is used to send messages from external systems. It is
implemented using the SafeStoreConnector. Its device independent part is a Web server servlet
which runs under a Tomcat engine. To use this connector, you must also configure Tomcat and the
Secure Socket Layer.
14.3.11.4 Parameters
The following parameters are set:
Name Description Mandatory Values
xpath_get_messag
e_id
An XPath expression used to extract the message
identifier from a message. Used in conjunction
with the xpath_get_provider_id to track
messages and handle duplicate messages.
Yes
xpath_get_provider
_id
An XPath expression used to extract the sender
identification from a message. As it is possible for
different senders to have the same id, the value
from this parameter is concatenated with the
xpath_get_message_id value to ensure a unique
value.
Yes
Name Description Mandatory Values
waitForClientToNotifyW
henDone
Determines the mode of notification:
• one-phase: a message is completed when
the client has downloaded it from the
server.
• two-phase: a message is completed when
the client system has updated TRM.
Yes • false: one-phase
•true: two-phase.
timeout-enabled Determines if the time-out mechanism is
enabled.
Yes • true
•false
timeout-to-period-
millis
The period of time (in milliseconds) that
determines when a message is timed-out.
Yes

Implemented connectors
SWIFT Connectivity Guide 211
14.3.12 MQSeries connector factory
The MQSeries connector factory enables TRMSwift to send and receive messages from an MQSeries
queue. It also enables TRMSwift to send and receive SWIFT messages from SWIFTAlliance, using the
SWIFTAlliance MQSA tool.
The MQSeries connector factory supports the following connector types:
•Inbound synchronous
•Inbound asynchronous
•Outbound synchronous
•Outbound asynchronous.
The synchronous connectors do not use SafeStore and have limited facilities for tracking message
history and development. The asynchronous connectors provide more flexibility and use the
State/Status engine to detect the status of a message (such as completed, waiting, or failed).
14.3.12.1 Message delivery
Message delivery is ensured through reconciliation on the outbound side of the asynchronous
connector.
Two types of replies are treated:
•LOCAL REPORT
A local report returns information about the success or failure of sending the message to
SWIFTAlliance. This report is of type MQMT_REPLY, and returns the information about the
message delivery in its feedback field.
The type of expected report is configurable via the feeder setup parameter REPORT. It is can ask
for only for either positive and negative REPORTS (MQC.MQRO_PAN| MQC.MQRO_NAN) or none
at all (MQC.MQRO_NONE). The default setting is MQC.MQRO_PAN| MQC.MQRO_NAN.
•SWIFT ACKNACK
A SWIFT ACKNACK can be returned via several different types of reply. Currently the following
replies are implemented:
–TRANSMISSION NOTIFICATION returns the result of transmission to the SWIFT network in
the feedback field
–DELIVERY NOTIFICATION (not a system message) returns information about the delivery of
the SWIFT message to the correspondent in the feedback field.
–INFORMATION NOTIFICATION is a message generated by SWIFTAlliance Access to show
details of a routing or processing result. Inside SWIFTAlliance Access, an Information
Notification is called an intervention. An Information Notification indicates that there was a
problem, so it is always considered as negative feedback.
–HISTORY NOTIFICATION represents a list of Information Notifications. History Notifications
are ignored within TRMSwift.
timeout-min-uptime-
millis
Used during system downtime to determine
the period of time (in milliseconds) the
system waits for, before initiating the
time-out mechanism.
Yes
timeout-retry-time-
millis
The period of time (in milliseconds) that the
Garbage Collector thread waits before
removing timed-out records from the
SafeStore.
Yes
Name Description Mandatory Values

Implemented connectors
212 © Wall Street Systems IPH AB - Confidential
TRMSwift differentiates between these types of reply. If one of them arrives in TRMSwift, it is
evaluated and the message is moved to its next or previous state in TRMSwift, depending on
whether the feedback of the reply is positive or negative.
The property trmswift.ibmmq.ACKNACK in ibmmq.properties specifies if TRMSwift is waiting for a
SWIFT ACKNACK. By default, it does not wait for an ACKNACK.
If a connector is configured as waiting for a reply, the messages remain in the workflow element
OutboundMessageHandler after being sent, until the requested replies arrive. If a LOCAL REPORT
and ACKNACK are expected and the REPORT returns a negative reply, the message is moved on and
TRMSwift does not wait for the ACKNACK.
14.3.12.2 Parameters
Note: Parameter names are in uppercase to match the MQSeries conventions.
The following parameters apply to both inbound and outbound connectors:
Name Description Values
CONNECTORSIDE The direction of communication. • inbound: the connector is being used to
receive data
• outbound: the connector is being used to
send data
USEASYNC Determines if the connector is
synchronous or asynchronous.
• true: asynchronous
• false: synchronous
QMGRHOSTNAME The host name of the network
where the MQSeries manager is
running.
string
QMGRPORT The port number that the MQSeries
manager is listening on.
integer; default is 1414
CHANNEL The channel used to connect to the
MQSeries manager. See the
MQSeries documentation for more
information.
string; for example: SYSTEM.DEF.SVRCONN
TRANSPORT The transport used to connect to
the MQSeries manager. See the
MQSeries documentation for more
information.
• MQC.TRANSPORT_MQSERIES
• MQC.TRANSPORT_MQSERIES_
CLIENT: use this value for TCP/IP client
connection
• MQC.TRANSPORT_MQSERIES_
BINDINGS
• MQC.TRANSPORT_MQJD
TRANSACTIONAL Determines if transactional features
in MQSeries are used. Transaction
features prevent the loss of
messages if the system crashes
during the period when the
message is fetched and saved in
TRMSwift.
•true
•false
RESOLVER Determines the resolver; you can
use the TRMSwift resolver or use a
different one.
class implementing interface:
com.trema.babelfish.feeder.connector.ibmmq.b
ackend.MQResolverInterface
ENABLETRACE Determines if the trace facility
supplied in the MQSeries Java base
classes is enabled. The MQSeries
trace facility uses standard output.
•true
•false (default)

Implemented connectors
SWIFT Connectivity Guide 213
The following parameters apply to asynchronous outbound connectors only:
TRACELEVEL Sets the trace level; 1 is the lowest
level and 5 is the highest level.
integer [1-5]
QMGR The name of the queue manager
holding the queue.
string
QUEUE The name of the queue from which
messages are read.
string; upper case recommended
Q_OPEN_OPTIONS The options to be used when
opening this queue.
MQC.MQOO_* constants grouped with bitwise
or operator. The default for inbound queues is
MQC.MQOO_INPUT_AS_Q_DEF and for
outbound queues MQC.MQOO_OUTPUT.
PULLPERIOD Used for asynchronous inbound
connectors only. The number of
milliseconds for which the worker
thread sleeps before making
another fetch on the queue.
integer
STATEMAP Used for asynchronous connectors
only. Used internally to manage
TRMSwift states.
predefined string; for example:
ARRIVED:READ:FAILED?READ:FINISHED:FAILE
D?TIMEOUT:TIMEOUT:TIMEOUT
STATUSMAP Used for asynchronous connectors
only.
predefined string; for example:
EMPTY:EMPTY:EMPTY:EMPTY:EMPTY:EMPTY:EMP
TY:EMPTY:EMPTY:EMPTY:EMPTY:EMPTY:
SUCCESS|COMPLETED:EMPTY:EMPTY:EMPTY:TI
MEOUT
CCSID A character set identifier. See the
MQSeries documentation for more
information.
integer; for example:
• 819: iso-8859-1 / latin1 / ibm819
• 915: iso-8859-5 / cyrillic / ibm915
Name Description Values
REPLYQMGR The name of the queue manager
holding the replies (similar to
QMGR); used by outreconciliator1.
Name of the queue manager holding the
replies (similar to QMGR).
REPLYQUEUE The name of the queue from which
reply messages are read; used by
OUTRECONCILIATOR1.
The name of the queue from which reply
messages are read.
REPLYQ_OPEN_OPTIONS The options to use when opening
this reply queue (similar to
_OPEN_OPTIONS).
MQC.MQOO_* constants grouped with
bitwise or operator. The default for reply
queues is MQC.MQOO_INPUT_AS_Q_DEF
REPORT All MQC.MQRO_* constants,
grouped with bitwise or operator.
See the MQSeries documentation
for more information.
MQC.MQRO_* constants grouped with
bitwise or operator.
It can ask only for either positive and
negative REPORTS (MQC.MQRO_PAN|
MQC.MQRO_NAN) or none at all
(MQC.MQRO_NONE).
The default setting is MQC.MQRO_PAN|
MQC.MQRO_NAN.
ACKNACK Specified if the message is
expecting an ACK/NACK from
SWIFT.
•true
• false (default).
Name Description Values

Implemented connectors
214 © Wall Street Systems IPH AB - Confidential
14.3.12.3 MQ descriptor: FORMAT parameter
TRMSwift reads the trmswift.ibmmq.OUTMSG_FORMAT parameter from the ibmmq.properties file
and uses it in the IBMMQASYNCOUT connector to set the FORMAT record of the MQ descriptor of the
MQ messages it creates.
14.3.13 JMS connector factory
The Java Message Server (JMS) connector factory enables TRMSwift to connect to systems that
provide a JMS interface, such as MQSeries. You can extend the connector to work with other
interfaces by creating a new resolver. For example, you can extend the existing JNDI resolver for
use on a LDAP server.
•The JMS connector factory supports the following connector types:
•Inbound synchronous
•Inbound asynchronous
•Outbound synchronous
•Outbound asynchronous.
The synchronous connectors do not use SafeStore and have limited facilities for tracking message
history and development. The asynchronous connectors provide more flexibility and use the
State/Status engine to detect the status of a message (such as completed, waiting, or failed).
Message delivery is ensured through reconciliation on the outbound side. The following reconciliator
interfaces are available:
•com.trema.babelfish.feeder.connector.jms.reconciliator.ReconciliatorInterface
You can customize reconciliation with this interface.
•com.trema.babelfish.feeder.connector.jms.reconciliator.MQSAReconciliator
Used for reconciliation via MQSA connections. Only Local Reports messages are reconciled.
•com.trema.babelfish.feeder.connector.jms.reconciliator.OKReconciliator
Used when reconciliation is not required. Messages are always accepted.
•com.trema.babelfish.feeder.connector.jms.reconciliator.NOTOKReconciliator
Used for testing purposes. Messages are always rejected.
14.3.13.1 Parameters
All JMS parameters affecting MQSeries take precedence over the parameters supplied by TRMSwift
JMS connectors. See the IBM MQSeries JMS documentation for a full list of parameters.
Note: Parameter names are in uppercase to match the JMS conventions.
The following parameters apply to both inbound and outbound connectors:
REPLYPULLPERIOD The interval in milliseconds between
fetches of the reply queue for
messages.
Integer: the default is 10 000.
Name Description Values
Name Description Values
CONNECTORSIDE The direction of
communication.
• inbound: the connector is being used to receive data
• outbound: the connector is being used to send data
USEASYNC Determines if the connector
is synchronous or
asynchronous.
• true: asynchronous
• false: synchronous

Implemented connectors
SWIFT Connectivity Guide 215
USEJNDI Determines if the connector
uses JNDI to resolve the
connection to the MQSeries
manager.
• true (not currently implemented)
• false (default)
QMGRHOSTNAME The host name of the
network where the
MQSeries manager is
running.
string
QMGRPORT The port number that the
MQSeries manager is
listening on.
integer; default is 1414
CHANNEL The channel used to
connect to the MQSeries
manager. See the MQSeries
documentation for more
information.
string; for example: SYSTEM.DEF.SVRCONN
TRANSPORT The transport used to
connect to the manager.
See the MQSeries
documentation for more
information.
• JMSC.MQJMS_TP_BINDINGS_MQ
• JMSC.MQJMS_TP_CLIENT_MQ_TCPIP: use this value
for TCP/IP client connection
• JMSC.MQJMS_TP_DIRECT_TCPIP
• JMSC.MQJMS_TP_MQJD
TRANSACTIONAL Determines if transactional
features in MQSeries are
used. Transaction features
prevent the loss of
messages if the system
crashes during the period
when the message is
fetched and saved in
TRMSwift.
•true
•false
RESOLVER Determines the resolver;
you can use the TRMSwift
resolver or use a different
one.
class implementing interface:
com.trema.babelfish.feeder.connector.jms.backend.JMS
10ResolverInterface
• com.trema.babelfish.feeder.connector.jms.backend.JM
S10ResolverLocal: TCP/IP resolver (specific to
MQSeries)
• com.trema.babelfish.feeder.connector.jms.backend.JM
S10ResolverJNDI (generic JNDI factory resolver)
ENABLETRACE Determines if the trace
facility supplied in the
MQSeries Java base classes
is enabled.
•true
• false (default)
The MQSeries trace facility uses mqjms.trc. You can also
use the JMS MQSeries properties MQJMS_TRACE_LEVEL
and MQJMS_TRACE_DIR.
QMGR The name of the queue
manager holding the
queue.
string
QUEUE The name of the queue
from which messages are
read.
string; upper case recommended
ICF When USEJNDI is true, the
class specified here is used
to resolve the factory.
LDAP server: com.sun.jndi.ldap.LdapCtxFactory
Name Description Values

Implemented connectors
216 © Wall Street Systems IPH AB - Confidential
The following parameter applies to inbound connectors only:
The following parameters apply to outbound connectors only:
URL When USEJNDI is true, this
url is used to resolve the
factory.
Example: ldap://labsgc1.corp.trema.com
QFCLOOKUP The factory name in JNDI. string; for example ivtQCF
QLOOKUP The queue name in JNDI. string; for example ivtQ
TARGETCLIENT The target client. internal JMSC constant; use
JMSC.MQJMS_CLIENT_NONJMS_MQ for compatibility
between JMS and MQSeries generated messages.
For more information, see the
com.ibm.mq.jms.MQQueue.setTargetClient function.
STATEMAP Used for asynchronous
connectors only. Used
internally to manage
TRMSwift states.
predefined string; for example:
ARRIVED:READ:FAILED?READ:FINISHED:FAILED?TIME
OUT:TIMEOUT:TIMEOUT
STATUSMAP Used for asynchronous
connectors only.
predefined string; for example:
EMPTY:EMPTY:EMPTY:EMPTY:EMPTY:EMPTY:EMPTY:EMP
TY:EMPTY:EMPTY:EMPTY:EMPTY:
SUCCESS|COMPLETED:EMPTY:EMPTY:EMPTY:TIMEOUT
Name Description Values
CACHERECEIVERC
TX
Enables the receiver context to
be reused instead of creating
one for each message.
•true
•false
Name Description Values
CACHESENDERCTX Enables the sender context to be
reused instead of creating one for
each message.
•true
•false
OUTRECONCILIATOR1 The name of the class which is
used for reconciliation by the
connector.
java class, implementing
com.trema.babelfish.feeder.connector.jm
s.reconciliator.ReconciliatorInterface
OUTRECONCILIATOR1TO The timeout period for
OUTRECONCILIATOR1. Reject on
expiration.
integer
REPLYQMGR The name of the queue manager
holding the replies (similar to
QMGR); used by
OUTRECONCILIATOR1.
string
REPLYQUEUE The name of the queue from which
reply messages are read; used by
OUTRECONCILIATOR1.
string; upper case recommended
Name Description Values
SWIFT Connectivity Guide 217
Chapter 15 TRMSwift monitor configuration
The TRMSwift user interface consists of the System Monitor and the Message Monitor. This chapter
describes how to configure these two interfaces.
15.1 Starting the user interfaces with TRM variables
You can run System Monitor and Message Monitor using TRM environment variables. TRMSwift
retrieves the username and password from TRM and bypasses the login dialog.
15.2 Configuring the trusted connection
You can configure TRMSwift to use the trusted connection if you are running the application under
Windows. The trusted connection enables users to access TRMSwift with their Windows user name
and password.
To configure the trusted connection:
•In trmswift.bat or rc.trmswift, set the trmswift.database.type variables to
mssql_with_trusted_connection.
•If you wish to enable users to start TRMSwift from TRM ensure the FK_TRUSTED_CONNECTION is
set to 1.
15.3 Setting the user interface permissions
System Monitor and Message Monitor have a number of permission settings that determine which
users may start the interfaces and view data. This can be done with the Security Center.
15.4 Configuring System Monitor
System Monitor is used to monitor various aspects of TRMSwift. System Monitor monitors the
system rather than the data within the system. System Monitor monitors:
•TRMSwift system components
•TRMSwift logs.

Configuring System Monitor
218 © Wall Street Systems IPH AB - Confidential
15.4.1 Columns
You can configure the columns that are displayed in each of the System Monitor pages. The
definition of a column is always the same irrespective of its content. For example, the column
definition may be for a system component or for a log.
You must define at least one column for each of the logs, otherwise System Monitor cannot start up.
The following example shows the configuration for two columns that relate to the System
Component pages:
System Monitor Columns
1: <SystemMonitorService>
2:<column
3: class="STRING"
4: name="Name"
5: panel="SYSTEMCOMPONENT"
6: path="/component/name/text()"
7: width="150" />
8:<column
9: class="STRING"
10: name="Type"
11: panel="SYSTEMCOMPONENT"
12: path="/component/type/text()"
13: width="100" />
14:.
15:.
16:.
17: </SystemMonitorService>
To define columns, use a setupelement with the following attributes:
The following table describes the various column attributes:
Attribute Description/Value
name SETUP
type COLUMNS
component_name SystemMonitorService
Attribute
Name Optional Default
Value Description
Name No The display name of the column header. This value must
be unique.
Class No The type of content that is displayed in the column:
• STRING: Used for string values and dates.
• INTEGER: Used for numeric values such as IDs.
Panel No The panel to which the column belongs:
•SYSTEMCOMPONENT
• WORKFLOWLOG
•SYSTEMLOG
• ERRORLOG.

Configuring System Monitor
SWIFT Connectivity Guide 219
15.4.1.1 Defining system components
You define system components using the <component> tag.
The following is a sample of XML that defines a single system component. It is a sample of XML used
in the path attribute.
Sample XML for defining a Single Component
1:<component>
2: <name>Payment</name>
3: <type>Feeder</type>
4: <status>Activated</status>
5: <statusdescription>Feeder for basic Payments</statusdescription>
6: <owner>fk</owner>
7: <inetaddress>localhost</inetaddress>
8: <logwho></logwho>
9: <logtype>ERROR</logtype>
10:</component>
The following table describes the various sub-tags of the <component> tag:
Path No For the System Component panel, this is the XPath
expression that defines the content of the column. For
more information, see 15.4.1.1 Defining system
components on page 219.
For Log panels, possible values are:
• component
•user
•id
•situation
•message
•date.
For more information on defining log events, see 15.4.1.2
Defining a Log event on page 220.
Width Yes 100 Defines the width (in pixels) of the column.
Editable Yes FALSE Determines whether the content of a column may be
edited. For example, the logging attributes of a
component may be changed. If a column in a Log panel is
editable, the underlying data within the log is not
changed when the user edits the column.
Action Yes FALSE Determines whether an action is produced when the
content of a column is edited. You must also set the
Editable attribute to TRUE to produce an action.
Attribute
Name Optional Default
Value Description
Tag Description
<name> The unique name of the component.

Configuring System Monitor
220 © Wall Street Systems IPH AB - Confidential
15.4.1.2 Defining a Log event
For performance reasons, the Log events for Workflow Log, System Log and Error Log are not stored
as XML. They are stored in a Java class and transferred to and from the database using CORBA.
The content of the column is defined using the path attribute for the column (see 15.4.1 Columns
on page 218).
<type> The type of the component. Possible values are:
• Feeder: an adapter from which a business event is received or to
which a message is passed.
• Translator: formats a message into the well formatted message
before sending it to an adapter or displaying it in Message
Monitor
• Audit Manager: audits events and places them in the relevant
log.
•Permission Manager: determines whether a user has the correct
access to perform a particular action.
• System Monitor: usually the owner of the component is the user
who is logged on to System Monitor.
• Message Monitor: usually the owner of the component is the
user who is logged on to Message Monitor.
• Babelfish Core: the TRMSwift core.
<status> The operational status of the component. Possible values are:
• Activated: The component is running.
• Hanging: The component is not running.
• Suspended: The component was suspended by System Monitor.
• Shutting Down: System Monitor or a user using the interfaces
has requested that the component be shut down.
<statusdescription> A description of the operational status of the component.
<owner> The user that has logged on to the component.
<inetaddress> The IP address or host name of the component.
<logwho> The sub-components that should be logged (not to an audit log, but
rather to the log file of the component). This might produce a log of
output. Only used in conjunction with the <type> Babelfish Core.
<logtype> The different types of logs that are recorded in the log file of the
component. Possible values are:
•EXIT
•ENTRY
•DEBUG
•SQL
•XML
•CONF
•INFO
•WARN
•ERROR
•FATAL.
Tag Description

Configuring Message Monitor
SWIFT Connectivity Guide 221
The following fields may be displayed for the log event:
15.5 Configuring Message Monitor
Message Monitor is used to monitor the status of business events and messages within the TRMSwift
workflow. Users may preview or verify messages, depending on the modes and actions available to
them. Message Monitor also enables users with the correct permissions to route messages
differently within the TRMSwift workflow.
You can configure the following aspects of Message Monitor:
•General layout and default values
•Previewers
•Columns
•Modes and actions
•Filter Editor
Each aspect is defined using the <MessageMonitorService> tag and a sub-tag, for example
<generalsetup> for the general layout.
15.5.1 General layout and default values
The general configuration of Message Monitor pertains to the layout of Message Monitor on screen
as well as some default settings.
Message Monitor General Configuration
1: <MessageMonitorService>
2: <generalsetup>
3: <threadpreview>5</threadpreview>
Keyword Description Applies To
component The unique name of the component which caused the
entry to be recorded in the log.
Workflow Log
System Log
Error Log
user The ID of the user that caused the action to be
recorded in the log.
Workflow Log
Error Log
id The unique TRMSwift ID of the business event or
message. You can use this ID to search the log.
Workflow Log
situation A string describing the situation in which the log
event was created.
Workflow Log
System Log
Error Log
message A string describing the log event. Workflow Log
System Log
Error Log
severity A string describing the severity of the log event.
Possible values are:
• INFORMATION
•WARNING
•FATAL.
Error Log
date The date and time when the event was recorded in
the log. The date is displayed in the format
yyyy-mm-dd hh:mm:ss.
Workflow Log
System Log
Error Log

Configuring Message Monitor
222 © Wall Street Systems IPH AB - Confidential
4: <autofetch>Yes</autofetch>
5: <autopreview>Yes</autopreview>
6: <autorelated>No</autorelated>
7: <autosequence>No</autosequence>
8: <defaultwidth>10</defaultwidth>
9: <sizex1>690</sizex1>
10: <sizey1>400</sizey1>
11: <sizex2>300</sizex2>
12: <sizey2>600</sizey2>
13: <borderxsize>5</borderxsize>
14: <borderysize>5</borderysize>
15: <reverseorderfetching>No</reverseorderfetching>
16: </generalsetup>
17:</MessageMonitorService>
To define the general configuration, use a setupelement with the following attributes:
The following table describes the various sub-tags of the <generalsetup> tag:
Attribute Description/Value
name SETUP
type GENERAL
component_name MessageMonitorService
Tag Description
<threadpreview> The maximum number of threads that may be used when formatting a
message for previewing. This value must be greater than or equal to 1.
The recommended maximum value is 10. The default value is 1.
<autofetch> Determines whether business events or messages are automatically
refreshed when data is updated. Possible values:
•yes: business events and messages are automatically refreshed
•no: business events and messages are not automatically refreshed.
Users can override this setting using Update > Real Time in Message
Monitor.
<autopreview> Determines whether preview data for the selected business event or
message is displayed in the Preview panel. Possible values:
•yes: the preview data is automatically displayed
•no: the preview data is not automatically displayed.
Users can override this setting using Options > Auto Preview in
Message Monitor.
<autorelated> Determines whether items related to the selected business event or
message are displayed in the Related panel. Possible values:
•yes: the related item is automatically displayed
•no: the related item is not automatically displayed.
Users can override this setting using Options > Auto Related in
Message Monitor.

Configuring Message Monitor
SWIFT Connectivity Guide 223
15.5.2 Previewers
The previewer configuration defines the various previewers that are available within Message
Monitor. It defines what the previewer displays and the menu options that enable the user to select
the previewer. You can also define previewers to be available only for certain business events or
messages.
The following example shows the configuration for a single previewer.
Message Monitor Previewers
<MessageMonitorService>
<previewsetup>
<previewer formatted="yes">
<name>Text Previewer</name>
<class>
com.trema.babelfish.helpers.driver.TextPreviewHelper
</class>
<mnemonic>t</mnemonic>
<musthaveflags />
<maynothaveflags>
<IsBusinessEvent />
</maynothaveflags>
<archivePath>//formatted_data/formatted/text()</archivePath>
</previewer>
: <previewer>
.
.
</previewsetup>
<autosequence> Determines whether sequences that are related to the selected
message are displayed in the Sequence panel. Possible values:
•yes: the sequence is automatically displayed
•no: the sequence is not automatically displayed.
Users can override this setting using Options > Auto Sequence in
Message Monitor.
<defaultwidth> Determines the default width of a column that does not have a width
specified. The value must be greater than zero, but must not be too
large.
<Sizex1> Determines the width of the Message panel.
<Sizex2> Determines the height of the Message panel.
<Sizey1> Determines the width of the Preview panel.
<Sizey2> Determines the height of the Preview panel.
<borderxsize> Determines the size of the separator between the Message panel and
the Preview panel.
<borderysize> Determines the size of the separator between the Message panel and
the Related / Sequence panel.
<reverseorderfe
tching>
Determines whether business events and messages are fetched from
the database in reverse order, based on their TRMSwift ID.
Tag Description

Configuring Message Monitor
224 © Wall Street Systems IPH AB - Confidential
To define the previewer configuration, use a setupelement with the following attributes:
You use the <previewer> tag to define each previewer.
The formatted attribute indicates whether the business event or message should be formatted
before being passed to the previewer. Valid values are yes and no. Yes indicates that the business
event or message is pre-formatted.
The <name> tag defines the unique name of the previewer as it is displayed in the Options menu in
Message Monitor.
The <class> tag indicates which previewer functionalities to use. The following table describes the
various class values:
The <mnemonic> tag determines the shortcut key for selecting the previewer in Message Monitor.
The shortcut key must be one of the letters contained in the name of the previewer. The shortcut
keys must be unique.
The <musthaveflags> and the <maynothaveflags> tags determine when the previewer is used.
Users can check the corresponding flags of the selected business event or message in Message
Monitor. In the example, business events are not previewed. When the user selects a business event
for previewing, the preview data is not displayed in the Previewer.
The <archivePath> tag determines the text that is available to the previewer when you open
Message Monitor in archive mode. This tag is only used for formatted previewers.
15.5.3 Columns
You can configure the columns that are displayed in Message Monitor.
Message Monitor Columns
Attribute Description/Value
name SETUP
type PREVIEW
component_name MessageMonitorService
Class Description
TextPreviewHelper Displays a well formatted SWIFT message. Business events are
generally not displayed as they are not formatted. Only the
formatted part of the message is displayed.
SwiftTextPreviewHelp
er
Displays a well formatted SWIFT message. Business events are
generally not displayed as they are not formatted. Descriptive
names are displayed for the SWIFT tags.
TreePreviewHelper Displays either a business event or message in the form of a
tree. The business event or message does not have to be
formatted. If formatted, the resulting display differs from the
unformatted version.
XMLPreviewHelper Displays the XML of the business event or message. The XML is
indented with two spaces. The business event or message does
not have to be formatted. If formatted, the resulting display
differs from the unformatted version.
DefaultPreviewHelper Displays the XML of the business event or message. The XML is
not indented and is displayed using a single line. The business
event or message does not have to be formatted. If formatted,
the resulting display differs from the unformatted version.
FaxPreviewer Displays messages sent using the fax format.
Configuring Message Monitor
SWIFT Connectivity Guide 225
1: <MessageMonitorService>
2:<column
3: alignment="right"
4: conditionalpath="/msg[@type="MESSAGE"]"
5: name="Creation Date"
6: path="/*/@creationdate/text()"
7: width="30"
8: type="date"
9: format="yyyy-mm-dd">
10: fromformat="yyyymmdd">
11: <maynothaveflags>
12: <IsBusinessEvent />
13: </maynothaveflags>
14: </column>
15: <column
16: .
17: .
18: </MessageMonitorService>
To define columns, use a setupelement with the following attributes:
The <column> tag has a number of attributes that define how and where the column is displayed.
These attributes are described below. You can also determine whether the column values are
displayed in Message Monitor using the <musthaveflags> and <maynothaveflags> tags. Users
can check the corresponding flags of the selected business event or message in Message Monitor. In
the example, the column is blank if it is a business event.
The following table describes the various column attributes:
Attribute Description/Value
name SETUP
type COLUMNS
component_name MessageMonitorService
Attribute Description
name A unique name for the column and also the display name for the column
header in Message Monitor. You can use spaces in the name.
pathtype Defines the type of the path:
•xpath
•key.

Configuring Message Monitor
226 © Wall Street Systems IPH AB - Confidential
path When the pathtype is set to xpath, the attribute contains an XPath
expression.
When the pathtype is set to key, the attribute contains one of the following
values:
• stateElement_id; the ID of the message or business event
• stateElement_reference; the reference of the message or business
event
• stateElement_owner; the owner of the message or business event
• stateElement_owner_type; the type of the owner
• stateElement_state; the state of the message or business event
• stateElement_flags; the flags of the message or business event
• stateElement_uflags; the user flags of the message or business event
• stateElement_stamp
• stateElement_creationDate
• stateElement_modificationDate
• stateElement_allFlags; a concatenation of all flags
You can use these keys for all panels in Message Monitor. Search keys are
also available for all panels.
In addition, sequenceID and messageID are available in the Sequence
panel.
conditional-
path
An XPath expression that determines whether the column is displayed. A
value is only displayed if the pattern can be matched to the XML.
To display a column in the Message panel or Related panel, the
conditionalpath must match the following:
• conditionalpath="/msg[@type=’MESSAGE’]" (Message panel)
• conditionalpath="/msg[@type=’related’]" (Related panel).
To display a column in the Sequence panel, the conditional path must be
match the following XML example:
<sequence>
<message>
<searchkey1>
value
</searchkey1>
<searchkey2>
value
</searchkey2>
.
.
</message>
<message>
<searchkey1>
value
</searchkey1>
.
.
</message>
</sequencelist>
This matching is done each time a new message is displayed (or the
sequence is refreshed). In the example, two messages will be displayed.
Any of the fields of the message can be used.
align Determines the alignment of the column. Possible values are:
•left
•center
•right.
Attribute Description

Configuring Message Monitor
SWIFT Connectivity Guide 227
15.5.4 Modes and actions
Message Monitor uses modes to determine which business events and messages are displayed.
Modes take into account the state as well as the flags, to determine if a business event or message
is displayed.
Users can perform various actions on a business event or message that is displayed in Message
Monitor.
$
Modes and Actions
1: <MessageMonitorService>
2:<mode name="Verify1"
3: mnemonic="f"
4: preview="Yes">
5: splitstate="KeyLoader"
6: mergedstate="KeyLoader">
7: <split>
8: <addflags>
9: <HasBeenSplit/>
10: </addflags>
11: </split>
12: <merged>
13: <addflags>
14: <HasBeenSplit/>
15: </addflags>
16: </merged>
17: <state>Verify1</state>
18: <musthaveflags />
19: <maynothaveflags />
20: <action accelerator="112"
21: markashaveseen="yes"
width Determines the width (in pixels) of the column. Do not make the column
too wide.
type Defines the type of data that is displayed in the column. Possible values
are:
•date: The date format is specified using the format and fromformat
attributes.
•string: No formatting is applied to the value. Generally the string is
left-aligned.
•money: A monetary amount. Use a decimal place, and if required
thousand separators, to format the amount. All data must be displayed
using the same decimal precision. Generally monetary values are
right-aligned.
•integer: Does not use formatting. Generally integers are right-aligned.
•flags: Represents the flags for the business event or message. Use the
name of the flag rather than the flag id. Generally flags are left-aligned.
format Determines how the values in the column are formatted. You can use
different formats for different columns. For example, a general date format
may be yyyy-MM-dd hh:mm:ss or yyyy-MM-dd. For number formats, a
pattern such as #,###,##0.00 indicates a number with thousand
separators and two decimal places.
fromformat Determines the parsing format that is used when working with dates. By
specifying the format, you enable Message Monitor to correctly interpret
the date format.
Attribute Description

Configuring Message Monitor
228 © Wall Street Systems IPH AB - Confidential
22: mnemonic="a"
23: name="Accept"
24: state="Verify2">
25: <addflags></addflags>
26: <removeflags></removeflags>
27: </action>
28: <action accelerator="120"
29: mnemonic="s"
30: name="Set Urgent"
31: state="Verify1">
32: <addflags><Urgent/></addflags>
33: <removeflags/>
34: </action>
35: <action accelerator="121"
36: mnemonic="r"
37: name="Remove Urgent"
38: state="Verify1">
39: <addflags/>
40: <removeflags>
41: <Urgent/>
42: </removeflags>
43: </action>
44:</mode>
45:<mode>
46:.
47:.
48: <MessageMonitorService>
To define modes and actions, use a setupelement with the following attributes:
You use the <mode> tag to define each mode. The following table describes the mode attributes:
Attribute Description/Value
name SETUP
type MODES
component_name MessageMonitorService
Attribute Description
name A unique name for the mode and also the display name in the Mode menu
in Message Monitor. This name is also used for setting user permissions.
mnemonic A shortcut key that activates the mode in the Mode menu. The shortcut
key must be one of the letters contained in the name of the mode. The
shortcut keys must be unique.
preview Determines whether a business event or message can be previewed when
using this mode. Valid values are yes (default) and no. Yes indicates that
the business event or message can be previewed.
splitstate The state to which a message is routed after it has been split from a
merged message. You can add or remove flags when splitting a message
and routing it to the <splitstate>.
If the original merged message contained two messages, the splitting
action produces two messages set to the <splitstate>.
If the original merged message represents more messages, only the
‘single’ message is routed to the <splitstate>. The other message is still a
merged message and is routed to the <mergedstate>.

Configuring Message Monitor
SWIFT Connectivity Guide 229
In the example, the Verify1 mode fetches business events and messages in the Verify1 state. You
can fetch records in other states, using additional <state> tags. The additional states are
considered as an OR condition. The <musthaveflags> and <maynothaveflags> tags are used in
conjunction with each state and are considered as an AND condition. The <musthaveflags> and
<maynothaveflags> tags enable users to check the corresponding flags in Message Monitor.
For each mode, you can specify a number of actions that the user can perform on a business event
or message in Message Monitor. Actions may change the state or they may change the flags of a
business event or message. The example shows a state change from Verify1 to Verify2 or adding an
Urgent flag.
If the user has access to a mode, the user may perform any of the actions defined for that mode.
You can configure different modes with the same state and flag specifications but different actions.
User access to modes is defined using permissions (for more information, see Chapter 10 TRMSwift
security and permissions setup on page 117).
The splitstate and mergedstate attributes enable a menu item to be displayed in Message Monitor
for the specified mode. This menu item enables users to split a merged message. The <addflags>
and <removeflags> tags can be used to add or remove flags when splitting a message and routing
it to its splitstate or mergedstate. Users can also split messages by selecting a sequence in Message
Monitor and using the right mouse button.
You can define a number of attributes for an action. The following table describes the various action
attributes:
mergedstate The state to which a merged message is routed after a message is split
from it. You can add or remove flags when splitting a message and
routing it to the <mergedstate>.
If the original merged message represents more than two messages, only
the ‘single’ message is routed to the <splitstate>. The other message is
still a merged message and is routed to the <mergedstate>.
limit Number of elements to display in this mode (e.g. limit="2000"). 0 means
no limit, and 5000 is the default.
Attribute Description
name A unique name for the action and also the display name for the action
in the Command menu or the popup menu.
accelerator The accelerator key used to activate the action. See your Java
documentation for a list of Virtual Key codes.
markashaveseen Indicates that a business event or message is marked as having been
seen when a user performs an action (4-eyes principle). Possible
values are yes and no. Yes indicates that the business event or
message is checked for the 4-eyes principle.
eyesrequired The number of eyes required (the 4-eyes principle) to verify a
business event:
0: ignore the 4-eyes principle
2: one person required for verification
4: two people required for verification.
cleareyesrequired If a business event or message is rejected, this is used to reset the
number of eyes that are already stored as having seen it.
mnemonic A shortcut key that activates the action in the Command menu. The
shortcut key must be one of the letters contained in the name of the
action. The shortcut keys must be unique.
Attribute Description

Configuring Message Monitor
230 © Wall Street Systems IPH AB - Confidential
Flags are added or removed from a business event or message using the <addflags> and
<removeflags> tag.
Note: Generally, the <addflags> and <removeflags> are not used in conjunction with the
markashaveseen attribute. If you do need to configure such a scenario, follow the
example shown in 15.5.4 Modes and actions on page 227.
15.5.5 Modes and Permissions
To create a new Mode, proceed as follows:
1. Make the graphical change in MessageMonitor. Update the setupmessagemonitor.xml as
described.
2. Update the TRM object hierarchy structure.
There are three possible methods of doing this:
•Method 1: Modify the configuration file. You can modify the file
[sybase | mssql | oracle]/data/object_hierarchy.pl. For example, to add a new mode
‘Verify3’, add the following entry :
SWIFT
. TRMSwift
.. TRMSWIFT_MODE
... Enquire
... Verify1
... Verify2
... Completed
... DeadLetterBin
... ReSend (DLB)
... ReSplit (DLB)
... ReNotify (DLB-TooManyTries)
... ReMerge
... ManualIntervention
... ManualIntervention (OMH)
... Outstanding
... BENRetryer
... TimeOutExpired
Then reload the file in the database.
•Method 2: Add the values directly to the database. Enter the following commands on the TRM
database:
insert into ObjectHierarchy (dep_object_id, object_id, object_type) values
('IKIT_MODE', 'Verify3’, 1)
exec GrantObjectPermission @object_id = "Verify3", @permission_id = "START",
@user_id = "ALL", @setup_p = 1
•Method 3: Use Object Hierarchy Editor to create a new mode and then Permission Editor to add
permissions to it.
3. Set the configuration in Security KIT using the permission id ‘START’.
state The state determines to which state (workflow element) the business
event or message should be sent when the action is performed. If the
state of the business event or message is the same as the current
state, it is not updated. This scenario may occur when only the flags
for the message require updating.
Attribute Description

Configuring Message Monitor
SWIFT Connectivity Guide 231
15.5.6 Filter Editor
The filter editor configuration defines the fields that are displayed in the Filter Editor. You can define
the caption, name, data type and the date format.
The fields are grouped into system filter and custom filter fields. System filter fields refer to those
properties of business events and messages that already exist in the database. Custom filter fields
refer to the search keys which are extracted by the KeyLoader (for more information on KeyLoader,
see 13.2.3.7 KeyLoader on page 167).
The following is an example of the configuration for the Filter Editor:
Filter Editor
1: <MessageMonitorService>
2: <filtersetup>
3: <dateformat date="yyyy/MM/dd" datetime="yyyy/MM/dd HH:mm:ss"/>
4: <keyset>
5: <!-- possible type values are: money, double, long, date special -->
6: <!-- System filter fields -->
7: <key caption="Created / Modified" name="system_createModify"
type="date" fromDateMinus="1" />
9: <key caption="ID" name="system_id" type="long"/>
10: <!-- Custom filter fields -->
11: <key caption="Reference" name="reference" />
12: <key caption="Sender" name="sender" />
13: <key caption="Receiver" name="receiver" />
14: <key caption="Type" name="type" />
15: <key caption="Number" name="number"/>
16: <key caption="Payment ID" name="id" type="long"/>
17: <key caption="Counterparty" name="cp_client_id" />
18: <key caption="Amount" name="amount" type="money" />
19: <key caption="Currency" name="currency" />
20: <key caption="Rate" name="rate" type="double" />
21: <key caption="Amount 2" name="amount2" type="money" />
22: <key caption="Currency 2" name="currency2" />
23: <key caption="Value Date" name="value_date" type="date" />
24: <key caption="Expiration Date" name="expiry_date" type="date" />
25: <key caption="Maturity Date" name="maturity_date" type="date" />
26: <key caption="Instrument" name="instrument" />
27: <!-- System filter fields -->
28: <key caption="Owner" name="system_owner" />
29: <key caption="Owner Type" name="system_ownerType" />
30: <key caption="State" name="system_state" type="special" />
31:</keyset>
32: </filtersetup>
33: </MessageMonitorService>
To define filter configuration, use a setupelement with the following attributes:
The <filtersetup> tag has a sub-tag called <dateformat> which defines the format when a user
enters a date. The date and the datetime attributes define the format. If you specify dateformat
values, you must specify both the date and datetime attributes as the user can enter either a date
Attribute Description
name SETUP
type FILTER
component_name MessageMonitorService
Configuring Message Monitor
232 © Wall Street Systems IPH AB - Confidential
or date that includes time. The default values are yyyy-MM-dd for the date attribute and
yyyy-MM-dd HH:mm:ss for datetime.
You use the <keyset> tag to define the fields. Each field has its own <key> tag. The order in
which the fields are listed defines the order in which the fields are displayed in the Filter Editor. The
following table describes the key attributes:
The system filter fields are not mandatory but must be configured if you want to change the default
filter criteria. You can specify your own caption but the name attribute must match a value shown in
the table below. The following system filter fields are available:
Note: The default value of system_createModify is the current date. You must configure this
value to enable users to see business events or messages created on dates other than the
current date.
Attribute Description
caption The display name of the field.
name The name of the field. You can specify any value for custom filter fields.
For system filter fields, these values are restricted. See the system filter
table below.
type Possible values are:
•Double: floating point values (such as rate)
•Long: integer numbers (such as ID)
•Money: currency values (such as amount)
•Date: dates
•Special: displays the State field as a pulldown menu. Only used for the
name system_state. See the system filter table below.
If you do not specify a type value, the default setting is Text.
fromDateMinus Used only for system filter fields. See the system filter table below.
Caption Name Type Default Value
ID system_id long
Reference system_reference
Owner system_owner
Owner Type system_ownerType
State system_state special All states that are defined for the mode.
Created/
Modified
system_createModify date The current date.
To specify a value other than the default
value, set a value for the fromDateMinus
attribute. The value displayed in Filter Editor
is the current date minus the fromDateMinus
value.
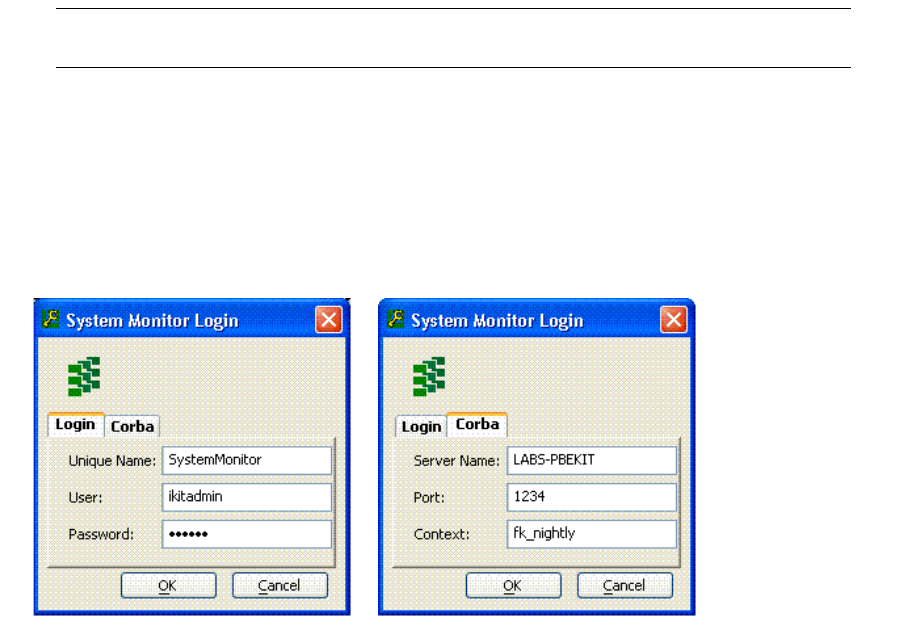
SWIFT Connectivity Guide 233
Chapter 16 TRMSwift debugging
16.1 Using System Monitor
System Monitor enables you to monitor TRMSwift using a graphic interface. System Monitor enables
you to:
•Indicate the current operational status of TRMSwift and its components
•Manipulate various components within TRMSwift
•Inspect the different system logs such as Workflow Logs, System Logs and Error Logs
•Perform actions.
You can also monitor the TRMSwift system using Real Time Process Monitor (RTPM) within TRM. The
RTPM application enables you to monitor and manage TRMSwift services (core and feeders only).
You can stop and restart these services using RTPM. For more information, refer to the TRM
documentation.
Note: Depending on your PC setup, you may need to change your display color settings for
optimum performance of System Monitor.
16.1.1 Accessing TRMSwift System Monitor
Your system configuration determines how you access System Monitor. The following set of
instructions explains the TRMSwift Login dialog. Your system configuration may bypass this dialog.
To access System Monitor:
1. From the TRM Application Manager, double-click on the System Monitor icon.
The following dialog is displayed (both pages shown):
2. In the Unique Name field, enter the name of the System Monitor connection.
You can open one or more System Monitor connections. Your login details are automatically
detected for the first connection that you open. For each additional connection that you open,
you must enter a unique name.
3. In the User field, enter your username.
4. In the Password field, enter your password.
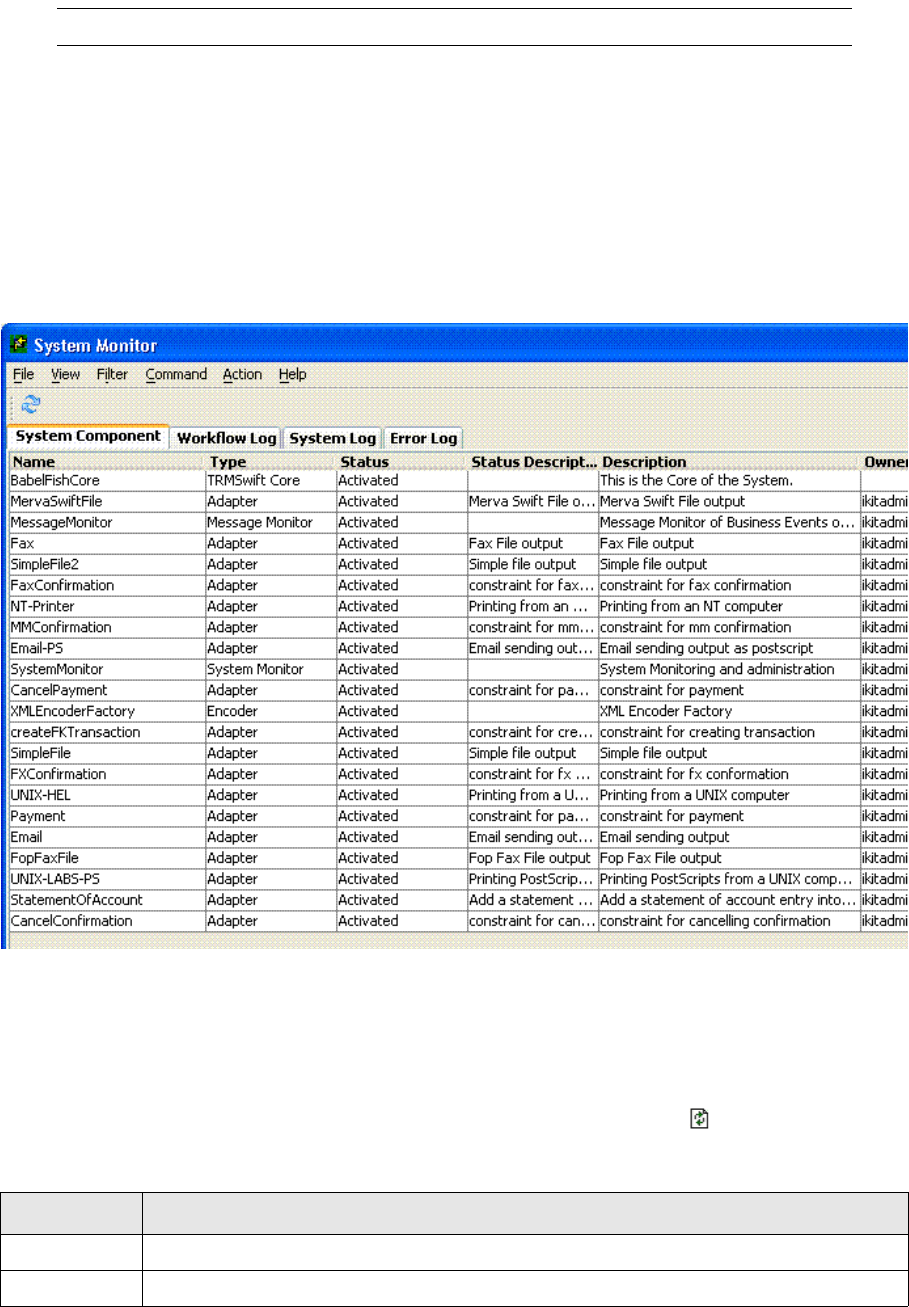
Using System Monitor
234 © Wall Street Systems IPH AB - Confidential
5. Click OK.
Note: The Corba Port and Corba Server Name fields are automatically populated.
16.1.2 The System Monitor window
System Monitor contains four tabs:
•System Component
•Workflow Log
•System Log
•Error Log.
An example of System Monitor is shown below:
16.1.3 Using the System Component tab
The System Component tab displays a list of system components. An example of the System
Component tab is shown on the previous page.
The list of system components that is displayed depends on the filter setting that is selected in the
Filter menu. To update system component details, click the Refresh button .
The following table describes the fields displayed in the System Component tab:
Column Description
Name The unique name of the component.
Type The type of component that is being monitored, such as Permission Manager or Adapter.

Using System Monitor
SWIFT Connectivity Guide 235
16.1.4 Viewing the Workflow Log
The Workflow Log tab displays a list of events that have taken place in the TRMSwift workflow. The
list of events that is displayed depends on the filter settings (see 16.1.7 Entering search criteria in
the log panels on page 238).
An example of the Workflow Log tab is shown below:
The following table describes the fields displayed in the Workflow Log tab:
Status The status of the component. You can change the status of the component.
Click the field to display a drop-down list. Select the required status from
the drop-down list.
Status
Description
A description of the status of the component.
Description A description of the functionality of the component.
Owner The name of the process running the component.
IP Address The IP address from which the component is running.
Component
Log
The components that are being logged by TRMSwift.
Log Type The type of log information, such as ALL, NONE and ERROR.
Column Description
Column Description
Component The unique name of the component.

Using System Monitor
236 © Wall Street Systems IPH AB - Confidential
16.1.5 Viewing the System Log
The System Log tab displays a list of events that have occurred at system level. Logged system
events include activation, configuration, suspension or shutdown of a component. The list of events
that is displayed depends on the filter settings (see 16.1.7 Entering search criteria in the log panels
on page 238).
An example of the System Log tab is shown below:
The following table describes the fields displayed in the System Log tab:
User The name of the user running the component.
ID The identification number(s) associated with the business event or message for which the log
entry is created.
Situation A description of the workflow, such as Routed or Split.
Message A description of the action that was performed on the business event or message.
Date The date and time (in the format YYYY-MM-DD or YYYY-MM-DD HH:MM:SS) when the event
occurred.
Column Description
Column Description
Component The unique name of the component that triggered the system event.
Situation A description of the type of system event.
Message A description of the system event.
Date The date and time (in the format YYYY-MM-DD or YYYY-MM-DD HH:MM:SS) when the event
occurred.
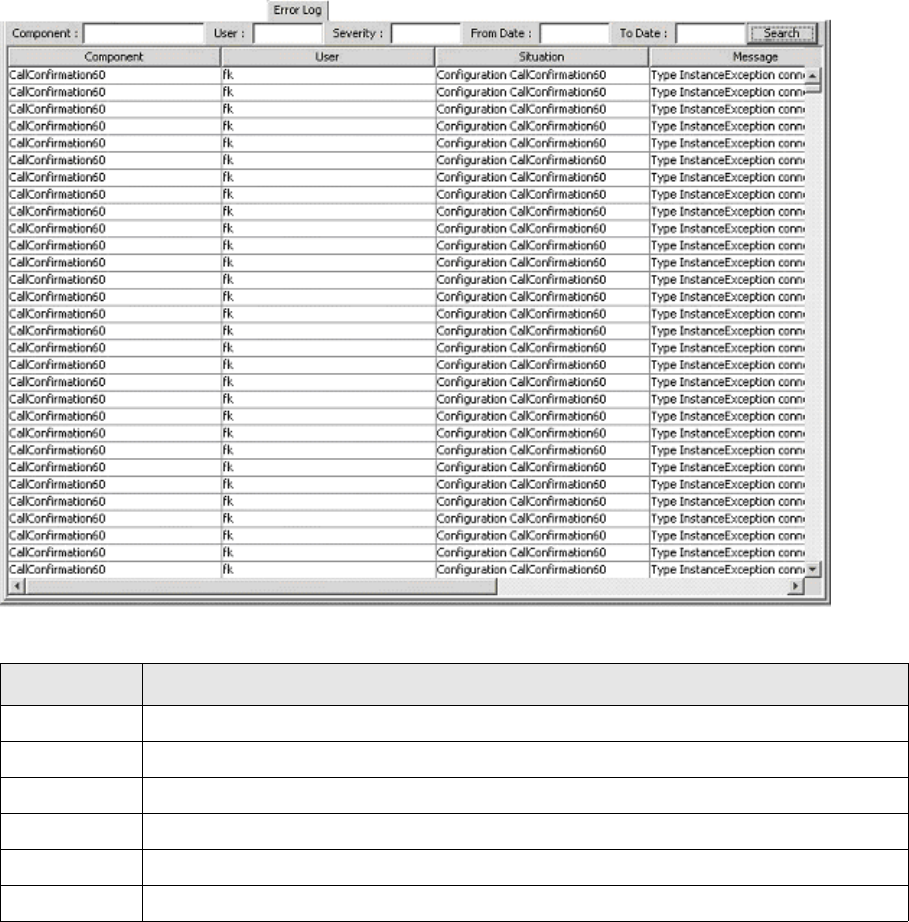
Using System Monitor
SWIFT Connectivity Guide 237
16.1.6 Viewing the Error Log
The Error Log tab displays a list of errors that have occurred in TRMSwift. The list of errors that is
displayed depends on the filter settings (see 16.1.7 Entering search criteria in the log panels on
page 238).
An example of the Error Log tab is shown below:
The following table describes the fields displayed in the Error Log tab:
Column Description
Component The unique name of the component.
User The name of the user running the component.
Situation Specifies where the error occurred.
Message A description of the error.
Severity The severity of the error.
Date The date and time of the error (in the format YYYY-MM-DD or YYYY-MM-DD HH:MM:SS).
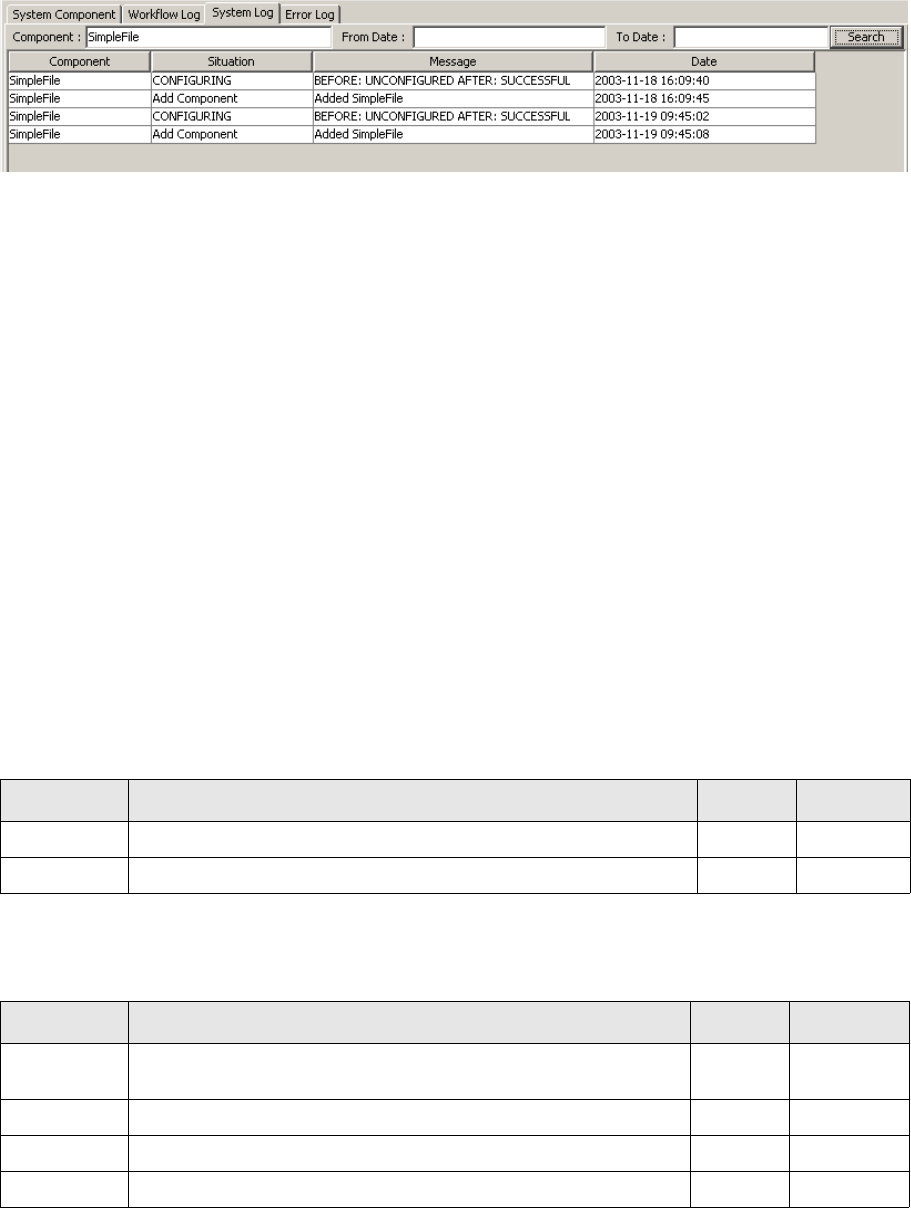
Triggering actions
238 © Wall Street Systems IPH AB - Confidential
16.1.7 Entering search criteria in the log panels
You can filter the log data that is displayed in System Monitor. To filter data, you enter your search
criteria in the search fields and click the Search button. The following example illustrates a search on
System Log events:
The search criteria must match the log data exactly; there are no wildcards available and the search
fields are case sensitive.
16.2 Triggering actions
Actions are triggered by the InboundMessageHandler. An action consists of polling specified
adapters for new business events or messages. The Action menu contains a list of actions for
registered workflow components. The Action menu displays only those actions to which you have
access.
When you select an action, it is performed as soon as the InboundMessageHandler’s current adapter
query is finished. Each time an action is triggered by System Monitor, the event is logged in System
Log.
16.3 Toolbar menu items
16.3.1 File menu
The File menu contains the following options:
16.3.2 View menu
The View menu contains the following options:
Menu Option Enables you to... Shortcut Keyboard
Refresh Update the data that is displayed. F5 Alt + F + R
Exit Shut down the System Monitor application. Alt + F + X
Menu Option Enables you to... Shortcut Keyboard
System
Component
Display the System Component tab. Alt + 1 Alt + V +S
Workflow Log Display the Workflow Log tab. Alt + 2 Alt + V + W
System Log Display the System Log tab. Alt + 3 Alt + V + L
Error Log Display the Error Log tab. Alt + 4 Alt + V + E

Toolbar menu items
SWIFT Connectivity Guide 239
16.3.3 Filter menu
The Filter menu is only available when the System Component tab is displayed. The Filter menu
contains the following options:
16.3.4 Command menu
The Command menu is only available when the System Component tab is displayed. The Command
menu contains the following options:
16.3.5 Action menu
The Action menu contains actions for registered workflow components. The menu options that are
displayed in the Action menu depend on your system configuration and your user permissions.
16.3.6 Help menu
The Help menu contains the following options:
Menu Option Enables you to... Keyboard
All Display all TRMSwift components. Alt + I + A
Activated Hide or display those components that are active. Alt + I + C
Suspended Hide or display those components that are suspended. Alt + I + S
Shutdown Hide or display those components that are shut down. Alt + I + H
Menu Option Enables you to... Keyboard
Activate Activate a component. Alt + C + A
Suspend Suspend a component. Alt + C + S
Shutdown Shutdown a component. Alt + C + H
Re-configure Re-configure TRMSwift after a modification to the configuration. Alt + C + E
Menu Option Enables you to... Keyboard
First action’s
caption
Perform the first action in the menu. Ctrl + 1
Second action’s
caption
Perform the second action in the menu. Ctrl + 2
... ... ...
Menu Option Enables you to...
About View information about the current version of System Monitor.
Copy Version Info Copy data about the current TRMSwift system to the clipboard.

Logging components
240 © Wall Street Systems IPH AB - Confidential
16.4 Logging components
16.4.1 Log files
File logging can be activated for most components by changing the dedicated log4j configuration
files (log4j.*.xml).
The logging settings are:
The TRMSwift logger is based on the Log4J framework. With log4j it is possible to enable logging at
runtime without modifying the application binary. Logging behavior is controlled by editing the
TRMSwift log4j configuration files (log4j.*.xml). See the online log4j documentation for details.
•log4j.archive.mmo.xml
•log4j.archive.xml
•log4j.core.xml
•log4j.debug.xml
•log4j.dump.xml
•log4j.esiadapter.xml
•log4j.feeder.xml
•log4j.migrate.xml
•log4j.mmo.xml
•log4j.smo.xml
•log4j.sqlfiles.xml
•log4j.stop.xml
•log4j.update.xml
These files configure how TRMSwift programs are logged, including the Enterprise Swift Integration
Adapter (ESIAdapter), Message Monitor, Core, Feeder, and System Monitor.
For log4j configuration, see http://logging.apache.org/log4j/1.2/publications.html.
Setting Description
FATAL A fatal error has occurred, causing TRMSwift to shut down.
ERROR An error has occurred.
WARN A non-critical error.
INFO High level processing details.
CONF Configuration information.
DATA Manipulated data.
JMS Java-related information (messaging).
ENTRY Entry into certain methods to track the progress.
EXIT Exit from certain methods to track the progress.
SQL Any SQL command that is executed.
Logging components
SWIFT Connectivity Guide 241
Here is a sample log4j.feeder.xml file:
<?xml version="1.0" encoding="UTF-8"?>
<!DOCTYPE log4j:configuration SYSTEM "log4j.dtd">
<!-- ================================================================= -->
<!-- -->
<!-- TRMSwift Log4j Configuration -->
<!-- -->
<!-- Supported trace levels -->
<!-- ALWAYS:FATAL:ERROR:WARN:DEBUG:CONF:DATA:JMS:DEBUG:ENTRY:EXIT:SQL-->
<!-- -->
<!-- Priorities: -->
<!-- ALWAYS...: Top priority -->
<!-- EXIT.....: Least important -->
<!-- -->
<!-- Caution: -->
<!-- ALWAYS, CONF, DATA, JMS, ENTRY, EXIT, and SQL -->
<!-- are TRMSwift custom levels. -->
<!-- To use them, you need to use the following identifiers: -->
<!-- -->
<!-- CONF#com.trema.babelfish.helpers.log.IkitLogLevel -->
<!-- DATA#com.trema.babelfish.helpers.log.IkitLogLevel -->
<!-- JMS#com.trema.babelfish.helpers.log.IkitLogLevel -->
<!-- DEBUG#com.trema.babelfish.helpers.log.IkitLogLevel -->
<!-- SQL#com.trema.babelfish.helpers.log.IkitLogLevel -->
<!-- ENTRY#com.trema.babelfish.helpers.log.IkitLogLevel -->
<!-- EXIT#com.trema.babelfish.helpers.log.IkitLogLevel -->
<!-- -->
<!-- Sample: -->
<!-- value="SQL#com.trema.babelfish.helpers.log.IkitLogLevel" -->
<!-- -->
<!-- ================================================================= -->
<!-- For more configuration infromation and examples see the Jakarta Log4j website:
http://jakarta.apache.org/log4j -->
<log4j:configuration xmlns:log4j="http://jakarta.apache.org/log4j/" debug="false">
<!-- ================================= -->
<!-- Preserve messages in a local file -->
<!-- ================================= -->
<!-- A size based file rolling appender -->
<!-- appender name="FILE" class="org.apache.log4j.RollingFileAppender"-->
<appender name="FILE" class="biz.wss.log4j.SplitBackupRollingFileAppender">
<param name="Threshold" value="DEBUG"/>
<param name="File" value="${trmswift.log.path}/trmswift.feeder.log"/>
<param name="Append" value="false"/>
<param name="MaxFileSize" value="10MB"/>
<param name="MaxBackupIndex" value="4"/>
<!-- List of log levels (separated by comma) generating msgs in independent files -->
<param name="SplitLevels" value="DATA"/>
<!-- backup directory settings -->
<param name="BackupDirectoryMaxSize" value="200MB"/>
<param name="BackupDirectoryDatePattern"
value="'_'yyyy-MM-dd'_at_'HH'h'mm'mn'ss's'"/>
<!-- Enable the following layout to log the threads matrix -->
<!--
<layout class="biz.wss.log4j.layout.ExtendedPatternLayout">
<param name="MaxLoggedThreads" value="50" />
<param name="ThreadsSeparator" value="|" />
<param name="ConversionPattern" value="%p | %d{ISO8601} | %t | %T | %C{1} | %m%n" />
</layout>
-->
<layout class="org.apache.log4j.PatternLayout">
<param name="ConversionPattern" value="%p | %d{ISO8601} | %t | %C{1} | %m%n" />
</layout>
Logging components
242 © Wall Street Systems IPH AB - Confidential
</appender>
<!-- ============================== -->
<!-- Append messages to the console -->
<!-- ============================== -->
<appender name="CONSOLE" class="org.apache.log4j.ConsoleAppender">
<param name="Threshold" value="DEBUG"/>
<param name="Target" value="System.out"/>
<!-- Enable the following layout to log the threads matrix -->
<!--
<layout class="biz.wss.log4j.layout.ExtendedPatternLayout">
<param name="MaxLoggedThreads" value="50" />
<param name="ThreadsSeparator" value="|" />
<param name="ConversionPattern" value="%p | %d{ISO8601} | %t | %T | %C{1} | %m%n" />
</layout>
-->
<layout class="org.apache.log4j.PatternLayout">
<param name="ConversionPattern" value="%p | %d{ISO8601} | %t | %C{1} | %m%n" />
</layout>
</appender>
<!-- ============================== -->
<!-- Limit categories -->
<!-- ============================== -->
<!-- Top level path. Common to all WSS classes -->
<category name="biz.wss">
<priority value="DEBUG"/>
</category>
<!-- Top level path. Common to all Trema classes -->
<category name="com.trema">
<priority value="DEBUG"/>
</category>
<!-- TRMSwift specific -->
<category name="com.trema.babelfish">
<priority value="DEBUG"/>
</category>
<!-- TRMSwift feeder specific -->
<category name="com.trema.babelfish.feeder">
<priority value="DEBUG"/>
</category>
<!-- Database access -->
<category name="com.trema.babelfish.dbms">
<priority value="DEBUG"/>
</category>
<!-- ============================== -->
<!-- Setup the Root category -->
<!-- ============================== -->
<root>
<appender-ref ref="CONSOLE"/>
<appender-ref ref="FILE"/>
</root>
</log4j:configuration>
16.4.1.1 FileAct logging at startup
If you want to log the internal representation of ESICRM/FileAct information on startup, add these
lines to the log4j.esiadapter.xml file, between the <log4j:configuration>
</log4j:configuration> tags:

Obtaining the full XML of a business event or message
SWIFT Connectivity Guide 243
<!-- Set to DEBUG: logs the matching capability of FileAct messages at startup -->
<category name=" biz.wss.esiadapter.onyxservice.api.impl.FileActAPI ">
<priority value="DEBUG" />
</category>
16.4.2 Logging manipulated data
Note that XML manipulations are logged to independant files according to
biz.wss.log4j.SplitBackupRollingFileAppender appender in the log4j configuration files. The
levels are defined as a list in the <param name="SplitLevels" value="level1, level2,
leveln"/> parameter (see line in red above).
16.4.3 TRMSwift event logs
There are three TRMSWift event logs (TRMSwift Error Log, TRMSwift System Log and TRMSwift
Workflow Log) showing the following information:
16.5 Obtaining the full XML of a business event or message
You can use the debugelement target to reconstruct the full XML of either a business event or
message. You use the command -Dname=value with the following properties:
•id; the id of the business event or message
•xpath; the XPath expression to extract part of the XML.
16.6 Performing actions on Workflow Elements or the Encoder
You can use the debugaction target to run the rules and actions of a given workflow element for a
particular business event or message. It takes the following parameters:
•id; the id of the business event or message
•uniqueName; the unique name of the workflow element
•xpath; the XPath expression which is applied to the result of rules and actions.
You can use the following shortcut targets for common workflow elements where the unique name
has already been defined:
•debugactionBES; using the workflow element with the name BusinessEventSplitter
•debugactionXML; using the workflow element with the unique name that is specified for the
encoder.
Parameter Description
Component A TRMSwift Component. Can be the name of the TRMSwift component (core, feeder name ) or
the name of the workflow element.
Situation The status of the log.
Message The message of the log.
Severity The severity of the message.
Date Date and time of the log.
User The related user.
Inbound Message Handler
244 © Wall Street Systems IPH AB - Confidential
This target can be run for all workflow elements or the encoder, except for the Inbound Message
Handler. The business event does not yet exist in the database when the rules for the Inbound
Message Handler are run, so the constructed XML is different. Instead, you can pass it a file,
however, the XML file must first be created by obtaining the full XML.
16.7 Inbound Message Handler
If the rules and actions for the Inbound Message Handler are simplified in such a way that they input
data "as is", it is possible to determine the output of the adapter. If this is not the case, the changes
made by the Inbound Message Handler must be taken into consideration when you use the
constructed XML of the business event to determine the output of the adapter.
16.8 Plain XML tools
There are general tools for working with XML, XSLT and XPath. Such tools can be used to check that
the XSLT script of the actions works correctly or that an XPath expression finds what it is supposed
to.
You can use the full XML of a business event or message (by using the debugelement target) and
then run the XSLT scripts against that (found in the configuration files).
16.9 Validating custom transformation scripts
You can use the trmswift.bat xsl command to validate custom transformation scripts without having
to launch the TRMSwift servers. You can even use this command to access TRMSwift extensions
including SwiftLib NumberLib, and DateLib.
The command syntax is:
trmswift xsl <XML file> <XSL file> <output file>
If you run the command simply as trmswift xsl, then file defaults are used as if you entered (Unix
version shown):
trmswift xml $FK_HOME/etc/trmswift/test/xsl/sample.xml
$FK_HOME/etc/trmswift/test/xsl/sample.xsl $FK_HOME/etc/trmswift/test/xsl/sample.out
This command also creates XML files that are easy to read.
16.10 TestFeeder
TestFeeder is an TRMSwift feeder which enables you to test encoding without connecting to TRM,
comKIT or an external system. TestFeeder reads XML files which are generated by other feeders and
tests the encoding without sending or receiving external messages. Messages are processed by
TRMSwift, encoded, and copied to a file in an output directory.
You use the following command:
Unix:
rc.trmswift testfeeder <path_in> <path_out>
TestFeeder
SWIFT Connectivity Guide 245
Windows:
trmswift.bat testfeeder <path_in> <path_out>
path_in defines the directory containing the file to read and path_out defines the directory where
TRMSwift writes the output file.
To use TestFeeder, you configure the following in TRMSwift:
1. Create an entry in the InboundMessageHandler settings.
The entry in setup.xml is:
<setupelement name="SETUP"
type="GENERAL"
component_name="InboundMessageHandler">
<data>
<InboundMessageHandler>
(…)
<feederlist>
<feeder name="TestFeeder" fetchPerPoll="1" retry="100"
2. Create an entry in the OutBoundMessageHandler settings.
The entry in setup.xml is:
<setupelement name="SETUP"
type="GENERAL"
component_name="OutboundMessageHandler">
<data>
<OutboundMessageHandler replyFinderWait="5000"
queuedMessageFinder Wait="5000">
(…)
<feederlist>
<feeder name="TestFeeder"></feeder>
3. Create a TestFeeder rule.
The TestFeeder rule adopts the following format:
<!-- =====[ OMH_Test Test]============== -->
<datasetup file="rulesTest.xml" name="Rules for Test">
<action name="OMH_Test" template_list="no" cacheable_list="yes" fixed_result="yes"
active_from="NULL" active_to="">
<data>
<destination>
<sendto name="TestFeeder">
<addflags><SentToMervaFile /></addflags>
</sendto>
</destination>
</data>
</action>
<rule>
<name>OMH_Test</name>
<order_id>99</order_id>
<xpath>/message[kind="SWIFT"]</xpath>
<action>OMH_Test</action>
<component_name>OutboundMessageHandler</component_name>
<active_from/>
<active_to/>
</rule>
</datasetup>
Troubleshooting
246 © Wall Street Systems IPH AB - Confidential
When the TestFeeder is running, you can see it in System Monitor. You receive messages as though
you were connected to an external system.
16.11 Troubleshooting
How to see in TRM that a message was sent correctly.
This depends on your TRM setup. Because TRMSwift uses the TRM workflow (transaction, payment,
contract or movement flow) to determine which messages are sent, it uses the same mechanism to
indicate whether the message was sent correctly. Generally, TRMSwift accepts a transaction,
payment, contract or movement twice. The first time is when it picks it up (so that it does not pick
the message up again). The second time is when the message is sent (or could not be sent). If in
either case there was a problem, a reject is performed in the workflow, otherwise an accept is
performed.
You can tell that the message was sent as the transaction, payment, contract or movement has
been accepted in the workflow. If it was rejected, the message could not be sent.
Error message indicating that there is more than one connector with the same name
when starting the adapters.
The adapters are trying to load the connector into memory from the database, but find the
connector twice. The most likely reason is that you have defined the same component twice in the
TRMSWIFT_COMPONENT property in your custom.properties file.
What happens if a message is sent to a system that is not running?
This depends on the adapter being used as well as the configuration of the TRMSwift workflow. The
adapter may respond that the message could not be sent because there is a problem. The workflow
can then have the message wait for several minutes before trying again.
Transactions getting stuck in the GET or HOLD states in TRM
There are two possible reasons:
•The mode being used does not have the correct permissions for updating columns. The
comment_4 column is used to add a message indicating whether or not the transaction has been
picked up by TRMSwift or sent successfully.
•TRMSwift has not finished processing the transaction. In this case you can verify in TRMSwift
what the problem might be.
A business event ends up in the Dead Letter Bin
The process of picking up the transactions in TRM may not have been successfully completed. You
should check if the business event has been assigned the flag PossibleDuplicate. Business events are
assigned this flag when TRMSwift cannot accept the transaction in the TRM workflow.
Open a transaction board in SH-GET mode, enter any value in comment 4 and accept the
transaction. If the transaction cannot be accepted or you cannot enter a value in comment 4, there
is a problem with the workflow or transactions.
You can open a transaction board in SH-GET mode by opening a “shell”. From the command line,
type fktransactionboard.exe -mode SH-GET. The SH-GET mode displays all transactions waiting
to be picked up. You can test any transaction, but for a more accurate picture, you should test a
transaction which corresponds to the suspended adapter.
Error "Cannot find property ant.home?" when running one of the scripts
Since each script in turn calls Java, you must ensure that you are using the correct version of Java.
Why is the TRMSwift Core not communicating with the client when the Message/System
Monitor starts up?
This is probably because your DNS is not configured correctly. When a Message/System Monitor logs
in, communication should bi-directional. If the server cannot resolve the client host name, it cannot
Troubleshooting
SWIFT Connectivity Guide 247
communicate. On UNIX you can by-pass the problem by placing the client IP address and full host
name (and domain) in the /etc/hosts file.
System/Message Monitor is not behaving correctly since I made some changes to the
system.
You should ensure that all components (server, System Monitor, and Message Monitor) are updated
and are of the same version. Select Help/About to determine which version of System Monitor or
Message Monitor you are using.
Why did my business event end up in the Dead Letter Bin?
The process of picking up the transactions in TRM may not have been successfully completed. You
should check if the business event has been assigned the flag PossibleDuplicate. Business events are
assigned this flag when TRMSwift cannot accept the transaction in the TRM workflow.
Open a transaction board in SH-GET mode, enter any value in comment 4 and accept the
transaction. If the transaction cannot be accepted or you cannot enter a value in comment 4, there
is a problem with the workflow or transactions.
You can open a transaction board in SH-GET mode by opening a “shell”. From the command line,
type fktransactionboard.exe -mode SH-GET. The SH-GET mode displays all transactions waiting
to be picked up. You can test any transaction, but for a more accurate picture, you should test a
transaction which corresponds to the suspended adapter.
I am running TRMSwift on several machines and System Monitor and Message Monitor are
not able to find the Core object.
This is most likely a DNS problem and the server cannot be located. Try to start TRMSwift processes
with the option:
-ORBiiop.publishIP=true
In build.xml, define the following argument for each target:
<arg line="(...) -ORBiiop.publishIP=true "/>
Troubleshooting
248 © Wall Street Systems IPH AB - Confidential
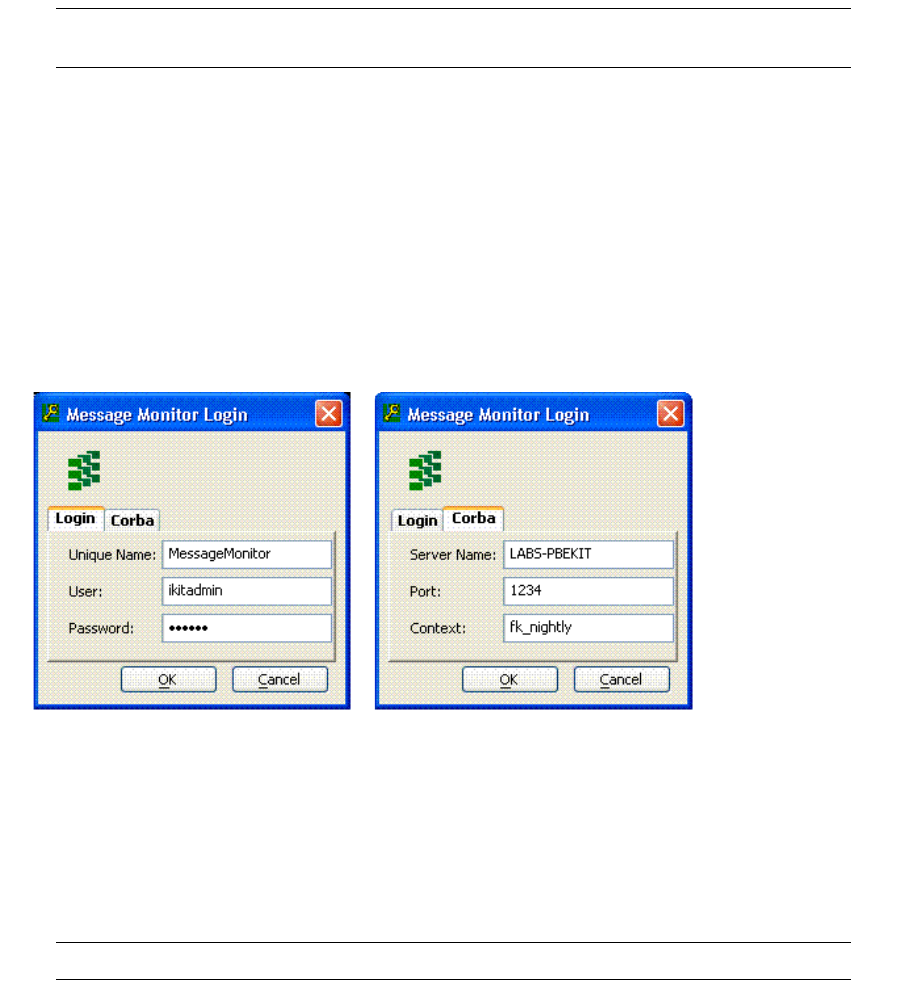
SWIFT Connectivity Guide 249
Chapter 17 TRMSwift Message Monitor
TRMSwift Message Monitor enables you to manipulate messages that are currently active in
TRMSwift. When you access TRMSwift Message Monitor, you can determine the list of messages you
want to view by selecting one of the available modes. Different modes allow you to perform different
actions, depending on what permissions are granted for the mode.
Note: Depending on your PC setup, you may need to change your display color settings for
optimum performance of Message Monitor.
17.1 Accessing TRMSwift Message Monitor
Your system configuration determines how you access TRMSwift Message Monitor. The following set
of instructions explains the TRMSwift Login dialog. Your system configuration may bypass this
dialog.
To access Message Monitor using the TRMSwift login dialog:
1. From the TRM Application Manager, double-click on the Message Monitor icon.
The following dialog is displayed (both pages shown):
2. In the Unique Name field, enter the name of the Message Monitor connection.
You can open one or more Message Monitor connections. Your login details are automatically
detected for the first connection that you open. For each additional connection that you open,
Message Monitor generates a unique name (System Monitor behaves similarly).
3. In the User field, enter your username.
4. In the Password field, enter your password.
5. Click Ok.
Note: The Corba Port and Corba Server Name fields are automatically populated.
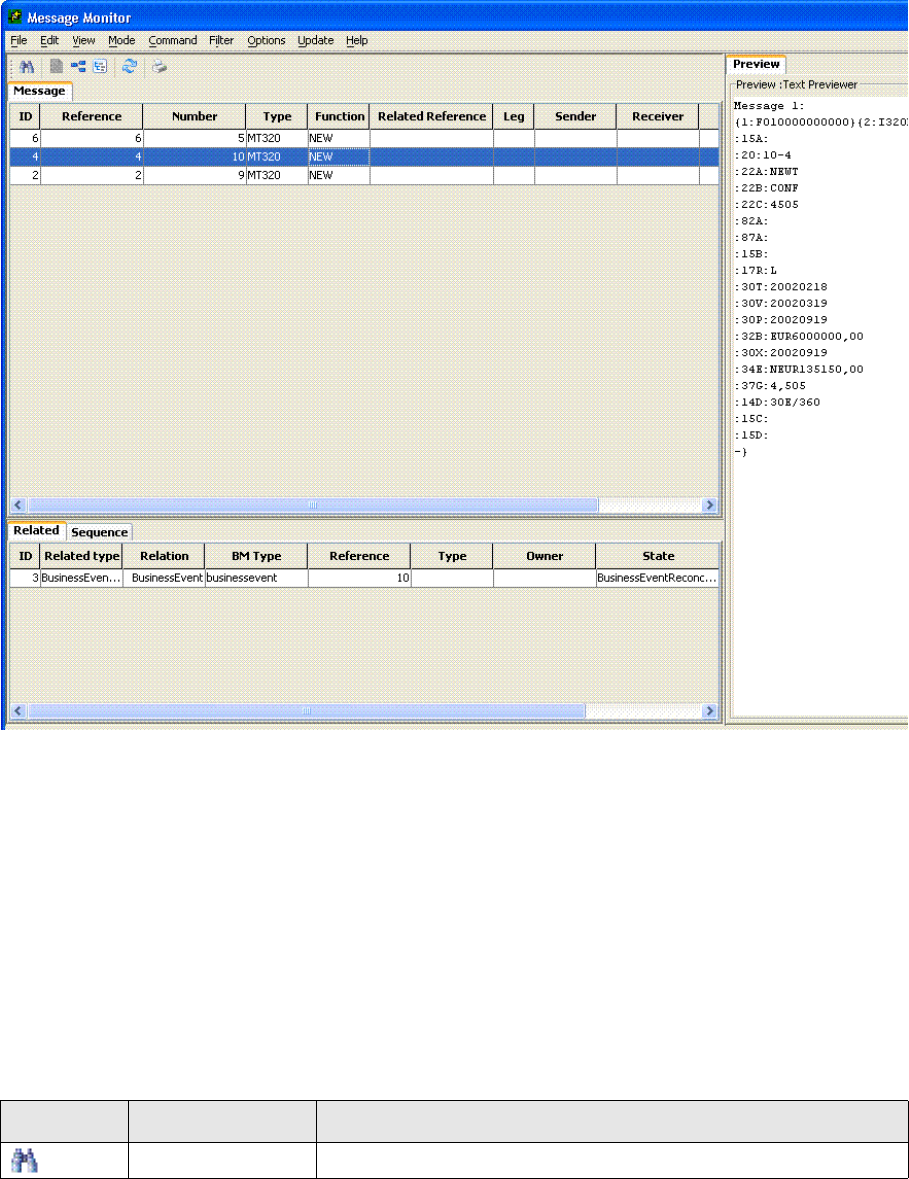
The Message Monitor window
250 © Wall Street Systems IPH AB - Confidential
17.2 The Message Monitor window
Message Monitor is divided into three panels, together with a status bar indicating the processing of
messages and business events.
The data that is displayed in each panel depends on what modes you have access to, and the
command and preview options you have chosen. An example of Message Monitor is shown below:
Message Monitor panels are as follows:
•Message panel
Enables you to monitor and view business events and messages (see 17.2.2 Message panel on
page 251).
•Preview panel
Displays the text, tree or XML format of the selected message (see 17.2.3 Preview panel on
page 251).
•Related or Sequence panel
Enables you to view a list of related business events and messages, and sequence information
(see 17.2.4 Related and Sequence panel on page 255).
17.2.1 Toolbar
The Message Monitor toolbar provides the following commands:
Icon Name Click to...
Filter Display the Filter Editor.
The Message Monitor window
SWIFT Connectivity Guide 251
17.2.2 Message panel
The Message panel enables you to monitor and view the details of business events and messages.
The business events and messages that are displayed depend on what mode you have selected from
the Modes menu. Modes act as filters so that you can manage the status of business events and
messages. You can also filter business events and messages using the Filter Editor (see 17.2.3
Preview panel on page 251).
Business events and messages are sorted by ID and displayed in ascending order. By clicking on any
column header, you can sort by that column into ascending or descending order. Sorting
characteristics are saved for each mode independently.
The following table describes the fields displayed in the Message panel. The fields that are displayed
in the Message panel depend on the mode you have selected.
17.2.3 Preview panel
The Preview panel displays the text, tree or XML format of the selected message, depending on the
preview type you have chosen from the Options menu.
Preview View a business event or message.
Sequence Display message fields in the Sequence panel.
Related Display related business events or messages in the Related panel.
Update Refresh data.
Print Preview Panel Print the data displayed in the Preview panel.
Icon Name Click to...
Column Description
ID The identification number of the business event or message.
Reference A unique reference number that links a business event in TRMSwift to a transaction in TRM.
Number The transaction number in TRM.
Type Identifies the message type, such as MT103.
Kind Identifies the message category, such as SWIFT.
Function Identifies the message function, for example CANCEL, AMEND or NEW.
Related
Reference
SWIFT reference to the previous message (used only for CANCEL or AMEND messages).
Leg Identifies a particular message for a business event; some business events such as FX Swap
may contain more than one message.
Sender The entity who sent the message.
Receiver The entity who received the message.
State The state of the business event or message.
Flags Indicates the status of a business event or message (for more information see 17.3.2.1
Flags on page 259).
Owner Specifies the owner of the business event, such as Payment, FX Spot or Forward.
Creation Date The date the business event or message was created.
Modification
Date
The date the business event or message was last modified.

The Message Monitor window
252 © Wall Street Systems IPH AB - Confidential
A popup menu provides access to preview information by right-clicking in the Preview panel. You
can send the preview information to a printer, save the contents to a file, or copy the contents to the
clipboard. You can also preview data in a separate window.
17.2.3.1 Text previewer
The following is a sample of a formatted text SWIFT message:

The Message Monitor window
SWIFT Connectivity Guide 253
17.2.3.2 Tree previewer
The following is a sample of the graphical tree structure of the contents of a formatted XML file:
You can expand or contract branches using the plus and minus nodes, to display business event
flags, messages and sequences.
The color coding depends on the type of XML but usually adopts the following standard:
•Green: represents an XML attribute
•Blue: represents an XML node
•Black: represents the attribute values.
Nodes
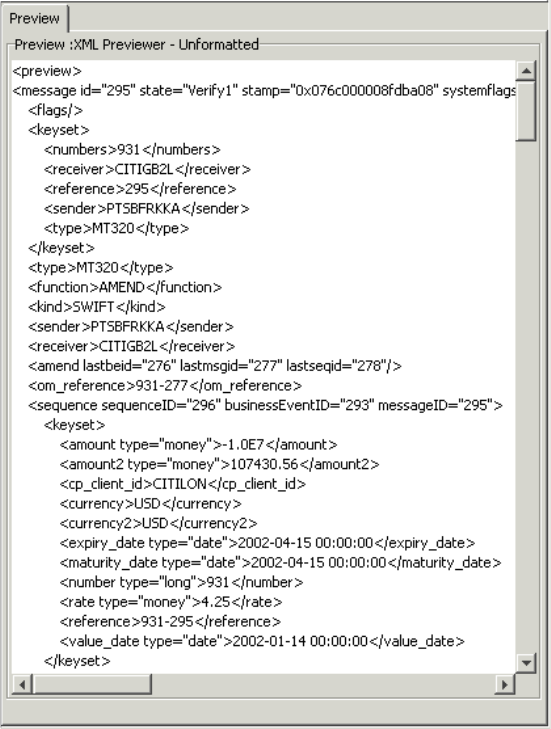
The Message Monitor window
254 © Wall Street Systems IPH AB - Confidential
17.2.3.3 XML previewer
The XML previewer displays the full XML as text:

The Message Monitor window
SWIFT Connectivity Guide 255
17.2.3.4 Fax previewer
The Fax previewer enables you to view a message in Fax format.
17.2.4 Related and Sequence panel
17.2.4.1 Related tab
The Related tab enables you to view details of related business events and messages. The following
table describes the fields displayed in the Related tab:
Column Description
ID The identification number of the related business event or message.
Related Type The related type, such as Message For or Business Event For.
Relation For a related business event, this field displays Message as the relation. For a related
message, this field displays Business Event as the relation.
BM Type Determines whether the related item is a business event or a message.
Reference Unique reference number that links business events in TRMSwift to a transaction in TRM.
Type The type of related message, such as MT101. This field is empty for related business events.
Owner The owner of the related business event, such as Payment, FX Spot or Forward.
States The state of the related business event or message.
Flags Indicates the status of the related business event or message.

Using Filter Editor
256 © Wall Street Systems IPH AB - Confidential
17.2.4.2 Sequence tab
The Sequence tab enables you to view sequence information for the message selected in the
Message panel. The sequence or order of the fields is specified at configuration time. The fields that
are displayed depend on the type of message selected in the Message panel.
17.3 Using Filter Editor
The Filter Editor enables you to define the filter criteria to reduce the number of business events and
messages that are displayed. You define filter criteria for each mode.
The Filter Editor contains two panels. Data is filtered according to the information you specify in both
panels. An example of the Filter Editor is shown below:
The Created/Modified drop-downs open a date picker dialog where you can select the date range.
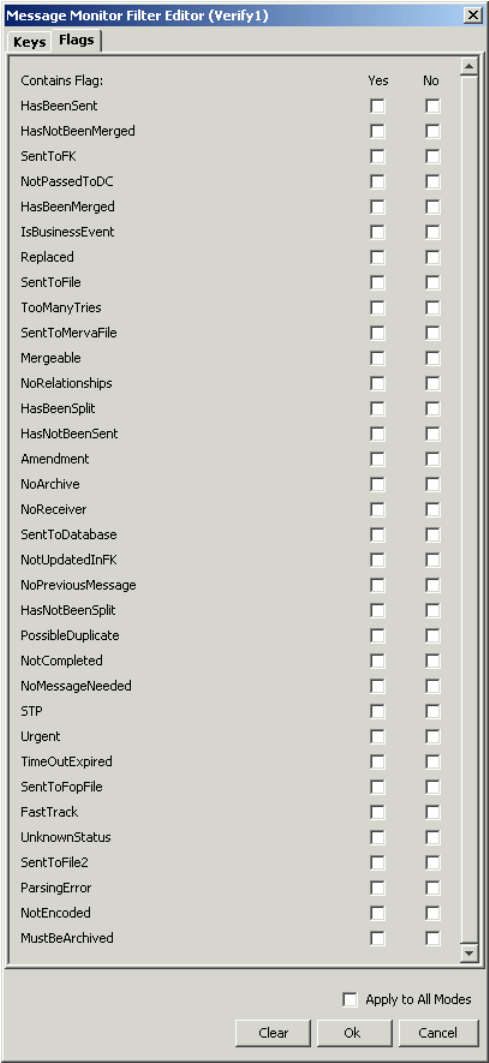
Using Filter Editor
SWIFT Connectivity Guide 257
The Message Monitor window is disabled when Filter Editor is open.
Selecting Apply to All Modes, applies the filter settings you have entered to all modes. The Clear
button clears all fields. The Cancel button closes the Filter Editor without saving the settings.
17.3.1 Keys panel
Empty fields are excluded from the search criteria. Where wildcards are allowed, they can be used
as follows:
•% matches zero or more characters
For example, 123%4 will return all numbers that start with 123 and end with 4.

Using Filter Editor
258 © Wall Street Systems IPH AB - Confidential
•_ matches exactly one character
For example, 123_4 will return all numbers starting with 123, followed by one character,
followed by a 4.
The following fields (system fields) are available by default in Filter Editor.
You can filter on the following fields, if the keys and values have been specified in Key Loader:
Field Description Format Default Value
Created/
Modified
The dates between which a message
was created or last modified.
Depends on your
system configuration.
The From field contains the
current date minus a specified
number.
The To field is empty.
ID The ID of the message or business
event.
A positive whole
number
Owner The owner of the business event. Any text; wildcards
can be used
Owner Type The owner type of the business
event.
Any text; wildcards
can be used
State The state of the business event. A
drop-down menu is only displayed if
there are several states available for
the current mode; if there is only
one state, it is shown as a text field.
Drop-down menu or
simple text
ALL states for current mode
Field Description Format
Reference The reference number of the business event. Any text; wildcards can be used
Sender The entity that sent the message. Any text; wildcards can be used
Receiver The entity that received the message. Any text; wildcards can be used
Type The message type. Any text; wildcards can be used
Number The transaction number in TRM. Any text; wildcards can be used
Payment ID The payment ID in Settlement Manager. A whole number
Counterparty The counterparty for the transaction. Any text; wildcards can be used
Amount The transaction amount. A whole or floating point number
Currency The transaction currency. Any text; wildcards can be used
Rate The transaction rate. A whole or floating point number
Amount2 The second transaction amount. A whole or floating point number
Currency2 The second transaction currency. Any text; wildcards can be used
Value Date The value dates on which to filter. YYYY-MM-DD or YYYY-MM-DD HH:MM:SS
unless otherwise configured
Expiration
Date
The expiration dates on which to filter. YYYY-MM-DD or YYYY-MM-DD HH:MM:SS
unless otherwise configured
Maturity
Date
The maturity dates on which to filter. YYYY-MM-DD or YYYY-MM-DD HH:MM:SS
unless otherwise configured
Instrument The TRM instrument. Any text; wildcards can be used

Using Filter Editor
SWIFT Connectivity Guide 259
17.3.2 Flags panel
In the Flags panel, there are two checkboxes for each flag: Yes and No. These checkboxes specify
that the flag has been set or has not been set for the message, respectively. Flag settings that are
predefined for a mode are disabled. It is not possible to check both the Yes and No checkboxes for
the same flag.
17.3.2.1 Flags
Flags indicate the status of a business event or message in TRMSwift. TRMSwift has pre-defined
flags which are described in the table below. Your system configuration may contain additional flags.
Flag Description System
Flag?
Amendment The item is an amendment. No
HasBeenMerged The item has been merged. No
HasBeenSent The item has been sent. No
HasBeenSplit The item has been split. No
HasNotBeenMerged The item has not been merged. No
HasNotBeenSent The item has not been sent. No
HasNotBeenSplit The item has not been split. No
IsBusinessEvent The item as a business event. Yes
Mergeable The item is mergeable. Yes
MustbeArchived The item must be archived. Yes
NoPreviousMessage There is no previous message before this item. No
NoReceiver The receiver for this item has not been specified. No
NoRelationships No relationships are created for this item. Yes
NotCompleted The item is not completed. Yes
NotEncoded The item is not encoded. No
NotPassedToDC The item has not been passed to the delivery component. No
NotUpdatedInFK The item has not been updated in TRM. No
PossibleDuplicate The item may be a duplicate of another item. Yes
Replaced The item has been replaced. No
SentToDatabase The item has been sent to the database. No
SentToFile The item has been sent to a file. No
SentToFile2 No
SentToMervaFile The item has been sent to a Merva file. No
TooManyTries The item has been processed too many times. Yes
UnknownStatus The status of the item is unknown. Yes
Urgent The item is urgent. No

Toolbar menu items
260 © Wall Street Systems IPH AB - Confidential
17.4 Toolbar menu items
17.4.1 File menu
The File menu contains the following options:
17.4.2 Edit menu
The Edit menu contains the following options:
17.4.3 View menu
The View menu contains the following options:
17.4.4 Mode menu
The options that are displayed in the Mode menu are determined by your user permissions. The
Mode menu may contain some or all of the following options:
Menu Option Enables you to... Keyboard
New Connection Close the current Message Monitor session and open another connection. Alt + F + N
New Archive
Connection
Close the current Message Monitor session and open Message Monitor in
archive mode.
Alt + F + A
Page Setup Display a standard Windows Print dialog. Alt + F + U
Print Preview
Panel
Print the data that is displayed in the Preview Panel. Alt + F + P
Exit Shut down the Message Monitor application. Alt + F + X
Menu Option Enables you to... Keyboard
Select All Select all rows displayed in the Message panel. Ctrl + A
Copy Copy rows that you have selected in the Message panel. Ctrl + C
Menu Option Enables you to...
Toolbar Hide or display the toolbar.
Status Bar Hide or display the status bar.
Menu Option Enables you to retrieve... Keyboard
Verify1 Messages in the Verify1 state in TRMSwift. Alt + M + F
Verify 2 Messages in the Verify2 state in TRMSwift. Alt + M + V
Completed Business events and messages in the Completed state. Alt + M + C
Outstanding Business events and messaged not in the Completed state. Alt+ M + O
Enquire All business events and messages in TRMSwift. Alt + M + E

Toolbar menu items
SWIFT Connectivity Guide 261
17.4.5 Command menu
The options that are displayed in the Command menu are determined by the mode you have
selected and your system configuration. The Command menu may contain the following options:
ReSend - DLB Messages that have been sent to the Dead Letter Bin (DLB). Messages
are sent to the DLB because they cannot be routed through the
workflow controller.
Messages in the DLB can be:
• Re-sent to the state Verify1
• Resubmitted to the BusinessEventSplitter
(if a message has not already been created).
Alt + M + S
ReSplit - DLB Business events that have been sent to the Dead Letter Bin. Alt + M + P
ManualIntervention Messages that must be manually sent. Alt + M + M
ManualIntervention
(OMH)
Messages that have been sent but for which confirmation cannot be
obtained, such as due to connection problems.
You can resend messages in this state.
Alt + M + N
BENRetryer Business events whose status has not yet been updated in TRM. Alt + M + R
Menu Option Enables you to retrieve... Keyboard
Menu Option Enables you to... Shortcut Keyboard
Preview Display a preview of a business event or message in the
Preview panel.
F6 Alt + C + P
Related Display related business events or messages in the Related
panel.
Available for all modes.
F7 Alt + C + R
Sequence Display message data in the Sequence panel.
Available for all modes.
F8 Alt + C + Q
Split Split a merged message.
This only applies to sequences.
F9 Alt + C + S
Accept Move a message to the Verify state.
Only available for the Verify1 mode.
Shift + F1 Alt + C + A
Set Urgent Set the Urgent flag on a message.
Only available for the Verify mode.
Shift + F9 Alt + C+ T
Remove Urgent Remove the Urgent flag on a message.
Only available for the Verify mode.
Shift + F10 Alt + C+ V
Reject
(from Verify 1)
Send a message to the Business Event Reconciliator. The
business event is sent to TRM with a failed status thus rejecting
the transaction or payment.
Only available for the Verify1 mode.
Shift + F2 Alt + C + J
Reject
(from Verify 2)
Move a message to the Verify1 state.
Only available for the Verify2 mode.
Shift + F3 Alt + C + J
Send Send a message to the SWIFT network.
Only available for the Verify2 mode.
Shift + F4 Alt + C + S
Re-Verify Resend a message for verification. Shift + F5 Alt + C + V
Re-Split Resend a business event to the Business Event Splitter. Shift + F5 Alt + C + S

Toolbar menu items
262 © Wall Street Systems IPH AB - Confidential
17.4.6 Filter menu
The Filter menu contains the following option:
17.4.7 Option menu
The Option menu contains the following options:
Merge Merge a message. Shift + F11 Alt + C + M
Re-load Keys Send a message to the Keyloader so that the keys can be
reloaded.
Shift + F12 Alt + C + K
Archive Archive a message; sets the MustbeArchived flag and removes
the NoArchive flag.
Shift + F3 Alt + C + A
NoArchive Disable the archiving facility for a message; sets the NoArchive
flag and removes the MustbeArchived flag.
Shift + F4 Alt + C + N
MayBeArchived Allow the Archive Manager rules to determine whether an
element is archived; the MustbeArchived and NoArchive flags
are removed.
Shift + F5 Alt + C + M
Re-Send Resend a message. Shift + F3 Alt + C + S
Completed Move a message to the Completed state, if the message is in
the BENRetryer mode. TRM is not updated with the success or
failure status.
Shift + F3 Alt + C + C
Retry Immediately update the status in TRM, if the message is in the
BENRetryer mode.
Shift + F4 Alt + C + R
HasNotBeenSent Set the HasNotBeenSent flag and send the message to the
Business Event Reconciliator.
Shift + F6
HasBeenSent Set the HasBeenSent flag and send the message to the
Business Event Reconciliator.
Shift + F7 Alt + C + R
Menu Option Enables you to... Shortcut Keyboard
Menu Option Enables you to... Keyboard
Edit Filter Edit the filter criteria using Filter Editor. Ctrl + F
Menu Option Enables you to... Keyboard
Text Previewer Display the text of a SWIFT message. Alt + O + T
Tree Previewer Display a graphical tree structure of the formatted XML for a
message. You can expand branches or nodes of business events
and associated messages.
Alt + O + P
Tree Previewer -
Unformatted
Display a graphical tree structure of the unformatted XML for a
message. You can expand branches or nodes of business events
and associated messages.
Alt + O + F
XML Previewer Display the formatted XML as text. Alt + O + X
XML Previewer -
Unformatted
Display the unformatted XML as text. Alt + O + U
Fax Previewer Display a message in fax format. Alt + O + A
Auto Preview Hide or display data in the Preview panel. Alt + O + V
Auto Related Hide or display data in the Related panel. You must refresh the
data.
Alt + O + R

Toolbar menu items
SWIFT Connectivity Guide 263
17.4.8 Update menu
The Update menu contains the following options:
17.4.9 Help menu
The Help menu contains the following options:
Auto Sequence Hide or display data in the Sequence panel. You must refresh the
data.
Alt + O + S
Menu Option Enables you to... Keyboard
Menu Option Description Keyboard
Now Business events and messages are not automatically updated. Use the
Refresh facility to update the data that is displayed.
F5
Real Time Business events and messages are automatically updated.
Menu Option Enables you to...
About View information about the current version of Message Monitor.
Copy Version Info Copy data about the current TRMSwift system to the clipboard.
Toolbar menu items
264 © Wall Street Systems IPH AB - Confidential

SWIFT Connectivity Guide 265
Chapter 18 ESIAdapter File Interface
18.1 Introduction
The ESIAdapter File Interface is a means of sending FileAct messages from an external system (e.g.
SAP) to banks via the SWIFT network. This is done by placing the files to be sent from an external
system into the appropriate "input" directory, which the ESIAdapter File Interface then processes.
Note: This interface works independantly from TRMSwift and Websuite, which are unaware of
this processing.
18.2 Requirements and features
•FileAct
To send a FileAct request, ESIAdapter needs three pieces of information in order to determine
the parameters required to send the message. These are:
–The BIC of the sender
–The BIC of the receiver
–The Request Type as represented in the Request Type field in the FileAct tab of the
ESIAdapter Editor.
•File format
Any file format is allowed, but the maximum file size should not exceed 150MB.
•Directory structure
ESIAdapter File Interface has a directory structure that allows it to control the processing of
each file:
If there is more than one destination, then you can use subdirectories in each of the six
directories above, for example dir-1, dir-2, dir-3 could be used to handle three different
destinations.
•Queues
<top directory>
send Where the file to be sent should be dropped by the external application.
processing Where the file is stored until successfully send to Message Bus.
processed Where the file is stored until the final response is received from ESIAdapter.
archive Where the file is stored after successful completion.
error Where the file is stored after unsucessful completion.
log Where the process log is stored.
Requirements and features
266 © Wall Street Systems IPH AB - Confidential
Sending and listening queues must be set.
•Module name
For the system to be able to identify and to adequately use delivery notification, it is necessary
to use the dedicated module name FILE added to the existing CM and TRMSwift). This module
name should be part of the message unique ID.
•Duplicate detection
You can check the message to send for duplicates. This checking should be optional as there
might be other criteria than the filename to determine uniqueness and avoid sending the same
file twice.
•Sleep time
You can set the sleep time before the send process starts looking actively for new files to send.
•File positioning
In order to streamline the process, it is recommended that the send directory be fed by file
transfer from another directory on the same machine rather than fed directly through FTP. Also,
file size should be checked before processing.
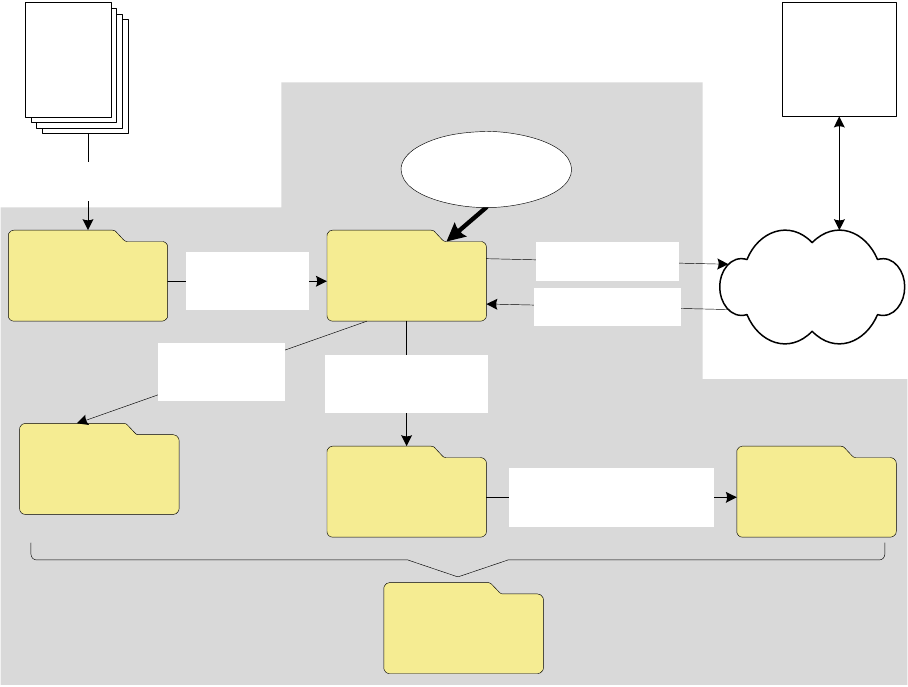
How it works
SWIFT Connectivity Guide 267
18.3 How it works
18.3.1 Startup
ESIAdapter File Interface is an Onyx-based process and can be started with the command:
onyx esiadapter-file
18.3.2 Processing
The Listener process starts by scanning incoming status messages so that any outstanding
messages can be handled before looking at what files are currently in the file system.
The Sender process starts by searching the processing directory for files that may not have been
put on the Message Bus during the previous operation.
The Sender process then searches the send directory for newly dropped files awaiting processing.
After a successful build of the message and successful sending, the Listener process awaits
corresponding delivery notifications from SWIFT.
All status messages (Delivery Notifications) received are appended to the log for further reference.
While waiting for all Delivery Notifications, the file is moved from the processing to the processed
directory. Matching between files and Delivery Notifications is automatic.
Once all corresponding Delivery Notifications have been received (last DN received), file moves from
the processed to the archive directory.
SWIFT Network
BANKS
processingsend
processed archive
logs
error
File sent to bank via
SWIFTNet FileAct
Delivery notifications
to ESIAapter
File picked up
File size checked
Processing starts
Processing failed,
File moves to
error directory
Processing successful,
File moves to
processed directory
Delivery notification received
DN matches original file
File moves to archive
Original
file(s)
File(s) placed in the
send directory
Listener process
Sender process
Files successfully processed
Duplicates
Regular processing Status changes
Status messages (Delivery Notifications)
Error causes
Crash handling events
ESIAdapter File Interface

Configuration
268 © Wall Street Systems IPH AB - Confidential
18.3.3 Recovery and errors
The process can recover properly from a system and/or application crash. The process checks the
status of files that could have been in different states of processing at the time of the crash.
When processing has not been successful, the file that failed to be sent is stored in the error
directory.
18.3.4 Logging
All processing events and recovery actions are logged in the log directory.
Because of their role and sensitivity, log and archive directories are not automatically cleaned.
18.4 Configuration
ESIAdapter File Interface is an Onyx process and has a properties file with parameters that can be
edited. The file is called esiadapter-file.properties and is located in the directory
etc/onyx/properties.
The parameters are described in the table below:
18.4.1 Bank connection configuration
The mapping of the directory structure to the FileAct parameters needed to deliver the file to the
correct bank is set up in the file esiadapter-file-bootstrap.xml which resides in the directory
etc/onyx/properties.
Parameter Description
esifile.destination.esiadapter The name of the queue that messages are sent to, which is the same
as the queue that ESIAdapter is listening to for incoming work. The
default value is ${wss.env.name}.esiadapter.in and should not
need to be changed.
esifile.destination.esifile The name of the queue where statuses are read from. The default
value is ${wss.env.name}.esiadapter.file and should not need
to be changed. There is a corresponding entry in the
esiadapter.properties file: esiadapter.destination.file
and both names must be the same.
esifile.topdirectory The name of the directory containing all subdirectories.
esifile.module.name The module name that is used as part of the unique ID. There must
be a corresponding setup in ESIAdapter which restricts the possible
names to FILE, CM or TRMSwift. FILE is reserved for this interface
and so this value should not need to be changed. The appropriate
patch of ESIAdapter is required to support this.
esifile.samename.duplicates This tells ESIAdapter File Interface either to generate unique names
for the files or to rely on the system that generates the files for
unique names. The possible values are:
true
The system creating the files ensures unique filenames.
false
The system generating the files does not ensure unique filenames, so
ESIAdapter generates the names instead.
esifile.loop.sleep The number of seconds to be inactive before actively looking for files.
The value should be based on the frequency of the arrival of files to be
sent. Start with a value of 60.
Configuration
SWIFT Connectivity Guide 269
The mapping is related to the setup in the ESIAdapter Editor FileAct tab. Here is an example (see
notes on the bold text below the code snippet):
<bean id="esifileDirectoryMap"
class="java.util.HashMap"
scope="singleton">
<constructor-arg>
<map>
<entry>
<key><value>dir-1</value></key>
<props>
<prop key="sender">PTSGGBEE</prop>
<prop key="receiver">SOGEFRPP</prop>
<prop key="request-type">pain.xxx.cfonb160.pre</prop>
</props>
</entry>
<entry>
<key><value>dir-2</value></key>
<props>
<prop key="sender">PTSGGBEE</prop>
<prop key="receiver">CHASGB20</prop>
<prop key="request-type">pain.001.001.02</prop>
</props>
</entry>
</map>
</constructor-arg>
</bean>
What you should change in this file are the number of entries, which depends on:
•The number of different sender/receiver/request-type combinations needed
•The names of the directories, which can be any unique name
•The actual values for sender, receiver and request-type.
dir-1 The name of the directory.
PTSGGBEE The BIC of the sender as per the BIC in the ESIAdapter Editor.
SOGEFRPP The BIC of the receiver as per the BIC in the ESIAdapter Editor.
pain.xxx.cfonb160.pre The Request Type as per the FileAct page entry for the receiver in the ESIAdapter
Editor.
dir-2 The name of the directory.
PTSGGBEE The BIC of the sender as per the BIC in the ESIAdapter Editor.
CHASGB20 The BIC of the receiver as per the BIC in the ESIAdapter Editor.
pain.001.001.02 The Request Type as per the FileAct page entry for the receiver in the ESIAdapter
Editor.
Configuration
270 © Wall Street Systems IPH AB - Confidential
SWIFT Connectivity Guide 271
Appendix A Properties files
This section describes properties files used in a TRM SWIFT installation. The following files:
•esiadapter.properties
•ssl.properties
•credentials.properties
are described in Chapter 2 ESIAdapter configuration on page 21.
A.1 environment.properties
wss.env.name
The FK_IDENT environment variable.
Set in the Onyx startup script from the FK_IDENT environment variable value.
Do not modify this property.
A.2 jms.properties
jms.queue.prefix
Message queue prefix used to differentiate queues from various environments on a single message
bus.
uses the same value as the wss.env.name property.
Do not modify this property.
jms.setNoInactivityTimeout
The maximum inactivity duration (before which the socket is considered dead) in milliseconds. On
some platforms it can take a long time for a socket to appear to die, so we allow the broker to kill
connections if they are inactive for a given period of time.
Use any positive value. Set a negative value to disable the inactivity monitoring.
Used by some transports to enable a keep alive heart beat feature. See
http://activemq.apache.org/configuring-wire-formats.html.
A.3 oracle.properties
The Onyx modules access the database via two different libraries: Hibernate and dbKIT. The
following sections present general and specific properties.
oracle.properties
272 © Wall Street Systems IPH AB - Confidential
A.3.1 General properties
jdbc.host
Database server host.
Set in the Onyx startup script from the MODULES_DB_HOST environment variable value.
Do not modify this property.
jdbc.port
Database server port.
The value is set in the Onyx startup script from the MODULES_DB_PORT environment variable value.
Do not modify this property.
jdbc.database
Database name.
Set in Onyx startup script from the MODULES_DB_NAME environment variable value.
Do not modify this property.
jdbc.oracle.schema.owner
Oracle database schema owner.
Set in Onyx startup script from the FK_DATABASE environment variable value.
Do not modify this property.
A.3.2 Hibernate properties
jdbc.hibernate.dialect
The name of the dialect that is used by Hibernate to generate SQL.
With the current version of Oracle and Hibernate, the only value allowed is
org.hibernate.dialect.Oracle9Dialect.
Do not modify this property.
jdbc.hibernate.showsql
Writes all SQL statements to the console. This is an alternative to setting the log category
org.hibernate.SQL to debug.
Values: true or false
Enabling the DEBUG log level may impact performance.
jdbc.hibernate.username
Database connection super user.
Value: ${database.connection.username} from the file credentials.properties.
jdbc.hibernate.password
Database connection super user password.
Value: ${database.connection.password} from file credentials.properties.
jdbc.hibernate.driver
The Java class that is to be used as the driver.
oracle.properties
SWIFT Connectivity Guide 273
Value: oracle.jdbc.OracleDriver
The driver must be from an Oracle 10.2 package. (This is the default since WSS version 7.2.1.5.)
jdbc.hibernate.url
The dataset connection URL.
Value: dbc:oracle:thin:@${jdbc.host}:${jdbc.port}:${jdbc.database}
Do not modify this property.
hibernate.jdbc.batch_size
An indication of how many SQL statements that can be processed at the same time.
Value: 0
The allowed value is zero, as other ones can interfere with the writing of CLOB fields to the
database.
oracle.properties
274 © Wall Street Systems IPH AB - Confidential

SWIFT Connectivity Guide 275
Appendix B Time zones
The values listed here may be used as values for time zones with the Scheduler:
Scheduler Time zone values
Pacific/Niue
Pacific/Apia
MIT
Pacific/Pago_Pago
Pacific/Tahiti
Pacific/Fakaofo
Pacific/Honolulu
HST
America/Adak
Pacific/Rarotonga
Pacific/Marquesas
Pacific/Gambier
America/Anchorage
AST
Pacific/Pitcairn
America/Vancouver
America/Tijuana
America/Los_Angeles
PST
America/Dawson_Creek
America/Phoenix
PNT
America/Edmonton
America/Mazatlan
America/Denver
CST
America/Porto_Acre
America/Bogota
America/Guayaquil
America/Jamaica
America/Cayman
America/Managua
America/Panama
America/Lima
America/Indianapolis
IET
America/Nassau
America/Montreal
America/Havana
America/Port-au-Prince
America/Grand_Turk
America/New_York
EST
America/Antigua
America/Anguilla
America/Curacao
America/Aruba
America/Barbados
America/La_Paz
America/Manaus
America/Dominica
America/Santo_Domingo
America/Grenada
America/Guadeloupe
America/Guyana
America/St_Kitts
America/St_Lucia
America/Martinique
America/Montserrat
America/Puerto_Rico
PRT
America/Port_of_Spain
America/St_Vincent
America/Tortola
America/St_Thomas
America/Caracas
Antarctica/Palmer
Atlantic/Bermuda
America/Cuiaba
America/Halifax
Atlantic/Stanley
America/Thule
America/Asuncion
America/Santiago
America/St_Johns
CNT
America/Fortaleza
America/Cayenne
America/Paramaribo
America/Montevideo
America/Buenos_Aires
AGT
America/Godthab
America/Miquelon
America/Sao_Paulo

276 © Wall Street Systems IPH AB - Confidential
BET
America/Noronha
Atlantic/South_Georgia
Atlantic/Jan_Mayen
Atlantic/Cape_Verde
America/Scoresbysund
Atlantic/Azores
Africa/Ouagadougou
Africa/Abidjan
Africa/Accra
Africa/Banjul
Africa/Conakry
Africa/Bissau
Atlantic/Reykjavik
Africa/Monrovia
Africa/Casablanca
Africa/Timbuktu
Africa/Nouakchott
Atlantic/St_Helena
Africa/Freetown
Africa/Dakar
Africa/Sao_Tome
Africa/Lome
GMT
UTC
Atlantic/Faeroe
Atlantic/Canary
Europe/Dublin
Europe/Lisbon
Europe/London
Africa/Luanda
Africa/Porto-Novo
Africa/Bangui
Africa/Kinshasa
Africa/Douala
Africa/Libreville
Africa/Malabo
Africa/Niamey
Africa/Lagos
Africa/Ndjamena
Africa/Tunis
Africa/Algiers
Europe/Andorra
Europe/Tirane
Europe/Vienna
Europe/Brussels
Europe/Zurich
Europe/Prague
Europe/Berlin
Europe/Copenhagen
Europe/Madrid
Europe/Gibraltar
Europe/Budapest
Europe/Rome
Europe/Vaduz
Europe/Luxembourg
Africa/Tripoli
Europe/Monaco
Europe/Malta
Africa/Windhoek
Europe/Amsterdam
Europe/Oslo
Europe/Warsaw
Europe/Stockholm
Europe/Belgrade
Europe/Paris
ECT
Africa/Bujumbura
Africa/Gaborone
Africa/Lubumbashi
Africa/Maseru
Africa/Blantyre
Africa/Maputo
Africa/Kigali
Africa/Khartoum
Africa/Mbabane
Africa/Lusaka
Africa/Harare
CAT
Africa/Johannesburg
Europe/Sofia
Europe/Minsk
Asia/Nicosia
Europe/Tallinn
Africa/Cairo
Scheduler Time zone values

SWIFT Connectivity Guide 277
ART
Europe/Helsinki
Europe/Athens
Asia/Jerusalem
Asia/Amman
Asia/Beirut
Europe/Vilnius
Europe/Riga
Europe/Chisinau
Europe/Bucharest
Europe/Kaliningrad
Asia/Damascus
Europe/Kiev
Europe/Istanbul
EET
Asia/Bahrain
Africa/Djibouti
Africa/Asmera
Africa/Addis_Ababa
EAT
Africa/Nairobi
Indian/Comoro
Asia/Kuwait
Indian/Antananarivo
Asia/Qatar
Africa/Mogadishu
Africa/Dar_es_Salaam
Africa/Kampala
Asia/Aden
Indian/Mayotte
Asia/Riyadh
Asia/Baghdad
Europe/Simferopol
Europe/Moscow
Asia/Tehran
MET
Asia/Dubai
Indian/Mauritius
Asia/Muscat
Indian/Reunion
Indian/Mahe
Asia/Yerevan
NET
Asia/Baku
Asia/Aqtau
Europe/Samara
Asia/Kabul
Indian/Kerguelen
Asia/Tbilisi
Indian/Chagos
Indian/Maldives
Asia/Dushanbe
Asia/Ashkhabad
Asia/Tashkent
Asia/Karachi
PLT
Asia/Bishkek
Asia/Aqtobe
Asia/Yekaterinburg
Asia/Calcutta
IST
Asia/Katmandu
Antarctica/Mawson
Asia/Thimbu
Asia/Colombo
Asia/Dacca
BST
Asia/Almaty
Asia/Novosibirsk
Indian/Cocos
Asia/Rangoon
Indian/Christmas
Asia/Jakarta
Asia/Phnom_Penh
Asia/Vientiane
Asia/Saigon
VST
Asia/Bangkok
Asia/Krasnoyarsk
Antarctica/Casey
Australia/Perth
Asia/Brunei
Asia/Hong_Kong
Asia/Ujung_Pandang
Asia/Macao
Asia/Kuala_Lumpur
Asia/Manila
Asia/Singapore
Asia/Taipei
Asia/Shanghai
CTT
Asia/Ulan_Bator
Asia/Irkutsk
Asia/Jayapura
Asia/Pyongyang
Asia/Seoul
Pacific/Palau
Asia/Tokyo
Scheduler Time zone values

278 © Wall Street Systems IPH AB - Confidential
JST
Asia/Yakutsk
Australia/Darwin
ACT
Australia/Adelaide
Australia/Broken_Hill
Australia/Hobart
Antarctica/DumontDUrville
Pacific/Truk
Pacific/Guam
Pacific/Saipan
Pacific/Port_Moresby
Australia/Brisbane
Asia/Vladivostok
Australia/Sydney
AET
Australia/Lord_Howe
Pacific/Ponape
Pacific/Efate
Pacific/Guadalcanal
SST
Pacific/Noumea
Asia/Magadan
Pacific/Norfolk
Pacific/Kosrae
Pacific/Tarawa
Pacific/Majuro
Pacific/Nauru
Pacific/Funafuti
Pacific/Wake
Pacific/Wallis
Pacific/Fiji
Antarctica/McMurdo
Asia/Kamchatka
Pacific/Auckland
NST
Pacific/Chatham
Pacific/Enderbury
Pacific/Tongatapu
Asia/Anadyr
Pacific/Kiritimati
Scheduler Time zone values

SWIFT Connectivity Guide 279
Appendix C Configuration data
C.1 Configuration
TRMSwift is highly configurable. Configuration is done in XML; each component can superimpose its
own requirements on the configuration without affecting the underlying storage mechanism. The
setup can be broken down into three main types of configuration: setup, actions, and rules.
C.1.1 Setup
The Setup data can deal with almost any kind of configuration. The setup itself is a block of XML that
contains a format based on the context in which it will be used. Because of the nature of changing
setups, it is also possible to have the same setup, but for different periods (similar to a journal).
Setup data is contained within the SetupElement table as indicated below:
C.1.2 Actions
“Actions” means the generic way in which XML is manipulated to provide data that TRMSwift can
use. Three different types of actions exist:
•XSLT scripts
•Action Lists (also known as Template Lists)
•The resulting XML (also known as Fixed Actions - as if it was produced by an XSLT script or
Action List).
Column Comment
setup_id * Contains the unique ID of the Setup. The ID is generated by the database and is a
numeric value.
name ** Name of the Setup. This should be a meaningful name.
setup_type ** The type of the Setup. This should be a meaningful name.
component_name ** The name of the component that will use the Setup.
flags Currently this value is not used.
active_from The date from which the Setup should be active. The default value is NULL.
active_to The date until which the Setup should be active. The default value is NULL.
xml The actual XML that contains the setup.
*The setup_id is the primary key. The name, setup_type, and component_name should always be unique for
the active_from and active_to dates.
**The name, setup_type and component_name fields can have almost any value, but should have meaningful
names. Whenever a particular component or component type is to be configured, the TRMSwift documentation
indicates what these fields should be set to (for example: for Flag Mapping, the values must be SETUP,
FLAGMAPPING and FLAGMAPPING respectively; for a Business Event Splitter named ABC, the values must be
SETUP, GENERAL, and ABC respectively).
***There are no relationships with other tables.

Configuration
280 © Wall Street Systems IPH AB - Confidential
An XSLT script is normally used to manipulate the input XML and to produce a block of XML that can
be used for further processing. It can also produce a block of XML that represents an Action List; in
this instance, the data contained in the configuration is the XSLT script used for transforming the
XML.
An Action List (whether a fixed result or produced by an XSLT script) represents a list of Actions that
should be performed in sequence. Each action is performed in sequence using the previous action's
output as input XML. The data contained in the configuration is a specific XML representation of the
actions (or at least their names) to be run.
With a Fixed Action, the data contained in the configuration is simply the resulting XML. This way
there is no real work to be done (this can be used for things like the actions of an Outbound Message
Handler).
Action data is contained within the Action table as indicated below:
C.1.3 Rules
Rules identify the steps to be taken to complete the workings of a particular Component. There are
different types of rules within TRMSwift, including:
•Action rules
•Workflow Decider rules
•Individual Workflow Element rules
These rules are always used with actions. Certain components have to perform rules and actions to
know how to complete their task.
When this happens, the rules are evaluated by priority (or order) to determine which rule matches.
When a particular rule is found, the corresponding action is performed. No further rules are
evaluated. (The rule definition must contain a reference to an action.)
Rules are contained within the XPathRule table as indicated below:
Column Comment
name The unique name of the action. Note that the name must be unique to the active_from and
active_to values.
action_id * A unique (auto incremented) identity value.
active_from The date from which the Setup should be active. The default value is NULL.
active_to The date until which the Setup should be active. The default value is NULL.
flags Used to store different attributes of the action in the form of binary values set or cleared on the
column. The following values exist:
1: The action is a Template List (or Action List).
2: The list is cacheable (it will not change because of XSLT).
4: The action is a Fixed Result action.
xml The actual XML that contains the action.
*The action_id is the primary key, but name, active_from and active_to should always be unique.
Column Comment
name * The unique name of the rule. This name must be unique to the active_from and active_to
dates.
order_id The order in which the rule should be evaluated. The lower the value, the higher the
priority of the rule. Rules with higher priorities will be evaluated first.
xpath An XPath expression that will be evaluated against the Full XML of the State Element. If
the Xpath expression finds one or more values, the rule is considered to be true and the
appropriate action will be performed.
Permissioning
SWIFT Connectivity Guide 281
C.2 Permissioning
Permissioning in TRMSwift can be defined using a TRM protocol. See Security KIT in the TRM System
Administration Guide.
C.3 Logs
Three logs are kept in TRMSwift's database. These logs are used more for auditing purposes than for
tracking or debugging. These are:
•Workflow log
•System log
•Error log.
You can access this log information via the TRMSwift Error Log Report, the TRMSwift System Log
Report, and the TRMSwift Workflow Log Report. You find these in Application Manager.
C.3.1 Workflow log
The workflow log contains all auditing information for State Elements (business events and
messages). Whenever a particular action is performed on such a State Element (for example, by the
TRMSwift Workflow, or a user using the Message Monitor), the action is logged. By looking at the
workflow log, you can determine what has happened to a particular business event or message.
Note: The business event and message have different IDs in TRMSwift and will be logged with
these IDs.
The workflow log is contained within the WorkflowLog table as indicated below:
action The unique name of the action that must be performed if the rule is matched. Each rule
can perform only one action (even if it is a single template list that performs multiple
action), but one action can be called by many rules.
component_name The name of the component to which this rule applies. Note that a rule can only apply to
a single component.
xpath_type This field is currently not being used.
active_from * The date from which the setup should be active. The default value is NULL.
active_to * The date until which the setup should be active. The default value is NULL.
*Note that the name, active_from and active_to fields are used to uniquely identify the rule to be used.
Column Comment
Column Comment
component The component that was involved in performing the action (the unique name of the Message
Monitor or Workflow Element).
workflow _id The ID of the State Element for which the event is logged. This can be only a business event or
message.
user_id The user ID that caused this event to occur. If the TRMSwift Core triggered the event, the
Core's user ID will be used (normally fk).

Business data
282 © Wall Street Systems IPH AB - Confidential
C.3.2 System log
The System log contains all events that happen on a system level; for example, a new component
registering with the Core (such as a Message Monitor or Adapter. There are no events logged for
State Elements.
The System Log is contained within the SystemLog table as indicated below:
C.3.3 Error log
The Error log contains all adapter errors that occurred. It is contained within the ErrorLog table as
indicated below:
C.4 Business data
Some tables in TRMSwift contains business- related data. The bulk of the data is stored as XML data
within a table. The rest of the data is stored as "normal" columns in a table row. The tables are:
situation A string indicating the situation under which the event occurred.
message A string indicating the actual message with which the event occurred. This should normally be
a meaningful message.
date_log The date and time at which the event occurred.
There is no primary key for this log.
Column Comment
Column Comment
component The component that was involved in performing the action (the unique name of the Message
Monitor or Workflow Element).
workflow _id The ID of the State Element for which the event is logged. This can be only a business event or
message.
user_id The user ID that caused this event to occur. If theTRMSwift Core triggered the event, the
Core's user ID will be used (normally fk).
situation A string indicating the situation under which the event occurred.
message A string indicating the actual message with which the event occurred. This should normally be
a meaningful message.
date_log The date and time at which the event occurred.
There is no primary key for this log.
Column Comment
component The component that was involved when the error occurred.
user_id The user ID involved when the error occurred.
situation A string indicating the situation under which the error occurred.
message A string indicating the actual message with which the error occurred. This should normally be a
meaningful message.
date_log The date and time at which the even occurred.
There is no primary key for this log.

Business data
SWIFT Connectivity Guide 283
•State Elements (Business Events and Messages)
•Element Sequences
•Search Keys
•Specification
•State Element Time Out (for Waiters)
•State Element Eyes (for 4-eyes verification)
•DeliveryElement
•Counter Element
•Safe Store
C.4.1 State elements (business events and messages)
State Elements is the collective name for Business Events and Messages. Each state element has
basic data that is required irrespective of the type of business event or message that it represents
(for example, there is certain data that is common to a FAX confirmation message and a SWIFT
payment message). This data is also referred to as System data.
Column Comment
state_id * The unique ID of the state element within TRMSwift. If the same transaction is amended
and pushed to TRMSwift a second time, a new row will be created with a new ID. This
ID is also used in many of the other tables as a foreign key.
reference ** *** The reference received from the external application (or the adapter). Typically this
includes the name of the file received, the number of the TRM transaction, and the ID of
the payment.
owner** The unique name of the Adapter from which the business event was received.
owner_type ** *** A generic type associating different types of business events received from different
adapters. A "confirmation" can be received from different adapters. A new confirmation
is received from one adapter and a cancel confirmation is received from another.
state The state of the state element. The concept of states is similar to that of TRM
(Transaction.state_id). Each state element can have only one state and must be in a
state at all times.
flags The system flags that have been set for this state element (expressed as bits set within
the integer). Via configuration, the flags can be set or removed and act similarly
tostatuses in TRM. The available flags are determined in the FLAGMAPPING section in
setup.xml.
uflags The user flags that have been set for this state element (expressed as bits set within
the integer). Via configuration, the flags can be set or removed and act similarly to
statuses in TRM. The available flags are determined in the FLAGMAPPING section in
setup.xml.
stamp A unique stamp that is used to ensure that only one update is performed on a state
element. When the state element is retrieved, the stamp is also retrieved. When an
update is done, the stamp is compared to ensure that it has not been changed.
creation_date This is the date and time at which the state element was inserted into the database
(typically by the Inbound Message Handler).
modification_date This is the date and time at which the state element was last modified. Such a
modification can be triggered by a user action (such as accepting the message in the
Message Monitor) or by a Workflow process.
xml A block of XML representing the XML of the state element. Note however that the full
XML consists of a lot more XML than just this block.

Business data
284 © Wall Street Systems IPH AB - Confidential
C.4.2 Element sequences
An Element Sequence is the linking between a business event and a message. It is used as a link
table between two StateElement table joins (one being for business events and the other for
messages). It helps the “many-to-many” relationship between these two "StateElement" tables.
Logically this link also contains information such as the XML associated with the sequence and the
degree to which a business event and message have been reconciled. This data is stored in the
ElementSequence table.
C.4.3 Search keys
A Search Key is a lookup value that can be added to a state element or an element sequence. The
SearchKey itself is a name with a value. The name is defined in setup.xml in SearchKeyMapping
section. Here you can specify the type of the value, and define which searchkey will be used.
Note: The search key data is included in the full XML of the state element or sequence.
The search key data is stored in the SearchKey table. There is one line for each element and the
structure is as follows
merged A flag indicating if the state element is a Merged State Element or not (0 means it is
not). A merged state element is a state element that does not exist as a normal state
element, because it has been merged with another state element (via the Message
Merger). The merging of state elements creates a new state element with more than
one sequence. The old state element becomes a merged state element that is used only
if the sequences are un-merged again. It acts as a place keeper for the data that will be
restored upon splitting of sequences.
*The state_id forms the primary key for this table.
**For messages this value can be null or can be populated by the rules of the Business Event Splitter.
***The reference and owner_type columns combined should uniquely identify the transaction, payment, file,
and other such entities to the adapter.
Column Comment
Column Comment
sequence_id * The unique ID of the Element Sequence. The value auto-increments.
business_event The ID of the business event (in the StateElement table) to which this sequence
belongs.
message The ID of the message (in the StateElement table) to which the sequence belongs.
flags_ber An integer value with bits set to indicate which reconciliation has been performed.
These values can differ depending on the configuration of the Reconciliator(s) in
TRMSwift.
merged_message_id The ID of the message (the merged state element in the StateElement table) that acts
as a place holder for the old state element for the sequence before the merge. The
message value before the merge should be the same as the merged_message_id after
the merge. The reverse is true for splitting.
xml The XML representing the data of the sequence. Typically this is where most of the data
of the message resides.
*The sequence_id is the primary key for this table.
Column Comment
search_key_id* The unique ID of the state element or sequence. See the flags column for more details.

Business data
SWIFT Connectivity Guide 285
All data in this table is determined by the Rules and Actions of a Key Loader. For example, if in the
configuration of the SearchKeyMapping you have defined
<column name="value_1">number</column>
<column name="value_2">sender</column>
the value of the SearchKey concerning the ‘sender’ will be stored in the value_2 column of the
SearchKey table.
C.4.4 Specification
The Specification table keeps track of relationships between state elements of the same type
(typically business events). It acts as a linking table between two StateElement tables. It also tracks
the type of relationship together with the two IDs of the state element that have a relationship with
each other. The data is kept in the Specification table:
C.4.5 State element timeout (for waiters)
The Waiter Workflow Element needs to know when a particular state element should be released to
the next workflow element in the flow. To do this, it has to keep track of the expiry times of each of
the individual state elements. The waiter workflow element is responsible for inserting and removing
elements from this table. This is done in the TimeOut table:
flags* If the ID refers to a state element, then bit 1 in the flags column will not be set to 0. If
the ID refers to an element sequence, bit 1 in the flags columns will be set to 1. Only bit
1 is used.
value_xx These columns contain data defined in SearchKeyMapping for value_xx.
double_value_xx These columns contain data defined in SearchKeyMapping for double_value_xx.
long_value_xx These columns contain data defined in SearchKeyMapping for long_value_xx.
money_value_xx These columns contain data defined in SearchKeyMapping for money_value_xx.
date_value_xx These columns contain data defined in SearchKeyMapping for date_value_xx.
*The search_key_id and flags columns serve as the primary key for this table.
Column Comment
Column Comment
specification_id * The ID of the state element that has a relationship with another state element. Typically
this is the newer of the two IDs. In the case of a history relationship, this is the ID of the
new state element.
other_id * The ID of the state element with which the first state element has a relationship. In the
case of a history relationship, this is the ID of the older state element.
relashionship * A descriptive - and valid XML element - name that can be used for the relationship
(typically "history" or "related").
*The specification_id, other_id and relashionship columns serve as the primary key for this table.
Column Comment
time_id * The ID of the state element for which the expiry time is being remembered.
name * The unique name of the waiter that should remember this time.
expiry The date and time of the expiry. This value is generally calculated by rules and actions or by
the configuration of the waiter.
Business data
286 © Wall Street Systems IPH AB - Confidential
C.4.6 State element eyes (for 4-eyes verification)
To have 4-eyes verification, you must keep track of who has actually seen a particular state
element. This is done by keeping a list of state element IDs and distinct user IDs in the
StateElementEyes table.
The Message Monitor maintains this table as follows:
•Adds entries to the table when a user performs certain actions on a state element (for example,
accepting it). The user actions that trigger these table entries depend on how the Message
Monitor actions have been configured.
•Checks the table, when required, to verify that the correct number of users has seen the
particular state element. If this is the case, then the action is completed, otherwise
it is not completed.
•Removes entries from the table if necessary; for example, when a message has been accepted
by one person, then rejected later by another person.
See 15.5 Configuring Message Monitor on page 221 for how Message Monitor actions can be
configured to obtain the required result.
C.4.7 Delivery element
The DeliveryElement table is used as a temporary storage table while messages are being sent to an
adapter. While the message is at the adapter, the entries should remain in the table. The aim of the
table is to keep track of the interaction between the outbound message handler and the adapters. It
keeps track of the following:
•The list of adapters to which a message should be sent. This is done by creating a new row for
each adapter.
•The order in which the adapters should be tried (the fallback order).
•What should be done to the message once it has been delivered successfully to the adapter.
•The data that was sent to the adapter so that it can be added to the message if required.
•The progress of the attempt of sending the message together with the success or failure
outcome.
The data is stored in the DeliveryElement table:
*The time_id and name columns serve as the primary key for this table. In theory, only the time_id is
required, as a state element can be at only one state at any given time.
Column Comment
Column Comment
state_eyes_id * The ID of the state element that has been seen by a user.
user_id * The ID of the user that has seen the state element. This user ID should correspond to the
entries in the UserGroup table.
*The state_eyes_id and user_id columns serve as the primary key for this table.
Column Comment
delivery_id * The ID of the state element that should be sent to an adapter. Note that a state
element can have more than one row.
component * The unique name of the outbound message handler sending the message.
delivery_component * The unique name of the adapter to which the state element should be sent.
status

Business data
SWIFT Connectivity Guide 287
C.4.8 Counter element
Certain parts of TRMSwift require a counter to be kept. The counter itself has not real meaning other
than the instances where it is used (one being the naming of files delivered to a particular Adapter).
For this purpose the CounterElement table keeps track of the name of the counter as well as the way
in which the counter should be incremented. A counter can be accessed as a Connector (within the
Adapter framework) or from an Extension method.
order_id The order in which the adapters should be tried. The smaller the number, the earlier
the adapter will be tried.
addflags The system flags that will be added to the message if the message was sent
successfully.
removeflags The system flags that will be removed from the message if the message was sent
successfully.
adduflags The user flags that will be added to the message if the message was sent successfully.
removeuflags The user flags that will be removed from the message if the message was sent
successfully.
xml The XML that was passed to the adapter. This XML will be used to extract data to save
to the message upon success (if required).
flags An integer used as a bitwise flag to keep track of the status of the message. The
following values have meaning:
1: The adapter has been selected for the message to be sent to. This means when its
time comes, the message will be sent to the Adapter mentioned in the
delivery_component column.
2: The message was sent to the adapter, but no answer has been received.
4: A status message has been received. This flag does not indicate a success or failure
status.
8: The adapter returned a Success status.
16: The adapter returned a Failure status.
32: The status is unknown, so upon start up, the OutboundMessageHandler will add
the UnknownStatus flag and route the state element.
64: The message should not be encoded before it is sent to the adapter, but the full
XML should be sent instead.
*The delivery_id, component and delivery_component columns serve as the primary key for this table. In
theory the component is not required as a message can be in only one state at any given time.
Column Comment
Column Comment
counter_type * The type of the counter (duration wise). Possible values are daily, monthly or yearly.
name * The unique name of the counter. This can be a generic name, but should be meaningful.
value The current value of the counter. This is the value that is incremented.
limit The upper limit of the value. If the limit is exceeded, the value is reset to 1.
countdate The current date of the counter. Countdate and counter_type determine when the counter
should be reset.
flags This column is currently not used.
stamp A unique database stamp to ensure that updates can only be done in a predictable manner
(to avoid clashes).
*The counter_type and name columns serve as the primary key for this table

Business data
288 © Wall Street Systems IPH AB - Confidential
C.4.9 Safe store
The adapter framework requires that certain messages are safe stored because of the nature of the
interface with which it communicates. In the case of CASmf / SWIFTAlliance, the message can take
several minutes before an acknowledgement is received. If the status of the message is not kept
within the adapter, communication will not work correctly. for this reason, the status of the message
is kept in the SafeStore table.
Note that the safe store can be used for incoming business events or for outgoing messages. The
state and status columns are used to for a type of "state machine" that is used for determining how
a particular state element should be processed. This means that various connectors can internally
use the SafeStore regardless of how their communication is handled towards the outside world. For
example: the CASmf Adapter can be used to wait for a reply from only SWIFTAlliance, or it can wait
for a reply from the SWIFT Network or the counterpart’s SWIFTAlliance. The different "routes" here
are implemented with different "state machines".
Column Comment
safe_id * A unique ID with which the SafeStore entry can be identified. This ID does not refer to
anything else.
owner_id The unique name of the adapter that has stored this copy of the state element.
client_id The ID of the "client" when using HTTP adapters. This field is used with security
certificates.
reference_id The ID of the message in TRMSwift. This should correspond to the state element ID,
but is stored as a String rather than as a number.
system_reference_id The reference of the state element as received from the initial system.
state ** The state of the state element.
status ** The status of the state element.
data The XML data of the state element. For a message this will be the formatted XML (as
received by the outbound message handler). For a business event this ise the XML
representing the data created by the initial system.
reason A generic reason for why the state / status is changed.
queued The date and time when the state / status of the state element is changed.
expiry_date The date and time at which the SafeStore element should be returned and be marked
as Timed-Out.
stamp A unique database stamp updated each time the state element is changed.
*the safe_id column is the primary key for this table.
**The state and status columns are used together to form a "state machine" that is used to determine how to
process the state element.
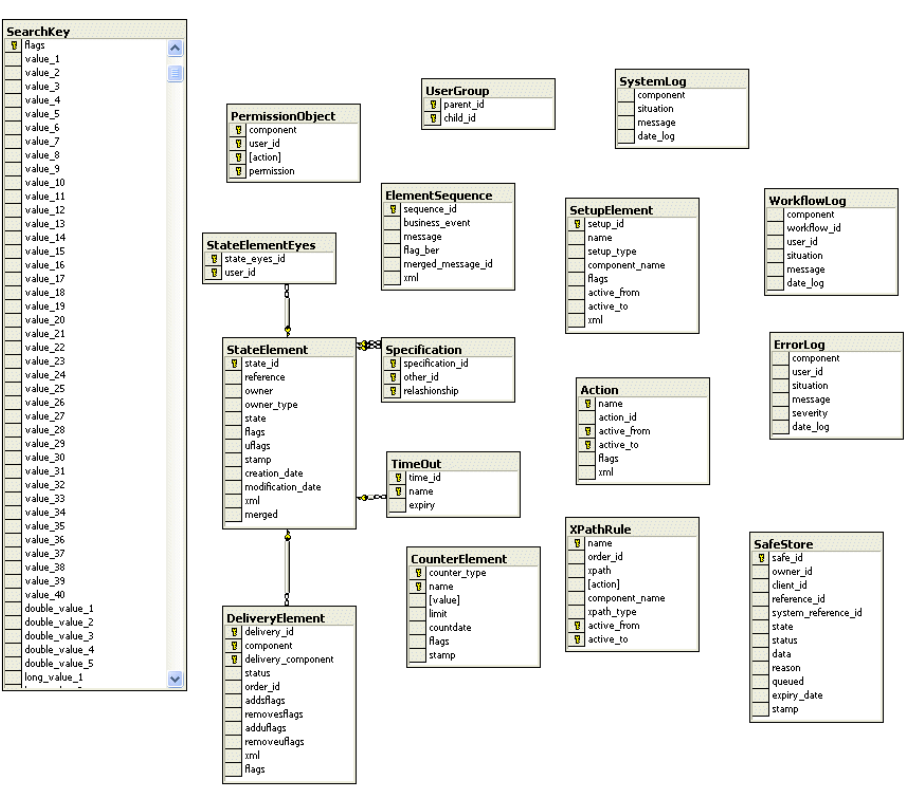
Entity Diagram
SWIFT Connectivity Guide 289
C.5 Entity Diagram
The diagram below depicts most of the relationships that exist. The relationships below are enforced
by the database. Other relationships are enforced by usage or by the application that manipulates
the data.
Entity Diagram
290 © Wall Street Systems IPH AB - Confidential
SWIFT Connectivity Guide 291
Appendix D Connecting to TRM components
The methods of connecting to and retrieving data from TRM are described here. More details can be
found on the TRM documentation.
D.1 Running comKIT services
TRMSwift requires the comKIT Transaction service and Static Data service. They can be run as
follows:
On Windows, from a WallStreetSystem Shell:
"comkitd -M comkit/transaction -C TRMSwift_transaction --trace-level 50
"comkitd -M comkit/static-data -C TRMSwift_static-data --trace-level 50
On Unix :
rc.comkitd -M comkit/transaction -C TRMSwift_transaction --trace-level 50
rc.comkitd -M comkit/static-data -C TRMSwift_static-data --trace-level 50
D.2 Using ActiveMQ and Serviced
TRMSwift is using the Settlement Queue mechanism, enabling it to read business objects from a
message bus. To run the message bus and services:
1. Launch the message bus. Refer to the documentation for activeMQ on
http://activemq.apache.org/
2. Set the environment variable NV_BROKER_URL, to connect and know where this message bus is
running. For example:
NV_BROKER_URL=tcp://localhost:61616
3. Launch the appropriate ServiceD:
On Windows:
serviced -p %FK_HOME%\etc\serviced\send-settlement.xml -p
%FK_HOME%\etc\serviced\swift-response.xml --trace-level 50
On Unix:
serviced -p $FK_HOME\etc\serviced\send-settlement.xml -p
$FK_HOME\etc\serviced\swift-response.xml --trace-level 50
Using ActiveMQ and Serviced
292 © Wall Street Systems IPH AB - Confidential
SWIFT Connectivity Guide 293
Appendix E Reading passwords from memory
For security reasons, you may wish to read a password from shared memory, rather than as a
parameter from the command line.
E.1 Using Shared Memory
To use this functionality, you need to load shared memory on the machine where you run the core
and feeder processes.
E.1.1 UNIX
TRMSwift uses the same protocol as TRM. Edit the file fk-login in FK_HOME/etc and add the
TRMSwift user name and password:
<server>:<database>:<user>:<password>
You can use wildcards, such as *:*:fk:<password> to work with all databases and servers.
Enter the following command:
./rc.login
This creates the shared memory. (You can verify this with ipcs -m.)
This shared memory is created for the user who issued the rc.login command, for a particular
server and a particular database.
For more details, see the TRM documentation.
E.1.2 Windows
See the TRM documentation for details.
E.2 Starting processes without entering a password
You can now start the core and feeder processes without specifying a password.
Starting processes without entering a password
294 © Wall Street Systems IPH AB - Confidential
