WSS System Admin Guide
User Manual:
Open the PDF directly: View PDF ![]() .
.
Page Count: 106 [warning: Documents this large are best viewed by clicking the View PDF Link!]
- Preface
- Chapter 1 Introduction
- Chapter 2 Integrating Wallstreet Suite modules
- 2.1 Integrating WebSuite (CMM) with TRM and ACM
- 2.2 Integrating WebSuite (CMM) with TRM
- 2.2.1 Starting the TRM integration services
- 2.2.1.1 Starting the OmniNames CORBA naming service
- 2.2.1.2 Starting mdsd
- 2.2.1.3 Starting the Forecast service
- 2.2.1.4 Starting the TRM-to-CMM cash movement services
- 2.2.1.5 Starting the TRM-to-CMM interest and foreign exchange rate services
- 2.2.1.6 Starting the TRM integration services using shell scripts
- 2.2.2 Starting the CMM integration services
- 2.2.3 Configuring other integration components
- 2.2.1 Starting the TRM integration services
- 2.3 Integrating WebSuite (CMM) and ACM
- 2.4 Static Data Management
- 2.5 Integrating ACM with TRM
- Chapter 3 Cashflow Forecast/TRM interface
- 3.1 Introduction
- 3.1.1 Aggregated forecasts from WebSuite (CMM)
- 3.1.2 TRM
- 3.1.2.1 Request for forecasts
- 3.1.2.2 Saving of aggregated forecasts in TRM
- 3.1.2.3 Forecast Exposure data structure
- 3.1.2.4 Forecast instrument data structure
- 3.1.2.5 Calculation of Base Amount
- 3.1.2.6 Saving Forecast Exposure consideration
- 3.1.2.7 Managing the change
- 3.1.2.8 Usage in risk management
- 3.1.2.9 Parallel Accounting
- 3.1.3 Application Programming Interfaces (API)
- 3.2 Configuration
- 3.3 TRM to CMM forecast interface configuration
- 3.4 TRM to CMM Delivery versus Payment (DvP) settlement configuration
- 3.1 Introduction
- Chapter 4 Tracking data across modules
- Chapter 5 Using Process Monitor
- 5.1 Introduction
- 5.2 Components
- 5.3 Possible configurations
- 5.4 Installing Process Monitor
- 5.5 Security considerations
- 5.6 Configuring Process Monitor
- 5.7 Creating new users
- 5.8 Managing processes
- 5.9 Troubleshooting
- Chapter 6 Transferring data: DBLoader
- Chapter 7 Secure setup for ActiveMQ
- Appendix A Onyx
- Appendix B Environment color schemes

2
Information in this document is subject to change without notice and does not represent a commitment on the part
of Wall Street Systems. The software and documentation, which includes information contained in any databases,
described in this document is furnished under a license agreement or nondisclosure agreement and may only be
used or copied in accordance with the terms of the agreement. It is against the law to copy the software or
documentation except as specially allowed in the license or nondisclosure agreement. No part of this publication
may be reproduced, stored in a retrieval system, or transmitted, in any form or by any means, electronic, mechanical,
photocopying, recording, or otherwise, without the prior written permission of Wall Street Systems.
Although Wall Street Systems has tested the software and reviewed the documentation, Wall Street Systems
makes herein no warranty or representation, either expressed or implied, with respect to software or
documentation, its quality, performance, marketability, or fitness for a particular purpose. As a result, this
software is provided "as is", and in no event will Wall Street Systems be liable for direct, indirect, special,
incidental, or consequential damages from any defect in the software or by virtue of providing this
documentation, even if advised of the possibility of such damages. The documentation may contain technical
inaccuracies and omissions.
The mention of an activity or instrument in this publication does not imply that all matters relating to that activity or
instrument are supported by Wallstreet Suite, nor does it imply that processing of or by that activity or instrument is
carried out in any particular way, even if such processing is customary in some or all parts of the industry.
The windows and screen images shown herein were obtained from prototypes during software development. The
actual windows and screen images in the software may differ.
Wall Street Systems, WSS, WALLSTREET, WALLSTREET SUITE and the Wall Street Systems logos are
trademarks of Wall Street Systems Delaware, Inc.
Finance KIT, Trema and Trema logo are trademarks of Wall Street Systems Sweden AB.
Microsoft and Windows are either registered trademarks or trademarks of Microsoft Corporation in the United States
and/or other countries.
Adobe, Acrobat, and Acrobat Reader are either registered trademarks or trademarks of Adobe Systems
Incorporated in the United States and/or other countries.
All other products mentioned in this book may be trademarks or service marks of their respective companies or
organizations.
Company names, people names, and data used in examples are fictitious unless otherwise noted.
This edition applies to Wallstreet Suite version 7.3.14 and to all later releases and versions until indicated in new
editions or Wall Street Systems communications. Make sure you are using the latest edition for the release level of
the Wall Street Systems product.
© Copyright 2011 Wall Street Systems IPH AB. All rights reserved.
Second Edition (May 2011)
System Administration Guide 3
Contents
Preface .............................................................................................................................9
Introduction .................................................................................................................................... 9
How to use this book ..................................................................................................................... 9
Conventions ................................................................................................................................ 9
WebSuite and its modules .......................................................................................................... 9
Associated documents .................................................................................................................. 9
1 Introduction ...............................................................................................................11
1.1 Architecture overview ........................................................................................................... 11
1.2 Installation ............................................................................................................................. 11
1.2.1 Database ......................................................................................................................... 11
1.2.1.1 Oracle ................................................................................................................... 11
1.2.1.2 Microsoft SQL Server (MSSQL) ........................................................................... 12
1.2.2 Application Servers ......................................................................................................... 12
1.2.2.1 Tomcat ..................................................................................................................12
1.2.2.2 Weblogic ............................................................................................................... 12
2 Integrating Wallstreet Suite modules ......................................................................13
2.1 Integrating WebSuite (CMM) with TRM and ACM ............................................................... 13
2.2 Integrating WebSuite (CMM) with TRM ............................................................................... 14
2.2.1 Starting the TRM integration services ............................................................................. 14
2.2.1.1 Starting the OmniNames CORBA naming service ............................................... 14
2.2.1.2 Starting mdsd ....................................................................................................... 14
2.2.1.3 Starting the Forecast service ................................................................................ 15
2.2.1.4 Starting the TRM-to-CMM cash movement services ............................................ 15
2.2.1.5 Starting the TRM-to-CMM interest and foreign exchange rate services ............... 15
2.2.1.6 Starting the TRM integration services using shell scripts ..................................... 16
2.2.2 Starting the CMM integration services ............................................................................ 16
2.2.2.1 Setting the tcmd Web Service URL configuration parameter ............................... 17
2.2.2.2 Starting tcmd ........................................................................................................ 17
2.2.3 Configuring other integration components ...................................................................... 17
2.2.3.1 Configuring balance export ................................................................................... 17
2.3 Integrating WebSuite (CMM) and ACM ................................................................................ 18
2.3.1 Setup in CMM ................................................................................................................. 18
2.3.2 Setup in ACM .................................................................................................................. 19
2.4 Static Data Management ....................................................................................................... 19
2.4.1 Integrating WebSuite (CMM) with SDM .......................................................................... 19
4 © Wall Street Systems IPH AB - Confidential
2.5 Integrating ACM with TRM ................................................................................................... 19
2.5.1 ACM database objects .................................................................................................... 20
2.5.2 ACM client components .................................................................................................. 20
2.5.3 ACM security ................................................................................................................... 20
2.5.4 ACM - TRM interface ...................................................................................................... 20
3 Cashflow Forecast/TRM interface ...........................................................................21
3.1 Introduction ........................................................................................................................... 21
3.1.1 Aggregated forecasts from WebSuite (CMM) ................................................................. 21
3.1.1.1 Key concepts ........................................................................................................ 21
3.1.1.2 CMM: important integration concepts ................................................................... 21
3.1.2 TRM ................................................................................................................................ 23
3.1.2.1 Request for forecasts ........................................................................................... 23
3.1.2.2 Saving of aggregated forecasts in TRM ............................................................... 23
3.1.2.3 Forecast Exposure data structure ........................................................................ 24
3.1.2.4 Forecast instrument data structure ....................................................................... 25
3.1.2.5 Calculation of Base Amount ................................................................................. 26
3.1.2.6 Saving Forecast Exposure consideration ............................................................. 26
3.1.2.7 Managing the change ........................................................................................... 27
3.1.2.8 Usage in risk management ................................................................................... 28
3.1.2.9 Parallel Accounting ............................................................................................... 28
3.1.3 Application Programming Interfaces (API) ...................................................................... 28
3.2 Configuration ......................................................................................................................... 28
3.2.1 Importing Cashflow forecasts from CMM to TRM ........................................................... 28
3.2.2 CMM Setup ..................................................................................................................... 29
3.2.3 Instrument setup ............................................................................................................. 30
3.2.3.1 Feature Forecast Method ..................................................................................... 31
3.2.3.2 Feature Dual currency forecasts .......................................................................... 31
3.2.3.3 Feature Forecast Interface ................................................................................... 31
3.2.3.4 Import XML Definition ........................................................................................... 32
3.2.3.5 Example of XML Definition ................................................................................... 32
3.2.3.6 Selection section .................................................................................................. 33
3.2.3.7 Aggregation section .............................................................................................. 34
3.2.3.8 Mapping section ................................................................................................... 35
3.2.4 Creation of transaction .................................................................................................... 35
3.2.5 Import Activity ................................................................................................................. 36
3.2.5.1 Running the import activity ................................................................................... 36
3.2.5.2 Importing process ................................................................................................. 36
3.2.6 Valuation ......................................................................................................................... 37
3.2.7 Custom Insert Procedure API ......................................................................................... 38
3.2.8 API for retrieving forecast exposures from TRM ............................................................. 39
3.2.9 Debugging ....................................................................................................................... 40
3.3 TRM to CMM forecast interface configuration ................................................................... 41
3.3.1 TRM to CMM payment interface configuration ............................................................... 42
3.4 TRM to CMM Delivery versus Payment (DvP) settlement configuration ......................... 42
3.4.1 Rules ............................................................................................................................... 42
3.4.2 Flow ................................................................................................................................ 45
System Administration Guide 5
3.4.3 DvP rejection ................................................................................................................... 45
4 Tracking data across modules ................................................................................47
4.1 Introduction ........................................................................................................................... 47
4.2 Transactional Data and their References ........................................................................... 47
4.2.1 Key transactional data ....................................................................................................47
4.2.1.1 TRM ...................................................................................................................... 47
4.2.1.2 CMM .....................................................................................................................48
4.2.1.3 ACM ...................................................................................................................... 48
4.2.2 Key integration points ..................................................................................................... 48
4.2.3 Key cross-module references ......................................................................................... 49
4.2.3.1 TRM - CMM .......................................................................................................... 49
4.2.3.2 TRM - ACM ........................................................................................................... 49
4.2.3.3 CMM - ACM .......................................................................................................... 49
4.3 Available tracking tools ........................................................................................................ 49
4.3.1 Reconciliation on a transactional level ............................................................................ 51
4.3.1.1 TRM ...................................................................................................................... 51
4.3.2 CMM ............................................................................................................................... 52
4.3.2.1 Key reports ........................................................................................................... 52
4.3.3 ACM ................................................................................................................................ 52
4.3.3.1 Key reports ........................................................................................................... 52
4.3.3.2 Key online applications ......................................................................................... 52
5 Using Process Monitor .............................................................................................53
5.1 Introduction ........................................................................................................................... 53
5.2 Components .......................................................................................................................... 53
5.3 Possible configurations ....................................................................................................... 54
5.3.1 How it works .................................................................................................................... 54
5.3.1.1 Simple case .......................................................................................................... 54
5.3.1.2 Complex case ....................................................................................................... 55
5.4 Installing Process Monitor ................................................................................................... 55
5.4.1 Installation under Windows using the Suite Installer ....................................................... 56
5.4.2 Downloading the Process Monitor packages .................................................................. 56
5.4.3 Configuring pmsd and pmad ........................................................................................... 56
5.4.3.1 Windows environment .......................................................................................... 56
5.4.3.2 UNIX environment ................................................................................................ 58
5.4.3.3 Configuring the Process Monitor admin ............................................................... 59
5.5 Security considerations ....................................................................................................... 59
5.5.1 Controlling access ........................................................................................................... 59
5.5.2 Setting up private key certificate authentication .............................................................. 59
5.5.2.1 Installing and configuring a test private key certificate ......................................... 60
5.5.3 Setting up .NET security ................................................................................................. 60
5.6 Configuring Process Monitor ............................................................................................... 61
5.6.1 Setting up configuration files ........................................................................................... 61
5.6.2 pmsd_config.tmpl ............................................................................................................ 62
6 © Wall Street Systems IPH AB - Confidential
5.6.3 env_<environment-name>.xml ....................................................................................... 63
5.6.3.1 notifications ...........................................................................................................65
5.6.3.2 common_variables ............................................................................................... 65
5.6.3.3 processes ............................................................................................................. 65
5.6.4 Customizing the Process Monitor configuration from the site directory .......................... 68
5.7 Creating new users ............................................................................................................... 68
5.8 Managing processes ............................................................................................................. 69
5.8.1 Using Process Monitor .................................................................................................... 69
5.8.2 Working with processes in a system environment .......................................................... 70
5.8.2.1 Working with all processes ................................................................................... 70
5.8.2.2 Working with a single process .............................................................................. 71
5.8.2.3 Using Configuration Editor .................................................................................... 71
5.8.3 Using pm_cmd ................................................................................................................ 72
5.8.3.1 Getting help .......................................................................................................... 72
5.9 Troubleshooting .................................................................................................................... 73
5.9.1 Configuration and customization-related problems ......................................................... 73
5.9.2 Communication and network-related problems .............................................................. 73
5.9.3 Log levels ........................................................................................................................ 73
5.9.3.1 Add a custom Log Level ....................................................................................... 74
5.9.4 Message logs .................................................................................................................. 75
6 Transferring data: DBLoader ...................................................................................77
6.1 Introduction ........................................................................................................................... 77
6.1.1 Restrictions and recommendations ................................................................................. 77
6.1.1.1 Transaction data ................................................................................................... 77
6.1.1.2 Large objects ........................................................................................................ 77
6.1.2 Terminology .................................................................................................................... 78
6.1.2.1 From and To ......................................................................................................... 78
6.1.2.2 Object and Object Instance .................................................................................. 78
6.2 Operation ............................................................................................................................... 78
6.2.1 Where to find DBLoader ................................................................................................. 78
6.2.2 How to run DBLoader ..................................................................................................... 78
6.2.2.1 Properties file contents ......................................................................................... 80
6.2.3 User interface description ............................................................................................... 81
6.2.3.1 Source and destination ......................................................................................... 81
6.2.3.2 Database connection ............................................................................................ 81
6.2.3.3 Save Settings ....................................................................................................... 82
6.2.3.4 The To screen ...................................................................................................... 82
6.2.3.5 Categories ............................................................................................................ 83
6.2.3.6 Entity selection ..................................................................................................... 84
6.2.3.7 Additional parameters ........................................................................................... 84
6.2.4 Progress screen .............................................................................................................. 85
6.3 Issues and setup ................................................................................................................... 86
6.3.1 Errors .............................................................................................................................. 86
7 Secure setup for ActiveMQ ......................................................................................89
System Administration Guide 7
7.1 Prerequisites ......................................................................................................................... 89
7.2 Generate certificates and public and private keys ............................................................ 89
7.3 Encrypt passwords ............................................................................................................... 89
7.4 Changes required to configuration files ............................................................................. 89
7.4.1 activemq.xml ................................................................................................................... 89
7.4.2 wss.bat (.sh) .................................................................................................................... 90
7.4.3 database.properties ........................................................................................................ 90
7.4.4 10_base.bat .................................................................................................................... 91
7.4.5 spring-tech.xml ................................................................................................................ 91
7.4.6 credentials.properties ...................................................................................................... 92
7.4.7 RCPSuite.bat .................................................................................................................. 92
Appendix A: Onyx ....................................................................................................................93
A.1 Introduction ........................................................................................................................... 93
A.2 JDBC property file setup ..................................................................................................... 93
A.2.1 Example: ......................................................................................................................... 93
A.3 Environment property file setup ......................................................................................... 93
A.3.1 Example .......................................................................................................................... 94
A.4 ssl.properties file .................................................................................................................. 94
A.4.1 Whom does the client trust? ........................................................................................... 94
A.4.2 How does the client presents itself to the server? .......................................................... 94
A.4.3 How does the client encrypt data? ................................................................................. 94
A.4.4 JVM parameters ............................................................................................................. 94
A.5 Troubleshooting ................................................................................................................... 95
A.5.1 Setting log and traces ..................................................................................................... 95
A.5.1.1 Working system .................................................................................................... 95
A.5.1.2 "could not connect to broker" message ................................................................ 97
A.5.1.3 "Error creating bean with name..." message ........................................................ 98
A.5.1.4 IBM-MQ 2397 and IBM-MQ 2055 ....................................................................... 98
A.5.1.5 Follow-up on a job .............................................................................................. 100
Appendix B: Environment color schemes ...........................................................................103
B.1 Introduction ......................................................................................................................... 103
B.2 How it works ....................................................................................................................... 104
B.2.1 WebSuite theming components .................................................................................... 104
8 © Wall Street Systems IPH AB - Confidential
System Administration Guide 9
Preface
Introduction
This guide is intended for Wallstreet Suite system administrators who maintain the multiple modules
of Wallstreet Suite.
How to use this book
Conventions
Examples in this book are shown for both Windows and Unix operating systems. You should make
the necessary changes where appropriate, for example:
•Slashes or backslashes: /usr/bin/ for Unix, and C:\ for Windows.
•Names of environment variables: $ENV_NAME for Unix, %ENV_NAME% for Windows.
WebSuite and its modules
WebSuite is Wallstreet Suite’s web-based interface that contains either or both of these modules:
•Cash Management Module (CMM)
•TRMWeb: the web-based version of the Transaction and Risk Management Module (TRM).
When referring to the individual modules of WebSuite, the convention is "WebSuite (CMM)" or
"CMM", and "WebSuite (TRM)" or "TRMWeb".
Associated documents
Associated documents can be accessed from the Help menu of Wallstreet Suite applications.
10 © Wall Street Systems IPH AB - Confidential
All Wallstreet Suite user documentation can be downloaded from the Customer Support site
https://customerservices.trema.com.
System Administration Guide 11
Chapter 1 Introduction
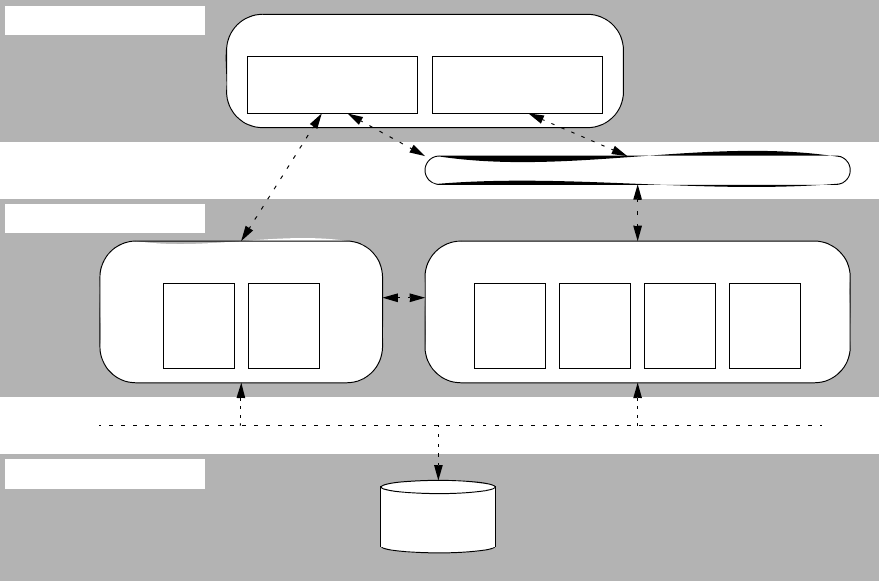
1.1 Architecture overview
The diagram below gives an overview of a Wallstreet Suite system that includes Transaction and
Risk Management Module (TRM), Cash Management Module (CMM), Accounting Module (ACM), and
Static Data Module (SDM).
1.2 Installation
1.2.1 Database
The Wallstreet Suite currently supports the following databases: Oracle, MS SQL Server, and
Sybase.
1.2.1.1 Oracle
The Wallstreet Suite can be implemented in one Oracle instance with two schema owners. The first
schema owner is for TRM and ACM, and the second for CMM. Some customers may choose to deploy
HTTP Web Server
TRM SDM
Real-time Processes
SDM CMM ACM TRM
J2EE Application Server(s)
TRM/ACM/SDM
(rich Windows client)
TRM/CMM
(thin browser client)
Client Desktop
TRM, ACM,
SDM, CMM
databases
CLIENT
APPLICATION SERVER
RDBMS SERVER
1 Introduction
1.2 Installation
12 © Wall Street Systems IPH AB - Confidential
CMM in a different Oracle instance for performance reasons. Follow the TRM, ACM, and CMM
installation instructions for creating the Oracle instance and creating the module schemas.
1.2.1.2 Microsoft SQL Server (MSSQL)
The Wallstreet Suite needs to be implemented in two MSSQL instances, the first instance for TRM
and ACM and the second for CMM (this is because CMM and TRM are using incompatible case
sensitivity settings). However, the two instances can reside on the same physical hardware. Follow
the TRM, ACM, and CMM installation instructions for creating the two MSSQL instances and the
corresponding module schemas.
1.2.2 Application Servers
The Wallstreet Suite uses J2EE application servers to implement the business logic of the following
modules:
•WebSuite (TRMWeb part)
This is a web-based front end to core TRM business logic, achieved by encapsulating CORBA
business objects. The interface is delivered in a web application archive (WAR) file.
•WebSuite (CMM part)
All of the CMM business logic is contained within a WAR file. Users access the business logic
through a J2EE servlet that is deployed within the application server.
•Accounting Module (ACM)
ACM business logic is deployed in the application server as a J2EE application contained in a
WAR file. Users access the businesses logic through:
–Wallstreet Suite activities launched from the Activity Manager
–ACM Reports using Wallstreet Suite Report Generator
–The ACM Accounting Entry Manager. The ACM Accounting Entry Manager is built using the
Eclipse Rich Client Platform (RCP).
Currently none of the Wallstreet Suite modules are using Enterprise Java Beans (EJBs). This allows
the suite to be deployed in lighter weight JSP/Servlet containers such as Tomcat.
1.2.2.1 Tomcat
The Wallstreet Suite installation package contains a Tomcat application server. This package is then
preconfigured according to the needs of each module.
1.2.2.2 Weblogic
For customers who prefer a commercially-supported application server, the Wallstreet Suite is
certified to run against Weblogic. Customers wishing to use Weblogic must download and install the
Weblogic container. The Wallstreet Suite installation package for Weblogic includes steps to
customize a pre-installed Weblogic application server. This means that each module delivers a
plug-in that can be used to automatically configure an existing Weblogic application server. Refer to
the individual installation procedure guides of each module for details.

System Administration Guide 13
Chapter 2 Integrating Wallstreet Suite modules
This chapter describes the steps for manually integrating the Wallstreet Suite modules.
Note: If your organization installed Wallstreet Suite using the Suite Installer, these steps have
been completed.
2.1 Integrating WebSuite (CMM) with TRM and ACM
Once WebSuite is installed, you must edit the module’s integrated_suite_module_config.xml file
if you are planning to integrate the module with TRM and ACM.
The integrated_suite_module_config.xml file indicates which modules are installed in your
organization’s environment. By default, only CMM is flagged as installed in the file. The file drives
CMM functionality related to integration; therefore, you must edit it if TRM, ACM, or both are also
installed in your organization’s environment.
To edit the integrated_suite_module_config.xml file:
1. Log into CMM.
2. Select Admin - Utilities - Setup - Review CMM Configuration Documents.
3. In the Review Configuration Documents page:
a. Ensure the list at the top of the page is set to Standard Config Documents.
b. Click integrated_suite_module_config.xml.
c. Remove the comment tags (<!-- and -->) surrounding TRM’s and ACM’s module elements:
<?xml version="1.0" encoding="UTF-8"?>
<module_config>
<module name="cmm" installed="true"/>
<module name="acm" installed="true"/>
<module name="trm" installed="true"/>
</module_config>
d. Click Save.
4. Log out of WebSuite.
5. Restart the application server.

2 Integrating Wallstreet Suite modules
2.2 Integrating WebSuite (CMM) with TRM
14 © Wall Street Systems IPH AB - Confidential
2.2 Integrating WebSuite (CMM) with TRM
Once CMM and tcmd are installed, you need to integrate CMM with TRM so that the following data
can be shared:
•TRM to CMM
–Financial transactions
–Interest rates
–Foreign exchange rates
•CMM to TRM
–Bank balances
–Forecasts.
For the CMM-TRM integration components to function properly, certain TRM services and the tcmd
application server must be running.
2.2.1 Starting the TRM integration services
The following TRM services are required for the integrated environment to function and must be
started in this order:
1. CORBA naming service (OmniNames)
2. Real-Time Message Delivery Service Daemon (MDSD)
3. TRM-to-CMM forecast services:
–Forecast service running under serviced
4. TRM-to-CMM cash movement services:
–Transaction Daemon (transd)
–Settlement Manager environment variable
5. TRM-to-CMM foreign exchange and interest rate services:
–Prices Manager Module Daemon (moduled).
Note: The following sections assume that you will start these TRM services from a command line
shell with all of the TRM environment variables set (in other words, an evaluated shell). To
obtain an evaluated shell, select Shell from the TRM Application Manager.
2.2.1.1 Starting the OmniNames CORBA naming service
The CORBA naming service holds the references to all of the different integration components. The
integration components locate each other through the CORBA naming service. TRM ships with a
default CORBA naming service called OmniNames.
To start the OmniNames CORBA naming service, enter the following at the command prompt:
omninames -start
Note: By default, the OmniNames naming service caches CORBA object references. Usually,
these cache files are stored in C:\temp in Windows environments. If all services are being
restarted, it is safe to remove these cache files.
2.2.1.2 Starting mdsd
mdsd sends real-time messages to the various TRM services. This daemon notifies the other
services when changes occur within TRM.
2 Integrating Wallstreet Suite modules
2.2 Integrating WebSuite (CMM) with TRM
System Administration Guide 15
To start mdsd, enter the following at the command prompt:
mdsd
2.2.1.3 Starting the Forecast service
In Process Monitor, find the Forecast service under serviced and start it.
2.2.1.4 Starting the TRM-to-CMM cash movement services
Cash movements are sent to CMM via the TRM Settlement Manager. When a user accepts a payment
or receipt in the TRM Settlement Manager, a request is sent to CMM via TCMD. CMM either accepts
the payment or receipt, or rejects it. If CMM rejects the payment or receipt, the user is notified with
the reason.
transd and one environment variable must be set for this interaction to work.
2.2.1.4.1 Starting transd
transd notifies other TRM services when transactions are being modified. This is required in
integrated environments to ensure that the financial forecast services are notified of any changes to
the underlying transactions they are monitoring. Specifically, as cash movements are being sent to
CMM, the corresponding financial forecasts should be removed.
To start transd, enter the following at the command prompt:
transd
2.2.1.4.2 Adding the FK_CMM_CONNECTION environment variable
To allow the TRM Settlement Manager to send cash movements to CMM, it must know how to locate
the running TCMD cash movement service. When TCMD is started (see 2.2.2.2 Starting tcmd on
page 17), it registers the cash movement service to the CORBA naming service. The TRM Settlement
Manager needs to know the name of this CORBA instance, and the name is passed to the TRM
Settlement Manager via an environment variable.
The value of the environment variable should be the same name as the cash movement service in
the TCMD runtime parameter configuration file. Usually, this is cash-movement.
Add the following environment variable to the TRM GUI environment:
set FK_CMM_CONNECTION=cash-movement
2.2.1.5 Starting the TRM-to-CMM interest and foreign exchange rate services
CMM obtains rates using two methods:
•Interest rates are retrieved from TRM via tcmd.
•Foreign exchange rates are retrieved via tcmd.
TCMD uses a Price Manager service running inside moduled.
When starting moduled, you specify the name of the CORBA Price Manager instance. Typically, this
is prices.
To start moduled, enter the following at the command prompt:
moduled -f prices=default_prices -r 2> integ-prices.txt 1>&2 &
2.2.1.5.1 moduled and the --module-no-redirect option
One of the options available for moduled is --module-no-default that disables the use of the
default configuration file. This option also requires the use of --module-config, or --module-alias
and --module-redirect.
Therefore, to supply a redirect specified at the command line that is not overridden by one supplied
in the configuration file, we recommended that you use --module-no-redirect instead.
Run moduled with the --help option to display a list of possible options and arguments.

2 Integrating Wallstreet Suite modules
2.2 Integrating WebSuite (CMM) with TRM
16 © Wall Street Systems IPH AB - Confidential
2.2.1.6 Starting the TRM integration services using shell scripts
The shell scripts in this section start the TRM services on Unix and Windows.
These shell scripts are examples only and are not intended for a production TRM environment. You
need to adjust them for your organization’s TRM environment.
Note: transd is not included in these shell scripts because it is already running in most TRM
environments.
Unix shell script:
To be modified •••
$> cat /usr/trema/fk7.1.0/bin/integration-services.sh
#!/bin/sh
eval `/usr/trema/fk7.1.0/bin/environ -e fk710Ident`
PATH=$FK_HOME/sbin:$FK_HOME/bin:$PATH
export PATH
FK_DB_SERVER=FK71DB.CORP.TREMA.COM
export FK_DB_SERVER
FK_LOGIN=DBO/fk71
export FK_LOGIN
kill -9 `cat integ-tmd.pid`
tmd --service-name tmd-cmm 2> integ-tmd.txt 1>&2 &
echo $! > integ-tmd.pid
kill -9 `cat integ-prices.pid`
moduled -f prices=default_prices -r 2> integ-prices.txt 1>&2 &
echo $! > integ-prices.pid
kill -9 `cat integ-tcfd.pid`
tcfd -s -v --portfolio TOP --tmd tmd-cmm --context 3 --column-cashflow-type
2>integ-tcfd.txt 1>&2 &
echo $! > integ-tcfd.pid
Windows shell script:
To be modified •••
type integration-services.bat
start tmd --service-name tmd-cmm 2> integ-tmd.txt 1>&2 &
start moduled -f prices=default_prices -r 2> integ-prices.txt 1>&2 &
start tcfd -s --portfolio TOP --tmd tmd-cmm --context 3 --column-transaction
--column-cashflow-type 2>integ-tcfd.txt 1>&2 &
2.2.2 Starting the CMM integration services
The CMM integration services are handled by a Web-service-based application called tcmd.
CMM uses tcmd to process messages for the following services:
•TRM-to-CMM forecasts
•TRM-to-CMM cash movements
•Interest rates

2 Integrating Wallstreet Suite modules
2.2 Integrating WebSuite (CMM) with TRM
System Administration Guide 17
•Foreign exchange rates.
2.2.2.1 Setting the tcmd Web Service URL configuration parameter
For CMM to communicate with TRM via the tcmd application server, you need to set the TCMD Web
Service URL configuration parameter in CMM to the URL used to locate the TCMD application server.
(Usually, you only need to change the port.)
For information on setting configuration parameters, see the WebSuite System Administration
Guide.
2.2.2.2 Starting tcmd
You start tcmd using the batch files and shells scripts created by the Suite Installer.
2.2.3 Configuring other integration components
The export of balances from CMM to TRM are handled outside tcmd.
2.2.3.1 Configuring balance export
The balance export is done directly from CMM by calling the TRM ImportBalance stored procedure.
This procedure inserts data into the database.
A JDBC connection is created from the CMM application server to the database server. The JDBC
connection is configured via the TRM_config.xml file. This file is automatically generated during the
installation of CMM and is located in
..\<CMM Instance>\InstallationData\installation\database\
Note: If the TRM_config.xml file is incorrect, the export balance interface does not work. Typical
mistakes include incorrect user, incorrect password, incorrect database server, and
missing file.
Because of how the JDBC driver is used in CMM, it is only possible to obtain the return code from the
procedure in failure cases. This may make troubleshooting difficult. In test environments, it is
possible to execute the procedure directly to troubleshoot an issue.
Note: Executing these procedures will modify the database.
The following SQL statements allow you to do this.
Oracle:
set serveroutput on;
declare result number;
begin
dbms_output.enable(1000000);
result := ImportBalance (
'<bank account number.',
<amount>,
'<client_id>',
'<currency>',
'<bank_client_id>',
<balance_type_id>,
TO_DATE('<MM-DD-YYYY 00:00:00>','MM_DD_YYYY_HH24_MI_SS'),1);
dbms_output.put_line('Result:' ||result);
end;:
SQLServer:
exec ImportBalance
'<bank account number.',
<amount>,
2 Integrating Wallstreet Suite modules
2.3 Integrating WebSuite (CMM) and ACM
18 © Wall Street Systems IPH AB - Confidential
'<client_id>',
'<currency>',
'<bank_client_id>',
<balance_type_id>,
'<balance_date>', 1
2.2.3.1.1 Examples
Oracle:
set serveroutput on;
declare result number;
begin
dbms_output.enable(1000000);
result := ImportBalance (
'IHB_11286FT_EUR',
10000,
'DAU-SIRAC',
'EUR',
'DAUPHINE-IHB',
1,
TO_DATE('05-18-2006 00:00:00','MM_DD_YYYY_HH24_MI_SS'),1);
dbms_output.put_line('Result:' ||result);
end;
SQLServer:
exec ImportBalance
'IHB_11286FT_EUR',
10000,
'DAU-SIRAC',
'EUR',
'DAUPHINE-IHB',
1,
'2005/05/18', 1
2.3 Integrating WebSuite (CMM) and ACM
This section describes all the necessary settings for integrating ACM and CMM. These must be
performed in both modules.
2.3.1 Setup in CMM
Once CMM is installed, complete the following steps:
1. If you have not already done so, edit the integrated_suite_module_config.xml file.
For more information, see 2.1 Integrating WebSuite (CMM) with TRM and ACM on page 13.
2. Log into WebSuite.
3. Select Admin - Utilities - Setup - Configuration Parameters.
4. In the Configuration Parameters Maintenance screen, set the Multiple Postings configuration
parameter to True.
For more information on the Configuration Parameters function, see the WebSuite
System Administration Guide.
5. Log out of CMM.

2 Integrating Wallstreet Suite modules
2.4 Static Data Management
System Administration Guide 19
2.3.2 Setup in ACM
In order to retrieve accounting data from CMM, ACM communicates with the CMM application server
via the Web Services interface.
For ACM integration with CMM, set the ACM_CMM_INTERFACE_PROXY_URL server variable to the
location where the CMM web service for ACM is located (depends on the CMM configuration):
Unix:
$ENV{ACM_CMM_INTERFACE_PROXY_URL}="http://localhost:8081/cmm/iws/acmcmm";
Windows:
SET ACM_CMM_INTERFACE_PROXY_URL=http://localhost:8081/cmm/iws/acmcmm
Values localhost and 8081 should be replaced with the actual hostname and port where the CMM
web service provider (Tomcat or Weblogic) is running.
The ACM_CMM_INTERFACE_PROXY_URL environment variable must be configured before deploying the
ACM server to the Tomcat or Weblogic application server. For more details, refer to the section on
environment variables in the ACM System Admin Guide.
Note: Using localhost on a multi-homed computer is not recommended. Either verify that the
command ping localhost correctly returns the IP address 127.0.0.1, or use a fully
qualified DNS entry or IP address instead.
2.4 Static Data Management
Static Data Management (SDM) can be installed for use with:
•TRM without CMM
SDM installation is described in the WSS Database Setup Guide.
•TRM with CMM
This requires the installation of the SDM Synchronizer software at the CMM end; see the WSS
Suite Installation Guide.
For a description of SDM, see the TRM System Administration Guide.
2.4.1 Integrating WebSuite (CMM) with SDM
Using a text editor, open the TRM environment file (the file passed as an argument to fk.bat when
you start Wallstreet Suite). Make sure that the following variables are set:
2.5 Integrating ACM with TRM
If you installed ACM as described in the WSS Suite Installation Guide, ACM is already integrated with
TRM.
MODULES_NAMING_HOST The name of the computer where the Corba naming service is running.
MODULES_NAMING_PORT The port on which the naming service is running.
CMM_HTTP_ADDR The URL where the CMM server can be reached.
2 Integrating Wallstreet Suite modules
2.5 Integrating ACM with TRM
20 © Wall Street Systems IPH AB - Confidential
In order to better understand the ACM - TRM relationship from a technical perspective, this section
describes the most important aspects.
2.5.1 ACM database objects
ACM database objects (tables, views, stored procedures, etc.) are built into the same database (and
schema on Oracle) as TRM. Note the following conditions:
•The database build must be completed before the ACM database build is launched.
•The ACM and TRM packages must have the same four-level release version number (n.n.n.n).
•When upgrading, the TRM upgrade must be successfully completed before starting the ACM
upgrade.
ACM uses some tables, views, and stored procedures which are installed and maintained by TRM.
For example, ACM Editors display values and selection lists based on TRM tables such as domains,
clients, and portfolios. The TRM entities shared with ACM are:
•The security model
•Static data (ACM has read-only access)
•Activities management
•Procedures for interfacing.
2.5.2 ACM client components
ACM client components are installed in the TRM directory hierarchy. ACM uses and shares some of
the TRM key components:
•ACM editors are based on the Static Data Framework (SDF) used by TRM.
•ACM reports use the TRM Report Generator.
•ACM activities are launched from ACM Activity Manager which is a TRM component that filters
only the activities that are delivered with ACM.
2.5.3 ACM security
The ACM security model is based on TRM security mechanisms that include Users, User Groups,
Domains, and Object Permissions. Note that:
•ACM security settings are performed via Security KIT which is delivered with TRM.
•Relevant security settings (for example, Users and Domains) defined for TRM are automatically
applied in ACM applications.
2.5.4 ACM - TRM interface
The ACM - TRM interface consists of a set of stored procedures that are delivered and installed as a
part of the ACM installation.
As long as the TRM activity mechanism (activityd process) is installed and running, and ACM is
installed, the TRM - ACM interface is technically operational.

System Administration Guide 21
Chapter 3 Cashflow Forecast/TRM interface
3.1 Introduction
From Wallstreet Suite version 7.1, the CMM module includes Cash Flow Forecasting (CFF). In order
to support the relevant business processes, cashflow forecasts need to be integrated in risk
management (TRM) and hedge accounting (TRM and ACM).
3.1.1 Aggregated forecasts from WebSuite (CMM)
CMM provides aggregated forecasts via an interface to TRM. The aggregated forecasts received are
turned into exposures and saved in TRM. The exposures are saved as transactions with a new
transaction extension: Forecast Exposure.
TRM uses transactions with Forecast Exposures in figure calculations (both for risk management and
hedge accounting) and in the hedge accounting process.
3.1.1.1 Key concepts
Definition of data flows (for cash flows) between CMM and TRM is primarily defined in TRM by
configuring a Forecast instrument and defining the relevant transactions using such instruments.
This means that the transactions in TRM are first entered into the system manually, preserving the
relevant integration information.
It is possible to use the same CMM-detailed underlying forecasts in multiple aggregations to be
saved in TRM. This means that the selection and aggregation of forecasts can be fine-tuned
depending on their eventual use; for example, saving forecasts for risk management at a different
granularity than forecasts for hedge accounting, or for selecting different underlying detailed
forecasts to be used for such views.
Note: This is important to bear in mind when configuring the system to avoid double-counting
underlying detailed forecasts (for example, in the case of portfolio trees).
The feature described above, together with support for designation by amount, optimizes the
aggregation of forecasts for hedge accounting purposes to directly form hedge underlying. The
hedge underlying is then used in layers for individual hedging transactions.
3.1.1.2 CMM: important integration concepts
With its cashflow forecasting functionality, CMM enables entry, import, mirroring, and maintenance
of detailed cashflow forecasts. Individual forecasts are subject to strict change control (versioning)
and an approval process. A variety of outcomes is available for analyzing forecasts in various
dimensions, including time and categorizations. Such outcomes can be presented in reports and
used as input to TRM.
3.1.1.2.1 Detailed forecasts: selection and aggregation
CMM provides selection and aggregation functionality when preparing the outcomes described
above.
It allows the supplying of selection criteria together with some additional parameters such as Report
Mapping or Time Bucketing (explained below). Based on these input parameters, CMM filters only
the relevant forecasts, and applies the requested categorization (Report Mapping) and time
dimension (Time bucketing).

3 Cashflow Forecast/TRM interface
3.1 Introduction
22 © Wall Street Systems IPH AB - Confidential
Aggregation criteria then ensure that the detailed forecasts are aggregated to the requested level
(technically, the aggregation criteria are applied via a list of requested values; CMM aggregates to a
maximum level to supply the outcome of these values).
The selection and aggregation functionality is used for CMM and TRM integration; TRM always asks
only for relevant forecasts at the relevant granularity level.
There is a list of fields available for selection and aggregation in CMM. Only some of the fields are
relevant for TRM, and these are described later in this chapter.
3.1.1.2.2 Approval Process
The approval process is implemented via a forecast flow. Since risk management and hedge
accounting (TRM) are applied only to forecasts from a certain state in the approval process, only the
relevant forecasts must be selected. Typically these are "Released" forecasts only. However, the
required state is configurable.
3.1.1.2.3 Change Control
Every change of a forecast is logged: a change creates a new version of the forecast, and the older
one is expired but not deleted. This allows the reproduction of a historical version of a forecast by
using the "as of date" input parameter. Although aggregated forecasts are not saved in CMM, by
preserving the history of detailed forecasts, consistency is also achieved for the aggregates
(assuming the same selection and aggregation criteria are applied). This is important in the context
of usage of aggregated forecasts in TRM, since the figures transferred to TRM can be later examined
even after the underlying detailed forecasts have since been updated.
3.1.1.2.4 Time Dimension
In addition to the "as of date" concepts explained above, there are three important time-related
considerations: time interval for reported forecasts, time span of forecasts, and reporting in time
buckets.
Time Buckets: there is an aspect of time-bucketing when reporting. The time bucket set for
aggregation is configurable. An important consideration regarding the integration of the CMM
forecasting functionality with TRM risk management and hedge accounting is turning time buckets
into TRM value dates. The usage of the first or last date of the time bucket can be specified in the
configuration. Where a customer requires a different behavior, this can be handled via a Customer
Specific Development as described later.
Note: It is recommended that customers use time buckets when aggregating forecasts to
minimize the number of transferred forecasts. However, forecast value dates can be used
for aggregation instead of time buckets.
Time span of forecasts: detailed forecasts can span a time interval since they have a "date from"
and "date to" value dates. In order to provide relevant report outcomes when using time bucketing
functionality, the forecast must fit entirely into one time bucket. This must be considered when
configuring time buckets and designating the usage of the "date from" / "date to" value date
functionality.
Reporting time interval: when outcomes (report or request from TRM) are required from CMM, a
Report Date From and Report Date To must be provided, and the outcome is limited accordingly. It
includes only forecasts falling entirely within the interval (see above). In addition to exact dates, it is
also possible to provide relative dates: for example Report Date To +36m, meaning that the report
will contain forecasts with value dates falling from Report Date From up to Report Date From + 36
months.
3.1.1.2.5 Entities relationships
The definition of CMM static data includes a function called "entity relationship". It is possible to
define an infinite number of entity relationship types, and to create entity relationships using such
types. These groups can then be further used, for example, in selections: it is possible to specify a
parent entity and relationship type, and CFF returns data for only those entities that match the
relationship of the given type.

3 Cashflow Forecast/TRM interface
3.1 Introduction
System Administration Guide 23
3.1.1.2.6 Forecasts Categorization
Detailed forecasts are assigned to Cashflow Types serving as a low level categorization. Cashflow
forecasting functionality includes a flexible mechanism of defining Report Mapping, where the
low-level instrument types can be further grouped into Report Groups and such Report Groups
assigned to higher level Report Categories. Since the usage of detailed forecasts can differ, and the
categorization could be important for aggregations, it is important to preserve such functionality (in
a limited form providing Report Group) to be mapped to TRM. In other words, it must be possible to
request an aggregation of forecasts according to certain Report Mapping definitions and to receive
aggregated figures by Report Groups with the Report Group being part of the available information.
The Report Mapping can also be used for filtering a subset of forecasts, since Cashflow Types that
are not explicitly included in Report Mapping can be ignored (and so not sent from CMM to TRM).
3.1.2 TRM
Exposures coming from forecasts are managed in TRM as transactions with forecast exposures. One
transaction keeps multiple forecast exposures. In order to acquire the relevant forecasts from CMM,
the appropriate transactions must be entered into the system first: they serve as a source of
information about what CMM forecasts should be considered. TRM then requests the relevant data
from CMM, based on information included in the transaction, and according to the XML file attached
to the instrument.
3.1.2.1 Request for forecasts
TRM uses its activity management mechanism to pull forecasts from CMM. The request is initiated
by manual triggering or by activity scheduling. The activity Forecast Exposures from CMM start-up
parameters include:
•Due date: the date when the activity is run.
•Due date offset: number of days to anticipate "as of date" when requesting data from CMM:
"due date - due date offset" is calculated, and used as:
–"as of date": (due date + due date offset) when asking CMM for date.
–active until: for closing previous versions of the Forecast Exposures - one more day is
subtracted for this purpose (as_of_date = active until date).
–active since: for marking the validity of new versions of the Forecast Exposures (as of date).
•Portfolio: portfolio where all transactions are processed. If the top portfolio is specified, all sub
portfolios in the tree are also processed.
•Minimum Transaction State: the transaction state required for transactions to be processed.
•Rate Scenario: used for finding the rate and calculating Base Amount.
•Value Date From: first date (inclusive) forecasts from CMM are considered (this date is supplied
to the "Report From" field when requesting data from CMM).
•Value Date To: last date (inclusive) forecasts from CMM are considered (this date is supplied to
the "Report To" field when requesting data from CMM).
The transfer of aggregated forecasts are logged via the Activity log.
3.1.2.2 Saving of aggregated forecasts in TRM
To save the forecasts, the existing transaction extension concept is used. This calls for creating a
new data structure called Forecast Exposure, extending transaction information for keeping all
important information on forecasts. It means the information will not be saved in the form of
Cashflows.
Note: For technical reasons, forecast Transaction contains a cashflow that is not of interest to
end users.
3 Cashflow Forecast/TRM interface
3.1 Introduction
24 © Wall Street Systems IPH AB - Confidential
When the activity is run, the system goes through all transactions in the given portfolio, and for
those with a forecast instrument, it calls CMM with relevant aggregation and selection parameters.
Once the data is received, a new set of Forecast Exposures is inserted for the transaction, and
previous Forecast Exposures are marked as historical.
Reflection of CMM cashflow forecasts in TRM transaction/Forecast Exposure is determined by:
•Selection criteria
•Aggregation criteria
•Mapping from CMM fields to TRM.
All these criteria and parameters are attached to the forecast instrument.
3.1.2.3 Forecast Exposure data structure
As well as some internal fields such as flags and internal types and subtypes, Forecast Exposures
have:
•Number: reference to transaction.
•ID: unique forecast exposure record identification (sequential number).
•Leg Group: unique logical forecasts set number (identical for all versions of the given forecast).
•Forecast Id: forecast id for easier identification of the logical forecasts set (the name for a given
Leg Group). For example, it can be a period label for forecasts aggregated by time periods, or an
individual CMM forecast ID for non-aggregated detailed forecasts. This is configurable.
•Currency id: forecast currency.
•Value date: value date of the forecast.
•Payment Client ID: used for the counterparty where aggregation is done by counterparty.
•Active since: validity of the record.
•Active until: validity of the record.
•Amount.
•Base currency id.
•FX Rate.
•Base amount.
•Parameters (20 Parameter fields).
Leg Group and Forecast ID are especially important. From a logical point of view. they present a
hierarchical structure (although saved only on Forecast Exposure):
The Leg Group and Forecast Id are used for differentiating time periods (for example, calendar
months). The usage is explained in a detailed example which is available in the supporting
documentation. Forecast Id serves to represent the same information as Leg Group in a more
user-friendly way (for example, for time period "20050101-20050131", or for forecasts transferred
individually "BTI 2345").
Forecast ID composition is definable in the mapping parameters, logical examples corresponding to
the above:
TRM.Forecast_id = CMM.time_bucket_from, "-", CMM.time_bucket_to
TRM Forecast_id = "BTI ", CMM.source_reference_id
Transaction
Leg Group / Forecast Id
Forecast Exposure

3 Cashflow Forecast/TRM interface
3.1 Introduction
System Administration Guide 25
3.1.2.4 Forecast instrument data structure
The Forecast instrument is used when entering transactions representing cashflow forecasts.
The main Instrument features are:
•Forecast: ensures proper handling of transaction, reading Forecast Exposures.
•Dual Currency Forecast: ensures handling of forecasts with consideration, see description below.
•Forecast Method: this ensures relevant valuation of forecasts.
It is necessary to always set-up:
–Forecast Method feature
–Either Forecast or Dual Currency Forecast feature.
The Forecast instrument has the following specific information in the Forecast page:
•Name of the XML file for Selection, Aggregation, and Mapping parameters
•Name of the CSD procedure for adjusting Forecast Exposures before saving to the database
(hook).
3.1.2.4.1 Selection, Aggregation, and Mapping information
Configuration of selection, aggregation, and mapping is attached to the Forecast instrument, in a
configuration file in XML format that holds the relevant information. The information in configuration
files can either explicitly express the parameters, or can refer to a value in a CMM aggregated
forecast, TRM transaction, instrument (such as Branch Code) or Forecast Exposure.
In TRM, either existing standard fields of the transaction and Forecast Exposure can be used (such
as Owner in the transaction, or Payment Client ID, i.e. counterparty in Forecast Exposure), or
user-defined Parameter fields can be used for other values.
Note: There are 20 parameters available in a transaction which are used system-wide, and there
are corresponding parameters in Forecast Exposure.
3.1.2.4.2 Selection Criteria
The configuration file for selection typically mixes explicit values with links to transaction or
instrument information. Here is an example:
CMM.Workflow Status = "Released", CMM.entity_id=TRM.Owner
For the transaction with Forecast instrument with the XML file described earlier, TRM sends a
request only for Released CMM forecasts and for CMM entity_id equal to Owner in the TRM
transaction. This means that if there are multiple transactions entered in TRM with different owners,
the selection in CMM will differ.
To increase the selection criteria flexibility, the following is also available:
•Multiple values of one parameter can be provided; they are considered as "OR".
•NOT EQUAL is available as an operator for selected parameters, namely for Currency ID.
•In addition to TRM Transaction parameters, Portfolio Base Currency is also available.
As an example, the above allows the selection of all forecasts in a currency different from the
Portfolio Base currency:
CMM.currency_id NOT= TRM.Portfolio base_currency_id
3.1.2.4.3 Aggregation Criteria
Aggregation criteria are always given in the configuration file attached to Instrument. For example:
CMM.entity_id, CMM.business_segment_id
aggregates selected forecasts according to entity and business segment.
3 Cashflow Forecast/TRM interface
3.1 Introduction
26 © Wall Street Systems IPH AB - Confidential
It should be noted that aggregation might not be required at all in some cases and individual CMM
forecasts can be transferred. On the other hand, it should be also noted that parameters used for
selection or mapping also need to be included in aggregation.
3.1.2.4.4 Mapping
Mapping of CMM forecasts (aggregated or individual, depending on aggregation criteria) is specified
field by field. For example:
<field from="currency_id" to="currency_id"/>
<field from="forecast_value_date_to" to="value_date"/>
<field from="amount" to="amount"/>
<field from="report_group_id" to="param_19"/>
By default, no changes between CMM values and TRM values are supported. For specific cases
where individual customers wish to modify values before saving, there is an option for sending the
aggregated forecast information into a custom application and to receive the values back. For
example, for determining the TRM transaction value date from the CMM time bucket, or for
adjustments of exposure (such as certain quotas). The potential CSD procedure name is specified in
the relevant field in the Forecast page of Instrument editor.
3.1.2.5 Calculation of Base Amount
CMM data includes only forecast amount and currency. TRM data also includes base currency id, FX
Rate and Base Amount.
When inserting the data into TRM, the data is completed in the following way:
•Base currency id: this currency is taken from the portfolio base currency, and can be replaced by
a mapped value from the CMM Entity base currency (potential use: where individual entities
would not have their own portfolios to reflect base currency, data could still reflect the base
currency of the entity in the Forecast Exposure).
•FX Rate: Rate scenario is provided as an Activity input parameter.
•Base amount: is calculated from the values above.
3.1.2.6 Saving Forecast Exposure consideration
The customer may require specific monitoring of forecast exposures. Here are two situations:
•In some cases the Forecast Exposure is monitored from two different perspectives: the exposure
owner (i.e. transaction owner) and exposure "hedger". The exposure hedger is interested not
only in the Forecast Exposure currency, but since he will hedge it against "his" base currency, he
also has to see the exposure of his base currency to the exposure owner base currency.
•For commodity forecasts that are modeled as currencies, it is also necessary to express the
pricing currency.
For these purposes there are specific features to allow saving additional Forecast Exposures to
ensure the expected monitoring of exposures. This feature is linked to Instrument: there is a specific
parameter at instrument level to switch this feature on. The second Forecast Exposure record is
created from the original one as follows:
•ID: original forecast ID with the opposite sign.
•Currency id: the currency mapped from CMM parameters (typically commodity currency, which
is in one of the CMM customer-defined attributes), otherwise the base currency of the portfolio is
used (applicable to "ordinary" foreign currency forecasts).
•Amount: Amount from the original Forecast Exposure amount converted into the currency of the
new forecast record, using FX forward rate from Rate Scenario from Activity start-up
parameters, with the opposite sign.
•FX Rate: since there might be a triangular calculation involved (typically for commodities), the
rate is calculated from Base Amount and Amount to ensure consistency of all figures.
•Base amount: Base Amount from the original Forecast Exposure Amount with the opposite sign.
3 Cashflow Forecast/TRM interface
3.1 Introduction
System Administration Guide 27
•All other information is identical to the original forecast.
Example of additional Forecast Exposure for group FX hedging (forecast of 100 USD in
EUR portfolio):
Example of additional Forecast Exposure for commodity (forecast of 100 tons of palladium
priced/paid in USD in USD portfolio):
Example of additional Forecast Exposure for commodity (forecast of 100 tons of palladium
priced/paid in USD in EUR portfolio):
3.1.2.7 Managing the change
Forecasts for individual periods (value dates or calendar time buckets), as maintained in TRM,
change over time. This change is managed by expiring old Forecast Exposures and entering new
ones. Validity is managed via the Active Since / Active Until fields.
When "updating" Forecast Exposures for a specific transaction, all Forecast Exposures in the Value
Date From, Value Date To time period (from activity) are expired (Active Until is updated to the day
prior to the as-of-date); for new Forecast Exposures, the Active Since date is set to the as-of-date.
Where the update is run several times per day, only one (the latest) version of forecasts per day is
kept.
Note: Since Forecast Exposures outside Value Date From, Value Date To time periods are kept
open (not expired), it is possible to use them in reports (e.g. the Cashflow report).
Individual Forecast Exposure sets and their versions are linked (apart from the forecast header, i.e.
transaction) via Leg Group / Forecast Id described earlier. In order to assign the incoming forecast
information to the relevant Leg Group (or to create a new Leg Group), the incoming data from CMM
is first converted to Forecast Id then compared with the saved Forecast Ids. Where the Forecast Id
under the given transaction already exists, a new Forecast Exposure is entered under the same Leg
Group. In the opposite case, a new Leg Group is created.
Trans.
Number ID Leg
Group Forecast Id Currency
Id Amount
Base
Currency
Id
FX
Rate
Base
Amount
1 11 1 20050101 -
20050131
USD 100 EUR 1.2 83
1 -11 1 20050101 -
20050131
EUR -83 EUR 1 -83
Trans.
Number ID Leg
Group Forecast Id Currency
Id Amount
Base
Currency
Id
FX
Rate
Base
Amount
2 12 1 20050101 -
20050131
XPD 100 USD 186 18600
2 -12 1 20050101 -
20050131
USD -18600 USD 1 -18600
Trans.
Number ID Leg
Group Forecast Id Currency
Id Amount
Base
Currency
Id
FX
Rate
Base
Amount
3 13 1 20050101 -
20050131
XPD 100 EUR 155 15500
3 -13 1 20050101 -
20050131
USD -18600 EUR 1.2 -15500

3 Cashflow Forecast/TRM interface
3.2 Configuration
28 © Wall Street Systems IPH AB - Confidential
3.1.2.8 Usage in risk management
Usage of Forecast Exposures is transparent to end users in risk management. Once the selection in
risk management (e.g. Treasury Monitor or Key Figure Reports) includes transactions with Forecast
Exposures, the relevant figures are calculated and shown consistently with other figures.
Forecast Exposures are also shown in the Cashflow report in a consistent way with Cashflows.
3.1.2.9 Parallel Accounting
Forecast transactions must follow the standard setup of contexts and result modes. Forecast
exposure is without any context information. However, to be evaluated in Treasury Monitor and for
key figures/hedge key figures calculation, the forecast transaction must belong to the appropriate
result modes.
3.1.3 Application Programming Interfaces (API)
Integration of CMM and TRM is addressed via internal WSS mechanisms as described above. To
enable customers to develop additional specific logic in the area of hedge accounting for forecast
cashflow hedging, the following APIs are provided:
•Adjustment of the aggregated forecast coming from CMM before saving to TRM:
Before saving aggregated forecasts to TRM (after mapping), all data in the forecasts "to be
saved" is made available to an external procedure. If this option is used, the external procedure
can adjust the data and hand it back to TRM, and the normal saving process resumes.
•Receive/provide TRM transactions/cashflows from/to an external system:
The TRM comKIT transaction service is available to read and write transactions and cashflows.
•Receive TRM forecast exposures to an external system.
3.2 Configuration
3.2.1 Importing Cashflow forecasts from CMM to TRM
The cashflow forecast is the estimation of a money transfer (payment or receipt) in the future while
the exact amount is currently not known. The estimation may change over time. There are two
important dates:
•As Of Date: the date when the user is looking at the forecast (usually today but not necessarily).
•Value Date: date when the money transfer is expected to happen (some date in future).
Example: Forecast history in CMM (showing the historical versions of one forecast):
As Of Date Value Date Amount
27. 1. 2006 31. 8. 2008 200 000
26. 2. 2006 31. 8. 2008 210 000
12. 3. 2006 31. 8. 2008 190 000
20. 3. 2006 31. 8. 2008 220 000
29. 3. 2006 31. 8. 2008 230 000
14. 8. 2006 31. 8. 2008 225 000

3 Cashflow Forecast/TRM interface
3.2 Configuration
System Administration Guide 29
Subsequent import of forecast exposures in TRM:
Comments:
•Value Date of the forecast does not change in time. CMM offers the possibility to have the Value
Date specified as "General". This is not a specific date but a whole month, e.g. August 2008 - the
user does not know the exact date but estimates it will be in August in 2008.
•The forecasted amount changes over time -on 15. 2. 2006, the forecasted amount is 200 000,
on 15. 3. 2006 there is a forecasted amount 190 000 etc.
The system (CMM) also lets the user specify the As of Date: imagine that today is 14. 4. 2006
but the user can specify the As of Date differently (backwards in the history) to see that the
forecasted amount on 9. 3. 2006 was 210 000 etc.
•In CMM, forecasts may change continuously. However, on the TRM side, the forecasts are
imported only via activity. It means that:
–Some of the "versions" of the forecast may not be reflected in TRM.
–A new record is created in TRM even if there was no change in CMM.
•Only the date is relevant in Forecast Exposures, and time is not considered: active_until of
version N is active_since of version (N - 1). In example above, the first version (amount 200
000) is valid even if looked at as of 27. 2. 2006 at 16:37:53 (even though technically the
forecast's active_until is 27. 2. 2006 0:00:00).
•active_until of the last version of a forecast in TRM is not set. This last version is valid from
active_since until the import activity is run again, and the active_until is updated).
Note: active_until is set to 1. 1. 5000
3.2.2 CMM Setup
A crucial part of the CMM/TRM interface is the CMM service tcmd (CMM CORBA service), which has
to be installed, running, and registered in the CORBA naming service under name
finance-kit/$FK_IDENT/cff-forecast.cmm.
The property $FK_IDENT represents the real FK_IDENT from the environment where the TRM
activityd is running. There are two entries from tcmd registered in the naming service:
•cff-forecast.cmm
•cash-movement.cmm
Only the first one is needed for the import. For detailed information please refer to the CMM
documentation.
Active Since Active Until Value Date Amount
31. 1. 2006 27. 2. 2006 31. 8. 2008 200 000
28. 2. 2006 30. 3. 2006 31. 8. 2008 210 000
31. 3. 2006 29. 4. 2006 31. 8. 2008 230 000
30. 4. 2006 30. 5. 2006 31. 8. 2008 230 000
31. 5. 2006 29. 6. 2006 31. 8. 2008 230 000
30. 6. 2006 30. 7. 2006 31. 8. 2008 230 000
31. 7. 2006 30. 8. 2006 31. 8. 2008 230 000
31. 8. 2006 29. 9. 2006 31. 8. 2008 225 000
30. 9. 2006 --------------- 31. 8. 2008 225 000
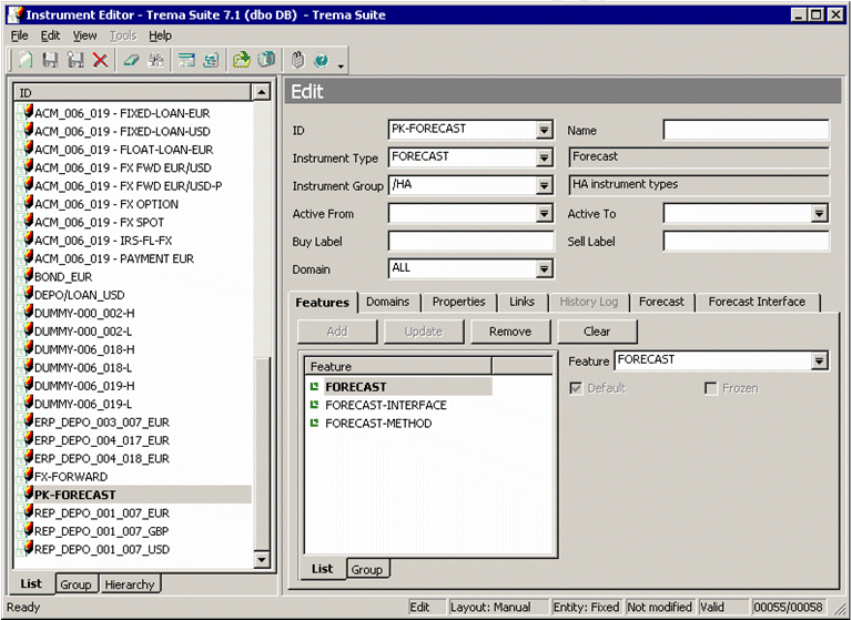
3 Cashflow Forecast/TRM interface
3.2 Configuration
30 © Wall Street Systems IPH AB - Confidential
3.2.3 Instrument setup
A new instrument must be created with these features:
•FORECAST-METHOD: indicates that the transaction with this instrument represents cashflow
forecasts.
•FORECAST-INTERFACE
Either
•FORECAST: indicates that forecasts will be stored as plain forecasts.
Or
•DUAL-CURRENCY-FORECAST: indicates dual currency forecast.
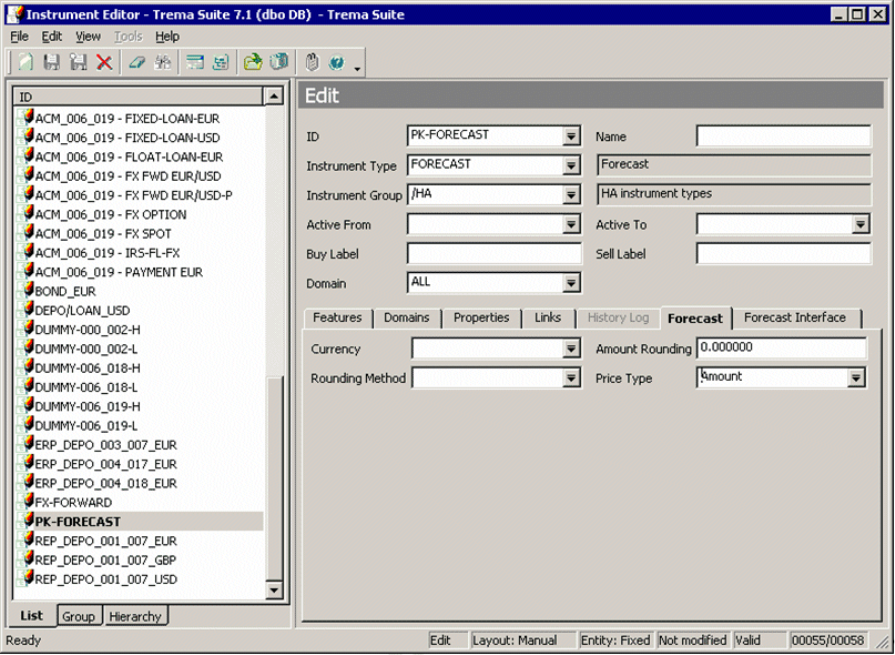
3 Cashflow Forecast/TRM interface
3.2 Configuration
System Administration Guide 31
3.2.3.1 Feature Forecast Method
The Feature Forecast Method provides the Forecast page, where detailed information about forecast
valuation can be set up. The typical setting is shown below:
3.2.3.2 Feature Dual currency forecasts
Dual currency forecasts represent a special form of forecast exposures. They consist of two records
stored in the ForecastExposure table. The first one is the original plain forecast, identical to a plain
forecast and having a positive id. The second record represents the forecast in dual currency and
has a negative id; the absolute value of the id is the same as for the first record of the plain
forecast. The features FORECAST and DUAL-CURRENCY-FORECAST are exclusive, so only one can
be attached to instrument.
3.2.3.3 Feature Forecast Interface
Feature FORECAST-INTERFACE provides a new page called "Forecast Interface" in the Instrument
editor. Select the page and set Interface Transfer Definition; the value in this field is the name of the
XML file defined above. Note that this is the name and extension but without the full path - the
import script has the predefined path specified.

3 Cashflow Forecast/TRM interface
3.2 Configuration
32 © Wall Street Systems IPH AB - Confidential
Custom Insert Procedure specifies the stored procedure that is called during the import of forecasts.
Before forecasts are inserted into TRM, they can be changed inside this stored procedure.
3.2.3.4 Import XML Definition
The XML file for import has to be placed in the directory $FK_HOME/etc/cmm/ on the server where
the activity daemon is running.
Note: If the activity daemon runs on a UNIX platform, then putting the XML file on a Windows
client has no effect.
3.2.3.5 Example of XML Definition
The XML definition follows the logical architecture of the CMM/TRM interface, and consists of three
parts:
•Selection
•Aggregation
•Mapping.
<?xml version="1.0" encoding="UTF-8"?>
<CFF-mapping>
<selection>
<entity_id from="transaction.owner_id"/>
<work_flow_status value="Released"/>
<currency_id from="transaction.portfolio.currency_id" operator="!="/>
<business_segment_id from="transaction.param_18"/>
<report_mapping_id value="RM GS"/>
<time_bucket_set_id value="timebuckets_1128501007718"/>
</selection>
3 Cashflow Forecast/TRM interface
3.2 Configuration
System Administration Guide 33
<aggregations>
<currency_id/>
<time_bucket_from/>
<time_bucket_to/>
<report_group_id/>
<business_segment_id/>
</aggregations>
<mapping>
<field from="time_bucket_from+'-'+time_bucket_to" to="forecast_id"/>
<field from="currency_id" to="currency_id"/>
<field from="time_bucket_to" to="value_date"/>
<field from="amount" to="amount"/>
<field from="report_group_id" to="param_19"/>
<field from="business_segment_id" to="param_18"/>
</mapping>
</CFF-mapping>
Warning: The Activityd daemon caches the XML file until it is restarted. When modifying an
XML file for Forecast Interface instruments, you must restart the Activityd daemon.
3.2.3.6 Selection section
The selection section, based on CFF-mapping.xsd, contains a list of columns specifying criteria for
imported forecasts. Only forecasts in CMM which match these criteria are imported.
* Attribute "from" refers to the actual value on transaction (or activity).
For example, <entity_id f --rom="transaction.param_3"> restricts the set of forecasts that are
being imported to forecasts for entity having id equal to the value of Parameter #3 on the
Element Attribute Attribute type/allowed
values Mandatory
forecast_as_of_date value date One of attributes (value, from)
from *
report_from value date One of attributes (value, from)
from *
report_to value date One of attributes (value, from)
from *
entity_id value string One of attributes (value, from)
from *
work_flow_status value "Entered" or "Released "No
currency_id value string One of attributes (value, from)
from *
operator **
business_segment_id value string One of attributes (value, from)
from *
report_mapping_id value string Yes
time_bucket_set_id value string Yes
entity_relationship_type_id value string Yes
3 Cashflow Forecast/TRM interface
3.2 Configuration
34 © Wall Street Systems IPH AB - Confidential
corresponding transaction (how the import is tied to a transaction - see below ). Possible values for
attribute "from":
** Attribute "operator" specifies the relationship between the value of the forecast and the value
specified by the attribute "from" or "value". Possible values for attribute "operator":
3.2.3.7 Aggregation section
The aggregation section lists columns on forecasts in CMM that will be used for aggregation. Records
are grouped together (one resulting record will be stored in TRM) if they have the same value in
each of the columns listed in this section.
Possible values:
activity.due_date activity.due_date-activity.due_date_offset
activity.value_date_from activity.value_date_to
transaction.portfolio.currency_id transaction.owner_id
transaction.param_1 transaction.param_2
transaction.param_3 transaction.param_4
transaction.param_5 transaction.param_6
transaction.param_7 transaction.param_8
transaction.param_9 transaction.param_10
transaction.param_11 transaction.param_12
transaction.param_13 transaction.param_14
transaction.param_15 transaction.param_16
transaction.param_17 transaction.param_18
transaction.param_19
==
!=
>
<
>=
<=
currency_id
entity_id
time_bucket_from
time_bucket_to
counterparty_id
report_group_id
source_reference_id
parameter_0
3 Cashflow Forecast/TRM interface
3.2 Configuration
System Administration Guide 35
3.2.3.8 Mapping section
The mapping section specifies the relationship between columns on forecasts returned from CMM
and columns in TRM. This section contains a sequence of field tags, each of them having the
attributes "from" (referring to forecast columns in CMM) and "to" (columns in the ForecastExposure
table in TRM). Possible values for the "from" attribute:
3.2.4 Creation of transaction
To be able to import forecasts from CMM, the transaction with the Forecast instrument must first be
created. It serves only as storage for forecast exposures, and must meet following criteria:
•Transactions must belong to the appropriate result modes.
•The opening date of the transaction should be in the past, generally on or before the start of the
period during which the forecasts will be imported from CMM.
time_bucket_from
time_bucket_to
time_bucket_from+'-'+time_bucket_to
'BTI'+source_reference_id
forecast_as_of_date
forecast_value_date_from
forecast_value_date_to
cash_flow_type_id
cash_flow_direction
currency_id
counterparty_id
source_reference_id
time_bucket_label
entity_base_currency_id
entity_id
amount
business_segment_id
report_group_id
parameter_0
parameter_1
parameter_2
parameter_3
parameter_4
parameter_5
parameter_6
parameter_7
parameter_8
parameter_9
3 Cashflow Forecast/TRM interface
3.2 Configuration
36 © Wall Street Systems IPH AB - Confidential
•The value date and closing date should be in the future (analogous to the opening date - on or
after the end of the period for imports).
•Amount and deal rate is not important; it can be set to anything, for example 1.00.
3.2.5 Import Activity
A new activity with activity type Forecast Exposures from CMM must be created with the following
parameters:
•Portfolio: portfolio containing forecast transactions.
•Minimum Transaction State: typical value is FINAL or OPEN.
•Value Date From/Value Date To: these two parameters define the time period for the value date
of the cashlow forecasts to be imported (only forecasts having a value date inside this period are
subject to the import).
The preferred format is YYYYMMDD (i.e. 20060414 for April 14, 2006). Other formats may work,
but they depend on the locale settings of the server.
Also, it is possible to specify "relative date" (or "date offset"), for example 3M (meaning three
months). The real date is then calculated as As Of Date + "date offset").
•Scenario: rate scenario.
3.2.5.1 Running the import activity
After all process steps are completed as described above, the import activity can be started.
Select the activity defined above and enter the Due Date and possibly Due Date Offset. Due Date
(adjusted by Due Date Offset) determines the As Of Date (moment at which forecasts will be
searched).
It is important to understand that the time specified in the Due Date parameter of the activity has
no effect (except for activities scheduled for the future - then it will be started only at the given
time, not at midnight) - the time part is not taken into account on the TRM side. On the other hand
in CMM, time is a regular part of the As Of Date.
The situation described in the following example should be avoided:
•The forecast is created in CMM today at 10:30 - with amount 1000.
•The forecast is modified today at 14:20 - the amount is now 1200.
•The Import activity is started with Due Date yesterday - forecast is not imported. This is
expected behavior because the forecast was not there yesterday.
•The Import activity is started with Due Date today 11:00 - forecast is not imported. This looks
strange because the forecast is already in CMM - the user would expect to get the version with
the 1000 amount. Because the time part of Due Date is ignored, CMM is asked for forecasts as of
today 00:00:00 and the forecast was not yet there at midnight.
•So, to get the forecast, the user must set Due Date to today and Due Date Offset to 1 (or Due
Date to tomorrow - but then the activity would be run tomorrow, not now). As Of Date will be
tomorrow and the forecast will be imported with the amount 1200. There is no way to import the
version with amount 1000.
3.2.5.2 Importing process
1. The Import activity starts a Python script which performs the import of cashflow forecasts from
CMM to TRM. This script fetches all active transactions (via the stored procedure
ReadPortfolioPeriod) and loops through all these fetched transactions. Each of them checks the
instrument - if the instrument does not have FORECAST-METHOD and one of FORECAST,
DUAL-CURRENCY-FORECAST features, then the transaction is skipped and no forecasts are
imported into TRM for this transaction. Otherwise the import XML file is looked for. If the file

3 Cashflow Forecast/TRM interface
3.2 Configuration
System Administration Guide 37
specified on the Forecast Interface page of the instrument is not found then defaultmap.xml is
used.
2. Values from the "selection" section are evaluated (non-constant values are taken from
transaction or activity) and together with the "aggregation" section (and value_date_from and
value_date_to activity parameters) a query to CMM is constructed. This query request is sent to
tcmd (CMM CORBA service) and aggregated forecasts are obtained.
3. Then - still in the loop for each transaction- the DeactivateForecastExposures stored procedure
is called with parameters:
a. Transaction Number
b. Value Date From
c. Value Date To
d. As Of Date.
4. This procedure finds all records in the ForecastExposure table for the transaction having Value
Date between Value Date From and Value Date To that are valid on As Of Date. These records
are marked as valid only until As Of Date - 1 day.
5. Then - still in the loop for each transaction - the InsertForecastExposure stored procedure is
called for each forecast record returned from CMM. The following types of parameters are
supplied:
a. Parameters taken from the iterated transaction: number, base_currency_id.
b. Parameters taken from the activity: active_since ( As of date), scenario_id.
c. Constant parameters: active_until - 1. 1. 5000; active_until is mandatory so some value has
to be passed and 1. 1. 5000 is considered to be infinity.
d. Parameters determined by the "mapping" section of the import XML file.
e. Parameters determined by external logic: fx_rate
6. CSD stored procedure on forecast exposure can be applied.
7. The InsertForecastExposure stored procedure inserts a record into the ForecastExposure table.
3.2.6 Valuation
The valuation of forecast exposures depends on the FX rate, which is taken from Price Manager. The
FX rate is the forward rate between As of date and Value Date of the forecast.
For dual currency forecasts, the logic is more complex. As dual currency forecasts are assumed
following imported forecasts, either:
•The currency_2_id parameter is specified in the mapping section in the Import XML file and
therefore passed to InsertForecastExposure.
or
•The DUAL-CURRENCY-FORECAST feature is set on the transaction's instrument: currency_2_id is
set to the base currency of the transaction's portfolio.
For dual currency forecasts, the record inserted into ForecastExposure is duplicated (after being
adjusted by the hook procedure) and the following columns are changed:
Column ID Original forecast value Dual currency forecast value
id X -X
currency_id @currency_id @currency_2_id
amount @amount -(amount calculated from @amount between
currencies @currency_id and @currency_2_id
using rate calculated via stored procedure
FXBookRate)

3 Cashflow Forecast/TRM interface
3.2 Configuration
38 © Wall Street Systems IPH AB - Confidential
3.2.7 Custom Insert Procedure API
Before forecast exposures are saved during the import process, the CSD stored procedure on
forecast exposure can be applied. There might be, for example, a requirement that the value dates
of the forecast are always on the 15th of the month.
The name of the procedure can be specified on the Forecast Interface page of the Instrument Editor,
Custom Insert Procedure field.
If the name is not supplied then the Configuration table is examined for a record with
•id 513 : Hook procedure for forecast exposure insert)
•value: name of the hook procedure (the value is different from "<none>").
If such a record exists, the specified stored procedure is used.
The Custom Insert Procedure must define the following list of parameters (only IN/OUT parameters
may "adjusted"):
base_amount @base_amount -@base_amount
fx_rate @fx_rate DCFamount/DCFbase_amount (DCF prefix
means values calculated for dual currency
forecast)
Column ID Original forecast value Dual currency forecast value
Parameter name Data type IN/OUT
stamp timestamp IN
number int IN
id int IN
active_since datetime IN OUT
active_until datetime IN OUT
leg_group int IN OUT
forecast_id varchar(50) IN OUT
payment_client_id ClientId IN OUT
value_date datetime IN OUT
type_id CashflowTypeId IN OUT
subtype_id CashflowSubtypeId IN OUT
currency_id CurrencyId IN OUT
currency_2_id CurrencyId IN OUT
amount Money IN OUT
base_currency_id CurrencyId
IN OUT
base_amount Money IN OUT
fx_rate float IN OUT
scenario_id ScenarioNameId IN OUT
param_0 varchar(50) IN OUT
param_1 varchar(50) IN OUT

3 Cashflow Forecast/TRM interface
3.2 Configuration
System Administration Guide 39
3.2.8 API for retrieving forecast exposures from TRM
For retrieving existing Forecast exposures in TRM, the stored procedure SearchForecastExposure is
used with the following list of parameters:
param_2 varchar(50) IN OUT
param_3 varchar(50) IN OUT
param_4 varchar(50) IN OUT
param_5 varchar(50) IN OUT
param_6 varchar(50) IN OUT
param_7 varchar(50) IN OUT
param_8 varchar(50) IN OUT
param_9 varchar(50) IN OUT
param_10 varchar(50) IN OUT
param_11 varchar(50) IN OUT
param_12 varchar(50) IN OUT
param_13 varchar(50) IN OUT
param_14 varchar(50) IN OUT
param_15 varchar(50) IN OUT
param_16 varchar(50) IN OUT
param_17 varchar(50) IN OUT
param_18 varchar(50) IN OUT
param_19 varchar(50) IN OUT
flags int IN OUT
batch_p bit IN
debug_p bit IN
Parameter name Data type IN/OUT
Parameter name Type Mandatory Default value Note
number int Y
id int N null No restriction if null
active_since datetime N today Fetch only forecasts
active on or before
specified value *
active_until datetime N today Fetch only forecasts
active on or after
specified value *
leg_group int N null No restriction if null
forecast_id varchar(50) N null No restriction if null
payment_client_id ClientId N null No restriction if null
value_date datetime N null No restriction if null

3 Cashflow Forecast/TRM interface
3.2 Configuration
40 © Wall Street Systems IPH AB - Confidential
* The period active_since - active_until specifies a restriction period: selected forecasts must be
active during the whole restriction period. If there is a need to fetch forecasts being at least partly
active during the restriction period, then the active_since and active_until parameters have to be
swapped (that is, active_until is before active_since).
3.2.9 Debugging
It is necessary in certain situations to trace the import process to determine what goes wrong. There
should be a log file in $FK_HOME/var/log/activity (name of the file is the name of the activity).
The following environment variables can be set:
•DATABASE_DEBUG (for example, to value 3)
•FK_TRACE_LEVEL (for example, to value 99).
The Activity daemon must then be restarted.
It is also possible to try to run the import Python script from a shell on the server where activityd is
running. The command line is similar to the following example:
type_id CashflowTypeId N null No restriction if null
subtype_id CashflowSubtypeId N null No restriction if null
currency_id CurrencyId N null No restriction if null
base_currency_id CurrencyId N null No restriction if null
param_0 varchar(50) N null No restriction if null
param_1 varchar(50) N null No restriction if null
param_2 varchar(50) N null No restriction if null
param_3 varchar(50) N null No restriction if null
param_4 varchar(50) N null No restriction if null
param_5 varchar(50) N null No restriction if null
param_6 varchar(50) N null No restriction if null
param_7 varchar(50) N null No restriction if null
param_8 varchar(50) N null No restriction if null
param_9 varchar(50) N null No restriction if null
param_10 varchar(50) N null No restriction if null
param_11 varchar(50) N null No restriction if null
param_12 varchar(50) N null No restriction if null
param_13 varchar(50) N null No restriction if null
param_14 varchar(50) N null No restriction if null
param_15 varchar(50) N null No restriction if null
param_16 varchar(50) N null No restriction if null
param_17 varchar(50) N null No restriction if null
param_18 varchar(50) N null No restriction if null
param_19 varchar(50) N null No restriction if null
flags int N null No restriction if null
Parameter name Type Mandatory Default value Note
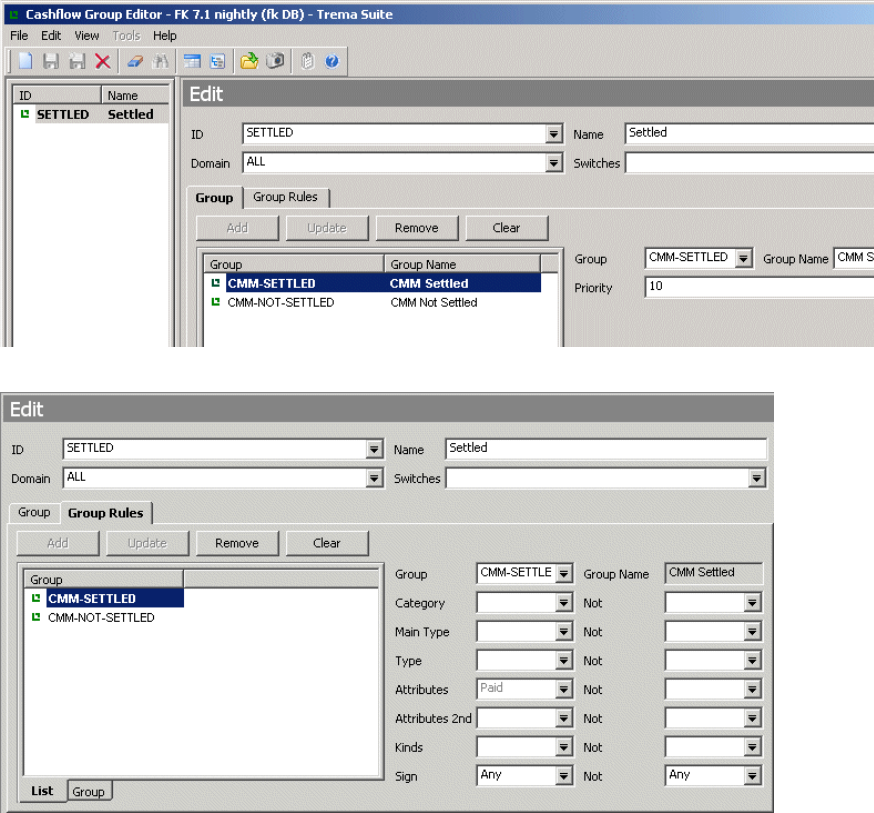
3 Cashflow Forecast/TRM interface
3.3 TRM to CMM forecast interface configuration
System Administration Guide 41
python $FK_HOME/bin/run-task.py --task=tasks.cmm.cff_from_cmm portfolio_id=MY-PTF
date=20060414 due_date_offset=0 value_date_from=20070101 value_date_to=20071231
scenario= debug=1
The last parameter (debug=1) makes the Python script more verbose but the results will not be
stored in the database (it is not possible to pass the debug parameter from the activity) - this is the
behavior most commonly required when debugging.
3.3 TRM to CMM forecast interface configuration
The TRM to CMM forecast interface supports the passing of the cashflow group from TRM to CMM to
indicate which forecasts have been settled. However, if these cashflow groups are not defined in
TRM, then no forecasts will be transferred to CMM. These groups are assigned to cashflows through
rules in the TRM Cashflow Group Editor.
1. Open the Cashflow Group Editor from TRM Application Manager.
2. Create a cashflow group called SETTLED.
3. Create two groups within the SETTLED group: CMM-NOT-SETTLED, CMM-SETTLED.
4. Configure the CMM-SETTLED subgroup to be attached when the cashflow is marked Paid.
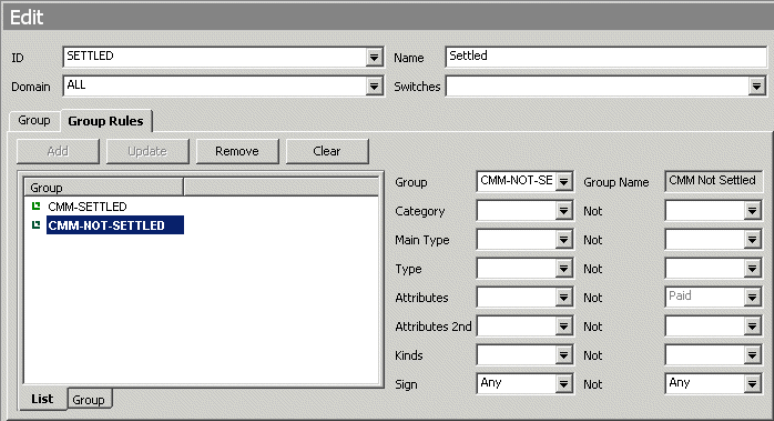
3 Cashflow Forecast/TRM interface
3.4 TRM to CMM Delivery versus Payment (DvP) settlement configuration
42 © Wall Street Systems IPH AB - Confidential
5. Configure the CMM-NOT-SETTLED sub group to be attached when the cashflow is not marked
Paid.
3.3.1 TRM to CMM payment interface configuration
The CMM payment method is assigned to a TRM payment based on a mapping from the TRM transfer
method and payment advice type.
These mappings are configurable in the cash_movement_to_cash_record.xml file in
..\installationdata\installation\templates\handler_based\trm\cash_movement.
Valid payment advice types:
•CMM-RELEASABLE : The payment will be released in CMM.
•CMM-NON-RELEASABLE: The payment will not be released in CMM.
Valid mapping of releasable payment transfer methods to CMM payment methods are:
•CMM-WT maps to WT (Wire Transfer)
•CMM-ITC maps to ITC (Inter Company)
•All CMM-NON-RELEASABLE advice types map to SETTLED by default.
3.4 TRM to CMM Delivery versus Payment (DvP) settlement
configuration
This is handled automatically by Wallstreet Suite by using specific factory rules and integrating these
rules in the setttlement flow.
3.4.1 Rules
The Factory settlement rule ADMETHOD-CMM-NON-RELEASABLE (see in the TRM Settlement Rule
Editor) checks for Our Client Group that has the value of CMM, and if the settlement is of type "DvP"
then all DvP settlements get the advice method CMM-NON-RELEASABLE when the portfolio owner of
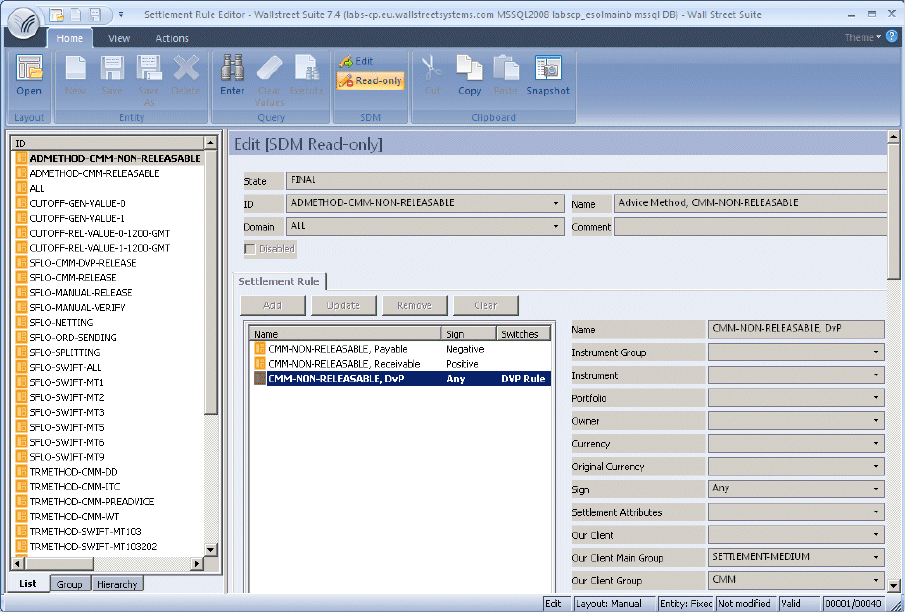
3 Cashflow Forecast/TRM interface
3.4 TRM to CMM Delivery versus Payment (DvP) settlement configuration
System Administration Guide 43
the transaction belongs to the SETTLEMENT-MEDIUM group CMM. All settlements not matching
other CMM advice methods automatically get payment method SETTLED in CMM.
The Factory settlement rules TRMMETHOD-SWIFT-MT541 and TRMMETHOD-SWIFT-MT543 (see in
the TRM Settlement Rule Editor) have a set of DvP rules which checks the Our Client Group that has
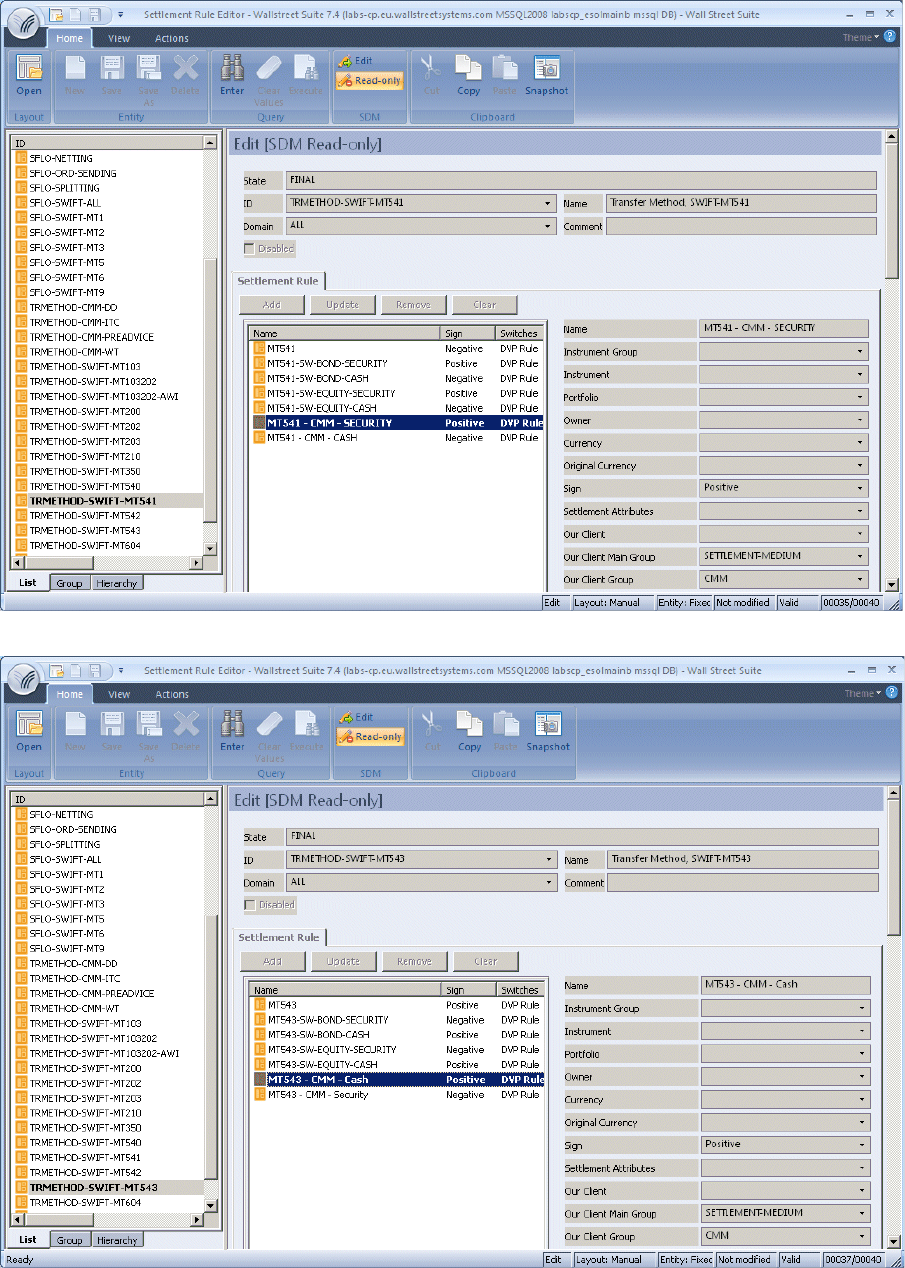
3 Cashflow Forecast/TRM interface
3.4 TRM to CMM Delivery versus Payment (DvP) settlement configuration
44 © Wall Street Systems IPH AB - Confidential
the value of CMM to ensure that the transfer method SWIFT-MT541 or SWIFT-MT543 are assigned to
DvP settlements when the portfolio owner belongs to SETTLEMENT-MEDIUM group CMM.
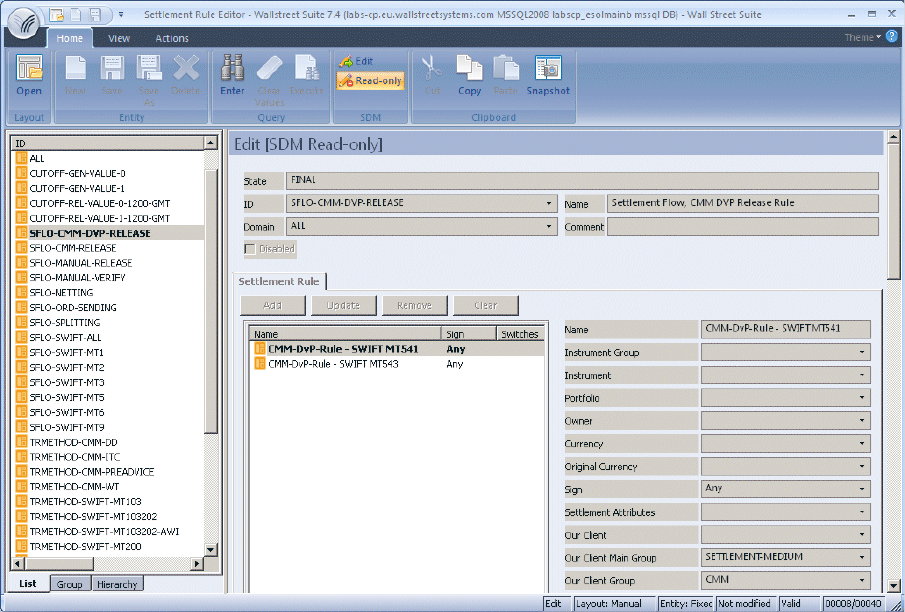
3 Cashflow Forecast/TRM interface
3.4 TRM to CMM Delivery versus Payment (DvP) settlement configuration
System Administration Guide 45
The settlement rule SFLO-CMM-DVP-RELEASE identifies DvP settlements to be sent to CMM after the
TRMSwift settlement message has been successfully processed.
3.4.2 Flow
In settlement.py the ACCEPT operation contains an agent definition that sends a DvP settlement to
CMM after it has been successfully processed by TRMSwift (released to SWIFT as acknowledged by
EsiAdapter) if it matches the rule SFLO-CMM-DVP-RELEASE:
#... to CMM service - if dvp settlement processed first via TRMSwift
(state_between ('SWIFT-HOLD'), mask (0),
rule ('SFLO-CMM-DVP-RELEASE', 'service/entity-broker/settlement@rule'),
service ('service/entity-broker/settlement@cmm-accept')),
In settlement.py the REJECT operation contains an agent definition that sends a DvP settlement to
CMM if it matches the rule SFLO-CMM-DVP-RELEASE when rejected from RELEASED:
(state ('RELEASED'), not_mask (1), mask (0),
rule ('SFLO-CMM-DVP-RELEASE', 'service/entity-broker/settlement@rule'),
service ('service/entity-broker/settlement@cmm-reject')),
3.4.3 DvP rejection
When rejecting a DvP settlement after the corresponding SWIFT MT541 or MT543 message has been
sent and the corresponding cash part has been sent to CMM, you must:
1. Unauthorize the CMM settled cash record.
2. Reject the settlement in TRM so that it reverts to the state "Waiting for SWIFT".

3 Cashflow Forecast/TRM interface
3.4 TRM to CMM Delivery versus Payment (DvP) settlement configuration
46 © Wall Street Systems IPH AB - Confidential
3. Reject the FIN message by sending the cancellation MT541 or MT543 created when the
settlement is rejected.
Note: The settlement cannot be rejected before the corresponding cancellation SWIFT message
is sent.
System Administration Guide 47
Chapter 4 Tracking data across modules
4.1 Introduction
Wallstreet Suite consists of multiple business modules: TRM, CMM and ACM. Each module has its
own business functionality, and static data that includes reporting and monitoring tools.
Because the business flow involves multiple modules, there is a need to track information related to
one business event across modules.
This chapter highlights key references between transactional data in individual modules, and
describes the available reporting and monitoring tools to facilitate the tracking.
4.2 Transactional Data and their References
4.2.1 Key transactional data
Here is a summary of the types of transactional data found in the different modules of Wallstreet
Suite. For more detailed descriptions, see the relevant module’s documentation.
4.2.1.1 TRM
The Transaction and Risk Module deals mainly with financial transactions. To provide a full picture
about the future position it must also provide forecasts from commercial activities.
•Transaction
Core information on entered or imported financial transactions. the key data entity in TRM holds
a relatively large amount of information for modeling various instrument types.
Information about future positions from financial transactions is also available in CMM.
•Cashflow
TRM uses a cashflow model to present individual financial instruments. Cashflows are attached
to a transaction. One transaction can have one or more cashflows. A single cashflow belongs to
one transaction only. Normally, cashflows are automatically generated, based on transaction
information and instrument data. In some cases, they can be updated.
•Forecast Exposure
Imported CMM aggregated forecasts are saved as Forecast Exposures which are simple future
cashflows.
•Payment
Information about payment from a financial transaction: payments are typically generated from
transactions and cashflows. One payment can come from one or more cashflows. One cashflow
can belong to one payment only.
As indicated above, cashflows might be netted into one payment, for example by client or
currency, which means that payment can be related to multiple transactions. One transaction
can have more than one payment.
4 Tracking data across modules
4.2 Transactional Data and their References
48 © Wall Street Systems IPH AB - Confidential
Payments can be split. A split is recorded on the original payment and a new additional payment
is generated. The new additional payment does not contain a reference to the original cashflows.
Payments are also processed in CMM.
•Accounting Event
Accounting data for further processing in ACM: in TRM, accounting events are created by the
processing of transactions and cashflows, according to the relevant configuration setup
information.
Accounting Events are also processed in ACM.
4.2.1.2 CMM
The Cash Management Module deals mainly with information about payments, both commercial
(entered or imported) and financial (from TRM). It also keeps cash account information as recorded
by an external or in-house bank.
The module also includes Cash Flow Forecasting functionality (sometimes referred to as the Cash
Forecasting Module) showing both commercial (entered or imported) forecasts or a financial forecast
(from TRM).
•Cash Record
Typically information about payment in CMM, either manually entered or imported. It could also
be could be also other information, such as an adjustment from reconciliation.
•Bank Transaction
Cash account movements, typically imported or a manually entered bank statement line. These
are reconciled with cash records and linked together after successful reconciliation.
•Forecast
Cash flow forecast as captured or imported into CMM. Key data entity for cash flow forecasting
functionality.
Aggregated forecasts can be transferred to TRM.
•Accounting Event
Accounting data for further processing in ACM. In CMM, these are created by processing cash
records and bank transactions, according to the relevant configuration setup information.
Accounting Events are also processed in ACM.
4.2.1.3 ACM
The Accounting Module centralizes accounting information from other modules (TRM and CMM) or
manual entries, posts it to relevant accounts, and presents it in a sub-ledger.
•Accounting Entry
Sub-ledger account posting: can be either captured manually or generated by processing the
relevant data from TRM and CMM.
In the accounting entry flow, the entries are mapped into sub-ledger accounts, grouped if
relevant, grouped into vouchers, and finally posted.
4.2.2 Key integration points
The business event flow will typically involve multiple modules: for example, a financial transaction
entered in TRM, position and results booked in ACM, and payment processed in CMM and booked in
ACM.
The modules are tightly integrated to provide seamless business functionality. Key flows for
transactional data are:
4 Tracking data across modules
4.3 Available tracking tools
System Administration Guide 49
•Position from TRM financial transactions is available in CMM.
•Aggregated CMM forecasts are available in TRM.
•TRM payments are processed in CMM.
•TRM accounting events are processed in ACM.
•CMM accounting events are processed in ACM.
4.2.3 Key cross-module references
To ensure that the business flow can be followed, there is a referencing schema in place to allow a
user to backtrack to the source information. Key references are described below.
4.2.3.1 TRM - CMM
TRM payments are transferred into CMM cash records. In order to be able to backtrack from the
CMM cash record to the TRM payment, a unique reference (TRM Settlement ID) is kept in Customer
Reference Number and simultaneously the Orig System Code is set to "TRM". The TRM logical
transaction number (affect number in the cashflow table or target transaction number in Transaction
Manager) is also available when reporting on the CMM cash record - External Reference(s). We also
transfer the TRM Cashflow Type to the CMM Cash Record. This is available by drilling down on a cash
record, or in a a cash transaction report such as the Financial Cashflow Type report.
TRM cashflows can be transferred to CMM as forecasts. All cashflows in a portfolio under the
portfolio FORECAST-TOP-PORTFOLIO in Configuration Table Editor will have forecasts created as
they are processed in the TRM transaction flow. These forecasts expire once the corresponding
settlements are sent as cash records to CMM (upon release of the settlement). Forecasts from TRM
cashflows contain a reference to the originating TRM cashflow and transaction: cashflow id, logical
TRM transaction number, and the technical TRM transaction number.
Some of the CMM aggregated forecasts are transferred into TRM forecast exposures. Since the
grouping is flexible, there is no direct referencing schema. However, CMM allows the defining of
identical grouping for monitoring in CMM forecast reports, and for the transfer of forecasts to ensure
that data validity can be checked.
4.2.3.2 TRM - ACM
TRM hands over the data relevant to accounting via TRM accounting events. ACM processes these
events and creates ACM accounting entries. Accounting entries from TRM include "TRM" in Orig
Group and also the key reference for back-tracking: TRM Accounting Event ID. In addition, there is
the TRM transaction number available in the Reference field.
4.2.3.3 CMM - ACM
CMM hands over the data relevant to accounting via CMM accounting events. ACM processes these
events and creates ACM accounting entries. Accounting entries from CMM include "CMM" in Orig
Group and also the key reference for back-tracking: CMM Accounting Event ID. In addition, there is
the CMM cash record or bank transaction ID available in the Reference field.
4.3 Available tracking tools
The reference data described above can be tracked using various tools across the system, including
online applications and onscreen reporting. See the module documentation for descriptions of
individual reports and screens. This section provides a logical overview and highlights cross-module
integration aspects of individual reports.
•Reporting Tools
4 Tracking data across modules
4.3 Available tracking tools
50 © Wall Street Systems IPH AB - Confidential
Wallstreet Suite currently offers two reporting tools. TRM and ACM both use Report Generator,
and CMM uses Data Analyzer. Both are highly configurable by end users who can create
customized reports.
Both reporting solutions offer drill-down functionality. CMM Data Analyzer allows drill-downs
inside CMM reports. TRM/ACM Report Generator allows drill-downs inside TRM and ACM, and
also across TRM and ACM.
You can use certain reports for tracking the IDs of transactions, settlements, and cash records
across TRM and CMM:
–CMM Forecast reports
For forecasts you have references to the originating TRM cashflow and transactions:
cashflow id ("Source Ref ID"), cashflow type ("Cashflow Subtype"), logical TRM transaction
number/affect number ("External Reference") and the technical TRM transaction number
("Source Ref Event ID").
–CMM Cash Transaction, Cash Position, Cash Monitor, Cash Reconciliation, and Manual
Reconciliation reports
These reports display the transaction number ("External Reference" - logical transaction
number).
•Online Applications
These applications are primarily designed for data entry and maintenance. However, many of
them can readily be used for tracking when required.
4 Tracking data across modules
4.3 Available tracking tools
System Administration Guide 51
4.3.1 Reconciliation on a transactional level
4.3.1.1 TRM
4.3.1.1.1 Key reports
4.3.1.1.2 Key on-line applications
Integration Tracing Report This report is primarily designed to focus on TRM integration points. It
provides information (counts) of generated subsequent data used for
transaction processing by further modules: accounting events for ACM or
payments for TRM.
Transaction Report Provides relevant information about the transaction as saved in the system.
By using formatting and grouping, a variety of useful layouts can be created.
Classification Report Similar to the Transaction Report, but presenting the transaction in all result
modes and showing related classifications. By using report filters, it can also
show only those transactions that are not classified - a layout like this can be
used as a useful checking report.
Cashflow Report Provides relevant information about cashflows and forecast exposures
(including link to transaction) as saved in the system. It shows both
Cashflows and Forecast Exposures fields in a consistent way, enabling the
creation of combined reports.
Settlement Report Provides relevant information about payments as saved in the system. It
allows searching: for example, for a specific payment (by providing Payment
ID). By using formatting, it is possible to group by payments and expand by
transactions, or vice versa.
Settlement Cashflows Report Similar to Settlement Report, but in addition, shows all of the related
cashflows of the transactions.
Accounting Events Report Provides information about accounting outcomes generated by TRM that are
to be processed by ACM. Includes a reference to transaction number. Both
daily accounting events and CTB events (key figures) are show in this report.
Transaction Manager Provides information on financial transactions, including the detailed
modelling to transaction, leg, schedule and cashflows. Also allows the
calculation of risk and result figures.
Settlement Manager Provides information on payments, including detailed beakdown to cashflows
(with regard to transactions).
Treasury Monitor Provides information on the position. Can be used for back tracking the
actual aggregated TRM forecast position in CMM.
4 Tracking data across modules
4.3 Available tracking tools
52 © Wall Street Systems IPH AB - Confidential
4.3.2 CMM
4.3.2.1 Key reports
4.3.3 ACM
4.3.3.1 Key reports
4.3.3.2 Key online applications
Cash Transaction Report Provides detailed information regarding all transactions that are imported
from an external system, such as an accounts-payable or -receivable system.
This report also presents manually entered corporate transactions and settled
financial transactions from TRM. The report can be used to identify open or
unreconciled transactions and can be used in conjunction with the bank
statement and CMM's forecast reports to build an accurate and
comprehensive understanding of the corporate cash position.
Bank Transaction Report Provides the ability to report all actual bank records imported from external
banks, manually entered or generated by the in-house banks. The bank
transactions provide a link back to the cash instruction that it is reconciled to.
Forecast Report Allows the user to view all the cash flow forecast records that originate from
TRM, manually entered, imported, or from any other source. The report is
built on the flexible reporting framework and the Custom Forecast reports
therefore provide the flexibility to present TRM forecast data in CMM
consistently with the forecast reporting available in TRM.
Bank Balance Analysis Report Provides a view of an entity's, bank's, or bank account group's opening and
closing bank balances for a specified date range. This allows the ability to
observe and analyse the flow of funds in and out of the related bank
accounts. This report in conjunction with the ACM balance report provides a
reconciliation of balances in a cash account.
Accounting Events Report Used to report on accounting events generated for transfer to ACM. This
report provides a clear view of the record flow from the CMM to the ACM
using the CMM flexible reporting infrastructure to allow the user to customize
the format of the report using the Format Editor and the selection criteria
using the Criteria Editor.
Entry State Report Provides detailed information on the accounting entries and their complete
processing along the ACM flow. Namely, it shows the originating system
(column Origin group TRM/CMM or ACM for manual entries) and the relevant
details (column Origin, e.g., TRM-via-CMM, then column CMM transaction
type recognizing the bank transaction or cash record, Reference is to the
transaction ID in the respective source system) as well as aggregation details
and status of the entry (for example, status Aggregated, Not-Mapped,
Posted).
Accounting Entry Manager This application works with vouchers. It provides details on the entries that
are already grouped to voucher; unlike, for example, the Entry State Report
which shows all the entries. It can also display and manipulate any non-Final
vouchers. For all these, it shows a level of detail similar to the Entry State
report. Unlike the Entry State report, it allows advanced query execution.

System Administration Guide 53
Chapter 5 Using Process Monitor
5.1 Introduction
Process Monitor is a Wallstreet Suite management system that provides the following features:
•Monitoring functions to view the runtime status of Unix processes and Windows services.
•Monitoring of Wallstreet Suite application logs and for dispatching e-mail notifications.
•Management functions for managing your system configuration and administering the starting
and stopping of services within one or more system environments, including:
–Grouping processes into one or more system environments
–Defining and enforcing start/stop-related process dependencies
–Defining system-wide or process-specific environment variables and parameters to pass at
process start-up
–Supporting the segregation of security and operations roles of users.
Note: A system environment is any installation of Wallstreet Suite as part of a self-sufficient
system for achieving an operational goal such as the evaluation, test, or production of data
generated by Wallstreet Suite.
•Administrative functions include:
–Centralized configuration, with everything configured at the Process Monitor level
–Administration access control
–Secret parameters (such as privileged user passwords) hidden from operators
–Secure Sockets Layer (SSL)-based communication among components.
5.2 Components
Process Monitor is made up of three primary components:
•The administration console, pm_admin, which is a user-friendly Windows application. It runs on
any version of Microsoft Windows with .NET Framework Version 1.1 (such as Windows XP).
A command line tool, pm_cmd, is also available for Windows and Unix.
•The Process Monitor service daemon, pmsd, controls the core functions. It is available for
Windows and Unix.
•A Process Monitor agent daemon, pmad, running on each participating server computer running
a Wallstreet Suite process. The agent relays information about client-side processes that can be
viewed at the administration console. It is available for Windows and Unix.
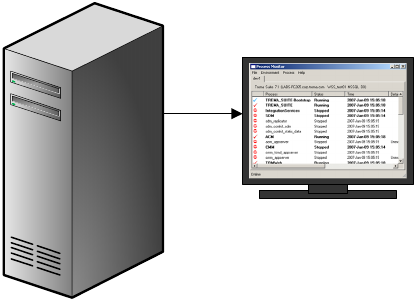
5 Using Process Monitor
5.3 Possible configurations
54 © Wall Street Systems IPH AB - Confidential
5.3 Possible configurations
5.3.1 How it works
Depending on the size and load-sharing requirements of your Wallstreet Suite system, the
Wallstreet Suite processes/services may be installed on one or multiple machines. These
processes/services need starting, stopping, and monitoring. Process Monitor handles this simply and
efficiently as follows:
1. On every machine where there are Wallstreet Suite processes/services installed, there must be a
copy of the Process Monitor agent daemon (pmad). Use either the Windows or Unix version of
pmad, depending on the target machine’s operating system.
2. On a suitable machine, install either the Unix or Windows version of the Process Monitor service
daemon (pmsd).
3. On a suitable machine, install either the Process Monitor Admin Console application (Windows
machine only), or the Unix or Windows version of the command line tool pm_cmd.
4. Configure an XML file to tell the Admin program in 3 above where pmsd is, and to tell pmsd
where each pmad is.
5.3.1.1 Simple case
The diagram below shows a very simple case: one Windows machine that handles all Wallstreet
Suite processes, so only one pmad is needed. The pmsd and the Process Monitor Admin Console
application have also been installed on the same machine.
Windows:
pm_admin
pmsd
pmad

5 Using Process Monitor
5.4 Installing Process Monitor
System Administration Guide 55
5.3.1.2 Complex case
The next diagram shows a more complex case:
Top machine:
Administration is being done on a separate machine, and this can be either a Unix machine running
the command line admin program pm_cmd, or a Windows machine running pm_cmd or the Process
Monitor Admin Console.
Servers 1 and 2:
One can be running Unix, the other Windows. Each server is running Wallstreet Suite
processes/services, and therefore must have pmad installed. Server 1 also has pmsd, but pmsd
could have been installed on any one of the three machines, or even on a fourth machine.
They are all interconnected via a network, and the Process Monitor traffic is encrypted.
5.4 Installing Process Monitor
All Process Monitor components can be installed on Windows and/or UNIX-based computers, except
the graphical administration console which can only be installed on a Windows PC.
There is one Process Monitor installation package per Wallstreet Suite-compliant operating system
(for example, Itanium, Sun-Solaris, and Windows).
Corporate network
> pm_cmd
Unix:
pm_cmd
OR:
SERVER 1
Unix/
Windows:
pmsd
pmad
SERVER 2
Unix/
Windows:
pmad
EITHER:
Windows:
pm_admin
or
pm_cmd

5 Using Process Monitor
5.4 Installing Process Monitor
56 © Wall Street Systems IPH AB - Confidential
5.4.1 Installation under Windows using the Suite Installer
If you use the Suite Installer to install Wallstreet Suite, Process Monitor is downloaded and installed
as part of the Suite Installer installation process.
Also, by default, pmad and pmsd are installed as Windows services. To disable them, edit the file
shared\components\pmm\config.properties, and set this parameter to false:
pmm.create.windows.services=false
pmad and pmsd Windows service names can be set using following parameters :
pmm.pmsd.service.name="Wallstreet Suite - pmsd"
pmm.pmad.service.name="Wallstreet Suite - pmad"
5.4.2 Downloading the Process Monitor packages
Do the following:
1. From the Wall Street support site, download one or more Process Monitor packages, depending
on the operating system(s) used in your Wallstreet Suite installation.
2. Copy and expand the relevant package to a suitable directory on each computer in your
Wallstreet Suite installation.
Note: From now on, we use installDir to represent the path to the pmm folder: the top level
Process Monitor folder after you have expanded the package.
5.4.3 Configuring pmsd and pmad
Depending on which platform(s) you are configuring Process Monitor on, see 5.4.3.1 Windows
environment on page 56 or 5.4.3.2 UNIX environment on page 58.
5.4.3.1 Windows environment
5.4.3.1.1 Configuring the Process Monitor Service (pmsd)
This is required on only one of the Wallstreet Suite servers.
1. Configure an SSL private key certificate. Name these files pmsd_cert.pem and pmsd_key.pem
and overwrite the default demo key and certificate in the installDir/etc/conf/certs
directory.
2. Open a Windows Command Prompt, go to the installDir\bin directory and enter the
command:
pmsd.exe --unregister
The --unregister flag checks for a previously registered Process Monitor Service on this
computer. If no such Service was registered, a warning is generated. Dismiss the warning and
continue. Otherwise, the command unregisters the service. Any existing Process Monitor files
are not removed.
3. To register pmsd as a Windows service, enter the command:
pmsd.exe --register --home "installDir" [--port port]
where:
port is the port that will accept connections from the Admin Console application (the default is
8884).
4. You can start pmsd either as a process or a Windows service. Normally, you run it as a process
for debugging purposes, then run it as a Windows service once it is working correctly.

5 Using Process Monitor
5.4 Installing Process Monitor
System Administration Guide 57
–As a Windows service: open the Windows Control Panel, select Administrative Tools - Services,
and start the Process Monitor Service Daemon.
–As a process: to start pmsd in debugging mode (which writes log-file entries to the console),
open a Windows Command Prompt, change to the installDir directory, and run
pmsd_debug.bat. You should edit the script to configure your specific port if it is different
from 8885.
5.4.3.1.2 Automatically starting up processes
If you want all Wallstreet Suite processes that are flagged as "auto-start" to be started when pmsd
is launched (either as a process or a Windows Service), do the following:
1. Open the file %FK_HOME%\sharedconf\components\pmm\config.properties, and ensure that
the following line appears:
–If pmsd is to be run as a process: pmm.process.auto_start=true
–If pmsd is to be run as a service: pmm.pmsd.service.process.auto_start=true
2. Run the Suite Installer reconfigure command, as described in the WSS Suite Installation
Guide. Here is an example:
%si% reconfigure -i installation_directory -e env_name -n env_number
5.4.3.1.3 Configuring the Process Monitor Agent (pmad)
1. Configure an SSL private key certificate. Name these files pmad_cert.pem and pmad_key.pem
and overwrite the default demo key and certificate in the installDir/etc/conf/certs
directory.
2. Open a Windows Command Prompt, go to the installDir directory and enter the command:
pmad.exe --unregister
The --unregister flag checks for a previously registered Process Monitor agent service on this
computer. If no such service was registered, a warning is generated. Dismiss the warning and
continue. Otherwise, the command unregisters the service. Any existing Process Monitor files
are not removed.
3. To register pmad as a Windows service, enter the command:
pmad.exe --register –-home "installDir" [--port port]
where:
port is the port that will accept connections from Process Monitor Service (the default is 8885). :
Note: No connection to pmsd is possible if this port is not identical to the one specified in the
configuration file pmsd_config.xml. See XXX.
4. You can start pmad either as a process or a Windows service. Normally, you run it as a process
for debugging purposes, then run it as a Windows service once it is working correctly.
–As a Windows service: open the Windows Control Panel, select Administrative Tools - Services,
and start the Process Monitor Agent Daemon.
–As a process: to start pmad in debugging mode (which writes log-file entries to the
console), open a Windows Command Prompt, change to the installDir directory, and run
pmad_debug.bat. You should edit the script to configure your specific port if it is different
from 8885.
Repeat this process for all Windows computers in your Wallstreet Suite system.
5 Using Process Monitor
5.4 Installing Process Monitor
58 © Wall Street Systems IPH AB - Confidential
5.4.3.2 UNIX environment
5.4.3.2.1 Configuring the Process Monitor Service (pmsd)
This is required on only one of the Wallstreet Suite servers:
1. Configure an SSL private key certificate. Name these files pmsd_cert.pem and pmsd_key.pem
and overwrite the default demo key and certificate in the installDir/etc/conf/certs
directory.
2. Configure your pmsd.sh script
–It is recommended to start and stop the Process Monitor service using the pmsd.sh shell
script. You may customize this script with your own parameters.
–You can set the debugging mode (DEBUG=”--debug”) which writes log file entries to the
console, and change the PORT variable (default 8884) on which pmsd will accept connections
from the administration interface (pm_admin/pm_cmd).
3. Start the Process Monitor service through your system’s start mechanism. To start, go to the
installDir directory and type:
./pmsd.sh start
To stop, type:
./pmsd.sh stop
5.4.3.2.2 Automatically starting up processes
If you want all Wallstreet Suite processes that are flagged as "auto-start" to be started when pmsd
is launched, do the following:
1. Open the file $FK_HOME/sharedconf/components/pmm/config.properties, and ensure that the
following line appears:
pmm.process.auto_start=true
2. Run the Suite Installer reconfigure command, as described in the WSS Suite Installation
Guide. Here is an example:
python $SIPM_HOME/tpm.py reconfigure -i installation_directory -e env_name -n
env_number
5.4.3.2.3 Configuring the Process Monitor agent (pmad)
1. Configure an SSL private key certificate. Name these files pmad_cert.pem and pmad_key.pem
and overwrite the default demo key and certificate in the installDir/etc/conf/certs
directory.
2. Configure your pmad.sh script
–It is recommended to start and stop the Process Monitor agent using the pmad.sh shell
script. You may customize this script to your own parameters.
–You can set the debugging mode (DEBUG=”--debug”) which writes log-file entries to the
console and change the PORT variable (default 8885) on which pmad will accept connections
from pmsd to the value that you configured in pmsd_config.xml.
3. Start Process Monitor agent through your system’s start mechanism.
To start, go the the installDir directory and type:
./pmad.sh start
To stop, type:
./pmad.sh stop
5 Using Process Monitor
5.5 Security considerations
System Administration Guide 59
5.4.3.3 Configuring the Process Monitor admin
Edit the admin.sh file and set the PORT variable (default 8884) to the port on which pmsd is listening
for connections (see Configuring the Process Monitor Service), and by changing the HOST variable
(default localhost) to the address of the host on which you have configured pmsd.
5.4.3.3.1 Configuring the Process Monitor Admin Console
Edit the Admin.bat file and replace the port (default 8884) by the one you have used in your pmsd
setup, and by changing the host address (default localhost) to the host address of the computer
on which you have installed pmsd.
5.5 Security considerations
5.5.1 Controlling access
The following components enable security specialists and system administrators to control access
and processes based on the roles assigned to users and the permissions required to log into or start
applications.
•You may create an agent_<agent-name>.accounts for a Windows-based agent in the
installDir/etc/conf/private directory of the pmsd installation. This accounts file allows you
to configure window processes to be launched under explicit credentials (other that the pmad’s
account credentials which is the default).
•When confidential or sensitive parameters, such as a privileged account’s password, is needed
for a process under Process Monitor’s management, you can create a file
env_<environment-name>.secret in the installDir/etc/conf/private directory to make
that information available to privileged administrators while preventing system operators and
other users from seeing it.
See 5.6.1 Setting up configuration files on page 61 for more information about the accounts and
secret files.
Keep in mind these additional security considerations:
•The file pmsd_passwd,located in installDir/etc/conf/private, contains user names and
the associated passwords in encrypted form. Removing the entries for a user prevents that user
from using the administration console. For that reason, access to the working directory should
be restricted to privileged users.
•The Process Monitor agents must run under a sufficiently high privileged account to enable them
to read and write data as well as launch and stop the processes that they manage.
•pmsd’s core configuration file pmsd_config.xml enables you to identify which users are allowed
to edit the configuration and who, as operators, are allowed only to start or stop processes.
Users with edit permission automatically have “manage” rights, and users having a valid login to
pmsd have the right to view the status of any system environment. User names referred to in
the configuration file must exist at runtime. (User names, stored in the pmsd_passwd file, are
created in the administration console.) In an initial installation, one user with id admin and
password password is provided. The password of the admin user should be changed on the first
connection. For more information, see 5.6.2 pmsd_config.tmpl on page 62.
•Only unauthenticated Simple Mail Transfer Protocol (SMTP) transport is supported by Process
Monitor for mail notifications.
5.5.2 Setting up private key certificate authentication
Each computer running pmsd and/or pmad requires private key certificate authentication. Contact
your local Certificate Authority to obtain and install this protection.
5 Using Process Monitor
5.5 Security considerations
60 © Wall Street Systems IPH AB - Confidential
5.5.2.1 Installing and configuring a test private key certificate
While operating Wallstreet Suite and Process Monitor in a test environment, you can use a test
(temporary) private key certificate for 60 days. To obtain the temporary key and certificate, you will
need openssl, which is distributed with TRM and also obtainable as a downloadable package from
http://www.openssl.org. The file testsslconfig.txt provided with openssl contains a default
certificate configuration and may be edited for tailoring it to your test environment.
To create the temporary private key certificate:
1. Install the full openssl package.
2. Set up the path to the installed directory where openssl.exe is located.
3. Run the utility create key&cert.bat. The files newkey.pem and newcert.pem are created.
4. Rename those newly created files to:
For the service: pmsd_key.pem and pmsd_cert.pem
For an agent: pmad_key.pem and pmad_cert.pem.
5. Copy the newly renamed files to the installDir/etc/conf/certs directory.
6. For each additional set of agent files needed, rerun the utility, rename the files, and copy them
to the working directory set up for pmad on that agent’s computer.
5.5.3 Setting up .NET security
Before running pm_admin.exe which is located on a shared network drive
(\\<remote_host>\...\pmm\<remote_host>_admin.bat) on a local Windows PC, set up .NET
Security as in the following example:
1. Raise the .NET security level for the local intranet group.
–Access Control Panel/Administrative Tools/Microsoft .NET Framework 1.1 Wizards
–Click Adjust .NET Security
–Select Local Intranet
–Move slider to Full Trust
2. Include the remote host (which hosts pm_admin.exe) in your Local Intranet group
–Access Control Panel/Internet Options/Security tab
–Click Local intranet

5 Using Process Monitor
5.6 Configuring Process Monitor
System Administration Guide 61
–Turn on the Include settings as in this example:
5.6 Configuring Process Monitor
After installing its components, you must configure Process Monitor by setting up the following:
•Configuration files that define parameters for Process Monitor components and operations
•User IDs and passwords for users of the administration monitor.
5.6.1 Setting up configuration files
The following files are used to configure Process Monitor:
•pmsd_config.xml, the core configuration file, located in installDir/etc/conf, defines global
parameters for Process Monitor. This file identifies the location of agent (pmad) computers, the
system environments, the mail server for dispatching notifications, and access rights for Process
Monitor administrators. See 5.6.2 pmsd_config.tmpl on page 62 for more information on this
file.
•agent_<agent-name>.accounts, an optional file to be created in the
installDir/etc/conf/private directory for any Windows agent, provides the means to
identify user accounts on each agent computer. (Mechanisms available on UNIX do not require
the explicit knowledge of account passwords.) These accounts can be used to launch processes
with a better control on their access rights within their host.
5 Using Process Monitor
5.6 Configuring Process Monitor
62 © Wall Street Systems IPH AB - Confidential
Specify each user account on its own line in the file using the following syntax:
id=accountRef,userid=windowsUserID,password=userPassword
The user ID (windowsUserID) and password (userPassword) combination must already exist as a
user account on the agent’s Windows computer. Assign an ID (accounReft) to this user account,
and use that ID as the value of the <manage> tag’s account attribute to identify the user
account to apply to the process. For more information, see the <manage> tag.
•env_<environment-name>.xml defines specific parameters for the named system
environment. The configuration identifies the processes that make up the system environment
and their monitoring and management parameters as well as their interdependencies. See 5.6.3
env_<environment-name>.xml on page 63 for more information on this file. This configuration
file is required for each system environment to be monitored by Process Monitor.
•env_<environment-name>.secret is an optional, “secret” file in the
installDir/etc/conf/private directory, in which you can store confidential or sensitive
parameter values for the named system environment. Any string in the form [<<text>>]
appearing in command parameters, environment variables, or stdio interactions within the
named system environment is substituted by a defined secret value without making it visible to
the operator.
For example, to configure the batch user password 1A2B3C4Z (which you want to conceal from
users), add the following line to the secret file:
MYPASSW=1A2B3C4Z
Then, to access that password, use the string [$(MYPASSW)].
•override.settings allows you to specify higher values for parameters related to the
communication protocol between monitor and agents. Create a file named override.settings
in the etc/conf directory, and specify the new values, each on a separate line.
The currently supported settings are:
AgentInitialPacketSize=<memory in KB>
AdminInitialPacketSize=<memory in KB>
AgentCommandTimeout=<time in ms>
The size, in KB, represents the initial size of the internal receive buffer for the relevant
application (AgentInitialPacketSize applies to pmad, and AdminInitialPacketSize to
pm_cms and the GUI).
In 7.3 versions of WSS, this size is not dynamic and needs to be increased manually when
adding more environments to monitor or more processes to the agent. In 7.4 onwards, the
values of Agent|AdminInitialPacketSize expand automatically if the packets sent by the
remote entity are bigger than the current buffer size.
AgentCommandTimeout represents the time in milliseconds allowed to a command issued by the
agent to complete (e.g. start/stop activityd, or any other kind of monitored process).
5.6.2 pmsd_config.tmpl
The core configuration file pmsd_config.xml, located in the installDir/etc/conf directory on the
pmsd-designated computer, has the following structure:
<monitor id="id" [desc="description"] [notify="email"]>
[<smtphost address="address" port="port" />]
<agents>
<agent id="id" [desc="description"]>
<host address="address" port="port" />
</agent>
...
</agents>

5 Using Process Monitor
5.6 Configuring Process Monitor
System Administration Guide 63
<environments>
<environment id="id" [desc="description"]>
<access_rights>
<edit userids="admin user1 user2" />
<manage userids="admin user3" />
</access_rights>
</environment>
</environments>
</monitor>
Note: Items in italics within quotation marks are variables. Replace the variable by the desired
value. For example, in the syntax userids=”admin user1 user2”, replace user1 and user
2 with the user IDs you want.
Brackets around an element or attribute (as in the [desc=”description”] attribute) indicate
an optional element or attribute and are not part of the tagging syntax. If you use the
optional element or attribute in your xml file, omit the brackets.
The ID and description of the instance of Process Monitor can be any alphanumeric string. The
optional notify email parameter will receive system-level notifications such as inability to reach as
configured agent.
The optional <smtphost> tag specifies the IP address and port of an accessible SMTP server on the
network. No notification is sent when this parameter is unspecified.
The <agents> section should have one entry for each computer where pmad components reside.
The entry identifies the agent’s IP address and the port on which pmad is listening for connections.
The port parameter in pmsd_config.xml must match the port parameter supplied on the command
line of the corresponding pmad. The default is 8885.
The <environments> section lists all system environments that pmsd manages. At least one system
environment should be specified.
You can identify which users are allowed to edit the configuration and who, as operators, are
allowed only to start or stop processes. Users with edit permission automatically have "manage"
rights, and users having a valid login to Process Monitor have the right to view the status of any
system environment.
User names in the <access_rights> section must exist at runtime. Use the administration console
to create the desired user names. In an initial installation, one user with id admin and password
password is provided. Change the password of the admin user on the first connection.
5.6.3 env_<environment-name>.xml
Each environment defined in the pmsd_conf.xml file must have an associated
environment-configuration file named env_environment-name.xml in installDir/etc/conf.
The environment configuration file looks like this:
<environment>
<notifications>
<notify severity="BENIGN|SERIOUS|CRITICAL" email="user@domain" />
...
</notifications>
<common_variables [include="path"]>
<set var="name" value="value" [export="true|false"] />
...
</common_variables>
<processes>
<process id="id" [desc="description"] agent="agentId"
[kind="WINDOWS_SERVICE|APPLICATION|VIRTUAL"]
[importance="MISSION_CRITICAL|IMPORTANT|USEFUL"] >
[<log [id=”identifier”] file="path">
5 Using Process Monitor
5.6 Configuring Process Monitor
64 © Wall Street Systems IPH AB - Confidential
[<filters>
<filter>
<match>regexp</match>
[<not_match>regexp</not_match>]
<message severity="BENIGN|SERIOUS|CRITICAL">msg</message>
</filter>
...
</filters>]
</log>
…
<log>
…
</log>]
<windows_service name="serviceName" />
[<application [name="process name"] [pidfile="path"] />
[<spy command="path" [arguments="arguments"] />]
[<manage control="MANUAL|AUTOMATIC "[account="account"]
<start [timeout="milliseconds"] [wait="milliseconds"]
[autorestart="true|false"] >
<command path="executablepath" [arguments="arguments"]
[final="true|false"] />
[<variables [include="path"] [useAgentEnvironment=”true|false”] >
<set var="name" value="value" />
...
</variables>]
[<stdio>
<enter text="text" [after_prompt="something"]
[after_delay="millisecs"] />
...
</stdio>]
</start>
<stop [timeout="milliseconds"] [kill="normal|brutal|normal_then_brutal"]>
[<command [path="executablepath"] [arguments="arguments"] />]
[<variables [include="path"] [useAgentEnvironment=”true|false”] >
<set var="name" value="value" />
...
</variables>]
<stop>
<dependencies>
[<requires process="processId" [stop_on_stop="true|false"] />
...]
[<uses process="processId" [start_on_start=”true|false” />
...]
</dependencies>
</manage>]
</process>
...
</processes>
</environment>
The elements that make up the env_environment-name.xml file are described in this section. The
following notational conventions are used in the above structure:
•Items in italics within quotation marks are variables. Replace the variable by the
desired value. For example, in the syntax file=”path”, replace path with the actual path of
the file that will contain the log data.
5 Using Process Monitor
5.6 Configuring Process Monitor
System Administration Guide 65
•Brackets around an element or attribute (as in the [include=”path”] attribute) indicate an
optional element or attribute and are not part of the tagging syntax. If you use the optional
element or attribute in your xml file, omit the brackets.
•A vertical bar between words (as in the optional attribute
kind=”WINDOWS_SERVICE|APPLICATION”) means “or”. For example, when specifying the
attribute kind for the <process> tag, your tagging should be either kind=”WINDOWS_SERVICE”
or kind=”APPLICATION”.
5.6.3.1 notifications
The <notifications> element identifies at what level of warning a notification e-mail should be
sent to an e-mail address. You can repeat the <notify> sub-element to notify several recipients.
5.6.3.2 common_variables
The <common_variables> element identifies environment variables. If the export attribute is set to
true (which is the default), the variable will be copied in the environment of any process launched by
Process Monitor. Otherwise it will only be accessible by pmsd itself in the xml configuration. You
can repeat the <set> sub-element so that multiple variables can be passed at the start-up of
Process Monitor. With the include attribute, you can specify the path to a file that contains one or
more environment variable settings expressed in the following form:
variable_name=value
variable_name=value
.
variable_name=value
The path can be a fully qualified path statement or one relative to the installation directory for pmsd.
Note all variables included from such a file are automatically exportable.
Variable names used in the element can be subsequently referenced by name or through the use of
the string $(variable_name). For example:
home=C:\my_work
address=$(home)\test
messages=3000
bufsize=$(messages)
5.6.3.3 processes
The <processes> element identifies each process in the system environment and enables
process-specific control and management. For each process identified by a <process> tag, the
sub-elements shown in the following table provide additional control.
Unlike Services on Windows, processes present obstacles to efficient monitoring and managing:
•The executable file of a process may be hidden by a batch process, script, or other utility
program.
•Two or more processes running simultaneously may have identical names.
Two techniques are provided so that, by fine-tuning the configuration, you identify the most critical
elements of the process to be monitored:
1. At least one of the following must be defined in the <process> element in order for pmad to
monitor the process:
–The <windows_service> sub-element for a Windows service
–The actual executable file for the <command> sub-element (specified as final=”true”)
–A process-generated Process ID (PID) file for the <pidfile> sub-element
–A plug-in for the <spy> sub-element

5 Using Process Monitor
5.6 Configuring Process Monitor
66 © Wall Street Systems IPH AB - Confidential
2. The <manage> element provides the capability to exert control over the process.
Sub-element Description
process The <process> tag identifies the user-defined ID, descriptive text, and pmad agent
name (the ID of the agent as defined in the pmsd_config.xml file) for the computer
running the process.
The kind attribute governs how Process Monitor starts and stops the process.
The importance attribute is mapped internally to the notification severity to determine
with what urgency to send notifications. For example, the unexpected malfunction of a
process whose importance is “mission critical” causes a “critical” notification to be sent.
By default, the kind attribute is APPLICATION, and the importance attribute is USEFUL.
A VIRTUAL process does not have a real executable. It serves materialize a group of
processes that, together, provide a function. The group of processes making up the
virtual process is defined by means of the dependencies in the <manage> tag.
log If the application generates a log file, this sub-element can make it accessible to
Process Monitor.
The path identifies the location of the log file generated by the application or Service.
The default is no logging.
Several log files may be configured in which case you should make sure they are
uniquely identified by the id attribute.
Note: Process Monitor does not generate process-related log files, nor does it
manipulate log files.
filters/filter One or more log filters can be used for each process log to detect noteworthy activity
and trigger an event or an alert. You specify the applicable rule to apply and the
priority level of the matching messaging when the rule applies. The default is to not
apply filters. Each rule is constructed by means of a regular expression that must
match an input line (<match>regexp</match>) and an optional excluding regular
exception (<not_match>regexp</not_match>). A message with the desired severity
will be generated when the match expression is satisfied and the not_match expression
is not satisfied (or not defined).
For example, suppose the log contains an entry such as the following:
Fatal Err 1036 - Out of memory
Constructing the rule
<filter>
<match>Fatal Error (.*)</match> <message severity="CRITICAL">
FATAL_ERR $2 </message> </filter>
searches log lines for the string “Fatal Error” followed by a space and then any text
until the end of the line. When a match is found, a message FATAL_ERR followed by
the remainder of the line (.*, which is 1036 - Out of memory) and of severity
CRITICAL is sent to pm_admin and optionally by email.
windows_service The name of the Service when the process is specified with the kind attribute
WINDOWS_SERVICE.
application The <pidfile> subelement allows you to specify the path to the PID file that the
process is known to generate (when applicable). Otherwise, a process name that will
be looked up by pmad can be specified in the <name> subelement. However, if more
than one instance of such a process may be running the process name method will not
function deterministically.
spy The path to a custom “spy” plugin. A spy plugin can be used to better test the state of
a process. A spy plugin can be written in any language as long as it is capable of
returning a result code. A result code 0 indicates that the spied process is running
smoothly. A result code of 1 indicates that it is hanging or otherwise seriously
impaired. A result code of 2 indicates that the process is not running.

5 Using Process Monitor
5.6 Configuring Process Monitor
System Administration Guide 67
manage <manage> enables you to exert control over the process. If the <manage> section is
omitted, Process Monitor can monitor the process but has no ability to control it.
The control attribute specifies how you want the process started: MANUAL enables
direct start/stop user control over the process; however, the process will be started
automatically if some other process that depends on it is started. AUTOMATIC disables
direct user control on the process and lets Process Monitor decide automatically when
the process needs to be started or may be stopped based on dependencies.
The default setting for the control attribute is AUTOMATIC.
The account attribute specifies an account reference under which a Windows process
should be started. The associated user name and password must be specified in the
agent_agent-name.accounts file.
manage
<start> tag
The <start> tag gives you control over the start-up of the process.
The timeout attribute expresses in milliseconds the time after which the attempt to
start the process times out. The default is 30000 (thirty seconds).
The wait attribute specifies the delay in milliseconds of the start-up. The default is
1000 (one second).
The autorestart attribute indicates whether an attempt to restart a recently stopped
process should be made automatically. The default is false.
manage
<command> tag
The <command> tag enables you to specify the path of a command to use to start the
process, arguments to pass to that command, and whether the command is the actual
process executable file (“true”) or if the process is indirectly executed through an
intermediary shell script (“false”). The default is “false.”
manage
<variables> tag
The <variables> tag defines environment variables to be passed to the process at
launch. You can repeat the <set> sub-element so that multiple variables can be
passed. You can also specify variables with the include attribute. By defining
useAgentEnvironment="true" (default is false), you can pass all the variables that
are defined in the agent’s environment to the process.
manage
<stdio> tag
(APPLICATION process only)
The <stdio> tag, optionally used for processes of the APPLICATION kind, makes it
possible to simulate the prompting and entry of input (for example, simulating the
prompting of a user login, followed by the entry of the valid login).
The text attribute is the text to be obtained as input.
The after_prompt attribute identifies the prompting message.
The after_delay is the time, in milliseconds, after which the text is sent to the process.
manage
<stop> tag
The <stop> tag gives you control over the stopping of processes (except for Windows
services).
The timeout attribute expresses in milliseconds the time after which the attempt to
stop the process times out. The default is 30000 (thirty seconds).
The kill attribute specifies how the process should be killed in the absence of a kill
command on a Unix system. “normal” is the equivalent of a kill -9, “brutal”
corresponds to a kill -15, “normal_then_brutal” performs a brutal kill only if a
preceding normal kill failed to stop the process. The default is normal_then_brutal.
manage
<command> and
<variables>
tags
The <command> and <variables> tags provide the same functionality for stopping
processes than the corresponding tags defined in the <start> tag (see above)
Sub-element Description

5 Using Process Monitor
5.7 Creating new users
68 © Wall Street Systems IPH AB - Confidential
The “secret file”(env_environment-name.secret) involves the use of a confidential string or
parameter value. The contents of the secret value are expanded in the following in the environment
configuration:
<common_variables> value attribute
<command> arguments attribute
<variables> value attribute
<stdio> text attribute
<stop> arguments attribute
5.6.4 Customizing the Process Monitor configuration from the site directory
To do this:
1. Move the Process Monitor’s pmm directory and contents under the ws-suite directory.
2. Create a pmm/etc/conf directory structure in your site directory:
<site>/base/pmm/etc/conf
3. Copy the environment file you want to modify and modify it.
4. Perform a site command:
a. Execute setup.bat/.sh from <installation_directory>\SI_Manager\packagemanager,
where <installation_directory> is the directory where you unzipped the product. This
evaluates the environment.
b. %si% site -s c:\ws-suite\<site> -i c:\ws-suite\7.n.n -e dev -n 1
5.7 Creating new users
To create a new user for accessing the administration console, do the following on the server where
pmsd is running:
1. Select File - Create User. The Create User dialog is displayed.
2. Type a new user name and associated password.
3. Click OK.
Newly created users and their associated passwords are stored in the pmsd_password file in the
working directory set up for pmsd.
manage
<dependencies>
tag
The <dependencies> tag enables you to specify IDs of processes that the current
process might require for operation or, with the uses attribute, optionally (not of
necessity) work with.
The stop_on_stop attribute within the <required> tag makes it possible to stop the
current process if the “requires” process crashes or is otherwise unavailable (default is
false).
The start_on_start attribute within the <uses> tag makes it possible NOT to
automatically start the dependent process (if set to false) when set to false (default is
true).
Sub-element Description
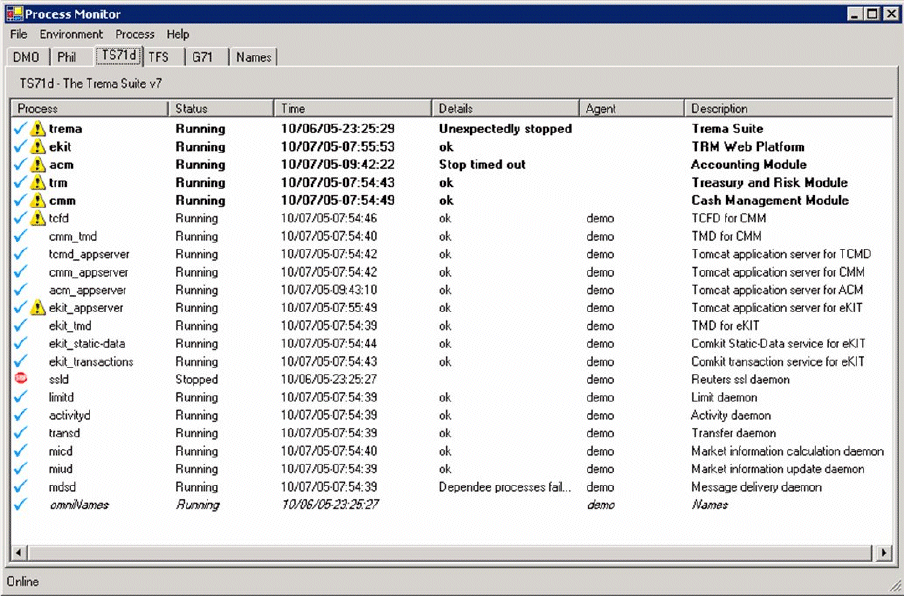
5 Using Process Monitor
5.8 Managing processes
System Administration Guide 69
5.8 Managing processes
To manage Wallstreet Suite processes, you can use either or both the following applications:
•Process Monitor
This is a Windows-only application that provides a detailed and versatile real time control and
display of all processes, and their dependencies. See 5.8.1 Using Process Monitor on page 69.
•pm_cmd
This is a Windows and Unix-based command-line application, which provides control and display
of all processes and also enables the user to script the starting and stopping of any Wallstreet
Suite processes. See 5.8.3 Using pm_cmd on page 72.
5.8.1 Using Process Monitor
The Process Monitor application, shown below, provides a tool for viewing and managing processes
in each system environment defined in the file pmsd_config.xml.
For each system environment, the following information is displayed:
•Process—The name of the process, configured for the system environment as the process ID.
(See 5.6.3.3 processes on page 65 for more information.) The yellow information icon indicates
that one or more alerts exist for that process.
•Status—One of the following:
– Offline—The agent cannot be reached. (The agent has not been started, or communication
with the agent cannot take place.)
– About to start—The start command is queued for the process.
– Starting—The start command has been issued, and starting is in progress.
– Started—The process has been started successfully.
– Running—The process is ready for use.

5 Using Process Monitor
5.8 Managing processes
70 © Wall Street Systems IPH AB - Confidential
– Hanging—The process is present but is not responding. (This status is optionally available for
processes monitored by a process monitor spy.)
– About to stop—The stop command is queued for the process.
– Stopping—The stop command has been issued, and stopping is in progress.
– Stopped—The process has been stopped successfully.
– Died—The process stopped unexpectedly (not as the result of a Process Monitor action).
•Details—Additional information about the status (for example, an error code for a failed action)
•Agent—The ID of the Process Monitor Agent defined in the pmsd_config.xml file.
•Description—The description for the agent taken from the pmsd_config.xml file.
Also, lines displayed in italic font indicate AUTOMATIC process that cannot be launched by direct
user control and lines in bold font indicate VIRTUAL processes (e.g. trm, acm, cmm, …).
To access the administration console:
1. Run <TS_App_Server_Name>_admin.bat in the pmm directory. A login dialog is then displayed.
Without arguments, this batch file assumes that the pmsd service is on the same server as
pm_admin.exe, and that the pmsd port number is 8887.
With arguments: <TS_App_Server_Name>_admin.bat <PMSD_HOST> <PMSD_PORT>
2. Use the preset user name admin and preset password password to log in the first time.
3. To change the password, check Change Password in the login dialog. A new field is displayed to
enable you to enter a new password.
4. Click OK to complete the password change.
5. To log off the console, select File - Logoff.
Changing the title
Additional information can be displayed in the title of the PM Admin GUI console window. If you
specify the --title switch when launching the console:
installDir\bin\pm_admin.exe --title <title>
The title <title> is appended to the default "Process Monitor" title.
5.8.2 Working with processes in a system environment
5.8.2.1 Working with all processes
To work with all processes in a single system environment:
1. Ensure that the desired environment is the one currently selected and visible in the
administration console.
2. Select Environment from the main menu.
3. Select one of the following menu items:
Menu item Description
Refresh Update the administration console with the most recent status of processes.
Clear All Alerts Clear the status of all alerts in the selected system environment.
Configuration Start the Configuration Editor for the selected system environment.

5 Using Process Monitor
5.8 Managing processes
System Administration Guide 71
5.8.2.2 Working with a single process
To work with a process:
1. Ensure that the desired environment is the one currently selected and visible in the
administration console.
2. Select the desired process. (Note: Double-clicking a process has the same effect as the View
Alerts menu item, described in the table below.)
3. Select Process from the main menu.
4. Select one of the following menu items:
A right-mouse click on a process will display a contextual menu allowing a short access to start, stop
and also kill. Note that the kill command bypasses all dependencies check to forcefully shut a
process down. It should normally never be used. Finally, a dependencies sub-menu in the contextual
menu will display all the dependencies of the selected process.
5.8.2.3 Using Configuration Editor
Use Configuration Editor to view the pmsd_config.xml file for the currently selected system
environment in the administration console.
To open pmsd_config.xml in the editor, select File - Service Configuration.
The on-line editing of the configuration through the administration console is not yet available.
Whenever a configuration file is changed (pmsd_configuration.xml or env_...xml) the Process
Monitor service (pmsd) must be stopped and restarted for the changes to take effect. The agents
need not be restarted.
Menu item Description
Start Launch the currently selected process.
Stop Stop the currently selected process.
Stopping a Windows-based process has the same effect as killing it.
Important: When a process is configured to be managed by Process Monitor, never
start or stop a process manually. Use Process Monitor’s Stop function to stop processes.
View Alerts Display notifications, if any, of unexpected changes of status or log filter results for the
selected process.
View Log Display the Log Viewer showing log messages for the selected process. (The log file
must already be configured in the environment file.)
View Agent Log Display the Log Viewer showing log messages for the agent associated with the selected
process.

5 Using Process Monitor
5.8 Managing processes
72 © Wall Street Systems IPH AB - Confidential
5.8.3 Using pm_cmd
The command-line version of Process Monitor is pm_cmd, which runs on Unix and Windows. It is
also useful for scripting the starting and stopping of processes.
pm_cmd is located in the bin directory of the pmm installation path.
5.8.3.1 Getting help
Get help on the command by entering:
pm_cmd -h
Which displays (Windows version shown):
SYNTAX: pm_cmd.exe <user>/<password>@<host>:<port> <command> [<args>]
where <command> [<args>]:
env list environments
proc list processes and their status
conf displays configuration of service
conf <env> diplays configuration of environment <env>
log displays log of service
log <agent> diplays log of agent <agent>
log <proc>@<env> diplays log of process <proc> in environment <env>
start <proc>@<env> start process <proc> in environment <env>
stop <proc>@<env> stop process <proc> in environment <env>
restart <proc>@<env> restart process <proc> in environment <env>
kill <proc>@<env> kill process <proc> in environment <env>
alerts <proc>@<env> displays alerts for process <proc> in environment <env>
5.8.3.1.1 Syntax
For the <host>:<port> URL, <host> is a valid DNS name or IP address of the machine where pmsd
is running, and <port> (for example 8887) is the port to which pmsd listens.
5.8.3.1.2 Finding out process names
To get a list of all Wallstreet Suite process names, as well as their current status, use the proc
command. For example:
pm_cmd.exe IT1/password1@localhost:8887 proc
5.8.3.1.3 Starting and stopping processes
Once you have the process names (and the environment name that they belong to) you can start
them and stop them using the start, stop, restart, and kill commands.
Some examples:
pm_cmd.exe it1/password1@localhost:8887 start WALLSTREET_SUITE@dev1
pm_cmd.exe it1/password1@localhost:8887 restart WebSuite@dev1
pm_cmd.exe it1/password1@localhost:8887 stop TRMSwift@dev1
Note: Just like the graphical Process Monitor application, pm_cmd respects all configuration
dependencies, and the AUTOMATIC or MANUAL start/stop setting for each process.
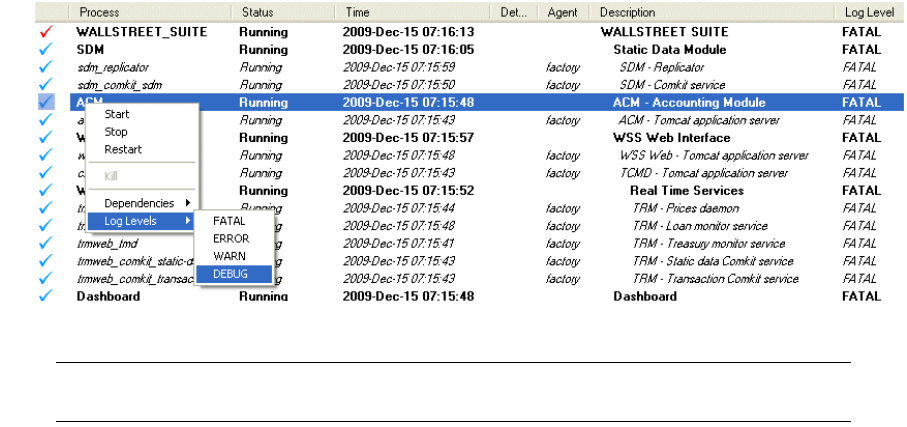
5 Using Process Monitor
5.9 Troubleshooting
System Administration Guide 73
5.9 Troubleshooting
5.9.1 Configuration and customization-related problems
•Check that names for all system environments and environment variables are correct. You can
verify that the settings are correct by running successfully a Process Monitor-controlled service
outside Wallstreet Suite (and pmsd) environment. To do so on Windows, open a Command
Prompt outside the TRM environment, then execute the service from the command line.
•Ensure that pm_admin was installed on a local drive, not on a network drive.
•Ensure that the .NET framework is installed on the computer running pm_admin.
•Check that users requiring edit rights (to modify configurations) or manage rights (to start and
stop processes) from administration console are set up properly in pmsd_config.xml.
•Ensure that the private key certificate used for temporary testing has not expired.
•Ensure that pmad has sufficient privileges for running the processes that it manages.
5.9.2 Communication and network-related problems
Ensure that the port addresses and host names used to install Process Monitor components match
across computers.
Check that each process agent name correctly identifies the agent on the computer where the
process is running.
5.9.3 Log levels
The Process Monitor GUI allows you to associate a debug level with a single process or group of
processes (virtual processes).
Changing the log level for a group of processes automatically changes the debug level for processes
in the group. Each process uses the debug level of its group unless a specific log level is assigned to
it.
The default log level is FATAL. This displays errors only.
If you change the log level of a process you must restart it to see the effect. This configuration is not
dynamic.
To change the log level for one process or group of processes:
1. Right click on the process and choose a new value for "Log Levels":
This operation forces a rewrite of the pmsd xml configuration file.
Note: During this operation which takes a few seconds, Process Monitor displays a a question
mark before displaying the process status.
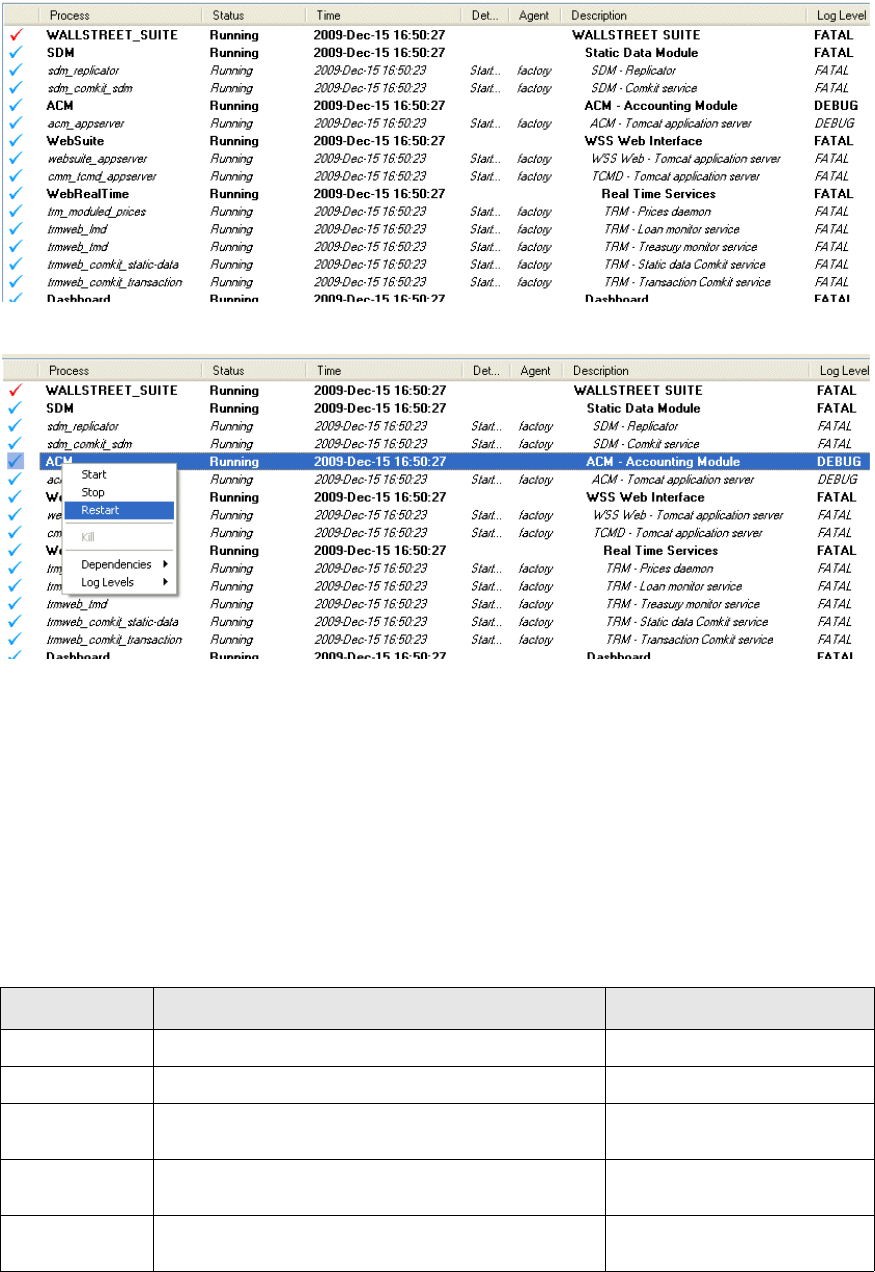
5 Using Process Monitor
5.9 Troubleshooting
74 © Wall Street Systems IPH AB - Confidential
When the reload is completed, the Log level column displays the new value for the process(es).
2. A Restart is required so that the new Log Level takes effect:
5.9.3.1 Add a custom Log Level
1. Open the pmsd xml configuration file (PM_HOME/etc/conf/env_<env>.xml)
2. Add one row to the loglevels section : in this example, the log level is called CUSTOM1.
<loglevels>
<loglevel databaselevel="0" id="1" log4jlevel="FATAL" name="FATAL" tracelevel="0"/>
<loglevel databaselevel="0" id="2" log4jlevel="ERROR" name="ERROR" tracelevel="0"/>
<loglevel databaselevel="0" id="3" log4jlevel="WARN" name="WARN" tracelevel="5"/>
<loglevel databaselevel="1" id="4" log4jlevel="DEBUG" name="DEBUG" tracelevel="40"/>
<loglevel databaselevel="1" id="5" log4jlevel="DEBUG" name="CUSTOM1" tracelevel="20"/>
</loglevels>
Attributes are:
3. Restart pmsd.
Attribute Description Values for custom log level
id Unique id. Numeric value: 5 or higher.
name Name displayed in the Process Monitor screen. Alphanumeric value.
tracelevel C++ specific tracing level, corresponding to
--trace-level parameter passed to TRM processes.
Numeric values between 0 and
99.
log4jlevel Log4j debug mode. Most Java processes have their
own log4j config file, which defines Debug's level.
DEBUG, INFO, WARN, ERROR,
FATAL, ALL, OFF.
databaselevel Defines if database traces are required (it corresponds
to DATABASE_DEBUG=1).
0 or 1.
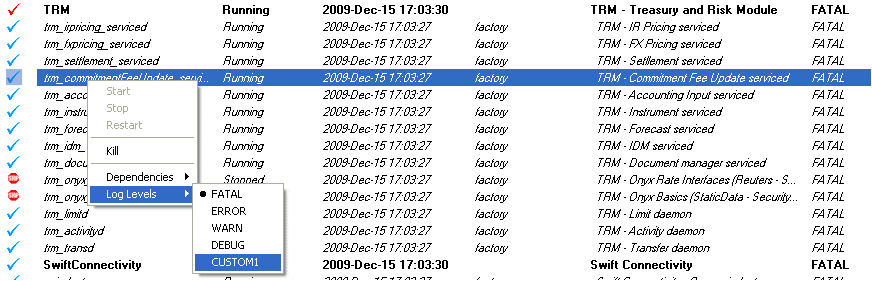
5 Using Process Monitor
5.9 Troubleshooting
System Administration Guide 75
4. Use the new Log Level:
5.9.4 Message logs
Several files are produced to log the messages and alerts that Process Monitor generates:
•pmsd.log, created in pmsd’s directory when the Process Monitor Service is executed, can be
viewed by means of the Log Viewer. To view log messages in the Log Viewer:
a. Select File - Service Log.
b. Click Refresh to update the list with the most recent log messages.
c. Click Done to close the Log Viewer.
•pmad.log, created in pmad’s directory when the Process Monitor Agent is executed, logs
agent-side messages.
•process@environment.alerts, located in pmsds’s working directory, stores log scanning alerts
per process.
•process@environment.pid, located in pmad’s working directory, is a temporary file per process
that stores relevant PIDs (for "final" processes).
1.
5 Using Process Monitor
5.9 Troubleshooting
76 © Wall Street Systems IPH AB - Confidential
System Administration Guide 77
Chapter 6 Transferring data: DBLoader
6.1 Introduction
The DBLoader tool is a software package that allows the transfer of data from one database to
another with the possibility of storing the data in XML files as an intermediate step. DBLoader can:
•Be used from the command line or via its own graphical user interface.
•Copy data from a database.
•Copy data to a set of files.
•Copy data to a database.
•Use the features of the data to perform the extraction and loading.
•Use an object-based approach rather than table-based.
•Query particular data within an object.
•Remap system-generated keys.
•Be database-independent for Sybase, Oracle and MSSQL.
•Support objects from TRM, ACM and CMM.
•Support automatic foreign key data extraction.
•Support update or not of existing data.
•Support removal or not of extra data.
6.1.1 Restrictions and recommendations
Although DBLoader can handle many different categories, only the ACM Factory, TRM Factory, and
All Factory categories have been certified by Wallstreet Systems. When working with other
categories, extreme care should be taken. Using DBLoader for transferring transaction data is not
recommended.
6.1.1.1 Transaction data
DBLoader is not the recommended tool for copying transactions from one database to another.
Simple non-linked transactions (FXSpot/Forward, FXSwap and Depo Loans) can be copied, but
transactions that are linked to other transactions (including rollovers and repos) lose their link
information and thus become single transactions in the new database.
6.1.1.2 Large objects
There are performance problems with large objects when the object has children; for example,
SetupMapHeader and VaR tables if VaR is being used. DBLoader has some optimizations for large
single table-based objects, for example Prices. But for multiple table objects such as
SetupMapHeader, optimization is not possible.
In the destination database, the performance of this object can be enhanced if the tables associated
with the object are empty. Also, much of the data stored in this object is not really needed, so use
query parameters to extract only the instances that are needed.

6 Transferring data: DBLoader
6.2 Operation
78 © Wall Street Systems IPH AB - Confidential
Memory usage is normally capped. but it will be high when copying SetupMapHeader from one
database to another. The python scripts are set to use a maximum of 1024 Megabytes of memory.
Hint:
Use user_id=DBO to copy the factory-created objects only.
6.1.2 Terminology
6.1.2.1 From and To
DBLoader always requires a source and a destination. Depending on the situation:
•From and Source is used to describe where the data is read from.
•To and Destination will be used to describe where the data is to be written.
Note that either could be a directory containing XML files, or a database.
6.1.2.2 Object and Object Instance
Object is used to describe a grouping of tables with one table being the parent.
For example, the object Currency consists of the table Currency as the parent, and CurrencyCross,
CurrencyCrossFixed, CurrencyGroupMap, CurrencyJournal, CurrencyModeSetup, and
CurrencySetup as child tables. Typically the unique key of the parent is the main non-unique key
within the children.
An object instance is one row of data of the parent and all rows with the same parent key from all
the children.
The terms Entity and Subentity are also used, where Entity means the same as Object and
Subentity means the child of an Entity.
6.2 Operation
6.2.1 Where to find DBLoader
You can find DBLoader in the following places within the TRM file structure ($FK_HOME):
•The location of python scripts for running DBLoader is in share/common/dbloader/bin.
•The setup for debugging, log4j.xml, is in java/conf/log4j/dbloader.
•The location of category files and object definition XML files is share/common/dbloader/def.
•Properties files with connection details can be located anywhere; however, the entry in the
Application Manager looks for properties files in share/common/dbloader/def.
•The jar file, biz.wss.trm.program.dbloader_VERSION.jar is located in
java/Jupiter/plugins but should never need to be accessed.
6.2.2 How to run DBLoader
To make it easier to run DBLoader, the following python file scripts are available in
$FK_HOME/share/common/dbloader/bin (see table below for descriptions of arguments used with
DBLoader and the python scripts):
•generic.py props-dir
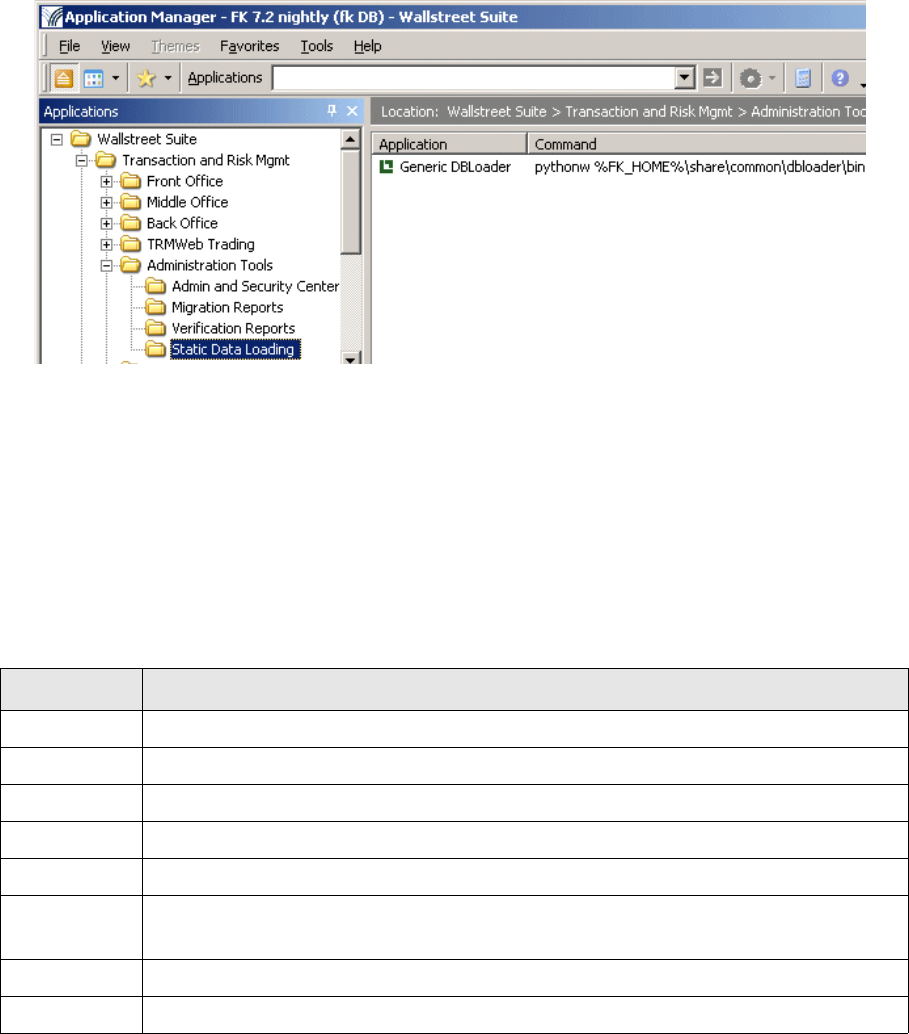
6 Transferring data: DBLoader
6.2 Operation
System Administration Guide 79
Displays the full graphical user interface to gather information. This is also available from
Application Manager:
•file-to-db-nowin.py from-file.properties to-db.properties xx.category
Non-window copying from a file set to a database.
•db-to-file-nowin.py from-db.properties to-file.properties xx.category
Non-window copying from a database set to a file.
•script.py xml_script_file
Window-based, but uses all information from the supplied script file xml_script_file.
•encrypt-pw.py
Generates an encrypted password suitable for inclusion in the properties files.
Argument Description
from-type Can be either database or file, and specifies where the data is coming from.
from-info A properties file for the from-type. See 6.2.2.1 Properties file contents on page 80.
to-type Can be either database or file, and specifies where the data is going to.
to-info A properties file for the to-type. See 6.2.2.1 Properties file contents on page 80.
objects The name of a category file to be used as the list of wanted objects.
no-win Either true or false and specifies whether the windows should be displayed or not.
Note: All other arguments must be also specified for this to have an effect.
script Use the specified XML file as the complete definition of connections and objects to work with.
props-dir Directory containing multiple connection detail properties files.

6 Transferring data: DBLoader
6.2 Operation
80 © Wall Street Systems IPH AB - Confidential
6.2.2.1 Properties file contents
Database connection
For a database connection the following data must be supplied (shown with example values):
Type=oracle
Can be oracle, Sybase, sybase3, jtds-sybase, mssql or sqlserver. Case is not important.
Note that Sybase uses a jconnect5.5 and is unsuitable as a driver for the To connectivity.
jtds-sybase and sqlserver use the jtds1.2 driver and are considered the best ones to use.
Using sybase3 may require the installation of jconn3. Using mssql requires the installation of
una.jar.
Server=server.corp.company.com
Port=1521
Owner=DBO
The actual owner of the database, important for Oracle.
Instance=cfactory
The database name
User=dbo
Database login name
Password=xxxxx
The password. The password can be entered as clear text or encrypted by encrypt-pw.bat.
Service=SYBASE
This only needed for the creation of tables and is the same value as the -S option for the build
script (Sybase and mssql) or -D for oracle.
File properties
A file properties file contains:
Directory=the directory where the files are to be found.
xx.category Category files are used to group useful data into one selection. By default the following
category files are provided, but individual sites can generate their own:
•trm.category All available trm objects.
•TRM-Factory.category A subset of the most useful trm objects.
•TRM-Templates.category All trm template objects.
•acm.categeory All acm objects.
•ACM-Factory.category A subset of the necessary acm objects.
•cmm.category A subset of necessary cmm objects.
•ALL-Factory.category A complete set of Factory data for all modules.
A category file contains only the name of the Object, one per line. The .category suffix is
mandatory, but the file name can be any name that is unique in the directory. Category files
are placed in the share/common/dbloader/def directory along with the Object Definition
XML files.
Argument Description
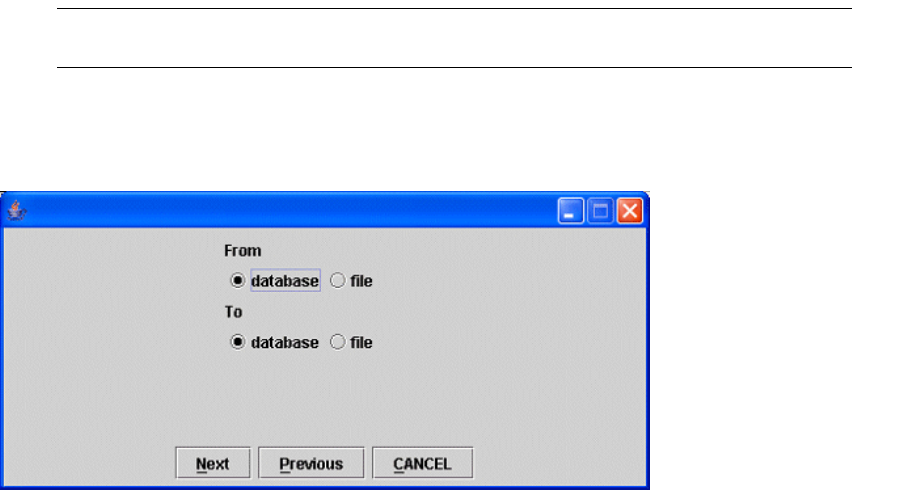
6 Transferring data: DBLoader
6.2 Operation
System Administration Guide 81
6.2.3 User interface description
This section describes all screens that can appear when running the generic.py or the other python
launcher scripts already described.
Note: In the screens that follow, the Save Settings function may not be available in the current
version of DBLoader.
6.2.3.1 Source and destination
Indicate what type of storage the data is coming from and for what type of storage the data is going
to. This screen is not shown if from-type and to-type are specified.
After clicking Next, the screen displayed depends on whether the source is a database or a directory.
In either case, the fields can be filled in by hand or by choosing from a list of predefined properties
files. Property files can also be saved from the application if the details are new but would be needed
in the future. Note that the properties files need to be in the same location. In a standard
installation, the directory is $FK_HOME/share/common/dbloader/def.
6.2.3.2 Database connection
Fill in the fields, or select a previously saved environment (if any) from the Available Environments
drop-down.
Server The machine that the database server is running on.
Port The actual port that the database server is listening on.
Instance Typically the name of the database but the meaning is slightly different for Oracle.
Owner The database owner. Normally this will be dbo but with Oracle it may be changed.
Service This is only needed if tables are going to be created (see later). It is the same as the -S option
for build.pl.
User The user ID. Normally use the superuser but the issue is the permissions on the objects to be
written.
Password The password of the user.
Note: If kept in properties files it should be encrypted.
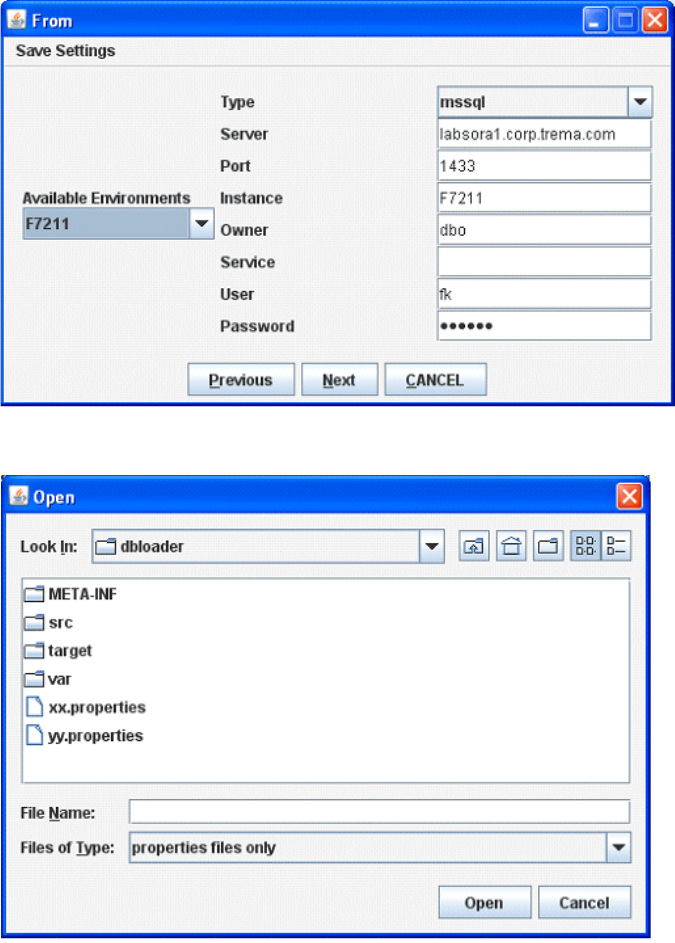
6 Transferring data: DBLoader
6.2 Operation
82 © Wall Street Systems IPH AB - Confidential
6.2.3.3 Save Settings
6.2.3.4 The To screen
Describe the destination entity, which can be either a database or a directory. In this example a
directory is being used but if a database was used then the needed information would be the same
as the From example above. The directory does not need to exist when creating the XML files but
must exist when reading them.
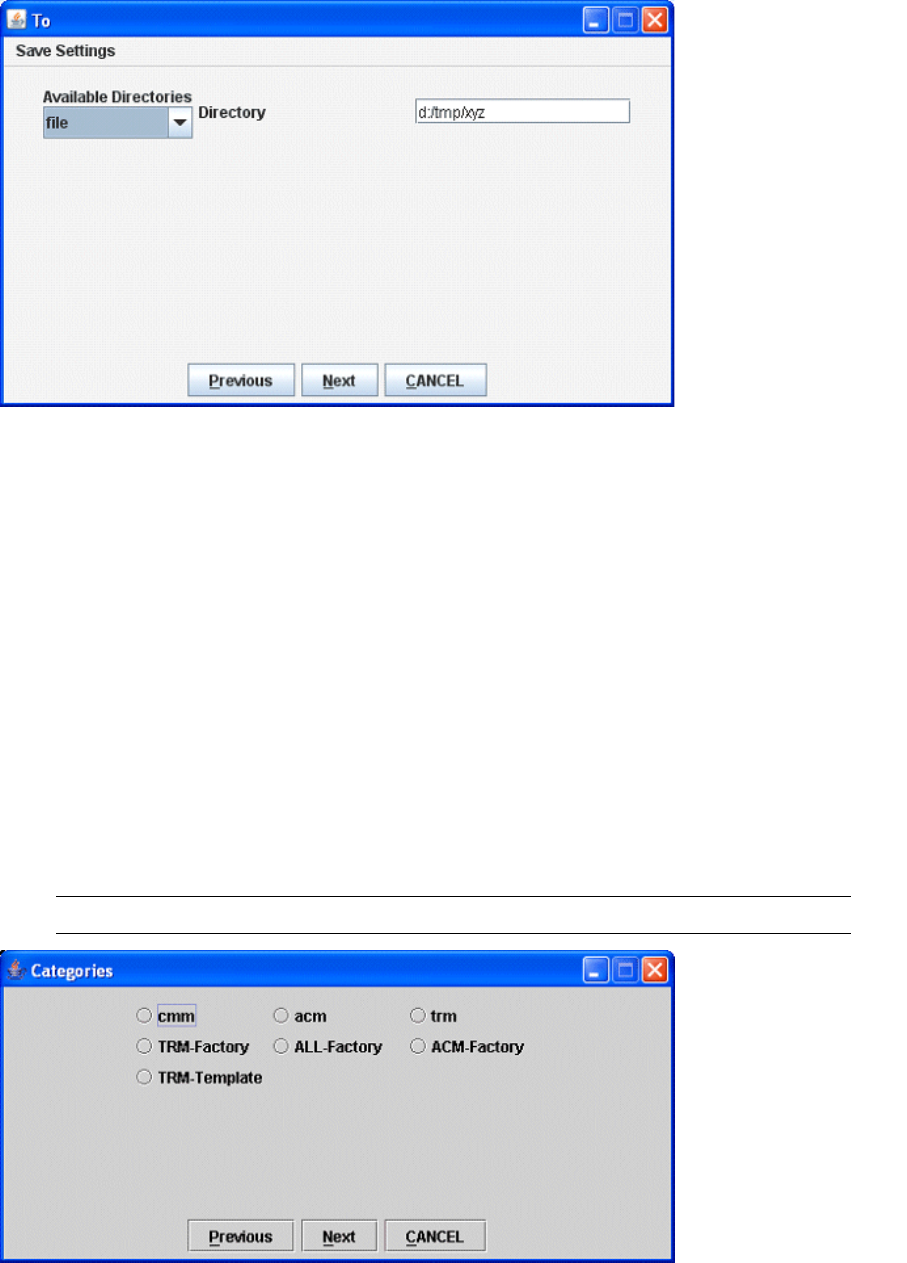
6 Transferring data: DBLoader
6.2 Operation
System Administration Guide 83
Right-click in the Directory field to open a navigation dialog.
6.2.3.5 Categories
Categories are a way of setting up groups of objects so that they can be dealt with as a single entity.
This streamlines the selection in the subsequent screen. More categories can be created by placing
.category files in the def directory. This screen allows for a setup so that, for example, smaller
subsets of the total set of objects can be presented to facilitate the work of choosing which objects
to copy.
Note: You can select more than one category.
After clicking Next, a list of all available objects is displayed.
cmm A subset of necessary cmm objects.
acm All acm objects.
trm All available trm objects.
TRM-Factory A subset of the most useful trm objects.
ALL-Factory A complete set of Factory data for all modules.
ACM-Factory A subset of the necessary acm objects.
TRM-Templates All trm template objects.
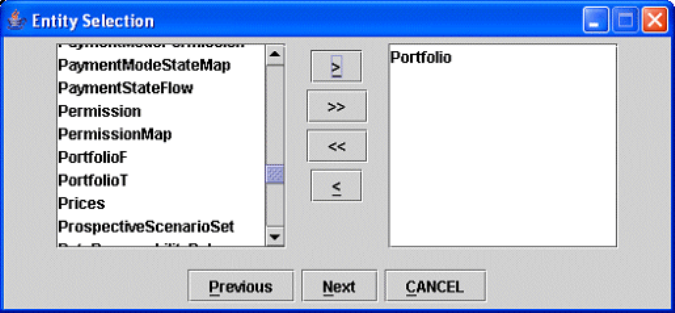
6 Transferring data: DBLoader
6.2 Operation
84 © Wall Street Systems IPH AB - Confidential
6.2.3.6 Entity selection
Selected entities appear in the right list, available entities in the left list. The buttons work like this:
Right-clicking a selected entity displays a dialog where further actions can be performed on the
entity.
6.2.3.7 Additional parameters
6.2.3.7.1 Query criteria
•Operates on the From database.
•Default is: no criteria.
•Has lookup lists where there is a List procedure associated with the field. This may be on the
parent table of the object itself or on any of its foreign keys.
•If the value is not numeric then wildcards are generally acceptable.
6.2.3.7.2 Switches
Include Foreign Keys
Acts on the From Database and is only active when the From source is a database. Only active if
one object is chosen. It is assumed that if multiple objects have been selected then the user wants
to control the process. Finds the data for the objects using the foreign key specification for the whole
object: the parent table plus all of the children tables.
For example: you are copying Yield Curve X from database A to database B; the Yield Curve is in
currency DKK, and the currency DKK is not present in database B. Then the application will
automatically copy currency DKK in addition to instrument X. This assumes that currency is a
foreign key in the Yield Curve definition.
>Moves the entity highlighted in the left list to the right list
>> Moves all entities in the left list to the right list.
<< Moves the entity highlighted in the right list to the left list
<Moves all entities in the right list to the left list.
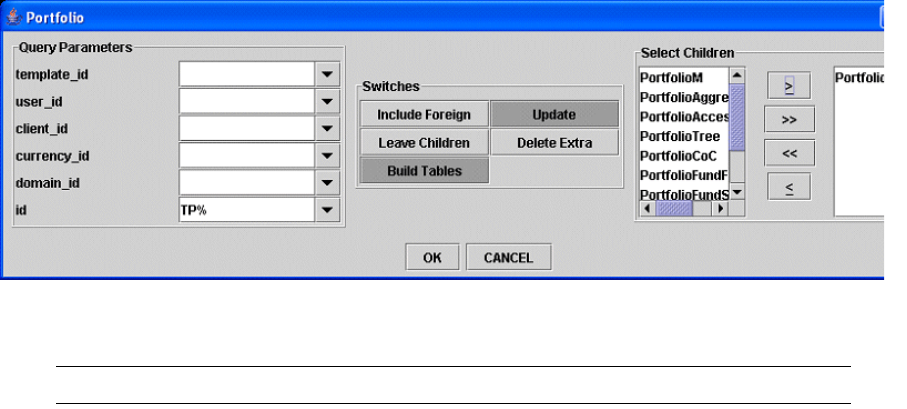
6 Transferring data: DBLoader
6.2 Operation
System Administration Guide 85
Update or Leave
If the object exists in the target database, use the unique key as the query. Two modes of operation
are available:
1. The data is updated: all non-key values are set to the value of the incoming object.
2. The data is not updated. For example, the data itself has been updated in the target database,
so the changes are not to be reverted.
The default behavior is to update.
Leave Children
With subentities of existing object instances there are two approaches to what should happen with
the rows that do not match the incoming data.
1. Remove the non matching rows so the sub entity looks the same as the incoming entity.
2. Leave the additional rows. The default action is to delete the non matching rows which can be
overridden with the Leave Children switch.
Delete Extra
Use this switch if you want the destination database to look exactly like the source database at the
object level; any objects in the destination database that do not exist in the source database are
removed from the destination database.
Rebuild Tables
With TRM and ACM this switch enables the creation of the database tables associated with the
object. The tables are built by calling the appropriate build script. It relies on the correct
environment being in place and that the service entry has been filled in for the database connection.
Select Children
This switch allows for selecting the subentities that will be included in the object.
6.2.4 Progress screen
Note: The Restart button may not be available in the current version oif DBLoader.
Save Setting Use this to save the entire setup for replaying using the script.py script. Opens a
navigation dialog.
Finish Starts the transfer process.
Close Closes the whole application.
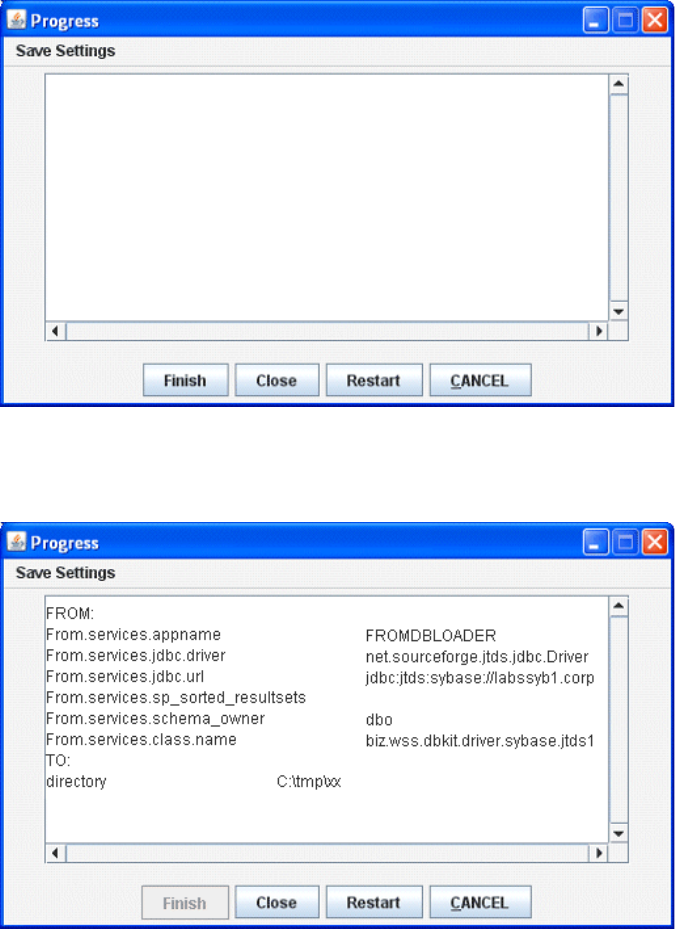
6 Transferring data: DBLoader
6.3 Issues and setup
86 © Wall Street Systems IPH AB - Confidential
Once you click Finish, the detail of the To and From connections are shown, and the status of each
transfer to the destination. Success is reported on the Object instance but Failure is reported on the
actual insert that has failed. Failures are usually supplied with reasons for failure. This information is
also written to warning.log.
6.3 Issues and setup
6.3.1 Errors
Failures and warnings are reported both in the Progress screen and in a file called warning.log
which is written to the current directory, normally the users’ home directory. Typically there can be
two types of output:
Restart Allows for the whole process to be started again by returning to the first screen.
Cancel Click at any time to abort the whole process.
6 Transferring data: DBLoader
6.3 Issues and setup
System Administration Guide 87
•Where there is an sql failure, which is reported as such.
•Where a stored procedure has reported a non zero return result; this is reported with the value.
The values have the following meanings:
1. DB_ERROR
2. PERMISSION_DENIED
3. NOT_FOUND
4. DOES_EXIST
5. DOES_NOT_EXIST
6. CHANGED
Error numbers 2, 5, and 6 are the most common, and indicate that either the database is being
updated by someone else or the setup is inappropriate for this type of operation by the user.
6 Transferring data: DBLoader
6.3 Issues and setup
88 © Wall Street Systems IPH AB - Confidential
System Administration Guide 89
Chapter 7 Secure setup for ActiveMQ
This chapter dewscribes how to secure the communication between the Wallstreet Suite modules
and the message broker ActiveMQ.
7.1 Prerequisites
•Install WallStreet Suite
•Do not start any processes before the procedures described in this chapter.
7.2 Generate certificates and public and private keys
Generate a certificate and private and public key for each component which will communicate with
message broker over SSL. Wallstreet Suite comes with tool that does this: see the WebSuite Cash
Management Connectivity Guide and search for ssl certificate generation.
Store the generated certificates and public and private keys for the following components in the
following places:
7.3 Encrypt passwords
The passwords that you chose in the previous section to protect generated public and private keys
need to be encrypted. See the WSS Suite Installation Guide and search for password encryption.
7.4 Changes required to configuration files
7.4.1 activemq.xml
Path: <suite-root>/envs/<environment>/var/active-mq/conf/
Active MQ <suite-root>/envs/<environment>/var/active-mq/conf/certs
Onyx <suite-root>/components/trm/fk72/etc/onyx/configuration/context/keys
RCP Suite <suite-root>/components/trm/fk72/java/jupiter/configuration/keys. Copy only
the file rcpsuite.ts to this path.
serviced You can save certificates anywhere in the file system. See 7.4.4 10_base.bat on page 91, and
look at the example of environment variable FK_MQ_BROKER_URL_CPP "telling" serviced
where they are located.
7 Secure setup for ActiveMQ
7.4 Changes required to configuration files
90 © Wall Street Systems IPH AB - Confidential
Comment out in <beans>/<broker>/<transportConnectors> everything except the tag
<transportConnector name="ssl"...>:
<beans>
...
<broker brokerName="localhost" useJmx="true" xmlns="http://activemq.org/config/1.0">
...
<transportConnectors>
<transportConnector name="ssl" uri="ssl://<machine>:<port>?wantClientAuth=true"/>
</transportConnectors>
...
</broker>
...
</beans>
Do not change <machine>:<port> - keep what was in the file.
In <beans>/<broker>/<plugins>, uncomment the tags <jaasAuthenticationPlugin> and
<messageSigningPlugin>, and replace <encrypted-password> with the encrypted password for the
keys for ActiveMQ which you already obtained using the password encryption tool:
<beans>
...
<broker brokerName="localhost" useJmx="true" xmlns="http://activemq.org/config/1.0">
...
<plugins>
<propertyDecrypterPlugin xmlns="http://xbean.wss.biz/schemas/plugin"/>
<jaasAuthenticationPlugin xmlns="http://xbean.wss.biz/schemas/plugin"
principalMappingConfiguration="${activemq.base}/conf/security/principal_mapping_config.x
ml"/>
<messageSigningPlugin xmlns="http://xbean.wss.biz/schemas/plugin"
certificate="${activemq.base}/conf/certs/localhost/localhost.p12"
certificateAlias="localhost"
certificatePassword="<encrypted-password>"/>
<timeStampingPlugin xmlns="http://xbean.wss.biz/schemas/plugin"/>
</plugins>
...
</broker>
...
</beans>
7.4.2 wss.bat (.sh)
Path: <suite-root>/envs/<environment>/var/active-mq/conf/
Change the following four lines to give ActiveMQ the location and passwords of the key store and
truststore:
set SSL_OPTS=%SSL_OPTS% -Djavax.net.ssl.keyStorePassword=<encrypted-password>
set SSL_OPTS=%SSL_OPTS% -Djavax.net.ssl.trustStorePassword=<encrypted-password>
set SSL_OPTS=%SSL_OPTS%
-Djavax.net.ssl.keyStore="%ACTIVEMQ_BASE%\conf\certs\localhost\localhost.ks"
set SSL_OPTS=%SSL_OPTS%
-Djavax.net.ssl.trustStore="%ACTIVEMQ_BASE%\conf\certs\localhost\localhost.ts"
7.4.3 database.properties
Path: <suite-root>/envs/<environment>/var/active-mq/conf/security/wss/
Modify the properties jdbc.driver and jdbc.url - examples are in comments at the beginning of
the file.

7 Secure setup for ActiveMQ
7.4 Changes required to configuration files
System Administration Guide 91
7.4.4 10_base.bat
Path: <suite-root>/envs/<environment>/etc/environment/parts/
In variables FK_MQ_BROKER_URL_CPP and FK_MQ_BROKER_URL_JAVA:
•Replace tcp: by ssl:
•Change the port to the port defined in
<suite-root>/envs/<environment>/var/active-mq/conf/activemq.xml:
<transportConnector name="ssl" uri="ssl://<machine>:<port>..."/>
(The SSL port number is usually one higher than the TCP port number).
Example before change:
SET
FK_MQ_BROKER_URL_CPP=tcp://localhost:20160?transport.ResponseCorrelator.maxRespo
nseWaitTime=10000
SET FK_MQ_BROKER_URL_JAVA=failover:tcp://localhost:20160
and after change:
SET
FK_MQ_BROKER_URL_CPP=ssl://localhost:20161?transport.ResponseCorrelator.maxRespo
nseWaitTime=10000
SET FK_MQ_BROKER_URL_JAVA=failover:ssl://localhost:20161
(The real port numbers will most probably be different to those in the example above.)
With FK_MQ_BROKER_URL_CPP set as above, serviced (and all other components that are not
written in Java) will communicate with the message broker over SSL. But they will not send their
certificate to the message broker, nor verify the message broker’s certificate. If you want these
components to use certificates, you must change the variable FK_MQ_BROKER_URL_CPP as
follows:
set
FK_MQ_BROKER_URL_CPP=ssl://172.24.17.185:20361?transport.ResponseCorrelator.maxR
esponseWaitTime=10000
&tcpTracingEnabled=true
&commandTracingEnabled=true
&sslCAFile=CA.cert.pem
&sslCertFile=serviced.cert.pem
&sslKeyFile=serviced.key.pem
&sslPassword=<encrypted-password>
&sslVerifyPeer=true
&sslCiphers=AES
Note: The value of this variable should be exporessed on a single line. Here, it has been split over
multiple lines for easier readability.
7.4.5 spring-tech.xml
Path: <suite-root>/components/trm/fk72/etc/onyx/configuration/context/
Uncomment:
<!-- SSL -->
<alias name="JMSFactorySenderSSL" alias="JMSFactorySender"/>
<alias name="JMSFactorySSL" alias="JMSFactory"/>
and comment out TCP:
7 Secure setup for ActiveMQ
7.4 Changes required to configuration files
92 © Wall Street Systems IPH AB - Confidential
<!-- TCP
<alias name="JMSFactorySenderTCP" alias="JMSFactorySender"/>
<alias name="JMSFactoryTCP" alias="JMSFactory"/>
-->
7.4.6 credentials.properties
Path: <suite-root>/components/trm/fk72/etc/onyx/configuration/context/properties/
Change the values of the following two properties to the encrypted passwords of truststore and
keystore for Onyx:
# SSL connection passwords
ssl.connection.keyStorePassword=<encrypted-password>
ssl.connection.trustStorePassword=<encrypted-password>
7.4.7 RCPSuite.bat
Path: <suite-root>/components/trm/fk72/java/jupiter/
Change the value of following property to the encrypted password of truststore for RCP Suite:
set PARAMS=%PARAMS% -Djavax.net.ssl.trustStorePassword=<encrypted-password>
System Administration Guide 93
Appendix A Onyx
A.1 Introduction
Onyx is a Java Bean container developed by Wallstreet Systems, based on the Spring framework.
This chapter describes how to configure the relevant property files for the services of Onyx,
including the Enterprise Swift Integration Adapter (ESIAdapter). See the WSS SWIFT Connectivity
Guide.
A.2 JDBC property file setup
The file is called jdbc.properties, and is located in
<Client_Installation_directory>\components\trm\fk72\etc\onyx\configuration\context\p
roperties
A.2.1 Example:
jdbc.tahoe.host=10.35.0.121
jdbc.tahoe.database=WS7REA5
jdbc.tahoe.port=1531
jdbc.tahoe.show.sql=true
jdbc.tahoe.username=dbo
jdbc.tahoe.password=trema
jdbc.tahoe.driver=oracle.jdbc.OracleDriver
jdbc.tahoe.url=jdbc:oracle:thin:@${jdbc.tahoe.host}:${jdbc.tahoe.port}:${jdbc.tahoe.
database}
jdbc.tahoe.hibernate.dialect=org.hibernate.dialect.Oracle9Dialect
jdbc.tahoe.hibernate.poolsize=5
jdbc.tahoe.hibernate.showsql=true
jdbc.host=10.35.0.121
jdbc.database=WS7REA5
jdbc.port=1531
jdbc.show.sql=true
jdbc.username=dbo
jdbc.password=trema
jdbc.driver=oracle.jdbc.OracleDriver
jdbc.url=jdbc:oracle:thin:@${jdbc.host}:${jdbc.port}:${jdbc.database}
jdbc.hibernate.dialect=org.hibernate.dialect.Oracle9Dialect
jdbc.hibernate.poolsize=5
A.3 Environment property file setup
The file is called jdbc.properties. The wss.env.name parameters have to set to the FK_IDENT
environment variable.
A Onyx
A.4 ssl.properties file
94 © Wall Street Systems IPH AB - Confidential
A.3.1 Example
#
The environment name used to identify this instance
#
Wss.env.name=rea5
A.4 ssl.properties file
Onyx, (and thus ESIAdapter) uses the standard Java Virtual Machine parameters for configuring SSL
connections.
For more information, see the following documentation provided by Sun:
•Java Secure Socket Extension:
http://java.sun.com/javase/6/docs/technotes/guides/security/jsse/JSSERefGuide.ht
ml
•Java SE Security: http://java.sun.com/javase/technologies/security/
•Key Stores: http://java.sun.com/j2se/1.5.0/docs/api/java/security/KeyStore.html
•Secure Sockets Layer Wikipedia: http://en.wikipedia.org/wiki/Secure_Sockets_Layer
The following is a simplified overview of SSL. For the complete SSL/TLS protocol, see
http://tools.ietf.org/html/rfc4346
There are three main concepts when configuring SSL connections. From the client’s (Onyx)
perspective:
•Whom does the client trust?
•How does the client present itself to the server?
•How does the client encrypt data?
A.4.1 Whom does the client trust?
In an installation, the TrustStore contains one or more certificates for trusted entities. This implies
that the client uses information from the TrustStore to verify the server in the SSL connection.
Typically, this trusted entity is a Certificate Authority (CA) and it is the public key of the CA which is
imported into the TrustStore. Normally the CA has generated public/private key pairs for both server
and the client (onyx), and is in the position to trust both.
A.4.2 How does the client presents itself to the server?
The KeyStore is used to answer the second and third questions, how do I present myself to the
server, and how do I encrypt data.
The client presents itself to the server by obtaining its public key from the KeyStore and
communicating it via the SSL/TLS protocol. The client uses its private key (found in the KeyStore)
to sign a challenge provided by the server. The server is then able to verify the client by using the
CA’s public key obtained from its own TrustStore (a store on the server), and the client’s public key
sent to the server. The client is then able to communicate to the server.
A.4.3 How does the client encrypt data?
At this point the server and the client negotiate a symmetric key to encrypt the channel.
A.4.4 JVM parameters
The following JVM parameters are used to configure the KeyStore and TrustStore. They have
common behavior, and differ in the names of the properties only.
A Onyx
A.5 Troubleshooting
System Administration Guide 95
•javax.net.ssl.trustStore/javax.net.ssl.keyStore
The path to the Store, typically a file.
•javax.net.ssl.trustStorePassword/javax.net.ssl.keyStorePassword
The password used to open the Store, if it is password protected.
•javax.net.ssl.trustStoreType/javax.net.ssl.keyStoreType
The format of the Store, for example if the Store has been created with the Java keytool then
typically the format is JKS. If openssl or other tools are used then format will not be JKS, but
will be documented by the tool. For example it is possible to use PKCS12-formatted Stores with
the Sun JDK.
All of these are documented fully in Java Secure Socket Extension:
http://java.sun.com/javase/6/docs/technotes/guides/security/jsse/JSSERefGuide.html
A.5 Troubleshooting
A.5.1 Setting log and traces
In log4j.xml, use the default BackupRollingFileAppender that keeps only the most recent files.
If you do need email notification, you can use the following setting:
<appender name="MAIL" class="org.apache.log4j.net.SMTPAppender">
<param name="To" value="Anthony.Leach@wallstreetsystems.com"/>
<param name="SMTPHost" value="mailhost"/>
<param name="Subject" value="ESIADAPTER Problem"/>
<param name="From" value="system@client.com"/>
<param name="BufferSize" value="1"/>
<layout class="org.apache.log4j.PatternLayout">
<param name="ConversionPattern" value="%d %5p [%t] (%F:%L) - %m%n" />
</layout>
</appender>
A.5.1.1 Working system
When there are no problems, you may see the following traces:
2008-06-18 13:31:38,076 DEBUG [Thread-2] (MQSeriesAPI.java:201) - Received
Content:{1:F01AREVFRP0AXXX0000000000}{2:I101BSUIFRP0XXXXN2020}{3:{108:0071814}}{4:
:20:0071814
:28D:1/1
:50L:COMPANY SA
:50H:/FR7631489000100014323912447
COMPANY SA
PARIS FR
:52A:BSUIFRP0XXX
:30:080619
:21:0071814
:23E:INTC
:32B:EUR100,
A Onyx
A.5 Troubleshooting
96 © Wall Street Systems IPH AB - Confidential
:57A:ZYAEFRP0XXX
:59:/FR7630004008280001056442376
COMPANY SA
PARIS FR
:70:Test virement trEso
:71A:OUR
-}
2008-06-18 13:31:58,405 DEBUG [Thread-2] (MQSeriesAPI.java:109) - Received from ack
feedback=275
2008-06-18 13:31:58,405 INFO [Thread-2] (MQSeriesAPI.java:210) -
handleAckMessage(feedback=275)
2008-06-18 13:31:58,405 DEBUG [Thread-2] (MQSeriesAPI.java:201) - Received
Content:{1:F21AREVFRP0AXXX0211000630}{4:{177:0806181531}{451:0}{108:0071814}}{S:{CON:}{T
RN:0071814}}
2008-06-18 13:32:23,655 DEBUG [Thread-2] (MQSeriesAPI.java:109) - Received from ack
feedback=275
2008-06-18 13:32:23,655 INFO [Thread-2] (MQSeriesAPI.java:210) -
handleAckMessage(feedback=275)
2008-06-18 13:32:23,655 DEBUG [Thread-2] (MQSeriesAPI.java:201) - Received
Content:{1:F01AREVFRP0AXXX0211000555}{2:O0111332080618DYMFXXXXHXXX00005400760806181532S}
{4:{175:1531}{106
:080618AREVFRP0AXXX0211000630}{108:0071814}{175:1531}{107:080618BSUIFRP0AXXX4223246243}}
{5:{CHK:5103888ABA6A}{SYS:}{TNG:}}{S:{COP:P}}
This shows that ESIAdapter:
•Received an M101.
•Received an ACK from the library
•Received a service bureau ACK
•Received a bank acknowledgement 011.
To enable this level of debug, edit log4j.xml and add or update the section:
<category name="biz.wss.esiadapter.onyxservice.api.impl.MQHelper">
<priority value="DEBUG" />
</category>
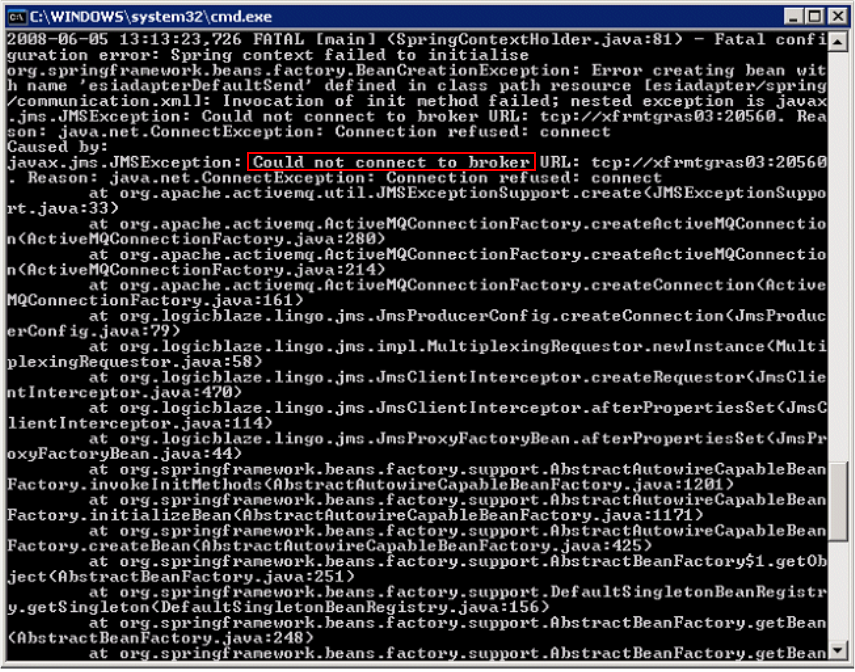
A Onyx
A.5 Troubleshooting
System Administration Guide 97
A.5.1.2 "could not connect to broker" message
In this case of message:
You can see could not connect to broker. Verify on the PMM that the ActiveMQ is running, and if
the broker is not correct, check the variable FK_MQ_BROKER_URL.
telnet <hostname> <port number>
Interpretation
•telnet can not connect:
–Test that this is the good server/port.
–Test if the server ID is down.
From the server host run
either: hwr_chksrv.bat <port number>
Or: netstat -a | grep <port number> on *nix
–The server is not reachable:
traceroute to the host server ).
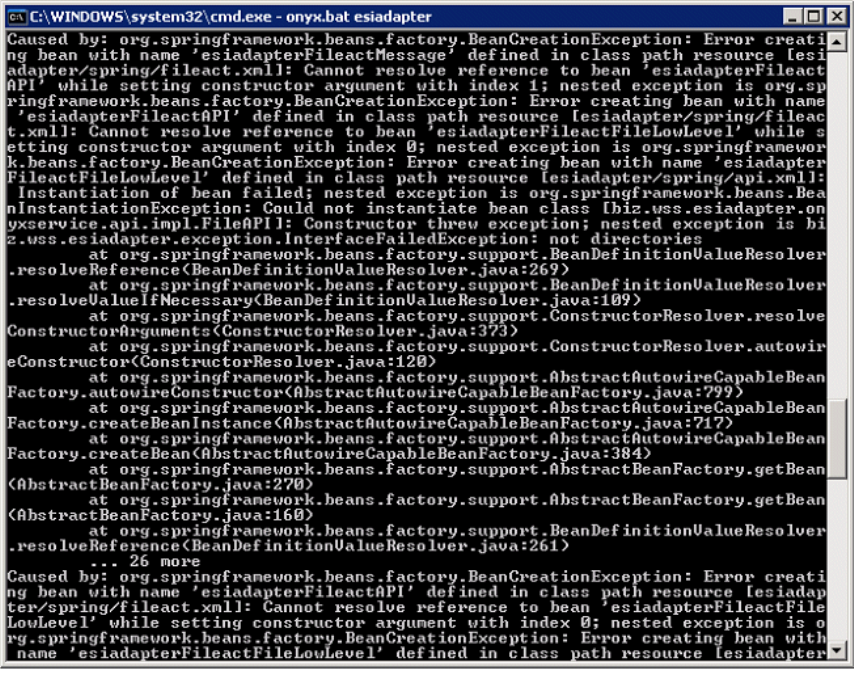
A Onyx
A.5 Troubleshooting
98 © Wall Street Systems IPH AB - Confidential
A.5.1.3 "Error creating bean with name..." message
Check in the file ..\site\components\trm\fk72\etc\onyx\configuration\context\properties.
The paths of esiadapter.fileactfile.topdirectory must match the folder you created before.
*nix> fgrep directory esiadapter.properties
Dos> hwr_ckdirprop.bat esiadapter.properties
There are several folders to create
A.5.1.4 IBM-MQ 2397 and IBM-MQ 2055
Try to turn on the SSL traces in ssl.properties.
javax.net.debug=ssl,handshake,all
A.5.1.4.1 SSL traces
The log will looks like:
init context
trigger seeding of SecureRandom
done seeding SecureRandom
instantiated an instance of class com.sun.net.ssl.internal.ssl.SSLSocketFactoryImpl
04:55:41 [1213721741708] Thread: main Class: SSLHelper creating
SSL socket
A Onyx
A.5 Troubleshooting
System Administration Guide 99
04:55:41 [1213721741942] Thread: main Class: SSLHelper setting
enabled cipher suites to 'SSL_RSA_EXPORT_WITH_RC4_40_MD5'
04:55:41 [1213721741942] Thread: main Class: SSLHelper Setting
protocol to SSLv3
04:55:41 [1213721741942] Thread: main Class: SSLHelper Supported
Protocols are SSLv2Hello, SSLv3, TLSv1,
04:55:41 [1213721741942] Thread: main Class: SSLHelper calling
startHandshake
Remove the channel definition file from esiadapter.properties:
init context
trigger seeding of SecureRandom
done seeding SecureRandom
instantiated an instance of class com.sun.net.ssl.internal.ssl.SSLSocketFactoryImpl
%% No cached client session
*** ClientHello, SSLv3
RandomCookie: GMT: 1213656645 bytes = { 80, 1, 3, 23, 116, 231, 60, 146, 111, 140, 12,
190, 215, 226, 162, 225, 135, 114, 212, 34, 204, 122, 247, 26, 164, 110, 1
Session ID: {}
Cipher Suites: [SSL_RSA_EXPORT_WITH_RC4_40_MD5]
Compression Methods: { 0 }
***
[write] MD5 and SHA1 hashes: len = 45
0000: 01 00 00 29 03 00 48 57 EE 45 50 01 03 17 74 E7 ...)..HW.EP...t.
0010: 3C 92 6F 8C 0C BE D7 E2 A2 E1 87 72 D4 22 CC 7A <.o........r.".z
0020: F7 1A A4 6E C2 C5 00 00 02 00 03 01 00 ...n.........
main, WRITE: SSLv3 Handshake, length = 45
[Raw write]: length = 50
0000: 16 03 00 00 2D 01 00 00 29 03 00 48 57 EE 45 50 ....-...)..HW.EP
0010: 01 03 17 74 E7 3C 92 6F 8C 0C BE D7 E2 A2 E1 87 ...t.<.o........
0020: 72 D4 22 CC 7A F7 1A A4 6E C2 C5 00 00 02 00 03 r.".z...n.......
0030: 01 00 ..
main, received EOFException: error
main, handling exception: javax.net.ssl.SSLHandshakeException: Remote host closed
connection during handshake
main, SEND TLSv1 ALERT: fatal, description = handshake_failure
main, WRITE: TLSv1 Alert, length = 2
[Raw write]: length = 7
If the problem is at the other side of the network, contact the service bureau or the other
party involved.
A Onyx
A.5 Troubleshooting
100 © Wall Street Systems IPH AB - Confidential
A.5.1.5 Follow-up on a job
A successful job log looks like this.
However, you may want to look at the ESIAdapter tables:
-- Oracle --
SELECT
id,owner_id,module_id,max_state_id,current_state_id,from_client,to_char(request_time,'DD
-MON-YYYY HH24:MI:SS') "request time"
FROM AdapterRequestEntry
where module_id like '%11563%'
ORDER BY request_time desc
163 finswift CM-11563 4 4 1 18-JUIN -2008 13:31:33
The module_id is a reference provided by the system sending information to ESIAdapter.
Here, it is built from CM (the name of the requester system) and 11563 (the job ID).
Note: Another requester system will use another reference.
select <s.ID>, s.owner_id, s.system_module_id, s.current_state_id
from AdapterSentEntry s; AdapterRequestEntry r
where r.module_id like '%11563%'
and s.owner_id = r.id
A Onyx
A.5 Troubleshooting
System Administration Guide 101
order by 1
164 163 SWIII21C-CM-11563 4
The system_module_id is a reference used in exchange with another system. It may or may not
look similar to the joblogid. Yyou need to use the join to retrieve related records.
A Onyx
A.5 Troubleshooting
102 © Wall Street Systems IPH AB - Confidential

System Administration Guide 103
Appendix B Environment color schemes
B.1 Introduction
From version 7.3.3 of Wallstreet Suite, you can differentiate between Wallstreet Suite environments
by color-coding them.
You can select one of four color schemes. You choose the initial color scheme and change it later
using the Wallstreet Suite Installer:
The color scheme that you choose is applied to the user interfaces of all Wallstreet Suite applications
including WebSuite. The effect is to apply a tint to them. The screenshot below shows Transaction
Manager running in an environment that uses the "Production" scheme (no tinting at all), then the
same application running in an environment using the "Development" scheme (tinted green):

B Environment color schemes
B.2 How it works
104 © Wall Street Systems IPH AB - Confidential
This enables you to color-code up to three environments (the fourth is untinted, and should be used
for the "live" or production environment only).
B.2 How it works
Suite Installer sets the environment variable FK_COLOR_ENV_TYPE to one of four possible values,
depending on the installation type you choose:
Suite Installer sets the environment variable FK_COLOR_SCHEME to a particular color value depending
on the value of FK_COLOR_ENV_TYPE. Here are the factory values:
Both these environment variables are reflected in the \sharedconf\environment.properties file
(in the example below, the installation type is set to Production):
# Color properties to defined basically some color to distinguish environment
ts.env.color.scheme=
# env.type must be one of this (prod, dev ,preprod, playground)
ts.env.color.env.type=prod
WebSuite also depends on the value of FK_COLOR_ENV_TYPE for its color scheme, but handles it in a
different way.
B.2.1 WebSuite theming components
These are all stored in this path:
<installation_dir>\ws-suite\components\wss-web\websuite\resources\style\classic
and consist of the following files, where <env_type> is the value of FK_COLOR_ENV_TYPE: prod, dev,
preprod, or playground:
•Stylesheets
\style\theming\login\login_<env_type>.css
Used by login and password expiry/change HTML files.
•Background images
\image\nav\gradient_<env_type>.jpg
Installation type FK_COLOR_ENV_TYPE value
Production prod
Development dev
Pre Production preprod
Playground playground
Installation
type
FK_COLOR_ENV_TYPE
value FK_COLOR_SCHEME value Effect on TRM/ACM
applications
Production prod null nothing (no color tint)
Development dev d2d859,eceeb7,f0f2c7,939823 green tint
Pre Production preprod d77e82,edc6c8,f1d2d4,be3940 red tint
Playground playground b2c2e5,dee5f3,e5eaf6,5478c6 blue tint
B Environment color schemes
B.2 How it works
System Administration Guide 105
Used by login and password expiry/change HTML files in the login box, and by the portal HTML
file.
•HTML portal files
\ekit_theming\ekit_nav\ekit_nav_<env_type>.html
This is the header of each WebSuite screen apart from the login screens.
•HTML login files
\ekit_theming\ekit_login\ekit_login_<env_type>.html
•HTML password expiry files
\ekit_theming\ekit_expiry\ekit_login_expiry_<env_type>.html
•HTML password change files
\ekit_theming\ekit_change\ekit_login_change_<env_type>.html
Example of a WebSuite "Preprod" password change screen:
B Environment color schemes
B.2 How it works
106 © Wall Street Systems IPH AB - Confidential
