Lightstreamer Web Client Guide
User Manual:
Open the PDF directly: View PDF ![]() .
.
Page Count: 17

Web Client Guide
Target API: Lightstreamer Web Client (Unified) v. 7.2.0
Last updated: 11/03/2019

Table of contents
1 INTRODUCTION...............................................................................................................3
2 WEB CLIENT DEVELOPMENT................................................................................................4
2.1 Deployment Architecture.................................................................................4
2.1.1 Deployment and Browsers...............................................................................4
2.2 Site/Application Architecture............................................................................5
2.3 The LightstreamerClient..................................................................................6
2.3.1 Using an AMD loader.......................................................................................6
2.3.2 Using Global Objects.......................................................................................9
2.3.3 Name Clashes...............................................................................................10
2.3.4 LightstreamerClient in a Web Worker..............................................................11
2.4 The Subscription Listeners.............................................................................12
2.4.1 StaticGrid......................................................................................................12
2.4.2 DynaGrid......................................................................................................13
2.5 Building........................................................................................................14
2.5.1 RequireJS optimization tool (r.js)....................................................................14
2.6 Troubleshooting............................................................................................15
2.6.1 Check for exceptions.....................................................................................15
2.6.2 Server-sent errors.........................................................................................15
2.6.3 Logging........................................................................................................16
2.6.4 Still in trouble................................................................................................17
- 2 -

1Introduction
This document provides a conceptual introduction to the development of Lightstreamer Clients based
on the Web (Unified API) Client Library.
A full JavaScript API reference is available both online and within the software distribution:
–Online JSDoc: http://www.lightstreamer.com/docs/client_javascript_uni_api/index.html
–Bundled JSDoc: "Lightstreamer/DOCS-SDKs/sdk_client_web_unified/doc/API-reference-
index.html"
- 3 -
2Web Client Development
The Lightstreamer Web Client API (Unified) is a set of JavaScript classes/modules that can be
included into any Web site, HTML5 application, or JavaScript application in general in order to make
it "Lightstreamer-enabled", that is, ready to receive and send real-time data from/to Lightstreamer
Server.
The Web Client Library, in the basic form provided in the distribution, is comprised of one single
JavaScript file, lightstreamer.js, that contains all of the available classes; in this form, it also
requires an AMD loader to be used. It is possible to customize the library to only include the desired
classes and to be usable without any AMD loader by means of a generator distributed with the library
itself. The generator is in the form of a simple HTML file: generator.html.
2.1 Deployment Architecture
For demo purpose, Lightstreamer Server contains an internal web server that is able to serve static
web resources. This makes it simple to distribute out-of-the-box demos (such as the Stock-List
Demo) and to get started with Lightstreamer development. But for actual projects and production
scenarios, it is highly recommended that an external web server is used (because Lightstreamer is
optimized for pushing real-time data, not for serving static pages).
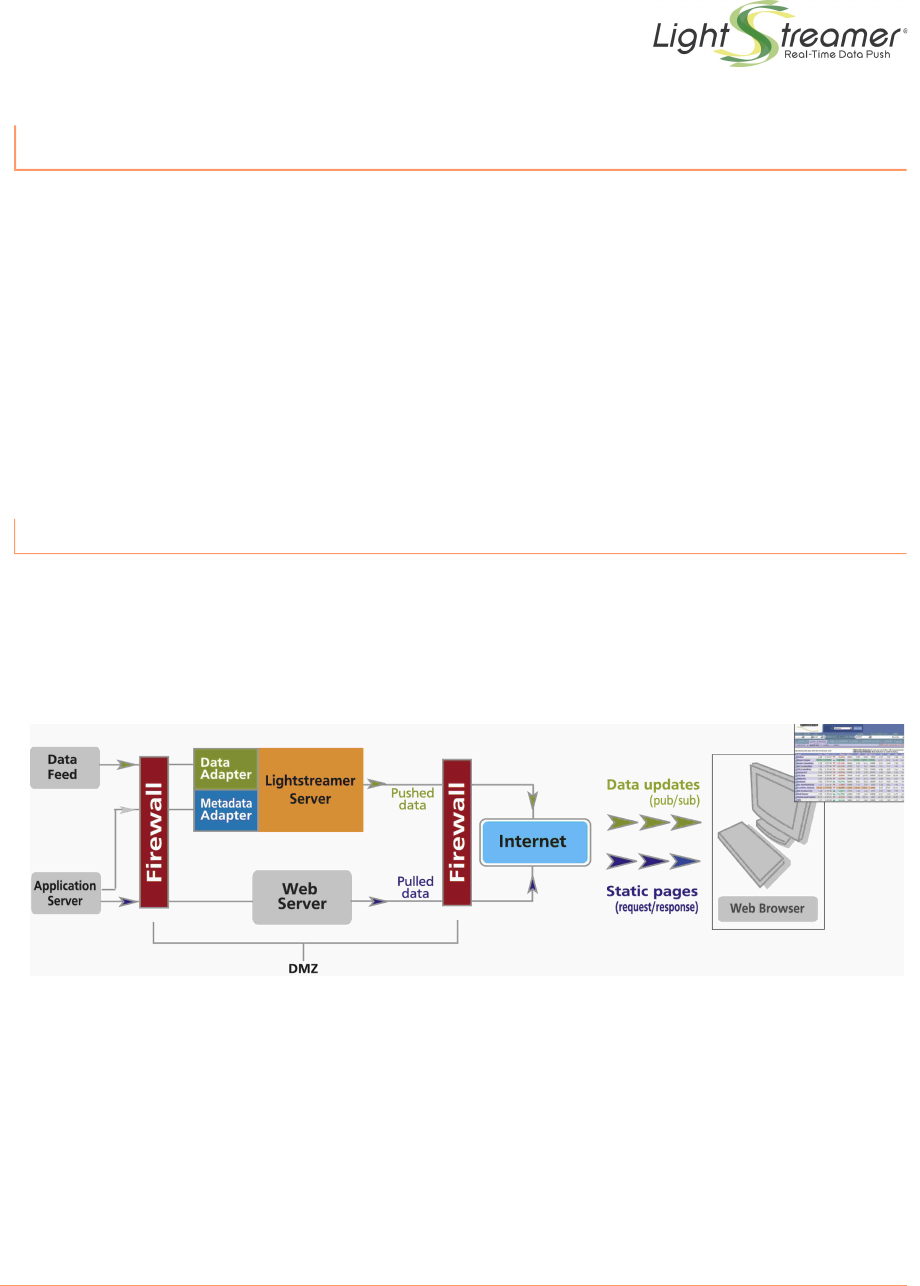
Typically, a Lightstreamer Server and any common web server (e.g. Apache, nginx, IIS or any other
web server of your choice) are deployed in the DMZ network. Lightstreamer Server gets the data and
metadata from the back-end servers that are protected by the second firewall. The web browser gets
the static web pages, as usual, from your web server, then it connects to Lightstreamer Server to
receive the flow of real-time updates. Of course, both servers can be clustered for fail-over and load
balancing.
It is also possible to let a browser load the static web pages directly from the file system of the client
machine, a case that is useful during development and testing.
2.1.1 Deployment and Browsers
Depending on the chosen deployment architecture, on the browser in use, and on some
configuration parameters, the Web Client Library will try to connect to the designated
Lightstreamer Server in the best possible way.
- 4 -
With older versions of the Web Client Library, it was mandatory that the Web server and the
Lightstreamer server shared the same domain name (e.g. www.mycompany.com and
realtime.mycompany.com). Starting from Client Library version 6.0 (then named JavaScript
Client Library), this is no longer required, even if there are cases where this might be
useful. A spreadsheet is available online, which summarizes the client-side combinations and
the instructions on which settings to use to guarantee that an optimal connection is
established. See the legend on the second tab to learn about the meaning of each column:
Lightstreamer JS Client - Deployment Config Matrix
Basically, by still sharing the same domain name between the Web server and the
Lightstreamer server, and setting such domain explicitly in the page, you guarantee that
streaming mode works across all browsers, including older IE versions. Otherwise, on these
browsers some form of polling mode will be automatically selected instead of streaming. For
many kinds of applications, you will not probably need to care that streaming mode is always
enabled. But for very high-performance applications (high throughput and low latency) that
require old-browser compatibility, you might prefer to keep the same-domain rule.
HINT: In case you need to test a deployment scenario, involving specific hostnames and
domain names for the Web server and the Lightstreamer server, and you are developing on a
stand-alone machine without a DNS (so you probably have Lightstreamer Server and the Web
server on the same machine on different ports), you can simulate the final environment by
editing the host file of your machine. For example, in a Windows environment, you will edit the
"C:\WINDOWS\system32\drivers\etc\hosts" file and add something like:
127.0.0.1 www.mycompany.com
127.0.0.1 realtime.mycompany.com
2.2 Site/Application Architecture
Each page of the site that is going to receive and/or send real-time updates from/to Lightstreamer
Server must include a LightstreamerClient instance, which transparently manages the connections
to Lightstreamer Server.
If you have multiple pages or page instances of your site open at the same time within different
browser tabs or windows, you might want different LightstreamerClient instances to share the
same session and connection, to avoid saturating the browser connection pool (if applicable) and/or
to avoid opening several sessions for the same user. You can achieve that by leveraging the
provided enableSharing function for each instance of LightstreamerClient. When different
LightstreamerClient instances share the same connection there is one single instance holding the
connection; such instance is called the Master LightstreamerClient (or simply Master Client) while
the others are referred to as Slaves. In case the Master LightstreamerClient is terminated (e.g. its
tab is closed), the Slave LightstreamerClients will automatically and transparently elect a new
Master, which will restore the connection and all the subscriptions.
NOTE: In case the document.domain property is set on the page hosting the Master Client,
any other page of the site that wants to host a Slave Client needs to set its document domain
too. Vice versa, if the document.domain property is not set on the page hosting the Master
Client, any other page of the site that wants to host a Slave Client cannot set its own
document domain. The simplest way to be sure to avoid any issue is to set or not set the
document.domain in all the pages of the site.
- 5 -
So, when you have multiple pages open at a time connecting to the same Lightstreamer application,
you will probably share the session/connection among them. But what if you navigate your site
serially, page after page? The Lightstreamer session will open and close on each page, because the
LightstreamerClient object is created and destroyed together with the hosting page. This is usually
acceptable, as the session creation is very fast (depending on your custom server-side Metadata
Adapter implementation, for handling authentication). Should you need to persist the physical
session/connection across page navigation, a solution would be to place the Master
LightstreamerClient inside a hidden frame (or iframe), and perform the actual site navigation in a
visible frame (or iframe). An example of this strategy is the pre-installed "Framed Stock-List Demo".
The user can navigate between two lists of 15 stocks. Each list is contained in a separate page. The
Master LightstreamerClient is loaded in a hidden frame of the encapsulating frameset, so that the
Lightstreamer session survives any page switch. Switching between the two pages originates the
subscriptions/unsubscriptions requests to Lightstreamer Server as part of the same session.
The lightstreamer.js library is designed to work even outside of a browser context. This means you
can use it within any JavaScript-based environment, including PhoneGap, SmartTV, and others. For
the Node.js environment, a similar, specialized library is made available as a different SDK.
Connection sharing between multiple instances of LightstreamerClient is not supported in these
contexts.
2.3 The LightstreamerClient
An HTML page, produced through any kind of server technology (e.g. JSP, ASP, PHP, Node.js, etc.)
can host a LightstreamerClient to connect to a Lightstreamer Server.
As said above, a Master LightstreamerClient (or Master Client) is a LightstreamerClient instance that
has also the responsibility of holding the connection to the Lightstreamer Server. A Slave
LightstreamerClient exploits the connection hold by a Master Client to subscribe its Subscriptions to
the Lightstreamer Server and to receive real-time updates.
Below are the steps required to transform a normal HTML page into an HTML page receiving updates
from a LightstreamerClient. (The code examples assume that the lightstreamer.js library and, in the
AMD case, the AMD loader require.js are deployed under the "/js" folder of the web server; see
section 2.1).
Note that by default the library is distributed in the basic AMD form. Other versions of the library can
be obtained through the generator.html file distributed with the library itself.
2.3.1 Using an AMD loader
The Asynchronous Module Definition (AMD) API specifies a mechanism for defining
modules such that the module and its dependencies can be asynchronously loaded. See
https://github.com/amdjs/amdjs-api/wiki/AMD
To use the default version of the Lightstreamer library an AMD loader is needed. We suggest
using RequireJS: http://requirejs.org/
A very simple AMD loader, that does not support dynamic loading of .js files, can be
embedded in the lightstreamer.js through the generator.html; usage details can be found on
the generator inline help. For the sake of simplicity we will assume the use of the full-blown
RequireJS library.
1. Include the libraries
As a very first action, the HTML page should import, in its HEAD section, the require.js
and lightstreamer.js JavaScript libraries, in this exact order.
This can be done through the following code:
- 6 -

<script src="/js/require.js"></script>
<script src="/js/lightstreamer.js"></script>
2. Include the style sheets
All the cascading style sheets (CSS) declared in the Lightstreamer functions should be
defined or linked in the HEAD section of the page.
3. Obtain the LightstreamerClient class
Once the libraries are included, a script element should be added to include the
application code. In the AMD version of the library none of the available classes is
declared as a global object on the page: a call to the require method of the AMD loader in
use is needed to obtain the various constructors. For now we will only require the
LightstreamerClient class, as shown below. The code in the next bullets will be placed in
the require callback (i.e.: where the "CODE HERE" comment is).
<script>
require(["LightstreamerClient"],
function(LightstreamerClient) {
//CODE HERE
});
</script>
4. Create the LightstreamerClient object
To connect to a Lightstreamer Server, a LightstreamerClient object has to be created,
configured, and instructed to connect to the Lightstreamer Server.
A minimal version of the code that creates a LightstreamerClient and connects to the
Lightstreamer Server on http://push.mycompany.com will look like this:
var myClient = new LightstreamerClient(
"http://push.mycompany.com", "MyAdapterSet");
myClient.connect();
In the example above only a minimal configuration, consisting of the address of the server
and the Adapter Set to be used, is done. A typical version of the script, however, would
set one or more LightstreamerClient properties through the setter methods provided for
the LightstreamerClient object and its member objects and would also add a listener for
the instance. Please, consult the JSDoc for details on the LightstreamerClient,
ConnectionDetails and ConnectionOptions classes.
5. Obtain the ConnectionSharing class, if needed
As previously stated, it is possible to make different LightstreamerClient instances share
the same connection.
By default the connection is not shared so, before calling the connect method, it is
necessary to instruct the client on the sharing policies to be applied for the sharing to
happen. If such sharing is desired, as a first step we need to extend our require call to
also include the ConnectionSharing class:
<script>
require(["LightstreamerClient","ConnectionSharing"],
function(LightstreamerClient,ConnectionSharing) {
//CODE HERE
- 7 -

});
</script>
6. Sharing a connection
If sharing is desired, once the ConnectionSharing class is available, the above code will
change like this:
var myClient = new LightstreamerClient(
"http://push.mycompany.com", "MyAdapterSet");
myClient.enableSharing(new ConnectionSharing(
"MyApplication", "ATTACH", "CREATE"));
myClient.connect();
"MyApplication" is a unique name for the application, "ATTACH" is the policy to be applied
if a compatible connection is found and "CREATE" is the policy to be applied if such a
connection is not found. In the above case we've instructed the client to attach to an
existing connection if available (thus becoming a Slave Client) or to create its own if not
(becoming a Master Client). Consult the JSDoc for details on the available policies and
their effects.
7. Obtain the Subscription class
For each subscription to be subscribed to a Lightstreamer Server a Subscription instance
is needed. As a first step we need to extend our require call to also include the
Subscription class:
<script>
require(["LightstreamerClient","ConnectionSharing",
"Subscription"],
function(LightstreamerClient,ConnectionSharing,Subscription) {
//CODE HERE
});
</script>
8. Create a Subscription object
Once the Subscription class is available, an instance has to be created and configured to
describe the subscription we are going to send to the Lightstreamer Server. A simple
Subscription containing three items and three fields to be subscribed in MERGE mode is
easily created (see Lightstreamer General Concepts):
var mySubscription = new Subscription("MERGE",["item1",
"item2", "item3"],["field1", "field2", "field3"]);
Several configuration options are available. In particular, in case the Adapter Set contains
multiple Data Adapters, specifying the name of the Data Adapter that supplies the items in
the subscription may be needed. This is accomplished through a line of code like the
following:
mySubscription.setDataAdapter("MyDataAdapter");
The subscription to the server of the newly created Subscription instance is performed
through a simple call:
myClient.subscribe(mySubscription);
- 8 -
Note that once the Subscription is passed to the LightstreamerClient as shown above, it
will be persisted across sessions meaning that if the Master Client disconnects from the
server and then reconnects again there is no need to perform a new subscribe call.
9. Listen for real-time updates
Before sending the subscription to the server, usually at least one listener is attached to
the Subscription instance in order to consume the real-time updates. The following code
shows the value of the "field1" field in a JavaScript alert each time a new update is
received for the subscription:
mySubscription.addListener({
onItemUpdate: function(updateObject) {
alert(updateObject.getValue("field1"));
}
});
Some ready-made SubscriptionListener classes are available in the library. Such listeners
will be described in section 2.4
10. The complete code
Below is the complete JavaScript code:
<script>
require(["LightstreamerClient","ConnectionSharing",
"Subscription"],
function(LightstreamerClient,ConnectionSharing,Subscription) {
var myClient = new LightstreamerClient(
"http://push.mycompany.com", "MyAdapterSet");
myClient.enableSharing(new ConnectionSharing(
"MyApplication", "ATTACH", "CREATE"));
myClient.connect();
var mySubscription = new Subscription("MERGE",["item1",
"item2", "item3"],["field1", "field2", "field3"]);
mySubscription.setDataAdapter("MyDataAdapter");
mySubscription.addListener({
onItemUpdate: function(updateObject) {
alert(updateObject.getValue("field1"));
}
});
myClient.subscribe(mySubscription);
});
</script>
2.3.2 Using Global Objects
If the use of an AMD loader is not desired, it is possible to generate a flavour of Lightstreamer
Web (Unified API) Client Library that declares its classes in the global namespace.
- 9 -
1. Generate the library
To create such a library the generator.html must be loaded inside a browser and
configured with the "Use globals" option selected. Once the "Create library" button has
been clicked the resulting library will be created in the text-area on the bottom of the
generator. Copy the shown text inside a text editor and save as lightstreamer.js.
2. Include the library
As the AMD loader is no longer needed there is only one library to be included:
<script src="/js/lightstreamer.js"></script>
3. The complete code
The code of the application remains quite the same as the previous example
excluding the require wrapping:
<script>
var myClient = new LightstreamerClient(
"http://push.mycompany.com", "MyAdapterSet");
myClient.enableSharing(new ConnectionSharing(
"MyApplication", "ATTACH", "CREATE"));
myClient.connect();
var mySubscription = new Subscription("MERGE",["item1",
"item2", "item3"],["field1", "field2", "field3"]);
mySubscription.setDataAdapter("MyDataAdapter");
mySubscription.addListener({
onItemUpdate: function(updateObject) {
alert(updateObject.getValue("field1"));
}
});
myClient.subscribe(mySubscription);
</script>
2.3.3 Name Clashes
When working on big HTML front-end including different JavaScript libraries, some name
collisions may occur in both the AMD and Global cases. The generator offers two options,
namely Use namespaced globals and Use AMD with namespaced names, that can be
used to generate a library that prevents such collisions from happening.
- 10 -
1. AMD case
In the AMD case the only difference is in the names used in the first parameter of the
require call:
<script>
require(["Lightstreamer/LightstreamerClient",
"Lightstreamer/ConnectionSharing"
"Lightstreamer/Subscription"],
function(LightstreamerClient,
ConnectionSharing,
Subscription) {
//CODE HERE
});
</script>
everything else remains as is in the normal AMD case.
2. Globals case
The Globals case needs a little more work because the Lightstreamer. prefix has to be
added to the constructor names each time an instance of one of the classes from the
Lightstreamer library is needed. In the above examples two instances (one
LightstreamerClient and one Subscription) are generated. The related code will then
become like this:
var myClient = new Lightstreamer.LightstreamerClient(
"http://push.mycompany.com", "MyAdapterSet");
var mySubscription = new Lightstreamer.Subscription("MERGE",
["item1", "item2", "item3"],["field1", "field2", "field3"]);
2.3.4 LightstreamerClient in a Web Worker
A LightstreamerClient instance can also be used inside a WebWorker even though in this case
connection sharing is disabled. Also note that the Lightstreamer Web (Unified API) Client
Library cannot be used in any flavour inside a Worker if the target browser is Opera.
1. Create a Worker
To load the client in a Worker, a Worker is needed first. A listener on the worker can
be used to receive messages from the worker itself. Simply put the following code in a
HTML file
<script>
var worker = new Worker('index.js');
worker.addEventListener('message', function(event) {
alert(event.data);
});
</script>
- 11 -

2. Prepare the Worker Code
The index.js file specified in the above code will contain the JavaScript code used to
connect to a Lightstreamer Sever. It starts including the needed libraries
importScripts("require.js");
importScripts("lightstreamer.js");
then the same code shown in the AMD example can be used (comprised of the
require call) with only one single difference, that is, a different approach is used to
consume the Subscription data: such data is sent back as an event using the
postMessage facility (note that the alert method is not even available in the Worker
context):
mySubscription.addListener({
onItemUpdate: function(updateObject) {
postMessage(updateObject.getValue("field1"));
}
});
2.4 The Subscription Listeners
The Lightstreamer Web (Unified API) Client Library includes some SubscriptionListener
implementations that can be used in an HTML page to show the data received on a Subscription.
Below is a description of the two main implementations: StaticGrid and DynaGrid. Actually, such
classes can also be used without listening on Subscription objects, but such usage is out of the scope
of this document.
In the following description the term cell is used to refer to the atomic unity of visualization for data
pushed by Lightstreamer and associated to a field (see General Concepts).
In order to declare a cell, a special DIV element or a special SPAN element should be used. It is
possible to choose between a DIV and a SPAN tag for each cell, according to the front-end
requirements1. Alternative ways for supplying push cells are available, which allow the use of any kind
of tag. See the JSDoc for details.
2.4.1 StaticGrid
In a StaticGrid each cell is statically defined in the HTML page.
Each cell for this kind of grid can define the following special properties:
•[mandatory] data-source: this special property must be specified with its value being
"lightstreamer" in order to authorize the StaticGrid to use such HTML element as a
cell.
•[mandatory] data-grid: an identifier that is used to associate a cell with a StaticGrid
instance: the same value has to be specified in the constructor of the said StaticGrid.
•[mandatory] data-row: a number representing the row number this cell is associated
with. As all the cells have to be manually defined, the number of rows in the grid is
defined by the biggest value of this property in all the cells related to the StaticGrid
(note that data-item can be used instead of data-row in some special cases. Check
the JSDoc for details).
•[mandatory] data-field: the name of the field to be associated with the cell (it can also
be a field index, see the JSDoc for details)
1 See http://www.w3.org/TR/REC-html40/struct/global.html#h-7.5.4 for a formal specification of the difference between DIV
and SPAN.
- 12 -

•[optional] data-num: if there is the requirement to have more cells related to the same
row/field pair, it is possible to specify this property in order to distinguish between such
cells when handling the StaticGrid events.
•[optional] data-update: by default the content of a cell is updated with the received
values. By specifying this property, it is possible to target any property of the HTML
element (e.g.: the src property of an IMG tag) or its stylesheet.
•[optional] data-fieldtype The StaticGrid class offers the extractFieldList and
extractCommandSecondLevelFieldList functions to read from the html the data-field
values of the associated cells. Using this property is possible to specify if a field has to
be extracted during extractFieldList executions (missing data-fieldtype property or
“first-level” value), during extractCommandSecondLevelFieldList (data-fieldtype set to
“second-level”) or neither (data-fieldtype set to “extra”)
Example (HTML part)
...
<div data-source="lightstreamer" data-grid="quotes" data-row="1"
data-field="field1">-</div>
<div data-source="lightstreamer" data-grid="quotes" data-row="1"
data-field="field2">-</div>
<div data-source="lightstreamer" data-grid="quotes" data-row="2"
data-field="field1">-</div>
<div data-source="lightstreamer" data-grid="quotes" data-row="2"
data-field="field2">-</div>
...
Example (JavaScript part)
new StaticGrid("quotes",true);
Only the basic bits of the StaticGrid are described in this guide; check out the JSDoc for all
the details.
2.4.2 DynaGrid
In a DynaGrid only one row of cells is defined in the HTML page (the template). New rows
are then cloned from the given template row. The template row will be associated to the
DynaGrid instance via its id property and will contain all of the necessary cells. The data-
source property of this template has to be configured as if it was a cell.
Each cell for this kind of grid can define the following special properties:
•[mandatory] data-source: this special property must be specified with its value being
"lightstreamer" in order to authorize the DynaGrid to use such HTML element as a
cell.
•[mandatory] data-field: the name of the field to be associated with the cell (it can also
be a field index, see the JSDoc for details)
•[optional] data-num: if there is the requirement to have more cells related to the same
field, it is possible to specify this property in order to distinguish between such cells
when handling the DynaGrid events.
•[optional] data-update: by default the content of a cell is updated with the received
values. By specifying this property it is possible to target any property of the HTML
element (e.g.: the src property of an IMG tag) or its stylesheet.
•[optional] data-fieldtype The DynaGrid class offers the extractFieldList and
extractCommandSecondLevelFieldList functions to read from the html the data-field
values of the associated cells. Using this property is possible to specify if a field has to
be extracted during extractFieldList executions (missing data-fieldtype property or
“first-level” value), during extractCommandSecondLevelFieldList (data-fieldtype set to
“second-level”) or neither (data-fieldtype set to “extra”)
- 13 -
Example (HTML part)
...
<div id="quotes" data-source="lightstreamer">
<div data-source="lightstreamer" data-field="field1">-</div>
<div data-source="lightstreamer" data-field="field2">-</div>
</div>
...
Example (JavaScript part)
new DynaGrid("quotes",true);
2.5 Building
When using an AMD loader it is expected for the custom JavaScript code to be split in a series of
small modules each one in its own .js file. This is a very good approach during development as it
permits to have a well organized project and well structured code. Unfortunately that approach is not
suitable to deploy the project on the web since each JavaScript module will require the browser to
perform a HTTP GET request to the web server to be downloaded thus increasing load times.
Some tools exist that solve this problem by combining .js files together to make them “deploy-friendly”.
When using such tools it is important to be able to instruct the process to avoid searching for
Lightstreamer modules since such modules are already compressed in one single file.
2.5.1 RequireJS optimization tool (r.js)
RequireJS offers an optimization tool that is perfect for the task. It combines AMD modules
files together; it also leverages either Google Closure Compiler or UglifyJS to further
compress and optimize the JavaScript code to be deployed.
To run it requires either Rhino or Node.js (when used with Node.js it does not support the
Google Closure Compiler). You can find a full description of the tool on its website.
When preparing its configuration file it is possible to specify which modules do not need to
be resolved and concatenated with the rest of the code by using the paths option:
•AMD version
paths: {
"LightstreamerClient": "empty:",
"Subscription": "empty:"
}
•AMD with namespaced names version:
paths: {
"Lightstreamer/LightstreamerClient": "empty:",
"Lightstreamer/Subscription": "empty:"
}
NOTE: the above examples assume that only LightstreamerClient and
Subscription classes are used from the Lightstreamer library; one entry per each used
class is needed.
- 14 -
2.6 Troubleshooting
During development it is always possible to encounter issues preventing custom code from working as
expected. If that happens you can follow the tips in this section to solve the issues.
2.6.1 Check for exceptions
The first thing to look at when facing an issue is the console of the browser in use. Most
modern browsers offer some sort of built-in JavaScript console: fire it up and reload your
application; if there is a piece of code throwing an exception it will be likely shown there.
2.6.2 Server-sent errors
When connecting to a server, subscribing to an item or sending a message, something can
go wrong due to misconfiguration, adapter errors or server constraints. In these cases the
server will send back an error that will be exposed on the appropriate listener(s). You can
register a listener on your objects to receive such notifications:
•Connection errors
a ClientListener instance can be used to receive error notifications on
LightstreamerClient instances. Note that the ClientListener interface has some
methods other than the error one that we're going to see now. See the JSDoc for full
details
var myLSClient = new LightstreamerClient();
myLSClient.addListener({
onServerError: function(errorCode,errorMessage) {
//here you can consume the error
}
});
•Subscription errors
a SubscriptionListener instance can be used to receive error notifications regarding
a Subscription. Note that the SubscriptionListener interface has some methods other
than the error ones that we're going to see now. See the JSDoc for full details
var mySubscription = new Subscription();
mySubscription.addListener({
onSubscriptionError: function(errorCode,errorMessage) {
//here you can consume the error
},
onCommandSecondLevelSubscriptionError:
function(errorCode,errorMessage,relatedkey) {
//this one can only be fired in case a two-level
subscription is created
//here you can consume the error
}
});
- 15 -
•Message errors
a ClientMessageListener instance can be used to receive error notifications on sent
messages. Note that the ClientMessageListener interface has some methods other
than the error one that we're going to see now. See the JSDoc for full details
myLSClient.sendMessage(myMessage,mySequence,myTimeout,{
onError: function(myMessage) {
//here you can consume the error
},
onDeny: function(myMessage,denyCode,denyMessage) {
//here you can consume the error
}
});
2.6.3 Logging
The Lightstreamer Web Client API (Unified) includes a simple LoggerProvider logging
interface that can be implemented to consume log messages from within the library.
A ready-made implementation of such interface, together with several log appender classes, is
distributed with the library. The configuration of this logging facility should be different between
development and production environments.
The suggested approach is to use a ConsoleAppender configured at INFO level during
development and a RemoteAppender configured at ERROR level or no appenders at all on
production deployments.
The log messages are also identified by a category. For full details about available classes
and categories consult the JSDoc.
•Development setup
During development we suggest to setup a ConsoleAppender at INFO level to keep
an eye on what is happening on the library. Most modern desktop browsers include
(or can be extended with) a console showing the messages produced by such
appender (for instance, look for the Developer Tools).
To setup such logging the following code can be used:
require(["LightstreamerClient","SimpleLoggerProvider",
"ConsoleAppender","LogMessages"],
function(LightstreamerClient,SimpleLoggerProvider,
ConsoleAppender,LogMessages) {
var loggerProvider = new SimpleLoggerProvider();
LightstreamerClient.setLoggerProvider(loggerProvider);
var myAppender = new ConsoleAppender("INFO","*");
loggerProvider.addLoggerAppender(myAppender);
});
- 16 -
•Production setup
During production we suggest to remove the ConsoleAppender and add a
RemoteAppender that will forward its messages to the configured Lightstreamer
Server
To setup such logging the following code can be used (where myClient is the instance
of LightstreamerClient connected to the server where the logging has to be sent):
require(["LightstreamerClient","SimpleLoggerProvider",
"RemoteAppender","LogMessages"],
function(LightstreamerClient,SimpleLoggerProvider,
RemoteAppender,LogMessages) {
var loggerProvider = new SimpleLoggerProvider();
LightstreamerClient.setLoggerProvider(loggerProvider);
var myAppender = new RemoteAppender("ERROR","*",
myClient);
loggerProvider.addLoggerAppender(myAppender);
});
Note the LogMessages module that is required but never used. If this module is not required
by the client JavaScript code, only message codes are produced by the library. Simply
requiring this class will expand the log message codes into full string messages.
Using this approach and the generator.html it is possible to generate a library that does not
include any log message. Note that log codes, generated when the LogMessages module is
not included, can always be transformed back to log messages later
require(["LogMessages"], function(LogMessages) {
LogMessages.getMessage(codeToBeTransformed);
});
2.6.4 Still in trouble
If none of the above suggestions made you find a solution to your problems you can reach
out to our public forums.
- 17 -
