Web Developer's Reference Guide
Web%20Developer's%20Reference%20Guide
User Manual:
Open the PDF directly: View PDF ![]() .
.
Page Count: 838 [warning: Documents this large are best viewed by clicking the View PDF Link!]
- Cover
- Copyright
- Credits
- About the Authors
- About the Reviewers
- www.PacktPub.com
- Table of Contents
- Preface
- Chapter 1: HTML Elements
- Chapter 2: HTML Attributes
- Global attributes
- Miscellaneous
- accept
- accept-charset
- action
- alt
- async
- autocomplete
- autofocus
- autoplay
- autosave
- cite
- cols
- colspan
- datetime
- disabled
- download
- content
- controls
- for
- form
- formaction
- height
- href
- hreflang
- label
- list
- loop
- max
- maxlength
- media
- method
- min
- multiple
- name
- novalidate
- pattern
- placeholder
- poster
- readonly
- rel
- required
- reversed
- rows
- rowspan
- scope
- selected
- size
- src
- start
- step
- type
- value
- width
- wrap
- Chapter 3: CSS Concepts and Applications
- Chapter 4: CSS Properties – Part 1
- Chapter 5: CSS Properties – Part 2
- Chapter 6: CSS Properties – Part 3
- Chapter 7: CSS Functions
- Chapter 8: JavaScript Implementations, Syntax Basics, and Variable Types
- Chapter 9: JavaScript Expressions, Operators, Statements, and Arrays
- Chapter 10: JavaScript Object-Oriented Programming
- Chapter 11: Extending JavaScript
and ECMAScript 6
- Compatibility and goals
- JavaScript subset and extensions
- Scoped variables and constants
- Shorthand functions
- Multiple catch clauses
- E4X – ECMAScript for XML
- ECMAScript 6 features
- Arrow functions
- Classes
- Enhanced object literals
- Template strings
- Destructuring assignment
- Extended parameter handling
- Bindings
- Iterators and the for...of operator
- Generators
- Better Unicode support
- Modules
- Module loaders
- Collections
- Proxies
- Symbols
- Subclassable built-ins
- Promises
- Core math library APIs
- Binary and octal literals
- Reflect API
- Tail calls
- Chapter 12: Server-side JavaScript – NodeJS
- Chapter 13: Bootstrap – The Stylish CSS Frontend Framework
- Introduction to Bootstrap foundations
- Getting started
- Layouts
- The grid system
- Typography
- Tables
- Lists
- Forms in Bootstrap
- Images
- Navigation elements
- The navigation bar
- Panels
- Breadcrumbs
- Labels and badges
- Pagination
- Progress bars
- Advanced Bootstrap/JavaScript plugins
- Customizing Bootstrap
- Websites built with Bootstrap
- Bootstrap resources
- Chapter 14: jQuery – The Popular JavaScript Library
- Chapter 15: AngularJS – Google's In-Demand Framework
- Index

Web Developer's Reference Guide
Copyright © 2016 Packt Publishing
All rights reserved. No part of this book may be reproduced, stored in a retrieval
system, or transmitted in any form or by any means, without the prior written
permission of the publisher, except in the case of brief quotations embedded in
critical articles or reviews.
Every effort has been made in the preparation of this book to ensure the accuracy
of the information presented. However, the information contained in this book is
sold without warranty, either express or implied. Neither the authors, nor Packt
Publishing, and its dealers and distributors will be held liable for any damages
caused or alleged to be caused directly or indirectly by this book.
Packt Publishing has endeavored to provide trademark information about all of the
companies and products mentioned in this book by the appropriate use of capitals.
However, Packt Publishing cannot guarantee the accuracy of this information.
First published: March 2016
Production reference: 1180316
Published by Packt Publishing Ltd.
Livery Place
35 Livery Street
Birmingham B3 2PB, UK.
ISBN 978-1-78355-213-9
www.packtpub.com
www.allitebooks.com

Credits
Authors
Joshua Johanan
Talha Khan
Ricardo Zea
Reviewers
Chetankumar Akarte
Gergo Bogdan
Rahul Devaskar
David Ellenwood
Philippe Reneiver Gonin
Robert Mion
Natalie Olivo
Mateus Ortiz
Commissioning Editor
Edward Gordon
Acquisition Editor
Meeta Rajani
Content Development Editor
Samantha Gonsalves
Technical Editor
Abhishek R. Kotian
Copy Editor
Pranjali Chury
Project Coordinator
Kinjal Bari
Proofreader
Sas Editing
Indexer
Monica Ajmera Mehta
Graphics
Disha Haria
Production Coordinator
Conidon Miranda
Cover Work
Conidon Miranda
www.allitebooks.com

About the Authors
Joshua Johanan is a web developer who currently lives in South Bend, Indiana.
He has been a web developer for ve years. He has built sites using many different
languages, including PHP, Python, JavaScript, and C#; although if asked, he would
prefer using Python and JavaScript. These languages have led him to use different
MVC frameworks, such as Zend Framework, Django, and .Net's MVC.
As you can see from this book, Joshua has also used JavaScript on both the backend
with Node.js and frontend using many different libraries. These include Backbone,
React, jQuery, and plain old JavaScript.
He currently works for a healthcare organization, writing websites in C#. This does
not allow him to utilize the latest ashy browser technologies, but it does enforce
good development skills, such as maintainability and scalability.
This is his rst book, but he does post somewhat regularly on his blog at http://
ejosh.co/de/.
I would like to thank my wife, Liz, for her support through the
writing of this book. I would also like to thank Dexter and Gizmo,
who hung out by my feet as I wrote most of this book.
www.allitebooks.com

Talha Khan is a passionate web developer, JavaScript enthusiast, software
consultant, and coffee freak from Pakistan who is currently residing in UAE. He has
more than ve years of experience in this eld. Despite graduating in mathematics
and statistics, his love for web technologies pushed him toward the eld of web
technologies. He is experienced in developing interactive websites and web
applications using PHP, MYSQL, and Dot Net Suite along with HTML, CSS, and
JavaScript libraries. He has been teaching web development as well and is an active
contributor on programming forums such as StackOverow. Occasionally, he tweets
at @alphaprofile.
Talha has worked and consulted on various projects for several major brands and
companies. Tossdown.com, a leading restaurants and food search engine of Pakistan,
is among one of his major achievements. He is also running his own start-up while
educating newbies on technology. He is currently working as a software architect for
UAE's biggest swimming academy, Hamilton Aquatics.
I want to thank my parents for keeping me motivated and my
friends who supported me in writing, as I could count on them
anytime if I had to use their laptop. I am also grateful to Tahir Ali
Khan, who helped me at every step throughout my career and was
like a guiding light.
I would like to take this opportunity to thank all the teachers and
mentors who helped me shape my career and helped me whenever
I needed it. These people were my source of inspiration. A special
thanks to Omair Bangash, who took the risk of employing someone
from a non-IT background and taught me to a level where I am now
teaching others. His condence in me was enough to push me to
reach to my goals. I worked under many projects of various scales
and technologies under his supervision. He helped me at every step
to hone my skills. I don't think I would be have been able to write
this book had it not been for his constant support and motivation.
Without learning from these teachers, there is not a chance I could
be doing what I do today, and it is because of them and others who I
may not have listed here that I feel compelled to pass my knowledge
on to those willing to learn.
www.allitebooks.com

Ricardo Zea hails originally from Medellín, Colombia. He is a passionate and
seasoned full-stack designer who is now located in Dayton, Ohio, USA. He is always
looking for ways to level up his skills and those around him. Constantly wondering
how things are made on the Web, how they work, and why, have made Ricardo a
very technical designer, allowing him to explain to others the intricacies of design
and the technicalities of the Web in ways that are very easy to understand and
assimilate.
Ricardo has a master's degree in publicity and advertising and has deep passion
for understanding human behavior. He also has a ercely competitive PC gaming
hunger. Together, all this has allowed him to switch from the creative side of the
brain to the rational side very easily, allowing him to visualize and create technically
sound web and mobile designs that are responsive, perform well, and convey the
proper message through design.
Ricardo is the author of Mastering Responsive Web Design, Packt Publishing. He's also
the organizer of the CodePen Dayton meetup group. He's a member of the Dayton
web developers and UX Dayton meetup groups. He's also one of the rst members
of SitePoint's Ambassadors program. He's also the author of the monthly web design
and development newletter Level Up!. He was also a technical reviewer for Sass and
Compass, Designers Cookbook, and Sass Essentials, all by Packt Publishing. For several
years, he was also a Flash and CorelDRAW professor at different universities in his
home country, Colombia.
Ricardo has 15 years of experience in web design and 20 years of experience
in visual and graphic design.
A huge and innite thanks to my wife, Heather, and my beautiful
son, Ricardo. They are my inspiration to be a better professional, a
better person, a better husband, and a better dad.
To my mom, Socorro, who showed me the values that made me the
man I am today. To my dad, Ricardo "Pinta" Zea, for teaching me to
be determined to not only be good at what I do but to be the best I
can be.
To God, for allowing me to share with everyone my knowledge
of CSS.
And to you, the readers, for giving me the chance to help you be
better web professionals.
www.allitebooks.com

About the Reviewers
Chetankumar Akarte is the CEO of Renuka Technologies Private Limited,
Nagpur, located in central India. He is an engineer (electronics) from Nagpur
University with more than 10 years of experience in the design, development, and
deployment of web-based, Windows-based, and mobile-based applications with
expertise in PHP, .NET, JavaScript, Java, Android, and more.
Chetankumar likes to contribute to newsgroups and forums. He has written articles
for Electronics For You, DeveloperIQ, and Flash and Flex Developer's Magazine. In
his spare time, he likes to maintain his technical blog (http://www.tipsntracks.
com) to get in touch with the developer community. He has been the technical
reviewer for four books published by Packt Publishing. He has released more than
96 applications on the Android market! One of his applications, an English to Hindi
Dictionary, is like a pocket dictionary for students, which has more than a hundred
thousand downloads. You can nd it at https://play.google.com/store/apps/
details?id=com.sachi.hindi.dictionary.
Chetankumar lives in Nagpur with wife, Shraddha, and his two children, Kaiwalya
and Hrutvij. You can visit his websites, http://www.sahityachintan.com and
http://www.tipsntracks.com, or get in touch with him at chetan.akarte@gmail.
com.
I'd like to thank my wife, Shraddha, and my parents for their
consistent support and encouragement. I'd also like to thank my
lovely children, Kaiwalya and Hrutvij, who allowed me to dedicate
all of their playtime with me to this book. I'd also like to thank Packt
Publishing for this opportunity to do something useful, especially
the project coordinator, Kinjal Bari, for all the valuable support.
www.allitebooks.com

Gergo Bogdan is a software engineer with over eight years of experience in the IT
industry. During this time, he worked at small companies as well as multinational
organizations. He has vast expertise in multiple technologies, starting from .NET and
Python to JavaScript and Java. He loves to create technical articles and tutorials for
fellow developers, and he is a passionate blogger (http://grelution.com). He is
the author of the Web API Development with Flask video course, Packt Publishing.
Rahul Devaskar is a software engineer with experience of building real-time
event-driven applications, context-aware applications, and web applications. His
expertise includes web apps development, mobile apps development, API server
development, and real-time analytics. He has built apps using AngularJS, Node.js,
MongoDB, and Ionic.
I'd like to thank my wife, Niyati, for her constant support and
encouragement.
David Ellenwood is a frontend developer and WordPress expert with more
than 15 years of experience on the Web. As the owner and solo developer at DPE
Websmithing and Design, LLC, he enjoys providing consulting services to midsize
customers looking to update or extend their existing websites beyond traditional
brochureware. He lives with his beautiful wife and two amazing boys at the
westernmost tip of Lake Superior in Superior, Wisconsin.
Philippe Renevier Gonin has been an assistant professor at the University
Nice Sophia Antipolis (UNS), France, since 2005. He teaches web technologies,
software engineering (architecture and development), and HCI (Human Computer
Interaction). On the research front, Philippe works on connections between user-
centered design (for example, user and tasks models) and software engineering (for
example, component architecture and UI development).
www.allitebooks.com

Robert Mion takes every effort to design experiences that continually delight,
empower, and inspire people, often by repeatedly triggering that magical moment
when your brain makes your mouth go A ha! or Of course!. This passion was
ignited when watching Pixar's Toy Story at the age of eight. The re has only
grown since then.
Robert continues to use his amassed knowledge of storytelling, color, typography,
layout, design, human psychology, and web technologies as an excuse to have fun
every day by crafting experiences designed to go beyond solving problems—to
emotionally connect with users and to help them become more awesome.
Robert and his wife, Laura, currently live in Fort Mill, SC—minutes south of the
Queen City—with their two pugs (one, a pug-boxer mix).
Natalie Olivo has worked with web-based technologies for almost a decade and
began her career in coding when the majority of HTML pages were tabular and
inexible. She remembers the excitement and satisfaction in the creative process of
building her rst prototype for a messaging application while she was employed at
one of the rst popular social networks in the age before Facebook. Natalie's wide
ranging experience include key development roles in companies such as Godiva,
Barnes and Noble, and The Daily Beast. She has spent the last year building out the
mobile web experience at The Daily Beast, and enjoys the challenges of building
applications that are performant for mobile web. She is currently a senior frontend
engineer at Business Insider.
Mateus Ortiz is the creator of some cool open source projects such as Web
Components Weekly (webcomponentsweekly.me), the rst weekly World of Web
Components, and web components the right way, and other projects. He is only
17 years old and spends his days helping and creating new open source projects.
Mateus lives in Brazil where he makes several talks on the frontend. You can nd
him on Twitter at twitter.com/mteusortiz.
First of all, I'd like to thank God. I'd like to thank my mother, who
always supports me and helps me in everything, my father, and all
my family and friends. I'd also like to thank Packt Publishing for the
opportunity to assist in the review of this book.
www.allitebooks.com

www.PacktPub.com
eBooks, discount offers, and more
Did you know that Packt offers eBook versions of every book published, with PDF
and ePub les available? You can upgrade to the eBook version at www.PacktPub.
com and as a print book customer, you are entitled to a discount on the eBook copy.
Get in touch with us at customercare@packtpub.com for more details.
At www.PacktPub.com, you can also read a collection of free technical articles, sign
up for a range of free newsletters and receive exclusive discounts and offers on Packt
books and eBooks.
TM
https://www2.packtpub.com/books/subscription/packtlib
Do you need instant solutions to your IT questions? PacktLib is Packt's online digital
book library. Here, you can search, access, and read Packt's entire library of books.
Why subscribe?
• Fully searchable across every book published by Packt
• Copy and paste, print, and bookmark content
• On demand and accessible via a web browser

[ i ]
Table of Contents
Preface xxi
Chapter 1: HTML Elements 1
DOCTYPE 1
Attributes 2
Description 2
html 2
Attributes 2
Description 2
Document metadata 3
head 3
Semantic content sections 9
body 9
section 9
nav 10
Headings 11
header 12
footer 13
address 13
aside 14
p 14
Content sections 14
hr 15
pre 15
blockquote 15
ol 16
ul 17
li 17
dl 18

Table of Contents
[ ii ]
dt 19
dd 19
gure 20
gcaption 20
div 21
Inline elements 22
a 22
abbr 23
bdo 23
br 24
cite 24
code 25
dfn 25
em 25
kbd 26
mark 26
q 26
s 27
samp 27
small 27
span 28
strong 28
sub 28
sup 29
time 29
var 30
wbr 30
Embedded content 30
img 30
embed 33
object 34
param 35
video 35
audio 36
source 37
track 38
Tables 39
table 39
caption 39
colgroup 40
tbody 40

Table of Contents
[ iii ]
thead 41
tfoot 41
tr 42
td 43
th 43
Forms 44
Form 44
eldset 45
legend 46
label 46
input 47
button 49
select 50
optgroup 51
option 52
textarea 53
Drawing elements 54
canvas 54
svg 55
Chapter 2: HTML Attributes 57
Global attributes 57
accesskey 57
class 58
contenteditable 58
data-* 58
dir 59
draggable 59
id 60
lang 60
spellcheck 61
style 61
tabindex 61
title 62
Miscellaneous 62
accept 62
accept-charset 63
action 63
alt 64
async 64
autocomplete 65

Table of Contents
[ iv ]
autofocus 65
autoplay 66
autosave 66
cite 66
cols 67
colspan 67
datetime 68
disabled 68
download 69
content 69
controls 70
for 70
form 71
formaction 71
height 72
href 72
hreang 73
label 73
list 74
loop 74
max 75
maxlength 75
media 76
method 76
min 76
multiple 77
name 77
novalidate 78
pattern 78
placeholder 79
poster 79
readonly 79
rel 80
required 80
reversed 81
rows 81
rowspan 82
scope 82
selected 83
size 83
src 84

Table of Contents
[ v ]
start 84
step 85
type 85
value 86
width 87
wrap 87
Chapter 3: CSS Concepts and Applications 89
Basic selectors 90
The simple selector 90
The type selectors 90
The universal selector 91
The attribute selectors 92
The class selectors 93
The ID selectors 94
Combinators 94
Descendant combinator 95
The child combinator 96
The adjacent sibling combinator 97
The general sibling combinator 97
The selector specicity 98
Pseudo-classes 99
The link pseudo-classes 99
User action pseudo-classes 100
The structural selectors 101
:rst-child 102
:rst-of-type 102
:last-child 103
:last-of-type 103
:nth-child() 104
:nth-last-child 104
:nth-last-of-type and :nth-of-type 105
:only-child 106
:only-of-type 106
Validation 107
:checked 107
:default 107
:disabled and :enabled 108
:empty 108
:in-range and :out-of-range 109
:invalid and :valid 110

Table of Contents
[ vi ]
:not or negation 110
:optional and :required 111
:lang() 111
Pseudo-elements 112
::before and ::after 112
::rst-letter 113
::rst-line 113
::selection 114
Generated content 114
content 115
Quotation marks 116
Chapter 4: CSS Properties – Part 1 117
Animation 118
Base markup and CSS 118
Final CSS code 130
Background 131
background-attachment 131
background-blend-mode 132
background-clip 134
background-color 135
background-image 136
background-origin 138
Box model 143
width 143
height 144
padding 145
margin 146
border 148
box-sizing 150
max-height 150
max-width 151
min-height 152
min-width 153
object-t 154
object-position 155
Border radius 156
border-radius 156
Unit 158
Relative length units 158
Viewport-relative length units 161

Table of Contents
[ vii ]
Absolute length units 162
Angle data types 164
Resolution units 165
Duration units 165
Column 166
Flexible box (exbox) 172
ex-grow 173
ex-shrink 173
ex-basis 174
ex-direction 175
ex-wrap 176
ex-ow 177
align-content 178
align-items 179
align-self 180
order 181
justify-content 182
ex 183
Summary 183
Chapter 5: CSS Properties – Part 2 185
Fonts 185
font-family 185
font-feature-settings 186
font-size 188
font-size-adjust 189
font-stretch 190
font-style 191
font-variant 192
font-variant-ligatures 192
font-weight 193
font 194
Transform 195
transform 195
transform-origin 197
transform-style 198
Transition 199
Positioning 202
position 202
top 203

Table of Contents
[ viii ]
bottom 204
left 205
right 206
vertical-align 207
Text 207
color 208
text-align 208
text-decoration 209
text-decoration-line 210
text-decoration-color 210
text-decoration-style 211
text-indent 211
text-overow 211
text-rendering 212
text-shadow 214
text-transform 214
text-underline-position 215
direction 216
Tables 217
table-layout 217
border-collapse 218
border-spacing 218
empty-cells 219
caption-side 219
Words and paragraphs 220
hyphens 220
word-break 221
word-spacing 222
word-wrap 223
line-height 223
orphans 224
quotes 225
widows 226
writing-mode 226
letter-spacing 227
white-space 228
tab-size 229
Paging 229
page-break-after 230
page-break-before 230
page-break-inside 231
Table of Contents
[ ix ]
Chapter 6: CSS Properties – Part 3 233
Page box 233
bleed 233
marks 234
List 234
list-style 235
list-style-type 235
list-style-position 236
list-style-image 237
Counter 237
counter-reset 238
counter-increment 239
Drop shadows 240
box-shadow 240
Display and visibility 242
all 242
clear 243
display 245
opacity 247
lter 248
overow 252
overow-x 253
overow-y 253
visibility 254
z-index 255
Masking and clipping 255
mask 256
mask-clip 257
mask-composite 258
mask-image 259
mask-mode 260
mask-origin 260
mask-position 261
mask-repeat 262
mask-size 263
mask-type 264
mask-border 264
mask-border-source 264
mask-border-mode 265
mask-border-slice 265
mask-border-width 266

Table of Contents
[ x ]
mask-border-outset 267
mask-border-repeat 268
clip-path 268
Image rendering and orientation 271
image-orientation 272
image-rendering 272
User interface 273
cursor 273
pointer-events 276
outline 277
3-Dimensional 278
perspective 278
perspective-origin 279
backface-visibility 280
Summary 280
Chapter 7: CSS Functions 283
Filter 283
brightness() 283
contrast() 284
grayscale() 284
invert() 285
hue-rotate() 285
blur() 286
saturate() 286
sepia() 286
Transforms 287
matrix() 287
matrix3d() 288
rotate() 288
rotate3d() 289
rotateX() 289
rotateY() 290
rotateZ() 291
scale() 291
scale3d() 292
scaleX() 292
scaleY() 293
scaleZ() 293
skew() 294
skewX() 294

Table of Contents
[ xi ]
skewY() 295
steps() 295
translate() 296
translate3d() 297
translateX() 297
translateY() 298
translateZ() 298
Colors 299
hsl() and hsla() 299
rgb() and rgba() 300
Gradients 300
linear-gradient() 301
radial-gradient() 302
repeating-linear-gradient() 304
repeating-radial-gradient() 305
Values 306
attr() 306
Responsive Table 307
calc() 308
url() 309
cubic-bezier() 310
Miscellaneous 312
drop-shadow() 312
element() 312
image() 313
opacity() 313
perspective() 314
rect() 314
At-rules 315
@charset 315
@document() 316
@font-face 317
@import 320
@keyframes 321
@media 323
@namespace 324
@page 325
@supports 326
Global CSS keyword values 328
Summary 331

Table of Contents
[ xii ]
Chapter 8: JavaScript Implementations, Syntax Basics,
and Variable Types 333
History of JavaScript 334
Evolution of JavaScript 335
JavaScript implementations 335
Core JavaScript (ECMAScript) 336
Document object model (DOM) 336
Browser object model (BOM) 337
Client-side JavaScript 337
Loading external JavaScript les 339
Server-side JavaScript 341
The language syntax 344
Language 345
Type 345
The character set 345
Identiers 351
Reserved keywords 351
Comments 353
Literals 354
Statements 356
Optional semicolon 359
Data type 360
The typeof operator 361
The undened type 362
The null type 363
The number type 364
The Boolean type 366
The string type 367
The object type 368
Variable, scope, and memory 369
Variable declaration 371
The variable scope 372
Primitive and reference values 373
The execution context and scope 374
Garbage collection 375
Chapter 9: JavaScript Expressions, Operators, Statements,
and Arrays 377
Expressions 377
Primary expressions 378
Object initializer 379

Table of Contents
[ xiii ]
The function denition expression 380
The property access expression 381
The invocation expression 382
The object creation expression 383
Evaluation expression 383
Operators 384
Overview 384
Arithmetic operators 385
Logical operators 390
Assignment operators 393
Exponentiation assignment (**=) 396
Relational operators 396
Statements 400
Expression statements 401
Compound empty statements 401
Declaration statements 402
Conditional statements 403
Loops 407
Jumps and labeled statements 411
Arrays 414
Array types 414
Array type object 415
Creating arrays 415
Reading and writing array elements 417
Multidimensional arrays in JavaScript 417
Properties in an array 418
Array methods 419
ECMA5 Array methods 426
Chapter 10: JavaScript Object-Oriented Programming 433
Polymorphism 433
Encapsulation 433
Inheritance 434
Abstraction 434
Objects 434
Creating objects 435
Design patterns 436
Property getter and setter 449
Deleting properties 450
Testing properties 450
Enumerating properties 451

Table of Contents
[ xiv ]
Property attributes 452
Serializing objects 454
Objects methods 454
Functions and methods 455
Invoking functions 455
Dening functions 455
Function arguments and parameters 456
Parameters and return values 456
Functions as namespace 457
Closure 457
Function properties 458
Methods 458
Function constructor 458
Classes and modules 459
Classes and prototypes 459
Constructors 460
Dening a class 461
Classes in the ECMA5 script 462
Modules 462
Inheritance 463
Prototype chaining 463
Constructor stealing 464
Combination inheritance 465
Prototypal inheritance 466
Parasitic inheritance 467
Parasitic combination inheritance 468
Subclasses 469
Built-in objects 470
Global objects 470
Date object 471
Math object 475
The RegExp object 478
String object 480
Array objects 484
Chapter 11: Extending JavaScript and ECMAScript 6 491
Compatibility and goals 491
JavaScript subset and extensions 493
JavaScript subsets 493
JavaScript extensions 496
Const 496

Table of Contents
[ xv ]
Let 497
Destructuring assignment 498
For each 498
Iterator 498
Generators 498
Array 498
Generator expression 498
Scoped variables and constants 499
Shorthand functions 500
Multiple catch clauses 500
The try clause 500
The catch clause 501
The nally clause 502
E4X – ECMAScript for XML 504
ECMAScript 6 features 504
Arrow functions 505
Classes 506
Enhanced object literals 507
Template strings 509
Destructuring assignment 510
Extended parameter handling 512
Bindings 514
Iterators and the for...of operator 515
Generators 516
Better Unicode support 516
Modules 517
Module loaders 518
Collections 519
Proxies 532
Symbols 532
Subclassable built-ins 534
Promises 534
Core math library APIs 539
Binary and octal literals 540
Reect API 540
Tail calls 551
Chapter 12: Server-side JavaScript – NodeJS 553
File and process management 555
Modules 555
The OS module 558

Table of Contents
[ xvi ]
The process module 559
File functions 564
The path module 571
REPL 574
Handling errors 575
Utilities 577
Events 577
Crypto 580
Buffer 584
Console 589
npm (Node Package Manager) 591
Stream 593
The net module 598
createServer 598
net.Server 599
The HTTP module 604
createServer 604
http.Server 605
IncomingMessage 607
ServerResponse 609
http.request 611
http.get 612
http.clientRequest 613
Chapter 13: Bootstrap – The Stylish CSS Frontend Framework 615
Introduction to Bootstrap foundations 615
Getting started 617
Layouts 617
The grid system 620
Typography 624
Tables 627
Lists 629
Forms in Bootstrap 630
Images 634
Navigation elements 636
The navigation bar 637
Panels 638
Breadcrumbs 639
Labels and badges 640
Pagination 640
Table of Contents
[ xvii ]
Progress bars 641
Advanced Bootstrap/JavaScript plugins 642
Customizing Bootstrap 652
Websites built with Bootstrap 652
Bootstrap resources 653
Chapter 14: jQuery – The Popular JavaScript Library 655
The evolution of JQuery 655
Getting started 656
Installing JQuery 656
Using jQuery 656
Selectors 657
Element selectors 658
ID selectors 658
Class selectors 659
Events 659
Mouse events 659
Keyboard events 667
Form events 669
Document events 674
Effects and animations 676
Hide, show, and toggle 678
Fade 681
Sliding 685
Callback 688
callbacks.add() 688
callbacks.re() 689
callbacks.remove() 690
callbacks.disable() 690
Chaining 691
jQuery and the document object model 691
jQuery traversing 692
Ancestors 693
Descendants 694
Siblings 695
Filtering 699
Using AJAX in jQuery 701
The jQuery Ajax load 701
jQuery Ajax Get 702
jQuery Ajax Post 703

Table of Contents
[ xviii ]
Miscellaneous jQuery functions 704
noConict() 704
param() 704
index() 705
each() 706
data() 707
removeData() 707
jQuery plugins 708
jQuery resources 709
Chapter 15: AngularJS – Google's In-Demand Framework 711
Modules (ngApp) 712
module 712
cong 713
run 714
Routing (ngRoute) 715
ngView 715
$routeProvider 715
$route 716
$routeParams 717
Dependency injection 718
Dependency injection in Angular 718
injector 719
$injector 719
Controllers 720
ngController 721
$scope 721
Data binding and templates 722
Event binding 722
Scope 722
Digest cycle 722
$digest 723
$watch 723
$apply 724
Hierarchies 725
Services 725
Factory 726
Service 727
Provider 728
Value 729

Table of Contents
[ xix ]
Constant 730
$http 730
Convenience methods 731
Notable services 733
Promises 733
$q 734
Expressions 735
Expressions in JavaScript 735
Directives 736
Normalization 736
Scope 736
Modifying DOM 739
Event binding 740
Directive denition object 741
Key directives 742
Globals 754
Extend 754
noop 755
isUndened 756
Copy 756
Bind 757
Forms 757
ngModel 758
CSS classes 758
Validation 758
Testing 760
Unit testing with Jasmine and Karma 760
ngMock 761
Unit testing controllers 763
Unit testing directives 763
Unit testing services 764
Index 767
www.allitebooks.com

[ xxi ]
Preface
This book covers many concepts that any web developer may need to know. These
concepts may be new or known, but forgotten. The rst two chapters in this book
will cover the basic elements and attributes of HTML. The next four chapters will
cover the concepts and syntax of CSS. JavaScript will be the focus of the next ve
chapters. Finally, we will cover external libraries. These include Bootstrap, jQuery,
and Angular. Because this is a reference guide, it is not set up as a read-through
tutorial. Each section and concept is written to stand on its own so that you can nd
the piece of information that you need quickly.
What this book covers
Chapter 1, HTML Elements, covers all the elements that you will need when building
a web page. This is focused on HTML5.
Chapter 2, HTML Attributes, focuses on any the attributes that can be used with
HTML elements.
Chapter 3, CSS Concepts and Applications, focuses on selectors. Selectors are core to
determining which elements the CSS attributes apply to.
Chapter 4, CSS Properties – Part I, covers properties for animation, background, the
box model, CSS units, columns, and the mighty Flexbox.
Chapter 5, CSS Properties – Part II, covers properties for fonts, transforms, transitions,
positions, text, tables, words and paragraphs, and paging.
Chapter 6, CSS Properties – Part III, covers properties for the page box, lists, counters,
drop shadows, display and visibility, clipping and masking, user interface, and 3D.

Preface
[ xxii ]
Chapter 7, CSS Functions, covers functions for lters, transforms, colors, gradients,
and values. It covers a few extra concepts like at-rules, global keyword values,
and miscellaneous.
Chapter 8, JavaScript Implementations, Syntax Basics, and Variable Types, talks about
JavaScript implementations and language basics, including syntax and variables
and their types. This chapter will enable us to understand and get started with basic
scripting.
Chapter 9, JavaScript Expressions, Operators, Statements, and Arrays, enables us to
advance with our basic JavaScript language understanding and introduces JavaScript
expressions, basic operators, statements, loops, conditions, and arrays. This also
covers examples for better understanding.
Chapter 10, JavaScript Object-Orientated Programming, explains the basic concepts of
object-oriented programming, that is, inheritance, polymorphism, abstraction, and
encapsulation. You will also learn the usage of objects, classes, and related methods.
We will cover examples for better understanding.
Chapter 11, Extending JavaScript and ECMA Script 6, covers all the newly introduced
features of ECMAScript 6, which was released in 2015, such as new objects, patterns,
syntax changes, and new methods on existing objects. This chapter covers all these
features in detail.
Chapter 12, Server-side JavaScript – NodeJS, continues to focus on JavaScript. The
difference is that we will now write JavaScript on the server side instead of the client
side. We can use the concepts covered in the other JavaScript chapters in addition to
learning specic NodeJS objects and paradigms.
Chapter 13, Bootstrap – The Stylish CSS Frontend Framework, talks about Bootstrap,
which is an intuitive framework for creating responsive websites. It uses JavaScript,
HTML, and CSS. This chapter will give you a detailed look at the Bootstrap
framework and will enable you to create responsive layouts and web pages. Each
topic in this chapter has a relevant example.
Chapter 14, jQuery – The Popular JavaScript Library, focuses on jQuery, which is
a JavaScript library that simplies dealing with various aspects of an HTML
document. In this chapter, you will learn to traverse elements of an HTML
document, methods, event handling, animations, and AJAX for rapid development.
Chapter 15, AngularJS – Google's In-Demand Framework, is where we conclude this
book by nishing the external library section. Angular has been one of the most
popular frameworks since it was introduced by Google. We will look at all the main
concepts that you will need to begin writing applications with Angular.

Preface
[ xxiii ]
What you need for this book
Most likely, for this book, you will need nothing that you are not already using! You
will need a computer, a browser, and a text editor. Each chapter will cover different
concepts and languages, so there may be differences between each chapter.
Here is a summary of the various things you will need throughout the chapters:
• For Chapters 1-5, you will only need a text editor and a browser.
• For Chapters 6-11, you will need the same text editor and browser, but
with JavaScript being a programming language, I would recommend an
integrated development environment (IDE). JetBrains makes a great IDE
called WebStorm for web development. However, this is not necessarily
needed for these chapters.
• For Chapters 12-14, you will again need a text editor and browser. An IDE
would also be very helpful for this section. Anytime you are dealing with
complex frameworks, an IDE will make your life easier.
Although you can just use a notepad and a browser to do any sort of development,
an IDE is always preferred and suggested for development in any specic language.
I would suggest using Adobe Dreamweaver for beginners. The intellisense of
IDE makes it a lot easier to code as it auto-suggests various methods, names, and
variables, so you don't have to remember everything. As we will be dealing with the
elements and document nodes in the JQuery section, you should have extensions
enabled in your browser. ECMA Script 6 is very recent and not fully supported by
all browsers. In some examples, you might have to load ES6 compilers to enable that
feature in your browser. However, I would highly recommend that you use the latest
version of Google Chrome as a client, as it covers most of the sections in ES6.
Who this book is for
This book is intended for beginners as well as advanced web developers. This book
will be a valuable resource for anyone who is a web developer. You can look up
any concept that deals with HTML, CSS, JavaScript, NodeJS, Bootstrap, jQuery, or
Angular in this book.
Conventions
In this book, you will nd a number of text styles that distinguish between different
kinds of information. Here are some examples of these styles and an explanation of
their meaning.
Preface
[ xxiv ]
Code words in text, database table names, folder names, lenames, le extensions,
pathnames, dummy URLs, user input, and Twitter handles are shown as follows:
"HTML5 has a simple document type declaration, <!DOCTYPE html>."
A block of code is set as follows:
<div class="example">
This is an example HTML element
</div>
When we wish to draw your attention to a particular part of a code block, the
relevant lines or items are set in bold:
try{
JSON.parse(jsonObject);
} catch (ex) {
//do something with this error
}
Any command-line input or output is written as follows:
# cp /usr/src/asterisk-addons/configs/cdr_mysql.conf.sample
/etc/asterisk/cdr_mysql.conf
New terms and important words are shown in bold. Words that you see on the
screen, for example, in menus or dialog boxes, appear in the text like this: "Clicking
the Next button moves you to the next screen."
Warnings or important notes appear in a box like this.
Tips and tricks appear like this.

Preface
[ xxv ]
Reader feedback
Feedback from our readers is always welcome. Let us know what you think about
this book—what you liked or disliked. Reader feedback is important for us as it helps
us develop titles that you will really get the most out of.
To send us general feedback, simply e-mail feedback@packtpub.com, and mention
the book's title in the subject of your message.
If there is a topic that you have expertise in and you are interested in either writing
or contributing to a book, see our author guide at www.packtpub.com/authors.
Customer support
Now that you are the proud owner of a Packt book, we have a number of things to
help you to get the most from your purchase.
Downloading the example code
You can download the example code les for this book from your account at http://
www.packtpub.com. If you purchased this book elsewhere, you can visit http://www.
packtpub.com/support and register to have the les e-mailed directly to you.
You can download the code les by following these steps:
1. Log in or register to our website using your e-mail address and password.
2. Hover the mouse pointer on the SUPPORT tab at the top.
3. Click on Code Downloads & Errata.
4. Enter the name of the book in the Search box.
5. Select the book for which you're looking to download the code les.
6. Choose from the drop-down menu where you purchased this book from.
7. Click on Code Download.
Once the le is downloaded, please make sure that you unzip or extract the folder
using the latest version of:
• WinRAR / 7-Zip for Windows
• Zipeg / iZip / UnRarX for Mac
• 7-Zip / PeaZip for Linux
Errata
Although we have taken every care to ensure the accuracy of our content, mistakes
do happen. If you nd a mistake in one of our books—maybe a mistake in the text or
the code—we would be grateful if you could report this to us. By doing so, you can
save other readers from frustration and help us improve subsequent versions of this
book. If you nd any errata, please report them by visiting http://www.packtpub.
com/submit-errata, selecting your book, clicking on the Errata Submission Form
link, and entering the details of your errata. Once your errata are veried, your
submission will be accepted and the errata will be uploaded to our website or added
to any list of existing errata under the Errata section of that title.
To view the previously submitted errata, go to https://www.packtpub.com/books/
content/support and enter the name of the book in the search eld. The required
information will appear under the Errata section.
Piracy
Piracy of copyrighted material on the Internet is an ongoing problem across all
media. At Packt, we take the protection of our copyright and licenses very seriously.
If you come across any illegal copies of our works in any form on the Internet, please
provide us with the location address or website name immediately so that we can
pursue a remedy.
Please contact us at copyright@packtpub.com with a link to the suspected pirated
material.
We appreciate your help in protecting our authors and our ability to bring you
valuable content.
Questions
If you have a problem with any aspect of this book, you can contact us at
questions@packtpub.com, and we will do our best to address the problem.
[ 1 ]
HTML Elements
HyperText Markup Language (HTML) is a language that annotates text. Annotation
of text is done using elements. Using the following p element, as an example, we will
see how to use HTML:
<p>This is an example</p>
HTML elements also have attributes that will modify how they are rendered or
interpreted. Attributes are added inside of the starting tag. Here is the class
attribute in a div element:
<div class="example">This is an example</div>
There have been multiple specications of HTML so far, but we will just look at the
most commonly used and important elements of HTML5. HTML5 is the latest ofcial
specication, so we will be as future-proof as possible at the time of writing this
book. You will want to follow the specications of HTML as closely as possible. Most
browsers are very forgiving and will render your HTML, but when you go beyond
the specications, you can and will run into strange rendering issues.
All HTML elements will have global attributes. The attributes listed for
each element in the sections that follow are the attributes beyond the
global attributes.
DOCTYPE
The DOCTYPE element denes the document type of the le, as follows:
<!DOCTYPE documentType>

HTML Elements
[ 2 ]
Attributes
The documentType attribute that you can see in the preceding code lets the browser
know the type of document you will use.
Description
HTML5 has a simple document type declaration, <!DOCTYPE html>. This lets the
browser know that the document is HTML5. The previous versions of HTML needed
a formal denition of the version being used, but HTML5 has removed this for
simplicity.
Most browsers will enforce strict adherence to the document type declared and
try and gure out what it is based on looking at the document. This can lead to
rendering issues, so it is recommended that you do follow the standards.
Here is an HTML5 declaration:
<!DOCTYPE html>
html
The html element is the root element of the HTML document:
<html manifest></html>
Attributes
The manifest attribute links to a resource manifest that lists which les should be
cached.
Description
The html element must directly follow the DOCTYPE element. This is the root element
that all other elements must be descendants of.
The html element must have one head element and one body element as its children.
All other elements will be inside these tags.

Chapter 1
[ 3 ]
Here is what a simple HTML page looks like:
<!DOCTYPE html>
<html manifest="offline.appcache"><head>
</head>
<body>
Hey
</body>
</html>
Document metadata
The next elements will give metadata about the document. In addition to this, you
can also include links to resources, such as CSS and JavaScript.
head
The head element is the metadata parent element. All other metadata elements will
be children of this element:
<head></head>
Description
The head element usually must have a title element inside it. The elements that
can go in head are title, link, meta, style, script, noscript, and base. These
elements are explained next.
Here is an example of the head element that denes a title and stylesheet
element:
<head>
<title>Title that appears as the tab name</title>
<link href="style.css" rel="stylesheet"
type="text/css" media="all" />
</head>
title
The title element displays the title of the document. This is what is displayed in the
browser's tab or the browser window:
<title></title>

HTML Elements
[ 4 ]
Description
The title element is an aptly named element. This is a required element in head,
and there should only be one title element for a document. Here is a simple
example of title element:
<head>
<title>Example</title>
</head>
link
The link element links a resource to the current document:
<link crossorigin href media rel sizes type></link>
Attributes
The attributes that are used in the link element are as follows:
• crossorigin: This tells the browser whether to make the Cross-Origin
Resource Sharing (CORS) request or not
• href: This indicates the URL of the resource
• media: This selects the media that this resource applies to
• rel: This indicates the relationship of this resource to the document
• sizes: This is used with rel when it is set to icons
• type: This indicates the type of content of the resource
Description
The link element has a lot of attributes, but most of the time, it is used for loading
the CSS resources. This means that you will want to use the attributes href, rel,
type, and media at least.
You can have multiple link elements in a head element. Here is a simple example of
how to load CSS:
<link href="style.css" rel="stylesheet"
type="text/css" media="all" />
<link href="style.css" media="screen"
rel="styleshhet" sizes type="text/css"></link>
See also
You can also refer to the crossorigin, href, media, rel, sizes, and type attributes
to nd out more details about the title element.

Chapter 1
[ 5 ]
meta
The meta element contains metadata about the document. The syntax is as follows:
<meta content http-equiv name></meta>
Attributes
The attributes that are used in the meta element are as follows:
• content: This states the value of either the name or http-equiv attribute.
• http-equiv: This attribute, in the case of HTML5, can be set to default-
style, which sets the default style. Alternatively, it can be set to refresh,
which can specify the number of seconds taken to refresh the page
and a different URL for the new page if needed, for example, http-
equiv="1;url=http://www.google.com".
• name: This states the name of the metadata.
Description
The meta tag has many nonstandard applications. The standardized applications can
be viewed in Chapter 2, HTML Attributes.
Apple has many meta tags that will pass information to an iOS device.
You can set a reference to an App Store application, set an icon, or display
the page in the full screen mode, as just a few examples. All of these tags
are nonstandard, but useful when targeting iOS devices. This is true for
many other sites and companies.
You can use multiple meta tags in a head element. Here are two examples. The rst
example will refresh the page every 5 seconds and the other will dene the author
metadata:
<meta http-equiv="refresh" content="5" />
<meta name="author" content="Joshua" />
See also
You can also refer to the name attribute to nd out more details about the meta
element.

HTML Elements
[ 6 ]
style
The style element contains the style information.
CSS:
<style media scoped type></style>
Attributes
The attributes that are used in the style element are as follows:
• media: This is a media query
• scoped: The styles contained in this element only apply to the parent element
• type: This sets the type of document; the default value is text/css
Description
The style element is usually in the head element. This allows you to dene CSS
styles for the current document.
The preferred method of using CSS is to create a separate resource and use the link
element. This allows styles to be dened once and used everywhere on a website
instead of dening them on every page. This is a best practice as it allows us to
dene the styles in one spot. We can then easily nd and change styles.
Here is a simple inline stylesheet that sets the font color to blue:
<style media="screen" scoped type="text/css">
body{
color: #0000FF;
}
</style>
See also
You can also refer to the global attributes and Chapters 3-7 to know more details
about the style element.
base
The base element is the base URL for the document. The syntax is as follows:
<base href target>

Chapter 1
[ 7 ]
Attributes
The attributes that are used in the base element are as follows:
• href: This indicates the URL to be used as the base URL
• target: This indicates the default target to be used with the URL
Description
The base URL is used whenever a relative path or URL is used on a page. If this is
not set, the browser will use the current URL as the base URL.
Here is an example of how to set the base URL:
<base href="http://www.packtpub.com/">
See also
You can also refer to the target attribute to nd out more details about the base
element.
script
The script element allows you to reference or create a script for the document:
<script async crossorigin defer src type><script>
Attributes
The attributes that are used in the script element are as follows:
• async: This is a Boolean attribute that tells the browser to process this script
asynchronously. This only applies to the referenced scripts.
• crossorigin: This tells the browser whether to make a CORS request or not.
• defer: This is a Boolean attribute that tells the browser to execute the script
after the document has been parsed.
• src: This distinguishes the URL of the script.
• type: This defines the type of the script that defaults to JavaScript if the
attribute is omitted.

HTML Elements
[ 8 ]
Description
The script element is the way to get JavaScript into your document and add
enhanced interactivity. This can be done using a bare script tag and adding
JavaScript into the element. Also, you can use the src attribute to reference an
external script. It is considered a best practice to reference a script le as it can be
reused here.
This element can be a child of head or can be placed anywhere in the body of the
document. Depending on where the script element is located, you may or may not
have access to the DOM.
Here are two examples of using a script element. The rst example will reference
an external script, the second will be an inline script element, and the last will show
how to use the crossorigin attribute:
<script src="example.js" type="text/javascript"></script>
<script>
var a = 123;
</script>
<script async crossorigin="anonymous" defer
src="application.js" type="text/javascript"><script>
noscript
The noscript element will be parsed if scripting is turned off in the browser. The
syntax is as follows:
<noscript></noscript>
Description
If scripting is enabled, the content inside of this element will not appear on the page
and the code inside it will run. If scripting is disabled, it will be parsed.
This element is mainly used to let the user know that the site may not work with
JavaScript. Almost every website today not only uses JavaScript, but requires it.
Here is an example of the noscript element:
<noscript>
Please enable JavaScript.
</noscript>

Chapter 1
[ 9 ]
Semantic content sections
The next elements are the main elements to use when adding content to the
document. For example, using the article element instead of an arbitrary div
element allows the browser to infer that this is the main content of the page. These
elements should be used to give structure to a document and not be used for styling
purposes. Semantic elements make our HTML document more accessible using an
ever-increasing amount of different devices.
body
The body element is the main content section of the document. There must be only
one main element, its syntax is as follows:
<body></body>
Attributes
The attributes of the body element include the inline event attributes.
Description
The body element is the main content section of most documents. It must be the
second child element of html, and there should only be one body element in a
document.
Here is an example of the body element:
<body>
<span>Example Body</span>
</body>
section
The section element describes the content section of a document. For example, this
can be a chapter of a book:
<section></section>

HTML Elements
[ 10 ]
Description
The section element is a new element that was introduced in HTML5. A section
element should group the content together. While not a requirement, using a
heading element as the rst element in the code is a best practice. The section should
be viewed as another part of the outline of the document. It groups related items into
an easily targeted area. You can use this element multiple times in a document.
Here is an example of the section element:
<section>
<h2>Section Heading</h2>
<p>Section content.</p>
</section>
nav
The nav element is the navigation element:
<nav></nav>
Description
The nav element is another semantic element introduced with HTML5. This lets the
browser know that the content of this element is the parent and is for navigation.
The nav element enhances accessibility by giving screen readers a landmark for
navigation. This element should wrap any site navigation or other links that are
grouped together for ease of navigation. You can use this multiple times.
Here is an example of using the nav element:
<nav>
<ul>
<li><a href="#">Home</a></li>
</ul>
</nav>
article
The article element is designed to wrap content that can stand on its own:
<article></article>

Chapter 1
[ 11 ]
Description
The article element is a new element introduced in HTML5. The article element
is similar to the section element; in that, it denotes that the content in the element
is the core part of the page. The article element should be a complete composition
that can stand on its own. For example, in a blog, the actual blog post should be
wrapped with an article element.
Content can then be further broken down using either an article element or a
section element. There is no standard rule for when to use either. However, both
should be related to the content in the outer article element.
Here is an example of the article element being used:
<article>
<header>
<h1>Blog Post</h1>
</header>
<p>This post covers how to use an article element...</p>
<footer>
<address>
Contact the author, Joshua
</address>
<footer>
</article>
Headings
The heading elements are the elements that specify different levels of headings
according to their importance:
<h1></h1>
<h2></h2>
<h3></h3>
<h4></h4>
<h5></h5>
<h6></h6>
Description
These should be used to give relative importance to different headings. For example,
h1 should be used for the title of the document. The importance of a heading goes
down as the heading value goes up, that is, h6 is the least important level of heading
in the example that follows.

HTML Elements
[ 12 ]
Here is an example using all the headings:
<h1>Heading Importance 1</h1>
<h2>Heading Importance 2</h2>
<h3>Heading Importance 3</h3>
<h4>Heading Importance 4</h4>
<h5>Heading Importance 5</h5>
<h6>Heading Importance 6</h6>
See also
You can also refer to the global attributes to learn the heading element in more
detail.
header
The header element groups the content that is considered to be the header for a
particular group of content, its syntax is as follows:
<header></header>
Description
The header element is usually one of the rst content elements on the page. It will
most likely contain navigation options, a logo, and/or a search box. The header
is usually repeated on multiple pages of a website. Each section or article can also
contain a header. This is a new element introduced in HTML5.
Here is an example of the header element:
<header>
<img src="logo.png" />
</header>
See also
You can also refer to the global attributes to nd out about the header element in
more detail.

Chapter 1
[ 13 ]
footer
The footer element provides a footer of a particular group of content, its syntax is as
follows:
<footer></footer>
Description
The footer element wraps all the content that is considered to be the footer of the
document. Usually, this will include copyright, author, and/or social media links. Of
course, what you decide to put into a footer is arbitrary. Each section or article can
also contain a footer.
Here is an example of the footer element:
<footer>
Written by: Joshua Johanan
</footer>
address
The address element is used for the contact address of the author or organization, its
syntax is as follows:
<address></address>
Description
Use the address element when you have the contact information of the user. The
address element will add semantic value to the content, contrary to a regular div
element.
Usually, this will be placed in the footer, but it can be used in an article or body
section. It will apply to the nearest article element or to the entire document. Do
not use any of the content section elements in an address element.
Here is the address element in use:
<footer>
<address>
Please contact me at my <a href="#">website</a>
</address>
</footer>
www.allitebooks.com

HTML Elements
[ 14 ]
aside
The aside element is for supplemental content:
<aside></aside>
Description
Use the aside element to highlight the content that is tied to the main article. Some
examples in the context of the blog would be the author's prole, other posts by this
author, or even related advertisements.
Here is an example of aside:
<aside>
Peyton Manning is a 5-time MVP (2003, 2004, 2008, 2009, 2013)
</aside>
p
The p element is known as the paragraph element. This is a block element, its syntax
is as follows:
<p></p>
Description
The p element should be used to distinguish between separate paragraphs in a
document. This element is associated with the text and inline elements. You will
not want to use a div element, for example. If you nd yourself wanting to do this,
you may want to build your document differently.
Here are a couple of paragraphs:
<p>This is an intro paragraph.</p>
<p>This paragraph will build upon the opening.</p>
Content sections
The content sections are quite similar to the semantic content sections. The main
difference is that the use of all the given elements are not driven by the outline or
purpose of the document like the semantic sections are.

Chapter 1
[ 15 ]
hr
The hr element is the horizontal rule element, its syntax is as follows:
<hr>
Description
By default, the hr element will draw a horizontal line in the content. You can change
the look of this element through CSS.
This element should never have any content inside of it:
<p>This is a paragraph.</p>
<hr/>
<p>This paragraph goes in another direction.</p>
pre
The pre element is the preformatted text:
<pre></pre>
Description
The text in an HTML document is usually not shown in the browser with the same
whitespace or line breaks as it is in a text document. The pre element allows you to
display text in the same way as it is in the document. Whitespace and line breaks will
be preserved.
Here is an example of using line breaks:
<pre>This text
has some
line breaks.</pre>
blockquote
The syntax of a blockquote element is as follows:
<blockquote cite></blockquote>
Attributes
The cite attribute is used in the blockquote element to point to the URL of the cited
document.

HTML Elements
[ 16 ]
Description
The blockquote element is used when pulling a quotation out of a document or text.
Here is an example:
<blockquote cite="https://www.packtpub.com/">
<p>Contact Us</p>
</blockquote>
ol
The ol element is the ordered list element, which has the following syntax:
<ol reversed start type></ol>
Attributes
The attributes that are used in the ol element are as follows:
• reversed: This is a Boolean value. It denotes that the list is in a reverse order.
• start: This accepts a value as a number to start with.
• type: This will change the type of the numbered elements. By default, we
can have a numbered list (1), but we can change to other types, such as
lowercase letters (a), uppercase letters (A), lowercase Roman numerals (i),
and uppercase Roman numerals (I).
Description
The ol element can be used in the same situations as a ul element, except that an ol
element is numbered instead of bulleted. For example, you would use a ul element
for a grocery list and an ol element for a numbered set of instructions. You can have
multiple ul or ol elements nested within each other.
The items in the list will be the li elements.
Here is an example of a list that uses Roman numerals and starts at 10.
<ol start="10" type="i">
<li>Roman numeral 10</li>
<li>Roman numeral 11</li>
</ol>

Chapter 1
[ 17 ]
See also
You can also refer to the ul and li elements to nd out more about the ol element.
ul
The ul element is an unordered list element:
<ul></ul>
Description
The ul element can be used in the same situations as an ol element, but a ul element
will be bulleted and an ol element will be numbered.
When you style this list, you should use CSS and not the older HTML 4 attributes.
You can nest the ul and ol elements multiple times.
Here is an example of the ul element:
<ul>
<li>Items in</li>
<li>no particular</li>
<li>order</li>
</ul>
See also
You can also refer to the ol and li elements to learn more about the ul element.
li
The li element is the list item element:
<li value></li>
Attributes
The value attribute is used in the li element with the ol element and it is the value
of the item in the ordered list.

HTML Elements
[ 18 ]
Description
You will use the li element for each item in a list.
Here is an example:
<ul>
<li>Item 1</li>
<li>Item 2</li>
<li>Item 3</li>
</ul>
See also
You can also refer to the ol and ul elements to know more details about the li
element.
dl
The dl element is the denition list element:
<dl></dl>
Description
The dl element is a list where the items have a term and denition; however, the dl
element can be used for more than just terms and denitions.
You must use the dt element followed by the dd element when building the list for
the dl element. Each dt element can have multiple dd elements after it.
Here is an example:
<dl>
<dt>PactPub</dt>
<dd>Packt Publishing</dd>
</dl>
See also
You can also refer to the dt and dd elements to nd out more about the dl element.

Chapter 1
[ 19 ]
dt
The dt element is the denition term element:
<dt></dt>
Description
The dt element is the rst item in a denition list, the dd element being the other
item.
Here is an example:
<dl>
<dt>PactPub</dt>
<dd>Packt Publishing</dd>
</dl>
See also
You can also refer to the dl and dd elements to nd out more about the dt element.
dd
The dd element is the denition description element:
<dd></dd>
Description
The dd element is the second item in a denition list, the other one being the dt
element.
Here is an example:
<dl>
<dt>PactPub</dt>
<dd>Packt Publishing</dd>
</dl>
See also
You can also refer to the dl and dd elements to nd out more about the dd element.

HTML Elements
[ 20 ]
gure
The syntax of the figure element is as follows:
<figure></figure>
Description
The figure element is a new element introduced with HTML5. In much the same
way as an article adds some meaning where there was none, a gure adds meaning
too. A gure is an image or any other item of information that is related to the
document. This has more meaning than just using an img element.
Here is an example:
<figure>
<img src="figure1.jpg" title="Figure 1" />
<figcaption>Figure One</figcaption>
</figure>
See also
You can also refer to the figcaption element to nd out more about the figure
element.
gcaption
The figcaption element is the gure caption element:
<figcaption></figcaption>
Description
The figcaption element was introduced in HTML5 along with the gure. This
element provides the caption for a gure. This element must be inside a figure
element and it must be either the rst or last child of the figure element.
Here is a simple example of the figcaption element:
<figure>
<img src="figure1.jpg" title="Figure 1" />
<figcaption>Figure One</figcaption>
</figure>

Chapter 1
[ 21 ]
See also
You can also refer to the figure element to nd out more about the figcaption
element.
div
The div element is the division element:
<div></div>
Description
The div element is one of the most used elements in HTML today. It is the element
used to split up your document into arbitrary divisions. The div element has no
default styling. These divisions could be for placement, styling, or any other reason.
A div element does not affect the semantic meaning of the document. It should only
be used when no other element suits your requirements.
Here is an example:
<div>
You can put whatever you want in here!
<div>
More elements.
</div>
</div>
main
The syntax of the main element is as follows:
<main></main>
Description
The main element should have the main content of the document inside it. You
cannot have this element as a descendant of the article, aside, footer, header,
or nav elements. This differs from an article, in that, an article should be a self-
contained element.

HTML Elements
[ 22 ]
Here is an example of the main element in use:
<main>
This is the main content of the document.
<article>
Here is the article of the document.
</article>
</main>
Inline elements
The following elements can all wrap text- and block-level elements to give them
functionality, style, and meaning.
a
The a element is the anchor element. This is where HTML gets the HyperText (HT),
the syntax is as follows:
<a download href media ping rel target type></a>
Attributes
Here are the attributes that are used in the a element:
• download: This attribute lets the browser know that the item should be
downloaded. The dialog will default to the filename in this attribute.
• href: This is the link target.
• media: This states the media that the stylesheet should apply to based on a
media query.
• ping: This makes a URL to ping and notify if the link is followed.
• rel: This states the relationship of the document being linked to.
• target: This states where the target link is to be displayed.
• type: This states the MIME type of the linked resource.
Description
The a element is one of the most important and useful elements. It allows you to link
documents together and you can easily jump between elements. We can say that the
Web would not be as popular as it is now without this very easy-to-use element.

Chapter 1
[ 23 ]
The link can be that of an anchor tag in the document, a relative URL, or any
external resource. When linking to an anchor tag in the current document, use the a
tag and the id attribute.
The content you put inside the a element will become part of what the user can click
on to follow the link. This includes the text, img, and div elements, to name a few.
Here is an example of an img element with an image:
<a href="http://www.packtpub.com">
<img src="packt_logo.png" />
</a>
Here is an example of a PDF document that will be downloaded; this will track each
click:
<a download="report.pdf" href="assests/report.pdf"
media="min-width: 1024px" ping="track/click" rel="alternate"
target="_blank" type=" application/pdf"></a>
abbr
The abbr element is the abbreviation element:
<abbr></abbr>
Description
The abbr element is used to show what an abbreviation stands for. You should put
the full word in the title attribute. Most browsers will display this as a tooltip
when you hover over this element.
Here is an example:
<abbr title="abbreviation">abbr</abbr>
bdo
The bdo element is the bi-direction override element:
<bdo dir></bdo>

HTML Elements
[ 24 ]
Attributes
The dir attribute is used in the bdo element, which gives the direction of the text. Its
values can be ltr, rtl, and auto.
Description
The bdo element will override the current direction of the text for the direction
dened in the element.
Here is an example:
<bdo dir="rtl">Right to Left.</bdo>
br
The br element is the line break element:
<br>
Description
The br element adds a line break. This is needed as line breaks in text are ignored
when rendered in the browser. This should not be used to help place elements, as
that is the job of CSS.
Here is an example:
First Name<br>
LastName
cite
The cite element is the citation element:
<cite></cite>
Description
The cite element is used to cite another source. Most browsers will render this in
italics.
Here is an example:
This quote is from <cite>Web Developer's Reference</cite>

Chapter 1
[ 25 ]
code
The syntax of the code element is as follows:
<code></code>
Description
The code element is used to display the programming code in a document. The
browser will use a monospace font for it.
Here is an example:
Here is some JavaScript: <code>var a = 'test'</code>
dfn
The dfn element is the dening instance element:
<dfn></dfn>
Description
The dfn element is used to create a dening instance or the rst time a specic word
is introduced and explained.
Here is an example of the dfn element:
<dfn>HTML</dfn>, or HyperText Markup Language.
em
The em element is the emphasis element:
<em></em>
Description
The em element is used to add more emphasis to a specic word or phrase. By
default, browsers will render this in italic font, but it should not just be used for
italics.

HTML Elements
[ 26 ]
kbd
The kbd element is the keyboard input element:
<kbd></kbd>
Description
The kbd element is used for text that the user should input. This does not mean that
the user inputs data into the element, rather they will enter it into a window, console,
or some application on their computer.
Here is an example:
Press <kbd>Win + R</kbd> to open the Run dialog.
mark
The syntax of the mark element is as follows:
<mark></mark>
Description
The mark element is used to highlight text.
Here is an example:
<mark>This</mark> will be highlighted
q
The q element is the quote element:
<q cite></q>
Attributes
The cite attribute used in the q element states the URL of the source of the quote.

Chapter 1
[ 27 ]
Description
The q element is used for short quotes. For longer quotes, use blockquote.
Here is an example:
<q cite="http://en.wikiquote.org/">Don't quote me on this.</q>
See also
You can also refer to the blockquote attribute to learn more about the q element.
s
The s element is the strikethrough element:
<s></s>
Description
The s element should be used when a piece of information in the document is no
longer accurate. This is different than a revision made to the document.
Here is an example:
Today is the <s>twenty-fifth<s> twenty-sixth.
samp
The samp element is the sample output element:
<samp></samp>
Description
The samp element is used to show the sample output from a command or program.
Here is an example:
The command should output <samp>Done!</samp>
small
The syntax of the small element is as follows:
<small></small>

HTML Elements
[ 28 ]
Description
The small element is used to make the text smaller. This is usually done with text
such as the copyright or legal text.
Here is an example:
<small>Copyright 2014</small>
span
The syntax of the span element is as follows:
<span></span>
Description
The span element is much like the div element; in that, it is just an arbitrary
container. The div element is a block-level element, and the span element is an inline
element. The element does not add any semantic meaning to the text or document.
Often, it is used to add a CSS style to the text:
<span>This text is in the span element.</span>
strong
The syntax of the strong element is as follows:
<strong></strong>
Description
The strong element should be used when certain text needs more importance. This
carries some semantic meaning. The strong element's default style in most browsers
is bold. This should not then be interchangeable with the b element, as that does not
carry any semantic meaning.
Here is an example:
<strong>Warning!</strong> JavaScript must be enabled.
sub
The sub element is the subscript element:
<sub></sub>

Chapter 1
[ 29 ]
Description
The sub element will render the text as a subscript.
Here is an example:
H<sub>2</sub>O
sup
The sup element is the superscript element:
<sup></sup>
Description
The sup element will render the text as a superscript.
Here is an example:
x<sup>2</sup> is what x squared should look like
time
The syntax of the time element is as follows:
<time datetime></time>
Attributes
The datetime attribute used in the time element gives a string that is the date and
time value.
Description
The datetime element allows browsers to easily parse dates out of a document. You
can wrap a date or the description of a date (tomorrow or July 4, for example) and
still have an exact date for the browser to read.
Here is an example:
The party is on <time datetime="2014-11-27 14:00">
Thanksgiving @ 2PM</time>

HTML Elements
[ 30 ]
var
The var element is the variable element:
<var></var>
Description
The var element is used for variables in a mathematical expression or for
programming.
Here is an example:
The variable <var>x</var> is equal to the string test
in this example.
wbr
The wbr element is the word break opportunity element:
<wbr>
Description
The wbr element is a new element that was introduced with HTML5. We use this
element to let the browser know of a good spot to break between words. This does
not force a break, but if a break is needed, then the browser will respect the element.
It is an empty tag, meaning that it should not have an ending tag.
Here is an example:
If you have a really short width <wbr>then you <wbr>
could have breaks.
Embedded content
The following elements are used to embed media or other objects into the document.
img
The img element is the image element:
<img alt crossorigin height ismap sizes src srcset width />

Chapter 1
[ 31 ]
Attributes
The attributes that are used in the img element are as follows:
• alt: This is the alternate text for the image. Use this to describe the image.
This is used to enhance accessibility.
• crossorigin: This lets the browser know whether this image should be
fetched with a CORS request. If the image will be modified in a canvas
element and not from the same domain name, then a CORS request must be
used.
• height: This is an attribute to set the height of the image.
• ismap: This lets the browser know whether the image is used in a
server-side map.
• sizes: This is a list of media conditions that will map to a size. This is used
to help the browser determine which image to use. By default, this will be
100 VW, which is 100% of the view width.
• src: This is the most important attribute, it is the image URL.
• srcset: This is a list of multiple images that can be used for display on our
web page. This is used to target different screen sizes or pixel densities.
• width: This is an attribute to set the width of the image.
Description
The img element is used if you want an image in the document. This element has
many attributes, but the src and alt attributes are the only required attributes. The
alt attribute should be used to describe the image in almost 100% of the cases. The
main exception is when the image is only used as a decorative image, for example,
when an image is used instead of a horizontal rule. The width and height can be
used if the image is of a different size than what is needed on the page; otherwise, it
defaults to the size of the image.
The crossorigin element can be confusing. It is used to ensure that you have
ownership of an image before you modify the image in a canvas element. The
image needs to either be from the same fully qualied domain name or the server's
response must let the browser know whether the current domain can use the image.
Finally, srcset is used to give the browser a list of images that it can use. This is
done with a comma-separated list of URLs and a descriptor. A descriptor can either
be a width descriptor, which would be a number followed by w, or a pixel descriptor,
which is a number followed by x. The width descriptor tells the browser the width
of the image. The pixel descriptor tells the browser the pixel density it should use for
the image.

HTML Elements
[ 32 ]
The width descriptor can also be used by the browser when the pixel
density changes. For example, if you have an image that is double
the resolution and the pixel density doubles as well, the browser will
choose the larger resolution.
The sizes element is used along with srcset to help the browser identify a break
point. This is done using a media condition, for example, "(min-width: 1600px)
25vw, 100vw". This states that if the width of the page is at least 1600 pixels, the
images will be 25% of the view width, otherwise the view width is 100%. This helps
the browser know where you want a break point and how large you want the image
to be.
The best way to think about srcset is that you are letting the browser
know about all the images that can be used in a specic img element. You
include the information that the browser is most concerned about—width
and pixel density—and let the browser choose.
Here are a few examples. The rst example is a simple img tag and the next one uses
crossorigin:
<img src="example.png" alt="This is an example image"/>
<img src="example.png" crossorigin="anonymous"
alt="This is an example image"/>
Here is a srcset example that lets the browser choose the image based on pixel
density:
<img src="normal.jpg" srcset="normal.jpg 1x,
retina.jpg 2x" alt="Image of Person in article" />
The following is an example using srcset and widths:
<img src="regular.jpg" srcset="double_size.jpg 1000w,
regular.jpg 500w" sizes="100vw" alt="A bird"/>
iframe
The iframe element is the inline frame element:
<iframe height name seamless src width></iframe>

Chapter 1
[ 33 ]
Attributes
The attributes that are used in the iframe element are as follows:
• height: This is the attribute to set the height.
• name: This states a name that can be used in the target attribute.
• seamless: This makes iframe appear as part of the content of the document.
This will apply the outer context CSS and enables us to open links in the
outer context.
• src: This is the URL of the embedded document.
• width: This is the attribute to set the width.
Description
The iframe element is used to embed another full HTML document inside the
current document.
Here is an example that loads the Google homepage and another that loads Packt
Publishing's page:
<iframe src="http://www.google.com"></iframe>
<iframe height="100px" name="remote-document"
seamless src="https://www.packtpub.com/" width="100px"></iframe>
embed
The syntax of the embed element is as follows:
<embed height src type width/>
Attributes
The attributes that are used in the embed element are as follows:
• height: This is the attribute to set the height
• src: This is the URL of the object to be embedded
• type: This is the MIME type of the object
• width: This is an attribute to set the width

HTML Elements
[ 34 ]
Description
The embed element is used to embed other objects in the document. There are other
elements for embedding objects as well, depending on their type. For example, you
can embed a video using the video element, as follows:
<embed src="example.mp4" type="video/mp4"/>
See also
You can also refer to the audio, video, and object elements to learn more about the
embed element.
object
The syntax of the object element is as follows:
<object data height type width></object>
Attributes
Here are the attributes that are used in the object element:
• data: This is the URL of the object to be embedded
• height: This is the attribute to set the height
• type: This is the MIME type of the object
• width: This is the attribute to set the width
Description
The object element can be used very much like the embed element. This has
historically been used for the Flash objects.
Here is an example:
<object data="example.swf" type="application/x-shockwave-flash">
</object>
See also
You can also refer to the audio, video, embed, and param attributes to nd out more
about the object element.

Chapter 1
[ 35 ]
param
The param element is the parameter element:
<param name="movie" value="video.swf"/>
Attributes
The attributes that are used in the param element are as follows:
• name: This is the name of the parameter
• value: This is the value of the parameter
Description
The param element denes a parameter for the object element. The parent of this
element should be an object element.
Here is an example. This example is useful when using objects on older browsers:
<object data="example.swf" type="application/x-shockwave-flash">
<param name="movie" value="example.swf" />
</object>
video
The syntax of the video element is as follows:
<video autoplay buffered controls crossorigin
height loop muted played poster src width></video>
Attributes
The attributes that are used in the video element are as follows:
• autoplay: This is a Boolean attribute that tells the browser to start playing
the video as soon as it can play after the loading has stopped
• buffered: This is a read object that tells how much of the video has buffered
• controls: This is a Boolean attribute to decide whether to display the
controls
• crossorigin: This attribute is used make a CORS request if you plan on
modifying the video in a canvas and the video is not hosted at the same fully
qualified domain name

HTML Elements
[ 36 ]
• height: This is the attribute to set the height
• loop: This states whether or not to loop the video
• muted: This states whether or not to mute the audio
• played: This is a read object, which reads how much of the video has been
played
• poster: This is a URL of an image that will be displayed until the video can
played
• src: This is the URL of the video
• width: This is the attribute to set the width
Description
The video element is a new element introduced in HTML5. You can use this to play
a video directly in the browser. This is very useful as the user does not need a plugin
or special player to view the video. In addition to this, you can use the video element
as a source for the canvas element.
You can also use the source element to include multiple sources in case the browser
can only play a certain type of le. If the browser does not support the video element
or the le type, you can put the fallback content into the element.
Here is an example using the video element and another that demonstrates possible
values for all of the attributes:
<video src="example.mp4" autoplay poster=
"example-poster.png"></video>
<video autoplay buffered controls crossorigin="anonymous"
height="100px" loop muted played poster="cover.jpg"
src="video.ogg" width="100px"></video>
See also
You can also refer to the source and track attributes to nd out more about the
video element.
audio
The syntax of the audio element is as follows:
<audio autoplay buffered controls loop muted played
src volume></audio>

Chapter 1
[ 37 ]
Attributes
The attributes that are used in the audio element are as follows:
• autoplay: This is the attribute in which the browser will start playing the
audio as soon as it can without loading
• buffered: This is the attribute that has the buffered time ranges
• controls: This is the attribute that has the browser display controls
• loop: This is the attribute that decides whether or not to loop the audio
• muted: This is the attribute that decides whether or not to mute the audio
• played: This is the attribute that has the time ranges of the audio played
• src: This is the attribute that gives the URL of the audio
• volume: This is the attribute that ranges the volume from 0.0 to 1.0
Description
The audio element was introduced in HTML5. You can add an audio to your page
and make the browser play it.
You can also use the source element to include multiple sources in case the browser
can play a certain type of le. If the browser does not support the audio element or
the le type, you can put fallback content into the element.
Here is an example using the audio element:
<audio src="test.mp3" autoplay loop>
Your browsers does not support the audio element.
</audio>
See also
You can also refer to the source and track attributes to nd out more about the
audio element.
source
The syntax of the source element is as follows:
<source src type />

HTML Elements
[ 38 ]
Attributes
The attributes that are used in the source element are as follows:
• src: This is the URL of the resource
• type: This is the MIME type of the resource
Description
The source element is used to add multiple sources to the audio, picture, and
video elements. It must be a child of one of these elements. You can use this to
specify multiple formats of the same resource. For example, you can have two
different video encodings for a video. If the browser cannot play the rst, it will fall
back to the other.
Here is an example with an audio element:
<audio autoplay controls>
<source src="test.ogg" type="audio/ogg" />
<source src="test.mp3" type="audio/mpeg">
</audio>
See also
You can also refer to the audio and video attributes to nd out more about the
audio element.
track
The syntax of the track element is as follows:
<track default kind label src />
Attributes
Here are the attributes that are used in the track element:
• default: This states whether the chosen track is the default track or not.
• kind: This states the different kinds of tracks that can be loaded. Here are the
values: subtitles, captions, descriptions, chapters, or metadata.
• label: This is the title of the track.
• src: This is the URL of the resource.

Chapter 1
[ 39 ]
Description
You will mainly use the track element to add captions or subtitles to videos.
Here is an example video with captions:
<video src="test.mp4">
<track label="English" kind="captions" src="en.vtt" default>
<track label="Spanish" kind="captions" src="sp.vtt">
</video>
Tables
Tables are useful for showing data. They make dening rows and columns very easy.
In the past, tables were used to create layouts, but today, that is done with CSS. They
should be used to only display the tabular data.
table
The syntax of the table element is as follows:
<table></table>
Description
The table element is the root element for creating a table. All the other elements in
this section must be children of this element.
Here is a simple example of the table element:
<table>
<tr>
<td>Column in Row 1</td>
</tr>
</table>
caption
The syntax of the caption element is as follows:
<caption></caption>

HTML Elements
[ 40 ]
Description
The caption element will be the title of the table. This element must be the rst child
of the table element.
Here is a simple example:
<table>
<caption>Caption for the table</caption>
<tr>
<td>Column in Row 1</td>
</tr>
</table>
colgroup
The colgroup element is the column group element:
<colgroup span></colgroup>
Attributes
The span attribute states the number of columns the group spans.
Description
The colgroup element is used to dene styles that are common to all columns or
groups of columns. This element is not as useful as it once was as the new CSS
selectors can target all the columns and even some specic columns.
tbody
The tbody attribute is the table body element:
<tbody></tbody>
Description
The tbody attribute is the main part of a table. All of the data rows and columns
should go in this element. This element should have one or more tr elements as its
children.

Chapter 1
[ 41 ]
Here is an example:
<table>
<tbody>
<tr>
<td>Column in Row 1</td>
</tr>
</tbody>
</table>
thead
The thead element is the table head element:
<thead></thead>
Description
The thead element is the row that has all of the column headings. It must appear
before the tbody or tfoot elements.
Here is an example:
<table>
<thead>
<tr>
<th>Heading 1</th>
</tr>
</thead>
<tbody>
<tr>
<td>Column in Row 1</td>
</tr>
</tbody>
</table>
tfoot
The tfoot element is the table footer element:
<tfoot></tfoot>

HTML Elements
[ 42 ]
Description
The tfoot element is the footer for the table. It must be used after any thead
elements, but can be either before or after tbody. The placement of the tfoot
element does not affect where it is rendered, which is always at the bottom.
Here is an example:
<table>
<tbody>
<tr>
<td>Column in Row 1</td>
</tr>
</tbody>
<tfoot>
<tr>
<td>Footer 1</td>
</tr>
</tfoot>
</table>
tr
The tr element is the table row element:
<tr></tr>
Description
The tr element is the row element. Every time you need another row in a table,
use this element. This element can be the child of a table, tbody, thead, or tfoot
element. You must use either a td or th as its child.
Here is an example:
<table>
<tbody>
<tr>
<td>Column in Row 1</td>
</tr>
</tbody>
</table>

Chapter 1
[ 43 ]
td
The td element is the table cell element:
<td colspan headers rowspan></td>
Attributes
The attributes that are used in the td element are as follows:
• colspan: This tells how many columns it will span as an integer
• rowspan: This tells how many rows the rowspan attribute will span as an
integer
• headers: This is a space-separated list of strings that match the ID of any th
element
Description
The td element is the basic table column element. The colspan and rowspan
attributes allow you to make the column wider and taller, respectively.
Here is an example:
<table>
<tbody>
<tr>
<td>Column in Row 1</td>
</tr>
</tbody>
</table>
th
The th element is the table header cell element:
<th colspan rowspan></th>
Attributes
The attributes that are used in the th element are as follows:
• colspan: This states the number of columns the colspan attribute will span
as an integer
• rowspan: This states the number of rows the rowspan attribute will span as
an integer

HTML Elements
[ 44 ]
Description
The th element is used when we add a column to the thead element.
Here is an example:
<table>
<thead>
<tr>
<th>Header</th>
</tr>
</thead>
</table>
Forms
Forms are great for getting information from the user. They usually have multiple
elements inside them that accept input from the user. The data acquired from the
input of the user is then sent to the server to process.
Form
The syntax of the form element is as follows:
<form accept-charset action autocomplete enctype
method name novalidate target></form>
Attributes
The attributes that are used in the form element are as follows:
• accept-charset: This is a list of character encodings that the server accepts.
This can be a space- or comma-delimited list.
• action: This is the URL that will process the form.
• autocomplete: This lets the browser know whether it can autocomplete this
form with previous values.
• enctype: This sets the MIME type for the content being sent to the server.
• method: This is the HTTP method that will be used to submit the form. It can
be Post or Get.
• name: This is the name of the form.
• novalidate: This tells the browser not to validate the form.
• target: This states where the response will be displayed. This can be: _self,
_blank, _parent, or _top.

Chapter 1
[ 45 ]
Description
The form element is the root element of a form in a document. When submitted, the
form will contain all the data that is entered into the different elements inside of the
form.
Here is a simple form of the syntax:
<form action="processForm" method="post">
<input type="text" name="text-input"/>
<button type="submit">Submit!</button>
</form>
eldset
The syntax of the fieldset element is as follows:
<fieldset disabled form name></fieldset>
Attributes
The attributes that are used in the fieldset element are as follows:
• disabled: This disables all the elements in the fieldset
• form: This is the ID of the form the form attribute belongs to
• name: This is the name of fieldset
Description
The fieldset element allows us to group related inputs together. The default style
of most browsers is to put a border around the eldset.
If the rst element is a legend element, then the eldset will use that as its label.
Here is an example of using the fieldset element:
<form action="processForm" method="post">
<fieldset>
<legend>This is a fieldset</legend>
<input type="text" name="text-input" />
</fieldset>
</form>

HTML Elements
[ 46 ]
See also
You can also refer to the legend attribute to nd out more about the fieldset
element.
legend
The syntax of the legend element is as follows:
<legend></legend>
Description
The legend element will become the label of the fieldset element that it is a child
of.
See also
You can also refer to the fieldset element to nd out more about the legend
element.
label
The syntax of the label element is as follows:
<label accesskey for form></label>
Attributes
The attributes that are used in the label element are as follows:
• accesskey: This is a shortcut for the accesskey element
• for: This is the ID of a form element that this is the label for
• form: This is the ID of the form the form attribute is associated with
Description
The label element is for labeling inputs. You can either put the element in the label
or use the for attribute. When the label is correctly linked to an input, you can click
the label and the cursor will be in the input.

Chapter 1
[ 47 ]
Here is an example that covers each different way of labeling an element:
<form action="processForm" method="post">
<label>First name: <input type="text"
name="firstName" /></label>
<label for="lastNameInput">Last name:
</label><input id="lastNameInput" type="text"
name="lastName" />
</form>
input
The syntax of the input element is as shown:
<input accept autocomplete autofocus checked disabled form
formaction formenctype formmethod formnovalidate
formtarget height inputmode max maxlength min minlength
multiple name placeholder readonly required size spellcheck
src step tabindex type value width></input>
Attributes
The attributes that are used in the input element are as follows:
• accept: This is used to specify which file types are accepted for the web
page.
• autocomplete: This says whether the browser can autocomplete this input
based on previous values.
• autofocus: This lets the browser automatically focus on the element. This
should only be used on one element.
• checked: This is used with the radio or checkbox. This will select the value
on page load.
• disabled: This says whether or not to disable the element.
• form: This states the ID of the form.
• formaction, formenctype, formmethod, formnovalidate, and formtarget:
These will override the form's value if these attributes are associated with a
button or image.
• height: This is used to set the height of the image.
• inputmode: This gives a hint to the browser of what keyboard to display. For
example, you can use numeric to specify only the keypad.
• max: This is the maximum number or date-time of the system.

HTML Elements
[ 48 ]
• maxlength: This is the maximum number of characters that can be accepted
in the web page.
• min: This is the minimum number or date-time of the system.
• minlength: This is the minimum number of characters.
• multiple: This says whether there can be multiple values or not. This is used
with email or file.
• placeholder: This is the text that is displayed in the element when there is
no value assigned to this attribute.
• readonly: This makes the element of the read-only format.
• required: This is the element that is required to be assigned a value and
cannot be blank.
• size: This is the size of the element.
• src: This will be the URL of the image if it is of the img type.
• step: This is used with the min and max attributes to determine the
incremental steps.
• tabindex: This is the order of the elements when using tab.
• type: Refer to the next section for the description.
• value: This is the initial value of the element.
• width: This is the attribute to set the width.
Description
The input element is the main way to get data from the user. This element can vary
quite a bit based on the type that is used. HTML5 has added a few inputs that also
give you validation. For example, the email type will also validate that the e-mail
is a valid email. In addition to this, the type can give hints to the browser about
what keyboard to display. This is important for mobiles, which have many different
virtual keyboards. For example, the tel type will show a number pad instead of the
regular keyboard. Here is a rundown of the different types of keyboards and their
description:
• button: This is a button.
• checkbox: This is a checkbox.
• color: For most browsers, this will create a color picker; however, it is not
required by HTML5.
• date: This creates a date picker.

Chapter 1
[ 49 ]
• datetime: This creates a date and time picker using a time zone.
• datetime-local: This creates a date and time picker without a time zone.
• email: This is a text input for e-mail addresses. This type validates e-mails.
• file: This selects a file.
• hidden: This attribute will not be displayed, but the value will still be part of
the form.
• image: This essentially creates an image button.
• month: This can enter the month and year.
• number: This is used for a floating point number.
• password: This is a text input where the text is not shown.
• radio: This is a control to group multiple elements using the same name
attribute. Only one from the provided list can be selected.
• range: This a way to select a range of numbers.
• reset: This resets the form.
• search: This is a text input.
• submit: This is a button that will submit the form.
• tel: This is an input to enter a phone number.
• text: This is your basic text input.
• time: This is the time without a time zone.
• url: This an input to enter a URL. This will do validation as well.
• week: This is to enter the week number.
Here is an example of the text, e-mail, and tel inputs:
<input type="text" name="name" placeholder="enter email"/>
<input type="email" />
<input type="tel" />
button
The syntax of the button element is as follows:
<button autofocus disabled form formaction formenctype
formmethod formnovalidate formtarget name type value></button>

HTML Elements
[ 50 ]
Attributes
The attributes that are used in the button element are as follows:
• autofocus: This lets the browser automatically focus on the element that this
is an attribute of. This should only be used on one element.
• disabled: This states whether or not to disable the element.
• form: This is the ID of the form.
• formaction, formenctype, formmethod, formnovalidate, and formtarget:
These will override the form's value if this is a button or image.
• name: This is the name of the button for the form.
• type: This changes what the button does. The values are submit—which
submits the form, reset— which resets the form, button—which is the
default that does nothing.
• value: This is the initial value of the element.
Description
The button element creates a button that can be clicked on. Changing the type
attribute will change its behavior.
Here is an example of the reset and submit buttons:
<button type="reset">Reset</button>
<button type="submit">Submit</button>
select
The syntax of the select element is as follows:
<select autofocus disabled form multiple name required
size ></select>
Attributes
The attributes that are used in the button element are as follows:
• autofocus: This lets the browser automatically focus on this element. This
should only be used on one element.
• disabled: This states whether or not to disable the element.
• form: This is the ID of the form.

Chapter 1
[ 51 ]
• multiple: This states whether or not multiple items can be selected.
• name: This is the name of the element.
• required: This checks whether the option needs a value.
• size: This determines the number of rows for the element.
Description
The button element is used with the option element. Multiple option elements can
be added to the list to select or choose from. The value of the selected option is used
when the form is submitted.
Here is an example:
<select name="select">
<option value="1">One</option>
<option value="2">Two</option>
</select>
See also
You can also refer to the optgroup and option attributes to nd out more about the
button element.
optgroup
The optgroup element is the option group element:
<optgroup disabled label></optgroup>
Attributes
The attributes that are used in the optgroup element are as follows:
• disabled: This disables the group
• label: This is the heading in the drop-down menu
Description
The optgroup element allows you to group options together. The children of this
element need to be the option elements. They are not selectable and do not have a
value.

HTML Elements
[ 52 ]
Here is an example of the outgroup element with car makes and models:
<select name="cars">
<optgroup label="Ford">
<option value="Fiesta">Fiesta</option>
<option value="Taurus">Taurus</option>
</optgroup>
<optgroup label="Honda">
<option value="Accord">Accord</option>
<option value="Fit">Fit</option>
</optgroup>
</select>
See also
You can also refer to the option and select elements to learn more about the
optgroup element.
option
The syntax of the option element is as shown:
<option disabled selected value></option>
Attributes
The attributes that are used in the option element are as follows:
• disabled: This states whether or not the element is disabled.
• selected: This states whether or not the option is selected. We can set only
one option per selected element.
• value: This states the value of the option.
Description
The option elements are the actual items in the select element. They can either be
the child of a select or optgroup element.
Here is an example:
<select name="select">
<option value="1">One</option>
<option value="2">Two</option>
</select>

Chapter 1
[ 53 ]
See also
You can also refer to the select and optgroup elements to nd out more about the
option element.
textarea
The syntax of the textarea element is as follows:
<textarea autocomplete autofocus cols disabled form
maxlength minlength name placeholder readonly required
rows spellcheck wrap></textarea>
Attributes
The attributes that are used in the textarea element are as follows:
• autocomplete: This states whether the browser can autocomplete this input
based on previous values or not.
• autofocus: This lets the browser automatically focus on this element. This
should only be used on one element.
• cols: This states the width of the textarea element in characters.
• disabled: This states whether or not to disable the element.
• form: This is the ID of the form.
• maxlength: This is the maximum number of characters.
• minlength: This is the minimum number of characters.
• name: This is the name of the element.
• placeholder: This is the text that is displayed in the element when there is
no value.
• readonly: This makes the element read-only.
• required: This states that the element is required and cannot be blank.
• rows: This states the number of rows for textarea.
• spellcheck: This states whether or not the element should have the spelling
checked.
• wrap: This states how the lines are wrapped.

HTML Elements
[ 54 ]
Description
You will use this when you need more text than just a single line.
Here is an example:
<textarea cols="20" rows="10"
placeholder="Input text here"></textarea>
Drawing elements
In previous versions of HTML, if you wanted a graphic or image, you had to create
it in another application and use the img element to pull it into your document.
HTML5 has brought some new elements and features to replace the old elements
that allow you to draw your own images in the browser.
canvas
The syntax of the canvas element is as follows:
<canvas height width></canvas>
Attributes
The attributes that are used in the canvas element are as follows:
• height: This is an attribute to set the height
• width: This is an attribute to set the width
Description
The canvas element is used for drawing. You can use JavaScript to draw lines,
shapes, and images; pull frames from videos; and use WebGL, to name just a few
features. The HTML element is just the canvas (aptly named!) that you use to make a
drawing. All of the interaction happens in JavaScript.
Here is an example of a small canvas element:
<canvas height="400" width="400">
Your browser does not support the canvas element.
</canvas>

Chapter 1
[ 55 ]
svg
The svg element is the Scalable Vector Graphics (SVG) element:
<svg height viewbox width ></svg>
Attributes
The attributes that are used in the svg element are as follows:
• height: This is the attribute that sets the height.
• viewbox: This sets the bounds for the element. It takes four numbers that
map to min-x, min-y, width, and height.
• width: This is the attribute that sets the width.
Description
SVG is not a true HTML element. It is its own specication with many elements and
attributes. There are books written entirely about SVG. This element is here because
you can now create inline SVG in an HTML document. This gives you a lot of
exibility with two-dimensional drawings that images do not give you.
Here is an example that demonstrates the difference between height, width, and
viewport. The viewport takes up the bounds of the element, and height and width
give the element its size:
<svg xmlns="http://www.w3.org/2000/svg"
preserveAspectRatio=""
width="200" height="100" viewBox="0 0 400 200">
<rect x="0" y="0" width="400" height="200"
fill="yellow" stroke="black" stroke-width="3" />
</svg>
[ 57 ]
HTML Attributes
HTML is built using elements. Each of these elements will have attributes. The
attributes can change how the browser renders the element, congures it, and the
behavior involving the element.
The focus of the chapter will be entirely on attributes. If you are unsure about which
attributes apply to which elements, the previous chapter goes over almost all the
elements and the attributes that apply to them.
Global attributes
These are attributes that are available for every HTML element. However, you
should note that just because the attribute is available, it does not mean that it will
actually do anything.
accesskey
The accesskey attribute creates a keyboard shortcut to activate or focus on the
element:
<element accesskey></element>
Description
The accesskey attribute allows you to create a keyboard shortcut. This can be
a space-delimited list of characters. Most browsers on Windows will use Alt +
accesskey and most browsers on Mac use Ctrl + Option + accesskey.
Here is an example using a textbox that can be focused on with the character q:
<input type="search" name="q" accesskey="q"/>

HTML Attributes
[ 58 ]
class
The class attribute is often used to help group similar elements for CSS selectors:
<element class></element>
Description
The class attribute is one of the most used attributes. The class attribute allows
CSS to target multiple elements and apply a style to them. In addition to this, many
people also use the class attribute to help target elements in JavaScript.
Class takes a space-delimited list of class names.
Here is an example that applies the search-box class to an element:
<input type="search" name="q" class="search-box"/>
contenteditable
The contenteditable attribute sets the element's content as editable:
<element contenteditable></element>
Description
The contenteditable attribute tells the browser that the user can edit the content in
the element. The contenteditable attribute should have a value of true or false,
where true means that the element is editable.
Here is an example with a div element:
<div contenteditable="true">
Click here and edit this sentence!</div>
data-*
The data-* attribute is the custom attribute for elements:
<element data-*></-></element>
Description
You can name the data attribute whatever you want as long as the name does not
start with XML, does not use any semicolons, and does not have any uppercase
letters. The value can be anything.

Chapter 2
[ 59 ]
Here is a list of items with the data-id attributes. Note that the attribute name data-
id is arbitrary. You can use any valid name here:
<li data-id="1">First Row</li>
<li data-id="2">Second Row</li>
<li data-id="3">Third Row</li>
dir
The dir attribute denes the text direction:
<element dir></element>
Description
The dir attribute is the direction attribute. It species the text direction. The
following are its possible values:
• auto: This lets the browser choose the direction automatically
• ltr: This lets the browser choose the left to right direction
• rtl: The browser chooses the right to left direction
Here is an example for the ltr and rtl attributes.
<div dir="ltr">Left to Right</div>
<div dir="rtl">Right to Left</div>
draggable
The draggable attribute denes whether the element is draggable:
<element draggable-></element>
Description
The draggable attribute allows the element to be dragged around. Note that most
elements require JavaScript as well for this to work fully:
Here is an example:
<div draggable="true">You can drag me.</div>

HTML Attributes
[ 60 ]
hidden
The hidden attribute prevents the rendering of the element:
<element hidden></element>
Description
The hidden attribute is used to hide elements. However, a hidden element can be
overridden and displayed through CSS or JavaScript. This is a Boolean attribute
so including this attribute sets the value to true and excluding it sets the value
to false.
Here is an example:
<div hidden>This should not show</div>
id
The id attribute is a unique identier of the element:
<element id></element>
Description
The id attribute is a unique identier of the element. This is used for fragment
linking and easily accessing the element in JavaScript and CSS.
Here is an example using a div element:
<div id="the-first-div">This is the first div.</div>
lang
The lang attribute denes the language used in the element:
<element lang></element>
Description
The lang attribute sets the language for the element. The acceptable value should be
a BCP47 language. There are too many to list here, but you can read the standard at
http://www.ietf.org/rfc/bcp/bcp47.txt. The language is important for things
such as screen readers to use correct pronunciation.

Chapter 2
[ 61 ]
Here is a simple example using English:
<div lang="en">The language of this element is English.</div>
spellcheck
The spellcheck attribute species whether spell check can be used:
<element spellcheck></element>
Description
The spellcheck attribute was introduced in HTML5. It will tell the browser whether
to spellcheck this element or not. The value should either be true or false.
Here is an example using textarea:
<textarea spellcheck="false">
Moste fo teh worsd r mispeld.</textarea>
style
The style attribute is used to set the inline style:
<element style></element>
Description
You can add CSS styles directly to an element with the style attribute. Any
style rule that you can use in CSS, you can use here. Remember that this will take
precedence over any other styles dened in CSS.
Here is an example that sets the background to red and text to white:
<div style="background: #ff0000; color: #ffffff">
This has inline styles.</div>
tabindex
The tabindex attribute sets the tab order:
<element tabindex></element>

HTML Attributes
[ 62 ]
Description
The tabindex attribute element denes the order in which elements will focus when
the Tab key is used. There are three different types of values you can use. The rst is
a negative number. This denes that it is not in the list of elements for tab order. A
zero value means that the browser should determine the order of this element. This
is usually the order in which the elements occur in the document. This is a positive
number and it will set the tab order.
The following example demonstrates that you can set tabindex in a different order
to where the elements are in the document:
<input type="text" tabindex="1" />
<input type="text" tabindex="3" />
<input type="text" tabindex="2" />
title
The title attribute is the text for a tooltip:
<element title></element>
Description
The title attribute gives extra information about the element. Usually, the title is
shown as a tooltip for the element. For example, when using an image, this could be
the name of the image or a photo credit:
<p title="Some extra information.">
This is a paragraph of text.</p>
Miscellaneous
The miscellaneous grouping of attributes will have no hierarchy as they can be used
on many different elements.
accept
The accept attribute gives the list of types for the server:
<element accept></element>
Elements
The elements used in the accept attribute are form and input.

Chapter 2
[ 63 ]
Description
The accept attribute allows you to suggest the le type that this form or input
should accept. You can use audio/*, video/*, image/*, a MIME type, or the
extension.
Here is an example looking for PNG les:
<input type="file" accept=".png, image/png"/>
accept-charset
The accept-charset attribute gives the list of support charsets:
<element accept-charset></element>
Elements
The form element is used in the accept-charset attribute.
Description
The accept-charset attribute sets the charset that the form will accept. UTF-8 is
most commonly used as it accepts many characters from many languages.
Here is an example of using the charset attribute:
<form accept-charset="UTF-8"></form>
action
The action attribute is where the form is processed, the syntax is as follows:
<element action ></element>
Elements
The form element is used in the action element.
Description
The action attribute consists of the URL that will process the form's data.
Here is an example:
<form action="form-process.php"></form>
www.allitebooks.com

HTML Attributes
[ 64 ]
alt
The alt attribute is an alternative text for the element:
<element alt ></element>
Elements
The elements that are used in the alt attribute are applet, area, img, and input.
Description
The alt attribute is an alternate text in case the element cannot render the code. The
text should pass the same information to the user that the image would have.
Some browsers (Chrome being the most commonly used) will not display the text,
and you may need to use the title attribute. This is not the standardized behavior.
Here is an example using an image:
<img alt="Login button." src="non-loading-image.png"/>
async
The async attribute is used for the asynchronous execution of the script:
<element async ></element>
Elements
The script element is used in the async attribute.
Description
The async attribute tells the browser to load and execute the script asynchronously.
By default, the browser will load scripts synchronously. An asynchronous load
will immediately download and parse the script without blocking the rendering
of the page.
Here is an example:
<script src="application.js" async></script>

Chapter 2
[ 65 ]
autocomplete
The autocomplete attribute denes whether the element can be autocompleted:
<element autocomplete ></element>
Elements
The form and input elements are used in the autocomplete attribute.
Description
The autocomplete attribute lets the browser know whether or not it can
autocomplete the form or input from the previous values. This can have on and off
as the values.
Here is an example:
<input type="text" autocomplete="off"
placeholder="Will not autocomplete"/>
autofocus
The autofocus attribute denes whether the element would be focused
automatically on the elements:
<element autofocus ></element>
Elements
The button, input, select, and textarea elements are used in the autofocus
attribute.
Description
The autofocus attribute will set the focus to the element. This should only be used
on one element.
Here is an example of the autofocus attribute with a text input:
<input type="text" autofocus/>

HTML Attributes
[ 66 ]
autoplay
The autoplay attribute denes whether the audio or video track should play as soon
as possible:
<element autoplay ></element>
Elements
The audio and video elements are used in the autoplay attribute.
Description
The autoplay attribute will make the element play as soon as it can, without having
to stop to load.
Here is an example with an audio le:
<audio autoplay src="audio.mps"></audio>
autosave
The autosave attribute denes whether the previous values should be saved:
<element autosave ></element>
Elements
The input element is used in the autosave attribute.
Description
The autosave attribute tells the browser to save values entered into this input. This
means that on the next page load, the values will be persisted. It should have a
unique name that the browser can associate the saved values to. This attribute may
or may not work in some browsers as it is not fully standardized.
Here is an example:
<input type="text" autosave="textautosave" />
cite
The cite attribute has the source of the quote:
<element cite ></element>

Chapter 2
[ 67 ]
Elements
The blockquote, del, ins, and q elements are used in the cite attribute.
Description
The cite attribute points to the source of a quote by providing a URL.
Here is an example:
<blockquote cite=
"http://en.wikiquote.org/wiki/The_Good,_the_Bad_and_the_Ugly">
After a meal there's nothing like a good cigar.
</blockquote>
cols
The cols attribute gives the number of columns:
<element cols ></element>
Elements
The textarea element is used with the cols attribute.
Description
The cols attribute gives the number of columns in a textarea element.
Here is an example of it in use:
<textarea cols="30"></textarea>
colspan
The colspan attribute gives the number of columns a cell should span:
<element colspan ></element>
Elements
The td and th elements are used in the colspan attribute.

HTML Attributes
[ 68 ]
Description
The colspan attribute gives the number of columns a table cell should span.
Here is an example using a table element:
<table>
<tr><td colspan="2">1 and 2</td></tr>
<tr><td>1</td><td>2</td></tr>
</table>
datetime
The datetime attribute gives the date and time associated with this element:
<element datetime ></element>
Elements
The del, ins, and time elements are used with the datetime attribute.
Description
The datetime attribute should be the time that the action implied by the element
was taken. This attribute is mainly used with the del and ins elements to show
when the deletion or insertion occurred.
Here is an example using del:
My name is <del datetime="2014-12-16T23:59:60Z">John</del>Josh.
disabled
The disabled attribute denes whether the element can be used or not:
<element disabled ></element>
Elements
The button, fieldset, input, optgroup, option, select, and textarea elements
are used in the disabled attribute.

Chapter 2
[ 69 ]
Description
The disabled attribute makes the element unusable. If the element is disabled, it
cannot be used. This means that buttons cannot be clicked, text areas and text inputs
cannot have text entered, dropdowns cannot be changed, and so on.
Here is an example with a button element:
<button disabled>This is a disabled button</button>
download
The download attribute sets a link to download a resource:
<element download ></element>
Elements
The a element is used in the download attribute.
Description
The download attribute tells the browser to download the resource when clicked on.
This means that when the a element is clicked, a save dialog will appear with the
value of the attribute as the default name.
Here is an example:
<a href="example.pdf" download="example.pdf">Save the PDF</a>
content
The content attribute gives a value to go with the name attribute:
<element content ></element>
Elements
The meta element is used in the content attribute.

HTML Attributes
[ 70 ]
Description
The content attribute is an attribute for the meta tag. It is used as the value of the
name attribute.
Here is an example:
<meta name="example" content="value for example" />
controls
The controls attribute denes whether the controls should be displayed:
<element controls ></element>
Elements
The audio and video elements are used in the controls attribute.
Description
The controls attribute tells the browser to display controls for a media le. This is a
Boolean attribute.
Here is an audio example:
<audio controls src="example.mp3"></audio>
for
The for attribute sets the element this attribute is associated with:
<element for ></element>
Elements
The label element is used with the for attribute.
Description
The for attribute species which form input the label is associated with. This is
specied using the ID of the input element. The label will also allow the user to click
on it and focus on the input.

Chapter 2
[ 71 ]
Here is an example with a text input:
<label for="username">Username</label>
<input type="text" id="username" name="username" />
form
The form attribute sets the form with which this input is associated:
<element form ></element>
Elements
The button, fieldset, input, labellable, object, output, select, and textarea
elements are used in the form attribute.
Description
The form attribute references the form that these controls are in:
<form method="get" id="example-form">
</form>
<input type="text" form="example-form" />
formaction
The formaction attribute sets the form action for the element:
<element formaction ></element>
Elements
The button and input elements are used in the formaction attribute.
Description
The formaction attribute will override the action of the form for this element. This
should be a URL. If used on the form element itself, this attribute species the target
for the form data. If used on an element within the form (for example, button), this
overrides the declared value on the form itself.

HTML Attributes
[ 72 ]
Here is an example with a button:
<form method="get" action="formaction.php">
<button formaction="buttonaction.php">Press me</button>
</form>
height
The height attribute sets the height of an element:
<element height ></element>
Elements
The canvas, embed, iframe, img, input, object, and video elements are used in the
height attribute.
Description
The height attribute sets the height of the element. Only the elements listed in the
previous section should use this attribute and all other elements should use CSS to
set their height.
You may see many HTML documents that use height on many
elements. This is not valid anymore and CSS should be used to set
the height on any other elements.
Here is an example with a canvas:
<canvas height="400" width="400"></canvas>
href
The href attribute gives the URL of the resource:
<element href ></element>
Elements
The a, base, and link elements are used in the href attribute.

Chapter 2
[ 73 ]
Description
The URL for the element is given by the href attribute.
Here is an example with an anchor element:
<a href="http://www.google.com">Google</a>
hreang
The hreflang attribute states the language of the resource:
<element hreflang ></element>
Elements
The a and link elements are used in the hreflang attribute.
Description
The hreflang attribute is the language of the linked document. The acceptable
values should be in the BCP47 language. There are too many to list here, but you can
read the standard at http://www.ietf.org/rfc/bcp/bcp47.txt.
Here is an example:
<a href="http://www.google.com" hreflang="en">Google</a>
label
The label attribute states the title of the track:
<element label ></element>
Elements
The track element is used in the label attribute.

HTML Attributes
[ 74 ]
Description
The label attribute is used with the track element to give a title to the track.
Here is an example with subtitles for a video:
<video src="sample.mp4">
<track kind="subtitles" label="English Subtitles"
src="en.vtt" />
</video>
list
The list attribute gives the list of options:
<element list ></element>
Elements
The input element is used in the list attribute.
Description
The list attribute ties to a datalist attribute with a list of options for input.
This example has a list of fruits for a text input:
<input type="text" list="fruit" />
<datalist id="fruit">
<option>Apple</option>
<option>Banana</option>
</datalist>
loop
The loop attribute denes whether the element should loop the media:
<element loop ></element>
Elements
The audio and video elements are used in the loop attribute.

Chapter 2
[ 75 ]
Description
The loop attribute is a Boolean attribute which will play the media on a loop.
Here is an example with an audio element:
<audio src="example.mp3" loop></audio>
max
The max attribute denes the maximum value:
<element max ></element>
Elements
The input and progress elements are used in the max attribute.
Description
The max attribute sets the maximum numeric or date-time value allowed.
Here is an example with an input:
<input type="number" min="0" max="5" >
maxlength
The maxlength attribute denes the maximum number of characters:
<element maxlength ></element>
Elements
The input and textarea elements are used in the maxlength attributes.
Description
The maxlength attribute sets the maximum number of characters.
Here is an example with an input:
<input type="text" maxlength="5">

HTML Attributes
[ 76 ]
media
The media attribute sets the media for the linked resource:
<element media ></element>
Elements
The a, area, link, source, and style elements are used in the media attribute.
Description
The media attribute species which media this resource is for. Usually, this attribute
is used with link and the CSS. The standardized values are screen, print, and all.
The screen value is for displaying on a monitor, the print value is when printing,
and the all value is both. Different browsers do have a few other values, but nothing
that works across all.
Here is an example with CSS to create a print stylesheet:
<link rel="stylesheet" href="print.css" media="print"/>
method
The method attribute denes the HTTP method of form:
<element method ></element>
Elements
The form element is used in the method attribute.
Description
The method attribute sets the HTTP method of the form. The two values are GET,
which is the default, and POST.
Here is an example of a form that submits using the POST HTTP method:
<form method="post" action="formaction.php"></form>
min
The min attribute denes the minimum value:
<element min ></element>

Chapter 2
[ 77 ]
Elements
The input element is used in the min attribute.
Description
The min attribute is the opposite of max. It sets the minimum value for an input.
Here is an example:
<input type="number" min="2">
multiple
The multiple attribute denes whether multiple values can be selected:
<element multiple ></element>
Elements
The select element is used in the multiple attribute.
Description
The multiple attribute allows you to select multiple values. This is a Boolean
attribute.
Here is an example:
<select multiple>
<option>First</option>
<option>Second</option>
</select>
name
The name attribute is the name of the element:
<element name ></element>
Elements
The button, form, fieldset, iframe, input, object, select, textarea, and meta
elements are used in the name attribute.

HTML Attributes
[ 78 ]
Description
The name attribute names an element. This allows you to get the value of the element
in a submitted form.
Here is an example with an input:
<input type="text" id="username" name="username" />
novalidate
The novalidate attribute denes whether the validation should be skipped:
<element novalidate ></element>
Elements
The form element is used in the novalidate attribute.
Description
The novalidate attribute sets the form to not validate when submitted. The browser
will validate the input without adding any client-side code. This is a Boolean
attribute.
Here is an example:
<form method="post" action="formaction.php" novalidate></form>
pattern
The pattern attribute denes a regular expression:
<element pattern ></element>
Elements
The input element is used in the pattern attribute.
Description
You can use a regular expression in this attribute to validate the input.
Here is an example that will only be valid with numbers:
<input pattern="[0-9].+" type="text" />

Chapter 2
[ 79 ]
placeholder
The placeholder attribute gives a hint for the user in the element:
<element placeholder ></element>
Elements
The input and textarea elements are used in the placeholder attribute.
Description
When the element has not been interacted with (no value and is not in focus), it
will display the text in this attribute. The value will disappear once the element is
interacted with.
Here is an example with input:
<input type="text" name="username"
placeholder="Please enter username"/>
poster
The poster attribute gives an image for a video:
<element poster ></element>
Elements
The video element is used in the poster attribute.
Description
The poster attribute should point to an image that will be the poster (or placeholder)
for a video element until the video is loaded.
Here is an example:
<video src="video-about-dogs.mp4"
poster="images/image-of-dog.png"></video>
readonly
The readonly attribute denes whether the element is editable:
<element readonly ></element>

HTML Attributes
[ 80 ]
Elements
The input and textarea elements are used in the readonly attribute.
Description
The readonly attribute makes the element readonly or not editable. This is a Boolean
attribute.
Here is an example with a text input:
<input type="text" readonly />
rel
The rel attribute denes the relationship of the element:
<element rel ></element>
Elements
The a and link elements are used in the rel attribute.
Description
The rel attribute is the relationship between the linked resource and the document.
Usually, you will see this used with the link element and CSS or with the a element
and the value of nofollow.
Here is a CSS example:
<link rel="stylesheet" href="style.css"
type="text/css" media="screen" />
required
The required attribute denes whether the element is required when submitting
a form:
<element required ></element>
Elements
The input, select, and textarea elements are used in the required attribute.

Chapter 2
[ 81 ]
Description
The required attribute makes the element required in the form. The form will not
get submitted until the element is lled out. This is a Boolean attribute.
Here is an example with a text input:
<input required type="text" />
reversed
The reversed attribute changes the list order display:
<element reversed ></element>
Elements
The ol element is used in the reversed attribute.
Description
The reversed attribute is only an attribute of an ordered list, and it will render the
list in the reverse order. The items are not in reverse, but rather the numbered list
indicators are. This is a Boolean attribute.
Here is an example:
<ol reversed>
<li>1</li>
<li>2</li>
<li>3</li>
</ol>
rows
The rows attribute sets rows in a text area:
<element rows ></element>
Elements
The textarea element is used in the rows attribute.

HTML Attributes
[ 82 ]
Description
The rows attribute sets the number of rows in textarea.
Here is an example:
<textarea rows="30"></textarea>
rowspan
The rowspan attribute sets the number of rows that a cell will span:
<element rowspan ></element>
Elements
The td and th elements are used in the rowspan attribute.
Description
The rowspan attribute is used on the table cell elements. It will make the cell span the
number of rows in the value.
Here is an example:
<table>
<tr><td rowspan="2">Pets</td><td>Dogs</td></tr>
<tr><td>Cats</td></tr>
</table>
scope
The scope attribute denes the cell with which the element is associated:
<element scope ></element>
Elements
The td and th elements are used in the scope attribute.
Description
The scope attribute indicates what the cell is associated with. For example, this
could be row or col. This is a great benet for accessibility. It helps to convey the
relationship of the rows and columns in the table when a screen reader is used.

Chapter 2
[ 83 ]
Here is an example with a table cell:
<table>
<tr><th>Name</th><th>Age</th></tr>
<tr><td scope="row">Gizmo</td><td>4</td></tr>
</table>
selected
The selected attribute sets the default selection:
<element selected ></element>
Elements
The option element is used in the selected attribute.
Description
The selected attribute will set the option to be selected when the page loads. This
should only be set on one option element per select element. This is a Boolean
attribute.
Here is an example:
<select>
<option>Cats</option>
<option selected>Dogs</option>
</select>
size
The size attribute sets the width of element:
<element size ></element>
Elements
The input and select elements are used in the size attribute.

HTML Attributes
[ 84 ]
Description
The size attribute determines the width of the element unless the element is an
input and text or password. It will then determine the number of characters the
element can display. This is specied as the number of characters in the integer form.
The default for this is 20.
Here is an example with a text input:
<input type="text" size="100" />
src
The src attribute gives the URL for the element:
<element src ></element>
Elements
The audio, embed, iframe, img, input, script, source, track, and video elements
are used in the src attribute.
Description
The src attribute gives the URL of the resource for the element.
Here is an example with an image element:
<img src="dogs.png" />
start
The start attribute sets the starting number:
<element start ></element>
Elements
The ol element is used in the start attribute.

Chapter 2
[ 85 ]
Description
The start attribute will change the starting number for an ordered list.
Here is an example:
<ol start="10">
<li>1</li>
<li>2</li>
</ol>
step
The step attribute determines the jump between each number:
<element step ></element>
Elements
The input element is used in the step attribute.
Description
The step attribute is used with an input element and the type attribute of number
or date-time. It determines how far to step for each increment.
Here is an example with a number input. You will only be able to increment by 5
four times before reaching the max:
<input type="number" min="0" max="20" step="5" />
type
The type attribute denes the type of the element:
<element type ></element>

HTML Attributes
[ 86 ]
Elements
The button, input, embed, object, script, source, and style elements are used in
the type attribute.
Description
The type attribute is one of the most complex attributes. It can completely change
the look and behavior of an element. For example, input.
Here is a list for each element:
• button: Following are the values of the button attribute:
°button: This is the default value
°reset: This resets the form
°submit: This submits the form
• input: Please view the input element section from the previous chapter.
• embed: This will be the MIME type of the embedded resource.
• object: This will be the MIME type of the object.
• script: This will be the MIME type. Usually text/javascript are used.
• source: This will be the MIME type.
• style: This will be MIME type. Usually text/css are used.
Here is an example with an input:
<input type="password" />
value
The value attribute sets the value of the element:
<element value ></element>
Elements
The button, input, li, option, progress, and param elements are used in the value
attribute.
Chapter 2
[ 87 ]
Description
The value attribute will set the value of the element at page load.
Here is an example with a text input:
<input type="text" value="Hey!"/>
width
The width attribute sets the width of the element:
<element width ></element>
Elements
The canvas, embed, iframe, img, input, object, and video elements are used in the
width attribute.
Description
The width attribute sets the width of the element.
You may see many HTML documents that use width on many elements.
This is not valid any more; CSS should be used to set the width on any
other elements.
Here is an example with a canvas element:
<canvas width="200" height="200"></canvas>
wrap
The wrap attribute sets how the text is wrapped:
<element wrap ></element>
Elements
The textarea element is used in the wrap attribute.

HTML Attributes
[ 88 ]
Description
The wrap attribute decides whether or not text can be wrapped in textarea. The
values can be hard or soft. A hard value will insert line breaks into the text. It must
also be used with the cols attribute, so it knows where the end of the line is. A soft
value will not insert any line breaks.
Here is an example:
<textarea cols="10" wrap="hard"></textarea>

[ 89 ]
CSS Concepts and
Applications
Cascading Style Sheet (CSS) is the preferred way to style HTML. HTML has a style
element and a global style attribute. These make it very easy to write unmaintainable
HTML. For example, let's imagine that we have 10 elements on an HTML page for
which we want the font color to be red. We create a span element to wrap the text
that has the font color red, as follows:
<span style="color: #ff0000;"></span>
Later, if we decide to change the color to blue, we will have to change 10 instances of
that element and then multiply this by the number of pages we have used the span
element on. This is completely unmaintainable.
This is where CSS comes in. We can target specic elements/groups of elements to
which we wish to apply a specic style. CSS allows us to dene these styles, easily
update them, and change them from one place to another.
This book will focus on the most used CSS selectors, units, rules, functions, and
properties from CSS1, CSS2.1, and CSS3. For the most part, these should all work in
any browser, but there are exceptions. A great rule of thumb is that newer browsers
will have fewer issues.
We will get started with a quick overview of the different types of basic selectors.

CSS Concepts and Applications
[ 90 ]
Basic selectors
A selector represents a structure. This representation is then used in a CSS rule to
determine what elements are selected to be styled by this rule. CSS style rules apply
in the form of a waterfall effect. Each rule that is matched is also passed on to each
of its children, matched and applied based on the weight of the selector. This section
will only focus on the most basic of selectors.
The basic selectors are either type selectors, universal selectors, attribute selectors,
class selectors, ID selectors, or pseudo-classes.
All CSS selectors are case-insensitive. Selectors can also be grouped
together to share rules. To group selectors, you just have to split them
with commas. Consider the following example:
p { color: #ffffff; }
article { color: #ffffff }
Here, the following is the same as the preceding declaration
p, article { color: #ffffff }
The simple selector
The following selectors are all the simple selectors for CSS.
The type selectors
The type selectors selects based on the element name:
E
ns|E
Here, E is the element name and ns is a namespace.
Description
This is the simplest way to select elements—using their name. For the most part,
when using just HTML, you not need to worry about the namespace, as all of the
HTML elements are in the default namespace. An asterisk can be used to specify all
namespaces, for example, *|Element.

Chapter 3
[ 91 ]
When this selector is used, it will match all of the elements in the document. For
example, if you have fteen h2 elements and use a single h2 element, then this rule
will match all fteen.
Here are a few examples of the type selector. The rst code sets all the h1 elements'
font color to red. The next code applies red as the background color for all p
elements:
h1 { color: #ff0000; }
p { background: #ff0000; }
The universal selector
The asterisk (*) represents any and all qualied elements:
*
ns|*
*|*
Here, ns is a namespace.
Description
This is essentially a wildcard selector. It will match every element. This is true even
when used with other selectors. For example, *.my-class and .my-class are the
same.
While you can use it as a single selector to match every element, it is most useful
when used with other selectors. Following along with our preceding example, we
may want to select any element that is a descendant of an article element. This
selector is very explicit and easy to read, take a look at the following syntax:
article *
Here is an example. The rst example uses attribute selectors to select any elements
with hreflang in English, and the second example will select all elements in the
document:
*[hreflang="en"] { display: block; background:url(flag_of_the_UK); }
* { padding: 0; }

CSS Concepts and Applications
[ 92 ]
The attribute selectors
These selectors will match against attributes of an element. There are seven different
types of attribute selector and they are as follows:
[attribute]
[attribute=value]
[attribute~=value]
[attribute|=value]
[attribute^=value]
[attribute$=value]
[attribute*=value]
These selectors are usually preceded by a type selector or universal selector.
Description
This selector is a way to use a regular expression syntax in a selector rule. Each
of the selectors will act differently based on the use, so they are listed with the
differences here:
• [attribute]: This matches an element that has the [attribute] attribute,
irrespective of the value of the attribute.
• [=]: The value has to be an exact match.
• [~=]: This is used when the attribute takes a list of values. One of the values
in the list must match.
• [|=]: This attribute must either be an exact match or the value must begin
with the value followed immediately by a -.
• [^=]: This attribute matches the value that has this prefix.
• [$=]: This attribute matches the value that has this suffix.
• [*=]: This attribute matches any substring of the value.
The best way to really show the difference between these is to use some examples.
We will look at the lang and href attributes. The examples will be in the same order
in which they were introduced.

Chapter 3
[ 93 ]
Here is the HTML le that the examples will be selecting.
<span lang="en-us en-gb">Attribute Selector</span>
<span lang="es">selector de atributo</span>
<span lang="de-at de">German (Austria)</span>
<a href="https://example.com">HTTPS</a>
<a href="http://google.com">Google</a>
<a href="http://example.com/example.pdf">Example PDF</a>
Using the following, we should have all the spans with a lang attribute with a black
background, Spanish will be grey, German will be red, English will be blue, anchor
elements that have https attribute will be yellow, any PDFs will be red, and any
anchor to Google will be green. Here are the preceding styles described:
span[lang] { background-color: #000000; color: #ffffff; }
span[lang="es"] { color: #808080; }
span[lang~="de-at"] { color: #ff0000; }
span[lang|="en"] { color: #0000ff; }
a[href^="https"] { color: #ffff00; }
a[href$="pdf"] { color: #ff0000; }
a[href*="google"] { color: #00ff00; }
The class selectors
This selector will match the HTML elements based on the class attribute of
the element.
element.class
.class or *.class
element.class.another-class
Description
This is the most commonly used selector. Selecting based on the class attribute
allows you to style elements in an orthogonal manner. Classes can be applied
to many different elements and we can style each of those elements in the same
manner.
The class selector can be stacked so that both classes will have to be present.

CSS Concepts and Applications
[ 94 ]
Here is some HTML with different elements that have a class attribute:
<h1 class="red">Red Text</h1>
<span class="red">Red Text</span>
<span class="green black">Green text, black background</span>
<span class="green">Normal text</span>
Here is the CSS to style the HTML:
.red { color: #ff0000; }
.green.black { color: #00ff00; background-color: #000000; }
When the red class is applied to an element, it will change the color of the text
to red. The compound green and black will only select elements that have both
classes dened.
The ID selectors
This selector will match based on the ID attribute of the element:
#id
element#id or *#id
Description
The ID attribute should be unique for the document, so the ID selector should only
ever target one element. This is in contrast to the class selector, which can be used
to select multiple elements. As an example, you can use a class selector to make
every image on your page have a certain amount of margin and have a rule that
specically targets just your logo to have a different amount of margin.
Here is an example CSS rule that targets an ID of a logo:
#logo { margin: 10px; }
Combinators
Combinators are used to select more complex structures. They can help target
specic elements or groups of elements that would be difcult to target otherwise.

Chapter 3
[ 95 ]
Descendant combinator
This selector species that an element must be contained by another element.
The combinator is the whitespace character. We are explicitly dening it here
so that it is clear:
selector-a selector-b
Description
The two or more statements used in this selector can be any valid selector statement.
For example, the rst could be a class selector followed by a type selector. The
distance between the selectors does not matter. Each intermediate element will not
have to be listed for the selector to work.
The combinator can be stacked. Each statement will have a whitespace character
around it. This list of selectors does not need to be all inclusive, but for the selector to
match the hierarchy, it does need to exist.
This selector is best used when you only want to style elements in certain situations.
The following example highlights this.
In this rst example, we will target images that are in an ordered list with the ID of
presidents and give them a red border. Here is its HTML code:
<ol id="presidents">
<li><img src="pres01.png" alt="PortraitProtrait of George
Washington" />George Washington</li>
<li><img src="pres02.png" alt="PortraitProtrait of John Adams"
/>John Adams</li>
</ol>
<img src="not_pres.png" alt="not a President - no border" />
Here is the CSS rule:
ol#presidents img { border: 1px solid #ff0000; }

CSS Concepts and Applications
[ 96 ]
Here is an example that demonstrates that there can be many elements between
selectors. Here is the very arbitrary HTML.
<div class="example">
I am normal.
<div>
<div class="select-me">
I am red.
<span class="select-me">I am red as well.</span>
</div>
</div>
</div>
Here is the CSS rule:
.example .select-me { color: #ff0000; }
Finally, here is an example of a multiple selector hierarchy, which has the following
HTML:
<div class="first">Not the target
<div class="second">Not the target
<div class="third">I am the target.</div>
</div>
</div>
The CSS rule:
.first .second .third { color: #ff0000; }
The child combinator
This selector targets a specic child:
element-a > element-b
Description
This is very similar to the descendant combinatory except for the fact that this only
targets a child relationship. The second selector must be a direct descendant of the
parent directly contained by the rst.
Here is an example that will only target the rst span in this HTML:
<div>Here is an <span>arbitrary</span>
<p><span>structure.</span></p></div>

Chapter 3
[ 97 ]
Here is the CSS rule that only sets the rst span's color to red:
div > span { color: #ff0000; }
The adjacent sibling combinator
This selector targets elements that are next to each other in the hierarchy:
element-a + element-b
Description
The two elements must have the same parent, and the rst element must be
immediately followed by the second.
Here is an example that highlights how the selector works. Only the second span will
have the rule applied. The nal span's preceding sibling is not another span so it is
not matched by the selector. Here is the HTML.
<p>Here are a few spans in a row: <span>1</span> <span>2</span>
<em>3</em> <span>4</span></p>
CSS:
span + span { color: #ff0000; }
The general sibling combinator
This selector targets any element that has the same parent and follows the rst:
element-a ~ element-b
Description
This is similar to the adjacent sibling combinatory; in that, both elements need the
same parent. The difference is that the two elements can be separated by other
elements.
Here is an example that shows that both the second and third spans will be targeted
even though there is an em element between them. Here is the HTML:
<p>Here are a few spans in a row: <span>1</span> <span>2</span>
<em>3</em> <span>4</span></p>
Here is the CSS rule:
span ~ span { color: #ff0000; }

CSS Concepts and Applications
[ 98 ]
The selector specicity
This is not a selector rule like the others in this section. An element can be targeted
by multiple rules, so how do you know which rule takes precedence? This is where
specicity comes in. You can calculate which rule will be applied. Here is how it is
calculated. Keep in mind that an inline style will trump any selector specicity:
• The number of ID selectors in the selector is denoted by a
• The number of class selectors, attribute selectors, and pseudo-classes in
the selector is denoted by b
• The number of type selectors and pseudo-elements in the selector is denoted
by c
• Any universal selectors are ignored
The numbers are then concatenated together. The larger the value, the more
precedence the rule has. Let's look at some selector examples. The examples will be
composed of the selector and then the calculated value:
• h1: a=0 b=0 c=1, 001 or 1
• h1 span: a=0 b=0 c=2, 002 or 2
• h1 p > span: a=0 b=0 c=3, 003 or 3
• h1 *[lang="en"]: a=0 b=1 c=1, 011 or 11
• h1 p span.green: a=0 b=1 c=3, 013 or 13
• h1 p.example span.green: a=0 b=2 c=3, 023 or 23
• #title: a=1 b=0 c=0, 100
• h1#title: a=1 b=0 c=1, 101
The easiest way to think about this is that each grouping (a, b, or c) should be a
smaller group of elements to choose from. This means that each step has more
weight. For example, there can be many instances of h1 on a page. So, just selecting
h1 is a little ambiguous. Next, we can add a class, attribute, or pseudo-class
selector. This should be a subset of the instances of h1. Next, we can search by
ID. This carries the most weight because there should only be one in the entire
document.
Here is an example HTML that has three headings:
<h1>First Heading</h1>
<h1 class="headings"><span>Second Heading</span></h1>
<h1 class="headings" id="third">Third Heading</h1>

Chapter 3
[ 99 ]
Here is the CSS rule that will target each heading differently. The rst rule targets all
the elements, but it has the lowest specicity, the next rule is in the middle, and the
last rule only targets one element. In the following example, /* */ denotes text that
is a comment:
h1 { color: #ff0000; } /* 001 */
h1.headings span { color: #00ff00; } /* 012 */
h1#third { color: #0000ff; } /* 101 */
Pseudo-classes
Pseudo-classes are selectors that use information that is outside of the document
tree. The information that is not in the attributes of the element. This information can
change between visits or even during the visit. Pseudo-classes always have a colon
followed by the name of the pseudo-class.
The link pseudo-classes
There are two mutually exclusive link pseudo-classes, namely, :link and :visited.
:link
This selects links that have not been visited. The syntax is as follows:
:link
Description
This pseudo-class exists on any anchor element that has not been visited. The
browser may decide to switch a link back after some time.
Here is an example along with the :visited pseudo-class. Here is its HTML:
<a href="#test">Probably not visited</a>
<a href="https://www.google.com">Probably visited</a>
Here is the CSS. We can make an assumption that you have visited Google, so the
link would likely be green in color:
a:link { color: #ff0000; }
a:visited { color: #00ff00; }

CSS Concepts and Applications
[ 100 ]
:visited
This selects links that have been visited. The syntax is as follows:
:visited
Description
This pseudo-class exists on any anchor element that has been visited.
Here is an example along with the :link pseudo-class. Here is its HTML:
<a href="#test">Probably not visited</a>
<a href="https://www.google.com">Probably visited</a>
Here is the CSS. We can make the same assumption that you have visited Google, so
the rst link should be red and the second link will be green in color:
a:link { color: #ff0000; }
a:visited { color: #00ff00; }
User action pseudo-classes
These classes take effect based on actions of the user. These selectors are not
mutually exclusive, and an element can have several matches at once.
:active
This is used when the element is being activated:
:active
Description
The :active selector is most commonly used when the mouse button is pressed
but not released. This style can be superseded by the other user actions or link
pseudo-classes.
Here is an example:
<a href="https://www.google.com">Google</a>
The link will turn green while you are clicking on it. Here is its CSS:
a:active { color: #00ff00; }

Chapter 3
[ 101 ]
:focus
This selector targets the element that has to be focused on. The syntax is as follows:
:focus
Description
An element is considered to have focus when it accepts keyboard input. For example,
a text input element that you have either tabbed to or have clicked inside.
Here is a text input example:
<input type="text" value="Red when focused">
Here is the CSS. This also highlights the fact that you can use a pseudo-class, which
allows use of more complex selectors:
input[type="text"]:focus { color: #ff0000; }
:hover
This selector targets the elements when a user hovers their mouse over an element:
:hover
Description
This is used when a user has their cursor hovering over an element. Some browsers
(a great example being mobile touch devices, such as mobile phones) may not
implement this pseudo-class, as there is no way to determine whether a user is
hovering over an element.
Here is an example:
<span>Hover over me!</span>
The text in the span will be red in color when hovered over. Here is its CSS:
span:hover { color: #ff0000; }
The structural selectors
These selectors allow you to select elements based on the document tree; this is very
difcult or impossible to do with other selectors. This only selects nodes that are
elements and does not include text that is not inside an element. The numbering is
1-based indexing.

CSS Concepts and Applications
[ 102 ]
:rst-child
This targets an element that is the rst child of another element:
:first-child
Description
This is the same as :nth-child(1). This selector is straightforward, the rst child of
the element type this is applied to will be selected.
Here is an example that will only select the rst paragraph element. Here is the
HTML:
<p>First paragraph.</p>
<p>Second paragraph.</p>
Here is the CSS. This will change the text of the rst paragraph red:
p:first-child { color: #ff0000; }
:rst-of-type
This targets the rst element type that is a child of another element:
:first-of-type
Description
The :first-of-type attribute is different from :first-child because it will not
select the element unless it is the rst child. This is the same as :nth-of-type(1).
Here is an example that will target the rst paragraph element even though it is not
the rst child. Here is the HTML:
<article>
<h1>Title of Article</h1>
<p>First paragraph.</p>
<p>Second paragraph.</p>
</article>
Here is the CSS:
p:first-of-type { color: #ff0000; }

Chapter 3
[ 103 ]
:last-child
This targets an element that is the last child of another element:
:last-child
Description
This is the same as :nth-last-child(1). This selector is straightforward, the last
child of the element type this is applied to will be selected.
Here is an example that will only select the last paragraph element. Here is the
HTML:
<p>First paragraph.</p>
<p>Second paragraph.</p>
Here is the CSS. This will change the color of the second and rst paragraph red.
This selector works because even on the most basic of pages, the p element is a child
of the body element:
p:last-child { color: #ff0000; }
:last-of-type
This targets the last element type that is a child of another element:
:last-of-type
Description
The :last-of-type attribute is different from :last-child because it will not select
the element unless it is the rst last-child attribute. This is the same as :nth-
last-of-type(1).
Here is an example that will target the last paragraph element. Here is its HTML:
<article>
<p>First paragraph.</p>
<p>Second paragraph.</p>
<a href="#">A link</a>
</article>
Here is the CSS:
p:last-of-type { color: #ff0000; }

CSS Concepts and Applications
[ 104 ]
:nth-child()
This will divide all of the child elements and select them based on where they exist:
:nth-child(an+b)
Description
This selector has a parameter that is very expressive in what you can select. This
also means that it is more complex than most other CSS rules. Here is the technical
specication of the parameter. This selects elements based on its preceding elements.
The parameter can be split into two parts: part a Part b. The part a is an integer that
is followed by the character n. Part b has an optional plus or minus sign followed by
an integer. The parameter also accepts two keywords: even and odd. Consider 2n+1
for example.
This is much easier to understand when you look at it this way. The rst part, an, is
what the children are divided by. The 2n value would make groups of two elements
and 3n value would make groups of three elements, and so on. The next part +1
will then select that element in the grouping. 2n+1 would select every odd item row
because it is targeting the rst element in every grouping of two elements. 2n+0 or
2n+2 would select every even item row. The rst part, part a, can be omitted, and
then it would just select the nth child out of the entire group. For example, :nth-
child(5) would only select the fth child and no other.
Table rows are a great example of using this selector, so we will target every odd
row. Here is the HTML:
<table>
<tr><td>First (will be red)</td></tr>
<tr><td>Second</td></tr>
<tr><td>Third (will be red)</td></tr>
</table>
Here is the CSS:
tr:nth-child(2n+1) { color: #ff0000; }
:nth-last-child
This will target the nth element from the end:
:nth-last-child(an+b)

Chapter 3
[ 105 ]
Description
This selector counts the succeeding elements. The counting logic is the same as it is
for :nth-child.
Here is an example using a table. Here is the HTML:
<table>
<tr><td>First</td></tr>
<tr><td>Second</td></tr>
<tr><td>Third</td></tr>
<tr><td>Fourth</td></tr>
</table>
The rst CSS rule will change the color of every other row to red, but because it
counts from the end, the rst and third row will be selected. The second CSS rule will
only target the last row:
tr:nth-last-child(even) { color: #ff0000; }
tr:nth-last-child(-n+1) { color: #ff0000; }
See also
The previous section :nth-child.
:nth-last-of-type and :nth-of-type
This selects elements based on their type and where they exist in the document:
:nth-last-of-type(an+b)
:nth-of-type(an+b)
Description
Like all the other nth selectors, this one uses the same logic as :nth-child. The
difference nth-of-type being that :nth-last-of-type only groups by elements of
the same type.
Here is an example that uses paragraphs and spans:
<p>First</p>
<span>First Span</span>
<span>Second Span</span>
<p>Second</p>
<p>Third</p>

CSS Concepts and Applications
[ 106 ]
Here is the CSS. This rule will only target the paragraphs and make the odd ones red:
p:nth-of-type(2n+1) { color: #ff0000; }
See also
The previous section :nth-child.
:only-child
This targets an element that has no siblings:
:only-child
Description
This will match when the :only-child attribute is the only child of an element.
Here is an example with two tables, where one has multiple rows and the other has
only one:
<table>
<tr><td>First</td></tr>
<tr><td>Second</td></tr>
<tr><td>Third</td></tr>
</table>
<table>
<tr><td>Only</td></tr>
</table>
Here is the CSS to target the only row in the second table:
tr:only-child { color: #ff0000; }
:only-of-type
This targets when there is only one of this element:
:only-of-type
Description
This will only match when there are no other siblings of the same type under a
parent element.

Chapter 3
[ 107 ]
Here is an example that uses arbitrary divisions to create a structure where one
paragraph element is the only one of its type. Here is the HTML:
<div>
<p>Only p.</p>
<div>
<p>Not the </p>
<p>only one.</p>
</div>
</div>
Here is the CSS rule that will only target the rst paragraph's element:
p:only-of-type { color: #ff0000; }
Validation
These are pseudo-classes that can be used to target the state of input elements and
more.
:checked
This attribute targets the checked radio button or checkbox:
:checked
Description
Any element that can be toggled on or off can use this selector. As of now, these are
radio buttons, checkboxes, and options in a selective list.
Here is an example with a checkbox and a label value:
<input type="checkbox" checked value="check-value" name="test" />
<label for="test">Check me out</label>
Here is a CSS rule that will target the label only when the checkbox is checked:
input:checked + label { color: #ff0000; }
:default
This targets the default element from many similar elements:
:default

CSS Concepts and Applications
[ 108 ]
Description
Use this selector to help dene the default element from a group of elements.
In a form, this would be the default button or the initially selected option from a
select element.
Here is an example using a form:
<form method="post">
<input type="submit" value="Submit" />
<input type="reset" value="Reset" />
</form>
Here is the CSS. This will only target the submit input as it is the default:
:default { color: #ff0000; }
:disabled and :enabled
These will target elements based on their enabled state:
:disabled
:enabled
Description
There is a disabled attribute that is available on interactive elements. Using
:disabled will target elements where the :disabled attribute is present and
:enabled will do the opposite.
Here is some HTML with two inputs out of which one is disabled:
<input type="submit" value="Submit" disabled/>
<input type="reset" value="Reset" />
Here is the CSS. The disabled input will have its text color set as red and the other as
green:
input:disabled { color: #ff0000; }
input:enabled { color: #00ff00; }
:empty
This targets elements that have no children:
:empty

Chapter 3
[ 109 ]
Description
This targets nodes without any children. Children can be any other element
including text nodes. This means that even one space will count as a child. However,
comments will not count as children.
Here is an example with three div tags. The rst is empty, the next has text, and the
nal one has one space in it. Here is the HTML:
<div></div>
<div>Not Empty</div>
<div> </div>
Here is the CSS. Only the rst div will have a red background:
div { height: 100px; width: 100px; background-color: #00ff00; }
div:empty { background-color: #ff0000; }
:in-range and :out-of-range
These selectors target elements that have a range limitation:
:in-range
:out-of-range
Description
Some elements now have range limitations that can be applied. When the value is
outside of this range, the :out-of-range selector will target it, and when the value
is within the range, :in-range will target it.
Here is an example that uses an input that is the number type:
<input type="number" min="1" max="10" value="11" />
<input type="number" min="1" max="10" value="5" />
Here is the CSS. The rst input will have red text because it is beyond the maximum
range and the second will have green text:
:in-range {color: #00ff00; }
:out-of-range { color: #ff0000; }

CSS Concepts and Applications
[ 110 ]
:invalid and :valid
The :invalid and :valid attribute targets an element based on the validity of the
data:
:invalid
:valid
Description
Certain input elements have data validity, a great example being the e-mail element.
The selectors select based on whether the data is valid or not. You should note that
some elements are always valid, for example, a text input, and some elements will
never be targeted by these selectors, for example, a div tag.
Here is an example with an e-mail input:
<input type="email" value="test@test.com" />
<input type="email" value="not a valid email" />
Here is the CSS. The rst input will be green as it is valid and the other will be red:
:valid {color: #00ff00; }
:invalid { color: #ff0000; }
:not or negation
The :not attribute negates a selector:
:not(selector)
Description
The :not parameter must be a simple selector and will target the elements where the
:not parameter is not true. This selector does not add to specicity of the rule.
Here is an example using paragraphs:
<p>Targeted Element</p>
<p class="not-me">Non targeted element</p>
Here is the CSS. Only the rst paragraph will be targeted:
p:not(.not-me) {color: #ff0000; }

Chapter 3
[ 111 ]
:optional and :required
The :optional and :required attributes target elements that are either optional or
required, respectively.
:optional
:required
Description
This is used for any input element that is required or optional.
Here is an example that has two inputs—one that is required and one that is not:
<input type="text" value="Required" required />
<input type="text" value="Optional" />
Here is the CSS. The required input will have red text and the optional input will
have green text:
:required { color: #ff0000; }
:optional { color: #00ff00; }
:lang()
The :lang() attribute targets based on the language:
:lang(language)
Description
This selector works differently to the attribute selector; in that, this will target all
elements that are in a specic language even if they are not explicitly dened. The
attribute selector will only target elements that have a lang attribute.
Here is an example with a span element that does not have a lang attribute, but it is
the child of the body which does:
<body lang="en-us">
<span>This is English.</span>
</body>

CSS Concepts and Applications
[ 112 ]
Here is the CSS. The rst rule will match the element, but the second will not
match anything:
:lang(en) { color: #ff0000; }
span[lang|=en] { color: #00ff00; }
Pseudo-elements
These are selectors that go beyond what is specied in the document. The selectors
select things that may not even be elements in the document. Pseudo-elements
are not considered part of a simple selector. This means that you cannot use a
pseudo-element as part of the :not() selector. Finally, only one pseudo-element can
be present per selector.
Note that all of the pseudo-elements start with a double colon (::). This
was introduced in CSS3 to help differentiate between pseudo-classes
that have a single colon (:). This is important because in CSS2, pseudo-
elements only had the single colon. For the most part, you should use
the double colon.
::before and ::after
These are used to insert generated content before or after the selected element:
::before
::after e
Description
This will insert content into the document based on the selector. Whether the content
is placed before or after the element targeted depends on the pseudo-element used.
Refer to the Generated content section to see what you can insert.
Here is an example that uses both ::before and ::after. This will create a turkey
sandwich. Here is the HTML.
<p class="sandwich">Turkey</p>
Here is the CSS that will put a slice of bread before and after the turkey:
p.sandwich::before, p.sandwich::after
{ content: ":Slice of Bread:"; }
Chapter 3
[ 113 ]
See also
Generated content
::rst-letter
This targets the rst letter of an element:
::first-letter
Description
This will select the rst letter of an element as long as it does not have any other
content before it, for example an img element before a character would make
::first-letter not select the rst character. Any punctuation that either precedes
or follows the rst letter would be included with the rst letter. This will select any
character, including not just letters but also numbers.
This only applies to block-like containers such as block, list-item, table-cell,
table-caption, and inline-block elements.
The ::first-letter pseudo-element will only match if the rst letter
is on the rst formatted line. If there is a line break before the rst letter
appears, it will not be selected.
Here is an example, which will not select the rst letter:
<p><br />First letter</p>
Here is the CSS:
p::first-letter { font-size: 2em; }
Here is an example:
<p>This is a long line of text that may or may not be broken up
across lines.</p>
Here is the CSS. The T in This will be two times the font size of all the other
characters:
p::first-letter { font-size: 2em; }
::rst-line
The ::first-line attribute targets the rst line of an element:
::first-line

CSS Concepts and Applications
[ 114 ]
Description
This will target the rst formatted line of a block-like container such as a block box,
inline-block, table-caption, or table-cell.
Here is an example, with the following HTML:
<p>This is a long line of text that may or may not be broken up
across lines based on the width of the page and the width of the
element it is in.</p>
<p>This is the entire first line.</p>
Here is the CSS. This will make the rst line, whatever it may be, red:
p::first-line { color: #ff0000; }
::selection
This targets text highlighted by the user:
::selection
Description
This pseudo-element allows you to style any text that is highlighted by the user.
This pseudo-element does not exist in CSS3, but it is part of the next version. Most
browsers will still honor this pseudo-element.
Here is an example:
<p>Highlight this to text.</p>
Here is the CSS. When the text is selected, the text will be white on a red background:
::selection { color: #ffffff; background: #ff0000; }
Generated content
This is not a selector, but is used with the pseudo-elements ::before and ::after.
There are only certain types of content that you can generate. Here is a rundown.

Chapter 3
[ 115 ]
content
This is the content that will be placed either before or after elements:
content(none, <string>, <uri>, <counter>, open-quote, close-quote,
no-open-quote, no-close-quote, attr(x))
Parameters
Following are the parameters and their description:
• none: This parameter does not generate any content
• normal: This is the default parameter and is the same as none
• <string>: This is any string text content
• <uri>: This will map to a resource, for example, an image
• <counter>: This can be used as either the counter() or counters() function
to put a counter before or after each element
• open-quote and close-quote: This is used with the quotes generated
content property
• no-open-quote and no-close-quote: This does not add content, but
increments or decrements the nesting level of quotes
• attr(x):This returns the value of the attribute of the element this is targeting
Description
This property is used to add content to the document. The output is controlled by the
value used. The values can be combined to create more complex content.
A new line can be inserted with the characters \A. Just remember that HTML will
ignore a line break by default.
Here are some examples. These will demonstrate how to use many of the content
values:
<h1>First</h1>
<h1>Second</h1>
<h1 class="test">Attribute</h1>
<h2>Line Break</h2>
<blockquote>Don't quote me on this.</blockquote>

CSS Concepts and Applications
[ 116 ]
Here is the CSS. The h1 elements will have the word "chapter" along with a
number before each. The h2 element will have a line break in its content. Finally, the
blockquote will have an opening quote and a closing quote:
h1 { counter-increment: chapter; }
h1::before { content: "Chapter" counter(chapter) ": " attr(class)
; }
h2::before { content: "New\A Line"; white-space: pre; }
blockquote::before { content: open-quote; }
blockquote::after { content: close-quote; }
Quotation marks
Quotation marks specify which characters are used as open and close quotes:
quotes: [<string> <string>]+
Parameters
<string> <string>: These are pairs of characters that will represent an open and
close quote. You can use this multiple times to create levels of quotes.
Description
We can use this property to set which quotation marks are used.
Here is an example that has a nested quote:
<blockquote>Don't quote me <blockquote>on</blockquote>
this.</blockquote>
The quotation marks are completely arbitrary. Here is the CSS:
blockquote { quotes: ":" "!" "&" "*"; }
[ 117 ]
CSS Properties – Part 1
CSS properties are characteristics of an element in a markup language (HTML, SVG,
XML, and so on) that control their style and/or presentation. These characteristics
are part of a constantly evolving standard from the W3C.
A basic example of a CSS property is border-radius:
input {
border-radius: 100px;
}
There is an incredible number of CSS properties, and learning them all is virtually
impossible. Adding more into this mix, there are CSS properties that need to be
vendor prexed (-webkit-, -moz-, -ms-, and so on), making this equation even
more complex.
Vendor prexes are short pieces of CSS that are added to the beginning of the CSS
property (and sometimes CSS values too). These pieces of code are directly related
to either the company that makes the browser (the "vendor") or to the CSS engine of
the browser.
There are four major CSS prexes: -webkit-, -moz-, -ms- and -o-. They are
explained here:
• -webkit-: This references Safari's engine, Webkit (Google Chrome and
Opera used this engine in the past as well)
• -moz-: This stands for Mozilla, who creates Firefox
• -ms-: This stands for Microsoft, who creates Internet Explorer
• -o-: This stands for Opera, but only targets old versions of the browser
Google Chrome and Opera both support the -webkit- prex. However, these two
browsers do not use the Webkit engine anymore. Their engine is called Blink and is
developed by Google.

CSS Properties – Part 1
[ 118 ]
A basic example of a prexed CSS property is column-gap:
.column {
-webkit-column-gap: 5px;
-moz-column-gap: 5px;
column-gap: 5px;
}
Knowing which CSS properties need to be prexed is futile. That's why it's important
to keep a constant eye on CanIUse.com. However, it's also important to automate the
prexing process with tools such as Autoprefixer or -prefix-free, or mixins in
preprocessors, and so on.
However, vendor prexing isn't in the scope of the book, so the properties we'll
discuss are absent of any vendor prexes. If you want to learn more about vendor
prexes, you can visit Mozilla Developer Network (MDN) at http://tiny.cc/
mdn-vendor-prefixes.
Let's get the CSS properties reference rolling.
Animation
Unlike the old days of Flash, where creating animations required third-party
applications and plugins, today we can accomplish practically the same things with a
lot less overhead, better performance, and greater scalability all through CSS only.
Forget plugins and third-party software! All we need is a text editor, some
imagination, and a bit of patience to wrap our heads around some of the animation
concepts CSS brings to our plate.
Base markup and CSS
Before we dive into all the animation properties, we will use the following markup
and animation structure as our base:
HTML:
<div class="element"></div>
CSS:
.element {
width: 300px;
height: 300px;
}
Chapter 4
[ 119 ]
@keyframes fadingColors {
0% {
background: red;
}
100% {
background: black;
}
}
In the examples, we will only see the .element rule since the HTML and
@keyframes fadingColors will remain the same.
The @keyframes declaration block is a custom animation that can be
applied to any element. When applied, the element's background will
go from red to black.
Ok, let's do this.
animation-name
The animation-name CSS property is the name of the @keyframes at-rule that we
want to execute, and it looks like this:
animation-name: fadingColors;
Description
In the HTML and CSS base example, our @keyframes at-rule had an animation
where the background color went from red to black. The name of that animation is
fadingColors.
So, we can call the animation like this:
CSS:
.element {
width: 300px;
height: 300px;
animation-name: fadingColors;
}
This is a valid rule using the longhand. There are clearly no issues with it at all. The
thing is that the animation won't run unless we add animation-duration to it.

CSS Properties – Part 1
[ 120 ]
animation-duration
The animation-duration CSS property denes the amount of time the animation
will take to complete a cycle, and it looks like this:
animation-duration: 2s;
Description
We can specify the units either in seconds using s or in milliseconds using ms.
Specifying a unit is required. Specifying a value of 0s means that the animation
should actually never run.
However, since we do want our animation to run, we do the following:
CSS:
.element {
width: 300px;
height: 300px;
animation-name: fadingColors;
animation-duration: 2s;
}
As mentioned earlier, this will make a box go from its red background to black in 2
seconds and then stop.
animation-iteration-count
The animation-iteration-count CSS property denes the number of times the
animation should be played, and it looks like this:
animation-iteration-count: infinite;
Description
Here are two values: infinite and a number, such as 1, 3, or 0.5. Negative numbers
are not allowed.
Add the following code to the prior example:
CSS:
.element {
width: 300px;
height: 300px;
animation-name: fadingColors;
animation-duration: 2s;
animation-iteration-count: infinite;
}

Chapter 4
[ 121 ]
This will make a box go from its red background to black, start over again with the
red background and go to black, innitely.
animation-direction
The animation-direction CSS property denes the direction in which the
animation should play after the cycle, and it looks like this:
animation-direction: alternate;
Description
There are four values: normal, reverse, alternate, and alternate-reverse.
• normal: This makes the animation play forward. This is the default value.
• reverse: This makes the animation play backward.
• alternate: This makes the animation play forward in the first cycle, then
backward in the next cycle, then forward again, and so on. In addition,
timing functions are affected, so if we have ease-out, it gets replaced by
ease-in when played in reverse.
We'll look at these timing functions in a minute.
• alternate-reverse: This is the same thing as alternate, but the animation
starts backward, from the end.
In our current example, we have a continuous animation. However, the background
color has a "hard stop" when going from black (end of the animation) to red (start of
the animation).
Let's create a more "uid" animation by making the black background fade into red
and then red into black without any hard stops. Basically, we are trying to create a
"pulse-like" effect:
CSS:
.element {
width: 300px;
height: 300px;
animation-name: fadingColors;
animation-duration: 2s;
animation-iteration-count: infinite;
animation-direction: alternate;
}

CSS Properties – Part 1
[ 122 ]
animation-delay
The animation-delay CSS property allows us to dene when exactly an animation
should start. This means that as soon as the animation has been applied to an
element, it will obey the delay before it starts running.
It looks like this:
animation-delay: 3s;
Description
We can specify the units either in seconds using s or in milliseconds using ms.
Specifying a unit is required.
Negative values are allowed. Take into consideration that using negative values
means that the animation should start right away, but it will start midway into the
animation for the opposite amount of time as the negative value.
Use negative values with caution.
CSS:
.element {
width: 300px;
height: 300px;
animation-name: fadingColors;
animation-duration: 2s;
animation-iteration-count: infinite;
animation-direction: alternate;
animation-delay: 3s;
}
This will make the animation start after 3 seconds have passed.
animation-ll-mode
The animation-fill-mode CSS property denes which values are applied to an
element before and after the animation. Basically, outside the time the animation is
being executed.
It looks like this:
animation-fill-mode: none;

Chapter 4
[ 123 ]
Description
There are four values: none, forwards, backwards, and both.
• none: No styles are applied before or after the animation.
• forwards: The animated element will retain the styles of the last keyframe.
This the most used value.
• backwards: The animated element will retain the styles of the first keyframe,
and these styles will remain during the animation-delay period. This is
very likely the least used value.
• both: The animated element will retain the styles of the first keyframe before
starting the animation and the styles of the last keyframe after the animation
has finished. In many cases, this is almost the same as using forwards.
The prior properties are better used in animations that have an end and stop. In our
example, we're using a fading/pulsating animation, so the best property to use is
none.
CSS:
.element {
width: 300px;
height: 300px;
animation-name: fadingColors;
animation-duration: 2s;
animation-iteration-count: infinite;
animation-direction: alternate;
animation-delay: 3s;
animation-fill-mode: none;
}
animation-play-state
The animation-play-state CSS property denes whether an animation is running
or paused, and it looks like this:
animation-play-state: running;
Description
There are two values: running and paused. These values are self-explanatory.

CSS Properties – Part 1
[ 124 ]
CSS:
.element {
width: 300px;
height: 300px;
animation-name: fadingColors;
animation-duration: 2s;
animation-iteration-count: infinite;
animation-direction: alternate;
animation-delay: 3s;
animation-fill-mode: none;
animation-play-state: running;
}
In this case, dening animation-play-state as running is redundant, but I'm
listing it for purposes of the example.
animation-timing-function
The animation-timing-function CSS property denes how an animation's speed
should progress throughout its cycles, and it looks like this:
animation-timing-function: ease-out;
There are ve predened values, also known as easing functions, for the Bézier
curve (we'll see what the Bézier curve is in a minute): ease, ease-in, ease-out,
ease-in-out, and linear.
ease
The ease function sharply accelerates at the beginning and starts slowing down
towards the middle of the cycle, and it looks like this:
animation-timing-function: ease;
ease-in
The ease-in function starts slowly accelerating until the animation sharply ends,
and it looks like this:
animation-timing-function: ease-in;
ease-out
The ease-out function starts quickly and gradually slows down towards the end
and it looks like this:
animation-timing-function: ease-out;
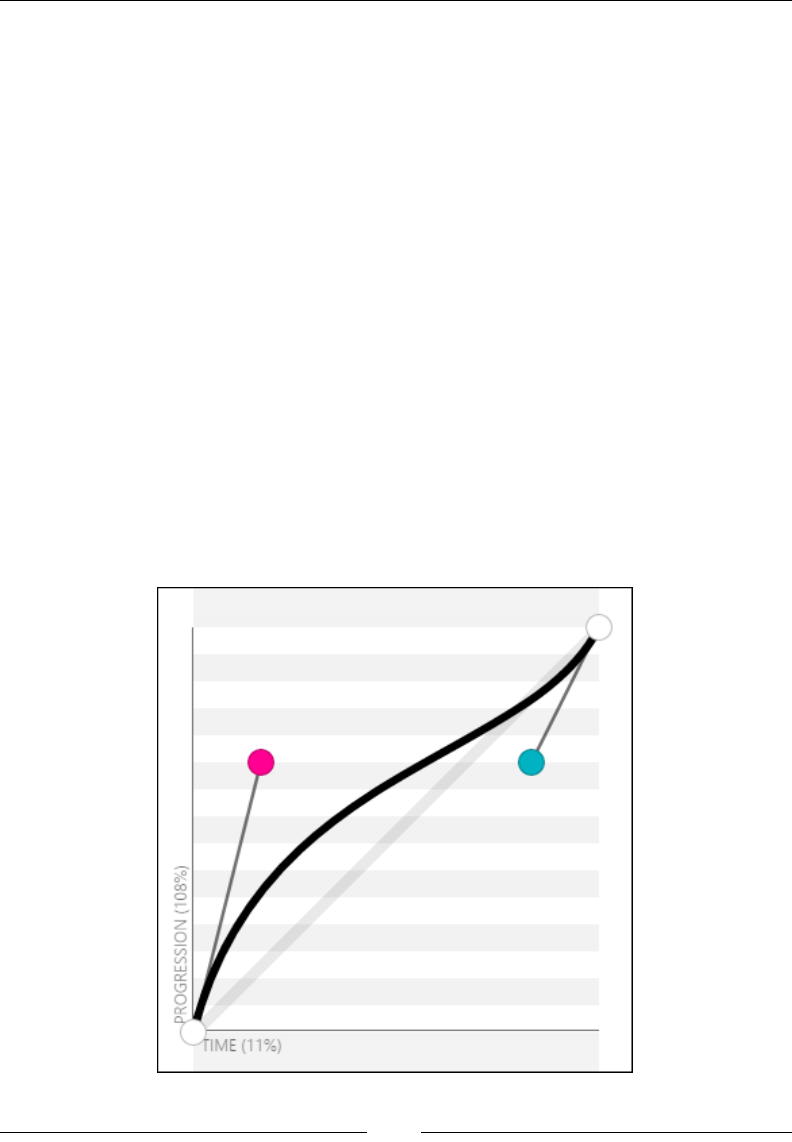
Chapter 4
[ 125 ]
ease-in-out
The ease-in-out function starts slowly and it gets fast in the middle of the cycle. It
then starts slowing down towards the end. And it looks like this:
animation-timing-function:ease-in-out;
linear
The linear function has constant speed. No accelerations of any kind happen. It
looks like this:
animation-timing-function: linear;
Now, the easing functions are built on a curve named the Bézier curve and can be
called using the cubic-bezier() function or the steps() function.
cubic-bezier()
The cubic-bezier() function allows us to create custom acceleration curves. Most
use cases can benet from the already dened easing functions we just mentioned
(ease, ease-in, ease-out, ease-in-out and linear), but if you're feeling
adventurous, cubic-bezier() is your best bet.
Here's what a Bézier curve looks like:
CSS Properties – Part 1
[ 126 ]
Parameters
The cubic-bezier() function takes four parameters as follows:
animation-timing-function: cubic-bezier(x1, y1, x2, y2);
X and Y represent the x and y axes. The numbers 1 and 2 after each axis represent
the control points. 1 represents the control point starting on the lower left, and 2
represents the control point on the upper right.
Description
Let's represent all ve predened easing functions with the cubic-bezier()
function:
• ease: animation-timing-function: cubic-bezier(.25, .1, .25, 1);
• ease-in: animation-timing-function: cubic-bezier(.42, 0, 1, 1);
• ease-out: animation-timing-function: cubic-bezier(0, 0, .58, 1);
• ease-in-out: animation-timing-function: cubic-bezier(.42, 0, .58,
1);
• linear: animation-timing-function: cubic-bezier(0, 0, 1, 1);
I'm not sure about you, but I prefer to use the predened values.
Now, we can start tweaking and testing each value to the decimal, save it, and wait
for the live refresh to do its thing. However, that's too much time wasted testing if
you ask me.
The amazing Lea Verou created the best web app to work with Bézier
curves. You can nd it at cubic-bezier.com. This is by far the easiest
way to work with Bézier curves. I highly recommend this tool.
The Bézier curve image showed earlier was taken from the cubic-bezier.com
website.

Chapter 4
[ 127 ]
Let's add animation-timing-function to our example:
CSS:
.element {
width: 300px;
height: 300px;
animation-name: fadingColors;
animation-duration: 2s;
animation-iteration-count: infinite;
animation-direction: alternate;
animation-delay: 3s;
animation-fill-mode: none;
animation-play-state: running;
animation-timing-function: ease-out;
}
steps()
The steps() timing function isn't very widely used, but knowing how it works is a
must if you're into CSS animations.
It looks like this:
animation-timing-function: steps(6);
This function is very helpful when we want our animation to take a dened number
of steps.
After adding a steps() function to our current example, it looks like this:
CSS:
.element {
width: 300px;
height: 300px;
animation-name: fadingColors;
animation-duration: 2s;
animation-iteration-count: infinite;
animation-direction: alternate;
animation-delay: 3s;
animation-fill-mode: none;
animation-play-state: running;
animation-timing-function: steps(6);
}
This makes the box take six steps to fade from red to black and vice versa.

CSS Properties – Part 1
[ 128 ]
Parameters
There are two optional parameters that we can use with the steps() function: start
and end.
• start: This will make the animation run at the beginning of each step. This
will make the animation start right away.
• end: This will make the animation run at the end of each step. This is the
default value if nothing is declared. This will give the animation a short delay
before it starts.
Description
After adding a steps() function to our current example, it looks like this:
CSS:
.element {
width: 300px;
height: 300px;
animation-name: fadingColors;
animation-duration: 2s;
animation-iteration-count: infinite;
animation-direction: alternate;
animation-delay: 3s;
animation-fill-mode: none;
animation-play-state: running;
animation-timing-function: steps(6, start);
}
Granted, the pulsating effect in our example isn't quite noticeable when we add
the steps() function. However, you can see it more clearly in this pen from Louis
Lazarus when hovering over the boxes, at http://tiny.cc/steps-timing-
function
Here's an image taken from Stephen Greig's article in Smashing Magazine,
Understanding CSS Timing Functions, that explains start and end from the
steps() function:
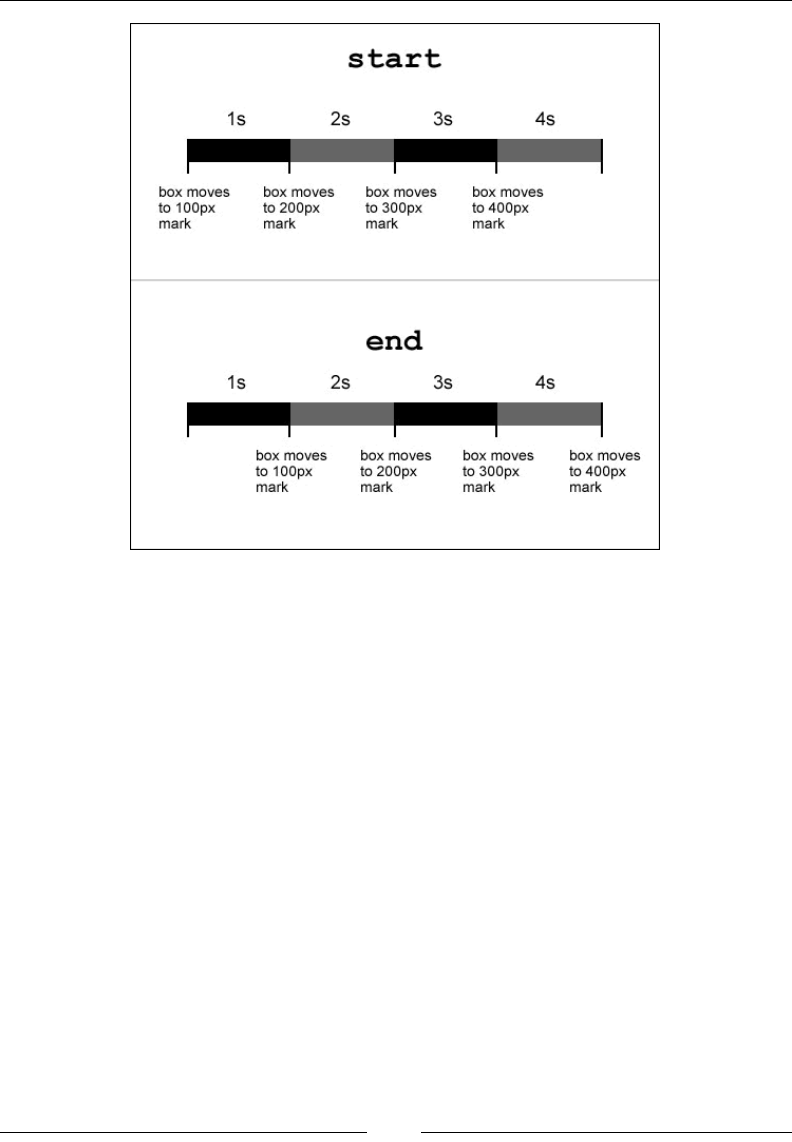
Chapter 4
[ 129 ]
Also, there are two predened values for the steps() function: step-start and
step-end.
• step-start: This is the same thing as steps(1, start). It means that every
change happens at the beginning of each interval.
• step-end: This is the same thing as steps(1, end). It means that every
change happens at the end of each interval.
CSS:
.element {
width: 300px;
height: 300px;
animation-name: fadingColors;
animation-duration: 2s;
animation-iteration-count: infinite;
animation-direction: alternate;
animation-delay: 3s;
animation-fill-mode: none;
animation-play-state: running;
animation-timing-function: step-end;
}

CSS Properties – Part 1
[ 130 ]
animation
The animation CSS property is the shorthand for animation-name, animation-
duration, animation-timing-function, animation-delay, animation-
iteration-count, animation-direction, animation-fill-mode, and animation-
play-state.
It looks like this:
animation: fadingColors 2s;
Description
For a simple animation to work, we need at least two properties: animation-name
and animation-duration.
If you feel overwhelmed by all these properties, relax. Let me break them down for
you in simple bits.
Using the animation longhand, the code would look like this:
CSS:
.element {
width: 300px;
height: 300px;
animation-name: fadingColors;
animation-duration: 2s;
}
Using the animation shorthand, which is the recommended syntax, the code would
look like this:
CSS:
.element {
width: 300px;
height: 300px;
animation: fadingColors 2s;
}
This will make a box go from its red background to black in 2 seconds, and then stop.
Final CSS code
Let's see how all the animation properties look in one nal example showing both
the longhand and shorthand styles.
Chapter 4
[ 131 ]
Longhand style
.element {
width: 300px;
height: 300px;
animation-name: fadingColors;
animation-duration: 2s;
animation-iteration-count: infinite;
animation-direction: alternate;
animation-delay: 3s;
animation-fill-mode: none;
animation-play-state: running;
animation-timing-function: ease-out;
}
Shorthand style
.element {
width: 300px;
height: 300px;
animation: fadingColors 2s infinite alternate 3s none running
ease-out;
}
The animation-duration property will always be considered rst
rather than animation-delay. All other properties can appear in any
order within the declaration.
Here is a demo in CodePen: http://tiny.cc/animation
Background
The CSS background properties handle the display of background effects on HTML
elements.
background-attachment
The background-attachment CSS property denes how the background of an
element scrolls relative to its containing parent, and it looks like this:
background-attachment: fixed;

CSS Properties – Part 1
[ 132 ]
Description
There are three values: scroll, fixed, and local.
• scroll: The background does not move within its container
• fixed: The background stays fixed to the viewport, no matter what
• local: The background scrolls within its container and the viewport
CSS:
.scroll {
background-attachment: scroll;
}
.fixed {
background-attachment: fixed;
}
.local {
background-attachment: local;
}
Here is a demo in CodePen: http://tiny.cc/css-background
background-blend-mode
The background-blend-mode CSS property species how the background image of
an element should blend with its background color, and it looks like this:
background-blend-mode: multiply;
Description
There are 18 possible blend mode values:
• color: Hue and saturation from the top color prevail, but the luminosity of
the bottom color is added. Gray levels are preserved.
• color-burn: The final color is the result of taking the bottom color and
inverting it, dividing the value by the top color, and then inverting that
value.
• color-dodge: The final color is the result of dividing the bottom color with
the inverse of the top one.
• darken: The final color is the result of taking the darkest value per color in
each channel.

Chapter 4
[ 133 ]
• difference: The final color is the result of taking the lighter color and
subtracting the darker color of the background image and background color.
• exclusion: The result is similar to the difference, but with lower contrast.
• hard-light: If the bottom color is darker, then the result is multiply.
However, if the bottom color is lighter, the result is screen.
• hue: Takes the hue of the top color, and the saturation and luminosity of the
bottom color.
• inherit: The final color inherits the blend mode of its parent container.
• initial: This is the default value without any blending.
• lighten: The result is the lightest values per color from each channel.
• luminosity: The result is the luminosity of the top color, and the hue and
saturation of the bottom one.
• multiply: Multiply the top and bottom colors. This is the same effect as
printing the colors on a translucent film and laying them one on top of the
other.
• normal: The final color is the color on top, regardless of the color underneath
it.
• overlay: The final color is multiply if the bottom color is darker. And it
would be screen if the bottom color is lighter.
• saturation: The final color is the saturation of the top color plus the hue and
luminosity of the bottom one.
• screen: Invert both the top and bottom colors, multiply them, and then
invert that final color.
• soft-light: Same as hard-light attribute but softer, like pointing a
diffused light on the final color.
In the following example, we will declare two backgrounds, an image and a color,
and then apply a blend mode to them:
CSS with longhand:
.element {
width: 500px;
height: 500px;
background-image: url('../images/image.jpg');
background-color: red;
background-blend-mode: multiply;
}
CSS Properties – Part 1
[ 134 ]
CSS with shorthand:
.element {
width: 500px;
height: 500px;
background-image: url(../images/image.jpg) red;
background-blend-mode: multiply;
}
Notice that in the second example, the path to the image is not inside
quotes. The quotes, single [''] or double [""], are optional.
CSS-Tricks has a great Pen showing all these blend modes. However, I forked it to
improve a few things on it.
So, check out the CodePen demo with all the blend modes at http://tiny.cc/
background-blend-mode
background-clip
The background-clip CSS property helps dene whether an element's background
extends below its border or not, and it looks like this:
background-clip: border-box;
Description
There are four values: inherit, border-box, padding-box, and content-box.
inherit
This takes the value from its parent element.
border-box
This makes the background cover the entire container, including the border.
padding-box
This makes the background extend only up to where the border starts.
content-box
This works like border-box, but it will take into consideration any padding, thus
creating a gap between the border and the background.
Chapter 4
[ 135 ]
CSS:
.element {
background-clip: border-box;
}
Here is a demo in CodePen: http://tiny.cc/background-clip
background-color
The background-color CSS property denes the solid background color of an
element, and it looks like this:
background-color: red;
Description
Also, transparent is actually a color in CSS.
If we wanted to set a gradient background color, we'd have to use the
background-image property instead. This is because gradients are
actually images.
The color value can be dened using any of the following methods:
• Named color
• Hexadecimal
• RGB and RGBa
• HSL and HSLa
CSS:
/*Named Color*/
.element {
background-color: red;
}
/*HEX*/
.element {
background-color: #f00;
}
/*RGB*/
.element {
background-color: rgb(255,0,0);
}

CSS Properties – Part 1
[ 136 ]
/*RGBa*/
.element {
/*Background has 50% opacity*/
background-color: rgba(255, 0, 0, .5);
}
/*HSL*/
.element {
background-color: hsl(0, 100%, 50%);
}
/*HSLa*/
.element {
/*Background has 50% opacity*/
background-color: hsla(0, 100%, 50%, .5);
}
background-image
The background-image CSS property sets an image or gradient in the background of
an element, and it looks like this:
background-image: url(../images/background.jpg);
Alternatively, it could also look like this:
background-image: linear-gradient(red, orange);
Description
This property supports the JPG, PNG, GIF, SVG, and WebP image formats.
We can also use the none value to declare the absence of an image.
An element can also have several background images in a single declaration.
When it comes to gradients, there are two styles: Linear and Radial.
Linear
Its syntax is linear-gradient. These gradients can go vertical, horizontal, or
diagonal.

Chapter 4
[ 137 ]
Radial
Its syntax is radial-gradient. These gradients are circular in nature, and by
default, they will adapt to an element's dimension. For example, if the element is
a perfect square, it would make a perfect circular radial gradient. However, if the
element is a rectangle, then the radial gradient would look like an oval.
We can add as many colors in a gradient as we want or need to. Unless it is strictly
necessary, I recommend that you steer away from doing so, as it can have a negative
impact on browser performance.
Additionally, in order to give us more control over the gradients, we can dene
where a gradient color stops so that the following one can start. This is called color
stops. Color stops can be dened in pixels or percentages. Percentages are more
commonly used because of their relative nature, which helps maintain the integrity
and proportions of the gradients.
CSS:
/*Graphic file*/
.element {
background-image: url(../images/bg-texture.jpg);
}
/*Multiple images*/
.element {
background-image:
url(../images/bg-icon.svg),
url(../images/bg-texture.jpg);
}
/*Linear gradient*/
.element {
background-image: linear-gradient(red, orange);
}
/*Linear Gradient with color stops*/
.element {
background-image: linear-gradient(red 40px, orange 25%, green);
}
/*Radial gradient*/
.element {
background-image: radial-gradient(red, orange);
}
/*Radial gradient with color stops*/
.element {
background-image: radial-gradient(red 40px, orange 25%, green);
}

CSS Properties – Part 1
[ 138 ]
background-origin
The background-origin CSS property denes how the background gets rendered
inside an element, and it looks like this:
background-origin: border-box;
Description
This property works similarly to the background-clip CSS property, except that
with background-origin, the background is resized instead of clipped.
There are four values: border-box, padding-box, content-box, and inherit.
• border-box: The background extends all the way to the edge of the
container, but under the border
• padding-box: The background extends to meet the border edge to edge
• content-box: The background is rendered inside the content box
• inherit: This is the default value
CSS:
.element {
background-origin: border-box;
}
Here is a demo in CodePen: http://tiny.cc/background-origin
background-position
The background-position CSS property allows us to place the background (image
or gradient) anywhere within its parent container, and it looks like this:
background-position: 10px 50%;
Description
We can use three different types of values: predened keywords, percentage, and
length.
Predened keywords
Values such as left, right, top, and bottom are the predened keywords.

Chapter 4
[ 139 ]
Percentages
Values such as 5% and 80%.
Length
Values such as 15px 130px.
This property requires you to declare two values: the rst value relates to the x axis
(horizontal) and the second value to the y axis (vertical).
The default value is 0 0; which is exactly the same as left top.
CSS:
/*Default values*/
.element {
background-position: 0 0;
}
/*Keyword values*/
.element {
background-position: right bottom;
}
/*Percentages values*/
.element {
background-position: 5% 80%;
}
/*Length values*/
.element {
background-position: 15px 130px;
}
Here is a demo in CodePen: http://tiny.cc/background-position
background-repeat
The background-repeat CSS property has two functions:
1. To dene whether a background image is repeated or not
2. To determine how the background image is repeated
It looks like this:
background-repeat: no-repeat;

CSS Properties – Part 1
[ 140 ]
Alternatively, it could also look like this:
background-repeat-x: repeat;
Description
This property only works if background-image has been declared.
There are four values: repeat, repeat-x, repeat-y, and no-repeat.
• repeat: The background image will repeat in both x and y axes. This will
completely fill the container. This is the default value.
• repeat-x: The background image will only repeat in the x axis, hence,
horizontally.
• repeat-y: The background image will only repeat in the y axis, hence,
vertically.
• no-repeat: The background image will not be repeated and will only
display one instance of it.
CSS:
/*Default value*/
.repeat { background-repeat: repeat; }
/*Repeat horizontally*/
.repeat-x { background-repeat: repeat-x; }
/*Repeat vertically*/
.repeat-y { background-repeat: repeat-y; }
/*No repeat*/
.no-repeat { background-repeat: no-repeat; }
Here is a demo in CodePen: http://tiny.cc/background-repeat
background-size
The background-size CSS property denes the size of the background image, and it
looks like this:
background-size: contain;
Description
There are ve values: a length value, a percentage value, auto, contain, and cover.

Chapter 4
[ 141 ]
Length value
This is when we use one of the following units: px, em, in, mm, cm, vw, and so on.
Percentage value
This is when we use percentages such as 50%, 85%, and so on.
auto
This value scales the image in the corresponding direction (horizontal or vertical) in
order to maintain its aspect ratio and not deform it.
contain
This value makes sure the image can be seen completely within its parent container.
The image does not bleed on the edges; it's "contained".
cover
This value scales the image and takes the longest dimension (horizontal or vertical).
It makes sure that the image completely covers that dimension. Bleeding can occur if
the container and the image have different aspect ratios.
When declaring the size of the background, we can use either one or two values. The
rst value is the width, and the second is the height of the background image.
Using one value means that the second value is set to auto. When using two values,
we are then dening the width and height values of the background image.
We can use any measurement unit we want. Pixels, percentages, and the auto value
are the most commonly used though.
We can even combine multiple images in the same container. The background
shorthand property is the best way to handle this situation.
CSS:
.contain {
background-size: contain;
}
.cover {
background-size: cover;
}
.auto {
background-size: auto;
}

CSS Properties – Part 1
[ 142 ]
.multiple {
background-image:
url(../images/image-1.jpg),
url(../images/image-2.jpg);
background-size: 150px 100px, cover;
}
Here is a demo in CodePen: http://tiny.cc/background-size
background
The background CSS property is the shorthand in which we can list all background
values.
I often see many developers write the longhand version of the property to declare a
single value, such as a color. Here is an example:
background-color: red;
Although this is totally ne, I prefer to use the shorthand version for practically
everything:
background: red;
This is a bit more scalable because if we need to add any other values, all we need
to do is add the new value to this declaration rather than writing a separate one.
However, at the end, it's all a matter of personal style.
CSS:
/*BG color*/
.element { background: red; }
/*BG color and image*/
.element { background: url(../images/bg.png) red; }
/*BG color, image and position*/
.element { background: url(../images/bg.png) 50% 50% red; }
/*BG color, image, position and do not repeat*/
.element { background: url(../images/bg.png) 50% 50% red no-
repeat; }
/*BG color, image, position, do not repeat and size*/
.element { background: url(../images/bg.png) 50% 50% / contain red
no-repeat; }
/*BG color, image, position, do not repeat, size and clip*/
.element { background: url(../images/bg.png) 50% 50% / contain red
no-repeat content-box; }

Chapter 4
[ 143 ]
/*BG color, image, position, do not repeat, size, clip and
attachment*/
.element { background: url(../images/bg.png) 50% 50% / contain red
no-repeat content-box fixed; }
Box model
Every element in the web is a square, and as such, it has intrinsic characteristics:
width, height, padding, border, and margin. All these characteristics, put together,
make the box model.
The almighty box model is one of the most talked about subjects in the CSS industry
due to IE6 and IE7 being the most popular browsers back in the day. However, they
had major issues interpreting this simple CSS concept. This meant the web designers
and developers had to come up with all sorts of tricks to get around such a problem.
Those days are now gone, for the most part at least.
Let's move on to the box model properties.
width
The width CSS property species the width of an element's content area, and it looks
like this:
width: 10px;
Alternatively, it could also look like this:
width: 10px 50px;
Description
The content area is inside the padding, border, and margin of the element.
Let's talk about the most used values and keywords: the length value, percentage
value, auto, max-content, min-content, and fit-content.
Length value
This is basically when we use one of the following units: px, em, in, mm, cm, vw,
and so on.
Percentage value
This is when we use percentages such as 50%, 85%, and so on.

CSS Properties – Part 1
[ 144 ]
auto
This is a keyword value that allows the browser to choose the width of the element.
max-content
This is a keyword value that makes the container take the width of its content.
min-content
This is a keyword value that makes the container as small as possible depending on
its content.
t-content
This is a keyword value that makes the container match the width of its content. This
works great on containers with unknown or variable width.
You can nd more information on MDN at http://tiny.cc/mdn-width
CSS:
/*max-content*/
.element {
width: max-content;
}
/*min-content*/
.element {
width: min-content;
}
/*fit-content*/
.element {
width: fit-content;
}
Here is a demo in CodePen: http://tiny.cc/width
height
The height CSS property species the height of an element's content area, and it
looks like this:
height: 200px;

Chapter 4
[ 145 ]
Description
The content area is inside the padding, border, and margin of the element.
The most used values are a length value, a percentage value, and inherit.
Length value
This is basically when we use one of the following units: px, em, in, mm, cm, vw,
and so on.
Percentage value
This is when we use percentages such as 50%, 85%, and so on.
inherit
With this keyword, the element will inherit its parent container's height.
You can nd more information on MDN at http://tiny.cc/mdn-height
CSS:
/*Length value*/
.element {
height: 200px;
}
/*Percentage value*/
.element {
height: 50%;
}
/*Inherit value*/
.element {
height: inherit;
}
padding
The padding CSS property creates a space on all four sides of an element on the
inside, between its content and the edges, and it looks like this:
padding: 10px;
Alternatively, it could also look like this:
padding: 10px 15px;

CSS Properties – Part 1
[ 146 ]
Description
Borders and margins are outside of the content area and do not get affected by the
padding.
The padding property is the shorthand for padding-top, padding-right, padding-
bottom, and padding-left. We can use one, two, three, or all four values.
• One value: This means that all four sides have the same value.
• Two values: The first value is for Top and Bottom. The second value is for
Left and Right.
• Three values: The first value is for Top. The second value is for Left and
Right. The third value is for Bottom.
• Four values: The first value is for Top. The second is for Right. The third is
for Bottom. The fourth is for Left.
Negative values are not allowed.
CSS:
/*Shorthand, ONE value: all four sides have the same padding*/
.element { padding: 10px; }
/*Shorthand, TWO values: Top & Bottom - Left & Right*/
.element { padding: 10px 15px; }
/*Shorthand, THREE values: Top - Left & Right - Bottom*/
.element { padding: 10px 15px 20px; }
/*Shorthand, FOUR values: Top - Right - Bottom - Left*/
.element { padding: 10px 15px 20px 25px; }
/*Longhand, all values. They can go in any order*/
.element {
padding-top: 10px;
padding-right: 15px;
padding-bottom: 20px;
padding-left: 25px;
}
margin
The margin CSS property denes an outside space on one, two, three or all four sides
of an element, and it looks like this:
margin: 10px;

Chapter 4
[ 147 ]
Alternatively, it could also look like this:
margin: 10px 15px;
Description
The margin property is the shorthand for margin-top, margin-right, margin-
bottom, and margin-left. Just like with padding, we can use one, two, three, or all
four values.
• One value: This means that all four sides have the same padding.
• Two values: The first value is for Top and Bottom. The second value is for
Left and Right.
• Three values: The first value is for Top. The second value is for Left and
Right. The third value is for Bottom.
• Four values: The first value is for Top. The second is for Right. The third is
for Bottom. The fourth value is for Left.
Negative values are allowed.
CSS:
/*Shorthand, ONE value: all four sides have the same padding*/
.element { margin: 10px; }
/*Shorthand, TWO values: Top & Bottom - Left & Right*/
.element { margin: 10px 15px; }
/*Shorthand, THREE values: Top - Left & Right - Bottom*/
.element { margin: 10px 15px 20px; }
/*Shorthand, FOUR values: Top - Right - Bottom - Left*/
.element { margin: 10px 15px 20px 25px; }
/*Longhand, all values. They 1can go in any order*/
.element {
margin-top: 10px;
margin-right: 15px;
margin-bottom: 20px;
margin-left: 25px;
}
Collapsing margins
There is a particular behavior with the margins. If two stacked elements have top
and bottom margins, the margins are not added. Instead, the larger value is the only
one taken into account.

CSS Properties – Part 1
[ 148 ]
For example, we have an <h1> heading and a <p> paragraph. The heading has a
bottom margin of 20px, and the paragraph has a top margin of 10px.
Our senses immediately tell us that the total margin is 30px, but in reality, because
vertical margins collapse, only the largest value is considered, in this case, 20px.
The reason for this is that many elements, such as headings and paragraphs in our
example, have both top and bottom margins. So, having the margins collapse allows
the content and layout to maintain consistency and avoid creating undesired extra
spacing between stacked elements.
This is also good because it saves us the effort of having to "negate" margins on every
stacked element that has top and bottom margins, again, to avoid creating those
extra spaces.
The way I see it, is that collapsing margins is an editorial feature of the CSS margin
property. I hope that the prior explanations help embrace this behavior.
Here is a demo in CodePen: http://tiny.cc/collapsing-margins
border
The border CSS property is the shorthand that denes an element's border thickness,
style, and color.
The border property and all its sister properties (border-width, border-style,
and border-color) and variations are self-explanatory, so there's no need for a
Description section like in prior properties.
The CSS example ahead will help clarify the use of these properties.
border-width
This is the thickness of the border. It can be declared using px or em, but px yields
more controllable results.
border-style
This denes the type of line or no line at all. It supports the following values: dashed,
dotted, double, groove, hidden, inset, none, outset, ridge, and solid.

Chapter 4
[ 149 ]
border-color
This denes the color of the line. It supports all color modes: HEX, RGB, RGBa, HSL,
HSLs, and color name.
Keep in mind that all HTML elements are squares, so we can target any side of an
element with border-top-color, border-right-color, border-bottom-color, or
border-left-color.
The order of the values in the shorthand does not affect the output.
In the following example, the top rule in shorthand syntax accomplishes exactly the
same accomplishment as the bottom rule with the longhand syntax:
CSS:
/*Shorthand*/
.element-shorthand {
border: 10px solid green;
}
/*Longhand*/
.element-longhand {
/*Width*/
border-top-width: 10px;
border-right-width: 10px;
border-bottom-width: 10px;
border-left-width: 10px;
/*Style*/
border-top-style: solid;
border-right-style: solid;
border-bottom-style: solid;
border-left-style: solid;
/*Color*/
border-top-color: green;
border-right-color: green;
border-bottom-color: green;
border-left-color: green;
}

CSS Properties – Part 1
[ 150 ]
box-sizing
The box-sizing CSS property allows us to change the way browsers understand the
box model by default, and it looks like this:
box-sizing: border-box;
Description
There are two values: content-box and border-box.
content-box
This is the default value. The padding, border, and margin values are added to the
nal width and height of the element. This value is rarely used exactly because of the
behavior I just described.
border-box
On the other hand, since this value changes the box model, the padding and border
are not added to the nal width and height of the element but only to the margin.
CSS:
/*Padding, border and margin are added to the element's dimensions*/
.element {
box-sizing: content-box;
}
/*Padding and border are not added to the element's dimensions, only
margin*/
.element {
box-sizing: border-box;
}
/*Always start your CSS with this rule*/
*, *:before, *:after {
box-sizing: border-box;
}
Here is a demo in CodePen: http://tiny.cc/box-sizing
max-height
The max-height CSS property denes the maximum height of an element, and it
looks like this:
max-height: 150px;

Chapter 4
[ 151 ]
Description
The max-height attribute overrides the height property. Negative values are not
allowed.
The most used values are a length value and a percentage value.
Length value
This is when we use one of the following units: px, em, in, mm, cm, vw, and so on.
Percentage value
This is when we use percentages such as 50%, 85%, and so on.
You can nd more information on MDN at http://tiny.cc/mdn-max-height
CSS:
/*Length value*/
.element {
height: 75px;
/*This property overrides height*/
max-height: 150px;
}
/*Percentage value*/
.element {
max-height: 65%;
}
max-width
The max-width CSS property denes the maximum width of an element, and it looks
like this:
max-width: 75px;
Description
The max-width attribute overrides the width property. Negative values are not
allowed.
The most used values are a length value and a percentage value.

CSS Properties – Part 1
[ 152 ]
Length value
This is when we use one of the following units: px, em, in, mm, cm, vw, and so on.
Percentage value
This is when we use percentages such as 50%, 85%, and so on.
You can nd more information on MDN at http://tiny.cc/mdn-max-width
CSS:
/*Length value*/
.element {
width: 150px;
/*This property overrides width*/
max-width: 75px;
}
/*Percentage value*/
.element {
max-width: 65%;
}
min-height
The min-height CSS property denes the minimum height of an element, and it
looks like this:
min-height: 300px;
Description
The min-height attribute overrides the height and max-height properties.
Negative values are not allowed.
The most used values are a length value and a percentage value.
Length value
This is when we use one of the following units: px, em, in, mm, cm, vw, and so on.
Percentage value
This is when we use percentages such as 50%, 85%, and so on.
You can nd more information on MDN at http://tiny.cc/mdn-min-height

Chapter 4
[ 153 ]
CSS:
/*Length value*/
.element {
height: 75px;
max-height: 150px;
/*This property overrides height and max-height*/
min-height: 300px;
}
/*Percentage value*/
.element {
min-height: 65%;
}
min-width
The min-width CSS property denes the minimum width of an element, and it looks
like this:
min-widht: 300px;
Description
The min-width attribute overrides the width and max-width properties.
Negative values are not allowed.
The most used values are a length value and a percentage value.
Length value
This is when we use one of the following units: px, em, in, mm, cm, vw, and so on.
Percentage value
This is when we use percentages such as 50%, 85%, and so on.
You can nd more information on MDN at http://tiny.cc/mdn-min-width
CSS:
/*Length value*/
.element {
width: 150px;
max-width: 75px;
CSS Properties – Part 1
[ 154 ]
/*This property overrides width and max-width*/
min-width: 300px;
}
/*Percentage value*/
.element {
min-width: 65%;
}
object-t
The object-fit CSS property denes how a replaced element ts inside its content
box, and it looks like this:
object-fit: cover;
Description
A replaced element is an HTML element whose content and dimensions are intrinsic
(dened by the element itself) and are not dened by CSS or by its context or
surroundings.
Examples of replaced elements are <img>, <video>, <audio>, <canvas>, <iframe>,
<textarea>, <object>, <input>, <button>, <br>, and <hr>.
Now, the most important characteristic of replaced elements is that we cannot apply
generated content to them via CSS using the :before or :after pseudo-element
selectors.
This property can come in handy when we want a group of thumbnails to have the
same width and height, but without distorting the images. However, the images for
the thumbnails are uploaded by users, which means that the uploaded images can
be of all sizes and different aspect ratios. The object-fit CSS property can help us
have control of the thumbnails in such a situation.
The content inside the replaced element is centered vertically and
horizontally by default. However, the content can be repositioned using
the object-position property.
There are four keyword values: contain, cover, fill, none, and scale-down.
contain
The aspect ratio of the content inside the replaced element is preserved. This content
is enlarged as much as possible until it reaches its maximum size dened by its
width and height. It's possible to see some "unlled" areas of the element due to
preservation of the aspect ratio.

Chapter 4
[ 155 ]
cover
The aspect ratio of the content inside the replaced element is preserved. This
content is enlarged as much as possible until it completely lls or "covers"
the entire content box.
ll
The aspect ratio of the content inside the replaced element is not necessarily
preserved. This means that when lling the entire content box, the content of the
replaced element can be stretched or shrunk during the scaling up or scaling down
of the content.
none
No resizing is done.
scale-down
This acts as if none or contain were declared. The idea here is that the browser will
try to gure out the smallest concrete size of the content inside the replaced element
in order to make it t in its content box while preserving the aspect ratio of the
content inside the replaced element.
CSS:
img {
width: 15em;
height: 25em;
object-fit: contain;
}
Here is a demo in CodePen: http://tiny.cc/object-fit-position
object-position
The object-position CSS property denes the location of the content of the
replaced element, and it looks like this:
object-position: right bottom;
Description
As described in the Tip of the object-t CSS property, by default, the content of the
replaced element is placed in the center of the content box, which is 50% 50%.

CSS Properties – Part 1
[ 156 ]
Now, this property behaves similarly to the background-position CSS property.
This means, we can declare either one or two values.
The values are either length or percentages of keyword values top, right, bottom, or
left. Negative values are allowed.
CSS:
img {
width: 15em;
height: 25em;
object-fit: contain;
object-position: right bottom;
}
Here is a demo in CodePen: http://tiny.cc/object-fit-position
Border radius
With this property, we can not only make rounded corners but also circles, ellipses,
and other interesting shapes.
I admit that the term "rounded corners" is far less obscure than "border radius".
border-radius
The border-radius CSS property allows us to make rounded corners on almost any
HTML element, and it looks like this:
border-radius: 20px;
Description
The border-radius attribute is also the shorthand syntax for the border-top-left-
radius, border-top-right-radius, border-bottom-right-radius, and border-
bottom-left-radius properties.
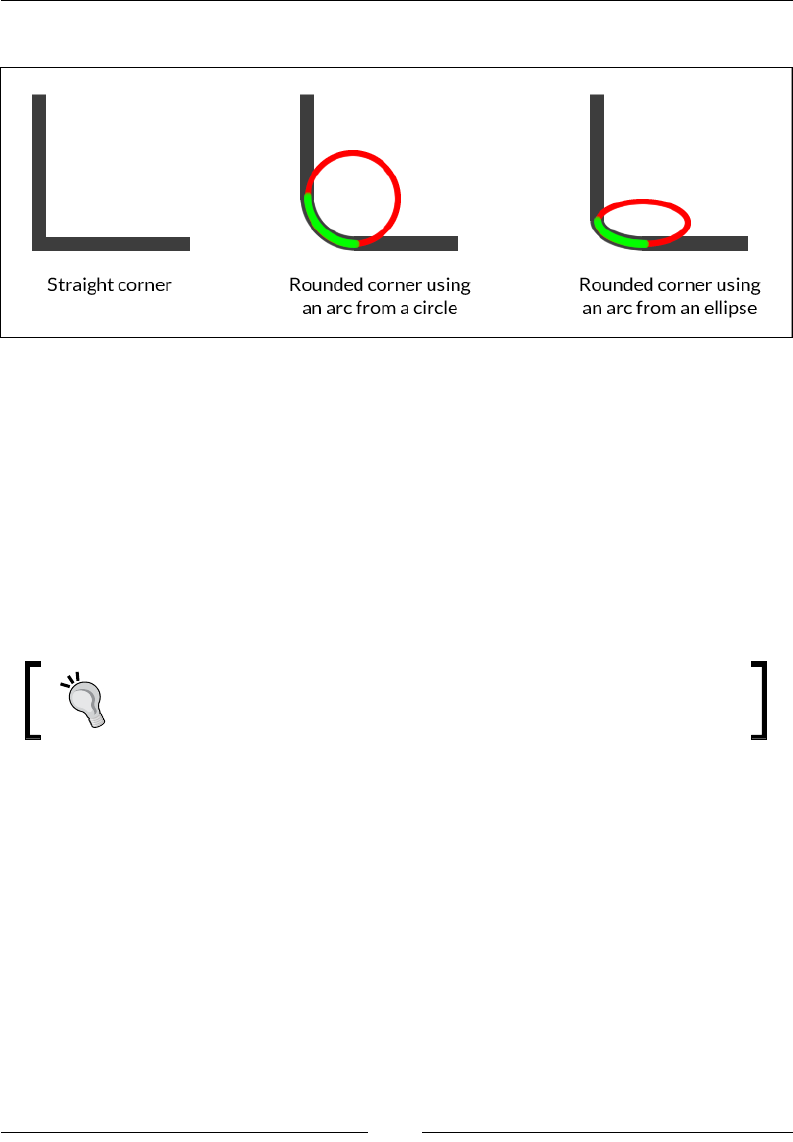
Chapter 4
[ 157 ]
Using either a circle or an ellipse, we can create rounded corners:
There are two values: a length value and a percentage value.
Length value
This is when we use one of the following units: px, em, in, mm, cm, vw, and so on.
Percentage value
This is when we use percentages such as 50%, 85%, and so on.
We can use, one, two, three, or four values in the same declaration. We can also use a
slash symbol, "/", to separate groups of values.
Sometimes, the background color or texture "bleeds" over the rounded
corners in some browsers. Use background-clip to x this issue.
CSS:
/*Longhand*/
.element {
border-top-left-radius: 20px;
border-top-right-radius: 20px;
border-bottom-right-radius: 20px;
border-bottom-left-radius: 20px;
}
/*Shorthand*/
.element { border-radius: 20px; }
/*Two values: top-left-and-bottom-right - top-right-and-bottom-
left*/

CSS Properties – Part 1
[ 158 ]
.element-1 { border-radius: 70px 7px; }
/*Three values: top-left - top-right-and-bottom-left - bottom-
right*/
.element-2 { border-radius: 70px 7px 20px; }
/*Four values: top-left - top-right - bottom-right - bottom-left*/
.element-3 { border-radius: 70px 7px 20px 150px; }
/*Values divided with a slash "/" symbol */
.element-4 { border-radius: 70px 7px/20px 30px; }
/*Circle*/
.element-5 { border-radius: 200px; }
/*Ellipse*/
.element-6 { height: 100px; border-radius: 100%; }
/*Pill*/
.element-7 { height: 100px; border-radius: 100px; }
/*Half Pill: top-left - top-right - bottom-right - bottom-left*/
.element-8 { height: 100px; border-radius: 100px 0 0 100px; }
Here is a demo in CodePen: http://tiny.cc/css-border-radius
Unit
CSS unit is a type of data with which we can dene measurements, and it looks like
this:
max-height: 150px;
Alternatively, it could also look like this:
transform: rotate(45deg);
There is no space between the number and the unit.
In most cases, the unit isn't required after the number 0 (zero).
There are several types of length units, such as described in the following
explanations.
Relative length units
They are dependent on another element's length (usually, a parent element in the
DOM) that relates directly to the element in question. When the other element's
length changes, the length of the element in question maintains the dened
proportion. In other words, there is no need to declare the length of the child element
again.

Chapter 4
[ 159 ]
Description
Relative units are always the best way to go if we want to build scalable systems.
Setting values in a single element and then modifying that single element to affect
the whole system saves a lot of time and many headaches.
ex
The ex sufx stands for an element's x-height. The ex CSS unit refers to the height of
lowercase x. This height is dependent on the font. In other words, the heights can be
different if we are using Arial than if we are using Verdana, even if the value is the
same.
CSS:
.element {
padding: 2ex;
}
ch
The ch sufx stands for character. The ch CSS unit refers to the width of the
character 0 (zero). This width is dependent on the font. In other words, the widths
can be different if we are using Arial than if we are using Verdana, even if the value
is the same.
CSS:
.element {
padding: 2ch;
}
em
The em sufx stands for the pronunciation of the letter m, and it represented the
width of the lower case m in the print and typography industries. In CSS, the em unit
represents a calculation of an element's font-size property.
This unit can be used together with many CSS properties, but the most common use
is to dene font-size elements.
However, many web designers and developers prefer to use rem units to avoid the
inheritance issue em units have in nested elements (3-4 or more levels deep).

CSS Properties – Part 1
[ 160 ]
CSS:
.element {
font: 1.5em Arial, Helvetica, san-serif;
}
rem
The rem sufx stands for the abbreviation of the term root element. The rem CSS
unit represents the font size of the root element in a markup document. A markup
document is not only an HTML document; it can also be an XML, SVG, or other
markup-based document.
Granted that in this guide, we are referring to an HTML document, and since this is
the case, the root element is the <html> element.
A very common practice is to set the font size on the <html> element to 62.5%. This
way, when we're setting our font sizes for other elements, we can still think in pixels,
but write in rem units to maintain the relative font size when scaling up or down our
document in our responsive projects.
CSS:
html {
font-size: 62.5%;
}
h1 {
/*It's the same as 22px*/
font-size: 2.2rem;
}
The % sign
The % sign is what it implies, percentage. In CSS em units and percentage units
yield the same result. Percentage values, such as any of the other relative units, are
dependent on another value, usually that of the parent element.
Like all other relative units, percentages and responsive web design go hand in hand.
CSS:
.element {
margin: 0 1%;
}

Chapter 4
[ 161 ]
Viewport-relative length units
These units relate to the viewport. If the viewport's dimensions change, the
properties using viewport-relative length values adapt to the new dimensions of the
view window.
Description
These units are a godsend in my book. They do what we would expect of fonts in a
responsive world: enlarge or shrink according to the width or height of the viewport.
Let's check them out.
vh
The vh sufx stands for viewport height. The vh CSS unit relates to the height of the
viewport. The value of vh is 1/100th of the height of the viewport.
For example, if we declare the font-size of an element as 1vh, and the browser
window is 500px, the font size is then 5px.
CSS:
.element {
font-size: 1vh;
}
vw
The vw sufx stands for viewport width. The vw CSS unit relates to the width of the
viewport. The value of vw is 1/100th of the width of the viewport.
For example, if we declare the font-size of an element as 1vh, and the browser
window is 1400px, the font size is then 14px.
CSS:
.element {
font-size: 1vw;
}
vmin
The vmin sufx stands for viewport minimum. The vmin CSS unit relates to the
smallest value of the viewport, of either its height or its width. The value of
vmin is 1/100th of the side with the smallest length of the viewport.

CSS Properties – Part 1
[ 162 ]
For example, if we declare the font-size of an element as 1vmin and the browser's
viewport is 600 × 800, the font size is then 6px.
CSS:
.element {
font-size: 1vmin;
}
vmax
The vmax sufx stands for viewport maximum. The vmax CSS unit relates to the
largest value of the viewport, of either its height or its width. The value of vmax is
1/100th of the side with the largest length of the viewport.
For example, if we declare the font-size of an element as 1vmax, and the browser's
viewport is 600 × 800, the font size is then 8px.
CSS:
.element {
font-size: 1vmax;
}
Absolute length units
These units represent a physical dimension of an element. Some units in CSS come
from the printing world, and although it's not common to use them, it's important to
know as much as we can about them.
Description
These types of units relate directly to a physical measurement. They work best when
the output environment is known, like in print.
The most used absolute unit is the pixel (px). A pixel is known to be a single dot on a
screen. The thing is that there is no industry standard for the size of that dot.
In other words, a pixel in a standard LED/LCD display (for example, a monitor or
a TV) has different sizes than a pixel in a high-density screen. Even the pixel sizes
between high-density screens are different.
Let's see what each abbreviation means, and at the end of the section, we'll be able to
see a single example with all the units.

Chapter 4
[ 163 ]
cm
The cm sufx stands for centimeter.
mm
The mm sufx stands for millimeter.
in
The in sufx stands for inch.
pc
The pc sufx stands for pica.
pt
The pt sufx stands for point.
px
The px sufx stands for pixel.
CSS:
All the following values represent units that resemble 16px font size, but in different
length units.
/*Centimeter*/
.element { font-size: .43cm; }
/*Millimeter*/
.element { font-size: 4.3mm; }
/*Inch*/
.element { font-size: .17in; }
/*Pica*/
.element { font-size: 1pc; }
/*Point*/
.element { font-size: 12pt; }
/*Pixel*/
.element { font-size: 16px; }

CSS Properties – Part 1
[ 164 ]
Angle data types
These units represent angle values.
Description
These units are used whenever we want to rotate an element via the transform
property.
Aside from the deg data type, the other angle data type units aren't really that
common.
Let's check them out though.
deg
The deg sufx stands for degrees.
grad
The grad sufx stands for gradients.
rad
The rad sufx stands for radians.
turn
The turn sufx is not an abbreviation; it's the actual word turn. There is one turn in a
full circle, so if we're going to make a horizontal rectangle rotate 90 degrees to make
it vertical, we would dene it as .25turn, because it's ¼th of the complete turn.
CSS:
All the following values represent units that resemble a 90-degree turn of an element
but in different angle data types:
/*Degrees*/
.element { transform: rotate(90deg); }
/*Gradians*/
.element { transform: rotate(100grad); }
/*Radians*/
.element { transform: rotate(89.535rad); }
/*Turn*/
.element { transform: rotate(.25turn); }

Chapter 4
[ 165 ]
Resolution units
These units represent the screen density of pixels on any given output or device.
Unlike relative and absolute units, it's necessary to add the unit to the value 0 (zero).
Description
Whenever we need to consider density screens, resolution units will do the heavy
lifting for us. They are used in media queries.
Let's see how they work.
dpi
The dpi sufx stands for dots per inch. Screens contain 72 or 96 dpi, whereas a printed
document has much larger dpi. 1 inch = 2.54 cm, so 1dpi≈ 0.39dpcm.
dpcm
The dpcm sufx stands for dots per centimeter. 1 inch = 2.54 cm, so 1dpcm≈ 2.54dpi.
dppx
The dppx sufx stands for dots per pixel. 1dppx = 96dpi due to the 1:96 xed ratio of
CSS pixels.
CSS:
/**@2x pixel ratio**/
/*Dots per inch*/
@media (min-resolution: 192dpi) { ... }
/*Dots per centimeter*/
@media (min-resolution: 75.5906dpcm) { ... }
/*Dots per pixel*/
@media (min-resolution: 2dppx) { ... }
Duration units
These units represent the duration of an animation in either seconds or milliseconds.
Description
These units are quite straightforward and are only used in CSS animations.

CSS Properties – Part 1
[ 166 ]
You may think that because all other units use two, three, or four letters
in their abbreviation (px, dip, dpcm, and so on). Always remember:
when declaring the seconds unit only one s is used. Using sec or secs
is incorrect.
ms
The ms sufx stands for milliseconds. 1000ms= 1 second.
s
The s sufx stands for seconds. 1s = 1000 milliseconds.
CSS:
/*Milliseconds*/
.element { animation-duration: 3ms; }
.element { transition: .003s; }
/*Seconds*/
.element { animation-duration: 3s; }
.element { transition: 3000ms; }
Column
CSS columns is the most versatile way to uidly distribute long strings of content
while retaining scalability. If the content grows or is reduced, it would automatically
reow in the available space of the declared columns.
Although not necessarily ideal, actual elements such as DIVs can also be distributed
in columns with the CSS columns property.
Let's dive in.
column-count
The column-count CSS property denes the number of columns of an element, and
it looks like this:
column-count:3;

Chapter 4
[ 167 ]
Description
We can use either a number value or the keyword auto.
When we use the auto keyword, we're letting the browser decide how many
columns can t within the available space. This is a very powerful and robust
solution for responsive layouts. However, it is required that we declare column-
width for this to work.
CSS:
/*Let the browser decide*/
.element {
column-count: auto;
column-width: 200px;
}
/*Specific number of columns*/
.element {
column-count: 3;
}
column-ll
The column-fill CSS property controls how the content is assigned across columns,
and it looks like this:
column-fill: balance;
Description
There are two keywords: auto and balance.
• auto: This means that the content is filled sequentially. Basically, as space
becomes available, the content will start filling it. This makes the parent
container grow vertically by making the columns taller in order to fit the
content.
• balance: This means that the content will be equally distributed in the
available columns. For this to work, we need to declare a height on the parent
container. This will make sure that the columns are of the specific height as
well. The problem with this is that the content will just keep flowing outside
the parent container if the parent container becomes too small.

CSS Properties – Part 1
[ 168 ]
CSS:
/*Balance*/
.element {
column-fill: balance;
column-count: 4;
height: 400px;
}
/*Auto*/
.element {
column-fill: auto;
column-count: 4;
}
column-gap
The column-gap CSS property denes the space between columns. In editorial terms,
this space is the "gutter", and it looks like this:
column-gap: 50px;
Description
There are two values: the auto keyword and a length value.
• auto: This is the default value defined by the spec, which is 1em.
• Length value: We define this using px or em.
CSS:
/*Auto = 1em*/
.element {
column-gap: auto;
column-count: 4;
}
/*Length value: px or em*/
.element {
column-gap: 50px;
column-count: 4;
}

Chapter 4
[ 169 ]
column-rule
The column-rule CSS property creates or draws a vertical line that "separates" the
columns, and it looks like this:
column-rule: 2px solid black;
Description
We can dene three aspects of the column-rule CSS property: the thickness or
width; the style, which are the same styles of the border-style property; and
color.
The column-rule CSS property is the shorthand of the following properties:
• column-rule-width: This can be just a length value (a number), or we can
use any of these keywords: thin, medium, or thick.
• column-rule-style: This can be any of the border-style values, such as
dotted, dashed, inset, and so on.
• column-rule-color: This is a color defined in any format: HEX, RGB, or HSL.
It also supports alpha channel, so RGBa and HSLa are allowed.
CSS:
/*Length, solid line and RGBa*/
.element {
column-gap: auto;
column-count: 4;
column-rule: 2px solid rgba(0, 0, 0, .3);
}
/*Keyword, dotted and color name*/
.element {
column-gap: 50px;
column-count: 4;
column-rule: thick dotted black;
}
column-rule-color
The column-rule-color CSS property denes the color of the dividing line between
columns.
Colors can be dened in any format: HEX, RGB, or HSL. It also supports alpha channel,
so RGBa and HSLa are allowed.

CSS Properties – Part 1
[ 170 ]
CSS:
.element {
column-rule-color: red;
}
column-rule-style
The column-rule-style CSS property denes the style of the dividing line between
columns.
It can be any of the border-style values, for example, dotted, dashed, inset, and
so on.
CSS:
.element {
column-rule-style: dotted;
}
column-rule-width
The column-rule-width CSS property denes the thickness (width) of the dividing
line between columns.
It can be just a length value (a number), or we can use any of these keywords: thin,
medium, or thick.
CSS:
.element {
column-rule-width: 5px;
}
column-span
The column-span CSS property makes an element that's supposed to behave like a
column into an element that spans across all columns. The element is still a "column",
but it now expands the full width of the columns, like a block element.
There are two values, none and all, which are self-explanatory.

Chapter 4
[ 171 ]
CSS:
.element {
column-span: all;
}
Here is a demo in CodePen: http://tiny.cc/column-span
column-width
The column-width CSS property denes the width of the columns.
When we dene the width of the columns, the browser will automatically add or
remove columns depending on the available space.
For example, if we say our columns are 200px wide and the parent container is
800px, then the browser will include three columns (taking into account the default
column-gap of 1em). However, if the container is at least 450px wide, the browser
will t two columns.
CSS:
/*em value*/
.element {
column-width: 10em;
}
/*px value*/
.element {
column-width: 200px;
}
columns
The columns CSS property is the shorthand that we can use to set column-width and
column-count.
It can accept either one or two values in the same declaration. The order of the values
doesn't matter, but it's a good measure to declare column-width rst and column-
count second.
CSS:
/*column-width and then column-count*/
.element {
columns: 300px 2;
}
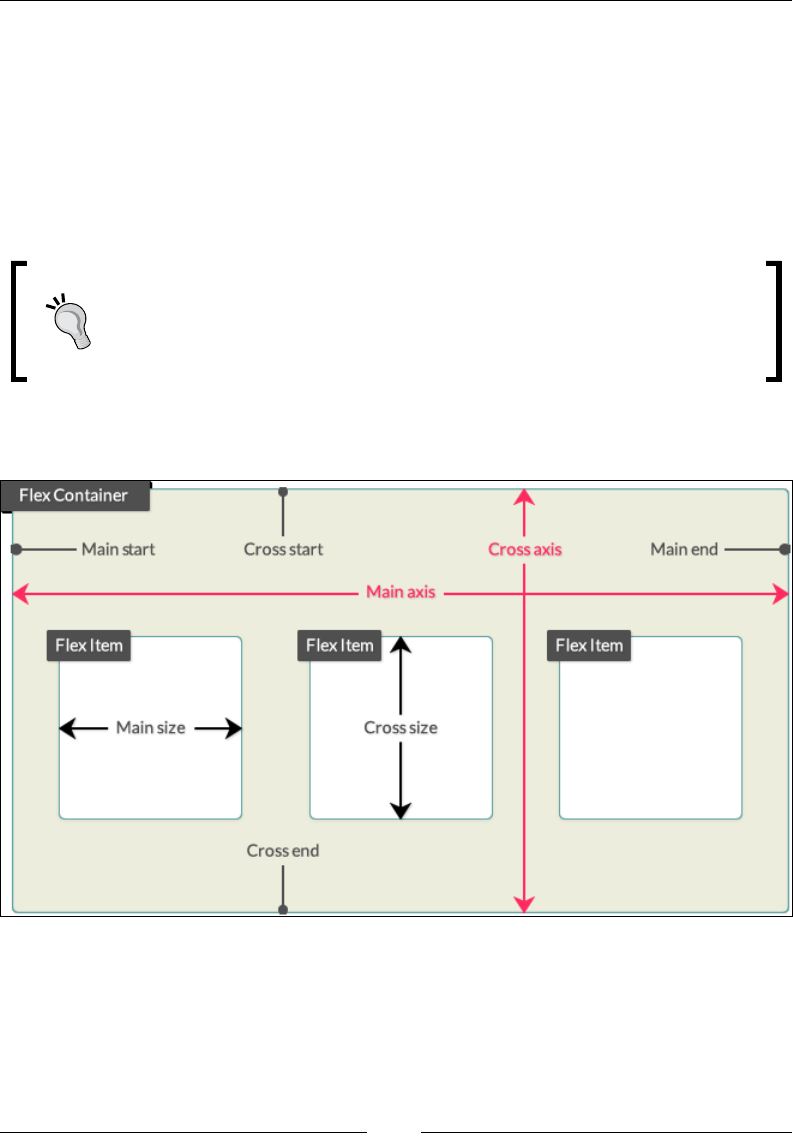
CSS Properties – Part 1
[ 172 ]
Flexible box (exbox)
Flexbox is one of the most useful CSS modules when it comes to arranging elements
in a container. Flexbox allows elements to grow or shrink, depending on the
available space in order to maintain the integrity of layouts.
Using Flexbox is the next step after using oat-based layouts, not only because it can
be easier to work with and wrap our heads around its concepts, but also because it
may result in less markup and CSS.
A powerful partner to Flexbox is the Grid Layout, which is still in its early
stages of development, and browser support is scarce. Since Grid Layout
is out of the scope of this section, you can read more on Rachel Andrew's
project site, Grid By Example, at http://gridbyexample.com/
Before we dive into the Flexbox properties, the following diagram will help us
understand the terminology and orientations:
Let's dive into Flexbox properties.

Chapter 4
[ 173 ]
ex-grow
This property denes how much a ex item should grow relative to other ex items
via a ex grow factor, and it looks like this:
flex--grow: 2;
Description
The ex grow factor is a number without a unit. Negative values are invalid.
The ex item will grow by the dened grow factor as long as there is space to do so.
It can grow on both the main or cross axes, depending on the direction dened by
the flex-direction property, which we'll talk about in a minute.
CSS:
/*First flex item will take 1 unit of the available space*/
.element-1 { flex-grow: 1; }
/*Second and third flex items will take 2 units of the available
space*/
.element-2 { flex-grow: 2; }
.element-3 { flex-grow: 2; }
/*Fourth flex item will take 1 unit of the available space*/
.element-4 { flex-grow: 1; }
ex-shrink
This property denes how much a ex item should shrink relative to other ex items
via a ex shrink factor, and it looks like this:
flex-shrink: 1;
Description
The ex shrink factor is a number without a unit. Negative values are invalid.
This is used when the sum of all ex items exceeds the size of the ex container.
This could be horizontally or vertically (main axis or cross axis). By assigning ex
shrink factors to one or multiple ex items, we can make them t the size of the ex
container.

CSS Properties – Part 1
[ 174 ]
CSS:
/*First flex item will take 1 unit of the available space*/
.element-1 { flex-shrink: 1; }
/*Second and third flex items will take 2 units of the available
space*/
.element-2 { flex-shrink: 2; }
.element-3 { flex-shrink: 2; }
/*Fourth flex item will take 1 unit of the available space*/
.element-4 { flex-shrink: 1; }
ex-basis
This property denes the initial width of a ex item, and it looks like this:
flex-basis: 200px;
Description
ex-basis accepts a length value with either an absolute or a relative length unit
(px, em, %, and so on) or the content keyword.
When using content, the container will adapt to the content inside of it. Negative
values are invalid.
CSS:
/*Both elements will be 50% wide*/
/*Both elements will be 50% wide*/
.a { flex-grow: 1; }
.b { flex-grow: 1; }
/*First element WILL NOT grow and has a fixed width of 200px if
there's enough space*/
.a {
flex-grow: 0;
flex-basis: 200px;
}
/*Second element WILL grow and has a minimum width of 200px if
there's enough space*/
.b {
flex-grow: 1;
flex-basis: 200px;
}

Chapter 4
[ 175 ]
/*First element WILL grow and has a minimum width of 200px if
there's enough space*/
.a {
flex-grow: 1;
flex-basis: 200px;
}
/*Second element:
- WILL NOT grow
- WILL shrink if the container is smaller than 400px
- It has a minimum width of 200px if there's enough space*/
.b {
flex-grow: 0;
flex-shrink: 1;
flex-basis: 200px;
}
ex-direction
The flex-direction CSS property denes the direction of the ex items inside a
ex container, and it looks like this:
flex-direction: column;
Description
This property sets the direction in which ex items can be laid out, either horizontal
with row or vertical with column.
There are four values: two for horizontal and two for vertical:
row
This lays out the ex items on a horizontal axis. This is the default value.
When ex items are laid out with row, they stack side by side from left to right.
row-reverse
This is the same as row but in reverse. When ex items are laid out with row-
reverse, they stack side by side from right to left.
column
This lays out the ex items on a vertical axis.
When ex items are laid out with column, they stack one on top of the other, starting
from top to bottom.
CSS Properties – Part 1
[ 176 ]
column-reverse
This is the same as column but in reverse.
When ex items are laid out with column-reverse, they stack one on top of the
other, starting from bottom to top.
The flex-direction property is applied to the ex container, not the
ex items.
CSS:
/*Horizontal axis: row*/
.flex-container { flex-direction: row; }
/*Horizontal axis: row-reverse*/
.flex-container { flex-direction: row-reverse; }
/*Vertical axis: column*/
.flex-container { flex-direction: column; }
/*Vertical axis: column*/
.flex-container { flex-direction: column-reverse; }
ex-wrap
The flex-wrap CSS property denes whether a ex item should wrap or not when
the container becomes too small, and it looks like this:
flex-wrap: wrap;
Description
This property accepts one of three keyword values: nowrap, wrap and wrap-reverse.
nowrap
This is the default value. It tells the ex item to not wrap.
wrap
This tells the ex element to wrap.
wrap-reverse
This tells the ex element to wrap but in reverse.
Chapter 4
[ 177 ]
The flex-wrap property is applied to the ex container, not the
ex items.
CSS:
.flex-container {
flex-wrap: wrap;
}
ex-ow
The flex-flow CSS property is the shorthand for the flex-direction and flex-
wrap properties, and it looks like this:
flex-flow: row wrap-reverse;
Description
We now know that the flex-direction property denes the direction of the
ex items in either columns or rows.
The flex-wrap attribute, on the other hand, denes whether the ex items should
wrap or not when the container becomes too small.
We can specify either one or two values. The order doesn't affect the result.
The flex-direction attribute can take any of its available values: row : (default
value), row-reverse, column, or column-reverse.
The flex-wrap attribute can take any of its available values as well: nowrap
(default value),wrap, or wrap-reverse.
The flex-flow property is applied to the ex container, not the
ex items.
CSS:
/*Main axis and elements will wrap from bottom to top*/
.flex-container {
flex-direction: row;
flex-wrap: wrap-reverse;
}

CSS Properties – Part 1
[ 178 ]
/*Above rule is the same as this rule*/
.flex-container { flex-flow: row wrap-reverse; }
/*Main axis and flex items will wrap from top to bottom*/
.flex-container { flex-flow: row-reverse wrap; }
/*Cross axis, wrapping doesn't happen on column layout*/
.flex-container { flex-flow: column; }
align-content
The align-content CSS property aligns lines inside a ex container as long as there
is extra space on the cross axis, and it looks like this:
align-content: center;
Description
There are six values: flex-start, flex-end, center, space-around, space-
between, and stretch.
ex-start
This groups the lines to the start of the container.
ex-end
This groups the lines to the end of the container.
center
This groups the lines to the center of the container.
space-around
This distributes the lines evenly in the container, but the rst line is placed at the
start of the container and the last line at the end.
space-between
This distributes the lines evenly in the container with an even amount of space
between each line.
stretch
This is the default value. The lines will evenly stretch to ll the whole container.

Chapter 4
[ 179 ]
The align-content property is applied to the ex container, not the
ex items.
CSS:
/*All lines at the top*/
.flex-container { align-content: flex-start; }
/*All lines at the bottom*/
.flex-container { align-content: flex-end; }
/*All lines at the center*/
.flex-container { align-content: center; }
/*Evenly spaced lines. The top one touches the top edge; the
bottom one touches the bottom edge*/
.flex-container { align-content: space-around; }
/*Evenly spaced lines, even the top and bottom ones*/
.flex-container { align-content: space-between; }
/*Lines will stretch to fill all the available space*/
.flex-container { align-content: stretch; }
align-items
The align-items CSS property sets the default alignment of the ex elements inside
the ex container, and it looks like this:
align-items: center;
Description
This property accepts ve values: flex-start, flex-end, center, baseline, and
stretch.
ex-start
This aligns the ex elements to the beginning of the container.
ex-end
This aligns the ex elements to the end of the container.
center
This aligns the ex elements to the center of the container and and at the same time,
it aligns them to their center.

CSS Properties – Part 1
[ 180 ]
baseline
This aligns the ex elements to the text baseline inside each ex element.
stretch
This stretches the ex elements to ll the entire parent container.
The align-items property is applied to the ex container, not the
ex items.
CSS:
/*Align items to the beginning*/
.flex-container { align-items: flex-start; }
/*Align items to the end*/
.flex-container { align-items: flex-end; }
/*Align items to the center*/
.flex-container { align-items: center; }
/*Align items to their text baseline*/
.flex-container { align-items: baseline; }
/*Make items stretch and fill the parent container*/
.flex-container { align-items: stretch; }
align-self
The align-self CSS property aligns a specic ex item within its parent container,
and it looks like this:
align-self: flex-start;
Description
This property accepts the exact values as align-items, and the results are the same
as well: flex-start, flex-end, center, baseline, and stretch.
ex-start
This aligns the ex element to the beginning of the container.
ex-end
This aligns the ex element to the end of the container.

Chapter 4
[ 181 ]
center
This aligns the ex element to the center of the container.
baseline
This aligns the ex element to the text baseline inside each ex element.
stretch
This stretches the ex elements to ll the entire parent container.
CSS:
/*Align the flex item to the top*/
.element { align-self: flex-start; }
/*Align the flex item to the bottom*/
.element { align-self: flex-end; }
/*Align the flex item to the center*/
.element { align-self: center; }
/*Align the flex items to their text baseline*/
.element { align-self: baseline; }
/*Make the flex item stretch*/
.element { align-self: stretch; }
order
The order CSS property is used to alter the default order of ex items within the
same parent container, and it looks like this:
order: 3;
Description
By default, ex items appear in the same order they appear in the source (HTML).
The order property allows us to alter the display order while maintaining their
source order. This property accepts a number value without a unit.
The order is dened in a logical way: The lower the number, the more ahead it is
in the order. Items that have the same number are laid out according to the source
document.

CSS Properties – Part 1
[ 182 ]
The starting number is 0 (zero), not 1. Negative values are allowed.
CSS:
/*The default order of all elements has been altered,
however, their source order remains the same.*/
.element-1 { order: 3; }
.element-2 { order: 0; }
.element-3 { order: -1; }
.element-4 { order: 2; }
justify-content
The justify-content CSS property works only on ex items. It allows the browser to
distribute the space in between and around the ex items based on their main axes.
Description
This property supports ve keyword values: flex-start, flex-end, center,
space-between, and space-around.
ex-start
This is the default value. It groups and positions the elements to the beginning of the
container.
ex-end
This groups and positions the elements to the end of the container.
center
This groups and positions the elements to the center of the container.
space-between
This spreads and positions the elements along the container and spaces them evenly.
The rst and last ex items are ushed against the left-hand and right-hand sides
respectively. In other words, the rst and last ex items touch the left and right
edges.

Chapter 4
[ 183 ]
space-around
Similar to the space-between property, this spreads and positions the elements
along the container and spaces them evenly.
However, the rst and last ex items do not touch the left and right edges.
CSS:
.flex-container {
display: flex;
justify-content: space-between;
}
ex
The flex CSS property is the shorthand in which we can declare the values for
flex-grow, flex-shrink, and flex-basis. It's recommended that you follow this
order when declaring the values.
CSS:
/*Apply flexbox to the parent container*/
.flex-container { display: flex; }
/*Flex items create 4 containers, each of different size.
Each container grows/shrinks proportional to the
flex growth/shrink factorsand the browser automatically
calculates the flex-basis*/
.element-1 { flex: 1 4 auto; }
.element-2 { flex: 2 3 auto; }
.element-3 { flex: 3 2 auto; }
.element-4 { flex: 4 1 auto; }
Summary
And this is how you start the rst chapter about CSS Properties! We learned what
CSS properties and vendor prexes are.
Now, with the animation properties clear we can start working on great interactions
for our sites and applications. We can also handle all background features, be
positioning or even blend modes to create nice visual effects without having to
depend on image editors of any kind.

CSS Properties – Part 1
[ 184 ]
The Box Model concept is something we can tackle easier especially knowing that
legacy IE's have less and less impact than before. This is greatly impacted by how
we work with CSS units since we need to understand which units work best with
different use cases and requirements.
We learned that CSS columns are a great tool to distribute long strings of text. And
that the mighty Flexbox is the go-to feature to arrange elements in containers.
Improving our typography and transformations are part of the next chapter,
amongst other interesting properties.
Buckle up!

[ 185 ]
CSS Properties – Part 2
Ok, we're through Part 1 of the CSS properties. Indeed, there are many, many more
properties to talk about.
Let's now move on to Part 2.
Fonts
In the world of design, fonts are one of the most powerful assets we have, and at the
same time, they are one of the most underappreciated ones.
Typography is so powerful that when we use it correctly, we may even get away
with not using a single image in our project.
Let's take a look at the CSS font properties, shall we?
font-family
The font-family CSS property denes the font we want an element to use, and
looks like this:
font-family: "Times New Roman", Times, Baskerville, Georgia,
serif;
Description
This property can hold one or multiple font names in its declaration. There is no limit
as to how many font names it can hold; however, it is not only very unlikely to list
more than four or ve fonts, but it's also unnecessary.

CSS Properties – Part 2
[ 186 ]
The font family names are separated by commas. We call this the font stack. The
browser will read the font stack and use the rst one in the stack, if it can't nd it or
download it, it will move on to the next font family name and so on until it's able to
use one from the stack.
There are two types of font family names: family name and generic family name.
Family name
Family names are actually names that represent real fonts, such as Times, Arial,
Verdana, Monaco, and so on. They should always be listed before generic family
names in the font stack.
Generic family names
These are the only keywords that represent a system font. They are called fallback
fonts. They should always be listed after the family names in the font stack. Generic
family names can be monospace, san-serif, serif, cursive, and fantasy.
It is not mandatory to use quotes (single or double) when a font family
name has multiple words. For example, writing font-family:
"Times New Roman", serif; is the same as writing font-family:
Times New Roman, serif;. Note that Times New Roman is not
quoted in the second example.
CSS:
.element {
font-family: "Times New Roman", Times, Baskerville, Georgia,
serif;
}
font-feature-settings
The font-feature-settings CSS property provides control over typographic
properties in OpenType fonts, and looks like this:
font-feature-settings: "smcp";

Chapter 5
[ 187 ]
Description
The font-feature-settings CSS property allows us to control and use other alternative
glyphs that come included in some font les.
An example of an alternate glyph is for example when we type the fractions 1/2 or
1/4 the font actually includes the "small superscript" version like ½ and ¼. Or if we
type H2O it turns into H2O.
Remember, not all fonts contain special glyphs (font features).
To nd out what font features a font le has, you can use any of these two tools:
1. Fontdeck.com (text has link http://fontdeck.com/) - Find the font you
want and on the About this typeface, look for the OPENTYPE line, there all
the font features will be listed for that specific font.
2. Test OpenType features (text has link http://www.impallari.com/
testing/index.php) - Just drag and drop your font file(s) and click on the
OpenType Features link on the top left, a large panel will slide where you
can select which features to see.
Here are some of the most common feature tags:
•dlig: Discretionary ligatures
•kern: Kerning
•liga: Standard ligatures
•lnum: Lining figures
•onum: Old style figures
•tnum: Tabular figures
•smcp: Small capitals
•ss01, ss02, ss03, ss04… ss20: Stylistic sets (font-dependent)
•swsh: Swash
For more information, check out the MDN website: http://tiny.cc/mdn-font-
feature-settings
For a complete list of all font features, check the Microsoft site at http://tiny.cc/
msn-font-features-list

CSS Properties – Part 2
[ 188 ]
CSS:
/*Small capitals*/
.element {
font-feature-settings: "smcp";
}
font-size
The font-size CSS property denes the size of the text of an element, and it looks
like this:
font-size-settings: "smcp";
Description
This property can also be used to change the size of other elements since we can
compute the value of em, rem, and ex length units as well.
There are a few different value types that we can use with the font-size CSS
property: absolute keywords/size, relative size, length, and percentage.
Absolute keywords/size
The sizes dened relate directly to specic font sizes. They can also be used to set a
font size of an element based on the parent element's font size. Values are as follows:
• xx-small
• x-small
• small
• medium (default value)
• large
• x-large
• xx-large
Relative size keywords
These sizes increase or reduce the font size of an element based on the font size of its
parent container. The values are:
• smaller
• larger

Chapter 5
[ 189 ]
Length
Negative values are invalid. When using px, the font size is absolute; it's not relative
to the font size of the parent container. When using em, ex, and ch, the font size is
relative to the font size of the element's parent container. When using rem, the font
size is relative to the root element, that is, the <html> element. When using vw, vh,
vmax, and vmin the font size is relative to the viewport.
To see all the available values of this attribute, refer to the Absolute Length Units
section.
The most popular units are:
• px
• em
• rem
Percentage
The percentage attribute refers to the percentage of the parent element's font size.
Its unit is %.
CSS:
/*Absolute keywords/size*/
.element { font-size: x-small; }
/*Relative size*/
.element { font-size: smaller; }
/*Length value*/
.element { font-size: 18px; }
/*Percentage value*/
.element { font-size: 62.5%; }
font-size-adjust
The font-size-adjust CSS property helps us dene the aspect ratio of the fonts
based on the size difference of the lowercase letter x and upper case letter X, and it
looks like this:
font-size-adjust: .5";
CSS Properties – Part 2
[ 190 ]
Description
In the font stack, the font sizes can be different from one font to the other, thus
the styling of the text can considerably vary from the intended design. With the
font-size-adjust CSS property, we can solidly predict that the font sizes are
consistent when the browser uses any font from the font stack.
This property accepts a numeric value without a unit. It can also accept decimal
values.
A great online tool that can do this for us is Fontdeck's font-size-adjust web app:
http://fontdeck.com/support/fontsizeadjust.
Although Firefox is the only one that supports the font-size-
adjust property at the time of writing this section, I decided to still
include it because it will be of great value once other browsers start
supporting it.
CSS:
.element {
font-size-adjust: .5;
}
font-stretch
The font-stretch CSS property allows us to select a condensed, normal, or
expanded face from the font family in question, and it looks like this:
font-stretch: condensed;
Description
The font-stretch property doesn't just stretch the font to whatever we tell it to. It
looks for an actual face inside the font le that matches the declared style; or at that
is as close as possible.
This property supports the following values:
• ultra-condensed
• extra-condensed
• condensed
• semi-condensed
• normal

Chapter 5
[ 191 ]
• semi-expanded
• expanded
• extra-expanded
• ultra-expanded
CSS:
.element {
font-stretch: condensed;
}
font-style
The font-style CSS property species the font style of an element, and it looks like
this:
font-style: italic;
Description
The font-style property accepts the following values: normal, italic, and
oblique.
Let's clear up the difference between italic and oblique.
According to the spec:
"Italic forms are generally cursive in nature, while oblique faces are typically
sloped versions of the regular face."
This means that when we declare the font style italic, the browser will look for the
italic face of the font and use that face. A good example of this is the typeface Georgia;
when we use the italic property, we can clearly see that it's an actual italicized face
rather than making the normal face oblique.
Oblique makes the Normal face slanted or inclined in order to simulate italics.
CSS:
.element {
font-style: italic;
}

CSS Properties – Part 2
[ 192 ]
font-variant
The font-variant CSS property turns the targeted text into small caps and it looks
like this:
font-variant: small-caps;
Description
The font-variant property is considered a shorthand in CSS3 and has been
extended with new values, which developers rarely use.
One thing to note is that if the text is already in all caps and we apply the
small-caps property to it, the text will not change; it will continue to be
in all caps.
The most used values are: normal and small-caps. Some of the additional
values in CSS3 are small-caps, all-small-caps, petite-caps, all-petite-caps,
unicase, and titling-caps.
For more information, check out the MDN website: http://tiny.cc/mdn-font-
variant
CSS:
.element {
font-variant: small-caps;
}
font-variant-ligatures
The font-variant-ligatures CSS property denes ligatures in text, which specify
how glyphs are combined in order to produce a more harmonic text, and it looks like
this:
font-variantligatures: discretionary-ligatures;
Description
The font-variant-ligatures are common in OpenType fonts.
The font-variant-ligatures property uses the following values:
common-ligatures, no-common-ligatures, discretionary-ligatures,
no-discretionary-ligatures, historical-ligatures,
no-historical-ligatures, contextual, no-contextual, and contextual.
Chapter 5
[ 193 ]
For more information, check out the MDN website: http://tiny.cc/mdnfont-
variant-ligatures
CSS:
.element {
font-variant-ligatures: discretionary-ligatures;
}
font-weight
The font-weight CSS property denes the thickness (weight) of the font, and it
looks like this:
font-weight: bold;
Description
This property accepts two types of values: a numeric value and a keyword value.
Numeric values
This property accepts numeric values such as 100, 200, 300, 400, 500, 600, 700, 800
and 900.
Keyword values
This property also accepts keyword values such as normal, bold, bolder, and
lighter.
The normal keyword is the same as 400 numeric value and the bold
keyword is the same as 700.
One thing to note is that the keywords bolder and lighter are dependent on the
parent element's font weight.
CSS:
/*Numeric value*/
.element { font-weight: 200; }
/*Keyword value*/
.element { font-weight: bold; }
CSS Properties – Part 2
[ 194 ]
font
The font CSS property is the shorthand for the font-style, font-variant,
font-weight, font-size, line-height, and font-family properties, and it looks
like this:
font: italic small-caps bold 18px/2 "Times New Roman", Times,
Baskerville, Georgia, serif;
Description
There are a few things to consider when using the font shorthand in order for it to
work:
• At least the font-size and font-family properties need to be declared
• If any of the preceding two properties are omitted, the declaration will be
ignored
• If any more than these two properties are going to be declared, it's
mandatory to adhere to the following order:
°font-style
°font-variant
°font-weight
°font-size
°line-height
°font-family
When declaring the line-height value in the shorthand, it always has
to go after the font-size property separated with a slash "/" character,
for example, .element { font: 12px/1.6 Arial; }.
• CSS:
/*All font properties in a single declaration*/
.element { font: italic small-caps bold 18px/2 "Times New Roman",
Times, Baskerville, Georgia, serif; }
/*font-style*/
.element { font-style: italic; }
/*font-variant*/
.element { font-variant: small-caps; }
/*font-weight*/
.element { font-weight: bold; }
/*font-size*/

Chapter 5
[ 195 ]
.element { font-size: 18px; }
/*line-height*/
.element { line-height: 2; }
/*font-family*/
.element { font-family: "Times New Roman", Times, Baskerville,
Georgia, serif; }
Transform
CSS transforms have gained such popularity that it's rare not to see some sort of
transformation in a website nowadays—from button shapes and animations to
layouts.
Let's dig in.
transform
The transform CSS property allows us to scale, rotate, skew, and translate elements
in 2D and 3D spaces, and it looks like this:
transform: translate(-10px, 10%);
Description
This property supports the following values: scale(), skewX() and skewY(),
translate(), rotate(), matrix(), and perspective().
Note that X-axis equals horizontal and Y-axis equals vertical.
An easy way to remember which axis is which is by saying this: "x is a
cross so the x-axis is across". http://tiny.cc/xy-axis
scale()
The scale() function scales an element. It's also the shorthand for scaleX() and
scaleY() functions. It accepts a numeric value without a unit. The numeric value
represents the proportion in which the element will be scaled. For example, 2 means
that the element will be scaled to twice its size. Negative values are valid.

CSS Properties – Part 2
[ 196 ]
skew()
The skew() function tilts the element. If a single value is declared, then it will only
tilt the element on the x axis. If two values are declared, then the element is tilted
on both the x and y axes. The skew() function accepts a numeric value followed by
the deg, grad, rad, or turn units. However, the deg unit is the most commonly used
unit. Negative values are valid.
skewX() and skewY()
The skewX() and skewY() functions tilts the element only horizontally or vertically.
translate()
The translate() function alters the location of an element. If a single value is
declared, then it will only translate the element on the X-axis. If two values are
declared, then the element is translated in both the X and Y-axis. Negative values
are valid.
translateX() and translateY()
The translateX() and translateY() functions alters the location either
horizontally or vertically.
rotate()
The rotate() function rotates an element around a xed point in a 2D space. It
accepts a numeric value followed by the deg, grad, rad, or turn units. The deg unit is
the most common though. Negative values are valid.
matrix()
The matrix() function is shorthand for all transformation values since they can be
combined here. Granted the complexity of the matrix() function, this requires a
solid understanding of math.
perspective()
This value gives a 3D perspective to the element; once the perspective is set, we can
then use any of the other values. The element in question will react in a 3D plane. It
accepts a numeric value with a length unit.

Chapter 5
[ 197 ]
The explanation of the advanced mathematics of the matrix() function are out of
scope of this book. However, for very detailed explanations, you can refer to either
of these two articles:
• Understanding the CSS Transforms Matrix by Tiffany Brown at
http://tiny.cc/css-matrix-1
• The CSS3 matrix() Transform for the Mathematically Challenged by Zoltan
Hawryluk at http://tiny.cc/css-matrix-2
CSS:
/*Scale the same value in both X an Y-axis*/
.element { transform: scale(1.1); }
/*Scale different values for X and Y-axis*/
.element { transform: scale(1.1, 1.5); }
/*Tilt the element on X-axis only*/
.element { transform: skew(10deg); }
/*Tilt the element on both X and Y-axis*/
.element { transform: skew(10deg, -20deg); }
/*Move the element 10px to the right*/
.element { transform: translate(10px); }
/*Move the element 10px to the right and 10% down*/
.element { transform: translate(-10px, 10%); }
/*Rotate in a 2D plane*/
.element { transform: rotate(10deg); }
/*Matrix*/
.element { transform: matrix(2, 2, 1, 2, 0, 0); }
/*Add perspective to the element to make it rotate in a 3D plane*/
.element { transform: perspective(100px) rotateX(40deg); }
transform-origin
The transform-origin CSS property allows us to change the point of origin of the
transformed element, and it looks like this:
transform-origin: 50px;
Description
The transform-origin property only works if the transform property is declared.
2D transformations can affect the x and y axes. 3D transformations can change these
two as well as the z axis.
For a 2D transformation, up to two values can be declared; the rst one is the X axis
(horizontal) and the second the Y axis (vertical).

CSS Properties – Part 2
[ 198 ]
3D transformations can take up to three values that represent the X, Y, and Z axes.
The keywords that are accepted in this property are: top, right, bottom, left,
and center.
CSS:
/*Single value affects both X and Y-axis*/
.element {
transform: scale(2, 4);
transform-origin: 50px;
}
/*Two values one for each axis*/
.element {
transform: scale(2, 4);
transform-origin: 50px -100px;
}
/*Keyword value*/
.element {
transform: scale(2, 4);
transform-origin: bottom;
}
/*Length and keyword values*/
.element {
transform: scale(2, 4);
transform-origin: 50px bottom;
}
/*Both keyword values*/
.element {
transform: scale(2, 4);
transform-origin: right bottom;
}
transform-style
The transform-style CSS property denes whether an element is positioned in a
3D space or 2D space (at), and it looks like this:
transform-style: preserve-3d;
Chapter 5
[ 199 ]
Description
This property takes only two values: flat and preserve-3d.
When the preserve-3d property is applied, the elements' stack on the z axis can
be altered via the translate() function, thus the elements can appear in different
planes regardless of the order in which they appear in the source HTML.
When the flat property is applied, the elements obey the order in which they
appear in the source HTML.
Note that this property is applied to the parent element,
not the child elements.
CSS:
/*Perspective*/
.parent-container {
transform-style: preserve-3d;
perspective: 500px;
}
.element-1 {
transform: translateZ(1px) rotateX(60deg);
}
.element-2 {
transform: translateZ(-2px);
}
Transition
CSS transitions allow us to have very granular control over our animations.
Let's take a look at these properties.
transition
The transition CSS property is the shorthand for all transition properties:
transition-delay, transition-duration, transition-property, and
transition-timing-function. It looks like this:
transition: width 400ms ease-out 1s;

CSS Properties – Part 2
[ 200 ]
Description
This property lets us dene the transition between two states of an element via the
:hover or :active pseudo-classes.
One thing to consider is that the order in which these properties appear doesn't
matter. However, since transition-delay and transition-duration use the
same value unit, transition-delay will always be considered rst, followed by
transition-duration.
CSS:
/*Shorthand with all properties in a single declaration*/
.element {
width: 100px;
/*property - duration - timing function - delay*/
transition: width 400ms ease-out 1s;
}
/*Longhand. Each property is declared separately*/
.element {
transition-property: width;
transition-duration: 400ms;
transition-timing-function: ease-out;
transition-delay: 1s;
}
.element:hover {
width: 300px;
}
transition-delay
The transition-delay CSS property allows us to set a timer. When the timer
reaches zero, the transition begins. It looks like this:
transition-delay: 1s;
Description
This property accepts a numeric value followed by either s or ms, which stand for
seconds and milliseconds, respectively.
CSS:
.element {
transition-delay: 1s;
}

Chapter 5
[ 201 ]
transition-duration
The transition-duration CSS property allows us to dene how long a transition
should take from start to end. This is also called a cycle, and it looks like this:
transition-duration: 400ms;
Description
The transition-duration property accepts a numeric value followed by either s or
ms, which stand for seconds and milliseconds, respectively.
CSS:
.element {
transition-duration: 400ms;
}
transition-property
The transition-property CSS property species which CSS property or properties
will be transitioned.
Not all properties are animatable though. The W3C has a nice list of animatable CSS
properties, which can be found at http://tiny.cc/w3c-animatable-css-props
Description
The transition-property CSS property accepts the following values:
• none: This means that no transitions will take place
• all: This means that all properties will be transitioned
• Property name: This means that the specified property or properties will be
transitioned
CSS:
.element {
transition-property: width;
}

CSS Properties – Part 2
[ 202 ]
transition-timing-function
The transition-timing-function CSS property denes how an animation's speed
should progress throughout its cycles.
Both the transition-timing-function and animation-timing-function
properties accept the same ve predened values, which are also known as easing
functions for the Bézier curve: ease, ease-in, ease-out, ease-in-out, and linear.
Refer to the animation-timing-function section for a detailed explanation of all the
values.
CSS:
.element {
transition-timing-function: ease-out;
}
Positioning
Positioning elements is something we spend a lot of our time on when building sites
and applications, so having a good understanding of how to place an element on a
layout is crucial, especially when an element can have different positions depending
on the available space.
Let's see what positioning is all about.
position
The position CSS property denes the location of an element.
Description
There are ve keyword values for the position property: static, absolute,
relative, fixed, and sticky.
static
This is the default value of the position property. The element stays in the ow of
the document and appears in the actual location where it's located in the markup.
absolute
The element is removed from the document ow and it's positioned in relation to its
closest relative positioned ancestor element.

Chapter 5
[ 203 ]
relative
The element does not change positions unless one or several properties of top,
right, bottom, or left are declared. It also creates a reference position for absolute
positioned child elements.
xed
The element is removed from the document ow just like the absolute positioned
elements. However, unlike the absolute positioned elements, which are relative to
an ancestor element, the fixed elements are always relative to the document.
sticky
This value is a mix between the relative and fixed positions. The element is
treated as relative until a specic point or threshold is met, at which point the
element is then treated as fixed. At the time of writing this, only Firefox supports
this property.
CSS:
/*Position relative*/
.element {
position: relative;
}
/*When the element hits the top of the viewport, it will stay fixed at
20px from the top*/
.element {
position: sticky;
top: 20px;
}
top
The top CSS property is closely tied to the position property.
This property species the distance of an element from the top of its current
location if the element has position: relative; declared or from the top of its
nearest ancestor when the ancestor has position: relative; and the element has
position: absolute; declared.
If none of the ancestors have position: relative; declared, the absolute
positioned element will traverse the DOM until it reaches the <body> tag, at which
point it will position itself at the top of the page regardless of its location in the
source HTML.
Negative values are valid.

CSS Properties – Part 2
[ 204 ]
Description
It supports the following values:
• auto: The auto keyword is the default value. The browser calculates the top
position.
• Length value: For the length value, we use one of the following units: px,
em, in, mm, cm, vw, and so on.
• Percentage value: For the percentage value, we use percentages like 50%,
85%, and so on.
CSS:
/*auto*/
.element { top: auto; }
/*Length value*/
.element { top: 20px; }
/*Percentage value*/
.element { top: 15%; }
bottom
The bottom CSS property is closely tied to the position property.
This property species the distance of an element from the bottom of its current
location if the element itself has position: relative; declared or from the bottom
of its nearest ancestor when the ancestor has position: relative; and the element
has position: absolute; declared.
If none of the ancestors have position: relative; declared, the absolute
positioned element will traverse the DOM until it reaches the <body> tag, at which
point it will position itself at the bottom of the page regardless of its location in the
source HTML.
Negative values are valid.
Description
It supports the following values:
• auto: The auto keyword is the default value for the bottom property. The
browser calculates the top position.
• Length value: For the length value, we use one of the following units: px,
em, in, mm, cm, vw, and so on.

Chapter 5
[ 205 ]
• Percentage value: For the percentage value, we use percentages like 50%,
85%, and so on.
CSS:
/*auto*/
.element { bottom: auto; }
/*Length value*/
.element { bottom: 20px; }
/*Percentage value*/
.element { bottom: 15%; }
left
The left CSS property is closely tied to the position property.
This property species the distance of an element from the left of its current
location if the element has position: relative; declared or from the left of its
nearest ancestor when the ancestor has position: relative; and the element has
position: absolute; declared.
If none of the ancestors have position: relative; declared, the absolute
positioned element will traverse the DOM until it reaches the <body> tag, at which
point it will position itself at the left of the page regardless of its location in the
source HTML.
Negative values are valid.
Description
The left property supports the following values:
• auto: The auto keyword is the default value for the left property. The
browser calculates the top position.
• Length value: For the length value, we use one of the following units: px,
em, in, mm, cm, vw, and so on.
• Percentage value: For the percentage value, we use percentages like 50%,
85%, and so on.

CSS Properties – Part 2
[ 206 ]
CSS:
/*auto*/
.element { left: auto; }
/*Length value*/
.element { left: 20px; }
/*Percentage value*/
.element { left: 15%; }
right
The right CSS property is closely tied to the position property.
This property species the distance of an element from the right of its current
location if the element has position: relative; declared or from the right of its
nearest ancestor when the ancestor has position: relative; and the element has
position: absolute; declared.
If none of the ancestors have position: relative; declared, the absolute
positioned element will traverse the DOM until it reaches the <body> tag, at which
point it will position itself at the right of the page regardless of its location in the
source HTML.
Negative values are valid.
Description
It supports the following values:
• auto: The auto keyword is the default value for the right property. The
browser calculates the top position.
• Length value: For the length value, we use one of the following units: px,
em, in, mm, cm, vw, and so on.
• Percentage value: For the percentage value, we use percentages like 50%,
85%, and so on.
CSS:
/*auto*/
.element { right: auto; }
/*Length value*/
.element { right: 20px; }
/*Percentage value*/
.element { right: 15%; }

Chapter 5
[ 207 ]
vertical-align
The vertical-align CSS property controls the vertical positioning of an element in
order to align it to another element(s) next to it.
Description
It accepts the following values:
• baseline: This is the default value. It aligns the elements to the bottom,
exactly at the last line of text regardless of the elements' line height. In other
words, it aligns the last line of text to baselines of the elements.
• bottom: This aligns the elements' containers to the bottom. The text and line
height of the elements are not considered, only the elements' containers to
the bottom.
• Length value: For the length value, we use one of the following units: px,
em, in, mm, cm, vw, and so on. Negative values are valid.
• middle: This aligns the elements to their horizontal center based on their
vertical midpoint.
• Percentage value: For the percentage value, we use percentages like 50%,
85%, and so on. Negative values are valid.
• sub: This aligns the element to the subscript baseline of the parent container.
• super: This aligns the element to the superscript baseline of the parent
container.
• top: This aligns the elements' containers to the top. The text and line height
of the elements are not considered.
• text-bottom: This aligns the elements to the bottom based on the parent's
text baseline. The line height of the elements is not considered, only the
bottom of their containers is considered.
• text-top: This aligns the elements to the top based on the parent's text
baseline. The line height of the elements is not considered, but the top of their
containers is.
Text
Typography is an incredibly powerful design feature and, in reality, styling text with
CSS is actually simple.
Let's see how.

CSS Properties – Part 2
[ 208 ]
color
The color CSS property denes the color of the text and looks like this:
color: red;
Alternatively, it can look like this:
color: #f00;
Description
The color property supports all color modes, HEX, RGB, RGBa, HSL, HSLs, and color
name.
CSS:
/*Color Name*/
.element { color: red; }
/*HEX*/
.element { color: #f00; }
/*RGB*/
.element { color: rgb(255, 0, 0); }
/*RGBa - Color has 50% opacity*/
.element { color: rgba(255, 0, 0, .5); }
/*HSL*/
.element { color: hsl(0, 100%, 50%); }
/*HSLa - Color has 50% opacity*/
.element { color: hsla(0, 100%, 50%, .5); }
text-align
The text-align CSS property denes the alignment of the text, and it looks like this:
text-align: center;
Description
The text can be centered, left-aligned, right-aligned, and fully-justied.
The text-align property only works on inline elements. If this property is applied
to a block-level element, it will not work on the element itself, but it will work on its
content.

Chapter 5
[ 209 ]
CSS:
/*Centered text*/
.element { text-align: center; }
/*Left aligned text*/
.element { text-align: left; }
/*Right aligned text*/
.element { text-align: right; }
/*Fully justified text*/
.element { text-align: justify; }
text-decoration
The text-decoration CSS property denes several formatting features for the text,
and it looks like this:
text-decoration: underline;
Description
The text-decoration property accepts the following keyword values: underline,
overline, line-through, none, and blink.
This property is also the shorthand for the text-decoration-line,
text-decoration-color, and text-decoration-style properties.
It can accept one, two, or three values in the same declaration if used as a shorthand.
CSS:
/*Line above the text*/
.element { text-decoration: overline; }
/*Line under the text*/
.element { text-decoration: underline; }
/*Line across the text*/
.element { text-decoration: line-through; }
/*No underline*/
.element { text-decoration: none; }
/*Blinking text*/
.element { text-decoration: blink; }
/*Shorthand*/
/*Two values*/
.element { text-decoration: underline wavy; }
/*Three values*/
.element { text-decoration: overline dashed yellow; }

CSS Properties – Part 2
[ 210 ]
text-decoration-line
The text-decoration-line CSS property denes the type of decoration line that a
text can have, and it looks like this:
text-decoration-line: overline;
Description
The text-decoration-line property accepts one, two, or three values in a single
declaration. The keyword values are the same as in the text-decoration property:
underline, overline, line-through, none, and blink.
CSS:
/*One value*/
.element { text-decoration-line: overline; }
/*Two values*/
.element { text-decoration-line: overline underline; }
/*Three values*/
.element { text-decoration-line: overline underline blink; }
text-decoration-color
The text-decoration-color CSS property denes the type of color the
text-decoration property can have, and it looks like this:
text-decoration-color: red;
Description
It supports all color modes: HEX, RGB, RGBa, HSL, HSLs, and color name.
CSS:
/*Color Name*/
.element { text-decoration-color: red; }
/*HEX*/
.element { text-decoration-color: #f00; }
/*RGB*/
.element { text-decoration-color: rgb(255, 0, 0); }
/*RGBa - Color has 50% opacity*/
.element { text-decoration-color: rgba(255, 0, 0, .5); }
/*HSL*/
.element { text-decoration-color: hsl(0, 100%, 50%); }
/*HSLa - Color has 50% opacity*/
.element { text-decoration-color: hsla(0, 100%, 50%, .5); }

Chapter 5
[ 211 ]
text-decoration-style
The text-decoration-style CSS property denes the type of line the
text-decoration property can have, and it looks like this:
text-decoration-style: dotted;
Description
The text-decoration-style property supports the following keyword values:
dashed, dotted, double, solid, and wavy.
CSS:
.element {
text-decoration-style: wavy;
}
text-indent
The text-indent CSS property denes the space to the left (indentation) of the rst
line of text in an element, and it looks like this:
text-indent: red;
Description
It accepts length and percentage values. Negative values are valid.
CSS:
.element {
text-indent: 50px;
}
text-overow
The text-overflow CSS property denes how text that is bleeding outside of a
container should be clipped, and it looks like this:
text-overflow: ellipsis;

CSS Properties – Part 2
[ 212 ]
Description
For this property to work, two other properties should have to be declared:
overflow: hidden; and white-space: nowrap;.
There are two keyword values: clip and ellipsis.
clip
This cuts the text exactly at the edge of its parent container. This may cause the last
character to be clipped at any point showing only a portion of it.
ellipsis
This adds an ellipsis character "…" at the end of the line of text.
CSS:
.element {
white-space: nowrap;
overflow: hidden;
text-overflow: ellipsis;
}
text-rendering
The text-rendering CSS property allows us to dene the quality of the text over
speed/performance and it looks like this:
text-rendering: optimizeLegibility;
Description
Depending on the font, when this property is applied, we can see benets like better
kerning and better ligatures.
However, since this CSS property is actually an SVG property and is not part of any
CSS standard, browsers and operating systems apply this property at their own
discretion, which in turn may not yield the desired improvements from one browser
and/or platform to another.
In addition to this, some small screen devices have serious performance issues when
they encounter the text-rendering CSS property, especially older iOS and Android
devices.
Chapter 5
[ 213 ]
Use the text-rendering CSS property with extreme caution and make
sure you run all pertinent tests.
This property supports four values: auto, optimizeSpeed, optimizeLegibility,
and geometricPrecision.
auto
This is the default value. The browser tries to make the best educated guess as to
how to render the text in order to optimize for speed, legibility, and geometric
precision.
Remember, each browser interprets this property differently.
optimizeSpeed
The browser favors rendering speed over legibility and geometric detail. It disables
kerning and ligatures.
optimizeLegibility
The browser favors legibility over rendering speed and geometric detail. It enables
kerning and some optional ligatures. Keep in mind that if the browser tries to use
any kerning and ligatures, this information needs to be contained in the font le,
otherwise we won't see the effects of such features.
geometricPrecision
The browser favors geometric detail over legibility and rendering speed. This
property helps when scaling fonts.
For example, the kerning in some fonts does not scale correctly, so when we apply
this value, the browser is capable of keeping the text looking nice.
CSS:
.element {
text-rendering: geometricPrecision;
}

CSS Properties – Part 2
[ 214 ]
text-shadow
The text-shadow CSS property applies a drop shadow to the text, and it looks like
this:
text-shadow: 5px -2vw .2cm black;
Description
This property can accept two, three, or four values in the same declaration. The rst
length value in the declaration will always be for the x-offset value and the second
length value for the y-offset value.
These are the four values it supports: x-offset, y-offset, color, and blur.
• x-offset: This sets the horizontal distance of the shadow from the text. It's
declared as a length value (px, em, in, mm, cm, vw, and so on). Negative values
are valid. This value is mandatory.
• y-offset: This sets the vertical distance of the shadow from the text. It's
declared as a length value (px, em, in, mm, cm, vw, and so on). Negative values
are valid. This value is mandatory.
• color: This is the color of the text shadow. It supports all color modes:
HEX, RGB, RGBa, HSL, HSLs, and color name. This value is optional. If it is not
specified, the default color will be the same color as the text itself.
• blur: This is the smudge effect. It's declared as a length value (px, em, in,
mm, cm, vw, and so on). It supports all color modes: HEX, RGB, RGBa, HSL, HSLs,
and color name. This value is optional. If it is not specified, the default value is
zero (0).
CSS:
/*2 values: x-offset and y-offset*/
.element { text-shadow: 5px 10px; }
/*3 values: x-offset, y-offset and blur. Color value defaults to
the font color*/
.element { text-shadow: 5px 2vw 5px; }
/*4 values: x-offset, y-offset, blur and color name*/
.element { text-shadow: 5px -2vw .2cm black; }
text-transform
The text-transform CSS property controls the capitalization of text, and it looks
like this:
text-transform: capitalize;

Chapter 5
[ 215 ]
Description
The text-transform property supports the following four keyword values: none,
capitalize, uppercase, and lowercase.
• none: This is the default value. No capitalization should be applied to the
element.
• capitalize: This capitalizes the first letter of each word. This property is
smart enough to ignore any special characters or symbols at the beginning of
the line and capitalize the first letter of the first word.
• uppercase: This changes all the text to upper case/capitals. This property
can also ignore special characters or symbols at the beginning of the line.
• lowercase: This makes all the text lowercase. This property can also ignore
special characters or symbols at the beginning of the line.
text-underline-position
The text-underline-position CSS property denes the location of the underline
on elements that have the text-decoration property declared, and it looks like this:
text-underline-position: left;
Description
The text-underline-position property supports four keyword values: auto,
left, right, and under.
auto
This is the default value. This property allows the browser to decide where to place
the underline, whether at the base line of the text or below it.
left
This is only for vertical writing modes. It places the underline to the left of the text.
right
This is only for vertical writing modes. It places the underline to the right of the text.

CSS Properties – Part 2
[ 216 ]
under
This value places the underline below the base line of the text, so it won't cross any
descender (it supports values like q, p, y, and so on). This is helpful in text that has
mathematical and chemical formulas that use a lot of subscripts, so the underline
doesn't interfere with certain characters and make such formulas confusing or
difcult to read.
CSS:
.element {
text-underline-position: left;
}
direction
The direction CSS property sets the direction of the text. Left to right for western
languages and other similar languages and right to left for languages like Arabic or
Hebrew. It looks like this:
direction: rtl;
Description
The text direction is typically dened in the HTML via the dir attribute rather than
via CSS.
The direction CSS property is not inherited by table cells. So, in addition to this,
it's recommended to set the direction of the text via the dir attribute in the HTML
document to maintain complete cascading support if the CSS les do not load.
This property accepts two keyword values, ltr and rtl, which mean left to right and
right to left.
CSS:
.element {
direction: rtl;
}

Chapter 5
[ 217 ]
Tables
Tables, tables, tables! Together with images, HTML tables are the black sheep of web
design.
Regardless of being the black sheep, the power of tables is amazing. And if there's an
HTML element that does its job well, very well, it's tables.
Let's dig in.
table-layout
The table-layout CSS property allows us to dene the how HTML tables are laid
out on the document, and it looks like this:
table-layout: fixed;
Description
There are two keyword values: auto and fixed.
• auto: This is the default value. Tables are automatically laid out by the
browser this way without declaring anything in the CSS. The table cells
adapt to the content inside of them; the behavior of table can sometimes be
unpredictable.
• fixed: By declaring the width of the table cells from the first row, the
rendering of the entire table can be actually faster; anything we do to
improve performance is big win for everyone.
Since the table cells have a xed width, depending on the data in the cells, some
information can overow the cells. Using a combination of the overflow properties
and text-overflow: ellipsis; we can x the issue.
CSS:
table {
table-layout: fixed;
}

CSS Properties – Part 2
[ 218 ]
border-collapse
The border-collapse CSS property tells the table cells to stay separated or get close
together (collapse), and it looks like this:
border-collapse: collapse;
Description
This property supports two keyword values: separate and collapse.
• separate: This is the default value. There is a space between the table cells,
and each cell has its own border.
• collapse: This value brings the cells together, thus the space is lost and the
cells share borders.
CSS:
table {
border-collapse: collapse;
}
border-spacing
The border-spacing CSS property creates a space between the table cells, and it
looks like this:
border-spacing: 10px;
Description
The border-spacing property only works when the border-collapse: separate;
declaration is present.
CSS:
table {
border-collapse: separate;
border-spacing: 10px;
}

Chapter 5
[ 219 ]
empty-cells
The empty-cells CSS property allows us to dene how browsers should render
borders and backgrounds on cells that have no content in them, and it looks like this:
empty-cells: hide;
Description
The empty-cells property supports two keyword values: show and hide, which
determine whether the borders and background should, or should not, be rendered.
CSS:
table {
empty-cells: hide;
}
caption-side
The caption-side CSS property denes the location of the table caption, and it
looks like this:
caption-side: bottom;
Description
It supports two keyword values: top and bottom.
In CSS 2, other keyword values, such as left and right, were supported, but they
were dropped in CSS 2.1.
CSS:
caption {
caption-side: bottom;
}
CSS Properties – Part 2
[ 220 ]
Words and paragraphs
Continuing with typography features, we now enter the word and paragraph
properties.
Let's get going.
hyphens
The hyphens CSS property tells the browser how to handle hyphenation when text
lines wrap, and it looks like this:
hyphens: auto;
Description
We can control when to hyphenate and whether to allow it or let it happen under
certain conditions.
Hyphenation is language dependent. The language in a document is dened by the
lang attribute; browsers will hyphenate if they support the language and a proper
hyphenation dictionary is available. Each browser supports hyphenation differently.
Ensure that the lang attribute is declared either globally on the <html>
tag or on the specic element whose content should be hyphenated.
This property supports three keyword values: none, manual, and auto.
• none: Text lines are not broken at line breaks even if there are characters
suggesting where a line break should be introduced. Lines will only break on
whitespace.
• manual: Text lines are broken at line breaks where there are characters that
suggest a line break.
• auto: The browser makes the decision to introduce line breaks as it seem
necessary. It bases its decisions on either the presence of hyphenation
characters or by language-specific information.

Chapter 5
[ 221 ]
Unicode characters to suggest line break opportunities
There are two Unicode characters that we can use to manually set a potential line
break in the text:
U+2010 (HYPHEN)
This character is called a hard hyphen. It's an actual hyphen "-" and it's visible in the
text. The browser may or may not break the line on that specic character.
U+00AD (SHY)
This character is called a soft hyphen. Although it is present in the markup, it is not
rendered in the text. However, the browser sees this character and, if it can use it to
create a line break, it will. To insert a soft hyphen, we use ­.
CSS:
.element {
hyphens: auto;
}
word-break
The word-break CSS property is used to specify whether line breaks should happen
within words instead of breaking the lines on a hyphen or a space between words,
and it looks like this:
word-break: break-all;
Description
The word-break property is very helpful in situations where a long string, such as a
URL, is wider than its parent container, thus disrupting the layout or bleeding off the
side. Applying the word-break property makes the URL break somewhere along the
string.
This property supports three keyword values: normal, break-all, and keep-all.
normal
This is the default value. Line breaks will happen based on default line breaking
rules.

CSS Properties – Part 2
[ 222 ]
break-all
This allows line breaks to happen anywhere, including between two letters.
keep-all
This affects CJK (Chinese, Japanese, and Korean) text only. Here, text words are not
broken.
CSS:
.element {
word-break: break-all;
}
word-spacing
The word-spacing CSS property controls the space between words, and it looks like
this:
word-spacing: .2em;
Description
It supports the following values: a normal value, a length value and a percentage
value.
normal
This is the default value. It's dened by the current font or the browser itself, and it
resets to the default spacing.
Length value
We use one of the following units when we use a length value: px, em, in, mm, cm, vw,
and so on
Percentage value
For a percentage value, we use percentages like 50%, 85%, and so on.
CSS:
.element {
word-spacing: .2em;
}

Chapter 5
[ 223 ]
word-wrap
The word-wrap CSS property allows long words to break at an arbitrary point if
there are no suggested break points in the long word in question, and it looks like
this:
empty-cells: hide;
Description
This property supports two keyword values: normal and break-word.
• normal: It makes long words break at normal break points
• break-word: It indicates that otherwise unbreakable words can now break at
an arbitrary point
CSS:
.element {
word-wrap: break-word;
}
line-height
The line-height CSS property denes the distance between lines of text. In
typography, the line height is called leading.
Description
It supports the following values: a normal value, a number value, a length value,
and a percentage value.
• normal: This is the default value. The line height is defined by the browser.
• Number value: This is a number without any unit. This is the recommended
method. The reason a unitless value is recommended is because this value
can cascade into child elements. Child elements can then scale their line
height based on their font size.
• Length value: We use one of the following units when we use the length
value: px, em, in, mm, cm, vw, and so on. We can use decimals as well.
• Percentage value: For the percentage value, we use percentages like 50%,
85%, and so on.

CSS Properties – Part 2
[ 224 ]
CSS:
.element {
line-height: 1.6;
}
orphans
Let's understand the term orphans rst. Orphans are the lines of a paragraph left in
the previous page when a block of text is split over two pages. In the Web world, this
is seen in text that spans several columns, where the rst line of a paragraph is left on
the previous column.
From an editorial standpoint, this is very bad. The recommended treatment of
orphans is to leave at least three lines on the previous page or column. The more
lines, the better.
The orphans CSS property controls the number of lines left on the previous page,
and it looks like this:
orphans: 3;
Description
This property is very useful in print stylesheets, but it can also work when using CSS
columns.
It supports a numeric value without a unit. This numeric value denes the number
of lines left on the previous page or column.
CSS:
/*Print stylesheet*/
@media print {
.element {
orphans: 3;
}
}
/*Screen stylesheet*/
.element {
orphans: 4;
}

Chapter 5
[ 225 ]
quotes
The quotes CSS property controls the types of quotation marks to use, and it looks
like this:
quotes: """ """ "'" "'";
Description
Quotation marks are added via the :before and :after pseudo-elements.
The simplest way to add quotation marks is to let the browser do it using
the content property and the open-quote and close-quote values:
content: open-quote; and content: close-quote;.
We can also declare the types of quotes we want to use and not let the browser
decide. We'll see this in the following CSS example.
Quotes always start and end with a double-character symbol, either " " or, for
example, « » in French. But, if there's a nested quote, this nested quote uses a single-
character symbol, either ' ' or, for example, ‹ › in French.
This property supports two values: none and a [string string] value.
none
No quotation marks are generated when using the content property.
[string string +] value
Each string represents a pair of quotes. The rst string represents the outer level
quotation marks and the second string represents the nested level quotation marks.
The + sign means that we can add deeper levels of nested quotation marks, but it's
not really necessary, two levels should work for most cases.
Taking into account these considerations, we can then create the following quotation
marks with the quotes property:
CSS:/*Quotation marks inserted by the browser " " and ' '*/
p:before { content: open-quote; }
p:after { content: close-quote; }
/*Custom declared quotation marks*/
p { quotes: """ """ "'" "'"; }
/*French quotation marks*/
p { quotes: "«" "»" "‹" "›"; }

CSS Properties – Part 2
[ 226 ]
widows
Let's clarify the term widows rst. Widows are the lines of a paragraph that appear
on the next page when a block of text is split over two pages. In the Web world, this
is seen in text that spans several columns, where the last line of a paragraph appears
on the next column.
From an editorial standpoint, this is very bad. The recommended treatment of
widows is to leave at least three lines on the next page or column. The more lines,
the better.
The widows CSS property controls the number of lines that will appear on the next
page, and it looks like this:
widows: 3;
Description
The widows property is very useful in print stylesheets, but it can also work when
using CSS columns.
It supports a numeric value without a unit. This numeric value denes the amount of
lines that will appear on the next page or column.
CSS:
/*Print stylesheet*/
@media print {
.element {
widows: 3;
}
}
/*Screen stylesheet*/
.element {
widows: 4;
}
writing-mode
The writing-mode CSS property denes the direction in which lines of text or even
block-level elements are laid out, either vertically or horizontally, and it looks like
this:
writing-mode: vertical-rl;

Chapter 5
[ 227 ]
Description
This property supports three keyword values: horizontal-tb, vertical-rl, and
vertical-lr.
horizontal-tb
This means horizontal, from top to bottom. The content ows from left to right, top to
bottom.
vertical-rl
This means vertical, from right to left. The content is turned 90 degrees and ows
vertically.
To understand this better, think of this: tilt your head to the right shoulder, at this
point, you will be able to read the text ow from top (which was to the right before
tilting your head) to bottom (which was to the left before tilting your head).
vertical-lr
This means vertical, from left to right. The content is turned 90 degrees and ows
vertically.
However, unlike vertical-rl, when you tilt your head over your right shoulder,
the content ows from bottom (which was to the left before tilting your head) to top
(which was to the right before tilting your head), and the text lines are inverted.
CSS:
.element {
writing-mode: vertical-rl;
}
letter-spacing
The letter-spacing CSS property denes the space between the characters in a line
of text, and it looks like this:
letter-spacing: 5px;
Description
The letter-spacing property supports the keyword values: normal and length.
Negative values are valid.

CSS Properties – Part 2
[ 228 ]
Unless you understand the legibility and design implications, the default
letter spacing in most fonts is ideal and should rarely be changed.
CSS:
.element {
letter-spacing: 5px;
}
white-space
The white-space CSS property denes how the whitespace inside an element is
going to be treated, and it looks like this:
white-space: pre-wrap;
Description
This property supports ve keyword values: normal, nowrap, pre, pre-wrap, and
pre-line.
normal
This is the default value. If we have two or more spaces together, they will collapse
into a single space. This is the normal behavior of HTML documents. It will wrap the
text where necessary.
nowrap
Multiple spaces will collapse into a single space, and the line will never wrap except
if there's a <br> tag in the markup.
pre
It's the same as the HTML element <pre>, which means preformatted. This value
will honor all spaces in the text, but will not wrap it unless there's a <br> tag in the
markup, just like nowrap does. This value is great to display short chunks of code.
pre-wrap
This value honors all the spaces and will wrap the text where necessary. This value is
great to display long chunks of code.

Chapter 5
[ 229 ]
pre-line
This value collapses multiple spaces into a single space and will wrap the text where
necessary.
tab-size
The tab-size CSS property allows us to dene the number of spaces the tab
character can have.
As we saw in the prior white-space property description, multiple spaces are
collapsed into a single space by default. Therefore, this property will only work on
elements that are inside a <pre> tag or, have one of the white-space properties that
honor multiple spaces, pre and pre-wrap.
This property is great for displaying code.
The default number of spaces the tab character has is 8. But we, web designers
and developers, are picky and like either four spaces or sometimes two. With the
tab-size property, we can modify that default value to anything we want.
Description
The tab-size property supports two values: A numeric value and a length value.
• Numeric value: It's just a number without a unit. Negative values are not
valid.
• Length value: We use one of the following units when we use the length
value: px, em, in, mm, cm, vw, and so on.
CSS:
pre {
white-space: pre-wrap;
tab-size: 4;
}
Paging
Although we build sites and applications for the Web, sometimes what we make is
also printed.
The following properties will help us make our content more presentable and better
handled across pages when printed.
Let's check out these paging properties.

CSS Properties – Part 2
[ 230 ]
page-break-after
The page-break-after CSS property denes where the page breaks after a specic
element, and it looks like this:
page-break-after: always;
Description
What this means is that when a new page break is created, a new page will be
printed.
It works only on block-level elements. Also, since this property is used for printing,
it's common to see it inside an @print media query.
This property supports ve keyword values: always, auto, avoid, left, and right.
• always: This value will force a page break after the element.
• auto: This is the default value. It creates automatic page breaks.
• avoid: This will not allow any page breaks after the element, if possible.
• left: This will force one or two page breaks after the element in order to
make the following page a left-side page.
• right: This will force one or two page breaks after the element in order to
make the following page a right-side page.
CSS:
@media print {
.element {
page-break-after: always;
}
}
page-break-before
The page-break-before CSS property works similar to the page-break-after CSS
property. However, it denes where the page breaks before a specic element, and it
looks like this:
page-break-before: always;

Chapter 5
[ 231 ]
Description
When a new page break is created, a new page will be printed.
It works only on block-level elements. Also, since this property is used for printing,
it's common to see it inside an @print media query.
This property supports the same ve keyword values as the page-break-before
property: always, auto, avoid, left, and right.
Refer to the page-break-before CSS property section for the description of each
keyword value.
CSS:
@media print {
.element {
page-break-before: always;
}
}
page-break-inside
The page-break-inside CSS property also works similar to the
page-break-before and page-break-after properties. However, it denes
where the page breaks inside a specic element, and it looks like this:
page-break-inside: avoid;
Description
What this means is that when a new page break is created, a new page will be
printed.
This property supports only two keyword values, though: auto and avoid.
• auto: This is the default value. It creates automatic page breaks.
• avoid: This will not allow any page breaks inside the element, if possible.
CSS:
@media print {
.element {wdwqd
page-break-before: avoid;
}
}

[ 233 ]
CSS Properties – Part 3
Now that we're done with Part 2 of the CSS properties, let's end strongly with Part 3.
Let's do this.
Page box
The page box is a square/rectangular area built out of two parts: the page area and
the margin area.
The page area is where the content sits and all elements are laid out. The margin area
sits around the page area and is transparent. If we add a background color to the
page area, it will cover the page area and the margin area.
The size of the page box cannot be modied. But if we plan to modify some of the
page box properties, we need to include them in an @page rule.
Let's check it out.
bleed
The bleed CSS property is also called the CSS at-rule descriptor. It denes how much
a page should "overow" or bleed outside the page box. This property only works if
marks have been enabled using the marks property, which we'll see next.

CSS Properties – Part 3
[ 234 ]
Description
The bleed property only supports a length value: px, em, in, mm, cm, vw, and so on.
CSS:
@page {
bleed: 5mm;
}
marks
The marks CSS property, also called a CSS at-rule descriptor, denes the types of mark
that should be rendered and printed outside the page box.
Since the marks are printed outside the page box, the pages need to be a bit larger in
order to have the space to print the marks.
Description
The marks property supports three keyword values: crop, cross, and none.
• crop: Crop marks define where the page should be cut
• cross: Cross marks are used to align the pages
• none: Marks will not be displayed
CSS:
@page {
marks: crop cross;
}
List
CSS lists are one of the most versatile elements of web design. Aside from being
used for making, well, lists, they are also used for navigation, layouts, slideshows,
carousels, and so on.
Let's see some of their properties.

Chapter 6
[ 235 ]
list-style
The list-style CSS property is shorthand for the list-style-type, list-style-
image, and list-style-position properties. These properties are actually the
values that the list-style CSS property supports. We'll see all these properties
next.
Description
The list-style property supports one, two, or three values, in any order. If a value
isn't declared, it will use its default value.
CSS:
/*Default values*/
ul { list-style: disc outside none; }
/*One value, the other two are default*/
ul { list-style: circle; }
/*Two values, the other one is defaults*/
ul { list-style: lower-roman inside; }
/*Three values*/
ul { list-style: decimal outside url(../images/list-bullet.png); }
list-style-type
The list-style-type CSS property denes the type of graphic or marker (also
called bullet) the list will use. The color of the marker is determined by the color of
the text of the element it's applied to.
Description
The list-style-type property supports many values, but we'll list 15 of the most
commonly used ones: armenian, circle, decimal, decimal-leading-zero, disc,
georgian, lower-alpha, lower-greek, lower-latin, lower-roman, none, square,
upper-alpha, upper-latin, and upper-roman.
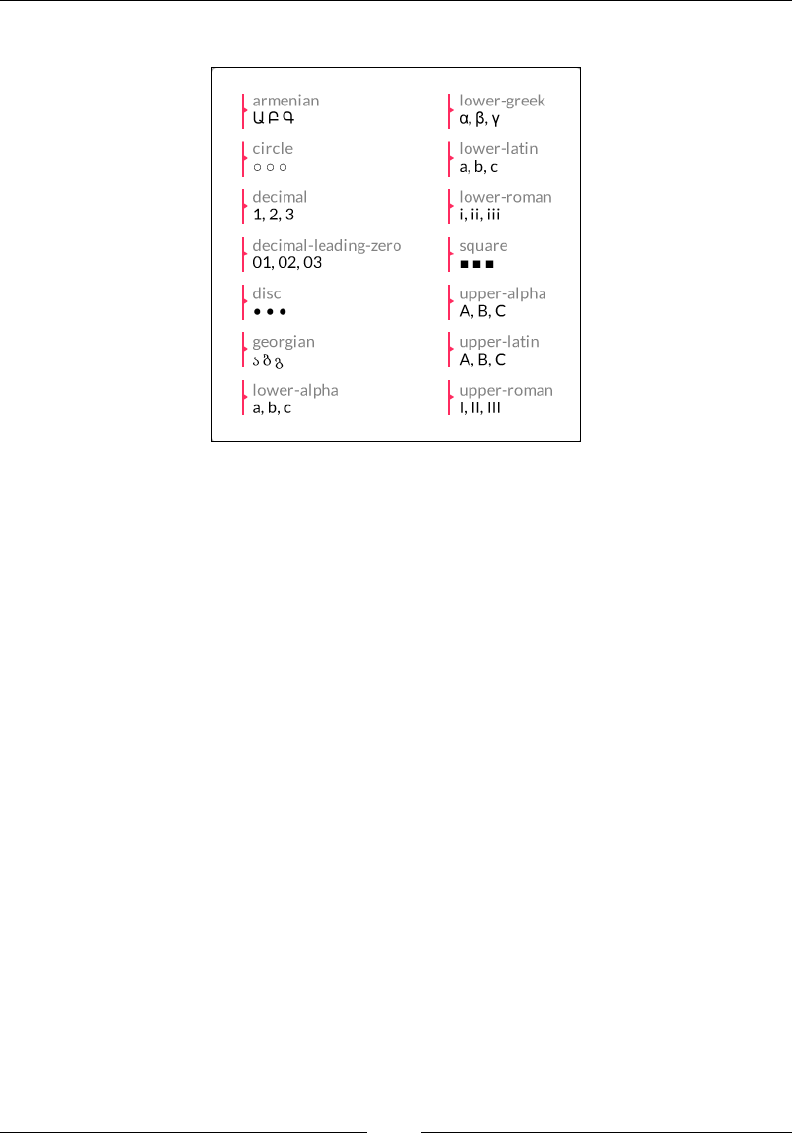
CSS Properties – Part 3
[ 236 ]
Here's a screenshot with all values except the none value:
CSS:
/*Style: 01, 02, 03...*/
ul { list-style-type: decimal-leading-zero; }
/*Style: α, β, γ...*/
ul { list-style-type: lower-greek; }
/*Style: A, B, C...*/
ul { list-style-type: upper-latin; }
list-style-position
The list-style-position CSS property denes the location of the marker.
Description
The list-style-position property supports two keyword values: inside and
outside.
inside
When the inside value is applied, the marker will appear inside the text. If there's
a line that wraps, the marker will be ushed to the left and not "sticking out" like in
traditional lists.

Chapter 6
[ 237 ]
outside
The default value is outside. When this value is applied (or not, since it's the
default), the marker will appear outside the text. If there's a line that wraps, the
marker will be outside the text block. It will "stick out" just like in traditional lists.
CSS:
ul {
list-style-position: inside;
}
list-style-image
The list-style-image CSS property allows us to replace the default markers with a
custom image.
Description
The list-style-image property supports one keyword value and one function:
none and url().
• none: No image is used to replace the marker
• url(): It's used to define the path to the image that will replace the marker
CSS:
ul {
list-style-image: url(../images/list-bullet.png);
}
Here's a demo in CodePen with all HTML lists: http://tiny.cc/html-lists
Counter
Traditional lists via the <ul>, <ol>, <dl> tags aren't too versatile when it comes to
styling the markers. Sometimes, we have to rely on extra markup to accomplish
some minimal custom styling.
CSS counters, on the other hand, take styling lists (or any element for that matter) to
a whole new level of customization and styling.
Granted, CSS counters rely not only on the properties we're going to see next, but
also on the content property and the :before pseudo-element.
Let's check out the properties that make CSS counters so great.

CSS Properties – Part 3
[ 238 ]
counter-reset
The counter-reset CSS property resets the counter by giving it a name, and it looks
like this:
counter-reset: basic-counter;
Description
The counter-reset property serves two purposes: resets the counter and denes
a name for the counter. The name is later used by the counter-increment and
counter()/counters() functions that we'll see later.
I have to admit that the term "counter-reset" isn't as intuitive as it should be if it's
used to set a name for the counter. Something like "counter-name" would be more
suitable if you ask me.
This property supports two values: a name and a number.
We can reference multiple counter resets in the same declaration.
name
We need to give the reset counter a name. This value is required. It can be any name
but it needs to adhere to the following conditions:
• It can start with a letter, an underscore "_", or a hyphen "-"
• It can start with a hyphen "-" character but cannot have two consecutive
hyphens at the beginning of the name
• The name cannot be just a hyphen"-"; at least one more character is required,
but it can't be a number since it would be interpreted as "minus 1" (-1)
• It cannot start with a number or a special character like #, $, !, and so on
number
It's the number that the counter is reset to. The default value is 0 (zero) if no value is
declared.
This value is optional unless we want to start the list from a number different than
1. Pay close attention to this value, because the rst number in the list is not the
number declared in this value.
If we set the value to 1, the list starts at 2. If we leave the value empty, it defaults to 0
(zero) and the list starts at 1. Negative values are valid.

Chapter 6
[ 239 ]
CSS:
/*Define a name and counter reset to 0*/
ul { counter-reset: basic-counter; }
/*The counter will start at 3*/
ul { counter-reset: basic-counter 2; }
/*Multiple counters in a single declaration*/
ul { counter-reset: basic-counter-A, basic-counter-B 2; }
counter-increment
The counter-increment CSS property increments the value of one or more
counters, and it looks like this:
counter-increment: basic-counter 2;
Description
This property is used with the counter-reset CSS property. This is because the
name specied in the counter-reset property is used in the counter-increment
CSS property.
As a refresher, remember that the counter name will also be used by the counter()/
counters() function.
We can declare multiple counter increments in the same declaration. Multiple
counters are separated by a space. This property supports two values: A name and a
number.
name
It can be any name but it needs to adhere to the following conditions:
• It can start with a letter, an underscore "_", or a hyphen "-"
• It can start with a hyphen "-" character but not have two consecutive
hyphens at the beginning of the name
• The name cannot be just the hyphen"-"; at least one more character is
required, but it can't be a number since it would be interpreted as "minus 1"
(-1).
• It cannot start with a number or a special character like #, $, !, and so on.

CSS Properties – Part 3
[ 240 ]
number
This is the number that the counter is reset to. The default value is 0 (zero) if no value
is declared. This value is optional unless we want to start the list from a number
different than 1.
Now, the number value denes the amount of increments each counter will have. For
example, if we declare 2, then the counter will be 2, 4, 6, and so on. If we declare 3,
then the counter will be 3, 6, 9, and so on.
If we do not declare a value, the default increment will be by 1, as in 1, 2, 3, and so on.
Negative values are valid. If we declare -2, then the counter will be -2, -4, -6, and so
on.
CSS:
/*First, define a name and counter reset to 0 with counter-reset*/
ul { counter-reset: basic-counter; }
/*Then, invoque the counter name and increment every element by 2 (2,
4, 6, and so on.)*/
ul li { counter-increment: basic-counter 2; }
/*Multiple counters*/
ul li { counter-increment: basic-counter 2 roman-numeral-counter;
}
Here is a demo in CodePen: http://tiny.cc/css-counters
Drop shadows
There are three ways to create the effect of depth: using lights, shadows, or both.
Let's see how we create box shadows for our containers.
box-shadow
The box-shadow CSS property creates one or several shadows on an element, and it
looks like this:
box-shadow: 10px 10px 13px 5px rgba(0, 0, 0, .5) inset;

Chapter 6
[ 241 ]
Description
The box-shadow property supports three, four, ve, or six values in the same
declaration: four length values, one color value, and the keyword inset.
Length values
We use one of the following units when we use the length values: px, em, in, mm, cm,
vw, and so on.
The four length values are as follows:
• The first value is for the horizontal offset of the shadow. Negative values are
valid. This value is required.
• The second value is for the vertical offset of the shadow. Negative values are
valid. This value is required.
• The third value is for the blur radius of the shadow. The larger the value,
the more spread the shadow becomes, but also more translucent. Negative
values are not valid. This value is required.
• The fourth value is for the size of the shadow (or "spread radius"). Negative
values are valid. This value is optional.
Color value
This is the fth value in the list. It supports all color modes: HEX, RGB, RGBa, HSL,
HSLs, and color name.
This value is optional. If no color is specied, it's up to the browser to decide which
color to use. Some browsers may not even display a shadow at all without a color
value.
The color value can go either at the beginning or at the end of the declaration but
never between the length values; otherwise, the box-shadow property won't work.
inset
The sixth value in the list is inset. It creates the shadow inside the container, like a
background. However, if there is actually a background color or image, the inset
shadow will sit on top of it but under the content without affecting the layout of the
child elements of the container.

CSS Properties – Part 3
[ 242 ]
This value is optional. If this value is not declared, the shadow defaults to displaying
the shadow outside the element.
This value can go either at the beginning or at the end of the declaration but never
between the length values; otherwise, the box-shadow property won't work.
CSS:
/*Left 10px, top 10px, blur 13px, spread 5px, RGBa mode, inside
the element*/
.element {
box-shadow: 10px 10px 13px 5px rgba(0, 0, 0, .5) inset;
}
Display and visibility
Display properties are some of the most widely used CSS features in web design and
development.
Let's check them out.
all
The all CSS property resets an element's properties to its default values, and it looks
like this:
all: initial;
Description
The only properties that are not reset are the direction and unicode-bidi
properties, which control text direction. This is important because text direction
is required to understand the content. If these properties were reset by the all
property, then text would run the opposite way it's supposed to, disrupting the
message completely.

Chapter 6
[ 243 ]
This property supports three keyword values: initial, inherit, and unset.
• initial: This changes all the properties of the element or the element's
parent to their initial values.
• inherit: This changes all the properties of the element or the element's
parent to their parent values.
• unset: This changes all the properties of the element or the element's parent
to their parent values if those properties are inheritable, otherwise it will
change them to their initial value.
CSS:
/*Change an element's properties to their initial value*/
.element { all: initial; }
/*Inherit all the initial properties of the parent container*/
.element { all: inherit; }
/*Change the parent's properties to its parent values if
inheritable*/
.parent-container { all: unset; }
clear
The clear CSS property species which side of an element, or both, should not oat,
and it looks like this:
clear: both;
Description
When the clear property is used, it clears the specic box in question, not its child
elements. If we wanted to clear its child elements, we'd have to declare the clear
property on them.
When dealing with oat-based grids, this property is crucial to the layout. That is
because oated elements are taken out of the document ow. Thus, their parent
container will not take them into account and its height isn't determined by those
oated elements anymore.
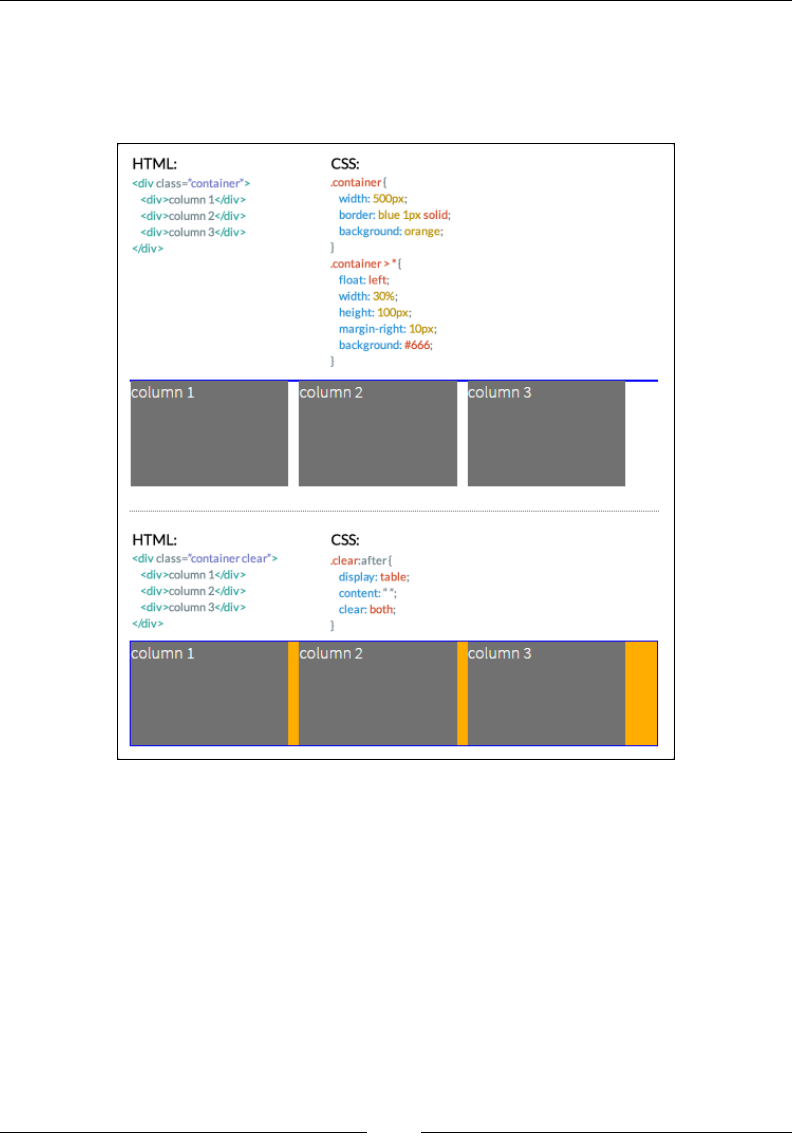
CSS Properties – Part 3
[ 244 ]
So, adding a clearing declaration (with the display and content properties) to the
parent's :after pseudo element "tells" the parent element to consider the oated
elements and thus the parent container's height is now determined by the tallest
oating child element. Let's take a look at the following image:
Here is a demo in CodePen: http://tiny.cc/clearing-floats
The clear CSS property supports four values: left, right, both, and none.
• left: It means that floated elements to the left are not allowed.
• right: It means that floated elements to the right are not allowed.
• both: It means that floated elements, both left and right, are not allowed.
• none: This is the default value. No clearing is performed and floating
elements to both sides are allowed.

Chapter 6
[ 245 ]
CSS:
/*Float an element to the left*/
.element-a { float: left; }
/*Float an element to the right*/
.element-b { float: right; }
/*Clear the floats on the parent container*/
.parent-container:after {
content: '';
display: table;
clear: both;
}
display
The display CSS property denes how an element (box) should be or should not be
displayed on a page. It looks like this:
display: block;
Description
This property accepts about 25 keyword values; some of them are very obscure and
rarely used. Let's focus on the 15 most relevant ones:
• block
• flex
• grid
• inline
• inline-block
• inline-flex
• none
• table
• table-cell
• table-column
• table-column-group
• table-footer-group
• table-header-group
• table-row
• table-row-group

CSS Properties – Part 3
[ 246 ]
• block: Makes an element be displayed as a block-level element, like a <div>
tag or an <h1> element.
• flex: Makes an element be displayed as a block-level element and lays out
its content based on the Flexbox model.
• grid: Makes an element be displayed as a block-level element and lays out
its content based on the Grid model.
• inline: Makes an element be displayed as an inline-level element, like a link
<a> element.
• inline-block: Makes an element be displayed as an inline-block element,
like a list <li> element.
• inline-flex: Makes an element be displayed as an inline element and lays
out its content based on the Flexbox model.
• none: Hides the element from rendering in the browser. The element still
exists in the markup though. When this value is applied to an element, the
browser does not render the element and all its children.
Table-related values
In the following list, all the table-related values are mapped to an HTML element.
So when any of those values are applied to an element, they make that element
behave as a table-related element. Let's take a look at the attributes:
• table = <table>
• table-cell = <td>
• table-column = <col>
• table-column-group = <colgroup>
• table-footer-group = <tfoot>
• table-header-group = <thead>
• table-row = <tr>
• table-row-group = <tbody>
Visit MDN for a list of all the display values: http://tiny.cc/mdn-display

Chapter 6
[ 247 ]
CSS:
/*Make an element display like a block level element*/
.element { display: block; }
/*Make an element display like a <table> element*/
.element { display: table; }
/*Make an element display like an inline-block element - <li>*/
.element { display: inline-block; }
/*Hide an element an its children*/
.element { display: none; }
opacity
The opacity CSS property denes the transparency (opacity) of an element, and it
looks like this:
opacity: .55;
Description
When the opacity property is applied to an element, the element itself and its
children are affected.
This property supports a numeric value ranging from 0.0 (zero) to 1.0, which is the
default value. A value of 0 is completely transparent, as in 0 percent opaque, and 1 is
100 percent opaque, no transparency whatsoever. Decimal numbers are allowed.
This property behaves the same as the alpha channel value used in the RGBa and
HSLa color modes.
CSS:
/*Make an element 55% opaque. This affects its children as well*/
.element { opacity: .55; }
/*Makes shadow 20% opaque. Same effect as in RGBa and HSLa color
modes.*/
.element { box-shadow: 0 0 5px rgba(0, 0, 0, .2); }
CSS Properties – Part 3
[ 248 ]
lter
The filter CSS property allows us to apply visual effects to an img element or to the
background or border properties, and it looks like this:
filter: blur(10px);
Description
A few examples of CSS lters are blur, turning a color image into grayscale or sepia,
or changing its opacity.
This filter property is not the same as Microsoft's proprietary
filter property that only IE supports. Unlike Microsoft's proprietary
lters, which are not part of a standard, this CSS filter property is
part of a work in progress of the W3C.
This property supports 11 values. These values are called CSS functions. Multiple
functions can be declared in the same selector, separated by a space.
Let's see the list:
• blur()
• brightness()
• contrast()
• drop-shadow()
• grayscale()
• hue-rotate()
• invert()
• opacity()
• saturate()
• sepia()
• url()
blur()
This gives a smudge effect. Values are declared as length values (px, em, in, mm, cm, vw
and so on). The higher the value, the more intense the blur effect is (and vice versa).
Percentage and negative values are not allowed, but decimal values are allowed.

Chapter 6
[ 249 ]
brightness()
This modifies the illumination of an image. Values are declared as either a
percentage or a number without a unit, for example, 10% and 0.5%.
A value of 100% leaves the element unchanged, and a value of 0% makes the element
completely black. Values over 100% are allowed and create a more intense effect.
There is no limit to the value.
Then, a value of 1 leaves the element unchanged; a value of 0 makes the element
completely black. Values over 1 are allowed and create a more intense effect. There is
no limit to the value. Negative values are not valid.
contrast()
This modifies the contrast of an element. Values are declared as either a percentage
or a number without a unit, for example, 10% and 0.5%.
A value of 100% leaves the element unchanged, and a value of 0% makes the element
completely black. Values over 100% are allowed and create a more intense effect.
There is no limit to the value.
Then, a value of 1 leaves the element unchanged; a value of 0 makes the element
completely black. Values over 1 are allowed and create a more intense effect. There is
no limit to the value. Negative values are not valid, and decimal values are allowed.
drop-shadow()
This adds a shadow under the element.
This function works almost exactly the same way as the box-shadow property with
two differences: the drop-shadow() function doesn't support the spread-radius
attribute or the inset values.
Please refer to the box-shadow property for a detailed description of all the values.
Additionally, some browsers actually provide hardware acceleration when using this
function, which eventually improves performance. You know how it goes, anything
we can do to improve performance is always a+1.
grayscale()
This converts an element to grayscale. Values are declared as either a percentage or a
number without a unit, for example, 10% and 0.5%.
A value of 0% leaves the element unchanged; a value of 100% makes the element
grayscale. Values over 100% are not allowed.

CSS Properties – Part 3
[ 250 ]
A value of 0 leaves the element unchanged, and a value of 1 makes the element
grayscale. Values over 1 are not allowed. Negative values are not valid, and decimal
values are allowed.
hue-rotate()
This applies a hue rotation to the element. It accepts an angle value.
The angle value denes the degrees around the color wheel the element sample will
be modied to. There isn't a maximum value, however, if the value is larger than
360deg, the rotation will just go around. For example, if we declare 380deg, that
would the same as 20deg.
invert()
The invert() function inverts the color of the element. If used in an image, it makes
the image look like a lm negative.
A value of 100% completely inverts the element's color; a value of 0% leaves the
element unchanged. Values over 100% are not allowed.
A value of 1 completely inverts the element's color, and a value of 0 leaves the
element unchanged. Values over 1 are not allowed.
Negative values are not valid, and decimal values are allowed.
opacity()
It denes the transparency (opacity) of an element. When this function is applied to
an element, the element itself and its children are affected.
This function supports a numeric value ranging from 0 (zero) to 1, which is the
default value. A value of 0 is completely transparent, as in 0% opaque, and 1 is 100%
opaque, no transparency whatsoever.
Negative values are not valid, and decimal values are allowed.
saturate()
It affects the saturation levels of an element. Values are declared as either a
percentage or a number without a unit, for example, 10% and 0.5%.
The default saturation value of an element is 100%, or 1 if using a unitless number.
A value of 0% completely desaturates the element (it removes all color leaving the
element in grayscale); a value of 100% leaves the element unchanged. Values over
100% are allowed, creating a more intense effect.

Chapter 6
[ 251 ]
A value of 0 completely desaturates the element (it removes all color leaving the
element in grayscale), and a value of 1 leaves the element unchanged. Values over 1
are allowed, creating a more intense effect.
sepia()
This converts an element to sepia—think of a grayscale image but in shades of
brown.
A value of 100% completely turns the element to sepia; a value of 0% leaves the
element unchanged. Values over 100% are not allowed.
A value of 1 completely turns the element to sepia; a value of 0 leaves the element
unchanged. Values over 1 are not allowed. Negative values are not valid.
url()
It takes the location of an XML le with an SVG lter to be applied to the element.
The URL may include an anchor to a specic lter element in the SVG.
CSS:
/*Blur*/
.element { filter: blur(10px); }
/*Brightness*/
.element { filter: brightness(20%); }
/*Contrast*/
.element { filter: contrast(10); }
/*Drop shadow*/
.element { filter: drop-shadow(5px 5px 3px rgba(0, 0, 0, .5)); }
/*Grayscale*/
.element { filter: grayscale(.8); }
/*Hue rotation*/
.element { filter: hue-rotate(80deg); }
/*Invert*/
.element { filter: invert(1); }
/*Opacity*/
.element { filter: opacity(.2); }
/*Saturation*/
.element { filter: saturate(300%); }
/*Sepia*/
.element { filter: sepia(100%); }
/*URL*/
.element { filter: url(/images/file.svg#blur); }
/*Multiple filters for a single element*/
.element { filter: sepia(100%) saturate(200%) hue-rotate(50deg); }

CSS Properties – Part 3
[ 252 ]
overow
The overflow CSS property denes how a block level element should handle content
that "bleeds" (overows) outside its boundaries, and it looks like this:
overflow: auto;
Description
A peculiarity of the overflow property is that it is used to clear oats and make
the parent container expand vertically to wrap the oating elements. This is
accomplished by using any of the following values except visible.
However, a word of caution. When using the prior technique since it can have
unforeseen effects. For example, if a child element has a box-shadow, the shadow
could be clipped/hidden.
In order for content to overow, the parent container needs to have a xed height or
the content needs to have a white-space: nowrap; declaration applied to it.
This property supports four keyword values: auto, hidden, scroll, and visible.
• auto: This creates horizontal and vertical scrollbars only if necessary. In other
words, if the content overflows the container in any direction, the browser
will create scrollbars in one or both axes.
• hidden: This will clip/hide the content that's outside of the element. No
scrollbars are generated. This value is very popular when clearing floats.
Again, be careful when using this value.
• scroll: This creates horizontal and vertical scrollbars even if the content
isn't overflowing the container.
• visible: This is the default value. No content is clipped/hidden and no
scrollbars are generated.
CSS:
/*Scroll bars are generated if the content needs them*/
.element {
white-space: nowrap;
overflow: auto;
}
/*Clearing floats. Be careful with this technique*/
.parent-container { overflow: hidden; }

Chapter 6
[ 253 ]
overow-x
The overflow-x CSS property behaves the same as the overflow property, and it
looks like this:
overflow-x: auto;
Description
The difference is that the overflow-x property handles the overow on the X axis
(horizontally). Please refer to the description of overflow, since the values are the
same.
CSS:
.element {
white-space: nowrap;
overflow-x: auto;
}
overow-y
The overflow-y CSS property behaves like the overflow property, and it looks like
this:
overflow-y: auto;
Description
The difference is that the overflow-y property handles the overow on the Y axis
(vertically). Please refer to the prior description of overflow, since the values are the
same.
CSS:
.element {
height: 100px;
overflow-y: auto;
}

CSS Properties – Part 3
[ 254 ]
visibility
The visibility CSS property denes whether an element is visible or not, and it
looks like this:
visibility: hidden;
Description
The visibility property is similar to display: none; in terms of hiding an
element; the difference is that when hiding an element with the visibility
property, the space the element occupies still affects the layout. It's just "invisible".
With display: none;, it's like the element doesn't even exist.
The visibility CSS property is not inheritable; in other words, we can still make
the child elements visible even if their parent container is not. It can also be used to
hide rows and columns in tables.
This property supports three different keyword values: collapse, hidden, and
visible.
• collapse: This is used only on table elements to remove rows or columns.
However, the collapsed/hidden elements still affect the layout since they are
still taking up their space. If this value is used in other elements than a table
elements, they will be treated as if the value hidden is being used.
• hidden: This is used to visually hide an element. However, any hidden
elements still affect the layout because they are still taking up their space.
• visible: This is the default value. It makes an element visible.
CSS:
/*Hide an element*/
.element { visibility: hidden; }
/*Parent container visible while child heading is visible*/
.parent-container { visibility: hidden; }
.parent-container h1 { visibility: visible; }
/*Hide table elements*/
tr { visibility: collapse; }
tfoot { visibility: collapse; }

Chapter 6
[ 255 ]
z-index
The z-index CSS property denes the stacking order of elements. Think of it in this
way: elements sometimes overlap, like a stack of poker cards on a table. The card
sitting at the top of the stack has the highest z-index, the card sitting at the bottom
has the lowest z-index.
For this property to work, the element has to have a position property declared with
any value different from static.
Description
The z-index property accepts two values: a number and a keyword value.
• Number value: This is also called an "integer". It's just a number without a
unit.
• auto: This is the default value. The stacking order of elements is the same as
their parent.
CSS:
/*Set all cards to relative position so z-index can work*/
.card { position: relative; }
/*The Ace card sits on top of the pile*/
.card.ace { z-index: 2; }
/*The Five card sits at the bottom of the pile*/
.card.five { z-index: 0; }
/*The Queen card sits in between the Ace and the Five*/
.card.queen { z-index: 1; }
Masking and clipping
These two features allow us to hide parts of an element in order to show a
background image or color, or to give an element a special shape. Both terms can be
a bit confusing, so let's see a brief description of each:
• Clipping is done with vectors or paths since this CSS feature was taken from
the SVG specification. It creates a solid edge between the element and its
background.
• Masking, on the other hand, uses images/bitmaps. With images, we can
have "feathered" or blurred edges, whereas with clipping we have straight
edges.
Let's check these properties out.

CSS Properties – Part 3
[ 256 ]
mask
The mask CSS property is the shorthand for the mask-clip, mask-composite, mask-
image, mask-mode, mask-origin, mask-position, mask-repeat, and mask-size
properties. We'll see each of these in more detail later. The mask property looks like
this:
mask: url(../images/mask.png) 50% 50% / contain no-repeat border-
box;
Description
A group of all the prior properties is called a "mask layer".
It's recommended to use the shorthand syntax over individual specic properties,
since the shorthand resets undeclared properties to their initial values. This is helpful
because it makes it easier to override values later in the cascade, thus avoiding
specicity issues and potential use of the !important directive.
Additionally, mask-clip and mask-origin use a geometry value. If we declare only
one value, then both properties will use that value. With two values, mask-clip will
use the rst one and mask-origin will use the second one.
As I mentioned before, CSS masks use images, which means that we can reference a
bitmap/raster le with a transparency or a background gradient with the linear-
gradient() CSS function. We can even create a mask by referencing several images
in the same declaration.
There are two types of mask: alpha masks and luminance masks. We'll see what each
of these types of mask are later.
CSS:
/*Mask referencing a bitmap file.
We are specifying: mask-image mask-position / mask-size mask-
repeat mask-clip
*/
.element {
mask: url(../images/mask.png) 50% 50% / contain no-repeat
border-box;
}
/*Mask using the CSS linear-gradient property*/
.element {
mask: linear-gradient(black 5%, transparent);
}

Chapter 6
[ 257 ]
/*Mask created by declaring multiple masks*/
.element {
mask:
url(../images/mask.png) 50% 50% / contain no-repeat border-
box,
linear-gradient(white 5%, transparent);
}
mask-clip
The mask-clip CSS property determines the area of the element that will be affected
by the mask, and it looks like this:
mask-clip: padding-box;
Description
This property is similar to the background-clip CSS property. Refer to Chapter 4,
CSS Properties – Part 1, for more information.
Multiple comma-separated keyword values can be present in the same declaration.
Each value represents its corresponding image in the comma-separated values of the
mask-image property.
It supports four keyword values: border-box, content-box, padding-box, and no-
clip.
• border-box: This is the default value. If the element has any borders, they
are seen through the mask.
• content-box: Only the parts of the element that are inside its content area are
visible through the mask.
• padding-box: If the element has any padding, it will be seen through the
mask.
• no-clip: The content is not clipped.
CSS:
/*Padding box clipping*/
.element { mask-clip: padding-box; }
/*Multiple values*/
.element { mask-clip: padding-box, border-box; }
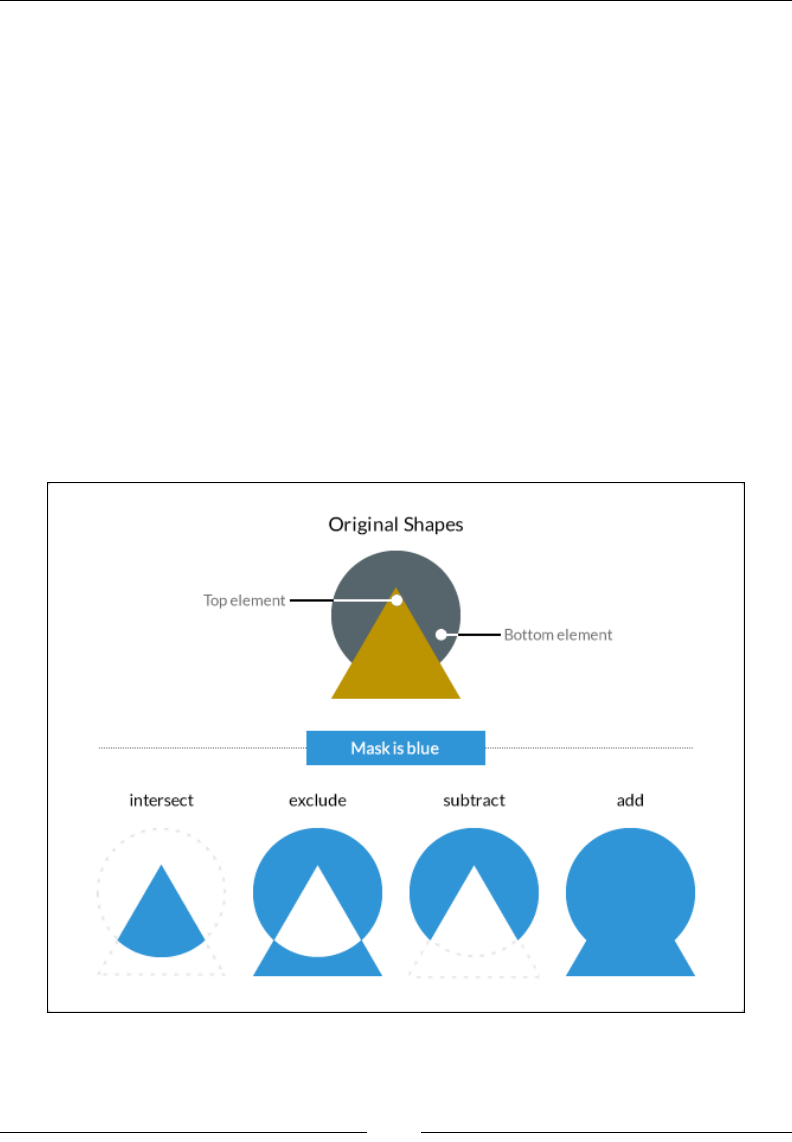
CSS Properties – Part 3
[ 258 ]
mask-composite
The mask-composite CSS property denes how multiple masks with different
shapes are combined or composited to form a single mask, and it looks like this:
mask-composite: intersect;
Description
The mask-composite property works when mask-image is used and at least two
mask images are declared. Multiple comma-separated keyword values can be
present in the same declaration. Each value represents its corresponding image in the
comma-separates values of the mask-image property.
The mask-composite CSS property supports four keyword values: add, subtract,
exclude, and intersect.
For example, picture part of triangle over part of a circle, where the triangle is on top
and the circle below; the different types of composite make different shapes of masks:

Chapter 6
[ 259 ]
• intersect: The shape of the mask is where the triangle and the circle
overlap, or intersect. The rest of the shape is discarded.
• exclude: The part where the triangle and the circle intersect is discarded,
and the rest of the elements is what makes the mask.
• subtract: Since the triangle is on top, it will trim or crop the circle, thus
leaving a Pac-Man shape mask.
• add: The triangle is fused to the circle creating a single shape that will be
used as the mask.
CSS:
/*Intersect the masks*/
.element { mask-composite: intersect; }
/*Multiple values*/
.element { mask-composite: intersect, exclude; }
mask-image
The mask-image CSS property denes the image or images to be used as mask layers
on any given element, and it looks like this:
mask-composite: intersect;
Description
The mask-image property may also refer to <mask> elements in an SVG le. Multiple
values are comma-separated. The images can be bitmap les, SVGs, and even CSS
gradients that are images as well.
CSS:
/*Mask referencing a bitmap*/
.element { mask-image: url(../images/mask.png); }
/*Mask using a CSS gradient*/
.element { mask-image: linear-gradient(black 5%, transparent); }
/*Mask referencing an SVG <mask>*/
.element { mask-image: url(../images/file.svg#mask); }
/*Multiple values*/
.element { mask-image: url(../images/mask.png), linear-
gradient(black 5%, transparent); }

CSS Properties – Part 3
[ 260 ]
mask-mode
The mask-mode CSS property denes whether the mask layer is an alpha mask or a
luminance mask. These terms are the actual keyword values, and it looks like this:
mask-mode: alpha;
Description
Multiple comma-separated keyword values can be present in the same declaration.
Each value represents its corresponding image in the comma-separates values of the
mask-image property.
Alpha masks
Alpha masks use the alpha channel of the image. Whatever is transparent will be
covered; whatever is opaque will show. Of course, a semi-transparent area on the
image is partially covered.
Luminance masks
Luminance masks uses the luminance values of the image. Whatever is white on
the image being used as mask will show. Whatever is black is hidden. Gray areas
partially cover the image.
CSS:
/*Alpha mask*/
.element { mask-mode: alpha; }
/*Multiple values*/
.element { mask-mode: alpha, luminance; }
mask-origin
The mask-origin CSS property denes the location or position of the mask layer in
relation to the element's box starting at the top left corner, and it looks like this:
mask-mode: alpha;
Description
The mask-origin property works in a similar way to the background-origin
property. Refer to Chapter 4, CSS Properties – Part 1, for more information.
Now, this property can be used in both HTML and SVG elements. However, there
are some keyword values that apply to one that won't work on the other.

Chapter 6
[ 261 ]
Multiple comma-separated keyword values can be present in the same declaration.
Each value represents its corresponding image in the comma-separates values of the
mask-image property.
The HTML keyword values are border-box, padding-box, margin-box, and
content-box.
The SVG keyword values are view-box, fill-box, and stroke-box.
• border-box: The origin starts at the top left corner of the border box. It will
include the border and any padding (if any is declared) when applying the
mask, but it will not go beyond that border.
• padding-box: The origin starts at the top-left corner of the padding box. It
will include the padding when applying the mask, but it will not include any
borders if any are declared.
• margin-box: The origin starts at the top-left corner of the margin box. It will
include the margin, the border, and the padding when applying the mask.
• content-box: The origin starts at the top-left corner of the content box. It will
include only the content area. No margins, padding, or borders are taken into
consideration.
• view-box: It uses the closest SVG viewport as a reference box.
• fill-box: The position of the mask is relative to the object bounding box.
• stroke-box: The position of the mask is relative to the stroke bounding box.
CSS:
/*Content box origin; the mask will exclude borders and paddings*/
.element { mask-origin: content-box; }
/*Multiple values*/
.element { mask-origin: border-box, padding-box; }
mask-position
The mask-position CSS property denes the starting position of the mask, and it
looks like this:
mask-position: right top;
Description
This property works similar to the background-position property. Refer to Chapter
4, CSS Properties – Part 1, for more information.

CSS Properties – Part 3
[ 262 ]
Multiple comma-separated keyword values can be present in the same declaration.
Each value represents its corresponding image in the comma-separates values of the
mask-image property.
The mask-position CSS property supports several types of values: four keyword
values, top, right, bottom, and left; a length value, px, em, in, mm, cm, vw, and so on;
and a percentage value such as 50%, 85%, and so on.
CSS:
/*Keyword values*/
.element { mask-position: right top; }
/*Length and Percentage values*/
.element { mask-position: 50px 25%; }
/*Multiple values*/
.element { mask-position: right top, 50% 50%; }
mask-repeat
The mask-repeat CSS property denes whether a mask layer is repeated or not, and
it looks like this:
mask-repeat: space;
Description
This property works in a similar way to the background-repeat property. Refer to
Chapter 4, CSS Properties – Part 1, for more information.
Multiple comma-separated keyword values can be present in the same declaration.
Each value represents its corresponding image in the comma-separates values of the
mask-image property.
It supports six keyword values: repeat, no-repeat, repeat-x, repeat-y, space,
and round.
• repeat: The mask will be repeated on both the X and Y axes. This is the
default value.
• no-repeat: The mask is not repeated on any axis. The mask image is
displayed only once.
• repeat-x: The mask is repeated on the X axis (horizontally).
• repeat-y: The mask is repeated on the Y axis (vertically).
• space: The mask is repeated as many times as possible without being clipped
or cut in both the X and Y axes.

Chapter 6
[ 263 ]
• round: Similar to the space value, the difference is that the mask images are
rescaled in order to fit the specified direction.
CSS:
/*Space out the mask without clipping it*/
.element { mask-repeat: space; }
/*Repeat the mask in the X-axis (horizontally)*/
.element { mask-repeat: repeat-x; }
/*Multiple values*/
.element { mask-repeat: space, repeat-x; }
mask-size
The mask-size CSS property denes the dimensions or size of a mask image, and it
looks like this:
mask-size: contain;
Description
The mask-size property works similar to the background-size property. Refer to
Chapter 4, CSS Properties – Part 1, for more information.
Multiple comma-separated keyword values can be present in the same declaration.
Each value represents its corresponding image in the comma-separates values of the
mask-image property.
The mask-position CSS property supports several types of value: a length value, a
percentage value, and three keyword values.
• Length value: This is when we use one of the following units: px, em, in, mm,
cm, vw, and so on.
• Percentage value: This is when we use percentages such as 50%, 85%, and
so on.
• contain: This scales the image mask without distorting its aspect ratio to fit
the maximum width or height of the element.
• cover: This scales the image mask and distorts it if necessary in order to fit
the maximum width or height of the element. If the image mask is larger on
its width or height, it will get clipped.
• auto: This scales the image mask to the actual size of the image's intrinsic
proportions without distorting it.

CSS Properties – Part 3
[ 264 ]
CSS:
.element {
mask-size: contain;
}
mask-type
The mask-type CSS property is specically for SVG les. It species if an SVG
<mask> element is an alpha or a luminance mask.
For the denitions of alpha and luminance masks, refer to the mask-mode property.
mask-border
The mask-border CSS property is the shorthand for the mask-border-source,
mask-border-mode, mask-border-slice, mask-border-width, mask-border-
outset, and mask-border-repeat properties. It looks like this:
mask-border: url(../images/border-image-mask.png) 15 / 15px
stretch and so on;
Description
Using the shorthand is recommended because any values that are not declared
are set to their initial values, thus making it easier to override down the road,
minimizing the use of the !important directive.
CSS:
.element {
mask-border: url(../images/border-image-mask.png) 15 / 15px
stretch;
}
mask-border-source
The mask-border-source CSS property denes an image that is to be used in the
border-image declaration.

Chapter 6
[ 265 ]
CSS:
/*Border image referencing a bitmap file*/
.element { mask-border-image: url(../images/border-image-
mask.png); }
/*Border image using a CSS gradient*/
.element { mask-border-image: linear-gradient(red, transparent); }
mask-border-mode
The mask-border-mode CSS property denes whether the image used for the mask
is an alpha mask or a luminance mask.
For the denitions of alpha and luminance masks, refer to the mask-mode property.
CSS:
.element {
mask-border-mode: luminance;
}
mask-border-slice
The mask-border-slice CSS property is used to slice the image into nine parts, and
it looks like this:
mask-border-slice: 40;
Description
Think of this example: take a square image and trace two vertical lines and then two
horizontal lines. We end up with nine parts, like Tic-Tac-Toe, on top of the image.
This property supports one, two, three, or four keyword offset values: top, right,
bottom, left, and fill. These values, except fill, can be declared using either a
number value without a unit or a percentage value using 50%, 85%, and so on.
If one value is declared, all four sides take that value. If two values are declared, the
rst value is for the top and bottom sides, and the second value for the left and right
sides. If three values are declared, then the rst value is for the top side, the second
value is for the left and right sides, and the third for the bottom side. If four values
are declared, they correspond to top, right, bottom, and left sides.
CSS Properties – Part 3
[ 266 ]
When declaring a unitless value with a bitmap image mask, the value
is interpreted as if it were pixels.
ll
By default, the center of the image mask is discarded and treated as empty. If this
value is present, the center will be taken into account and will become part of the
mask.
CSS:
/*All sides are offset by 40*/
.element { mask-border-slice: 40; }
/*Top & bottom and left & right values*/
.element { mask-border-slice: 20% 30%; }
/*Make the center of the image part of the mask with top & bottom,
and left & right offsets*/
.element { mask-border-slice: fill 40 25; }
mask-border-width
The mask-border-width CSS property scales the mask image slices created by the
mask-border-slices property, and it looks like this:
mask-border-width: auto;
Description
This mask-border-width property supports one, two, three, or four keyword offset
values: top, right, bottom, left, and auto. These values, except auto, can be
declared using either a number value without a unit, or a percentage value such as
50%, 85%, and so on.
If one value is declared, all four sides take that value. If two values are declared, the
rst value is for the top and bottom sides, and the second value for the left and right
sides. If three values are declared, then the rst value is for the top side, the second
value is for the left and right sides, and the third for the bottom side. If four values
are declared, they correspond to top, right, bottom and left sides.

Chapter 6
[ 267 ]
auto
It makes the mask border use the intrinsic width or height of the image slice. The
browser is the one that decides if it needs to use this intrinsic width or height or not.
CSS:
.element {
mask-border-width: auto;
}
mask-border-outset
The mask-border-outset CSS property denes the amount the border mask image
area extends beyond its border box, and it looks like this:
mask-border-outset: 10px;
Description
This property supports one, two, three, or four keyword outset values: top, right,
bottom, and left. These values can be declared using either a number value without
a unit, or a length value using px, em, in, mm, cm, vw, and so on. The number value
without a unit is a multiplier of the border-width property of the element.
If one value is declared, all four sides take that value. If two values are declared, the
rst value is for the top and bottom sides, and the second value for the left and right
sides. If three values are declared, then the rst value is for the top side, the second
value is for the left and right sides, and the third for the bottom side. If four values
are declared, they correspond to the top, right, bottom and left sides.
CSS:
/*All four sides have the same value*/
.element { mask-border-outset: 10px; }
/*Top & bottom and left & right values*/
.element { mask-border-outset: 2 6; }
/*Top, left & right, and bottom values*/
.element { mask-border-outset: 5 20px 2; }

CSS Properties – Part 3
[ 268 ]
mask-border-repeat
The mask-border-repeat CSS property denes how the image mask for all four
sides and the center are scaled and tiled (repeated) around the element, and it looks
like this:
mask-border-repeat: repeat;
Description
The mask-border-repeat property supports one or two keyword values. The values
are: repeat, round, stretch and space.
repeat
The mask border image is tiled (repeated). Under certain circumstances, the image
mask can be clipped on the edges showing only part of it.
round
This works in a similar way to repeat; the difference is that the image mask is scaled
to t exactly in the allotted distance without clipping the image mask.
stretch
This is the default value. The image mask is stretched to completely ll the area.
space
Similar to repeat, but the difference is that if the area isn't lled with complete
image masks, it will distribute the space around the tiles.
CSS:
.element {
mask-border-repeat: repeat;
}
clip-path
The clip-path CSS property is used to partially or fully hide parts of an element
and it looks like this:
clip-path: url(..images/file.svg#clipping-path);
Chapter 6
[ 269 ]
Description
We can say that clip-path is a form of masking. The difference is that clipping uses a
vector graphic to do the clipping, rather than a bitmap/raster image.
This vector graphic can be a basic shape or an SVG path.
Note: The clip CSS property is now deprecated due to poor
features and limitations with SVGs. The current and widely
supported clip-path property is part of the SVG specication,
and it's been adopted by the CSS masking module.
The clip-path CSS property combined with the shape-outside property can create
amazing layouts. With this combination, we can make a paragraph "curve" around a
clipped element whose basic shape is also a curve or circle.
This property supports four values: three functions: url(), a shape, a geometry box,
and one keyword value none.
url()
This CSS function points to an SVG clipPath element that will be used as the
clipping path.
CSS:
/*Clipping path referenced from an external SVG file*/
.element { clip-path: url(..images/file.svg#clipping-path); }
/*Clipping path referenced from an embedded SVG*/
.element { clip-path: url(#clipping-path); }
circle()
This CSS function declares a circle as a clipping path. This function accepts two
arguments: a shape radius and a position.
• Shape radius: It defines the radius of the circle. It supports a length, a
percentage, and two keyword values. Negative values are not allowed.
The two keyword values are: closest-side or farthest-side.
°closest-side: This is the default value. If this value is not declared,
the browser will take the length from the center of the circle to its
closest side, and create a circle based on that distance. With this, the
circle never bleeds or overflows the content, it's always complete.

CSS Properties – Part 3
[ 270 ]
°farthest-side: This value will create a circle by taking the length
from the center to the farthest side. This means that if the element has
a side that is longer than the other, the circle will bleed or overflow
on the opposite sides.
• Position: It defines the location of the circle. The position value is preceded
by the at word. If this value is not declared, the circle will be positioned at
the center of the element. The values for this argument are the same as those
of the background-position property.
CSS:
/*Circle 150px wide and tall with location*/
.element { clip-path: circle(150px at 0 50%); }
/*Circle without location is centered on the element*/
.element { clip-path: circle(150px); }
/*Circle defaults to closest-side and is centered on the element*/
.element { clip-path: circle(); }
ellipse()
This CSS function declares an ellipse as a clipping path. It takes the same arguments
as the circle() function; the only difference is that it accepts two radii values, rx
and ry, for the shape radius instead of one. rx represents the X axis and ry the Y
axis.
CSS:
/*Ellipse with location*/
.element { clip-path: ellipse(200px 100px at 0 50%); }
/*Ellipse without location is centered*/
.element { clip-path: ellipse(200px 100px); }
/*No value makes an ellipse that is as wide an tall as the
element*/
.element { clip-path: ellipse(); }
inset()
This CSS function denes a rectangle shape inside the element. It can take one,
two, three, or four offset values. The syntax is the same as the syntax of the margin
property.
It supports a length and a percentage value.
Additionally, the inset() function also supports a border-radius value, which
is optional. This value must be preceded by the term round before any length or
percentages are declared.

Chapter 6
[ 271 ]
CSS:
/*Inset clip path where all four offset sides have the same
distance*/
.element { clip-path: inset(20px); }
/*Inset clip path with border-radius declared*/
.element { clip-path: inset(5% 20px 10% 40px round 20px); }
polygon()
This CSS function is used to declare more various types of shapes, usually irregular
ones that are different from a square, a circle or an ellipse.
Coordinate pairs are used to declare the points of the polygon; each pair species
the position of a point. The rst argument represents the X-position and the second
argument, the Y-position coordinates. The rst and last coordinate points are closed
automatically by the browser. The coordinate values are comma-separated and
support a length or a percentage value.
Now, creating polygons by hand is not only a major undertaking but it could be very
time consuming. The best solution is to use a tool for the creation process:
• Bennet Feely's Clippy (http://bennettfeely.com/clippy/)
• Clip Path Generator (http://cssplant.com/clip-path-generator)
CSS:
/*This polygon has 3 pairs of coordinates so it creates a
triangle-shaped clipping path*/
.element { clip-path: polygon(0 0, 0 100%, 100% 0); }
/*Custom polygon (a star) from Bennett Feely's, Clippy tool*/
.element { clip-path: polygon(50% 0%, 63% 38%, 100% 38%, 69% 59%,
82% 100%, 50% 75%, 18% 100%, 31% 59%, 0% 38%, 37% 38%); }
none
There is no clipping path that gets created.
Image rendering and orientation
Making sure images display correctly is not only a designer's responsibility, we as
web designers and developers also have a say in how images behave and display
under particular circumstances.
Let's see how to change the orientation and rendering quality of images with CSS.

CSS Properties – Part 3
[ 272 ]
image-orientation
The image-orientation CSS property denes the rotation that we can apply to an
image, and it looks like this:
image-orientation: flip;
Description
Many images contain information about the settings used to take a picture, such as
ISO speed, aperture, shutter speed, camera model, white balance, date and time,
and so on. This information is called EXIF Data, and CSS uses this data for image
orientation purposes. It also supports one or two values in a single declaration.
The image-orientation property supports two keyword values and an angle value:
from-image, flip, and an angle value.
• from-image: The image is rotated using the EXIF Data contained in the
image.
• flip: The image is flipped horizontally; it's reflected. This value should go
after the angle value.
• Angle value: This defines the rotation applied to the image. It uses a
number followed by the deg unit. This value should go before the flip
keyword value.
CSS:
/*Flip the image horizontally*/
img { image-orientation: flip; }
/*Rotate the image 180 degrees and flip it horizontally*/
img { image-orientation: 180deg flip; }
/*Follow the orientation from the EXIF information in the image*/
img { image-orientation: from-image; }
image-rendering
The image-rendering CSS property denes what type of algorithm the browser
should use to render scaled images, and it looks like this:
image-rendering: pixelated;

Chapter 6
[ 273 ]
Description
The image-rendering CSS property works for either downscaled or upscaled
images. This property supports three keyword values: auto, crisp-edges, and
pixelated.
• auto: This is the default value. When an image is either scaled up or down,
this property smooths or blurs the image in order to preserve the best
appearance possible. However, sometimes this may produce undesired
results, depending on the type of image.
• crisp-edges: This property does not apply any smoothing or blurring to
the image. It preservers its contrast, edges, and color. This property was
exclusively created for pixel art.
• pixelated: This property only works on images that have been scaled up
via the nearest neighbor algorithm, which makes the image look like it was
made with large pixels. This is useful when scaling up checkered patterns like
a chessboard, a checkerboard, or QR codes.
CSS:
/*Good for checkered patterns or QR codes*/
img { image-rendering: pixelated; }
/*Exclusively for pixel art*/
img { image-rendering: crisp-edges; }
User interface
The following properties are directly tied to UX Design but on the frontend.
Addressing the following properties from the beginning of any build can go a long
way.
Let's check them out.
cursor
The cursor CSS property denes the style of the pointer, and it looks like this:
cursor: pointer;

CSS Properties – Part 3
[ 274 ]
Description
The cursor property is meant to work only in the hover state; this property is not
meant to replace the styling of the pointer in its normal state.
All operating system have many types of cursors for all types of behaviors, so
whenever we need a certain action a cursor for it may already exist.
We can also use custom cursors. Keep in mind the following notes:
• It's recommended that the image of the cursor is 32 x 32 pixels.
• It's required to declare a built-in cursor to act as a fallback in case the custom
image(s) doesn't load.
• Legacy versions of IE require an absolute path to the image of the custom
cursor.
• We can use .cur or .png files for custom cursors. However, legacy IEs only
support the .cur extension.
The cursor CSS property can accept one or multiple values in the same declaration.
This property supports the following values: a URL, X and Y coordinates, and 32
keyword values.
A URL (or URI)
The URL is used for custom cursors. It's the path to the image. Several URLs can
be dened in the same declaration. Thus, several custom cursors can be used. If
declaring more than one URL, the values are comma-separated.
It's mandatory that after the declaration of the URL, a native non-URL value should
be declared. This is so if everything else fails, the user can still use the pointer. This
value is optional.
X and Y coordinates
The X and Y coordinates are used to align the custom cursor with the right hotspot.
These coordinates are just two numbers without a unit and separated only by a
space.
Negative numbers are not allowed and the values range from 0 to 32.
32 keyword values
The keyword values use the operating system or browser native cursors. There's
practically a cursor for any pointer action.

Chapter 6
[ 275 ]
Here's a list of the 32 keyword values:
• alias
• all-scroll
• auto
• cell
• col-resize
• context-menu
• copy
• crosshair
• default
• e-resize
• ew-resize
• help
• move
• n-resize
• ne-resize
• nesw-resize
• no-drop
• none
• not-allowed
• ns-resize
• nw-resize
• nwse-resize
• pointer
• progress
• row-resize
• s-resize
• se-resize
• sw-resize
• text
• vertical-text
• w-resize
• wait

CSS Properties – Part 3
[ 276 ]
Some of the most commonly used values are default, move, pointer, and text:
• default: This sets the default pointer. This is the arrow pointer we all know.
• move: This sets the move pointer. It looks like a large plus sign with arrows on
all four ends.
• pointer: This sets the pointer to the "hand" icon.
• text: This sets the text pointer. It usually looks like a serif capital "I" but
taller.
See all cursors in action here: http://tiny.cc/cursor
CSS:
/*Custom cursor with absolute path and coordinates*/
.element { cursor: url(/images/cursor.cur) 10 10, default; }
/*Multiple custom cursors with coordinates*/
.element { cursor: url(/images/cursor-1.png) 5 5, url(/images/
cursor-2.png) 0 0, default; }
/*Assign a pointer on the <button> and <select> elements*/
button,
select { cursor: pointer; }
pointer-events
The pointer-events CSS property controls when an element in the document can
become a target of mouse/touch events, and it looks like this:
pointer-events: none;
Description
One particularity of pointer-events is as shown in the following example: say we
have two containers where they considerably overlap. If we apply pointer-events:
none; to the element on top, the clicking/tapping goes through that element and
targets the content in the bottom one. Basically, we can select the content on the
bottom element even if we're clicking/tapping on the element on top.
This property supports ten keyword values. However, only two are related to
HTML; all the rest are part of the SVG specication, which is out of the scope
of this guide.
Those HTML-related values are none and auto.

Chapter 6
[ 277 ]
none
No mouse/touch events will act on the element. However, if the element has
descendants with pointer-events set to a different value, those descendent
elements will trigger mouse events.
auto
This is the default value. This acts as if no pointer-events were declared.
More info on MDN can be found here: http://tiny.cc/mdn-pointer-events
CSS:
/*Clicking/tapping on the element won't work*/
.element { pointer-events: none; }
/*Restore the default clicking/tapping behavior to the element*/
.element { pointer-events: auto; }
outline
The outline CSS property creates a border around an element to provide a visual
cue that it's active or has gained focus.
This property is the shorthand for the outline-color, outline-width and
outline-style properties. For convenience, it's recommended to always use this
shorthand rather than separate properties when declaring outline.
The difference between outline and border is that outline doesn't take up space;
it's created on top of the content, so the layout is never affected by it.
However, declaring the outline values is exactly the same as declaring the border
values.
Description
The outline CSS property supports three values represented in longhand
properties: the color, the width, and the style. All three values are required and can
appear in any order in the declaration.
• color: This is mapped to the outline-color property. It's the color of the
outline. It supports all color modes: HEX, RGB, RGBa, HSL, HSLs, and color
name.
• width: This is mapped to the outline-width property. It's the thickness of
the outline. It supports any length value, such as px, em, in, mm, cm, vw, and so
on. Percentage values are not valid.

CSS Properties – Part 3
[ 278 ]
• style: This is mapped to the outline-style property. It's the type of line to
be used. It takes the same values as border: dashed, dotted, double, groove,
hidden, inset, none, outset, ridge, and solid.
CSS:
.element {
outline: dotted 2px rgba(0, 0, 0, .5);
}
3-Dimensional
The power of CSS is mind-boggling; not only can we do amazing animations just
with CSS, but CSS can also handle three-dimensional designs.
Let's check out the properties that allows us to do so.
perspective
The perspective CSS property denes the distance between the screen and the user
in the Z axis, and it looks like this:
perspective: 300px;
Description
Keep in mind that the perspective property is applied to the parent element in
order to enable a 3D canvas or space in which its child elements will move.
This property accepts a keyword value, normal, and a length value.
normal
No perspective is dened on the parent element.
Length value
This is when we use one of the following units: px, em, in, mm, cm, vw, and so on.
The lower the value, the closer the elements will move in the Z axis. Thus, the
perspective is more pronounced. With higher values, the perspective effect is less
intense.

Chapter 6
[ 279 ]
CSS:
/*Enable perspective for child elements by applying it on the
parent container*/
.parent-container { perspective: 300px; }
/*Child element will move in a 3D plane*/
.parent-container .element { transform: rotateX(170deg); }
perspective-origin
The perspective-origin CSS property denes the origin of the X and Y axis of an
element in a 3D space, and it looks like this:
Perspective-origin: 24% center;
Description
This is what is known as the vanishing point used by the perspective property.
The perspective-origin property supports a combination of three types of value:
a length value, a percentage value, and ve keyword values in both X and Y axes.
Length value
This is when we use one of the following units: px, em, in, mm, cm, vw, and so on.
Percentage value
This is when we use percentages like 50%, 85%, and so on.
Keyword values
The ve keyword values are top, right, bottom, left, and center.
CSS:
Adding to the prior CSS from the perspective example:
/*Enable perspective for child elements by applying it on the
parent container*/
/*The origin of the perspective X and Y-axis*/
.parent-container {
perspective: 300px;
perspective-origin: 24% center;
}
/*Child element will move in a 3D plane*/
.parent-container .element { transform: rotateX(170deg); }

CSS Properties – Part 3
[ 280 ]
backface-visibility
The backface-visibility CSS property denes whether the rear face of an element
that's facing the viewer is visible or not, and it looks like this:
backface-visibility: hidden;
Description
The backface-visibility property supports two self-explanatory keyword values:
visible and hidden.
CSS:
And finalizing the prior example from the perspective-origin
example:
/*Enable perspective for child elements by applying it on the
parent container*/
/*The origin of the perspective X and Y-axis*/
.parent-container {
perspective: 300px;
perspective-origin: 24% center;
}
/*Child element will move in a 3D plane*/
/*The backside of the element will not be visible*/
.parent-container .element {
transform: rotateX(170deg);
backface-visibility: hidden;
}
Summary
And this is it for the CSS Properties chapters, quite a ride eh?
In this nal chapter we learned how to work with the Page Box's properties like
bleed and marks for printing. We also learned that HTML lists are used for many
other things like menus, navigation, slideshow, and so on, amongst other things like
CSS counters and how to create custom styles for list marks.
Creating the effect of depth with drop shadows is quite easy with the box-shadow
property. Just don't overdo it. Then we learned about display and visibility, one of
the most important features of CSS. In this section we learned how to clear oating
elements as well in addition to applying lters to images and elements alike.

Chapter 6
[ 281 ]
Masking and clipping elements isn't so difcult after all, we can use either bitmaps
or vectors depending on our specic circumstances. This led us to understand better
how to work with images and their orientation.
Then we talked about some User Interface features like creating custom cursors or
adapting the default cursor to change depending on its context.
And nally we learned about the 3D properties like perspective and backface-
visiblity that allow us to do pretty cool things with CSS only.
The following chapter about CSS functions is going to take what we've seen so far to
a new level of possibilities.
Let's y.

[ 283 ]
CSS Functions
CSS functions are used for many things in CSS. They can be used to create special
types of processes such as creating animations or use custom fonts, or create visual
effects like transparencies or transforming elements in both two-dimensional
and three-dimensional planes.
Let's see what CSS functions are all about.
Filter
CSS lters allow us to manipulate the color of an element in different ways.
brightness()
The brightness() CSS function is used with the filter property, and it looks
like this:
filter: brightness(20%);
Description
The brightness() function modifies the illumination of an image. Values are
declared as either a percentage or a number without a unit, for example, 10% and
0.5%
A value of 100% leaves the element unchanged; a value of 0% makes the element
completely black. Values over 100% are allowed and create a more intense effect.
There is no limit to the value.
A value of 1 leaves the element unchanged; a value of 0 makes the element
completely black. Values over 1 are allowed and create a more intense effect.
There is no limit to the value. Also, negative values are not valid for either the
percentage of the number.

CSS Functions
[ 284 ]
CSS:
.element {
filter: brightness(20%);
}
contrast()
The contrast() CSS function is used with the filter property, and it looks
like this:
filter: contrast(10);
Description
The contrast() function modifies the contrast of an element. Values are declared
as either a percentage or a number without a unit, for example, 10% and 0.5%.
A value of 100% leaves the element unchanged; a value of 0% makes the element
completely black. Values over 100% are allowed and create a more intense effect.
There is no limit to the value.
A value of 1 leaves the element unchanged; a value of 0 makes the element
completely black. Values over 1 are allowed and create a more intense effect. There
is no limit to the value. Also, negative values are not valid and decimal values are
allowed for both.
CSS:
.element {
filter: contrast(10);
}
grayscale()
The grayscale() CSS function is used with the filter property, and it looks
like this:
filter: grayscale(.8);
Description
The grayscale() function converts an element to shades of black. Values are
declared as either a percentage or a number without a unit, for example, 10% and
0.5%.

Chapter 7
[ 285 ]
A value of 0% leaves the element unchanged; a value of 100% makes the element
grayscale. Values over 100% are not allowed.
A value of 0 leaves the element unchanged; a value of 1 makes the element grayscale.
Values over 1 are not allowed. Also, negative values are not valid for either. Decimal
values are allowed
invert()
The invert() CSS function is used with the filter property, and it looks like this:
filter: invert(1);
Description
The invert() function inverts the color of the element. If used in an image, it makes
the image look like a lm negative.
A value of 100% completely inverts the element's color; a value of 0% leaves the
element unchanged. Values over 100% are not allowed.
A value of 1 completely inverts the element's color; a value of 0 leaves the element
unchanged. Values over 1 are not allowed. Also, negative values are not valid.
Decimal values are allowed for both.
hue-rotate()
The hue-rotate() CSS function is used with the filter property, and it looks
like this:
filter: hue-rotate(80deg);
Description
The hue-rotate() function applies a hue rotation to the element. It accepts an
angle value.
The angle value denes the degrees around the color wheel that the element sample
will be modied to.
There is no maximum value. However, if the value is larger than 360deg, the rotation
will just go around. For example, if we declare 380deg, that would the same as 20deg.

CSS Functions
[ 286 ]
blur()
The blur() CSS function is used with the filter property, and it looks like this:
filter: blur(10px);
Description
The blur() function gives the smudge effect. Values are declared as length values (px,
em, in, mm, cm, vw and so on). The higher the value, the more intense the blur effect is,
and vice versa.
Percentage and negative values are not allowed, but decimal values are.
saturate()
The saturate() CSS function is used with the filter property, and it looks
like this:
filter: saturate(300%);
Description
It affects the saturation levels of an element. Values are declared as either a
percentage or a number without a unit, for example, 10% and 0.5%
The default saturation value of an element is 100%, or 1 if using a unitless number.
A value of 0% completely desaturates the element (it removes all color leaving the
element in grayscale); a value of 100% leaves the element unchanged. Values over
100% are allowed creating a more intense effect.
A value of 0 completely desaturates the element (it removes all color leaving the
element in grayscale); a value of 1 leaves the element unchanged. Values over 1 are
allowed creating a more intense effect.
sepia()
The sepia() CSS function is used with the filter property, and it looks like this:
filter: sepia(100%);
Description
The sepia() function converts an element to sepia. Think of a grayscale image but in
shades of brown.

Chapter 7
[ 287 ]
A value of 100% completely turns the element to sepia; a value of 0% leaves the
element unchanged. Values over 100% are not allowed.
A value of 1 completely turns the element to sepia; a value of 0 leaves the element
unchanged. Values over 1 are not allowed.
Also, for both, negative values are not valid.
Transforms
CSS transforms have gained such popularity that it's rare not to see some sort of
transformation in a website nowadays, for example, button shapes, animations,
and layouts.
Let's see the transformation CSS functions.
matrix()
The matrix() CSS function is used with the transform property, and it looks
like this:
matrix(0.5, 0, 0.0881635, 0.5, 0, 0);
Description
The matrix() function is the shorthand for all transformation properties, since
they can be combined here. This function is used to dene a two-dimensional
transformation matrix.
This function requires a solid understanding of math, but in reality this function
isn't something to be done by hand. Instead, we can use a tool like Eric Meyer's and
Aaron Gustafson's The Matrix Resolutions (http://tiny.cc/eric-meyer-matrix).
The explanation of the advanced mathematics of the matrix() function are beyond
the scope of this book. However, for very detailed explanations you can refer to any
of these two articles:
• Understanding the CSS Transforms Matrix by Tiffany Brown
(http://tiny.cc/css-matrix-1)
• The CSS3 matrix() Transform for the Mathematically Challenged by Zoltan
Hawryluk (http://tiny.cc/css-matrix-2)

CSS Functions
[ 288 ]
CSS:
/*This*/
.element { transform: skew(10deg) scale(.5); }
/*Is the same as this*/
.element { transform: matrix(0.5, 0, 0.0881635, 0.5, 0, 0); }
matrix3d()
The matrix3d() CSS function is used with the transform property, and it looks
like this:
matrix3d(0.852825, 0.195593, -0.484183, 0, 0.0958426, 0.852825,
0.513326, 0, 0.513326, -0.484183, 0.708564, 0, 0.948667, 1.04842,
0.0291436, 1);
Description
Just like the two-dimensional matrix() function, the matrix3d() function is a
shorthand, but this one is for all transform 3D properties in a 4 x 4 grid.
This function requires a solid understanding of math, but in reality this function isn't
something to be done by hand. Instead, we can use a tool like Eric Meyer and Aaron
Gustafson's The Matrix Resolutions (http://tiny.cc/eric-meyer-matrix).
CSS:
/*This*/
.element { transform: rotate3d(10, 10, 1, 45deg) translate3d(1px,
1px, 0); }
/*Is the same as this*/
.element { transform: matrix3d(0.852825, 0.195593, -0.484183, 0,
0.0958426, 0.852825, 0.513326, 0, 0.513326, -0.484183, 0.708564,
0, 0.948667, 1.04842, 0.0291436, 1); }
rotate()
The rotate() CSS function is used with the transform property, and it looks
like this:
rotate(10deg);

Chapter 7
[ 289 ]
Description
The rotate() function rotates an element around a xed point in a two-dimensional
space. It accepts an angle value using the deg, grad, rad, or turn units. The deg unit
is most commonly used. Negative values are valid.
CSS:
.element {
transform: rotate(10deg);
}
rotate3d()
The rotate3d() CSS function is used with the transform property, and it looks
like this:
rotate3d(1, 2, 1, 10deg);
Description
The rotate3d() function rotates an element around a xed position in a
three-dimensional plane via the X, Y, and Z axes. It accepts four values: three unitless
number values that correspond to the X, Y, and Z axes, and an angle value that denes
the amount of rotation.
Positive values rotate the element clockwise in the corresponding axis. Negative
values rotate the element counter-clockwise.
CSS:
.element {
transform: rotate3d(1, 2, .5, 10deg);
}
rotateX()
The rotateX() CSS function is used with the transform property, and it looks
like this:
transform: rotateX(25deg);
The previous code is similar to the following code:
transform: rotate3d(1, 0, 0, 25deg);

CSS Functions
[ 290 ]
Description
The rotateX() function rotates an element on the X axes in a three-dimensional
plane. It accepts an angle value.
Positive values rotate the element clockwise. Negative values rotate the element
counter-clockwise.
CSS:
/*This*/
.element { transform: rotateX(25deg); }
/*Is the same as this*/
.element { transform: rotate3d(1, 0, 0, 25deg); }
rotateY()
The rotateY() CSS function is used with the transform property, and it looks
like this:
transform: rotateY(75deg);
The previous line is the same as this:
transform: rotate3d(0, 1, 0, 75deg);
Description
The rotateY() function rotates an element on the Y axes in a three-dimensional
plane. It accepts an angle value.
Positive values rotate the element clockwise. Negative values rotate the element
counter-clockwise.
CSS:
/*This*/
.element { transform: rotateY(75deg); }
/*Is the same as this*/
.element { transform: rotate3d(0, 1, 0, 75deg); }

Chapter 7
[ 291 ]
rotateZ()
The rotateY() CSS function is used with the transform property, and it looks
like this:
transform: rotateZ(33deg);
Which is the same as this:
transform: rotate3d(0, 0, 1, 33deg);
Description
The rotateY() function rotates an element on the Z axes in a three-dimensional
plane. It accepts an angle value.
Positive values rotate the element clockwise. Negative values rotate the element
counter-clockwise.
CSS:
/*This*/
.element { transform: rotateZ(33deg); }
/*Is the same as this*/
.element { transform: rotate3d(0, 0, 1, 33deg); }
scale()
The scale() CSS function is used with the transform property, and it looks
like this:
.element { transform: scale(2); }
Or:
.element { transform: scale(2, 3); }
Description
The scale() function changes the size of an element in a two-dimensional plane to
make it larger or smaller. It supports one or two unitless number values, where the
second value is optional. The number indicates the number of times the element
should be scaled. For example, a value of 2 means the element is scaled (enlarged)
200%; a value of 0.5 means the element should be scaled (reduced) to 50%.
The rst value represents a horizontal scale and the second a vertical scale. If a single
value is declared, it means that both orientations will use the same value.
CSS Functions
[ 292 ]
Negative values are allowed. However, when negative values are used, the element
is ipped.
When an element is scaled, it does not affect the layout;
it will simply overlap or appear below other elements
depending on the source order.
CSS:
/*Element is flipped in both directions and scaled to 200% its
size*/
.element { transform: scale(-2); }
/*Element is scaled to 200% horizontally and 300% vertically*/
.element { transform: scale(2, 3); }
scale3d()
The scaled3d() CSS function is used with the transform property, and it looks
like this:
transform: scale3d(2, 2, 2);
Description
The scaled3d() function changes the size of an element in a three-dimensional
plane via the X, Y, and Z axes to make it larger or smaller.
It supports three unitless number values which are required. Negative values are
allowed. However, when negative values are used, the element is ipped.
CSS:
/*The element is twice the size*/
.element { transform: scale3d(2, 2, 2); }
/*Flipped element in both X and Y-axis while scaled to 300%, and
200% on the Z-axis*/
.element { transform: scale3d(-3, -3, 2); }
scaleX()
The scaleX() CSS function is used with the transform property, and it looks
like this:
transform: scaleX(-2);

Chapter 7
[ 293 ]
Description
The scaleX() function changes the size of an element on the X axes in a two-
dimensional plane. It supports a unitless number value.
Negative values are allowed. However, the element is ipped when negative values
are used.
CSS:
.element {
transform: scaleX(-2);
}
scaleY()
The scaleY() CSS function is used with the transform property, and it looks
like this:
transform: scaleY(4);
Description
The scaleY() function changes the size of an element on the Y axes in a two-
dimensional plane. It supports a unitless number value.
Negative values are allowed. However, the element is ipped when negative values
are used.
CSS:
.element {
transform: scaleY(4);
}
scaleZ()
The scaleZ() CSS function is used with the transform property, and it looks
like this:
transform: scaleZ(3);
Description
The scaleZ() function changes the size of an element on the Y axes in a two-
dimensional plane. It supports a unitless number value.

CSS Functions
[ 294 ]
Negative values are allowed. However, the element is ipped when negative values
are used.
CSS:
.element {
transform: scaleY(4);
}
skew()
The skew() CSS function is used with the transform property, and it looks like this:
transform: skew(20deg);
Or you can also use the following code:
transform: skew(20deg, 25deg);
Description
The skew() function skews or tilts an element on the X axes or both the X and the Y
axes on a two-dimensional plane. For example, a parallelogram is a skewed rectangle.
It supports one or two angle values: the rst one corresponds to the X axes and the
second one to the Y axes. If only one value is declared, the element is skewed only on
the X axes. Negative values are allowed.
It's recommended that you use either the skewX() or skewY() functions rather than
skew(), because skew() has been removed from the spec (although most browsers
still support it).
CSS:
/*One value only affects the element on the X-axis*/
.element { transform: skew(20deg); }
/*Two values affects the element on both X and Y-axis*/
.element { transform: skew(20deg, 25deg); }
skewX()
The @skewX() CSS function is used with the transform property, and it looks
like this:
transform: skewX(40deg);

Chapter 7
[ 295 ]
Description
The @skewX() function skews or tilts an element on the X axes on a two-dimensional
plane.
It supports one angle value. Negative values are allowed.
CSS:
.element {
transform: skewX(40deg);
}
skewY()
The @skewY() CSS function is used with the transform property, and it looks
like this:
transform: skewY(36deg);
Description
The @skewY() function skews or tilts an element on the Y axes in a two-dimensional
plane.
It supports one angle value. Negative values are allowed.
CSS:
.element {
transform: skewY(36deg);
}
steps()
The steps() timing function is used with the transition-timing-function or the
animation-timing-function properties, and it looks like this:
transition-timing-function: steps(3);
animation-timing-function: steps(3);

CSS Functions
[ 296 ]
Description
The steps() timing function divides the transition or the animation into intervals
of equal sizes. We can also specify if the steps of transition or animation happen at
the start or the end of the interval. The end value is the default in case no argument
is declared.
It supports one numeric value, or one numeric value and an optional value of either
start or end.
The best way to understand how start or end works is with an example: the
animation will begin right away when using start, and it will be delayed a bit
when using end.
CSS:
/*The transition is divided in 3 equal size intervals*/
.element { transition-timing-function: steps(3); }
/*The transition is divided in 3 equal size intervals but it will
delay a bit before it starts*/
.element { transition-timing-function: steps(3, end); }
translate()
The translate() CSS function is used with the transform property, and it looks
like this:
transform: translate(20px);
Or like this:
transform: translate(20px, -50%);
Description
The translate() function affects the position of an element on the X axes or both
the X and the Y axes on a two-dimensional plane.
It supports both length and percentage values. Negative values are allowed. It
supports one or two length and percentage values; the rst one corresponds to the
X-axis and the second one to the Y-axis. If only one value is declared, the element is
moved only on the X-axis. Negative values are allowed.

Chapter 7
[ 297 ]
CSS:
/*One value, the element is moved on the X-axis only*/
.element { transform: translate(20px); }
/*Two values, the element is moved on the X and Y-axis*/
.element { transform: translate(20px, -50%); }
translate3d()
The translate3d() CSS function is used with the transform property and the
perspective function, and it looks like this:
transform: perspective(100px) translate3d(75px, 75px, -200px);
Description
The translate3d() function is used to move an element on the X, Y, and Z axes on
a three-dimensional plane.
It supports both length and percentage values. Negative values are allowed.
In order to be able to see this function work, we need to give the element in
question a three-dimensional plane with the perspective function, otherwise the
translate3d() declaration will have no effect.
CSS:
.element {
transform: perspective(100px) translate3d(75px, 75px, -200px);
}
translateX()
The translateX() CSS function is used with the transform property, and it looks
like this:
transform: translateX(99%);
Description
The translateX() function is used to move an element on the X axes in a
two-dimensional plane.
It supports both length and percentage values. Negative values are allowed.

CSS Functions
[ 298 ]
CSS:
.element {
transform: translateX(99%);
}
translateY()
The translateY() CSS function is used with the transform property, and it looks
like this:
transform: translateY(55px);
Description
This is used to move an element on the Y axes in a two-dimensional plane. It
supports both length and percentage values. Negative values are allowed.
CSS:
.element {
transform: translateY(55px);
}
translateZ()
The translateZ() CSS function is used with the transform property and with the
perspective function, and it looks like this:
transform: perspective(100px) translateZ(77px);
Description
This is used to move an element on the Z axes on a three-dimensional plane. It
supports both length and percentage values. Negative values are allowed.
In order to be able to see this function work, we need to give the element in
question a three-dimensional plane with the perspective function; otherwise, the
translateZ() declaration will have no effect.
CSS:
.element {
transform: perspective(100px) translateZ(77px);
}

Chapter 7
[ 299 ]
Colors
Colors can make or break a design, there are many ways to go about creating palettes
and all that good stuff.
Let's take a look at HSL(a) and RGB(a).
hsl() and hsla()
The hsl() and hsla() CSS functional notations set the color in HSL/HSLa formats,
and they look like this:
background-color: hsl(10, 20%, 30%);
background-color: hsla(10, 20%, 30%, .5);
Description
HSL stands for Hue, Saturation, and Lightness (or Luminance). The a stands for
Alpha, which is the alpha channel, with which we declare the transparency of the
color.
The hsl() function supports three or four values separated by commas. The rst
value is the hue, which is the base color. This is declared with a unitless number. This
number represents an angle in degrees (10 = 10º) in the color wheel from 0 to 360. So,
0 and 360 are Red, 90 is Yellow-Green, 180 is Cyan, and 270 is Blue-Magenta.
The second value is the saturation, which is basically the amount of the base color.
This is declared with a percentage value. 0% means there is no base color at all and it
shows gray. 100% means the base color is full.
The third value is the lightness, also known as luminance. This is basically the
brightness of the base color. 0% means there is no lightness, hence it's black. 100% is
full lightness, hence it looks white. 50% means the base color is full.
The fourth value is the alpha channel. This is the transparency of the color. It's
declared with a unitless numeric decimal value from 0 to 1. Complete transparent is
0, and 1 is fully opaque.
The great advantage that HSL color naming system has over RGB is that it is more
intuitive. Once we choose a base color, we can easily create a palette based on that
color by only changing the saturation and lightness values.
You can see the HSL color wheel in CodePen: http://tiny.cc/hsl-color-wheel

CSS Functions
[ 300 ]
CSS:
/*HSL*/
.element { background-color: hsl(240, 100%, 50%); }
/*HSLa*/
.element { background-color: hsla(10, 20%, 30%, .5); }
rgb() and rgba()
The rgb() and rgba() CSS functional notations set the color in RGB/RGBa formats,
and they look like this:
background-color: rgb(240, 100, 50);
background-color: rgba(10, 20, 30, .5);
Description
RGB stands for Red, Green and Blue. The a stands for Alpha, which is the alpha
channel with which we declare the transparency of the color.
This supports three or four unitless numeric values separated by commas, or three
percentage values and one unitless numeric value. The last value is for the alpha channel.
The numeric values range from 0 to 255. The percentage values range from 0% to
100%. For example, we can represent the color green as rgb(0, 255, 0) or
rgb(0, 100%, 0).
As I just mentioned, the fourth value is the alpha channel. This is the transparency of
the color. It's declared with a unitless numeric decimal value from 0 to 1. Complete
transparent is 0, and 1 is fully opaque.
CSS:
/*RGB*/
.element { background-color: rgb(240, 100, 50); }
/*RGBa*/
.element { background-color: rgba(10, 20, 30, .5); }
Gradients
For those who didn't know, CSS gradients are actually images. But these images are
created by the browser the moment it sees a gradient color declared. The thing with
these images is that they are created on the y and do not cause any HTTP requests.

Chapter 7
[ 301 ]
CSS gradients are so powerful that we can not only create gradients in any direction
and various shapes, but we can also create amazing patterns.
With this being said, Lea Verou has an amazing library of CSS patterns created
with gradients everyone reading this book should bookmark. Check it out here:
http://tiny.cc/leave-verou-css3-patterns
Let's see how to create gradients in CSS.
linear-gradient()
The linear-gradient() CSS function creates a gradient that transitions from one
color to another in a line. It looks like this in its simplest form:
background-image: linear-gradient(red, blue);
Description
We can create linear gradients that obey practically any direction called the gradient
line: left to right, right to left, top to bottom, bottom to top, diagonal, and at any
degree in a 360º radius.
If no direction for the gradient line is specied, the default value is from top
to bottom.
Any amount of colors can be declared in the gradient line. Technically speaking,
there's no limit, but from a design standpoint we should always try to keep it simple.
At least two color values are required.
The linear-gradient() function supports all color modes: HEX, RGB, RGBa, HSL,
HSLa, and color name.
Direction
We can also declare the direction of the gradient line via an angle value or four
keyword values: to top, to bottom, to left, and to right.
• to top: The gradient will start at the bottom and end at the top
• to bottom: The gradient will start at the top and end at the bottom
• to left: The gradient will start at the right and end at the left
• to right: The gradient will start at the left and end at the right
The angle value is dened at the beginning of the declaration and can range from 0 to
360. Larger values wrap around the circumference.
CSS Functions
[ 302 ]
Color stops
We can also dene where a color stops in the gradient. A color stop is a combination
of a color value followed by a stop position, which is optional.
Stop positions can be declared in any length value or a percentage value and go after
the color value.
Percentage values are more commonly used due to the fact
that they can scale with the element. Pixel values are ne too,
but they just don't have the same versatility as relative units.
Color stops are very exible because they allow us to make solid transitions between
colors. This is great for making patterns or other types of graphics that require solid
color transitions, like country ags.
When the stop positions aren't declared, the browser distributes the gradient colors
evenly along the gradient line.
CSS:
/*Basic gradient. Colors are distributed evenly along the gradient
line*/
.element { background-image: linear-gradient(red, blue); }
/*Gradient goes from right to left and starts with color red*/
.element { background-image: linear-gradient(to left, red, blue); }
/*Gradient line is diagonal; inclined 170 degrees*/
.element { background-image: linear-gradient(170deg, red, blue); }
/*Gradient with stop positions in percentages*/
.element { background-image: linear-gradient(red 50%, blue 75%); }
/*Gradient with stop positions in pixels*/
.element { background-image: linear-gradient(red 100px, blue
150px); }
/*Colombian flag (yellow, blue and red bands) made with solid
color transitions using stop positions*/
.element { background-image: linear-gradient(#fcd116 50%, #003893
50%, #003893 75%, #ce1126 75%); }
radial-gradient()
The radial-gradient() CSS function creates a gradient that transitions from
one color to another but in circular or elliptical form, and it looks like this in its
simplest form:
background-image: radial-gradient(orange, green);

Chapter 7
[ 303 ]
Description
There are three parts to a radial gradient: its center, its ending shape, and color stops.
The center denes the location in the element from which the radial gradient will
start; a radial gradient doesn't have to start at the center of an element. The ending
shape denes if the radial gradient is going to be a circle or an ellipse. The ellipse
shape is the default shape if the circle keyword isn't declared. The color stops
are the colors that make the gradient and, if declared, any stop positions which are
optional. Remember that stop positions can be declared in any length value or a
percentage value and go after the color value.
At least two colors are required to make a radial gradient, or any gradient for that
matter.
Position
We can dene where the center of the radial gradient is located within the element.
As I mentioned before, the default position is at the center of the element.
To declare a specic position we use the keyword at and dene the X and Y axes
coordinates. This value should go before any color value is declared but after the
ending shape.
The X and Y axes coordinates can be declared in any length value, a percentage value
or any of the keyword values, top, right, bottom, and left. This is pretty much the
same way we declare the background-position on an element.
The position requires an ending shape to be declared, either circle or ellipse;
otherwise, the declaration is invalid.
Sizing
We can also change the size of the radial gradient. The size of the gradient is declared
before the position but it can go before or after the ending shape. It can take one or two
values for width and height. If one value is declared it will be used for both.
The size can be dened with a length value, a percentage value, or one of four keyword
values: closest-corner, farthest-corner, closest-side, and farthest-side.
• closest-corner: The size of the gradient depends on the corner that is
closest to the center.
• farthest-corner: The size of the gradient depends on the corner that is
farthest from the center.

CSS Functions
[ 304 ]
• closest-side: The size of the gradient depends on the side that is closest to
the center.
• farthest-side: The size of the gradient depends on the side that is farthest
from the center.
CSS:
/*Basic gradient. Colors are distributed evenly in the ellipse*/
.element { background-image: radial-gradient(red, blue); }
/*Ending shape declared as circle*/
.element { background-image: radial-gradient(circle, red, blue); }
/*Position declared (only one value). Gradient will start at the
left and center*/
.element { background-image: radial-gradient(circle at left, red,
blue); }
/*Position declared (two values)*/
.element { background-image: radial-gradient(circle at left top,
red, blue); }
/*Position declared with percentages. An ending shape value is
required*/
.element { background-image: radial-gradient(circle at 25% 75%,
red, blue); }
/*Size of the gradient declared in pixels*/
.element { background-image: radial-gradient(100px 50px ellipse at
25% 75%, red, blue); }
/*Size of the gradient relative to the farthest side of the
element. Ending shape can be after or before size*/
.element { background-image: radial-gradient(circle farthest-side
at 25% 75%, red, blue); }
repeating-linear-gradient()
The repeating-linear-gradient() CSS function is used to repeat a gradient
image, and it looks like this:
background-image: repeating-linear-gradient(orange 50px, green
75px);
Description
The repeating-linear-gradient() function uses the same syntax and values as
the linear-gradient() CSS function, so please refer to that function for a detailed
explanation of all the available values.

Chapter 7
[ 305 ]
In order for the repeating-linear-gradient() function to work, we need to dene
stop positions on the colors. Otherwise, the repeated gradient will look as if we're just
using linear-gradient().
CSS:
/*Basic repeating linear gradient*/
.element { background-image: repeating-linear-gradient(orange
50px, green 75px); }
/*Repeating gradient goes from right to left and starts with color
orange*/
.element { background-image: repeating-linear-gradient(to left,
orange 50px, green 75px); }
/*Repeating gradient line is diagonal; inclined 170 degrees*/
.element { background-image: repeating-linear-gradient(170deg,
orange 50px, green 75px); }
/*Repeating gradient with stop positions in percentages*/
.element { background-image: repeating-linear-gradient(orange 25%,
green 50%); }
repeating-radial-gradient()
The repeating-radial-gradient() CSS function is used to repeat a gradient
image, and it looks like this:
background-image: repeating-radial-gradient(navy 50px, gray 75px);
Description
The repeating-radial-gradient() function uses the same syntax and values as
the radial-gradient() CSS function, so please refer to that function for a detailed
explanation of all the available values.
In order for the repeating-radial-gradient() function to work, we need to dene
stop positions on the colors. Otherwise, the repeated gradient will look as if we're just
using radial-gradient().
CSS:
/*Basic repeating linear gradient*/
.element { background-image: repeating-radial-gradient(navy 50px,
gray 75px); }
/*Ending shape declared as circle*/
.element { background-image: repeating-radial-gradient(circle,
navy 50px, gray 75px); }

CSS Functions
[ 306 ]
/*Position declared (only one value). Gradient will start at the
left and center*/
.element { background-image: repeating-radial-gradient(circle at
left, navy 50px, gray 75px); }
/*Position declared (two values)*/
.element { background-image: repeating-radial-gradient(circle at
left top, navy 50px, gray 75px); }
/*Position declared with percentages. Defaults to ellipse shape
unless 'circle' is specified*/
.element { background-image: repeating-radial-gradient(at 25% 75%,
navy 50px, gray 75px); }
/*Size of the gradient declared in pixels*/
.element { background-image: repeating-radial-gradient(200px 25px
at 25% 75%, navy 50px, gray 75px); }
/*Size of the gradient relative to the farthest side of the
element. Ending shape can be after or before size*/
.element { background-image: repeating-radial-gradient(circle
farthest-side at 25% 75%, navy 50px, gray 75px); }
Values
The following CSS functions allow us to declare many custom values for various
results. Let's check them out.
attr()
The attr() CSS function allows us to target the value of any HTML attribute and
use in CSS, and it looks like this:
attr(href);
Description
The term attr is the abbreviation of the word attribute. This CSS function targets an
HTML attribute and uses its value to accomplish different things via CSS.
In CSS, the attr() function is most commonly used with the content property
together with the :after CSS pseudo-element to inject content into the document,
but in reality the attr() function can be used with any other CSS property.
In HTML, it's very common to use the attr() CSS function to target the HTML5
data- or the href attributes. The attr() function can be used to target any HTML
attribute.
Chapter 7
[ 307 ]
In CSS3 the syntax of the attr() CSS function is a bit different. It accepts not only
an attribute value but it also accepts two more arguments, a type-or-unit argument
and an attribute fallback argument. The type-or-unit argument is optional. It tells the
browser which type of attribute is in order to interpret its value. The attribute fallback
argument denes a fallback value in case something goes wrong during the parsing
of the main attribute of the element.
The new CSS3 syntax that includes the type-or-unit and
the attribute fallback arguments is not stable and it may
potentially be dropped from the spec. Do your research
before deciding to use the new syntax.
A good practice for printing web documents is to print the URL next to the linked
element. Another common practice is to use a combination of the attr() CSS
function with the content property and the HTML5 data- attribute in responsive
tables to inject the content of a cell (usually a heading) next to their corresponding
value via CSS, thus saving space.
CSS:
/*Print the links from the content*/
@media print {
main a[href]:after {
content: attr(href);
}
}
Responsive Table
When the viewport width is 640px or less, the table will become responsive. This is
accomplished by combining the use of the attr() CSS function with the content
property and the HTML5 data- attribute.
HTML:
<table>
<tr class="headings">
<th>Plan</th>
<th>Price</th>
<th>Duration</th>
</tr>
<tr>
<td data-label="Plan:">Silver</td>
<td data-label="Price:">$50</td>

CSS Functions
[ 308 ]
<td data-label="Duration:">3 months</td>
</tr>
</table>
CSS:
/*40em = 640÷16*/
@media (max-width:40em) {
/*Behave like a "row"*/
td, tr {
display: block;
}
/*Hide the headings but not with display: none; for
accessibility*/
.headings {
position: absolute;
top: -100%;
left: -100%;
overflow: hidden;
}
/*Inject the content from the data-label attribute*/
td:before {
content: attr(data-label);
display: inline-block;
width: 70px;
padding-right: 5px;
white-space: nowrap;
text-align: right;
font-weight: bold;
}
}
calc()
The calc() CSS function allows us to perform mathematical calculations, and it
looks like this:
width: calc(100% / 2 + 25px);
Or like this:
padding: calc(5 * 2px - .25em);

Chapter 7
[ 309 ]
Description
We can perform those calculations with addition (+), subtraction (-), division (/),
and multiplication (*). It's commonly used to calculate relative values for width and
height, but as you saw, we can use this function with any CSS property.
A few things to consider are that a space is required before and after the addition
(+) and subtraction (-) operators, otherwise a subtraction, for example, can be
considered to have a negative value, for example, calc(2.5em -5px). This
calc() function is invalid since the second value is considered a negative value.
Space is required after the subtraction (-) operator. However, the division (/) and
multiplication (*) operators don't require the spaces.
Now, when doing a division (/), the value on the right must be a number value. For a
multiplication (*) operation, at least one of the values must be number value as well.
CSS:
/* The element's width is half its intrinsic width plus 25px*/
.element { width: calc(100% / 2 + 25px); }
/*The element's padding is 10px minus .25em of the result*/
.element { padding: calc(5 * 2px - .25em); }
url()
The url() CSS function is used to point to an external resource, and it looks like this:
background-image: url(..images/sprite.png);
Description
The url() function uses the URL value to point or link to a resource. URL stands for
Uniform Resource Locator.
This function is commonly used with the background or background-image
properties, but it can be used with any of the properties that take a URL as a value,
like @font-face, list-style, cursor, and so on.
The URL can be quoted using single (' ') or double quotes (" "), or not quoted at
all. However, there can't be any combinations of quote styles such as starting with a
single quote and ending with a double quote.
Also, double quotes inside a URL that uses single quotes and single quotes inside a
URL that uses double quotes must be escaped with a backslash (\). Otherwise, it will
break the URL.

CSS Functions
[ 310 ]
The URL pointing to the resource can be either absolute or relative. If it's relative, it's
relative to the location of the style sheet in the folder structure, not the webpage itself.
The url() CSS function also supports Data URI's, which is basically the code of
an image. So instead of pointing the selector to download an image in the /images
folder, we can embed the actual image in the CSS.
Be careful with this because although we are reducing an HTTP request (and that's a
huge win), we might be making the CSS le larger and a bit harder to maintain if the
image changes. There can also be potential performance and render-blocking issues.
For more information about Data URIs, you can read this great article by Nicholas
Zakas: Data URIs Explained (https://www.nczonline.net/blog/2009/10/27/
data-uris-explained/).
CSS:
/*Colombian flag icon as Data URI. No quotes in URL*/
.element { background:
url(data:image/png;base64,iVBORw0KGgoAAAANSUhEUgAAABAAAAALCAYAAAB2
4g05AAAABHNCSVQICAgIfAhkiAAAAAlwSFlzAAALEgAACxIB0t1+/AAAABx0RVh0U2
9mdHdhcmUAQWRvYmUgRmlyZXdvcmtzIENTNui8sowAAAAkSURBVCiRY3y7leE/AwWA
iRLNw8QARgbO40M8EBnvMgz1dAAAkeoGYBluZXgAAAAASUVORK5CYII=) #ccc no-
repeat center; }
/*Custom cursor. Single quotes in URL*/
.element { cursor: url('../images/cursor.cur') 10 10, default; }
/*Web font. Double quotes in URL*/
@font-face {
font-family: Franchise;
src: url("../fonts/franchise.woff") format("woff");
}
cubic-bezier()
The cubic-bezier() function allows us to create custom acceleration curves, and it
looks like this:
animation-timing-function: cubic-bezier(.42, 0, 1, 1);

Chapter 7
[ 311 ]
Description
The cubic-bezier() function is used with the animation-timing-function and
the transition-timing-function CSS properties. Most use cases can benet from
the already dened easing functions we mentioned in Chapter 4, CSS Properties
– Part 1, (ease, ease-in, ease-out, ease-in-out, and linear); if you're feeling
adventurous, cubic-bezier() is your best bet.
Refer to the animation-timing-function CSS property in Chapter 4, CSS Properties
– Part 1, to see what a Bézier curve looks like. The cubic-bezier() function takes
four parameters in the form of:
animation-timing-function: cubic-bezier(a, b, a, b);
Let's represent all ve predened easing functions with the cubic-bezier()
function:
• ease: animation-timing-function: cubic-bezier(.25, .1, .25, 1);
• ease-in: animation-timing-function: cubic-bezier(.42, 0, 1, 1);
• ease-out: animation-timing-function: cubic-bezier(0, 0, .58, 1);
• ease-in-out: animation-timing-function: cubic-bezier(.42, 0,
.58, 1);
• linear: animation-timing-function: cubic-bezier(0, 0, 1, 1);
I'm not sure about you, but I prefer to use the predened values.
Now, we can start tweaking and testing each value to the decimal, save, and wait for
the live refresh to do its thing. But that's too much wasted time testing if you ask me.
The amazing Lea Verou created the best web app to work with Bézier curves: www.
cubic-bezier.com. This is by far the easiest way to work with Bézier curves. I
highly recommend this tool.
The Bézier curve image showed previously was taken from the www.cubic-bezier.
com website.
CSS:
.element {
width: 300px;
height: 300px;
animation: fadingColors 2s infinite alternate 3s none running
cubic-bezier(.42, 0, 1, 1);
}

CSS Functions
[ 312 ]
Miscellaneous
The following CSS functions have no specic category, so we grouped them here in a
miscellaneous section.
Let's see what we have.
drop-shadow()
The drop-shadow() CSS function works with the filter property adds a shadow
under the element, and it looks like this:
drop-shadow(5px 5px 3px rgba(0, 0, 0, .5));
Description
The drop-shadow() function works almost exactly the same way as the box-shadow
property with two differences: the drop-shadow() function doesn't support the
spread-radius or the inset values.
Please refer to the box-shadow property for a detailed description of all the values.
Additionally, some browsers actually provide hardware acceleration when using this
function, which eventually improves performance. You know how it goes; anything
we can do to improve performance is always a +1.
CSS:
.element {
filter: drop-shadow(5px 5px 3px rgba(0, 0, 0, .5));
}
element()
The element() CSS function allows us to use any HTML element as a background
for another HTML element, and it looks like this:
background: element(#other-element);
Description
Use cases for the element() function are rare, but nonetheless it is available to us
(granted, browser support isn't ideal yet).

Chapter 7
[ 313 ]
CSS:
.element {
background: element(#other-element);
}
image()
The image() CSS function allows us to target an image le to be used as background,
and it looks like this:
image(../images/sprite.png);
Description
The image() function is practically the same as the url() function and it's
considered to be more exible and ideal to declare background images rather than
using the commonly known url() function. However, the image() CSS function is
at risk from being dropped from the spec due to lack of browser support.
CSS:
.element {
background-image: image(../images/sprite.png);
}
opacity()
The opacity() CSS function works with the filter property. It denes the
transparency (opacity) of an element, and it looks like this:
filter: opacity(.2);
Description
When this function is applied to an element, the element itself and its children are
affected. This function supports a numeric value ranging from 0 (zero) to 1 which
is the default value. A value of 0 is completely transparent, as in 0% opaque, and
1 is 100% opaque, no transparency whatsoever. Decimal numbers are allowed but
negative values are not.
CSS:
.element {
filter: opacity(.2);
}

CSS Functions
[ 314 ]
perspective()
The perspective() CSS function is used with the transform CSS property, and it
looks like this:
perspective(300px);
Description
This value gives three-dimensional perspective to the element. The element in
question will react in a three-dimensional plane.
This function works similarly to the perspective property, and the difference is that
the perspective() function is used to give perspective to a single element. Hence, it's
applied to the element itself. The perspective property is good for giving perspective
to several elements at once, hence it is applied to the parent element instead.
For example, if we apply the perspective() function to every element on a list,
each element will have its own vanishing point. But if we apply the perspective
property to the parent container of that list, all elements will share the same
vanishing point.
The perspective() function on its own doesn't do much, so in order to see it in
action we must combine it with any of the other transform functions like rotate(),
rotateX(), or rotateY().
It accepts a numeric value with a length unit. Negative values are not allowed. The
value denes the distance of the Z axes from the user.
The higher the value, the less intense the perspective. This is because the element
is farther away from us. However, the lower the value, the more pronounced the
perspective looks. This is because the element is closer to us.
CSS:
.element {
transform: perspective(300px) rotateY(45deg);
}
rect()
The rect() CSS function is used to create a rectangle-shaped clipping mask with the
clip property, and it looks like this:
clip: rect(0, 100px, 200px, 0);
Chapter 7
[ 315 ]
The clip CSS property is now deprecated due to poor features
and limitations with SVGs. The current and widely supported
clip-path property is part of the SVG specication and it has
been adopted by the CSS Masking module.
Description
This function only works with the clip property, and as I mentioned, this
property is now deprecated. Also, this CSS function does not work with the more
modern clip-path CSS property, so the recommendation is to use the inset()
CSS function instead.
Refer to the inset() CSS function in Chapter 6, CSS Properties – Part 3.
At-rules
CSS at-rules start with the @ character and are followed by a keyword or identier.
They always have to end with a semicolon (;) character.
Some of the most popular at-rules are @font-face, which is used to declare custom
fonts; @import that is used to import external CSS les (not recommended by the
way for performance reasons), and it is also used in some CSS preprocessors to
bring external partial les that will eventually get compiled into a single CSS le
(recommended method); @media is used to declare media queries in our responsive
projects or print style sheets and so on; @keyframes is used to create animations and
so on.
At-rules, let's see where they're at.
@charset
The @charset() at-rule denes the character encoding to be used by a style sheet,
and it looks like this:
@charset "UTF-8";
Description
We rarely need to dene the character encoding in a style sheet as long as it's dened
in the HTML. When the browser detects the character encoding in the HTML, it
implies that it's the same character encoding for the CSS le(s).

CSS Functions
[ 316 ]
If you like to declare the character encoding in your CSS les, that's ne too. If you
plan to use this in a style sheet, it should be the rst thing at the top of the le. It
cannot have a space character before the @ symbol, or a blank line above it. The
character encoding name should always be inside quotes, either single (' ') or double
quotes (" ").
CSS:
/*Correct character encoding directive*/
@charset "UTF-8";
/*Character encoding of the CSS is set to Latin-9 (Western
European languages, with Euro sign)*/
@charset 'iso-8859-15';
/*This is invalid, there is a space before the @ symbol*/
@charset "UTF-8";
/*This is invalid, character encoding name should be inside single
[''] or double quotes [""]*/
@charset UTF-8;
@document()
The @document() at-rule allows to dene styles that only apply to a certain pages of
a site, and it looks like this in one of its forms:
@document url('http://website.com/page.html') { ... }
Description
There are four CSS functions that are exclusive to the @document() at-rule: url(),
url-prefix(), domain(), and regexp(" "). Multiple functions can be dened in a
single declaration.
The values inside the functions can either be declared without quotation marks, or
use single (' ') or double quotes (" "). Only the regexp("") function requires the
use of double quotes (" ").
• url(): This restricts the styles to a document that matches the URL
• url-prefix(): This restricts the styles to a document that start with the
specified URL
• domain(): This restricts the styles to a document's specific domain
• regexp(""): This restricts the styles to a document that match the regular
expression

Chapter 7
[ 317 ]
CSS:
/*url() function*/
@document url('http://website.com/page.html') { ... }
/*url-prefix() function*/
@document url-prefix("http://website.com/about/") { ... }
/*domain() function*/
@document domain(website.com) { ... }
/*regexp() function*/
@document regexp("https:.*")
/*Multiple functions in a single declaration*/
@document url('http://website.com/page.html') { ... },
url-prefix("http://website.com/about/") { ... },
domain(website.com) { ... },
regexp("https:.*") { ... }
@font-face
The @font-face() at-rule is used to dene custom fonts to use on a document, and
it looks like this in its simplest form:
@font-face {
font-family: Franchise;
src: url("../fonts/franchise.woff") format("woff");
}
Description
The @font-face() at-rule has been around for actually more years than many
believe, so our buddy IE6 supports this function. With the @font-face() at-rule, we
can target custom font les to use on a website/webapp and extend the design and
branding possibilities way beyond system fonts.
One peculiarity of custom fonts is that different versions of each browser support
one format but not another or even has its own proprietary font format.
Paul Irish's article Bulletproof @font-face Syntax, where the smiley face technique
originated, is a must-read @font-face article for all web designers and developers
(http://tiny.cc/paul-irish-font-face).
The ve font formats we need to account for are: WOFF/WOFF2, EOT, TTF, OTF,
and SVG.

CSS Functions
[ 318 ]
WOFF/WOFF2
WOFF stands for Web Open Font Format and was created by Mozilla. The WOFF
format is a wrapper for OTF/TTF font formats and it provides better font data
compression than any other format, thus making the le(s) smaller.
WOFF2 is basically WOFF on steroids. It provides even more compression, about 30
percent in average and in some cases up to 50 percent more.
All modern browsers support these two formats.
EOT
EOT stands for Embedded Open Type and was created by Microsoft. Only old
versions of IE (IE6 to IE8) require the use of this font format. No other browsers
support this format, so if we don't need to support legacy browsers, we do not need
to declare a link to this font format in the @font-face() at-rule declaration.
OTF and TTF
OTF and TTF stand for OpenType Font and TrueType Font. These font formats are
cross-platform compatible and include advanced layout features and information for
expert typographic control. OTF is a newer format and has a few more features than
TTF, such as small caps, ligatures, fractions, and so on.
SVG
SVG stands for Scalable Vector Graphic. An SVG font le doesn't really have a font;
it has vector representations of the font. This type of font le is used when old iOS
devices need to be supported. However, if this type of font is not declared, the old iOS
device will simply use a system font instead, which if you ask me, I'm totally ne with.
The values inside the @font-face brackets are called the font descriptors. In it, we
can declare several values: font-family, src, font-variant, font-stretch, font-
style, font-weight, and unicode-range.
font-family
This is a required value. It denes the name of the font to be used in the style sheet.
src
This is a required value. It denes the location or URL of the font le(s). Multiple
URLs can be dened in the same src declaration block to account for the different
types of fonts that each browser supports. However, legacy IEs choke when it nds
multiple URLs in the same src declaration block, so an independent src declaration
block needs to be declared if support for legacy IEs is required.

Chapter 7
[ 319 ]
In addition to targeting external les with URLs, we can also target locally installed
les with the local() function.
font-variant
The font-variant CSS property turns the targeted text into small caps. In CSS3, it's
considered a shorthand and has been extended with new values, which developers
rarely use. Refer to Chapter 5, CSS Properties – Part 2, for more information.
font-stretch
The font-stretch CSS property allows us to select a condensed, normal, or expanded
face from the font family in question. Refer to Chapter 5, CSS Properties – Part 2, for
more information.
font-weight
The font-weight CSS property denes the thickness (weight) of the font. Refer to
Chapter 5, CSS Properties – Part 2, for more information.
unicode-range
The unicode-range CSS property descriptor denes a specic range of characters or
glyphs that should be downloaded from a font declared in a @font-face declaration.
This is helpful, for example, when working on a site with different languages. By
declaring unicode-range, the browser only downloads the specic characters of that
language for that page, thus saving bandwidth and optimizing performance.
This property is rarely used.
Google fonts
We can't talk about @font-face without talking about Google Fonts. Google Fonts
is a free web font service that allows us to practically skip all the manual work
of creating @font-face declaration block in our CSS les by giving us an HTML
<link> that points to the font(s) we selected.
Check out Google Fonts at http://tiny.cc/google-fonts
HTML:
<!-- Google Fonts link snippet -->
<link href='https://fonts.googleapis.com/css?family=Roboto'
rel='stylesheet' type='text/css'>

CSS Functions
[ 320 ]
CSS:
/*Full descriptive @font-face declaration*/
@font-face {
font-family: Roboto;
/*IE9 Compat Modes*/
src: url("../fonts/roboto.eot");
/*Locally installed font file*/
src: local("roboto"),
/*IE6-IE8*/
url("../fonts/roboto.eot?#iefix") format("embedded-
opentype"),
/*Modern Browsers*/
url("../fonts/roboto.woff2") format("woff2"),
url("../fonts/roboto.woff") format("woff"),
/*Safari, Android, iOS*/
url("../fonts/roboto.ttf") format("truetype"),
/*Old iOS devices*/
url("../fonts/roboto.svg#roboto") format("svg");
/*Unicode range*/
unicode-range: U+0400-045F, U+0490-0491, U+04B0-04B1, U+2116;
/*Font properties*/
font-weight: normal;
font-style: normal;
}
/*Recommended @font-face syntax*/
@font-face {
font-family: Roboto;
src: url("../fonts/roboto.woff2") format("woff2"),
url("../fonts/roboto.woff") format("woff");
font-weight: normal;
font-style: normal;
}
/*Usage*/
.element {
font-family: Roboto, Arial, Helvetica, san-serif;
}
@import
The @import() at-rule is used to import a style sheet into another, and it looks
like this:
@import "other-style-sheet.css";
Chapter 7
[ 321 ]
Description
The previous example targets another style sheet with a string value. But style
sheets can also be imported using the url() function.
The @import rules should always precede any other rules except the @charset rule,
otherwise, it will be ignored by the browser.
One thing to take into consideration is cascading. Imported style sheets cascade
in the order they are imported. There is also a way to specify the media a specic
imported style sheet is for via media queries. If more than one media query is
declared, it needs to be separated by commas.
It's a known fact that using @import has a negative impact on
performance due to sequential downloading instead of parallel
downloads and multiple HTTP requests. Read more about this
issue on Steve Souders' article Don't Use @import at
http://tiny.cc/steve-souders-avoidimport
CSS:
/*Import a style sheet in the same directory*/
@import "other-style-sheet.css";
/*Import a style sheet from a relative path*/
@import url(../other-stylesheets/other-style-sheet.css);
/*Import a style sheet with an absolute path*/
@import url(http://website.com/other-stylesheets/other-style-
sheet.css);
/*Define a print style sheet with the 'print' media query*/
@import "print.css" print;
/*Declare multiple media queries*/
@import "screen.css" screen, projection;
/*Use more a commonly known media query*/
@import url("portrait.css") screen and (orientation: portrait);
@keyframes
The @keyframes() at-rule is used to list CSS properties to be animated, and it looks
like this:
@keyframes animationName {
from {
/*Animation properties START here*/
}
to {

CSS Functions
[ 322 ]
/*Animation properties END here*/
}
}
Description
The animation created with the @keyframes at-rule only runs for one cycle. If we want
the animation to play over and over, ease-in, ease-out, or show other behavior, we
need to declare those properties in the element itself, outside the @keyframes at-rule.
Please refer to the Animation section in Chapter 4, CSS Properties – Part 1, for detailed
explanations of those CSS properties.
The animation's name (also called an identier) always comes after the @keyframes
keyword separated by a space. This animation name will later be referenced with the
animation-name or animation shorthand CSS properties.
The beginning and end of an animation can be declared with the two selector
keywords from and to, or with two keyframe selectors 0% and 100%. Negative values are
not allowed.
Obviously, we can declare intermediate waypoints but we can only do this using
keyframe selectors. There is no limit to the amount of properties that can be declared
in the @keyframes at-rule. However, some browsers animate properties that the spec
says can't be animated, while others follow the spec correctly. Granted, the spec is
unclear about some of the denitions, so make sure to run proper tests.
Now the difference between using @keyframes at-rule and the transition property
is that with the @keyframes at-rule we have the power of dening what happens in
the middle waypoints rather than letting the browser gure it out for us.
Basically, if we have a simple animation, we can just use the transition property. If
we have somewhat more complex and elaborate animations, use @keyframes.
CSS:
@keyframes diamond {
from {
top: 0;
left: 0;
}
25% {
top: 200px;
left: -200px;
}
50% {

Chapter 7
[ 323 ]
top: 400px;
left: 0;
}
75% {
top: 200px;
left: 200px;
}
to {
top: 0;
left: 0;
}
}
.element {
position: relative;
animation: diamond 3s infinite ease-in-out;
}
@media
The @media() at-rule allows us to dene a set of CSS styles that apply to a certain
media type, and it looks like this:
@media (min-width: 40em) { ... }
You can use the preceding code or the following code as well:
@media print { ... }
Description
This piece of CSS allows us to declare any set of styles to a specic media type.
The two types of directives that come after the @media() at-rule, for example, print
and screen and even (min-width: 40em) or (max-width: 40em), and they are
called media queries.
The keywords (print and screen) are called media types. And the ones that test
specic features of a User Agent (UA) or display are called media features.

CSS Functions
[ 324 ]
Media types
Media types are case-sensitive. There are 10 media types that we can use with the
@media() at-rule:
• all: This is meant to work on all devices
• braille: This is meant to work with braille tactile-feedback devices
• embossed: This is meant to work on braille printers
• handheld: This is meant to work with handled "mobile" devices
• print: This is meant to work for printing documents
• projection: This is meant to work with projectors
• screen: This is meant to work with computer screens of all sizes
• speech: This is meant to work with speech synthesizers
• tty: This is meant to work with teletypes
• tv: This is meant to work with televisions
CSS:
/*Viewport width media query*/
@media (min-width: 40em) {
header { background: red; }
}
/*Print media query*/
@media print {
*, *:before, *:after { background-image: none; }
}
@namespace
The @namespace() at-rule is used to dene the XML namespaces in a style sheet, and
it looks like this:
@namespace url(http://www.w3.org/1999/xhtml);
You can use the preceding code or the following code as well:
@namespace svg url(http://www.w3.org/2000/svg);

Chapter 7
[ 325 ]
Description
We use the @namespace() at-rule in a CSS document when we need to use selectors
that apply or target certain elements in a specic namespace. For example, we can
have an embedded SVG le in our HTML document. The thing is that SVGs share
common elements with HTML and XML, such as the <a> element. So instead of
creating a separate style sheet to target the SVG elements, we can declare an SVG
namespace with the @namespace() at-rule to target the <a> elements within the
same HTML document, thus we only have to work in one style sheet rather than two
(or more).
Now, the @namespace() at-rule is mostly used for legacy XHTML documents where
it's necessary to declare a namespace in the <html> element:
<html xmlns="http://www.w3.org/1999/xhtml" xml:lang="en" lang="en">
With the xmlns directive in place, we can now declare the namespaces in our CSS.
Finally, we can then target the <a> elements in the SVG block without affecting the
HTML <a> elements.
The URLs are merely to make the markup more readable and easier to understand
when someone is reading through it.
XHTML:
<!DOCTYPE html PUBLIC "-//W3C//DTD XHTML 1.0 Strict//EN"
"http://www.w3.org/TR/xhtml1/DTD/xhtml1-strict.dtd">
<html xmlns="http://www.w3.org/1999/xhtml" xml:lang="en" lang="en">
CSS:
@namespace "http://www.w3.org/1999/xhtml";
@namespace svg "http://www.w3.org/2000/svg";
svg|a {
background: orange;
}
@page
The @page() at-rule is used to modify certain properties of a page to get it ready for
printing, and it looks like this:
@page {
margin: 2cm;
}

CSS Functions
[ 326 ]
Description
When using the @page() at-rule, only a few properties of the page can be changed:
margins, widows, orphans, and page breaks. Declaring any other types of properties
will be ignored.
We can also declare if we want to target only the rst page, all the left pages only, or all
the right pages only with the :first, :left and :right pseudo-classes. The @page()
at-rule is most commonly used to change the margins.
CSS:
/*Affects all pages*/
@page {
margin: 2cm;
}
/*Affects all left pages only*/
@page :left {
margin: .8in;
orphans: 3;
}
/*Affects all right pages only*/
@page :right {
margin: 15mm;
}
@supports
The @supports() at-rule is used to detect a feature on a browser, and it looks
like this:
@supports (display: flex) { ... }
Description
Feature detection is something that's usually done with polylls like Modernizr. With
the @supports() at-rule, we can accomplish similar results via CSS only.
In order for this function to work properly, we need to specify a property and a value.
There are three keyword operators that we can use with the @supports() at-rule:
not, and and or.
The not operator
Just like we can check for features that the browser supports, we can also check for
features that the browser does not support using the not operator.

Chapter 7
[ 327 ]
The and operator
The and operator allows us to check for multiple CSS properties in the same
declaration.
The or operator
A good example of this operator is when we need to check for a vendor-prexed
CSS property in case we need to support legacy browsers. When using this operator,
if one of the expressions is true, it will make all other expressions valid as well.
Additionally, we can also combine operators when necessary.
CSS:
/*Detect a feature that is supported*/
@supports (transform: translateX(-50%)) {
.element {
transform: translateY(-50%)
}
}
/*Detect a feature that is NOT supported*/
@supports not (transform: translateX(-50%)) {
.element {
margin-left: 120px;
}
}
/*Detect multiple features*/
@supports (transform: translateX(-50%)) and (display: flex) {
.element {
transform: translateY(-50%);
justify-content: space-between;
}
}
/*Detect at least one feature*/
@supports (-webkit-box-pack: justify) or (-webkit-justify-content:
space-between) or (-ms-flex-pack: justify) or (justify-content:
space-between) {
.element {
justify-content: space-between;
}
}
/*Combining conditions*/
@supports (transform: translateX(-50%)) and ( (-webkit-justify-
content: space-between) or (justify-content: space-between) ) {
transform: translateY(-50%);
justify-content: space-between;
}
CSS Functions
[ 328 ]
Global CSS keyword values
The following list of keyword values is ubiquitous to web designers and developers,
but have you ever wondered what exactly they mean and do?
auto
The auto CSS keyword value tells the browser to automatically compute the CSS
property's value, and it looks like this:
margin: auto;
The term auto is short for automatic. It's not the same as saying 100% because 100%
is an actual dened value; auto is calculated by the browser.
One of the most common locations to see the keyword auto applied is when
centering an element horizontally with the margin CSS property.
CSS:
.element {
margin: auto;
}
I've seen most people use margin: 0 auto; to center an element.
This is ne, but the value zero (0) can be omitted. margin: auto;
is enough and yields the same result.
inherit
The inherit CSS keyword value makes an element derive/inherit the values of its
parent container.
CSS:
/*All <h1>'s are red*/
h1 { color: red; }
/*All text in .element is blue*/
.element { color: blue; }
/*Make all <h1>'s inside .element blue*/
.element h1 { color: inherit; }

Chapter 7
[ 329 ]
initial
The initial CSS keyword value sets the CSS property to its default value as per
the CSS spec.
CSS:
/*All <h1>'s are red*/
h1 { color: red; }
/*Set the color of all <h1>'s inside .element to the default
(black)*/
.element h1 { color: initial; }
none
The none CSS keyword value denes the lack of a specic styling.
CSS:
.element {
border: none;
}
normal
The normal CSS keyword value denes a standard value.
CSS:
.element {
font-weight: normal;
}
unset
The unset CSS keyword is the combination of the inherit and initial keywords,
and it looks like this:
color: unset;
By combining the inherit and initial keywords, the unset CSS keyword value
resets the value of a property.

CSS Functions
[ 330 ]
If an element is inheriting values from its parent container and the unset keyword
is declared, then the property's value is reset to the parent container's value (since
it's inheriting). But if an element has no parent container and the unset keyword is
declared, then its property's value is reset to the default value as per the spec (since
it's not inheriting).
CSS:
/*All <h1>'s are set to the default color per the spec*/
h1 { color: unset; }
/*All <h1>'s are set to the default color of the parent*/
.element { color: green; }
.element h1 { color: unset; }
revert
The revert CSS keyword value is like an undo in CSS as it returns the cascade to a
previous state and resets the property to the default value dened by the user agent.
It looks like this:
display: revert;
This is different from the initial CSS keyword because revert rolls back the
cascade and resets the value as per the user agent's style sheet value. With initial
the value is reset to its default value as per the specication.
For example, the spec says that the default value of display is inline. However,
most UAs assign a default value of display: block; to <div>, or display: table;
to <table>.
CSS:
/*Default value per the spec*/
display: inline;
/*Default value per the UA style sheet*/
div { display: block; }
/*Style defined by the developer/designer*/
.element { display: inline-block; }
/*Style sheet is rolled back and DIV behaves as display: block;*/
div.element { display: revert; }

Chapter 7
[ 331 ]
Summary
This conclude the chapters about CSS, pretty interesting stuff eh?
We learned about CSS Filters and how we can modify elements' colors without
having to rely on image editing tools. This also applies to CSS Transforms because
we can modify the shape and orientation of elements', at least to some extent, quite
easily with CSS only.
At the same time we learned about the different ways we can create colors in CSS,
and that HSL mode is more intuitive and versatile than any other color mode.
Calculating and declaring different values with the attr() or calc() functions
opens new possibilities in our CSS toolbox, for example, how to make responsive
tables.
We now know that to improve performance with drop shadows we can use the
drop-shadow() function; or to modify the transparency of an element we can use
the opacity() function; or the perspective of an element with the perspective()
function.
At-rules now make more sense I'm sure. Additionally, we addressed the different
font formats and learned that if we don't need to support legacy IEs we can just use
WOFF and WOFF2.
And nally, we got clarication on the all the global CSS keyword values like auto or
inherit that we use all the time and never really question what they are and how they
work.
Note that you don't have to know and remember all the CSS functions, you need to
know where to look—this book.

[ 333 ]
JavaScript Implementations,
Syntax Basics, and
Variable Types
JavaScript (JS) is a programming language mostly used to produce dynamic and
user-interactive webpages. A huge number of websites and all the latest Internet
browsers (clients) use and support JavaScript. It is a part of the stack of technologies
that every web developer must learn; these include HTML (the content), CSS (the
presentation of content), and JS (behavior of the content when a user interacts with
the webpage).
Previously, the use of JavaScript was just limited to input validations. For example,
it can produce an error message if the user enters invalid information or tries to
submit a form with missing information. Now, JS is acknowledged as a fully-edged
programming language that is capable of manipulating with complex calculations
and deals with all aspects of a client window. JS enhances the webpage by making
it more interactive. For instance, a page with scattered thumbnails can be converted
into a pretty stylish image gallery, content of the website can be loaded without
forcing the client to reload it over and over, different sorts of error handling can
be done in a nice way, user polls can be created and their results can be viewed on
a website, and playing with HTML elements on the go and much more is made
possible by the power of JavaScript.
JavaScript is quick—real quick. It responds instantly to user actions, such as clicking,
double-clicking, resizing, dragging, scrolling, and so on. JavaScript has a syntax that
is similar to that of the Java language. The name JavaScript causes confusion for many
people. Only the syntax of JS resembles the syntax of the Java language. Otherwise, it
has nothing to do with the Java programming language at all.

JavaScript Implementations, Syntax Basics, and Variable Types
[ 334 ]
The following are some of the key differences between Java (programming language)
and JS (scripting language):
• JavaScript is embedded into HTML and runs in a browser, while Java
requires a Java Virtual Machine (JVM) for its execution; however, Java
applets can run in browsers.
• JavaScript is known as a client-side language as it runs in the browser on the
client end, but now, Node.js is the gateway of JS to the server end. On the
other hand, Java runs on the web server, for example, Apache Tomcat.
• JavaScript is usually interpreted by the client, while Java is compiled and
then executed by a JVM.
• JavaScript was created by Netscape (now Mozilla) while Java was developed
by Sun Microsystems (now Oracle).
History of JavaScript
Brendan Eich of Netscape (now Mozilla) developed JavaScript in 1995. Originally,
it was named as Mocha, later its name was changed to Livescript, and nally
it was renamed to JavaScript. After its launch, Microsoft introduced Jscript—
their own version of JavaScript that was included in Internet Explorer. Netscape
submitted JavaScript to European Computer Manufacturers Association(ECMA)
for standardization and specication. The standardized version was named
ECMAScript. ECMAScript is a trademarked scripting language specication
standardized by ECMA International.
The ECMAScript V5 introduced a new mode called the strict mode; this brought
forward better and thorough error checking to avoid constructs that cause
errors. Many ambiguities from the third version were removed and real-world
implementations were added.
The ECMAScriptV6 added plenty of new syntax for writing complex programs. It
introduced classes and modules extending the semantics from V5. Iterators were also
added in this version along with many Python-styled semantics, including proxies,
arrow functions, generators and generator expressions, maps, sets, and so on.

Chapter 8
[ 335 ]
Evolution of JavaScript
After the standardization of JavaScript as ECMAScript, the next step was to have
complete control over Document Object Model (DOM).
The HTML is parsed into DOM by the web browser's DOM API. DOM is the client
understanding of the webpage. All the elements/nodes are converted into a tree-like
structure known as DOM Tree. The members of this tree can be manipulated on the
y using different methods such as getElementById()and getElementsByName().
The HTML source we see in developer tools, such as Inspect Element, Fire Bug, and
so on are DOM View. These development tools also help a lot to modify our DOM
instantly.
Later, Asynchronous JavaScript and XML (AJAX) was introduced to make
asynchronous applications. The data was sent to and received from the web server
without reloading or refreshing the whole DOM Tree (asynchronously).
As JavaScript advanced, different JS libraries were developed to ease DOM
manipulation. Some of the popular libraries are jQuery, Prototype, and Mootools.
The primary feature of these libraries is to handle DOM manipulations, animations,
and AJAX. The most famous and widely used JS library is jQuery. Furthermore, a
server-side version of JavaScript was developed and named Node.js.
In this book, you will learn about JavaScript, its history, and its evolution. You
will learn about its implementations and syntax. Function references and complete
examples for how to use it in different cases are also provided.
JavaScript implementations
As JavaScript and ECMA Script are used in similar context, JavaScript has much
more to offer than ECMAScript. It is implemented in the following three parts:
• Core JavaScript (ECMAScript)
• Document Object Model (DOM)
• Browser Object Model (BOM)

JavaScript Implementations, Syntax Basics, and Variable Types
[ 336 ]
Core JavaScript (ECMAScript)
JavaScript supports mobile devices as well as desktop computers; this feature
makes it a cross-platform scripting language. However, it is not much useful if used
alone, which is why it is used along with server-side languages to make powerful
and interactive applications. It can be easily integrated within a web browser
environment, enabling users to have complete control over the browser's objects
and events.
The core capabilities of JavaScript are also called ECMAScript. ECMAScript is not
actually browser-dependent or environment-dependent. It is a set of core language
elements that are used in different environments such as ScriptEase and Flash
Action Script. Hence, we can say that ECMA Script contains denitions for the
following:
• Language syntax
• Keywords/reserved words
• Data types
• Statements
• Operators
• Control structures
• Objects (for example, array, date, math and so on)
Therefore, ECMAScript denes all of the functions, methods, properties, and
objects of a scripting language. Other scripting languages such as JavaScript are
implementations of ECMAScript.
ECMAScript is implemented differently in various browsers, after which DOM and
BOM are included.
Document object model (DOM)
DOM is an Application Programming Interface(API) for HTML and XML
documents. It is a logical structure of the web document. It is a hierarchical tree view
of the nodes that are present in the document. The browser translates the document
into DOM and only understands it. DOM enables developers to take control over the
nodes and to make changes to the document on the y.
Chapter 8
[ 337 ]
For instance, this is a simple webpage:
<html>
<head>
<title>My Web Document</title>
</head>
<body>
<p>Javascript Reference!<p>
</body>
</html>
Browser object model (BOM)
While DOM deals with the document, Browser Object Model (BOM) deals with
the browser window. BOM enables programmers to perform several actions on the
browser window, which is not directly related to and has no impact on the HTML
document itself. BOM also deals with the browser objects, such as history, screen,
navigator, and location.
BOM is implemented differently in different clients.
Client-side JavaScript
JavaScript is primarily known as a client-side scripting language. Any language that
is used to write programs or scripts that are executed in a client (any web browser
such as Internet Explorer, Safari, Google Chrome, Mozilla Firefox, Opera, and so
on) is called a client-side scripting language. These scripts make your HTML look
interactive and dynamic. JavaScript enables user to interact with the web page's
content and the client window itself.
Adding JavaScript into a web page
Mostly, JavaScript code is embedded into the HTML within the <script> tags and
can be viewed by viewing the source of the page. A good practice to embed
JavaScript into your page is to place all the scripts in a separate le (a JavaScript le
having the .js le extension). Then, this le can be included on the page. When the
page is interpreted, it will be treated the same as if it was embedded on the same
page.
JavaScript Implementations, Syntax Basics, and Variable Types
[ 338 ]
The JavaScript les must be of a .js extension.
Since, the client is expecting HTML all the time, anything else such as styles or
scripts have to be enclosed in their specic tags; for example:
<style>
/* all css code */
</style>
<script>
//all scripts
</script>
The JavaScript interpreter is evoked as soon as the browser's rendering engine
discovers any <script> tag.
Most of the time, JavaScript lies within the <head> tags of the web document:
<html>
<head>
<title>My First JavaScript Example</title>
<script type="text/javascript">
alert("Hello earthlings!");
</script>
</head>
<body>
</body>
</html>
The type attribute species that the code enclosed within these <script> tags is
plain code written in JavaScript. It is not compulsory to mention the type attribute.
The preceding code can be written without it as well and will work exactly the same.
Although <script>tags can be placed anywhere within an HTML document,
another good practice is to place it at the end of the document before closing the
</body> tag so that all the pages are loaded before any script executes.

Chapter 8
[ 339 ]
Loading external JavaScript les
Just like external CSS les are included into the web page, JavaScript can also be
included into the webpage from external JavaScript les. Let's take a look at the
following HTML code:
<html>
<head>
<title> My First JavaScript Example </title>
<script src="external_javascript_Planets.js"></script>
</head>
<body>
</body>
</html>
The src attribute is very similar to that used in the image <img> tags. It just mentions
the reference path to the external JavaScript les, which are later included into the
page. Do not add any other JavaScript code into the <script> tags, which import
external JS les. If needed, place another <script> tag.
Multiple external JS les can also be included, as follows:
<html>
<head>
<title> My First JavaScript Example </title>
<script src="external_javascript_Moon.js"></script>
<script src="external_javascript_Sun.js"></script>
<script src="external_javascript)Stars.js"></script>
</head>
<body>
</body>
</html>
In cases where external JavaScript libraries, such as jQuery and MooTools
are used, the order in which the les are included has to be taken care of.

JavaScript Implementations, Syntax Basics, and Variable Types
[ 340 ]
Writing our rst program in JavaScript
Don't worry; it is not at all an alien language. It is a high-level language and can be
understood very easily as its statements, keywords, and other syntax is based on
basic English. The simplest way to learn any programming language is to jump into
it and play with its code. To get your feet wet in JavaScript, we will write a very basic
JavaScript program.
Prerequisites
The following are the prerequisites that are required to write our rst JavaScript
program:
•A web browser
•A text/code editor
•A web document
How to do it
1. Create a index.html le in any code editor you are comfortable with. Copy
and paste the following code into your document. It is a simple HTML code:
<html>
<head>
<title> My First JavaScript Example </title>
</head>
<body>
<h1>The Planetary System</h1>
</body>
</html>
2. Create a <script> tag after a <title> tag before closing the </head> tag
in the head section:
<html>
<head>
<title> My First JavaScript Example </title>
<script type="text/javascript"></script>
</head>
<body>
<h1>The Planetary System</h1>
</body>
</html>

Chapter 8
[ 341 ]
3. Insert alert("hello world"); document.write('<h2>This text has
been added by JavaScript!</h2>'); within the script tags.
4. The alert attribute is a JavaScript function that creates a popup with the
message written inside the quotes and parentheses. The message is treated
as a string passed to the alert function. Similarly, document.write is a
JavaScript function that outputs the given string on the webpage.
<html>
<head>
<title> My First JavaScript Example </title>
<script type="text/javascript">
alert("Hello Earthlings");
document.write('<h2>Greetings from Mars!</h2>');
</script>
</head>
<body>
<h1>The Planetary System</h1>
</body>
</html>
5. Double-click on the index.html le to execute and open it in the browser. A
popup will appear with an alert message.
Click on OK to close the alert box and the webpage will be displayed.
This was your rst step into the world of JavaScript, although it was very basic and
did not show the real power of JavaScript. We will be practicing advanced JavaScript
code in the chapters that follow.
Server-side JavaScript
The server is responsible for serving web pages in programming languages. The
client sends a request to the server with a command, and the server responds to that
client request. Server-side programming is the name given to programs that run on
the server. We will study this in further detail in Chapter 11, Extending JavaScript and
ECMA Script 6.
The term server-side means that the control over webpages is handled by web servers
rather than web pages. Web crossing runs that script and sends information in the
form of HTML to each user's browsers.
JavaScript Implementations, Syntax Basics, and Variable Types
[ 342 ]
Rhino and Node are both commonly used to create servers. Server-side scripting is
not downloaded to client's browser.
Server side
Server side refers to operations that are performed by the server in a client–server
relationship in a computer networking. The term server side can also be understood
as anything outside of the browser.
Client side
Anything that is at client side means that it is running inside the web browser.
Scripting with Rhino
Rhino is a JavaScript engine/interpreter developed and written in the Java language
and managed by the Mozilla foundation (http://www.mozilla.org/rhino) as open
source software. It enables and allows JavaScript program elements to access the
complete Java API.
Description
Rhino is a JavaScript open source implementation written in pure Java. Rhino is used
to provide scripting to end users. Basically, Rhino converts JavaScript scripts into
classes. It is used for server-side programming in JavaScript.
MDN mentions the following: "Scripting Java has many uses. It allows us to write
powerful scripts quickly by making use of the many Java libraries available." More
information on things such as the this statement would extend the general statement
and give some insight into the this statement's implementation and its purpose.
We can use Rhino scripting as a shell for acting like a debugger. This shell runs code
in a batch mode. Batch mode refers to batch processing, which means automated
processing without human intervention. Batch is the opposite of interactive.
Being open source, Rhino is a free program provided by Mozilla and can
be downloaded from http://www.mozilla.org/rhino. Rhino is
distributed as a JAR le. To start it with a command line, you can execute
the Rhino JAR on a le from the command-line interface:
java -jar rhino1_7R3/js.jar programfiles.js
The 1.7R2 version of Rhino uses ECMAScript 3, while the 1.7R3 version
of Rhino partially uses ECMAScript 5. The latest stable release of Rhino is
1.7R5, which was released on January 29, 2015.

Chapter 8
[ 343 ]
Here are a few functions with their usage and description:
Function Usage Description
print print(x) This is a global print function that
prints to the console
version version(170) This is used to tell Rhino that we
want the JS 1.7 features
load load(file1,file2…) This loads and executes one or
more files of JavaScript code
readFile readFile(file) This reads a text file and returns its
contents as a string
readUrl readUrl(url) This reads the textual contents of
a URL and returns the output as a
string
spawn spawn(f) This runs f() or load and
executes the f file in a new thread
runCommand runCommand(cmd,[args..]) This runs a system command with
zero or more command-line args
quit quit() This makes Rhino exit
Here is a simple example that displays the message in the strNote string:
Dim strNote
strNote = "Welcome to Rhino"
Rhino.printstrNote
You can nd some more useful scripts at http://www.rhinoscript.org/.
Node.js
Node.js is an implementation of JavaScript that allows JavaScript to run outside the
browser and perform OS-based and network-based tasks. It is a runtime interface for
JavaScript.
Node uses Google V8, which implements ECMAScript 5 standards, meaning
that there is not much difference between the syntax of JavaScript and Node. For
example, if you want to print out "Hello World" in the console, you will write the
following:
console.log("Hello from Mars!"); //This is same for JavaScript as
well.

JavaScript Implementations, Syntax Basics, and Variable Types
[ 344 ]
Description
Node.js is a super fast interface that runs on the Google Chrome V8 engine.
Node.js is easy to use, fast, and scalable. Like JavaScript client-side programming,
Node.js provides abstraction. So, by this abstraction, Node.js can handle a huge
amount of code.
Here is an example or server-side coding in Node.js:
var http=require("http");
http.createServer(function(request,response){
response.writeHead(200,{"content-type":" text/plain"});
response.write("Hello from Mars!");
response.end();
}).listen(8080)
The language syntax
The language syntax is basically a means of communication. In a programming
language, it's a formal way of communicating with algorithms, from both algorithms
to programmer and programmer to machine. This is because a machine works on
given instructions.
These instructions are meant to be written in a specic format, so that a machine
could understand and compile it properly. That specic format is dened by some
general rules of a programming language, known as language syntax.
A computer contains a list of instructions to be executed. Every computer language
has different syntax and rules. To use different languages, we must have knowledge
of their language syntax, such as the following:
• Syntax (a set of symbols and rules)
• Semantics (for transforming term to term)
• Pragmatics (the particular construct of a language)
Similarly, other languages in JavaScript have a unique syntax. JavaScript is
not a language of Java; these are two different languages and the syntaxes for
both languages are different. JavaScript is a powerful and expressive language.
JavaScript's statements are separated by a semicolon at the end.

Chapter 8
[ 345 ]
The JavaScript language syntax is much easy for beginners who have an idea of
object-oriented programming. JavaScript is contained between the <scripts>…</
script> tags. These are treated as HTML tags in any web browser.
You can place your JavaScript code anywhere on your webpage, but I prefer the way
of dening your script using the <head> tag. So, the structure of your script will be
as follows:
<head>
<script>
……………..
</script>
</head>
Basically, the <script> tag when written writing <head> tag, tells the browser that
this scripts need to be executed rst when the web page loads. Although, its a good
practice to include javaScript is to place it at the bottom of a web page. There are two
important attributes of this script tag.
Language
The language attribute will tell which language attribute you are using; typically,
it's JavaScript. It is the default value if the attribute is absent.
Type
The type attribute is the same as the preceding explanation. This is not a required
attribute. Its value is set as text/javascript, which shows that this scripting
language is in use.
<script language=" javascript" type="text/javascript">
.Script code.
</script>
The character set
A character set is basically a list of characters recognized by computer hardware
and software. It is represented by a number. Earlier ASCII was used as standard
character set encoding for web pages. There were lots of character encoding
problems that were almost solved after the arrival of HTML5 and XML. JavaScript
provides support for different types of languages and their characters. The character
set attribute shows the character encoding in external les. For HTML5, there is a
default character set encoding is UTF-8.

JavaScript Implementations, Syntax Basics, and Variable Types
[ 346 ]
There are some common values of character set encoding such as the following:
• ISO-8859-1: This is used to encode the Latin alphabet
• UTF-8: This is used for Unicode encoding that is compatible with ASCII
For example, if your frontend page is in Spanish, and you do not use the character
set property in your page, then it will not show some special characters in Spanish
clearly. For this, you must declare a character set property in the top <head> tag of
your page, as follows:
<meta charset="utf-8">?
For this, you can also change your web server's conguration to serve
as UTF-8. Alternatively, we can send a content-type header to our
server-side script.
In JavaScript, the charset property returns the character encoding of the current
document. The syntax for reading the characterSet property from the document is
document.characterSet;.
We can dene the characterSet attribute in the <script> tag in the parent page of
our website, as follows:
<script type="text/javascript"charset="utf-8"></script>
Another way is to add the UTF-8 character set into the server
conguration le (.htaccess), as follows:
AddCharset UTF-8
So, character set encoding will apply to all JavaScript pages in
your application.
Case sensitivity
HTML is not a case-sensitive language, but XML and JavaScript are case sensitive
languages.
Description
JavaScript is a case-sensitive language. Case sensitivity in JavaScript does not only
apply to variable names but also to JavaScript keywords and JavaScript's event
handlers. For example, if you have the firstname and firstName variables, then
these will be two different variables. In JavaScript, while calling a function, you must
write its name exactly the same way as it was dened, matching the letter case.
Chapter 8
[ 347 ]
A popular convention also used in JavaScript's primitive methods is to use camel
case, in which a phrase is written with the rst letter of the rst word in lowercase
and every successive word has an uppercase rst letter, which makes it easier to
read.
Examples of some functions are as follows:
• toUpper();
• toArray();
Keywords in JavaScript are all in lowercase such as while, for, if,
and so on.
JavaScript has functions that are built into the language; they take strings and
transform them to the uppercase or lowercase. This can make handling strings
easier to manipulate when the input has varying cases. The following are the two
parameters the functions can take:
• .toUpperCase()
• .toLowerCase()
The .toUppercase() function will convert letters into uppercase and the
.toLowerCase() function will convert letters into lowercase. These are the built-in
and case-sensitive functions of JavaScript.
Whitespaces and line breaks
Whitespaces and line breaks are used to format and indent code in a neat and
consistent manner so that the code becomes readable and easy to understand.
Description
Spaces, Tabs, New lines which are not a part of a string are called whitespaces.
JavaScript removes whitespaces and line breaks between tokens in the programs,
Spaces and Line breaks that are a part of a string are not removed when script
is executed.
In any text, there are three types of line breaks:\r\n or as \r or \n.
These line breaks occur in different types of operating systems:
• \r\n is usually created on Windows
• \n is usually created on OS X

JavaScript Implementations, Syntax Basics, and Variable Types
[ 348 ]
If you want to remove line breaks from any text, then we must deal with all types of
line breaks because the text could be from these three sources Windows, Linux, and
Mac.
We have several methods to remove line breaks from any text. For example, we have
the following:
varabc = abc.replace(/(\r\n|\n|\r)/gm,"");
In this code, we have used a regular expression for removing line breaks from our
text. This will remove line breaks \r\n, then \n, and nally \r. We used the sufx
gm at the end of the regular expression because m shows that line breaks should be
removed from all the text and g shows that it should be done more than once.
Regular expressions are discussed in detail in Chapter 8, JavaScript Expressions,
Operators, Statements, and Arrays.
Now, there are some spaces between texts; you can remove these whitespaces using
JavaScript. There are different functions of JavaScript for removing all leading spaces
from a string; you can use the following:
str = str.replace(/^\s+|\s+$/g,'');
This piece of code uses a regular expression, which checks multiple occurrences of
white spaces at beginning and end of string.
The g in this regular expression shows that the global search should be performed
while checking the text. There are more methods, such as the following:
•The string.replace() function is used to replace all leading whitespaces
with an empty string
•The str.trim() function is used to remove spaces from both sides of a
string
The Unicode escape sequence
Every Unicode escape sequence consists of six characters with a much defined
syntax: four characters following \u. Smaller code is accompanied by leading
zeroes but the length of the sequence is maintained. For example, \u00a9 has two
leading zeros. Similarly, the copyright symbol can be represented as \u00A9.
Any character with a code point that is less than 65536 can be escaped using
the hexadecimal value of its code point, prefixed with \u.
Chapter 8
[ 349 ]
A code point (also known as character code) is a numerical representation
of a specic Unicode character.
Description
The JavaScript Unicode escape sequence allows you to place special characters in a
string. Browsers that support JavaScript can use the escape function.
To add the next line within the same string, we can use \n. Let's take a look at the
following code:
alert("Welcome to JavaScript. \n We hope you love it!")
To add quotes within a string, we can use something like this:
var myquote="Jinnah said \"Impossible is a word unknown to me.\""
This Unicode escape sequence starts with a backslash (\) followed by characters.
This backslash is the escape sequence character. To insert a backslash itself, just add
another backslash "\" before the next one. Also called double backslash (\\).
You can specify a Unicode character by \uaaaa, where aaaa is a hexadecimal
number. So a Unicode escape character can represent a 16-bit character.
A Unicode escape sequence represents a Unicode sequence, as follows:
•A backslash (\)
•A character (u)
•A hexadecimal number (0-9)(a-f)
For example, the word cat will be represented as \u732b.
A Unicode escape sequence can also be used in comments and literals. Consider the
following example:
var x = "http\\u00253A\\u00252F\\u00252Fexample.com";
The hexadecimal part of this kind of a character escape is case-insensitive,
which means \u041a and \u041A are equivalent.
JavaScript Implementations, Syntax Basics, and Variable Types
[ 350 ]
You can also represent an escape sequence to represent a Unicode character ["\
u03b1"] as ["a"].The Unicode escape for the character é, for example, is \u00E9,
and the following two JavaScript strings are identical:
"cafn" === "caf\u00e9" // => true
The == operator tries to convert the values to the same type before testing if they're
the same; whereas, === does not do this. It requires objects to be of the same type to
be equal.
Here are some examples of the escape sequence for some characters:
Unicode Escape sequence Meaning
\u000B \v Vertical tab
\u000A \n New line
\u0009 \t White spaces
\u000C \f Form field
\u000D \r Line terminator
\u0020 Whitespace
Normalization
The Unicode standard (which can be found at http://unicode.org/standard/
standard.html) denes the most acceptable pattern of encoding characters and
the normalization method. Javascript presupposes that the code it is reading and
interpreting has all the Unicode representations normalized. ECMAScript V6 has a
string prototype function (string.prototype.normalize()) to x any unaddressed
encodings.
ECMAScript 6 introduces String.prototype.normalize(), which
takes care of Unicode normalization.
Chapter 8
[ 351 ]
Identiers
Identiers are used to give names to functions and variables. There are certain rules
for these identiers and these rules are the same for all programming languages.
Identiers can contain letters and a digest of the complete Unicode character set.
These JavaScript identiers include variables, objects, functions, properties, methods,
events, and so on.
Here are the rules for identiers:
• Identifiers cannot start with a number
• Identifiers can contain numbers, letters, underscore, and the dollar sign ($)
• It can be of any length
• These are case-sensitive
• We must not use reserved words for identifiers
We can also use Unicode characters as identiers. Unicode escape
sequences such as \uaaaa, can also be used as identiers. We must
avoid using global methods or properties as identiers.
A best practice while writing identiers is to use one word and use
camel case. Consider the following example:
• myNote
• myNewNotebook
• $sum
The var variable is a valid identier name, but it is an invalid identier because
of the reserved word. If you use a valid identier, then your browser will handle
it correctly; however, if you use an invalid identier, your browser will show a
warning recognizing it as a bug.
Reserved keywords
Reserved words are keywords in JavaScript. There are some words that cannot be
used as a function or a variable name. These reserved words are also identiers.
These reserved words are reserved for JavaScript engine. If you use these reserved
words as a function, variable, or a method name, then your browser will show a
warning and your script may fail.
Reserved words are basically keywords that have special meaning in JavaScript, for
example, break, case, do, delete, else, and so on.
JavaScript Implementations, Syntax Basics, and Variable Types
[ 352 ]
There are three types of reserved words:
• Protected reserved words
• New reserved word
• Future reserved words
Protected reserved words
Protected reserved words cannot be used as a variable or a function name. If we use
these, then there will be a compilation error in it. Here are a few protected reserved
words:
Break case catch
class const Continue
Debugger Default Delete
do Else Export
Extends False If
Import in var
New reserved words
JavaScript also released new keywords, and these reserved words have a special
meaning for the current version of JavaScript. These reserved keywords can also be
used as identiers. Once you declare it as an identier, then it will forget that it was a
keyword. Here are some examples of new reserved keywords:
Abstract Boolean byte
char enum final
doubke implements int
interface internal long
set short static
uint ulong ushort
Chapter 8
[ 353 ]
Future reserved words
Future reserved words are proposed for future extensions of JavaScript. These are
also used as an identier in the current version of JavaScript. When you choose a
word as an identier, it is also important to note whether it is already the name of
JavaScript reserved keyword. Here are some examples of future reserved words:
asset event
namespace require
transient violate
ensure goto
native synchronized
use Invariant
Comments
In any programming language, comments are used to make your code readable. In
JavaScript, comments are used to explain JavaScript code.
Another use of comments is to write them to add hints, suggestions, and warnings
into our JavaScript code, so if someone other than the developer wants to change
or modify your script, they can easily modify it. Use of comments in a script is
considered as a best practice. Comments are also used to disable the execution of
some parts of code. In debugging, comments are very helpful, so it is a valuable
debugging tool for developers.
There are three different types of comments you can put into your JavaScript script:
• Multiple-line comments
• One-line comments
• The HTML comment opening sequence
Multiple-line comments
We can write multiple lines between the comment boundaries; this block of code will
not be executed:
/* this is a comment */

JavaScript Implementations, Syntax Basics, and Variable Types
[ 354 ]
One-line comments
Adding two forward slashes in the beginning of the line comments it. The text
between // and the end of the line is commented and will not be compiled. Double
forward slash is used to comment one line at a time:
// this is comment
The HTML comment opening sequence
JavaScript treats the HTML comment's opening sequence, that is, <!-- as //
comment. It does not recognize the closing sequence of HTML comment, that is, -->
HTML styled comments are not usually used within JavaScript code blocks as // is
much handy. It is recommended not to use HTML comments in JS as that was an old
practice. They were used to hide incompatible JavaScript code from old browsers.
Literals
Literals are used to represent values for the different data structures in JavaScript;
for example:
• 3.14
• to be or not to be
In the following sections, we will cover the literal types for JavaScript.
Object literals
An object literal is used to hold values in an object.
Description
An object literal holds pairs of comma-separated lists of property names and
associated values, and they are enclosed within {}. It is possible for an object literal
to have no values as well. In an object literal, each name:value pair is separated by a
comma.
Here is an example of an object literal:
varbookObj={
bookName="The Kite Runner",
CoverImage="KiteRunner1.png",
Author="KhaledHoesenni",
bookCategory ="Bestseller"
};

Chapter 8
[ 355 ]
Array literals
An array literal contains a list of expressions that represent an array element.
Description
Array literals contain values inside an array. They are placed inside array brackets
[] and each element is separated by a comma (,). Just like an object literal, an array
can be empty and contain 0 elements. When you create an array literal it is specied
values as its element and its length is specied as a number of arguments of this
array. Here is an example of an array literal:
var Planets= ["Earth", "Neptune", "Saturn", "Mars"];
Boolean literals
As the name suggests, a Boolean literal has Boolean values, so its value is either true
or false.
Integers
Integer literals must contain values that are only integers.
Description
In JavaScript, an integer literal must contain a digit from 0 to 9. Commas and
brackets are not allowed in integer literals. Integers can be negative or positive. If
there is no sign present then it is consider as positive.
Floating point literals
A oating point literal is used to contain oating numbers—numbers that have a
decimal point, fraction, or exponent.
Description
Examples of oating point literals are as follows:
22.56
-26.35689
18.4e2 //Equivalent to [18.4 x 10^2]
-17.22E3 //Equivalent to [17.22 x 10^-3]

JavaScript Implementations, Syntax Basics, and Variable Types
[ 356 ]
String literals
String literals, as the name suggests, hold only string values, that is, values placed
inside a pair of quotation marks.
Description
A string literal contains characters placed inside quotation marks. You can also create
a null string to not contain anything. Two or more strings can be joined together
using the + sign. Special characters can be inserted in the string. A few special
characters are \n, \r, \b, \t, to name a few.
A few examples of string examples are as follows:
strFirstName= "Jamie";
strLastName="Down";
strMarksObtained="200";
strClassesJoined="Microprocessors, "+ "Microcontrollers";
strAddress= "Michigan University \n United States";
Statements
JavaScript also supports a set of statements used to identify a set of instructions
and carry out tasks. There are different types of statements in JavaScript such as if,
for, while, and so on. The basic purpose of using these statements is to evaluate or
check whether certain conditions are being met. These statements are common for
all programming languages.
Conditional statements
As the name suggests, conditional statements are based on conditions and the if
and then rule. For example, "if you work hard, you will get rewarded". Here,
working hard is the condition of getting rewarded.
Consider the following example:
if (age < 20 && age > 12) {
person = "Teen ager";
}
else {
person = "Not a Teenager";
}

Chapter 8
[ 357 ]
The loop statement
In a loop statement, a condition is provided within a set of parentheses. If the
condition evaluates to true, then the loop will continue working, and if the
condition equates to false, the program will jump to the next line after the loop. An
exception is the do while loop, which will always execute at least once. There are
different types of loops in programming languages; they are as follows:
• The for loops
• The for/in loops
• The while loops
• The do/while loops
Here is an example that shows how the while loop is used:
var number = "";
var n = 0;
while (n < 10) {
number += "\nThe number is " + n;
n++;
}
console.log(number);
Loops are covered in more detail in Chapter 8, JavaScript Expressions, Operators,
Statements, and Arrays.
Object manipulation statements
Object manipulation statements in JavaScript are used to access the object's
properties and methods at runtime to perform certain functions. JavaScript uses the
for…in and with statements to manipulate objects.
Here is an example that shows how the object car can be manipulated:
<script type="text/javascript">
var x;
var car = new Object();
car.brand = "Porche";
car.model = "2014";
car.colour = "Black";
for (x in car) {
console,log(x + " --- " + car[x] + "<br />");
}
</script>

JavaScript Implementations, Syntax Basics, and Variable Types
[ 358 ]
Output:
brand — Porche
model — 2014
color — Black
Exception handling statements
The try, catch, throw, and finally statements are used in JavaScript exception
handling. Let's take a look at the following description:
• The try statement tests code for errors.
• The catch statement usually follows the try statement and catches and
handles the error found in the try block.
• The throw statement creates custom errors or alerts.
• The finally statement executes code after try and catch, regardless of the
result. Usually, this block of code is used to clean up and release resources.
Here is an example showing how exceptions are handled using the try and catch
block:
<!DOCTYPE html>
<html>
<head>
<script type="text/javascript">
<!--
function Calculate() {
x = document.getElementById("Val1").value;
y = document.getElementById("Val2").value;
try{
if ( x == 0 ||y==0 ) {
throw("Divide by zero error." );
}
else {
var a = x / y;
alert("The answer is: " + a );
}
catch ( err ) {
Chapter 8
[ 359 ]
alert("Error: " + err );
}
}
//-->
</script>
</head>
<body>
<form>
<p>Enter first value</p>
<input id="Val1" type="text">
<p>Enter second value</p>
<input id="Val2" type="text">
<p><input type="button" value="Calculate"
onclick="Calculate();" /></p>
</form>
</body>
</html>
Optional semicolon
Semicolons in JavaScript are used to separate statements from each other. Let's say,
if you have two different statements and you just write them, then it will not be
understandable. So, JavaScript uses semicolons to separate statements. It will make
your code clear and meaningful. If you do not use semicolon in JavaScript, then it
will make your statements complex, meaning that the end of one of your statements
could be the start of your statement.
Placing semicolons in your code can help you prevent a lot of errors.
Absence of semicolons, from your code block will treat it as a single
line of code when compiled resulting in several errors.
JavaScript does not consider a line break as a semicolon. Here is an example of the
use of semicolons in JavaScript:
a=10;
b=20;
a=10; b=20;

JavaScript Implementations, Syntax Basics, and Variable Types
[ 360 ]
A semicolon in JavaScript is not a terminator; these are just separators
used to separate statements.
JavaScript automatically inserts a semicolon at the end of your statement. You
should not put a semicolon after the closing curly bracket. Similarly, at times, putting
a semicolon after round brackets ()is also a bad idea, and importantly, the code will
not run.
If there is a for loop in your script, then put a semicolon after the rst and second
statements and don't put a semicolon after third statement. It will produce a syntax
error. For example, if you have a for loop like this:
for(i=0;i<5;i++;){}
The preceding code will give you a syntax error. The right way of doing this is
as follows:
for(i=0;i<5;i++){}
Here are some rules for semicolons:
• Insert a semicolon when an assignment operator is used
• Insert a semicolon after rite operand of assignment operator
• Insert a semicolon after a closing round bracket of a function
• Insert a semicolon after keywords
• When you declare a variable insert a semicolon
Data type
A computer works on a set of given instructions; it cannot differentiate between a
number and a character. For example, if you write some numbers, such as 12345,
and some character, abcsd, it cannot tell integers from characters. So, data types
are used for this. The datatype tells which type of data is being used or referenced
in a statement.
In all programming languages (C, C++, Java, JavaScript), data types are used.
Every data type has a specic function of storing data. Many classical computer
programming languages require you to specify the data type when you declare a
data object. JavaScript does not have this requirement. Similarly, some databases
require declaration of the data types for storing data.
Chapter 8
[ 361 ]
JavaScript is a dynamic language. This means that if you declare an object, then its
data type can be changed dynamically, for example:
var a=16;
a="abc";
a=true;
In the rst statement, the data type is an integer; in the second statement, the
data type is a character; and in third statement, the data type is a Boolean. So, in
JavaScript, the data type dynamically changes while the program is being processed.
There are six major data types dened in ECMAScript standard.
• Null
• Undefined
• Boolean
• String
• Symbol
• Number
JavaScript considers integer values and oating point values to
be the same. It doesn't distinguish between the two. All numbers
in JavaScript are represented as oating point type values.
Here, Null and undefined are trivial data types in JavaScript because each of these
denes single values. JavaScript also supports a composite data type, which is
known as the object. Objects in JavaScript are treated as an associative array.
Functions in JavaScript are also treated as objects. So, functions can also be stored as
a variable.
The typeof operator
Operators are used to nd the type of a JavaScript variable. For example, you have
two numbers variables, as follows:
5+1=6
Here, 5 and 1 are operands and + is an operator.
The syntax of this operator is as follows:
Typeof(operand)
JavaScript Implementations, Syntax Basics, and Variable Types
[ 362 ]
Description
The Typeof operator is a unary operator; it returns a string that indicates the typeof
expressions. The typeof operator returns information as a string. There are six
possible values that can be returned as a string. They are string, number, object,
function, Boolean, and undefined.
Here are some examples of the typeof operator:
• typeof("5"+"1"): This will return a string
• typeof(5+1): This will return a number
• typeof(5+"1"): This will return a string
• typeof(5*"1"): This will return a number
The typeof operator is not a function. Operands are written in round
brackets, so it looks like a function, but these are not functions. When
you use the typeofnull operator, it returns an object.
The undened type
In JavaScript, an empty variable or a variable without values has an undened value.
And, typeof is also undened. If you want to empty a variable, you can assign it an
undened value; for example:
var employee = undefined;
Description
In JavaScript, undefined is a property of the global object. This means that the
value is undened and we declare it in the global scope of the browser.
There are basically three property attributes of undefined:
• Writeable
• Enumerable
• Configurable
These three property attributes show that, for modern browsers, these properties
are not writeable, enumerable, and congurable. And, we should avoid overriding
these properties. The undefined type is a primitive type in JavaScript.
Chapter 8
[ 363 ]
The Undefined type shows that a variable has not been assigned a value.
All browsers, such as Firefox, Google Chrome, Opera, and Safari, support
the undefined property according to ECMAScript.
Undened is a built-in type in the JavaScript library. Every type of function for
which the value is not dened is consider as an undefined type. For example, if
you have a function without the return statement, the result of that function will be
considered as undened.
Being a property of a global object, its value is initially undened. We can access it
as a global variable, although it's a global property. A simple idea of an undened
type is when a variable is not dened in your script, but it does exist and you are
considering it as a global variable.
Whenever a function executes in a script, and it nishes executing without returning
a value, then it returns the undefined type, for example:
var abc,
f1=function(){}
f2=function() {
var hello;
return hello;
}
typeof(abc) ; // undefined
typeof(f1); // function
typeof(f2); // function
Here, in this example, the variable abc is dened but no value has been assigned to
it. Notice that undefined type is a primitive property of a object declared in a global
scope. Here, dening it as a global object does not mean that it cannot be redened.
It can be redened according to ECMAScript. So, undefined is not a reserved word;
it can be used as a variable name in other scopes outside of its global scope.
When you use comparison operators, you can also declare the undefined type there
to know whether a variable has a value or not.
The null type
In JavaScript, null shows an empty value.
Here is the syntax:
varabc; // Here abc does not exist and it has been not
initialized
varabc=null; // Here abc exist but it does not has a value or a
type
JavaScript Implementations, Syntax Basics, and Variable Types
[ 364 ]
Description
The data type of null is an object in JavaScript. Null shows that value does not exist
in the script. When you want to empty a value, you declare it as a null. Null can be
expected in places where we are expecting some values, but we nd nothing.
There is a big difference between the null and undefined type.
The data type of null is an object and the data type of undefined
is undened. In the identity operator, null cannot be undened,
but in the equality operator, null can be undened. This is because
the equality operator will cast the value on the left to the same type
before making a comparison.
Undened means a variable is declared but values is not assigned. For instance,
var abc:
console.log(abc); //undefined
console.log(typeof abc); //undefinednull is an empty value. It can
be assigned to a variable which means variable is defined and an empty
value has been assigned to it. For instance,var abc = null;
console.log(abc); //null
console.log(typeof abc); //returns object
Consider the following example:
Null===undefined;
//It's a false because identity operator always verify data type
//equality
Null==undefined; //It's true because of equality operator
"You may wonder why the typeof operator returns object for a value that is null.
This was actually an error in the original JavaScript implementation that was
then copied in ECMAScript. Today, it is rationalized that null is considered a
placeholder for an object, even though, technically, it is a primitive value."
- Professional JS For Web Developers, Wrox Press
The number type
There is only one type of number in JavaScript. Numbers can be written with or without
decimals. Much larger or smaller numbers can be written with scientic notation.
Chapter 8
[ 365 ]
Description
Unlike other programming languages where we have several numeric data types like
integer, oat, double, and so on. JavaScript has a Number data type for all numeric
values. JavaScript has three symbolic values for this type: innity, and NaN (not
a valid number). NaN dened in the number type in JavaScript shows that it is a
reserved word, and its value is not a number in reality.
There is no difference between an integer and a oating point value
in JavaScript.
Integer values can be positive numbers, 0, or negative numbers. They can be of any
base number like base 10, 16, or 8. But mostly, in JavaScript, numbers are written
to base 10. To check the largest or smallest number representable or available in
JavaScript, you can use constants of maximum and minimum values:
Number.maxValue
Number.minValue
In Firefox or Chrome, it is Number.MAX_VALUE.
In the number type, you only check a number that has two representations, for
example, if you have the number 0, then it has two representations—one is -0 and the
other is +0. JavaScript numbers can be written with or without a decimal point; for
example:
A non- decimal number
var a=10
A number with decimal
var b=10.0123
If the number is too large or too short, then we use a scientic notation's exponent for
it. Consider the following example:
If we have a number 100000000
var a=1000e5
And 0.00111
var b=111e-5
The limit is 1e+21 (the console displays a scientic notation from the power of 10).
JavaScript Implementations, Syntax Basics, and Variable Types
[ 366 ]
In other programming languages, we can dene numbers as float,
integer, long, and short. But, in JavaScript, there is only one data
type for numbers, that is, numbers. These numbers follow the IEEE
standard and also these numbers are double-point precision.
The Boolean type
In programming languages, the Boolean type works on the Boolean logic in which
variables return results as true or false. These true and false are basically literals.
The Boolean logic is used usually in comparison operators, for example, lesser or
greater than, and so on.
Any variable can be assigned a Boolean value written as true or false in lower
case.
Description
In JavaScript, when you declare a Boolean data type to a variable, then the variable
should not have any quote. Here is how you should use boolean assignment: var abc
= "true"; //string assignment and var abc = true; //boolean assignment.
The Boolean variables are also used in the if, if then else, and while loop.
Here is an example showing how Boolean variables are used:
var x=true;
if(x==true) {
document.write("this true");
}
The Boolean operators are also used when there is a lack of or presence of a value.
For example, if we have a checkbox in our script, then its value is present or not
depending on whether it is checked or not.
In other data types, there is an unlimited number of values a variable can take, but
for the Boolean data types, there are only two—true and false. This data type is
usually used when we have a controlled structure such as a comparison, the if else
loop, and the while loop. These are controlled structures. The If and else statement
performs one action if the value is true; otherwise, it will perform another action,
that is, false.

Chapter 8
[ 367 ]
You can also use the Boolean data type as a comparative expression. A comparative
expression is an expression that evaluates 0, null, and undefined as false and
other values as true. Consider the following example:
C=A+B
In this example, the result of A+B is stored in C rst and then this expression is
evaluated. If you want to check that the C value is equal to A+B, then you must use
the comparison operator for this, as follows:
C==A+B
The string type
In JavaScript, anything that is written between quotes is treated as a string. Double
or single quotes can be used.
Strings literals can be dened in two ways. One way is to write a string in double
quotes and the other way is to write a string in single quotes.
There is no special type of representation of a single character in
JavaScript. If you want to represent a single character in JavaScript, then
you must dene a single character string, for example, the character a.
An empty string is a zero length string, for example "".
Description
In JavaScript, the text data is represented in the form of the string data type. In
programming languages, string is a combination of characters and numbers. A
JavaScript string is an ordered sequence of zero or more characters.
The restriction for writing these strings is that you must use the same quotation mark
at the beginning and end. This means that a string that starts with a single quote
must end with a single quote, and the same rule applies for double quotation marks.
Consider the following example:
var x="xyz" //double quotes
var y='xyz' //single quotes
var z="" //empty string

JavaScript Implementations, Syntax Basics, and Variable Types
[ 368 ]
If there is a problem in a string and it cannot show some characters. For a
representation of these characters, there is a technique in JavaScript—we dene
the escape sequence for this. This means that the character which we cannot write
directly is written using an escape sequence. For example, if we want to insert a
quotation mark within a string, we can do it by preceding quotation mark with a
backslash. It is known as escaping the quotation mark. Similarly, string literals are
unable to represent nonprinting characters such as tab, new line, and so on.
An escape sequence is a combination of characters starting with a backslash. Some
escape sequences are as follows:
• \b: BackspaceDeletes the previous character and moves cursor one space
backwards.
• \n: New lineEnds the current line and moves the cursor to a new line. If used
in the middle of a string it will move the text after \n to new line.
• \f: Form feedIt is a page-break ASCII control character. It tells printer to
continue printing on new page.
• \v: Vertical tabIt was used to control the vertical movement on page. It is
rarely used now.
• \t: Horizontal tab control the insertion of text horizontally on page. It is
inserted usually using the Tab key on the keyboard.
• \" : Double QuotesA double quotes is preceded with a backslash to insert it
within a string.
• \' : Single QuotesA single quotes is preceded with a backslash to insert it
within a string.
• \\: Backslash to insert a backslash within a string we escape it with another
backslash.
Here is an example of this:
var abc = "hello \n Morning"
Its output will be as follows:
Hello
Morning
The object type
Object is a sequence of primitive and, sometimes, reference data types stored as
name-value pairs.
The syntax is as follows:
varsomeObj= {property:value};

Chapter 8
[ 369 ]
Description
In JavaScript, objects are written into curly brackets. Each item of an object is called a
property. Property values can be dened as any valid data type as well as functions
or methods. Consider the following example:
varobj= {book_name:"xyz", Author:"abc"};
We can say that the object is a list of items, and each item in the list has some method
and function stored as its name-value pair:
In JavaScript, everything is like an object, for example:
• Regular expressions are objects
• Numbers are objects
• Strings are objects
• Mathematical notations are objects
• Arrays and functions are objects
• Objects are objects
The property name of any item can be a string or number. When a property is a
number, then the way of writing this property is different; we will write it as follows:
var age = {"30": "abc"};
In JavaScript, objects are used to store data and for writing your own custom
methods and functions. Primitive values are, for example, null, undefined, true,
and false else.
Object properties are basically variables that are used in methods and function
internally. They can also be global variables for the whole page. There is a difference
between a method and a function. A function is a standalone unit of an object, but a
method is attached to an object and it is used with this keyword:
Document.write ("hello world");
Variable, scope, and memory
When we describe a variable in JavaScript, there is no limit to how much data this
variable holds. The maximum is described by the browser's capacity depending on
how much data it can hold. Let's take a look the following code:
var abc="xyz";
JavaScript Implementations, Syntax Basics, and Variable Types
[ 370 ]
We can dene a variable in JavaScript using the var keyword. We can dene the
value of a variable immediately or later. A variable that we dene outside the
boundary of a function is a global variable.
Creating too many global variables in JavaScript is a very bad approach.
The major reason why global variables are discouraged in JavaScript
is because in JavaScript, all the code shares a single global namespace,
also JavaScript has implied global variables, that is, variables that are
not explicitly declared in local scope are automatically included with
global namespaces. Relying too much on global variables can result in
conicts between various scripts on the same page.
Every function in a script can access a global variable. When you dene a variable
in a function, then its scope is inside that function. Let's take a look at the following
code snippet:
Function abc() {
var xyz="abc";
}
The scope of a global variable never stops during the execution of the
whole page even it is not needed.
If you fail to write var inside the function, then this variable is considered as a global
variable. If you dene a variable with the same global variable name, then it will be
considered as a global variable.
JavaScript dynamically allocates memory to variables. When the scope of these
variables is dereferenced or nished, it is automatically removed from the memory
by the garbage collector. So, its disadvantage is that the unwanted variables remain
in the memory.
There are two ways to save memory:
• Using the function scope
• Dereferencing these variables manually

Chapter 8
[ 371 ]
The use of the function scope is more appropriate as variables get dereferenced when
the function ends, thus saving memory:
(Function (window, document, undefined) {
varabc="abc";
}
(window, document);
Variable declaration
JavaScript variables can be identied by unique names. These unique names
are known as identiers. Variables in JavaScript are used to store information.
Identiers can be of any length and size, for example, a, b, myName.
When you declare a variable in JavaScript, the machine will save it in the memory
so that you can store or retrieve data from memory when needed. Variable names
should be unique in the script.
The rules to declare variable names in JavaScript are the same as those for identiers,
as discussed previously.
When a code starts its execution, it rst processes the variable declaration. These
variables can be declared globally as well as within a function. We can declare
multiple comma-separated variables, for example:
var myName,myAddress,myContact;
When we store data into a variable, this process is called variable initialization. We
can initialize a variable at the time of its creation or later when we want to use it, for
example:
var a=1;
var b=2;
var c;
c=a+b;
Here, in this example, the variable a stores the value 1, and b stores 2, and then we
create the variable c and dene its value later.

JavaScript Implementations, Syntax Basics, and Variable Types
[ 372 ]
The variable scope
A variable scope is a frame where a variable exists in a program. We can dene a
scope of a variable in a program. Basically, the scope is a set of methods, functions,
and objects that we have access to.
There are two scopes of variables in JavaScript:
• Local scope variables
• Global scope variables
Local scope variables
A variable when dened inside a function is called a local scope variable, as this
variable can only be accessed into this function. Function variables will be local to
this variable.
Description
For a variable, which is dened in the local scope, a variable of the same name can be
used in a different function. When a function starts, the local variable is created and
when the function ends, the local variable is deleted. In JavaScript, always declare
variables before using them; failing to do this will throw some exceptions. In a
function, if you have a local and a global variable with the same name, then the local
variable will get priority over the global variable. So, avoid using the same variable
name. Let's take a look at the following code snippet:
function xyz() {
varabc="xyz";
document.write(abc);
}
Global scope variables
A global variable can be declared anywhere in a JavaScript program. They can
be accessed from everywhere. A global scope variable remains in the memory
throughout the execution of scripts on the page. This results in memory depletion.

Chapter 8
[ 373 ]
Description
Basically, global variables are window objects. Global variables are generally dened
outside of the function and all functions in a webpage can access this global variable.
If you give some value to a variable which is not declared, then this variable will be
considered as a global variable. When you close a web page, the global variable will
be deleted. For frontend developers in HTML, the window object is a global variable.
var abc="xyx";
functionmy Function() {
//some code
}
Primitive and reference values
There are two types of values a variable can have:
• Primitive type values
• Reference type values
Primitive type values
Generally objects are aggregated from properties and those properties can be used to
reference the object. Primitive (value, data type) is not an object and has no methods
associated to it.
Description
In JavaScript, there are ve types of the primitive type: string, number, null,
undefined, and Boolean. A primitive value is stored directly in the stack. These
values are stored in the same location from which they are accessed. Because of its
xed size, it can be easily manipulated.
Reference type values
Reference type values are specialized objects similar to arrays and functions stored in
a heap. A pointer is used to locate their location into the memory.
Description
In JavaScript, a variable holding a reference type value is stored in the heap memory.
These objects cannot be easily manipulated because they contain arbitrary elements
and properties. When a reference value is passed to a function, the function modies
its values or contents, and that change can be seen by the object, which calls the
function and other functions that have references to the object.

JavaScript Implementations, Syntax Basics, and Variable Types
[ 374 ]
The execution context and scope
The scope and context are not the same things. Every function in JavaScript has a
scope and a context. When we declare a function in JavaScript, this function can
be accessed in different and various contexts and scopes. JavaScript follows design
patterns for scopes and context.
The main difference between a scope and context is that scope is function based and
context is object based. The scope is used to access a function when it is invoked.
Whereas the context is used with the this keyword, so it is basically a reference type.
The scope is associated with the execution context when the execution context starts.
There is a chain of scope with it, for example:
function first() {
second();
function second() {
third();
function third() {
fourth();
function fourth() {
// do something
}
}
}
}
first();
In JavaScript, the environment in which the code is executed is classied into the
following:
• Global code
• Function code
• Eval code
The global code
The global code is a default environment where the code is executed for the rst
time, that is, the external .js les and local inline code are loaded.

Chapter 8
[ 375 ]
The function code
The function code is the environment in which ow control enters the function
body during the code execution. Every return from the function exits the current
execution context.
The eval code
The code is supplied to built-in eval functions. The eval code calls the context and
creates an execution context.
For example:
var eval_context = { a: 10, b: 20, c: 30 };
function test() {
console.log(this);
}
function evalInContext() {
console.log(this); // { a: 10, b: 20, c: 30 }
eval("test()"); // { a: 10, b: 20, c: 30 } inside test()
}
evalInContext.call(eval_context);
In this example you call the function with the context you want and run eval within
that function.
Garbage collection
There is no separate memory management in JavaScript. A browser decides when
a cleanup is needed. Garbage collection is basically knowing if the variables are still
being used or will be used in future throughout the program execution and if not
collect and remove them. In simple words, the track of reference made to an object is
kept in background. once it becomes idle or reaches zero it can be collected by the GC.
We can clean memory manually, but in some cases, there is no need for manual
memory cleaning. We cannot force JavaScript to clean memory because this task
is done on runtime by the garbage collector. Some heavy applications, such as
computer games, require a lot of memory and slowdown your system; so, in this
case, it only depends on your code and how you structured your application code for
use of computer memory.
You can structure your code by following these steps:

JavaScript Implementations, Syntax Basics, and Variable Types
[ 376 ]
Objects
When you declare an object, try to reuse that object by deleting its properties
and restoring it to an empty object such as {}. This process is known as
recycling the objects. When an object is created for the first time (new foo();),
memory is allocated to it. So, if an object is already declared, we can reuse it in
our script.
Arrays
When you use an array in your script, clear that array after using it. Assigning [] to an
array is often used as a shorthand to clear it, but it actually creates a new empty array
and garbages the old one. You can set the array length to 0, (arr.length = 0;); this
will also clear the array but while reusing the same array object.
Functions
When you need to call a function more than one time, then you can optimize our
code by assigning a permanent variable to the function rather than calling it again
and again.

[ 377 ]
JavaScript Expressions,
Operators, Statements,
and Arrays
JavaScript is the most commonly used web programming language and is very
popular among developers around the world. This chapter will cover most of the
expressions, operators, statements, and arrays used in this language.
Expressions
A valid unit of code required to resolve a value is known as an expression. It is a set
of literals, operators, variables, and expressions required to evaluate a value. This
value can be a string or any logical value. An expression results in a value that can be
written wherever a value is expected. There are two types of expressions:
• An expression that assigns a value to a variable
• An expression that has a value
Consider the following example:
var A = 2;
In the preceding example, a value is assigned to variable A, and for assigning
that value to the variable, we use an assignment operator. Now consider another
example:
2+3;
JavaScript Expressions, Operators, Statements, and Arrays
[ 378 ]
In this example, no value is assigned to a variable; however, it evaluates the result of
2+3 as 5. The operator used in this expression is known as an addition operator.
Expressions in JavaScript can be broadly classied into three types:
• Arithmetic: These evaluate numbers. This means that these expressions
perform mathematical calculations between values.
• Logical: These are used to evaluate and give the result in the form of true or
false.
• String: These are used to evaluate strings.
There is another type of expression known as a conditional
expression. These expressions are usually used in the if-else
and loop conditions. These conditional expressions evaluate the
result in the form of true or false and have only two values True
and False. If the rst condition is true, then it will evaluate rst,
otherwise it will evaluate second, for example:
int age = 20;
var flag;
if (age<18) {
flag=true;
}
else {
flag=false;
}
Primary expressions
In JavaScript, primary expressions are basic keywords and they are special objects,
identiers, and literals, which do not need any further evaluation to resolve their
value. They may also be the result of another expression that is surrounded by
brackets.
For example, this and function are keywords and these are primary expressions
in JavaScript. The this keyword always returns a value whenever it enters an
execution context. Identiers are also primary expressions, and they refer to a
function or an object.

Chapter 9
[ 379 ]
There are four types of literals, as primary expressions:
• Boolean literals: These contain 1/0 or true/false
• Null literals: These contain a null value
• Undefined literals: These contain any type of data type
• String literals: These contain a string of characters
Object initializer
In JavaScript, an object initializer is used to initialize an object. It is an expression
known as an object initializer. Every object in JavaScript is an entity that has a type.
Every object has some property associated with it. There are functions associated
with objects and these functions are called methods. Objects properties are basically
JavaScript variables. A property associated with an object tells you about the object's
characteristics.
Object properties can belong to primitive data types such as int or other data types
such as char. An object can have an empty property as well. We can create an object
with an empty property, as follows:
var xyz={};
In these curly brackets, you can easily and quickly create objects. These are comma-
separated name-value pairs. The object initializer is basically used to create a new
object. These object initializers are called object literals.
In JavaScript, the property name and object name are case sensitive,
so when you create an object, this should be kept in mind.
An object initializer creates an object with a literal notation, for example:
var studentInfo = { age:24, Name:"Ali" };
This is covered in more detail in Chapter 8, JavaScript Object-Oriented Programming.

JavaScript Expressions, Operators, Statements, and Arrays
[ 380 ]
The function denition expression
Functions in JavaScript are dened with a function keyword. Expressions are
dened on these functions. They are used to declare a function or function
expression. You can dene a function anywhere in your script. Functions use
expressions to dene their prototype.
There are many ways to dene a function in JavaScript, for example, we have the
following:
• The function declaration
• The function expression
The function declaration
When a browser thinks of executing a script, a function declaration is a pre-executed
stage. A function can be declared anywhere in your code:
function greetings() {
alert("Happy New Year");
}
greetings();
The function expression
When a function takes the form of an expression, it is called a function expression.
This expression can be a large expression, meaning that the function declaration
requires several expressions. The function that is assigned with a function expression
can be named or can be without a name. This is commonly referred to as an
anonymous function. It is a rst-class value, which means that it allows passing
values in the function as parameters.
Consider the following example:
var abc=function() {
return 1;
};
var xyz=function foo() {
return 2;
};

Chapter 9
[ 381 ]
A function value can also be assigned to another function parameter. In this way, a
function value is passed to another function parameter as a pass-by-value.
var f = function f ( function foo() );
A function in JavaScript is also a regular value. If you do not want your variables to be
set in the global scope, then put these variables into a function. We do this because it's
not always a good choice to set a global variable, as it can be accessed by any function
anywhere in the program, which may alter the value of the variable and overwrite the
original value that was supposed to be used. Functions are generally written inside
brackets because JavaScript allows expressions to be all in the same space.
The property access expression
In JavaScript, to access a value of an object or value of an array element, we use
the property access operation. There are two ways of writing the property access
expression to access values from these expressions:
• Bracket notation
• Dot notation
The bracket notation
A bracket notation is also known as an array notation. The syntax for writing a
bracket notation is as follows:
get=abc[xyz];
abc[xyz]=set;
get = abc [1]; // get value at array abc index 1
The dot notation
A dot notation is also known as an object notation. The syntax for writing a dot
notation is as follows:
document.write ("hello world");

JavaScript Expressions, Operators, Statements, and Arrays
[ 382 ]
The invocation expression
In JavaScript, an invocation expression is used to execute or invoke a function or an
expression. When a function invocation starts, it rst evaluates its expression and
then its arguments. Here are the two targets on an invocation expression:
• The invocation target
• The optional argument list
Invocation target
An invocation target followed by an open bracket then a target list and then a closing
bracket target list must be classied as a method or object. There are two types of
argument lists:
• Positional arguments
• Named arguments
Positional arguments are expressions and named arguments are identiers. Here is
an example of an invocation expression:
Function.getvalue(5);
Math.max(2,3);
Named arguments are the arguments that are passed with its name.
The optional argument list
Variable is assigned a value that is passed as a parameter to the function. If the value
is not passed, a default value is assigned to the variable:
function add(a, b) {
b = typeof b !== 'undefined' ? b : 0; // if b not defined set
it to 0
return a+b;
}
add(10); // returns 10

Chapter 9
[ 383 ]
The object creation expression
In JavaScript, this expression is used to create an object using the constructor method.
This method is used to initialize an object's properties. This method rst creates new
objects and then initializes the objects using object initializer methods in JavaScript.
The constructors that are used to initialize the object do not return any value, and this
value becomes the value of the object. Consider the following example:
New myObj();
Evaluation expression
The evaluation expression is used to evaluate a string. This is a property of the global
object in JavaScript. When it evaluates a string, it gives a value as the output.
The Eval() function is used in JavaScript to get a value. In this function, we do
the following:
• As the input, we pass one argument
• If it does not return a value, then it means that there is an error in the code,
and it will send an exception
var x = 10;
console.log(eval("x * 5")); //50
There are two ways you can invoke an eval() function:
• Direct: Calls a function directly named 'eval'. Direct eval() executes code in its
local scope. For example:
var abc = 'global scope';
function directEval() {
'use strict';
var abc = 'local scope';
console.log(eval('abc')); // local scope
}
• Indirect: By calling it through call() function, method of window or by
storing it with a different name and calling from there, etc. Indirect eval()
executes code in its global scope. For example:
var abc = 'global scope';
function indirectEval() {
'use strict';
var abc = 'local scope';
// eval via call()

JavaScript Expressions, Operators, Statements, and Arrays
[ 384 ]
console.log(eval.call(null, 'abc')); // global scope
console.log(window.eval('abc')); // global scope
console.log((1, eval)('abc')); // global scope
// eval with a different name
var abceval = eval;
console.log(abceval('abc')); // global scope
var obj = { eval: eval };
console.log(obj.eval('abc')); // global scope
}
Operators
In programming languages, operators are operations to be performed on operands.
Basically, operators are symbols used to perform various operations. Consider the
following example:
9 + 11 = 20
In the preceding example, 9 and 11 are operands and + is the additional operator.
Overview
Like other languages, in JavaScript, there are several operators to perform an
operation, such as addition, multiplication, subtraction, and so on.
In JavaScript, there are different operators such as:
• The logical operator
• The bitwise operator
• The conditional operator
• The arithmetic operator
• The assignment operator
Binary operator
As the name suggests, binary operators require two operands; for example:
A + B
Here, A and B are operands and + is the operator to perform addition between them.

Chapter 9
[ 385 ]
Unary operator
In programming languages, unary operators have just one operand and operator
with them, for example:
A++;
This can also be written as:
++A;
A++ is a post increment operator. It will rst evaluate A and then
increment it; whereas,++A is a pre-increment operator. It increments
the value of A and then evaluates the expression.
Ternary operator
The ternary operators require three operands to perform different operations; for
example:
<condition> ? <true>: <false>;
In the preceding statement, ? is the ternary operator.
Arithmetic operators
In programming languages, arithmetic operators are use to perform arithmetic
operations on values and variables. The basic arithmetic operations are as follows:
• +: Addition
• -: Subtraction
• *: Multiplication
• /: Division
• %: Modulus operator
• ++: Increment operator
• --: Decrement operator
These operators perform operations on numeric operands and return a result as a
numeric value.
JavaScript Expressions, Operators, Statements, and Arrays
[ 386 ]
In JavaScript, operators are the same as those in other programming languages; for
example, if you want to perform division between variables, then you will write the
expression as follows:
var a=2;
a=(2+a)*1/a;// a=2
console.log(a); // prints 2
In JavaScript, arithmetic operators are the most useful and powerful
operators.
The + operator
The + operator performs an addition of two or more numbers.
Returns
The + operator returns the addition of the numbers.
Parameter
The + operator does not have any parameters.
Description
The + operator is used to add two numbers or two variables in which numbers are
stored.
For example:
var a = 3;
var b = 4;
var c = a + b;
Document.Write("The value of c is " + c);
Document.Write(3+1);
The output of this will be:
The value of c is 7
4
Chapter 9
[ 387 ]
This operator can also be used to append or concat two strings; for
example:
document.write("Apple "+"Banana");
The output will be as follows:
Apple Banana
The - operator
The - operator performs a subtraction between two numbers.
Returns
The result of the - operator returns subtraction between two numbers.
Parameter
The - operator has no parameters.
Description
The - operator is used to subtract two numbers or two variables in which numbers
are stored.
Consider the following example:
var a = 6;
var b = 4;
var c = a - b;
Document.Write("The value of c is " + c);
Document.Write(3-1);
The output of this will be as follows:
The value of c is 2
2
The * operator
The * operator performs a multiplication between two or more numbers.
Returns
The result of the multiplication between the numbers.

JavaScript Expressions, Operators, Statements, and Arrays
[ 388 ]
Parameter
There are no parameters.
Description
This operator is used to multiply two or more numbers or two or more variables in
which numbers are stored.
Consider the following example:
var a = 3;
var b = 4;
var c = a * b;
Document.Write("The value of c is " + c);
Document.Write(3*1);
The output of this will be as follows:
The value of c is 12
3
The / operator
The / operator performs a division between two numbers.
Returns
The result of the division between the numbers.
Parameter
There are no parameters.
Description
This is also called the remainder operator, since the value returned is not an absolute
value (in that, it retains the sign of the rst operand, not the second).
Consider the following example:
var a = 5;
var b = 2;
var c = a % b;
Document.Write("The value of c is " + c);
Document.Write(10%3);

Chapter 9
[ 389 ]
The output will be as follows:
The value of c is 1
1
The % operator
The % modulus operator is used to calculate the remainder.
Returns
The result of the multiplication between the numbers.
Parameter
There are no parameters.
Description
This operator is used to multiply two or more numbers or two or more variables
in which numbers are stored.
Consider the following example:
var a = 3;
var b = 4;
var c = a * b;
Document.Write("The value of c is " + c);
Document.Write(3*1);
The output will be as follows:
The value of c is 12
3
The ++ Operator
The ++ operator is used to increment a value.
Returns
The result is the incremented value.
Parameter
There are no parameters.

JavaScript Expressions, Operators, Statements, and Arrays
[ 390 ]
Description
Increment. the value and stores the value in itself.
Consider the following example:
I = 0; // I contains 0
I++; // this line is equivalent to I = I + 1
The output of this will be:
I = 1
The -- Operator
The -- operator is used to decrement a value.
Returns
The result is the decremented value.
Parameter
There are no parameters.
Description
The -- operator decrements the value and stores the value in itself.
For example:
I = 0; // I contains 0
I--; // this line is equivalent to I = I - 1
The output will be as follows:
I = - 1
Logical operators
In programming languages, logical operators are Boolean operators. These operators
work on Boolean logic. Like other languages, JavaScript works on Boolean evaluation.
These Boolean operators always return a Boolean value. There are two possible results
of any logical operator:
• True
• False
Chapter 9
[ 391 ]
The following are the logical operators used in programming languages as well as
JavaScript:
• Logical AND (&&)
• Logical OR(||)
• Logical NOT(!)
Arithmetic operators get priority over logical operators.
Let's say, if there is an expression and there are logical and arithmetic operators in it,
then the arithmetic operators will be evaluated rst because of their higher priority.
Logical operators work from left to right.
Logical operations are applicable on everything. A non-Boolean value can result
in a Boolean value after evaluation.
The && Operator
The && operator is the translation of the English word "and". For example, if we have
to write apples and oranges, we write apples && oranges.
Returns
This returns the most specic value on an operand; if a non-Boolean value is used,
then a non-Boolean value is returned.
Parameter
We normally write an expression or a condition that is to be evaluated separated by
the '&&' sign.
Description
This is called the AND operator.
Here is an example of the && operator:
var a= true && true; // it will be true
var b=true && false;//it will be false
The || Operator
This operator is the translation of the English word "or". For example, if we have to
write apples or oranges, we write apples || oranges.

JavaScript Expressions, Operators, Statements, and Arrays
[ 392 ]
Returns
This returns the most specic value on an operand; if a non-Boolean value is used,
then a non-Boolean value is returned.
Parameter
We normally write an expression or a condition that is to be evaluated separated by
the '||' sign.
Description
This is called the OR operator.
Here is an example of the || operator:
var a= true || true; // it will be true
var b=true || false;// it will be true
The ! Operator
This is the NOT operator. NOT operator evaluates if the values are not equal to each
other. For instance:
if(abc != 0){
//if abc is not equal to 0 run this block
}else{
//if abc = 0 then run this block
}
Returns
Boolean value.
Parameter
null
Description
This is called as the NOT operator.
Here is an example of the ! operator:
var a=!false //it will print true
var b=!true //it will print false
Chapter 9
[ 393 ]
In JavaScript, these logical operators are used in conditional statements
and in the while loop.
Assignment operators
In JavaScript, assignment operators are used to assign values to variables. The
assignment operator = assigns the value of the operand on it right to the operand
on its left. For instance, abc = xyz, here xyz is right operand whose value is being
assigned to abc, which is the left operand. An assignment operator can assign the
value of a single variable to multiple variables. In the following sections, we will
discuss the assignment operators in JavaScript.
The = operator
The = operator is used to assign the value to a variable.
Returns
There are no parameters but it is used between two or more operands.
Parameters
There are no parameters.
Description
This is the simplest of all assignment operators and is used commonly. It assigns the
value of the right side operand to the left side operand.
Consider the following example:
var x=2;
console.log("The value of x is " + x);
The output of this will be:
The value of x is 2
The += operator
This operator is known as addition assignment operator.
Returns
This adds the value to the variable and returns the result of the addition.

JavaScript Expressions, Operators, Statements, and Arrays
[ 394 ]
Parameters
There are no parameters.
Description
The addition assignment operator is used to add a value to a variable and assign the
value to another or the same variable in the same operation.
Consider the following example:
var abc = 2;
abc += 10;
console.log(abc); //12
This is short hand of writing abc = abc + 10.
The -= operator
This operator is known as subtraction assignment operator.
Returns
This operator subtracts the given value from the variable and returns the result of the
subtraction.
Parameters
There are no parameters.
Description
The -= operator is used to subtract a value from a variable and assign the given
value to another or the same variable in the same operation.
Consider the following example:
var abc = 10;
abc -= 2;
console.log(abc); //8
This is short hand of writing abc = abc - 2.
The *= Operator
This operator is known as multiplication assignment operator.

Chapter 9
[ 395 ]
Returns
This multiplies the variable and the value and returns the result of the multiplication.
Parameters
There are no parameters.
Description
This operator is used to multiply a value with a variable and assign the value to
another or the same variable in the same operation.
Consider the following example:
var abc = 5;
abc *= 5;
console.log(abc); //25
This is short hand of writing abc = abc * 5.
The /= Operator
This operator is known as division assignment operator.
Returns
It divides the variable with the value of right operand and assign it to the variable.
Parameters
There are no parameters.
Description
This operator is used to divide a variable with the value and assign the result to
the variable.
Consider the following example:
var abc = 5;
abc /= 5;
console.log(abc); //1
This is short hand of writing abc = abc / 5.
The %= Operator
The %= operator is also called remainder assignment operator.
JavaScript Expressions, Operators, Statements, and Arrays
[ 396 ]
Parameters
The %= operator takes a null parameter.
Returns
The %= operator returns the remainder.
Description
It divides the variable with the value of right operand and assigns the remainder
value it to the variable. For example:
var abc = 10;
abc %= 3;
console.log(abc); //1
This is short hand of writing abc = abc % 3.
This is an experimental technology, part of the ECMAScript
2016 (ES7) proposal.
Exponentiation assignment (**=)
This operator returns the result of raising power of left operand to the value of
second operand.
var abc = 5;
abc **= 2;
console.log(abc); //25
This is short hand of writing abc = abc ** 2.
Relational operators
In programming languages, relational operators are also known as comparison
operators. These operators show the relative order of two values. These comparison
operators are covered in the following sections.
The < operator
The < (Less Than) operator operator is used to compare the values on both sides
of the expression and check whether the value of the left-hand side is less than the
value on the right-hand side of the operator.

Chapter 9
[ 397 ]
Returns
If the preceding condition is true, then expression returns true else false.
Parameter
Here, both the operands must be numbers or both must be strings.
Description
This is also known as the less than operator.
A simple example of the usage of this operator is as follows:
if(2<3) { //returns true
//block of code
}
The <= Operator
The <= operator is used to compare the values on both sides of the expression
and check whether the value on the left-hand side is less than or equal to the value
on the right-hand side of the operator.
Returns
If the preceding condition is true, then it returns the Boolean value true,
otherwise it returns false.
Parameter
Here, both the operands must be numbers or both must be strings.
Description
This is also known as the less than or equal to operator.
A simple example of the usage of this is as follows:
if(2 <= 3) { //returns true
//block of code
}
The > Operator
The > operator is used to compare the values on both sides of the expression and
check whether the value on the left-hand side is greater than the value on the
right-hand side of the operator.

JavaScript Expressions, Operators, Statements, and Arrays
[ 398 ]
Returns
If the preceding condition is true, then it returns the Boolean value true, otherwise
it returns false.
Parameter
Here, both the operands must be numbers or both must be strings.
Description
This is also known as the greater than operator.
A simple example of the usage of this is as follows:
if(2>3) { //returns false
//block of code
}
The >= Operator
The >= operator is used to compare the values on both the sides of the expression
and check whether the value on the left-hand side is greater than or equal to the
value on the right-hand side of the operator.
Returns
If the preceding condition is true, then it returns the Boolean value true, otherwise it
returns false.
Parameter
Here, both the operands must be numbers or both must be strings.
Description
This is also known as the greater than or equal to operator.
A simple example of the usage of this is as follows:
if(3 >= 3) { //returns true
//block of code
}

Chapter 9
[ 399 ]
The != Operator
The != operator is used to compare the values on both the sides of the expression
and check whether the value on the left-hand side is not equal to the value on the
right-hand side of the operator.
Returns
If the preceding condition is true, then it returns the Boolean value true, otherwise it
returns false.
Parameter
Here, both the operands must be numbers or both must be strings.
Description
This is also known as the not equal to operator.
A simple example of the usage of this is as follows:
if(2!=3) { //returns true
//block of code
}
The == Operator
The == operator is used to compare the values on both sides of the expression and
check whether the value of the left-hand side is equal to the value on the right-hand
side of the operator.
Returns
If the preceding condition is true, then it returns the Boolean value true, otherwise it
returns false.
Parameter
Here, both the operands must be numbers or both must be strings.
Description
This is also known as the Equal To operator.
A simple example of the usage of this is as follows:
if(2==3) { //returns false
//block of code
}

JavaScript Expressions, Operators, Statements, and Arrays
[ 400 ]
The === Operator
The === operator is used to compare the values on both sides of the expression and
see if the value of the left is equal to the value on the right of the operator and to also
check if both the operands are of the same datatype.
Returns
If the preceding condition is true, then it returns the Boolean value true, otherwise it
returns false.
Parameter
The === operator takes parameter null.
Description
This is also known as the equal value and equal type operator.
A simple example of the usage of this is as follows:
if(3 === 3) { //returns true
//block of code
}
if(3 === "3") { //returns false
//block of code
}
Statements
JavaScript works on sets of statements. These statements have an appropriate syntax
where the syntax depends on what the statements contain. A statement can have
multiple lines in it. Basically, a statement is a set of instructions given to a computer
browser to execute JavaScript code. A statement can return a value that is terminated
with a semicolon. A statement can be a call for a certain action, for example:
Document.Write("hello world");
The preceding statement calls the in-built Write() function and prints the message
hello world on the screen.
We can write multiple statements in one line separated by a semicolon; for example:
var a=20; var b=2;var c=a*b; document.write(c);

Chapter 9
[ 401 ]
A statement can also be terminated with a line break, for example:
var a=20;
Document.Write(a);
Each statement in JavaScript runs one by one in order of the given instructions in the
JavaScript program.
Expression statements
In JavaScript, there is a difference between a statement and an expression. Whenever
a value is expected in your script or code, an expression produces that value using a
statement.
An expression is made of literals, variables, operators, and methods. The data type of
the returned value depends on the variable used in the expression. We can create a
compound expression from a smaller expression's group depending on their data type.
x = Math.PI;
cx = Math.cos(x);
alert("cos(" + x + ") = " + cx);
Statements are basically actions performed in scripts, for example, loops and
if-else are statements in JavaScript. Wherever JavaScript expects a statement and
you can also write an expression, is called an expression statement. It fullls purpose
of both statement and expression. But this can not be reversed. We can not write a
statement where JavaScript is expecting an expression. For instance, if statement can
not be used as an argument to a function.
To prevent this from happening JavaScript doesn't allow us to use function expressions
and object literals as statements, that is, expression statement should not start with:
• Curly brace
• Keyword function
Compound empty statements
A compound statement is a set of statements written in curly brackets and all these
statements are separated by a semicolon. It combines multiple statements in a program
into a single statement. A compound statement is also known as a block statement.

JavaScript Expressions, Operators, Statements, and Arrays
[ 402 ]
This type of statement is usually used with conditional statements such as if, else,
for, while loop, and so on. Consider the following example:
if(x<10) // if x is less than 10 then x is incremented {
x++;
}
An empty statement is the opposite of a compound statement. There is no statement
in an empty statement but just a semicolon. This semicolon means that no statement
will be executed. Usually, empty statements are used when you need to put
comments in your code. Consider the following example:
for(i=0; i<10; i++)
{} /* Empty */
Declaration statements
This statement is use to declare a variable or a function in JavaScript.
function
In JavaScript, the function keyword is used to declare a function in a program.
Here is a simple example where the myFunction function is declared:
function myFunction() {
//block of code
}
var
In JavaScript, to declare a variable, we use the var keyword. We need to declare a
variable before using it.
Consider the following example:
var a =5;
var b = 23.5;
var c = "Good morning";
Here is an example of both var and function:
var a=2;
var b=3;
function Addition(x,y) {
return x+y;

Chapter 9
[ 403 ]
}
var c= Addition(a,b)
Document.Write("The value of c is " + c)
The output of the preceding code will be as follows:
The value of c is 5
Conditional statements
In JavaScript, when we want to perform different actions for different statements, we
use a conditional statement. These are a set of commands to perform different actions
on different conditions. In JavaScript, there are three types of conditional statements,
which are as follows:
• if
• else
• switch
Basically, these statements show the ow of your code. Conditional statements
control the ow of your program, that is, which action will be perform on
which condition.
Consider an example where you have an e-commerce website and you want
to display an offer label on a product when there is special offer on it. In such
a scenario, you can place the appropriate code inside conditional statements.
If statements
In programming languages, the if statement is a control statement. An if statement
has two important parts:
• A condition
• A code to perform the action
In JavaScript and other languages, the if statement makes decisions based on the
variable and type of data. For example, if you write a script asking to be notied on
your birthday, then when the time arrives, the message "It's your birthday today"
will be displayed.
The if statement is only executed when the condition is true. If the expression is
false, then it will not execute.

JavaScript Expressions, Operators, Statements, and Arrays
[ 404 ]
Syntax
Here is the syntax for an if statement in JavaScript:
if(condition) {
// block of code
}
Example
For example, in JavaScript, we can write an if statement code as follows:
var cAge=25;
If (cAge>18) {
document.write ("You must have CNIC");
}// if age is above 18 it displays that you must have a CNIC
Else if statements
In JavaScript, there may be some situations when we require to make a decision
based on different possibilities. The else if statement will only be executed when
the previous statement is false and its condition is true. There are two major points
of the else if statement, they are as follows:
• There should be an if statement before any else if statement
• You may use as many else if statements as desired, but at the end,
you must have an else statement.
Syntax
Here is the syntax for a simple if statement in JavaScript:
if(condition 1) {
// block of code
}
else if(condition 2) {
//block of code
}
else {
// block of code
}
In the preceding syntax, two conditions can be checked for their validity.

Chapter 9
[ 405 ]
Here is the syntax for a slightly more complex else if statement in JavaScript:
if(condition 1) {
// block of code
}
else if(condition 2) {
// block of code
}
else if(condition 3) {
// block of code
}
else {
// block of code
}
In the preceding syntax, three conditions can be checked for their validity.
Example
For example, if you have a web page and you want to check who is accessing that
web page. You will put two custom messages in your script inside the Else if
statement. You will write these as follows:
var person="Manager";
If(person=="Admin") {
Document.Write("I am visiting it");
}
Else if(person=="Manager") {
Document.Write("I am accessing it");
}
Else {
document.write("hello kitty");
}
The Else if statement is one of the most advanced forms of statements in
JavaScript. It makes a decision after checking all the if conditions. It is just a type
of complex statement where every if is a part of an else statement. All conditions
must be true within the parenthesis following the else if keyword. If any of the
conditions are false, then the else part will be executed.

JavaScript Expressions, Operators, Statements, and Arrays
[ 406 ]
Switch statement
In programming languages, the switch statement execution depends only on the
value of the expression. There are lists of cases against which checks are done. The
checks are done sequentially; JavaScript interpreter checks the rst case and its
condition to check whether it is true or not. Similarly, checks are done for all case
statements to check whether their conditions are true and to nd a break statement.
When the interpreter encounters the break statement, it exits the switch loop. The
break statement is meant to ensure that the switch statement returns control to the
calling function once one case is executed, interpreter does not forward the control to
the next applicable case.
Syntax
Here is the syntax for a simple switch statement in JavaScript:
switch(condition/expression)
case expression 1:
//block of code
break;
case expression 2:
//block of code
break;
case expression 3:
//block of code
break;
default:
//block of code
break;
Example
Following is an example of a valid switch statement:
Switch (personName)
case "Jack":
alert("my name is Jack");
Break;
case "Ahmed":
alert("my name is Ahmed");
break;
default:
alert("my name is Talha");
break;

Chapter 9
[ 407 ]
If the preceding code does not nd a matching case then it executes the default
statement. Basically a switch statement is an expression which evaluates different
statements in order to execute some code based on some conditions.
Loops
In programming languages, loops are used to execute a block of code a number of
times, depending on a condition. For example, if you have a statement and you want
to execute it over and over, you just put it in a loop. Loops are basically used for
repetitive tasks.
Another specic example of a loop is that if you want to traverse an array to nd a
specic number, you have to iterate through array elements. Each iteration will get
the next array index.
There are four types of loops in JavaScript, they are as follows:
• for
• while
• do-WHILE
• for-in
For repetitive tasks we put a set of instructions in a loop. To control the number
of times a loop executes, we use control variables in a loop for incrementing or
decrementing value of an iterator or counter variable, which will repeat the block of
code. You can also use the break and continuous statements in a loop.
For loop
The for loops are used to loop through or execute a block of code, until a condition
returns a false result. In a for loop, we mention how many times the script should
perform. For example, you might want to execute your script 12 times.
Syntax
A for loop in JavaScript is the same as in other languages, such as C, C++, and
Python. The for loop syntax has three important parts:
• Initialization: This is where loop initializes the counter variable. This is the
first statement when a loop starts its execution.
• Condition: This is an expression to be evaluated before every loop iteration.
If the condition is satisfied and is true, we enter the loop; otherwise, if the
condition is not satisfied and the condition returns false, then we exit the
for loop.

JavaScript Expressions, Operators, Statements, and Arrays
[ 408 ]
• Increment/Decrement: This is used for iteration and for increasing or
decreasing the counter variable value. This is an update statement where
increment or decrement is executed.
for (initialization; condition; increment / decrement) {
//code block
}
Example
Consider the following example of a basic counter code in JavaScript:
var i; // declares the variable i
for(i=1; i < 5 ; i++) {
Document.Write("basic counter:"+i);
Document.Write("<br/>");
}
The output will be as follows:
Basic counter:1
Basic counter:2
Basic counter:3
Basic counter:4
While loop
This is also a commonly used loop in JavaScript. The while loop executes a block
of statements repeatedly as long as its condition is true. The loop exits when the
condition becomes false.
Syntax
Here is the syntax for a while loop in JavaScript:
while (condition expression) {
// code block
}
There are two parts of a while loop:
• The condition statement
• The while loop code written in curly brackets
The while loop conditions have to be met in order for the loop to work. If the
condition breaks, then the loop breaks.

Chapter 9
[ 409 ]
Example
Here is an example of the while loop, which will print numbers from 1 to 4:
var count= 0;
While(count<5) {
Document.Write("count");
Document.Write("<br/>");
count++;
}
The output will be as follows:
1
2
3
4
Do while loop
The do while loop is also known as a post-test loop because it rst executes the
statement and then checks the condition. If the condition is true, then it will enter
the loop, and if the condition is false, it will break out from the loop.
Syntax
Here is the syntax for the do while loop in JavaScript:
Do {
//statement
}
While(condition);
There are two important parts of the do while loop:
• A statement
• A condition
The do while loop is similar to the while loop, but it checks the condition at the end
of the loop. The do while loop executes the specied statement at least once before
checking the condition.

JavaScript Expressions, Operators, Statements, and Arrays
[ 410 ]
Example
Here is an example of the do while loop that prints the values 1 to 5:
var i=1;
Do {
document.write("The value of i is " + i + "</br>");
i++;
}
While(i<6);
The output will be as follows:
The value of i is 1
The value of i is 2
The value of i is 3
The value of i is 4
The value of i is 5
The do while loop can be used where we need to execute the loop at
least once, irrespective of whether or not the condition is met.
For in loop
There is another type on loop used in JavaScript that is known as the for in loop.
This loop is used for object properties in JavaScript. In this loop, one property of the
object is assigned to a variable name.
Syntax
Here is a syntax for the for in loop in JavaScript:
For (property in object) {
//code block
}
Example
Here is an example of the for in loop:
var I;
For (I is navigator) {
Document.Write(i);
}
Document.Write("The loop ends here");

Chapter 9
[ 411 ]
Jumps and labeled statements
In JavaScript, the jump statements are used to force the ow of execution to jump to
another condition in the script. Basically, it is used to terminate iterative statements.
There are two types of jump statements in JavaScript:
• Break
• Continue
These statements are used when you immediately leave a loop or when you want to
jump to another condition due to a condition in a code.
Break statement
In JavaScript, a break statement is used with a switch statement. It is used to exit a
loop or a condition earlier than planned. Break statements are also used in the for
loop and the while loop.
Syntax
Here is the syntax for the break statement in JavaScript:
Any loop(condition) {
//block of code that will be executed
break;
//block of code that won't get executed
}
Example
Consider the following simple example:
var i=1;
While(i<10) {
if(i==3) {
Document.Write("Breaking from if loop");
Break;
}
Document.Write("The value of i is " + i);
i+=2;
}
The output will be as follows:
The value of i is 1
Breaking from if loop
The value of i is 3

JavaScript Expressions, Operators, Statements, and Arrays
[ 412 ]
Continue statement
The keyword continue will skip the current iteration.
Syntax
Here is the syntax for the continue statement in JavaScript:
Any loop(condition) {
//block of code that will be executed
Any loop (condition) {
//block of code that will be executed
continue;
block of code that wont be executed
}
//block of code that will be executed
}
Example
Consider the following simple example:
var i=1;
While(i<5) {
if(i==3) //skip the iteration {
Document.Write("Continue statement encountered");
continue;
}
Document.Write("The value of i is " + i);
i=i+2;
}
The output will be as follows:
The value of i is 1
Continue statement encountered
Return statement
In JavaScript, a return statement is used to return a value from a function.
After returning the value, it stops the function execution. Every function and
statement returns a value. If no return statement is provided, undened value
is returned instead.

Chapter 9
[ 413 ]
Syntax
Here is the syntax for the return statement in JavaScript:
function myfunc(x, y) {
//some block of code
return x;
}
Document.Write("The result is " + myfunc(2, 3));
Example
Consider the following simple example showing the working of a return statement:
Function multiply(a,b) {
return a*B;
}
var mul=multiply(2,3);
Document.Write("The result is "+ mul);
The output will be as follows:
The result is 6
Throw statement
A throw statement is used to create a user-dened error condition for the try
and catch block. These errors are also called exceptions. We can create our own
exceptions in a code script.
Syntax
Here is the syntax for the throw statement in JavaScript:
try {
//block of code
throw "error";
//block of code
}
catch(error) {
//block of code
}

JavaScript Expressions, Operators, Statements, and Arrays
[ 414 ]
Example
Let's take a look at the following code snippet:
Try {
document.write( "hello world);//the code will throw an error due
to the missing "
}
Catch(error) {
Error.messageTxt;
}
Try catch nally statement
In a try statement we write the code that needs error testing when it is being
executed. In a catch block, you write code to handle errors occurring in the try
block. When you write code inside the try block, you must write a catch block
to handle any error that might occur in the the try block. The finally statement
executes when the try and catch statements are executed successfully.
Syntax
The syntax for a try, catch, and finally block is as shown in the following code
snippet:
Try {//generate exception}
Catch {//error handling code}
Finally {//block of code which runs after try and catch}
Arrays
Arrays are use to store ordered collections of data. If we have multiple items, then
we can use arrays to store these values. Array prototype methods are used to
perform mutation operations in JavaScript. There is no xed length of an array. An
array can contain multiple value types and the number of items can be mutated at
any point after initialization.
Array types
There are two array types in JavaScript:
• Nominal type: This type of array has a unique identity.
• Structure type: This array type looks like an interface; it is also known as
duck type. It uses a specific implementation of a behavior.

Chapter 9
[ 415 ]
Sparse array
In programming languages, a sparse array denotes an array that has
the same values such as 0 or null. There is a large number of zeroes
in an array storage, which occurs in a sparse array. In a sparse array,
indexes do not start from 0. In a sparse array, lengths of the elements
are less than the length of the property.
In JavaScript, the length property is not the actual amount of elements
in the array, it is last index+1. So, in case of a sparse array, this is crucial
to deal with the blank indexes. Consider the following example:
var person=[];
Person[1]="Ali";
Person[20]="Ahmed";
Alert(person.length);// it will be 21 length
Array type object
Some objects in JavaScript look like an array, but in reality, they are not arrays. They
are known as array-like objects.
An array-like object:
• Has: This tells you the number of elements an object has
• Does not have: These are array methods such as indexOf, push, and forEach
Strings as an array
There are some strings in JavaScript that behave like an array. If we
make a string like an array, then it will only be treated as an array.
There are some methods in arrays such as push(), reverse(),
and so on, which do not work on strings.
Creating arrays
In JavaScript, there are two ways to create arrays:
• Using an array initializer
• Using an array constructor
You can use either of these two methods.

JavaScript Expressions, Operators, Statements, and Arrays
[ 416 ]
We have a comma-separated string in brackets in an array initializer; for example:
var students= ["Ali","Ahmed","Amina"];
In JavaScript, you can also create an array using an array constructor using a new
keyword, which creates an array and assigns values to it; for example:
var students=new Array ("Ali,"Ahmed","Amina");
The array initializer method is a quick and good way of initializing an
array because its execution speed is higher than that of the constructor
method. If you do not pass any argument in an array constructor, then
it will set its length to zero.
Array initializer
Arrays are used to store ordered collections of data in a single variable. It means that
when you want to store a list of items then you should use an array. Before using
an array in your program you need to rst initialize it.
In an array initializer, there are comma separated lists of items stored in a variable,
for example:
var a1=[];
var a2=[2];
var a3=[1,2,3];
var a4=['hi', [2]];
When you initialize an array using an array initializer, the type does
not have to be the same for all items. Also, arrays can have zero
length.
Array constructor
There are three different ways in which you can use an array constructor. Their
syntax is as follows:
var a1=new array(); // new empty array
var a2=new array(2); // new array of size 2
var a3= new array(1,2,3); // new array containing 1, 2, 3
If you call an array constructor without argument it will set its length to zero.
If an array constructor has only one argument then this argument will initialize its
new length.

Chapter 9
[ 417 ]
If you call an array with two or more elements, the the argument will initialize an
array with size equal to the number of parameters.
Reading and writing array elements
To read and write elements from an array we use square brackets []. It works as
accessing object properties. Inside the brackets there should be a non-negative
number. The syntax for both reading and writing in an array is the same. Values
are also indexed in an array. You read values index by index. The array's reference
should be on left side of bracket.
Consider the following example:
var obj=["abc"];
var start=obj[0]; //its is for reading
Document.Write(start);
var obj[1]="hello";
i="world";
Obj[i]="hello world";//writing
Document.Write(obj[i]);
The output of this would be as follows:
Hello world
Multidimensional arrays in JavaScript
Like other programming languages, you can also create multidimensional arrays in
JavaScript. Their syntax is same as in other languages. In multidimensional arrays
you create arrays within arrays of nested array loops.
You can create an array by adding more arrays for each dimension you need.
Creating a multidimensional array is useful when you need to cover the whole
storage with information. If most of your data is sparse, meaning if array is empty,
then a better technique to store the information is using an associative array. Here is
an example of creating a multidimensional array in JavaScript:
var a=5;
var b=2;
var c=new array();
For(i=0;i<5;i++) {
C[i]=new array();
for For(j=0;j<5;j++)
c[i][j]; }}
}

JavaScript Expressions, Operators, Statements, and Arrays
[ 418 ]
Properties in an array
An array has a prototype, length, and a constructor as its properties.
Length
In JavaScript, the array length property returns the number of elements in an array.
Returns
This returns an integer value of 32 bit.
Description
We can also use an array length property when we want to empty an array at any
time. When you increase the length of any array, it will not increase the number of
elements in it. We can set or return the length of any array using the array length
property.
Consider the following example:
var num=new Array[1,2,3];
Document. write (num.length);
The output will be as follows:
3
Constructor
An array contractor is used to initialize an array. An array can contain zero or more
elements and has the following syntax where array elements are separated by a
comma inside square brackets.
var fruits = ["Apple", "Banana"];
Prototype
All array instances inherit from Array.prototype. The prototype constructor of an
array allows to add new methods and properties to the Array() object.
Array.prototype is an array itself.
Array.isArray(Array.prototype); // true
You can nd detailed information on how to make these changes at MDN
(https://developer.mozilla.org/en-US/docs/Web/JavaScript/Reference/
Global_Objects/Array/prototype).

Chapter 9
[ 419 ]
Array methods
There are several methods that can be performed on arrays to obtain different
results. Some of these methods are dened in the following sections.
concat()
The concat() method performs concatenation between two arrays.
Returns
The concat() method returns the concatenated array.
Parameter
The concat() method takes a string to concatenate with.
Description
This takes two arrays and joins them.
var alpha = ['a', 'b', 'c'],
var numeric = [1, 2, 3];
var alphaNumeric = alpha.concat(numeric);
console.log(alphaNumeric); // Result: ['a', 'b', 'c', 1, 2, 3]
every()
The every() method tests a function for every array element.
Returns
The every() method returns a Boolean true or false.
Parameter
A call back function to be applied on every element of the array.
Description
If every element in an array provides the testing function, then it returns true.
function isBigEnough(element, index, array) {
return element >= 10;
}
[12, 5, 8, 130, 44].every(isBigEnough); // false
[12, 54, 18, 130, 44].every(isBigEnough); // true

JavaScript Expressions, Operators, Statements, and Arrays
[ 420 ]
foreach()
The foreach() method executes a function passed as a parameter for every element
of the array.
Returns
The output of each function.
Parameter
A call back function to be called for every element of the array.
Description
The foreach() method calls the functions of each element:
function logArrayElements(element, index, array) {
console.log('a[' + index + '] = ' + element);
}
// Note elision, there is no member at 2 so it isn't visited
[2, 5, , 9].forEach(logArrayElements);
// logs:
// a[0] = 2
// a[1] = 5
// a[3] = 9
join()
This joins all elements into a string.
Returns
A joined string.
Parameter
Null or a separator to place between array elements.
Description
It joins all elements into a string.
var a = ['One', 'Two', 'Three'];
var var1 = a.join(); // assigns 'One,Two,Three' to var1
var var2 = a.join(', '); // assigns 'One, Two, Three' to var2
var var3 = a.join(' + '); // assigns 'One + Two + Three' to var3
var var4 = a.join(''); // assigns 'OneTwoThree' to var4

Chapter 9
[ 421 ]
pop()
The pop() method removes the last element of an array, just like a stack.
Returns
The pop() method returns a null parameter.
Parameter
The pop() method takes the null parameter.
Description
It removes the last element of an array, just like a stack.
var myColours = ['Yellow', 'Black', 'Blue', 'Green'];
console.log(myColours); // ['Yellow', 'Black', 'Blue', 'Green']
var popped = myColours.pop();
console.log(myColours); // ['Yellow', 'Black', 'Blue' ]
console.log(popped); // 'Green'
push()
It adds elements on the last index on an array.
Returns
null.
Parameter
null.
Description
This adds elements at the last index on an array.
var sports = ['cricket', 'baseball'];
var total = sports.push('football');
console.log(sports); // ['cricket', 'baseball', 'football']
console.log(total); // 3
indexOf()
The indexOf() method returns the rst index of an array.

JavaScript Expressions, Operators, Statements, and Arrays
[ 422 ]
Returns
The indexOf()method returns an index.
Parameter
The indexOf() method takes an array element as a parameter.
Description
It returns the rst index of an array.
var array = [2, 5, 9];
array.indexOf(9); // 2
array.indexOf(7); // -1 if not found
lastIndexOf()
The lastIndexOf() method returns the last index at which a given element
is found inside an array.
Returns
It returns the last index of an array.
Parameter
An array element.
Description
var array = [2, 5, 9, 2];
array.indexOf(2); // 3
array.indexOf(7); // -1 if not found
reverse()
The reverse() method reverses the order of all the elements in an array.
Returns
The array.
Parameter
null.

Chapter 9
[ 423 ]
Description
The reverse() method reverses the order of the elements in an array. The rst
element becomes the last element and so on.
var myArray = ['one', 'two', 'three'];
myArray.reverse();
console.log(myArray) // ['three', 'two', 'one']
shift()
In an array, the shift() method removes the very rst element and returns
that element.
Returns
null.
Parameter
null.
Description
In an array, it removes the very rst element and returns the removed element.
var myColours = ['Yellow', 'Black', 'Blue', 'Green'];
console.log(myColours); // ['Yellow', 'Black', 'Blue', 'Green']
var shifted = myColours.shift();
console.log(myColours); // ['Black', 'Blue', 'Green']
console.log(shifted); // 'Green'
unshift()
This method adds a new element at the beginning of the array and returns the new
array length.
Returns
The new length of the array.
Parameter
The element(s) to add in the array.

JavaScript Expressions, Operators, Statements, and Arrays
[ 424 ]
Description
This method adds a new element at the beginning of the array and returns the new
array length:
var arr = [1, 2, 3];
arr.unshift(0); // arr is [0, 1, 2, 3]
slice()
The slice() method slices an array into a new array.
Returns
The new sliced array.
Parameter
The indices of elements to slice.
Description
This method slices an array into a new array:
var fruits = ['Banana', 'Orange', 'Lemon', 'Apple', 'Mango'];
var citrus = fruits.slice(1, 3);
// citrus contains ['Orange','Lemon']
splice()
The splice() method is also used to add new elements to an array by removing
existing elements.
Returns
The new spliced array.
Parameter
The indices of elements to remove and the elements to add.

Chapter 9
[ 425 ]
Description
This method is also used to add new elements to an array by removing existing
elements:
var myCars = ['Audi', 'BMW', 'Ferrari', 'Volkswagen'];
// removes 0 elements from index 2, and inserts 'Toyota'
var removed = myCars.splice(2, 0, 'Toyota');
// myCars is ['Audi', 'BMW', 'Toyota', 'Volkswagen']
// removed is [], no elements removed
sort()
This sorts an array alphabetically.
Returns
null.
Parameter
null.
Description
Called as an array method, this sorts an array alphabetically (unicode characters) and
will not work well with numbers:
var fruit = ['cherries', 'apples', 'bananas'];
fruit.sort(); // ['apples', 'bananas', 'cherries']
toString()
The toString() method converts the object into a string.
Returns
The toString() method returns a string.
Parameter
The toString() method takes a null parameter.

JavaScript Expressions, Operators, Statements, and Arrays
[ 426 ]
Description
Converts the array object into a string with its elements separated by commas
character.
var monthNames = ['Jan', 'Feb', 'Mar', 'Apr'];
var myVar = monthNames.toString(); // 'Jan,Feb,Mar,Apr' to myVar.
ECMA5 Array methods
New array methods were added into the ECMA5 script, which is also known as arrays
extras. These are nine new methods. These methods perform common operations
working with arrays. These new methods are covered in the following sections.
array.prototype.map()
The map() method creates a new array on the result values from each iteration.
Returns
A modied array.
Parameters
A callback function.
Description
It loops through an array, running a function, and creates a new array based on the
return values from each iteration. It takes the same arguments as the forEach()
method.
Here is a simple example:
var numbers = [1, 4, 9];
var roots = numbers.map(Math.sqrt);
The roots are now as follows:
[1, 2, 3]
array.prototype.lter()
The filter() function creates a new or modied array that consist of values that are
processed by the function.

Chapter 9
[ 427 ]
Returns
A modied array.
Parameters
A callback function.
Description
It creates a new array of only those elements that returned true to their callbacks.
Here is a simple example:
function isBigEnough(value) {
return value >= 10;
}
var filtered = [12, 5, 8, 130, 44].filter(isBigEnough);
The output is as follows:
[12, 130, 44]
array.prototype.reduce()
The reduce() function simultaneously applies a function to two values of the array
to reduce them to a single value. The direction of selection of values is from left to
right.
Returns
A modied array.
Parameters
A callback function.
Description
The array.prototype.reduce() method is used to accumulate all values in an
array to a single value by the operations performed in the callback function.
Here is a simple example:
[0, 1, 2, 3, 4].reduce(function(previousValue, currentValue,
index, array) {
return previousValue + currentValue;
});
JavaScript Expressions, Operators, Statements, and Arrays
[ 428 ]
The callbacks are executed as follows:
previousValue currentValue index array return
value
First call 0 1 1 [0, 1, 2, 3, 4] 1
Second call 1 2 2 [0, 1, 2, 3, 4] 3
Third call 3 3 3 [0, 1, 2, 3, 4] 6
Fourth call 6 4 4 [0, 1, 2, 3, 4] 10
array.prototype.forEach()
The array.prototype.forEach() method executes a function passed as a
parameter for every element of the array.
Returns
The output of each function.
Parameter
A callback function to be called for every element of the array.
Description
The array.prototype.forEach() method calls functions of each element. Here is a
simple example:
function logArrayElements(element, index, array) {
console.log('a[' + index + '] = ' + element);
}
// Note elision, there is no member at 2 so it isn't visited
[2, 5, , 9].forEach(logArrayElements);
// logs:
// a[0] = 2
// a[1] = 5
// a[3] = 9
array.prototype.indexOf()
The array.prototype.indexOf() method returns the rst index of an array.

Chapter 9
[ 429 ]
Returns
An index.
Parameter
An array element.
Description
The array.prototype.indexOf() method returns the rst index of an array. Here is
a simple example:
var array = [2, 5, 9];
array.indexOf(9); // 2
array.indexOf(7); // -1 if not found
array.prototype.lastIndexOf()
The array.prototype.lastIndexOf() method returns the last index at which a
given element is found inside an array.
Returns
It returns the last index of an array.
Parameter
An array element.
Description
As stated in the preceding descriptions, the array.prototype.lastIndexOf()
function will return the last index of the specied element if found within the array.
Here is a simple example:
var array = [2, 5, 9, 2];
array.indexOf(2); // 3
array.indexOf(7); // -1 if not found
array.prototype.every()
The array.prototype.every() method tests a function for every array element.
Returns
A Boolean true or false.

JavaScript Expressions, Operators, Statements, and Arrays
[ 430 ]
Parameter
A callback function to be applied on every element of the array.
Description
If every element in an array provides the testing function, then it returns true. Here
is a simple example:
function isBigEnough(element, index, array) {
return element >= 10;
}
[12, 5, 8, 130, 44].every(isBigEnough); // false
[12, 54, 18, 130, 44].every(isBigEnough); // true
array.prototype.some()
This method tests if any element passes the test implemented by the provided
function.
Returns
A Boolean True or False.
Parameters
A callback function.
Description
The array.prototype.some() method is similar to Array.prototype.every(), but
here the condition is that at least one callback should return true.
A simple example is as follows:
function isBiggerThan10(element, index, array) {
return element > 10;
}
[2, 5, 8, 1, 4].some(isBiggerThan10); // false
[12, 5, 8, 1, 4].some(isBiggerThan10); // true
array.prototype.reduceRight()
The array.prototype.reduceRight() method applies a function simultaneously
against two values of the array (from right to left) so as to reduce them to a single
value.

Chapter 9
[ 431 ]
Returns
A modied array.
Parameters
A callback function.
Description
This is exactly the same as reduce, but it starts from right and moves toward the
left while accumulating the values.
Here is a simple example:
var total = [0, 1, 2, 3].reduceRight(function(a, b) {
return a + b;
});
This returns the sum as 6.
[ 433 ]
JavaScript Object-Oriented
Programming
JavaScript is an object-oriented programming language. In object-oriented
programming (OOP) languages, we use the concept of objects rather than actions
to develop applications. In the past, JavaScript had no real foundation and was just
a basic language. JavaScript is not a fully OOP-based language like JAVA, C#, and
other programming languages, but it still has many OOP features.
There are many features in JavaScript where code is reused. So, rather than using
procedural concepts in JavaScript, we use object-oriented programming techniques.
There are four basic principles of object-oriented programming.
Polymorphism
Since JavaScript is a dynamic language, it supports polymorphism. Polymorphism
can be understood as the ability of an object to be different at different times. For
example, a shape can be a square, a rectangle, or a circle.
Encapsulation
This feature is also supported in JavaScript. It means protecting parts of code
from external use. It protects part of the code that does not concern the end user
but is important for running an application, such as in an application that stores
passwords. Users don't have to know how their passwords are encrypted. Hence,
this code is encapsulated.

JavaScript Object-Oriented Programming
[ 434 ]
Inheritance
In JavaScript, inheritance can be used to derive properties of parent objects to their
child objects and have some unique attributes for themselves as well. For example, a
square and a triangle may inherit their stroke or ll from a shape object and, at the
same time, have a number of vertices unique to themselves.
Abstraction
Abstraction is not natively supported in JavaScript, but there are methods through
which this can be achieved, using a combination of polymorphism and inheritance.
Objects
Objects are the basic key to understand object-oriented programming. Programming
objects are just like real-world objects. Look around, you'll see many objects. Your
car, mobile phone, desk, laptop, pet dog, and DVD player are all objects.
All objects have two characteristics: properties and methods.
A mobile has properties (color, screen size, height, and weight) and methods (make
calls, send SMSs, receive calls, and transfer les).
A car has properties (color, height, gearbox, wheels, engine, brakes, and steering)
and methods (start engine, steer, change gear, apply brake, stop, and crash).
Just like these real-world examples, the objects in OOP have the same characteristics.
So, an object, in terms of programming, can have properties (variables in any
programming language) and methods (functions in any programming language).
Hence, we can dene an object as "an entity or a thing that has some properties and
methods associated with it. An object can be individually selected and manipulated".
All generic properties and methods are combined into a template called a class.
A class is then used as a template to instantiate single or multiple objects.
In JavaScript, there are many built-in objects, such as Maths, Dates, Regular
Expressions, Arrays, and so on.

Chapter 10
[ 435 ]
Creating objects
In JavaScript, we can create objects in three different ways:
• Using object literals
• Using new keywords
• Using the object.create() method (ECMAScript 5)
Object literals
This is the simplest way to create an object. An object can be both created and
dened in one statement using an object literal. An object literal is a comma-
separated list of name:value (like year:1990, age:25) pairs enclosed within curly
brackets.
Here is an example:
var car= {
model:"2014",
company:"Honda",
color:"White"
};
In the preceding example, we have created a car object with four properties or
attributes.
var empty = {}
On the other hand, this piece of code creates an object with no properties.
The new keyword
The new keyword is used to create and initialize a new object. The new keyword is
always followed by a function call. This function is known as a constructor, which
initializes the newly created object. JavaScript contains built-in constructors for the
native types.
Here is an example:
var car = new Object();
car.model = "2014";
car.company = "Honda";
car.colour = "White";

JavaScript Object-Oriented Programming
[ 436 ]
The preceding example also creates a new car object with four properties:
varempty = new Object(); // An empty object, same as {}.
vararr = new Array(); // An empty array, same as [].
varcurrdate = new Date(); // Current Date.
varregex = new RegExp("JavaScript"); // A pattern matching object.
The object.create() method
The object.create() method was originally dened in ECMAScript 5. It is also
used to create an object. The rst argument passed to this method is the prototype of
that object. The second argument is optional. It describes the object's properties.
Here is an example:
// obj1 inherits properties model, company and colour.
varcar =
Object.create({model:"2014",company:"Honda",colour:"White"});
// car inherits no properties or methods.
varcar = Object.create(null);
Null can be passed if the object does not have any prototype. However, this object
will not inherit anything:
// car is same as {} or new Object().
varcar = Object.create(Object.prototype);
Design patterns
To write scalable code, we need to track down the recurring sections in our code and
to optimize them in a way that it's easy to maintain the code. Design patterns help us
in doing this.
In a book, Addison-Wesley Professional by Erich Gamma, John Vlissides, Ralph Johnson,
and Richard Helm; First edition (November 10, 1994), Design Patterns are dened as:
A design pattern names, abstracts, and identies the key aspects of a common
design structure that make it useful for creating a reusable object-oriented design.
The design pattern identies the participating classes and their instances, their
roles and collaborations, and the distribution of responsibilities.

Chapter 10
[ 437 ]
Each design pattern focuses on a particular object-oriented design problem or
issue. It describes when it applies, whether or not it can be applied in view of other
design constraints, and the consequences and trade-offs of its use. Since we must
eventually implement our designs, a design pattern also provides sample code to
illustrate an implementation.
Although design patterns describe object-oriented designs, they are based on
practical solutions that have been implemented in mainstream object-oriented
programming languages.
Developers usually question whether there is any best design pattern to implement
in their workow.
Actually, no single design pattern is perfect for all scenarios. Each and every web
application that is developed has its own needs. We have to see which pattern will
add value to our application if implemented, because all design patterns serve
different solutions.
So, once we have a good understanding of design patterns, it will be easier for us to
integrate a pattern into our application architecture. Design patterns are classied
into three categories: creational, structural, and behavioral.
• Creational design patterns: Constructor, factory, prototype, and singleton
are examples of creational design patterns
• Structural design patterns: Decorator, façade, and flyweight are example of
structural design patterns
• Behavioral design patterns: Observer and mediator are examples of such
patterns
Constructor pattern
Constructors are special methods used to initialize objects. They may accept
arguments, which are then used to set values to member properties and methods
when the object is created. Native constructors, such as arrays and objects, are
present inside JavaScript as native functions. We can also create custom constructors
that dene properties and methods for our custom object.

JavaScript Object-Oriented Programming
[ 438 ]
Description
In the constructor method, we create an object using the new keyword. In this
method, we dene properties and methods with the this keyword. Properties are
dened after the = sign. When you dene each property, you must place a semicolon
at the end. When you use the this method in your script, you need to rst initialize
the object and then use it in your code:
Simple constructors
A constructor is considered to be the most suitable way to implement an instance.
The new keyword tells JavaScript that we would like that function to act like a
constructor and to create an instance also called object. Within a constructor, the
this keyword is used to reference the new object.
Prototype constructors
Prototype is a property of functions in JavaScript. Whenever a constructor function
is invoked to create a new object, all of the characteristics of that constructor's
prototype are then associated to the new object.
Module pattern
Modules are an essential part of any well-constructed web application. They are
independent blocks linked with each other in a neat, understandable and well-
organized way. In other words, they give the program a structure and also provide
encapsulation.
Description
Modules can be implemented in several ways in JavaScript. We will be discussing
two of them here:
• Object literal notation
• The module pattern
Object literal notation
As we have read earlier, object literals are a list of name:value pairs separated by
commas enclosed inside curly braces {}. Names can be identiers or strings followed
by a colon. Make sure there is no comma after the last name:value pair; otherwise,
it may result in some unexpected errors:
varObjectLiteral = {
variableKey: Value,

Chapter 10
[ 439 ]
functionKey: function() {
//...
}
};
We do not have to instantiate object literals with the new keyword.
Care should be taken to see that the keyword new is not used at the start of the
statement. This is because the opening curly bracket could be interpreted as the
start of a code block.
We can add new members from the outside object as follows:
myModule.property = 'someValue';
Using modules can help in hiding data members (encapsulation) and managing
code in an organized way.
The module pattern
In conventional software engineering, the module pattern provides public and
private access to classes, methods, and variables. The focus of the module pattern
is to reduce the use of global variables, minimizing the conicts inside the code
throughout the application.
This is the most famous and commonly used design pattern that is implemented
in large JavaScript frameworks and extension libraries such as jQuery, ExtJS, YUI,
and DoJo.
Here is an example of the module pattern that makes use of a shared private cache.
This method enables us to create objects using shared storage that will, in return,
optimize performance because the functions are only created one time in the start.
The mixin uses the function reference to call them rather than creating a new
instance of that function every time it needs them.
Here are a few advantages and disadvantages of the module pattern:
Advantages:
• This pattern has a cleaner approach for developers
• It supports encapsulation
• There is less global namespace cluttering
• This supports localized functions and variables with closures

JavaScript Object-Oriented Programming
[ 440 ]
Disadvantages:
• As the public and private members are accessed in a different manner, when
there is a need to change visibility of a specific member we would have to
change it everywhere the object was being used
• Private members cannot be accessed from new methods that are added to
objects afterwards
• Private members cannot be extended easily
The revealing module pattern
This pattern is almost identical to the module pattern. The only difference is that, in
this pattern, all members are kept private until they are explicitly called, usually by
an object literal returned by the closure from which it is dened.
Description
Christian Heilmann engineered this pattern. He disliked the fact that we had to
switch to object literal notation for the objects that we want to keep public. There
was another drawback: we had to repeat the name of main object if we had to access
public variables from one method into an other or call public methods.
In this pattern, we dene all functions and variables as private and, at the end of
module, return an anonymous object along with the pointers to the private functions
and variables we would like to expose as public.
Here are a few advantages and disadvantages of the revealing module pattern:
Advantages:
• Cleaner approach for developers
• Supports encapsulation
• Less global namespace cluttering
• Localized functions and variables with closures
• More consist script syntax
• Explicit definition of public functions and variables
• Increased readability

Chapter 10
[ 441 ]
Disadvantages:
•Private members are inaccessible
•It's difficult to patch public functions and variables that are referred to by
some private members
The singleton pattern
This pattern ensures that only one instance of a class is created and provides a global
access point to the object.
Description
The singleton pattern is implemented by creating a class with a method whose
object can only be created if it doesn't exist already. If the object already existed, the
reference will be returned to that object.
It is recommended to delay the initialization of singletons in cases where they
require some information that might not be available at the time of initialization.
Hence, they are different from static classes or objects.
Here are a few advantages and disadvantages of the singleton pattern:
Advantages:
•Optimized memory usage
•Single global point of access
•Delayed initialization, which prevents instantiation until it is required
Disadvantages:
•There is no reset option once it is instantiated.
•Unit testing is difficult because when we reference a singleton class that
exists outside of the class under test, then we do not have a true unit test.
Instead of what should have been a single unit test of the target class, we end
up testing the target class and the singleton together.
•It may introduce hidden dependencies.
The observer pattern
The observer pattern is such that if one object changes state all others are notied
and can update automatically. Thus this pattern denes a one-to-many dependency
relationship between objects.

JavaScript Object-Oriented Programming
[ 442 ]
Description
In the observer pattern, an object (also called a subject/publisher) is connected to
multiple other objects that are dependent on our subject. These depending objects are
called observers/subscribers.
The subject broadcasts a notication whenever a change in state occurs. All observers
receive the notication and update them accordingly.
The book, Design Patterns: Elements of Reusable Object-Oriented Software, describes the
observer pattern as follows:
"One or more observers are interested in the state of a subject and register their
interest with the subject by attaching themselves. When something changes in our
subject that the observer may be interested in, a notify message is sent which calls
the update method in each observer. When the observer is no longer interested in
the subject's state, they can simply detach themselves."
Here are a few advantages and disadvantages of the observer pattern:
Advantages:
• Requires a deeper understanding of various components in the system and
their relationship with each other
• Helps in pointing out dependencies
• Helps in disintegrating objects into smaller reusable components
Disadvantages:
• Application integrity check can become difficult
• Switching an observer from one subject to another can be tough
The mediator pattern
As the name suggests, a mediator is a person who assists in negotiations between
two or more conicting parties.
In terms of software engineering, mediator comes under the behavioral design
pattern category. The pattern enables us to implement a single object through which
different components of an application communicate.

Chapter 10
[ 443 ]
Description
The mediator pattern promotes loose coupling by ensuring that, instead of objects
interacting with each other directly, they communicate across a central point.
Let's take a real-world example to understand it in a better way. Consider an airport
trafc-control system. The control tower acts as a mediator, while all other planes are
communicating with the control tower and waiting for the notications to land or
to take off. They do not contact each other but just with the control tower. The role
of the control tower is very essential and central. Hence, it an important key for this
system.
Similarly, the mediator is as important in this pattern.
When we call mediator's subscribe method, we pass in a callback, and the mediator
queues up these callbacks for when the given event is red and subsequently the
decoupled object's callback is red. Mediator triggers the signal for the object to re,
allowing the object to be decoupled from any others.
Here are a few advantages and disadvantages of the mediator pattern:
Advantages:
• Removes many-to-many relationships
• Establishes many-to-one relationship
• Help us to figure out dependencies
• Helps in disintegrating objects to promote smaller reusable components
Disadvantages:
• Introduces a single point of failure
• Performance issues may arise when too many modules try to communicate
back and forth
The prototype pattern
In the prototype pattern, objects are created on the template of the existing object
through cloning.

JavaScript Object-Oriented Programming
[ 444 ]
Description
This pattern focuses on creating an object that can be used as a template/blueprint
for other objects through prototypal inheritance. JavaScript has native support for
prototypal inheritance. Therefore, it's easy to work in this pattern.
Here are a few advantages and disadvantages of the prototype pattern:
Advantages:
• Suitable for applications where object creation is in focus
• Better performance as new objects inherit features from the prototype
Disadvantages:
• Overkill for an application that has very few objects or prototypes
Command pattern
In this pattern, commands are encapsulated as objects.
Description
Command objects allow loosely coupled systems to separate objects that issue
requests from the objects that process requests. These requests are known as events
and the code that processes these requests is called an event handler.
In simpler words, we can say that the main purpose of the command pattern is
separating the features of giving out commands from executing commands and
delegating this feature to a different object. Practically, command objects bind an
action to the object that will invoke the action. They always include a function
such as run() or execute(). One of the biggest advantages of this pattern is that
command objects with the same interface can be easily interchanged whenever
needed.
Advantages:
• The command pattern makes it easier to construct general components that
have to execute/delegate/sequence method calls
• Command objects with same interface can be interchanged whenever needed
• It allows bookkeeping about command executions, without interference from
the client

Chapter 10
[ 445 ]
Disadvantages:
• It significantly increases the number of classes for each command
It is useful while creating structures where generation and execution of requests do
not depend on each other. We can say that a command instance can be instantiated
by the client and run later by the invoker. The client and invoker may not know
anything about each other.
This pattern is scalable as we can add new commands without changing any existing
code.
The facade pattern
A façade is a front layer that is presented to and is visible to the world. Behind it lies
all the complexity and unpresentable objects.
Description
The façade pattern is a structural pattern that enables us to hide the backend
complexities under an interface. This pattern increases usability of the application
modules. Internal features and methods are not exposed directly to developers, but
they can interact with them through this façade. This pattern makes your application
secure.
jQuery is an example of a JavaScript library that uses the façade pattern.
Whenever we use jQuery's $(this).animate() or $(this).css() function, we are
using a façade. Similarly, $(document).ready() implements a façade.
The core jQuery attributes should be considered intermediate abstractions. The more
immediate burden to developers is the DOM API and facades are what make the
jQuery library so easy to use.
The ready() function has lots of complexities at the backend. jQuery simplies
browser inconsistency to ensure that ready() is invoked at the appropriate time.
However, we only see a façade or a simple interface layer.

JavaScript Object-Oriented Programming
[ 446 ]
Here are a few advantages and disadvantages of the facade pattern:
Advantages:
• Improves a web application's security
• Compatible with other patterns
• Easier to patch internal modules
• Easier to implement
• Provides a simpler public interface
• Being used in other JavaScript frameworks, such as jQuery
Disadvantages:
• No proven disadvantages
The factory pattern
Just like other creational design patterns, the factory pattern also focuses on object
creation. However, it differs in the way that it does not require a constructor method
to create objects.
Description
The factory pattern provides an interface for object creation where we specify the
type of factory object we need to create. Subclasses are allowed to decide which
class will be instantiated so that they can specify which type of factory object will be
created. Factory pattern is very extensible. Factory methods are used when collection
of objects are being maintained. These collection of objects are different but still have
many common methods and properties.
In this pattern, we do not use the new keyword to create an object.
Let's take a real-time example that will clarify this pattern:
Suppose there is a garment factory. We need to create a type of garment. Instead of
creating this object directly using the new keyword, we will request a factory object
for a new garment. We tell the factory which type of object is needed (a shirt, jeans,
coat, a scarf, and so on). It instantiates that class and returns the object for our further
usage.
ExtJS is a JavaScript library that uses this pattern. Methods for creating objects can be
categorized and further sub classed.

Chapter 10
[ 447 ]
Here are a few advantages and disadvantages of the factory pattern:
Advantages:
• Object creation is much easier through an interface class, which does the
process for us
• Good for creating objects based on different scenarios
• Practical for similar instantiating objects
• Creating objects through one instance is simplified
Disadvantages:
• Difficult to test object-creation process as it's hidden behind factory methods
The mixin pattern
In OOP, mixins are classes that can be inherited by a subclass or a group of
subclasses for functionality reuse.
Description
Subclassing means to inherit properties for our new object from a super or base class
object.
For instance, there is an apple class that is able to extend from another class, fruit.
Here, fruit is a superclass, while apple is a subclass of fruit. All objects of apple
inherit properties from fruit. However, apple is able to dene its own methods and
override those dened by fruit.
If apple needs to call an overridden method in fruit, it's called method chaining.
If apple needs to call fruit's constructor, it's called constructor chaining.
Mixins let other objects inherit their functionality with a very minimal level of
complexity. This pattern allows us to share functionalities from many mixins
through multiple inheritance.
Here are a few advantages and disadvantages of the mixin pattern:
Advantages:
This pattern helps in decreasing function duplication and promotes reuse of
functions. In applications where functionality is shared across the system, we can put
the shared functions in mixins and focus on the rest of the distinct functionality in
our system.

JavaScript Object-Oriented Programming
[ 448 ]
Disadvantages:
Keeping functionality in the object prototype may result in prototype pollution and
may confuse tracking the origin of our functions. This may cause problems in large-
scale applications.
Example:
// Detailed explanation of Mixin Design Pattern in JavaScript can be
found here: http://addyosmani.com/resources/essentialjsdesignpatterns/
book/#mixinpatternjavascript
/* Car Class */
var Car = function(settings) {
this.model = settings.model || 'no model provided';
this.colour = settings.colour || 'no colour provided';
};
/* Mixin Class */
var Mixin = function(){};
Mixin.prototype = {
driveForward: function() {
console.log('drive forward');
},
driveBackward: function() {
console.log('drive backward');
}
};
/* Augment existing class with a method from another class */
function augment(receivingClass, givingClass) {
/* only provide certain methods */
if(arguments[2]) {
var i, len = arguments.length;
for (i=2; i<len; i++) {
receivingClass.prototype[arguments[i]] = givingClass.
prototype[arguments[i]];
}
}
/* provide all methods */
else {
var methodName;
for (methodName in givingClass.prototype) {
/* check to make sure the receiving class doesn't have a
method of the same name as the one currently being processed */
if (!receivingClass.prototype[methodName]) {

Chapter 10
[ 449 ]
receivingClass.prototype[methodName] = givingClass.
prototype[methodName];
}
}
}
}
/* Augment the Car class to have the methods 'driveForward' and
'driveBackward' */
augment(Car, Mixin, 'driveForward', 'driveBackward');
/* Create a new Car */
var vehicle = new Car({model:'Ford Escort', colour:'blue'});
/* Test to make sure we now have access to the methods */
vehicle.driveForward();
vehicle.driveBackward();
Property getter and setter
In programming languages, getting and setting properties are used to get and set
the values of an object. The getter method is used to get values of properties and
the setter method is used to set values of properties.
There are two property accessors in JavaScript:
• getter
• setter
Description
• The getter and setter are methods that help us access and manipulate
the data within an object very easily. They can help us build shortcuts to
access concealed information. The getter and setter methods work in such
a way that they bind objects with a function so that they look like normal
object properties.
• getter: This method is a special kind of property accessor. When you want
to access a property, the value is generated dynamically. Here is an example:
Obj.getButtonColor();
• setter: This method is used to set properties. It passes a value as an argument
and the returned value of the function is set to the property. Here is an example:
Obj.setButtonColor(value);

JavaScript Object-Oriented Programming
[ 450 ]
Deleting properties
Just like we can add properties to objects, JavaScript allows us to remove object
properties as well.
Description
The delete operator is used to delete a property of an object. It deletes properties
from the local version. The scope of a property can be reassigned to another variable
on the same scope. In JavaScript, the delete operator always returns a Boolean
value. Using this keyword, you cannot delete objects declared with the var keyword.
Let's assume we have an object like this:
varauthor = {
"name":"talha",
"age":"24"
};
We wish to remove the age property so that we can have a nal object that looks
like this:
{
"name":"talha"
};
Enter the following command:
deleteauthor.age;
You can also use this command to achieve the same result:
delete author["age"];
Testing properties
One of the common tests performed by developers on an object is to check whether
an object has a specic property or not. There are different ways to check whether an
object has a given property.

Chapter 10
[ 451 ]
Description
In JavaScript, there are two methods for property testing:
• hasOwnProperty: This method is used to check whether an object has its
own property or not. If the property is inherited from anywhere, then it will
return false:
For example:
samantha = new girls();
samantha.eyecolor = 'brown';
o.hasOwnProperty('eyecolor'); // returns true
• propertyIsEnumerable: This method returns true, only if hasOwnProperty
returns true and that property is enumerable.
To check properties in JavaScript, we can use the in keyword. If an object property
has its own value, it will return true.
Here is an example:
var girls = {
name: 'Samantha',
height: 'Tall',
eyecolor: 'brown',
address: null
};
'name' in girls; // true
'age' in girls; // false
Enumerating properties
In JavaScript, enumeration of an object's properties is done using the for-in loop.
Description
In JavaScript, enumerating properties are used in the for-in loop as this loop
accesses all properties of an object. When we want to check the list of properties of an
object, then we use the for-in loop to iterate properties. It assigns the name of the
property to the loop variable.
Inherited objects are not enumerable, but properties that you add with these objects
are enumerable.

JavaScript Object-Oriented Programming
[ 452 ]
Here is an example:
var student = {
Name:"Ali",
Age:"24",
Edu:"Engineering"
}
Sudent.propertyIsEnumerable('Name');
// will return true since object's properties are enumerable
for(var property in student) {
Console.log(property); //will log all properties
}
Property attributes
The information associated with every JavaScript property is called an attribute.
Different types of property attributes are explained here.
Description
There are two types of JavaScript properties:
• Data property
• AccessorProperty (getter and setter properties)
There are four attributes that a property has:
• Enumerable: This checks whether the property is in a loop construct
• Configurable: This checks whether we can delete or modify a property
• Writable: This checks whether we can set the value of a property or not
• Value: This is a value of property and it can be of any data type in JavaScript
The data property has all of the preceding attributes, while the accessor
property does not have a value or writable attribute.

Chapter 10
[ 453 ]
Object attributes
There are three types of object properties in JavaScript:
• Named data properties: These are normal object properties in which an
object maps string name a to a value. Here is an example:
Var x={
prop:555
};
console.log(x.prop); //its get method
c.prop="xyz"; //its set method
• Named accessor properties: Functions that are used to get and set properties
are known as named accessor properties. Here is an example:
Var x = {
get name() {
return getter;
}
}
Here's another example:
var x = {
set name(val) {
console.log(val);
}
}
• Internal properties: Some properties that are not accessible via language
are called internal properties in JavaScript. These properties are purely for
specification purposes. These properties have special names and are written
inside square brackets. All objects have an internal property known as
[[Prototype]]. The value of this property is either null or an object, which
is used for implementing inheritance.
It has two parts:
°Prototype: This tells the prototype of an object
°Extensible: This tells us whether we can or cannot add properties
to an object

JavaScript Object-Oriented Programming
[ 454 ]
Serializing objects
Serializing an object means converting an object into bytes so that it can be stored in
memory persistently, or it can be sent across the network. These bytes can then be
deserialized into the original object.
Description
Serialization is used to store or preserve the internal state of an object. In serialization,
an object can be transported or retrieved later. There are two methods of serialization
in JavaScript:
• JSON.stringify
• JSON.parse
Here is an example:
Obj={a:1}
A=json.stringify(obj);
// creates a JSON String from an array or object
B=json.parse(A);
// parses a JSON Object 'A' in an object.
These methods can also retrieve and store objects, arrays, strings, true and false.
Enumerable values are preserved or restored by the JSON.stringify() method.
Objects methods
Object methods are functions that are stored as object properties. These methods can
be performed by calling them directly following a variable for which the function is
to be called and a . (dot).
Description
Every object has methods, which are basically actions performed on it. A method is a
property of an object.
The toLowerCase(), toUpperCase(), substr(), trim(), charAt(), and indexOf()
methods are some of the examples of native (part of the core language) methods of a
string object.
Here is an example using the toUpperCase() method:
var book = "JavaScript Reference!";
var result = book.toUpperCase();

Chapter 10
[ 455 ]
The value of the result will be:
JAVASCRIPT REFERENCE!
Functions and methods
A function is a part of code that does a particular operation that is written by the
user and called by name independently. A function may be passed some data and it
may also return some data. On the other hand, you can think of methods as dened
properties of objects that can be called with reference from the object of the class
only. Objects that are associated with methods are basically window objects. The
syntax of dening a method and a function is different in JavaScript. Methods are
only used to dene window objects. The way of dening a method is different than
dening a function in JavaScript.
Invoking functions
The four different ways of invoking a function are as follows:
• Invoking a function as a function
• Invoking a function as a method
• Invoking a function as a constructor
• Invoking a function with a function method
All these methods were discussed in detail in the previous chapter. There is a
different way of initializing the this keyword. When you call a function, it starts a
function. However, when you invoke a function, it executes it.
Dening functions
When you dene a function, your script will not execute, but when you invoke
a function, the script will execute. A JavaScript function performs a particular
task. When any object calls this function, it starts working. To dene a function in
JavaScript, we use the function keyword. A function can have multiple parameters
depending on the task. You can nd more detail for this in Chapter 8, JavaScript
Implementations, Syntax Basics, and Variable Types.

JavaScript Object-Oriented Programming
[ 456 ]
Function arguments and parameters
In JavaScript, a function can have number of arguments. A function may be called
with a number of arguments. If you do not provide any argument in a function, then
it will become undened. Arguments are optional in a JavaScript function. If you do
not pass any argument in a function, then it will set it to default. Here is an example:
Function arg(x,y) {
Console.log(x+y);
Arg(2);
Arg(2,1);
}
In this example, we passed two arguments in the function: arguments x and y.
When the rst function arg(2) is called, then a=2 and b will be undened. When the
second function is called, a=2 and b=1.
Parameters and return values
We know we can pass arguments in a function. A function returns a value to perform a
different operation in your script. There are two ways to pass a value into a function:
• Pass by value: When we pass any variable (of primitive data types) as an
argument in the function, we pass it by value. For example, first, the value is
2. After passing, it is 3:
var a=2;
console.log(a); // shows 2
functionpassVal(a);{
a=3;
}
console.log(a); // shows 3
• Pass by reference: When you pass a value to an object, it is passed by
reference:
functionpassingVariables(a, b, c) {
a = a + 10;
b.value = "changed";
c = {value: "changed"};
}
varnum = 10;
varvar1 = {value: "unaffected"};
varvar2 = {value: "unaffected"};

Chapter 10
[ 457 ]
passingVariables (num, var1, var2);
console.log(num); // 20
console.log(var1.value); // changed
console.log(var2.value); // unaffected
Functions as namespace
Namespace is a set of logical identiers grouped together. JavaScript does not
provide a namespace facility by default. So, for creating namespaces in JavaScript,
we declare a global object and make all functions and properties into that global
object, for example:
var stud=student || {};
stud.student=function(name) {
this.name ;
}
var s=new stud.student("Ali");
Closure
To write better code, we use closures in JavaScript. Better code means code that is
creative and expressive. In JavaScript, you encounter closures repeatedly, whether
you are a good JavaScript programmer or not. Depending on how you use closures
in your code, it could be complex or easy.
Basically, closures are the inner functions of JavaScript used to access the outer
function's scope. There are three scopes of a closure:
• Access of outer function variables
• Access to its own scope variables
• Access to its global variables
Inner functions also have access to outer function variables and parameters. In its
own scope, variables are dened in curly brackets. Here is an example:
functionstudentName(name) {
varstdName="Student Name";
functionstdLastName(){
returnstdName+name; }
returnstdntLastName();
}

JavaScript Object-Oriented Programming
[ 458 ]
Function properties
To dene a function in JavaScript, we use the function variable. This function
can be called anywhere in your script. It could also be a function constructor. The
attributes and their descriptions are as follows:
• arguments: This is an array passed to a function as an argument
• argument.length: This tells us the number of arguments in a function
• constructor: This is used to create an object
• length: This defines the number on an argument
• prototype: This allows a function to add object properties
• arguments.callee: This tells us which function is executing currently
Methods
Actions performed on objects are known as methods in JavaScript. They contain
function denitions. They are stored as object properties in a script. For example, you
can create a method like this in JavaScript:
Student.FullName = function() {
// define your code here
}
Here FullName is both a property (Student.FullName) and a method
(Student.FullName()). When you access object properties without brackets,
this will return a function denition. Here is an example:
Name=Student.FullName;
Function constructor
A function constructor is used to dene a function dynamically. A new operator is
use to dene a function with the constructor method. You can also pass as many
arguments you want to use in your script to a constructor. The last argument will be
the body of the function. It can also contain statements separated by commas. Here is
an example:
varobj = new Function('a', 'b', 'return a*b;');
We cannot pass the same function name in a constructor as an argument, as it will
create an error in the script. It can also create an unnamed function, known as an
anonymous function.
Chapter 10
[ 459 ]
Classes and modules
In JavaScript, we do not have any native approach to creating classes, but we can
create a class using prototype inheritance and a constructor function.
Classes are containers for objects. We use classes to encapsulate a namespace and logic.
To instantiate a class, we can use the new keyword. Classes are similar to constructor
functions. Here is an example:
function student(nameI) {
This.name=name;
this.age='18';
}
student.prototype.std=function() {
//define some code
};
module.export=student;
Modules are used to include and extend classes and properties easily.
Modules attach properties to global objects to export module values.
Classes and their modules are extremely important and vital aspects of JavaScript.
We will be covering the following topics in the subsequent sections:
• Classes and prototypes
• Constructors
• Java-style classes in JavaScript
• Augmented JavaScript
• Types of classes
• Subclasses
• Classes in ECMA5 script
• Modules
Classes and prototypes
In JavaScript, a class is an object with special types of properties and methods. It is
used to create instances and dene the behavior of instances. Instances' behavior
changes dynamically and we have a special syntax to write it in JavaScript. Instances
are created when special methods are invoked on a class.

JavaScript Object-Oriented Programming
[ 460 ]
Prototypes and functions are two different things in JavaScript. A constructor can be
any function, but a prototype is a special kind of object. To dene a behavior of any
instance, we use a prototype. There are no special properties or methods a prototype
has. When we modify a prototype, we have instances.
In simpler words, we can say that in JavaScript, a constructor can be any function
that is responsible for creating an instance. On the other hand, a prototype can be
any object that has no special methods or properties. Prototypes are responsible for
an instance's behavior.
In JavaScript, the prototype and constructor functions act like a class, because a class
has a constructor, and to dene methods, you have a prototype:
Here is an example:
//Constructor Function
var Cat = function(name) {
this.Name = name;
this.Meow = function() {
console.log(this.Name + " meow");
};
}
//Prototype object method
var Cat = function(name) {
this.Name = name;
}
Cat.prototype.Meow = function() {
console.log(this.Name + " meow");
};
//Both gives same results
var cat = new Cat("Capri");
cat.Meow();
There are no special properties or objects associated with a prototype. An object in
your script can be an empty project or a prototype. When we say that any object can
be a prototype, then this object will have functions and data types. Prototypes are not
special kinds of objects, but classes are special kinds of objects in JavaScript.
Constructors
A class contains a set of objects, and for initialization of the objects, we use
constructors. In a class, we can create objects using the new operator. We can dene a
class as a subclass to construct objects.

Chapter 10
[ 461 ]
With a single property of prototype, a constructor is created. If we overwrite the
prototype property, the reference to the constructor might be lost. In JavaScript, we
use the constructor property to create a class from an object that is passed as an
object. Here is an example:
var color = 'black';
function Cat() {
// public property
this.color = '';
// private constructor
var __construct = function(that) {
console.log("I have a Cat!");
that.color = 'brown';
}(this)
// getter
this.getColor = function() {
returnthis.color;
}
// setter
this.setColor = function(color) {
this.color = color;
}
}
var b = new Cat();
console.log(b.getColor()); // should be brown
b.setColor('white');
console.log(b.getColor()); // should be white
console.log(color); // should be black
Dening a class
There are three ways of dening a class in JavaScript:
• Using a function
• Using object literals
• A singleton using a function

JavaScript Object-Oriented Programming
[ 462 ]
Using a function
You can create an object using the new keyword in a function. To access methods and
properties, use the this keyword. There would be a conict if you dene a function
with the same name in a class.
Using object literals
To dene an object or array in JavaScript, we use literals. Here is an example:
Varobj= {};
Varobj=[];
Classes in the ECMA5 script
For specic objects' properties, the ECMA5 script added ve methods. These
methods are used to secure and restrict the extensibility of objects in the script. These
methods are:
• Enumerable
• Writable
• Getter
• Setter
• Configurable
When we dene a class in JavaScript, these methods are very useful. When you store
an object, it sets an object ID for these methods. When we use a looping statement,
it will return this object ID. All objects inherit the object ID, which is enumerable.
To read a property, it will invoke the getter function, and there will be no setter
function. So, it will be read-only. We cannot modify it, so it cannot be deleted.
Modules
The two very important aspects of modules are:
• They have dependencies: This means that when you write a module in your
system, it is fully dependent on the function. We import dependencies from
functions while creating our application.
• They have exports: If you leave some function and variable public in your
system, anything can export these. For example, you have exported a
function $function, module that depends on this function will also have
access to this function.

Chapter 10
[ 463 ]
A module can export a number of multiple variables and functions. To export these
functions and variables, we use the export keyword. Here is an example:
Export function sub(a,b) {
Return a+b;
}
We can also store a variable after exporting it. Here is an example:
Var string=function(a,b) {
Return a+b;
}
Inheritance
JavaScript supports prototype inheritance. In other programming languages, objects
and classes inherit from each other to use each other's properties and functions.
However, in JavaScript, you have an object-based inheritance, which is called a
prototype, in which objects use the properties of other objects. For example, if you
have a Person object, then you can use the _proto_ attribute for that object to create
another Student object:
Prototype chaining
In JavaScript, you create new objects from existing objects. This process is called
prototype chaining. It is similar to inheritance in object-oriented systems.

JavaScript Object-Oriented Programming
[ 464 ]
Description
Prototype is a property of the constructor function. When you add any object
property to a prototype, it will add this property or method to the objects created by
the constructor function. In prototype chaining, we create a function prototype using
the properties of the constructor function. Using this, all methods or properties
transfer to the prototype object from the constructor function. This method is very
easy and useful for creating the constructor function to create objects. Here is an
example:
function person(name) {
this.name=name;
}
person.prototype= {
sayHi:function() {
console.log("something");
}
Function student(name) {
This.name=name;
}
}
Student.prototype=new Person();
Varstd=new student("Ali");
Std.sayHi();
In method resolution, rst JavaScript checks objects for methods. When you use
prototype chaining, it can override methods for prototypes of an object. So, the
JavaScript construction function sets methods for objects.
Constructor stealing
In JavaScript, constructor stealing is also called classical inheritance. This method is
use to inherit problems of prototype reference values.
Description
In constructor stealing, we call a super constructor in a subtype constructor. This
idea is quite simple and easy. We use the call() and apply() methods for function
calling. Here is an example:
function super() {
this.name=["Ali"];
}
function sub() {
Chapter 10
[ 465 ]
super.call(this);
}
varstd=new sub();
std.name.push("Ali");
varstd1= new sub();
console.log(std1.name);
In this example, we used the call() method to call a super constructor for a newly
created subclass instead of a subconstructor. This will initialize all objects in the
super() function on sub().
When we use prototype chaining, the constructor function will
allow us to pass arguments from a super constructor to within the
subconstructor.
Combination inheritance
Combination inheritance is also called pseudo-classical inheritance. This is a
combination of constructor stealing and prototype chaining.
Description
In combination inheritance, prototype chaining inherits properties and methods from
a prototype, and constructor stealing inherits instances. In this way, we can reuse
methods on prototypes by allowing methods to have their own properties. Here is
an example:
functionSuperType(name) {
this.name = name;
this.colors = ['yellow', 'purple', 'indigo'];
}
SuperType.prototype.sayName = function() {
//console.log(this.name);
};
functionSubType(name, age) {
//inherit properties
SuperType.call(this, name);
this.age = age;
}
//inherit methods
SubType.prototype = new SuperType();
SubType.prototype.sayAge = function() {
//console.log(this.age);

JavaScript Object-Oriented Programming
[ 466 ]
};
varinstance1 = new SubType('John Doe', 26);
instance1.colors.push('white');
//console.log(instance1.colors); //'yellow,purple,indigo,white'
instance1.sayName(); //'John Doe';
instance1.sayAge(); //26
varinstance2 = new SubType('Kate', 21);
//console.log(instance2.colors); //'yellow,purple,indigo'
instance2.sayName(); //'Kate';
instance2.sayAge(); //21
In this example, the SuperType constructor denes two properties: name and colors.
The SuperType prototype has a single method called sayName(). The SubType
constructor calls the SuperType constructor, passing in the name argument, and
denes its own property called age. Additionally, the SubType prototype is assigned
to be an instance of SuperType, and then, a new method called sayAge() is dened.
With this code, it's then possible to create two separate instances of SubType that
have their own properties, including the colors property, but all use the same
methods. Addressing the downsides of both prototype chaining and constructor
stealing, combination inheritance is the most frequently used inheritance pattern in
JavaScript. It also preserves the behavior of instanceof and isPrototypeOf() to
identify the composition of objects.
Prototypal inheritance
In prototypal inheritance, we use an object as a base for another object.
Description
In prototypal inheritance, there are no classes, only objects. To create an object, you
can either create a totally new object or you can clone an existing object. New objects
can be then extended with new properties.
Here is an example:
varobject=Object.create(null);
The preceding object has no prototype and is a clone of null:
var rectangle = {
area: function () {
returnthis.width * this.height;
}
};
varrect = Object.create(rectangle);

Chapter 10
[ 467 ]
In the preceding example, rect inherits the area function from rectangle.
Here, rectangle is an object literal, an object literal is a way to create a clone
of Object.prototype.
It can also be written as follows:
var rectangle = Object.create(Object.prototype);
rectangle.area = function () {
returnthis.width * this.height;
};
We can extend the newly created object as follows:
rect.width=50;
rect.height=100;
console.log(rect.area());
We can create a constructor function that will clone rectangle for us and will
extend it with the height and width properties:
var rectangle = {
create: function (width, height) {
var self = Object.create(this);
self.height = height;
self.width = width;
return self;
},
area: function () {
returnthis.width * this.height;
}
};
varrect = rectangle.create(50, 100);
console.log(rect.area());
Parasitic inheritance
Parasitic inheritance is similar to prototypal inheritance.
Description
It simply works by creating a function that performs inheritance, object
augmentation, and nally, it returns the object after completing each task:
Function abc(x) {
Var clone=obj(abc);

JavaScript Object-Oriented Programming
[ 468 ]
Clone.sayHi=function() {
};
return clone;
}
Var student= {
Name="Ali";
};
Varstd=new abc(student);
Std.sayHi();
Here, in this example, we have the abc() function that has one argument, which
is an object based on a new object. This object is passed to the object function and
saves the resulting object into a clone variable. Now, the clone object will have a
new object property, and at the end, we return the object.
Parasitic combination inheritance
A parasite is dened as an organism that lives inside another organism and relies on
its resources. Similarly, in this inheritance, a child object relies on a parent object and
extends its properties from it.
Description
The rst constructor calls the subtype prototype and then it calls the subtype
constructor. This is a very efcient way of creating new objects in JavaScript. At the
end, the subtype will have all the properties of the super type. Here is an example:
function super(name) {
this.name=["Ali"];
}
super.prototype.sayHi=function() {
console.log("something");
}
function sub(age) {
this.age=age;
super.call(this,name);
}
sub.prototype=new super();
sub.prototype.sayHi();
The only difference between parasitic combination inheritance and combination
inheritance is that, in the former one, the base constructor is called once, and in the
latter one, the base constructor is called twice.

Chapter 10
[ 469 ]
Subclasses
In every programming language, every subclass has a super class that inherits its
properties and methods from. JavaScript is not a pure class-based programming
language, but it follows some of the rules of OOP. We make classes in JavaScript
using object notations.
In JavaScript, you can only perform inheritance using the constructor function or
prototype. This inheritance is only done at run time, which means dynamically. Here
is an example:
// super class
functionsuperClass() {
this.bye = superBye; //method 1
this.hello = superHello; //method 2
}
//sub class
functionsubClass() {
this.inheritFrom = superClass; //inherit-from method defines
superclass
this.inheritFrom(); //inherit from method called
this.bye = subBye; method 1 overridden in subclass
}
functionsuperHello() {
return "Hello from superClass";
}
functionsuperBye() {
return "Bye from superClass";
}
functionsubBye() {
return "Bye from subClass";
}
To run the preceding code execute following method:
functionprintSub() {
varnewClass = new subClass();
console.log(newClass.bye());
console.log(newClass.hello());
}

JavaScript Object-Oriented Programming
[ 470 ]
Built-in objects
To add exibility in language, JavaScript supports a number of built-in objects. The
most commonly used objects are:
• Global
• Date
• Math
• RegExp (Regular Expression)
• Array
Implementations of these built-in objects are complex and different.
Global objects
Global objects are objects dened outside the function. Every function can access
these variables because their scope is global for all.
When you do not declare a variable and assign a value to it, then it will automatically
become global.
Description
When your code starts execution, functions and constants immediately become
available. A global variable does not initialize with the new keyword. Basically,
global objects are used to share same data to add properties. You can store methods
within global objects in your script.
Objects that you cannot access directly for accessing those object we use global
objects. We pass those object directly as arguments after declaring the global
variable. You can create a number of instances and a number of global objects in
your script.
A global object has a xed number of properties. Multiple object instances can access
this global object. Here is an example:
varstudentName="Ali"
functionmyStd(){ }
student=new Global("name");
student.age=18;
person=new Global("name");
post(person.age);

Chapter 10
[ 471 ]
Date object
Date objects in JavaScript deal with date and time objects. For example, if we are
writing a script and we need some functionality of date and time, then we can use
this built-in object simply.
getTime()
This function is used to get the current time with respect to the number of
milliseconds since January 1, 1970.
Parameters
There are no parameters passed.
Returns
The number of milliseconds since January 1, 1970.
Description
As the name states, this function is used to obtain the current time, in the form of
milliseconds. We need to create a date object rst.
var time = new Date();
time.getTime(); // This will output time as 1454905019871
getMilliseconds()
This function is used to get the current time with respect to the number of
milliseconds.
Parameters
There are no parameters passed.
Returns
A number from 0-999.
Description
As the name states, this function is used to obtain the current time, in the form of
milliseconds. We need to create a date object rst.
var time = new Date();
time.getMilliseconds();

JavaScript Object-Oriented Programming
[ 472 ]
getMinutes()
This function is used to get the current time with respect to the number of minutes.
Parameters
There are no parameters passed.
Returns
A number from 0-59.
Description
This function is used to obtain the current time, in the form of minutes. We need to
create a date object rst.
var time = new Date();
time.getMinutes();
getHours()
This function is used to get the current time with respect to the number of hours.
Parameters
There are no parameters passed.
Returns
A number from 0-23 with 0 being midnight.
Description
This function is used to obtain the current time, in the form of hours. We need to
create a date object rst.
var time = new Date();
time.getHours();
getDate()
This function is used to get the current day.
Parameters
There are no parameters passed.

Chapter 10
[ 473 ]
Returns
A number from 1-31.
Description
This function is used to obtain the current day. We need to create a date object rst.
var time = new Date();
time.getDate();
getDay()
This function is used to get the current day in the week.
Parameters
There are no parameters passed.
Returns
A number from 0-6 with 0 being Sunday.
Description
This function is used to obtain the current day in the week. We need to create a date
object rst.
var time = new Date();
time.getDay();
getMonth()
This function is used to get the current month.
Parameters
There are no parameters passed.
Returns
A number from 0-11.

JavaScript Object-Oriented Programming
[ 474 ]
Description
This function is used to obtain the current month in the year. We need to create a
date object rst.
var time = new Date();
time.getMonth();
getFullYear()
This function is used to get the current year.
Parameters
There are no parameters passed.
Returns
The year in the YYYY format.
Description
This function is used to obtain the current year. We need to create a date object rst.
var time = new Date();
time.getYear();
Set date methods
Methods are available in date objects to manipulate dates. We can also adjust the
date dynamically. Here is an example:
var dob=new date();
dob.setDate(19.03.1990);
We can also set upcoming dates and the current date by using this function, for
example:
var dob=new date();
dob.setDate(dob.getDate + 7);
The date set methods are:
• setTime()
• setMilliseconds()
• setMinutes()
• setMinutes()

Chapter 10
[ 475 ]
• setHours()
• setDate()
• setDay()
• setMonth()
• setFullYear()
These methods are very similar to the date get methods described in the preceding
term list.
We can also compare dates using the date object.
Math object
In JavaScript, the math object is used to perform mathematical operations.
This object has several mathematical functions. Here is an example:
• Math.E
• Math.PI
• Math.sqrt
• Math.Ln2
• Math.ln10
The math object has different methods. For example, we have the pow method that
calculates the power of the rst variable times the second.
Math.pow(base, exponent);
document.write(Math.pow(2,4)); // 16 here 2 is base and 4 is
exponent.
min()
This function is used to nd out the the argument with the minimum value.
Parameters
The values to be evaluated are passed as parameters.
Returns
The argument with the minimum value.

JavaScript Object-Oriented Programming
[ 476 ]
Description
As the name suggests, this function is simply used to obtain the minimum value
among all values in an argument
For example:
min(10, 56, 3, 26, -6, 4); //The value returned is -6
max()
This function is used to nd the argument with the maximum value.
Parameters
The values to be evaluated are passed as parameters.
Returns
The argument with the maximum value.
Description
As the name suggests, this function is simply used to obtain the maximum value
among all values in an argument.
For example:
max(10, 56, 3, 26, -6, 4); //The value returned is 56
random()
This function is used to generate a random number between 0 and 1.
Parameters
No parameters.
Returns
A random number between 0 and 1.
Description
The random() function is useful in generating random numbers. The value of the
number will always lie between 0 and 1 (never exactly 1). For example:
Math.random();

Chapter 10
[ 477 ]
round()
This function is used to round the number to its nearest integer value.
Parameters
The values to be evaluated are passed as parameters.
Returns
The rounded number.
Description
This method is used to create integer values after rounding them.
For example:
Math.round(4.3);// The value returned is 4
Math.round(4.8);// The value returned is 5
Math.round(4.5);// The value returned is 5
ceil()
This function is used to round a number up to the nearest and highest possible
integer value.
Parameters
The values to be evaluated are passed as parameters.
Returns
The highest rounded number.
Description
This method is used to create integer values after rounding them to the higher
integer.
For example:
Math.ceil(-6.2);// The value returned is -6
Math.ceil(6.2);// The value returned is 7

JavaScript Object-Oriented Programming
[ 478 ]
oor()
This function is used to round a number down to the nearest and lowest possible
integer value.
Parameters
The values to be evaluated are passed as parameters.
Returns
The lowest rounded number.
Description
This method is used to create integer values after rounding them to the lower
integer.
For example:
Math.floor(2.3);//The value returned is 2
Math.floor(-2.3);//The value returned is -3
The RegExp object
In JavaScript, for pattern matches in string, we use a regular expression. It is a very
powerful and useful tool for expression pattern matching.
Parameters
The following are the parameters:
• Pattern: The text/pattern of the regular expression
• Flags: If specified, flags can have any combination of the following:
°g: Global match
°i: Ignore case
°m: Multiline; treat beginning and end characters (^ and $) as working
over multiple lines (that is, match the beginning or end of each line
(delimited by \n or \r), not only the very beginning or end of the
whole input string)

Chapter 10
[ 479 ]
Returns
The return type of different regular expressions is different.
Description
Using a regular expression, you can make a complex task simple by writing
few lines of codes. There are ve methods in JavaScript:
• RegExp.exec(pattern)
• RegExp.replace(pattern)
• RegExp.split(pattern)
• RegExp.match(pattern)
Dening a regular expression
There are two ways of writing a regular expression in JavaScript. These are:
• RegExp constructor method
• Literal syntax
There are differences between the RegExp object and global object. They
look the same but act differently.
RegExp constructor
This method is used to dynamically construct a string search pattern. A regular
expression in this method should be written in quotation marks. This method has
three parameters. Here is an example:
var email=new RegExp("\d{2},"g");
In this example:
• E-mail is a required parameter to which regular expression values are
assigned
• \d is a pattern parameter used to match regular expression
• g is global, which is a flag parameter. In this function, there are four types of
parameters (g, I, m ,u).

JavaScript Object-Oriented Programming
[ 480 ]
Literal syntax
In literal notation, we write a regular expression without brackets. Here, i is a ag
that shows to ignore case of the text whether it is uppercase, lowercase or any other.
We have more ag objects such as the following ones:
• g: Global object
• i: Ignore case
• m: Multi search
• u: Unicode search
In regular expressions, we can have a global regular expression object, which will
have information for each match case. A simple regular expression object has
information about a particular regular expression:
var exp=\d{2}/i
String object
There are four string methods for pattern matching. In these objects, a pattern is
sent with a parameter. These methods allow you to search, match, replace, and split
patterns.
These methods are represented as follows.
Match(pattern)
This method is used to nd a matching pattern within a string. Using the not (!)
operator it can also be used to nd non-matches.
The syntax is string.Match(Expression).
Parameters
The string pattern that is to be matched.
Returns
It returns the result if a match is found or 0 or null if no match is found.
Description
This runs a search for matching strings in a regular expression. If the search is
matched or successful then it will return an array of matching results, if not then it
will return null or 0. It is also used to update properties in a regular expression.
Chapter 10
[ 481 ]
Here is an example:
var str=("I have 10 dollars");
//The pattern below is used to find non-digits in a string
var parsestring= str.match(/\D/g);
// Outputs I, ,h,a,v,e, , ,D,o,l,l,a,r,s
Replace(pattern)
This method is used to replace a part of the string.
The syntax is string.replace(stringSearched, stringReplacement).
Parameters
The string pattern that is to be replaced is passed as a parameter.
Returns
The string with the replaced value.
Description
This executes a search and is used for replacement of regular expression match
resulted with alternative text. This is also used for replacement of regular expressions
with specic and different regExp properties.
Here is an example:
var str1=("Apple Pie");
var parsestring1=str1.replace("Pie", "Cinnamon Roll");
Here the value of parsestring1 is Apple Cinnamon Roll.
Remember here that the search is case sensitive, so if you provide
the value parsestring1=str1.replace("piE", "Cinnamon
Roll"); then no replacement is done.
Also, only the rst occurrence of the pattern is replaced. Hence:
var str1=("Apple Pie , Banana Pie", "Strawberry PIE");
var parsestring1=str1.replace("Pie", "Cinnamon Roll");
Here the value of parsestring1 is Apple Cinnamon Roll, Banana Pie,
Strawberry PIE.

JavaScript Object-Oriented Programming
[ 482 ]
To perform a global search and replacement so that all occurrences are replaced we
use the following code:
var str1=("Apple Pie , Banana Pie", "Strawberry PIE");
var parsestring1=str1.replace(/Pie/g, "Cinnamon Roll");
Here the value of parsestring1 is Apple Cinnamon Roll, Banana Cinnamon Roll,
Strawberry PIE.
For a global insensitive search, use the following code:
var str1=("Apple Pie , Banana Pie, "Strawberry PIE");
var parsestring1=str1.replace(/Pie/gi, "Cinnamon Roll");
Here the value of parsestring1 is Apple Cinnamon Roll, Banana Cinnamon Roll,
Strawberry Cinnamon Roll.
Split(pattern)
This is use to split a string in a regular expression.
The syntax is string.split(separator,limit).
Parameters
A separator and limit are provided as optional parameters.
Returns
The split string is returned.
Description
With this method the string is split. Every word in the string is treated as a single
element in an array. If a null string is passed as a parameter, the method causes each
letter to be split into different characters. For example:
var str1 = "My Car is at the garage in Queens";
var parseString = str1.split("");
The value of parseString will be:
M,y, ,C,a,r, ,i,s, ,a,t, ,t,h,e, ,g,a,r,a,g,e, ,i,n, ,Q,u,e,e,n,s

Chapter 10
[ 483 ]
Providing a limit will return a comma separated array of the words containing only
the specied number of elements. For example:
var str1 = "My Car is at the garage in Queens";
var parseString = str1.split(" ", 3);
The value of parseString is My,Car,is.
Using a letter or letters as a separator will give the following results:
var str1 = "My Car is at the garage in Queens";
var parseString = str1.split("a");
The value of parseString will be:
My C,r is ,t the g,r,ge in Queens
Here is another example:
var str1 = "My Car is at the garage in Queens";
var parseString = str1.split("ar");
The value of parseString will be:
My C, is at the g,age in Queens
search(pattern)
This method is used to search for a particular string.
The syntax is string.search(stringSearched).
Parameters
The string pattern that is to be searched is passed as a parameter.
Returns
It returns the position of the starting letter of the string if a match is found. If no
match is found then it returns -1.
Description
It is used to nd a match in a string. If a match is found it will send an index of
that match otherwise, if a match is not found, it will return -1. Global ags are not
supported by this method.
JavaScript Object-Oriented Programming
[ 484 ]
Here is an example:
var str1=("I have 10 dollars in my pocket");
var parsestring=str1.search("i");
The value of parseString here is 18.
There are additional string methods available to perform other tasks on
strings.
A detailed list of these methods can be found at https://msdn.
microsoft.com/en-us/library/ecczf11c(v=vs.94).aspx.
Array objects
An array is a collection of objects.
To create an array in JavaScript, the elements of the collection are enclosed within
square brackets and separated by commas, as seen here:
varcolors = ["red", "yellow", "blue"]
An array can also be initialized using the new keyword or by specifying their length
between 0 and 232-1:
new array(first, second, third, … )
new array(7) // creates an array of size 7
To access array elements, we can use an index notation:
varlastColor = colors[2]; // blue
Always remember that array elements always start with the zero index. Hence, the
third element in the preceding array has the index of 2.
Array objects can hold all sorts of data, for example, strings, numbers, literals, dates,
and even user-dened objects.
.Pop()
This method is used to pop an element out of an array.
Parameters
There are no parameters for this method.

Chapter 10
[ 485 ]
Returns
It returns the popped element of the array.
Description
Here an array is considered as a stack and the elements that are last in the array are
popped out rst. This follows the LIFO principle.
Here is an example:
var sweets = ["Red Velvet", "Chocolate Mousse", "Strawberry
Delight", "Pineapple Sundae", "Black Forest"];
var element= sweets.Pop();
The value of the element here is Black Forest.
.Push()
This method is used to push an element into an array.
Parameters
There are no parameters for this method.
Returns
It returns the new length of the array.
Description
Here an array is considered as a stack and the elements that are pushed appear at the
end of the array.
Here is an example:
var sweets = ["Red Velvet", "Chocolate Mousse", "Strawberry
Delight", "Pineapple Sundae", "Black Forest"];
var element= sweets.Push("Lemon Meringue");
The value of the element here is 6.
.ToString()
This converts the elements in an array into a string. The elements appear as comma-
separated strings.

JavaScript Object-Oriented Programming
[ 486 ]
Parameters
There are no parameters.
Returns
This returns a string containing the elements of the array.
Description
The ToString() function is used to convert an array into a string. The elements of
the array appear in the string and are separated by a comma:
var sweets = ["Red Velvet", "Chocolate Mousse", "Strawberry
Delight", "Pineapple Sundae", "Black Forest"];
var StrSweets= sweets.ToString()
Here the value of StrSweets is:
Red Velvet,Chocolate Mousse,Strawberry Delight,Pineapple
Sundae,Black Forest
.ValueOf()
This method is also used to convert an array into a string.
Parameters
There are no parameters.
Returns
This returns a string containing the elements of the array.
Description
This is default behaviour of the array and works same as the ToString() function.
var sweets = ["Red Velvet", "Chocolate Mousse", "Strawberry
Delight", "Pineapple Sundae", "Black Forest"];
var StrSweets= sweets.ValueOf()
Here the value of StrSweets is:
Red Velvet,Chocolate Mousse,Strawberry Delight,Pineapple
Sundae,Black Forest

Chapter 10
[ 487 ]
.Join()
This method is used to convert an array into a string. The elements are separated
by the delimiter specied.
Parameters
A separator to separate the elements in the new string.
Returns
This returns a string containing the elements of the array separated by the delimiter
specied.
Description
The Join() function is used to convert an array into a string. The elements of the
array appear in the string and are separated by the delimter:
var sweets = ["Red Velvet", "Chocolate Mousse", "Strawberry
Delight", "Pineapple Sundae", "Black Forest"];
var StrSweets= sweets.Join(*)
Here the value of StrSweets is:
Red Velvet * Chocolate Mousse * Strawberry Delight * Pineapple
Sundae * Black Forest
.Splice()
Splice, as the name suggests, is used to add new elements into the array. Unlike the
push() method we can add elements in whichever position we want.
Parameters
The following are the parameters:
• Position
• Number of elements to be removed
• Elements to be added
Returns
The array as a string along with the new elements, if any.

JavaScript Object-Oriented Programming
[ 488 ]
Description
This method is used to remove and add elements in one step. We can specify where
the new element is to be added and which elements are to be removed.
var sweets = ["Red Velvet", "Chocolate Mousse", "Strawberry
Delight", "Pineapple Sundae", "Black Forest"];
var StrSweets= sweets.splice(2, 0, "Lemon Meringue");
Here the value of StrSweets is:
Red Velvet,Chocolate Mousse,Lemon Meringue,Strawberry
Delight,Pineapple Sundae,Black Forest
.sort()
This method is used to sort an array into alphabetical order.
Parameters
No parameters.
Returns
The sorted array is returned.
Description
The sort method is used to sort an array, alphabetically.
Here is an example:
var sweets = ["Red Velvet", "Chocolate Mousse", "Strawberry
Delight", "Pineapple Sundae", "Black Forest"];
var StrSweets= sweets.Sort();
Here the value of StrSweets is:
Black Forest,Chocolate Mousse,Pineapple Sundae,Red
Velvet,Strawberry Delight
.reverse()
As the name suggests it reverses the order of the array.

Chapter 10
[ 489 ]
Parameters
No parameters.
Returns
The reversed array is returned.
Description
The reverse method is used to sort an array, alphabetically, in reverse order.
Here is an example:
var sweets = ["Red Velvet", "Chocolate Mousse", "Strawberry
Delight", "Pineapple Sundae", "Black Forest"];
var StrSweets= sweets.reverse();
Here the value of StrSweets is:
Strawberry Delight,Red Velvet,Pineapple Sundae,Chocolate
Mousse,Black Forest.slice()
.slice()
As the name suggests, this method is used to slice up an array and create a new array
using a part of the original array.
Parameters
The index at which we want the array sliced. The index of an array begins at 0. So the
rst element has index 0, the second element has index 1, and so on.
Returns
The sliced array containing the remaining elements is returned.
Description
The slice method is used to slice up an array and get the remainder of the array as a
string.
Here is an example:
var sweets = ["Red Velvet", "Chocolate Mousse", "Strawberry
Delight", "Pineapple Sundae", "Black Forest"];
var StrSweets= sweets.slice(3);

JavaScript Object-Oriented Programming
[ 490 ]
Here the value of StrSweets is:
Pineapple Sundae,Black Forest
.concat()
This method is used to concatenate two or more arrays into a single array.
Parameters
The array to be concated is passed as the parameter.
Returns
This method returns the concated array.
Description
The Concat() method is used to create a single array by joining two or more arrays.
Here is an example:
var greenShades= ["Mint", "Basil", "Pine", "Emerald"];
var BlueShades=["Azure", "Cerulean", "Navy", "Aegan"];
var VioletShades= ["Lilac", "Orchid", "Mauve", "Wisteria"];
var CoolShades=greenShades.concat(BlueShades, VioletShades);
Here the value of CoolShades is:
Mint,Basil,Pine,Emerald,Azure,Cerulean,Navy,Aegan,Lilac,Orchid,
Mauve,Wisteria

[ 491 ]
Extending JavaScript
and ECMAScript 6
ECMA 262 is a standard that denes the core features of the JavaScript language.
The language that is dened by this standard is called ECMAScript. JavaScript is
an implementation of ECMAScript. It runs in web browsers at the client end, while
Node.js runs at the server end. ECMAScript 6 was released in June 2015. ES6 is a
major update from ES5, which was released in 2009.
A complete language specications draft of ES6 language specications can be
obtained from https://people.mozilla.org/~jorendorff/es6-draft.html.
Compatibility and goals
The ES6 compatibility chart shows which features of ES6 are supported in the current
browsers. It also links all listed features to their specication guides.
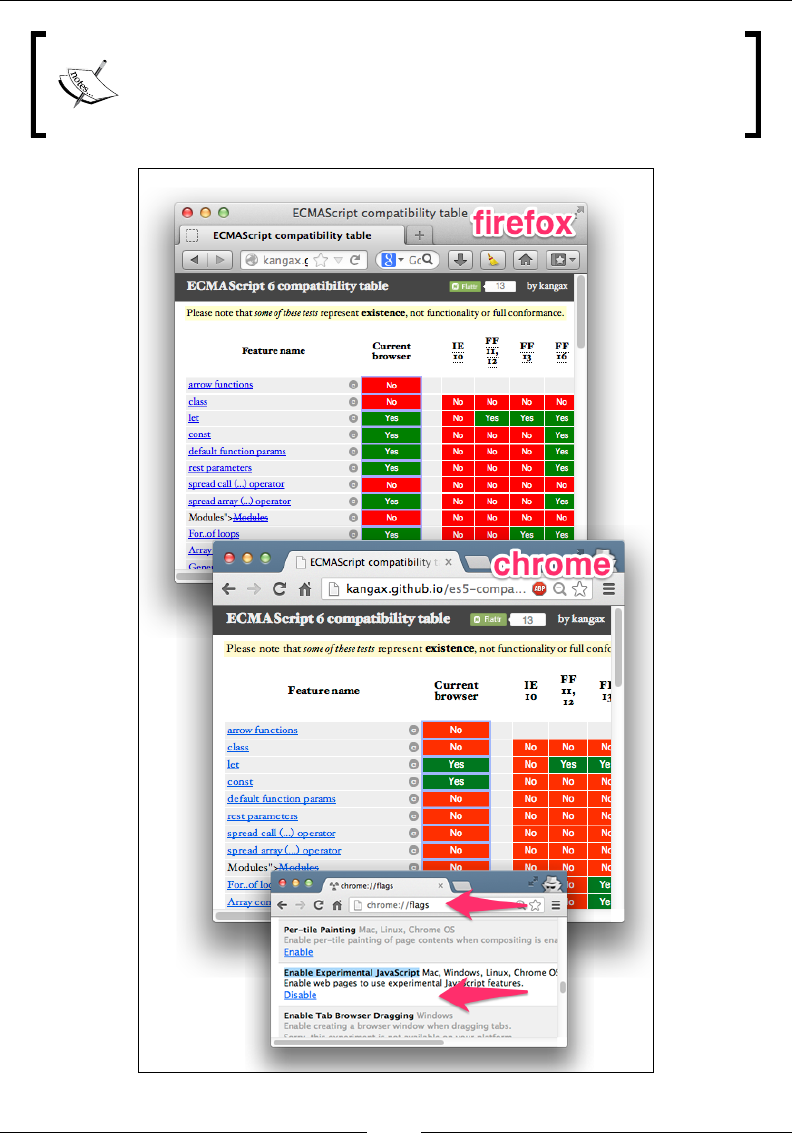
Extending JavaScript and ECMAScript 6
[ 492 ]
It should be noted that some of the features might not be under
compliance with their exact specications. While working in Chrome,
don't forget to enable the Experimental JavaScript ags.
Reference: Use ECMAScript 6 Today

Chapter 11
[ 493 ]
ECMA6 script has the following major goals:
• Default exports
• Static structure of modules
• Support for asynchronous and synchronous loading
• Used for dependencies between modules
JavaScript subset and extensions
Subsets are mostly dened for security purposes; scripts written using secure
language subsets can be executed safely even if its source is untrusted, for instance,
an ad server. Some of these subsets will be described later.
As JavaScript continued to evolve and allowed explicit extensions, newer versions
were released. Many of the features were standardized. These extensions are
compatible with modern browsers such as Firefox and Chrome. However, the
implementation of non-standard extensions may require an external compiler
because these features are being updated in major JavaScript engines now.
JavaScript subsets
As stated earlier, for execution security of untrusted code, we use subsets in
JavaScript. For example, when we have a credit card checking script in which a credit
card number is sent to a remote server, then for this type of information security, we
use subset. By dening a subset, we check the behavior of a program that we have
strictly not allowed. So, it means that we use subsets for a certain amount of code,
and the other part of the code is omitted.
There are two goals of a JavaScript subset:
• The subset construct should be added to maximize coverage use of JavaScript
constructs
• It is used to extend analysis to accommodate changes
These subset are dened for every reason.
Extending JavaScript and ECMAScript 6
[ 494 ]
The good parts: This is a subset that is part of the language used for the best
and the worthy part of the script. The main goal of this subset is it puries and
simplies code, and makes the script easier and more understandable. The good
parts subset does not have an eval() function. It also eliminates the continue
and with statements. It does not include function denition statements, and only
denes function using the function denition expression. Using a function denition
statement, it denes a function, and then, after dening the function, it does not use
the function denition statement.
In subset curly brackets, we have a body of loops and conditional
statements. If there is a single statement in the body, then it would not
allow the brackets to be omitted.
Secure subsets
There are various implementations of secure subsets. Some of them are briey
described here.
ADsafe
ADsafe (http://www.adsafe.org/) was one of the rst presented security subjects.
It was proposed and created by Douglas Crockford. ADsafe uses tools such asJSLint
(http://www.jslint.com/) to verify the unsafe code. It enforces good programming
practices, so the likelihood of unsecure code executing correctly is much higher. It
blocks the script from accessing the global variables or accessing the DOM directly.
Instead, it allows the script to access the ADsafe object, which provides access to a
secure API and indirect access to the DOM elements. ADsafe does not alter scripts
and has no impact on its functionality. It enables us to determine quickly whether
the script is safe to be placed on a page. It also works as a base that helps in the
development of other secure subsets.
Dojox
The dojox.secure tool (https://dojotoolkit.org/reference-guide/1.10/
dojox/secure.html) is a security subset inspired from ADsafe. It is an extension of
the Dojo toolkit (http://dojotoolkit.org) and was developed by Kris Zyp. It is
fully packed with components that ensure safe execution and loading of untrusted
code, content, ads, and widgets from a different domain. It provides a sandbox
environment and limited DOM elements for interaction:
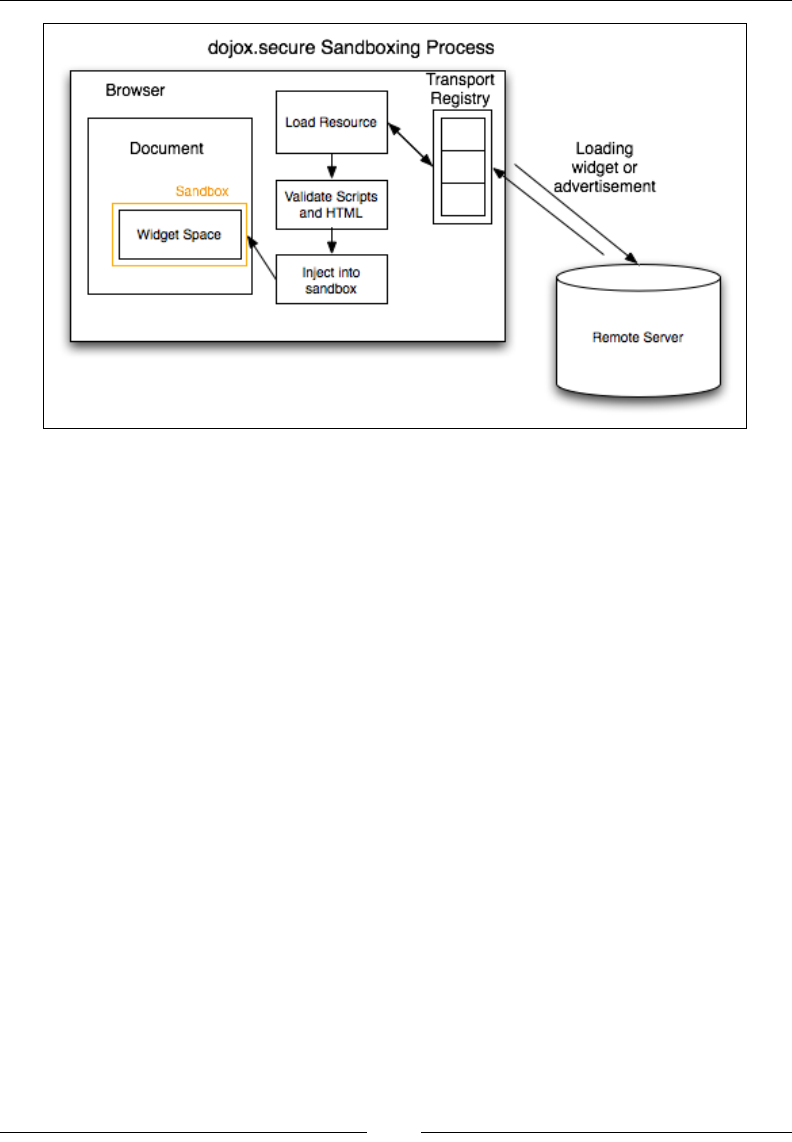
Chapter 11
[ 495 ]
Caja
Caja (https://developers.google.com/caja/) is an open source secure subset
powered by Google. Caja (which means "box" in Spanish) further denes two
subsets:
• Cajita (which means "small box" in Spanish) is a narrow subset just like
ADsafe and dojox.secure
• Valija (which means "suitcase" in Spanish) is a broader subset and is
much more similar to ECMAScript in strict mode (with the eval() method
removed)
Caja is a compiler tool that transforms third-party content such as HTML, CSS, and
JS into secure code, which is then easy to embed in a website.
FBJS
FBJS (https://github.com/facebook/fbjs) is a JavaScript secure subset used
by Facebook. It allows untrusted code to be executed in a secure environment.
It transforms code to ensure security. During the transformation, all top-level
identiers are renamed by adding the module-specic prex. Adding module
specic prex prevents querying any global identiers. For example, you are
developing an app having the xyz123 ID, and there is a foo() function in the code. It
will eventually become xyz123_foo(). Even function calls to eval() are redirected
to a non-existent function.
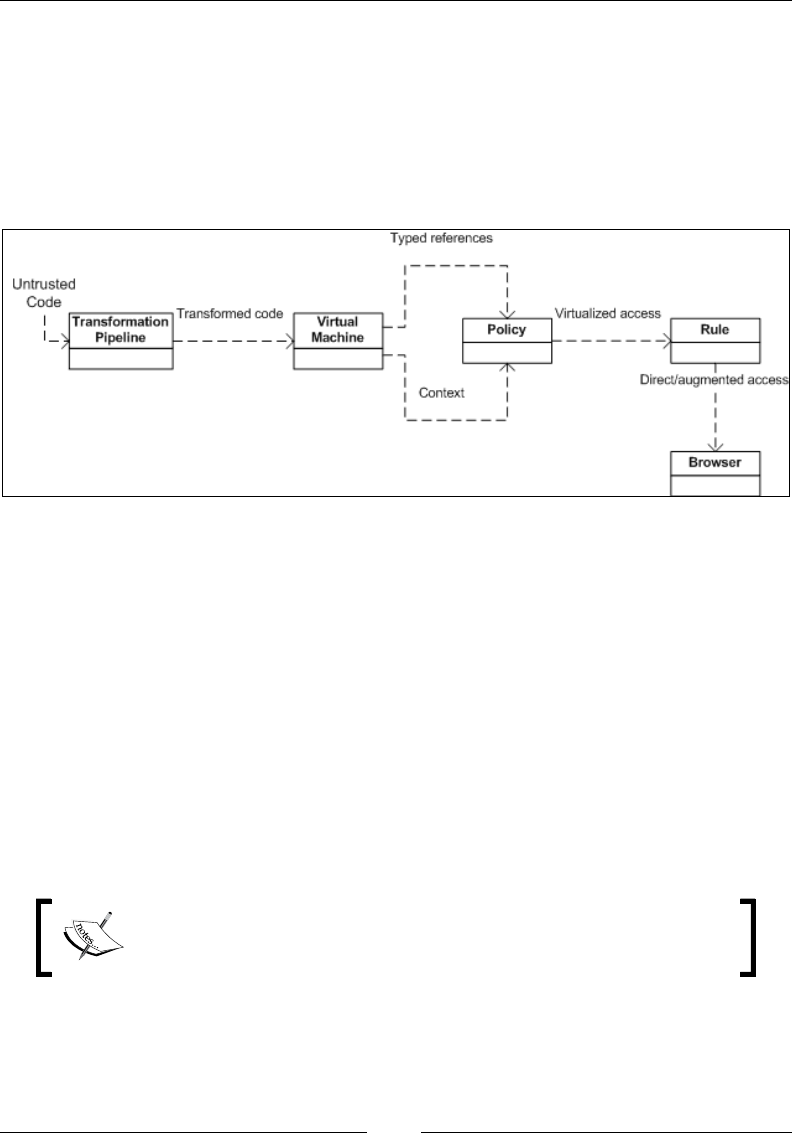
Extending JavaScript and ECMAScript 6
[ 496 ]
Microsoft's web sandbox
Microsoft's Web Sandbox (http://www.websandbox.org/) denes a broad secure
subset of JavaScript, HTML, and CSS. Sandbox implements host virtualization
to provide security and extensibility. The untrusted code is executed in a virtual
machine instead of running directly in a browser. A virtual machine quarantines the
untrusted code, which prevents it from interacting with the elements outside the
virtual machine. Let's take a look at the following block diagram:
Microsoft's Web Sandbox
JavaScript extensions
Lots of new and useful features have been coded. They will be standardized with
the release of ES6. ES6 was set to be ofcially released in June 2015. However,
many of the features and extensions are already available on Firefox and Chrome
(Experimental JavaScript ag has to be turned on in order to access some of the ES6
features). We will discuss the major features in the rest of the chapter.
Const
It works like variable keyword var. For declaring a constant, we use the word const.
In order to use assignment we must declare constant.
Values declared with the const can not be redeclared, redened or
reinitialized. JavaScript provide 8 constants through math object.
One of them is PI. we can not reinitialize PI using const.

Chapter 11
[ 497 ]
Let
The Let keyword is used for the block scoping of variables. The variables are
declared at the start of the code instead of at the start of functions:
var name = "john";
console.log(name);
In the preceding example, the name john is the value of name logged in console.
The declarations in JavaScript are moved to the top. The position of the variables
declared or initialized in the scope of the function does not matter, and they will
be hoisted to the top by default. JavaScript's default conduct is to move variable
declarations to the top.
Hoisting is JavaScript's default behavior to move variable declarations to the top.
Variables in JavaScript are function scoped. This means, variables are available
throughout the function, even if they are declared in a nested code block. Here is a
short example in which we will log the output in the console of our client, that is,
Chrome, Firefox, and so on:
var name = "john";
(function () {
// var name = undefined;
if (!name)
{ var name = "jane"; }
console.log(name); // "jane"
}());
From the preceding example, the value of name used to log-in into the console is
jane.
ES6 handles this issue with let. Let is very much like var. The only difference is
that let is block scoped, and var is function scoped. We can rewrite the previous
example using let, as shown here:
var name = "john";
(function () {
// var name = undefined;
if (!name) {
let name = "jane";
}
console.log(name); // "john"
}());
Extending JavaScript and ECMAScript 6
[ 498 ]
Notice that although the value of name is jane inside the function, using the let
keyword sets its scope to global and the value of name defaults to john. Hence, john
is logged in the client's console.
If we declare a variable as a constant, assign it some value, use the same
constant somewhere else that changes its value, then its new value will
be ignored. Like variables, we can add constants anywhere in our script
without breaking our code.
Destructuring assignment
We can assign multiple values to the variables in a function using one command.
For each
The iteration of property value is done using this loop. The iteration of property
name is done.
Iterator
The object for the next method is returned. The object that is returned has _
iterator_ property. The iterator is used for iteratable objects.
Generators
The generation of object is done here. A generated object is returned whenever
a function invokes the this method. The yield keyword is used. The current
execution of the function is specied by the generated object.
Array
The iteratable objects with the same values in the array are shorthanded by the
use of array.
Generator expression
The functions are shorthanded for multiple try-catch expressions. The thing that
is returned is the generated object wrapped in {} and not in []. We use this for
multiple values to variables in the function.
Chapter 11
[ 499 ]
Scoped variables and constants
When we declare a variable, then it has a local scope and a global scope. We can
dene a variable anywhere in our script. When we declare a variable in JavaScript,
we can assign a value to it at the time of declaration or later. Here is an example:
_xyz123; // variable declared without assigning a value to it
varabc = "Star"; //variable declared while assigning a value to it
In JavaScript, a variable is dened by a dollar sign the same as in query. In
JavaScript, we create variables dynamically using the var keyword. Every variable
has a name and a value associated with it. These values can be of any type, such
as number, array, string, and so on. A variable name could be a combination of
characters and numbers. Here is an example:
(a==undefined){
a=5}
A variable that is declared outside a function is a global variable having a global
scope. This means that it can be accessed from anywhere within a script.
We can also declare a variable constant with the const keyword. A constant variable
value is constant.
Constants can be dened using the const keyword as shown here:
Const a=5;
The const and let keywords work in a similar way that they
both are block scoped. However, in the case of const, values
cannot be redeclared, redened, or reinitialized. In short, const
values are read-only.
Here is a working example:
const PI = 3.14159265359;
console.log("value of PI = " + PI); //value of PI = 3.14159265359
PI = 3.1415; //<------- Can not re-assign value to PI
console.log("value of PI = " + PI); //value of PI = 3.14159265359
const PI = 2.0312; //<------- Can not re-initialize value of PI

Extending JavaScript and ECMAScript 6
[ 500 ]
console.log("value of PI = " + PI); //Uncaught TypeError:
Identifier 'PI' has already been declared
var PI = 9.2144; //<------- Can not re-declare value of PI
console.log("value of PI = " + PI); //Uncaught TypeError:
Identifier 'PI' has already been declared.
The class variables are declared in the class but not within methods of any class,
whereas the local variable exits within the methods of any class.
Shorthand functions
Shorthand function, also known as expression closure, is a technique to use simple
functions in JavaScript. It is used to omit a function's curly brackets in the event; it
returns a true or false statement. Similarly, if you omit the return keyword, it
would also send you the exact same result.
The expression will be evaluated quickly after the argument list in your script by
omitting the curly brackets and the return keyword.
Here is an example:
Let student=function(a)
A+1, yes
Function()
True,no
This behaves similarly like functions. They are dened with curly brackets and
a return statement. This is very useful when we want to pass a function as an
argument to a function.
Multiple catch clauses
In JavaScript, try/catch statements are use to handle exceptions present in the try
code blocks.
The try clause
In the try block, the statements to be evaluated are executed.
Chapter 11
[ 501 ]
If you want to deliberately throw an exception, we would use the throw
statement. This will abort the execution of the remaining statements, and
the control will move to the catch block.
The catch clause
After checking and encountering an error in the statements in the try block, the
exception block is called. If the exception encountered is the same as the exception
handled in the catch block, then the control immediately shifts to the catch block,
and the statements within the catch block are executed.
The statements presented after the erroneous statement will not be executed, unless
there is a return statement in the finally block.
A good practice is to use a conditional catch clause rst if we anticipate
that any exception will occur. An unconditional catch clause is placed
last to handle all the remaining exceptions:
try {
demotrycatchfunction(); // may throw any type of
exceptions
}
catch (e) {
if (e instanceofReferenceError) {
// statements to handle ReferenceErrorexceptions
} else if (e instanceofSyntaxError
) {
// statements to handle SyntaxError exceptions
}
else if (e instanceofEvalError) {
// statements to handle EvalError exceptions
}
else {
// statements to handle any unspecified exceptions
logMyError(e); // pass the exception object to the
error handler
}
}

Extending JavaScript and ECMAScript 6
[ 502 ]
The nally clause
This block will execute statements present within at end, whether an exception has
occurred or not. The statements in a finally block execute irrespective of whether
an error occurred. The finally block generally contains code that must be executed
regardless of anything. Hence, we generally release resources and close connection
inside a finally block. The syntax for writing a simple try-catch-finally block is
as follows:
try {
//try code - This is the Code block to try
}
catch(error) {
//catch code – This is the Code block that handle errors
}
finally {
//finally code - This is the Code block to be executed
regardless of try catch results
}
We can also write this with a nested catch blocks like this:
try {
//do something
}
catch (Exception e) {
try {
//do something with little likeliness of output
}
catch (Exception ex) {
try {
//do the minimum acceptable
}
catch (Exception e1) {
//More try catches?
}
}
}
Chapter 11
[ 503 ]
Here is an example showing the working of multiple catch clauses:
functionCheckEligibility(Age) {
var result;
try { //try block
if (Age < 16 { //condition to be tested
throw new Error("Children below the age of 16 are not allowed.
Parent Supervision needed!"); //incase of false result, an
error will be raised
}
result = age;
}
catch (e) { //catch block
console.log(e.toString()); //error is converted to string and
logged into the console
throw e; //Uncaught Error
}
finally { // finally block - It will run in the end regardless
of the try, catch results
console.log("Age doesn't matter!");
}
return result;
};
Let's pass 14 as the argument to the function, as shown here:
CheckEligibility(14);
The output will be as follows:
Children below the age of 16 are not allowed. Parent Supervision
needed!
In try-catch statements, we must have at least one finally or
try-catch block. Try doesn't necessarily need a catch clause. If
a try statement does not contain at least one catch block, it must
contain a finally block. The possible exception handling clauses with
try-catch-finally are the try-catch, try-finally, or try-
catch-finally clauses.

Extending JavaScript and ECMAScript 6
[ 504 ]
E4X – ECMAScript for XML
It is an extension in JavaScript for support of XML extension with JavaScript. By
using E4x, it provides easy access for XML document by the DOM interface. It
is a server-side technology used in Rhino and SpiderMonkey because these are
powerful extensions by all browsers.
Before E4X, it was very difcult and time consuming for reading and writing in
XML. In JavaScript, E$X provides XML document as a XML object, which represents
XML fragments as a xmlList. E4X supports special kinds of XML objects. This
technique is used in client-side programming.
Here is an example:
varstudent=<student>
<studentInfo>
<name>Ali</name></studentInfo>
</student>
If we enter this XML into our JavaScript code, the E4X interpreter will handle it as an
XML object in your script.
ECMAScript 6 features
ECMAScript 6, otherwise called ECMAScript 2015, is the most recent form of the
ECMAScript standard. ES6 is an important upgrade to the language, and the rst
update to language since the release of ES5.1 in June 2011
A few of the new features of ES6 are:
• Arrow functions
• Classes
• Enhanced object literals
• Destructuring assignment
• Extended parameter handling
• Generator
• Modules
• Proxy
We will look at all these functions in the upcoming sections.

Chapter 11
[ 505 ]
Arrow functions
Arrow functions are also known as fat arrow functions. It is a function and is similar
to what we use in C#, Java, and Coffee Script. Statements and expression bodies are
supported by arrows. The lexical of arrows is similar to its surrounding code. This is
not the case in functions.
As the name suggests, arrow functions use a shorter syntax, an arrow (=>), for
denition and in syntax.
For example, look at the following example:
// An empty arrow function returns undefined
let empty =()=>{};
(()=>"pine")()// returns "pine"
var simple = a => a >20?20: a;
simple(20);// 20
simple(10);// 10
let max =(a, b)=> a > b ?a : b;
// Easy array filtering, mapping, ...
varsampleArray=[7,4,1,0,3,5,11];
var sum =sampleArray.reduce((a, b)=> a + b);// The answer is 29
var even =sampleArray.filter(v => v %2==0);// The answer is [4, 0]
var odd =sampleArray.filter(v => v %2!=0);// The answer is [7, 1,
3, 5, 11]
var double =sampleArray.map(v => v *2);// The answer is[14, 8, 2,
0, 6, 10, 22]
An arrow function expression or a fat arrow function are shorter in syntax when
compared with function expressions. Arrow function is used to bind the value of
this. (It does not binds its own arguments, super, this or new.target). Arrow
functions are anonymous.
The yield keyword is used to pause and resume a generator function (function*
function keyword with an asterisk denes a generator function that returns a
Generator object).

Extending JavaScript and ECMAScript 6
[ 506 ]
Classes
ES6 classes' syntax is simpler and easier than that of area syntactical sugar over
the prototype-based object-oriented pattern. It is a syntactical sugar. One-time
declaration makes class patterns easier to use and simplies the use of class patterns.
Classes support constructors, instance, prototype-based inheritance, static methods,
and super calls.
Here is an example of writing a class in ES6 and ES5:
//ES5
functionsomeES5Class(fname, age) { // standard way to create an
object prototype i.e. constructor function
this.fname = fname;
this.age = age;
}
someES5Class.prototype.sayName = function() { //prototype property
enables us to add new functions to an existing prototype
console.log(this.fname);
}
someES5Class.prototype.sayAge = function() { //prototype property
enables us to add new functions to an existing prototype
console.log(this.age);
}
varmyInstance = new someES5Class('Talha', 25); //new keyword is
used with a constructor function to create new objects from the
same prototype
myInstance.sayName(); //the new method can then be called as a
regular member
myInstance.sayAge();
/*Output:
Talha
25*/
//ES6
classsomeES6Class { // ES6 class
constructor(fname, age) { // a constructor is defined with
default parameters
this.fname = fname;
this.age = age;
}

Chapter 11
[ 507 ]
sayName() { //functions can be added to the class
console.log(this.fname);
}
sayAge() { //functions can be added to the class
console.log(this.age);
}
}
varmyInstance = new someES6Class('Talha', 25); //new keyword is
used to create new objects from the class
myInstance.sayName(); //functions are the class members and can be
called directly
myInstance.sayAge();
/*Output:
Talha
25*/
Enhanced object literals
Object literals is one of the most popular patterns of JavaScript. JSON is based on object
literals. The reason for its popularity is that it provides a very quick, short, and neat
way to do key:value assignments, dene methods, evaluate expressions, and make
super calls. ES6 has extended the object literal syntax in various ways. This makes
them more useful. Two types of extensions for object literals are explained here.
Property initializer shorthand
Earlier in ECMAScript 5, object literals were a comma-separated collection of
name:value pairs. There was a likelihood of duplication while property values were
being initialized.
Here is an example:
functioncreateStudent(StudentID, name, class) {
return {
StudentID: StudentID,
name: name,
class: class,
};
}

Extending JavaScript and ECMAScript 6
[ 508 ]
In the preceding example, the createStudent() function creates a student object
whose name and class properties are similar to the function parameters. This results
in duplication of name and class properties, even though both behave differently.
To correct this, the initializer shorthand property was introduced in ECMAScript 6.
This removed all the likelihood of duplication between property names and local
variables.
For instance, createStudent() can be revised as follows:
functioncreateStudent(StudentID, name, class) {
return {
StudentID,
name,
class,
};
}
In the event that property name will be the same as property estimation, you can
simply incorporate property name without colon and value.
If the property of an object literal has no value, the JavaScript engine searches
for a variable with a similar name in the surrounding. If the search procedure is
successful, the value is assigned to the same party name in object literals.
Method initializer shorthand
With the advent of ECMAScript 6, many things improved, making the work of a
web developer simpler. The syntax of writing methods in object literals improved to
a great extent. Earlier, in ECMAScript 5, we needed to specify a name and write the
complete function denition then and there.
Here is an example:
varcustomer = {
name: "Samantha",
logName: function() {
console.log(this.name);
}
};

Chapter 11
[ 509 ]
With ECMAScript 6, the syntax became easier to code. Colon and function keywords
have been removed. The same example can be rewritten as follows:
varcustomer = {
name: "Samantha",
logName() {
console.log(this.name);
}
};
person.logName();varobject = {
// __prototype__
__prototype__: theProtoTypeObj,
// Shorthand for 'handler: handler'
handler,
// Methods
toString() {
// Super calls
return "x " + super.toString();
},
// Dynamic property names
[ 'property_' + (() => 20)() ]: 20
};
Template strings
Template strings amplify ECMAScript with syntactic sugar to build string. This
component is like string introduction highlights in Perl, Python, and so on. You
can likewise add a tag to permit redid string development, staying away from and
counteracting infusion assaults or building complex information structures from
string substance. They also enable us to create domain-specic languages (DSLs) to
deal with content in a safe way.
Instead of adding more extending functionality to JavaScript strings, template strings
provide a total new approach for string interpolation.
Basics
The simplest format of a template string is as follows:
literal${substitution_variable}literal
This is the most basic form of template strings which performs substitutions.

Extending JavaScript and ECMAScript 6
[ 510 ]
Template strings are enclosed within backticks (`) instead of single or double quotes.
Here is an example:
letbasic_string = `Kung Fu Panda`;
console.log(basic_string); // "Kung Fu Panda"
console.log(typeofbasic_string); // "string"
console.log(basic_string.length); // 13
In this example, a basic_string variable contains a simple JavaScript string. The
template string syntax is only used to create the string value, which is then assigned
to basic_string.
If there is a need to use a backtick in string, then you can escape it using a backslash
(\):
letbasic_string = `\`Kung Fu\` Panda.`; // `Kung Fu' Panda
Multiline strings
In this type of string, we can add multiple lines in a single line of code. To insert a
new line in a string, we have to include \n within the string manually, as follows:
letmultiline_string = "Kung Fu Panda, \n\
Releasing in 2016";
console.log(multiline_string);
The output of this is:
Kung Fu Panda
Releasing in 2016
We need to be careful regarding the whitespaces, as whitespaces within backticks
are considered to be part of the string. All whitespaces before the second line are
considered to be part of the string.
Destructuring assignment
In JavaScript, destructuring means pattern matching. In ES6, we can do efcient
pattern matching in objects and arrays. Earlier, this was a long and complicated task.
Here are some working examples written in a client console.

Chapter 11
[ 511 ]
Fetching data from objects and arrays is very common in JavaScript. Object
properties are usually stored in local variables for instant access. Let's take a look at
the following code snippet:
var settings = {
replay: true,
save: false
};
// later
varlocalReplay = options.replay,
localSave = options.save;
ES6 made this easier by introducing destructuring assignments, which goes through
an object or an array and stores specied values in the local variables. It allows
binding using pattern matching for objects and arrays.
Array destructuring
All variables can be initialized and swapped at once instead of the conventional way
of creating a temporary variable:
var [ first, last ] = ["one", "hundred"] // initialize
console.log(first + " to " + last); // one to hundred
[first, last] = [last, first] // variable swapping
console.log(first + " to " + last); // hundred to one
Multiple values from a function are returned with ease using array destructuring.
We don't have to wrap around an object. To skip variables, you can leave the
position of the array element blank:
function dob() {
return [29, "November", 1990, "Thursday"];
}
var [date, month, year, day] = dob();
console.log("My date of birth is on " + date + " " + month); // My
date of birth is on 29 November

Extending JavaScript and ECMAScript 6
[ 512 ]
Object destructuring
Due to destructuring, variables can also be initialized from an object that is returned
from a function even with deeply nested objects.
Destructuring enables variables to be initialized from an object that is returned by a
function having deeply nested objects. Just like Array destructuring, we can skip the
ones not needed. Here's the working snippet:
function dob() {
return {
date: 29,
month: "November",
year: 1990,
time: {
hour: 12, // nested
minute: 35,
meridian: "AM"
}
};
}
var { date: d, month: m, time : { hour: h, meridian: p } } =
dob();
// h is the nested property while year and minute is skipped
console.log("I was born on " + d + " " + m + " at " + h + " " +
p); // I was born on 29 November at 12 AM
Extended parameter handling
Functions are an important and fundamental part of any language. ES6 has
introduced a number of incremental improvements in functions. This makes them
less error prone and more powerful.
Functions allow any number of parameters to be passed irrespective of the number
of parameters in the function denition. There are three types of these parameters
that could be passed to functions:
• Default
• Rest
• Spread

Chapter 11
[ 513 ]
Default parameter
ES6 lets us set default parameters. A parameter with a default value is considered
optional. It binds trailing parameters to an array:
function multiply(x, y) {
y = typeofy !== 'undefined' ? y : 1;
returnx*y;
}
multiply(10);
Rest parameter
Rest parameters replace the need for arguments and addresses common cases more
directly. Rest parameters are indicated by three dots (…) preceding a parameter.
Here is an example showing the rest parameter:
//Rest Parameter
function sum(…nums) {
var result = 0;
nums.forEach(function(number) {
result += number;
});
return result;
}
console.log(sum(1)); // 1
console.log(sum(1, 2, 3)); // 6
The named parameter becomes an array containing the rest of the parameters.
Adding more than one named argument may cause syntax error.
Spread operator
Spread operator is very similar to the rest parameter, but it allows us to split the
array to individual arguments, which are then passed to the function as separate
arguments.
Here is an example showing the spread operator:
//Spread Operator
functionsum2(a, b, c) {
return a + b + c;
}
varargs = [1, 2];
console.log(sum(…args, …args, 3)); // 6

Extending JavaScript and ECMAScript 6
[ 514 ]
Here is an example showing the usage of default, rest, and spread parameters:
function sum() {
return ;
}
console.log(sum(
(1, 2)
//Spread Operator
//Rest Parameter
//Default Parameter Values
//Default Parameter Values
functioninc(num, increment = 1) {
returnnum + increment;
}
console.log(inc(2, 2)); // 4
console.log(inc(4)); // 5
Bindings
The let keyword is a new var. The declaration syntax for the let keyword is the
same as for var. You can basically replace var with let to declare a variable but
keep its scope to the current code:
functiongetCuisine(condition) {
if (condition) {
letcuisine = "Mediterranean";
// other code
returncuisine;
}
else {
// cuisine does not exist here
return null;
}
// cuisine does not exist here
}

Chapter 11
[ 515 ]
Variables dened using const are considered to be constants, so the value cannot be
changed once set. For this reason, every const variable has to be initialized:
// Valid constant
const ITEMS = 10;
// Syntax error: missing initialization
const ITEM;
Iterators and the for...of operator
We use iterators to allow customization of an object's iteration method/behavior,
such as CLRIE numerable or Java Iterable. Generalize the for..in operator to
custom iterator-based iteration with for..of. Iterators are an important feature of
ECMAScript 6. When used in combination with new array methods and new types
of collections (for example, sets and maps), iterators become even more important for
the efcient processing of data.
Fibonacci numbers, or the Fibonacci arrangement, are the numbers in the
accompanying whole number succession:
let fibonacci = {
[Symbol.iterator]() {
let x = 0, y = 1;
return {
next() {
[x, y] = [y, x + y];
return { done: false, value: y }
}
}
}
}
for (vari of fibonacci) {
// truncate the sequence at 3000
if (i> 3000)
break;
console.log(i);
}

Extending JavaScript and ECMAScript 6
[ 516 ]
Generators
Custom iterators are a useful tool but it requires careful programming so that it can
maintain its internal state explicitly. ES6 introduced generators which provide a
powerful alternative. Generator allows us to create an iteration algorithm by writing
a single function. This single function is able to maintain its own state.
A generator is a function that returns an iterator. The generator functions are
denoted by embedding an asterisk (*) after the function keyword. A normal function
becomes a generator if it contains a yield expression and uses function* syntax.
It doesn't matter whether there is space between the function keyword
and the asterisk.
The yield keyword is utilized within the generators function to indicate the qualities
that the iterator must return when the next() method is called. So, in the event that
you need to return unique values for each progressive call to next():
We can convert the previous iterator example to use a generator, as shown here:
let fibonacci = {
*[Symbol.iterator]() {
let prex = 0, cury = 1
for (;;) {
[ prex, cury ] = [ cury, prex+curv ] = [
yield cury
}
}
}
for (let ni of fibonacci) {
if (ni> 3000)
break
console.log(ni)
}
Better Unicode support
ES6 supports Unicode, including new Unicode literal form in strings, new RegExp u
mode to handle code points, as well as new APIs to process strings at the 21-bit code
points level. These updates enable us to create global apps in JavaScript. ECMAScript
6 enforces encoding of strings in UTF.

Chapter 11
[ 517 ]
The supported Unicode examples are as follows:
// same as ECMAScript 5
"𝌆".length == 2
// new RegExpbehaviour, opt-in 'u'
"𝌆".match(/./u)[0].length == 2
// new form
"\u{1D306}"=="𝌆"=="\uD834\uDF06"
// new String ops
"𝌆".codePointAt(0) == 0x20BB7
// for-of iterates code points
for(var c of "𝌆") {
console.log(c);
}
Modules
ECMAScript 6 enables us to export and import symbols to and from modules
without polluting the global namespace. It provides added support for modules for
component denition. Runtime behavior is dened by a host-dened default loader.
It is an implicitly asynchronous model; no code is executed until the necessary
modules are available and processed:
export function sum(x, y, {
return x + y
}
console.log("4π = " + math.sum(math.pi, math.pi, math.pi,
math.pi));
console.log("2π = " + sum(pi, pi));
Some additional features include export default and export *, as shown in the
following code snippet:
exportvar e = 2.71828182846;
export default function(x) {
returnMath.log(x);
}
console.log("2π = " + ln(e)*pi*2);

Extending JavaScript and ECMAScript 6
[ 518 ]
Module loaders
Module loaders are used primarily to resolve module speciers, loading modules,
and so on. They are responsible for downloading the required modules and binding
them asynchronously. This brings to light the dependencies of a client script. The
constructor is Reflect.Loader.
Module loaders support:
• Compilation hooks
• Nested virtualization
• Dynamic loading
• Global namespace isolation
• State isolation
Loader methods
• System.module(source, options?): This is used to assess the JavaScript
code in source to a module (which is delivered and returned non-concurrently
by means of a guarantee)
• System.set(name, module): This is used for the registration of the module
created by System.module()
• System.define(name, source, options?): This is used to assess the
module code in source and registers the outcome
We can congure the default module loader, and new loaders can be constructed to
evaluate and load code in isolated or constrained contexts:
System.import('libraries/math').then(function(mx) {
console.log("π = " + (mx.pi));
});
// Create execution sandboxes – new Loaders
var loader = new Loader({
global: fixup(window)
});
loader.eval("console.log('live to code!');");
// Directly manipulate module cache
System.get('jquery');
System.set('jquery', Module({$: $}));

Chapter 11
[ 519 ]
Collections
Collections are used to create unique values collections of any type in JavaScript. In
a collection of values, you can also add and remove values. There is no direct access
to values in collection, and these are of array type.
In ECMAscript 6, collections are a new efcient way to store data. JavaScript arrays
are similar to other programming language arrays with index. By use of these arrays,
you can pull double and triple data and also stack data. There are many new types of
collections in JavaScript. Here are some examples:
• Sets
• Maps
• WeakMap
• WeakSet
Sets
A set has a unique collection of values. The unique values of a set are also of object
reference types. Values in sets cannot be duplicated. Before you access values from a
set, you need to check whether the values are present or not.
We can add values in a set and also check the size of values in a set. Here is an
example:
Var students=new set();
Students.add(10);
Students.add("Ali");
Maps
A map object is a key/value map. Any value in map may be used as a key or a value.
Elements can iterate in a map in an insertion order, and it returns an array of a value
or a key. There are two properties of map:
• Map.length: Returns the number of elements in a map
• Map.prototype: The Map.prototype property represents the prototype for
the map constructor
Here are some of the methods of the map object.

Extending JavaScript and ECMAScript 6
[ 520 ]
Map.prototype.clear()
The clear() method removes all elements from a map object.
Returns
It returns nothing.
Parameter
There is no input parameter.
Description
After using this function, everything that we have initialized on map will be erased.
The function has no parameter and returns nothing as it wipes out everything.
Here is an example of this method:
varmyMap=newMap();
myMap.set("pine","apple");
myMap.set(1,"apple");
myMap.size;// 2
myMap.has("cone");// will return false
myMap.has("pine")// will return true
Map.prototype.delete()
The delete() method removes the specied element from a Map object.
Returns
It returns true if a component in the map object existed and has been evacuated. It
returns false if the component does not exist.
Parameter
A key is required. The key here is basically the element to be removed.
Description
This is different from map.prototype.clear() as it clearly removes a specic
element instead of deleting every element on the map. We pass a key (the element to
be deleted), and the function returns true or false, depending on the key.

Chapter 11
[ 521 ]
Here is an example of this method:
varmyMap=newMap();
myMap.set("pine","apple");
myMap.delete("apple");// Returns true. Successfully removed.
myMap.has("apple");// Returns false. The "apple" element is no
longer present.
Map.prototype.entries()
This function is used to tell us about the key and value of elements on map.
Returns
It returns a new iterator object that contains a key and a value for every element
on the map.
Parameter
There are no input parameters.
Description
This function is utilized for letting us know about the key and value of components
on map.
Here is an example of this method:
varmyMap=newMap();
myMap.set("0","pine");
myMap.set(1,"apple");
myMap.set({},"cone");
varmapIter=myMap.entries();
console.log(mapIter.next().value);// ["0", "pine"]
console.log(mapIter.next().value);// [1, "apple"]
console.log(mapIter.next().value);// [Object, "cone"]
Map.prototype.forEach()
The forEach method executes the given callback once to every key/value pair in the
map object.
Returns
It returns nothing.

Extending JavaScript and ECMAScript 6
[ 522 ]
Parameter
There are three parameters: the element value, element key, and the map object being
traversed.
Description
The forEach strategy executes the given callback once to every key of the guide
that really exists. It is not conjured for keys that have been erased. Nonetheless, it is
executed for values that are available; however, they have the value dened.
Here is an example of this method:
functionlogMapElements(value, key, map) {
console.log("m["+ key +"] = "+ value);
}
Map([["foo",3],["apple",{}],["cone",
undefined]]).forEach(logMapElements);
// logs:
// "m[pine] = 3"
// "m[apple] = [object Object]"
// "m[cone] = undefined"
Map.prototype.get()
A specic element from the map is returned using the get() method.
Returns
It returns the key that is used as a parameter (only if it is found in map); or else, it
returns an error message.
Parameter
It requires a key that is to be returned from the map.
Description
We input a key that we want to nd in the map, and the function returns it. It is used
when we want to get the value of an element.
Here is an example of this method:
varmyMap=newMap();
myMap.set("apple","pine");
myMap.get("apple");// Returns "apple".
myMap.get("cone");// Returns undefined.

Chapter 11
[ 523 ]
Map.prototype.has()
The function returns true (Boolean value) if the element exists and false if it does
not.
Returns
It returns true if a component with the specied key exists in the map object. If not
found, it returns false.
Parameter
A key is required.
Description
We pass a key in the function to check whether a certain element exists in the map or
not. If the element exists, true is returned; otherwise, false is returned.
An example of this method is shown here:
varmyMap=newMap();
myMap.set("apple","pine");
myMap.has("apple");// returns true
myMap.has("cone");// returns false
Map.prototype.keys()
It returns keys for every element in the map.
Returns
It returns a new object that contains the keys of all elements on the map.
Parameter
There is no input parameter.
Description
The keys() strategy gives back another iterator object that contains the keys for
every component in the map object in the insertion order.

Extending JavaScript and ECMAScript 6
[ 524 ]
An example of this method is shown here:
varmyMap=newMap();
myMap.set("0","pine");
myMap.set(1,"apple");
myMap.set({},"cone");
varmapIter=myMap.keys();
console.log(mapIter.next().value);// "0"
console.log(mapIter.next().value);// 1
console.log(mapIter.next().value);// Object
Map.prototype.set()
This is the procedure to add a new element on map.
Returns
It returns the map object.
Parameter
This is the key of the element to be added on map.
Description
The set() strategy includes another component with a predetermined key and value
to a map object.
An example of this method is shown here:
varmyMap=newMap();
// Add new elements to the map
myMap.set("apple","pine");
myMap.set(1,"pineapple");
// Update an element in the map
myMap.set("apple","custard");
Map.prototype.values()
This is the method to get a new object containing values of each element.

Chapter 11
[ 525 ]
Returns
It returns an object that has values of all components on map.
Parameter
There is no input parameter.
Description
The values() technique gives back another iterator object that contains the values
for every component in the map object in the insertion manner.
Here is an example of this method:
varmyMap = new Map();
varkeyObj = {},
keyFunc = function () {},
keyString = "This is a sample string";
// setting the values
myMap.set(keyString, "value associated to 'This is a sample
string'");
myMap.set(keyObj, "value associated to a keyObj");
myMap.set(keyFunc, "value associated to a keyFunc");
myMap.size; // 3
// getting the values
myMap.get(keyString); // "value associated to 'This is a sample
string'"
myMap.get(keyObj); // "value associated to a keyObj"
myMap.get(keyFunc); // "value associated to a keyFunc"
myMap.get("a string"); // "value associated to 'This is a sample
string'"
// because keyString === 'a string'
myMap.get({}); // undefined, because keyObj !== {}
myMap.get(function() {}) // undefined, because keyFunc !==
function () {}
Extending JavaScript and ECMAScript 6
[ 526 ]
WeakMap
It is the same as map, but there is some difference in it. It only accepts objects as keys.
Primitive data types are not allowed in WeakMap. There is no garbage collection in a
WeakMap because it doesn't reference to an object acting like a key. As a result of these
differences, there is no method to access keys in WeakMap.
Keys in WeakMap are not enumerable, which means that there is no
method to give you a list of keys. There is size property available in
WeakMap.
Here is an example:
varmyWeakMap1 = new WeakMap(),
myWeakMap2 = new WeakMap(),
varo1 = {},
o2 = function(){},
o3 = window;
myWeakMap1.set(o1, 37);
myWeakMap1.set(o2, "pineapple");
myWeakMap2.set(o1, o2);
myWeakMap2.set(o3, undefined);
myWeakMap2.set(myWeakMap1, myWeakMap2);
myWeakMap1.get(o2); // "pineapple"
myWeakMap2.get(o2); // undefined, because there is no value for o2
on myWeakMap2
myWeakMap2.get(o3); // undefined, because that is the set value
myWeakMap1.has(o2); // will return true
myWeakMap2.has(o2); // will return false
myWeakMap2.has(o3); // will return true
myWeakMap1.has(o1); // will return true
myWeakMap1.delete(o1);
myWeakMap1.has(o1); // will return false
WeakMap.prototype.clear()
This is used to remove all elements from the WeakMap. This is obsolete now, but is,
however, still used in a few browsers.
Returns
It returns the key of the element to be removed from the WeakMap object.

Chapter 11
[ 527 ]
Parameters
This is t key of the element to be removed from the WeakMap object.
Description
Here is an example:
varwm = new WeakMap();
varobject = {};
wm.set(object, "pine");
wm.set(window, "apple");
wm.has(object); // will return true
wm.has(window); // will return true
wm.clear();
wm.has(object) // will return false
wm.has(window) // will return false
WeakMap.prototype.delete()
This method is used to remove a specic object from WeakMap.
Returns
It returns true if an element in the WeakMap object has been removed successfully.
Parameters
This is the key of the element to remove from the WeakMap object.
Description
The delete() method removes the specied element from a WeakMap object.
Here is an example:
varwm = new WeakMap();
wm.set(window, "pineapple");
wm.delete(window); // Returns true. Successfully removed.
wm.has(window); // Returns false. The window object is no
longer in the WeakMap.

Extending JavaScript and ECMAScript 6
[ 528 ]
WeakMap.prototype.get()
This method is used to retrieve a specic object from WeakMap.
Returns
It returns the element associated with the specied key or is undened if the key
can't be found in the WeakMap object.
Parameters
This is the key of the element to return from the WeakMap object.
Description
The key of the element to return from the WeakMap object.
Here is an example:
varwm = new WeakMap();
wm.set(window, "pine");
wm.get(window); // Returns "pine".
wm.get("apple"); // Returns undefined.
WeakMap.prototype.has()
This method is used to check whether the specied object exists in WeakMap.
Returns
It returns true if an element with the specied key exists in the WeakMap object;
otherwise it returns false.
Parameters
It is the key of the element to test for presence in the WeakMap object.
Description
The has() method returns a Boolean indicating whether an element with the
specied key exists in the WeakMap object or not.
Here is an example:
varwm = new WeakMap();
wm.set(window, "pine");
wm.has(window); // returns true
wm.has("apple"); // returns false

Chapter 11
[ 529 ]
WeakMap.prototype.set()
This method is used to add an object to a specic location.
Returns
The WeakMap object.
Parameters
• Key: The key of the element to add to the WeakMap object
• Value: The value of the element to add to the WeakMap object
Description
The set() method adds a new element with a specied key and value to a WeakMap
object.
Here is an example:
varwm = new WeakMap();
varobject = {};
// Add new elements to the WeakMap
wm.set(object, "pine").set(window, "apple"); // chainable
// Update an element in the WeakMap
wm.set(object, "cone");
Weakset
This is a collection of objects that don't stop its elements from being garbage
collected. There is no looping, iteration, and learning in WeakSet. It has three
methods.
WeakSet.prototype.add(someValue)
This method appends a new object at the end of the WeakSet.
Returns
The WeakSet.prototype.add(someValue) method returns Nothing
Parameter
The object to add to the WeakSet collection.

Extending JavaScript and ECMAScript 6
[ 530 ]
Description
The add() method appends a new object to the end of a WeakSet object.
An example of this method is as follows:
varmyWeakSet=newWeakSet();
myWeakSet.add(window);// add the window object to the WeakSet
created above
myWeakSet.has(window);// will return true
WeakSet.prototype.delete(someValue)
This method removes the specied object from WeakSet.
Returns
Returns true if the value is found in WeakSet and is deleted. Returns false if the
value is not found.
Parameter
The value to be deleted is sent as a parameter.
Description
The delete() strategy expels the predened element from a WeakSet object. It is
used while we need to delete some element from WeakSet.
An example of this method is as follows:
varmyWeakSet=newWeakSet();
varmyObject={};
myWeakSet.add(window);
myWeakSet.delete(myObject);// Will return false
myWeakSet.delete(window);// Will return true.
myWeakSet.has(window);// Will return false.
WeakSet.prototype.has(someValue)
This method will return true if the object exists in WeakSet; otherwise, false is
returned.

Chapter 11
[ 531 ]
Returns
It returns true if a component with the predened value exists in the WeakSet object;
otherwise, it returns false.
Parameter
Requires a value that is to be searched.
Description
The has() technique gives back a Boolean demonstrating whether an item exists in
WeakSet or not.
An example of this method is shown here:
varws=newWeakSet();
varobject={};
ws.add(window);
mySet.has(window); // will return true
mySet.has(object); // will return false
It has only arbitrary values. References of objects are held in a weak manner in a
WeakSet object. They can also be garbage collectors. In WeakSet, there is no list of
current objects because of the garbage collector. These objects are not enumerable.
Here is an example:
// Sets
varmySet = new Set();
mySet.add("apple").add("candy");
mySet.size === 2;
mySet.has("hello") === false;
// Maps
varmyMap = new Map();
myMap.set("boy", 27);
myMap.set(f, 25);
myMap.get(f) == 25;
// Weak Maps
varmyWeakMap = new WeakMap();
myWeakMap.set(s, { extra: 99 });
myWeakMap.size === undefined

Extending JavaScript and ECMAScript 6
[ 532 ]
// Weak Sets
varmyWeakSet = new WeakSet();
myWeakSet.add({ data: 99 });
Proxies
Proxies enable object creation with a wide range of behaviors available to host
objects. They can be used for object virtualization, interception, logging/proling,
and so on. Proxies provide developers with an unprecedented control over objects
and unlimited possibilities to dene new interaction patterns.
Here is an example:
vartargetObject = {};
varhandlerObject = {
get: function (receiver, book) {
return `Title, ${name}!`;
}
};
varproxyObject = new Proxy(target, handler);
proxyObject.world === 'Lahore!';
// Proxying a function object
vartargetObject = function () { return 'Target, I am'; };
varhandlerObject = {
apply: function (receiver, ...args) {
return 'Le proxy';
}
};
var p = new Proxy(target, handler);
p() === 'Le proxy';
Symbols
A symbol is a unique type which can be used as an identier for object properties.
The symbol object is an implicit object wrapper for the symbol primitive data type.
Here is how you can create a new primitive symbol:
var symb = Symbol();
OR
var symb = Symbol('abc');

Chapter 11
[ 533 ]
The preceding code creates two new symbols. Symbol('abc') does not force
converts abc into an object but creates a new separate object.
Symbol('abc') === Symbol('abc'); //false
Using Symbol() with new keyword will throw a type error.
var symb = new Symbol(); // TypeError
This prevents creation of an explicit Symbol wrapper object instead of a new symbol
value. Creating an explicit wrapper object around primitive data types were only
supported until ES5. However, existing primitive wrapper objects like new Boolean,
new String and new Number can still be created for legacy reasons.
And if it is necessary to create Symbol wrapper object, you can use the Object()
function:
var symb = Symbol("abc");
typeof symb; // "symbol"
var symbObj = Object(symb);
typeof symbObj; // "object"
The Object.getOwnPropertySymbols() method returns an array of symbols and
lets you nd symbol properties on a given object.
Here is an example:
varSomeClass = (function() {
var key = Symbol("key");
functionSomeClass(privateData) {
this[key] = privateData;
}
SomeClass.prototype = {
doStuff: function() {
... this[key] ...
}
};
returnSomeClass;
})();
var c = new SomeClass("bye")
c["key"] === undefined

Extending JavaScript and ECMAScript 6
[ 534 ]
The ECMAScript 6 standard uses a special notation to indicate symbols,
prexing the identier with @@, such as @@create.
Subclassable built-ins
In ECMAScript 6, built-ins such as Date, Array, and DOM elements can be
subclassed. Object construction for a function named Ctor now uses two phases:
• Call Ctor[@@create] to allocate the object and install any special behavior
• Invoke constructor on new instance to initialize it
The known @@create symbol is available via Symbol.create. Built-ins now expose
their @@create syntax explicitly.
Here is an example:
// Pseudo-code of Array
classSomeArray {
constructor(...args) { /* ... */ }
static [Symbol.create]() {
}
}
// User code of Array subclass
classSomeArray extends Array {
constructor(...args) { super(...args); }
}
// Two-phase 'new':
// 1) Call @@create to allocate object
// 2) Invoke constructor on new instance
vararr = new SomeArray();
arr[1] = 123;
arr.length == 1
Promises
ECMAScript 6 introduced promises. It is a library used for asynchronous
programming. It is a rst-class representation of a value that may be made available
in the future. Many existing JavaScript libraries already use promises.
Some of the methods for promises in ES6 are mentioned here.

Chapter 11
[ 535 ]
Promise.All()
This method returns a promise that is resolved once all the promises in the iterable
argument have been resolved. In the case of a rejection, it returns with the reason of
the rst-passed promise that was rejected.
Returns
The Promise.All() method returns nothing.
Parameter
An iterable object, such as an array.
Description
Promises returns result as an array of values. If any value in the array is not a
promise, then it is converted using Promise.resolve. If any of the passed in promises
rejects, then all promise are rejected and the reason of rejection of a promise is
returned. It discards all other promise whether they have been resolved or not. If an
empty array is passed, then this method resolves immediately.
An example of this method is shown here:
varprom1 = 6000;
varprom2 = new Promise(function(resolve, reject) {
setTimeout(resolve, 100, "Here");
});
Promise.all([prom1, prom2]).then(function(values) {
console.log(values); // [6000, "Here"]
});
Promise.prototype.catch()
This method is used only in cases where objects are rejected. It works the same as
promise.prototype.then().
Returns
The promise.prototype.catch() method returns nothing.
Parameter
• One rejected: A function called when the promise is rejected. This function
has one argument, the rejection reason.

Extending JavaScript and ECMAScript 6
[ 536 ]
Description
The catch() technique gives back a promise and manages rejected cases. It behave
similar as calling Promise.prototype.then(undefined, onRejected).
An example of this method is as follows:
varprom1= new Promise(function(resolve, reject) {
resolve('This was Successful!!');
});
prom1.then(function(value) {
console.log(value); // "This was Successful!!"
throw 'oh, no!';
}).catch(function(e) {
console.log(e); // "Error found"
}).then(function() {
console.log('Catch Done!');
}, function () {
console.log('Not fired due to the catch');
});
Promise.resolve(value)
This method returns a promise object that is resolved by the specied value. If the
value is associated to a then method, the returned promise will move to the then
method, adopting its nal state. Otherwise, the returned promise will be fullled
with the specied value.
Returns
The promise object that is resolved with the given value.
Parameter
Let's take a look at the following parameters and their use:
• onFulfilled: A function called when the Promise is fulfilled
• onRejected: A function called when the promise is rejected
Description
The Promise.resolve(value) system gives back a Promise question that is
determined with the given quality. On the off chance that the quality is a then
able (that is, has a then technique), the returned promise will follow that then able,
adopting its possible state.

Chapter 11
[ 537 ]
The then() technique gives back a Promise. It takes two contentions: callback
capacities for the achievement and disappointment instances of the Promise.
Using the then method
An example of this method is as follows:
varprom1=newPromise(function(resolve, reject) {
resolve("This was a Success!");
// or
// reject ("Error Found Try Again!");
});
prom1.then(function(value) {
console.log(value);//This was a Success!
},function(reason){
console.log(reason);// Error Found Try Again!
});
Chaining
As the then() method returns a Promise, you can easily chain then calls:
varp2=newPromise(function(resolve, reject) {
resolve(1);
});
p2.then(function(value) {
console.log(value);// 1
return value +1;
}).then(function(value) {
console.log(value);// 2
});
p2.then(function(value) {
console.log(value);// 1
});
You can also use chaining to implement one function with a Promise-based API on
top of another such function:
functionfetch_current_data() {
returnfetch("current-data.json").then((response)=> {
if(response.headers.get("content-type")!="application/json") {
thrownewTypeError();
}
var j =response.json();

Extending JavaScript and ECMAScript 6
[ 538 ]
// maybe do something with j
return j;// fulfillment value given to user of
// fetch_current_data().then()
});
}
Promise.reject(value)
This function returns a promise object that is rejected because of the passed
value/reason.
Returns
The Promise.reject() method returns a simple output telling the reason for
rejection.
Parameter
Reason why this promise is rejected.
Description
The static Promise.reject() function capacity gives back a Promise that is rejected.
For troubleshooting purposes and specic mistake nding, it is helpful to make the
reason an instance of error.
An example of this method is shown here:
Promise.reject("Testing Promise reject").then(function(reason) {
// not called
},function(reason) {
console.log(reason);// "Testing Promise reject"
});
Promise.reject(newError("fail")).then(function(error) {
// not called
},function(error) {
console.log(error);// Stacktrace
});
Promise.race(value)
This function returns a promise that is resolved or rejected the same way as the
promises passed in iterable, with the value or reason from that promise.

Chapter 11
[ 539 ]
Returns
The Promise.race() function returns a promise.
Parameter
An iterable object, such as an array.
Description
The race function gives back a Promise that is settled the same route as the initially
passed Promise to settle. It determines or rejects, whichever happens rst.
An example of this method is as follows:
varmyPromise1=newPromise(function(resolve, reject) {
setTimeout(resolve,800,"first");
});
varmyPromise2=newPromise(function(resolve, reject) {
setTimeout(resolve,300,"second");
});
Promise.race([myPromise1,myPromise2]).then(function(value) {
console.log(value);// "second"
// Both resolve, but myPromise2 is faster
});
Core math library APIs
ECMAScript 6 has made several new extensions to the prebuilt libraries, including
core Math libraries, arrays, string helpers, and Object.assign for copying.
These new methods help in speeding up the execution process, hence resulting in
enhancing the performance of applications that may perform calculations and string
manipulation. It also improves the speed of applications that must perform many
calculations and string manipulations.
Numerous new library increases, including core Math libraries, array conversion
helpers, string helpers, and Object.assign for copying. An example of using the
Core Math Library APIs is as follows:
Number.EPSILON
Number.isInteger(Infinity) // will return false
Number.isNaN("NaN") // will return false
Math.acosh(3) // 1.762747174039086
Math.hypot(3, 4) // 5

Extending JavaScript and ECMAScript 6
[ 540 ]
Math.imul(Math.pow(2, 32) - 1, Math.pow(2, 32) - 2) // 2
"Neptune".includes("cd") // This will return false
"Mars".repeat(4) // This will be "MarsMarsMarsMars"
Array.from(document.querySelectorAll('*')) // Returns a real Array
Array.of(1, 2, 3) // Similar to new Array(...), but without
special one-arg behavior
[0, 0, 0].fill(2, 1) // [0,2,2]
[24, 14, 23, 57, 89, 75, 33].find(x => x == 33) // 33
[24, 14, 23, 57, 89, 75, 33].findIndex(x => x == 14) // 1
[1, 2, 3, 4, 5].copyWithin(3, 0) // [1, 2, 3, 1, 2]
["x", "y", "z"].entries() // iterator [0, "x"], [1,"y"], [2,"z"]
["x", "y", "z"].keys() // iterator 0, 1, 2
Binary and octal literals
ECMAScript 6 introduced binary and octal literal notations, for binary (b) and
octal (o). Both these notations are a little similar to hexadecimal literal notation for
prepending 0x or 0X to a value.
The new octal literal format begins with 0o or 0O, while the new binary literal format
begins with 0b or 0B. Each literal type must be followed by one or more digits; 0-7 for
octal and 0-1 for binary. Here's an example:
// ECMAScript 6
varvalue11 = 0o65; // 53 in decimal
varvalue22 = 0b100; // 4 in decimal
0b111110111 === 503 // will return true
0o767 === 503 // will return true
Reect API
The reflect object is a single object that contains functions related to the reection
API. As the name suggests, it is merely a reection of the objects so that one can
observe them closely, regardless of who the object was created by. The reflect
object is not a function object. It does not have a constructor method. It cannot be
invoked as a function, because it does not have a call method.
Reect API is known to be the inverse of Proxy API.
Here is a list of methods a reflect object has.

Chapter 11
[ 541 ]
Reect.get(target, prop, [receiver])
This method allows you to get the property of an object. This method is similar to
property accessors syntax (object[propertyKey]).
Returns
The reflect object returns the value of property.
Parameter
The parameters are target objects on which to get property, the name of property,
and the value.
Description
The static Reflect.get() method works like getting a property from an object
(target[propertyKey]) as a function.
An example of the get method is as follows:
// Object
varobject={a:4,b:5};
Reflect.get(object,"b");// 5
// Array
Reflect.get(["first","second"],1);// "second", since array starts
with 0 index
// Proxy with a get handler
var x ={p:9};
varobject=newProxy(x, {
get(a,b,c){returnb +"meow";}
});
Reflect.get(object,"woof");// "woofbar"
Reect.set(target, prop, value, [receiver])
This method allows you to set a property of an object. This method is also similar to
property accessor syntax.
Returns
The Reflect.set(target, prop, value, [receiver] returns a Boolean value
indicating whether property was successful or not.

Extending JavaScript and ECMAScript 6
[ 542 ]
Parameter
Parameters are target objects, name of the property, the value to set, and the receiver.
Description
The static Reflect.set() strategy works like setting a property on an item.
An example of this method is shown here:
// Object
varobject={};
Reflect.set(object,"property","value");// will return true
object.property;// "value"
// Array
vararr=["cow","cow","cow"];
Reflect.set(arr,1,"goat");// will return true
arr[1];// "goat"
// It can truncate an array.
Reflect.set(arr,"length",1);// will return true
arr;// ["goat"];
// With just one argument, propertyKey and value are "undefined".
varobject={};
Reflect.set(object);// will return true
Reflect.getOwnPropertyDescriptor(object,"undefined");
// { value: undefined, writable: true, enumerable: true,
configurable: true }
Reect.has(target, prop)
This method allows you to check whether an object holds a specic property. This
method is similar to the in operator.
Returns
The Reflect.has(target, prop) returns a Boolean value indicating whether the
target has a property or not.
Parameter
The target object and the property key (name of property to check) is passed.

Chapter 11
[ 543 ]
Description
The static Reflect.has() technique works like the in operator as a function.
An example of this method is shown here:
Reflect.has({a:0},"a");// will return true
Reflect.has({a:0},"b");// will return false
// returns true for properties in the prototype chain
Reflect.has({a:0},"toString");
// Proxy with .has() handler method
object=newProxy({}, {
has(s,d){returns.startsWith("cat");}
});
Reflect.has(object,"catastrophe");// will return true
Reflect.has(object,"camel");// will return false
Reect.apply(target, receiver, args)
This method is used to call a target function with a specied set of arguments.
Returns
The Reflect.apply(target, receiver, args) method returns nothing.
Parameter
Target function to call. thisArgument and ArgumentList is passed as parameters.
Description
The static Reflect.apply() technique calls an objective function with specied
arguments.
An example of this method is shown here:
Reflect.apply(Math.floor, undefined,[3.999]);
// 3;
Reflect.apply(String.fromCharCode, undefined,[80, 97, 107, 105,
115, 116, 97, 110]);
// "Pakistan"
Reflect.apply("".charAt,"stars",[2]);
// "a"

Extending JavaScript and ECMAScript 6
[ 544 ]
Reect.construct(target, args)
This method allows you to call a constructor function with multiple arguments.
It is just like calling new function (…args).
Returns
The Reflect.construct(target, args) returns nothing.
Parameter
The target function to be called, an argument list, and the new target (constructor to
be used) are parameters.
Description
The Reflect.construct method permits you to conjure a constructor with a
variable number of contentions (which would likewise be conceivable utilizing the
spread operator consolidated with the new operator).
An example of this method is shown here:
Using Reflect.construct():
var d =Reflect.construct(Date,[2015,1,5]);
dinstanceofDate;// will return true
d.getFullYear();// 2015
Using newTarget:
functionmyConstructor(){}
var result =Reflect.construct(Array,[],myConstructor);
Reflect.getPrototypeOf(result);// myConstructor.prototype
Array.isArray(result);// will return true
Reect.getOwnPropertyDescriptor(target, prop)
This method is just like Object.getOwnPropertyDescriptor(). This method
returns a property descriptor of a specic property if it exists on an object; otherwise,
undened is returned. The only difference between these two is the way non-object
targets are handled.
Returns
The Reflect.getOwnPropertyDescriptor(target, prop) method returns a
property descriptor object.

Chapter 11
[ 545 ]
Parameter
The target object in which to look for property, and property key (name of the
property to be applied) are the parameters.
Description
The Reflect.getOwnPropertyDescriptor system gives back a property
descriptor of the given property in the event that it exists on the object, indistinct
something else undened is returned if property does not exists. The main contrast
to Object.getOwnPropertyDescriptor() is the manner by which non-object
targets are taken care of.
An example of this method is shown here:
Using Reflect.getOwnPropertyDescriptor():
Reflect.getOwnPropertyDescriptor({a:"bye"},"a");
// {value: "bye", writable: true, enumerable: true, configurable:
true}
Reflect.getOwnPropertyDescriptor({x:"bye"},"y");
// undefined
Reflect.getOwnPropertyDescriptor([],"length");
// {value: 0, writable: true, enumerable: false, configurable:
false}
Difference to Object.getOwnPropertyDescriptor():
If the rst argument to this method is not an object (a primitive), then it will cause a
TypeError. With Object.getOwnPropertyDescriptor, a non-object rst argument
will be coerced to an object at rst:
Reflect.getOwnPropertyDescriptor("woof",0);
// TypeError: "woof" is not non-null object
Object.getOwnPropertyDescriptor("dummy",0);
// { value: "d", writable: false, enumerable: true, configurable:
false }
Reect.deneProperty(target, prop, desc)
This method is similar toObject.defineProperty(). This method allows us to
modify the property of an object. The Object.defineProperty() method returns
an object or returns a type error if the property is not dened successfully. The
Reflect.defineProperty() method returns true if the property was dened
successfully. Otherwise, it returns false.

Extending JavaScript and ECMAScript 6
[ 546 ]
Returns
The Reflect.defineProperty(target, prop, desc) method returns a Boolean
demonstrating regardless of whether the property was effectively characterized.
Parameter
Target object, property key, and attributes are the parameters.
Description
The Reflect.defineProperty technique permits the exact expansion to or
change of a property on an object. For more subtle elements, see the Object.
defineProperty, which is comparative. Object.defineProperty gives back the
objects or tosses TypeError if the property has not been effectively characterized.
Reflect.defineProperty, then again, essentially gives back a Boolean
demonstrating regardless of whether the property was effectively characterized.
An example of this method is shown here:
Using Reflect.defineProperty():
http://haseeb.deeurl.com/client-demos/everydayadvice/v3/={};
Reflect.defineProperty(object,"x",{value:7});// will return true
object.x;// 7
Checking if property denition has been successful:
With Object.defineProperty, which returns an object if successful or throws a
TypeError otherwise, you would use a try...catch block to catch any error that
occurred while dening a property. As Reflect.defineProperty returns a Boolean
success status, you can just use an if...else block here:
if(Reflect.defineProperty(target, property, attributes)) {
// will return success
}
else{
// will return failure
}
Reect.getPrototypeOf(target)
This method returns a prototype of the specied object. It is similar to the Object.
getPrototypeOf() method.
Returns
The Reflect.getPrototypeOf(target) method returns the prototype of object
or null.

Chapter 11
[ 547 ]
Parameter
The target object for which we need the prototype is passed as a parameter.
Description
The static Reflect.getPrototypeOf() method is the same technique as Object.
getPrototypeOf(). It gives back the model (that is, the estimation of the inside
[[Prototype]] property) of the predetermined item.
An example of this method is shown here:
Reflect.getPrototypeOf({});// Object.prototype
Reflect.getPrototypeOf(Object.prototype);// will return null
Reflect.getPrototypeOf(Object.create(null));// will return null
Reect.setPrototypeOf(target, newProto)
This method sets the prototype of object to another object or to null. This method is
the same as the Object.setPrototypeOf() method.
Returns
The Reflect.setPrototypeOf(target, newProto) method returns a Boolean
showing regardless of whether the model was effectively set.
Parameter
The target object and prototype are parameters.
Description
The Reflect.setPrototypeOf method changes the prototype (that is, the value of
the internal [[Prototype]] property) of the specied object.
An example of this method is shown here:
Reflect.setPrototypeOf({},Object.prototype);// will return true
Reflect.setPrototypeOf({},null);// will return true
Reflect.setPrototypeOf(Object.freeze({}),null);// will return false
var target ={};
varprototype=Object.create(target);
Reflect.setPrototypeOf(target,prototype);// will return false

Extending JavaScript and ECMAScript 6
[ 548 ]
Reect.deleteProperty(target, prop)
This method is used to delete properties from an object. This method is similar to the
delete operator as a function.
Returns
The Reflect.deleteProperty(target, prop) method returns a Boolean value
telling us whether the property is deleted or not.
Parameter
The target object and the name of the property to be deleted are parameters.
Description
The Reflect.deleteProperty method permits you to erase a property on an object.
It returns boolean value indicating if the property was successfully removed or not,
regardless of whether the property was effectively characterized. It is almost similar
to the non-strict delete operator.
An example of this method is shown here:
varobject={a:11,b:12};
Reflect.deleteProperty(object,"a");// will return true
object;// { y: 12 }
vararr=[11,12,13,14,15];
Reflect.deleteProperty(arr,"3");// will return true
arr;// [11, 12, 13, , 15]
// Returns true if no such property exists
Reflect.deleteProperty({},"bar");// will return true
// Returns false if a property is unconfigurable
Reflect.deleteProperty(Object.freeze({bar:1}),"bar");// will
return false
Reect.enumerate(target)
This method returns an iterator with enumerable own and inherited properties of the
target object.
Returns
Returns an iterator with the enumerable own and acquired properties of the
objective object.

Chapter 11
[ 549 ]
Parameter
Target object on which to get property is passed in the function.
Description
The Reflect.enumerate() method returns an iterator with the enumerable own
and inherited properties of the target object.
An example of this method is shown here:
varobject={a:98,b:99};
for(var name ofReflect.enumerate(object)) {
console.log(name);
}
// logs "a" and "b"
Reect.preventExtensions(target)
This is the same method as Object.preventExtensions(). It prevents us from
adding more properties (extensions) to an object.
Returns
Returns a Boolean demonstrating regardless of whether the objective was effectively
set to forestall expansions.
Parameter
Target object on which we have to prevent extensions.
Description
The static Reflect.preventExtensions() method keeps new properties from
always being added to an object (that is, counteracts future augmentations to the
item). It is like Object.preventExtensions(), yet with a few contrasts.
An example of this method is as follows:
varblank={};
Reflect.isExtensible(blank);// === will return true
Reflect.preventExtensions(blank);
Reflect.isExtensible(blank);// === will return false

Extending JavaScript and ECMAScript 6
[ 550 ]
Reect.isExtensible(target)
This method allows us to check whether new properties can be added to an object
or whether the object is extensible or not. This method is similar to the Object.
isExtensible() method.
Returns
A Boolean value indicating whether the target is extensible or not.
Parameter
The target object that has to be checked for its extensibility.
Description
The static Reflect.isExtensible() technique gures out whether an item is
extensible (whether it can have new properties added to it). It is like Object.
isExtensible(), yet with a few contrasts.
An example of this method is shown here:
var blank ={};
Reflect.isExtensible(blank);
The preceding function will return true.
Reect.ownKeys(target)
This method returns the object's own property keys.
Returns
The Reflect.ownKeys(target) method returns an array of target objects.
Parameter
Target object from where to get keys.

Chapter 11
[ 551 ]
Description
The static Reflect.set() strategy works like setting a property on an object.
Here is an example of this method:
Reflect.ownKeys({a:5,b:6,c:7});
Reflect.ownKeys([]);
varsymbol=Symbol.for("dirt");
varsymbolb=Symbol.for("sky");
varobject={[symbol]:0,"string":0,"99":0,"4":0,
[symbolb]:0,"100":0,"-7":0,"second string":0};
Reflect.ownKeys(object);
Tail calls
Calls in tail position won't be able to grow the stack without any limits. It helps in
making recursive algorithms safe and secure in the safe of unbounded inputs.
Example
The following function produces a factorial of any number passed to it. There is a tail
call in the end of the function which recalls the function. Previously, we used to get a
stackoverow error, but ES6 is safe for handling arbitrary inputs.
If the output is out of range, it will simply display innity:
function factorial(n, acc) {
'use strict';
if (n <= 1) return acc;
return factorial(n - 1, n * acc);
}
console.log(factorial(5, 1)); //120
console.log(factorial(200, 1)); //Infinity
// Stack overflow in most implementations today,
// but safe on arbitrary inputs in ES6
console.log(factorial(10000000, 1));
[ 553 ]
Server-side
JavaScript – NodeJS
Node.js is a relatively new server platform that is built on JavaScript. One of the
main features of Node is that it is a non-blocking server. This means that resource-
intensive tasks will not tie up the server. Node.js can then handle many concurrent
connections. It can also handle real-time communications more easily than a blocking
server.
One of the main uses of Node.js is as a web server. This is a perfect task as serving
web pages usually involves reading les and connecting to a database. It is able
to serve more clients while either of these two actions are executing. This is very
different compared to a blocking server. A blocking server would have to wait for all
the resources to return before it could respond to more requests.
Note that this reference will only be Node.js specic; we will not cover
any frameworks or libraries in this chapter.
The most popular frameworks are useful and should be utilized whenever possible,
but our focus will only be on functions and modules that are included with Node.js.
There will be no coverage of Express (arguably, the most used Node.js framework).
Most importantly, we will cover the building blocks of Node.js that Express and its
dependencies are built on.
A great book that covers frameworks and more is Building Scalable Apps with Redis
and Node.js by Packt Publishing.

Server-side JavaScript – NodeJS
[ 554 ]
In this chapter, the following groups of references will be described, accompanied
with examples:
• File and process management:
°Modules
°OS (operating system)
°Process
°File
°Path
°REPL (Read Eval Print Loop)
°Errors
• Utilities:
°Events
°Crypto
°Buffer
°Console
°Npm (Node Package Manager)
°Stream
• Net modules:
°createServer
°net.Server
• HTTP:
°Server
°IncomingMessage
°ServerResponse
°clientRequest

Chapter 12
[ 555 ]
File and process management
We will start our overview of Node.js with the basics. This will include loading
modules, managing processes, handling les and paths, and REPL (Read Eval Print
Loop). These are things that virtually any Node.js project will need.
Modules
Node.js is a modular system. Much of the functionality of Node.js is contained in
modules that must be loaded at runtime. This makes the knowledge of loading and
building modules a core requirement to using Node. Here are the references you can
use for your Node modules:
• require()
• modules.export
require()
This loads the module at the given path:
require(path)
Return value
The return value will be an object. The properties of this object will vary, depending
on what is loaded. We will cover module.exports next, which is what module
designers and even you can use to set the value of this return value.
Description
The require() function is used to load the module at a path, where the path can be
a core module (a module packaged with Node.js), directory, le, or module (a project
that you or someone else has built). As a result, it is very versatile. The require()
function will try to resolve the passed-in path in this order: the core module, the
directory or le if the path begins with "./", "/", "../", and then the module, take a
look at the following description for more information. You then need to check the
require function in different locations for all of this to work:
• You will first look for a core module. The core modules can be viewed in the
source of Node.js under the lib directory. We will cover the most prolifically
used modules in this chapter.
• Next, require would load the path as a file if the string begins with "./" ,"/",
or "../". These are current directory, root directory, and parent directory,
respectively.

Server-side JavaScript – NodeJS
[ 556 ]
• If the filename is not found, require will then try appending .js, .json,
or .node. This means that the require (./data/models) function and
require (./data/models,js) will load the same file. If require does not
find a file, then it will try to load the path as a directory. This means it will
look for either an index.js file or the main property inside package.json.
Require will then either use index.js or package.json to load as a file.
• Finally, if the path does not start with "./", "/", or "../" and it is not a core
module, require will search for a node_modules folder. The first directory
will be the current directory. After that, each directory will be a parent
directory, all the way up to the root directory. In addition to this, require
will also search the paths in the NODE_PATH environment variable.
As a quick summary, here is the order that require will use:
• Core module (no relative path)
• File module (relative path)
• Folder module (relative path)
• The node_modules module (no relative path)
Here are some examples of how the require function is used to load core modules,
les, or modules:
var http = require('http'); //loads a core module
As you can see from the comment, this example will load the HTTP core module:
var data = require('./data'); //loads a directory
This example shows you how to load a directory:
var dataModels = require('./data/models'); //loads the file
models.js
This one will load a le:
var redis = require('redis'); //loads a module
Finally, this one will load a module.
Every Node.js project will use require many times, so knowing how and where it
will load is important.
Here is a simple example that demonstrates require and how it works with
module.exports.
Chapter 12
[ 557 ]
Here is the le that will be loaded with require, requireTest.js, and it will be
loaded from a relative path:
module.exports = 'This value is from requireTest';
Here is how to load this value in a Node.js script:
var requireTest = require('./requireTest');
console.log(requireTest);
module.exports
The module.exports property is a convenience property used in a module to expose
the functionality of the module outside the scope of the current le.
Return value
The module.exports property is the return value from the module. This can seem
misleading though. We will not return module.exports. It is the object or properties
set at module.exports that are available from this module.
Description
The module.exports property is the link from the current le into the scope of the
calling le. Any variables dened in the current le will not be in the scope of le
that calls it. To make the variables available, you must either set them as the value
of module.exports or as properties of module.exports. This functionality is the
mechanism that Node.js uses with require. Exports can be set to any type: string,
integer, function, object, and many others. Functions allow us to either pass in
values or create a constructor() function. Objects can be created and then used to
overwrite the exports object or can be added to the exports object as properties. We
have all of JavaScript's function- and object-creation tricks at our disposal.
A quick note is that require will cache output. This means consecutive
calls to the same module will return the same instance of an object.

Server-side JavaScript – NodeJS
[ 558 ]
Examples of the constructor() function being used are shown here:
• This allows an object to be passed in:
module.exports = function Foo(bar) {do something with
bar};
• This allows the export function to be executed:
module.exports = function FooConstructor() {};
• The foo property will be used in the following two examples:
module.exports = {foo: foo()};
module.exports.foo = foo();
The OS module
Here are the most important functions and properties of the os module. The os
module allows you to get information from the operating system. This is important
as we may need to know the hostname or how many CPUs are currently available.
All the functions that we will look at now assume that var os = require('os') is
already in the le.
hostname()
This will return the hostname of the device:
.hostname()
Description
An example of how the os.hostname() function is used is shown here. In this
case, it will return the hostname of the current computer used. It will not return the
domain sufx of the computer:
os.hostname();
cpus()
This will return the number of CPUs of the current device:
.cpus()

Chapter 12
[ 559 ]
Description
We will get an array of objects that map to each CPU. The objects will have the
model, speed, and times:
• Model and speed are the processor model and speed of the CPU,
respectively. Note that, most of the time, model and speed will not be
relevant to our code.
• Times has the breakdown of how many milliseconds the CPU has spent in
user, nice, sys, idle, and irq.
This information can be used, most of the time, to nd out how many CPUs the
machine has. It is good to know this information, as Node.js is single threaded and
we can launch multiple processes in a cluster for each CPU.
Here is an example of getting the number of CPUs on a computer:
var cpus = os.cpus().length;
networkInterfaces()
This gets a list of network interfaces:
.networkInterfaces()
Description
This will be an object that contains all the network interfaces. Each property maps to
an interface and it will have an array of all the IP addresses (IPv4 and IPv6).
As an example, this is how you can get the object that has all the interfaces for a
computer:
var network = os.networkInterfaces();
The process module
Process is an object that allows us to get access to events on the process. We can
also get access to stdin, stdout, and stderr. These are global objects that will be
available in any le or context.

Server-side JavaScript – NodeJS
[ 560 ]
stdout
The stdout object is a writable stream.
stdout
Description
This is the stream that will connect to stdout. Note that streams will be covered later
in this chapter under Utilites. If we are running Node.js as a console application,
this is where we could write to stdout if needed. Most streams in Node are non-
blocking, but writes to stdout and stderr are blocking.
We also can use stdout to nd out whether Node.js is running in TTY. We can
access process.stdout.isTTY. This is a Boolean value.
The example here will show us how to write a message to the stdout stream. By
default, this will be sent to the process.stdout.write console. This will write to
stdout.
stderr
The stderr object is a writable stream.
stderr
Description
This is similar to stdout, with the key difference being it writes to stderr. This
is very useful for console applications as we can write to the console what is
happening.
As an example, this writes to the stderr stream. By default this will write to the
console.
process.stderr.write("Something seems to have gone wrong.");
stdin
This is a readable stream that maps to stdin.
stdin

Chapter 12
[ 561 ]
Description
This maps to the standard stream, stdin, in the same way stdout and stderr map
to the stderr streams. The difference is that the stdin object is readable, while the
others are writable. Anything that is piped into this process can be read out using
process.stdin. To read from a readable stream, we will have to listen for two
possible events that let us know how we can retrieve data. The rst is readable, and
the other is data. We will cover this more in depth when we get to the stream section.
For instance, this example takes the data that is sent in through stdin and sends it to
stdout using the readable event:
process.stdin.on('readable', function() {
var data = process.stdin.read();
if(data !== null) process.stdout.write(data);
});
argv
This is all the command-line arguments passed in:
argv
Description
The argv commands will be an array of all the arguments passed into this script.
Arguments are split by spaces. This means that debug=true (which has no spaces)
will be one argument, and debug = true (a space between each word) will be
three. This is an important distinction to keep in mind if you want to pass values in
arguments. Arguments 0 and 1 will always be the node and the path and lename of
the current script.
Here is an example:
process.argv.forEach(function(val){ if(val === 'debug'){ debug();
} });
Signal events
Signal events allow you to listen for the standard POSIX signals:
process.on({signal, callback});

Server-side JavaScript – NodeJS
[ 562 ]
Description
All of the POSIX signals, except SIGKILL and SIGSTOP, can be listened for. In
addition to these signals, you can also listen for some Windows signals. Here is the
list of signals:
• SIGUSR1: This is a user-defined signal. In Node.js, it is usually used to start
the debugger.
• SIGTERM: This is the signal to terminate.
• SIGINT: This is the signal to interrupt. It is usually sent by pressing Ctrl + C.
• SIGPIPE: This lets a process know when it is trying to pipe to a nonexistent
process.
• SIGHUP: This is the signal that tells a process that the terminal it was running
in has hung up.
• SIGBREAK: This is non-POSIX and is used by Windows. It should be used in a
manner similar to SIGINT.
• SIGWINCH: This is the signal to tell the process that the window has changed
size.
Here is an example of listening for SIGINT, which recognizes that Ctrl + C was
pressed:
process.on('SIGINT', function(){
//ctrl+c was pressed
});
process.env
This object contains the environment variables:
process.env
Description
The process.env object is a simple JavaScript object that contains all the
environment variables. Each property will be a string.
A great place to put conguration settings is in the environment when building an
extensible application. The process.env object can then be used to check whether
the current environment is in production or even to just store the conguration
settings.

Chapter 12
[ 563 ]
Here is an example of checking for environment and setting a value from the
environment:
if(process.env.NODE_ENV !== 'production')
//do test stuff
var redisHost = process.env.REDIS_HOST;
kill
This will send a signal event to a process:
process.kill(pid, [signal])
Description
This will send any of the signal events that are dened in the signal events section,
which that we covered earlier. This is essentially running the POSIX kill command.
We can use this kill command to send the current process a signal, using
process.pid, or to send another process that we have a reference to the kill signal.
Here is an example of killing the specic process ID 4634:
process.kill(4634, 'SIGTERM');
pid
This gets the current pid:
process.pid
Description
It is the pid (process ID) of the process.
This is an example of process.kill and process.pid used together:
process.kill(process.pid, 'SIGTERM');
cwd
This gets the current working directory:
process.cwd()
Server-side JavaScript – NodeJS
[ 564 ]
Here is an example that set the cwd variable to the current working directory of the
process:
var cwd = process.cwd();
File functions
This section is not a true module, like the previous section on process. This section
will focus on any of the functions or modules that allow us to read, write, or nd les
and directories.
__lename
This returns a string of the current lename:
__filename
Description
The __filename command returns the current lename. This can be different,
depending on which le is being executed. A module that is being executed will
return its lename instead of the main entry point.
Here is an example of logging the current lename to the console:
console.log(__filename);
__dirname
This is a string of the current directory:
__dirname
Description
Much like __filename, this will return the currently executing le's directory. The
__dirname command is used many times when a relative path needs to be created.
Both the __filename and __dirname variables are available in any
le being executed by Node.js. They are determined per le, so they are
correct for each le that gets executed.
This example assumes Express has been loaded as express:
//express is loaded
app.use(express.static(__dirname + '/static'));
Chapter 12
[ 565 ]
The le module
We will now look at a list of key functions in the le module. All of these functions
just run the underlying POSIX commands.
Each of the commands we cover will have an asynchronous and synchronous
version of each function. The synchronous function will be the same name, with Sync
appended, for example, open and openSync. In a way, the asynchronous versions
are more like Node.js, in that, they let the event loop process without holding up
execution.
Each asynchronous function will need a callback function dened as the last
parameter. This function will be in the form of function(err, result). We will
cover this when we get to handling errors. The quick takeaway is that the rst
parameter, err, will be null if no error occurred, or it will have the error.
In the current versions of Node.js, you need not use a callback function,
but this will become an exception in v0.12.
The synchronous functions will not process anything in the event loop until the
function returns. While this seems against the Node.js non-blocking paradigm, it
makes sense in certain cases, for example, when a specic le must be opened before
anything else can process. This means that the classic try/catch is needed to handle
any exceptions or errors.
In almost every circumstance, the asynchronous version is the one that should
be used.
Each example is under the assumption that the fs variable already exists. Here is
the code that sets the fs variable to the fs module:
var fs = require('fs');
stat
This returns fs.Stats, which is an object with information about the queried le
or directory:
fs.statstat(path, callback)
fs.statSync(path)

Server-side JavaScript – NodeJS
[ 566 ]
Description
The stat variable gets the the data that would be returned after running stat() on
the operating system. The stat object is an instance of fs.Stats. This object gives us
useful functions such as isFile() and isDirectory(). In addition to this, fs.Stats
has many properties. We can see the modied time, access time, and le size.
There are more functions and properties, but these are the most likely used.
The fs.lstat() and fs.fstat() functions will both return an fs.Stats object
when pointed to a le. The difference is that lstat will run against a link instead
of following the link to the le or directory. The fstat runs against a le descriptor
instead of a path.
Here is an example that loads a le named test.txt in the same directory as the
code le and logs the fs.Stats object:
fs.stat(__dirname + '\test.txt', function(err, stats){
console.log(stats);
});
open
This returns a le descriptor of the path passed in:
fs.open(path, flags, [mode], callback)
fs.openSync(path, flags, [mode])
Description
This will open a le in the path passed in. There are many ags that can be passed.
They are described here:
• r: Read only, errors when file does not exist
• r+: Read and write, errors when file does not exist
• rs: Read synchronous, here, "synchronous" only refers to the filesystem
caching data and not synchronous such as openSync
• rs+: Read and write synchronous
• w: Write
• wx: Write, errors when file exists
• w+: Read and write, file is created or truncated
• a: Append, file is created
• ax: Append, errors when file exists

Chapter 12
[ 567 ]
• a+: Read and append, file is created
• ax+: Read and append, errors when file exists
The ags allow you to open, read, and write a le, whether it exists or not. This
means that most of the time, a call to fs.exists is not required as one of the ags
will give you the answer you need.
The mode parameter is the permissions that are used if a le is created. It defaults to
0666.
Finally, the callback returns a le descriptor. With this, data can be read or written
using fs.read or fs.write.
This is an example of opening the le test.txt:
fs.open(__dirname + '\file.txt', 'r', function(err, fd){
//fd is available to be read from
});
read
This reads from a le descriptor:
fs.read(fd, buffer, offset, length, position, callback)
fs.readSync(fd, buffer, offset, length, position)
Description
The read() function takes a lot of parameters to run. We need a le descriptor,
which we get from open, a buffer, and the size of the le. In the example, we used
fs.stat to get the le size.
Here is a full example of opening a le and reading from it:
fs.stat(__dirname + '/test.txt', function(error, stats) {
fs.open(__dirname + '/test.txt', 'r', function(err, fd){
var buffer = new Buffer(stats.size);
fs.read(fd, buffer, 0, stats.size, null, function(err,
bytesRead, buffer){
console.log(buffer.toString('utf8'));
});
});
});

Server-side JavaScript – NodeJS
[ 568 ]
readFile
This is a simplied version for reading a le:
fs.readFile(filename, [options], callback)
fs.readFileSync(filename, [options])
Description
The readFile() function greatly simplies the process of reading a le in Node.js.
In the previous function, fs.read, we needed to set everything up before we tried
to read the le. The readFile() function allows us to just pass a lename and get a
buffer back of what is in the le.
The optional options object takes a ag and an encoding property. The ag
property is the same as the ag from fs.open, so any of them can be used. The
encoding is used for the buffer that is returned in the callback.
Here is an example that demonstrates how much easier it is to load a le with
readFile. The example is also using the optional options parameter:
var filename = __dirname + '/test.txt';
fs.readFile(filename, {flag: 'r', encoding: 'utf8'}, function(err,
data){
console.log(data.toString('utf8'));
});
close
This will close a le descriptor:
fs.close(fd, callback)
fs.closeSync(fd)
Description
It is important to close any les that we open in our scripts. If we get a le descriptor
from fs.open, we will need to call fs.close on that le descriptor at some point.
This is an example of closing a le descriptor:
fs.close(fd, function(err){
//handle err here
});

Chapter 12
[ 569 ]
write
This writes to a le descriptor:
fs.write(fd, buffer, offset, length, position, callback)
fs.writeSync(fd, buffer, offset, length, position)
Description
The write() function takes a le descriptor and buffer to write to a le. Much like
read, we have to pass in quite a few parameters to make this work.
In the following example, we are reading a le into a buffer and then writing that
buffer back out to another le. The offset and length are both integers that we need to
pass in. The position can be an integer, but it can also be null. Null will start writing
at the current position in the le.
Just like read, write can be complex. Here is a full example of reading from one le
and writing to another:
var fs = require('fs');
var filename = __dirname + '/test.txt';
var writeFile = __dirname + '/test2.txt';
fs.stat(filename, function(error, stats) {
fs.open(filename, 'r', function(err, fd) {
var buffer = new Buffer(stats.size);
fs.read(fd, buffer, 0, stats.size, null, function(err,
bytesRead, buffer) {
fs.open(writeFile, 'w', function(err, writeFD) {
//will create a file named test2.txt with the contents
from test.txt
fs.write(writeFD, buffer, 0, buffer.length, null,
function(err, bytesWritten, writeBuffer) {
console.log(writeBuffer.toString('utf8'));
});
});
});
});
});

Server-side JavaScript – NodeJS
[ 570 ]
writeFile
This is a simplied function to write to a le:
fs.writeFile(filename, data, [options], callback)
fs.writeFileSync(filename, data, [options])
Description
Exactly like the difference between read and readFile, writeFile is a simplied
version of write. We just pass in a lename and a string or buffer, and it will write
the le.
The callback only returns an error when it occurs.
readFile and writeFile seem like the best choices in most cases, and in fact, this
is most likely true. The main thing that you give up using these functions is control.
You can only read an entire le or write an entire le.
With read or write, you can read any portion and write any portion of
a le. This is an important difference to keep in mind.
Here is an example of writeFile:
var filename = __dirname + '/write.txt';
var buffer = new Buffer('Write this to a file.', 'utf8');
fs.writeFile(filename, buffer, {encoding: 'utf8', flag: 'w'},
function(err){
if(null !== null){
//do something
}
});
appendFile
This function allows us to append a le:
fs.appendFile(filename, data, [options], callback)
fs.appendFileSync(filename, data, [options])
Chapter 12
[ 571 ]
Description
appendFile exists because writeFile will only write an entire le. So, we need
another function to add to a le. This is where giving up some control for ease comes
in. If we were using a le descriptor and write, then we could choose to start writing
at the end of the le. This is effectively appending the le:
Here is an example of appendFile:
var filename = __dirname + '/write.txt';
var buffer = new Buffer('Append this to a file.', 'utf8');
fs.appendFile(filename, buffer, {encoding: 'utf8', flag: 'w'},
function(err){
if(null !== null){
//do something
}
});
The path module
The path module is separate from the le module. Path is concerned with xing
paths, whereas le is concerned with working with les and directories. Many times,
these modules will be used together.
The functions covered are the most used and most useful. You will most likely need
to locate paths relative to your current project, and this is what the path module is
for:
Note that the path module does not check for the existence of path
modications. It essentially only makes changes to the string value
of a path.
Just like the other modules, the example assumes that the path module has been
loaded:
var path = require('path');
normalize
This returns a string of the path with any oddities xed:
path.normalize(pathString)

Server-side JavaScript – NodeJS
[ 572 ]
Description
Normalize will x many problems associated with reading paths. A great example of
this is the difference between Windows and Unix paths. Unix uses forward slashes,
and Windows uses backslashes. Normalize will return the correct slashes based on
the system it is executed on.
In addition to this, normalize will also remove the current directory and parent
directory shortcuts, (. and .. respectively). It will also remove double slashes from a
directory. It normalizes any paths passed in.
Here is an example of using Unix slashes on a Windows system. This example will
change all the slashes to backslashes:
var pathString = "/unix/style/path/separators";
console.log(path.normalize(pathString));
join
This returns a string of all the paths joined together:
path.join([pathString1],[…])
Description
Join makes it easy to create a path from partial paths. This seems like something that
can be done with concatenation, but it is easy to forget about path separators. Join
will make sure that the path separators will all be in the correct spots.
Here is an example of join. The example will take all the parameters and join them
together with the correct slash for your system:
console.log(path.join('path', 'separators', 'added'));
resolve
This returns the string of the path based on the parameters:
path.resolve([pathString], […])
Description
This can be viewed as the cd command executed for each parameter. The paths
passed in can be relative or full paths. A relative path will add to the returned path,
and a full path will be used whole.

Chapter 12
[ 573 ]
Here are two examples:
• Relative paths, will return /home/josh/test:
console.log(path.resolve('/home/josh/node', '..', 'test'));
• A full path will return /home/brian/node:
console.log(path.resolve('/home/josh/node', '/home/brian/node'));
relative
This returns the difference between the to and from paths:
path.relative(from, to)
Description
The path returned can be used with cd to change to the new directory.
Here is an example that will return ../../brian/node, because you must go up two
parent folders and over to brian/node to get from one to the other:
var from = '/home/josh/node';
var to = '/home/brian/node';
console.log(path.relative(from, to));
dirname
This returns a string of the directory name:
path.dirname(pathString)
This example will return the directory that the current le is in. If the le was
in the directory /home/users/jjohanan/node, then the example will return
/home/users/jjohanan/node:
console.log(path.dirname(__filename));
basename
This returns a string of the nal part of a path:
path.basename(pathString, [ext])

Server-side JavaScript – NodeJS
[ 574 ]
Description
This will either return the lename or directory depending on what path is passed
in. The optional ext parameter will remove that portion from the return value if it
exists.
Here are two examples, one involving a le and the other a directory:
• This will return test:
console.log(path.basename('/home/josh/test.js', '.js'));
• This will return josh:
console.log(path.basename('/home/josh'));
extname
This returns a string of the extension of the path. If there is no extension, a blank
string is returned:
path.extname(pathString)
Here are two examples:
• This example will return .js:
console.log(path.extname('/home/josh/test.js'));
• This example will return a blank string:
console.log(path.extname('/home/josh'));
REPL
REPL stands for Read Eval Print Loop. What this means is that it is an interactive
console. We can enter in a command (Read). The command will be executed (Eval).
The output of the command will will be printed to the console (Print). Finally, we
can do this as many times as we want (Loop). REPL is great to run a few lines of code
to see what they will do.
node
This starts Node.js in the REPL mode:
node

Chapter 12
[ 575 ]
Description
The main way REPL will be used is by calling it directly. This can be done by
executing Node.js without a le to serve, by running just node. Once node has
returned with a prompt, we can add commands and see what happens when we run
them. This is perfect to test a few lines of code.
Here is a quick example of logging in to the console; rst run node to get a prompt
and then run the command:
node
//wait for >
console.log('hey this REPL!');
Handling errors
Errors are a part of any development project. We must be able to handle errors in a
graceful way. If we do not, then we are creating bad experiences for our users. Even
worse, we could be opening up a vector for attack. A stack trace that gets sent to an
end user can give out many details.
This will be a special section that deals more with design patterns than with actual
code reference. Node.js is an asynchronous event-driven platform. For the major
part, most people have not worked on a platform like this and can make mistakes
when handling errors. We feel that handling errors is very important.
The core of this information comes from Joyent, one the major forces
behind Node.js today. You can nd more information on Joyent at
https://www.joyent.com/developers/node/design/errors.
Types of errors
Errors can be split into two types: operational and programmer errors. Operational
errors are errors that occur during the operation of an application. A database server
not being accessible is an example. These errors can be planned for and handled
gracefully.
Next is programmer errors, which are errors in the literal sense. For example, a piece
of code is malformed or an unexpected condition has come up. These are very hard
to plan for (if we had planned for them, then they wouldn't be errors!). These will
almost always break the server, so we can come back through the logs to nd what
went wrong.

Server-side JavaScript – NodeJS
[ 576 ]
Error design patterns
Now that we know the two different types of errors, let's look at the three ways of
alerting an application that has an error. The three ways are throwing the error,
asynchronous callback, and emitting an error event:
• The first pattern of throwing the error is built into JavaScript. This pattern is
great for any synchronous code. If we are doing any synchronous operations
and an error occurs, we should throw it. When handling a synchronous call,
we should wrap the function call in a try/catch block. Here is an example
with JSON.parse, which runs synchronously and throws an error when a
non-JSON string is passed to it:
try{
JSON.parse(jsonObject);
} catch (ex) {
//do something with this error
}
• The next pattern is using an asynchronous callback. Many built-in Node
functions do this already. The pattern is to use a callback that has the
signature function(error, result). The first parameter will either have
an error or be null or undefined. We can implement this ourselves whenever
we write an asynchronous function. If there is an error, return it in the
callback as the first parameter.
When handling errors like these, we must put an error check in every
callback function. This is important, as not doing this can silently
swallow errors.
A good example of this is asynchronous and synchronous filesystem module
calls. For example, read takes a callback, and readSync should be wrapped in a
try/catch block.
Here is an example callback and check for error:
fs.read(path, function (err, data) {
if(err !== null)
//handle error
})

Chapter 12
[ 577 ]
Finally, we can emit an error event. This is used for asynchronous functions as well.
Whether we implement a callback or event is a personal choice, but it should be clear
which one is being used. It is also a best practice to just implement one. Many times,
an event is used when there is a long running asynchronous process. Reading data
from a network socket is an example. A socket does not always give the data in one
simple pass, so events are set up. One of those events is an error event. To handle
this, we just need to listen for that event. Here is an example of listening for the error
event of a socket:
socket.on('error', function(error){
//handle error here
})
Utilities
In the next group of modules, we will look at utilities. The functions chosen here
are used across many different types of applications. We will cover everything from
events and cryptology to buffers and npm.
Events
Events are used in many built-in Node objects. This is because emitting and listening
for events is the perfect way to let another function know when to start executing.
This is especially true in the asynchronous world of Node.js. Anytime we use the on
function of an object, it means that it has inherited from EventEmitter. All of the
examples will assume that the events variable is already created as follows:
var events = require('events');
EventEmitter
This is the parent class that can be inherited from to create a new EventEmitter:
events.EventEmitter
Description
Node.js has a fully featured event system that we can easily inherit from and
implement. We do not need any extra frameworks or custom code. EventEmitter
is the class to inherit from, and we will get every function in the rest of this section
available.

Server-side JavaScript – NodeJS
[ 578 ]
Here is an example of setting up a custom the EventEmitter parameter:
var util = require('util');
var events = require('events');
function MyEventEmitter(){
events.EventEmitter.call(this);
this.test = function (emitThis) {
this.emit('testEvent', emitThis);
}
}
util.inherits(MyEventEmitter, events.EventEmitter);
var myEE = new MyEventEmitter();
myEE.on('testEvent', function (data) { console.log(data) });
myEE.test('test');
on
This function adds a listener for a specic event:
emitter.on(event, listenerFunction)
emitter.addListener(event, listenerFunction)
Description
The on function has become the preferred naming convention to add listeners to
events. As an example, jQuery uses the exact same function name for their event
listeners. The event handler is a string name of the event that will be emitted. The
listenerFunction parameter is what will be executed when the event is emitted.
The listenerFunction parameter can be an anonymous function or a reference to
a function. The preferred way of adding a listener is with a reference to a function.
This will allow us to remove this specic listener at a later time.
Here is an example based on our new MyEventEmitter class:
var quickLog = function (data) {
console.log('quickLog: ' + data);
}
myEE.on('testEvent', quickLog);

Chapter 12
[ 579 ]
once
This works just like on, except it only executes once and then removes itself as a
listener:
emitter.once(event, listenerFunction)
removeListener
This is the function that is used to remove a listener from an event:
emitter.removeListener(event, function)
Description
When we are done listening for this event, we will want to remove our listener. This
will help prevent memory leaks. If we added an anonymous function as the listener,
then we cannot remove it as we do not have a reference to it. Using our previous
example from on, we will remove the listener:
myEE.removeListener('testEvent', quickLog);
removeAllListeners
This function will remove every listener for all events or a specic event:
emitter.removeAllListeners([event])
Description
This is essentially the nuclear option to remove listeners. This is indiscriminate with
listeners. The removeAllListeners parameter will even remove listeners we did not
add. Use this as a last resort.
An example that removes all the listeners from this event is shown here. If the event
was left blank, it would remove all listeners for all events:
myEE.removeAllListeners('testEvent');
setMaxListeners
This function sets the number of listeners before Node.js and warns about a possible
memory leak:
emitter.setMaxListeners(numberOfListeners)

Server-side JavaScript – NodeJS
[ 580 ]
Node.js has a helpful warning when the number of listeners exceeds a threshold. The
default value is 10, so when you add the eleventh listener, Node.js will warn:
(node) warning: possible EventEmitter memory leak detected. 11
listeners added. Use emitter.setMaxListeners() to increase limit.
As a general rule, this is true. If we keep adding listeners to an event, there is a great
chance for a memory leak. However, there will be times when we will need more
than 10 listeners on an event. This is where we use setMaxListeners. If we set the
max listeners to zero, then we can add as many as we want.
Here is an example of setting the max listeners to 50:
myEE.setMaxListeners(50);
emit
This is how we re off an event:
emitter.emit(eventName, [argument], […])
If we have extended an object to be an event emitter, then we will want to emit some
events! This is the function to do that. It will execute all the event listeners that have
attached themselves to this event based on eventName.
Here is an example that shows a listener being added and then emitting an event:
myEE.on('testEvent', function (data) { console.log(data) });
myEE.emit('testEvent', 'Emit This!', 'Another Argument!');
Crypto
Every modern application needs cryptography. A great example of Node.js using
cryptography is with HTTPS. We will not explore the inner workings of HTTPS
as there is a module (the https module) that does this for us. We will look at the
cryptographic functions used to hash, store, and check passwords.
In the same way as the other modules, we will require the crypto module and have
it available for use in our examples. Here is what we will need:
var crypto = require('crypto');
createHash
This function will return a crypto.Hash object:
crypto.createHash(algorithm)
Chapter 12
[ 581 ]
Description
The algorithms that can be used will be different for each system as it relies
on OpenSSL. We can nd out the algorithms that crypto can use by calling
crypto.getHashes(). This will return an array of strings that can then be
passed into createHash as the algorithm.
The return object from this function is a crypto.Hash object, which is covered
in the next section.
Here is an example that creates an MD5 hash:
var md5 = crypto.createHash('md5');
The hash object
This is the object that is returned from crypto.createHash:
hash.update(data, [encoding])
hash.digest([encoding])
Description
Once we get a reference to the Hash object that has been returned, you will see that
it has two functions. The rst is update, which allows us to add to the data that will
be hashed. This can be called multiple times. This is important if we want to hash a
stream input.
The next function is digest. This will return digest based on the algorithm the hash
object was created with. The string encoding for this function can be hex, binary, or
BASE64.
Here is a full example of reading data from a le and then calculating the MD5 hash
of the le.
var f = file.readFileSync(__dirname + '/test.txt');
var md5 = crypto.createHash('md5');
md5.update(f);
console.log(md5.digest('base64'));
Do not use hashing for passwords. The next function we will cover
is much more secure than a simple hash. A digest hash is great for
checking if some data has changed, as the hashes will be different if
even one bit is different. In addition to this, it can be used as a key or
identier. A great example is using it for a memory cache and using the
hash as the key. If the data is the same, the key will be the same.

Server-side JavaScript – NodeJS
[ 582 ]
pbkdf2
This function will use HMAC-SHA1 multiple times to create a derived key:
crypto.pbkdf2(password, salt, iterations, keyLength, callback)
crypto.pbkdf2Sync(password, salt, iterations, keyLength)
Return Type
Both pbkdf2 and pbkdf2Sync will return a derived key as a buffer.
Description
Pbkdf2 (password-based key derivation function 2) is designed for password
storage. It is better than hashing because it is difcult. Hashing is designed to be a
quick calculation. This is bad because modern CPUs can calculate thousands upon
thousands of hashes a second. This makes cracking a hashed password easy.
Pbkdf2 xes this using a work factor in iterations. The higher the iterations, the
longer the calculation will take. Now, instead of calculating thousands a second, we
can slow a CPU down to just a few a second. This is a signicant decrease.
These are the parameters used:
• password: This is the string we want to create a derived key for.
• salt: This is a string that is combined with the password. Doing this ensures
that the same password will not have the same hash if salt is different.
• iterations: This is the work factor that instructs the function how many
times to repeat. This can be increased as CPUs become faster. Currently, at
least 10,000 should create a reasonably secure derived key.
• keyLength: This is the desired length of the returned derived key.
Here is an example of creating a derived key for the string password and salt:
crypto.pbkdf2('password', 'salt', 10000, 32, function (err, key) {
console.log(key.toString('base64'));
});
randomBytes
This returns cryptographically strong pseudo-random data:
crypto.randomBytes(length, [callback])

Chapter 12
[ 583 ]
Return type
A buffer is returned.
Description
Random data is needed for various functions. While no data can truly be random,
there are varying levels of randomness. The randomBytes parameter is random
enough to use for cryptographic functions. A perfect use of randomBytes is for a
salt to be used in pbkdf2. The salt variable is combined with the password to
create a different hash even if the passwords are the same.
This function can be executed asynchronously or synchronously. It depends on
whether there is a callback, which it would then execute asynchronously.
Here is a function to create a random salt for pbkdf2. If you compare this example
to the previous one, you will see that this example outputs a unique string each time,
while the previous one does not:
var random = crypto.randomBytes(256);
crypto.pbkdf2('password', random.toString('base64'), 10000, 32,
function (err, key) {
console.log(key.toString('base64'));
});
pseudoRandomBytes
This returns pseudo-random data:
crypto.pseudoRandomBytes(length, [calback])
crypto.pseudoRandomBytes(length)
Return Type
A buffer is returned.
Description
This functions exactly like randomBytes, except it is not cryptographically strong.
This means that we should not use it with any cryptographic functions such as
pbkdf2.
We can use it for anything else that requires randomness, a lename, or a cache key
for example.

Server-side JavaScript – NodeJS
[ 584 ]
Here is a simple example of executing this function asynchronously:
crypto.pseudoRandomBytes(256, function (err, randomData) {
console.log(randomData.toString('base64'));
});
Buffer
Node.js uses buffers internally for many things. We have seen this as we have had
buffers returned for many functions. This is because anytime raw data or binary data
needs to be stored, it will be stored in a buffer.
Buffers have a few quirks about them that we must keep in mind. First, buffers
store data, but to utilize the data held inside them, we must encode it. We will
cover the encodings and how to do this in this section. Second, buffers cannot be
resized. When they are created, we must give a length, and that will always be
the length of that buffer. We can, of course, create a new buffer that is larger
and then copy over the data. Finally, a buffer is a global. We do not need to have
var buffer = require('buffer'). Also, it can be utilized in any le at any time.
Buffer creation
The initialization function of a buffer is as shown in the following code snippet:
new Buffer(size)
new Buffer(array)
new Buffer(str, [encoding])
Return value
This returns a buffer object.
Description
There are three different ways to initialize a buffer. The rst function uses an integer
of the given size, the next one uses an array, and the nal method can use just a
string. The encoding is optional, as it defaults to UFT8.
This example demonstrates initializing using an array with the hello string in
ASCII:
var hello = [72, 101, 108, 108, 111];
var buffer = new Buffer(hello);
console.log(buffer.toString('ascii'));

Chapter 12
[ 585 ]
index
This gets the value at the specic index in the buffer:
buffer[index]
Return Value
This returns the value at the index.
Description
This works much like an array. Here is an example of getting the rst index in the
buffer:
var buffer = new Buffer('Hello!');
console.log(buffer[0]);
toString
This returns the buffer as a string based on the encoding:
buffer.toString([encoding], [start], [end])
Return Value
This returns a string.
Description
This is most likely the function that you will use to get the data out of a buffer. The
rst parameter is encoding, which is one of the following:
• ASCII
• UTF8
• UTF16LE
• BASE64
• Binary
• Hex
All the parameters are optional, so this means that they all have default values.
Encoding is defaulted to UTF8, start is 0, and end is the end of the buffer.

Server-side JavaScript – NodeJS
[ 586 ]
Here is an example of creating a buffer and retrieving the data out of it. It explicitly
denes each of the parameters:
var buffer = new Buffer('Hello this is a buffer');
console.log(buffer.toString('utf8', 0, buffer.length));
toJSON
This returns the contents of the buffer as a JavaScript object:
buffer.toJSON()
Return Value
This returns an array with the contents of the buffer.
Description
This will return contents of the buffer mapped to an array. This example is similar to
the previous example, but with toJSON:
var buffer = new Buffer('Hello this is a buffer');
console.log(buffer.toJSON());
isBuffer
This is a class method that will determine whether an object is a buffer:
Buffer.isBuffer(objectToTest)
Return Value
This returns a Boolean value.
Description
Remember that this is a class method, so it can be executed without a new instance of
buffer. Here is an example of using the function:
var buffer = new Buffer('Hello this is a buffer');
console.log(Buffer.isBuffer(buffer));
write
The following code writes to the buffer.
buffer.write(stringToWrite, [offset], [length], [encoding])

Chapter 12
[ 587 ]
Return value
This returns an integer of the number of bytes written.
Description
This function will write the string passed into the buffer. Much like the other buffer
functions, there are many optional parameters that have defaults. The default offset
is 0, the length is buffer.length – offset, and the encoding is UTF8.
This example writes to a buffer twice using the return value from the rst write to
append the second string:
var buffer = new Buffer(12);
var written = buffer.write('Buffer ', 0, 7, 'utf8');
console.log(written);
buffer.write('time.', written);
console.log(buffer.toString());
byteLength
This function will get the length of a string in bytes based on the encoding:
buffer.byteLength(string, [encoding])
Return value
This returns an integer of the number of bytes needed.
Description
Buffers cannot be resized after initializing, so we may need to know how big a string
is beforehand. This is where byteLength comes in.
Here is an example that determines the size of a string and then writes it to the
buffer:
var byteLength = Buffer.byteLength('Buffer time.', 'utf8');
var buffer = new Buffer(byteLength);
var written = buffer.write('Buffer time.', 0, buffer.length, 'utf8');
console.log(buffer.toString());

Server-side JavaScript – NodeJS
[ 588 ]
readUInt
This will get an unsigned integer at a certain spot in the buffer:
buffer.readUInt8(offset, [noAssert])
buffer.readUInt16LE(offset, [noAssert])
buffer.readUInt16BE(offset, [noAssert])
buffer.readUInt32LE(offset, [noAssert])
buffer.readUInt32BE(offset, [noAssert])
Return Value
This returns an unsigned integer of the size used, 8 for readUInt8.
Description
Not all data stored in a buffer is exactly a byte. Sometimes, data will need to be read
in 16-bit or 32-bit chunks. In addition to this, you can also specify whether the data is
little endian or big endian, denoted by LE or BE in the function name, respectively.
The offset is which spot in the buffer to start at. The noAssert parameter will run
validation if the offset size is in the buffer. By default, it is false.
Here is an example of setting data and then reading the data out with readUInt16:
var buffer = new Buffer(2);
buffer[0] = 0x1;
buffer[1] = 0x2;
console.log(buffer.readUInt16LE(0));
console.log(buffer.readUInt16BE(0));
writeUInt
This writes an unsigned integer to a buffer:
buffer.writeUInt8(value, offset, [noAssert])
buffer.writeUInt16LE(value, offset, [noAssert])
buffer.writeUInt16BE(value, offset, [noAssert])
buffer.writeUInt32LE(value, offset, [noAssert])
buffer.writeUInt32BE(value, offset, [noAssert])
Description
This is the exact opposite of the readUInt function. Sometimes, we need to write
data that is larger than one byte in length. These functions make it simple.
Chapter 12
[ 589 ]
The noAssert parameter is optional, and it defaults to false. This will not run any
validation on the value or offset.
Here is an example of writing UInt16 to the buffer:
var buffer = new Buffer(4);
buffer.writeUInt16LE(0x0001, 0);
buffer.writeUInt16LE(0x0002, 2);
console.log(buffer);
Note that there are more read and write functions of this type for the
buffer class. Instead of creating a very redundant section, I will list
them. Remember that they work in the same fashion as the functions
we have covered: readInt8, readInt16LE, readInt16BE,
readInt32LE, readInt32BE, readDoubleLE, readDoubleBE,
readFloatLE, and readFloatBE. There is a write() function that
maps to each one of these as well.
Console
This is much like the console that is present in most modern browsers. The console
essentially maps to stdout and stderr. This isn't a module, and each function is not
very complex, so let's jump right in.
log
This writes to stdout:
console.log(message, […])
Description
This is probably the most used console function. It is great for debugging, and the
output can be combined with piping to write to a le for a history. The multiple
parameters create a string-like function.
Here is an example of using multiple parameters:
console.log('Multiple parameters in %s', 'console.log');
dir
This is an alias for util.inspect:
console.dir(object)

Server-side JavaScript – NodeJS
[ 590 ]
Description
Many times, the output of console.log and console.dir will be similar. However,
when trying to look at an object, console.dir should be preferred.
time and timeEnd
These two functions are used together to mark the start and end of a timer:
console.time(label)
console.timeEnd(label)
Description
These two functions will always be used together. The console.time parameter
will start a timer that can be stopped with console.timeEnd by passing the same
label. When timeEnd is called, it will log the elapsed time between start and end in
milliseconds.
Here is an example that uses setTimeout:
console.time('simple-timer');
setTimeout(function () {
console.timeEnd('simple-timer');
}, 500);
trace
This logs to the console and includes a stack trace:
console.trace(message, […])
Description
This works much like console.log. The rst parameter can be treated like a
formatted string, with the other parameters supplying the additional input. The
main difference is that console.trace will include a stack trace when it logs to the
console.
Here is a simple example:
console.trace('This should be the first line.');

Chapter 12
[ 591 ]
npm (Node Package Manager)
npm is not a Node.js module like. We will look at some of npm's features and uses,
as almost every Node.js project will use npm.
Most modern platforms have a way of grouping together code that serves a function
or purpose called packages. Node.js uses npm to track, update, pin, and install these
packages.
init
This initializes a node module by creating package.json in the current directory:
npm init
Description
An interactive console session will ask you quite a few questions and use the
answers to build a package.json le for you. This is a great way to kick off a new
module. This will not delete your current the package.json le or any of the current
properties if the package.json le exists.
package.json
This is the le that has all the information about your project.
Description
This is not a function or command, but it is the most important le in your project. It
is what determines all the information about your project. Although technically, the
only properties needed are name and version, there are many properties that can be
set. If this le was created using npm in it, you will have quite a few already lled
out. It would be tedious to list out all the possibilities. Here are just a few of the most
useful: name, version, scripts, dependencies, devDependencies, authors, and license.
The npm docs at https://www.npmjs.org/doc/files/package.json.html go
through all the settings their uses.
install
This is the command to install a package:
npm install
npm install [package] [@version] [--save | --save-dev]

Server-side JavaScript – NodeJS
[ 592 ]
Description
This is the main way to install new packages and their dependencies. If npm install
is called without any parameters, it will use package.json and install all the
dependencies.
This command also allows you to install packages by executing it with the name of
the package. This can be augmented by adding a version. If the version is omitted,
it will install the newest version. In addition to this, you can use save ags that create
a property in dependencies or devDependcies.
This is not the entire list of what npm install can do, but it is the most used list.
update
This will update a package to the newest version:
npm update [package]
Description
This command will update all the packages or a specic package to the newest
version.
shrinkwrap
This will explicitly dene all the dependencies for a project:
npm shrinkwrap
Description
This is different from the basic list of dependencies in package.json. Most packages
have requirements of their own. When a package is installed, npm will go out and
nd the newest version that matches the dependency's specied version. This can
lead to different versions of packages installed when run at different times. This is
something that most developers want to avoid.
One way to combat this is to run npm shrinkwrap. It will create
npm-shrinkwrap.json. This le will explicitly dene the versions currently
installed recursively for every package installed. This ensures that when you
run npm install again, you will know what package versions will get installed.

Chapter 12
[ 593 ]
run
This will run an arbitrary command:
npm run [script]
Description
The package.json le has a property named scripts. This is an object that can have
a list of commands that can be run by npm. These scripts can be anything that runs
from the command line.
There are three commands on npm that use these scripts objects. These are npm test,
npm start, and npm stop. These commands map to test, start, and stop the scripts
object, respectively.
Here is an example for a scripts object from package.json and the way to call it
from npm:
package.json:
"scripts": {
"hey": "echo hey"
}
npm run hey
Stream
Stream is an interface that is used by many internal objects. Any time data needs to
be read or written, it is most likely done through a stream. This ts with the Node.js
asynchronous paradigm. If we are reading a large le from the lesystem, we would
create a listener to tell us when each chunk of data is ready to be read. This does not
change if that le is coming from the network, an HTTP request, or stdin.
We are only going to cover using a stream, in this book. The stream interface can be
implemented with your own objects as well.
Streams can be readable, writable, or duplex (both). We will cover readable and
writable streams separately.
Readable
This is, of course, a stream that we can get data out of. A readable stream can be
in one of the two different modes, owing, or non-owing. Which mode it is in
depends on which events are listened for.

Server-side JavaScript – NodeJS
[ 594 ]
To put a stream in the owing mode, you will just have to listen for the data event.
Conversely, to put a stream in the non-owing mode, you will have to listen for the
readable event and then call the stream.read() function to retrieve data. The easiest
way to understand the modes is to think about the data as a lot of chunks. In the
owing mode, every time a chunk is ready, the data event will re, and you can read
that chunk in the callback of the data event. In the non-owing mode, the chunk will
re a readable event, and then, you will have to call read to get the chunk.
Here is a list of events:
• readable
• data
• end
• close
• error
Here are two examples, one that uses owing and one that uses non-owing:
var fs = require('fs');
var readable = fs.createReadStream('test.txt');
readable.on('data', function (chunk) {
console.log(chunk.toString());
});
var fs = require('fs');
readable.on('readable', function () {
var chunk;
while (chunk = readable.read()) {
console.log(chunk.toString());
}
});
read
Use with a non-owing readable stream:
readable.read([size])
Return value
This returns either a string, buffer, or null. A string is returned if the encoding is set.
A buffer is returned if the encoding is not set. Finally, null is returned when there is
no data in the stream.

Chapter 12
[ 595 ]
Description
This reads from a stream. Most of the time, the optional parameter size is not needed
and should be avoided. Only use this with a non-owing stream.
Here is a simple example that reads a le:
readable.on('readable', function () {
var chunk;
while (chunk = readable.read()) {
console.log(chunk.toString());
}
});
setEncoding
This sets the encoding of the stream:
stream.setEncoding(encoding)
Description
By default, a readable stream will output a buffer. This will set the encoding of the
buffer, so a string is returned.
Here is the opening example with setEncoding used:
readable.setEncoding('utf8');
readable.on('readable', function () {
var chunk;
while (chunk = readable.read()) {
console.log(chunk);
}
});
resume and pause
These functions pause and resume a stream:
stream.pause()
stream.resume()
Description
Pause will stop a stream from emitting data events. If this is called on a non-owing
stream, it will be changed into a owing stream and be paused. Resume will cause
the stream to start emitting data events again.

Server-side JavaScript – NodeJS
[ 596 ]
Here is an example that pauses the stream for a few seconds before reading it:
readable.pause();
readable.on('data', function (chunk) {
console.log(chunk.toString());
});
setTimeout(function () { readable.resume();}, 3000);
pipe
This allows you to take the output of a readable stream and send it to the input of a
writable stream:
readable.pipe(writable, [options])
Return Value
This returns the writable stream so that piping can be chained.
Description
This is exactly the same as piping output in a shell.
A great design paradigm is to pipe from a stream to another stream that transforms
the stream and then pipe that to the output. For example, you want to send a le
over the network. You would open the le as a readable stream, pass it to a duplex
stream that would compress it, and pipe the output of the compression to a socket.
Here is a simple example of piping output to stdout:
var readable = fs.createReadStream('test.txt');
readable.pipe(process.stdout);
writable
This is the stream the data goes to. This is a little simpler as there are really only two
functions that matter: write and end.
Here are the events and details of when they re:
• drain: This fires when the internal buffer has written all the data
• finish: This fires when the stream has been ended and all the data has been
written
• error: This fires when an error occurs

Chapter 12
[ 597 ]
It is important to note that a stream can be given more data than it
can write in a timely fashion. This is especially true when writing to a
network stream. Because of this, the events finish and drain to let
your program know that the data has been sent.
write
This function writes to the stream:
writable.write(chunk, [encoding], [callback])
Return value
This returns a Boolean value if the stream has written completely.
Description
This is the main function of a writable stream. Data can be a buffer or string,
encoding defaults to UTF8, and the callback is called when the current chunk of data
has been written.
Here is a simple example:
var fs = require('fs');
var writable = fs.createWriteStream('WriteStream.txt');
var hasWritten = writable.write('Write this!', 'utf8', function () {
console.log('The buffer has written');
});
end
This will close the stream, and no more data can be written:
writable.end([chunk], [encoding], [callback])
Description
When you are done writing to a stream, the end function should be called on it. All
the parameters are optional, a chunk is data that you can write before the stream
ends, encoding will default to UTF8, and the callback will be attached to the nish
event.

Server-side JavaScript – NodeJS
[ 598 ]
Here is an example to end a writable stream:
var fs = require('fs');
var writable = fs.createWriteStream('WriteStream.txt');
writable.end('Last data written.', 'utf8', function () {
//this runs when everything has been written.
});
The net module
The net module in Node.js allows us to create network connections. The connections
that are created will be streams that we can write to and read from. This section will
focus on just network connections and not HTTP. Node.js has a full HTTP module,
and we will cover that in the next section.
All the functions assume that the net module has been loaded like this:
var net = require('net');
createServer
This function will create a TCP server:
net.createServer([options], [listener])
Return value
This returns a net.Server object.
Description
This function allows us to listen for connections. The returned object will be a
net.Server object, and the connection listener will be passed to a net.Socket
object. We will cover both of these objects shortly.
Here is a simple example that shows us how to listen and write to a socket. Each
connection will have to be manually closed:
var net = require('net');
var server = net.createServer(function (connection) {
connection.write('You connected!');
});
server.listen(5000, function () {
console.log('Listening on port 5000');
});

Chapter 12
[ 599 ]
net.Server
We will now look at the net.Server object. All of the functions in the next section
will need to a have a Server object created through createServer.
The net.Server parameter is an EventEmitter that will emit events. Here is a list of
the events with the event argument if there is one:
• Connection: net.Socket
• close
• Error: Error
• listening
Here is an example that uses all of the events:
var net = require('net');
var server = net.createServer();
server.on('listening', function () {
console.log('I am listening');
});
server.on('connection', function (socket) {
console.log(socket);
socket.end();
server.close();
});
server.on('error', function (err) {
console.log(err);
});
server.on('close', function () {
console.log('The server has stopped listening');
});
server.listen(5000);
listen
This starts accepting connections:
server.listen(port, [host], [backlog], [callback])
Description
Creating a server does not get it to start listening to requests. We will have to give
the listen function at least a port. The host is optional, as it will listen on all IPv4
addresses, and the backlog will be the queue of connections. Finally, the callback will
be called when the server starts listening.

Server-side JavaScript – NodeJS
[ 600 ]
You may get EADDRINUSE. This just means that the port is already being used by
another process.
Here is an example that denes all the parameters:
server.listen(5000, '127.0.0.1', 500, function () {
console.log('Listening on port 5000');
});
close
This closes the current server:
server.close([callback])
Description
This will stop the server from creating new connections. This is important to
remember because it will not close the current connections.
The callback is called when there are no more connections.
address
This gets the port and address:
server.address()
Description
This will give you the port and IP address where this server is listening.
getConnections
This gets the number of connections:
server.getConnections(callback)
Return Value
This returns an integer.
Description
This does not give any information on each connection. It only returns the number.
This is a great way to see whether there are any connections. The callback function
will need to be in the form of function(err, connections).

Chapter 12
[ 601 ]
connect
This easily creates a connection to the specied address:
net.connect(port, [host], [connectListener])
net.createConnection(port, [host], [connectListener])
Return value
This returns a net.Socket object.
Description
This function does not do anything that you cannot do with a socket. It is a
convenient function that returns a net.Socket object.
For the parameters, a port is required, the host will default to localhost, and
connectListener will be added to the connect event of the newly formed
net.Socket object.
Here is an example that will connect to a server we just created and send data
every second:
var net = require('net');
var server = net.createServer();
server.on('listening', function () {
console.log('I am listening');
});
server.on('connection', function (socket) {
socket.on('data', function (d) {
console.log('from client: ' + d);
});
});
server.listen(5000);
var client = net.connect({ port: 5000, host: 'localhost' }, function
() {
setInterval(function () {
client.write('hey!');
}, 1000);
});

Server-side JavaScript – NodeJS
[ 602 ]
net.Socket
This section will be similar to the net.Server section. The net.Socket parameter is
the object that is returned anytime a connection is made. It can also be used to create
a new connection.
It is a readable and writable stream. This is the only way to send and receive data
from a net.Socket.
Here is the list of events along with details of when they re:
• connect: On connection.
• data: When data is received.
• end: When the socket has ended.
• timeout: When the socket has timed out from inactivity. The socket is still
open at this point.
• drain: When all the data in the write buffer has been sent.
• Error: On error.
• close: When the socket closes.
As net.Socket is a readable stream, there is no read function. You will have to
listen for the data event to the get the data.
Here is an example of using a socket to connect to a local server:
var server = net.createServer();
server.on('listening', function () {
console.log('I am listening');
});
server.on('connection', function (socket) {
socket.on('data', function (d) {
console.log('from client: ' + d);
});
});
server.listen(5000);
var client = new net.Socket();
client.on('connect', function () {
setInterval(function () {
client.write('Hey!');
}, 1000);
});
client.connect(5000, 'localhost');

Chapter 12
[ 603 ]
connect
This creates a connection:
socket.connect(port, [host], [listener])
Description
This is the function that actually creates a connection. Much like net.connection,
the port is required, the host will default to localhost, and the listener just maps the
function to the connection event.
Here is an example that connects locally and writes to the connection:
var client = new net.Socket();
client.on('connect', function () {
setInterval(function () {
client.write('Hey!');
}, 1000);
});
client.connect(5000, 'localhost');
write
This sends data out on the socket:
socket.write(data, [encoding], [callback])
Description
The socket is buffered because it is very easy to queue up more data than can be sent
over the network. This is done automatically by Node.js, but you should be aware of
this, as buffering will use up memory as it is holding the data to be sent.
The encoding parameter will default to UTF8, but any of the encodings we have
discussed can be used. The callback will be called once the data has been written
over the socket.
Here is an example with all of the parameters dened:
var client = new net.Socket();
client.on('connect', function () {
client.write('This is the data', 'utf8', function(){
console.log('Data has been sent');
});
});
client.connect(5000, 'localhost');

Server-side JavaScript – NodeJS
[ 604 ]
end
This starts the closing process of the socket:
socket.end([data], [encoding])
Description
This is effectively closing the socket. We cannot say for sure, but the reason could be
that the server could send some data back, although the socket will close shortly.
You can send some data before the socket closes, and this is what the optional
parameters are for:
Here is an example that closes a socket.
var client = new net.Socket();
client.on('connect', function () {
client.end('I am closing', 'utf8');
});
client.connect(5000, 'localhost');
The HTTP module
We will cover the HTTP server module. Technically, you could write your HTTP
server using the net module, but you do not have to.
Some of these functions are very similar to the net module functions. This should
make sense as HTTP, at its core, is a network server.
All of these functions and objects are also used with the HTTPS module. The only
difference is that for the options of createServer and https.request, you can pass
certicates.
All of the following examples assume that the module has been loaded:
var http = require('http');
createServer
This creates an HTTP server:
http.createServer([requestListener])

Chapter 12
[ 605 ]
Return Value
This returns an http.Server object.
Description
Much like net.createServer, this is required to serve anything. The
requestListener parameter is attached to the request event.
Here is a simple example that just logs to the console any time a request is made:
var server = http.createServer(function (req, res) {
console.log('Someone made a request!');
res.end();
});
server.listen(8080);
http.Server
This is the server object that is returned from http.createServer. This is the object
that will respond to all requests.
We will start with the functions and look at each event separately as the events are
important to handling requests.
listen
This tells the server to listen on the supplied port, path, or le descriptor:
server.listen(port, [host], [callback])
server.listen(path, [callback])
server.listen(fd, [callback])
Description
Although this function has three different ways to execute, you will most likely only
use the network listener. In fact, the other two listeners are difcult, if not impossible,
to even execute on Windows. Let's cover the last two quickly.
The path listener will use a local socket server, and the le descriptor will need a
handle. If this sounds foreign, it means you will use the other method.
The network listener requires that the port be used. The host will default to localhost
if nothing is passed in. In all the functions, a callback will be attached to the listening
event.

Server-side JavaScript – NodeJS
[ 606 ]
Here is an example of listening on a network port with all the parameters dened:
var server = http.createServer();
server.listen(8080, 'localhost', function(){
console.log('The server is listening');
});
close
This closes the server:
server.close([callback])
Description
This will stop the server from listening. The callback will be attached to the close
event.
Here is a simple example:
var server = http.createServer();
server.listen(8080, 'localhost', function () {
server.close(function () {
console.log('Server has closed');
});
});
Events
The http.Server parameter is an EventEmitter object. The events are also where
the majority of work will be done.
request
This event res when a request comes in:
server.on('request', function (req, res) { });
Description
If you only listen to one event, this is the event to listen for. It has the request and
the server's response. The req attribute will be http.IncomingMessage, and the
res attribute will be http.ServerResponse. We will look at both of these objects in
this section. In addition to this, req implements a readable stream interface, and res
implements a writable stream interface.

Chapter 12
[ 607 ]
Here is an example of listening for a request:
server.on('request', function (req, res) {
res.end();
console.log('A request was received');
});
close
This event res when the server closes:
server.on('close', function () { });
upgrade
This event res when the client sends an HTTP upgrade:
server.on('upgrade', function (req, socket, buffer) { });
Description
An upgrade request asks the web server to change protocols. If you are
implementing another protocol other than HTTP you should listen and deal with this
event. A great example of this is a WebSocket upgrade.
The req attribute is the request, the socket will be a net.Socket, and buffer is a
Buffer.
IncomingMessage
This is the request object when listening for the request event or from
http.clientRequest. This is a readable stream.
headers
The HTTP headers from the request:
message.headers
Description
Sometimes, you will want to make decisions based on the information in the headers.
Here is an example using headers to check for basic authentication:
server.on('request', function (req, res) {
if (req.headers.authorization !== undefined)
//do a check here
res.end();
});

Server-side JavaScript – NodeJS
[ 608 ]
method
This gets the HTTP method of the request:
message.method
Description
This returns the method as a string in uppercase. Here is an example for GET:
server.on('request', function (req, res) {
if (req.method === 'GET')
res.write(req.method);
res.end();
});
url
This is the URL that was requested:
message.url
Description
This will be a string of the URL, including any query parameters. You can parse
the string yourself or use Node's query string module and use the parse function.
Here is a simple example that will serve any les in the current directory. Remember
that this is only an example and does no error checking:
server.on('request', function (req, res) {
var file = fs.createReadStream('.' + req.url);
file.pipe(res);
});
data
This is the data event from the readable stream interface.
Description
If you have an incoming message, most likely, you would want to know what is in
the message. As it is a readable stream, we will need to listen for the data event to
get all the data out. When the data is exhausted, the end event will re.

Chapter 12
[ 609 ]
Here is an example that creates listeners for the data and end event:
var data = '';
response.on('data', function (chunk) {
console.log(chunk);
data += chunk;
});
response.on('end', function () {
console.log(data);
});
ServerResponse
This is the response that the HTTP server creates for the event request. Each request
needs a response, and this is it. This implements a writable interface.
writeHead
This will write the HTTP response header:
response.WriteHead(statusCode, [headers])
Description
This writes the header for the response. This needs to be called before
response.write. If it is not, then the server will send it for you with the
headers you have set.
statusCode is the HTTP status code of the response. A header is an object
with the name of the header as a property and the value as the value.
Here is an example that writes the header:
server.on('request', function (req, res) {
res.writeHead(200, { 'Content-Type': 'text/html' });
res.end();
});
statusCode
This sets the status code of the response:
response.statusCode

Server-side JavaScript – NodeJS
[ 610 ]
Description
This is used instead of response.writeHead. If this is called after writeHead has
been executed, then it will not change the response header. It must be called instead
of it.
Here is an example that uses statusCode:
server.on('request', function (req, res) {
res.statusCode = 404;
res.end();
});
setHeader
This writes a specic header:
response.setHeader(name, value)
Description
In the same way that statusCode must be called instead of writeHead, setHeader
must be called instead of writeHead. This can be called multiple times to set multiple
headers.
Here is an example of using statusCode and setHeader together:
server.on('request', function (req, res) {
res.statusCode = 200;
res.setHeader('Content-Type', 'text/html');
res.setHeader('Custom-Header', 'Custom-Value');
res.end();
});
write
This is the function that writes the response body:
response.write(chunk, [encoding])

Chapter 12
[ 611 ]
Description
The response.write parameter is a writable stream, so this interface can be used. A
chunk can be a buffer or string. The encoding is optional as it will default to UTF8.
Here is an example that writes a simple HTML page as the response:
server.on('request', function (req, res) {
res.statusCode = 200;
res.setHeader('Content-Type', 'text/html');
res.write('<html><body><h1>Hello!</h1></body></html>');
res.end();
});
end
This ends the response:
response.end([data], [encoding])
Description
The response parameter is a writable stream, so we must end the stream when we
are done writing. Data is any optional data that needs to be written, and encoding
will default to UTF8. All of the examples for response have used res.end. If you do
not end the response, the browser will wait for a response from the server.
http.request
This makes a request using HTTP:
http.request(options, [callback])
Return value
This returns an http.ClientRequest object.
Description
Node.js allows you to consume HTTP as well as serve it. The options object has
many properties that can be set. Here is a list of them:
• host
• hostname
• port
• localAddress

Server-side JavaScript – NodeJS
[ 612 ]
• socketPath
• method
• path
• headers
• auth
• agent
Every option is not required for each request. Most of the time, only hostname, port,
path, and method are needed to make a request. The options parameter can also be a
URL as a string.
The callback will be attached to the response event. The request object is a writable
stream so that data can be sent to the server. Here is an example that makes a
request to Packt Publishing:
var request = http.request({
host: 'www.packtpub.com',
port: 80,
path: '/',
method: 'GET'
}, function (res) {
console.log(res);
});
request.end();
http.get
This is the convenience method for a GET request:
http.get(options, [callback])
Return value
This returns a http.ClientRequest object.
Description
This works in a manner similar to http.request, except it automatically sends an
empty request and calls the end function. If you are only making a GET request, this
can save some boilerplate code.

Chapter 12
[ 613 ]
Here is an example that requests Packt Publishing:
http.get('http://www.packtpub.com', function (res) {
console.log(res);
});
http.clientRequest
This is the object that is returned from http.request.
write
This writes to the server in the request:
request.write(data, [encoding])
Description
The http.clientRequest attribute is a writable stream. It is writable as you may
need to send data to the remote server, for example, when making a POST request.
This works like all the other writable streams, so data can be a buffer or string, and
encoding will default to UTF8.
end
This ends the request:
request.end([data], [encoding])
Description
When you are writing to a stream, you must end the stream with this function.
Without doing this, the connection will stay and/or timeout. Data is optional and
can be a buffer or string, while encoding will default to UTF8.
response
This is the response event. It lets you know that the remote server has responded:
request.on('response', function(response){})

Server-side JavaScript – NodeJS
[ 614 ]
Description
This event res when the remote server responds. The response object in the callback
will be http.incomingMessage.
If no response handler is added, the server response will be discarded. If there is a
response handler, then Node.js will start to buffer the response to memory. If you do
not read it back out, you can cause the server to crash.
Here is an example listener that reads the data from the response:
var request = http.request({host: 'www.google.com', path: '/', port:
80, method: 'GET'});
request.on('response', function (response) {
var data = '';
response.on('data', function (chunk) {
console.log(chunk);
data += chunk;
});
response.on('end', function () {
console.log(data);
});
});

[ 615 ]
Bootstrap – The Stylish CSS
Frontend Framework
Bootstrap is a frontend framework and open source tool for developing websites and
applications using HTML and CSS.
Twitter Blueprint was the initial name given to Bootstrap. Mark Otto and Jacob
Thornton developed Bootstrap and used Twitter as the framework for consistency.
According to Twitter developer Mark Otto:
"A super small group of developers and I got together to design and build a new
internal tool and saw an opportunity to do something more. Through that process,
we saw ourselves build something much more substantial than another internal
tool. Months later, we ended up with an early version of Bootstrap as a way to
document and share common design patterns and assets within the company."
The rst ofcial release of Bootstrap was August 19, 2011. There are currently three
versions of Bootstrap. However, Bootstrap 4 has been announced
but its nal version is yet to be released.
Introduction to Bootstrap foundations
Bootstrap is compatible with the most recent versions of many web browsers
including Firefox, Opera, Internet Explorer, Google Chrome, and Safari browsers.

Bootstrap – The Stylish CSS Frontend Framework
[ 616 ]
The HTML5 doctype
To get started with Bootstrap, the following piece of code for HTML5 doctype must
be included in every bootstrap project:
<!DOCTYPE html>
<html lang="en">
...
</html>
Mobile rst
Bootstrap is very mobile friendly. Mobile First styles are all included in a library
and not scattered among various les. For accurate rendering and touch zooming,
add the viewport meta tag to <head>:
<meta name="viewport" content="width=device-width, initial-
scale=1.0">
Zooming can be disabled by setting the property user-scalable to no in the viewport
meta tag, as shown here:
<meta name="viewport" content="width=device-width, initial-
scale=1.0, maximum-scale=1.0, user-scalable=no">
Responsive images
Images can be made to respond to various screen sizes using a simple class, as follows:
<img src="..." class="img-responsive" alt="Responsive image">
Containers
In bootstrap, all the web page content and the grid system is wrapped inside a main
container. These containers are not nestable.
There are two types of containers, they are as follows:
• Responsive fixed width container, for example:
<div class="container"></div>
• Responsive full width container, for example:
<div class="container-fluid"></div>

Chapter 13
[ 617 ]
Getting started
It's now time to get started with your rst Bootstrap project or website. You can get
Bootstrap from various sources. For a kick start, here are a few sources for you to get
your hands on Bootstrap.
The Github project
Bootstrap is an open source project from the creators of Twitter. You can download it
from their GitHub repository or any other command-line interface you prefer.
Downloading Bootstrap
You can easily download Bootstrap from the following link: https://github.com/
twbs/bootstrap/releases/download/v3.3.5/bootstrap-3.3.5-dist.zip
Installing with bower
You can install Bootstrap with bower using the following command:
$ bower install bootstrap
Installing with npm
You can install Bootstrap with npm using the following command:
$ npm install bootstrap
Installing with composer
You can install Bootstrap with composer using the following command:
$ composer require twbs/bootstrap
Layouts
Layouts help you to dene a standard structure or the skeleton for your websites.
There are three types of layouts:
• Fixed layouts
• Fluid layouts
• Responsive layouts

Bootstrap – The Stylish CSS Frontend Framework
[ 618 ]
Fixed layouts do not change with screen size and all styles are static. Fluid layouts make
the div elements ow to the bottom if they cannot be accommodated across the width
of the viewing screen. Responsive layouts keep a very close eye on and respond to the
adjusting screen sizes. These options can be used as described in the following sections.
Fixed layouts
A xed layout of a website has a wrapper (which wraps or contains all columns) of
a constant width, that is, which cannot be changed no matter how small or how big
the screen resolution is. The wrapper or the container cannot be moved and is set to
a xed position. The reason why many web designers prefer xed layouts is due to
ease in usage and customization.
Description
In xed layout, column widths are xed and cannot be changed. The syntax for
declaring xed layouts for your website is as follows:
<body>
<div class="container"> <!--This line is for declaring fixed
layouts-->
</div>
</body>
Everything inside the container class in the preceding code will be xed for every
device in which this code is executed.
Fluid layouts
A uid layout acts just like a liquid and adjusts itself according to the screen resolution
of the user at runtime. The components of such layouts mainly contain percentage
widths and thus adjust to the user's screen effectively. Such layouts are more user
friendly and make the website look better. It also improves accessibility and interface.
Description
Fluid layouts adjust themselves according to the screen resolution they receive
using predened percentage widths. The syntax for declaring uid layouts for your
website is shown here:
<div class="container-fluid"> <!--declaration of a fluid
container-->
<div class="row-fluid">
<div class="span3"> <!--spans 3 columns -->
<!--Sidebar content-->
</div>
Chapter 13
[ 619 ]
<div class="span5"> <!--spans 5 columns -->
<!--Body content-->
</div>
</div>
</div>
Bootstrap's grid system allows up to 12 columns across the page.
In the preceding example, span3 combines three columns and span5 combines ve
columns, and together they complete the whole page adjusting the layout according
to the screen resolution.
Responsive layouts
Responsive layouts provide a design for a website depending on the number of
conditions, which include ratios, widths, display types, and so on. Such layouts
automatically adjust and adapt to any screen size, thus providing better accessibility
and optimal viewing experience to the user.
Description
Responsive layouts are a growing trend among web designers as they offer less
hassles in customization and implementation.
The following example code shows how you can include responsive features using
meta tags along with a Bootstrap stylesheet:
<meta name="viewport" content="width=device-width, initial-
scale=1.0">
<link href="assets/css/bootstrap-responsive.css" rel="stylesheet">
Supported devices
To provide effective layouts on a number of different devices, Bootstrap can support
many media queries in one le. The following table shows the range of devices that
are supported:
Label Layout width Column width Gutter width
Large display 1200px and up 70px 30px
Default 980px and up 60px 20px
Portrait tablets 768px and up 42px 20px
Phones to tablets 767px and lower Fluid columns, no fixed width available
Phones 480px and lower Fluid columns, no fixed width available
Referenced from: http://getbootstrap.com/css/#grid-options
Bootstrap – The Stylish CSS Frontend Framework
[ 620 ]
The grid system
Use rows and columns to create a grid of a specic size and add data to it. Here are a
few guidelines to keep in mind:
• Place rows in a .container(fixed-width) or .container-fluid(full-
width) methods for accurate alignment.
• Horizontal groups of columns can be created using rows. Insert data in
columns, and only columns may be immediate children of rows.
Padding is used by columns for creating gutters. That cushioning is counterbalanced
in lines for the rst and the last section by means of negative edge on .lines.
Initiate columns by specifying the number columns. Not more than 12 columns can
be initiated in a row, all extra columns will jump on a new line. Grid classes apply
to devices with screen widths greater than or equal to the breakpoint sizes, and
overrides grid classes targeted at smaller devices.
The grid options cheat sheet
The following table shows some effective ways in which the Bootstrap grid system
can be used to work for multiple devices:
Large Device
(>=1200 px)s
Medium
Devices (>=992
px)
Small Devices
such as Tablets
(>=768px)
Extra small
devices such
as Phones
(<768px)
Grid behavior Collapsed to start, horizontal above breakpoints Horizontal at
all times
Max container
width
1170px 970px 750px None (auto)
Class prefix .col-lg- .col-md- .col-sm- .col-xs-
# of columns 12
Max column
width
95px 78px 60px Auto
Gutter width 350px (15px on each side of a column)
Nestable Yes
Offsets Yes
Column
ordering
Yes
source: www.getbootstrap.com/css/

Chapter 13
[ 621 ]
Media queries
Media queries help the website to adjust the styles according to the screen size. We
can use the media queries in our LESS les in order to create the key breakpoints in
our grid system. Observing the cheat sheet, we can write media queries. Let's take a
look at the following code snippet:
/* Large Device (>=1200 px) */
@media (min-width: @screen-lg-min) { ... }
/*Medium Devices (>=992 px)*/
@media (min-width: @screen-md-min) { ... }
/* Small Devices such as Tablets (>=768px) */
@media (min-width: @screen-sm-min) { ... }
/* Extra small devices such as Phones (<768px)*/
/* No media query as this is the default*/
We occasionally expand on these media queries to include a max width to limit CSS
to a narrower set of devices:
/* Large Device (>=1200 px) */
@media (min-width: @screen-lg-min) { ... }
/*Medium Devices (>=992 px)*/
@media (min-width: @screen-md-min) and (max-width: @screen-md-max)
{ ... }
/* Small Devices such as Tablets (>=768px) */
@media (min-width: @screen-sm-min) and (max-width: @screen-sm-max)
{ ... }
/* Extra small devices such as Phones (<768px)*/
@media (max-width: @screen-xs-max) { ... }
Responsive column resets
We need these types of columns because sometimes in a grid, not all the columns
end with the same alignment due to a varying amount of data in it. However,
responsive columns will ensure that everything is perfectly aligned. Let's take a look
at the following code snippet:
<div class="row">
<div class="col-xs-6 col-sm-3" style="background-color:pink">.
col-xs-6 .col-sm-3</div>

Bootstrap – The Stylish CSS Frontend Framework
[ 622 ]
<div class="col-xs-6 col-sm-3" style="background-
color:brown;">.col-xs-6 .col-sm-3</div></div>
<!-- Add the extra clearfix for only the required viewport -->
<div class="clearfix visible-xs-block"></div>
<div class="col-xs-6 col-sm-3" style="background-
color:orange;>.col-xs-6 .col-sm-3</div>
<div class="col-xs-6 col-sm-3" style="background-
color:black;>.col-xs-6 .col-sm-3</div>
</div>
Offsetting columns
Sometimes, we need to place a column or start a column with some free space offset.
So, we set an offset from where the column needs to begin:
<div class="row">
<div class="col-md-4">.col-md-4</div>
<div class="col-md-4 col-md-offset-4">.col-md-4 .col-md-offset-
4</div>
</div>
<div class="row">
<div class="col-md-3 col-md-offset-3">.col-md-3 .col-md-offset-
3</div>
<div class="col-md-3 col-md-offset-3">.col-md-3 .col-md-offset-
3</div>
</div>
<div class="row">
<div class="col-md-6 col-md-offset-3">.col-md-6 .col-md-offset-
3</div>
</div>
Nesting columns
As the name suggests, nesting columns are an embedment of a column within a
column. Let's take a look at the following code snippet:
<div class="row">
<div class="col-md-9">
Level 1: .col-md-9
<div class="row">
<div class="col-md-6">
Level 2: .col-md-6

Chapter 13
[ 623 ]
</div>
<div class="col-md-6">
Level 2: .col-md-6
</div>
</div>
</div>
</div>
Column ordering
Column ordering can also be changed by moving columns to right or left. The
following code shows how columns can be moved:
<div class="row">
<div class="col-md-9 col-md-push-3">.col-md-9 .col-md-push-
3</div>
<div class="col-md-3 col-md-pull-9">.col-md-3 .col-md-pull-
9</div>
</div>
LESS variables and mixins
LESS mixins and variables are used to quickly instantiate a layout using specic
values given through variables and mixins.
Mixins
Mixins are mainly used together with grid variables to provide CSS styles for
individual elements.
Description
Mixins, as the name suggests, are a way of including or mixing a group of properties
from one rule set into another rule set. The following example shows the make-row()
mixin:
make-row (@gutter: grid-gutter-width) {
margin-left : (@gutter / -2);
margin-right : (@gutter/ -2);
&: extend( .clearfix all);
}
The make-row() mixin generates styles for the wrapper element, which contains all
the columns. It uses the value from the @gutter parameter to calculate the left and
right margins for a row.

Bootstrap – The Stylish CSS Frontend Framework
[ 624 ]
Variables
The media query point from where columns start oating, total number of columns
and gutter width are determined by variables. This information is provided by
variables in order to generate predened grid classes and for custom mixins as well.
Description
Variables are used along with mixins to generate styles for individual elements.
The following piece of code predenes some variables that are used in mixins as
default values:
//Number of columns in the grid.
@grid-columns: 12;
//padding between columns. Divided in half for left and right.
@grid-gutter-width: 30px;
//point at which the navbar collapses.
@grid-float-breakpoint: 768px;
Typography
Typography is the art and technique of arranging type elements to make written
language legible, readable, and appealing when displayed with the use of headings,
bold fonts, italic fonts, strong fonts, lists, and so on.
Headings
In Bootstrap, all headings from h1 to h6 are available from HTML. Headings are
mainly used to highlight the main topics under discussion. The heading text should
be included between proper HTML heading tags, for example, <h1> Here is the
heading text </h1>. The heading size decreases as the heading number increases,
providing the facility to highlight the main topics and subtopics. This technique
helps in managing a proper design for the website.
Here are a few examples of how headings can be used:
<h1> This is a Bootstrap heading H1</h1>
<h2> This is a Bootstrap heading H2</h2>
<h3> This is a Bootstrap heading H3</h3>
<h4> This is a Bootstrap heading H4</h4>
<h5> This is a Bootstrap heading H5</h5>
<h6> This is a Bootstrap heading H6</h6>

Chapter 13
[ 625 ]
Body
All the HTML tags related to typography and design must be included within
the body tags, for example, text, hyperlinks, images, tables, lists, and so on. The
following code shows a paragraph tag, which shows the text in a paragraph:
<p>...</p>
Lead body
The lead class helps make the text inside the tags stand out. The method of its
declaration is as stated here:
<p class="lead">...</p>
Emphasis
Emphasis basically afliates the size and font of the text to its importance in a
document. For example, larger text would have more importance than smaller text or
text in italics might contain a reference from another resource.
Small text
The text within the small tags is mainly reduced to 85% of the original size. This
technique is mainly used to lessen the importance of the text:
<small>...</small>
Bold text
The text within the strong tags is made more visible by making it larger and bolder.
This helps in increasing the emphasis of the text in the document:
<strong>...</strong>
Italics text
The text within the em tags is italicized. This technique is mainly used to denote
references, among many other uses:
<em>...</em>

Bootstrap – The Stylish CSS Frontend Framework
[ 626 ]
Alignment
Alignment is a basic technique used to align a paragraph to the left, right, or center
of the screen, regardless of the screen resolution:
<p class="text-left">Text here will be left-aligned</p>
<p class="text-center"> Text here will be center-aligned </p>
<p class="text-right"> Text here will be right-aligned </p>
Abbreviations
The customized <abbr> element of HTML can be used with the following syntax as
shown in the following code snippet.
Basic
The <abbr> tag shows a smaller version of text and is expanded when the mouse is
hovered over it:
<abbr title="attribute">Here is an example of an attribute
tag</abbr>
The output of this code will show the attr abbreviation.
Initialism
Initialism has the same functionality as the basic abbreviation but with smaller text:
<abbr title="HyperText Markup Language" class="initialism">HTML
using Initialism</abbr>
Addresses
Address tags are used to accommodate all text related to an address. The following
example shows the format:
<address> …
<strong>Packt PublishingPublishing.</strong><br>
Berwick House, <br>
35 Livery St, <br>
Birmingham B3 2PB,<br>
United Kingdom <br>
<abbr title="Phone">P:</abbr> +44 121 265 6484
</address>
Chapter 13
[ 627 ]
Blockquotes
Blockquotes are mainly used for quoting text from another source. They are used
with paragraph tags for quoting a paragraph:
<blockquotes> … </blockquotes>
Tables
Tables are used to clearly display the contents in an organized form so that data is
easily accessible and readable.
# Category Item ItemID
1 Apparel Blue Shirt App_BlueShirt
2 Apparel White Coat App_WhiteCoat
3 Accessories Leather Belt Acc_LeatherBelt
Basic
In the preceding table, is the basic version of a Bootstrap table with light padding
and horizontal dividers only. The syntax is as follows:
<table class="table"> ... </table>
Striped rows
The structure of striped rows is the same as that of the basic table, its style is similar
to the strips of zebra crossing, that is, lighter and darker alternative rows:
<table class="table table-striped"> ... </table>
Bordered table
This class converts a table into equal divisions with visible boundaries. Each division
contains a single value:
<table class="table table-bordered"> ... </table>
Hover rows
This class adds the feature that highlights the row on which the mouse hovers:
<table class="table table-hover"> ... </table>

Bootstrap – The Stylish CSS Frontend Framework
[ 628 ]
Condensed rows
A more squeezed and smaller version of a table can be achieved by decreasing the
padding between rows:
<table class="table table-condensed"> ... </table>
Contextual classes
Contextual classes when applied to table rows or cells, give them predened colors.
Here are a few available classes:
• .active: This class applies a hover color to the table row
• .success: This class applies green color to the table row
• .info: This class applies blue color to the table row
• .warning: This class applies yellow color to the table row
• .danger: This class applies red color to the table row
We can set entire rows or individual cells to display a certain color to denote a
particular message. Here is an example of how this can be achieved:
<!-- Contextual classes when applied on rows -->
<tr class="active">...</tr>
<tr class="success">...</tr>
<tr class="warning">...</tr>
<tr class="danger">...</tr>
<!-- Contextual classes when applied on cells (`td` or `th`) -->
<tr> <td class="active">...</td>
<td class="success">...</td>
<td class="warning">...</td>
<td class="danger">...</td> </tr>
Responsive tables
Responsive tables adjust themselves to scroll horizontally on small devices.
The difference is only visible on small devices:
<div class="table-responsive">
<table class="table"> ... </table>
</div>

Chapter 13
[ 629 ]
Lists
Lists are used to group data in a certain order, or it can be ungrouped to display data
in a sequential form.
Lists can be of the following types:
• Unordered
• Ordered
• Unstyled
• Inline
• Description
Unordered lists
An unordered list is a collection of items in which the order does not matter. Here is
the syntax of an unordered list:
<ul>
<li>...</li>
<li>...</li>
</ul>
Ordered lists
An ordered list is a collection of items where the order does matter. Here is the
syntax of an ordered list:
<ol>
<li>...</li>
<li>...</li>
</ol>
Unstyled lists
Unstyled lists can be ordered or unordered with the removal of the left margin and
the default list style. Here is the syntax of an unstyled list:
<ul class="list-unstyled">
<li>...</li>
<li>...</li>
</ul>

Bootstrap – The Stylish CSS Frontend Framework
[ 630 ]
Inline lists
Inline lists arrange all items of a list into a single line or row. Here is the syntax of an
inline list:
<ul class="list-inline">
<li>...</li>
<li>...</li>
</ul>
Description lists
A description list contains the list items along with their descriptions. Here is the
syntax of a description list:
<dl>
<dt>...</dt>
<dd>...</dd>
</dl>
Horizontal description
The horizontal description class does the same thing as the description list class with
the only difference being the placement of the corresponding description of the list
item in the same line. Here is the syntax of an horizontal description list:
<dl class="dl-horizontal">
<dt>...</dt>
<dd>...</dd>
</dl>
Forms in Bootstrap
Form elements are various elements used in Bootstrap to make navigation and GUI
more appealing and satisfying. Use of various text boxes, buttons, and so on enable
better output.
There are three types of layout for forms:
• Vertical forms
• Inline forms
• Horizontal forms

Chapter 13
[ 631 ]
Vertical forms
Vertical forms are the default layout of bootstrap forms. The attribute used here is
role and the value of it is set to form to provide better accessibility and automatic
and default styling for the form. The syntax for this is as follows:
<form role="form"> … </form>
Inline forms
Many a time, we also come across forms in which the elements of the forms are
present inline and in a single line and left aligned. Inline forms are required to have
the form-inline class for the <form> element. The syntax for this as follows:
<form class="form-inline" role="form"> … </form>
Horizontal forms
A horizontal form is the most nifty of this set and is broadly used on web pages to
collect data from website users. The appearance and performance of this form is
something that sets it apart from the other two types of forms. This form aligns labels
and groups of form controls in a horizontal layout.
Horizontal forms are required to have the form-horizontal class for the <form>
element. Additionally, labels are to have the control-label class for the <label>
element. The syntax is as follows:
<form class="form-horizontal" role="form"> … </form>
Inputs for forms in Bootstrap
All different input types supported by HTML are available to use even in Bootstrap,
making it simple for someone from an HTML background to grasp the concepts.
Inputs such as textarea, password, radio button, checkbox and many more are
supported in Bootstrap.
The syntax for a simple text box as a means of input is as follows:
<input type="text" class="form-control" placeholder="Text input"
id ="txtName">

Bootstrap – The Stylish CSS Frontend Framework
[ 632 ]
If we want the text altered to not show the actual letters being typed in, then we can
use the input type as password. The syntax for using the input type as password is
as follows:
<inputtype="password"class="form-control" placeholder="Text
input"id="txtPassword">
Textarea
The textarea is an area that holds text entered by the user; it can hold small words to
large paragraphs. The syntax for textarea is as follows:
<textarea class="form-control" rows="44"></textarea>
The preceding line tells the control that the textarea must span four rows.
Help text
The help block provides block-level help text for form controls:
<span class="help-block"> </span>
Checkbox
The checkbox control allocates a box to a certain group of related options that can
be selected by clicking on the box. This feature is used when the user is required to
select only from the given options. The syntax for adding a checkbox is as follows:
<div class="checkbox"> </div>
Here is the syntax to add a checkbox that is disabled:
<div class="checkbox disabled"> </div>
Select list
The select class control triggers a dropdown menu that contains a group of options
from which only one can be selected at a time. Its syntax is as follows:
<select class="form-control"> … </form>

Chapter 13
[ 633 ]
Radio button
The radio class control does the same as the checkbox except that the user can
choose only one option at a time. Its syntax is as follows:
<div class="radio"> … </div>
Here is the syntax to add a radio class that is disabled:
<div class="radio disabled"> </div>
Static control
The static class control allows the user to insert text in a horizontal form next to
its corresponding label. Text can be added next to a form label in a horizontal form
using the "form-control-static" class within paragraph tags. The form-static-
control class must be used.
The following example inserts the static text—Web Developer's Reference Guide:
<pclass="form-control-static">Web Developer's Reference Guide<p>
Input focus
The input class lets an input eld automatically focus when the page loads. Its
syntax is as follows:
<input class="form-control" id="focusedInput" type="text"
value="...">
Disabled input
The disabled attribute disables input in a particular text box, it cannot be clicked
on or used. To use this, the disabled attribute can be added to a <fieldset> tag to
disable all of its controls.
Validation states
These classes give meaning to input controls when returning a message from the
server such as elds that were left empty or when an incorrect combination is entered.
Validation states can be used by adding .has-success, .has-warning, or .has-
error in a class. This is shown in the following code:
<div class="form-group has-success"> … </div>
<div class="form-group has-warning"> … </div>
<div class="form-group has-error"> … </div>
Bootstrap – The Stylish CSS Frontend Framework
[ 634 ]
Control sizing
Users can easily set the height of various columns as per their requirement.
We can easily set heights and widths using classes such as .input-lg and .col-lg-*:
<input class="form-control input-lg" type="text"
placeholder=".input-lg">
<div class="col-xs-2"> … </div>
Images
We can add classes to an <img> element for image manipulation using built-in CSS
styles:
<img src="..." alt="..." class="img-rounded">
<img src="..." alt="..." class="img-circle">
<img src="..." alt="..." class="img-thumbnail">
The preceding code will create the following images:
Note that Internet Explorer 8 lacks support for rounded corners in images.
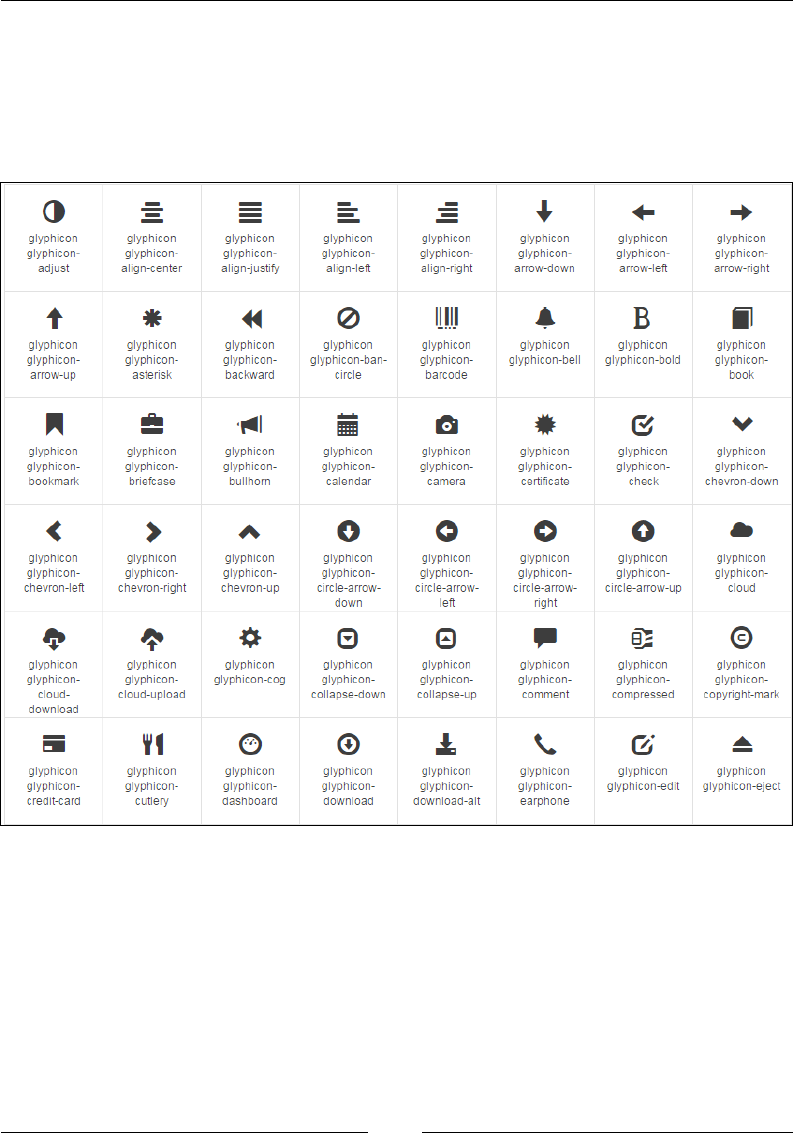
Chapter 13
[ 635 ]
Icons (Glyphicons)
Glyphicons are small icons used to help the user understand the meaning of a
function. For example, an e-mail will have an envelope icon, search would have
a magnifying glass icon, and so on. Some Glyphicons are shown in the following
diagram:
More than 250 Glyphicons in font format are present in the Glyphicon Halings set.
Here is how to add Glyphicons in Bootstrap:
<span class="glyphicon glyphicon-search"></span>

Bootstrap – The Stylish CSS Frontend Framework
[ 636 ]
All the available Glyphicons can be found at http://getbootstrap.
com/components/.
Navigation elements
Bootstrap supports multiple types of navigation element and can be used as
described in the following code:
Tabs
The tab class creates small tabs on the navigation bar, and each tab provides a link to
different pages:
<ul class="nav nav-tabs"> … </ul>
The tabs basically are links to other pages or websites; thus, the tab class should be
declared within the link tags, as shown in the preceding code.
Pills
The pill class has the same functionality as the tab class, with the only difference
being the styling. The tabs now appear like pills:
<ul class="nav nav-pills"> … </ul>
Justied
Adding an additional class of nav-justified would allow tabs or pills to
automatically adjust themselves according to the screen resolution. The tabs or pills
are given equal widths:
<ul class="nav nav-tabs nav-justified"> … </ul>
Disabled links
Adding a disabled class to a tab or pill in a navigation bar would remove the hover
state, disabling the access to the link:
<ul class="nav nav-pills">
...
<li class="disabled"><a href="#">Disabled link</a></li>
...
</ul>

Chapter 13
[ 637 ]
Remember to place the actual link in place of #.
The navigation bar
Navigation in Bootstrap helps in navigating through the website. It allows quick
access to the links a user visits often.
Default
The navbar class is used to create a simple navigation bar by including .navbar and
.navbar-default in the navigation tab:
<nav class="navbar navbar-default" role="navigation">
To make a scalable, responsive menu bar that collapses to a dropdown when
displaying on mobile devices, use the following class to wrap the bar:
<div class="navbar-header">
Forms
You can also put forms within a navigation bar by adding the .navbar-form class:
<form class="navbar-form navbar-left" role="search">
Buttons
Similar to the navbar class, .navbar-btn adds a button to the bar that can perform
many useful functions:
<button type="button" class="btn btn-default navbar-btn"> …
</button>
Text
By adding the .navbar-text class, we can also add text to the navigation bar:
<p class="navbar-text"> … </p>

Bootstrap – The Stylish CSS Frontend Framework
[ 638 ]
Non-nav links
The navbar-link class allows us to add standard links that are not in the navbar
navigation component:
<p class="navbar-text navbar-right">
<a href="#" class="navbar-link"></a>
</p>
Fixed to top
Adding the navbar-fixed-top class within the <nav> tabs allows navbar to
dynamically position itself at the top of the page. Here is its syntax:
<nav class="navbar navbar-default navbar-fixed-top"
role="navigation">
Fixed to bottom
The navbar-fixed-bottom class allows the navigation bar to sit right at the bottom
of the page. Here is its syntax:
<nav class="navbar navbar-default navbar-fixed-bottom"
role="navigation">
Static top
The navbar-static-top class adds a new feature to the navigation bar that allows
the element to scroll along with the page. Here is its syntax:
<nav class="navbar navbar-default navbar-static-top"
role="navigation">
Inverted navbar
The navbar-inverse class only changes the color of the navigation bar and turns
it into the opposite color. For example, navbar gets a black background with white
text:
<nav class="navbar navbar-inverse" role="navigation">
Panels
Panels are simple boxes that contain plain text. Panels are mostly used in order to
present important information in a visually favorable way.

Chapter 13
[ 639 ]
Basic
A basic panel consists of a single box containing some text. The method of its
declaration is shown here:
<divclass="panel panel-default"> … </div>
Heading
The panel-heading class adds an additional box above the basic panel, which
contains its heading or title. Both boxes are of different colors by default. Here is the
syntax:
<divclass="panel-heading">This is a Panel Heading</div>
Footer
The panel-footer class adds a box beneath a basic panel which also contains text of
some sort. Here is the syntax:
<divclass="panel-footer">This is a Panel Footer</div>
Group
Panels under the panel-group class are grouped together. Here is the syntax:
<divclass="panel-group">
Breadcrumbs
Breadcrumbs serve as a helping tool that keeps track of the path you take to visit
different pages. Using breadcrumbs, you can know the current location of a page on
a website.
Breadcrumbs are used to nd out the current page's path in a navigation hierarchy.
Here is a sample code:
<ol class="breadcrumb">
<li><a href="#">Home</a></li>
<li><a href="#">Library</a></li>
<li class="active">Data</li>
</ol>

Bootstrap – The Stylish CSS Frontend Framework
[ 640 ]
Labels and badges
Labels and badges offer help tools that keep track of the progressive factors, such
as numerical indicators, counts, percentages, and so on, by keeping counts or by
showing the status of a website being loaded and so on.
Labels
Labels are associated with different headings or titles which help in keeping records
of counts or give tips among other things. Labels can be declared as follows:
<h3>This is an example Heading<span class="label label-
default">This is an example label</span></h3>
Badges
Badges are the same as labels with the only difference being the shape. Badges have
more curved shapes than labels. They are mainly used to notify the user of the new
changes, unseen e-mails, and so on. Let's take a look at the following code snippet:
<a href="#">Check EMailsEMails <span class="badge">4545</span></a>
Pagination
Pagination is the grouping of data on various pages like a textbook where data
of same importance is usually posted on the same page for better accessibility.
Pagination is highly scalable and provides larger click areas which are hard to miss.
Pagination can be used along with tables and is useful for paginating search results.
Default
Following is a basic example of bootstrap pagination:
<ul class="pagination">
<li>
<a href="#" aria-label="Previous">
<span aria-hidden="true">«</span>
</a>
</li>
<li><a href="#">1</a></li>
<li><a href="#">2</a></li>
<li><a href="#">3</a></li>
<li><a href="#">4</a></li>
<li><a href="#">5</a></li>
Chapter 13
[ 641 ]
<li>
<a href="#" aria-label="Next">
<span aria-hidden="true">»</span>
</a>
</li>
</ul>
Adding .active to <li> will highlight the current page link:
<li class='active'><a href="#">3</a></li>
Adding .disabled to <li> will disable the page link and make it unclickable:
<li class='disabled'><a href="#">3</a></li>
Pager
The next and previous links are used in pagination for quick access. Pagers are
mainly used by simple sites such as magazines, newspapers, or blogs, and so on.
Here is the syntax:
<ul class="pager"> … </ul>
Progress bars
A basic progress bar is a rectangular bar that lls according to the level of progress
achieved. These bars are mainly used for the purpose of showing current progress
regarding an action.
Here is the code to create progress bars:
<divclass="progress">
<divclass="progress-bar"role="progressbar"aria-
valuenow="505"
aria-valuemin="0"aria-valuemax="100"style="width:505%">
</div>
</div>
For more types visit: http://www.w3schools.com/bootstrap/
bootstrap_progressbars.asp.

Bootstrap – The Stylish CSS Frontend Framework
[ 642 ]
Advanced Bootstrap/JavaScript plugins
Bootstrap can benet from powerful JavaScript libraries to display various kinds of
dynamic content on web pages. Bootstrap plugins require jQuery as a dependency.
These include buttons, dropdowns, tooltips, alerts, tabs, and more. We will now
cover how to use them.
Buttons
Buttons in Bootstrap can be used under various combinations.
Basic
The btn-group class generates a default grey button with curved edges that can
trigger any function when clicked on by the user:
<div class="btn-group"> … </div>
Button toolbar
The btn-toolbar class groups together all buttons that are included in the
btn-toolbar class:
<div class="btn-toolbar" role="toolbar"> … </div>
Sizing
The sizing class is used to size groups of buttons at once by just adding btn-
group-*.
The declaration is shown here:
<div class="btn-group btn-group-lg">...</div> //large
<div class="btn-group">...</div> //normal
<div class="btn-group btn-group-sm">...</div> //small
<div class="btn-group btn-group-xs">...</div> //extra small
Nesting
Creating drop-down menus with a series of buttons can be done by placing a
btn-group within a btn-group as shown here:
<div class="btn-group" role="group" aria-label="...">
<button type="button" class="btn btn-default">Alpha</button>
<button type="button" class="btn btn-default">Beta</button>

Chapter 13
[ 643 ]
<button type="button" class="btn btn-default">Gamma</button
<div class="btn-group" role="group">
<button type="button" class="btn btn-default dropdown-toggle"
data-toggle ="dropdown"> List of Top Publishers</button>
<ul class="Top Publishers">
<li><a href="https://www.packtpub.com/"> Packt
Publishing</a></li>
<li><a href="http://www.oreilly.com/"> O'Reilly</a></li>
</ul>
</div>
</div>
Vertical variation
The btn-group-vertical class arranges a group of buttons in a vertical fashion.
Here is the syntax:
<div class="btn-group-vertical"> ... </div>
Justied link variation
The btn-group-justified class allows the button groups to adjust themselves
according to any screen resolution and provides equal widths to the buttons. Here is
the syntax:
<div class="btn-group btn-group-justified"> ... </div>
Dropdowns
Dropdown menus are triggered when a button is clicked on the dropdown by the
user. Dropdowns are mainly used to access additional related links.
Single button
The btn btn-default dropdown-toggle class changes a button into a simple drop-
down menu. Its declaration is shown in the following code:
<button type="button" class="btn btn-default dropdown-toggle"
data-toggle="dropdown">
<span class="caret"></span>
</button>

Bootstrap – The Stylish CSS Frontend Framework
[ 644 ]
Split button
The btn btn-danger class does not change the button entirely into a dropdown,
rather it splits a button into two parts where one performs a simple button function
and the other becomes a dropdown menu:
<div class="btn-group">
<button type="button" class="btn btn-danger">Action</button>
<button type="button" class="btn btn-danger dropdown-toggle" data-
toggle="dropdown">
<span class="caret"></span>
<span class="sr-only">Toggle for Dropdown</span>
</button>
</div>
Tooltips
Tooltips are small boxes that pop up when the pointer is hovered over an element.
To create a tooltip, add the data-toggle="tooltip" attribute to an element. Add
the data-toggle="tooltip" attribute to an element to create a tooltip. To specify
the text that is displayed inside a tooltip, use the title attribute:
<ahref="#"data-toggle="tooltip"title="Tooltip">…</a>
Positioning
The positioning tool is used to position a popup box of tooltips, for example,
when a box may pop up on the top or bottom or to the left or right of an element:
Here is the syntax for positioning it at the top:
<ahref="#"data-toggle="tooltip"data-
placement="top"title="Tooltip">Tooltip at the top</a>
Here is the syntax for positioning it at the bottom:
<ahref="#"data-toggle="tooltip"data-
placement="bottom"title="Tooltip"> Tooltip at the bottom</a>
Here is the syntax for positioning it on the left of the element:
<ahref="#"data-toggle="tooltip"data-
placement="left"title="Tooltip">Tooltip at the left</a>
Chapter 13
[ 645 ]
Here is the syntax for positioning it on the right of the element:
<ahref="#"data-toggle="tooltip"data-
placement="right"title="Tooltip"> Tooltip at the right</a>
Remember to place the actual link in place of #.
Popovers
Popovers and tooltips have the same functionalities with the only difference that for
popovers to appear, the element needs to be clicked on by the user. They are used to
present additional information regarding the element.
Basic creation
Popovers can be generated using the following piece of code:
<a href="#" data-toggle="popover" title="Popover Header" data-
content="Some content inside the popover">Toggle popover</a>
Positioning
Popovers can be positioned on the top or bottom or to the left or right of the element
using the following code.
Here is the syntax for positioning the popovers at the top:
<a href="#" title="Header" data-toggle="popover" data-
placement="top" data-Content="Content"> Popover at the top </a>
Here is the syntax for positioning it at the bottom:
<a href="#" title="Header" data-toggle="popover" data-
placement="bottom" data-content="Content"> Popover at the bottom
</a>
Here is the syntax for positioning it on the left:
<a href="#" title="Header" data-toggle="popover" data-
placement="left" data-content="Content"> Popover at the
leftleft</a>
Here is the syntax for positioning it on the right:
<a href="#" title="Header" data-toggle="popover" data-
placement="right" data-content="Content">PopoverPopover at the
right </a>
Bootstrap – The Stylish CSS Frontend Framework
[ 646 ]
Remember to place the actual link in place of #.
Closing
The popover class allows the popover to close when you click elsewhere:
<a href="#" title="Dismissible popover" data-toggle="popover"
data-trigger="focus" data-content="Click anywhere in the document
to close the popover">Click here to close popover</a>
Alerts
Bootstrap provides the utility of displaying alert messages. The code for its
declaration is shown here. Bootstrap also allows you to assign different colors to
alert messages to signify different situations. Bootstrap requires jQuery, and $ in
this syntax means we are invoking jQuery. Let's take a look at the following code:
<button type="button" class="close" data-dismiss="alert" aria
label="Close"> <span aria-hidden="true">×</span> </button>
The syntax of an alert is as follows:
$().alert():
This listens for click events on its elements having data-dismiss-alert. The syntax is
as follows:
$().alert('close'):
This removes an alert from the DOM. The element will fade out if it includes the
.fade and .in classes.
Tabs
Tabs are used in navigation bars to provide quick access to different links or pages.
Tabs need to be individually activated, as follows:
<div class="container">
<h1>Alpha Zoo</h1>
<ul class="nav nav-tabs">
<li class="active">
<li><a href="#">Exhibit A to Exhibit H</a></li>
<li><a href="#">Exhibit I to Exhibit M</a></li>
<li><a href="#">Exhibit N to Exhibit Y</a></li>
<li><a href="#">Mini Aquarium</a></li>

Chapter 13
[ 647 ]
<li><a href="#">Alpha Aviary</a></li>
<li><a href="#">Adopt an animal for just $4</a></li>
</ul>
<br>
<p>Welcome to our Zoo! We take pride in the happy animals we
house.</p>
</div>
We can use the fade class to fade the content of tabs after viewing them:
<div class="tab-content">
<div role="tabpanel" class="tab-pane fade in active"
id="homepage">...</div>
<div role="tabpanel" class="tab-pane fade"
id="profile">...</div>
<div role="tabpanel" class="tab-pane fade" id="posts">...</div>
<div role="tabpanel" class="tab-pane fade"
id="settings">...</div>
</div>
Accordions
Many a time, we come across scenarios wherein we need to manage large amounts
of information within a single page. Placing all this content on a single page may
lead to the creation of a very long page, and scrolling up or down may be frustrating
for the person using the website. Accordion widgets are used to solve this problem,
as they are used on websites to manage the large amount of content and navigation
lists. They are basically collapsible panels inside which information is placed. With
the Bootstrap collapse plugin, its very simple to create accordions.
This code creates an accordion with panel components:
<div class="panel-group" id="accordion">
<H1> Welcome to Alpha Zoo </H1>
<p>Welcome to our Zoo! We take pride in the happy animals we
house.</p>
<div class="panel panel-default">
<div class="panel-heading">
<h4 class="panel-title">
<a data-toggle="collapse" data-parent="#accordion"
href="#collapse1">
Exhibit A to Exhibit H</a>
</h4>
</div>
<!--Data for Panel 1-->
<div id="collapse1" class="panel-collapse collapse in">
<div class="panel-body">

Bootstrap – The Stylish CSS Frontend Framework
[ 648 ]
These exhibits are for animals from the tropical regions
of the planet. Take a guided tour through Exhibit A, our
largest exhibit housing our bengal tigers Uri and Kayla
with their cubs at exhibit A or simply feed our talking
toucan Charlie in Exhibit D.
<a href='#'> See more</a>
</div>
</div>
</div>
<!--Data for Panel 2-->
<div class="panel panel-default">
<div class="panel-heading">
<h4 class="panel-title">
<a data-toggle="collapse" data-parent="#accordion"
href="#collapse2">
Exhibit I to Exhibit M</a>
</h4>
</div>
<div id="collapse2" class="panel-collapse collapse">
<div class="panel-body">
This is the second panel. The content for the second panel
will go in here.
</div>
</div>
</div>
</div>
Modals
Modal plugins are popup windows or boxes that are displayed at the top of the page.
A modal looks like this:
Modal size
The modal dialog boxes come in two sizes. Small modals can be used for dealing
with small functions, whereas large modals can be used to prompt large datasets.
Small
The modal-dialog modal-sm class creates a small modal. Here is the syntax:
<divclass="modal-dialog modal-sm">
Large
The modal-dialog modal-lg class creates a large modal. Here is the syntax:
<divclass="modal-dialog modal-lg">

Chapter 13
[ 649 ]
Media objects
Media objects are abstract object styles that can be used for making blog comments
or other descriptive thumbnails:
• .media: This class floats a media object to the right or left of a content block
• .media-list: This class forms an unordered list of items:
<div class="media">
<a class="pull-left" href="#">
<img class="media-object" data-src="holder.js/64x64">
</a>
<div class="media-body">
<h4 class="media-heading">This is the Main Media
heading </h4>
</div>
<div>
<ul class="media-list">
<li class="media">
<a class="pull-left" href="#">
<img class="media-object" data-src="holder.js/64x64">
</a>
<div class="media-body">
<h4 class="media-heading">This is a Media heading
</h4>
<!-- Nested media object -->
</div>
</li>
</ul>
Carousels
The carousel plugin allows you to make elements move in a circle while viewing
each element one by one.
Carousels show components by cycling through them. This can be done using the
following code, which creates a carousel of animal photographs:
<divid="myCarousel"class="carousel slide"data-ride="carousel">
<!-- Indicators -->
<olclass="carousel-indicators">
<lidata-target="#myCarousel"data-slide-to=
"0"class="active"></li>
<lidata-target="#myCarousel"data-slide-to="1"></li>
<lidata-target="#myCarousel"data-slide-to="2"></li>
<lidata-target="#myCarousel"data-slide-to="3"></li>
</ol>
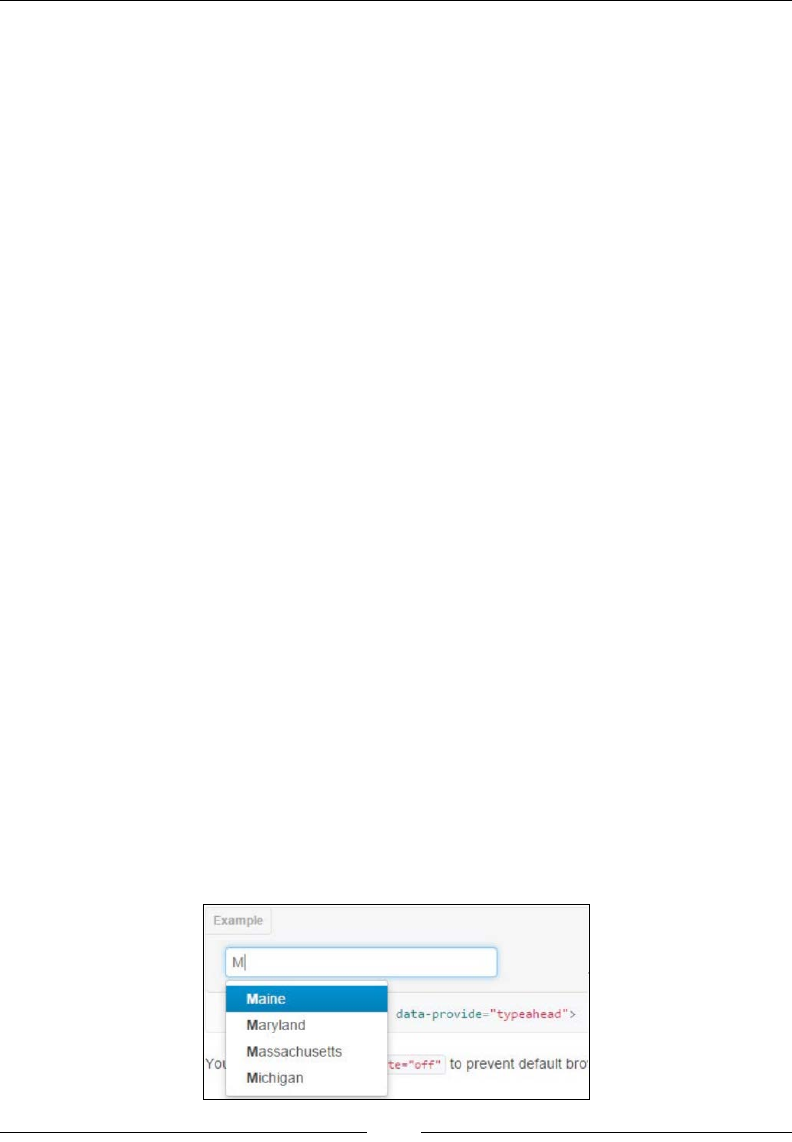
Bootstrap – The Stylish CSS Frontend Framework
[ 650 ]
<!-- Wrapper for slides -->
<divclass="carousel-inner"role="listbox">
<divclass="item active">
<imgsrc="Emperor_Penguin.jpg"alt="Emperor Penguin">
</div>
<divclass="item">
<imgsrc="bengal_tiger.jpg"alt="Tiger">
</div>
<divclass="item">
<imgsrc="african_elephant.jpg"alt="Elephant">
</div>
<divclass="item">
<imgsrc="australian_kiwi.jpg"alt="Kiwi">
</div>
</div>
<!-- Left and right controls -->
<aclass="left carousel-
control"href="#myCarousel"role="button"data-slide="prev">
<spanclass="glyphicon glyphicon-chevron-left"aria-
hidden="true"></span>
<spanclass="sr-only">Previous</span>
</a>
<aclass="right carousel-
control"href="#myCarousel"role="button"data-slide="next">
<spanclass="glyphicon glyphicon-chevron-right"aria-
hidden="true"></span>
<spanclass="sr-only">Next</span>
</a>
</div>
Typehead
A Typehead is just another form of textbox that provides text predictions as the user
types into the text box and may look something like this if programmed to type
ahead the states of the US:

Chapter 13
[ 651 ]
How to create typehead
The following code shows how you can create a simple typehead textbox:
<input type="text" data-provide="typeahead">
Usage of typehead via JavaScript
We can call the typehead using the following code:
$('.typeahead').typeahead()
For a complete implementation, visit https://twitter.github.io/typeahead.js/
examples/.
Scrollspy
The Scrollspy plugin allows the navigation targets to automatically update
themselves when the user scrolls up or down.
Scrollspy can help in identifying the section of the page you have reached while
scrolling randomly and makes nding required data much easier. The Scrollspy
plugin can normally be activated in two ways, which we will see now.
Activating Scrollspy via a data attribute
The data attribute allows spying on a particular element by adding <data-spy
="scroll" to the element:
<body data-spy="scroll" data-target=".navbar">...</body>
Activating Scrollspy via JavaScript
Scrollspy can also be triggered by JavaScript by selecting the element and executing
the scrollspy() function:
$('#navbar').scrollspy()
Afx
The afx plugin is used to lock an element to an area on a page.
The afx plugin can be activated using data attributes or JavaScript. Afx plugins are
used to place social icons on websites, where they are locked in one place so that they
can be accessed by the user any time.
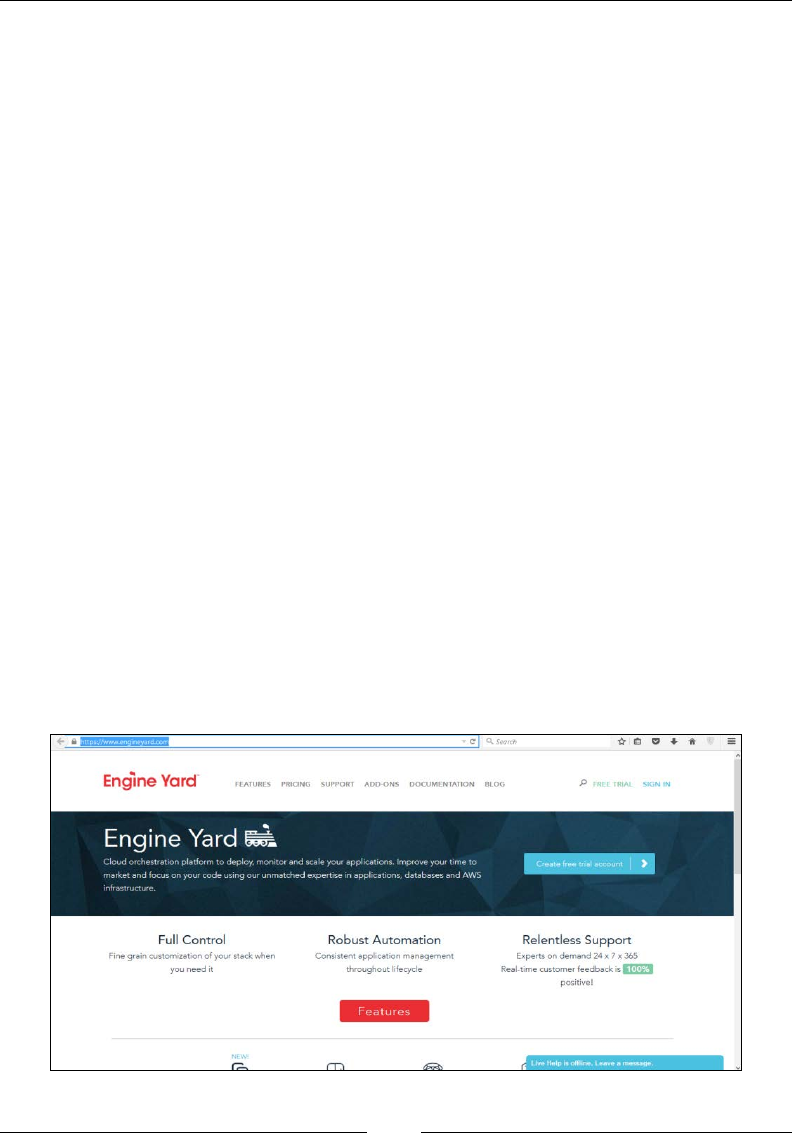
Bootstrap – The Stylish CSS Frontend Framework
[ 652 ]
Activating the afx plugin via a data attribute
Use the following method to activate the affix tool:
<div data-spy="affix" data-offset-top="200">...</div>
Activating the afx plugin via JavaScript
We can also activate the affix tool via JavaScript manually using the following code:
$('#navbar').affix()
Customizing Bootstrap
Since Bootstrap is a very heavy project, including all its repositories is not actually
required, and even if you do, this could put enormous load on your website, making
it sluggish and affecting user experience. To get the Bootstrap engine suited to your
specic needs, go to http://getbootstrap.com/customize/ and import a style
le with the settings you need. You can also import your existing settings le on the
preceding link, add or remove options within the GUI, and get an updated version
without writing a single line of code.
Websites built with Bootstrap
WordPress is out there, and a lot of big websites and companies are using it.
Twitter's website itself is made with Bootstrap. Take a look at some famous websites
built with the Bootstrap framework:
• https://www.engineyard.com/

Chapter 13
[ 653 ]
• http://www.hublot.com/en/
• https://www.fliplingo.com
Bootstrap resources
The Internet is full of Bootstrap resources; here are a few:
• www.wrapbootstrap.com: You can buy or sell at WrapBootstrap. It is a huge
marketplace for premium templates and themes.
• www.bootswatch.com: Bootstrap themes are released under the MIT license
and maintained by the community on GitHub. Themes are built for the latest
version of Bootstrap.
Bootstrap – The Stylish CSS Frontend Framework
[ 654 ]
•www.startbootstrap.com: Startbootstrap is an easy way to learn and
develop Bootstrap, as it contains thousands of starter themes and templates,
even for Bootstrap 3.
•http://themes.getbootstrap.com: These are the official Bootstrap themes
and templates from the creators of Bootstrap and include dashboards,
admins, and marketing sites.
Here are a few more resources for Bootstrap, but there are many more. You can surf
through these sites and gain some more knowledge about the working and intricacies
of Bootstrap:
•http://expo.getbootstrap.com/
•https://bootstrapbay.com/blog/built-with-bootstrap/
•http://builtwithbootstrap.com/
•http://getbootstrap.com/getting-started/#examples
As of now, Bootstrap version 4 alpha has been launched. All
the JavaScript plugins have been rewritten in ECMAScript6,
Completely shifted from LESS to SASS and IE8 support has
been dropped.
Here is ofcial blog post: http://blog.getbootstrap.
com/2015/08/19/bootstrap-4-alpha/
[ 655 ]
jQuery – The Popular
JavaScript Library
jQuery is an open source JavaScript library. jQuery makes JavaScript programming
much simpler.
The following are the notable corporate members of the jQuery foundation:
• WordPress: (http://wordpress.org/)
• IBM: (http://ibm.com/)
• NeoBux: (http://www.neobux.com/)
• Mozilla: (http://www.mozilla.org/)
• Intel's Open Source Technology Center: (http://software.intel.com/
en-us/oss)
• Adobe: (http://adobe.com/)
You can nd all about jQuery at their ofcial website (www.jQuery.com).
The evolution of JQuery
jQuery has been evolving since day one. There are two major releases available for
download. The versions 1.x and 2.x differ in a way; 1.x is more stable and supports
older browsers as well; whereas, 2.x has the same API as 1.x but without the support
for legacy browsers.
A legacy browser is an older version of a browser that has not been
updated to the latest available version.

jQuery – The Popular JavaScript Library
[ 656 ]
If you are using jQuery for a project, you can get another version that takes fewer
resources and is faster to load.
Getting started
To get started with developing jQuery, you can download jQuery software by
visiting https://jquery.com/. In the following sections, we will cover a few
download links.
Installing JQuery
We can download jQuery from http://jquery.com/download/.
There are two versions of jQuery available for download: compressed and
uncompressed.
To choose your option, go to the preceding link and right-click on Save as and select
My Computer and download it.
jQuery 1.x
We can download the minied version from http://code.jquery.com/jquery-
1.11.3.min.js.
For development, we can download the version 1.x from http://code.jquery.
com/jquery-1.11.3.js.
jQuery 2.x
We can download the minied version from http://code.jquery.com/jquery-
2.1.4.min.js.
For development, we can download the version 2.x from http://code.jquery.
com/jquery-2.1.4.js.
Using jQuery
jQuery is an extremely powerful JavaScript library. Here are a few sample pieces of
code to give you a head start on your next project.
Chapter 14
[ 657 ]
If you have downloaded the jQuery library to your hard disk and plan to use it from
there, then you can include the following code in your HTML <head> tag:
<script src="js/jquery.min.js"></script>
Here, js is a folder in the root directory of your project.
To avoid longer loading time and performance issues, scripts should
be added to the end of the <body> tag because when the browser
loads the web page (let's say, sample1.html) and the scripts are
at the end of the body tag, the browser can render the content of the
page (the body) and only start loading scripts afterward.
Another preferred approach is to use the Google hosted libraries; these provide
faster rendering to your pages and jQuery code than using your own hosted jQuery
libraries. You can use the Google developer hosted libraries with the following
piece of code:
<script src="https://ajax.googleapis.com/ajax/libs/
jquery/2.1.3/jquery.min.js">
</script>
The jQuery syntax is used to perform any specic action on elements of HTML.
The basic syntax is as follows:
$(selector).action()
Here is the description:
• $: $ is used to access the jQuery object.
• (selector): The query (or find) HTML elements using familiar
CSS-style selector syntax. For example, you can select by element name,
type, class or id.
• jQuery action(): For example, it can be events like click, keypress, focus
and so on.
Selectors
As the name suggests, selector attributes are used to select various elements
of HTML. The selector attributes basically support the CSS selectors.
Selectors begin with a $ sign followed by parentheses: $()

jQuery – The Popular JavaScript Library
[ 658 ]
Element selectors
Element selectors select elements using their name. For example, if a paragraph is
written in the tags <p>, you can select this paragraph using its name, that is, p:
$("p")
Parameters
The name of the element to be chosen is passed as a parameter.
Returns
The element selectors returns the element.
Description
The element selectors select elements using their name. For example, if a paragraph
is written in the tags <p>, you can select this paragraph using its name.
ID selectors
ID selectors select elements using their ID. Each element of the HTML can have its
own identifying ID and it can be accessed using #. For example, to access the element
with the ID text, we can use the following syntax:
$("#text")
Parameters
The pound sign (or number sign) or a hash sign followed by the ID name is passed as
a parameter.
Returns
This returns the element using the ID passed as a parameter.
Description
This selects elements using their ID. IDs are usually used to uniquely identify DOM
elements that are accessed through the pound symbol in Javascript or the hash sign.

Chapter 14
[ 659 ]
Class selectors
Class selectors select the elements using the class name. For example, a class named
sample can be accessed by the following syntax:
$(".sample")
Parameters
A dot/period followed by the name of the class is passed as a parameter.
Returns
This returns the elements using the Class name passed as parameter.
Description
This selects the elements using the class name.
Events
JQuery makes it easier to response when user interacts with the web page. For
example, we can perform several tasks when they click somewhere, scroll the
document, hover on eld or anything like that. Whenever user interacts with the web
page, an event is occurred. We can use event handling to execute our code.
Mouse events
These are the events that are instantiated as soon as the user activates any of
the functions related to the mouse. In the following sections, we will cover the
description of each mouse event.
.click()
The click event takes a DOM object and calls the function if or when it is clicked by
the user.
Parameters
The click event receives a callback function.
Returns
This returns the response generated by the function called on click.

jQuery – The Popular JavaScript Library
[ 660 ]
Description
The click event uses the ID to get what the user has clicked on and accordingly calls
its respective function dened inside the body.
Here is an example of its usage.
HTML Code:
<div id="clicked">
//function to be called after clicked
</div>
jQuery Code:
$( "#clicked" ).click(function() {
alert( "Function for .click() called." );
});
.dblclick()
We can attach a handler to the double-click event of an HTML element using the
.dblclick() jQuery method.
Parameters
The dbclick event receives a callback function.
Returns
This returns the response generated by the function called on double click.
Description
The dblclick event uses the ID to get what the user had double clicked on and
accordingly calls its respective function.
Here is an example of its usage.
HTML Code:
<div id="clicked">
// function to be called after clicked
</div>

Chapter 14
[ 661 ]
jQuery Code:
$( "#clicked" ).dblclick(function() {
alert( "Function for .dblclick() called." );
});
.hover()
The hover event uses the ID to get what the user had his mouse on and accordingly
calls its respective function.
Parameters
The hover event receives a callback function.
Returns
This returns the response generated by the function called on hover.
Description
The hover event uses the ID to get what the user had his mouse on and accordingly
calls its respective function.
Here is an example of its usage.
HTML Code:
<ul>
<li>Lahore</li>
<li>Karachi</li>
<li>Peshawar</li>
<li>Sialkot</li>
</ul>
jQuery Code:
$( "li" ).hover(
function() {
$( this ).append( $( "<span> (*)</span>" ) ); // "this" is
used to access the current object itself
}, function() {
$( this ).find( "span:first" ).remove();
}
);

jQuery – The Popular JavaScript Library
[ 662 ]
.mousedown()
The .mousedown event is activated when the user left-clicks on the mouse and
highlights a specic text.
Parameters
The .mousedown() function which gets executed when the element is clicked.
Returns
This returns the response generated by the function called on click.
Description
The event is activated when the user left-clicks and highlights some specic text.
Here is an example of its usage.
HTML Code:
<div id="myTarget">
Click here
</div>
jQuery Code:
$( "#myTarget" ).mousedown(function() {
alert( "Function for .mousedown() called." );
});
.mouseenter()
The event is activated when the mouse is hovered over the selected text and a
function is called accordingly.
Parameters
The mouseenter event receives a callback function.
Returns
This returns the response generated by the function called on mouse enter.

Chapter 14
[ 663 ]
Description
This event is activated when the mouse is hovered over the selected text and a
function is called accordingly. The event related to the mouseenter() is red only
once, so it does not matter if you hold the cursor over an element, the function
assigned through this function is executed only once.
Here is an example of its usage.
HTML Code:
<div id="external">
External
<div id="internal">
Internal
</div>
</div>
<div id="myLog"></div>
jQuery Code:
$( "#external" ).mouseenter(function() {
$( "#myLog" ).append( "<p>Function for .mouseenter()
called.</p>" );
});
.mouseleave()
The .mouseleave event is activated when the cursor is moved away from the HTML
element.
Parameters
The mouseleave event receives a callback function.
Returns
This returns the response generated by the function called on clicked.
Description
The event is activated when the mouse is left. The function is called accordingly.

jQuery – The Popular JavaScript Library
[ 664 ]
Here is an example of its usage.
HTML Code:
<div id="external">
External
<div id="internal">
Internal
</div>
</div>
<div id="myLog"></div>
jQuery Code:
$( "#external" ).mouseleave(function() {
$( "#myLog" ).append( "<p> Function for .mouseleave()
called.</p>" );
});
.mousemove()
The .mousemove event is triggered when the mouse is being moved within an
element.
Parameters
The mousemove event receives a callback function.
Returns
This returns the response generated by the function called on mouse move.
Description
This event is triggered when the mouse is being moved within an element.
Here is an example of its usage.
HTML Code:
<div id="myTarget">
Move here
</div>
<div id="other">
Trigger the Function
</div>
<div id="myLog"></div>

Chapter 14
[ 665 ]
jQuery Code:
$( "#myTarget" ).mousemove(function( event ) {
// the event keyword identifies the mousemove event in the case
of this example
var msg = "Function for .mousemove() called at ";
msg += event.pageX + ", " + event.pageY;
$( "#myLog" ).append( "<div>" + msg + "</div>" );
});
.mouseout()
The .mouseout event is triggered when the mouse pointer leaves the boundaries of
the element. Any HTML element can be bound to this event.
Parameters
The mouseout event receives a callback function.
Returns
This returns the response generated by the function called when the mouse moves
out of the targeted element.
Description
The mouseout event is triggered when the mouse pointer leaves the element.
Here is an example of its usage.
Required HTML Code:
<div id="external">
External
<div id="internal">
Internal
</div>
</div>
<div id="other">
Trigger the Function
</div>
<div id="myLog"></div>

jQuery – The Popular JavaScript Library
[ 666 ]
Required jQuery Code:
$( "#external" ).mouseout(function() {
$( "#myLog" ).append( "<p>Function for .mouseout() called.</p>"
);
});
.toggle()
This .toggle() function is used to bind multiple handlers to matching elements that
are executed on alternate clicks.
Parameters
The parameters of the toggle() function are duration, easing, and callback.
The duration parameter is optional and is used to specify the speed of the hide and
show effect. The possible values are fast, slow, and milliseconds. The default is 400
ms.
The easing parameter is optional and is used to specify the easing() function that
is to be used for animation. The default value is string.
The callback parameter too is optional and is used to specify the function that is to
be called once the animation is complete.
Returns
This returns the output of the function that is called.
Description
This function is used to check the visibility of an element and then alternate between
the hide() and show() methods. The callback is always red once the animation is
complete and only once for the element that nds a match.
Here is an example of its usage.
Required HTML Code:
<ul>
<li>Mercury</li>
<li>Venus</li>
<li>Earth</li>
<li>Mars</li>
</ul>

Chapter 14
[ 667 ]
Required jQuery Code:
$(document).ready(function() {
$("ul").click(function() {
$("li").toggle("slow", function() {
});
});
});
Keyboard events
The keyboard events are triggered on Keyboard functions, for example, when a
button/key is pressed or released, and so on. Keyboard events can be controlled
with the following built-in jQuery functions. The available functions are KeyDown,
KeyPress, and KeyUp.
The only practical difference between KeyDown and KeyPress is that KeyPress relays
the character resulting from a KeyPress event and is only called if there is one.
For example, if you press A on your keyboard, you'll get this sequence of events:
• KeyDown: KeyCode=Keys.A, KeyData=Keys.A, Modifiers=Keys.None
• KeyPress: KeyChar='a'
• KeyUp: KeyCode=Keys.A
.keydown()
The keydown event is instantiated when a key is pressed by the user.
Parameters
The keydown event sends the key pressed as a parameter.
Returns
This returns the output of the function that is called when a key is pushed down.
Description
The keydown event is instantiated when the user presses a key, which calls the
function to be executed.
Here is an example of its usage.

jQuery – The Popular JavaScript Library
[ 668 ]
Required HTML Code:
<form>
<input id="myTarget" type="text" value="KeyPress">
</form>
Required jQuery Code:
$( "#myTarget" ).keydown(function() {
alert( "Function for .keydown() called." );
});
The preceding sample code selects the div element with the myTarget ID and
triggers the alert function when a key is pressed down.
.keypress()
The keypress event is instantiated when a key is pressed by the user.
Parameters
This sends the key pressed as parameter.
Returns
This returns the output of the function called by the key press.
Description
The keypress event is instantiated when the user presses a key, which calls the
function to be executed.
Here is an example of its usage.
Required HTML Code:
<form>
<fieldset>
<input id="myTarget" type="text" value="Tomato">
</fieldset>
</form>
Required jQuery Code:
$( "#myTarget" ).keypress(function() {
console.myLog( "Function for .keypress() called." );
});

Chapter 14
[ 669 ]
The preceding sample code selects the div element with the myTarget ID and
triggers the alert function when a key is pressed.
.keyup()
The keyup event occurs when the key that is pressed is released by the user.
Parameters
This sends the key pressed as a parameter.
Returns
This returns the output of the function that is called when key is released.
Description
The event occurs when the key pressed is released by the user.
Here is an example of its usage.
Required HTML Code:
<form>
<input id="myTarget" type="text" value="Hello there">
</form>
Required jQuery Code:
$( "#myTarget" ).keyup(function() {
alert( "Function for .keyup() called." );
});
The preceding sample code selects the div with the myTarget ID and triggers the
alert function when a key is released.
Form events
Form events are when elements inside a form are bound to jQuery. These events
are helpful when it comes to processing data entered via forms. These events can be
used on elements inside the <form> tags. We will now cover the description of each
form event.

jQuery – The Popular JavaScript Library
[ 670 ]
submit()
The submit event, as the name suggests, is red when a form is submitted.
Its syntax is $(selector).submit(function).
Parameters
The parameter taken is the function that is to be run once the form is submitted.
Returns
This event does not return anything.
Description
The submit() function is a form event. It is used to bind form elements with a
function that needs to be called whenever a form is submitted.
Required HTML Code:
<form action="">
User ID: <input type="text" name="UsrID" value="KA112"><br>
Password: <input type="password" name="password"
value="Password"><br>
<input type="submit" value="Submit">
</form>
Required JQuery Code:
$(document).ready(function() {
$("form").submit(function() {
alert("Form Submitted!");
});
});
change()
The change event is red whenever the value of an element in a form changes.
Its syntax is $(selector).change(function).
Parameters
The parameter taken is the function that is to be run once the value of the selected
element changes.

Chapter 14
[ 671 ]
Returns
This event does not return anything.
Description
This event is used to bind the event to a function that needs to be called whenever
a value inside a form element changes. This function works only on the <input>,
<textarea>, and <select> elements.
Required HTML Code:
<select name="ShadesOfGreen">
<option value="Jade">Jade</option>
<option value="Mint">Mint</option>
<option value="Emerald">Emerald</option>
<option value="Moss">Moss</option>
</select>
Required JQuery Code:
$(document).ready(function() {
$("select").change(function() {
alert("Option Changed");
});
});
blur()
The blur event is red whenever an element in a form loses its focus and the user
moves to the next element in the form.
Its syntax is $(selector).blur(function).
Parameters
The parameter taken is the function that is to be run once the element loses focus.
Returns
This event does not return anything.
Description
The blur event is used to call a function whenever an element loses its focus.

jQuery – The Popular JavaScript Library
[ 672 ]
Required HTML Code:
User ID: <input type="text">
Gender: <select name="Gender">
<option value="Male">Male</option>
<option value="Female">Female</option>
</select>
Required JQuery Code:
$(document).ready(function() {
$("input").blur(function() {
alert("User ID lost foucs");
});
});
focus()
The focus event is red whenever an element in a form gets its focus.
Its syntax is $(selector).focus(function).
Parameters
The parameter taken is the function that is to be run once the element is in focus.
Returns
This event does not return anything.
Description
The focus event is used to call a function whenever an element is in focus. An
element is generally in focus when we select it with the mouse or use the Tab key to
navigate to it. This event is triggered only when the specied element is in focus and
not the element's children.
The focus event is generally used with the blur event.
Required HTML Code:
User ID: <input type="text" name="UsrID"><br>
Email ID: <input type="text" name="emailID">

Chapter 14
[ 673 ]
Required JQuery Code:
$(document).ready(function() {
$("input").focus(function() {
$(this).css("background-color", "#cccccc");
});
$("input").blur(function() {
$(this).css("background-color", "#ffffff");
});
});
focusin()
This event is red whenever an element or its child is in focus.
Its syntax is $(selector).focusin(function).
Parameters
The parameter taken is the function that is to be run once the element is in focus.
Returns
This event does not return anything.
Description
The focusin event is used to call a function whenever an element is in focus. This
event is also called whenever a child element is in focus.
Required HTML Code:
<div>
Name: <input type="text" name="fullname"><br>
Email: <input type="text" name="email">
</div>
Required JQuery Code:
$(document).ready(function() {
$("div").focusin(function() {
$(this).css("background-color", "#cccccc");
});
});

jQuery – The Popular JavaScript Library
[ 674 ]
focusout()
The focusout event is red whenever an element or its child is out of focus.
Its syntax is $(selector).focusout(function).
Parameters
The parameter taken is the function that is to be run once the element is in focus.
Returns
This event does not return anything.
Description
This event is red whenever an element or its child loses its focus. This event is
generally used along with the focusin event.
Required HTML Code:
<div>
Name: <input type="text" name="fullname"><br>
Email: <input type="text" name="email">
</div>
Required JQuery Code:
$(document).ready(function() {
$("div").focusin(function() {
$(this).css("background-color", "#cccccc");
});
$("div").focusout(function() {
$(this).css("background-color", "#ffffff");
});
});
Document events
Document events are generally red whenever a document is loaded. In the
following sections, we will cover the description of each document event.

Chapter 14
[ 675 ]
resize()
The resize event is red whenever the user resizes the window. Its syntax is as
follows:
$(selector).resize(function)
Parameters
The parameter taken is the function that is to be run once the window is resized.
Returns
This event does not return anything.
Description
The resize event is used to call a function when the user resizes the window.
Required HTML Code:
<p></p>
Required JQuery Code:
$(document).ready(function() {
$(window).resize(function() {
$("p").text("Window resized!!");
});
});
scroll()
The scroll event is red whenever the user scrolls in the (scrollable) element. We
can use this event to bind it to a function. Its syntax is as follows:
$(selector).scroll(function)
Parameters
The parameter taken is the function that is to be run once the user scrolls on the
element.
Returns
This event does not return anything.

jQuery – The Popular JavaScript Library
[ 676 ]
Description
The scroll event is red whenever the user scrolls in an element.
Required HTML Code:
<div style="border:1px solid
black;width:200px;height:100px;overflow:scroll;">Lorem ipsum
dolor sit amet, consectetur adipiscing elit. Curabitur vehicula
ultrices nulla vel facilisis. Curabitur elementum lorem non
massa porttitor accumsan. Cras eu leo tincidunt, pulvinar neque
et, tempus dolor. Nam condimentum nisl vel quam posuere, vitae
malesuada nunc molestie. Aliquam pulvinar diam eu magna sagittis
efficitur. Vestibulum tempor, leo accumsan maximus hendrerit, ex
nisi rutrum sapien, nec ultricies tellus nisl ac lacus.
Phasellus sed ligula augue.
</div>
<p></p>
Required JQuery Code:
$(document).ready(function() {
$("div").scroll(function() {
$("p").text( "Text Scrolled!");
});
});
Effects and animations
Custom animations and effects can be added to various elements to enhance your
interface using varying designs and colors.
animate()
The animate() function uses some built-in animations to animate objects in and off
the view.
Its syntax is as follows:
(selector).animate({styles},speed,easing,callback)

Chapter 14
[ 677 ]
Parameters
The animate function accepts the parameters duration, easing, and callback.
The duration parameter is optional and is used to specify the speed of the hide and
show effect. Its possible values are fast, slow, and milliseconds. The default is 400ms.
The easing parameter is optional and is used to specify the easing function that is to
be used for the animation. The default is string.
The callback parameter too is optional and is used to specify the function that is to
be called once the animation is complete.
Returns
Animations return the modied object containing all the modications.
Description
Custom animations and effects can be added to various elements to enhance your
interface using varying designs and colors.
stop()
The stop() method stops the animation of the selected element.
Its syntax is $(selector).stop(stopAll,goToEnd);
Parameters
This takes two Booleans, which are both set to false by default, as parameters.
Returns
This does not return anything.
Description
This function stops running the animation as soon as it is called. If the rst parameter
is set to true, this removes all the other animations for the element. If the second
parameter is set to true, it quickly nishes the current animation.
Here is an example of its usage.

jQuery – The Popular JavaScript Library
[ 678 ]
Required HTML Code:
<div id="sample">
<img id="sample" src="myImage.png" alt="" width="1" height="2">
</div>
Required jQuery Code:
$( "#sample" ).hover(function() {
$( this ).find( "img" ).stop( true, true ).fadeOut();
}, function() {
$( this ).find( "img" ).stop( true, true ).fadeIn();
});
The preceding sample code creates a nice fade effect without the common problem of
multiple queued animations.
Hide, show, and toggle
Elements can be set to hide and show, where hide makes the elements disappear
from the eye of the user and show does the opposite.
hide()
The hide() function, if applied on an HTML element, hides it from view. This can
be used in generating dynamic content based on user activity. The following is its
syntax:
$(selector).hide(speed,callback);
Parameters
This takes speed in milliseconds and the callback function as parameters. The values
taken as parameters are as follows:
• Fast
• Slow
• Time in milliseconds
Returns
This does not return anything.

Chapter 14
[ 679 ]
Description
This function is equivalent to setting the CSS property display: none for the
selected element. It also saves the original display property for future use.
Here is an example of its usage.
Required HTML Code:
<div id="sample">
</div>
<img id="myImage" src="myImage.jpeg" alt="" width="1" height="2">
Required jQuery Code:
$( "#sample" ).click(function() {
$( "#myImage" ).hide( "slow", function() {
alert( "Animation complete." );
});
});
show()
The show() function, if applied on an HTML element, makes the hidden element
visible. This can be used to control and manipulate dynamic content based on user
activity, for example, making certain form options visible after a certain checkbox is
selected. The following is its syntax:
$(selector).show(speed,callback);
Parameters
This takes speed in milliseconds and the callback function as parameters. The values
taken as parameters are as follows:
• Fast
• Slow
• Time in milliseconds
Returns
This does not return anything.

jQuery – The Popular JavaScript Library
[ 680 ]
Description
This function removes the display:none property from the element and reverts it to
the original. For example, if an element has a property display:inline-block and
was hidden using the hide function, it will set the display back to inline-block.
Here is an example of its usage.
Required HTML Code:
<div id="sample">
</div>
<img id="myImage" src="myImage.jpeg" alt="" width="1" height="2">
Required jQuery Code:
$( "#sample" ).click(function() {
$( "#myImage" ).Show( "slow", function() {
alert( "Animation complete." );
});
});
toggle()
The toggle() function, if applied on an HTML element, toggles with the visibility
of that element:
$(selector).toggle(speed,callback);
Parameters
This takes the speed in milliseconds and the callback function as parameters.
The values taken are as follows:
• Fast
• Slow
• Time in milliseconds
Returns
This does not return anything.
Description
This function is used to toggle with the visibility of the elements.
Chapter 14
[ 681 ]
This function should not be confused with the mouse event
function toggle(), which was explained previously. To ensure
which toggle() function is being used. Check the parameters
passed to the function.
Here is an example of its usage.
Required HTML Code:
<div id="sample">
</div>
<img id="myImage" src="myImage.jpeg" alt="" width="1" height="2">
Required jQuery Code:
$( "#sample" ).click(function() {
$( "#myImage" ).Show( "slow", function() {
alert( "Animation complete." );
});
});
Fade
Fade can be used to set the visibility of elements.
fadeIn()
The fadeIn() function is similar to the show() function in functionality, but
fadeIn() comes with a nice fading transition effect.
Its syntax is $(selector).fadeIn(speed,callback);.
Parameters
This takes speed in milliseconds and the callback function as parameters. The values
taken as parameters are as follows:
• Fast
• Slow
• Time in milliseconds
Returns
This does not return anything.

jQuery – The Popular JavaScript Library
[ 682 ]
Description
This works in a similar way to the show() function but with a fade transition.
Here is an example of its usage.
Required HTML Code:
<div id="sample">
Click here
</div>
<img id="myImage" src="myImage.png" alt="" width="1" height="2">
Required jQuery Code:
$( "#sample" ).click(function() {
$( "#myImage" ).fadeIn( "slow", function() {
// Animation complete
});
});
The preceding sample code selects the div element with the sample ID and fades in
the image with the myImage ID with slow animation.
fadeOut()
The fadeOut() function is similar to the hide() function in functionality, but it
comes with a nice fading transition effect.
Its syntax is as follows: $(selector).fadeOut(speed,callback);
Parameters
This takes speed in milliseconds and the callback function as parameters. The values
taken as parameters are as follows:
• Fast
• Slow
• Time in milliseconds
Returns
This does not return anything.

Chapter 14
[ 683 ]
Description
The fadeOut() function works in a similar way to the hide() function but with a
fade transition.
Here is an example of its usage.
Required HTML Code:
<div id="sample">
Click here
</div>
<img id="myImage" src="myImage.png" alt="" width="1" height="2">
Required jQuery Code:
$( "#sample" ).click(function() {
$( "#myImage" ).fadeOut( "fast", function() {
// Animation complete
});
});
fadeToggle()
The fadeToggle() function automatically toggles an element's display property
from none to block, inline, and so on.
Here is an example of its syntax:
$(selector).fadeToggle(speed,callback);
Parameters
This takes speed in milliseconds and the callback function as parameters. The values
taken as parameters are as follows:
• Fast
• Slow
• Time in milliseconds
Returns
This does not return anything.

jQuery – The Popular JavaScript Library
[ 684 ]
Description
If an element is already hidden, fadeToggle() will make it visible and vice versa.
Here is an example of its usage.
Required HTML Code:
<div id="sample">
Click here
</div>
<img id="myImage" src="myImage.png" alt="" width="1" height="2">
Required jQuery Code:
$( "#sample" ).click(function() {
$( "#myImage" ).fadeToggle( 2000, function() {
// Animation complete
});
});
fadeTo()
The fadeTo() function adjusts the opacity of the target element to the given value.
Its syntax is as follows:
$(selector).fadeTo( duration, opacity [, complete ] )
$(selector).fadeTo( duration, opacity [, easing ] [, complete ] )
Parameters
This takes duration in milliseconds as parameters. The values taken as parameters
are as follows:
• Fast
• Slow
• Time in milliseconds
The other parameter is opacity for the target element. The value lies between 0 and 1
and the nal parameter is the callback function.
Returns
This does not return anything.

Chapter 14
[ 685 ]
Description
The fadeTo() function is similar to the fadeIn() method. But the user can specify
the target opacity here. For example, set an element to 50% opacity by pacing 0.5 as
the opacity.
Required HTML Code:
<div id="sample">
Click here
</div>
<img id="myImage" src="myImage.png" alt="" width="1" height="2">
Required jQuery Code:
$( "#sample" ).click(function() {
$( "#myImage" ).fadeTo( "Fast", 0.5, function() {
// Animation complete
});
});
Sliding
Sliding methods are used to slide the elements in up or down directions. The
slideDown() function will make element visible, while the slideUp() function will
hide the contents of the element.
slideDown()
The slideDown() function slides down the selected element with the specied
speed.
Here is an example of its syntax:
$(selector).slideDown(speed,callback);
Parameters
This this takes speed in milliseconds and the callback function as parameters. The
values taken as parameters are as follows:
• Fast
• Slow
• Time in milliseconds

jQuery – The Popular JavaScript Library
[ 686 ]
Returns
This does not return anything.
Description
The slideDown() function makes a hidden element visible with a nice sliding effect.
Here is an example of its usage.
Required HTML Code:
<div id="sample">
Click here
</div>
<img id="myImage" src="myImage.png" alt="" width="1" height="2">
Required jQuery Code:
$( "#sample" ).click(function() {
$( "#myImage" ).slideDown( "slow", function() {
// Animation complete.
});
});
slideUp()
The slideUp() function slides up (hides) the selected element with the specied
speed.
Here is an example of its syntax:
$(selector).slideUp(speed,callback);
Parameters
Takes speed in milliseconds and the callback function as parameters. The values
taken as parameters are as follows:
• Fast
• Slow
• Time in milliseconds
Returns
This does not return anything.

Chapter 14
[ 687 ]
Description
This function hides the selected element with a nice sliding effect in the upward
direction.
Here is an example of its usage.
Required HTML Code:
<div id="sample">
Click here
</div>
<img id="myImage" src="myImage.png" alt="" width="1" height="2">
Required jQuery Code:
$( "#sample" ).click(function() {
$( "#myImage" ).slideUp( "fast", function() {
// Animation complete.
});
});
slideToggle()
The slideToggle() function toggles between slideUp() and slideDown() for the
selected element with the specied speed.
Here is an example of its syntax:
$(selector).slideToggle(speed,callback);
Parameters
This takes speed in milliseconds and the callback function as parameters. The values
taken as parameters are as follows:
• Fast
• Slow
• Time in milliseconds
Returns
This does not return anything.

jQuery – The Popular JavaScript Library
[ 688 ]
Description
Just as fadeToggle() switches transitions between two states, slideToggle() can
slide an element up or down.
Here is an example of its usage.
Required HTML Code:
<div id="sample">
Click here
</div>
<img id="myImage" src="myImage.png" alt="" width="1" height="2">
Required jQuery Code:
$( "#sample" ).click(function() {
$( "#myImage" ).slideToggle( "fast", function() {
// Animation complete.
});
});
Callback
Multiple lines of statements are queued rather than being executed simultaneously.
A callback function queues the statements and executes them one by one.
Its syntax is as follows:
var callbacks = $.Callbacks();
The object created can be used to add, remove, instantiate, and disable callbacks.
The supported functions are callbacks.add(), callbacks.remove(), callbacks.
fire(), and callbacks.disable().
callbacks.add()
This function is used to add all the functions in an array that are to be called later.
Parameters
This takes ags as strings as its parameters.

Chapter 14
[ 689 ]
Returns
This method returns the callback's object to which it is associated with, (this).
Description
The callbacks.add() function adds the function to the callback array.
Here is an example of its usage.
Required jQuery Code:
function myFunc1( value ) {
console.myLog( value );
}
function myFunc2( value ) {
console.myLog( "myFunc2 says: " + value );
return false;
}
var callbacks = $.Callbacks();
callbacks.add( myFunc1 );
// Outputs: meow!
callbacks.fire( "meow!" );
callbacks.add( myFunc2 );
// Outputs: woof!, myFunc2 says: woof!
callbacks.fire( "woof!" );
callbacks.re()
The callbacks.fire() function invokes the callbacks in a list with any arguments
that have been passed.
Parameters
This takes a list of arguments to pass back to the callback list.

jQuery – The Popular JavaScript Library
[ 690 ]
Returns
This returns the callback objects onto which it is attached.
Description
The callbacks.fire() function is used to invoke the callbacks in a list with the
arguments. The preceding example could be referenced.
callbacks.remove()
The callbacks.remove() function is used to remove a function from the array.
Parameters
This takes ags as strings as its parameters.
Returns
This returns the callbacks object onto which it is attached.
Description
This removes the function from the callback array. The preceding example could be
referenced.
callbacks.disable()
The callbacks.disable() function disables the call of the next function in the
array.
Parameters
This does not take any parameter.
Returns
This returns the callbacks object to which the object is attached.

Chapter 14
[ 691 ]
Description
The execution of the next function in the array is prevented using the callbacks.
disable() function:
var sound = function( value ) {
console.log( value );
};
var callbacks = $.Callbacks();
// Add the above function to the list
callbacks.add( sound );
// Fire the items on the list
callbacks.fire( "Woof!" );
// Disable further calls being possible
callbacks.disable();
callbacks.fire( "Meow" );
Chaining
A varying amount of statements can be executed by chaining them on the same
element. Each statement will be executed one after the other.
The value returned from each chained action is a new jQuery object. Chaining can be
done by appending one action to the previous action; for example:
$("#p1").css("color", "blue").slideDown(100).slideUp(35);
Here, the actions slideUp() and slideDown() are performed one after the other.
jQuery and the document object model
The DOM denes a standard for accessing HTML and XML documents:
"The W3C Document Object Model (DOM) is a platform and language-neutral
interface that allows programs and scripts to dynamically access and update the
content, structure, and style of a document."

jQuery – The Popular JavaScript Library
[ 692 ]
The following are some ways of DOM manipulation in jQuery:
• text(): This sets or returns the text content of the selected elements
• html(): This sets or returns the content of the selected elements
• val(): This sets or returns the values of form fields
jQuery traversing
You can traverse through the elements in the order they are combined. All the
elements are mostly combined in the form of a tree, and we can traverse them
starting from the root.
Elements are not combined per se, but they are rather structured or
modeled within the document object.
Let's take a look at the following image:
Let's take a look at the following description:
• The <div> element is the parent of <ul> and an ancestor of everything inside it
• The <ul> element is the parent of both the <li> elements and a child of <div>
• The left <li> element is the parent of <span>, child of <ul>, and a
descendant of <div>
• The <span> element is a child of the left <li> and a descendant of <ul>
and <div>
• The two <li> elements are siblings (they share the same parent)
• The right <li> element is the parent of <b>, child of <ul>, and a descendant
of <div>
• The <b> element is a child of the right <li> and a descendant of <ul> and <div>

Chapter 14
[ 693 ]
Ancestors
An ancestor is a parent!
We will cover three useful jQuery methods for traversing up the DOM tree in the
following sections.
parent()
The parent() function returns the parent of selected element.
Parameters
This takes no parameter, but it is called as a function of the jQuery object.
Returns
This returns the parent of the element.
Description
This function returns the parent of the selected element:
$(document).ready(function() {
$("span").parent();
});
parents():
The parents(): function returns an array of parents of the selected element till root.
Parameters
This takes no parameter but is called as a function of the jQuery object.
Returns
This function returns all the parents of an element.
Description
The parents(): function returns an array of parents of the selected element till root:
$(document).ready(function() {
$("span").parents();
});

jQuery – The Popular JavaScript Library
[ 694 ]
parentsUntil():
$(selector).parentsUntil(stop,filter);
The parentsUntil() method returns all ancestors between the selector and
stop element.
An ancestor element is a parent, grandparent, great-grandparent, and so on.
Parameters
Stop an optional parameter that indicates where to stop the search for matching
ancestor elements. Filter an optional parameter usually an expression to narrow
down the search between selector and stop.
Returns
This returns all parents between the two selected elements.
Description
This function returns the parents between two selected elements:
$(document).ready(function() {
$("span").parentsUntil("div");
});
Descendants
A child of the parent is called its descendant.
In the following sections, we will cover two useful jQuery methods for traversing
down the DOM tree.
children()
The children() function returns the children of the selected element.
Parameters
This takes no parameters but it is called as a function of the jQuery object.
Returns
This returns an array of HTML elements that are children of the target element.

Chapter 14
[ 695 ]
Description
This function returns the children of the selected element:
$(document).ready(function(){
$("div").children();
});
nd()
The find() function returns an array of children up to the child that has no children
of its own, which is also called a leaf.
Parameters
The find() function takes the HTML element as parameters.
Returns
This returns all the children of the target element.
Description
This function returns an array of children up to the leaf of the tree:
$(document).ready(function() {
$("div").find("span");
});
Siblings
Siblings are elements that share a same parent.
There are many useful jQuery methods for traversing sideways in the DOM tree,
which we cover here.
siblings()
$(selector).siblings(filter);
The siblings() function returns all the siblings of the selected element.
Parameters
Filter is an optional parameter usually an expression to narrow down the search
among all siblings.

jQuery – The Popular JavaScript Library
[ 696 ]
Returns
This returns all the siblings of the element.
Description
This function returns all the siblings of the selected element using the
filter parameter:
$(document).ready(function() {
$("span").siblings("div");
});
next()
$(selector).next(filter);
Filter is an optional parameter usually an expression to narrow down the search for
next sibling.
Parameters
This takes no parameters, but is called as a function of the jQuery object.
Returns
This returns the next siblings of the element.
Description
This function returns the next siblings of the selected element using the filter
parameter:
$(document).ready(function(){
$("span").next();
});
nextAll()
$(selector).nextAll(filter);
The nextAll() function returns an array of the next siblings of the selected element.
Parameters
Filter is an optional parameter usually an expression to narrow down the search for
all next sibling.

Chapter 14
[ 697 ]
Returns
This returns an array of all the next siblings of the target element.
Description
This function returns an array of the next siblings of the selected element using
the parameter:
$(document).ready(function() {
$("span").nextAll();
});
nextUntil()
$(selector).nextUntil(stop, filter);
The nextUntil() function returns an array of next siblings of the selected element
between two specied elements.
Parameters
Stop an optional parameter that indicates where to stop the search for next matching
sibling elements.
Filter an optional parameter usually an expression to narrow down the search for
sibling elements between selector and stop.
Returns
This returns all the next siblings of the element.
Description
This function returns an array of next siblings of the selected element between
two elements:
$(document).ready(function() {
$("span").nextUntil('H4');
});
prev()
$(selector).prev(filter);
The prev() function returns the previous siblings of the selected element.

jQuery – The Popular JavaScript Library
[ 698 ]
Parameters
Filter is an optional parameter usually an expression to narrow down the search for
previous sibling.
Returns
The prev() function returns the previous siblings of the element.
Description
This function returns the previous siblings of the selected element using the filter
parameter:
$(document).ready(function() {
$("span").prev();
});
prevAll()
$(selector).prevAll(filter);
The prevAll() function returns an array of the previous siblings of the selected
element.
Parameters
Filter is an optional parameter usually an expression to narrow down the search for
all previous siblings.
Returns
The prevAll() function returns the array of all the previous siblings of the element.
Description
This function returns an array of the previous siblings of the selected element using
the parameter:
$(document).ready(function() {
$("span").prevAll();
});
prevUntil()
The prevUntil() function returns an array of the previous siblings of the selected
element between two elements.

Chapter 14
[ 699 ]
Parameters
This takes the element up to which the search of siblings is limited.
Returns
This returns an array of all the previous siblings of the element.
Description
This function returns an array of the previous siblings of the selected element and
the parameter:
$(document).ready(function() {
$("span").prevUntil("Div");
});
Filtering
The ltering method is used to locate a specic element based on its location.
rst()
The first() function outputs the rst element of the selected elements.
Parameters
The first() function takes the selected element as parameter.
Returns
This returns a jQuery object that stores a reference to the rst item from an array of
items matching the provided selector string.
Description
This function outputs the rst element of the selected elements. The following
example outputs the rst H1 heading inside the <div> tag:
$(document).ready(function() {
$("div H1").first();
});
last()
This function returns the last element of the selected elements.

jQuery – The Popular JavaScript Library
[ 700 ]
Parameters
The last() function takes the selected element as parameter.
Returns
This returns a jQuery object that stores a reference to the last item from an array of
items matching the provided selector string.
Description
This function outputs the last element of the selected elements. The following
example outputs the last H1 heading inside the <div> tag:
$(document).ready(function() {
$("div H1").last();
});
eq()
The eq() function returns the element specied at the corresponding index number,
provided that we begin the numbering from 0. Hence, the rst element will have its
index number as 0, the second element will have the index number 1, and so on.
Parameters
The eq() function takes the selected element and the index number as parameters.
Returns
This returns the element at the specied index number.
Description
This function returns the element specied at the corresponding index number.
The following example returns the fth div element:
$(document).ready(function() {
$("div").eq(4);
});
lter()
The filter() function is used to obtain a list of elements that satisfy a particular
condition. All the elements that satisfy the specied condition will be returned.
Chapter 14
[ 701 ]
Parameters
The element to be searched and the condition that the element must satisfy are taken
as parameters here.
Returns
This returns a list of elements that satisfy a specied condition.
Description
The filter() function is useful for searching and obtaining a list of elements that
satisfy a specied condition. In the following example, we will search and obtain a
list of all the <div> elements that have their class named as Feedback:
$(document).ready(function() {
$("div").filter(".Feedback");
});
The not() method is the reverse of the filter() method. If you want
to nd elements that do not satisfy the mentioned condition, not() can
be used.
Using AJAX in jQuery
Asynchronous JavaScript and XML (AJAX) was the base building block of Single
Page Applications (SPAs). This method is used to update the content of a web page
without reloading the whole page. This method helps save precious resources and
decreases the time taken for loading a page considerably, since only parts of the page
are reloaded and not the entire page.
More than often, you have visited the Google search page for searching answers to
your questions. Have you noticed how the page displays results as you type into the
search box and provides useful suggestions of related searches? Or the product lters
on Amazon and Ebay websites. These effects are achieved with AJAX.
The jQuery Ajax load
The load() method loads data from a server and puts the returned data into the
selected element.
Its syntax is as follows:
$(selector).load(URL,data,callback);

jQuery – The Popular JavaScript Library
[ 702 ]
Parameters
The load() method take the URL, data, and callback as parameters.
The callback parameter can have the following parameters:
• responseTxt: This parameter contains the resulting content when successful
• statusTxt: This parameter contains the status of the request, that is,
success, notmodified, error, timeout, parsererror
• xhr: This parameter contains the XMLHttpRequest object
Returns
The data from the URL is placed in the selected element.
Description
The load() method loads data from a server and puts the returned data into the
selected element. The following example loads the Sample.txt le into the specied
<div> tag:
$("#div1").load("Sample.txt" , function(responseTxt, statusTxt,
xhr);
jQuery Ajax Get
The Get request gets the data from the server with an HTTP GET request:
• GET: This requests data from a specified resource
Its syntax is as follows:
$.get(URL,callback);
Parameters
This takes the URL and callback as parameters. Here the callback parameter
is optional.
Returns
The Get request returns the data fetched from the URL.

Chapter 14
[ 703 ]
Description
The Get request gets the data from the server with an HTTP GET request:
$.get("Sample.html", myfunction(data)
The required HTML le is as follows:
<p> This is the data from the Sample.html file</p>
The preceding code will fetch the data from the html le and the line This is the
data from the Sample.html will be displayed in an alert box on triggering.
jQuery Ajax Post
The Post request gets data from the server with an HTTP POST request:
• POST: This requests data from a specified resource
Its syntax is as follows:
$.post(URL, data, callback);
Parameters
This takes URL, data, and callback as parameters. Here, the data and callback
parameters are optional.
Returns
This returns the data fetched from the URL.
Description
This gets data from the server with an HTTP POST request:
$.post("Sample.html", myfunction(data)
The required HTML le is as follows:
<p> This is the data from the Sample.html file</p>
The preceding code will fetch the data from the HTML le and This is the data from
the Sample.html will be displayed in an alert box when triggered.

jQuery – The Popular JavaScript Library
[ 704 ]
Miscellaneous jQuery functions
Here are a few more jQuery functions.
noConict()
Different scripts cannot work at the same time. Hence, in order to remove the
conicts, we use the noConflict() function.
Its syntax is as follows:
$.noConflict()
Parameters
An optional parameter for this method is removeAll. This parameter is used to
release the control over all jQuery variables. It's a Boolean value. If present, it
indicates that the control over all values must be released.
Returns
This method does not return anything.
Description
The $ symbol is used by various JavaScript libraries, which if used alongside jQuery
may cause issues. The noConflict() function returns the control of the $ symbol to
the other library.
The following code shows how one event has to wait when the other event is in process:
$.noConflict();
jQuery(document).ready(function() {
jQuery("button").click(function() {
jQuery("p").text("jQuery is still working!");
});
});
param()
The param() method is used to create a serialized representation of an object.
Its syntax is as follows:
$.param(object)

Chapter 14
[ 705 ]
Parameters
Object and trad are the parameters used in this function. Trad is an optional
parameter and is used when a traditional param serialization is needed. This
parameter is optional.
Returns
This returns a serialized representation of the object.
Description
The param() method is used to generate a serialized representation of an object or
an array. This is mostly used where a query string is to be generated. The following
example creates a query string for the student object:
$(document).ready(function() {
StudentObj = new Object();
StudentObj.name = "Kate";
StudentObj.age = 21;
StudentObj.class = "Micro-Processors";
$("button").click(function() {
$("div").text($.param(StudentObj));
});
});
index()
The index() method is used to nd out the position of an element.
Its syntax is as follows:
$(selector).index()
Parameters
The element whose position is to be found is taken as a parameter.
Returns
This method returns the index position of the rst occurrence of the specied
element, which is relative to the selector or specied element.

jQuery – The Popular JavaScript Library
[ 706 ]
Description
The index() method is used to get the position of the element that is passed as a
parameter. The rst occurrence of that element is searched for and its position is
returned. If the particular element is not found, then -1 is returned. The position
numbering begins at 0.
The following example nds the position of the div element and returns its index
in an alert box:
$(document).ready(myfunction() {
$("div").click(myfunction() {
alert($(this).index());
});
});
each()
The each() function is used to run a specic function for every element that matches
the criteria.
Its syntax is as follows:
$(selector).each(function(index,element))
Parameters
The only parameter this takes is the function(index, element). Here the position
of the selector can be specied at index and the element can be specied in element.
Returns
This method does not return anything.
Description
The each() function runs the specied function for each and every element that
matches the criteria. In the following example, an alert is created every time the
<div> tag is encountered:
$(document).ready(function() {
$("button").click(function() {
$("div").each(function() {
alert($(this).text())
});
});
});

Chapter 14
[ 707 ]
data()
The data() method is used to obtain data from the selected element. It is also used
to submit data to the selected element.
Its syntax is as follows: $(selector).data(name)
Parameters
$(selector).data(name,value);
To attach data to element, parameters passed are name and value. that name is then
used to retrieve the data value.
Returns
This returns data from the selected element.
Description
The data() function is used to attach data to or from an element. In the following
example, we rst attach the data to the <div> element:
$(document).ready(function() {
$("#btnAttach").click(function() {
$("div").data("greetingmsg", "Welcome To Alpha Zoo");
});
$("#btnGetAttached").click(function() {
alert($("div").data("greetingmsg"));
});
});
removeData()
The removeData() method is used to remove data that was previously attached to
the element with the data() method.
Its syntax is $(selector).removeData(name).
Parameters
The name of the data that is to be removed is taken as a parameter.
jQuery – The Popular JavaScript Library
[ 708 ]
Returns
This does not return anything.
Description
As the name suggests, the removeData() method is used to remove data that was
already set. The following example removes data that was set on the <div> tag:
$("#btnRemoveData").click(function() {
$("div").removeData("greetingmsg");
alert("Message from the site" + $("div").data("greetingmsg"));
});
jQuery plugins
Plugins are used to create a modular part of an application using various elements
that can be used in multiple projects. Here is a simple demonstration:
(function( $ ) {
$.myFunc.showLinkLocation = function() {
this.filter( "a" ).append(function() {
return " (" + this.href + ")";
});
return this;
};
}( jQuery ));
For more support on creating custom plugins, you can visit https://
learn.jquery.com/plugins/basic-plugin-creation/.
The jQuery community is huge. Developers have made some really great jQuery
plugins and extensions that you can use in your projects. All these projects are
available free of cost; however, there are some paid options too. The following are
some great jQuery plugins:
• NIVO Slider: This is one of the oldest and most popular image gallery
plugins by Dev7Studios. It has a built-in image cropping system and comes
with many themes and visual transitions.
• nanoGALLERY: This is another great image gallery plugin that comes with
navigation, lightbox, lazy load, thumbnails, and many more goodies. It is
also compatible with Bootstrap.

Chapter 14
[ 709 ]
• MixItUp: This plugin will help you make AJAX filters for your portfolio and
galleries with smooth animations.
• jQuery Knob: This is an extremely innovative jQuery plugin that makes
touchable and clickable dials. Even if you are not using it in your projects,
you should definitely take a look at its implementation.
• Tubular: This plugin lets you set a YouTube video as your web page's
background.
• Arc Text: This plugin converts your text into arc shapes. You can use your
mouse to push and pull the text to shape them in arcs.
jQuery resources
If you are hungry for more jQuery goodies, head over to this great website called
jQuery Rain at www.jqueryrain.com. They have over 3500 jQuery plugins and
tutorials with working demonstrations and sample codes.
[ 711 ]
AngularJS – Google's
In-Demand Framework
Angular is an application framework that helps you create web applications. It
builds off of HTML and JavaScript to make the creation of dynamic applications
easier. Angular extends and is a superset of JavaScript at the same time. You can
use plain old JavaScript and Angular to build your application.
This creates a double-edged sword. On the positive side, it is much easier to build
dynamic user interfaces and keep your code maintainable and testable. On the
other side, you must learn the overall concept of how an Angular application is
built, which Angular piece goes where. This is very different to any other JavaScript
application you may have built.
If all you have ever built is user interfaces with jQuery, BackBone, or plain old
JavaScript, then much of Angular will seem new and different.
We will try to cover Angular in a hierarchical way. We will start at the top with
containers that hold other parts and objects and end functions that can be used
across many objects. We will also touch upon testing, as it is a core part of how
Angular is built.
Let's not waste any more time and jump right to it.
All of the examples assume that you have loaded Angular so that the angular
object is available.
If you are unsure on how to load Angular, visit the ofcial Angular page
at https://angularjs.org/.

AngularJS – Google's In-Demand Framework
[ 712 ]
Modules (ngApp)
This is the high-level container for all the other parts of your application. There are
more functions than those listed here, but they will be described in the section they
relate to. For example, you can use module.controller to create a controller, but
this function will be under the controller section.
module
Modules are the rst basic building block of an Angular application:
angular.module(moduleName, [dependencies], [configFunction])
angular.module(moduleName)
Parameters
• moduleName: This is a string that will identify the module. It should be
unique.
• dependencies(optional): This is an array of module names that this
module is dependent on.
• configFunction(optional): This is a function that will configure the
module. See config section.
Return value
This is an Angular module object.
Description
This function will either create a new module or retrieve a module. This depends on
whether we pass in an array of dependencies. If dependencies are omitted, then a
module is retrieved. Conversely, if we include an array of modules to load (the array
can also be empty), then a module will be created.
When you have a group of objects that work together, it is a good idea to put them
into a module. Do not worry about creating too many modules. A module should
have one and only one clear function. Then, all the objects that it needs to accomplish
that function would be packaged with it.

Chapter 15
[ 713 ]
Here are a few examples of creating modules:
• This creates a new module: var firstModule = angular.
module('firstModule', []);
• This retrieves a module named firstModule: var firstModule =
angular.module('firstModule');
• This creates a module that relies on firstModule: var secondModule =
angular.module('secondModule', ['firstModule']);
cong
This allows you to congure providers:
module.config(configFunction)
Parameters
• The configFunction function is the function that will be executed.
Return value
This is an Angular module object.
Description
This is the function that should be used to congure providers. We will cover
providers later in this chapter, but there are a few examples in this section. This
allows for providers to be created before the module actually executes.
The providers will be injected into this function when called. For example, you can
use $provide or $routeProvider and they will be available. If you want to use a
custom provider, it would have to be created before config. The custom object will
need provider appended to the name for it to be available in config.
Here are a couple of examples using providers:
• This example uses $provide. The provider will be available later as
firstProvider:
firstModule.config(function ($provide) {
$provide.provider('firstProvider', function () {
this.$get = function () {
return function () { alert('First!'); }
}
});
});

AngularJS – Google's In-Demand Framework
[ 714 ]
• This example creates a provider first. It is injected as firstProvider in
config and used later:
firstModule.provider('first', function () {
this.$get = function () {
return function () { alert('First!'); }
}
});
firstModule.config(function (firstProvider) {
console.log(firstProvider);
});
run
This function is executed after cong:
module.run(runFunction)
Parameters
• The runFunction function is the function that will be executed.
Return value
This is an Angular module object.
Description
The run() function gets executed after config. At this point, all modules will be
loaded. It is the rst function called after the module is initialized after config.
What you do in this function will depend on the module.
Here is an example that sets a scope variable. The variable will be available in the
module in later functions:
firstModule.run(function ($rootScope) {
$rootScope.test = 'test';
});
Chapter 15
[ 715 ]
Routing (ngRoute)
The ngRoute module is a module that will allow you to congure routing in your
application. Routing is listening for changes to the location and then automatically
responding to those changes with a new controller and template. It uses ngView,
$routeProvider, and $route.
Your module will need to depend on ngRoute to use these directives
and services. We will also need to include the Angular route JavaScript
in our HTML.
ngView
This works with the $route service as a spot for content:
<ng-view [onload=''] [autoscroll='']/>
<element ng-view [onload=''] [autoscroll='']/>
Parameters
• onload(Angular expression): This evaluates on load.
• autoscroll(Angular expression): Whether or not $anchorScroll
is used with this ngView. By default, it is disabled. Otherwise, it will
evaluate whether the expression is true or not.
Return value
This is a directive.
Description
When routing, you will need to mark a part of your application where dynamic
content can be loaded. This is what ngView does. When a route is matched, it will
load the new content where ngView is. An example will be provided for all of
ngRoute at the end of the section.
$routeProvider
This is a provider that lets you congure routes:
$routeProvider.when(path, route)
$routeProvider.otherwise(route)

AngularJS – Google's In-Demand Framework
[ 716 ]
Parameters
• path(string): This is what the location will be matched against. It can
contain named groups by using a colon (:group), can include a star to match
multiple parts (:group*), and can be optional (:group?).
• route(object): This object tells Angular what to do when the route
matches. The object can have these properties (not an inclusive list):
°controller
°template
°templateUrl
°resolve
Return value
This returns $routeProvider, so it is chainable.
Description
This is the provider that can be used to congure all of the routes. It can be injected
into module.config.
$route
This is the actual service that provides which route denition has been matched. This
is an object that can be injected directly into a controller.
Properties
• current(object): This object has the current variables based on the route
that was matched. This will include $route, loadedTemplateUrl, locals,
params, and scope.
• routes(object): This has all the routes configured.
Events
These events can be listened for the $route object:
• $routeChangeStart: This event is fired before the actual route change
• $routeChangeSuccess: This event is fired after a route has been resolved
• $routeChangeError: This event is fired if any of the route promises are
rejected

Chapter 15
[ 717 ]
Description
This is a service that can be injected into each controller. The controller can then look
at the properties to get information about the route that was matched. The routing
matching will happen without your intervention and then you can update your
controller's scope when the route is loaded.
$routeParams
This is a service that will return the parameters of the loaded route. This will
only give you parameters after a route has resolved, so you may need to use
$route.current.params. This can be injected into a controller.
Here is an example using all of the directives and services in ngRoute. First, we have
an HTML body tag. This will also include an inline template named main.html. This
template will echo out the $route and $routeParams objects:
<body ng-app="firstModule">
<div ng-view></div>
<a href="#/main/1">Main</a>
<script type="text/ng-template" id="main.html">
<pre>$routeParams = {{$routeParams}}</pre>
<pre>$route = {{$route}}</pre>
</script>
</body>
Here is the script that will execute this. First is the creation of the module, then the
conguration of $routeProvider and, nally, the denition of a controller for the
provider to use:
var firstModule = angular.module('firstModule', ['ngRoute']);
firstModule.config(function ($routeProvider) {
$routeProvider.when('/main/:id', {
controller: 'MainController',
templateUrl: 'main.html'
});
});
firstModule.controller('MainController', function ($scope, $route,
$routeParams) {
$scope.$route = $route;
$scope.$routeParams = $routeParams;
});
AngularJS – Google's In-Demand Framework
[ 718 ]
Dependency injection
Angular makes use of dependency injection everywhere. Dependency injection
is when a function does not initialize the dependencies it needs. Instead, they are
injected into the function as parameters. For example, when a module needs a route
provider, it asks for one. The module does not care how or when the route provider
was created; it just wants a reference.
You actually use the injector in everything you do in Angular. Angular just does it
for you. We will look at $injector and understand how it works but, most likely,
you will not need to use these functions.
Dependency injection in Angular
We will quickly cover the common ways that objects are injected into functions in
Angular. Using a controller as an example, we will cover the two most common
methods. Both of these are using Angular's injection behind the scenes:
• Defining the variables in a function: You just have to pass the name of the
object you need injected. Here is an example that uses $scope and a service:
firstModule.controller('DIController', function ($scope,
customService) {
//$scope and customService are available here
console.log($scope);
console.log(customService);
});
• Using an array to list the dependencies: You can get the exact same result
using an array. The elements of the array will be the objects you need as
strings. Finally, you will just need to have a function as the last element in the
array. The function can even rename the variable if needed. Here is the same
example in the array format:
firstModule.controller('DIController', ['$scope',
'customService', function (newScope, custom) {
// newScope and custom are available here
console.log(newScope);
console.log(custom);
}]);
Only the array format is minication safe. The rst function will not
work once the source has been minied.

Chapter 15
[ 719 ]
injector
Use this to get an Angular injector that you can invoke:
angular.injector(modules)
Parameters
• The modules(array) array is a list of the modules you want to load. You
must include ng.
Return value
This returns an injector object. See $injector section.
Description
You can create this object to use Angular's injector object. List out the references you
want and then invoke your function.
Here is an example that gets a reference to the $http service:
var injector = angular.injector(['ng']);
var injectTest = function ($http) { console.log($http); };
injector.invoke(injectTest);
$injector
You will very rarely ever need to create an injector in Angular. It will be provided
for you. You can get a reference to the injector by injecting it or retrieving it from a
current module. Here are examples for both:
• You can get a reference from any element inside of the module:
var injector = angular.element(document.body).injector();
• You can have it injected into a function. Here is an example using config:
firstModule.config(function ($routeProvider, $injector) {
console.log($injector);
});

AngularJS – Google's In-Demand Framework
[ 720 ]
Methods
• annotation: This returns an array of the objects that will be injected
• get(name): This returns the service with its name
• invoke(function): This will execute the function injecting the dependencies
• has(name): This allows you to determine whether a service exists
Description
Angular will do this automatically for you, but it is always good to have an idea
of what is happening. This is especially true with something that works just like
$injector. Each time a function executes with dependencies, Angular will invoke
the function from the injector, sending the correct parameters if they have been
created and registered.
Controllers
Controllers are one of the core units of any Angular application. Controllers are used
to create a small part of a module that requires its own scope. Each module can have
many controllers. Controllers should be small and focused on one task.
Each controller should really only worry about the data and any events that modify
that data. This means a controller should not modify the DOM, change output or
input, or share state with another controller. Each of these should use the Angular
solution, directives or lters, and services, respectively.
Controllers are created from a module reference, so they are tied to modules. Here is
an example of creating a simple controller:
firstModule.controller('SimpleController', ['$scope', function
($scope) {
$scope.hey = "HEY!";
console.log($scope);
}]);
This module can then be attached to a DOM element with ngController:
<div ng-controller="SimpleController">
{{ hey }}
</div>

Chapter 15
[ 721 ]
ngController
This is a core part of how Angular maps to the model-view-controller pattern.
<element ng-controller />
Parameters
• The ng-controller(expression) attribute is a string that will tell Angular
which controller is tied to this element.
Description
A controller needs a part of the document to attach. This directive will bind the
controller, with its scope, to this element.
If a controller has been dened in a route, then you should not add this directive to
the page. The router will take care of binding to the correct element.
Here is an example of using ngcontroller to create an alias for the controller:
<div ng-controller="SimpleController as simple">
{{ simple.hey }}
</div>
$scope
This is the most important part of a controller. This is the where you should place
everything you are tracking for this controller. This includes any functions that
modify the scope.
The $scope controller is injected into the controller by declaring a dependency to it
(see dependency injection). There are built-in functions and properties (see Scopes),
but because it is just a JavaScript object, you can add your own functions and
properties. These will map directly to the template in the controller.
Here is an example of a controller that denes one property, hey, and a function,
changeHey. It is important to note that there are no references to DOM references at
all in this function:
firstModule.controller('SimpleController', ['$scope', function
($scope) {
$scope.hey = "HEY!";
$scope.changeHey = function () {
$scope.hey = $scope.hey === 'HEY!' ? 'OK!' : 'HEY!';
};
}]);

AngularJS – Google's In-Demand Framework
[ 722 ]
Here is the template with all the data binding in the HTML document:
<div ng-controller="SimpleController">
{{ hey }}
<input type="text" ng-model="hey"/>
<button ng-click="changeHey()">{{hey}}</button>
</div>
Angular will know what hey is in this element because it is scoped to just
SimpleController.
Data binding and templates
A controller uses HTML as its templating language. You can bind a value from the
controller's scope just by surrounding it in double brackets ({{ }}). That is really all
there is to it!
For some elements such as input, select, and textarea, you cannot just add the
value of a scope object to bind them. You will have to use the ngModel directive.
The $scope section has a great example of binding scope values to the template.
Event binding
Angular uses directives to bind events. In the $scope section, the example uses
ngClick to listen for the click event on a button.
See the Directives, Event Binding section for a list of the most used event directives.
Scope
The $scope object that gets injected into controllers has some functionality. In
addition to this, we will look at the hierarchies and digest cycle of scopes.
Digest cycle
This is an important concept to understand with scopes. The digest cycle, from a high
level, is a cycle that checks to see whether any scope variables have been changed. If
they have, it then executes a function. Take binding a scope variable to the template
with {{variable}}. The digest cycle will now watch this variable and, anytime it
changes, it will update the template. If the variable is bound anywhere else, it will be
updated as well. This is how Angular "magically" makes values auto update.

Chapter 15
[ 723 ]
A few things to keep in mind is that not everything in the scope is watched. The
easiest way to have it watched is to bind it. You can also manually watch values.
Also, remember that performance issues can arise when you are watching many
variables. The digest cycle goes through all the watchers.
$digest
This is how you can start the digest cycle:
scope.$digest()
Description
This will manually kick off the digest cycle for the scope. In most cases, this does not
need to be called. For example, $digest does not need to be called after updating
a value from a click event when handled through Angular. Angular will start the
digest cycle for you. A good rule of thumb is that if you are changing or updating a
value from an Angular event or directive in a controller, you would not need to call
$digest.
One case where you may need to call it is when dealing with an asynchronous call in
a custom directive.
$watch
This allows you to watch a value or computed value in the digest cycle:
scope.$watch(watch, listener)
Parameters
• watch(string or function): This is what you want to watch. A string will
be evaluated as an expression. The function will have access to the scope
through the first parameter. Using a function allows you to watch not only
for values, but also calculated values of variables in the scope.
• listener(function): This function will have the function(newVal,
oldVal, scope) signature. This is the function that will execute when the
value changes.
Return value
This is a function to deregister the watch.

AngularJS – Google's In-Demand Framework
[ 724 ]
Description
This is how to manually add a watch to the digest cycle. There are two main reasons
to do this. The rst is that you will need to run a custom function when a value
changes. The other is that you will need to watch a combination or calculation of a
value in $scope.
Here is an example that has a watch for a string and a function. The basis of the
example is from Controllers, $scope sections. The rst watch listens for the hey
variable in the scope. The other one watches to see whether the value of hey has
three or more characters. It will only re when this threshold has been crossed and
not re again until it is crossed in the opposite direction:
$scope.$watch('hey', function (newVal, oldVal, scope) {
alert('Hey was changed from ' + oldVal + ' to ' + newVal);
});
$scope.$watch(function (scope) {
return scope.hey.length >= 3;
}, function (newVal, oldVal, scope) {
console.log('Hey listener');
});
$apply
This is a way to manually start the digest cycle:
scope.$apply(func)
Parameters
• The func(function or string) attribute is a string, it would be evaluated
as an expression. If it is a function, the function would be executed.
Return value
This is the return value of the function or expression.

Chapter 15
[ 725 ]
Description
This will manually kick off the digest cycle. Much like $digest, this should not be
called for the most part, except for specic situations. The most common situation
is when a scope value has been changed outside of Angular, for example, an
asynchronous AJAX call that has a reference to a scope value. The update happens
outside of the digest loop and Angular does not know as it did not use any Angular
methods.
This leads to a best practice to always use Angular's services and functions. If you do
so, you should never have to run $apply.
Another best practice is to run your function inside $apply. Angular will catch any
errors that are thrown and you can deal with them the Angular way.
Here is an example that updates the scope inside setTimeout after 2 seconds. As the
digest loop has nished, it will not see this change unless $apply is called:
setTimeout(function () {
$scope.$apply(function () { $scope.hey = 'Updated from
setTimeout'; });
}, 2000);
Hierarchies
Angular applications only have one root scope but many child scopes. When a
variable is referenced, it will check the current scope it is in and then check the
parent. This will happen all the way up to the root scope. This is very similar to how
JavaScript objects work with the prototype property. You can nd more about this in
Chapter 8, JavaScript Object-orientated Programming.
Services
The role services play in an Angular application is clear, but there can be confusion
around the creation of services. This is because there are three very similar ways to
create a service in Angular. We will look at each of these and why they should be used.
A service in Angular is an object that can be an authority on data (meaning it is the
only source of some data). A great example is the route provider as it is the only
object that provides route information. It is a singleton that all modules utilize, a way
to keep data in sync between controllers, or all of these! A great example of a service
that you will most likely need is $http. It makes AJAX requests for you. You can
build a service that returns data from your API and you do not have to worry about
creating AJAX calls in each and every controller.

AngularJS – Google's In-Demand Framework
[ 726 ]
Another example is the $route and $routeParams services. When you have a
reference to the $route service, you can always nd out what route has been
matched. The $routeParams service will let you know the parameters.
Services should be used anytime you have the need to write the same code more
than once. You can pull it out and put it into a service. In addition to this, services
should be created for any data that will be used by more than one controller. The
controller can then ask the service for the data. This will keep this data the same
across multiple controllers.
All of the functions listed can be called from the module or off the $provide
injectable object.
Factory, service, and provider will all rely on an HTML template of this:
<div ng-controller="SimpleController">
{{ service }}
</div>
Factory
This is the method to create factories:
module.factory(name, getFunction)
Parameters
• name(string): This is the name that the service will be known by. This can
be used for dependency injection.
• getFunction(function or array): This is the function that will return the
service. This can also be an array that lists the dependencies.
Return value
This is an Angular module object.
Description
The service factory is great when you need a singleton. No conguration other than
what is done in the factory() function is done. The object will be the same each
time it is injected.

Chapter 15
[ 727 ]
Here is a simple example that will return the name of the service. The example also
creates a dependency on $http:
firstModule.factory('firstFactory', ['$http', function ($http) {
var serviceName = 'firstFactory';
return {
getName: function(){return serviceName;}
};
}]);
Service
Services can be initialized with new keyword:
module.service(name, constructor)
Parameters
• name(string): This is the name of the service
• constructor(function or array): This will be the function that is called
as the constructor
Return value
This is an Angular module object.
Description
The key distinction between a service and a factory is that it can be initialized with
new. Here is an example that depends on $http:
firstModule.service('firstService', ['$http', function ($http) {
return function (name) {
var serviceName = name;
this.getName = function () {
return serviceName;
};
};
}]);

AngularJS – Google's In-Demand Framework
[ 728 ]
Here is the controller that will initialize the service:
firstModule.controller('SimpleController', ['$scope',
'firstService', function ($scope, firstService) {
var first = new firstService('First Service Name');
var second = new firstService('Second Service Name');
$scope.service = second.getName();
}]);
Provider
The function that provides the most control of the setup of a provider:
module.provider(name, provider)
Parameters
• name(string): This is the name of the provider
• provider(function or array)
Return value
This is an Angular module object.
Description
This is the nal and most complex way to build a service. It must return an
object with a $get method. You should use this when you must have this object
ready for conguration. This is the only provider that can be injected during the
conguration phase of application startup. The word "provider" will be appended
to the name of this. For example, if you named your provider my, it will be injected
using myProvider. Here is an example provider that has its name injected during
conguration. First up is the provider denition:
firstModule.provider('first', function () {
var serviceName;
return {
configSet: function (name) {
serviceName = name;
},
$get: function () {
return {

Chapter 15
[ 729 ]
getName: function () { return serviceName; }
};
}
}
});
Next is the conguration. Notice how it is injected using firstProvider:
firstModule.config(['firstProvider', function (firstProvider) {
firstProvider.configSet('firstProvider123');
}]);
Finally, here is the controller:
firstModule.controller('SimpleController', ['$scope', 'first',
function ($scope, firstProvider) {
$scope.test = firstProvider.getName();
}]);
Value
This sets a value in the module:
module.value(name, value)
Parameters
• name(string): This is the name of the value
• value(object): This can be anything
Return value
This is an Angular module object.
Description
A value is something that is set and then can be injected later. Values can only be
injected into a controller or service, not during conguration.
Here is a simple example of value:
firstModule.value('appTitle', 'First App');

AngularJS – Google's In-Demand Framework
[ 730 ]
Constant
This creates a constant variable in a module:
module.constant(name, value)
Parameters
• name(string): This is the name of the value
• value(object): This can be anything
Return value
This is an Angular module object.
Description
This is very similar to value, except that this can be used in the config function and
that the value cannot be decorated.
Here is a simple example of constant:
firstModule.constant('appTitle', 'First App');
$http
This is the service used to make HTTP calls:
$http(config)
Parameters
• config(object): This object has the following properties:
°method(string): This is the HTTP method.
°url(string): This is the URL.
°params(string or object): This is the params for the request. An
object will be mapped key to value for this.
°data(string or object): This is the data to be sent in the request.
°headers(object): This sets the headers for the request.
°xsrfHeadername(string): This is the name of the header for XSRF.
°xsrfCookieName(string): This is the name of the cookie for XSRF.
Chapter 15
[ 731 ]
°cache(Boolean): This is used to decide whether to cache data or not.
°responseType(string): This is used to decide what the request type
will be.
Return value
A promise will be returned.
Description
If you are familiar with jQuery's AJAX function, then you are familiar with this. This
is Angular's way of making any XMLHttpRequests. For most things, you will use one
of the convenience methods that make using $http easier.
Convenience methods
You can use all of the HTTP methods as functions: GET, POST, HEAD, PUT, DELETE, and
PATCH. We will just look at GET, POST, and JSONP closely.
GET, POST, and JSONP will cover most, if not all, of many
people's needs for $http. If this does not, view the $http
documentation at https://docs.angularjs.org/api/ng/
service/$http.
Each function will take the URL as the rst parameter and a config object, which is
the same config object that $http() gets.
GET
This is a GET request:
$http.get(url, config)
Description
This executes a simple GET request. Here is an example of a factory that uses
$http.get:

AngularJS – Google's In-Demand Framework
[ 732 ]
Here is the factory:
firstModule.factory('httpService', ['$http', function ($http) {
return {
test: function () { return $http.get('test', {params:
'test'}); }
}
}]);
This returns a promise that the controller can then use:
firstModule.controller('SimpleController', ['$scope',
'httpService', function ($scope, httpService) {
httpService.test().success(function (data, status) {
console.log(data);
})
.error(function (data, status) { console.log('An error
occured');});
}]);
POST
This is a POST request:
$http.post(url, config)
Description
This will make a POST request. Here is a factory that makes a POST and an example
that uses localhost. Remember that you must be running a server that responds to
POST requests for this to work:
firstModule.factory('httpService', ['$http', function ($http) {
return {
test: function () { return $http.post('http://localhost/post',
{ data: 'HEY' }); }
}
}]);
jsonp
When you have to make a cross origin request, you should use JSONP. This will allow
you to use the data instead of the request being blocked based on security.
Chapter 15
[ 733 ]
Notable services
I will list out some useful services that can be injected, with a short blurb about each:
• $anchorScroll: This parameter allows you to scroll to the element in the
hash
• $animate: This parameter allows DOM manipulations
• $cacheFactory: This allows caching
• $http: See $http
• $interval: This uses Angular's way to call setInterval
• $location: This gets the information about window.location
• $rootScope: This returns the root scope for the application
• $route: See Routing
• $q: This allows promises to be added in our project
• $timeout: This uses Angular's way to call setTimout
This is not a comprehensive list as Angular has many services and can create and
include more. These are the ones that you will most likely use in your applications.
Promises
In JavaScript, many actions are asynchronous. A great example of this is an AJAX
request. When the request is sent, you do not know when or even if a request will be
returned. This is where promises come in.
A promise is an object that will promise to run a function once an asynchronous
event has happened. In our example, the event will be the request returning. This
could be in a few milliseconds or longer, depending on the timeout setting.
In addition to tracking successful events, promises can be rejected. This allows the
object that was waiting for the response to do something different.
Visit https://promisesaplus.com/ for the complete specication
for using promises in JavaScript. Promises or promise-like objects are
applicable in almost any JavaScript that you may write.

AngularJS – Google's In-Demand Framework
[ 734 ]
$q
This is the service that implements promises:
$q.defer()
Return value
This returns a deferred object.
Description
This is the core of building and using promises. The rst thing is to get a deferred
object, which will have to resolve and reject functions. When the action is successful,
call the resolve function; when it fails, call reject. Finally, return the promise with
defer.promise.
With the promise, you can call then, which takes two functions. The rst will be
called when resolve is called, and the second will be called when reject is called.
The promise can be passed around and have then called multiple times.
Anytime you are doing anything asynchronous, you should use promises. With
Angular, you should use $q as it is tied in with rootscope.
Here is an example where a function will succeed when the number is even and fail
when the number is odd. Then, it is executed twice, logging to the console, whether
it succeeded or failed. Note that the function is created in the controller, but a utility
function like this should be put a service into production:
firstModule.controller('SimpleController', ['$scope', '$q',
function ($scope, $q) {
function qTest(number) {
console.log($q);
var defer = $q.defer();
if (number % 2 === 0) {
defer.resolve(number);
} else {
defer.reject(number);
}
return defer.promise;
};

Chapter 15
[ 735 ]
qTest(2)
.then(function (n) { console.log('succeeded!'); }, function
(n) { console.log('failed!'); });
qTest(3)
.then(function (n) { console.log('succeeded!'); }, function
(n) { console.log('failed!'); });
}]);
Expressions
Expressions are a feature of Angular. They are a subset of JavaScript commands in
addition to some Angular function. Expressions are used in many places in Angular.
For example, anytime you bind data, you can use an expression. This makes
understanding expressions important.
An expression will be evaluated to a value, to a true statement, to a function in
scope, or to a variable in scope. This makes them powerful, but they do have some
limitations.
Expressions in JavaScript
You can use some JavaScript, but not all JavaScript in an expression. Here are some
of the things that you can and cannot do in JavaScript using expressions:
• You can use a string, number, Boolean, array literal, or object literal
• You can use any operators, for example, a + b, a && b, or a || b
• You can access properties on an object or look up values in an array
• You can make function calls
• You cannot use flow control statements in an expression, for example, an if
statement
Context
When an expression is evaluated in Angular, it will use the scope that it is in. This
means that you can use any object or function that is accessible in the scope. One
difference is that you will not get access to the global window. For example, you will
not be able to use window.alert in an expression.
AngularJS – Google's In-Demand Framework
[ 736 ]
Directives
Directives are what Angular uses to connect to the Document Object Model (DOM).
This allows Angular to separate the concerns of what each part of the application
should do. This means that a controller should never touch the DOM. A controller
should only work through directives to change the DOM.
Normalization
When using directives, Angular must parse the DOM and gure out what directives
apply to it. This is done by normalizing all the elements and tags. Normalization
will remove any ";" "," " -", or" _". It will also remove x- and data- from the
beginning of any attributes. For example, when looking for ngModel, all of the
following will match:
• x-ng:model
• data-ng_model
• ng-model
• ng:model
If you are concerned with HTML 5 validation, then you should use the
data- normalization.
Scope
Scopes inside directives can become very confusing. We will look at a few examples
of the different ways to use scope.
First up is just inheriting the scope. This means that the directive will use whatever
value the variable has in the controller's scope. In this example, test will have to be
set in the controller's scope:
firstModule.directive('firstTest', function () {
return {
template: 'This is the test directive. Test: {{test}}'
};
});

Chapter 15
[ 737 ]
@ binding
The next scope modication will be to isolate the scope. You can set the scope
property of the returned Directive Denition Object (see the next section). What you
use here will change how the scope is built. An @ symbol will read in the value as a
one-way bind into the scope. An = symbol will create a two-way bind. Each of these
can have the name of the attribute used after them.
For example, to bind one way to the attribute scope-test, use: @scopeTest. Here is an
example that does that:
firstModule.directive('firstTest', function () {
return {
restrict: 'AE',
scope: {
test: '@scopeTest'
},
template: 'This is the test directive. Test: {{test}}'
};
});
This can be used like this:
<div first-test scope-test="Scope Test Value"></div>
= binding
Here is the example using =. The controller will need to have a variable in scope to
pass to the directive. Here is the directive:
firstModule.directive('firstTest', function () {
return {
restrict: 'AE',
scope: {
test: '='
},
template: 'This is the test directive. Test: {{test}}'
};
});
The directive is then used like this:
<div first-test test="fromControllerScope"></div>
Notice that the attribute used to connect the scope was called test. This is because
we only used =, instead of =nameOfVariable.

AngularJS – Google's In-Demand Framework
[ 738 ]
& binding
This is the nal way is to pass a function in. This is done with &. When creating a
directive with isolated scope, you run into a problem with letting the controller know
when to take an action. For example, when a button is clicked, the & binding allows
the controller to pass in the reference to a function and have the directive execute it.
Here is an example directive:
firstModule.directive('firstTest', function () {
return {
restrict: 'AE',
scope: {
testAction: '&'
},
template: '<button ng-click="testAction()">Action!</button>'
};
});
The template now has a button that will call testAction when clicked. The
testAction parameter that will execute is passed in from the controller and lives in
the directive's scope.
Here is the DOM of this directive:
<div first-test test-action="functionFromController()"></div>
Another situation comes up where you will need to pass information from the
directive to the controller, for example, the event object or a variable from the scope.
Here is an example that shows how Angular makes the $event object available in
functions.
Here is the directive:
firstModule.directive('firstTest', function () {
return {
restrict: 'AE',
scope: {
testAction: '&'
},
template: '<button>Action!</button>',
link: function ($scope, element) {
element.on('click', function (e) {
$scope.$apply(function () {

Chapter 15
[ 739 ]
$scope.testAction({ $e: e, $fromDirective: 'From
Directive' });
});
});
}
};
});
The key is the link property. This runs after compilation of the directive and is
bound to the instance of the directive. This is important if you have a repeating
directive. Next you listen for click using a jQuery-like API called JQLite. From here,
we must call $apply because we are outside of Angular and it will not pick up any
changes made here. Finally, we executed the expression that was passed in creating
two variables, $e and $fromDirective, that will be available in the function in the
controller.
Here is what the directive will look like in the DOM:
<div first-test test-action="functionFromController($e,
$fromDirective)"></div>
The two variables, $e and $fromDirective, need to be called the same thing as you
dened in the directive.
Modifying DOM
Angular makes very clear separation of concerns. This helps prevent hard-to-trace
bugs from appearing. One of the separations is that controllers should not modify
the DOM. Where does one modify the DOM then? In directives.
Directives are the only piece of your Angular application that should have any
knowledge of what elements are in the DOM. When a DOM modication needs to be
made, it should be the directive that does it.
Angular includes a jQuery-like library called jQLite. It has many of jQuery's DOM
manipulation functions. If you know jQuery, you already know jQLite.
Here is a simple example of a directive that adds a div element when a button is
clicked. The example uses jQLite's append function:
firstModule.directive('firstTest', function () {
return {
restrict: 'AE',
scope: {
testAction: '&'
},

AngularJS – Google's In-Demand Framework
[ 740 ]
template: '<button>Add a DIV!</button>',
link: function ($scope, element) {
element.on('click', function (e) {
element.append('<div>I was added!</div>');
});
}
};
});
Event binding
In an Angular application, only directives should be listening for DOM events, for
example, the click event. This makes it very clear where the handlers reside.
Here is an example that binds to the click event of the element and logs to the
console:
firstModule.directive('firstTest', function () {
return {
restrict: 'AE',
scope: {
testAction: '&'
},
template: '<button>Add a DIV!</button>',
link: function ($scope, element) {
element.on('click', function (e) {
console.log(e);
});
}
};
});
Additionally, directives can let a controller pass in a function and execute it when an
event happens (see = binding). Finally, the directive can even pass parameters into
the controller from the directive. A great example is the event object that is returned
from the event (see & binding).

Chapter 15
[ 741 ]
Directive denition object
The directive denition object is the object that tells Angular how to build a directive.
Here are the most used properties and a quick overview of what they do:
• priority: A directive with a higher priority will be compiled first. This
defaults to 0.
• scope: See Directives, Scope section for a much more in depth overview.
• controller: This can be confusing, but controller is used to share logic
between directives. Another directive can share the code in the controller
by using require and listing the name of the required directive. That
directive's controller will be injected into the link function. The function
will have the following definition: function($scope, $element, $attrs,
$transclude).
• require: A string of the directive that is required. Prepending ? will make
this optional, ^ will search the element and parents throwing an error if
not found, and ?^ will search the element and parents, but is optional.
The function instance will be shared across directives.
• restrict: This will restrict the ways you can define the directive in
the DOM. Here are the options, with E and A being the most commonly
used ones:
°E: This stands for element
°A: This stands for attribute and default
°C: This stands for class
°M: This stands for comment
• template: HTML as a string or a function that returns a string that has the
definition of function(element, attrs).
• templateUrl: Loads the template from this URL.
• link: This is where any DOM manipulations or listeners are put. This
function will have this definition: function(scope, element, attrs,
requiredController, transcludeFunction). If another directive is
required, then its controller property would be the requiredController
parameter.

AngularJS – Google's In-Demand Framework
[ 742 ]
Controller vs link
When to use the controller or link function can be very confusing when building
directives. You should view the controller function as the interface that another
directive can use. When a directive is required by another directive, the controller
return value is injected into the link function. This will be the fourth parameter.
The object is then accessible from link. The link function is used for any DOM
manipulations or listeners.
Key directives
Here are some of the most often used directives.
ngApp
This is the root of your Angular application:
<element ng-app></element>
Parameters
• The ng-app(string) attribute is the name of the default module.
Description
This will set the root element of the application. This can be put on any element,
including the root HTML element.
This will automatically bootstrap Angular loading the module that is dened in
ng-app.
ngModel
This binds data from the scope to elements:
<input ng-model [ng-required ng-minlength ng-maxlength ng-pattern
ng-change ng-trim]></input>
Parameters
• ng-model(string): This will be a variable in the scope
• ng-required(boolean): This sets this input as required
• ng-minlength(int): This sets the minimum length
• ng-maxlength(int): This sets the maximum length

Chapter 15
[ 743 ]
• ng-pattern(string): This is the regular expression that the value must
match
• ng-change(expression): This is the Angular expression that will execute
on value change
• ng-trim(boolean): This decides whether or not to trim the value
Description
This is used to bind variables in the controller's scope to input elements (text, select,
or textarea). This will be a two-way binding, so any changes in the variable will
update all occurrences of it.
Here is a simple example with text input:
<input ng-model="test" type="text"/>
{{test}}
ngDisabled
This can disable an element:
<input ng-disabled></input>
Parameters
• If the ng-disabled(expression) attribute evaluates to true, the input will
be disabled.
Description
This allows you to disable an input easily through code. The expression can bind to a
scope variable or just evaluate what is in the expression.
Here is a simple example that disables a text input:
<input ng-disabled="true" type="text"/>
ngChecked
This can make an element checked:
<input ng-checked></input>

AngularJS – Google's In-Demand Framework
[ 744 ]
Parameters
• The ng-checked(expression) attribute is the Angular expression that
should evaluate to a JavaScript Boolean value.
Description
This is the Angular way to check or uncheck a checkbox based on something in
the controller.
Here is an example:
<input ng-checked="true" type="checkbox"/>
ngClass
This sets the class of an element:
<element ng-class></element>
Parameters
• The ng-class(expression) attribute can be a string, array, or an object map.
Description
When the expression is a string or array, then the value of the string or the values
of the array will be applied as classes to the element. These can be tied to variables
in the scope, of course.
Here is an example of using a string to set the class. Here is the style that will be
applied:
.double { font-size: 2em; }
Here is the code to apply it:
<div ng-class="classString">Text</div>
<input type="text" ng-model="classString" />
The class is tied to the value of the classString variable. The input is bound so
that any change will update the class on div. Once you type in double, it will apply
the style.

Chapter 15
[ 745 ]
Here is an example using an object map. The object's property name is the class that
will be applied and the value must be true. Here is a similar example utilizing the
same class:
<div ng-class="{double: classString}">Text</div>
<input type="text" ng-model="classString" />
You will notice that once you type anything into the input, the class will be applied.
This is because a non-blank string will be true. You can use this to apply as many
classes as needed using more properties.
ngClassOdd and ngClassEvent
These set the class of an odd or even element, respectively:
<element ng-class-odd></element>
<element ng-class-even></element>
Parameters
• The ng-class-odd or ng-class-even(expression) attributes must
evaluate to a string or an array of strings that will become the class(es) for the
element.
Description
These two directives are related and can even be applied to the same element. If a
repeated element is odd, then ng-class-odd will evaluate and the same is true for
ng-class-even.
Here is an example that will make every odd element twice the size and every even
element half the size. Here are the styles:
.odd { font-size: 2em; }
.even { font-size: .5em; }
Here are the elements. The ul attribute creates the data to be repeated, and each span
parameter statically sets the class to either odd or even. You can use variables in
scope as well:
<ul ng-init="numbers=[1,2,3,4]">
<li ng-repeat="number in numbers">
<span ng-class-even="'even'" ng-class-
odd="'odd'">{{number}}</span>
</li>
</ul>

AngularJS – Google's In-Demand Framework
[ 746 ]
ngRepeat
This is a template that can be repeated:
<element ng-repeat></element>
Parameters
• The ng-repeat(repeat_expression) attribute is similar to an expression,
but it has a few syntax differences. Go to the description for the full
explanation.
Description
Many times you will have data that has a similar template, but changes for each row
of data. This is where ng-repeat comes in. The ng-repeat function will repeat the
HTML that you have for each item in the repeat expression.
The repeat expression is an expression that tells ng-repeat what items are going to
be looped over. Here is a rundown of some expressions:
• item in collection: This is the classic foreach statement. It will loop over
each item in a collection (an array, for example). The item parameter will be
available inside the template.
• (key, value) in collection: If your data is in an object and you want to
be able to associate the name of the property to the value, then you will need
to do use this.
• item in collection track by grouping: This allows for grouping. The
grouping will only give you one item for each unique value of grouping.
• repeat expression | filter: You can filter any of these expressions to
give you a subset of the data.
Here is an example using an unordered list. Here is the controller:
firstModule.controller('SimpleController', ['$scope', function
($scope) {
$scope.items = [{id: 1, name: 'First' }, {id: 2, name:
'Second'}];
}]);

Chapter 15
[ 747 ]
Here is the HTML for the controller:
<div ng-controller="SimpleController">
<ul>
<li ng-repeat="item in items track by item.id">
ID: {{item.id}}
Name: {{item.name}}
</li>
</ul>
</div>
ngShow and ngHide
These can show or hide elements, respectively:
<element ng-show></element>
<element ng-hide></element>
Parameters
• The ng-show or ng-hide(expression) attributes will be evaluated to true
or false, and the element will either by shown or hidden.
Description
These directives allow you to show or hide content based on the data in the scope.
Here is an example that uses a counter to show or hide elements. You can use
ng-hide and use the opposite logic. Here is the controller:
firstModule.controller('SimpleController', ['$scope', function
($scope) {
$scope.count = 0;
$scope.increase = function () { $scope.count++; };
}]);
Next is the HTML:
<div ng-controller="SimpleController">
<div ng-show="count == 0">Count is zero: {{count}}</div>
<div ng-show="count > 0">Count is greater than zero:
{{count}}</div>
<button ng-click="increase()">Increase Count</button>
</div>

AngularJS – Google's In-Demand Framework
[ 748 ]
ngSwitch
This creates a switch statement:
<element ng-switch>
<element ng-switch-when></element>
<element ng-switch-default></element>
</element>
Parameters
• ng-switch(expression): This is an expression that returns a value. This
value will be used when evaluating ng-switch-when.
• ng-switch-when(expression): When the value matches this expression,
then this element will be visible.
• ng-switch-default: This element will show when ng-switch-when does
not match.
Description
This directive works much like the JavaScript switch statement. Different cases are
tested against, and the one that matches is used. If none of the cases match, then a
default element is used.
Here is an example that jumps between even and odd. Here is the controller:
firstModule.controller('SimpleController', ['$scope', function
($scope) {
$scope.count = 0;
$scope.increase = function () { $scope.count++; };
}]);
Then comes the HTML:
<div ng-controller="SimpleController">
<div ng-switch="count % 2">
<div ng-switch-when="0">Count is Even: {{count}}</div>
<div ng-switch-when="1">Count is Odd: {{count}}</div>
</div>
<button ng-click="increase()">Increase Count</button>
</div>

Chapter 15
[ 749 ]
ngClick
This is used to dene the click handler:
<element ng-click></element>
Parameters
• The ng-click(expression) attribute is what will be evaluated when the
element is clicked. A function can be used, and the event object is available
using the function($event) function definition. Any other variables in
scope can be passed as well, for example, $indexin a repeater.
Description
This directive allows you to run JavaScript on the click of an element. Usually, this is
used with a function that is in the scope.
Here is an example that will increment a scope variable. First, here are the
controller's scope variables:
$scope.counter = 0;
$scope.functionFromController = function (e) { $scope.counter++;
};
Next, this is the element with the ng-click directive. In this example, you do not use
the event object, but it demonstrates how to get it to the controller function:
<button ng-click="functionFromController($event)">Click
Me!</button>
{{counter}}
ngDblclick
This is used to dene the double-click handler:
<element ng-dblclick></element>
Parameters
• The ng-dblclick(expression) function, a function can be used and the
event object is available using the function($event) function definition.
Any other variables in scope can be passed as well, for example, $index
in a repeater.

AngularJS – Google's In-Demand Framework
[ 750 ]
Description
This directive is very similar to ngClick. When the element is double-clicked, the
expression will be evaluated.
This is an example of a div that will increment a counter when double-clicked. Here
are the controller's variables:
$scope.counter = 0;
$scope.functionFromController = function (e) { $scope.counter++;
};
Here is the element and directive:
<div ng-dblclick="functionFromController($event)">Double Click
Me!</div>
{{counter}}
ngMousedown, ngMouseup, ngMouseover,
ngMouseenter, and ngMouseleave
These are used to dene the mouse event handlers:
<element ng-mousedown></element>
<element ng-mouseup></element>
<element ng-mouseover></element>
<element ng-mouseenter></element>
<element ng-mouseleave></element>
Parameters
• In the ng-mouse*(expression) function, a statement or function can be
used, and the event object is available using the function($event) function
definition. Any other variables in the scope can be passed as well, for
example, $index in a repeater.
Description
These are grouped together as they are all related. When the mouse takes the action
(down, up, over, enter, or leave), the expression will be evaluated.
This example is a little crazy, but it demonstrates how to use these events. Here is the
relevant portion of the controller:
$scope.counter = 0;
$scope.functionFromController = function (e) { $scope.counter++;
};

Chapter 15
[ 751 ]
Here are the directives:
<div ng-mousedown="functionFromController($event)" ng-
mouseup="functionFromController($event)"
ng-mouseenter="functionFromController($event)" ng-
mouseleave="functionFromController($event)"
ng-mouseover="functionFromController($event)">Mouse Over
Me!</div>
{{counter}}
ngMousemove
This is used to dene the mouse move handler:
<element ng-mousemove</element>
Parameters
• In the ng-mousemove(expression) function, a statement or function can be
used, and the event object is available using the function($event) function
definition. Any other variables in the scope can be passed as well, for
example, $index in a repeater.
Description
This res when the mouse moves. Unless the directive is on the entire page, the event
will be limited to only the element it is applied to.
Here is an example that will display the mouse's x and y coordinates. Here are the
relevant scope variables:
$scope.x = 0;
$scope.y = 0;
$scope.functionFromController = function (e) {
$scope.x = e.pageX;
$scope.y = e.pageY;
};
Then comes the directive:
<div ng-mousemove="functionFromController($event)">Move the mouse
to see the x and y coordinates!</div>
{{x}}
{{y}}

AngularJS – Google's In-Demand Framework
[ 752 ]
ngKeydown, ngKeyup, and ngKeypress
These are used to dene the key press handlers:
<element ng-keydown></element>
<element ng-keyup></element>
<element ng-keypress></element>
Parameters
• In the ng-key*(expression) function, a statement or function can be used,
and the event object is available using the function($event) function
definition. Any other variables in the scope can be passed as well, for
example, $index in a repeater.
Description
These will re when the key is pressed or released.
Here is an example that will retrieve the key code from the key that was pressed
down. Here are the relevant scope variables:
$scope.keyCode = 0;
$scope.functionFromController = function (e) {
$scope.keyCode = e.keyCode;
};
Next comes the directive:
<input type="text" ng-keydown="functionFromController($event)"/>
Which key: {{keyCode}}
ngSubmit
These are used to dene the submit handler:
<form ng-submit></form>
Parameters
• In the ng-submit(expression) function, a statement or function can be
used, and the event object is available using the function($event) function
definition. Any other variables in the scope can be passed as well, for
example, $index in a repeater.

Chapter 15
[ 753 ]
Description
This directive is used to capture the submit event of a form. If the form does not
have an action attribute, then this will prevent the form from reloading the current
page.
Here is a simple example that logs the event object to console on submit. Here is the
directive:
<form ng-submit="functionFromController($event)"><input
type="submit" id="submit" value="Submit" /></form>
Next comes the controller code:
$scope.functionFromController = function (e) {
console.log(e);
};
ngFocus and ngBlur
These are used to dene the focus and blur handlers, respectively:
<input, select, textarea, a, window ng-focus></input>
<input, select, textarea, a, window ng-blurs></input>
Parameters
• In the ng-focus(expression) function, a statement or function can be
used, and the event object is available using the function($event) function
definition. Any other variables in the scope can be passed as well, for
example, $index in a repeater.
Description
The ngFocus handler will re when the element gains focus, and ngBlur will re
when it loses focus. Here is an example with a text input that logs the event to
console:
<input type="text" ng-focus="functionFromController($event)"/>
Here is the controller code:
$scope.functionFromController = function (e) {
console.log(e);
};

AngularJS – Google's In-Demand Framework
[ 754 ]
ngCopy, ngCut, and ngPaste
<element ng-copy></element>
<element ng-cut></element>
<element ng-paste></element>
Parameters
• ng-copy, ng-cut, or ng-paste(expression): A statement or function can
be used, and the event object is available using the function($event)
function definition. Any other variables in the scope can be passed as well,
for example, $index in a repeater.
Description
These are the events that will be red when text is either cut, copied, or pasted. Here
is an example that uses all three:
<input type="text" ng-cut="functionFromController($event)" ng-
copy="functionFromController($event)" ng-
paste="functionFromController($event)" />
Here is the controller code:
$scope.functionFromController = function (e) {
console.log(e);
};
Globals
This next group of functions can be executed from anywhere in Angular without
having to inject them. They are mainly utility functions that allow you to do things
easier or do things the Angular way.
Extend
This provides a way to combine two objects:
angular.extend(srcObject, destObject)
Parameters
• srcObject(object): The object that extends will copy the properties from
• Destobject(object): The object that extends will copy the properties to

Chapter 15
[ 755 ]
Return value
This returns a reference of destObject.
Description
In JavaScript, there is no in-built way to extend an object using another object. This
function does just that.
Here is a simple example that will extend one object with the other's property:
var first = { first: '1' };
var second = { second: '2' };
var extended = angular.extend(first, second);
//extended will be {first:'1', second:'2'}
noop
This is the no operation function:
angular.noop()
Parameters
• The any or none functions are used as these functions does nothing, you can
pass in no parameters or as many as you want.
Return value
This will return undefined.
Description
It is useful to have a function do no operation (noop). A great example of this is when
you have a function as a parameter that is optional. If it is not passed in, you can run
noop instead.
This is a simple example that demonstrates the scenario explained earlier:
function test(doSomething) {
var callback = cb || angular.noop;
callback('output');
}

AngularJS – Google's In-Demand Framework
[ 756 ]
isUndened
This checks to see whether something is undened:
angular.isUndefined(object)
Parameters
• The object(any type) function can be any variable.
Return value
This returns a Boolean value.
Description
This states whether or not the variable is dened.
Copy
This makes a copy of an object:
angular.copy(srcObject, [destObject])
Parameters
• srcObject(any type): This is the source object to be copied.
• destObject(same type as srcObject): This is optional. If it is supplied, it
would be the destination of the copy operation.
Return value
This function returns the copy of srcObject. If destObject is supplied, it would be
returned.
Description
When you need to make a copy of an object instead of modifying the original object,
use this function.

Chapter 15
[ 757 ]
Bind
This binds a function to an object:
angular.bind(self, function, [args..])
Parameters
• self(object): This will set this (the inner self-reference) in the function
• Function(function): This is the function that is being bound
• Args(any type): These are the arguments that will be bound to the function
Return value
This is the new bound function.
Description
This creates a new bound function that will execute in the context of self. This allows
you to dene a function and then execute it many times in different contexts. This is
further extended by binding arguments as well.
This is a contrived example, but demonstrates the principles. First is a function
that depends on the context to execute. It will add the rst parameter to this and
multiply that result:
function addAndMultiply(toAdd, toMultiply) {
return (this + toAdd) * toMultiply;
}
Next, you will use angular.bind to create a new function:
var newFunc = angular.bind(4, addAndMultiply, 1);
This can be executed, and the return value will be 5 times the multiplier. In newFunc,
this is 4, and toAdd is 1, so the inner parens will always be 5. For example this will
return 10:
newFunc(2);
Forms
Forms are a core part of sending data to a server in HTML. As a result of this,
Angular has some extra features that work with forms.

AngularJS – Google's In-Demand Framework
[ 758 ]
ngModel
Each form input will need ngModel dened to store the value in the scope. See
Directives, ngModel for more information.
Here is a simple form that binds two text inputs:
<form name="form">
First Name: <input type="text" name="firstname" ng-
model="data.firstName" />
Last Name: <input type="text" name="lastName" ng-
model="data.lastName" />
</form>
{{data.firstName}} {{data.lastName}}
CSS classes
Angular will automatically add CSS classes to the form and elements that you can
then target with CSS. Here is the list of CSS classes and when they are applied:
• ng-valid: This denotes that the form or element is valid
• ng-invalid: This denotes that the form or element is invalid
• ng-pristine: This denotes that the control has not been changed
• ng-dirty: This denotes that the control has been changed
Validation
Angular has features that make validation very easy. First, Angular will use any
of the HTML 5 input types. These allow the browser to do some validation, but
Angular will still track any errors.
Next, you can use any of the built-in validation directives of ngModel. The list is
required, pattern, minLength, maxLength, min, and max. See Directives, ngModel for
more info about each. When an input fails validation, the value will not be passed
into the bound scope variable.

Chapter 15
[ 759 ]
Here is an example that sets a minimum length on firstName:
<form name="form">
First Name: <input type="text" name="firstname" ng-
minlength="10" ng-model="data.firstName" />
Last Name: <input type="text" name="lastName" ng-
model="data.lastName" />
</form>
{{data.firstName}} {{data.lastName}}
When a form is given a name attribute, it is bound to the scope as that name. When
inputs are given names in a form, they are bound to that form. This allows you to use
other directives with these values.
Here is an example that will show an error message when the text input does not
meet the minimum length of 10:
<form name="form">
First Name: <input type="text" name="firstname" ng-
minlength="10" ng-model="data.firstName" />
<div ng-show="form.firstname.$invalid">First name must be 10
characters!</div>
Last Name: <input type="text" name="lastName" ng-
model="data.lastName" />
</form>
{{data.firstName}} {{data.lastName}}
The validation message will only show when the eld is invalid.
The form will have $dirty, $invalid, $pristine, and $valid as properties that
can be used in directives or in scope. The inputs will have the same properties
and additionally an $error object that will have each of the failed validations as
a property. In the preceding example, this means that form.firstname.$error.
minLength will return true when the input has failed that validation and false
when it is valid.
Custom validators
When you need to create your own logic, you can build a custom validator. You
will need to create a new directive, require ngModel, and pass the value through the
$parsers object of the ngModel controller when it is passed into the link function.
Then, use $setValidity based on whether or not the value passed validation.

AngularJS – Google's In-Demand Framework
[ 760 ]
Here is an example of a custom validator where you cannot have the value of the
input set to josh:
firstModule.directive('notJosh', function () {
return {
require: 'ngModel',
link: function (scope, element, attrs, ctrl) {
ctrl.$parsers.unshift(function (viewValue) {
if (viewValue.toUpperCase() === 'JOSH') {
ctrl.$setValidity('notJosh', false);
return undefined
}
else {
ctrl.$setValidity('notJosh', true);
return viewValue;
}
});
}
}
});
Testing
Testing should always be a major part of any development project. Angular has
been built from the beginning to be testable. It has clear separation of concerns; for
example, you do not need to build a full DOM to test a controller. Angular also uses
dependency injection everywhere, which makes mocking up objects very easy.
Unit testing with Jasmine and Karma
Jasmine and Karma are two tools that allow you to quickly and easily test your
Angular code.
Jasmine
This is the actual unit testing library that we will use. Jasmine is a behavior-driven
testing framework and is really easy to write.

Chapter 15
[ 761 ]
Karma
Karma is the test runner that will watch your les and automatically kick off your
tests. It runs on Node.js, so you must have it installed. You can then install Karma
with npm:
install karma-jasmine
Karma can watch your test les and rerun them whenever any of the les change.
You can also debug tests in the browser if there are any issues. It is a great
complement to Jasmine, and Google recommends both for testing.
ngMock
The ngMock handler is used to help mock up your application when testing. When
testing, you will not want to create an entire DOM to load just one module. This is
where ngMock can create a controller instance for use, and we can then test it.
Module
This allows you to load a module:
module(moduleName)
Parameters
• The moduleName(string) function take
Description
You do not have a root element to put ng-app on, so module allows us to load a
module to get access to its controllers, services, and directives. You should only use
this function in tests after loading ngMock.
Inject
This gets the Angular inject services:
inject(toBeInjected)
Parameters
• The toBeInjected(function) function works much like other injected
functions. List out the objects to be injected, and they will be available in the
function body.

AngularJS – Google's In-Demand Framework
[ 762 ]
Description
Use inject to get access to built-in Angular services, such as $controller and
$compile, or use it to get access to a loading module's services.
Inject can load dependencies if they are wrapped with underscores. For example,
inject would load $compile if it is used as _$compile_. This is done because in a test,
we will need to create a reference to the $compile service, and most likely, we would
want to use $compile as the variable name. The underscores allow you to inject it
and use the $compile variable.
$httpBackend
This can create a mock response:
$httpBackend.when(requestType, url, [requestParameters],
[headers])
$httpBackend.expect(requestType, url, [requestParameters],
[headers])
$httpBackend.respond(response)
Parameters
• requestType(string): This is the HTTP method of the request
• url(string): This is the URL of the request
• requestParameters(object): These are the parameters of the request
• headers(object): These are the headers for the request
• response(string, object): This is the response of the request
Return value
This returns a handler that can call respond.
Description
Making AJAX calls is a perfect example of something that should not be done
in a unit test. There are too many things out of your control for unit testing. The
$httpBackend handler is provided by ngMock so that you can create a mock
response.
The handler must match the expected method and URL at the very least. You can
also match the optional parameters and headers if you plan on making specic
requests with them.

Chapter 15
[ 763 ]
When the request is matched, you can send back a string or object as the response.
This allows you to create a test that uses $httpBackend, as you know what the
response is going to be.
The difference between expect and when is that expect has to be called in the test,
whereas when does not have that requirement.
Unit testing controllers
Here is an example of a simple unit test for a controller. First, you must create a
controller and then load it in our test:
var firstModule = angular.module('firstModule', ['ngMock']);
firstModule.controller('SimpleController', ['$scope', function
($scope) {
$scope.test = 'HEY!';
}]);
You can now create the test. In the test, you must load the firstModule module,
inject $controller, and create an instance of SimpleController. Here is the test:
describe('SimpleController', function () {
var scope = {};
var simpleCtrl;
beforeEach(module('firstModule'));
it("should have a scope variable of test", inject(function
($controller) {
expect(scope.test).toBe(undefined);
simpleCtrl = $controller('SimpleController', { $scope: scope
});
expect(scope.test).toBe('HEY!');
}));
});
Unit testing directives
This example will show you how to test a directive. First, create the directive:
firstModule.directive('simpleDirective', function () {
return {
restrict: 'E',
scope:{
test: '@'
},

AngularJS – Google's In-Demand Framework
[ 764 ]
replace: true,
template: '<div>This is an example {{test}}.</div>'
};
});
Next, you will need to load the module, inject $compiler and $rootscope, compile
the directive, and nally, start the digest loop at least once to bind any values:
describe('simpleDirective', function () {
var $compile, $rootScope;
beforeEach(module('firstModule'));
beforeEach(inject(function (_$compile_, _$rootScope_) {
$compile = _$compile_;
$rootScope = _$rootScope_;
}));
it('should have our compiled text', function () {
var element = $compile('<simple-directive
test="directive"></simple-directive>')($rootScope);
$rootScope.$digest();
expect(element.html()).toContain('This is an example
directive.');
});
});
Unit testing services
The nal testing example will test a service. First, create a service:
firstModule.factory('firstFactory', ['$http', function ($http) {
return {
addOne: function () {
return $http.get('/test', {})
.then(function (res) {
return res.data.value + 1;
});
}
}
}]);

Chapter 15
[ 765 ]
Next, you will have to load the module, inject $httpBackend and the service factory,
create a response, and load the response. Notice the use of $httpBackend.flush().
This will send the response to any open requests:
describe('firstFactory', function () {
var $httpBackend, testingFactory, handler;
beforeEach(module('firstModule'));
beforeEach(inject(function (_$httpBackend_, firstFactory) {
$httpBackend = _$httpBackend_;
handler = $httpBackend.expect('GET', '/test')
.respond({ value: 1 });
testingFactory = firstFactory;
}));
it('should run the GET request and add one', function () {
testingFactory.addOne()
.then(function (data) {
expect(data).toBe(2);
});
$httpBackend.flush();
});
});

[ 767 ]
Index
Symbols
3-Dimensional
about 278
backface-visibility CSS property 280
perspective CSS property 278
perspective-origin CSS property 279
::before and ::after 112
::rst-letter 113
::rst-line 113, 114
::selection 114
:active 100
:apply, scope
about 724, 725
parameters 724
:checked 107
:default 107, 108
:digest, scope 723
:disabled 108
:empty 108, 109
:enabled 108
:rst-child 102
:rst-of-type 102
:focus 101
:hover 101
:httpBackend, ngMock
about 762, 763
parameters 762
:http documentation
URL 731
$http, services
about 730, 731
parameters 730, 731
$injector, dependency injection
about 719, 720
methods 720
:in-range 109
:invalid 110
:lang() 111
:last-child 103
:last-of-type 103
:link 99
:not or negation 110
:nth-child() 104
:nth-last-child 104, 105
:nth-last-of-type 105
:nth-of-type 105
:only-child 106
:only-of-type 106
:optional 111
:out-of-range 109
$q service 734
:required 111
$routeParams, routing (ngRoute) 717
$routeProvider, routing (ngRoute)
about 715, 716
parameters 716
:route, routing (ngRoute)
about 716, 717
events 716
properties 716
$scope, controllers 721, 722
:valid 110
:visited 100
$watch, scope
about 723
parameters 723, 724
@charset at-rule 315
.click() method 659
.concat() method 490
.dblclick() method 660
__dirname command 564

[ 768 ]
@document at-rule 316
__lename command 564
@font-face at-rule
about 317
Embedded Open Type (EOT) 318
font-family 318
font-stretch 319
font-variant 319
font-weight 319
Google Fonts 319
OpenType Font (OTF) 318
Scalable Vector Graphic (SVG) 318
src 318
TrueType Font (TTF) 318
unicode-range 319
URL 317
WOFF/WOFF2 318
.hover() method 661
@import at-rule
about 320, 321
URL 321
.Join() method 487
.keydown() event 667
@keyframes at-rule 321, 322
.keypress() event 668, 669
.keyup() event 669
@media at-rule
about 323
media types 324
.mousedown() method 662
.mouseenter() method 662, 663
.mouseleave() method 663, 664
.mousemove() event 664
.mouseout() event 665
@namespace at-rule 324, 325
- operator 387
-- operator 390
-= operator 394
! operator 392
!= operator 399
* operator 388
*= operator 395
/ operator 388
/= operator 395
% operator 389
%= operator 396
+ operator 386
++ operator 389
+= operator 394
< operator 396
<= operator 397
= operator 393
== operator 399
=== operator 400
> operator 398
>= operator 398
|| operator 392
&& Operator 391
@page at-rule 325, 326
.Pop() method 484, 485
.Push() method 485
.reverse() method 488
.slice() method 489, 490
.sort() method 488
.Splice() method 487
@supports at-rule
about 326
and operator 327
not operator 326
or operator 327
.toggle() event 666
toggle() function 680
.ToString() method 485, 486
.ValueOf() method 486
A
abbr element 23
absolute length units
cm sufx 163
in sufx 163
mm sufx 163
pc sufx 163
pt sufx 163
px sufx 163
abstraction 434
accept attribute
about 62, 63
elements 62
accept-charset attribute
about 63
elements 63
accesskey attribute 57

[ 769 ]
action attribute
about 63
elements 63
addition operator 378
address 600
address element 13
adjacent sibling combinator 97
Adobe
URL 655
ADsafe
URL 494
a element
attributes 22
description 23
Afx, Bootstrap/JavaScript plugins
about 651
activating, via data attribute 652
activating, via JavaScript 652
align-content CSS property
about 178
center 178
ex-end 178
ex-start 178
space-around 178
space-between 178
stretch 178
align-items CSS property
about 179
baseline 180
center 179
ex-end 179
ex-start 179
stretch 180
align-self CSS property
about 180
baseline 181
center 181
ex-end 180
ex-start 180
stretch 181
all CSS property 242
Alpha (a) 299
alt attribute
about 64
elements 64
ancestors
about 693
parent() function 693
parents() function 693
parentsUntil() function 694
AND operator 391
angle data types
deg sufx 164
grad sufx 164
rad sufx 164
turn sufx 164
Angular
URL 711
animatable CSS properties
URL 201
animate() function 677
animation
about 118
base markup and CSS 118, 119
URL 131
animation CSS property 130
animation-delay CSS property 122
animation-direction CSS property 121
animation-duration CSS property 120
animation-ll-mode CSS property 122, 123
animation-iteration-count CSS property 120
animation-name CSS property 119
animation-play-state CSS property 123
animation, properties
Longhand style 130
Shorthand style 131
animation-timing-function CSS
property 124
cubic-bezier() function 125, 126
ease function 124
ease-in function 124
ease-in-out function 125
ease-out function 124
linear function 125
steps() timing function 127, 128
Apache Tomcat 334
appendFile 571
Application Programming Interface
(API) 336
Arc Text plugin 709
argv command 561
arithmetic expression 378
arithmetic operators
- operator 387

[ 770 ]
-- operator 390
* operator 387
/ operator 388
% operator 389
+ operator 386
++ operator 389
about 385
array-like objects 415
array literals 355
array, methods
concat() 419
every() 419
foreach() 420
indexOf() 421
join() 420
lastIndexOf() 422
pop() 421
push() 421
reverse() 422
shift() 423
slice() 424
sort() 425
splice() 424, 425
toString() 425
unshift() 423
array object
.concat() method 490
.Join() method 487
.Pop() method 484
.Push() method 485
.reverse() method 488
.slice() method 489
.sort() method 488
.Splice() method 487
.ToString() method 485
.ValueOf() method 486
about 484
array, properties
about 418
constructor 418
length 418
prototype 418
array.prototype.every() method 430
array.prototype.lter() method 426, 427
array.prototype.forEach() method 428
array.prototype.indexOf() method 429
array.prototype.lastIndexOf() method 429
array.prototype.map() method 426
array.prototype.reduce() method 427, 428
array.prototype.reduceRight() method 430
array.prototype.some() method 430
arrays
about 376, 414, 498
constructor 416, 417
creating 415, 416
ECMA5 array methods 426
elementd, reading 417
elements, writing 417
extras 426
initializer 416
methods 419
multidimensional arrays 417
properties 418
type object 415
types 414
array, types
nominal type 414
structure type 414
arrow functions 505
article element
about 10
description 11
aside element
about 14
description 14
asJSLint
URL 494
assignment operators
-= operator 394
*= operator 394
/= operator 395
%= operator 395
+= operator 393, 394
= operator 393
about 393
async attribute
about 64
elements 64
Asynchronous JavaScript and XML
(AJAX) 335, 701
at-rules
@charset 315
@document 316
@font-face 317

[ 771 ]
@import 320
@keyframes 321
@media 323
@namespace 324
@page 325
@supports 326
about 315
attr() CSS function 306
attribute (ar) 306
attribute selectors 92
audio element 37
autocomplete attribute
about 65
elements 65
autofocus attribute
about 65
elements 65
automatic (auto) CSS keyword value 328
autoplay attribute
about 66
elements 66
autosave attribute
about 66
elements 66
axis
URL 195
B
BackBone 711
backface-visibility CSS property 280
background-attachment CSS property
about 131
URL 132
background-blend-mode CSS property
about 132-134
URL 134
background-clip CSS property
border-box 134
content-box 134
inherit 134
padding-box 134
URL 135
background-color CSS property 135
background-image CSS property
about 136
linear 136
radial 137
background-origin CSS property
URL 138
background-position CSS property 138
length 139
percentages 139
predened keywords 138
URL 139
background-repeat CSS property
about 139
URL 140
background-size CSS property
auto 141
contain 141
cover 141
length value 141
percentage value 141
URL 142
Badges 640
base element
about 6
attributes 7
basename 574
bdo element
about 23
attributes 24
Bennet Feelys
URL 271
Bézier curve 124
binary and octal literals 540
binary operator 384
bind, global
about 757
parameters 757
bindings 514
bleed CSS property 233, 234
blockquote element
about 15
attributes 15
description 16
block statement 401
blur() CSS function 286
blur() event 671
body element
about 9
attributes 9
description 9

[ 772 ]
Boolean literals 355
Boolean type 366
Bootstrap
about 615
containers 616
customizing 652
downloading 617
HTML5 doctype 616
Mobile rst 616
resources 653, 654
Responsive images 616
websites built with 652
Bootstrap, installing
with bower 617
with composer 617
with npm 617
Bootstrap/JavaScript plugins
accordions 647
Afx 651
alerts 646
buttons 642
carousels 649
Dropdowns 643
media objects 649
modals 648
Popovers 645
Scrollspy 651
tabs 646
tooltips 644
Typeahead 650
border-collapse CSS property 218
border CSS property
about 148
border-color 149
border-style 148
border-width 148
border-radius CSS property
about 156, 157
length value 157
percentage value 157, 158
border-spacing CSS property 218
bottom CSS property
about 204
auto 204
length value 204
percentage value 205
bower
Bootstrap, installing with 617
box model
about 143
width CSS property 143
box-shadow CSS property
about 240, 241
color value 241
inset 241, 242
length values 241
box-sizing CSS property
about 150
border-box 150
content-box 150
URL 150
bracket notation 381
Breadcrumbs 639
break statement 411
br element 24
brightness() CSS function 283
Browser object model (BOM) 337
buffer
about 584
byteLength 587
creation 584
index 585
isBuffer 586
readUInt 588
return value 584
toJSON 586
toString 585
write 586
writeUInt 588
built-in objects
about 470
array object 484
date object 471
global objects 470
math object 475
RegExp object 478
string object 480
bullet 235
button element
about 49
attributes 50
description 50

[ 773 ]
buttons, Bootstrap/JavaScript plugins
about 642
basic 642
justied link variation 643
nesting 642
sizing 642
toolbar 642
vertical variation 643
byteLength 587
C
Caja
URL 495
Cajita 495
calc() CSS function 308, 309
callback
about 688
callbacks.add() 688
callbacks.disable() 690
callbacks.re() 689
callbacks.remove() 690
callbacks.add() function 688
callbacks.disable() function 690
callbacks.re() function 689
callbacks.remove() function 690
canvas element
attributes 54
description 54
caption element
about 39
description 40
caption-side CSS property 219
Cascading Style Sheet (CSS) 89
case sensitive language 346
cass selectors 659
catch clauses
about 500, 501
nally clause 502, 503
try clause 500
ceil() function 477
chaining 691
change() event 670, 671
character code 349
character set
about 345, 346
case-sensitive language 346, 347
comments 353
ISO-8859-1 346
literals 354
normalization 350
optional semicolon 359, 360
reserved keywords 351, 352
statements 356
Unicode escape sequence 348-350
UTF-8 346
whitespaces and line breaks 347, 348
child combinator 96
children() function 694
cite attribute
about 66, 67
elements 67
cite element 24
class
about 434, 506
and modules 459
and prototypes 459, 460
dening 461
function, using 462
object literals, using 462
class attribute 58
class selectors 93, 94
clear CSS property 243, 244
URL 244
Client-side JavaScript
about 337
JavaScript, adding into web page 337, 338
client-side scripting language 337
clip-path CSS property
about 268, 269
circle() CSS function 269, 270
ellipse() CSS function 270
inset() CSS function 270
none 271
polygon() CSS function 271
url() CSS function 269
Clip Path Generator
URL 271
clipping 255
close 568, 600, 606
closures 457
code element 25
CodePen
URL 134

[ 774 ]
code point 349
colgroup element
about 40
attributes 40
description 40
collections
about 519
maps 519
sets 519
WeakMap 526
Weakset 529
color CSS property 208
colors
about 299
hsl() and hsla() CSS function 299
rgb() and rgba() CSS function 300
cols attribute
about 67
elements 67
colspan attribute
about 67, 68
elements 67
column-count CSS property 166
column-ll CSS property 167
column-gap CSS property 168
column-rule-color CSS property 169
column-rule CSS property 169
column-rule-style CSS property 170
column-rule-width CSS property 170
columns CSS property 171
column-span CSS property 170
column-width CSS property 171
combination inheritance 465
combinators
about 94
adjacent sibling combinator 97
child combinator 96
descendant combinator 95
general sibling combinator 97
selector specicity 98
command pattern 444
comments
about 353
HTML comment opening sequence 354
multiple-line comment 353
one-line comments 354
composer
Bootstrap, installing with 617
compound empty statements 402
concat() 419
conditional expression 378
conditional statements 356
about 403
else if statements 404
if statements 403
switch statements 406
cong, modules (ngApp)
about 713
parameters 713
connect 601-603
console
about 589
dir 589
log 589
time and timeEnd 590
trace 590
Const 496
constant
about 730
parameters 730
constructor pattern
about 437
module pattern 438-440
object literal notation 438
prototype constructors 438
simple constructors 438
constructors 460
constructor stealing 464
content attribute
about 69, 70
elements 69
contenteditable attribute 58
content, generated
about 114, 115
content 115
parameters 115
quotation marks 116
content sections
about 14
blockquote element 15
dd element 19
div element 21

[ 775 ]
dl element 18
dt element 19
gcaption element 20
gure element 20
hr element 15
li element 17
main element 21
ol element 16
pre element 15
ul element 17
continue statement 412
contrast() CSS function 284
controllers
$scope 721
about 720
data binding and templates 722
event binding 722
ngController 721
controls attribute
about 70
element 70
copy, global
about 756
parameters 756
Core JavaScript (ECMAScript) 336
core math library APIs 539
counter
about 237
counter-increment CSS property 239
counter-reset CSS property 238
counter-increment CSS property
about 239
name 239
number 240
counter-reset CSS property 238
name 238
number 238
cpus() function 559
createHash 581
createServer, HTTP module
about 604, 605
return value 605
createServer, net module
about 598
return value 598
Cross-Origin Resource Sharing (CORS) 4
crypto
about 580
createHash 580
hash object 581
pbkdf2 582
pseudoRandomBytes 583
randomBytes 582
CSS
about 118
animation CSS property 130
animation-delay CSS property 122
animation-direction CSS property 121
animation-duration CSS property 120
animation-ll-mode CSS property 122, 123
animation-iteration-count CSS property 120
animation-name CSS property 119
animation-play-state CSS property 123
animation-timing-function CSS
property 124
classes 758
patterns, URL 301 prexes 117
properties 117
units 158
CSS background properties
about 131, 134, 142
background-attachment CSS property 131
background-blend-mode CSS
property 132-134
background-clip CSS property 134
background-color CSS property 135
background-image CSS property 136
background-origin CSS property 138
background-position CSS property 138
background-repeat CSS property 139, 140
background-size CSS property 140
CSS columns
about 166
column-count CSS property 166
column-ll CSS property 167
column-gap CSS property 168
column-rule-color CSS property 169
column-rule CSS property 169
column-rule-style CSS property 170
column-rule-width CSS property 170
columns CSS property 171
column-span CSS property 170
column-width CSS property 171

[ 776 ]
CSS, prexes
-moz 117
-ms 117
-o 117
-webkit 117
cubic-bezier() CSS function 310, 311
cubic-bezier() function 125
parameters 126
cursor CSS property
32 keyword values 274, 276
about 273, 274
A URL (or URI) 274
URL 276
X and Y coordinates 274
custom plugins
URL 708
cycle 201
D
data 608
data-* attribute 58, 59
data binding and templates, controllers 722
data() method 707
data type
about 360
Boolean type 366
null type 363
number type 364
object type 368
string type 367
typeof operator 361, 362
undened type 362
date object
getDate() 472
getDay() 473
getFullYear() 474
getHours() 472
getMilliseconds() 471
getMinutes() 472
getMonth() 473
getTime() 471
set date methods 474
datetime attribute
about 68
elements 68
dd element 19
declaration statements
function keyword 402
var keyword 402, 403
dependency injection
$injector 719
about 718
in Angular 718
injector 719
descendant combinator 95, 96
descendants
about 694
children() function 694, 695
nd() function 695
description lists 630
design patterns
about 436
behavioral design patterns 437
command pattern 444
constructor pattern 437
creational design patterns 437
facade pattern 445
factory pattern 446
mediator pattern 442
mixin pattern 447
observer pattern 441
prototype pattern 443
revealing module pattern 440
singleton pattern 441
structural design patterns 437
destructuring assignment 498
dfn element 25
dir 590
dir attribute 59
direction CSS property 216
directive denition object
about 741
controller vs link 742
directives
about 736
directive denition object 741
DOM, modifying 739
event binding 740
key directives 742
normalization 736
scopes 736
dirname 573

[ 777 ]
disabled attribute
about 68, 69
elements 68
display and visibility properties
about 242
all CSS property 242
clear CSS property 243
display CSS property 245
lter CSS property 248
opacity CSS property 247
overow CSS property 252
overow-x CSS property 253
overow-y CSS property 253
visibility CSS property 254
z-index CSS property 255
display CSS property
table-related values 246
div element 21
dl element
about 18
description 18
DOCTYPE element
about 1
attributes 2
document events
about 674
resize() 675
scroll() 675
document metadata
about 3
base element 6
head element 3
link element 4
meta element 5
noscript element 8
script element 7
style element 6
title element 3
Document Object Model
(DOM) 335, 336, 736
Dojo
URL 494
Dojox
URL 494
dojox.secure tool
URL 494
domain-specic languages (DSLs) 509
DOM Tree 335
dot notation 381
double click 660
do while loop 409
download attribute
about 69
elements 69
draggable attribute 59
drawing elements
about 54
canvas element 54
svg element 55
dropdowns, Bootstrap/JavaScript plugins
about 643
single button 643
split button 644
drop-shadow() CSS function 312
drop shadows
box-shadow CSS property 240
dt element 19
duration units
about 165
ms sufx 166
s sufx 166
E
E4X 504
each() method 706
ECMA5 array methods
array.prototype.every() method 429
array.prototype.lter() method 426
array.prototype.forEach() method 428
array.prototype.indexOf() method 428
array.prototype.lastIndexOf() method 429
array.prototype.map() method 426
array.prototype.reduce() method 427
array.prototype.reduceRight() method 430
array.prototype.some() method 430
ECMA5 script
classes 462
ECMAScript
about 334, 491
for XML 504
ECMAScript 6
about 504
array, destructuring 511

[ 778 ]
assignment, destructuring 510, 511
binary and octal literals 540
bindings 514, 515
classes 506
collections 519
compatibility and goals 491, 493
core math library APIs 539
enhanced object literals 507
for...of operator 515
generators 516
iterators 515
language specications, URL 491
module loaders 518
modules 517
object, destructuring 512
parameter, handling 512
promises 534
proxies 532
subclassable built-ins 534
symbols 532
template strings 509
Unicode support 516
ECMAScript 2015
about 504
fat arrow functions 505
effects and animations
about 676
animate() 676
stop() 677
element() CSS function 312
elements
hide 678
show 678
toggle 678
element selectors 658
else if statements 404, 405
embedded content
about 30
audio element 36
embed element 33
iframe element 32
img element 30
object element 34
param element 35
source element 37
track element 38
video element 35
Embedded Open Type (EOT) 318
embed element
about 33
attributes 33
description 34
em element
about 25
description 25
emit function 580
empty-cells CSS property 219
encapsulation 433
end 604, 611
eq() function 700
equal To operator 399
equal value and equal type operator 400
errors
design patterns 576, 577
handling 575
operational 575
programmer 575
types 575
European Computer Manufacturers
Association (ECMA) 334
evaluation expression 383
event binding
about 740
controllers 722
EventEmitter 577
events
about 577, 659
emit function 580
EventEmitter 577
keyboard events 667
mouse events 659
once function 579
on function 578
removeAllListeners function 579
removeListener function 579
setMaxListeners function 579
events, http.Server
about 606
close 607
request 606
upgrade 607
every() 419
exception handling statement 358
exceptions 413

[ 779 ]
execution context and scope
about 374
eval code 375
function code 375
global code 374
EXIF Data 272
Express 553
expression closure 500
expressions
about 377, 735
arithmetic 378
conditional expression 378
context 735
evaluation expression 383
function denition expression 380
in JavaScript 735
invocation expression 382
logical 378
object creation expression 383
object initializer 379
primary expressions 378
property access expression 381
string 378
expression statement 401
extend, global
about 754, 755
parameters 754
extname 574
F
facade pattern 445
factory pattern 446
factory, services
parameters 726
fade
about 681
fadeIn() function 681
fadeOut() function 682
fadeTo() function 684, 685
fadeToggle() function 683
fadeIn() function 681, 682
fadeOut() function 682
fadeTo() function 684
fadeToggle() function 683
fallback fonts 186
FBJS
URL 495
eldset element
about 45
attributes 45
gcaption element 20
gure element
about 20
description 20
le and process management
about 555
errors, handling 575
functions 564, 571
modules 555
OS module 558
process module 559
Read Eval Print Loop (REPL) 574
le functions
__dirname coammand 564
__lename command 564
about 564
appendFile 570
close 568
le module 565
open 566
read 567
readFile 568
stat object 565
write 569
writeFile 570
lter
about 283
blur() CSS function 286
brightness() CSS function 283
contrast() CSS function 284
grayscale() CSS function 284
hue-rotate() CSS function 285
invert() CSS function 285
matrix3d() CSS function 288
matrix() CSS function 287
rotate3d() CSS function 289
rotate() CSS function 288
rotateX() CSS function 289
rotateY() CSS function 290
rotateZ() CSS function 291
saturate() CSS function 286

[ 780 ]
scale3d() CSS function 292
scale() CSS function 291
scaleX() CSS function 292
scaleY() CSS function 293
scaleZ() CSS function 293
sepia() CSS function 286
skew() CSS function 294
skewX() CSS function 294
skewY() CSS function 295
steps() timing function 295
transforms 287
translate3d() CSS function 297
translate() CSS function 296
translateX() CSS function 297
translateY() CSS function 298
translateZ() CSS function 298
lter CSS property
blur() 248
brightness() 249
contrast() 249
drop-shadow() 249
grayscale() 249
hue-rotate() 250
invert() 250
opacity() 250
saturate() 250
sepia() 251
url() 251
lter() function 700, 701
ltering
about 699
eq() function 700
lter() function 700
rst() function 699
last() function 699
nally clause 502, 503
nd() function 695
rst() function 699
Flash Action Script 336
ex-basis property 174
ex CSS property 183
ex-direction CSS property
about 175
column 175
column-reverse 176
row 175
row-reverse 175
ex-ow CSS property 177
Flexible box (exbox)
about 172
align-content CSS property 178
align-items CSS property 179
align-self CSS property 180
ex-basis property 174
ex CSS property 183
ex-direction CSS property 175
ex-ow CSS property 177
ex-shrink property 173
ex-wrap CSS property 176
justify-content CSS property 182
order CSS property 181
properties.lex-grow 173
ex-shrink property 173
ex-wrap CSS property
about 176
nowrap 176
wrap 176
wrap-reverse 176
oating point literals 355
oor() function 478
focus() event 672
focusin() event 673
focusout() event 674
font CSS property 194
Fontdeck
URL 190
font descriptors 318
font-family CSS property
about 185, 186
family name 186
family name, generic 186
font-feature-settings CSS property 186, 187
fonts
about 185
font CSS property 194
font-family CSS property 185
font-feature-settings CSS property 186
font-size-adjust CSS property 189
font-size CSS property 188
font-stretch CSS property 190
font-style CSS property 191
font-variant CSS property 192
font-variant-ligatures CSS property 192
font-weight CSS property 193

[ 781 ]
font-size-adjust CSS property 189, 190
font-size CSS property
about 188
absolute keywords/size 188
length 189
percentage 189
relative size keywords 188
font-stretch CSS property 190
font-style CSS property 191
font-variant CSS property 192
font-variant-ligatures property 192
font-weight CSS property
about 193
keyword values 193
numeric values 193
footer element 13
for attribute
about 70
elements 70
for each 498
foreach() 420
for in loop 410
for loop 407
formaction attribute
about 71
elements 71
form attribute
about 71
elements 71
form element
attributes 44
description 45
form events
about 669
blur() 671
change() 670
focus() 672
focusin() 673
focusout() 674
submit() 670
forms
about 44, 630, 757
button element 49
CSS classes 758
eldset element 45
form element 44
horizontal 631
inline 631
input 631
input element 47
label element 46
legend element 46
ngModel 758
optgroup element 51
option element 52
select element 50
textarea element 53
validation 758, 759
vertical 631
forms, input
Checkbox 632
Control sizing 634
Disabled input 633
help text 632
Input focus 633
Radio button 633
Select list 632
Static control 633
Textarea 632
Validation states 633
for...of operator 515
function constructor 458
function denition expression
about 380
function declaration 380
function expression 380
function expression 380
functions
about 376, 455
arguments and parameters 456
as namespace 457
closure 457
dening 455
invoking 455
parameters and return values 456
properties 458
G
garbage collection
about 375
arrays 376
functions 376
objects 376

[ 782 ]
general sibling combinator 97
generator expression 498
generators 498, 516
getConnections 600
getDate() function 472
getDay() function 473
getFullYear() function
set date methods 474, 475
getHours() function 472
getMilliseconds function 471
getMinutes() function 472
getMonth() function 473, 474
GET request, services 731, 732
getTime() function 471
global attributes
about 57
accesskey attribute 57
class attribute 58
contenteditable attribute 58
data-* attribute 58
dir attribute 59
draggable attribute 59
id attribute 60
lang attribute 60
spellcheck attribute 61
style attribute 61
tabindex attribute 61
title attribute 62
Global CSS keyword values
about 328
auto 328
inherit 328
initial 329
none 329
normal 329
revert 330
unset 329
global objects 470
globals
about 754
bind 757
copy 756
extend 754
isUndened 756
noop 755
global scope variables 373
global variable 499
Glyphicons 635, 636
Google Fonts
URL 319
gradients
about 300
linear-gradient() CSS function 301
radial-gradient() CSS function 302
repeating-linear-gradient() CSS
function 304
repeating-radial-gradient() CSS
function 305
grayscale() CSS function 284, 285
greater than operator 398
greater than or equal to operator 398
grid system
about 620
columns, nesting 622
columns, offsetting 622
columns, ordering 623
grid options, cheat sheet 620
media queries 621
Responsive Column Resets 621
H
hard hyphen 221
hash object 581
head element 3
header element
about 12
description 12
headers 607
headings element
about 11
description 11
height attribute
about 72
elements 72
height CSS property
about 144, 145
inherit 145
length value 145
percentage value 145
hidden attribute 60
hide() function 678, 679

[ 783 ]
hostname() function 558
href attribute
about 72, 73
elements 72
hreang attribute
about 73
elements 73
hr element
about 15
description 15
hsl() and hsla() CSS function 299
HSL color wheel
URL 299
HTML 57
HTML5 doctype 616
html element
about 2
attributes 2
description 2
HTML lists
URL 237
http.clientRequest, HTTP module
about 613
end 613
response 613, 614
write 613
http.get, HTTP module 612, 613
HTTP module
about 604
createServer 604
http.clientRequest 613
http.get 612
http.request 611
http.Server 605
IncomingMessage 607
ServerResponse 609
http.request, HTTP module 611, 612
http.Server, HTTP module
about 605
close 606
events 606
listen 605
hue-rotate() CSS function 285
Hue, Saturation, and Lightness (HSL) 299
HyperText (HT) 22
HyperText Markup Language (HTML) 1
hyphens CSS property
about 220
Unicode characters 221
I
IBM
URL 655
id attribute 60
identiers 322, 351, 371
ID selectors 94, 658
iframe element
about 32
attributes 33
description 33
if statements 403, 404
image() CSS function 313
image-orientation CSS property 271, 272
image-rendering CSS property 271-273
images
about 634
Icons (Glyphicons) 635
img element
about 30
attributes 31
description 31, 32
IncomingMessage, HTTP module
about 607
data 608
headers 607
method 608
url 608
index
about 585
return value 585
index() method 705
indexOf() 422
inheritance
about 434, 463
combination inheritance 465
constructor stealing 464
parasitic combination inheritance 468
parasitic inheritance 467
prototypal inheritance 466
prototype chaining 463, 464
subclasses 469
inherit CSS keyword value 328

[ 784 ]
init 591
initial CSS keyword value 329
inject, ngMock
about 761, 762
parameters 761
injector, dependency injection
about 719
parameters 719
inline elements
abbr element 23
about 22
a element 22
bdo element 23
br element 24
cite element 24
dfn element 25
em element 25
kbd element 26
mark element 26
q element 26
samp element 27
s element 27
small element 27
span element 28
strong element 28
sub element 28
sup element 29
time element 29
var element 30
wbr element 30
inline lists 630
input element
about 47
attributes 47, 48
description 48, 49
install command 592
integer 255
Intel's Open Source Technology Center
URL 655
internal properties 453
invert() CSS function 285
invocation expression
about 382
invocation target 382
optional argument list 382
isBuffer 586
ISO-8859-1 346
isUndened, global
about 756
parameters 756
iterator 498, 515
J
Jasmine 760
JavaScript extensions 496
JavaScript (JS)
about 333, 334
evolution 335
expressions 735
external JavaScript les, loading 339
rst program, prerequisites 340, 341
rst program, writing 340
history 334
implementations 335
JavaScript (JS), implementations
Browser object model (BOM) 337
Client-side JavaScript 337
Core JavaScript (ECMAScript) 336
Document object model (DOM) 336
external JavaScript les, loading 339
Server-side JavaScript 341
JavaScript subset
about 493
good parts 494
secure subsets 494
Java Virtual Machine (JVM) 334
join 572
Joyent
URL 575
jQuery
about 655, 656, 711
and document object model (DOM) 691
installing 656
jQuery 1.x 656
jQuery 2.x 656
plugins 708
resources 709
URL 656
using 656, 657
jQuery Ajax get 702
jQuery Ajax load 701
jQuery Ajax post 703

[ 785 ]
jQuery, functions
about 704
data() method 707
each() method 706
index() method 705
noConict() 704
param() method 704
removeData() method 707
jQuery Knob plugin 709
jQuery Rain
URL 709
jQuery, traversing
about 692
ancestors 693
descendants 694
ltering 699
siblings 695
Jscript 334
jumps and labeled statements
about 411
break statement 411
continue statement 412
return statement 412
throw statement 413
try catch nally statement 414
justify-content CSS property
about 182
center 182
ex-end 182
ex-start 182
space-around 183
space-between 182
K
Karma 761
kbd element
about 26
description 26
keyboard events
.keydown() 667
.keypress() 668
.keyup() 669
about 667
key directives
about 742
ngApp 742
ngBlur 753
ngChecked 743
ngClass 744
ngClassOdd and ngClassEvent 745
ngClick 749
ngCopy 754
ngCut 754
ngDblclick 749
ngDisabled 743
ngFocus 753
ngKeydown 752
ngKeypress 752
ngKeyup 752
ngModel 742, 743
ngMousedown 750
ngMouseenter 750
ngMouseleave 750
ngMousemove 751
ngMouseover 750
ngMouseup 750
ngPaste 754
ngRepeat 746
ngShow and ngHide 747
ngSubmit 752, 753
ngSwitch 748
kill command 563
L
label attribute
about 73, 74
elements 73
label element
attributes 46
description 46, 47
labels 640
lang attribute 60
language syntax
about 344, 345
language attribute 345
type attribute 345
last() function 700
lastIndexOf() 422
layouts
about 617
xed layouts 618
uid layouts 618

[ 786 ]
responsive layouts 619
supported devices 619
leading 223
left CSS property
about 205
auto 205
length value 205
percentage value 205
legend element
about 46
description 46
LESS mixins 623
LESS variables 624
Let keyword 497, 498
letter-spacing CSS property 227
li element
about 17
attributes 17
description 18
linear-gradient() CSS function
about 301
color steps 302
direction 301
line-height CSS property 223
link element
about 4
attributes 4
description 4
link pseudo classes
:link 99
:visited 100
list attribute
about 74
elements 74
listen 599, 600, 605
lists
about 234, 629
description lists 630
horizontal description 630
inline lists 630
list-style CSS property 235
list-style-image CSS property 237
list-style-position CSS property 236
list-style-type CSS property 235
ordered lists 629
unordered lists 629
unstyled lists 629
list-style CSS property 235
list-style-image CSS property 237
list-style-position CSS property
about 236
inside 236
outside 237
list-style-type CSS property 235
literals
about 354
array literals 355
Boolean literals 355
oating point literals 355
object literals 354
string literals 356
Livescript 334
local scope variables 372
log 589
logical expression 378
logical operators
! operator 392
|| operator 391
&& Operator 391
about 390, 391
Longhand style 130
loop attribute
about 74, 75
elements 74
loops
about 407
do while loop 409
for in loop 410
for loop 407, 408
while loop 408
loop statement 357
M
main element
about 21
description 21
maps
Map.prototype.clear() 520
Map.prototype.delete() 520
Map.prototype.entries() 521
Map.prototype.forEach() 521
Map.prototype.get() 522
Map.prototype.has() 523

[ 787 ]
Map.prototype.keys() 523, 524
Map.prototype.set() 524
Map.prototype.values() 525
margin CSS property
about 146
margins, collapsing 147
URL 148
mark element
about 26
description 26
marks CSS property 234
mask-border CSS property 264
mask-border-mode CSS property 265
mask-border-outset CSS property 267
mask-border-repeat CSS property
about 268
repeat 268
round 268
space 268
stretch 268
mask-border-slice CSS property
about 265
ll 266
mask-border-source CSS property 264
mask-border-width CSS property
about 266
auto 267
mask-clip CSS property 257
mask-composite CSS property 258, 259
mask CSS property 256
mask-image CSS property 259
masking 255
mask-mode CSS property
about 260
alpha masks 260
luminance masks 260
mask-origin CSS property 260, 261
mask-position CSS property 261
mask-repeat CSS property 262
mask-size CSS property 263
mask-type CSS property 264
Match(pattern) method 480
math object
about 475
ceil() 477
oor() 478
max() 476
min() 475
random() 476
round() 477
matrix3d() CSS function 288
matrix() CSS function 287
URL 287
Matrix Resolutions
URL 288
max attribute
about 75
elements 75
max() function 476
max-height CSS property
about 150
length value 151
percentage value 151
maxlength attribute
about 75
elements 75
max-width CSS property
about 151
length value 152
percentage value 152
media attribute
about 76
elements 76
media features 323
media queries 323
mediator pattern 442, 443
media types 323, 324
meta element
about 5
attributes 5
description 5
method attribute
about 76
elements 76
methods 379, 458, 608
Microsoft's web sandbox
URL 496
min attribute
about 76, 77
elements 77
min() function 475, 476
min-height CSS property
about 152
length value 152

[ 788 ]
percentage value 152
min-width CSS property
about 153
length value 153
percentage value 153
miscellaneous attributes
about 62
accept attribute 62
accept-charset attribute 63
action attribute 63
alt attribute 64
async attribute 64
autocomplete attribute 65
autofocus attribute 65
autoplay attribute 66
autosave attribute 66
cite attribute 66, 67
cols attribute 67
colspan attribute 67
content attribute 69
controls attribute 70
datetime attribute 68
disabled attribute 68
download attribute 69
for attribute 70
formaction attribute 71
form attribute 71
height attribute 72
href attribute 72
hreang attribute 73
list attribute 74
loop attribute 74
max attribute 75
maxlength attribute 75
media attribute 76
method attribute 76
min attribute 76
multiple attribute 77
name attribute 77
novalidate attribute 78
pattern attribute 78
placeholder attribute 79
poster attribute 79
readonly attribute 80
rel attribute 80
required attribute 80
reversed attribute 81
rows attribute 81
rowspan attribute 82
scope attribute 82, 83
selected attribute 83
size attribute 83, 84
src attribute 84
start attribute 84
step attribute 85
type attribute 85, 86
value attribute 86
width attribute 87
wrap attribute 87
miscellaneous CSS functions
about 312
drop-shadow() CSS function 312
element() CSS function 312
image() CSS function 313
opacity() CSS function 313
perspective() CSS function 314
rect() CSS function 314
mixin pattern 447, 448
MixItUp plugin 709
Mocha 334
Modals plugin, Bootstrap/JavaScript
plugins
about 648
objects 649
size 648
Modernizr 326
module.exports property, modules
about 557
return value 557
module loaders
about 518
methods 518
module, ngMock
about 761
parameters 761
modules
about 462, 517, 555
module.exports property 557
require() function 555
modules (ngApp)
about 712
cong 713
modules 712
run 714

[ 789 ]
mouse events
.click() 659
.dblclick() 660
.hover() 661
.mousedown() 662
.mouseenter() 662
.mouseleave() 663
.mousemove() 664
.mouseout() 665
.toggle() 666
Mozilla Developer Network (MDN)
URL 118
Mozilla foundation
URL 342
multidimensional arrays
in JavaScript 417
multiple attribute
about 77
elements 77
N
name attribute
about 77, 78
elements 77
named accessor properties 453
named data properties 453
nanoGALLERY 708
nav element
about 10
description 10
navigation bar
about 637
buttons 637
default 637
xed to bottom 638
xed to top 638
forms 637
inverted navbar 638
Non-nav link 638
static top 638
text 637
navigation elements
about 636
Disabled links 636
Justied 636
Pills 636
Tabs 636
nearest neighbor algorithm 273
NeoBux
URL 655
net module
about 598
createServer 598
net.Server 599
Netscape 334
net.Server, net module
about 599
address 600
close 600
connect 601
getConnections 600
listen 599
net.Socket, net module
about 602
connect 603
end 604
write 603
networkInterfaces() function 559
new keyword 435
nextAll() function 697
next() function 696
nextUntil() function 697
ngApp 742
ngBlur 753
ngChecked 743, 744
ngClass 744
ngClassEvent 745
ngClassOdd 745
ngClick 749
ngController
about 721
parameters 721
ngCopy 754
ngCut 754
ngDblclick 749
ngDisabled 743
ngFocus 753
ngHide 747
ngKeydown 752
ngKeypress 752
ngKeyup 752

[ 790 ]
ngMock
$httpBackend 762
about 761
inject 761
module 761
ngModel 743, 758
ngMousedown 750
ngMouseenter 750
ngMouseleave 751
ngMousemove 751
ngMouseover 750
ngMouseup 750
ngMoussedown 750
ngPaste 754
ngRepeat 746
ngShow 747
ngSubmit 752, 753
ngSwitch 748
ngView, routing (ngRoute)
about 715
parameters 715
NIVO Slider 708
noConict() 704
node 575
Node 342
Node.js 335, 343, 344
none CSS keyword value 329
noop, global
about 755
parameters 755
normal CSS keyword value 329
normalization
about 736
about 350
normalize 572
noscript element
about 8
description 8
not equal to operator 399
novalidate attribute
about 78
elements 78
npm (Node Package Manager)
about 591
Bootstrap, installing with 617
docs, URL 591
init 591
install 591
package.json 591
run 593
shrinkwrap 592
update 592
null type 363, 364
number type 364, 365
O
object, attributes
about 453
internal properties 453
named accessor properties 453
named data properties 453
object.create() method 436
object creation expression 383
object element
attributes 34
description 34
object-t CSS property
about 154
contain 154
cover 155
ll 155
none 155
scale-down 155
URL 155
object initializer 379
object literals
about 354, 379, 435, 507
method initializer shorthand 508, 509
property initializer shorthand 507
object manipulation statement 357
object-oriented programming (OOP)
languages 433
object-position CSS property 155, 156
objects
about 376, 434
creating 435
methods 454, 455
properties, deleting 450
properties, enumerating 451
properties, testing 450
property attributes 452
property getter and setter 449
serializing 454

[ 791 ]
objects, creating
about 435
new keyword 435
object.create() method 436
object literal 435
object type 369
observer pattern 442
observers/subscribers 442
ol element
attributes 16
description 16
once function 579
on click 662
on clicked 663
on function 578
on hover 661
on mouse enter 662
opacity() CSS function 313
opacity CSS property 247
open 566, 567
OpenType Font (OTF) 318
operators
about 384
arithmetic operator 385
assignment operators 393
binary operator 384
logical operator 390, 391
relational operators 396
ternary operator 385
unary operator 385
optgroup element
about 51
attributes 51
description 51
option element
attributes 52
description 52
order CSS property 181
ordered lists 629
OR operator 392
orphans CSS property 224
OS module
about 558
cpus() function 558
hostname() function 558
networkInterfaces() function 559
outline CSS property
auto 277
overow CSS property 252
overow-x CSS property 253
overow-y CSS property 253
P
package.json 591
Pac-Man shape mask 259
padding CSS property 145, 146
page box
about 233
bleed CSS property 233
marks CSS property 234
page-break-after CSS property 230
page-break-before CSS property 230, 231
page-break-inside CSS property 231
pagination
about 640
default 640
pager 641
paging
about 229
page-break-after CSS property 230
page-break-before CSS property 230
page-break-inside CSS property 231
panels
about 638
basic 639
footer 639
group 639
heading 639
param element
about 35
attributes 35
description 35
parameter handling
about 512
default parameter 513
rest parameter 513
spread operator 513
param() method 705
parasitic combination inheritance 468
parasitic inheritance 467
parent() function 693

[ 792 ]
parentsUntil() function 694
path module
about 571
basename 573
dirname 573
extname 574
join 572
normalize 571
relative 573
resolve 572
pattern attribute
about 78
elements 78
Pbkdf2 (password-based key derivation
function 2) 582
p element
about 14
description 14
perspective() CSS function 314
perspective CSS property
about 278
length value 278
normal 278
perspective-origin CSS property
about 279
keyword values 279
length value 279
percentage value 279
pid 563
pipe 596
placeholder attribute
about 79
elements 79
pointer-events CSS property
about 276
auto 277
none 277
polymorphism
about 433
encapsulation 433
inheritance 434
abstraction 434
pop() 421
popovers, Bootstrap/JavaScript plugins
about 645
basic creation 645
closing 646
positioning 645
position CSS property
about 202
absolute 202
xed 203
relative 203
static 202
sticky 203
position property
bottom CSS property 204
left CSS property 205
position CSS property 202
right CSS property 206
top CSS property 203
vertical-align CSS property 207
poster attribute
about 79
elements 79
POST request, services
about 732
jsonp 732
pre element
about 15
description 15
prevAll() function 698
prev() function 698
prevUntil() function 698, 699
primary expressions
about 378
boolean literal 379
null literal 379
string literal 379
undened literal 379
primitive and reference values 373
process.env object 562
process module
about 559
argv command 561
cwd variable 563
kill command 563
pid 563
process.env object 562
signal events 561, 562
stderr object 560
stdin object 560
stdout object 560

[ 793 ]
progress bars
about 641
URL 641
promises
$q 734
about 534, 733
Promise.All() 535
Promise.prototype.catch() 535
Promise.race(value) 538
Promise.reject(value) 538
Promise.resolve(value) 536
URL 733
properties
about 369
AccessorProperty 452
data property 452
properties, attributes
about 452
congurable 452
enumerable 452
value 452
writable 452
property access expression
about 381
bracket notation 381
dot notation 381
property accessors 449
prototypal inheritance 466
prototype chaining 464
prototype pattern 444
prototypes
and classes 460
providers
about 728, 729
parameters 728
proxies 532
pseudo classes
:rst-child 102
:rst-of-type 102
:last-child 103
:last-of-type 103
:nth-child() 104
:nth-last-child 104
:nth-last-of-type and :nth-of-type 105
:only-child 106
:only-of-type 106
about 99
link pseudo classes 99
structural selectors 101
user action pseudo classes 100
pseudo-classical inheritance 465
pseudo-elements
::before and ::after 112
::rst-letter 113
::rst-line 113, 114
::selection 114
about 112
pseudoRandomBytes 583
push() 421
Q
q element
about 26
attributes 26
description 27
quotation marks
about 116
parameters 116
quotes CSS property
[string string +] value 225
about 225
none 225
R
radial-gradient() CSS function
position 303
sizing 303
radial-gradient() CSS function 303
randomBytes 583
random() function 476
read 567, 595
readable, stream
about 594
pipe 596
read 594
resume and pause 595
setEncoding 595
Read Eval Print Loop (REPL)
about 574
node 574
readFile 568

[ 794 ]
readonly attribute
about 79, 80
elements 80
readUInt 588
rect() CSS function 314, 315
reference type values 373
Reect API
about 540
Reect.apply(target, receiver, args) 543
Reect.construct(target, args) 544
Reect.deneProperty
(target, prop, desc) 545, 546
Reect.deleteProperty(target, prop) 548
Reect.enumerate(target) 548, 549
Reect.getOwnPropertyDescriptor
(target, prop) 544, 545
Reect.getPrototypeOf(target) 546
Reect.get(target, prop, [receiver]) 541
Reect.has(target, prop) 542
Reect.isExtensible(target) 550
Reect.ownKeys(target) 550
Reect.preventExtensions(target) 549
Reect.setPrototypeOf
(target, newProto) 547
Reect.set(target, prop, value,
[receiver]) 541
RegExp object
about 478, 479
literal syntax 480
parameters 478
RegExp constructor 479
regular expression, dening 479
returns 479
relational operators
!= operator 399
< operator 396, 397
<= operator 397
== operator 399
=== operator 400
> operator 397
>= operator 398
about 396
relative 573
relative length units
% sign 160
about 158
ch sufx 159
em sufx 159
ex sufx 159
rem sufx 160
rel attribute
about 80
elements 80
remainder operator 388
removeAllListeners function 579
removeData() method 707
removeListener function 579
repeating-linear-gradient() CSS
function 304
repeating-radial-gradient() CSS
function 305
Replace(pattern) method 481
REPL (Read Eval Print Loop) 555
required attribute
about 80, 81
elements 80
require() function, modules
about 555, 556
return value 555
reserved keywords
about 351
future 353
new 352
protected 352
types 352
resize() event 675
resolution units
about 165
dpcm sufx 165
dpi sufx 165
dppx sufx 165
resolve 572
responsive layouts 619
resume and pause 595
return statement 412, 413
revealing module pattern 440, 441
reverse() 423
reversed attribute
about 81
elements 81
revert CSS keyword value 330
rgb() and rgba() CSS function 300

[ 795 ]
RGB (Red, Green and Blue) 300
Rhino
scripting with 342, 343, 504
script, URL 343
URL 342
right CSS property
about 206
auto 206
length value 206
percentage value 206
rotate3d() CSS function 289
rotate() CSS function 288, 289
rotateX() CSS function 289, 290
rotateY() CSS function 290
rotateZ() CSS function 291
round() function 477
routing (ngRoute)
$route 716
$routeParams 717
$routeProvider 715
about 715
ngView 715
rows attribute
about 81, 82
element 81
rowspan attribute
about 82
elements 82
run command 593
run, modules (ngApp)
about 714
parameters 714
S
samp element
about 27
description 27
saturate() CSS function 286
Scalable Vector Graphics (SVG) 55
Scalable Vector Graphic (SVG) 318
scale3d() CSS function 292
scale() CSS function 291, 292
scaleX() CSS function 292, 293
scaleY() CSS function 293
scaleZ() CSS function 293, 294
scope
$apply 724
$digest 723
$watch 723
@ binding 737
& binding 738
= binding 737
about 722, 736
digest cycle 722
hierarchies 725
scope attribute
about 82
elements 82
scoped variables and constants 499, 500
ScriptEase 336
script element
about 7
attributes 7
description 8
scroll() event 675
Scrollspy, Bootstrap/JavaScript plugins
about 651
activating, via data attribute 651
activating, via JavaScript 651
search(pattern) method 483
section element
about 9
description 10
secure subsets
ADsafe 494
Dojox 494, 495
FBJS 495
Microsofts web sandbox 496
selected attribute
about 83
elements 83
select element
about 50
attributes 50
description 51
selectors
about 90, 657
attribute selectors 92
class selectors 93, 94, 659
element selectors 658
ID selectors 94, 658
simple selector 90

[ 796 ]
type selectors 90
universal selector 91
s element
about 27
description 27
semantic content sections
about 9
address element 13
aside element 14
body element 9
footer element 13
header element 12
headings element 11
nav element 10
p element 14
section element 9
sepia() CSS function 286
ServerResponse, HTTP module
about 609
end 611
setHeader 610
statusCode 609
write 610
writeHead 609
Server-side JavaScript
about 341, 342
client side 342
Node.js 343, 344
Rhino, scripting with 342, 343
server side 342
services
$http 730
about 725-727
constant 730
convenience methods 731
factory 726
notable services 733
parameters 727
provider 728
value 729
setEncoding 595
setHeader 610
setMaxListeners function 579
shift() 423
shorthand functions 500
shorthand style 131
show() function 679, 680
shrinkwrap 592
siblings
about 695
nextAll() function 696
next() function 696
nextUntil() function 697
prevAll() function 698
prev() function 697
prevUntil() function 698
siblings() function 695
siblings() function 695
signal events 562
Single Page Applications (SPAs) 701
singleton pattern 441
size attribute
about 83, 84
elements 83
skew() CSS function 294
skewX() CSS function 294, 295
skewY() CSS function 295
slice() 424
slideDown() function 685
slideToggle() function 687
slideUp() function 686, 687
sliding
about 685
slideDown() 685
slideToggle() 687
slideUp() 686, 687
small element
about 27
description 28
smudge effect 214
soft hyphen 221
source element
about 37
attributes 38
description 38
span element
about 28
description 28
spellcheck attribute 61
SpiderMonkey 504
splice() 424
Split(pattern) method 482, 483

[ 797 ]
src attribute
about 84
elements 84
start attribute
about 84, 85
Statbootstrap 654
statements
about 356, 400
compound empty statements 401
conditional statements 356, 403
declaration statements 402
exception handling statements 358
expression statements 401
jumps and labeled statements 411
loops 407
loop statement 357
object manipulation statements 357
stat object 566
statusCode 610
stderr object 560
stdin object 561
stdout object 560
step attribute
about 85
elements 85
steps() timing function 127, 295, 296
about 128, 129
parameters 128
stop() method 677
stream
about 593
readable 593
writable 596
strict mode 334
string expression 378
string literals 356
string methods
URL 484
string object
about 480
Match(pattern) 480
Replace(pattern) 481
search(pattern) 483
Split(pattern) 482
string type 367, 368
strong element
about 28
description 28
style attribute 61
style element 6
Subclassable built-ins 534
sub element
about 28
description 29
submit() event 670
Sun Microsystems 334
svg element 55
switch statements 406
symbols 532
T
tabindex attribute 61, 62
table element 39
table-layout CSS property 217
tables
about 39, 217, 627
basic version 627
border-collapse CSS property 218
bordered table 627
border-spacing CSS property 218
caption element 39
caption-side CSS property 219
colgroup element 40
condensed rows 628
contextual classes 628
empty-cells CSS property 219
hover rows 627
responsive tables 628
striped rows 627
table element 39
table-layout CSS property 217
tbody element 40
td element 43
tfoot element 41
thead element 41
th element 43
tr element 42
tab-size CSS property
about 229
length value 229
numeric value 229

[ 798 ]
Tail calls
about 551
example 551
tbody element
about 40
description 40
td element
about 43
attributes 43
description 43
template strings
about 509
basic strings 509
multiline strings 510
ternary operator 385
testing
about 760
ngMock handler 761
unit testing controllers 763
unit testing directives 763, 764
unit testing services 764, 765
unit testing, with Jasmine 760
unit testing, with Karma 761
text
about 207
color CSS property 208
text-align CSS property 208
text-decoration-color CSS property 210
text-decoration CSS property 209
text-decoration-line CSS property 210
text-decoration-style CSS property 211
text-indent CSS property 211
text-overow CSS property 211
text-rendering CSS property 212
text-transform CSS property 214
text-underline-position CSS property 215
text-align CSS property 208
textarea element
attributes 53
description 54
text-decoration-color CSS property 210
text-decoration CSS property 209
text-decoration-line CSS property 210
text-decoration-style CSS property 211
text-indent CSS property 211
text-overow CSS property
about 211
clip 212
ellipsis 212
text-rendering CSS property
about 212, 213
auto 213
geometricPrecision 213
optimizeLegibility 213
optimizeSpeed 213
text-shadow CSS property 214
text-transform CSS property 214, 215
text-underline-position CSS property
about 215
auto 215
left 215
right 215
under 216
tfoot element
about 41
description 42
thead element 41
th element
attributes 43
description 44
throw statement 413, 414
time and timeEnd 590
time element 29
timing function
URL 128
title attribute 62
title element
about 3
description 4
toJSON 586
tooltips, Bootstrap/JavaScript plugins
about 644
positioning tool 644, 645
top CSS property
about 203, 204
auto 204
length value 204
percentage value 204
toString 585, 586
trace 590

[ 799 ]
track element
attributes 38
description 39
transform
about 195
transform CSS property 195
transform-origin CSS property 197
transform-style CSS property 198
transition CSS property 199
transform CSS property
about 195
matrix() function 196
perspective() function 196
rotate() function 196
scale() function 195
skew() function 196
skewX() and skewY() function 196
translate() function 196
translateX() and translateY() function 196
transition
transition CSS property 199
transition-delay CSS property 200
transition-duration CSS property 201
transition-property CSS property 201
transition-timing-function CSS
property 202
translate3d() CSS function 297
translate() CSS function 296
translateX() CSS function 297
translateY() CSS function 298
translateZ() CSS function 298
tr element 42
TrueType Font (TTF) 318
try catch nally statement 414
try clause 501
Tubular plugin 709
Twitter Blueprint 615
Typeahead, Bootstrap/JavaScript plugins
about 650
creating 651
using, via JavaScript 651
type attribute
about 85, 86
elements 86
typeof operator 361, 362
type selectors 90
Typography
abbreviations 626
abbreviations, basic 626
abbreviations, initialism 626
about 624
addresses 626
alignment 626
Blockquotes 627
body 625
bold text 625
emphasis 625
headings 624
italics text 625
lead body 625
small text 625
U
ul element 17
unary operator 385
undened type 362, 363
Unicode escape sequence 348, 350
Unicode standard
URL 350
Uniform Resource Locator (URL) 309
units
about 158
absolute length units 162
angle data types 164
CSS column 166
duration units 165
relative length units 158, 159
resolution units 165
viewport-relative length units 161
universal selector 91
unordered lists 629
unset CSS keyword value 329
unshift() 423
unstyled lists 629
update command 592
url 608
url() CSS function 309, 310
user action pseudo classes
:active 100
:focus 101
:hover 101
about 100

[ 800 ]
User Agent (UA) 323
user interface
about 273
cursor CSS property 273
outline CSS property 277
pointer-events CSS property 276
UTF-8 346
utilities
about 577
buffer 584
console 589
crypto 580
events 577
npm (Node Package Manager) 591
stream 593
V
validation
about 758
custom validators 759
Valija 495
value attribute
about 86, 87
elements 86
values
about 306, 729
attr() CSS function 306
calc() CSS function 308
cubic-bezier() CSS function 310
parameters 729
responsive table 307
url() CSS function 309
var element 30
variable 369, 371
variable scope
about 372
execution context and scope 374
global scope variables 372
local scope variables 372
primitive and reference values 373
primitive type values 373
reference type values 373
vertical-align CSS property 207
video element
about 35
attributes 35
viewport-relative length units
about 161
vh sufx 161
vmax sufx 162
vmin sufx 161, 162
vw sufx 161
visibility CSS property 254
W
wbr element
description 30
WeakMap
about 526
WeakMap.prototype.clear() 526
WeakMap.prototype.delete() 527
WeakMap.prototype.get() 528
WeakMap.prototype.has() 528
WeakMap.prototype.set() 529
Weakset
about 529
WeakSet.prototype.add(someValue) 529
WeakSet.prototype.delete(someValue) 530
WeakSet.prototype.has
(someValue) 530, 531
Web Open Font Format (WOFF) 318
while loop 408
white-space CSS property
about 228
normal 228
nowrap 228
preformatted (pre) 228
pre-line 229
pre-wrap 228
whitespaces and line breaks 347, 348
widows CSS property 226
width attribute
about 87
elements 87
width CSS property
auto 144
t-content 144
length value 143
max-content 144
min-content 144
percentage value 143
URL 144

[ 801 ]
WOFF2 318
word-break CSS property
about 221
break-all 222
keep-all 222
normal 221
WordPress
URL 655
words and paragraphs
about 220
hyphens CSS property 220
letter-spacing CSS property 227
line-height CSS property 223
orphans CSS property 224
quotes CSS property 225
tab-size CSS property 229
white-space CSS property 228
widows CSS property 226
word-break CSS property 221
word-spacing CSS property 222
word-wrap CSS property 223
writing-mode CSS property 226
word-spacing CSS property
about 222
length value 222
normal 222
percentage value 222
word-wrap CSS property 223
wrap attribute
about 87, 88
elements 87
WrapBootstrap 653
write 569, 587, 603, 611
writeable, stream
about 596
write function 597
writeFile 570
write function 597
writeHead 609
writeUInt 588, 589
writing-mode CSS property
about 226, 227
horizontal-tb 227
vertical-lr 227
vertical-rl 227
Z
z-index CSS property 255
