WebSuite System Administration Guide Admin
User Manual:
Open the PDF directly: View PDF ![]() .
.
Page Count: 522 [warning: Documents this large are best viewed by clicking the View PDF Link!]
- Preface
- Chapter 1 Overview
- 1.1 WebSuite from a system administrator’s perspective
- 1.2 Opening configuration files
- 1.2.1 Customization
- 1.2.2 Opening configuration files with the Review CMM Configuration Documents function
- 1.2.3 Opening configuration files without the Review CMM Configuration Documents function
- 1.2.4 Returning a configuration file to its default settings
- 1.2.5 Editing configuration files that use the HTML handler framework
- 1.2.6 Configuration files
- Chapter 2 Setting configuration parameters
- 2.1 Setting configuration parameters
- 2.2 Setting static data configuration parameters
- 2.3 Setting market data configuration parameters
- 2.4 Setting security configuration parameters
- 2.4.1 Alphanumeric Passwords
- 2.4.2 Attribute Security Enabled
- 2.4.3 Display Page Security Information
- 2.4.4 Display System Error Messages in the UI
- 2.4.5 Enable Security
- 2.4.6 Maximum Number of Unsuccessful Login Attempts
- 2.4.7 Minimum Password Length
- 2.4.8 Number of Days Passwords are Archived
- 2.4.9 Number of Passwords Archived
- 2.4.10 Password Duration
- 2.4.11 Security by Cash Flow Type Enabled
- 2.5 Setting Task Scheduler configuration parameters
- 2.6 Setting menu and user interface configuration parameters
- 2.7 Setting forecasted activity configuration parameters
- 2.8 Setting expected and instructed activity configuration parameters
- 2.8.1 Allow Cross Currency Transactions
- 2.8.2 Allow External Intercompany Direct Debit
- 2.8.3 Allow Negative Payments
- 2.8.4 AP Import Customer Reference Validation
- 2.8.5 Authorization Limit Rule Action Type
- 2.8.6 Automatic Transaction Rejection
- 2.8.7 Business Day Convention for Single Transaction Entry
- 2.8.8 Default Payment Method for Transactions
- 2.8.9 Disable Intercompany Transaction Comments Upon Authorization
- 2.8.10 Enable Transaction Routing Trace
- 2.8.11 Extended Remittance Details Entry/Edit Mode
- 2.8.12 Foreign Exchange Usage Date
- 2.8.13 Generate Payment Confirmation Documents
- 2.8.14 Intercompany Transaction Foreign Exchange Conversion Required
- 2.8.15 Mark In-House Bank Records As Settled
- 2.8.16 Ordering Party Legal Name To Use In Bank Files
- 2.8.17 Parse User ID In Transaction File Imports Via Task Scheduler
- 2.8.18 Payment Error Messages
- 2.8.19 Repetitive Transaction Security
- 2.8.20 Target Party Legal Name To Use In Bank Files
- 2.8.21 Transaction Authorization Logging Enabled
- 2.8.22 User Configurable Transaction Routing for AP
- 2.8.23 User Configurable Transaction Routing for DD
- 2.9 Setting bank-reported activity configuration parameters
- 2.9.1 ACM Posting Validation for Transaction Entry
- 2.9.2 Allow Export of Empty Close-Ended Bank Statements
- 2.9.3 Bank Account Type For Transaction Entry
- 2.9.4 Create Cash and Holdings Balance
- 2.9.5 Default Bank Stmt Rule type for External Account
- 2.9.6 Display Datanet Checkbox on Bank Transaction Import
- 2.9.7 Enable Entity Security For Calculate Bank Balances
- 2.9.8 Post Processing Enabled for B&T loads with Errors
- 2.9.9 Rounding Method for Balance Calculation
- 2.9.10 Transaction Amount Additional Validation for Transaction Entry
- 2.9.11 Treat Self-owned IC Accts As Regular IC Accts
- 2.9.12 Enable Undo of Bank Transaction Imports by Bank Account
- 2.10 Setting reconciliation configuration parameters
- 2.10.1 Allow Description Update on One-to-Many Reconciliation
- 2.10.2 Allow Generic Date Updating In Reconcile Process
- 2.10.3 Disable Reconciliation During Import
- 2.10.4 Enable 4-eyes security on reconciliation
- 2.10.5 Reconcile By Entity
- 2.10.6 Reconciliation Cash Reconciled Indicator
- 2.10.7 Reconciliation Cash Record Status
- 2.10.8 Reconciliation Cheque Number Validation
- 2.10.9 Reconciliation Post Processing
- 2.10.10 Reconciliation Remove Outstanding Current Days
- 2.10.11 Reconciliation Start Page
- 2.10.12 Reconciliation Value Date Validation
- 2.10.13 Updating Value Date in Reconciliation
- 2.10.14 Use Reconciliation Tolerances
- 2.11 Setting cash concentration configuration parameters
- 2.12 Setting interest, fee, and tax configuration parameters
- 2.13 Setting treasury management configuration parameters
- 2.14 Setting accounting configuration parameters
- 2.15 Setting monitoring configuration parameters
- 2.16 Setting miscellaneous configuration parameters
- Chapter 3 Managing security
- 3.1 Understanding security
- 3.2 Managing CMM administrative centers
- 3.2.1 Prerequisites
- 3.2.2 Creating administrative centers
- 3.2.3 Editing administrative center names
- 3.2.4 Editing administrative center component assignments
- 3.2.5 Editing administrative center security profile assignments
- 3.2.6 Deleting administrative centers
- 3.2.7 Managing multiple administrative centers’ assignments
- 3.2.8 Copying administrative centers’ assignments
- 3.3 Managing CMM profiles
- 3.3.1 Configuring default counterparty and bank account access
- 3.3.2 Managing profiles for functions and attributes
- 3.3.3 Managing profiles for entities
- 3.3.4 Managing profiles for counterparties
- 3.3.5 Managing profiles for bank accounts
- 3.3.6 Managing profiles for cash flow types
- 3.3.7 Managing profiles for authorization request types
- 3.3.8 Managing multiple profiles
- 3.4 Managing TRM lists and list groups
- Creating client list groups
- Editing client list groups
- Deleting client list groups
- 3.5 Managing users and user groups
- 3.6 Using the relational data model
- 3.7 Controlling the editing of cash record fields through modes
- Chapter 4 Managing the Task Scheduler
- Chapter 5 Configuring workflows
- 5.1 Completing forecasted activity setup
- 5.1.1 Configuring forecast horizons
- 5.1.2 Configuring forecast workflow
- 5.1.3 Configuring forecast mirroring
- 5.1.4 Configuring the forecast allocation model
- 5.1.5 Customizing forecasted activity functions
- 5.1.5.1 Customizing the Enterº functions
- 5.1.5.2 Customizing the Approveº functions
- 5.1.5.3 Customizing the 2nd Approveº functions
- 5.1.5.4 Customizing the Releaseº functions
- 5.1.5.5 Customizing the Re-Openº functions
- 5.1.5.6 Customizing the Cancel Forecasts function
- 5.1.5.7 Customizing drilldown pages
- 5.1.5.8 Customizing forecast allocation pages
- 5.2 Completing expected and instructed activity setup
- 5.2.1 Configuring transaction templates and repetitive codes
- 5.2.2 Configuring transaction routing rules (and related data)
- 5.2.3 Configuring the payment flow
- 5.2.4 Configuring transaction processing rules
- 5.2.4.1 Prerequisites
- 5.2.4.2 Creating transaction processing rules
- 5.2.4.3 Editing transaction processing rules
- 5.2.4.4 Deleting transaction processing rules
- 5.2.4.5 Enabling and disabling transaction processing rules
- 5.2.4.6 Using cash record rules in transaction processing rules
- 5.2.4.7 Last Modifier, Not Last Modifier
- 5.2.4.8 Last Acceptor, Not Last Acceptor
- 5.2.4.9 Using field value functions
- 5.2.5 CMM Cash Record Rule Editor
- 5.2.6 Configuring pre-advice reporting limits
- 5.3 Completing bank-reported activity setup
- 5.3.1 Configuring bank transaction templates
- 5.3.2 Configuring bank transaction rules
- 5.3.2.1 Prerequisites
- 5.3.2.2 Creating bank transaction rules
- 5.3.2.3 Editing bank transaction rules
- 5.3.2.4 Deleting bank transaction rules
- 5.3.2.5 Enabling and disabling bank transaction rules
- 5.3.2.6 Using field value functions in If conditions
- 5.3.2.7 Using field value functions in Then and Else actions
- 5.3.2.8 Selecting bank transaction attributes for inclusion in bank account lists
- 5.3.3 Configuring bank transaction validation rules
- 5.3.4 Configuring bank transaction quick entry
- 5.3.5 Configuring bank statement number rules
- 5.3.6 Configuring bank statement headers
- 5.3.7 Configuring intraday bank statement processing rules
- 5.3.7.1 Prerequisites
- 5.3.7.2 Creating intraday bank statement processing rules
- 5.3.7.3 Creating intraday bank statement processing rules based on existing rules
- 5.3.7.4 Editing intraday bank statement processing rules
- 5.3.7.5 Deleting intraday bank statement processing rules
- 5.3.7.6 Enabling and disabling intraday bank statement processing rules
- 5.3.8 Configuring bank balance type access
- 5.3.9 Customizing bank-reported activity functions
- 5.4 Completing reconciliation setup
- 5.4.1 Configuring reconciliation processing
- 5.4.2 Configuring reconciliation tolerance groups and rules
- 5.4.3 Configuring 4-eyes approval for manual reconciliations
- 5.4.4 Configuring internal bank transaction generation
- 5.4.5 Configuring cash allocation groups and rules
- 5.4.6 Customizing reconciliation functions
- 5.5 Completing netting setup
- 5.6 Completing cash concentration setup
- 5.7 Completing interest, fee, and tax setup
- 5.8 Completing central bank reporting setup
- 5.8.1 Configuring regulatory codes
- 5.8.1.1 Prerequisites
- 5.8.1.2 Creating internal regulatory codes
- 5.8.1.3 Editing internal regulatory codes
- 5.8.1.4 Deleting internal regulatory codes
- 5.8.1.5 Creating external regulatory codes
- 5.8.1.6 Editing external regulatory codes
- 5.8.1.7 Deleting external regulatory codes
- 5.8.1.8 Creating regulatory code mappings
- 5.8.1.9 Editing regulatory code mappings
- 5.8.1.10 Deleting regulatory code mappings
- 5.8.1 Configuring regulatory codes
- 5.9 Completing treasury management setup
- 5.9.1 Completing treasury management setup
- 5.9.2 Completing treasury management setup
- 5.1 Completing forecasted activity setup
- Chapter 6 Configuring navigation
- Chapter 7 Configuring the user interface
- 7.1 Understanding the user interface
- 7.2 Configuring display policies
- 7.3 Configuring style and other user interface elements
- 7.3.1 Prerequisites
- 7.3.2 Defining style using the CSS files
- 7.3.3 Defining style using the t7silver.xml file
- 7.3.4 Configuring number, date, and time formats
- 7.3.5 Configuring the popup calendar button
- 7.3.6 Configuring the context-sensitive help button
- 7.3.7 Configuring the Favorites list
- 7.3.8 Configuring the "Please Wait" message
- 7.4 Customizing pages
- 7.5 Configuring the user’s session timeout
- Chapter 8 Translating the user interface
- 8.1 Introduction
- 8.2 Translating the CMM component
- 8.3 Translating the TRM and ACM components and the menu
- Chapter 9 Configuring views
- 9.1 Configuring transaction dialogs
- 9.2 Configuring deal entry
- 9.2.1 TRM transactions
- 9.2.2 Configuring view names
- 9.2.3 Configuring views
- 9.2.3.1 Configuring inheritance
- 9.2.3.2 Configuring parameters
- 9.2.3.3 Configuring fields
- 9.2.3.4 Configuring style and templates
- 9.2.3.5 Configuring statuses
- 9.2.3.6 Configuring data sources
- 9.2.3.7 Configuring the Enter Board
- 9.2.3.8 Configuring the Transaction Board
- 9.2.3.9 Configuring multiple deal entry
- 9.2.3.10 Configuring scenarios
- 9.2.3.11 Configuring scenario structures
- 9.2.3.12 Configuring scenario names
- 9.2.3.13 Configuring debug
- 9.2.3.14 Configuring scenario steps
- 9.2.3.15 Configuring step types and parameters
- 9.2.4 Configuring transitions
- 9.2.5 Example
- 9.3 Configuring reports
- 9.4 Configuring the Treasury Monitor
- Chapter 10 Configuring reports and worksheets
- 10.1 Understanding reports and worksheets
- 10.2 Configuring report templates (and related data)
- 10.3 Configuring Cash Monitor and Cash Position report templates (and related data)
- 10.4 Configuring report mappings
- 10.4.1 Configuring report mapping relationships
- 10.4.1.1 Prerequisites
- 10.4.1.2 Creating report mapping relationships
- 10.4.1.3 Editing report mapping relationships
- 10.4.1.4 Editing report mapping relationships’ categories, groups, instrument type mappings, and security
- 10.4.1.5 Deleting report mapping relationships
- 10.4.1.6 Copying report mapping relationships
- 10.4.2 Configuring report mapping categories
- 10.4.2.1 Prerequisites
- 10.4.2.2 Adding report mapping categories to relationships
- 10.4.2.3 Removing report mapping categories from relationships
- 10.4.2.4 Changing the order of report mapping categories in relationships
- 10.4.2.5 Editing report mapping categories
- 10.4.2.6 Deleting report mapping categories
- 10.4.3 Configuring report mapping groups
- 10.4.4 Configuring report mapping group versioning
- 10.4.5 Configuring instrument type mappings
- 10.4.1 Configuring report mapping relationships
- 10.5 Configuring report media
- 10.6 Configuring time bucket sets
- Chapter 11 Configuring data sources
- Chapter 12 Monitoring user activity
- Chapter 13 Reviewing and managing logs
- Chapter 14 Completing miscellaneous tasks
- 14.1 Configuring the nvp.xml file
- 14.2 Configuring the config.xml file
- 14.3 Releasing process locks
- 14.4 Clearing cache of data sources
- 14.5 Exporting data to your browser or spreadsheet application
- 14.6 Analyzing performance
- 14.7 Changing the user that connects the application to the database
- 14.8 Cash record Additional Attributes
- Chapter 15 Going live
- Appendix A Security and link IDs
- Appendix B Time zones
- Appendix C TRM fields
- Appendix D Example forecast allocation model
- Appendix E Forecast function attributes
- Appendix F Automatic logon from TRM
- Appendix G Managing SWIFT FIN messages

2
Information in this document is subject to change without notice and does not represent a commitment on the part
of Wall Street Systems. The software and documentation, which includes information contained in any databases,
described in this document is furnished under a license agreement or nondisclosure agreement and may only be
used or copied in accordance with the terms of the agreement. It is against the law to copy the software or
documentation except as specially allowed in the license or nondisclosure agreement. No part of this publication
may be reproduced, stored in a retrieval system, or transmitted, in any form or by any means, electronic, mechanical,
photocopying, recording, or otherwise, without the prior written permission of Wall Street Systems.
Although Wall Street Systems has tested the software and reviewed the documentation, Wall Street Systems
makes herein no warranty or representation, either expressed or implied, with respect to software or
documentation, its quality, performance, marketability, or fitness for a particular purpose. As a result, this
software is provided "as is", and in no event will Wall Street Systems be liable for direct, indirect, special,
incidental, or consequential damages from any defect in the software or by virtue of providing this
documentation, even if advised of the possibility of such damages. The documentation may contain technical
inaccuracies and omissions.
The mention of an activity or instrument in this publication does not imply that all matters relating to that activity or
instrument are supported by Wallstreet Suite, nor does it imply that processing of or by that activity or instrument is
carried out in any particular way, even if such processing is customary in some or all parts of the industry.
The windows and screen images shown herein were obtained from prototypes during software development. The
actual windows and screen images in the software may differ.
Wall Street Systems, WSS, WALLSTREET, WALLSTREET SUITE and the Wall Street Systems logos are
trademarks of Wall Street Systems Delaware, Inc.
Finance KIT, Trema and Trema logo are trademarks of Wall Street Systems Sweden AB.
Microsoft and Windows are either registered trademarks or trademarks of Microsoft Corporation in the United States
and/or other countries.
Adobe, Acrobat, and Acrobat Reader are either registered trademarks or trademarks of Adobe Systems
Incorporated in the United States and/or other countries.
All other products mentioned in this book may be trademarks or service marks of their respective companies or
organizations.
Company names, people names, and data used in examples are fictitious unless otherwise noted.
This edition applies to Wallstreet Suite version 7.3.16 and to all later releases and versions until indicated in new
editions or Wall Street Systems communications. Make sure you are using the latest edition for the release level of
the Wall Street Systems product.
© Copyright 2011 Wall Street Systems IPH AB. All rights reserved.
First Edition (August 2011)
WebSuite System Administration Guide 3
Contents
Preface ...........................................................................................................................21
Introduction .................................................................................................................................. 21
How to use this guide .................................................................................................................. 21
Recommended reading ............................................................................................................. 21
Assumptions .............................................................................................................................. 22
Associated documents ................................................................................................................ 22
1 Overview ....................................................................................................................23
1.1 WebSuite from a system administrator’s perspective ..................................................... 23
1.1.1 apps Folder ..................................................................................................................... 23
1.1.2 ConfigurationData and InstallationData folders .............................................................. 23
1.1.2.1 Configuration overrides ........................................................................................ 23
1.1.2.2 Customization ....................................................................................................... 23
1.1.2.3 Upgrade ................................................................................................................ 24
1.1.3 Runtime folder ................................................................................................................. 24
1.1.4 VirtualDirectory folder ..................................................................................................... 24
1.1.5 Import and export folders ................................................................................................ 25
1.2 Opening configuration files .................................................................................................25
1.2.1 Customization ................................................................................................................. 25
1.2.2 Opening configuration files with the Review CMM Configuration Documents function .. 26
1.2.3 Opening configuration files without the Review CMM Configuration Documents function .
27
1.2.4 Returning a configuration file to its default settings ........................................................ 27
1.2.5 Editing configuration files that use the HTML handler framework ................................... 27
1.2.6 Configuration files ........................................................................................................... 29
2 Setting configuration parameters ............................................................................49
2.1 Setting configuration parameters ........................................................................................ 49
2.1.1 Prerequisites ................................................................................................................... 49
2.1.2 Setting configuration parameters using the Configuration Parameters function ............. 50
2.1.3 Setting configuration parameters using the Configuration Maintenance functions ......... 50
2.2 Setting static data configuration parameters ..................................................................... 50
2.2.1 Allow Bank Accounts at Multiple IHBs ............................................................................ 50
2.2.2 Allow Bank Accounts Outside Functional Currency ........................................................ 51
2.2.3 Display Counterparty Bank Account Additional Attributes .............................................. 51
2.3 Setting market data configuration parameters .................................................................. 51
2.3.1 Automatically Calculate Euro Rates ................................................................................ 52
4 © Wallstreet Systems IPH AB - Confidential
2.3.2 Foreign Exchange Base Currency .................................................................................. 52
2.4 Setting security configuration parameters ......................................................................... 52
2.4.1 Alphanumeric Passwords ............................................................................................... 52
2.4.2 Attribute Security Enabled .............................................................................................. 53
2.4.3 Display Page Security Information .................................................................................. 53
2.4.4 Display System Error Messages in the UI ...................................................................... 54
2.4.5 Enable Security ............................................................................................................... 54
2.4.6 Maximum Number of Unsuccessful Login Attempts ....................................................... 54
2.4.7 Minimum Password Length ............................................................................................. 55
2.4.8 Number of Days Passwords are Archived ...................................................................... 55
2.4.9 Number of Passwords Archived ...................................................................................... 55
2.4.10 Password Duration ........................................................................................................56
2.4.11 Security by Cash Flow Type Enabled ........................................................................... 56
2.5 Setting Task Scheduler configuration parameters ............................................................ 57
2.5.1 Minimum Minutes Before Forcing Queue Termination ................................................... 57
2.6 Setting menu and user interface configuration parameters ............................................. 57
2.6.1 JavaScript Enabled ......................................................................................................... 57
2.6.2 Maximum Number of Rows in Combo Box Before Filtering is Enabled .......................... 58
2.6.3 Scroll Page Count ........................................................................................................... 58
2.7 Setting forecasted activity configuration parameters ....................................................... 58
2.7.1 Forecast Default Entity Mirror Participation .................................................................... 58
2.7.2 Forecast Default Instrument Mirroring Policy .................................................................. 59
2.7.3 Forecast General Item Input Method .............................................................................. 59
2.7.4 Forecast Mirroring Policy ................................................................................................ 60
2.8 Setting expected and instructed activity configuration parameters ................................ 60
2.8.1 Allow Cross Currency Transactions ................................................................................ 60
2.8.2 Allow External Intercompany Direct Debit ....................................................................... 61
2.8.3 Allow Negative Payments ............................................................................................... 61
2.8.4 AP Import Customer Reference Validation ..................................................................... 62
2.8.5 Authorization Limit Rule Action Type .............................................................................. 62
2.8.6 Automatic Transaction Rejection .................................................................................... 62
2.8.7 Business Day Convention for Single Transaction Entry ................................................. 63
2.8.8 Default Payment Method for Transactions ...................................................................... 63
2.8.9 Disable Intercompany Transaction Comments Upon Authorization ............................... 64
2.8.10 Enable Transaction Routing Trace ............................................................................... 64
2.8.11 Extended Remittance Details Entry/Edit Mode ............................................................. 64
2.8.12 Foreign Exchange Usage Date ..................................................................................... 65
2.8.13 Generate Payment Confirmation Documents ............................................................... 65
2.8.14 Intercompany Transaction Foreign Exchange Conversion Required ........................... 66
2.8.15 Mark In-House Bank Records As Settled ..................................................................... 66
2.8.16 Ordering Party Legal Name To Use In Bank Files ........................................................ 66
2.8.17 Parse User ID In Transaction File Imports Via Task Scheduler .................................... 67
2.8.18 Payment Error Messages ............................................................................................. 67
2.8.19 Repetitive Transaction Security .................................................................................... 68
2.8.20 Target Party Legal Name To Use In Bank Files ........................................................... 68
2.8.21 Transaction Authorization Logging Enabled ................................................................. 69
2.8.22 User Configurable Transaction Routing for AP ............................................................. 69
WebSuite System Administration Guide 5
2.8.23 User Configurable Transaction Routing for DD ............................................................ 69
2.9 Setting bank-reported activity configuration parameters ................................................. 70
2.9.1 ACM Posting Validation for Transaction Entry ................................................................ 70
2.9.2 Allow Export of Empty Close-Ended Bank Statements ................................................... 71
2.9.3 Bank Account Type For Transaction Entry ..................................................................... 71
2.9.4 Create Cash and Holdings Balance ................................................................................ 71
2.9.5 Default Bank Stmt Rule type for External Account ......................................................... 72
2.9.6 Display Datanet Checkbox on Bank Transaction Import ................................................ 72
2.9.7 Enable Entity Security For Calculate Bank Balances ..................................................... 73
2.9.8 Post Processing Enabled for B&T loads with Errors ....................................................... 73
2.9.9 Rounding Method for Balance Calculation ...................................................................... 74
2.9.10 Transaction Amount Additional Validation for Transaction Entry .................................. 74
2.9.11 Treat Self-owned IC Accts As Regular IC Accts ........................................................... 75
2.9.12 Enable Undo of Bank Transaction Imports by Bank Account ....................................... 75
2.10 Setting reconciliation configuration parameters ............................................................. 75
2.10.1 Allow Description Update on One-to-Many Reconciliation ........................................... 76
2.10.2 Allow Generic Date Updating In Reconcile Process ..................................................... 76
2.10.3 Disable Reconciliation During Import ............................................................................ 76
2.10.4 Enable 4-eyes security on reconciliation ....................................................................... 78
2.10.5 Reconcile By Entity ....................................................................................................... 78
2.10.6 Reconciliation Cash Reconciled Indicator ..................................................................... 79
2.10.7 Reconciliation Cash Record Status .............................................................................. 79
2.10.8 Reconciliation Cheque Number Validation ................................................................... 79
2.10.9 Reconciliation Post Processing ..................................................................................... 80
2.10.10 Reconciliation Remove Outstanding Current Days ..................................................... 80
2.10.11 Reconciliation Start Page ............................................................................................ 81
2.10.12 Reconciliation Value Date Validation .......................................................................... 81
2.10.13 Updating Value Date in Reconciliation ........................................................................ 81
2.10.14 Use Reconciliation Tolerances ................................................................................... 82
2.11 Setting cash concentration configuration parameters .................................................... 82
2.11.1 Account Settlement Balance Type ................................................................................ 82
2.11.2 Negative Balance Payment Method .............................................................................. 83
2.12 Setting interest, fee, and tax configuration parameters .................................................. 83
2.12.1 Post Interest To Period ................................................................................................. 83
2.12.2 Show Bank Account Group For Interest Calculation ..................................................... 84
2.13 Setting treasury management configuration parameters ............................................... 84
2.13.1 Accrual Start Date ......................................................................................................... 85
2.13.2 Deal Settlement Requires Rollover Decision ................................................................ 85
2.13.3 Liquidate Only Traded Issues ....................................................................................... 85
2.13.4 Liquidate Without Accounting ....................................................................................... 86
2.13.5 Provide Correspondent Accounts For Deal Settlement ................................................ 86
2.14 Setting accounting configuration parameters ................................................................. 86
2.14.1 Account Balance Type .................................................................................................. 86
2.14.2 GL Export Aggregation ................................................................................................. 87
2.14.3 GL Specification Based Export ..................................................................................... 87
2.14.4 Period-End Post at Deal Maturity .................................................................................. 88
6 © Wallstreet Systems IPH AB - Confidential
2.15 Setting monitoring configuration parameters .................................................................. 88
2.15.1 Audit Root Directory ...................................................................................................... 88
2.15.2 Authorization Request Type .......................................................................................... 88
2.15.3 Send Mail Server .......................................................................................................... 89
2.16 Setting miscellaneous configuration parameters ............................................................ 89
2.16.1 Data Caching Poll Delay ............................................................................................... 89
2.16.2 Force Garbage Collection ............................................................................................. 90
2.16.3 Installation ..................................................................................................................... 90
2.16.4 Maximum Number of Transactions being Fetched ....................................................... 90
2.16.5 Memory Utilization Before Force GC ........................................................................... 91
3 Managing security .....................................................................................................93
3.1 Understanding security ........................................................................................................ 93
3.1.1 Determining your organization’s security level ................................................................ 93
3.1.2 Configuring administrative centers (if necessary) ........................................................... 94
3.1.3 Configuring security profiles ............................................................................................ 94
3.1.4 Configuring users and user groups ................................................................................. 95
3.1.5 Configuring user reauthentication ................................................................................... 96
3.2 Managing CMM administrative centers ............................................................................... 97
3.2.1 Prerequisites ................................................................................................................... 97
3.2.2 Creating administrative centers ...................................................................................... 98
3.2.3 Editing administrative center names ............................................................................... 98
3.2.4 Editing administrative center component assignments ................................................... 99
3.2.5 Editing administrative center security profile assignments ............................................. 99
3.2.6 Deleting administrative centers ....................................................................................... 99
3.2.7 Managing multiple administrative centers’ assignments ............................................... 100
3.2.8 Copying administrative centers’ assignments ............................................................... 100
3.3 Managing CMM profiles ...................................................................................................... 100
3.3.1 Configuring default counterparty and bank account access ......................................... 101
3.3.1.1 Prerequisites ....................................................................................................... 101
3.3.1.2 Configuring default counterparty access ............................................................ 101
3.3.1.3 Configuring default bank account access ........................................................... 101
3.3.2 Managing profiles for functions and attributes .............................................................. 102
3.3.2.1 Managing security by function profiles ............................................................... 102
3.3.2.2 Managing security by attribute profiles ............................................................... 104
3.3.3 Managing profiles for entities ........................................................................................ 106
3.3.3.1 Managing security by entity profiles ................................................................... 106
3.3.3.2 Managing security by entity by function profiles ................................................. 108
3.3.4 Managing profiles for counterparties ............................................................................. 110
3.3.4.1 Managing security by counterparty profiles ........................................................ 110
3.3.4.2 Managing security by counterparty by function profiles ...................................... 111
3.3.5 Managing profiles for bank accounts ............................................................................ 113
3.3.5.1 Managing security by bank account profiles ....................................................... 114
3.3.5.2 Managing security by settlement group profiles ................................................. 115
3.3.6 Managing profiles for cash flow types ........................................................................... 116
3.3.6.1 Managing attribute groups .................................................................................. 117
3.3.6.2 Managing security by cash flow type profiles ..................................................... 119
WebSuite System Administration Guide 7
3.3.7 Managing profiles for authorization request types ........................................................ 120
3.3.7.1 Prerequisites ....................................................................................................... 120
3.3.7.2 Creating security by authorization request type profiles ..................................... 121
3.3.7.3 Editing security by authorization request type profile names .............................. 121
3.3.7.4 Editing security by authorization request type profile assignments .................... 121
3.3.7.5 Deleting security by authorization request type profiles ..................................... 121
3.3.8 Managing multiple profiles ............................................................................................ 121
3.3.8.1 Prerequisites ....................................................................................................... 121
3.3.8.2 Managing multiple CMM profiles ........................................................................ 122
3.4 Managing TRM lists and list groups .................................................................................. 122
3.4.1 Managing currency lists ................................................................................................ 122
3.4.1.1 Prerequisites ....................................................................................................... 123
3.4.1.2 Creating currency lists ........................................................................................ 123
3.4.1.3 Editing currency lists ........................................................................................... 123
3.4.1.4 Deleting currency lists ........................................................................................ 124
3.4.2 Managing currency list groups ...................................................................................... 124
3.4.2.1 Prerequisites ....................................................................................................... 124
3.4.2.2 Creating currency list groups .............................................................................. 124
3.4.2.3 Editing currency list groups ................................................................................ 125
3.4.2.4 Deleting currency list groups .............................................................................. 125
3.4.3 Managing client lists ...................................................................................................... 125
3.4.3.1 Prerequisites ....................................................................................................... 125
3.4.3.2 Creating client lists ............................................................................................. 126
3.4.3.3 Editing client lists ................................................................................................ 126
3.4.3.4 Deleting client lists .............................................................................................. 126
3.4.4 Managing client list groups ........................................................................................... 126
3.4.4.1 Prerequisites ....................................................................................................... 127
3.4.5 Managing instrument lists ............................................................................................. 127
3.4.5.1 Prerequisites ....................................................................................................... 128
3.4.5.2 Creating instruments lists ................................................................................... 128
3.4.5.3 Editing instrument lists ........................................................................................ 128
3.4.5.4 Deleting instrument lists ..................................................................................... 129
3.4.6 Managing instrument list groups ................................................................................... 129
3.4.6.1 Prerequisites ....................................................................................................... 129
3.4.6.2 Creating instrument list groups ........................................................................... 129
3.4.6.3 Editing instrument list groups ............................................................................. 130
3.4.6.4 Deleting instrument list groups ........................................................................... 130
3.4.7 Managing portfolio lists ................................................................................................. 130
3.4.7.1 Prerequisites ....................................................................................................... 130
3.4.7.2 Creating portfolio lists ......................................................................................... 130
3.4.7.3 Editing portfolio lists ............................................................................................ 131
3.4.7.4 Deleting portfolio lists ......................................................................................... 131
3.4.8 Managing portfolio mappings and mapping rules ......................................................... 131
3.4.8.1 Prerequisites ....................................................................................................... 131
3.4.8.2 Managing portfolio mapping rules ...................................................................... 132
3.4.8.3 Managing portfolio report mappings ................................................................... 132
3.4.8.4 Managing portfolio treasury mappings ............................................................... 132
3.5 Managing users and user groups ...................................................................................... 133
8 © Wallstreet Systems IPH AB - Confidential
3.5.1 Managing users ............................................................................................................ 133
3.5.1.1 Prerequisites ....................................................................................................... 133
3.5.1.2 Managing users in TRM ..................................................................................... 133
3.5.1.3 Editing users in CMM ......................................................................................... 134
3.5.1.4 Assigning CMM profiles to users ........................................................................ 134
3.5.1.5 Assigning TRM lists to users .............................................................................. 135
3.5.2 Managing CMM user groups ......................................................................................... 135
3.5.2.1 Prerequisites ....................................................................................................... 135
3.5.2.2 Creating user groups .......................................................................................... 136
3.5.2.3 Editing user group names ................................................................................... 136
3.5.2.4 Editing user group assignments ......................................................................... 136
3.5.2.5 Deleting user groups .......................................................................................... 136
3.5.3 Managing TRM user groups ......................................................................................... 136
3.5.3.1 Prerequisites ....................................................................................................... 136
3.5.3.2 Creating user groups .......................................................................................... 137
3.5.3.3 Editing user groups ............................................................................................. 137
3.5.3.4 Deleting user groups .......................................................................................... 137
3.5.3.5 Assigning users to user groups .......................................................................... 137
3.5.4 Configuring user reauthentication ................................................................................. 137
3.5.4.1 Prerequisites ....................................................................................................... 138
3.5.4.2 Configuring user reauthentication ....................................................................... 138
3.5.5 Running the Security Access report .............................................................................. 139
3.5.5.1 Prerequisites ....................................................................................................... 139
3.5.5.2 Running the Security Access report ................................................................... 139
3.6 Using the relational data model ......................................................................................... 139
3.6.1 Table design details ...................................................................................................... 140
3.6.1.1 ObjectTypes table design details ........................................................................ 140
3.6.1.2 ObjectACLS table design details ........................................................................ 141
3.6.2 Completing security tasks using the RDM .................................................................... 141
3.6.2.1 Creating administrative centers .......................................................................... 141
3.6.2.2 Creating users .................................................................................................... 141
3.6.2.3 Deactivating users .............................................................................................. 142
3.6.2.4 Assigning security profiles to users .................................................................... 142
3.6.2.5 Assigning users to administrative centers .......................................................... 144
3.6.2.6 Creating security profiles .................................................................................... 145
3.7 Controlling the editing of cash record fields through modes ........................................ 146
3.7.1 Setting up modes .......................................................................................................... 146
3.7.2 Checking mode configuration ....................................................................................... 147
3.7.3 List of configurable fields .............................................................................................. 149
3.7.3.1 Working with CptyOneOffSection ....................................................................... 150
3.7.3.2 Note on Edited Cash Record .............................................................................. 151
4 Managing the Task Scheduler ...............................................................................153
4.1 Understanding the Task Scheduler ................................................................................... 153
4.1.1 Defining Task Scheduler components .......................................................................... 153
4.1.2 Determining which tasks to run through the Task Scheduler ........................................ 153
4.2 Managing parameter sets ................................................................................................... 153
WebSuite System Administration Guide 9
4.2.1 Prerequisites ................................................................................................................. 154
4.2.2 Creating parameter sets ............................................................................................... 154
4.2.3 Editing parameter sets .................................................................................................. 155
4.2.4 Deleting parameter sets ................................................................................................ 155
4.3 Managing tasks ................................................................................................................... 155
4.3.1 Prerequisites ................................................................................................................. 155
4.3.2 Creating tasks ............................................................................................................... 156
4.3.3 Editing tasks .................................................................................................................. 156
4.3.4 Deleting tasks ............................................................................................................... 156
4.4 Starting and stopping Task Scheduler services .............................................................. 156
4.4.1 Prerequisites ................................................................................................................. 157
4.4.2 Starting a Task Scheduler service ................................................................................ 157
4.4.3 Stopping a Task Scheduler service .............................................................................. 157
4.5 Monitoring Task Scheduler remotely ................................................................................ 157
5 Configuring workflows ...........................................................................................159
5.1 Completing forecasted activity setup ............................................................................... 159
5.1.1 Configuring forecast horizons ....................................................................................... 159
5.1.1.1 Prerequisites ....................................................................................................... 159
5.1.1.2 Configuring forecast horizons ............................................................................. 159
5.1.1.3 Returning forecast horizons to their default settings .......................................... 160
5.1.2 Configuring forecast workflow ....................................................................................... 160
5.1.2.1 Prerequisites ....................................................................................................... 162
5.1.2.2 Configuring forecast workflow ............................................................................ 162
5.1.3 Configuring forecast mirroring ....................................................................................... 165
5.1.3.1 Prerequisites ....................................................................................................... 165
5.1.3.2 Configuring forecast mirroring ............................................................................ 165
5.1.4 Configuring the forecast allocation model ..................................................................... 166
5.1.4.1 Prerequisites ....................................................................................................... 166
5.1.4.2 Configuring the forecast allocation model .......................................................... 166
5.1.4.3 Testing the forecast allocation model ................................................................. 166
5.1.4.4 Returning the forecast allocation model to its default settings ........................... 167
5.1.5 Customizing forecasted activity functions ..................................................................... 168
5.1.5.1 Customizing the Enterº functions ........................................................................ 168
5.1.5.2 Customizing the Approveº functions ................................................................... 170
5.1.5.3 Customizing the 2nd Approveº functions ............................................................ 171
5.1.5.4 Customizing the Releaseº functions ................................................................... 172
5.1.5.5 Customizing the Re-Openº functions .................................................................. 173
5.1.5.6 Customizing the Cancel Forecasts function ....................................................... 175
5.1.5.7 Customizing drilldown pages .............................................................................. 175
5.1.5.8 Customizing forecast allocation pages ............................................................... 177
5.2 Completing expected and instructed activity setup ........................................................ 182
5.2.1 Configuring transaction templates and repetitive codes ............................................... 182
5.2.1.1 Configuring transaction templates ...................................................................... 182
5.2.1.2 Configuring transaction repetitive codes ............................................................ 183
5.2.2 Configuring transaction routing rules (and related data) ............................................... 185
10 © Wallstreet Systems IPH AB - Confidential
5.2.2.1 Configuring settlement models ........................................................................... 185
5.2.2.2 Configuring transaction routing rules .................................................................. 186
5.2.3 Configuring the payment flow ....................................................................................... 191
5.2.3.1 Building the payment flow ................................................................................... 191
5.2.3.2 Using CMM Cash Record Rules to control the payment flow ............................. 191
5.2.3.3 Workflow example .............................................................................................. 192
5.2.3.4 Handlers in the flow ............................................................................................ 193
5.2.3.5 Monitoring the payment flow ............................................................................... 194
5.2.4 Configuring transaction processing rules ...................................................................... 194
5.2.4.1 Prerequisites ....................................................................................................... 194
5.2.4.2 Creating transaction processing rules ................................................................ 195
5.2.4.3 Editing transaction processing rules ................................................................... 196
5.2.4.4 Deleting transaction processing rules ................................................................. 198
5.2.4.5 Enabling and disabling transaction processing rules .......................................... 198
5.2.4.6 Using cash record rules in transaction processing rules .................................... 198
5.2.4.7 Last Modifier, Not Last Modifier .......................................................................... 200
5.2.4.8 Last Acceptor, Not Last Acceptor ....................................................................... 201
5.2.4.9 Using field value functions .................................................................................. 202
5.2.5 CMM Cash Record Rule Editor ..................................................................................... 207
5.2.5.1 Descriptions of the condition and criteria fields .................................................. 209
5.2.6 Configuring pre-advice reporting limits ......................................................................... 210
5.2.6.1 Prerequisites ....................................................................................................... 210
5.3 Completing bank-reported activity setup ......................................................................... 211
5.3.1 Configuring bank transaction templates ........................................................................ 211
5.3.1.1 Prerequisites ....................................................................................................... 211
5.3.1.2 Creating bank transaction templates .................................................................. 212
5.3.1.3 Editing bank transaction templates ..................................................................... 212
5.3.1.4 Deleting bank transaction templates .................................................................. 212
5.3.1.5 Enabling and disabling bank transaction templates ........................................... 213
5.3.2 Configuring bank transaction rules ............................................................................... 213
5.3.2.1 Prerequisites ....................................................................................................... 213
5.3.2.2 Creating bank transaction rules .......................................................................... 214
5.3.2.3 Editing bank transaction rules ............................................................................ 216
5.3.2.4 Deleting bank transaction rules .......................................................................... 218
5.3.2.5 Enabling and disabling bank transaction rules ................................................... 218
5.3.2.6 Using field value functions in If conditions .......................................................... 218
5.3.2.7 Using field value functions in Then and Else actions ......................................... 223
5.3.2.8 Selecting bank transaction attributes for inclusion in bank account lists ............ 232
5.3.3 Configuring bank transaction validation rules ............................................................... 233
5.3.3.1 Prerequisites ....................................................................................................... 233
5.3.3.2 Configuring bank statement number validation rules ......................................... 233
5.3.3.3 Configuring bank balance validation rules .......................................................... 235
5.3.3.4 Setting attributes ................................................................................................. 238
5.3.3.5 Enabling import on closed accounts ................................................................... 238
5.3.4 Configuring bank transaction quick entry ...................................................................... 239
5.3.4.1 Prerequisites ....................................................................................................... 239
5.3.4.2 Configuring bank transaction quick entry ........................................................... 239
5.3.5 Configuring bank statement number rules .................................................................... 240
WebSuite System Administration Guide 11
5.3.5.1 Prerequisites ....................................................................................................... 241
5.3.5.2 Creating bank statement number rules .............................................................. 242
5.3.5.3 Editing the bank statement number rule ............................................................. 242
5.3.5.4 Deleting bank statement number rules ............................................................... 242
5.3.6 Configuring bank statement headers ............................................................................ 243
5.3.6.1 Prerequisites ....................................................................................................... 243
5.3.6.2 Configuring the default bank statement header .................................................. 243
5.3.6.3 Configuring the custom bank statement header ................................................. 244
5.3.7 Configuring intraday bank statement processing rules ................................................. 245
5.3.7.1 Prerequisites ....................................................................................................... 245
5.3.7.2 Creating intraday bank statement processing rules ........................................... 246
5.3.7.3 Creating intraday bank statement processing rules based on existing rules ...... 246
5.3.7.4 Editing intraday bank statement processing rules .............................................. 247
5.3.7.5 Deleting intraday bank statement processing rules ............................................ 247
5.3.7.6 Enabling and disabling intraday bank statement processing rules ..................... 247
5.3.8 Configuring bank balance type access ......................................................................... 248
5.3.8.1 Prerequisites ....................................................................................................... 248
5.3.8.2 Configuring bank balance type access ............................................................... 248
5.3.9 Customizing bank-reported activity functions ............................................................... 248
5.3.9.1 Customizing the Bank Transaction Import Rules function .................................. 248
5.3.9.2 Customizing the Bank Transaction Group Details page ..................................... 251
5.4 Completing reconciliation setup ....................................................................................... 252
5.4.1 Configuring reconciliation processing ........................................................................... 253
5.4.1.1 Prerequisites ....................................................................................................... 253
5.4.1.2 Configuring the reconciliation_config.xml (rule engine) file ................................ 253
5.4.1.3 Configuring the reconciliation_config.xml (process flow) file .............................. 255
5.4.2 Configuring reconciliation tolerance groups and rules .................................................. 256
5.4.2.1 Configuring reconciliation tolerance groups ....................................................... 256
5.4.2.2 Configuring reconciliation tolerance rules ........................................................... 257
5.4.3 Configuring 4-eyes approval for manual reconciliations ............................................... 259
5.4.3.1 Prerequisites ....................................................................................................... 261
5.4.3.2 Adding reconciliation rights to a user profile ....................................................... 261
5.4.4 Configuring internal bank transaction generation ......................................................... 261
5.4.4.1 Prerequisites ....................................................................................................... 262
5.4.4.2 Configuring internal bank transaction generation ............................................... 262
5.4.4.3 Configuring the internal bank transaction booking date ..................................... 263
5.4.5 Configuring cash allocation groups and rules ............................................................... 264
5.4.5.1 Configuring cash allocation groups .................................................................... 264
5.4.5.2 Configuring cash allocation rules ........................................................................ 265
5.4.6 Customizing reconciliation functions ............................................................................. 267
5.4.6.1 Customizing the Cash Reconciliation function ................................................... 267
5.5 Completing netting setup ................................................................................................... 268
5.5.1 Configuring netting periods ........................................................................................... 268
5.5.1.1 Prerequisites ....................................................................................................... 268
5.5.1.2 Creating netting periods ..................................................................................... 269
5.5.1.3 Editing netting periods ........................................................................................ 269
5.5.1.4 Deleting netting periods ...................................................................................... 269
12 © Wallstreet Systems IPH AB - Confidential
5.6 Completing cash concentration setup .............................................................................. 269
5.6.1 Configuring target balance rules ................................................................................... 269
5.6.1.1 Prerequisites ....................................................................................................... 270
5.6.1.2 Creating target balance rules ............................................................................. 270
5.6.1.3 Editing target balance rules ................................................................................ 270
5.6.1.4 Deleting target balance rules .............................................................................. 270
5.6.2 Configuring settlement rules ......................................................................................... 271
5.6.2.1 Prerequisites ....................................................................................................... 271
5.6.2.2 Creating intercompany settlement rules ............................................................. 271
5.6.2.3 Creating pool-transfer settlement rules .............................................................. 272
5.6.2.4 Creating external-transfer settlement rules ........................................................ 272
5.6.2.5 Deleting settlement rules .................................................................................... 272
5.7 Completing interest, fee, and tax setup ............................................................................ 273
5.7.1 Configuring interest, fee, and tax calculation processing .............................................. 273
5.7.2 Prerequisites ................................................................................................................. 273
5.7.2.1 Configuring interest, fee, and tax calculation ...................................................... 273
5.7.2.2 Configuring interest, fee, and tax calculation report content .............................. 273
5.7.2.3 Configuring single period/calculation type interest, fee, and tax calculation ....... 274
5.7.3 Configuring interest, fee, and tax calculation methods ................................................. 274
5.7.3.1 Prerequisites ....................................................................................................... 275
5.7.3.2 Creating interest, fee, and tax calculation methods ............................................ 275
5.7.3.3 Editing interest, fee, and tax calculation methods .............................................. 275
5.7.3.4 Deleting interest, fee, and tax calculation methods ............................................ 276
5.7.3.5 Assigning interest, fee, and tax calculation methods to bank accounts ............. 276
5.7.4 Configuring interest, fee, and tax calculations .............................................................. 276
5.7.4.1 Prerequisites ....................................................................................................... 276
5.7.4.2 Configuring interest, fee, and tax calculations .................................................... 277
5.7.5 Configuring credit line limits .......................................................................................... 277
5.7.5.1 Prerequisites ....................................................................................................... 277
5.7.5.2 Creating credit line limits .................................................................................... 278
5.7.5.3 Editing credit line limits ....................................................................................... 278
5.7.5.4 Deleting credit line limits ..................................................................................... 279
5.7.6 Customizing interest, fee, and tax functions ................................................................. 279
5.7.6.1 Customizing the Calculation Assignment page .................................................. 279
5.7.6.2 Prerequisites ....................................................................................................... 279
5.7.6.3 Customizing the Derivative Report page ............................................................ 279
5.7.6.4 Prerequisites ....................................................................................................... 280
5.7.6.5 Customizing the Derivative Report page ............................................................ 280
5.8 Completing central bank reporting setup ......................................................................... 280
5.8.1 Configuring regulatory codes ........................................................................................ 280
5.8.1.1 Prerequisites ....................................................................................................... 280
5.8.1.2 Creating internal regulatory codes ...................................................................... 281
5.8.1.3 Editing internal regulatory codes ........................................................................ 281
5.8.1.4 Deleting internal regulatory codes ...................................................................... 281
5.8.1.5 Creating external regulatory codes ..................................................................... 281
5.8.1.6 Editing external regulatory codes ....................................................................... 282
5.8.1.7 Deleting external regulatory codes ..................................................................... 282
5.8.1.8 Creating regulatory code mappings .................................................................... 282
WebSuite System Administration Guide 13
5.8.1.9 Editing regulatory code mappings ...................................................................... 282
5.8.1.10 Deleting regulatory code mappings .................................................................. 283
5.9 Completing treasury management setup ......................................................................... 283
5.9.1 Completing treasury management setup ...................................................................... 283
5.9.1.1 Configuring deal pages ....................................................................................... 283
5.9.1.2 Configuring automatic pricing ............................................................................. 284
5.9.1.3 Configuring cash flow forecasting mappings ...................................................... 288
5.9.1.4 Configuring trader-client mappings ..................................................................... 289
5.9.1.5 Configuring trading hours ................................................................................... 290
5.9.1.6 Configuring mode mappings ............................................................................... 290
5.9.2 Completing treasury management setup ...................................................................... 291
5.9.2.1 Configuring issues .............................................................................................. 291
5.9.2.2 Configuring deal limits ........................................................................................ 293
5.9.2.3 Configuring portfolios and portfolio relationships ................................................ 295
5.9.2.4 Configuring confirmation document templates ................................................... 297
6 Configuring navigation ...........................................................................................309
6.1 Configuring menu groups .................................................................................................. 309
6.1.1 Prerequisites ................................................................................................................. 310
6.1.2 Creating menu groups .................................................................................................. 310
6.1.3 Editing menu groups ..................................................................................................... 313
6.1.4 Deleting menu groups ................................................................................................... 314
6.2 Configuring the menu ......................................................................................................... 315
6.2.1 Prerequisites ................................................................................................................. 315
6.2.2 Configuring the menu .................................................................................................... 315
6.3 Configuring the menu in a standalone TRM/ACM web environment ............................. 316
6.3.1 Configuring the menu .................................................................................................... 316
6.3.2 Assigning user permissions .......................................................................................... 319
7 Configuring the user interface ...............................................................................321
7.1 Understanding the user interface ...................................................................................... 321
7.2 Configuring display policies .............................................................................................. 321
7.2.1 Prerequisites ................................................................................................................. 322
7.2.2 Configuring display policies .......................................................................................... 322
7.3 Configuring style and other user interface elements ...................................................... 324
7.3.1 Prerequisites ................................................................................................................. 326
7.3.2 Defining style using the CSS files ................................................................................. 326
7.3.3 Defining style using the t7silver.xml file ........................................................................ 327
7.3.4 Configuring number, date, and time formats ................................................................. 328
7.3.5 Configuring the popup calendar button ......................................................................... 329
7.3.6 Configuring the context-sensitive help button ............................................................... 330
7.3.7 Configuring the Favorites list ........................................................................................ 331
7.3.8 Configuring the "Please Wait" message ....................................................................... 332
7.4 Customizing pages ............................................................................................................. 332
7.4.1 Prerequisites ................................................................................................................. 333
14 © Wallstreet Systems IPH AB - Confidential
7.4.2 Customizing the login page ........................................................................................... 333
7.4.3 Customizing the daily activity timetable page ............................................................... 334
7.5 Configuring the user’s session timeout ........................................................................... 335
7.5.1 TRMWeb session timeout ............................................................................................. 335
7.5.2 CMM session timeout ................................................................................................... 335
8 Translating the user interface ................................................................................337
8.1 Introduction ......................................................................................................................... 337
8.2 Translating the CMM component ...................................................................................... 337
8.2.1 Introduction ................................................................................................................... 337
8.2.1.1 Translation files .................................................................................................. 337
8.2.1.2 Supported languages file .................................................................................... 338
8.2.1.3 Translation methods ........................................................................................... 338
8.2.1.4 Selecting a language .......................................................................................... 338
8.2.2 Adding a language to supported_languages.xml .......................................................... 339
8.2.3 Translating the server files directly ............................................................................... 339
8.2.4 Translating with the Multilingual Maintenance utility ..................................................... 340
8.2.4.1 Prerequisites ....................................................................................................... 340
8.2.4.2 Translation .......................................................................................................... 340
8.2.5 Displaying and testing the translation ........................................................................... 340
8.3 Translating the TRM and ACM components and the menu ............................................ 341
8.3.1 Introduction ................................................................................................................... 341
8.3.1.1 Translation files .................................................................................................. 341
8.3.1.2 Supported languages file .................................................................................... 342
8.3.1.3 Selecting a language .......................................................................................... 342
8.3.2 Translation .................................................................................................................... 343
8.3.2.1 Adding a language to internationalisation.properties .......................................... 343
8.3.2.2 Translating the files ............................................................................................ 344
8.3.3 Translation tips .............................................................................................................. 344
8.3.3.1 Translating views ................................................................................................ 344
8.3.3.2 Translating templates ......................................................................................... 345
8.3.4 Displaying and testing the translation ........................................................................... 345
9 Configuring views ...................................................................................................347
9.1 Configuring transaction dialogs ........................................................................................ 347
9.1.1 Configuring views .......................................................................................................... 347
9.1.2 Configuring inheritance ................................................................................................. 348
9.1.3 Configuring fields .......................................................................................................... 348
9.1.4 Configuring styles and templates .................................................................................. 348
9.1.4.1 Configuring the HTML ........................................................................................ 348
9.1.4.2 Configuring hidden styles ................................................................................... 350
9.1.4.3 Configuring common styles ................................................................................ 350
9.1.4.4 Configuring error fields ....................................................................................... 350
9.1.5 Configuring actions and events ..................................................................................... 350
9.1.5.1 Configuring statuses ........................................................................................... 350
9.1.5.2 Configuring dependsOn ...................................................................................... 351
WebSuite System Administration Guide 15
9.1.5.3 Configuring checks ............................................................................................. 351
9.2 Configuring deal entry ........................................................................................................ 351
9.2.1 TRM transactions .......................................................................................................... 352
9.2.2 Configuring view names ................................................................................................ 352
9.2.3 Configuring views .......................................................................................................... 353
9.2.3.1 Configuring inheritance ....................................................................................... 353
9.2.3.2 Configuring parameters ...................................................................................... 353
9.2.3.3 Configuring fields ................................................................................................ 354
9.2.3.4 Configuring style and templates ......................................................................... 356
9.2.3.5 Configuring statuses ........................................................................................... 356
9.2.3.6 Configuring data sources .................................................................................... 356
9.2.3.7 Configuring the Enter Board ............................................................................... 356
9.2.3.8 Configuring the Transaction Board ..................................................................... 358
9.2.3.9 Configuring multiple deal entry ........................................................................... 360
9.2.3.10 Configuring scenarios ....................................................................................... 363
9.2.3.11 Configuring scenario structures ........................................................................ 363
9.2.3.12 Configuring scenario names ............................................................................. 363
9.2.3.13 Configuring debug ............................................................................................ 364
9.2.3.14 Configuring scenario steps ............................................................................... 364
9.2.3.15 Configuring step types and parameters ............................................................ 365
9.2.4 Configuring transitions .................................................................................................. 369
9.2.4.1 Configuring conditions of transitions ................................................................... 370
9.2.5 Example ........................................................................................................................ 371
9.3 Configuring reports ............................................................................................................ 372
9.3.1 Configuring report layouts ............................................................................................. 373
9.3.2 Configuring views .......................................................................................................... 373
9.3.2.1 Configuring input parameters ............................................................................. 373
9.3.3 Configuring report parameters ...................................................................................... 374
9.3.4 Configuring style ........................................................................................................... 374
9.3.5 Configuring events ........................................................................................................ 374
9.3.5.1 Configuring default values .................................................................................. 375
9.3.5.2 Configuring checks ............................................................................................. 375
9.3.6 Limiting the number of rows in list reports .................................................................... 375
9.3.7 Configuring templates ................................................................................................... 375
9.3.8 Configuring other parameters ....................................................................................... 376
9.3.8.1 Accessing the TRM Report Generator ............................................................... 376
9.3.8.2 Navigating and internationalizing reports ........................................................... 376
9.3.9 Creating a report ........................................................................................................... 377
9.3.10 Example ...................................................................................................................... 378
9.4 Configuring the Treasury Monitor ..................................................................................... 379
9.4.1 Configuring layout ......................................................................................................... 379
9.4.2 Configuring views .......................................................................................................... 380
9.4.3 Configuring style ........................................................................................................... 380
9.4.4 Configuring events ........................................................................................................ 380
9.4.4.1 Configuring default values .................................................................................. 380
9.4.4.2 Configuring checks ............................................................................................. 381
9.4.5 Configuring templates ................................................................................................... 382
16 © Wallstreet Systems IPH AB - Confidential
9.4.6 Configuring other parameters ....................................................................................... 383
9.4.6.1 Configuring navigation and internationalization for Treasury Monitor layouts .... 383
9.4.7 Creating a Treasury Monitor view ................................................................................. 383
9.4.8 Example ........................................................................................................................ 384
10 Configuring reports and worksheets ..................................................................387
10.1 Understanding reports and worksheets ......................................................................... 387
10.2 Configuring report templates (and related data) ............................................................ 387
10.2.1 Configuring formats ..................................................................................................... 387
10.2.1.1 Prerequisites ..................................................................................................... 388
10.2.1.2 Creating list formats .......................................................................................... 388
10.2.1.3 Creating pivot table formats .............................................................................. 390
10.2.1.4 Editing formats .................................................................................................. 393
10.2.1.5 Deleting formats ............................................................................................... 393
10.2.2 Configuring criteria sets .............................................................................................. 394
10.2.2.1 Prerequisites ..................................................................................................... 394
10.2.2.2 Creating criteria sets ......................................................................................... 394
10.2.2.3 Editing criteria sets ........................................................................................... 395
10.2.2.4 Deleting criteria sets ......................................................................................... 396
10.2.3 Configuring report templates ....................................................................................... 397
10.2.3.1 Prerequisites ..................................................................................................... 397
10.2.3.2 Creating report templates ................................................................................. 398
10.2.3.3 Editing report templates .................................................................................... 398
10.2.3.4 Deleting report templates ................................................................................. 399
10.2.4 Configuring the default accessibility level for report templates ................................... 399
10.2.4.1 Prerequisites ..................................................................................................... 399
10.2.4.2 Configuring the default accessibility level for report templates ......................... 399
10.3 Configuring Cash Monitor and Cash Position report templates (and related data) ... 400
10.3.1 Configuring Cash Monitor and Cash Position formats ................................................ 400
10.3.1.1 Prerequisites ..................................................................................................... 400
10.3.1.2 Creating list formats .......................................................................................... 401
10.3.1.3 Creating pivot table formats .............................................................................. 403
10.3.1.4 Creating formats based on existing formats ..................................................... 406
10.3.1.5 Editing formats .................................................................................................. 406
10.3.1.6 Deleting formats ............................................................................................... 407
10.3.2 Configuring Cash Monitor and Cash Position criteria sets .......................................... 407
10.3.2.1 Prerequisites ..................................................................................................... 407
10.3.2.2 Creating criteria sets ......................................................................................... 408
10.3.2.3 Creating criteria sets based on existing criteria sets ........................................ 409
10.3.2.4 Editing criteria sets ........................................................................................... 409
10.3.2.5 Deleting criteria sets ......................................................................................... 410
10.3.3 Configuring Cash Monitor and Cash Position report templates .................................. 410
10.3.3.1 Prerequisites ..................................................................................................... 411
10.3.3.2 Creating report templates ................................................................................. 411
10.3.3.3 Creating report templates from existing report templates ................................. 412
10.3.3.4 Editing report templates .................................................................................... 412
10.3.3.5 Deleting report templates ................................................................................. 413
WebSuite System Administration Guide 17
10.4 Configuring report mappings .......................................................................................... 413
10.4.1 Configuring report mapping relationships ................................................................... 414
10.4.1.1 Prerequisites ..................................................................................................... 414
10.4.1.2 Creating report mapping relationships .............................................................. 414
10.4.1.3 Editing report mapping relationships ................................................................ 415
10.4.1.4 Editing report mapping relationships’ categories, groups, instrument type
mappings, and security .................................................................................................... 415
10.4.1.5 Deleting report mapping relationships .............................................................. 416
10.4.1.6 Copying report mapping relationships .............................................................. 416
10.4.2 Configuring report mapping categories ....................................................................... 416
10.4.2.1 Prerequisites ..................................................................................................... 416
10.4.2.2 Adding report mapping categories to relationships .......................................... 417
10.4.2.3 Removing report mapping categories from relationships ................................. 417
10.4.2.4 Changing the order of report mapping categories in relationships ................... 417
10.4.2.5 Editing report mapping categories .................................................................... 417
10.4.2.6 Deleting report mapping categories .................................................................. 418
10.4.3 Configuring report mapping groups ............................................................................ 418
10.4.3.1 Prerequisites ..................................................................................................... 418
10.4.3.2 Adding report mapping groups to categories .................................................... 418
10.4.3.3 Removing report mapping groups from categories ........................................... 418
10.4.3.4 Changing the order of report mapping groups in categories ............................ 419
10.4.3.5 Editing report mapping groups ......................................................................... 419
10.4.3.6 Deleting report mapping groups ....................................................................... 419
10.4.4 Configuring report mapping group versioning ............................................................. 419
10.4.4.1 Prerequisites ..................................................................................................... 420
10.4.4.2 Creating ladders ............................................................................................... 420
10.4.4.3 Editing ladders .................................................................................................. 420
10.4.4.4 Deleting ladders ................................................................................................ 421
10.4.5 Configuring instrument type mappings ....................................................................... 421
10.4.5.1 Prerequisites ..................................................................................................... 421
10.4.5.2 Creating instrument type mappings .................................................................. 422
10.4.5.3 Editing instrument type mappings .................................................................... 422
10.4.5.4 Deleting instrument type mappings .................................................................. 422
10.5 Configuring report media ................................................................................................. 422
10.5.1 Prerequisites ............................................................................................................... 422
10.5.2 Configuring report media ............................................................................................ 422
10.6 Configuring time bucket sets ........................................................................................... 423
10.6.1 Prerequisites ............................................................................................................... 424
10.6.2 Creating time bucket sets ........................................................................................... 424
10.6.3 Editing time bucket sets .............................................................................................. 425
10.6.4 Deleting time bucket sets ............................................................................................ 425
10.6.5 Copying time bucket sets ............................................................................................ 425
10.6.6 Testing time bucket sets ............................................................................................. 425
10.6.7 Using time bucket sets ................................................................................................ 426
11 Configuring data sources .....................................................................................427
11.1 Configuring presentation ................................................................................................. 427
18 © Wallstreet Systems IPH AB - Confidential
11.2 Configuring call chains .................................................................................................... 427
11.3 Configuring component details ....................................................................................... 428
11.3.1 Configuring the selector control .................................................................................. 428
11.3.2 Configuring views (services and dialogs) .................................................................... 428
11.3.3 Configuring data source bindings ............................................................................... 430
11.3.4 Configuring the data source gateway bundle .............................................................. 432
11.3.5 Configuring scripted data sources .............................................................................. 432
11.3.6 Configuring view actions ............................................................................................. 434
11.4 Samples ............................................................................................................................. 435
11.4.1 Words of wisdom about customization ....................................................................... 435
11.4.2 Creating a scripted data source .................................................................................. 436
12 Monitoring user activity ........................................................................................439
12.1 Understanding monitoring ............................................................................................... 439
12.1.1 Selecting monitoring tools ........................................................................................... 439
12.1.2 Selecting user activities .............................................................................................. 440
12.2 Authorizing user activity .................................................................................................. 450
12.2.1 Prerequisites ............................................................................................................... 450
12.2.2 Changing activities’ authorization levels ..................................................................... 451
12.2.3 Approving and declining activities ............................................................................... 451
12.2.4 Reviewing activities ..................................................................................................... 451
12.3 Auditing user activity ........................................................................................................ 452
12.3.1 Selecting events and object attributes to audit ........................................................... 452
12.3.1.1 Prerequisites ..................................................................................................... 452
12.3.1.2 Selecting events to audit .................................................................................. 452
12.3.1.3 Selecting object attributes to audit .................................................................... 453
12.3.2 Managing audit report templates ................................................................................ 453
12.3.2.1 Prerequisites ..................................................................................................... 453
12.3.2.2 Creating audit report templates ........................................................................ 453
12.3.2.3 Editing audit report templates ........................................................................... 454
12.3.2.4 Deleting audit report templates ......................................................................... 454
12.3.3 Auditing user activity ................................................................................................... 454
12.3.3.1 Prerequisites ..................................................................................................... 454
12.3.3.2 Importing audit files .......................................................................................... 454
12.3.3.3 Running audit reports ....................................................................................... 455
12.4 Subscribing to events ....................................................................................................... 455
12.4.1 Prerequisites ............................................................................................................... 455
12.4.2 Subscribing to events .................................................................................................. 455
13 Reviewing and managing logs .............................................................................457
13.1 Reviewing the job log ....................................................................................................... 457
13.1.1 Prerequisites ............................................................................................................... 458
13.1.2 Review the job log ....................................................................................................... 458
13.2 Reviewing transaction error message logs .................................................................... 458
13.2.1 Prerequisites ............................................................................................................... 458
WebSuite System Administration Guide 19
13.2.2 Reviewing transaction error message logs ................................................................. 459
13.3 Reviewing export status logs .......................................................................................... 459
13.3.1 Prerequisites ............................................................................................................... 459
13.3.2 Reviewing export status logs ...................................................................................... 459
13.4 Reviewing and managing message logs ........................................................................ 459
13.4.1 Prerequisites ............................................................................................................... 461
13.4.2 Editing message logs .................................................................................................. 462
13.4.3 Deleting message logs ................................................................................................ 462
13.4.4 Resetting all message logs to defaults levels ............................................................. 462
13.4.5 Reviewing message logs ............................................................................................ 463
13.5 Managing log file types .................................................................................................... 463
13.5.1 Prerequisites ............................................................................................................... 463
13.5.2 Setting preferences for log file types ........................................................................... 463
13.5.3 Refreshing and archiving log file types ....................................................................... 463
13.5.4 Refreshing and archiving all log file types ................................................................... 463
14 Completing miscellaneous tasks ........................................................................465
14.1 Configuring the nvp.xml file ............................................................................................. 465
14.1.1 Prerequisites ............................................................................................................... 465
14.1.2 Configuring the nvp.xml file ......................................................................................... 465
14.2 Configuring the config.xml file ........................................................................................ 468
14.2.1 Prerequisites ............................................................................................................... 468
14.2.2 Configuring the config.xml file ..................................................................................... 469
14.2.3 Using the CMM Cryptography tool .............................................................................. 470
14.3 Releasing process locks .................................................................................................. 470
14.3.1 Prerequisites ............................................................................................................... 471
14.3.2 Releasing process locks ............................................................................................. 471
14.4 Clearing cache of data sources ....................................................................................... 471
14.4.1 Prerequisites ............................................................................................................... 471
14.4.2 Clearing cache of data sources .................................................................................. 472
14.5 Exporting data to your browser or spreadsheet application ........................................ 472
14.5.1 Prerequisites ............................................................................................................... 472
14.5.2 Exporting data to your browser or spreadsheet application ........................................ 472
14.6 Analyzing performance .................................................................................................... 473
14.6.1 Prerequisites ............................................................................................................... 473
14.6.2 Monitoring JMX with JConsole .................................................................................... 473
14.6.3 Importing page usage files .......................................................................................... 474
14.7 Changing the user that connects the application to the database .............................. 474
14.8 Cash record Additional Attributes ................................................................................... 475
15 Going live ...............................................................................................................477
15.1 Verifying setup .................................................................................................................. 477
15.1.1 Verifying static data integrity ....................................................................................... 477
15.1.1.1 Prerequisites ..................................................................................................... 477
20 © Wallstreet Systems IPH AB - Confidential
15.1.1.2 Verifying static data integrity ............................................................................. 478
15.1.2 Verifying file locations ................................................................................................. 478
15.1.2.1 Prerequisites ..................................................................................................... 478
15.1.2.2 Verifying file locations ....................................................................................... 478
15.1.3 Verifying the Task Scheduler ...................................................................................... 478
15.1.3.1 Prerequisites ..................................................................................................... 479
15.1.3.2 Verifying the Task Scheduler ............................................................................ 479
15.2 Migrating to the production environment ....................................................................... 479
15.2.1 Migrating the database ............................................................................................... 479
15.2.2 Migrating the configuration files .................................................................................. 479
Appendix A: Security and link IDs........................................................................................481
Appendix B: Time zones........................................................................................................497
Appendix C: TRM fields.........................................................................................................503
Appendix D: Example forecast allocation model................................................................511
Appendix E: Forecast function attributes............................................................................515
WebSuite System Administration Guide 21
Preface
Introduction
This guide enables system administrators to configure and administer WebSuite.
System administrators should have a general knowledge of the following:
•Basic treasury and cash management
•Technologies used to configure web-based applications, including XML and CSS
•The web browser you are using to access WebSuite (for example, Microsoft Internet Explorer).
How to use this guide
To use this guide, follow the recommended reading and be aware of the assumptions defined in this
section.
Recommended reading
If you are new to WebSuite, read Chapter 1 Overview on page 23.
If you are responsible for configuring and administering the CMM components of WebSuite, read the
following:
•Chapter 2 Setting configuration parameters on page 49
•Chapter 3 Managing security on page 95
•Chapter 4 Managing the Task Scheduler on page 153
•Chapter 5 Configuring workflows on page 159
•Chapter 6 Configuring navigation on page 309
•Chapter 7 Configuring the user interface on page 321
•Chapter 8 Translating the user interface on page 337
•Chapter 10 Configuring reports and worksheets on page 387
•Chapter 12 Monitoring user activity on page 439
•Chapter 13 Reviewing and managing logs on page 457
•Chapter 14 Completing miscellaneous tasks on page 465
•Chapter 15 Going live on page 477.
22 © Wall Street Systems IPH AB - Confidential
If you are responsible for configuring and administering the TRM and ACM components of WebSuite,
read the following:
•Chapter 3 Managing security on page 95
•Chapter 5 Configuring workflows on page 159
•Chapter 6 Configuring navigation on page 309
•Chapter 7 Configuring the user interface on page 321
•Chapter 8 Translating the user interface on page 337
•Chapter 9 Configuring views on page 347
•Chapter 11 Configuring data sources on page 427
•Chapter 14 Completing miscellaneous tasks on page 465
•Chapter 15 Going live on page 477.
Assumptions
This guide assumes the following:
•You are using the default menu installed with WebSuite (unless you are customizing the menu as
documented in Chapter 6 Configuring navigation on page 309).
•You are using Microsoft Internet Explorer
•You have access to the WebSuite application server or servers.
Associated documents
Associated documents can be accessed from the Help menu of TRM and ACM. All Wallstreet Suite
user documentation can be downloaded from the Wallstreet Customer Support site
https://clientextranet.wallstreetsystems.com/Pages/Welcome.aspx.

WebSuite System Administration Guide 23
Chapter 1 Overview
WebSuite is a fully web-enabled software application that allows you to deploy optimal centralized or
decentralized treasury and cash management.
1.1 WebSuite from a system administrator’s perspective
WebSuite is a web-based, Java 2 Enterprise Edition (J2EE) application. It consists of an application
component and a database component. In a standard installation, the application component
consists of the following folders:
•apps
•ConfigurationData
•InstallationData
•Runtime
•VirtualDirectory.
In addition, an installation usually includes a set of import and export subfolders at the installation
root folder level.
1.1.1 apps Folder
The apps folder can contain a folder or a WAR file depending on how your organization installed the
application. The folder or WAR file contains the JAR, XML, HTML, and other files that make up the
application component.
1.1.2 ConfigurationData and InstallationData folders
The ConfigurationData and InstallationData folders allow you to customize CMM by storing
XML-based configuration files outside of the default CMM configuration (DefaultData).
1.1.2.1 Configuration overrides
Any configuration file in the ConfigurationData or InstallationData folder overrides its "twin"
configuration file in the default CMM configuration folder (assuming it is in the correct subfolder)
without actually overwriting it.
The override order is as follows: the InstallationData folder takes precedence over
ConfigurationData which takes precedence over DefaultData.
1.1.2.2 Customization
This allows you to maintain customized configuration files in the ConfigurationData and
InstallationData folders.
Note: Those two folders should be replicated (or linked) in the installation site folder.
1 Overview
1.1 WebSuite from a system administrator’s perspective
24 © Wall Street Systems IPH AB - Confidential
1.1.2.3 Upgrade
When you upgrade Wallstreet Suite, before applying the old configuration files from the
InstallationData and ConfigurationData folders, check them against the new default
configurations available in the InstallationData/ConfigurationData/DefaultData folders of the
new installation, and merge what has been added between the two versions (for example, a new
import format may have been added).
Contact the Support Center if you are in any doubt about the configuration merging.
1.1.3 Runtime folder
The Runtime folder contains files that are not visible to the web server. CMM stores Task Scheduler,
JVM log, JUnit log, and other such files in this folder.
The Runtime folder usually contains the following subfolders:
Note: There is one Runtime folder per application server.
1.1.4 VirtualDirectory folder
The VirtualDirectory folder contains files that are visible to the web server. You store logo,
signature, confirmation document template, and other such files in this folder.
The VirtualDirectory folder usually contains the following subfolders:
Name Contents
var All other subfolders
Archive Archived JVM logs
data Database files
db_schemas Database schemas
fileuploads Temporary files for file uploads
taskscheduler Task Scheduler files
tempfiles Tem p orary fil es
Name Contents
graphics Logos, icons, and other images in the WebSuite user interface
images Graphs and other images automatically generated by CMM in select reports
1 Overview
1.2 Opening configuration files
WebSuite System Administration Guide 25
Note: There is one VirtualDirectory folder per application server.
1.1.5 Import and export folders
For information on import and export folders, see the WebSuite Cash Management Connectivity
Guide.
1.2 Opening configuration files
Configuration files allow you to customize pages and other components of WebSuite.
Most configuration files utilize XML and are stored in one of three locations:
•Configuration files that are relevant to individual application servers are maintained in an
InstallationData folder for each application server. This folder is located here:
<install home>\envs\<env>\etc\wss-web\cmm\InstallationData
•Configuration files that are relevant to the web interface as a whole are maintained in a central
ConfigurationData folder. This folder is located here:
<install home>\envs\<env>\etc\wss-web\cmm\ConfigurationData
•Default configuration files contain all the CMM configuration. The DefaultData folder is located
here:
<install
home>\components\wss-web\websuite\DefaultData\default\AurosConfigData\standard
1.2.1 Customization
Any customization must be done in the ConfigurationData or InstallationData folder.
If by default, the configuration file to be customized is not present in these two folders, the original
file must be copied from the DefaultData folder and put under ConfigurationData (if this is to be
a global configuration change), or under the InstallationData folder (if this is an
environment-specific change), respecting the same folder hierarchy.
logs Logs that allow you to monitor activity in CMM
Note: For more information on logs, see Chapter 13 Reviewing and managing
logs on page 457.
reports Confirmation document and other reports
rtf_documents Confirmation document and other RTF templates
signatories Signatories’ signature images
style Style files
templates Tem p lat es
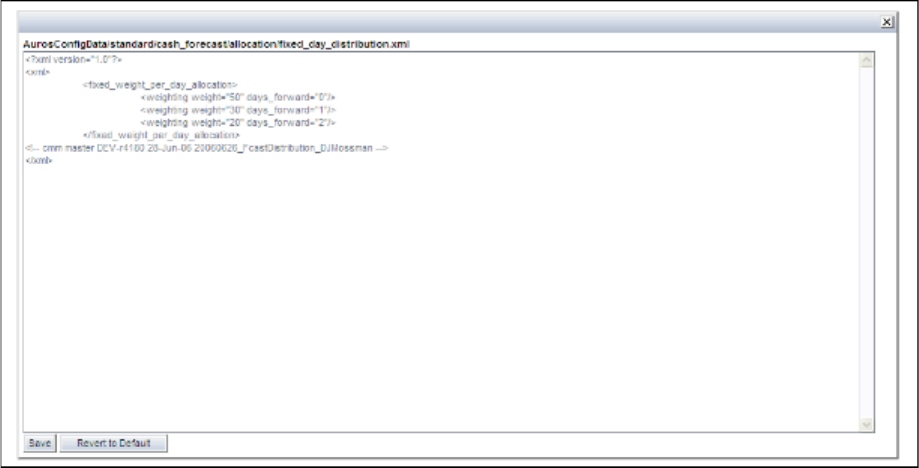
1 Overview
1.2 Opening configuration files
26 © Wall Street Systems IPH AB - Confidential
1.2.2 Opening configuration files with the Review CMM Configuration Documents
function
To open configuration files with the Review CMM Configuration Documents function:
1. Select Admin - Utilities - Setup - Review CMM Configuration Documents.
2. In the Review Configuration Documents page:
–To view or edit all editable configuration files, or edit a configuration file, select
Installation Config Documents in the list.
–To view or edit a subset of the most commonly modified editable configuration files, select
Standard Config Documents in the list.
You can also access files in the Runtime and VirtualDirectory folders:
–To view a file in the Runtime folder, select Runtime Directory Documents in the list.
–To view or edit a file in the VirtualDirectory folder, select Virtual Directory Config
Documents in the list.
3. Navigate to the configuration file you want to open using the bulleted list.
In the bulleted list, folders are represented by black bulleted list items while configuration files
are represented by blue bulleted list items. To view the contents of a folder, click its bulleted list
item.
4. Click the configuration file. A window opens, displaying the contents of the configuration file:
5. Edit and save the configuration file as described in this guide.
When you first edit a configuration file in the Review CMM Configuration Documents function,
WebSuite creates a version of the file in the ConfigurationData folder. This version overrides
the default version from the DefaultData folder. However, the function allows you to delete the
custom version in the ConfigurationData folder and resume using the default version in the
DefaultData folder.
1 Overview
1.2 Opening configuration files
WebSuite System Administration Guide 27
1.2.3 Opening configuration files without the Review CMM Configuration
Documents function
To open configuration files without the Review CMM Configuration Documents function (assuming
the files is not present already in the InstallationData or ConfigurationData folder):
1. Open the DefaultData folder:
<install
home>\components\wss-web\websuite\DefaultData\default\AurosConfigData\standard
2. Locate and copy the configuration file to the appropriate location in the ConfigurationData
folder.
3. Open the configuration file in a text editor.
4. Edit and save the configuration file as described in the documentation.
1.2.4 Returning a configuration file to its default settings
To return a configuration file to its default settings:
1. Select Admin - Utilities - Setup - Review CMM Configuration Documents.
2. In the Review Configuration Documents page:
–To view or edit all editable configuration files, or edit a configuration file, select
Installation Config Documents in the list.
–To view or edit a subset of the most commonly modified editable configuration files, select
Standard Config Documents in the list.
3. Navigate to the configuration file you want to edit using the bulleted list.
In the bulleted list, folders are represented by black bulleted list items while configuration files
are represented by blue bulleted list items. To view the contents of a folder, click its bulleted list
item.
4. Click the configuration file. A window opens, displaying the contents of the configuration file.
5. Click Revert to Default.
An archived version of the edited file is saved in [WebSuite installation
root]\ConfigurationData\Archive.
(If the file is not available in the Review CMM Configuration Documents function, you can return
it to its default settings by removing it from the ConfigurationData folder.)
1.2.5 Editing configuration files that use the HTML handler framework
The HTML handler framework allows you to configure select pages using XML elements that are
similar in structure to HTML.
The following is an example application of the HTML handler framework:
º
<table>
<tr>
<th>
<text value="ID"/>
</th>
</tr>
<tr>
<td>
<text value="${_id}"/>
</td>
</tr>
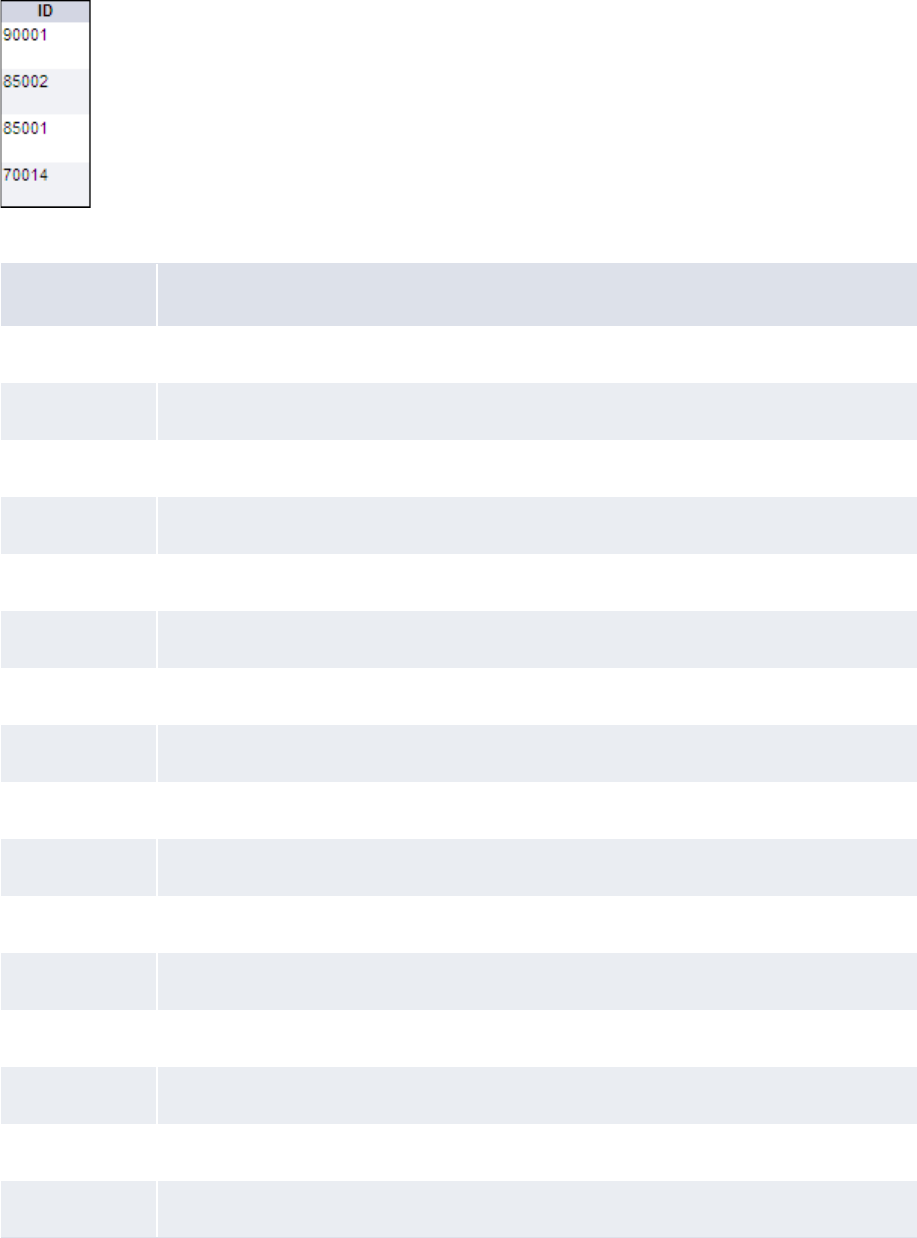
1 Overview
1.2 Opening configuration files
28 © Wall Street Systems IPH AB - Confidential
</table>
º
This example creates a one-column table, with "ID" in the header row, and ID values in the body
rows:
The following table presents the HTML handler framework elements:
Element Purpose
h1 Create a level-1 heading
h2 Create a level-2 heading
h3 Create a level-3 heading
h4 Create a level-4 heading
h5 Create a level-5 heading
pCreate a paragraph
aCreate a hyperlink
span Create a span
table Create a table
tr Create a table row
th Create a table head cell
td Create a table body cell
sp Create a non-breaking space
hr Create a horizontal rule
input Create an input item (text field, number field, option button, checkbox, image, or hidden)
font Display text in a specified font.

1 Overview
1.2 Opening configuration files
WebSuite System Administration Guide 29
1.2.6 Configuration files
The following table lists all configuration files in the ConfigurationData folder:
bBold text
iItalicize text
uUnderline text
center Center align text
select Display a CMM attribute’s value
Configuration file Description
User
interface
accessible
data_import_export_config.xml Defines which tables are imported
or exported by the XML data
importer/exporter tools.
No
import_export_map_config.xml Defines a map between the TRM
and CMM databases.
Yes
appserver
authentication
eKIT
ekitAuthConfig.xml Defines the integration of CMM with
the WebSuite.
For more information, see the
Wallstreet Suite System
Administration Guide.
Yes
reauth
reauthentication.xml Defines processes for which user
reauthentication is required.
For more information, see 3.5.4
Configuring user reauthentication
on page 142.
Yes
strong_auth
1 Overview
1.2 Opening configuration files
30 © Wall Street Systems IPH AB - Confidential
sa_cert_config.xml Configures CMM’s strong
authentication support.
Yes
ws
extwsaccessconfig.xml Defines external web service
access.
For more information, see the CMM
Interfaces Guide.
Yes
intwsaccessconfig.xml Defines internal web service
access.
For more information, see the CMM
Interfaces Guide.
Yes
sslconnectionproperties.xml Secures web services.
For more information, see the CMM
Interfaces Guide.
Yes
cash_forecast
report_mapping
report_group_version_control.xml Defines the order of precedence of
report mapping groups with usage
policies are set to Display but
only Include Latest
Version in Balances.
For more information, see 10.4.4
Configuring report mapping group
versioning on page 419.
Yes
workflow
default_forecast_workflow_config.xm
l
Defines the default forecasted
activity workflow.
For more information, see 5.1.2
Configuring forecast workflow on
page 160.
Yes
mlt_forecast_workflow_config.xml Defines the medium- and long-term
forecasted activity workflow.
For more information, see 5.1.2
Configuring forecast workflow on
page 160.
Yes
1 Overview
1.2 Opening configuration files
WebSuite System Administration Guide 31
st_forecast_workflow_config.xml Defines the short-term forecasted
activity workflow.
For more information, see 5.1.2
Configuring forecast workflow on
page 160.
Yes
data
iban_definitions.xml Defines basic characteristics of
IBANs for 42 European countries
and 2 non-European countries.
Yes
table
fileimportexportformats.xml Defines supported import and
export formats for interfaces.
For more information, see the CMM
Interfaces Guide.
Yes
translation
cashrecord_to_internal_bank_transac
tions.xml
Defines how internal bank
transactions are generated from
internal cash records.
Yes
cr_to_bt_txn_date_configuration.xml Defines the internal bank
transaction booking date.
For more information, see 5.4.4
Configuring internal bank
transaction generation on page
261.
Yes
database
config.xml Configures the connection from the
CMM application server to the CMM
database.
For more information, see 14.2
Configuring the config.xml file on
page 468.
No
TRM_config.xml Configures the connection from the
CMM application server to the TRM
database.
For more information, see the
Wallstreet Suite System
Administration Guide.
No
handlers
1 Overview
1.2 Opening configuration files
32 © Wall Street Systems IPH AB - Confidential
accounting
get_closing_the_book_events.xml Defines how to get
closing-the-book accounting
events.
No
get_daily_accting_events.xml Defines how to get daily accounting
events.
No
reset_accting_events.xml Defines how to reset accounting
events.
No
set_failed_accting_events.xml Defines how to set failed
accounting events.
No
set_processed_accting_events.xml Defines how to set processed
accounting events.
No
cash_mgmt
targetbalance.xml Configures target balancing
functionality.
No
bank_acct
calculations
get_bank_account_calc_periods.
xml
Defines how to get bank account
calculation interest, fee, and tax
calculation periods.
No
interest_fee_tax_calculation.x
ml
Configures interest, fee, and tax
calculation.
For more information, see 5.7.1
Configuring interest, fee, and tax
calculation processing on page 273.
No
interest_fee_tax_calculation_r
eport.xml
Configures interest, fee, and tax
calculation report content.
For more information, see 5.7.1
Configuring interest, fee, and tax
calculation processing on page 273.
No
interest_fee_tax_calculation_s
ingle_period_single_calculation_
type.xml
Configures single period/calculation
type interest, fee, and tax
calculation.
For more information, see 5.7.1
Configuring interest, fee, and tax
calculation processing on page 273.
No
1 Overview
1.2 Opening configuration files
WebSuite System Administration Guide 33
visual
bank_accts_calculation_assi
gnment_editor.xml
Defines the layout of the
Calculation Assignment page.
For more information, see 5.7.6.1
Customizing the Calculation
Assignment page on page 279.
No
interest_fee_tax_calculatio
n_derivative_report.xml
Defines the layout of the Derivative
Report page.
For more information, see 5.7.6.3
Customizing the Derivative Report
page on page 279.
No
choice_lists
choice_lists.xml Defines features of lists (or "choice
lists") in CMM.
Yes
configurable
bank_txn_txn_type_label_config.x
ml
Defines values for bank transaction
transaction type lists.
Yes
bank_txn_txn_type_label_config_f
or_crs.xml
Defines values for bank transaction
transaction type lists.
Yes
report_accessibility.xml Defines the default accessibility
level for report templates.
For more information, see 10.2.4
Configuring the default accessibility
level for report templates on page
399.
Yes
reusable_bank_txn_attributes.xml Defines bank transaction attributes
for inclusion in bank account lists.
For more information, see 5.3.2
Configuring bank transaction rules
on page 213.
No
ihb
in_house_bank_configurations.xml Defines the internal bank
transaction booking dates.
For more information, see 5.4.4
Configuring internal bank
transaction generation on page
261.
Yes
1 Overview
1.2 Opening configuration files
34 © Wall Street Systems IPH AB - Confidential
language_translations
en_translation.xml Contains the English language
translation of the user interface.
For more information, see 8.2
Translating the CMM component on
page 337.
Yes
fr_translation.xml Contains the French language
translation of the user interface.
For more information, see 8.2
Translating the CMM component on
page 337.
Yes
supported_languages.xml Defines the language transactions
supported by the user interface.
For more information, see 8.2
Translating the CMM component on
page 337.
Yes
menu
xml
link
link_attributes.xml Defines the IDs and labels of menu
links.
For more information, see Chapter
6 Configuring navigation on page
309.
Yes
link_targets.xml Defines the targets of menu links.
For more information, see Chapter
6 Configuring navigation on page
309.
No
menu
DisplayPolicies.xml Defines display policies for the user
interface, such as the displaying of
secured functions in the menu and
the displaying of the Upload Files…
button in import functions.
For more information, see 7.2
Configuring display policies on page
321.
No

1 Overview
1.2 Opening configuration files
WebSuite System Administration Guide 35
mgAccounting.xml Defines the contents of the
Accounting menu group.
For more information, see Chapter
6 Configuring navigation on page
309.
No
mgCoreData.xml Defines the contents of the Core
Date menu group.
For more information, see Chapter
6 Configuring navigation on page
309.
No
mgForecasting.xml Defines the contents of the
Forecasting menu group.
For more information, see Chapter
6 Configuring navigation on page
309.
No
mgInhouseBank.xml Defines the contents of the
In-House Bank menu group.
For more information, see Chapter
6 Configuring navigation on page
309.
No
mgPaymentFactory.xml Defines the contents of the
Payment Factory menu group.
For more information, see Chapter
6 Configuring navigation on page
309.
No
mgSecurity.xml Defines the contents of the Security
menu group.
For more information, see Chapter
6 Configuring navigation on page
309.
No
mgSystemUtility.xml Defines the contents of the System
Utilities menu group.
For more information, see Chapter
6 Configuring navigation on page
309.
No
mgTreasury.xml Defines the contents of the
Treasury Management menu group.
For more information, see Chapter
6 Configuring navigation on page
309.
No
pgFrameIndex.xml Defines the contents of the menu.
For more information, see Chapter
6 Configuring navigation on page
309.
No
pgMorningActivityTimetable.xml Defines the contents of the Morning
Activity Timetable menu group.
No
1 Overview
1.2 Opening configuration files
36 © Wall Street Systems IPH AB - Confidential
process_flow
bank_transaction
bank_transaction_validation.xml Configures bank statement number
validation rules and bank balance
validation rules.
For more information, see 5.3.3
Configuring bank transaction
validation rules on page 233.
Yes
reconciliation
reconciliation_config.xml Configures accounting-level
reconciliation.
For more information, see 5.4.1
Configuring reconciliation
processing on page 253.
Yes
transaction_processing
transaction_process_flow.xml Configures the expected and
instructed activity workflow.
Yes
report
report_preferences.xml Defines if report pages display in
the same browser window as CMM
or in a different browser window for
each medium.
For more information, see 10.5
Configuring report media on page
422.
Yes
ruleengine
bank_transaction
edit
bank_txn_attribute_definition.xm
l
Defines the attributes that can be
edited for manually entered and
other bank transactions.
No
report
1 Overview
1.2 Opening configuration files
WebSuite System Administration Guide 37
bank_txn_cash_record_group_table
_row.xml
Defines the layout of the Bank
Transaction Group Details page.
For more information, see 5.3.9.2
Customizing the Bank Transaction
Group Details page on page 251.
No
bank_txn_group_detail.xml Defines the layout of the Bank
Transaction Group Details page.
For more information, see 5.3.9.2
Customizing the Bank Transaction
Group Details page on page 251.
No
bank_txn_group_table_row.xml Defines the layout of the Bank
Transaction Group Details page.
For more information, see 5.3.9.2
Customizing the Bank Transaction
Group Details page on page 251.
No
reconciliation
reconciliation_config.xml Configures accounting-level
reconciliation.
For more information, see 5.4.1
Configuring reconciliation
processing on page 253.
Yes
rules
bank_txn_import
config
bank_txn_import_actions_table_
buttons.xml
Defines the layout of the THEN –
Enrichment Actions section’s
buttons in the Bank Transaction
Import Rule Editor page.
For more information, see 5.3.9.1
Customizing the Bank Transaction
Import Rules function on page 248.
No
bank_txn_import_actions_table_
header.xml
Defines the layout of the THEN –
Enrichment Actions section’s
header row in the Bank Transaction
Import Rule Editor page.
For more information, see 5.3.9.1
Customizing the Bank Transaction
Import Rules function on page 248.
No
1 Overview
1.2 Opening configuration files
38 © Wall Street Systems IPH AB - Confidential
bank_txn_import_actions_table_
row.xml
Defines the layout of the THEN –
Enrichment Actions section’s body
rows in the Bank Transaction
Import Rule Editor page.
For more information, see 5.3.9.1
Customizing the Bank Transaction
Import Rules function on page 248.
No
bank_txn_import_action_tasks_t
able_buttons.xml
Defines the layout of the THEN –
Transaction Creation Actions
section’s buttons in the Bank
Transaction Import Rule Editor
page.
For more information, see 5.3.9.1
Customizing the Bank Transaction
Import Rules function on page 248.
No
bank_txn_import_action_tasks_t
able_header.xml
Defines the layout of the THEN –
Transaction Creation Actions
section’s header row in the Bank
Transaction Import Rule Editor
page.
For more information, see 5.3.9.1
Customizing the Bank Transaction
Import Rules function on page 248.
No
bank_txn_import_action_tasks_t
able_row.xml
Defines the layout of the THEN –
Transaction Creation Actions
section’s body rows in the Bank
Transaction Import Rule Editor
page.
For more information, see 5.3.9.1
Customizing the Bank Transaction
Import Rules function on page 248.
No
bank_txn_import_else_actions_t
able_buttons.xml
Defines the layout of the ELSE –
Actions section’s buttons in the
Bank Transaction Import Rule
Editor page.
For more information, see 5.3.9.1
Customizing the Bank Transaction
Import Rules function on page 248.
No
bank_txn_import_else_actions_t
able_header.xml
Defines the layout of the ELSE –
Actions section’s header row in the
Bank Transaction Import Rule
Editor page.
For more information, see 5.3.9.1
Customizing the Bank Transaction
Import Rules function on page 248.
No
bank_txn_import_else_actions_t
able_row.xml
Defines the layout of the ELSE –
Actions section’s body rows in the
Bank Transaction Import Rule
Editor page.
For more information, see 5.3.9.1
Customizing the Bank Transaction
Import Rules function on page 248.
No

1 Overview
1.2 Opening configuration files
WebSuite System Administration Guide 39
bank_txn_import_else_action_ta
sks_table_buttons.xml
Defines the layout of the ELSE –
Transaction Creation Actions
section’s buttons in the Bank
Transaction Import Rule Editor
page.
For more information, see 5.3.9.1
Customizing the Bank Transaction
Import Rules function on page 248.
No
bank_txn_import_else_action_ta
sks_table_header.xml
Defines the layout of the ELSE –
Transaction Creation Actions
section’s header row in the Bank
Transaction Import Rule Editor
page.
For more information, see 5.3.9.1
Customizing the Bank Transaction
Import Rules function on page 248.
No
bank_txn_import_else_action_ta
sks_table_row.xml
Defines the layout of the ELSE –
Transaction Creation Actions
section’s body rows in the Bank
Transaction Import Rule Editor
page.
For more information, see 5.3.9.1
Customizing the Bank Transaction
Import Rules function on page 248.
No
bank_txn_import_if_condition_t
able_buttons.xml
Defines the layout of the IF
Conditions section’s buttons in the
Bank Transaction Import Rule
Editor page.
For more information, see 5.3.9.1
Customizing the Bank Transaction
Import Rules function on page 248.
No
bank_txn_import_if_condition_t
able_header.xml
Defines the layout of the IF
Conditions section’s header row in
the Bank Transaction Import Rule
Editor page.
For more information, see 5.3.9.1
Customizing the Bank Transaction
Import Rules function on page 248.
No
bank_txn_import_if_condition_t
able_row.xml
Defines the layout of the IF
Conditions section’s body rows in
the Bank Transaction Import Rule
Editor page.
For more information, see 5.3.9.1
Customizing the Bank Transaction
Import Rules function on page 248.
No
if_fields.xml Defines the values that display in
the Fields lists of the IF Conditions
section in the Bank Transaction
Import Rule Editor page.
No
1 Overview
1.2 Opening configuration files
40 © Wall Street Systems IPH AB - Confidential
rule_editor.xml Defines the overall layout of the
Bank Transaction Import Rule
Editor page.
For more information, see 5.3.9.1
Customizing the Bank Transaction
Import Rules function on page 248.
No
security
default_security_setup.xml Defines the default security setup
of CMM.
For more information, see 3.3.1
Configuring default counterparty
and bank account access on page
103.
Yes
initialsecuritysetup.xml Defines secured functions and
menu groups.
For more information, see Chapter
6 Configuring navigation on page
309.
No
security_by_cash_flow_type
attribute_group_mapping.xml Defines groups of attributes for
security by cash flow type
purposes.
For more information, see 3.3.6.1
Managing attribute groups on page
119.
No
secured_attribute_groups.xml Secures attribute groups defined by
the
attribute_group_mapping.xml
file.
For more information, see 3.3.6.1
Managing attribute groups on page
119.
No
styles
ekit.xml Defines the visual style of CMM and
related user interface elements.
For more information, see 7.3
Configuring style and other user
interface elements on page 324.
No
templates
activitytimetable
1 Overview
1.2 Opening configuration files
WebSuite System Administration Guide 41
activitytimetable.xml Defines the layout of the daily
activity timetable page.
For more information, see 7.4
Customizing pages on page 332.
Yes
bank_transaction
config
bank_balance_type_date_format_co
nfig.xml
Defines which bank balance types
display in the Enter Bank
Statement and Bank Statement
functions and, of those, which can
be edited in the Enter Bank
Statement function.
For more information, see 5.3.8
Configuring bank balance type
access on page 248.
Yes
handler_based
cashforecast_drilldown.xml Defines the layout of drilldown
pages in forecasting functions.
For more information, see 5.1.5.7
Customizing drilldown pages on
page 175.
Yes
cash_record_list_attributes.xml Defines the attributes included in
cash record lists.
Yes
cf_bankreported_drilldown.xml Defines the layout of bank-reported
activity drilldown pages in
forecasting functions.
For more information, see 5.1.5.7
Customizing drilldown pages on
page 175.
Yes
cf_currentavailable_drilldown.xml Defines the layout of
current-available activity drilldown
pages in forecasting functions.
For more information, see 5.1.5.7
Customizing drilldown pages on
page 175.
Yes
cf_instructed_drilldown.xml Defines the layout of expected and
instructed activity drilldown pages
in forecasting functions.
For more information, see 5.1.5.7
Customizing drilldown pages on
page 175.
Yes
1 Overview
1.2 Opening configuration files
42 © Wall Street Systems IPH AB - Confidential
cf_unrecd_items_drilldown.xml Defines the layout of unreconciled
item drilldown pages in forecasting
functions.
For more information, see 5.1.5.7
Customizing drilldown pages on
page 175.
Yes
cf_unrecd_items_drilldown_cash_reco
rds.xml
Defines the layout of unreconciled
cash-record item drilldown pages in
forecasting functions.
For more information, see 5.1.5.7
Customizing drilldown pages on
page 175.
Yes
cf_unrecd_items_drilldown_current_a
vailable.xml
Defines the layout of unreconciled
current-available item drilldown
pages in forecasting functions.
For more information, see 5.1.5.7
Customizing drilldown pages on
page 175.
Yes
bank_acct_stmt
bank_acct_stmt_operate_page_head
er.xml
Defines bank statement headers.
For more information, see 5.3.6
Configuring bank statement
headers on page 243.
No
bank_txn_quick_entry
bank_txn_quick_entry_default_con
figuration.xml
Defines the default values and
other aspects of the Enter Bank
Transactions function.
For more information, see 5.3.4
Configuring bank transaction quick
entry on page 239.
Yes
cash_forecast
cash_forecast_2nd_approval_ws_fo
oter.xml
Defines the layout of worksheet
footers in the 2nd Approve…
functions.
For more information, see 5.1.5.3
Customizing the 2nd Approveº
functions on page 171.
Yes
cash_forecast_approval_detail_fo
oter.xml
Defines the layout of detail footers
in the Approve… functions.
For more information, see 5.1.5.2
Customizing the Approveº functions
on page 170.
Yes
1 Overview
1.2 Opening configuration files
WebSuite System Administration Guide 43
cash_forecast_approval_ws_footer
.xml
Defines the layout of worksheet
footers in the Approve… functions.
For more information, see 5.1.5.2
Customizing the Approveº functions
on page 170.
Yes
cash_forecast_cancel_forecasts_f
ooter.xml
Defines the layout of footers in the
Cancel Forecasts function.
For more information, see 5.1.5.6
Customizing the Cancel Forecasts
function on page 175.
Yes
cash_forecast_capture_detail_foo
ter.xml
Defines the layout of detail footers
in the Enter… functions.
For more information, see 5.1.5.1
Customizing the Enterº functions
on page 168.
Yes
cash_forecast_capture_ws_footer.
xml
Defines the layout of worksheet
footers in the Enter… functions.
For more information, see 5.1.5.1
Customizing the Enterº functions
on page 168.
Yes
cash_forecast_cash_reconciliatio
n_detail_footer.xml
Defines the layout of detail footers
in the Cash Reconciliation function.
For more information, see 5.7.6.1
Customizing the Calculation
Assignment page on page 279.
Yes
cash_forecast_cash_reconciliatio
n_footer.xml
Defines the layout of worksheet
footers in the Cash Reconciliation
function.
For more information, see 5.7.6.1
Customizing the Calculation
Assignment page on page 279.
Yes
cash_forecast_mlt_2nd_approval_w
s_footer.xml
Defines the layout of worksheet
footers in the 2nd Approve
Medium- to Long-Term Forecasts
function.
For more information, see 5.1.5.3
Customizing the 2nd Approveº
functions on page 171.
Yes
cash_forecast_mlt_approval_ws_fo
oter.xml
Defines the layout of worksheet
footers in the Approve Medium- to
Long-Term Forecasts function.
For more information, see 5.1.5.2
Customizing the Approveº functions
on page 170.
Yes
1 Overview
1.2 Opening configuration files
44 © Wall Street Systems IPH AB - Confidential
cash_forecast_mlt_capture_ws_foo
ter.xml
Defines the layout of worksheet
footers in the Enter Medium- to
Long-Term Forecasts functions.
For more information, see 5.1.5.1
Customizing the Enterº functions
on page 168.
Yes
cash_forecast_mlt_release_ws_foo
ter.xml
Defines the layout of worksheet
footers in the Release Medium- to
Long-Term Forecasts functions.
For more information, see 5.1.5.4
Customizing the Releaseº functions
on page 172.
Yes
cash_forecast_mlt_reopen_ws_foot
er.xml
Defines the layout of worksheet
footers in the Re-Open Medium- to
Long-Term Forecasts function.
For more information, see 5.1.5.5
Customizing the Re-Openº
functions on page 173.
No
cash_forecast_release_detail_foo
ter.xml
Defines the layout of detail footers
in the Release… functions.
For more information, see 5.1.5.4
Customizing the Releaseº functions
on page 172.
No
cash_forecast_release_ws_footer.
xml
Defines the layout of worksheet
footers in the Release… functions.
For more information, see 5.1.5.4
Customizing the Releaseº functions
on page 172.
No
cash_forecast_reopen_detail_foot
er.xml
Defines the layout of detail footers
in the Re-Open… functions.
For more information, see 5.1.5.5
Customizing the Re-Openº
functions on page 173.
Yes
cash_forecast_reopen_ws_footer.x
ml
Defines the layout of worksheet
footers in the Re-Open… functions.
For more information, see 5.1.5.5
Customizing the Re-Openº
functions on page 173.
Yes
cash_forecast_st_2nd_approval_ws
_footer.xml
Defines the layout of worksheet
footers in the 2nd Approve
Short-Term Forecasts function.
For more information, see 5.1.5.3
Customizing the 2nd Approveº
functions on page 171.
Yes
1 Overview
1.2 Opening configuration files
WebSuite System Administration Guide 45
cash_forecast_st_approval_ws_foo
ter.xml
Defines the layout of worksheet
footers in the Approve Short-Term
Forecasts functions.
For more information, see 5.1.5.2
Customizing the Approveº functions
on page 170.
Yes
cash_forecast_st_capture_ws_foot
er.xml
Defines the layout of worksheet
footers in the Enter Short-Term
Forecasts functions.
For more information, see 5.1.5.1
Customizing the Enterº functions
on page 168.
Yes
cash_forecast_st_release_ws_foot
er.xml
Defines the layout of worksheet
footers in the Release Short-Term
Forecasts functions.
For more information, see 5.1.5.4
Customizing the Releaseº functions
on page 172.
Yes
cash_forecast_st_reopen_ws_foote
r.xml
Defines the layout of worksheet
footers in the Re-Open Short-Term
Forecasts function.
For more information, see 5.1.5.5
Customizing the Re-Openº
functions on page 173.
Yes
cash_forecast_viewallocatableite
ms_footer.xml
Defines the layout of the footer in
the Allocatable Items page.
For more information, see 5.1.5.8
Customizing forecast allocation
pages on page 177.
Yes
cash_forecast_viewallocateditems
_footer.xml
Defines the layout of the footer in
the Preview Allocations page.
For more information, see 5.1.5.8
Customizing forecast allocation
pages on page 177.
Yes
allocation
allocatableitems.xml Defines the layout of the
Allocatable Items page.
For more information, see 5.1.5.8
Customizing forecast allocation
pages on page 177.
Yes
allocateditems.xml Defines the layout of the Preview
Allocations page.
For more information, see 5.1.5.8
Customizing forecast allocation
pages on page 177.
Yes
1 Overview
1.2 Opening configuration files
46 © Wall Street Systems IPH AB - Confidential
approval
approve_selected_details.xml Customizes the Approve…
functions.
Yes
cash_fcast_detail_approval_dis
play.xml
Customizes the Approve…
functions.
Yes
capture
cash_fcast_detail_capture_add_
item.xml
Customizes the Enter… functions. Yes
cash_fcast_detail_capture_disp
lay.xml
Customizes the Enter… functions. Yes
cash_fcast_detail_capture_prev
iew_distributions.xml
Customizes the Enter… functions. Yes
cash_reconciliation
cash_reconciliation_detail_dis
play.xml
Customizes the Cash Reconciliation
function.
Yes
cash_reconciliation_detail_ret
rieve_adjustments.xml
Customizes the Cash Reconciliation
function.
Yes
cash_reconciliation_initiate_a
djustment.xml
Customizes the Cash Reconciliation
function.
Yes
release
cash_fcast_detail_release_disp
lay.xml
Customizes the Release…
functions.
Yes
release_selected_details.xml Customizes the Release…
functions.
Yes
reopen
cash_fcast_detail_reopen_displ
ay.xml
Customizes the Re-Open…
functions.
Yes
1 Overview
1.2 Opening configuration files
WebSuite System Administration Guide 47
reopen_selected_details.xml Customizes the Re-Open…
functions.
Yes
cash_mgmt
cash_mgmt_operate_footer.xml Customizes the Cash Monitor
function.
Yes
cash_mgmt_rectxrdetails_footer.x
ml
Customizes the Cash Monitor
function.
Yes
recommended_transfer_details.xml Customizes the Cash Monitor
function.
Yes
interest_fee_tax
interest_fee_tax_report_page_foo
ter.xml
Customizes the Interest Report
function.
Yes
settlement_model_routing
create_obo_records.xml Defines routing settlement. Yes
create_primary_records.xml Defines routing settlement. Yes
create_routing_records.xml Defines routing settlement. Yes
define_routing_path.xml Defines routing settlement. Yes
find_routing_path.xml Defines routing settlement. Yes
no_settlement_model.xml Defines the "no settlement" routing
settlement model.
For more information, see 5.2.2.1
Configuring settlement models on
page 185.
Yes
shortest_route_model.xml Defines the "shortest route" routing
settlement model.
For more information, see 5.2.2.1
Configuring settlement models on
page 185.
Yes
trm
1 Overview
1.2 Opening configuration files
48 © Wall Street Systems IPH AB - Confidential
cash_movement
cash_movement_to_cash_record.x
ml
Defines how TRM cash movements
are converted to CMM cash records.
Yes
login
login.xml Defines the layout of the login
page.
For more information, see 7.4
Customizing pages on page 332.
No
splash.xml Defines the layout of the splash
page.
No
user_configurable_events
templates
generate_internal_bank_txns.xml Configures internal bank
transaction generation.
For more information, see 5.4.4
Configuring internal bank
transaction generation on page
261.
Yes
gen_int_bank_txns_CDR_PDR_conf.xml Configures internal bank
transaction generation.
For more information, see 5.4.4
Configuring internal bank
transaction generation on page
261.
Yes

WebSuite System Administration Guide 49
Chapter 2 Setting configuration parameters
CMM’s configuration parameters allow you to configure key components of the module, including
default functional settings and file paths.
2.1 Setting configuration parameters
You can set all configuration parameters in the Configuration Parameters function. In addition, you
can set configuration parameters that impact specific areas of CMM in the following functions:
•Forecast Configuration Maintenance
•Payment Factory Configuration Maintenance
•Reconciliation Configuration Maintenance
•Interfaces Configuration Maintenance
•Security Configuration Maintenance.
2.1.1 Prerequisites
The following are prerequisites for setting configuration parameters:
Category Tasks
Security Ensure you have access to the following functions:
• FG-0014 Configuration Parameters
• FG-0420 View/Edit Forecasting Configuration
• FG-0440 View/Edit Security Configuration
• FG-0460 View/Edit Interfaces Configuration
• FG-0470 View/Edit Payment Factory Configuration
• FG-0480 View/Edit Reconciliation Configuration.
For more information, see Chapter 3 Managing security on page 95.

2 Setting configuration parameters
2.2 Setting static data configuration parameters
50 © Wall Street Systems IPH AB - Confidential
2.1.2 Setting configuration parameters using the Configuration Parameters
function
To set a configuration parameter using the Configuration Parameters function:
1. Select Admin - Utilities - Setup - Configuration Parameters.
2. In the Configuration Parameters Maintenance [list] page, enter search criteria.
3. Click Search.
4. Drill down on the configuration parameter.
5. In the Configuration Parameters Maintenance [editor] page, set the configuration parameter.
6. Click Save.
2.1.3 Setting configuration parameters using the Configuration Maintenance
functions
To set a configuration parameter using one of the Configuration Maintenance functions:
1. Select one of the following:
–Forecasting - Configuration - Forecast Configuration Maintenance
–Payment Factory - Configuration - Payment Factory Configuration Maintenance
–Banking - Configuration - Reconciliation Configuration Maintenance
–Admin - Static Data - Bank Interfacing - Interfaces Configuration Maintenance
–Admin - Security - Management - Security Configuration Maintenance.
2. In the resulting page, set the configuration parameter.
3. Click Save.
2.2 Setting static data configuration parameters
This section defines the configuration parameters relevant to static data. You must set these
configuration parameters before managing static data.
2.2.1 Allow Bank Accounts at Multiple IHBs
The Allow Bank Accounts At Multiple IHBs configuration parameter specifies if an entity can hold
internal bank accounts with one in-house bank or multiple in-house banks:
Attribute Value
Possible values • True
An entity can hold internal bank accounts with multiple in-house banks.
• False
An entity can hold internal bank accounts with one in-house bank.
Default value • True

2 Setting configuration parameters
2.3 Setting market data configuration parameters
WebSuite System Administration Guide 51
2.2.2 Allow Bank Accounts Outside Functional Currency
The Allow Bank Accounts Outside Functional Currency configuration parameter specifies if an entity
can hold internal bank accounts in currencies other than its functional currency:
2.2.3 Display Counterparty Bank Account Additional Attributes
The Display Counterparty Bank Account Additional Attributes configuration parameter specifies
whether the additional direct debit attributes display in the Counterparty Bank Accounts function:
2.3 Setting market data configuration parameters
This section defines the configuration parameters relevant to market data. You must set these
configuration parameters before configuring market data.
Editable in • Configuration Parameters
Attribute Value
Possible values • True
An entity can hold internal bank accounts in currencies other than its functional
currency.
• False
An entity can hold internal bank accounts in its functional currency only.
Default value • True
Editable in • Configuration Parameters
Attribute Value
Possible
values • True
The additional direct debit attributes display in the Counterparty Bank Accounts function.
• False
The additional direct debit attributes do not display in the Counterparty Bank Accounts
function.
Default value • False
Editable in • Configuration Parameters
• Payment Factory Configuration Maintenance

2 Setting configuration parameters
2.4 Setting security configuration parameters
52 © Wall Street Systems IPH AB - Confidential
2.3.1 Automatically Calculate Euro Rates
The Automatically Calculate Euro Rates configuration parameter specifies how CMM calculates euro
foreign exchange rates:
2.3.2 Foreign Exchange Base Currency
The Foreign Exchange Base Currency configuration parameter specifies the currency CMM uses as
the base when calculating foreign exchange:
2.4 Setting security configuration parameters
This section defines the configuration parameters relevant to security. You must set these
configuration parameters before managing security.
2.4.1 Alphanumeric Passwords
The Alphanumeric Passwords configuration parameter specifies if new user passwords must contain
both letters and numbers:
Attribute Value
Possible values • True
CMM auto-calculates euro foreign exchange rates.
• False
CMM uses the rates in the database table.
Default value • False
Editable in • Configuration Parameters
Attribute Value
Possible values • [Valid currency]
The currency CMM uses as the base when calculating foreign exchange.
Default value •USD
Editable in • Configuration Parameters
Attribute Values

2 Setting configuration parameters
2.4 Setting security configuration parameters
WebSuite System Administration Guide 53
2.4.2 Attribute Security Enabled
The Attribute Security Enabled configuration parameter specifies if security by attribute is enabled:
Note: Security by attribute is used to secure attributes in the Enter Single Transaction function.
2.4.3 Display Page Security Information
The Display Page Security Information configuration parameter specifies if security IDs are
displayed at the bottom of every page:
Possible values • True
New user passwords must contain both letters and numbers.
• False
New passwords can contain letters, numbers, or both.
Default value • True
Editable in • Configuration Parameters
• Security Configuration Maintenance
Attribute Values
Possible values • True
Security by attribute is enabled.
• False
Security by attribute is disabled.
Default value • False
Editable in • Configuration Parameters
• Security Configuration Maintenance
Attribute Value
Possible values • True
Security IDs display at the bottom of every page.
• False
Security IDs do not display.
Default value • False
Editable in • Configuration Parameters
• Security Configuration Maintenance
2 Setting configuration parameters
2.4 Setting security configuration parameters
54 © Wall Street Systems IPH AB - Confidential
2.4.4 Display System Error Messages in the UI
The Display System Error Messages in the UI configuration parameter specifies whether or not
system error messages may be displayed in the browser.
2.4.5 Enable Security
The Enable Security configuration parameter specifies if security by bank entity and security by
bank account are enabled:
2.4.6 Maximum Number of Unsuccessful Login Attempts
The Maximum Number of Unsuccessful Login Attempts configuration parameter specifies the
maximum number of times a user can enter an incorrect password in a single login:
Attribute Value
Possible values • True
System error messages are displayed in the WebSuite browser window.
• False
System error messages are hidden.
Default value • True
Editable in • Configuration Parameters
Attribute Value
Possible values • Entity
Security by entity is enabled and security by bank account is disabled.
• Entity and Bank Account
Both security by entity and security by bank account are enabled.
Default value • Entity
Editable in • Configuration Parameters
• Security Configuration Maintenance
Attribute Value
Possible
values
• [Valid whole number greater than 0]
The maximum number of times a user can enter an incorrect password in a single login
before CMM locks out the user.
Default value •3
2 Setting configuration parameters
2.4 Setting security configuration parameters
WebSuite System Administration Guide 55
2.4.7 Minimum Password Length
The Minimum Password Length configuration parameter specifies the minimum length of user
passwords:
2.4.8 Number of Days Passwords are Archived
The Number of Days Passwords are Archived configuration parameter specifies the maximum
number of days users’ passwords are archived:
Note: When a user enters a new password, CMM verifies that the new password is not the same
as any of the archived passwords. This configuration parameter works in conjunction with
Number of Passwords Archived, and Wallstreet recommends entering a number between 0
and 90 in it.
2.4.9 Number of Passwords Archived
The Number of Passwords Archived configuration parameter specifies the maximum number of user
passwords archived in CMM:
Editable in • Configuration Parameters
• Security Configuration Maintenance
Attribute Value
Possible values • [Valid whole number greater than 0]
All user passwords must contain at least this number of characters.
Default value •6
Editable in • Configuration Parameters
• Security Configuration Maintenance
Attribute Value
Possible values • [Valid whole number greater than 0]
The maximum number of days users’ passwords are archived in CMM.
Default value •90
Editable in • Configuration Parameters
• Security Configuration Maintenance
Attribute Value
Possible values • [Valid whole number greater than 0]
The maximum number of passwords archived in CMM for each user.
2 Setting configuration parameters
2.4 Setting security configuration parameters
56 © Wall Street Systems IPH AB - Confidential
Note: When a user enters a new password, CMM verifies that the new password is not the same
as any of the archived passwords. This configuration parameter works in conjunction with
Number of Days Passwords are Archived, and Wallstreet recommends entering a number
between 0 and 10 in it.
2.4.10 Password Duration
The Password Duration configuration parameter specifies the time (in days) in which users are
required to change their passwords:
Note: Wallstreet recommends entering a number between 1 and 365 in this configuration
parameter.
2.4.11 Security by Cash Flow Type Enabled
The Security By Cash Flow Type Enabled configuration parameter specifies security by cash flow
type is enabled:
Default value •10
Editable in • Configuration Parameters
• Security Configuration Maintenance
Attribute Value
Possible values • [Valid whole number greater than 0]
The time, measured in days, in which users are required to change their passwords.
Default value • 100
Editable in • Configuration Parameters
• Security Configuration Maintenance
Attribute Value
Possible values • True
Security by cash flow type is enabled. To view security attributes, a user must be
assigned at least one security by cash flow type profile.
• False
Security by cash flow type is disabled.
Default value • False
Editable in • Configuration Parameters
2 Setting configuration parameters
2.5 Setting Task Scheduler configuration parameters
WebSuite System Administration Guide 57
2.5 Setting Task Scheduler configuration parameters
This section defines the configuration parameter relevant to the Task Scheduler. You must set this
configuration parameter before configuring the Task Scheduler.
2.5.1 Minimum Minutes Before Forcing Queue Termination
The Minimum Minutes Before Forcing Queue Termination configuration parameter specifies the
minimum number of minutes CMM should wait before terminating a Task Scheduler queue:
Note: Wallstreet recommends you enter 0.
2.6 Setting menu and user interface configuration parameters
This section defines the configuration parameters relevant to the menu and user interface. You must
set these configuration parameters before configuring the menu and user interface.
2.6.1 JavaScript Enabled
The JavaScript Enabled configuration parameter specifies if JavaScript features in CMM are
available:
Note: The following functionality does not operate as documented if the JavaScript Enabled
configuration parameter is set to False: multiple clicking of buttons and links messaging,
Attribute Value
Possible values • [Valid whole number greater than 0]
The minimum number of minutes CMM should wait before terminating a Task Scheduler
queue.
Default value •0
Editable in • Configuration Parameters
Attribute Value
Possible values • True
JavaScript features in CMM are available.
• False
JavaScript features in CMM are not available.
Default value • True
Editable in • Configuration Parameters
2 Setting configuration parameters
2.7 Setting forecasted activity configuration parameters
58 © Wall Street Systems IPH AB - Confidential
deletion and other confirmation requests, popup calendars, function search and favorites,
and many-to-many reconciliation.
2.6.2 Maximum Number of Rows in Combo Box Before Filtering is Enabled
The Maximum Number of Rows in Combo Box Before Filtering is Enabled configuration parameter
specifies the maximum number of values that can display in a list (or "combo box"):
2.6.3 Scroll Page Count
The Scroll Page Count configuration parameter specifies the number of page links that display
before and after the current page:
2.7 Setting forecasted activity configuration parameters
This section defines the configuration parameters relevant to forecasted activity. You must set these
configuration parameters before capturing, processing, and analyzing forecasted activity.
2.7.1 Forecast Default Entity Mirror Participation
The Forecast Default Entity Mirror Participation configuration parameter specifies if entities are
forecast participants by default:
Attribute Value
Possible
values
• [Valid whole number greater than 0]
The maximum number of values that can display in a list. If the number of available
values for a list exceeds this number, a filter feature displays beside the list.
Default value •60
Editable in • Configuration Parameters
Attribute Value
Possible
values
• [Valid whole number between 1 and 10]
In functions where a table crosses multiple pages, CMM displays a set of links that allow
users to navigate from page to page. This configuration parameter specifies the number of
page links that display before and after the current page.
Default
value
•4
Editable in • Configuration Parameters
Attribute Value
2 Setting configuration parameters
2.7 Setting forecasted activity configuration parameters
WebSuite System Administration Guide 59
Note: This configuration parameter is only applicable if the Forecast Mirroring Policy configuration
parameter is set to Mirror By Instrument Type/Counterparty.
2.7.2 Forecast Default Instrument Mirroring Policy
The Forecast Default Instrument Mirroring Policy configuration parameter specifies if CMM mirrors
the payment sides or receipt sides of forecasts:
Note: This configuration parameter is only applicable if the Forecast Mirroring Policy configuration
parameter is set to Mirror By Instrument Type/Counterparty.
2.7.3 Forecast General Item Input Method
The Forecast General Item Input Method configuration parameter specifies how users enter
forecasts:
Possible values • True
Entities are forecast participants by default.
• False
Entities are not forecast participants by default.
Default value • True
Editable in • Configuration Parameters
• Forecast Configuration Maintenance
• Forecast Mirroring
Attribute Value
Possible values • Payment
CMM mirrors the payment sides of forecasts.
• Receipt
CMM mirrors the receipt sides of forecasts.
Default value • Payment
Editable in • Configuration Parameters
• Forecast Configuration Maintenance
• Forecast Mirroring
Attribute Value

2 Setting configuration parameters
2.8 Setting expected and instructed activity configuration parameters
60 © Wall Street Systems IPH AB - Confidential
2.7.4 Forecast Mirroring Policy
The Forecast Mirroring Policy configuration parameter specifies if CMM mirrors forecasts:
2.8 Setting expected and instructed activity configuration
parameters
This section defines the configuration parameters relevant to expected and instructed activity. You
must set these configuration parameters before capturing, processing, and analyzing expected and
instructed activity.
2.8.1 Allow Cross Currency Transactions
The Allow Cross Currency Transactions configuration parameter specifies if CMM calculates foreign
exchange on value date or transaction date:
Possible values •Textbox
Users enter forecasts using fields (or "text boxes").
•Drilldown
Users enter forecasts using drilldowns.
Default value • Drilldown
Editable in • Configuration Parameters
• Forecast Configuration Maintenance
• Forecast Entry
Attribute Values
Possible values • No Mirroring
CMM does not mirror forecasts.
• Mirror By Instrument Type/Counterparty
CMM mirrors forecasts based on instrument type and counterparty.
Default value • Mirror By Instrument Type/Counterparty
Editable in • Configuration Parameters
• Forecast Configuration Maintenance
• Forecast Mirroring
Attribute Value
2 Setting configuration parameters
2.8 Setting expected and instructed activity configuration parameters
WebSuite System Administration Guide 61
2.8.2 Allow External Intercompany Direct Debit
The Allow External Intercompany Direct Debit configuration parameter specifies if CMM can process
intercompany direct debits through external bank accounts:
2.8.3 Allow Negative Payments
The Allow Negative Payments configuration parameter specifies if users are allowed to enter
negative payments:
Possible
values • True
CMM allows cross-currency transactions through entities’ external bank accounts.
• False
CMM does not allow cross-currency transactions through entities’ external bank accounts.
Default value • True
Editable in • Configuration Parameters
• Payment Factory Configuration Maintenance
Attribute Value
Possible
values • True
CMM can process intercompany direct debits through external bank accounts.
• False
CMM cannot process intercompany direct debits through external bank accounts.
Default value • False
Editable in • Configuration Parameters
• Payment Factory Configuration Maintenance
Attribute Value
Possible values • True
CMM allows users to enter negative payments.
• False
CMM does not allow users to enter negative payments.
Default value • False
Editable in • Configuration Parameters
• Payment Factory Configuration Maintenance
2 Setting configuration parameters
2.8 Setting expected and instructed activity configuration parameters
62 © Wall Street Systems IPH AB - Confidential
2.8.4 AP Import Customer Reference Validation
The AP Import Customer Reference Validation configuration parameter specifies if CMM validates
customer reference IDs during accounts payable file imports:
2.8.5 Authorization Limit Rule Action Type
The Authorization Limit Rule Action Type configuration parameter specifies how transaction
processing rules affect the Authorize Transactions function:
2.8.6 Automatic Transaction Rejection
The Automatic Transaction Rejection configuration parameter specifies if CMM automatically rejects
transactions during the bank message file import:
Attribute Values
Possible
values • True
CMM validates customer reference IDs during accounts payable file imports.
• False
CMM does not validate customer reference IDs during accounts payable file imports.
Default value • True
Editable in • Configuration Parameters
• Payment Factory Configuration Maintenance
Attribute Values
Possible
values • Allow
You can view and authorize a transaction in the Authorize Transactions function if a rule
grants (or "allows") your access to the transaction.
• Stop
You can view and authorize a transaction in the Authorize Transactions function if no rule
revokes (or "stops") your access to the transaction.
Default value • Allow
Editable in • Configuration Parameters
Attribute Value
Possible
values • True
CMM automatically rejects transactions during the bank message file import.
• False
CMM does not automatically reject transactions during the bank message file import.
2 Setting configuration parameters
2.8 Setting expected and instructed activity configuration parameters
WebSuite System Administration Guide 63
2.8.7 Business Day Convention for Single Transaction Entry
This parameter controls the Value Date adjustment at single Transaction Entry when weekends and
holidays are checked:
2.8.8 Default Payment Method for Transactions
The Default Payment Method for Transactions configuration parameter specifies the default payment
method assigned to new cash records:
Note: When cash records are created from bank transactions (during the finalization process),
the value in the Payment Method field is copied to the new cash record. If the bank transaction
value for Payment Method is null, the assigned value will be obtained from this configuration
parameter.
Default value • False
Editable in • Configuration Parameters
• Payment Factory Configuration Maintenance
Attribute Value
Possible
values
• Following Business Day
The non-business day is moved to the next business day
• Modified following business day
The non-business day is moved to the next business day unless it is in a different month,
in which case the date is rolled back to the previous business day.
Default value • Modified following business day
Editable in • Configuration Parameters
Attribute Value
Possible values • [Valid payment method]
The default payment method assigned to new cash records.
Default value •EFT
Editable in • Configuration Parameters
• Payment Factory Configuration Maintenance

2 Setting configuration parameters
2.8 Setting expected and instructed activity configuration parameters
64 © Wall Street Systems IPH AB - Confidential
2.8.9 Disable Intercompany Transaction Comments Upon Authorization
The Disable Intercompany Transaction Comments Upon Authorization configuration parameter
specifies if CMM generates its standard intercompany comment during authorization:
2.8.10 Enable Transaction Routing Trace
The Enable Transaction Routing Trace configuration parameter specifies if transaction routing
information is stored in the TransactionChangeLog database table:
2.8.11 Extended Remittance Details Entry/Edit Mode
The Extended Remittance Details Entry/Edit Mode configuration parameter specifies the remittance
detail entry page that is available in the Enter Single Transaction function:
Attribute Values
Possible
values • True
CMM does not generate its standard intercompany comment ("I/C payment/receipt on behalf
of: [Party short name]" where [Party short name] is the originating entity’s short name).
This is beneficial in situations in which you want to complete bank transfers between two
entities’ external bank accounts and do not want to include the standard intercompany
comment in the file to the bank.
• False
CMM generates its standard intercompany comment.
Default
value
• False
Editable in • Configuration Parameters
Attribute Value
Possible
values • True
Transaction routing information is stored in the TransactionChangeLog database table and
can be viewed when drilling down on cash records.
• False
Transaction routing information is not stored in the TransactionChangeLog database table.
Default
value
• False
Editable in • Configuration Parameters
• Payment Factory Configuration Maintenance
Attribute Value

2 Setting configuration parameters
2.8 Setting expected and instructed activity configuration parameters
WebSuite System Administration Guide 65
2.8.12 Foreign Exchange Usage Date
The Foreign Exchange Usage Date configuration parameter specifies if CMM calculates foreign
exchange on value date or transaction date:
2.8.13 Generate Payment Confirmation Documents
The Generate Payment Confirmation Documents configuration parameter specifies if CMM generates
the confirmation documents upon the release of aggregate payments:
Possible
values • True
The Extended Remittance Details Entry/Edit page is available in the Enter Single Transaction
function.
• False
The Quick Remittance Details Entry/Edit page is available in the Enter Single Transaction
function. This page restricts the number of attributes to the most essential ones.
Default
value
• False
Editable in • Configuration Parameters
• Payment Factory Configuration Maintenance
Attribute Value
Possible values •Value Date
CMM calculates foreign exchange on value date.
•Transaction Date
CMM calculates foreign exchange on transaction date.
Default value • Value Date
Editable in • Configuration Parameters
• Payment Factory Configuration Maintenance
Attribute Value
Possible
values • True
CMM generates the confirmation documents upon the release of aggregate payments.
• False
CMM does not generate the confirmation documents upon the release of the aggregate
payments.
Default value • True
Editable in • Configuration Parameters
• Payment Factory Configuration Maintenance
2 Setting configuration parameters
2.8 Setting expected and instructed activity configuration parameters
66 © Wall Street Systems IPH AB - Confidential
2.8.14 Intercompany Transaction Foreign Exchange Conversion Required
The Intercompany Transaction Foreign Exchange Conversion Required configuration parameter
specifies if CMM completes foreign exchange conversion at transaction creation during authorization
or at bank balance update:
2.8.15 Mark In-House Bank Records As Settled
The Mark In-House Bank Records As Settled configuration parameter specifies if IHB cash records
are marked as settled:
2.8.16 Ordering Party Legal Name To Use In Bank Files
The Ordering Party Legal Name To Use In Bank Files configuration parameter specifies whether CMM
uses the ordering party’s long name or bank account name in transaction files sent to banks:
Attribute Value
Possible
values • True
CMM completes foreign exchange conversion at transaction creation during authorization.
(This only applies to intercompany transactions in which the party bank account currency is
different than the transaction currency.)
• False
CMM completes foreign exchange conversion at bank balance update.
Default
value
• True
Editable in • Configuration Parameters
• Payment Factory Configuration Maintenance
Attribute Value
Possible values • True
IHB cash records are marked as settled.
• False
IHB cash records are not marked as settled.
Default value • True
Editable in • Configuration Parameters
• Payment Factory Configuration Maintenance
Attribute Value
2 Setting configuration parameters
2.8 Setting expected and instructed activity configuration parameters
WebSuite System Administration Guide 67
2.8.17 Parse User ID In Transaction File Imports Via Task Scheduler
The Parse User ID In Transaction File Imports Via Task Scheduler configuration parameter specifies
if the file import process attempts to parse the user ID in the header of standard accounts payable
and direct debit files:
Note: If you set this configuration parameter to True and there is no user ID on the file, CMM
uses the default behavior (it sets the user ID to System). Otherwise, CMM verifies that the
ID on the file is an actual ID in the system (if it is not, CMM fails the import) and places the
ID on all records in the file.
2.8.18 Payment Error Messages
The Payment Error Messages configuration parameter specifies if users can drill down on errors
during payment release to correct the related static data:
Possible values •1
CMM uses the ordering party’s long name in transaction files sent to banks.
•2
CMM uses the ordering party’s bank account name in transaction files sent to banks.
Default value •1
Editable in • Configuration Parameters
Attribute Value
Possible values • True
The file import process attempts to parse the user ID in the header of standard accounts
payable and direct debit files.
• False
The file import process uses the default user ID assigned by CMM.
Default value • False
Editable in • Configuration Parameters
Attribute Value
Possible
values • True
When users encounter errors while releasing payments, they can drill down on those errors
to correct the related static data.
• False
When users encounter errors while releasing payments, they cannot drill down on those
errors to correct the related static data.
Default value • False
2 Setting configuration parameters
2.8 Setting expected and instructed activity configuration parameters
68 © Wall Street Systems IPH AB - Confidential
Note: Do not set this configuration parameter to True if your organization has implemented
security, as allowing users to correct static data from payment release can compromise
your organization’s security.
2.8.19 Repetitive Transaction Security
The Repetitive Transaction Security configuration parameter specifies if CMM applies security to both
payor and receiver for entering and editing of repetitive transactions:
2.8.20 Target Party Legal Name To Use In Bank Files
The Target Party Legal Name To Use In Bank Files configuration parameter specifies whether CMM
uses the target party’s long name or bank account name in transaction files sent to banks:
Editable in • Configuration Parameters
• Payment Factory Configuration Maintenance
Attribute Values
Possible
values
• True
CMM applies security to both payor and receiver for entering and editing of repetitive
transactions. Users can only enter or edit transactions for which they have access to the
payor, the receiver, or both.
• False
CMM only applies security to payor for entering and editing of repetitive transactions. Users
can enter or edit transactions for which they have access to the payor.
Default
value
• True
Editable in • Configuration Parameters
• Payment Factory Configuration Maintenance
Attribute Value
Possible values •1
CMM uses the target party’s long name in transaction files sent to banks.
•2
CMM uses the target party’s bank account name in transaction files sent to banks.
Default value •1
Editable in • Configuration Parameters

2 Setting configuration parameters
2.8 Setting expected and instructed activity configuration parameters
WebSuite System Administration Guide 69
2.8.21 Transaction Authorization Logging Enabled
The Transaction Authorization Logging Enabled configuration parameter specifies if logging is
available during transaction authorization:
2.8.22 User Configurable Transaction Routing for AP
The User Configurable Transaction Routing configuration parameter specifies if user-configurable or
code-based transaction routing functionality is enabled for AP.
2.8.23 User Configurable Transaction Routing for DD
The User Configurable Transaction Routing configuration parameter specifies if user-configurable or
code-based transaction routing functionality is enabled for Direct Debit:
Attribute Value
Possible values • True
Logging is available during transaction authorization (through the job log).
• False
Logging is not available during transaction authorization.
Default value • True
Editable in • Configuration Parameters
• Payment Factory Configuration Maintenance
Attribute Value
Possible values • True
User-configurable transaction routing functionality is enabled for AP.
• False
Code-based transaction routing functionality is enabled for AP.
Default value • True
Editable in • Configuration Parameters
• Payment Factory Configuration Maintenance
Attribute Value
Possible values • True
User-configurable transaction routing functionality is enabled for Direct Debit.
• False
Code-based transaction routing functionality is enabled for Direct Debit.
2 Setting configuration parameters
2.9 Setting bank-reported activity configuration parameters
70 © Wall Street Systems IPH AB - Confidential
Note: If you enter False in the above (User Configurable Transaction Routing for AP or User
Configurable Transaction Routing for DD), you cannot take advantage of the customizable
routing features, nor use routing in conjunction with the bank transaction rules, nor route
transactions across multiple in-house banks, nor route transactions in an integrated
environment.
2.9 Setting bank-reported activity configuration parameters
This section defines the configuration parameters relevant to bank-reported activity. You must set
these configuration parameters before capturing, processing, and analyzing bank-reported activity.
2.9.1 ACM Posting Validation for Transaction Entry
The ACM Posting Validation for Transaction Entry configuration parameter specifies the number of
in-house banks and clients for which you can enter transactions in the Enter Bank Transactions
function:
Note: This configuration parameter ensures transactions post correctly to ACM and is only valid if
your organization is using CMM with ACM.
Default value • True
Editable in • Configuration Parameters
• Payment Factory Configuration Maintenance
Attribute Value
Possible
values • Bank
You can enter transactions for multiple clients but for only one in-house bank in the Enter
Bank Transactions function.
• Client
You can enter transactions for multiple in-house banks but for only one client in the Enter
Bank Transactions function.
•Both
You can enter transactions for only one client and one in-house bank in the Enter Bank
Transactions function.
Default value • Bank
Editable in • Configuration Parameters
• Payment Factory Configuration Maintenance
2 Setting configuration parameters
2.9 Setting bank-reported activity configuration parameters
WebSuite System Administration Guide 71
2.9.2 Allow Export of Empty Close-Ended Bank Statements
The Allow Export of Empty Close-Ended Bank Statements configuration parameter specifies whether
you can export and close closed-ended (or "user-controlled") bank statements:
Note: This configuration parameter ensures transactions post correctly to ACM and is only valid if
your organization is using CMM with ACM.
2.9.3 Bank Account Type For Transaction Entry
The Bank Account Type For Transaction Entry configuration parameter specifies the type of bank
accounts available in the Enter Bank Transactions function:
2.9.4 Create Cash and Holdings Balance
The Create Cash and Holdings Balance configuration parameter specifies if CMM creates a total cash
and holdings balance when you import SWIFT bank transaction messages:
Attribute Value
Possible values • True
You can export and close closed-ended (or "user-controlled") bank statements.
• False
You cannot export and close closed-ended (or "user-controlled") bank statements.
Default value •N/A
Editable in • Configuration Parameters
Attribute Value
Possible
values • Internal
Only internal bank accounts are available in the Enter Bank Transactions function.
• External
Only external bank accounts are available in the Enter Bank Transactions function.
• All
Both internal and external bank accounts are available in the Enter Bank Transactions
function.
Default value • Internal
Editable in • Configuration Parameters
• Payment Factory Configuration Maintenance
Attribute Value
2 Setting configuration parameters
2.9 Setting bank-reported activity configuration parameters
72 © Wall Street Systems IPH AB - Confidential
2.9.5 Default Bank Stmt Rule type for External Account
The Default Bank Stmt Rule type for External Account configuration parameter specifies whether the
bank statement type for external bank accounts is open-ended or closed-ended:
2.9.6 Display Datanet Checkbox on Bank Transaction Import
The Display Datanet Checkbox on Bank Transaction Import configuration parameter specifies if the
Datanet Pre-Check checkbox displays in the Import Bank Transaction Files function:
Possible
values • True
CMM creates a total cash and holdings balance when you import SWIFT bank transaction
messages.
• False
CMM does not create a total cash and holdings balance when you import SWIFT bank
transaction messages.
Default value • Payment
Editable in • Configuration Parameters
• Payment Factory Configuration Maintenance
Attribute Value
Possible values •Open Ended
The bank statement type for external bank accounts is open-ended.
•Closed Ended
The bank statement type for external bank accounts is closed-ended.
Default value • Open Ended
Editable in • Configuration Parameters
Attribute Value
Possible
values • True
The Datanet Pre-Check checkbox displays in the Import Bank Transaction Files function.
• False
The Datanet Pre-Check checkbox does not display in the Import Bank Transaction Files
function.
Default value • False
Editable in • Configuration Parameters
• Payment Factory Configuration Maintenance
2 Setting configuration parameters
2.9 Setting bank-reported activity configuration parameters
WebSuite System Administration Guide 73
Note: Datanet delivers bank balances and transactions in two types of files: a daily file, which
contains a percentage of the previous day’s bank transactions, and a cumulative file
(usually weekly), which contains all PDR bank transactions for the period. If, after setting
this configuration parameter to True, you select the checkbox and then import bank
transactions, CMM checks the Datanet files for bank transactions that are identical to
previously imported bank transactions. It marks these bank transactions as failed. This
prevents the creation of duplicate bank transactions in the CMM database.
2.9.7 Enable Entity Security For Calculate Bank Balances
The Enable Entity Security For Calculate Bank Balances configuration parameter specifies if CMM
enables security by entity for the calculation of bank balances:
2.9.8 Post Processing Enabled for B&T loads with Errors
The Post Processing Enabled for B&T loads with Errors configuration parameter specifies if CMM
completes post-processing on bank statement, transaction, and balance import files (or manual
entries) that contain errors:
Attribute Value
Possible values • True
CMM enables security by entity for the calculation of bank balances.
• False
CMM disables security by entity for the calculation of bank balances.
Default value • False
Editable in • Configuration Parameters
Attribute Values
Possible
values • True
CMM completes post-processing on bank statement, transaction, and balance import files
(or manual entries) that contain errors.
• False
CMM does not complete post-processing on bank statement, transaction, and balance
import files (or manual entries) that contain errors.
Default
value
• False
Editable in • Configuration Parameters
• Payment Factory Configuration Maintenance
2 Setting configuration parameters
2.9 Setting bank-reported activity configuration parameters
74 © Wall Street Systems IPH AB - Confidential
2.9.9 Rounding Method for Balance Calculation
The Rounding Method for Balance Calculation configuration parameter specifies how CMM calculates
bank balances:
Note: When you first upgrade to this release, the configuration parameter is set to Total.
Wallstreet recommends you change it to Detail; otherwise, CMM’s bank balances may not
match ACM’s.
2.9.10 Transaction Amount Additional Validation for Transaction Entry
The Transaction Amount Additional Validation for Transaction Entry configuration parameter
specifies if the balance of bank transactions must be zero if you have not entered cash records in the
Enter Bank Transactions function:
Note: If you have entered cash records, this configuration parameter does not take effect and
the balance of bank transactions must equal the balance of cash records.
Attribute Value
Possible
values • Detail
Like ACM, CMM calculates bank balances based by summing individual bank transactions’
bank account amounts.
• Total
Unlike ACM, CMM calculates bank balances by summing individual bank transactions’
amounts and then converting them to the bank account’s currency.
Default value • Total
Editable in • Configuration Parameters
Attribute Value
Possible
values • True
In the Enter Bank Transactions function, the balance of bank transactions must be zero (in
other words, the absolute value of payments must equal the absolute value of receipts) if
you have not entered cash records.
• False
In the Enter Bank Transactions function, the balance of bank transactions does not have to
be zero if you have not entered cash records.
Default
value
• False
Editable in • Configuration Parameters
• Payment Factory Configuration Maintenance

2 Setting configuration parameters
2.10 Setting reconciliation configuration parameters
WebSuite System Administration Guide 75
2.9.11 Treat Self-owned IC Accts As Regular IC Accts
The Treat Self-owned IC Accts As Regular IC Accts configuration parameter specifies what occurs
when you run a report in bank view:
2.9.12 Enable Undo of Bank Transaction Imports by Bank Account
The Enable Undo of Bank Transaction Imports by Bank Account configuration parameter specifies if
the undo of Bank transaction Import can be done on the entire file or per Bank Account (if a bank
file contains several accounts).
Note: If you select True you will have the possibility to undo at both file level and per account,
but the undo at file level is faster when the parameter is set to False. If you do not need
to undo the import at bank account level you should set the parameter to False.
2.10 Setting reconciliation configuration parameters
This section defines the configuration parameters relevant to reconciliation. You must set these
configuration parameters before reconciling activity.
Attribute Value
Possible
values • True
When you run a report in bank view, CMM flips the signage and debit and credit indicators
for internal bank accounts where the owner is an in-house bank.
• False
When you run a report in bank view, CMM does not flip the signage and debit and credit
indicators for internal bank accounts where the owner is an in-house bank.
Default value • True
Editable in • Configuration Parameters
Attribute Value
Possible
values
•True
Enables the undo of Bank Transaction Imports by Bank Account. When a bank transaction
file contains a statement for several accounts it is possible to undo the import at account
level. It is recommended that you also enable bank statement validation.
• False
A Bank Transaction Import can only be undone for the entire file imported.
Default value • False
Editable in • Configuration Parameters
2 Setting configuration parameters
2.10 Setting reconciliation configuration parameters
76 © Wall Street Systems IPH AB - Confidential
2.10.1 Allow Description Update on One-to-Many Reconciliation
The Allow Description Update on One-to-Many Reconciliation configuration parameter specifies if
you can update cash records’ description fields during manual reconciliation:
2.10.2 Allow Generic Date Updating In Reconcile Process
The Allow Generic Date Updating In Reconcile Process configuration parameter specifies if CMM
updates cash record dates during reconciliation using its generic process or a customer-specific
process:
2.10.3 Disable Reconciliation During Import
The Disable Reconciliation During Import configuration parameter specifies if CMM attempts to
reconcile bank transactions during import:
Attribute Value
Possible values • True
You can update cash records’ description fields during manual reconciliation.
• False
You cannot update cash records’ description fields during manual reconciliation.
Default value • False
Editable in • Configuration Parameters
• Reconciliation Configuration Maintenance
Attribute Value
Possible
values • True
CMM updates cash record dates during reconciliation using its generic process. (In other
words, CMM overrides the cash records’ transaction dates with the imported bank
statements’ transaction dates.)
• False
CMM updates cash record dates during reconciliation using a customer-specific process.
Default
value
• True
Editable in • Configuration Parameters
• Reconciliation Configuration Maintenance
Attribute Value

2 Setting configuration parameters
2.10 Setting reconciliation configuration parameters
WebSuite System Administration Guide 77
Possible values • True
CMM does not attempt to reconcile bank transactions during import.
• False
CMM does attempt to reconcile bank transactions during import.
Default value • False
Editable in • Configuration Parameters

2 Setting configuration parameters
2.10 Setting reconciliation configuration parameters
78 © Wall Street Systems IPH AB - Confidential
2.10.4 Enable 4-eyes security on reconciliation
The Enable 4 Eyes security on reconciliation configuration parameter determines whether or not
"4-eyes" approval is required for manual reconciliations of external transactions.
for further information, see 5.4.3 Configuring 4-eyes approval for manual reconciliations on page
259.
2.10.5 Reconcile By Entity
The Reconcile By Entity configuration parameter specifies if the balance of bank transactions must
be zero if you have not entered cash records in the Enter Bank Transactions function:
Attribute Value
Possible
values • True
Reconciliations resulting in an exact match performed manually must first be interim
reconciled by a user with a "Basic Reconciler" role, then finalized by a user with a
"Reconciliation Final Approver" role.
Reconciliations requiring manually performed adjustments must first be interim reconciled
by a user with a "Reconciler with Adjustment Authority" role, then finalized by a user with
a "Reconciliation Final Approver" role.
• False
Manual reconciliations do not require "4-eyes" approval.
Default
value
• False
Editable in • Configuration Parameters
• Reconciliation Configuration Maintenance
Attribute Value
Possible
values • True
CMM applies security by entity to reconciliation. Only users with access to an entity can
reconcile the entity’s cash records and bank transactions.
• False
CMM does not apply security by entity to reconciliation. All users can reconcile an entity’s
cash records and bank transactions.
Default
value
• False
Editable in • Configuration Parameters
• Reconciliation Configuration Maintenance

2 Setting configuration parameters
2.10 Setting reconciliation configuration parameters
WebSuite System Administration Guide 79
2.10.6 Reconciliation Cash Reconciled Indicator
The Reconciliation Cash Reconciled Indicator configuration parameter specifies if CMM automatically
reconciles a bank transaction at the cash level if a user manually reconciles it at the accounting
level:
2.10.7 Reconciliation Cash Record Status
The Reconciliation Cash Record Status configuration parameter specifies which cash records are
available for reconciliation:
2.10.8 Reconciliation Cheque Number Validation
The Reconciliation Cheque Number Validation configuration parameter specifies if check number
validation is enabled for reconciliation:
Attribute Value
Possible
values • True
When a user manually reconciles a bank transaction at the accounting level, CMM
automatically reconciles it at the cash level.
• False
When a user manually reconciles a bank transaction at the accounting level, CMM does
not automatically reconcile it at the cash level.
Default value • False
Editable in • Configuration Parameters
Attribute Value
Possible values • All
All cash records are available for reconciliation.
• Released
Only released cash records are available for reconciliation.
•Authorized
Only authorized and released cash records are available for reconciliation.
Default value • All
Editable in • Configuration Parameters
• Reconciliation Configuration Maintenance
Attribute Value
2 Setting configuration parameters
2.10 Setting reconciliation configuration parameters
80 © Wall Street Systems IPH AB - Confidential
2.10.9 Reconciliation Post Processing
The Reconciliation Post Processing configuration parameter specifies if CMM defers reconciliation
post-processing to finalization:
2.10.10 Reconciliation Remove Outstanding Current Days
The Reconciliation Remove Outstanding Current Days configuration parameter specifies if CMM
removes outstanding intraday records not reconciled to previous-day records:
Possible
values • True
Automatic reconciliation fails if the check number on the cash record and bank transaction
do not match.
• False
Automatic reconciliation does not fail if the check number on the cash record and bank
transaction do not match.
Default value • True
Editable in • Configuration Parameters
• Reconciliation Configuration Maintenance
Attribute Value
Possible values • True
CMM does not defer reconciliation post-processing.
• False
CMM defers reconciliation post-processing to finalization.
Default value • True
Editable in • Configuration Parameters
• Reconciliation Configuration Maintenance
Attribute Value
Possible
values • True
CMM removes outstanding intraday records not reconciled to previous-day records.
• False
CMM does not remove outstanding intraday records not reconciled to previous-day
records.
Default value • All
Editable in • Configuration Parameters
• Reconciliation Configuration Maintenance

2 Setting configuration parameters
2.10 Setting reconciliation configuration parameters
WebSuite System Administration Guide 81
2.10.11 Reconciliation Start Page
The Reconciliation Start Page configuration parameter specifies the starting page for the Bank
Reconciliation function:
2.10.12 Reconciliation Value Date Validation
The Reconciliation Value Date Validation configuration parameter specifies if value data validation is
enabled for reconciliation:
2.10.13 Updating Value Date in Reconciliation
The Updating Value Date In Reconciliation configuration parameter specifies if CMM updates cash
records’ value dates based on bank transactions’ value dates during reconciliation:
Attribute Value
Possible
values • Bank Transaction
The Bank Transaction and Balance Reconciliation page opens when users first open the Bank
Reconciliation function.
• Cross Batch Search
The Cross-Batch Unreconciled Transaction - Criteria Selection page opens when users first
open the Bank Reconciliation function.
Default
value
• Bank Transaction
Editable in • Configuration Parameters
• Reconciliation Configuration Maintenance
Attribute Values
Possible
values • True
Value dates on cash records and bank transactions must match for those cash records and
bank transactions to reconcile.
• False
Value dates on cash records and bank transactions do not have to match for those cash
records and bank transactions to reconcile.
Default value • False
Editable in • Configuration Parameters
• Reconciliation Configuration Maintenance
Attribute Values

2 Setting configuration parameters
2.11 Setting cash concentration configuration parameters
82 © Wall Street Systems IPH AB - Confidential
2.10.14 Use Reconciliation Tolerances
The Use Reconciliation Tolerances configuration parameter specifies if CMM uses tolerances when
reconciling cash records and bank transactions:
2.11 Setting cash concentration configuration parameters
This section defines the configuration parameters relevant to cash concentration. You must set
these configuration parameters before concentrating cash.
2.11.1 Account Settlement Balance Type
The Account Settlement Balance Type configuration parameter specifies whether CMM settles IHB
bank account balances on value date or transaction date:
Possible values • True
CMM updates cash records’ value dates based on bank transactions’ value dates during
reconciliation.
• False
CMM does not update cash records’ value dates based on bank transactions’ value dates
during reconciliation
Default value • False
Editable in • Configuration Parameters
Attribute Value
Possible
values •0
CMM does not use tolerances when reconciling cash records and bank transactions.
•1
CMM uses tolerances when reconciling cash records and bank transactions.
Default value •0
Editable in • Configuration Parameters
• Reconciliation Configuration Maintenance
Attribute Value
Possible values •1
CMM settles IHB bank account balances on value date.
•2
CMM settles IHB bank account balances on transaction date.
2 Setting configuration parameters
2.12 Setting interest, fee, and tax configuration parameters
WebSuite System Administration Guide 83
2.11.2 Negative Balance Payment Method
The Negative Balance Payment Method configuration parameter specifies the payment method used
for negative allocation settlement:
Note: CMM no longer supports allocation settlement.
2.12 Setting interest, fee, and tax configuration parameters
This section defines the configuration parameters relevant to interest, fees, and taxes. You must set
these configuration parameters before calculating interest, fees, and taxes.
2.12.1 Post Interest To Period
The Post Interest To Period configuration parameter specifies the transaction date and value date
settings for interest and interest adjustments:
Default value •2
Editable in • Configuration Parameters
Attribute Value
Possible values • [Valid CMM payment method]
The payment method used for negative allocation settlement.
Default value •N/A
Editable in • Configuration Parameters
Attribute Value

2 Setting configuration parameters
2.13 Setting treasury management configuration parameters
84 © Wall Street Systems IPH AB - Confidential
2.12.2 Show Bank Account Group For Interest Calculation
The Show Bank Account Group For Interest Calculation configuration parameter specifies if you can
use bank account groups as selection criteria when calculating or undoing interest and fees:
2.13 Setting treasury management configuration parameters
This section defines the configuration parameters relevant to deals. You must set these
configuration parameters before capturing, processing, and analyzing deals.
Possible
values •0
The transaction dates for interest and interest adjustment are both set to the date of
running the interest calculation. The value date for interest of April is May 1, for interest of
May is June 1, and so on. The value date for interest adjustment is the same as the next
interest payment date.
•1
The transaction and value dates for interest are both set to the last day of the interest
calculation period. The value date for interest adjustment is the same date as the value date
for interest. The transaction date for interest adjustment is the last day of the current
interest calculation period (in other words, the same as the transaction date for the next
interest payment).
•2
The transaction and value dates for interest will both be set to the next interest payment
date. The value date for interest adjustment will be the same date as the value date for
interest. The transaction date for interest adjustment is the next interest payment date in
the current interest calculation period.
Default
value
•1
Editable in • Configuration Parameters
Attribute Value
Possible
values • True
You can use bank account groups as selection criteria when calculating or undoing interest
and fees. (This is beneficial if you are an existing customer that uses the legacy bank
account group functionality rather than the bank account relationship functionality.)
• False
You cannot use bank account groups as selection criteria when calculating or undoing
interest and fees.
Default
value
• False
Editable in • Configuration Parameters

2 Setting configuration parameters
2.13 Setting treasury management configuration parameters
WebSuite System Administration Guide 85
2.13.1 Accrual Start Date
The Accrual Start Date configuration parameter specifies the first day of accruals for deals:
2.13.2 Deal Settlement Requires Rollover Decision
The Deal Settlement Requires Rollover Decision configuration parameter specifies if users must
complete the rollover process for all deals at maturity or can bypass the rollover process:
2.13.3 Liquidate Only Traded Issues
The Liquidate Only Traded Issues configuration parameter specifies if users can only liquidate traded
issues or can liquidate all deals:
Attribute Value
Possible values • On Value Date
The first day of accruals for deals is the value date.
• One Day After Value Date
The first day of accruals for deals is one day after the value date.
Default value • On Value Date
Editable in • Configuration Parameters
Attribute Value
Possible values • True
Users must complete the rollover process for all deals at maturity.
• False
Users can bypass the rollover process.
Default value • True
Editable in • Configuration Parameters
Attribute Value
Possible values • True
Users can only liquidate traded issues.
• False
Users can liquidate all deals.
Default value • False
Editable in • Configuration Parameters

2 Setting configuration parameters
2.14 Setting accounting configuration parameters
86 © Wall Street Systems IPH AB - Confidential
2.13.4 Liquidate Without Accounting
The Liquidate Without Accounting configuration parameter specifies how accounting on the
liquidation of deals is completed:
2.13.5 Provide Correspondent Accounts For Deal Settlement
The Provide Correspondent Accounts For Deal Settlement configuration parameter specifies if users
must select correspondent bank accounts when settling deals:
2.14 Setting accounting configuration parameters
This section defines the configuration parameters relevant to accounting. You must set these
configuration parameters before managing and analyzing accounting.
2.14.1 Account Balance Type
The Account Balance Type configuration parameter specifies how CMM handles credits and debits
when posting to the internal general ledger:
Attribute Value
Possible values • True
CMM does not complete accounting on the liquidation of deals.
• False
The user can choose to complete accounting on the liquidation of deals.
Default value • False
Editable in • Configuration Parameters
Attribute Value
Possible values • True
Users must select correspondent bank accounts when settling deals.
• False
Users only need to select correspondent bank accounts when overriding a selected bank
account is mandatory.
Default value • True
Editable in • Configuration Parameters
Attribute Value

2 Setting configuration parameters
2.14 Setting accounting configuration parameters
WebSuite System Administration Guide 87
2.14.2 GL Export Aggregation
The GL Export Aggregation configuration parameter specifies if CMM aggregates entries when
exporting the external general ledger:
2.14.3 GL Specification Based Export
The GL Specification Based Export configuration parameter specifies whether general ledger exports
are specification based or code based:
Possible
values • Functional
When posting to the internal general ledger, CMM converts credits and debits to the
entity’s base currency. The functional credits and debits must net to zero.
• Transactional
When posting to the internal general ledger, CMM ensures transactional credits and debits
net to zero.
Default value • Functional
Editable in • Configuration Parameters
Attribute Value
Possible
values • True
When exporting the external general ledger, CMM aggregates all entries with the same
party ID, accounting period, transaction currency, and external general ledger account
code and exports net amounts.
• False
When exporting the external general ledger, CMM exports every entry in the general ledger.
Default value • False
Editable in • Configuration Parameters
Attribute Value
Possible values • True
General ledger exports are specification based.
• False
General ledger exports are code based.
Default value • False
Editable in • Configuration Parameters
2 Setting configuration parameters
2.15 Setting monitoring configuration parameters
88 © Wall Street Systems IPH AB - Confidential
2.14.4 Period-End Post at Deal Maturity
The Period-End Post at Deal Maturity configuration parameter specifies if users must complete
period-end posting when maturing a deal:
Note: If the secondary ID is blank, this configuration parameter applies to all parties. If the
secondary ID contains a party’s ID, the parameter applies to that party.
2.15 Setting monitoring configuration parameters
CMMThis section defines the configuration parameters relevant to monitoring. You must set these
configuration parameters before monitoring user activity.
2.15.1 Audit Root Directory
The Audit Root Directory configuration parameter specifies the file path of audit event files:
2.15.2 Authorization Request Type
The Authorization Request Type configuration parameter specifies if the initiator of an authorization
request type event can authorize the event:
Attribute Value
Possible values • True
Users must complete period-end posting when maturing a deal.
• False
Users can choose to complete period-end posting or not when maturing a deal.
Default value • False
Editable in • Configuration Parameters
Attribute Values
Possible values • [Valid file path]
The file path for audit event files.
Default value • D:\cmm\auditfiles
Editable in • Configuration Parameters
Attribute Value
2 Setting configuration parameters
2.16 Setting miscellaneous configuration parameters
WebSuite System Administration Guide 89
2.15.3 Send Mail Server
The Send Mail Server configuration parameter specifies the SMTP server CMM uses to send event
subscription e-mail messages:
2.16 Setting miscellaneous configuration parameters
This section defines miscellaneous configuration parameters.
2.16.1 Data Caching Poll Delay
The Data Caching Poll Delay configuration parameter specifies the number of seconds between
checks to clear cached data in CMM:
Note: Only change this configuration parameter for testing purposes.
Possible values • Type 1 – Initiator can approve
The initiator of an authorization request event can authorize the event.
• Type 2 – Initiator cannot approve
The initiator of an authorization request cannot authorize the event.
Default value • Type 1 – Initiator can approve
Editable in • Configuration Parameters
• Security Configuration Maintenance
Attribute Value
Possible values • [Valid server name]
The SMTP server CMM uses to send event subscription e-mail messages.
Default value •N/A
Editable in • Configuration Parameters
Attribute Value
Possible values • [Valid whole number greater than 0]
The number of seconds between checks to clear cached data in CMM.
Default value • 120
Editable in • Configuration Parameters
2 Setting configuration parameters
2.16 Setting miscellaneous configuration parameters
90 © Wall Street Systems IPH AB - Confidential
2.16.2 Force Garbage Collection
The Force Garbage Collection configuration parameter specifies whether CMM enforces full garbage
collection at the expiry of a session:
2.16.3 Installation
The Installation configuration parameter specifies the ID supplied by Wallstreet for each customer:
Note: This configuration parameter activates any customer-specific functionality. It cannot be set
from the user interface. For information on setting this configuration parameter, contact
Wallstreet.
2.16.4 Maximum Number of Transactions being Fetched
The Maximum Number of Transactions being Fetched configuration parameter specifies the
maximum number of transactions per fetch:
Attribute Value
Possible
values • True
CMM enforces full garbage collection at the expiry of a session (assuming the server
memory utilization is over the threshold defined by the Memory Utilization Before Force GC
configuration parameter).
• False
CMM does not enforce full garbage collection at the expiry of a session.
Default
value
• True
Editable in • Configuration Parameters
Attribute Value
Possible values • [Valid customer name]
The ID supplied by Wallstreet for each customer.
Default value •N/A
Editable in • Configuration Parameters
Attribute Value
Possible values • [Valid whole number]
The maximum number of transactions per fetch.
Default value •N/A

2 Setting configuration parameters
2.16 Setting miscellaneous configuration parameters
WebSuite System Administration Guide 91
2.16.5 Memory Utilization Before Force GC
The Memory Utilization Before Force GC configuration parameter specifies the percentage of
memory utilization required before CMM enforces garbage collection:
Editable in • Configuration Parameters
Attribute Value
Possible
values
• [Valid whole number between 1 and 100]
The percentage of memory utilization required before CMM enforces garbage collection
(assuming the Force Garbage Collection configuration parameter is set to True).
Default value •80
Editable in • Configuration Parameters
2 Setting configuration parameters
2.16 Setting miscellaneous configuration parameters
92 © Wall Street Systems IPH AB - Confidential
WebSuite System Administration Guide 93
Chapter 3 Managing security
WebSuite provides the security necessary to ensure its components are accessed by only those
users your organization specifies.
Security handles all aspects of user access to functions, attributes, entities, counterparties,
bank accounts, settlement groups, cash flow types, and so on.
3.1 Understanding security
Each CMM user is assigned a set of security profiles. These security profiles define the functions,
attributes, entities, counterparties, bank accounts, settlement groups, and cash flow types that the
user can access while using the module.
Your organization can assign security profiles to its users at a centralized level, a decentralized level,
or a combination of the two called "mixed mode".
To configure security and ensure users can only access appropriate functions, attributes, entities,
counterparties, bank accounts, settlement groups, and cash flow types, your organization needs to
complete the following task:
1. Determine your organization’s security level
2. Set up administrative centers (if necessary)
3. Set up security profiles
4. Set up users and user groups
5. Set up user reauthentication.
3.1.1 Determining your organization’s security level
Your organization can set up security at one of three levels:
•Centralized
•Decentralized
•Mixed mode.
Use the centralized level if your organization wants to maintain responsibility for security with a
single individual or group of individuals. In security at a centralized level, these individuals are
referred to as "super users" because they have full access to the module.
Use the decentralized level if your organization wants to distribute responsibility for security across
departments, divisions, or entities. In security at a decentralized level, multiple individuals or groups
of individuals within your organization are responsible for security. As in security at a centralized
level, these individuals are referred to as super users. Each super user or group of super users is
responsible for one administrative center, which is a subset of users with access to a subset of the
organization’s functions, attributes, entities, counterparties, bank accounts, cash flow types, and
authorization request types.
CMM is installed with one administrative center named "Global". All existing functions, attributes,
entities, counterparties, bank accounts, cash flow types, authorization request types, and users are
assigned to this administrative center by default, and all other administrative centers that you enter
3 Managing security
3.1 Understanding security
94 © Wall Street Systems IPH AB - Confidential
are children of this administrative center. Super users assigned to the Global administrative center
are Global super users, while all super users assigned to other administrative centers are
administrative center super users.
If you are managing security at the centralized level, you assign all users to the Global
administrative center; there is no need to create other administrative centers. If you are managing
security at a decentralized level, you assign each user to an appropriate administrative center. Users
with access to all functions, attributes, entities, counterparties, bank accounts, cash flow types, and
authorization request types in their administrative center become the super users of those
administrative centers.
Mixed mode security is a combination of centralized and decentralized security. In mixed mode
security, the Global super user assigns functions to Global-level security by function profiles and
then assigns the Global-level security by function profiles to administrative centers. The
administrative center super users can assign the Global-level security by function profiles to users in
their administrative centers; however, they cannot edit or delete the Global-level security by
function profiles. If the Global super user assigns functions to the administrative centers in addition
to Global-level security by function profiles, the administrative center super users can assign these
functions to administrative-center-level security by function profiles and then assign the
administrative-center-level security by function profiles to users.
Note: As of this release, Global super users cannot assign other Global-level security profiles (for
example, security by entity and security by counterparty profiles) to administrative
centers.
3.1.2 Configuring administrative centers (if necessary)
If your organization is planning to set up security at a decentralized or mixed-mode level, you need
to create one or more new administrative centers (in addition to the default Global administrative
center).
For instructions, see 3.2 Managing CMM administrative centers on page 97.
3.1.3 Configuring security profiles
After you have created the administrative centers, users in each administrative center can configure
security profiles:
Security profiles Set up at a centralized level? Set up at a decentralized level?
Security by function Yes Yes
Security by attribute Yes Yes
Security by entity Yes Yes
Security by entity by function Yes Yes
Security by counterparty Yes Yes
Security by counterparty by function Yes Yes
Security by bank account Yes Yes
Security by settlement group Yes No
3 Managing security
3.1 Understanding security
WebSuite System Administration Guide 95
For instructions, see 3.3 Managing CMM profiles on page 100.
3.1.4 Configuring users and user groups
After you have created administrative centers and set up security profiles in each administrative
center, you can create the administrative centers’ users and assign appropriate security profiles to
each user. In addition, you can organize users to groups to reference in transaction processing
rules.
For instructions, see 3.5 Managing users and user groups on page 133.
In most situations, a users’ security profiles are independent of each other. For example, the
functions assigned to a user do not affect the authorization request types assigned to the user.
However, the following security profiles interact to determine the user’s access to entities and
counterparties:
•Security by function
•Security by entity
•Security by entity by function
•Security by counterparty
•Security by counterparty by function.
When a user opens a function, CMM completes the following process:
CMM1. determines if the user has access to the function (in other words, if the user is assigned a
security by function profile that includes the function):
–If the user does have access, CMM opens the function and continues to step 2.
–If the user does not have access, CMM displays an appropriate warning message.
CMM2. determines which entities the user can access in the function. It does this by intersecting the
user’s security by entity and security by entity by function profiles. The following are the security
by function, security by entity, and security by entity by function profiles of an example user:
The user can access FG-0188 Single Transaction Entry and FG-0053 Bank Statement Entry:
–If the user opens the Enter Single Transaction function, he or she can access Acme USA (but
no other entities). This is because FG-0188 Single Transaction Entry is included in the user’s
Security by cash flow type Yes Yes
Security by authorization request
type
Yes Yes
3 Managing security
3.1 Understanding security
96 © Wall Street Systems IPH AB - Confidential
assigned security by entity by function profile—therefore, security by entity by function
applies—and Acme USA is included in the user’s security by entity and security by entity by
function profiles. Because Acme Canada is not included in the security by entity profile and
Acme Mexico is not included in the security by entity by function profile, the user cannot
access them in the Enter Single Transaction function.
–If the user opens the Enter Bank Statement function, he or she can access Acme USA and
Acme Mexico (but no other entities). This is because FG-0053 Bank Statement Entry is not
included in the user’s assigned security by entity by function profile—therefore, security by
entity by function does not apply—and Acme USA and Acme Mexico are included in the user’s
security by entity profile.
Though FG-0067 Cash Transaction Report is included in the user’s security by entity by function
profile, he or she cannot access it because it is not included in his or her security by function
profile.
CMM3. determines which counterparties the user can access in the function. It does this by
intersecting the user’s security by counterparty and security by counterparty by function
profiles. The following are the security by function, security by counterparty, and security by
counterparty by function profiles of an example user:
The user can access FG-0188 Single Transaction Entry and FG-0053 Bank Statement Entry:
–If the user opens the Enter Single Transaction function, he or she can access Smith Company
(but no other counterparties). This is because FG-0188 Single Transaction Entry is included
in the user’s assigned security by counterparty by function profile—therefore, security by
counterparty by function applies—and Smith Company is included in the user’s security by
counterparty and security by counterparty by function profiles. Because Williams Company is
not included in the security by counterparty profile and Johnson Company is not included in
the security by counterparty by function profile, the user cannot access them in the Enter
Single Transaction function.
–If the user opens the Enter Bank Statement function, he or she can access Smith Company
and Johnson Company (but no other counterparties). This is because FG-0053 Bank
Statement Entry is not included in the user’s assigned security by counterparty by function
profile—therefore, security by counterparty by function does not apply—and Smith Company
and Johnson Company are included in the user’s security by counterparty profile.
Though FG-0067 Cash Transaction Report is included in the user’s security by counterparty by
function profile, he or she cannot access it because it is not included in his or her security by
function profile.
3.1.5 Configuring user reauthentication
You can require users to reauthenticate their identities (by entering their passwords) before
completing business-critical processes, such as releasing payments.

3 Managing security
3.2 Managing CMM administrative centers
WebSuite System Administration Guide 97
For instructions, see 3.5.4 Configuring user reauthentication on page 137
3.2 Managing CMM administrative centers
CMM is installed with one administrative center named "Global". All existing functions, attributes,
entities, counterparties, bank accounts, cash flow types, authorization request types, and users are
assigned to this administrative center by default.
You can create additional administrative centers. These administrative centers are children of the
Global administrative center.
3.2.1 Prerequisites
The following are prerequisites for managing CMM administrative centers:
Category Tasks
Security Ensure you have access to the following functions:
• FG-0120 Security by Administrative Center
• FG-0314 Multiple Security Assignments
• FG-0317 Copy Administrative Center Assignments.
For more information, see Chapter 3 Managing security on page 93.
3 Managing security
3.2 Managing CMM administrative centers
98 © Wall Street Systems IPH AB - Confidential
3.2.2 Creating administrative centers
To create an administrative center:
1. Select Admin - Security - Administrative Centers - Security by Administrative Center.
2. In the Administrative Center Information page, click New Entry.
3. In the Administrative Center Creation page, create the administrative center.
4. Click Save.
5. In the Administrative Center Information page, click the administrative center’s Modify Admin Center
Assignment link.
6. In the Administrative Center Assignments page, assign functions to the administrative center.
7. Click Entity Assignments.
8. Assign entities to the administrative center.
9. Click Counterparty Assignments.
10. Assign counterparties to the administrative center.
11. Click Bank Account Assignments.
12. Assign bank accounts to the administrative center.
13. Click Cash Flow Type Assignments.
14. Assign cash flow types to the administrative center.
15. Click Authorization Request Type Assignments.
16. Assign authorization request types to the administrative center.
17. Click Attribute Assignments.
18. In the Security By Attribute Templates - Criteria Selection page:
–To assign accounts payable import attributes to the administrative center, select
Edit AP Txn Attributes in the Attribute Template list.
–To assign direct debit import attributes to the administrative center, select
Edit DD Txn Attributes in the Attribute Template list.
–To assign manual entry attributes to the administrative center, select Edit Manual Entered
Txn Attributes in the Attribute Template list.
19. Click Continue.
20. In the Administrative Center Assignments page, assign attributes to the administrative center.
21. Click Return.
22. In the Administrative Center Information page, click the administrative center’s Admin Center
Management link.
23. In the Administrative Center Assignments page, assign security by function profiles to the
administrative center.
3.2.3 Editing administrative center names
To edit an administrative center’s name:
1. Select Admin - Security - Administrative Centers - Security by Administrative Center.
2. In the Administrative Center Information page, click the administrative center’s Modify Admin Center
Information link.
3. In the Administrative Center Maintenance page, edit the profile’s name.
4. Click Save.
3 Managing security
3.2 Managing CMM administrative centers
WebSuite System Administration Guide 99
3.2.4 Editing administrative center component assignments
To edit an administrative center’s component assignments:
1. Select Admin - Security - Administrative Centers - Security by Administrative Center.
2. In the Administrative Center Information page, click the administrative center’s Modify Admin Center
Assignment link.
3. In the Administrative Center Assignments page, assign functions to the administrative center.
4. Click Entity Assignments.
5. Assign entities to the administrative center.
6. Click Counterparty Assignments.
7. Assign counterparties to the administrative center.
8. Click Bank Account Assignments.
9. Assign bank accounts to the administrative center.
10. Click Cash Flow Type Assignments.
11. Assign cash flow types to the administrative center.
12. Click Authorization Request Type Assignments.
13. Assign authorization request types to the administrative center.
14. Click Attribute Assignments.
15. In the Security By Attribute Templates - Criteria Selection page:
–To assign accounts payable import file attributes to the administrative center, select
Edit AP Txn Attributes in the Attribute Template list.
–To assign direct debit import file attributes to the administrative center, select
Edit DD Txn Attributes in the Attribute Template list.
–To assign manual entry attributes to the administrative center, select Edit Manual Entered
Txn Attributes in the Attribute Template list.
16. Click Continue.
17. In the Administrative Center Assignments page, assign attributes to the administrative center.
3.2.5 Editing administrative center security profile assignments
To edit an administrative center’s security profile assignments:
1. Select Admin - Security - Administrative Centers - Security by Administrative Center.
2. In the Administrative Center Information page, click the administrative center’s Admin Center
Management link.
3. In the Administrative Center Assignments page, assign security by function profiles to the
administrative center.
3.2.6 Deleting administrative centers
As of this release, you cannot delete administrative centers.
3 Managing security
3.3 Managing CMM profiles
100 © Wall Street Systems IPH AB - Confidential
3.2.7 Managing multiple administrative centers’ assignments
To manage multiple administrative centers’ assignments:
1. Select Admin - Security - Profiles - Multiple Security Assignments.
2. In the Multiple Security Assignments - Criteria Selection page, enter search criteria.
3. Click Continue.
4. In the Multiple Assignments page, select the appropriate components and administrative
centers.
5. Do one of the following:
–To add the selected components to the selected administrative centers, click Add.
–To remove the selected components from the select administrative centers, click Remove.
3.2.8 Copying administrative centers’ assignments
To copy an administrative center’s assignments:
1. Select Admin - Security - Administrative Centers - Copy Administrative Center Assignments.
2. In the Copy Administrative Center Assignments page, select the source administrative center in
the Administrative Center To Copy From list.
3. Select the destination administrative centers.
4. Select the checkboxes of the components you want to copy from the source
administrative center to the destination administrative center.
All checkboxes are selected by default.
5. Click Copy.
3.3 Managing CMM profiles
In many organizations, CMM users are responsible for different components of the module. For
example, in an organization of 50 entities, one user may be responsible for capturing trading activity
for 10 of the entities, while another user may be responsible for settling the internal bank accounts
of all of the entities.
To accommodate this disbursement of responsibilities, CMM allows you to define each user’s access
based on the following components:
•Functions
•Attributes
•Entities
•Counterparties
•Bank accounts
•Settlement groups
•Cash flow types
•Authorization request types.
3 Managing security
3.3 Managing CMM profiles
WebSuite System Administration Guide 101
3.3.1 Configuring default counterparty and bank account access
The default_security_setup.xml file defines users’ default access to counterparties and bank
accounts.
3.3.1.1 Prerequisites
The following are prerequisites for configuring default counterparty and bank account access:
3.3.1.2 Configuring default counterparty access
To configure default counterparty access:
1. Open the following configuration file:
[Standard configuration file path]
security
default_security_setup.xml
For instructions on opening configuration files, see 1.2 Opening configuration files on page 25.
2. In the CPTY element’s access_right attribute, enter one of the following values:
–NONE to enable security by counterparty. (Users can only access counterparties for which
they have security by counterparty profiles.)
–ALL to disable security by counterparty. (Users can access all counterparties.)
3. In the CPTY element’s value attribute, enter one or more of the following values:
–0 for no access rights
–1 for read access rights
–2 for write access rights
–4 for view access rights
–8 for delete access rights
–16 for update access rights
–32 for execute access rights.
If you are entering more than one value in this attribute, separate the values by OR (for example
1 OR 2).
4. Save and close the file.
3.3.1.3 Configuring default bank account access
To configure default bank account access:
1. Open the following configuration file:
[Standard configuration file path]
security
Category Tasks
Security Ensure you have access to the following function:
• FG-0400 Review CMM Configuration.
For more information, see Chapter 3 Managing security on page 93.

3 Managing security
3.3 Managing CMM profiles
102 © Wall Street Systems IPH AB - Confidential
default_security_setup.xml
For instructions on opening configuration files, see 1.2 Opening configuration files on page 25.
2. In the BANKACCOUNT element’s access_right attribute, enter one of the following values:
–NONE to enable security by bank account. (Users can only access bank accounts for which
they have security by bank account profiles.)
–ALL to disable security by bank account. (Users can access all bank accounts.)
3. In the BANKACCOUNT element’s value attribute, enter one or more of the following values:
–0 for no access rights
–1 for read access rights
–2 for write access rights
–4 for view access rights
–8 for delete access rights
–16 for update access rights
–32 for execute access rights.
If you are entering more than one value in this attribute, separate the values by OR (for example
1 OR 2).
4. Save and close the file.
3.3.2 Managing profiles for functions and attributes
In CMM, a function is a set of pages that allows users to complete one or more specific tasks. (A
function in CMM is equivalent to an editor or board in TRM.)
The fields, lists, buttons, links, and other controls on a CMM page are sometimes referred to as
attributes—particularly if the controls are connected to specific fields in the module’s database.
You can secure all functions in CMM through security by function profiles and a set of attributes in
the Edit Transactions function through security by attribute profiles.
3.3.2.1 Managing security by function profiles
Security by function allows you to add functions to new or existing profiles. You can then assign
these profiles to users through the User Information function. For example, you can create a profile
with access to only the forecasting functions. You can then assign this security profile to specific
users. As long as these users do not have access to any other security by function profiles, they can
only access the forecasting functions.
Each function has a unique ID, and these unique IDs appear in the function names listed on the
Security by Function - Functionality Assignment page. You can display these IDs at the bottom of
every page by setting the Display Page Security Information configuration parameter to True. For
more information on this configuration parameter, see 2.4 Setting security configuration parameters
on page 52.
Functions may or may not be assigned to profiles. If a function is assigned to no profiles, no users
have access to the function. If a function is assigned to at least one profile, access to the function is
restricted and only users who are assigned to the profile have access to the function.
CMM is installed with a default security by function profile, ADMIN_PROFILE_FG, which contains all
functions. This security by function profile is assigned to the webadmin user, and you can assign it
to other users to whom you want to grant full access to CMM. CMM is also installed with another
default security by function profile, SECURITY_PROFILE_FG, which contains all security functions.
You can assign this security by function profile to users to whom you want to grant access to the
security functions.

3 Managing security
3.3 Managing CMM profiles
WebSuite System Administration Guide 103
3.3.2.1.1 Prerequisites
The following are prerequisites for configuring security by function profiles:
3.3.2.1.2 Creating security by function profiles
To create a security by function profile:
1. Select Admin - Security - Profiles - Security by Function.
2. In the Security by Function Profile Information page, click New Entry.
3. In the Security Profile Creation page, create the profile.
4. Click Save.
5. In the Security by Function - Functionality Assignment page, assign functions to the profile.
3.3.2.1.3 Editing security by function profile names
To edit a security by function profile’s name:
1. Select Admin - Security - Profiles - Security by Function.
2. In the Security by Function Profile Information page, click the profile’s Modify Profile Information link.
3. In the Security Profile Maintenance page, edit the profile’s name.
4. Click Save.
3.3.2.1.4 Editing security by function profile assignments
To edit a security by function profile’s assignments:
1. Select Admin - Security - Profiles - Security by Function.
2. In the Security by Function Profile Information page, click the profile’s Modify Profile Assignment link.
3. In the Security by Function - Functionality Assignment page, edit the profile’s assignments.
3.3.2.1.5 Deleting security by function profiles
To delete a security by function profile:
1. Select Admin - Security - Profiles - Security by Function.
2. In the Security by Function Profile Information page, click the profile’s Modify Profile Information link.
3. In the Security Profile Maintenance page, click Delete.
4. In the resulting dialog, click OK.
Category Tasks
Security Ensure you have access to the following function:
• FG-0287 Security by Function.
For more information, see Chapter 3 Managing security on page 93.
3 Managing security
3.3 Managing CMM profiles
104 © Wall Street Systems IPH AB - Confidential
3.3.2.2 Managing security by attribute profiles
You can assign the following attributes in the Edit Transactions function to profiles for accounts
payable imports, direct debit imports, and manual entries:
•Value Date
•Amount
•Entity Bank Account
•Payment Method
•Cash Flow Type
•Actual Or Forecast
•Priority Status
•Counterparty Bank Account
•One-off counterparty
–Name
–Address
–City
–State
–Country
–Postal/Zip Code
•One-off counterparty bank account
–Primary Number
–Primary Number Type
–Secondary Number
–Secondary Number Type
–ABA/Branch Code
–Swift Code
–Bank Name
–Bank Address
–Bank City
–Bank State
–Bank Country
–Postal/Zip Code
•Cheque Number
•Bank Reference Number
•Customer Reference Number
•Bank Deposit Number
•Regulatory Code
•Bank Instructions
•Counterparty Message

3 Managing security
3.3 Managing CMM profiles
WebSuite System Administration Guide 105
•Comments
•Delete
•Bank Holiday Country
•Remittance Details
•Additional Attributes
•Intermediary/Correspondent.
Assuming a user has access to FG-0036 Edit Transactions, he or she can only edit the attributes he
or she is assigned and that are available in the transaction’s current state.
3.3.2.2.1 Prerequisites
The following are prerequisites for configuring security by attribute profiles:
3.3.2.2.2 Creating security by attribute profiles
To create a security by attribute profile:
1. Select Admin - Security - Profiles - Security by Attribute.
2. In the Security by Attribute Profile Information page, click New Entry.
3. In the Security Profile Creation page, create the profile.
4. Click Save.
5. In the Security By Attribute Templates - Criteria Selection page:
–To assign accounts payable import attributes to the administrative center, select
Edit AP Txn Attributes in the Attribute Template list.
–To assign direct debit import attributes to the administrative center, select
Edit DD Txn Attributes in the Attribute Template list.
–To assign manual entry attributes to the administrative center, select Edit Manual Entered
Txn Attributes in the Attribute Template list.
6. Click Continue.
7. In the Security by Attribute - Attribute Assignment page, assign attributes to the profile.
Category Tasks
Configuration parameters Ensure the following configuration parameter is set:
• Attribute Security Enabled.
For more information, see 2.4 Setting security configuration parameters on
page 52.
Security Ensure you have access to the following function:
• FG-0386 Security by Attribute.
For more information, see Chapter 3 Managing security on page 93.
3 Managing security
3.3 Managing CMM profiles
106 © Wall Street Systems IPH AB - Confidential
3.3.2.2.3 Editing security by attribute profile names
To edit a security by attribute profile’s name:
1. Select Admin - Security - Profiles - Security by Attribute.
2. In the Security by Attribute Profile Information page, click the profile’s Modify Profile Information link.
3. In the Security Profile Maintenance page, edit the profile’s name.
4. Click Save.
3.3.2.2.4 Editing security by attribute profile assignments
To edit a security by attribute profile’s assignments:
1. Select Admin - Security - Profiles - Security by Attribute.
2. In the Security by Attribute Profile Information page, click the profile’s Modify Profile Assignment link.
3. In the Security By Attribute Templates - Criteria Selection page:
–To assign accounts payable import attributes to the administrative center, select
Edit AP Txn Attributes in the Attribute Template list.
–To assign direct debit import attributes to the administrative center, select
Edit DD Txn Attributes in the Attribute Template list.
–To assign manual entry attributes to the administrative center, select Edit Manual Entered
Txn Attributes in the Attribute Template list.
4. Click Continue.
5. In the Security by Attribute - Attribute Assignment page, edit the profile’s assignments.
3.3.2.2.5 Deleting security by attribute profiles
To delete a security by attribute profile:
1. Select Admin - Security - Profiles - Security by Attribute.
2. In the Security by Attribute Profile Information page, click the profile’s Modify Profile Information link.
3. In the Security Profile Maintenance page, click Delete.
4. In the resulting dialog, click OK.
3.3.3 Managing profiles for entities
In CMM, an entity is a company, branch, or division in your organization for which users enter and
report on activity.
You can secure entities through security by entity profiles. In addition, you can map security by
function profiles to security by entity profiles through security by entity by function profiles.
3.3.3.1 Managing security by entity profiles
Security by entity allows you to add entities to profiles. You can then assign the profiles to users
through the User Information function. For example, you can create a profile with access to only the
North American entities in your organization. You can then assign this profile to specific users. As
long as these users do not have access to any other security by entity profiles, they can only access
those entities residing in North America.
Users can only access the entities allotted to them in their profiles. Therefore, when a user selects
All in an Entity list, he or she can only see all entities defined in his or her profiles, not all entities in
CMM.
If an entity is not assigned to a profile, it is only available in the Security by Entity function.
Therefore, no one can access the entity outside of the Security by Entity function until it is added to
a profile.

3 Managing security
3.3 Managing CMM profiles
WebSuite System Administration Guide 107
CMM is installed with a default security by entity profile, ADMIN_PROFILE_ENTITY, which contains
all entities. This security by entity profile is assigned to the webadmin user, and you can assign it to
other users to whom you want to grant access to all entities.
3.3.3.1.1 Prerequisites
The following are prerequisites for configuring security by entity profiles:
3.3.3.1.2 Creating security by entity profiles
To create a security by entity profile:
1. Select Admin - Security - Profiles - Security by Entity.
2. In the Security by Entity Profile Information page, click New Entry.
3. In the Security Profile Creation page, create the profile.
4. Click Save.
5. In the Security by Entity - Entity Assignment page, assign entities to the profile.
3.3.3.1.3 Editing security by entity profile names
To edit a security by entity profile’s name:
1. Select Admin - Security - Profiles - Security by Entity.
2. In the Security by Entity Profile Information page, click the profile’s Modify Profile Information link.
3. In the Security Profile Maintenance page, edit the profile’s name.
4. Click Save.
3.3.3.1.4 Editing security by entity profile assignments
To edit a security by entity profile’s assignments:
1. Select Admin - Security - Profiles - Security by Entity.
2. In the Security by Entity Profile Information page, click the profile’s Modify Profile Assignment link.
3. In the Security by Entity - Entity Assignment page, edit the profile’s assignments.
3.3.3.1.5 Deleting security by entity profiles
To delete a security by entity profile:
1. Select Admin - Security - Profiles - Security by Entity.
2. In the Security by Entity Profile Information page, click the profile’s Modify Profile Information link.
3. In the Security Profile Maintenance page, click Delete.
4. In the resulting dialog, click OK.
Category Tasks
Static data Ensure the following static data are available:
• Entities.
For more information, see the CMM User Guide.
Security Ensure you have access to the following function:
• FG-0286 Security by Entity.
For more information, see Chapter 3 Managing security on page 93.
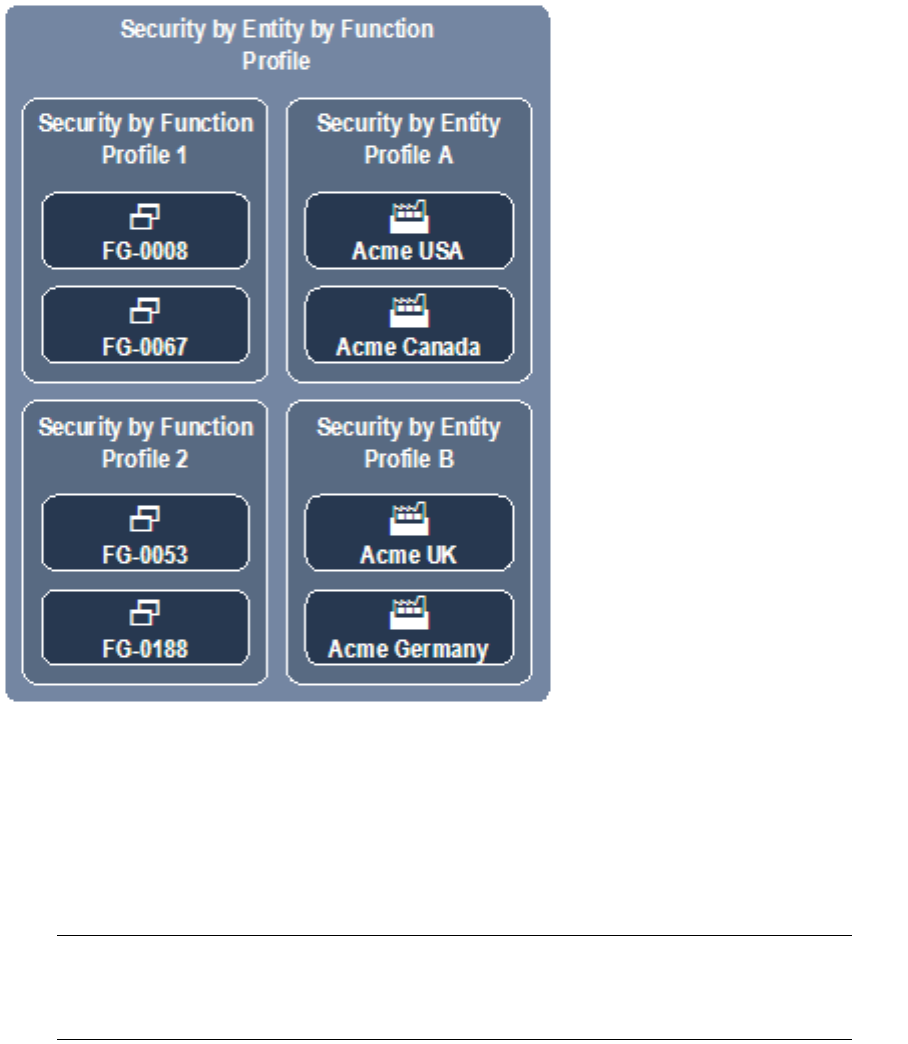
3 Managing security
3.3 Managing CMM profiles
108 © Wall Street Systems IPH AB - Confidential
3.3.3.2 Managing security by entity by function profiles
Security by entity by function allows you to link existing security by function and security by entity
profiles. A user with a security by entity by function profile can access all entities assigned to the
profile’s security by entity profiles in the functions assigned to the profile’s security by function
profiles.
Security by entity by function is useful when you want to provide users with access to multiple sets
of functions but with different entities in each set.
The following diagram presents an example security by entity by function profile:
If a user is assigned this security by entity by function profile, he or she can access Acme USA,
Acme Canada, Acme UK, and Acme Germany (but no other entities) in the following functions:
•FG-0008 Bank Transaction Report
•FG-0053 Bank Statement Entry
•FG-0067 Cash Transaction Report
•FG-0188 Single Transaction Entry.
Note: This assumes the user has security by function access to the four functions and security by
entity access to the four entities. For more information, see 3.3.2.1 Managing security by
function profiles on page 102 and 3.3.3.1 Managing security by entity profiles on page
106.

3 Managing security
3.3 Managing CMM profiles
WebSuite System Administration Guide 109
3.3.3.2.1 Prerequisites
The following are prerequisites for configuring security by entity by function profiles:
3.3.3.2.2 Creating security by entity by function profiles
To create a security by entity by function profile:
1. Select Admin - Security - Profiles - Security by Entity by Function.
2. In the Security by Entity by Functional Group Information page, click New Entry.
3. In the Security Profile Creation page, create the profile.
4. Click Save.
5. In the Security by Entity by Functional Group Assignment page, assign security by function and
security by entity profiles to the profile.
3.3.3.2.3 Editing security by entity by function profile names
To edit a security by entity by function profile’s name:
1. Select Admin - Security - Profiles - Security by Entity by Function.
2. In the Security by Entity by Functional Group Information page, click the profile’s
Modify Profile Information link.
3. In the Security Profile Maintenance page, edit the profile’s name.
4. Click Save.
3.3.3.2.4 Editing security by entity by function profile assignments
To edit a security by entity by function profile’s assignments:
1. Select Admin - Security - Profiles - Security by Entity by Function.
2. In the Security by Entity by Functional Group Information page, click the profile’s
Modify Profile Assignment link.
3. In the Security by Entity by Functional Group Assignment page, edit the profile’s assignments.
3.3.3.2.5 Deleting security by entity by function profiles
To delete a security by entity by function profile:
1. Select Admin - Security - Profiles - Security by Entity by Function.
2. In the Security by Entity by Functional Group Information page, click the profile’s
Modify Profile Information link.
3. In the Security Profile Maintenance page, click Delete.
4. In the resulting dialog, click OK.
Category Tasks
Security Ensure you have access to the following function:
• FG-0380 Security by Entity by Function.
For more information, see Chapter 3 Managing security on page 93.
In addition:
• Create security by function profiles as documented in 3.3.2.1 Managing security by
function profiles on page 102
• Create security by entity profiles as documented in 3.3.3.1 Managing security by entity
profiles on page 106.

3 Managing security
3.3 Managing CMM profiles
110 © Wall Street Systems IPH AB - Confidential
3.3.4 Managing profiles for counterparties
In CMM, a counterparty is the beneficiary party in a transaction. For the purposes of security, a
counterparty can be internal to your organization (in which case, the counterparty is an entity) or
external to your organization.
You can secure counterparties through security by counterparty profiles. In addition, you can map
security by function profiles to security by counterparty profiles through security by counterparty by
function profiles.
3.3.4.1 Managing security by counterparty profiles
Security by counterparty allows you to add counterparties to profiles. You can then assign the
profiles to users through the User Information function. For example, you can create a profile with
access to only European counterparties. You can then assign this profile to specific users. As long as
these users do not have access to any other security by counterparty profiles, they can only access
those counterparties residing in Europe.
Users can only access the counterparties allotted to them in their profiles. Therefore, when a user
selects All in a Counterparty list, he or she can only see all counterparties defined in his or her
profiles, not all counterparties in CMM.
Users can only access the counterparties allotted to them in their profiles. Therefore, when a user
selects All in an Counterparty list, he or she can only see all counterparties defined in his or her
profiles, not all counterparties in CMM.
CMM is installed with a default security by counterparty profile, ADMIN_PROFILE_CPTY, which
contains all counterparties. This security by counterparty profile is assigned to the webadmin user,
and you can assign it to other users to whom you want to grant access to all counterparties.
3.3.4.1.1 Prerequisites
The following are prerequisites for configuring security by counterparty profiles:
3.3.4.1.2 Creating security by counterparty profiles
To create a security by counterparty profile:
1. Select Admin - Security - Profiles - Security by Counterparty.
2. In the Counterparty Security Profile Information page, click New Entry.
3. In the Security Profile Creation page, create the profile.
4. Click Save.
5. In the Counterparty Security Assignment page, assign counterparties to the profile.
Category Tasks
Static data Ensure the following static data are available:
• Counterparties.
For more information, see the CMM User Guide.
Security Ensure you have access to the following function:
• FG-0382 Security by Counterparty.
For more information, see Chapter 3 Managing security on page 93.
In addition, configure default counterparty access as documented in 3.3.1 Configuring default
counterparty and bank account access on page 101.
3 Managing security
3.3 Managing CMM profiles
WebSuite System Administration Guide 111
3.3.4.1.3 Editing security by counterparty profile names
To edit a security by counterparty profile’s name:
1. Select Admin - Security - Profiles - Security by Counterparty.
2. In the Counterparty Security Profile Information page, click the profile’s Modify Profile Information
link.
3. In the Security Profile Maintenance page, edit the profile’s name.
4. Click Save.
3.3.4.1.4 Editing security by counterparty profile assignments
To edit a security by counterparty profile’s assignments:
1. Select Admin - Security - Profiles - Security by Counterparty.
2. In the Counterparty Security Profile Information page, click the profile’s Modify Profile Assignment
link.
3. In the Counterparty Security Assignment page, edit the profile’s assignments.
3.3.4.1.5 Deleting security by counterparty profiles
To delete a security by counterparty profile:
1. Select Admin - Security - Profiles - Security by Counterparty.
2. In the Counterparty Security Profile Information page, click the profile’s Modify Profile Information
link.
3. In the Security Profile Maintenance page, click Delete.
4. In the resulting dialog, click OK.
3.3.4.2 Managing security by counterparty by function profiles
Security by counterparty by function allows you to link existing security by function and security by
counterparty profiles. A user with a security by counterparty by function profile can access all
counterparties assigned to the profile’s security by counterparty profiles in the functions assigned to
the profile’s security by function profiles.
Security by counterparty by function is useful when you want to provide users with access to
multiple sets of functions but with different counterparties in each set.
The following diagram presents an example security by counterparty by function profile:
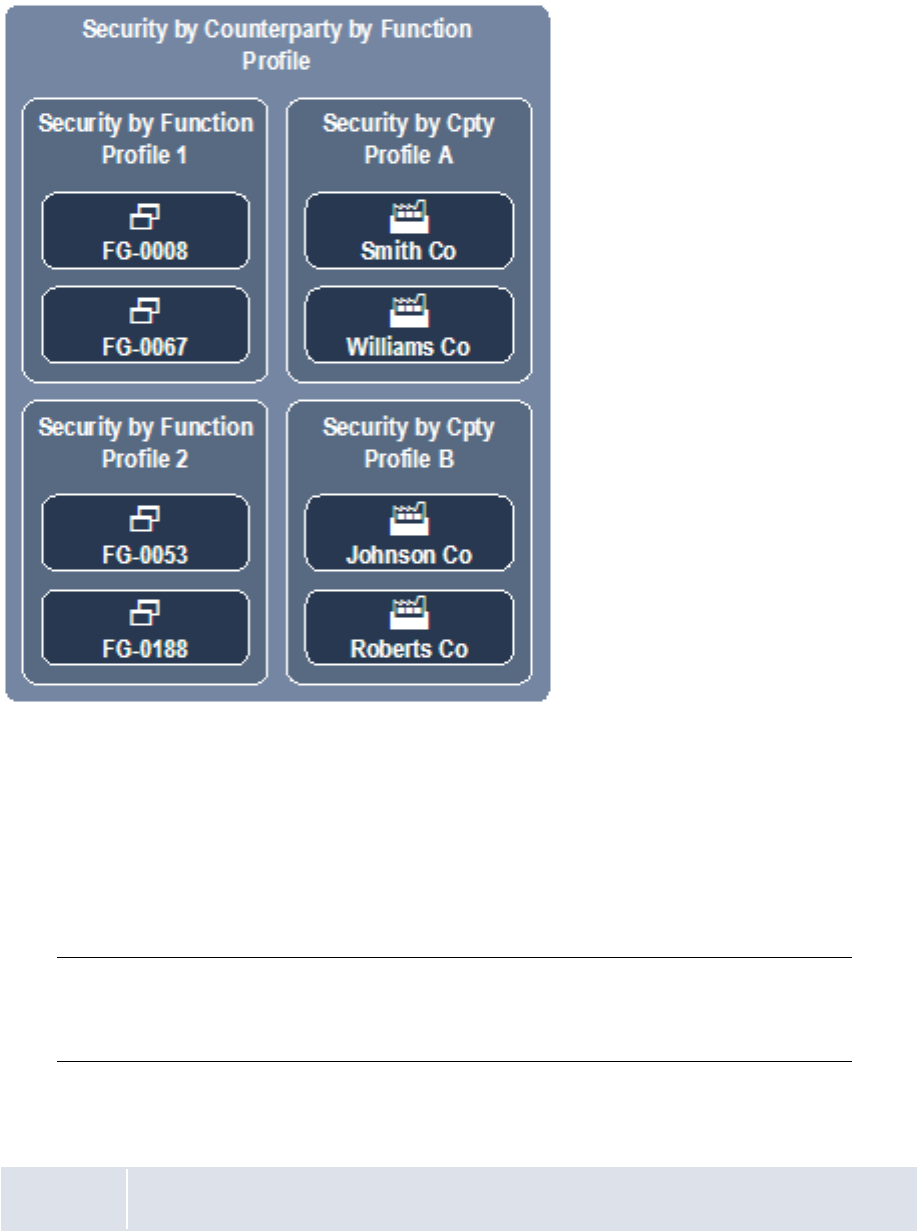
3 Managing security
3.3 Managing CMM profiles
112 © Wall Street Systems IPH AB - Confidential
If a user is assigned this security by counterparty by function profile, he or she can access Smith
Company, Williams Company, Johnson Company, and Roberts Company (but no other
counterparties) in the following functions:
•FG-0008 Bank Transaction Report
•FG-0053 Bank Statement Entry
•FG-0067 Cash Transaction Report
•FG-0188 Single Transaction Entry.
Note: This assumes the user has security by function access to the four functions and security by
counterparty access to the four counterparties. For more information, see 3.3.2.1
Managing security by function profiles on page 102 and 3.3.4.1 Managing security by
counterparty profiles on page 110.
3.3.4.2.1 Prerequisites
The following are prerequisites for configuring security by counterparty by function profiles:
Category Tasks

3 Managing security
3.3 Managing CMM profiles
WebSuite System Administration Guide 113
3.3.4.2.2 Creating security by counterparty by function profiles
To create a security by counterparty by function profile:
1. Select Admin - Security - Profiles - Security by Counterparty by Function.
2. In the Security by Counterparty by Functional Group Information page, click New Entry.
3. In the Security Profile Creation page, create the profile.
4. Click Save.
5. In the Security by Counterparty by Functional Group Assignment page, assign security by
function and security by counterparty profiles to the profile.
3.3.4.2.3 Editing security by counterparty by function profile names
To edit a security by counterparty by function profile’s name:
1. Select Admin - Security - Profiles - Security by Counterparty by Function.
2. In the Security by Counterparty by Functional Group Information page, click the profile’s
Modify Profile Information link.
3. In the Security Profile Maintenance page, edit the profile’s name.
4. Click Save.
3.3.4.2.4 Editing security by counterparty by function profile assignments
To edit a security by counterparty by function profile’s assignments:
1. Select Admin - Security - Profiles - Security by Counterparty by Function.
2. In the Security by Counterparty by Functional Group Information page, click the profile’s
Modify Profile Assignment link.
3. In the Security by Counterparty by Functional Group Assignment page, edit the profile’s
assignments.
3.3.4.2.5 Deleting security by counterparty by function profiles
To delete a security by counterparty by function profile:
1. Select Admin - Security - Profiles - Security by Counterparty by Function.
2. In the Security by Counterparty by Functional Group Information page, click the profile’s
Modify Profile Information link.
3. In the Security Profile Maintenance page, click Delete.
4. In the resulting dialog, click OK.
3.3.5 Managing profiles for bank accounts
To capture and process transactions, an entity must hold at least one bank account in CMM.
Security Ensure you have access to the following function:
• FG-0384 Security by Counterparty by Function.
For more information, see Chapter 3 Managing security on page 93.
In addition
• Create security by function profiles as documented in 3.3.2.1 Managing security by function
profiles on page 102
• Create security by counterparty profiles as documented in 3.3.4.1 Managing security by
counterparty profiles on page 110.
3 Managing security
3.3 Managing CMM profiles
114 © Wall Street Systems IPH AB - Confidential
By default, CMM is secured by entity. As a result, a user must have access to an entity to capture,
process, and view activity in the entity’s bank accounts. However, if you set the Enable Security
configuration parameter to Entity and Bank Account, CMM is secured by both entity and
bank account. In this situation, a user must have access to both an entity (through security by
entity) and its bank account (through security by bank account) to capture, process, and view
activity in the bank accounts.
Note: For more information on the Enable Security configuration parameter, see 2.4 Setting
security configuration parameters on page 52.
CMM also includes security by settlement group for organizations using the module’s settlement
functionality. (A settlement group is a group of entity bank accounts that a user can settle at a
single time.)
3.3.5.1 Managing security by bank account profiles
Security by bank account allows you to assign bank accounts to profiles. You can then assign the
profiles to users through the User Information function. For example, you can create a profile with
access to only US dollar bank accounts. You can then assign this profile to specific users. As long as
these users do not have access to any other security by bank account profiles, they can only
capture, process, and view activity in the US dollar bank accounts, not other bank accounts.
3.3.5.1.1 Prerequisites
The following are prerequisites for configuring security by bank account profiles:
3.3.5.1.2 Creating security by bank account profiles
To create a security by bank account profile:
1. Select Admin - Security - Profiles - Security by Bank Account.
2. In the Security by Bank Account Profile Information page, click New Entry.
3. In the Security Profile Creation page, create the profile.
4. Click Save.
5. In the Security by Bank Account - Bank Account Assignment page, assign bank accounts to the
profile.
3.3.5.1.3 Editing security by bank account profile names
To edit a security by bank account profile’s name:
1. Select Admin - Security - Profiles - Security by Bank Account.
2. In the Security by Bank Account Profile Information page, click the profile’s Modify Profile Information
link.
3. In the Security Profile Maintenance page, edit the profile’s name.
4. Click Save.
Category Tasks
Configuration
parameters
Ensure the following configuration parameters have been set:
•Enable Security.
For more information, see 2.4 Setting security configuration parameters on page 52.

3 Managing security
3.3 Managing CMM profiles
WebSuite System Administration Guide 115
3.3.5.1.4 Editing security by bank account profile assignments
To edit a security by bank account profile’s assignments:
1. Select Admin - Security - Profiles - Security by Bank Account.
2. In the Security by Bank Account Profile Information page, click the profile’s Modify Profile Assignment
link.
3. In the Security by Bank Account - Bank Account Assignment page, edit the profile’s
assignments.
3.3.5.1.5 Deleting security by bank account profiles
To delete a security by bank account profile:
1. Select Admin - Security - Profiles - Security by Bank Account.
2. In the Security by Bank Account Profile Information page, click the profile’s Modify Profile Information
link.
3. In the Security Profile Maintenance page, click Delete.
4. In the resulting dialog, click OK.
3.3.5.2 Managing security by settlement group profiles
Security by settlement group allows you to assign settlement groups to profiles. You can then assign
the profiles to users through the User Information function. For example, you can create a profile
with access to only the European settlement group. You can then assign this profile to specific users.
As long as these users do not have access to any other security by settlement group profiles, they
can only settle European bank accounts, not other bank accounts.
For more information on settlement groups, see the CMM User Guide.
CMM is installed with a default security by settlement group profile,
ADMIN_PROFILE_SETTLEMENT_GROUP, which contains all settlement groups. This security by
settlement group profile is assigned to the webadmin user, and you can assign it to other users to
whom you want to grant access to all settlement groups.
3.3.5.2.1 Prerequisites
The following are prerequisites for configuring security by settlement group profiles:
Category Tasks
Static data Ensure the following static data are available:
• Settlement groups.
For more information, see the CMM User Guide.
Security Ensure you have access to the following function:
• FG-0312 Security by Settlement Group.
For more information, see Chapter 3 Managing security on page 93.

3 Managing security
3.3 Managing CMM profiles
116 © Wall Street Systems IPH AB - Confidential
3.3.5.2.2 Creating security by settlement group profiles
To create a security by settlement group profile:
1. Select Admin - Security - Profiles - Security by Settlement Group.
2. In the Security by Settlement Group Profile Information page, click New Entry.
3. In the Security Profile Creation page, create the profile.
4. Click Save.
5. In the Security by Settlement Group - Settlement Groups Assignment page, assign settlement
groups to the profile.
3.3.5.2.3 Editing security by settlement group profile names
To edit a security by settlement group profile’s name:
1. Select Admin - Security - Profiles - Security by Settlement Group.
2. In the Security by Settlement Group Profile Information page, click the profile’s Modify Profile
Information link.
3. In the Security Profile Maintenance page, edit the profile’s name.
4. Click Save.
3.3.5.2.4 Editing security by settlement group profile assignments
To edit a security by settlement group profile’s assignments:
1. Select Admin - Security - Profiles - Security by Settlement Group.
2. In the Security by Settlement Group Profile Information page, click the profile’s Modify Profile
Assignment link.
3. In the Security by Settlement Group - Settlement Groups Assignment page, edit the profile’s
assignments.
3.3.5.2.5 Deleting security by settlement group profiles
To delete a security by settlement group profile:
1. Select Admin - Security - Profiles - Security by Settlement Group.
2. In the Security by Settlement Group Profile Information page, click the profile’s Modify Profile
Information link.
3. In the Security Profile Maintenance page, click Delete.
4. In the resulting dialog, click OK.
3.3.6 Managing profiles for cash flow types
A cash flow type is a means of classifying a forecast, transaction, or bank transaction. Examples of
cash flow types include Commercial Payment, Commercial Receipt, Bank Fee, and Salary.
Note: In CMM, a cash flow type is an instrument type with the Status list set to Enabled.
Therefore, cash flow types may also be referred to as instrument types in the CMM
user interface and documentation.
The primary reason for securing cash flow types is to hide specific attributes of transactions from
one or more users. For example, you may want to hide the beneficiary attribute in salary payments
so that users outside of the payroll department cannot see how much each employee is paid.

3 Managing security
3.3 Managing CMM profiles
WebSuite System Administration Guide 117
Securing cash flow type involves the following steps:
1. For each activity type (forecast, transaction, and bank transaction), organize attributes into
higher level attribute groups, such as Amount and Counterparty.
2. For each activity type, define which attribute groups are secured.
3. Create security by cash flow type profiles.
4. Assign the security by cash flow type profiles to users.
5. Set the Security By Cash Flow Type Enabled configuration parameter to True.
If a user does not have access to a cash flow type (because it is not in his or her assigned security
by cash flow type profile) and the Security By Cash Flow Type Enabled configuration parameter is
set to True, the user cannot view the values of secured attributes for transactions of that cash flow
type. "Secured" displays in place of the attributes’ values.
Cash flow types may or may not be assigned to profiles. If a cash flow type is assigned to no
profiles, no users have access to the cash flow type. If a cash flow type is assigned to at least one
profile, access to the cash flow type is restricted and only users who are assigned to the profile have
access to the cash flow type.
3.3.6.1 Managing attribute groups
You can configure attribute groups by editing two XML files in the InstallationData folder.
Default secured attribute groups are provided with CMM. Therefore, you only need to edit the files if
you do not want to use the default grouping and securing of attributes.
3.3.6.1.1 Prerequisites
The following are prerequisites for configuring attribute groups:
3.3.6.1.2 Creating attribute groups
To create an attribute group:
1. Open the following configuration file:
[Standard configuration file path]
security
security_by_cash_flow_type
attribute_group_mapping.xml
For instructions on opening configuration files, see 1.2 Opening configuration files on page 25.
2. Add an attribute_group child element to the appropriate transaction_type element. The
following is an example:
<attribute_group_mapping>
…
<transaction_type transaction_type_name="Cash">
…
<attribute_group attribute_group_name="Counterparty">
<attribute attribute_name="Cpty ID"/>
<attribute attribute_name="Cpty Long Name"/>
Category Tasks
Security Ensure you have access to the following function:
• FG-0400 Review CMM Configuration.
For more information, see Chapter 3 Managing security on page 93.

3 Managing security
3.3 Managing CMM profiles
118 © Wall Street Systems IPH AB - Confidential
<attribute attribute_name="Counterparty"/>
</attribute_group>
…
</transaction_type>
…
</attribute_group_mapping>
There are three transaction_type elements in the file:
–Cash for expected and instructed activity
–Forecast for forecasted activity
–Bank for bank-reported activity.
3. Save and close the file.
3.3.6.1.3 Editing attribute groups
To edit an attribute group:
1. Open the following configuration file:
[Standard configuration file path]
security
security_by_cash_flow_type
attribute_group_mapping.xml
For instructions on opening configuration files, see 1.2 Opening configuration files on page 25.
2. Edit the attribute group’s attribute_group element.
3. Save and close the file.
3.3.6.1.4 Deleting attribute groups
To delete an attribute group:
1. Open the following configuration file:
[Standard configuration file path]
security
security_by_cash_flow_type
attribute_group_mapping.xml
For instructions on opening configuration files, see 1.2 Opening configuration files on page 25.
2. Delete the attribute group’s attribute_group element.
3. Save and close the file.
3.3.6.1.5 Securing attribute groups
To secure an attribute group:
1. Open the following configuration file:
[Standard configuration file path]
security
security_by_cash_flow_type
secured_attribute_groups.xml

3 Managing security
3.3 Managing CMM profiles
WebSuite System Administration Guide 119
For instructions on opening configuration files, see 1.2 Opening configuration files on page 25.
2. Add an attribute_group child element to the appropriate transaction_type element. The
following is an example:
<secured_attribute_groups>
…
<transaction_type transaction_type_name="Cash">
…
<attribute_group attribute_group_name="Counterparty"/>
…
</transaction_type>
º
</secured_attribute_groups>
3. Save and close the file.
3.3.6.2 Managing security by cash flow type profiles
Security by cash flow type allows you to assign cash flow types to profiles. You can then assign the
profiles to users through the User Information function. For example, you can create a profile with
access to only the Salary cash flow type. You can then assign this profile to specific users. These
users can access the attributes you secured in 3.3.6.1 Managing attribute groups on page 117 for
activity with cash flow types of Salary. Assuming the Salary cash flow type is not assigned to any
other security by cash flow type profile, other users cannot access the attributes you secured for
activity with cash flow type of Salary; "Secured" displays in place of the attributes’ values.
3.3.6.2.1 Prerequisites
The following are prerequisites for configuring security by cash flow type profiles:
3.3.6.2.2 Creating security by cash flow type profiles
To create a security by cash flow type profile:
1. Select Admin - Security - Profiles - Security by Cash Flow Type.
2. In the Security by Cash Flow Type Profile Information page, click New Entry.
3. In the Security Profile Creation page, create the profile.
4. Click Save.
5. In the Security by Cash Flow Type Profile Assignment page, assign cash flow types to the profile.
Category Tasks
Configuration
parameters
Ensure the following configuration parameter has been set:
• Security By Cash Flow Type Enabled.
For more information, see 2.4 Setting security configuration parameters on page
52.
Static data Ensure the following static data are available:
•Cash flow types.
For more information, see the CMM User Guide.
Security Ensure you have access to the following function:
• FG-0376 Security by Cash Flow Type.
For more information, see Chapter 3 Managing security on page 93.

3 Managing security
3.3 Managing CMM profiles
120 © Wall Street Systems IPH AB - Confidential
3.3.6.2.3 Editing security by cash flow type profile names
To edit a security by entity profile’s name:
1. Select Admin - Security - Profiles - Security by Cash Flow Type.
2. In the Security by Cash Flow Type Profile Information page, click the profile’s Modify Profile
Information link.
3. In the Security Profile Maintenance page, edit the profile’s name.
4. Click Save.
3.3.6.2.4 Editing security by cash flow type profile assignments
To edit a security by entity profile’s assignments:
1. Select Admin - Security - Profiles - Security by Cash Flow Type.
2. In the Security by Cash Flow Type Profile Information page, click the profile’s Modify Profile
Assignment link.
3. In the Security by Cash Flow Type Profile Assignment page, edit the profile’s assignments.
3.3.6.2.5 Deleting security by cash flow type profiles
To delete a security by entity profile:
1. Select Admin - Security - Profiles - Security by Cash Flow Type.
2. In the Security by Cash Flow Type Profile Information page, click the profile’s Modify Profile
Information link.
3. In the Security Profile Maintenance page, click Delete.
4. In the resulting dialog, click OK.
3.3.7 Managing profiles for authorization request types
Security by authorization request type allows you to assign authorization request types to profiles.
You can then assign the profiles to users through the User Information function. For example, you
can create a profile with access to only the accounting-related authorization request types. You can
then assign this profile to specific users. As long as these users do not have access to any other
security by authorization request type profiles, they can only authorize accounting activities, not
other activities such as creating, editing, and deleting entities.
For more information on authorization request types, see 12.2 Authorizing user activity on page
450.
CMM is installed with a default security by authorization request type profile,
ADMIN_PROFILE_AUTHREQ, which contains all authorization request types. This security by
authorization request type profile is assigned to the webadmin user, and you can assign it to other
users to whom you want to grant access to all authorization request types.
3.3.7.1 Prerequisites
The following are prerequisites for configuring security by authorization request type profiles:
Category Tasks
Security Ensure you have access to the following function:
• FG-0011 Security by Authorization Request Type.
For more information, see Chapter 3 Managing security on page 93.

3 Managing security
3.3 Managing CMM profiles
WebSuite System Administration Guide 121
3.3.7.2 Creating security by authorization request type profiles
To create a security by authorization request type profile:
1. Select Admin - Security - Profiles - Security by Authorization Request Type.
2. In the Security by Authorization Request Type Profile Information page, click New Entry.
3. In the Security Profile Creation page, create the profile.
4. Click Save.
5. In the Security by Authorization Request Type - Authorization Request Type Assignment page,
assign authorization request types to the profile.
3.3.7.3 Editing security by authorization request type profile names
To edit a security by authorization request type profile’s name:
1. Select Admin - Security - Profiles - Security by Authorization Request Type.
2. In the Security by Authorization Request Type Profile Information page, click the profile’s
Modify Profile Information link.
3. In the Security Profile Maintenance page, edit the profile’s name.
4. Click Save.
3.3.7.4 Editing security by authorization request type profile assignments
To edit a security by authorization request type profile’s assignments:
1. Select Admin - Security - Profiles - Security by Authorization Request Type.
2. In the Security by Authorization Request Type Profile Information page, click the profile’s
Modify Profile Assignment link.
3. In the Security by Authorization Request Type - Authorization Request Type Assignment page,
edit the profile’s assignments.
3.3.7.5 Deleting security by authorization request type profiles
To delete a security by authorization request type profile:
1. Select Admin - Security - Profiles - Security by Authorization Request Type.
2. In the Security by Authorization Request Type Profile Information page, click the profile’s
Modify Profile Information link.
3. In the Security Profile Maintenance page, click Delete.
4. In the resulting dialog, click OK.
3.3.8 Managing multiple profiles
Using the Multiple Security Assignments function, you can add components (functions, attributes,
entities, counterparties, bank accounts, settlement groups, cash flow types, or authorization request
types) to multiple profiles or remove components from multiple profiles.
3.3.8.1 Prerequisites
The following are prerequisites for configuring multiple CMM profiles:
Category Tasks

3 Managing security
3.4 Managing TRM lists and list groups
122 © Wall Street Systems IPH AB - Confidential
3.3.8.2 Managing multiple CMM profiles
To manage multiple CMM profiles:
1. Select Admin - Security - Profiles - Multiple Security Assignments.
2. In the Multiple Security Assignments - Criteria Selection page, enter search criteria.
3. Click Continue.
4. In the Multiple Assignments page, select the appropriate components and security profiles.
5. Do one of the following:
–To add the selected components to the selected security profiles, click Add.
–To remove the selected components from the select security profiles, click Remove.
3.4 Managing TRM lists and list groups
In the TRM and ACM components of WebSuite, users have access to the following static data
entities:
•Currencies
•Clients
•Instruments
•Portfolios.
You can create lists and list groups to limit the amount of information displayed in the TRM and ACM
components of WebSuite to correspond to user requirements. In effect, you restrict the currencies
and instruments in which traders can deal. Limiting traders’ options in this way:
•Acts as an additional security measure
•Reduces the risk of error
•Enables the traders to input deals more quickly.
3.4.1 Managing currency lists
The TRM and ACM components of WebSuite contain all currencies from Wallstreet Suite (assuming
you have synchronized static data). However, not all web interface users may require access to all
currencies. For example, foreign exchange traders in your organization may only trade in US dollars,
Static data Ensure the following static data are available:
• Entities
•Counterparties
• Bank accounts
• Settlement groups
• Cash flow types.
For more information, see the CMM User Guide.
Security Ensure you have access to the following function:
• FG-0314 Multiple Security Assignments.
For more information, see Chapter 3 Managing security on page 93.

3 Managing security
3.4 Managing TRM lists and list groups
WebSuite System Administration Guide 123
Japanese yen, and euros and, therefore, do not require access to other currencies such as Canadian
dollars.
You can create currency lists, which are sets of selected currencies. You can then assign currency
lists to specific user groups through currency list groups.
3.4.1.1 Prerequisites
The following are prerequisites for managing currency lists:
3.4.1.2 Creating currency lists
To create a currency list:
1. Select Trading - Configuration - Entities - Currencies - Lists.
2. In the Currency Lists page, enter an appropriate name for the currency list in the List Name field.
3. Do one of the following:
–To include select currencies in the currency list, move the currencies from Available to list to In
list and then sort the currencies in In list.
For detailed instructions on moving currencies between Available to list and In list, see the CMM
User Guide.
You can filter the currencies that display in Available to list by doing the following:
a. Enter filter criteria.
b. Click Refresh.
–To include all currencies in the currency list, select the Always build this list with all available items
checkbox.
4. Click Save List.
3.4.1.3 Editing currency lists
To edit a currency list:
1. Select Trading - Configuration - Entities - Currencies - Lists.
2. In the Currency Lists page, click View in the appropriate currency list’s row.
3. Edit the currency list’s name in the List Name field if desired.
4. Do one of the following:
–To include select currencies in the currency list, clear the Always build this list with all available items
checkbox if it is selected, move the currencies from Available to list to In list, and then sort the
currencies in In list.
For detailed instructions on moving currencies between Available to list and In list, see the CMM
User Guide.
Category Tasks
Static data Ensure the following static data are available:
• Currencies.
For more information, see the CMM User Guide.
Security Ensure you have access to the following function:
• FG-1063 [Currency] Lists.
For more information, see Chapter 3 Managing security on page 93.

3 Managing security
3.4 Managing TRM lists and list groups
124 © Wall Street Systems IPH AB - Confidential
You can filter the currencies that display in Available to list by doing the following:
a. Enter filter criteria.
b. Click Refresh.
–To include all currencies in the currency list, select the Always build this list with all available items
checkbox.
5. Click Save List.
3.4.1.4 Deleting currency lists
To delete a currency list:
1. Select Trading - Configuration - Entities - Currencies - Lists.
2. In the Currency Lists page, click Delete in the appropriate currency list’s row.
You cannot delete a currency list if it is referenced in a currency list group.
3.4.2 Managing currency list groups
After you have created a currency list as documented in 3.4.1 Managing currency lists on page 122,
you can map the currency list to one or more user groups through currency list groups.
3.4.2.1 Prerequisites
The following are prerequisites for managing currency list groups:
3.4.2.2 Creating currency list groups
To create a currency list group:
1. Select Trading - Configuration - Entities - Currencies - List Groups.
2. In the Currency Lists Groups page, click Create New.
3. Enter an appropriate name for the currency list group in the List Group Name field.
4. Click Create New.
5. Add a user group/currency list mapping to the currency list group:
6. Click Add.
7. Repeat steps 5 to 6 for each user group/currency list mapping you want to add to the currency
list group.
Category Tasks
Security Ensure you have access to the following function:
• FG-1064 [Currency] List Groups.
For more information, see Chapter 3 Managing security on page 93.
In addition:
• Create currency lists as documented in 3.4.1 Managing currency lists on page 122
• Create user groups as documented in 3.5.3 Managing TRM user groups on page 136.

3 Managing security
3.4 Managing TRM lists and list groups
WebSuite System Administration Guide 125
3.4.2.3 Editing currency list groups
To edit a currency list group:
1. Select Trading - Configuration - Entities - Currencies - List Groups.
2. In the Currency List Groups page, select the appropriate currency list group in the List Group name
list.
3. Do the following:
–To add a user group/currency list mapping to the currency list group:
a. Enter data:
b. Click Add.
–To remove a user group/currency list mapping from the currency list group, click Delete in the
mapping’s row.
3.4.2.4 Deleting currency list groups
To delete a currency list group:
1. Select Trading - Configuration - Entities - Currencies - List Groups.
2. In the Currency List Groups page, select the appropriate currency list group in the List Group name
list.
3. Click Delete.
3.4.3 Managing client lists
The TRM and ACM components of WebSuite contain all clients from Wallstreet Suite (assuming you
have synchronized static data). However, not all web interface users may require access to all
clients. For example, foreign exchange traders in your organization may only trade for Acme US,
Acme Japan, and Acme Germany and, therefore, do not require access to other clients such as Acme
Canada.
You can create client lists, which are sets of selected clients. You can then assign client lists to
specific user groups through client list groups.
3.4.3.1 Prerequisites
The following are prerequisites for managing client lists:
Category Tasks
Static data Ensure the following static data are available:
•Clients.
For more information, see the CMM User Guide.
Security Ensure you have access to the following function:
• FG-1065 [Client] Lists.
For more information, see Chapter 3 Managing security on page 93.
3 Managing security
3.4 Managing TRM lists and list groups
126 © Wall Street Systems IPH AB - Confidential
3.4.3.2 Creating client lists
To create a client list:
1. Select Trading - Configuration - Entities - Clients - Lists.
2. In the Client Lists page, enter an appropriate name for the currency list in the List Name field.
3. Do one of the following:
–To include select clients in the client list, move the clients from Available to list to In list and then
sort the clients in In list.
For detailed instructions on moving clients between Available to list and In list, see the CMM User
Guide.
You can filter the clients that display in Available to list by doing the following:
a. Enter filter criteria.
b. Click Refresh.
–To include all clients in the client list, select the Always build this list with all available items checkbox.
4. Click Save List.
3.4.3.3 Editing client lists
To edit a client list:
1. Select Trading - Configuration - Entities - Clients - Lists.
2. In the Client Lists page, click View in the appropriate client list’s row.
3. Edit the client list’s name in the List Name field if desired.
4. Do one of the following:
–To include select clients in the client list, clear the Always build this list with all available items
checkbox if it is selected, move the clients from Available to list to In list, and then sort the clients
in In list.
For detailed instructions on moving clients between Available to list and In list, see the CMM User
Guide.
You can filter the clients that display in Available to list by doing the following:
a. Enter filter criteria.
b. Click Refresh.
–To include all clients in the client list, select the Always build this list with all available items checkbox.
5. Click Save List.
3.4.3.4 Deleting client lists
To delete a client list:
1. Select Trading - Configuration - Entities - Clients - Lists.
2. In the Client Lists page, click Delete in the appropriate client list’s row.
You cannot delete a client list if it is referenced in a client list group.
3.4.4 Managing client list groups
After you have created a client list as documented in 3.4.3 Managing client lists on page 125, you
can map the client list to one or more user groups through client list groups.

3 Managing security
3.4 Managing TRM lists and list groups
WebSuite System Administration Guide 127
3.4.4.1 Prerequisites
The following are prerequisites for managing client list groups:
Creating client list groups
To create a client list group:
1. Select Trading - Configuration - Entities - Clients - List Groups.
2. In the Client Lists Groups page, click Create New.
3. Enter an appropriate name for the client list group in the List Group Name field.
4. Click Create New.
5. Add a user group/client list mapping to the client list group:
6. Click Add.
7. Repeat steps 5 to 6 for each user group/client list mapping you want to add to the client list
group.
Editing client list groups
To edit a client list group:
1. Select Trading - Configuration - Entities - Clients - List Groups.
2. In the Client List Groups page, select the appropriate client list group in the List Group name list.
3. Do the following:
–To add a user group/client list mapping to the client list group:
a. Enter data:
b. Click Add.
–To remove a user group/client list mapping from the client list group, click Delete in the
mapping’s row.
Deleting client list groups
To delete a client list group:
1. Select Trading - Configuration - Entities - Clients - List Groups.
2. In the Client List Groups page, select the appropriate client list group in the List Group name list.
3. Click Delete.
3.4.5 Managing instrument lists
The TRM and ACM components of WebSuite contain all instruments from Wallstreet Suite (assuming
you have synchronized static data). However, not all web interface users may require access to all
instruments. For example, some users may only deal in one type of financial market and, therefore,
only require instruments relevant to that financial market.
Category Tasks
Security Ensure you have access to the following function:
• FG-1066 [Client] List Groups.
For more information, see Chapter 3 Managing security on page 93.
In addition:
• Create client lists as documented in 3.4.3 Managing client lists on page 125
• Create user groups as documented in 3.5.3 Managing TRM user groups on page 136.

3 Managing security
3.4 Managing TRM lists and list groups
128 © Wall Street Systems IPH AB - Confidential
You can create instrument lists, which are sets of selected instruments. You can then assign
instrument lists to specific user groups through instrument list groups.
3.4.5.1 Prerequisites
The following are prerequisites for managing instrument lists:
3.4.5.2 Creating instruments lists
To create an instrument list:
1. Select Trading - Configuration - Entities - Instruments - Lists.
2. In the Instrument Lists page, enter an appropriate name for the instrument list in the List Name
field.
3. Do one of the following:
–To include select instruments in the instrument list, move the instruments from Available to list
to In list and then sort the instruments in In list.
For detailed instructions on moving instruments between Available to list and In list, see the CMM
User Guide.
You can filter the instruments that display in Available to list by doing the following:
a. Enter filter criteria.
b. Click Refresh.
–To include all instruments in the instrument list, select the Always build this list with all available items
checkbox.
4. Click Save List.
3.4.5.3 Editing instrument lists
To edit an instrument list:
1. Select Trading - Configuration - Entities - Instruments - Lists.
2. In the Instrument Lists page, click View in the appropriate instrument list’s row.
3. Edit the instrument list’s name in the List Name field if desired.
4. Do one of the following:
–To include select instruments in the instrument list, clear the Always build this list with all available
items checkbox if it is selected, move the instruments from Available to list to In list, and then sort
the instruments in In list.
For detailed instructions on moving instruments between Available to list and In list, see the CMM
User Guide.
Category Tasks
Static data Ensure the following static data are available:
• Instruments.
For more information, see the CMM User Guide.
Security Ensure you have access to the following function:
• FG-1067 [Instrument] Lists.
For more information, see Chapter 3 Managing security on page 93.

3 Managing security
3.4 Managing TRM lists and list groups
WebSuite System Administration Guide 129
You can filter the instruments that display in Available to list by doing the following:
a. Enter filter criteria.
b. Click Refresh.
–To include all instruments in the instrument list, select the Always build this list with all available items
checkbox.
5. Click Save List.
3.4.5.4 Deleting instrument lists
To delete an instrument list:
1. Select Trading - Configuration - Entities - Instruments - Lists.
2. In the Instrument Lists page, click Delete in the appropriate instrument list’s row.
You cannot delete an instrument list if it is referenced in an instrument list group.
3.4.6 Managing instrument list groups
After you have created an instrument list as documented in 3.4.5 Managing instrument lists on page
127, you can map the instrument list to one or more user groups through instrument list groups.
3.4.6.1 Prerequisites
The following are prerequisites for managing instrument list groups:
3.4.6.2 Creating instrument list groups
To create an instrument list group:
1. Select Trading - Configuration - Entities - Instruments - List Groups.
2. In the Instrument Lists Groups page, click Create New.
3. Enter an appropriate name for the instrument list group in the List Group Name field.
4. Click Create New.
5. Add a user group/instrument list mapping to the instrument list group:
6. Click Add.
7. Repeat steps 5 to 6 for each user group/instrument list mapping you want to add to the
instrument list group.
Category Tasks
Security Ensure you have access to the following function:
• FG-1068 [Instrument] List Groups.
For more information, see Chapter 3 Managing security on page 93.
In addition:
• Create instrument lists as documented in 3.4.5 Managing instrument lists on page 127
• Create user groups as documented in 3.5.3 Managing TRM user groups on page 136.

3 Managing security
3.4 Managing TRM lists and list groups
130 © Wall Street Systems IPH AB - Confidential
3.4.6.3 Editing instrument list groups
To edit an instrument list group:
1. Select Trading - Configuration - Entities - Instruments - List Groups.
2. In the Instrument List Groups page, select the appropriate instrument list group in the List Group
name list.
3. Do the following:
–To add a user group/instrument list mapping to the instrument list group:
a. Enter data:
b. Click Add.
–To remove a user group/instrument list mapping from the instrument list group, click Delete in
the mapping’s row.
3.4.6.4 Deleting instrument list groups
To delete an instrument list group:
1. Select Trading - Configuration - Entities - Instruments - List Groups.
2. In the Instrument List Groups page, select the appropriate instrument list group in the List Group
name list.
3. Click Delete.
3.4.7 Managing portfolio lists
The TRM and ACM components of WebSuite contain all portfolios from Wallstreet Suite (assuming
you have synchronized static data). You can group portfolios in lists as documented in this section.
3.4.7.1 Prerequisites
The following are prerequisites for managing portfolio lists:
3.4.7.2 Creating portfolio lists
To create a portfolio list:
1. Select Trading - Configuration - Entities - Porfolios - Lists.
2. In the Portfolio Lists page, enter an appropriate name for the portfolio list in the List Name field.
3. Do one of the following:
–To include select portfolios in the portfolio list, move the portfolios from Available to list to In list
and then sort the portfolios in In list.
For detailed instructions on moving portfolios between Available to list and In list, see the CMM
User Guide.
Category Tasks
Static data Ensure the following static data are available:
• Portfolios.
Security Ensure you have access to the following function:
• FG-1069 [Portfolio] Lists.
For more information, see Chapter 3 Managing security on page 93.

3 Managing security
3.4 Managing TRM lists and list groups
WebSuite System Administration Guide 131
You can filter the portfolios that display in Available to list by doing the following:
a. Enter filter criteria.
b. Click Refresh.
–To include all portfolios in the portfolio list, select the Always build this list with all available items
checkbox.
4. Click Save List.
3.4.7.3 Editing portfolio lists
To edit a portfolio list:
1. Select Trading - Configuration - Entities - Porfolios - Lists.
2. In the Portfolio Lists page, click View in the appropriate portfolio list’s row.
3. Edit the portfolio list’s name in the List Name field if desired.
4. Do one of the following:
–To include select portfolios in the portfolio list, clear the Always build this list with all available items
checkbox if it is selected, move the instruments from Available to list to In list, and then sort the
portfolios in In list.
For detailed instructions on moving portfolios between Available to list and In list, see the CMM
User Guide.
You can filter the portfolios that display in Available to list by doing the following:
a. Enter filter criteria.
b. Click Refresh.
–To include all portfolios in the portfolio list, select the Always build this list with all available items
checkbox.
5. Click Save List.
3.4.7.4 Deleting portfolio lists
To delete a portfolio list:
1. Select Trading - Configuration - Entities - Porfolios - Lists.
2. In the Portfolio Lists page, click Delete in the appropriate portfolio list’s row.
3.4.8 Managing portfolio mappings and mapping rules
In WebSuite, you can create the following types of portfolio mapping:
•Dealing mapping rules
•Report mappings
•Treasury map pings.
For example, in dealing mapping rules, you map a portfolio list to the appropriate users, currencies,
clients, and instruments. When you do this, only the portfolios that match the mapping criteria you
define are available to the trader on the deal page.
3.4.8.1 Prerequisites
The following are prerequisites for managing portfolio mappings and mapping rules:
Category Tasks

3 Managing security
3.4 Managing TRM lists and list groups
132 © Wall Street Systems IPH AB - Confidential
3.4.8.2 Managing portfolio mapping rules
To manage portfolio mapping rules:
1. Select Trading - Configuration - Entities - Porfolios - Deal Mappings.
2. Do the following:
–To create a portfolio mapping rule:
a. Click Add Row.
b. Create the portfolio mapping rule in the resulting row of controls.
c. Click Add.
–To delete a portfolio mapping rule, click Delete in its row.
3.4.8.3 Managing portfolio report mappings
To manage portfolio report mappings:
1. Select Trading - Configuration - Entities - Porfolios - Report Mappings.
2. Do the following:
–To create a portfolio report mapping:
a. Click Add Row.
b. Create the portfolio report mapping in the resulting row of controls.
c. Click Add.
–To delete a portfolio report mapping, click Delete in its row.
3.4.8.4 Managing portfolio treasury mappings
To manage portfolio treasury mappings:
1. Select Trading - Configuration - Entities - Porfolios - Treasury Mappings.
2. Do the following:
–To create a portfolio treasury mapping:
a. Click Add Row.
b. Create the portfolio treasury mapping in the resulting row of controls.
c. Click Add.
–To delete a portfolio treasury mapping, click Delete in its row.
Security Ensure you have access to the following functions:
• FG-1070 Deal Mappings
• FG-1071 Report Mappings
• FG-1072 Treasury Mappings.
For more information, see Chapter 3 Managing security on page 93.
In addition:
• Create currency lists as documented in 3.4.1 Managing currency lists on page 122
• Create client lists as documented in 3.4.3 Managing client lists on page 125
• Create instrument lists as documented in 3.4.3 Managing client lists on page 125
• Create portfolio lists as documented in 3.4.7 Managing portfolio lists on page 130
• Create user groups as documented in 3.5.3 Managing TRM user groups on page 136.

3 Managing security
3.5 Managing users and user groups
WebSuite System Administration Guide 133
3.5 Managing users and user groups
and user groups
You must create a user account for each person in your organization who requires access to
WebSuite. A person’s user account defines his or her name and other relevant information,
password, and access to the suite.
You can assign users to groups for organization and security. However, as explained in this section,
user groups in CMM are not the same as user groups in TRM. (CMM user groups are intended for use
with transaction processing rules, while TRM user groups are intended for use with security and are
analogous to CMM administrative centers.)
Finally, you can define specific processes in WebSuite that require a user to reauthenticate his or her
identity before proceeding.
3.5.1 Managing users
Each person in your organization who requires access to WebSuite must have a user account. A
person’s user account defines his or her name and other relevant information, password, and access
to the suite.
WebSuite is installed with one default user account: webadmin. The default password for webadmin
is webadmin12; however, you must change this password after initializing security. For more
information, see the CMM Enhancements Guide.
3.5.1.1 Prerequisites
The following are prerequisites for managing users:
3.5.1.2 Managing users in TRM
You can manage users in TRM using the User Administration Editor. For information on the User
Administration Editor, see the TRM System Administration Guide.
After creating a user in the User Administration Editor, you must assign the appropriate security by
function and other profiles to the user as described in Assigning CMM profiles to users. Otherwise,
the user cannot access the functions or data in WebSuite.
Category Tasks
Security If you are managing users in TRM, ensure you have access to the User Administration
Editor.
For more information, see the TRM System Administration Guide.
If you are managing users in CMM, ensure you have access to the following functions:
• FG-0186 User Information
• FG-0315 Multiple Assignments to Users
• FG-0316 Copy User Assignments
• FG-1062 Users.
For more information, see Chapter 3 Managing security on page 93.
In addition:
• Create CMM administrative centers as documented in 3.2 Managing CMM
administrative centers on page 97
• Create CMM profiles as documented in 3.3 Managing CMM profiles on page 100
• Create TRM lists and list groups as documented in 3.4 Managing TRM lists and list
groups on page 122
• Create TRM user groups as documented in 3.5.3 Managing TRM user groups on page
136.
3 Managing security
3.5 Managing users and user groups
134 © Wall Street Systems IPH AB - Confidential
3.5.1.3 Editing users in CMM
To edit a user in CMM:
1. Select Admin - Security - Users - User Information.
2. In the User - Criteria Selection page, enter search criteria.
3. Click Search.
4. In the User Information page, click the user’s Modify User Information link.
5. In the User Information Maintenance page, edit the user.
6. Click Save.
3.5.1.4 Assigning CMM profiles to users
To assign CMM profiles to users:
1. Select Admin - Security - Users - User Information.
2. In the User - Criteria Selection page, enter search criteria.
3. Click Search.
4. In the User Information page, click the user’s Modify Security Setup link.
5. In the Modify Security Setup page, assign security by function profiles to the user.
6. Click Security by Entity.
7. Assign security by entity profiles to the user.
8. Click Security by Authorization Request Type.
9. Assign security by authorization request type profiles to the user.
10. Click Security by Settlement Group.
11. Assign security by settlement group profiles to the user.
12. Click Security by Counterparty.
13. Assign security by counterparty profiles to the user.
14. Click Security by Entity by Function.
15. Assign security by entity by function profiles to the user.
16. Click Security by Counterparty by Function.
17. Assign security by counterparty by function profiles to the user.
18. Click Security by Attribute.
19. Assign security by attribute profiles to the user.
20. Click Security by Bank Account.
21. Assign security by bank account profiles to the user.
22. Click Security by Cash Flow Type.
23. Assign security by cash flow type profiles to the user.
Alternatively, you can assign CMM profiles to multiple users or copy CMM profile assignments from
one user to one or more other users.

3 Managing security
3.5 Managing users and user groups
WebSuite System Administration Guide 135
To assign CMM profiles to multiple users:
1. Select Admin - Security - Users - Multiple Assignments to Users.
2. In the Multiple Assignments to Users - Criteria Selection page, select the appropriate CMM
profile type in the Add To/Remove From Users list.
3. Click Continue.
4. In the Multiple Assignments page, select the appropriate CMM profiles and users.
5. Do one of the following:
–To add the selected CMM profiles to the selected users, click Add.
–To remove the selected CMM profiles from the selected users, click Remove.
To copy CMM profile assignments from one user to one more other users:
1. Select Admin - Security - Users - Copy User Assignments.
2. In the Copy User Assignments page, select the source user in the User To Copy From list.
3. Select the destination users.
4. Select the checkboxes of the CMM profiles you want to copy from the source user to the
destination users.
All checkboxes are selected by default.
5. Click Copy.
3.5.1.5 Assigning TRM lists to users
You can group currencies, clients (or "parties"), instruments, and portfolios in lists and then assign
these lists to user groups through list groups. This functionality is similar in concept to CMM profiles,
as it allows you to assign a subset of data to a subset of users for security purposes.
For information on managing TRM lists and list groups in WebSuite, see 3.4 Managing TRM lists and
list groups on page 122.
3.5.2 Managing CMM user groups
The Security by User Group function allows you to organize users into groups. You or your
organization’s users can then reference the user groups in transaction processing rules. (For
information on transaction processing rules, see 5.2.4 Configuring transaction processing rules on
page 194.)
CMM is installed with a default user group, ADMIN_PROFILE_USERGROUP, which contains all users.
Note: CMM user groups are not related to TRM user groups. For information on TRM user groups,
see 3.5.3 Managing TRM user groups on page 136.
3.5.2.1 Prerequisites
The following are prerequisites for managing CMM user groups:

3 Managing security
3.5 Managing users and user groups
136 © Wall Street Systems IPH AB - Confidential
3.5.2.2 Creating user groups
To create a user group:
1. Select Admin - Security - Profiles - Security by User Group.
2. In the Security by User Group Information page, click New Entry.
3. In the Security Profile Creation page, create the user group.
4. Click Save.
5. In the Security by User Group - User Group Assignment page, assign users to the group.
3.5.2.3 Editing user group names
To edit a user group’s name:
1. Select Admin - Security - Profiles - Security by User Group.
2. In the Security by User Group Information page, click the user group’s Modify Profile Information link.
3. In the Security Profile Maintenance page, edit the user group’s name.
4. Click Save.
3.5.2.4 Editing user group assignments
To edit a user group’s assignments:
1. Select Admin - Security - Profiles - Security by User Group.
2. In the Security by User Group Information page, click the user group’s Modify Profile Assignment link.
3. In the Security by User Group - User Group Assignment page, edit the user group’s
assignments.
3.5.2.5 Deleting user groups
To delete a user group:
1. Select Admin - Security - Profiles - Security by User Group.
2. In the Security by User Group Information page, click the user group’s Modify Profile Information link.
3. In the Security Profile Maintenance page, click Delete.
4. In the resulting dialog, click OK.
3.5.3 Managing TRM user groups
In TRM, every user must be assigned to a user group. Therefore, you must create user groups
before creating users.
User groups are used for organization and security. For example, by assigning all foreign exchange
traders to a user group, you can quickly and easily restrict these users access to functionality and
data relevant to foreign exchange trading and not, for example, bond dealing.
Note: TRM user groups are not related to CMM user groups. For information on CMM user groups,
see 3.5.2 Managing CMM user groups on page 135.
3.5.3.1 Prerequisites
The following are prerequisites for managing TRM user groups:

3 Managing security
3.5 Managing users and user groups
WebSuite System Administration Guide 137
3.5.3.2 Creating user groups
To create a user group:
1. Select Admin - Trading - User Groups - Groups.
2. In the User Groups: Edit Group page, click Create new.
3. In the User Groups: Create Group page, enter an appropriate name for the user group in the
Group name field.
4. Click Create group.
5. In the User Groups: Edit Group page, assign a parent and start page to the user group.
6. Click Save.
3.5.3.3 Editing user groups
To edit a user group:
1. Select Admin - Trading - User Groups - Groups.
2. In the User Groups: Edit Group page, select the user group in the list.
3. Edit the user group.
4. Click Save.
3.5.3.4 Deleting user groups
To delete a user group:
1. Select Admin - Trading - User Groups - Groups.
2. In the User Groups: Edit Group page, select the user group in the list.
3. Click Delete Group.
3.5.3.5 Assigning users to user groups
After you have created a user group, you can create users and assign them to the user group. For
information on creating users, see 3.5.1 Managing users on page 133.
3.5.4 Configuring user reauthentication
To enhance WebSuite’s security, you can require users to reauthenticate their identities (by entering
their passwords) before completing business-critical processes, such as releasing payments. If a
user does not enter his or her password correctly within the number of times defined by the
Maximum Number of Unsuccessful Login Attempts configuration parameter, his or her account is
locked and the process is not completed.
You can configure the following processes, in particular, to require user reauthentication:
Process Specific action
Authorizing transactions Clicking Authorize Selected Transactions in the Authorize
Transactions function
Releasing payments Clicking Release Selected Payments in the Release Payments
function
Releasing receipts Clicking Release in the Release Receipts function

3 Managing security
3.5 Managing users and user groups
138 © Wall Street Systems IPH AB - Confidential
If you do not want to require user reauthentication for these processes or you want to require user
re authentication for additional processes, you can edit the reauthentication.xml file.
3.5.4.1 Prerequisites
The following are prerequisites for configuring user reauthentication:
3.5.4.2 Configuring user reauthentication
To configure user reauthentication:
1. Set the Display Page Security Information configuration parameter to True (see 2.4 Setting
security configuration parameters on page 52).
2. For each process for which you want to require reauthentication:
a. Navigate to the appropriate page.
b. Record the page’s ID.
c. Record the appropriate button or link’s label verbatim.
3. Open the following configuration file:
[Standard configuration file path]
appserver
authentication
reauth
reauthentication.xml
For instructions on opening configuration files, see 1.2 Opening configuration files on page 25.
4. Do the following:
–To require user reauthentication for a process, enter a new item element in the file for the
process. The following is an example:
<?xml version="1.0"?>
<reauthentication>
<item page_id="ALT-5917" type="button" label="Authorize Selected
Transactions"/>
<item page_id="ALT-5443" type="button" label="Release Selected Payments"/>
<item page_id="ALT-5678" type="button" label="Release"/>
<item page_id="ALT-5439" type="button" label="Reject Transaction(s)"/>
</reauthentication>
The page_id attribute must contain a valid page ID.
Category Tasks
Configuration
parameters
Ensure the following configuration parameters have been set:
• Display Page Security Information
• Maximum Number of Unsuccessful Login Attempts.
For more information, see 2.4 Setting security configuration parameters on page 52.
Security Ensure you have access to the following functions:
• FG-0400 Review CMM Configuration.
For more information, see Chapter 3 Managing security on page 93.

3 Managing security
3.6 Using the relational data model
WebSuite System Administration Guide 139
The type attribute must contain one of two values:
–button for a button
–href for a link.
Finally, the label attribute must contain the label of the button or link verbatim.
–To not require user reauthentication for a process, remove or comment out its item element.
5. Save and close the file.
3.5.5 Running the Security Access report
After you have created administrative centers and profiles and assigned them to users, you can
analyze user access to CMM through the Security Access report.
3.5.5.1 Prerequisites
The following are prerequisites for running the Security Access report:
3.5.5.2 Running the Security Access report
To run the Security Access report:
1. Select Admin - Security - Management - Review Security Access.
2. In the Security Access Report - Criteria Selection page, enter search criteria.
3. Click Continue.
4. In the Security Access Report cont. - Criteria Selection page, continue to enter search criteria.
5. Do one of the following:
–To view the report in your browser, click Report.
–To view the report in a spreadsheet application (for example, Microsoft Excel), click
View In Spreadsheet.
3.6 Using the relational data model
As an alternative to managing CMM security through the user interface, you can manage it through
the relational data model (RDM).
Warning: Wallstreet strongly recommends you use the user interface rather than the RDM to
manage CMM security. If you choose to use the RDM to manage CMM security, be
aware that it is not fully supported by Wallstreet.
The following two tables and two views make up the security RDM:
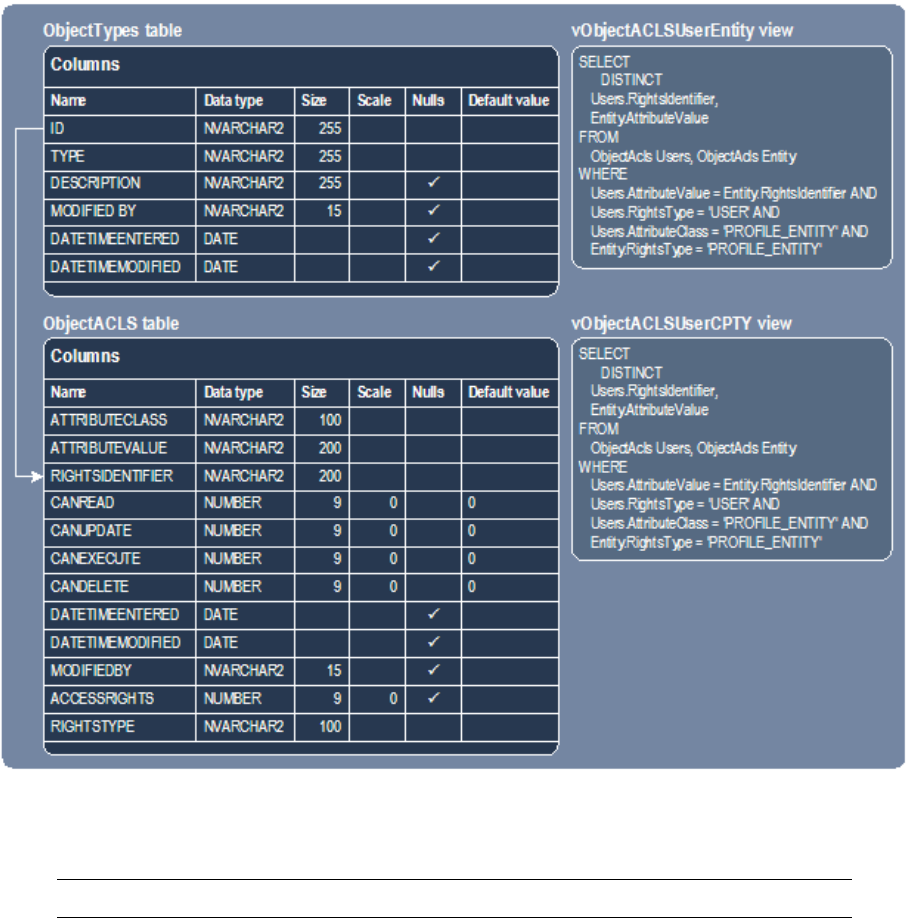
3 Managing security
3.6 Using the relational data model
140 © Wall Street Systems IPH AB - Confidential
All CMM securable objects are stored in the ObjectTypes table. Details of each object defined in the
ObjectTypes table are stored in the ObjectACLS table through a foreign key relationship between
ObjectTypes.ID and ObjectACLS.RIGHTSIDENTIFIER.
Note: There are exceptions when you apply security to report mappings.
3.6.1 Table design details
This section documents the design details of the ObjectTypes and ObjectACLS tables.
3.6.1.1 ObjectTypes table design details
The following are the primary key constraints for the ObjectTypes table:
•ID
•TYPE.
The following are the column details for the ObjectTypes table:
3 Managing security
3.6 Using the relational data model
WebSuite System Administration Guide 141
3.6.1.2 ObjectACLS table design details
The following are the primary key constraints for the ObjectACLS table:
•ATTRIBUTECLASS
•ATTRIBUTEVALUE
•RIGHTSIDENTIFIER
•RIGHTSTYPE.
The following are the column details for the ObjectACLS table:
3.6.2 Completing security tasks using the RDM
You can complete the following security tasks using the RDM:
•Create administrative centers
•Create users
•Deactivate users
•Assign security profiles to users
•Assign users to administrative centers
•Create security profiles.
3.6.2.1 Creating administrative centers
To create an administrative center:
INSERT INTO ObjectTypes (
ID, TYPE, DESCRIPTION, ModifiedBy, DateTimeEntered,DateTimeModified)
VALUES (
ID_OF_THE_ADMIN_CENTER,
’ADMIN_CENTER’,
DESCRIPTION_OF_THE_ ADMIN_CENTER,
’system’,
DATE,
DATE)
3.6.2.2 Creating users
To create a user:
INSERT INTO Employees (
EmployeeID, LastName, FirstName, JobID, UserId, ModifiedBy, CountryCode,
EmployeeInitials, DateTimeEntered, DateTimeModified)
VALUES (
’jsmith’,
’Smith’,
’Joe’,
’IHB BACK’,
’jsmith’,
’system’,
’DE’,
’JWS’,
NOW,
NOW)
INSERT INTO UserProfiles (
WebUserID, WebPassword, DBLogin, DBPassword, LogWarning, LogError, LogMessage,
WebPwdExpiryDate, AccountLocked, NumberAttempt, DateTimeAccessed,
DateTimeEntered, DateTimeModified, ModifiedBy)
3 Managing security
3.6 Using the relational data model
142 © Wall Street Systems IPH AB - Confidential
VALUES (
’psmith’,
’password’,
’’,
’’,
’’,
’’,
’’,
FUTURE_DATE,
1,
0,
NOW,
NOW,
NOW,
’system’)
DELETE FROM ObjectACLs
WHERE RightsIdentifier = ’GLOBAL’ AND
RightsType = ’ADMIN_CENTER’ AND
AttributeValue = ’psmith’ AND
AttributeClass = ’USER’
DELETE FROM ObjectACLs
WHERE RightsIdentifier = ’GLOBAL’ AND
RightsType = ’ADMIN_CENTER’ AND AttributeValue = ’psmith’ AND
AttributeClass = ’USER’
3.6.2.3 Deactivating users
To deactivate (or "lock") a user:
UPDATE UserProfiles SET AccountLocked = 2, DateTimeAccessed = NOW,
DateTimeModified = NOW, ModifiedBy =’system’ WHERE UserProfiles.WebUserID =
’jsmith’
3.6.2.4 Assigning security profiles to users
To assign a security by function profile to a user:
INSERT INTO ObjectACLs (
RightsIdentifier, RightsType, AttributeValue, AttributeClass, AccessRights,
CanRead, CanUpdate, CanExecute, CanDelete, DateTimeEntered, DateTimeModified,
ModifiedBy)
VALUES (
’jsmith’, // User ID
’USER’,
’SECURITY_PROFILE_FG’, // Profile ID
’PROFILE_FG’,
5, 1, 0, 0, 0,
NOW,
NOW,
’system’)
To assign a security by attribute profile to a user:
INSERT INTO ObjectACLs (
RightsIdentifier, RightsType, AttributeValue, AttributeClass, AccessRights,
CanRead, CanUpdate, CanExecute, CanDelete, DateTimeEntered, DateTimeModified,
ModifiedBy)
VALUES (
’jsmith’, // User ID
’USER’,
’SECURITY_PROFILE_ATTRIBUTE’, // Profile ID
’PROFILE_ATTRIBUTE’,
5, 1, 0, 0, 0,
3 Managing security
3.6 Using the relational data model
WebSuite System Administration Guide 143
NOW,
NOW,
’system’)
To assign a security by entity profile to a user:
INSERT INTO ObjectACLs (
RightsIdentifier, RightsType, AttributeValue, AttributeClass, AccessRights,
CanRead, CanUpdate, CanExecute, CanDelete, DateTimeEntered, DateTimeModified,
ModifiedBy)
VALUES (
’jsmith’, // User ID
’USER’,
’ADMIN_PROFILE_ENTITY’, // Profile ID
’PROFILE_ENTITY’,
5, 1, 0, 0, 0,
NOW,
NOW,
’system’)
To assign a security by entity by function profile to a user:
INSERT INTO ObjectACLs (
RightsIdentifier, RightsType, AttributeValue, AttributeClass, AccessRights,
CanRead, CanUpdate, CanExecute, CanDelete, DateTimeEntered, DateTimeModified,
ModifiedBy)
VALUES (
’jsmith’, // User ID
’USER’,
’BANK_STATEMENT’, // Profile ID
’ENTITY_BY_FUNCTION’,
5, 1, 0, 0, 0,
NOW,
NOW,
’system’)
To assign a security by counterparty profile to a user:
INSERT INTO ObjectACLs (
RightsIdentifier, RightsType, AttributeValue, AttributeClass, AccessRights,
CanRead, CanUpdate, CanExecute, CanDelete, DateTimeEntered, DateTimeModified,
ModifiedBy)
VALUES (
’jsmith’, // User ID
’USER’,
’ADMIN_PROFILE_CPTY’, // Profile ID
’PROFILE_CPTY’,
5, 1, 0, 0, 0,
NOW,
NOW,
’system’)
To assign a security by counterparty by function profile to a user:
INSERT INTO ObjectACLs (
RightsIdentifier, RightsType, AttributeValue, AttributeClass, AccessRights,
CanRead, CanUpdate, CanExecute, CanDelete, DateTimeEntered, DateTimeModified,
ModifiedBy)
VALUES (
’jsmith’, // User ID
’USER’,
’BANK_STATEMENT’, // Profile ID
’CPTY_BY_FUNCTION’,
5, 1, 0, 0, 0,
NOW,
3 Managing security
3.6 Using the relational data model
144 © Wall Street Systems IPH AB - Confidential
NOW,
’system’)
To assign a security by bank account profile to a user:
INSERT INTO ObjectACLs (
RightsIdentifier, RightsType, AttributeValue, AttributeClass, AccessRights,
CanRead, CanUpdate, CanExecute, CanDelete, DateTimeEntered, DateTimeModified,
ModifiedBy)
VALUES (
’jsmith’, // User ID
’USER’,
’ADMIN_PROFILE_BANKACCOUNT’, // Profile ID
’PROFILE_BANKACCOUNT’,
5, 1, 0, 0, 0,
NOW,
NOW,
’system’)
To assign a security by cash flow type profile to a user:
INSERT INTO ObjectACLs (
RightsIdentifier, RightsType, AttributeValue, AttributeClass, AccessRights,
CanRead, CanUpdate, CanExecute, CanDelete, DateTimeEntered, DateTimeModified,
ModifiedBy)
VALUES (
’jsmith’, // User ID
’USER’,
’ADMIN_PROFILE_CASHFLOWTYPE’, // Profile ID
’PROFILE_CASHFLOWTYPE’,
5, 1, 0, 0, 0,
NOW,
NOW,
’system’)
To assign a security by authorization request type profile to a user:
INSERT INTO ObjectACLs (
RightsIdentifier, RightsType, AttributeValue, AttributeClass, AccessRights,
CanRead, CanUpdate, CanExecute, CanDelete, DateTimeEntered, DateTimeModified,
ModifiedBy)
VALUES (
’jsmith’, // User ID
’USER’,
’ADMIN_PROFILE_AUTHREQ’, // Profile ID
’PROFILE_AUTHREQUEST’,
5, 1, 0, 0, 0,
NOW,
NOW,
’system’)
3.6.2.5 Assigning users to administrative centers
To assign a user to an administrative center:
INSERT INTO ObjectACLs (
RightsIdentifier, RightsType, AttributeValue, AttributeClass, CanDelete,
CanExecute, CanUpdate, CanRead, AccessRights, DateTimeEntered, DateTimeModified,
ModifiedBy)
VALUES (
ID_OF_THE_ADMIN_CENTER,
’ADMIN_CENTER’,
ID_OF_THE_ADMIN_CENTER,
’USER’,
’0’,
3 Managing security
3.6 Using the relational data model
WebSuite System Administration Guide 145
’0’,
’0’,
’1’,
’5’,
DATE,
DATE,
’system’)
3.6.2.6 Creating security profiles
To create a security profile:
INSERT INTO ObjectTypes (
ID, TYPE, DESCRIPTION, ModifiedBy, DateTimeEntered, DateTimeModified)
VALUES (
ID_OF_THE_PROFILE,
TYPE_OF_THE_PROFILE,
DESCRIPTION_OF_THE_PROFILE,
’system’,
DATE,
DATE)
TYPE_OF_THE_PROFILE in the above code listing can be one of the following:
•PROFILE_ATTRIBUTE
•PROFILE_AUTHREQUEST
•PROFILE_BANKACCOUNT
•PROFILE_CASHFLOWTYPE
•PROFILE_CPTY
•PROFILE_ENTITY
•PROFILE_FG
•PROFILE_SETTLGROUP
•CPTY_BY_FUNCTION
•ENTITY_BY_FUNCTION.
If TYPE_OF_THE_PROFILE is PROFILE_ATTRIBUTE, PROFILE_AUTHREQUEST, PROFILE_BANKACCOUNT,
PROFILE_CASHFLOWTYPE, PROFILE_CPTY, PROFILE_ENTITY, or PROFILE_FG, assign the security
profile to the appropriate administrative center:
•If the administrative center can modify (in other words, is the owner of) the security profiles:
INSERT INTO ObjectACLs (
RightsIdentifier, RightsType, AttributeValue, AttributeClass, CanDelete,
CanExecute,CanUpdate, CanRead, AccessRights, DateTimeEntered,
DateTimeModified, ModifiedBy)
VALUES (
’GLOBAL’,
’ADMIN_CENTER’,
ID_OF_THE_PROFILE,
TYPE_OF_THE_PROFILE,
’0’,
’0’,
’0’,
’1’,
’63’,
DATE,
DATE,
3 Managing security
3.7 Controlling the editing of cash record fields through modes
146 © Wall Street Systems IPH AB - Confidential
’system’)
•If the administrative center can view the security profiles:
INSERT INTO ObjectACLs (
RightsIdentifier, RightsType, AttributeValue, AttributeClass, CanDelete,
CanExecute,CanUpdate, CanRead, AccessRights, DateTimeEntered,
DateTimeModified, ModifiedBy)
VALUES (
’GLOBAL’,
’ADMIN_CENTER’,
ID_OF_THE_PROFILE,
TYPE_OF_THE_PROFILE,
’0’,
’0’,
’0’,
’1’,
’5’,
DATE,
DATE,
’system’)
Finally, assign the security profile to a new user (XXX in the following code listing):
INSERT INTO ObjectACLs (
RightsIdentifier, RightsType, AttributeValue, AttributeClass, CanDelete,
CanExecute, CanUpdate, CanRead, AccessRights, DateTimeEntered, DateTimeModified,
ModifiedBy)
VALUES (
’XXX’,
’USER’,
ID_OF_THE_PROFILE,
TYPE_OF_THE_PROFILE,
’0’,
’0’,
’0’,
’1’,
’5’,
DATE,
DATE,
’system’)
To view the functions you can include in a security profile, see Appendix A Security and link IDs on
page 481.
3.7 Controlling the editing of cash record fields through modes
Modes in WebSuite can be used to control the default fields that can be edited on a cash record
based on its authorization flow state. This is used in conjunction with functional profiles and
attributes profiles. For more information on how these combine to control the editing of a cash
records, see the Editing and deleting transactions section of the WebSuite User Guide.
3.7.1 Setting up modes
Modes are configured using the cash_record.sql script in $FK_HOME/share/<database>/setup. This
script executes the SetupEntityMode stored procedure. For more details, see the Setting up modes
section of the TRM System Admin Guide.
3 Managing security
3.7 Controlling the editing of cash record fields through modes
WebSuite System Administration Guide 147
Here are a few examples of mode setup for WebSuite:
•Authorizable states (NEW and INCOMPLETE): In this example, all fields are editable except for
some main fields that are read-only.
exec SetupEntityMode @mode_id="ALT-5713",@entity_type="CashRecord"
,@minimum_state_id="NEW"
,@maximum_state_id="INCOMPLETE"
,@grant_p=0
,@add_p=0
,@columns = "transactionType entityID Cpty CptyName currencyCode
onAddRemittanceDetailsEvent onAddAdditionalAttributesEvent"
go
The exceptions are specified in the @column
•Releasable states: In this example, all fields are read only except for 3 comment fields that are
editable.
exec SetupEntityMode @mode_id="ALT-5713",@entity_type="CashRecord"
,@state_id="AUTHORIZED"
,@grant_p=1
,@add_p= 1
,@columns = "comments CptyMsg BankInst"
go
•This example shows how to add attribute exceptions to a state:
EXEC SetupEntityColumn
@mode_id ='ALT-5713'
,@entity_type='CashRecord'
,@state_id='NEW'
,@columns = 'AorF BankDepNum BankInst ChequeNumber Cpty CptyABABrnch
CptyAddrOne CptyAddrThree CptyAddrTwo CptyBankAcctNum CptyBankPrimaryAcctNumType
CptyBankSecondaryAcctNum CptyBankSecondaryAcctNumType CptyBnkAddrOne
CptyBnkAddrThree CptyBnkAddrTwo CptyBnkCity CptyBnkCty'
•The set up can also be performed on the NA state (for receipts). In this example, only Comment,
Counterparty and Bank Instruction fields stay editable on receipts:
exec SetupEntityMode @mode_id="ALT-5713",@entity_type="CashRecord"
,@state_id="NA"
,@grant_p=1
,@add_p= 1
,@columns = "comments CptyMsg BankInst"
go
•This example shows how to remove the whole configuration.
delete EntityMode where entity_type = 'CashRecord'
go
delete ModeColumn where entity_type = 'CashRecord'
Go
3.7.2 Checking mode configuration
You can check the configuration by launching the mode configuration report from Admin - Utilities -
Workflow Engines Setup - Mode Configuration Report.
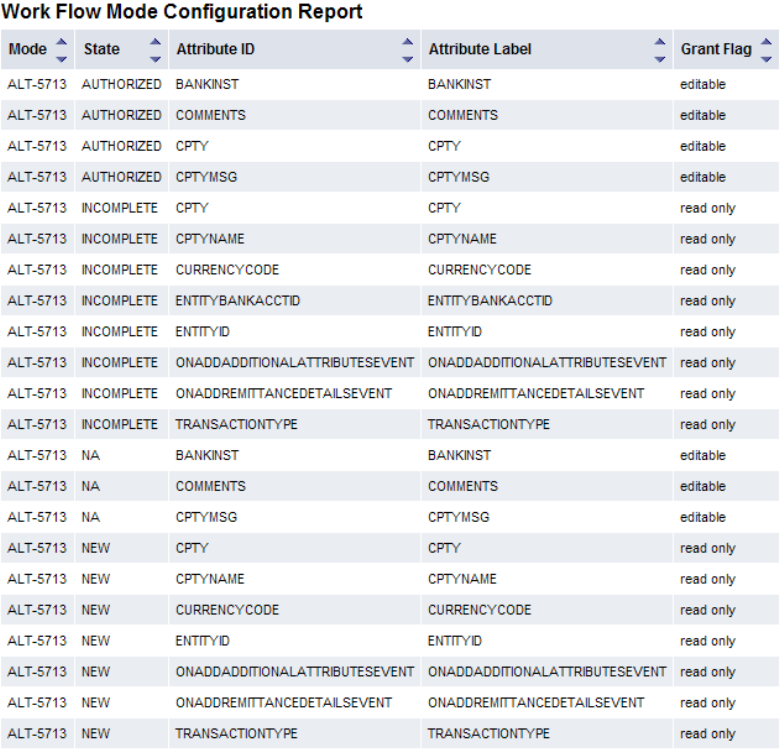
3 Managing security
3.7 Controlling the editing of cash record fields through modes
148 © Wall Street Systems IPH AB - Confidential
The report example below displays the configuration performed by the stored procedures so it shows
the exceptions specified for each state and does not show all fields.
According to the report example above:
•For the NEW state, all fields are editable except the ones in the report that are read only.
•For receipt in NA state, all fields are read only except the ones in the report that are specified as
editable.
You can also use the following SQL script to check the mode configuration and get a list of editable
or read only fields:
SELECT M.mode_id, M.state_id ,
CASE M.grant_p
when 0 then 'editable'
ELSE 'readonly'
End as DefaultConfig
, CASE M.grant_p
when 0 then 'readonly '+E.column_id
ELSE 'editable '+E.column_id
End
as exceptions
FROM EntityMode M
LEFT OUTER JOIN ModeColumn E
on M.entity_type = E.entity_type and E.state_id = M.state_id
WHERE M.entity_type = 'CashRecord'
ORDER BY M.mode_id, M.state_id, E.column_id

3 Managing security
3.7 Controlling the editing of cash record fields through modes
WebSuite System Administration Guide 149
3.7.3 List of configurable fields
The fields that you can configure to be editable or read only appear in the Security by Attribute - Attribute
Assignment page that is accessible via Admin - Security - Profiles - Security by Attribute.You can configure the
following fields:
ID Field label
AorF Actual Or Forecast
BankDepNum Bank Deposit Number
BankInst Bank Instructions
ChequeNumber Cheque Number
Cpty Counterparty
CptyABABrnch Counterparty Bank ABA/Branch Code
CptyAddrOne Counterparty Address 1
CptyAddrTwo Counterparty Address 2
CptyAddrThree Counterparty Address 3
CptyBankAcctNum Counterparty Bank Primary Account Number
CptyBankPrimaryAcctNumType Counterparty Bank Primary Account Number Type
CptyBankSecondaryAcctNum Counterparty Bank Secondary Account Number
CptyBankSecondaryAcctNumType Counterparty Bank Secondary Account Number
CptyBnkAddrOne Counterparty Bank Address 1
CptyBnkAddrTwo Counterparty Bank Address 2
CptyBnkAddrThree Counterparty Bank Address 3
CptyBnkCity Counterparty Bank City
CptyBnkCty Counterparty Bank Country
CptyBnkNme Counterparty Bank Name
CptyBnkSt Counterparty Bank State
CptyBnkZip Counterparty Bank Zip/Postal Code
CptyCity Counterparty City
CptyCntry Counterparty Country
CptyMsg Counterparty Message
CptyName Counterparty Name
CptyOneOffSection* One-off counterparty section.
Note: You can only configure this field via scripts.
CptyState Counterparty State
CptySwift Counterparty Bank Swift Code
CptyZip Counterparty Zip/Postal Code
CustRefNum Customer Reference Number
RegCode Regulatory Code
amount Txn Amount
3 Managing security
3.7 Controlling the editing of cash record fields through modes
150 © Wall Street Systems IPH AB - Confidential
* These parameters control sub-sections, not individual fields.
Note: Field names are not case sensitive in the script.
Note: Cpty is also used in other payments than one-off payment, hence it is not part of
CptyOneOffSection.
3.7.3.1 Working with CptyOneOffSection
Editing fields in the One-Off sub-section can be controlled for the whole section or for individual
fields. The parameter to control all one-off fields at once is CptyOneOffSection but if you set a
one-off field individually, it becomes an exception.
Note: The Remittance, the Additional Attributes and the Intermediary/Correspondent
sub-sections are controlled at section level only.
This example illustrates how exceptions work:
In NEW state, we want all the fields of the one off section to be editable except for the Swift Code field
that should be read only.
•If the default setting for the NEW state is editable, you need to specify the Swift Code
(CptySwift) field as an exception.
•If default setting for the NEW state is read only, you need to specify the one-off section
CptyOneOffSection as exception and the Swift Code (CptySwift) as an exception again. This
makes the section editable except for the Swift Code field.
bankHolidays Bank Holiday Country
bankRefNum Bank Reference Number
cashFlowTypeID Cash Flow Type
comments Comments
cptyBankAccountID Counterparty Bank Account
currencyCode Currency
entityBankAcctID Entity Bank Account
entityID Entity
includeWandH Include Weekends and Holidays
Note: You can only configure this field via scripts.
onAddAdditionalAttributesEvent * Additional Attributes
onAddIntermediaryCorrespondantInfo* Intermediary/Correspondent Info
onAddRemittanceDetailsEvent* Remittance Details
paymentMethodID paymentMethodID
transactionType Transaction Type
txnDate Txn Date
txnPriorityId Txn Priority Status
valueDate Value Date
ID Field label
3 Managing security
3.7 Controlling the editing of cash record fields through modes
WebSuite System Administration Guide 151
3.7.3.2 Note on Edited Cash Record
A cash record that is the result of an edit action, is flagged in the
CASHRECORDADDITIONALATTRIBUTES table with ATTRIBUTEVALUE EditTxnFlag.
You can use the com.wss.workflow.agents.hasEditFlag.xml flow agent to apply an authorization flow
condition on this flag so an edited record could have a specific authorization flow.
3 Managing security
3.7 Controlling the editing of cash record fields through modes
152 © Wall Street Systems IPH AB - Confidential

WebSuite System Administration Guide 153
Chapter 4 Managing the Task Scheduler
A task is an action you need CMM to complete, either on a one-off basis or a regular basis, to
complete business processes.
Note: Tasks are also referred to as "jobs" in CMM.
The Task Scheduler function allows you to schedule tasks in CMM.
4.1 Understanding the Task Scheduler
In CMM, you can complete most tasks manually through the user interface. However, it can be
beneficial to complete some tasks automatically on a regularly scheduled basis. The Task Scheduler
function allows you to do this.
4.1.1 Defining Task Scheduler components
The Task Scheduler function utilizes three components:
•Services
•Tasks
• Parameter sets.
Select tasks may refer to a parameter set, which is a list of attributes (or "parameters") which a
record must meet to be processed by the task.
4.1.2 Determining which tasks to run through the Task Scheduler
You can run a variety of tasks in the Task Scheduler function. Some of these tasks, such as Entity
Import, only need to be run once in a typical installation. Others, such as Bank Transaction Loader,
may be run daily.
When you first install CMM, you work with Wallstreet to determine which tasks to run in the Task
Scheduler function.
4.2 Managing parameter sets
Using parameter sets, you can schedule multiple runs of a task, with each run using a unique set of
attributes (or "parameters"). For example, you could schedule two runs of the IHB Account
Settlement task, one in which first-level bank accounts are settled and the other in which all other
level bank accounts are settled.

4 Managing the Task Scheduler
4.2 Managing parameter sets
154 © Wall Street Systems IPH AB - Confidential
4.2.1 Prerequisites
The following are prerequisites for configuring parameter sets:
4.2.2 Creating parameter sets
To create a parameter set:
1. Select Admin - Utilities - Task Scheduler.
2. In the Task Scheduler page, click Enter Parameters.
3. In the Task Selection page, select the appropriate task in the Task list.
4. Click Next.
5. In the task’s parameter set list page, click New Entry.
6. In the task’s parameter set editor page, create the parameter set:
7. Click Save.
Category Tasks
Static data Ensure the following static data are available:
• Entities
•Counterparties
•Banks
• Bank accounts
• Bank account relationships
• Bank account groups
• Settlement groups.
For more information, see the CMM User Guide.
Interfaces Ensure the following interface data are available:
•Interchanges.
For more information, see the CMM Interfaces Guide.
Security Ensure you have access to the following function:
• FG-0279 Task Scheduler.
In addition, ensure you have access to the entities, banks, and bank accounts you want to
include in parameter sets.
For more information, see Chapter 3 Managing security on page 95.
4 Managing the Task Scheduler
4.3 Managing tasks
WebSuite System Administration Guide 155
4.2.3 Editing parameter sets
To edit a parameter set:
1. Select Admin - Utilities - Task Scheduler.
2. In the Task Scheduler page, click Enter Parameters.
3. In the Task Selection page, select the appropriate task in the Task list.
4. Click Next.
5. In the task’s parameter set list page, drill down on the parameter set.
6. In the task’s parameter set editor page, edit the parameter set.
7. Click Save.
4.2.4 Deleting parameter sets
To delete a parameter set:
1. Select Admin - Utilities - Task Scheduler.
2. In the Task Scheduler page, click Enter Parameters.
3. In the Task Selection page, select the appropriate task in the Task list.
4. Click Next.
5. In the task’s parameter set list page, drill down on the parameter set.
6. In the task’s parameter set editor page, click Delete.
7. In the resulting dialog, click OK.
4.3 Managing tasks
To schedule a task in the Task Scheduler function, you need to set it to run immediately one time or
based on a defined schedule multiple times.
Note: Schedule tasks to run at times that do not coincide with other CMM tasks or with network
or database backup activities.
4.3.1 Prerequisites
The following are prerequisites for configuring tasks:
Category Tasks
Security Ensure you have access to the following function:
• FG-0279 Task Scheduler.
For more information, see Chapter 3 Managing security on page 95.
Tas k S c h e d u l e r Ensure the following Task Scheduler task has been completed:
•4.2 Managing parameter sets on page 153.
4 Managing the Task Scheduler
4.4 Starting and stopping Task Scheduler services
156 © Wall Street Systems IPH AB - Confidential
4.3.2 Creating tasks
To create a task:
1. Select Admin - Utilities - Task Scheduler.
2. In the Task Scheduler page, select the appropriate task in the Schedule New Task list.
3. Click Schedule New Task.
4. In the Scheduled Task page, create the task.
Wallstreet recommends tasks be scheduled to run at times that do not coincide with other CMM
tasks or with network or database backup activities.
5. Do one of the following:
–To run the task on a regularly scheduled basis, click Save.
–To run the task immediately, click Run it Now.
–To run the task once according to the schedule, click Run Once.
4.3.3 Editing tasks
To edit a task:
1. Select Admin - Utilities - Task Scheduler.
2. In the Task Scheduler page, drill down on the task.
3. In the Scheduled Task page, edit the task.
Wallstreet recommends tasks be scheduled to run at times that do not coincide with other CMM
tasks or with network or database backup activities.
4. Click Save.
4.3.4 Deleting tasks
To delete a task:
1. Select Admin - Utilities - Task Scheduler.
2. In the Task Scheduler page, drill down on the task.
3. In the Scheduled Task page, click Delete.
4. In the resulting dialog, click OK.
4.4 Starting and stopping Task Scheduler services
By default, the Task Scheduler function contains two services for the JVM in your organization’s
WebSuite system:
•taskMonitorService
•taskLauncherService.
You can start and stop Task Scheduler services as documented in this section.

4 Managing the Task Scheduler
4.5 Monitoring Task Scheduler remotely
WebSuite System Administration Guide 157
4.4.1 Prerequisites
The following are prerequisites for starting and terminating Task Scheduler queues:
4.4.2 Starting a Task Scheduler service
To start a Task Scheduler service:
1. Select Admin - Utilities - Task Scheduler.
2. In the Task Scheduler page, select the service’s checkbox.
3. Click Start Service.
4. Click Refresh.
4.4.3 Stopping a Task Scheduler service
To terminate a Task Scheduler service:
1. Select Admin - Utilities - Task Scheduler.
2. In the Task Scheduler page, select the service’s checkbox.
3. Click Stop Service.
4. Click Refresh.
4.5 Monitoring Task Scheduler remotely
You can check that Task Scheduler is running OK by accessing this URL:
http://server:port/websuite/index.do?handleWebEvent(alterna.taskscheduler.webservice
.CaCheckTaskSchedulerWebEventHandler)
You will see something like this if all is well:
Task Scheduler Monitoring Summary @ Mon Aug 23 16:32:01 GMT 2010
Found 0 running queues ...
Found 6 scheduled jobs in database ...
Found 2 running services
End of Task Scheduler Monitoring Summary ... Mon Aug 23 16:32:01 GMT 2010
You will see something like this if there is a problem:
Task Scheduler Monitoring Summary @ Mon Aug 23 18:14:11 GMT 2010
Found 0 running queues ...
Found 6 scheduled jobs in database ...
Exception received when checking the running tasks list:
java.lang.InterruptedException: waitTillDone: 1000 ms has been elapsed! Actual: 1001
Category Tasks
Security Ensure you have access to the following function:
• FG-0279 Task Scheduler.
For more information, see Chapter 3 Managing security on page 95.
4 Managing the Task Scheduler
4.5 Monitoring Task Scheduler remotely
158 © Wall Street Systems IPH AB - Confidential
End of Task Scheduler Monitoring Summary ... Mon Aug 23 18:14:11 GMT 2010

WebSuite System Administration Guide 159
Chapter 5 Configuring workflows
Before users can complete the tasks documented in the WebSuite User Guide, you must configure
workflows as documented in this chapter.
5.1 Completing forecasted activity setup
Before you can capture, process, and analyze forecasted activity, you or another user must
complete the following setup procedures:
1. Set configuration parameters for forecasted activity.
2. Configure forecast horizons.
3. Configure forecast workflow.
4. Configure forecast mirroring.
5. Configure the forecast allocation model.
In addition, you or another user can customize select forecasted activity functions for your
organization.
5.1.1 Configuring forecast horizons
In CMM, the main difference between short-term forecasts and medium- and long-term forecasts is
their horizons. You can define these horizons using the Forecast Horizons function.
5.1.1.1 Prerequisites
The following are prerequisites for configuring forecast horizons:
5.1.1.2 Configuring forecast horizons
To configure forecast horizons:
1. Select Forecasting - Configuration - Forecast Horizons.
Alternatively, select Forecasting - Configuration - Forecast Configuration Maintenance and open the Forecast
Horizons section.
2. In the Forecast Horizons Maintenance page, configure forecast horizons.
3. Click Save.
Category Tasks
Security Ensure you have access to the following function:
• FG-0420 View/Edit Forecasting Configuration.
For more information, see Chapter 3 Managing security on page 93.
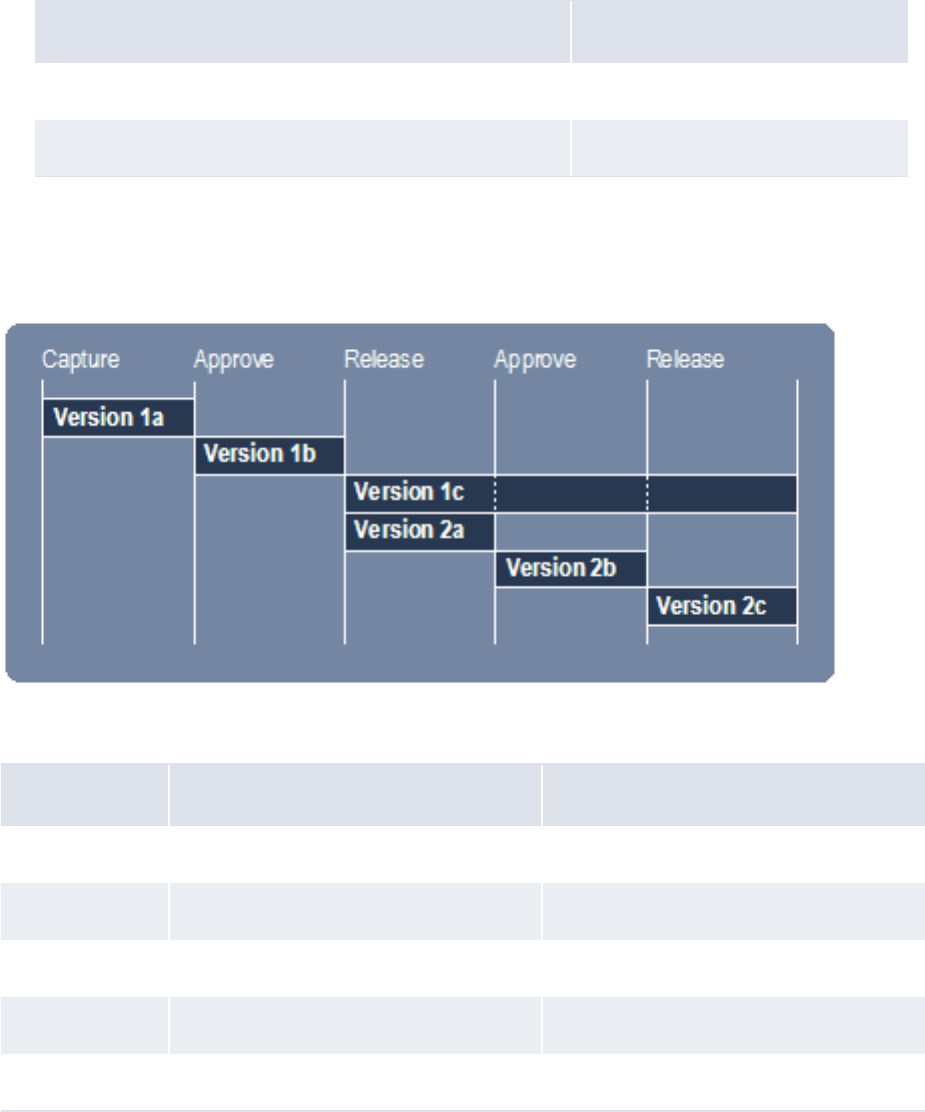
5 Configuring workflows
5.1 Completing forecasted activity setup
160 © Wall Street Systems IPH AB - Confidential
5.1.1.3 Returning forecast horizons to their default settings
To return forecast horizons to their default settings:
1. Select Forecasting - Configuration - Forecast Horizons.
Alternatively, select Forecasting - Configuration - Forecast Configuration Maintenance and open the Forecast
Horizons section.
2. In the Forecast Horizons Maintenance page, click Revert to Default.
CMM returns the forecast horizons to their default settings:
5.1.2 Configuring forecast workflow
CMM is installed with a default forecast workflow. As users complete each step in this workflow, CMM
creates a new version of the forecast:
When CMM creates a new version of the forecast, it updates the forecast’s primary and secondary
workflow statuses:
Control Default value
MLT Planning Horizon 12
ST Planning Horizon 2
Version Primary workflow status Secondary workflow status
1a Entered [None]
1b Authorized [None]
1c Released Reopened
2a Entered [None]
2b Authorized [None]
5 Configuring workflows
5.1 Completing forecasted activity setup
WebSuite System Administration Guide 161
The following table presents the possible primary and secondary workflow statuses for forecasts in
the default forecast workflow:
You can customize the forecast workflow for your organization. In addition, you can change the
labels of primary and secondary workflow statuses as well as the operations users select to move
forecasts from one status to another.
If you want to use the same forecast workflow for both the short term and the medium and long
terms, you must configure the default_forecast_workflow_config.xml file.
If you want to use different forecast workflows for the short term and the medium and long terms,
you must configure the st_forecast_workflow_config.xml and
mlt_forecast_workflow_config.xml files.
2c Released Reopened
Primary workflow
status Description
Possible
secondary
workflow
statuses
Entered A newly captured forecast (either imported or manually
entered).
•None
• Canceled
Incomplete A partially authorized forecast.
This primary workflow status takes effect if your organization
requires two authorizations for forecasts and you have
completed the first authorization of a forecast but not the
second.
•Rejected
•Repaired
•Reopened
• Canceled
Authorized A fully authorized forecast. •Rejected
•Repaired
•Reopened
• Canceled
Released A released forecast. •Reopened
•Updated
• Canceled
Working Version The current working version of a forecast.
This primary workflow status includes all unchanged items from
the current released forecast plus any new forecasts and any
changes to released forecasts in any primary workflow status
(Entered, Incomplete, and Authorized) that are not
rejected or canceled.
[N/A]
In Authorization The current working version of the forecast as described for
Working Version, but excluding anything in Entered status.
[N/A]
5 Configuring workflows
5.1 Completing forecasted activity setup
162 © Wall Street Systems IPH AB - Confidential
5.1.2.1 Prerequisites
The following are prerequisites for configuring forecast workflow:
5.1.2.2 Configuring forecast workflow
To configure forecast workflow:
1. Open the following configuration file:
[Standard configuration file path]
cash_forecast
workflow
default_forecast_workflow_config.xml
Alternatively:
–To configure the forecast workflow for short-term forecasts only, open the
st_forecast_workflow_config.xml file.
–To configure the forecast workflow for medium- and long-term forecasts only, open the
mlt_forecast_workflow_config.xml file.
For instructions on opening configuration files, see 1.2 Opening configuration files on page 25.
2. Do the following:
–To edit the workflow operations’ labels:
a. Locate the following section:
º
<workflow_operations>
<workflow_operation value="noaction" label="No Action Selected"/>
<workflow_operation value="" label="No Action Selected"/>
<workflow_operation value="edit" label="Save"/>
<workflow_operation value="approve" label="Approve"/>
<workflow_operation value="reject" label="Reject"/>
<workflow_operation value="release" label="Release"/>
<workflow_operation value="cancel" label="Cancel"/>
</workflow_operations>
º
b. In each workflow_operation element, edit the label attribute’s value as appropriate.
–To edit the primary workflow statuses’ labels:
a. Locate the following section:
º
<workflow_status_codes>
<workflow_status_code value="" label="All"/>
<workflow_status_code value="Entered" label="Entered"/>
<workflow_status_code value="Authorized" label="Authorized"/>
<workflow_status_code value="Released" label="Released"/>
Category Tasks
Security Ensure you have access to the following functions:
• FG-0400 Review CMM Configuration
• FG-0420 View/Edit Forecasting Configuration.
For more information, see Chapter 3 Managing security on page 93.
5 Configuring workflows
5.1 Completing forecasted activity setup
WebSuite System Administration Guide 163
<workflow_status_code value="Working" label="Working Version"
type="derived">
<derivation type="working_version_with_status_code_list">
<included_workflow_status_code value="Entered"/>
<included_workflow_status_code value="Authorized"/>
</derivation>
</workflow_status_code>
<workflow_status_code value="InAuth" label="In Authorization"
type="derived">
<derivation type="working_version_with_status_code_list">
<included_workflow_status_code value="Authorized"/>
</derivation>
</workflow_status_code>
…
</workflow_status_codes>
º
b. In each workflow_status_code element, edit the label attribute’s value as appropriate
In addition to editing the existing primary workflow statuses’ labels, you can create new,
derived workflow statuses. Use the example included in this section as a template.
–To edit the secondary workflow statuses’ labels:
a. Locate the following section:
º
<second_workflow_status_codes>
<workflow_status_code value="" label="All"/>
<workflow_status_code value="None" label="None"/>
<workflow_status_code value="Rejected" label="Rejected"/>
<workflow_status_code value="Repaired" label="Repaired"/>
<workflow_status_code value="Reopened" label="Reopened"/>
<workflow_status_code value="Updated" label="Updated"/>
<workflow_status_code value="Canceled" label="Canceled"/>
</second_workflow_status_codes>
º
b. In each workflow_status_code element, edit the label attribute’s value as appropriate.
–To assign workflow operations to specific tasks (or "contexts"):
a. Locate the following section:
º
<supported_operations workflow_operation_context="capture_detail">
<supported_workflow_operation value="edit"/>
<supported_workflow_operation value="cancel"/>
</supported_operations>
<supported_operations
workflow_operation_context="cash_reconciliation_detail">
<supported_workflow_operation value="noaction"/>
<supported_workflow_operation value="edit"/>
<supported_workflow_operation value="cancel"/>
</supported_operations>
<supported_operations workflow_operation_context="approval_detail">
<supported_workflow_operation value=""/>
<supported_workflow_operation value="approve"/>
<supported_workflow_operation value="reject"/>
</supported_operations>
<supported_operations workflow_operation_context="release_detail">
<supported_workflow_operation value=""/>
<supported_workflow_operation value="release"/>
<supported_workflow_operation value="reject"/>
</supported_operations>
5 Configuring workflows
5.1 Completing forecasted activity setup
164 © Wall Street Systems IPH AB - Confidential
<supported_operations workflow_operation_context="approve">
<supported_workflow_operation value=""/>
<supported_workflow_operation value="approve"/>
</supported_operations>
<supported_operations workflow_operation_context="release">
<supported_workflow_operation value=""/>
<supported_workflow_operation value="release"/>
<supported_workflow_operation value="reject"/>
</supported_operations>
º
b. In each supported_operations element, add and remove
supported_workflow_operation child elements as appropriate.
The following are the acceptable values for the value attribute of the
supported_workflow_operation element:
–[Blank]
–noaction
–edit
–approve
–reject
–release
–cancel.
–To edit the workflow:
a. Locate the following section:
º
<workflow_definitions>
<apply_to_forecast_types>
<forecast_type value="ST"/>
<forecast_type value="MLT"/>
</apply_to_forecast_types>
<default_change_policy value="no_update"/>
<workflow_operation value="noaction">
…
<state_definition WorkflowStatusCode="None">
<SecondWorkflowStatusCode>
<SecondWorkflowStatusCodeValue value="None"/>
</SecondWorkflowStatusCode>
<change_policy value="no_update"/>
<next_state_definition WorkflowStatusCode="None"
SecondWorkflowStatusCode="None"/>
</state_definition>
</workflow_operation>
º
b. In the apply_to_forecast_types element, enter the types of forecast to which the
forecast applies by adding and removing forecast_type child elements as appropriate.
c. In the default_change_policy element, enter the default change policy in the value
attribute.
d. In each workflow_operation element, enter the primary workflow statuses, secondary
workflow statuses, change policies, and next state definitions for the element’s workflow
operation by adding and removing state_definition child elements as appropriate.
3. Save and close the file.
5 Configuring workflows
5.1 Completing forecasted activity setup
WebSuite System Administration Guide 165
5.1.3 Configuring forecast mirroring
Intercompany forecasts are those between internal parties that do not affect external bank
accounts. Intercompany activity does not impact cash requirements; however, it can impact foreign
exchange requirements. Therefore, both the payment and receipt flows must be captured.
Users may want to mirror intercompany forecasts. For example, a payment from one entity to
another, if mirrored, automatically creates a corresponding receipt. Mirroring ensures intercompany
payments are automatically balanced by intercompany receipts. When you enter a forecast with an
internal counterparty that is a forecast participant, the counterparty can view the mirror forecast in
its reports.
Note: Workflow actions applied to the parent forecast are also applied to the child forecast.
However, workflow actions applied to the child forecast are not applied to the parent
forecast.
5.1.3.1 Prerequisites
The following are prerequisites for configuring forecast mirroring:
5.1.3.2 Configuring forecast mirroring
To configure forecast mirroring:
1. Select Forecasting - Configuration - Forecast Mirroring.
Alternatively, select Forecasting - Configuration - Forecast Configuration Maintenance and open the Forecast
Mirroring section.
2. In the Forecast Mirroring Configuration Maintenance page, set the following configuration
parameters:
–Forecast Default Entity Mirror Participation
–Forecast Default Instrument Mirroring Policy
–Forecast Mirroring Policy.
Category Tasks
Static data Ensure the following static data are available:
• Entities
• Instrument types.
For more information, see the WebSuite User Guide.
Security Ensure you have access to the following functions:
• FG-0105 Instrument Types
• FG-0167 Edit Entity
• FG-0420 View/Edit Forecasting Configuration.
In addition, ensure you have access to the entities that you want to act as counterparties in
mirrored forecasts.
For more information, see Chapter 3 Managing security on page 93.
5 Configuring workflows
5.1 Completing forecasted activity setup
166 © Wall Street Systems IPH AB - Confidential
For information on these configuration parameters, see 2.7 Setting forecasted activity
configuration parameters on page 58.
3. If you enabled mirroring in step 2:
a. For each entity that will be acting as a counterparty in mirrored forecasts, set its
Forecast Mirroring Participation Policy additional attribute to true.
b. For each instrument type for which you want to override the default setting of the Forecast
Default Instrument Mirroring Policy configuration parameter, set its Forecast Mirroring additional
attribute to Payment or Receipt.
For more information, see the WebSuite User Guide.
5.1.4 Configuring the forecast allocation model
Users can initialize short-term forecasts from medium- and long-term forecasts through the Enter
Short-Term Forecasts function. How CMM allocates a medium- or long-term forecast’s amounts to
short-term forecasts depends on how you configure the forecast allocation model.
The Forecast Allocation Models function allows you to configure the forecast allocation model as well
as test it and return it to its default settings.
Note: For a detailed example of how to configure the forecast allocation model, see Appendix D
Example forecast allocation model on page 511.
5.1.4.1 Prerequisites
The following are prerequisites for configuring the forecast allocation model:
5.1.4.2 Configuring the forecast allocation model
To configure the forecast allocation model:
1. Select Forecasting - Configuration - Forecast Allocation Models.
Alternatively, select Forecasting - Configuration - Forecast Configuration Maintenance and click
Manage Forecast Allocation Models in the Related Configurations section of the resulting page.
2. In the Forecast Allocation Model Maintenance page, configure the forecast allocation model.
3. Click Save.
5.1.4.3 Testing the forecast allocation model
To test the forecast allocation model:
1. Select Forecasting - Configuration - Forecast Allocation Models.
Category Tasks
Security Ensure you have access to the following function:
• FG-0420 View/Edit Forecasting Configuration.
For more information, see Chapter 3 Managing security on page 93.
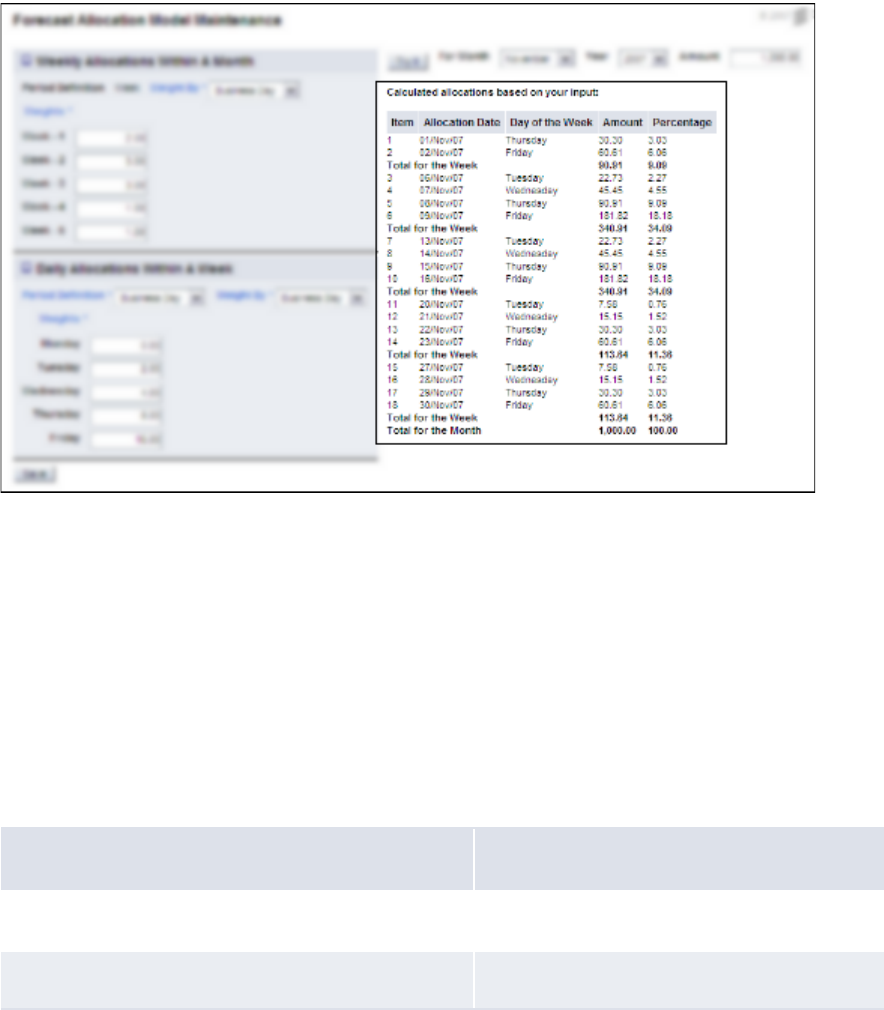
5 Configuring workflows
5.1 Completing forecasted activity setup
WebSuite System Administration Guide 167
Alternatively, select Forecasting - Configuration - Forecast Configuration Maintenance and click
Manage Forecast Allocation Models in the Related Configurations section of the resulting page.
2. In the Forecast Allocation Model Maintenance page:
–Select the month you want to use for the test in the For Month list.
–Select the year you want to use for the test in the Year list.
–Enter the amount you want to use for the test in the Amount field.
3. Click Try It.
CMM displays a table that shows how the amount you entered in the Amount field is allocated for
the month and year you selected in the For Month and Year lists using the forecast allocation
model:
5.1.4.4 Returning the forecast allocation model to its default settings
To return the forecast allocation model to its default settings:
1. Select Forecasting - Configuration - Forecast Allocation Models.
Alternatively, select Forecasting - Configuration - Forecast Configuration Maintenance and click
Manage Forecast Allocation Models in the Related Configurations section of the resulting page.
2. In the Forecast Allocation Model Maintenance page, click Revert to Default.
3. In the resulting dialog, click OK.
CMM returns the forecast allocation model to its default values:
Control Default value
Weekly Allocations Within A Month
Period Definition Week
5 Configuring workflows
5.1 Completing forecasted activity setup
168 © Wall Street Systems IPH AB - Confidential
5.1.5 Customizing forecasted activity functions
You or another user can customize select forecasted activity functions for your organization as
documented in this section.
5.1.5.1 Customizing the Enter… functions
The Enter Short-Term Forecasts and Enter Medium- to Long-Term Forecasts functions allow users to
manually enter forecasts in CMM.
You can customize the footers that display in the main and drilldown pages of these functions.
Specifically, you can add buttons to and remove buttons from the footers.
5.1.5.1.1 Prerequisites
The following are prerequisites for customizing the Enter Short-Term Forecasts and Enter Medium-
to Long-Term Forecasts functions:
Weight By Business Day
Week – 1 2
Week – 2 3
Week – 3 3
Week – 4 1
Week – 5 1
Daily Allocations Within A Week
Period Definition Business Day
Weight By Business Day
Monday 0
Tuesday 2
Wednesday 4
Thursday 8
Friday 16
Category Tasks

5 Configuring workflows
5.1 Completing forecasted activity setup
WebSuite System Administration Guide 169
5.1.5.1.2 Customizing the main page footer
To customize the main page footer:
1. Open the following configuration file:
[Standard configuration file path]
templates
handler_based
cash_forecast
cash_forecast_capture_ws_footer.xml
Alternatively:
–To customize the main page footer in only the Enter Short-Term Forecasts function, open the
cash_forecast_st_capture_ws_footer.xml file.
–To customize the main page footer in only the Enter Medium- to Long-Term Forecasts
function, open the cash_forecast_mlt_capture_ws_footer.xml file.
For instructions on opening configuration files, see 1.2 Opening configuration files on page 25.
2. Do the following:
–To add a button to the footer, enter a display_command or display_report_refresh
element (using one of the existing display_command or display_report_refresh elements
as a template).
–To remove a button from the footer, delete its display_command or
display_report_refresh element.
Buttons display in the same order as listed in the file.
3. Save and close the file.
5.1.5.1.3 Customizing the drilldown page footer
To customize the drilldown page footer:
1. Open the following configuration file:
[Standard configuration file path]
templates
handler_based
cash_forecast
cash_forecast_capture_detail_footer.xml
For instructions on opening configuration files, see 1.2 Opening configuration files on page 25.
2. Do the following:
–To add a button to the footer, enter a display_report_refresh element (using one of the
existing display_report_refresh elements as a template).
–To remove a button from the footer, delete its display_report_refresh element.
Security Ensure you have access to the following function:
• FG-0400 Review CMM Configuration.
For more information, see Chapter 3 Managing security on page 93.

5 Configuring workflows
5.1 Completing forecasted activity setup
170 © Wall Street Systems IPH AB - Confidential
Buttons display in the same order as listed in the file.
3. Save and close the file.
5.1.5.2 Customizing the Approve… functions
The FG-0342 Approve Short-Term Cash Forecasts and Approve Medium- to Long-Term Forecasts
functions allow users to complete the first approval of forecasts.
You can customize the footers that display in the main and drilldown pages of these functions.
Specifically, you can add buttons to and remove buttons from the footers.
5.1.5.2.1 Prerequisites
The following are prerequisites for customizing the Approve Short-Term Forecasts and Approve
Medium- to Long-Term Forecasts functions:
5.1.5.2.2 Customizing the main page footer
To customize the main page footer:
1. Open the following configuration file:
[Standard configuration file path]
templates
handler_based
cash_forecast
cash_forecast_approval_ws_footer.xml
Alternatively:
–To customize the main page footer in only the Approve Short-Term Forecasts function, open
the cash_forecast_st_approval_ws_footer.xml file.
–To customize the main page footer in only the Approve Medium- to Long-Term Forecasts
function, open the cash_forecast_mlt_approval_ws_footer.xml file.
For instructions on opening configuration files, see 1.2 Opening configuration files on page 25.
2. Do the following:
–To add a button to the footer, enter a display_command or display_report_refresh
element (using one of the existing display_command or display_report_refresh elements
as a template).
–To remove a button from the footer, delete its display_command or
display_report_refresh element.
Buttons display in the same order as listed in the file.
3. Save and close the file.
Category Tasks
Security Ensure you have access to the following function:
• FG-0400 Review CMM Configuration.
For more information, see Chapter 3 Managing security on page 93.

5 Configuring workflows
5.1 Completing forecasted activity setup
WebSuite System Administration Guide 171
5.1.5.2.3 Customizing the drilldown page footer
To customize the drilldown page footer:
1. Open the following configuration file:
[Standard configuration file path]
templates
handler_based
cash_forecast
cash_forecast_approval_detail_footer.xml
For instructions on opening configuration files, see 1.2 Opening configuration files on page 25.
2. Do the following:
–To add a button to the footer, enter a display_report_refresh element (using one of the
existing display_report_refresh elements as a template).
–To remove a button from the footer, delete its display_report_refresh element.
Buttons display in the same order as listed in the file.
3. Save and close the file.
5.1.5.3 Customizing the 2nd Approve… functions
The 2nd Approve Short-Term Forecasts and 2nd Approve Medium- to Long-Term Forecasts functions
allow users to complete the second approval of forecasts.
You can customize the footers that display in the main and drilldown pages of these functions.
Specifically, you can add buttons to and remove buttons from the footers.
Note: In the default forecast workflow, second approval of forecasts is not required. Therefore, if
your organization is using the default forecast workflow, its users will not use the 2nd
Approve Short-Term Forecasts and 2nd Approve Medium- to Long-Term Forecasts
functions.
5.1.5.3.1 Prerequisites
The following are prerequisites for customizing the 2nd Approve Short-Term Forecasts and 2nd
Approve Medium- to Long-Term Forecasts functions:
5.1.5.3.2 Customizing the main page footer
To customize the main page footer:
1. Open the following configuration file:
[Standard configuration file path]
templates
handler_based
Category Tasks
Security Ensure you have access to the following function:
• FG-0400 Review CMM Configuration.
For more information, see Chapter 3 Managing security on page 93.
5 Configuring workflows
5.1 Completing forecasted activity setup
172 © Wall Street Systems IPH AB - Confidential
cash_forecast
cash_forecast_2nd_approval_ws_footer.xml
Alternatively:
–To customize the main page footer in only the 2nd Approve Short-Term Forecasts function,
open the cash_forecast_st_2nd_approval_ws_footer.xml file.
–To customize the main page footer in only the 2nd Approve Medium- to Long-Term Forecasts
function, open the cash_forecast_mlt_2nd_approval_ws_footer.xml file.
For instructions on opening configuration files, see 1.2 Opening configuration files on page 25.
2. Do the following:
–To add a button to the footer, enter a display_command or display_report_refresh
element (using one of the existing display_command or display_report_refresh elements
as a template).
–To remove a button from the footer, delete its display_command or
display_report_refresh element.
Buttons display in the same order as listed in the file.
3. Save and close the file.
5.1.5.3.3 Customizing the drilldown page footer
To customize the drilldown page footer, follow the instructions in 5.1.5.2 Customizing the Approveº
functions on page 170.
5.1.5.4 Customizing the Release… functions
The Release Short-Term Forecasts and Release Medium- to Long-Term Forecasts functions allow
users to release forecasts.
You can customize the footers that display in the main and drilldown pages of these functions.
Specifically, you can add buttons to and remove buttons from the footers.
5.1.5.4.1 Prerequisites
The following are prerequisites for customizing the Release Short-Term Forecasts and Release
Medium- to Long-Term Forecasts functions:
5.1.5.4.2 Customizing the main page footer
To customize the main page footer:
1. Open the following configuration file:
[Standard configuration file path]
templates
handler_based
cash_forecast
Category Tasks
Security Ensure you have access to the following function:
• FG-0400 Review CMM Configuration.
For more information, see Chapter 3 Managing security on page 93.
5 Configuring workflows
5.1 Completing forecasted activity setup
WebSuite System Administration Guide 173
cash_forecast_release_ws_footer.xml
Alternatively:
–To customize the main page footer in only the Release Short-Term Forecasts function, open
the cash_forecast_st_release_ws_footer.xml file.
–To customize the main page footer in only the Release Medium- to Long-Term Forecasts
function, open the cash_forecast_mlt_release_ws_footer.xml file.
For instructions on opening configuration files, see 1.2 Opening configuration files on page 25.
2. Do the following:
–To add a button to the footer, enter a display_command or display_report_refresh
element (using one of the existing display_command or display_report_refresh elements
as a template).
–To remove a button from the footer, delete its display_command or
display_report_refresh element.
Buttons display in the same order as listed in the file.
3. Save and close the file.
5.1.5.4.3 Customizing the drilldown page footer
To customize the drilldown page footer:
1. Open the following configuration file:
[Standard configuration file path]
templates
handler_based
cash_forecast
cash_forecast_release_detail_footer.xml
For instructions on opening configuration files, see 1.2 Opening configuration files on page 25.
2. Do the following:
–To add a button to the footer, enter a display_report_refresh element (using one of the
existing display_report_refresh elements as a template).
–To remove a button from the footer, delete its display_report_refresh element.
Buttons display in the same order as listed in the file.
3. Save and close the file.
5.1.5.5 Customizing the Re-Open… functions
The Re-Open Short-Term Forecasts and Re-Open Medium- to Long-Term Forecasts functions allow
users to reopen forecasts.
You can customize the footers that display in the main and drilldown pages of these functions.
Specifically, you can add buttons to and remove buttons from the footers.
Note: In the default forecast workflow, forecasts are automatically reopened when they are
released. Therefore, if your organization is using the default forecast workflow, its users
will not use the Re-Open Short-Term Forecasts and Re-Open Medium- to Long-Term
Forecasts functions.
5 Configuring workflows
5.1 Completing forecasted activity setup
174 © Wall Street Systems IPH AB - Confidential
5.1.5.5.1 Prerequisites
The following are prerequisites for customizing the Re-Open Short-Term Forecasts and Re-Open
Medium- to Long-Term Forecasts functions:
5.1.5.5.2 Customizing the main page footer
To customize the main page footer:
1. Open the following configuration file:
[Standard configuration file path]
templates
handler_based
cash_forecast
cash_forecast_reopen_ws_footer.xml
Alternatively:
–To customize the main page footer in only the Re-Open Short-Term Forecasts function, open
the cash_forecast_st_reopen_ws_footer.xml file.
–To customize the main page footer in only the Re-Open Medium- to Long-Term Forecasts
function, open the cash_forecast_mlt_reopen_ws_footer.xml file.
For instructions on opening configuration files, see 1.2 Opening configuration files on page 25.
2. Do the following:
–To add a button to the footer, enter a display_command or display_report_refresh
element (using one of the existing display_command or display_report_refresh elements
as a template).
–To remove a button from the footer, delete its display_command or
display_report_refresh element.
Buttons display in the same order as listed in the file.
3. Save and close the file.
5.1.5.5.3 Customizing the drilldown page footer
To customize the drilldown page footer:
1. Open the following configuration file:
[Standard configuration file path]
templates
handler_based
cash_forecast
cash_forecast_reopen_detail_footer.xml
Category Tasks
Security Ensure you have access to the following function:
• FG-0400 Review CMM Configuration.
For more information, see Chapter 3 Managing security on page 93.
5 Configuring workflows
5.1 Completing forecasted activity setup
WebSuite System Administration Guide 175
For instructions on opening configuration files, see 1.2 Opening configuration files on page 25.
2. Do the following:
–To add a button to the footer, enter a display_report_refresh element (using one of the
existing display_report_refresh elements as a template).
–To remove a button from the footer, delete its display_report_refresh element.
Buttons display in the same order as listed in the file.
3. Save and close the file.
5.1.5.6 Customizing the Cancel Forecasts function
The Cancel Forecasts function allow users to cancel forecasts entered or imported in error.
You can customize the footers that display in the main page of this functions. Specifically, you can
add buttons to and remove buttons from the footer.
5.1.5.6.1 Prerequisites
The following are prerequisites for customizing the Cancel Forecasts function:
5.1.5.6.2 Customizing the Cancel Forecasts function
To customize the Cancel Forecasts function:
1. Open the following configuration file:
[Standard configuration file path]
templates
handler_based
cash_forecast
cash_forecast_cancel_forecasts_footer.xml
For instructions on opening configuration files, see 1.2 Opening configuration files on page 25.
2. Do the following:
–To add a button to the footer, enter a display_command or display_report_refresh
element (using one of the existing display_command or display_report_refresh elements
as a template).
–To remove a button from the footer, delete its display_command or
display_report_refresh element.
Buttons display in the same order as listed in the file.
3. Save and close the file.
5.1.5.7 Customizing drilldown pages
In the forecast functions, users can drill down on amounts. The resulting drilldown pages present
the activities that makes up the amounts.
You can customize the titles and layouts of these pages.
Category Tasks
Security Ensure you have access to the following function:
• FG-0400 Review CMM Configuration.
For more information, see Chapter 3 Managing security on page 93.
5 Configuring workflows
5.1 Completing forecasted activity setup
176 © Wall Street Systems IPH AB - Confidential
5.1.5.7.1 Prerequisites
The following are prerequisites for customizing drilldown pages:
5.1.5.7.2 Customizing drilldown pages
To customize a drilldown page:
1. Open the following configuration file:
[Standard configuration file path]
templates
handler_based
cashforecast_drilldown.xml
cf_bankreported_drilldown.xml
cf_currentavailable_drilldown.xml
cf_instructed_drilldown.xml
cf_unrecd_items_drilldown.xml
cf_unrecd_items_drilldown_cash_records.xml
cf_unrecd_items_drilldown_current_available.xml
For instructions on opening configuration files, see 1.2 Opening configuration files on page 25.
2. Do the following:
–Edit the page’s title and criteria:
º
<page_title value="Cash Forecast Details"/>
Enter an appropriate title for the page.
<selection_criteria_display display="true" editable="false"/>
Enter true to display criteria in the drilldown page or false to not display criteria in the
drilldown page.
Enter true to allow users to edit criteria or false to not allow users to edit criteria.
º
–Add a column to the page’s table:
a. In the attributes element, enter an attribute child element for the column. The
following is an example:
º
<attributes>
…
<attribute id="InvoiceDate"/>
…
</attributes>
Category Tasks
Security Ensure you have access to the following function:
• FG-0400 Review CMM Configuration.
For more information, see Chapter 3 Managing security on page 93.
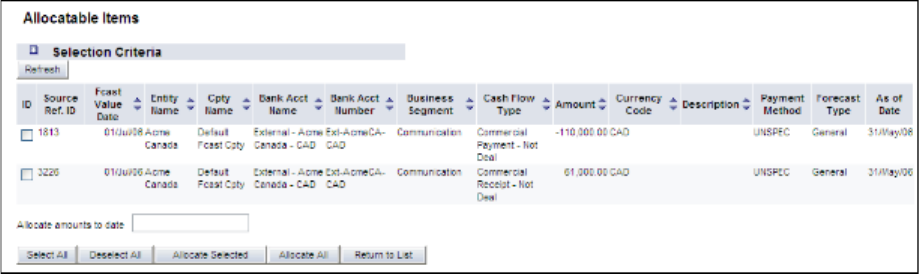
5 Configuring workflows
5.1 Completing forecasted activity setup
WebSuite System Administration Guide 177
º
b. In the row_definition element, enter a column child element for the column. The
following is an example:
º
<row_definition summary="false">
<column title="InvoiceDate">
<attribute id="InvoiceDate" sortable="true"/>
</column>
</row_definition>
º
–Remove a column from the page’s table:
a. Remove the column’s attribute child element in the attributes element.
b. Remove the column’s column child element in the row_definition element.
For a list of columns you can include in the page’s table, see Appendix E Forecast function
attributes on page 515.
3. Save and close the file.
5.1.5.8 Customizing forecast allocation pages
The Allocatable Items page allows users to select medium- and long-term forecasts to allocate:
The Preview Allocations page allows users to view and save short-term forecasts created from the
medium- and long-term forecasts you selected in the Allocatable Items
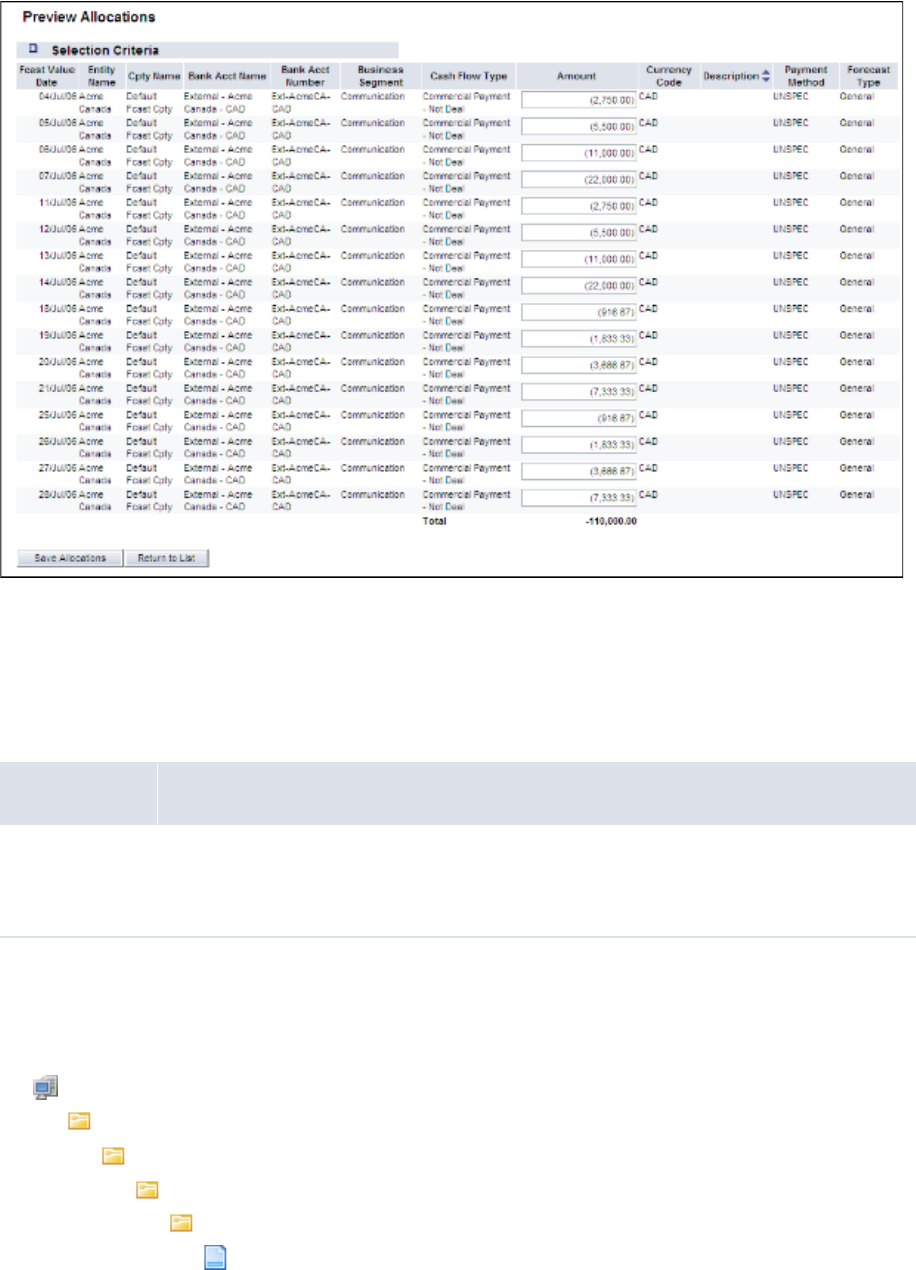
5 Configuring workflows
5.1 Completing forecasted activity setup
178 © Wall Street Systems IPH AB - Confidential
page:
You can customize the titles and layouts of these pages.
5.1.5.8.1 Prerequisites
The following are prerequisites for customizing forecast allocation pages:
5.1.5.8.2 Customizing the Allocatable Items page
To customize the Allocatable Items page:
1. Open the following configuration file:
[Standard configuration file path]
templates
handler_based
cash_forecast
allocation
allocatableitems.xml
Category Tasks
Security Ensure you have access to the following function:
• FG-0400 Review CMM Configuration.
For more information, see Chapter 3 Managing security on page 93.
5 Configuring workflows
5.1 Completing forecasted activity setup
WebSuite System Administration Guide 179
For instructions on opening configuration files, see 1.2 Opening configuration files on page 25.
2. Do the following:
–Edit the page’s title and criteria:
º
<page_title value="Allocatable Items"/>
Enter an appropriate title for the page.
<selection_criteria_display display="true" editable="true"/>
Enter true to display criteria in the Allocatable Items page or false to not display criteria in
the Allocatable Items page.
Enter true to allow users to edit criteria or false to not allow users to edit criteria.
º
–Add a column to the page’s table:
a. In the attributes element, enter an attribute child element for the column. The
following is an example:
º
<attributes>
…
<attribute id="InvoiceDate"/>
…
</attributes>
b. In the row_definition element, enter a column child element for the column. The
following is an example:
º
<row_definition summary="false">
<column title="InvoiceDate">
<attribute id="InvoiceDate" sortable="true"/>
</column>
</row_definition>
º
–Remove a column from the page’s table:
a. Remove the column’s attribute child element in the attributes element.
b. Remove the column’s column child element in the row_definition element.
For a list of columns you can include in the page’s table, see Appendix E Forecast function
attributes on page 515.
3. Save and close the file.
4. Open the following configuration file:
[Standard configuration file path]
templates
handler_based
cash_forecast
cash_forecast_viewallocatableitems_footer.xml
5 Configuring workflows
5.1 Completing forecasted activity setup
180 © Wall Street Systems IPH AB - Confidential
For instructions on opening configuration files, see 1.2 Opening configuration files on page 25.
5. Do the following:
–To add a button to the footer, enter a display_command or display_report_refresh
element (using one of the existing display_command or display_report_refresh elements
as a template).
–To remove a button from the footer, delete its display_command or
display_report_refresh element.
Buttons display in the same order as listed in the file.
6. Save and close the file.
5.1.5.8.3 Customizing the Preview Allocations page
To customize the Preview Allocations page:
1. Open the following configuration file:
[Standard configuration file path]
templates
handler_based
cash_forecast
allocation
allocateditems.xml
For instructions on opening configuration files, see 1.2 Opening configuration files on page 25.
2. Do the following:
–Edit the page’s title and criteria:
º
<page_title value="Preview Allocations"/>
Enter an appropriate title for the page.
<selection_criteria_display display="true" editable="true"/>
Enter true to display criteria in the Preview Allocations page or false to not display criteria
in the Preview Allocations page.
Enter true to allow users to edit criteria or false to not allow users to edit criteria.
º
–Add a column to the page’s table:
a. In the attributes element, enter an attribute child element for the column. The
following is an example:
º
<attributes>
…
<attribute id="InvoiceDate"/>
…
</attributes>
º
b. In the row_definition element, enter a column child element for the column. The
following is an example:
º
<row_definition summary="false">
<column title="InvoiceDate">

5 Configuring workflows
5.1 Completing forecasted activity setup
WebSuite System Administration Guide 181
<attribute id="InvoiceDate" sortable="true"/>
</column>
</row_definition>
º
Another example:
<column title="Description">
<attribute id="Description" sortable="true" editable="true"/>
</column>
Attributes that accept the editable attribute are:
CptyShortName
BankAccountID
BusinessSegmentID
InstrumentTypeID
ForecastAmountInput
CurrencyCode
Description
PaymentMethodID
StringAttributeValue_[0-9]
–Remove a column from the page’s table:
a. Remove the column’s attribute child element in the attributes element.
b. Remove the column’s column child element in the row_definition element.
For a list of columns you can include in the page’s table, see Appendix E Forecast function
attributes on page 515.
3. Save and close the file.
4. Open the following configuration file:
[Standard configuration file path]
templates
handler_based
cash_forecast
cash_forecast_viewallocateditems_footer.xml
For instructions on opening configuration files, see 1.2 Opening configuration files on page 25.
5. Do the following:
–To add a button to the footer, enter a display_command or display_report_refresh
element (using one of the existing display_command or display_report_refresh elements
as a template).
–To remove a button from the footer, delete its display_command or
display_report_refresh element.
Buttons display in the same order as listed in the file.
6. Save and close the file.

5 Configuring workflows
5.2 Completing expected and instructed activity setup
182 © Wall Street Systems IPH AB - Confidential
5.2 Completing expected and instructed activity setup
Before you can capture, process, and analyze expected and instructed activity, you or another user
must complete the following setup procedures:
1. Set configuration parameters for expected and instructed activity.
2. Configure transaction templates and repetitive codes.
3. Configure confirmation documentation templates.
4. Configure the payment flow.
5. Configure transaction routing rules (and related data).
6. Configure transaction authorization rules.
7. Configure transaction processing rules.
5.2.1 Configuring transaction templates and repetitive codes
Transaction templates and repetitive codes eliminate the need to enter identical or nearly identical
transactions manually.
5.2.1.1 Configuring transaction templates
In the Single Transaction Template Maintenance function, users can create, edit, and delete
transaction templates that can be used in single transaction entry to eliminate the need for entering
information manually.
5.2.1.1.1 Prerequisites
The following are prerequisites for creating transaction templates:
Category Tasks
Static data Ensure the following static data are available:
• Currencies
•Countries
• States
• Payment methods
• Entities
•Counterparties
•Banks
• Bank accounts
• Instrument types.
• Cash flow types.
For more information, see the WebSuite User Guide.
Security Ensure you have access to the following functions:
• FG-6000 Single Transaction Template Maintenance
In addition, ensure you have access to the entities, counterparties, and bank accounts you
want to include in the transaction template.
For more information, see Chapter 3 Managing security on page 93.

5 Configuring workflows
5.2 Completing expected and instructed activity setup
WebSuite System Administration Guide 183
5.2.1.1.2 Creating transaction templates
To create a transaction template:
1. Select Payment Factory - Configuration - Single Transaction Template Maintenance.
2. In the Single Transaction Template Maintenance page:
–Enter the contents of the template.
–Enter an appropriate name in the Template Name field.
–Enter an appropriate description in the Template Description field.
–Select the appropriate type in the Template Type list:
3. Click Save New Template.
5.2.1.1.3 Editing transaction templates
To edit a transaction template:
1. Select Payment Factory - Capture - Enter Single Transaction.
2. In the Single Transaction Entry page, select the transaction template in the Template Name list.
3. Click Edit Template.
4. Edit the contents of the template.
5. Click Save Template.
5.2.1.1.4 Deleting transaction templates
To delete a transaction template:
1. Select Payment Factory - Capture - Enter Single Transaction.
2. In the Single Transaction Entry page, select the transaction template in the Template Name list.
3. Click Delete Template.
5.2.1.2 Configuring transaction repetitive codes
CMM allows the entry of transaction repetitive codes associated with various banking activities and
executes the functions associated with these codes based on the value dates and time frames
assigned.
Type Description
Default When creating a Default transaction template, you do not need to provide information
in any of the attributes. When users apply Default transaction templates to
transactions, they can change all attributes including those defined by the transaction
template.
Limited When creating a Limited transaction template, you do not need to provide information
in any of the attributes. When users apply Limited transaction templates to
transactions, they can change all attributes except those defined by the transaction
template.
Repetitive Repetitive transaction templates are the most restrictive of the three. When creating a
Repetitive transaction template, you must provide information in all fields except
Amount, Value Date, and Transaction Date. When users apply Repetitive transaction templates
to their transactions, they can only change the Amount, Value Date, and Transaction Date
fields.

5 Configuring workflows
5.2 Completing expected and instructed activity setup
184 © Wall Street Systems IPH AB - Confidential
5.2.1.2.1 Prerequisites
The following are prerequisites for configuring transaction repetitive codes:
5.2.1.2.2 Creating transaction repetitive codes
To create a transaction repetitive code:
1. Select Payment Factory - Configuration - Repetitive Codes.
2. In the Repetitive Code - Criteria Selection page, click Search.
3. In the Repetitive Code Maintenance [list] page, click New Entry.
4. In the Repetitive Code Maintenance [editor] page, create the transaction repetitive code.
5. Click Save.
5.2.1.2.3 Editing transaction repetitive codes
To edit a transaction repetitive code:
1. Select Payment Factory - Configuration - Repetitive Codes.
2. In the Repetitive Code - Criteria Selection page, enter search criteria.
3. Click Search.
4. In the Repetitive Code Maintenance [list] page, drill down on the transaction repetitive code.
5. In the Repetitive Code Maintenance [editor] page, edit the transaction repetitive code.
6. Click Save.
5.2.1.2.4 Deleting transaction repetitive codes
To delete transaction repetitive codes:
1. Select Payment Factory - Configuration - Repetitive Codes.
2. In the Repetitive Code - Criteria Selection page, enter search criteria.
3. Click Search.
4. In the Repetitive Code Maintenance [list] page, drill down on the transaction repetitive code.
5. In the Repetitive Code Maintenance [editor] page, click Delete.
6. In the resulting dialog, click OK.
Category Tasks
Static data Ensure the following static data are available:
•Banks
• Bank accounts
• Cash flow types.
For more information, see the WebSuite User Guide.
Security Ensure you have access to the following function:
• FG-0070 Enter Repetitive Transactions.
In addition, ensure you have access to the bank accounts and cash flow types you want to
include in the repetitive codes.
For more information, see Chapter 3 Managing security on page 93.
5 Configuring workflows
5.2 Completing expected and instructed activity setup
WebSuite System Administration Guide 185
5.2.2 Configuring transaction routing rules (and related data)
Following code-based or configurable rules, CMM can route transactions through the most cost
efficient bank accounts without manual intervention.
The User Configurable Transaction Routing configuration parameter defines whether CMM refers to
the legacy code-based routing rules or the new configurable routing rules:
•If the configuration parameter is set to True, CMM refers to the new configurable routing rules.
•If the configuration parameter is set to False, CMM refers to the legacy code-based
routing rules.
The configuration parameter is set to True by default.
If your organization is new to CMM as of 7.1 or later, leave the configuration parameter set to True.
Do not change it to False as this can cause problems with routing.
If your organization has upgraded to this release from one prior to CMM 7.1 and you want to
migrate to configurable routing rules, leave the configuration parameter set to True. You need to
review your existing code-based routing rules and create corresponding configurable routing rules
as documented in the remainder of this section. For more information, contact Wallstreet.
If your organization has upgraded to this release from one prior to CMM 7.1 but you do not want to
migrate to configurable routing rules, set the configuration parameter to False. However, if you do
this, you cannot take advantage of the configurable routing features, use routing in conjunction with
the bank transaction rules, route transactions across multiple in-house banks, or route transactions
in an integrated environment.
Note: In a future release, Wallstreet will retire code-based routing rules. Therefore, if you decide
to continue with code-based routing rules in this release, consider an eventual migration to
configurable routing rules.
5.2.2.1 Configuring settlement models
The Transaction Routing Rules function allows users to create and manage routing rules if you
choose to use configurable routing rules. One attribute of each routing rule is the settlement model.
A settlement model controls how a transaction is settled once all relevant bank accounts (paying,
receiving, and executing) are defined by the routing rule.
Note: If a transaction specifies a correspondent bank account, the settlement model creates
correspondent cash records.
CMM is installed with the following settlement models:
You can configure these settlement models by editing the following files:
•no_settlement_model.xml
•shortest_route_model.xml.
Name Description
No settlement Does not attempt to settle transactions. Instead, this model creates cash records for a
presettled transaction (for example, transactions presettled in an external ERP system).
Shortest route Settles transactions across single or multiple in-house banks by using the shortest path.
(This model can be used for most transactions.)
5 Configuring workflows
5.2 Completing expected and instructed activity setup
186 © Wall Street Systems IPH AB - Confidential
Warning: Wallstreet strongly recommends that you only edit these files while working with a
Wallstreet representative or consultant as any errors can negatively impact routing.
5.2.2.1.1 Prerequisites
The following are prerequisites for configuring settlement models:
5.2.2.1.2 Configuring settlement models
To configure a settlement model:
1. Open one of the following configuration files:
[Standard configuration file path]
templates
handler_based
settlement_model_routing
no_settlement_model.xml
shortest_route_model.xml
For instructions on opening configuration files, see 1.2 Opening configuration files on page 25.
2. Review the file’s comments, which provide a description of the model and instructions for
modifying it.
3. Edit the file.
4. Save and close the file.
5.2.2.2 Configuring transaction routing rules
Routing allows you to enter a transaction without selecting paying or receiving bank accounts. Based
on pre-defined criteria, such as the currency and country of the transaction, CMM selects the best
paying bank account. For example, if you enter and then authorize a cross-border transaction, CMM
selects a paying bank account in the same country and currency of the beneficiary, thereby
converting the cross-border transaction to a domestic transaction and saving the related banking
and foreign exchange fees.
In releases prior to CMM 7.1, Wallstreet created transaction routing rules in the CMM code for your
organization as part of the initial implementation. If any changes were required to the transaction
routing rules after the initial implementation, you needed to contact Wallstreet to make those
changes—you could not make them yourself from the CMM user interface.
In this release, you can configure transaction routing rules from the CMM user interface through the
Transaction Routing Rules function.
Note: A set of system default routing rules are installed with CMM. While you cannot edit or
delete these routing rules, you can enable or disable them and you can use them as
templates for other routing rules.
Category Tasks
Security Ensure you have access to the following function:
• FG-0400 Review CMM Configuration.
For more information, see Chapter 3 Managing security on page 93.

5 Configuring workflows
5.2 Completing expected and instructed activity setup
WebSuite System Administration Guide 187
5.2.2.2.1 Prerequisites
The following are prerequisites for configuring transaction routing rules:
5.2.2.2.2 Creating transaction routing rules
To create a transaction routing rule:
1. Select Payment Factory - Configuration - Transaction Routing Rules.
2. In the Transaction Routing Rule Editor - Criteria Selection page, click Search.
3. In the Transaction Routing Rule List page, click New Entry.
4. In the header section of the Transaction Routing Rule Editor page, enter the transaction routing
rule’s header data.
5. In the Apply Rule to section, select the checkboxes of the items to which you want to apply the
transaction routing rule.
6. Click Refresh.
7. In the remaining sections, enter the transaction routing rule’s remaining data.
For information on the controls in all other sections, contact Wallstreet.
8. Click Save.
Category Tasks
Static data Ensure the following static data are available:
• Currencies
• Payment methods
• Entities
•Counterparties
•Banks
• Bank accounts
• Cash flow types.
For more information, see the WebSuite User Guide.
Security Ensure you have access to the following function:
• FG-0368 Transaction Routing Rule Editor.
In addition, ensure you have access to the entities, counterparties, bank accounts, and
cash flow types you want to include in the transaction routing rules.
For more information, see Chapter 3 Managing security on page 93.
Expected and
instructed activity
setup
Ensure the following task has been completed:
•5.2.2.1 Configuring settlement models on page 185.
5 Configuring workflows
5.2 Completing expected and instructed activity setup
188 © Wall Street Systems IPH AB - Confidential
5.2.2.2.3 Editing transaction routing rules
To edit a transaction routing rule:
1. Select Payment Factory - Configuration - Transaction Routing Rules.
2. In the Transaction Routing Rule Editor - Criteria Selection page, enter search criteria.
3. Click Search.
4. In the Transaction Routing Rule List page, drill down on the transaction routing rule.
5. In the Transaction Routing Rule Editor page, edit the transaction routing rule.
For information on the controls in all other sections, contact Wallstreet.
6. Click Save.
5.2.2.2.4 Deleting transaction routing rules
To delete a transaction routing rule:
1. Select Payment Factory - Configuration - Transaction Routing Rules.
2. In the Transaction Routing Rule Editor - Criteria Selection page, enter search criteria.
3. Click Search.
4. In the Transaction Routing Rule List page, select the transaction routing rule’s checkbox.
5. Click Delete All Selected.
6. In the resulting dialog, click OK.
5.2.2.2.5 Enabling and disabling transaction routing rules
To enable or disable a transaction routing rule:
1. Select Payment Factory - Configuration - Transaction Routing Rules.
2. In the Transaction Routing Rule Editor - Criteria Selection page, enter search criteria.
3. Click Search.
4. In the Transaction Routing Rule List page, select the transaction routing rule’s checkbox.
5. Do one of the following:
–To enable the transaction routing rule, click Enable All Selected.
–To disable the transaction routing rule, click Disable All Selected.
5.2.2.2.6 Using field value functions
The following are the field value functions and parameters supported by the Transaction Routing
Rules function:
5 Configuring workflows
5.2 Completing expected and instructed activity setup
WebSuite System Administration Guide 189
Note: Parameters ending in "String" (for example, [SearchString]) can contain string values, and
parameters ending in "Int" (for example, [CountInt]) can contain integer values.
•=
•<>
•<
•<=
•>
•>=
•Between
The Between function allows you to search for a field value between two specified values. It can
have two parameters as defined in the following table:
The following are examples:
•Contains
The Contains function allows you to search for a string of characters in any position of a field’s
value. It can have one parameter as defined in the following table:
Number Definition
2[FirstInt],[SecondInt]
Where
• [FirstInt] is the first specified value
• [SecondInt] is the second specified value.
Parameter(s) Original field value Resulting field value
1,3 2True
1,3 4False
Number Definition
1[ContainString]
Where
• [ContainString] is a string of characters anywhere in the field value.
5 Configuring workflows
5.2 Completing expected and instructed activity setup
190 © Wall Street Systems IPH AB - Confidential
The following are examples:
•Starts with
The Starts with function allows you to search for a string of characters at the beginning of a
field’s value. It can have one parameter as defined in the following table:
The following are examples:
•Ends with
The Ends with function allows you to search for a string of characters at the end of a field’s
value. It can have one parameter as defined in the following table:
The following are examples:
Parameter(s) Original field value Resulting field value
abc abc123?def456 True
123 abc123?def456 True
xyz abc123?def456 False
Number Definition
1[StartString]
Where
• [StartString] is a string of characters at the beginning of the field value.
Parameter(s) Original field value Resulting field value
abc123 abc123?def456 True
def456 abc123?def456 False
Number Definition
1[EndString]
Where
• [EndString] is a string of characters at the end of the field value.
Parameter(s) Original field value Resulting field value
def456 abc123?def456 True
abc123 abc123?def456 False
5 Configuring workflows
5.2 Completing expected and instructed activity setup
WebSuite System Administration Guide 191
5.2.3 Configuring the payment flow
In CMM, the "payment flow" refers to the cash record’s authorization workflow as well as the steps
leading up to payment release. This flow can be configured to have as many authorization steps as
needed. Technical consultants are responsible for building the authorization steps and the
transitions and actions between these steps.
Once the flow is in place, you can configure:
•How the routing of a cash record in the flow is controlled using CMM Cash Record Rules.
•Who can authorize a cash record in the various authorization steps. The users or users belonging
to specific access profiles that can authorize a cash record is controlled in Transaction Processing
Rules. Search for the Security Center in the WSS System Admin Guide for details.
5.2.3.1 Building the payment flow
The flow consists of entity states and operation agents.
Entity states define the possible states of a cash record in the flow. They are built using the file
cash_record.sql.
An operation agent executes an agent based on conditions (state, rules, mask). The different
operation agents are built in the cash_record.py file.
For information about entity flow, see the TRM System Administration Guide, and search for
cash_record.py.
Once the payment flow with the different transitions is in place, routing a cash record in the flow is
controlled using CMM Cash Record Rules, XML Rule Services and the current state of the cash
record.
5.2.3.2 Using CMM Cash Record Rules to control the payment flow
Each transition in the payment flow has a rule and a not-rule (CMM Cash Record Rule) associated
with it. Cash records matching the rule will go through the transition, those matching the not rule
will not and will be checked against the next transition in the flow (see the order number for each
action). See 5.2.3.3 Workflow example on page 192.
Cash record rules are defined in CMM Cash Record Rule Editor, available from TRM Application
Manager.
5.2.3.2.1 Using Rule Service to control the work payment flow
To each transition action in the flow we can also associate a condition using rule services. This works
in the same way as cash record rules condition checking but it offers more possibilities. Cash record
rules use criteria directly linked to the cash record information (except for counterparty group).
These rule services are standard XML handlers (like those used in XML import/export) which trigger
some internal code and reply true or false (matching or not matching).
The most basic rule services call directly some specific XML handlers which set the answer in the
Handler Context:
<?xml version="1.0"?>
<!--
This is calling the matching handler
Excepted parameters (usually set by the workflow engine) :
- cash_records is a CaCashRecordData
- rule_id is a String
-->
<matching_rule/>
Standard XML handlers can be called as soon as the result value is set in the context (context
variable id: action_status-value: SUCCESS or FAILURE)
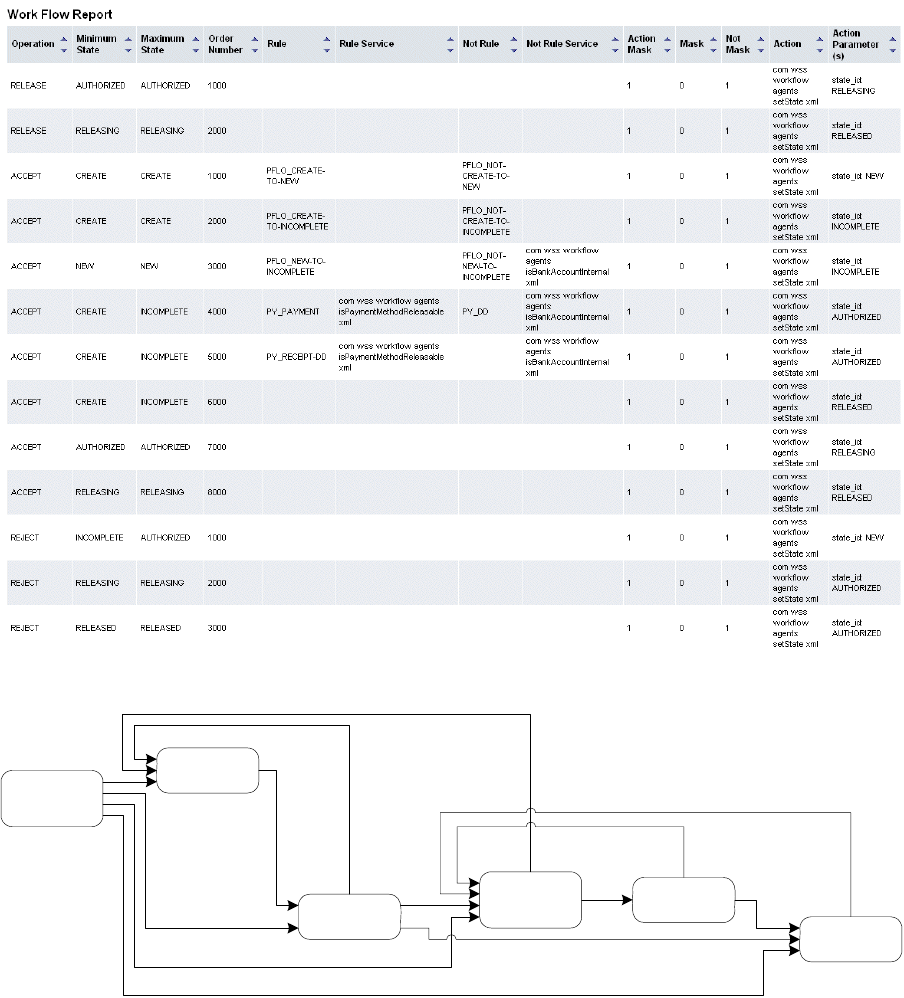
5 Configuring workflows
5.2 Completing expected and instructed activity setup
192 © Wall Street Systems IPH AB - Confidential
5.2.3.3 Workflow example
The Work Flow report in CMM shows the authorization work flow's transition (operation agents). It is
available from the Admin - Utilities - Workflow Engines Setup menu option. Here is an example Work Flow
report:
Here is a diagram of the state flow from the example work flow above:
AUTHORIZED
RELEASED
RELEASING
NEW
CREATE
INCOMPLETE
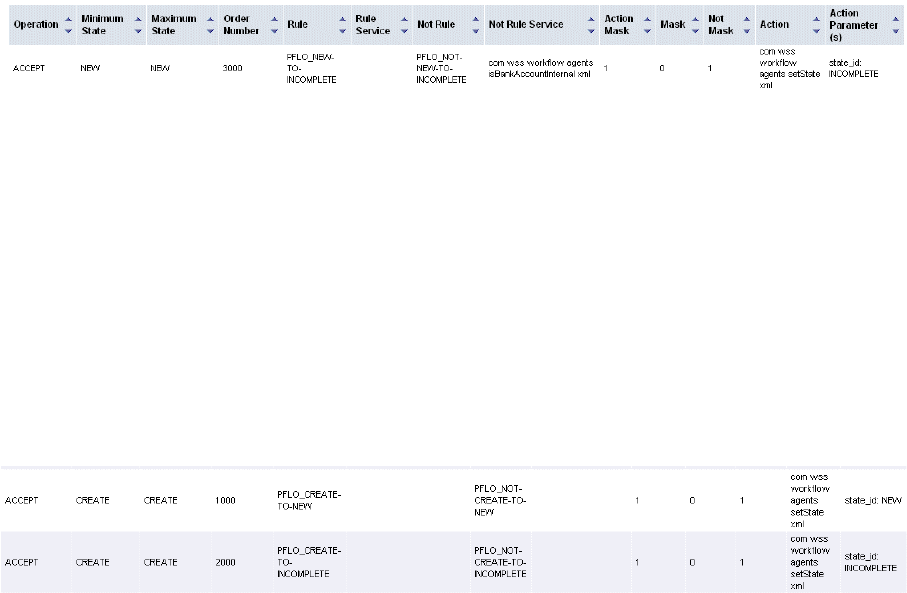
5 Configuring workflows
5.2 Completing expected and instructed activity setup
WebSuite System Administration Guide 193
The report shows the different operation agents for a payment flow. An operation agent is made of:
•One Operation
•Minimum State and Maximum State to which this operation can apply.
•Cash Record Rules and Not Rules. The operation is executed if the cash record matches the rule
and does not match the not-rule.
•Rule Service and Not Rule Service. This is similar to cash record rules matching but relies on XML
handlers that return true or false.
•Masks: to control the sequence or chain of actions; mainly to ensure that only one action is
performed per operation event.
•Action and Action Parameter: what action is performed by the operation, and the resulting state
change to be applied to the cash record.
Example:
This Operation agent controls the transition from state NEW (minimum and maximum states) to state
INCOMPLETE (Action is set state and Action Parameter is INCOMPLETE). When a user accepts a cash
record in state NEW, the Cash record data is matched against the Rule and the Not Rule. It is also
matched against the XML rules using the Rule Service and Not Rule Service.
If the cash record matches the rule and does not match the not-rule, it is moved to state
INCOMPLETE for another level of authorization. Otherwise the flow checks the next Operation agent in
the list (based on Order Number).
Mask and Not Mask: when an operation event starts, the mask value is set to 0. Starting at the top of
the flow, comparisons are made until the operation type and state match, and a rule also gets a
match. If the mask is currently 0, the action is performed (a change of state) and the mask is set to
1. Looking at the Flow Report, it is clear that once the mask is set to 1, no further actions in the
remaining flow can be performed. This ensures that the new state is not processed within the same
operation event.
Other operation agent examples to explain cash record creation:
When a Cash record is created it gets the state CREATE which is a system state. Immediately, the
system applies an ACCEPT action on this cash record. This means that no cash record should remain
in state CREATE. Operation agents in the flow assign the correct state to the newly created cash
record.
5.2.3.4 Handlers in the flow
A handler is a tag that can be used in an XML file used by the rule services and agents. It triggers
Java internal code from an XML file and enables:
•Building more powerful rules for the flow (see 5.2.3.2.1 Using Rule Service to control the work
payment flow on page 191)
•Building of actions inside the flow.

5 Configuring workflows
5.2 Completing expected and instructed activity setup
194 © Wall Street Systems IPH AB - Confidential
5.2.3.5 Monitoring the payment flow
•Work Flow report
Displays the payment flow order and rules. It is available from the Admin - Utilities - Workflow Engines
Setup menu option.
•State Changes Audit Trail
Produces a report that displays all actions taken on cash records in the authorization flow. It is
available from the Admin - Utilities - Workflow Engines Setup menu option.
5.2.4 Configuring transaction processing rules
The Transaction Processing Rules function allows you to create and maintain transaction processing
rules. Transaction processing rules consist of three parts:
Table notes:
1. As of this release, the possible actions are stopping or allowing the relevant process.
The Transaction Processing Rules function currently supports rules for transaction authorization. In
future releases, the function may support rules for other transaction processes in CMM.
5.2.4.1 Prerequisites
The following are prerequisites for configuring transaction processing rules:
Name Description
If One or more conditions that a transaction either meets or does not meet.
Then The actions that take place if the transaction meets the If conditions. [1]
Else The actions that take place if the transaction does not meet the If conditions. [1]
Category Tasks
Security Ensure you have access to the following function:
• FG-0069 Regulatory Reporting Code Maintenance.
In addition, create user groups to reference in the transaction processing rules.
For more information, see Chapter 3 Managing security on page 93.
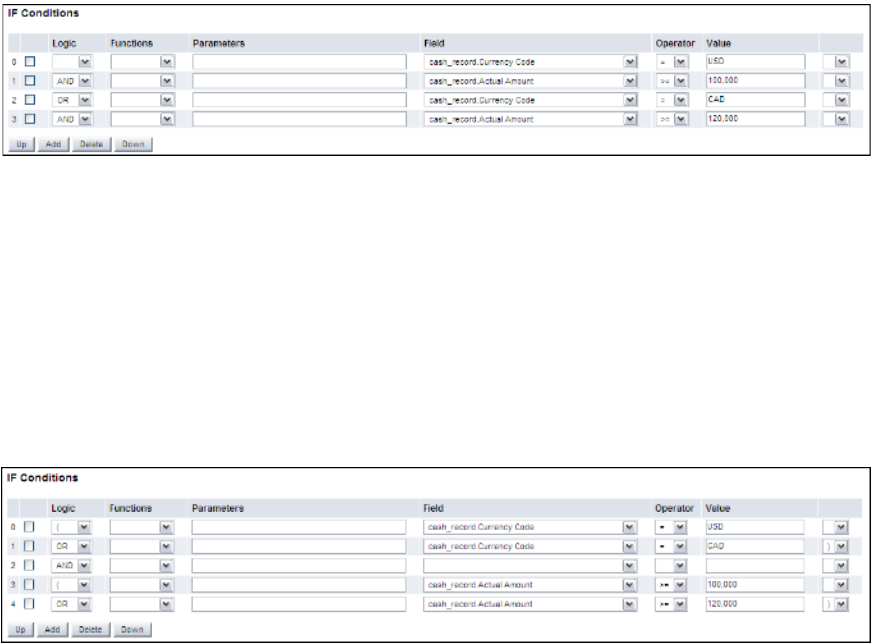
5 Configuring workflows
5.2 Completing expected and instructed activity setup
WebSuite System Administration Guide 195
5.2.4.2 Creating transaction processing rules
To create a transaction processing rule:
1. Select Payment Factory - Configuration - Transaction Processing Rules.
2. In the Transaction Processing Rules - Criteria Selection page, click Search.
3. In the Rule List page, click New Entry.
4. In the Transaction Processing Rule Editor page, create the transaction processing rule.
5. In the IF Conditions section of the Transaction Processing Rule Editor page:
–To create an If condition:
a. Click Add.
b. In the resulting row, create the If condition.
–To delete an If condition:
a. Select the If condition’s checkbox.
b. Click Delete.
–To change the position of an If condition:
a. Select the If condition’s checkbox.
b. Click Up or Down until the If condition is in the desired position.
Ensure at least one If condition defines the user group to which the limit rule applies.
You can connect If conditions by selecting AND or OR in the list at the beginning of each row. The
following is an
example:
Because AND takes precedence over OR, CMM interprets this example as follows:
The currency code must equal USD, and the actual amount must be equal to or greater than
100,000.
or
The currency code must equal CAD, and the actual amount must be equal to or greater than
120,000.
You can override this behavior by selecting ( and ) in the lists at the beginning and end of each
row. The following is an
example:
5 Configuring workflows
5.2 Completing expected and instructed activity setup
196 © Wall Street Systems IPH AB - Confidential
CMM interprets this example as follows:
The currency code must equal USD or CAD.
and
The actual amount must be equal to or greater than 100,000 or 120,000.
The above two examples produce similar but not identical results. A transaction with a currency
code of CAD and an actual amount of 100,000 would fail in the first example but would pass in
the second one. Therefore, it is important that you carefully plan your If conditions.
6. In the THEN section of the Transaction Processing Rule Editor page:
–To create a Then action:
a. Click Add.
b. In the resulting row, create the Then action.
–To delete a Then action:
a. Select the Then action’s checkbox.
b. Click Delete.
–To change the position of a Then action:
a. Select the Then action’s checkbox.
b. Click Up or Down until the Then action is in the desired position.
7. In the Else – Actions section of the Transaction Processing Rule Editor page, repeat step 6 for
Else actions.
8. Click Save.
To validate the transaction processing rule before saving it, click Validate.
5.2.4.3 Editing transaction processing rules
To edit a transaction processing rule:
1. Select Payment Factory - Configuration - Transaction Processing Rules.
2. In the Transaction Processing Rules - Criteria Selection page, enter search criteria.
3. Click Search.
4. In the Rule List page, drill down on the transaction processing rule.
5. In the Transaction Processing Rule Editor page, edit the transaction processing rule.
6. In the IF Conditions section of the Transaction Processing Rule Editor page:
–To create an If condition:
a. Click Add.
b. In the resulting row, create the If condition.
–To delete an If condition:
a. Select the If condition’s checkbox.
b. Click Delete.
–To change the position of an If condition:
a. Select the If condition’s checkbox.
b. Click Up or Down until the If condition row is in the desired position.
Ensure at least one If condition defines the user group to which the limit rule applies.
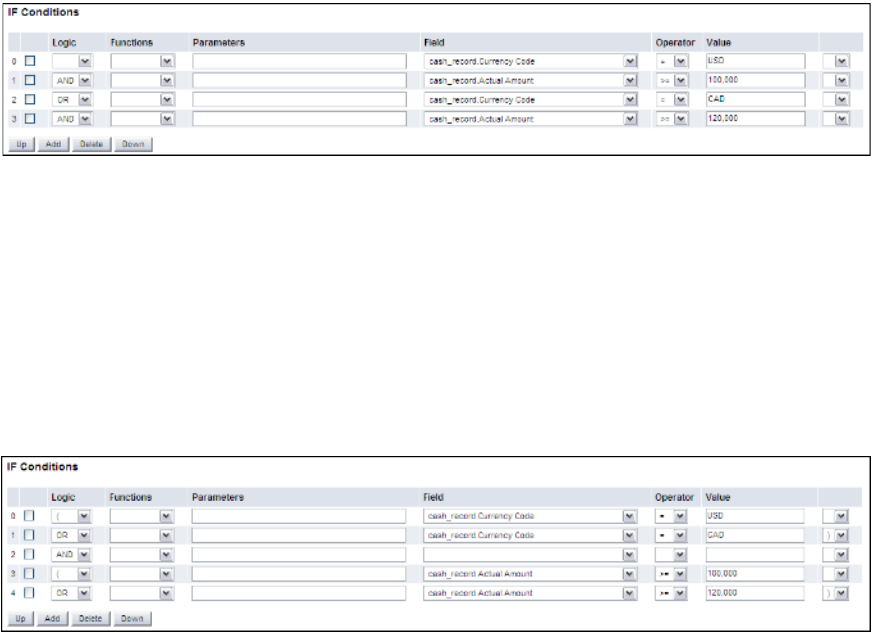
5 Configuring workflows
5.2 Completing expected and instructed activity setup
WebSuite System Administration Guide 197
You can connect If conditions by selecting AND or OR in the list at the beginning of each row. The
following is an example:
Because AND takes precedence over OR, CMM interprets this example as follows:
The currency code must equal USD, and the actual amount must be equal to or greater than
100,000.
or
The currency code must equal CAD, and the actual amount must be equal to or greater than
120,000.
You can override this behavior by selecting ( and ) in the lists at the beginning and end of each
row. The following is an example:
CMM interprets this example as follows:
The currency code must equal USD or CAD.
and
The actual amount must be equal to or greater than 100,000 or 120,000.
5 Configuring workflows
5.2 Completing expected and instructed activity setup
198 © Wall Street Systems IPH AB - Confidential
The above two examples produce similar but not identical results. A transaction with a currency
code of CAD and an actual amount of 100,000 would fail in the first example but would pass in
the second one. Therefore, it is important that you carefully plan your If conditions.
7. In the THEN section of the Transaction Processing Rule Editor page:
–To create a Then action:
a. Click Add.
b. In the resulting row, create the Then action.
–To delete a Then action:
a. Select the Then action’s checkbox.
b. Click Delete.
–To change the position of a Then action:
a. Select the Then action’s checkbox.
b. Click Up or Down until the Then action row is in the desired position.
8. In the Else – Actions section of the Transaction Processing Rule Editor page, repeat step 7 for
Else actions.
9. Click Save.
To validate the transaction processing rule before saving it, click Validate.
5.2.4.4 Deleting transaction processing rules
To delete a transaction processing rule:
1. Select Payment Factory - Configuration - Transaction Processing Rules.
2. In the Transaction Processing Rules - Criteria Selection page, enter search criteria.
3. Click Search.
4. In the Rule List page, select the transaction processing rule’s checkbox.
5. Click Delete All Selected.
6. In the resulting dialog, click OK.
5.2.4.5 Enabling and disabling transaction processing rules
To enable or disable a transaction processing rule:
1. Select Payment Factory - Configuration - Transaction Processing Rules.
2. In the Transaction Processing Rules - Criteria Selection page, enter search criteria.
3. Click Search.
4. In the Rule List page, select the transaction processing rule’s checkbox.
5. Do one of the following:
–To enable the transaction processing rule, click Enable All Selected.
–To disable the transaction processing rule, click Disable All Selected.
5.2.4.6 Using cash record rules in transaction processing rules
Cash record rules can be used in the 'IF' part of a transaction processing rule. If 'Payment' 'is
matching' a cash record rule, we can stop or allow the authorization. This can be used combined
with a condition on User Groups as in the following example.

5 Configuring workflows
5.2 Completing expected and instructed activity setup
WebSuite System Administration Guide 199
Aim
To grant authorization permission for a cash record in state NEW and coming from an AP Import to
the CMM user group AUTHO-NEW-AP.
Solution
Set up the following cash record rule based on Source (AP Import) and Cash Record Status (NEW)
Set up the following a transaction processing rule to proceed with transaction authorization if the
user is a member of the user group AUTHO-NEW-AP, and if the cash record matches the cash record
rule specified
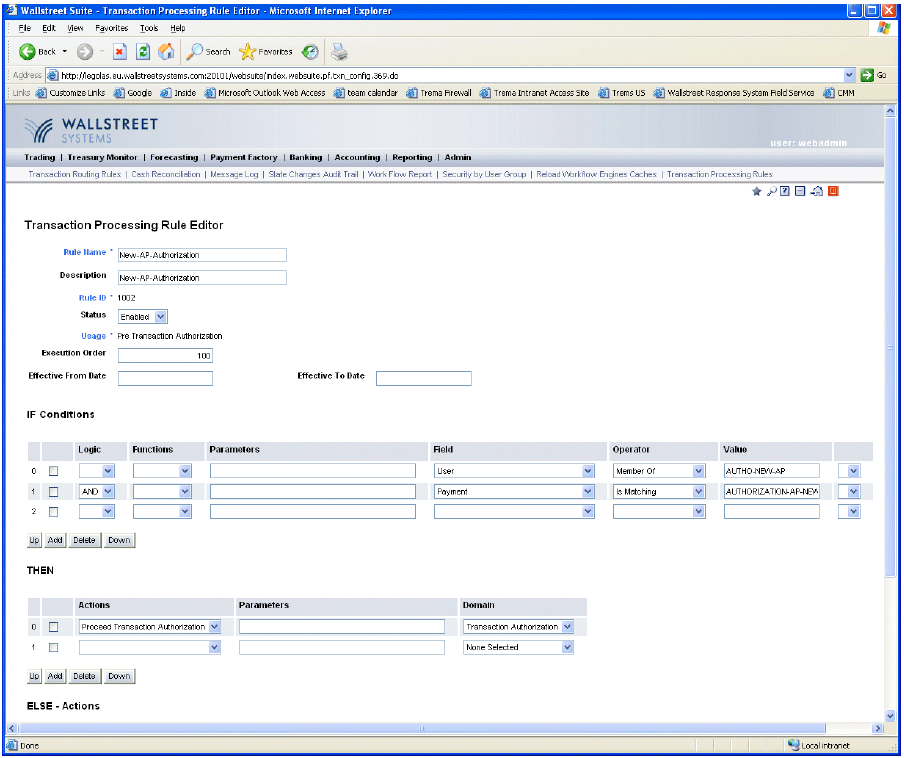
5 Configuring workflows
5.2 Completing expected and instructed activity setup
200 © Wall Street Systems IPH AB - Confidential
above:
5.2.4.7 Last Modifier, Not Last Modifier
Using 'Is Last Modifier' or 'Is Not Last Modifier' in the IF part of a transaction processing rule will
check the user doing the action (authorizing a transaction) against the user who last modified the
cash record. Setting a transaction processing rule where user 'is last modifier' is needed if you do
not want the last modifier of the transaction to be allowed to do the next
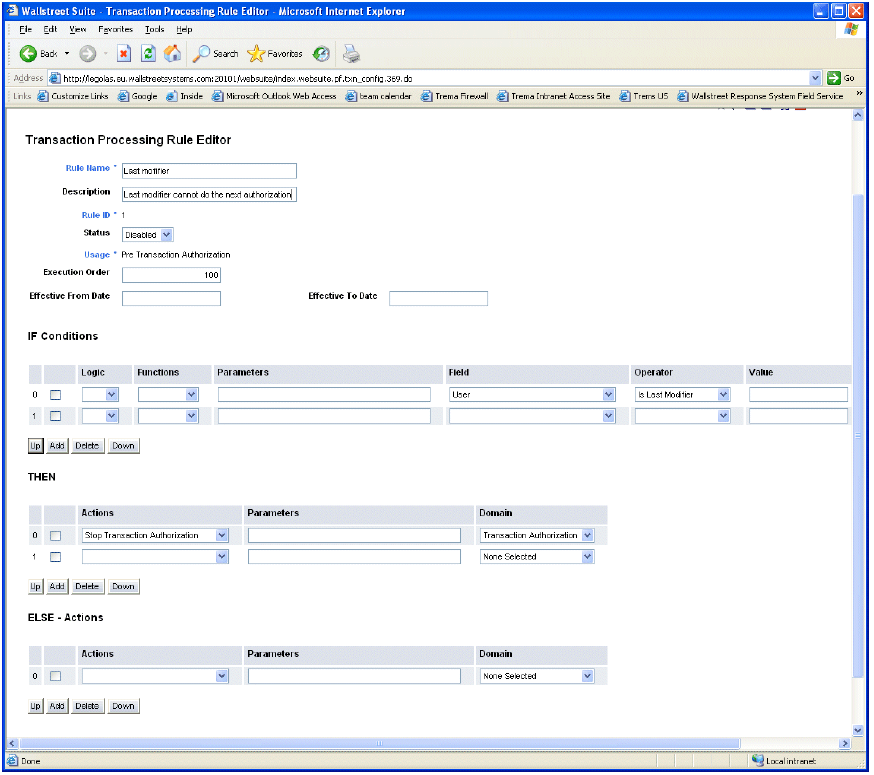
5 Configuring workflows
5.2 Completing expected and instructed activity setup
WebSuite System Administration Guide 201
authorization.
With this setup, if a user manually enters a cash record (or modifies an existing cash record) that
user is not allowed to do the next authorization on this cash record.
5.2.4.8 Last Acceptor, Not Last Acceptor
Using 'Is Last Acceptor or 'Is Not Last Acceptor' in the IF part of a transaction processing rule will
check the user doing the action (authorizing a transaction) against the user who last accepted the
cash record. This can be used to prevent a user from doing two consecutive authorizations on a cash
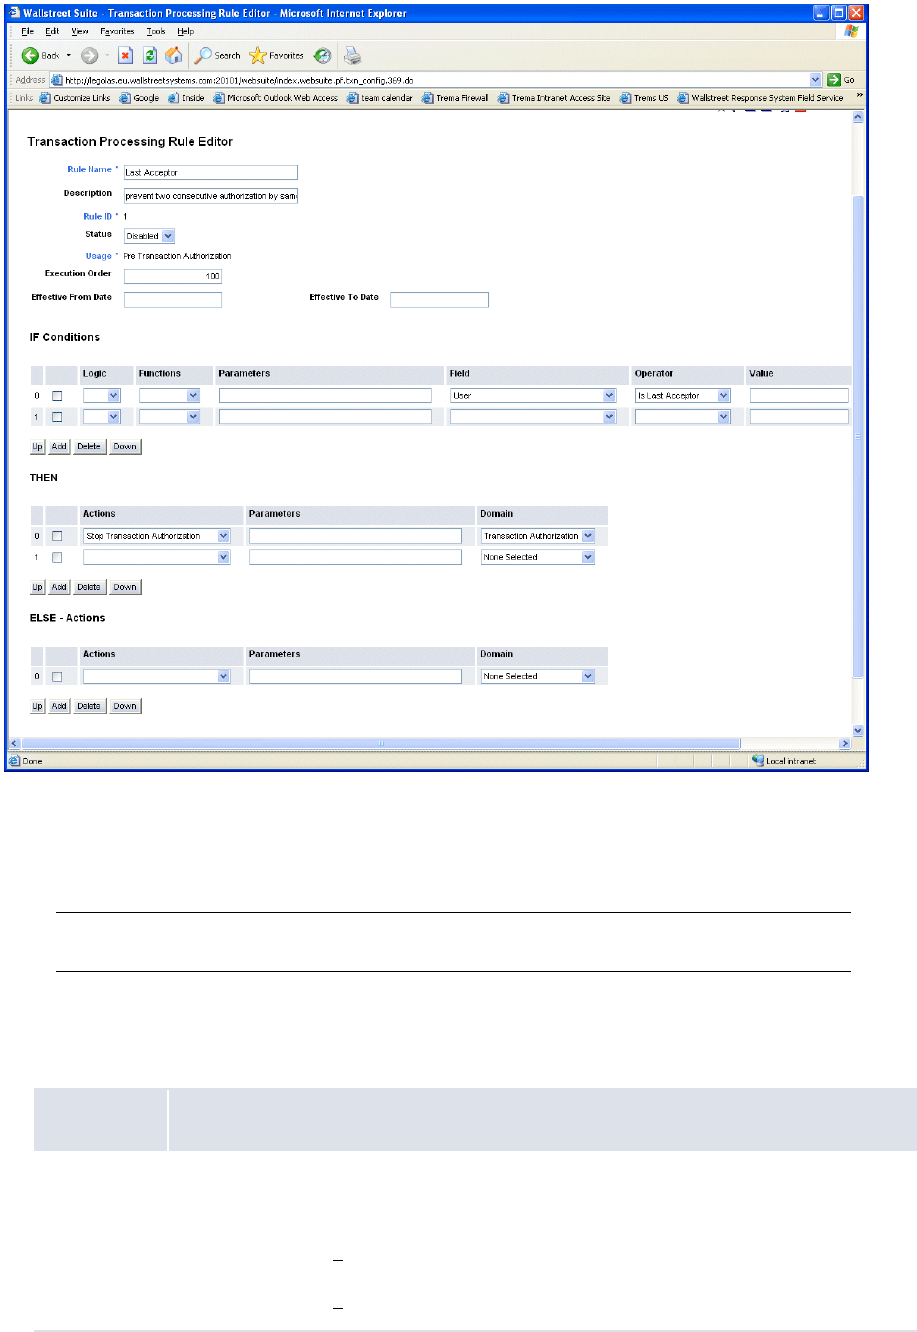
5 Configuring workflows
5.2 Completing expected and instructed activity setup
202 © Wall Street Systems IPH AB - Confidential
record.
5.2.4.9 Using field value functions
The following are the field value functions and parameters supported by the Transaction Processing
Rules function:
Note: Parameters ending in "String" (for example, [SearchString]) can contain string values, and
parameters ending in "Int" (for example, [CountInt]) can contain integer values.
•Substring
The Substring function allows you to search for or select a defined portion (or "substring") of a
field’s value. It can have two, three, four, or five parameters as defined in the following table:
Number Definition
2[StartInt],[EndInt]
Where
• [StartInt] is the first character place from the beginning of the field value to include in
the substring. [1]
• [EndInt] is the last character place from the beginning of the field value to include in
the substring. [1]
5 Configuring workflows
5.2 Completing expected and instructed activity setup
WebSuite System Administration Guide 203
Table notes:
1. Parameters such as [StartInt] and [EndInt] always start counting character positions from 0.
Therefore, the first character position is 0; the second, 1; the third, 2; and so on.
The following are examples:
3[SearchString],[StartInt],[EndInt]
Where
• [SearchString] is a string of characters to be searched for in the field value.
• [StartInt] is the first character place after [SearchString] to include in the substring.
[1]
• [EndInt] is the last character place after [SearchString] to include in the substring. [1]
4[SearchString],[StartInt],[EndString],[LengthInt]
Where
• [SearchString] is a string of characters to be searched for in the field value.
• [StartInt] is the first character place after [SearchString] to include in the substring.
[1]
• [EndString] is a string of characters that immediately follow the substring. [1]
• [LengthInt] is either the length of the substring or "-1" (to not specify a length). [1]
If CMM cannot find [EndString] in the field value, it ignores it and uses [LengthInt]
instead.
5[ConditionString],[CountInt],[SearchString],[StartInt],[EndString]
Where
• [ConditionString] is a string of characters that must exist in the field value.
• [SearchString] is a string of characters to be searched for in the field value.
• [CountInt] is an occurrence of the [SearchString]. [1]
• [StartInt] is the first character after the [CountInt] occurrence of [SearchString] to
include in the substring. [1]
• [EndString] is a string of characters that immediately follow the substring.
Parameter(s) Original field
value Resulting field value
3,5 abc123?def456 123
def,0,2 abc123?def456 456
abc,0,?,-1 abc123?def456 123
abc,0,!,6 abc123?def456 123?def
("!" is not in the original field value and, therefore, is ignored
by CMM.)
abc123,0,?,3,? abc123?def456?ghi
789
456
xyz123,0,?,3,? abc123?def456?ghi
789
No result
("xyz123" is not in the original field value.)

5 Configuring workflows
5.2 Completing expected and instructed activity setup
204 © Wall Street Systems IPH AB - Confidential
•Contains
The Contains function allows you to search for a string of characters in any position of a field’s
value. It can have one parameter as defined in the following table:
The following are examples:
•Starts with
The Starts with function allows you to search for a string of characters at the beginning of a
field’s value. It can have one parameter as defined in the following table:
The following are examples:
•Ends with
The Ends with function allows you to search for a string of characters at the end of a field’s
value. It can have one parameter as defined in the following table:
Number Definition
1[ContainString]
Where
• [ContainString] is a string of characters anywhere in the field value.
Parameter(s) Original field value Resulting field value
abc abc123?def456 True
123 abc123?def456 True
xyz abc123?def456 False
Number Definition
1[StartString]
Where
• [StartString] is a string of characters at the beginning of the field value.
Parameter(s) Original field value Resulting field value
abc123 abc123?def456 True
def456 abc123?def456 False
Number Definition
1[EndString]
Where
• [EndString] is a string of characters at the end of the field value.
5 Configuring workflows
5.2 Completing expected and instructed activity setup
WebSuite System Administration Guide 205
The following are examples:
•Trim
The Trim function allows you to remove spaces, or a defined character or set of characters from
the beginning of a field’s value. It can have zero or one parameters as defined in the following
table:
The following are examples:
•Append
The Append function allows you to add text to the end of a field’s value. It can have one or three
parameters as defined in the following table:
Parameter(s) Original field value Resulting field value
def456 abc123?def456 True
abc123 abc123?def456 False
Number Definition
0[N/A]
1[TrimString]
Where
• [TrimString] is a character or set of characters to remove from the beginning of the
field.
Parameter(s) Original field value Resulting field value
[N/A] abc123 abc123
[N/A] abc123 abc123 abc123 abc123
0000123456 123456
0000123000 123000
Number Definition
1[ConcatString]
Where
• [ConcatString] is a string of characters to add to the end of the field value.
5 Configuring workflows
5.2 Completing expected and instructed activity setup
206 © Wall Street Systems IPH AB - Confidential
Table notes:
1. Parameters such as [StartInt] and [EndInt] always start counting character positions from 0.
Therefore, the first character position is 0; the second, 1; the third, 2; and so on.
The following are examples:
•Prefix
The Prefix function allows you to add text to the beginning of a field’s value. As a result, the
original field value is concatenated at the end of the resulting field value. It can have one or
three parameters as defined in the following table:
Table notes:
1. Parameters such as [StartInt] and [EndInt] always start counting character positions from 0.
Therefore, the first character position is 0; the second, 1; the third, 2; and so on.
The following are examples:
3[SearchString],[StartInt],[EndInt]
Where
• [SearchString] is a string of characters to be searched for in the field value.
• [StartInt] is the first character place after [SearchString] to add to the end of the
field value. [1]
• [EndInt] is the last character place after [SearchString] to add to the end of the field
value. [1]
Parameter(s) Original field value Resulting field value
?ghi789 abc123?def456 abc123?def456?ghi789
abc123,0,6 abc123?def456 abc123?def456?def456
def123,0,6 abc123?def456 No result
("def123" is not in the original field
value.)
Number Definition
1[ConcatString]
Where
• [ConcatString] is a string of characters to add to the beginning of the field.
3[SearchString],[StartInt],[EndInt]
Where
• [SearchString] is a string of characters to be searched for in the field.
• [StartInt] is the first character place after [SearchString] to add to the end of the
field. [1]
• [EndInt] is the last character place after [SearchString] to add to the end of the
field. [1]
Parameter(s) Original field value Resulting field value
5 Configuring workflows
5.2 Completing expected and instructed activity setup
WebSuite System Administration Guide 207
•IsEmpty
The IsEmpty function allows you to determine if a selected field is empty or not. It returns a
value of true if the field is empty or false if the field is not empty.
5.2.5 CMM Cash Record Rule Editor
Use CMM Cash Record Rule Editor to define rules that can be used as IF conditions in the CMM
payment flow or in CMM Transaction Processing Rules.The main part of this editor defines the rule:
The Cash Record Rule page contains the actual IF conditions: the criteria that the cash record will be
matched against.
It is possible to create and save multiple conditions with different names. The logical operator
between these conditions is OR.
ghi789? abc123?def456 ghi789?abc123?def456
ghi789?,3,6 abc123?def456 789?abc123?def456
Description
Rule Unique ID of the cash record rule.
Name Cash record rule name.
Category Reserved for future use.
Comment Free text comment.
Disabled Switch on to disable this rule.
5 Configuring workflows
5.2 Completing expected and instructed activity setup
208 © Wall Street Systems IPH AB - Confidential
Example
To build a rule that will select:
Cash records coming from an AP import AND with payment method EFT
OR
Cash records coming from a DD Import
From the screenshots below, you can see that a rule called AP-OR-DD-IMPORTS has been created,
and that it contains two conditions called DD Import:
and AP
Import-EFT:
5 Configuring workflows
5.2 Completing expected and instructed activity setup
WebSuite System Administration Guide 209
5.2.5.1 Descriptions of the condition and criteria fields
Field Description
Source How the cash record was created in CMM, for example from an AP file import,
or entered manually.
Cashflow Source Commercial or Financial. For example, cash records coming from TRM
cashflows are financial.
Cashflow Type Cash record cashflow type.
Payment method payment method of the Cash record.
Cash Record Type Payment or Receipt.
Cash Record Subtype Direct debit or not.
Cash Record Template Template name that was used to create the cash record in CMM single
transaction entry.
Cash Record Status Status of the cash record in the authorization workflow.
Priority Status Urgent or not.
Secure Transaction Yes or no.
Intercompany Yes or no.
Originating Entity Originator of the cash record.
Entity The party that owns the cash record.
Counterparty The counterparty of the cash record.
Originating
Entity/Entity/Counterparty
Main Group fields
Client Main Group to which the entity (Originating Entity/Entity/Counterparty )
belongs to (defined in TRM Client Editor and TRM Client Group Editor).
Originating
Entity/Entity/Counterparty
Group fields
Client Group to which the entity (Originating Entity/Entity/Counterparty)
belongs to (defined in TRM Client Editor and TRM Client Group Editor).
Originating
Entity/Entity/Counterparty
Bank fields
Bank of the corresponding entity.
Originating
Entity/Entity/Counterparty
Account and Number fields
Bank Account ID and Bank Account number of the corresponding entity.

5 Configuring workflows
5.2 Completing expected and instructed activity setup
210 © Wall Street Systems IPH AB - Confidential
5.2.6 Configuring pre-advice reporting limits
CMM can send pre-advices for receipts (notifying a bank of an incoming receipt).
When your organization notifies its bank early in the business day, the bank can secure better
overnight rates than would be possible if a large receipt came in at the end of the day. If your
organization sends a pre-advice to its bank but does not send a receipt, your organization can be
penalized.
Limits (on processing amounts) are used to ensure that only those receipts that are of sufficient
amounts are displayed for consideration of notifying the banks. Limits (on bank amounts) also
ensure that users know if the receipt amount exceeds the bank’s imposed limit.
5.2.6.1 Prerequisites
The following are prerequisites for configuring pre-advice reporting limits:
5.2.6.1.1 Creating pre-advice reporting limits
To create a pre-advice reporting limit:
1. Select Banking - Configuration - Pre-Advice Reporting Limits.
2. In the Pre-Advice Reporting Limits - Criteria Selection page, click Search.
3. In the Pre-Advice Reporting Limits page, click New Entry.
4. In the Pre-Advice Reporting Limit page, create the pre-advice reporting limit.
5. Click Save.
Originating
Entity/Entity/Counterparty
Account Group fields
Account group the corresponding entity account belongs to.
Originating
Entity/Entity/Counterparty
Account Type fields
Type of account the corresponding entity account belongs to.
Currency Currency of the cash record.
Amount From / to Amount of the cash record.
Category Tasks
Static data Ensure the following static data are available:
• Currencies
•Banks.
For more information, see the WebSuite User Guide.
Security Ensure you have access to the following function:
• FG-0262 Pre-Advice Reporting Limits.
For more information, see Chapter 3 Managing security on page 93.

5 Configuring workflows
5.3 Completing bank-reported activity setup
WebSuite System Administration Guide 211
5.2.6.1.2 Editing pre-advice reporting limits
To edit a pre-advice reporting limit:
1. Select Banking - Configuration - Pre-Advice Reporting Limits.
2. In the Pre-Advice Reporting Limits - Criteria Selection page, enter search criteria.
3. Click Search.
4. In the Pre-Advice Reporting Limits page, drill down on the pre-advice reporting limit.
5. In the Pre-Advice Reporting Limit page, edit the pre-advice reporting limit.
6. Click Save.
5.2.6.1.3 Deleting pre-advice reporting limits
To delete a pre-advice reporting limit:
1. Select Banking - Configuration - Pre-Advice Reporting Limits.
2. In the Pre-Advice Reporting Limits - Criteria Selection page, enter search criteria.
3. Click Search.
4. In the Pre-Advice Reporting Limits page, drill down on the pre-advice reporting limit.
5. In the Pre-Advice Reporting Limit page, click Delete.
6. In the resulting dialog, click OK.
5.3 Completing bank-reported activity setup
Before you can capture, process, and analyze bank-reported activity, you or another user must
complete the following setup procedures:
1. Set configuration parameters for bank-reported activity.
2. Configure bank transaction templates.
3. Configure bank transaction rules.
4. Configure bank transaction validation rules.
5. Configure bank statement number rules.
6. Configure intraday bank statement processing rules.
In addition, you or another user can customize select bank-reported activity functions for your
organization.
5.3.1 Configuring bank transaction templates
The Bank Transaction Templates function allows you to create, edit, delete, enable, and disable
bank transaction templates. You can refer to bank transaction templates in post-processing actions
of bank transaction rules. For more information on bank transaction rules, see 5.3.2 Configuring
bank transaction rules on page 213.
5.3.1.1 Prerequisites
The following are prerequisites for configuring bank transaction templates:
Category Tasks

5 Configuring workflows
5.3 Completing bank-reported activity setup
212 © Wall Street Systems IPH AB - Confidential
5.3.1.2 Creating bank transaction templates
To create a bank transaction template:
1. Select Banking - Configuration - Bank Transaction Templates.
2. In the Bank Transaction Templates - Criteria Selection page, click Search.
3. In the Bank Transaction Template List page, click New Entry.
4. In the Bank Transaction Template Maintenance page, create the bank transaction template.
5. Click Save.
5.3.1.3 Editing bank transaction templates
To edit a bank transaction template:
1. Select Banking - Configuration - Bank Transaction Templates.
2. In the Bank Transaction Templates - Criteria Selection page, enter search criteria.
3. Click Search.
4. In the Bank Transaction Template List page, drill down on the bank transaction template.
5. In the Bank Transaction Template Maintenance page, edit the bank transaction template.
6. Click Save.
5.3.1.4 Deleting bank transaction templates
To delete a bank transaction template:
1. Select Banking - Configuration - Bank Transaction Templates.
2. In the Bank Transaction Templates - Criteria Selection page, enter search criteria.
3. Click Search.
4. In the Bank Transaction Template List page, select the bank transaction template’s checkbox.
5. Click Delete All Selected.
6. In the resulting dialog, click OK.
Static data Ensure the following static data are available:
• Currencies
• Bank accounts
• Cash flow types.
For more information, see the WebSuite User Guide.
Interfaces Ensure the following interface data are available:
• Transaction subtype mappings.
For more information, see the CMM Interfaces Guide.
Security Ensure you have access to the following function:
• FG-0358 Bank Transaction Templates.
In addition, ensure you have access to the bank accounts and cash flow types you want to
include in the bank transaction templates.
For more information, see Chapter 3 Managing security on page 93.

5 Configuring workflows
5.3 Completing bank-reported activity setup
WebSuite System Administration Guide 213
5.3.1.5 Enabling and disabling bank transaction templates
To enable or disable a bank transaction template:
1. Select Banking - Configuration - Bank Transaction Templates.
2. In the Bank Transaction Templates - Criteria Selection page, enter search criteria.
3. Click Search.
4. In the Bank Transaction Template List page, select the bank transaction template’s checkbox.
5. Do one of the following:
–To enable the bank transaction template, click Enable All Selected.
–To disable the bank transaction template, click Disable All Selected.
5.3.2 Configuring bank transaction rules
The Bank Transaction Import Rules function allows you to manage bank transaction rules. Bank
transaction rules enrich bank transactions after they have been imported or manually entered into
CMM. This is beneficial in situations where you need information in a particular field to complete
business processes in CMM (such as reconciliation) but a bank cannot provide this information in the
field for technical reasons. In addition, bank transaction rules define post-processing activities on a
bank-transaction-by-bank-transaction basis and replace the bank account mirroring functionality of
previous versions.
5.3.2.1 Prerequisites
The following are prerequisites for configuring bank transaction rules:
Category Tasks
Static data Ensure the following static data are available:
• Currencies
• Attribute parameters
• Bank accounts
• Bank account relationships
• Cash flow types.
For more information, see the WebSuite User Guide.
Security Ensure you have access to the following functions:
• FG-0340 Bank Transaction Import Rules
• FG-0400 Review CMM Configuration.
In addition, ensure you have access to the bank accounts and cash flow types you want to
include in the bank transaction rules.
For more information, see Chapter 3 Managing security on page 93.
Bank-reported
activity setup
Ensure the following tasks have been completed:
•5.2.2.2 Configuring transaction routing rules on page 186
•5.3.1 Configuring bank transaction templates on page 211.
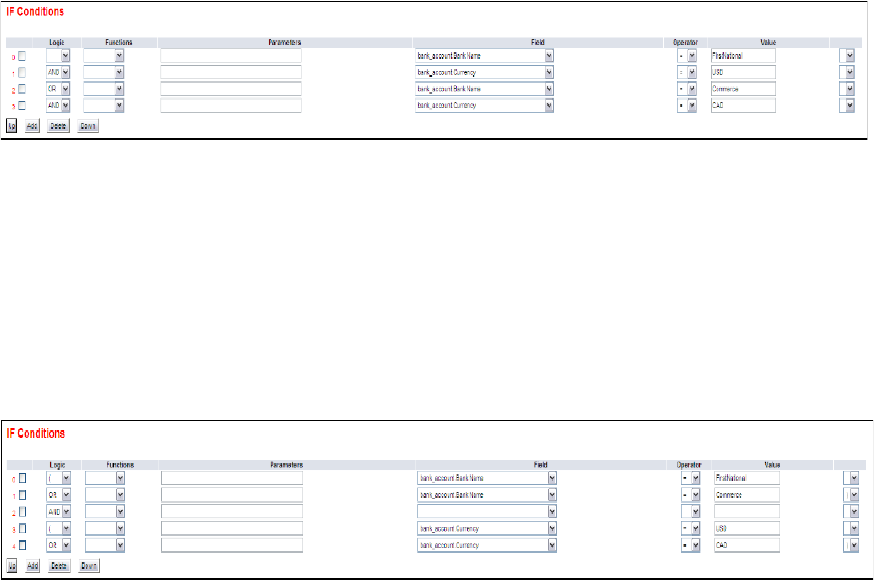
5 Configuring workflows
5.3 Completing bank-reported activity setup
214 © Wall Street Systems IPH AB - Confidential
5.3.2.2 Creating bank transaction rules
To create a bank transaction rule:
1. Select Banking - Configuration - Bank Transaction Import Rules.
2. In the Bank Transaction Import Rule Editor - Criteria Selection page, click Search.
3. In the Bank Transaction Import Rule List page, click New Entry.
4. In the Bank Transaction Import Rule Editor page, create the bank transaction rule.
5. In the IF Conditions section of the Bank Transaction Import Rule Editor page:
–To create an If condition:
a. Click Add.
b. In the resulting row, create the If condition.
–To delete an If condition:
a. Select the If condition’s checkbox.
b. Click Delete.
–To change the position of an If condition:
a. Select the If condition’s checkbox.
b. Click Up or Down until the If condition is in the desired position.
You can connect If conditions by selecting AND or OR in the list at the beginning of each row. The
following is an
example:
Because AND takes precedence over OR, CMM interprets this example as follows:
The bank name must equal FirstNational, and the bank account currency must equal USD.
or
The bank name must equal Commerce, and the bank account currency must equal CAD.
You can override this behavior by selecting ( and ) in the lists at the beginning and end of each
row. The following is an
example:
CMM interprets this example as follows:
The bank name must equal FirstNational or Commerce.
and
5 Configuring workflows
5.3 Completing bank-reported activity setup
WebSuite System Administration Guide 215
The bank account country must equal USD or CAD.
The above two examples produce similar but not identical results. A bank transaction with a
bank name of Commerce and a bank account currency of USD would fail in the first example but
would pass in the second one. Therefore, it is important that you carefully plan your If
conditions.
6. In the THEN – Enrichment Actions section of the Bank Transaction Import Rule Editor page:
–To create a Then enrichment action:
a. Click Add.
b. In the resulting row, create the Then enrichment action.
If you use the FindBankAccount or FindParty functions in an enrichment action, be aware
that these functions return internal identifiers for storage in the specified target fields.
Any subsequent reports and views that refer to the target fields display the internal
identifiers rather than your organization’s business identifiers (such as bank account
numbers and party names). Therefore, Wallstreet recommends that you store business
identifiers in other target fields.
–To delete a Then enrichment action:
a. Select the Then enrichment action’s checkbox.
b. Click Delete.
–To change the position of a Then enrichment action:
a. Select the Then enrichment action’s checkbox.
b. Click Up or Down until the Then enrichment action is in the desired position.
7. In the THEN – Transaction Creation Actions section of the Bank Transaction Import Rule Editor
page:
–To create a Then post-processing action:
a. Click Add.
b. In the resulting row, create the Then post-processing action.
–To delete a Then post-processing action:
a. Select the Then post-processing action’s checkbox.
b. Click Delete.
8. In the Else – Enrichment Actions section of the Bank Transaction Import Rule Editor page, repeat
step 7 for Else enrichment actions.
9. In the Else – Transaction Creation Actions section of the Bank Transaction Import Rule Editor
page, repeat step 8 for Else post-processing actions.
10. Click Save.
To validate the bank transaction rule before saving it, click Validate The Rule.
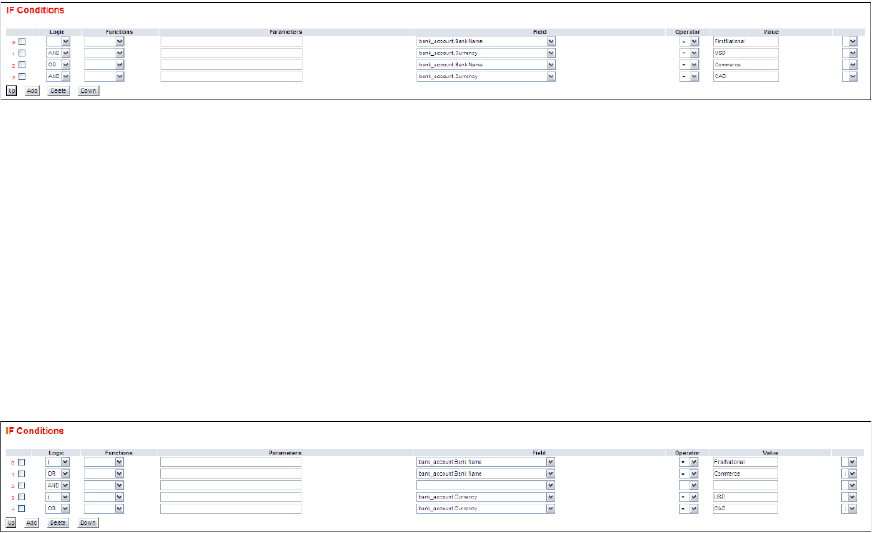
5 Configuring workflows
5.3 Completing bank-reported activity setup
216 © Wall Street Systems IPH AB - Confidential
5.3.2.3 Editing bank transaction rules
To edit a bank transaction rule:
1. Select Banking - Configuration - Bank Transaction Import Rules.
2. In the Bank Transaction Import Rule Editor - Criteria Selection page, enter search criteria.
3. Click Search.
4. In the Bank Transaction Import Rule List page, drill down on the bank transaction rule.
5. In the Bank Transaction Import Rule Editor page, edit the bank transaction rule.
6. In the IF Conditions section of the Bank Transaction Import Rule Editor page:
–To create an If condition:
a. Click Add.
b. In the resulting row, create the If condition.
–To delete an If condition:
a. Select the If condition’s checkbox.
b. Click Delete.
–To change the position of an If condition:
a. Select the If condition’s checkbox.
b. Click Up or Down until the If condition is in the desired position.
You can connect If conditions by selecting AND or OR in the list at the beginning of each row. The
following is an
example:
Because AND takes precedence over OR, CMM interprets this example as follows:
The bank name must equal FirstNational, and the bank account currency must equal USD.
or
The bank name must equal Commerce, and the bank account currency must equal CAD.
You can override this behavior by selecting ( and ) in the lists at the beginning and end of each
row. The following is an
example:
CMM interprets this example as follows:
The bank name must equal FirstNational or Commerce.
5 Configuring workflows
5.3 Completing bank-reported activity setup
WebSuite System Administration Guide 217
and
The bank account country must equal USD or CAD.
The above two examples produce similar but not identical results. A bank transaction with a
bank name of Commerce and a bank account currency of USD would fail in the first example but
would pass in the second one. Therefore, it is important that you carefully plan your If
conditions.
7. In the THEN – Enrichment Actions section of the Bank Transaction Import Rule Editor page:
–To create a Then enrichment action:
a. Click Add.
b. In the resulting row, create the Then enrichment action.
If you use the FindBankAccount or FindParty functions in an enrichment action, be aware
that these functions return internal identifiers for storage in the specified target fields.
Any subsequent reports and views that refer to the target fields display the internal
identifiers rather than your organization’s business identifiers (such as bank account
numbers and party names). Therefore, Wallstreet recommends that you store business
identifiers in other target fields.
–To delete a Then enrichment action:
a. Select the Then enrichment action’s checkbox.
b. Click Delete.
–To change the position of a Then enrichment action:
a. Select the Then enrichment action’s checkbox.
b. Click Up or Down until the Then enrichment action is in the desired position.
8. In the THEN – Transaction Creation Actions section of the Bank Transaction Import Rule Editor
page:
–To create a Then post-processing action:
a. Click Add.
b. In the resulting row, create the Then post-processing action.
–To delete a Then post-processing action:
a. Select the Then post-processing action’s checkbox.
b. Click Delete.
9. In the Else – Enrichment Actions section of the Bank Transaction Import Rule Editor page, repeat
step 7 for Else enrichment actions.
10. In the Else – Transaction Creation Actions section of the Bank Transaction Import Rule Editor
page, repeat step 8 for Else post-processing actions.
11. Click Save.
To validate the bank transaction rule before saving it, click Validate The Rule.
5 Configuring workflows
5.3 Completing bank-reported activity setup
218 © Wall Street Systems IPH AB - Confidential
5.3.2.4 Deleting bank transaction rules
To delete a bank transaction rule:
1. Select Banking - Configuration - Bank Transaction Import Rules.
2. In the Bank Transaction Import Rule Editor - Criteria Selection page, enter search criteria.
3. Click Search.
4. In the Bank Transaction Import Rule List page, select the bank transaction rule’s checkbox.
5. Click Delete All Selected.
6. In the resulting dialog, click OK.
5.3.2.5 Enabling and disabling bank transaction rules
To enable or disable a bank transaction rule:
1. Select Banking - Configuration - Bank Transaction Import Rules.
2. In the Bank Transaction Import Rule Editor - Criteria Selection page, enter search criteria.
3. Click Search.
4. In the Bank Transaction Import Rule List page, select the bank transaction rule’s checkbox.
5. Do one of the following:
–To enable the bank transaction rule, click Enable All Selected.
–To disable the bank transaction rule, click Disable All Selected.
5.3.2.6 Using field value functions in If conditions
The following are the field value functions and parameters supported by If conditions in the Bank
Transaction Import Rules function:
Note: Parameters ending in "String" (for example, [SearchString]) can contain string values, and
parameters ending in "Int" (for example, [CountInt]) can contain integer values.
•Substring
The Substring function allows you to search for or select a defined portion (or "substring") of a
field’s value. It can have two, three, four, or five parameters as defined in the following table:
Number Definition
2[StartInt],[EndInt]
Where
• [StartInt] is the first character place from the beginning of the field value to include in
the substring. [1]
• [EndInt] is the last character place from the beginning of the field value to include in
the substring. [1]
3[SearchString],[StartInt],[EndInt]
Where
• [SearchString] is a string of characters to be searched for in the field value.
• [StartInt] is the first character place after [SearchString] to include in the substring.
[1]
• [EndInt] is the last character place after [SearchString] to include in the substring. [1]
5 Configuring workflows
5.3 Completing bank-reported activity setup
WebSuite System Administration Guide 219
Table notes:
1. Parameters such as [StartInt] and [EndInt] always start counting character positions from 0.
Therefore, the first character position is 0; the second, 1; the third, 2; and so on.
The following are examples:
•Contains
The Contains function allows you to search for a string of characters in any position of a field’s
value. It can have one parameter as defined in the following table:
4[SearchString],[StartInt],[EndString],[LengthInt]
Where
• [SearchString] is a string of characters to be searched for in the field value.
• [StartInt] is the first character place after [SearchString] to include in the substring.
[1]
• [EndString] is a string of characters that immediately follow the substring. [1]
• [LengthInt] is either the length of the substring or "-1" (to not specify a length). [1]
If CMM cannot find [EndString] in the field value, it ignores it and uses [LengthInt]
instead.
5[ConditionString],[CountInt],[SearchString],[StartInt],[EndString]
Where
• [ConditionString] is a string of characters that must exist in the field value.
• [SearchString] is a string of characters to be searched for in the field value.
• [CountInt] is an occurrence of the [SearchString]. [1]
• [StartInt] is the first character after the [CountInt] occurrence of [SearchString] to
include in the substring. [1]
• [EndString] is a string of characters that immediately follow the substring.
Parameter(s) Original field
value Resulting field value
3,5 abc123?def456 123
def,0,2 abc123?def456 456
abc,0,?,-1 abc123?def456 123
abc,0,!,6 abc123?def456 123?def
("!" is not in the original field value and, therefore, is ignored
by CMM.)
abc123,0,?,3,? abc123?def456?ghi
789
456
xyz123,0,?,3,? abc123?def456?ghi
789
No result
("xyz123" is not in the original field value.)
Number Definition
5 Configuring workflows
5.3 Completing bank-reported activity setup
220 © Wall Street Systems IPH AB - Confidential
The following are examples:
•Starts with
The Starts with function allows you to search for a string of characters at the beginning of a
field’s value. It can have one parameter as defined in the following table:
The following are examples:
•Ends with
The Ends with function allows you to search for a string of characters at the end of a field’s
value. It can have one parameter as defined in the following table:
The following are examples:
1[ContainString]
Where
• [ContainString] is a string of characters anywhere in the field value.
Parameter(s) Original field value Resulting field value
abc abc123?def456 True
123 abc123?def456 True
xyz abc123?def456 False
Number Definition
1[StartString]
Where
• [StartString] is a string of characters at the beginning of the field value.
Parameter(s) Original field value Resulting field value
abc123 abc123?def456 True
def456 abc123?def456 False
Number Definition
1[EndString]
Where
• [EndString] is a string of characters at the end of the field value.
Parameter(s) Original field value Resulting field value
def456 abc123?def456 True
5 Configuring workflows
5.3 Completing bank-reported activity setup
WebSuite System Administration Guide 221
•Trim
The Trim function allows you to remove spaces, or a defined character or set of characters from
the beginning of a field’s value. It can have zero or one parameters as defined in the following
table:
The following are examples:
•Append
The Append function allows you to add text to the end of a field’s value. It can have one or three
parameters as defined in the following table:
Table notes:
1. Parameters such as [StartInt] and [EndInt] always start counting character positions from 0.
Therefore, the first character position is 0; the second, 1; the third, 2; and so on.
abc123 abc123?def456 False
Number Definition
0[N/A]
1[TrimString]
Where
• [TrimString] is a character or set of characters to remove from the beginning of the
field.
Parameter(s) Original field value Resulting field value
[N/A] abc123 abc123
[N/A] abc123 abc123 abc123 abc123
0000123456 123456
0000123000 123000
Number Definition
1[ConcatString]
Where
• [ConcatString] is a string of characters to add to the end of the field value.
3[SearchString],[StartInt],[EndInt]
Where
• [SearchString] is a string of characters to be searched for in the field value.
• [StartInt] is the first character place after [SearchString] to add to the end of the
field value. [1]
• [EndInt] is the last character place after [SearchString] to add to the end of the field
value. [1]
5 Configuring workflows
5.3 Completing bank-reported activity setup
222 © Wall Street Systems IPH AB - Confidential
The following are examples:
•Prefix
The Prefix function allows you to add text to the beginning of a field’s value. As a result, the
original field value is concatenated at the end of the resulting field value. It can have one or
three parameters as defined in the following table:
Table notes:
1. Parameters such as [StartInt] and [EndInt] always start counting character positions from 0.
Therefore, the first character position is 0; the second, 1; the third, 2; and so on.
The following are examples:
•Replace
The Replace function allows you to replace one or more characters in a field’s value with one or
more other characters. It can have two parameters as defined in the following table:
Parameter(s) Original field value Resulting field value
?ghi789 abc123?def456 abc123?def456?ghi789
abc123,0,6 abc123?def456 abc123?def456?def456
def123,0,6 abc123?def456 No result
("def123" is not in the original field
value.)
Number Definition
1[ConcatString]
Where
• [ConcatString] is a string of characters to add to the beginning of the field.
3[SearchString],[StartInt],[EndInt]
Where
• [SearchString] is a string of characters to be searched for in the field.
• [StartInt] is the first character place after [SearchString] to add to the end of the
field. [1]
• [EndInt] is the last character place after [SearchString] to add to the end of the
field. [1]
Parameter(s) Original field value Resulting field value
ghi789? abc123?def456 ghi789?abc123?def456
ghi789?,3,6 abc123?def456 789?abc123?def456
Number Definition
5 Configuring workflows
5.3 Completing bank-reported activity setup
WebSuite System Administration Guide 223
The following are examples:
•ParseDate
The ParseDate function allows you to compare the date in a field to the current server date.
When using the ParseDate function, you do not enter a set of parameters. Instead, you use the
Field, Operator, and Value controls to specify a condition. The following are three examples:
As the last two examples in the above table show, you can include relative dates in the Value
control. For more information on relative dates, see the WebSuite User Guide.
5.3.2.7 Using field value functions in Then and Else actions
The following are the field value functions and parameters supported by Then and Else actions in the
Bank Transaction Import Rules function:
Note: Parameters ending in "String" (for example, [SearchString]) can contain string values, and
parameters ending in "Int" (for example, [CountInt]) can contain integer values.
•Substring
2[OriginalString],[NewString]
Where
• [OriginalString] is the character or characters you want to replace.
• [NewString] is the character or characters you want to use in place of each
occurrence of [OriginalString].
Parameter(s) Original field value Resulting field value
-,_ 123-456-789 123_456_789
-, 123-456-789 123456789
Field Operator Value Explanation
bank_txn.Transaction
Date
=01/Oct/
07
A bank transaction meets this condition if its transaction
date is equal to October 1, 2007.
bank_txn.Transaction
Date
> t A bank transaction meets this condition if its transaction
date is later than the current server date.
For example, if the current server date is October 1,
2007, bank transactions must have transaction dates
later than October 1, 2007, to meet this condition.
bank_txn.Transaction
Value Date
<= -1m A bank transaction meets this condition if its value date
is equal to or earlier than one month before the current
server date.
For example, if the current sever date is October 1,
2007, bank transactions must have value dates equal to
or before September 1, 2007, to meet this condition.
5 Configuring workflows
5.3 Completing bank-reported activity setup
224 © Wall Street Systems IPH AB - Confidential
The Substring function allows you to search for or select a defined portion (or "substring") of a
field’s value. It can have two, three, four, or five parameters as defined in the following table:
Table notes:
1. Parameters such as [StartInt] and [EndInt] always start counting character positions from 0.
Therefore, the first character position is 0; the second, 1; the third, 2; and so on.
Number Definition
2[StartInt],[EndInt]
Where
• [StartInt] is the first character place from the beginning of the field value to include
in the substring. [1]
• [EndInt] is the last character place from the beginning of the field value to include in
the substring. [1]
3[SearchString],[StartInt],[EndInt]
Where
• [SearchString] is a string of characters to be searched for in the field value.
• [StartInt] is the first character place after [SearchString] to include in the substring.
[1]
• [EndInt] is the last character place after [SearchString] to include in the substring.
[1]
4[SearchString],[StartInt],[EndString],[LengthInt]
Where
• [SearchString] is a string of characters to be searched for in the field value.
• [StartInt] is the first character place after [SearchString] to include in the substring.
[1]
• [EndString] is a string of characters that immediately follow the substring. [1]
• [LengthInt] is either the length of the substring or "-1" (to not specify a length). [1]
If CMM cannot find [EndString] in the field value, it ignores it and uses [LengthInt]
instead.
5[ConditionString],[CountInt],[SearchString],[StartInt],[EndString]
Where
• [ConditionString] is a string of characters that must exist in the field value.
• [SearchString] is a string of characters to be searched for in the field value.
• [CountInt] is an occurrence of the [SearchString]. [1]
• [StartInt] is the first character after the [CountInt] occurrence of [SearchString] to
include in the substring. [1]
• [EndString] is a string of characters that immediately follow the substring.

5 Configuring workflows
5.3 Completing bank-reported activity setup
WebSuite System Administration Guide 225
The following are examples:
•Trim
The Trim function allows you to remove spaces, or a defined character or set of characters from
the beginning of a field’s value. It can have zero or one parameters as defined in the following
table:
The following are examples:
•Append
Parameter(s) Original field
value Resulting field value
3,5 abc123?def456 123
def,0,2 abc123?def456 456
abc,0,?,-1 abc123?def456 123
abc,0,!,6 abc123?def456 123?def
("!" is not in the original field value and, therefore, is
ignored by CMM.)
abc123,0,?,3,? abc123?def456?ghi
789
456
xyz123,0,?,3,? abc123?def456?ghi
789
No result
("xyz123" is not in the original field value.)
Number Definition
0[N/A]
1[TrimString]
Where
• [TrimString] is a character or set of characters to remove from the beginning of the
field.
Parameter(s) Original field value Resulting field value
[N/A] abc123 abc123
[N/A] abc123 abc123 abc123 abc123
0000123456 123456
0000123000 123000
5 Configuring workflows
5.3 Completing bank-reported activity setup
226 © Wall Street Systems IPH AB - Confidential
The Append function allows you to add text to the end of a field’s value. It can have one or three
parameters as defined in the following table:
Table notes:
1. Parameters such as [StartInt] and [EndInt] always start counting character positions from 0.
Therefore, the first character position is 0; the second, 1; the third, 2; and so on.
The following are examples:
•Prefix
The Prefix function allows you to add text to the beginning of a field’s value. As a result, the
original field value is concatenated at the end of the resulting field value. It can have one or
three parameters as defined in the following table:
Number Definition
1[ConcatString]
Where
• [ConcatString] is a string of characters to add to the end of the field value.
3[SearchString],[StartInt],[EndInt]
Where
• [SearchString] is a string of characters to be searched for in the field value.
• [StartInt] is the first character place after [SearchString] to add to the end of the
field value. [1]
• [EndInt] is the last character place after [SearchString] to add to the end of the field
value. [1]
Parameter(s) Original field value Resulting field value
?ghi789 abc123?def456 abc123?def456?ghi789
abc123,0,6 abc123?def456 abc123?def456?def456
def123,0,6 abc123?def456 No result
("def123" is not in the original field
value.)
Number Definition
1[ConcatString]
Where
• [ConcatString] is a string of characters to add to the beginning of the field.
5 Configuring workflows
5.3 Completing bank-reported activity setup
WebSuite System Administration Guide 227
Table notes:
1. Parameters such as [StartInt] and [EndInt] always start counting character positions from 0.
Therefore, the first character position is 0; the second, 1; the third, 2; and so on.
The following are examples:
•Replace
The Replace function allows you to replace one or more characters in a field’s value with one or
more other characters. It can have two parameters as defined in the following table:
The following are examples:
•FindBankAccount
The FindBankAccount function allows you to select an entity bank account for an enriched
bank transaction. This function allows you to use a single bank transaction rule to enrich
bank transactions for multiple entity bank accounts.
Note that the FindBankAccount function returns the entity bank account’s unique internal
identifier rather than its primary number, secondary number, or name.
The FindBankAccount function can have six parameters as defined in the following table:
3[SearchString],[StartInt],[EndInt]
Where
• [SearchString] is a string of characters to be searched for in the field.
• [StartInt] is the first character place after [SearchString] to add to the end of the
field. [1]
• [EndInt] is the last character place after [SearchString] to add to the end of the
field. [1]
Parameter(s) Original field value Resulting field value
ghi789? abc123?def456 ghi789?abc123?def456
ghi789?,3,6 abc123?def456 789?abc123?def456
Number Definition
2[OriginalString],[NewString]
Where
• [OriginalString] is the character or characters you want to replace.
• [NewString] is the character or characters you want to use in place of each
occurrence of [OriginalString].
Parameter(s) Original field value Resulting field value
-,_ 123-456-789 123_456_789
-, 123-456-789 123456789
Number Definition

5 Configuring workflows
5.3 Completing bank-reported activity setup
228 © Wall Street Systems IPH AB - Confidential
The following are examples:
6[PartyIDString],[BankIDString],[BankAccountNumberString],[CurrencyCodeString],[TypeSt
ring],[ActionString]
Where
• [PartyIDString] is the ID of the entity bank account’s client (or "party").
• [BankIDString] is the ID of the entity bank account’s bank.
• [BankAccountNumberString] is the entity bank account’s number.
• [CurrencyCode] is the code of the entity bank account’s currency.
• [TypeString] is one of the following values:
-internal to search for internal bank accounts
-external to search for external bank accounts
-any to search for either internal or external bank accounts.
• [ActionString] is one of the following values:
-one to select a bank account if it is the only bank account that matches the criteria
defined in the other parameters (otherwise, return a blank string)
-any or blank to select a bank account regardless of whether it is or is not the only
bank account that matches the criteria defined in the other parameters.
All parameters are optional.
The values of the first four parameters can be static (for example, AcmeUS), derived from a
system-defined attribute (for example, ${bank_txn.Party ID}), or derived from a
user-defined attribute (for example, ${bank_txn.SubPartyID}).
Note: For more information on user-defined attributes, see the WebSuite User Guide.
Parameter(s) Original field
value Resulting field value
AcmeUS,FirstNtl,1234567,USD,external
,one
N/A A bank account that matches the following
criteria:
•Party: Acme USA
• Bank: First National
• Number: 1234567
• Currency: US dollar
• Type: External. [1]
AcmeUS,FirstNtl,1234567,USD,external
,any
N/A A bank account that matches the following
criteria:
•Party: Acme USA
• Bank: First National
• Number: 1234567
• Currency: US dollar
• Type: External.

5 Configuring workflows
5.3 Completing bank-reported activity setup
WebSuite System Administration Guide 229
Table notes:
1. If more than one bank account matches these criteria, CMM returns a blank string.
2. The Source Fields lists on the Bank Transaction Import Rule Editor page display all attributes
that you can reference for this function.
•FindParty
The FindParty function allows you to select an entity bank account client for an enriched
bank transaction. This function allows you to use a single bank transaction rule to enrich
bank transactions for multiple entity bank account clients.
Note that the FindParty function returns the entity bank account client’s unique internal identifier
rather than its short name or long name.
The FindParty function can have five parameters as defined in the following table:
AcmeCA,BankComm,,CAD,external,one N/A A bank account that matches the following
criteria:
•Party: Acme Canada
•Bank: Bank of Commerce
• Number: Any value
• Currency: Canadian dollar
• Type: External. [1]
AcmeCA,BankComm,,CAD,external, N/A A bank account that matches the following
criteria:
•Party: Acme Canada
•Bank: Bank of Commerce
• Number: Any value
• Currency: Canadian dollar
• Type: External.
${bank_txn.SubPartyID},${bank_txn.
Bank ID},,${bank_txn.Bank Acct
Currency},external,any
A bank account that matches the following
criteria:
• Party: The value of the bank transaction’s
user-defined SubPartyID attribute, which
can be populated by the FindParty function
• Bank: The bank transaction bank
• Number: Any value
• Currency: The bank transaction currency
• Type: External. [2]
Number Definition

5 Configuring workflows
5.3 Completing bank-reported activity setup
230 © Wall Street Systems IPH AB - Confidential
The following are examples:
6[BankIDString],[BankAccountNumberString],[CurrencyCodeString],[TypeString],[ActionStrin
g]
Where
• [BankIDString] is the ID of the entity bank account’s bank.
• [BankAccountNumberString] is the entity bank account’s number.
• [CurrencyCode] is the code of the entity bank account’s currency.
• [TypeString] is one of the following values:
-internal to search for internal bank accounts
-external to search for external bank accounts
-any to search for either internal or external bank accounts.
• [ActionString] is one of the following values:
-one to select a bank account if it is the only bank account that matches the criteria
defined in the other parameters (otherwise, return a blank string)
-any or blank to select a bank account regardless of whether it is or is not the only
bank account that matches the criteria defined in the other parameters.
All parameters are optional.
The values of the first three parameters can be static (for example, FirstNtl), derived from a
system-defined attribute (for example, ${bank_txn.Bank ID}), or derived from a
user-defined attribute (for example, ${bank_txn.SubBankID}).
Note: For more information on user-defined attributes, see the WebSuite User Guide.
Parameter(s) Original field
value Resulting field value
FirstNtl,1234567,USD,external,one N/A An entity bank account client that
matches the following criteria:
• Bank: First National
• Number: 1234567
• Currency: US dollar
• Type: External. [1]
FirstNtl,1234567,USD,external,any N/A An entity bank account client that
matches the following criteria:
• Bank: First National
• Number: 1234567
• Currency: US dollar
• Type: External.
BankComm,,CAD,external,one N/A An entity bank account client that
matches the following criteria:
• Bank: Bank of Commerce
• Number: Any value
• Currency: Canadian dollar
• Type: External. [1]

5 Configuring workflows
5.3 Completing bank-reported activity setup
WebSuite System Administration Guide 231
Table notes:
1. If more than one entity bank account client matches these criteria, CMM returns a blank
string.
2. The Source Fields lists on the Bank Transaction Import Rule Editor page display all attributes
that you can reference for this function.
•setRelativeDate
The setRelativeDate function allows you to set a date field based on the value of the source field
(if a source field is specified) or the current server date (if no source field is specified).
When using the setRelativeDate function, you do not enter a set of parameters. Instead, you use
the Target Fields, Source Fields, and Values controls to specify an action. The following are four
examples:
BankComm,,CAD,external, N/A An entity bank account client that
matches the following criteria:
• Bank: Bank of Commerce
• Number: Any value
• Currency: Canadian dollar
• Type: External.
${bank_txn.Bank ID},,${bank_txn.Bank
Acct Currency},external,any
N/A An entity bank account client that
matches the following criteria:
• Bank: The bank transaction bank
• Number: Any value
• Currency: The bank transaction
currency
• Type: External. [2]
Target field Source field Value Explanation
Transaction Val ue Date bank_txn.Transaction
Date
+1d The bank transaction’s value date is
set to one day after the transaction
date.
For example, if the transaction date is
October 1, 2007, the value date is set
to October 2, 2007.
Transaction Val ue Date bank_txn.Transaction
Value Date
+2d The bank transaction’s value date is
set to two days after its original date.
For example, if the original value date
is October 1, 2007, the reset value
date is October 3, 2007.
Transaction Val ue Date +1d The bank transaction’s value date is
set to one day after the current
server date.
For example, if the current server
date is October 2, 2007, the value
date is set to October 3, 2007.

5 Configuring workflows
5.3 Completing bank-reported activity setup
232 © Wall Street Systems IPH AB - Confidential
As the first three examples in the above table show, you can include relative dates in the Values
control. For more information on relative dates, see the WebSuite User Guide.
•setAbsoluteDate
The setAbsoluteDate function allows you to set a date field based on the current server date.
When using the setAbsoluteDate function, you do not enter a set of parameters. Instead, you
use the Target Fields and Values controls to specify an action. The following are four examples:
As the first two examples in the above table show, you can include relative dates in the Values
control. For more information on relative dates, see the WebSuite User Guide.
5.3.2.8 Selecting bank transaction attributes for inclusion in bank account lists
To select bank transaction attributes for inclusion in bank account lists:
1. Open the following configuration file:
[Standard configuration file path]
handlers
choice_lists
configurable
reusable_bank_txn_attributes.xml
For instructions on opening configuration files, see 1.2 Opening configuration files on page 25.
2. Move the item elements for the bank transaction attributes you want to select for inclusion in
bank account lists outside of the comment tags. The following is an example:
<resuable_bank_txn_attributes>
<!-- following are available attributes
<item attribute_id="${cpty_message}" label="Counterparty Message"/>
<item attribute_id="${bank_reference_number}" label="Bank Reference
Number"/>
<item attribute_id="${customer_reference_number}" label="Customer
Reference Number"/>
<item attribute_id="${swift_related_reference_number}" label="SWIFT
Related Reference Number"/> <item attribute_id="${bank_instructions}"
label="Bank Instructions"/>
Transaction Val ue Date bank_txn.Transaction
Date
01/Oct/
07
The bank transaction date is set to
October 1, 2007. (The value of the
Source Fields control is ignored in this
situation because the Values control
contains an absolute date.)
Target field Value Explanation
Transaction Val ue Date tThe transaction’s value date is set to the current server date.
For example, if the current server date is October 1, 2007, the
value date is set to October 1, 2007.
Transaction Date +1m The bank transaction’s transaction date is set to one month
after the current server date.
For example, if the current server date is October 1, 2007, the
transaction date is set to November 1, 2007.
Transaction Val ue Date 01/Oct/07 The bank transaction’s value date is set to October 1, 2007.
5 Configuring workflows
5.3 Completing bank-reported activity setup
WebSuite System Administration Guide 233
-->
<item attribute_id="${cpty_message}" label="Counterparty Message"/>
</resuable_bank_txn_attributes>
3. Save and close the file.
5.3.3 Configuring bank transaction validation rules
When you capture a bank transaction through import or manual entry, CMM can validate its
statement number and balances based on rules defined in the bank_transaction_validation.xml
file. This file can contain rules at three levels:
•Application
•Bank
•Bank account.
When CMM validates bank transactions using this file, it first searches for rules at the bank account
level. If none apply, CMM searches for rules at the bank level. If none apply, CMM refers to the rules
at the application level.
CMM always completes the following validations on closed-ended bank statements:
•In a bank statement reset period, there are no duplicate bank statement numbers.
•The current bank statement is open if additional bank transactions are being captured against it.
•The previous bank statement is closed (if there is one).
•The bank statement numbers increment by one (assuming internal bank statement number
generation is enabled).
5.3.3.1 Prerequisites
The following are prerequisites for configuring bank transaction validation rules:
5.3.3.2 Configuring bank statement number validation rules
To configure bank statement number validation rules:
1. Open the following configuration file:
[Standard configuration file path]
process_flow
bank_transaction
bank_transaction_validation.xml
For instructions on opening configuration files, see 1.2 Opening configuration files on page 25.
2. Locate the following section:
º
<statement_number_validation>
…
<application validation="true">
Category Tasks
Security Ensure you have access to the following function:
• FG-0400 Review CMM Configuration.
For more information, see Chapter 3 Managing security on page 93.

5 Configuring workflows
5.3 Completing bank-reported activity setup
234 © Wall Street Systems IPH AB - Confidential
…
<unique_statement_number_in_reset_period validation="true"
proceed_with_error="false"/>
…
<one_statement_number_per_statement_period validation="true"
proceed_with_error="false"/>
…
<sequential_numbers validation="true" increment_by="1"
proceed_with_error="true"/>
</application>
…
</statement_number_validation>
º
3. Do one of the following:
–To enable bank statement number validation at the application level:
a. Set the application element’s validation attribute to true.
b. Edit the application element’s child elements:
For information on the child elements’ attributes, see Setting attributes.
–To disable bank statement number validation at the application level, set the application
element’s validation attribute to false.
4. Locate the following section:
º
<statement_number_validation>
…
<bank bank_id="BOA_NL" validation="false">
<unique_statement_number_in_reset_period validation="true"
proceed_with_error="true"/>
<one_statement_number_per_statement_period validation="true"
proceed_with_error="true"/>
<sequential_numbers validation="true" increment_by="1"
proceed_with_error="true"/>
</bank>
…
</statement_number_validation>
Element Validation
unique_statement_number_
in_reset_period
In a bank statement reset period, there are no duplicate bank
statement numbers.
one_statement_number_per
statement_period
Only one bank statement number can be captured in a given
bank statement period.
Note: This validation is only applicable for open-ended bank
statements; closed-ended bank statements, by
definition, can only have one bank statement open at
any given time.
sequential_numbers The bank statement number increments by the defined value.

5 Configuring workflows
5.3 Completing bank-reported activity setup
WebSuite System Administration Guide 235
º
5. Using the provided bank element as a template, create a set of bank elements for your
organization’s banks, setting each bank element’s bank_id attribute to the appropriate bank ID.
6. For each bank element you created in step 5, do one of the following:
–To enable bank statement number validation at the bank level:
a. Set the bank elements’ validation attributes to true.
b. Edit each bank element’s child elements. For more information, see step 3.
–To disable bank statement number validation at the bank level, set the bank elements’
validation attributes to false.
7. Locate the following section:
º
<statement_number_validation>
…
<bank_account bank_account_id="Ent3_BOA_EUR" validation="true">
<unique_statement_number_in_reset_period validation="true"
proceed_with_error="false"/>
<one_statement_number_per_statement_period validation="true"
proceed_with_error="false"/>
<sequential_numbers validation="true" increment_by="2"
proceed_with_error="false"/>
</bank_account>
</statement_number_validation>
º
8. Using the provided bank_account element as a template, create a set of bank_account
elements for your organization’s entity bank accounts, setting each bank_account element’s
bank_account_id attribute to the appropriate entity bank account ID.
9. For each bank_account element you created in step 8, do one of the following:
–To enable bank statement number validation at the bank account level:
a. Set the bank_account elements’ validation attributes to true.
b. Edit each bank_account element’s child elements. For more information, see step 3.
–To disable bank statement number validation at the bank account level, set the
bank_account elements’ validation attributes to false.
10. Save and close the file.
5.3.3.3 Configuring bank balance validation rules
To configure bank balance validation rules:
1. Open the following configuration file:
[Standard configuration file path]
process_flow
bank_transaction
bank_transaction_validation.xml
For instructions on opening configuration files, see 1.2 Opening configuration files on page 25.
2. Locate the following section:
º
<bank_balance_validation>
…
<application validation="true">
5 Configuring workflows
5.3 Completing bank-reported activity setup
236 © Wall Street Systems IPH AB - Confidential
<opening_statement_balance validation="true" proceed_with_error="false"/>
<closing_statement_balance validation="false" proceed_with_error="true"/>
<opening_txn_date_balance validation="false" proceed_with_error="true"/>
<closing_txn_date_balance validation="false" proceed_with_error="true"/>
<opening_value_date_balance validation="false"
proceed_with_error="true"/>
<closing_value_date_balance validation="false"
proceed_with_error="true"/>
</application>
…
</bank_balance_validation>
º
3. Do one of the following:
–To enable bank balance validation at the application level:
a. Set the application element’s validation attribute to true.
b. Edit the application element’s child elements:
For information on the child elements’ attributes, see Setting attributes.
–To disable bank balance validation at the application level, set the application element’s
validation attribute to false.
4. Locate the following section:
º
<bank_balance_validation>
…
<bank bank_id="BOA_NL" validation="false">
<opening_statement_balance validation="true" proceed_with_error="true"/>
<closing_statement_balance validation="false" proceed_with_error="true"/>
Element Validation
opening_statement_
balance
The opening statement balance is equal to the previous closing
statement balance (if it exists).
Note: This validation is only applicable to closed-ended bank
statements.
closing_statement_
balance
The closing statement balance is equal to the opening statement
balance plus all transaction amounts in the statement.
Note: This validation is only applicable to closed-ended bank
statements.
opening_txn_date_b
alance
The opening transaction date balance is equal to the previous day
closing transaction date balance (if it exists).
closing_txn_date_b
alance
The closing transaction date balance is equal to the opening
transaction date balance plus all transaction date transaction amounts.
Note: This validation is only applicable to the updating of internal bank
accounts in the Enter Bank Statement function.
opening_value_date
_balance
The opening value date balance is equal to the previous day closing
value date balance (if it exists).
closing_value_date
_balance
The closing transaction date balance is equal to the opening value date
balance plus all value date transaction amounts.
5 Configuring workflows
5.3 Completing bank-reported activity setup
WebSuite System Administration Guide 237
<opening_txn_date_balance validation="true" proceed_with_error="true"/>
<closing_txn_date_balance validation="false" proceed_with_error="true"/>
<opening_value_date_balance validation="true" proceed_with_error="true"/>
<closing_value_date_balance validation="false"
proceed_with_error="true"/>
</bank>
<bank bank_id="IHBCanada" validation="false">
<opening_statement_balance validation="true" proceed_with_error="true"/>
<closing_statement_balance validation="false" proceed_with_error="true"/>
<opening_txn_date_balance validation="true" proceed_with_error="true"/>
<closing_txn_date_balance validation="false" proceed_with_error="true"/>
<opening_value_date_balance validation="true" proceed_with_error="true"/>
<closing_value_date_balance validation="false"
proceed_with_error="true"/>
</bank>
<bank bank_id="IHB" validation="false">
<opening_statement_balance validation="true" proceed_with_error="true"/>
<closing_statement_balance validation="false" proceed_with_error="true"/>
<opening_txn_date_balance validation="true" proceed_with_error="true"/>
<closing_txn_date_balance validation="false" proceed_with_error="true"/>
<opening_value_date_balance validation="true" proceed_with_error="true"/>
<closing_value_date_balance validation="false"
proceed_with_error="true"/>
</bank>
…
</bank_balance_validation>
º
5. Using the provided bank elements as templates, create a set of bank elements for your
organization’s banks, setting each bank element’s bank_id attribute to the appropriate bank ID.
6. For each bank element you created in step 5, do one of the following:
–To enable bank balance validation at the bank level:
a. Set the bank elements’ validation attributes to true.
b. Edit each bank element’s child elements. For more information, see step 3.
–To disable bank balance validation at the bank level, set the bank elements’ validation
attributes to false.
7. Locate the following section:
º
<bank_balance_validation>
…
<bank_account bank_account_id="Ent3_BOA_EUR" validation="false">
<opening_statement_balance validation="false" proceed_with_error="true"/>
<closing_statement_balance validation="false" proceed_with_error="true"/>
<opening_txn_date_balance validation="false" proceed_with_error="true"/>
<closing_txn_date_balance validation="false" proceed_with_error="true"/>
<opening_value_date_balance validation="false"
proceed_with_error="true"/>
<closing_value_date_balance validation="false"
proceed_with_error="true"/>
</bank_account>
<bank_account bank_account_id="IHB_BOA_EUR" validation="false">
<opening_statement_balance validation="false" proceed_with_error="true"/>
<closing_statement_balance validation="false" proceed_with_error="true"/>
<opening_txn_date_balance validation="false" proceed_with_error="true"/>
<closing_txn_date_balance validation="false" proceed_with_error="true"/>
<opening_value_date_balance validation="false"
proceed_with_error="true"/>

5 Configuring workflows
5.3 Completing bank-reported activity setup
238 © Wall Street Systems IPH AB - Confidential
<closing_value_date_balance validation="false"
proceed_with_error="true"/>
</bank_account>
</bank_balance_validation>
º
8. Using the provided bank_account elements as templates, create a set of bank_account
elements for your organization’s entity bank accounts, setting each bank_account element’s
bank_account_id attribute to the appropriate entity bank account ID.
9. For each bank_account element you created in step 8, do one of the following:
–To enable bank balance validation at the bank account level:
a. Set the bank_account elements’ validation attributes to true.
b. Edit each bank_account element’s child elements. For more information, see step 3.
–To disable bank balance validation at the bank account level, set the bank_account
elements’ validation attributes to false.
10. Save and close the file.
5.3.3.4 Setting attributes
In steps 3, 6, and 9 in the above two sections, you define validation rules by editing child elements.
The following table defines these child elements’ attributes and their available values:
Note: The proceed_with_errors and increment_by attributes only take effect if the validation
attribute is set to true.
5.3.3.5 Enabling import on closed accounts
By default, attempting to import a closed account is not allowed, and creates an error in the review
job log. To enable importing closed accounts, do the following:
1. Open the following configuration file:
[Standard configuration file path]
process_flow
Attribute Values
validation true to enable the validation defined by the child element.
false to disable the validation defined by the child element.
proceed_with_e
rror
true to store bank transactions or update and store bank balances with warning
messages if the bank transactions or balances fail validation.
false to store bank transactions or balances as errors if the bank transactions or
balances fail validation. This allows users to correct underlying problems and reimport
the bank transactions or balances.
Note: When you manually enter or update—rather than import—a bank transaction or
balance, CMM does not save the bank transaction or balance if there are errors
(when the proceed_with_error attribute is set to false). Otherwise, CMM only
saves bank transactions or balances with generated warnings. Messages
generated due to validation are displayed on screen.
increment_by The value by which bank statement numbers increment.
(This attribute is only available for sequential_numbers elements.)
5 Configuring workflows
5.3 Completing bank-reported activity setup
WebSuite System Administration Guide 239
bank_transaction
bank_transaction_validation.xml
For instructions on opening configuration files, see 1.2 Opening configuration files on page 25.
2. In the <bank_transaction_validation> section, ensure that this line exists and is set to true:
<import_statement_on_closed_account enabled="true"/>
5.3.4 Configuring bank transaction quick entry
The Enter Bank Transactions function allows you to quickly enter bank transactions (and matching
cash records) using customizable worksheets. You can configure the Enter Bank Transactions
function by editing the bank_txn_quick_entry_default_configuration.xml file.
5.3.4.1 Prerequisites
The following are prerequisites for configuring bank transaction quick entry:
5.3.4.2 Configuring bank transaction quick entry
To configure bank transaction quick entry
1. Open the following configuration file:
[Standard configuration file path]
templates
handler_based
bank_txn_quick_entry
bank_txn_quick_entry_default_configuration.xml
For instructions on opening configuration files, see 1.2 Opening configuration files on page 25.
2. Edit the marked attributes’ values:
º
<config>
<default_bank_account bank_account_id=""/>
Enter the ID of the default entity bank account for the Enter Bank Transactions function.
<default_counterparty cpty_id=""/>
Enter the ID of the default counterparty for the Enter Bank Transactions function.
…
<default_cash_flow_type cash_flow_type=""/>
Enter the ID of the default cash flow type for the Enter Bank Transactions function. (Ensure
the cash flow type you specify in this attribute supports both payments and receipts;
otherwise, CMM ignores it.)
<bt_originating_system_code originating_system_code="ME_BT"/>
Enter the originating system code for the Enter Bank Transactions function.
Category Tasks
Security Ensure you have access to the following function:
• FG-0400 Review CMM Configuration.
For more information, see Chapter 3 Managing security on page 93.

5 Configuring workflows
5.3 Completing bank-reported activity setup
240 © Wall Street Systems IPH AB - Confidential
<cr_auto_originating_system_code originating_system_code="ME_CR_AUTO"/>
Enter the automatic originating system code for the Enter Bank Transactions function.
<cr_manual_originating_system_code
originating_system_code="ME_CR_MANUAL"/>
Enter the manual originating system code for the Enter Bank Transactions function.
<validation>
<acm_posting_override value="true">
Enter true to enable ACM posting override or false to disable ACM posting override.
<cash_record allow_multiple_booking_amount_entered="false"/>
Enter true to enable entry of multiple booking amounts or false to disable entry of
multiple booking amounts.
</acm_posting_override>
<same_value_date_batch value="false"/>
Enter true to verify that all value dates in a batch are identical or false to not verify
that all value dates in a batch are identical.
<same_txn_date_batch value="false"/>
Enter true to verify that all transaction dates in a batch are identical or false to not
verify that all transaction dates in a batch are identical.
</validation>
…
</config>
3. Save and close the file.
5.3.5 Configuring bank statement number rules
You create bank statement number rules to assign numbers to bank statements as well as define
whether bank statement are open-ended or closed-ended.
In the case of internal bank statements, CMM automatically assigns numbers to statements based
on the rules. In the case of external bank statements, CMM refers to the numbers in the bank
statements’ import files.
You can maintain bank statement number rules at three levels:
•Default
•Bank
•Bank account.
CMM applies a rule to a bank statement at the lowest possible level. The following table presents
four examples:
No. Applicable rule at Bank level? Applicable rule at Bank Account
level? Rule applied
1No Yes Bank Account level rule
2Yes Yes Bank Account level rule
3Yes No Bank level rule
5 Configuring workflows
5.3 Completing bank-reported activity setup
WebSuite System Administration Guide 241
The Default bank statement number rule is set as follows:
Therefore, if you make no further changes to the bank statement number rules, these settings apply
to all bank statements.
Note: You cannot create a new bank statement number rule if there are any existing open bank
statements in CMM. In addition, you cannot create an external bank statement number
rule at the Default level or for an in-house bank or internal bank account at the Bank and
Bank Account levels respectively.
5.3.5.1 Prerequisites
The following are prerequisites for configuring bank statement number rules:
4No No Default level rule
Attribute Value
ID Default
Reset Period None Selected
Reset Date [Blank]
Statement Period User Controlled
Statement End Date [Blank]
Bank Holiday Country None Selected
Minimum Statement Number 1
Maximum Statement Number 100,000
Current Statement Number 1
Starting Statement Sequence Number 1
Date Type None Selected
Sequence Type Bank Account
Disable Statement Number Generation No
Category Tasks

5 Configuring workflows
5.3 Completing bank-reported activity setup
242 © Wall Street Systems IPH AB - Confidential
5.3.5.2 Creating bank statement number rules
To create a bank statement number rule:
1. Select Banking - Configuration - Bank Statement Number Rules.
2. In the Bank Transaction Statement Number Rule Editor - Criteria Selection page, select the
appropriate level in the Rule Level list.
Do not select Default Level, as you cannot create a new bank statement number rule at the
Default level.
3. Click Search.
4. In the Bank Transaction Statement Number Rule List page, click New Entry.
5. In the Bank Account Statement Number Rule Entry page, create the bank statement number
rule.
6. Click Save.
5.3.5.3 Editing the bank statement number rule
To edit the bank statement number rule:
1. Select Banking - Configuration - Bank Statement Number Rules.
2. In the Bank Transaction Statement Number Rule Editor - Criteria Selection page, select the
appropriate level in the Rule Level list.
3. Click Search.
4. In the Bank Transaction Statement Number Rule List page, drill down on the bank statement
number rule.
5. In the Bank Account Statement Number Rule Entry page, edit the bank statement number rule.
6. Click Save.
5.3.5.4 Deleting bank statement number rules
To delete bank statement number rules:
1. Select Banking - Configuration - Bank Statement Number Rules.
2. In the Bank Transaction Statement Number Rule Editor - Criteria Selection page, select the
appropriate level in the Rule Level list.
Static data Ensure the following static data are available:
•Countries
• Bank holidays
•Banks
• Bank accounts.
For more information, see the WebSuite User Guide.
Security Ensure you have access to the following function:
• FG-0363 Bank Statement Number Rules.
In addition, ensure you have access to the banks and bank accounts for which you want to
manage bank statement number rules.
For more information, see Chapter 3 Managing security on page 93.

5 Configuring workflows
5.3 Completing bank-reported activity setup
WebSuite System Administration Guide 243
Do not select Default Level, as you cannot delete the bank statement number rule at the
Default level.
3. Click Search.
4. In the Bank Transaction Statement Number Rule List page, drill down on the bank statement
number rule.
5. In the Bank Account Statement Number Rule Entry page, click Delete.
6. In the resulting dialog, click OK.
5.3.6 Configuring bank statement headers
The bank statements that users can generate and display in the Bank Statement function include a
header. The header contains general information on each bank statement, including its number,
dates, entity, bank, and entity bank account:
You can customize the header by doing the following:
•Modify the layout
•Add or remove information
•Include an image, such as your organization’s logo.
You can configure the default bank statement header referenced by most report templates in the
Bank Statement function by editing the bank_acct_stmt_operate_page_header.xml file.
Optionally, you can create a custom bank statement header and map it to a specific report template.
The report template then reference that bank statement header rather than the default one.
5.3.6.1 Prerequisites
The following are prerequisites for configuring bank statement headers:
5.3.6.2 Configuring the default bank statement header
To configure the default bank statement header:
1. Open the following configuration file:
[Standard configuration file path]
templates
Category Tasks
Security Ensure you have access to the following function:
• FG-0400 Review CMM Configuration.
For more information, see Chapter 3 Managing security on page 93.

5 Configuring workflows
5.3 Completing bank-reported activity setup
244 © Wall Street Systems IPH AB - Confidential
handler_based
bank_acct_stmt
bank_acct_stmt_operate_page_header.xml
For instructions on opening configuration files, see 1.2 Opening configuration files on page 25.
2. Edit the file as appropriate.
To include an image in the bank statement header, place the image’s file (in a Web accessible
format such as GIF, JPEG, or PNG) in …\VirtualDirectory\graphics\ and then insert an HTML
image reference in the bank_acct_stmt_operate_page_header.xml file to the image file. The
following is an example:
<img src="/content/graphics/acme_logo.gif" border="0"/>
3. Save and close the file.
5.3.6.3 Configuring the custom bank statement header
To configure a custom bank statement header:
1. Open the following configuration file:
[Standard configuration file path]
report
mappings
bank_acct_stmt.xml
For instructions on opening configuration files, see 1.2 Opening configuration files on page 25.
2. Note the mapping ID of the report template for which you want to create the custom bank
statement.
The following is an example:
º
<mapping is_hidden="false" is_secured="false" mapping_id="1163718653321"
mapping_name="AcmeBankStmt" report_format_id="userbank_acct_stmt1.xml"
report_title="Acme Bank Statement" selection_criteria_id="bankAcctStmt_sc1.xml"
skip_selection_criteria="false" system_default="false" usage_mode="operate"
usage_qualifier="operate"/>
º
3. Navigate to the following folder in the CMM application server:
[Standard configuration file path]
templates
handler_based
bank_acct_stmt
4. Create a copy of the bank_acct_stmt_operate_page_header.xml file with the following name:
bank_acct_stmt_operate_page_header[Mapping ID].xml
Where [Mapping ID] is the mapping ID of the report template that you noted in step 3.
(Ensure there are no spaces, hyphens, underscores, or other punctuation before or after the
mapping ID.)
5. Open the file using a text editor.
6. Edit the file as appropriate.
7. Save and close the file.

5 Configuring workflows
5.3 Completing bank-reported activity setup
WebSuite System Administration Guide 245
5.3.7 Configuring intraday bank statement processing rules
CMM supports two types of bank statement:
•Intraday (CDR): A bank statement containing transactions and balances for the current
processing day. Organizations use intraday bank statements to verify transactions as well as
view the amount of activity occurring in bank accounts at any given point of time to manage
their cash positions more aggressively. In addition, some organizations soft reconcile
transactions from intraday bank statements to transactions captured in CMM.
•Previous-day (PDR): A bank statement containing transactions and balances for the previous
day. The transactions and balances in previous-day bank statements are usually considered to
be actual activity and time. Organizations hard reconcile transactions from previous-day bank
statements to transactions captured in CMM.
The Intraday Bank Statement Processing Rules function allows you to set up processing rules (and
accompanying matching tolerances) for intraday bank statements.
CMM is installed with one intraday bank statement processing rule, System Default. As its name
implies, this rule is the default: if no other rule applies to an intraday bank statement, this rule takes
effect. In addition to the System Default rule, you can create other rules that apply to specific
banks. A rule defines the following:
•The type of the intraday bank statement:
–Incremental: An intraday bank statement that contains only new information (compared to
the previously imported intraday bank statement).
–Cumulative: An intraday bank statement that contains both new and existing information.
•The number of times the intraday bank statement can be imported:
–Once.
–Multiple times.
•Whether CMM can apply bank transaction (or "enrichment") rules to the intraday bank statement
or not
•The action CMM must take when importing a matching previous-day bank statement the next
day:
–Preserve the intraday bank statement.
–Remove the intraday bank statement (during import or finalization)
•Tolerances, which allow intraday transactions from previously imported bank statements to be
matched to previous-day transactions.
CMM matches intraday bank transactions (CDRs) to previous-day bank transactions (PDRs)
automatically using the intraday bank statement processing rules. Unlike with the accounting-level
reconciliation, there is no functionality available to manually match CDRs to PDRs.
If multiple CDRs match one PDR, CMM matches the first CDR that it finds to the PDR. This ensures
there is no double counting of CDRs and PDRs in cash position reports.
5.3.7.1 Prerequisites
The following are prerequisites for configuring intraday bank statement processing rules:
Category Tasks
Static data Ensure the following static data are available:
•Banks.
For more information, see the WebSuite User Guide.
5 Configuring workflows
5.3 Completing bank-reported activity setup
246 © Wall Street Systems IPH AB - Confidential
5.3.7.2 Creating intraday bank statement processing rules
To create an intraday bank statement processing rule:
1. Select Banking - Configuration - Intraday Bank Statement Processing Rules.
2. In the Intraday Bank Statement Processing Rules - Criteria Selection page, click Search.
3. In the Intraday Bank Statement Processing Rules List page, click New Entry.
4. In the first two sections of the Intraday Bank Statement Processing Rule Editor page, create the
intraday bank statement processing rule.
5. In the third section (Matching Tolerances) of the Intraday Bank Statement Processing Rule
Editor page:
–To create a matching tolerance:
a. Click Add Tolerance.
b. In the resulting row, create the matching tolerance.
–To delete a matching tolerance, click in its row.
You can define a maximum of five matching tolerances for the intraday bank statement
processing rule.
6. Click Save.
5.3.7.3 Creating intraday bank statement processing rules based on existing rules
To create an intraday bank statement processing rule based on an existing rule:
1. Select Banking - Configuration - Intraday Bank Statement Processing Rules.
2. In the Intraday Bank Statement Processing Rules - Criteria Selection page, enter search criteria.
3. Click Search.
4. In the Intraday Bank Statement Processing Rules List page, drill down on the existing intraday
bank statement processing rule on which you want to base the new rule.
5. In the first two sections of the Intraday Bank Statement Processing Rule Editor page, edit the
intraday bank statement processing rule.
6. In the third section (Matching Tolerances) of the Intraday Bank Statement Processing Rule
Editor page:
–To create a matching tolerance:
a. Click Add Tolerance.
b. In the resulting row, create the matching tolerance.
–To delete a matching tolerance, click in its row.
You can define a maximum of five matching tolerances for the intraday bank statement
processing rule.
7. Click Save As.
Security Ensure you have access to the following function:
• FG-0500 Intraday Bank Statement Processing Rules.
In addition, ensure you have access to the banks you want to include in the intraday bank
statement processing rules.
For more information, see Chapter 3 Managing security on page 93.

5 Configuring workflows
5.3 Completing bank-reported activity setup
WebSuite System Administration Guide 247
5.3.7.4 Editing intraday bank statement processing rules
To edit an intraday bank statement processing rule:
1. Select Banking - Configuration - Intraday Bank Statement Processing Rules.
2. In the Intraday Bank Statement Processing Rules - Criteria Selection page, enter search criteria.
3. Click Search.
4. In the Intraday Bank Statement Processing Rules List page, drill down on the intraday bank
statement processing rule.
5. In the first two sections of the Intraday Bank Statement Processing Rule Editor page, edit the
intraday bank statement processing rule.
6. In the third section (Matching Tolerances) of the Intraday Bank Statement Processing Rule
Editor page:
–To create a matching tolerance:
a. Click Add Tolerance.
b. In the resulting row, create the matching tolerance.
–To delete a matching tolerance, click in its row.
You can define a maximum of five matching tolerances for the intraday bank statement
processing rule.
7. Click Save.
5.3.7.5 Deleting intraday bank statement processing rules
To delete an intraday bank statement processing rule:
1. Select Banking - Configuration - Intraday Bank Statement Processing Rules.
2. In the Intraday Bank Statement Processing Rules - Criteria Selection page, enter search criteria.
3. Click Search.
4. In the Intraday Bank Statement Processing Rules List page, select the intraday bank statement
processing rule’s checkbox.
5. Click Delete All Selected.
You can also delete an intraday bank statement processing rule by drilling down on it and
clicking Delete.
5.3.7.6 Enabling and disabling intraday bank statement processing rules
To enable or disable an intraday bank statement processing rule:
1. Select Banking - Configuration - Intraday Bank Statement Processing Rules.
2. In the Intraday Bank Statement Processing Rules - Criteria Selection page, enter search criteria.
3. Click Search.
4. In the Intraday Bank Statement Processing Rules List page, select the intraday bank statement
processing rule’s checkbox.
5. Do one of the following:
–To enable the intraday bank statement processing rule, click Enable All Selected.
–To disable the intraday bank statement processing rule, click Disable All Selected.
Only one rule per domain (either Application or Bank) can be enabled, although multiple,
disabled rules can exist per domain.
At least one rule for the Application domain must be enabled.

5 Configuring workflows
5.3 Completing bank-reported activity setup
248 © Wall Street Systems IPH AB - Confidential
If you enable a rule for the Application domain, CMM automatically disables the previously
enabled rule for the Application domain.
5.3.8 Configuring bank balance type access
The bank_balance_type_date_format_config.xml file defines which bank balance types display in
the Enter Bank Statement and Bank Statement functions and, of those, which can be edited in the
Enter Bank Statement function.
5.3.8.1 Prerequisites
The following are prerequisites for configuring bank balance type access:
5.3.8.2 Configuring bank balance type access
To configure bank balance type access:
1. Open the following configuration file:
[Standard configuration file path]
templates
bank_transaction
config
bank_balance_type_date_format_config.xml
For instructions on opening configuration files, see 1.2 Opening configuration files on page 25.
2. For each bank balance type’s balance element, do the following:
–In the date_type attribute, enter open to display the bank balance type in the Enter Bank
Statement and Bank Statement functions or close to hide the bank balance type in the Enter
Bank Statement and Bank Statement functions.
–In the editable attribute, enter yes to make the bank balance type editable in the Enter
Bank Statement function or no to not make the bank balance type editable in the Enter Bank
Statement function.
3. Save and close the file.
5.3.9 Customizing bank-reported activity functions
You or another user can customize select bank-reported activity functions for your organization as
documented in this section.
5.3.9.1 Customizing the Bank Transaction Import Rules function
Category Tasks
Security Ensure you have access to the following function:
• FG-0400 Review CMM Configuration.
For more information, see Chapter 3 Managing security on page 93.

5 Configuring workflows
5.3 Completing bank-reported activity setup
WebSuite System Administration Guide 249
The following files define the layout of this page:
•Overall layout
–rule_editor.xml
•IF Conditions section
–bank_txn_import_if_condition_table_header.xml
–bank_txn_import_if_condition_table_row.xml
–bank_txn_import_if_condition_table_buttons.xml
•THEN – Enrichment Actions section
–bank_txn_import_actions_table_header.xml
–bank_txn_import_actions_table_row.xml
–bank_txn_import_actions_table_buttons.xml
•THEN – Transaction Creation Actions section
–bank_txn_import_action_tasks_table_header.xml
–bank_txn_import_action_tasks_table_row.xml
–bank_txn_import_action_tasks_table_buttons.xml
•ELSE – Actions section
–bank_txn_import_else_actions_table_header.xml
–bank_txn_import_else_actions_table_row.xml
–bank_txn_import_else_actions_table_buttons.xml
•ELSE – Transaction Creation Actions section
–bank_txn_import_else_actions_tasks_table_header.xml
–bank_txn_import_else_actions_tasks_table_row.xml
–bank_txn_import_else_actions_tasks_table_buttons.xml.
In addition, the reusable_bank_txn_attributes.xml file allows you to select bank transaction
attributes (in addition to the user-defined bank-transaction attributes) to display in the Client Account
and Counterparty Bank Account lists of the THEN – Transaction Creation Actions and ELSE – Transaction
Creation Actions sections.
5.3.9.1.1 Prerequisites
The following are prerequisites for customizing the Bank Transaction Import Rules function:
5.3.9.1.2 Customizing the Bank Transaction Import Rule Editor page
To customize the Bank Transaction Import Rule Editor page:
1. Open the following configuration file:
[Standard configuration file path]
Category Tasks
Security Ensure you have access to the following function:
• FG-0400 Review CMM Configuration.
For more information, see Chapter 3 Managing security on page 93.

5 Configuring workflows
5.3 Completing bank-reported activity setup
250 © Wall Street Systems IPH AB - Confidential
ruleengine
rules
bank_txn_import
config
rule_editor.xml
For instructions on opening configuration files, see 1.2 Opening configuration files on page 25.
2. Edit the file as appropriate.
3. Save and close the file.
5.3.9.1.3 Configuring the section layouts
To configure a section’s layout:
1. Open one of the following configuration files:
[Standard configuration file path]
ruleengine
rules
bank_txn_import
config
bank_txn_import_if_condition_table_header.xml
bank_txn_import_actions_table_header.xml
bank_txn_import_action_tasks_table_header.xml
bank_txn_import_else_actions_table_header.xml
bank_txn_import_else_actions_tasks_table_header.xml
For instructions on opening configuration files, see 1.2 Opening configuration files on page 25.
2. Do the following:
–Change a column’s title by editing its text element’s value attribute.
–Change the order of columns by changing the order of the th elements.
–Remove a column by surrounding its th element with comment tags (<!-- and -->).
3. Save and close the file.
4. Open one of the following configuration file:
[Standard configuration file path]
ruleengine
rules
bank_txn_import
config
bank_txn_import_if_condition_table_row.xml
bank_txn_import_actions_table_row.xml
bank_txn_import_action_tasks_table_row.xml
bank_txn_import_else_actions_table_row.xml
bank_txn_import_else_actions_tasks_table_row.xml

5 Configuring workflows
5.3 Completing bank-reported activity setup
WebSuite System Administration Guide 251
For instructions on opening configuration files, see 1.2 Opening configuration files on page 25.
5. Repeat the actions you completed in step 2, but with the td elements, so that the header and
row columns are identical.
6. Save and close the file.
7. Open one of the following configuration file:
[Standard configuration file path]
ruleengine
rules
bank_txn_import
config
bank_txn_import_if_condition_table_buttons.xml
bank_txn_import_actions_table_buttons.xml
bank_txn_import_action_tasks_table_buttons.xml
bank_txn_import_else_actions_table_buttons.xml
bank_txn_import_else_actions_tasks_table_buttons.xml
For instructions on opening configuration files, see 1.2 Opening configuration files on page 25.
8. Change the order of buttons by changing the order of the input elements.
9. Save and close the file.
5.3.9.2 Customizing the Bank Transaction Group Details page
The Bank Transaction Group Details page allows users to view all bank transactions and reconciled
cash records in a group.
You can customize this page by editing the bank_txn_group_detail.xml,
bank_txn_group_table_row.xml, and bank_txn_cash_record_group_table_row.xml files.
5.3.9.2.1 Prerequisites
The following are prerequisites for customizing the Bank Transaction Group Details page:
5.3.9.2.2 Customizing the Bank Transaction Group Details page
To customize the Bank Transaction Group Details page’s layout:
1. Open the following configuration file:
[Standard configuration file path]
ruleengine
bank_transaction
report
bank_txn_group_detail.xml
Category Tasks
Security Ensure you have access to the following function:
• FG-0400 Review CMM Configuration.
For more information, see Chapter 3 Managing security on page 93.

5 Configuring workflows
5.4 Completing reconciliation setup
252 © Wall Street Systems IPH AB - Confidential
For instructions on opening configuration files, see 1.2 Opening configuration files on page 25.
2. Edit the file as appropriate.
3. Save and close the file.
4. Open the following configuration file:
[Standard configuration file path]
ruleengine
bank_transaction
report
bank_txn_group_table_row.xml
For instructions on opening configuration files, see 1.2 Opening configuration files on page 25.
5. Do the following:
–Change the order of columns by changing the order of the th elements.
–Remove a column by surrounding its th element with comment tags (<!-- and -->).
6. Save and close the file.
7. Open the following configuration file:
[Standard configuration file path]
ruleengine
bank_transaction
report
bank_txn_cash_record_group_table_row.xml
8. Do the following:
–Change the order of columns by changing the order of the th elements.
–Remove a column by surrounding its th element with comment tags (<!-- and -->).
9. Save and close the file.
5.4 Completing reconciliation setup
Before you can reconcile activity, you or another user must complete the following setup procedures:
1. Set configuration parameters for reconciliation.
2. Configure reconciliation processing.
3. Configure reconciliation tolerance groups and rules.
4. Configure internal bank transaction generation.
5. Configure cash allocation groups and rules.
In addition, you or another user can customize select reconciliation functions for your organization.
5 Configuring workflows
5.4 Completing reconciliation setup
WebSuite System Administration Guide 253
5.4.1 Configuring reconciliation processing
When users initiate an automatic accounting-level reconciliation, CMM attempts to match bank
transactions to cash records. The reconciliation_config.xml (rule engine) file allows you to
configure this process by defining the following:
•Whether CMM generates cash records for all internal bank transactions or only select internal
bank transactions
•Whether users can edit individual child bank transactions in a bank transaction group
•Whether users can unreconcile individual bank transactions or cash records in a group.
By default, the reconciliation_config.xml (rule engine) file is set as follows:
•CMM only generates cash records for bank transactions with the following cash flow types:
–Bank Interest (BANKINT)
–Bank Fee (BANKFEE)
–Commitment Fee (COMMFEE)
–Overdraft Fee (OVDRFEE)
–Tax (TAX).
•Users cannot edit individual child bank transactions in a bank transaction group.
•Users cannot unreconcile individual bank transactions or cash records in a group.
However, you can configure the file to meet your organization’s needs, and you can configure it so
that different settings apply to each in-house bank.
A set of is_to_update… elements in the file configure the relaying of dates from external bank
transactions to internal cash records.
In addition to the reconciliation_config.xml (rule engine) file, the reconciliation_config.xml
(process flow) file allows you to configure accounting-level reconciliation processing. Specifically, it
allows you to define whether CMM creates ZBA bank transactions at finalization. If you are
upgrading to this release from one prior to CMM 7.1, CMM creates ZBA bank transactions at
finalization by default. If you want to use bank transaction rules to create these bank transactions,
you must change this behavior by editing the reconciliation_config.xml (process flow) file.
Finally, a set of configuration parameters allow you to configure other aspects of accounting-level
reconciliation processing.
5.4.1.1 Prerequisites
The following are prerequisites for configuring reconciliation processing:
5.4.1.2 Configuring the reconciliation_config.xml (rule engine) file
To configure the reconciliation_config.xml (rule engine) file:
1. Open the following configuration file:
[Standard configuration file path]
ruleengine
Category Tasks
Security Ensure you have access to the following function:
• FG-0400 Review CMM Configuration.
For more information, see Chapter 3 Managing security on page 93.

5 Configuring workflows
5.4 Completing reconciliation setup
254 © Wall Street Systems IPH AB - Confidential
reconciliation
reconciliation_config.xml
For instructions on opening configuration files, see 1.2 Opening configuration files on page 25.
2. Do the following:
–Configure automatic accounting-level reconciliation at the module level:
a. Edit the marked attributes’ values:
º
<application_configuration
ALLOW_INDIVIDUAL_UNRECONCILED_TRANSACTION_UPDATE="false"
Enter true to allow users to edit child bank transactions (as long as they are not
reconciled) in a bank transaction group and to unreconcile individual bank transactions
or cash records in a group or false to not allow users to edit child bank transactions in a
bank transaction group or to unreconcile individual bank transactions or cash records in a
group. (Regardless of whether you enter true or false, users cannot edit a parent bank
transaction if it has reconciled child bank transactions. They must unreconcile the child
bank transactions first.)
AUTO_CREATE_CASH_RECORDS_FOR_INTERNAL_BANK_TRANSACTION= "false">
Enter true to create cash records for all internal bank transactions without existing
corresponding cash records during automatic reconciliation or false to not create cash
records for all internal bank transactions without existing corresponding cash records
during automatic reconciliation.
<always_create_cash_records_for_internal_bank_transaction
cash_flow_type="BANKINT"/>
<always_create_cash_records_for_internal_bank_transaction
cash_flow_type="BANKFEE"/>
<always_create_cash_records_for_internal_bank_transaction
cash_flow_type="COMMFEE"/>
<always_create_cash_records_for_internal_bank_transaction
cash_flow_type="OVDRFEE"/>
<always_create_cash_records_for_internal_bank_transaction
cash_flow_type="TAX"/>
</application_configuration>
º
b. If you set the AUTO_CREATE_CASH_RECORDS_FOR_INTERNAL_BANK_TRANSACTION attribute
to false, specify cash flow types that you want to exclude from this rule by adding
always_create_cash_records_for_internal_bank_transaction child elements. The
following is an example:
º
<application_configuration
ALLOW_INDIVIDUAL_UNRECONCILED_TRANSACTION_UPDATE="false"
AUTO_CREATE_CASH_RECORDS_FOR_INTERNAL_BANK_TRANSACTION= "false">
…
<always_create_cash_records_for_internal_bank_transaction
cash_flow_type="BANKFEE"/>
…
</application_configuration>
º
The value of the cash_flow_type attribute must be identical to the cash flow type’s ID in
the database.

5 Configuring workflows
5.4 Completing reconciliation setup
WebSuite System Administration Guide 255
If a cash flow type has an always_create_cash_records… child element but you do not
want to exclude it from the rule, remove the always_create_cash_records… child
element.
–Configure automatic accounting-level reconciliation at the in-house bank level by entering an
ihb_configuration element for each in-house bank. The following is an example:
º
<ihb_configuration
PARTY_ID="IHBNA"
AUTO_CREATE_CASH_RECORDS_FOR_INTERNAL_BANK_TRANSACTION= "true" >
<always_create_cash_records_for_internal_bank_transaction
cash_flow_type="BANKINT"/>
<always_create_cash_records_for_internal_bank_transaction
cash_flow_type="BANKFEE"/>
<always_create_cash_records_for_internal_bank_transaction
cash_flow_type="COMMFEE"/>
<always_create_cash_records_for_internal_bank_transaction
cash_flow_type="OVDRFEE"/>
<always_create_cash_records_for_internal_bank_transaction
cash_flow_type="TAX"/>
</ihb_configuration>
º
The value of the PARTY_ID attribute must be identical to the in-house bank’s ID in the
database.
You cannot use the ALLOW_INDIVIDUAL_UNRECONCILED_TRANSACTION_UPDATE attribute in
ihb_configuration elements. (This is a module-level only element.)
If a particular in-house bank does not have an ihb_configuration element, the
application_configuration element applies to the in-house bank.
3. Locate the following section:
º
<!-- The following are examples for post-recon configurations
<is_to_update_dates_for_netting_transactions value="true">
<request date_type="TRANSACTION" value="BANKTRANSACTION.TXNEFFDATE"
condition="ACCOUNTINGPERIOD"/>
<request date_type="VALUE" value="BANKTRANSACTION.TXNVALUEDATE"/>
</is_to_update_dates_for_netting_transactions>
<is_to_update_dates_for_external_transaction value="true">
<request date_type="TRANSACTION" value="BANKTRANSACTION.TXNEFFDATE"
condition="ACCOUNTINGPERIOD"/>
</is_to_update_dates_for_external_transaction>
<is_to_update_dates_for_composite_transactions value="true"/>
<is_to_update_authorization_status_for_ internal_transactions value="true">
<request source_status="" target_status="Released"/>
</is_to_update_authorization_status_for_ internal_transactions>
-->
º
4. To enable these elements, remove the comment tags (<!-- and -->).
To configure these elements, contact Wallstreet.
5. Save and close the file.
5.4.1.3 Configuring the reconciliation_config.xml (process flow) file
To configure the reconciliation_config.xml (process flow) file:
1. Open the following configuration file:
[Standard configuration file path]

5 Configuring workflows
5.4 Completing reconciliation setup
256 © Wall Street Systems IPH AB - Confidential
process_flow
reconciliation
reconciliation_config.xml
For instructions on opening configuration files, see 1.2 Opening configuration files on page 25.
2. Edit the marked attribute’s value:
º
<reconciliation_config>
<zba_finalization_enabled value="false"/>
Enter true to create ZBA bank transactions at finalization or false to not create ZBA bank
transactions at finalization.
º
</reconciliation_config>
3. Save and close the file.
5.4.2 Configuring reconciliation tolerance groups and rules
Bank transactions and cash records do not have to match exactly to be reconciled at the accounting
level if their differences are within the defined limits of an assigned reconciliation tolerance rule.
You create reconciliation tolerance rules in groups and then assign groups to bank accounts. When
CMM reconciles bank transactions to cash records in a particular bank account, it uses the
reconciliation tolerance rules in the bank account’s group. If, however, a bank account does not
have an assigned group, it uses the default group.
5.4.2.1 Configuring reconciliation tolerance groups
The first step in defining a set of reconciliation tolerance rules is to create a group for them.
When first setting up tolerance groups in CMM, create one with the name "Default". This will be the
default reconciliation tolerance group for bank accounts that are not assigned to specific tolerance
groups.
5.4.2.1.1 Prerequisites
The following are prerequisites for configuring reconciliation tolerance groups:
Category Tasks
Static data Ensure the following static data are available:
• Bank accounts.
For more information, see the WebSuite User Guide.
Security Ensure you have access to the following functions:
• FG-0068 Reconciliation Tolerances
• FG-0130 Entity Bank Accounts.
In addition, ensure you have access to the bank accounts to which you want to assign
reconciliation tolerance groups.
For more information, see Chapter 3 Managing security on page 93.
5 Configuring workflows
5.4 Completing reconciliation setup
WebSuite System Administration Guide 257
5.4.2.1.2 Creating reconciliation tolerance groups
To create a reconciliation tolerance group:
1. Select Banking - Configuration - Reconciliation Tolerances.
2. In the Reconciliation Tolerance Groups page, click New Entry.
3. In the Reconciliation Tolerance Group Maintenance page, enter the name of the
reconciliation tolerance group in the Name field.
4. Click Continue.
5. In the Reconciliation Tolerance Entry page, add reconciliation tolerance rules to the group.
For instructions, see 5.4.2.2 Configuring reconciliation tolerance rules on page 257. (The group
must contain at least one reconciliation tolerance rule.)
5.4.2.1.3 Editing reconciliation tolerance groups
To edit a reconciliation tolerance group:
1. Select Banking - Configuration - Reconciliation Tolerances.
2. In the Reconciliation Tolerance Groups page, drill down on the reconciliation tolerance group.
3. In the Reconciliation Tolerance Group Maintenance page, change the name of the
reconciliation tolerance group in the Name field.
4. Click Continue.
5. In the Reconciliation Tolerance Entry page, edit the group’s reconciliation tolerance rules.
For instructions, see 5.4.2.2 Configuring reconciliation tolerance rules on page 257.
5.4.2.1.4 Deleting reconciliation tolerance groups
To delete a reconciliation tolerance group:
1. Select Banking - Configuration - Reconciliation Tolerances.
2. In the Reconciliation Tolerance Groups page, drill down on the reconciliation tolerance group.
3. In the Reconciliation Tolerance Group Maintenance page, click Delete.
4. In the resulting dialog, click OK.
5.4.2.1.5 Assigning reconciliation tolerance groups to entity bank accounts
To assign a reconciliation tolerance group to an entity bank account:
1. Select Admin - Static Data - Entities - Entity Bank Accounts.
2. In the Entity Bank Accounts - Criteria Selection page, enter search criteria.
3. Click Search.
4. In the Entity Bank Accounts List page, drill down on the entity bank account.
5. In the Entity Bank Accounts Maintenance page, click Edit Reconciliation Tolerance Group.
This link only displays if you are editing an external bank account.
6. In the Reconciliation Tolerance Group Information page, select a reconciliation tolerance group
in the Tolerance Group Name list.
7. Click Save.
5.4.2.2 Configuring reconciliation tolerance rules
After creating a reconciliation tolerance group, you can create, edit, and delete its rules.

5 Configuring workflows
5.4 Completing reconciliation setup
258 © Wall Street Systems IPH AB - Confidential
5.4.2.2.1 Prerequisites
The following are prerequisites for configuring reconciliation tolerance rules:
5.4.2.2.2 Creating reconciliation tolerance rules
To create reconciliation tolerance rules:
1. Select Banking - Configuration - Reconciliation Tolerances.
2. In the Reconciliation Tolerance Groups page, click the appropriate reconciliation tolerance
group’s Edit Tolerances link.
3. In the Reconciliation Tolerance Entry page, click Add Tolerance.
4. In the resulting row, create the reconciliation tolerance.
5. Click Save.
5.4.2.2.3 Editing reconciliation tolerance rules
To edit reconciliation tolerance rules:
1. Select Banking - Configuration - Reconciliation Tolerances.
2. In the Reconciliation Tolerance Groups page, click the appropriate reconciliation tolerance
group’s Edit Tolerances link.
3. In the Reconciliation Tolerance Entry page, edit the reconciliation tolerance.
4. Click Save.
5.4.2.2.4 Deleting reconciliation tolerance rules
To delete a reconciliation tolerance rule:
1. Select Banking - Configuration - Reconciliation Tolerances.
2. In the Reconciliation Tolerance Groups page, click the appropriate reconciliation tolerance
group’s Edit Tolerances link.
3. In the Reconciliation Tolerance Entry page, select the reconciliation tolerance rule’s Delete
checkbox.
4. Click Save.
Category Tasks
Security Ensure you have access to the following functions:
• FG-0068 Reconciliation Tolerances.
For more information, see Chapter 3 Managing security on page 93.
Reconciliation setup Ensure the following task has been completed:
• 5.4.2.1 Configuring reconciliation tolerance groups on page 256.
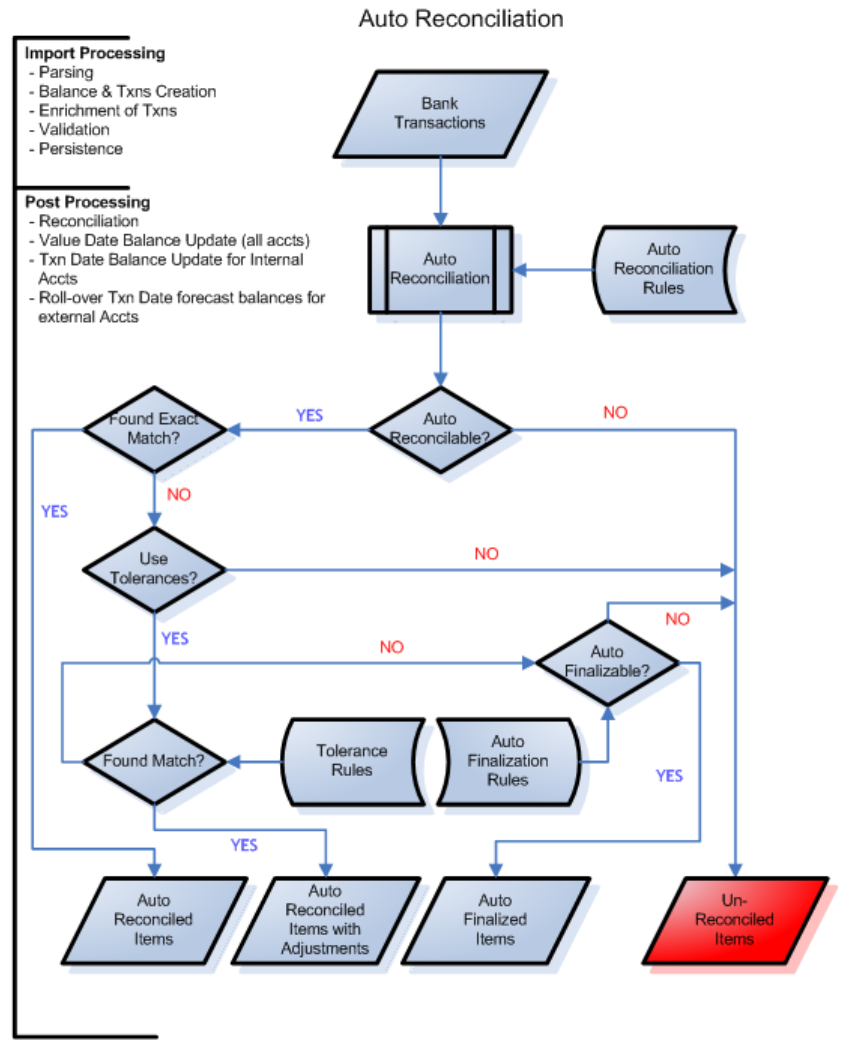
5 Configuring workflows
5.4 Completing reconciliation setup
WebSuite System Administration Guide 259
5.4.3 Configuring 4-eyes approval for manual reconciliations
The following diagrams show the flow for automatic and manual reconciliation.
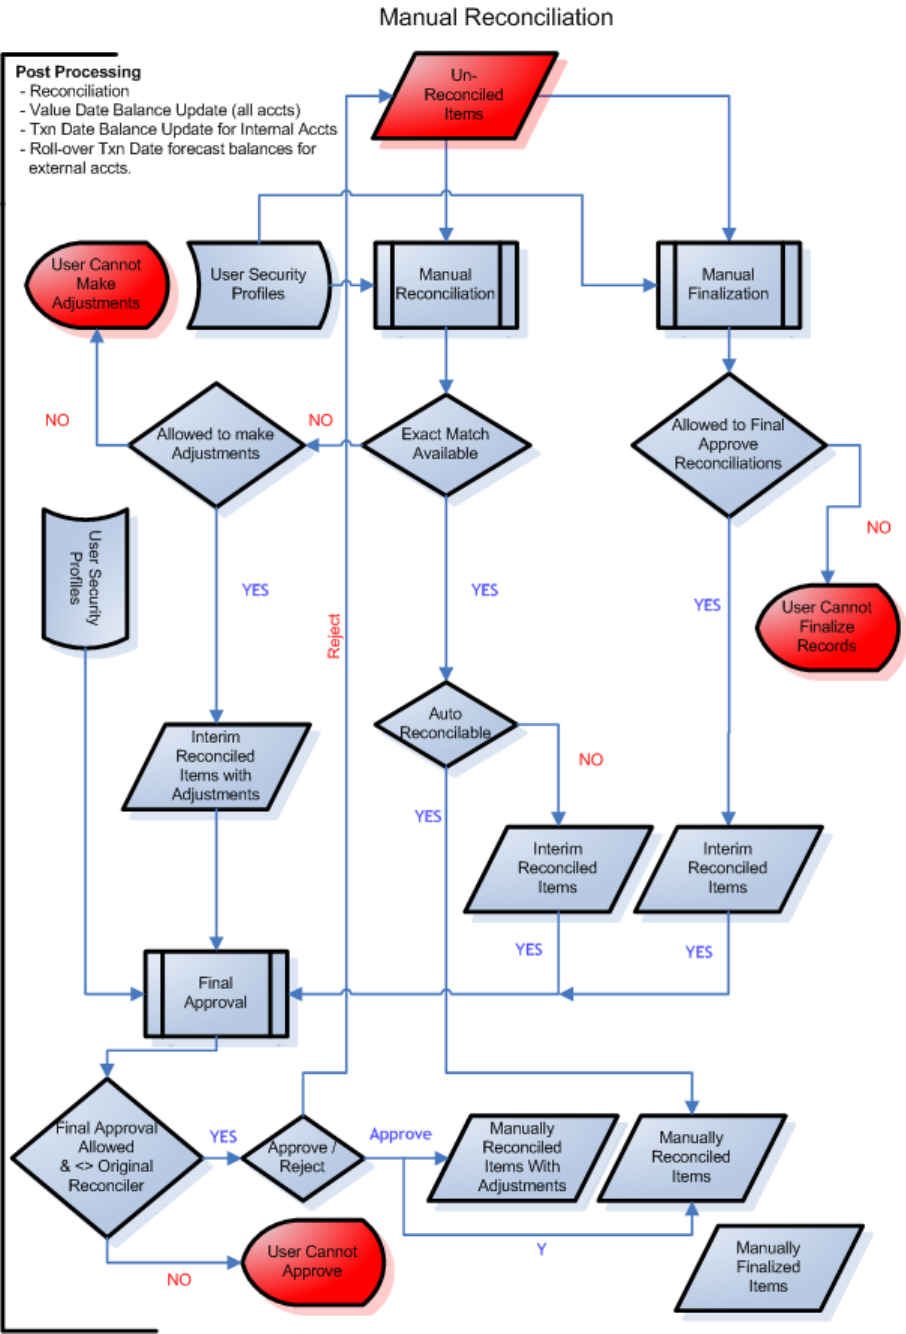
5 Configuring workflows
5.4 Completing reconciliation setup
260 © Wall Street Systems IPH AB - Confidential

5 Configuring workflows
5.4 Completing reconciliation setup
WebSuite System Administration Guide 261
For manual reconciliations between bank transactions and cash records involving exact matches or
adjustments, you can impose 4-eyes security at various stages in the flow. This is done by assigning
the appropriate functional group to a user’s profile.
For a manual reconciliation where an exact match is found, a user with "Reconciliation Final
Approval" in his/her profile must approve items that have been interim-reconciled before the items
pass to state Finalized.
Note: This user cannot be the same user who originally interim-reconciled the items; the system
does not allow this.
For a manual reconciliation that requires an adjustment cash record, the process is the same, but
the user that creates the adjustment must have the authority to do so; there must be the "Create
Reconciliation Adjustments" function in his/her profile.
Ensure that this "4-eyes" security has been enabled; see 2.10.4 Enable 4-eyes security on
reconciliation on page 78.
5.4.3.1 Prerequisites
The following are prerequisites for configuring manual reconciliation security:
5.4.3.2 Adding reconciliation rights to a user profile
1. Select Admin - Security - Profiles - Security by Function.
2. In the Security by Function Profile Information page, click the appropriate Profile’s Modify Profile
Assignment link.
3. In the Security by Function - Functionality Assignment page, ensure that the following functions
are correctly selected in the profile:
5.4.4 Configuring internal bank transaction generation
CMM allows users to generate bank transactions for internal cash records. These bank transactions
are referred to as "internal bank transactions", and CMM automatically reconciles them to their
originating cash records.
You can configure the following components of internal bank transaction generation:
•Whether CMM generates bank transactions for all released internal cash records or only those
not related to unreconciled external cash records in on-behalf-of transactions
•Whether CMM generates previous day (PDR) or intraday (CDR) bank transactions
Category Tasks
Security Ensure you have access to the following functions:
• FG-0287 Security by Function.
For more information, see Chapter 3 Managing security on page 93.
Reconciliation setup Ensure the following task has been completed:
•See 2.10.4 Enable 4-eyes security on reconciliation on page 78.
Final approval FG-0108.03 Reconciliation Final Approval
Right to create adjustments FG-0108.02 Create Reconciliation Adjustments
Right to review and finalize closing balances FG-0108.01 Review and Finalize Closing Balances
5 Configuring workflows
5.4 Completing reconciliation setup
262 © Wall Street Systems IPH AB - Confidential
In the former case, CMM hard reconciles the bank transactions to their originating internal cash
records.
In the latter case, CMM soft reconciles the bank transactions to their originating internal cash
records. (Users can later hard reconcile these bank transactions through the Close Internal Bank
Transactions function.)
•Whether CMM automatically finalizes bank transactions after reconciling them
•The bank transactions’ booking (or "transaction") dates.
5.4.4.1 Prerequisites
The following are prerequisites for configuring reconciliation processing:
5.4.4.2 Configuring internal bank transaction generation
To configure internal bank transaction generation:
1. Open the following configuration file:
[Standard configuration file path]
user_configurable_events
templates
generate_internal_bank_txns.xml
For instructions on opening configuration files, see 1.2 Opening configuration files on page 25.
2. Edit the marked attribute’s value:
º
<constraint_provider
provider_type_id="cash_records_for_internal_bank_txns"/>
Enter cash_records_for_internal_bank_txns to generate bank transactions for all internal
cash records in Released status or cash_records_for_internal_bank_txns_excl_ unrec_obo
to generate bank transactions for all internal cash records in Released status except for those
internal cash records associated with unreconciled external cash records in on-behalf-of
transactions.
º
3. Save and close the file.
4. Open the following configuration file:
[Standard configuration file path]
user_configurable_events
templates
gen_int_bank_txns_CDR_PDR_conf.xml
For instructions on opening configuration files, see 1.2 Opening configuration files on page 25.
5. Locate the following section:
Category Tasks
Security Ensure you have access to the following function:
• FG-0400 Review CMM Configuration.
For more information, see Chapter 3 Managing security on page 93.

5 Configuring workflows
5.4 Completing reconciliation setup
WebSuite System Administration Guide 263
º
<load_internal_bank_txns
source_context_id="translated_internal_bank_txns"
result_context_id="bank_txn_load_details"
day_report_level="previous"
Enter previous to generate previous-day bank transactions and hard reconcile them to internal
cash records or current to generate intraday bank transactions and soft reconcile them to
internal cash records.
auto_finalize="true"/>
Enter true to automatically finalize generated bank transactions or false to not automatically
finalize generated bank transactions. (This allows users to review the bank transactions and
then manually finalize them.)
º
6. Save and close the file.
5.4.4.3 Configuring the internal bank transaction booking date
To configure the internal bank transaction booking date:
1. Open the following configuration file:
[Standard configuration file path]
data
translation
cr_to_bt_txn_date_configuration.xml
For instructions on opening configuration files, see 1.2 Opening configuration files on page 25.
2. In the txn_date_conf element, enter a set of if child elements to define how CMM sets the
booking date. The following is an example:
<txn_date_conf>
<if condition="${originating_system_code}" value="SETTLEMENT">
<set_node_attribute attribute_name="ActualTxnDate" append="false"
value="${actual_txn_date}"/>
</if>
<if condition="${originating_system_code}" value="SETTLEMENT"
operator="notequals">
<get_bank_txn_booking_date bank_id="${bank_acct_bank_id}"
result_context_id="booking_date"/>
<set_node_attribute attribute_name="ActualTxnDate" append="false"
value="${booking_date}"/>
</if>
</txn_date_conf>
In this example, the booking dates of all bank transactions with originating system codes other
than SETTLEMENT are set to the current system date (as defined in steps 4 to 6).
The cr_to_bt_txn_date_configuration.xml file is very flexible, and you can configure it to set
different booking dates for different originating system codes, cash flow types, in-house banks,
and so on.
3. Save and close the file.
4. Open the following configuration file:
[Standard configuration file path]
handlers
ihb

5 Configuring workflows
5.4 Completing reconciliation setup
264 © Wall Street Systems IPH AB - Confidential
in_house_bank_configurations.xml
For instructions on opening configuration files, see 1.2 Opening configuration files on page 25.
5. Enter an in_house_bank_configuration element for each in-house bank. The following is an
example:
º
<in_house_bank_configuration ihb_party_id="IHBNA">
Enter the ID of the in-house bank.
<process name="interest_fee_tax_calculation">
<param name="split_positive_from_negative" value="true"/>
<param name="to_generate_cash_records_from_
bank_transactions_for_internal_bank_accounts" value="true"/>
</process>
<process name="generate_bank_transactions_from_cash_records">
<param name="time_zone_id" value="America/New_York"/>
Enter one of the time zone IDs listed in Appendix B Time zones on page 497.
<param name="offset_time_in_mins" value="60"/>
Enter the time in minutes to book bank transactions in relationship to midnight of the
booking date. (A positive number books bank transactions after midnight, while a
negative number books bank transactions before midnight.)
<param name="process_holidays" value="true"/>
Enter true to consider bank holidays when setting the closing date or false to not
consider bank holidays when setting the closing date. (If you set this attribute to true
and a closing date falls on a bank holiday, CMM changes the closing date to the next
business day.)
</process>
</in_house_bank_configuration>
º
6. Save and close the file.
5.4.5 Configuring cash allocation groups and rules
The Cash Allocation Rules function designates amounts each bank account receives based on
selected currencies. Cash allocation rules allow you to allocate the money in one bank account to a
number of different bank accounts (for example, a national organization sharing its money with all
its subsidiaries).
5.4.5.1 Configuring cash allocation groups
Before creating cash allocation rules, you must create cash allocation groups for the appropriate
banks. Bank account and currency selections are considered a cash allocation group, and the rules
entered apply to the group.
5.4.5.1.1 Prerequisites
The following are prerequisites for configuring cash allocation groups:
Category Tasks

5 Configuring workflows
5.4 Completing reconciliation setup
WebSuite System Administration Guide 265
5.4.5.1.2 Creating cash allocation groups
To create a cash allocation group:
1. Select Banking - Configuration - Cash Allocation Rules.
2. In the Cash Allocation Bank Selection page, select the appropriate bank in the Bank Name list.
3. Click Select.
4. In the Cash Allocation Group Selection page for your selected bank:
–Select the appropriate bank account or All to apply the group to all bank accounts in the
Bank Account list.
–Select the appropriate currency or All to apply the group to all currencies in the Currency list.
5. Click Create.
6. In the Allocation Group Details page for your selected bank, add cash allocation rules to the
group.
For instructions, see 5.4.5.2 Configuring cash allocation rules on page 265. (The group must
contain at least one cash allocation rule.)
7. Click Save Group.
5.4.5.1.3 Deleting cash allocation groups
To delete a cash allocation group:
1. Select Banking - Configuration - Cash Allocation Rules.
2. In the Cash Allocation Bank Selection page, click Show All.
3. In the Cash Allocation Groups for All Banks page, select the group’s Del checkbox.
4. Click Delete Marked.
5.4.5.2 Configuring cash allocation rules
After creating cash allocation groups, you can add rules to them. You do this in the Allocation Group
Details page of the Cash Allocation Rules function.
5.4.5.2.1 Prerequisites
The following are prerequisites for configuring cash allocation rules:
Static data Ensure the following static data are available:
• Currencies
•Banks
• Bank accounts.
For more information, see the WebSuite User Guide.
Security Ensure you have access to the following function:
• FG-0010 Cash Allocation Rules.
In addition, ensure you have access to the banks and bank accounts for which you want to
configure cash allocation groups.
For more information, see Chapter 3 Managing security on page 93.
Category Tasks

5 Configuring workflows
5.4 Completing reconciliation setup
266 © Wall Street Systems IPH AB - Confidential
5.4.5.2.2 Opening the Allocation Group Details page
To open the Allocation Group Details page:
1. Select Banking - Configuration - Cash Allocation Rules.
2. In the Cash Allocation Bank Selection page:
–To drill down on the Allocation Group Details page for a select cash allocation group:
a. Select the appropriate bank in the Bank Name list.
b. Click Select.
c. In the Cash Allocation Group Selection page, enter search criteria.
d. Click Select.
–To drill down on the Allocation Group Details page from a list of all cash allocation groups in
a select bank:
a. Select the appropriate bank in the Bank Name list.
b. Click Select.
c. In he Cash Allocation Group Selection page, click Show All.
d. In the Cash Allocation Groups page, click the group’s Details link.
If there are no existing groups for your selected bank, bank account, and currency, you can
create a new group.
–To drill down on the Allocation Group Details page from a list of all cash allocation groups in
CMM:
a. Click Show All.
b. In the Cash Allocation Groups for All Banks page, drill down on the appropriate group.
5.4.5.2.3 Creating cash allocation rules
To create a cash allocation rule:
1. Open the Allocation Group Details page.
2. Click Add Rule.
3. In the resulting row, create the cash allocation rule.
4. Click Save Group.
Static data Ensure the following static data are available:
• Bank accounts.
For more information, see the WebSuite User Guide.
Security Ensure you have access to the following function:
• FG-0010 Cash Allocation Rules.
In addition, ensure you have access to the bank accounts for which you want to
configure cash allocation rules.
For more information, see Chapter 3 Managing security on page 93.
Reconciliation setup Ensure the following task has been completed:
•5.4.5.1 Configuring cash allocation groups on page 264.

5 Configuring workflows
5.4 Completing reconciliation setup
WebSuite System Administration Guide 267
5.4.5.2.4 Editing cash allocation rules
To edit a cash allocation rule:
1. Open the Allocation Group Details page.
2. Edit the cash allocation rule.
3. Click Save Group.
5.4.5.2.5 Deleting cash allocation rules
To delete a cash allocation rule:
1. Open the Allocation Group Details page.
2. Select the rule’s Del checkbox.
3. Click Save Group.
5.4.6 Customizing reconciliation functions
You or another user can customize select reconciliation functions for your organization as documented
in this section.
5.4.6.1 Customizing the Cash Reconciliation function
Reconciling at the cash level allows users to verify prior day bank-reported activity against
forecasted activity, rolling forward or canceling differences between the two.
The Cash Reconciliation function allow users to reconcile activity at the cash level. You can
customize the footers that display in the main and drilldown pages of this function. Specifically, you
can add buttons to and remove buttons from the footers.
5.4.6.1.1 Prerequisites
The following are prerequisites for customizing the Cash Reconciliation function:
5.4.6.1.2 Customizing the main page footer
To customize the main page footer:
1. Open the following configuration file:
[Standard configuration file path]
templates
handler_based
cash_forecast
cash_forecast_cash_reconciliation_footer.xml
Category Tasks
Security Ensure you have access to the following function:
• FG-0400 Review CMM Configuration.
For more information, see Chapter 3 Managing security on page 93.

5 Configuring workflows
5.5 Completing netting setup
268 © Wall Street Systems IPH AB - Confidential
For instructions on opening configuration files, see 1.2 Opening configuration files on page 25.
2. Do the following:
–To add a button to the footer, enter a display_command or display_report_refresh
element (using one of the existing display_command or display_report_refresh elements
as a template).
–To remove a button from the footer, delete its display_command or
display_report_refresh element.
Buttons display in the same order as listed in the file.
3. Save and close the file.
5.4.6.1.3 Customizing the drilldown page footer
To customize the drilldown page footer:
1. Open the following configuration file:
[Standard configuration file path]
templates
handler_based
cash_forecast
cash_forecast_cash_reconciliation_detail_footer.xml
For instructions on opening configuration files, see 1.2 Opening configuration files on page 25.
2. Do the following:
–To add a button to the footer, enter a display_report_refresh element (using one of the
existing display_report_refresh elements as a template).
–To remove a button from the footer, delete its display_report_refresh element.
Buttons display in the same order as listed in the file.
3. Save and close the file.
5.5 Completing netting setup
Before you can complete netting, you must creating netting periods.
5.5.1 Configuring netting periods
Netting periods are lengths of time that you can specify in CMM. Like accounting periods, they can
be open or closed. They may or may not coincide with settlement activity.
Any transactions entered in the Netting Application function must be assigned to an open netting
period. These transactions’ transaction and value dates are set to the last date of their netting
periods.
5.5.1.1 Prerequisites
The following are prerequisites for configuring netting periods:
Category Tasks

5 Configuring workflows
5.6 Completing cash concentration setup
WebSuite System Administration Guide 269
5.5.1.2 Creating netting periods
To create a netting period:
1. Select Banking - Netting - Netting Periods.
2. In the Netting Periods - Criteria Selection page, click Search.
3. In the Netting Periods [list] page, click New Entry.
4. In the Netting Periods [editor] page, create the netting period.
5. Click Save.
5.5.1.3 Editing netting periods
To edit a netting period:
1. Select Banking - Netting - Netting Periods.
2. In the Netting Periods - Criteria Selection page, enter search criteria.
3. Click Search.
4. In the Netting Periods [list] page, drill down on the netting period.
5. In the Netting Periods [editor] page, edit the netting period.
6. Click Save.
5.5.1.4 Deleting netting periods
To delete a netting period:
1. Select Banking - Netting - Netting Periods.
2. In the Netting Periods - Criteria Selection page, enter search criteria.
3. Click Search.
4. In the Netting Periods [list] page, drill down on the netting period.
5. In the Netting Periods [editor] page, click Delete.
5.6 Completing cash concentration setup
Before you can complete target balancing, you must configure target balance rules.
Before you can complete settlement, you must configure relevant configuration parameters and
configure settlement rules.
5.6.1 Configuring target balance rules
Target balancing is a method of transferring funds from bank account to bank account for liquidity,
legal, or other reasons.
Target balance rules are maintained on a bank-account-by-bank-account basis. You can create, edit,
and delete target balance rules through the Target Balance Rules function or the Entity Bank
Accounts function.
Security Ensure you have access to the following function:
• FG-0264 Netting Periods.
For more information, see Chapter 3 Managing security on page 93.

5 Configuring workflows
5.6 Completing cash concentration setup
270 © Wall Street Systems IPH AB - Confidential
5.6.1.1 Prerequisites
The following are prerequisites for configuring target balance rules:
5.6.1.2 Creating target balance rules
To create a target balance rule:
1. Select Banking - Configuration - Target Balance Rules.
2. In the Target Balance Rules page, drill down on the bank account for which you want to create
the target balance rule.
You can also open this page through the Entity Bank Accounts function by drilling down on the
entity bank account and clicking Target Balance Rules.
3. In the Target Balance Rule page, create the target balance rule.
4. Click Save.
5.6.1.3 Editing target balance rules
To edit a target balance rule:
1. Select Banking - Configuration - Target Balance Rules.
2. In the Target Balance Rules page, drill down on the target balance rule’s entity bank account.
You can also open this page through the Entity Bank Accounts function by drilling down on the
entity bank account and clicking Target Balance Rules.
3. In the Target Balance Rule page, edit the target balance rule.
4. Click Save.
5.6.1.4 Deleting target balance rules
To delete a target balance rule:
1. Select Banking - Configuration - Target Balance Rules.
2. In the Target Balance Rules page, drill down on the target balance rule’s entity bank account.
Category Tasks
Static data Ensure the following static data are available:
• Bank accounts.
For more information, see the WebSuite User Guide.
Security Ensure you have access to the following function:
• FG-0130 Entity Bank Accounts
• FG-0339 Target Balance Rules.
In addition, ensure you have access to the bank accounts for which you want to
configure target balance rules.
For more information, see Chapter 3 Managing security on page 93.
Expected and
instructed activity
Ensure the following task has been completed:
• 5.2.1 Configuring transaction templates and repetitive codes on page 182.

5 Configuring workflows
5.6 Completing cash concentration setup
WebSuite System Administration Guide 271
You can also open this page through the Entity Bank Accounts function by drilling down on the
entity bank account and clicking Target Balance Rules.
3. In the Target Balance Rule page, click Delete.
4. In the resulting dialog, click OK.
5.6.2 Configuring settlement rules
For each internal entity bank account in CMM, you can create a settlement rule of one of the
following methods:
•Intercompany
•Pool-transfer
•External-transfer.
5.6.2.1 Prerequisites
The following are prerequisites for configuring settlement rules:
5.6.2.2 Creating intercompany settlement rules
To create an intercompany settlement rule:
1. Select Admin - Static Data - Entities - Entity Bank Accounts.
2. In the Entity Bank Accounts - Criteria Selection page, enter search criteria.
3. Click Search.
4. In the Entity Bank Accounts List page, drill down on the appropriate entity bank account.
5. In the Entity Bank Accounts Maintenance page, click Edit IHB Account Settlement Rule.
6. In the Account Settlement Rule page, create the intercompany settlement rule.
7. Click Continue.
8. In the Inter-Company Settlement Rule page, continue to create the intercompany settlement
rule.
9. Click Save.
Category Tasks
Static data Ensure the following static data are available:
•Payment methods
• Bank accounts.
For more information, see the WebSuite User Guide.
Security Ensure you have access to the following function:
• FG-0130 Entity Bank Accounts.
In addition, ensure you have access to the bank accounts for which you want to configure
settlement rules.
For more information, see Chapter 3 Managing security on page 93.
5 Configuring workflows
5.6 Completing cash concentration setup
272 © Wall Street Systems IPH AB - Confidential
5.6.2.3 Creating pool-transfer settlement rules
To create a pool-transfer settlement rule:
1. Select Admin - Static Data - Entities - Entity Bank Accounts.
2. In the Entity Bank Accounts - Criteria Selection page, enter search criteria.
3. Click Search.
4. In the Entity Bank Accounts List page, drill down on the appropriate entity bank account.
5. In the Entity Bank Accounts Maintenance page, click Edit IHB Account Settlement Rule.
6. In the Account Settlement Rule page, create the pool-transfer settlement rule.
7. Click Continue.
8. In the Pool Transfer Settlement Rule page, continue to create the pool-transfer settlement rule.
9. Click Save.
5.6.2.4 Creating external-transfer settlement rules
To create an external-transfer settlement rule:
1. Select Admin - Static Data - Entities - Entity Bank Accounts.
2. In the Entity Bank Accounts - Criteria Selection page, enter search criteria.
3. Click Search.
4. In the Entity Bank Accounts List page, drill down on the appropriate entity bank account.
5. In the Entity Bank Accounts Maintenance page, click Edit IHB Account Settlement Rule.
6. In the Account Settlement Rule page, create the external-transfer settlement rule.
7. Click Continue.
8. In the External Transfer Settlement Rule page, continue to create the external-transfer
settlement rule.
9. Click Save.
5.6.2.5 Deleting settlement rules
To delete a settlement rule:
1. Select Admin - Static Data - Entities - Entity Bank Accounts.
2. In the Entity Bank Accounts - Criteria Selection page, enter search criteria.
3. Click Search.
4. In the Entity Bank Accounts List page, drill down on the appropriate entity bank account.
5. In the Entity Bank Accounts Maintenance page, click Edit IHB Account Settlement Rule.
6. In the Account Settlement Rule page, click Delete.
7. In the resulting dialog, click OK.

5 Configuring workflows
5.7 Completing interest, fee, and tax setup
WebSuite System Administration Guide 273
5.7 Completing interest, fee, and tax setup
Before you can calculate and analyze interest, fees, and taxes, you or another user must complete
the following setup procedures:
1. Set configuration parameters for interest, fees, and taxes.
2. Configure interest, fee, and tax calculation processing.
3. Configure interest, fee, and tax calculation methods.
4. Configure interest, fee, and tax calculations.
5. Configure credit line limits.
In addition, you or another user can customize select interest, fee, and tax functions for your
organization.
5.7.1 Configuring interest, fee, and tax calculation processing
Users can create interest, fee, and tax calculation methods and then apply these methods to bank
accounts. CMM then calculates and pays or charges interest, fees, and taxes based on the methods.
5.7.2 Prerequisites
The following are prerequisites for configuring interest, fee, and tax calculation processing:
5.7.2.1 Configuring interest, fee, and tax calculation
To configure interest, fee, and tax calculation:
1. Open the following configuration file:
[Standard configuration file path]
handlers
cash_mgmt
bank_acct
calculations
interest_fee_tax_calculation.xml
For instructions on opening configuration files, see 1.2 Opening configuration files on page 25.
2. Edit the file as appropriate.
3. Save and close the file.
5.7.2.2 Configuring interest, fee, and tax calculation report content
To configure interest, fee, and tax calculation report content:
1. Open the following configuration file:
[Standard configuration file path]
Category Tasks
Security Ensure you have access to the following function:
• FG-0400 Review CMM Configuration.
For more information, see Chapter 3 Managing security on page 93.
5 Configuring workflows
5.7 Completing interest, fee, and tax setup
274 © Wall Street Systems IPH AB - Confidential
handlers
cash_mgmt
bank_acct
calculations
interest_fee_tax_calculation_report.xml
For instructions on opening configuration files, see 1.2 Opening configuration files on page 25.
2. Edit the file as appropriate.
3. Save and close the file.
5.7.2.3 Configuring single period/calculation type interest, fee, and tax calculation
To configure single period/calculation type interest, fee, and tax calculation:
1. Open the following configuration file:
[Standard configuration file path]
handlers
cash_mgmt
bank_acct
calculations
interest_fee_tax_calculation_single_period_
single_calculation_type.xml
For instructions on opening configuration files, see 1.2 Opening configuration files on page 25.
2. Edit the file as appropriate.
3. Save and close the file.
5.7.3 Configuring interest, fee, and tax calculation methods
Your organization can pay or receive interest, fees, and taxes on both internal and external bank
accounts by assigning them interest, fee, and tax calculation methods.
CMM calculates interest, fees, and taxes paid or received for all bank accounts based on the
assigned interest, fee, and tax calculation method and bank account balance information over the
period for which the interest, fees, or taxes are due. For interest, fees, and taxes to be calculated,
the balance type field must be specified within the payment period. As well, an interest rate must be
in effect for the date of each bank balance within the payment period. You can choose to pay or
charge interest as it is calculated or net the interest calculated on a bank account over a period of
time into a single payment (if the net amount is positive) or charge (if the net amount is negative).
Note: External bank account interest is useful because it allows you to verify the banks’ interest
payments. It also facilitates cash position reporting, as interest can be taken into account
during daily cash positioning.
In some situations, it is necessary to pay or charge the interest, fees, and taxes calculated on an
internal bank account to an external bank account. CMM now supports these situations, and you can
now pay or charge the interest, fees, and taxes calculated on an internal bank account to an
external bank account. The external bank account may be the header bank account in a pooling
structure or it may be a different bank account. In the latter case, the bank account is referred to as
the cash pool header sister bank account.

5 Configuring workflows
5.7 Completing interest, fee, and tax setup
WebSuite System Administration Guide 275
If you choose to pay or charge the interest, fees, and taxes to an external bank account, you can do
the following:
•Specify a minimum threshold for interest. If the interest calculated on a bank account or group
of bank accounts equals or exceeds the minimum threshold, the interest is paid out; otherwise,
it is not.
•Offset the payment or charging of interest on a bank account by a specified number of days from
the value date.
5.7.3.1 Prerequisites
The following are prerequisites for configuring interest, fee, and tax calculation methods:
5.7.3.2 Creating interest, fee, and tax calculation methods
To create an interest, fee, and tax calculation method:
1. Select Admin - Market Data - Interest - Interest Calculation Methods.
2. In the Interest Calculation Methods Maintenance [list] page, click New Entry.
3. In the Interest Calculation Methods Maintenance [editor] page, create the interest, fee, and tax
calculation method.
4. Click Save.
5.7.3.3 Editing interest, fee, and tax calculation methods
To edit an interest, fee, and tax calculation method:
1. Select Admin - Market Data - Interest - Interest Calculation Methods.
2. In the Interest Calculation Methods Maintenance [list] page, drill down on the interest, fee, and
tax calculation method.
3. In the Interest Calculation Methods Maintenance [editor] page, edit the interest, fee, and tax
calculation method.
4. Click Save.
Category Tasks
Market data Ensure the following market data are available:
• Interest rate categories
• Interest rate types.
For more information, see the WebSuite User Guide.
Security Ensure you have access to the following function:
• FG-0043 Interest Calculation Methods.
For more information, see Chapter 3 Managing security on page 93.

5 Configuring workflows
5.7 Completing interest, fee, and tax setup
276 © Wall Street Systems IPH AB - Confidential
5.7.3.4 Deleting interest, fee, and tax calculation methods
To delete an interest, fee, and tax calculation method:
1. Select Admin - Market Data - Interest - Interest Calculation Methods.
2. In the Interest Calculation Methods Maintenance [list] page, drill down on the interest, fee, and
tax calculation method.
3. In the Interest Calculation Methods Maintenance [editor] page, click Delete.
4. In the resulting dialog, click OK.
5.7.3.5 Assigning interest, fee, and tax calculation methods to bank accounts
After creating interest, fee, and tax calculation methods, you can assign them to individual entity
bank accounts. For more information, see 5.7.4 Configuring interest, fee, and tax calculations on
page 276.
5.7.4 Configuring interest, fee, and tax calculations
After you have created interest, fee, and tax calculation methods (as documented in 5.7.3
Configuring interest, fee, and tax calculation methods on page 274), you can create interest, fee,
and tax calculations for each entity bank account in CMM.
5.7.4.1 Prerequisites
The following are prerequisites for configuring interest, fee, and tax calculations:
Category Tasks
Static data Ensure the following static data are available:
• Bank accounts
• Bank account relationships.
For more information, see the WebSuite User Guide.
Security Ensure you have access to the following function:
• FG-0130 Entity Bank Accounts.
In addition, ensure you have access to the bank accounts for which you want to
configure interest, fee, and tax calculations.
For more information, see Chapter 3 Managing security on page 93.
Interest, fee, and
tax setup
Ensure the following tasks have been completed:
•5.7.3 Configuring interest, fee, and tax calculation methods on page 274
•5.7.5 Configuring credit line limits on page 277.

5 Configuring workflows
5.7 Completing interest, fee, and tax setup
WebSuite System Administration Guide 277
5.7.4.2 Configuring interest, fee, and tax calculations
To configure an interest, fee, and tax calculation:
1. Select Admin - Static Data - Entities - Entity Bank Accounts.
2. In the Entity Bank Accounts - Criteria Selection page, enter search criteria.
3. Click Search.
4. In the Entity Bank Accounts List page, drill down on the appropriate entity bank account.
5. In the Entity Bank Accounts Maintenance page, click Assign Calculations.
6. In the Calculation Assignment page, select the appropriate calculations’ checkboxes.
7. Click Assign Calculation Assignments.
8. Enter details for the selected calculations in the resulting rows.
9. Click Save.
5.7.5 Configuring credit line limits
Using the Limits function, you can create, edit, and delete credit line limits. You can later use credit
line limits in entity bank accounts’ commitment and overdraft fee calculations.
Credit line limits consist of periods. A period is a credit line limit amount and the date range for
which that credit line limit amount is in effect.
5.7.5.1 Prerequisites
The following are prerequisites for configuring credit line limits:
Category Tasks
Static data Ensure the following static data are available:
• Currencies.
For more information, see the WebSuite User Guide.
Security Ensure you have access to the following functions:
• FG-0172 Limit Maintenance
• FG-0395 Credit Line Limit Maintenance.
For more information, see Chapter 3 Managing security on page 93.
5 Configuring workflows
5.7 Completing interest, fee, and tax setup
278 © Wall Street Systems IPH AB - Confidential
5.7.5.2 Creating credit line limits
To create a credit line limit:
1. Select Admin - Static Data - Exposure Management - Limits.
2. In the Limit Type Selection page, select Credit Line in the Limit Type list.
3. Click Continue.
4. In the Credit Line Limit Search - Criteria Selectio page, enter search criteria.
5. Click Search.
6. In the Assign Counterparty Profiles page, click New Entry.
7. In the Enter New Credit Line Limit page, create the credit line limit.
8. Do the following:
–To add a period to the credit line limit:
a. Click Add Period (if there is no blank row of controls).
b. In the resulting blank row of controls, create the period.
The period’s date range as defined by its Effective Date and Expiry Date fields cannot overlap
any other period’s date range in the credit line limit.
–To remove a period from the credit line limit:
a. Select the period’s checkbox.
b. Click Delete Period.
9. Click Save.
5.7.5.3 Editing credit line limits
To edit a credit line limit:
1. Select Admin - Static Data - Exposure Management - Limits.
2. In the Limit Type Selection page, select Credit Line in the Limit Type list.
3. Click Continue.
4. In the Credit Line Limit Search - Criteria Selectio page, enter search criteria.
5. Click Search.
6. In the Assign Counterparty Profiles page, drill down on the credit line limit.
7. In the Update Credit Line Limit page, edit the credit line limit.
8. Do the following:
–To add a period to the credit line limit:
a. Click Add Period (if there is no blank row of controls).
b. In the resulting blank row of controls, create the period.
The period’s date range as defined by its Effective Date and Expiry Date fields cannot overlap
any other period’s date range in the credit line limit.
–To remove a period from the credit line limit:
a. Select the period’s checkbox.
b. Click Delete Period.
9. Click Save.
5 Configuring workflows
5.7 Completing interest, fee, and tax setup
WebSuite System Administration Guide 279
5.7.5.4 Deleting credit line limits
To delete a credit line limit:
1. Select Admin - Static Data - Exposure Management - Limits.
2. In the Limit Type Selection page, select Credit Line in the Limit Type list.
3. Click Continue.
4. In the Credit Line Limit Search - Criteria Selectio page, enter search criteria.
5. Click Search.
6. In the Assign Counterparty Profiles page, drill down on the credit line limit.
7. In the Update Credit Line Limit page, click Delete.
5.7.6 Customizing interest, fee, and tax functions
You or another user can customize select interest, fee, and tax functions for your organization as docu-
mented in this section.
5.7.6.1 Customizing the Calculation Assignment page
You can configure the Calculation Assignment page following the procedure in this section.
5.7.6.2 Prerequisites
The following are prerequisites for customizing the Calculation Assignment page:
5.7.6.2.1 Customizing the Calculation Assignment page
To customize the Calculation Assignment page:
1. Open the following configuration file:
[Standard configuration file path]
handlers
cash_mgmt
bank_acct
calculations
visuals
bank_accts_calculation_assignment_editor.xml
For instructions on opening configuration files, see 1.2 Opening configuration files on page 25.
2. Edit the file as appropriate.
3. Save and close the file.
5.7.6.3 Customizing the Derivative Report page
You can configure the Derivative Report page following the procedure in this section.
Category Tasks
Security Ensure you have access to the following function:
• FG-0400 Review CMM Configuration.
For more information, see Chapter 3 Managing security on page 93.
5 Configuring workflows
5.8 Completing central bank reporting setup
280 © Wall Street Systems IPH AB - Confidential
5.7.6.4 Prerequisites
The following are prerequisites for customizing the Derivative Report page:
5.7.6.5 Customizing the Derivative Report page
To customize the Derivative Report page:
1. Open the following configuration file:
[Standard configuration file path]
handlers
cash_mgmt
bank_acct
calculations
visuals
interest_fee_tax_calculation_derivative_report.xml
For instructions on opening configuration files, see 1.2 Opening configuration files on page 25.
2. Edit the file as appropriate.
3. Save and close the file.
5.8 Completing central bank reporting setup
Before you can manage and analyze transaction regulatory codes, you need to configure regulatory
codes.
5.8.1 Configuring regulatory codes
Central banks require codes be attached to all transactions to further describe the purpose of the
transaction for reporting purposes. Central banks have a standard set of such codes called
regulatory codes. Some regulatory codes have an additional code that further clarifies the
transaction type. A number of transfers can use a set of regulatory codes; however, the additional
code indicates whether the transfer of monies is going into or out of a country.
Use the internal regulatory code functionality to maintain internal regulatory codes in CMM. You can
then map these codes to external ones.
5.8.1.1 Prerequisites
The following are prerequisites for configuring regulatory codes:
Category Tasks
Security Ensure you have access to the following function:
• FG-0400 Review CMM Configuration.
For more information, see Chapter 3 Managing security on page 93.
Category Tasks

5 Configuring workflows
5.8 Completing central bank reporting setup
WebSuite System Administration Guide 281
5.8.1.2 Creating internal regulatory codes
To create an internal regulatory code:
1. Select Admin - Static Data - Central Bank Reporting - Regulatory Reporting Codes.
2. In the Regulatory Reporting Codes - Criteria Selection page, enter search criteria.
3. Click Search.
4. In the Regulatory Code Maintenance page, create the internal regulatory code.
5. Click Save.
5.8.1.3 Editing internal regulatory codes
To edit an internal regulatory code:
1. Select Admin - Static Data - Central Bank Reporting - Regulatory Reporting Codes.
2. In the Regulatory Reporting Codes - Criteria Selection page, enter search criteria.
3. Click Search.
4. In the Regulatory Reporting Codes List page, drill down on the internal regulatory code.
5. In the Regulatory Code Maintenance page, edit the internal regulatory code.
6. Click Save.
5.8.1.4 Deleting internal regulatory codes
To delete an internal regulatory code:
1. Select Admin - Static Data - Central Bank Reporting - Regulatory Reporting Codes.
2. In the Regulatory Reporting Codes - Criteria Selection page, enter search criteria.
3. Click Search.
4. In the Regulatory Reporting Codes List page, drill down on the internal regulatory code.
5. In the Regulatory Code Maintenance page, click Delete.
6. In the resulting dialog, click OK.
5.8.1.5 Creating external regulatory codes
To create an external regulatory code:
1. Select Admin - Static Data - Central Bank Reporting - Regulatory Reporting Codes.
2. In the Regulatory Reporting Codes - Criteria Selection page, enter search criteria.
3. Click Search.
4. In the Regulatory Reporting Codes List page, click New Entry.
5. In the Regulatory Code Maintenance page, create the external regulatory code.
6. Click Save.
Security Ensure you have access to the following function:
• FG-0069 Regulatory Reporting Code Maintenance.
For more information, see Chapter 3 Managing security on page 93.
5 Configuring workflows
5.8 Completing central bank reporting setup
282 © Wall Street Systems IPH AB - Confidential
5.8.1.6 Editing external regulatory codes
To edit an external regulatory code:
1. Select Admin - Static Data - Central Bank Reporting - Regulatory Reporting Codes.
2. In the Regulatory Reporting Codes - Criteria Selection page, enter search criteria.
3. Click Search.
4. In the Regulatory Reporting Codes List page, drill down on the external regulatory code.
5. In the Regulatory Code Maintenance page, edit the external regulatory code.
6. Click Save.
5.8.1.7 Deleting external regulatory codes
To delete an external regulatory code:
1. Select Admin - Static Data - Central Bank Reporting - Regulatory Reporting Codes.
2. In the Regulatory Reporting Codes - Criteria Selection page, enter search criteria.
3. Click Search.
4. In the Regulatory Reporting Codes List page, drill down on the external regulatory code.
5. In the Regulatory Code Maintenance page, click Delete.
6. In the resulting dialog, click OK.
5.8.1.8 Creating regulatory code mappings
To create a regulatory code mapping:
1. Select Admin - Static Data - Central Bank Reporting - Regulatory Reporting Codes.
2. In the Regulatory Reporting Codes - Criteria Selection page, click Regulatory Reporting Code Mappings.
3. In the Regulatory Reporting Code Mappings - Criteria Selection page, enter search criteria.
4. Click Search.
5. In the Regulatory Reporting Code Mappings page, click New Entry.
6. In the Regulatory Code Mappings Maintenance page, create the regulatory code mapping.
7. Click Save.
5.8.1.9 Editing regulatory code mappings
To edit regulatory code mappings:
1. Select Admin - Static Data - Central Bank Reporting - Regulatory Reporting Codes.
2. In the Regulatory Reporting Codes - Criteria Selection page, click Regulatory Reporting Code Mappings.
3. In the Regulatory Reporting Code Mappings - Criteria Selection page, enter search criteria.
4. Click Search.
5. In the Regulatory Reporting Code Mappings page, drill down on the regulatory code mapping.
6. In the Regulatory Code Mappings Maintenance page, edit the regulatory code mapping.
7. Click Save.
5 Configuring workflows
5.9 Completing treasury management setup
WebSuite System Administration Guide 283
5.8.1.10 Deleting regulatory code mappings
To delete regulatory code mappings:
1. Select Admin - Static Data - Central Bank Reporting - Regulatory Reporting Codes.
2. In the Regulatory Reporting Codes - Criteria Selection page, click Regulatory Reporting Code Mappings.
3. In the Regulatory Reporting Code Mappings - Criteria Selection page, enter search criteria.
4. Click Search.
5. In the Regulatory Reporting Code Mappings page, drill down on the regulatory code mapping.
6. In the Regulatory Code Mappings Maintenance page, click Delete.
7. In the resulting dialog, click OK.
5.9 Completing treasury management setup
This section documents the setup of the TRM treasury management functionality.
5.9.1 Completing treasury management setup
Before you can use the TRM functionality in WebSuite, you or another user must complete the setup pro-
cedures in this chapter.
5.9.1.1 Configuring deal pages
After you have created all the necessary lists and groups and completed the appropriate mappings
(see 3.4 Managing TRM lists and list groups on page 122), you can define the deal pages for each
market.
When users open a deal page, the options available to them are limited to the lists and groups
specified in the page setup.
Note: You must also set up the mode mapping for deal entry. For more information, see 5.9.1.6
Configuring mode mappings on page 290.
When WebSuite is used to price orders, the deal price time limit parameter must be customized in
the transaction flow. There is one limit for automatic pricing and another for manual pricing.
5.9.1.1.1 Prerequisites
The following are prerequisites for configuring deal pages:
Category Tasks
Security Ensure you have access to the following function:
• FG-1073 Deal Page Setup.
In addition:
• Create currency list groups
• Create client list groups
• Create instrument list groups.
For more information, see the Wallstreet Suite System Administration Guide.

5 Configuring workflows
5.9 Completing treasury management setup
284 © Wall Street Systems IPH AB - Confidential
5.9.1.1.2 Creating deal pages
To create a deal page:
1. Select Trading - Configuration - Deal Page Setup.
2. In the Deal Page Setup page, click Add row.
3. Create the deal page in the resulting row.
4. Click Save.
5.9.1.1.3 Deleting deal pages
To delete a deal page:
1. Select Trading - Configuration - Deal Page Setup.
2. In the Deal Page Setup page, click Delete in the deal’s row.
5.9.1.2 Configuring automatic pricing
Automatic pricing is managed by groups and rules. You set these up according to the needs of your
organization. Automatic pricing helps to shorten the amount of time a dealer spends on entering and
committing a deal.
WebSuite offers automatic pricing for FX deals and deposit/loan transactions. WebSuite enables
automatic pricing for FX deals.This section describes how to set up the automatic pricing feature of
WebSuite.
The automatic pricing engine uses its own flow to process transactions. This flow, provided with the
default TRM setup, consists of the definitions of specific states (E-ORDER-*), modes (E-ORDER-*),
statuses (eKIT-*), and a rule (TFLO-STATE_E-ORDER-VERIFY-TO-EXPIRED).
5.9.1.2.1 Configuring automatic pricing groups
The actual pricing is done in TRM according to the instrument setup and the market rates—
WebSuite is only adding margin (spread) based on pre-setup rules (counterparty, amount level, and
so on) on top of the deal rates calculated by TRM. TRM retrieves the deal rates from the underlying
market rates (coming from the default market source) or from the yield curves (or "valuation
curve") as defined in the instrument setup.
Basically, WebSuite checks if the deal should be automatically priced, depending on a set of
configurable conditions (automatic pricing rules). If it should be automatically priced, WebSuite uses
the TRM pricing functions and can optionally automatically calculate an adjustment (spread). First
set up an automatic pricing group and then map an automatic pricing rule to the group. Each kind of
deal has its specific margin calculation and, therefore, its specific group editor. Editors are available
for the following instruments:
•FX spot (including pre-spot)
•FX forward
•FX swap
•MM deposit/loan.
Prerequisites
The following are prerequisites for configuring automatic pricing groups:
Category Tasks

5 Configuring workflows
5.9 Completing treasury management setup
WebSuite System Administration Guide 285
Creating automatic pricing groups
To create an automatic pricing group:
1. Select one of the following:
–Trading - Configuration - Automatic Pricing - Price Groups - Auto Accept
If there is no need to calculate an adjustment (spread) for the deals, select the above
function to use the automatic pricing engine as an automatic accept engine
–Trading - Configuration - Automatic Pricing - Price Groups - FX Spot
–Trading - Configuration - Automatic Pricing - Price Groups - FX Forward
–Trading - Configuration - Automatic Pricing - Price Groups - FX Swap
–Trading - Configuration - Automatic Pricing - Price Groups - Deposit/Loan.
2. In the Automatic Pricing Groups page, click New Price Group.
3. In the Automatic Pricing Groups: Create New/Edit page, create the automatic pricing group.
4. Do the following:
–To add a limit/margin to the automatic pricing group:
a. Click Add row.
b. Create the limit/margin in the resulting row.
–To remove a limit/margin from the automatic pricing group, click Remove in the limit/margin’s
row.
5. Click Save.
Security Ensure you have access to the following functions:
• FG-1074 [Price Groups] All
• FG-1075 [Price Groups] Auto Accept
• FG-1076 [Price Groups] FX Spot
• FG-1077 [Price Groups] FX Forward
• FG-1078 [Price Groups] FX Swap
• FG-1079 [Price Groups] Deposit/Loan.
For more information, see the Wallstreet Suite System Administration Guide.

5 Configuring workflows
5.9 Completing treasury management setup
286 © Wall Street Systems IPH AB - Confidential
Editing automatic pricing groups
To edit an automatic pricing group:
1. Select one of the following:
–Trading - Configuration - Automatic Pricing - Price Groups - Auto Accept
–Trading - Configuration - Automatic Pricing - Price Groups - FX Spot
–Trading - Configuration - Automatic Pricing - Price Groups - FX Forward
–Trading - Configuration - Automatic Pricing - Price Groups - FX Swap
–Trading - Configuration - Automatic Pricing - Price Groups - Deposit/Loan.
2. In the Automatic Pricing Groups page, click Edit.
3. In the Automatic Pricing Groups: Create New/Edit page, edit the automatic pricing group.
4. Do the following:
–To add a limit/margin to the automatic pricing group:
a. Click Add row.
b. Create the limit/margin in the resulting row.
–To remove a limit/margin from the automatic pricing group, click Remove in the limit/margin’s
row.
5. Click Save.
Deleting automatic pricing groups
To delete an automatic pricing group:
1. Select one of the following:
–Trading - Configuration - Automatic Pricing - Price Groups - Auto Accept
–Trading - Configuration - Automatic Pricing - Price Groups - FX Spot
–Trading - Configuration - Automatic Pricing - Price Groups - FX Forward
–Trading - Configuration - Automatic Pricing - Price Groups - FX Swap
–Trading - Configuration - Automatic Pricing - Price Groups - Deposit/Loan.
2. In the Automatic Pricing Groups page, click Delete.
Reviewing all automatic pricing groups
To review all automatic pricing group:
1. Select Trading - Configuration - Automatic Pricing - Price Groups - All.
2. In the Automatic Pricing Groups page, do the following:
–To create an automatic pricing group, click New Price Group.
–To edit an automatic pricing group, click Edit in the automatic pricing group’s row.
–To delete an automatic pricing group, click Delete in the automatic pricing group’s row.
Calculating margins
Margin calculations are done using the fields of the configuration row matching the deal as described
above.
Instrument Margin calculation

5 Configuring workflows
5.9 Completing treasury management setup
WebSuite System Administration Guide 287
5.9.1.2.2 Configuring automatic pricing rules
You can apply automatic pricing rules to the price groups you created in 5.9.1.2.1 Configuring
automatic pricing groups on page 284.
Prerequisites
The following are prerequisites for configuring trader-client mappings:
FX spot Margin 1 = round( FX Spot Rate * Matching Row [ Spot Adjust ] / Point Factor )
Matching Row[ Adjust ] means the Adjust field of the configuration row matching the
deal.
FX forward Margin 2 = round( Deal Rate * Matching Row [ Adjust ] / Point Factor )
If no zero crossing is enabled and the FX total points sign is changing due to margin 2,
force the FX total points to be 0:
Margin 2 = - FX Forward Points * Sign
FX swap FX swap margins are the combination of FX spot margin and FX forward margin:
Margin 1 = round( FX Spot Rate * Matching Row [ Spot Adjust ] / Point Factor )
Margin 2 = round( Deal Rate * Matching Row [ Adjust ] / Point Factor )
If no zero crossing is enabled and the FX total points sign is changing due to margin 2,
force the FX total points to be 0:
Margin 2 = - FX Forward Points * Sign
Deposit/loan Calculated Margin = Deal Rate * Matching Row [ Adjust ] * Sign
Competitive Rate/Price = Deal Rate
Competitive Rate/Price (2nd) = Book Value
Competitive Rate/Price (3rd) = Calculated Margin
Deal Rate = Deal Rate + Calculated Margin
Category Tasks
Static data Ensure the following static data are available:
• Currencies
•Clients
• Instruments.
For more information, see the TRM User Guide.
Security Ensure you have access to the following function:
• FG-1080 Price Rules.
In addition:
• Create user groups.
For more information, see the Wallstreet Suite System Administration Guide.
Treasury management
setup
Ensure the following task has been completed:
•5.9.1.2.1 Configuring automatic pricing groups on page 284.

5 Configuring workflows
5.9 Completing treasury management setup
288 © Wall Street Systems IPH AB - Confidential
Creating automatic pricing rules
To create an automatic pricing rule:
1. Select Trading - Configuration - Automatic Pricing - Price Rules.
2. In the Automatic Pricing Rules page, click Add row.
3. Create the automatic pricing rule in the resulting row.
4. Click Add.
Deleting automatic pricing rules
To delete an automatic pricing rule:
1. Select Trading - Configuration - Automatic Pricing - Price Rules.
2. In the Automatic Pricing Rules page, click Delete in the automatic pricing rule’s row.
5.9.1.3 Configuring cash flow forecasting mappings
The central treasury is responsible for managing the liquidity of the entities of the organization and may
also be responsible for hedging the currency risks of the operations within the organization.
The treasury must receive reliable information about the cash movements of the whole organization to
carry out either of these tasks successfully.
The Cashflow Forecasting function is a tool through which entities can advise the treasury of any antic-
ipated future cash flows, both incoming and outgoing. Using WebSuite, you can define a short- or
long-term cash flow forecast by bank account, by instrument, by currency, and so on.
5.9.1.3.1 Prerequisites
The following are prerequisites for configuring cash flow forecasting mappings:
Category Tasks
Static data Ensure the following static data are available:
• Currencies
•Clients
• Bank accounts
• Instruments
•Portfolios.
For more information, see the TRM User Guide.
Security Ensure you have access to the following function:
• FG-1081 Cashflow Forecasting.
In addition:
• Create user groups.
For more information, see the Wallstreet Suite System Administration Guide.

5 Configuring workflows
5.9 Completing treasury management setup
WebSuite System Administration Guide 289
5.9.1.3.2 Creating cash flow forecasting mappings
To create a cash flow forecasting mapping:
1. Select Trading - Configuration - Cashflow Forecasting.
2. In the Cashflow Forecasting Mappings page, click Add row.
3. Create the cash flow forecasting mapping in the resulting row.
4. Click Add.
5.9.1.3.3 Deleting cash flow forecasting mappings
To delete a deal page:
1. Select Trading - Configuration - Cashflow Forecasting
2. In the Cashflow Forecasting Mappings page, click Delete in the cash flow forecast mapping’s row.
5.9.1.4 Configuring trader-client mappings
A trader-client mapping maps a specific trader (or group of traders) to one or more clients. The
mapping defines that a trader is dealing "on behalf of" a particular client.
5.9.1.4.1 Prerequisites
The following are prerequisites for configuring trader-client mappings:
5.9.1.4.2 Configuring trader-client mappings
To configure a trader-client mapping:
1. Select Admin - Trading - Trader-Client Mappings.
2. In the Trader-Client Mappings page, select a user group in the User Groups list.
3. Select one or more specific domains in the Domains list.
4. Click Refresh.
5. Do one of the following:
–To map one or more clients in the selected domains to the selected user group, select those
clients in the Clients list.
–To map all clients in the selected domains to the selected user group, select the All checkbox.
If you select the All checkbox, any new clients in the selected domains created after you save
the mapping will be added to the mapping automatically.
6. Click Create/Update Mapping.
Category Tasks
Static data Ensure the following static data are available:
•Clients.
For more information, see the TRM User Guide.
Security Ensure you have access to the following function:
• FG-1082 Trader-Client Mappings.
In addition:
• Create user groups.
For more information, see the Wallstreet Suite System Administration Guide.

5 Configuring workflows
5.9 Completing treasury management setup
290 © Wall Street Systems IPH AB - Confidential
5.9.1.5 Configuring trading hours
In your organization, there may be WebSuite users working in different time zones. You can define the
trading hours to restrict the hours in which the users can make deals. Trading hours are specified in serv-
er time using the time zone of the server.
5.9.1.5.1 Prerequisites
The following are prerequisites for configuring trading hours:
5.9.1.5.2 Creating trading hours
To create trading hours:
1. Select Admin - Trading - Trading Hours.
2. In the Trading Hours - Setup page, click Add row.
3. Create the trading hours in the resulting row.
4. Click Save.
5.9.1.5.3 Deleting trading hours
To delete trading hours:
1. Select Admin - Trading - Trading Hours.
2. In the Trading Hours - Setup page, click Delete in the trading hours’ row.
5.9.1.6 Configuring mode mappings
Mode mappings are used to map TRM modes to WebSuite modes. The modes define which fields in
the transaction are editable and which options are available in the WebSuite page.
You must set up two mode mappings for each cash flow forecasting group. The cash flow forecasting
groups are:
•Planning forecast
–cff
–cff_editable
•Actuals
–cff_actuals
–cff_actuals_editable.
The two mode mappings for cash flow forecasting are:
•cff[_xxx] corresponds to transactions you can view
•cff[_xxx]_editable corresponds to the transactions you can view and modify.
Category Tasks
Security Ensure you have access to the following function:
• FG-1083 Trading Hours.
In addition:
• Create user groups.
For more information, see the Wallstreet Suite System Administration Guide.

5 Configuring workflows
5.9 Completing treasury management setup
WebSuite System Administration Guide 291
Note: This procedure is mandatory for WebSuite setup.
5.9.1.6.1 Prerequisites
The following are prerequisites for configuring mode mappings:
5.9.1.6.2 Configuring mode mappings
To configure mode mappings:
1. Select Admin - Trading - Mode Mappings.
2. In the Mode Mappings page, select a TRM mode for each TRM web interface mode.
3. Click Save.
5.9.2 Completing treasury management setup
Before you can capture and process deals and manage risk, you or another user must complete the set-
up procedures in this section.
5.9.2.1 Configuring issues
You and other users can create deals based on issues in three instrument categories:
•Common equities
•Long-term securities
•Money market funds.
During implementation, Wallstreet and your organization work together to enter issues in CMM.
However, you may need to create new issues or edit or delete existing ones after implementation to
reflect changes in your organization.
5.9.2.1.1 Prerequisites
The following are prerequisites for configuring issues:
Category Tasks
Security Ensure you have access to the following function:
• FG-1084 Mode Mappings.
For more information, see the Wallstreet Suite System Administration Guide.
Category Tasks

5 Configuring workflows
5.9 Completing treasury management setup
292 © Wall Street Systems IPH AB - Confidential
5.9.2.1.2 Creating issues
To create an issue:
1. Select Trading - Configuration - Add Issue.
2. In the Add New Issue page:
a. Chose an appropriate instrument category.
b. Select an instrument type in the list in the instrument category’s row.
c. Click Continue in the instrument category’s row.
3. In the Enter Details page, create the issue.
4. Click Save or Save/Continue.
5.9.2.1.3 Editing issues
To edit an issue:
1. Select Trading - Configuration - Edit Issues.
2. In the Issue - Criteria Selection page, enter search criteria.
3. Click Search.
4. In the Issues page, drill down on the issue.
5. In the resulting page, edit the issue.
6. Click Save or Save/Continue.
Static data Ensure the following static data are available:
• Currencies
• Countries
• Bank holidays
• Entities
• Counterparties
• Party roles
• Portfolios
• Instrument categories
• Instrument types.
For more information, see the WebSuite User Guide.
Security Ensure you have access to the following functions:
• FG-0020 Fixing Floating Rates on Issues
• FG-0050 Browse Issues
• FG-0051 Edit Issues
• FG-0052 Issue Pricing
• FG-0174 Add New Issue.
In addition, ensure you have access to the entities and counterparties of the issues you want
to configure.
For more information, see Chapter 3 Managing security on page 93.
5 Configuring workflows
5.9 Completing treasury management setup
WebSuite System Administration Guide 293
5.9.2.1.4 Deleting issues
To delete an issue:
1. Select Trading - Configuration - Edit Issues.
2. In the Issue - Criteria Selection page, enter search criteria.
3. Click Search.
4. In the Issues page, drill down on the issue.
5. In the resulting page, click Delete.
6. In the resulting dialog, click OK.
5.9.2.1.5 Reviewing issues
To review an issue:
1. Select Trading - Configuration - Review Issues.
2. In the Issue - Criteria Selection page, enter search criteria.
3. Click Search.
4. In the Issues page, drill down on the issue.
5.9.2.1.6 Fixing floating rates on issues
To fix floating rates on an issue:
1. Select Trading - Configuration - Fixing Floating Rates on Issues.
2. In the Fixing Floating Rate Issues - Criteria Selection page, enter search criteria.
3. Click Search.
4. In the Fixable Floating Rate Issues page, drill down on the issue.
5. In the Payment Schedule Of Issue page, enter data in the Fixing Rate field.
6. Select the Select to Fix checkbox.
7. Click Save.
8. Click Return.
5.9.2.1.7 Setting prices on issues
To set prices on an issue:
1. Select Trading - Configuration - Issue Pricing.
2. In the Maintaining Prices - Criteria Selection page, enter search criteria.
3. Click Search.
4. In the Maintenance of Issue or Deals Prices page, enter data in the Current Market Value field.
5. Select either the Price option button or the Yield option button to indicate whether the amount is
the price of the issue or the amount expected to yield.
6. Click Save.
5.9.2.2 Configuring deal limits
Deal limits are always unique to a denominated currency and have a specific time frame. If a global
limit is set, other limits can be added to individual accounts. If individual limits are set, a global limit
can be added since the global limit does not override subsequent limit creation. Limits can also be
set for one day and are in effect for that one day only.

5 Configuring workflows
5.9 Completing treasury management setup
294 © Wall Street Systems IPH AB - Confidential
If an open-ended limit is entered (in other words, the limit has no end date), no other limit with
exactly the same attributes can be created. As a result, it is better to create limits that have end
dates. CMM does not identify what limits are set as open ended, and finding a limit to correct a
problem may prove difficult.
Currency conversions are applied to limit checks. If a payment is issued in a currency other than the
currency of the bank account, the amount defaults to the currency of the bank account you selected.
The limit is then checked against the converted amount for payment authorization.
5.9.2.2.1 Prerequisites
The following are prerequisites for configuring deal limits:
5.9.2.2.2 Creating deal limits
To create a deal limit:
1. Select Admin - Static Data - Exposure Management - Limits.
2. In the Limit Type Selection page, select Deal in the Select a Limit Type list.
3. Click Continue.
4. In the Deal Limit Search - Criteria Selection page, enter search criteria.
5. Click Search.
6. In the Deal Limit Admin Viewer page, click New Entry.
7. In the Deal Limit Editor page, create the deal limit.
8. Click Save.
Category Tasks
Static data Ensure the following static data are available:
• Currencies
• Entities
•Counterparties
•Portfolios
• Instrument types.
For more information, see the WebSuite User Guide.
Security Ensure you have access to the following function:
• FG-0172 Limit Maintenance.
In addition, ensure you have access to the entities and counterparties of the deal limits you
want to configure.
For more information, see Chapter 3 Managing security on page 93.

5 Configuring workflows
5.9 Completing treasury management setup
WebSuite System Administration Guide 295
5.9.2.2.3 Editing deal limits
To edit a deal limit:
1. Select Admin - Static Data - Exposure Management - Limits.
2. In the Limit Type Selection page, select Deal in the Select a Limit Type list.
3. Click Continue.
4. In the Deal Limit Search - Criteria Selection page, enter search criteria.
5. Click Search.
6. In the Deal Limit Admin Viewer page, drill down on the deal limit.
7. In the Deal Limit Editor page, edit the deal limit.
8. Click Save.
5.9.2.2.4 Deleting deal limits
To delete a deal limit:
1. Select Admin - Static Data - Exposure Management - Limits.
2. In the Limit Type Selection page, select Deal in the Select a Limit Type list.
3. Click Continue.
4. In the Deal Limit Search - Criteria Selection page, enter search criteria.
5. Click Search.
6. In the Deal Limit Admin Viewer page, drill down on the deal limit.
7. In the Deal Limit Editor page, click Delete.
8. In the resulting dialog, click OK.
5.9.2.3 Configuring portfolios and portfolio relationships
The portfolio relationship functionality is similar to the other relationship functionality. Portfolios can
be grouped together for reporting and tracking purposes using this functionality.
Before grouping portfolios in relationships, you must first create the portfolios.
5.9.2.3.1 Prerequisites
The following are prerequisites for configuring portfolios and portfolio relationships:
5.9.2.3.2 Creating portfolios
To create a portfolio:
1. Select Trading - Configuration - Portfolios.
Category Tasks
Security Ensure you have access to the following functions:
• FG-0057 Party Relationship Maintenance
• FG-0066 Portfolio Maintenance.
For more information, see the Wallstreet Suite System Administration Guide.
5 Configuring workflows
5.9 Completing treasury management setup
296 © Wall Street Systems IPH AB - Confidential
Alternatively, select Admin - Static Data - Supporting Data - Party Relationships, select Portfolios in the
Relationship Type list, and then click Continue.
2. In the Portfolio Relationship Maintenance [list] page, click New Entry.
3. In the Portfolio Relationship Maintenance [editor] page, create the portfolio.
4. Click Save.
5.9.2.3.3 Editing portfolios
To edit a portfolio:
1. Select Trading - Configuration - Portfolios.
Alternatively, select Admin - Static Data - Supporting Data - Party Relationships, select Portfolios in the
Relationship Type list, and then click Continue.
2. In the Portfolio Relationship Maintenance [list] page, drill down on the portfolio.
3. In the Portfolio Relationship Maintenance [editor] page, create the portfolio.
4. Click Save.
5.9.2.3.4 Deleting portfolios
To delete a portfolio:
1. Select Trading - Configuration - Portfolios.
Alternatively, select Admin - Static Data - Supporting Data - Party Relationships, select Portfolios in the
Relationship Type list, and then click Continue.
2. In the Portfolio Relationship Maintenance [list] page, drill down on the portfolio.
3. In the Portfolio Relationship Maintenance [editor] page, click Delete.
4. In the resulting dialog, click OK.
5.9.2.3.5 Managing portfolio relationships
To manage portfolio relationships:
1. Select Trading - Configuration - Portfolios.
Alternatively, select Admin - Static Data - Supporting Data - Party Relationships, select Portfolios in the
Relationship Type list, and then click Continue.
2. In the Portfolio Relationship Maintenance [list] page, drill down on the appropriate portfolio.
3. In the Portfolio Relationship Maintenance [editor] page, click Edit Portfolio Relationships.
4. In the Portfolio Relationships page, select the appropriate parent and child portfolios.
5.9.2.3.6 Reviewing portfolio relationships
To review portfolio relationships:
1. Select Trading - Configuration - Portfolios.
Alternatively, select Admin - Static Data - Supporting Data - Party Relationships, select Portfolios in the
Relationship Type list, and then click Continue.
2. In the Portfolio Relationship Maintenance [list] page, drill down on the appropriate portfolio.
3. In the Portfolio Relationship Maintenance [editor] page, click View Hierarchy.
To view a parent or child portfolio’s relationships, click its bulleted hyperlink.

5 Configuring workflows
5.9 Completing treasury management setup
WebSuite System Administration Guide 297
5.9.2.4 Configuring confirmation document templates
The Confirmation Document Templates function contains all templates that produce the notification
of payment and receipt of various cash flows that have been generated by CMM. Entity,
counterparty, and contact names merge with the templates to create a notification letter.
These templates are applied in a variety of situations and can be used by a number of different
counterparties. When a notification letter is created, the data captured in it is based on the
counterparty assignments that were added to the template.
You can assign counterparties to confirmation document templates. The templates can then draw
information from the counterparty data to complete the notification letter. If no counterparties have
been added to a specific template, all counterparties, payments, receipts, and instruments types or
categories use the template. Selecting a specific counterparty limits the use of the template to only
that counterparty.
5.9.2.4.1 Prerequisites
The following are prerequisites for configuring confirmation document templates:
5.9.2.4.2 Creating confirmation document templates
To create a confirmation document template:
1. Using Microsoft Word or another word processor, create the Microsoft RTF file for a confirmation
document template.
For a list of placeholder tags you can include in the Microsoft RTF file, see Confirmation
document template placeholders.
2. Upload the Microsoft RTF file to the CMM application server under the following folder:
…\[CMM folder]\VirtualDirectory\rtf_documents
3. Select Trading - Configuration - Confirmation Document Templates.
4. In the Document Templates List page, click New Entry.
5. In the Document Templates Maintenance page, create the confirmation document template.
6. Click Save.
Category Tasks
Static data Ensure the following static data are available:
•Counterparties
• Instrument categories
• Instrument types.
For more information, see the WebSuite User Guide.
Security Ensure you have access to the following function:
• FG-0018 Confirmation Document Templates.
In addition, ensure you have access to the counterparties you want to add to confirmation
document templates.
For more information, see Chapter 3 Managing security on page 93.

5 Configuring workflows
5.9 Completing treasury management setup
298 © Wall Street Systems IPH AB - Confidential
5.9.2.4.3 Editing confirmation document templates
To edit a confirmation document template:
1. Select Trading - Configuration - Confirmation Document Templates.
2. In the Document Templates List page, click ID in the confirmation document template’s row.
3. In the Document Templates Maintenance page, edit the confirmation document template.
4. Click Save.
5.9.2.4.4 Deleting confirmation document templates
To delete a confirmation document template:
1. Select Trading - Configuration - Confirmation Document Templates.
2. In the Document Templates List page, click ID in the confirmation document template’s row.
3. In the Document Templates Maintenance page, click Delete.
4. In the resulting dialog, click OK.
5.9.2.4.5 Viewing confirmation document templates’ Microsoft RTF files
To view a confirmation document template’s Microsoft RTF file:
1. Select Trading - Configuration - Confirmation Document Templates.
2. In the Document Templates List page, click View Document in the confirmation document
template’s row.
5.9.2.4.6 Adding counterparties to confirmation document templates
To add a counterparty to a confirmation document template:
1. Select Trading - Configuration - Confirmation Document Templates.
2. In the Document Templates List page, click Assign Counterparty in the confirmation document
template’s row.
3. In the Counterparty Assignment List page, click New Entry.
4. In the Counterparty Assignment page, assign a counterparty to the confirmation document
template.
5. Click Save.
5.9.2.4.7 Removing counterparties from confirmation document templates
To remove a counterparty from a confirmation document template:
1. Select Trading - Configuration - Confirmation Document Templates.
2. In the Document Templates List page, click Assign Counterparty in the confirmation document
template’s row.
3. In the Counterparty Assignment List page, click Delete in the counterparty’s row.
5.9.2.4.8 Confirmation document template placeholders
The following table presents the placeholders you can include in confirmation document template
RTF files:
Corresponding attribute Tag
ALL_IN_RATE **ALL_IN_RATE**

5 Configuring workflows
5.9 Completing treasury management setup
WebSuite System Administration Guide 299
CALCULATED_PRICE **CALC_PRICE**
CHILD_DEAL_ID **CHILD_DEAL_ID**
COMMISSION_AMOUNT **COMM_AMT**
CONTRACT_FX_RATE **CON_FX_RATE**
CONFIRMATION_DATE **CONF_DATE**
COST_PROCEEDS **COST_PROCEEDS**
COUNTERPARTY_FULL_ADDRESS **CPTY_ADDR**
COUNTERPARTY_ADDRESS_1 **CPTY_ADDR_1**
COUNTERPARTY_ADDRESS_2 **CPTY_ADDR_2**
COUNTERPARTY_ADDRESS_3 **CPTY_ADDR_3**
COUNTERPARTY_ADDRESS_4 **CPTY_ADDR_4**
COUNTERPARTY_BANK_ACCOUNT_ID **CPTY_BANK_ACCT_ID**
COUNTERPARTY_BANK_ACCOUNT_NAME **CPTY_BANK_ACCT_NM**
COUNTERPARTY_BANK_ACCOUNT_NUMBER **CPTY_BANK_ACCT_NUM**
COUNTERPARTY_BANK_ACCOUNT_SORT_CODE **CPTY_BANK_ACCT_SORT_CD**
COUNTERPARTY_BANK_ADDRESS_1 **CPTY_BANK_ADDR_1**
COUNTERPARTY_BANK_ADDRESS_2 **CPTY_BANK_ADDR_2**
COUNTERPARTY_BANK_ADDRESS_3 **CPTY_BANK_ADDR_3**
COUNTERPARTY_BANK_ADDRESS_4 **CPTY_BANK_ADDR_4**
COUNTERPARTY_BANK_CITY **CPTY_BANK_CITY**
COUNTERPARTY_BANK_CONTACT_FIRST_NAME **CPTY_BANK_CNCT_F_NM**
COUNTERPARTY_BANK_CONTACT_LAST_NAME **CPTY_BANK_CNCT_L_NM**
COUNTERPARTY_BANK_COUNTRY **CPTY_BANK_CTRY**
COUNTERPARTY_BANK_ID **CPTY_BANK_ID**
5 Configuring workflows
5.9 Completing treasury management setup
300 © Wall Street Systems IPH AB - Confidential
COUNTERPARTY_BANK_LONG_NAME **CPTY_BANK_LONG_NM**
COUNTERPARTY_BANK_POSTAL_CODE **CPTY_BANK_POST_CD**
COUNTERPARTY_BANK_SHORT_NAME **CPTY_BANK_SHORT_NM**
COUNTERPARTY_BANK_STATE **CPTY_BANK_STATE**
COUNTERPARTY_CITY **CPTY_CITY**
COUNTERPARTY_CONTACT_FIRST_NAME **CPTY_CNCT_F_NM**
COUNTERPARTY_CONTACT_FULL_NAME **CPTY_CNCT_FL_NM**
COUNTERPARTY_CONTACT_LAST_NAME **CPTY_CNCT_L_NM**
COUNTERPARTY_COUNTRY **CPTY_CTRY**
COUNTERPARTY_EMAIL_ACCOUNT **CPTY_EMAIL**
COUNTERPARTY_FAX_NUMBER **CPTY_FAX**
COUNTERPARTY_ID **CPTY_ID**
COUNTERPARTY_LONG_NAME **CPTY_LONG_NM**
COUNTERPARTY_PHONE_NUMBER **CPTY_PHONE**
COUNTERPARTY_POSTAL_CODE **CPTY_POST_CD**
COUNTERPARTY_SALUTATION **CPTY_SALUTATION**
COUNTERPARTY_SHORT_NAME **CPTY_SHORT_NM**
COUNTERPARTY_STATE **CPTY_STATE**
COUNTERPARTY_TRADER_NAME **CPTY_TRDR**
CPTY_NET_AMOUNT **CPTY_NET_AMT**
DESCRIPTION **DESC**
ENTITY_FULL_ADDRESS **ENTITY_ADDR**
ENTITY_ADDRESS_1 **ENTITY_ADDR_1**
ENTITY_ADDRESS_2 **ENTITY_ADDR_2**

5 Configuring workflows
5.9 Completing treasury management setup
WebSuite System Administration Guide 301
ENTITY_ADDRESS_3 **ENTITY_ADDR_3**
ENTITY_ADDRESS_4 **ENTITY_ADDR_4**
ENTITY_CITY **ENTITY_CITY**
ENTITY_CONTACT_FIRST_NAME **ENTITY_CNCT_F_NM**
ENTITY_CONTACT_FULL_NAME **ENTITY_CNCT_FL_NM**
ENTITY_CONTACT_LAST_NAME **ENTITY_CNCT_L_NM**
ENTITY_COUNTRY **ENTITY_CTRY**
ENTITY_EMAIL_ACCOUNT **ENTITY_EMAIL**
ENTITY_FAX_NUMBER **ENTITY_FAX**
ENTITY_ID **ENTITY_ID**
ENTITY_LONG_NAME **ENTITY_LONG_NM**
ENTITY_NET_AMOUNT **ENT_NET_AMT**
ENTITY_PHONE_NUMBER **ENTITY_PHONE**
ENTITY_POSTAL_CODE **ENTITY_POST_CD**
ENTITY_SHORT_NAME **ENTITY_SHORT_NM**
ENTITY_STATE **ENTITY_STATE**
ENTITY_TAX_ID **ENTITY_TAX_ID**
ENTITY_TRADER_NAME **ENTITY_TRDR**
FEE_AMOUNT **FEE_AMT**
INTRUMENT_NAME **INSTRMT_NM**
INTEREST_AMOUNT **INT_AMT**
INTEREST_CODE **INT_CODE**
INTEREST_RATE **INT_RATE**
INTEREST_TYPE **INT_TYPE**

5 Configuring workflows
5.9 Completing treasury management setup
302 © Wall Street Systems IPH AB - Confidential
ISSUE_PRIMARY_ID_AND_TYPE **ISSUE_1STID_AND_TYPE**
ISSUE_RATING_1_AND_TYPE **ISSUE_1STRATING_AND_TYPE**
ISSUE_SECONDARY_ID_AND_TYPE **ISSUE_2NDID_AND_TYPE**
ISSUE_RATING_2_AND_TYPE **ISSUE_2NDRATING_AND_TYPE**
ISSUE_RATING_3_AND_TYPE **ISSUE_3RDRATING_AND_TYPE**
ISSUE_COUPON_RATE **ISSUE_COUPON_RATE**
ISSUE_DATE_MINUS_VALUE_DATE **DIFF_VDT_IDT**
ISSUE_DATE **ISSUE_DATE**
ISSUE_MATURITY_DATE **ISSUE_MAT_DATE**
ISSUE_NAME **ISSUE_NAME**
ISSUER_NAME **ISSUER**
ISSUER_STATE **ISSUER_STATE**
ISSUER_TAX_ID **ISSUER_TAX_ID**
ISSUER_ADDRESS_1 **ISSUER_ADDR_1**
ISSUER_ADDRESS_2 **ISSUER_ADDR_2**
ISSUER_ADDRESS_3 **ISSUER_ADDR_3**
ISSUER_ADDRESS_4 **ISSUER_ADDR_4**
ISSUER_CITY **ISSUER_CITY**
ISSUER_CONTACT_FIRST_NAME **ISSUER_CNCT_F_NM**
ISSUER_CONTACT_FULL_NAME **ISSUER_CNCT_FL_NM**
ISSUER_CONTACT_LAST_NAME **ISSUER_CNCT_L_NM**
ISSUER_COUNTRY **ISSUER_CTRY**
ISSUER_EMAIL_ACCOUNT **ISSUER_EMAIL**
ISSUER_FAX_NUMBER **ISSUER_FAX**

5 Configuring workflows
5.9 Completing treasury management setup
WebSuite System Administration Guide 303
ISSUER_FULL_ADDRESS **ISSUER_ADDR**
ISSUER_ID **ISSUER_ID**
ISSUER_LONG_NAME **ISSUER_LONG_NM**
ISSUER_PHONE_NUMBER **ISSUER_PHONE**
ISSUER_POSTAL_CODE **ISSUER_POST_CD**
ISSUER_SHORT_NAME **ISSUER_SHORT_NM**
LEGAL_ENTITY_FULL_ADDRESS **LENTITY_ADDR**
LEGAL_ENTITY_ADDRESS_1 **LENTITY_ADDR_1**
LEGAL_ENTITY_ADDRESS_2 **LENTITY_ADDR_2**
LEGAL_ENTITY_ADDRESS_3 **LENTITY_ADDR_3**
LEGAL_ENTITY_ADDRESS_4 **LENTITY_ADDR_4**
LEGAL_ENTITY_CITY **LENTITY_CITY**
LEGAL_ENTITY_CONTACT_FIRST_NAME **LENTITY_CNCT_F_NM**
LEGAL_ENTITY_CONTACT_FULL_NAME **LENTITY_CNCT_FL_NM**
LEGAL_ENTITY_CONTACT_LAST_NAME **LENTITY_CNCT_L_NM**
LEGAL_ENTITY_COUNTRY **LENTITY_CTRY**
LEGAL_ENTITY_EMAIL_ACCOUNT **LENTITY_EMAIL**
LEGAL_ENTITY_FAX_NUMBER **LENTITY_FAX**
LEGAL_ENTITY_ID **LENTITY_ID**
LEGAL_ENTITY_LONG_NAME **LENTITY_LONG_NM**
LEGAL_ENTITY_PHONE_NUMBER **LENTITY_PHONE**
LEGAL_ENTITY_POSTAL_CODE **LENTITY_POST_CD**
LEGAL_ENTITY_SHORT_NAME **LENTITY_SHORT_NM**
LEGAL_ENTITY_STATE **LENTITY_STATE**

5 Configuring workflows
5.9 Completing treasury management setup
304 © Wall Street Systems IPH AB - Confidential
LEGAL_ENTITY_TAX_ID **LENTITY_TAX_ID**
MATURITY_DATE_AMOUNT **MAT_AMT**
MATURITY_DATE **MAT_DATE**
NEW_INTEREST_RATE **INT_RATE_TWO**
NEW_MATURITY_AMOUNT **MAT_AMT_TWO**
NEW_MATURITY_DATE **MAT_DATE_TWO**
NEW_VALUE_AMOUNT **VAL_AMT_TWO**
PARENT_DEAL_ID **PARENT_DEAL_ID**
PRICE **PRICE**
PAYMENT_AMOUNT **PAY_AMT**
PAYING_BANK_ACCOUNT_ID **PAY_BANK_ACCT_ID**
PAYING_BANK_ACCOUNT_NAME **PAY_BANK_ACCT_NM**
PAYING_BANK_ACCOUNT_NUMBER **PAY_BANK_ACCT_NUM**
PAYING_BANK_ACCOUNT_SORT_CODE **PAY_BANK_ACCT_SORT_CD**
PAYING_BANK_ADDRESS_1 **PAY_BANK_ADDR_1**
PAYING_BANK_ADDRESS_2 **PAY_BANK_ADDR_2**
PAYING_BANK_ADDRESS_3 **PAY_BANK_ADDR_3**
PAYING_BANK_ADDRESS_4 **PAY_BANK_ADDR_4**
PAYING_BANK_CITY **PAY_BANK_CITY**
PAYING_BANK_CONTACT_FIRST_NAME **PAY_BANK_CNCT_F_NM**
PAYING_BANK_CONTACT_LAST_NAME **PAY_BANK_CNCT_L_NM**
PAYING_BANK_COUNTRY **PAY_BANK_CTRY**
PAYING_BANK_ID **PAY_BANK_ID**
PAYING_BANK_LONG_NAME **PAY_BANK_LONG_NM**

5 Configuring workflows
5.9 Completing treasury management setup
WebSuite System Administration Guide 305
PAYING_BANK_POSTAL_CODE **PAY_BANK_POST_CD**
PAYING_BANK_SHORT_NAME **PAY_BANK_SHORT_NM**
PAYING_BANK_STATE **PAY_BANK_STATE**
PAYING_COUNTERPARTY_BANK_ACCOUNT_NAME **PAY_CPTY_BANK_ACCT_NM**
PAYING_COUNTERPARTY_BANK_ACCOUNT_NUMBER **PAY_CPTY_BANK_ACCT_NUM**
PAYING_COUNTERPARTY_BANK_ACCOUNT_SORT_CODE **PAY_CPTY_BANK_ACCT_SORT_CD**
PAYING_COUNTERPARTY_BANK_ADDRESS_1 **PAY_CPTY_BANK_ADDR_1**
PAYING_COUNTERPARTY_BANK_ADDRESS_2 **PAY_CPTY_BANK_ADDR_2**
PAYING_COUNTERPARTY_BANK_ADDRESS_3 **PAY_CPTY_BANK_ADDR_3**
PAYING_COUNTERPARTY_BANK_ADDRESS_4 **PAY_CPTY_BANK_ADDR_4**
PAYING_COUNTERPARTY_BANK_CITY **PAY_CPTY_BANK_CITY**
PAYING_COUNTERPARTY_BANK_CONTACT_FIRST_NAME **PAY_CPTY_BANK_CNCT_F_NM**
PAYING_COUNTERPARTY_BANK_CONTACT_LAST_NAME **PAY_CPTY_BANK_CNCT_L_NM**
PAYING_COUNTERPARTY_BANK_COUNTRY **PAY_CPTY_BANK_CTRY**
PAYING_COUNTERPARTY_BANK_ID **PAY_CPTY_BANK_ID**
PAYING_COUNTERPARTY_BANK_LONG_NAME **PAY_CPTY_BANK_LONG_NM**
PAYING_COUNTERPARTY_BANK_POSTAL_CODE **PAY_CPTY_BANK_POST_CD**
PAYING_COUNTERPARTY_BANK_SHORT_NAME **PAY_CPTY_BANK_SHORT_NM**
PAYING_COUNTERPARTY_BANK_STATE **PAY_CPTY_BANK_STATE**
PAYMENT_CURRENCY_CODE **PAY_CURR_CD**
PAYMENT_CURRENCY_NAME **PAY_CURR_NM**
PURCHASED_INTEREST_AMOUNT **PURCH_INT_AMT**
PURCHASED_OR_SOLD **PURCHD_OR_SOLD**
RECEIPT_AMOUNT **REC_AMT**

5 Configuring workflows
5.9 Completing treasury management setup
306 © Wall Street Systems IPH AB - Confidential
RECEIVING_BANK_ACCOUNT_ID **REC_BANK_ACCT_ID**
RECEIVING_BANK_ACCOUNT_NAME **REC_BANK_ACCT_NM**
RECEIVING_BANK_ACCOUNT_NUMBER **REC_BANK_ACCT_NUM**
RECEIVING_BANK_ACCOUNT_SORT_CODE **REC_BANK_ACCT_SORT_CD**
RECEIVING_BANK_ADDRESS_1 **REC_BANK_ADDR_1**
RECEIVING_BANK_ADDRESS_2 **REC_BANK_ADDR_2**
RECEIVING_BANK_ADDRESS_3 **REC_BANK_ADDR_3**
RECEIVING_BANK_ADDRESS_4 **REC_BANK_ADDR_4**
RECEIVING_BANK_CITY **REC_BANK_CITY**
RECEIVING_BANK_CONTACT_FIRST_NAME **REC_BANK_CNCT_F_NM**
RECEIVING_BANK_CONTACT_LAST_NAME **REC_BANK_CNCT_L_NM**
RECEIVING_BANK_COUNTRY **REC_BANK_CTRY**
RECEIVING_BANK_ID **REC_BANK_ID**
RECEIVING_BANK_LONG_NAME **REC_BANK_LONG_NM**
RECEIVING_BANK_POSTAL_CODE **REC_BANK_POST_CD**
RECEIVING_BANK_SHORT_NAME **REC_BANK_SHORT_NM**
RECEIVING_BANK_STATE **REC_BANK_STATE**
RECEIPT_CURRENCY_CODE **REC_CURR_CD**
RECEIPT_CURRENCY_NAME **REC_CURR_NM**
REFERENCE_NUMBER **REF_NUM**
SPOT_FX_RATE **SPOT_RATE**
STAMPING_FEE_RATE **STAMPING_FEE_RATE**
TERM **TERM**
TXN_DATE **TXN_DATE**

5 Configuring workflows
5.9 Completing treasury management setup
WebSuite System Administration Guide 307
USER_FISRT_NAME **USER_F_NM**
USER_LAST_NAME **USER_L_NM**
VALUE_DATE_AMOUNT **VAL_AMT**
VALUE_DATE **VALUE_DATE**
WITHHOLDING_TAX_AMOUNT **WITH_TAX_AMT**
ROLLOVER_CHILD_MATURITY_DATE_INTEREST_AMOUNT **RO_CHILD_MD_INT_AMT**
ROLLOVER_CHILD_MATURITY_DATE_WITHHOLDING_TAX_AMOUN
T
**RO_CHILD_MD_WHT_AMT**
5 Configuring workflows
5.9 Completing treasury management setup
308 © Wall Street Systems IPH AB - Confidential
WebSuite System Administration Guide 309
Chapter 6 Configuring navigation
WebSuite is installed with a default menu containing the following groups:
•Trading
•Treasury Monitor
•Forecasting
•Payment Factory
•Banking
•Accounting
•Reporting
•Admin.
Each group contains a set of subgroups, and the subgroups contain links to functions.
You can customize your organization’s menu to better reflect its business processes by editing the
default menu groups or by creating new ones. For example, you can create two new menu groups:
•Corporate Treasury
•Subsidiary.
You can place links to all functions applicable to your organization’s corporate treasury in the
Corporate Treasury menu group and all functions applicable to your organization’s subsidiaries in
the Subsidiaries menu group.
To customize your organization’s menu in this fashion, you need to do the following:
1. Create new menu groups, or edit or delete existing ones.
2. Configure the menu to include your changes to the menu groups.
6.1 Configuring menu groups
A menu group is defined by an XML file and consists of the following components:
•A menu group ID (which must be identical to the menu group’s file name)
•A menu group name
•A link ID
•One or more subgroups
•One or more links to functions.
The menu group and link IDs are transparent to users. However, they are critical to the
configuration of the menu and must be unique. The menu references the link ID, and security by
function references the menu group ID.

6 Configuring navigation
6.1 Configuring menu groups
310 © Wall Street Systems IPH AB - Confidential
Note: To view a menu group, a user must have security access to its function. For example, to
view the Payment Factory menu group, a user must have security access to MLT-10015
Payment Factory. For more information on security, see Chapter 3 Managing security on
page 95.
In a menu group, function links can be included in the group or nested in a subgroup:
You can modify existing menu groups by extracting and editing their XML files, or define new menu
groups by creating XML files based on the existing menu groups’ XML files. If you choose to do the
latter, you must configure security by function for your new menu groups.
6.1.1 Prerequisites
The following are prerequisites for configuring menu groups:
6.1.2 Creating menu groups
To create a menu group:
1. Extract the following files:
Category Tasks
Security Ensure you have access to the following function:
• FG-0400 Review CMM Configuration.
For more information, see Chapter 3 Managing security on page 95.
6 Configuring navigation
6.1 Configuring menu groups
WebSuite System Administration Guide 311
[Standard configuration file path]
menu
xml
menu
mgAccounting.xml
mgCoreData.xml
mgForecasting.xml
mgInhouseBank.xml
mgPaymentFactory.xml
mgSecurity.xml
mgSystemUtility.xml
mgTreasury.xml
If your organization is using CMM as part of Wallstreet Suite, extract the files from the
…\AurosConfigData\ingeg\ folder; otherwise, extract the files from the
…\AurosConfigData\standard\ folder.
For instructions on extracting configuration files, see 1.2 Opening configuration files on page 25.
2. Create a copy of one of the files to use it as a template for a new menu group file.
Name the copy mg[MenuGroupID].xml, where [MenuGroupID] is the ID of the new menu group
(for example, mgCorpTreasury.xml), and place it in the same location in the InstallationData
folder.
3. Open the copy in a text editor.
4. Edit the marked elements’ values:
º
<MENU_ID>mgPaymentFactory</MENU_ID>
Enter mg[MenuGroupID], were [MenuGroupID] is the ID of the new menu group. (This element’s
value must match the file name you entered in step 2, without the .xml file extension.)
<MENU_DISPLAY_NAME>Payment Factory</MENU_DISPLAY_NAME>
Enter the name of the new menu group.
<MENU_LINK>
<LINK_ID>10015</LINK_ID>
Enter a unique link ID for the menu group.
</MENU_LINK>
º
5. Do the following:
–To add a subgroup, enter a HEADER element and LINK_ID child elements in the appropriate
location. The following is an example:
º
<HEADER id="Monitoring" label="Monitoring">
<LINK_ID>39</LINK_ID>
<LINK_ID>193</LINK_ID>
</HEADER>
º
–To remove a subgroup, delete its HEADER element and LINK_ID child elements.
–To add a function, enter a LINK_ID child element in the appropriate location. The following is
an example:

6 Configuring navigation
6.1 Configuring menu groups
312 © Wall Street Systems IPH AB - Confidential
º
<LINK_ID>39</LINK_ID>
º
–To remove a function, delete its LINK_ID child element.
You can enter LINK_ID child elements in the MENU element (after the MENU_LINK element) or in a
HEADER element:
–If you enter a LINK_ID child element in the MENU element, it displays at the top of the menu
group.
–If you enter a LINK_ID child element in a HEADER element, it displays in the HEADER
element’s subgroup.
For a list of function link IDs you can reference in LINK_ID elements, see Appendix A Security
and link IDs on page 481.
6. Save and close the file.
7. Open one of the following configuration files:
[Standard configuration file path]
menu
xml
link
link_attributes.xml
For instructions on opening configuration files, see 1.2 Opening configuration files on page 25.
8. Add a LINK element for the new menu group. The following is an example:
º
<LINK>
<LINK_ID>90001</LINK_ID>
<DISPLAY>
<LANGUAGE>
<DIALECT>english</DIALECT>
<DISPLAY_LABEL>Corporate Treasury</DISPLAY_LABEL>
</LANGUAGE>
</DISPLAY>
</LINK>
º
9. Save and close the file.
10. Open one of the following configuration files:
[Standard configuration file path]
menu
xml
link
link_targets.xml
For instructions on opening configuration files, see 1.2 Opening configuration files on page 25.
11. Add a LINK element for the new menu group. The following is an example:
º
<LINK>
<LINK_ID>90001</LINK_ID>
<TARGET type="menu">
<MENU_LINK_ID id="90001"/>
</TARGET>

6 Configuring navigation
6.1 Configuring menu groups
WebSuite System Administration Guide 313
</LINK>
º
12. Save and close the file.
13. Open one of the following configuration files:
[Standard configuration file path]
security
initialsecuritysetup.xml
For instructions on opening configuration files, see 1.2 Opening configuration files on page 25.
14. Add a group_node element for the new menu group. The following is an example:
º
<group_node type="FUNCTIONAL_GROUP" name="MLT-90001" description="Corporate
Treasury">
<node type="PAGE" name="MLT-90001" description="Corporate Treasury"/>
</group_node>
º
15. Save and close the file.
16. Add the menu group to the menu. For more information, see 6.2 Configuring the menu on page
315.
17. Log in and secure the menu group. For more information, see Chapter 3 Managing security on
page 95.
6.1.3 Editing menu groups
To edit a menu group:
1. Open the menu group’s configuration file.
For instructions on opening configuration files, see 1.2 Opening configuration files on page 25.
2. Do the following:
–To add a subgroup, enter a HEADER element and LINK_ID child elements in the appropriate
location. The following is an example:
º
<HEADER id="Monitoring" label="Monitoring">
<LINK_ID>39</LINK_ID>
<LINK_ID>193</LINK_ID>
</HEADER>
º
–To remove a subgroup, delete its HEADER element and LINK_ID child elements.
–To add a function, enter a LINK_ID child element in the appropriate location. The following is
an example:
º
<LINK_ID>39</LINK_ID>
º
You can enter LINK_ID child elements in the MENU_LINK element or a HEADER element:
–If you enter a LINK_ID child element in the MENU_LINK element, its function displays at
the top of the menu group.
–If you enter a LINK_ID child element in a HEADER element, its function displays in the
HEADER element’s subgroup.

6 Configuring navigation
6.1 Configuring menu groups
314 © Wall Street Systems IPH AB - Confidential
For a list of function link IDs you can reference in LINK_ID elements, see Appendix A
Security and link IDs on page 481.
–To remove a function, delete its LINK_ID child element.
3. Save and close the file.
6.1.4 Deleting menu groups
To delete a menu group:
1. Delete the menu groups’ files.
2. Open one of the following configuration files:
[Standard configuration file path]
menu
xml
link
link_attributes.xml
For instructions on opening configuration files, see 1.2 Opening configuration files on page 25.
3. Remove the menu groups’ LINK elements.
4. Save and close the file.
5. Open one of the following configuration files:
[Standard configuration file path]
menu
xml
link
link_targets.xml
For instructions on opening configuration files, see 1.2 Opening configuration files on page 25.
6. Remove the menu groups’ LINK elements.
7. Save and close the file.
8. Open one of the following configuration files:
[Standard configuration file path]
security
initialsecuritysetup.xml
For instructions on opening configuration files, see 1.2 Opening configuration files on page 25.
9. Remove the menu groups’ group_node elements.
10. Save and close the file.
11. Remove the menu group from the menu. For more information, see 6.2 Configuring the menu on
page 315.

6 Configuring navigation
6.2 Configuring the menu
WebSuite System Administration Guide 315
6.2 Configuring the menu
The menu is defined by the pgFrameIndex.xml file. This file is identical in structure to the menu
group files, but contains one additional set of elements:
menu_url
Using these elements, you refer to the menu group files.
Note: You can also refer to functions in the menu using LINK_ID elements.
6.2.1 Prerequisites
The following are prerequisites for configuring the menu:
6.2.2 Configuring the menu
To configure the menu:
1. Open one of the following configuration files:
[Standard configuration file path]
menu
xml
menu
pgFrameIndex.xml
For instructions on opening configuration files, see 1.2 Opening configuration files on page 25.
2. Do the following:
–To add a menu group, enter a MENU_URL element in the appropriate location. The following is
an example:
º
<MENU_URL>mgCorpTreasury.xml</MENU_URL>
º
The MENU_URL element’s value must be identical to the menu group’s file name (including the
.xml file extension).
–To remove a menu group, delete its MENU_URL element.
–To add a function, enter a LINK_ID element in the appropriate location. The following is an
example:
º
<LINK_ID>39</LINK_ID>
º
Category Tasks
Security Ensure you have access to the following function:
• FG-0400 Review CMM Configuration.
For more information, see Chapter 3 Managing security on page 95.
6 Configuring navigation
6.3 Configuring the menu in a standalone TRM/ACM web environment
316 © Wall Street Systems IPH AB - Confidential
For a list of function link IDs you can reference in LINK_ID elements, see Appendix A
Security and link IDs on page 481.
–To remove a function, delete its LINK_ID element.
3. Save and close the file.
6.3 Configuring the menu in a standalone TRM/ACM web
environment
If your organization is using a standalone TRM/ACM web environment (in other words, it using
WebSuite without CMM), you can configure the menu by editing the following file:
[WebSuite
home]\trema\webapps\ekit\WEB-INF\classes\conf\registry\rtd\services\navigation\n
avigation.xml
Note the following limitations when configuring the menu in a standalone TRM/ACM web
environment:
•Tree controls can have a maximum of two levels and are currently used for first and second
levels (menu). They can be extended to any level; however, branding changes are necessary to
implement this.
• Tab controls are currently used for all other levels. Navigation dialogs allow overlapping while
fitting in each other.
For example, a tree view can contain the items displayed in the embedded tab view by using the
navigation option LevelMax=2 in the parent navigation dialog. By default, it is set to 1. You can
increase this value to increase overlapping (set to 0 to overlap all).
Note: If you want to use a navigation dialog without embedding it in the parent navigation
dialog, use embedNavigation="false". This is useful for a quick links page.
6.3.1 Configuring the menu
Each navigation item has an action assigned to it. An action occurs when you click on a navigation
item. For example:
<spot action="scenario(view=fx_spot, scenario=priced)" allowedGroups= "ekit_user "
/>
An item can allow access to a business page (such as, deal entry or report). Items can also be used
to group other items; in this case, you use block items. For example:
<equity alias="tabs" allowedGroups="ekit_user, ekit_and_oms_user">
<items>
<equity action="scenario(view=eq, scenario=priced)" allowedGroups="ekit_user,
ekit_and_oms_user" />
</items>
</equity>
An entry in the navigation file is split into several parts: the identifier of the item, the action or the
alias link to the item, and the users allowed to access the item. The following table describes each of
these parts:
Component Description Example
6 Configuring navigation
6.3 Configuring the menu in a standalone TRM/ACM web environment
WebSuite System Administration Guide 317
Identifier Each entry must start with an
Identifier. The Identifier must be
unique in a block level.
support
Action Internal URL referring to another
item in the navigation.
action="#index.support.suppo
rtweb"
External URL External URL. action="#http://support.trem
a.com"
Static pages static_page(template=
template_path) where
template_path refers to an HTML
file in:
[WebSuite
home]/deploy/ekit.ear/web
.war/application/ekit/sit
e/[trema|customer]/static
action="static_page(template
=static/support/support)"
Note: The .html extension is
absent from the end of the
file name.
Deal entry, cash flow
forecasting scenario(view=view_name,
scenario=scenario_name)
where view_name corresponds to
the view defined in view.xml and
scenario_name corresponds to
the scenario defined in
scenario.xml.
action="scenario(view=batch_
fx, scenario=batch_create)"
Reports ReportController(view=view_nam
e) where view_name corresponds
to the view defined in view.xml.
action="ReportController(vie
w=report_fxdd)"
Treasury monitor TreasuryViewController(v
iew=view_name,
page=page_name) where
view_name corresponds to the
view defined in view.xml.
action="TreasuryViewControll
er(view=treasury,
page=TP-LIQ/Balance_by_date_
and_account)"
Note: The page_name makes the
link with the layout. It is
composed of the name of the
book followed by the name of
the layout (defined in the
Wallstreet Suite XML layout
file).
Admin For each section of the
administration part, there is a
different controller. A controller
defines which parameters can be
accepted.
action="AdminImportControlle
r"

6 Configuring navigation
6.3 Configuring the menu in a standalone TRM/ACM web environment
318 © Wall Street Systems IPH AB - Confidential
Alias Aliases are defined at the beginning
of the navigation file.
They can be used instead of
actions.
By default, two aliases are defined:
tabs and transaction.
<aliases>
<tabs>navigation(template
=ekit_sub)</tabs>
<transaction>navigation(t
emplate=transaction/secti
on.frontpage,
embedNavigation=false)</t
ransaction>
</aliases>
Ta b s In this example, the items are
defined as level two items.
<fx alias="tabs"
allowedGroups= "#inherit">
<items>
<batch_create
action="scenario(view=
batch_fx,
scenario=batch_create)
"allowedGroups=
"#inherit" />
<loop_create
action="scenario(view=
fx_spot,
scenario=loop_create)"
allowedGroups=
"#inherit" />
<spot
action="scenario(view=
fx_spot,
scenario=normal)"
allowedGroups=
"#inherit" />
<forward
action="scenario(view=
spot_forward,
scenario=priced)"
allowedGroups=
"#inherit" />
<swap
action="scenario(view=
fx_swap,
scenario=priced)"
allowedGroups=
"#inherit" />
<option
action="scenario(view=
fx_option,
scenario=priced)"
allowedGroups=
"#inherit " />
</items>
</fx>
Transa ction This example defines that a specific
page containing a link to all items is
present.
alias="transaction"

6 Configuring navigation
6.3 Configuring the menu in a standalone TRM/ACM web environment
WebSuite System Administration Guide 319
6.3.2 Assigning user permissions
You must set sufficient user permissions (per group basis) for each item in the navigation structure.
You can set one or more groups for each item.
The wildcard (*) allows all groups to access an item. For example:
<etrade alias="transaction" allowedGroups="ekit_user, ekit_admin">
<fx alias="tabs" allowedGroups="ekit_user">
<trema action="#index.trema.abouttrema" allowedGroups="*">
Note: You cannot use the wildcard in a group name (for example, ekit_* for ekit_user and
ekit_admin).
If a restricted group of users is given permission to access a top-level item but other users are only
given permission to access lower-level items, only the restricted group of users can navigate
through the top-level item using the WebSuite menu. The other users are only able to access the
lower-level items by entering the full path in the URL or by going through another link. They cannot
use the top-level item. For example:
<etrade alias="transaction" allowedGroups="ekit_admin">
<fx alias="tabs" allowedGroups= "*">
Only users in the ekit_admin group are able to access fx from the menu. Users who are not
members of ekit_admin can access fx through the URL:
https://ekiktserver/ekit/index.etrade.fx.
6 Configuring navigation
6.3 Configuring the menu in a standalone TRM/ACM web environment
320 © Wall Street Systems IPH AB - Confidential
WebSuite System Administration Guide 321
Chapter 7 Configuring the user interface
You can modify most of the user interface’s elements, including the following:
•Font faces and sizes
•Colors
•Number, date, and time formats
•Utilities (including popup calendars and context-sensitive help)
•The login page
•The daily activity timetable page.
By modifying these elements, you can configure the user interface for your organization—matching
it to your organization’s corporate standards.
In addition, if users in your organization read languages other than English and French (the two
language sets installed with WebSuite), you can create new language sets to translate the user
interface to these languages.
7.1 Understanding the user interface
WebSuite is installed with a default menu and user interface. The menu references and screen
captures in the guides are based on these defaults.
The defaults have been designed to satisfy most organization’s needs. However, your organization
may want to customize the menu to better reflect its business process or the user interface to match
its corporate style. In addition, your organization may want to create custom translations of the user
interface for users who are not fluent in English or French (the two languages supported by the
default installation of WebSuite). To address such needs, you can customize the menu and user
interface by editing a set of XML and CSS files as documented in this chapter.
7.2 Configuring display policies
The DisplayPolicies.xml file defines display policies for the menu and other user interface
functions. These display policies control the following:
•How WebSuite displays functions to which a user does not have security access in the menu
•Whether users can specify personal startup pages or not
•Whether links to previously opened functions display at the top of each page or not
•Whether Upload Files… buttons display in the import functions or not.
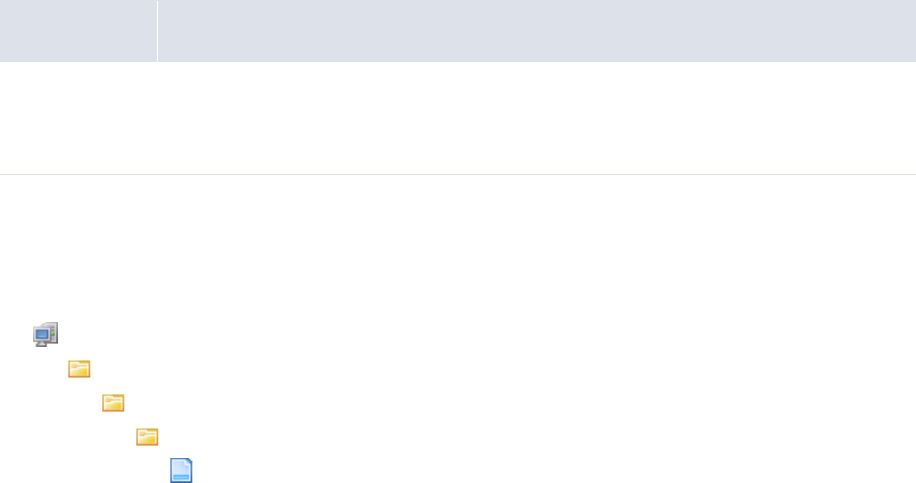
7 Configuring the user interface
7.2 Configuring display policies
322 © Wall Street Systems IPH AB - Confidential
7.2.1 Prerequisites
The following are prerequisites for configuring display policies:
7.2.2 Configuring display policies
To configure display policies:
1. Open one of the following configuration files:
[Standard configuration file path]
menu
xml
menu
DisplayPolicies.xml
For instructions on opening configuration files, see 1.2 Opening configuration files on page 25.
2. Edit the marked attributes’ values:
º
<MenuPolicies>
…
<InaccessibleLinks display_policy="link"/>
Enter hide to not display functions to which a user does not have security access in the
menu, static to display functions to which a user does not have security access in the menu
as static text, or link to display functions to which a user does not have security access in
the menu as links. (If you enter link and the user clicks one of these functions, a warning
message displays.)
…
<MenuDisplayComponentFactory classname="alterna.menu.visual.
CaEKitMenuDisplayComponentFactory"/>
Enter the class name of the factory that creates menu widgets. (If you specify a value,
WebSuite ignores the values in the MenuFramesetDisplayRequest and
ControllingWebEvent elements’ classname handlers. Only edit this value after consulting
with Wallstreet.)
…
<MenuFramesetDisplayRequest classname="alterna.menu.visual.frameset.
CaNullFramesetDisplayRequest"/>
Enter the class name of the menu frameset display request. (Only edit this value after
consulting with Wallstreet.)
<ControllingWebEvent classname="alterna.menu.visual.esol.
CaEsolMenuWebEventHandler"/>
Enter the class name of the controlling Web event. (Only edit this value after consulting with
Wallstreet.)
<MenuItemSecurityPolicy
classname="alterna.security.CaMenuItemSecurityPolicy"/>
Category Tasks
Security Ensure you have access to the following function:
• FG-0400 Review CMM Configuration.
For more information, see Chapter 3 Managing security on page 95.
7 Configuring the user interface
7.2 Configuring display policies
WebSuite System Administration Guide 323
Enter the class name of the menu item security policy. (Only edit this value after consulting
with Wallstreet.)
<AllowUserSpecifiedStartupPage value="true"/>
Enter true to allow users to specify personal startup pages or false to not allow users to
specify personal startup pages.
<ShowRecentLinks value="true"/>
Enter true to display links to previously opened functions at the top of each page or false
to not display links to previously opened functions at the top of each page.
<MaxRecentLinks value="4"/>
Enter the default number of previously opened function links to display at the top of each
page. (Each user can specify his or her preferred number of previously opened function links
in the User Options function.)
<!--
<AllowedFileUploadImportTypeIDs>
<ImportTypeID value="1"/>
<ImportTypeID value="2"/>
<ImportTypeID value="3"/>
<ImportTypeID value="6"/>
<ImportTypeID value="12"/>
<ImportTypeID value="27"/>
<ImportTypeID value="38"/>
</AllowedFileUploadImportTypeIDs>
-->
</MenuPolicies>
º
3. If desired, display Upload Files… buttons in the import functions:
a. Remove the comment markers (<!-- and -->) before and after the
AllowedFileUploadImportTypeIDs element.
b. Do the following:
–To disp l ay the Upload Files… button in a particular function, make no further changes.
–To not display the Upload Files… button in a particular function, place comment markers
before and after its ImportTypeID element.
The following table defines which ImportTypeID elements map to which functions:
Element ID Function
1Import Bank Transaction Files
2Import Transaction Files (accounts payable)
3Import FX Rates
6Import AR Files
12 Import Interest Rates
27 Import Transaction Files(direct debit)
38 Import Forecasts

7 Configuring the user interface
7.3 Configuring style and other user interface elements
324 © Wall Street Systems IPH AB - Confidential
4. Save and close the file.
7.3 Configuring style and other user interface elements
Style (or "look and feel") defines a user interface’s visual elements, including font faces and sizes,
colors, heights, widths, and margins.
In WebSuite, style is defined by the t7silver.xml file and a set of CSS files:
•The t7silver.xml file contains the following displayable elements:
displayable element Type Description
header CSS file
paths
Defines paths to the CSS files.
text Style Defines the following style elements of static
text:
•Font face
•Size
• Color
• Format (bold, italic, underline).
textinput Other Defines the configuration of the popup
calendar button.
datetext Other Defines the configuration of date and time
formats.
numbertext Other Defines the configuration of number formats.
message Style Defines the following style elements of
messages:
•Font face
•Size
• Color
• Format (bold, italic, underline).
tablecolumn Style Defines the following style element of table
columns:
• Horizontal alignment.
tablerow Style Defines the following style element of table
rows:
• Background color.
tableheaderrow Style Defines the following style element of table
header rows:
• Background color.
7 Configuring the user interface
7.3 Configuring style and other user interface elements
WebSuite System Administration Guide 325
tableheadercell Style Defines the following style elements of table
header cells:
• Horizontal alignment
• Vertical alignment
• Background color.
tabledetail Style Defines the following style element of table
body cells:
• Horizontal alignment.
table Style Defines the following style elements of
tables:
•Width
•Border
• Cell padding
•Cell spacing
• Horizontal alignment.
body Style Defines the following style elements of the
page body:
•Margins
• Background color.
pleasewait Other Defines the configuration of the "Please Wait"
message.
calendarpopupbutton Other Defines the configuration of the popup
calendar window.
button Style Defines the following style element of
buttons:
•CSSclass.
pushbutton Style Defines the following style element of push
buttons:
•CSSclass.
span Style Defines the following style element of push
buttons:
•CSSclass.
favorites Other Defines the configuration of favorites.
contextsensitivehelp Other Defines the configuration of context-sensitive
help.
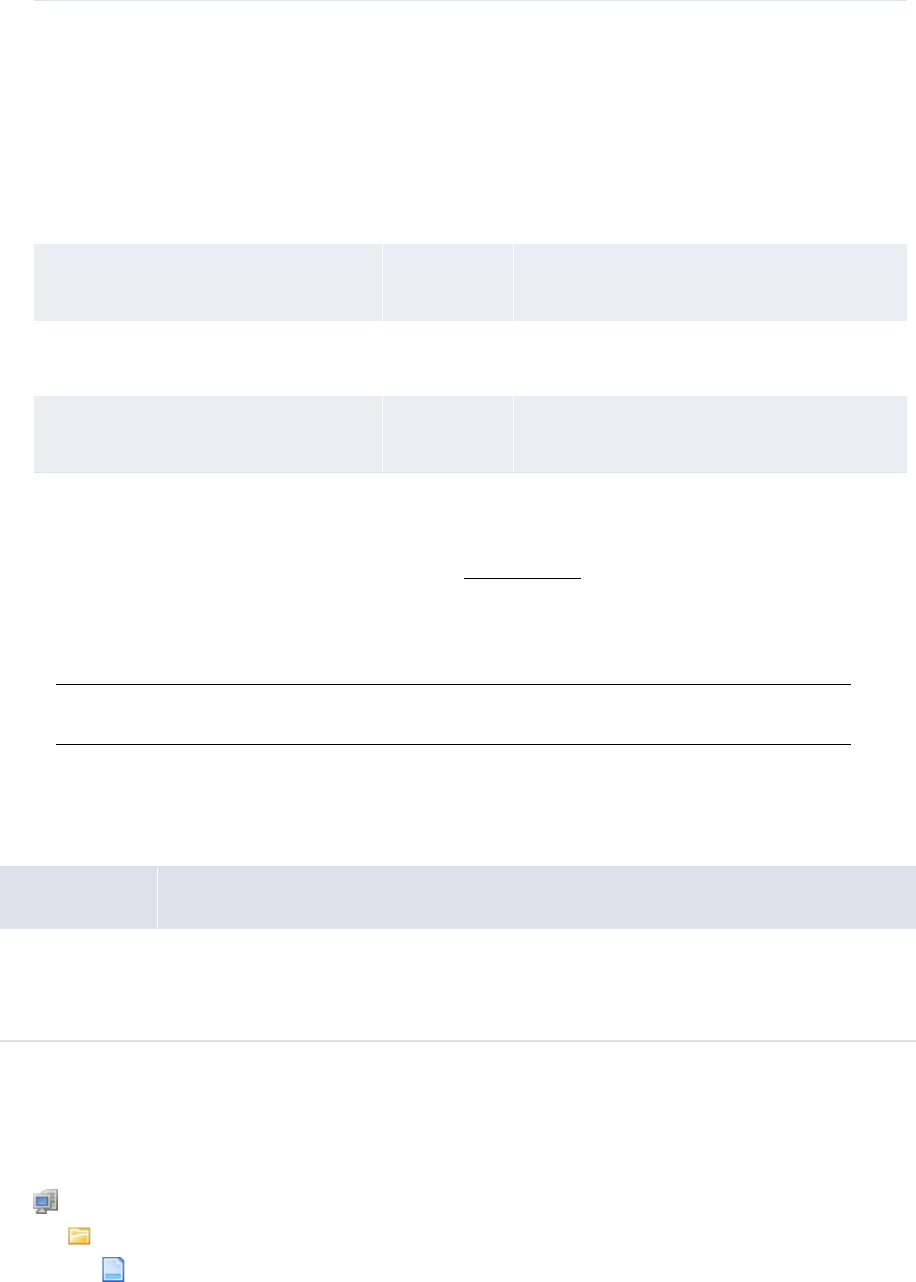
7 Configuring the user interface
7.3 Configuring style and other user interface elements
326 © Wall Street Systems IPH AB - Confidential
As shown in the above table, some of the display elements control style while others control
other features.
•The CSS files are based on the World Wide Web Consortium’s Cascading Style Sheets standard.
For more information on this standard, see the W3C website.
You can define style in the style-relevant display elements of the t7silver.xml file or in the CSS
files. If you choose the latter, the CSS files override the style-related displayable elements in the
t7silver.xml file.
Note: Wallstreet recommends defining style in the CSS files as they offer greater flexibility than
the t7silver.xml file.
7.3.1 Prerequisites
The following are prerequisites for configuring style and other user interface elements:
7.3.2 Defining style using the CSS files
To define style using the CSS files:
1. Open the following configuration file:
[Standard configuration file path]
styles
t7silver.xml
scrollabletable Style Defines the following style elements of
scrollable tables:
•Height
•Width
•Border
• Cell padding
•Cell spacing
• Horizontal alignment.
hideshowdisplayable Other Defines the configuration of show/hide
sections.
selectioncriteria Other Defines the configuration of selection criteria
sections.
sectionaldisplayable Other Defines the configuration of selection
sections.
Category Tasks
Security Ensure you have access to the following function:
• FG-0400 Review CMM Configuration.
For more information, see Chapter 3 Managing security on page 95.

7 Configuring the user interface
7.3 Configuring style and other user interface elements
WebSuite System Administration Guide 327
For instructions on opening configuration files, see 1.2 Opening configuration files on page 25.
2. Locate the stylesheet element of the first CSS file you want to edit and change the value of its
replace_existing attribute to false.
The following is an example:
<stylesheet path="${VirtualDirectory}/styles/t7silver" name="common.css"
source_path="styles/t7silver" replace_existing="false"/>
3. Repeat step 2 for each CSS file you want to edit.
4. Save and close the file.
5. Navigate to the following location in the VirtualDirectory folder:
styles
t7silver
6. Edit the appropriate CSS files.
7.3.3 Defining style using the t7silver.xml file
To define style using the t7silver.xml file:
1. Open the following configuration file:
[Standard configuration file path]
styles
t7silver.xml
For instructions on opening configuration files, see 1.2 Opening configuration files on page 25.
2. Define style in this file by entering the appropriate attribute child elements in the style-related
displayable elements. The following is an example:
º
<displayable id="text" class="alterna.appserver.visual.CaStringDisplayable">
…
<context id="default">
<qualifier value="default">
<attribute id="italic" value="false"/>
<attribute id="underline" value="false"/>
<attribute id="bold" value="false"/>
<attribute id="color" value=""/>
<attribute id="fontsizeincrement" value=""/>
<attribute id="fontface" value="Arial"/>
</qualifier>
<qualifier value="label">
<attribute id="bold" value="true"/>
</qualifier>
<qualifier value="headerlabel">
<attribute id="bold" value="false"/>
</qualifier>
<qualifier value="sectionheader">
<attribute id="bold" value="true"/>
</qualifier>
<qualifier value="sectionheaderoff">
<attribute id="bold" value="true"/>
</qualifier>
<qualifier value="sectionheaderon">
<attribute id="bold" value="true"/>
</qualifier>
<qualifier value="pagetitle">

7 Configuring the user interface
7.3 Configuring style and other user interface elements
328 © Wall Street Systems IPH AB - Confidential
</qualifier>
</context>
</displayable>
º
The meta child element at the beginning of each displayable element defines the acceptable
qualifier and attribute child elements for that displayable element.
3. Save and close the file.
7.3.4 Configuring number, date, and time formats
To configuring number, date, and time formats:
1. Open the following configuration file:
[Standard configuration file path]
styles
t7silver.xml
For instructions on opening configuration files, see 1.2 Opening configuration files on page 25.
2. Edit the marked attributes’ values:
º
<displayable id="numbertext"
class="alterna.appserver.visual.CaNumberDisplayable">
<extends>
<parent id="text"/>
</extends>
<context id="default">
<qualifier id="usage" value="default">
<attribute id="numberformatstr" value="###,##0.00"/>
Enter the default format for static non-integer displays.
</qualifier>
<qualifier id="usage" value="integer">
<attribute id="numberformatstr" value="###,##0"/>
Enter the default format for static integer displays.
</qualifier>
</context>
<context id="textboxcontent">
<qualifier id="usage" value="default">
<attribute id="numberformatstr" value="###,##0.00"/>
Enter the default format for editable non-integer displays.
</qualifier>
<qualifier id="usage" value="integer">
<attribute id="numberformatstr" value="###,##0"/>
Enter the default format for editable integer displays.
</qualifier>
</context>
</displayable>
º
3. Edit the marked attributes’ values:
º
<displayable id="datetext" class="alterna.appserver.visual.CaDateDisplayable"
styleclassname="alterna.appserver.visual.style. CaDateDisplayStyle">
<extends>

7 Configuring the user interface
7.3 Configuring style and other user interface elements
WebSuite System Administration Guide 329
<parent id="text"/>
</extends>
<context id="default">
<qualifier id="usage" value="default">
<attribute id="dateformatstr" value="dd/MM/yyyy"/>
Enter the default format for static date displays.
</qualifier>
<qualifier id="usage" value="timeformatstr">
<attribute id="dateformatstr" value="HH:mm:ss"/>
Enter the default format for static time displays.
</qualifier>
<qualifier id="usage" value="datetimeformat">
<attribute id="dateformatstr" value="dd/MM/yyyy HH:mm:ss"/>
Enter the default format for static date and time displays.
</qualifier>
</context>
<context id="textboxcontent">
<qualifier id="usage" value="default">
<attribute id="dateformatstr" value="dd/MM/yyyy"/>
Enter the default format for editable date displays.
</qualifier>
<qualifier id="usage" value="timeformatstr">
<attribute id="dateformatstr" value="HH:mm:ss"/>
Enter the default format for editable time displays.
</qualifier>
<qualifier id="usage" value="datetimeformat">
<attribute id="dateformatstr" value="dd/MM/yyyy HH:mm:ss"/>
Enter the default format for editable date and time displays.
</qualifier>
</context>
</displayable>
º
4. Save and close the file.
7.3.5 Configuring the popup calendar button
To configure the popup calendar button:
1. Open the following configuration file:
[Standard configuration file path]
styles
t7silver.xml
For instructions on opening configuration files, see 1.2 Opening configuration files on page 25.
2. Edit the marked attribute’s value:
º
<displayable id="textinput"
class="alterna.appserver.visual.CaTextInputDisplayable">
<meta>
<qualifiers>
<qualifierdomain>

7 Configuring the user interface
7.3 Configuring style and other user interface elements
330 © Wall Street Systems IPH AB - Confidential
<domainvalue id="default"/>
</qualifierdomain>
</qualifiers>
<attributes>
<attribute_def id="datepopupenabled"/>
</attributes>
</meta>
<context id="default">
<qualifier value="default">
<attribute id="datepopupenabled" value="false"/>
Enter true to display the popup calendar button by default or false to not display
the popup calendar button by default.
</qualifier>
</context>
</displayable>
º
3. Edit the marked attribute’s value:
º
<displayable id="calendarpopupbutton"
class="alterna.appserver.visual.CaPopupCalendarButtonDisplayable">
<meta>
<qualifiers>
<qualifierdomain>
<domainvalue id="default"/>
</qualifierdomain>
</qualifiers>
<attributes>
<attribute_def id="datepopuplabel"/>
<attribute_def id="datepopuphtmlfile"/>
</attributes>
</meta>
<context id="default">
<qualifier value="default">
<attribute id="datepopuplabel" value="..."/>
Enter the popup calendar window’s label.
<attribute id="datepopuphtmlfile" value="calendar.html"/>
</qualifier>
</context>
</displayable>
º
4. Save and close the file.
7.3.6 Configuring the context-sensitive help button
To configure the context-sensitive help button:
1. Open the following configuration file:
[Standard configuration file path]
styles
t7silver.xml
For instructions on opening configuration files, see 1.2 Opening configuration files on page 25.
2. Edit the marked attributes’ values:
º

7 Configuring the user interface
7.3 Configuring style and other user interface elements
WebSuite System Administration Guide 331
<displayable id="contextsensitivehelp" class="alterna.
appserver.visual.help.CaHelpDisplayable">
<meta>
<qualifiers>
<qualifierdomain>
<domainvalue id="default"/>
</qualifierdomain>
</qualifiers>
<attributes>
<attribute_def id="enabled"/>
<attribute_def id="text"/>
<attribute_def id="displayimage"/>
<attribute_def id="tooltip"/>
</attributes>
</meta>
<context id="default">
<qualifier value="default">
<attribute id="enabled" value="true"/>
Enter true to display the context-sensitive help button by default or false to not
display the context-sensitive help button by default.
<attribute id="text" value=""/>
Enter link text.
<attribute id="displayimage" value="true"/>
Enter true to display the context-sensitive help button image or false to display the
context-sensitive help link text defined in the above marked attribute.
<attribute id="tooltip" value="Help on this page"/>
Enter tool tip text.
</qualifier>
</context>
</displayable>
º
3. Save and close the file.
7.3.7 Configuring the Favorites list
To configure the Favorites list:
1. Open the following configuration file:
[Standard configuration file path]
styles
t7silver.xml
For instructions on opening configuration files, see 1.2 Opening configuration files on page 25.
2. Edit the marked attribute’s value:
º
<displayable id="favorites" class="alterna.menu.visual.
displayable.CaFavoritesDisplayable">
<meta>
<qualifiers>
<qualifierdomain>
<domainvalue id="default"/>
</qualifierdomain>
</qualifiers>
7 Configuring the user interface
7.4 Customizing pages
332 © Wall Street Systems IPH AB - Confidential
<attributes>
<attribute_def id="max_width"/>
</attributes>
</meta>
<context id="default">
<qualifier value="default">
<attribute id="max_width" value="25"/>
Enter the maximum length (in characters) of options in the Favorites list.
</qualifier>
</context>
</displayable>
º
3. Save and close the file.
7.3.8 Configuring the "Please Wait" message
To configure the "Please Wait" message, edit the file
\components\wss-web\websuite\resources\pleasewait.html. This includes:
•A link to a pleasewait.css file where you can make font, size, and other changes.
•A link to a logo GIF file.
•An animated progress bar GIF file.
•The "please wait..." text displayed when the application displays this HTML file.
You can edit these components as you wish, as long as you do not change the name of the file
pleasewait.html.
7.4 Customizing pages
You can customize the login and daily activity timetable pages.
You can replace the logo that displays on the login page with your organization’s This allows you to
brand WebSuite for your organization:

7 Configuring the user interface
7.4 Customizing pages
WebSuite System Administration Guide 333
The daily activity timetable displays the activities to be completed each day, the time each activity is
to be completed, and the person or department responsible for completing each activity. It includes
links to select functions in WebSuite; therefore, users can use the daily activity timetable as an
entry point into WebSuite’s functionality.
The activity_timetable.xml file allows you to configure the daily activity timetable for your
organization.
7.4.1 Prerequisites
The following are prerequisites for customizing pages:
7.4.2 Customizing the login page
To customize the login page:
1. Open one of the following configuration files:
Category Tasks
Security Ensure you have access to the following function:
• FG-0400 Review CMM Configuration.
For more information, see Chapter 3 Managing security on page 95.

7 Configuring the user interface
7.4 Customizing pages
334 © Wall Street Systems IPH AB - Confidential
[Standard configuration file path]
templates
login
login.xml
For instructions on opening configuration files, see 1.2 Opening configuration files on page 25.
2. Edit the marked attribute’s value:
<alterna:template xmlns:alterna="http://www.alterna.com">
<div id="loginpagelogo">
<img name="null" src="image/2/trema_large.gif" id="loginlogo"/>
Enter the URL of the logo.
</div>
º
</alterna:template>
º
3. Save and close the file.
7.4.3 Customizing the daily activity timetable page
To customize the daily activity timetable page:
1. Open one of the following configuration files:
[Standard configuration file path]
templates
activitytimetable
activitytimetable.xml
For instructions on opening configuration files, see 1.2 Opening configuration files on page 25.
2. Do the following:
–To create an activity, add a tr element to the file between the table element’s closing and
opening tags. The following is an example:
º
<table>
º
<tr>
<td><alterna:menulink id="379" label="Accounting-Level
Reconciliation"/></td>
<td>8:00 am</td>
<td>Accounting Department</td>
</tr>
º
<table>
º
For a list of menu link IDs you can use in the id attribute of the alterna:menulink element,
see Appendix A Security and link IDs on page 481.
7 Configuring the user interface
7.5 Configuring the user’s session timeout
WebSuite System Administration Guide 335
As an alternative to using the alterna:menulink element, you can use the alterna:href
element, which contains two attributes:
–event_handler_classname, which specifies the event handler class name of the page to
which you want to link. (For more information on event handler class names, contact
Wallstreet.)
–label, which specifies the link’s label.
–To edit an activity, modify its tr element.
–To delete an activity, remove its tr element.
In addition to creating, editing, and deleting activities, you can complete other modifications to
the activity_timetable.xml file such as adding or removing columns.
3. Save and close the file.
7.5 Configuring the user’s session timeout
There are two session timeout parameters:
•The EKIT_SESSION_EXPIRATION_TIMEOUT environment variable, for the TRMWeb part of
WebSuite.
•An XML parameter for the CMM part of WebSuite.
7.5.1 TRMWeb session timeout
Open the file envs\<env_name>\etc\environment\parts\27_trmweb.bat, and set the
environment variable EKIT_SESSION_EXPIRATION_TIMEOUT to a number expressed in milliseconds.
If EKIT_SESSION_EXPIRATION_TIMEOUT is set to 1 minute for example, the session will time out
between 1 min and 1 min 59s as there is a thread that wakes up every
EKIT_SESSION_EXPIRATION_TIMEOUT period to clean expired sessions.
7.5.2 CMM session timeout
The CMM part of WebSuite relies on the application server to store user sessions. Open the file
envs\<env>\var\appservers\websuite-tomcat\conf\web.xml, and find this:
<session-config>
<session-timeout>30</session-timeout>
</session-config>
The <session-timeout> parameter value is in minutes.
The session expires in the browser based on the EKIT_SESSION_EXPIRATION_TIMEOUT value.
7 Configuring the user interface
7.5 Configuring the user’s session timeout
336 © Wall Street Systems IPH AB - Confidential

WebSuite System Administration Guide 337
Chapter 8 Translating the user interface
8.1 Introduction
The WebSuite user interface is displayed in English by default. You can translate the interface into
one or more languages, then select the language you wish to use.
This section describes how to:
•Configure and translate the CMM component of WebSuite.
•Configure and translate the TRM and ACM components of WebSuite.
•Translate the WebSuite menu bar and menu options.
•Select the language displayed for users.
Language codes
For ISO language codes, see http://ftp.ics.uci.edu/pub/ietf/http/related/iso639.txt
Editing XML files
When editing any XML files in WebSuite, ensure that you use an editor application that does no
conversion of the file contents, and that saves modified files using the UTF-8 character encoding
format.
When translating into a non-Latin alphabet, ensure that your editor application fully supports that
alphabet in the UTF-8 character encoding format.
8.2 Translating the CMM component
8.2.1 Introduction
CMM is installed with English and French translations of the user interface. You can modify these
translations and create new ones for other languages.
8.2.1.1 Translation files
The existing English language version of the CMM part of WebSuite is defined in an XML file called
en_translation.xml. This XML file contains one label element for each translatable phrase in CMM.
The format looks like this:
<language_translations>
...
<label id=" functions " value=" Functions " />
...
</language_translations>
The id attribute contains the phrase’s identifier (in English) and the value attribute contains the
phrase that is displayed in the user interface.
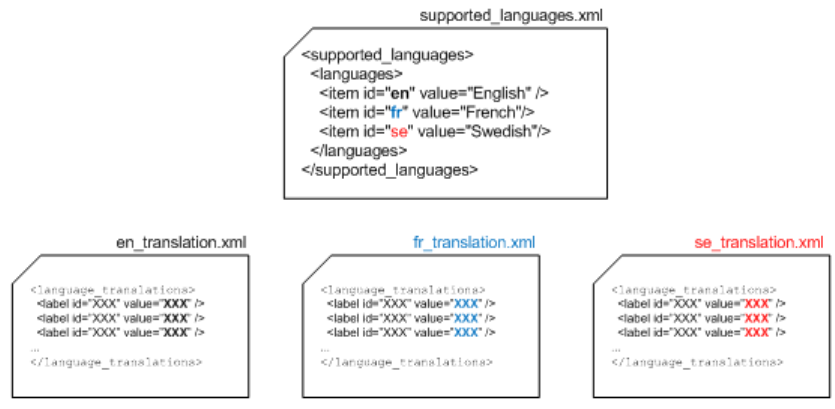
8 Translating the user interface
8.2 Translating the CMM component
338 © Wall Street Systems IPH AB - Confidential
By creating another translation file and translating the contents of the value attribute, you can
display the CMM components of WebSuite in another language.
8.2.1.2 Supported languages file
The supported_languages.xml file lists the language translations supported by CMM. For a
language translation to be available in CMM, it must be referenced in this file:
8.2.1.3 Translation methods
You can create new language translations or edit existing ones by using an application within
WebSuite, or by directly editing files on the server.
•Use the WebSuite utility Multilingual Maintenance when you are editing an existing language and
need to translate only a small number of phrases.
•Directly edit the XML file when creating a new language translation or to translate a large
number of phrases.
8.2.1.4 Selecting a language
After you have configured the language translations, each user can select a language through the
User Options function. The following interface text uses the selected translation file:
•Menus (but only if CMM is installed as "standalone" - without the TRM component)
•Page titles
•Field, list, and other control titles
•Buttons
•Links
•Messages
•Tool tips.
8 Translating the user interface
8.2 Translating the CMM component
WebSuite System Administration Guide 339
The following appears untranslated:
•The TRM and ACM part of the interface (unless it has already be done, and configured properly).
See 8.3 Translating the TRM and ACM components and the menu on page 341.
•Some static text
•The online help system
•Dynamic text from sources such as static and market data (displays in the language in which it
was entered).
•The login page displays in the browser’s default language.
8.2.2 Adding a language to supported_languages.xml
1. Open the supported_languages.xml file.
The supported_languages.xml file can be in one of three locations:
–If no translations or edits have been done yet, extract the file from:
\envs\env\etc\wss-web\websuite\WEB-INF\lib\cmm-core-7.2.n.nn-r00nn.jar
–If translations or edits have already been done, the file should be in:
<install
home>\components\wss-web\websuite\DefaultData\default\AurosConfigData\standar
d\language_translations
(However, you should be using a site structure where you make changes to files, and then
copy them to the WebSuite system.)
–If translations or edits have already been done, the file should be in a site directory.
For instructions on opening configuration files, see 1.2 Opening configuration files on page 25.
2. Add an item element to the file for the new language translation. The following is an example of
adding Swedish:
<supported_languages>
<languages>
<item id="en" value="English"/>
<item id="fr" value="French"/>
<item id="se" value="Swedish"/>
</languages>
</supported_languages>
3. Save the file to your site structure, then copy the file to:
\envs\env\etc\wss-web\cmm\ConfigurationData\installation\language_translations
8.2.3 Translating the server files directly
This is the recommended method for translating the CMM component of WebSuite. To use the
WebSuite utility, see 8.2.4 Translating with the Multilingual Maintenance utility on page 340.
1. Create a copy of the en_translation.xml or fr_translation.xml file. This file is in the same
directory as the supported_languages.xml file described in the previous section.
2. Save the file to your site structure, then copy the file, when ready, to:
\envs\env\etc\wss-web\cmm\ConfigurationData\installation\language_translations
3. Open the file in a suitable text editor.
4. In each label element’s value attribute, replace the English or French translation with the new
language translation. The following is an example for Swedish:
8 Translating the user interface
8.2 Translating the CMM component
340 © Wall Street Systems IPH AB - Confidential
<language_translations>
...
<label id=" functions " value="Funktioner"/>
...
</language_translations>
5. Save the file in the UTF-8 character format.
6. Restart the application server.
8.2.4 Translating with the Multilingual Maintenance utility
For small edits of existing translation files, you can use the Multilingual Maintenance utility.
Otherwise, see 8.2.3 Translating the server files directly on page 339.
8.2.4.1 Prerequisites
The following are prerequisites for translating using Multilingual Maintenance:
8.2.4.2 Translation
1. Log into WebSuite.
2. Select Admin - Utilities - Setup - Review Multilingual Phrases.
3. In the Multilingual - Criteria Selection page, select a base language translation in the
From Language list.
4. Select the new language translation you added to the supported_languages.xml file in the To
Language list.
5. Select the Display Translated checkbox.
6. Click Search.
7. In the Multilingual Maintenance page, select the first phrase you want to translate.
8. Click Edit.
9. Enter the phrase as it should display in the new language translation in the To Phrase field.
10. Click Save.
11. Repeat for each phrase you want to translate.
Note: This saves the xx_translation.xml file to
\envs\ts71demo99\etc\wss-web\cmm\ConfigurationData\installation\language_tra
nslations. Also, the file contains only those phrases that have been edited.
8.2.5 Displaying and testing the translation
To use the new or edited translation file:
1. Select Admin - User Options.
2. In the User Option page, click Set defaults.
3. In the Define Default Values page, select the language from the Default Language drop-down. The
options here correspond to the item=... value=... in the supported_languages.xml file.
Category Tasks
Security Ensure you have access to the following functions:
• FG-0352 Multilingual Maintenance
• FG-0400 Review CMM Configuration.
For more information, see Chapter 3 Managing security on page 95.
8 Translating the user interface
8.3 Translating the TRM and ACM components and the menu
WebSuite System Administration Guide 341
You can keep this file selected in the user interface while editing it, so that you can test your
translations as you create them.
8.3 Translating the TRM and ACM components and the menu
8.3.1 Introduction
The TRM/ACM components are installed with English and French translations of the user interface.
You can modify these translations and create new ones for other languages. This also applies to the
interface menus.
8.3.1.1 Translation files
The existing English language version of the TRM and ACM part of WebSuite is defined text-based
properties files. The format consists of a list of label identiers and their values. For example:
strings.services.view.command.fields.accrued_interest.en=Accrued Interest
By creating another translation file and translating the contents of the value attribute, you can
display the TRM and ACM components of WebSuite in another language.
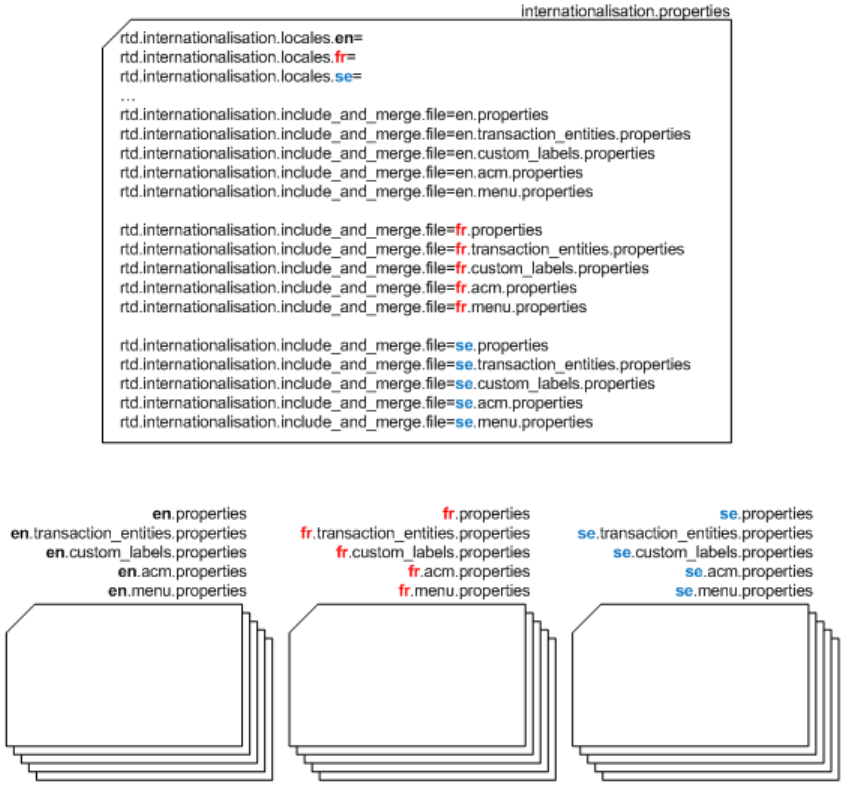
8 Translating the user interface
8.3 Translating the TRM and ACM components and the menu
342 © Wall Street Systems IPH AB - Confidential
8.3.1.2 Supported languages file
The internationalisation.properties file contains the currently supported languages, and a list
of properties files that contain the relevant language translations. In the diagram below, French is
the selected language, and English, French, and Swedish properties files are referenced:
8.3.1.3 Selecting a language
After you have configured the language translations, each user can enable the language by selecting
the correct language in the browser options. The following interface text uses the selected language:
•Menus
•Page titles
•Field, list, and other control titles
•Buttons
•Links
•Messages
•Tool tips.
8 Translating the user interface
8.3 Translating the TRM and ACM components and the menu
WebSuite System Administration Guide 343
The following appears untranslated:
•The CMM part of the interface (unless it has already be done, and configured properly). See 8.2
Translating the CMM component on page 337.
•Some static text
•The online help system
•Dynamic text from sources such as static and market data (displays in the language in which it
was entered).
•The login page displays in the browser’s default language.
8.3.2 Translation
The files requiring translations stored in:
\components\wss-web\trmweb\integration\conf\registry\rtd\services\internationalisati
on
The files are:
•en.acm.properties
•en.custom_labels.properties
•en.menu.properties
•en.properties
•en.transaction_entities.properties
8.3.2.1 Adding a language to internationalisation.properties
1. Open the internationalisation.properties file.
The sinternationalisation.properties file can be in one of three locations:
–If no translations or edits have been done yet, extract the file from:
\envs\env\etc\wss-web\websuite\WEB-INF\lib\cmm-core-7.2.n.nn-r00nn.jar
–If translations or edits have already been done, the file should be in:
\components\wss-web\trmweb\integration\conf\registry\rtd\services\internation
alisation
(However, you should be using a site structure where you make changes to files, and then
copy them to the WebSuite system.)
–If translations or edits have already been done, the file should be in a site directory.
For instructions on opening configuration files, see 1.2 Opening configuration files on page 25.
2. For each supported language, add a line like this:
rtd.internationalisation.locales.xx=
where xx is the language identifier. So this:
rtd.internationalisation.locales.en=
rtd.internationalisation.locales.fr=
Means that English and French are supported.
3. For each supported translation (apart from English which should normally always be there), add
a list of file names like this:
–xx.acm.properties
–xx.custom_labels.properties

8 Translating the user interface
8.3 Translating the TRM and ACM components and the menu
344 © Wall Street Systems IPH AB - Confidential
–xx.menu.properties
–xx.properties
–xx.transaction_entities.properties
where xx is the language identifier.
4. Save the file to your site structure, then copy the file to:
\components\wss-web\trmweb\integration\conf\registry\rtd\services\internationalisati
on
8.3.2.2 Translating the files
There is no utility to do this.
1. Create copies opf the en.xxxxx.properties files, and replace the en with the relevant language
identifier. For example, for French:
fr.acm.properties
fr.custom_labels.properties
fr.menu.properties
fr.properties
fr.transaction_entities.properties
2. Save the file to your site structure, then copy the file, when ready, to:
\components\wss-web\trmweb\integration\conf\registry\rtd\services\internationali
sation
3. Open each file in a suitable text editor, and:
a. For each label to be translated, change the .en at the end of the label to .xx, where xx is the
language identifier.
b. Translate the English value of each label.
Here is an example. This string in en.menu.properties:
strings.services.navigation.websuite.report.en=Reporting
becomes in French:
strings.services.navigation.websuite.report.fr=Rapports
in the file fr.menu.properties.
4. Save the file in the UTF-8 character format.
5. Restart the application server.
8.3.3 Translation tips
8.3.3.1 Translating views
In the main translation file, all items related to views start with strings.services.View. This is
followed by the identifier of the view.
The child view inherits the translations from the parent view. Several elements of the view can be
translated as described in the following table:
Element Description Example
Title The title of the view is simply identified by the name
of the view itself.
strings.services.View.fx_spot_
create.en=FX Spot Deal

8 Translating the user interface
8.3 Translating the TRM and ACM components and the menu
WebSuite System Administration Guide 345
8.3.3.2 Translating templates
Templates in WebSuite are used for dynamically generating the different dialogs of the application.
In these templates, certain text is not taken from dynamic data but stored locally in the HTML
template.
8.3.4 Displaying and testing the translation
To use the new or edited translation file, open your browser’s Options dialog and select the
language.
You can keep this file selected in the user interface while editing it, so that you can test your
translations as you create them.
Fields Each field of a view must be translated.
The fields can be displayed with a different name in
each view. As all views inherit from the default view,
the translation of most of the fields is done for the
view by default. These do not need to be redone in
each view if the string associated with the field is the
default.
strings.services.view.default.
fields.sign_id.en=Transaction
Sign
Actions Elements that include buttons and similar controls. strings.services.view.default.
actions.apply.en=Create Deal
Element Description Example
8 Translating the user interface
8.3 Translating the TRM and ACM components and the menu
346 © Wall Street Systems IPH AB - Confidential
WebSuite System Administration Guide 347
Chapter 9 Configuring views
Views are a basic component in the configuration of WebSuite. They are reused throughout the
different parts of WebSuite (for example, in deal entry, reports, and Treasury Monitor).
9.1 Configuring transaction dialogs on page 347 describes the parts of view configuration that are
common to all areas of WebSuite. The parts intended for specific areas of WebSuite are described in
9.2 Configuring deal entry on page 351, 9.3 Configuring reports on page 372, and 9.4 Configuring
the Treasury Monitor on page 379.
The configuration of views in WebSuite is usually carried out by business or technical consultants.
They do so by modifying the dialog appearance (including priority of fields, handling errors in fields,
and modifying field behavior, dependencies and defaults) and by configuring how transaction lists
and queries are handled.
The configuration is performed by modifying the following XML registry files:
•[WebSuite
home]\webapps\trema\ekit\WEB-INF\classes\conf\registry\rtd\services\view\view.xm
l
•[WebSuite
home]\webapps\trema\ekit\WEB-INF\classes\conf\registry\rtd\services\view\views\*
.xml.
9.1 Configuring transaction dialogs
This section describes the configuration that relates to entering and modifying transaction dialogs in
the following areas:
• Views
• Inheritance
• Fields
• Styles and templates
• Events
• Actions.
9.1.1 Configuring views
Views are processed by WebSuite controllers to activate a dialog.
Views define the fields displayed on a screen used to enter a transaction, to display a list of
transactions, to generate a report, and to display treasury monitor or cash flow forecasting
information.
9 Configuring views
9.1 Configuring transaction dialogs
348 © Wall Street Systems IPH AB - Confidential
9.1.2 Configuring inheritance
A view can inherit characteristics from another view. Some properties can be defined at a high level
to avoid the need to redefine them for each view. Some views can be defined as the parent of other
views and not be directly used by a controller.
For example, you can change the appearance of a field throughout WebSuite by changing
parameters in a single place in the configuration of the parent view.
The default view is never used directly. It is used as a base for all other views to facilitate global
changes. Inherited parameters are then overridden when you assign other values.
Values must be restated to be invoked, and parameters must be used in order to differ from the
inherited parameters.
9.1.3 Configuring fields
Regardless of inheritance, a controller only processes the fields that are explicitly declared in its
corresponding view.
Inheritance only influences the following parameters of the declared fields:
• Style
• DependsOn
• Default values of the fields
• Events
Therefore, the fields that appear in the view must be explicitly stated. The name for the fields must
correspond to the TRM transaction fields for Deal Entry, Treasury Monitor, and Cashflow Forecasting,
and report parameters for Reports.
A field is displayed either with its default name or with another name if it has been redefined in the
translation of WebSuite (see 8.3 Translating the TRM and ACM components and the menu on page
341).
9.1.4 Configuring styles and templates
The style parameter provides the means to control the visual appearance of a field.
For example:
<cp_client_id style="counterparty"/>
The value of style corresponds to an HTML file. These files are stored in the following directory:
[WebSuite
home]\trema\webapps\ekit\application\ekit\site\[trema|custom]\transaction\form
The naming convention for field style templates is as follows:
java.lang.datatype.stylename.html
or
java.util.datatype.stylename.html
For example:
java.lang.String.counterparty.html
9.1.4.1 Configuring the HTML
You can modify the HTML to define how items are displayed on the page (for example, option
buttons, lists, and fields).
For example:
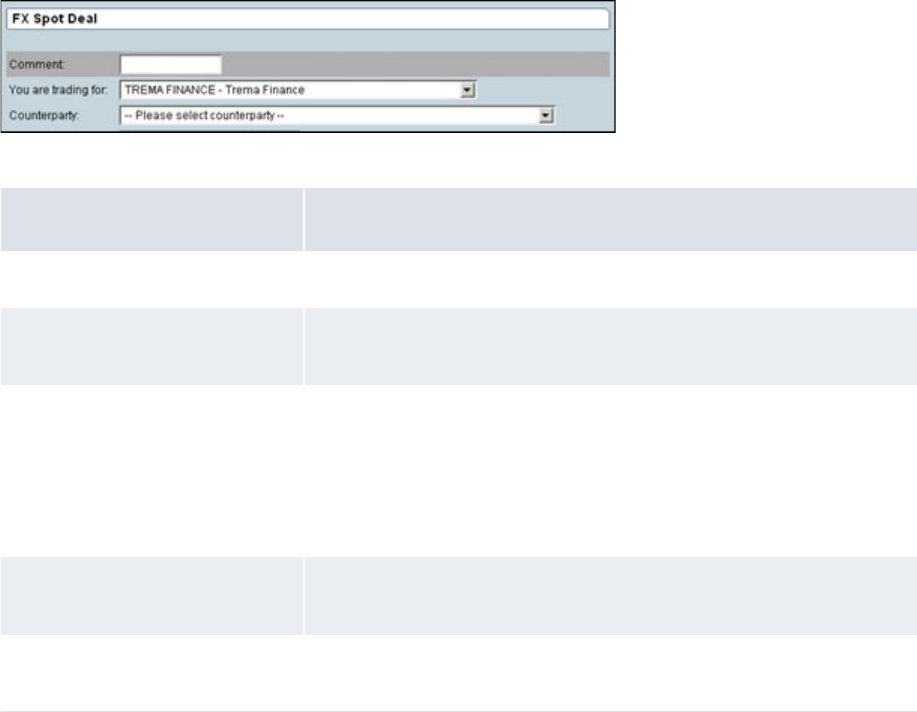
9 Configuring views
9.1 Configuring transaction dialogs
WebSuite System Administration Guide 349
<c.control c.type="errorfield">
<select
c.type="selector"
c.format="{value} - {label}"
c.noselectdata="No counterparty available"
c.prompt="-- Please select counterparty --"
c.data="cp_client_id_list">
</select>
</c.control>
Displays as follows:
The following table describes the end result of the HTML code:
Some of these styles are defined by default in the following views:
•transaction_default
•report_default
•treasury_default
•cff_default.
For example:
<transaction_default inherit="default">
<params dealPage=""/>
<fields>
<type_id style="optiontype"/>
<traderClient style="clientList"/>
<deal_rate style="rate"/>
<nominal_rate style="rate"/>
<cp_client_id style="counterparty"/>
HTML code Result
c.type="selector" The user can select a value but cannot enter another value.
c.format="{value} -
{label}"
The value is displayed with its ID and its real name.
c.data="cp_client_id_list" Defines which data source is used (that is, which list of data is
displayed).
The list of available data sources is defined in:
[WebSuite
home]\trema\ekit\[conf|conf.site]\registry\rtd\service
s\selectableData\selectableData.xml
c.noselectdata="No
counterparty available"
Defines which value is displayed if the data source returns no data.
c.prompt="-- Please select
counterparty --"
Defines the first value of the list to inform the user that a value must be
selected.
9 Configuring views
9.1 Configuring transaction dialogs
350 © Wall Street Systems IPH AB - Confidential
<instrument_id style="instrument"/>
<ekit_direction style="direction"/>
<currency_id style="currency1"/>
<currency_2_id style="currency2"/>
<maturity_code style="maturitycode"/>
<portfolio_id style="portfolio" dependsOn="cp_client_id, instrument_id,
currency_id, currency_2_id"/>
</fields>
</transaction_default>
The styles are inherited by all views which depend on this one. If no style has been defined for a
field, the one defined in the parent view is used. If no style has been defined in the parent view, the
default style of the data type is used.
9.1.4.2 Configuring hidden styles
Some fields defined in the view are used for submittal but not displayed. In this case, the style
hidden is used. For example:
<market_id style="hidden"/>
9.1.4.3 Configuring common styles
Referencing a unique style name allows several fields to share common input field templates. For
example:
<deal_rate style="rate"/>
<nominal_rate style="rate"/>
Both TRM fields then use the java.lang.String.rate.html template. Altering this template affects
all views where the style is rate and also when the style is inherited.
9.1.4.4 Configuring error fields
Error fields are handled in each field style template:
<c.control c.type="errorfield">
<input type="text" size="15" c.control>
</c.control>
9.1.5 Configuring actions and events
All default values are defined in the <script> part of the <init> block.
A default value can be set for all fields. If a field is editable, you can modify the default value. If the
field is not editable or hidden, you must set a default value and you cannot modify this value.
For example:
<events>
<init>
<script>
model.market_id = ’FX’ ;
model.opening_date = getDate () ;
</script>
</init>
</events>
9.1.5.1 Configuring statuses
A view or a field can be disabled, readOnly, or readWrite.
If a view is readOnly, the fields of the view can only be read.

9 Configuring views
9.2 Configuring deal entry
WebSuite System Administration Guide 351
For example:
• To set a view as readOnly, the parameter status has to be set in the part of the identifier of the
view:
<fx_spot status="readOnly">
• To set a field as readOnly, the parameter status has to be set in the part of the identifier of the
field:
<number status="readOnly" />
9.1.5.2 Configuring dependsOn
This parameter is used to automatically refresh (reload) the dialog to reflect new states if fields
depend on the user-altered values of other fields.
In other words, configuring this parameter defines which depending values in the current dialog are
displayed. If the user makes any changes, the field in question reloads with the corresponding
values.
For example:
<portfolio_id style="portfolio"dependsOn="cp_client_id"/>
The selection of portfolios displayed to the user now depends on the counterparty. If any of these
are changed by the user, the dialog reloads to display a new selection of portfolios. Data sources
must be set up correctly.
9.1.5.3 Configuring checks
By default, fields selected in a view are mandatory. This means that WebSuite displays an error if
the dialog is submitted and no value is defined for the current field. The list of optional fields has to
be set.
For example:
<checkMandatoryFields optional="comment, comment_2"/>
The way to add this check in the view depends on the type of the view (for example, transaction or
report) and is described in the specific section of this guide.
9.2 Configuring deal entry
This section describes how transactions are managed and configured in WebSuite, with regards to
two major functional areas of the application:
• Entering, validating and confirming transactions (in Enter Board)
• Performing queries to display lists of transactions (in Transaction Board).
The Business and Technical Consultants are responsible for modifying the transaction dialog
appearance (including priority of fields, handling errors in transaction fields, and modifying
transaction field behavior, dependencies and defaults), and for configuring how transaction lists and
queries are handled.
Changes to the configuration of views or scenarios are made using the following XML files:
Name Description File

9 Configuring views
9.2 Configuring deal entry
352 © Wall Street Systems IPH AB - Confidential
9.2.1 TRM transactions
In TRM, all transactions are made of a number of fields. The combination of these fields allows you
to create or manipulate a transaction entity.
At any given time, a transaction entity can have only one state. This state belongs to a TRM
configured transaction flow through which all entered transactions must move. When a transaction
moves forwards or backwards in the flow, the transaction state changes.
All fields in TRM transactions are accessed through modes. The mode is the overall way of
configuring the environment, which allows you to manipulate a transaction entity.
Depending on the mode configuration, the transaction can be manipulated in the following ways:
• Canceling the transaction
• Committing the transaction
• Moving the transaction forwards to the next state
• Moving the transaction backwards in the transaction flow.
TRM modes are mapped to WebSuite modes through the administration of mode mappings (for
more information, see 5.9.1.6 Configuring mode mappings on page 290). The mode defines which
fields in the transactions can be edited and which of the above mentioned manipulation options are
available. By configuring the view.xml file, you can:
• Treat transactions on a singular basis (enter, validate, and commit transactions)
• Perform queries to display lists of transactions.
9.2.2 Configuring view names
The actual name of a view is composed as follows:
view_viewType
view is the type of deal that is manipulated by the view (for example, fx_spot, spot_forward).
viewType is the type of action that the view is automatically set by the scenario according to the
current scenario step.
For example:
<fx_spot_create inherit="transaction_default">
View descriptions Views define the field which
will be displayed to enter a
transaction or display a list
of transactions.
[WebSuite
home]\trema\ekit\webapps\ekit\WEB-INF\classes
\conf\registry\rtd\services\view\views\*
Scenario
descriptions
Scenarios describe how
views are linked together.
[WebSuite
home]\trema\webapps\ekit\WEB-INF\classes\conf
\registry\rtd\services\scenario\scenario\*
[WebSuite
home]\trema\webapps\ekit\WEB-INF\classes\conf
\registry\rtd\services\scenario\declaration.x
ml
Special
transaction fields
descriptions
N/A [WebSuite
home]\trema\webapps\ekit\WEB-INF\classes\conf
\registry\rtd\services\transaction\transactio
n.xml

9 Configuring views
9.2 Configuring deal entry
WebSuite System Administration Guide 353
In the normal scenario, the successive viewType are:
•create
•validate
•confirm.
Views can be split into three categories:
•Enter Board or Single Deal Entry
•Multiple Deal Entry
•Transaction Board.
9.2.3 Configuring views
In addition to the configuration common to all views, this part of the configuration is common to:
•Enter Board
•Transaction Board
•Multiple Deal Entry.
9.2.3.1 Configuring inheritance
Inheritance allows you to propagate properties from parent views to children.
View inheritance is a way to share behavior, the localized labels (see 8.3 Translating the TRM and
ACM components and the menu on page 341), and the fields’ attributes between views. For
instance, the view transaction_default contains default actions and field styles to create deal
entry pages for single transactions.
The view fields and the view parameters are not shared between the parent view and the child view.
Inheritance applies to the following:
•The fields’ style
•Dependencies between fields
•Data source setup
•Default value
•Actions
•Checks.
Values must be restated to be invoked, and parameters must be used to differ from the inherited
parameters.
For example:
<fx_spot_create inherit="transaction_default">
9.2.3.2 Configuring parameters
The following table describes the parameters for deal entry views:
Parameter Description Example
dealPage This is the name that is used in the mapping between the view
and the mode in TRM. This mapping is done in the
administration of WebSuite.
<params
mode="fx_spot_create"
dealPage="fx_spot"/>
9 Configuring views
9.2 Configuring deal entry
354 © Wall Street Systems IPH AB - Confidential
9.2.3.3 Configuring fields
Regardless of inheritance, a controller only processes the fields that are explicitly declared in its
corresponding view.
Inheritance only influences the following parameters of the declared fields:
• Style
• DependsOn.
Therefore, the fields which must appear in the view must be explicitly stated. The name for the
fields must correspond to the TRM transaction fields. See Appendix C TRM fields on page 503.
For example:
<fx_spot_create inherit="transaction_default">
<params mode="fx_spot_create" dealPage="fx_spot"/>
<fields>
<market_id style="hidden"/>
<comment/>
<traderClient/>
<cp_client_id/>
<instrument_id/>
<ekit_direction/>
<amount/>
<currency_id/>
<currency_2_id/>
<portfolio_id/>
</fields>
</fx_spot_create>
Note: Before the creation of the transaction, the field number cannot be used. Even if the field is
hidden or optional, an error is displayed and the transaction will not be created.
9.2.3.3.1 Configuring special fields
Special fields are fields that are used in WebSuite but do not correspond directly to a transaction
field in TRM. The definition of these special fields is done in transaction.xml:
mode This is the name that is used in the mapping between the view
and the list of currencies, clients, and instruments in the
administration of WebSuite.
<params
mode="fx_spot_create"
dealPage="fx_spot"/>
template This parameter is used to override the HTML template file
specified in the scenario.
N/A
Field Description Example

9 Configuring views
9.2 Configuring deal entry
WebSuite System Administration Guide 355
ekit_direction This special field contains the deal
direction (buy = true, sell =
false).
If ekit_direction is present
in a view, all the amount fields
present in that view are shown as
positive values.
If ekit_direction is not
present, the amount fields
behave in the same way as in
TRM (it can have positive or
negative values).
This field is linked to the value of
the quote_amount, the
amount, the units and the
book_value by default. Other
fields can be added to the list of
dependant fields (for example,
base_spot_amount).
If the name of a field is defined
with the parameter
invert="true", the amount
is inverted when entered in TRM.
<direction
class="com.trema.esol.ekit.business.g
ateway.transaction.filter.DirectionFi
lter">
<field_name>ekit_direction</field_n
ame>
<fields>
<quote_amount invert="true"/>
<amount/>
<units/>
<book_value/>
</fields>
</direction>
fieldaliases To avoid using unclear names,
such as, param_0, some aliases
can be defined. Each alias has to
be defined with the same syntax:
<alias_name>transaction_
field</alias_name>
<!-- the field aliases filter -->
<fieldaliases
class="com.trema.esol.ekit.business.g
ateway.transaction.filter.FieldAliase
sFilter">
<fields>
<!-- eKIT fields -->
<autoprice>param_4</autoprice>
<mirrored>param_8</mirrored>
<traderClient>param_6</traderCli
ent>
<swapField>param_0</swapField>
<dealExpirationTime>param_2</dea
lExpirationTime>
<!-- OMS fields -->
<handleInstr>param_1</handleInst
r>
<orderType>param_5</orderType>
<execInstr>param_7</execInstr>
<validUntil>param_9</validUntil>
</fields>
</fieldaliases>
9 Configuring views
9.2 Configuring deal entry
356 © Wall Street Systems IPH AB - Confidential
9.2.3.4 Configuring style and templates
The style parameter provides the means of controlling the visual appearance of a field (see 9.1.4
Configuring styles and templates on page 348 for more information on styles that relate to all parts
of WebSuite configuration).
9.2.3.5 Configuring statuses
A view or a field can be disabled, readOnly, or readWrite.
For example:
• To set a view as readOnly, the parameter status has to be set in the part of the identifier of the
view.
For example:
<fx_spot status="readOnly">
• To set a field readOnly, the parameter status has to be set in the part of the identifier of the
field.
For example:
<number status="readOnly" />
9.2.3.6 Configuring data sources
Data sources are used to get data from TRM through stored procedures. The available data sources
are defined in the following files:
•[WebSuite
home]\trema\webapps\ekit\WEB-INF\classes\conf\registry\rtd\services\selectableDa
ta\selectableData.xml
•[WebSuite
home]\trema\webapps\ekit\WEB-INF\classes\conf\registry\rtd\services\views\dataso
urces.[cff|treasury|transaction].js.
In these files, groups of data sources are defined. For example, in the
datasources.transaction.js file, the following is defined:
function datasources_transaction_common() {
currency_2_id_list = bundles.ekit_bundle.currency_2_id_list(_userID, deal_page);
currency_id_list = bundles.ekit_bundle.currency_id_list(_userID, deal_page);
cp_client_id_list = bundles.ekit_bundle.cp_client_id_list(_userID, deal_page);
trader_client = bundles.ekit_bundle.trader_client(_userID);
}
In this example, transaction_common is the name of the data source group and
currency_2_id_list is the name of a data source.
9.2.3.7 Configuring the Enter Board
Enter Board or Simple Deal Entry corresponds to an enter board in TRM:

9 Configuring views
9.2 Configuring deal entry
WebSuite System Administration Guide 357
9.2.3.7.1 Configuring the data source
The requested data sources are defined in:
[WebSuite
home]\trema\webapps\ekit\WEB-INF\classes\conf\registry\rtd\services\view\views\t
ransaction\transaction_default.xml
For example:
<setup_datasources>
<script>
datasources_view();
datasources_transaction_common();
datasources_transaction_model();
datasources_check_tradehours();
</script>
</setup_datasources>
The requested data source groups are view, transaction_common, and transaction_model.
9.2.3.7.2 Configuring default values
All default values are defined in the <script> part of the <init> event.
A default value can be set for all fields. If a field is editable, the default value can be modified by the
user, if the field is not editable or hidden, a default value must be set and this value cannot be
modified by the user.
For example:
<events>
<init>
<script>
model.market_id = ’FX’;
</script>
</init>
</events>

9 Configuring views
9.2 Configuring deal entry
358 © Wall Street Systems IPH AB - Confidential
9.2.3.7.3 Configuring actions
WebSuite supports a number of actions. Actions, with regards to transactions, can be of the
following types:
• Commit (commit)
• Cancel (cancel)
• Done (done)
• Apply (apply)
• Reject (reject)
• Early Expiration (earlyexp)
• Roll-Over (rollover).
These actions are displayed in the WebSuite user interface as a button.
What happens when this action is selected is defined in the Event part of the view configuration.
Note: If closeDialog(’action’,’commit’); is not specified in the definition of your action,
then the dialog will not close or move to the next scenario step (you may use that to
implement a refresh action).
The implementation of the actions for the standard events is not needed if you inherit from the
views transaction_default or transaction_list_default, since these views already have an
implementation for these actions.
Checks or events can be carried out when an action is submitted:
• Check optional fields
In a view, some fields can be optional. They need to be declared in the optional parameter of a
checkTransactionFields action.
If some fields are synonymous, that is if the user has to fill one of the two fields but not both of
them, they need to be declared in the synonym parameter.
<commit>
<script>
checkTransactionFields();
if(!hasError())
closeDialog(’action’,’commit’);
</script>
</commit>
Within the <script> tag all functions defined in the corresponding JavaScript file (for example,
script.view.js) can be called.
9.2.3.8 Configuring the Transaction Board
Transaction Board (or transaction lists) in WebSuite are configured using the same parameters used
for transactions. However, some characteristics are specific to transaction lists:
• Multiple transactions are displayed simultaneously
• Actions can be performed on several transactions at the same time
• Single transactions can be edited.
By default all transaction boards inherit from transaction_list_default.
The inheritance principle for Transaction Board is the same as for Enter Board:

9 Configuring views
9.2 Configuring deal entry
WebSuite System Administration Guide 359
9.2.3.8.1 Configuring fields
The field principle for Transaction Board is the same as for Enter Board. However, there are two
specific fields:
9.2.3.8.2 Configuring default values
There is no default value for the action; this implies that the user must select an action for each
transaction in the Transaction Board.
This must be done in the setup_list_datasource part by setting a value to each ekit_action. The
value can be:
•commit
•hold
•cancel.
For example:
<setup_list_datasources>
<script>
datasources_view();
datasources_transaction_common();
datasources_check_tradehours();
for(var i=model.length-1;i>=0;i--) {
model[i].ekit_action = ’commit’;
}
</script>
</setup_list_datasources>
Name Description
ekit_action This is a specific field which contains the action that will be applied on the transaction.
number This is the number of the transaction similar to the number in an Enter Board. However, the
style of this field needs to be transactionID so that the user can select it to see the details
of the transaction.
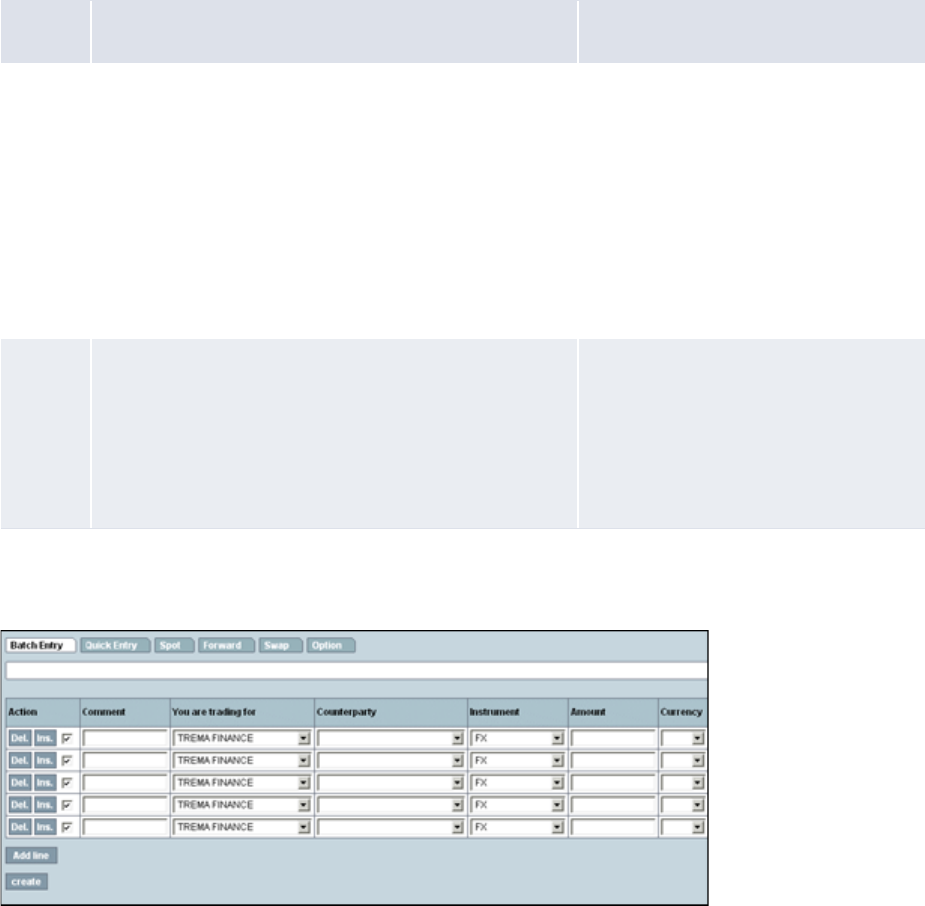
9 Configuring views
9.2 Configuring deal entry
360 © Wall Street Systems IPH AB - Confidential
9.2.3.8.3 Configuring actions
The actions that can be used in Transaction Board are:
9.2.3.9 Configuring multiple deal entry
By default all multiple deal entry boards inherit from transaction_list_default:
9.2.3.9.1 Configuring fields
The inheritance principle for Transaction Board is the same as for Enter Board:
Action Description Example
Select This action occurs when the user clicks the number of the
transaction. WebSuite displays the details of the selected
transaction in an enter board.
To include the select action in the
events part:
<select>
<script>
closeDialog(’action’,
’select’,
’selected’,selected,’tra
nsactionID’,
selected.number.value);
</script>
</select>
Submit This action occurs when the user clicks the submit button
at the end of the page. The action defined in
ekit_action is then applied on each corresponding
transaction.
<submit>
<script>
closeDialog(’action’,
’submit’);
</script>
</submit>

9 Configuring views
9.2 Configuring deal entry
WebSuite System Administration Guide 361
The field principle for Multiple Deal Entry is the same as for Enter Board. However, there are two
specific fields:
9.2.3.9.2 Configuring data sources
For multiple deal entry, view and transaction_common data sources need to be defined at the list
level and transaction_model at the transaction level.
For example:
<setup_list_datasources>
<script>
datasources_view();
datasources_transaction_common();
datasources_check_tradehours();
</script>
</setup_list_datasources>
9.2.3.9.3 Configuring initialization
As in simple deal entry, the fields of the transactions can have default values. This has to be carried
out in two stages:
• In the first stage, in the init_list block to define that each transaction will be initialized:
Name Description
ekit_action This is a specific field which has to contain create.
number This field cannot be present in a multiple deal entry view.
9 Configuring views
9.2 Configuring deal entry
362 © Wall Street Systems IPH AB - Confidential
<!-- initialize the list -->
<init_list>
<script>
<!-- initialize each line -->
<foreach>
<script>
<throw event="init"/>
</script>
</foreach>
</script>
</init_list>
•Then in the second stage, the initialization of the transaction is similar to the same action in an
enter board:
<!-- initialize a line -->
<init>
<script>
model.market_id=’FX’;
model.ekit_action=’create’;
</script>
</init>
9.2.3.9.4 Configuring actions
The following are actions for multiple deal entry:
•create.
This action occurs when the user clicks on the Create button at the end of the page. The action
defined in ekit_action is then applied on each corresponding transaction.
For example:
<!-- create the transactions -->
<create>
<script>
currentView.check_list();
if(!hasError())
closeDialog(’action’, ’create’);
</script>
</create>
The corresponding checks are done here:
<check_list>
<script>
// remove the transactions with hold/empty action
for(var i=model.length-1;i>=0;i--)
{
if(model[i].ekit_action.value == null) model.remove(i);
}
// check the transactions
for(var i=model.length-1;i>=0;i--)
{
currentView.check(i.toString(), model[i]);
}
</script>
</check_list>
9 Configuring views
9.2 Configuring deal entry
WebSuite System Administration Guide 363
9.2.3.10 Configuring scenarios
The scenario for a transaction is the process that any given transaction passes through, from deal
entry to final committing of a deal to TRM.
Depending on the client specific requirements and the transaction, the transaction user interface
must pass through one or more of the following steps:
• Transaction create
• Waiting (if the deal is being manually priced, the WebSuite user must await TRM pricing)
• Validation: presentation of transaction
• Confirmation
• Error screens
• Transaction Board (display of several transactions)
• Multiple transactions create
• Special edit steps.
Scenarios are necessary because transactions behave differently. Through the scenario
configurations, WebSuite can be tailored to suit a number of different processes depending on user
groups or types of transactions.
This configuration is stored in file stores in .scenario\scenarios\.
Scenarios typically apply to a large set of transactions. Modifying any scenario will therefore have
consequences on all transactions using this scenario. You must verify which transactions use the
scenario before you make any modifications to it.
9.2.3.11 Configuring scenario structures
All dialogs related to transactions must pass through the defined structure in the scenario. This allows
different scenarios to be configured for different user groups, even though the underlying transaction
might be identical.
For example, in a client specific setup, a transaction must pass through different validation steps, which
relate to different user groups.
To forward the user to a new dialog, certain transition conditions must be met. These are typically actions
(clicking on a button), but can also relate to field values.
A scenario structure must look like this:
<scenarioname>
<stepname type="theType" optional_parameters>
<transitions>
<transition condition="theCondition" action="the Action" />
</transitions>
</stepname>
…
</scenarioname>
9.2.3.12 Configuring scenario names
The scenario name is unique. The navigation.xml file references to scenarios must therefore
correspond to this unique name.
For example:
<forward action="scenario(view=spot_forward, scenario=loop_create)"
allowedGroups= "*" />
Corresponds to the following scenario definition in scenarios\loop_create.xml:
9 Configuring views
9.2 Configuring deal entry
364 © Wall Street Systems IPH AB - Confidential
<loop_create debug="false">
<create type="create_transaction" template="loop_create" viewType="create">
<transitions>
<!-- if commit and autoprice loop directly on create -->
<transition condition="result==’succeeded’ and autoprice==true"
goto="create" />
<!-- if commit go to to wait -->
<transition condition="result==’succeeded’" goto="wait" />
</transitions>
</create>
<!-- wait until the transaction has reached the deal_wait mode -->
<wait type="wait_transaction" view="deal_wait">
<transitions>
<!-- if the wait is over, return to create -->
<transition condition="result==’succeeded’" goto="create" />
</transitions>
</wait>
</loop_create>
9.2.3.13 Configuring debug
When the debug parameter is set to true, traces are displayed in the log file each time a user enters
or leaves a scenario step.
For example:
<loop_create debug="true">
9.2.3.14 Configuring scenario steps
The scenario step in the scenario must meet certain conditions before the user is allowed to forward
the transaction to the next step in the process, depending on these conditions.
Each transaction step has to start by an identifier.
For example:
<create type="create_transaction" template="loop_create" viewType="create">
<transitions>
<!-- if commit and autoprice loop directly on create -->
<transition condition="result==’succeeded’ and autoprice==TRUE"
goto="create" />
<!-- if commit go to to wait -->
<transition condition="result==’succeeded’" goto="wait" />
</transitions>
</create>
It is only possible to move between steps within the same scenario; steps are referenced by their
identifier. (See 9.2.4 Configuring transitions on page 369 for more details.)
For example:
<loop_create debug="true">
<create type="create_transaction" template="loop_create" viewType="create">
<transitions>
<!-- if commit and autoprice loop directly on create -->
<transition condition="result==’succeeded’ and autoprice==true"
goto="create" />
<!-- if commit go to to wait -->
<transition condition="result==’succeeded’" goto="wait" />
</transitions>
</create>
<!-- wait until the transaction has reached the deal_wait mode -->
<wait type="wait_transaction" view="deal_wait">
<transitions>

9 Configuring views
9.2 Configuring deal entry
WebSuite System Administration Guide 365
<!-- if the wait is over, return to create -->
<transition condition="result==’succeeded’" goto="create" />
</transitions>
</wait>
</loop_create>
9.2.3.15 Configuring step types and parameters
The WebSuite scenario configuration currently supports several step types. This type corresponds to
a sub-scenario or a scenario step defined in declaration.xml.
The available scenario steps are declared at the beginning of the declaration.xml file:
Step type Description Example
Sub-scenar
io
Sub-scenarios are generic part of scenario
which can be taken and assembled to create
scenarios.
<create type="create_transaction"
template="loop_create"
viewType="create">
<transitions>
<!-- if commit and autoprice loop
directly on create -->
<transition
condition="result==’succeeded’ and
autoprice==TRUE" goto="create" />
<!-- if commit go to wait -->
<transition
condition="result==’succeeded’"
goto="wait" />
</transitions>
</create>
Scenario
step
Scenario steps are the smaller entities
usable in scenario.
They correspond to Java classes.
Note: These scenario steps are meant to be
executed in a specific order. A typical
scenario will usually have the
sequence
"init/send_XXX/wait/getResult". If
this order is not matched then
unexpected errors may occur.
Look at declaration.xml and
scenario.xml for samples of scenarios.
Always try to use them as a basis to your
own scenarios.
<empty_transactions
type="emptyTransactionList" size="5"
initialize="true" model="transactions"
viewType="create">
<transitions>
<!-- empty transactions cannot
fail -->
<transition
goto="init_transactions" />
</transitions>
</empty_transactions>
Parameter Description Example
transactionDump Display in the log file the
value of the fields of the
transaction.
<dump_transaction
type="transactionDump" >
9 Configuring views
9.2 Configuring deal entry
366 © Wall Street Systems IPH AB - Confidential
emptyTransaction Create an empty
transaction model.
This takes the parameter
model which always has the
value "transaction".
<empty_transaction
type="emptyTransaction"
model="transaction">
viewEvent Executes an event of the
view.
This takes a parameter
event="xxx" where
xxx is the name of an
event of the view.
This takes the parameter
model which always has the
value "transaction".
<init_transaction type="viewEvent"
event="init" model="transaction">
sendCreate Sends the transaction to
comKIT to create the
transaction in the database.
This takes two parameters:
model which always has the
value "transaction" and
request which always has
the value "request".
<send_create type="sendCreate"
model="transaction"
request="request">
sendWaitState Send Fetch command to
comKIT until a transaction
reaches a specific state.
This takes the parameter
request which always has
the value "request".
<send_wait type="sendWaitState"
request="request">
sendSearch Send Fetch command to
comKIT with the
parameters contained in
the model to get all
transactions corresponding
to these criteria.
This takes two parameters:
model which always has the
value "transaction" and
request which always has
the value "request".
<send_search type="sendSearch"
model="transaction"
request="request"
viewType="results">
sendLoad Send a Fetch command to
comKIT to get a specific
transaction.
This takes the parameter
request which always has
the value "request".
<send_load type="sendLoad"
request="request">
sendUpdate Send changes on a specific
transaction to comKIT.
This takes the parameter
request which always has
the value "request".
<send_load type="sendUpdate"
request="request">

9 Configuring views
9.2 Configuring deal entry
WebSuite System Administration Guide 367
sendCancel Cancel a transaction.
This takes the parameter
request which always has
the value "request".
<send_cancel type="sendCancel"
request="request">
sendEarlyExpiration Request the generation of
an early expiration on a
specific transaction.
This takes two parameters:
model which always has the
value "transaction" and
request which always has
the value "request".
<send_ee
type="sendEarlyExpiration"
model="transaction"
request="request">
sendRollover Request the generation of
an early expiration on a
specific transaction.
This takes two parameters:
model which always has the
value "transaction" and
request which always has
the value "request".
<send_ro type="sendRollover"
model="transaction"
request="request">
sendCreateTranche Request the generation of a
tranche.
This takes three
parameters: model which
always has the value
"transaction", request
which always has the value
"request", and facilityID
which always has the value
"facilityID".
<send_create_tranche
type="sendCreateTranche"
facilityID="facilityID"
model="transaction"
request="request">
sendGetTrancheDefaults Request the default value
for a tranche on a specific
transaction.
These takes three
parameters: model which
always has the value
"transaction", request
which always has the value
"request", and facilityID
which always has the value
"facilityID".
<send_get_defaults
type="sendGetTrancheDefaults"
facilityID="facilityID"
model="transaction"
request="request">
getResult Get the result of one of the
send commands (for
example, sendUpdate,
sendLoad).
This takes two parameters:
request which always has
the value "request" and
return which defines what
you expect to get.
<get_result type="getResult"
request="request" return="()">
9 Configuring views
9.2 Configuring deal entry
368 © Wall Street Systems IPH AB - Confidential
For multiple transaction operations:
For sub-scenario and scenario steps parameters, the parameter template defined within the HTML
template is used to display a view.
The template files are stored in:
[WebSuite home]\trema\webapps\ekit\application\ekit\site\trema\transaction.html
Note: If a template is defined in the view too, the template of the view will be used.
Parameter Description Example
emptyTransactionList Creates an empty list of
transactions.
This takes the parameter
model which always has the
value "transaction".
<declare_transactions
type="emptyTransactionList"
model="transactions"
viewType="results">
sendActionList This takes two parameters:
model which always has the
value "transaction" and
request which always has
the value "request".
<send_action_list
type="sendActionList"
model="transactions"
request="request">
getResults Get the results of one of the
send commands (for
example, sendUpdate,
sendLoad).
This takes two parameters:
request which always has
the value "request" and
return which defines what
you expect to get.
<get_results type="getResults"
model="transactions"
request="request">
wait Wait for a pending request
to complete.
N/A
Parameter Description Example
viewType Defines which extension the view must have. If the default view name is
fx_spot and the value of
viewType is confirm, the view
which is displayed is
fx_spot_confirm.
Controller A controller is an HTML screen that allows the
users to show or edit specific objects like
transactions or reports. Typical controllers are
transactionsDialog or transactionInfo.
<show_error type="dialog"
controller="transactionInfo"
model="transaction"
template="error">

9 Configuring views
9.2 Configuring deal entry
WebSuite System Administration Guide 369
9.2.4 Configuring transitions
Transitions map directly to action names defined in each controller. The goto command allows
jumping between different steps in the scenario, depending on certain conditions.
The conditions are evaluated in the order they are declared, and the first matched condition defines
the transition.
For example:
<get_list>…</get_list>
<show_transactions type="dialog" viewType="list" controller="trans
actionsDialog" template="list" model="transactions">
<transitions>
<!-- The user selected clicked on ’query again’ -->
<transition condition="action==’done’" return="result,action" />
<!-- The user selected one transaction -->
<transition condition="action==’select’ and selected!=null"
goto="edit_transaction" />
<!-- The made batch operations on a set of transactions -->
<transition condition="action==’submit’" goto="do_actions" />
</transitions>
</show_transactions>
<edit_transaction>…</edit_transaction>
<do_actions>…</do_actions>
<get_list>…</get_list>
<show_transactions type="dialog" viewType="list" controller="transactionsDialog"
template="list" model="transactions">
<transitions>
<!-- The user selected clicked on ’query again’ -->
<transition condition="action==’done’" return="result,action" />
<!-- The user selected one transaction -->
<transition condition="action==’select’ and selected!=null"
goto="edit_transaction" />
<!-- The made batch operations on a set of transactions -->
<transition condition="action==’submit’" goto="do_actions" />
doForward This parameter is only available for
sendCreate, sendTrancheCreate, and
sendActionList.
This parameter can be defined at the scenario
step level or in a sub-scenario; it is then used
when a scenario step fulfilling this parameter is
met.
The available values are true or
false.
When doForward is set to true
when a transaction is created, it
moves forward in the transaction
flow.
The value of doForward is true
by default.
move and
direction
These parameters are only available for
sendUpdate.
These parameters can be defined at the scenario
step level or in a sub-scenario. They are then
used when a scenario step fulfilling this
parameter is met.
The available values are true or
false.
When move is set to true when a
transaction is updated, it moves in
the transaction flow; the direction
parameter sets the direction.
If the direction is true, the
transaction moves forward in the
flow, if the direction is false, the
transaction moves backwards in the
flow.
The values of move and direction are
true by default.

9 Configuring views
9.2 Configuring deal entry
370 © Wall Street Systems IPH AB - Confidential
</transitions>
</show_transactions>
<edit_transaction>…</edit_transaction>
<do_actions>…</do_actions>
To leave a sub-scenario, the last transition has to have goto="(exit)".
For example:
<get_result type="getResult" request="request" return="(transactionID,
autoprice)">
<transitions>
<transition condition="result==’failed’" goto="form" />
<transition condition="result==’succeeded’" goto="(exit)" />
</transitions>
</get_result>
9.2.4.1 Configuring conditions of transitions
A transition is used if the result of the condition is true. The and and or operators can be used to
make more complex conditions. Several parameters can be used to define the condition.
Parameter Description Example
Action All actions defined in the view can be
used by the scenario step following this
view.
action is the name of the action that
uses the last controller.
To close the last dialog by clicking the Commit
button:
<transition
condition="action==’commit’"
goto="commit_transaction" />
To close the last transaction list dialog by
clicking on the number of a transaction:
<transition
condition="action==’select’"
goto="commit_transaction" />
Result Result can be used to check the result of
a fetch from comKIT. The value of result
can be failed or succeeded.
N/A
Current
transaction
The value of a field of the current
transaction can be used. It will be
referenced by
transaction.fieldname.
<transition
condition="result==’succeeded’ and
transaction.market_id=’FX’"
goto="confirm_FX" />

9 Configuring views
9.2 Configuring deal entry
WebSuite System Administration Guide 371
9.2.5 Example
TRMYou can edit the view.xml file to define the transaction fields to appear in a certain order for a
specific transaction. In this example, the transaction fields which should appear in the FX Spot
transaction have been defined:
<fx_spot_create inherit="transaction_default">
<params mode="fx_spot_create" dealPage="fx_spot"/>
<fields>
<!-- status= { "disabled" | "readOnly" | "readWrite" } -->
<market_id style="hidden"/>
<comment/>
<traderClient/>
<cp_client_id/>
<instrument_id/>
<ekit_direction/>
Selected
transaction
When a transaction is selected in a
transaction board, the values of the fields
of the transaction can be used in the
scenario. selected="selected" must be
added to the select action of the
corresponding view.
<select>
<script>
closeDialog(’action’,’select’,’s
elected’, selected,
’transactionID’,
selected.number.value);
</script>
</select>
The fields can then be accessed using
selected.fieldname:
<show_transactions type="dialog"
controller="transactionsDialog"
template="list" model="transactions">
<transitions>
<!-- The user selected clicked
on ’query again’ -->
<transition
condition="action==’done’"
goto="get_list" />
<!-- The user selected (at
least) one transaction -->
<transition
condition="action==’select’ and
selected.number!=null and
selected.ekit_direction==TRUE"
goto="edit_export_transaction"
/>
<transition
condition="action==’select’ and
selected.number!=null and
selected.ekit_direction==FALSE"
goto="edit_import_transaction"
/>
<!-- The made batch operations
on a set of transactions -->
<transition
condition="action==’submit’"
goto="do_actions"/>
</transitions>
</show_transactions>
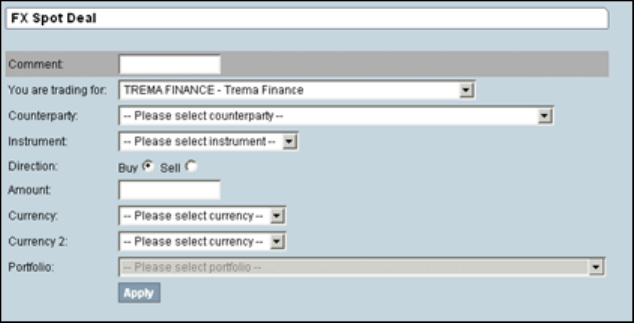
9 Configuring views
9.3 Configuring reports
372 © Wall Street Systems IPH AB - Confidential
<amount/>
<currency_id/>
<currency_2_id/>
<portfolio_id/>
</fields>
<events>
<init>
<script>
model. ekit_direction=’true’;
model.market_id=’FX’;
</script>
</init>
</events>
<actions>
<apply/>
</actions>
</fx_spot_create>
9.3 Configuring reports
This section describes how to add new reports to WebSuite by changing the configuration but
without modifying the code.
View and report configuration can be performed by modifying XML files in the following directory:
[WebSuite
home]\trema\webapps\ekit\WEB-INF\classes\conf\registry\rtd\services\view\views\r
eport\
By changing the WebSuite report configuration, you can configure the parameters used for input.
This means that you can modify the existing report configuration setup or add new report types.
Business consultants are usually responsible for the modification of reports, and technical
consultants, for adding report types.
In WebSuite, a report consists of the following elements:
•A report layout produced by TRM’s Report Generator
•Views that define the parameters of the report
•Templ a tes.

9 Configuring views
9.3 Configuring reports
WebSuite System Administration Guide 373
9.3.1 Configuring report layouts
A report in WebSuite is based on a layout created in TRM. This layout is fixed in WebSuite; it cannot
be changed.
A report layout from TRM is based on a report type. The report layout is a file with the extension
.fkr, and the report type is a file with the extension .frp.
Both are necessary to create a report in WebSuite.
9.3.2 Configuring views
All report views inherit their properties from the report_default view.
Each view starts with an identifier:
For example:
<report_fxdd inherit="report_default">
See9.1 Configuring transaction dialogs on page 347 for general information concerning views.
9.3.2.1 Configuring input parameters
The input parameters are defined in the <fields> block.
9.3.2.1.1 Configuring mandatory fields
The following parameters are selected by the user in the input page:
For example:
Field Description
report_
type
This is the name of theTRM report type used for this report (for example, Transactions Report,
Key-Figure Report, and so on).
The report_type can be found in the report layout.
report_
name
This is the full path to the layout from the report.layout directory you defined during the
installation.
layout In WebSuite, you have a choice of three different types of layout. The possible values for layout
are 0, 1, and 2.
9 Configuring views
9.3 Configuring reports
374 © Wall Street Systems IPH AB - Confidential
<fields>
<report_type />
<report_name />
<layout />
<market_id style="hidden" />
<state_id style="hidden" />
<opening_date_from />
<opening_date_to />
<portfolio_id />
</fields>
9.3.3 Configuring report parameters
The report parameters that can be used in the view depend on the report type. The list of
parameters which can be used in the report is defined at the beginning of the report type, on the
line starting with Parameters.
For example:
# $Trema: transactions.frd,v 5.3 2001/05/30 14:52:26 yrey Exp $ [FK Report Definition]
[Main]
Type=transactions
Name=Transactions
Report Procedure=transactions-report
Parameters=portfolio_id,instrument_id,cp_client_id,collateral_number,opening_date_from
,opening_date_to,value_date_from,value_date_to,state_id
The exact names of these parameters must be used in the view.
For example:
<fields>
<report_type />
<report_name />
<layout />
<market_id style="hidden" />
<state_id style="hidden" />
<opening_date_from />
<opening_date_to />
<portfolio_id />
</fields>
All mandatory fields of the report must be declared with a value.
9.3.4 Configuring style
A style must be defined for each field. The style defines how a value is inserted in this field.
In the report_default view, by default, most of the fields use the style Default.
See 9.1.4 Configuring styles and templates on page 348 for general information concerning styles.
9.3.5 Configuring events
All the events and actions are defined in an <events> block.
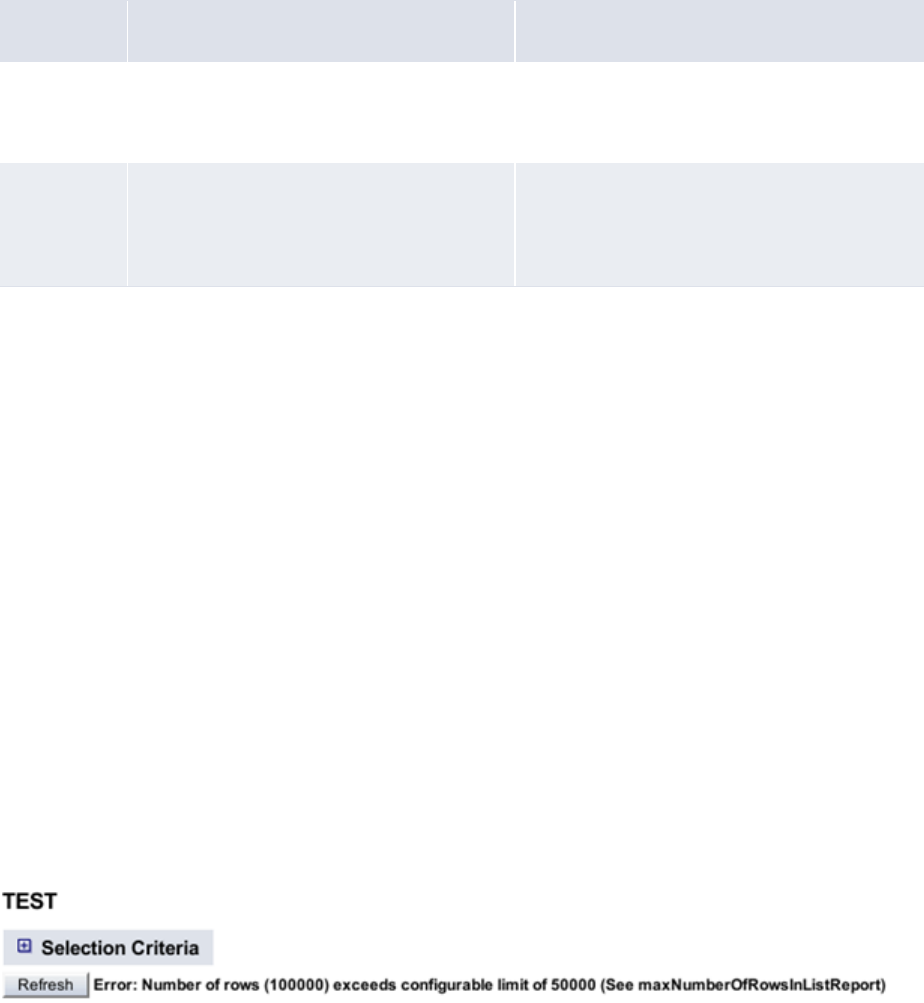
9 Configuring views
9.3 Configuring reports
WebSuite System Administration Guide 375
9.3.5.1 Configuring default values
See 9.1.5 Configuring actions and events on page 350 for general information concerning default
values.
9.3.5.2 Configuring checks
In a report, two sets of checks have to be defined: checkInput and requestOutput.
For each part, the available checks are:
9.3.6 Limiting the number of rows in list reports
Report processing may use a lot of computer resources; in extreme cases it may cause the
application to hang. To avoid this, you can set the maximum number of lines to be processed by the
list type reports.
To limit the number of rows in list reports:
1. Open the runtime_parameters.xml file located in the
etc/wss-web/cmm/InstallationData/installation directory.
2. Go to the maxNumberOfRowsInListReport entry:
<name name="maxNumberOfRowsInListReport">
<description/>
<value>0</value>
</name>
3. Change the number between the value tags according to how many lines you want to allow in
list reports.
0 (default value) = no limit
n = n number of lines to be displayed
If a limit is defined in the .xml file, users are notified during repot execution if the number of lines in
that report exceeds the allowed maximum and the report is not generated. This image illustrates an
example:
9.3.7 Configuring templates
By default, the reports are displayed using the template:
Check Description Example
Check
optional
fields
The optional parameter of
checkMandatoryFields contains the
list of the optional fields.
<checkMandatoryFields optional="
minimum_state_id "/>
Check order
of the date
In reports, the order of the dates can be
checked using checkOrderedDates.
The parameter inf defines the earlier date
and sup the later date.
<checkOrderedDates
inf="opening_date_from"
sup="opening_date_to"/>
9 Configuring views
9.3 Configuring reports
376 © Wall Street Systems IPH AB - Confidential
[WebSuite
help]\trema\webapps\ekit\application\ekit\site\trema\report\input_output.html
You can define that a report uses a specific template, for example, to add comments at the end of
the report.
For this, a params block must be added to the view. This block will have one parameter,
template-inputOutput, which will contain the full path to the new template, starting in:
[WebSuite home]\trema\webapps\ekit\application\ekit\site\trema\
For example:
<params template-inputOutput="report/input_output.met_outst_pos" />
9.3.8 Configuring other parameters
This section defines other configuration parameters for reports.
9.3.8.1 Accessing the TRM Report Generator
All parameters concerning TRM are stored in:
[EKIT_HOME]/trema/webapps/ekit/WEB-INF/classes/conf/registry/rtd/services/report/repor
t.xml
<reportDriver>
<classname="com.trema.esol.ekit.data.server.report.driver.win32.BasicTracker"
/>
<!-- Number of seconds this service should wait for a report to be delivered
-->
<!-- by the Finance KIT report generator. Once the timeout expires, the report
-->
<!-- driver returns a specific ’timeout’ error. This allows to interrupt -->
<!-- long generation and prevent from starvation when all drivers are waiting
-->
<!-- for reports to be generated. -->
<!-- 0 value means wait forever. -->
<!-- DO NOT FORGET TO SET CHANNEL TIMEOUT ACCORDING TO THIS TIMEOUT -->
<generationTimeout>300</generationTimeout>
<xml_format version="3" />
<home path="P:\fk6.0.0" />
<report layout="P:\fk6.0.0.local\reports\layouts"
type="P:\fk6.0.0\share\reports\types"
menu="P:\fk6.0.0\share\reports\menu.fkm" />
<module suffix=".dll" path="P:\fk6.0.0\bin\module" />
<orb config="P:\fk6.0.0\etc\orb.conf" />
<!-- values in {sybase, mssql, oracle} -->
<db type="sybase" />
<!-- sets SYBASE or ORACLE_HOME environment variable -->
<db_driver path="D:\dev\sybase12" />
<context>
<env SystemRoot="C:\WINDOWS" />
</context>
</reportDriver>
9.3.8.2 Navigating and internationalizing reports
To have a report available in WebSuite, entries in navigation and internationalization must also be add-
ed. See Chapter 6 Configuring navigation on page 309 and 8.3 Translating the TRM and ACM
components and the menu on page 341 for more information.
9 Configuring views
9.3 Configuring reports
WebSuite System Administration Guide 377
9.3.9 Creating a report
To create a report:
1. Create the report layout in TRM(for example, ReportNew.fkr).
2. Find the name of the report_type in the report layout. For example:
[FK Report]
[Main]
Type=transactions
Name=Transactions Report
3. Get the parameter list. For example:
# $Trema: transactions.frd,v 5.3 2001/05/30 14:52:26 yrey Exp $
[FK Report Definition]
[Main]
Type=transactions Name=Transactions Report
Procedure=transactions-report
Parameters=portfolio_id,instrument_id,cp_client_id,collateral_number,opening_
date_from,opening_date_to,value_date_from,value_date_to,state_id
4. Create the view with the list of fields. For example:
<report_new inherit="report_default">
<fields>
<report_type/>
<report_name/>
<layout/>
<market_id style="hidden"/>
<state_id style="hidden"/>
<opening_date_from/>
<opening_date_to/>
<portfolio_id/>
</fields>
</report_new>
5. Add the default values with the name of the report type, the name of the report layout, and if
needed, the other default values. For example:
<events>
<init>
<script>
model.report_type=’transactions’;
model.report_name=’ekit/eKitFXDailyDeals’;
model.layout=1; model.market_id=’FX’;
model.state_id=’OPEN’;
</script>
</init>
</events>
6. Add the checks. For example:
<checkInput>
<actions>
<checkMandatoryFields optional=""/>
<checkOrderedDates inf="opening_date_from" sup="opening_date_to"/>
</actions>
</checkInput>
<requestOutput>
<actions>
<checkMandatoryFields optional=""/>
<checkOrderedDates inf="opening_date_from" sup="opening_date_to"/>
</actions>
9 Configuring views
9.3 Configuring reports
378 © Wall Street Systems IPH AB - Confidential
</requestOutput>
7. Add an entry in the navigation part. For example:
<newReportLayout action=" ReportController(view=report_new) allowedGroups=
"admin,public" />
8. Add an entry in the internationalization part for the navigation. For example:
strings.services.navigation.report.fx.newReportLayout.en=New Report
9. Add an entry in the internationalization part for the view. For example:
strings.services.view.report_new.en=New Report
9.3.10 Example
By configuring the view.xml file, you can configure different input parameters for different report
types. In this example, the title of the report (FX Daily Deals) can be configured in the
en.properties file. Note that parameters of reports are extracted from the standard parameters of
the report:
<report_fxdd inherit="report_default">
<fields>
<report_type/>
<report_name/>
<layout/>
<market_id style="hidden"/>
<state_id style="hidden"/>
<opening_date_from/>
<opening_date_to/>
<portfolio_id/>
</fields>
<events>
<init>
<actions>
<set field="report_type" value="transactions"/>
<set field="report_name" value="ekit/eKitFXDailyDeals"/>
<set field="layout" value="1"/>
<set field="market_id" value="fx"/>
<set field="state_id" value="OPEN"/>
</actions>
</init>
<checkInput>
<actions>
<checkMandatoryFields optional=""/>
<checkOrderedDates inf="opening_date_from" sup="opening_date_to"/>
</actions>
</checkInput>
<requestOutput>
<actions>
<checkMandatoryFields optional=""/>
<checkOrderedDates inf="opening_date_from" sup="opening_date_to"/>
</actions>
</requestOutput>
</events>
</report_fxdd>
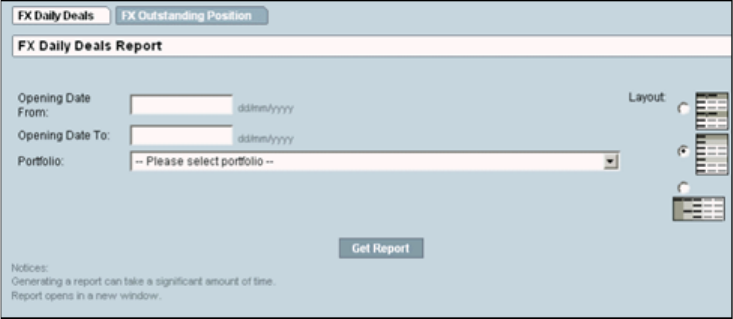
9 Configuring views
9.4 Configuring the Treasury Monitor
WebSuite System Administration Guide 379
9.4 Configuring the Treasury Monitor
This section describes how you can manage data from TRM Treasury Monitor in WebSuite.
You can only use Treasury Monitor in WebSuite if you are using TRM 5.1, 6.0, 6.5, or later.
Furthermore, you can only generate a snapshot of values from TRM Treasury Monitor in WebSuite.
Business and technical consultants are responsible for modifying the dialog appearance (including
priority of fields, handling errors in fields, and modifying field behavior, dependencies and defaults).
Changes in the configuration of views must be made in the XML file in the following folder:
[WebSuite
home]\trema\webapps\ekit\WEB-INF\classes\conf\registry\rtd\services\view\views\t
reasury\
9.4.1 Configuring layout
Treasury Monitor is based on a layout defined in TRM. (Refer to the TRM User Guide for more
information.)
If WebSuite is installed on Windows, all layouts from TRM must be installed locally on the server.
All layouts for Treasury Monitor have to be stored in a tree structure starting in a unique directory.
This directory is defined in:
[WebSuite
home]\trema\webapps\ekit\WEB-INF\classes\conf\registry\rtd\services\datakit\comm
on\tms.xml
In the xml_config block, the parameter basedir contains an absolute or a relative path from:
[WebSuite home]\trema\webapps\ekit\WEB-INF\classes
From this root directory, all layouts must be included in sub-directories. Each sub-directory should
be seen as aTRM Treasury Monitor book.
For example:
<tms>
<view>
<!-- XML view base directory : absolute or relative path -->
<xml_config basedir="./fk/treasury/fk60/view/ekit" />
<!-- xml_config basedir="P:/fk6.0/tms/xml-views"/-->
</view>
<!-- the TMS to WSS Web data converter -->

9 Configuring views
9.4 Configuring the Treasury Monitor
380 © Wall Street Systems IPH AB - Confidential
<converter
class="com.trema.esol.datakit.fk60.tms.converter.EkitTreasuryMonitorConverter
60" />
</tms>
9.4.2 Configuring views
The input parameters for Treasury Monitor are a fixed list of fields. The list itself cannot be changed
but the order of fields in the list can be changed.
Refer to the TRM User Guide for information about fields.
Note: date_time_id and day_behavior_id are specific toTRM 6.0. You must uncomment it;
otherwise, date_time_id must be hidden (there is no control to handle this field).
For example:
<treasury inherit="treasury_default">
<fields>
<portfolio_id />
<figure_currency_id />
<state_id />
<start_date_id />
<end_date_id />
<start_scenario_id />
<end_scenario_id />
<valuation_method_id />
<var_scenario_id />
<context_id />
<!-- FK 6.0 additional fields -->
<date_time_id style="hidden" />
<day_behavior_id />
<!-- FK 6.5 additional fields -->
<var_confidence_level_id />
<var_horizon_id />
º
9.4.3 Configuring style
A style must be defined for each field. The style defines how a value is input in this field.
In the report_default view, by default, most of the fields use the style Default.
See 9.1.4 Configuring styles and templates on page 348 for general information concerning styles.
9.4.4 Configuring events
All the events and actions are defined in an <events> block.
9.4.4.1 Configuring default values
Some possible initial values are as follows:
Field Mandatory Possible values
portfolio_id Yes Any existing
state_id Yes Any existing
9 Configuring views
9.4 Configuring the Treasury Monitor
WebSuite System Administration Guide 381
See 9.1.5 Configuring actions and events on page 350 for general information concerning default
values.
9.4.4.2 Configuring checks
All check actions are in the getOutput block in the events block.
The available checks are:
start_date_id Yes Any date
end_date_id Yes Any date
context_id Yes Empty or any existing
figure_currency_id Yes Any existing
start_scenario_id Yes Empty or any existing
valuation_method_id Yes One of the following:
• PORTFOLIO
• NORMAL
• ZERO COUPON
• ZERO SPOT
• SPOT VALUATION
• BENCHMARK
• ZERO SPOT
• SPOT VALUATION
var_scenario_id Yes Empty or any existing
var confidence level id No One of the following:
• One-day horizon
•One-week horizon
• One-month horizon
var_confidence_lvel_id No Empty or between 50 and 100
date_time_id No Always hidden; ignore
day_behaviour_id Yes One of the following:
• OPEN DAY
• CLOSED DAY
• REALIZED DAY
Check Description Example
9 Configuring views
9.4 Configuring the Treasury Monitor
382 © Wall Street Systems IPH AB - Confidential
9.4.5 Configuring templates
By default, the reports are displayed using the template:
[WebSuite home]\trema\webapps\ekit\application\ekit\site\trema\treasury\*.html
The screen sequence (state diagram) is defined in:
[WebSuite
home]\trema\webapps\ekit\WEB-INF\classes\conf\registry\rtd\frontend\dialogs\TreasuryVi
ewController.xml
This file contains:
<?xml version="1.0" encoding="UTF-8"?>
<TreasuryViewController>
<views>
<input>
<automatonState>input</automatonState>
<template>treasury/input</template>
</input>
<inputPopup>
<automatonState>input</automatonState>
<template>treasury/input.popup</template>
</inputPopup>
<inputOutput>
<automatonState>inputOutput</automatonState>
<template>treasury/input_output</template>
</inputOutput>
<!-- Excel specifics -->
<inputOutput_splashXLS>
<automatonState>inputOutput</automatonState>
<template>treasury/input_output.splash_xls</template>
</inputOutput_splashXLS>
<inputOutput_xls>
<automatonState>inputOutput</automatonState>
<template>treasury/input_output.xls</template>
<mime type="application/vnd.ms-excel" ext="xls" inline="false"/>
</inputOutput_xls>
</views>
<actions>
<init view="inputPopup"/>
<checkInput view="inputPopup"/>
<getOutput view="inputOutput" errorView="input"/>
<!-- Excel specifics -->
<exportExcel view="inputOutput"/>
<splashScreenExcel view="inputOutput_splashXLS"/>
<getExcel view="inputOutput_xls"/>
</actions>
</TreasuryViewController>
Note: This file must not be changed.
Check
optional
fields
The optional parameter of
checkMandatoryFields contains the
list of the optional fields.
<checkMandatoryFields optional="
date_time_id "/>
Check order
of the date
In reports, the order of the dates can be
checked using checkOrderedDates.
The parameter inf defines the earlier date
and sup the later date.
<checkOrderedDates
inf="start_date_id"
sup="end_date_id"/>
9 Configuring views
9.4 Configuring the Treasury Monitor
WebSuite System Administration Guide 383
You can define that a report uses a specific template, for example, to add comments at the end of
the report.
For this, a params block must be added to the view. This block will have one parameter
template-inputOutput, which will contain the full path to the new template starting in:
[WebSuite home]\trema\webapps\ekit\application\ekit\site\trema
For example:
<params template-inputOutput="treasury/input_output.met_outst_pos" />
9.4.6 Configuring other parameters
This section defines other configuration parameters for Treasury Monitor.
9.4.6.1 Configuring navigation and internationalization for Treasury Monitor layouts
To have a Treasury Monitor layout available in WebSuite, entries in navigation and
internationalization must also be added. See Chapter 6 Configuring navigation on page 309 and 8.3
Translating the TRM and ACM components and the menu on page 341.
9.4.7 Creating a Treasury Monitor view
To create a Treasury Monitor view:
1. Create the Treasury Monitor layout in TRM and store it in the Treasury folder in the root folder
for layouts (for example, Treasury/TreasuryNew.xml).
2. Create the view with the list of fields. For example:
<treasury_new inherit="treasury_default">
<fields>
<portfolio_id />
<figure_currency_id />
<state_id />
<start_date_id />
<end_date_id />
<start_scenario_id />
<end_scenario_id />
<valuation_method_id />
<var_scenario_id />
<context_id />
<!-- FK 6.0 additional fields -->
<date_time_id style="hidden" />
<day_behavior_id />
</fields>
</treasury_new>
3. Add the default values with the name of the report type, the name of the report layout, and if
needed the other default values. For example:
<events>
<init>
<actions>
<set field="portfolio_id" value="TEST" />
<set field="state_id" value="OPEN" />
</actions>
</init>
</events>
4. Add the checks. For example:
<getOutput>
<actions>
9 Configuring views
9.4 Configuring the Treasury Monitor
384 © Wall Street Systems IPH AB - Confidential
<checkOrderedDates inf="start_date_id" sup="end_date_id" />
<!-- FK 6.0 and FK 6.5 only -->
<checkMandatoryFields optional="date_time_id" />
</actions>
</getOutput>
5. Add an entry in the navigation. For example:
<newTreasuryMonitor action=" TreasuryViewController(view=treasury _new,
page=Treasury/TreasuryNew)" allowedGroups= "#inherit" />
6. Add an entry in the internationalization for the navigation. For example:
strings.services.navigation.treasury.newTreasuryMonitor.en=New Treasury
Monitor
7. Add an entry in the internationalization for the view. For example:
strings.services.view.treasury_new.en=New Treasury Monitor
9.4.8 Example
By configuring the view.xml file, you can configure different input parameters for different report
types. In this example, the title of the report (Treasury) can be configured in the en.properties
file:
<treasury inherit="treasury_default">
<fields>
<portfolio_id/>
<figure_currency_id/>
<state_id/>
<start_date_id/>
<end_date_id/>
<start_scenario_id/>
<end_scenario_id/>
<valuation_method_id/>
<var_scenario_id/>
<context_id/>
<!-- FK 6.0 additional fields -->
<date_time_id style="hidden"/>
<day_behavior_id/>
</fields>
<events>
<init>
<script>
model.portfolio_id=’TEST’;
model.state_id=’OPEN’;
model.figure_currency_id=’EUR’
</script>
</init>
<getOutput>
<actions>
<checkOrderedDates inf="start_date_id" sup="end_date_id" />
<!-- FK 6.0 only -->
<checkMandatoryFields optional="date_time_id"/>
</actions>
</getOutput>
</events>
</treasury>
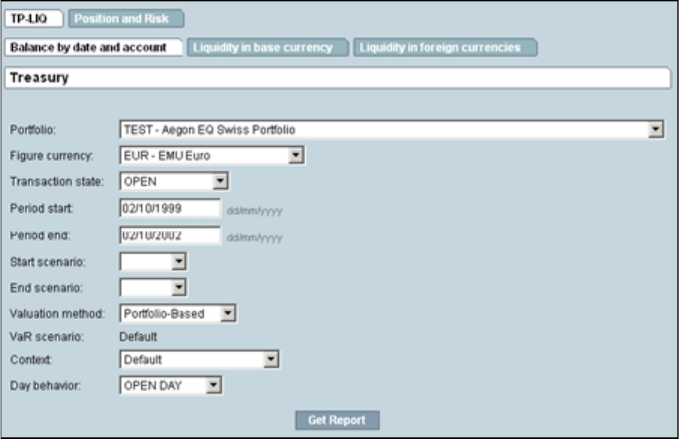
9 Configuring views
9.4 Configuring the Treasury Monitor
WebSuite System Administration Guide 385
9 Configuring views
9.4 Configuring the Treasury Monitor
386 © Wall Street Systems IPH AB - Confidential
WebSuite System Administration Guide 387
Chapter 10 Configuring reports and worksheets
Several functions utilize the flexible reporting framework. Most of these functions contain default
report templates and all allow you to create custom report templates. You can generate custom
reports or worksheets from these report templates and use them as part of your organization’s
processes.
Functions that utilize the flexible reporting framework are very similar in design and operation.
Therefore, once you have learned to create report templates in one function, you can apply this
knowledge in all other functions.
10.1 Understanding reports and worksheets
As noted at the beginning of this chapter, several functions in CMM are based on the flexible reporting
framework. The flexible reporting framework allows you to generate reports or worksheets based on
report templates. Most flexible reporting framework functions include a default set of report
templates. You can create additional ones following the instructions in this chapter.
The benefit of the flexible reporting framework is that allows you and other users to view, analyze,
and manipulate data in fully customizable reports and worksheets that meet your particular needs.
In comparison, most static functions in CMM only allow you to view, analyze, and manipulate data in
a static format.
10.2 Configuring report templates (and related data)
In the flexible reporting framework functions, you can create and manage report templates. A report
template consists of two components:
•Format
•Criteria set.
The format defines the information that displays in the report templates and the layout of that
information. The criteria set defines the data to be selected for inclusion in reports or worksheets
generated from the report templates.
10.2.1 Configuring formats
Report templates support two format types:
•List
•Pivot table.
The following sections present generic procedures for creating, editing, and deleting formats.
Specific steps may vary depending on the function in which you are configuring formats.
10 Configuring reports and worksheets
10.2 Configuring report templates (and related data)
388 © Wall Street Systems IPH AB - Confidential
Note: These sections is applicable to formats in all functions based on the flexible reporting
framework except Cash Monitor and Cash Position. For information on formats in the Cash
Monitor and Cash Position functions, see 10.3.1 Configuring Cash Monitor and Cash
Position formats on page 400.
10.2.1.1 Prerequisites
The following are prerequisites for configuring formats:
10.2.1.2 Creating list formats
To create a list format:
1. Select the appropriate function.
Category Tasks
Security Ensure you have access to the appropriate flexible reporting framework function.
For more information, see Chapter 3 Managing security on page 95.
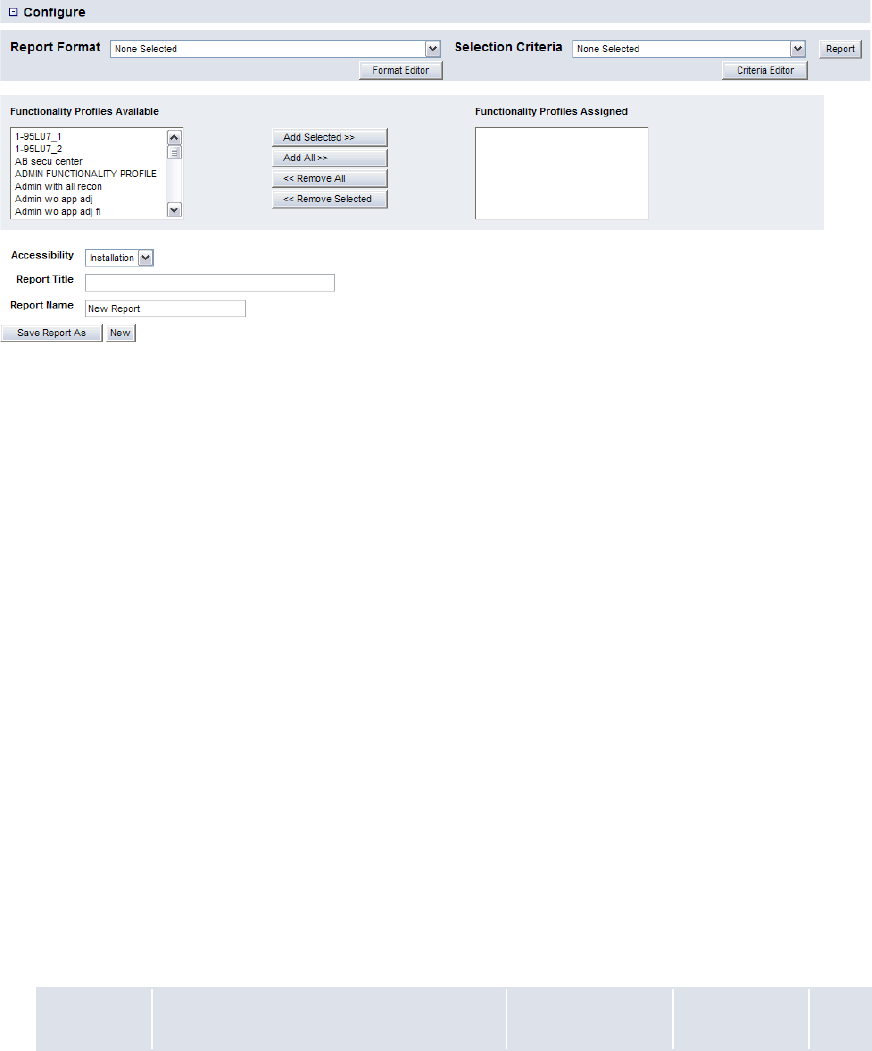
10 Configuring reports and worksheets
10.2 Configuring report templates (and related data)
WebSuite System Administration Guide 389
If you previously selected one of the function’s existing report templates as a favorite, click
Return to List.
2. In the function’s report template list page, display the Configure controls.
3. Ensure the Report Format list is set to None Selected.
4. Click Format Editor.
5. In the Report Template Definition – Select Report Format page, select the List Report option
button.
6. Click Continue.
7. In the Report Template Definition page:
a. Do one of the following:
–To make the format available to other users, select Installation in the Accessibility list.
–To not make the format available to other users, select Personal in the Accessibility list.
b. Do one of the following:
–To not display criteria in the format, select Not Displayed in the Selection Criteria list.
–To display editable criteria in the format, select Displayed/Editable in the
Selection Criteria list.
–To display static criteria in the format, select Displayed/Static in the Selection Criteria list.
c. Assign attributes to the format.
d. Enter the name of the format in the Template Name field.
8. Click Continue.
9. In the second Report Template Definition page:
a. For each attribute, enter or select the appropriate values:
Control Description Value Constraints Req.
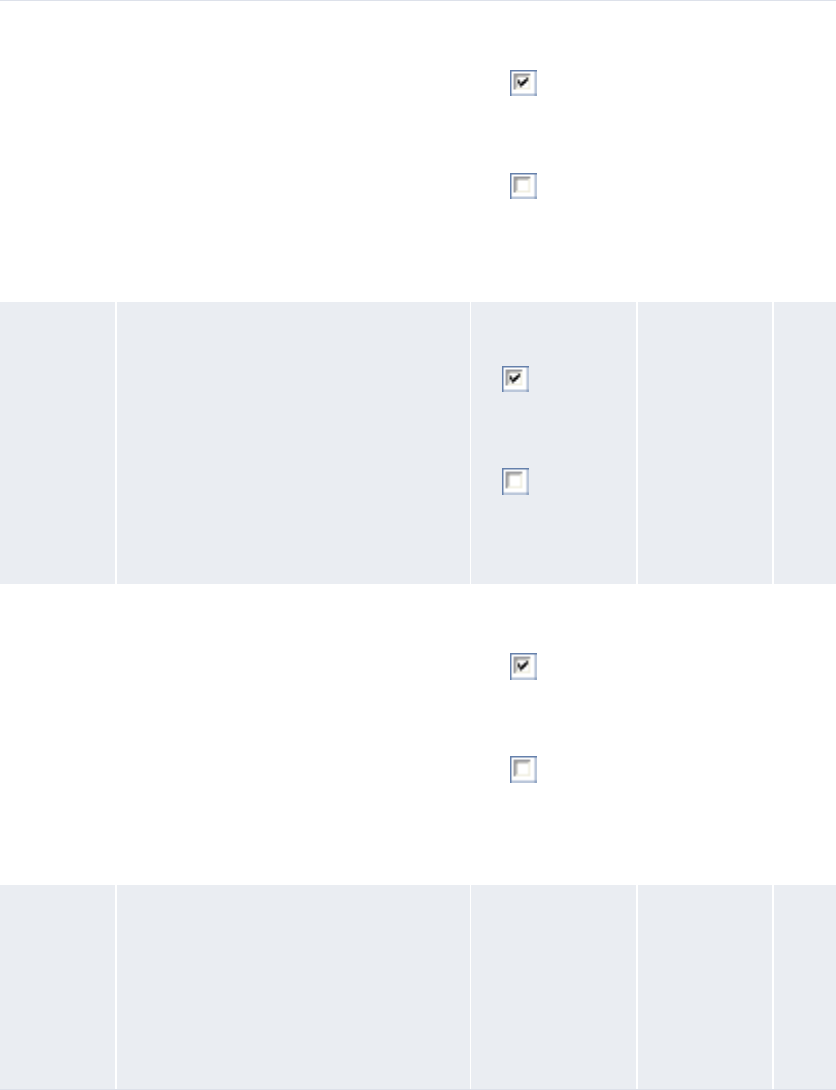
10 Configuring reports and worksheets
10.2 Configuring report templates (and related data)
390 © Wall Street Systems IPH AB - Confidential
b. Do one of the following:
–To display summarized information in the format, select Summary in the rows list.
–To display detailed information in the list format, select Detail in the rows list.
10. Click Save Template As.
10.2.1.3 Creating pivot table formats
To create a pivot table format:
1. Select the appropriate function.
Section
Header
A value that indicates whether to group
the format in sections by the attribute.
One of the
following:
• to group
the format in
sections by
the attribute
• to not
group the
format in
sections by
the attribute
•None No
Subtotal by A value that indicates whether to
subtotal amounts in the format by the
attribute.
One of the follow-
ing:
• to subtotal
amounts in the
format by the
attribute
• to not
subtotal
amounts in the
format by the
attribute
•None No
Show Totals A value that indicates whether to display
totals for this attribute in the format.
One of the
following:
• to display
totals for this
attribute in
the format
• to not
display totals
for this
attribute in
the format
•None No
Order By An appropriate number in the first list.
Ascending or Descending in the
second list.
For example, if you select 1 in the first
list and Ascending in the second list,
CMM first sorts reports by the selected
attribute in ascending order.
Attribute •None No

10 Configuring reports and worksheets
10.2 Configuring report templates (and related data)
WebSuite System Administration Guide 391
If you previously selected one of the function’s existing report templates as a favorite, click
Return to List.
2. In the function’s report template list page, display the Configure controls.
3. Ensure the Report Format list is set to None Selected.
4. Click Format Editor.
5. In the Report Template Definition – Select Report Format page, select the Pivot Table option
button.
6. Click Continue.
7. In the Report Template Definition page:
a. Do one of the following:
–To make the format available to other users, select Installation in the Accessibility list.
–To not make the format available to other users, select Personal in the Accessibility list.
b. Do one of the following:
–To not display criteria in the format, select Not Displayed in the Selection Criteria list.
–To display editable criteria in the format, select Displayed/Editable in the
Selection Criteria list.
–To display static criteria in the format, select Displayed/Static in the Selection Criteria list.
c. Select the Suppress Empty Columns checkbox to hide empty columns in the format.
d. Select the Suppress Empty Rows checkbox to hide empty rows in the format.
e. Select Static HTML in the Report Table Display Type list.
f. Assign column, row, and data attributes to the format.
g. Select Column or Row in the Data Attribute Orientation list.
h. Select Sum, Conditional Sum, Min, or Max in the Operation list.
i. Select the appropriate number in the Display Units list.
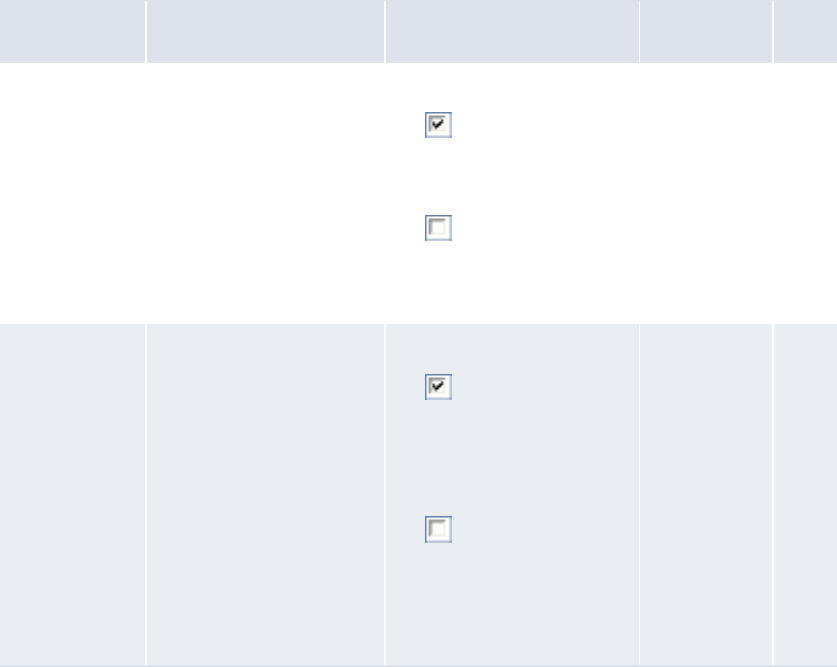
10 Configuring reports and worksheets
10.2 Configuring report templates (and related data)
392 © Wall Street Systems IPH AB - Confidential
For example, if you select 1,000’s, all data attributes display amounts in thousands using
simple rounding as required.
j. Select the appropriate list or pivot table format in the Drilldown Target list.
k. Enter the name of the format in the Template Name field.
8. Click Continue.
9. In the second Report Template Definition page:
a. For each column and row attribute, enter or select the appropriate values:
If Report Mapping is a selected attribute and you are planning to use the format with mappings
that include interim balances, you must select the Report as Component checkbox for the Report
Mapping attribute.
By default, pivot table formats display all available values for their attributes. You can
change this behavior for an attribute by clicking Specify Value in its row. In the resulting page:
–To only display select values of the attribute in the format, select
Report only the values listed in the list.
–To only display select values of the attribute and any other values with data in the
format, select Report specified values and any other values with data in the list.
Control Description Value Constraints Req.
Show Subtotals A value that indicates
whether to display
subtotals in the pivot table
format for the column or
row attribute.
One of the following:
• to display subtotals
in the pivot table format
for the column or row
attribute
• to not display
subtotals in the pivot
table format for the
column or row attribute
•None No
Report as
Component
A value that indicates
whether to display all
components of the column
or row attribute in a single
column rather than in
multiple rows and
columns.
One of the following:
• to display all
components of the
column or row attribute
in a single column rather
than in multiple rows
and columns
• to not display all
components of the
column or row attribute
in a single column rather
than in multiple rows
and columns
•None No
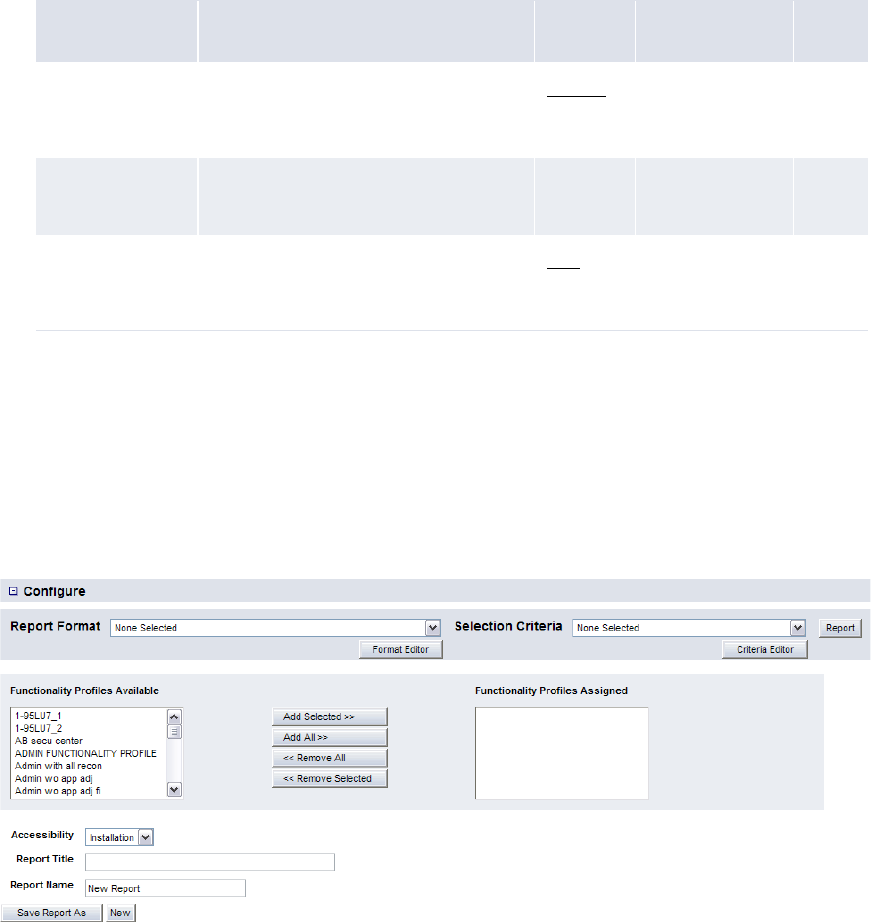
10 Configuring reports and worksheets
10.2 Configuring report templates (and related data)
WebSuite System Administration Guide 393
Then click Add Value and enter the appropriate text in the resulting field for each value you
want to specify. When complete, click Save followed by Return.
b. For each data attribute, enter or select the appropriate values:
10. Click Save Template As.
10.2.1.4 Editing formats
To edit a format:
1. Select the appropriate function.
If you previously selected one of the function’s existing report templates as a favorite, click
Return to List.
2. In the function’s report template list page, display the Configure controls.
3. Select the format in the Report Format list.
4. Click Format Editor.
5. In the Report Template Definition page, edit the format.
6. Click Save Template.
10.2.1.5 Deleting formats
To delete a format:
1. Select the appropriate function.
Control Description Value Constraints Req.
Decimal Precision The number of digits to display after
the decimal place of all numbers in the
data attribute.
Integer •None No
Drilldown Targets The format that displays when users
drill down on the data attribute.
Format •None No
Label A title for the page that displays when
a user drills down on an amount in the
data attribute.
Text •None No
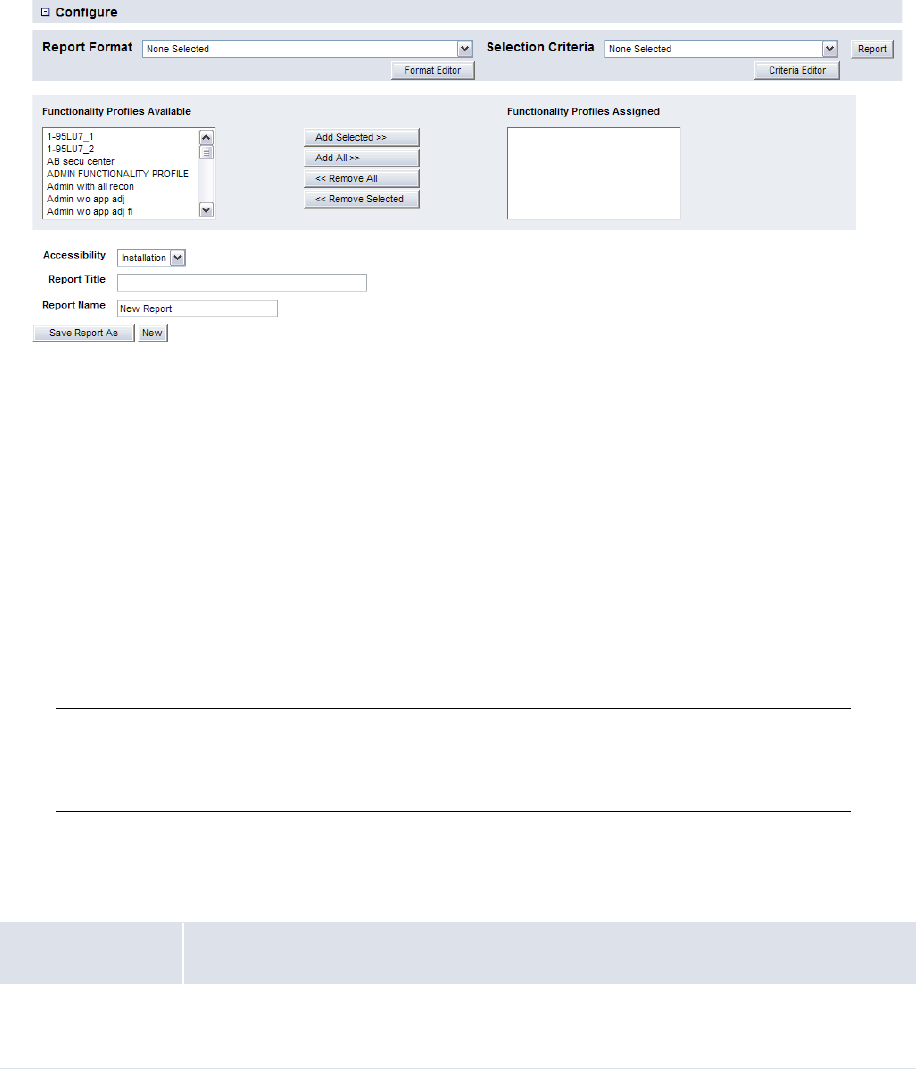
10 Configuring reports and worksheets
10.2 Configuring report templates (and related data)
394 © Wall Street Systems IPH AB - Confidential
If you previously selected one of the function’s existing report templates as a favorite, click
Return to List.
2. In the function’s report template list page, display the Configure controls.
3. Select the format in the Report Format list.
4. Click Format Editor.
5. In the Report Template Definition page, click Delete Template.
6. In the resulting dialog, click OK.
10.2.2 Configuring criteria sets
Criteria sets allow you to define the criteria of report templates. Specifically, you can define which
criteria display in the report templates and, of those, which can be modified by users and which
cannot. In addition, you can select default values for the criteria.
The following sections present generic procedures for creating, editing, and deleting criteria sets.
Specific steps may vary depending on the function in which you are maintaining formats.
Note: These sections is applicable to criteria sets in all functions based on the flexible reporting
framework except Cash Monitor and Cash Position. For information on criteria sets in the
Cash Monitor and Cash Position functions, see 10.3.2 Configuring Cash Monitor and Cash
Position criteria sets on page 407.
10.2.2.1 Prerequisites
The following are prerequisites for configuring criteria sets:
10.2.2.2 Creating criteria sets
To create a criteria set:
1. Select the appropriate function.
Category Tasks
Security Ensure you have access to the appropriate flexible reporting framework function.
For more information, see Chapter 3 Managing security on page 95.
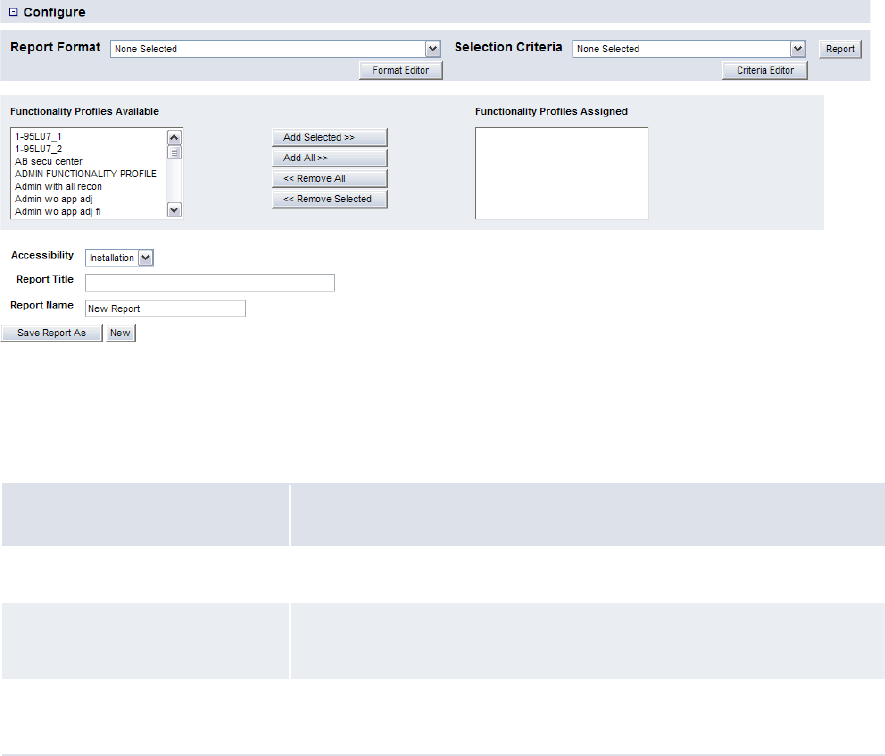
10 Configuring reports and worksheets
10.2 Configuring report templates (and related data)
WebSuite System Administration Guide 395
If you previously selected one of the function’s existing report templates as a favorite, click
Return to List to open the function’s report template list page.
2. In the function’s report template list page, display the Configure controls.
3. Ensure the Selection Criteria list is set to None Selected.
4. Click Criteria Editor.
5. In the Selection Criteria Template Editor – Display Type Selection page, select one of three
options for each criterion:
6. Click Continue.
7. In the Default Value Selection page, select the default value for each criterion.
8. Do one of the following:
–To make the criteria set available to other users, select Installation in the Accessibility list.
–To not make the criteria set available to other users, select Personal in the Accessibility list.
9. Enter the name of the criteria set in the Template Name field.
10. Click Save Template As.
10.2.2.3 Editing criteria sets
To edit a criteria set:
1. Select the appropriate function.
Option Description
Not Displayed The criterion does not display in the report template.
Displayed/Editable The criterion displays in the report template and can be modified by
the user.
Displayed/Static The criterion displays in the report template but cannot be modified by
the user.

10 Configuring reports and worksheets
10.2 Configuring report templates (and related data)
396 © Wall Street Systems IPH AB - Confidential
If you previously selected one of the function’s existing report templates as a favorite, click
Return to List to open the function’s report template list page.
2. In the function’s report template list page, display the Configure controls.
3. Select the criteria set in the Selection Criteria list.
4. Click Criteria Editor.
5. In the Selection Criteria Template Editor – Display Type Selection page, select one of three
options for each criterion:
6. Click Continue.
7. In the Default Value Selection page, select the default value for each criterion.
8. Do one of the following:
–To make the criteria set available to other users, select Installation in the Accessibility list.
–To not make the criteria set available to other users, select Personal in the Accessibility list.
9. Change the name of the criteria set in the Template Name field.
10. Click Save Template.
10.2.2.4 Deleting criteria sets
To delete a criteria set:
1. Select the appropriate function.
Option Description
Not Displayed The criterion does not display in the report template.
Displayed/Editable The criterion displays in the report template and can be modified by
the user.
Displayed/Static The criterion displays in the report template but cannot be modified
by the user.
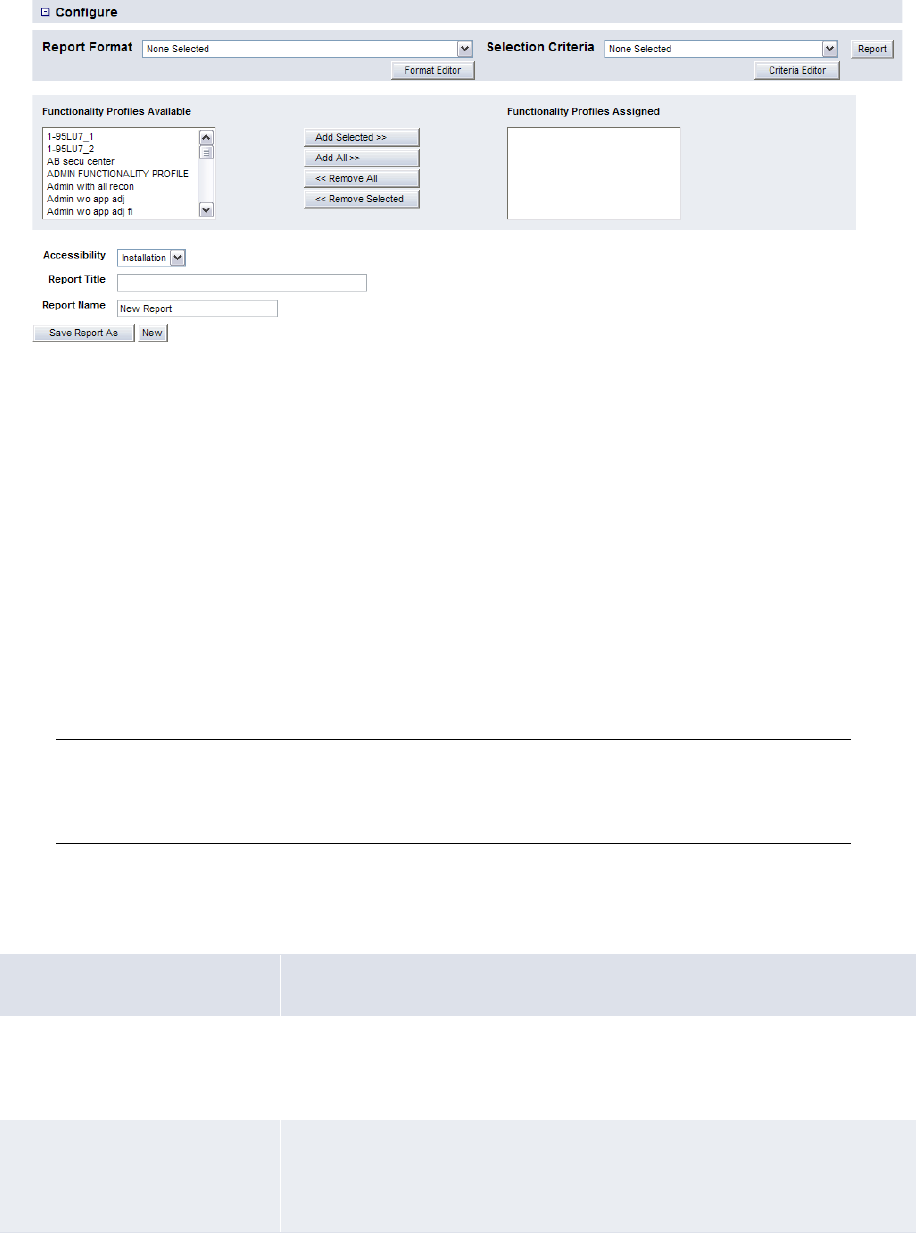
10 Configuring reports and worksheets
10.2 Configuring report templates (and related data)
WebSuite System Administration Guide 397
If you previously selected one of the function’s existing report templates as a favorite, click
Return to List to open the function’s report template list page.
2. In the function’s report template list page, display the Configure controls.
3. Select the criteria set in the Selection Criteria list.
4. Click Criteria Editor.
5. In the Selection Criteria Template Editor – Display Type Selection page, click Continue.
6. In the Default Value Selection page, click Delete Template.
7. In the resulting dialog, click OK.
10.2.3 Configuring report templates
A report template is, essentially, a pairing of a format and a criteria set.
In a flexible reporting framework function, you can pair a format to a criteria set regardless of
whether the format and criteria set are part of existing report templates or not. However, if you are
creating a report template at the installation level, you cannot assign personal-level formats and
criteria sets to it.
Note: The following sections is applicable to report templates in all functions based on the flexible
reporting framework except Cash Monitor and Cash Position. For information on report
templates in the Cash Monitor and Cash Position functions, see 10.3.3 Configuring Cash
Monitor and Cash Position report templates on page 410.
10.2.3.1 Prerequisites
The following are prerequisites for configuring report templates:
Category Tasks
Security Ensure you have access to the appropriate flexible reporting framework
function.
For more information, see Chapter 3 Managing security on page 95.
Reports and worksheets Ensure the following report and worksheet tasks have been completed:
• 10.2.1 Configuring formats on page 387
• 10.2.2 Configuring criteria sets on page 394

10 Configuring reports and worksheets
10.2 Configuring report templates (and related data)
398 © Wall Street Systems IPH AB - Confidential
10.2.3.2 Creating report templates
To create a report template:
1. Select the appropriate function.
If you previously selected one of the function’s existing report templates as a favorite, click
Return to List to open the function’s report template list page.
2. In the function’s report template list page, display the Configure controls.
3. Select the report template’s format in the Report Format list.
4. Select the report template’s criteria set in the Selection Criteria list.
5. Assign security by functionProfiles to the report template.
6. Do one of the following:
–To make the report template available to other users, select Installation in the Accessibility
list.
–To not make the report template available to other users, select Personal in the Accessibility
list.
7. Enter the title of the report template in the Report Title field.
8. Enter the name of the report in the Report Name field.
9. Click Save Report As.
10.2.3.3 Editing report templates
To edit a report template:
1. Select the appropriate function.

10 Configuring reports and worksheets
10.2 Configuring report templates (and related data)
WebSuite System Administration Guide 399
If you previously selected one of the function’s existing report templates as a favorite, click
Return to List to open the function’s report template list page.
2. In the function’s report template list page, click Edit in the report template’s row.
3. Select the report template’s format in the Report Format list.
4. Select the report template’s criteria set in the Selection Criteria list.
5. Assign security by function profiles to the report template.
6. Do one of the following:
–To make the report template available to other users, select Installation in the Accessibility
list.
–To not make the report template available to other users, select Personal in the Accessibility
list.
7. Change the title of the report template in the Report Title field.
8. Change the name of the report in the Report Name field.
9. Click Save Report.
10.2.3.4 Deleting report templates
To delete a report template:
1. Select the appropriate function.
If you previously selected one of the function’s existing report templates as a favorite, click
Return to List to open the function’s report template list page.
2. In the function’s report template list page, click Delete in the report template’s row.
3. In the resulting dialog, click OK.
10.2.4 Configuring the default accessibility level for report templates
When a user first creates a report template, the Accessibility list is set to Installation by default.
The user can later change the list to Personal if he or she is creating a personal report template.
If you prefer the Accessibility list be set to Personal by default, you can make this change by
configuring the report_accessibility.xml file. You may want to do this if users in your
organization will only be creating personal-level report templates and you want to save them work
by not having to change the Accessibility list from Installation to Personal each time they create a
report template.
10.2.4.1 Prerequisites
The following are prerequisites for configuring report media:
10.2.4.2 Configuring the default accessibility level for report templates
To configure the default accessibility level for report templates:
1. Open one of the following configuration files:
Category Tasks
Security Ensure you have access to the following function:
• FG-0400 Review CMM Configuration.
For more information, see Chapter 3 Managing security on page 95.

10 Configuring reports and worksheets
10.3 Configuring Cash Monitor and Cash Position report templates (and related data)
400 © Wall Street Systems IPH AB - Confidential
[Standard configuration file path]
handlers
choice_lists
configurable
report_accessibility.xml
For instructions on opening configuration files, see 1.2 Opening configuration files on page 25.
2. To make Personal the default accessibility level, move its element above Installation’s element:
<accessibility_list>
<item id="personal" label="Personal"/>
<item id="installation" label="Installation"/>
º
</accessibility_list>
3. Save and close the file.
10.3 Configuring Cash Monitor and Cash Position report
templates (and related data)
The Cash Monitor and Cash Position functions are based on the flexible reporting framework.
Therefore, you can create and manage report templates in these functions. A report template
consists of two components:
•Format
•Criteria set.
The format defines the information that displays in the report templates and the layout of that
information. The criteria set defines the data to be selected for inclusion in reports or worksheets
generated from the report templates.
10.3.1 Configuring Cash Monitor and Cash Position formats
Report templates support two format types:
•List
•Pivot table.
The following sections present procedures for creating, editing, and deleting formats in the Cash
Monitor and Cash Position functions. For procedures for creating, editing, and deleting formats in
other flexible reporting framework functions, see 10.2.1 Configuring formats on page 387.
10.3.1.1 Prerequisites
The following are prerequisites for configuring Cash Monitor and Cash Position formats:
Category Tasks

10 Configuring reports and worksheets
10.3 Configuring Cash Monitor and Cash Position report templates (and related data)
WebSuite System Administration Guide 401
10.3.1.2 Creating list formats
To create a list format:
1. Select the appropriate function.
If you previously selected one of the function’s existing report templates as a favorite, click
Return to List.
2. In the function’s report template list page, click Configure a Report.
3. Click New Format.
4. In the Configure Report Template section:
a. Select List Report in the Select Report Format list.
b. Enter the appropriate value:
5. In the Headline section, select the appropriate values:
6. In the Attributes section, assign attributes to the format.
7. In the Attribute Values section:
a. Select the appropriate values for each attribute you assigned to the format in step 6:
Security Ensure you have access to the following functions:
• FG-0338 Cash Monitor
• FG-0338.01 Configure Cash Monitor
• FG-0397 Cash Position
• FG-0397.01 Configure Cash Position.
For more information, see Chapter 3 Managing security on page 95.
Control Description Value Constraints Req.
Template Name An appropriate name for the
format.
Tex t • Must be unique No
Control Description Value Constraints Req.
Accessibility A value that indicates
whether the format is
available to all users or
you only.
One of the following:
•Installation if the
format is available to all
users
•Personal if the format
is available to you only
•None No
Selection Criteria A value that indicates
how criteria display in
the format.
One of the following:
• Not Displayed
• Displayed/Editable
• Displayed/Static
•None No
Control Description Value Constraints Req.
10 Configuring reports and worksheets
10.3 Configuring Cash Monitor and Cash Position report templates (and related data)
402 © Wall Street Systems IPH AB - Confidential
Section
Header
A value that indicates whether to
group the format in sections by
the attribute.
One of the
following:
• to group the
format in
sections by the
attribute
• to not group
the format in
sections by the
attribute
•Is only
applicable to
non-amount
attributes
No
Subtotal by A value that indicates whether to
subtotal amounts in the format
by the attribute.
One of the
following:
• to subtotal
amounts in the
format by the
attribute
• to not
subtotal
amounts in the
format by the
attribute
•Is only
applicable to
non-amount
attributes
No
Show Totals A value that indicates whether to
display totals for this attribute in
the format.
One of the
following:
• to display
totals for this
attribute in the
format
• to not
display totals for
this attribute in
the format
•Is only
applicable to
amount
attributes
No
Order By
(First list)
A value that indicates the priority
of the attribute in the ordering
entries in the format.
For example, if you select 1 for
the Entity Name attribute and 2 for
the Currency Code attribute, entries
in the report are first sorted by
entity name and then by currency
ID.
An appropriate
number
•None No
Order By
(Second
list)
A value that indicates whether
you want to sort entries in the
format by the attribute in
ascending (A to Z) or descending
(Z to A) order.
One of the
following:
•Ascending
•Descending
•None No

10 Configuring reports and worksheets
10.3 Configuring Cash Monitor and Cash Position report templates (and related data)
WebSuite System Administration Guide 403
b. Do one of the following:
–To display summarized information in the format, select Summary in the Rows list.
–To display detailed information in the list format, select Detail in the Rows list.
8. Click Save Template.
10.3.1.3 Creating pivot table formats
To create a pivot table format:
1. Select the appropriate function.
If you previously selected one of the function’s existing report templates as a favorite, click
Return to List.
2. In the function’s report template list page, click Configure a Report.
3. Click New Format.
4. In the Configure Report Template section:
a. Select Pivot Table in the Select Report Format list.
b. Enter or select the appropriate values:
5. In the Headline section, select the appropriate values:
Control Description Value Constraints Req.
Template Name An appropriate name for
the format.
Tex t •Must be
unique
No
Data Attribute
Orientation
A value that indicates
whether data attributes
display as columns or rows
in the format.
One of the following:
• Column
• Row
•None No
Operation The operation to perform
on data attributes in the
format.
One of the following:
• Sum
• Conditional
Sum
• Min
• Max
•None No
Display Units The number of digits to
which data attributes
display in the report.
For example, if you select
1,000’s, the number
5,363,810 displays as
5,364 in the format.
One of the following:
• 1’s
• 1,000’s
• 1,000,000’s
• 1,000,000,000’s
•None No
Drilldown Target The default format to
display when a user drills
down on a data attribute.
Format •None No
Control Description Value Constraints Req.
10 Configuring reports and worksheets
10.3 Configuring Cash Monitor and Cash Position report templates (and related data)
404 © Wall Street Systems IPH AB - Confidential
Accessibility A value that indicates
whether the format is
available to all users or
only you.
One of the following:
•Installation if the
format is available to all
users
•Personal if the format
is available to you only
•None No
Selection Criteria A value that indicates
how criteria display in
the format.
One of the following:
• Not Displayed
• Displayed/Editable
• Displayed/Static
•None No
Report Table Display
Type
The default display type
of the format.
Static HTML •None No
Suppress Empty
Columns
A value that indicates
whether empty columns
are displayed in the
format.
One of the following:
• to not display empty
columns in the format
• to display empty
columns in the format
•None No
Suppress Empty Rows A value that indicates
whether empty rows are
displayed in the format.
One of the following:
• to not display empty
rows in the format
• to display empty rows
in the format
•None No
Exclude Target
Balances
A value that indicates
whether target balance
information is displayed
in the format.
One of the following:
• to not display target
balance information in
the format
• to display target
balance information in
the format
•None No
10 Configuring reports and worksheets
10.3 Configuring Cash Monitor and Cash Position report templates (and related data)
WebSuite System Administration Guide 405
6. In the Columns, Rows, and Data sections, assign attributes to the format.
7. In the Columns and Rows subsections of the Attribute Values section:
a. Select the appropriate values for each column and row attribute you assigned to the format
in step 6:
b. Click Specify Values for each column and row attribute you assigned to the format in step 6.
c. In the resulting dialog:
a. Do one of the following:
–To display only specified values for the attribute, select Report only the values
listed in the list.
–To display both specified values and any other values containing data for the
attribute, select Report specified values and any other values with data in
the list.
b. Specify values.
For some attributes, you specify a value by clicking Add Value and entering the value in the resulting
field.
For other attributes, you specify a value by clicking and dragging it from the Available Attributes list to the
Control Description Value Constraints Req.
Show Subtotals A value that
indicates whether
to display totals for
this attribute in the
format.
One of the following:
• to display
totals for this
attribute in the
format
• to not display
totals for this
attribute in the
format
•None No
Report as
Component
A value that
indicates whether
to display all
components of the
column or row
attribute in a single
column.
One of the following:
• to display all
components of the
column or row
attribute in a
single column
• to display all
components of the
column or row
attribute in
multiple columns
•For the Report Mapping
attribute, must be
selected you are
planning to use the
format with mappings
that include interim
balances
No
10 Configuring reports and worksheets
10.3 Configuring Cash Monitor and Cash Position report templates (and related data)
406 © Wall Street Systems IPH AB - Confidential
Selected Attributes list.
c. Click OK.
8. In the Data subsection of the Attribute Values section, enter or select the appropriate values for
each data attribute you assigned to the format in step 6:
9. Click Save Template.
10.3.1.4 Creating formats based on existing formats
To create a format based on an existing format:
1. Select the appropriate function.
If you previously selected one of the function’s existing report templates as a favorite, click
Return to List.
2. In the function’s report template list page, do one of the following:
–Drill down on the existing format from a report template that utilizes the format:
a. Click in the report template’s row.
b. Select Edit Format in the resulting menu.
–Drill down on the existing format from the configuration tab:
a. Click Configure a Report.
b. Select the format in the Report Format list.
c. Click Edit.
3. Enter the name of the new format in the Template Name field.
4. Make any other desired changes to the new format.
5. Click Save Template As.
10.3.1.5 Editing formats
To edit a format:
1. Select the appropriate function.
Control Description Value Constraints Req.
Decimal Precision A value that indicates whether the format
is available to all users or only you.
Integer •None No
Label A label for the data attribute.
Note: If you do not enter a label, the
format uses the attribute’s name
instead.
Text •None No
Drilldown Target The format to display when a user drills
down on the data attribute.
Note: This drilldown target format
overrides the default drilldown
target format you selected in step
4b.
Format •None No

10 Configuring reports and worksheets
10.3 Configuring Cash Monitor and Cash Position report templates (and related data)
WebSuite System Administration Guide 407
If you previously selected one of the function’s existing report templates as a favorite, click
Return to List.
2. In the function’s report template list page, do one of the following:
–Drill down on the format from a report template that utilizes the format:
a. Click in the report template’s row.
b. Select Edit Format in the resulting menu.
–Drill down on the format from the configuration tab:
a. Click Configure a Report.
b. Select the format in the Report Format list.
c. Click Edit.
3. Edit the format.
4. Click Save Template.
10.3.1.6 Deleting formats
To delete a format:
1. Select the appropriate function.
If you previously selected one of the function’s existing report templates as a favorite, click
Return to List.
2. In the function’s report template list page, do one of the following:
–Drill down on the format from a report template that utilizes the format:
a. Click in the report template’s row.
b. Select Edit Format in the resulting menu.
–Drill down on the format from the configuration tab:
a. Click Configure a Report.
b. Select the format in the Report Format list.
c. Click Edit.
3. Click Delete.
4. In the resulting dialog, click Delete now.
10.3.2 Configuring Cash Monitor and Cash Position criteria sets
Criteria sets allow you to define the criteria of report templates. Specifically, you can define which
criteria display in the report templates and, of those, which can be modified by users and which
cannot. In addition, you can select default values for the criteria.
The following sections present procedures for creating, editing, and deleting criteria sets in the Cash
Monitor and Cash Position function. For procedures for creating, editing, and deleting criteria sets in
other flexible reporting framework functions, see 10.2.2 Configuring criteria sets on page 394.
10.3.2.1 Prerequisites
The following are prerequisites for configuring Cash Monitor criteria sets:
Category Tasks
10 Configuring reports and worksheets
10.3 Configuring Cash Monitor and Cash Position report templates (and related data)
408 © Wall Street Systems IPH AB - Confidential
10.3.2.2 Creating criteria sets
To create a criteria set:
1. Select the appropriate function.
If you previously selected one of the function’s existing report templates as a favorite, click
Return to List.
2. In the function’s report template list page, click Configure a Report.
3. Click New Criteria.
4. In the Template Name section, enter or select the appropriate values:
5. In the Primary Criteria and Secondary Criteria sections, do the following for each criterion:
a. Select the Displayed checkbox to display the criterion.
b. Select the Editable checkbox to allow users to edit the criterion.
The Editable checkbox only displays if you selected the Displayed checkbox in step 5a.
c. Enter or select a default value for the criterion.
If you type a word or phrase in a list control, the list automatically filters to display all
possible values that contain that word or phrase. For example, if you type Acme in an Entity
list, the following values display:
–Acme Canada
–Acme US
–Worldwide Acme IHB.
You can include wildcards (*) in your queries. For example, if you type Worldwide*IHB in an
Entity list, the following values display:
–Worldwide Acme IHB
–Worldwide SmithCo IHB.
6. Click Save Template.
Security Ensure you have access to the following functions:
• FG-0338 Cash Monitor
• FG-0338.01 Configure Cash Monitor
• FG-0397 Cash Position
• FG-0397.01 Configure Cash Position.
For more information, see Chapter 3 Managing security on page 95.
Control Description Value Constraints Req.
Accessibility A value that indicates
whether the criteria set is
available to all users or
you only.
One of the following:
•Installation if the
criteria set is available to
all users
•Personal if the criteria
set is available to you
only
•None No
Template Name An appropriate name for
the criteria set.
Text •Must be
unique
No

10 Configuring reports and worksheets
10.3 Configuring Cash Monitor and Cash Position report templates (and related data)
WebSuite System Administration Guide 409
10.3.2.3 Creating criteria sets based on existing criteria sets
To create a criteria set based on an existing criteria set:
1. Select the appropriate function.
If you previously selected one of the function’s existing report templates as a favorite, click
Return to List.
2. In the function’s report template list page, do one of the following:
–Drill down on the existing criteria set from a report template that utilizes the criteria set:
a. Click in the report template’s row.
b. Select Edit Criteria in the resulting menu.
–Drill down on the existing criteria set from the configuration tab:
a. Click Configure a Report.
b. Select the criteria in the Selection Criteria list.
c. Click Edit.
3. Enter the name of the new criteria set in the Template Name field.
4. Make any other desired changes to the new criteria set.
5. Click Save Template As.
10.3.2.4 Editing criteria sets
To edit a criteria set:
1. Select the appropriate function.
If you previously selected one of the function’s existing report templates as a favorite, click
Return to List.
2. In the function’s report template list page, do one of the following:
–Drill down on the criteria set from a report template that utilizes the criteria set:
a. Click in the report template’s row.
b. Select Edit Criteria in the resulting menu.
–Drill down on the criteria set from the configuration tab:
a. Click Configure a Report.
b. Select the criteria set in the Selection Criteria list.
c. Click Edit.
3. In the Template Name section, enter or select the appropriate values:
Control Description Value Constraints Req.
Accessibility A value that indicates
whether the criteria set is
available to all users or
you only.
One of the following:
•Installation if the
criteria set is available to
all users
•Personal if the criteria
set is available to you
only
•None No

10 Configuring reports and worksheets
10.3 Configuring Cash Monitor and Cash Position report templates (and related data)
410 © Wall Street Systems IPH AB - Confidential
4. In the Primary Criteria and Secondary Criteria sections do the following for each criterion:
a. Select the Displayed checkbox to display the criterion.
b. Select the Editable checkbox to allow users to edit the criterion.
The Editable checkbox only displays if you selected the Displayed checkbox in step 5a.
c. Enter or select a default value for the criterion.
If you type a word or phrase in a list control, the list automatically filters to display all
possible values that contain that word or phrase. For example, if you type Acme in the Entity
list, the following values display:
–Acme Canada
–Acme US
–Worldwide Acme IHB.
You can include wildcards (*) in your queries. For example, if you type Worldwide*IHB in the
Entity list, the following values display:
–Worldwide Acme IHB
–Worldwide SmithCo IHB.
5. Click Save Template.
10.3.2.5 Deleting criteria sets
To delete a criteria set:
1. Select the appropriate function.
If you previously selected one of the function’s existing report templates as a favorite, click
Return to List.
2. In the function’s report template list page, do one of the following:
–Drill down on the criteria set from a report template that utilizes the criteria set:
a. Click in the report template’s row.
b. Select Edit Criteria in the resulting menu.
–Drill down on the criteria set from the configuration tab:
a. Click Configure a Report.
b. Select the criteria set in the Selection Criteria list.
c. Click Edit.
3. Click Delete.
4. In the resulting dialog, click Delete now.
10.3.3 Configuring Cash Monitor and Cash Position report templates
A report template is, essentially, a pairing of a format and a criteria set.
In a flexible reporting framework function, you can pair a format to a criteria set regardless of
whether the format and criteria set are part of existing report templates or not. However, if you are
creating a report template at the installation level, you cannot assign personal-level formats and
criteria sets to it.
Template Name An appropriate name for
the criteria set.
Text •Must be
unique
No
10 Configuring reports and worksheets
10.3 Configuring Cash Monitor and Cash Position report templates (and related data)
WebSuite System Administration Guide 411
The following sections document the configuration of report templates for the Cash Monitor or Cash
Position function. For information on the configuration of report templates in other flexible reporting
framework functions, see 10.2.3 Configuring report templates on page 397.
10.3.3.1 Prerequisites
The following are prerequisites for configuring Cash Monitor or Cash Position criteria sets:
10.3.3.2 Creating report templates
To create a report template:
1. Select the appropriate function.
If you previously selected one of the function’s existing report templates as a favorite, click
Return to List.
2. In the function’s report template list page, click Configure a Report.
3. Create the report template:
Category Tasks
Security Ensure you have access to the following functions:
• FG-0338 Cash Monitor
• FG-0338.01 Configure Cash Monitor
• FG-0397 Cash Position
• FG-0397.01 Configure Cash Position.
For more information, see Chapter 3 Managing security on page 95.
Control Description Value Constraints Req.
Report Title An appropriate title for
the report template.
The title displays at the
top of any reports
generated from the
report template.
Text •None No
Report Name An appropriate name for
the report template.
Text •Must be
unique
No
Report Format The report template’s
format.
Format •None No
Selection Criteria The report template’s
criteria set.
Criteria set •None No
Accessibility A value that indicates
whether the report
template is available to
all users or you only.
One of the following:
•Installation if the
report template is
available to all users
•Personal if the report
template is available to
you only
•None No
10 Configuring reports and worksheets
10.3 Configuring Cash Monitor and Cash Position report templates (and related data)
412 © Wall Street Systems IPH AB - Confidential
4. Assign security by function profiles to the report template.
5. Click Save.
10.3.3.3 Creating report templates from existing report templates
To create a report template from an existing report template:
1. Select the appropriate function.
If you previously selected one of the function’s existing report templates as a favorite, click
Return to List.
2. In the function’s report template list page, do one of the following:
–Drill down on the existing report template using the menu:
a. Click in the report template’s row.
b. Select Edit in the resulting menu.
–Drill down on the existing report template using the toolbar:
a. Select the report template’s row.
b. Click .
3. Enter the name of the new report template in the Report Name field.
4. Assign security by function profiles to the report template.
5. Make any other desired changes to the report template.
6. Click Save.
10.3.3.4 Editing report templates
To edit a report template:
1. Select the appropriate function.
If you previously selected one of the function’s existing report templates as a favorite, click
Return to List.
2. In the function’s report template list page, do one of the following:
–Drill down on the report template using the menu:
a. Click in the report template’s row.
b. Select Edit in the resulting menu.
–Drill down on the report template using the toolbar:
a. Select the report template’s row.
b. Click ..
3. Edit the report template:
Control Description Value Constraints Req.
Report Title An appropriate title for
the report template.
The title displays at the
top of any reports
generated from the
report template.
Text •None No
10 Configuring reports and worksheets
10.4 Configuring report mappings
WebSuite System Administration Guide 413
4. Assign security by function profiles to the report template.
5. Click Save.
10.3.3.5 Deleting report templates
To delete a report template:
1. Select the appropriate function.
If you previously selected one of the function’s existing report templates as a favorite, click
Return to List.
2. In the function’s report template list page, do one of the following:
–Delete the report template using the menu:
a. Click in the report template’s row.
b. Select Delete in the resulting menu.
–Delete the report template using the toolbar:
a. Select the report template’s row.
b. Click .
3. In the resulting dialog, click Delete now.
10.4 Configuring report mappings
Using CMM’s Report Mapping function, you can configure report mappings. Report mappings allow
you to map instrument types to rows or columns in report templates. In report mappings,
instrument types are organized into groups, groups are organized into categories, and categories
are organized into relationships.
Report Name An appropriate name for
the report template.
Text •Must be
unique
No
Report Format The report template’s
format.
Format •None No
Selection Criteria The report template’s
criteria set.
Criteria set •None No
Accessibility A value that indicates
whether the report
template is available to
all users or you only.
One of the following:
•Installation if the
report template is
available to all users
•Personal if the report
template is available to
you only
•None No

10 Configuring reports and worksheets
10.4 Configuring report mappings
414 © Wall Street Systems IPH AB - Confidential
10.4.1 Configuring report mapping relationships
The following report mapping relationships are installed with CMM:
•CM-Mapping
•Forecast
•Forecast Cash Flow Corporate
•Forecast Cash Flows
•Operating
•US-Mapping.
Users that are liked to the AGR-ALL-CM-REPORT Access Profile can view and modify these report
mapping relationships.
The Forecast, Forecast Cash Flow Corporate, Forecast Cash Flows, and Operating report mapping
relationships are used by formats in several of the flexible reporting framework functions.
The CM-Mapping and US-Mapping report mapping relationships are used by formats in the Cash
Monitor, Cash Position, and forecasting functions. The US-Mapping report mapping relationship is
intended for organizations operating in the United States and includes report mapping categories for
floats and controlled disbursements. For more information, see the WebSuite User Guide.
You can create additional report mapping relationships using the Report Mapping function.
10.4.1.1 Prerequisites
The following are prerequisites for configuring report mapping relationships:
10.4.1.2 Creating report mapping relationships
To create a report mapping relationship:
1. Select Reporting - Configuration - Report Mapping.
2. In the Report Mapping - Criteria Selection page, enter the ID of the report mapping relationship
in the Relationship ID field.
3. Enter the name of the report mapping relationship in the Relationship Name field.
4. Click Save new mapping.
5. In the Report Mapping page, add categories, groups, and instrument type mappings to the
report mapping relationship.
Category Tasks
Security Ensure you have access to the following function:
• FG-0265 Report Mapping.
In addition, ensure security by function profiles are available.
For more information, see Chapter 3 Managing security on page 95.
10 Configuring reports and worksheets
10.4 Configuring report mappings
WebSuite System Administration Guide 415
For more information, see:
–10.4.2 Configuring report mapping categories on page 416
–10.4.3 Configuring report mapping groups on page 418
–10.4.5 Configuring instrument type mappings on page 421.
6. Click Edit Security.
7. In the Edit Security for Report Relationship page, assign security by function profiles to the
report mapping relationship:
–Security by function profiles with read access can view the report mapping relationship.
–Security by function profiles with modify access can both view and edit the report mapping
relationship.
If you assign a security by function profile modify access, it automatically has read access.
10.4.1.3 Editing report mapping relationships
To edit a report mapping relationship:
1. Select Reporting - Configuration - Report Mapping.
2. In the Report Mapping - Criteria Selection page, click Report Relationships.
3. In the Financial Cash Flow Forecasting - Report Relationships page, drill down on the report
mapping relationship.
4. In the Financial Cash Flow Forecasting - Edit Report Relationship page, edit the report mapping
relationship.
5. Click Save.
10.4.1.4 Editing report mapping relationships’ categories, groups, instrument type mappings,
and security
To edit a report mapping relationship’s categories, groups, instrument type mappings, and security:
1. Select Reporting - Configuration - Report Mapping.
2. In the Report Mapping - Criteria Selection page, select the report mapping relationship in the
Mapping list.
3. Click Search.
4. In the Report Mapping page, edit the report mapping relationship’s categories, groups, and
instrument type mappings.
For more information, see:
–10.4.2 Configuring report mapping categories on page 416
–10.4.3 Configuring report mapping groups on page 418
–10.4.5 Configuring instrument type mappings on page 421.
5. Click Edit Security.
6. In the Edit Security for Report Relationship page, assign security by function profiles to the
report mapping relationship.
–Security by function profiles with read access can view the report mapping relationship.
–Security by function profiles with modify access can both view and edit the report mapping
relationship.
If you assign a Security by function profile modify access, it automatically has read access.

10 Configuring reports and worksheets
10.4 Configuring report mappings
416 © Wall Street Systems IPH AB - Confidential
10.4.1.5 Deleting report mapping relationships
To delete a report mapping relationship:
1. Select Reporting - Configuration - Report Mapping.
2. In the Report Mapping - Criteria Selection page, click Report Relationships.
3. In the Financial Cash Flow Forecasting - Report Relationships page, select the
report mapping relationship’s Delete checkbox.
4. Click Delete Selected.
10.4.1.6 Copying report mapping relationships
To copy a report mapping relationship:
1. Select Reporting - Configuration - Report Mapping.
2. In the Report Mapping - Criteria Selection page, select the existing report mapping relationship
in the Mapping list.
3. Enter the ID of the new report mapping relationship in the Relationship ID field.
4. Enter the name of the new report mapping relationship in the Relationship Name field.
5. Do one of the following:
–To create the new report mapping relationship and link its categories and groups to the
original report mapping relationship’s categories and groups click Copy selected mapping.
Any changes you make to the original or new report mapping relationship’s existing
categories and groups are reflected in the other report mapping relationship’s categories and
groups. However, you can enter new categories and groups to either report mapping
relationship without impacting the other.
This functionality is useful when you want to create a base set of categories and groups and
utilize that base set across multiple report mapping relationships.
–To create the new report mapping relationship but not link its categories and groups to the
original report mapping relationship’s categories and groups, click
Copy selected mapping and its categories and groups.
Any changes you make to the original or new report mapping relationship’s existing
categories or groups are not reflected in the other report mapping relationship’s categories
and groups.
This functionality is useful when you want to create a base set of categories and groups,
utilize that base set across multiple report mappings, but then modify it in each report
mapping relationship without impacting the other report mapping relationships.
10.4.2 Configuring report mapping categories
Categories are the first level of organization in report mapping relationships.
10.4.2.1 Prerequisites
The following are prerequisites for configuring report mapping categories:
Category Tasks

10 Configuring reports and worksheets
10.4 Configuring report mappings
WebSuite System Administration Guide 417
10.4.2.2 Adding report mapping categories to relationships
To add a report mapping category to a relationship:
1. Create a new report mapping relationship or edit an existing one. For more information, see
10.4.1 Configuring report mapping relationships on page 414.
2. In the Report Mapping page:
–Add a new report mapping category to the relationship:
a. Click New Category.
b. In the Report Mapping Category Maintenance page, create the report mapping category.
c. Click Save.
–Add an existing report mapping category to the relationship:
a. Select the report mapping category in the New Category list.
b. Click Map Selected Category.
10.4.2.3 Removing report mapping categories from relationships
To remove a report mapping category from a relationship:
1. Edit an existing report mapping relationship. For more information, see 10.4.1 Configuring
report mapping relationships on page 414.
2. In the Report Mapping page, click the delete icon in the report mapping category’s row.
10.4.2.4 Changing the order of report mapping categories in relationships
To change the order of a report mapping category in a relationship:
1. Edit an existing report mapping relationship. For more information, see 10.4.1 Configuring
report mapping relationships on page 414.
2. In the Report Mapping page, click and in the report mapping relationship’s row to move it up
or down.
10.4.2.5 Editing report mapping categories
To edit a report mapping category:
1. Edit an existing report mapping relationship. For more information, see 10.4.1 Configuring
report mapping relationships on page 414.
2. In the Report Mapping page, drill down on the report mapping category.
3. In the Report Mapping Category Maintenance page, edit the report mapping category.
4. Click Edit Security.
5. In the Edit Security for Report Category page, assign security by function profiles to the report
mapping category.
Security Ensure you have access to the following function:
• FG-0265 Report Mapping.
In addition, ensure security by function profiles are available.
For more information, see Chapter 3 Managing security on page 95.
Reports and worksheets Ensure the following report and worksheet task has been completed:
• 10.4.1 Configuring report mapping relationships on page 414.

10 Configuring reports and worksheets
10.4 Configuring report mappings
418 © Wall Street Systems IPH AB - Confidential
10.4.2.6 Deleting report mapping categories
To delete a report mapping category:
1. Edit an existing report mapping relationship. For more information, see 10.4.1 Configuring
report mapping relationships on page 414.
2. In the Report Mapping page, drill down on the report mapping category.
3. In the Report Mapping Category Maintenance page, click Delete.
10.4.3 Configuring report mapping groups
Groups are the second level of organization in report mapping relationships.
10.4.3.1 Prerequisites
The following are prerequisites for configuring report mapping groups:
10.4.3.2 Adding report mapping groups to categories
To add a report mapping group to a category:
1. Edit an existing report mapping relationship. For more information, see 10.4.1 Configuring
report mapping relationships on page 414.
2. In the Report Mapping page:
–Add a new report mapping group to a category:
a. Click New Group for the appropriate report mapping category.
b. In the Financial Cash Flow Forecasting - Group Maintenance page, create the report
mapping group.
c. Click Save.
–Add an existing group to a category:
a. Select the group in the New Group list for the appropriate report mapping category.
b. Click Map Selected Group.
10.4.3.3 Removing report mapping groups from categories
To remove a report mapping group from a category:
1. Edit an existing report mapping relationship. For more information, see 10.4.1 Configuring
report mapping relationships on page 414.
2. In the Report Mapping page, click the delete icon in the report mapping group’s row.
Category Tasks
Security Ensure you have access to the following function:
• FG-0265 Report Mapping.
In addition, ensure security by function and security by counterparty profiles are
available.
For more information, see Chapter 3 Managing security on page 95.
Reports and
worksheets
Ensure the following report and worksheet tasks have been completed:
• 10.4.1 Configuring report mapping relationships on page 414
• 10.4.2 Configuring report mapping categories on page 416.

10 Configuring reports and worksheets
10.4 Configuring report mappings
WebSuite System Administration Guide 419
10.4.3.4 Changing the order of report mapping groups in categories
To change the order of a report mapping group in a category:
1. Edit an existing report mapping relationship. For more information, see 10.4.1 Configuring
report mapping relationships on page 414.
2. In the Report Mapping page, click and in the report mapping group’s row to move it up or
down.
10.4.3.5 Editing report mapping groups
To edit a report mapping group:
1. Edit an existing report mapping relationship. For more information, see 10.4.1 Configuring
report mapping relationships on page 414.
2. In the Report Mapping page, drill down on the report mapping group.
3. In the Financial Cash Flow Forecasting - Group Maintenance page, edit the report mapping
group.
4. Click Edit Security.
5. In the Edit Security for Report Group page, assign security by function profiles to the report
mapping group.
6. Click Return.
7. In the Financial Cash Flow Forecasting - Group Maintenance page, click Edit Assigned
Counterparty Profiles.
8. In the Assign Counterparty Profiles page, assign security by counterparty profiles to the report
mapping group.
These security by counterparty assignments are only applicable to the entering and editing of
forecasts. CMM includes them as a means to filter the number of counterparties available in
these functions. They are not meant to replace general security by counterparty or security by
counterparty by function.
9. Click Save.
10.4.3.6 Deleting report mapping groups
To delete a report mapping group:
1. Edit an existing report mapping relationship. For more information, see 10.4.1 Configuring
report mapping relationships on page 414.
2. In the Report Mapping page, drill down on the report mapping group.
3. In the Financial Cash Flow Forecasting - Group Maintenance page, click Delete.
10.4.4 Configuring report mapping group versioning
In the Report Mapping function, a user can create a report mapping category with multiple groups.
If the groups’ usage policies are set to Display but only Include Latest Version in Balances,
you must define the groups’ order of precedence in the report_group_version_control.xml file.
Any reports utilizing the category’s report mapping relationship will only display the must current
version (in other words, group).
In the report_group_version_control.xml file, categories are represented by ladders, and groups
are represented by rungs. The higher the rung (in other words, the greater its value), the more
current its version/group.
This functionality has several possible applications, including displaying of controlled disbursements
in cash positions for entities operating in the United States. For more information on this particular
example, see the WebSuite User Guide.
10 Configuring reports and worksheets
10.4 Configuring report mappings
420 © Wall Street Systems IPH AB - Confidential
10.4.4.1 Prerequisites
The following are prerequisites for configuring report mapping group versioning:
10.4.4.2 Creating ladders
To create a ladder:
1. Open the following configuration file:
[Standard configuration file path]
cash_forecast
report_mapping
report_group_version_control.xml
For instructions on opening configuration files, see 1.2 Opening configuration files on page 25.
2. Add a ladder child element to the version_control_ladders element. The following is an
example:
º
<version_control_ladder>
…
<ladder report_category_label="Disbursements">
<rung version_level="3" report_group_label="Final Disbursements"/>
<rung version_level="2" report_group_label="Intermediate Disbursements"/>
<rung version_level="1" report_group_label="Initial Disbursements"/>
</ladder>
…
</version_control_ladder>
The value in the report_category_label attribute must be identical to the label of the related
report mapping category in the Report Mapping function.
Similarly, the value in the report_group_label attribute must be identical to the label of the
related report mapping group in the Report Mapping function.
The greater the value of the version_level attribute, the more current its version/group.
3. Save and close the file.
10.4.4.3 Editing ladders
To edit a ladder.
1. Open the following configuration file:
[Standard configuration file path]
Category Tasks
Security Ensure you have access to the following function:
• FG-0400 Review CMM Configuration.
For more information, see Chapter 3 Managing security on page 95.
Reports and
worksheets
Ensure the following report and worksheet tasks have been completed:
• 10.4.1 Configuring report mapping relationships on page 414
• 10.4.2 Configuring report mapping categories on page 416
• 10.4.3 Configuring report mapping groups on page 418.
10 Configuring reports and worksheets
10.4 Configuring report mappings
WebSuite System Administration Guide 421
cash_forecast
report_mapping
report_group_version_control.xml
For instructions on opening configuration files, see 1.2 Opening configuration files on page 25.
2. Edit the ladder’s ladder element.
3. Save and close the file.
10.4.4.4 Deleting ladders
To delete a ladder.
1. Open the following configuration file:
[Standard configuration file path]
cash_forecast
report_mapping
report_group_version_control.xml
For instructions on opening configuration files, see 1.2 Opening configuration files on page 25.
2. Delete the ladder’s ladder element.
Only delete a ladder if its report mapping category no longer exists.
3. Save and close the file.
10.4.5 Configuring instrument type mappings
After you have created report mappings, categories, and groups, you can map instrument types to
them.
10.4.5.1 Prerequisites
The following are prerequisites for configuring instrument type mappings:
Category Tasks
Static data Ensure the following static data are available:
• Instrument types.
For more information, see the WebSuite User Guide.
Security Ensure you have access to the following function:
• FG-0265 Report Mapping.
For more information, see Chapter 3 Managing security on page 95.
Reports and worksheets Ensure the following report and worksheet tasks have been completed:
• 10.4.1 Configuring report mapping relationships on page 414
• 10.4.2 Configuring report mapping categories on page 416
• 10.4.3 Configuring report mapping groups on page 418.

10 Configuring reports and worksheets
10.5 Configuring report media
422 © Wall Street Systems IPH AB - Confidential
10.4.5.2 Creating instrument type mappings
To create an instrument type mapping:
1. Edit an existing report mapping relationship. For more information, see 10.4.1 Configuring
report mapping relationships on page 414.
2. In the Report Mapping page, click New Mapping for the appropriate report mapping group.
3. Create the instrument type mapping in the resulting row of controls.
4. Click Save Detail.
10.4.5.3 Editing instrument type mappings
To edit an instrument type mapping:
1. Edit an existing report mapping relationship. For more information, see 10.4.1 Configuring
report mapping relationships on page 414.
2. In the Report Mapping page, click Edit detail in the instrument type mapping’s row.
3. Edit the instrument type mapping in the resulting row of controls.
4. Click Save Detail.
10.4.5.4 Deleting instrument type mappings
To delete an instrument type mapping:
1. Edit an existing report mapping relationship. For more information, see 10.4.1 Configuring
report mapping relationships on page 414.
2. In the Report Mapping page, click the delete icon in the instrument type mapping’s row.
10.5 Configuring report media
Most reports allow you to view data in different media, including HTML, Adobe PDF, and Microsoft
Excel.
The report_preferences.xml file allows you to define whether reports open in the same browser
window as WebSuite or in a different window for each medium.
10.5.1 Prerequisites
The following are prerequisites for configuring report media:
10.5.2 Configuring report media
To configure report media:
1. Open the following configuration file:
Category Tasks
Security Ensure you have access to the following function:
• FG-0400 Review CMM Configuration.
For more information, see Chapter 3 Managing security on page 95.
10 Configuring reports and worksheets
10.6 Configuring time bucket sets
WebSuite System Administration Guide 423
[Standard configuration file path]
report
report_preferences.xml
For instructions on opening configuration files, see 1.2 Opening configuration files on page 25.
2. For each medium’s dispatch element, do one of the following:
–To display reports in the same browser window as WebSuite, set the dispatch_type param
child element’s value attribute to current_window and remove the window_name param child
element (if it exists). The following is an example:
…
<dispatch implementation="_html_media">
<param name="dispatch_type" value="current_window"/>
</dispatch>
º
–To display reports in a different browser window than WebSuite, set the dispatch_type
param child element’s value attribute to new_window and add the window_name param child
element (if it does not exist). The following is an example:
º
<dispatch implementation="_pdf_media">
<param name="dispatch_type" value="new_window"/>
<param name="window_name" value="report"/>
</dispatch>
º
3. Save and close the file.
10.6 Configuring time bucket sets
CMM reports usually display data on a daily basis. However, you may want to display data on a
weekly, monthly, or yearly basis—particularly when working with medium- to long-term activity.
Time bucket sets allow you to define such time intervals.
Time bucket sets are available as criteria in the following flexible report framework functions:
•Cash management reporting
–Cash Position
•Forecast activity
–Forecast Reports
You can manage time bucket sets for these functions in the Time Bucket Sets function. Six time
bucket sets are installed with CMM in this function.
Time bucket Definition
Daily – 2 Weeks Then Monthly Displays transactions on a daily basis for two weeks then monthly thereafter.
Monthly – 6 Months Displays transactions on a monthly basis for six months.
Monthly – 12 Months Displays transactions on a monthly basis for 12 months.

10 Configuring reports and worksheets
10.6 Configuring time bucket sets
424 © Wall Street Systems IPH AB - Confidential
You can edit or delete these time bucket sets (if you have security access to FG-0392.01 Configure
Maintain Time Bucket Sets) or create new ones.
10.6.1 Prerequisites
The following are prerequisites for configuring time bucket sets:
10.6.2 Creating time bucket sets
To create a time bucket set:
1. Select Reporting - Configuration - Time Bucket Sets.
2. In the Time Bucket Set Maintenance page, click New.
3. In the Time Bucket Definition page, create the time bucket set.
4. Do the following:
–To add a time bucket to the set:
a. Click Add Bucket Definition.
b. In the resulting row of controls, create the time bucket.
–To remove a time bucket from the set, click Delete Time Buckets in its row.
5. Click Save.
Monthly – 24 Months Displays transactions on a monthly basis for 24 months.
ST Planning Horizon Displays transactions according to your organization’s short-term planning
horizon.
MLT Planning horizon Displays transactions according to your organization’s medium- to long-term
planning horizon.
Category Tasks
Security Ensure you have access to the following functions:
• FG-0392 Maintain Time Bucket Sets
• FG-0392.01 Configure Maintain Time Bucket Sets.
For more information, see Chapter 3 Managing security on page 95.
10 Configuring reports and worksheets
10.6 Configuring time bucket sets
WebSuite System Administration Guide 425
10.6.3 Editing time bucket sets
To edit a time bucket set:
1. Select Reporting - Configuration - Time Bucket Sets .
2. In the Time Bucket Set Maintenance page, drill down on the time bucket set.
3. In the Time Bucket Definition page, create the time bucket set.
4. Do the following:
–To add a time bucket to the set:
a. Click Add Bucket Definition.
b. In the resulting row of controls, create the time bucket.
–To remove a time bucket from the set, click Delete Time Buckets in its row.
5. Click Save.
10.6.4 Deleting time bucket sets
To delete a time bucket set:
1. Select Reporting - Configuration - Time Bucket Sets.
2. In the Time Bucket Set Maintenance page, drill down on the time bucket set.
3. In the Time Bucket Definition page, click Delete.
4. In the resulting dialog, click OK.
10.6.5 Copying time bucket sets
To copy a time bucket set:
1. Select Reporting - Configuration - Time Bucket Sets
2. In the Time Bucket Set Maintenance page, drill down on the time bucket set.
3. In the Time Bucket Definition page, click Copy.
4. Enter the name of the new time bucket set in the Time Bucket Set Label field.
5. Make any other appropriate changes to the new time bucket set.
6. Click Save.
10.6.6 Testing time bucket sets
To test a time bucket set:
1. Select Reporting - Configuration - Time Bucket Sets.
2. In the Time Bucket Set Maintenance page, drill down on the time bucket set.
3. In the Time Bucket Definition page, enter an appropriate date in the Starting on field.
4. Click Try It.

10 Configuring reports and worksheets
10.6 Configuring time bucket sets
426 © Wall Street Systems IPH AB - Confidential
10.6.7 Using time bucket sets
After you have created and tested time bucket sets, you can use them in the criteria of flexible
reports and worksheets in conjunction with the Report From and To fields:
•CMM always uses the value in the Report From field as the first date of the worksheet.
•If you do not enter a value in the To field, CMM determines the last date of the worksheet based
on the selected time bucket set.
•If you do enter a value in the To field, CMM determines the last date of the report as follows:
–If the To field’s date is before the selected time bucket’s last date, CMM uses the To field’s
date as the last date of the report.
–If the To field’s date is after the selected time bucket’s last date, CMM uses the selected time
bucket’s last date as the last date of the report.
Note: CMM uses the time bucket’s starting date for forward rate foreign exchange conversion of
cross-currency amounts to a reporting currency.
WebSuite System Administration Guide 427
Chapter 11 Configuring data sources
This chapter documents the configuration of data sources for WebSuite.
11.1 Configuring presentation
Data sources allow you to list and select the valid value(s) for a model field in list boxes or
drop-down boxes.
While the current value of a field is contained in the model, the list of valid values may come from
several places.
The list box usually displays for each item a value but may also display other information such as a
label. So a data source is a list of rows with a column which represent the value.
11.2 Configuring call chains
Let’s review the data source call chain from the display up to the data source generation.
In the HTML, a selector-like control is about to display a list of values: either the list of values are
directly defined in the HTML or the selector looks in the control context chain for the name of the
data source; its value is the requested data source.
The selector does not trigger the data source calculation itself. Data sources are requested by
another control: the view or selectable data. The selectable data is deprecated and is only used in
the admin, so this guide does not specify its usage.
The view dialog triggers data sources through events scripted in JavaScript. The script can directly
provide hard-coded data sources or send a data sources request to the backend. For transactions,
the required data sources can be calculated using a generic field name to data source binding
configuration (since version 7.1.3.3).
Most of the backend data sources are accessed through data sources bundles. And most of them are
accessed through the data source gateway bundle. There are other backend data sources providers:
the treasury monitor bundle and view actions such as the transaction view action (since version
7.1.2.2).
The data source gateway bundle provides access to several backend bundles, a caching mechanism
and a block-on access-only mechanism.
Backend bundles are either coded in Java or in a script using XML for declaration and SQL for
implementation. Custom data sources can be written in both languages. Use the script for simple
tasks and the Java for the complex ones.
11 Configuring data sources
11.3 Configuring component details
428 © Wall Street Systems IPH AB - Confidential
11.3 Configuring component details
This section documents the configuration of component details.
11.3.1 Configuring the selector control
The c.data attribute gives the reference to the data source to display. Possible values for c.data
are:
•The constant name of the data source
•Since version 7.1.2.2, model: for a dynamic naming
The model attribute dataSourceName (changed in version 7.1.3.3) contains the data source
name.
• Since version 7.1.3.3, model: for a dynamic reference.
The model attribute dataSource contains either the data source name or directly the data
source.
The c.format attribute specifies the columns to display. Columns are formatted as string, so the
format is a string template using the syntax {my_column} to insert a column. Commonly used
formats are {value} and {value} – {label}.
For an inline data source, just set the values in the HTML. The model type is restricted to string,
boolean, or number.
The following is an example boolean data source (see also the template style
java.lang.Boolean.default.html):
<span c.type="selector">
<label for="a">Yes</label> <input type="radio" value="true" id="a">
<label for="b">No</label> <input type="radio" value="false" id="b">
</span>
11.3.2 Configuring views (services and dialogs)
Each time data sources are required by a view dialog (during page events submit and paint) a view
event is triggered.
In the view dialog displaying objects, the view event setup_datasources is triggered. In the view
dialog displaying lists, the view event setup_list_datasources is triggered. An additional event
can also be triggered for each item in the list. This event is specified in the HTML page with c.event,
usually equal to setup_datasources.
Common set of data sources are defined inside script methods, so their definition can be shared in
several views. In this case, they are defined in a JavaScript file.
For example:
<transaction_default…>
º
<events>
<setup_datasources>
<script>
datasources_view();
datasources_transaction_common();
datasources_transaction_model();
datasources_check_tradehours();
</script>
</setup_datasources>
º
11 Configuring data sources
11.3 Configuring component details
WebSuite System Administration Guide 429
Remember to use the view inheritance to call the parent data sources if you just want to add some
custom ones.
For example:
<simple_search_query inherit="board_query">
º
<events>
<setup_datasources>
<script>
parentView.setup_datasources();
datasources_search();
</script>
</setup_datasources>
º
To access a data source through the data source gateway bundle and make it available for a
selector, use the following syntax:
function datasource_currency_id() {
return bundles.ekit_bundle.currency_id_list(_userID, deal_page);
}
º
currency_id_list = datasource_currency_id();
Data sources can also be defined inline. In this case, try to make them constant and not to
reevaluate them each time.
For example:
function datasources_cashflow_common() {
var data = java.lang.reflect.Array.newInstance(java.lang.Object, 10);
data[0] = ’Fee’;
data[1] = ’Fee’;
data[2] = ’Interest’;
data[3] = ’Interest’;
data[4] = ’Principal’;
data[5] = ’Amortization’;
data[6] = ’Profit/Loss’;
data[7] = ’Profit/Loss’;
data[8] = ’Tax’;
data[9] = ’Tax’;
cashflow_type_list = new KeyIsValue(data, DataSources.FIELDS_VALUE_LABEL);
}
For example (since version 7.1.2.2):

11 Configuring data sources
11.3 Configuring component details
430 © Wall Street Systems IPH AB - Confidential
var datasource_cashflow_type = createConstFunction(function() {
var data = [
’Fee’,
’Fee’,
’Interest’,
’Interest’,
’Principal’,
’Amortization’,
’Profit/Loss’,
’Profit/Loss’,
’Tax’,
’Tax’,
];
return new KeyIsValue(objectArray(data), DataSources.FIELDS_VALUE_LABEL);
});
function datasources_cashflow_common() {
cashflow_type_list = datasource_cashflow_type();
}
Fields that should be used to display the data source are listed or, for common case, defined using
constants such as DataSources.FIELDS_VALUE_LABEL.
Some useful symbols defined in JavaScript:
11.3.3 Configuring data source bindings
For transactions, data sources required in a view can be calculated using the field names defined in
this view. A binding mechanism allows mapping a field name to a script function that returns the
data source used to display this field. The binding definition for each transaction field and each
sub¬entity field is placed in a separate script file. This definition is processed by the default
transaction data sources (datasources_transaction_common and
Symbol Description
KeyIsValue
Create a data source from an array. Columns are interlaced in
the array.
DataSources.FIELDS_VALUE_LABEL
Equals to {"value", "label"}.
Defines the two columns value and label. Use this constant in
conjunction with display format {value} – {label} or {la-
bel}.
DataSources.FIELDS_VALUE
Equals to {"value"},
Define the single column value.
Since version 7.1.2.2
objectArray
Create an object array.
Used to convert a JavaScript array to a Java array.
createConstFunction
Create a no arguments function that returns a constant.
The value of the constant equals the evaluation of the no argu-
ments function passed as parameter. This constant is evaluated
when this method is called then cached. Use this method to cre-
ate an accessor to a constant.
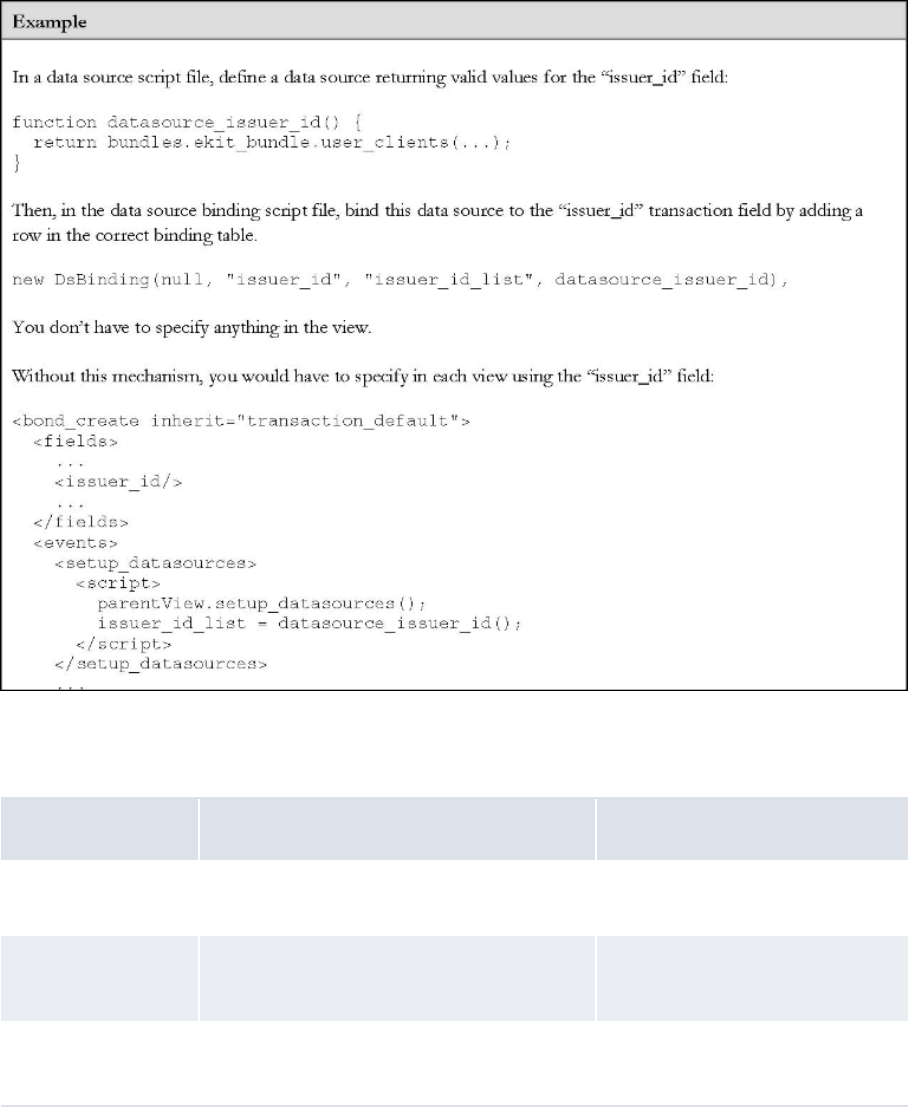
11 Configuring data sources
11.3 Configuring component details
WebSuite System Administration Guide 431
datasources_transaction_model) called by the root transaction view. Thus, you don’t have to
specify in each view the data sources you are using for each field. This is especially useful for the
fields which are not common fields.
Each model field has also its data source name attribute defined during the process, so you can
define the style of the field to a generic HTML template using a dynamic data source name (where
c.data attribute is set to model:).
To create a new row defining a data source binding, use the following syntax:
DsBinding(entityName, fieldName, dsName, dsFunction)
Parameter Description Examples
entityName The model entity name, or null for the main
entity (the transaction entity)
null "Schedule"
fieldName The entity model field name "calendar_id"
"method_id"
dsName The data source name (the one used in the
HTML)
"calendar_id_list"
"Schedule_method_id_list"
11 Configuring data sources
11.3 Configuring component details
432 © Wall Street Systems IPH AB - Confidential
For example:
new DsBinding(null, "calendar_id", "calendar_id_list", datasource_calendar_id),
new DsBinding("Schedule", "method_id", "Schedule_method_id_list",
datasource_Schedule_method_id),
Then you must determine in which data source group (table) you insert the new row. It depends on
the nature of the data source:
11.3.4 Configuring the data source gateway bundle
The data source gateway bundle is accessed in scripts using the syntax:
currency_id_list = bundles.ekit_bundle.currency_id_list(_userID, deal_page);
Where bundles.ekit_bundle is the bundle, currency_id_list is the data source name, (_userID,
deal_page) is the data source parameters and the returned result is the data source.
The call to a data source is not blocking and returns immediately. The returned data source is in fact
a proxy that blocks waiting for the result only if the data source rows are accessed. Thus, if a data
source is preloaded but never used, the page display won’t wait for it.
Data sources may be cached. The data source descriptor tells the bundle whether the data source
can be cached or not. The cache key is composed of all the data source parameters.
11.3.5 Configuring scripted data sources
The scripted data sources are available through the core data sources remote gateway. In the
registry, they are mainly defined in script.core.xml. The script language is XML for the declaration
part and it embeds SQL for the implementation.
In the SQL part, you can either call a store procedure or write a select statement.
For example:
<datasource name="mode_states">
<parameters>
<mode_id null="exit" />
</parameters>
<database>fk_shared</database>
<cacheable>true</cacheable>
<columns>
dsFunction The data source function to call to generate
the data source object
datasource_calendar_id
datasource_Schedule_method_i
d
Data source group name Description
TRANSACTION_COMMON_ADMIN_DS_BIN
DINGS
The data sources filtered by the admin rules and common to each
row in a transaction list (those that don’t depend on the model).
TRANSACTION_MODEL_ADMIN_DS_BIND
INGS
The data sources filtered by the admin rules that depend on the
transaction model fields.
TRANSACTION_COMMON_DS_BINDINGS The data sources common to each row in a transaction list (those
that don’t depend on the model).
TRANSACTION_MODEL_DS_BINDINGS The data sources that depend on the transaction model fields.

11 Configuring data sources
11.3 Configuring component details
WebSuite System Administration Guide 433
<state_id role="value" sort="true" />
</columns>
<script type="sql_call" src="SearchMode" />
</datasource>
For example:
<datasource name="portfolio_owner">
<parameters>
<portfolio_name type="varchar" null="exit" />
</parameters>
<database>ekit</database>
<cacheable>true</cacheable>
<columns>
<client_name role="value" />
<client_description role="label" />
</columns>
<script type="sql">
<src>
SELECT c.client_name, c.client_description
FROM EKITClients c, EKITPortfolios p
WHERE c.client_name = p.client_name
AND
p.portfolio_name =
?
ORDER BY
c.client_name
</src>
</script>
</datasource>
Use the following syntax to create a scriptable data source:
Element Example
datasource name name="STRING" name="my_datasource"
paramaters <parameters> <NAME:STRING
type="STRING" null="ENUM{allow, exit,
error}"/> <NAME:STRING value="OBJECT"/>
</parameters>
<parameters> <user type="varchar"
null="error"/> <domain type="varchar"
null="exit"/> </parameters> <parameters>
<interface_id value=" IDL:.Date_Basis:1.0"
/> </parameters>
cacheable <cacheable>BOOLEAN</cacheable> <cacheable>true</cacheable>
database <database>STRING</database>
Database in {fk_shared, fk_user, ekit}:
•fk_shared: To access fk store procedures when
the result is cached and shared by all users
•fk_user: To access fk store procedures when the
result is user dependent.
(The user must appear in the parameter list if the
data source is cacheable.)
•ekit: To access WebSuite table.
<database>ekit</database>

11 Configuring data sources
11.3 Configuring component details
434 © Wall Street Systems IPH AB - Confidential
11.3.6 Configuring view actions
View actions are similar to scenario actions (they share the same engine). Actions are java bean
methods invoked through JavaScript. So, actions can also return data sources.
The transaction view action loadTransactionDefaults is used to load the transaction defaults
(including its sub-entities) and some of its associated data sources. Each loaded data source name is
stored in the corresponding transaction model field attribute. So, in the html template, use the
syntax c.data="model:" to retrieve the data source name dynamically.
For example:
columns <columns> <NAME:STRING
role="STRING" sort="BOOLEAN"/> </columns>
The returned columns. Sorting is used for store
procedures and applies to one column only.
<columns> <client_name role="value"/>
<client_description role="label"/>
</columns>
script <script type="ENUM{sql,
sql_call}"> ... </script>
Starting blanks are expected to be removed by the
registry.
See script types below for examples.
<script type="sql_call" src="TEXT"/>
Calls the store procedure.
<script type="sql_call"
src="SearchClientAccount"/>
<script type="sql">
<src>TEXT</src>
</script>
<script type="sql">
<criteria param="TEXT" />
<src trigger="TEXT">TEXT</src>
</script>
Execute the SQL select statement.
<script type="sql">
<src>
select c.name, c.description from clients c
</src>
</script>
<script type="sql">
<criteria param="market_id" />
<src trigger="FX">
select i.name from fx_instrument
</src>
<src trigger="MM">
select i.name from instrument
</src>
</script>
11 Configuring data sources
11.4 Samples
WebSuite System Administration Guide 435
<events>
<setup_datasources>
<script>
º
trViewAction.loadTransactionDefaults(currentView, model,
[
’facility_id’,
’tranche_id’,
’instrument_id’,
’transaction_template_id’,
’portfolio_id’,
’location_id’,
’cp_client_id’,
’currency_id’,
]);
</script>
</setup_datasources>
º
</events>
<fields>
º
<facility_id style="facility" />
<tranche_id style="tranche" />
<instrument_id style="commonList" />
<transaction_template_id style="commonList" />
<portfolio_id style="commonList" />
<location_id style="commonList" />
<cp_client_id style="commonList" />
<currency_id style="commonList" />
</fields>
11.4 Samples
The following are samples for data source configuration.
11.4.1 Words of wisdom about customization
WebSuite has something similar to the site directory of TRM. WebSuite reads the configuration files
in order from the following directories:
•[WebSuite home]\conf
•[WebSuite home]\support\conf (if defined)
•[WebSuite home]\common\conf
•[WebSuite home]\integration\conf (only for the integrated module setup)
•[WebSuite home]\builtin\conf.
On Unix, these directories are also available as soft links in:
11 Configuring data sources
11.4 Samples
436 © Wall Street Systems IPH AB - Confidential
[WebSuite home]\
All directories exist from the beginning but the first two are empty except for the top directory
structure. Copy all files from the directory [WebSuite home]\builtin\conf or [WebSuite
home]\integration\conf (only for the integrated module setup) that are modified after
installation. In other words, the directory [WebSuite home]\builtin\conf or [WebSuite
home]\integration\conf (only for the integrated module setup) should contain the original
distribution version of the file, and the directories [WebSuite home]\conf or [WebSuite
home]\support\conf (if defined) or [WebSuite home]\common\conf, the modified copy.
We define hereafter some directories references we will use later on.
•[WebSuite WAR home]=[WebSuite
home]\..\..\..\envs\[Environment]\etc\wss-web\websuite
•[WebSuite service directory]=[WebSuite home]\common\conf\ registry\rtd\services
•[WebSuite site directory]=[WebSuite WAR home]\style\custom.
11.4.2 Creating a scripted data source
In this sample, we will create a data source for a report input page.
The report we will be customizing is a custody balance report.
Edit or create the report view in the file:
[WebSuite service directory]/view/report/report_custody_balance.xml
On the field, add a new style and fill the dependency list with the fields to pass as the data source
parameters:
<fields>
<client_id…/>
<custody_id style="custody" dependsOn="client_id" />
º
</fields>
Create a data source setup block or edit the current one. Create the call to the new data source and
pass it some model fields as parameters. Affect the result to the data source name to use in the
HTML selector control:
<events>
<setup_datasources>
<script>
parentView.setup_datasources();
custody_id_list = bundles.ekit_bundle.custody_id_list(model.client_id);
</script>
</setup_datasources>
º
<events>
Edit the scriptable data source file or create a new one for all your custom data sources:
[WebSuite services directory]/datasource/script.core.xml
Define the data source as follow. This data source is based on a store procedure call. The
parameters received are directly passed to the store procedure. The returned row contains only one
column, sorted by the engine, and bound to the mandatory value role:
<datasource name="custody_id_list">
<parameters>
<client_id null="exit" />
</parameters>
<database>fk_shared</database>
<cacheable>true</cacheable>
<columns>
<custody_id role="value" sort="true" />
11 Configuring data sources
11.4 Samples
WebSuite System Administration Guide 437
</columns>
<script type="sql_call" src="SearchCustody" />
</datasource>
Create a new HTML template file. The file name is based on the field type and style:
[WebSuite site directory]/transaction/form/java.lang.String.custody.html
Create the HTML template. In the selector control, define the data source name to use and the
display format. The format can use any of the roles defined in the data source returned rows. In this
case, we only display the value role:
<c.control c.type="errorfield">
<select c.type="selector" c.data="custody_id_list" c.format="{value}"
c.noselectdata="No custodian available" c.prompt="--Please select a custodian
--" >
</select>
</c.control>
You are done.
11 Configuring data sources
11.4 Samples
438 © Wall Street Systems IPH AB - Confidential

WebSuite System Administration Guide 439
Chapter 12 Monitoring user activity
You may need to monitor user activity in Wallstreet Suite for the following reasons:
•To ensure users are capturing and maintaining data in Wallstreet Suite appropriately
•To incorporate Wallstreet Suite into your organization’s auditing processes
•To conform to local laws and regulations such as the Sarbanes-Oxley Act in the United States.
This chapter documents the tools at your disposal to monitor activity in CMM. For information on
monitoring activity in other modules, see the TRM System Administration Guide.
12.1 Understanding monitoring
As noted at the beginning of this chapter, CMM includes a set of tools that allow you to monitor user
activity.
This section introduces the monitoring tools in CMM and explains how to select the appropriate tools
and user activities to monitor for your organization’s needs.
12.1.1 Selecting monitoring tools
CMM includes the following monitoring tools:
Tool Description Recommendation
Authorization For a select set of activities (referred to as
authorization request types in CMM), you can define a
required number of authorizations. If a user attempts
to complete an activity linked to an authorization
request type requiring one or more authorizations, a
message displays that states that one or more other
users most authorize the activity before it is committed
to the database. Users with access to the appropriate
authorization request type can then authorize the
activity in the Pending Authorizations function.
For more information on authorization, see 12.2
Authorizing user activity on page 450.
Use this monitoring tool if you
need to set up a four-eye security
structure in CMM, where one user
completes an activity and one or
more other users must authorize
the activity before it is committed
to the database.
Authorization offers the most
control of the monitoring tools as
no activity linked to an
authorization request type
requiring one or more
authorizations can be committed
to the database before it is
reviewed and approved by at least
one other user.

12 Monitoring user activity
12.1 Understanding monitoring
440 © Wall Street Systems IPH AB - Confidential
While these monitoring tools are presented separately, you can use them together in an integrated
monitoring solution. The following is an example:
When your organization first implements CMM, it creates a set of bank accounts. All activity in
CMM is processed through these bank accounts; therefore, it is important that their data in the
module be correct. You can set the required number of authorizations for the creating, editing,
and deleting of bank accounts to 1 to ensure each bank account is approved by an assigned user
before being committed to the database. The assigned users can subscribe to the appropriate
events so that they are notified when a bank account is created, edited, or deleted and can
authorize the changes immediately. Finally, you can record the creating, editing, and deleting of
bank accounts in a custom audit report for later analysis as part of an overall audit of the
CMM implementation.
12.1.2 Selecting user activities
After selecting one or more monitoring tools, you must decide which user activities you want to
monitor. Monitoring all activities is not usually necessary and, in the case of auditing, can cause
problems with module performance. Therefore, Wallstreet recommends that you only monitor
activity relevant to the functionality you are using in CMM and that you must control for internal
corporate standards or local laws and regulations.
The following table presents the authorization request types, audit events, and event subscriptions
available in CMM organized by user activity:
Auditing You can create custom audit reports that allow you to
monitor selected activities (or "events") and object
attributes that are created or modified as part of those
activities. For example, you can create a custom report
that allows you to monitor the entry, editing, and
deleting of static data in CMM for a select set of
attributes.
For more information on auditing, see 12.3 Auditing
user activity on page 452.
Use this monitoring tool if you
need to maintain a detailed audit
trail of user activity in CMM for
compliance to internal corporate
standards or local laws and
regulations.
While auditing does not provide
the control of the authorization
monitoring tool, it does allow you
to record and analyze user activity
at a detailed level.
Event
subscriptions
Each CMM user can subscribe to activities (or "events")
of interest. When one of these activities is initiated, the
user receives notification through an e-mail or browser
popup.
For more information on event subscriptions, see 12.4
Subscribing to events on page 455.
Use this monitoring tool if you
need immediate notification of an
activity. For example, if you are
responsible for security in CMM
and subscribe to the User
Re-authentication Failed event,
you receive notification whenever
a user unsuccessfully attempts to
reauthenticate his or her identity.
You can then investigate the
activity without delay.
Like auditing, event subscriptions
do not provide the control of the
authorization monitoring tool.
However, they do allow you to
monitor user activity as it occurs.
User activity Monitoring tool components
Logging in and out

12 Monitoring user activity
12.1 Understanding monitoring
WebSuite System Administration Guide 441
Logging in and out Event subscriptions:
• User Logged In
• User Logged Out
• User Account Locked
Reauthenticating identity Audit events:
• Re-Authentication: Successful
• Re-Authentication: Failed
Event subscriptions:
• User Re-authentication Successful
• User Re-authentication Failed
Configuration parameters
Setting configuration parameters Authorization request types:
• Modification of Configuration Parameter
• Modification of In-House Bank Configuration
Static data
Managing entities Authorization request types:
• Addition of New Entity
• Modification of Existing Entity
• Deletion of Existing Entity
Audit events:
•Party:Insert
• Party: Update
• Party: Delete
Event subscriptions:
• Entity Added
•Entity Updated
•Entity Deleted
• Entity Import Started
• Entity Import Succeeded
• Entity Import Errors
• Entity Import Failed
Managing in-house banks Authorization request types:
• Addition of New IHB Party
• Modification of Existing IHB Party
• Deletion of Existing IHB Party
Audit events:
•Party:Insert
• Party: Update
• Party: Delete

12 Monitoring user activity
12.1 Understanding monitoring
442 © Wall Street Systems IPH AB - Confidential
Managing counterparties Authorization request types:
• Addition of New Counterparty
• Modification of Existing Counterparty
• Deletion of Existing Counterparty
Audit events:
•Party:Insert
• Party: Update
• Party: Delete
Event subscriptions:
• Counterparty Added
• Counterparty Updated
• Counterparty Deleted
Managing entity bank accounts Authorization request types:
• Addition of New Entity Bank Account
• Modification of Existing Entity Bank Account
• Deletion of Existing Entity Bank Account
Audit events:
• Bank Account: Insert
• Bank Account: Update
• Bank Account: Delete
Event subscriptions:
• Entity Bank Account Added
• Entity Bank Account Updated
• Entity Bank Account Deleted
• Bank Account Import Started
• Bank Account Import Complete
• Bank Account Import Errors
• Bank Account Import Failed
Managing counterparty bank accounts Authorization request types:
• Addition of New Counterparty Bank Account
• Modification of Existing Counterparty Bank Account
• Deletion of Existing Counterparty Bank Account
Audit events:
• Bank Account: Insert
• Bank Account: Update
• Bank Account: Delete
Event subscriptions:
• Counterparty Bank Account Added
• Counterparty Bank Account Updated
• Counterparty Bank Account Deleted
Managing bank account groups Authorization request types:
• Addition of Bank Account Group Mapping
• Deletion of Bank Account Group Mapping

12 Monitoring user activity
12.1 Understanding monitoring
WebSuite System Administration Guide 443
Market data
Capturing and maintaining foreign exchange
rates
Event subscriptions:
• Foreign Exchange Rate Import Started
• Foreign Exchange Rate Import Succeeded
• Foreign Exchange Rate Import Errors
• Foreign Exchange Rate Import Failed
Interfaces
Managing SWIFT templates Authorization request types:
• Addition of new SWIFT Template
• Modification of Existing SWIFT Template
• Deletion of Existing SWIFT Template
Security
Managing users Authorization request types:
• Addition of New User
• Modification of Existing User Information
• Modification of Existing User Security Access
• Modify Login Information
• Deactivation of Existing User
Audit events:
•User Profiles:Insert
• User Profiles: Update
• User Profiles: Delete
• User Right: Grant
•User Right:Revoke
Managing CMM administrative centers Authorization request types:
• Addition of New Administrative Center
• Modification of Existing Administrative Center
Assignments
Managing CMM profiles Authorization request types:
• Creation of New Security Profile
• Modification of Existing Security Profile
• Deletion of Existing Security Profile
Audit events:
• Access Right: Insert
• Access Right: Update
• Access Right: Delete
• Access Right: Grant
• Access Right: Revoke
Monitoring
12 Monitoring user activity
12.1 Understanding monitoring
444 © Wall Street Systems IPH AB - Confidential
Authorizing user activity Authorization request types:
• Modification of Existing Authorization Request Type
Forecasted activity
Importing forecasts Event subscriptions:
• Operational Forecast Import Started
• Operational Forecast Import Complete
• Operational Forecast Import Errors
• Operational Forecast Import Failed
Transferring forecasts to TRM Event subscriptions:
• Forecast Transfer to TRM Started
• Forecast Transfer to TRM Complete
• Forecast Transfer to TRM Errors
• Forecast Transfer to TRM Failed
Expected and instructed activity
Setup
Configuring transaction templates Authorization request types:
• Creating Commercial Transaction Templates
• Updating Commercial Transaction Templates
• Deleting Commercial Transaction Templates
Configuring transaction repetitive codes Authorization request types:
• Addition of New Repetitive Code
• Modification of Existing Repetitive Code
• Deletion of Existing Repetitive Code
Configuring transaction routing rules Authorization request types:
• Addition of New Transaction Routing Rule
• Modification of Existing Transaction Routing Rule
• Deletion of Existing Transaction Routing Rule
Audit events:
• Transaction Routing Rules: Insert
• Transaction Routing Rules: Update
• Transaction Routing Rules: Delete
12 Monitoring user activity
12.1 Understanding monitoring
WebSuite System Administration Guide 445
Configuring transaction processing rules Authorization request types:
• Addition of New Transaction Processing Rule
• Modification of Existing Transaction Processing Rule
• Deletion of Existing Transaction Processing Rule
Audit events:
• Transaction Processing Rules: Insert
• Transaction Processing Rules: Update
• Transaction Processing Rules: Delete
Workflow
Importing transactions Audit events:
• Cash Record: Insert
• Audit Message: Undo Transaction Import
Event subscriptions:
• Payment Import Started
• Payment Import Complete
• Payment Import Errors
• Payment Import Failed
• Receivables Import Started
• Receivables Import Complete
• Receivables Import Errors
• Receivables Import Failed
Entering transactions Authorization request types:
• Addition of One-Off Counterparty
Audit events:
• Cash Record: Insert
Editing and deleting transactions Audit events:
• Cash Record: Update
• Cash Record: Delete
Authorizing transactions Audit events:
•Payment: Authorize
• Payment: Unauthorize
12 Monitoring user activity
12.1 Understanding monitoring
446 © Wall Street Systems IPH AB - Confidential
Releasing transactions Audit events:
• Payment: Release
• Audit Message: Release
• Audit Message: Undo Payment Release
Event subscriptions:
•Payment Release Started
•Payment Release Complete
• Payment Release Errors
• Payment Release Failed
• Receipt Release Started
• Receipt Release Complete
• Receipt Release Errors
• Receipt Release Failed
Importing bank acknowledgements Event subscriptions:
• Bank Message Import Started
• Bank Message Import Complete
• Bank Message Import Errors
• Bank Message Import Failed
Rejecting transactions Event subscriptions:
•Transaction Rejected
Bank-reported activity
Setup
Configuring bank transaction rules Authorization request types:
• Addition of New Enrichment Rule
• Modification of Existing Enrichment Rule
• Deletion of Existing Enrichment Rule
Audit events:
• Bank Transaction Enrichment Rules: Insert
• Bank Transaction Enrichment Rules: Update
• Bank Transaction Enrichment Rules: Delete
Configuring intraday bank statement
processing rules
Authorization request types:
• Addition of New Intraday Bank Statement
Processing Rule
• Modification of Existing Intraday Bank Statement
Processing Rule
• Deletion of Existing Intraday Bank Statement
Processing Rule
Audit events:
• CDR PDR Processing Rules: Insert
• CDR PDR Processing Rules: Update
• CDR PDR Processing Rules: Delete

12 Monitoring user activity
12.1 Understanding monitoring
WebSuite System Administration Guide 447
Workflow
Importing bank statements, transactions,
and balances
Audit events:
• Bank Transaction: Insert
•Bank Balance:Insert
Event subscriptions:
• Bank Transaction Import Started
• Bank Transaction Import Complete
• Bank Transaction Import Errors
• Bank Transaction Import Failed
Entering bank statements, transactions, and
balances
Audit events:
• Bank Transaction: Insert
•Bank Balance:Insert
Editing bank statements Audit events:
• Bank Transaction: Update
Updating bank balances Audit events:
• Bank Balance: Update
•Bank Balance:Delete
Closing and exporting bank statements Audit events:
• Audit Message: Bank Statement Export
Event subscriptions:
• Bank Transaction Export Started
• Bank Transaction Export Complete
• Bank Transaction Export Errors
• Bank Transaction Export Failed
Reconciliation
Reconciling activity at the accounting level Audit events:
• Cash Record: Reconcile
•Cash Record:Unreconcile
Event subscriptions:
• Transactions Reconciled
•Transactions Unreconciled
• Transactions Reconciliation Failed
Cash concentration
Settling bank accounts Audit events:
•IHB Settlement Bank Account: Insert
• IHB Settlement Bank Account: Update
• IHB Settlement Bank Account: Delete
12 Monitoring user activity
12.1 Understanding monitoring
448 © Wall Street Systems IPH AB - Confidential
Accounting event export
Configuring posting requiring definitions Authorization request types:
• Addition of New Posting Criteria
• Modification of Existing Posting Criteria
• Deletion of Existing Posting Criteria
• Modification of Existing Posting Criteria Priorities
CMM treasury management
Setup
Configuring issues Audit events:
• LTD Issue: Insert
• LTD Issue: Update
•LTDIssue:Delete
Workflow
Capturing deals Audit events:
• Deal: Insert
Editing and deleting deals Audit events:
• Deal: Update
•Deal:Delete
Confirming deals Audit events:
•Deal:Confirmed
• Deal: Status Change
Settling deals Audit events:
• Deal Settlement Bank Account: Insert
• Deal Settlement Bank Account: Delete
• Deal: Status Change
CMM accounting
Setup
Configuring the treasury chart of accounts Authorization request types:
• Addition of New Treasury Chart of Account
• Modification of Existing Treasury Chart of Account
• Deletion of Existing Treasury Chart of Account
12 Monitoring user activity
12.1 Understanding monitoring
WebSuite System Administration Guide 449
Configuring external charts of accounts Authorization request types:
• Addition of New External Chart of Account
• Modification of Existing External Chart of Account
• Deletion of Existing External Chart of Account
• Copy Existing External Chart of Accounts From
Entity
Configuring account mapping rules Authorization request types:
• Addition of New External GL Account Mapping Logic
• Modification of Existing External GL Account
Mapping Logic
• Deletion of Existing External GL Account Mapping
Logic
• Assign External GL Account Mapping Logic to Entity
Treasury Chart of Account
Configuring account mappings Authorization request types:
• Addition of New External GL Account Mapping
• Modification of Existing External GL Account
Mapping
• Deletion of Existing External GL Account Mapping
Audit events:
• Company GL Account Mapping: Insert
• Company GL Account Mapping: Update
• Company GL Account Mapping: Delete
Configuring accounting periods Authorization request types:
• Addition of New Accounting Period
• Modification of Existing Accounting Period
• Deletion of Existing Accounting Period
• Copy Existing Accounting Periods From Another
Entity
• Copy Existing Accounting Periods To Other Entities
• Open or Close Accounting Period
• Open or Close All Accounting Periods
Configuring posting rules Authorization request types:
• Modification of Existing Treasury GL Posting Rule
Workflow
Generating and posting treasury entries Audit events:
• Treasury GL: Insert
• Treasury GL: Update
• Treasury GL: Delete
•Treasury GL:Sent
• Treasury GL: Not Sent
• Cash Record: Posted
• Cash Record: Not Posted
12 Monitoring user activity
12.2 Authorizing user activity
450 © Wall Street Systems IPH AB - Confidential
12.2 Authorizing user activity
In most organizations, many users enter and maintain information in CMM ranging from user names
and passwords to entity and counterparty static data to transaction details. These users may be in
different entities or divisions and may have different levels of authority in the organization. You can
secure CMM such that one or more other users must approve a user’s entry or modification of
information before the information is committed to the database.
Note: The authorization management functionality only applies to manual entry and modification
of information in CMM, not static data imports.
You can assign authorization authority for the activities to users.
When a user enters or modifies information in a secured activity, CMM displays a confirmation
message stating that the entry or modification requires authorization before it is applied to the
database. Users with authorization status for this activity can then view the entry or modification
and choose to approve or reject it.
Security can be enforced for three types of authorization request: commercial template creation,
deletion, and update.
Note: For a list of authorization request types, see 12.1 Understanding monitoring on page 439.
12.2.1 Prerequisites
The following are prerequisites for authorizing user activity:
Generating and posting external entries Audit events:
• Company GL: Insert
• Company GL: Update
• Company GL: Delete
•Company GL:Sent
• Company GL: Not Sent
Revaluating transactions Authorization request types:
• Modification of Existing FX Revaluation Account
Designation
Other
Editing additional attributes in bank accounts,
instrument types, and so on
Audit events:
• Additional Attributes: Insert
• Additional Attributes: Update
• Additional Attributes: Delete
Category Tasks

12 Monitoring user activity
12.2 Authorizing user activity
WebSuite System Administration Guide 451
12.2.2 Changing activities’ authorization levels
To change an activity’s authorization level:
1. Select Admin - Security - Authorization - Authorization Request Types.
2. In the Authorization Request Types List page, drill down on the activity.
3. In the Authorization Request Types Maintenance page:
–Enter the appropriate number of approvals in the Required Approvals field.
–For the following types: Creating Commercial Transaction Templates, Deleting Commercial
Transaction Templates and Updating Commercial Transaction Templates, you can check the
Enable Security checkbox to restrict pending authorization to those users that have security
access to the entity, the bank account, and the counterparty involved in each commercial
template.
4. Click Save.
12.2.3 Approving and declining activities
To approve or decline and activity:
1. Select Admin - Security - Authorization - Pending Authorizations.
2. In the Pending Authorizations page:
–To approve an activity, select its Approve checkbox.
–To reject an activity, select its Decline checkboxes.
3. Click Approve/Decline.
Before approving or rejecting an activity, you can drill down on it to view its details, including the
number of required approvals and total approvals.
12.2.4 Reviewing activities
To review an activity:
1. Select Admin - Security - Authorization - Review Authorization Requests.
2. In the Authorization Request Review - Criteria Selection page, enter search criteria.
3. Click Search.
4. In the Authorization Request List page, drill down on the activity to review it details, including
the number of required and total approvals.
Configuration
parameters
Ensure the following configuration parameter has been set:
• Authorization Request Type.
For more information, see 2.15 Setting monitoring configuration parameters on page
88.
Security Ensure you have access to the following functions:
• FG-0196 Authorization Request Types
• FG-0197 Pending Authorizations
• FG-0377 Authorization Request Review.
In addition, ensure you have access to the authorization request types of the
activities you want to authorize.
For more information, see Chapter 3 Managing security on page 95.
12 Monitoring user activity
12.3 Auditing user activity
452 © Wall Street Systems IPH AB - Confidential
12.3 Auditing user activity
The auditing functionality allows you to track user activity in CMM.
Audit files track selected events in CMM. The information tracked relates to:
•System areas (for example, deals or cash records)
•Events or actions that have taken place (for example, inserts or deletions).
Audit information is saved in a .txt file within the …\Audit folder. Every hour or 1,000 entries, the
.txt file to which information is currently being written is moved to the rollover folder,
…\Audit\rollover, and a new audit file is created. It is from the rollover file that the audit files are
imported.
Note: Audit files for the hour immediately prior to the import may not be available for import. If
the information you require is within that hour, you must wait for CMM to process the audit
files. The processing of the audit files takes approximately one hour.
12.3.1 Selecting events and object attributes to audit
Before you can create audit report templates, you need to select which CMM events and object
attributes you want to audit.
Note: For a list of audit events, see 12.1 Understanding monitoring on page 439.
12.3.1.1 Prerequisites
The following are prerequisites for selecting events and object attributes to audit:
12.3.1.2 Selecting events to audit
To select an event to audit:
1. Select Admin - Security - Audit - Audit Events.
2. In the Auditable Events page, select the event’s Is Audited checkbox.
3. Click Save.
Category Tasks
Security Ensure you have access to the following functions:
• FG-0194 Auditable Events
• FG-0195 Audit Object Attributes.
For more information, see Chapter 3 Managing security on page 95.

12 Monitoring user activity
12.3 Auditing user activity
WebSuite System Administration Guide 453
12.3.1.3 Selecting object attributes to audit
To select an object attribute to audit:
1. Select Admin - Security - Audit - Audit Object Attributes.
2. In the Audit Objects page, drill down on the appropriate event.
3. In the Object Attributes page:
–to select the object attribute for auditing, select its Audit checkbox.
–To select the object attribute for reporting, select its Report checkbox.
4. Click Save.
12.3.2 Managing audit report templates
After selecting events and object attributes to audit, but before auditing user activity, you can
create audit report templates.
12.3.2.1 Prerequisites
The following are prerequisites for managing audit report templates:
12.3.2.2 Creating audit report templates
To create an audit report template:
1. Select Admin - Security - Audit - Audit Reporting.
2. In the Audit Reports page, click New Entry.
3. In the Edit Audit Report Template - Page 1 of 2 page, create the audit report template.
4. Click Next.
5. In the Edit Audit Report Template - Page 2 of 2 page, continue to create the audit report
template.
6. Click Save.
Category Tasks
Security Ensure you have access to the following function:
• FG-0193 Audit Reporting.
For more information, see Chapter 3 Managing security on page 95.
Monitoring Ensure the following monitoring task has been completed:
•12.3.1 Selecting events and object attributes to audit on page 452.

12 Monitoring user activity
12.3 Auditing user activity
454 © Wall Street Systems IPH AB - Confidential
12.3.2.3 Editing audit report templates
To edit an audit report template:
1. Select Admin - Security - Audit - Audit Reporting.
2. In the Audit Reports page, click Edit in the audit report template’s row.
3. In the Edit Audit Report Template - Page 1 of 2 page, edit the audit report template.
4. Click Next.
5. In the Edit Audit Report Template - Page 2 of 2 page, continue to edit the audit report template.
6. Click Save.
12.3.2.4 Deleting audit report templates
To delete an audit report template:
1. Select Admin - Security - Audit - Audit Reporting.
2. In the Audit Reports page, click Delete in the audit report template’s row.
12.3.3 Auditing user activity
After selecting events and object attributes to audit and creating audit report templates, you can
audit user activity.
12.3.3.1 Prerequisites
The following are prerequisites for auditing user activity:
12.3.3.2 Importing audit files
You can import audit files on a regular basis by scheduling the Audit Event File Import task in the
Task Scheduler function. For more information, see Chapter 4 Managing the Task Scheduler on page
153.
You can also import audit files on a one-time basis using the Import Audit Files function:
1. Select Admin - Security - Audit - Import Audit Files.
2. In the Audit File Import page, click Import Audit Files.
Category Tasks
Configuration parameters Ensure the following configuration parameter has been set:
• Audit Root Directory.
For more information, see 2.15 Setting monitoring configuration parameters on
page 88.
Security Ensure you have access to the following functions:
• FG-0193 Audit Reporting
• FG-0208 Import Audit Files
• FG-0279 Task Scheduler.
For more information, see Chapter 3 Managing security on page 95.
Monitoring Ensure the following monitoring task has been completed:
•12.3.2 Managing audit report templates on page 453.
12 Monitoring user activity
12.4 Subscribing to events
WebSuite System Administration Guide 455
12.3.3.3 Running audit reports
To run an audit report:
1. Select Admin - Security - Audit - Audit Reporting.
2. In the Audit Reports page, click Report in the appropriate report template’s row.
3. In the Audit Report Parameters page, enter search criteria.
4. Click Continue:
–If there are conditions defined in the template, continue to step 5.
–If there are no conditions defined in the template, do not continue to step 5.
5. In the Audit Report Conditions page, select the conditions you want to further refine in the
audit report.
The specific controls on this page vary depending on the report.
6. Click Continue.
12.4 Subscribing to events
You can subscribe to CMM events to receive notification through an e-mail or browser popup.
Note: For a list of event subscriptions, see 12.1 Understanding monitoring on page 439.
12.4.1 Prerequisites
The following are prerequisites for subscribing to events:
12.4.2 Subscribing to events
To subscribe to events:
1. Select Admin - User Options.
2. In the User Options page, click Maintain Event Subscriptions.
3. In the Maintain Event Subscriptions page, display the Subscriber Details section’s controls.
4. Enter your e-mail address in the E-mail Address field.
5. Click Update.
6. Select the Subscribe checkboxes of the events you want to monitor.
7. Click Save.
Category Tasks
Configuration parameters Ensure the following configuration parameter has been set:
• Send Mail Server.
For more information, see 2.15 Setting monitoring configuration
parameters on page 88.
12 Monitoring user activity
12.4 Subscribing to events
456 © Wall Street Systems IPH AB - Confidential

WebSuite System Administration Guide 457
Chapter 13 Reviewing and managing logs
CMM includes an extensive set of logs that allow you to track activity in the module.
13.1 Reviewing the job log
When CMM completes a task, it writes a record containing the status information for the task in the
job log. If CMM did not complete the task successfully, the record provides the applicable task status
and error messages.
The following are the possible statuses for tasks in the jog log:
Status Description
Complete The task was successful.
Deleted
Unreleased
UNDONE
The task was undone.
Duplicate File
Errors
Encryption
Errors
File Errors
Unknown Error
Incomplete
Invalid File
Path
All Failed
One or more high-level errors occurred and, as a result, the task failed.
Duplicate file errors occur when the unique identifier of the file (either the file name or
identifier within the file) matches one that has already been imported.
In the list of jobs, the error count and record count are both -1, which indicates that no
records were imported.
File errors occur when:
• The file format is wrong and the file cannot be parsed.
• The file cannot be decrypted for some reason.
• The logging data cannot be initialized.
• During file parsing, some conversion (for example, string to double or string to date)
fails.
• The number of invalid records exceeds the allowed maximum (200).
Load Errors
Review Log
Partial
Released
One or more detail-level errors occurred and, as a result, the task partially completed but
details in the task failed.
Load errors typically occur when some of the records in the file have successfully imported,
while others have failed or all records have failed for some reason. The error count and
record count on the list of background and import/export logs will either be the same
number (in other words, all records failed) or different numbers with the error count being
less than the record count.
Load errors occur when:
• Validation fails (for example, invalid party ID).
• For payments, routing fails (for example, a valid paying account cannot be found based
on the routing rules defined).

13 Reviewing and managing logs
13.2 Reviewing transaction error message logs
458 © Wall Street Systems IPH AB - Confidential
13.1.1 Prerequisites
The following are prerequisites for reviewing the job log:
13.1.2 Review the job log
To review the job log:
1. Select Admin - Utilities - Review Job Log.
2. In the Review Job Log - Criteria Selection page, enter search criteria.
3. Click Search.
4. In the Review Job Log page, drill down on a job log record to view its details.
The top section of the resulting page (either Job Log Detail or Import Export Log Detail) presents
the task-level data. If the job log contains errors or other additional data, the table in the bottom
section of the page provides details of these errors or other additional data.
13.2 Reviewing transaction error message logs
The Review Transaction Error Messages function allows you to review error messages from
transaction imports or exports.
13.2.1 Prerequisites
The following are prerequisites for reviewing transaction error message logs:
Started The task is currently running.
Category Tasks
Security Ensure you have access to the following function:
• FG-0039 Review Job Log.
In addition, ensure you have access to the entities, counterparties, and bank accounts of the
tasks you want to review in the job log.
For more information, see Chapter 3 Managing security on page 95.
Category Tasks
Security Ensure you have access to the following function:
• FG-0124 Review Payment Error Messages.
For more information, see Chapter 3 Managing security on page 95.

13 Reviewing and managing logs
13.3 Reviewing export status logs
WebSuite System Administration Guide 459
13.2.2 Reviewing transaction error message logs
To review transaction error message logs:
1. Select Reporting - Payment Factory - Review Transaction Error Messages.
2. In the Payment Error Message - Criteria Selection page, enter search criteria.
3. Click Search.
13.3 Reviewing export status logs
The Review Export Status function allows you to view export status logs imported from banks.
13.3.1 Prerequisites
The following are prerequisites for reviewing export status logs:
13.3.2 Reviewing export status logs
To review export status logs:
1. Select Payment Factory - Processing - Review Export Status.
2. In the Export Status - Criteria Selection page, enter search criteria.
3. Click Search.
There are two links in the resulting page (Export Status):
–To view a list of acknowledgement and acceptance status codes and their definitions, click
Acknowledgement and Acceptance Status Code Definitions.
–To view a list of unmatched replies, click View Unmatched Replies.
13.4 Reviewing and managing message logs
Use the Message Log function to define the levels and output destinations of the various message
logs in CMM.
Category Tasks
Security Ensure you have access to the following function:
• FG-0200 Review Export Status.
In addition, ensure you have access to the banks of the logs you want to review.
For more information, see Chapter 3 Managing security on page 95.
13 Reviewing and managing logs
13.4 Reviewing and managing message logs
460 © Wall Street Systems IPH AB - Confidential
Certain application server message logs are particularly beneficial when you are troubleshooting
with Wallstreet:
•0Appserver.event
•0Appserver.eventTime
•0Appserver.eventTime.WebService
•0Appserver.eventTime.XMLHttp
•0AppserverDatabase
•0AppserverDatabase.connection
•0AppserverDatabase.security
•0AppserverDatabase.sql
•0AppServer.WebService
•0AppServer.WebService.filter.
•Cmm.sdm.eventTime
The following table presents the results of specific levels and output destinations for each of these
application server message logs:
Message log Element Results
0Appserver.event Ter se This displays the times for the start and end of Web events.
0Appserver.event Verbose This displays the Web variables that are sent from this page.
0AppserverDatabase Trema Log This logs messages to two files: ml.Database.log and
ml.user.log, where user is the user’s ID.
0Appserver.eventTime Terse/ Ve r
bose
Logs all normal user http requests. See note 1.
0Appserver.eventTime.WebS
ervice
Ter s e/Ver
bose
Logs all WebService requests. See note 1.
0Appserver.eventTime.XMLHt
tp
Ter s e/Ver
bose
Logs all Ajax requests. See note 1.
0AppserverDatabase.connect
ion
Terse This logs database connections that are not closed.
0AppserverDatabase.connect
ion
Verbose This logs all database connections. (This can generate large
amounts of data, so use it carefully.)

13 Reviewing and managing logs
13.4 Reviewing and managing message logs
WebSuite System Administration Guide 461
Table note 1:
Terse mode: logs user, navigation page (if it's an http request) and the elapsed time for the request.
Verbose mode: logs user, navigation page (if it is an http request) at the incoming (REQUEST IN) of
the request. It also logs user, navigation page (if it's an http request) and the elapsed time at the
outgoing (REQUEST OUT) of the request
If, in the Message Log function, a message group’s Trema Log checkbox is selected, you can view the
resulting log files for that message group in the Log Viewer function.
13.4.1 Prerequisites
The following are prerequisites for reviewing and managing message logs:
0AppserverDatabase.security Verbose This displays information about each row being secured.
You see one message for each column that is secured in the
result set. This message is as follows: "canRead: column:" +
secureColumn + "class:" + secureClass + "value:" +
field_value + "can_read:" + canRead
Where
•secureColumn is the column from the query that is being
secured.
•secureClass is the type of security being applied.
(Currently, this is only PARTIES.)
•field_value is the value of the second column in the row.
•canRead is true if the row will be returned to the user.
0AppserverDatabase.sql Error This logs the SQL string and stack trace for SQL errors.
0AppserverDatabase.sql Terse This logs SQL.
0AppserverDatabase.sql Verbose This logs the timings for SQL execution.
0AppServer.WebService Verbose This logs the SOAP (XML messages) in the Web services
interfaces.
0AppServer.WebService.filter Verbose This logs the security filtering completed on the SOAP (XML
messages) in the Web services interfaces.
Cmm.sdm.eventTime Ter se/ Ve r
bose
Logs all SDM requests. See note 1.
Category Tasks
Security Ensure you have access to the following functions:
• FG-0003 Message Log
• FG-0114 Log Viewer.
For more information, see Chapter 3 Managing security on page 95.
13 Reviewing and managing logs
13.4 Reviewing and managing message logs
462 © Wall Street Systems IPH AB - Confidential
13.4.2 Editing message logs
To edit a message log:
1. Select Admin - Utilities - Analysis - Message Log.
2. In the Message Control Data Maintenance - Selection page, drill down on the message log.
3. In the Message Control Data Maintenance page, enter any appropriate changes to the message
log’s name in the field.
4. Select the desired message levels’ checkboxes:
–Terse
–Verbose
–Warnings
–Errors
–Message Traces
–Users.
In the default setup, the Errors checkbox is selected and the other checkboxes are cleared.
5. Select the desired output destinations’ checkboxes:
–Trema Log (If you select this checkbox, messages will be captured in the Wallstreet message
log and will be accessible from the Log Viewer function.)
–Application Server
–Browser.
In the default setup, the Trema Log checkbox is selected and the other three checkboxes are
cleared.
6. Click Save.
13.4.3 Deleting message logs
To delete a message log:
1. Select Admin - Utilities - Analysis - Message Log.
2. In the Message Control Data Maintenance - Selection page, drill down on the message log.
3. In the Message Control Data Maintenance page, click Delete.
4. In the resulting dialog, click OK.
13.4.4 Resetting all message logs to defaults levels
To reset all message logs to default levels:
1. Select Admin - Utilities - Analysis - Message Log.
2. In the Message Control Data Maintenance - Selection page, click Reset All To Default Log Levels.
In the default setup for each message log:
–The errors message level is set, while all other levels are not.
–The Wallstreet log destination output is set, while all others are not.

13 Reviewing and managing logs
13.5 Managing log file types
WebSuite System Administration Guide 463
13.4.5 Reviewing message logs
To review a message log:
1. Select Admin - Utilities - Analysis - Log Viewer.
2. In the Log Viewer page, drill down on the message log.
To display the most recent log files, click Refresh at the bottom of the Log Viewer page.
13.5 Managing log file types
Using the Log File Types function, you can manage the size and archiving of log file types.
13.5.1 Prerequisites
The following are prerequisites for managing log file types:
13.5.2 Setting preferences for log file types
To set preferences for a log file type:
1. Select Admin - Utilities - Setup - Log File Types.
2. In the Log File Types page, drill down on the log file type.
3. In the Log File Types Maintenance page, set preferences for the log file type.
4. Click Save.
13.5.3 Refreshing and archiving log file types
To refresh and archive a log file type:
1. Select Admin - Utilities - Setup - Log File Types.
2. In the Log File Types page, drill down on the log file type.
3. In the Log File Types Maintenance page, click Refresh and Archive.
13.5.4 Refreshing and archiving all log file types
To refresh and archive all log file types:
1. Select Admin - Utilities - Setup - Log File Types.
2. In the Log File Types page, click Refresh and Archive All.
Category Tasks
Security Ensure you have access to the following function:
• FG-0139 Log File Types.
For more information, see Chapter 3 Managing security on page 95.
13 Reviewing and managing logs
13.5 Managing log file types
464 © Wall Street Systems IPH AB - Confidential

WebSuite System Administration Guide 465
Chapter 14 Completing miscellaneous tasks
This chapter documents miscellaneous tasks for CMM setup and administration.
14.1 Configuring the nvp.xml file
The nvp.xml file allows you to define several parameters. Each parameter is specified in a name
element, which contains two child elements:
•description: A brief description of the parameter and its possible values.
•value: The parameter’s value.
The following is an example:
º
<name name="ServerName">
<description>
The Server Name of where JVM is started.
</description>
<value>
acme1-60001
</value>
</name>
º
14.1.1 Prerequisites
The following are prerequisites for configuring the nvp.xml file:
14.1.2 Configuring the nvp.xml file
To configure the nvp.xml file:
1. Open the following configuration file: <standard installation path>\nvp.xml
Category Tasks
Security Ensure you have access to the following function:
• Review CMM Configuration Documents.
For more information, see Chapter 3 Managing security on page 95.

14 Completing miscellaneous tasks
14.1 Configuring the nvp.xml file
466 © Wall Street Systems IPH AB - Confidential
For instructions on opening configuration files, see 1.2 Opening configuration files on page 25.
2. Ensure each name element’s value child element contains the correct value:
Element Possible values Default value
ApImportBatchSize Specifies the size of internal
batching for imported
transactions. Choose the value to
strike a balance between large
memory consumption (large
values) and bigger CPU load
(small values).
Example: SUN JVM 1.4.2, Xmx set
to 1GB; value 45000 will cause
out of memory error while 10000
(recommended default value) will
be fine. Should a memory error
occur that is related to an import,
the value can be decreased, but
this will affect performance.
This setting affects the import
performance for relatively large
imports.
10000
ConvertSQLToUpperCase true: Convert database table and
column names to uppercase
letters.
false: Do not convert database
table and column names to
uppercase letters.
Note: This element is only
applicable if your
organization is running SQL
Server in a case-sensitive
environment.
false
DataCaching_enabled true: Dynamically clear cached
data.
false: Do not dynamically clear
cached data.
false
DatabaseSecurityFiltering_enabl
ed
true: Apply entity and
counterparty security to the
database level.
false: Apply entity and
counterparty security within
memory.
true
HistorySize The maximum number of pages
users can reopen by clicking Back
in their browser.
Note: This element can accept
any whole number greater
than 0 as a value.
Wallstreet recommends 10.
10
14 Completing miscellaneous tasks
14.1 Configuring the nvp.xml file
WebSuite System Administration Guide 467
ID_RuntimePath A physical path to the read/write
folder used for runtime files such
as logs and locks.
[Set correctly at install
time and based on the
values set in the
install.properties
file (for example,
C:\tomcat2\caltst1D2
\Runtime)]
ID_VirtualDirectory The virtual directory name or alias
specified on the Web server set up
for the path specified in
ID_VirtualDirectoryPath
.
[Set correctly at install
time and based on the
values set in the
install.properti
es file (for example,
content1)]
ID_VirtualDirectory Path The path to the working virtual
directory utilized by the
application server.
[Set correctly at install
time and based on the
values set in the
install.properties
file (for example,
C:\tomcat2\caltst1D2
\ VirtualDirectory)]
isIntegratedInstall A value that indicates whether the
installation is intrinsically
integrated with other modules.
@@integrated.instal
l@@
MaxConcurrentWindows The maximum number of windows
that can be open in the same
session.
Note: This element can accept
any whole number greater
than 0 as a value.
Wallstreet recommends 10.
10
Menu The menu to use.
Note: Valid values for this
parameter are standard,
integ, and demo. (Leave
this element blank to use
the standard menu.)
[Blank]
ServerName The name of the JVM’s server.
Note:
[Server name]
System_Available true: Make CMM unavailable for
use during installation.
false: Make CMM available for
use during installation.
true
TCMD_Web_Service_URL The URL of the TCMD integration
server.
http://localhost:99
99/tcmd/iws/generic
ws
14 Completing miscellaneous tasks
14.2 Configuring the config.xml file
468 © Wall Street Systems IPH AB - Confidential
3. Save and close the file.
14.2 Configuring the config.xml file
The config.xml file configures the connection from the CMM application server to the CMM
database. This file is automatically generated at the time of the application server installation and
seldom requires any updates. The only time this file needs to be updated is when the CMM database
is moved to another database instance or a different physical database server.
To improve the config.xml file’s security, you can encrypt its values. (The password values are
encrypted by default.) You do this using the CMM Cryptography tool. The CMM Cryptography tool
allows you to encrypt text. To ensure the config.xml file’s integrity, you cannot decrypt text.
Note: You can also use the CMM Cryptography tool to encrypt text for TRM_config.xml and
mercury_fx_price.xml.
There are two different versions of the config.xml file: one to be used with Apache Tomcat and the
other to be used with BEA WebLogic.
14.2.1 Prerequisites
The following are prerequisites for configuring the config.xml file:
StatusAndFaultProcessingEnabled The default value should be set to
false so that whenever any XML
files are being parsed for building
action handlers, it does not try to
build status and fault handlers for
them (normally there are no
status or fault handlers
registered) thus improving the
overall performance. Some DOM
parsers (3rd party library) may
not be thread safe, so it is
important not to traverse these
DOM elements (XML tags)
unnecessarily; so the default
value is set to false. However, if
you do want to register any status
and fault handlers for any of the
XML tags (e.g.for additional
logging or custom actions) set the
value to true in the relevant XML
file as shown in this example:
<manage_handler_build_polic
y
enable_status_and_fault_pro
cessing="true"/>
This overrides just for that file.
false
Category Tasks
Security Ensure you have access to the following function:
• Review CMM Configuration Documents.
For more information, see Chapter 3 Managing security on page 95.

14 Completing miscellaneous tasks
14.2 Configuring the config.xml file
WebSuite System Administration Guide 469
14.2.2 Configuring the config.xml file
To configure the config.xml file:
1. Open the following configuration files:
[Standard configuration file path]
database
config.xml
For instructions on opening configuration files, see 1.2 Opening configuration files on page 25.
2. Edit the marked elements and attributes’ values:
º
<config name="database">
<rdbms>
<type>ORACLE</type>
Enter ORACLE if your organization is using an Oracle database with CMM or MSSQL if your
organization is using a SQL Server database with CMM.
<transaction_type>TRANSACTION_READ_COMMITTED </transaction_type>
<server>dbserver</server>
Enter the hostname of the database server.
<name>cmmdb</name>
Enter the name of the CMM database instance.
<username>cmm_user</username>
<userpassword>-CvCqjSBJLHE=</userpassword>
<schemaowner>CMM_OBJECTS</schemaowner>
Enter the schema owner.
</rdbms>
<connection type="JDBC_TOMCAT_CONNECTIONPOOL">
<listener>
<listener-class>alterna.appserver.database.connectors.
CaJDBCConnectionListener</listener-class>
<properties>
<property name="poolSizeWarningThreshold" value="25"/>
the pool size warning threshold. This value should be 10 less than the max pool
size. (When the number of allocated connections has reached the size defined by
this property element, the listener logs a message indicating the current pool size
is approaching the maximum.) By default, it is set to "25". If your organization
changes the value for the Maximum Pool Size in the Weblogic/Websphere
console, or in the config.xml file for a Tomcat installation.
<property name="threadDumpDepth" value="15"/>
Enter the thread dump depth. (When a connection leak has been detected, CMM
logs the stack trace of the originator with this depth to the message log,
ml.ConnectionLeakage.[Time Stamp].txt. The default value of this element is
"12", but "15" provides more information on the originator. However, the higher
the value, the greater the impact on performance. A depth of "15" normally
requires less than 16 milliseconds but most of the time is free, 0 milliseconds.)
</properties>
</listener>
<jdbcpool>
<pooldriver>com.protomatter.jdbc.pool.JdbcConnectionPoolDriver</pooldri
ver>
14 Completing miscellaneous tasks
14.3 Releasing process locks
470 © Wall Street Systems IPH AB - Confidential
<poolurl>jdbc:protomatter:pool:CmmCP</poolurl>
<poolproperties>
<poolproperty name="jdbc.validityCheckStatement" value="SELECT
count(*) FROM Countries"/>
<poolproperty name="pool.refreshThreadCheckInterval" value="120"/>
<poolproperty name="pool.initialSize" value="5"/>
<poolproperty name="pool.maxSize" value="20"/>
<poolproperty name="pool.growBlock" value="2"/>
<poolproperty name="pool.createWaitTime" value="500"/>
</poolproperties>
<jdbc name="Auros">
<driver>oracle.jdbc.driver.OracleDriver</driver>
Enter the database-specific JDBC driver. (This element is only required if you are
using Tomcat as CMM’s application server.)
<url>jdbc:oracle:thin:@dbserver.corp.trema.com:152:cmmdb</url
>
Enter the database-specific URL for the JDBC driver. (This element is only
required if you are using Tomcat as CMM’s application server.)
<properties>
…
<property name="user" value="cmm_user"/>
Enter cmm_user.
<property name="password" value="-CvCqjSBJLHE="/>
Enter the password of the cmm_user.
</properties>
</jdbc>
</jdbcpool>
</connection>
</config>
If you want to disable the listener element, including the following subelement in it:
<property name="enabled" value="false"/>
3. Save and close the file.
14.2.3 Using the CMM Cryptography tool
To use the CMM Cryptography tool:
1. In a browser, navigate to [CMM URL]/clientcrypto.html, where [CMM URL] is your
organization’s URL for CMM (for example, http://server.organization.com/cmm).
2. In the CMM Cryptography page, enter the text you want to encrypt in the Input Text field.
3. Click Encrypt.
4. Copy the encrypted text and paste it into the appropriate location in the config.xml file.
14.3 Releasing process locks
Processes initiated through user activity in CMM or through scheduled tasks in the Task Scheduler
function can place locks on the application and the database. Occasionally these processes can
"hang", preventing access to portions of CMM. In some situations, these processes can also cause
problems with queues in the Task Scheduler function.
14 Completing miscellaneous tasks
14.4 Clearing cache of data sources
WebSuite System Administration Guide 471
You can release locks using the Release Process Locks function.
The Release Process Locks function displays all processes that are running for longer than expected
and have locks in place. You can select these processes and release their locks through the function.
Warning: This functionality should be used only for manual error recovery scenarios by
administrators. Any mis-use of this functionality could cause data corruption.
14.3.1 Prerequisites
The following are prerequisites for releasing process locks:
14.3.2 Releasing process locks
To release process locks:
1. Select Admin - Utilities - Setup - Release Process Locks.
2. In the Release Process Locks page, select the processes’ checkboxes.
If you or another user initiated a task through the Task Scheduler function, you may need to
select two tasks at the same time. This situation arises when the Task Scheduler function places
a lock in the application, and the process, itself, places a lock in the application.
3. Click Release Process Locks.
4. In the resulting dialog, click OK.
14.4 Clearing cache of data sources
Use the Data Source Cache Maintenance function to clear the cache of all the data sources being
registered in CMM. This allows you to manually clear the cache of the data sources without
restarting CMM when the corresponding database tables have been manually updated.
14.4.1 Prerequisites
The following are prerequisites for clearing cache of data sources:
Category Tasks
Configuration
parameters
Ensure the following configuration parameter is set:
• JavaScript Enabled.
For more information, see 2.6 Setting menu and user interface configuration
parameters on page 57.
Security Ensure you have access to the following function:
• FG-0326 Release Process Locks.
For more information, see Chapter 3 Managing security on page 95.
Category Tasks

14 Completing miscellaneous tasks
14.5 Exporting data to your browser or spreadsheet application
472 © Wall Street Systems IPH AB - Confidential
14.4.2 Clearing cache of data sources
To clear cache of data sources:
1. Select Admin - Utilities - Setup - Data Source Cache Maintenance.
2. In the Data Source Cache Maintenance page, select the appropriate data sources.
3. Click Clear Cache.
Note: You can also clear this cache from outside of WebSuite using the following script:
http://serveraddress:websuiteport/websuite/index.do?handleWebEvent(alterna.hierarchy
util.cache.CaClearBankAccountHierarchyCacheWebEventHandler)
14.5 Exporting data to your browser or spreadsheet application
Use the Data Dump function to export data from CMM to your browser or spreadsheet application so
that you can analyze the data or use it to generate reports.
14.5.1 Prerequisites
The following are prerequisites for exporting data to your browser or spreadsheet application:
14.5.2 Exporting data to your browser or spreadsheet application
To export data to your browser or spreadsheet application:
1. Select Admin - Utilities - Analysis - Data Dump.
2. In the Data Dump - Criteria Selection page, select the appropriate database table in the Table
Name list.
3. Do one of the following:
–To export the data in the selected database table to your browser, click Report.
–To export the data in the selected database table to your spreadsheet application, click View in
Spreadsheet.
Security Ensure you have access to the following function:
• FG-0394 Data Source Cache Maintenance.
For more information, see Chapter 3 Managing security on page 95.
Category Tasks
Security Ensure you have access to the following function:
• FG-0214 Data Dump.
For more information, see Chapter 3 Managing security on page 95.
14 Completing miscellaneous tasks
14.6 Analyzing performance
WebSuite System Administration Guide 473
14.6 Analyzing performance
Wallstreet has included some JMX components to allow you to monitor and manage the JVM
performance and resources.
In addition, the Import Page Usage Files function allows you to import page usage information files
into the database when working with Wallstreet on performance issues.
Note: You can also deliver the import page usage files to Wallstreet directly rather than importing
them into the database.
14.6.1 Prerequisites
The following are prerequisites for importing accounts payable and direct debit files:
14.6.2 Monitoring JMX with JConsole
To monitor JMX with JConsole:
1. Launch JConsole.
2. In the JConsole Connect to Agent dialog, open the Remote tab.
3. Enter the appropriate information:
4. Click Connect.
5. In the J2SE Monitoring & Management Console window, open the MBeans tab.
6. Open the WallStreetSuite folder.
7. Navigate to and open the appropriate item to review its performance:
Category Tasks
Security Ensure you have access to the following function:
• FG-0502 Import Page Usage Files.
For more information, see Chapter 3 Managing security on page 95.
Logging Select the Terse checkbox, the Verbose checkbox, or both for the System Page Usage message
log. For more information, see 13.4 Reviewing and managing message logs on page 459.
Other Ensure you have JDK 1.5.0 or later installed on your computer.
Control Description
Host or IP The IP of the WebSuite server.
Port The port number of the WebSuite server.
User Name Your user name.
Password Your password.
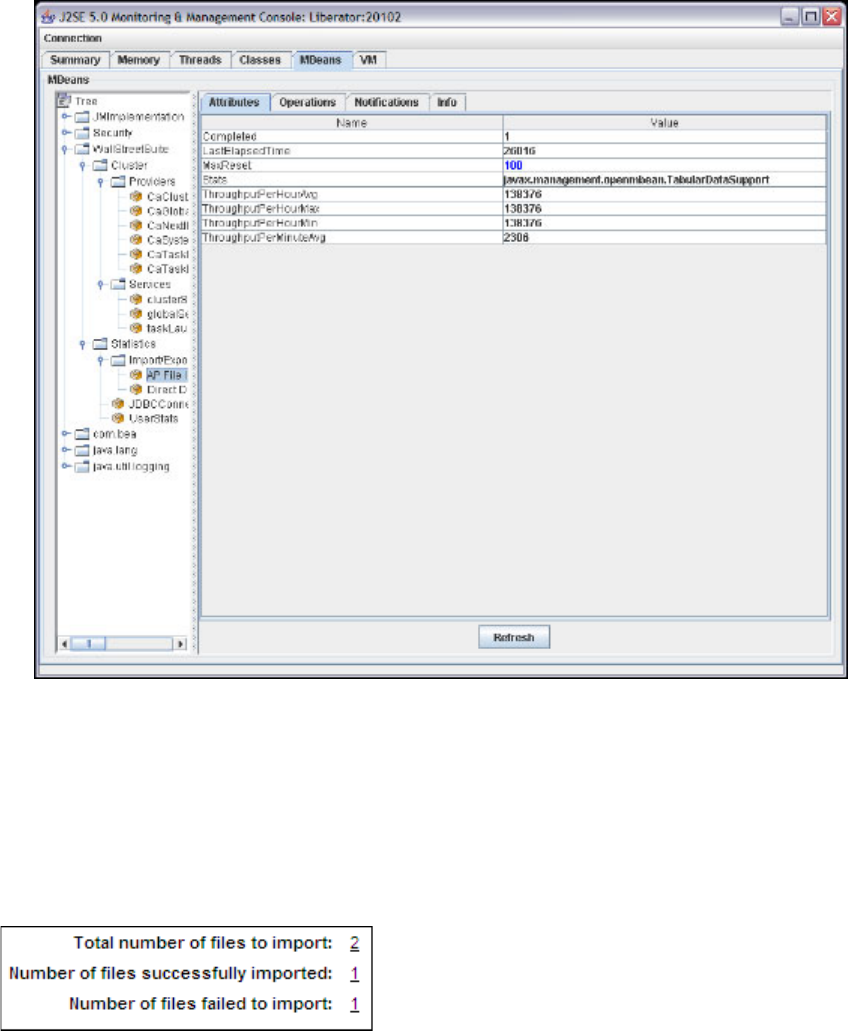
14 Completing miscellaneous tasks
14.7 Changing the user that connects the application to the database
474 © Wall Street Systems IPH AB - Confidential
14.6.3 Importing page usage files
To import page usage files:
1. Select Admin - Utilities - Setup - Import Page Usage Files.
2. In the Page Usage Import page, click Import Page Usage Files.
CMM displays the number of files it attempted to import, the number it imported successfully, and
the number it did not import successfully:
You can drill down on the numbers to view related records in the job log. (This is useful when you
want to determine why CMM did not import a file successfully.)
14.7 Changing the user that connects the application to the
database
Currently, the default user that connects the Websuite application to the database is the dbo user.
In some situations, it may be desirable to change this user to the dbpu user, which is a less
14 Completing miscellaneous tasks
14.8 Cash record Additional Attributes
WebSuite System Administration Guide 475
privileged user than dbo, but still has the correct permissions to run the Websuite application. To
make this change, you need to update the following files:
In the script file 27_trmweb.bat/27_trmweb.pl in ws-suite/envs/dev/etc/environment/parts:
•Change the value of the property $ENV{EKIT_FK_RDBMS_CONNECTION_USER} from dbo to dbpu.
•Change the value of the property $ENV{EKIT_FK_RDBMS_CONNECTION_PASSWORD} to the correct
password for the dbpu user.
In the config.xml file in
ws-suite/envs/dev/etc/wss-web/cmm/ConfigurationData/installation/database:
•Change the username parameter from dbo to dbpu.
For installations using Tomcat, there are two occurrences that need to be changed.
In the TRM_config.xml file in
ws-suite/envs/dev/etc/wss-web/cmm/ConfigurationData/installation/database:
•Change the username parameter from dbo to dbpu.
For installations using Tomcat, there are two occurrences that need to be changed.
In non-Tomcat installations, the JDBC connection pool properties username and password in the
application server administration console need to changed appropriately.
14.8 Cash record Additional Attributes
Cash records can have up to ten custom attributes, asprovided by default. These attributes are
available from the Parameter Editor, and are defined in the CASHRECORDCONTENTTYPE table.
This table can be edited by a technical consultant who can modify the cash record’s attribute name
and add new ones if needed. These attributes can be set on cash records and are stored as values in
the CASHRECORDS table:
ADDITIONALATTRIBUTEIDxx and ADDITIONALATTRIBUTEVALUExx, where xx = 01 to 20.
ADDITIONALATTRIBUTEIDxx corresponds to CASHRECORDCONTENTTYPE.CONTENTTYPEID
ADDITIONALATTRIBUTEVALUExx is of type VARCHAR (max length=255) and is entered at Cash
Record capture or import.
Note: There is no restriction on the number of attributes that can be configured, but only the first
20 can be mapped to accounting entries in ACM.
If you want to add attributes, note that the following have been defined already, so we recommend
that you start with unused attribute numbers.
Attribute number Attribute value
1 FED_WIRE_NUMBER
2 RETRIEVAL_LOCATION_ID
3 PERSONAL_IDENTIFICATION_NUMBER
4 TAX_PAYER_ID
5 TAX_PAYMENT_TYPE_CODE
6 TAX_PAYMENT_SUBTYPE_CODE
7 TAX_PAYER_VERIFICATION_ID
8BANK_PREAUTHORIZATION_STATUS
14 Completing miscellaneous tasks
14.8 Cash record Additional Attributes
476 © Wall Street Systems IPH AB - Confidential
9BANK_PREAUTHORIZATION_ID
10 ORIG_PAGE
11 RETRIEVAL_LOCATION_NAME
12 RETRIEVAL_LOCATION_ADDRESS1
13 RETRIEVAL_LOCATION_ADDRESS2
14 TRANSACTION_TYPE_CODE
16 FINANCIAL_CHARGE_ALLOCATION
Attribute number Attribute value

WebSuite System Administration Guide 477
Chapter 15 Going live
After completing all setup tasks documented in the preceding chapters of this guide, you must
complete the final set of tasks documented in this chapter to go live.
15.1 Verifying setup
The following functions in CMM allow you to verify the setup of the module prior to going live:
•Check Referential Integrity
•Check File Locations
•Check Task Scheduler Installation.
15.1.1 Verifying static data integrity
Due to the interdependency of the static data tables, you must create static data in the order
specified in the CMM User Guide to ensure CMM functions properly. If static data is missing in one
table, related static data may not display in reports and queries.
The Check Referential Integrity function allows you to analyze critical static data for
interdependency issues. Using this function, you can identify and enter missing static data.
15.1.1.1 Prerequisites
The following are prerequisites for verifying static data integrity:
Category Tasks
Static data Ensure all static data required by your organization are available.
For more information, see the CMM User Guide.
Security Ensure you have access to the following function:
• FG-0180 Check Referential Integrity.
For more information, see Chapter 3 Managing security on page 95.

15 Going live
15.1 Verifying setup
478 © Wall Street Systems IPH AB - Confidential
15.1.1.2 Verifying static data integrity
To verify static data integrity:
1. Select Admin - Utilities - Configuration Checking - Check Referential Integrity.
2. In the Referential Integrity - Criteria Selection page, select the checkboxes of the static data
items you want to verify.
3. Click Search.
4. In the Referential Integrity Maintenance page, click the link in the Missing Information column of the
first static data item.
5. Enter any missing static data.
6. Repeat steps 4 to 5 for each static data item.
7. Repeat steps 1 to 3 to verify that all missing static data are addressed for the selected functions.
15.1.2 Verifying file locations
Use the Check File Locations function to ensure all file locations are correctly specified, allowing CMM
to work properly. The Check File Locations function also provides the means to add or change
folders as needed.
15.1.2.1 Prerequisites
The following are prerequisites for verifying file locations:
15.1.2.2 Verifying file locations
To verify file locations:
1. Select Admin - Utilities - Configuration Checking - Check File Locations.
2. In the Check File Locations - Criteria Selection page, select the appropriate checkboxes.
3. Click Search.
4. In the File Locations Maintenance page:
–To create a missing folder manually, drill down on the relevant error.
–To create a missing folder automatically, select the relevant error’s Create Directory checkbox
and click Create Selected.
15.1.3 Verifying the Task Scheduler
Before creating parameter sets and tasks in the Task Scheduler, you need to verify that the queues
are communicating with the application server.
Category Tasks
Security Ensure you have access to the following function:
• FG-0181 Check File Locations.
For more information, see Chapter 3 Managing security on page 95.

15 Going live
15.2 Migrating to the production environment
WebSuite System Administration Guide 479
15.1.3.1 Prerequisites
The following are prerequisites for verifying the Task Scheduler:
15.1.3.2 Verifying the Task Scheduler
To verify the Task Scheduler:
1. Select Admin - Utilities - Configuration Checking - Check Task Scheduler Installation.
Alternatively, you can select Admin - Utilities - Task Scheduler and then click Verify Installation.
2. In the Task Scheduler Installation Verifying Results page:
–If the status of each task is OK, the Task Scheduler is installed correctly.
–If the status of a task is not OK:
a. Refer to the correcting hint to resolve the problem.
b. Once the problem is resolved, click Retry.
15.2 Migrating to the production environment
Usually, your organization sets up Wallstreet Suite in a test environment and then migrates it to a
production environment when it is ready to go live.
15.2.1 Migrating the database
For information on migrating the database, see the appropriate installation guide for your database.
For assistance, contact Wallstreet.
15.2.2 Migrating the configuration files
For information on migration configuration files, contact Wallstreet.
Category Tasks
Security Ensure you have access to the following functions:
• FG-0182 Check Task Scheduler Installation
• FG-0279 Task Scheduler.
For more information, see Chapter 3 Managing security on page 95.
15 Going live
15.2 Migrating to the production environment
480 © Wall Street Systems IPH AB - Confidential
WebSuite System Administration Guide 481
Appendix A Security and link IDs
The following table presents the security and link IDs of all functions in WebSuite, sorted by the default
menu:
Name Type Security ID Link ID
Trading Group MLT-10004 10004
Configuration Subgroup N/A N/A
Deal Page Setup Function FG-1073 1073
Entities Subgroup N/A N/A
Currencies Subgroup N/A N/A
Lists Function FG-1063 1063
List Groups Function FG-1064 1064
Clients Subgroup N/A N/A
Lists Function FG-1065 1065
List Groups Function FG-1066 1066
Instruments Subgroup N/A N/A
Lists Function FG-1067 1067
List Groups Function FG-1068 1068
Portfolios Subgroup N/A N/A
Lists Function FG-1069 1069
Deal Mappings Function FG-1070 1070
Report Mappings Function FG-1071 1071
Treasury Mappings Function FG-1072 1072
Automatic Pricing Subgroup N/A N/A
Price Groups Subgroup N/A N/A
All Function FG-1074 1074
Auto Accept Function FG-1075 1075
FX Spot Function FG-1076 1076
FX Forward Function FG-1077 1077
FX Swap Function FG-1078 1078
Deposit/Loan Function FG-1079 1079
Price Rules Function FG-1080 1080
Capture Subgroup N/A N/A

482 © Wall Street Systems IPH AB - Confidential
Foreign Exchange Subgroup N/A N/A
Spot Function FG-1001 1001
Spot (Batch Entry) Function FG-1002 1002
Forward Function FG-1003 1003
Swap Function FG-1004 1004
Option Function FG-1005 1005
IR Instruments Subgroup N/A N/A
Short Deposit/Loan Function FG-1006 1006
Fixed Deposit/Loan Function FG-1007 1007
Floating Deposit/Loan Function FG-1008 1008
Bond Function FG-1009 1009
Discount Function FG-1010 1010
IR Swap Function FG-1011 1011
Cross Currency IR Swap Function FG-1012 1012
Equity Function FG-1013 1013
Cash Subgroup N/A N/A
BA Balance Function FG-1014 1014
Payment Function FG-1015 1015
Transfer Function FG-1016 1016
Commercial Lending Subgroup N/A N/A
Loan Drawdown Entry Function FG-1024 1024
Loan Drawdown Search Function FG-1025 1025
Loan Monitor Subgroup N/A N/A
Basic Function FG-1026 1026
Advanced Function FG-1027 1027
Enhanced Function FG-1028 1028
Expert Function FG-1029 1029
Request Subgroup N/A N/A
Foreign Exchange Subgroup N/A N/A
Spot Function FG-1017 1017
Forward Function FG-1018 1018
Swap Function FG-1019 1019
Option Function FG-1020 1020
IR Instruments Subgroup N/A N/A
Short Deposit/Loan Function FG-1021 1021
Pending Transactions Function FG-1022 1022
Name Type Security ID Link ID
WebSuite System Administration Guide 483
Priced Transactions Function FG-1023 1023
Processing Subgroup N/A N/A
Deal Confirmation Function FG-1030 1030
Reopened Transactions Function FG-1031 1031
Review Transactions Subgroup N/A N/A
Simple Search Function FG-1032 1032
Advanced Search Function FG-1033 1033
Treasury Monitor Group TBD TBD
Instrument Based Subgroup N/A N/A
EQ Summary Function FG-1046 1046
EQ Detail Function FG-1047 1047
TP-LIQ Subgroup N/A N/A
Balance by date and account Function FG-1048 1048
Liquidity in base currency Function FG-1049 1049
Liquidity in foreign currencies Function FG-1050 1050
Position and Risk Subgroup N/A N/A
Instrument Category Function FG-1051 1051
Instrument Group Function FG-1052 1052
Instrument Function FG-1053 1053
Maturity Bucket Function FG-1054 1054
Liquidity Function FG-1055 1055
Miscellaneous Subgroup N/A N/A
Crossed totals Function FG-1056 1056
Liquidities Function FG-1057 1057
Forecasting Group MLT-10001 10001
Configuration Subgroup N/A N/A
Forecast Configuration Maintenance Function FG-0420 420
Forecast Entry Function FG-0420 421
Forecast Mirroring Function FG-0420 422
Forecast Horizons Function FG-0420 423
Forecast Allocation Models Function FG-0420 424
Forecast Import Formats Function FG-0398 398
Review Forecast Configuration Documents Function FG-0420 426
Capture Subgroup N/A N/A
Import Forecasts Function FG-0373 373
Enter (Cut & Paste) Forecasts Function FG-0399 399
Name Type Security ID Link ID
484 © Wall Street Systems IPH AB - Confidential
Enter Short-Term Forecasts Function FG-0336 336
Configure Short Term Cash Forecast Entry Subfunction FG-0336.01 N/A
Report Administrator Subfunction FG-0393 N/A
Enter Medium- to Long-Term Forecasts Function FG-0337 337
Configure Medium-Long Term Cash Forecast Entry Subfunction FG-0337.01 N/A
Report Administrator Subfunction FG-0393 N/A
Processing Subgroup N/A N/A
Approve Short-Term Forecasts Function FG-0342 342
Configure Short Term Cash Forecast Approval Subfunction FG-0342.01 N/A
Report Administrator Subfunction FG-0393 N/A
Approve Medium- to Long-Term Forecasts Function FG-0343 343
Configure Medium-Long Term Cash Forecast
Approval
Subfunction FG-0343.01 N/A
Report Administrator Subfunction FG-0393 N/A
2nd Approve Short-Term Forecasts Function FG-0361 361
Configure Short Term Cash Forecast 2nd Approval Subfunction FG-0361.01 N/A
Report Administrator Subfunction FG-0393 N/A
2nd Approve Medium- to Long-Term Forecasts Function FG-0362 362
Configure Medium-Long Term Cash Forecast 2nd
Approval
Subfunction FG-0362.01 N/A
Report Administrator Subfunction FG-0393 N/A
Release Short-Term Forecasts Function FG-0344 344
Configure Short Term Cash Forecast Release Subfunction FG-0344.01 N/A
Report Administrator Subfunction FG-0393 N/A
Release Medium- to Long-Term Forecasts Function FG-0345 345
Configure Medium-Long Term Cash Forecast Release Subfunction FG-0345.01 N/A
Report Administrator Subfunction FG-0393 N/A
Re-Open Short-Term Forecasts Function FG-0365 365
Configure Short Term Cash Forecast Re-open Subfunction FG-0365.01 N/A
Report Administrator Subfunction FG-0393 N/A
Re-Open Medium- to Long-Term Forecasts Function FG-0366 366
Configure Medium-Long Term Cash Forecast Re-open Subfunction FG-0366.01 N/A
Report Administrator Subfunction FG-0393 N/A
Cancel Forecasts Function FG-0390 390
Configure Cancel Forecasts Subfunction FG-0390.01 N/A
Payment Factory Group MLT-10015 10015
Configuration Subgroup N/A N/A
Name Type Security ID Link ID
WebSuite System Administration Guide 485
Payment Factory Configuration Maintenance Function FG-0470 470
Transaction Routing Rules Function FG-0368 368
Transaction Authorization Rules Function FG-0218 218
Transaction Processing Rules Function FG-0369 369
Repetitive Codes Function FG-0071 71
Single Transaction Template Maintenance Function FG-6000 6000
Capture Subgroup N/A N/A
Import Transaction Files Function FG-0203 203
Browse Transaction Files Subfunction FG-0203.01 N/A
Edit Transaction Files Subfunction FG-0203.02 N/A
Import AR Files Function FG-0205 205
Browse AR Files Subfunction FG-0205.01 N/A
Edit AR Files Subfunction FG-0205.02 N/A
Enter Single Transaction Function FG-0188 188
Single Transaction Entry - Complete Access Subfunction TMP-0002 N/A
Enter Repetitive Transactions Function FG-0070 70
Enter Intercompany Payment Function FG-0320 320
Enter Deposits Function FG-0017 17
Undo Transaction File Imports Function FG-0204 204
Undo AR File Imports Function FG-0206 206
Processing Subgroup N/A N/A
Edit Transactions Function FG-0036 36
Edit Manual Transactions Subfunction FG-0036.01 3601
Edit AP Transactions Subfunction FG-0036.02 3602
Edit DD Transactions Subfunction FG-0036.03 3603
Edit Intercompany Payment Function FG-0232 232
Authorize Transactions Function FG-0123 5917
Configure Transaction Authorization Report Subfunction FG-0123.01 N/A
Report Administrator Subfunction FG-0393 N/A
Release Payments Function FG-0064 64
Release Receipts Function FG-0161 161
Reject Transactions Function FG-0216 216
Import Bank Message Files Function FG-0207 207
Review Payment Authorization Function FG-0062 62
Review Unreleased Payments Function FG-0129 129
Review Release Documents Function FG-0063 63
Name Type Security ID Link ID

486 © Wall Street Systems IPH AB - Confidential
Review Export Status Function FG-0200 200
Undo Transaction Authorization Function FG-0210 210
Undo Transaction Releases Function FG-0209 209
Undo Transaction Rejection Function FG-0007 7
Banking Group MLT-10001 10001
Configuration Subgroup N/A N/A
Bank Transaction Import Rules Function FG-0340 340
Bank Transaction Templates Function FG-0358 358
Bank Statement Number Rules Function FG-0363 363
Intraday Bank Statement Processing Rules Function FG-0500 500
Reconciliation Configuration Maintenance Function FG-0480 480
Reconciliation Tolerances Function FG-0068 68
Cash Allocation Rules Function FG-0010 10
Target Balance Rules Function FG-0339 339
Pre-Advice Reporting Limits Function FG-0262 262
Verify Internal Bank Balances Function FG-0378 378
Capture Subgroup N/A N/A
Import Bank Transaction Files Function FG-0201 201
Browse Bank Transaction Files Subfunction FG-0201.01 N/A
Edit Bank Transaction Files Subfunction FG-0201.02 N/A
Enter Bank Statement Function FG-0053 53
Enter Bank Transactions Function FG-0388 388
Configure Enter Bank Transactions Subfunction FG-0388.01 N/A
Report Administrator Subfunction FG-0393 N/A
Undo Bank Transaction File Imports Function FG-0202 202
Bank Statement Subgroup N/A N/A
Close Bank Statements Function FG-0389 389
Configure Bank Statements Closure Subfunction FG-0389.01 N/A
Report Administrator Subfunction FG-0393 N/A
Export Bank Statements Function FG-0301 301
Configure Bank Statement Export Subfunction FG-0301.01 N/A
Report Administrator Subfunction FG-0393 N/A
Generate Internal Bank Transactions Function FG-0330 330
Close Internal Bank Transactions Function FG-0341 341
Undo Bank Statement Exports Function FG-0372 372
Bank Balance Subgroup N/A N/A
Name Type Security ID Link ID

WebSuite System Administration Guide 487
Update Bank Balances Function FG-0131 131
Calculate Bank Balances Function FG-0220 220
Recalculate IHB Account Balances Function FG-0006 6
Export Bank Account Balance Function FG-0332 332
Reconciliation Subgroup N/A N/A
Cash Reconciliation Function FG-0370 370
Configure Cash Reconciliation Subfunction FG-0370.01 N/A
Report Administrator Subfunction FG-0393 N/A
Manual Reconciliation Function FG-0379 379
Manual Reconciliation Template Maintenance Subfunction FG-0379.01 N/A
Report Administrator Subfunction FG-0393 N/A
Bank Reconciliation Function FG-0108 108
Review and Finalize Closing Balances Subfunction FG-0108.01 N/A
Create Reconciliation Adjustments Subfunction FG-0108.02 N/A
Enter Cash Allocations Function FG-0054 54
Interest Subgroup N/A N/A
Interest Calculation Function FG-0219 219
Undo Interest Calculation Function FG-0335 335
Target Balancing Subgroup N/A N/A
Cash Monitor Function FG-0338 338
Configure Cash Monitor Subfunction FG-0338.01 N/A
Run all sweeps Subfunction FG-0338.02 N/A
Run Selected Transfers Subfunction FG-0338.03 N/A
Report Administrator Subfunction FG-0393 N/A
Settlement Subgroup N/A N/A
Lock/Unlock Settlement Accounts Function FG-0313 313
Settle Bank Accounts Function FG-0309 309
Undo Settlement Function FG-0310 310
Netting Subgroup N/A N/A
Netting Application Function FG-0255 255
Enter Intercompany Payments Subfunction FG-0255.01 N/A
Edit and Approve Intercompany Payments Subfunction FG-0255.02 N/A
Enter, Edit and Approve FX Offer/Asks Subfunction FG-0255.03 N/A
Net Position by Entity Subfunction FG-0255.04 N/A
Net Position by Currency Subfunction FG-0255.05 N/A
New Cash Flow by SubCenter Subfunction FG-0255.06 N/A
Name Type Security ID Link ID
488 © Wall Street Systems IPH AB - Confidential
Netting Periods Function FG-0264 264
Net Position By Entity Function FG-0042 42
Net Position By Currency Function FG-0090 90
Central Banking Subgroup N/A N/A
Regulatory Transaction Codes Function FG-0302 302
Accounting Group MLT-10001 10001
Configuration Subgroup N/A N/A
Posting Requirement Definition Function FG-0178 178
Processing Subgroup N/A N/A
Generate Daily Accounting Events Function FG-0374 374
Reporting Group TBD TBD
Configuration Subgroup N/A N/A
Report Mapping Function FG-0265 265
Time Bucket Sets Function FG-0392 392
Configure Maintain Time Bucket Sets Subfunction FG-0392.01 N/A
Trading Subgroup N/A N/A
FX Instruments Subgroup N/A N/A
FX Daily Deals Function FG-1034 1034
FX Outstanding Position Function FG-1035 1035
EQ Instruments Subgroup N/A N/A
Equity Function FG-1036 1036
EQ Transactions Function FG-1037 1037
MM Instruments Subgroup N/A N/A
MM Daily Deals Function FG-1038 1038
MM Inventory Function FG-1039 1039
Other Reports Subgroup N/A N/A
Key Figure Function FG-1042 1042
Balance Function FG-1043 1043
Cashflows Function FG-1044 1044
Fixing Rate Function FG-1045 1045
Forecasting Subgroup N/A N/A
Forecast Reports Function FG-0013 13
Configure Custom Forecast Report Subfunction FG-0013.50 N/A
Report Administrator Subfunction FG-0393 N/A
Payment Factory Subgroup N/A N/A
Cash Transaction Report Function FG-0067 5873
Name Type Security ID Link ID

WebSuite System Administration Guide 489
Configure Cash Transaction Reports Subfunction FG-0067.01 N/A
Report Administrator Subfunction FG-0393 N/A
Cash Position Function FG-0397 397
Configure Cash Position Subfunction FG-0397.01 N/A
Report Administrator Subfunction FG-0393 N/A
Transaction Analysis Function FG-0128 128
Remittance Detail Report Function FG-0166 166
Review Transaction Error Messages Function FG-0124 124
Banking Subgroup N/A N/A
Bank Statement Subgroup N/A N/A
Bank Statement Function FG-0364 364
Configure Bank Transaction Statement Subfunction FG-0364.01 N/A
Report Administrator Subfunction FG-0393 N/A
Bank Transaction Report Function FG-0008 5872
Configure Bank Transaction Reports Subfunction FG-0008.01 N/A
Report Administrator Subfunction FG-0393 N/A
Bank Download Report Function FG-0245 245
Review Returned Checks Function FG-0009 9
Bank Balance Subgroup N/A N/A
Bank Balance Analysis Function FG-0002 360
Configure Bank Balance Analysis Subfunction FG-0002.01 N/A
Report Administrator Subfunction FG-0393 N/A
International Bank Account Balances Function FG-0047 47
Cash Balance Subgroup N/A N/A
Update Cash Balances Function FG-0507 N/A
Calculate Cash Balances Function FG-0506 N/A
Reconciliation Subgroup N/A N/A
Daily Reconciliation Report Function FG-0015 15
Suspense Reconciliation Report Function FG-0246 246
Interest Subgroup N/A N/A
Interest Report Function FG-0160 160
Configure Bank Account Interest Report Subfunction FG-0160.01 N/A
Report Administrator Subfunction FG-0393 N/A
Interest Allocation Function FG-0133 133
Credit Line Report Function FG-0375 375
Configure Credit Line Report Subfunction FG-0375.01 N/A
Name Type Security ID Link ID

490 © Wall Street Systems IPH AB - Confidential
Report Administrator Subfunction FG-0393 N/A
Bank Account Summary Report Function FG-0396 396
Configure Credit Line Limit Reports Subfunction FG-0396.01 N/A
Report Administrator Subfunction FG-0393 N/A
Settlement Subgroup N/A N/A
Settlement Report Function FG-0187 187
Central Banking Subgroup N/A N/A
Central Bank Regulatory Report Function FG-0073 73
Regulatory Reporting Function FG-0288 288
Accounting Subgroup N/A N/A
Chart of Accounts Function FG-2001 2001
Chart of Accounts Verification Function FG-2002 2002
Accounting Entry State Function FG-2003 2003
Accounting Journal Function FG-2004 2004
Trial Balance Summary Function FG-2005 2005
Accounting Events Report Function FG-0383 383
Daily Activity Timetable Function FG-0137 137
Admin Group TBD TBD
Trading Subgroup N/A N/A
Synchronization Console Function FG-1060 1060
Static Data Subgroup N/A N/A
Portfolio Function FG-1058 1058
User Groups Subgroup N/A N/A
Groups Function FG-1061 1061
Users Function FG-1062 1062
Application Server Subgroup N/A N/A
Information Subgroup N/A N/A
Environment Function FG-1085 1085
Log Function FG-1086 1086
Trader-Client Mappings Function FG-1082 1082
Trading Hours Function FG-1083 1083
Mode Mappings Function FG-1084 1084
User Information Function FG-1089 1089
Static Data Subgroup N/A N/A
Entities Subgroup N/A N/A
Edit Entity Function FG-0167 167
Name Type Security ID Link ID

WebSuite System Administration Guide 491
Edit In-House Bank Function FG-0354 354
Entity Bank Accounts Function FG-0130 130
Entity Relationships Function FG-0056 56
Entity ID Mapping for AP & AR Function FG-0055 55
Bank Account Group Mapping Function FG-0093 93
Settlement Groups Function FG-0295 295
People Function FG-0065 65
Signatories Function FG-0076 76
Counterparties Subgroup N/A N/A
Edit Counterparty Function FG-0170 169
Counterparty Bank Accounts Function FG-0171 171
Counterparty Types Function FG-0098 98
Counterparty Contacts Function FG-0112 112
Replace Counterparties Function FG-0072 72
Supporting Data Subgroup N/A N/A
Bank Account Relationships Function FG-0501 501
Bank Account Types Function FG-0001 1
Bank Holidays Function FG-0005 5
Business Segments Function FG-0367 367
Countries Function FG-0097 97
Currencies Function FG-0099 99
Employee Roles Function FG-0106 106
Industry Codes Function FG-0040 40
Parameter Editor Function FG-0355 355
Party Relationships Function FG-0057 57
Party Roles Function FG-0061 61
Payment Methods Function FG-0307 307
Regions Function FG-0121 121
States Function FG-0077 77
Instruments Subgroup N/A N/A
Instrument Categories Function FG-0104 104
Instrument Groups Function FG-0267 267
Instrument Types Function FG-0105 105
Central Bank Reporting Subgroup N/A N/A
Regulatory Reporting Codes Function FG-0069 69
Exposure Management Subgroup N/A N/A
Name Type Security ID Link ID

492 © Wall Street Systems IPH AB - Confidential
Limits Function FG-0172 172
Credit Line Limit Maintenance Subfunction FG-0395 N/A
Bank Interfacing Subgroup N/A N/A
Interfaces Configuration Maintenance Function FG-0460 460
Communication Protocols Function FG-0096 96
Communication Protocol Parameters Function FG-0038 38
Signers Function FG-0183 183
Signer Parameters Function FG-0184 184
Command Line Processors Function FG-0359 359
Interchanges Function FG-0175 175
Branch Qualifiers Function FG-0004 4
SWIFT Payment Templates Function FG-0318 318
Transaction Subtype Mapping Function FG-0085 85
Review Subgroup N/A N/A
Review Entities Function FG-0060 60
Review Counterparties Function FG-0059 59
Review Entity Bank Accounts Function FG-0058 58
Market Data Subgroup N/A N/A
Interest Subgroup N/A N/A
Import Interest Rates Function FG-0276 276
Interest Rates Function FG-0045 45
Tiered Interest Rates Function FG-0268 268
Interest Rate Categories Function FG-0044 44
Interest Rate Types Function FG-0046 46
Interest Calculation Methods Function FG-0043 43
Yield Curves Function FG-0296 296
Yield Curve Interest Rates Function FG-0297 297
Foreign Exchange Subgroup N/A N/A
Import FX Rates Function FG-0199 199
FX Rates Function FG-0100 100
FX Rate Sources Function FG-0179 179
FX Rate Source Mapping Function FG-0078 78
Review Subgroup N/A N/A
Review Interest Rates Function FG-0235 235
Review FX Rates Function FG-0234 234
Review Interest Calculation Methods Function FG-0134 134
Name Type Security ID Link ID

WebSuite System Administration Guide 493
Security Subgroup N/A N/A
Management Subgroup N/A N/A
Security Configuration Maintenance Function FG-0440 440
Review Security Access Function FG-0141 141
Initialize Security Function FG-0049 49
Profiles Subgroup N/A N/A
Security by Function Function FG-0287 287
Security by Attribute Function FG-0386 386
Security by Entity Function FG-0286 286
Security by Entity by Function Function FG-0380 380
Security by Counterparty Function FG-0382 382
Security by Counterparty by Function Function FG-0384 384
Security by Bank Account Function FG-0371 371
Security by Settlement Group Function FG-0312 312
Security by Cash Flow Type Function FG-0376 376
Security by Authorization Request Type Function FG-0011 11
Multiple Security Assignments Function FG-0314 314
Users Subgroup N/A N/A
User Information Function FG-0186 186
User Information - New User Subfunction FG-0186.01 N/A
Modify User Information Subfunction FG-0186.02 N/A
Modify Security Setup Subfunction FG-0186.03 N/A
Modify Login Information Subfunction FG-0186.04 N/A
Multiple Assignments to Users Function FG-0315 315
Copy User Assignments Function FG-0316 316
Security by User Group Function FG-0381 381
Administrative Centers Subgroup N/A N/A
Security by Administrative Center Function FG-0120 120
Copy Administrative Center Assignments Function FG-0317 317
Authorization Subgroup N/A N/A
Authorization Request Types Function FG-0196 196
Review Authorization Requests Function FG-0377 377
Pending Authorizations Function FG-0197 197
Audit Subgroup N/A N/A
Audit Object Attributes Function FG-0195 195
Audit Events Function FG-0194 194
Name Type Security ID Link ID

494 © Wall Street Systems IPH AB - Confidential
Audit Reporting Function FG-0193 193
Import Audit Files Function FG-0208 208
Utilities Subgroup N/A N/A
Task Scheduler Function FG-0279 279
Terminate Queues Subfunction TQS-0001 N/A
Review Job Log Function FG-0039 39
Analysis Subgroup N/A N/A
Data Dump Function FG-0214 214
Log Viewer Function FG-0114 114
Message Log Function FG-0003 113
Session Info. Function N/A 324
Setup Subgroup N/A N/A
Configuration Parameters Function FG-0014 14
Data Source Cache Maintenance Function FG-0394 394
Import Page Usage Files Function FG-0502 502
Log File Types Function FG-0139 323
Release Process Locks Function FG-0326 326
Accounting Flag Utility Function FG-0177 177
Remote Processes Function FG-0303 303
Review Multilingual Phrases Function FG-0352 352
Review CMM Configuration Documents Function FG-0400 400
Workflow Engines Setup Subgroup N/A N/A
Reload Workflow Engines Caches Function ALT-0505.02 20002
State Changes Audit Trail Function ALT-0505.03 20003
Work Flow Report Function ALT-0505.04 20004
Check Selection Criteria Template Integrity Function ALT-0505.05 20005
Bank Interfacing Subgroup N/A N/A
Import Free Format Message File Function FG-0504 504
Free Format Messaging Function FG-0503 503
Communication Dispatch Function FG-0215 215
Configuration Checking Subgroup N/A N/A
Check File Locations Function FG-0181 181
Check Task Scheduler Installation Function FG-0182 182
Check Referential Integrity Function FG-0180 180
Daily Bulletins Subgroup N/A N/A
Enter Daily Bulletins Function FG-0272 272
Name Type Security ID Link ID
WebSuite System Administration Guide 495
View Daily Bulletins Function FG-0281 281
User Options Function N/A 86
Maintain Event Subscriptions Subfunction FG-0385 N/A
Miscellaneous N/A N/A N/A
Show User Name Subfunction FG-0391 N/A
Name Type Security ID Link ID
496 © Wall Street Systems IPH AB - Confidential
WebSuite System Administration Guide 497
Appendix B Time zones
Wallstreet Suite supports the following time zones:
ACT AET Africa/Abidjan
Africa/Accra Africa/Addis_Ababa Africa/Algiers
Africa/Asmera Africa/Bamako Africa/Bangui
Africa/Banjul Africa/Bissau Africa/Blantyre
Africa/Brazzaville Africa/Bujumbura Africa/Cairo
Africa/Casablanca Africa/Ceuta Africa/Conakry
Africa/Dakar Africa/Dar_es_Salaam Africa/Djibouti
Africa/Douala Africa/El_Aaiun Africa/Freetown
Africa/Gaborone Africa/Harare Africa/Johannesburg
Africa/Kampala Africa/Khartoum Africa/Kigali
Africa/Kinshasa Africa/Lagos Africa/Libreville
Africa/Lome Africa/Luanda Africa/Lubumbashi
Africa/Lusaka Africa/Malabo Africa/Maputo
Africa/Maseru Africa/Mbabane Africa/Mogadishu
Africa/Monrovia Africa/Nairobi Africa/Ndjamena
Africa/Niamey Africa/Nouakchott Africa/Ouagadougou
Africa/Porto-Novo Africa/Sao_Tome Africa/Timbuktu
Africa/Tripoli Africa/Tunis Africa/Windhoek
AGT America/Adak America/Anchorage
America/Anguilla America/Antigua America/Araguaina
America/Aruba America/Asuncion America/Atka
America/Barbados America/Belem America/Belize
America/Boa_Vista America/Bogota America/Boise
America/Buenos_Aires America/Cambridge_Bay America/Cancun
America/Caracas America/Catamarca America/Cayenne
America/Cayman America/Chicago America/Chihuahua
America/Cordoba America/Costa_Rica America/Cuiaba
America/Curacao America/Danmarkshavn America/Dawson
America/Dawson_Creek America/Denver America/Detroit
America/Dominica America/Edmonton America/Eirunepe
498 © Wall Street Systems IPH AB - Confidential
America/El_Salvador America/Ensenada America/Fort_Wayne
America/Fortaleza America/Glace_Bay America/Godthab
America/Goose_Bay America/Grand_Turk America/Grenada
America/Guadeloupe America/Guatemala America/Guayaquil
America/Guyana America/Halifax America/Havana
America/Hermosillo America/Indiana/ Indianapolis
America/Indiana/Knox America/Indiana/Marengo America/Indiana/Vevay
America/Indianapolis America/Inuvik America/Iqaluit
America/Jamaica America/Jujuy America/Juneau
America/Kentucky/ Louisville America/Kentucky/
Monticello America/Knox_IN America/La_Paz
America/Lima America/Los_Angeles America/Louisville
America/Maceio America/Managua America/Manaus
America/Martinique America/Mazatlan America/Mendoza
America/Menominee America/Merida America/Mexico_City
America/Miquelon America/Monterrey America/Montevideo
America/Montreal America/Montserrat America/Nassau
America/New_York America/Nipigon America/Nome
America/Noronha America/North_Dakota/ Center
America/Panama America/Pangnirtung America/Paramaribo
America/Phoenix America/Port_of_Spain America/Port-au-Prince
America/Porto_Acre America/Porto_Velho America/Puerto_Rico
America/Rainy_River America/Rankin_Inlet America/Recife
America/Regina America/Rio_Branco America/Rosario
America/Santiago America/Santo_Domingo America/Sao_Paulo
America/Scoresbysund America/Shiprock America/St_Johns
America/St_Kitts America/St_Lucia America/St_Thomas
America/St_Vincent America/Swift_Current America/Tegucigalpa
America/Thule America/Thunder_Bay America/Tijuana
America/Tortola America/Vancouver America/Virgin
America/Whitehorse America/Winnipeg America/Yakutat
America/Yellowknife Antarctica/Casey Antarctica/Davis
Antarctica/ DumontDUrville Antarctica/Mawson
Antarctica/McMurdo Antarctica/Palmer Antarctica/South_Pole
Antarctica/Syowa Antarctica/Vostok Arctic/Longyearbyen
ART Asia/Aden Asia/Almaty
Asia/Amman Asia/Anadyr Asia/Aqtau
WebSuite System Administration Guide 499
Asia/Aqtobe Asia/Ashgabat Asia/Ashkhabad
Asia/Baghdad Asia/Bahrain Asia/Baku
Asia/Bangkok Asia/Beirut Asia/Bishkek
Asia/Brunei Asia/Calcutta Asia/Choibalsan
Asia/Chongqing Asia/Chungking Asia/Colombo
Asia/Dacca Asia/Damascus Asia/Dhaka
Asia/Dili Asia/Dubai Asia/Dushanbe
Asia/Gaza Asia/Harbin Asia/Hong_Kong
Asia/Hovd Asia/Irkutsk Asia/Istanbul
Asia/Jakarta Asia/Jayapura Asia/Jerusalem
Asia/Kabul Asia/Kamchatka Asia/Karachi
Asia/Kashgar Asia/Katmandu Asia/Krasnoyarsk
Asia/Kuala_Lumpur Asia/Kuching Asia/Kuwait
Asia/Macao Asia/Macau Asia/Magadan
Asia/Makassar Asia/Manila Asia/Muscat
Asia/Nicosia Asia/Novosibirsk Asia/Omsk
Asia/Oral Asia/Phnom_Penh Asia/Pontianak
Asia/Pyongyang Asia/Qatar Asia/Qyzylorda
Asia/Rangoon Asia/Riyadh Asia/Riyadh87
Asia/Riyadh88 Asia/Riyadh89 Asia/Saigon
Asia/Sakhalin Asia/Samarkand Asia/Seoul
Asia/Shanghai Asia/Singapore Asia/Taipei
Asia/Tashkent Asia/Tbilisi Asia/Tehran
Asia/Tel_Aviv Asia/Thimbu Asia/Thimphu
Asia/Tokyo Asia/Ujung_Pandang Asia/Ulaanbaatar
Asia/Ulan_Bator Asia/Urumqi Asia/Vientiane
Asia/Vladivostok Asia/Yakutsk Asia/Yekaterinburg
Asia/Yerevan AST Atlantic/Azores
Atlantic/Bermuda Atlantic/Canary Atlantic/Cape_Verde
Atlantic/Faeroe Atlantic/Jan_Mayen Atlantic/Madeira
Atlantic/Reykjavik Atlantic/South_Georgia Atlantic/St_Helena
Atlantic/Stanley Australia/ACT Australia/Adelaide
Australia/Brisbane Australia/Broken_Hill Australia/Canberra
Australia/Darwin Australia/Hobart Australia/LHI
Australia/Lindeman Australia/Lord_Howe Australia/Melbourne
Australia/North Australia/NSW Australia/Perth
Australia/Queensland Australia/South Australia/Sydney
500 © Wall Street Systems IPH AB - Confidential
Australia/Tasmania Australia/Victoria Australia/West
Australia/Yancowinna BET Brazil/Acre
Brazil/DeNoronha Brazil/East Brazil/West
BST Canada/Atlantic Canada/Central
Canada/Eastern Canada/East-Saskatchewan Canada/Mountain
Canada/Newfoundland Canada/Pacific Canada/Saskatchewan
Canada/Yukon CAT CET
Chile/Continental Chile/EasterIsland CNT
CST CST6CDT CTT
Cuba EAT ECT
EET Egypt Eire
EST EST5EDT Etc/GMT
Etc/GMT+0 Etc/GMT+1 Etc/GMT+10
Etc/GMT+11 Etc/GMT+12 Etc/GMT+2
Etc/GMT+3 Etc/GMT+4 Etc/GMT+5
Etc/GMT+6 Etc/GMT+7 Etc/GMT+8
Etc/GMT+9 Etc/GMT0 Etc/GMT-0
Etc/GMT-1 Etc/GMT-10 Etc/GMT-11
Etc/GMT-12 Etc/GMT-13 Etc/GMT-14
Etc/GMT-2 Etc/GMT-3 Etc/GMT-4
Etc/GMT-5 Etc/GMT-6 Etc/GMT-7
Etc/GMT-8 Etc/GMT-9 Etc/Greenwich
Etc/UCT Etc/Universal Etc/UTC
Etc/Zulu Europe/Amsterdam Europe/Andorra
Europe/Athens Europe/Belfast Europe/Belgrade
Europe/Berlin Europe/Bratislava Europe/Brussels
Europe/Bucharest Europe/Budapest Europe/Chisinau
Europe/Copenhagen Europe/Dublin Europe/Gibraltar
Europe/Helsinki Europe/Istanbul Europe/Kaliningrad
Europe/Kiev Europe/Lisbon Europe/Ljubljana
Europe/London Europe/Luxembourg Europe/Madrid
Europe/Malta Europe/Minsk Europe/Monaco
Europe/Moscow Europe/Nicosia Europe/Oslo
Europe/Paris Europe/Prague Europe/Riga
Europe/Rome Europe/Samara Europe/San_Marino
Europe/Sarajevo Europe/Simferopol Europe/Skopje
Europe/Sofia Europe/Stockholm Europe/Tallinn
WebSuite System Administration Guide 501
Europe/Tirane Europe/Tiraspol Europe/Uzhgorod
Europe/Vaduz Europe/Vatican Europe/Vienna
Europe/Vilnius Europe/Warsaw Europe/Zagreb
Europe/Zaporozhye Europe/Zurich GB
GB-Eire GMT GMT0
Greenwich Hongkong HST
Iceland IET Indian/Antananarivo
Indian/Chagos Indian/Christmas Indian/Cocos
Indian/Comoro Indian/Kerguelen Indian/Mahe
Indian/Maldives Indian/Mauritius Indian/Mayotte
Indian/Reunion Iran Israel
IST Jamaica Japan
JST Kwajalein Libya
MET Mexico/BajaNorte Mexico/BajaSur
Mexico/General Mideast/Riyadh87 Mideast/Riyadh88
Mideast/Riyadh89 MIT MST
MST7MDT Navajo NET
NST NZ NZ-CHAT
Pacific/Apia Pacific/Auckland Pacific/Chatham
Pacific/Easter Pacific/Efate Pacific/Enderbury
Pacific/Fakaofo Pacific/Fiji Pacific/Funafuti
Pacific/Galapagos Pacific/Gambier Pacific/Guadalcanal
Pacific/Guam Pacific/Honolulu Pacific/Johnston
Pacific/Kiritimati. Pacific/Kosrae Pacific/Kwajalein
Pacific/Majuro Pacific/Marquesas Pacific/Midway
Pacific/Nauru Pacific/Niue Pacific/Norfolk
Pacific/Noumea Pacific/Pago_Pago Pacific/Palau
Pacific/Pitcairn Pacific/Ponape Pacific/Port_Moresby
Pacific/Rarotonga Pacific/Saipan Pacific/Samoa
Pacific/Tahiti Pacific/Tarawa Pacific/Tongatapu
Pacific/Truk Pacific/Wake Pacific/Wallis
Pacific/Yap PLT PNT
Poland Portugal PRC
PRT PST PST8PDT
ROK Singapore SST
SystemV/AST4 SystemV/AST4ADT SystemV/CST6
SystemV/CST6CDT SystemV/EST5 SystemV/EST5EDT
502 © Wall Street Systems IPH AB - Confidential
SystemV/HST10 SystemV/MST7 SystemV/MST7MDT
SystemV/PST8 SystemV/PST8PDT SystemV/YST9
SystemV/YST9YDT Turkey UCT
Universal US/Alaska US/Aleutian
US/Arizona US/Central US/Eastern
US/East-Indiana US/Hawaii US/Indiana-Starke
US/Michigan US/Mountain US/Pacific
US/Pacific-New US/Samoa UTC
VST WET W-SU
Zulu
WebSuite System Administration Guide 503
Appendix C TRM fields
The following are TRM fields:
action_date : java.util.Date action_fx_spot_rate : java.lang.String
action_fx_fixing_rate : java.lang.String pricing_date : java.util.Date
accrual_date_basis : java.lang.String accrual_date_basis_2 : java.lang.String
accrued_from : java.util.Date accrued_from_2 : java.util.Date
accrued_interest : java.lang.Integer active_at_date : java.util.Date
amount : java.lang.Double amount_2 : java.lang.Double
amount_left : java.lang.Double amount_match : java.lang.Double
amount_precision : java.lang.Integer amount_precision_2 : java.lang.Integer
amount_sold : java.lang.Double audit_number : java.lang.String
base_amount : java.lang.Double base_currency_id : java.lang.String
base_date : java.util.Date base_fx_book_rate : java.lang.String
base_fx_exposure : java.lang.Double base_fx_rate : java.lang.String
base_fx_spot_rate : java.lang.String base_interest_rate : java.lang.Double
base_ir_exposure : java.lang.Double base_price : java.lang.String
base_spot_amount : java.lang.Double batch_id : java.lang.String
book_value : java.lang.Double broker_id : java.lang.String
buy_amount : java.lang.Double buy_currency_id : java.lang.String
buy_date : java.util.Date buy_fx_exposure : java.lang.Double
buy_interest_rate : java.lang.String buy_ir_exposure : java.lang.Double
buy_price : java.lang.String buy_spot_amount : java.lang.Double
buy_currency_id : java.lang.String buy_date : java.util.Date
buy_fx_exposure : java.lang.Double buy_interest_rate : java.lang.String
buy_ir_exposure : java.lang.Double buy_price : java.lang.String
buy_spot_amount : java.lang.Double roll_over_method : java.lang.String
cashflow_roll : java.lang.String cashflow_roll_2 : java.lang.String
closing_date : java.util.Date collateral_amount : java.lang.Double
collateral_instrument_id : java.lang.String collateral_price : java.lang.String
collateral_price_2 : java.lang.Double collateral_price_precision : java.lang.Integer
collateral_price_precision_2 : java.lang.Integer collateral_rate : java.lang.Double
collateral_index : java.lang.String collateral_index_rate : java.lang.String
504 © Wall Street Systems IPH AB - Confidential
collateral_reinvestment_rate : java.lang.String comment : java.lang.String
comment_2 : java.lang.String comment_3 : java.lang.String
comment_4 : java.lang.String coupons_per_year : java.lang.Integer
coupons_per_year_2 : java.lang.Integer cp_client_id : java.lang.String
cp_client_name : java.lang.String cp_trader_id : java.lang.String
currency_2_id : java.lang.String currency_id : java.lang.String
date : java.util.Date date_basis : java.lang.String
date_basis_2 : java.lang.String dattr_0 : java.lang.String
dattr_1 : java.lang.String dattr_2 : java.lang.String
dattr_3 : java.lang.String dattr_4 : java.lang.String
dattr_5 : java.lang.String dattr_6 : java.lang.String
dattr_7 : java.lang.String dattr_8 : java.lang.String
dattr_9 : java.lang.String deal_price : java.lang.String
deal_price_2 : java.lang.String deal_rate : java.lang.String
deal_rate_2 : java.lang.String deal_rate_2_type_id : java.lang.String
deal_rate_type_id : java.lang.String simple_margin : java.lang.String
approx_margin : java.lang.String ytm_margin : java.lang.String
approx_rate : java.lang.String duration_negat : java.lang.Double
duration_posit : java.lang.Double event_result : java.lang.String
expiry_date : java.util.Date fattr_0 : java.lang.String
fattr_1 : java.lang.String fattr_2 : java.lang.String
fattr_3 : java.lang.String fattr_4 : java.lang.String
fee_amount : java.lang.Double figure_amount : java.lang.Double
figure_base_amount : java.lang.Double figure_base_interest_rate : java.lang.Double
figure_base_discount_rate : java.lang.Double figure_spot_rate : java.lang.Double
figure_base_spot_rate : java.lang.Double figure_beta : java.lang.Double
figure_book_value : java.lang.Double figure_book_value_local : java.lang.Double
figure_accrued_interest : java.lang.Double figure_ctd_1_delivery_date : java.util.Date
figure_ctd_1_implied_repo : java.lang.Double figure_ctd_1_instrument_id : java.lang.String
figure_ctd_2_delivery_date : java.util.Date figure_ctd_2_implied_repo : java.lang.Integer
figure_ctd_2_instrument_id : java.lang.String figure_currency_id : java.lang.String
figure_d1 : java.lang.Double figure_d2 : java.lang.Double
figure_date : java.util.Date figure_valuation_date : java.util.Date
figure_delivery_amount : java.lang.Double figure_delivery_date : java.util.Date
figure_delivery_units : java.lang.Double figure_delta : java.lang.Double
figure_discount_rate : java.lang.Double figure_duration : java.lang.Double
figure_duration_negat : java.lang.Double figure_duration_posit : java.lang.Double
WebSuite System Administration Guide 505
figure_effective_convexity : java.lang.Double figure_elasticity : java.lang.Double
figure_eq_exposure : java.lang.Double figure_expiry_rate : java.lang.Double
figure_fixing_rate : java.lang.Double figure_forward_delta : java.lang.Double
figure_forward_price : java.lang.Double figure_fx_spot_rate_fig : java.lang.String
figure_fx_rate_fig : java.lang.String figure_fx_exposure : java.lang.Double
figure_fx_rate : java.lang.String figure_fx_spot_rate : java.lang.String
figure_gamma : java.lang.Double figure_gamma_value : java.lang.Double
figure_index : java.lang.Double figure_index_rate : java.lang.Double
figure_interest_rate : java.lang.Integer figure_ir_exposure_1 : java.lang.Double
figure_ir_exposure_down : java.lang.Double figure_ir_exposure_up : java.lang.Double
figure_market_value : java.lang.Double figure_market_value_clean : java.lang.Double
figure_market_value_local : java.lang.Double figure_spread_market_value : java.lang.Double
figure_spread_market_value_local : java.lang.Double figure_maturity : java.lang.Double
figure_modified_duration : java.lang.Double figure_net_duration : java.lang.Double
figure_nominal_amount : java.lang.Double figure_option_spot_date : java.util.Date
figure_option_spot_rate : java.lang.Double figure_payment_date : java.util.Date
figure_risk_date : java.util.Date figure_present_index : java.lang.Double
figure_present_value : java.lang.Double figure_present_value_d : java.lang.Double
figure_price : java.lang.Double figure_realized_eq_profit : java.lang.Double
figure_realized_fx_profit : java.lang.Double figure_realized_interest : java.lang.Integer
figure_realized_ir_profit : java.lang.Double figure_realize_date : java.util.Date
figure_result_margin1 : java.lang.Double figure_result_margin2 : java.lang.Double
figure_result_price : java.lang.Double figure_rho : java.lang.Double
figure_rho_risk : java.lang.Double figure_risk_value : java.lang.Double
figure_sigma : java.lang.Double figure_spot_date : java.util.Date
figure_fx_spot_date : java.util.Date figure_settlement_date : java.util.Date
figure_maturity_date : java.util.Date figure_spot_duration : java.lang.Double
figure_spot_duration_negat : java.lang.Double figure_spot_duration_posit : java.lang.Double
figure_spot_net_duration : java.lang.Double figure_spot_nominal_amount : java.lang.Double
figure_spot_risk_1 : java.lang.Double figure_spot_risk_2 : java.lang.Double
figure_spot_value : java.lang.Double figure_strike_price : java.lang.Double
figure_strike_probability : java.lang.Double figure_theta : java.lang.Double
figure_theta_risk : java.lang.Double figure_time_risk : java.lang.Double
figure_underlying_market_value : java.lang.Double figure_intrinsic_value : java.lang.Double
figure_time_value : java.lang.Double figure_underlying_spot_units : java.lang.Double
figure_underlying_units : java.lang.Double figure_units : java.lang.Double
figure_deal_rate : java.lang.String figure_deal_price : java.lang.String
506 © Wall Street Systems IPH AB - Confidential
figure_unrealized_accrued_ir_profit :
java.lang.Double
figure_unrealized_eq_profit : java.lang.Double
figure_unrealized_fx_profit : java.lang.Double figure_unrealized_interest : java.lang.Integer
figure_unrealized_ir_profit : java.lang.Double figure_value_date : java.util.Date
figure_vega : java.lang.Double figure_vega_risk : java.lang.Double
figure_volatility : java.lang.Double figure_yield_gamma_value : java.lang.Double
figure_yield_ir_exposure_1 : java.lang.Double figure_yield_to_maturity : java.lang.Double
first_interest_period : java.util.Date first_interest_period_2 : java.util.Date
first_principal_period : java.util.Date first_principal_period_2 : java.util.Date
fixing_amount : java.lang.Double fixing_calendar_id : java.lang.String
fixing_calendar_id_2 : java.lang.String fixing_currency_id : java.lang.String
fixing_date : java.util.Date fixing_offset : java.lang.Integer
fixing_offset_2 : java.lang.Integer fixing_in_arrears : java.lang.Boolean
fixing_in_arrears_2 : java.lang.Boolean fixing_period_id : java.lang.String
fixing_period_id_2 : java.lang.String fixing_price : java.lang.Double
fixing_rate_id : java.lang.String fixing_rate_id_2 : java.lang.String
fx_exposure : java.lang.Double fx_exposure_rough : java.lang.Double
fx_finance_rate : java.lang.Double fx_forward_ask_points : java.lang.Double
fx_forward_bid_points : java.lang.Double fx_forward_points : java.lang.Double
fx_market_points : java.lang.Double fx_market_rate : java.lang.String
fx_rate : java.lang.String fx_spot_rate : java.lang.String
fx_target_date : java.util.Date fx_total_points : java.lang.Double
iattr_0 : java.lang.String iattr_1 : java.lang.String
iattr_2 : java.lang.String iattr_3 : java.lang.String
iattr_4 : java.lang.String imm_dates : java.lang.Boolean
imm_dates_2 : java.lang.Integer index : java.lang.Integer
index_rate : java.lang.Double instrument_id : java.lang.String
interest_adjusted : java.lang.Integer interest_adjusted_2 : java.lang.Integer
interest_calendar_id : java.lang.Integer interest_calendar_id_2 : java.lang.Intege
ir_difference : java.lang.Double ir_exposure : java.lang.Double
ir_exposure_2 : java.lang.Double ir_exposure_rough : java.lang.Double
ir_exposure_rough_2 : java.lang.Double issuer_id : java.lang.String
issue_index : java.lang.Integer last_interest_period : java.util.Date
last_interest_period_2 : java.util.Date last_principal_period : java.util.Date
last_principal_period_2 : java.util.Date leg_1_id : java.lang.String
leg_2_id : java.lang.String local_account_id : java.lang.String
local_account_id_1 : java.lang.String local_account_id_2 : java.lang.String
local_account_id_3 : java.lang.String local_account_id_4 : java.lang.String
WebSuite System Administration Guide 507
local_bank_id : java.lang.String local_bank_id_1 : java.lang.String
local_bank_id_2 : java.lang.String local_bank_id_3 : java.lang.String
local_bank_id_4 : java.lang.String local_client_id_1 : java.lang.String
local_client_id_2 : java.lang.String local_client_id_3 : java.lang.String
local_client_id_4 : java.lang.String local_corr_bank_id_1 : java.lang.String
local_corr_bank_id_2 : java.lang.String local_corr_bank_id_3 : java.lang.String
local_corr_bank_id_4 : java.lang.String local_custody_account_id : java.lang.String
local_custody_id : java.lang.String local_main_bank_id_1 : java.lang.String
local_main_bank_id_2 : java.lang.String local_main_bank_id_3 : java.lang.String
local_main_bank_id_4 : java.lang.String logical_number : java.lang.String
margin1 : java.lang.String margin2 : java.lang.String
market_id : java.lang.String mattr_0 : java.lang.String
mattr_1 : java.lang.String mattr_2 : java.lang.String
mattr_3 : java.lang.String mattr_4 : java.lang.String
maturity : java.lang.Integer maturity_amount : java.lang.Double
maturity_code : java.lang.String maturity_date : java.util.Date
net_amount : java.lang.Double net_amount_2 : java.lang.Double
nominal_rate : java.lang.String nominal_rate_2 : java.lang.String
nominal_rate_2_type_id : java.lang.String nominal_rate_type_id : java.lang.String
number : java.lang.String opening_date : java.util.Date
opening_time : java.util.Date other_account_id : java.lang.String
other_account_id_1 : java.lang.String other_account_id_2 : java.lang.String
other_account_id_3 : java.lang.String other_account_id_4 : java.lang.String
other_bank_id : java.lang.String other_bank_id_1 : java.lang.String
other_bank_id_2 : java.lang.String other_bank_id_3 : java.lang.String
other_bank_id_4 : java.lang.String other_client_id_1 : java.lang.String
other_client_id_2 : java.lang.String other_client_id_3 : java.lang.String
other_client_id_4 : java.lang.String other_corr_bank_id_1 : java.lang.String
other_corr_bank_id_2 : java.lang.String other_corr_bank_id_3 : java.lang.String
other_corr_bank_id_4 : java.lang.String other_custody_account_id : java.lang.String
other_custody_id : java.lang.String other_main_bank_id_1 : java.lang.String
other_main_bank_id_2 : java.lang.String other_main_bank_id_3 : java.lang.String
other_main_bank_id_4 : java.lang.String package_id : java.lang.Integer
package_type_id : java.lang.String param_0 : java.lang.String
param_1 : java.lang.String param_2 : java.lang.String
param_3 : java.lang.String param_4 : java.lang.String
param_5 : java.lang.String param_6 : java.lang.String
508 © Wall Street Systems IPH AB - Confidential
param_7 : java.lang.String param_8 : java.lang.String
param_9 : java.lang.String parent_number : java.lang.String
payment_calendar_id : java.lang.String payment_calendar_id_2 : java.lang.String
payment_convention : java.lang.String payment_convention_2 : java.lang.String
payment_currency_id_1 : java.lang.String payment_currency_id_2 : java.lang.String
payment_currency_id_3 : java.lang.String payment_currency_id_4 : java.lang.String
points_from_ir_diff : java.lang.Integer portfolio_id : java.lang.String
portfolio_name : java.lang.String premium_amount : java.lang.Double
premium_currency_id : java.lang.String premium_date : java.util.Date
premium_price : java.lang.String premium_type_id : java.lang.Integer
price : java.lang.String price_precision : java.lang.Integer
principal_calendar_id : java.lang.String principal_calendar_id_2 : java.lang.String
pseudo_repayment : java.lang.Integer pseudo_settlement : java.lang.Boolean
dvp_settlement : java.lang.Boolean dvp_repayment : java.lang.Boolean
quote_amount : java.lang.Double quote_currency_id : java.lang.String
quote_date : java.util.Date quote_fx_exposure : java.lang.Double
quote_fx_rate : java.lang.String quote_fx_spot_rate : java.lang.String
quote_interest_rate : java.lang.Double quote_ir_exposure : java.lang.Double
quote_price : java.lang.String quote_spot_amount : java.lang.Double
rate : java.lang.Double rate_cap : java.lang.String
rate_floor : java.lang.String rate_precision : java.lang.Integer
reference_number : java.lang.String reference_rate_id : java.lang.String
reference_rate_id_2 : java.lang.String repayments_per_year : java.lang.Integer
repayments_per_year_2 : java.lang.Integer repayment_method : java.lang.String
repayment_method_2 : java.lang.String repayment_percent : java.lang.Double
repayment_percent_2 : java.lang.Double repayment_sum : java.lang.Double
rule_id : java.lang.String sattr_0 : java.lang.String
sattr_1 : java.lang.String sattr_2 : java.lang.String
sattr_3 : java.lang.String sattr_4 : java.lang.String
sattr_5 : java.lang.String sattr_6 : java.lang.String
sattr_7 : java.lang.String sattr_8 : java.lang.String
sattr_9 : java.lang.String sell_amount : java.lang.Double
sell_currency_id : java.lang.String sell_date : java.util.Date
sell_fx_exposure : java.lang.Double sell_interest_rate : java.lang.Double
sell_ir_exposure : java.lang.Double sell_price : java.lang.String
sell_spot_amount : java.lang.Double settlement_amount : java.lang.Double
sign : java.lang.Integer spot_date : java.util.Date
WebSuite System Administration Guide 509
spread : java.lang.String spread_2 : java.lang.String
state_id : java.lang.String status : java.lang.String
time_risk : java.lang.Double trader_id : java.lang.String
trading_price : java.lang.String trading_price_2 : java.lang.String
type_buy_option : java.lang.Boolean type_buy_sell_back : java.lang.Integer
type_cap : java.lang.Boolean type_collar : java.lang.Boolean
type_floor : java.lang.Boolean type_id : java.lang.String
type_repo : java.lang.Boolean type_sell_option : java.lang.Integer
type_open : java.lang.Boolean units : java.lang.Double
value_date : java.util.Date vega_risk : java.lang.Double
collateral_haircut : java.lang.Double collateral_method : java.lang.String
collateral_type : java.lang.String collateral_market_price : java.lang.String
collateral_market_rate : java.lang.Double collateral_rate_2 : java.lang.Double
collateral_number : java.lang.String competitive_cp_client_id_1 : java.lang.String
competitive_cp_client_id_2 : java.lang.String competitive_cp_client_id_3 : java.lang.String
competitive_cp_client_id_4 : java.lang.String competitive_cp_client_id_5 : java.lang.String
competitive_price_1 : java.lang.Double competitive_price_2 : java.lang.Double
competitive_price_3 : java.lang.Double competitive_price_4 : java.lang.Double
competitive_price_5 : java.lang.Double.
510 © Wall Street Systems IPH AB - Confidential
WebSuite System Administration Guide 511
Appendix D Example forecast allocation model
A forecast allocation model allocates 20% to the first week in the month, 30% to the second, 30%
to the third, 10% to the fourth, and 10% to the fifth. Since the weeks have different numbers of
business days, the model weighs each week by the number of business days. It then allocates each
of these weekly allocations to the business days in the week.
In November 2006, there are three business days in the first week; five in the second, third, and
fourth weeks; and four in the fifth week. The following table shows how the model allocates an
amount of 1,000 to the weeks of this month:
Table notes:
1. Business days in week • Allocation weight
2. Allocation weight / Sum of total weights • Number of allocation days
3. Amount to allocate • Weight percentage
The model then allocates these amounts to daily forecasts using the weightings in the following
table:
Week Business days in
week
Allocation
weight
Total weight
[1]
Weight percentage
[2] Allocation [3]
1 3 20 60 13.33% 133.33
2 5 30 150 33.33% 333.33
3 5 30 150 33.33% 333.33
4 5 10 50 11.11% 111.11
5 4 10 40 8.89% 88.89
Day Allocation weight
Monday 0
Tue sd ay 2
Wednesday 4
Thursday 8
Friday 16
512 © Wall Street Systems IPH AB - Confidential
Note: The weights are relative to each other and do not necessarily need to add to 100.
The following table presents the allocations for the first week:
The following table presents the allocations for the second week:
The following table presents the allocations for the third week:
The following table presents the allocations for the fourth week:
Day Amount to
allocate Allocation weight Weight percentage Allocation
1 (Wednesday) 133.33 41.90% 19.05
2 (Thursday) 133.33 83.81% 38.09
3 (Friday) 133.33 16 7.62% 76.19
Day Amount to
allocate Allocation weight Weight percentage Allocation
6 (Monday) 333.33 00.00% 0.00
7 (Tuesday) 333.33 22.22% 22.22
8 (Wednesday) 333.33 44.44% 44.44
9 (Thursday) 333.33 88.89% 88.89
10 (Friday) 333.33 16 17.78% 177.78
Day Amount to
allocate Allocation weight Weight percentage Allocation
13 (Monday) 333.33 00.00% 0.00
14 (Tuesday) 333.33 22.22% 22.22
15 (Wednesday) 333.33 44.44% 44.44
16 (Thursday) 333.33 88.89% 88.89
17 (Friday) 333.33 16 17.78% 177.78
Day Amount to
allocate Allocation weight Weight percentage Allocation
WebSuite System Administration Guide 513
Finally, the following table presents the allocations for the fifth week:
CMM allows for a sequence of allocations to be performed (in memory) to maintain flexibility and
simplicity of the configuration files.
20 (Monday) 111.11 00.00% 0.00
21 (Tuesday) 111.11 20.74% 7.41
22 (Wednesday) 111.11 41.48% 14.81
23 (Thursday) 111.11 82.96% 29.63
24 (Friday) 111.11 16 5.93% 59.26
Day Amount to
allocate Allocation weight Weight percentage Allocation
27 (Monday) 88.89 00.00% 0.00
28 (Tuesday) 88.89 21.27% 12.70
29 (Wednesday) 88.89 42.54% 25.40
30 (Thursday) 88.89 85.08% 50.79
514 © Wall Street Systems IPH AB - Confidential
WebSuite System Administration Guide 515
Appendix E Forecast function attributes
The following are attributes you can reference when customizing pages in the forecast functions:
AllocationReferenceID AmountTypeName
BankAccountCurrencyCode BankAccountID
BankAccountName BankAccountNumber
BankAcctCountryCode BankAcctCountryName
BankAcctGroupID BankAcctGroupName
BankID BankName
BankReportedAmount BankReportedAmount
BusinessSegmentName CashFlowDirection
CashFlowSource CashReconciledInd
CashReconciledString CptyID
CptyLongName CptyPartyType
CptyShortName CptyType
CurrencyCode CurrentAvailableAmount
CurrentAvailableAmountReportingCurrency CurrentAvailableMinusBankReported
CurrentAvailableMinusBankReportedReporti
ngCurrency
Description
ForecastAmount ForecastAmountReportingCurrency
ForecastAsOfDate ForecastItemTypeLabel
ForecastMinusBankReported ForecastMinusBankReportedReportingCurren
cy
ForecastMinusInstructed ForecastMinusInstructedReportingCurrency
ForecastQualityCode
ForecastValueDate ForecastValueDateFrom
ForecastValueDateTo
InstructedAmount InstructedAmountReportingCurrency
InstructedMinusBankReported InstructedMinusBankReportedReportingCurr
ency
InstrumentName InstrumentTypeID
InvoiceDate MirrorReferenceID
OriginatingSystemName ParentBankAccountName
ParentBankAccountNumber ParentPartyName
PartyFunctionalCurrencyCode PartyID
516 © Wall Street Systems IPH AB - Confidential
PartyName PaymentMethodName
RecurrenceReferenceID ReportingCurrency
ReportingWorkflowStatusCode SecondWorkflowStatusCode
SourceReferenceGroupID SourceReferenceGroupTextID
SourceReferenceID SourceReferenceTextID
StringAttributeValue_0 StringAttributeValue_1
StringAttributeValue_2 StringAttributeValue_3
StringAttributeValue_4 StringAttributeValue_5
StringAttributeValue_6 StringAttributeValue_7
StringAttributeValue_8 StringAttributeValue_9
TimeBucketEndDate TimeBucketStartDate
TransactionSource TxnHistoryLink
UniqueID WorkflowStatusCode
WorkflowStatusComments WorkflowStatusComments2
WorkflowStatusComments3
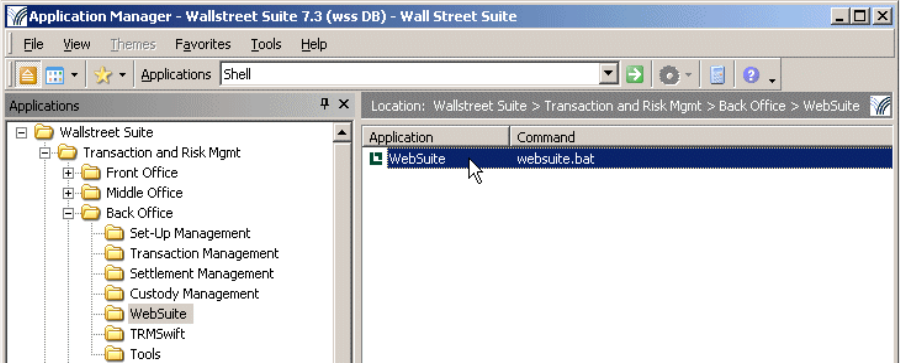
WebSuite System Administration Guide 517
Appendix F Automatic logon from TRM
F.1 Introduction
This allows a TRM user to open WebSuite without having to log on.
When activated this feature modifies the WebSuite shortcut in TRM Application Manager:
This shortcut normally opens a browser at the WebSuite login page. When automatic logon is
activated in the environment, this shortcut skips the login page and displays the current user's main
page. If automatic login is not working, the browser will still be opened but on the default login
page.
F.1.1 Restrictions
The following restrictions apply:
•Not be compatible with authenticators other than the default one.
•May work only when normal authentification has been used in TRM and not trusted
authentification.
•Will work only with users that are allowed to run WebSuite (must be in the Web User Group)
•May not work if multiple users are using the same server to run Application Manager, for
example Citrix clients.
F.2 Configuration
This requires configuration on:
•TRM:
The WEBSUITE_SSO environment variable must be set to true.
•WebSuite:

518 © Wallstreet Systems IPH AB - Confidential
A trusted authenticator must be added to the list of authenticators.
F.2.1 TRM configuration
Edit the file 27_trmweb.bat which you can find in this folder:
<installationfolder>\envs\merck\etc\environment\parts\
and change the line SET WEBSUITE_SSO=false to SET WEBSUITE_SSO=true.
Hint:
Provide two shortcuts in Application Manager depending on your installation and users’
configuration.
F.2.1.1 Advanced configuration
Output to a console window
You can modify the websuite.bat file to use the java instead of javaw command, and output to the
Windows Command Prompt window.
RSA key
The RSA key used to do SHA encryption is stored in etc\websuite\cmm-trmweb.login.key.txt
See the value of the environment variable EKIT_CMM_SHARED_KEY. If you use a TRM client only, this
file should be added, as it is not installed using Suite Installer.
See the script to see all environment variables that are used.
Traces
More traces could be activated in the log4j configuration file for browserrunner, located in
components\trm\etc\browser-runner\log4j.properties.
F.2.2 Websuite configuration
Edit the file CredentialsServiceDefinitions.xml to add the trusted authenticator in append
mode. You can find this file here:
<installationfolder>\envs\<yourenv>\etc\wss-web\cmm\InstallationData\installation\ap
pserver\service_definitions\
Example of what to add is shown in bold:
<ServiceDefinition
interface_classname="alterna.appserver.security.IaCredentialsAuthenticator"
implementation_classname="com.trema.webfusion.authentication.WFCredentialsAuthenticator"
name="IaCredentialsAuthenticator"
isDefault="true" />
<ServiceDefinition
interface_classname="alterna.appserver.security.IaCredentialsAuthenticator"
implementation_classname="alterna.appserver.security.CaTrustedSourceCredentialsAut
henticator"
name="IaCredentialsAuthenticator"
isDefault="false"
registration_policy="append" />
F.2.2.1 Advanced configuration
Edit the file trusted_login_config.xml. You can find this file here:
<installationfolder>\envs\<yourenv>\etc\wss-web\cmm\InstallationData\installation\ap
pserver\authentication\trusted_login\
WebSuite System Administration Guide 519
The default values should fit the default integrated authenticator:
<xml>
<trusted_login_name value="_auth" />
<trusted_login_path value="/websuite" />
<password_validation_enabled value="true" />
<!-- if password_verification is enabled, specify the type of verification;
currently supported types: ldap, cmm_native, wfca -->
<!-webfusion credentials authenticator is used -->
<password_validation_type value="wfca" />
<password_validation_timestamp_enabled value="true" />
<!-range of time an encoded url is valid in milliseconds -->
<password_validation_timestamp_timeout value="120000" />
</xml>
password_validation_type value="wfca": WebFusionCredentialsAuthenticator password
validation type (the default for the integrated version) is applied during the auto-login.
password_validation_timestamp_enabled value="true": adds more security, as this adds a
timestamp validation on the server when a user tries to login with an encrypted autologin url. For
example, a user cannot reuse the same URL after the timeout value, and must generate a new one
by reusing the websuite.bat command. This prevents a malicious user who tries to reuse another
user session.
Edit the file WebContainServiceDefinitions.xml. You can find this file here:
\appserver\service_definitions\
The file should contain this line:
<ServiceDefinition
interface_classname="alterna.appserver.security.IaCredentialsAuthenticator" name="wfca"
implementation_classname="com.trema.webfusion.authentication.WFCredentialsAuthenticator"
/>
520 © Wallstreet Systems IPH AB - Confidential
WebSuite System Administration Guide 521
Appendix G Managing SWIFT FIN messages
You can manage incoming and outgoing SWIFT FIN messages to and from the cash management
and the treasury systems via the menu option Payment Factory - Processing - Message Admin.
For full details, see the Wallstreet Suite SWIFT Connectivity Guide, and search for FIN message
administration (WebSuite).
522 © Wallstreet Systems IPH AB - Confidential
