Windows PowerShell Scripting Guide EBook Power Shell(TM)
User Manual:
Open the PDF directly: View PDF ![]() .
.
Page Count: 687 [warning: Documents this large are best viewed by clicking the View PDF Link!]
- Cover
- Dedication
- Contents at a Glance
- Table of Contents
- Acknowledgments
- Introduction
- Chapter 1: The Shell in Windows PowerShell
- Chapter 2: Scripting Windows PowerShell
- Why Use Scripting?
- Configuring the Scripting Policy
- Running Windows PowerShell Scripts
- Use of Variables
- Use of Constants
- Using Flow Control Statements
- Using the For Statement
- Using Decision-Making Statements
- Working with Data Types
- Unleashing the Power of Regular Expressions
- Using Command-Line Arguments
- Summary
- Chapter 3: Managing Logs
- Chapter 4: Managing Services
- Chapter 5: Managing Shares
- Chapter 6: Managing Printing
- Chapter 7: Desktop Maintenance
- Chapter 8: Networking
- Chapter 9: Configuring Desktop Settings
- Chapter 10: Managing Post-Deployment Issues
- Chapter 11: Managing User Data
- Chapter 12: Troubleshooting Windows
- Chapter 13: Managing Domain Users
- Chapter 14: Configuring the Cluster Service
- Chapter 15: Managing Internet Information Services
- Chapter 16: Working with the Certificate Store
- Chapter 17: Managing the Terminal Services Service
- Chapter 18: Configuring Network Services
- Chapter 19: Working with Windows Server 2008 Server Core
- Appendix A: Cmdlet Naming Conventions
- Appendix B: ActiveX Data Object Provider Names
- Appendix C: Frequently Asked Questions
- Appendix D: Scripting Guidelines
- Appendix E: General Troubleshooting Tips
- Index
- About the Author
PUBLISHED BY
Microsoft Press
A Division of Microsoft Corporation
One Microsoft Way
Redmond, Washington 98052-6399
Copyright © 2008 by Ed Wilson
All rights reserved. No part of the contents of this book may be reproduced or transmitted in any form or
by any means without the written permission of the publisher.
Library of Congress Control Number: 2007941089
Printed and bound in the United States of America.
1 2 3 4 5 6 7 8 9 QWT 3 2 1 0 9 8
Distributed in Canada by H.B. Fenn and Company Ltd.
A CIP catalogue record for this book is available from the British Library.
Microsoft Press books are available through booksellers and distributors worldwide. For further infor-
mation about international editions, contact your local Microsoft Corporation office or contact Microsoft
Press International directly at fax (425) 936-7329. Visit our Web site at www.microsoft.com/mspress.
Send comments to mspinput@microsoft.com.
Microsoft, Microsoft Press, Active Directory, ActiveX, Excel, Internet Explorer, MSDN, MSN, Outlook,
SQL Server, Visual Basic, Windows, Windows NT, Windows PowerShell, Windows Server, Windows
Vista, and Zune are either registered trademarks or trademarks of Microsoft Corporation in the United
States and/or other countries. Other product and company names mentioned herein may be the
trademarks of their respective owners.
The example companies, organizations, products, domain names, e-mail addresses, logos, people, places,
and events depicted herein are fictitious. No association with any real company, organization, product,
domain name, e-mail address, logo, person, place, or event is intended or should be inferred.
7KLVERRNH[SUHVVHVWKHDXWKRU¶VYLHZVDQGRSLQLRQV7KHLQIRUPDWLRQFRQWDLQHGLQWKLVERRNLVSURYLGHG
without any express, statutory, or implied warranties. Neither the authors, Microsoft Corporation, nor its
resellers, or distributors will be held liable for any damages caused or alleged to be caused either directly
or indirectly by this book.
Acquisitions Editor: Martin DelRe
Developmental Editor: Karen Szall
Project Editor: Denise Bankaitis and Michelle Goodman
Editorial Production: Custom Editorial Productions, Inc.
Technical Reviewer: Bob Hogan; Technical Review services provided by Content Master, a member
of CM Group, Ltd.
Cover: Tom Draper Design
Body Part No. X14-14922
This book is dedicated to Teresa. I am so glad
you decided to share your life with me.
A03D622791.fm Page iii Friday, December 14, 2007 10:52 AM
A03D622791.fm Page iv Friday, December 14, 2007 10:52 AM

v
Contents at a Glance
1 The Shell in Windows PowerShell . . . . . . . . . . . . . . . . . . . . . . . . . . . . . . . . 1
2 Scripting Windows PowerShell . . . . . . . . . . . . . . . . . . . . . . . . . . . . . . . . . . 33
3 Managing Logs . . . . . . . . . . . . . . . . . . . . . . . . . . . . . . . . . . . . . . . . . . . . . . . 59
4 Managing Services . . . . . . . . . . . . . . . . . . . . . . . . . . . . . . . . . . . . . . . . . . . . 81
5 Managing Shares . . . . . . . . . . . . . . . . . . . . . . . . . . . . . . . . . . . . . . . . . . . . 115
6 Managing Printing . . . . . . . . . . . . . . . . . . . . . . . . . . . . . . . . . . . . . . . . . . . 147
7 Desktop Maintenance . . . . . . . . . . . . . . . . . . . . . . . . . . . . . . . . . . . . . . . . 171
8 Networking . . . . . . . . . . . . . . . . . . . . . . . . . . . . . . . . . . . . . . . . . . . . . . . . . 207
9 Configuring Desktop Settings . . . . . . . . . . . . . . . . . . . . . . . . . . . . . . . . . 245
10 Managing Post-Deployment Issues . . . . . . . . . . . . . . . . . . . . . . . . . . . . . 277
11 Managing User Data . . . . . . . . . . . . . . . . . . . . . . . . . . . . . . . . . . . . . . . . . 325
12 Troubleshooting Windows . . . . . . . . . . . . . . . . . . . . . . . . . . . . . . . . . . . . 349
13 Managing Domain Users . . . . . . . . . . . . . . . . . . . . . . . . . . . . . . . . . . . . . . 379
14 Configuring the Cluster Service . . . . . . . . . . . . . . . . . . . . . . . . . . . . . . . . 405
15 Managing Internet Information Services . . . . . . . . . . . . . . . . . . . . . . . . 443
16 Working with the Certificate Store . . . . . . . . . . . . . . . . . . . . . . . . . . . . . 473
17 Managing the Terminal Services Service. . . . . . . . . . . . . . . . . . . . . . . . . 509
18 Configuring Network Services . . . . . . . . . . . . . . . . . . . . . . . . . . . . . . . . . 541
19 Working with Windows Server 2008 Server Core . . . . . . . . . . . . . . . . . 583
A Cmdlet Naming Conventions . . . . . . . . . . . . . . . . . . . . . . . . . . . . . . . . . . 619
B ActiveX Data Object Provider Names . . . . . . . . . . . . . . . . . . . . . . . . . . . 621
C Frequently Asked Questions . . . . . . . . . . . . . . . . . . . . . . . . . . . . . . . . . . . 623
D Scripting Guidelines . . . . . . . . . . . . . . . . . . . . . . . . . . . . . . . . . . . . . . . . . . 631
E General Troubleshooting Tips . . . . . . . . . . . . . . . . . . . . . . . . . . . . . . . . . 639
A04G622791.fm Page v Friday, December 14, 2007 10:52 AM
A04G622791.fm Page vi Friday, December 14, 2007 10:52 AM

vii
Table of Contents
Acknowledgments . . . . . . . . . . . . . . . . . . . . . . . . . . . . . . . . . . . . . . . . . . . . . . . . . . . . . . . . . . . . xvii
Introduction . . . . . . . . . . . . . . . . . . . . . . . . . . . . . . . . . . . . . . . . . . . . . . . . . . . . . . . . . . . . . . . . . xix
Is This Book for Me?. . . . . . . . . . . . . . . . . . . . . . . . . . . . . . . . . . . . . . . . . . . . . . . . . . . . . . xix
About the Companion CD. . . . . . . . . . . . . . . . . . . . . . . . . . . . . . . . . . . . . . . . . . . . . . . . . . xx
System Requirements. . . . . . . . . . . . . . . . . . . . . . . . . . . . . . . . . . . . . . . . . . . . . . . . . . . . . xxi
Technical Support. . . . . . . . . . . . . . . . . . . . . . . . . . . . . . . . . . . . . . . . . . . . . . . . . . . . . . . . xxi
1 The Shell in Windows PowerShell. . . . . . . . . . . . . . . . . . . . . . . . . . . . . . . . . .1
Installing Windows PowerShell . . . . . . . . . . . . . . . . . . . . . . . . . . . . . . . . . . . . . . . . . . . . . . 1
Verifying Installation with VBScript. . . . . . . . . . . . . . . . . . . . . . . . . . . . . . . . . . . . . . 1
Deploying Windows PowerShell . . . . . . . . . . . . . . . . . . . . . . . . . . . . . . . . . . . . . . . . 2
Interacting with the Shell . . . . . . . . . . . . . . . . . . . . . . . . . . . . . . . . . . . . . . . . . . . . . . . . . . . 3
Introducing Cmdlets . . . . . . . . . . . . . . . . . . . . . . . . . . . . . . . . . . . . . . . . . . . . . . . . . . . . . . .5
Configuring Windows PowerShell . . . . . . . . . . . . . . . . . . . . . . . . . . . . . . . . . . . . . . . . . . . 6
Creating a Windows PowerShell Profile. . . . . . . . . . . . . . . . . . . . . . . . . . . . . . . . . . 6
Configuring Windows PowerShell Startup Options . . . . . . . . . . . . . . . . . . . . . . . . 6
Security Issues with Windows PowerShell . . . . . . . . . . . . . . . . . . . . . . . . . . . . . . . . . . . . . 7
Controlling the Execution of Cmdlets . . . . . . . . . . . . . . . . . . . . . . . . . . . . . . . . . . . 7
Confirming Commands . . . . . . . . . . . . . . . . . . . . . . . . . . . . . . . . . . . . . . . . . . . . . . . 9
Suspending Confirmation of Cmdlets . . . . . . . . . . . . . . . . . . . . . . . . . . . . . . . . . . 10
Supplying Options for Cmdlets. . . . . . . . . . . . . . . . . . . . . . . . . . . . . . . . . . . . . . . . . . . . . 11
Working with Get-Help . . . . . . . . . . . . . . . . . . . . . . . . . . . . . . . . . . . . . . . . . . . . . . . . . . . 12
Working with Aliases to Assign Shortcut Names to Cmdlets. . . . . . . . . . . . . . . . . . . . 15
Additional Uses of Cmdlets . . . . . . . . . . . . . . . . . . . . . . . . . . . . . . . . . . . . . . . . . . . . . . . . 16
Using the Get-ChildItem Cmdlet. . . . . . . . . . . . . . . . . . . . . . . . . . . . . . . . . . . . . . . 17
Formatting Output . . . . . . . . . . . . . . . . . . . . . . . . . . . . . . . . . . . . . . . . . . . . . . . . . . 17
Using the Get-Command Cmdlet . . . . . . . . . . . . . . . . . . . . . . . . . . . . . . . . . . . . . . 24
Microsoft is interested in hearing your feedback so we can continually improve our books and learning
resources for you. To participate in a brief online survey, please visit:
www.microsoft.com/learning/booksurvey/
What do you think of this book? We want to hear from you!
A05T622791.fm Page vii Friday, December 14, 2007 10:52 AM

viii Table of Contents
Exploring with the Get-Member Cmdlet. . . . . . . . . . . . . . . . . . . . . . . . . . . . . . . . 27
Summary . . . . . . . . . . . . . . . . . . . . . . . . . . . . . . . . . . . . . . . . . . . . . . . . . . . . . . . . . . . . . . . 31
2 Scripting Windows PowerShell. . . . . . . . . . . . . . . . . . . . . . . . . . . . . . . . . . 33
Why Use Scripting? . . . . . . . . . . . . . . . . . . . . . . . . . . . . . . . . . . . . . . . . . . . . . . . . . . . . . . 33
Configuring the Scripting Policy . . . . . . . . . . . . . . . . . . . . . . . . . . . . . . . . . . . . . . . . . . . 36
Running Windows PowerShell Scripts . . . . . . . . . . . . . . . . . . . . . . . . . . . . . . . . . . . . . . . 39
Use of Variables. . . . . . . . . . . . . . . . . . . . . . . . . . . . . . . . . . . . . . . . . . . . . . . . . . . . . . . . . . 39
Use of Constants. . . . . . . . . . . . . . . . . . . . . . . . . . . . . . . . . . . . . . . . . . . . . . . . . . . . . . . . . 40
Using Flow Control Statements . . . . . . . . . . . . . . . . . . . . . . . . . . . . . . . . . . . . . . . . . . . . 41
Adding Parameters to ForEach-Object . . . . . . . . . . . . . . . . . . . . . . . . . . . . . . . . . 42
Using the Begin Parameter . . . . . . . . . . . . . . . . . . . . . . . . . . . . . . . . . . . . . . . . . . . 42
Using the Process Parameter. . . . . . . . . . . . . . . . . . . . . . . . . . . . . . . . . . . . . . . . . . 43
Using the End Parameter . . . . . . . . . . . . . . . . . . . . . . . . . . . . . . . . . . . . . . . . . . . . . 43
Using the For Statement . . . . . . . . . . . . . . . . . . . . . . . . . . . . . . . . . . . . . . . . . . . . . . . . . . 43
Using Decision-Making Statements. . . . . . . . . . . . . . . . . . . . . . . . . . . . . . . . . . . . . . . . . 44
Using If … Elseif … Else . . . . . . . . . . . . . . . . . . . . . . . . . . . . . . . . . . . . . . . . . . . . . . . 45
Using Switch. . . . . . . . . . . . . . . . . . . . . . . . . . . . . . . . . . . . . . . . . . . . . . . . . . . . . . . . 46
Working with Data Types . . . . . . . . . . . . . . . . . . . . . . . . . . . . . . . . . . . . . . . . . . . . . . . . . 49
Unleashing the Power of Regular Expressions . . . . . . . . . . . . . . . . . . . . . . . . . . . . . . . . 53
Using Command-Line Arguments . . . . . . . . . . . . . . . . . . . . . . . . . . . . . . . . . . . . . . . . . . 56
Summary . . . . . . . . . . . . . . . . . . . . . . . . . . . . . . . . . . . . . . . . . . . . . . . . . . . . . . . . . . . . . . . 58
3 Managing Logs . . . . . . . . . . . . . . . . . . . . . . . . . . . . . . . . . . . . . . . . . . . . . . . 59
Identifying the Event Logs . . . . . . . . . . . . . . . . . . . . . . . . . . . . . . . . . . . . . . . . . . . . . . . . 59
Reading the Event Logs . . . . . . . . . . . . . . . . . . . . . . . . . . . . . . . . . . . . . . . . . . . . . . . . . . . 60
Exporting to Text. . . . . . . . . . . . . . . . . . . . . . . . . . . . . . . . . . . . . . . . . . . . . . . . . . . . 61
Export to XML . . . . . . . . . . . . . . . . . . . . . . . . . . . . . . . . . . . . . . . . . . . . . . . . . . . . . . 62
Perusing General Log Files . . . . . . . . . . . . . . . . . . . . . . . . . . . . . . . . . . . . . . . . . . . . . . . . 64
Examining Multiple Logs . . . . . . . . . . . . . . . . . . . . . . . . . . . . . . . . . . . . . . . . . . . . . 65
Retrieving a Single Event Log Entry . . . . . . . . . . . . . . . . . . . . . . . . . . . . . . . . . . . . 66
Searching the Event Log . . . . . . . . . . . . . . . . . . . . . . . . . . . . . . . . . . . . . . . . . . . . . . . . . . 68
Filtering on Properties . . . . . . . . . . . . . . . . . . . . . . . . . . . . . . . . . . . . . . . . . . . . . . . 69
Selecting the Source. . . . . . . . . . . . . . . . . . . . . . . . . . . . . . . . . . . . . . . . . . . . . . . . . 69
Selecting the Severity. . . . . . . . . . . . . . . . . . . . . . . . . . . . . . . . . . . . . . . . . . . . . . . . 70
Selecting the Message . . . . . . . . . . . . . . . . . . . . . . . . . . . . . . . . . . . . . . . . . . . . . . . 70
A05T622791.fm Page viii Friday, December 14, 2007 10:52 AM

Table of Contents ix
Managing the Event Log . . . . . . . . . . . . . . . . . . . . . . . . . . . . . . . . . . . . . . . . . . . . . . . . . . 71
Identifying the Sources. . . . . . . . . . . . . . . . . . . . . . . . . . . . . . . . . . . . . . . . . . . . . . . 71
Modifying the Event Log Settings. . . . . . . . . . . . . . . . . . . . . . . . . . . . . . . . . . . . . . 71
Examining WMI Event Logs . . . . . . . . . . . . . . . . . . . . . . . . . . . . . . . . . . . . . . . . . . . . . . . . 75
Making Changes to the WMI Logging Level. . . . . . . . . . . . . . . . . . . . . . . . . . . . . 76
Using the Windows Event Command-Line Utility . . . . . . . . . . . . . . . . . . . . . . . . 76
Writing to Event Logs . . . . . . . . . . . . . . . . . . . . . . . . . . . . . . . . . . . . . . . . . . . . . . . . . . . . . 77
Creating a Source . . . . . . . . . . . . . . . . . . . . . . . . . . . . . . . . . . . . . . . . . . . . . . . . . . . 77
Putting Cmdlet Output into the Log . . . . . . . . . . . . . . . . . . . . . . . . . . . . . . . . . . . 78
Creating Your Own Event Logs . . . . . . . . . . . . . . . . . . . . . . . . . . . . . . . . . . . . . . . . . . . . . 79
Summary. . . . . . . . . . . . . . . . . . . . . . . . . . . . . . . . . . . . . . . . . . . . . . . . . . . . . . . . . . . . . . . . 80
4 Managing Services . . . . . . . . . . . . . . . . . . . . . . . . . . . . . . . . . . . . . . . . . . . . 81
Documenting the Existing Services . . . . . . . . . . . . . . . . . . . . . . . . . . . . . . . . . . . . . . . . . 81
Working with Running Services . . . . . . . . . . . . . . . . . . . . . . . . . . . . . . . . . . . . . . . 82
Writing to a Text File . . . . . . . . . . . . . . . . . . . . . . . . . . . . . . . . . . . . . . . . . . . . . . . . . 83
Writing to a Database. . . . . . . . . . . . . . . . . . . . . . . . . . . . . . . . . . . . . . . . . . . . . . . . 85
Setting the Service Configuration. . . . . . . . . . . . . . . . . . . . . . . . . . . . . . . . . . . . . . . . . . . 94
Accepting Command-Line Arguments . . . . . . . . . . . . . . . . . . . . . . . . . . . . . . . . . 97
Stopping Services . . . . . . . . . . . . . . . . . . . . . . . . . . . . . . . . . . . . . . . . . . . . . . . . . . . 97
Performing a Graceful Stop . . . . . . . . . . . . . . . . . . . . . . . . . . . . . . . . . . . . . . . . . . . 99
Starting Services . . . . . . . . . . . . . . . . . . . . . . . . . . . . . . . . . . . . . . . . . . . . . . . . . . . 101
Performing a Graceful Start . . . . . . . . . . . . . . . . . . . . . . . . . . . . . . . . . . . . . . . . . . 102
Desired Configuration Maintenance . . . . . . . . . . . . . . . . . . . . . . . . . . . . . . . . . . . . . . . 107
Verifying Desired Services Are Stopped. . . . . . . . . . . . . . . . . . . . . . . . . . . . . . . . 108
Reading a File to Check Service Status. . . . . . . . . . . . . . . . . . . . . . . . . . . . . . . . . 109
Verifying Desired Services Are Running. . . . . . . . . . . . . . . . . . . . . . . . . . . . . . . . 110
Confirming the Configuration. . . . . . . . . . . . . . . . . . . . . . . . . . . . . . . . . . . . . . . . . . . . . 110
Producing an Exception Report . . . . . . . . . . . . . . . . . . . . . . . . . . . . . . . . . . . . . . . . . . . 111
Summary. . . . . . . . . . . . . . . . . . . . . . . . . . . . . . . . . . . . . . . . . . . . . . . . . . . . . . . . . . . . . . . 113
5 Managing Shares. . . . . . . . . . . . . . . . . . . . . . . . . . . . . . . . . . . . . . . . . . . . . 115
Documenting Shares. . . . . . . . . . . . . . . . . . . . . . . . . . . . . . . . . . . . . . . . . . . . . . . . . . . . .115
Documenting User Shares . . . . . . . . . . . . . . . . . . . . . . . . . . . . . . . . . . . . . . . . . . . 122
Writing Shares to Text. . . . . . . . . . . . . . . . . . . . . . . . . . . . . . . . . . . . . . . . . . . . . . . 125
Documenting Administrative Shares . . . . . . . . . . . . . . . . . . . . . . . . . . . . . . . . . . 126
Writing Share Information to a Microsoft Access Database . . . . . . . . . . . . . . . 126
A05T622791.fm Page ix Friday, December 14, 2007 10:52 AM

xTable of Contents
Auditing Shares. . . . . . . . . . . . . . . . . . . . . . . . . . . . . . . . . . . . . . . . . . . . . . . . . . . . . . . . . 130
Modifying Shares . . . . . . . . . . . . . . . . . . . . . . . . . . . . . . . . . . . . . . . . . . . . . . . . . . . . . . . 133
Using Parameters with the Script . . . . . . . . . . . . . . . . . . . . . . . . . . . . . . . . . . . . . 134
Translating the Return Code . . . . . . . . . . . . . . . . . . . . . . . . . . . . . . . . . . . . . . . . . 135
Creating New Shares . . . . . . . . . . . . . . . . . . . . . . . . . . . . . . . . . . . . . . . . . . . . . . . . . . . . 137
Creating Multiple Shares . . . . . . . . . . . . . . . . . . . . . . . . . . . . . . . . . . . . . . . . . . . . . . . . . 141
Deleting Shares . . . . . . . . . . . . . . . . . . . . . . . . . . . . . . . . . . . . . . . . . . . . . . . . . . . . . . . . . 143
Deleting Only Unauthorized Shares . . . . . . . . . . . . . . . . . . . . . . . . . . . . . . . . . . . . . . . 145
Summary . . . . . . . . . . . . . . . . . . . . . . . . . . . . . . . . . . . . . . . . . . . . . . . . . . . . . . . . . . . . . . 146
6 Managing Printing . . . . . . . . . . . . . . . . . . . . . . . . . . . . . . . . . . . . . . . . . . . 147
Inventorying Printers . . . . . . . . . . . . . . . . . . . . . . . . . . . . . . . . . . . . . . . . . . . . . . . . . . . . 147
Querying Multiple Computers . . . . . . . . . . . . . . . . . . . . . . . . . . . . . . . . . . . . . . . 148
Logging to a File . . . . . . . . . . . . . . . . . . . . . . . . . . . . . . . . . . . . . . . . . . . . . . . . . . . 150
Writing to a Microsoft Access Database . . . . . . . . . . . . . . . . . . . . . . . . . . . . . . . 152
Reporting on Printer Ports . . . . . . . . . . . . . . . . . . . . . . . . . . . . . . . . . . . . . . . . . . . . . . . 157
Identifying Printer Drivers . . . . . . . . . . . . . . . . . . . . . . . . . . . . . . . . . . . . . . . . . . . . . . . . 163
Installing Printer Drivers . . . . . . . . . . . . . . . . . . . . . . . . . . . . . . . . . . . . . . . . . . . . . . . . . 165
Installing Printer Drivers Found on Your Computer . . . . . . . . . . . . . . . . . . . . . 165
Installing Printer Drivers Not Found on Your Computer . . . . . . . . . . . . . . . . . 167
Summary . . . . . . . . . . . . . . . . . . . . . . . . . . . . . . . . . . . . . . . . . . . . . . . . . . . . . . . . . . . . . . 169
7 Desktop Maintenance . . . . . . . . . . . . . . . . . . . . . . . . . . . . . . . . . . . . . . . . 171
Maintaining Desktop Health. . . . . . . . . . . . . . . . . . . . . . . . . . . . . . . . . . . . . . . . . . . . . . 171
Inventorying Drives . . . . . . . . . . . . . . . . . . . . . . . . . . . . . . . . . . . . . . . . . . . . . . . . 171
Writing Disk Drive Information to Microsoft Access . . . . . . . . . . . . . . . . . . . . . 175
Working with Partitions . . . . . . . . . . . . . . . . . . . . . . . . . . . . . . . . . . . . . . . . . . . . . 179
Matching Disks and Partitions . . . . . . . . . . . . . . . . . . . . . . . . . . . . . . . . . . . . . . . 181
Working with Logical Disks . . . . . . . . . . . . . . . . . . . . . . . . . . . . . . . . . . . . . . . . . . 184
Monitoring Disk Space Utilization . . . . . . . . . . . . . . . . . . . . . . . . . . . . . . . . . . . . . . . . . 188
Logging Disk Space to a Database. . . . . . . . . . . . . . . . . . . . . . . . . . . . . . . . . . . . 192
Monitoring File Longevity . . . . . . . . . . . . . . . . . . . . . . . . . . . . . . . . . . . . . . . . . . . 196
Monitoring Performance . . . . . . . . . . . . . . . . . . . . . . . . . . . . . . . . . . . . . . . . . . . . . . . . . 199
Using Performance Counter Classes . . . . . . . . . . . . . . . . . . . . . . . . . . . . . . . . . . 200
Identifying Sources of Page Faults . . . . . . . . . . . . . . . . . . . . . . . . . . . . . . . . . . . . 204
Summary . . . . . . . . . . . . . . . . . . . . . . . . . . . . . . . . . . . . . . . . . . . . . . . . . . . . . . . . . . . . . . 204
A05T622791.fm Page x Friday, December 14, 2007 10:52 AM

Table of Contents xi
8 Networking . . . . . . . . . . . . . . . . . . . . . . . . . . . . . . . . . . . . . . . . . . . . . . . . . 207
Working with Network Settings . . . . . . . . . . . . . . . . . . . . . . . . . . . . . . . . . . . . . . . . . . . 207
Reporting Networking Settings. . . . . . . . . . . . . . . . . . . . . . . . . . . . . . . . . . . . . . . 207
Working with Adapter Configuration. . . . . . . . . . . . . . . . . . . . . . . . . . . . . . . . . . 212
Filtering Only Properties that Have a Value . . . . . . . . . . . . . . . . . . . . . . . . . . . . 218
Configuring Network Adapter Settings . . . . . . . . . . . . . . . . . . . . . . . . . . . . . . . . . . . . . 223
Detecting Multiple Network Adapters. . . . . . . . . . . . . . . . . . . . . . . . . . . . . . . . . 223
Writing Network Adapter Information to a Microsoft Excel Spreadsheet . . . 224
Identifying Connected Network Adapters. . . . . . . . . . . . . . . . . . . . . . . . . . . . . . 228
Setting Static IP Address. . . . . . . . . . . . . . . . . . . . . . . . . . . . . . . . . . . . . . . . . . . . . 230
Enabling DHCP. . . . . . . . . . . . . . . . . . . . . . . . . . . . . . . . . . . . . . . . . . . . . . . . . . . . . 235
Configuring the Windows Firewall . . . . . . . . . . . . . . . . . . . . . . . . . . . . . . . . . . . . . . . . . 239
Reporting Firewall Settings . . . . . . . . . . . . . . . . . . . . . . . . . . . . . . . . . . . . . . . . . . 240
Configuring Firewall Settings. . . . . . . . . . . . . . . . . . . . . . . . . . . . . . . . . . . . . . . . . 241
Summary. . . . . . . . . . . . . . . . . . . . . . . . . . . . . . . . . . . . . . . . . . . . . . . . . . . . . . . . . . . . . . . 243
9 Configuring Desktop Settings. . . . . . . . . . . . . . . . . . . . . . . . . . . . . . . . . . 245
Working with Desktop Configuration Issues. . . . . . . . . . . . . . . . . . . . . . . . . . . . . . . . . 245
Setting Screen Savers . . . . . . . . . . . . . . . . . . . . . . . . . . . . . . . . . . . . . . . . . . . . . . . . . . . . 245
Auditing Screen Savers . . . . . . . . . . . . . . . . . . . . . . . . . . . . . . . . . . . . . . . . . . . . . . 246
Listing Only Properties with Values . . . . . . . . . . . . . . . . . . . . . . . . . . . . . . . . . . . 252
Reporting Secure Screen Savers . . . . . . . . . . . . . . . . . . . . . . . . . . . . . . . . . . . . . . 256
Managing Desktop Power Settings . . . . . . . . . . . . . . . . . . . . . . . . . . . . . . . . . . . . . . . . 263
Changing the Power Scheme . . . . . . . . . . . . . . . . . . . . . . . . . . . . . . . . . . . . . . . . . . . . . 269
Summary. . . . . . . . . . . . . . . . . . . . . . . . . . . . . . . . . . . . . . . . . . . . . . . . . . . . . . . . . . . . . . . 275
10 Managing Post-Deployment Issues . . . . . . . . . . . . . . . . . . . . . . . . . . . . . 277
Setting the Time . . . . . . . . . . . . . . . . . . . . . . . . . . . . . . . . . . . . . . . . . . . . . . . . . . . . . . . .277
Setting the Time Remotely. . . . . . . . . . . . . . . . . . . . . . . . . . . . . . . . . . . . . . . . . . . 278
Logging Results to the Event Log . . . . . . . . . . . . . . . . . . . . . . . . . . . . . . . . . . . . . 283
Configuring the Time Source . . . . . . . . . . . . . . . . . . . . . . . . . . . . . . . . . . . . . . . . . . . . . 289
Using the Net Time Command . . . . . . . . . . . . . . . . . . . . . . . . . . . . . . . . . . . . . . . 290
Querying the Registry for the Time Source. . . . . . . . . . . . . . . . . . . . . . . . . . . . . 292
Enabling User Accounts . . . . . . . . . . . . . . . . . . . . . . . . . . . . . . . . . . . . . . . . . . . . . . . . . . 297
Creating a Local User Account . . . . . . . . . . . . . . . . . . . . . . . . . . . . . . . . . . . . . . . . . . . . 303
Creating a Local User . . . . . . . . . . . . . . . . . . . . . . . . . . . . . . . . . . . . . . . . . . . . . . . 303
Creating a Local User Group . . . . . . . . . . . . . . . . . . . . . . . . . . . . . . . . . . . . . . . . . 306
A05T622791.fm Page xi Friday, December 14, 2007 10:52 AM

xii Table of Contents
Configuring the Screen Saver . . . . . . . . . . . . . . . . . . . . . . . . . . . . . . . . . . . . . . . . . . . . . 309
Renaming the Computer. . . . . . . . . . . . . . . . . . . . . . . . . . . . . . . . . . . . . . . . . . . . . . . . . 316
Shutting Down or Rebooting a Remote Computer. . . . . . . . . . . . . . . . . . . . . . . . . . . 319
Summary . . . . . . . . . . . . . . . . . . . . . . . . . . . . . . . . . . . . . . . . . . . . . . . . . . . . . . . . . . . . . . 323
11 Managing User Data. . . . . . . . . . . . . . . . . . . . . . . . . . . . . . . . . . . . . . . . . . 325
Working with Backups . . . . . . . . . . . . . . . . . . . . . . . . . . . . . . . . . . . . . . . . . . . . . . . . . . . 325
Configuring Offline Files . . . . . . . . . . . . . . . . . . . . . . . . . . . . . . . . . . . . . . . . . . . . . . . . . 328
Enabling the Use of Offline Files . . . . . . . . . . . . . . . . . . . . . . . . . . . . . . . . . . . . . . . . . . 331
Working with System Restore . . . . . . . . . . . . . . . . . . . . . . . . . . . . . . . . . . . . . . . . . . . . . 340
Retrieving System Restore Settings . . . . . . . . . . . . . . . . . . . . . . . . . . . . . . . . . . . 340
Listing Available System Restore Points. . . . . . . . . . . . . . . . . . . . . . . . . . . . . . . . 344
Summary . . . . . . . . . . . . . . . . . . . . . . . . . . . . . . . . . . . . . . . . . . . . . . . . . . . . . . . . . . . . . . 347
12 Troubleshooting Windows . . . . . . . . . . . . . . . . . . . . . . . . . . . . . . . . . . . . 349
Troubleshooting Startup Issues . . . . . . . . . . . . . . . . . . . . . . . . . . . . . . . . . . . . . . . . . . . 349
Examining the Boot Configuration . . . . . . . . . . . . . . . . . . . . . . . . . . . . . . . . . . . 349
Examining Startup Services . . . . . . . . . . . . . . . . . . . . . . . . . . . . . . . . . . . . . . . . . . 352
Displaying Service Dependencies . . . . . . . . . . . . . . . . . . . . . . . . . . . . . . . . . . . . . . . . . 355
Examining Startup Device Drivers . . . . . . . . . . . . . . . . . . . . . . . . . . . . . . . . . . . . 360
Investigating Startup Processes . . . . . . . . . . . . . . . . . . . . . . . . . . . . . . . . . . . . . . 365
Investigating Hardware Issues . . . . . . . . . . . . . . . . . . . . . . . . . . . . . . . . . . . . . . . . . . . . 368
Troubleshooting Network Issues . . . . . . . . . . . . . . . . . . . . . . . . . . . . . . . . . . . . . . . . . . 373
Summary . . . . . . . . . . . . . . . . . . . . . . . . . . . . . . . . . . . . . . . . . . . . . . . . . . . . . . . . . . . . . . 377
13 Managing Domain Users . . . . . . . . . . . . . . . . . . . . . . . . . . . . . . . . . . . . . . 379
Creating Organizational Units . . . . . . . . . . . . . . . . . . . . . . . . . . . . . . . . . . . . . . . . . . . . 379
Creating Domain Users . . . . . . . . . . . . . . . . . . . . . . . . . . . . . . . . . . . . . . . . . . . . . . . . . . 382
Modifying User Attributes. . . . . . . . . . . . . . . . . . . . . . . . . . . . . . . . . . . . . . . . . . . . . . . . 385
Modifying General User Information. . . . . . . . . . . . . . . . . . . . . . . . . . . . . . . . . . 386
Modifying the Address Tab . . . . . . . . . . . . . . . . . . . . . . . . . . . . . . . . . . . . . . . . . . 387
Modifying the Profile Tab . . . . . . . . . . . . . . . . . . . . . . . . . . . . . . . . . . . . . . . . . . . 388
Modifying the Telephone Tab . . . . . . . . . . . . . . . . . . . . . . . . . . . . . . . . . . . . . . . . 389
Modifying the Organization Tab . . . . . . . . . . . . . . . . . . . . . . . . . . . . . . . . . . . . . 389
Modifying a Single User Attribute . . . . . . . . . . . . . . . . . . . . . . . . . . . . . . . . . . . . 390
Creating Users from a .csv File . . . . . . . . . . . . . . . . . . . . . . . . . . . . . . . . . . . . . . . . . . . . 393
Setting the Password . . . . . . . . . . . . . . . . . . . . . . . . . . . . . . . . . . . . . . . . . . . . . . . 394
Enabling the User Account . . . . . . . . . . . . . . . . . . . . . . . . . . . . . . . . . . . . . . . . . . 394
A05T622791.fm Page xii Friday, December 14, 2007 10:52 AM

Table of Contents xiii
Creating Domain Groups . . . . . . . . . . . . . . . . . . . . . . . . . . . . . . . . . . . . . . . . . . . . . . . . . 395
Adding a User to a Domain Group. . . . . . . . . . . . . . . . . . . . . . . . . . . . . . . . . . . . . . . . . 398
Adding Multiple Users with Multiple Attributes. . . . . . . . . . . . . . . . . . . . . . . . . . . . . . 400
Summary. . . . . . . . . . . . . . . . . . . . . . . . . . . . . . . . . . . . . . . . . . . . . . . . . . . . . . . . . . . . . . . 404
14 Configuring the Cluster Service . . . . . . . . . . . . . . . . . . . . . . . . . . . . . . . . 405
Examining the Clustered Server . . . . . . . . . . . . . . . . . . . . . . . . . . . . . . . . . . . . . . . . . . . 405
Reporting Cluster Configuration. . . . . . . . . . . . . . . . . . . . . . . . . . . . . . . . . . . . . . 411
Reporting Node Configuration . . . . . . . . . . . . . . . . . . . . . . . . . . . . . . . . . . . . . . . 416
Querying Multiple Cluster Classes . . . . . . . . . . . . . . . . . . . . . . . . . . . . . . . . . . . . 420
Managing Nodes. . . . . . . . . . . . . . . . . . . . . . . . . . . . . . . . . . . . . . . . . . . . . . . . . . . . . . . . 431
Adding and Evicting Nodes . . . . . . . . . . . . . . . . . . . . . . . . . . . . . . . . . . . . . . . . . . 431
Removing the Cluster . . . . . . . . . . . . . . . . . . . . . . . . . . . . . . . . . . . . . . . . . . . . . . . 437
Summary. . . . . . . . . . . . . . . . . . . . . . . . . . . . . . . . . . . . . . . . . . . . . . . . . . . . . . . . . . . . . . . 442
15 Managing Internet Information Services . . . . . . . . . . . . . . . . . . . . . . . . 443
Enabling Internet Information Services Management . . . . . . . . . . . . . . . . . . . . . . . . 443
Reporting IIS Configuration. . . . . . . . . . . . . . . . . . . . . . . . . . . . . . . . . . . . . . . . . . . . . . . 445
Reporting Site Information . . . . . . . . . . . . . . . . . . . . . . . . . . . . . . . . . . . . . . . . . . 445
Reporting on Application Pools . . . . . . . . . . . . . . . . . . . . . . . . . . . . . . . . . . . . . . 447
Reporting on Application Pool Default Values . . . . . . . . . . . . . . . . . . . . . . . . . . 451
Reporting Site Limits. . . . . . . . . . . . . . . . . . . . . . . . . . . . . . . . . . . . . . . . . . . . . . . . 454
Listing Virtual Directories . . . . . . . . . . . . . . . . . . . . . . . . . . . . . . . . . . . . . . . . . . . . 457
Creating a New Web Site . . . . . . . . . . . . . . . . . . . . . . . . . . . . . . . . . . . . . . . . . . . . . . . . . 459
Creating a New Application Pool . . . . . . . . . . . . . . . . . . . . . . . . . . . . . . . . . . . . . . . . . . 464
Starting and Stopping Web Sites . . . . . . . . . . . . . . . . . . . . . . . . . . . . . . . . . . . . . . . . . . 467
Summary. . . . . . . . . . . . . . . . . . . . . . . . . . . . . . . . . . . . . . . . . . . . . . . . . . . . . . . . . . . . . . . 471
16 Working with the Certificate Store . . . . . . . . . . . . . . . . . . . . . . . . . . . . . 473
Locating Certificates in the Certificate Store. . . . . . . . . . . . . . . . . . . . . . . . . . . . . . . . . 473
Listing Certificates . . . . . . . . . . . . . . . . . . . . . . . . . . . . . . . . . . . . . . . . . . . . . . . . . . 479
Locating Expired Certificates . . . . . . . . . . . . . . . . . . . . . . . . . . . . . . . . . . . . . . . . . 483
Identifying Certificates about to Expire . . . . . . . . . . . . . . . . . . . . . . . . . . . . . . . . 488
Managing Certificates . . . . . . . . . . . . . . . . . . . . . . . . . . . . . . . . . . . . . . . . . . . . . . . . . . . 492
Inspecting a Certificate. . . . . . . . . . . . . . . . . . . . . . . . . . . . . . . . . . . . . . . . . . . . . . 492
Importing a Certificate . . . . . . . . . . . . . . . . . . . . . . . . . . . . . . . . . . . . . . . . . . . . . . 497
Deleting a Certificate . . . . . . . . . . . . . . . . . . . . . . . . . . . . . . . . . . . . . . . . . . . . . . . 501
Summary. . . . . . . . . . . . . . . . . . . . . . . . . . . . . . . . . . . . . . . . . . . . . . . . . . . . . . . . . . . . . . . 507
A05T622791.fm Page xiii Friday, December 14, 2007 10:52 AM

xiv Table of Contents
17 Managing the Terminal Services Service. . . . . . . . . . . . . . . . . . . . . . . . . 509
Configuring the Terminal Service Installation . . . . . . . . . . . . . . . . . . . . . . . . . . . . . . . 509
Documenting Terminal Service Configuration . . . . . . . . . . . . . . . . . . . . . . . . . . 509
Disabling Logons . . . . . . . . . . . . . . . . . . . . . . . . . . . . . . . . . . . . . . . . . . . . . . . . . . 513
Modifying Client Properties . . . . . . . . . . . . . . . . . . . . . . . . . . . . . . . . . . . . . . . . . 517
Managing Users . . . . . . . . . . . . . . . . . . . . . . . . . . . . . . . . . . . . . . . . . . . . . . . . . . . . . . . . 521
Enabling Users to Access the Server . . . . . . . . . . . . . . . . . . . . . . . . . . . . . . . . . . 524
Configuring Client Settings . . . . . . . . . . . . . . . . . . . . . . . . . . . . . . . . . . . . . . . . . . 527
Summary . . . . . . . . . . . . . . . . . . . . . . . . . . . . . . . . . . . . . . . . . . . . . . . . . . . . . . . . . . . . . . 539
18 Configuring Network Services . . . . . . . . . . . . . . . . . . . . . . . . . . . . . . . . . 541
Reporting DNS Settings. . . . . . . . . . . . . . . . . . . . . . . . . . . . . . . . . . . . . . . . . . . . . . . . . . 541
Configuring DNS Logging Settings . . . . . . . . . . . . . . . . . . . . . . . . . . . . . . . . . . . 548
Reporting Root Hints . . . . . . . . . . . . . . . . . . . . . . . . . . . . . . . . . . . . . . . . . . . . . . . 556
Querying “A” Records . . . . . . . . . . . . . . . . . . . . . . . . . . . . . . . . . . . . . . . . . . . . . . . 557
Configuring DNS Server Settings. . . . . . . . . . . . . . . . . . . . . . . . . . . . . . . . . . . . . . . . . . 562
Reporting DNS Zones . . . . . . . . . . . . . . . . . . . . . . . . . . . . . . . . . . . . . . . . . . . . . . . . . . . 568
Creating DNS Zones. . . . . . . . . . . . . . . . . . . . . . . . . . . . . . . . . . . . . . . . . . . . . . . . . . . . . 571
Managing WINS and DHCP . . . . . . . . . . . . . . . . . . . . . . . . . . . . . . . . . . . . . . . . . . . . . . 576
Summary . . . . . . . . . . . . . . . . . . . . . . . . . . . . . . . . . . . . . . . . . . . . . . . . . . . . . . . . . . . . . . 581
19 Working with Windows Server 2008 Server Core . . . . . . . . . . . . . . . . . 583
Initial Configuration . . . . . . . . . . . . . . . . . . . . . . . . . . . . . . . . . . . . . . . . . . . . . . . . . . . . . 583
Joining the Domain . . . . . . . . . . . . . . . . . . . . . . . . . . . . . . . . . . . . . . . . . . . . . . . . 584
Setting the IP Address . . . . . . . . . . . . . . . . . . . . . . . . . . . . . . . . . . . . . . . . . . . . . . 592
Configuring the DNS Settings. . . . . . . . . . . . . . . . . . . . . . . . . . . . . . . . . . . . . . . . 597
Renaming the Server . . . . . . . . . . . . . . . . . . . . . . . . . . . . . . . . . . . . . . . . . . . . . . . 605
Managing Windows Server 2008 Server Core . . . . . . . . . . . . . . . . . . . . . . . . . . . . . . . 611
Monitoring the Server . . . . . . . . . . . . . . . . . . . . . . . . . . . . . . . . . . . . . . . . . . . . . . 611
Querying Event Logs . . . . . . . . . . . . . . . . . . . . . . . . . . . . . . . . . . . . . . . . . . . . . . . 614
Summary . . . . . . . . . . . . . . . . . . . . . . . . . . . . . . . . . . . . . . . . . . . . . . . . . . . . . . . . . . . . . . 617
A Cmdlet Naming Conventions . . . . . . . . . . . . . . . . . . . . . . . . . . . . . . . . . . 619
B ActiveX Data Object Provider Names . . . . . . . . . . . . . . . . . . . . . . . . . . . 621
C Frequently Asked Questions . . . . . . . . . . . . . . . . . . . . . . . . . . . . . . . . . . . 623
A05T622791.fm Page xiv Friday, December 14, 2007 10:52 AM

Table of Contents xv
D Scripting Guidelines . . . . . . . . . . . . . . . . . . . . . . . . . . . . . . . . . . . . . . . . . . 631
General Script Construction. . . . . . . . . . . . . . . . . . . . . . . . . . . . . . . . . . . . . . . . . . . . . . . 631
Include Functions in the Script that Calls the Function. . . . . . . . . . . . . . . . . . . 631
Use Full Cmdlet Names and Full Parameter Names. . . . . . . . . . . . . . . . . . . . . . 632
Use Get-Item to Convert Path Strings to Rich Types . . . . . . . . . . . . . . . . . . . . . 633
General Script Readability . . . . . . . . . . . . . . . . . . . . . . . . . . . . . . . . . . . . . . . . . . . . . . . . 633
Formatting Your Code . . . . . . . . . . . . . . . . . . . . . . . . . . . . . . . . . . . . . . . . . . . . . . . . . . . 634
Working with Functions . . . . . . . . . . . . . . . . . . . . . . . . . . . . . . . . . . . . . . . . . . . . . 635
Creating Template Files. . . . . . . . . . . . . . . . . . . . . . . . . . . . . . . . . . . . . . . . . . . . . . 637
Writing Functions . . . . . . . . . . . . . . . . . . . . . . . . . . . . . . . . . . . . . . . . . . . . . . . . . . 637
Creating and Naming Variables and Constants . . . . . . . . . . . . . . . . . . . . . . . . . 638
E General Troubleshooting Tips. . . . . . . . . . . . . . . . . . . . . . . . . . . . . . . . . . 639
Index. . . . . . . . . . . . . . . . . . . . . . . . . . . . . . . . . . . . . . . . . . . . . . . . . . . . . . . . . . . . . . . . . . . . 643
Microsoft is interested in hearing your feedback so we can continually improve our books and learning
resources for you. To participate in a brief online survey, please visit:
www.microsoft.com/learning/booksurvey/
What do you think of this book? We want to hear from you!
A05T622791.fm Page xv Friday, December 14, 2007 10:52 AM
A05T622791.fm Page xvi Friday, December 14, 2007 10:52 AM
xvii
Acknowledgments
With every book I write, I find new challenges to overcome…and new friends to help me do it!
However, in addition to my new friends, I also continue to receive tons of help from my old
friends as well. My best friend is Teresa, who also happens to be my wife. Teresa continues to
develop her skills in the publishing field; any success my other books have gained is due in
no small part to her skills as a technical reader. I value her suggestions, comments, and ability
to spot errors. Any thoughts my editors have that I am literate are directly attributable to her.
The amazing thing: She is trained as an accountant!
I also need to thank my agent Claudette Moore of the Moore Literary Agency. She makes me
feel like I am the only writer she is representing. The level of personal attention I receive from
her is just wonderful. She also does an excellent job of helping to ensure I am working on the
right project at the proper time. She makes sure I can focus on my current project while she
takes care of getting my next project lined up. This is no small feat!
Martin DelRe is my acquisitions editor at MSPress. WOW! This guy is an amazing supporter
of scripting and he knows how to make sure that the books that are published meet the needs
of the scripting community. But he goes way above and beyond that. He is one of the most
cheerful and enthusiastic people I know, and he seems to track the book projects from
inception all the way through the publishing process.
I was really fortunate to get Bob Hogan back to be my technical reviewer. He is a very positive,
supportive person who has a keen technical mind and really knows his scripting. He saved
me time and again on this project just as he did on my earlier books. Well done, Bob!
This book also saw the introduction of some new friends. Michelle Goodman did a superb job
as an editor and kept me on track to meet my deadlines. Over the 10 months I spent writing
the book, I flew nearly 200,000 miles, worked in nearly a dozen countries, went scuba diving
a few times, got sick once, and crossed the International Date Line six times. She stayed after
me, kept up with me, and even brought the project in two weeks early! Nice job.
Maureen Zimmerman was my content development editor once again; she got me off to a
great start and affected a smooth handoff to Michelle. Sweet! Dean Tsaltas, a real-life scripting
guy, answered several WMI questions, provided access to daily builds of the WMI SDK, and is
a great guy.
Denise Bankaitis picked up the reins after Michelle had to leave the project, and she stayed
after me and made sure I got all the rewrites done on time so that the book could make it to
press. Speaking of making it to press, Linda Allen at Custom Editorial Productions, Inc. was
the project manager/production wrangler and helped get the book into print. Kathy Eastman
was my copy editor and helped to ensure that the book at least looks like it was written by
someone who is semiliterate. Awesome job to all three.
A06A622791.fm Page xvii Friday, December 14, 2007 10:52 AM
xviii Acknowledgments
Jeffrey Snover, the architect for Windows PowerShell, should be mentioned simply because he
created what one customer recently told me was “the coolest thing to come out of Microsoft in
years.” This is saying a lot because we have come up with some really cool stuff recently, but
I have to agree. However, he also answered several Windows PowerShell questions that had
stumped me for days. He is brilliant.
Chris Bellée, Pete Christensen, and Jit Banerjie all are trained to deliver my Windows
PowerShell class and they routinely get pinged from me with comments such as, “This is not
working, can you figure it out?” Usually they do. I feel like they are all good friends, and I am
glad they are in Australia—so I can visit them! Better than that, Peter is also a scuba instructor
(I am jealous). Jit, of course, is not a new friend; I have been fortunate to know him for nearly
five years. Really fortunate because Jit’s wife is the best cook in Australia and is just a lovely
person. And Chris, well he is simply the coolest person I know!
A06A622791.fm Page xviii Friday, December 14, 2007 10:52 AM
xix
Introduction
The world’s greatest scripting language paired with the world’s greatest operating systems!
It’s like peanut butter and chocolate—they just belong together. Windows Vista and Windows
Server 2008 are not only the most important releases in the history of Microsoft, but are also
the most configurable. That’s right, configurable! The advances that make the GUI so awe-
some for normal users, however, also create a major pain for network administrators, consult-
ants, and power users. Fortunately, the tool used to administer Exchange Server 2007, Virtual
Server 2007, and even Windows Server 2008, is exactly the same tool available to administer
Windows Vista. That tool is Windows PowerShell.
As the author of five books on Windows scripting and as a consultant for Microsoft, I travel
the world sharing the good news of Visual Basic Script (VBScript), Windows Management
Instrumentation (WMI), Active Directory Services Interfaces (ADSI)…and now the new kid on
the block—Windows PowerShell.
Using Windows PowerShell, a novice network administrator can create a script that lists the
top resource-consuming processes on a computer by inputting just a single line of code. While
this same task can be completed using VBScript, VBScript takes much more time and typing
to perform the feat. You can use that exact line of code to find the top resource-consuming
processes on Windows Server 2008 or on Windows Vista.
New products from Microsoft will supply Windows PowerShell cmdlets (cmdlets are the
power in Windows PowerShell and are talked about in Chapter 1), interfaces, and in some
cases, even tools. This is truly sweet news, as it indicates we are nearing a time when there
really is a single way to administer and configure applications.
Windows PowerShell is a new scripting language that first appeared with Microsoft Exchange
2007. It is a release-to-the-Web product and it can be installed on Windows XP, Windows
Server 2003, and Windows Vista. It is also an installable feature included with Windows
Server 2008, and it will be included in the base installation of the next generation desktop
client. Because the Microsoft Exchange 2007 administrator tools are built upon Windows
PowerShell, Exchange administrators are often among the first to explore and use Windows
PowerShell. Managing security, registry resources, and service configuration are all activities
performed on a daily basis by network administrators, and by calling on the flexibility and
utility of Windows PowerShell, these tasks are easily performed.
Is This Book for Me?
Windows PowerShell Scripting Guide will equip you with the tools to automate the setup,
deployment, and management of computers running Windows. In addition, this book will
provide you with a thorough examination of the cmdlets that ship with the product.
A07I622791.fm Page xix Friday, December 14, 2007 10:53 AM
xx Introduction
More than 300 scripts illustrate the main tasks performed by a network administrator: security,
configuration, deployment, maintenance, networking, and troubleshooting.
Windows PowerShell Scripting Guide is perfect for several audiences, including:
■Windows networking consultants To standardize and to automate the installation and
configuration of .NET networking components.
■Windows network administrators To automate the day-to-day management of
Windows networks.
■Microsoft Certified Systems Engineers (MCSEs) and Microsoft Certified Trainers
(MCTs) To prepare for several of the new certification exams that now contain
Windows PowerShell questions.
■General technical staff To collect information and configure settings on Windows
computers.
■Power users To obtain maximum power and configurability of Windows computers at
home or in an unmanaged desktop workplace environment.
Windows PowerShell Scripting Guide is divided into four conceptual parts: understanding
Windows PowerShell, using Windows PowerShell with Windows Vista, using Windows
PowerShell with Windows Server 2008, and maintaining specific applications. The book is
not really divided into these sections, however, as each chapter is written as a standalone unit.
This allows you to pick up the book and quickly retrieve the information for a particular
question you might have; for example, if you need to manage IIS 7, you can quickly turn to
Chapter 15, “Managing Internet Information Services.”
About the Companion CD
The CD accompanying this book contains additional information and software components
and scripts. Lots and lots of scripts. In fact, there are exactly 317 scripts. (I know because
I wrote a script to count each and every one of ’em!) There are scripts and sample output
related to each chapter of the book. The folder names match the chapter names, so you should
have no trouble locating the one you need.
Most of the scripts are self-contained and do not assume specific values. These scripts have
command-line parameters that allow you to modify them at run time. There are some scripts,
however, that expose variables which are set to a specific sample value. These scripts must be
modified just a little to match your current environment. In all cases, these changes are noted
with at least a comment either in the code, in the book, or in both places.
There are a few database files included on the CD as well. These were created using Microsoft
Access 2007. However, as some of you may be using an older version of Access, I went ahead
and saved the database files in compatability mode. However, all of the screen shots in the
book that reference these database files were shot using Access 2007.
A07I622791.fm Page xx Friday, December 14, 2007 10:53 AM
Introduction xxi
If you choose to use the script installer on the CD accompanying this book, the sample
scripts will automatically be copied into the [My Documents]\Microsoft Press\PowerShell
Scripting Guide\scripts folder by default; however, you can change this location during
installation.
You don’t want to miss the \extras folder! Let me explain. I enjoy writing scripts—especially in
Windows PowerShell. As a result, I wrote a multitude of scripts that are not related to chapters
or topics covered in this book. (I got started and just couldn’t stop writing them!) However,
these scripts aren’t worthless; they may well illustrate particular techniques that you will find
beneficial. Some, such as the FlashingBunny.ps1 script, are a little silly and probably have little
redeeming value. However, you may find some gems in this folder to solve a very real problem
and save hours of your life. (For example, if your CIO asks you, “Can you write me a script that
would display a flashing bunny?” you’d be ready to go!)
System Requirements
■Minimum 1.0 gigahertz (GHz) in the Intel Pentium/Celeron family or the AMD
k6/Atholon/Duron family
■1.0 GB memory
■1.5 GB available hard disk space
■Display monitor capable of 1024 × 768 resolution or higher
■CD-ROM drive or DVD drive
■Microsoft Mouse or compatible pointing device
■Windows Server 2003 SP1, Windows XP SP2, or Windows Vista
■Microsoft .NET Framework 2.0
This book is written for both Windows Vista and Windows Server 2008 operating systems.
The scripts were not tested on Windows XP or Windows Server 2003, although in most cases
the scripts will run without modification.
Technical Support
Every effort has been made to ensure the accuracy of this book and the contents of the
companion CD-ROM. Microsoft Press provides corrections for books through the following
Web site http://www.microsoft.com/learning/support.
To connect directly with the Microsoft Press Knowledge Base and enter a query regarding a
question or an issue, go to http://www.microsoft.com/learning/support/search.asp.
A07I622791.fm Page xxi Friday, December 14, 2007 10:53 AM
xxii Introduction
If you have comments, questions, or ideas about this book or the companion CD-ROM, please
send them to Microsoft Press using either of the following methods:
Please note that product support is not offered through either of these addresses.
Find Additional Content Online As new or updated material becomes available that
complements your book, it will be posted online on the Microsoft Press Online Windows
Server and Client Web site. Based on the final build of Windows Server 2008, the type of
material you might find includes updates to book content, articles, links to companion
content, errata, sample chapters, and more. This Web site will be available soon at
www.microsoft.com/learning/books/online/serverclient, and will be updated periodically.
E-Mail mspinput@microsoft.com
Postal Mail Microsoft Press
Attn: Editor, Windows PowerShell Scripting Guide
One Microsoft Way
Redmond, WA 98052
A07I622791.fm Page xxii Friday, December 14, 2007 10:53 AM

1
Chapter 1
The Shell in Windows PowerShell
After completing this chapter, you will be able to:
■Install and configure Windows PowerShell.
■Tackle security issues with Windows PowerShell.
■Understand the basics of cmdlets.
■Work with aliases to assign shortcut names to cmdlets.
■Get help using Windows PowerShell.
On the Companion Disc All the scripts used in this chapter are located on the CD-ROM
that accompanies this book in the \scripts\chapter01 folder.
Installing Windows PowerShell
Because Windows PowerShell is not installed by default on any operating system released by
Microsoft, it is important to verify the existence of Windows PowerShell on the platform
before the actual deployment of either scripts or commands. This can be as simple as trying to
execute a Windows PowerShell command and looking for errors. You can easily accomplish
this from inside a batch file by querying the value %errorlevel%.
Verifying Installation with VBScript
A more sophisticated approach to the task of verifying the existence of Windows PowerShell
on the operating system is to use a script that queries the Win32_QuickFixEngineering
Windows Management Instrumentation (WMI) class. FindPowerShell.vbs is an example of
using Win32_QuickFixEngineering in Microsoft Visual Basic Scripting Edition (VBScript) to
find an installation of Windows PowerShell.
The FindPowerShell.vbs script uses the WMI moniker to create an instance of the
SwbemServices object and then uses the execquery method to issue the query. The WMI Query
Language (WQL) query uses the like operator to retrieve hotfixes with a hotfix ID such as
928439, which is the hotfix ID for Windows PowerShell on Windows XP, Windows Vista,
Windows Server 2003, and Windows Server 2008. Once the hotfix is identified, the script
simply prints out the name of the computer stating that Windows PowerShell is installed.
This is shown in Figure 1-1.
C01622791.fm Page 1 Saturday, December 8, 2007 6:28 PM

2Windows PowerShell Scripting Guide
Figure 1-1 The FindPowerShell.vbs script displays a pop-up box indicating that Windows
PowerShell has been found.
If the hotfix is not found, the script indicates that Windows PowerShell is not installed. The
FindPowerShell.vbs script can easily be modified to include additional functionality you may
require on your specific network. For example, you may want to run the script against multi-
ple computers. To do this, you can turn strComputer into an array and type in multiple com-
puter names. Or, you can read a text file or perform an Active Directory directory service
query to retrieve computer names. You could also log the output from the script rather than
create a pop-up box.
FindPowerShell.vbs
Const RtnImmedFwdOnly = &h30
strComputer = "."
wmiNS = "\root\cimv2"
wmiQuery = "Select * from win32_QuickFixEngineering where hotfixid like '928439'"
Set objWMIService = GetObject("winmgmts:\\" & strComputer & wmiNS)
Set colItems = objWMIService.ExecQuery(wmiQuery,,RtnImmedFwdOnly)
For Each objItem in colItems
Wscript.Echo "PowerShell is present on " & objItem.CSName
Wscript.quit
Next
Wscript.Echo “PowerShell is not installed”
Deploying Windows PowerShell
Once Windows PowerShell is downloaded from http://www.microsoft.com/downloads, you
can deploy Windows PowerShell in your environment by using any of the standard methods
you currently use. A few of the methods customers use to deploy Windows PowerShell follow:
■Create a Microsoft Systems Management Server (SMS) package and advertise it to the
appropriate organizational unit (OU) or collection.
■Create a Group Policy Object (GPO) in Active Directory and link it to the appropriate
OU.
■Call the executable by using a logon script.
If you are not deploying to an entire enterprise, perhaps the easiest way to install Windows
PowerShell is to simply double-click the executable and step through the wizard.
C01622791.fm Page 2 Saturday, December 8, 2007 6:28 PM

Chapter 1 The Shell in Windows PowerShell 3
Keep in mind that Windows PowerShell is installed by using hotfix technology. This means it
is an update to the operating system, and not an add-on program. This has certain advantages,
including the ability to provide updates and fixes to Windows PowerShell through operating
system service packs and through Windows Update. But there are also some drawbacks, in
that hotfixes need to be uninstalled in the same order that they were installed. For example, if
you install Windows PowerShell on Windows Vista and later install a series of updates, then
install Service Pack 1, and suddenly decide to uninstall Windows PowerShell, you will need to
back out Service Pack 1 and each hotfix in the appropriate order. (Personally, at that point I
think I would just back up my data, format the disks, and reinstall Windows Vista. I think it
would be faster. But all this is a moot point anyway, as there is little reason to uninstall Win-
dows PowerShell.)
Understanding Windows PowerShell
One issue with Windows PowerShell is grasping what it is. In fact, the first time I met
Jeffrey Snover, the chief architect for Windows PowerShell, one of the first things he said
was, “How do you describe Windows PowerShell to customers?”
So what is Windows PowerShell? Simply stated, Windows PowerShell is the next gener-
ation command shell and scripting language from Microsoft that can be used to replace
both the venerable Cmd.exe command interpreter and the VBScript scripting language.
This dualistic behavior causes problems for many network administrators who are used
to the Cmd.exe command interpreter with its weak batch language and the powerful
(but confusing) VBScript language for automating administrative tasks. These are not
bad tools, but they are currently used in ways that were not intended when they were
created more than a decade ago. The Cmd.exe command interpreter was essentially the
successor to the DOS prompt, and VBScript was more or less designed with Web pages
in mind. Neither was designed from the ground up for network administrators.
Interacting with the Shell
Once Windows PowerShell is launched, you can use it in the same manner as the Cmd.exe
command interpreter. For example, you can use dir to retrieve a directory listing. You can also
use cd to change the working directory and then use dir to produce a directory listing just as
you would perform these tasks from the CMD shell. This is illustrated in the UsingPower-
Shell.txt example that follows, which shows the results of using these commands.
UsingPowerShell.txt
PS C:\Users\edwils> dir
Directory: Microsoft.PowerShell.Core\FileSystem::C:\Users\edwils
C01622791.fm Page 3 Saturday, December 8, 2007 6:28 PM
4Windows PowerShell Scripting Guide
Mode LastWriteTime Length Name
---- ------------- ------ ----
d-r-- 11/29/2006 1:32 PM Contacts
d-r-- 4/2/2007 12:51 AM Desktop
d-r-- 4/1/2007 6:53 PM Documents
d-r-- 11/29/2006 1:32 PM Downloads
d-r-- 4/2/2007 1:10 AM Favorites
d-r-- 4/1/2007 6:53 PM Links
d-r-- 11/29/2006 1:32 PM Music
d-r-- 11/29/2006 1:32 PM Pictures
d-r-- 11/29/2006 1:32 PM Saved Games
d-r-- 4/1/2007 6:53 PM Searches
d-r-- 4/2/2007 5:53 PM Videos
PS C:\Users\edwils> cd music
PS C:\Users\edwils\Music> dir
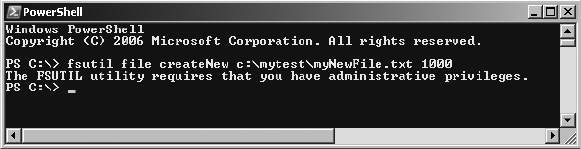
In addition to using traditional command interpreter commands, you can also use some of the
newer command-line utilities such as Fsutil.exe, as shown here. Keep in mind that access to
Fsutil.exe requires administrative rights. If you launch the standard Windows PowerShell
prompt from the Windows PowerShell program group, you will not have administrative
rights, and the error shown in Figure 1-2 will appear.
Figure 1-2 Windows PowerShell respects user account control and by default will launch with
normal user privileges. This can generate errors when trying to execute privileged commands.
Fsutil.txt
PS C:\Users\edwils> sl c:\mytest
PS C:\mytest> fsutil file createNew c:\mytest\myNewFile.txt 1000
File c:\mytest\myNewFile.txt is created
PS C:\mytest> dir
Directory: Microsoft.PowerShell.Core\FileSystem::C:\mytest
Mode LastWriteTime Length Name
---- ------------- ------ ----
-a--- 5/8/2007 7:30 PM 1000 myNewFile.txt
PS C:\mytest>
C01622791.fm Page 4 Saturday, December 8, 2007 6:28 PM

Chapter 1 The Shell in Windows PowerShell 5
Tip I recommend creating two Windows PowerShell shortcuts and saving them to the
Quick Launch bar. One shortcut launches with normal user permissions and the other
launches with administrative rights. By default you should use the normal user shortcut and
document those occasions that require administrative rights.
When you are finished working with the files and the folder, you can delete the file very easily
by using the del command. To keep from typing the entire file name, you can use wildcards
such as *.txt. This is safe enough, since you have first used the dir command to ensure there
is only one text file in the folder. Once the file is removed, you can use rd to remove the direc-
tory. As shown in DeleteFileAndFolder.txt example that follows, these commands work
exactly the same as you would expect when working with the command prompt.
DeleteFileAndFolder.txt
PS C:\> sl c:\mytest
PS C:\mytest> dir
Directory: Microsoft.PowerShell.Core\FileSystem::C:\mytest
Mode LastWriteTime Length Name
---- ------------- ------ ----
-a--- 5/8/2007 7:30 PM 1000 myNewFile.txt
PS C:\mytest> del *.txt
PS C:\mytest> cd c:\
PS C:\> rd c:\mytest
PS C:\> dir c:\mytest
Get-ChildItem : Cannot find path 'C:\mytest' because it does not exist.
At line:1 char:4
+ dir <<<< c:\mytest
PS C:\>
With these examples, you have been using Windows PowerShell in an interactive manner.
This is one of the primary uses of Windows PowerShell. In fact, the Windows PowerShell team
expects that 80 percent of users will work with Windows PowerShell interactively—simply as
a better command prompt. You open up a Windows PowerShell prompt and type in com-
mands. The commands can be typed one at a time or they can be grouped together like a
batch file. This will be discussed later, as the process doesn’t work by default.
Introducing Cmdlets
In addition to using traditional programs and commands from the Cmd.exe command inter-
preter, you can also use the cmdlets that are built into Windows PowerShell. Cmdlet is a name
created by the Windows PowerShell team to describe these native commands. They are like
executable programs but because they take advantage of the facilities built into Windows
C01622791.fm Page 5 Saturday, December 8, 2007 6:28 PM
6Windows PowerShell Scripting Guide
PowerShell, they are easy to write. They are not scripts, which are uncompiled code, because
they are built using the services of a special Microsoft .NET Framework namespace. Because
of their different nature, the Windows PowerShell team came up with the new term cmdlet.
Windows PowerShell comes with more than 120 cmdlets designed to assist network admin-
istrators and consultants to easily take advantage of Windows PowerShell without having to
learn the Windows PowerShell scripting language. These cmdlets are documented in Appen-
dix A, “Cmdlet Naming Conventions.” In general, the cmdlets follow a standard naming con-
vention such as Get-Help, Get-EventLog, or Get-Process. The “get” cmdlets display
information about the item that is specified on the right side of the dash. The “set” cmdlets are
used to modify or to set information about the item on the right side of the dash. An example
of a “set” cmdlet is Set-Service, which can be used to change the startmode of a service. An
explanation of this naming convention is found in Appendix A, “Cmdlet Naming Conventions.”
Configuring Windows PowerShell
Once Windows PowerShell is installed on a platform, there are still some configuration issues
to address. This is in part due to the way the Windows PowerShell team at Microsoft perceives
the use of the tool. For example, the Windows PowerShell team believes that 80 percent of
Windows PowerShell users will not utilize the scripting features of Windows PowerShell;
thus, the scripting capability is turned off by default. Find more information on enabling
scripting support in Windows Power Shell in Chapter 2, “Scripting Windows PowerShell.”
Creating a Windows PowerShell Profile
There are many settings that can be stored in a Windows PowerShell profile. These items can
be stored in a psconsole file. To export the console configuration file, use the Export-Console
cmdlet as shown here:
PS C:\> Export-Console myconsole
The psconsole file is saved in the current directory by default, and will have an extension of
.psc1. The psconsole file is saved in an .xml format; a generic console file is shown here:
<?xml version="1.0" encoding="utf-8"?>
<PSConsoleFile ConsoleSchemaVersion="1.0">
<PSVersion>1.0</PSVersion>
<PSSnapIns />
</PSConsoleFile>
Configuring Windows PowerShell Startup Options
There are several methods available to start Windows PowerShell. For example, if the logo you
receive when clicking the default Windows PowerShell icon seems to get in your way, you can
launch without it. You can start Windows PowerShell using different profiles and even run a
C01622791.fm Page 6 Saturday, December 8, 2007 6:28 PM
Chapter 1 The Shell in Windows PowerShell 7
single Windows PowerShell command and exit the shell. If you need to start a specific version
of Windows PowerShell, you can do that as well by supplying a value for the version parame-
ter. Each of these options is illustrated in the following list.
■Launch Windows PowerShell without the banner by using the -nologo argument as
shown here:
PowerShell -nologo
■Launch a specific version of Windows PowerShell by using the -version argument:
PowerShell -version 1.0
■Launch Windows PowerShell using a specific configuration file by specifying the
-psconsolefile argument:
PowerShell -psconsolefile myconsole.psc1
■Launch Windows PowerShell, execute a specific command, and then exit by using the
-command argument. The command must be prefixed by the ampersand sign and
enclosed in curly brackets:
powershell -command "& {get-process}"
Security Issues with Windows PowerShell
As with any tool as versatile as Windows PowerShell, there are some security concerns. Secu-
rity, however, was one of the design goals in the development of Windows PowerShell.
When you launch Windows PowerShell, it opens in your Users\userName folder; this ensures
you are in a directory where you will have permission to perform certain actions and activities.
This technique is far safer than opening at the root of the drive or opening in the system root.
To change to a directory, you can’t automatically go up to the next level; you must explicitly
name the destination of the change directory operation (but you can use the dotted notation
with the Set-Location cmdlets as in Set-Location ..).
Running scripts is disabled by default but this can be easily managed with Group Policy or
login scripts.
Controlling the Execution of Cmdlets
Have you ever opened a CMD interpreter prompt, typed in a command, and pressed Enter so
you could see what happens? If that command happens to be Format C:\, are you sure you
want to format your C drive? There are several arguments that can be passed to cmdlets to
control the way they execute. These arguments will be examined in this section.
C01622791.fm Page 7 Saturday, December 8, 2007 6:28 PM

8Windows PowerShell Scripting Guide
Tip Most of the Windows PowerShell cmdlets support a “prototype” mode that can be
entered by using the -whatif parameter. The implementation of the whatif switch can be
decided by the person developing the cmdlet; however, the Windows PowerShell team
recommends that developers implement -whatif if the cmdlet will make changes to the system.
Although not all cmdlets support these arguments, most of the cmdlets included with Win-
dows PowerShell do. The three ways to control execution are -whatif, -confirm, and suspend.
Suspend is not an argument that gets supplied to a cmdlet, but it is an action you can take at a
confirmation prompt, and is therefore another method of controlling execution.
To use -whatif, first enter the cmdlet at a Windows PowerShell prompt. Then type the -whatif
parameter after the cmdlet. The use of the -whatif argument is illustrated in the following
WhatIf.txt example. On the first line, launch Notepad. This is as simple as typing the word
notepad as shown in the path. Next, use the Get-Process cmdlet to search for all processes
that begin with the name note. In this example, there are two processes with a name beginning
with notepad. Next, use the Stop-Process cmdlet to stop a process with the name of notepad,
but because the outcome is unknown, use the -whatif parameter. Whatif tells you that it will
kill two processes, both of which are named notepad, and it also gives the process ID number
so you can verify if this is the process you wish to kill. Just for fun, once again use the Stop-
Process cmdlet to stop all processes with a name that begins with the letter n. Again, wisely
use the whatif parameter to see what would happen if you execute the command.
WhatIf.txt
PS C:\Users\edwils> notepad
PS C:\Users\edwils> Get-Process note*
Handles NPM(K) PM(K) WS(K) VM(M) CPU(s) Id ProcessName
------- ------ ----- ----- ----- ------ -- -----------
45 2 1044 3904 53 0.03 3052 notepad
45 2 1136 4020 54 0.05 3140 notepad
PS C:\Users\edwils> Stop-Process -processName notepad -WhatIf
What if: Performing operation "Stop-Process" on Target "notepad (3052)".
What if: Performing operation "Stop-Process" on Target "notepad (3140)".
PS C:\Users\edwils> Stop-Process -processName n* -WhatIf
What if: Performing operation "Stop-Process" on Target "notepad (3052)".
What if: Performing operation "Stop-Process" on Target "notepad (3140)".
So what happens if the whatif switch is not implemented? To illustrate this point, notice that
in the following WhatIf2.txt example, when you use the New-Item cmdlet to create a new
directory named myNewtest off the root, the whatif switch is implemented and it
confirms that the command will indeed create C:\myNewtest.
Note what happens, however, when you try to use the whatif switch on the Get-Help cmdlet.
You might guess it would display a message such as, “What if: Retrieving help information for
C01622791.fm Page 8 Saturday, December 8, 2007 6:28 PM

Chapter 1 The Shell in Windows PowerShell 9
Get-Process cmdlet.” But what is the point? As there is no danger with the Get-Help cmdlet,
there is no need to implement whatif on Get-Help.
WhatIf2.txt
PS C:\Users\edwils> New-Item -Name myNewTest -Path c:\ -ItemType directory -WhatIf
What if: Performing operation "Create Directory" on Target
"Destination: C:\myNewTest".
PS C:\Users\edwils> get-help Get-Process -whatif
Get-Help : A parameter cannot be found that matches parameter name 'whatif'.
At line:1 char:28
+ get-help Get-Process -whatif <<<<
Best Practices The use of the -whatif parameter should be considered an essential tool in
the network administrator’s repertoire. Using it to model commands before execution can
save hours of work each year.
Confirming Commands
As you saw in the previous section, you can use -whatif to create a prototype cmdlet in
Windows PowerShell. This is useful for checking what a command will do. However, to be
prompted before the command executes, use the -confirm switch. In practice, using the
-confirm switch can generally take the place of -whatif, as you will be prompted before the
action occurs. This is shown in the ConfirmIt.txt example that follows.
In the ConfirmIt.txt file, first launch Calculator (Calc.exe). Because the file is in the path, you
don’t need to hard-code either the path or the extension. Next, use Get-Process with the c*
wildcard pattern to find all processes that begin with the letter c. Notice that there are several
process names on the list. The next step is to retrieve only the Calc.exe process. This returns
a more manageable result set. Now use the Stop-Process cmdlet with the -confirm switch. The
cmdlet returns the following information:
Confirm
Are you sure you want to perform this action?
Performing operation "Stop-Process" on Target "calc (2924)".
[Y] Yes [A] Yes to All [N] No [L] No to All [S] Suspend
[?] Help (default is "Y"):
You will notice this information is essentially the same as the information provided by the
whatif switch but it also provides the ability to perform the requested action. This can
save time when executing a large number of commands.
ConfirmIt.txt
PS C:\Users\edwils> calc
PS C:\Users\edwils> Get-Process c*
C01622791.fm Page 9 Saturday, December 8, 2007 6:28 PM
10 Windows PowerShell Scripting Guide
Handles NPM(K) PM(K) WS(K) VM(M) CPU(s) Id ProcessName
------- ------ ----- ----- ----- ------ -- -----------
43 2 1060 4212 54 0.03 2924 calc
1408 7 3364 6556 81 372 casha
1132 16 23156 34680 129 3084 CcmExec
599 5 1680 4956 88 620 csrss
480 10 15812 20500 195 688 csrss
PS C:\Users\edwils> Get-Process calc
Handles NPM(K) PM(K) WS(K) VM(M) CPU(s) Id ProcessName
------- ------ ----- ----- ----- ------ -- -----------
43 2 1060 4212 54 0.03 2924 calc
PS C:\Users\edwils> Stop-Process -Name calc -Confirm
Confirm
Are you sure you want to perform this action?
Performing operation "Stop-Process" on Target "calc (2924)".
[Y] Yes [A] Yes to All [N] No [L] No to All [S] Suspend [?]
Help (default is "Y"): y
PS C:\Users\edwils> Get-Process c*
Handles NPM(K) PM(K) WS(K) VM(M) CPU(s) Id ProcessName
------- ------ ----- ----- ----- ------ -- -----------
1412 7 3364 6556 81 372 casha
1154 16 23224 34740 130 3084 CcmExec
598 5 1680 4956 88 620 csrss
477 10 15812 20488 195 688 csrss
Suspending Confirmation of Cmdlets
The ability to prompt for confirmation of a cmdlet’s execution is extremely useful and at times
may be vital in maintaining a high level of system uptime. For example, there are times when
you have typed in a long command and then remember that you must perform another pro-
cedure first. In this case, simply suspend execution of the command. The commands used in
the suspending execution of a cmdlet and associated output are shown in the following Sus-
pendConfirmation.txt example.
In the SuspendConfirmation.txt file, first launch Microsoft Paint (Mspaint.exe). Because
Mspaint.exe is in the path, you don’t need to supply any path information to the file. You then
get the process information by using the Get-Process cmdlet. Use the ms* wildcard, which
matches any process name that begins with the letters ms. Once you have identified the
correct process, use the Stop-Process cmdlet and the confirm switch. Instead of answering yes
to the confirmation prompt, just suspend execution of the command so you can run an
additional command (perhaps you forgot the process ID number). Once you have finished
running the additional command, type exit to return to the suspended command from the
nested prompt. Once you have killed the mspaint process, you can once again use the Get-
Process cmdlet to confirm the process has been killed.
C01622791.fm Page 10 Saturday, December 8, 2007 6:28 PM
Chapter 1 The Shell in Windows PowerShell 11
SuspendConfirmation.txt
PS C:\Users\edwils> mspaint
PS C:\Users\edwils> Get-Process ms*
Handles NPM(K) PM(K) WS(K) VM(M) CPU(s) Id ProcessName
------- ------ ----- ----- ----- ------ -- -----------
98 4 5404 10492 72 0.09 3064 mspaint
PS C:\Users\edwils> Stop-Process -id 3064 -Confirm
Confirm
Are you sure you want to perform this action?
Performing operation "Stop-Process" on Target "mspaint (3064)".
[Y] Yes [A] Yes to All [N] No [L] No to All [S] Suspend [?] Help (default is "Y"): s
PS C:\Users\edwils>>> Get-Process ms*
Handles NPM(K) PM(K) WS(K) VM(M) CPU(s) Id ProcessName
------- ------ ----- ----- ----- ------ -- -----------
97 4 5404 10496 72 0.09 3064 mspaint
PS C:\Users\edwils>>> exit
Confirm
Are you sure you want to perform this action?
Performing operation "Stop-Process" on Target "mspaint (3064)".
[Y] Yes [A] Yes to All [N] No [L] No to All [S] Suspend [?] Help (default is "Y"): y
PS C:\Users\edwils> Get-Process ms*
Supplying Options for Cmdlets
As you have seen in the previous sections, you can use -whatif and -confirm to control the
execution of cmdlets. One question students often ask me is, “How do I know what options
are available?” The answer is that the Windows PowerShell team created a set of standard
options. These standard options are called common parameters. When you look at the syntax
description for a cmdlet, often it will state that the cmdlet supports the common parameters.
This is shown here for the Get-Process cmdlet:
SYNTAX
Get-Process [[-name] <string[]>] [<CommonParameters>]
Get-Process -id <Int32[]> [<CommonParameters>]
Get-Process -inputObject <Process[]> [<CommonParameters>]
One of the useful features of Windows PowerShell is the standardization of the syntax in
working with cmdlets. This vastly simplifies learning the new shell and language. Table 1-1
lists the common parameters. Keep in mind that all cmdlets will not implement all of these
parameters. However, if the parameters are used they will be interpreted in the same way for
all cmdlets because the Windows PowerShell engine interprets the parameters.
C01622791.fm Page 11 Saturday, December 8, 2007 6:28 PM

12 Windows PowerShell Scripting Guide
Working with Get-Help
Windows PowerShell is intuitively easy to use; learn simply by doing. Online help makes it
even easier to use the program. The help system in Windows PowerShell can be entered by
several methods. To learn about using Windows PowerShell, use the Get-Help cmdlet as
shown here:
get-help get-help
This command prints out help about the Get-Help cmdlet. The output from this cmdlet is
shown here:
NAME
Get-Help
SYNOPSIS
Displays information about Windows PowerShell cmdlets and concepts.
SYNTAX
Get-Help [[-name] <string>] [-component <string[]>] [-functionality <string
[]>] [-role <string[]>] [-category <string[]>] [-full] [<CommonParameters>]
Get-Help [[-name] <string>] [-component <string[]>] [-functionality <string
[]>] [-role <string[]>] [-category <string[]>] [-detailed] [<CommonParamete
rs>]
Get-Help [[-name] <string>] [-component <string[]>] [-functionality <string
[]>] [-role <string[]>] [-category <string[]>] [-examples] [<CommonParamete
rs>]
Table 1-1 Common Parameters
Parameter Meaning
-whatif Tells the cmdlet not to execute; instead it will tell you what would
happen if the cmdlet were to actually run.
-confirm Tells the cmdlet to prompt prior to executing the command.
-verbose Instructs the cmdlet to provide a higher level of detail than a cmdlet
not using the verbose parameter.
-debug Instructs the cmdlet to provide debugging information.
-erroraction Instructs the cmdlet to perform a certain action when an error
occurs. Allowable actions are: continue, stop, SilentlyContinue, and
inquire.
-errorvariable Instructs the cmdlet to use a specific variable to hold error informa-
tion. This is in addition to the standard $error variable.
-outvariable Instructs the cmdlet to use a specific variable to hold the output
information.
-outbuffer Instructs the cmdlet to hold a certain number of objects prior to call-
ing the next cmdlet in the pipeline.
C01622791.fm Page 12 Saturday, December 8, 2007 6:28 PM
Chapter 1 The Shell in Windows PowerShell 13
Get-Help [[-name] <string>] [-component <string[]>] [-functionality <string
[]>] [-role <string[]>] [-category <string[]>] [-parameter <string>] [<Comm
onParameters>]
DETAILED DESCRIPTION
The Get-Help cmdlet displays information about Windows PowerShell cmdlets
and concepts. You can also use "Help {<cmdlet name> | <topic-name>" or "<cmd
let-name> /?". "Help" displays the help topics one page at a time. The "/?"
displays help for cmdlets on a single page.
RELATED LINKS
Get-Command
Get-PSDrive
Get-Member
REMARKS
For more information, type: "get-help Get-Help -detailed".
For technical information, type: "get-help Get-Help -full".
The awesome thing about online help for Windows PowerShell, is that not only does it display
help about commands—which you would expect—but it also has three different levels of dis-
play: normal, detailed, and full. Additionally, you can obtain help about concepts in Windows
PowerShell. This last feature is equivalent to having an online instruction manual. To retrieve
a listing of all the conceptual help articles, use the Get-Help about* command as shown here:
get-help about*
Suppose you do not remember the exact name of the cmdlet you wish to use but you remem-
ber it was a “get” cmdlet. You can use a wildcard (such as *) to obtain the name of the cmdlet.
This is shown here:
get-help get*
This technique of using a wildcard operator can be extended further. If you remember the
cmdlet was a “get” cmdlet and it started with the letter p you could use the following syntax to
retrieve the desired cmdlet:
get-help get-p*
Suppose, however, that you know the exact name of the cmdlet but you can’t exactly remem-
ber the syntax. For this scenario, you could use the -examples argument. To retrieve several
examples of the Get-PSDrive cmdlet, you could use Get-Help with the -examples argument as
shown here:
get-help get-psdrive -examples
C01622791.fm Page 13 Saturday, December 8, 2007 6:28 PM
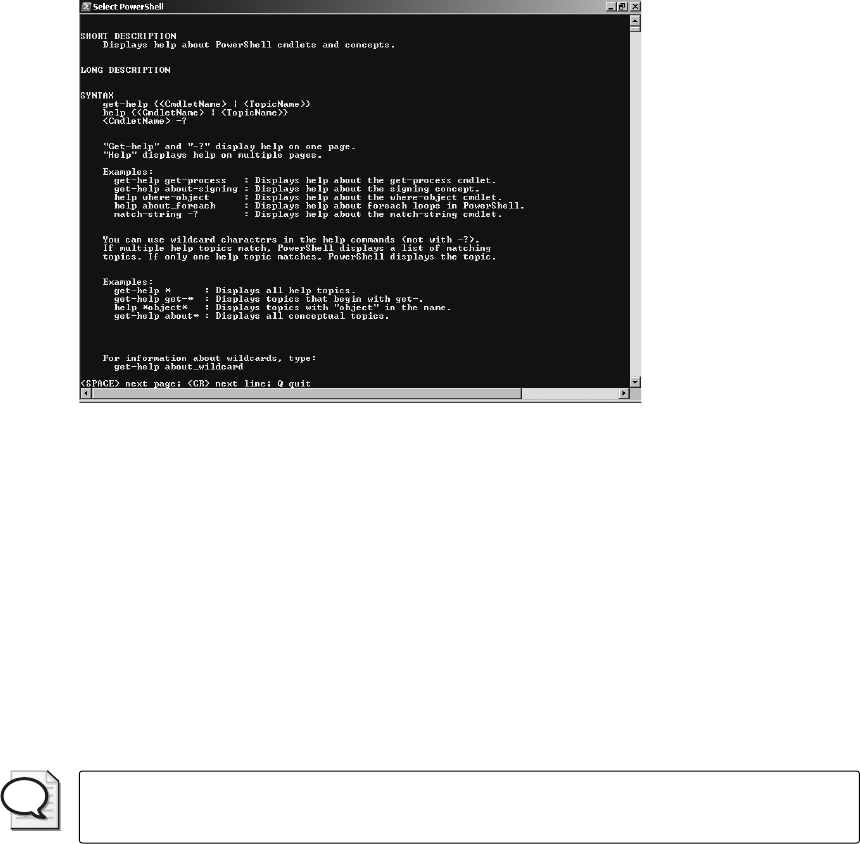
14 Windows PowerShell Scripting Guide
To see help displayed one page at a time, you can use the help function which displays the
help output text through the more function. This is useful if you want to avoid scrolling up and
down to see the help output. This command is shown here:
get-help get-help | more
The formatted output from the more function is shown in Figure 1-3.
Figure 1-3 By using the more function, you can display lengthy help topics one page at a time.
To obtain detailed help about the Get-Help cmdlet, use the -detailed argument as shown here:
get-help get-help -detailed
If you want to retrieve technical information about the Get-Help cmdlet, use the -full argu-
ment. This is shown here:
get-help get-help -full
Getting tired of typing Get-Help over and over? After all, it is eight characters long and one of
them is a dash. The solution is to create an alias to the Get-Help cmdlet. An alias is a shortcut
keystroke combination that will launch a program or cmdlet when typed. In the create Get-
Help alias for this example, you can assign the Get-Help to the gh key combination.
Tip Before creating an alias for a cmdlet, confirm there is not already an alias to the cmdlet
by using Get-Alias. Then use Set-Alias to assign the cmdlet to a unique keystroke combination.
C01622791.fm Page 14 Saturday, December 8, 2007 6:28 PM

Chapter 1 The Shell in Windows PowerShell 15
Working with Aliases to Assign Shortcut Names to
Cmdlets
Aliases allow you to assign shortcut names to cmdlets. This can greatly simplify working at the
Windows PowerShell prompt and it will allow you to customize the command syntax as you
prefer. As an example, suppose you want to create an alias for the Get-Help cmdlet. Instead of
typing Get-Help, perhaps you prefer to type gh. This can be accomplished in four simple steps.
First, ensure there is not already an alias assigned to the desired keystroke combination to
avoid confusion. The next thing you might want to do is review help for the Set-Alias cmdlet.
Once you have done this, call the Set-Alias cmdlet and pass the new name you want to create
and the name of the cmdlet you wish to alias. After you have created the alias, you may want
to use Get-Alias to verify the alias was created properly. The completed code from this section
is in the GhAlias.txt file in the chapter01 folder on the companion CD-ROM.
1. Retrieve an alphabetic listing of all currently defined aliases and inspect the list for one
assigned to either the Get-Help cmdlet or for the keystroke combination gh. The com-
mand to do this is shown here:
get-alias |sort
2. Once you have determined there is no alias for the Get-Help cmdlet and that none is
assigned to the gh keystroke combination, review the syntax for the Set-Alias cmdlet. Use
the -full argument to the Get-Help cmdlet. This is shown here:
get-help set-alias -full
3. Use the Set-Alias cmdlet to assign the gh keystroke combination to the Get-Help cmdlet.
To do this, use the following command:
set-alias gh get-help
4. Use the Get-Alias cmdlet to verify the alias was properly created. To do this, use the fol-
lowing command:
Get-Alias gh
Tip If the syntax of Set-Alias is a little confusing, you can use named parameters instead of
the default positional binding. In addition, I recommend using either the whatif switch or the
confirm switch. You can also specify a description for the alias. The modified syntax would
look like this:
Set-Alias -Name gh -Value Get-Help -Description "mred help alias" -WhatIf
As you have seen, Windows PowerShell can be used as a replacement to the CMD interpreter.
But it also has a large number of built-in cmdlets that provide the opportunity to perform a
plethora of activities. These cmdlets can be used either in a stand-alone fashion or they can be
run together as a group.
C01622791.fm Page 15 Saturday, December 8, 2007 6:28 PM

16 Windows PowerShell Scripting Guide
Accessing Windows PowerShell
Once Windows PowerShell is installed, it immediately becomes available for use. How-
ever, pressing R while pressing the Windows flag key on your keyboard to bring up the
Windows Run dialog box or mousing around—doing the old Start button/Run dialog
box thing and typing PowerShell all the time—becomes somewhat less helpful. I created
a shortcut to Windows PowerShell and placed that shortcut on my desktop. For me and
the way I work, this is ideal. This is so useful, in fact, that I wrote a script to perform this
function. This script can be called via a logon script, to automatically create the shortcut
on the desktop. The script is named CreateShortCutToPowerShell.vbs:
CreateShortCutToPowerShell.vbs
Option Explicit
Dim objshell
Dim strDesktop
Dim objshortcut
Dim strProg
strProg = "powershell.exe"
Set objshell=CreateObject("WScript.Shell")
strDesktop = objshell.SpecialFolders("desktop")
set objShortcut = objshell.CreateShortcut(strDesktop & "\powershell.lnk")
objshortcut.TargetPath = strProg
objshortcut.WindowStyle = 1
objshortcut.Description = funfix(strProg)
objshortcut.WorkingDirectory = "C:\"
objshortcut.IconLocation= strProg
objshortcut.Hotkey = "CTRL+SHIFT+P"
objshortcut.Save
Function funfix(strin)
funfix = InStrRev(strin,".")
funfix = Mid(strin,1,funfix)
End function
Additional Uses of Cmdlets
Now that you have learned about using the help utilities and working with aliases, it’s time to
examine some additional ways to use cmdlets in Windows PowerShell.
Tip To save time when typing the cmdlet name, simply type enough of the cmdlet name to
uniquely distinguish it, and then press the Tab key. What is the result? Tab completion
finishes the cmdlet name for you. This also works with argument names and other procedures.
Feel free to experiment with this great timesaving technique. You may never have to type
get-command again!
C01622791.fm Page 16 Saturday, December 8, 2007 6:28 PM

Chapter 1 The Shell in Windows PowerShell 17
As the cmdlets return objects instead of “string values” you can obtain additional information
about the returned objects. This additional information would not be available if you were
working with just string data. To obtain additional information, use the pipe character (|),
then take information from one cmdlet and feed it to another cmdlet. This may seem compli-
cated, but in reality, it is quite simple. By the end of this chapter, the procedure should seem
quite natural.
At the most basic level, consider the simple example of obtaining and formatting a directory
listing. After you retrieve the directory listing, you may want to format the way it is displayed,
perhaps as either a table or a list. As you can see, there are two separate operations: obtaining
the directory listing and formatting the list. This formatting task takes place on the right side
of the pipe after the directory listing has been gathered. This is the way pipelines work. Now,
let’s examine them in action while looking at the Get-ChildItem cmdlet.
Using the Get-ChildItem Cmdlet
Earlier in this chapter, you used the dir command to obtain a listing of all the files in a direc-
tory. This works because there is an alias built into Windows PowerShell that assigns the Get-
ChildItem cmdlet to the letter combination dir. We can verify this by using the Get-Alias
cmdlet. This is shown in the GetDirAlias.txt file.
GetDirAlias.txt
PS C:\> Get-Alias dir
CommandType Name Definition
----------- ---- ----------
Alias dir Get-ChildItem
In Windows PowerShell, there really is no cmdlet named dir, nor does it actually use the dir
command. The alias dir is associated with the Get-ChildItem cmdlet. This is why the output
from dir is different in Windows PowerShell than it is in the Cmd.exe interpreter. The alias dir
is shown here when you use the Get-Alias cmdlet to resolve the association.
Tip When using Get-ChildItem to produce a directory listing, use the force switch if you
want to view hidden and system files and folders. It would look like this: Get-ChildItem
-Force.
Formatting Output
There are four format cmdlets included with Windows PowerShell. Of these cmdlets, you will
routinely use three: Format-List, Format-Wide, and Format-Table. The fourth cmdlet, Format-
Custom, can display output in a fashion that is not a list, table, or wide format. It accomplishes
this by using a *.format.ps1xml file. You can use either the default view contained in the *.for-
mat.ps1xml files or you can define your own format.ps1xml file.
C01622791.fm Page 17 Saturday, December 8, 2007 6:28 PM
18 Windows PowerShell Scripting Guide
Let’s look at formatting output utilizing the remaining three format cmdlets beginning with
the most useful of the three: Format-List.
Format-List
Format-List is one of the core cmdlets you will use time and again. For example, if you use the
Get-WmiObject cmdlet to look at the properties of the Win32_LogicalDisk class, you will
receive a minimum listing of the default properties of the class. This listing is shown here:
PS C:\> Get-WmiObject Win32_LogicalDisk
DeviceID : C:
DriveType : 3
ProviderName :
FreeSpace : 10559041536
Size : 78452355072
VolumeName : Sea Drive
Although in many cases this behavior is fine, there are times when you may be interested in
the other properties of the class. The first thing to do when exploring other properties that
may be available is to use the wildcard *. This will list all the properties as shown here:
PS C:\> Get-WmiObject Win32_LogicalDisk | Format-List *
Status :
Availability :
DeviceID : C:
StatusInfo :
__GENUS : 2
__CLASS : Win32_LogicalDisk
__SUPERCLASS : CIM_LogicalDisk
__DYNASTY : CIM_ManagedSystemElement
__RELPATH : Win32_LogicalDisk.DeviceID="C:"
__PROPERTY_COUNT : 40
__DERIVATION : {CIM_LogicalDisk, CIM_StorageExtent,
CIM_LogicalDevice, CIM_LogicalElement...}
__SERVER : M5-1875135
__NAMESPACE : root\cimv2
__PATH : \\M5-1875135\root\cimv2:Win32_LogicalDisk.DeviceID="C:"
Access : 0
BlockSize :
Caption : C:
Compressed : False
ConfigManagerErrorCode :
ConfigManagerUserConfig :
CreationClassName : Win32_LogicalDisk
Description : Local Fixed Disk
DriveType : 3
ErrorCleared :
ErrorDescription :
ErrorMethodology :
FileSystem : NTFS
C01622791.fm Page 18 Saturday, December 8, 2007 6:28 PM
Chapter 1 The Shell in Windows PowerShell 19
FreeSpace : 10559041536
InstallDate :
LastErrorCode :
MaximumComponentLength : 255
MediaType : 12
Name : C:
NumberOfBlocks :
PNPDeviceID :
PowerManagementCapabilities :
PowerManagementSupported :
ProviderName :
Purpose :
QuotasDisabled :
QuotasIncomplete :
QuotasRebuilding :
Size : 78452355072
SupportsDiskQuotas : False
SupportsFileBasedCompression : True
SystemCreationClassName : Win32_ComputerSystem
SystemName : M5-1875135
VolumeDirty :
VolumeName : Sea Drive
VolumeSerialNumber : F0FE15F7
Once you have looked at all the properties that are available for a particular class, you can then
choose only the properties you are interested in. Replace the wildcard * with the property
names gleaned from the preceding listing. This technique is shown here:
PS C:\> Get-WmiObject Win32_LogicalDisk | Format-List Name, FileSystem, FreeSpace
Name : C:
FileSystem : NTFS
FreeSpace : 10559029248
Instead of typing a long list of property names, you can choose a range of property names by
using wildcard characters. To see only the property names that begin with the letter f, you can
use the technique shown here:
PS C:\> Get-WmiObject Win32_LogicalDisk | Format-List f*
FileSystem : NTFS
FreeSpace : 10558660608
If you want to see properties that begin with n and with f, then you need to introduce square
brackets as shown here:
PS C:\> Get-WmiObject Win32_LogicalDisk | Format-List [nf]*
FileSystem : NTFS
FreeSpace : 10558238720
Name : C:
NumberOfBlocks :
C01622791.fm Page 19 Saturday, December 8, 2007 6:28 PM
20 Windows PowerShell Scripting Guide
These commands, with their associated complete output, can be found in the Format-List.txt
file in the chapter01 folder on the companion CD-ROM.
Format-Table
The Format-Table cmdlet provides a number of features that make it especially well suited for
network management tasks. In particular, it produces columns of data that allow for quick
viewing. As with Format-List and Format-Wide, you can choose the properties you wish to dis-
play, and in so doing, easily eliminate distracting data from annoyingly verbose cmdlets. In
the example shown here, first take a recursive look through the hard drive to find all the log
files (those designated with the .log extension). While the output is considerable, it has been
trimmed here to show a sample of the output. The Format-Table cmdlet is used to produce the
output from the Get-ChildItem cmdlet shown here:
PS C:\> Get-ChildItem c:\ -Recurse -Include *.log | Format-Table
Directory: Microsoft.PowerShell.Core\FileSystem::C:\Backup_Extras_92705
Mode LastWriteTime Length Name
---- ------------- ------ ----
-a--- 8/3/2004 6:34 PM 3931872 setupapi.log
-a--- 8/2/2004 9:32 PM 206168 Windows Update.log
-a--- 6/8/2004 12:41 AM 170095 wmsetup.log
In addition to relying on the default behavior of the cmdlet, you can also choose specific prop-
erties. One issue with this approach, as shown here, is that the formatting uses the existing
screen resolution for the window, thus you often end up with columns on opposite sides of
the window. This can be acceptable for a quick-and-dirty column list, but it is not a format for
saving data.
PS C:\> Get-ChildItem c:\ -Recurse -Include *.log | Format-Table
-Property name, length, lastWriteTime
Name Length
LastWriteTime
----
------ -------------
setupapi.log 3931872
8/3/2004 6:34:53 PM
Windows Update.log 206168
8/2/2004 9:32:06 PM
wmsetup.log 170095
6/8/2004 12:41:32 AM
Debug.log 0
8/23/2006 8:10:38 PM
AVCheck.Log 191694
5/8/2007 9:28:05 AM
AVCheckServer.Log 7762
5/8/2007 9:28:05 AM
C01622791.fm Page 20 Saturday, December 8, 2007 6:28 PM
Chapter 1 The Shell in Windows PowerShell 21
To produce a list that uses the window size a bit more efficiently, you can specify the autosize
switch. There is only one thing to keep in mind when using the autosize switch: It needs to
know the length of the longest item to be stored in each column. To do this, the switch must
wait until all objects have been enumerated, then it will determine the maximum length of
each column and determine the size of the listing. This can cause the command execution to
block until all items have enumerated, so this process takes a while to complete. You may not
want to wait for the autosize to enumerate a large collection of objects if you are in a hurry, for
example, working on a server-down issue. For small object sets, the performance hit is negli-
gible; however, with a command that takes a long time to complete, such as this one, the dif-
ference is noticeable. The difference in output, however, is also noticeable (and you will
probably feel it is worth the wait to have a more manageable output).
PS C:\> Get-ChildItem c:\ -Recurse -Include *.log | Format-Table
-Property name, length, lastWriteTime -AutoSize
Name Length LastWriteTime
---- ------ -------------
setupapi.log 3931872 8/3/2004 6:34:53 PM
Windows Update.log 206168 8/2/2004 9:32:06 PM
wmsetup.log 170095 6/8/2004 12:41:32 AM
Debug.log 0 8/23/2006 8:10:38 PM
AVCheck.Log 191694 5/8/2007 9:28:05 AM
The last thing to look at in conjunction with Format-Table is pairing it with the Sort-Object
cmdlet. Sort-Object allows you to organize data by property and to display it in a sorted fash-
ion. In this example, the alias for Sort-Object (sort) is used, which reduces the amount of typ-
ing necessary. The command is still rather long and is wrapped here for readability. (To be
honest, when commands begin to reach this length, I have a tendency to turn the process into
a script.) When you examine the following command, notice that the data is sorted before
feeding it to the Format-Table cmdlet. Please note that by default the Sort-Object cmdlet sorts
in ascending (smallest to largest) order. If desired, you can specify the -descending switch to see
the files organized from largest to smallest.
PS C:\>Get-ChildItem c:\ -Recurse -Include *.log | Sort -Property
length | Format-Table name, lastwriteTime, length -AutoSize
Name LastWriteTime Length
---- ------------- ------
PASSWD.LOG 5/10/2007 2:44:58 AM 0
sam.log 11/29/2006 1:14:33 PM 0
poqexec.log 2/1/2007 6:50:49 PM 0
ChkAcc.log 5/10/2007 2:45:00 AM 0
Debug.log 8/23/2006 8:10:38 PM 0
setuperr.log 3/16/2007 7:18:17 AM 0
setuperr.log 4/4/2007 6:34:54 PM 0
netlogon.log 2/1/2007 7:04:44 PM 3
There are also other ways to sort. For example, you can sort the list of log files by date modi-
fied in descending order. By doing this, you can see the most recently modified log files. To
perform this procedure, you need to modify the sort object. The remainder of the command is
C01622791.fm Page 21 Saturday, December 8, 2007 6:28 PM
22 Windows PowerShell Scripting Guide
the same. A portion of this output is shown here. It is interesting to note that the majority of
these logs were modified during the log-on process.
PS C:\> Get-ChildItem c:\ -Recurse -Include *.log | Sort -Property
lastWriteTime -descending | Format-Table name, lastwriteTime, length -AutoSize
Name LastWriteTime Length
---- ------------- ------
mtrmgr.log 5/10/2007 4:56:52 AM 1538364
LocationServices.log 5/10/2007 4:56:26 AM 830557
StateMessage.log 5/10/2007 4:55:00 AM 129595
Scheduler.log 5/10/2007 4:55:00 AM 393352
StatusAgent.log 5/10/2007 4:53:24 AM 723564
edb.log 5/10/2007 4:51:49 AM 131072
PolicyEvaluator.log 5/10/2007 4:51:25 AM 1672613
ClientLocation.log 5/10/2007 4:51:24 AM 330046
FSPStateMessage.log 5/10/2007 4:51:18 AM 228879
CBS.log 5/10/2007 4:46:55 AM 28940091
CertificateMaintenance.log 5/10/2007 4:42:17 AM 206472
CcmExec.log 5/10/2007 4:00:51 AM 537177
wmiprov.log 5/10/2007 3:03:11 AM 19503
PolicyAgentProvider.log 5/10/2007 2:54:02 AM 252866
UpdatesHandler.log 5/10/2007 2:53:19 AM 108552
CIAgent.log 5/10/2007 2:53:19 AM 99114
ScanAgent.log 5/10/2007 2:53:18 AM 354939
UpdatesDeployment.log 5/10/2007 2:53:18 AM 1106297
SrcUpdateMgr.log 5/10/2007 2:53:02 AM 151452
smssha.log 5/10/2007 2:52:02 AM 107104
execmgr.log 5/10/2007 2:52:02 AM 150942
InventoryAgent.log 5/10/2007 2:52:02 AM 34034
ServiceWindowManager.log 5/10/2007 2:52:02 AM 139955
SdmAgent.log 5/10/2007 2:49:46 AM 172101
UpdatesStore.log 5/10/2007 2:49:43 AM 64787
WUAHandler.log 5/10/2007 2:49:39 AM 14590
CAS.log 5/10/2007 2:49:35 AM 198955
PeerDPAgent.log 5/10/2007 2:49:35 AM 7900
PolicyAgent.log 5/10/2007 2:49:35 AM 246873
RebootCoordinator.log 5/10/2007 2:49:35 AM 20420
InternetProxy.log 5/10/2007 2:49:34 AM 85825
ClientIDManagerStartup.log 5/10/2007 2:49:34 AM 158351
WindowsUpdate.log 5/10/2007 2:46:46 AM 1553462
edb.log 5/10/2007 2:46:43 AM 65536
setupapi.dev.log 5/10/2007 2:46:38 AM 6469237
setupapi.app.log 5/10/2007 2:46:38 AM 2722285
WMITracing.log 5/10/2007 2:45:57 AM 16777216
ChkAcc.log 5/10/2007 2:45:00 AM 0
PASSWD.LOG 5/10/2007 2:44:58 AM 0
If you look at the Format-Table.txt file in the chapter01 folder, you will notice there are many
errors in the log file. This is because the Get-ChildItem cmdlet attempted to access directories
and files that are protected, causing access-denied messages. During development these
errors are helpful to let you know that you are not accessing files and folders; however, they
C01622791.fm Page 22 Saturday, December 8, 2007 6:28 PM
Chapter 1 The Shell in Windows PowerShell 23
become problematic once you begin to analyze the data. An example of one of these errors is
shown here:
Get-ChildItem : Access to the path 'C:\Windows\CSC' is denied.
At line:1 char:14
The error message is helpful in that it tells you the name of the cmdlet that caused the error
and the action that provoked the error. You can eliminate these types of errors by using the
-ErrorAction common parameter on the Get-ChildItem cmdlet, specifying the SilentlyCon-
tinue keyword. This modified line of code is shown here:
PS C:\> Get-ChildItem c:\ -Recurse -Include *.log -errorAction SilentlyContinue
| Sort -Property lastWriteTime -descending | Format-Table name, lastwriteTime,
length -AutoSize
Format-Wide
The Format-Wide cmdlet is not nearly as useful as Format-Table or Format-List. This is due to
the limitation of displaying only one property per object. It can be useful, however, to have
such a list. For example, suppose you only want a list of the processes running on your com-
puter. You can use Get-Process cmdlet, and pipeline the resulting object to the Format-Wide
cmdlet. This is shown here:
PS C:\> Get-Process | Format-Wide
ApMsgFwd ApntEx
Apoint audiodg
casha CcmExec
csrss csrss
dwm explorer
FwcAgent Idle
InoRpc InoRT
InoTask lsass
lsm mobsync
MSASCui powershell
powershell PowerShellIDE
rundll32 SearchFilterHost
SearchIndexer SearchProtocolHost
services SLsvc
smss spoolsv
SRUserService svchost
svchost svchost
svchost svchost
svchost svchost
svchost svchost
svchost svchost
svchost svchost
svchost svchost
System taskeng
taskeng ThpSrv
C01622791.fm Page 23 Saturday, December 8, 2007 6:28 PM
24 Windows PowerShell Scripting Guide
ThpSrv TODDSrv
wininit winlogon
WINWORD wmdc
WmiPrvSE WmiPrvSE
The output, while serviceable, uses a lot of lines on the console and it also wastes quite a bit
of screen real estate. A better output can be obtained by using the -column parameter. This is
illustrated here:
PS C:\> Get-Process | Format-Wide -Column 4
Although the four-column output cuts the list length by half, it still does not maximize all the
available screen space. Though it might be possible to write a script that will figure out the
optimum value of the -column parameter, such as the following DemoFormatWide.ps1 script,
it is hardly worth the time and the trouble to pursue such an undertaking.
DemoFormatWide.ps1
function funGetProcess()
{
if ($args)
{
Get-Process |
Format-Wide -autosize
}
else
{
Get-Process |
Format-Wide -column $i
}
}
cls
$i = 1
for
($i ; $i -le 10 ; $i++)
{
Write-Host -ForegroundColor red "`$i is equal to $i"
funGetProcess
}
Write-Host -ForeGroundColor red "Now use format-wide -autosize"
funGetProcess("auto")
A better option for finding the optimum screen configuration for Format-Wide is to use the
-autosize switch, shown here:
PS C:\> Get-Process | Format-Wide -AutoSize
Using the Get-Command Cmdlet
There are three cmdlets that are analogous to the three key spices used in Cajun cooking. You
can make anything in the Cajun style of cooking if you remember: salt, pepper, and paprika.
You want to make Cajun green beans? Add some salt, pepper, and paprika. You want to work
C01622791.fm Page 24 Saturday, December 8, 2007 6:28 PM
Chapter 1 The Shell in Windows PowerShell 25
with Windows PowerShell? Remember the “Cajun” cmdlets: Get-Help, Get-Command, and
Get-Member. Calling on these three cmdlets, you can master Windows PowerShell. Since you
have already looked at Get-Help, the next cmdlet to examine is Get-Command.
The most basic use of Get-Command is to produce a listing of commands available to Win-
dows PowerShell. This is useful if you want to quickly see which cmdlets are available. This
elementary use of Get-Command is illustrated here. One point to notice is that the definition
is truncated.
PS C:\> Get-Command
CommandType Name Definition
----------- ---- ----------
Cmdlet Add-Content Add-Content
[-Path] <String[]> [-Value] <Object[...
Cmdlet Add-History Add-History
[[-InputObject] <PSObject[]>] [-Pass...
Cmdlet Add-Member Add-Member
[-MemberType] <PSMemberTypes> [-Name]...
Cmdlet Add-PSSnapin Add-PSSnapin
[-Name] <String[]> [-PassThru] [-Ve...
Cmdlet Clear-Content Clear-Content
[-Path] <String[]> [-Filter <Strin...
Cmdlet Clear-Item Clear-Item
[-Path] <String[]> [-Force] [-Filter ...
By default, Get-Command is limited to producing a listing of cmdlets; therefore the cmdlet
field is redundant. A nicer format of the list can be achieved by pipelining the resulting object
into the Format-List cmdlet and choosing only the name and definition. This is illustrated
here. As you can see in the code, this output is much easier to read and it provides the syntac-
tical definition of each command:
PS C:\> Get-Command | Format-List name, definition
Name : Add-Content
Definition : Add-Content [-Path] <String[]> [-Value] <Object[]> [-PassThru]
[-Filter <String>] [-Include <String[]>] [-Exclude <String[]>] [-Force]
[-Credential<PSCredential>] [-Verbose] [-Debug] [-ErrorAction <ActionPreference>]
[-ErrorVariable<String>] [-OutVariable <String>] [-OutBuffer <Int32>] [-WhatIf]
[-Confirm][-Encoding <FileSystemCmdletProviderEncoding>] Add-Content
[-LiteralPath] <String[]> [-Value] <Object[]> [-PassThru][-Filter <String>]
[-Include <String[]>] [-Exclude <String[]>] [-Force] [-Credential<PSCredential>]
[-Verbose] [-Debug] [-ErrorAction <ActionPreference>] [-ErrorVariable
<String>] [-OutVariable <String>] [-OutBuffer <Int32>] [-WhatIf] [-Confirm]
[-Encoding <FileSystemCmdletProviderEncoding>]
Name : Add-History
Definition : Add-History [[-InputObject] <PSObject[]>] [-Passthru] [-Verbose]
[-Debug] [-ErrorAction <ActionPreference>] [-ErrorVariable <String>] [-OutVariable
String>] [-OutBuffer <Int32>]
C01622791.fm Page 25 Saturday, December 8, 2007 6:28 PM
26 Windows PowerShell Scripting Guide
So far, we have looked at normal usage of the Get-Command cmdlet. However, a more inter-
esting method uses our knowledge of the noun and verb combination of cmdlet names.
Armed with this information, we can look for commands that have a noun-called process in
the name of the cmdlet This command would look like the following:
PS C:\> Get-Command -Noun process
CommandType Name Definition
----------- ---- ----------
Cmdlet Get-Process Get-Process
[[-Name] <String[]>] [-Verbose] [-De...
Cmdlet Stop-Process Stop-Process
[-Id] <Int32[]> [-PassThru] [-Verbo...
Using this procedure, if you want to find a cmdlet that contains the letter p in the noun por-
tion of the name, you can use wildcards to assist. This can reduce typing and help you explore
available cmdlets. This command is shown here:
PS C:\> get-command -Noun p*
CommandType Name Definition
----------- ---- ----------
Cmdlet Add-PSSnapin Add-PSSnapin
[-Name] <String[]> [-PassThru] [-Ve...
Cmdlet Convert-Path Convert-Path
[-Path] <String[]> [-Verbose] [-Deb...
Cmdlet Get-PfxCertificate Get-PfxCertificate [-
FilePath] <String[]> [-Verb...
Cmdlet Get-Process Get-Process
[[-Name] <String[]>] [-Verbose] [-De...
Cmdlet Get-PSDrive Get-PSDrive
[[-Name] <String[]>] [-Scope <String...
Cmdlet Get-PSProvider Get-PSProvider
[[-PSProvider] <String[]>] [-Verb...
Cmdlet Get-PSSnapin Get-PSSnapin
[[-Name] <String[]>] [-Registered] ...
Cmdlet Join-Path Join-Path
[-Path] <String[]> [-ChildPath] <Strin...
Cmdlet New-PSDrive New-PSDrive
[-Name] <String> [-PSProvider] <Stri...
Cmdlet Out-Printer Out-Printer
[[-Name] <String>] [-InputObject <PS...
Cmdlet Remove-PSDrive Remove-PSDrive
[-Name] <String[]> [-PSProvider <...
Cmdlet Remove-PSSnapin Remove-PSSnapin
[-Name] <String[]> [-PassThru] [...
Cmdlet Resolve-Path Resolve-Path
[-Path] <String[]> [-Credential <PS...
Cmdlet Set-PSDebug Set-PSDebug
[-Trace <Int32>] [-Step] [-Strict] [...
Cmdlet Split-Path Split-Path
[-Path] <String[]> [-LiteralPath <Str...
Cmdlet Stop-Process Stop-Process
C01622791.fm Page 26 Saturday, December 8, 2007 6:28 PM
Chapter 1 The Shell in Windows PowerShell 27
[-Id] <Int32[]> [-PassThru] [-Verbo...
Cmdlet Test-Path Test-Path
[-Path] <String[]> [-Filter <String>] ...
Cmdlet Write-Progress Write-Progress
[-Activity] <String> [-Status] <S...
By default, the Get-Command cmdlet displays only cmdlets; however, it can retrieve other
items as well—even .exe files and .dll files. This is because Get-Command will display informa-
tion about every item you can run in Windows PowerShell. An example of this is shown here
in a listing of commands that contains the word file in the name. One point to remember:
Only Windows PowerShell entities are displayed.
PS C:\> get-command -Name *file*
CommandType Name Definition
----------- ---- ----------
Application avifile.dll
C:\Windows\system32\avifile.dll
Application filemgmt.dll
C:\Windows\system32\filemgmt.dll
Application FileSystem.format.ps1xml
C:\Windows\System32\WindowsPowerShell\v1.0\FileS...
Application filetrace.mof
C:\Windows\System32\Wbem\filetrace.mof
Application forfiles.exe
C:\Windows\system32\forfiles.exe
You can easily correct this behavior by using the -commandType parameter and limiting the
search to cmdlets. This modified command is shown here:
PS C:\> get-command -Name *file* -CommandType cmdlet
CommandType Name Definition
----------- ---- ----------
Cmdlet Out-File Out-File
[-FilePath] <String> [[-Encoding] <Stri
These examples give you an idea of the types of searches you can perform with the Get-
Command cmdlet. These commands and their associated output are contained in the
Get-Command.txt file in the chapter01 folder on the companion CD-ROM.
Exploring with the Get-Member Cmdlet
The third important cmdlet provided with Windows PowerShell is Get-Member. Some stu-
dents look askance when I introduce Get-Member as one of the three “Cajun” cmdlets.
Indeed, I had one student who raised his hand and asked what it was good for. This is a fair
question. The thing that makes Get-Member so useful is that it can tell you which properties
and methods are supported by an object. If you remember that everything in Windows
PowerShell is an object, then you are well on your way to achieving enlightenment with this
command. Perhaps a simple example will illustrate the value of this cmdlet.
C01622791.fm Page 27 Saturday, December 8, 2007 6:28 PM
28 Windows PowerShell Scripting Guide
If you have a folder named mytest, and use the Get-Item cmdlet to obtain an object that repre-
sents the folder, you can store this reference in a variable named $a. This is shown here:
PS C:\> $a = Get-Item c:\mytest
Once you have an instance of the folder object contained in the $a variable, you can examine
the methods and properties of a folder object by pipelining the object into the Get-Member
cmdlet. This command and associated output are shown here:
PS C:\> $a | Get-Member
TypeName: System.IO.DirectoryInfo
Name MemberType Definition
---- ---------- ----------
Create Method System.Void Create(), System.Void
Create(DirectorySecurity directorySecurity)
CreateObjRef Method System.Runtime.Remoting.ObjRef
CreateObjRef(Type requestedType)
CreateSubdirectory Method System.IO.DirectoryInfo
CreateSubdirectory(String path), System.IO.Director...
Delete Method System.Void Delete(), System.Void
Delete(Boolean recursive)
Equals Method System.Boolean Equals(Object obj)
GetAccessControl Method System.Security.AccessControl.DirectorySecurity Get
AccessControl(), System
GetDirectories Method System.IO.DirectoryInfo[]
GetDirectories(), System.IO.DirectoryInfo[GetFiles Method System.IO
.FileInfo[] GetFiles(String searchPattern), System.IO.FileInfo[] G...
GetFileSystemInfos Method System.IO.FileSystemInfo[] GetFileSystemInfos(String
searchPattern), System...
GetHashCode Method System.Int32 GetHashCode()
GetLifetimeService Method System.Object GetLifetimeService()
GetObjectData Method System.Void GetObjectData
*(SerializationInfo info, StreamingContext context)
GetType Method System.Type GetType()
get_Attributes Method System.IO.FileAttributes get_Attributes()
get_CreationTime Method System.DateTime get_CreationTime()
get_CreationTimeUtc Method System.DateTime get_CreationTimeUtc()
get_Exists Method System.Boolean get_Exists()
get_Extension Method System.String get_Extension()
get_FullName Method System.String get_FullName()
get_LastAccessTime Method System.DateTime get_LastAccessTime()
get_LastAccessTimeUtc Method System.DateTime get_LastAccessTimeUtc()
get_LastWriteTime Method System.DateTime get_LastWriteTime()
get_LastWriteTimeUtc Method System.DateTime get_LastWriteTimeUtc()
get_Name Method System.String get_Name()
get_Parent Method System.IO.DirectoryInfo get_Parent()
get_Root Method System.IO.DirectoryInfo get_Root()
InitializeLifetimeService Method System.Object InitializeLifetimeService()
MoveTo Method System.Void MoveTo(String destDirName)
Refresh Method System.Void Refresh()
C01622791.fm Page 28 Saturday, December 8, 2007 6:28 PM
Chapter 1 The Shell in Windows PowerShell 29
SetAccessControl Method System.Void
SetAccessControl(DirectorySecurity directorySecurity)
set_Attributes Method System.Void set_Attributes(FileAttributes
value)
set_CreationTime Method System.Void set_CreationTime(DateTime
value)
set_CreationTimeUtc Method System.Void set_CreationTimeUtc(DateTime
value)
set_LastAccessTime Method System.Void set_LastAccessTime(DateTime
value)
set_LastAccessTimeUtc Method System.Void set_LastAccessTimeUtc(DateTime
value)
set_LastWriteTime Method System.Void set_LastWriteTime(DateTime
value)
set_LastWriteTimeUtc Method System.Void set_LastWriteTimeUtc(DateTime
value)
ToString Method System.String ToString()
PSChildName NoteProperty System.String PSChildName=mytest
PSDrive NoteProperty System.Management.Automation.PSDriveInfo
PSDrive=C
PSIsContainer NoteProperty System.Boolean PSIsContainer=True
PSParentPath NoteProperty System.String
PSParentPath=Microsoft.PowerShell.Core\FileSystem::C:\
PSPath NoteProperty System.String
PSPath=Microsoft.PowerShell.Core\FileSystem::C:\mytest
PSProvider NoteProperty System.Management.Automation.ProviderInfo
PSProvider=Microsoft.PowerShell.C...
Attributes Property System.IO.FileAttributes Attributes
{get;set;}
CreationTime Property System.DateTime CreationTime {get;set;}
CreationTimeUtc Property System.DateTime CreationTimeUtc {get;set;}
Exists Property System.Boolean Exists {get;}
Extension Property System.String Extension {get;}
FullName Property System.String FullName {get;}
LastAccessTime Property System.DateTime LastAccessTime {get;set;}
LastAccessTimeUtc Property System.DateTime LastAccessTimeUtc {get;set;}
LastWriteTime Property System.DateTime LastWriteTime {get;set;}
LastWriteTimeUtc Property System.DateTime LastWriteTimeUtc {get;set;}
Name Property System.String Name {get;}
Parent Property System.IO.DirectoryInfo Parent {get;}
Root Property System.IO.DirectoryInfo Root {get;}
Mode ScriptProperty System.Object Mode {get=$catr = "";...
From the listing of folder members, you can see there is a parent property. You can use the par-
ent property information to find the genus of the mytest folder. This is shown here:
PS C:\> $a.parent
Mode LastWriteTime Length Name
---- ------------- ------ ----
d--hs 5/11/2007 2:39 PM C:\
C01622791.fm Page 29 Saturday, December 8, 2007 6:28 PM
30 Windows PowerShell Scripting Guide
Perhaps you are interested in knowing when the folder was last accessed. To check on this,
you can use the LastAccessTime property as shown here:
PS C:\> $a.LastAccessTime
Friday, May 11, 2007 2:39:12 PM
If you want to confirm the object contained in $a is indeed a folder, you can use the PsIsCon-
tainer property. The Get-Member output tells you that PsIsContainer is a Boolean value, and so
it will reply as either true or false. This command is shown here:
PS C:\> $a.PsIsContainer
True
Maybe you would like to use one of the methods returned. You can use the moveTo method to
move the folder to another location. Get-Member tells you that the moveTo method must have
a string input that points to a destination directory. So, move the mytest folder to c:\moved-
Folder, then use the Test-Path cmdlet to check if the folder was moved to the new location.
These commands are illustrated here:
PS C:\> $a.MoveTo("C:\movedFolder")
PS C:\> Test-Path c:\movedFolder
True
PS C:\> Test-Path c:\mytest
False
PS C:\>
To confirm the name of the folder you now have represented by the object in the $a variable,
you can use the Name property. This is shown here with the associated output:
PS C:\> $a.name
movedFolder
If you want to delete the folder, you can use the delete method. This is shown here. To confirm
it is actually deleted, use dir m* to verify it is gone. These commands are shown here. Note that
the folder has now been deleted.
PS C:\> $a.Delete()
PS C:\> dir m*
Directory: Microsoft.PowerShell.Core\FileSystem::C:\
Mode LastWriteTime Length Name
---- ------------- ------ ----
d---- 4/21/2007 4:56 PM Maps
d---- 5/5/2007 3:51 PM music
-a--- 2/1/2007 6:17 PM 54 MASK.txt
C01622791.fm Page 30 Saturday, December 8, 2007 6:28 PM

Chapter 1 The Shell in Windows PowerShell 31
All of these commands and their associated output are contained in the Get-Member.txt file in
the chapter01 folder on the companion CD-ROM.
Working with the .NET Framework
It might be interesting to note that these commands are actually commands that come
from the .NET Framework. These are not Windows PowerShell commands at all. Of
course the Get-Item, Get-Member, and Test-Path cmdlets are Windows PowerShell com-
mands but System.IO.DirectoryInfo does not come from Windows PowerShell. This
means you use the same methods and properties from Windows PowerShell as a profes-
sional developer using Visual Basic .NET or C#. This also means that much more infor-
mation is available to you by using the Microsoft Developer Network (MSDN) and the
Windows Software Development Kit (SDK). The good news for you: If you can’t find
information using the online help (by using Get-Help), you can always refer to the
MSDN Web site or the Windows SDK for assistance.
Summary
This chapter examined the different ways to determine if Windows PowerShell is installed on
a computer and the steps involved in configuring Windows PowerShell for use in a corporate
enterprise environment. We covered the creation of Windows PowerShell profiles and
explored various methods of launching both Windows PowerShell and Windows PowerShell
commands. The chapter included extending the features of Windows PowerShell via the cre-
ation of custom aliases and functions. Finally, we concluded with a discussion of three Win-
dows PowerShell cmdlets: Get-Help, Get-Command, and Get-Member.
C01622791.fm Page 31 Saturday, December 8, 2007 6:28 PM
C01622791.fm Page 32 Saturday, December 8, 2007 6:28 PM

33
Chapter 2
Scripting Windows PowerShell
After completing this chapter, you will be able to:
■Configure the scripting policy for Windows PowerShell.
■Run Windows PowerShell scripts.
■Use Windows PowerShell flow control statements.
■Use decision-making and branching statements.
■Identify and work with data types.
■Use regular expressions to provide advanced matching capabilities.
■Use command-line arguments.
On the Companion Disc All the scripts used in this chapter are located on the CD that
accompanies this book in the \scripts\chapter02 folder.
Why Use Scripting?
For many network administrators writing scripts—any kind of scripts—is a dark art more akin
to reading tea leaves than administering a server. Indeed, while most large corporations
seem to always have a “scripting guy,” they rarely have more than one. This is in spite of the
efforts by Microsoft to promote Visual Basic Scripting Edition (VBScript) as an administrative
scripting language. While most professionals will agree that the ability to quickly craft a script
to make ad hoc changes to dozens of networked servers is a valuable skill, few actually possess
this skill. In reality, however, many of the corporate “scripting guy” skills are more akin to
knowing where to find a script that can easily be modified than to actually understanding how
to write a script from scratch.
Hopefully, this will change in the Windows PowerShell world. The Windows PowerShell
syntax was deliberately chosen to facilitate ease of use and ease of learning. Corporate
enterprise Windows administrators are the target audience.
So why use scripting? There are several reasons. First, a script makes it easy to document a
particular sequence of commands. If you need to produce a listing of all the shares on a
computer, you can use the Win32_share WMI class and the Get-WmiObject cmdlet to retrieve
the results, as shown here:
PS C:\> Get-wmiObject win32_share
C02622791.fm Page 33 Saturday, December 8, 2007 6:32 PM
34 Windows PowerShell Scripting Guide
Name Path Description
---- ---- -----------
ADMIN$ C:\Windows Remote Admin
C$ C:\ Default share
CCMLogs$ C:\Windows\system32\ccm\logs
CCMSetup$ C:\Windows\system32\ccmsetup
IPC$
Remote IPC
music C:\music none
VPCache$ C:\Windows\system32\VPCache
WMILogs$ C:\Windows\system32\wbem\logs
But, suppose you only want to have a list of file shares? You may not be aware that a file share
is a type 0 share. So perhaps you need to search for this information on the Internet. Once you
have obtained the information, use the modified command shown here:
PS C:\> Get-WmiObject win32_share -Filter "type = '0'"
Name Path Description
---- --- -----------
CCMLogs$ C:\Windows\system32\ccm\logs
CCMSetup$ C:\Windows\system32\ccmsetup
music C:\music none
VPCache$ C:\Windows\system32\VPCache
WMILogs$ C:\Windows\system32\wbem\logs
You can see that not only do you need to remember the share type of 0, but the syntax is a bit
more complicated as well. So where do you write down this information? Here’s one sugges-
tion: When I was an administrator working on the Digital VAX, I kept a small pocket-size note-
book to store such cryptic commands. Of course, if I ever lost my little notebook or failed to
carry it, I was in big trouble!
Now suppose you are only interested in file shares that do not have a description assigned to
them. This command is shown here:
PS C:\> Get-WmiObject win32_share -Filter "type = '0' AND description = ''"
Name Path Description
---- ---- -----------
CCMLogs$ C:\Windows\system32\ccm\logs
CCMSetup$ C:\Windows\system32\ccmsetup
VPCache$ C:\Windows\system32\VPCache
WMILogs$ C:\Windows\system32\wbem\logs
At this point, you may feel the command and associated syntax are complicated enough to jus-
tify writing a script. Creating the script is easy; simply copy it from the Windows PowerShell
console and paste it into a text file. Name the script and change the extension to .ps1. You can
then run the script from inside Windows PowerShell. The commands just shown are saved
in Share.txt in the chapter02 folder on the companion CD-ROM. The script is named GetFile-
Shares.ps1.
C02622791.fm Page 34 Saturday, December 8, 2007 6:32 PM

Chapter 2 Scripting Windows PowerShell 35
An additional advantage to configuring a command as a script is that you can easily make
modifications. Whereas the previous command was limited to reporting only on file shares,
you can make a change to the script to allow reporting on print shares, remote administrative
shares, IPC shares, or any other defined share type. You can modify the script so you can
choose a share type when you launch the script. To do this, use an if … else statement to see if
a command-line argument has been supplied to the script.
Tip To check for a command-line argument, look for $args, which is the automatic variable
created to hold command-line arguments.
If there is a command-line argument, use the value supplied to the command line. If no value
is supplied when the script is launched, then you must supply a default value to the script. For
this script, you will list file shares and inform the user that you are using default values. The
Get-WmiObject syntax is the same as you used previously in the VBScript days. When writing
a script, it’s also useful to display a usage string. The following script, GetSharesWithArgs.ps1,
includes an example command to assist you with typing the correct syntax for the script.
GetSharesWithArgs.ps1
if($args)
{
$type = $args
Get-WmiObject win32_share -Filter "type = $type"
}
ELSE
{
Write-Host
"
Using defaults values, file shares type = 0.
Other valid types are:
2147483651 for disk drive admin share
2147483649 for print queue admin share
2147483650 for device admin share
2147483651 for ipc$ admin share
Example: C:\GetSharesWithArgs.ps1 '2147483651'
"
$type = '0'
Get-WmiObject win32_share -Filter "type = $type"
}
Another reason why network administrators write Windows PowerShell scripts is to run the
script as a scheduled task. In the Windows world there are multiple task scheduler engines.
Using the Win32_ScheduledJob WMI class you can create, monitor, and delete scheduled jobs.
This WMI class has been available since the Windows NT 4.0 days. Both Windows XP and
Windows Server 2003 have the Schtasks.exe utility, which offers more flexibility than the
Win32_ScheduledJob WMI class. Besides Schtasks.exe, Windows Vista and Windows Server
2008 also include the Schedule.Service object to simplify the configuration of scheduled jobs.
C02622791.fm Page 35 Saturday, December 8, 2007 6:32 PM
36 Windows PowerShell Scripting Guide
The script, ListProcessesSortResults.ps1, is something you may want to schedule to run
several times daily. The script produces a list of currently running processes and writes the
results to a text file as a formatted and sorted table.
ListProcessesSortResults.ps1
$args = "localhost","loopback","127.0.0.1"
foreach ($i in $args)
{$strFile = "c:\mytest\"+ $i +"Processes.txt"
Write-Host "Testing" $i "please wait ...";
Get-WmiObject -computername $i -class win32_process |
Select-Object name, processID, Priority, ThreadCount, PageFaults,
PageFileUsage |
Where-Object {!$_.processID -eq 0} | Sort-Object -property name |
Format-Table | Out-File $strFile}
Configuring the Scripting Policy
Since scripting in Windows PowerShell is not enabled by default, it is important to verify the
level of scripting support provided on the platform before deployment of either scripts or
commands. If you attempt to run a Windows PowerShell script when the support has not
been enabled, you’ll receive an error message and the script won’t run. This error message is
shown in Figure 2-1.
Figure 2-1 Attempting to run a script before scripting support is enabled generates an error.
C02622791.fm Page 36 Saturday, December 8, 2007 6:32 PM
Chapter 2 Scripting Windows PowerShell 37
This is referred to as the restricted execution policy. There are four levels of execution policy
that can be configured in Windows PowerShell with the Set-ExecutionPolicy cmdlet. These
four levels are listed in Table 2-1. The restricted execution policy can be configured via Group
Policy by using the Turn On Script Execution Group Policy setting in Active Directory
directory service. It can be applied to either the computer object or to the user object. The
computer object setting takes precedence over other settings.
Tip To retrieve the script execution policy use the Get-ExecutionPolicy cmdlet.
Configure user preferences for the restricted execution policy with the Set-ExecutionPolicy cmdlet
but note that these preferences won’t override settings configured by Group Policy. Obtain the
resulting set of restricted execution policy settings by using the Get-ExecutionPolicy cmdlet.
You should be aware that on Windows Vista, access to the registry key that contains the
script execution policy is restricted. A “normal” user will not be allowed to modify the key,
and even an administrator running with User Account Control (UAC) turned on will not
be allowed to modify the setting. If modification is attempted, the error shown in Figure 2-2 will
be generated.
There are, of course, several ways around the UAC issue. One choice is to simply turn off UAC;
in most circumstances this is an undesirable solution. A better solution is to right-click the
Windows PowerShell icon and select Run As Administrator as shown in Figure 2-3.
If you find right-clicking a bit too time-consuming (as I do!) you might prefer to create a
second Windows PowerShell shortcut. You might name this second shortcut admin_ps and
configure the shortcut properties to launch with administrative rights. For about 90 percent of
all your administrative needs, the first shortcut should suffice. If, however, you need “more
power,” then choose the administrative one. The shortcut properties you can use for the
admin_ps “administrative PowerShell” shortcut are shown in Figure 2-4.
Table 2-1 Script Execution Policy Levels
Level Meaning
Restricted Will not run scripts or configuration files.
AllSigned All scripts and configuration files must be signed by a trusted
publisher.
RemoteSigned All scripts and configuration files downloaded from the Internet
must be signed by a trusted publisher.
Unrestricted All scripts and configuration files will run. Scripts downloaded
from the Internet will prompt for permission prior to running.
C02622791.fm Page 37 Saturday, December 8, 2007 6:32 PM

38 Windows PowerShell Scripting Guide
Figure 2-2 An attempt to run the Set-ExecutionPolicy cmdlet will fail if the user does not have
administrative rights.
Figure 2-3 To launch Windows PowerShell with administrative rights, you can right-click the icon,
and select Run As Administrator.
C02622791.fm Page 38 Saturday, December 8, 2007 6:32 PM
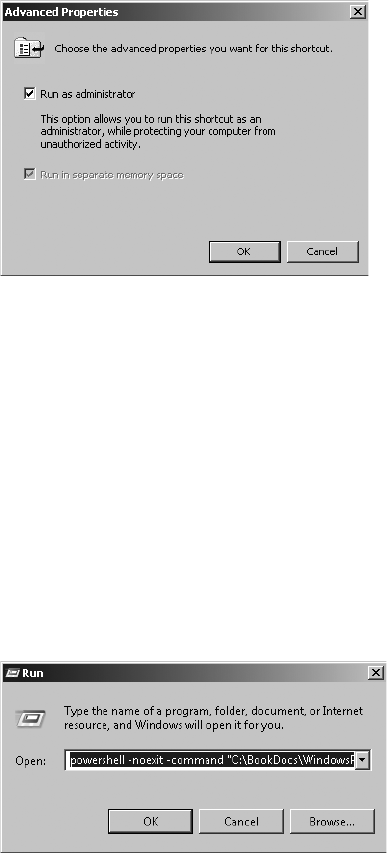
Chapter 2 Scripting Windows PowerShell 39
Figure 2-4 To configure the Windows PowerShell shortcut to run with administrative rights, choose
the Run As Administrator check box found under Advanced Properties.
Running Windows PowerShell Scripts
You can’t simply double-click a Windows PowerShell script and have it run. You cannot type
the name in the Start | Run dialog box, either. If you are inside Windows PowerShell, you can
run scripts if you have enabled the execution policy, but you need to type the entire path to
the script you want to run and make sure to include the .ps1 extension.
If you need to run a script from outside Windows PowerShell, you must type the full path to
the script, but you must also feed it as an argument to the PowerShell.exe program. In addi-
tion, you probably want to specify the -noexit switch so you can read the output from the script
inside the Windows PowerShell console. This syntax is shown in Figure 2-5.
Figure 2-5 To run a Windows PowerShell script from outside the console, use the -noexit argument
to allow you to see the results of the script.
Use of Variables
When working with Windows PowerShell, the default is that you don’t need to declare
variables prior to use; the variable is declared when you use it to hold data. All variable names
must be preceded with a dollar sign. There are a number of special variables in Windows
PowerShell. These variables are created automatically and each has a special meaning. Table 2-2
lists the special variables and their associated meanings.
C02622791.fm Page 39 Saturday, December 8, 2007 6:32 PM

40 Windows PowerShell Scripting Guide
Use of Constants
Constants in Windows PowerShell are like variables with two important exceptions: Their
value never changes, and they cannot be deleted. Constants are created by using the Set-Variable
cmdlet and specifying the -option argument to be equal to constant.
Tip When referring to a constant in the body of the script, you must preface it with the
dollar sign—just like any other variable. However, when creating the constant (or even a variable)
by using the Set-Variable cmdlet, as you specify the name argument you don’t include a
dollar sign.
Table 2-2 Use of Special Variables
Name Use
$^ Contains the first token of the last line input into the shell.
$$ Contains the last token of the last line input into the shell.
$_ The current pipeline object; used in script blocks, filters, Where-Object,
ForEach-Object, and switch.
$? Contains the success/fail status of the last statement.
$args Used in creating functions requiring parameters.
$error If an error occurred, the error object is saved in the $error variable.
$executioncontext The execution objects available to cmdlets.
$foreach Refers to the enumerator in a foreach loop.
$home The user’s home directory; set to %HOMEDRIVE%\%HOMEPATH%.
$input Input is piped to a function or code block.
$match A hash table consisting of items found by the -match operator.
$myinvocation Information about the currently executing script or command line.
$pshome The directory where Windows PowerShell is installed.
$host Information about the currently executing host.
$lastexitcode The exit code of the last native application to run.
$true Boolean TRUE.
$false Boolean FALSE.
$null A null object.
$this In the Types.ps1 XML file and some script block instances this represents
the current object.
$ofs Output field separator used when converting an array to a string.
$shellid The identifier for the shell. This value is used by the shell to determine
the execution policy and what profiles are run at startup.
$stacktrace Contains detailed stack trace information about the last error.
C02622791.fm Page 40 Saturday, December 8, 2007 6:32 PM
Chapter 2 Scripting Windows PowerShell 41
In the GetHardDiskDetails.ps1 script that follows, there is a constant named $intDriveType
with a value of 3 assigned. This constant is used because the Win32_LogicalDisk WMI class
uses a value of 3 in the DiskType property to describe a local fixed disk. When using Where-
Object and a value of 3, you eliminate network drives, removable drives, and ram drives from
the items returned.
The $intDriveType constant is only used with the Where filter line. The value of $strComputer,
however, will change once for each computer name that is specified in the array $aryComputers.
In the GetHardDiskDetails.ps1 script, the value of $strComputer will change twice. The first
time through the loop it will be equal to loopback and the second time through the loop it will
be equal to localhost. Even if you add 250 different computer names, the effect will be the
same—the value of $strComputer will change each time through the loop.
GetHardDiskDetails.ps1
$aryComputers = "loopback", "localhost"
Set-Variable -name intDriveType -value 3 -option constant
foreach ($strComputer in $aryComputers)
{"Hard drives on: " + $strComputer
Get-WmiObject -class win32_logicaldisk -computername $strComputer|
Where {$_.drivetype -eq $intDriveType}}
Using Flow Control Statements
Once scripting support is enabled on Windows PowerShell, you have access to some
advanced flow control cmdlets. However, this does not mean you cannot do flow control
inside the console. You can certainly use flow control statements inside the console. This is
shown here:
PS C:\> Get-Process | foreach ( $_.name ) { if ( $_.name -eq "system" ) {
Write-Host "system process is ID : " $_.ID } }
The problem is the amount of typing. It may be preferable to save such a command in a script.
Besides saving a long command in a file, there is also an advantage in readability. For example,
you can line up the curly brackets and the other components of the commands. You can also
avoid hard-coding process names into the script and instead save them as variables. This
makes it easy to modify the script or even to write the script to accept command-line argu-
ments. In the GetProcessByID.ps1 script shown here, you can see these options exhibited.
GetProcessByID.ps1
$strProcess = "system"
Get-Process |
foreach ( $_.name ) {
if ( $_.name -eq $strProcess )
{
Write-Host "system process is ID : " $_.ID
}
}
C02622791.fm Page 41 Saturday, December 8, 2007 6:32 PM

42 Windows PowerShell Scripting Guide
Adding Parameters to ForEach-Object
In the GetWmiAndQuery.ps1 script, the ForEach-Object cmdlet produces a listing from all
the WMI classes that have names containing usb. This particular script is very useful in that it
produces a listing of both the process name and associated process ID (PID). In addition, the
GetProcessByID.ps1 script is a good candidate to modify to accept a command-line argument.
Begin with the list switch from the Get-WmiObject cmdlet; you’ll end up with a complete list-
ing of all WMI classes in the default WMI namespace. Pipeline the resulting object into the
Where-Object cmdlet and filter the result set by the Name property when it is like the value
contained in the variable $strClass.
Using the Begin Parameter
Use the -begin parameter of the ForEach-Object cmdlet to write the name used to generate the
WMI class listings. This action does not affect the current pipeline object. In fact, neither the
-begin parameter or the -end parameter interact with the current pipeline object. But they are
great places to perform pre-processing and post-processing. The -process parameter is used to
contain the script block that will interact with the current pipeline object. This is the default
parameter, and doesn’t need to be named. The Get-WmiAndQuery.ps1 script is shown here.
GetWmiAndQuery.ps1
$strClass = "usb"
Get-WmiObject -List |
Where { $_.name -like "*$strClass*" } |
ForEach-Object -begin `
{
Write-Host "$strClass wmi listings"
Start-Sleep 3
}`
-Process `
{
Get-wmiObject $_.name
}
In the ProcessUsbHub.ps1 script, the Get-WmiObject cmdlet retrieves instances of the
Win32_USBHub class. Once we have a collection of usb hub objects, we pipeline the object to
the ForEach-Object cmdlet. Suggestion: To make the script easier to read, line up all the -begin,
-process, and -end parameters on the left side of the script. However, you will have to use the
“backtick” or grave accent (`) to indicate line continuation.
Tip The environment variable %computername% is always available and can be used to
extract the computer name for a script. An easy way to retrieve the value of this variable is to
use the Get-Item cmdlet to grab the value from the env:\ psdrive. The Value property
contains the computer name. This is illustrated here: (Get-Item env:\computerName) value.
C02622791.fm Page 42 Saturday, December 8, 2007 6:32 PM
Chapter 2 Scripting Windows PowerShell 43
The -begin section uses a code block to write the name of computer using the Write-Host
cmdlet. Use a sub-expression to get the computer name from the env:\ psdrive; use the
%computername% variable and extract its value.
Using the Process Parameter
In the -process section, simply use the current pipeline object (indicated by the $_ automatic
variable) to print the PnpDeviceID property from the Win32_USBHub WMI class. Again, use
the grave accent to indicate line continuation.
Using the End Parameter
The last section of the ProcessUsbHub.ps1 script contains the -end parameter. Use the Write-
Host cmdlet to print a string that indicates the command completed, and use a sub-expression
to print the value returned by the Get-Date cmdlet. The ProcessUsbHub.ps1 script is listed here.
ProcessUsbHub.ps1
Get-WmiObject win32_usbhub |
foreach-object `
-begin { Write-Host "Usb Hubs on:" $(Get-Item env:\computerName).value } `
-process { $_.pnpDeviceID} `
-end { Write-Host "The command completed at $(get-date)" }
Using the For Statement
Similar to the ForEach-Object cmdlet, the for statement is used to control execution of a script
block as long as a condition is true. Most of the time, you will use the for statement to perform
an action a certain number of times. In the line of code that follows, notice the basic for
construction. Use parentheses to separate the expression being evaluated from the code
block contained in curly brackets. The evaluated expression is composed of three sections.
The first section is a variable $a; you assign the value of 1 to it. The second section contains
the condition to be evaluated. In the code shown here, as long as the variable $a is less
than or equal to the number 3, the command in the code block section continues to run. The
last section of the evaluation expression adds the number 1 to the variable $a. The code block
is a simple printout of the word hello.
for ($a = 1; $a -le 3 ; $a++) {"hello"}
The PingARange.ps1 script shown here is a very useful little script because it can be used to
ping a range of Internet protocol (IP) addresses and will tell you whether or not the computer
is responding to Internet Control Message Protocol (ICMP) packets. This is helpful in
doing network discovery or in ensuring a computer is talking to the network. The $intPing
variable is set to 10 and defined as an integer. Next, the $intNetwork variable is assigned the
string 127.0.0. and is defined as a string.
C02622791.fm Page 43 Saturday, December 8, 2007 6:32 PM
44 Windows PowerShell Scripting Guide
The for statement is used to execute the remaining code the number of times specified in the
$intPing variable. The counter variable is created on the for statement line. This counter
variable, named $i, is assigned the value of 1. As long as $i is less than or equal to the value set
in the $intPing variable, the script will continue to execute. The final step, completed inside
the evaluator section of the for statement, is to add one to the value of $i.
The code block begins with the curly bracket. Inside the code block, first create a variable
named $strQuery; this is the string that holds the WMI query. Placing this in a separate
variable makes it easier to use $intNetwork along with the $i counter variable; these are used to
create a valid IP address for the WMI query that results in a ping.
The $wmi variable is used to hold the collection of objects that is returned by the Get-WmiObject
cmdlet. By using the optional query argument of the Get-WmiObject cmdlet, you are able to
supply a WMI query. The StatusCode property contains the result of the ping operation. A 0
indicates success, any other number means the ping failed. To present this information in a
clear fashion, use an if … else statement to evaluate the StatusCode property.
PingARange.ps1
[int]$intPing = 10
[string]$intNetwork = "127.0.0."
for ($i=1;$i -le $intPing; $i++)
{
$strQuery = "select * from win32_pingstatus where address = '" +
$intNetwork + $i + "'"
$wmi = get-wmiobject -query $strQuery
"Pinging $intNetwork$i ... "
if ($wmi.statuscode -eq 0)
{"success"}
else
{"error: " + $wmi.statuscode + " occurred"}
Using Decision-Making Statements
The ability to make decisions to control branching in a script is a fundamental technique. In
fact, this is the basis of automation. A condition is detected and evaluated, and a course
of action is determined. If you are able to encapsulate your logic into a script, you are well on
your way to having servers that monitor themselves. As an example, when you open Task
Manager on the server, what is the first thing you do? I often sort the list of processes by
memory consumption. The GetTopMemory.ps1 script, shown here, does this.
GetTopMemory.ps1
Get-Process |
Sort-Object workingset -Descending |
Select-Object -First 5
C02622791.fm Page 44 Saturday, December 8, 2007 6:32 PM
Chapter 2 Scripting Windows PowerShell 45
The GetTopMemory.ps1 script might be useful because it saves time in sorting a list. But what
do you do next? Do you kill the top memory consuming process? If you do, then there is no
decision to make. However, suppose you want to kill off only user mode processes that
consume more than 100 MB of memory? That may be a more constructive and better choice.
This will require some decision-making capability. Let us first examine the classic if … elseif …
else decision structure.
Using If … Elseif … Else
The most basic decision-making statement is the if … elseif … else structure. This structure is
easy to use because it is perfectly natural and is implied in normal conversation. For example,
consider the following conversation between two American tourists in Copenhagen:
If ( sunny and warm )
{ go to NyHavn }
Elseif ( cloudy and cool )
{ go to Tivoli }
Else
{ take s-tog to Malmo }
Even if you don’t speak Danish, you will be able to follow the conversation. If it is sunny and
warm, then the tourists will go to NyHavn. The first condition evaluation is whether the
weather is going to be sunny and warm. The condition is always enclosed in smooth paren-
theses. The script block that will be executed if the condition is true is in curly brackets. In
this example, if the weather is sunny and warm, the tourists will go to NyHavn (a beautiful
port with lots of outdoor cafes). However, if the weather is cloudy and cool, they will go to
Tivoli (an amusement park in the center of Copenhagen). If neither of these conditions is true,
for example, if it is raining or snowing, the tourists will take the train to Malmo (a city in
Sweden famous for its shopping).
To use the GetServiceStatus.ps1 script, you will first obtain a listing of all the services on the
computer. Do this by using the Get-Service cmdlet. Once you have a listing of the services, use
the Sort-Object cmdlet to sort the list of services based on their status. Next, use foreach to
walk through the collection of services. As you iterate through the services, use if … elseif … else
to evaluate the status. If the service is stopped, use the color red to display the name and
status. If the service is running, use green to display the name and status. If the service is in a
different state (such as pause), default to yellow to display the name and status. A decision
matrix such as this is very useful in allowing you to quickly scan a long list of services. The
GetServiceStatus.ps1 script is shown here. The constant color values that can be used with the
Write-Host cmdlet are detailed in the table that follows.
GetServiceStatus.ps1
Get-Service |
Sort-Object status -descending |
foreach {
if ( $_.status -eq "stopped")
{Write-Host $_.name $_.status -ForegroundColor red}
C02622791.fm Page 45 Saturday, December 8, 2007 6:32 PM

46 Windows PowerShell Scripting Guide
elseif ( $_.status -eq "running" )
{Write-Host $_.name $_.status -ForegroundColor green}
else
{Write-Host $_.name $_.status -ForegroundColor yellow}
}
Using Switch
In other programming languages, switch would be called the select case statement. The switch
statement is used to evaluate a condition against a series of potential matches. In this way, it is
essentially a streamlined if … elseif statement. When using the switch statement, the condition
to be evaluated is contained in side parentheses. Then, each condition to be evaluated is
placed inside a curly bracket within the code block. This is shown in the following command:
$a=5;switch ($a) { 4{"four detected"} 5{"five detected"} }
In the DisplayComputerRoles.ps1 script that follows, the script begins by using the $wmi vari-
able to hold the object that is returned by using the Get-WmiObject cmdlet. The DomainRole
property of the Win32_computersystem class is returned as a coded value. To produce an out-
put that is more readable, the switch statement is used to match the value of the DomainRole
property to the appropriate text value.
DisplayComputerRoles.ps1
$wmi = get-wmiobject win32_computersystem
"computer " + $wmi.name + " is: "
switch ($wmi.domainrole)
{
0 {"`t Stand alone workstation"}
1 {"`t Member workstation"}
2 {"`t Stand alone server"}
3 {"`t Member server"}
4 {"`t Back up domain controller"}
5 {"`t Primary domain controller"}
default {"`t The role can not be determined"}
}
Evaluating Command-Line Arguments
Switch is ideally suited to evaluate command-line arguments. In the GetDriveArgs.ps1 script
example that follows, you can use a function named funArg to evaluate the value of the
automatic variable $args. This automatic variable contains arguments supplied to the command
line when a script is run. This is a convenient variable to use when working with command-line
Black DarkBlue DarkGreen DarkCyan
DarkRed DarkMagenta DarkYellow Gray
DarkGray Blue Green Cyan
Red Magenta Yellow White
C02622791.fm Page 46 Saturday, December 8, 2007 6:32 PM
Chapter 2 Scripting Windows PowerShell 47
arguments. Switch is used to evaluate the value of $args. Four parameter arguments are
allowed with this script. The all argument does a WMI query to retrieve basic information on
all logical disks on the computer. The argument c is used to return only information about the
C drive. An interesting trick: The floppy drive is typically enumerated first, and the second
element in the array is the C drive. If this is not the case on your system, you can change it. The
purpose of the script is simply to point out the use of switch to parse command-line arguments.
Using the array element number is a nice way to retrieve WMI information in Windows
PowerShell. The free argument is used to only return free disk space on the C drive.
The help argument is used to print a help statement. It uses a here-string to make it easy to
type in the help message. The help message displays the purpose of the script and several
examples of command lines.
GetDriveArgs.ps1
Function funArg()
{
switch ($args)
{
"all" { gwmi win32_logicalDisk }
"c" { (gwmi win32_logicaldisk)[1] }
"free" { (gwmi win32_logicaldisk)[1].freespace }
"help" { $help = @"
This script will print out the drive information for
All drives, only the c drive, or the free space on c:
It also will print out a help topic
EXAMPLE:
>GetDriveArgs.ps1 all
Prints out information on all drives
>GetDriveArgs.ps1 c
Prints out information on only the c drive
>GetDriveArgs.ps1 free
Prints out freespace on the c drive
"@ ; Write-Host $help }
}
}
#$args = "help"
funArg($args)
Using Switch Wildcards
One of the more interesting uses of the switch command is the use of wildcards. This can open
up new opportunities to write clear and compact code that is both powerful and easy to
implement. The SwitchIPConfig.ps1 script holds the results of the ipconfig /all command in
the $a variable. Use switch with the -wildcard argument and feed it the text to parse inside the
smooth parenthesis. Then, open the script block with the curly brackets and type the pattern
to match. In this case, it is a simple *DHCP Server* phrase. In the script block that will execute
when the pattern match is found, use the Write-Host cmdlet to print the current line inside
the switch block. The interesting point is the use of the $switch automatic variable as the
C02622791.fm Page 47 Saturday, December 8, 2007 6:32 PM
48 Windows PowerShell Scripting Guide
enumerator. Specify the current property and retrieve the current line that is processing. In
this way, you can print the line you are interested in examining. The SwitchIPConfig.ps1
script is shown here.
SwitchIPConfig.ps1
$a = ipconfig /all
switch -wildCard ($a)
{
"*DHCP Server*" { Write-Host $switch.current }
}
Using Switch with Regular Expressions
Unlike a normal select case statement, the switch statement has the ability to work with regular
expressions. When looking for valuable information, you can use the switch statement to open
a text file, read the file into memory, and then use regular expressions to parse the file. Regu-
lar expressions can be as simple as matching a particular word or phrase or as complicated as
validating a legitimate e-mail address. The SwitchRegEx.ps1 script that follows examines a
sample text file for two words: test and good. If either word is found, the entire line containing
the matched word prints.
Following the switch statement, you can use the -regex parameter to indicate that you want to
use regular expressions as the matching tool. The value to switch on, inside the smooth paren-
theses, is actually a sub-expression that opens and reads the text file. The $ in front of the
curly brackets surrounding the path to a text file is the command to open and read the text
file into memory. Open the switch with the curly brackets and place each pattern to match
inside single quotations. The code block that will execute if the regular expression is matched
is also contained in curly brackets, and in this example it is a simple write-host. Once again,
use the $switch enumerator to retrieve the current line where the pattern match occurs.
SwitchRegEx.ps1
switch -regex (${c:\testa.txt})
{
'test' {Write-Host $switch.current}
'good' {Write-Host $switch.current}
}
The text of the TestA.txt file is shown here. This example will assist you in evaluating the out-
put from the script.
TestA.txt
This was a test file.
This was a good file.
This was a good test file.
C02622791.fm Page 48 Saturday, December 8, 2007 6:32 PM
Chapter 2 Scripting Windows PowerShell 49
Perhaps a more useful example of using the regular expression feature of the switch statement
is the VersionOfVista.ps1 script. Assign the string version to the $strPattern variable, and hold
the output of the net config workstation command in the $text variable. Then, use the -regex
parameter on the switch statement and feed it the content stored in the $text variable, and look
for the pattern that is stored in the $strPattern variable. Once you find it, print the entire line
by using the current property of the automatic variable $switch. The nice thing about this
script is that it tells you what version of Windows Vista you have. The entire output from net
config workstation command is 19 lines long. To compare results, here is a sample output
from VersionOfVista.ps1:
Software version Windows Vista (TM) Enterprise
VersionOfVista.ps1
$strPattern = "version"
$text = net config workstation
switch -regex ($text)
{
$strPattern { Write-Host $switch.current }
}
Working with Data Types
Windows PowerShell is a strongly typed language that acts as if it were typeless. This is
because Windows PowerShell does a good job of detecting data types and acting on them
accordingly. If something appears to be a string, Windows PowerShell will treat it as a string.
As an example, consider these three statements:
PS C:\> 1 + 1
2
PS C:\> 12:00 + :30
Unexpected token ':00' in expression or statement.
At line:1 char:6
+ 12:00 <<<< + :30
PS C:\> a + b
The term 'a' is not recognized as a cmdlet, function, operable program,
or script file. Verify the term and try again At line:1 char:2 + a <<<< + b
PS C:\>
Notice that only one statement completed without error—the one containing 1 + 1. Windows
PowerShell properly detected these as numbers and allowed the addition to proceed.
However, it is impossible to add letters or time.
However, if you put the letters a and b within double quotation marks and then add them, you
will notice that the action succeeds. This is shown here:
PS C:\> "a" + "b"
Ab
C02622791.fm Page 49 Saturday, December 8, 2007 6:32 PM
50 Windows PowerShell Scripting Guide
This behavior is not surprising, and in fact, is to be expected. Double quotation marks turn
the letters a and b into string values and concatenates the two letters. You can see this if
you pipeline the letter a into the Get-Member cmdlet as shown here. Notice that the first line
of output indicates the letter a is an object of the type system.string. Also observe that there are
many properties and methods you can use on a system.string object.
PS C:\> "a" | get-member
TypeName: System.String
Name MemberType Definition
---- ---------- ----------
Clone Method System.Object Clone()
System.Int32 CompareTo(String strB)
Contains Method System.Boolean Contains(String value)
CopyTo Method System.Void CopyTo(Int32 sourceIndex, Char[]
destination, Int32 destinationIn
EndsWith Method System.Boolean EndsWith(String value),
System.Boolean EndsWith(String value,
Equals Method System.Boolean Equals(Object obj),
System.Boolean Equals(String value), Syste...
GetEnumerator Method System.CharEnumerator GetEnumerator()
GetHashCode Method System.Int32 GetHashCode()
GetType Method System.Type GetType()
GetTypeCode Method System.TypeCode GetTypeCode()
get_Chars Method System.Char get_Chars(Int32 index)
get_Length Method System.Int32 get_Length()
IndexOf Method System.Int32 IndexOf(Char value, Int32
startIndex, Int32 count), System.Int32...
IndexOfAny Method System.Int32 IndexOfAny(Char[] anyOf, Int32
startIndex, Int32 count), System....
Insert Method System.String Insert(Int32 startIndex, String
value)
IsNormalized Method System.Boolean IsNormalized(), System.Boolean
IsNormalized(NormalizationForm
LastIndexOf Method System.Int32 LastIndexOf(Char value, Int32
startIndex, Int32 count), System.I...
LastIndexOfAny Method System.Int32 LastIndexOfAny(Char[] anyOf, Int32 start
Index, Int32 count), Sys...
Normalize Method System.String Normalize(), System.String
Normalize(NormalizationForm normaliz...
PadLeft Method System.String PadLeft(Int32 totalWidth),
System.String PadLeft(Int32 totalWid...
PadRight Method System.String PadRight(Int32 totalWidth),
System.String PadRight(Int32 totalW...
Remove Method System.String Remove(Int32 startIndex, Int32
count), System.String Remove(Int...
Replace Method System.String Replace(Char oldChar, Char
newChar), System.String Replace(Stri...
Split Method System.String[] Split(Params Char[]
separator), System.String[] Split(Char[] ...
StartsWith Method System.Boolean StartsWith(String value),
System.Boolean StartsWith(String val...
Substring Method System.String Substring(Int32 startIndex),
System.String Substring(Int32 star...
C02622791.fm Page 50 Saturday, December 8, 2007 6:32 PM
Chapter 2 Scripting Windows PowerShell 51
ToCharArray Method System.Char[] ToCharArray(), System.Char[]
ToCharArray(Int32 startIndex, Int3...
ToLower Method System.String ToLower(), System.String
ToLower(CultureInfo culture)
ToLowerInvariant Method System.String ToLowerInvariant()
ToString Method System.String ToString(), System.String
ToString(IFormatProvider provider)
ToUpper Method System.String ToUpper(), System.String
ToUpper(CultureInfo culture)
ToUpperInvariant Method System.String ToUpperInvariant()
Trim Method System.String Trim(Params Char[] trimChars),
System.String Trim()
TrimEnd Method System.String TrimEnd(Params Char[]
trimChars)
TrimStart Method System.String TrimStart(Params Char[]
trimChars)
Chars ParameterizedProperty System.Char Chars(Int32 index) {get
If you pipeline the number 1 into the Get-Member cmdlet, you will see that it is a system.int32
object, with a smaller listing of methods available than is available with the string class:
PS C:\> 1 | get-member
TypeName: System.Int32
Name MemberType Definition
---- ---------- ----------
CompareTo Method System.Int32 CompareTo(Int32 value), System.Int32
CompareTo(Object value)
Equals Method System.Boolean Equals(Object obj), System.Boolean
Equals(Int32 obj)
GetHashCode Method System.Int32 GetHashCode()
GetType Method System.Type GetType()
GetTypeCode Method System.TypeCode GetTypeCode()
ToString Method System.String ToString(), System.String
ToString(IFormatProvider provider), System.String ToS...
Once you have figured out how to use Get-Member to verify the reason for the behavior of an
object, you can use the type constraint objects to confirm an object of a specific data type. If
you want 12:00 to be interpreted as a date time object, use the [datetime] type constraint to
cast the string 12:00 into a date time object. This is shown here:
PS C:\> [datetime]"12:00" | get-member
TypeName: System.DateTime
Name MemberType Definition
---- ---------- ----------
Add Method System.DateTime Add(TimeSpan value)
AddDays Method System.DateTime AddDays(Double value)
AddHours Method System.DateTime AddHours(Double value)
AddMilliseconds Method System.DateTime AddMilliseconds(Double value)
AddMinutes Method System.DateTime AddMinutes(Double value)
AddMonths Method System.DateTime AddMonths(Int32 months)
C02622791.fm Page 51 Saturday, December 8, 2007 6:32 PM
52 Windows PowerShell Scripting Guide
AddSeconds Method System.DateTime AddSeconds(Double value)
AddTicks Method System.DateTime AddTicks(Int64 value)
AddYears Method System.DateTime AddYears(Int32 value)
CompareTo Method System.Int32 CompareTo(Object value),
System.Int32 CompareTo(DateTime value)
Equals Method System.Boolean Equals(Object value),
System.Boolean Equals(DateTime value)
GetDateTimeFormats Method System.String[] GetDateTimeFormats(),
System.String[] GetDateTimeFormats(IFormat...
GetHashCode Method System.Int32 GetHashCode()
GetType Method System.Type GetType()
GetTypeCode Method System.TypeCode GetTypeCode()
get_Date Method System.DateTime get_Date()
get_Day Method System.Int32 get_Day()
get_DayOfWeek Method System.DayOfWeek get_DayOfWeek()
get_DayOfYear Method System.Int32 get_DayOfYear()
get_Hour Method System.Int32 get_Hour()
get_Kind Method System.DateTimeKind get_Kind()
get_Millisecond Method System.Int32 get_Millisecond()
get_Minute Method System.Int32 get_Minute()
get_Month Method System.Int32 get_Month()
get_Second Method System.Int32 get_Second()
get_Ticks Method System.Int64 get_Ticks()
get_TimeOfDay Method System.TimeSpan get_TimeOfDay()
get_Year Method System.Int32 get_Year()
IsDaylightSavingTime Method System.Boolean IsDaylightSavingTime()
Subtract Method System.TimeSpan Subtract(DateTime value),
System.DateTime Subtract(TimeSpan value)
ToBinary Method System.Int64 ToBinary()
ToFileTime Method System.Int64 ToFileTime()
ToFileTimeUtc Method System.Int64 ToFileTimeUtc()
ToLocalTime Method System.DateTime ToLocalTime()
ToLongDateString Method System.String ToLongDateString()
ToLongTimeString Method System.String ToLongTimeString()
ToOADate Method System.Double ToOADate()
ToShortDateString Method System.String ToShortDateString()
ToShortTimeString Method System.String ToShortTimeString()
ToString Method System.String ToString(), System.String
ToString(String format), System.String T...
ToUniversalTime Method System.DateTime ToUniversalTime()
Date Property System.DateTime Date {get;}
Day Property System.Int32 Day {get;}
DayOfWeek Property System.DayOfWeek DayOfWeek {get;}
DayOfYear Property System.Int32 DayOfYear {get;}
Hour Property System.Int32 Hour {get;}
Kind Property System.DateTimeKind Kind {get;}
Millisecond Property System.Int32 Millisecond {get;}Property
System.Int32 Minute {get;}
Month Property System.Int32 Month {get;}
Second Property System.Int32 Second {get;}
Ticks Property System.Int64 Ticks {get;}
TimeOfDay Property System.TimeSpan TimeOfDay {get;}
Year Property System.Int32 Year {get;}
DateTime ScriptProperty System.Object DateTime {get=if
($this.DisplayHint -ieq "Date")...
C02622791.fm Page 52 Saturday, December 8, 2007 6:32 PM

Chapter 2 Scripting Windows PowerShell 53
There is no reason to use Get-Member to determine the data type of a particular object if you
are only interested in the name of the object. To do this, you can use the getType() method as
shown here. In the first case, you confirm that 12:00 is indeed a string. In the second case, you
cast the string into a datetime data type, and confirm it by once again using the getType()
method as shown here:
PS C:\> "12:00".getType()
IsPublic IsSerial Name BaseType
-------- -------- ---- --------
True True String System.Object
PS C:\> ([dateTime]"12:00").getType()
IsPublic IsSerial Name BaseType
-------- -------- ---- --------
True True DateTime System.ValueType
All of these commands are in the DataTypes.txt file found in the chapter02 folder on the com-
panion CD-ROM. Additional data type aliases are shown in Table 2-3.
Unleashing the Power of Regular Expressions
One of the interesting features of Windows PowerShell is the ability to work with regular
expressions. Regular expressions are optimized to manipulate text. You’ve learned about
using regular expressions with the switch statement to match a particular word, however, you
can do as much with the -wildcard switch. Now you’ll learn some of the more advanced tasks
you can complete with regular expressions. Table 2-4 lists the escape sequences you can use
with regular expressions.
Table 2-3 Data Type Aliases
Alias Type
[int] 32-bit signed integer
[long] 64-bit signed integer
[string] Fixed length string of Unicode characters
[char] A Unicode 16-bit character
[bool] True/False value
[byte] An 8-bit unsigned integer
[double] Double-precision 64-bit floating point number
[datetime] DateTime data type
[decimal] A 128-bit decimal value
[single] Single precision 32-bit floating point number
[array] An array of values
[xml] Xml objects
[hashtable] A hashtable object (similar to a dictionary object)
C02622791.fm Page 53 Saturday, December 8, 2007 6:32 PM

54 Windows PowerShell Scripting Guide
The RegExTab.ps1 script illustrates using an escape sequence in a regular expression script. It
opens a text file and looks for tabs. The easiest way to work with regular expressions is to
store the pattern in its own variable. This makes it easy to modify and to experiment without
worrying about breaking the script (simply use the # sign to comment out the line, then cre-
ate a new line with the same name and a different value).
The RegExTab.ps1 script specifies \t as the pattern. According to Table 2-4 this means you
look for tabs. Feed the pattern, contained in $strPattern, to the [regex] type accelerator as
shown here:
$regex = [regex]$strPattern
Next, store the content of the TabLine.txt text tile into the $text variable by using the syntax
shown here:
$text = ${C:\Chapter02\tabline.txt}
Then, use the matches method to parse the text file and look for matches with the pattern
specified in the $strPattern. Notice that you have already associated the pattern with the
regular expression object in the $regex variable. Count the number of times you have a match.
The complete RegExTab.ps1 script is shown here.
Table 2-4 Escape Sequences
Character Description
ordinary characters Characters other than . $ ^ { [ ( | ) * + ? \ match themselves.
\a Matches a bell (alarm) \u0007.
\b Matches a backspace \u0008 if in a [] character class; in a regular
expression, \b is a word boundary.
\t Matches a tab \u0009.
\r Matches a carriage return \u000D.
\v Matches a vertical tab \u000B.
\f Matches a form feed \u000C.
\n Matches a new line \u000A.
\e Matches an escape \u001B.
\040 Matches an ASCII character as octal (up to three digits); numbers
with no leading zero are backreferences if they have only one digit
or if they correspond to a capturing group number. For example,
the character \040 represents a space.
\x20 Matches an ASCII character using hexadecimal representation
(exactly two digits).
\cC Matches an ASCII control character; for example, \cC is control-C.
\u0020 Matches a Unicode character using hexadecimal representation
(exactly four digits).
C02622791.fm Page 54 Saturday, December 8, 2007 6:32 PM

Chapter 2 Scripting Windows PowerShell 55
RegExTab.ps1
$strPattern = "\t"
$regex = [regex]$strPattern
$text = ${C:\Chapter02\tabline.txt}
$mc = $regex.matches($text)
$mc.count
Table 2-5 lists the character patterns that can be used with regular expressions for performing
advanced pattern matching.
Table 2-5 Character Patterns
Character Description
[character_group] Matches any character in the specified character group. For
example, to specify all vowels, use [aeiou]. To specify all
punctuation and decimal digit characters, use [\p{P}\d].
[^character_group] Matches any character not in the specified character group. For
example, to specify all consonants, use [^aeiou]. To specify
all characters except punctuation and decimal digit characters,
use [^\p{P}\d].
[firstCharacter-lastCharacter] Matches any character in a range of characters. For example, to
specify the range of decimal digits from '0' through '9', the
range of lowercase letters from 'a' through 'f', and the range of
uppercase letters from 'A' through 'F', use [0-9a-fA-F].
. Matches any character except \n. If modified by the Singleline
option, a period matches any character.
\p{name} Matches any character in the Unicode general category or
named block specified by name (for example, Ll, Nd, Z, IsGreek,
and IsBoxDrawing).
\P{name} Matches any character not in Unicode general category or
specified named block
\w Matches any word character. Equivalent to the Unicode general
categories [\p{Ll}\p{Lu}\p{Lt}\p{Lo}\p{Nd}\p{Pc}\p{Lm}]. If ECMA-
Script-compliant behavior is specified with the ECMAScript
option, \w is equivalent to [a-zA-Z_0-9].
\W Matches any nonword character. Equivalent to the Unicode gen-
eral categories [^\p{Ll}\p{Lu}\p{Lt}\p{Lo}\p{Nd}\p{Pc}\p{Lm}]. If
ECMAScript-compliant behavior is specified with the ECMAScript
option, \W is equivalent to [^a-zA-Z_0-9].
\s Matches any white-space character. Equivalent to the escape
sequences and Unicode general categories [\f\n\r\t\v\x85\p{Z}].
If ECMAScript-compliant behavior is specified with the ECMA-
Script option, \s is equivalent to [ \f\n\r\t\v].
C02622791.fm Page 55 Saturday, December 8, 2007 6:32 PM

56 Windows PowerShell Scripting Guide
Suppose you want to identify white space in a file. To do this, you can use the match pattern
\s which is listed in Table 2-5 as a character pattern. The ability to find white space in a text
file is quite useful, because for many items, the end of line separator is just white space. To
illustrate working with white space, examine the following RegWhiteSpace.ps1 script.
The first line of the script includes a line of text to use for testing against. The pattern comes
from Table 2-5 and is a simple \s, which tells the regular expression you want to match on
white space. Then use the $matches variable to hold the match object returned by the match
static method of the regex type accelerator.
After printing the results of the match, move to phase two, which is to replace, using the same
pattern. To do this, feed the pattern to the replace method along with the variable containing
the unadulterated text message. Go ahead and print the value of $strReplace that now contains
the modified object.
RegWhiteSpace.ps1
$strText = "a nice line of text. We will search for an expression"
$Pattern = "\s"
$matches = [regex]::match($strText, $pattern)
"Result of using the match method, we get the following:"
$matches
$strReplace = [regex]::replace($strText, $pattern, "_")
"Now we will replace, using the same pattern. We will use
an underscore to replace the space between words:"
$strReplace
Using Command-Line Arguments
Modifying a script at run time is an important time-saving, labor-saving, and flexibility-pre-
serving technique. In many companies, first-level support is given the ability to run scripts but
not to create scripts. The first-level support personnel do not have access to script editors,
nor are they expected to know how to modify a script at design time. The solution is to use
\S Matches any non-white-space character. Equivalent to the
escape sequences and Unicode general categories
[^\f\n\r\t\v\x85\p{Z}]. If ECMAScript-compliant behavior is
specified with the ECMAScript option, \S is equivalent to
[^ \f\n\r\t\v].
\d Matches any decimal digit. Equivalent to \p{Nd} for Unicode and
[0-9] for non-Unicode, ECMAScript behavior.
\D Matches any nondigit character. Equivalent to \P{Nd} for
Unicode and [^0-9] for non-Unicode, ECMAScript behavior.
Table 2-5 Character Patterns (continued)
Character Description
C02622791.fm Page 56 Saturday, December 8, 2007 6:32 PM
Chapter 2 Scripting Windows PowerShell 57
command-line arguments that modify the behavior of the script. In this manner, the scripts
become almost like custom-written utilities that are edited by the user, rather than compo-
nents that are modified via a series of switches and parameters. An example of this technique
is shown in the ArgsShare.ps1 script.
The ArgsShare.ps1 script defines a simple function that is used to perform the WMI query. It
takes a single argument from the command line when the script is run. This will determine
the kind of shares that are returned.
An if … else statement is used to determine if a command-line argument is present. If it is not
present, then a friendly help message is displayed that suggests running help for the script. In
reality, anything that is not a recognized as a valid argument will result in displaying the help
string. The help message suggests the common question mark switch.
Once it is determined a valid command-line argument is present, the switch statement will
assign the appropriate value to the $strShare variable, and will then call the WMI function.
This procedure allows a user to type in a simple noun such as: admin, print, file, ipc, or all and
generate the appropriate WMI query. However, WMI expects a valid share type integer. By
using switch in this way, you generate the appropriate WMI query based upon input received
from the command line. If an unexpected command-line argument is supplied, the default
switch is used; this simply prints the help message. You can change this to perform an all type
of query or some other default WMI query, if desired. You can even paste your default WMI
query into the if(!args) statement and allow the default query to run when there is no argu-
ment present. This mimics the behavior of some Windows command-line utilities. The
ArgsShare.ps1 script is shown here.
ArgsShare.ps1
Function FunWMI($strShare)
{
Get-WmiObject win32_share -Filter "type = $strShare"
}
if(!$args)
{ "you must supply an argument. Try ArgsShare.ps1 ?"}
ELSE
{
$strShare = $args
switch ($strShare)
{
"admin" { $strShare = 2147483648 ; funwmi($strShare) }
"print" { $strShare = 2147483649 ; funwmi($strShare) }
"file" { $strShare = 0 ; funwmi($strShare) }
"ipc" { $strShare = 2147483651 ; funwmi($strShare) }
"all" { Get-WmiObject win32_share }
Default { Write-Host "You must supply either: admin, print, file, ipc, or all `n
Example: > ArgsShare.ps1 admin" }
}
}
C02622791.fm Page 57 Saturday, December 8, 2007 6:32 PM
58 Windows PowerShell Scripting Guide
Summary
In this chapter, we first examined the scripting policy provided by Windows PowerShell. We
looked at the steps involved in configuring Windows PowerShell for scripting use, explored
the various flow control statements, and examined scripts that use flow control for advanced
scripting needs. We looked at implementing decision making in Windows PowerShell and
saw how encapsulated logic can vastly simplify network administration tasks by acting upon
routine events when they are presented to the script. Finally, we explored the use of regular
expressions to provide advanced pattern-matching capabilities to both scripts and cmdlets.
C02622791.fm Page 58 Saturday, December 8, 2007 6:32 PM

59
Chapter 3
Managing Logs
After completing this chapter, you will be able to:
■Read the event log.
■Peruse general log files.
■Manage and search the event log.
■Examine the WMI event logs.
■Write to event logs.
■Create custom event logs.
On the Companion Disc All the scripts used in this chapter are located on the CD that
accompanies this book in the \scripts\chapter03 folder.
The Windows world contains numerous log files. In the past, you were mostly limited to the
“big three” event logs: Application, System, and Security. This has significantly changed with
the introduction of Windows Vista and Windows Server 2008. With the new log style, we
now have many new logs, containing a wealth of information. For some network administra-
tors, reviewing the event logs has been somewhat akin to exercising—it is something you know
you need to do, but may not always able to find the time to complete.
Identifying the Event Logs
As I mentioned a moment ago, with the advent of Windows Vista and Windows Server 2008,
event logging has been brought into the twenty-first century. The big three logs have been
joined by new options. An easy way to identify the event logs that are turned on is to use the
Get-EventLog cmdlet.
GetEventLogs.ps1
Get-EventLog -List
After you run the GetEventLog script, you have a listing of the event logs on the computer. The
list provides an excellent overview of the maximum size of the event logs, the number of
entries of the logs, and the retention and overwriting policy. These are shown in the output
printed here:
Max(K) Retain OverflowAction Entries Name
------ ------ -------------- ------- ----
15,168 0 OverwriteAsNeeded 7,318 Application
C03622791.fm Page 59 Saturday, December 8, 2007 6:27 PM
60 Windows PowerShell Scripting Guide
15,168 0 OverwriteAsNeeded 0 DFS Replication
20,480 0 OverwriteAsNeeded 0 Hardware Events
512 7 OverwriteOlder 0 Internet Explorer
512 7 OverwriteOlder 0 Key Management Service
16,384 0 OverwriteAsNeeded 0 Microsoft Office Diagnostics
16,384 0 OverwriteAsNeeded 495 Microsoft Office Sessions
30,016 0 OverwriteAsNeeded 48,462 Security
15,168 0 OverwriteAsNeeded 23,109 System
15,360 0 OverwriteAsNeeded 1,919 Windows PowerShell
Reading the Event Logs
Once you have used Get-EventLog -list to identify the event logs that are installed on your
computer, you can now use Get-EventLog to read the event logs. In the most basic form, you
simply feed the name of the event log to the Get-EventLog cmdlet. This is shown in the follow-
ing GetApplicationEventLog.ps1 script.
GetApplicationEventLog.ps1
Get-EventLog application
When you run the command, the entire contents of the event log are dumped to the screen.
The GetApplicationEventLog.ps1 script is a single line. Saving it as a script makes it easy to
remember this command, and you can always add more commands to the script later. If we
were to run the command that is contained in the script from the Windows PowerShell
console, then we would receive output that is similar to what is shown here:
PS C:\> Get-EventLog application
Index Time Type Source EventID Message
----- ---- ---- ------ ------- -------
7705 May 25 08:42 Info Software Licensin... 8196 License Activation
Scheduler (SLUINotify.dll) was not able to...
7704 May 25 08:42 Info Software Licensin... 12288 The client has sent
an activation request to the key manageme...
7703 May 25 08:40 Info Outlook 26 Connection to Microsoft
Exchange has been restored.
7702 May 25 08:37 Info Software Licensin... 8196 License Activation
Scheduler (SLUINotify.dll) was not able to...
7701 May 25 08:37 Info Software Licensin... 12288 The client has sent
an activation request to the key manageme...
7700 May 25 08:36 Info Outlook 26 Connection to
Microsoft Exchange has been lost. Outlook will ...
Scrolling through such a long list of text inside the Windows PowerShell console may be a bit
problematic for some people. Indeed, for most users, the output is nearly useless…although
it is impressive to the casual observer. For the information to be useful, you need to find a way
to utilize the output. We will examine text-processing techniques later in this chapter.
C03622791.fm Page 60 Saturday, December 8, 2007 6:27 PM
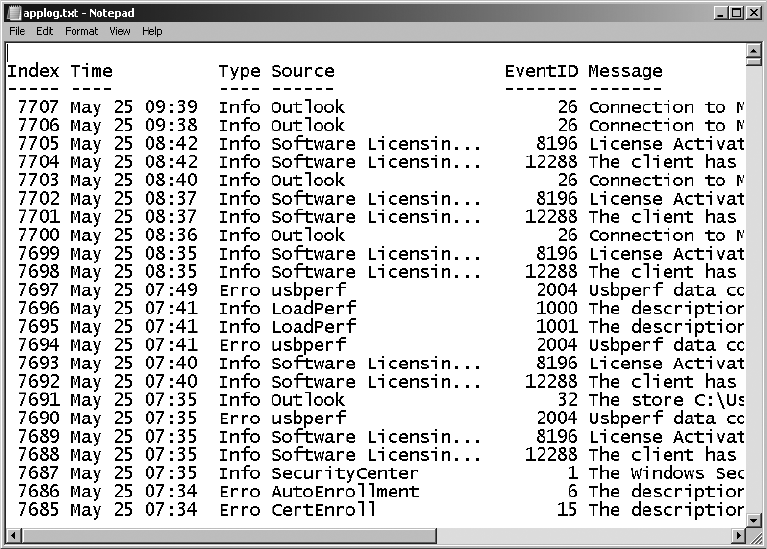
Chapter 3 Managing Logs 61
Exporting to Text
One way to deal with the vast numbers of event log entries scrolling down the screen is to
simply redirect the output to a text file. This is done in the WriteAppLogToText.ps1 script
shown here.
WriteAppLogToText.ps1
Get-EventLog application > c:\fso\applog.txt
The resulting text file is shown in Figure 3-1. Once you have the textual representation of the
event log in a text file, you can use the Find utility in Notepad to search and retrieve specific
items from the log file.
Figure 3-1 This is an exported application log as viewed in Notepad.exe.
While this may be a useful approach on a limited basis, a more interesting solution is to use
the text processing capabilities of the switch statement. This is shown in the following
ParseAppTextLog.ps1. The solution can be as simple as counting the types of entries in an
event log, such as in ParseAppTextLog.ps1, or it can be a more complex script that uses
regular expressions to perform a sophisticated search through the detail entries.
C03622791.fm Page 61 Saturday, December 8, 2007 6:27 PM
62 Windows PowerShell Scripting Guide
In ParseAppTextLog.ps1, you first initialize a variable named $strLog that is used to hold the
path to the event log you exported. Then, initialize the counter variables $e, $i, and $w. The
syntax is very compact, as shown here:
$e=$i=$w=0
After you have set all the counter variables to 0, go to the switch statement. You can use some
advanced features of switch here, such as feeding it a text file through the -file argument and
using a wildcard search by specifying the -wildcard argument. Switch will troll through the con-
tents of the text file and search for strings that contain the word error. If the search finds the
word error, it will increment the value of the $e counter by 1. The search also looks for strings
containing the word info and if it finds a match, this will also increment the $i counter by 1.
Finally, the search checks for matches to the word warn in any of its forms. If a match is found,
it will increment the variable $w by 1.
After reaching the end of the Applog.txt file, the script uses the Write-Output cmdlet to print
summary information. After the quotation marks are opened for Write-Output, the script
moves to the next line and prints the path contained in the $strLog variable. Finally, the script
printout lines up the output: errors, information, and warning messages.
ParseAppTextLog.ps1
$strLog = "c:\fso\applog.txt"
$e=$i=$w=0
switch -wildcard -file $strLog {
"*error*" { $e++ }
"*info*" { $i++ }
"*warn*" { $w++ }
}
Write-Output "
$strLog contains the following:
errors $e
warnings $w
information $i
"
Export to XML
One of the more intriguing ways to deal with the long lines of scrolling computer screen text
is to export the event log as an Extensible Markup Language (XML) file. To do this, you use
the Export-Clixml cmdlet. An example of this is shown in the WriteAppLogToXML.ps1 script.
To use this script, first retrieve an object representing the current application log. To do this,
use the Get-EventLog cmdlet and specify the name of the event log to retrieve. In this example,
use the application log. Pipeline the results of the Get-EventLog cmdlet to the Export-Clixml
cmdlet. Use the -path argument to the Export-Clixml cmdlet to specify a folder and file name
to hold the XML output. The folder must be present on your computer; if it doesn’t exist, then
an error such as the one shown in Figure 3-2 will be generated.
C03622791.fm Page 62 Saturday, December 8, 2007 6:27 PM
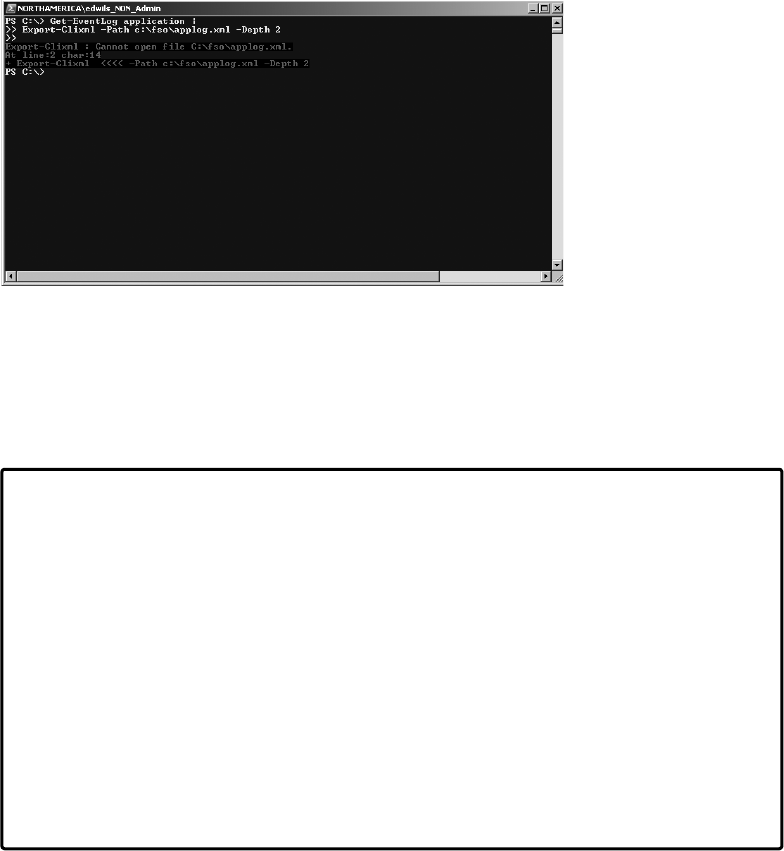
Chapter 3 Managing Logs 63
Figure 3-2 An error is generated when the target folder is not present.
Realize that the error message is a little misleading. The message states that it cannot open a
file, but you may think you are exporting XML, not opening a file. However, the error is a
result of a missing folder. If the folder isn’t present, the cmdlet can’t create and open it. Note,
however, that the output file doesn’t need to exist before running the cmdlet.
User Rights to Access Event Logs
One thing to keep in mind is that in both Windows Vista and Windows Server 2008,
users without elevated user credentials don’t have the ability to write to the root of the
drive. In that case, you need to have rights to an appropriate folder to dump event logs.
However, here’s a good thing to know: If you are simply accessing the application log,
you don’t need elevated permissions. When you use the Eventvwr.exe utility, you will be
prompted by User Account Control (UAC) because of the security log. Remember that
access to the security log requires the seSecurityPrivilege privilege to be granted to your
security token. This privilege is not granted to a normal user by default. It is, however,
granted to members of the administrator group, and will therefore require you to elevate
your script. The easy way to run scripts with elevated permissions is to create an elevated
Windows PowerShell prompt. Right-click the shortcut, choose Properties, select
Advanced, and check Run As Administrator.
WriteAppLogToXML.ps1
Get-EventLog application |
Export-Clixml -Path c:\fso\applog.xml -Depth 2
Once the event log has been exported to XML, you can open it in Microsoft Excel. To do this,
you just click Data, choose From Other Sources, and select From XML Data Import. It will
take a few minutes to perform the transformation, and you may see a message or two about
not finding a schema, but eventually you should end up with an Excel spreadsheet with all
your data in it. The column names are not the field names from the event log; rather they will
C03622791.fm Page 63 Saturday, December 8, 2007 6:27 PM
64 Windows PowerShell Scripting Guide
appear as n or ns:1 or a similar name. But if you examine the data in the columns, it should
be easy to match the names with the data stored in the log file. The important feature is the
ability to filter data by clicking the drop-down arrow at the top of each column. This is
shown in Figure 3-3.
Figure 3-3 Exporting the event log to Excel allows you to sort for—and view—critical messages.
Perusing General Log Files
If you are only interested in glancing at the event logs for an overview of the types of errors,
you can use the Get-EventLog cmdlet. This is shown in the GetNewestLogEntries.ps1 script.
This script relies upon using the -newest argument to retrieve only a specific number of event
log entries.
Tip When passing more than one argument to a cmdlet, I prefer to specify the name of all
parameters. Technically, you can use the default parameter without using its parameter name,
but then you still must specify the optional parameters. It can become confusing, so I just do
the following: type a hyphen, press Tab, press Enter, type another hyphen, and press Tab once
again and I am finished. This does not require much more time and it is a more robust method.
In the GetNewestLogEntries.ps1 script, use the $strLog variable to hold the string represent-
ing the event log you want to connect to. Also use the $intNew variable to hold the integer
that tells Get-EventLog how many event log entries to retrieve. Once you have initialized the
variables, use the Get-EventLog cmdlet to retrieve the last 50 entries from the application log.
By choosing only 50 entries, you strike a reasonable balance between speed and functionality;
that’s because in many cases, this technique is useful to get a quick overview of the types of
C03622791.fm Page 64 Saturday, December 8, 2007 6:27 PM

Chapter 3 Managing Logs 65
errors on a server or workstation. It is not very precise, however, as you don’t know exactly
how many entries were written in the previous day or even in the previous hour. As the script
is written, 50 entries may be those from a week, a day, or an hour or less, depending on server
use. The GetNewestLogEntries.ps1 script is shown here.
GetNewestLogEntries.ps1
$strLog = "application"
$intNew = 50
Get-EventLog -LogName $strLog -newest $intNew
Examining Multiple Logs
Looking through the latest entries in a particular log file may satisfy your curiosity, but as an
in-depth troubleshooting aid, it is rather weak. Instead, expand upon the idea of retrieving the
newest entries from the event log by modifying the GetNewestLogEntries.ps1 script to query
all the event logs.
Important One reason for abstracting variables from the crux of the cmdlet command
rather than hard-coding values is to promote code reuse.
In the GetNewestLogEntriesAllLogs.ps1, begin by creating a variable named $aryLogs and use
it to hold the event log objects that are returned by the Get-EventLog cmdlet when you use the
-list argument. Once you have an array of event log objects, feed the array into the foreach
statement. Use the same variable name for the individual event log that you used in the
GetNewestLogEntries.ps1 script. Use the $strLog variable to represent an individual event log
object from within the collection of eventlog objects that is stored in the $aryLogs variable.
Inside the foreach statement code block, use Write-Host to print a header for each log result.
Use the -foregroundcolor argument for the Write-Host cmdlet and specify the text to write in
green so it will stand out from the other lines on the screen. Use the grave accent (line contin-
uation or backtick) for the command to be continued on the next line. In this way, you can
align quotation marks and text output. If you don’t include an additional $ in front of the
$strLog.log command, you will receive output that gives only the name of the object, rather
than the value of the property you specified. Since you are working inside double quotes, you
don’t need to do anything with the rest of the text—including the $intNew variable, which will
reveal its value inside double quotation marks.
After closing out the quotation marks for the Write-Host cmdlet, use the Get-EventLog cmdlet
to retrieve every log by name using the Log property value from the $strLog object. Use the
newest argument and retrieve the number of event record objects indicated in the $intNew
variable. The GetNewestLogEntriesAllLogs.ps1 script is shown here.
C03622791.fm Page 65 Saturday, December 8, 2007 6:27 PM
66 Windows PowerShell Scripting Guide
GetNewestLogEntriesAllLogs.ps1
$aryLogs = Get-EventLog -List
$intNew = 5
foreach ($strLog in $aryLogs)
{
Write-Host -ForegroundColor green `
"
$($strLog.log) Log Newest $intNew entries
"
Get-EventLog -LogName $strLog.log -newest $intNew
}
Retrieving a Single Event Log Entry
If you need to view only the last entry written to the event log (for example, if an application
quit and you want to check the event log for additional information), use the Get-EventLog
cmdlet and specify the newest 1 log entry. This is illustrated in the GetSingleEventEntry.ps1
script, which has the advantage of simplicity. This script uses the standard -newest switch to
retrieve the most recently written entry. The GetSingleEventEntry.ps1script is shown here.
GetSingleEventEntry.ps1
Get-EventLog -LogName application -Newest 1
When the GetSingleEventEntry.ps1 script is run, the output is a single line that may provide
enough information to troubleshoot a problem. The output is shown here:
Index Time Type Source EventID Message
----- ---- ---- ------ ------- -------
7929 May 26 09:15 Erro usbperf 2004 Usbperf data collection
failed. Collect function called with
However, it is entirely likely that you’ll need more information than is available from the
default output. The easiest way to get the additional information is to simply pipeline
the result of your script into the Format-List cmdlet. You do not need to modify the
GetSingleEventEntry.ps1 script at all. Since it returns an object, you can pipeline that object
into another cmdlet as if the code has been typed at the Windows PowerShell prompt or as if
the new cmdlet has been added to your script. This is shown in Figure 3-4.
Perhaps a more interesting approach to retrieving the most recent event log entry relies on a
characteristic of the Get-EventLog cmdlet: The cmdlet retrieves a collection of event log
entries that is essentially a zero-based array. This means you can use the result from the
Get-EventLog cmdlet to retrieve a single entry as if it were an array by using the number in
square brackets. To do this, put smooth parentheses around the Get-EventLog system com-
mand as shown in the Get32ndEventLogEntry.ps1 that follows. Then, simply add [31] to the
end to retrieve the thirty-second entry from the event log file.
Get32ndEventLogEntry.ps1
(get-eventlog system)[31]
C03622791.fm Page 66 Saturday, December 8, 2007 6:27 PM
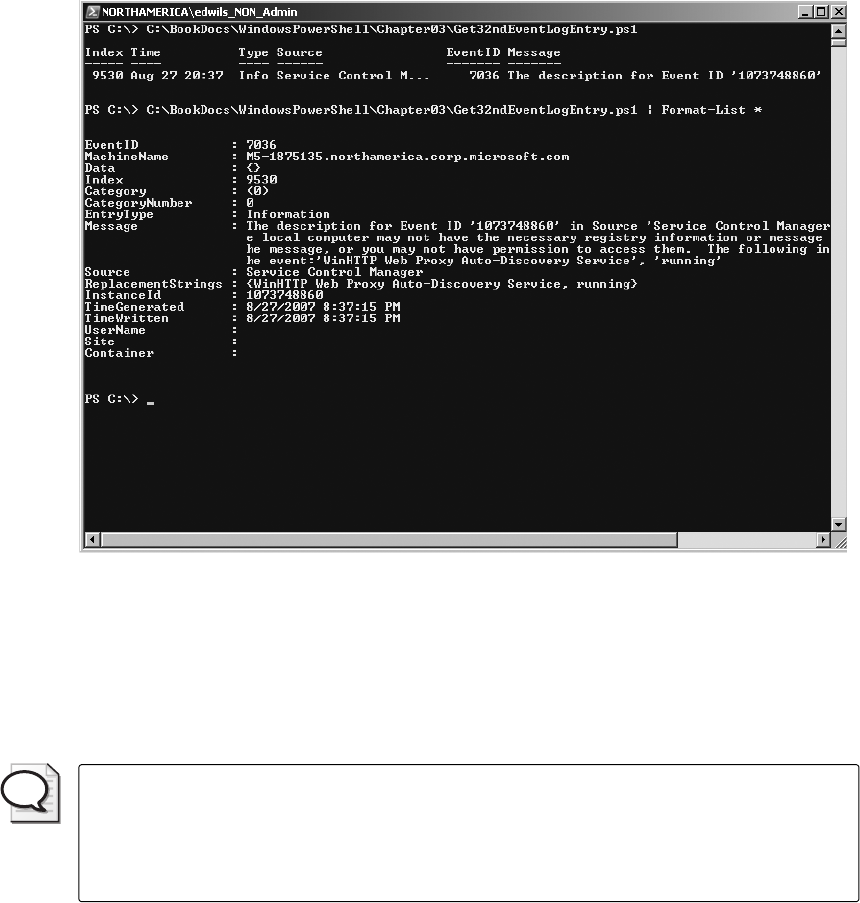
Chapter 3 Managing Logs 67
If you aren’t sure of the total number of entries in the event log file, you can use another Get-
EventLog cmdlet inside both the smooth parentheses and the square brackets. Get the length
of the application log, subtract 1 from it (because it is a zero-based array) and use this number
to retrieve the first entry in the event log. This is shown in the GetFirstEntry.ps1 script.
Figure 3-4 The result from a script can be piped into a cmdlet for further processing.
GetFirstEntry.ps1
(Get-EventLog application)[(Get-eventlog application).length-1] |
Format-list *
If you are only interested in the last event log entry, use [0] to retrieve the entry. This is
illustrated in the following GetLastEvent.ps1 script.
Tip When working with event logs, keep in mind that they are designed to wrap. This
means the most recent entry to the event log will always be in the [0] index position and
consequently, the first entry to the event log will have the highest index number. Because in
all likelihood you will not know the highest index number, you can use the length of the
event log as shown in the GetFirstEntry.ps1 script.
Once again, the GetFirstEntry.ps1 script relies upon the characteristic of event log objects,
namely, that they are returned by the Get-EventLog cmdlet as an indexed collection. This
allows you to retrieve the items from the collection by index number.
C03622791.fm Page 67 Saturday, December 8, 2007 6:27 PM
68 Windows PowerShell Scripting Guide
GetLastEvent.ps1
Write-Host "The following is the latest error in the log"
(Get-EventLog application)[0] | format-list *
To see all the information about a particular event log entry, pipeline the resulting event
record object to the Format-List cmdlet. The resulting output is shown here:
EventID : 1000
MachineName : M5-18.nwtraders.com
Data : {80, 23, 0, 0...}
Index : 8028
Category : (0)
CategoryNumber : 0
EntryType : Information
Message : The description for Event ID '1073742824' in Source 'LoadPerf'
cannot be found. The local computer may not have the necessary registry information
or message DLL files to display the message, or you may not have permission to
access them. The following information is part of the event:'WmiApRpl', 'WmiApRpl',
'16'
Source : LoadPerf
ReplacementStrings : {WmiApRpl, WmiApRpl, 16}
InstanceId : 1073742824
TimeGenerated : 5/27/2007 4:47:53 AM
TimeWritten : 5/27/2007 4:47:53 AM
UserName :
Site :
Container :
Searching the Event Log
Exporting event logs to text, to XML, or to some other format before searching the data
involves an extra step and is not as useful in the ebb and flow of production system operations
as reading an online log. For this reason, it’s important to brush up on your searching skills.
The easiest way to search the event log involves using the Get-EventLog cmdlet. But rather
than saving the data to an intermediate format, simply pipe the results into another cmdlet to
perform the search. You’ll soon learn several techniques for doing this. One of these tech-
niques is the SearchByEventID.ps1 script, shown here.
SearchByEventID.ps1
Get-EventLog -LogName system |
Where-Object { $_.eventID -eq 1129 }
To search the event log, you need to know the members of the eventlog entry object. This object
is actually named the System.Diagnostics.EventLogEntry object and is a standard Microsoft .NET
Framework class. You can use the Get-Member cmdlet to retrieve the properties of the
System.Diagnostics.EventLogEntry object. To do this, pipeline the object into the Get-Member
cmdlet. The command to do this follows, with the resulting properties shown in Table 3-1.
(Get-EventLog application)[0] | Get-Member -MemberType property
C03622791.fm Page 68 Saturday, December 8, 2007 6:27 PM

Chapter 3 Managing Logs 69
Filtering on Properties
To reduce the amount of information returned by the Get-EventLog cmdlet, you need to use
Where-Object to reduce the number of objects returned by the cmdlet. The main properties
from the event log that I often use for filtering entries are the Source, the Severity, the Event ID,
and the Message Text. This chapter has already examined filtering the event log based on
the Event ID and will now discuss the other options.
Selecting the Source
If you are having problems with Microsoft Outlook, then it makes sense to look for a source
named Outlook in the event log. To do this, use the FindUSBEvents.ps1 script to filter the
results based on the Source property. The Source property of an event log entry object is used
to record where the event came from. It can be from an application such as Outlook, from the
service controller, or from anything in between. In this script, you are looking for a source of
errors that has the letters usb in it so you can examine events related to USB devices.
To do this, use the Where-Object cmdlet. In the code block section of Where-Object, use the
$_ special variable. The $_ variable is used to refer to the current pipeline object. Look for
the Source property of the event log entry object and print the default record information for
a match with the source such as *usb*.. The FindUSBEvents.ps1 script is shown here.
Table 3-1 System.Diagnostics.EventLogEntry Properties
Name Definition
Category System.String Category {get;}
CategoryNumber System.Int16 CategoryNumber {get;}
Container System.ComponentModel.IContainer Container {get;}
Data System.Byte[] Data {get;}
EntryType System.Diagnostics.EventLogEntryType EntryType {get;}
Index System.Int32 Index {get;}
InstanceID System.Int64 InstanceId {get;}
MachineName System.String MachineName {get;}
Message System.String Message {get;}
ReplacementStrings System.String[] ReplacementStrings {get;}
Site System.ComponentModel.ISite Site {get;set;}
Source System.String Source {get;}
TimeGenerated System.DateTime TimeGenerated {get;}
TimeWritten System.DateTime TimeWritten {get;}
UserName System.String UserName {get;}
EventID System.Object EventID {get=$this.get_EventID() -band 0xFFFF;}
C03622791.fm Page 69 Saturday, December 8, 2007 6:27 PM
70 Windows PowerShell Scripting Guide
FindUSBEvents.ps1
Get-EventLog application |
Where-Object { $_.source -like "*usb*" }
Selecting the Severity
It is often useful to review only errors from the event log. In fact, in the “old days,” it was
common for a network administrator to right-click the event log, choose Filter, and then Select
Errors. There is some merit to this approach, but it also can mask some potential problems
that currently show up only as a warning or as an informational message in the event log.
With this in mind, consider the GetSystemLogErrors.ps1 script. Use the $strLog variable to
hold the name of the event log to examine. Then, use the $strType variable to contain the name
of the type of event log entry to retrieve. Next, use the Get-EventLog cmdlet to retrieve the
system event log and return a collection of event log entry objects. The resulting collection of
objects is then pipelined into the Where-Object cmdlet.
Once you get into the Where-Object cmdlet, use the $_ automatic variable inside the script
block and choose the EntryType property from the current pipelined object. Print the
default view of the object if the EntryType property is equal to the value contained in the
$strType variable, which in this case is error. The GetSystemLogErrors.ps1 script is shown here.
GetSystemLogErrors.ps1
$strLog ="system"
$strType="error"
Get-EventLog $strLog |
Where-Object { $_.entryType -eq $strType }
Selecting the Message
A powerful solution for searching the event log is to use regular expressions to parse the mes-
sage text portion of the event log. The Where-Object cmdlet has the ability to use regular
expressions when you specify the -match argument. Regular expressions are discussed in
Chapter 2, “Scripting Windows PowerShell”; for online help, use the following command:
get-help about_Regular_Expression
A positive feature of regular expressions is that there is no need to master the obscure dialect of
the regular expression language before using them. For example, in the GetHalfDuplex.ps1
script, you can draw on the flexibility of regular expressions to match the phrase half duplex in the
Message property of the event log entries. This is a very useful script because running it can show
you how many times your workstation or server connects at half duplex rather than full duplex.
When using the GetHalfDuplex.ps1 script, begin by assigning the string system to the variable
$strLog. The $strLog variable holds the name of the log to search. Next, use the variable
C03622791.fm Page 70 Saturday, December 8, 2007 6:27 PM
Chapter 3 Managing Logs 71
$strText to hold the text of your regular expression search. In this example, use the string half
duplex. After initializing the variables, use the Get-EventLog cmdlet and the -logname argu-
ment to confine the search to a particular event log.
Pipeline the resulting objects from the Get-EventLog cmdlet into the Where-Object cmdlet. In the
script block, use the automatic variable $_, which contains an event log entry object to retrieve
the Message property. Then, use the -match argument of the Where-Object cmdlet and look for the
string contained in the $strText variable. The GetHalfDuplex.psi script is shown here.
GetHalfDuplex.ps1
$strLog = "system"
$strText = "half duplex"
Get-EventLog -LogName $strLog |
Where-Object { $_.message -match $strText }
Managing the Event Log
There are many components to manage when working with event logs. Probably the most
important is the size of the log file. You want a log file that is large enough to contain the per-
tinent history of a particular system event, but not so large that it is cumbersome to work with.
Identifying the Sources
When working with event logs, it is important to know which log is being used for logging
purposes. To identify this information, you need to determine the registered sources for the
event log. An easy way to determine the sources for the event log is to use the WMI class
Win32_NtEventLogFile. This is exactly what we do in the GetLogSources.ps1 script. We first
define the $strLog variable, and assign the name of an event log to it. In the example, we use
the application log, but you could use any of the other log file names. We then use the Write-
Host cmdlet and print a header string. Next we use the Get-WmiObject cmdlet to query the
Win32_NtEventLogFile WMI class. We define a filter that will only retrieve sources that contain
the name of the event log in them. We conclude the script by using the ForEach-Object cmdlet
to print the source names. The completed GetLogSources.ps1 script is shown here.
GetLogSources.ps1
$strLog = "application"
Write-Host "The following sources are registered
for the $strLog log: `n"
Get-WmiObject win32_nteventlogfile -Filter "logfilename like '%$strLog%'" |
foreach { $_.sources }
Modifying the Event Log Settings
In the past, one of the frustrating things about managing Windows servers was difficulty
in configuring certain settings. It was possible to change the default size of an event log but
not to modify the retention policy using a script. By using the .NET Framework
C03622791.fm Page 71 Saturday, December 8, 2007 6:27 PM
72 Windows PowerShell Scripting Guide
System.Diagnostics.EventLog class, you now can set the retention policy on Windows Vista and
Windows Server 2008 computers.
If you can set the retention policy on your computers, you also can query the retention policy.
Using the GetEventLogRetentionPolicy.ps1 script, you can retrieve the maximum size of
the event log (in kilobytes), the minimum retention for the logs (in days), and the overflow
policy. There are three potential overflow policies that can be configured on Windows Vista
and on Windows Server 2008. These settings are listed here:
■DoNotOverwrite When the event log is full, existing entries are retained but new
entries are discarded.
■OverwriteAsNeeded When the event log is full, each new entry overwrites the oldest
entry.
■OverwriteOlder When the event log is full, new events overwrite events older than
specified by the MinimumRetentionDays property value. New events are discarded if the
event log is full and there are no events older than specified by the MinimumRetention-
Days property value.
The GetEventLogRetentionPolicy.ps1 script uses the New-Object cmdlet to create an instance
of the System.Diagnostics.EventLog class. The unusual part of this procedure is that you specify
an argument when creating this object—the name of the event log you want to work with.
Once you have an object to represent the application log, use the Write-Host cmdlet to print
the LogDisplayName property in the header to the output. Then, retrieve the MaximumKilo-
Bytes, MinimumRetentionDays, and the OverFlowAction properties. To avoid simply printing the
object name with the associated property name, you must prefix each variable with the $ sign
and enclose the name in smooth parentheses, as shown here:
$($objLog.maximumKiloBytes)
The action of the $ sign and smooth parentheses causes printing of the property value. To line
up the output and make the code easier to read, move the opening and closing quotation
marks for the Write-Host cmdlet to individual lines. There is no problem doing this with the
ending quotation mark, however, the opening quotation mark really belongs on the same line
as Write-Host. In this case, you must “cheat” a little and use the grave accent (backtick) at the
end of the Write-Host statement. This is the line continuation character that tells Windows
PowerShell that the command isn’t finished; by adding the grave accent, you’ll avoid an error
message. The full text of the GetEventLogRetentionPolicy.ps1 is shown here.
GetEventLogRetentionPolicy.ps1
$strLog = "application"
$objLog = New-Object system.diagnostics.eventlog("$strLog")
Write-Host `
"
The current settings on the $($objlog.logDisplayName) file are:
max kilobytes: $($objLog.maximumKiloBytes)
C03622791.fm Page 72 Saturday, December 8, 2007 6:27 PM
Chapter 3 Managing Logs 73
min retention days: $($objLog.minimumRetentionDays)
overflow policy: $($objLog.overFlowAction)
"
To change the event log retention policy, you will need to work with the System.Diagnostics.
EventLog class from the .NET Framework. You also need to specify which retention policy to
configure. When using the ModifyOverFlowPolicy method, two parameters are required: the
name of the policy and the number of days for retention. When specifying either DoNotOver-
write or OverwriteAsNeeded, the second parameter for the method call is ignored.
The SetEventLogRetentionPolicy.ps1 script uses the System.Diagnostics.EventLog .NET Frame-
work class to do two things. First, the script reports on the current settings for the specified
event log, and then it will change the retention policy to the value specified from the
command line as an argument to the script.
Best Practices By accepting command-line arguments in the SetEventLogRetention-
Policy.ps1 script, you gain a tremendous amount of flexibility. You can use this script like a
traditional script and hard-code the desired policy setting to line calling the ChangeLog-
Settings function. You can call the script from inside a traditional logon script, and pass the
desired argument from the script. You can use a traditional batch file to do the same thing.
You can even use the script like a command-line utility, and simply type the argument on the
same line as the one invoking the script.
When examining the SetEventLogRetentionPolicy.ps1 script, you will first notice the two
functions utilized by the script are listed at the top of the script. This is because of the way that
Windows PowerShell parses script files. Windows PowerShell uses a top-down approach,
similar to how a subway rider reads the newspaper—by starting at the top of the page and
reading down to the bottom. When you are past the two function definitions, you must initialize
several variables. The first one is $strLog, which holds the name of the event log you want
to modify. In this example, the string application is assigned so you can work with the
application log.
Important When running the SetEventLogRetentionPolicy.ps1 script, be sure to run it with
elevated rights or it will generate an error. You must have administrative rights to make
changes to the retention policy of event logs.
The next variable is $intRetention. This variable is set by default to 30, which means you
will set your event retention policy to 30 days. This value is only valid if you are using the
OverwriteOlder retention policy.
You will use the variable $objLog to hold the instance of the System.Diagnostics.EventLog class
and specify the name of the event log to work with. This code is shown here:
$objLog = New-Object system.diagnostics.eventlog("$strLog")
C03622791.fm Page 73 Saturday, December 8, 2007 6:27 PM
74 Windows PowerShell Scripting Guide
Once you have created and initialized your variables, you must call the DisplayLogSettings
function. This function will display the maximum size of the event log in kilobytes, the mini-
mum retention in days, and the overflow action. Use the Write-Host cmdlet to print the val-
ues. To align the quotation marks for the Write-Host cmdlet, use the line continuation
character (the grave accent or backtick) at the end of the line. This enables us to line up the
code and make it easy to read. In addition, note that to print the values of the variables—
instead of just the variable name or object name—you must surround the variable property
name combination with smooth parentheses and precede it with the $ character. An example
of this syntax is shown here:
overflow policy: $($objLog.overFlowAction)
Once you have printed the current event log settings, exit the function, and continue to the
next line of code in the script. If, however, there were no arguments supplied to the script
when it was run, then you call the ChangeLogSettings function with the help argument. This
will cause the script to print the detailed help usage and exit. This line of code is shown here:
if (!$args) { ChangeLogSettings("help") }
The ChangeLogSettings function is the major piece of code in the script. It uses the switch state-
ment and allows you to set the three separate event log retention policies with no need to
remember the obscure syntax of the System.Diagnostics.EventLog .NET Framework class. The
input parameter to the switch statement is named $profile and is used to match one of three
arguments: -donotow, -owasneeded, and -owolder. The value supplied as the argument determines
which log retention policy is applied. This portion of the code is shown here:
"doNotOW" { $objlog.modifyoverflowpolicy("DoNotOverwrite",-1) }
"owAsNeeded" { $objlog.modifyoverflowpolicy("OverwriteAsNeeded",-1) }
"owOlder" { $objlog.modifyoverflowpolicy("Overwriteolder",$intRetention) }
If any other value makes it through the switch, it is caught by default. The default action of the
switch statement is to print a detailed help message in red; this helps to ensure the message is
read. Once you read the help message, end the script by exiting. The complete text of the
SetEventLogRetentionPolicy.ps1 script is shown here.
SetEventLogRetentionPolicy.ps1
function DisplayLogSettings()
{
Write-Host `
"
The current settings on the $($objlog.LogDisplayName) file are:
max kilobytes: $($objLog.maximumKiloBYtes)
min retention days: $($objLog.minimumRetentionDays)
overflow policy: $($objLog.overFlowAction)
"
if (!$args) { ChangeLogSettings("help") }
}
function ChangeLogSettings($policy)
{ if($policy -ne "help")
C03622791.fm Page 74 Saturday, December 8, 2007 6:27 PM
Chapter 3 Managing Logs 75
{
Write-Host -ForegroundColor green "changing log policy ..."
}
switch($policy)
{
"doNotOW" { $objlog.modifyoverflowpolicy("DoNotOverwrite",-1) }
"owAsNeeded" { $objlog.modifyoverflowpolicy("OverwriteAsNeeded",-1) }
"owOlder" { $objlog.modifyoverflowpolicy("Overwriteolder",$intRetention) }
DEFAULT {
Write-Host -ForegroundColor red `
"
You need to specify either of the following: `n
doNotOW - do not overwrite logs
owAsNeeded - overwrite as needed
owOlder - overwrite events older than $intRetention days `n
Example: > SetEventLogRetentionPolicy.ps1 doNotOW
Sets retention policy to Do not Overwrite
Example: > SetEventLogRetentionPolicy.ps1 owAsNeeded
Sets retention policy to Overwrite as needed
Example: > SetEventLogRetentionPolicy.ps1 owOlder
Sets retention policy to Overwrite older than 30 days
Example: > SetEventLogRetentionPolicy.ps1 help
Displays this help message
"
exit }
}
}
$strLog = "application" #modify for different log
$intRetention = 30 #modify for different number of retention days
$objLog = New-Object system.diagnostics.eventlog("$strLog")
DisplayLogSettings($args)
ChangeLogSettings($args)
DisplayLogSettings($args)
Examining WMI Event Logs
Windows Management Instrumentation (WMI) is a critical component on Windows Vista
and Windows Server 2008 systems. To assist in managing and maintaining this critical
component, you need to adjust the WMI logging level. There are three logging levels that can
be set: none, errors only, and verbose. These are numbered logging level 0, 1, and 2, respectively.
These legacy logging levels are used for basic WMI tracing and also for older applications.
Newer WMI applications use Event Tracing for Windows (ETW) logs. The logging level can
be seen by using the following script.
GetWMILogLevel.ps1
Write-host "The wmi logging level is:
$((Get-WmiObject win32_wmisetting).logginglevel)"
C03622791.fm Page 75 Saturday, December 8, 2007 6:27 PM
76 Windows PowerShell Scripting Guide
Making Changes to the WMI Logging Level
If you want to make changes to the WMI logging level, you can use the SetWMILogLevel.ps1
script. It uses the same WMI class and the same WMI property, but it uses the put() method
to write changes back to WMI. Keep in mind that to run this script you must have elevated
permissions. If you don’t have elevated permissions, the script doesn’t generate an error, but
it doesn’t affect the desired change either—it simply runs to completion with no output, no
error, and no effect. The complete text of the SetWMILogLevel.ps1 script is shown here.
SetWMILogLevel.ps1
$wmiLog = Get-WmiObject win32_WMISetting
$wmiLog.logginglevel = 2
$wmiLog.put()
Using the Windows Event Command-Line Utility
In Windows Vista and Windows Server 2008, many of the old-fashioned ASCII-based text
logs have gone the way of the gopher server; they have been replaced by ETW trace logs.
These trace logs can be seen in the Event Viewer Microsoft Management Console (MMC) but
they are not visible using the normal utilities you use to work with event log files. This is
because they are not true event log files; instead, they are trace logs. Their presence in the
Event Viewer MMC is simply a result of convenient placement, not utilization requirements.
There is a command-line utility, the Windows Event Command-Line Utility (Wevtutil.exe),
that can be used to work with these trace logs. Simply manipulate the data returned by this
command within Windows PowerShell. In the CheckStatusWMILog.ps1 script, use the
Wevtutil program to retrieve information about the WMI diagnostic trace log.
When using the CheckStatusWMILog.ps1 script, assign the name of the WMI log as a string to
the $strLog variable. Then, use the switch statement with the -wildcard argument to search the
command output without having to specify an exact match. You can use wild characters, such as
* or ?, when looking for matches in the command output. Next, specify the text to switch on. To
obtain the text, run the Wevtutil command with the gl argument that tells the command to
retrieve a specific log. The name of the log is contained in the $strLog variable.
You can then move into the code block section of the switch statement; you are looking only
for a string that contains the word enabled in it. Once this is found, use the $switch automatic
variable to retrieve the current line in the output. The CheckStatusWMILog.ps1 script is
shown here.
CheckStatusWMILog.ps1
$strLog = "Microsoft-Windows-EventLog-WMIProvider/Debug"
switch -wildcard (wevtutil gl $strLog)
{
"*enabled*" { $switch.Current }
}
C03622791.fm Page 76 Saturday, December 8, 2007 6:27 PM

Chapter 3 Managing Logs 77
Writing to Event Logs
The ability to write to event logs using Windows PowerShell is an extremely useful capability.
Both the Windows Vista and the Windows Server 2008 event logs provide for the centralized
management of events that occur on the system. With the .NET Framework System.Diagnostics.
EventLog class, you can write to any of the classic event logs: System, Application, and Security.
But you can also create your own event logs or write to other event logs as well.
Creating a Source
Before you can write to an event log, you must first create a source. The source is used by the
event log to identify where the event originated. This provides a very useful property to use
in queries if you are writing to a shared source event log. Once the source is created, you create
a new instance of the event log object, associate the source with the event log, and then
specify the message. This is illustrated in the WriteToAppLog.ps1 script.
In the WriteToAppLog.ps1 script, first check to see if the source you want to use is already
defined and associated with an event log. To do this, use the not operator, which is the
exclamation point. The System.Diagnostics.EventLog class has the SourceExists method. Notice
that this method is static, and therefore you must precede the method name with two colons.
This syntax is shown here:
if(![system.diagnostics.eventlog]::sourceExists("ps_script"))
If the source does not exist, you must create the event source by using the CreateEventSource
method from the System.Diagnostics.EventLog class. When you use the CreateEventSource
method, you must specify both the source name and the name of the event log to which the
source will be attached.
Important An event source can be associated with only a single event log. If you want to
write to more than one event log, you must create more than one event source.
Once you have an event source defined, you can then use the New-Object cmdlet to create an
instance of the event log. In the WriteToAppLog.ps1 script, use the variable $strLog to hold
the event object that is returned by the New-Object cmdlet. When you call this cmdlet, you
must also specify the name of the log and the name of the computer on which the log resides.
In the example shown here, the application log is on a local computer. The use of a period (.)
is a commonly used shortcut to refer to the current computer.
Once there is a reference to the application log in the $strLog variable, use the Source property
to assign the ps_script source to the object. Then use the WriteEntry method to write the text
to the application log. Here, just write test from script. The WriteToAppLog.ps1 script is
shown here.
C03622791.fm Page 77 Saturday, December 8, 2007 6:27 PM
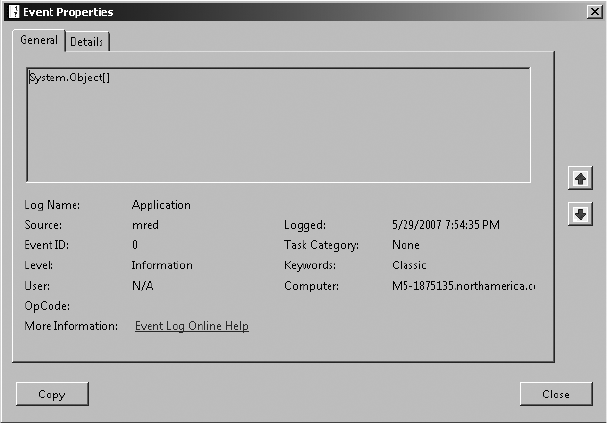
78 Windows PowerShell Scripting Guide
WriteToAppLog.ps1
if(![system.diagnostics.eventlog]::sourceExists("ps_script"))
{
$strLog = [system.diagnostics.eventlog]::CreateEventSource("ps_script","Application")
}
$strLog = new-object system.diagnostics.eventlog("application",".")
$strLog.source = "ps_script"
$strLog.writeEntry("test from script")
Putting Cmdlet Output into the Log
Writing something such as test from script is not terribly exciting. It does, however, have a lot
of potential. For example, you can use the WriteToAppLog.ps1 to record when a script runs
and whether or not it is successful. This is helpful from a troubleshooting perspective; for
example, when you are trying to find out why a particular configuration item is not available.
You can also use the write information to an event log methodology to store the results of a piece
of Windows PowerShell code. In the WriteProcessesToAppLog.ps1, you can write the results
of a WMI query to the application log. By documenting the processes that run on a computer
at a particular time, you have valuable information that is useful for performance tuning and
for security.
The WriteProcessesToAppLog.ps1 script is very similar to the WriteToAppLog.ps1 script,
with only a few differences. Keep in mind that Windows PowerShell works with objects and
pipelines objects, and writes object information in output. So when you attempt to store the
results of a WMI query into a variable to write to the event log, the results are less than
enthralling. This is shown in Figure 3-5.
Figure 3-5 Output from cmdlets must be converted to string for meaningful documentation.
C03622791.fm Page 78 Saturday, December 8, 2007 6:27 PM
Chapter 3 Managing Logs 79
The WriteProcessesToAppLog.ps1 script uses $strProcess to hold the information that is
returned from the Windows PowerShell cmdlets. First, use the Get-WmiObject cmdlet to
perform a basic WMI query of the class Win32_process. This results in a collection of objects that
contain all properties and methods of all processes on the computer. Reduce the amount of
information somewhat by using Select-Object and choosing only the name. The result is a
custom Windows PowerShell object. To transfer the information into a string, use the Out-String
cmdlet. Use the WriteEntry method from the System.Diagnostics.EventLog .NET Framework
class to feed the list process names contained in the $strProcess variable to the string. The
WriteProcessesToAppLog.ps1 script is shown here.
WriteProcessesToAppLog.ps1
$strProcess = get-WmiObject win32_process |
select-object name | out-string
if(![system.diagnostics.eventlog]::sourceExists("ps_script","."))
{
$strLog = [system.diagnostics.eventlog]::CreateEventSource("ps_script","Application")
}
$strLog = new-object system.diagnostics.eventlog("application",".")
$strLog.source = "ps_script"
$strLog.writeEntry($strProcess)
Creating Your Own Event Logs
One way to handle a plethora of events is to create your own event log. This makes the infor-
mation readily available and greatly simplifies the search task. To create a new event log, use
the CreateEventSource method from the System.Diagnostics.EventLog class and tell it both the
name of the source and the name of the log. An event source can only be associated with a sin-
gle event log, although a single event log can hold many sources, as you observed in the Get-
LogSources.ps1 script. To avoid errors, use the SourceExists method and give it the name of the
source you are looking for. If the source does not exist, create the source and event log at the
same time. However, if the source does exist, then write an error message and exit the script.
The CreateEventLog.ps1 script is shown here.
CreateEventLog.ps1
$strProcess = get-WmiObject win32_process |
select-object name | out-string
$source = "ps_script"
$log = "PS_Script_Log"
if(![system.diagnostics.eventlog]::sourceExists($source,"."))
{
[system.diagnostics.eventlog]::CreateEventSource($source,$log)
}
ELSE
{
write-host "$source is already registered with another event Log"
EXIT
}
C03622791.fm Page 79 Saturday, December 8, 2007 6:27 PM
80 Windows PowerShell Scripting Guide
$strLog = new-object system.diagnostics.eventlog($log,".")
$strLog.source = $source
$strLog.writeEntry($strProcess)
If the event source is already registered with a different event log and you want to keep the
same source name but use a custom event log, you will need to delete the event source. To do
this, you can use the DeleteEventSource method from the System.Diagnostics.EventLog class. In
the DeleteEventSource.ps1 script, use the SourceExists method to see if the event source is
already registered. If it is, then use the LogNameFromSourceName method to print the name of
the event log that the source is registered with. Once you do this, you’ll receive a message that
the event source will be deleted; you can delete the source. If the source is not already regis-
tered on the computer, you’ll receive a message indicating that the source is not registered.
The DeleteEventSource.ps1 script is shown here.
DeleteEventSource.ps1
$source = "ps_script"
if([system.diagnostics.eventlog]::sourceExists($source,"."))
{
$log = [system.diagnostics.eventlog]::LogNameFromSourceName($source,".")
Write-Host "$source is currently registered with $log log."
Write-Host -ForegroundColor red "$source will be deleted"
[system.diagnostics.eventlog]::DeleteEventSource($source)
}
ELSE
{ Write-Host -ForegroundColor green "$source is not regisered" }
Summary
This chapter explained how to work with event logs on Windows Vista or Windows Server
2008. We covered how to produce an inventory of the available event logs by using the Get-
EventLog cmdlet and how to use the same cmdlet to read the various event logs.
I also showed you how to search event logs. To do this, you had to pipeline the result from the
Get-Cmdlet cmdlet into a Where-Object cmdlet. This allowed you to filter the output of the
command to specific log entries. Finally, after you fine-tuned your search skills, you moved on
to writing to event logs and then to creating your own custom log files.
C03622791.fm Page 80 Saturday, December 8, 2007 6:27 PM

81
Chapter 4
Managing Services
After completing this chapter, you will be able to:
■Document the existing service configuration.
■Write to text files.
■Write to a centralized database.
■Produce a listing of required services.
■Produce a set of desired configurations.
■Generate a compliance report.
On the Companion Disc All the scripts used in this chapter are located on the CD that
accompanies this book in the \scripts\chapter04 folder.
Documenting the Existing Services
From both a performance perspective as well as a security perspective, it is important to know
which services are running on a server or workstation. There are two cmdlets you can use to
gather this information. The first is the Get-Service cmdlet and the second is the Get-WmiObject
cmdlet.
From a functionality standpoint, the Get-WmiObject cmdlet will use the Win32_Service class
and has more capabilities than the Get-Service cmdlet, including the ability to change the
configuration of a service. The added functionality comes with a price, however—it is a bit
more difficult to use.
When using the Get-Service cmdlet, the default behavior is to return a listing of all the services
on the computer; this output lists all services, both running and stopped. There are only three
properties returned: Status, Name, and DisplayName. The list is alphabetized by service name.
The default output from Get-Service is shown here in truncated form:
PS C:\> Get-Service
Status Name DisplayName
------ ---- -----------
Running AeLookupSvc Application Experience
Stopped ALG Application Layer Gateway Service
Running Appinfo Application Information
Stopped AppMgmt Application Management
Running AudioEndpointBu... Windows Audio Endpoint Builder
C04622791.fm Page 81 Saturday, December 8, 2007 6:33 PM
82 Windows PowerShell Scripting Guide
Running Audiosrv Windows Audio
Running BFE Base Filtering Engine
Running BITS Background Intelligent Transfer Ser...
If you want to know how many services are defined on your computer, you can use the Count-
Services.ps1 script. On my Windows Vista computer, there are 139 services registered—clearly
this becomes a management issue. Knowing the number of services registered on a computer
may be useful as a simple indicator of static state on that computer. It is, of course, not a total
indicator as you could uninstall one service and install a different one, and you would still
have 139 services, but as a quick indicator it is useful. To use the CountServices.ps1 script, call
the Get-Service cmdlet, surround the cmdlet name with parentheses, and then query the
Length property. The Length property is used to count the number of services on the computer.
The parentheses tell Windows PowerShell to execute the code inside the parentheses first and
then to perform the action on the outside of the parentheses; in this example, the action is to
perform a count. CountServices.ps1, a one-line script, is shown here.
CountServices.ps1
(Get-Service).length
Working with Running Services
Perhaps you are interested in knowing which services are running on your computer. You can
use the Get-Service cmdlet but you will need some additional power: the Where-Object
cmdlet. To obtain a list of the running services, you must first use the Get-Service cmdlet to
retrieve a listing of all services, then pipeline the resulting object into the Where-Object
cmdlet. Once you are in the Where-Object cmdlet, use a script block to examine the status of
each service in the object. Reference the current object by using the $_ automatic variable,
then use the -eq operator to see if the status is equal to the word running. If it is, receive it into
the new Windows PowerShell object that is created as a result of the Where-Object cmdlet.
Use smooth parentheses to surround the code on both sides of the pipeline object and query
the Length property. This is the information that is displayed in the console. The parentheses
force execution of the inside code before obtaining the length. The CountRunningSer-
vices.ps1 script is shown here.
CountRunningServices.ps1
(Get-Service | where-object { $_.status -eq "running" }).length
Keeping track of the number of running services is useful. As with a count of installed
services, it provides a quick “sanity check” to let you know if something has changed in your
system. This is an easier way to manage than glancing at your Services console; a sample is
shown in Figure 4-1. The Services console interface is quite busy and as a result, is not a good
tool to use for a fast overview of your service status. Windows PowerShell can provide a more
comprehensive overview of the service situation on your computer.
C04622791.fm Page 82 Saturday, December 8, 2007 6:33 PM
Chapter 4 Managing Services 83
Figure 4-1 The Services console provides information on the status of services.
Of course, the same caveat applies to using the count of defined services. It most certainly is
not a substitute for auditing, nor does it provide enhanced security. It is just a quick visual
indicator to see if there are any changes to your system.
Writing to a Text File
If checking the number of running services is useful for day-to-day management, document-
ing the names of the running services is even more important. There are several reasons for
writing the service information to a text file. Writing service information to a text file is an easy
process and doing so provides a convenient way to check your server state. In addition, writ-
ing service information to a text file is useful for documentation purposes, and it is a way to
maintain baseline configuration.
For example, suppose you want to optimize your server by turning off all unnecessary
services. It makes sense to write out the existing configuration before making massive changes
that may lead to disaster. By having a documented working configuration, you can vastly
simplify this task.
Writing running services to a text file is illustrated in the WriteRunningServicesToTxt.ps1
script. The text file created by the WriteRunningServicesToTxt.ps1 script is shown in Figure 4-2.
The automatic column headers make the file easy to read, but can present a problem when
used as input, unless you make certain allowances, such as skipping the header and separator
lines.
C04622791.fm Page 83 Saturday, December 8, 2007 6:33 PM
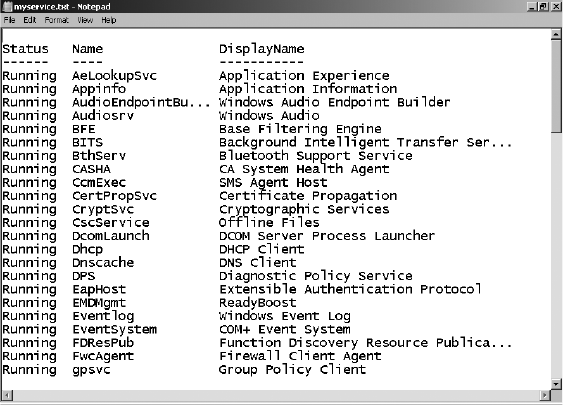
84 Windows PowerShell Scripting Guide
Figure 4-2 A listing of running services written to a text file.
To run the WriteRunningServicesToTxt.ps1 script, first create a variable named $strState and
assign the string running to it. Then create a variable named $strPath and assign a path to it on
your local system. In this example, use the path c:\fso\myservice.txt. Note that you must
include the prospective file name in the path. Then use the Get-Service cmdlet and pipeline
the resulting objects to the Where-Object cmdlet. The Where-Object cmdlet is used to filter
out every service that is not running. Once you have filtered the objects, pipeline the results to
the Out-File cmdlet, and feed the string contained in the $strPath variable to the -filepath
parameter. The completed WriteRunningServicesToTxt.ps1 script is shown here.
WriteRunningServicesToTxt.ps1
$strState = "running"
$strPath = "c:\fso\myservice.txt"
Get-Service |
Where-Object { $_.status -eq $strState } |
Out-File -FilePath $strPath
In addition to simply writing service information to a text file, you also can write the results to
a comma-separated value (.csv) formatted file. This actually becomes a useful solution that
opens many exciting doors. For example, Microsoft Excel loves .csv files, Microsoft Access
likes .csv files, and Microsoft Word can take a .csv file and easily turn it into a table. But those
are just Microsoft Office products; Microsoft SQL Server loves .csv files nearly as much as
Excel does.
I recommend that you visualize what your destination application will look like and who will
use the application. You can then use Windows PowerShell to configure the .csv file into the
best format for the end user. For example, if a spreadsheet is a simple two-column project with
the first column holding a service name, and the second column containing the status, it
makes sense to clean up your .csv file to eliminate any unnecessary properties before
C04622791.fm Page 84 Saturday, December 8, 2007 6:33 PM
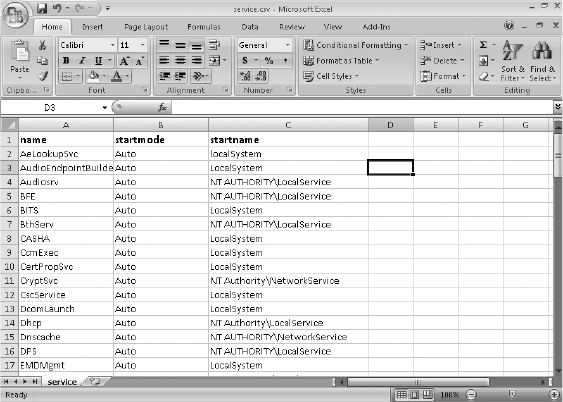
Chapter 4 Managing Services 85
importing data into Excel. You do this using the ExportRunningServices.ps1 script; the script
eliminates all properties except Name, StartMode, and StartName before exporting the data to
the .csv file. The resulting output is shown in Figure 4-3.
Figure 4-3 Cleanup of a .csv file is a trivial job when using ExportRunningServices.ps1 to export
data to Excel.
In the ExportRunningServices.ps1 script, you first create a variable named $strState and assign
the string running to it. Then, create a variable named $strPath to hold the string representing the
path to your exported file. Use the Get-WmiObject cmdlet to retrieve the Win32_Service WMI
class. Supply the string contained in the $strState variable to the -filter parameter of the Get-Wmi-
Object cmdlet. Pipeline the resulting object to the Select-Object cmdlet, and you can choose the
Name, StartMode, and StartName properties from the Win32_Service WMI class. Export the object
to a .csv file by using the Export-Csv cmdlet while supplying the string contained in the $strPath
variable to the -path parameter. The ExportRunningServices.ps1 script is shown here.
ExportRunningServices.ps1
$strState = "running"
$strPath = "C:\FSO\service.csv"
Get-WmiObject win32_service -Filter "state='$strState'" |
select-object name, startmode, startname |
Export-Csv -Path $strPath
Writing to a Database
By writing to a database, you have the opportunity to store the data in a more permanent
location. You can produce reports that provide pertinent information and that also are easy to
read and understand. Additionally, since they are designed for concurrent access, databases
are a more robust solution for storing data than are text files, which typically are limited to one
user at a time. By using the report writer in Access, the process of developing a report is as
C04622791.fm Page 85 Saturday, December 8, 2007 6:33 PM
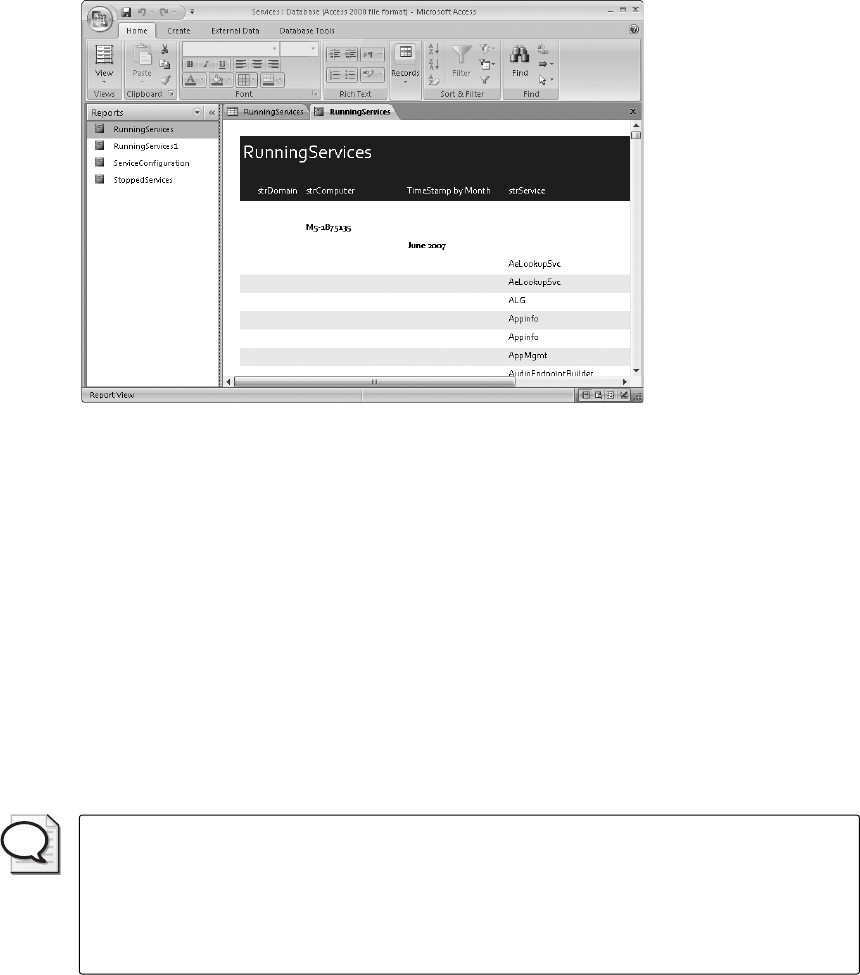
86 Windows PowerShell Scripting Guide
easy as clicking through a wizard. Once the file is written, the report has automatic grouping
and sorting, which makes it much easier for users to navigate through the information. Any
report generated through this process looks professional enough to share with upper manage-
ment. An example of a report generated using Access is shown in Figure 4-4.
Figure 4-4 The Access report wizard helps produce professional-looking reports.
The WriteRunningServicesToAccess.ps1 script demonstrates the process of writing to an
Access database by using Active X Data Objects (ADO) technology. On the first line of the
script, retrieve the current computer name by using the wshNetwork object. This is created by
using the New-Object cmdlet, specifying the -comobject parameter, and using the wscript.net-
work program ID. Enclose the entire statement in a set of smooth parentheses, and then
choose only the ComputerName property from the object. Assign this computer name to the
variable $strComputer.
On the second line of the script, use the same object and the same procedure, with one differ-
ence: choose the Domain property instead of the ComputerName property. The two lines of
code that work with the wshNetwork object are shown here:
$StrComputer = (New-Object -ComObject WScript.Network).computername
$StrDomain = (New-Object -ComObject WScript.Network).Domain
Tip To retrieve the ComputerName and the Domain properties from the wshNetwork object,
you create the same object twice; this procedure saves a bit of typing. Another way to
achieve the same objective is as follows:
$wshNetwork = (New-Object -ComObject WScript.Network)
$StrComputer = $wshNetwork.computername
$strDomain = $wshNetwork.domain
C04622791.fm Page 86 Saturday, December 8, 2007 6:33 PM

Chapter 4 Managing Services 87
On the third line of the script, define the WMI query through an unabashed WMI Query
Language (WQL) statement, “Select * from Win32_Service”. When you use this query with the
Get-WmiObject cmdlet, you retrieve every property from every service that is defined on the
computer. Hold this WQL statement in the variable $strQuery.
Note If WQL looks like SQL, there is a good reason; WQL is considered to be a subset of
Transact SQL.
Query the WMI service on the computer by calling the Get-WmiObject cmdlet and specifying
the -query parameter. The string contained in the $strWMIQuery variable is passed as the
query, and the resulting object is held in the $objService variable. The two lines of code that
define the WMI query and make the connection into WMI are shown here:
$strWMIQuery = "Select * from win32_Service"
$objservice = get-wmiobject -query $strWMIQuery
Once you make the connection into WMI and retrieve the information, use the Write-Host
cmdlet to print a status message. Use -foregroundcolor to print the message in yellow. The
string Obtaining service info … is hard-coded into the call for the Write-Host cmdlet. The Write-
Host line of code is shown here:
write-host -foreGroundColor yellow "Obtaining service info ..."
The Get-WmiObject cmdlet returns a collection of WMI objects, each representing a different
service that is defined on the computer. To deal with all the data, use the foreach statement
to walk through the collection. $strservice is a variable defined to hold each individual service
of the collection services stored within the $objService variable.
Open the script block for the ForEach cmdlet by using curly brackets. The first action inside
the ForEach code block is to use the if statement to determine if the service is running or
not. To do this, use the $Service.State property and check if it is equal to running. The ForEach
and opening code block for the if statement is shown here:
foreach ($service in $objService)
{
if ($service.state -eq "running")
{
If the service is running, enter another code block and store the Service.Name property in the
variable $strServiceName, then retrieve service state and assign it within the $strStatus variable.
The two WMI value assignments are shown here:
$strServiceName = $service.name
$strStatus = $service.State
On the next line create a variable named $adOpenStatic and assign the number 3 to it. This will be
used when opening the connection to the database. Create a variable named $adLockOptimistic
C04622791.fm Page 87 Saturday, December 8, 2007 6:33 PM
88 Windows PowerShell Scripting Guide
and set it equal to 3, as well. This value will also be used when opening the connection to the
database.
The complete path to the database is stored in the $strDB variable. This variable is used to
hold the name of the table to access. In this script, you will connect to the runningservices
table; this is the string you assign to the $strTable variable. The four variables that will be used
by ADO are shown here:
$adOpenStatic = 3
$adLockOptimistic = 3
$strDB = "c:\fso\services.mdb"
$strTable = "runningServices"
Now, with the preliminaries out of the way, you are ready to get into some nitty-gritty ADO.
You need to create two objects: a connection object and a recordset object. To create the
connection object, use the New-Object cmdlet, specify the -comobject parameter, and feed it the
program ID ADODB.Connection. Store the connection object in the $objConnection variable.
The next step is to create a recordset object. To do this, you also use the New-Object cmdlet and
the -comobject parameter. Use the ID ADODB.Recordset COM Object, and store the resulting
recordset object in the variable $objRecordSet. The code used to create the two ADODB objects
is shown here:
$objConnection = New-Object -ComObject ADODB.Connection
$objRecordSet = new-object -ComObject ADODB.Recordset
Now that you have the two ADODB objects created, you can “wire up” the ADO connection to
the services.mdb database. First, open the connection to the database. To do this, use the
connection object contained in the $objConnection variable. Use the open method from the con-
nection object and specify the Microsoft.Jet.OLEDB.4.0 provider. Separate the provider from
the data source; the data source is specified as the database with a path stored in the $strDB
variable. This line of code follows; notice that the command is a single logical line. The grave
accent inserted after the semicolon indicates line continuation, as shown here:
$objConnection.Open("Provider = Microsoft.Jet.OLEDB.4.0; `
Data Source= $strDB")
Once the connection to the database is open, use the open method from the recordset object.
To do this, first specify a SQL query, list the connection, and indicate how you want to open
the database. These parameters are shown in the following code:
$objRecordSet.Open("SELECT * FROM runningServices", `
$objConnection, $adOpenStatic, $adLockOptimistic)
Once the recordset is open, you can add new records to the recordset. To do this, use the addnew
method from the recordset object. To add data to the database, use the Fields.Item property
of the recordset object. The field names for the Access database can be found easily by looking
at the database table in Design view. This is shown in Figure 4-5.
C04622791.fm Page 88 Saturday, December 8, 2007 6:33 PM
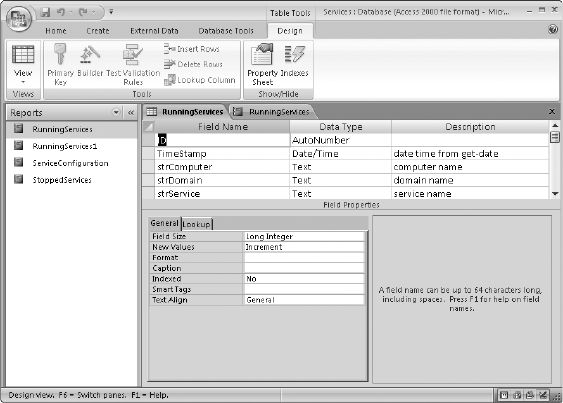
Chapter 4 Managing Services 89
Figure 4-5 Working in Design view of the database table makes it easy to locate the field names to
use in a Windows PowerShell script.
The field name in quotation marks comes from the database. Use the variables you assigned
previously. The exception is the use of the Get-Date cmdlet to retrieve the current date time
stamp. The code to do this is shown here:
$objRecordSet.AddNew()
$objRecordSet.Fields.item("TimeStamp") = Get-Date
$objRecordSet.Fields.item("strComputer") = $strComputer
$objRecordSet.Fields.item("strDomain") = $strDomain
$objRecordSet.Fields.item("strService") = $strServiceName
$objRecordSet.Fields.item("strStatus") = $strStatus
To write the data back to the database, use the update method from the recordset object. This
is shown here:
$objRecordSet.Update()
To provide feedback on progress in writing the data back to the database, use the Write-Host
cmdlet to print a series of forward slashes and back slashes (/\); each set of slashes represents
one service. This is shown in the following line of code. To indicate continuity, use the
-nonewline switch as shown here:
write-host -foregroundColor yellow "/\" -noNewLine
The output from this Write-Host cmdlet into the console may not be impressive, but it does
provide a good visual representation that the script is running and also indicates progress.
The completed output is shown in Figure 4-6.
C04622791.fm Page 89 Saturday, December 8, 2007 6:33 PM
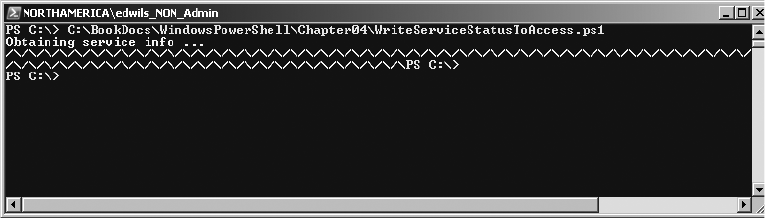
90 Windows PowerShell Scripting Guide
Figure 4-6 Visual indicators are helpful in showing progress to a user watching the console.
Once all the records have been written to the database, close out both the connection object
and the recordset object. These two lines of code are shown here:
$objRecordSet.Close()
$objConnection.Close()
The complete text of the WriteRunningServicesToAccess.ps1 script is shown here.
WriteRunningServicesToAccess.ps1
$StrComputer = (New-Object -ComObject WScript.Network).computername
$StrDomain = (New-Object -ComObject WScript.Network).Domain
$strWMIQuery = "Select * from win32_Service"
$objservice = get-wmiobject -query $strWMIQuery
write-host -foreGroundColor yellow "Obtaining service info ..."
foreach ($service in $objService)
{
if ($service.state -eq "running")
{
$strServiceName = $service.name
$strStatus = $service.State
$adOpenStatic = 3
$adLockOptimistic = 3
$strDB = "c:\fso\services.mdb"
$strTable = "runningServices"
$objConnection = New-Object -ComObject ADODB.Connection
$objRecordSet = new-object -ComObject ADODB.Recordset
$objConnection.Open("Provider = Microsoft.Jet.OLEDB.4.0; `
Data Source= $strDB")
$objRecordSet.Open("SELECT * FROM runningServices", `
$objConnection, $adOpenStatic, $adLockOptimistic)
$objRecordSet.AddNew()
$objRecordSet.Fields.item("TimeStamp") = Get-Date
$objRecordSet.Fields.item("strComputer") = $strComputer
$objRecordSet.Fields.item("strDomain") = $strDomain
$objRecordSet.Fields.item("strService") = $strServiceName
$objRecordSet.Fields.item("strStatus") = $strStatus
$objRecordSet.Update()
write-host -foregroundColor yellow "/\" -noNewLine
}
C04622791.fm Page 90 Saturday, December 8, 2007 6:33 PM
Chapter 4 Managing Services 91
}
$objRecordSet.Close()
$objConnection.Close()
Writing Stopped Services
Once you figure out how to write running services to an Access database, it is a trivial task
to modify the script to store stopped service information. The process involves adding an
additional table to the Access database, adding fields to the database, and creating an
appropriate report. Using Windows PowerShell scripting, all you have to do is make sure the
fields line up with the database.
Since the bulk of the work has already been done in the WriteRunningServicesToAccess.ps1
script, you can begin with it as the baseline and as your template. First, you need to change
the if statement, so that rather than looking for running services, it instead looks for stopped
services. The modified line of code is shown here:
if ($service.state -eq "stopped")
Once you have modified the if filter, change the name of the database table stored in the
$strTable variable to the StoppedServices table. You’ll also need to modify the access query
that is hard-coded in the open method call on the recordset object. The modified open method
call is shown here:
$objRecordSet.Open("SELECT * FROM StoppedServices", `
$objConnection, $adOpenStatic, $adLockOptimistic)
Because of the design of the database and because you’ll be collecting the same information,
there are no changes as you write to the database. You use the same field names for the
StoppedServices table that you used for the RunningServices table in the services database. The
completed WriteStoppedServicesToAccess.ps1 is shown here.
WriteStoppedServicesToAccess.ps1
$StrComputer = (New-Object -ComObject WScript.Network).computername
$StrDomain = (New-Object -ComObject WScript.Network).Domain
$strWMIQuery = "Select * from win32_Service"
$objservice = get-wmiobject -query $strWMIQuery
write-host -foreGroundColor yellow "Obtaining service info ..."
foreach ($service in $objService)
{
if ($service.state -eq "stopped")
{
$strServiceName = $service.name
$strStatus = $service.State
$adOpenStatic = 3
$adLockOptimistic = 3
$strDB = "c:\fso\services.mdb"
C04622791.fm Page 91 Saturday, December 8, 2007 6:33 PM

92 Windows PowerShell Scripting Guide
$strTable = "StoppedServices"
$objConnection = New-Object -ComObject ADODB.Connection
$objRecordSet = new-object -ComObject ADODB.Recordset
$objConnection.Open("Provider = Microsoft.Jet.OLEDB.4.0; `
Data Source= $strDB")
$objRecordSet.Open("SELECT * FROM StoppedServices", `
$objConnection, $adOpenStatic, $adLockOptimistic)
$objRecordSet.AddNew()
$objRecordSet.Fields.item("TimeStamp") = Get-Date
$objRecordSet.Fields.item("strComputer") = $strComputer
$objRecordSet.Fields.item("strDomain") = $strDomain
$objRecordSet.Fields.item("strService") = $strServiceName
$objRecordSet.Fields.item("strStatus") = $strStatus
$objRecordSet.Update()
write-host -foregroundColor yellow "/\" -noNewLine
}
}
$objRecordSet.Close()
$objConnection.Close()
Writing Service Configuration
The WriteServiceConfigToAccess.ps1 script has a few changes to the structure of the script,
and a few supplemental fields. The first change is to remove the if filter. This is because you
want the configuration of all services, whether they are running or not. This requires deleting
not only the line of code with the if statement, but also deleting two curly brackets as well.
Once you delete the if filter, you need to add some new variables and collect new information
from the WMI service object. Use the variable $strStartName to hold the account name that
the service will start with. It is contained in the WMI property StartName on the Win32_Service
class. This new line of code is shown here:
$strStartName = $service.StartName
The next piece of information to collect is the start mode of the service. The StartMode
property reports how the service is configured to startup. The values that may be reported by
the WMI StartMode property of the Win32_Service class are listed in Table 4-1.
Table 4-1 Service Start Modes
Start Mode Meaning
"Boot" Device driver started by operating system loader.
"System" Device driver started by operating system initialization process.
"Auto" Service started automatically by service control manager (SCM)
during system startup.
"Manual" Service started by SCM when a process calls StartService method.
"Disabled" Service cannot be started.
C04622791.fm Page 92 Saturday, December 8, 2007 6:33 PM

Chapter 4 Managing Services 93
The new line of code that collects the startmode information is shown here:
$strStartMode = $service.StartMode
The next two pieces of information to collect involve whether or not you can stop or pause a
service.
Pausing Services
Although it is not unusual to be able to stop a service, there are several processes that, if
stopped, would lead to system instability. Therefore, those services do not accept a stop
command. However, it is very unusual that a service will accept a pause command. In
fact, on my Windows Vista laptop, only eight services report the ability to accept a pause.
A script that will retrieve this information is shown here.
AcceptPause.ps1
Get-WmiObject -Class win32_service |
Where-Object { $_.acceptpause -eq "true" } |
Select-Object name
The following services will accept a pause command on my Windows Vista Professional
laptop. (Note that your results may be different depending on which options you have
selected and which version of Windows Vista you have installed.)
name
----
LanmanServer
LanmanWorkstation
Netlogon
seclogon
stisvc
TapiSrv
WerSvc
Winmgmt
The two properties that tell you whether or not a service can be stopped or paused are AcceptPause
and AcceptStop of the Win32_Service WMI class. The preceding script example uses the AcceptPause
property to determine what services are allowed to be paused. Since the properties return
a Boolean (true or false) value, these variables are named $blnAcceptPause and $blnAcceptStop. The
code that collects these values and stores them in the appropriate variables is shown here:
$blnAcceptPause = $service.AcceptPause
$blnAcceptStop = $service.AcceptStop
To write these values to the database is a fairly easy task. You need to follow the pattern
previously established for writing to the database. Keep the variable names and the database
field names similar to avoid confusion. The following code is an example:
$objRecordSet.Fields.item("strStartMode") = $strStartMode
$objRecordSet.Fields.item("blnAcceptPause") = $blnAcceptPause
$objRecordSet.Fields.item("blnAcceptStop") = $blnAcceptStop
C04622791.fm Page 93 Saturday, December 8, 2007 6:33 PM
94 Windows PowerShell Scripting Guide
After having made the changes to the script, you end up with the code for the WriteService-
ConfigToAccess.ps1 script. This completed script is shown here.
WriteServiceConfigToAccess.ps1
$StrComputer = (New-Object -ComObject WScript.Network).computername
$StrDomain = (New-Object -ComObject WScript.Network).Domain
$strWMIQuery = "Select * from win32_Service"
$objservice = get-wmiobject -query $strWMIQuery
write-host -foreGroundColor yellow "Obtaining service info ..."
foreach ($service in $objService)
{
$strServiceName = $service.name
$strStartName = $service.StartName
$strStartMode = $service.StartMode
$blnAcceptPause = $service.AcceptPause
$blnAcceptStop = $service.AcceptStop
$adOpenStatic = 3
$adLockOptimistic = 3
$strDB = "c:\fso\services.mdb"
$strTable = "ServiceConfiguration"
$strAccessQuery = "Select * from $strTable"
$objConnection = New-Object -ComObject ADODB.Connection
$objRecordSet = new-object -ComObject ADODB.Recordset
$objConnection.Open("Provider = Microsoft.Jet.OLEDB.4.0; `
Data Source= $strDB")
$objRecordSet.Open($strAccessQuery, `
$objConnection, $adOpenStatic, $adLockOptimistic)
$objRecordSet.AddNew()
$objRecordSet.Fields.item("TimeStamp") = Get-Date
$objRecordSet.Fields.item("strComputer") = $strComputer
$objRecordSet.Fields.item("strDomain") = $strDomain
$objRecordSet.Fields.item("strService") = $strServiceName
$objRecordSet.Fields.item("strStartName") = $strStartName
$objRecordSet.Fields.item("strStartMode") = $strStartMode
$objRecordSet.Fields.item("blnAcceptPause") = $blnAcceptPause
$objRecordSet.Fields.item("blnAcceptStop") = $blnAcceptStop
$objRecordSet.Update()
write-host -foregroundColor yellow "/\" -noNewLine
}
$objRecordSet.Close()
$objConnection.Close()
Setting the Service Configuration
To set the service configuration on a server, you need to know which services should be
running, whether the services are set to automatic or manual, and whether the services are
stopped and disabled. While this information is routinely documented in the Microsoft
Resource Kits, TechNet, and various white papers, there is also quite a bit of information you
C04622791.fm Page 94 Saturday, December 8, 2007 6:33 PM
Chapter 4 Managing Services 95
can obtain through Windows PowerShell to help in your decision-making. In the GetSpecific-
Service.ps1 script, you can print the information you receive from Get-Service about a specific
service. To do this, first assign the name of the service you are interested in to the variable
$strService. Then use the Get-Service cmdlet, specify the -name parameter, and use the value
contained in the $strService variable to supply the name. Pipeline the results to the Format-List
cmdlet and use the * wildcard character to choose all the properties from the class. The
GetSpecificService.ps1 script is shown.
GetSpecificService.ps1
$strService = "bits"
Get-Service -Name $strService |
Format-list *
When you run the GetSpecificService.ps1 script, you get some very useful information that
may help you set your desired configuration. The output from querying the bits service is
shown here:
Name : BITS
CanPauseAndContinue : False
CanShutdown : True
CanStop : True
DisplayName : Background Intelligent Transfer Service
DependentServices : {}
MachineName : .
ServiceName : BITS
ServicesDependedOn : {EventSystem, RpcSs}
ServiceHandle :
Status : Running
ServiceType : Win32ShareProcess
Site :
Container :
From a management perspective, four pieces of information are vital. These vital properties
are listed here:
■CanPauseAndContinue
■CanStop
■DependentServices
■ServicesDependedOn
It makes no sense to try stopping a service if CanStop is reporting false, as it will cause the
script to be delayed while it attempts to perform an illegal action on the service—or worse—it
could hang up the script. Keeping in mind both security and stability, you don’t want to stop
a service that may cause problems for other dependent services. While dependencies are eas-
ily spotted by looking at the services console, as shown in Figure 4-7, CanStop is much more
difficult to determine.
C04622791.fm Page 95 Saturday, December 8, 2007 6:33 PM
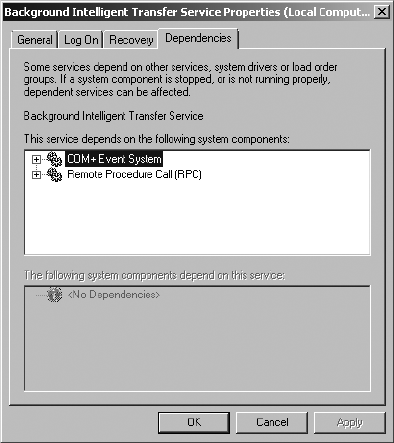
96 Windows PowerShell Scripting Guide
Figure 4-7 Before stopping a service, check for dependencies.
You will learn more about incorporating this information into scripts when examining
stopping services in the next section.
The GetSpecificService.ps1 script is easy to modify so it can query multiple services. For
example, when you run GetSpecificService.ps1 and check for the bits service, you find that
there are two service dependencies: EventSystem and RpcSs service. Let’s examine these
service dependencies in more detail.
In the GetMultipleServices.ps1, use the variable $aryService to hold the name of the two ser-
vices identified in the previous GetSpecificService.ps1 script. When you assign multiple val-
ues to a single variable, $aryService, Windows PowerShell automatically creates an array. To
create the array, use foreach and $strService as enumerators. Open the script block with the
curly brackets, use Write-Host to print the name of the service, and use the remainder of the
GetSpecificService.ps1 code. Use the Get-Service cmdlet -name argument, and have it retrieve
the service with a name matching the one contained in the $strService variable. To retrieve all
the properties of the service, pipeline the output into the Format-List cmdlet and use the wild-
card * to specify that you want all the properties and associated values. The GetMultipleSer-
vices.ps1 script is shown here.
GetMultipleServices.ps1
$aryService = "EventSystem","RpcSs"
foreach($strService in $aryService)
{
Write-Host "Service Info for: $strService"
Get-Service -Name $strService |
Format-list *
}
C04622791.fm Page 96 Saturday, December 8, 2007 6:33 PM
Chapter 4 Managing Services 97
Accepting Command-Line Arguments
Retrieving detailed service information about multiple services from inside Windows Power-
Shell is very useful. This is doubly so when you are in a situation where you do not have access
to the Internet, Microsoft TechNet, and the Microsoft Developer Network (MSDN) Web sites.
By using the capabilities of Windows PowerShell you can usually garner enough information
to enable you to make informed decisions about your server infrastructure.
Suggestion: For enhanced usability of the GetMultipleServices.ps1, just make a slight change
to the script. Instead of hard-coding the names of the services to query and assigning them
to the $aryService variable, instead use the automatic variable $args and assign it to the $ary-
Service variable. This allows you to make a single change and add the ability to control the way
the script executes at runtime instead of at design time.
To add the ability to retrieve command-line arguments for the script, modify the first line.
Instead of typing an array of service names, change the code as shown here:
$aryService = $args
When you run the ArgGetMultipleServices.ps1 script, pass its service names at the command
line. An example is shown here:
C:\fso \ArgGetMultipleServices.ps1 bits lanmanserver
The preceding command line assumes the script is stored in a folder named fso off the root of
the C drive. You supply two command-line arguments to the script to create the array of ser-
vices. The two service names are bits and lanmanserver. No comma is required to separate the
arguments. The full ArgGetMultipleServices.ps1 script follows.
ArgGetMultipleServices.ps1
$aryService = $args
foreach($strService in $aryService)
{
Write-Host "Service Info for: $strService"
Get-Service -Name $strService |
Format-list *
}
Stopping Services
There are two ways to stop services in Windows PowerShell. The two ways are listed here,
using the bits service as an example:
■Stop-Service -name bits
■(Get-WmiObject -class win32_service -filter “name = ‘bits’”).stopService()
C04622791.fm Page 97 Saturday, December 8, 2007 6:33 PM
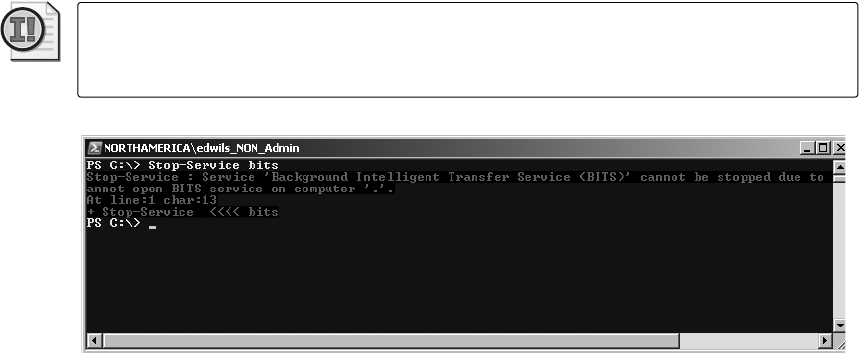
98 Windows PowerShell Scripting Guide
As you can see, the easier way to stop a service is to use the Stop-Service cmdlet. The Stop-
Service.ps1 script uses the Stop-Service cmdlet to stop the bits service on your computer.
There are also two ways to stop a service using the Stop-Service cmdlet: by name or by
displayname. The StopService.ps1 script shows how to stop the bits service by using its
service name: bits. If you use the DisplayName property to stop the bits service, you will type
Background Intelligent Transfer Service. In general, if you know the service name, use it, as
you will type less if you use the service name rather than the DisplayName property to control
the service. The $strService variable is used to hold the name of the service you want to stop.
Once you know the name of the service, then you use the Stop-Service cmdlet to stop the
service. Here, use the -name parameter and supply it the name of the service to stop that is
contained in the $strService variable. The StopService.ps1 script is shown here.
StopService.ps1
$strService = "bits"
Stop-Service -Name $strService
Important When using the Stop-Service cmdlet to stop a service, be sure that the script
is running with administrative rights, or it will fail. The error shown in Figure 4-8 will be
generated if administrative rights are not utilized.
Figure 4-8 You must have administrative rights when starting, stopping, or modifying a service
using Windows PowerShell.
If you want to stop several services, you can easily modify the StopService.ps1 script to
accommodate your needs. The change to the script entails creating an array of service names
and using the foreach statement to iterate through the array. The remainder of the script will
remain essentially the same.
In the StopMultipleServices.ps1 script, first create an array of service names. This is done in
the first line of the script as you assign the name of several services to the variable $aryServices.
Then, use the foreach statement to iterate through the array of services. Use the $strService
variable as the enumerator through the array. Next, use the Write-Host cmdlet to print a
message to the user that you are stopping a particular service. Once you have done this, call
the Stop-Service cmdlet and pass it the name of the service to stop. The StopMultiple-
Services.ps1 script is shown here.
C04622791.fm Page 98 Saturday, December 8, 2007 6:33 PM
Chapter 4 Managing Services 99
StopMultipleServices.ps1
$aryServices = "bits", "wuauserv", "CcmExec"
foreach ($strService in $aryServices)
{
Write-Host "Stopping $strService ..."
Stop-Service -Name $strService
}
Performing a Graceful Stop
To repeat: It makes sense to query the AcceptStop property of the Win32_Service WMI class
before attempting to stop the service.
Troubleshooting If you are having a problem with your script using the Get-WmiObject
cmdlet and the Win32_Service class, remember that the property names are not the same as
those used by the Get-Service cmdlet. As an example of this, Get-Service uses CanStop for
the property that indicates if a service is stoppable. The Get-WmiObject cmdlet and
Win32_Service WMI class use the property AcceptStop to indicate the same thing.
Not only does this make the script run faster and more efficiently, but it can also assist in
script-hang prevention. Using the CheckServiceThenStop.ps1 script, first create a variable
named $strService that is used to hold the name of the service to stop. This can be hard-coded
or easily modified to accept command-line input. The easiest way to accomplish this is to
modify $strService to use $args. The name of the computer that has the service you want to
stop is stored in the variable $strComputer. In this example, use the name localhost to refer to
the local computer. Use the $strClass variable to hold the name of the WMI class to query;
Win32_Service in this example.
Supply three arguments to the Get-WmiObject cmdlet: the class, the computer, and the filter.
The -class and -computer arguments simply read the values stored in the $strService and $str-
Computer variables respectively. The -filter argument takes the place of a where clause from a
WQL query. By using the -filter argument, the code is a bit cleaner than if you were to write the
equivalent WQL query (which would look something like this):
"Select * from win32_service where name = 'bits'"
While the syntax is not bad, it involves a lot more typing than using the Windows PowerShell
statement.
Tip When using the -filter argument of the Get-WmiObject cmdlet, remember that you do
not need the word where in the filter. In fact, if you do include the word where in the filter, it
will cause the filter to fail. So while it is the equivalent of WQL where clause, it does not
include the word where in it. Remembering this will save you typing time and also will save
you troubleshooting time as well.
C04622791.fm Page 99 Saturday, December 8, 2007 6:33 PM
100 Windows PowerShell Scripting Guide
Use the if statement to determine if you will attempt to stop the service or not. Because the
AcceptStop property is a Boolean (true/false) value, you can simplify your syntax and use the
if (condition is true) format. This format is much easier than typing a command such as this:
If ( $objWMIService.acceptStop -eq "true")
The code is exactly the same, but you save a little bit of typing and gain the benefit of more
readable code in the process. The actual if statement is shown here:
if( $objWMIService.Acceptstop )
After this step, open a set of curly brackets and use the Write-Host cmdlet to print a message
indicating your intention to attempt to stop the service specified in the $strService variable.
Once you have done this, call the stopService method from the Win32_Service class and
attempt to stop the specified service. The variable $rtn is used to capture completion status
information from the method call. A 0 result indicates no errors, whereas any other number
merits investigation.
To examine the return codes from the stopService method call, use the switch statement. If the
ReturnValue property is equal to 0, then use Write-Host to print a message that there were no
errors and that the method completed successfully. Otherwise, evaluate the error code for the
more common errors and print the appropriate message. If an error occurs that you did not
anticipate, use the default switch to print the exact error number. The switch statement is
shown here:
Switch ($rtn.returnvalue)
{
0 { Write-Host -foregroundcolor green "$strService stopped" }
2 { Write-Host -foregroundcolor red "$strService service reports" `
" access denied" }
5 { Write-Host -ForegroundColor red "$strService service cannot" `
" accept control at this time" }
10 { Write-Host -ForegroundColor red "$strService service is already" `
" stopped" }
DEFAULT { Write-Host -ForegroundColor red "$strService service reports" `
" ERROR $($rtn.returnValue)" }
}
If, however, the service will not accept a stop command, use an else statement and the Write-
Host cmdlet to print the name of the service, along with a statement saying that the service
will not accept a stop request from the service controller. This should only occur if the
service reports that it is not configured to accept a stop command. Keep in mind that there can
be a situation where the service is configured to accept a stop request, but it simply is not
accepting a stop request at the time. This might occur when the service controller is busy
with another service. This case should result in a return error code of 5, which is properly
evaluated by the switch statement. The completed CheckServiceThenStop.ps1 script is
shown here.
C04622791.fm Page 100 Saturday, December 8, 2007 6:33 PM
Chapter 4 Managing Services 101
CheckServiceThenStop.ps1
$strService = "bits"
$strComputer = "localhost"
$strClass = "win32_service"
$objWmiService = Get-Wmiobject -Class $strClass -computer $strComputer `
-filter "name = '$strService'"
if( $objWMIService.Acceptstop )
{
Write-Host "stopping the $strService service now ..."
$rtn = $objWMIService.stopService()
Switch ($rtn.returnvalue)
{
0 { Write-Host -foregroundcolor green "$strService stopped" }
2 { Write-Host -foregroundcolor red "$strService service reports" `
" access denied" }
5 { Write-Host -ForegroundColor red "$strService service cannot" `
" accept control at this time" }
10 { Write-Host -ForegroundColor red "$strService service is already" `
" stopped" }
DEFAULT { Write-Host -ForegroundColor red "$strService service reports" `
" ERROR $($rtn.returnValue)" }
}
}
ELSE
{
Write-Host "$strService will not accept a stop request"
}
Starting Services
Just as there are two ways to stop services in Windows PowerShell, there are also two ways to
start a service. The easiest way to start a service in Windows PowerShell is to use the Start-
Service cmdlet. To do this, supply either the service name or the display name. As with the Stop-
Service cmdlet, using the service name generally requires the least amount of typing.
StartService.ps1 uses the $strService variable to hold the name of the service to start. In this
case, begin with the bits service. Once the name of the service is assigned to the variable, use
the Start-Service cmdlet to start the service. Specify the -name parameter and feed it the
$strService variable. The StartService.ps1 script is shown here.
StartService.ps1
$strService = "bits"
Start-Service -Name $strService
If you want to start multiple services, you can, of course, create an array of service names, use
foreach to iterate through the array, and then call the Start-Service cmdlet to start the services.
This is exactly what to do using the StartMultipleServices.ps1 script.
In the StartMultipleServices.ps1 script example, assign the name of three services to the
variable $aryServices. Then use the foreach statement to walk through the array using the variable
$strService as the enumerator. Once inside the script block for the foreach statement, use the
C04622791.fm Page 101 Saturday, December 8, 2007 6:33 PM
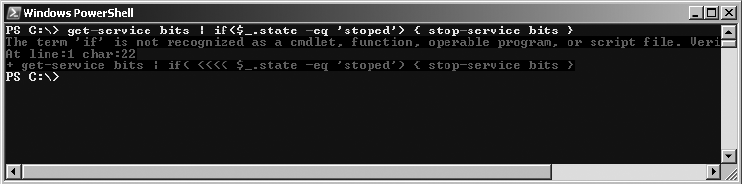
102 Windows PowerShell Scripting Guide
Write-Host cmdlet to print a message indicating the name of the service that is going to be
started. Then use the Start-Service cmdlet to start the service by name. The StartMultiple-
Services.ps1 script is shown here.
StartMultipleServices.ps1
$aryServices = "bits", "wuauserv", "CcmExec"
foreach ($strService in $aryServices)
{
Write-Host "Starting $strService ..."
Start-Service -Name $strService
}
Performing a Graceful Start
Just as it is important to verify that the service will accept a stop command (refer to “Performing a
Graceful Stop,” earlier in this chapter) it is just as important to be “polite” about attempting to
start a service. There are two potential conditions that need to be examined: if the service is already
running and if the service is disabled. Either of these conditions will generate an error message.
One problem with the StartMultipleServices.ps1 script is that is attempts to start the service
without checking to see if the requested service is already running. While this is not a
major problem, it is inefficient and can prolong script execution time. To correct this issue,
use Get-Service to examine the script status. If it is already running, you can report the status;
if the service isn’t running, you can start it.
When running the CheckServiceThenStart.ps1 script, first use the $strService variable to hold
the service name, then use the Get-Service cmdlet only to retrieve information about the
desired service. Do this by specifying the name of the service. Once you have retrieved the
service information, pipeline the object to the ForEach-Object cmdlet. You have to perform
this action, even though there is only one object in the pipeline. If you don’t use the ForEach-
Object cmdlet at this point in the process, you will receive the error shown in Figure 4-9.
Figure 4-9 You cannot pipeline an object into the if statement.
In the script block of the ForEach-Object cmdlet, use the if statement to evaluate the Status
property of the current pipeline object. This object is the bits service. If the service is not
running, use the Write-Host cmdlet to print a message indicating that you are going to start
the service. The Start-Service cmdlet is used to start the service. Use the -name parameter to
indicate which service you want to start.
C04622791.fm Page 102 Saturday, December 8, 2007 6:33 PM

Chapter 4 Managing Services 103
If the service is running, simply print this information using the Write-Host cmdlet. The
CheckServiceThenStart.ps1 script follows.
CheckServiceThenStart.ps1
$strService = "bits"
Get-Service -name $strService |
Foreach-object { if ($_.status -ne "running")
{
Write-Host "starting $strService ..."
Start-Service -Name $strService
}
ELSE
{
Write-Host "$strService is already started"
}
}
Two Ways to Work with Services
One of the frustrations for newcomers to Windows PowerShell is that there are multiple
ways of getting results. When students ask which way they should perform a process, I
tell them I have two criteria for choosing a procedure: which way is easiest, and which
way is most familiar. At times, however, the decision is not quite so simple. Let’s take
services, as an example. If I want to verify the status of a service, I can do the following:
Get-service bits
This code displays the status of the bits service as well as its display name. However, if I
want to find out if the service is set to start automatically, I might think that I should
pipeline the object into the Format-List cmdlet to find the information. Here is that com-
mand:
Get-Service bits | Format-List *
Name : BITS
CanPauseAndContinue : False
CanShutdown : True
CanStop : True
DisplayName : Background Intelligent Transfer Service
DependentServices : {}
MachineName : .
ServiceName : BITS
ServicesDependedOn : {EventSystem, RpcSs}
ServiceHandle :
Status : Running
ServiceType : Win32ShareProcess
Site :
Container :
C04622791.fm Page 103 Saturday, December 8, 2007 6:33 PM

104 Windows PowerShell Scripting Guide
As you might notice, the start mode of the service is not listed. To obtain this informa-
tion, you must use WMI. WMI is often more powerful than the built-in cmdlets found in
Windows PowerShell. The cmdlets were designed for ease of use and simplicity for the
most common administrative needs. At times, the simplicity comes at the expense of
some of the more “exotic” methods.
However, one of the powers of Windows PowerShell is that it utilizes WMI so well. Use
the following WMI command to retrieve all the properties associated with the bits ser-
vice:
Get-WmiObject win32_service -Filter "name = 'bits'" | fl [a-z]*
Name : BITS
Status : OK
ExitCode : 0
DesktopInteract : False
ErrorControl : Normal
PathName : C:\Windows\System32\svchost.exe -k netsvcs
ServiceType : Share Process
StartMode : Auto
AcceptPause : False
AcceptStop : True
Caption : Background Intelligent Transfer Service
CheckPoint : 0
CreationClassName : Win32_Service
Description : Transfers files in the background using idle network
bandwidth. If the service is disabled then any applications that depend on BITS,
such as Windows Update or MSN Explorer, will be unable to automatically download
programs and other information.
DisplayName : Background Intelligent Transfer Service
InstallDate :
ProcessId : 1096
ServiceSpecificExitCode : 0
Started : True
StartName : LocalSystem
State : Running
SystemCreationClassName : Win32_ComputerSystem
SystemName : M5-1875135
TagId : 0
WaitHint : 0
To summarize, if you do not find a “native” Windows PowerShell cmdlet, do not despair.
WMI or some other technology may well be an option. There is a good chance that if the
process can be done at all, you will be able to perform it by using Windows PowerShell.
It truly is a “power shell.”
If the service is disabled, will you be out of luck? Not at all! Using the Get-WmiObject cmdlet
and the Win32_Service WMI class, you can detect if a service is disabled, change the startup
mode, and then start the service. The ChangeModeThenStart.ps1 script does exactly that.
The ChangeModeThenStart.ps1 script begins with a user-defined function. The purpose of
this function is to evaluate the return code from calling the changeStartMode() method and the
C04622791.fm Page 104 Saturday, December 8, 2007 6:33 PM

Chapter 4 Managing Services 105
startservice() method. Both of these methods use the same return code values. Call the
function FunEvalRTN and pass it the object contained in the $rtn variable. Use the switch statement
to evaluate the return value. If it is 0, there were no errors; any other number indicates that an
error occurred on the method call. If there were no errors, the message is printed out in green.
One interesting feature about this function is the use of the $strCall variable. When each
method is called, you assign a string to the $strCall variable that indicates which method was
invoked.
The first line of code executed is not the function call, but rather it is the assignment of the
value bits to the variable $strService. (This code is discussed in the “Starting Services” section,
earlier in this chapter). The WMI piece of the script retrieves WMI information about the
Win32_Service that is named in the $strService variable. Evaluate the condition of the bits ser-
vice; if it isn’t running and the service is disabled, change the service start mode to manual
before attempting to start the service. The line of code that evaluates the condition of the ser-
vice is shown here:
if( $objWMIService.state -ne 'running' -AND $objWMIService.startMode -eq 'Disabled')
Note When making a compound if statement, keep in mind that -AND is a parameter
exactly like -ne (not equal) and -eq (equal). As a result, it also must be preceded by a hyphen.
If the service is not running and if it is set to a start mode of disabled, then you must change
the start mode. To do this, use the changestartmode() method from the Win32_Service WMI
class. When the method is called, it will return an object that contains the return code. The
return code from the method call is stored in the ReturnValue property. The properties that
begin with a double underscore on the returned object are system properties that provide
information about the WMI call. This management object is shown here:
$a = (Get-WmiObject win32_service -filter "name = 'bits'").stopservice()
$a | get-member
TypeName: System.Management.ManagementBaseObject#\__PARAMETERS
Name MemberType Definition
---- ---------- ----------
ReturnValue Property System.UInt32 ReturnValue {get;set;}
__CLASS Property System.String __CLASS {get;set;}
__DERIVATION Property System.String[] __DERIVATION {get;set;}
__DYNASTY Property System.String __DYNASTY {get;set;}
__GENUS Property System.Int32 __GENUS {get;set;}
__NAMESPACE Property System.String __NAMESPACE {get;set;}
__PATH Property System.String __PATH {get;set;}
__PROPERTY_COUNT Property System.Int32 __PROPERTY_COUNT {get;set;}
__RELPATH Property System.String __RELPATH {get;set;}
__SERVER Property System.String __SERVER {get;set;}
__SUPERCLASS Property System.String __SUPERCLASS {get;set;}
C04622791.fm Page 105 Saturday, December 8, 2007 6:33 PM
106 Windows PowerShell Scripting Guide
Once you have executed the changestartmode() method, assign a string to the $strCall parame-
ter to indicate which procedure is being executed. Call the FunEvalRTN function and pass the
object contained in the $rtn variable. As indicated previously, the function will translate many
of the common return codes from the method call.
After you leave the function, continue into the next section of the script. If the return code is
0, attempt to start the service by using the startservice() method, then call the FunEvalRTN
function to evaluate the results from the method call.
If the start mode is not set to disabled, call the startservice() method and then call the function
to evaluate the return code. The complete text of the ChangeModeThenStart.ps1 script is
shown here.
ChangeModeThenStart.ps1
function FunEvalRTN($rtn)
{
Switch ($rtn.returnvalue)
{
0 { Write-Host -foregroundcolor green "No errors for $strCall" }
2 { Write-Host -foregroundcolor red "$strService service reports" `
" access denied" }
5 { Write-Host -ForegroundColor red "$strService service can not" `
" accept control at this time" }
10 { Write-Host -ForegroundColor red "$strService service is already" `
" running" }
14 { Write-Host -ForegroundColor red "$strService service is disabled" }
DEFAULT { Write-Host -ForegroundColor red "$strService service reports" `
" ERROR $($rtn.returnValue)" }
}
$rtn=$strCall=$null
}
$strService = "bits"
$strComputer = "localhost"
$strClass = "win32_service"
$objWmiService = Get-Wmiobject -Class $strClass -computer $strComputer `
-filter "name = '$strService'"
if( $objWMIService.state -ne 'running' -AND $objWMIService.startMode -eq 'Disabled')
{
Write-Host "The $strService service is disabled. Changing to manual ..."
$rtn = $objWmiService.ChangeStartMode("Manual")
$strCall = "Changing service to Manual"
FunEvalRTN($rtn)
if($rtn.returnValue -eq 0)
{
Write-Host "The $strService service is not running. Attempting to start ..."
$rtn = $objWMIService.StartService()
$strCall = "Starting service"
C04622791.fm Page 106 Saturday, December 8, 2007 6:33 PM
Chapter 4 Managing Services 107
FunEvalRTN($rtn)
}
}
ELSEIF($objWMIService.state -ne 'running')
{
Write-Host "The $strService service is not running. Attempting to start ..."
$rtn = $objWMIService.StartService()
$strCall = "Starting service"
FunEvalRTN($rtn)
}
ELSEIF($objWMIService.state -eq 'running')
{
Write-Host "The $strService service is already running"
}
ELSE
{
Write-Host "$strService is indeterminent"
}
Desired Configuration Maintenance
To specify the service configuration on a server, you need to know the state each of the services
should be in. Knowing which services should be running, stopped, or disabled is important, but
it is only a small part of the process. You also need to know how they start, any dependencies
they may have, and which logon account they utilize. It also makes sense to have a way to match
the current running configuration with what you have documented. An easy way to do this is to
run a script on a server that is running in the state you want to document. This can be the work
station, the server you want to maintain, or some other server that has a similar configuration.
To begin, select the name and the status of each service on the computer, and write the informa-
tion out to a text file. The WriteServiceStatus.ps1 command is shown here.
WriteServiceStatus.ps1
$strPath = "c:\fso\dcm1.txt"
Get-Service |
format-table name, status -autosize |
Out-File -FilePath $strPath
After you have a listing of the services on the computer, how can you use the file? To begin,
you need to parse the file, locate the service name, and then compare it with the expected sta-
tus received from the previous computer. The easiest way to do this is to use the Compare-
Object cmdlet. By using the WriteServiceStatus.ps1 script to produce a text file that provides
a listing of the services and the status of the services on the computer, you can use the Com-
pareServicesTxt.ps1 script to compare the two text files. You can compare two computers or
you can look for changes on one computer. This technique has both troubleshooting and
auditing value.
C04622791.fm Page 107 Saturday, December 8, 2007 6:33 PM
108 Windows PowerShell Scripting Guide
Using the CompareServicesTxt.ps1 script, first assign the path of the configuration files to the
variables. Use $strReference to hold the path to the reference configuration, then use the
$strDifference variable to hold the list of services from the computer you plan to check, either
your primary computer or a second computer. After assigning values to the variables, use the
Compare-Object cmdlet to compare the contents of the two files, using the -referenceobject
parameter to point to the text file that we use for the baseline configuration. The -differenceobject
parameter is used to point to the file for the current configuration. If you simply point the
-referenceobject and -differenceobject parameters to the variables containing the path to the
configuration files, the comparison will be really dull. But because the cmdlet is designed to
compare objects, you must create objects for the cmdlet to look at. To do this, use the Get-Content
cmdlet to open and read both the reference file and the difference file. For readability
purposes, the CompareServicesTxt.ps1 script uses the grave accent to indicate line continuation.
The CompareServicesTxt.ps1 script is shown here.
CompareServicesTxt.ps1
$strReference = "c:\fso\dcm.txt"
$strDifference = "c:\fso\dcm1.txt"
Compare-Object `
-referenceobject $(get-content $strReference) `
-differenceobject $(get-content $strDifference)
Verifying Desired Services Are Stopped
To verify that desired services are stopped, first compile a list of the services you want to stop.
You can easily do this by writing the currently stopped services to a text file; edit the file as
needed. To write a list of stopped services to a text file, use the WriteStoppedServices.ps1
script.
Using the WriteStoppedServices.ps1 script, first assign the string stopped to the variable
$strState. Next, use the $strPath variable to hold the string that represents the location, including
file name, to store the file that will contain the list of services we want to stop. Then use the
Get-WmiObject cmdlet to retrieve the Win32_Service WMI. Use the -filter parameter to retrieve
only services that have a state equal to that defined in the $strState variable. When you have
retrieved all stopped services, pipeline the object to the Select-Object cmdlet and retrieve only
the name of each service. Pipeline the results to the Out-File cmdlet and use the -filepath
parameter to point to the location specified previously in the $strpath variable. The WriteStopped-
Services.ps1 script is shown here.
WriteStoppedServices.ps1
$strState = "stopped"
$strPath = "C:\FSO\StoppedServices.txt"
Get-WmiObject win32_service -Filter "state='$strState'" |
select-object name |
Out-File -FilePath $strPath
C04622791.fm Page 108 Saturday, December 8, 2007 6:33 PM
Chapter 4 Managing Services 109
When you have a list of the services you want to stop, you can use the list as input into a script,
connect to each service, and check the status to confirm the services are stopped. This is
shown in the CheckStoppedServices.ps1 script, that is shown in the next section.
Reading a File to Check Service Status
Using the CheckStoppedServices.ps1 script, first assign the string representing the path to the
file containing the list of stopped services to the variable $strFile. Use the Get-Content cmdlet
to retrieve the content from the file represented by $strFile. Then use the ForEach-Object
cmdlet to look through the stream of objects returned by Get-Content. As you enumerate
through the collection of service names, use the trimend() method to remove trailing spaces
from each line in the text file. This is necessary because the Out-File cmdlet seems to inundate
the lines of text with spaces. Use the variable $strQuery to hold text of the WMI query, then
use the Get-WmiObject cmdlet to perform the WMI query that was detailed in the $strQuery
variable. To specify the query for the Get-WmiObject cmdlet, use the -query parameter and
feed it the string contained in the $strQuery variable.
Once you have executed the WMI query, pipeline the results to the ForEach-Object cmdlet
and use the if statement to evaluate if the state of the service is equal to stopped. If it is, then use
the Write-Host cmdlet to print a message that the service is still stopped. To make the
message a bit more interesting, retrieve the Name property from the current pipeline object by
using the following code:
{ Write-Host $_.name "is still stopped" }
If the state of the service is not equal to stopped, then it is either running or paused and would
be an exception to the list of services that should be stopped. Once again, use the Write-Host
cmdlet to print the name of the service and its current state. However, you also must specify
the -foregroundcolor parameter and use the red qualifier to display the message in red.
CheckStoppedServices.ps1
$strFile = "c:\fso\StoppedServices.txt"
Get-Content $strFile |
foreach-object { $strService = $_.trimend()
$strQuery = "Select * from win32_service where name ='$strService'"
get-wmiobject -query $strQuery |
foreach-object `
{
if ($_.state -eq "stopped" )
{ Write-Host $_.name "is still stopped" }
ELSE
{ Write-Host -foregroundcolor RED $_.name `
" is no longer stopped. It is $($_.state)" }
}
}
C04622791.fm Page 109 Saturday, December 8, 2007 6:33 PM
110 Windows PowerShell Scripting Guide
Verifying Desired Services Are Running
To check for the state of the services that should be running, begin with a list of services you
want to have running. You need to read the text file of desired services and perform a WMI
query that checks for the status of each service on the list. After doing this, you need to use
logic to ensure the services are running.
This is what the CompareRunningServices.ps1 script helps with. First, assign the path to the
text file that details the services that should be running; assign the path to the $strFile vari-
able. Then use the Get-Content cmdlet and feed it the path stored in the $strFile variable. Pass
the object returned by the Get-Content cmdlet to the ForEach-Object cmdlet. Once inside the
code block for the ForEach-Object cmdlet, trim trailing spaces from the end of the name of
each service. To do this, use the trimend() method. Call this method on the $_ variable, which
is used to represent the current pipeline object. The CompareRunningServices.ps1 script is
shown here.
CompareRunningServices.ps1
$strFile = "c:\fso\runningservices.txt"
Get-Content $strFile |
Foreach-object { $strService = $_.trimend()
$strQuery = "Select * from win32_service where name ='$strService'"
get-wmiobject -query $strQuery |
foreach-object `
{
if ($_.state -eq "running" )
{ Write-Host $_.name "is still running" }
ELSE
{ Write-Host -foregroundcolor RED $_.name `
" is no longer running. It is $($_.state)" }
}
}
Confirming the Configuration
Service configuration is an extremely important security concern. An important security tenet
is to reduce the attack surface. One reason why Windows Server 2008 Core edition (Server
Core) is so popular is due to its reduced attack surface. Because service configuration is so
important to reducing the attack surface, you must ask yourself these three important config-
uration questions:
■How is the service set to start (automatically, manually, disabled)?
■What account does it start under (local system, network service, local service, user-
defined)?
■What password is used for the service (automatic, user-defined)?
C04622791.fm Page 110 Saturday, December 8, 2007 6:33 PM
Chapter 4 Managing Services 111
Producing an Exception Report
To produce a summary report of the service configuration information you have identified,
you must count each service and evaluate its start mode. If the service starts with a user-
defined account, you’ll need to record that information as well. In the EvaluateServicesAnd-
Count.ps1 script, use the Get-WmiObject cmdlet to retrieve the Win32_Service class and store
the resulting object in the $objWMIService variable.
Use the foreach statement and walk through the collection services. Use two switch statements
to parse through the object. In the first switch statement, look for startmode. If the startmode is
set to auto, you increment the $a counter variable (short for auto) and add its name to the
$auto variable used to maintain a listing of the automatically starting services. To print each
service name on an individual line, use the grave accent+n (`n) character combination.
Use this same technique for both manual and disabled services. This switch statement is
shown here:
switch ($i.startmode)
{
"auto" { $a++ ; $auto+="$($i.name)`n"}
"manual" { $m++ ; $manual+="$($i.name)`n"}
"disabled" { $d++ ; $disabled+="$($i.name)`n"}
DEFAULT { }
}
Use a second switch statement to evaluate the user account that is utilized to start the service.
To simplify the typing task, use a regular expression matching to look for the service account
names. As each match is found, increment a counter variable. If the account is not localsystem,
localservice, or networkservice, it is a user-defined service account and should be closely
scrutinized for both general security configuration and, in particular, password management.
The second switch statement is shown here:
switch -regex ($i.startName)
{
"localsystem" { $lsys++ }
"localservice" { $lsvc++ }
"NetworkService" { $nsvc++ }
DEFAULT { $osn++ ; $otherServiceNames+="$($i.startName)`n"}
}
The next section of the script produces the output. To reduce the amount of formatting for the
report, store the output in a giant here string, which allows you to type freeform without fol-
lowing quoting and special syntax rules.
If there are no user-defined service accounts, you don’t want to print a reminder about
checking passwords. However, if there are user-defined service accounts, you definitely need
C04622791.fm Page 111 Saturday, December 8, 2007 6:33 PM
112 Windows PowerShell Scripting Guide
to print a reminder. To do this, use an if statement and use += to add to the end of the $string
variable. The warning message is contained within a separate here string. This is shown here:
if($osn -ne 0)
{
$string+= @"
The other ids in use are listed here:
$otherServiceNames
You should investigate the passwords being used by:
$otherServiceNames
"@
}
The complete EvaluateServicesAndCount.ps1 script follows. The report should be viewed
using WordPad because the new line character (`n) does not print correctly in Notepad.
EvaluateServicesAndCount.ps1
$a=$m=$d=0
$lsvc=$lsys=$nsvc=$osn=0
$objWMIService = Get-WmiObject -Class win32_service -computer localhost
foreach ($i in $objWMIService)
{
switch ($i.startmode)
{
"auto" { $a++ ; $auto+="$($i.name)`n"}
"manual" { $m++ ; $manual+="$($i.name)`n"}
"disabled" { $d++ ; $disabled+="$($i.name)`n"}
DEFAULT { }
}
switch -regex ($i.startName)
{
"localsystem" { $lsys++ }
"localservice" { $lsvc++ }
"NetworkService" { $nsvc++ }
DEFAULT { $osn++ ; $otherServiceNames+="$($i.startName)`n"}
}
}
$string = @"
There are $($objWMIService.length) services defined
They start as follows:
automatic $a Manual $m disabled $d
The automatic services are:
---------------------------
$auto
The manual services are:
------------------------
$manual
C04622791.fm Page 112 Saturday, December 8, 2007 6:33 PM
Chapter 4 Managing Services 113
The disabled services are:
--------------------------
$disabled
The services start using the following accounts:
localsystem $lsys times
localService $lsvc times
networkService $nsvc times
Other user id $osn times
"@
if($osn -ne 0)
{
$string+= @"
The other ids in use are listed here:
$otherServiceNames
You should investigate the passwords being used by:
$otherServiceNames
"@
}
Out-File -InputObject $string -FilePath c:\fso\exceptopn.txt
Summary
This chapter examined various services that start and run on a server or workstation. We
looked at the steps involved in documenting the existing configuration, and examined the
startup mode, security, and credentials used by the various services. The chapter looked at
modifying these settings using script. Finally, we explored the use of a database to ensure con-
sistency across a Windows enterprise network.
C04622791.fm Page 113 Saturday, December 8, 2007 6:33 PM
C04622791.fm Page 114 Saturday, December 8, 2007 6:33 PM

115
Chapter 5
Managing Shares
After completing this chapter, you will be able to:
■Document existing shares on a system.
■Document user-defined shares.
■Verify the existence of administrative shares.
■Audit shares.
■Modify shares.
■Create new shares.
■Delete existing shares.
On the Companion Disc All the scripts used in this chapter are located on the CD that
accompanies this book in the \scripts\chapter05 folder.
Documenting Shares
There are several reasons why a network administrator might want to document existing
shares on a server or a workstation. You might want to learn how many shares exist and
what drives and folders the shares resolve to on the computer. A second reason might be to
examine the shares from a security perspective. Questions such as these often arise after
the shares have been documented:
■Which shares are required?
■Who has access to the shares?
■What are the security settings on the shares?
■What type of documentation is available on the shares?
To obtain this information about shares, you need to use the Win32_Share WMI class. You
can use the Get-WmiObject cmdlet to retrieve the information needed about shares from
Win32_Share. When using the ListShares.ps1 script, begin with the Get-WmiObject cmdlet
and query the Win32_Share class from WMI. To run the script against the local computer, use
the value localhost as the computer name. The management object that is returned by this
query gets pipelined to the Sort-Object cmdlet, where you can sort based on the Name
property. Once the list is sorted by name, pipeline the object to the Format-Table cmdlet,
where you can choose the Name, Path, and Description properties.
C05622791.fm Page 115 Saturday, December 8, 2007 6:34 PM
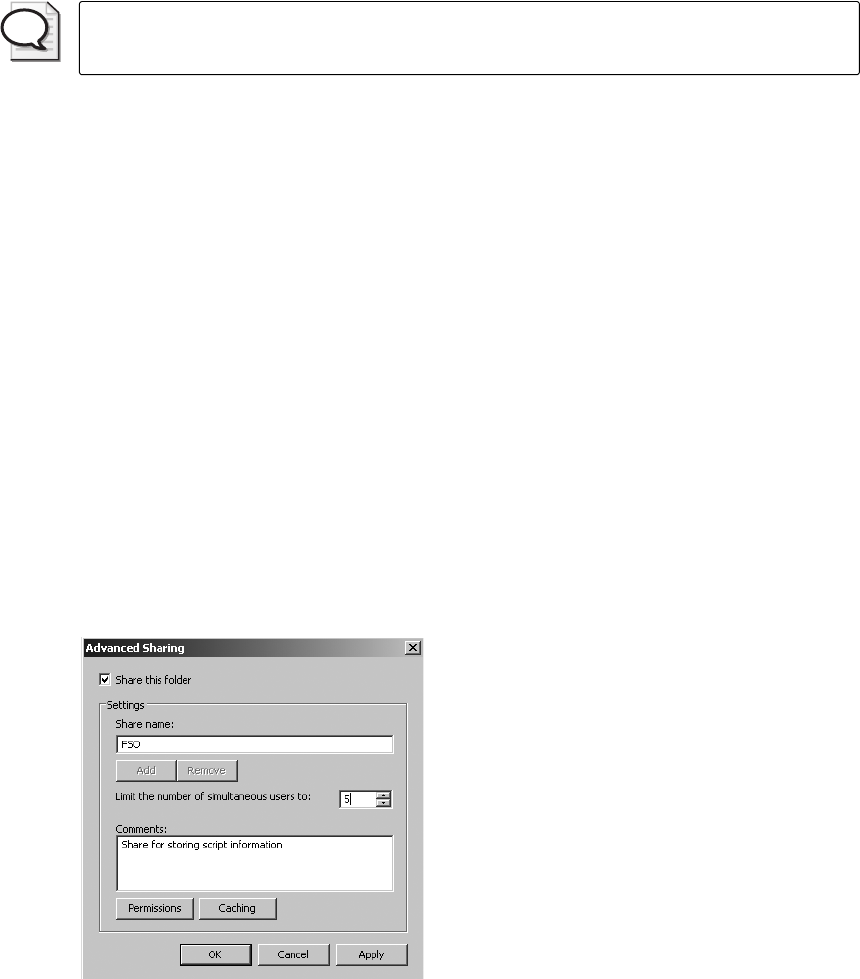
116 Windows PowerShell Scripting Guide
Tip When choosing properties that will be displayed in columns by using the Format-Table
cmdlet, the order in which they are selected determines the display order.
Use the -autosize switch to minimize the amount of space used between the columns in the
table. The complete ListShares.ps1 script follows.
ListShares.ps1
Get-WmiObject -Class win32_share -ComputerName localhost |
Sort-Object name |
Format-Table name, path, description -AutoSize
After running the ListShares.ps1 script, you’ll have a list that looks something like this:
name path description
---- ---- -----------
ADMIN$ C:\Windows Remote Admin
C$ C:\ Default share
CCMLogs$ C:\Windows\system32\ccm\logs
CCMSetup$ C:\Windows\system32\ccmsetup
IPC$ Remote IPC
music C:\music none
VPCache$ C:\Windows\system32\VPCache
WMILogs$ C:\Windows\system32\wbem\logs
If you need to obtain more detailed information about the shares, you use the ListShares-
Detailed.ps1 script. This script provides programmatic access to the kinds of information
shown in Figure 5-1.
Figure 5-1 Advanced Sharing information displayed in Windows Explorer.
When using the ListSharesDetailed.ps1 script, first use a $class variable to hold the name of
the WMI class to query. Once again, it is Win32_Share. Specify the name of the computer
to query; this example uses localhost, but you can use any computer on the network that you
C05622791.fm Page 116 Saturday, December 8, 2007 6:34 PM

Chapter 5 Managing Shares 117
have rights to access. Select the properties you are interested in from the Win32_Share WMI
class.
Identifying Properties of WMI Classes
One of the challenges when working with WMI classes is to identify the available
properties of the classes. An easy way to do this is to use the Get-Member cmdlet. Use
the Get-WmiObject cmdlet to specify the name of the WMI class and pipe the results to
the Get-Member cmdlet. The result tells you all the methods and properties that are
defined for the Win32_Share WMI class. Both the command and output are shown here:
PS C:\> Get-WmiObject win32_share | get-member
TypeName: System.Management.ManagementObject#root\cimv2\Win32_Share
Name MemberType Definition
---- ---------- ----------
GetAccessMask Method System.Management.ManagementBaseObject
SetShareInfo Method System.Management.ManagementBaseObject
AccessMask Property System.UInt32 AccessMask {get;set;}
AllowMaximum Property System.Boolean AllowMaximum {get;set;}
Caption Property System.String Caption {get;set;}
Description Property System.String Description {get;set;}
InstallDate Property System.String InstallDate {get;set;}
MaximumAllowed Property System.UInt32 MaximumAllowed {get;set;}
Name Property System.String Name {get;set;}
Path Property System.String Path {get;set;}
Status Property System.String Status {get;set;}
Type Property System.UInt32 Type {get;set;}
__CLASS Property System.String __CLASS {get;set;}
__DERIVATION Property System.String[] __DERIVATION {get;set;}
__DYNASTY Property System.String __DYNASTY {get;set;}
__GENUS Property System.Int32 __GENUS {get;set;}
__NAMESPACE Property System.String __NAMESPACE {get;set;}
__PATH Property System.String __PATH {get;set;}
__PROPERTY_COUNT Property System.Int32 __PROPERTY_COUNT {get;set;}
__RELPATH Property System.String __RELPATH {get;set;}
__SERVER Property System.String __SERVER {get;set;}
__SUPERCLASS Property System.String __SUPERCLASS {get;set;}
PSStatus PropertySet PSStatus {Status, Type, Name}
ConvertFromDateTime ScriptMethod System.Object ConvertFromDateTime();
ConvertToDateTime ScriptMethod System.Object ConvertToDateTime();
Delete ScriptMethod System.Object Delete();
GetType ScriptMethod System.Object GetType();
Put ScriptMethod System.Object Put();
Another way to access this same type of information is to use the Windows Management
Instrumentation Tester (Wbemtest.exe) program that is included in every version of the
Windows operating system that also includes WMI. As Figure 5-2 shows, Wbemtest.exe
provides convenient access to the properties and methods of all WMI classes.
C05622791.fm Page 117 Saturday, December 8, 2007 6:34 PM

118 Windows PowerShell Scripting Guide
Figure 5-2 The Windows Management Instrumentation Object Editor showing the
Win32_Share class.
The properties you select in the ListSharesDetailed.ps1 script are contained in an array named
$aryProperty. Each property name is contained in quotation marks and separated by a
comma. Because there are generally a large number of property names of interest, use a grave
accent (`) to continue the array definition to the next line.
Use the Get-WmiObject cmdlet to query the computer that is specified in the $computer
variable, and store the resulting object in the $objWMI variable. In all likelihood, this object
will contain information about multiple shares. Work with the share by using the foreach
statement. As each share is enumerated, use the Write-Host cmdlet to print a header for your
list, along with the name of the share.
Once again use the foreach statement to examine the properties in the array of properties, then
retrieve the value of each property and print it. Use the if statement to see if a property
contains any information. If the property is empty, don’t print the property, so your list
remains clean. The ListSharesDetailed.ps1 script is shown here.
ListSharesDetailed.ps1
$class = "Win32_Share"
$computer = "localhost"
$aryProperty ="type", "name", "allowMaximum", "caption", `
"description", "maximumAllowed", "Path"
$objWMI = Get-WmiObject -Class $class -computername $computer
foreach($share in $objWMI)
{
C05622791.fm Page 118 Saturday, December 8, 2007 6:34 PM
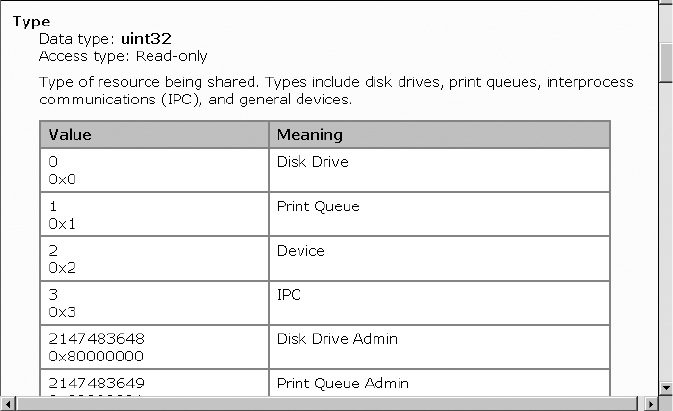
Chapter 5 Managing Shares 119
Write-Host `
"
`nProperty values of Share: $($share.name)
-------------------------
"
foreach($property in $aryProperty)
{
if($share.$property -notlike "")
{
Write-Host $property : $share.$property
}
}
}
The previous script, ListSharesDetailed.ps1, provides detailed information about the shares.
However, there is one problem with the output. As shown in the following code, the share
type is listed as a numbered value. Of course, this number is documented in the Windows
Software Development Kit (SDK) but it isn’t convenient to look up this information every time
you want to know the type of share you’re working with. Figure 5-3 shows the share code
translation page from the Windows SDK.
Figure 5-3 The Windows Software Development Kit contains the translation of the share coded values.
Sample output from the ListSharesDetailed.ps1 script is shown here:
Property values of Share: ADMIN$
-------------------------
type : 2147483648
name : ADMIN$
allowMaximum : True
C05622791.fm Page 119 Saturday, December 8, 2007 6:34 PM

120 Windows PowerShell Scripting Guide
caption : Remote Admin
description : Remote Admin
Path : C:\Windows
Property values of Share: C$
-------------------------
type : 2147483648
name : C$
allowMaximum : True
caption : Default share
description : Default share
Path : C:\
To convert the share numbered value to a friendly description, create a function based on
the decoding information gleaned from Windows SDK. This is what you do using the List-
SharesDetailedTranslateShareType.ps1 script.
The ListSharesDetailedTranslateShareType.ps1 script begins with a function. When you
declare a function, you can give it any name you want as long as it does not affect code except
from a readability perspective. In the ListSharesDetailedTranslateShareType.ps1 script exam-
ple, it’s named funlookup because you will use it to look up coded share types. When you call
the script, pass a value to the function (you will learn about this later). When the value is
received by the function, name it $intIN.
Use the switch statement to examine the value that is passed to the function. If the value is
equal to 0, use a global variable named $strRTN and assign the string Disk Drive to it. Con-
tinue this procedure for each of the remaining valid drive share types.
Note When using a variable inside a function, the value normally lives within the function.
If there is a variable outside the function with the same name, there may be some confusion.
Because functions do not return values, you must create a variable to hold the value. But to
use the same variable both inside and outside the function, it must be a global variable. Use
the following syntax when working with global variables:
$global:strRTN="Disk Drive"
Moving past the function, declare the $strRTN variable as a global variable and assign the
value $null to it. This ensures the variable does not contain any leftover data that could lead to
unpredictable function results. The syntax for this command is shown here:
$global:strRTN = $null
The remainder of the code is the same as the ListSharesDetailed.ps1 script except for the
addition of an extra if statement to filter out the property named Type. If the property
named Type is detected, use the funlookup function to evaluate the number, then print the
translated value, as shown here.
C05622791.fm Page 120 Saturday, December 8, 2007 6:34 PM
Chapter 5 Managing Shares 121
if($property -eq "type")
{
funLookup($share.$property)
Write-Host $property "name:" $strRTN
}
Once the script has called the funlookup function and has returned, set the $strRTN variable
back to null and continue iterating through the collection of shares and their associated
properties. The complete ListSharesDetailedTranslateShareType.ps1 script is shown here.
ListSharesDetailedTranslateShareType.ps1
Function funLookUp ($intIN)
{
switch ($intIN)
{
0 { $global:strRTN="Disk Drive" }
1 { $global:strRTN="Print Queue" }
2 { $global:strRTN="Device" }
3 { $global:strRTN="IPC " }
2147483648 { $global:strRTN="Disk Drive Admin" }
2147483649 { $global:strRTN="Print Queue Admin"}
2147483650 { $global:strRTN="Device Admin" }
2147483651 { $global:strRTN="IPC Admin" }
}
}
$global:strRTN = $null
$class = "Win32_Share"
$computer = "localhost"
$aryProperty ="type", "name", "allowMaximum", "caption", `
"description", "maximumAllowed", "Path"
$objWMI = Get-WmiObject -Class $class -computername $computer
foreach($share in $objWMI)
{
Write-Host `
"
`nProperty values of Share: $($share.name)
-------------------------
"
foreach($property in $aryProperty)
{
if($share.$property -notlike "")
{
Write-Host $property : $share.$property
}
if($property -eq "type")
{
funLookup($share.$property)
Write-Host $property "name:" $strRTN
}
}
$Global:strRTN=$null
}
C05622791.fm Page 121 Saturday, December 8, 2007 6:34 PM

122 Windows PowerShell Scripting Guide
Documenting User Shares
User-defined shares don’t show up as a special type of share. If a share is not an administrative
share and if it is not created by the IT staff, by the process of elimination it must be a user-
defined share. Interestingly enough, it may be “user-defined” and yet the user may not
be aware of it.
Best Practices When creating shares on a computer, always fill in the Description property
so it is easier to distinguish IT-created shares from user-created shares.
Nonadministrative shares are those that are not automatically created by the operating
system. These include both shares created by the IT department and those created by the user
community. Using the ListNonAdminShares.ps1 script, you can print the default properties
for all shares that have a share type that is less than 10.
ListNonAdminShares.ps1
Get-WmiObject win32_share -Filter "type < '10'"
A sample of the output from the ListNonAdminShares.ps1 script follows. It is interesting to
see that none of these shares has a description. The only information you know is that they
are disk shares and the path to where each share is located. It is very difficult to know why
some of these shares are on the computer. If whoever creates shares takes the time to
complete a description, a lot of potential difficulties can be avoided. These shares and their
nondescriptions are shown here:
Name Path Description
---- ---- -----------
CCMLogs$ C:\Windows\system32\ccm\logs
CCMSetup$ C:\Windows\system32\ccmsetup
VPCache$ C:\Windows\system32\VPCache
WMILogs$ C:\Windows\system32\wbem\logs
The Comments text box in the Advanced Sharing dialog box is shown in Figure 5-4; this is the
tool that is used to manually enter share descriptions.
At this time, you can’t easily distinguish between shares created by the IT staff and those created
by the user, but you can distinguish them from the automatically created administrative
shares. Using the WriteUserSharesToExcel.ps1 script that follows, you use the Microsoft Excel
automation model and write the share information to an Excel spreadsheet.
Begin by creating a variable named $strPath that holds the path and name of the completed
spreadsheet, then create an instance of the Excel.Application COM object. This object is used
to automate Excel. To create the object, use the New-Object cmdlet and specify the -comobject
parameter. The newly created Excel.Application object is stored in the $objExcel variable.
C05622791.fm Page 122 Saturday, December 8, 2007 6:34 PM
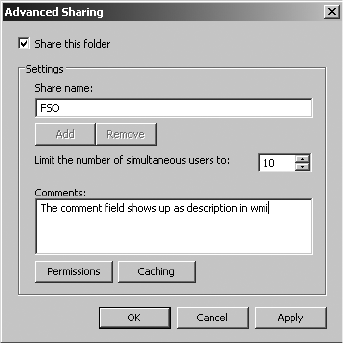
Chapter 5 Managing Shares 123
Figure 5-4 The Advanced Sharing dialog box allows for share comments.
Specify the Visible property to -1, which means true. This is exactly the same as using the
automatic variable $true. Once the Excel spreadsheet is created and visible, add a workbook
to it. To do this, use the add method as shown here:
$WorkBook=$objExcel.Workbooks.Add()
Now you need to be able to access a particular spreadsheet. To do this, use the item method as
shown here:
$sheet=$workbook.worksheets.item(1)
WriteUserSharesToExcel.ps1
$strPath="c:\fso\mySheet.xls"
$objExcel=New-Object -ComObject Excel.Application
$objExcel.Visible=-1
$WorkBook=$objExcel.Workbooks.Add()
$sheet=$workbook.worksheets.item(1)
$x=2
$strComputer = "."
$objWMIService = Get-WmiObject win32_Share
$sheet.Cells.item(1,1)=("Name of Share")
$sheet.Cells.item(1,2)=("Description of Share")
$sheet.Cells.item(1,3)=("Type of Share")
ForEach ($objShare in $objWMIService)
{
$sheet.Cells.item($x, 1)=($objShare.Name)
$sheet.Cells.item($x, 2)=($objShare.Description)
$sheet.Cells.item($x, 3)=($objShare.Type)
C05622791.fm Page 123 Saturday, December 8, 2007 6:34 PM
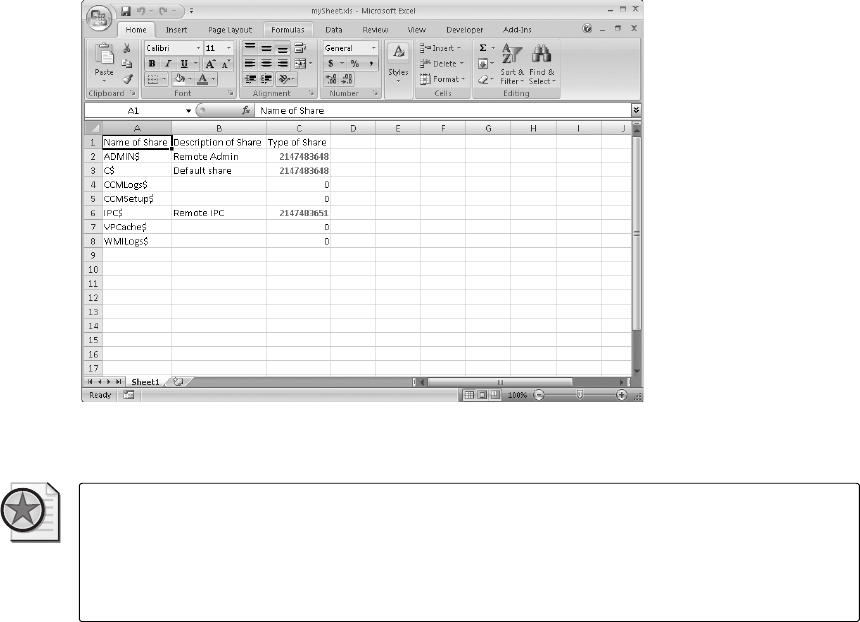
124 Windows PowerShell Scripting Guide
If($objShare.type -ne 0)
{
$sheet.Cells.item($x,3).font.colorIndex=3
$sheet.Cells.item($x,3).font.bold=$true
}
$x++
}
$range = $sheet.usedRange
$range.EntireColumn.AutoFit()
IF(Test-Path $strPath)
{
Remove-Item $strPath
$objExcel.ActiveWorkbook.SaveAs($strPath)
}
ELSE
{
$objExcel.ActiveWorkbook.SaveAs($strPath)
}
An example of the completed Excel spreadsheet is shown in Figure 5-5.
Figure 5-5 After saving share information into an Excel spreadsheet, it’s easy to do complex analysis
of the data generated.
Best Practices There are a number of software packages that create shares on a
computer. These are legitimate pieces of software, not malware. Commercial software may
create shares on a computer for various reasons. For example, it may be created for use by
some little-known feature of the software. Therefore, it is vital that shares are monitored,
audited, and controlled.
C05622791.fm Page 124 Saturday, December 8, 2007 6:34 PM

Chapter 5 Managing Shares 125
Writing Shares to Text
Although writing to an Excel spreadsheet is a useful methodology that can facilitate the
analysis of large amounts of data, at times all you need is a simple ASCII text file. This is the
technique you can use in the WriteSharesToFile.ps1 script.
Begin by declaring a $class variable to hold the name of the WMI class you will query. In
this case, you will query the Win32_Share class. Then use the variable $filePath to hold the
string that will define the location for the text file you want to create. This must be modified
to point to the desired location and the name you plan to use for the output file.
To query WMI, use the Get-WmiObject cmdlet. The default parameter to this cmdlet is -class
and so, technically, it is optional. However, to help make the script a bit easier to read, specify
the parameter. Pipeline the results from using the Get-WmiObject cmdlet to query the
Win32_Share WMI class to the Format-Table cmdlet. This cmdlet is used to remove any header
information that would limit the usefulness of the file and to choose the name from the WMI
object that was returned as a result of your query. This object is then piped to the Out-File
cmdlet. At a minimum, this cmdlet needs a file path. Using the encoding parameter ensures
that the output file is pure ASCII. The completed WriteSharesToFile.ps1 script is shown here.
WriteSharesToFile.ps1
$class = "win32_share"
$filePath = "c:\fso\shares.txt"
Get-WmiObject -class $class |
Format-Table -property name -hidetableheader |
Out-File -FilePath $filePath -encoding ASCII
A sample of the shares.txt file that is created using the WriteSharesToFile.ps1 script is shown
in Figure 5-6.
Figure 5-6 The results of the WriteSharesToFile.ps1 script.
C05622791.fm Page 125 Saturday, December 8, 2007 6:34 PM
126 Windows PowerShell Scripting Guide
Documenting Administrative Shares
Administrative shares on the Windows Vista and Windows Server 2008 platforms are shares
that are automatically created by the operating system. They are used to facilitate a number
of functions that are utilized by a wide range of applications. You should be aware of these
shares from several perspectives.
■In high-security environments, the existence of these administrative shares poses an
unacceptable level of risk, so the shares must be deleted. This is usually done in conjunction
with a Microsoft Consulting Services engagement; the procedure is heavily documented
and tested to ensure compatibility with all line of business (LOB) applications.
■In low-security environments, sometimes users find these shares and delete them in a
misguided attempt to make their computer more secure. This can cause many hours of
frustrating troubleshooting agony as the unsuspecting network administrator attempts
to identify a root cause for weird behaviors and intermittent problems.
To obtain a list of the administrative shares on your computer, use the ListAdminShares.ps1
script. This script uses the Get-WmiObject cmdlet to retrieve the Win32_Share WMI class. Use
a filter to obtain only shares with a type code less than 10. In this way, you retrieve only the
administrative shares that are automatically created. The ListAdminShares.ps1 script is shown
here.
ListAdminShares.ps1
Get-WmiObject win32_share -Filter "type > '10'"
A sample of the output from the ListAdminShares.ps1 script follows. By relying on only the
default view, you obtain information about the name of the share, the path of the share,
and any description that is associated with the share. Notice that all the administrative shares
have a description to make them easier to understand and easier to manage.
Name Path Description
---- ---- -----------
ADMIN$ C:\Windows Remote Admin
C$ C:\ Default share
IPC$ Remote IPC
Writing Share Information to a Microsoft Access Database
An Access database is a good place to store configuration information. This section continues
with details to add to your configuration maintenance database. By logging the information
that is discovered by using the script, you can easily track share modification, produce reports,
and verify configuration.
To use the WriteSharesToAccess.ps1 script, begin by declaring several variables that are used
to hold the computer name and the domain name of the computer. To do this, create an
instance of the wshNetwork object. This is done by using the New-Object cmdlet, using the
C05622791.fm Page 126 Saturday, December 8, 2007 6:34 PM
Chapter 5 Managing Shares 127
-Comobject switch, and specifying the program ID, which in this example is wscript.network.
These two lines of code are shown here:
$StrComputer = (New-Object -ComObject WScript.Network).computername
$StrDomain = (New-Object -ComObject WScript.Network).userDomain
Next, declare a variable $strWmiQuery to hold the WMI query and select all properties from
the Win32_Share WMI class for this script. Use the Get-WmiObject cmdlet and specify the
-query parameter so you can execute the query. The resulting object is stored in the variable
$objService. These two lines of code are shown here:
$strWMIQuery = "Select * from win32_Share"
$objService = get-wmiobject -query $strWMIQuery
Next, declare several variables that will be used to define the way the database is opened. The
first is $adOpenStatic, which is set to 3. Use this variable to tell ADO that you are opening
a static record set. The second variable is $adLockOptimistic, which is also set to 3. This will be
used to tell ADO that you want to use optimistic locking. The path to the database is stored
in the variable $strDB. The variable $strTable is used to hold the name of the table that will
be written to. The last variable in this section of code is $strAccessQuery, which holds the string
“Select * from $strTable”. We perform a query to obtain access to the table, even though we
are planning on writing to the table, and are not really interested in the actual query. This
section of code is shown here:
$adOpenStatic = 3
$adLockOptimistic = 3
$strDB = "c:\fso\ConfigurationMaintenance.mdb"
$strTable = "Shares"
$strAccessQuery = "Select * from $strTable"
Now you are ready to create a few more objects: a connection object and a recordset object.
To create these two COM objects, once again use the New-Object cmdlet. The code that
creates these two objects is shown here:
$objConnection = new-Object -ComObject ADODB.Connection
$objRecordSet = new-object -ComObject ADODB.Recordset
After opening the connection and recordset objects, it’s time to open the connection to the data-
base. When doing this, you must supply the name of the provider and the datasource.
The datasource is the database you’ll be working with. The datasource includes the name of
the database and the path to the database. The provider is specific to the database you are
trying to connect to. Since you are working with an Access database, you must use the
Microsoft.Jet.OLEDB.4.0 provider. The line of code that opens the connection to the database
is shown here:
$objConnection.Open("Provider = Microsoft.Jet.OLEDB.4.0; `
Data Source= $strDB")
C05622791.fm Page 127 Saturday, December 8, 2007 6:34 PM
128 Windows PowerShell Scripting Guide
After the connection to the database is open, you can open the recordset. To open it, specify
four parameters: the query, the connection, the means for opening the database, and how to
handle concurrent connections. Here is the line of code for that portion of the script:
$objRecordSet.Open($strAccessQuery, `
$objConnection, $adOpenStatic, $adLockOptimistic)
After the connection and the recordset have been opened, print a friendly message to provide
feedback indicating that the script is running. To do this, use the Write-Host cmdlet and
use a yellow font. This is shown here:
write-host -foreGroundColor yellow "Obtaining share info ..."
Because the WMI query returns information about a collection of shares, you’ll need to
examine the collection in order to return information about a single share. To do this, use the
foreach statement. The collection of share information is stored in the variable $objService
and the enumerator is the variable $service. The enumerator, $service, is used to point to an
individual share as you look through the collection of shares. Use the $service variable to
retrieve the properties of each share, as shown here:
foreach ($service in $objService)
To obtain the information that will be written to the database, use the $service enumerator and
retrieve the values you’re interested in. Create variables that are similar to the property names
so you can easily keep track of the different properties. This portion of the code is shown here:
$blnAllowMaximum = $service.AllowMaximum
$strCaption = $service.Caption
$strDescription = $service.Description
$intMaximumAllowed = $service.MaximumAllowed
$strName = $service.name
$strPath = $service.path
$intType = $service.type
After the information has been retrieved from WMI, use the addNew() method from the
recordset object to add a new record to the database. This is shown here:
$objRecordSet.AddNew()
To provide a time stamp for when the data is retrieved, use the Get-Date cmdlet to capture the
current date and time. All other data that is written to the database is stored in individual
variables. Once the data has been pointed to the appropriate fields in the table, call the
update() method on the recordset object. This section of code is shown here:
$objRecordSet.Fields.item("TimeStamp") = Get-Date
$objRecordSet.Fields.item("strComputer") = $strComputer
$objRecordSet.Fields.item("strDomain") = $strDomain
$objRecordSet.Fields.item("blnAllowMaximum") = $blnAllowMaximum
$objRecordSet.Fields.item("strCaption") = $strCaption
$objRecordSet.Fields.item("strDescription") = $strDescription
C05622791.fm Page 128 Saturday, December 8, 2007 6:34 PM
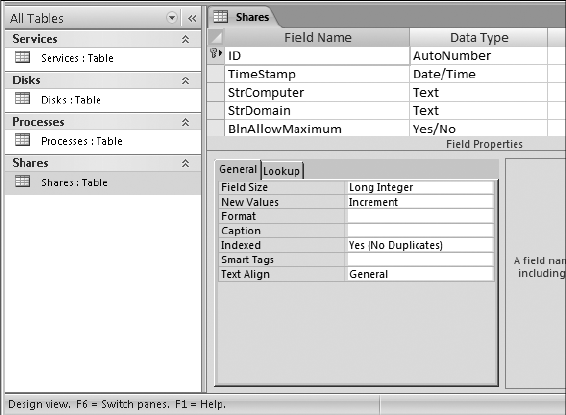
Chapter 5 Managing Shares 129
$objRecordSet.Fields.item("intMaximumAllowed") = $intMaximumAllowed
$objRecordSet.Fields.item("strName") = $strName
$objRecordSet.Fields.item("strPath") = $strPath
$objRecordSet.Fields.item("intType") = $intType
$objRecordSet.Update()
Each of the properties updated by the update() method corresponds to a field in the Access
database. The table from the database that matches this section of code is shown in Figure 5-7.
Figure 5-7 The shares schema of the share table shown in the previous code listing.
Use the Write-Host cmdlet to print a progress indicator. Write a forward slash and a back
slash (/\) for each item that is written to the database and use the -nonewline switch to keep
the slashes from printing in a list instead of a continuous line. This line of code is shown here:
write-host -foregroundColor yellow "/\" -noNewLine
When all of the data has been written to the database, close both the connection and the
record. This code is shown here:
$objRecordSet.Close()
$objConnection.Close()
The complete WriteSharesToAccess.ps1 script is shown here.
WriteSharesToAccess.ps1
$StrComputer = (New-Object -ComObject WScript.Network).computername
$StrDomain = (New-Object -ComObject WScript.Network).userDomain
$strWMIQuery = "Select * from win32_Share"
$objService = get-wmiobject -query $strWMIQuery
$adOpenStatic = 3
C05622791.fm Page 129 Saturday, December 8, 2007 6:34 PM
130 Windows PowerShell Scripting Guide
$adLockOptimistic = 3
$strDB = "c:\fso\ConfigurationMaintenance.mdb"
$strTable = "Shares"
$strAccessQuery = "Select * from $strTable"
$objConnection = new-Object -ComObject ADODB.Connection
$objRecordSet = new-object -ComObject ADODB.Recordset
$objConnection.Open("Provider = Microsoft.Jet.OLEDB.4.0; `
Data Source= $strDB")
$objRecordSet.Open($strAccessQuery, `
$objConnection, $adOpenStatic, $adLockOptimistic)
write-host -foreGroundColor yellow "Obtaining share info ..."
foreach ($service in $objService)
{
$blnAllowMaximum = $service.AllowMaximum
$strCaption = $service.Caption
$strDescription = $service.Description
$intMaximumAllowed = $service.MaximumAllowed
$strName = $service.name
$strPath = $service.path
$intType = $service.type
$objRecordSet.AddNew()
$objRecordSet.Fields.item("TimeStamp") = Get-Date
$objRecordSet.Fields.item("strComputer") = $strComputer
$objRecordSet.Fields.item("strDomain") = $strDomain
$objRecordSet.Fields.item("blnAllowMaximum") = $blnAllowMaximum
$objRecordSet.Fields.item("strCaption") = $strCaption
$objRecordSet.Fields.item("strDescription") = $strDescription
$objRecordSet.Fields.item("intMaximumAllowed") = $intMaximumAllowed
$objRecordSet.Fields.item("strName") = $strName
$objRecordSet.Fields.item("strPath") = $strPath
$objRecordSet.Fields.item("intType") = $intType
$objRecordSet.Update()
write-host -foregroundColor yellow "/\" -noNewLine
}
$objRecordSet.Close()
$objConnection.Close()
Auditing Shares
Shares, particularly user-configured shares, can be a source of insecure computing. Therefore,
it is incumbent upon network administrators to periodically audit shares on both work-
stations and servers to ensure that only authorized, properly configured shares are in use.
Depending on your auditing needs, you may inspect shares by producing a report from the
Access database examined earlier in this chapter to save your share information. Such a report
is shown in Figure 5-8.
C05622791.fm Page 130 Saturday, December 8, 2007 6:34 PM
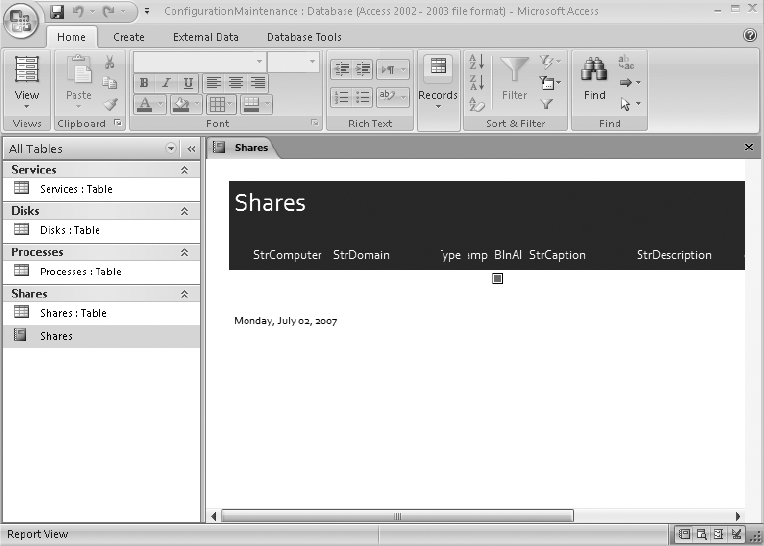
Chapter 5 Managing Shares 131
Figure 5-8 One of the strengths of Access is the ease of creating reports, such as this Shares report.
Another way to audit shares is to maintain a text file that lists the shares permitted on a
specific computer. This text file can be created using the WriteSharesToFile.ps1 script (assuming
that the computer is in a supported state at the time the script is run). An example of a text
file was shown previously in Figure 5-6. The text file can then be compared with the current
state of the computer, as we will see in a little bit.
Employing the inherent text-handling capabilities of Windows PowerShell, you can quickly
compare the list of current and desired shares. There are two tasks inherent in the auditing
task: ensuring that authorized shares are present and also ensuring that unauthorized shares
are not present.
Using CompareShares.ps1, you can compare existing shares to a text file of shares you want.
This script verifies that required shares are present, but does not detect unauthorized shares.
To create the CompareShares.ps1 script, first create a variable $strFile to hold the path to the
file holding the shares to be audited. Then, use the Get-Content cmdlet and read the contents
of the file. Pipeline the resulting object to the ForEach-Object cmdlet and use the trimend()
method from the System.String Microsoft .NET Framework class to ensure there is no
entrenched garbage on the end of the share name that is read from the Shares.txt file.
C05622791.fm Page 131 Saturday, December 8, 2007 6:34 PM
132 Windows PowerShell Scripting Guide
After you clean up the share name, use it in the WMI query that is submitted to the Get-
WmiObject cmdlet. Use the ForEach-Object cmdlet to determine whether the share listed in
the shares.txt file is still present. If it is present, print this information; otherwise, print a state-
ment that the share no longer exists.
The CompareShares.ps1 script is shown here.
CompareShares.ps1
$strFile = "c:\fso\shares.txt"
Get-Content $strFile |
foreach-object { $strShare = $_.trimend()
$strQuery = "Select * from win32_share where name ='$strShare'"
get-wmiobject -query $strQuery |
foreach-object `
{
if ($_.name )
{ Write-Host $_.name "is still present" }
ELSE
{ Write-Host -foregroundcolor RED $_.name `
" is no longer present" }
}
}
The CompareShares.ps1 script ensures that required shares are in existence on the service.
But then, there’s the opposite problem: detecting unauthorized shares. At first glance, the
situation seems to be very similar and should be rather easy to solve. It’s not as easy as it might
seem, however, as there is a dilemma when attempting to match a share name that ends in a
dollar sign. This is because of the way regular expressions perform matches. To solve this
issue, use the substring method from the System.String .NET Framework class. The substring
method takes two parameters: the first is the starting position and the second is the number
of characters to retrieve. Because each share name could be a different length, use the Length
property, subtract 1 from the length, and then retrieve the shortened share name.
In the AuditUnauthorizedShares.ps1 script, first use the Clear-Host cmdlet to clear the output
screen, then use the Get-Content cmdlet to retrieve the entire contents of the text file
containing the authorized shares. Store the contents of this file in the $strFile variable. Use the
variable $strQuery to hold the WMI query that retrieves all the shares that are defined on
the computer. Then execute the WMI query by using the Get-WmiObject cmdlet and use the
variable $shares to hold the management object that is returned.
Use the foreach statement to examine the collection of shares. Use the variable $share to
represent a single share from the collection of share objects, then use $shareName to retrieve
the share name from the share object and turn it into a string. After you have a string that
contains the share name, use the substring() method from the System.String .NET Framework
class to retrieve all characters in the share name except the last one. The two lines of code that
do this are shown here:
$shareName = $($share.name).tostring()
$shareName = $shareName.substring(0,$shareName.length-1)
C05622791.fm Page 132 Saturday, December 8, 2007 6:34 PM
Chapter 5 Managing Shares 133
Use the Write-Host cmdlet to print a progress indicator phrase that informs the user that you
are looking for a specific share. Because you have trimmed the share name, revert to using
the Name property from the share object. Print the message in yellow so it will be more visible.
If the share name from the computer system is found in the list of authorized shares, then a
string is printed in green. If, however, the share is not found in the list of authorized shares,
then you print the message in red. The complete AuditUnauthorizedShares.ps1 script is
shown here.
AuditUnauthorizedShares.ps1
Clear-Host
$strFile = Get-Content "c:\fso\shares.txt"
$strQuery = "Select * from win32_share"
$shares = get-wmiobject -query $strQuery
foreach ( $share in $shares)
{
$shareName = $($share.name).tostring()
$shareName = $shareName.substring(0,$shareName.length-1)
Write-Host "Searching for share $($share.Name) ..." -ForegroundColor yellow
if ( $strFile -match $shareName )
{ Write-Host "`t$($share.name) found" -foregroundcolor Green}
ELSE
{ Write-Host "`t$($share.Name) not found" -foregroundcolor red}
}
Modifying Shares
There are three items that can be modified on a share: the maximum number of allowed users,
the description, and the security settings. Two of these settings are very easy to modify:
description and maximum allowed users. Modifying the security setting is a bit more of a
challenge.
In the SetShareInfo.ps1 script, you create four variables that are used to hold information for
the script. The first, $shareName, holds the name of the share that will be modified. Because
WMI expects the name of the share to be enclosed in single quotes, include them here inside
the double quotes. The next variable that is created is $wmiClass, which is used to hold the
name of the WMI class to query. Since you are working with the Win32_Share class, this is
stored in the $wmiClass variable.
You now need to assign values for the parameters to modify. The first is the MaximumAllowed
property. This number is used to control simultaneous connections to the share.
The next property to be set is the description of the share. This property is a string and can be
used to document the reason for creating the share, which applications might use the share,
and even which user or department requested the share. You need to be aware, however, that
C05622791.fm Page 133 Saturday, December 8, 2007 6:34 PM

134 Windows PowerShell Scripting Guide
information typed in the Description property is visible on the network. It will show up in
network neighborhood, is visible if you use the Get-WmiObject Win32_Share command, and
will even show up in the remark column if someone types net share from a cmd prompt.
After you create the four variables, use the Get-WmiObject cmdlet to retrieve an instance of
the Win32_Share class. Use the -filter parameter to specify the name of the share you want to
work with. It is the share with the name stored in the $shareName variable. After retrieving a
specific share, call the setShareInfo method to assign values to the MaxAllowed and Description
properties of the class. Use the setShareInfo method to either assign a new value or modify
existing values.
When you call the setShareInfo method, you capture the return code in the variable $errRTN
and display the value of the ReturnValue property from the object that is returned. A 0
means there were no errors, which indicates the method call has completed successfully. This
is the value that is printed on the screen in the next line of code.
The completed SetShareInfo.ps1 script is shown here.
SetShareInfo.ps1
$shareName="'fso'"
$maxAllowed="5"
$description="Test"
$wmiClass="Win32_share"
$objService=Get-WmiObject -Class $wmiClass -filter "name=$shareName"
$errRTN=$objService.setShareInfo($maxAllowed,$description)
"Set share info completed with a return code of $($errRTN.returnvalue)"
Using Parameters with the Script
Although the previous script is useful and illustrates the procedure for modifying the share
description and maximum number of allowed users, it requires manually editing the script to
make changes. It may be useful to provide the ability to modify the way the script behaves
from the Windows PowerShell prompt. To do this, you must modify the script to use named
arguments. Named arguments in Windows PowerShell are called parameters.
Best Practices Because the main values for the SetShareInfo.ps1 script are already stored
in variables instead of hard-coded into the method call, it is not difficult to add the parameter
functionality to the script. When creating scripts, I do not like to place values directly into
the “worker section” of the script. I place everything into variables and then use the variables
in the method and function calls. While this is a little bit more work up front, it adds a
tremendous amount of flexibility to the script and makes it much easier to use the code to
create other, more complex scripts. For more information about the proper structure of
scripts and best practices for development, see Microsoft VBScript Step by Step (Microsoft
Press, 2006).
C05622791.fm Page 134 Saturday, December 8, 2007 6:34 PM

Chapter 5 Managing Shares 135
To convert the SetShareInfo.ps1 script into one that accepts parameters from the Windows
PowerShell prompt, begin by using the param keyword. Take the first three variables: $share-
Name, $maxAllowed, and $description, and move them inside the smooth parentheses used
by the param statement. For this script, keep the values previously assigned to the three
variables as these will become the default values for the script. If you don’t supply a value to
the parameter when you run the script, it will use the default value for that parameter. If
you don’t supply values for any parameters, the script will run as when it was the SetShare-
Info.ps1 script. The modified line of code is shown here:
param($shareName="'fso'", $maxAllowed=5, $description="Test script")
The complete SetShareInfoWithParameters.ps1 script follows:
SetShareInfoWithParameters.ps1
param($shareName="'fso'", $maxAllowed=5, $description="Test script")
$wmiClass="Win32_share"
$objService=Get-WmiObject -Class $wmiClass -filter "name=$shareName"
$errRTN=$objService.setShareInfo($maxAllowed,$description)
"Set share info completed with a return code of $($errRTN.returnvalue)"
Translating the Return Code
The last procedure you might want to perform when setting share information is to translate
the return code. This will make it easier to understand whether there is a problem with
script execution. Using a function to contain the logic for the translation of the return code
keeps the main body of the script clean and clutter-free.
More Info The values for the return code from calling the setShareInfo method on the
Win32_Share WMI class can be easily found in the Windows SDK. The Windows SDK can be
downloaded from http://www.microsoft.com/downloads, or it can be accessed online through
http://msdn2.microsoft.com/en-us/default.aspx.
The SetShareInfoWithParametersTranslateRtnValue.ps1 script starts with the param statement.
The param statement is used to provide the ability to the script to receive named command-
line arguments. Each variable begins with the dollar sign, and is assigned a value. If the
parameter is present on the command line, then any specified value will override the default
values detailed in the param statement. If, however, a parameter is left out, the script will
utilize the value that is listed in the param statement for the parameter. A positive feature of
the param statement is that you have complete freedom in the script. You can use none or all
of the command-line parameters. Of course, you can use any number of parameters in
between as well.
C05622791.fm Page 135 Saturday, December 8, 2007 6:34 PM
136 Windows PowerShell Scripting Guide
The function in the SetShareInfoWithParametersTranslateRtnValue.ps1 script is named
funlookup, and it accepts a single integer as input. When the funlookup function is called, you
pass the ReturnValue from the function to funlookup as the input parameter as shown here:
funlookup($errRTN.returnValue)
The body of the funlookup function is a switch statement that prints the meaning of the return
value that is contained inside the function within the $intIN variable. If no match is found
for the return code, the default string is displayed; this includes the error code received and a
string that indicates no match was found for the code. The funlookup function is shown here:
Function funlookup($intIN)
{
Switch($intIN)
{
0 { "Success" }
2 { "Access denied" }
8 { "Unknown failure" }
9 { "Invalid name" }
10 { "Invalid level" }
21 { "Invalid parameter" }
22 { "Duplicate share" }
23 { "Redirected path" }
24 { "Unknown device or directory" }
25 { "Net name not found" }
DEFAULT { "$intIN is an Unknown value" }
}
}
The complete SetShareInfoWithParametersTranslateRtnValue.ps1 script follows.
SetShareInfoWithParametersTranslateRtnValue.ps1
param($shareName="'fso'", $maxAllowed=5, $description="Test script")
Function funlookup($intIN)
{
Switch($intIN)
{
0 { "Success" }
2 { "Access denied" }
8 { "Unknown failure" }
9 { "Invalid name" }
10 { "Invalid level" }
21 { "Invalid parameter" }
22 { "Duplicate share" }
23 { "Redirected path" }
24 { "Unknown device or directory" }
25 { "Net name not found" }
DEFAULT { "$intIN is an Unknown value" }
}
}
C05622791.fm Page 136 Saturday, December 8, 2007 6:34 PM

Chapter 5 Managing Shares 137
$wmiClass="Win32_share"
$objService=Get-WmiObject -Class $wmiClass -filter "name=$shareName"
$errRTN=$objService.setShareInfo($maxAllowed,$description)
#"Set share info completed with a return code of $($errRTN.returnvalue)"
funlookup($errRTN.returnValue)
Creating New Shares
To create new shares, continue to use the Win32_Share WMI class. This time, try a different
method: the create method from the Win32_Share WMI class. To do this, rather than the
Get-WmiObject cmdlet, you retrieve a new instance of the Win32_Share class by using
the [wmiclass] type accelerator. When using [wmiclass] you are working with an instance
of the System.Management.ManagementObject .NET Framework class.
In creating the CreateShare.ps1 script, once again use the param statement to specify named
parameters to the script. There are four parameters as options to the script: the folderpath, the
sharename, the maxallowed, and the description. In the param statement, supply default values
for both the maxallowed parameter and the description parameter, using this line of code:
param($folderPath, $shareName, $maxAllowed=5, $description="Created by PowerShell")
Important When using the param statement to pass arguments to the script, you are
using parameters. Parameters are not the same as arguments, although in a generic sense,
parameters can be referred to as named arguments. However, they will not show up in the
$args automatic variable. The $args automatic variable holds arguments that are supplied to
the script. When using param in the CreateShare.ps1 script, $args is always 0 in length. If
parameters were the same as arguments, then $args would show how many parameters are
supplied to the script.
To ensure that the two required parameters are supplied to the script, use two if statements.
These two lines of code are located after both of the function definitions. If the parameter is
not supplied to the script, then the variable that holds the named parameter will not be
present. This is what you test. If the parameter is not present, print an error message that is
specific to the missing parameter and also print the help for the script by calling the funhelp
function. These two lines of code are shown here:
if(!($folderpath)) { "you must supply a path" ; funHelp }
if(!($sharename)) { "you must supply a name" ; funHelp }
In the funhelp function you can do three things. First, you use a here string to simplify typing
an extensive help topic (one that includes documentation for all parameters and also several
examples of the required syntax for the script). The second function performed in the funhelp
C05622791.fm Page 137 Saturday, December 8, 2007 6:34 PM
138 Windows PowerShell Scripting Guide
function is to print the text contained in the here string, which is assigned to the helpText
variable. The third use of the funhelp function is to exit the script. The funhelp function follows:
$helpText=@"
NAME: CreateShare.ps1
Creates a share on a local machine using default permissions
The folder to be shared does not need to exist as the script
checks for the existence of the folder and will create it if
it is not present
PARAMETERS:
-folderPath Specifies the path to the folder you wish to share
-shareName Specifies the name to assign to the share
-maxAllowed [optional] the maximum number of connections
-description [optional] description of the share (notes, reason etc)
SYNTAX:
CreateShare.ps1 -folderPath "c:\fso" -shareName "fso"
Creates a share of the folder c:\fso and gives it the name fso
5 people will be allowed to access the share, and it has a
description of Created by PowerShell
CreateShare.ps1 -folderPath "c:\fso" -shareName "fso" -maxAllowed 1
Creates a share of the folder c:\fso and gives it the name fso
1 person will be allowed to access the share, and it has a
description of Created by PowerShell
CreateShare.ps1 -folderPath "c:\fso" -shareName "fso" -maxAllowed 3
-description "fso share"
Creates a share of the folder c:\fso and gives it the name fso
3 people will be allowed to access the share, and it has a
description of fso share
"@
$helpText
exit
}
If the folder to be shared is not on the computer, create the folder. The code that does this first
uses the Test-Path cmdlet to discover if the path is present or not. If it is not present, then
print a message stating that you are creating the folder, and then use the New-Item cmdlet to
create the missing folder. The code that performs this function is shown here:
if(!(Test-Path $folderPath))
{
"Creating $folderPath ..."
New-Item -Path $folderPath -type directory
}
C05622791.fm Page 138 Saturday, December 8, 2007 6:34 PM
Chapter 5 Managing Shares 139
After you have verified the existence of the required parameters and of the folder to be shared,
it is time (finally!) to create the share. To do this, you first must create a new instance of
the Win32_Share class. Once this is done, use the create method from the Win32_Share WMI
class. The easiest way to do this is to use the [wmiclass] type accelerator to create the class and
store it within a variable. You then can call the method with the required parameters. To
simplify the process, you have all the parameters listed in variables (except for the security
option). These two lines of code are shown here:
$objWMI = [wmiClass]$class
$errRTN=$objWMI.create($folderPath, $shareName, $Type, $MaxAllowed, $description)
When calling methods, there is always a chance for a mishap. Because of this, it makes sense
to capture the error object that is created by the method. Use the variable $errRTN to hold
the error object and pass the return value to the funlookup function. This function will
translate both the return value and the coded value into a more easily understood string. This
function is shown here:
Function funlookup($intIN)
{
Switch($intIN)
{
0 { "Success" }
2 { "Access denied" }
8 { "Unknown failure" }
9 { "Invalid name" }
10 { "Invalid level" }
21 { "Invalid parameter" }
22 { "Duplicate share" }
23 { "Redirected path" }
24 { "Unknown device or directory" }
25 { "Net name not found" }
DEFAULT { "$intIN is an Unknown value" }
}
}
The completed CreateShare.ps1 script follows. To run the script, you must supply values for
both the folder location and the name of the share to create. You also can specify the
maxallowed value and the description for the share as well. If you run the script with no
parameters, it will print the help message, which details the parameters and provides several
examples of usage.
CreateShare.ps1
param($folderPath, $shareName, $maxAllowed=5, $description="Created by PowerShell")
function funHelp()
{
$helpText=@"
NAME: CreateShare.ps1
C05622791.fm Page 139 Saturday, December 8, 2007 6:34 PM
140 Windows PowerShell Scripting Guide
Creates a share on a local machine using default permissions
The folder to be shared does not need to exist as the script
checks for the existence of the folder and will create it if
it is not present
PARAMETERS:
-folderPath Specifies the path to the folder you wish to share
-shareName Specifies the name to assign to the share
-maxAllowed [optional] the maximum number of connections
-description [optional] description of the share (notes, reason etc)
SYNTAX:
CreateShare.ps1 -folderPath "c:\fso" -shareName "fso"
Creates a share of the folder c:\fso and gives it the name fso
5 people will be allowed to access the share, and it has a
description of Created by PowerShell
CreateShare.ps1 -folderPath "c:\fso" -shareName "fso" -maxAllowed 1
Creates a share of the folder c:\fso and gives it the name fso
1 person will be allowed to access the share, and it has a
description of Created by PowerShell
CreateShare.ps1 -folderPath "c:\fso" -shareName "fso" -maxAllowed 3
-description "fso share"
Creates a share of the folder c:\fso and gives it the name fso
3 people will be allowed to access the share, and it has a
description of fso share
"@
$helpText
exit
}
Function funlookup($intIN)
{
Switch($intIN)
{
0 { "Success" }
2 { "Access denied" }
8 { "Unknown failure" }
9 { "Invalid name" }
10 { "Invalid level" }
21 { "Invalid parameter" }
22 { "Duplicate share" }
23 { "Redirected path" }
24 { "Unknown device or directory" }
25 { "Net name not found" }
DEFAULT { "$intIN is an Unknown value" }
}
}
C05622791.fm Page 140 Saturday, December 8, 2007 6:34 PM
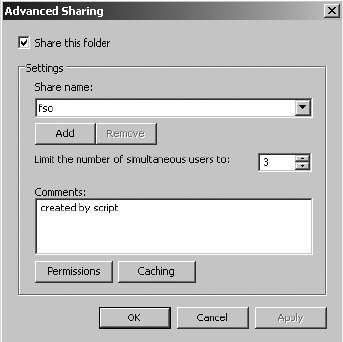
Chapter 5 Managing Shares 141
if(!($folderpath)) { "you must supply a path" ; funHelp }
if(!($sharename)) { "you must supply a name" ; funHelp }
$class = "Win32_share"
$Type = 0
if(!(Test-Path $folderPath))
{
"Creating $folderPath ..."
New-Item -Path $folderPath -type directory
}
$objWMI = [wmiClass]$class
$errRTN=$objWMI.create($folderPath, $shareName, $Type, $MaxAllowed, $description)
funLookup($errRTN.returnValue)
Once the share is complete, it looks like the share found in Figure 5-9.
Figure 5-9 An example of a share created using the CreateShare.ps1 script.
Creating Multiple Shares
There may be times when you need to create multiple shares simultaneously. One way to
do this is to modify the CreateShare.ps1 script to accept multiple share names and folder
names from the command line. To do this, use the CreateMultipleShares.ps1 script.
CreateMultipleShares.ps1
param($folderPath, $shareName, $maxAllowed=5, $description="Created by PowerShell")
function funHelp()
{
$helpText=@"
NAME: CreateMultipleShares.ps1
Creates multiple shares on a local machine using default permissions
The folder to be shared does not need to exist as the script
checks for the existence of the folder and will create it if
C05622791.fm Page 141 Saturday, December 8, 2007 6:34 PM
142 Windows PowerShell Scripting Guide
it is not present
PARAMETERS:
-folderPath Specifies the path to the folder you wish to share
-shareName Specifies the name to assign to the share
-maxAllowed [optional] the maximum number of connections
-description [optional] description of the share (notes, reason etc)
SYNTAX:
CreateMultipleShares.ps1 -folderPath "c:\fso", "c:\fso1" `
-shareName "fso", "fso1"
Creates two shares of the folder c:\fso, and c:\fso1 and
gives it the name fso, and fso1 5 people will be allowed
to access the shares, and they have a description of
Created by PowerShell
CreateMultipleShares.ps1 -folderPath "c:\fso", "c:\fso1 `
-shareName "fso", "fso1" -maxAllowed 1
Creates two shares of the folder c:\fso, and c:\fso1 and
gives it the name fso and fso1 1 person will be allowed
to access the shares, and they have a description of
Created by PowerShell
CreateMultipleShares.ps1 -folderPath "c:\fso", "c:\fso1", "c:\fso2" `
-shareName "fso", "fso1", "fso2" -maxAllowed 3 -description "fso share"
Creates three shares of the folder c:\fso, c:\fso1, c:\fso2
and gives it the name fso, fso1, fso2 3 people will be allowed
to access the shares, and they have a description of fso share
"@
$helpText
exit
}
Function funlookup($intIN)
{
Switch($intIN)
{
0 { "Success" }
2 { "Access denied" }
8 { "Unknown failure" }
9 { "Invalid name" }
10 { "Invalid level" }
21 { "Invalid parameter" }
22 { "Duplicate share" }
23 { "Redirected path" }
24 { "Unknown device or directory" }
25 { "Net name not found" }
DEFAULT { "$intIN is an Unknown value" }
}
}
C05622791.fm Page 142 Saturday, December 8, 2007 6:34 PM
Chapter 5 Managing Shares 143
if(!($folderpath)) { "you must supply a path" ; funHelp }
if(!($sharename)) { "you must supply a name" ; funHelp }
$class = "Win32_share"
$Type = 0
$iLength = $folderPath.length-1
for($i=0;$i -le $iLength;$i++)
{
if(!(Test-Path $folderPath[$i]))
{
"Creating $folderPath ..."
New-Item -Path $folderPath[$i] -type directory
}
$objWMI = [wmiClass]$class
$folder= $folderPath[$i]
$share= $shareName[$i]
$errRTN=$objWMI.create($folder, $share, $Type, $MaxAllowed, $description)
funLookup($errRTN.returnValue)
}
Deleting Shares
To delete a share using a Windows PowerShell script, you once again use the Win32_Share
WMI class. As you may already suspect, the method you use is named delete.
The DeleteShare.ps1 script begins by using the param keyword to provide command-line
input. One parameter is required—the name of the share to delete. The computername parameter
will use localhost if a value is not specified, and will allow you to delete a local share. This
line of code is shown here:
Param($shareName, $computerName="localhost")
When the script is run, it first evaluates the command-line parameters; the next line of code
that is processed checks for the existence of the shareName parameter. If the shareName
parameter is not supplied to the script, a message prints that the parameter is missing, and the
script calls the funhelp function. This line of code is shown here:
if(!($ShareName)) { "you must supply a shareName" ; funHelp }
The funhelp function uses a here string to simplify typing and punctuation. The entire here
string is assigned to the $helpText variable, which is printed prior to exiting the script. This
function, shown here, is called only if there’s a missing shareName parameter:
function funHelp()
{
$helpText=@"
NAME: DeleteShare.ps1
C05622791.fm Page 143 Saturday, December 8, 2007 6:34 PM
144 Windows PowerShell Scripting Guide
Deletes a share on a local or remotemachine using credentials
of logged on user
PARAMETERS:
-shareName Specifies the name of the share
-computerName [optional] the name of computer containing share
SYNTAX:
DeleteShare.ps1 -shareName "fso"
Deletes a share named fso on local computer
DeleteShare.ps1 -shareName "fso" -computerName "london"
Deletes a share named fso on a remote computer named london
"@
$helpText
exit
}
To delete the share, use the delete method from the Win32_Share WMI class. This section of
code is shown here:
$objWMI= Get-WmiObject -Class $wmiClass -computername $computerName `
-filter "Name = '$shareName'"
$objWMI.delete()
The DeleteShare.ps1 script is shown here.
DeleteShare.ps1
Param($shareName, $computerName="localhost")
function funHelp()
{
$helpText=@"
NAME: DeleteShare.ps1
Deletes a share on a local or remotemachine using credentials
of logged on user
PARAMETERS:
-shareName Specifies the name of the share
-computerName [optional] the name of computer containing share
SYNTAX:
DeleteShare.ps1 -shareName "fso"
Deletes a share named fso on local computer
DeleteShare.ps1 -shareName "fso" -computerName "london"
Deletes a share named fso on a remote computer named london
C05622791.fm Page 144 Saturday, December 8, 2007 6:34 PM
Chapter 5 Managing Shares 145
"@
$helpText
exit
}
if(!($ShareName)) { "you must supply a shareName" ; funHelp }
$wmiClass = "Win32_Share"
$objWMI= Get-WmiObject -Class $wmiClass -computername $computerName `
-filter "Name = '$shareName'"
$objWMI.delete()
Deleting Only Unauthorized Shares
As part of Desired Configuration Maintenance (DCM), it is important to control the shares
defined on a server or workstation. All shares should be approved and configured in a
standard mechanism. If they are not authorized then they should be removed. Earlier in this
chapter, you collected a list of the shares to define on your computer (WriteSharesToFile.ps1).
Later, you compared the contents of the text file that is produced to the current configuration
of the share, and printed the results (AuditUnauthorizedShares.ps1). However, to maintain
the desired configuration of your server, you must remove all unauthorized shares. To do this,
modify the AuditUnauthorizedShares.ps1 script to delete the unauthorized shares, rather
than just auditing them.
The only change made to the script (other than a message about deleting the unauthorized
share) is to add code to the else clause of the if ... else statement that performs the share
deletion. This code is shown here. Notice that this is essentially the same code as the Delete-
Share.ps1 script.
$wmiClass = "Win32_Share"
$objWMI= Get-WmiObject -Class $wmiClass -filter "Name = '$($share.Name)'"
$objWMI.delete()
The completed DeleteUnauthorizedShares.ps1 script follows.
DeleteUnauthorizedShares.ps1
Clear-Host
$strFile = Get-Content "c:\fso\shares.txt"
$strQuery = "Select * from win32_share"
$shares = get-wmiobject -query $strQuery
foreach ( $share in $shares)
{
$shareName = $($share.name).tostring()
$shareName = $shareName.substring(0,$shareName.length-1)
Write-Host "Searching for share $($share.Name) ..." -ForegroundColor yellow
if ( $strFile -match $shareName )
{ Write-Host "`t$($share.name) found" -foregroundcolor Green}
C05622791.fm Page 145 Saturday, December 8, 2007 6:34 PM
146 Windows PowerShell Scripting Guide
ELSE
{
Write-Host "`t$($share.Name) not authorized. Deleting now ..."
-foregroundcolor red
$wmiClass = "Win32_Share"
$objWMI= Get-WmiObject -Class $wmiClass -filter "Name = '$($share.Name)'"
$objWMI.delete()
}
}
Summary
In this chapter we examined the steps involved in managing shares. We first looked at
documenting the current shares on the computer—both user-defined and automatic or admin-
istrative shares. We next looked at the steps involved in creating new shares, organizational
policy concerning shares, and specific server settings related to sharing. The chapter also
examined share auditing and how to remove unauthorized shares.
C05622791.fm Page 146 Saturday, December 8, 2007 6:34 PM

147
Chapter 6
Managing Printing
After completing this chapter, you will be able to:
■Inventory printers.
■Install and manage printer drivers.
■Share printers.
On the Companion Disc All the scripts used in this chapter are located on the CD that
accompanies this book in the \scripts\chapter06 folder.
Inventorying Printers
Who knows how many printers are installed on their network? Who can keep up with the
individually shared printers that show up in workgroups or small offsite offices? With
no disrespect to print device makers, the management of printers is, for most network
administrators, a major problem.
For many professionals, this seemingly simple task can prove daunting. However, by judicious
application of Windows PowerShell and Windows Management Instrumentation (WMI)
you can rapidly bring sanity and order to the chaos. A script that illustrates this is the List-
Printers.ps1 script. In the ListPrinters.ps1 script you use the variable $class to hold the string
Win32_Printer that is used in the WMI query. Use the variable $computer to hold the name of
the computer to query for printers. The $wmi variable is used to hold the objects that are
returned from the Get-WmiObject query that is used to retrieve the information about
printers on the computer defined in the $computer variable. The printers retrieved in the
ListPrinters.ps1 script are the same ones that show up in the Printers applet in Control Panel,
as illustrated in Figure 6-1.
After the objects are returned from WMI by the Get-WmiObject cmdlet, use the Format-Table
cmdlet to format the output. In the Format-Table cmdlet, use the -property argument to
choose the properties to include in your report. In this example, choose the Name, System-
Name, and ShareName properties. Use the -groupby argument to group the output by driver.
The -inputobject argument is used to provide input to the cmdlet. In this example, use the
object that was created as a result of the Get-WmiObject cmdlet. This is contained in the
variable $wmi. The completed ListPrinters.ps1 script is shown here.
C06622791.fm Page 147 Saturday, December 8, 2007 6:36 PM
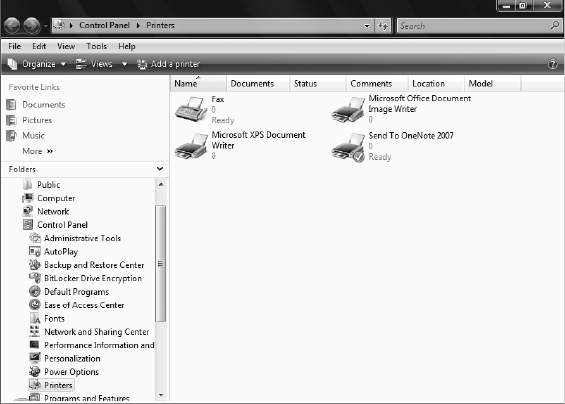
148 Windows PowerShell Scripting Guide
ListPrinters.ps1
$class = "win32_printer"
$computer = "localhost"
$wmi = Get-WmiObject -Class $class -computername $computer
format-table -Property name, systemName, shareName -groupby driverName `
-inputobject $wmi -autosize
Figure 6-1 Printers defined on a computer running Windows Vista, as shown in Control Panel.
A sample output from the ListPrinters.ps1 script follows. Note that each listing is preceded
with the driver name. This is a result of using the -groupby argument. This can have significant
advantages when the script is run against a busy print server that contains multiple printers.
driverName: Microsoft XPS Document Writer
name systemName shareName
---- ---------- ---------
Microsoft XPS Document Writer M5-1875135
driverName: IBM 4029 LaserPrinter PS39
name systemName shareName
---- ---------- ---------
IBM 4029 LaserPrinter PS39 M5-1875135
Querying Multiple Computers
There may be times when you need to query multiple computers or servers at the same time.
The easiest way to do this is to modify the ListPrinters.ps1 script and add the capability to
C06622791.fm Page 148 Saturday, December 8, 2007 6:36 PM
Chapter 6 Managing Printing 149
include more than one computer name for the target of operation. To enable this, you must
change the way you handle the $computer variable. To facilitate iterating through an array of
computer names, use the foreach statement and $computer as the enumerator. So that you
don’t have to make a lot of script changes, create a new variable named $arycomputer and
use it to hold the list of computer names for the query. Add a foreach statement and use it to
examine the collection of computer names typed in for the $arycomputer variable. The
completed ListPrintersFromMultipleComputers.ps1 script follows.
ListPrintersFromMultipleComputers.ps1
$class = "win32_printer"
$arycomputer = "localhost", "loopback"
foreach( $computer in $aryComputer)
{
Write-Host "Retrieving printers from $computer ..."
$wmi = Get-WmiObject -Class $class -computername $computer
format-table -Property name, systemName, shareName -groupby driverName `
-inputobject $wmi -autosize
}
Each time the ListPrintersFromMultipleComputers.ps1 script is run, it will connect to each
computer that is listed in the $arycomputer variable. Because this may be a large number of
computers, you need a way to uniquely identify which printers are associated with which
computers. To do this, use the Write-Host cmdlet and print the value of $comptuer before
obtaining the listing of printers for the computer. The resulting output follows, and
Figure 6-2 shows sample printer properties.
Retrieving printers from localhost ...
driverName: Microsoft XPS Document Writer
name systemName shareName
---- ---------- ---------
Microsoft XPS Document Writer M5-1875135
driverName: IBM 4029 LaserPrinter PS39
name systemName shareName
---- ---------- ---------
IBM 4029 LaserPrinter PS39 M5-1875135
Retrieving printers from loopback ...
driverName: Microsoft XPS Document Writer
name systemName shareName
---- ---------- ---------
C06622791.fm Page 149 Saturday, December 8, 2007 6:36 PM
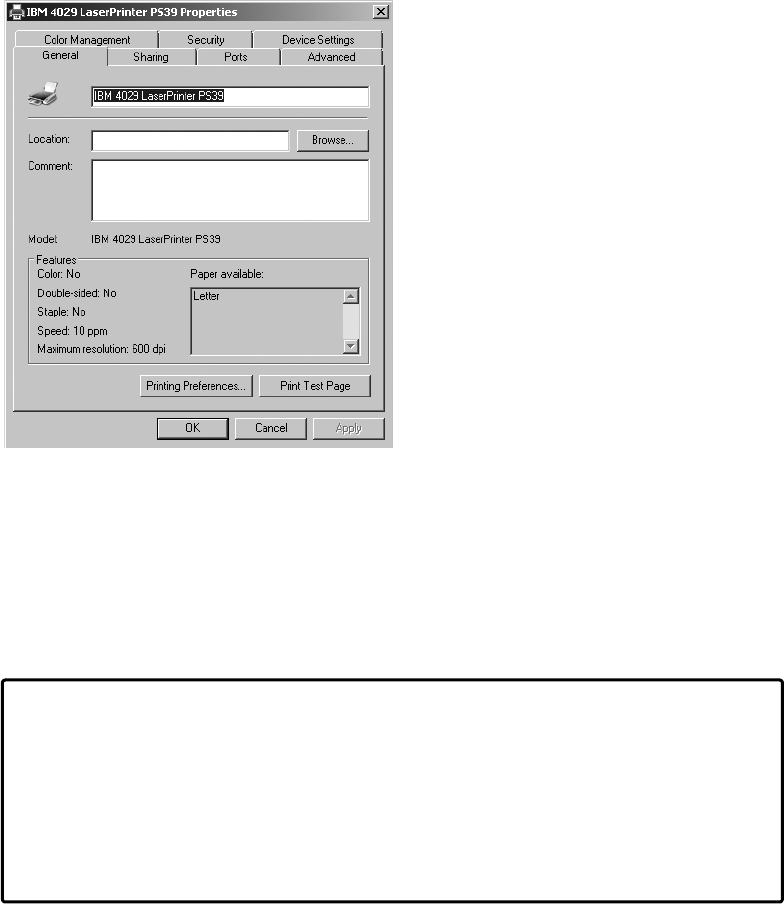
150 Windows PowerShell Scripting Guide
Microsoft XPS Document Writer M5-1875135
driverName: IBM 4029 LaserPrinter PS39
name systemName shareName
---- ---------- ---------
IBM 4029 LaserPrinter PS39 M5-1875135
Figure 6-2 An example of printer properties.
Logging to a File
To keep the information gathered from the WMI query in a more permanent fashion, write
the information to a text file. There are also other advantages. An ASCII text file is easy to use,
takes very little space, and can be interchanged with various applications, including Microsoft
Office productivity applications.
Working with Files
Windows PowerShell has a number of cmdlets that facilitate interoperating with text
files including Get-Content, which reads the content of a file, and Out-File, which cre-
ates text files. Text files offer the advantage of being lightweight and easily created,
modified, and deleted. The cmdlets built into Windows PowerShell make working
with text files even easier. A summary of text file manipulation cmdlets appears in
Table 6-1.
C06622791.fm Page 150 Saturday, December 8, 2007 6:36 PM

Chapter 6 Managing Printing 151
In the ListPrintersFromMultipleComputersWriteToFile.ps1 script, first declare a variable
$filePath that is used to hold the path to the file you create when using the Out-File cmdlet.
Use the variable $class to hold the WMI class you use to retrieve the printer information. The
WMI class used in this script is the Win32_Printer class. Create an array to hold the computer
you connect to, and then query for printers. In this example, use two names that refer to the
local computer: localhost and loopback. These are convenient computer names to use when
testing a script against multiple computers.
To work through the array, use the foreach statement. Create a variable $computer to use as the
enumerator as you work through all the computers defined in the $aryComputer array of
computer names. Once you have the enumerator, use the Write-Host cmdlet to print a status
message that lets you know which computer you are connecting to, and that you are retrieving
printer information from the computer.
Use the Get-WmiObject cmdlet to connect to the WMI service on the computer and retrieve
the printer information. When you use the Get-WmiObject cmdlet, specify the name of the
WMI class to use and the name of the computer to connect to. Store the WMI management
object that is returned within the $wmi variable.
The WMI management object is supplied to the Format-Table cmdlet with the -inputobject
parameter. Choose the name, SystemName, and ShareName properties from the management
object. Group the list by driver name and specify the -autosize parameter to make a nicely
formatted table. Pipeline the resulting object to the Out-File cmdlet and specify the path
stored in the $filePath variable to the -filepath parameter. Use the -encoding parameter
because you want the file encoded as pure ASCII. The completed ListPrintersFromMultiple-
ComputersWriteToFile.ps1 script is shown here.
ListPrintersFromMultipleComputersWriteToFile.ps1
$filePath = "c:\fso\printers.txt"
$class = "win32_printer"
Table 6-1 File Manipulation Cmdlets
Cmdlet Use
Out-File Creates files. Can change the width of the file and can use different
encoding schemes: Unicode, UTF 7,8,32, BigEndianUnicode, and
ASCII. Default scheme is Unicode.
Get-Content Returns a stream of data from a file. Reads the file one line at a
time and returns a different object for each line. Can also specify
credentials and encoding if required.
Add-Content Adds text to a file.
Set-Content Overwrites text to a file. Set-Content can be used to add the initial
content to a file if desired.
Clear-Content Deletes data in a file, but does not destroy the file itself.
C06622791.fm Page 151 Saturday, December 8, 2007 6:36 PM
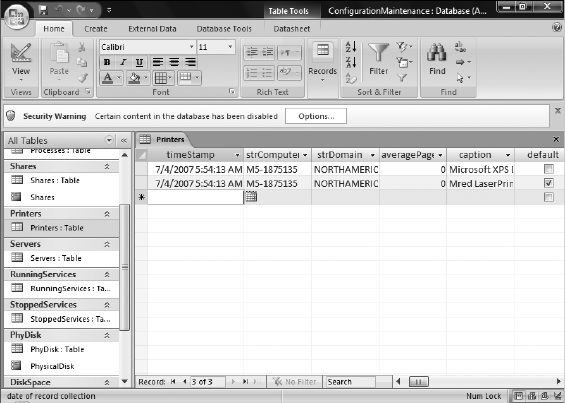
152 Windows PowerShell Scripting Guide
$arycomputer = "localhost", "loopback"
foreach( $computer in $aryComputer)
{
Write-Host "Retrieving printers from $computer ..."
$wmi = Get-WmiObject -Class $class -computername $computer
format-table -Property name, systemName, shareName -groupby driverName `
-inputobject $wmi -autosize | Out-File -FilePath $filePath -encoding ASCII
}
Writing to a Microsoft Access Database
To continue with the theme of employing database technology (continued from Chapter 4,
“Managing Services”) to store configuration information, once again use an Access database to
store the printer information. The database format in Access is shown in Figure 6-3.
Figure 6-3 Access database table design view.
While you are in Access designing your table, look at the report designer as well. It is possible
that something in the report layout might dictate how you decide to store the information in
the database. The Access report designer is shown in Figure 6-4.
In the WritePrinterInfoToAccess.ps1 script, first create a variable $strComputer to hold the
computer name. To obtain the name of the computer, create an instance of the wshNetwork
object by using the New-Object cmdlet. The wshNetwork object is a COM object with the
program ID of wscript.network. We use smooth parentheses to force the creation of the COM
object first, and then choose the ComputerName property. This computer name is then held in
the $strComputer variable.
C06622791.fm Page 152 Saturday, December 8, 2007 6:36 PM
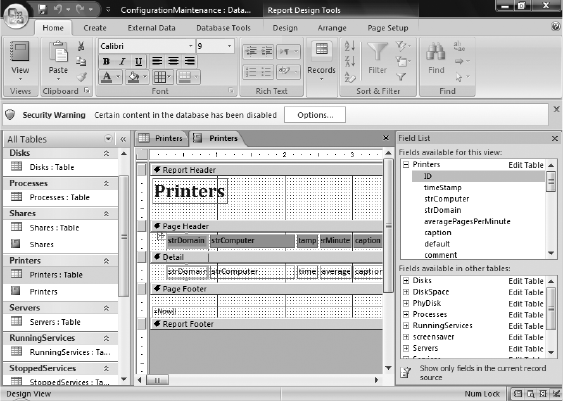
Chapter 6 Managing Printing 153
Next use the same object and the same methodology to retrieve the domain name. The
domain name is stored in the UserDomain property of the wshNetwork object. Once the data is
retrieved, store the value of the UserDomain property in the $strDomain variable. Create the
variable $strWMIQuery to hold the text representing the query you submit to WMI. The WMI
query chooses all the properties associated with printer objects.
Figure 6-4 The Access database report designer aids in the layout of report fields.
Create the $adOpenStatic and the $adLockOptimistic variables to determine the methodology
used to connect to the database. Use the $strDB variable to hold the path to the database.
Because you are going to work with an Access database, specify the actual path to the
.mdb file. The variable $strTable is used to hold the name of the table to which you write
the data.
To make a connection to the Access database and write to it, you must create two COM
objects. The first object needed is a connection object. This object provides the ability to open
the database. Specify the ADODB.Connection program ID to the New-Object cmdlet when
creating an instance of the connection object. The variable $objConnection is used to hold the
object returned by the New-Object cmdlet.
The next COM object to be created is the recordset object. Specify the ADODB.RecordSet
program ID to the New-Object cmdlet when creating the recordset object. Use the
$objRecordset variable to hold the object returned by the New-Object cmdlet.
After the connection and recordset objects are created, it’s time to begin the process of “wiring-
up” the connection. The first step is to open the connection to the database. To do this, specify
two elements: the provider and the path to the database file. Use a Jet OLEDB provider when
C06622791.fm Page 153 Saturday, December 8, 2007 6:36 PM
154 Windows PowerShell Scripting Guide
opening a connection to an Access database. The command that opens the connection to the
database is shown here:
$objConnection.Open("Provider = Microsoft.Jet.OLEDB.4.0; `
Data Source= $strDB")
After the connection to the database has been made, use the open method from the recordset
object. The open method needs four parameters: the -query, the -connection, the -means, and
the -locking parameters. These parameters are shown here:
$objRecordSet.Open("SELECT * FROM $strTable", `
$objConnection, $adOpenStatic, $adLockOptimistic)
After opening the connection to the database, use the Write-Host cmdlet to print a status
message that informs the user you are obtaining printer information. Use the -foregroundcolor
parameter to print the status message in yellow.
Color Parameters for Write-Host
There are 16 color values that can be specified for the Write-Host cmdlet. These colors
can be used for both the -foreground and the -background parameters. The judicious appli-
cation of color can add visual impact to your console output. There are times, however,
when you need to be careful. Because Windows PowerShell is very configurable, you can
never tell what someone may have defined as a console color setting. You may think that
using red for errors makes sense; however, I have observed users who have used red as
their background color. In that situation, if you choose red for errors, those important
error messages would be invisible to that user. There are two ways around this: One is to
define both a foreground and background color for status messages. Although this may
look rather ugly, it does make your messages visible. A more sophisticated approach is to
detect the background color of the console and then select a high-contrast setting that is
visually appealing. The color constant values that can be supplied to the Write-Host
cmdlet follow:
If you are unsure what the colors will look like against your chosen background color,
use the one-line script shown in Figure 6-5 to print all the colors against your current
background. This script, DemoWriteHostColors.ps1, is found in the extras folder on the
companion CD-ROM.
Black DarkBlue DarkGreen DarkCyan
DarkRed DarkMagenta DarkYellow Gray
DarkGray Blue Green Cyan
Red Magenta Yellow White
C06622791.fm Page 154 Saturday, December 8, 2007 6:36 PM
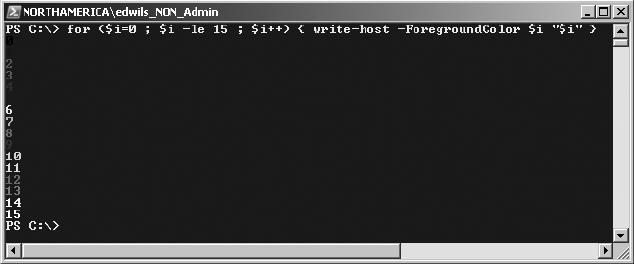
Chapter 6 Managing Printing 155
Figure 6-5 DemoWriteHostColors.ps1 script illustrates all the current colors available
to the Write-Host cmdlet.
After displaying a status message telling the user you are obtaining printer information, use
the foreach statement to iterate through the collection of printer objects. Use $printer as the
enumerator to hold your place as you examine the collection of printer objects. Open a code
block and use the addnew() method from the recordset object you created earlier. Use the item()
method to provide access to each field that is defined in the Access table you specified in the
query string. You must associate the data source from the WMI query with the appropriate
field in the database table. This section of code is rather long and could be easily munged.
Once you line up all the properties retrieved from WMI with the fields defined in the database
table, use the update() method to flush the information back to the Access database. This
section of code is shown here:
$objRecordSet.AddNew()
$objRecordSet.Fields.item("TimeStamp") = Get-Date
$objRecordSet.Fields.item("strComputer") = $strComputer
$objRecordSet.Fields.item("strDomain") = $strDomain
$objRecordSet.Fields.item("averagePagesPerMinute") =
` $printer.averagePagesPerMinute
$objRecordSet.Fields.item("caption") = $printer.caption
$objRecordSet.Fields.item("default") = $printer.default
$objRecordSet.Fields.item("comment") = $printer.comment
$objRecordSet.Fields.item("averagePagesPerMinute") = ` $printer.averagePagesPerMinute
$objRecordSet.Fields.item("description") = $printer.description
$objRecordSet.Fields.item("deviceID") = $printer.deviceID
$objRecordSet.Fields.item("direct") = $printer.direct
$objRecordSet.Fields.item("doCompleteFirst") = $printer.doCompleteFirst
$objRecordSet.Fields.item("driverName") = $printer.driverName
$objRecordSet.Fields.item("enableBIDI") = $printer.enableBIDI
$objRecordSet.Fields.item("enableDevQueryPrint") = $printer.enableDevQueryPrint
$objRecordSet.Fields.item("extendedPrinterStatus") = ` $printer.extendedPrinterStatus
$objRecordSet.Fields.item("hidden") = $printer.hidden
$objRecordSet.Fields.item("horizontalresolution") = $printer.horizontalresolution
$objRecordSet.Fields.item("verticalresolution") = $printer.verticalresolution
C06622791.fm Page 155 Saturday, December 8, 2007 6:36 PM
156 Windows PowerShell Scripting Guide
$objRecordSet.Fields.item("local") = $printer.local
$objRecordSet.Fields.item("keepprintedjobs") = $printer.keepprintedjobs
$objRecordSet.Fields.item("network") = $printer.network
$objRecordSet.Fields.item("printerstate") = $printer.printerstate
$objRecordSet.Fields.item("printerstatus") = $printer.printerstatus
$objRecordSet.Fields.item("printjobdatatype") = $printer.printjobdatatype
$objRecordSet.Fields.item("printprocessor") = $printer.printprocessor
$objRecordSet.Fields.item("priority") = $printer.priority
$objRecordSet.Fields.item("published") = $printer.published
$objRecordSet.Fields.item("queued") = $printer.queued
$objRecordSet.Fields.item("spoolenabled") = $printer.spoolenabled
$objRecordSet.Fields.item("systemname") = $printer.systemname
$objRecordSet.Fields.item("workoffline") = $printer.workoffline
$objRecordSet.Update()
After updating the record information in the database, go to the next WMI object, add a new
record to the database, and update all the information. Continue looping through the WMI
information until you reach the end of the collection. To indicate progress to the user, use
the Write-Host cmdlet and print a series of /\ characters on a single line. Each /\ represents
a single printer object. This line of code is shown here:
write-host -foregroundColor yellow "/\" -noNewLine
After updating the database, you must close both the connection object and the recordset object.
These final lines in the script are shown here:
$objRecordSet.Close()
$objConnection.Close()
The completed WritePrinterInfoToAccess.ps1 script follows.
WritePrinterInfoToAccess.ps1
$StrComputer = (New-Object -ComObject WScript.Network).computername
$StrDomain = (New-Object -ComObject WScript.Network).userDomain
$strWMIQuery = "Select * from win32_printer"
$objprinters = get-wmiobject -query $strWMIQuery
$adOpenStatic = 3
$adLockOptimistic = 3
$strDB = "c:\fso\configurationmaintenance.mdb"
$strTable = "printers"
$objConnection = New-Object -ComObject ADODB.Connection
$objRecordSet = new-object -ComObject ADODB.Recordset
$objConnection.Open("Provider = Microsoft.Jet.OLEDB.4.0; `
Data Source= $strDB")
$objRecordSet.Open("SELECT * FROM $strTable", `
$objConnection, $adOpenStatic, $adLockOptimistic)
write-host -foreGroundColor yellow "Obtaining printer info ..."
C06622791.fm Page 156 Saturday, December 8, 2007 6:36 PM
Chapter 6 Managing Printing 157
foreach ($printer in $objprinters)
{
$objRecordSet.AddNew()
$objRecordSet.Fields.item("TimeStamp") = Get-Date
$objRecordSet.Fields.item("strComputer") = $strComputer
$objRecordSet.Fields.item("strDomain") = $strDomain
$objRecordSet.Fields.item("averagePagesPerMinute") =
` $printer.averagePagesPerMinute
$objRecordSet.Fields.item("caption") = $printer.caption
$objRecordSet.Fields.item("default") = $printer.default
$objRecordSet.Fields.item("comment") = $printer.comment
$objRecordSet.Fields.item("averagePagesPerMinute") = ` $printer.averagePagesPerMinute
$objRecordSet.Fields.item("description") = $printer.description
$objRecordSet.Fields.item("deviceID") = $printer.deviceID
$objRecordSet.Fields.item("direct") = $printer.direct
$objRecordSet.Fields.item("doCompleteFirst") = $printer.doCompleteFirst
$objRecordSet.Fields.item("driverName") = $printer.driverName
$objRecordSet.Fields.item("enableBIDI") = $printer.enableBIDI
$objRecordSet.Fields.item("enableDevQueryPrint") = $printer.enableDevQueryPrint
$objRecordSet.Fields.item("extendedPrinterStatus") = ` $printer.extendedPrinterStatus
$objRecordSet.Fields.item("hidden") = $printer.hidden
$objRecordSet.Fields.item("horizontalresolution") = $printer.horizontalresolution
$objRecordSet.Fields.item("verticalresolution") = $printer.verticalresolution
$objRecordSet.Fields.item("local") = $printer.local
$objRecordSet.Fields.item("keepprintedjobs") = $printer.keepprintedjobs
$objRecordSet.Fields.item("network") = $printer.network
$objRecordSet.Fields.item("printerstate") = $printer.printerstate
$objRecordSet.Fields.item("printerstatus") = $printer.printerstatus
$objRecordSet.Fields.item("printjobdatatype") = $printer.printjobdatatype
$objRecordSet.Fields.item("printprocessor") = $printer.printprocessor
$objRecordSet.Fields.item("priority") = $printer.priority
$objRecordSet.Fields.item("published") = $printer.published
$objRecordSet.Fields.item("queued") = $printer.queued
$objRecordSet.Fields.item("spoolenabled") = $printer.spoolenabled
$objRecordSet.Fields.item("systemname") = $printer.systemname
$objRecordSet.Fields.item("workoffline") = $printer.workoffline
$objRecordSet.Update()
write-host -foregroundColor yellow "/\" -noNewLine
}
$objRecordSet.Close()
$objConnection.Close()
Reporting on Printer Ports
Printer ports are critical, but people often are not sure what they really are. The general
thought process seems to be that printer ports are those ambiguously named things that seem
to have something to do with IP addresses. However, keep in mind that if printer ports are set
incorrectly, print jobs may well vanish into cyberspace.
C06622791.fm Page 157 Saturday, December 8, 2007 6:36 PM

158 Windows PowerShell Scripting Guide
Figure 6-6 shows the printer ports as currently configured on a server.
Figure 6-6 An example of configured printer ports.
The ListPrinterPorts.ps1 script defines two command-line parameters, $strComputer and
$help, that are used to configure the way the script executes when run. If no parameters are
supplied to the script, it will print a listing of the printer ports on the local computer. You can,
however, use the script to connect to a remote computer and retrieve a listing of printer ports
on that computer.
Begin working with the ListPrinterPorts.ps1 script by using the param keyword to define two
named parameters. The first parameter, $strComputer, is set to a default value of localhost,
which is one of several aliases for the local computer. The second named parameter is $help,
which can be used to generate the help file.
Important When using the param keyword to specify named parameters for your script,
remember that the word param must be the first noncommented line of your script.
After defining the named arguments for the script, create a function named funhelp. This func-
tion is called if the script is run with the -help parameter specified. Interestingly enough,
whereas all the examples of using the -help parameter in the help file use -help ?, any value will
work in place of the question mark. This is because the if statement only checks for the
existence of the $help variable as is shown here:
if($help) { "Printing help now..." ; funHelp }
C06622791.fm Page 158 Saturday, December 8, 2007 6:36 PM

Chapter 6 Managing Printing 159
The part of the script that performs the WMI query is only three lines of code. The first line
specifies the WMI class that performs the query. In this script, use the Win32_TcpIpPrinterPort
WMI class. The second line of code uses the Get-WmiObject cmdlet to gather the WMI
information about printer ports from the computer specified in the $strComputer variable. The
resulting set of WMI management objects is cleaned up and stripped of any nonalphabetic
characters by using the Format-List cmdlet. This section of code is shown here:
$class = "Win32_TcpIpPrinterPort"
Get-WmiObject -Class $class -computername $strcomputer |
format-list [a-z]*
The completed ListPrinterPorts.ps1 script follows.
ListPrinterPorts.ps1
param($strComputer="localhost", $help)
function funHelp()
{
$helpText=@"
NAME: ListPrinterPorts.ps1
Produces a listing of printer ports on a local or remote machine.
PARAMETERS:
-computerName Specifies the name of the computer upon which to run the script
-help prints help file
SYNTAX:
ListPrinterPorts.ps1 -comptuerName MunichServer
Lists all the printer ports on a computer named MunichServer
FindPrinterPorts.ps1 -help ?
Prints out the help file information specified in the $helpText variable
"@
$helpText
exit
}
if($help) { "Printing help now..." ; funHelp }
$class = "Win32_TcpIpPrinterPort"
Get-WmiObject -Class $class -computername $strcomputer |
format-list [a-z]*
Creating a Help Function for Your Script
One way to make your scripts more user-friendly is to include a help function. An exam-
ple of this is shown in the ListPrinterPorts.ps1 script. But there are at least three ways to
do this. In the ListPrinterPorts.ps1 script, you define a parameter named $help. When
the script is run with the -help ? parameter, the help function will be displayed. There are
C06622791.fm Page 159 Saturday, December 8, 2007 6:36 PM
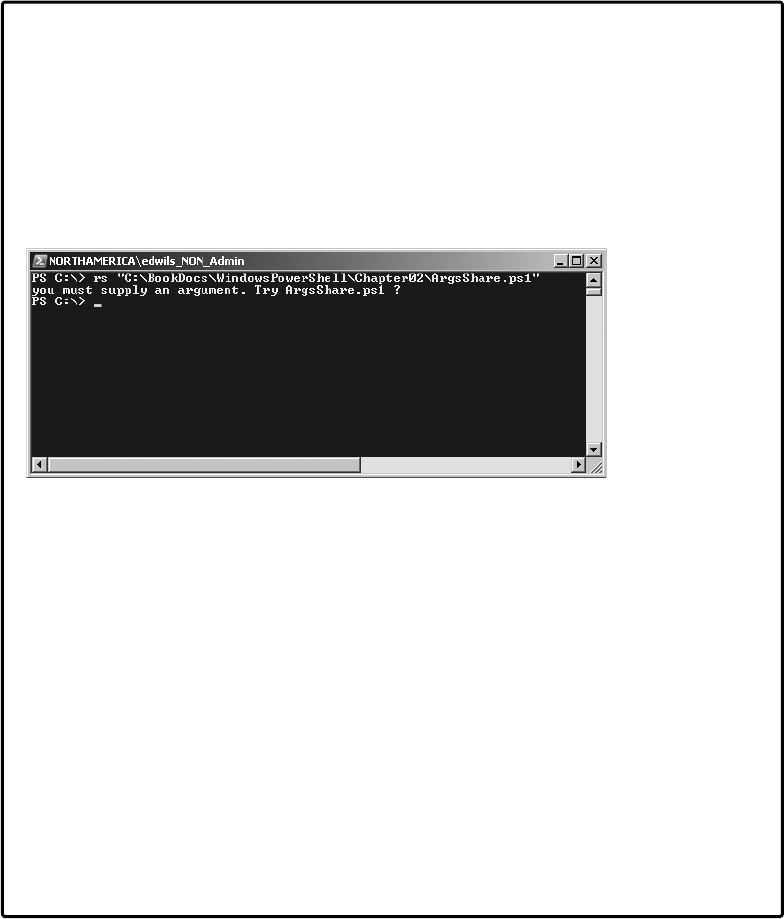
160 Windows PowerShell Scripting Guide
at least three features to include in this help function: a description of the script, the
parameters, and the syntax with an example. It makes sense to create a template for this
purpose. The template helps you to standardize the syntax and to simplify creation of
the help function.
A second way to include help is to use both an unnamed argument and the switch state-
ment to evaluate the value of $args. An example of this type of help is shown in the
ArgsShare.ps1 script from Chapter 2, “Scripting Windows PowerShell.” Sample output
from the ArgsShare.ps1 screen is shown in Figure 6-7.
Figure 6-7 By displaying help for missing arguments, the script becomes easier to use.
A third way to include help is to call it in conjunction with a missing parameter to a
script. For example, suppose your script requires two parameters: a share name and a
share path. You can’t create a share without specifying both a name of the share and the
folder to share. If one or the other is missing, then you can display a help message to
this effect. An example of this type of help is shown in the CreateShare.ps1 script in
Chapter 5, “Managing Shares.”
However you choose to implement help for scripts, consistency in naming parameters
helps tremendously to promote both readability and usability of your scripts. Of
course, if the script will be utilized for only a single, specific purpose, it may not be
advantageous to bother writing help text. However, if you are creating a utility script
used by numerous help desk and administrative teammates, it makes perfect sense to
write help text, as well as adding appropriate comments to the script. I believe that if the
script uses more than one parameter, then it is good practice to utilize a combination of
both the first and third help techniques described earlier.
There are other concerns about printer ports. Because a printer server is often multi-homed
and may host printer ports on multiple networks, you may want the ability to retrieve only
those printer ports configured on a specific network. This could be useful for managing the
network and also for troubleshooting.
In the FindPrinterPorts.ps1 script, you modify the ListPrinterPorts.ps1 script to allow for
an additional command-line parameter: -network. The -network parameter is the network ID
C06622791.fm Page 160 Saturday, December 8, 2007 6:36 PM

Chapter 6 Managing Printing 161
that will be used to identify the printer port. Set the parameter to a default 192.168 value,
a commonly used internal network address. This value can be edited in the script as
appropriate or overridden from the command line by running the script with the -network
command-line argument.
The -help parameter works exactly the same as with the ListPrinterPorts.ps1 script; refer to
that section of this chapter for assistance with that portion of the script.
To display only printer ports that are on the network address specified in the -network param-
eter, use a Where-Object cmdlet and perform a regular expression match on the network
address. Then use the -match parameter from the Where-Object to do the filtering.
After you find the local printers, use the Write-Host cmdlet to print a status message. Use the
Get-WmiObject cmdlet to retrieve the instances of the Win32_TcpIpPrinterPort class from the
specified computer and pipeline the results to the Where-Object cmdlet. The code block asso-
ciated with the Where-Object uses the $_ automatic variable that represents the current
object on the pipeline and it performs a regular expression match of the string specified for
the -network parameter. This section of code is shown here:
Write-Host -foregroundColor Yellow "Below are printer ports in the $network
range:`n"
Get-WmiObject -class $class -computername $strcomputer |
Where-object { $_.name -match $network }
Note There are times when you may want to use the Simple Network Management
Protocol (SNMP) to retrieve information about print devices. SNMP is a useful industry
standard technology that relies on sending messages to centralized systems configured as
message collectors. The password in such systems is called a community string. On some
networks, SNMP may violate security standards as the messages are transmitted in clear text.
If your printers are configured to use Simple Network Management Protocol to provide man-
agement information (providing messages such as “out of paper” and “low on toner”) to your
management application, then they have the SNMP protocol turned on. If they are SNMP
enabled, there is no reason to provide this information in an output. To make the output
easier to read, I generally evaluate the value of SNMPEnabled and then print information
appropriate to the specific device. This section of code is shown here:
if($($_.SNMPEnabled))
{
Write-Host -foregroundColor yellow "`tFollowing printer is SNMP enalbled"
Write-Host "`t$($_.name), $($_.portNumber), $($_.SNMPCommunity, $($_.SNMPDevIndex)`n"
}
ELSE
{
Write-Host -foregroundColor yellow "`tFollowing printer is NOT SNMP enabled`n"
write-host "`t$($_.name), $($_.portNumber)"
}
}
C06622791.fm Page 161 Saturday, December 8, 2007 6:36 PM

162 Windows PowerShell Scripting Guide
Tip When I evaluated the value of SNMPEnabled, after it moved into the if … else loop,
the property wouldn’t expand properly. If printed directly, it printed fine. To force it to be
evaluated prior to printing, I had to use an extra $ as shown here: $($_.SNMPEnabled). This is
a good technique to keep in mind as you will undoubtedly run into other situations when the
value does not expand according to your expectations.
Once you close out all the curly brackets and print the appropriate printer port information,
you are finished with the code. The completed FindPrinterPorts.ps1 script follows.
FindPrinterPorts.ps1
param( $strcomputer="localhost", $network="192.168", $help)
function funHelp()
{
$helpText=@"
DESCRIPTION:
NAME: FindPrinterPorts.ps1
Allows for the management of printer ports on a local or remote machine.
PARAMETERS:
-computerName Specifies the name of the computer upon which to run the script
-help prints help file
-network IP address one, two, or three octets
SYNTAX:
FindPrinterPorts.ps1 -comptuerName MunichServer
Lists all the printer ports on a computer named MunichServer
FindPrinterPorts.ps1 -help ?
Prints the help topic for the script
FindPrinterPorts.ps1 -computername MunichServer -network "10"
Sets a class A network address of 10 on the remote server munich server. Only
Printer ports assigned to the 10.x.x.x range will be returned
FindPrinterPorts.ps1
Returns printer ports in the 192.168.x.x range on the local machine
"@
$helpText
exit
}
if($help) { "Printing help now..." ; funHelp }
$class = "Win32_TcpIpPrinterPort"
Write-Host -foregroundColor Yellow "Below are printer ports in the $network range:`n"
Get-WmiObject -class $class -computername $strcomputer |
Where-object { $_.name -match $network } | foreach($_){
if($($_.SNMPEnabled))
{
C06622791.fm Page 162 Saturday, December 8, 2007 6:36 PM
Chapter 6 Managing Printing 163
Write-Host -foregroundColor yellow "`tFollowing printer is SNMP enalbled"
Write-Host "`t$($_.name), $($_.portNumber), $($_.SNMPCommunity, $($_.SNMPDevIndex)`n"
}
ELSE
{
Write-Host -foregroundColor yellow "`tFollowing printer is NOT SNMP enabled`n"
write-host "`t$($_.name), $($_.portNumber)"
}
}
Identifying Printer Drivers
A basic part of network management is working with printer drivers. Examining the printer
driver files is fundamental to good management. Many default printer drivers are installed on
a Windows Vista system. Adding a printer by using one of these default printer drivers is not
difficult. If, however, the driver is not on the system, the process is a bit more challenging.
In the FindPrinterDrivers.ps1 script, use the Get-ChildItem cmdlet to retrieve the .inf files
installed on the system that contain the letters prn. Use the env:\ psdrive to retrieve the value
of the %systemroot% environmental variable. Use the -exclude parameter to not return files
with a .pnf file extension.
In Figure 6-8, there is a view of the inf directory on a Windows Vista computer. Notice how
many files are contained in the folder. This is the reason for using the -exclude parameter in
the script.
Figure 6-8 The inf directory on computers running Windows Vista or Windows Server 2008
contains driver information.
C06622791.fm Page 163 Saturday, December 8, 2007 6:36 PM
164 Windows PowerShell Scripting Guide
When you have this collection of file information objects, pipeline the results into the Where-
Object cmdlet; use a regular expression match to look for the letters prn in the name of the
file. The resulting list of files is sorted by using the Sort-Object cmdlet and pipelined into the
Format-Table cmdlet where you choose the Name, Length, Creation Time, and LastWriteTime
properties. The completed FindPrinterDrivers.ps1 script is shown here.
FindPrinterDrivers.ps1
Get-ChildItem ((Get-Item Env:\systemroot).value+"\inf") -Exclude *.pnf |
Where-Object { $_.name -match "prn" } |
Sort-Object -Property name |
format-table -Property name, length, creationTime, lastWriteTime
Although theFindPrinterDrivers.ps1 script provides a list of the printer driver .inf files, it does
not easily tell you which printer drivers are actually available. The ReportAvailableDrivers.ps1
script parses all printer .inf files and looks for the presence of certain printer models. You
can count the number of each type of printer driver available on the system.
The first procedure the ReportAvailableDrivers.ps1 script follows is to initialize seven
variables and set their initial values to 0. These variables are used to hold a running count
of available printer drivers; this is used in the output section of the script to display the
information to the user. Use the Get-ChildItem cmdlet and build a path to the inf directory
in the computer’s system root. If the name contains the letters prn, open each .inf file by
using the switch statement and performing a regular expression match for the presence of
each printer type you are interested in. Increase the value contained in each of the variables
incrementally according to the match that was found; loop to the next .inf file and repeat
the process.
After going through each of the printer .inf files, print the results by using the Write-Host
cmdlet. The completed ReportAvailableDrivers.ps1 script is shown here.
ReportAvailableDrivers.ps1
$hp=$ibm=$lexmark=$star=$text=$ps=$generic=0
Get-ChildItem ((Get-Item Env:\systemroot).value+"\inf") -Exclude *.pnf |
Where-Object { $_.name -match "prn" } |
foreach-object($_){
switch -regex -file $_.fullname
{
'hp' { $hp++ }
'ibm' { $ibm++ }
'lexmark' { $lexmark++ }
'star' { $star++ }
'text' { $text++ }
'ps' { $ps++ }
'generic' { $generic++ }
}
}
"
C06622791.fm Page 164 Saturday, December 8, 2007 6:36 PM
Chapter 6 Managing Printing 165
The following details the printer drivers currently available on the system:
HP drivers: $hp
IBM drivers: $ibm
Lexmark drivers: $lexmark
Star drivers: $Star
Text drivers: $text
PS drivers: $ps
Generic drivers: $generic
"
Installing Printer Drivers
Once you’ve installed Windows Vista or Windows Server 2008, the next task is to configure
the printers. In Windows terminology, the physical printer is called a print device, and the
print queue on the computer is called the printer. It is the printer driver that performs the
transformation from a series of bits into a physical piece of paper that is an accurate
representation of the information you see on the screen. This transformation is referred to
as WYSIWYG, or “What You See Is What You Get.” This acronym is often pronounced as
“weeseewig.” In addition to assisting in the prevention of the infernal “blue screen of death”
(BSOD), a properly functioning printer driver is essential for Microsoft Office productivity
applications to format properly on the screen. In fact, if the correct printer driver is not
installed, Microsoft Word and Microsoft Excel might even hang and not paginate properly.
Installing Printer Drivers Found on Your Computer
Both Windows Vista and Windows Server 2008 ship with a number of drivers to work with a
wide range of hardware; printers are no exception. These printer drivers are stored in the
%systemroot%\inf directory. The printer driver files all have an .inf extension and include the
letters prn in their name. Armed with this information, you can obtain a listing of the .inf files
for the included printer drivers. This is what the FindPrinterDrivers.ps1 script is for. Once you
have this information, it is not difficult to install the printer driver onto Windows Vista or
Windows Server 2008.
The advantage of the printer driver installation process is that a limited user can more easily
add a printer to his or her profile without the seLoadDriverPrivilege privilege. As Figure 6-9
shows, the system makes it easy to select the existing driver.
Using the InstallPrinterDriver.ps1 script, you can install a printer driver into the user
profile that already resides on the Windows computer. The driver is in the drive cache but
has not been expanded and loaded. The first thing you need to do is to connect to the
Win32_PrinterDriver WMI class. To do this, use the [wmiclass] type accelerator. This line of
code is shown here:
$objWMI = [wmiclass]"Win32_PrinterDriver"
C06622791.fm Page 165 Saturday, December 8, 2007 6:36 PM
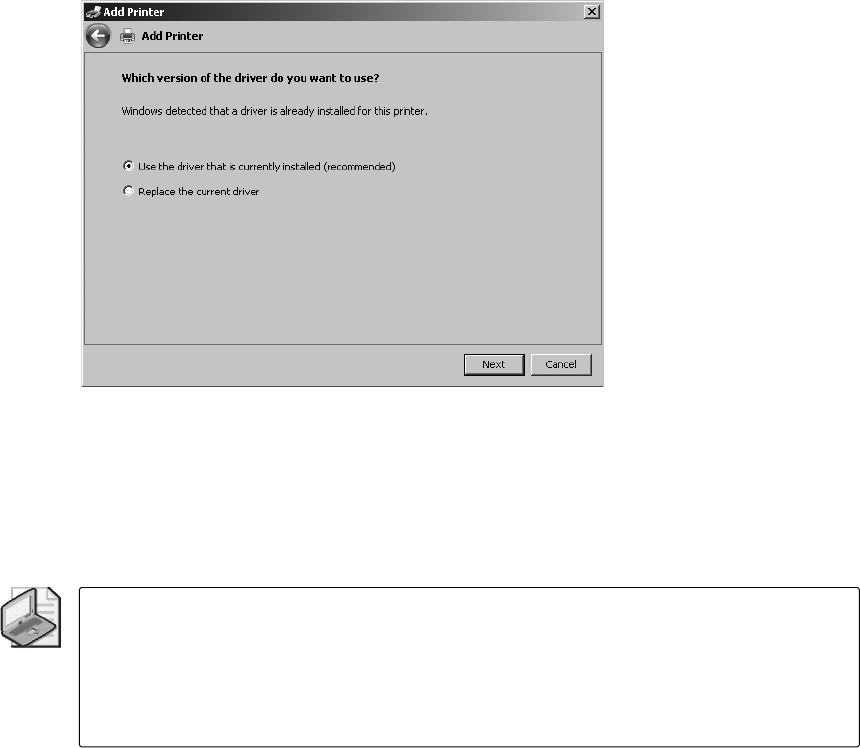
166 Windows PowerShell Scripting Guide
Figure 6-9 Windows Vista and Windows Server 2008 detect when a driver is already
installed and prompts you to use it.
When an instance of the System.Management.ManagementClass object is held in the $objWMI
variable, use the CreateInstance() method to create a new instance of the Win32_PrinterDriver
class in memory. This will be used to supply information to the management class object
contained in the $objWMI variable when you call the AddPrinterDriver() method.
Note Sometimes WMI is very particular. To use the AddPrinterDriver() method from WMI,
first create a new instance of a Win32_PrinterDriver WMI class. This is because the
AddPrinterDriver() method needs the printer driver to be supplied as an instance of the
Win32_PrinterDriver class. To do this, you must use Win32_PrinterDriver to create a new
instance of the Win32_PrinterDriver class before using the AddPrinterDriver() method of the
Win32_PrinterDriver class.
When you have the management class object contained in the $objWMI variable, you can use
the CreateInstance() method to create a blank copy of the Win32_PrinterDriver class. The line
of code that creates the new instance of the Win32_PrinterDriver class is shown here:
$objDriver=$objWMI.CreateInstance()
A blank copy of the class allows you to supply values for each property of the WMI class, if
needed. In the InstallPrinterDriver.ps1 script, you only need to use the name of the printer
driver, as the locally installed .inf files will point to all the other required files. As shown here,
assigning the name of the driver to the Name property is a straightforward value assignment:
$objDriver.name = "Generic / Text Only"
C06622791.fm Page 166 Saturday, December 8, 2007 6:36 PM

Chapter 6 Managing Printing 167
After supplying all the values required to create the printer driver, use the AddPrinterDriver()
method. This method takes a single argument, an object that contains an instance of the
Win32_PrinterDriver class. The InstallPrinterDriver.ps1 script contains that object in the
$objDriver variable. This line of code is shown here:
$rtnCode = $objwmi.addPrinterDriver($objDriver)
To determine if the AddPrinterDriver() method call was successful, print the return code. The
InstallPrinterDriver.ps1 script holds the error object in a variable named $rtnCode. The error
object has a property named ReturnValue. A 0 value indicates the command completed suc-
cessfully. The line that prints out the ReturnValue property of the error object is shown here:
$rtncode.returnValue
The complete InstallPrinterDriver.ps1 script is shown here.
InstallPrinterDriver.ps1
$objWMI = [wmiclass]"Win32_PrinterDriver"
$objDriver=$objWMI.CreateInstance()
$objDriver.name = "Generic / Text Only"
$rtnCode = $objwmi.addPrinterDriver($objDriver)
$rtncode.returnValue
Installing Printer Drivers Not Found on Your Computer
If a printer driver is not already on the disk, the task of installing the drive is a bit more chal-
lenging. As Table 6-2 shows, there are many properties defined for the Win32_PrinterDriver
class. Not all properties must be defined for all printer drivers, but there is some work
required.
Table 6-2 Win32_PrinterDriver Properties
Property Definition
Caption System.String Caption {get;set;}
ConfigFile System.String ConfigFile {get;set;}
CreationClassName System.String CreationClassName {get;set;}
DataFile System.String DataFile {get;set;}
DefaultDataType System.String DefaultDataType {get;set;}
DependentFiles System.String[] DependentFiles {get;set;}
Description System.String Description {get;set;}
DriverPath System.String DriverPath {get;set;}
FilePath System.String FilePath {get;set;}
HelpFile System.String HelpFile {get;set;}
InfName System.String InfName {get;set;}
C06622791.fm Page 167 Saturday, December 8, 2007 6:36 PM
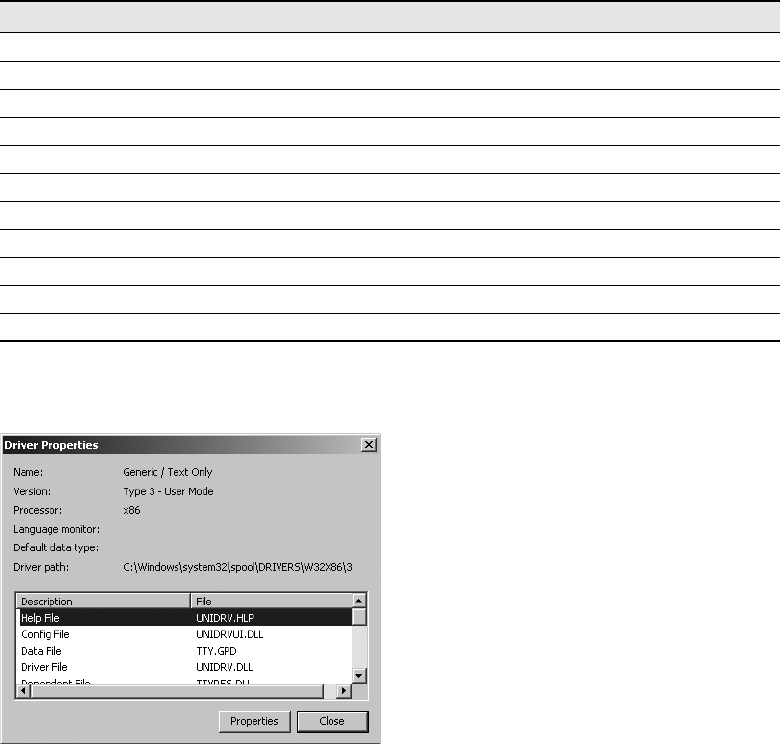
168 Windows PowerShell Scripting Guide
To find out what driver properties look like, use the Printer applet from Windows Vista or
Windows Server 2008 Control Panel. Figure 6-10 shows the driver properties.
Figure 6-10 Printer driver properties.
To use the InstallPrinterDriverFull.ps1 script, first use the [wmiclass] accelerator and specify
the Win32_PrinterDriver WMI class to return a management object that allows you to work
with the methods of the Win32_PrinterDriver class. When you have this object, store it in the
$objWMI variable.
The System.Management.ManagementObject for Win32_PrinterDriver contains the
CreateInstance() method. After creating a new instance of a Win32_PrinterDriver, store that
object in the $objDriver variable. This new copy of the Win32_PrinterDriver class is used with
the AddPrinterDriver() method of the original management object that is stored in the
$objWMI variable.
InstallDate System.String InstallDate {get;set;}
MonitorName System.String MonitorName {get;set;}
Name System.String Name {get;set;}
OEMUrl System.String OEMUrl {get;set;}
Started System.Boolean Started {get;set;}
StartMode System.String StartMode {get;set;}
Status System.String Status {get;set;}
SupportedPlatform System.String SupportedPlatform {get;set;}
SystemCreationClassName System.String SystemCreationClassName {get;set;}
SystemName System.String SystemName {get;set;}
Version System.UInt16 Version {get;set;}
Table 6-2 Win32_PrinterDriver Properties (continued)
Property Definition
C06622791.fm Page 168 Saturday, December 8, 2007 6:36 PM
Chapter 6 Managing Printing 169
The new instance of the printer driver class is stored in the $objDriver variable; this one needs
all the values specified for properties. Tell the new instance where all the files can be found.
Only the basic properties are used in the InstallPrinterDriverFull.ps1 script. The completed
InstallPrinterDriverFull.ps1 script is shown here.
InstallPrinterDriverFull.ps1
$objWMI = [wmiclass]"Win32_PrinterDriver"
$objDriver=$objWMI.CreateInstance()
$objDriver.name = "Generic / Text Only"
$objDriver.DriverPath = "C:\WINDOWS\System32\spool\DRIVERS\W32X86\3\UNIDRV.DLL"
$objDriver.ConfigFile = "C:\WINDOWS\System32\spool\DRIVERS\W32X86\3\UNIDRVUI.DLL"
$objDriver.DataFile = "C:\WINDOWS\System32\spool\DRIVERS\W32X86\3\TTY.GPD"
$objDriver.DependentFiles ="C:\WINDOWS\System32\spool\DRIVERS\W32X86\3\TTYRES.DLL", `
"C:\WINDOWS\System32\spool\DRIVERS\W32X86\3\TTY.INI", `
"C:\WINDOWS\System32\spool\DRIVERS\W32X86\3\TTY.DLL", `
"C:\WINDOWS\System32\spool\DRIVERS\W32X86\3\TTYUI.DLL", `
"C:\WINDOWS\System32\spool\DRIVERS\W32X86\3\UNIRES.DLL", `
"C:\WINDOWS\System32\spool\DRIVERS\W32X86\3\TTYUI.HLP", `
"C:\WINDOWS\System32\spool\DRIVERS\W32X86\3\STDNAMES.GPD"
$objDriver.HelpFile = "C:\WINDOWS\System32\spool\DRIVERS\W32X86\3\UNIDRV.HLP"
$rtnCode = $objwmi.addPrinterDriver($objDriver)
$rtncode.returnValue
Summary
In this chapter we examined issues surrounding printing. When working with printers, the
task begins with the printer drivers. Indeed, you can’t print to a print device if you don’t have
the appropriate printer driver. Printer drivers come from two places: They are either included
in Windows Vista or Windows Server 2008 or they are supplied directly from the hardware
manufacturer either through the Internet or included in the box with the print device. In
either case, the driver must be loaded onto the Windows platform. After examining the issues
surrounding printer driver deployment, we moved into the arena of sharing print devices. We
also examined the reporting of existing settings as well as the configuration of various aspects
of print device sharing.
C06622791.fm Page 169 Saturday, December 8, 2007 6:36 PM
C06622791.fm Page 170 Saturday, December 8, 2007 6:36 PM

171
Chapter 7
Desktop Maintenance
After completing this chapter, you will be able to:
■Inventory drive configurations.
■Write physical disk information to a Microsoft Access database.
■Report logical disk configurations.
■Monitor volume space utilization.
■Use performance counter classes.
On the Companion Disc The scripts used in this chapter are located on the CD that
accompanies this book in the \scripts\chapter07 folder.
Maintaining Desktop Health
Both Windows Vista and Windows Server 2008 are extremely reliable, self tuning, and nearly
maintenance-free. In high-performance computing environments or high-security environ-
ments, however, the default settings, although pretty good, may not always meet every need.
In this case you must monitor the performance of the system to see what can be modified,
tweaked, or adjusted to meet specific requirements.
Inventorying Drives
The first task when examining the drive configuration of your Windows Vista or Windows
Server 2008 system is to get a good idea of the installed drives. Because of the way Windows
abstracts the physical layout of the drives from the actual drives themselves, it is possible that
a user may not realize there is only a single drive or a pair of drives.
It’s common for many hardware vendors to create “hidden” partitions that are used for
various reasons. I noticed this on a drive that was shipped in as a replacement drive; it was
partitioned to the same size as the drive it was replacing, but had a much greater unformatted
disk capacity. Using Windows PowerShell and WMI, you can discover and document the
drive configuration on your computers. As shown in Figure 7-1, the default view of Windows
Explorer in Windows Vista does not display partition information.
The ReportDiskDriveConfiguration.ps1 script uses WMI to report on all the properties of a
physical disk drive. Use the Get-WmiObject cmdlet and the Win32_DiskDrive WMI class. The
script is designed to accept a single argument, which can be the name of a remote computer
to connect to for retrieving drive configuration information; or it can be a question mark (?),
which will cause the script to print help information.
C07622791.fm Page 171 Saturday, December 8, 2007 6:37 PM
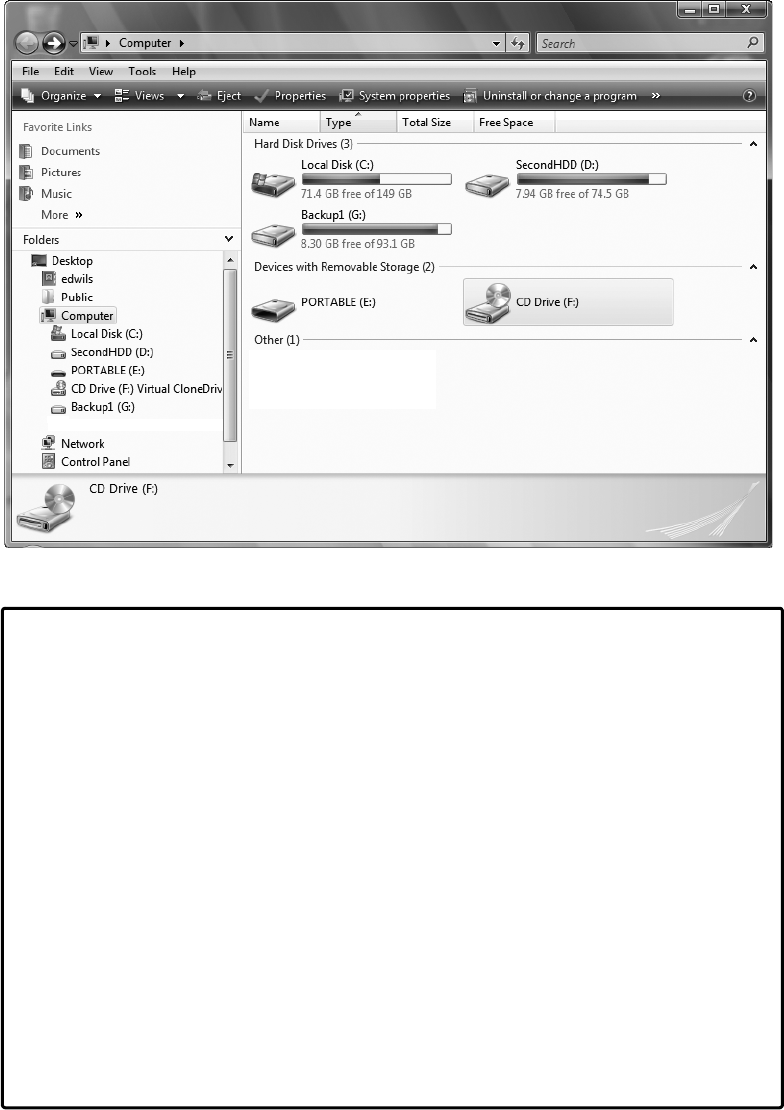
172 Windows PowerShell Scripting Guide
Figure 7-1 Windows Vista default drive view in Windows Explorer.
Using Default Arguments
When you call a script and supply a command-line argument, the automatic variable
$args will be created. To check whether an argument has been supplied to a script, query
for the presence of $args. If a command-line argument has not been supplied, you have
several options, including the following:
■You can assign a value to $args (and cause a default action to occur).
■You can display a help message and exit the script.
■You can prompt for the value.
Let’s look at each of the three options for dealing with a missing $args command-line
parameter. If you decide to assign a value to $args and cause a default action, you can use
code that looks like the following:
if(!$args) { $args = "my default action" }
The key when using this method is ensuring that the action is what most users of the
script want to perform. In this case, you also must inform users that you are taking the
default action. Whether or not you suggest they run help for more options is up to you.
C07622791.fm Page 172 Saturday, December 8, 2007 6:37 PM

Chapter 7 Desktop Maintenance 173
The second method of dealing with a missing command-line argument is to display a
help message, then exit. This code is shown here:
if(!$args) { "This script requires an argument. Try this …" ; exit }
When using the help-and-exit approach, keep in mind that you might be limiting the
usefulness of the script. You are forcing the user to supply a command-line value to run
the script.
The third method of dealing with missing command-line arguments—to prompt for the
value—is shown here:
if(!$args) { $args = Read-Host -Prompt "Please supply missing parameter" }
The major concern when using the prompt-for-information method is the potential of
hanging the script indefinitely if a value is not supplied.
The script begins by examining the $args variable. If it is not present, the script will perform
the default action, which is to run the script against the local computer. To do this, use the
exclamation mark (!), which is the “not operator,” and type it in front of $args. The if statement
is used to verify the existence of $args. This line of code is shown here:
if(!$args)
Open a code block and use the Write-Host cmdlet to print a message indicating you are
querying the local host computer. Set the value of $args to localhost. This is printed in green
and is shown here:
{
Write-Host -foregroundcolor green `
'Querying localhost ...'
$args = 'localhost'
}
If the value of the $args variable is equal to a question mark (?), then print a help message.
This message includes the name of the script, the description of the script, and sample syntax
for calling the script, as is shown here:
if($args -eq "?")
{"
ReportDiskDriveConfiguration.ps1
DESCRIPTION:
This script can take a single argument, computer name.
It will display drive configuration on either a local
or a remote computer. You can supply either a ? or a
name of a local machine.
EXAMPLE:
ReportDiskDriveConfiguration.ps1 remoteComputerName
C07622791.fm Page 173 Saturday, December 8, 2007 6:37 PM
174 Windows PowerShell Scripting Guide
reports on disk drive configuration on a computer named
remoteComputerName
The script will also display this help file. This is
done via the ? argument as seen here.
ReportDiskDriveConfiguration.ps1 ?
"
}
The basic WMI query uses the Get-WmiObject cmdlet. It specifies two parameters: the -class
parameter, which is Win32_DiskDrive, and the -computer parameter, which is set by the auto-
matic variable $args. If you don’t check for $args at the beginning of the script and if the script
is launched without a command-line argument for the computer name, it will generate an
error when run, as this section of code shows:
Get-WmiObject -Class Win32_DiskDrive `
-computer $args
The complete ReportDiskDriveConfiguration.ps1 script is shown here.
ReportDiskDriveConfiguration.ps1
if(!$args)
{
Write-Host -foregroundcolor green `
'Querying localhost ...'
$args = 'localhost'
}
if($args -eq "?")
{"
ReportDiskDriveConfiguration.ps1
DESCRIPTION:
This script can take a single argument, computer name.
It will display drive configuration on either a local
or a remote computer. You can supply either a ? or a
name of a local machine.
EXAMPLE:
ReportDiskDriveConfiguration.ps1 remoteComputerName
reports on disk drive configuration on a computer named
remoteComputerName
The script will also display this help file. This is
done via the ? argument as seen here.
ReportDiskDriveConfiguration.ps1 ?
"
}
Get-WmiObject -Class Win32_DiskDrive `
-computer $args
C07622791.fm Page 174 Saturday, December 8, 2007 6:37 PM
Chapter 7 Desktop Maintenance 175
Writing Disk Drive Information to Microsoft Access
To store the drive configuration information, write the information gathered to an Access data-
base. This will provide the ability to report on drive configuration from multiple computers in
a relatively easy fashion.
Using the WritePhysicalDiskInfoToAccess.ps1 script, gather both the computer name and
the user’s domain from the WshNetwork object. This object has the program ID of
Wscript.Network and is created by using the New-Object cmdlet. The code is shown here:
$SystemName = (New-Object -ComObject WScript.Network).computername
$DomainName = (New-Object -ComObject WScript.Network).userDomain
Next, use the variable $strWMIQuery to hold the string that will be used for the WMI query. It
is a rather generic “select everything from the Win32_Diskdrive” WMI class query. This line of
code is shown here:
$strWMIQuery = "Select * from win32_diskdrive"
To obtain the information from WMI, use the Get-WmiObject cmdlet and specify the -query
parameter. The string contained in the $strWMIQuery variable is supplied to the -query param-
eter. Hold the management object that is returned from the Get-WmiObject cmdlet in the
variable $objdisks, as is shown here:
$objdisks = get-wmiobject -query $strWMIQuery
Use two variables to control how the database is opened and the way that multiple accesses
are treated. These variables are initialized to 3, and will be used in the open method of the
connection object. This makes the code easier to read. Do this on a single line, as is shown here:
$adOpenStatic = $adLockOptimistic = 3
The next two variables help you connect to the correct database and the correct table within
the database. The $strDB variable holds a string that points to the location of the Access
database. The second variable, $strTable, holds the name of the table you’ll write to. The
PhyDisk table is shown in Figure 7-2.
The code that points to the database and to the PhyDisk table is shown here:
$strDB = "c:\fso\configurationmaintenance.mdb"
$strTable = "phydisk"
The next step is to create two objects, a connection object and a recordset object, as shown here:
$objConnection = New-Object -ComObject ADODB.Connection
$objRecordSet = new-object -ComObject ADODB.Recordset
C07622791.fm Page 175 Saturday, December 8, 2007 6:37 PM
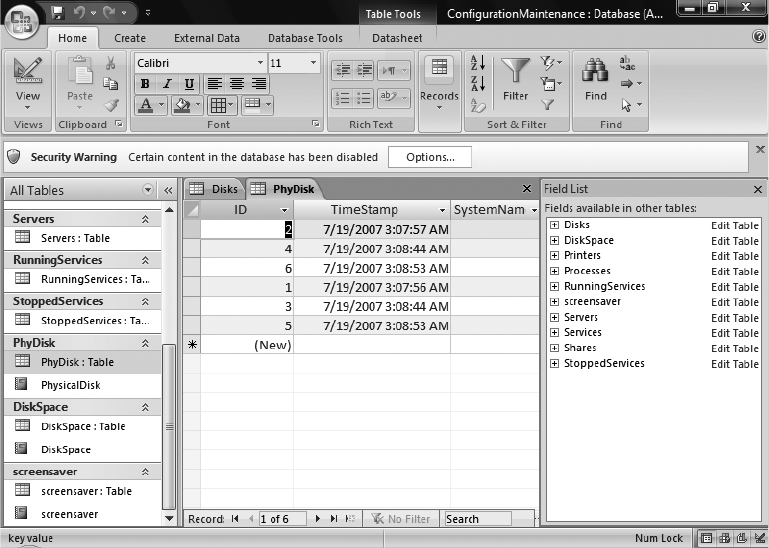
176 Windows PowerShell Scripting Guide
Figure 7-2 The layout of the PhyDisk table as seen in the Access database.
After creating the two objects, use the open method from the connection object. When using
the open method, specify two pieces of information: the provider and the name of the dataset
to open. This line of code is shown here:
$objConnection.Open("Provider = Microsoft.Jet.OLEDB.4.0; `
Data Source= $strDB")
After the connection to the database is opened, open the recordset. In the open method of the
recordset object, specify four parameters: a Structured Query Language (SQL) query, the reference
to the connection object, the means of opening the database, and the locking mechanism.
This line of code is shown here:
$objRecordSet.Open("SELECT * FROM $strTable", `
$objConnection, $adOpenStatic, $adLockOptimistic)
Use the Write-Host cmdlet to write a progress indicator to the screen, as shown here:
write-host -foreGroundColor yellow "Obtaining physical disk info ..."
C07622791.fm Page 176 Saturday, December 8, 2007 6:37 PM
Chapter 7 Desktop Maintenance 177
Because it is likely there are multiple drives returned from the Get-WmiObject cmdlet, use the
foreach statement to walk through the collection of management objects. Use the addnew()
method from the recordset object to write a new entry into the database. This is shown here:
foreach ($disk in $objdisks)
{
$objRecordSet.AddNew()
After adding a new record in the table, add the properties returned by WMI to the appropriate
fields in the database. To make things easier to understand, the same names are used, as
shown:
$objRecordSet.Fields.item("TimeStamp") = Get-Date
$objRecordSet.Fields.item("systemName") = $systemName
$objRecordSet.Fields.item("DomainName") = $DomainName
$objRecordSet.Fields.item("DeviceID") = $disk.DeviceID
$objRecordSet.Fields.item("Partitions") = $disk.Partitions
$objRecordSet.Fields.item("Index") = $disk.Index
$objRecordSet.Fields.item("SectorsPerTrack") = $disk.SectorsPerTrack
$objRecordSet.Fields.item("Size") = $disk.Size
$objRecordSet.Fields.item("TotalCylinders") = $disk.TotalCylinders
$objRecordSet.Fields.item("TotalHeads") = $disk.TotalHeads
$objRecordSet.Fields.item("TotalSectors") = $disk.TotalSectors
$objRecordSet.Fields.item("TotalTracks") = $disk.TotalTracks
$objRecordSet.Fields.item("TracksPerCylinder") = $disk.TracksPerCylinder
$objRecordSet.Fields.item("FirmWareRevision") = $disk.FirmWareRevision
$objRecordSet.Fields.item("Caption") = $disk.Caption
$objRecordSet.Fields.item("Model") = $disk.Model
$objRecordSet.Fields.item("SerialNumber") = $disk.SerialNumber
To write the information to the database, use the update method from the recordset object. This
is shown here:
$objRecordSet.Update()
Once again, use the Write-Host cmdlet to print a progress indicator. This time, draw a /\
symbol to the screen for each item retrieved, as is shown here:
write-host -foregroundColor yellow "/\" –noNewLine
The last procedure is cleaning up. To do this, use the close() method from both the recordset
object and the connection object, as this line of code shows:
$objRecordSet.Close()
$objConnection.Close()
After the WritePhysicalDiskInfoToAccess.ps1 script is run and has written the data to the
database, you can view the results from the disk report. This report is shown in Figure 7-3.
C07622791.fm Page 177 Saturday, December 8, 2007 6:37 PM
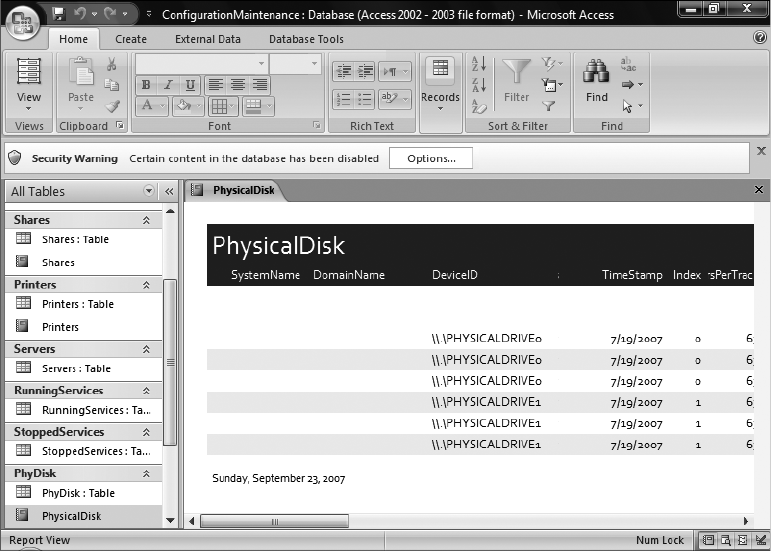
178 Windows PowerShell Scripting Guide
Figure 7-3 The Physical Disk report in Access makes it easy to view configuration information.
The completed WritePhysicalDiskInfoToAccess.ps1 script follows.
WritePhysicalDiskInfoToAccess.ps1
$SystemName = (New-Object -ComObject WScript.Network).computername
$DomainName = (New-Object -ComObject WScript.Network).userDomain
$strWMIQuery = "Select * from win32_diskdrive"
$objdisks = get-wmiobject -query $strWMIQuery
$adOpenStatic = $adLockOptimistic = 3
$strDB = "c:\fso\configurationmaintenance.mdb"
$strTable = "phydisk"
$objConnection = New-Object -ComObject ADODB.Connection
$objRecordSet = new-object -ComObject ADODB.Recordset
$objConnection.Open("Provider = Microsoft.Jet.OLEDB.4.0; `
Data Source= $strDB")
$objRecordSet.Open("SELECT * FROM $strTable", `
$objConnection, $adOpenStatic, $adLockOptimistic)
write-host -foreGroundColor yellow "Obtaining physical disk info ..."
foreach ($disk in $objdisks)
{
$objRecordSet.AddNew()
$objRecordSet.Fields.item("TimeStamp") = Get-Date
C07622791.fm Page 178 Saturday, December 8, 2007 6:37 PM
Chapter 7 Desktop Maintenance 179
$objRecordSet.Fields.item("systemName") = $systemName
$objRecordSet.Fields.item("DomainName") = $DomainName
$objRecordSet.Fields.item("DeviceID") = $disk.DeviceID
$objRecordSet.Fields.item("Partitions") = $disk.Partitions
$objRecordSet.Fields.item("Index") = $disk.Index
$objRecordSet.Fields.item("SectorsPerTrack") = $disk.SectorsPerTrack
$objRecordSet.Fields.item("Size") = $disk.Size
$objRecordSet.Fields.item("TotalCylinders") = $disk.TotalCylinders
$objRecordSet.Fields.item("TotalHeads") = $disk.TotalHeads
$objRecordSet.Fields.item("TotalSectors") = $disk.TotalSectors
$objRecordSet.Fields.item("TotalTracks") = $disk.TotalTracks
$objRecordSet.Fields.item("TracksPerCylinder") = $disk.TracksPerCylinder
$objRecordSet.Fields.item("FirmWareRevision") = $disk.FirmWareRevision
$objRecordSet.Fields.item("Caption") = $disk.Caption
$objRecordSet.Fields.item("Model") = $disk.Model
$objRecordSet.Fields.item("SerialNumber") = $disk.SerialNumber
$objRecordSet.Update()
write-host -foregroundColor yellow "/\" -noNewLine
}
$objRecordSet.Close()
$objConnection.Close()
Working with Partitions
On servers and workstations it is sometimes difficult to distinguish between a physical drive
and a disk partition. This is due, in part, to the way Windows abstracts the physical hardware
from the operating system. Accordingly, it may appear that you have a C, D, or even an E drive,
but in fact you may have just a single physical disk with three partitions. Knowing this infor-
mation can be useful from a maintenance perspective. It can also make a difference when a
user complains about running out of disk space (in terms of expanding a current partition or
creating a new drive/partition combination). Find partition information in the Computer
Management Disk Management utility as shown in Figure 7-4.
The ReportDiskPartition.ps1 script allows you to inspect the value of the $args automatic
variable to see if it contains any value. If there is no $args variable present, then it means the
script was run without arguments. When this situation arises, the script fails. To forestall
failure, supply the string localhost to the $args variable and use to retrieve WMI information
from the local computer. If you do this, be sure to let the user know that you are using a
default value. This section of code is shown here:
if(!$args)
{
Write-Host -foregroundcolor green `
'Querying localhost ...'
$args = 'localhost'
}
C07622791.fm Page 179 Saturday, December 8, 2007 6:37 PM
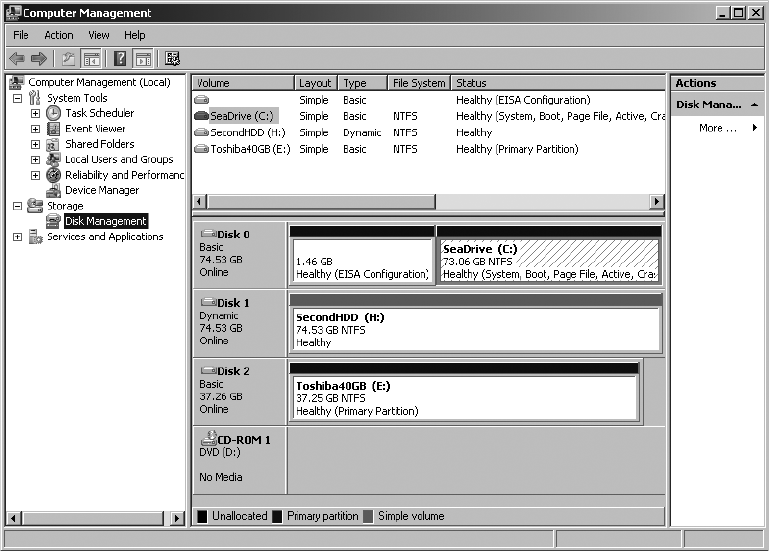
180 Windows PowerShell Scripting Guide
Figure 7-4 The Disk Management utility displays drive partition information.
If the script is run with a ?, then it will detect this value and print the online help message.
This concept can be extended to allow for other values as well (such as allowing the user to
type help, h, or other potential values). This section of code is shown here:
if($args -eq "?")
{"
ReportDiskPartition.ps1
DESCRIPTION:
This script can take a single argument, computer name.
It will display drive configuration on either a local
or a remote computer. You can supply either a ? or a
name of a local machine.
EXAMPLE:
ReportDiskPartition.ps1 remoteComputerName
reports on disk partition information on a computer named
remoteComputerName
The script will also display this help file. This is
done via the ? argument as seen here.
ReportDiskPartition.ps1 ?
"
}
C07622791.fm Page 180 Saturday, December 8, 2007 6:37 PM
Chapter 7 Desktop Maintenance 181
The script uses the Get-WmiObject cmdlet with the -class parameter to search the
Win32_DiskPartition WMI class to retrieve disk partition assignments and values. If $args is
used to assign an alternate computer name to the query, then it will be used here and supplied
to the -computer parameter of the Get-WmiObject cmdlet. This section of the code is shown
here:
Get-WmiObject -Class Win32_DiskPartition `
-computer $args
The completed ReportDiskPartition.ps1 script follows.
ReportDiskPartition.ps1
if(!$args)
{
Write-Host -foregroundcolor green `
'Querying localhost ...'
$args = 'localhost'
}
if($args -eq "?")
{"
ReportDiskPartition.ps1
DESCRIPTION:
This script can take a single argument, computer name.
It will display drive configuration on either a local
or a remote computer. You can supply either a ? or a
name of a local machine.
EXAMPLE:
ReportDiskPartition.ps1 remoteComputerName
reports on disk partition information on a computer named
remoteComputerName
The script will also display this help file. This is
done via the ? argument as seen here.
ReportDiskPartition.ps1 ?
"
}
Get-WmiObject -Class Win32_DiskPartition `
-computer $args
Matching Disks and Partitions
After matching drives and partitions by using the ReportDiskPartition.ps1 script, you may
wonder why you might need an additional script to work with disks and partitions. The
reason is that there are times when you simply need to know the partition information of a
specific drive. The ReportSpecificDiskPartition.ps1 script reports partition configuration
information on a single drive. This script will work either locally or remotely.
C07622791.fm Page 181 Saturday, December 8, 2007 6:37 PM

182 Windows PowerShell Scripting Guide
To control the execution of the ReportSpecificDiskPartitioin.ps1 script, begin with the param
keyword. This keyword allows you to use named arguments when launching the script. Three
arguments are specified: -computer, -disk and -help. The -computer parameter is initialized to
localhost, which means that if it’s absent, the script will run by default against the local
machine. The -disk parameter is initialized to disk #0, so if it is missing, the script will run by
default against the first disk on the machine. The -help parameter is not set to a default value.
If it is missing, it simply won’t have an effect on the script. This line of code follows:
param($computer="localhost",$disk="Disk #0",$help)
Important When using the param keyword to collect named arguments, keep in mind the
param keyword must be the first uncommented line in the script.
The next section of the script is used to evaluate the command-line parameters. Do this by
checking for the presence of each argument. To check for a parameter, look for the presence of
the variable. If it is found, you can perform specific actions including validating the supplied
value. If you find the -computer parameter, print a message indicating you’ll begin the query of
the computer. This code is shown here:
if($computer)
{
Write-Host -foregroundcolor green `
"Querying $computer ..."
}
If the -disk parameter is present, print a status message indicating your intention to gather the
specific partition configuration from that specific drive. This code is shown here:
if($disk)
{
Write-Host -foregroundcolor green `
"Querying $disk for partition information ..."
}
The only command-line parameter that is not initialized in the parameter definition is the -help
parameter. If the -help parameter is present, print the script name and description and sample
syntax. Once the help message is printed, use the exit statement to end the script. This section
of code is shown here:
if($help)
{"
ReportSpecificDiskPartition.ps1
DESCRIPTION:
This script can take a multiple arguments, computer name,
drive number and help.
It will display partition configuration on either a local
C07622791.fm Page 182 Saturday, December 8, 2007 6:37 PM
Chapter 7 Desktop Maintenance 183
or a remote computer. You can supply either help, drive and
name of a local or remote machine.
EXAMPLE:
ReportSpecificDiskPartition.ps1 -computer remoteComputername
reports on disk partition on drive 0 on a computer named
remoteComputerName
ReportSpecificDiskPartition.ps1 -computer remoteComputername -disk 'disk #1'
reports on disk partition on drive 1 on a computer named
remoteComputerName
ReportSpecificDiskPartition.ps1 -help y
Prints out the help information seen here.
"
Exit
}
After the code is written to handle the command-line arguments, use the Get-WmiObject
cmdlet to retrieve the disk partition information from the drive specified in the -disk parameter.
To retrieve the properties from the Win32_DiskPartition WMI class, use the -class parameter.
Target a specific computer with the -computer parameter and by targeting the computer
specified in the -computer parameter. Pipeline the management object that is returned into the
Where-Object cmdlet. In the code block used to create the filter for the Where-Object cmdlet,
look at the Name property of the current pipeline object. If it is a match for the value contained
in the $disk variable, continue the pipeline and pass it to the Format-List cmdlet to print a list
of all the properties that begin with a letter between a and z. This will eliminate the system
properties. This section of code is shown here:
Get-WmiObject -Class Win32_DiskPartition `
-computer $computer | Where-Object { $_.name -match $Disk } |
format-list [a-z]*
The completed ReportSpecificDiskPartition.ps1 script is shown here.
ReportSpecificDiskPartition.ps1
param($computer="localhost",$disk="Disk #0",$help)
if($computer)
{
Write-Host -foregroundcolor green `
"Querying $computer ..."
}
if($disk)
{
Write-Host -foregroundcolor green `
"Querying $disk for partition information ..."
}
if($help)
C07622791.fm Page 183 Saturday, December 8, 2007 6:37 PM
184 Windows PowerShell Scripting Guide
{"
ReportSpecificDiskPartition.ps1
DESCRIPTION:
This script can take a multiple arguments, computer name,
drive number and help.
It will display partition configuration on either a local
or a remote computer. You can supply either help, drive and
name of a local or remote machine.
EXAMPLE:
ReportSpecificDiskPartition.ps1 -computer remoteComputername
reports on disk partition on drive 0 on a computer named
remoteComputerName
ReportSpecificDiskPartition.ps1 -computer remoteComputername -disk 'disk #1'
reports on disk partition on drive 1 on a computer named
remoteComputerName
ReportSpecificDiskPartition.ps1 -help y
Prints out the help information seen here.
"
Exit
}
Get-WmiObject -Class Win32_DiskPartition `
-computer $computer | Where-Object { $_.name -match $Disk } |
format-list [a-z]*
Working with Logical Disks
Once you know where the disk partitions are located, you can examine the configuration of
the logical disks on the machine.
Use the ReportLogicalDiskConfiguration.ps1 script to check for the presence of a command-
line argument. To do this, look for the presence of the $args automatic variable. If this variable
isn’t there, this means the script was launched without any command-line arguments. Print a
message to the console by using the Write-Host cmdlet stating that you are using default
values and querying the local computer. This section of code is shown here:
if(!$args)
{
Write-Host -foregroundcolor green `
'Querying localhost ...'
$args = 'localhost'
}
C07622791.fm Page 184 Saturday, December 8, 2007 6:37 PM
Chapter 7 Desktop Maintenance 185
If the $args automatic variable is present and if it is equal to ?, print a help message. List the
name of the script, describe the use of the script, and supply sample syntax. This section of
the script follows:
if($args -eq "?")
{"
ReportLogicalDiskConfiguration.ps1
DESCRIPTION:
This script can take a single argument, computer name.
It will display logical disk configuration on either a local
or a remote computer. You can supply either a ? or a
name of a local machine.
EXAMPLE:
ReportLogicalDiskConfiguration.ps1 remoteComputerName
reports on logical disk configuration on a computer named
remoteComputerName
The script will also display this help file. This is
done via the ? argument as seen here.
ReportLogicalDiskConfiguration.ps1 ?
"
}
To retrieve the configuration information about the logical disks on the computer, use the
Get-WmiObject cmdlet, and use the -class parameter to query the Win32_LogicalDisk WMI
class. Use the -computer parameter to query the computer specified in $args. This section of
code is shown here:
Get-WmiObject -Class Win32_LogicalDisk `
-computer $args
The completed ReportLogicalDiskConfiguration.ps1 script is shown here.
ReportLogicalDiskConfiguration.ps1
if(!$args)
{
Write-Host -foregroundcolor green `
'Querying localhost ...'
$args = 'localhost'
}
if($args -eq "?")
{"
ReportLogicalDiskConfiguration.ps1
DESCRIPTION:
This script can take a single argument, computer name.
It will display logical disk configuration on either a local
or a remote computer. You can supply either a ? or a
name of a local machine.
C07622791.fm Page 185 Saturday, December 8, 2007 6:37 PM
186 Windows PowerShell Scripting Guide
EXAMPLE:
ReportLogicalDiskConfiguration.ps1 remoteComputerName
reports on logical disk configuration on a computer named
remoteComputerName
The script will also display this help file. This is
done via the ? argument as seen here.
ReportLogicalDiskConfiguration.ps1 ?
"
}
Get-WmiObject -Class Win32_LogicalDisk `
-computer $args
Using the ReportSpecificLogicalDisk.ps1 script, you can retrieve logical disk configuration
information associated with a specific logical disk. To do this, use the param statement to
allow the script to run with named arguments. The ReportSpecificLogicalDisk.ps1 script
takes three parameters: -computer, -disk, and -help. The -computer argument is initialized and
set to localhost. If no value is supplied for -computer from the command line, the default value
of localhost will be used for the $computer variable later in the script. The -disk parameter is
initialized to C. This allows the script to run against the C drive if no other value is supplied
for the -disk parameter. The -help parameter is not set to a value and will be ignored if it isn’t
present on the command line. This line of code is shown here:
param($computer="localhost",$disk="c:",$help)
If the $computer variable is present, use the Write-Host cmdlet to print a message indicating
the name of the computer that is being queried. If no value is supplied from the command line
for the -computer parameter, then the $computer variable will contain the default value of local-
host. This section of code is shown here:
if($computer)
{
Write-Host -foregroundcolor green `
"Querying $computer ..."
}
If the $disk variable is present, use the Write-Host cmdlet to print a message that indicates the
drive that will be queried. If the -disk parameter is not used from the command line to supply
a drive name, then the default value is C, as it was for initializing the $disk drive in the param-
eter statement. This section of code is shown here:
if($disk)
{
Write-Host -foregroundcolor green `
"Querying $disk for logical disk information ..."
}
C07622791.fm Page 186 Saturday, December 8, 2007 6:37 PM
Chapter 7 Desktop Maintenance 187
If the $help variable is present, it was supplied from the command line when the script was
run, as it is not pre-initialized. After the $help variable is detected, a help message is printed
that contains the name of the script, a description, and sample syntax. When the help
message has been printed, the script calls the exit statement to quit the script. This section of
the script is shown here:
if($help)
{"
ReportSpecificLogicalDisk.ps1
DESCRIPTION:
This script can take a multiple arguments, computer name,
drive number and help.
It will display logical disk configuration on either a local
or a remote computer. You can supply either help, drive and
name of a local or remote machine.
EXAMPLE:
ReportSpecificLogicalDisk.ps1 -computer remoteComputername
reports on logical disk on drive c: on a computer named
remoteComputerName
ReportSpecificLogicalDisk.ps1 -computer remoteComputername -disk 'd:'
reports on logical disk on drive d: on a computer named
remoteComputerName
ReportSpecificLogicalDiskn.ps1 -help y
Prints out the help information seen here.
"
Exit
}
To retrieve the logical disk configuration, use the Get-WmiObject cmdlet and specify the
Win32_LogicalDisk WMI class name as the -class parameter. Use the grave accent (`), the line
continuation character, to continue the logical code flow. Then use the -computer argument
and give it the value contained in the $computer variable. Pipeline the resulting management
to the Where-Object cmdlet and use a code block to filter the DeviceID property from the
current pipeline object. If the value of the DeviceID property matches the value contained in
the $disk variable, then pipeline the object to the Format-List cmdlet. Once at the Format-List
cmdlet, use only properties with a first letter in the range of a through z. This filter removes
the system properties (which all begin with a double underscore character). This code is
shown here:
Get-WmiObject -Class Win32_LogicalDisk `
-computer $computer | Where-Object { $_.deviceID -match $Disk } |
format-list [a-z]*
The completed ReportSpecificLogicalDisk.ps1 script follows.
C07622791.fm Page 187 Saturday, December 8, 2007 6:37 PM
188 Windows PowerShell Scripting Guide
ReportSpecificLogicalDisk.ps1
param($computer="localhost",$disk="c:",$help)
if($computer)
{
Write-Host -foregroundcolor green `
"Querying $computer ..."
}
if($disk)
{
Write-Host -foregroundcolor green `
"Querying $disk for logical disk information ..."
}
if($help)
{"
ReportSpecificLogicalDisk.ps1
DESCRIPTION:
This script can take a multiple arguments, computer name,
drive number and help.
It will display logical disk configuration on either a local
or a remote computer. You can supply either help, drive and
name of a local or remote machine.
EXAMPLE:
ReportSpecificLogicalDisk.ps1 -computer remoteComputername
reports on logical disk on drive c: on a computer named
remoteComputerName
ReportSpecificLogicalDisk.ps1 -computer remoteComputername -disk 'd:'
reports on logical disk on drive d: on a computer named
remoteComputerName
ReportSpecificLogicalDiskn.ps1 -help y
Prints out the help information seen here.
"
Exit
}
Get-WmiObject -Class Win32_LogicalDisk `
-computer $computer | Where-Object { $_.deviceID -match $Disk } |
format-list [a-z]*
Monitoring Disk Space Utilization
Even with today’s large hard drives, a typical Windows Vista installation can rapidly consume
the available disk space. At first you might not notice the effect, but after a while, the effect is
unavoidable. The question, of course, on the mind of the intrepid network administrator is,
C07622791.fm Page 188 Saturday, December 8, 2007 6:37 PM
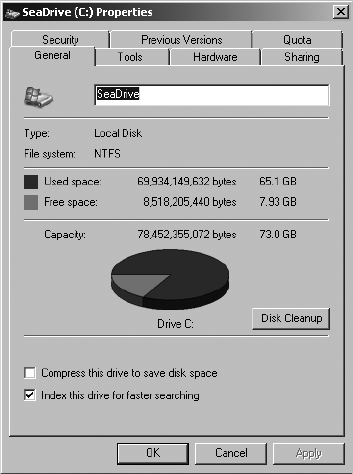
Chapter 7 Desktop Maintenance 189
“Where did it all go?” Before you can answer that question, you first must ensure the disk
space really is going somewhere. You can see the disk space information in the Properties
dialog box associated with the specific drive, as shown in Figure 7-5, but it often is difficult to
remember what the previous values were.
Figure 7-5 The Drive Properties dialog box shows a good overview of disk space utilization.
To keep track of previous values, you need to be aware of trends in disk space consumption
over time. This implies a need to store disk space statistics to a file, a Microsoft Excel spread-
sheet, or a database such as Microsoft Access—or perhaps even to all three.
To use the MonitorVolumeSpace.ps1 script, begin the script with a function named funline.
The funline function underlines output and provides a visual separator between the output
data retrieved for each drive. The funline function takes a string as input and stores it into a
variable named $strIN. The function queries the Length property of the input string and stores
it in a variable named $num. We then use a for loop that counts from 1 to the number repre-
senting the length of the input string. The for loop uses the $i variable as an enumerator; each
time through the loop it concatenates the equal sign (=) and stores the results in a variable
named $funline. It uses the Write-Host cmdlet to print the input string in yellow. Next, it uses
the Write-Host cmdlet to print the string of = stored in the $funline variable in dark yellow. The
funline function is shown here:
function funline ($strIN)
{
$num = $strIN.length
for($i=1 ; $i -le $num ; $i++)
{ $funline = $funline + "=" }
C07622791.fm Page 189 Saturday, December 8, 2007 6:37 PM

190 Windows PowerShell Scripting Guide
Write-Host -ForegroundColor yellow $strIN
Write-Host -ForegroundColor darkYellow $funline
}
The next procedure in the MonitorVolumeSpace.ps1 script is to create an array of computer
names. In this script, you have two hard-coded values: localhost and loopback. Both names
refer to the local computer. This means that as the script currently exists, it will print the
volume space twice for the local computer. To retrieve values from other machines, simply edit
the values stored in the $aryComputer variable. The $aryComputer line of code follows. This is
the line of the script that must be edited so you can run the script against different computers.
$arycomputer = "localhost", "loopback"
Troubleshooting When working with scripts, often you run into unexpected results. I
recently found a computer on a network with the name localhost. These types of problems
can be bothersome to troubleshoot. The MonitorVolumeSpace.ps1 script would print two
different values on the aforementioned network.
The next line of code in the MonitorVolumeSpace.ps1 script is the one containing the foreach
statement. The foreach statement is used to walk through the array of computer names
contained in the $aryComputer line of code. In the MonitorVolumeSpace.ps1 script, use the
variable $computer as the enumerator to keep track of your position in the $aryComputer array.
This line of code is shown here:
foreach($computer in $arycomputer)
The $volumeSet variable holds the management object that comes back as a result of using the
Get-WmiObject cmdlet to query the Win32_Volume WMI class. When making the connection
to retrieve the WMI class information, the -computer parameter is used to specify which
computer to connect to. The value held in the $computer variable is supplied to the -computer
parameter of the Get-WmiObject cmdlet. To limit the result to only fixed local disks, the -filter
parameter is used to filter the result set to drivetype = 3. This line of code is shown here:
$volumeSet = Get-WmiObject -Class win32_volume -computer $computer `
-filter "drivetype = 3"
Because it is possible that this query might return multiple volumes, once again use the
foreach statement to iterate through the $volumeSet object. Specify the variable $volume as the
enumerator through this collection, as is shown here:
foreach($volume in $volumeSet)
Once you begin to work with an individual volume, the first step to take is retrieving the drive
letter associated with that particular volume. Store this value in the variable $drive. This line of
code is shown here:
$drive=$volume.driveLetter
C07622791.fm Page 190 Saturday, December 8, 2007 6:37 PM

Chapter 7 Desktop Maintenance 191
Next, retrieve the amount of free disk space on the volume. This information is stored in the
FreeSpace property of the Win32_Volume WMI class and is reported in bytes. A good feature of
Windows PowerShell is that it can easily convert these numbers. To do this, you need a single
instance of the volume object and then use the GB Windows PowerShell constant (it does not
need to be all capital letters, but I think it looks better) to convert the number into gigabytes.
You want the result returned as an integer, so use the [int] type constraint on the $free variable,
which is storing the results for printing the status report. This line of code is shown here:
[int]$free=$volume.freespace/1GB
The next factor you must know about the volume is the capacity. Retrieve this information
from the Capacity property of the Win32_Volume WMI class. You’ll want to convert the
capacity of the volume into gigabytes. To do this, use the GB gigabyte constant and divide it
into the capacity of the drive. Store the resultant as an integer in the $capacity variable. This is
shown here:
[int]$capacity=$volume.capacity/1GB
To print a header for the output, use the funline function and supply it a string that indicates
the name of the computer and tells you its drive information. This line of code is shown here:
funline("Drives on $computer computer:")
Now print a status message as you retrieve the drive information for each volume on the
computer. This status message indicates that you are analyzing the drive. It then displays the
drive letter and the server name. Here’s a cool tip: Instead of creating another object to retrieve
the computer name, use the __Server system property. This line of code is shown here:
"Analyzing drive $drive $($volume.label) on $($volume.__server)"
Tip If you are working with WMI classes, nearly every class has the __Server system
property. You can query this property to retrieve the name of the computer being queried.
Finally, print an additional string message that displays the percentage of free disk space on
the volume. Type the `t characters to tab over one position. To tab over two positions, use
`t`t, and display the message string and the drive letter. Concatenate the string by using the
+ concatenation symbol. Use the {0:N2} format specifier to print the number to two decimals.
The last thing to do is calculate the percent of free disk space using the formula: ($free/
$capacity)*100. This section of code is shown here:
"`t`t Percent free space on drive $drive " + "{0:N2}" -f `
(($free/$capacity)*100)
The completed MonitorVolumeSpace.ps1 script follows.
C07622791.fm Page 191 Saturday, December 8, 2007 6:37 PM
192 Windows PowerShell Scripting Guide
MonitorVolumeSpace.ps1
function funline ($strIN)
{
$num = $strIN.length
for($i=1 ; $i -le $num ; $i++)
{ $funline = $funline + "=" }
Write-Host -ForegroundColor yellow $strIN
Write-Host -ForegroundColor darkYellow $funline
}
$arycomputer = "localhost", "loopback"
foreach($computer in $arycomputer)
{
$volumeSet = Get-WmiObject -Class win32_volume -computer $computer `
-filter "drivetype = 3"
foreach($volume in $volumeSet)
{
$drive=$volume.driveLetter
[int]$free=$volume.freespace/1GB
[int]$capacity=$volume.capacity/1GB
funline("Drives on $computer computer:")
"Analyzing drive $drive $($volume.label) on $($volume.__server)"
"`t`t Percent free space on drive $drive " + "{0:N2}" -f `
(($free/$capacity)*100)
}
}
Logging Disk Space to a Database
To track disk space utilization, you must store the information in a centralized location. A
convenient way to do this is to write the space utilization information to an Access database.
Using the WriteDiskSpaceInfoToAccess.ps1 script, you can retrieve the capacity of each drive
on the machine and store the information in a variable named $capacity. Then retrieve the
free space for each drive and store it in $freespace variable. After the percent of free space is
calculated, write disk information to the database. Let’s look at this in more detail.
Begin the WriteDiskSpaceInfoToAccess.ps1 script by creating a string to be used for the WMI
query. Select everything from the Win32_Volume WMI class where the DriveType property is
equal to 3. This limits the result set to fixed local disks. Use the $objdisks variable to hold the
management object that comes back from using the Get-WmiObject cmdlet. Use the -query
parameter to supply the WQL syntax query contained in the variable $strWMIQuery. These
two lines of code are shown here:
$strWMIQuery = "Select * from win32_volume where drivetype=3"
$objdisks = get-wmiobject -query $strWMIQuery
The next procedure is to create and initialize variables. This is done in the next four lines of
code. The first three variables created and initialized are used to hold the free disk space, disk
capacity, and the calculated percentage of free disk space value. Because you want to ensure
C07622791.fm Page 192 Saturday, December 8, 2007 6:37 PM
Chapter 7 Desktop Maintenance 193
the variables don’t contain any old information, set them equal to $null. This is all done on
a single line. The next two variables that are created and initialized are the two used to control
the way the database is opened and written to. These two variables, $adOpenStatic and
$adLockOptimistic, are on the same line and are both set to the value of 3. The next two
variables are used to point to the path to the database and the table to be queried. These four
lines of code are shown here:
$percentFree=$free=$capacity=$null
$adOpenStatic = $adLockOptimistic = 3
$strDB = "c:\fso\configurationmaintenance.mdb"
$strTable = "diskSpace"
After creating and initializing the initial variables, you’ll need to create several objects. There
are four New-Object commands used in the WriteDiskSpaceInfoToAccess.ps1 script. The first
two lines create the same object but use different properties. The wshNetwork object provides
the name of the computer and the name of the domain to which the computer is assigned.
The next two New-Object lines create the ADODB connection object and the ADODB recordset
object respectively. These four lines of code are shown here:
$SystemName = (New-Object -ComObject WScript.Network).computername
$DomainName = (New-Object -ComObject WScript.Network).userDomain
$objConnection = New-Object -ComObject ADODB.Connection
$objRecordSet = new-object -ComObject ADODB.Recordset
After completing the New-Object commands, the next step is to open the connection to
the Access database. Two things are required to open the connection object. The first is
knowing which provider to use and the second is the data source to open. For the
WriteDiskSpaceInfoToAccess.ps1 script, you must use the Microsoft.Jet.OLEDB.4.0 provider.
The line of code that opens the connection to the database is shown here:
$objConnection.Open("Provider = Microsoft.Jet.OLEDB.4.0; `
Data Source= $strDB")
After opening the connection to the database, the next step is opening the recordset. To do this,
use the open method from the recordset object. This method uses a query to retrieve the
records that go into making the recordset. Select all data in the table and specify a connection
to use for the query. Next, determine how to open the database and the type of table locking
to use. This line of code is shown here:
$objRecordSet.Open("SELECT * FROM $strTable", `
$objConnection, $adOpenStatic, $adLockOptimistic)
After the connection to the database is opened, print a progress indicator to the console by
using the Write-Host cmdlet. This is shown here:
write-host -foreGroundColor yellow "Obtaining disk space info ..."
The next procedure is to iterate through the collection of drives returned by the Get-Wmi-
Object cmdlet. Retrieve the free diskspace, convert it into megabytes, and assign it to the $free
C07622791.fm Page 193 Saturday, December 8, 2007 6:37 PM
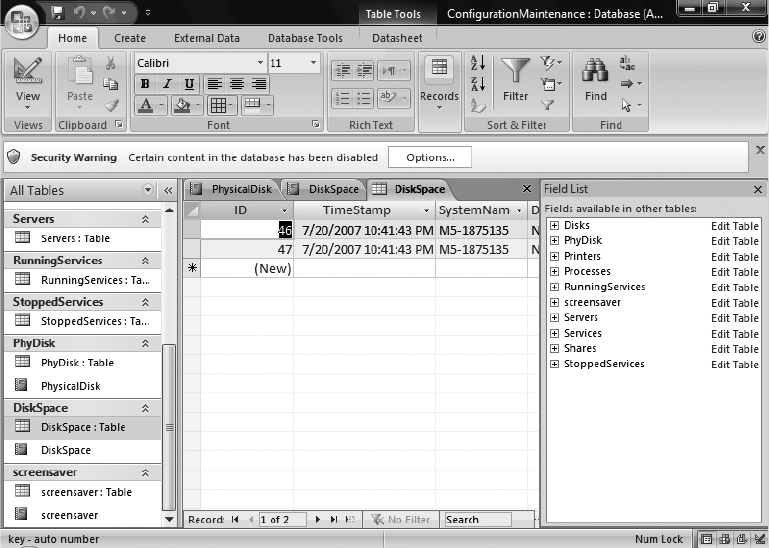
194 Windows PowerShell Scripting Guide
variable. Use the [int] type constraint to ensure the data is stored as an integer and retrieve
the Capacity property and convert it into megabytes as well. Store the result in a variable
named $capacity. Use the [int] type constraint to ensure the capacity information is stored in
the variable as an integer. These two lines of code are shown here:
[int]$free =$disk.freespace/1MB
[int]$capacity = $disk.capacity/1MB
To simplify the reporting task from the database, calculate the percent of free disk space for
the drive. This makes the report writer easier to use and allows you to forgo the process of
trying to calculate fields in the report. This line of code is shown here:
$percentFree = ($free/$capacity)*100
You must add a record to the database that will store the information. To do this, use the
addnew() method, then use the item method of the recordset object to retrieve each field from
the database. The design view of the database table, shown in Figure 7-6, can be invaluable
when creating property names.
Figure 7-6 The design view of the DiskSpace database table.
C07622791.fm Page 194 Saturday, December 8, 2007 6:37 PM
Chapter 7 Desktop Maintenance 195
Assign values to each of the fields. After adding information to the new record, use the
update() method to commit the changes. This is shown here:
$objRecordSet.AddNew()
$objRecordSet.Fields.item("TimeStamp") = Get-Date
$objRecordSet.Fields.item("systemName") = $systemName
$objRecordSet.Fields.item("DomainName") = $DomainName
$objRecordSet.Fields.item("DriveLetter") = $disk.DriveLetter
$objRecordSet.Fields.item("FreeSpace") = $free
$objRecordSet.Fields.item("Capacity") = $capacity
$objRecordSet.Fields.item("PercentFree") = $percentFree
$objRecordSet.Update()
After calling the update() method from the recordset object, continue to iterate through all the
drives in the collection. You’ll end up with a new record for each drive retrieved. Use the
Write-Host cmdlet to print a progress indicator to the user. To clean up the output, use the `r
characters to print a new line. This is more efficient than having to use the -nonewline argument
from the Write-Host cmdlet. Next, close both the record set and the connection object. This
code is shown here:
write-host -foregroundColor yellow "/\" -noNewLine
}
"`r"
$objRecordSet.Close()
$objConnection.Close()
After the WriteDiskSpaceInfoToAccess.ps1 script is run, it populates the database with disk
space information. The DiskSpace report from the Access database is shown in Figure 7-7.
The completed WriteDiskSpaceInfoToAccess.ps1 script is shown here.
WriteDiskSpaceInfoToAccess.ps1
$strWMIQuery = "Select * from win32_volume where drivetype=3"
$objdisks = get-wmiobject -query $strWMIQuery
$percentFree=$free=$capacity=$null
$adOpenStatic = $adLockOptimistic = 3
$strDB = "c:\fso\configurationmaintenance.mdb"
$strTable = "diskSpace"
$SystemName = (New-Object -ComObject WScript.Network).computername
$DomainName = (New-Object -ComObject WScript.Network).userDomain
$objConnection = New-Object -ComObject ADODB.Connection
$objRecordSet = new-object -ComObject ADODB.Recordset
$objConnection.Open("Provider = Microsoft.Jet.OLEDB.4.0; `
Data Source= $strDB")
$objRecordSet.Open("SELECT * FROM $strTable", `
$objConnection, $adOpenStatic, $adLockOptimistic)
write-host -foreGroundColor yellow "Obtaining disk space info ..."
foreach ($disk in $objdisks)
{
C07622791.fm Page 195 Saturday, December 8, 2007 6:37 PM
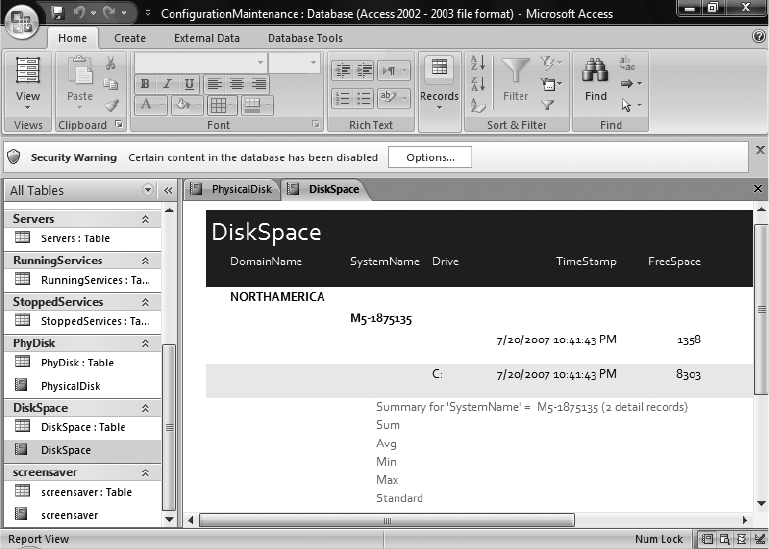
196 Windows PowerShell Scripting Guide
[int]$free =$disk.freespace/1MB
[int]$capacity = $disk.capacity/1MB
$percentFree = ($free/$capacity)*100
$objRecordSet.AddNew()
$objRecordSet.Fields.item("TimeStamp") = Get-Date
$objRecordSet.Fields.item("systemName") = $systemName
$objRecordSet.Fields.item("DomainName") = $DomainName
$objRecordSet.Fields.item("DriveLetter") = $disk.DriveLetter
$objRecordSet.Fields.item("FreeSpace") = $free
$objRecordSet.Fields.item("Capacity") = $capacity
$objRecordSet.Fields.item("PercentFree") = $percentFree
$objRecordSet.Update()
write-host -foregroundColor yellow "/\" -noNewLine
}
"`r"
$objRecordSet.Close()
$objConnection.Close()
Figure 7-7 The disk storage report from the DiskSpace table provides good summary information
of disk utilization and trends.
Monitoring File Longevity
It is nearly a truism in network administrator circles that users never delete anything. An
unmonitored file share on a file server is a license for users to consume as much disk space as
you have on the Storage Area Network (SAN). I know some network administrators who
C07622791.fm Page 196 Saturday, December 8, 2007 6:37 PM

Chapter 7 Desktop Maintenance 197
manually monitor the file shares for outdated files—such a short-term expedient is clearly not
a long-term solution. This is shown in Figure 7-8.
Figure 7-8 The manual method of managing out-of-date files involves using Windows Explorer to
present a directory list sorted by date.
Using the QueryOldFiles.ps1 script, you can connect to a folder and produce a listing of files
that haven’t been accessed in more than 30 days. What you decide to do with the list is up to
you.
Begin the QueryOldFiles.ps1 script with the funline function. This function is used to under-
line the header for the console output. The function takes the length of text that is passed to
the function, then builds up an underline character that is printed in dark yellow using the
Write-Host cmdlet. The function also prints original text that is passed to the function. This
code is shown here:
function funline ($strIN)
{
$num = $strIN.length
for($i=1 ; $i -le $num ; $i++)
{ $funline = $funline + "=" }
Write-Host -ForegroundColor yellow $strIN
Write-Host -ForegroundColor darkYellow $funline
}
C07622791.fm Page 197 Saturday, December 8, 2007 6:37 PM
198 Windows PowerShell Scripting Guide
Create and initialize three variables. The first, $folder, holds the folder to be examined for
untouched files. The second variable, $date, holds a datetime object that represents the current
date. The current date is obtained by using the Get-Date cmdlet. The last variable is the $limit
variable. The value contained within is used to determine the maximum age of a file before
making the file out-of-date report. These three lines of code are shown here:
$folder = "c:\fso"
$date = Get-Date
$limit = 30
Once you have initialized the variables, use the Get-ChildItem cmdlet to retrieve a listing of
files to examine. Supply the string contained in the $folder variable to the -path parameter of
the Get-ChildItem cmdlet, and use the -force parameter to return any hidden files. Take the
resulting fileinfo object and pipeline it to the ForEach-Object cmdlet. These two lines of code
are shown here:
Get-ChildItem -Path $folder -force |
foreach-object `
Once you are inside the ForEach-Object code block, create a new datetime object and store it
in the $newDate variable. To create the new datetime object, use the addDays() method from
the existing datetime object that is returned by querying the LastAccessTime property of the
current fileinfo object on the pipeline. Add the number contained in $limit variable to this
datetime object. This line of code is shown here:
$newDate=($_.LastAccessTime).adddays($limit)
Next, create a timespan object that will represent the cut-off date for aged nonaccessed files.
Create this timespan object by using the New-TimeSpan cmdlet and supplying the datetime
object that represents the current date to the -start parameter. The -end parameter of the New-
TimeSpan cmdlet receives the datetime object that represents the date the file was last
accessed plus the days limit contained in the $limit variable. The resulting timespan object is
held in the $limitdate variable. This line of code is shown here:
$limitDate = New-TimeSpan -start $date -end $newDate
Use the timespan object contained in the $limitdate variable to see if it is less than or equal to
0; if it is, the file is past the time specified in the $limit variable. In that case, take the fileinfo
object that is on the current pipeline, and choose the name and the LastAccessTime properties
and write them to a hash table. This section of code is shown here:
if ($limitDate -le 0)
{
$xfiles += @{ $_.name = $_.lastAccessTime }
}
After evaluating the files and creating a hash table containing all the expired files, you need to
produce an output report. To do this, use the Write-Host cmdlet and the Count property from
the hashtable object to produce a tally of the expired files. Incorporate the path to the folder
C07622791.fm Page 198 Saturday, December 8, 2007 6:37 PM
Chapter 7 Desktop Maintenance 199
and the limit value in the summary. Use the funline to highlight the list of expired files and
print the contents of the $xfiles hashtable. This section of code is shown here:
Write-Host "There are $($xfiles.count) files from $folder greater than $limit
days old."
FunLine("The expired files are listed below:")
$xfiles
The completed QueryOldFiles.ps1 script is shown here.
QueryOldFiles.ps1
function funline ($strIN)
{
$num = $strIN.length
for($i=1 ; $i -le $num ; $i++)
{ $funline = $funline + "=" }
Write-Host -ForegroundColor yellow $strIN
Write-Host -ForegroundColor darkYellow $funline
}
$folder = "c:\fso"
$date = Get-Date
$limit = 30
Get-ChildItem -Path $folder -force |
foreach-object `
{
$newDate=($_.LastAccessTime).adddays($limit)
$limitDate = New-TimeSpan -start $date -end $newDate
if ($limitDate -le 0)
{
$xfiles += @{ $_.name = $_.lastAccessTime }
}
}
Write-Host "There are $($xfiles.count) files from $folder greater than $limit
days old."
FunLine("The expired files are listed below:")
$xfiles
Monitoring Performance
Using the WMI performance classes, you can obtain sophisticated and accurate performance
information. The Win32_perfrawdata_perfdisk_logicaldisk WMI class provides access to the
same performance counter information that is available via the Performance Monitor tool. All
the classes in the tool, shown in Figure 7-9, are available by script. The good thing about being
able to access this information from a script, rather than only through the Microsoft Manage-
ment Console, is that you can more easily target specific properties and even take action if
desired when values go out of spec.
C07622791.fm Page 199 Saturday, December 8, 2007 6:37 PM
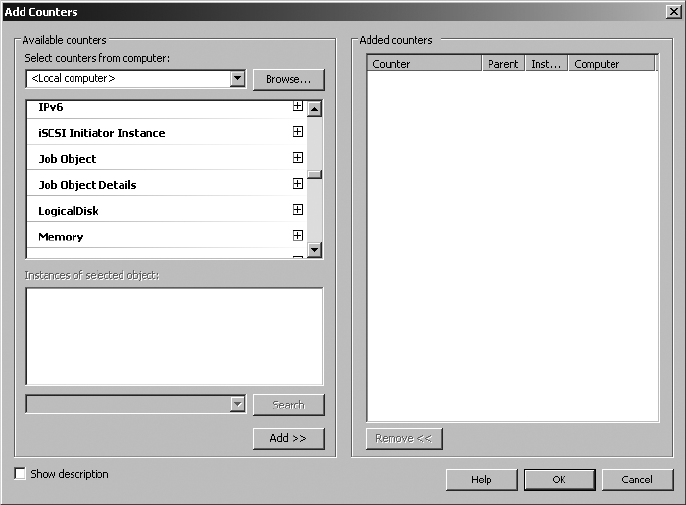
200 Windows PowerShell Scripting Guide
Figure 7-9 Performance counter classes displayed in the Performance Monitor tool.
Using Performance Counter Classes
The really good news is that there are 86 raw performance counter classes on a computer
running Windows Vista. There also are 87 cooked performance counter classes on a
Windows Vista computer. The difference between the raw and cooked classes is that the
cooked classes already have the concept of averaging built into them, whereas the raw classes
provide more of a snapshot in time. It is this instantaneous aspect of the raw classes that make
them a bit more difficult to work with. To gather any kind of meaningful data, you need
multiple data points.
With more than 170 performance WMI classes, it may be a bit of a problem to find the classes
that are required for a specific script. To assist with this, you can use the ListPerformance-
CounterClasses.ps1 to print a list of both the raw and the cooked counters. This script can be
run on both local and remote machines, and you can change the name space if required. This
script is shown here.
ListPerformanceCounterClasses.ps1
Param($computer="localhost", $namespace="root\cimv2")
"Querying $computer..."
"Perusing $namespace for performance classes"
$aryClasses = "perfformatteddata","perfrawdata"
foreach($class in $aryClasses)
C07622791.fm Page 200 Saturday, December 8, 2007 6:37 PM

Chapter 7 Desktop Maintenance 201
{
"Listing $class WMI classes ...`n"
Get-WmiObject -List -namespace $namespace `
-computer $computer |
Where-Object { $_.name -match $class }
}
You can add an additional parameter to the ListPerformanceCounterClasses.ps1 script to
allow it to search for classes related to disks, network, TCP, volume, or any noun you choose.
The revised script is saved as SearchTypePerformanceCounterClasses.ps1, as shown here.
SearchTypePerformanceCounterClasses.ps1
Param($computer="localhost", $namespace="root\cimv2", $type="disk")
"Querying $computer..."
"Perusing $namespace for performance classes"
"The following are $type performance classes"
$aryClasses = "perfformatteddata","perfrawdata"
foreach($class in $aryClasses)
{
"Listing $class WMI classes ...`n"
Get-WmiObject -List -namespace $namespace `
-computer $computer |
Where-Object { $_.name -match $class -and $_.name -match $type}
}
Troubleshooting If you run the GetDiskPerformance.ps1 script on your computer and it
does not return any data, it is probably because you need to run the script with administrator
permissions. This means launching Windows PowerShell and selecting Run As Administrator.
This is true for all performance counter classes on Windows Vista and Windows Server 2008.
The GetDiskPerformance.ps1 script illustrates how to work with the raw performance
counter classes from within a Windows PowerShell script. Begin by declaring a number of
variables. The first, $numrep, will determine how many loops it will take to gather the data.
The second variable, $sleep, is used to control how long the script pauses between loops. The
remaining variables are set to $null and are used to hold the actual counter values and the
timestamp. These three lines of code are shown here:
$numRep = 3
$sleep = 2
$n1=$d1=$n2=$d2=$r1=$r2=$w1=$w2=$null
The next step in the GetDiskPerformance.ps1 script is to use a for loop to collect multiple
instances of the performance counter data. This is accomplished using a for statement and
counting up to the value stored in the $numRep variable. The reason for the loop is that the
nature of the performance data makes sense only when examined over time. This line of code
is shown here:
for ($i=1 ; $i -le $numRep ; $i++)
C07622791.fm Page 201 Saturday, December 8, 2007 6:37 PM

202 Windows PowerShell Scripting Guide
Best Practices It is extremely common to see people query a performance WMI class and
simply print the values of the counters. This information is nearly meaningless, as you have
no trend for the data. In fact, the data often reflects a spike in certain processes due to the
script. Performance data should be examined over time. You may also want to consider
saving performance data to a database.
The next line of code uses the Get-WmiObject to query the Win32_perfrawdata_
perfdisk_logicaldisk WMI class. The management object returned is held in the $wmiPerf
variable. Use a filter to select the counter instance that has a name of _Total. This instance
contains data for all the logical disks. This line of code is shown here:
$wmiPerf=Get-WmiObject -class win32_perfrawdata_perfdisk_logicaldisk `
-Filter "name = '_Total'"
Next, gather the first data set. To do this, query the properties of the management object stored
in the $wmiPerf variable. These data points are unit64 WMI data types and you’ll have to use
the [double] type constraint to store the number. Choose three data points: percentIdleTime,
percentDiskTime, and the TimeStamp_Sys100NS. The TimeStamp_Sys100NS property is a
system generated timestamp. This is useful to keep all data points synchronized with the
same timestamp. This one is generated in 100 nanosecond units. This code is shown here:
[double]$n1 = $wmiperf.percentIdleTime
[double]$r1 = $wmiperf.percentDiskTime
[double]$d1 = $wmiperf.TimeStamp_Sys100NS
The next procedure is to halt script execution for a short time. This allows you to take another
snapshot. Depending on your goals, you may want to change the value of the sleep time. By
shortening the time between cycles, you may detect an intermittent issue. By increasing the
time between cycles, you can get a good overall trend. This line of code uses the Start-Sleep
cmdlet and a value stored in the $sleep variable. This code is shown here:
Start-Sleep -Seconds $sleep
After pausing execution of the script, you have exactly the same code as you used previously.
The reason for this is that you want to refresh the WMI performance counter information.
This section of code is virtually identical to the other code, except for using different variables
to hold the performance counter data. This is so you can have a new set of data associated
with the new timestamp.
$wmiPerf=Get-WmiObject -class win32_perfrawdata_perfdisk_logicaldisk `
-Filter "name = '_Total'"
[double]$n2 = $wmiperf.percentIdleTime
[double]$r2 = $wmiperf.percentDiskTime
[double]$d2 = $wmiperf.TimeStamp_Sys100NS
C07622791.fm Page 202 Saturday, December 8, 2007 6:37 PM
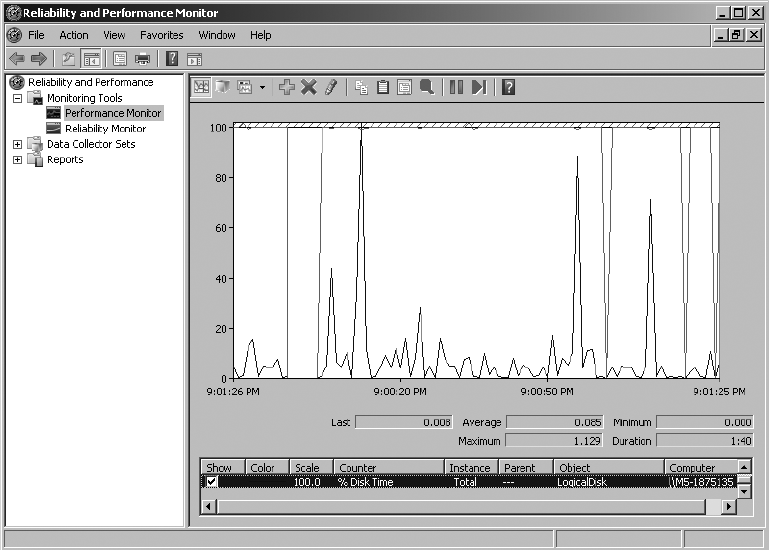
Chapter 7 Desktop Maintenance 203
Print a status message that uses the $i variable to keep track of how many repetitions have
been made. This line is shown here:
"rep $i . counting to rep $numrep ..."
The last step is to calculate percentages based on the data collected earlier in the script. To do
this, use the formulas shown here:
$PercentIdleTime = (1 - (($N2 - $N1)/($D2-$D1)))*100
"`tPercent Disk idle time is: " + "{0:N2}" -f $PercentIdleTime
$PercentDiskTime = (1 - (($r2 - $r1)/($D2-$D1)))*100
"`tPercent Disk time is: " + "{0:N2}" -f $PercentDiskTime
The completed GetDiskPerformance.ps1 script follows. This script displays the same informa-
tion as is displayed in the Performance Monitor tool. This is shown in Figure 7-10.
Figure 7-10 Disk performance counters seen in the Performance Monitor tool.
GetDiskPerformance.ps1
$numRep = 3
$sleep = 2
$n1=$d1=$n2=$d2=$r1=$r2=$w1=$w2=$null
for ($i=1 ; $i -le $numRep ; $i++)
C07622791.fm Page 203 Saturday, December 8, 2007 6:37 PM
204 Windows PowerShell Scripting Guide
{
$wmiPerf=Get-WmiObject -class win32_perfrawdata_perfdisk_logicaldisk `
-Filter "name = '_Total'"
[double]$n1 = $wmiperf.percentIdleTime
[double]$r1 = $wmiperf.percentDiskTime
[double]$d1 = $wmiperf.TimeStamp_Sys100NS
Start-Sleep -Seconds $sleep
$wmiPerf=Get-WmiObject -class win32_perfrawdata_perfdisk_logicaldisk `
-Filter "name = '_Total'"
[double]$n2 = $wmiperf.percentIdleTime
[double]$r2 = $wmiperf.percentDiskTime
[double]$d2 = $wmiperf.TimeStamp_Sys100NS
"rep $i . counting to rep $numrep ..."
$PercentIdleTime = (1 - (($N2 - $N1)/($D2-$D1)))*100
"`tPercent Disk idle time is: " + "{0:N2}" -f $PercentIdleTime
$PercentDiskTime = (1 - (($r2 - $r1)/($D2-$D1)))*100
"`tPercent Disk time is: " + "{0:N2}" -f $PercentDiskTime
}
Identifying Sources of Page Faults
Using the GetDiskPerformance.ps1 script, you can report on the amount of disk idle time as
well as the amount of time the disk is busy. One major cause of disk activity is page faults
caused by various applications. Whereas the previous script might be useful in trending disk
activity, it does not identify sources of page fault activity. In the FindMaxPageFaults.ps1 script,
use the Get-WmiObject cmdlet to retrieve all instances of the Win32_Process WMI class. Pipe-
line the resulting object to the Sort-Object cmdlet and sort the list by the PageFaults property.
Continue the pipeline to the Select-Object cmdlet. The advantage of using this cmdlet here is
that it allows you to retrieve only the top five processes that are generating the most page
faults. You can, of course, extend this script to retrieve more information about the offending
process. The completed FindMaxPageFaults.ps1 script is shown here.
FindMaxPageFaults.ps1
Get-WmiObject -Class win32_process |
Sort-Object -property pagefaults|
Select-Object name, pagefaults -last 5
Summary
This chapter examined the many different tasks involved in maintaining a typical desktop
computer used in a corporate enterprise environment, beginning with a look at disk space
utilization. Next, you learned various items that can use up a lot of disk space, and saw how
to monitor these things. We covered documenting drive configuration and writing disk drive
C07622791.fm Page 204 Saturday, December 8, 2007 6:37 PM
Chapter 7 Desktop Maintenance 205
information to an Access database. This chapter also looked at partitions and a script that can
report on disk partitions.
Next we began examining logical disks, first looking at reporting the logical disk configura-
tion, and then printing the configuration of a specific logical disk. After that, we moved on to
looking at volumes. As before, you learned about a script that would report basic volume
configuration information, and then examined scripts to report on disk space utilization and
scripts that write disk space information to an Access database. We also looked at querying
for old files and printing information on files that had not been accessed for an extended
period of time. And finally, we looked at WMI performance counter classes and at retrieving
performance information related to the disk drive.
C07622791.fm Page 205 Saturday, December 8, 2007 6:37 PM
C07622791.fm Page 206 Saturday, December 8, 2007 6:37 PM

207
Chapter 8
Networking
After completing this chapter, you will be able to:
■Configure network settings.
■Configure a static IP address.
■Enable DHCP.
■Report on current Windows firewall settings.
■Configure Windows firewall settings.
On the Companion Disc The scripts used in this chapter are located on the CD that
accompanies this book in the \scripts\chapter08 folder.
Working with Network Settings
Windows Vista introduces major changes for networking, including new firewall services and
Internet Protocol version 6 (IPv6). These new capabilities also bring forth new challenges
for network administrators. There are many new performance counter classes in Windows
Management Instrumentation (WMI) for working with IPv6 and modifications to existing
networking classes to support the display of IPv6 addresses. There are new methods that
enhance working with network adapters. In short, with new capabilities in networking also
come new capabilities in management as well.
Reporting Networking Settings
There are significant networking capabilities built into Windows Vista and Windows Server
2008. Ease of use seems to be a major design decision for Windows Vista. While this
greatly simplifies procedures for many customers, the ease-of-use features actually make it a
bit more confusing for experienced network administrators. Luckily, you can use Windows
PowerShell to bring order to the large number of network adapters on a typical computer.
These network adapters are shown in Figure 8-1.
The GetNetAdapterStatus.ps1 script reports the status of the various network adapters that
exist on the computer.
C08622791.fm Page 207 Saturday, December 8, 2007 6:39 PM
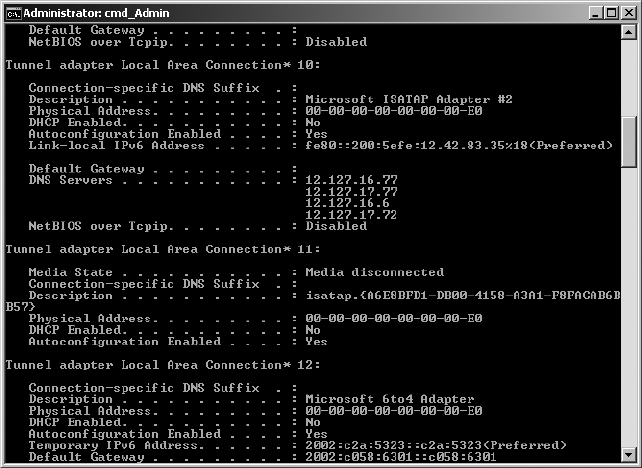
208 Windows PowerShell Scripting Guide
Figure 8-1 The large number of newly identified network adapters makes traditional management
methods tenuous.
In the GetNetAdapterStatus.ps1 script, begin with the param statement, which allows you to
target the script to run against a remote computer if desired. If the -computer parameter is not
supplied when the script is run, then you don’t target a remote computer; instead you will
default to run against the localhost. You can also use the -help parameter to display a help
string that displays information about the use and syntax of the script. This line of code is
shown here:
param($computer="localhost",$help)
The next section of code in the GetNetAdapterStatus.ps1 script is used to translate the status
code returned by the Win32_NetworkAdapter WMI class into a string value that will be
more easily understood. To do this, create a function named funstatus. The funstatus function
takes a single input parameter, which is supplied when the function is called from the main
script. This status code comes from the Win32_NetworkAdapter WMI class, which is the way
WMI reports information. Inside the funstatus function, the switch statement will evaluate
the value in $status. The script block for the switch statement contains all possible status codes
that are defined for the Win32_NetworkAdapter WMI class. These are the same status messages
displayed in the Network and Sharing Center shown in Figure 8-2.
C08622791.fm Page 208 Saturday, December 8, 2007 6:39 PM
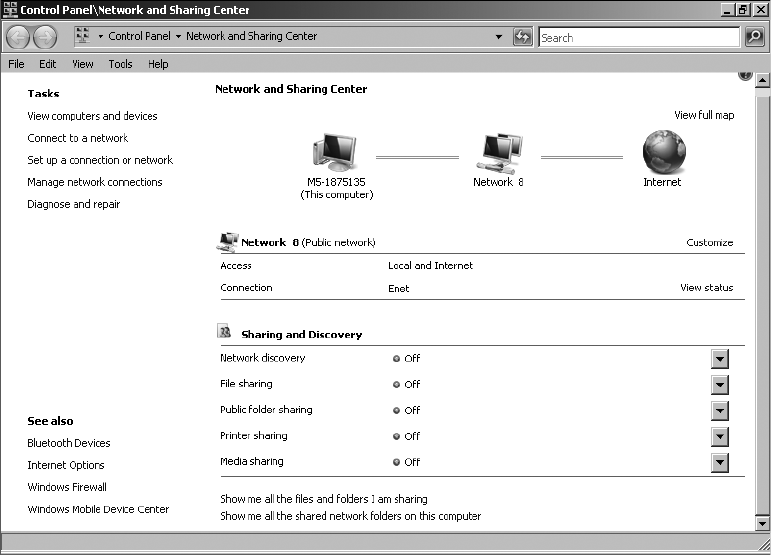
Chapter 8 Networking 209
Figure 8-2 Network status messages are displayed in the Network and Sharing Center.
These values and their meanings are documented in the Windows Software Development Kit
(SDK). The funstatus function is shown here:
function funStatus($status)
{
switch($status)
{
0 { " Disconnected" }
1 { " Connecting" }
2 { " Connected" }
3 { " Disconnecting" }
4 { " Hardware not present" }
5 { " Hardware disabled" }
6 { " Hardware malfunction" }
7 { " Media disconnected" }
8 { " Authenticating" }
9 { " Authentication succeeded" }
10 { " Authentication failed" }
}
}
C08622791.fm Page 209 Saturday, December 8, 2007 6:39 PM
210 Windows PowerShell Scripting Guide
Once you are past the funstatus function, define another function, funhelp, which is used to
display the help message to a user who specifies the -help parameter. The funhelp function uses
a here-string to create the help text. A here-string is defined by using the following tags: @”
to open the here-string and “ ” to close the here-string. The main advantage granted by the
here-string is the ability to ignore string formatting rules, so you don’t have to use `t for a tab,
`r to return to a new line, and quotes “ ” to define the strings. The here-string does not really
give you the ability to perform new types of string formatting, but it certainly makes it a lot
easier. The here-string is assigned to a variable, which you can call $helpText. It is printed at the
end of the function, just before calling the exit statement. The entire funhelp function (and
associated here-string) is shown here:
function funHelp()
{
$helpText=@"
DESCRIPTION:
NAME: GetNetAdapterStatus.ps1
Produces a listing of network adapters and status on a local or remote machine.
PARAMETERS:
-computerName Specifies the name of the computer upon which to run the script
-help prints help file
SYNTAX:
GetNetAdapterStatus.ps1 -computer MunichServer
Lists all the network adapters and status on a computer named MunichServer
GetNetAdapterStatus.ps1
Lists all the network adapters and status on local computer
GetNetAdapterStatus.ps1 -help ?
Displays the help topic for the script
"@
$helpText
exit
}
After completing the funhelp function, move to another function. The next function is the
funline function, used to underline and separate the network adapter settings. The funline
function accepts a single input parameter, named $strIN, which is used to hold the string that
will be underlined.
The first purpose of the funline function is to retrieve the length of the input string. The length,
obtained by querying the Length property of the sting, is stored in $num variable. Use the for
statement to count to the number stored in the $num variable. Inside the loop, add the $funline
variable to itself, and concatenate it with the equal sign (=). The last two things to do are to
C08622791.fm Page 210 Saturday, December 8, 2007 6:39 PM
Chapter 8 Networking 211
print the string value contained in the $strIN input variable in yellow and to print the line of
equal signs under the line of text in dark yellow (thereby giving the output a slightly three-
dimensional effect.) The funline function follows:
function funline ($strIN)
{
$num = $strIN.length
for($i=1 ; $i -le $num ; $i++)
{ $funline = $funline + "=" }
Write-Host -ForegroundColor yellow $strIN
Write-Host -ForegroundColor darkYellow $funline
}
The first line of code executed is not one of the functions; rather, it is the line that checks for
the presence of the $help variable on the stack. The $help variable will only be present if it is
supplied as a parameter when launching the script. If the $help variable is found, display a
message about retrieving help, and then move into the funhelp function (where you print the
help string contained in the giant here-string). The line of code that checks for the presence of
the $help parameter is shown here:
if($help) { "Printing help now..." ; funHelp }
If the $help variable is not present, then move to:
$objWMI=Get-WmiObject -Class win32_networkadapter -computer $computer
funline ("Network adapters and status on $computer")
foreach($net in $objWMI)
{
Write-Host "$($net.name)"
funstatus($net.netconnectionstatus)
}
And, finally, the completed GetNetAdapterStatus.ps1 script is shown here.
GetNetAdapterStatus.ps1
param($computer="localhost",$help)
function funStatus($status)
{
switch($status)
{
0 { " Disconnected" }
1 { " Connecting" }
2 { " Connected" }
3 { " Disconnecting" }
4 { " Hardware not present" }
5 { " Hardware disabled" }
6 { " Hardware malfunction" }
7 { " Media disconnected" }
8 { " Authenticating" }
9 { " Authentication succeeded" }
10 { " Authentication failed" }
}
}
C08622791.fm Page 211 Saturday, December 8, 2007 6:39 PM
212 Windows PowerShell Scripting Guide
function funHelp()
{
$helpText=@"
DESCRIPTION:
NAME: GetNetAdapterStatus.ps1
Produces a listing of network adapters and status on a local or remote machine.
PARAMETERS:
-computerName Specifies the name of the computer upon which to run the script
-help prints help file
SYNTAX:
GetNetAdapterStatus.ps1 -computer MunichServer
Lists all the network adapters and status on a computer named MunichServer
GetNetAdapterStatus.ps1
Lists all the network adapters and status on local computer
GetNetAdapterStatus.ps1 -help ?
Displays the help topic for the script
"@
$helpText
exit
}
function funline ($strIN)
{
$num = $strIN.length
for($i=1 ; $i -le $num ; $i++)
{ $funline = $funline + "=" }
Write-Host -ForegroundColor yellow $strIN
Write-Host -ForegroundColor darkYellow $funline
}
if($help) { "Printing help now..." ; funHelp }
$objWMI=Get-WmiObject -Class win32_networkadapter -computer $computer
funline ("Network adapters and status on $computer")
Working with Adapter Configuration
After you have a status list of the network adapters, you can query for the configuration of the
network adapters. You work with the same network adapters that are displayed in Network
Connections, available from Network And Sharing Center, in Control Panel, as shown in
Figure 8-3.
C08622791.fm Page 212 Saturday, December 8, 2007 6:39 PM
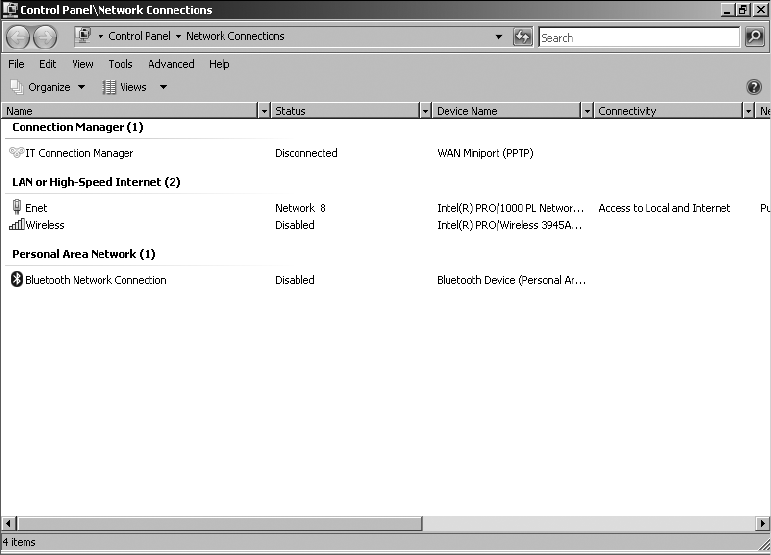
Chapter 8 Networking 213
Figure 8-3 Network adapters can be found in Network Connections.
To do this, use the Win32_NetworkAdapterConfiguration WMI class. Using the GetNetAdapter-
Config.ps1 script, retrieve extensive troubleshooting information about specific network
adapters. Do this by allowing the specification of several keywords, each of which causes the
script to return certain groupings of configuration information about the network adapters.
Let’s look more closely at the GetNetAdapterConfig.ps1 script.
Begin the GetNetAdapterConfig.ps1 script with the param statement. In this script, you define
three parameters: -computer, -query, and -help. Of the three, only one is set to a default value:
-computer is set to localhost. In this way, if no parameter is utilized, the script will still run
against the local computer. The param statement is shown here:
param($computer="localhost",$query,$help)
After the param statement, develop the funhelp function. This is a syntax similar to the function
of the same name in the GetNetAdapterStatus.ps1, which was covered previously in this
chapter. You create a here-string which is assigned to the $helpText variable. At the end of the
function, print the here-string contained in the $helpText variable, and then exit the script.
This is shown here:
function funHelp()
{
$helpText=@"
C08622791.fm Page 213 Saturday, December 8, 2007 6:39 PM
214 Windows PowerShell Scripting Guide
DESCRIPTION:
NAME: GetNetAdapterConfig.ps1
Produces a listing of network adapter configuration information
on a local or remote machine.
PARAMETERS:
-computer Specifies the name of the computer to run the script
-help prints help file
-query the type of query < ip, dns, dhcp, all >
SYNTAX:
GetNetAdapterConfig.ps1 -computerName MunichServer
Lists default network adapter configuration on a
computer named MunichServer
GetNetAdapterConfig.ps1 -computerName MunichServer -query IP
Lists IPaddress, IPsubnet, DefaultIPgateway, MACAddress
on a computer named MunichServer
GetNetAdapterConfig.ps1 -computerName MunichServer -query DNS
Lists DNSDomain, DNSDomainSuffixSearchOrder, DNSServerSearchOrder,
DomainDNSRegistrationEnabled on a computer named MunichServer
GetNetAdapterConfig.ps1 -computerName MunichServer -query DHCP
Lists Index,DHCPEnabled, DHCPLeaseExpires, DHCPLeaseObtained,
DHCPServer on a computer named MunichServer
GetNetAdapterConfig.ps1 -computerName MunichServer -query ALL
Lists all network adapter configuration information on a computer
named MunichServer
GetNetAdapterConfig.ps1 -help ?
Prints the help topic for the script
"@
$helpText
exit
}
The next line in the script is the one that determines if the help text will be printed. To do this,
use the if statement and check for the presence of the $help variable. The $help variable will
only be present if it is specified at the command line. In the if statement, if the $help variable
is present, the statement is assumed to be true and will therefore fire the code block, which
prints a status message and calls the function. This is shown here:
if($help) { "Printing help now..." ; funHelp }
C08622791.fm Page 214 Saturday, December 8, 2007 6:39 PM
Chapter 8 Networking 215
Next, assign a variety of values to a collection of variables. These variables are used to govern
the WMI query. Assign a value for $class which is used in performing the WMI query. Assign
a variety of property names to a group of variables. These are used to allow flexibility from
the command line. Each of the variables shown controls the functionality of the query. The
variable assignments are presented here:
$class="win32_networkadapterconfiguration"
$IPproperty="IPaddress, IPsubnet, DefaultIPgateway, MACAddress"
$dnsProperty="DNSDomain, DNSDomainSuffixSearchOrder, `
DNSServerSearchOrder, DomainDNSRegistrationEnabled"
$dhcpProperty="Index,DHCPEnabled, DHCPLeaseExpires, `
DHCPLeaseObtained, DHCPServer"
To determine if you must parse the -query parameter, use the if statement. It is a rather simple
statement: If the $query variable exists, then enter the following code block:
if($query)
If the $query variable exists, enter a switch statement. This switch evaluates the value contained
in the $query variable that was assigned at run time. To enter the switch statement, encase
the value of the $query variable within smooth parentheses. Open a code block with the curly
brackets, and list each of the possible conditions you want to evaluate. The clever part of the
script is using different variables to contain the separate collections of properties to select
from the same WMI class, based on the value of the string that was supplied to the -query
parameter.
The switch statement is used to build the select statement that will later get supplied to the
specified WMI class. Notice that there is a DEFAULT switch. This code block will be run if the
$query variable is initialized with a value that is not one of the four predefined conditions. This
will most likely occur if someone supplies an incorrect variable format to the $query variable.
This section of code is shown here:
switch($query)
{
"ip" { $query="Select $IPproperty from $class" }
"dns" { $query="Select $dnsProperty from $class" }
"dhcp" { $query="Select $dhcpProperty from $class" }
"all" {
$query = "Select * from $class" ; `
Get-WmiObject -Query $query | format-list * ;
exit
}
DEFAULT {
$query = "Select * from $class" ; `
Get-WmiObject -Query $query ; exit
}
}
}
C08622791.fm Page 215 Saturday, December 8, 2007 6:39 PM
216 Windows PowerShell Scripting Guide
If all else fails, use the else clause of the if statement. In the else clause, choose all the properties
from the WMI object, send the query to the Get-WmiObject cmdlet, and submit the statement
to the WMI database, as shown:
ELSE
{
$query = "Select * from $class" ; `
Get-WmiObject -Query $query ; exit
}
The last statement in the GetNetAdapterConfig.ps1 script performs the WMI query. To do
this, use the Get-WmiObject cmdlet and supply the query into the -query parameter. After
that, use the Format-Table cmdlet to clean up the output. When using the Format-Table
cmdlet, specify that you only want parameters that correspond to the code contained in the
Get-WmiObject cmdlet. This code is shown here:
Get-WmiObject -query $query | format-table [a-z]* -AutoSize
The completed GetNetAdapterConfig.ps1 script follows.
GetNetAdapterConfig.ps1
param($computer="localhost",$query,$help)
function funHelp()
{
$helpText=@"
DESCRIPTION:
NAME: GetNetAdapterConfig.ps1
Produces a listing of network adapter configuration information
on a local or remote machine.
PARAMETERS:
-computer Specifies the name of the computer to run the script
-help prints help file
-query the type of query < ip, dns, dhcp, all >
SYNTAX:
GetNetAdapterConfig.ps1 -computerName MunichServer
Lists default network adapter configuration on a
computer named MunichServer
GetNetAdapterConfig.ps1 -computerName MunichServer -query IP
Lists IPaddress, IPsubnet, DefaultIPgateway, MACAddress
on a computer named MunichServer
GetNetAdapterConfig.ps1 -computerName MunichServer -query DNS
Lists DNSDomain, DNSDomainSuffixSearchOrder, DNSServerSearchOrder,
DomainDNSRegistrationEnabled on a computer named MunichServer
GetNetAdapterConfig.ps1 -computerName MunichServer -query DHCP
C08622791.fm Page 216 Saturday, December 8, 2007 6:39 PM
Chapter 8 Networking 217
Lists Index,DHCPEnabled, DHCPLeaseExpires, DHCPLeaseObtained,
DHCPServer on a computer named MunichServer
GetNetAdapterConfig.ps1 -computerName MunichServer -query ALL
Lists all network adapter configuration information on a computer
named MunichServer
GetNetAdapterConfig.ps1 -help ?
Prints the help topic for the script
"@
$helpText
exit
}
if($help) { "Printing help now..." ; funHelp }
$class="win32_networkadapterconfiguration"
$IPproperty="IPaddress, IPsubnet, DefaultIPgateway, MACAddress"
$dnsProperty="DNSDomain, DNSDomainSuffixSearchOrder, `
DNSServerSearchOrder, DomainDNSRegistrationEnabled"
$dhcpProperty="Index,DHCPEnabled, DHCPLeaseExpires, `
DHCPLeaseObtained, DHCPServer"
if($query)
{
switch($query)
{
"ip" { $query="Select $IPproperty from $class" }
"dns" { $query="Select $dnsProperty from $class" }
"dhcp" { $query="Select $dhcpProperty from $class" }
"all" {
$query = "Select * from $class" ; `
Get-WmiObject -Query $query | format-list * ;
exit
}
DEFAULT {
$query = "Select * from $class" ; `
Get-WmiObject -Query $query ; exit
}
}
}
ELSE
{
$query = "Select * from $class" ; `
Get-WmiObject -Query $query ; exit
}
Get-WmiObject -query $query | format-table [a-z]* -AutoSize
C08622791.fm Page 217 Saturday, December 8, 2007 6:39 PM
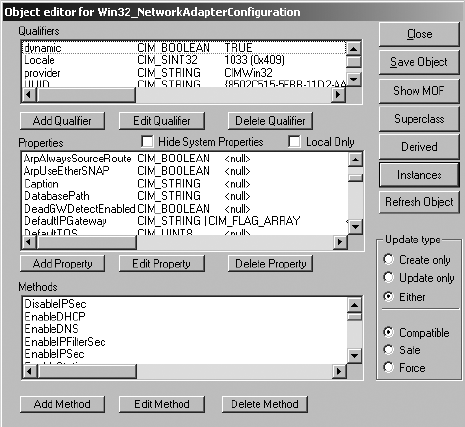
218 Windows PowerShell Scripting Guide
Filtering Only Properties that Have a Value
Using the NetworkAdapterConfigFiltered.ps1 script, query the Win32_NetworkAdapter-
Configuration WMI class, and print only properties that have a value. As you have no doubt
noticed from the previous scripts in this chapter, often property names that are displayed
don’t contain a value. Using the Windows Management Instrumentation Tester utility, shown
in Figure 8-4, you see there are many properties without a value.
Figure 8-4 The Object Editor of the Windows Management Instrumentation Tester utility can
display properties and their value.
This can make the output a little difficult to read and to understand. You can solve that
problem, if you’re willing to do some extra work.
The first line of the NetworkAdapterConfigFIltered.ps1 script declares the funline function. It
will accept a single input string. This line is shown here:
function funline ($strIN)
The funline function was used in the GetNetAdapterStatus.ps1 script, which was discussed
previously in this chapter. The first job the funline function performs inside the code block is
to obtain the length of the input string. The funline function then uses a for loop and counts
the number of times represented by the string length. With each pass through the loop,
funline concatenates an equal sign to itself. This provides a line separator that is exactly the
length of the input string; use this concatenated line to simulate an underline of the input
string. Print the input string in yellow by using the Write-Host cmdlet, and use the same
C08622791.fm Page 218 Saturday, December 8, 2007 6:39 PM

Chapter 8 Networking 219
cmdlet to specify a dark yellow foreground color for the underline. The funline function is
shown here:
function funline ($strIN)
{
$num = $strIN.length
for($i=1 ; $i -le $num ; $i++)
{ $funline = $funline + "=" }
Write-Host -ForegroundColor yellow `n$strIN
Write-Host -ForegroundColor darkYellow $funline
}
The next portion of the NetworkAdapterConfigFiltered.ps1 script uses the Get-WmiObject
cmdlet to retrieve the Win32_NetworkAdapterConfiguration WMI class information. Pipeline
the resulting management object to the ForEach-Object cmdlet; use it to iterate through the
collection of objects one network adapter at a time. This piece of the code follows. Note that
at the end of the ForEach-Object cmdlet, you use the grave accent (back tick) to indicate line
continuation.
Get-WmiObject win32_networkadapterconfiguration |
foreach-object `
Inside the code block of the ForEach-Object cmdlet, first print a header for the list of WMI
information. This makes it easy to distinguish between the different network adapters defined
on the computer. Use the Caption property from the Win32_NetworkAdapterConfiguration
WMI class and call the funline function. State that you’re querying the specific network
adapter. This line of code is shown here:
funline ("Querying: $($_.caption)")
Working with Variables and Quotes
When you print the value of a variable inside Windows PowerShell, you type the name
of the variable and obtain the value, as is shown here:
PS C:\> $a = 5
PS C:\> $a
5
PS C:\>
If you put the variable within double quotes you will still get the value of the variable, as
is shown here:
PS C:\> write-host "This is the value of $a"
This is the value of 5
PS C:\>
C08622791.fm Page 219 Saturday, December 8, 2007 6:39 PM

220 Windows PowerShell Scripting Guide
The sentence looks good as it’s typed, but when you execute the command, you lose the
variable name. You can deal with this in two ways. First, to stay with the current code,
add another call to $a. But this time, escape the $a by using a grave accent. This is
illustrated here:
PS C:\> write-host "This is the value of `$a: $a"
This is the value of $a: 5
PS C:\>
The moral of the story: If you want to easily expand the value of the variable and print
the name of the variable within double quotes, just use the grave accent.
You may ask, “What about single quotes?” Well, they work nearly the opposite way as
double quotes. To illustrate: First, print the value of $a within single quotes:
PS C:\> write-host 'This is the value of $a'
This is the value of $a
PS C:\>
As you can see, when a variable is printed within single quotes, you only print the
variable name, not the value. The easiest way to deal with this behavior is to leave the
code as is and put the $a outside the single quotes, as shown here:
PS C:\> write-host 'This is the value of $a:' $a
This is the value of $a: 5
PS C:\>
To illustrate another feature of Windows PowerShell related to variables and quotes—
automatic unraveling—begin by storing the results of a basic WMI query in the variable $a.
This is shown here:
PS C:\> $a=get-wmiobject -class win32_bios
PS C:\>
Next, print the version of the BIOS directly to the command line, as shown here:
PS C:\> $a.Version
TOSHIB - 20060821
PS C:\>
So far, so good. Now, put this result into a Write-Host cmdlet and add additional
information to it. This is shown here:
PS C:\> Write-Host "This laptop has a bios version $a.Version"
This laptop has a bios version \\M5-1875135\root\cimv2:Win32_BIOS.Name
="v3.20 ",SoftwareElementID="v3.20 ",SoftwareElementState=3,
TargetOperatingSystem=0,Version="TOSHIB - 20060821".Version
PS C:\>
As you can see, the results are a little overwhelming! This is the automatic unraveling
feature of Windows PowerShell. Impressive, huh? Perhaps this is just a little bit more
C08622791.fm Page 220 Saturday, December 8, 2007 6:39 PM

Chapter 8 Networking 221
information than you are prepared to handle at this time. So, how can you get the
information to behave as it did when it was on the Windows PowerShell line in the
console? The solution is actually rather elegant. Use another $ and wrap the command
in parentheses to prevent unraveling. This solution is illustrated here:
PS C:\> Write-Host "This laptop has a bios version $($a.Version)"
This laptop has a bios version TOSHIB - 20060821
PS C:\>
After using the funline function to print a header for your listing of properties, use the
psbaseobject. When you query psbaseobject, a System.Management.Automation.PSMemberSet
object is returned. The members of the psbaseobject are shown here:
PS C:\> (get-wmiobject win32_bus).psobject | get-member |
Format-Table name, membertype -AutoSize
Name MemberType
---- ----------
CompareTo Method
Copy Method
Equals Method
GetHashCode Method
GetType Method
get_BaseObject Method
get_ImmediateBaseObject Method
get_Members Method
get_Methods Method
get_Properties Method
get_TypeNames Method
ToString Method
BaseObject Property
ImmediateBaseObject Property
Members Property
Methods Property
Properties Property
TypeNames Property
You can see from the previous listing that you can retrieve a listing of the properties, methods,
or members if you wish. When using the NetworkAdapterConfigFiltered.ps1 script, you
only need the list of properties. You do this so you can inspect the value before printing the
results. If you don’t take this extra step, it is difficult to query the value and filter it.
Using the NetworkAdapterConfigFiltered.ps1 script, check to see if the Value property exists.
If there is a value present for the property, the Value property will exist. However, if the Value
property is absent, that means there is no value for the property—and by abstraction, there
is no reason to clutter your display with long-named empty properties. Here is the line of code
that performs this magic:
If($_.value)
C08622791.fm Page 221 Saturday, December 8, 2007 6:39 PM

222 Windows PowerShell Scripting Guide
If there is a value present for the property, check to see if the name has double underscores
(__) within the name. If it does, then skip the property, as you aren’t interested in looking at
the system properties of the WMI class. To check the property name, use a regular expression
match statement, as is shown here:
if ($_.name -match "__"){}
Tip When trying to match property names as we did here, there are basically two choices:
wildcards or regular expressions. To make the match with wildcards, you create something
similar to this: $_.name -like “*__*”. As you see, it is more difficult to type (at least in my
mind). The second option is to use not operators, in which case the expression is $_.name -
notmatch “__”. This method is considerably easier.
If the property name does not have a double underscore within the name, print the name of
the property, tab over two stops, and print the property value. This line of code is shown here:
Write-Host "$($_.name)`t`t $($_.value)"
The completed NetworkAdapterConfigFiltered.ps1 script is shown here.
NetworkAdapterConfigFiltered.ps1
function funline ($strIN)
{
$num = $strIN.length
for($i=1 ; $i -le $num ; $i++)
{ $funline = $funline + "=" }
Write-Host -ForegroundColor yellow `n$strIN
Write-Host -ForegroundColor darkYellow $funline
}
Get-WmiObject win32_networkadapterconfiguration |
foreach-object `
{
funline ("Querying: $($_.caption)")
$_.psobject.properties |
foreach-object `
{
If($_.value)
{
if ($_.name -match "__"){}
ELSE
{
Write-Host "$($_.name)`t`t $($_.value)"
}
}
}
}
C08622791.fm Page 222 Saturday, December 8, 2007 6:39 PM
Chapter 8 Networking 223
Configuring Network Adapter Settings
When there are multiple network adapters defined on a computer, the configuration scenario
becomes a bit more complicated. You must ensure you are configuring the correct network
adapter, and also ensure that the one you disable is not the network adapter you are connected
to. This section examines the issues involved in working with multiple network adapters.
Detecting Multiple Network Adapters
One problem with Windows Vista is that it seems to give priority to the wireless network
adapter. While this may be great for consumers who have one of those fancy cable modem/
wireless hub devices handed out by the local television cable service provider, this feature
can cause myriad problems for network administrators. It may even be a security issue; for
example, when a traveling executive is not able to get Internet access in a hotel room, Windows
Vista generously suggests enabling the wireless adapter to solve the problem as shown in
Figure 8-5. Following this course of action, however, can be a security issue for an unsuspect-
ing executive when connecting to an unsecured network.
Figure 8-5 When diagnosing a connectivity problem, Windows Vista offers to turn on the wireless
adapter.
When working with the GetNetID.ps1 script, you connect to the local computer and print the
network adapter name, interface index number, adapter type information, and the media
access control (MAC) address. These properties are useful in assisting you from an inventory
perspective.
The GetNetID.ps1 script uses the Get-WmiObject cmdlet and retrieves the Win32_
NetworkAdapter WMI class information. Use the Format-Table cmdlet to format the output.
Don’t print all the properties; instead, select only the name, InterfaceIndex, AdapterType,
and MacAddress properties. The -autosize switch is used on the Format-Table cmdlet to clean
up and tighten the display. The GetNetID.ps1 script is shown here.
GetNetID.ps1
Get-WmiObject -Class win32_networkadapter |
format-table -Property name, interfaceIndex, `
adapterType, macAddress –autosize
C08622791.fm Page 223 Saturday, December 8, 2007 6:39 PM
224 Windows PowerShell Scripting Guide
Writing Network Adapter Information to a Microsoft Excel
Spreadsheet
Using the WriteNetworkAdapterInfoToExcel.ps1 script, you gather configuration information
about the network adapters installed on the computer and write the information to an Excel
spreadsheet. This provides a convenient and persistent place for both storage and analysis.
To use the WriteNetworkAdapterInfoToExcel.ps1 script, begin by assigning a path for your
Excel spreadsheet to the $strPath variable. Create an instance of the Excel.Application COM
object, which you use to provide the ability to create and manipulate the Excel spreadsheet.
These two lines of code are shown here:
$strPath="c:\fso\netAdapter.xls"
$objExcel=New-Object -ComObject Excel.Application
Working with the Excel automation model, set the Visible property of the Excel.Application
object, which is stored in the $objExcel variable, to -1. The value of -1 will evaluate to true. Then
add a new workbook to Excel. These two lines of code are shown here:
$objExcel.Visible=-1
$WorkBook=$objExcel.Workbooks.Add()
Next, retrieve the first workshop and store the reference to it in the $sheet variable. To do this,
reference the new workbook created and stored in the $workbook variable and use the item
method to return the first worksheet. This line of code is shown here:
$sheet=$workbook.worksheets.item(1)
On the next line, declare a variable, $x, and assign the value 2 to it. This will be used to write
values on the second row of the Excel spreadsheet. The next step is to retrieve the name of the
computer. To do this, go to the environment PS drive and grab the value assigned to the
computername environmental variable. This returned value is stored in the $computer variable.
These two lines of code follow:
$x=2
$Computer = $env:computerName
Next, make the WMI query, using the Get-WmiObject cmdlet to query the Win32_Network-
Adapter WMI class. The resulting management object is stored in the $objWMIService variable.
This line of code is shown here:
$objWMIService = Get-WmiObject -class win32_NetworkAdapter `
-computer $Computer
The next section of code is used to supply the column headers for each property that is
retrieved from WMI. Use a for loop to specify each column that will be boldface. To print the
C08622791.fm Page 224 Saturday, December 8, 2007 6:39 PM
Chapter 8 Networking 225
column headers in bold, set the Bold property of the font to true. There is an automatic
variable: $true than can be used for this purpose. This section of code is shown here:
for($b=1 ; $b -le 10 ; $b++)
{$sheet.Cells.item(1,$b).font.bold=$true}
$sheet.Cells.item(1,1)=("Name of Adapter")
$sheet.Cells.item(1,2)=("Interface Index")
$sheet.Cells.item(1,3)=("Index")
$sheet.Cells.item(1,4)=("DeviceID")
$sheet.Cells.item(1,5)=("AdapterType")
$sheet.Cells.item(1,6)=("MacAddress")
$sheet.Cells.item(1,7)=("netconnectionid")
$sheet.Cells.item(1,8)=("NetConnectionStatus")
$sheet.Cells.item(1,9)=("NetworkAddresses")
$sheet.Cells.item(1,10)=("PermanentAddress")
After bolding the column headers, use a foreach statement to iterate through the collection of
WMI objects, retrieve the specific properties you are interested in, and plug them into the
appropriate columns. To do this, reference the cells by the item method. The item method
needs both x and y coordinates to locate a specific cell. To make the process easy, use $x to
track the row you are working with; use the y coordinate to refer to the specific column used
to store data. This section of code follows:
ForEach ($objNet in $objWMIService)
{
$sheet.Cells.item($x, 1)=($objNet.Name)
$sheet.Cells.item($x, 2)=($objNet.InterfaceIndex)
$sheet.Cells.item($x, 3)=($objNet.index)
$sheet.Cells.item($x, 4)=($objNet.DeviceID)
$sheet.Cells.item($x, 5)=($objNet.adapterType)
$sheet.Cells.item($x, 6)=($objNet.MacAddress)
$sheet.Cells.item($x,7)=($objNet.netconnectionid)
$sheet.Cells.item($x,8)=($objNet.NetConnectionStatus)
$sheet.Cells.item($x,9)=($objNet.NetworkAddresses)
$sheet.Cells.item($x,10)=($objNet.PermanentAddress)
Check to see if the network adapter type is an Ethernet adapter or if it is another type. The
easiest way to make this determination is to evaluate the AdapterType property of the
Win32_NetworkAdapter WMI class. Because you are looking for Ethernet adapters, use the
-notmatch operator, as shown in this line of code:
If($objNet.AdapterType -notMatch 'ethernet')
If the adapter type is not an Ethernet type of adapter, then change the color of the font and
make it bold. This shown in the two lines of code shown here:
$sheet.Cells.item($x,5).font.colorIndex=3
$sheet.Cells.item($x,5).font.bold=$true
C08622791.fm Page 225 Saturday, December 8, 2007 6:39 PM
226 Windows PowerShell Scripting Guide
The last function to perform in this section is to increment the value of $x so that the next
series of data is written on the next row in the spreadsheet. Use the ++ method, as shown here:
$x++
After the spreadsheet is created and displayed, it’s often necessary to change the column
widths to display all the information. To solve this problem, you can use the autofit() method,
which is a method used on a column object that belongs to a defined range within the spread-
sheet. The easiest way to define a range is to use the UsedRange property from the sheet object.
Once this is figured out, the rest is easy. These two lines of code are shown here:
$range = $sheet.usedRange
$range.EntireColumn.AutoFit()
At this time, be sure to save the spreadsheet. If the Excel workbook exists, you may decide to
delete it and then save the worksheet as a new spreadsheet. If, however, the Excel workbook
does not exist, just save it as a new workbook. The code that makes this decision for you
is shown here:
IF(Test-Path $strPath)
{
Remove-Item $strPath
$objExcel.ActiveWorkbook.SaveAs($strPath)
}
ELSE
{
$objExcel.ActiveWorkbook.SaveAs($strPath)
}
Figure 8-6 is an example of the completed Excel spreadsheet containing the network adapter
configuration information such as the name, interface index, and Mac address.
The completed WriteNetworkAdapterInfoToExcel.ps1 script follows.
WriteNetworkAdapterInfoToExcel.ps1
$strPath="c:\fso\netAdapter.xls"
$objExcel=New-Object -ComObject Excel.Application
$objExcel.Visible=-1
$workbook=$objExcel.workbooks.Add()
$sheet=$workbook.worksheets.item(1)
$x=2
$Computer = $env:computerName
$objWMIService = Get-WmiObject -class win32_NetworkAdapter `
-computer $Computer
for($b=1 ; $b -le 10 ; $b++)
{$sheet.Cells.item(1,$b).font.bold=$true}
$sheet.Cells.item(1,1)=("Name of Adapter")
C08622791.fm Page 226 Saturday, December 8, 2007 6:39 PM
Chapter 8 Networking 227
$sheet.Cells.item(1,2)=("Interface Index")
$sheet.Cells.item(1,3)=("Index")
$sheet.Cells.item(1,4)=("DeviceID")
$sheet.Cells.item(1,5)=("AdapterType")
$sheet.Cells.item(1,6)=("MacAddress")
$sheet.Cells.item(1,7)=("netconnectionid")
$sheet.Cells.item(1,8)=("NetConnectionStatus")
$sheet.Cells.item(1,9)=("NetworkAddresses")
$sheet.Cells.item(1,10)=("PermanentAddress")
ForEach ($objNet in $objWMIService)
{
$sheet.Cells.item($x, 1)=($objNet.Name)
$sheet.Cells.item($x, 2)=($objNet.InterfaceIndex)
$sheet.Cells.item($x, 3)=($objNet.index)
$sheet.Cells.item($x, 4)=($objNet.DeviceID)
$sheet.Cells.item($x, 5)=($objNet.adapterType)
$sheet.Cells.item($x, 6)=($objNet.MacAddress)
$sheet.Cells.item($x,7)=($objNet.netconnectionid)
$sheet.Cells.item($x,8)=($objNet.NetConnectionStatus)
$sheet.Cells.item($x,9)=($objNet.NetworkAddresses)
$sheet.Cells.item($x,10)=($objNet.PermanentAddress)
If($objNet.AdapterType -notMatch 'ethernet')
{
$sheet.Cells.item($x,5).font.colorIndex=3
$sheet.Cells.item($x,5).font.bold=$true
}
$x++
}
$range = $sheet.usedRange
$range.EntireColumn.AutoFit()
IF(Test-Path $strPath)
{
Remove-Item $strPath
$objExcel.ActiveWorkbook.SaveAs($strPath)
}
ELSE
{
$objExcel.ActiveWorkbook.SaveAs($strPath)
}
C08622791.fm Page 227 Saturday, December 8, 2007 6:39 PM
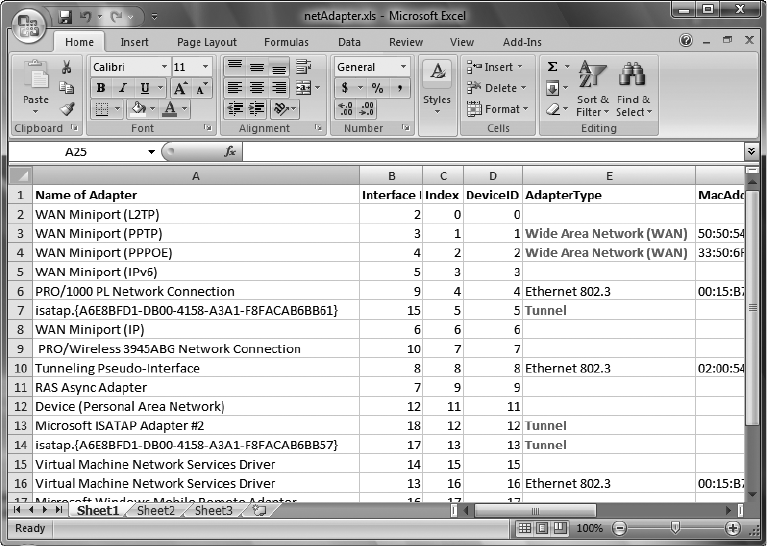
228 Windows PowerShell Scripting Guide
Figure 8-6 The Excel spreadsheet containing network adapter information.
Identifying Connected Network Adapters
A major security concern on networks is computers that are connected to more than a single
network. These dual-homed computers represent a threat when they bridge a secure network
with an insecure network. While this may be obvious when looking in Network Connections
in Control Panel, as shown in Figure 8-7, it may be an unwelcome surprise to the network
administrator.
This is a job for the FindConfigurationOfConnectedAdapters.ps1 script: identifying
computers with more than a single connected adapter. Another use of this script is to simplify
returning data on network adapters; the script only returns data on network adapters that
are connected. If there are no active connections, the script returns no data.
The significant thing about the FindConfigurationOfConnectedAdapters.ps1 script is that it
uses two WMI classes. Whereas the Win32_NetworkAdapter WMI class has a property named
Connected, the Win32_NetworkAdapterConfiguration WMI class does not.
C08622791.fm Page 228 Saturday, December 8, 2007 6:39 PM
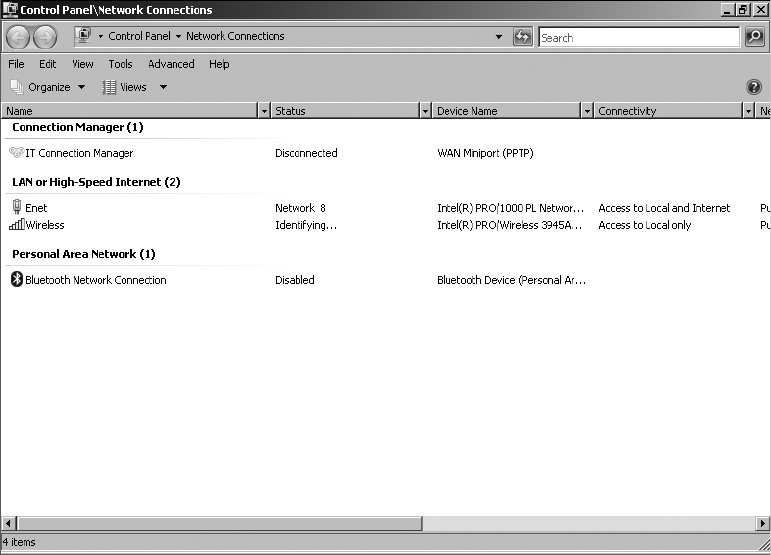
Chapter 8 Networking 229
Figure 8-7 Network Connections clearly points out when two network adapters are both connected.
First define two variables: $computer, which will be used to control where the WMI query will
take place, and $connected, which is the value for the NetConnectionStatus property, indicating
that the computer is connected. These two lines are shown here:
$computer="localhost"
$connected=2
Query the Win32_NetworkAdapter class and obtain a management object that represents the
network adapters that are connected. To retrieve only connected network adapters, use the
-filter parameter and specify that you are interested only in a net connection status that is
equal to the one specified in the $connected variable. Pipeline this information into a ForEach-
Object cmdlet. This section of code is shown here:
Get-WmiObject -Class win32_networkadapter -computername $computer `
-filter "netconnectionstatus = $connected" |
foreach-object `
Once inside the ForEach-Object cmdlet, perform another WMI query. This time, query the
Win32_NetworkAdapterConfiguration WMI class, and use a filter that retrieves the network
C08622791.fm Page 229 Saturday, December 8, 2007 6:39 PM
230 Windows PowerShell Scripting Guide
adapters identified in the previous query. Do this by retrieving the DeviceID from the current
pipeline object. This section of code is shown here:
Get-WmiObject -Class win32_networkadapterconfiguration `
-computername $computer -filter "Index = $($_.deviceID)"
The completed FindConfigurationOfConnectedAdapters.ps1 script follows.
FindConfigurationOfConnectedAdapters.ps1
$computer="localhost"
$connected=2
Get-WmiObject -Class win32_networkadapter -computername $computer `
-filter "netconnectionstatus = $connected" |
foreach-object `
{
Get-WmiObject -Class win32_networkadapterconfiguration `
-computername $computer -filter "Index = $($_.deviceID)"
}
Setting Static IP Address
There are many times when network administrators need to configure static IP addresses for
network devices, for special workstations, or more commonly, for servers. While setting the
static IP address is easily completed using the Internet Protocol version 4 property page, as
shown in Figure 8-8, it is not a solution for mass server deployment.
Figure 8-8 Setting the IP address using the Internet Protocol version 4 property page.
The Win32_NetworkAdapterConfiguration WMI class has 14 methods available through
Windows PowerShell. The SetStaticIP.ps1 script illustrates calling three of the methods.
C08622791.fm Page 230 Saturday, December 8, 2007 6:39 PM
Chapter 8 Networking 231
The first line of the SetStaticIP.ps1 script uses the param statement to allow for the input of
named command-line arguments to the script. It defines a number of parameters, but only
assigns a single one ($computer) with a default value. This line of code is shown here:
param($computer="localhost",$q,$ip,$sm,$dg,$dns,$help)
Define the funhelp function, as it is important to have online help available for a script that
contains a number of command-line parameters. Help makes the script easier to use. This
funhelp function is similar to others in that it uses a giant here-string to facilitate typing
quotation marks and tabbed spaces. At the end of the here-string, the funhelp function prints
the value contained in the $helpText variable and exits the script. The funhelp function is
shown here:
function funHelp()
{
$helpText=@"
DESCRIPTION:
NAME: SetStaticIP.ps1
Sets a static IP address on a local or remote machine.
PARAMETERS:
-computerName Specifies the name of the computer upon which to run the script
-q Queries all IP bound network adapters
-ip IP address to use
-sm Subnet mask to use
-dg Default gateway to use
-dns Dns server to use
-help prints help file
SYNTAX:
SetStaticIP.ps1 -q "yes" -computer MunichServer
Lists all the network adapters bound to IP on a computer named MunichServer
SetStaticIP.ps1
Lists all the network adapters bound to IP on local computer
SetStaticIP.ps1 -ip "10.0.0.1" -sm "255.0.0.0" -dg "10.0.0.5" -dns "10.0.0.2"
Sets the Ip address to 10.0.0.1 and the subnet mask to 255.0.0.0 and the default
Gateway to 10.0.0.5 with a dns server of 10.0.0.2 on the local machine
SetStaticIP.ps1 -help ?
Displays the help topic for the script
"@
$helpText
exit
}
C08622791.fm Page 231 Saturday, December 8, 2007 6:39 PM
232 Windows PowerShell Scripting Guide
The next function to define is the FunEvalRTN function. This function is used to evaluate the
return code that comes back from calling the various WMI methods needed to configure the
IP address. Once inside the FunEvalRTN function, use the switch statement to evaluate the
ReturnValue property of the return code. If the ReturnValue is 0, there were no errors. However,
if the value is any other number, the command is not successful. To make the return string
more informative, include a variable, $strCall, that contains the name of the method call that
generates the returnvalue. The FunEvalRTN function follows:
function FunEvalRTN($rtn)
{
Switch ($rtn.returnvalue)
{
0 { Write-Host -foregroundcolor green "No errors for $strCall" }
66 { Write-Host -foregroundcolor red "$strCall reports" `
" invalid subnetMask" }
70 { Write-Host -ForegroundColor red "$strCall reports" `
" invalid IP" }
71 { Write-Host -ForegroundColor red "$strCall reports" `
" invalid gateway" }
91 { Write-Host -ForegroundColor red "$strCall reports" `
" access denied"}
96 { Write-Host -ForegroundColor red "$strCall reports" `
" unable to contact dns server"}
DEFAULT { Write-Host -ForegroundColor red "$strCall service reports" `
" ERROR $($rtn.returnValue)" }
}
$rtn=$strCall=$null
}
To move onto the body of the script, check for the presence of the -help parameter. If it is
present on the command-line, there will be a $help variable. If it exists, call the funhelp function
and exit the script. Check for the -q parameter. If -q is present on the command line, there
will be a $q variable visible on the stack. If it is present, you’ll want to run a WMI query that
displays network adapters with IP enabled. Finally in this section of code, check for the
presence of the remaining command-line parameters. If they are missing, you won’t be able
to configure the IP settings, and you’ll need to call the funhelp function for assistance. This
section of code is shown here:
if($help) { funhelp }
if($q)
{
Get-WmiObject -Class win32_networkadapterconfiguration `
-computer $computer -filter "ipenabled = 'true'"
exit
}
if(!$ip) { funhelp }
if(!$sm) { funhelp }
if(!$dg) { funhelp }
if(!$dns) { funhelp }
C08622791.fm Page 232 Saturday, December 8, 2007 6:39 PM
Chapter 8 Networking 233
Next, declare a global variable using the $global tag and specifying the name of the variable to
be made global. Make it null by assigning the value $null to it. This line of code is shown here:
$global:RTN = $null
Now—and don’t laugh at this—you must make an array out of a single number. The metric for
the gateway must be specified as an array. However, you are only defining a single default
gateway. The string value is accepted by the method call with no problem; however, it
demands the metric be an array. To do this, use the [int32] type constraint to ensure the
number is an int32 data type, then go inside the type constraint and insert a set of empty
square brackets []. Assign the array to the $metric variable you plan to use on the method call.
This line of code is shown here:
$metric = [int32[]]1
Perform the WMI query to retrieve the network adapter that has an IP address bound to it and
store the results of the query in the $objWMI variable. This line of code is shown here (note
the grave accent at the end of the first line, indicating line continuation):
$objWMI = Get-WmiObject -Class win32_networkadapterconfiguration `
-computer $computer -filter "ipenabled = 'true'"
The next section of code is very straightforward: Call each of the methods in succession and
supply the values for each. Use the $strCall variable to hold a string indicating what you are
doing. Go into the FunEvalRTN function to evaluate the return code from each method call, as
this code shows:
$RTN=$objwmi.EnableStatic($ip, $sm)
$strCall="enable static IP and subnet mask"
FunEvalRTN($rtn)
$RTN=$objwmi.SetGateways($dg, $metric)
$strCall="enable set default gateway and metric"
FunEvalRTN($rtn)
$RTN=$objwmi.SetDNSServerSearchOrder($dns)
$strCall="Set the dns server search order"
FunEvalRTN($rtn)
The completed SetStaticIP.ps1 script follows.
SetStaticIP.ps1
param($computer="localhost",$q,$ip,$sm,$dg,$dns,$help)
function funHelp()
{
$helpText=@"
DESCRIPTION:
NAME: SetStaticIP.ps1
Sets a static IP address on a local or remote machine.
PARAMETERS:
C08622791.fm Page 233 Saturday, December 8, 2007 6:39 PM
234 Windows PowerShell Scripting Guide
-computerName Specifies the name of the computer upon which to run the script
-q Queries all IP bound network adapters
-ip IP address to use
-sm Subnet mask to use
-dg Default gateway to use
-dns Dns server to use
-help prints help file
SYNTAX:
SetStaticIP.ps1 -q "yes" -computer MunichServer
Lists all the network adapters bound to IP on a computer named MunichServer
SetStaticIP.ps1
Lists all the network adapters bound to IP on local computer
SetStaticIP.ps1 -ip "10.0.0.1" -sm "255.0.0.0" -dg "10.0.0.5" -dns "10.0.0.2"
Sets the Ip address to 10.0.0.1 and the subnet mask to 255.0.0.0 and the default
Gateway to 10.0.0.5 with a dns server of 10.0.0.2 on the local machine
SetStaticIP.ps1 -help ?
Displays the help topic for the script
"@
$helpText
exit
}
function FunEvalRTN($rtn)
{
Switch ($rtn.returnvalue)
{
0 { Write-Host -foregroundcolor green "No errors for $strCall" }
66 { Write-Host -foregroundcolor red "$strCall reports" `
" invalid subnetMask" }
70 { Write-Host -ForegroundColor red "$strCall reports" `
" invalid IP" }
71 { Write-Host -ForegroundColor red "$strCall reports" `
" invalid gateway" }
91 { Write-Host -ForegroundColor red "$strCall reports" `
" access denied"}
96 { Write-Host -ForegroundColor red "$strCall reports" `
" unable to contact dns server"}
DEFAULT { Write-Host -ForegroundColor red "$strCall service reports" `
" ERROR $($rtn.returnValue)" }
}
$rtn=$strCall=$null
}
if($help) { funhelp }
if($q)
{
C08622791.fm Page 234 Saturday, December 8, 2007 6:39 PM
Chapter 8 Networking 235
Get-WmiObject -Class win32_networkadapterconfiguration `
-computer $computer -filter "ipenabled = 'true'"
exit
}
if(!$ip) { funhelp }
if(!$sm) { funhelp }
if(!$dg) { funhelp }
if(!$dns) { funhelp }
$global:RTN = $null
$metric = [int32[]]1
$objWMI = Get-WmiObject -Class win32_networkadapterconfiguration `
-computer $computer -filter "ipenabled = 'true'"
$RTN=$objwmi.EnableStatic($ip, $sm)
$strCall="enable static IP and subnet mask"
FunEvalRTN($rtn)
$RTN=$objwmi.SetGateways($dg, $metric)
$strCall="enable set default gateway and metric"
FunEvalRTN($rtn)
$RTN=$objwmi.SetDNSServerSearchOrder($dns)
$strCall="Set the dns server search order"
FunEvalRTN($rtn)
Enabling DHCP
The opposite of setting a static IP address is turning on the Dynamic Host Configuration
Protocol (DHCP). Enabling DHCP is easy, involving a single click on the Internet Protocol
version 4 property page, as shown in Figure 8-9.
Figure 8-9 Enabling DHCP takes only a single click.
C08622791.fm Page 235 Saturday, December 8, 2007 6:39 PM
236 Windows PowerShell Scripting Guide
But what if you need to turn on DHCP for 1,000 workstations? I have heard tales of an entire
IT staff spending a Saturday turning on DHCP on workstations … and it took all day! DHCP
is by and large the most prevalent method of obtaining an IP address today. There are very few
companies that still manage static IP addresses for workstations. Many large companies have
implemented DHCP with static reservations for their server farms as well. The only thing
more convenient than using DHCP is to script it. The WorkWithDHCP.ps1 script reports
DHCP status, enables DHCP, releases the DHCP IP assigned address, and releases and renews
the DHCP assigned IP address. In many respects, this script is similar to the SetStaticIP.ps1
script covered previously in this chapter, and so a detailed discussion is not required. This is
a quick summary of the main points of the script.
In the first section, use the param statement, and define three parameters. The -computer
parameter is set to a default value of localhost. This line of code is shown here:
param($computer="localhost",$action,$help)
The funhelp function is almost exactly the same—a giant here-string. We will not discuss it
here. Nor is it necessary to discuss the FunEvalRTN function as it is nearly the same as the one
used in the SetStaticIP.ps1 script.
If the $help variable is present, it indicates the -help parameter was specified at run time, and
therefore you call the funhelp function. Declare the same global variable RTN and set it to $null.
Next, you’ll perform something unique: You want the script to display DHCP configuration
information if no parameters are supplied. To do this, look for the presence of the $action
variable. If it is not present, create it and assign the value q to it, which will cause the script to
perform the query. Use the same WMI query used in the previous script. This section of code
is shown here:
if($help) { funhelp }
$global:RTN = $null
if(!$action) { $action="q" }
$objWMI = Get-WmiObject -Class win32_networkadapterconfiguration `
-computer $computer -filter "ipenabled = 'true'"
Now, enter the switch statement, which is used to evaluate the value of the $action variable. If
it is equal to e, enable DHCP on the target computer. After calling the enableDHCP() method,
assign a string to the $strCall variable that is passed to the FunEvalRTN function, where it will
determine the success of the enableDHCP() method. This section of code follows:
Switch($action)
{
"e"{
$rtn = $objWMI.EnableDHCP() ;
$strCall = "Enable DHCP" ;
FunEvalRTN($rtn)
}
C08622791.fm Page 236 Saturday, December 8, 2007 6:39 PM
Chapter 8 Networking 237
The next section of the switch statement is used to evaluate the letter r. If the switch statement
finds the letter r, it releases the DHCP address. It does this by calling the releaseDHCPLease()
method. Assign a string to $strCall saying you are releasing the address, and evaluate the
return code by passing it to the FunEvalRTN function. This section of code is shown here:
"r" {
$rtn = $objWMI.ReleaseDHCPLease() ;
$strCall = "Release DHCP address" ;
FunEvalRTN($rtn)
}
The next section of the switch statement looks for rr. If the switch statement finds rr, it renews
the DHCP address. Assign a string to the $strCall variable, and evaluate the return code. as is
shown here:
"rr" {
$rtn = $objWMI.RenewDHCPLease() ;
$strCall = "Release and Renew DHCP address" ;
FunEvalRTN($rtn)
}
The final step in the switch statement is perhaps the hardest. Display the DHCP server that
handed out the IP address, noting when the lease was obtained and when it will expire. The
problem is not in obtaining the IP address of the DHCP server; rather, it is in converting the
UTC date object into “normal” time. To perform the conversion, use the Management.Manage-
mentDateTimeConverter .NET Framework class and call the toDateTime static method. Fortu-
nately, this .NET Framework class is readily available. Simply pass the UTC formatted date time
object to the method call. This section of code is shown here:
q" {
"DHCP Server: $($objWMI.dhcpserver)"
"Lease obtained: " + [Management.ManagementDatetimeConverter]::`
todatetime($objWMI.DHCPleaseObtained)
"Lease expires: " + [Management.ManagementDatetimeConverter]::`
todatetime($objWMI.DHCPleaseExpires)
}
The completed WorkWithDHCP.ps1 script follows.
WorkWithDHCP.ps1
param($computer="localhost",$action,$help)
function funHelp()
{
$helpText=@"
DESCRIPTION:
NAME: WorkWithDHCP.ps1
Works with DHCP settings on a local or remote machine.
PARAMETERS:
-computerName Specifies the name of the computer upon which to run the script
C08622791.fm Page 237 Saturday, December 8, 2007 6:39 PM
238 Windows PowerShell Scripting Guide
-action <q(uery) e(nable) r(elease) rr(release/renew) action to perform
-help prints help file
SYNTAX:
WorkWithDHCP.ps1 -q "yes" -computer MunichServer
Queries DHCP settings on a computer named MunichServer
WorkWithDHCP.ps1 -action e
enables DHCP on local computer
WorkWithDHCP.ps1 -action r
Releases the DHCP address on the local machine
WorkWithDHCP.ps1 -action rr
Releases and then renews the DHCP address on the local machine
WorkWithDHCP.ps1 -help ?
Displays the help topic for the script
"@
$helpText
exit
}
function FunEvalRTN($rtn)
{
Switch ($rtn.returnvalue)
{
0 { Write-Host -foregroundcolor green "No errors for $strCall" }
82 { Write-Host -foregroundcolor red "$strCall reports" `
" Unable to renew DHCP lease" }
83 { Write-Host -ForegroundColor red "$strCall reports" `
" Unable to release DHCP lease" }
91 { Write-Host -ForegroundColor red "$strCall reports" `
" access denied"}
DEFAULT { Write-Host -ForegroundColor red "$strCall service reports" `
" ERROR $($rtn.returnValue)" }
}
$rtn=$strCall=$null
}
if($help) { funhelp }
$global:RTN = $null
if(!$action) { $action="q" }
$objWMI = Get-WmiObject -Class win32_networkadapterconfiguration `
-computer $computer -filter "ipenabled = 'true'"
Switch($action)
{
"e"{
$rtn = $objWMI.EnableDHCP() ;
C08622791.fm Page 238 Saturday, December 8, 2007 6:39 PM
Chapter 8 Networking 239
$strCall = "Enable DHCP" ;
FunEvalRTN($rtn)
}
"r" {
$rtn = $objWMI.ReleaseDHCPLease() ;
$strCall = "Release DHCP address" ;
FunEvalRTN($rtn)
}
"rr" {
$rtn = $objWMI.RenewDHCPLease() ;
$strCall = "Release and Renew DHCP address" ;
FunEvalRTN($rtn)
}
"q" {
"DHCP Server: $($objWMI.dhcpserver)"
"Lease obtained: " + [Management.ManagementDatetimeConverter]::`
todatetime($objWMI.DHCPleaseObtained)
"Lease expires: " + [Management.ManagementDatetimeConverter]::`
todatetime($objWMI.DHCPleaseExpires)
}
}
Configuring the Windows Firewall
One of the bright new areas of security on Windows Vista or Windows Server 2008 is the vastly
improved Windows firewall. As you observe in Figure 8-10, the Windows Firewall has an
improved interface that makes it easy to see what is enabled and disabled through the firewall.
Figure 8-10 Windows Vista has improved firewall reporting.
C08622791.fm Page 239 Saturday, December 8, 2007 6:39 PM
240 Windows PowerShell Scripting Guide
Both Group Policy and netsh commands are available to help manage the Windows firewall.
Call on the netsh commands, and write scripts that can simplify the management of the
firewall.
Reporting Firewall Settings
Of course, a firewall is not much use if you are not sure how it is configured. This is even more
important because many pieces of software open ports in the firewall for some unknown
and often unwanted service during its installation. And while the software may not tell you
that it is opening firewall ports, you can easily detect them after the fact and rectify the
situation with a little judicious scripting.
When using the ParseFWConfig.ps1 script, begin by using the netsh utility to show the con-
figuration of the Windows firewall and store the resulting information in the $fwCfg variable.
Initialize both the $enable variable and the $disable variable and assign the value of $null to
them. These two lines of code are shown here:
$fwCfg = netsh firewall show config
$enable=$disable=$null
Use a switch statement and perform a regular expression match on the object that is stored in
the $fwCfg variable. This line is shown here:
switch -regex ($fwCfg)
Examine all the data stored in the $fwCfg variable and search for matches to the word enable.
After finding a match, add the current line to the $enable variable, and then append a new line
to the end of the concatenated text. This section of code is shown here:
"enable"
{
$enable+=$switch.current+"`n"
Go through the data stored in the $fwCfg variable and look for every occurrence of the word
disable. After finding a match, add the current line to the $disable variable, and then append a
new line to the end of the concatenated text. This section of code is shown here:
"disable"
{
$disable+=$switch.current+"`n"
After building up the variables to hold all the firewall configuration information, use a series
of Write-Host cmdlets to print the information. Retrieve the value of the computername
from the environmental PSDrive and print it as part of the header to your report. Print a listing
of both the enabled and disabled settings from the firewall configuration. This section of
code follows:
Write-Host -ForegroundColor cyan `
"Firewall configuration on $env:computername"
C08622791.fm Page 240 Saturday, December 8, 2007 6:39 PM
Chapter 8 Networking 241
Write-Host -ForegroundColor green `
"The following are enabled`n"
$enable
Write-Host -ForegroundColor red `
"The following are disabled`n"
$disable
The completed ParseFWConfig.ps1 script is shown here.
ParseFWConfig.ps1
$fwCfg = netsh firewall show config
$enable=$disable=$null
switch -regex ($fwCfg)
{
"enable"
{
$enable+=$switch.current+"`n"
}
"disable"
{
$disable+=$switch.current+"`n"
}
}
Write-Host -ForegroundColor cyan `
"Firewall configuration on $env:computername"
Write-Host -ForegroundColor green `
"The following are enabled`n"
$enable
Write-Host -ForegroundColor red `
"The following are disabled`n"
$disable
Configuring Firewall Settings
After reporting on the current settings, you’ll want to configure the Windows firewall settings.
There are two settings that you may need to enable on your Windows Vista and Windows
Server 2008 computers. The first is remote administration. Remote administration is required
if you want to perform remote WMI queries. The second is shared folders. Let’s examine two
scripts which can perform this configuration.
Using the EnableRemoteAdmin.ps1 script, you can open a port in the Windows firewall to
allow for remote management of your Windows Vista and Windows Server 2008 computers.
To do this, use the netsh utility and the set service functionality. Specify that you want to
enable remote administration. Store the resulting textual display and look for the word ok. If
you find it, print the information in green. This portion of the code is shown here:
$errRTN=netsh firewall set service remoteAdmin enable
if($errRTN -match 'ok')
{ Write-Host -ForegroundColor green "Remote admin enabled" }
C08622791.fm Page 241 Saturday, December 8, 2007 6:39 PM
242 Windows PowerShell Scripting Guide
It is possible the command will fail because of permissions. To open ports in the Windows
firewall, you must have administrative rights. Parse the returned information to see if the
words requires elevation appear. If you find this string in the output, then you know you must
elevate the rights; print information about this. This code is shown here:
ELSEIF($errRTN -match 'requires elevation')
{ Write-Host -ForegroundColor red "Remote admin not enabled" `
It is possible, however, that the script will fail for some other reason. If this is the case, then
print the entire error report contained in the $errRTN variable. This section of code is shown
here:
ELSE
{ Write-Host -ForegroundColor red "Remote admin not enabled" `
"The error reported was $errRTN" }
The complete EnableRemoteAdmin.ps1 script is shown here.
EnableRemoteAdmin.ps1
$errRTN=netsh firewall set service remoteAdmin enable
if($errRTN -match 'ok')
{ Write-Host -ForegroundColor green "Remote admin enabled" }
ELSEIF($errRTN -match 'requires elevation')
{ Write-Host -ForegroundColor red "Remote admin not enabled" `
"The operation requries admin rights"}
ELSE
{ Write-Host -ForegroundColor red "Remote admin not enabled" `
"The error reported was $errRTN" }
To enable shared folders, simply modify the EnableRemoteAdmin.ps1 script and change both
the prompts and the command.
The command to enable shared folders uses the netsh command and specifies that you need
to enable the fileAndPrint service. This line of code follows. You capture the data that is
returned from the command in the $errRTN variable.
$errRTN=netsh firewall set service fileAndPrint enable
The remainder of the script is the same as the EnableRemoteAdmin.ps1 script except for
changing the text displayed by the various Write-Host commands.
The completed EnableSharedFolders.ps1 script is shown here.
EnableSharedFolders.ps1
$errRTN=netsh firewall set service fileAndPrint enable
if($errRTN -match 'ok')
{ Write-Host -ForegroundColor green "Shared folders enabled" }
ELSEIF($errRTN -match 'requires elevation')
{ Write-Host -ForegroundColor red "Shared folders not enabled" `
C08622791.fm Page 242 Saturday, December 8, 2007 6:39 PM
Chapter 8 Networking 243
"The operation requries admin rights"}
ELSE
{ Write-Host -ForegroundColor red "Shared folders not enabled" `
"The error reported was $errRTN" }
Summary
In this chapter we examined the various activities related to working with networking on Win-
dows Vista or Windows Server 2008. We explored setting various items related to the Win-
dows TCP/IP stack, first looking at various scripts that provide the status of network adapters
and observing which ones were connected and then which ones contained no values in their
properties. We looked at getting the ID of network cards, and learned how to write the infor-
mation into an Excel spreadsheet. Moving on, we discussed setting a static IP address, how to
enable DHCP, and how to configure DNS for name resolution. In looking at the Windows fire-
wall, we saw how to use the netsh tool to report on Windows firewall settings and how to use
netsh to configure the firewall to allow for remote management and to permit remote file and
printer sharing.
C08622791.fm Page 243 Saturday, December 8, 2007 6:39 PM
C08622791.fm Page 244 Saturday, December 8, 2007 6:39 PM

245
Chapter 9
Configuring Desktop Settings
After completing this chapter, you will be able to:
■Report desktop settings.
■Configure screen saver settings.
■Manage desktop power settings.
On the Companion Disc The scripts used in this chapter are located on the CD that
accompanies this book in the \scripts\chapter09 folder.
Working with Desktop Configuration Issues
When deploying Windows Vista or Windows Server 2008, you may decide there are some set-
tings you would like to configure on the desktop (assuming, of course, you are not deploying
Windows Server 2008 Server Core, which does not have a graphical user interface). These set-
tings include screen saver and desktop power settings. While it is true that most corporations
will configure these types of settings through Group Policy, there are still some corporations
that are not fully utilizing their investment in Active Directory directory service technology
or have yet to completely deploy Active Directory. Additionally, there are still a significant
number of workgroups around and also smaller companies using only the default Group
Policy Objects (GPOs). With this in mind, let’s see how Windows PowerShell can bring order
to the chaos.
Setting Screen Savers
In most companies, workers do not have individual offices—instead they work in what are
poetically known as “cube farms.” While these vast areas of cubicles promote an open, airy
atmosphere that can lead to increased collaboration, they are also a security nightmare. In
contrast, if everyone has an individual office, there is the capability to maintain security. For
example, when a worker leaves an office to wander down the hall to pour a cup of coffee, she
or he merely needs to shut the self-locking door to maintain security. In most cubicles, how-
ever, there are no doors. In addition, there may be dozens of nearby coworkers who can easily
step over to access the system of an absent worker. In the same vein, a visitor may also have
access to the system in an open environment. This lack of physical security—when added to
the increased traffic through the area—makes having a secure screen saver on the computer as
necessary as having a mouse.
C09622791.fm Page 245 Saturday, December 8, 2007 6:40 PM
246 Windows PowerShell Scripting Guide
Auditing Screen Savers
One of the first steps to take when working with desktop settings is to examine the screen
saver that is configured on the computer. Look at it from a performance perspective: On a
server, there’s no need for a beautiful slide presentation of Hawaiian beach scenes or complex
rotating three-dimensional cubes with shimmering surfaces. The screen saver selection tool is
shown in Figure 9-1.
Figure 9-1 Picture screen saver showing the ability to personalize.
Examine the screen saver from a security perspective: Some screen savers contact outside
servers to update configurations and to report usage patterns. In some companies, the choice
of screen savers is not optional; if the screen faces the public, there are company-mandated
screen savers that display a suitable message. Whatever the reason, IT is often called upon to
audit the screen saver selection for specific computers. If you are asked to do this, you can use
the AuditScreenSaver.ps1 script. This script will detect if a currently logged-on user has a
screen saver enabled. It will also detect the name of the screen saver, the time-out value, and
whether it is a secure screen saver.
Begin the AuditScreensaver.ps1 script with the param statement and define two input param-
eters: $computer and $help. The $computer parameter is used to determine the computer the
script will run against. The $computer parameter has a default value of localhost, which means
the script will run against the local computer by default. The $help parameter is used to deter-
mine if help is displayed or not. This line of code is shown here:
param($computer="localhost", $help)
C09622791.fm Page 246 Saturday, December 8, 2007 6:40 PM
Chapter 9 Configuring Desktop Settings 247
Next, define a function named funline, which underlines a string that is passed to it. The fun-
line function is basically used to provide a nice visual separation when writing to the screen or
when writing to a text file. First, the funline function determines the length of the string that
was passed to it. This length governs how many equal signs (=) are glued together. In this
manner, the long string of equal signs are the same length as the length of the input string
(contained in the variable $strIN). A for loop is used to build up the separator string (named
$funline). When you concatenate the equal sign to itself in the $funline variable, use a short-
ened syntax of +=; this means that you start with values on the left and add to it the values on
the right. This shortened syntax has the same meaning as adding the variable to itself, as you
can see here:
$funline = $funline + "="
The shortened syntax for this statement used in the funline function is shown here:
$funline += "="
The last step in the funline function is to use the Write-Host cmdlet to print the input string
and print the line separator. The string is printed in yellow and the line separator is printed in
dark yellow. The funline function is shown here:
function funline ($strIN)
{
$num = $strIN.length
for($i=1 ; $i -le $num ; $i++)
{ $funline += "=" }
Write-Host -ForegroundColor yellow `n$strIN
Write-Host -ForegroundColor darkYellow $funline
}
The next step is to define the funhelp function, which is called when the -help parameter is sup-
plied to the script. The $helpText variable is used to hold the contents of a here-string. The
here-string is defined by using @” with text in the middle, followed by a “@ character. The
advantage is that you don’t need to pay attention to quote rules while inside a here-string, as
everything between @” and “@ is interpreted as a string. Use the funhelp function to present a
description and the syntax of the script. After printing the contents of the help string by print-
ing $helpText, exit the script by using the exit command. The funhelp function is shown here:
function funHelp()
{
$helpText=@"
DESCRIPTION:
NAME: AuditScreenSaver.ps1
Prints screensaver config on a local or remote machine.
PARAMETERS:
-computerName Specifies the name of the computer upon which to run the script
-help prints help file
C09622791.fm Page 247 Saturday, December 8, 2007 6:40 PM

248 Windows PowerShell Scripting Guide
SYNTAX:
AuditScreenSaver.ps1 -computer MunichServer
Lists screensaver configuration on a computer named MunichServer
AuditScreenSaver.ps1
Lists screensaver configuration on local computer
AuditScreenSaver.ps1 -help ?
Displays the help topic for the script
"@
$helpText
exit
}
Since there is a default value for the -computer parameter, you don’t need to check for the pres-
ence of the $computer variable, as it will always be there. With the -help parameter, however,
the situation is different. Help will only be displayed if the script is called with the -help param-
eter supplied. If $help is present, then call the funhelp function. The line of code that does this
is shown here:
if($help){funline("Obtaining help ...") ; funhelp }
To obtain the name of the logged-on user, use the Get-WmiObject cmdlet and retrieve the
UserName property from the Win32_ComputerSystem WMI class. Because this script can be
run remotely, use the -computername parameter and supply the value contained in the $com-
puter variable. This command is shown here:
$username = (get-wmiobject -class win32_computersystem `
-computername $computer).username
After obtaining the username from WMI, you’ll need to modify it a little to strip out the back-
slash (“\”) that may be present. To do this, first find the location of the backslash. Because the
value stored in the $username variable is a string, you can use string methods to find the back-
slash and then retrieve everything beyond the backslash.
Understanding String Methods
String methods are defined by the system.string Microsoft .NET Framework class and are
available whenever you are working with a string. For example, if you store a string in a
variable, you have access to string methods and you’ll be able to manipulate the string
contained in the variable.
For the StringMethods.ps1 script, start with a string; convert it to all uppercase by using
the toUpper() method. Print the value and then call the toLower() method. Finally, use
C09622791.fm Page 248 Saturday, December 8, 2007 6:40 PM
Chapter 9 Configuring Desktop Settings 249
the replace() method to replace the letter a with the word the. Once again, print the
results. The StringMethods.ps1 script is shown here.
StringMethods.ps1
$a="this is a string"
$a=$a.toUpper()
$a
$a=$a.ToLower()
$a
$a=$a.replace("a","the")
$a
If you use the Get-Member cmdlet on the $a variable from the StringMethods.ps1 script, you
will notice that there are 35 methods available for the system.string .NET Framework class:
The first method we use is the indexof() method. The index() method looks inside a string and
returns a number that represents where the pattern match is found. When you have this infor-
mation, use the substring() method to retrieve a specific portion of text from the string. In the
AuditScreenSaver.ps1 script, you want to return all of the text past the position where the
backslash was found. These two lines of code are shown here:
$index=$username.indexof("\")
$username=$username.substring($index+1)
Now, use the Get-WmiObject cmdlet to query the Win32_Desktop WMI class. When you do
this, use the -computername parameter to allow you to target a remote computer. The value
supplied to the -computername parameter is the one contained in the $computer parameter,
which receives its value from the -computer parameter supplied on the command line when
the script is run. Use the -filter parameter to reduce the objects returned to only those refer-
ring to the currently logged-on user. The username is contained in the $username variable—
but you must supply it inside quotation marks to WMI. To do this, you must “escape” the
Clone CompareTo Contains
CopyTo EndsWith Equals
get_Chars get_Length GetEnumerator
GetHashCode GetType GetTypeCode
IndexOf IndexOfAny Insert
IsNormalized LastIndexOf LastIndexOfAny
Normalize PadLeft PadRight
Remove Replace Split
StartsWith Substring ToCharArray
ToLower ToLowerInvariant ToString
ToUpper ToUpperInvariant Trim
TrimEnd TrimStart
C09622791.fm Page 249 Saturday, December 8, 2007 6:40 PM
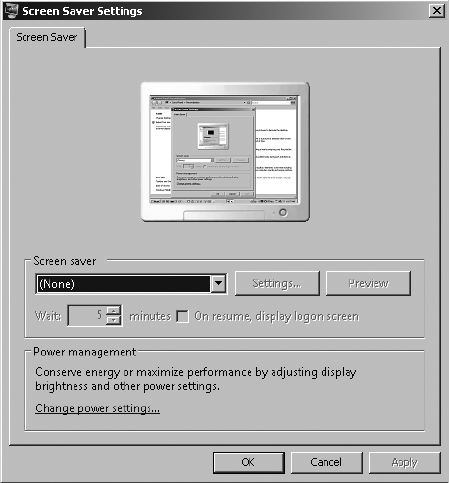
250 Windows PowerShell Scripting Guide
quotation marks with grave accent marks. To force the $username variable to expand properly,
use an additional dollar sign and surround it with smooth parentheses. Pipeline the resulting
psobject to the Select-Object cmdlet. This code is shown here:
$screensaver = Get-WmiObject -Class win32_desktop `
-computername $computer -filter "name like `"%$($username)`"" |
After you have the custom psobject over the pipeline from the Get-WmiObject cmdlet, use the
Select-Object cmdlet and choose all properties that begin with the word screen and also
choose the Name property. Write all this information back to the variable $screensaver. This
line of code is shown here:
Select-Object -Property screen*, name
After creating the custom object and storing it in the $screensaver variable, use the funline
function to print a header for your report. Choose the Name property from the object con-
tained in the $screensaver object, as this is the name of the currently logged-on user. Check out
this line of code here:
funline("Screen saver configuration for $($screensaver.name)")
The header is now written. Use the if statement to evaluate the ScreenSaverActive property.
Keep this in mind: If the screen saver is turned off as shown in Figure 9-2, but no reboot takes
place, the property reported for the screen saver doesn’t get updated. This is because of the
way the current configuration registry key gets populated at start up.
Figure 9-2 No screen saver selected.
C09622791.fm Page 250 Saturday, December 8, 2007 6:40 PM
Chapter 9 Configuring Desktop Settings 251
If the ScreenSaverActive property is equal to true, then print the executable, if it is secure or not,
and the time-out value that is configured for the screen saver. This time-out value is listed in
seconds. The default value of 10 minutes would therefore be reported as 600. This section of
code is shown here:
if($screensaver.ScreenSaverActive -eq "true")
{
Write-Host "The screensaver is: $($screensaver.screensaverExecutable)"
Write-Host "Secure Screensaver: $($screensaver.ScreenSaverSecure)"
Write-Host "Screensaver timeout: $($screensaver.ScreenSaverTimeout)"
}
If there is no screen saver configured, then you will use the else clause and print this fact. To
do this, use the code shown here:
ELSE
{ Write-Host "$($screensaver.name) does not have a screen saver"}
The completed AuditScreenSaver.ps1 script is shown here.
AuditScreenSaver.ps1
param($computer="localhost", $help)
function funline ($strIN)
{
$num = $strIN.length
for($i=1 ; $i -le $num ; $i++)
{ $funline = $funline + "=" }
Write-Host -ForegroundColor yellow `n$strIN
Write-Host -ForegroundColor darkYellow $funline
}
function funHelp()
{
$helpText=@"
DESCRIPTION:
NAME: AuditScreenSaver.ps1
Prints screensaver config on a local or remote machine.
PARAMETERS:
-computerName Specifies the name of the computer upon which to run the script
-help prints help file
SYNTAX:
AuditScreenSaver.ps1 -computer MunichServer
Lists screensaver configuration on a computer named MunichServer
AuditScreenSaver.ps1
Lists screensaver configuration on local computer
AuditScreenSaver.ps1 -help ?
C09622791.fm Page 251 Saturday, December 8, 2007 6:40 PM
252 Windows PowerShell Scripting Guide
Displays the help topic for the script
"@
$helpText
exit
}
if($help){funline("Obtaining help ...") ; funhelp }
$username = (get-wmiobject -class win32_computersystem `
-computername $computer).username
$index=$username.indexof("\")
$username=$username.substring($index+1)
$screensaver = Get-WmiObject -Class win32_desktop `
-computername $computer -filter "name like `"%$($username)`"" |
Select-Object -Property screen*, name
funline("Screen saver configuration for $($screensaver.name)")
if($screensaver.ScreenSaverActive -eq "true")
{
Write-Host "The screensaver is: $($screensaver.screensaverExecutable)"
Write-Host "Secure Screensaver: $($screensaver.ScreenSaverSecure)"
Write-Host "Screensaver timeout: $($screensaver.ScreenSaverTimeout)"
}
ELSE
{ Write-Host "$($screensaver.name) does not have a screen saver"}
Listing Only Properties with Values
One of the problems with using WMI to provide information for databases, spreadsheets,
reports, or even console output is the large number of properties that do not return
any information. As shown in Figure 9-3, these blank lines can make output a bit
distracting.
It seems you have two choices: to explicitly name every property that returns a value or to
just “live with it” and ignore the empty values. Actually, though, there is another option.
You can use Windows PowerShell to filter out the empty values. This is exactly what the
ReportDesktopSettings.ps1 script does.
The ReportDesktopSettings.ps1 script begins with the param statement. Define two input
parameters: -computer and -help. Assign a default value only to the $computer variable, as is
shown here:
param($computer="localhost", $help)
Define the funline function, which accepts a single input, $strIN. This input is used to print a
separator line between a line of text and the values reported by the remainder of the script.
This function works by determining the length of the input string and building up a string of
C09622791.fm Page 252 Saturday, December 8, 2007 6:40 PM
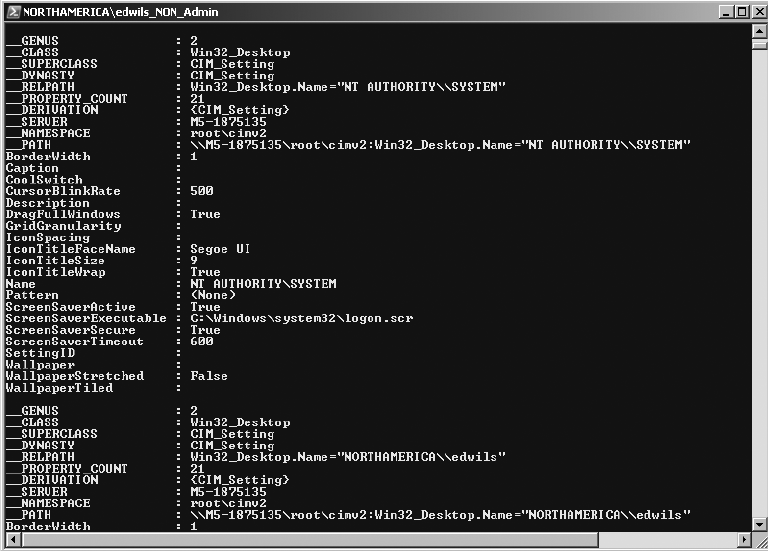
Chapter 9 Configuring Desktop Settings 253
equal signs (of course, you can use a different character as a separator if you wish). The funline
function is shown here:
function funline ($strIN)
{
$num = $strIN.length
for($i=1 ; $i -le $num ; $i++)
{ $funline = $funline + "=" }
Write-Host -ForegroundColor yellow `n$strIN
Write-Host -ForegroundColor darkYellow $funline
}
Figure 9-3 Blank lines in output can make the output difficult to read.
The next function to define is the funhelp function. It is a large here-string that will only be dis-
played if the script is run with the -help parameter specified. In the here-string, you define
three sections: description, parameters, and syntax. After the here-string is created, it is stored
in the variable $helpText. The function then displays the content of the $helpText variable and
exits. Here is the funhelp function:
function funHelp()
{
$helpText=@"
DESCRIPTION:
NAME: ReportDesktopSettings.ps1
Prints desktop config on a local or remote machine.
C09622791.fm Page 253 Saturday, December 8, 2007 6:40 PM
254 Windows PowerShell Scripting Guide
PARAMETERS:
-computerName Specifies the name of the computer upon which to run the script
-help prints help file
SYNTAX:
ReportDesktopSettings.ps1-computer MunichServer
Lists desktop configuration on a computer named MunichServer
ReportDesktopSettings.ps1
Lists desktop configuration on local computer
ReportDesktopSettings.ps1-help ?
Displays the help topic for the script
"@
$helpText
exit
}
After creating the functions, move into the body of the script. The first step is to check for the
presence of the $help variable. If it is present, that means the script was run with the -help
parameter. Inside the code block, call the funline function and supply a status string to it. Use
a semicolon to indicate you are finished with that command, and then call the funhelp func-
tion. This section is shown here:
if($help){ funline("obtaining help ...") ; funhelp }
Retrieve the current user’s name from the Win32_ComputerSystem WMI class by using the Get-
WmiObject cmdlet. Connect to the computer supplied to the -computer parameter and stored
in the $computer variable. This section of code is shown here:
$currentUser = (Get-WmiObject -class win32_computersystem `
-computername $computer).username
Use the Get-WmiObject cmdlet to query the Win32_Desktop WMI class. Use the -computer-
name parameter of the Get-WmiObject cmdlet and supply the value contained in the $com-
puter variable. Pipeline the resulting management object into the Where-Object cmdlet. Inside
the code block, examine the Name property of the Win32_Desktop class to see if it is equal to
the name stored in the $currentUser variable. If it is, then pipeline the object. This section of
code is shown here:
Get-WmiObject -Class win32_desktop -computername $computer |
Where-Object { $_.name -Eq $currentUser } |
Next, take the pipelined object from the desktop query and use the ForEach-Object cmdlet to
iterate through the object. Inside the code block, use the funline function to print a header for
C09622791.fm Page 254 Saturday, December 8, 2007 6:40 PM
Chapter 9 Configuring Desktop Settings 255
the display. Use psobject to get a list of the properties defined on the WMI object. (You can also
use psbase to do essentially the same thing.) When you have the psobject, obtain a listing of all
the properties of the WMI class by querying the Properties property. Pipeline the collection of
properties to the next section of the script, as follows:
foreach-object `
{ funline("Desktop settings for $($currentUser)")
$_.psobject.properties |
Because you receive a collection of properties, you need to iterate through them. To do this,
use the ForEach-Object cmdlet. If the property on the current pipeline has a value, examine it
to see if the name has a double underscore in it. If it does, then discard it. However, if it does
not have a double underscore, that indicates it isn’t a system property (you aren’t interested in
the system properties for this script).
If the property is not a system property, then print the name of the property, tab over two
stops, and print the value. This section of code is shown here:
foreach-object `
{
If($_.value)
{
if ($_.name -match "__"){}
ELSE
{
Write-Host "$($_.name)`t`t $($_.value)"
}
}
}
}
The completed ReportDesktopSettings.ps1 script is shown here.
ReportDesktopSettings.ps1
param($computer="localhost", $help)
function funline ($strIN)
{
$num = $strIN.length
for($i=1 ; $i -le $num ; $i++)
{ $funline = $funline + "=" }
Write-Host -ForegroundColor yellow `n$strIN
Write-Host -ForegroundColor darkYellow $funline
}
function funHelp()
{
$helpText=@"
DESCRIPTION:
NAME: ReportDesktopSettings.ps1
Prints desktop config on a local or remote machine.
C09622791.fm Page 255 Saturday, December 8, 2007 6:40 PM
256 Windows PowerShell Scripting Guide
PARAMETERS:
-computerName Specifies the name of the computer upon which to run the script
-help prints help file
SYNTAX:
ReportDesktopSettings.ps1-computer MunichServer
Lists desktop configuration on a computer named MunichServer
ReportDesktopSettings.ps1
Lists desktop configuration on local computer
ReportDesktopSettings.ps1-help ?
Displays the help topic for the script
"@
$helpText
exit
}
if($help){ funline("obtaining help ...") ; funhelp }
$currentUser = (Get-WmiObject -class win32_computersystem `
-computername $computer).username
Get-WmiObject -Class win32_desktop -computername $computer |
Where-Object { $_.name -Eq $currentUser } |
foreach-object `
{ funline("Desktop settings for $($currentUser)")
$_.psobject.properties |
foreach-object `
{
If($_.value)
{
if ($_.name -match "__"){}
ELSE
{
Write-Host "$($_.name)`t`t $($_.value)"
}
}
}
}
Reporting Secure Screen Savers
In many situations, perhaps even in most situations, you needn’t care what screen saver the
user has enabled; you simply need to ensure that it is secure. Using the term “secure screen
saver,” I mean one that will lock the computer after a certain period of inactivity. An example
of a secure screen saver is shown in Figure 9-4.
C09622791.fm Page 256 Saturday, December 8, 2007 6:40 PM
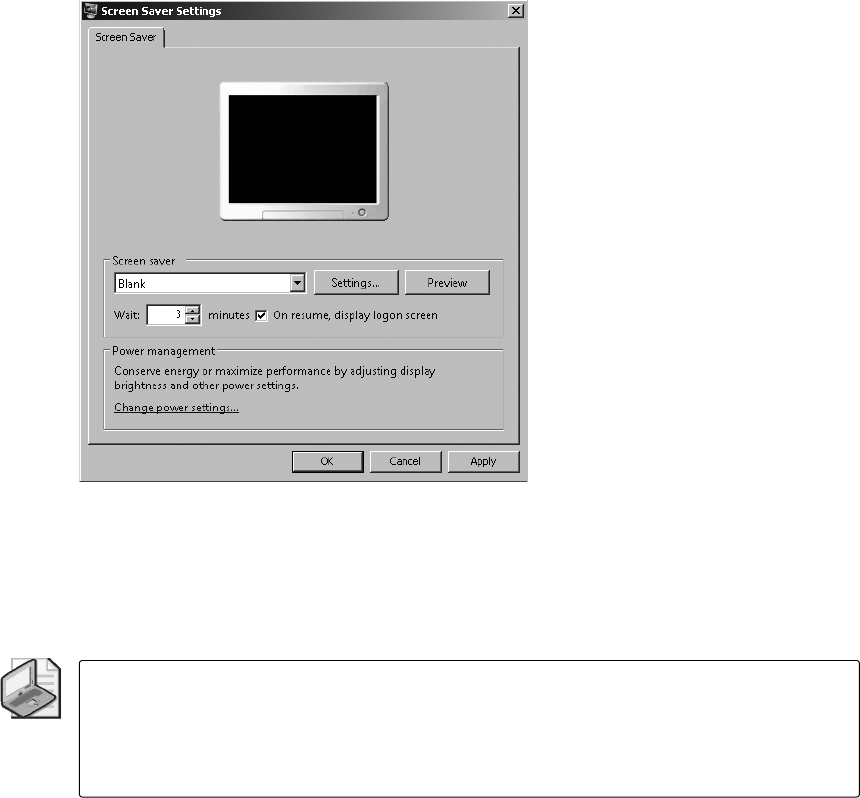
Chapter 9 Configuring Desktop Settings 257
Figure 9-4 Secure screen savers prompt for credentials.
Of course, this period of inactivity is often dictated by the company security policy, but it gen-
erally runs in the range of 5 minutes to as little as 1 minute. To audit these settings, it makes
sense to store this information in a database where you can easily perform analysis and run
reports that tell you the percentage of users in compliance with the policy.
Note If the secure screen saver is set via GPO, then why bother auditing? There are many
reasons: a file replication issue that is keeping the most current GPO from being replicated
and users who disconnect from the network for extended periods of time (such as laptops)
are just two likely reasons. You should always audit for compliance with security policies until
you are satisfied the policy is fully implemented.
Using the AuditScreenSaverWriteToAccess.ps1 script, you can query a local or remote com-
puter for all users who have profiles defined on the computer. You obtain the screen saver
configuration, and then write the information to a Microsoft Access database. Use the same
database file used throughout this book, the ConfigurationMaintenance.mdb file. Using the
ConfigurationMaintenance.mdb file, I have created a new table, the screen saver table, which
Figure 9-5 depicts.
C09622791.fm Page 257 Saturday, December 8, 2007 6:40 PM
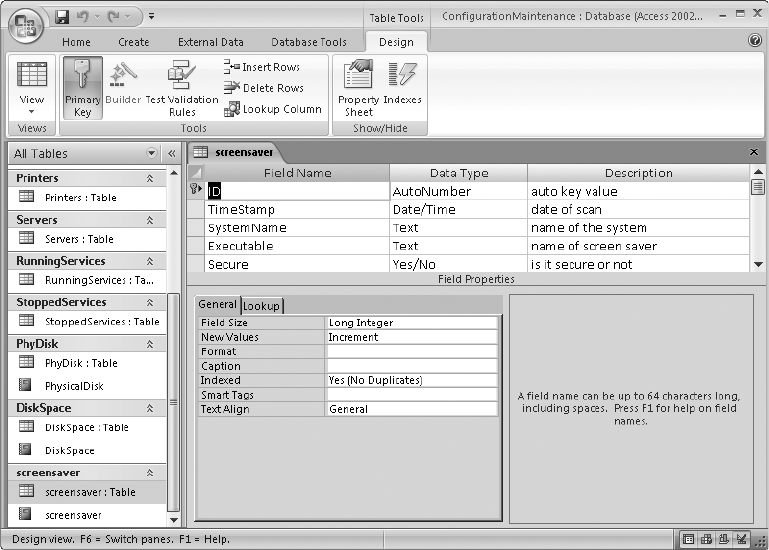
258 Windows PowerShell Scripting Guide
Figure 9-5 The screen saver table.
You can also create a new report—the screen saver report, which Figure 9-6 shows. This report
lists all the entries in the screen saver table, performs calculations on the percent of users with
active screen savers, and indicates whether or not the screen savers are secure.
So how does the data get into the database? Through the AuditScreenSaverWriteToAccess.ps1
script. Begin this script with the param statement. Define two named arguments to the script:
-computer and -help. These parameters are stored in the variables $computer and $help. The
$computer variable is assigned the default value of localhost, a reference to the local computer.
This line of code is shown here:
param($computer="localhost", $help)
Define the funline function, which is used to separate the output for a better display. It accepts
a string value as an input, determines the length of the string, and then builds an output vari-
able composed of a series of equal signs (=). These are printed in two different colors to give
it a 3D effect. The funline function is shown here:
function funline ($strIN)
{
$num = $strIN.length
for($i=1 ; $i -le $num ; $i++)
{ $funline += "=" }
C09622791.fm Page 258 Saturday, December 8, 2007 6:40 PM
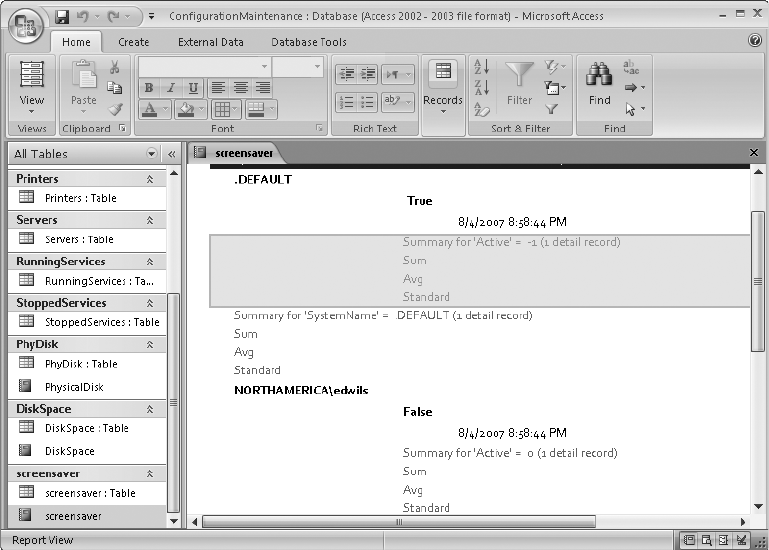
Chapter 9 Configuring Desktop Settings 259
Write-Host -ForegroundColor yellow `n$strIN
Write-Host -ForegroundColor darkYellow $funline
}
Figure 9-6 The screen saver report provides network administrators with a quick overview of screen
saver security.
To print a help string, if required, use the funhelp function. This function is displayed only if
the script is run with the -help parameter. The funhelp function basically defines a large here-
string that is stored in the $helpText variable. It then displays the string stored in the $helpText
and exits the script. This function is shown here:
function funHelp()
{
$helpText=@"
DESCRIPTION:
NAME: AuditScreenSaverWriteToAccess.ps1
writes secure screensaver config of a local or remote machine,
to an access database
PARAMETERS:
-computerName Specifies the name of the computer upon which to run the script
-help prints help file
SYNTAX:
AuditScreenSaverWriteToAccess.ps1 -computer MunichServer
C09622791.fm Page 259 Saturday, December 8, 2007 6:40 PM
260 Windows PowerShell Scripting Guide
Writes secure screensaver configuration of a computer named MunichServer
to an access database
AuditScreenSaverWriteToAccess.ps1
Writes secure screensaver configuration of local computer to an
access database
AuditScreenSaverWriteToAccess.ps1 -help ?
Displays the help topic for the script
"@
$helpText
exit
}
Use an if statement to determine if the funhelp function is to be called or not. If the $help vari-
able exists, then enter the code block which first calls the funline function and passes the
string “Obtaining help …” to the function. This will be printed with an underline. The semicolon
is used to allow an additional command to run, which in this case is used to call the funhelp
function. This section of code is shown here:
if($help){ funline("Obtaining help ...") ; funhelp }
Next, you must declare two variables, $adOpenStatic and $adLockOptimistic, and set them
equal to 3. These variables are used to control the way you’ll open the connection to the
Access database. The values are defined in the Windows Software Development Kit (SDK),
available from http://www.microsoft.com. Assign the path to the ConfigurationMaintenance.mdb
database to the $strDB variable. Use the $strTable variable to hold the name of the table
you want to write to, which is the screen saver table for this script. This section of code is
shown here:
$adOpenStatic = $adLockOptimistic = 3
$strDB = "c:\fso\configurationmaintenance.mdb"
$strTable = "screensaver"
For the script to work, you must create two objects. The first is a connection object, and the sec-
ond is a recordset object. These will allow you to connect to the database and to update the
table. These two lines of code are shown here:
$objConnection = New-Object -ComObject ADODB.Connection
$objRecordSet = new-object -ComObject ADODB.Recordset
The next step is to open the connection to the database. To do this, supply the name of the
provider to use. To work with an Access database, use the Microsoft.Jet.OLEDB.4.0 provider.
A list of various provider names that can be used with the open method of the ADODB.Connection
object is found in Appendix B. The second parameter, the open method, requires the path to
the data source. This section of code is shown here:
C09622791.fm Page 260 Saturday, December 8, 2007 6:40 PM
Chapter 9 Configuring Desktop Settings 261
objConnection.Open("Provider = Microsoft.Jet.OLEDB.4.0; `
Data Source= $strDB")
After opening the connection to the data source, open the record set. To do this, choose the
database table, the connection to use, and the method of opening the table. This code is
shown here:
$objRecordSet.Open("SELECT * FROM $strTable", `
$objConnection, $adOpenStatic, $adLockOptimistic)
After using the open method from the record set object, follow up with the Write-Host cmdlet
to print a status indicator. Use the -foregroundcolor parameter and choose a color that will
stand out a little. Supply a string value that informs the user that you are obtaining screen
saver information. This line of code is shown here:
write-host -foreGroundColor yellow "Obtaining screen saver info ..."
It is now time to obtain the WMI information. To do this, use the Get-WmiObject cmdlet and
choose the Win32_Desktop WMI class. Use the -computername parameter and give it the com-
puter name that is stored in the $computer variable. Use the -property parameter and choose
only the properties you’re interested in. Use the grave accent mark to indicate line continua-
tion. This section of code is shown here:
$aryscreensaver = Get-WmiObject -Class win32_desktop `
-computername $computer `
-Property name, screensaversecure, screensavertimeout, `
__server, ScreenSaverActive
To walk through the collection of objects received from the previous command, use the
foreach statement. For each loop through the collection, add a new record to the table using
the addnew() method. Next, use the item() method to add additional items to each of the prop-
erty names that are specified. After adding all the information, use the update() method to
write the changes to the database. As you loop through the collection, use the Write-Host
cmdlet to print a progress line of /\ characters. This section of code is shown here:
foreach( $screensaver in $aryScreensaver)
{
$objRecordSet.AddNew()
$objRecordSet.Fields.item("TimeStamp") = Get-Date
$objRecordSet.Fields.item("SystemName") = $($screensaver.name)
$objRecordSet.Fields.item("Executable") = $($screensaver.screensaverExecutable)
$objRecordSet.Fields.item("Secure") = $($screensaver.ScreenSaverSecure)
$objRecordSet.Fields.item("Active") = $($screensaver.ScreenSaverActive)
$objRecordSet.Fields.item("Timeout") = $($screensaver.ScreenSaverTimeout)
$objRecordSet.Update()
write-host -foregroundColor yellow "/\" -noNewLine
}
C09622791.fm Page 261 Saturday, December 8, 2007 6:40 PM
262 Windows PowerShell Scripting Guide
The last two parts of this script are closing the record set and closing the connection objects.
To do this, use the close() method. This section of code is shown here:
$objRecordSet.Close()
$objConnection.Close()
The completed AuditScreenSaverWriteToAccess.ps1 script follows.
AuditScreenSaverWriteToAccess.ps1
param($computer="localhost", $help)
function funline ($strIN)
{
$num = $strIN.length
for($i=1 ; $i -le $num ; $i++)
{ $funline += "=" }
Write-Host -ForegroundColor yellow `n$strIN
Write-Host -ForegroundColor darkYellow $funline
}
function funHelp()
{
$helpText=@"
DESCRIPTION:
NAME: AuditScreenSaverWriteToAccess.ps1
writes secure screensaver config of a local or remote machine,
to an access database
PARAMETERS:
-computerName Specifies the name of the computer upon which to run the script
-help prints help file
SYNTAX:
AuditScreenSaverWriteToAccess.ps1 -computer MunichServer
Writes secure screensaver configuration of a computer named MunichServer
to an access database
AuditScreenSaverWriteToAccess.ps1
Writes secure screensaver configuration of local computer to an
access database
AuditScreenSaverWriteToAccess.ps1 -help ?
Displays the help topic for the script
"@
$helpText
exit
}
if($help){ funline("Obtaining help ...") ; funhelp }
$adOpenStatic = $adLockOptimistic = 3
C09622791.fm Page 262 Saturday, December 8, 2007 6:40 PM
Chapter 9 Configuring Desktop Settings 263
$strDB = "c:\fso\configurationmaintenance.mdb"
$strTable = "screensaver"
$objConnection = New-Object -ComObject ADODB.Connection
$objRecordSet = new-object -ComObject ADODB.Recordset
$objConnection.Open("Provider = Microsoft.Jet.OLEDB.4.0; `
Data Source= $strDB")
$objRecordSet.Open("SELECT * FROM $strTable", `
$objConnection, $adOpenStatic, $adLockOptimistic)
write-host -foreGroundColor yellow "Obtaining screen saver info ..."
$aryscreensaver = Get-WmiObject -Class win32_desktop `
-computername $computer `
-Property name, screensaversecure, screensavertimeout, `
__server, ScreenSaverActive
foreach( $screensaver in $aryScreensaver)
{
$objRecordSet.AddNew()
$objRecordSet.Fields.item("TimeStamp") = Get-Date
$objRecordSet.Fields.item("SystemName") = $($screensaver.name)
$objRecordSet.Fields.item("Executable") = $($screensaver.screensaverExecutable)
$objRecordSet.Fields.item("Secure") = $($screensaver.ScreenSaverSecure)
$objRecordSet.Fields.item("Active") = $($screensaver.ScreenSaverActive)
$objRecordSet.Fields.item("Timeout") = $($screensaver.ScreenSaverTimeout)
$objRecordSet.Update()
write-host -foregroundColor yellow "/\" -noNewLine
}
$objRecordSet.Close()
$objConnection.Close()
Managing Desktop Power Settings
There are many components that can be stored in a power configuration policy. In this sec-
tion, let’s examine how you can retrieve the power policy for a computer. The power plan
settings are shown in Figure 9-7.
In the ReportPowerConfig.ps1 script, you’ll report on the existing power configuration
settings. The script supports several different switches, and can supply the following
information:
■All power configuration settings
■Current power configuration setting
■Available sleep states
■Last wake event
■All devices on the current computer
C09622791.fm Page 263 Saturday, December 8, 2007 6:40 PM
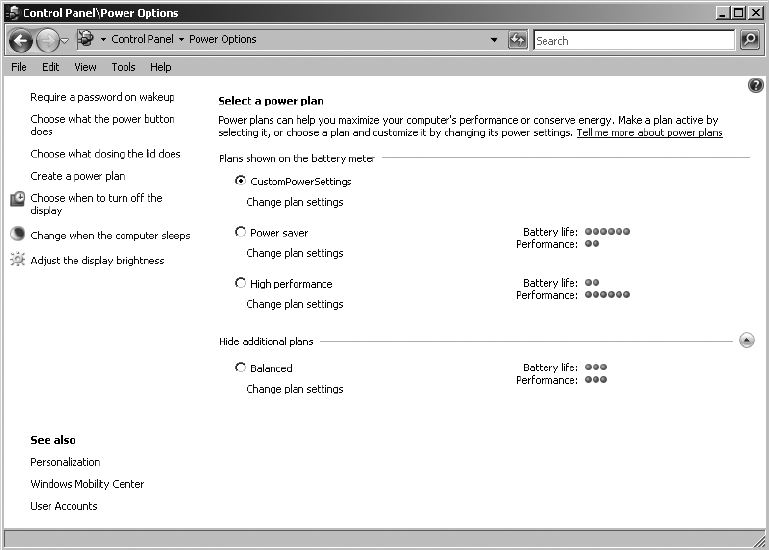
264 Windows PowerShell Scripting Guide
■All devices, and their configuration (including if they support sleep)
■All devices that are currently configured to wake the computer
■All devices that can be user-configured to wake the computer
Figure 9-7 Power plan settings for a Windows Server 2008 computer.
Begin the ReportPowerConfig.ps1 script with the param statement, where you define two
command-line parameters. The first is -a, which is set to a default value of a. The -a parameter
is used to specify the action for the script to perform. When the -a parameter is given the value
of a, it tells the script to list the active power configuration scheme. This is the default value,
so when run without arguments, the ReportPowerConfig.ps1 script will display the active
power configuration scheme. There are actually a large number of values that can be supplied
for the -a argument; you’ll learn more about them later. The -help parameter is used to display
help information, including a description, the parameters, and sample syntax. This script
does not support running remotely. The param line is shown here:
param($a="a", $help)
The next section of the ReportPowerConfig.ps1 script is the funline function. This function
accepts an input string, determines the length of the string, and then prints the string with a
line separator that is the same length as the string. To do this, obtain the length of the string
and use a for loop to build a variable named $funline, composed of a series of equal signs.
C09622791.fm Page 264 Saturday, December 8, 2007 6:40 PM
Chapter 9 Configuring Desktop Settings 265
The Write-Host cmdlet is used to print the string and the $funline variable. The funline()
function is shown here:
function funline ($strIN)
{
$num = $strIN.length
for($i=1 ; $i -le $num ; $i++)
{ $funline += "=" }
Write-Host -ForegroundColor yellow `n$strIN
Write-Host -ForegroundColor darkYellow $funline
}
The funhelp function follows the funline portion of the script. The funline function is basically
a large here-string that is assigned to the $helpText variable. After all the text is formatted and
assigned to the $helpText, display the string contained in the variable, and exit the script. The
most important portions of the help text are the descriptions of the switches and the sample
command lines. The funhelp() function is shown here:
function funHelp()
{
$helpText=@"
DESCRIPTION:
NAME: ReportPowerConfig.ps1
Prints power config on a local machine.
PARAMETERS:
-a(ction) action to perform <a(ctive scheme), l(ist),
q(uery), d(evice), dv(evice verbose),
dwa(evice wake armed), dwp(evice wake programable)>
-help prints help file
SYNTAX:
ReportPowerConfig.ps1
Lists power configuration on local computer
ReportPowerConfig.ps1 -a a
Lists active power configuration on local computer
ReportPowerConfig.ps1 -a l
Lists all power configuration on local computer
ReportPowerConfig.ps1 -a q
Lists all available sleep states on local computer
ReportPowerConfig.ps1 -a w
Lists last wake event on local computer
ReportPowerConfig.ps1 -a d
C09622791.fm Page 265 Saturday, December 8, 2007 6:40 PM
266 Windows PowerShell Scripting Guide
Lists all devices on local computer
ReportPowerConfig.ps1 -a dv
Lists all devices on local computer - verbose
ReportPowerConfig.ps1 -a dwa
Lists devices configured to wake the local computer
ReportPowerConfig.ps1 -a dwp
Lists devices that are user configurable to wake the
computer from sleep on local computer
ReportPowerConfig.ps1 -help ?
Displays the help topic for the script
"@
$helpText
exit
}
After creating the funhelp function, you must create code that can be used to determine
whether the help text will be displayed. To do this, look for the presence of the $help variable.
If it’s present, it means the -help parameter was specified when the script was run. If the $help
variable is present, call the funline function, print a message, and call the funhelp function. This
section of code is shown here:
if($help){funline("Obtaining help ...") ; funhelp }
To obtain the computer name, use the wscript.network COM object. Create this object by using
the New-Object cmdlet and specifying the -comobject parameter. Choose only the Computer-
Name property. The computer name is stored in the $computer variable. This line of code is
shown here:
$computer = (New-Object -ComObject WScript.Network).computername
Before actually obtaining the power configuration information, print a little header line. To do
this, use the funline function and supply a string to it. Use the value stored in the $computer
variable in the header. To do this, precede the variable name with a dollar sign and put the
entire string in parentheses. This line of code is shown here:
funline("Power configuration on: $($computer)")
The code that performs most of the work is the switch statement, which evaluates the value
supplied for the $a variable from the command line. If the value is a, use the Powercfg utility
to obtain the active power scheme. Because of the way the data is returned, use the `r special
character to return to the next line and to create a cleaner output. If the value supplied to the
C09622791.fm Page 266 Saturday, December 8, 2007 6:40 PM
Chapter 9 Configuring Desktop Settings 267
$a variable is l, then print a list of all the defined power configuration schemes. If a q is sup-
plied to the -a parameter, print all the available sleep states configured on the computer.
When a value of w is supplied to the -a parameter, print the last wake event. A value of d sup-
plied to the -a parameter means that you’ll perform a query for all the devices defined on the
computer. If the script is run and the value of $a is dv, it indicates you’ll perform a verbose
query of all the devices, a very extensive listing of all devices and their supported power man-
agement capabilities. If you supply a value of dwa when the script is run, the switch statement
evaluates this and will return a listing of all the devices that are configured to wake the com-
puter from sleep. The last potential value is dwp, which means that you’ll obtain a listing of all
the devices that can be configured to wake the computer from sleep. The complete switch
statement is shown here:
switch($a)
{
"a" { powercfg -getactivescheme ; "`r"}
"l" { powercfg -list }
"q" { powercfg -availablesleepstates }
"w" { powercfg -lastwake }
"d" { powercfg -devicequery all_devices }
"dv" { powercfg -devicequery all_devices_verbose }
"dwa" { powercfg -devicequery wake_armed }
"dwp" { powercfg -devicequery wake_programmable }
}
The completed ReportPowerConfig.ps1 script follows.
ReportPowerConfig.ps1
param($a="a", $help)
function funline ($strIN)
{
$num = $strIN.length
for($i=1 ; $i -le $num ; $i++)
{ $funline += "=" }
Write-Host -ForegroundColor yellow `n$strIN
Write-Host -ForegroundColor darkYellow $funline
}
function funHelp()
{
$helpText=@"
DESCRIPTION:
NAME: ReportPowerConfig.ps1
Prints power config on a local machine.
PARAMETERS:
-a(ction) action to perform <a(ctive scheme), l(ist),
q(uery), d(evice), dv(evice verbose),
dwa(evice wake armed), dwp(evice wake programable)>
-help prints help file
C09622791.fm Page 267 Saturday, December 8, 2007 6:40 PM
268 Windows PowerShell Scripting Guide
SYNTAX:
ReportPowerConfig.ps1
Lists power configuration on local computer
ReportPowerConfig.ps1 -a a
Lists active power configuration on local computer
ReportPowerConfig.ps1 -a l
Lists all power configuration on local computer
ReportPowerConfig.ps1 -a q
Lists all available sleep states on local computer
ReportPowerConfig.ps1 -a w
Lists last wake event on local computer
ReportPowerConfig.ps1 -a d
Lists all devices on local computer
ReportPowerConfig.ps1 -a dv
Lists all devices on local computer - verbose
ReportPowerConfig.ps1 -a dwa
Lists devices configured to wake the local computer
ReportPowerConfig.ps1 -a dwp
Lists devices that are user configurable to wake the
computer from sleep on local computer
ReportPowerConfig.ps1 -help ?
Displays the help topic for the script
"@
$helpText
exit
}
if($help){funline("Obtaining help ...") ; funhelp }
$computer = (New-Object -ComObject WScript.Network).computername
funline("Power configuration on: $($computer)")
switch($a)
{
"a" { POWERCFG -getactivescheme ; "`r"}
C09622791.fm Page 268 Saturday, December 8, 2007 6:40 PM
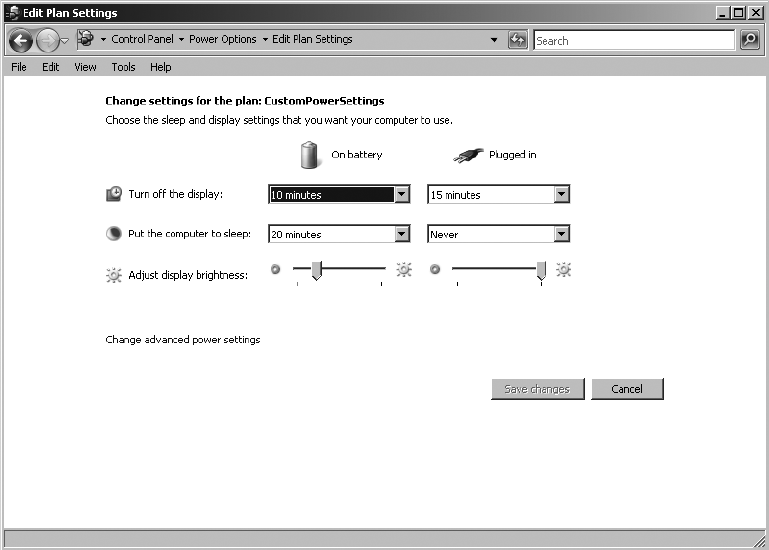
Chapter 9 Configuring Desktop Settings 269
"l" { powercfg -list }
"q" { powercfg -availablesleepstates }
"w" { powercfg -lastwake }
"d" { powercfg -devicequery all_devices }
"dv" { powercfg -devicequery all_devices_verbose }
"dwa" { powercfg -devicequery wake_armed }
"dwp" { powercfg -devicequery wake_programmable }
}
Changing the Power Scheme
There are a number of changes that can be made to the power scheme used by Windows Vista
or Windows Server 2008. These settings commonly take into account whether the computer
is running on power or on battery. If the computer is running on a battery, conservation often
becomes a concern. However, this is not always the case. In some circumstances, performance
of the computer is the most pressing factor; for example, if you know electricity will be
restored to the computer within a specific amount of time. The SetPowerConfig.ps1 script pro-
vides the ability to configure power settings for the monitor, disk, sleep, and hibernate fea-
tures on both the battery and power. You can create a custom power plan by using the power
options tool, as shown in Figure 9-8.
Figure 9-8 Custom power plan for a Windows Server 2008 computer.
C09622791.fm Page 269 Saturday, December 8, 2007 6:40 PM
270 Windows PowerShell Scripting Guide
The SetPowerConfig.ps1 script begins with the param statement. Using this script, you’ll
define four parameters; however, none of them is set to a default value. This is because some
of the arguments are mutually exclusive—for example, -q for query and -help for help. The -c
and the -t arguments must be supplied at the same time because the value given for -t deter-
mines the time-out value for the parameter to modify in the power scheme. If this value is
missing, then an error will be generated. You’ll find out how that is done later. The param line
of code is shown here:
param($c, $t, $q, $help)
The funline function is the next section of code in the SetPowerConfig.ps1 script. This func-
tion is used to underline the header of the power configuration report on the local computer.
This function is shown here:
function funline ($strIN)
{
$num = $strIN.length
for($i=1 ; $i -le $num ; $i++)
{ $funline += "=" }
Write-Host -ForegroundColor yellow `n$strIN
Write-Host -ForegroundColor darkYellow $funline
}
The funhelp function is used to display the help information for the script. In a script with this
many parameters and different combinations of switches, a good help string is very impor-
tant. The funhelp function basically creates a large here-string, stores it in the $helpText
variable, prints the help, and then exits the script. The funhelp function is shown here:
function funHelp()
{
$helpText=@"
DESCRIPTION:
NAME: SetPowerConfig.ps1
Sets power config on a local machine.
PARAMETERS:
-c(hange) <mp,mb,dp,db,sp,sb,hp,hb>
-q(uery) detailed query of current power plan
-t(ime out) time out value for change. Required when
using -c to change a value
-help prints help file
SYNTAX:
SetPowerConfig.ps1
Displays error message. Must supply a parameter
SetPowerConfig.ps1 -c mp -t 10
Sets time out value of monitor when on power to
10 minutes
C09622791.fm Page 270 Saturday, December 8, 2007 6:40 PM
Chapter 9 Configuring Desktop Settings 271
SetPowerConfig.ps1 -c mb -t 5
Sets time out value of monitor when on battery
to 5 minutes
SetPowerConfig.ps1 -c dp -t 15
Sets time out value of disk when on power to
15 minutes
SetPowerConfig.ps1 -c db -t 7
Sets time out value of disk when on battery
to 7 minutes
SetPowerConfig.ps1 -c sp -t 30
Sets time out value of standby when on power to
30 minutes
SetPowerConfig.ps1 -c sb -t 10
Sets time out value of standby when on battery
to 10 minutes
SetPowerConfig.ps1 -c hp -t 45
Sets time out value of hibernate when on power to
45 minutes
SetPowerConfig.ps1 -c hb -t 15
Sets time out value of hibernate when on battery
to 15 minutes
SetPowerConfig.ps1 -q c
Lists detailed configuration settings of the current
power scheme
SetPowerConfig.ps1 -help ?
Displays the help topic for the script
"@
$helpText
exit
}
Next, check to see if the $help variable is present. If it is, this indicates the script was launched
with the -help argument. If the $help variable is present, use the funline function to print a mes-
sage stating you are going to retrieve help, and then call the funhelp function. This line of code
is shown here:
if($help){funline("Obtaining help ...") ; funhelp }
C09622791.fm Page 271 Saturday, December 8, 2007 6:40 PM
272 Windows PowerShell Scripting Guide
Use the wshnetwork object to retrieve the computer name of the local computer. To do this, use
the New-Object cmdlet with the -comobject parameter, using the program ID wscript.network.
Put the whole thing in smooth parentheses, retrieve the ComputerName property, and store
the result in the $computer variable. This line of code is shown here:
$computer = (New-Object -ComObject WScript.Network).computername
If the -q parameter is supplied from the command line, then the $q variable will be present. If
it is, use the funline function to print a header with the computer name, then use the Powercfg
utility and supply the -query argument. This will produce a detailed listing of the current
power scheme that is in effect on the computer. Then exit the script. This section of code is
shown here:
if($q)
{
funline("Power configuration on: $($computer)")
powercfg -query
exit
}
You also need to ensure that if the -c parameter is specified that the -t parameter is also used.
This is because the $t variable contains the amount of time to specify for the timeout value. If
the $c variable is present, but the $t variable is not, then use the throw statement to cause an
error to be generated. This will print the string message in red (by default) and halt script exe-
cution. This section is shown here:
if($c -and !$t)
{
$(Throw 'A value for $t is required.
Try this: SetPowerConfig.ps1 -help ?')
}
Once all the basic parameters are verified, evaluate the value that was supplied to the -c param-
eter. To do this, use the switch statement. If the value supplied is mp, then set the monitor time-
out value when the computer is on AC power to the value in minutes contained in the $t vari-
able. If the value is mb, then if the computer is running on battery power, time out the monitor
to the $t value. If it is dp, then you will turn off the disks when on AC power after the value
specified in the $t value has passed. If the value is db, configure the current power scheme to
turn off the drives when the value represented by $t is reached. Sp will put the computer in
standby mode when on AC power and the time-out value of $t is reached. When sb is speci-
fied, it is the time-out value for standby on battery. If you want to cause the computer to hiber-
nate, you can use hp and specify the time-out value to modify the power scheme for
hibernation when on power. If hb is used, then it is the hibernation time-out when on battery.
The default parameter catches an invalid value for $c. This section of code is shown here:
switch($c)
{
"mp" { powercfg -CHANGE -monitor-timeout-ac $t }
"mb" { powercfg -CHANGE -monitor-timeout-dc $t }
C09622791.fm Page 272 Saturday, December 8, 2007 6:40 PM
Chapter 9 Configuring Desktop Settings 273
"dp" { powercfg -CHANGE -disk-timeout-ac $t}
"db" { powercfg -CHANGE -disk-timeout-dc $t }
"sp" { powercfg -CHANGE -standby-timeout-ac $t }
"sb" { powercfg -CHANGE -standby-timeout-dc $t }
"hp" { powercfg -CHANGE -hibernate-timeout-ac $t }
"hb" { powercfg -CHANGE -hibernate-timeout-dc $t }
DEFAULT {
"$c is not allowed. Try the following:
SetPowerConfig.ps1 -help ?"
}
}
The completed SetPowerConfig.ps1 script is shown here.
SetPowerConfig.ps1
param($c, $t, $q, $help)
function funline ($strIN)
{
$num = $strIN.length
for($i=1 ; $i -le $num ; $i++)
{ $funline += "=" }
Write-Host -ForegroundColor yellow `n$strIN
Write-Host -ForegroundColor darkYellow $funline
}
function funHelp()
{
$helpText=@"
DESCRIPTION:
NAME: SetPowerConfig.ps1
Sets power config on a local machine.
PARAMETERS:
-c(hange) <mp,mb,dp,db,sp,sb,hp,hb>
-q(uery) detailed query of current power plan
-t(ime out) time out value for change. Required when
using -c to change a value
-help prints help file
SYNTAX:
SetPowerConfig.ps1
Displays error message. Must supply a parameter
SetPowerConfig.ps1 -c mp -t 10
Sets time out value of monitor when on power to
10 minutes
SetPowerConfig.ps1 -c mb -t 5
Sets time out value of monitor when on battery
to 5 minutes
SetPowerConfig.ps1 -c dp -t 15
C09622791.fm Page 273 Saturday, December 8, 2007 6:40 PM
274 Windows PowerShell Scripting Guide
Sets time out value of disk when on power to
15 minutes
SetPowerConfig.ps1 -c db -t 7
Sets time out value of disk when on battery
to 7 minutes
SetPowerConfig.ps1 -c sp -t 30
Sets time out value of standby when on power to
30 minutes
SetPowerConfig.ps1 -c sb -t 10
Sets time out value of standby when on battery
to 10 minutes
SetPowerConfig.ps1 -c hp -t 45
Sets time out value of hibernate when on power to
45 minutes
SetPowerConfig.ps1 -c hb -t 15
Sets time out value of hibernate when on battery
to 15 minutes
SetPowerConfig.ps1 -q c
Lists detailed configuration settings of the current
power scheme
SetPowerConfig.ps1 -help ?
Displays the help topic for the script
"@
$helpText
exit
}
if($help){funline("Obtaining help ...") ; funhelp }
$computer = (New-Object -ComObject WScript.Network).computername
if($q)
{
funline("Power configuration on: $($computer)")
powercfg -query
exit
}
if($c -and !$t)
{
$(Throw 'A value for $t is required.
C09622791.fm Page 274 Saturday, December 8, 2007 6:40 PM
Chapter 9 Configuring Desktop Settings 275
Try this: SetPowerConfig.ps1 -help ?')
}
switch($c)
{
"mp" { powercfg -CHANGE -monitor-timeout-ac $t }
"mb" { powercfg -CHANGE -monitor-timeout-dc $t }
"dp" { powercfg -CHANGE -disk-timeout-ac $t}
"db" { powercfg -CHANGE -disk-timeout-dc $t }
"sp" { powercfg -CHANGE -standby-timeout-ac $t }
"sb" { powercfg -CHANGE -standby-timeout-dc $t }
"hp" { powercfg -CHANGE -hibernate-timeout-ac $t }
"hb" { powercfg -CHANGE -hibernate-timeout-dc $t }
DEFAULT {
"$c is not allowed. Try the following:
SetPowerConfig.ps1 -help ?"
}
}
Summary
This chapter examined configuring desktop settings on both Windows Vista and on Win-
dows Server 2008. We first looked at auditing the name and the type of screen saver that is
configured on a computer, then turned our attention to secure screen savers. We showed how
to detect if a screen saver is secure, how to perform an audit of the screen saver, and how to
write the information to a database. Next we examined power settings. In the power settings
section we looked at reporting the current power configuration settings. This useful technique
is vital to assisting users in maximizing battery life on portable computing devices. Finally, we
concluded the chapter with details about configuring power management settings.
C09622791.fm Page 275 Saturday, December 8, 2007 6:40 PM
C09622791.fm Page 276 Saturday, December 8, 2007 6:40 PM

277
Chapter 10
Managing Post-Deployment Issues
After completing this chapter, you will be able to:
■Rename the computer.
■Set the correct time.
■Configure the authorized time source.
■Create a local user account and set a password.
■Enable an administrator account.
■Shut down or reboot a remote computer or server.
On the Companion Disc All the scripts used in this chapter are located on the CD that
accompanies this book in the \scripts\chapter10 folder.
Even when Windows is deployed in an automated fashion, it seems there are still a number of
tasks that need to be performed after the operating system has been plopped down upon the
bare metal. These range from simple tasks—such as setting the time and time source—to more
complex operations, such as creating local users and configuring the firewall to allow for
remote administration. Some of these tasks are completed during deployment, whereas oth-
ers, such as creating local users, can only be accomplished after the operating system is
installed. In this chapter, we’ll look at some of the most common tasks performed after
deployment.
Setting the Time
The management of devices begins with the management of time. Although it is true that
domain-connected computers receive time updates from their domain controller, this arrange-
ment does not always work for computers that are not connected all the time, such as laptops.
But, when talking about post-deployment activities, I have observed—on several occasions—the
inability of a computer to join a domain because of a time skew. In situations such as this, the
ability to remotely set the time can save a great deal of frustration. This becomes especially
true when working with Windows Server 2008 Server Core. As you can see in Figure 10-1, the
time utility is much improved in Windows Vista and in Windows Server 2008, but it still does
not meet the needs for enterprise management.
C10622791.fm Page 277 Wednesday, December 12, 2007 1:36 PM
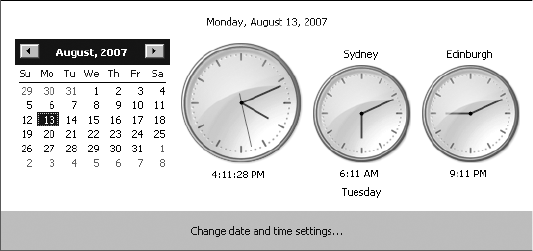
278 Windows PowerShell Scripting Guide
Figure 10-1 The new and improved Windows Vista and Windows Server 2008 time utility.
Setting the Time Remotely
When working with the GetSetTime.ps1 script, you connect to a remote computer by using
Windows Management Instrumentation (WMI). You can perform two functions: query the
time on a remote computer and set time on a remote computer to the same time as the local
computer. Because you’re using WMI to perform the query and to set the time on the remote
computer, this script can target a Windows Server 2008 Server Core as well as any other
Windows operating system that has WMI installed.
Begin the GetSetTime.ps1 script by defining three parameters. The first parameter is the name
of the computer you’ll connect to. This can be either a local computer or a remote computer.
By default, the value of $computer is set to localhost, which represents the local computer. The
second parameter is -a. Use the $a variable to hold the action you want to perform. This action
can be either q(uery) or s(et). The last parameter to define is the -help parameter. When the
$help variable is present, you’ll display a help string to the user. This first line of code is shown
here:
param($computer="localhost", $a, $help)
The second section of the script is the funline function, which is used to underline a section of
the screen output to make it easier to read the returned information. It accepts a single string
parameter, which is supplied when the function is called. Determine the length of the string,
and build up a line separator by using a for statement. After the line separator is created, use
the Write-Host cmdlet twice. The first time, print the input string; the second time, use the
cmdlet to print the line separator. The complete funline function follows:
function funline ($strIN)
{
$num = $strIN.length
for($i=1 ; $i -le $num ; $i++)
{ $funline += "=" }
Write-Host -ForegroundColor yellow `n$strIN
Write-Host -ForegroundColor darkYellow $funline
}
C10622791.fm Page 278 Wednesday, December 12, 2007 1:36 PM
Chapter 10 Managing Post-Deployment Issues 279
You must define the funhelp function, which is used to print a help message if the script is run
with the -help parameter. Create a here-string by beginning the help text with the @” charac-
ters; end the here-string with “@ to close out the string. Store the entire here-string in a vari-
able named $helpText. After the here-string is created, print the value stored in the $helpText
variable, and then exit the script. The funhelp function is shown here:
function funHelp()
{
$helpText=@"
DESCRIPTION:
NAME: GetSetTime.ps1
Prints or sets the current time on a local or remote machine.
PARAMETERS:
-computerName Specifies the name of the computer upon which to run the script
-a(ction) determines whether sets or gets the current time
-help prints help file
SYNTAX:
GetSetTime.ps1 -computer MunichServer
Lists current time on a computer named MunichServer
GetSetTime.ps1
Lists current time on local computer
GetSetTime.ps1 -a q
Lists current time on local computer
GetSetTime.ps1 -a q -computer MunichServer
Lists current time on a computer named MunichServer
GetSetTime.ps1 -a s -computer MunichServer
Sets current time on a computer named MunichServer
GetSetTime.ps1 -help ?
Displays the help topic for the script
"@
$helpText
exit
}
To determine whether or not to show the help string, check for the presence of the $help vari-
able. Because the $help variable is not initialized during the param statement, the only way it
will be available is if the script is run with the -help parameter. If you notice the $help variable,
C10622791.fm Page 279 Wednesday, December 12, 2007 1:36 PM

280 Windows PowerShell Scripting Guide
print a message stating that you are retrieving help; then call the funhelp function to print the
help text. This line of code is shown here:
if($help){funline("Obtaining help ...") ; funhelp }
Next, you need to get current date and time on the local computer. Even if you are targeting
the script to run on a remote computer, you still obtain the current date and time on the local
computer; that is, the computer where you launch the script from.
Note This procedure is a bit confusing—if you are targeting a remote computer with this
script, it actually runs on two computers. It obtains the date and time from the first computer
(the local computer) through the Get-Date cmdlet. Later, you obtain the date and time from
the remote computer with WMI. The Get-Date cmdlet is “pure PowerShell,” and in version 1.0,
Windows PowerShell does not “remote.” However, you are also using WMI and WMI remotes
very well.
After retrieving the current date and time by using the Get-Date cmdlet, convert it into a for-
mat that WMI understands. WMI requires the date-time value to be supplied in a format that
is named either Universal Time Coordinates (UTC) time or Distributed Management Task
Force (DMTF) format. UTC time is expressed in minutes from Greenwich Mean Time (GMT)
and will range from +720 to –720. The appropriate value is also subtracted or added for day-
light savings time as needed. As shown in the following line of code, the UTC time can be read,
but it is somewhat difficult. The first four digits are the year (2007). Next is the month (08),
then the day (10). The next numbers refer to time, right down to the second (12:07 and 19
seconds). The last three digits are the offset. Here, it is -240, which is -4 GMT. However, it is
-5 GMT during daylight savings time, so effectively it is like -4 GMT.
20070810120719.323553-240
It is possible to take a “normal” date-time value and convert it to UTC, but it is rather cumber-
some and (for me anyway) rather error prone. Luckily, you don’t have to do this manually.
Use the Microsoft .NET Framework class Management.ManagementDatetimeConverter to per-
form the conversion. There is a static method named, surprisingly enough, ToDmtfDateTime().
To call a static method, use a double colon (::) notation. This notation will take a “normal”
date-time object and convert it to UTC time format. Store the current date-time value in the
variable $date. To make the code more readable, use the grave accent mark for line continua-
tion. If you aren’t breaking the line, then type the line of code on a single line and remove the
grave accent:
$date = [Management.ManagementDatetimeConverter]::`
ToDmtfDateTime($(get-date))
Use the Get-WmiObject cmdlet to query the Win32_OperatingSystem WMI class and target the
computer specified from the command line when the script was run. By default, have $com-
puter set to a default value of localhost, but in most cases you will be supplying a different
C10622791.fm Page 280 Wednesday, December 12, 2007 1:36 PM
Chapter 10 Managing Post-Deployment Issues 281
value for the -computer parameter. Store the management object in the $objWMI variable.
Once again, use the line continuation character to break the code into two separate lines for
readability purposes. This section of code is shown here:
$objWMI = Get-WmiObject -ComputerName $computer `
-Class win32_operatingsystem
There are 75 properties defined on the Win32_OperatingSystem WMI class, and the previous
line of code retrieves them all. Retrieve any of the properties by querying the $objWMI vari-
able. You must retrieve the LocalDateTime property. This is the date-time that is retrieved from
the computer that is specified in the $computer variable, and in most cases it will be a remote
computer. This value is handed back in UTC format, and later is converted to a more readable
format. This line of code is shown here:
$localUTC=$objwmi.localDateTime
To add capabilities to the script, evaluate the parameter that is supplied to the a parameter
when the script is run. If the value specified for -a is “q,” then simply query the time of the
computer. This can be either local time or remote time, depending on the value of -computer.
Use the funline function to print a header for your report. Because the script can be run either
locally or remotely, retrieve the value of the Csname property. The Csname property is the
name of the computer system and always accurately points to where the time value is coming
from. When you have a header, use the Management.ManagementDatetimeConverter .NET
Framework class and the static method ToDateTime(), which converts the UTC format time to
“normal” time. This section of the switch statement is shown here:
switch($a)
{
"q" {
funline("The time on $($objWMI.csname) is")
[Management.ManagementDatetimeConverter]::`
ToDateTime($localUTC)
}
The next option to switch upon is the letter “s.” When “s” is supplied to the -a parameter from
the command line, then you’ll call the SetDateTime() method from the Win32_OperatingSystem
WMI class. The SetDateTime() method requires the time to be supplied in UTC format.
Because you have already converted the local time into UTC format and stored it in the $date
variable, it is a simple matter to plug it into the method call. Use the funline function to high-
light the action on the local screen. You’ll receive an error object that indicates the status of
the method call. When a 0 is returned, it indicates that no errors occurred during the setting
of the time. This object is simply printed on the screen with no attempt to translate any error
messages in this script. This section of the switch statement is shown here:
"s" {
funline("Setting current time on $computer ...")
$objWMI.SetDateTime($date)
}
C10622791.fm Page 281 Wednesday, December 12, 2007 1:36 PM
282 Windows PowerShell Scripting Guide
If neither an “s” nor a “q” is supplied to the -a parameter, then print the local time in normal
date-time fashion. To do this, use the DEFAULT clause of the switch statement. Use the funline
function to print a header message, and then use the Management.ManagementDatetimeCon-
verter .NET Framework class and call the ToDateTime() method. Give it the date-time that is
stored in the $localUTC variable. This time, as you may recall, comes directly from WMI and
will always represent the time that is current on the $computer system. This section of the
switch code is shown here:
DEFAULT {
funline("The time on $($objWMI.csname) is")
[Management.ManagementDatetimeConverter]::`
ToDateTime($localUTC)
}
}
The complete GetSetTime.ps1 script is shown here.
GetSetTime.ps1
param($computer="localhost", $a, $help)
function funline ($strIN)
{
$num = $strIN.length
for($i=1 ; $i -le $num ; $i++)
{ $funline += "=" }
Write-Host -ForegroundColor yellow `n$strIN
Write-Host -ForegroundColor darkYellow $funline
}
function funHelp()
{
$helpText=@"
DESCRIPTION:
NAME: GetSetTime.ps1
Prints or sets the current time on a local or remote machine.
PARAMETERS:
-computerName Specifies the name of the computer upon which to run the script
-a(ction) determines whether sets or gets the current time
-help prints help file
SYNTAX:
GetSetTime.ps1 -computer MunichServer
Lists current time on a computer named MunichServer
GetSetTime.ps1
Lists current time on local computer
GetSetTime.ps1 -a q
Lists current time on local computer
C10622791.fm Page 282 Wednesday, December 12, 2007 1:36 PM

Chapter 10 Managing Post-Deployment Issues 283
GetSetTime.ps1 -a q -computer MunichServer
Lists current time on a computer named MunichServer
GetSetTime.ps1 -a s -computer MunichServer
Sets current time on a computer named MunichServer
GetSetTime.ps1 -help ?
Displays the help topic for the script
"@
$helpText
exit
}
if($help){funline("Obtaining help ...") ; funhelp }
$date = [Management.ManagementDatetimeConverter]::`
ToDmtfDateTime($(get-date))
$objWMI = Get-WmiObject -ComputerName $computer `
-Class win32_operatingsystem
$localUTC=$objwmi.localDateTime
switch($a)
{
"q" {
funline("The time on $($objWMI.csname) is")
[Management.ManagementDatetimeConverter]::`
ToDateTime($localUTC)
}
"s" {
funline("Setting current time on $computer ...")
$objWMI.SetDateTime($date)
}
DEFAULT {
funline("The time on $($objWMI.csname) is")
[Management.ManagementDatetimeConverter]::`
ToDateTime($localUTC)
}
}
Logging Results to the Event Log
The GetSetTimeWriteToEventLog.ps1 script takes the previous GetSetTime.ps1 script and
adds a function, which then writes the results of the operation to the application log on the
computer from whence the script is run.
More Info The technique of writing to the event log is discussed in Chapter 3, “Managing
Logs.” For a complete discussion of working with event logs, please refer to that chapter.
C10622791.fm Page 283 Wednesday, December 12, 2007 1:36 PM
284 Windows PowerShell Scripting Guide
This chapter addresses only the new sections that are added to the script, as most of the script
is exactly the same.
The first differing portion of the GetSetTimeWriteToEventLog.ps1 script is the use of the auto-
matic variable $erroractionpreference. Set the value of this variable to SilentlyContinue, which
means that if an error is detected, the script doesn’t inform you of the error, but will continue
running until the end of the script is reached. In this particular script, choose this option
because you want the script to write to the event log, even if an error occurs during the
attempt to set the time.
Note There are four settings that can be specified for the $erroractionpreference variable.
These values are: SilentlyContinue (no error is reported), Continue (errors are reported), Inquire
(error is reported, and script asks to continue), Stop (error is reported, but script halts execu-
tion). The decision as to which action to specify is dependent upon both the criticality of the
operation (editing the registry vs. reading BIOS configuration) and error handling you have
added to the script (you detect when an error occurs, and roll back a series of changes you
made.) The default value for $erroractionpreference is Continue.
The line of code that specifies the action to take when an error is detected is shown here:
$erroractionpreference = "SilentlyContinue"
Next is the funlog function. In the GetSetTimeWriteToEventLog.ps1 script, use the funlog
function to write the error information from setting the time to the Application log. Begin with
the function declaration and define an input variable named $strErr. Then use an if statement
to see if a data source named ps_script is defined.
Defining Event Sources
You can create any new event log source you want. You can even create your own event
log! I prefer to create a single event source and use it for all of my scripts. This makes it
very easy to query the event log for only your events. You can use a script such as Event-
LogSpecificSource.ps1 to return entries from only your scripts. The EventLogSpecific-
Source.ps1 script is shown here.
EventLogSpecificSource.ps1
Get-EventLog -LogName application |
Where-Object { $_.source -eq "ps_script" }
These event sources show up in the Event Viewer management tool in the individual
entry, as shown in Figure 10-2. But the event sources also show up in the filter tool. As
shown in Figure 10-2, you can choose to filter the results based upon only your event
source.
C10622791.fm Page 284 Wednesday, December 12, 2007 1:36 PM
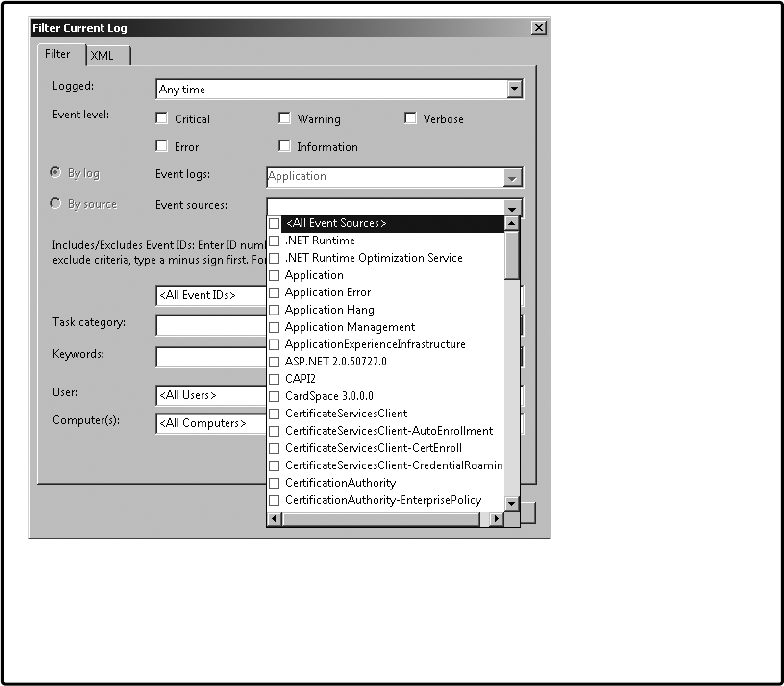
Chapter 10 Managing Post-Deployment Issues 285
Figure 10-2 The source is one of the predefined filters.
Because of the flexibility you have in retrieving events from a specific source, it seems to
be a good idea to limit your creativity when it comes to defining event sources. As a best
practice, I recommend that you stick to a single event source whenever possible.
To see if the ps_script data source exists, use the sourceExists() static method from the
System.Diagnostics.Eventlog .NET Framework class. If the source ps_script exists, then move to
the next section of the function and write to the Application log. When an event is written
to the Application log that uses the ps_script source, it appears in the event log, as shown in
Figure 10-3.
C10622791.fm Page 285 Wednesday, December 12, 2007 1:36 PM
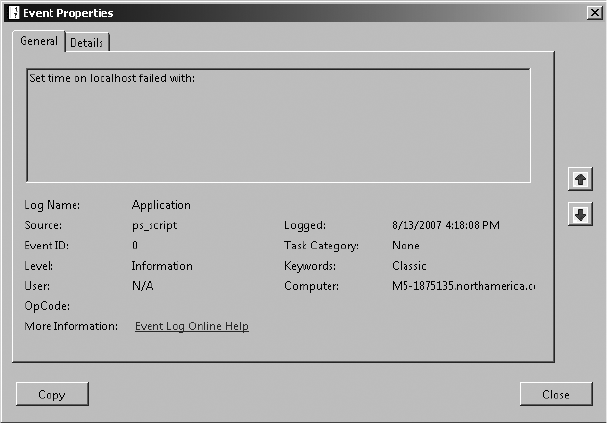
286 Windows PowerShell Scripting Guide
Figure 10-3 An Application log event from a custom event source.
If the source does not exist, create a new event source by using the createEventSource() method
from the System.Diagnostics.Eventlog .NET Framework class.
After creating the event source, use the New-Object cmdlet to create a new instance of the
System.Diagnostics.Eventlog .NET Framework class. Specify the Application log and use double
quotation marks to refer to the local computer. Store eventlog object in the $strLog variable.
Specify the source as ps_source and use the writeEntry() method to write the contents of the
$strErr variable to the application log. The complete funlog function is shown here:
function funlog ($strErr)
{
if(![system.diagnostics.eventlog]::sourceExists("ps_script","."))
{
$strLog = [system.diagnostics.eventlog]::CreateEventSource("ps_script",
"Application")
}
$strLog = new-object system.diagnostics.eventlog("application",".")
$strLog.source = "ps_script"
$strLog.writeEntry($strErr)
}
In the s section of the switch statement, you’ll set the time on the target computer. To set the
time, first call the funline function and print a statement letting the user know you are preparing
to set the time on the computer. Call the SetDateTime() method of the Win32_OperatingSystem
WMI class. The SetDateTime() method requires a date-time value for input, and it must be
in UTC format. From the previous script, you have code that performs the transformation.
Evaluate the return code from calling the method. If it is equal to 0, assign a string to the
$strErr variable, and call the funlog function to write the results to the event log. If, however,
C10622791.fm Page 286 Wednesday, December 12, 2007 1:36 PM
Chapter 10 Managing Post-Deployment Issues 287
the return code was not equal to 0, then create a message stating that an error occurred, and
write that information to the event log by calling the funlog function. This section of code is
shown here:
"s" {
funline("Setting current time on $computer ...")
$strErr = $objWMI.SetDateTime($date)
If($strErr.returnvalue -eq 0)
{
$strErr = "Set time on $($computer) = success"
}
ELSE
{
$strErr = "Set time on $($computer) failed with:`n" +
$strErr.returnvalue
}
funlog($strErr)
}
The completed GetSetTimeWriteToEventLog.ps1 script is shown here.
GetSetTimeWriteToEventLog.ps1
param($computer="localhost", $a, $help)
$erroractionpreference = "SilentlyContinue"
function funline ($strIN)
{
$num = $strIN.length
for($i=1 ; $i -le $num ; $i++)
{ $funline += "=" }
Write-Host -ForegroundColor yellow `n$strIN
Write-Host -ForegroundColor darkYellow $funline
}
function funlog ($strErr)
{
if(![system.diagnostics.eventlog]::sourceExists("ps_script","."))
{
$strLog =
[system.diagnostics.eventlog]::CreateEventSource("ps_script",
"Application")
}
$strLog = new-object system.diagnostics.eventlog("application",".")
$strLog.source = "ps_script"
$strLog.writeEntry($strErr)
}
function funHelp()
{
$helpText=@"
DESCRIPTION:
NAME: GetSetTimewritetoeventlog.ps1
Prints or sets the current time on a local or remote machine.
PARAMETERS:
C10622791.fm Page 287 Wednesday, December 12, 2007 1:36 PM
288 Windows PowerShell Scripting Guide
-computerName Specifies the name of the computer upon which to run the script
-a(ction) determines whether sets or gets the current time
-help prints help file
SYNTAX:
GetSetTimewritetoeventlog.ps1 -computer MunichServer
Lists current time on a computer named MunichServer
GetSetTimewritetoeventlog.ps1
Lists current time on local computer
GetSetTimewritetoeventlog.ps1 -a q
Lists current time on local computer
GetSetTimewritetoeventlog.ps1 -a q -computer MunichServer
Lists current time on a computer named MunichServer
GetSetTimewritetoeventlog.ps1 -a s -computer MunichServer
Sets current time on a computer named MunichServer
GetSetTimewritetoeventlog.ps1 -help ?
Displays the help topic for the script
"@
$helpText
exit
}
if($help){funline("Obtaining help ...") ; funhelp }
$date = [Management.ManagementDatetimeConverter]::`
ToDmtfDateTime($(get-date))
$objWMI = Get-WmiObject -ComputerName $computer `
-Class win32_operatingsystem
$localUTC=$objwmi.localDateTime
switch($a)
{
"q" {
funline("The time on $($objWMI.csname) is")
[Management.ManagementDatetimeConverter]::`
ToDateTime($localUTC)
}
"s" {
funline("Setting current time on $computer ...")
$strErr = $objWMI.SetDateTime($date)
If($strErr.returnvalue -eq 0)
{
C10622791.fm Page 288 Wednesday, December 12, 2007 1:36 PM
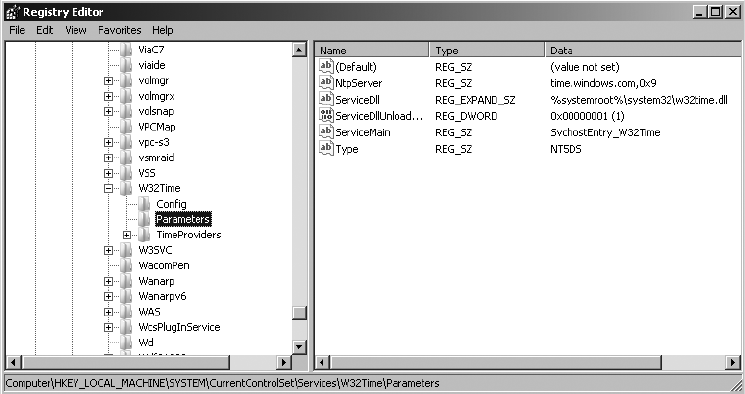
Chapter 10 Managing Post-Deployment Issues 289
$strErr = "Set time on $($computer) = success"
}
ELSE
{
$strErr = "Set time on $($computer) failed with:`n" +
$strErr.returnvalue
}
funlog($strErr)
}
DEFAULT {
funline("The time on $($objWMI.csname) is")
[Management.ManagementDatetimeConverter]::`
ToDateTime($localUTC)
}
}
Configuring the Time Source
To configure the time source on a computer, you have two options. The first is to use the net
time command, and the second is to edit the registry. Since the net time command is able to
remote, I prefer the first method. But for the sake of completeness, I will show you how to
query the registry key to ensure the change was successful. This registry key value is shown in
Figure 10-4.
Figure 10-4 The time source in the registry.
C10622791.fm Page 289 Wednesday, December 12, 2007 1:36 PM
290 Windows PowerShell Scripting Guide
Using the Net Time Command
In the SetTimeSource.ps1 script, use the param statement to define four command-line
parameters. The first is the -computer parameter that determines where the script runs. The
next parameter, -a, determines the action to take when the script is run. The third parameter,
-timeserver, is used to specify the name of the time server for the computer. The fourth
parameter, -help, is used to display the help text. This line of code is shown here:
param($computer="localhost",$a,$timeServer,$help)
Define the funhelp function used to display the help text when the script is run with the -help
parameter specified. In the funhelp function, create a here-string that is assigned to the variable
$helpText. In the here-string, list a description of the script, the parameters, and several exam-
ples of the syntax of the script. The help string will be displayed when the script is run, as
shown here:
PS C:\> SetTimeSource.ps1 -help ?
After the here-string is created, print the text stored in the $helpText variable, and then exit the
script. The complete funhelp function follows:
function funHelp()
{
$helpText=@"
DESCRIPTION:
NAME: SetTimeSource.ps1
Prints and sets the current time source on a local or remote machine.
PARAMETERS:
-computer Specifies the name of the computer upon which to run the script
-a(ction) The specific action to perform < qt, qs, s >
-timeServer The name of the time server to use
-help prints help file
SYNTAX:
SetTimeSource.ps1 -computer MunichServer
Lists current time on a computer named MunichServer
SetTimeSource.ps1
Lists current time on local computer
SetTimeSource.ps1 -computer MunichServer -a qs
Lists current time server on a computer named MunichServer
SetTimeSource.ps1 -computer MunichServer -a qs -timeServer 192.168.2.5
Sets the current time server on a computer named MunichServer
to 192.168.2.5
C10622791.fm Page 290 Wednesday, December 12, 2007 1:36 PM
Chapter 10 Managing Post-Deployment Issues 291
SetTimeSource.ps1 -help ?
Displays the help topic for the script
"@
$helpText
exit
}
You’ll need a mechanism to determine whether to print the help text. To do this, look for the
presence of the $help variable. If the $help variable is present, it means the script is run with
the -help parameter. If it is not present, then the script is run without the parameter. You can
use the if statement to perform this work. If the $help variable is present, call the funhelp func-
tion. This line of code is shown here:
if($help){funline("Obtaining help ...") ; funhelp }
Next is the switch statement, the most powerful statement in Windows PowerShell. Here, you
use the switch statement to evaluate the value of the $a variable. This value gets assigned when
the script is run with the -a parameter. If run with -a qt, the script will query the time on the
computer that is specified with the -computer parameter. If no value is supplied for -computer,
the script will execute on the local computer. Use the value qs to determine if you are querying
for the currently specified simple network time protocol (SNTP) server. If the script is run
with -a s, then you’ll set the time server. This command would look like the following:
PS C:\> SetTimeSource.ps1 -computer Bonn -a qs -timeServer Bali
If some other value is specified for the -a parameter, the switch will take the default action,
which is to simply print the current time on the computer specified by $computer. This section
is shown here:
switch($a)
{
"qt" { net time \\$computer }
"qs" { net time \\$computer /querySNTP}
"s" { net time \\$computer /setSNTP:$timeServer }
DEFAULT { net time \\$computer }
}
The completed SetTimeSource.ps1 script is shown here.
SetTimeSource.ps1
param($computer="localhost",$a,$timeServer,$help)
function funHelp()
{
$helpText=@"
DESCRIPTION:
NAME: SetTimeSource.ps1
Prints and sets the current time source on a local or remote machine.
C10622791.fm Page 291 Wednesday, December 12, 2007 1:36 PM
292 Windows PowerShell Scripting Guide
PARAMETERS:
-computer Specifies the name of the computer upon which to run the script
-a(ction) The specific action to perform < qt, qs, s >
-timeServer The name of the time server to use
-help prints help file
SYNTAX:
SetTimeSource.ps1 -computer MunichServer
Lists current time on a computer named MunichServer
SetTimeSource.ps1
Lists current time on local computer
SetTimeSource.ps1 -computer MunichServer -a qs
Lists current time server on a computer named MunichServer
SetTimeSource.ps1 -computer MunichServer -a s -timeServer 192.168.2.5
Sets the current time server on a computer named MunichServer
to 192.168.2.5
SetTimeSource.ps1 -help ?
Displays the help topic for the script
"@
$helpText
exit
}
if($help){("Obtaining help ...") ; funhelp }
switch($a)
{
"qt" { net time \\$computer }
"qs" { net time \\$computer /querySNTP}
"s" { net time \\$computer /setSNTP:$timeServer }
DEFAULT { net time \\$computer }
}
Querying the Registry for the Time Source
In the GetTimeSource.ps1 script, you’ll use the StdRegProv WMI class to query the registry.
The advantage of doing a WMI query is that you can make the registry query remotely,
whereas in Windows PowerShell version 1.0, the HLKM:\ and the HKCU:\ PSDrives are local
only. By using the StdRegProv WMI class, you can query the registry and also set values. The
discussion on this comes later in this chapter, in the “Configuring the Screen Saver” section.
C10622791.fm Page 292 Wednesday, December 12, 2007 1:36 PM

Chapter 10 Managing Post-Deployment Issues 293
When using the GetTimeSource.ps1 script, first use the param statement to define two
command-line arguments. The first argument is the -computer parameter. This determines
which computer you’ll query for the time source. The second argument is the -help parameter,
used to display command-line help. This line of code is shown here:
param($computer="localhost", $help)
Then, define the funline function. This is the funline2 function that is stored in the
Funline2.ps1 file.
Important What is different about the funline function in the GetTimeSource.ps1 script?
It’s the way that the variable is passed to the function by reference. This means that when the
variable is changed in the function, the changed value will be reflected back in the main
script. In this manner, you are able to “get a value” out of the function. Note that when you
do this, you must use the [ref] type constraint to convert the variable into a PSReference object.
In the funline function, use the [ref] type constraint on the input variable $strIN. Do this so you
can work with the variable by reference, instead of by value. This means that a change to the
value of the variable that takes place inside the function will be available outside of the func-
tion. This line of the funline function is shown here:
function funline ([ref]$strIN)
The next step is to determine the length of the string that is passed to the function. To do this,
examine the length of the Value property of $strIN. After using the [ref] constraint, you have a
PSReference object; to access the value, you must query the Value property. Since $strIN con-
tains an object, it has both methods and properties. Observe this process here:
PS C:\> $strin = "hi"
PS C:\> [ref]$strin
Value
-----
hi
PS C:\> [ref]$strin | gm
TypeName: System.Management.Automation.PSReference
Name MemberType Definition
---- ---------- ----------
Equals Method System.Boolean Equals(Object obj)
GetHashCode Method System.Int32 GetHashCode()
GetType Method System.Type GetType()
get_Value Method System.Object get_Value()
set_Value Method System.Void set_Value(Object value)
ToString Method System.String ToString()
Value Property System.Object Value {get;set;}
C10622791.fm Page 293 Wednesday, December 12, 2007 1:36 PM
294 Windows PowerShell Scripting Guide
Check out the line of code that determines the length of the string that is passed to the funline
function:
$num = $strIN.value.length
Once you have the length of the string, store the results in the $num variable. Use this number
to build up the output line string separator. Store the built-up line separator in the $funline
variable; assign the string value to the Value property of $strIN and concatenate it with the line
separator stored in the $funline variable. Before doing this, however, add a new line by using
the `n special character reference. This section of the funline function is shown here:
{
$num = $strIN.value.length
for($i=1 ; $i -le $num ; $i++)
{ $funline += "=" }
$strIN.value = "$($strIN.value)`n" + $funline
}
The next step is the funhelp function; use a here-string to create a help string for the script.
Assign the here-string to the $helpText variable. In the string, include the description of the
script, the parameters the script will accept, and the syntax for running the script. Close the
here-string, print the value of $helpText, and exit the script with the exit statement. The funhelp
function is shown here:
function funHelp()
{
$helpText=@"
DESCRIPTION:
NAME: GetTimeSource.ps1
Prints the current time source on a local or remote machine.
PARAMETERS:
-computerName Specifies the name of the computer upon which to run the script
-help prints help file
SYNTAX:
GetTimeSource.ps1 -computer MunichServer
Lists current time source on a computer named MunichServer
GetTimeSource.ps1
Lists current time source on local computer
GetTimeSource.ps1 -help ?
Displays the help topic for the script
"@
$helpText
exit
}
C10622791.fm Page 294 Wednesday, December 12, 2007 1:36 PM
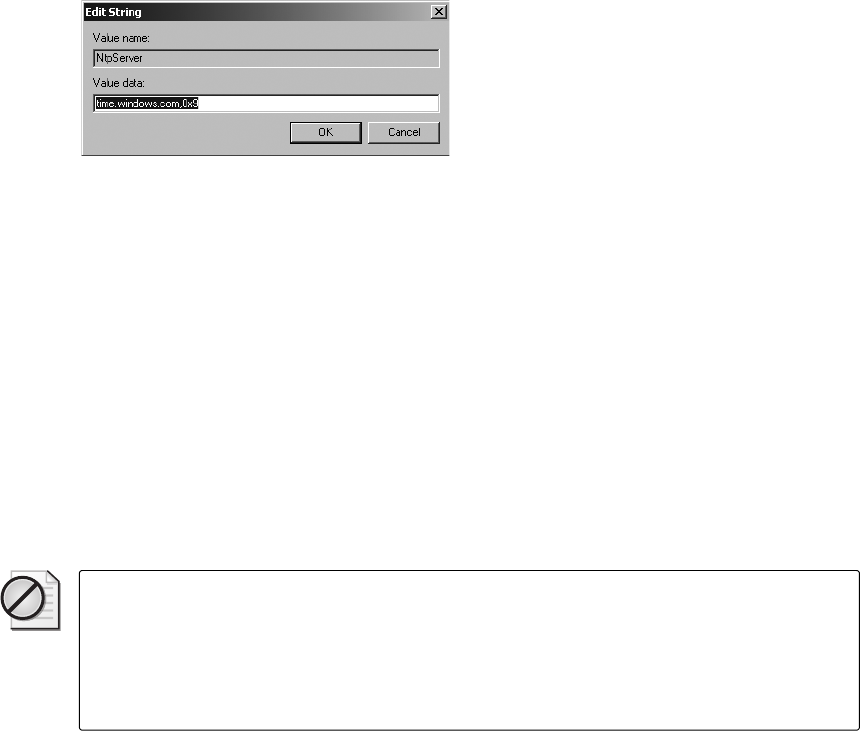
Chapter 10 Managing Post-Deployment Issues 295
To determine if you must show the help text, use the if statement and look for the presence of
the $help variable. If you find the $help variable, print a message stating you are obtaining
help, and call the funhelp function. No arguments are supplied to the funhelp function. This
section of code is shown here:
if($help){ "Obtaining help ..." ; funhelp }
Declare four variables, which are used to perform the WMI query using the StdRegProv WMI
class. The first is $hklm, which is set to a value of 2147483650. This number comes from the
WMI Software Development Kit (SDK) and it is used by the StdRegProv provider to refer to the
HKEY_LOCAL_MACHINE registry hive. The next variable, $strKey, is the registry key you
want to query. This is unique because there are no leading or trailing back slashes (\). The
third variable, $strValue, is used to specify the registry value to query. Here, check out the
NtpServer registry value; this registry key/value is shown in Figure 10-5.
Figure 10-5 NtpServer registry value.
The last variable contains the system.management.managementclass object that comes back
when you use the [wmiclass] type accelerator. This section of code is shown here:
$hklm = 2147483650
$strKey = "SYSTEM\CurrentControlSet\Services\W32Time\Parameters"
$strValue = "NtpServer"
$stdReg = [wmiclass]"\\$computer\root\default:stdregprov"
Now that you have a copy of the StdRegProv WMI class, you can use the GetStringValue()
method. The GetStringValue() method takes three parameters. The first is the registry hive
numeric value obtained from the WMI SDK. The second parameter is the registry key you
want to query. The last parameter is the registry value you want to return. Store the value in
the $strTime variable. This line of code is shown here:
$strTime = $stdReg.GetStringValue($hklm,$strKey,$strValue)
Caution If you have used the StdRegProv WMI class in VBScript before, please note that
the GetStringValue only takes three arguments here. In VBScript, you supply four variables,
and the last one holds the return value. You are, however, using the .NET management
classes, and not the scripting API, so there are some minor differences. This is one situation
that can cause frustration to an unsuspecting scripter who is “recycling” some old VBScript
code.
C10622791.fm Page 295 Wednesday, December 12, 2007 1:36 PM
296 Windows PowerShell Scripting Guide
If the query of the registry is successful, the registry value is stored in the sValue property. If an
error occurs during the query, then the numeric error code will be stored in the ReturnValue
property. Use this information with the if statement. If the ReturnValue is 0, print the value
obtained from the registry query. Use the funline function to underline the value. This section
of code is shown here:
if($strTime.returnvalue -eq 0)
{
$strOUT="$($strTime.sValue)"
funline([ref]$strOut)
}
However, if there is an error, the ReturnValue property will not be equal to 0, and you print that
value. This section of code is listed here:
ELSE
{
$strOut="An error $($strTime.returnvalue) occurred"
funline([ref]$strOut)
}
It doesn’t matter if the script is successful or not because you’ll print the results using the
Write-Host cmdlet. This section of code is as follows:
Write-Host -foregroundcolor green "Time source on $computer"
Write-Host -ForegroundColor cyan $strOut
The completed GetTimeSource.ps1 script is shown here.
GetTimeSource.ps1
param($computer="localhost", $help)
function funline ([ref]$strIN)
{
$num = $strIN.value.length
for($i=1 ; $i -le $num ; $i++)
{ $funline += "=" }
$strIN.value = "$($strIN.value)`n" + $funline
}
function funHelp()
{
$helpText=@"
DESCRIPTION:
NAME: GetTimeSource.ps1
Prints the current time source on a local or remote machine.
PARAMETERS:
-computerName Specifies the name of the computer upon which to run the script
-help prints help file
C10622791.fm Page 296 Wednesday, December 12, 2007 1:36 PM
Chapter 10 Managing Post-Deployment Issues 297
SYNTAX:
GetTimeSource.ps1 -computer MunichServer
Lists current time source on a computer named MunichServer
GetTimeSource.ps1
Lists current time source on local computer
GetTimeSource.ps1 -help ?
Displays the help topic for the script
"@
$helpText
exit
}
if($help){ "Obtaining help ..." ; funhelp }
$hklm = 2147483650
$strKey = "SYSTEM\CurrentControlSet\Services\W32Time\Parameters"
$strValue = "NtpServer"
$stdReg = [wmiclass]"\\$computer\root\default:stdregprov"
$strTime = $stdReg.GetStringValue($hklm,$strKey,$strValue)
if($strTime.returnvalue -eq 0)
{
$strOUT="$($strTime.sValue)"
funline([ref]$strOut)
}
ELSE
{
$strOut="An error $($strTime.returnvalue) occurred"
funline([ref]$strOut)
}
Write-Host -foregroundcolor green "Time source on $computer"
Write-Host -ForegroundColor cyan $strout
Enabling User Accounts
Unlike domain accounts, it is not very often that you’ll create a disabled user account. Local
user accounts are primarily created to provide access to local resources or for local service
accounts. They are not often used—except in workgroup settings—for logon user accounts.
This does not mean they are obsolete. To the contrary, with the enhanced peer-to-peer
capabilities of Windows Vista and the new features of Windows Server 2008, local user
accounts are even more important today than they were even five years ago.
C10622791.fm Page 297 Wednesday, December 12, 2007 1:36 PM
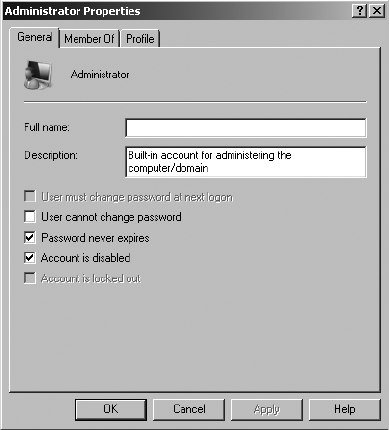
298 Windows PowerShell Scripting Guide
It is also true that when both Windows Vista and Windows Server 2008 are installed, the local
administrator account is disabled. This is shown in Figure 10-6. You may want to enable that
account to perform certain management tasks.
Figure 10-6 The local administrator account is disabled by default on Windows Vista and above.
Use the EnableDisableUser.ps1 script to enable the account and perform the requisite activi-
ties; then use the script to disable the local administrator account. You can also use this script
to change the local administrator password. To do this, just pretend you are going to enable
the local administrator account, and run the script with the enable option specified.
In the EnableDisableUser.ps1 script, begin with the param statement and specify five parameters.
The first one is -computer, which determines where the script will execute. By default, the
-computer parameter is set to run on the local computer. The -a parameter determines the action
to perform when the script is run. The -user parameter and -password parameter are used for work-
ing with the local user. The -help parameter will display help. This line of code is shown here:
param($computer="localhost", $a, $user, $password, $help)
The funhelp function displays help when the script is run with the -help parameter specified.
The funhelp function is similar to the others shown in this chapter. It uses a here-string, and
stores the information in the $helpText variable. After the description, parameters, and syntax
are detailed, the contents of the $helpText variable are displayed and the script exits. This func-
tion is displayed here:
function funHelp()
{
$helpText=@"
C10622791.fm Page 298 Wednesday, December 12, 2007 1:36 PM

Chapter 10 Managing Post-Deployment Issues 299
DESCRIPTION:
NAME: EnableDisableUser.ps1
Enables or Disables a local user on either a local or remote machine.
PARAMETERS:
-computer Specifies the name of the computer upon which to run the script
-a(ction) Action to perform < e(nable) d(isable) >
-user Name of user to modify
-help prints help file
SYNTAX:
EnableDisableUser.ps1
Generates an error. You must supply a user name
EnableDisableUser.ps1 -computer MunichServer -user myUser
-password Passw0rd^&! -a e
Enables a local user called myUser on a computer named MunichServer
with a password of Passw0rd^&!
EnableDisableUser.ps1 -user myUser -a d
Disables a local user called myUser on the local machine
EnableDisableUser.ps1 -help ?
Displays the help topic for the script
"@
$helpText
exit
}
Following the funhelp function, declare two variables. These variables contain
ADS_USER_FLAG_ENUM enumeration values, which are retrieved from the Windows SDK.
These values are used to either enable a user or to disable a user account.
$EnableUser = 512
$DisableUser = 2
Note While the ADS_USER_FLAG_ENUM enumeration values are documented in the Win-
dows SDK, their use as described here is not documented. Since you don’t have direct sup-
port for the IadsUser interface in Windows PowerShell, this means you don’t have access to
the AccountDisabled Boolean property that is available in VBScript. This makes the EnableDis-
ableUser.ps1 script an important example, because “rebranded” VBScripts simply will not
work using the WinNT provider.
After defining the two variables, test to see if you need to display the help string by checking
for the presence of the $help variable. (Actually, you can move this line up two spaces and
check before setting the $EnableUser and the $DisableUser variables, as it makes no difference
in performance of the script.) In this case, however, these variables are defined earlier in the
script. Use the same line of code you used in the GetTimeSource.ps1 script. It looks for the
C10622791.fm Page 299 Wednesday, December 12, 2007 1:36 PM

300 Windows PowerShell Scripting Guide
presence of the $help variable, prints a string, and calls the funhelp function if the $help vari-
able is found:
if($help){ "Obtaining help ..." ; funhelp }
Check to see if the $user variable is present. If it’s not, use the throw statement to generate an
error.
Tip The throw statement is not documented in the Windows PowerShell documentation,
although it shows up in one piece of sample syntax (when talking about code signing). It is
easier to use than the syntax: if(xxx) { xxx ; exit }. The disadvantage is that the output is not
very pretty.
The error text mentions that a user name is required; print the syntax for obtaining help. This
section of the script is shown here:
if(!$user)
{
$(Throw 'A value for $user is required.
Try this: EnableDisableUser.ps1 -help ?')
}
After determining that the user name is supplied, use the [ADSI] type accelerator and the
WinNT Active Directory Services Interface (ADSI) provider to connect to the local computer
SAM account database where you retrieve the user object. This line of code is shown here:
$ObjUser = [ADSI]"WinNT://$computer/$user"
The switch statement is used to evaluate the value of the $a variable, which is used to specify
the action you want the script to perform. If you are going to enable the user account, you’ll
need to set a password. The letter “e” (for enable) is supplied for the -a parameter to enable the
user account. Use the if statement to look for a password contained in the $password parame-
ter. If the password is not present, then you once again throw an exception, and point the user
back to the help file. If the password is present, then use the setpassword method to set the
password on the user object. Change the description to “enabled account” and supply the
appropriate value for the UserFlags property. After you’ve done all that, call the setinfo()
method to commit the changes back to the SAM account database. This section of the switch
statement is shown here:
switch($a)
{
"e" {
if(!$password)
{
$(Throw 'a value for $password is required.
Try this: EnableDisableUser.ps1 -help ?')
}
$objUser.setpassword($password)
C10622791.fm Page 300 Wednesday, December 12, 2007 1:36 PM
Chapter 10 Managing Post-Deployment Issues 301
$objUser.description = "Enabled Account"
$objUser.userflags = $EnableUser
$objUser.setinfo()
}
To disable a user account, all you really need to do is set the appropriate value for the Userflags
and call the setinfo() method. While you are at it, change the user Description property to “dis-
abled account.” Only perform this action if the value of “d” is supplied for the -a parameter.
This section of code is shown here:
"d" {
$objUser.description = "Disabled Account"
$objUser.userflags = $DisableUser
$objUser.setinfo()
}
If a value other than “e” or “d” is supplied for the -a parameter, go to the default switch. For this
script, you’ll print a string that points the user to the help file. This section of the code is
shown here:
DEFAULT
{
"You must supply a value for the action.
Try this: EnableDisableUser.ps1 -help ?"
}
}
The completed EnableDisableUser.ps1 script follows.
EnableDisableUser.ps1
param($computer="localhost", $a, $user, $password, $help)
function funHelp()
{
$helpText=@"
DESCRIPTION:
NAME: EnableDisableUser.ps1
Enables or Disables a local user on either a local or remote machine.
PARAMETERS:
-computer Specifies the name of the computer upon which to run the script
-a(ction) Action to perform < e(nable) d(isable) >
-user Name of user to modify
-help prints help file
SYNTAX:
EnableDisableUser.ps1
Generates an error. You must supply a user name
EnableDisableUser.ps1 -computer MunichServer -user myUser
-password Passw0rd^&! -a e
Enables a local user called myUser on a computer named MunichServer
C10622791.fm Page 301 Wednesday, December 12, 2007 1:36 PM
302 Windows PowerShell Scripting Guide
with a password of Passw0rd^&!
EnableDisableUser.ps1 -user myUser -a d
Disables a local user called myUser on the local machine
EnableDisableUser.ps1 -help ?
Displays the help topic for the script
"@
$helpText
exit
}
$EnableUser = 512
$DisableUser = 2
if($help){ "Obtaining help ..." ; funhelp }
if(!$user)
{
$(Throw 'A value for $user is required.
Try this: EnableDisableUser.ps1 -help ?')
}
$ObjUser = [ADSI]"WinNT://$computer/$user"
switch($a)
{
"e" {
if(!$password)
{
$(Throw 'a value for $password is required.
Try this: EnableDisableUser.ps1 -help ?')
}
$objUser.setpassword($password)
$objUser.description = "Enabled Account"
$objUser.userflags = $EnableUser
$objUser.setinfo()
}
"d" {
$objUser.description = "Disabled Account"
$objUser.userflags = $DisableUser
$objUser.setinfo()
}
DEFAULT
{
"You must supply a value for the action.
Try this: EnableDisableUser.ps1 -help ?"
}
}
C10622791.fm Page 302 Wednesday, December 12, 2007 1:36 PM
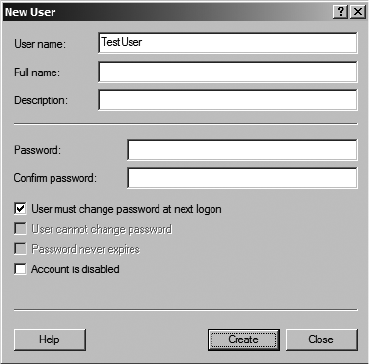
Chapter 10 Managing Post-Deployment Issues 303
Creating a Local User Account
There are also two methods to create a local user account. You can use net user, or you can use
ADSI. Of course, you can still use the graphical tool shown in Figure 10-7.
Figure 10-7 The graphical new user tool in the Computer Management console.
Use ADSI to create local users and groups. To create a local user account, once again use the
WinNT ADSI provider. Local user accounts don’t have as many attributes as domain user
accounts have, and so the process of creating them locally is not difficult.
Creating a Local User
Begin the CreateLocalUser.ps1 script with the param statement, where you define four param-
eters: -computer, -user, -password, and -help. This line of code is shown here:
param($computer="localhost", $user, $password, $help)
The next section of code is the funhelp function, which is used to print the help text. It is
shown here:
function funHelp()
{
$helpText=@"
DESCRIPTION:
NAME: CreateLocalUser.ps1
Creates a local user on either a local or remote machine.
PARAMETERS:
-computer Specifies the name of the computer upon which to run the script
-user Name of user to create
-help prints help file
C10622791.fm Page 303 Wednesday, December 12, 2007 1:36 PM
304 Windows PowerShell Scripting Guide
SYNTAX:
CreateLocalUser.ps1
Generates an error. You must supply a user name
CreateLocalUser.ps1 -computer MunichServer -user myUser
-password Passw0rd^&!
Creates a local user called myUser on a computer named MunichServer
with a password of Passw0rd^&!
CreateLocalUser.ps1 -user myUser -password Passw0rd^&!
with a password of Passw0rd^&!
Creates a local user called myUser on local computer with
a password of Passw0rd^&!
CreateLocalUser.ps1 -help ?
Displays the help topic for the script
"@
$helpText
exit
}
To determine if you need to display help, check for the presence of the $help variable. If the
$help variable is present, display a string message that indicates you are obtaining help, then
call the funhelp function. This line of code is shown here:
if($help){ "Obtaining help ..." ; funhelp }
Next, you must ensure that both the -user and the -password parameters of the script contain
values. You won’t check password length or user naming convention, but you can do those
sorts of tasks here. Instead, this time, simply accept the user name and the password that are
passed to the script when it is run. If these values are not present, then use the throw state-
ment to generate an error and to halt execution of the script. This section of code is shown
here:
if(!$user -or !$password)
{
$(Throw 'A value for $user and $password is required.
Try this: CreateLocalUser.ps1 -help ?')
}
After determining that the user name value and the password string have been supplied to the
script, use the [ADSI] type accelerator to connect to the local computer account database. Use
the create() method to create a user with the name supplied in the $user variable. Call the set-
password() method to set the password, then call the setinfo() method to write the changes to
the database. Next, set the Description property and once again call setinfo(). This section of
code is shown here:
C10622791.fm Page 304 Wednesday, December 12, 2007 1:36 PM
Chapter 10 Managing Post-Deployment Issues 305
$objOu = [ADSI]"WinNT://$computer"
$objUser = $objOU.Create("User", $user)
$objUser.setpassword($password)
$objUser.SetInfo()
$objUser.description = "Test user"
$objUser.SetInfo()
The completed CreateLocalUser.ps1 script follows.
CreateLocalUser.ps1
param($computer="localhost", $user, $password, $help)
function funHelp()
{
$helpText=@"
DESCRIPTION:
NAME: CreateLocalUser.ps1
Creates a local user on either a local or remote machine.
PARAMETERS:
-computer Specifies the name of the computer upon which to run the script
-user Name of user to create
-help prints help file
SYNTAX:
CreateLocalUser.ps1
Generates an error. You must supply a user name
CreateLocalUser.ps1 -computer MunichServer -user myUser
-password Passw0rd^&!
Creates a local user called myUser on a computer named MunichServer
with a password of Passw0rd^&!
CreateLocalUser.ps1 -user myUser -password Passw0rd^&!
Creates a local user called myUser on local computer with
a password of Passw0rd^&!
CreateLocalUser.ps1 -help ?
Displays the help topic for the script
"@
$helpText
exit
}
if($help){ "Obtaining help ..." ; funhelp }
if(!$user -or !$password)
{
$(Throw 'A value for $user and $password is required.
Try this: CreateLocalUser.ps1 -help ?')
}
C10622791.fm Page 305 Wednesday, December 12, 2007 1:36 PM
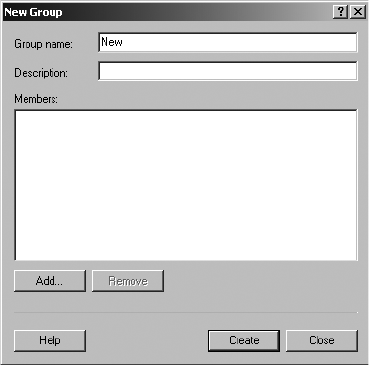
306 Windows PowerShell Scripting Guide
$objOu = [ADSI]"WinNT://$computer"
$objUser = $objOU.Create("User", $user)
$objUser.setpassword($password)
$objUser.SetInfo()
$objUser.description = "Test user"
$objUser.SetInfo()
Creating a Local User Group
You may need to create local groups on a Windows Vista or Windows Server 2008 computer
to control access to local resources, such as a shared scanner or printer. These local groups are
shown in Figure 10-8. Local groups are also used in workgroup settings, which are still used
in remote offices in many companies. Just as with the new user tool, there is also a new group
tool in the Computer Management console. This is shown in Figure 10-9.
Figure 10-8 Local groups are displayed in the Computer Management console.
In the CreateLocalGroup.ps1 script, first use the param statement to define three parameters:
-computer, -group, and -help. Set the -computer parameter to the local computer by default. This
line of code is listed here:
param($computer="localhost", $group, $help)
C10622791.fm Page 306 Wednesday, December 12, 2007 1:36 PM

Chapter 10 Managing Post-Deployment Issues 307
Figure 10-9 The graphical new group tool in the Computer Management console.
Define the funhelp function, a giant here-string, that is stored in the $helpText variable. Inside
the here-string, you are free to ignore quoting rules and you can format the text the way you
want it to appear on the screen. Define the description of the script, the parameters, and the
syntax. After defining these sections of the string, print the text of the $helpText variable and
exit the script. The funhelp function is shown here:
function funHelp()
{
$helpText=@"
DESCRIPTION:
NAME: CreateLocalGroup.ps1
Creates a local group on either a local or remote machine.
PARAMETERS:
-computer Specifies the name of the computer upon which to run the script
-group Name of group to create
-help prints help file
SYNTAX:
CreateLocalGroup.ps1
Generates an error. You must supply a group name
CreateLocalGroup.ps1 -computer MunichServer -group MyGroup
C10622791.fm Page 307 Wednesday, December 12, 2007 1:36 PM
308 Windows PowerShell Scripting Guide
Creates a local group called MyGroup on a computer named MunichServer
CreateLocalGroup.ps1 -group Mygroup
Creates a local group called MyGroup on local computer
CreateLocalGroup.ps1 -help ?
Displays the help topic for the script
"@
$helpText
exit
}
If the $help variable is present, print the help text. This line is shown here:
if($help){ "Obtaining help ..." ; funhelp }
You also need to ensure that a group name is supplied to the script when it is run. If the $group
variable is not present, then it was not supplied at run time, and therefore you’ll generate an
error by using the throw statement. This section follows:
if(!$group)
{
$(Throw 'A value for $group is required.
Try this: CreateLocalGroup.ps1 -help ?')
}
Finally, you work with the main [ADSI] section of the script. It is very similar to the section
that creates a local user. The main difference is that you create a group, rather than an individ-
ual user. Another difference is that no password is required for a group. Other than that, the
syntax is nearly identical. This section is presented here:
$objOu = [ADSI]"WinNT://$computer"
$objUser = $objOU.Create("Group", $group)
$objUser.SetInfo()
$objUser.description = "Test Group"
$objUser.SetInfo()
The completed CreateLocalGroup.ps1 script is shown here.
CreateLocalGroup.ps1
param($computer="localhost", $group, $help)
function funHelp()
{
$helpText=@"
DESCRIPTION:
NAME: CreateLocalGroup.ps1
Creates a local group on either a local or remote machine.
C10622791.fm Page 308 Wednesday, December 12, 2007 1:36 PM
Chapter 10 Managing Post-Deployment Issues 309
PARAMETERS:
-computer Specifies the name of the computer upon which to run the script
-group Name of group to create
-help prints help file
SYNTAX:
CreateLocalGroup.ps1
Generates an error. You must supply a group name
CreateLocalGroup.ps1 -computer MunichServer -group MyGroup
Creates a local group called MyGroup on a computer named MunichServer
CreateLocalGroup.ps1 -group Mygroup
Creates a local group called MyGroup on local computer
CreateLocalGroup.ps1 -help ?
Displays the help topic for the script
"@
$helpText
exit
}
if($help){ "Obtaining help ..." ; funhelp }
if(!$group)
{
$(Throw 'A value for $group is required.
Try this: CreateLocalGroup.ps1 -help ?')
}
$objOu = [ADSI]"WinNT://$computer"
$objUser = $objOU.Create("Group", $group)
$objUser.SetInfo()
$objUser.description = "Test Group"
$objUser.SetInfo()
Configuring the Screen Saver
In Chapter 9, “Configuring Desktop Settings,” you learned how to query various aspects of
screen savers. Now, you’ll learn how to change them. This is particularly important for Win-
dows Server 2008 Server Core. In fact, editing the registry on Windows Server 2008 Server
Core is the only way I know to set and configure a screen saver, other than to use Group Pol-
icy. There is, of course, the screen saver tool in Control Panel, shown in Figure 10-10, but this
does not have remote capabilities.
C10622791.fm Page 309 Wednesday, December 12, 2007 1:36 PM

310 Windows PowerShell Scripting Guide
Figure 10-10 The Screen Saver Settings dialog box in Control Panel.
In this section, you’ll see how to set the screen saver, make it active, set the time out value, and
make it secure. Of course, it is just as easy to turn it all off, and you’ll learn how to do that as
well.
In the ConfigureScreenSaver.ps1 script, there is a single script that will take a number of
parameters. The first is the name of the computer to manage, the second is the action to per-
form, the third is the value for the action, and the last is the -help parameter. This line of code
is presented here:
param($computer="localhost", $a, $v, $help)
Next is the funline function, the same funline function you used previously. This one is actually
funline2, which accepts the input by reference. This allows you to change the value of the vari-
able and pass back the modified variable to the main program. Since the $strIN variable comes
in by reference, you must query the Value property and then determine the length of the value
contained in the variable. After this, you can build up the line separator. Once this is complete,
concatenate both the input string and the line separator. The funline function is displayed
here:
function funline ([ref]$strIN)
{
$num = $strIN.value.length
for($i=1 ; $i -le $num ; $i++)
{ $funline += "=" }
$strIN.value = "$($strIN.value)`n" + $funline
}
C10622791.fm Page 310 Wednesday, December 12, 2007 1:36 PM
Chapter 10 Managing Post-Deployment Issues 311
Next is the funhelp function, which is similar to the other help functions. Build a help string
and assign it to the $helpText variable. Once this is done, print the contents of the variable and
exit the script. The help text is very important in a script with a large number of possible
actions that can be called. The funhelp function is shown here:
function funHelp()
{
$helpText=@"
DESCRIPTION:
NAME: ConfigureScreenSaver.ps1
Configures screen saver settings on a local or remote machine.
PARAMETERS:
-computer Specifies the name of the computer upon which to run the script
-a(ction) Action to perform < q(uery), ex(ecutable), at(active),
se(cure), to(time out) >
-v(alue) Value for above action (does not apply to query)
-help prints help file
SYNTAX:
ConfigureScreenSaver.ps1 -computer MunichServer -a ex -v bubbles.scr
Configures screen saver on a computer named MunichServer
The screen saver executable is bubbles.scr
ConfigureScreenSaver.ps1 -a se -v 1
Configures secure screen saver on local computer
The screen saver is the one already configured
ConfigureScreenSaver.ps1 -a at -v 1
Configures screen saver on local computer to be active
The screen saver is the one already configured
ConfigureScreenSaver.ps1 -a to -v 300
Configures screen saver time out value on local computer to
5 minutes. The screen saver is the one already configured
ConfigureScreenSaver.ps1 -help ?
Displays the help topic for the script
"@
$helpText
exit
}
There is another function: funeval, which is used to determine results from making various
changes. Instead of copying the same code over and over again, you can write a single func-
tion. The funeval function accepts an input variable named $strRTN. This variable will contain
the return code that comes back from calling the various WMI methods in this script. If the
C10622791.fm Page 311 Wednesday, December 12, 2007 1:36 PM
312 Windows PowerShell Scripting Guide
value is 0, then there are no errors, and you print the success result in green. However, if the
number is something other than 0, print the error code in red. The funeval function is shown
here:
function funeval ($strRTN)
{
if($strRTN.returnvalue -eq 0)
{ Write-Host -ForegroundColor green "success" }
ELSE
{ Write-Host -ForegroundColor red "$($strRTN.returnvalue) error" }
}
Check to see if you need to display help. This is easy: Simply look for the presence of the $help
variable. If it is there, print a string telling the user that the script is getting them help, and call
the funhelp function. This line of code is shown here:
if($help){ "Obtaining help ..." ; funhelp }
It is now time to define some variables, which are used to control the method calls in the
switch statement. The first variable is $hkcu, which is set to a number that represents the
HKEY_CURRENT_USER registry hive. Next, define the registry key you’ll query, which is
Control Panel\Desktop. Store this string in the $strKey variable, and then define each of the
registry values you’ll be working with. The difference here is that you assign an array to each
variable—this provides the ability to use the same variable to use for the registry query and to
have a string that is used in the output. Finally, make the connection to the WMI StdRegProv
class. This section of code is displayed here:
$hkcu = 2147483649 # numeric representation of HKCU from WMI SDK
$strKey = "Control Panel\Desktop"
$strExe = "SCRNSAVE.EXE", "ScreenSaver Executable"
$blnAct = "ScreenSaveActive", "ScreenSaver Active"
$blnSec = "ScreenSaverIsSecure", "ScreenSaver Secure"
$intTim = "ScreenSaveTimeOut", "ScreenSaver TimeOut"
$stdReg = [wmiclass]"\\$computer\root\default:stdregprov"
The last portion of this script is the switch statement, which provides the ability to perform
multiple actions from the same script. Evaluate the value of the $a variable. If the value is “q,”
then you’ll query each of the four registry key values defined in the reference section of the
script you just examined. To do this, create an array of the four variables and then iterate
through the array by using the foreach statement. Obtain the string value contained in the reg-
istry value, specifying that you want element 0 in the query. Evaluate the return value and
print the value. If an error occurs, print that as well. This section of the switch statement is
shown here:
switch($a)
{
"q"{
$aryValue = $strExe, $blnAct, $blnSec, $intTim
foreach($strValue in $aryValue)
C10622791.fm Page 312 Wednesday, December 12, 2007 1:36 PM
Chapter 10 Managing Post-Deployment Issues 313
{
$strRTN = $stdReg.GetStringValue($hkcu,$strKey,$strValue[0])
if($strRTN.returnvalue -eq 0)
{
$strOUT="$($strRTN.sValue)"
funline([ref]$strOut)
}
ELSE
{
$strOut="An error $($strRTN.returnvalue) occurred"
funline([ref]$strOut)
}
Write-Host -foregroundcolor green "$($strValue[1]) on $computer"
Write-Host -ForegroundColor cyan $strout
}
}
The second condition to switch upon is “ex.” If you supply “ex” to the -a parameter when run-
ning the script, it means you want to set the screen saver as executable. You have hard-coded
the location as being C:\Windows\System32. This is where all the default screen savers for
Windows Vista and Windows Server 2008 reside. You then simply supply the name of the
screen saver, such as bubbles.scr. Print a status message that you are setting the value speci-
fied in $strexe element 1, and call the funeval function. This section of the switch statement is
shown here:
"ex" {
$v = "C:\Windows\System32\$v"
$strRTN = $stdReg.SetStringValue($hkcu,$strKey,$strExe[0],$v)
"Setting $($strExe[1]) ... "
funeval($strRTN)
}
The next condition you may want to set on a screen saver is whether it’s active or not. This is
obviously a Boolean value, and you must only supply a 1 or a 0 when calling the script with
-a set to “at.” Then use the setStringValue() method from the StdRegProv WMI class and write
the information to the registry. Call the funeval function to see if it works. This is shown here:
"at" {
$strRTN = $stdReg.SetStringValue($hkcu,$strKey,$blnAct[0],$v)
"Setting $($blnAct[1]) ... "
funeval($strRTN)
}
You may also need to determine if the screen is secure or not. To do this, supply “se” to the -a
parameter and either a 1 or a 0 in the -v parameter. Write this information to the registry and
call the funeval function. This section of the switch statement is shown here:
"se" {
$strRTN = $stdReg.SetStringValue($hkcu,$strKey,$blnSec[0],$v)
"Setting $($blnSec[1]) ... "
funeval($strRTN)
}
C10622791.fm Page 313 Wednesday, December 12, 2007 1:36 PM
314 Windows PowerShell Scripting Guide
The last task you can perform to a screen saver is to set the time out value. This value is in sec-
onds. Supply “se” to the -a parameter and the number of seconds to the -v parameter when
calling the script. This section of code is displayed here:
"to" {
$strRTN = $stdReg.SetStringValue($hkcu,$strKey,$intTim[0],$v)
"Setting $($intTim[1]) ... "
funeval($strRTN)
}
}
The completed ConfigureScreenSaver.ps1 script is shown here.
ConfigureScreenSaver.ps1
param($computer="localhost", $a, $v, $help)
function funline ([ref]$strIN)
{
$num = $strIN.value.length
for($i=1 ; $i -le $num ; $i++)
{ $funline += "=" }
$strIN.value = "$($strIN.value)`n" + $funline
}
function funHelp()
{
$helpText=@"
DESCRIPTION:
NAME: ConfigureScreenSaver.ps1
Configures screen saver settings on a local or remote machine.
PARAMETERS:
-computer Specifies the name of the computer upon which to run the script
-a(ction) Action to perform < q(uery), ex(ecutable), at(active),
se(cure), to(time out) >
-v(alue) Value for above action (does not apply to query)
-help prints help file
SYNTAX:
ConfigureScreenSaver.ps1 -computer MunichServer -a ex -v bubbles.scr
Configures screen saver on a computer named MunichServer
The screen saver executable is bubbles.scr
ConfigureScreenSaver.ps1 -a se -v 1
Configures secure screen saver on local computer
The screen saver is the one already configured
ConfigureScreenSaver.ps1 -a at -v 1
Configures screen saver on local computer to be active
The screen saver is the one already configured
C10622791.fm Page 314 Wednesday, December 12, 2007 1:36 PM
Chapter 10 Managing Post-Deployment Issues 315
ConfigureScreenSaver.ps1 -a to -v 300
Configures screen saver time out value on local computer to
5 minutes. The screen saver is the one already configured
ConfigureScreenSaver.ps1 -help ?
Displays the help topic for the script
"@
$helpText
exit
}
function funeval ($strRTN)
{
if($strRTN.returnvalue -eq 0)
{ Write-Host -ForegroundColor green "success" }
ELSE
{ Write-Host -ForegroundColor red "$($strRTN.returnvalue) error" }
}
if($help){ "Obtaining help ..." ; funhelp }
$hkcu = 2147483649 # numeric representation of HKCU from WMI SDK
$strKey = "Control Panel\Desktop"
$strExe = "SCRNSAVE.EXE", "ScreenSaver Executable"
$blnAct = "ScreenSaveActive", "ScreenSaver Active"
$blnSec = "ScreenSaverIsSecure", "ScreenSaver Secure"
$intTim = "ScreenSaveTimeOut", "ScreenSaver TimeOut"
$stdReg = [wmiclass]"\\$computer\root\default:stdregprov"
switch($a)
{
"q"{
$aryValue = $strExe, $blnAct, $blnSec, $intTim
foreach($strValue in $aryValue)
{
$strRTN = $stdReg.GetStringValue($hkcu,$strKey,$strValue[0])
if($strRTN.returnvalue -eq 0)
{
$strOUT="$($strRTN.sValue)"
funline([ref]$strOut)
}
ELSE
{
$strOut="An error $($strRTN.returnvalue) occurred"
funline([ref]$strOut)
}
Write-Host -foregroundcolor green "$($strValue[1]) on $computer"
Write-Host -ForegroundColor cyan $strout
}
}
"ex" {
$v = "C:\Windows\System32\$v"
$strRTN = $stdReg.SetStringValue($hkcu,$strKey,$strExe[0],$v)
C10622791.fm Page 315 Wednesday, December 12, 2007 1:36 PM
316 Windows PowerShell Scripting Guide
"Setting $($strExe[1]) ... "
funeval($strRTN)
}
"at" {
$strRTN = $stdReg.SetStringValue($hkcu,$strKey,$blnAct[0],$v)
"Setting $($blnAct[1]) ... "
funeval($strRTN)
}
"se" {
$strRTN = $stdReg.SetStringValue($hkcu,$strKey,$blnSec[0],$v)
"Setting $($blnSec[1]) ... "
funeval($strRTN)
}
"to" {
$strRTN = $stdReg.SetStringValue($hkcu,$strKey,$intTim[0],$v)
"Setting $($intTim[1]) ... "
funeval($strRTN)
}
}
Renaming the Computer
One of the things that may be required after installing Windows Server 2008 or Windows
Vista is to rename the computer. It is true that if you perform an automated install, you may
include the name of the computer in the answer file. However, it is also true that from time to
time computers need to be renamed. To do this, use the RenameComputer.ps1 script.
Begin the RenameComputer.ps1 script with the param statement. You’ll write it a little differ-
ently this time, because you want to specify a couple of default values. Set the -computer
parameter to the local host computer, and the -user parameter to administrator. The -password
parameter is not set, and neither is the -newname parameter, which is used to supply a new
name for the computer. You also have the -help parameter. One thing to keep in mind is the
credentials used here go to WMI; you’re not allowed to use alternate credentials on a local WMI
connection. This concept is covered later in this chapter. The param statement is shown here:
param(
$computer="localhost",
$newName,
$user = "administrator",
$password,
$help
)
The funhelp function is used to display the help string. First create the here-string, and list
the description, parameters, and syntax of the script. Assign the here-string to the $helpText
variable. Print the value contained in the $helpText variable and exit the script. The funhelp
function is shown here:
function funHelp()
{
$helpText=@"
C10622791.fm Page 316 Wednesday, December 12, 2007 1:36 PM
Chapter 10 Managing Post-Deployment Issues 317
DESCRIPTION:
NAME: RenameComputer.ps1
Renames a local or remote machine.
PARAMETERS:
-computer Specifies the name of the computer upon which to run the script
-newname new name of the computer
-user user credentials
-password password of the user
-help prints help file
SYNTAX:
RenameComputer.ps1 -computer MunichServer -newname BerlinServer
Renames a computer named MunichServer to BerlinServer
RenameComputer.ps1 -computer MunichServer -newname BerlinServer
-user munich\admin -password MyPassword
Renames a computer named MunichServer to BerlinServer. Uses
the credentials of the munich admin, with password of MyPassword
RenameComputer.ps1
Generates an error. Must supply new name for computer
RenameComputer.ps1 -help ?
Displays the help topic for the script
"@
$helpText
exit
}
You must decide if you want to display the help text. If the $help variable is present, then print
a string and call the funhelp function. This line of code is displayed here:
if($help){ "Obtaining help ..." ; funhelp }
If you are running remotely, then the value contained in the $computer variable will not con-
tain the name localhost. In this case, use alternate credentials for the script. Use the -credential
parameter for the Get-WmiObject cmdlet, give it the name held in the $user parameter, and
call the rename() method. This section of code is listed here:
if($computer -ne "localhost")
{
$objWMI = Get-WmiObject -Class Win32_Computersystem `
-computername $computer -credential $user
$objWMI.rename($newName)
}
C10622791.fm Page 317 Wednesday, December 12, 2007 1:36 PM
318 Windows PowerShell Scripting Guide
If, however, you are running the script locally, then the value of $computer may very well be
localhost. In this case, call the Get-WmiObject cmdlet without the -credential switch. This
avoids the error of trying to use alternate credentials on a local WMI connection. Once again,
use the Get-WmiObject cmdlet, and call the rename() method of the Win32_ComputerSystem
WMI class. This is shown here:
ELSE
{
$objWMI = Get-WmiObject -Class Win32_Computersystem `
-computername $computer
$objWMI.rename($newName)
}
The complete RenameComputer.ps1 script is shown here.
RenameComputer.ps1
param(
$computer="localhost",
$newName,
$user = "administrator",
$password,
$help
)
function funHelp()
{
$helpText=@"
DESCRIPTION:
NAME: RenameComputer.ps1
Renames a local or remote machine.
PARAMETERS:
-computer Specifies the name of the computer upon which to run the script
-newname new name of the computer
-user user credentials
-password password of the user
-help prints help file
SYNTAX:
RenameComputer.ps1 -computer MunichServer -newname BerlinServer
Renames a computer named MunichServer to BerlinServer
RenameComputer.ps1 -computer MunichServer -newname BerlinServer
-user munich\admin -password MyPassword
Renames a computer named MunichServer to BerlinServer. Uses
the credentials of the munich admin, with password of MyPassword
RenameComputer.ps1
Generates an error. Must supply new name for computer
RenameComputer.ps1 -help ?
C10622791.fm Page 318 Wednesday, December 12, 2007 1:36 PM
Chapter 10 Managing Post-Deployment Issues 319
Displays the help topic for the script
"@
$helpText
exit
}
if($help) { "Obtaining help ..." ; funhelp }
if($computer -ne "localhost")
{
$objWMI = Get-WmiObject -Class Win32_Computersystem `
-computername $computer -credential $user
$objWMI.rename($newName)
}
ELSE
{
$objWMI = Get-WmiObject -Class Win32_Computersystem `
-computername $computer
$objWMI.rename($newName)
}
Shutting Down or Rebooting a Remote Computer
If you are renaming a computer or joining a domain, then you will need to be able to either
shut down or reboot a remote computer. To do this, you can use WMI to perform both tasks.
In the ShutdownRebootComputer.ps1 script, use the shutdown() and the reboot() methods
from the Win32_OperatingSystem WMI class. To determine which method to call, use the -a
parameter in the script to specify the action to take.
The first line of the ShutdownRebootComputer.ps1 script defines the param statement. Once
again, specify multiple default values as shown here:
param(
$computer="localhost",
$user = "administrator",
$password,
$a,
$help
)
Next, use the funhelp function to print a help string if requested by the user. The funhelp func-
tion is shown here:
function funHelp()
{
$helpText=@"
DESCRIPTION:
NAME: ShutdownRebootComputer.ps1
Shutdown or reboot a local or remote machine.
C10622791.fm Page 319 Wednesday, December 12, 2007 1:36 PM
320 Windows PowerShell Scripting Guide
PARAMETERS:
-computer Specifies the name of the computer upon which to run the script
-user user credentials
-password password of the user
-a(ction) action to perform < s(hutdown), r(eboot) >
-help prints help file
SYNTAX:
ShutdownRebootComputer.ps1-computer MunichServer -a s
Shutdown a remote computer named MunichServer
ShutdownRebootComputer.ps1-computer MunichServer -a r
-user munich\admin -password MyPassword
Reboots a computer named MunichServer. Uses the credentials
of the munich admin, with password of MyPassword
ShutdownRebootComputer.ps1
Displays message pointing to help
ShutdownRebootComputer.ps1 -help ?
Displays the help topic for the script
"@
$helpText
exit
}
You need to determine if the $help variable is present. If it is, then call the funhelp function. To
do this, use the code displayed here:
if($help){ "Obtaining help ..." ; funhelp }
Next, get to the switch statement. The first value to switch upon is the value “s” for shutdown.
If the script is run with the -a “s” argument, then call the shutdown() method from
Win32_OperatingSystem. To enable you to shut down the server, you must have the shutdown
privilege specified for your account. To use that privilege, you must set the EnablePrivileges
property to $true. This section of the script follows. Note: You also look for localhost, and
define the Get-WmiObject section twice; one enables you to use credentials and the second
runs without credentials.
switch($a)
{
"s" {
if($computer -ne "localhost")
{
$objWMI = Get-WmiObject -Class Win32_operatingsystem `
-computername $computer -credential $user
$objWMI.psbase.Scope.Options.EnablePrivileges = $true
$objWMI.shutdown()
C10622791.fm Page 320 Wednesday, December 12, 2007 1:36 PM
Chapter 10 Managing Post-Deployment Issues 321
}
ELSE
{
$objWMI = Get-WmiObject -Class Win32_operatingsystem `
-computername $computer
$objWMI.psbase.Scope.Options.EnablePrivileges = $true
$objWMI.shutdown()
}
}
The next condition to evaluate is if the value of $a is equal to “r.” If $a is equal to “r,” you’ll
want to reboot the server. Once again look for localhost, and if it is present, then you aren’t
allowed to use alternate credentials. If, however, the computer is not the local computer, you
can use alternate credentials. You’ll again need to enable special privileges. This section of the
switch is shown here:
"r" {
if($computer -ne "localhost")
{
$objWMI = Get-WmiObject -Class Win32_operatingsystem `
-computername $computer -credential $user
$objWMI.psbase.Scope.Options.EnablePrivileges = $true
$objWMI.reboot()
}
ELSE
{
$objWMI = Get-WmiObject -Class Win32_operatingsystem `
-computername $computer
$objWMI.psbase.Scope.Options.EnablePrivileges = $true
$objWMI.reboot()
}
}
This script can cause havoc if it is unexpectedly allowed to run and shut down the server. To
prevent this from occurring, set a default action that prints an abbreviated help string and
asks the user to run the script with the -help parameter. This default action is displayed here:
DEFAULT { "You must supply an action. Try this"
"ShutdownRebootComputer.ps1 -help ?" }
}
The complete ShutdownRebootComputer.ps1 script is shown here.
ShutdownRebootComputer.ps1
param(
$computer="localhost",
$user = "administrator",
$password,
$a,
$help
)
function funHelp()
C10622791.fm Page 321 Wednesday, December 12, 2007 1:36 PM
322 Windows PowerShell Scripting Guide
{
$helpText=@"
DESCRIPTION:
NAME: ShutdownRebootComputer.ps1
Shutdown or reboot a local or remote machine.
PARAMETERS:
-computer Specifies the name of the computer upon which to run the script
-user user credentials
-password password of the user
-a(ction) action to perform < s(hutdown), r(eboot) >
-help prints help file
SYNTAX:
ShutdownRebootComputer.ps1-computer MunichServer -a s
Shutdown a remote computer named MunichServer
ShutdownRebootComputer.ps1-computer MunichServer -a r
-user munich\admin -password MyPassword
Reboots a computer named MunichServer. Uses the credentials
of the munich admin, with password of MyPassword
ShutdownRebootComputer.ps1
Displays message pointing to help
ShutdownRebootComputer.ps1 -help ?
Displays the help topic for the script
"@
$helpText
exit
}
if($help){ "Obtaining help ..." ; funhelp }
switch($a)
{
"s" {
if($computer -ne "localhost")
{
$objWMI = Get-WmiObject -Class Win32_operatingsystem `
-computername $computer -credential $user
$objWMI.psbase.Scope.Options.EnablePrivileges = $true
$objWMI.shutdown()
}
ELSE
{
$objWMI = Get-WmiObject -Class Win32_operatingsystem `
-computername $computer
$objWMI.psbase.Scope.Options.EnablePrivileges = $true
$objWMI.shutdown()
C10622791.fm Page 322 Wednesday, December 12, 2007 1:36 PM
Chapter 10 Managing Post-Deployment Issues 323
}
}
"r" {
if($computer -ne "localhost")
{
$objWMI = Get-WmiObject -Class Win32_operatingsystem `
-computername $computer -credential $user
$objWMI.psbase.Scope.Options.EnablePrivileges = $true
$objWMI.reboot()
}
ELSE
{
$objWMI = Get-WmiObject -Class Win32_operatingsystem `
-computername $computer
$objWMI.psbase.Scope.Options.EnablePrivileges = $true
$objWMI.reboot()
}
}
DEFAULT { "You must supply an action. Try this"
"ShutdownRebootComputer.ps1 -help ?" }
}
Summary
In this chapter we covered some of the more common post-deployment issues that come after
the operating system has been installed. These issues involve setting the local time, configur-
ing an authoritative time source for the Win32Time service, and enabling or disabling local
user accounts. We also looked at the steps involved in creating both local users and local
groups. Next, we turned to setting screen saver settings on remote computers. Finally, we
looked at renaming the computer and rebooting a local or remote computer. Along the way,
we discovered some undocumented settings, switches, and statements.
C10622791.fm Page 323 Wednesday, December 12, 2007 1:36 PM
C10622791.fm Page 324 Wednesday, December 12, 2007 1:36 PM

325
Chapter 11
Managing User Data
After completing this chapter, you will be able to:
■Work with backups.
■Enable offline files.
■Configure offline files.
■Work with System Restore.
On the Companion Disc All the scripts used in this chapter are located on the CD that
accompanies this book in the \scripts\chapter11 folder.
Working with Backups
Because Windows Vista no longer has a backup utility, there are just a few backup options for
you to choose from: rely on users to create backups of their computers using the Backup
and Restore Center, use the system restore points, redirect user data to a network share, map
a drive via a network backup program, write a script that backs up files to a network location,
or purchase a third-party backup solution.
Windows PowerShell provides cmdlets that can be used to create one solution: the Backup-
FolderToServer.ps1 script. In this script, use the Copy-Item cmdlet to copy files in a particular
folder to a mapped drive location on a server or some other device for storing user data.
The script can also help you copy data to a portable storage device such as a flash memory
card or a USB drive and will allow users to copy files to a mapped home directory.
The BackupFolderToServer.ps1 script begins with the param statement, which allows you to
specify command-line arguments to the script. These arguments control how the script runs
and also saves you the trouble of having to edit the script before using it. Such a script can be
“driven” from a batch file that supplies a number of parameters and can also be called from
other Windows PowerShell scripts. This script defines three parameters: -source, -destination,
and -help. Each of these parameters is stored in the corresponding variable with the same
name. The line of code to use is shown here:
param($source, $destination, $help)
Next, create the funhelp function, which is used to display a help text message when the script
is run with the -help parameter. The funhelp function begins with declaring the $helpText
C11622791.fm Page 325 Wednesday, December 12, 2007 1:42 PM
326 Windows PowerShell Scripting Guide
variable, which stores a here-string. The here-string allows you to type in text for displaying on
the screen, saving time and reducing potential quoting errors. The help text consists of three
sections: the description of the script, the parameters the script will accept, and the syntax
that is required. After the help text is created, display the contents of the $helpText variable on
the screen and exit the script. The completed funhelp function is shown here:
function funHelp()
{
$helpText=@"
DESCRIPTION:
NAME: BackupFolderToServer.ps1
Backs up files in a folder to a mapped drive. The destination
folder does not have to be present
PARAMETERS:
-source the source of the files and folders
-destination where the files are to be copied
-help prints help file
SYNTAX:
BackupFolderToServer.ps1 -source c:\fso -destination h:\fso
Backs up all files and folders in c:\fso on local machine to
a mapped drive called h. The \fso folder does not need to
exist on the h:\ drive.
BackupFolderToServer.ps1
generates an error. the -source and -destination parameters
must be present
BackupFolderToServer.ps1 -help ?
Displays the help topic for the script
"@
$helpText
exit
}
You must check for the presence of the $help variable. If you find it, display a progress message
and call the funhelp function. Note that the semicolon allows you to run two separate
commands on the same line of text. This command is shown here:
if($help){ "Obtaining help ..." ; funhelp }
Look for the presence of the two mandatory parameters. These parameters are the -source and
the -destination parameters. The source location is a local path that must exist on the computer;
be aware that you must have rights to the folder. The mapped drive location does not have
to contain the destination folder as it is created when the script is run. If these two variables
C11622791.fm Page 326 Wednesday, December 12, 2007 1:42 PM
Chapter 11 Managing User Data 327
do not exist, use the throw statement to display an error message and exit the script. Point the
user to the help text syntax as shown here:
if(!$source -or !$destination)
{
$(throw "You must supply both source and destination.
Try this BackupFolderToServer.ps1 -help -?")
}
Now it is time to copy the files. The Copy-Item cmdlet accepts the -path parameter that is con-
tained in the $source variable. Use the $destination variable to feed the -destination parameter,
and use the -recurse switch to copy nested folders. This line of code is displayed here:
Copy-Item -Path $source -destination $destination -recurse
The completed BackupFolderToServer.ps1 script is shown here.
BackupFolderToServer.ps1
param($source, $destination, $help)
function funHelp()
{
$helpText=@"
DESCRIPTION:
NAME: BackupFolderToServer.ps1
Backs up files in a folder to a mapped drive. The destination
folder does not have to be present
PARAMETERS:
-source the source of the files and folders
-destination where the files are to be copied
-help prints help file
SYNTAX:
BackupFolderToServer.ps1 -source c:\fso -destination h:\fso
Backs up all files and folders in c:\fso on local machine to
a mapped drive called h. The \fso folder does not need to
exist on the h:\ drive.
BackupFolderToServer.ps1
generates an error. the -source and -destination parameters
must be present
BackupFolderToServer.ps1 -help ?
Displays the help topic for the script
"@
$helpText
exit
}
C11622791.fm Page 327 Wednesday, December 12, 2007 1:42 PM
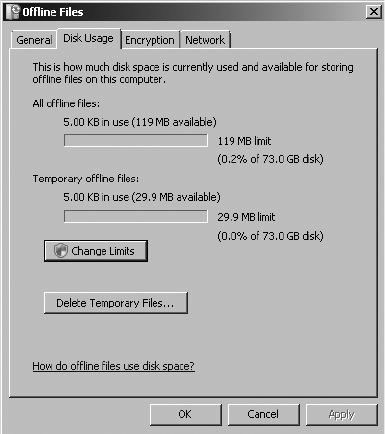
328 Windows PowerShell Scripting Guide
if($help){ "Obtaining help ..." ; funhelp }
if(!$source -or !$destination)
{
$(throw "You must supply both source and destination.
Try this BackupFolderToServer.ps1 -help -?")
}
Copy-Item -Path $source -destination $destination -recurse
Configuring Offline Files
Offline files provide automatic synchronization between files stored on a server and those
stored on a laptop or other portable computing device. This provides a high level of robust-
ness for the user, and also solves the backup problem of critical files. Additionally, it gives
the user the chance to check-in and to work with files. There is only one instance of the
offline files cache, accessed via the offline files applet from Control Panel; this is shown in
Figure 11-1. But there are a number of WMI classes supported by the WMI provider; they are
imaginatively named the OfflineFilesWmiProvider.
Figure 11-1 The offline cache location on the fixed local disk.
In the first script relating to offline files cache, use the Win32_OfflineFilesCache WMI class to
determine three pieces of information. The first thing you’ll want to know is if the offline files
feature is enabled or not. If it is enabled, then you need to know if it is active. If the offline
files feature is enabled and active, then you’ll want to know where the files are stored.
In the GetOffLineFiles.ps1 script, you first need to define a couple of parameters. The first
parameter is the -computer parameter. Set the value of the $computer variable to localhost so by
C11622791.fm Page 328 Wednesday, December 12, 2007 1:42 PM
Chapter 11 Managing User Data 329
default the script will run against the local computer. The second parameter to define is -help.
Don’t set the $help variable to a default value, because you aren’t interested in having it run
all the time. The param statement is used to declare both of the command-line parameters.
This line of code is shown here:
param($computer="localhost", $help)
You must define two functions. The first is the funline function, which is used to underline the
header line for script output. The funline function accepts a single input variable, which is
named $strIN. The $strIN variable holds the string value that gets passed to it, then uses the
Length property to determine how long the string is. Store this value in the $num variable. Use
the for statement to enter a loop that builds up a variable named $funline; this holds a series
of equal signs (=) as long as the string contained in the $strIN variable. After creating this line
separator, use two Write-Host cmdlets to print both the string contained in the $strIN variable
and the line separator contained in the $funline variable. Use contrasting colors for the two
-foregroundcolor parameters. The funline function is displayed here:
function funline ($strIN)
{
$num = $strIN.length
for($i=1 ; $i -le $num ; $i++)
{ $funline += "=" }
Write-Host -ForegroundColor yellow $strIN
Write-Host -ForegroundColor darkYellow $funline
}
After defining the funline function, define a function that displays online help data when the
script is run with the -help parameter specified. Begin the funhelp function by declaring a
variable, $helpText, and assigning a here-string to it. In the here-string, assign sections of text
for the description, parameters, and command-line syntax. After completing the here-string,
display the contents of the $helpText variable and exit the script. The funhelp function is
shown here:
function funHelp()
{
$helpText=@"
DESCRIPTION:
NAME: GetOffLineFiles.ps1
Prints the offline files config on a local or remote machine.
PARAMETERS:
-computer Specifies name of the computer upon which to run the script
-help prints help file
SYNTAX:
GetOffLineFiles.ps1 -computer MunichServer
Lists offline files config on a computer named MunichServer
GetOffLineFiles.ps1
C11622791.fm Page 329 Wednesday, December 12, 2007 1:42 PM
330 Windows PowerShell Scripting Guide
Lists offline files config on local computer
GetOffLineFiles.ps1 -help ?
Displays the help topic for the script
"@
$helpText
exit
}
To determine whether to display the contents of the help file, use an if statement to check
for the presence of the $help variable. If the $help variable is present, it means the script was
run with the -help parameter specified. If this is the case, then first call the funline function to
underline the status message, and then call the funhelp function to print the help file. This line
of code is displayed here:
if($help){ funline("Obtaining help ...") ; funhelp }
Now use the Win32_OfflineFilesCache WMI class to retrieve the three pieces of information
required for this script. To do this, use the Get-WmiObject cmdlet. Use the -class parameter
to tell WMI to query the Win32_OfflineFilesCache class and the -computername parameter to
connect to a different computer, if required; store the resulting WMI object in the $outtext
variable. This section of code appears here:
$outtxt = Get-WmiObject -Class win32_OfflineFilesCache `
-computername $computer
After retrieving the offline files configuration information, use the funline function to print a
status message about the $offline folder. Use the environmental variable computername to
retrieve the name of the current computer from the environmental PS drive env:\. This line of
code follows:
funline("Offline files configuration $env:computername")
Finally, use the Format-Table cmdlet to format the output string. Choose the properties in
the order you want the data to be displayed. Use the -inputobject parameter and supply the
management object stored in the $outtxt variable to this parameter. Choose the -autosize
parameter for a compact display on the screen. This section of code is represented here:
format-table -Property active, enabled,location -autosize `
-inputobject $outtxt
The completed GetOffLineFiles.ps1 script is shown here.
GetOffLineFiles.ps1
param($computer="localhost", $help)
function funline ($strIN)
C11622791.fm Page 330 Wednesday, December 12, 2007 1:42 PM
Chapter 11 Managing User Data 331
{
$num = $strIN.length
for($i=1 ; $i -le $num ; $i++)
{ $funline += "=" }
Write-Host -ForegroundColor yellow $strIN
Write-Host -ForegroundColor darkYellow $funline
}
function funHelp()
{
$helpText=@"
DESCRIPTION:
NAME: GetOffLineFiles.ps1
Prints the offline files config on a local or remote machine.
PARAMETERS:
-computer Specifies name of the computer upon which to run the script
-help prints help file
SYNTAX:
GetOffLineFiles.ps1 -computer MunichServer
Lists offline files config on a computer named MunichServer
GetOffLineFiles.ps1
Lists offline files config on local computer
GetOffLineFiles.ps1 -help ?
Displays the help topic for the script
"@
$helpText
exit
}
if($help){ funline("Obtaining help ...") ; funhelp }
$outtxt = Get-WmiObject -Class win32_OfflineFilesCache `
-computername $computer
funline("Offline files configuration $env:computername")
format-table -Property active, enabled,location -autosize `
-inputobject $outtxt
Enabling the Use of Offline Files
You may want to configure your Windows Vista and your Windows Server 2008 computers
to use offline files. To do this, you can use the offline tools management utility as shown in
Figure 11-2. This tool gives you the ability to enable—or disable—the use of offline files on the
local computer. This action requires administrative privileges, and necessitates a computer
reboot.
C11622791.fm Page 331 Wednesday, December 12, 2007 1:42 PM

332 Windows PowerShell Scripting Guide
Figure 11-2 Enable offline files using the GUI.
To enable or disable the offline files feature on more than one computer or as part of a
standard build process, you can use the EnableDisableOfflineFiles.ps1 script. This script uses
the Win32_OfflineFilesCache WMI class.
The EnableDisableOfflineFiles.ps1 script begins with the param statement, which provides
the ability to specify named arguments to the script when it runs. This allows you to control
how the script executes without having to edit it. The first parameter defined is the -computer
parameter. The $computer variable is automatically created to hold the data supplied when the
script is run. However, in this example the variable is set to a default value of localhost. This
allows you to run the script against the local computer with no need to supply a value. Then
define two other parameters: -a and -help; don’t assign default values to these variables. The -a
parameter is used to specify the action to perform when the script is run. The -help parameter
determines whether or not the help text is displayed. This line of code is shown here:
param($computer="localhost", $a, $help)
The next step is the funline function, used to underline the output from the script and to
provide a visual reference point to make the output easier to read and to understand. Declare
a single input statement to the function, which is named $strIN. The input string is whatever
is passed to the funline function. Use the Length property to determine the length of the line
passed to the function. Store the length of the string in the $num variable, and use it in the for
loop. Begin counting at 1 and continue looping until the value of $i (the counter variable) is
less than or equal to the sum stored in the $num variable. Increment the value of $i by 1
($i++). The code that runs as a result of the for loop is used to build the variable $funline with
a group of equal signs (=). Use the Write-Host cmdlet to print the input string. Specify that
C11622791.fm Page 332 Wednesday, December 12, 2007 1:42 PM
Chapter 11 Managing User Data 333
the -foregroundcolor parameter prints in yellow and the line separator contained in the $funline
function prints with a -foregroundcolor parameter of dark yellow. This provides a nice visual
effect to the line separator. This function is provided here:
function funline ($strIN)
{
$num = $strIN.length
for($i=1 ; $i -le $num ; $i++)
{ $funline += "=" }
Write-Host -ForegroundColor yellow $strIN
Write-Host -ForegroundColor darkYellow $funline
}
The funhelp function is the next step. This function is used to display a help message to the
user when the script is run with the -help parameter specified. There are no input parameters
defined for this function. Begin by declaring the variable $helpText and opening a here-string
by using the special character combination @”. The here-string uses the same characters in
reverse “@ to end the here-string. The advantage of using the here-string is that you can ignore
quoting rules, and simply type the text as you want it to appear in the output. In the here-
string, you define sections of help such as a general description of the script, the parameters
the script requires, and several syntax examples. The funhelp function ends by printing the
contents of the $helpText variable and calling the exit statement. The entire funhelp function
appears here:
function funHelp()
{
$helpText=@"
DESCRIPTION:
NAME: EnableDisableOffLineFiles.ps1
Enables or disables offline files on a local or remote machine.
A reboot of the machine MAY be required. This information will
be displayed in the status message once the script is run.
PARAMETERS:
-computer Specifies name of the computer upon which to run the script
-a(ction) < e(nable), d(isable) >
-help prints help file
SYNTAX:
EnableDisableOffLineFiles.ps1 -computer MunichServer -a e
Enables offline files on a computer named MunichServer
EnableDisableOffLineFiles.ps1 -a d
Disables offline files on local computer
EnableDisableOffLineFiles.ps1 -help ?
Displays the help topic for the script
"@
C11622791.fm Page 333 Wednesday, December 12, 2007 1:42 PM

334 Windows PowerShell Scripting Guide
$helpText
exit
}
After completing the funhelp function, move on to declare an additional function—the funtrans-
latemethod function. This function is used to translate the input parameter that is specified for
the -a (action) parameter. The value contained in the $a variable is supplied when the script is
run. In fact, this script generates an error if the -a parameter is missing when the script is run.
This makes sense, as you need to know if you want to either enable or disable offline files
before you run the script.
Variable Scoping
An advantage of defining a global variable in a script is that you can use the global vari-
able either inside or outside a function. Variables that are first created within a function
will only live inside that function. This is helpful, but it can be confusing at the same
time. You might very well end up with two variables—each named $a and each having a
different value—depending on where inside the script you are working. This is exactly
the situation you’ll see in the CreateVariableInFunctionAndOutsideFunction.ps1 script.
In this script, declare $a as a variable outside the function and assign a string value to it.
Then, call a function. Inside the function, you also have a variable named $a, and you’ll
assign a different string value to it. Because of a concept called scoping, there are in fact
two different variables; they both just happen to be named $a. Each of these variables
has its own unique value. When you leave the function, you have not touched the $a
variable residing outside the function. Inside the function, you don’t have access to the
value assigned to the $a residing outside the function. This is because the two variables
live in different scopes. When the CreateVariableInFunctionAndOutsideFunction.ps1
script is run, it produces the following results:
Inside the mytest function
This is a variable in the mytest function
Outside the function
This is a variable created outside the function
The completed CreateVariableInFunctionAndOutsideFunction.ps1 script is shown here.
CreateVariableInFunctionAndOutsideFunction.ps1
function mytest
{
$a = "This is a variable in the mytest function`n"
Write-Host "Inside the mytest function `n$a"
}
$a = "This is a variable created outside the function`n"
myTest
Write-Host "Outside the function `n$a"
C11622791.fm Page 334 Wednesday, December 12, 2007 1:42 PM

Chapter 11 Managing User Data 335
Now suppose you don’t have two variables with the same name defined in different
scopes. How does the concept of scoping affect the way you work with variables
and functions? In the CreateVariableInFunction.ps1 script, you’ll notice the opposite
situation. You create a variable named $a inside the function. You don’t have a $a
variable created outside the function, therefore the variable created inside the function is
not available outside the function.
When the CreateVariableInFunction.ps1 script is run, it enters the function and assigns
a value to the $a variable. It prints the value of $a. It now leaves the function, and if it
attempts to print the value of $a, there is simply a blank space. This occurs because the
variable created inside the function does not live outside the function.
The output from the CreateVariableInFunction.ps1 script is shown here:
Inside the mytest function
This is a variable in the mytest function
This is outside the function
The completed CreateVariableInFunction.ps1 script follows:
CreateVariableInFunction.ps1
function mytest
{
$a = "This is a variable in the mytest function`n"
Write-Host "Inside the mytest function `n$a"
}
myTest
Write-Host "This is $a outside the function"
To provide access to a variable both inside and outside a function, you must use a global
variable. To declare a global variable, use the $global tag in front of the variable name.
The syntax looks like this:
$global:myvariable = "This is global string"
In the CreateGlobalVariableInFunction.ps1, create a global variable in the function. This
allows you to access the value of the variable both inside and outside the function. You
can perform this in the reverse order as well—create the global variable outside the
function, and then use it inside the function, as it works both ways. When the Create-
GlobalVariableInFunction.ps1 script is run, the following text is displayed:
Inside the mytest function
This is a variable in the mytest function
Outside the function
This is a variable in the mytest function
C11622791.fm Page 335 Wednesday, December 12, 2007 1:42 PM

336 Windows PowerShell Scripting Guide
The completed CreateGlobalVariableInFunction.ps1 script is shown here.
CreateGlobalVariableInFunction.ps1
function mytest
{
$global:a = "This is a variable in the mytest function`n"
Write-Host "Inside the mytest function `n$a"
}
myTest
Write-Host "Outside the function `n$a"
To continue the discussion of the EnableDisableOfflineFiles.ps1 script, let’s come back to the
funtranslatemethod function, which uses the switch statement to evaluate the value that was
supplied to the -a parameter. If the value contained in the $a variable is the letter e, then
perform two tasks inside the code block: first assign the intrinsic variable $true to the global
variable $m and then use the global variable $msg and store the string that is displayed to the
user. Use the string “Enable offline files” to indicate the action you are trying to perform.
The other action defined in the funtranslatemethod function is the disable action. If the user
supplies the letter d to the script when it is run, use the global variable $m to hold the intrinsic
variable $false. A bit later, this will be supplied to the method call in the main body of the
script. Also store the string “Disable offline files” in the global variable $msg.
The default action of the switch statement is to store the string “is not an allowed response”
in the global variable $msg. Print the value of the action that was contained in the $a variable,
and use a special character `n to cause the string to print with a new line character at the end
of the string. The complete funtranslatemethod function follows:
function funtranslatemethod($a)
{
switch($a)
{
"e" { $global:m = $true
$global:msg = "Enable offline files"
}
"d" {
$global:m = $false
$global:msg = "Disable offline files"
}
default{
$global:msg = "$a is not an allowed response`n"
}
}
}
Next, check for the presence of two variables. The first one to look for is the $help variable. If
it is present, this indicates the script was run with the -help parameter, and as a result, you
C11622791.fm Page 336 Wednesday, December 12, 2007 1:42 PM

Chapter 11 Managing User Data 337
want to display the help text. To do this, use the if statement and check for the variable. If you
find it, then in the code block call the funline function, print a string message, and call the
funhelp function. All of that is done using this line of code:
if($help){ funline("Obtaining help ...") ; funhelp }
Look for the presence of the $a variable. If it is not present, it means the script was run
without the $a parameter. You want this as a required parameter, so use the throw statement
to print a message.
Note When you use the throw statement, it halts execution of the script, and prints the
message in red. This is similar to using the raise method of the error object in other
programming languages.
The string that you’ll “throw” is used to indicate the error that occurred—a value for the
-a parameter was not supplied. Then, point the user to the help file. This section of code is
shown here:
if(!$a)
{
$(throw "You must supply an action. try this:
EnableDIsableOfflineFiles.ps1 -help ?")
}
If the user doesn’t want to see the help file and has supplied a value for the action parameter,
then declare several global variables, set them to null, and call the funtranslatemethod function
to see which action you need to perform. These two lines of code are shown here:
$global:msg = $global:m = $null
funtranslatemethod($a)
It’s time to make the connection into WMI. To do this, use the [wmiclass] type accelerator,
which provides access to the System.Management.ManagementObject Microsoft .NET Frame-
work class. This .NET Framework class provides access to the WMI methods that might not
be available when using the Get-WmiObject cmdlet. Luckily, you can use the Get-Member
cmdlet and the Windows Software Development Kit (SDK) to provide additional information
about calling the methods. The syntax to connect to a remote computer using this class is a bit
strange, as you will see as you continue on. You’ll incorporate the $computer variable that is
supplied from the command line into the connection string to make it easy to target other
computers. Store the system.management.managementobject that is created in the $objWMI
variable. This line of code is shown here:
$objWMI = [wmiclass]"\\$computer\root\cimv2:win32_offlinefilescache"
C11622791.fm Page 337 Wednesday, December 12, 2007 1:42 PM
338 Windows PowerShell Scripting Guide
Now call the enable method, and either enable or disable the use of the offline files feature
in Windows Vista or Windows Server 2008. Use the funline function to print the status
message, and call the enable() method. This code is shown here:
funline("Configure Offline files on $computer ...")
$rtn = $objwmi.enable($m)
The next step is to evaluate the return code that is returned from calling the enable method
on the computer. If the ReturnValue property of the return code is equal to 0, then the call
succeeded. Otherwise, print the return code and state that the call was not successful. The
problem with this WMI class is that it does not always supply a nonzero return value. It does,
however, always return 0 when it succeeds. This code is displayed here:
if($rtn.returnvalue -eq 0)
{
Write-Host -ForegroundColor green "$msg succeeded"
}
ELSE
{
Write-Host -ForegroundColor red "$msg failed with $($rtn.returnvalue) "
}
Be sure to check the RebootRequired property. When the enable method works but detects
that a reboot is required, it will set the RebootRequired property. Look for it, and print that a
reboot is required. This code is shown here:
if($rtn.rebootrequired)
{ Write-Host -ForegroundColor cyan "reboot required" }
The completed EnableDisableOfflineFiles.ps1 script is shown here.
EnableDisableOfflineFiles.ps1
param($computer="localhost", $a, $help)
function funline ($strIN)
{
$num = $strIN.length
for($i=1 ; $i -le $num ; $i++)
{ $funline += "=" }
Write-Host -ForegroundColor yellow $strIN
Write-Host -ForegroundColor darkYellow $funline
}
function funHelp()
{
$helpText=@"
DESCRIPTION:
NAME: EnableDisableOffLineFiles.ps1
Enables or disables offline files on a local or remote machine.
A reboot of the machine MAY be required. This information will
C11622791.fm Page 338 Wednesday, December 12, 2007 1:42 PM
Chapter 11 Managing User Data 339
be displayed in the status message once the script is run.
PARAMETERS:
-computer Specifies name of the computer upon which to run the script
-a(ction) < e(nable), d(isable) >
-help prints help file
SYNTAX:
EnableDisableOffLineFiles.ps1 -computer MunichServer -a e
Enables offline files on a computer named MunichServer
EnableDisableOffLineFiles.ps1 -a d
Disables offline files on local computer
EnableDisableOffLineFiles.ps1 -help ?
Displays the help topic for the script
"@
$helpText
exit
}
function funtranslatemethod($a)
{
switch($a)
{
"e" { $glogal:m = $true
$global:msg = "Enable offline files"
}
"d" {
$global:m = $false
$global:msg = "Disable offline files"
}
default{
$global:msg = "$a is not an allowed response`n"
}
}
}
if($help){ funline("Obtaining help ...") ; funhelp }
if(!$a)
{
$(throw "You must supply an action. try this:
EnableDIsableOfflineFiles.ps1 -help ?")
}
$global:msg =$global:m = $null
funtranslatemethod($a)
$objWMI = [wmiclass]"\\$computer\root\cimv2:win32_offlinefilescache"
funline("Configure Offline files on $computer ...")
$rtn = $objwmi.enable($m)
if($rtn.returnvalue -eq 0)
C11622791.fm Page 339 Wednesday, December 12, 2007 1:42 PM
340 Windows PowerShell Scripting Guide
{
Write-Host -ForegroundColor green "$msg succeeded"
}
ELSE
{
Write-Host -ForegroundColor red "$msg failed with $($rtn.returnvalue) "
}
if($rtn.rebootrequired)
{ Write-Host -ForegroundColor cyan "reboot required" }
Working with System Restore
There are basically two WMI classes that can be used to manage system restore on a computer.
These classes are SystemRestore and SystemRestoreConfig. In this section, you’ll examine using
both of these classes to manage system restore on both local and remote computers.
Retrieving System Restore Settings
In working with the GetSystemRestoreSettings.ps1 script, first use the param statement to
permit the use of command-line arguments to the script. Define two parameters: -computer
and -help. This allows you to target a remote computer and to obtain help, if required. The
-computer parameter is set to a default value of localhost. This line of code is displayed here:
Param($computer = "localhost", $help)
Next, work with the funhelp function, which is used to print a help file when the script is run
with the -help parameter specified. To create the help file, use the variable $helpText and set
it equal to a here-string. The here-string allows you to ignore quoting rules while typing the
text into the script. In the here-string, you define a description, the parameters, and the syntax
of the script. After the here-string is created, print the value contained in the $helpText
variable, and exit the script. This is shown here:
function funHelp()
{
$helpText=@"
DESCRIPTION:
NAME: GetOffLineFiles.ps1
Prints the offline files config on a local or remote machine.
PARAMETERS:
-computer Specifies name of the computer upon which to run the script
-help prints help file
SYNTAX:
GetSystemRestoreSettings.ps1 -computer MunichServer
Lists system restore config on a computer named MunichServer
GetSystemRestoreSettings.ps1
C11622791.fm Page 340 Wednesday, December 12, 2007 1:42 PM
Chapter 11 Managing User Data 341
Lists system restore config on local computer
GetSystemRestoreSettings.ps1 -help ?
Displays the help topic for the script
"@
$helpText
exit
}
To determine if the script must display help, look for the presence of the $help variable. If you
find it, first call the funline function and print a progress indicator that is underlined. Next,
call the funhelp function. This code is displayed here:
if($help){ funline("Obtaining help ...") ; funhelp }
Create a constant named SecInDay that is set to a value of 86400. To create a constant, use the
New-Variable cmdlet and specify the -option parameter with the constant argument. This is
shown here:
New-Variable -Name SecInDay -option constant -value 86400
Now, it’s time to make the connection into WMI. To do this, use the Get-WmiObject cmdlet
and connect to the root\default WMI namespace. Use the -class parameter to specify the
SystemRestoreConfig WMI class name, and the -computername parameter to allow you to target
a specific computer. Store the resulting management object into the $objWMI variable. This
code is shown here:
$objWMI = Get-WmiObject -Namespace root\default `
-Class SystemRestoreConfig -computername $computer
Use the for statement to count from 0 to 15 and increment the $i variable. In the code
block for the for statement, use the Write-Host cmdlet and supply the $i variable to the
-foregroundcolor parameter. Print a status prompt, wait for 60 milliseconds, clear the screen,
and then repeat. The effect is like a multi-colored rolling progress indicator that will grab
users’ attention and alert them to the progress. This section of code is listed here:
for($i=0; $i -le 15; $i++)
{
Write-Host -ForegroundColor $i "Retrieving System Restore Settings"
Start-Sleep -Milliseconds 60
cls
}
You must decide if you’re going to use the computername environment variable from the
Windows PowerShell PSDrive or if you’ll use the value supplied to the -computer parameter.
That’s because the Windows PowerShell PSDrive is only available for the local computer—if
the computer is localhost, then it is local.
C11622791.fm Page 341 Wednesday, December 12, 2007 1:42 PM
342 Windows PowerShell Scripting Guide
if($computer -eq "localhost")
{
Write-Host "System Restore Settings on $env:computername"
}
However, if the computer name is some other value, use that value instead. This logic is
demonstrated here:
ELSE
{
Write-Host "System Restore Settings on $computer"
}
You’ll need to format your output. To do this, use the Format-Table cmdlet. In this example,
use the -inputobject parameter, and supply the management object stored in the $objWMI
variable to the cmdlet. Next, use the -property parameter to specify the properties to be listed
in the table. The unusual aspect of this script is using a hash table to change the formatting of
the printout of the property values. The hash table begins with the at symbol (@) and an
opening code block. Specify both the label to use and the expression to calculate the property
value. The printout reports the backup time in days instead of seconds, and also displays the
percent disk utilization with the percentage symbol. This section of code is shown here:
format-table -InputObject $objWMI -property `
@{
Label="Max disk utilization" ;
expression={ "{0:n0}"-f ($_.DiskPercent ) + " %"}
},
@{
Label="Scheduled Backup" ;
expression={ "{0:n2}"-f ($_.RPGlobalInterval / $SecInDay) + " days"}
},
@{
Label="Max age of backups" ;
expression={ "{0:n2}"-f ($_.RPLifeInterval / $SecInDay) + " days" }
}
The completed GetSystemRestoreSettings.ps1 script is shown here.
GetSystemRestoreSettings.ps1
Param($computer = "localhost", $help)
function funHelp()
{
$helpText=@"
DESCRIPTION:
NAME: GetOffLineFiles.ps1
Prints the offline files config on a local or remote machine.
PARAMETERS:
-computer Specifies name of the computer upon which to run the script
-help prints help file
C11622791.fm Page 342 Wednesday, December 12, 2007 1:42 PM
Chapter 11 Managing User Data 343
SYNTAX:
GetSystemRestoreSettings.ps1 -computer MunichServer
Lists system restore config on a computer named MunichServer
GetSystemRestoreSettings.ps1
Lists system restore config on local computer
GetSystemRestoreSettings.ps1 -help ?
Displays the help topic for the script
"@
$helpText
exit
}
if($help){ funline("Obtaining help ...") ; funhelp }
New-Variable -Name SecInDay -option constant -value 86400
$objWMI = Get-WmiObject -Namespace root\default `
-Class SystemRestoreConfig -computername $computer
for($i=0; $i -le 15; $i++)
{
Write-Host -ForegroundColor $i "Retrieving System Restore Settings"
Start-Sleep -Milliseconds 60
cls
}
if($computer -eq "localhost")
{
Write-Host "System Restore Settings on $env:computername"
}
ELSE
{
Write-Host "System Restore Settings on $computer"
}
format-table -InputObject $objWMI -property `
@{
Label="Max disk utilization" ;
expression={ "{0:n0}"-f ($_.DiskPercent ) + " %"}
},
@{
Label="Scheduled Backup" ;
expression={ "{0:n2}"-f ($_.RPGlobalInterval / $SecInDay) + " days"}
},
@{
Label="Max age of backups" ;
expression={ "{0:n2}"-f ($_.RPLifeInterval / $SecInDay) + " days" }
}
C11622791.fm Page 343 Wednesday, December 12, 2007 1:42 PM
344 Windows PowerShell Scripting Guide
Listing Available System Restore Points
Knowing the current system restore settings is useful, but what is extremely helpful to know
is which system restore points are available to be restored and how many of these restore
points are available. To do this, use the ListSystemRestorePoints.ps1 script.
On the first line of the script, use the param statement to define two command-line arguments.
These are the same parameters used in the last script: -computer and -help. This line of code is
shown here:
param($computer="localhost", $help)
The next function is named funlookup. This function is used to translate the coded value that
is returned from the SystemRestore WMI class to indicate the type of restore point performed.
To do this, pass the value stored in the $strIN variable by reference. This allows you to change
the value of the $strIN variable inside the function, and then use the variable outside the
function. The switch statement will match the value that was supplied originally to the
funlookup function. This code is displayed here:
function funLookup([ref]$strIN)
{
switch($strIN.value)
{
0 { $strIN.value = "APPLICATION INSTALL" }
1 { $strIN.value = "APPLICATION UNINSTALL" }
7 { $strIN.value = "SCHEDULED RESTORE POINT" }
13 { $strIN.value = "CANCELLED OPERATION" }
10 { $strIN.value = "DEVICE DRIVER INSTALL" }
12 { $strIN.value = "MODIFY SETTINGS" }
}
}
Move on to the funhelp function, which is similar to the one used in the last script. This displays
the help text when the script is run with the -help parameter. This code uses a here-string to
create the help text, and assigns the text to the $helpText variable. It then prints the contents
of the variable and exits the script. This code is shown here:
function funHelp()
{
$helpText=@"
DESCRIPTION:
NAME: ListSystemRestorePoints.ps1
Lists the system restore points on a local or remote machine.
PARAMETERS:
-computer Specifies name of the computer upon which to run the script
-help prints help file
SYNTAX:
ListSystemRestorePoints.ps1-computer MunichServer
Lists system restore points on a computer named MunichServer
C11622791.fm Page 344 Wednesday, December 12, 2007 1:42 PM
Chapter 11 Managing User Data 345
ListSystemRestorePoints.ps1
Lists system restore points on local computer
ListSystemRestorePoints.ps1-help ?
Displays the help topic for the script
"@
$helpText
exit
}
Check for the presence of the $help variable. If you find it, call the funline function to underline
the progress text, and then call the funhelp function. This code is shown here:
if($help){ funline("Obtaining help ...") ; funhelp }
After that task is completed, connect to the WMI service and retrieve the listing of system
restore points. To do this, use the Get-WmiObject cmdlet and specify the -class parameter to
retrieve the SystemRestore WMI class. Since this class lives in the root\default WMI namespace,
you must use the -namespace parameter to specify that location. Use the -computername
parameter to connect to the computer specified when the script is launched, and pipeline the
resulting object. This section of code is shown here:
Get-WmiObject -Class systemrestore -namespace root\default `
-computername $computer |
Next is the Format-Table cmdlet. Take the pipelined object from the Get-WmiObject cmdlet
and use it to build an output table. Use the hash table trick from the previous script to print a
custom table with calculated values and modified column heads. To convert the date time
string from the time that is reported from WMI into a “normal” date time value, use the .NET
Framework class Management.ManagementDatetimeCoverter. This .NET Framework class
utilizes the toDateTime() method to convert the WMI time format. Use the funlookup function
to translate the restore point type value into a more readable string value. Print the sequence
number without modification, and use the -autosize parameter. This section of code is shown
here:
format-Table -property `
@{
Label = "Time Created" ;
Expression = { $([Management.ManagementDatetimeConverter]::`
toDateTime($_.creationTime)) }
},
"description",
@{
Label = "RestorePoint Type" ;
Expression = { $strIN = $_.restorepointtype ;
funlookup([ref]$strIN) ; $strIN }
},
"SequenceNumber" -autosize
C11622791.fm Page 345 Wednesday, December 12, 2007 1:42 PM
346 Windows PowerShell Scripting Guide
The completed ListSystemRestorePoints.ps1 script is shown here.
ListSystemRestorePoints.ps1
param($computer="localhost", $help)
function funLookup([ref]$StrIN)
{
switch($strIN.value)
{
0 { $strIN.value = "APPLICATION INSTALL" }
1 { $strIN.value = "APPLICATION UNINSTALL" }
7 { $strIN.value = "SCHEDULED RESTORE POINT" }
13 { $strIN.value = "CANCELLED OPERATION" }
10 { $strIN.value = "DEVICE DRIVER INSTALL" }
12 { $strIN.value = "MODIFY SETTINGS" }
}
}
function funHelp()
{
$helpText=@"
DESCRIPTION:
NAME: ListSystemRestorePoints.ps1
Lists the system restore points on a local or remote machine.
PARAMETERS:
-computer Specifies name of the computer upon which to run the script
-help prints help file
SYNTAX:
ListSystemRestorePoints.ps1-computer MunichServer
Lists system restore points on a computer named MunichServer
ListSystemRestorePoints.ps1
Lists system restore points on local computer
ListSystemRestorePoints.ps1-help ?
Displays the help topic for the script
"@
$helpText
exit
}
if($help){ funline("Obtaining help ...") ; funhelp }
Get-WmiObject -Class systemrestore -namespace root\default `
-computername $computer |
format-Table -property `
@{
Label = "Time Created" ;
Expression = { $([Management.ManagementDatetimeConverter]::`
toDateTime($_.creationTime)) }
C11622791.fm Page 346 Wednesday, December 12, 2007 1:42 PM
Chapter 11 Managing User Data 347
},
"description",
@{
Label = "RestorePoint Type" ;
Expression = { $strIN = $_.restorepointtype ;
funlookup([ref]$strIN) ; $strIN }
},
"SequenceNumber" -autosize
Summary
In this chapter, we examined various ways to manage user data on a Windows Vista or
Windows Server 2008 computer. We first looked at backing up data. To do this, we examined
a script that backs up the contents of a folder to a file share on the network. This enables
the network administrator to use a network backup utility to archive the files to a tape or a
storage area network (SAN) solution.
We next looked at the offline files feature of Windows Server 2008 and Windows Vista, first
examining the settings for the offline files feature. Next, we looked at a script that provides the
ability to either enable or to disable the offline files feature. Along the way, we took a slight
excursion into the nether world of variable scoping issues.
We concluded the chapter by covering the system restore feature. We looked at a script that
will report the current settings of system restore and another script that lists all the system
restore points that are stored on a computer.
C11622791.fm Page 347 Wednesday, December 12, 2007 1:42 PM
C11622791.fm Page 348 Wednesday, December 12, 2007 1:42 PM

349
Chapter 12
Troubleshooting Windows
After completing this chapter, you will be able to:
■Troubleshoot startup issues.
■Work with service dependencies.
■Resolve hardware issues.
■Troubleshoot networking issues.
On the Companion Disc All the scripts used in this chapter are located on the CD that
accompanies this book in the \scripts\chapter12 folder.
Troubleshooting Startup Issues
If Windows won’t start properly, there are a few things you can check to see what is happening
with the computer. In Windows Vista and Windows Server 2008, you can examine the boot
configuration to see whether there are any configuration issues. You can also check the
startup services and dependencies. Services that are dependent upon one another are a useful
indication of a problem. If service A depends on service B and you notice that service A is not
running, that is a clue to check service B. Of course, in real life things are more complicated,
so you’ll need to bring scripting to bear on the situation. This section will examine these
issues.
Examining the Boot Configuration
Examining the boot configuration of a computer running Windows Vista or Windows Server
2008 can offer valuable information for troubleshooting startup problems. Information such
as the boot partition, boot directory, and scratch directory can be useful at one time or
another, but the retrieval of such information can consume minutes of your time when each
wasted moment takes you farther and farther away from the elusive “five-nines” (99.999%
up time).
In the DisplayBootConfig.ps1 script, you’ll begin with the param statement, which allows you
to change the target computer when you run the script. You can retrieve help information
as well. The -help parameter is configured as a switch parameter, meaning you don’t supply
any information when calling the parameter. This section of code is shown here:
param($computer="localhost", [switch]$help)
C12622791.fm Page 349 Wednesday, December 12, 2007 1:44 PM
350 Windows PowerShell Scripting Guide
Define the funhelp function, which is called when the -help switch parameter is specified when
running the script. Within the function, create a variable named $helpText to hold a here-
string used to create the help text. In the help text, display the description of the script, the
parameters, and the syntax of the script usage. Print the text stored in the $helpText variable
and exit the script. The funhelp function is displayed here:
function funHelp()
{
$helpText=@"
DESCRIPTION:
NAME: DisplayBootConfig.ps1
Displays a boot up configuration of a Windows system
PARAMETERS:
-computer The name of the computer
-help prints help file
SYNTAX:
DisplayBootConfig.ps1 -computer munich
Displays boot up configuration of a computer
named munich
DisplayBootConfig.ps1
Displays boot up configuration on local
computer
DisplayBootConfig.ps1 -help
Displays the help topic for the script
"@
$helpText
exit
}
Check to see whether the $help variable is present; if it is, the script was run with the -help
switch specified. When you find the $help variable, print a string stating you’ll obtain help and
then call the funhelp function. The semicolon allows you to specify two commands on the
same line, as is shown here:
if($help){ "Obtaining help ..." ; funhelp }
Next use the Get-WmiObject cmdlet to retrieve information from the Win32_BootConfiguration
WMI class. Supply the string contained in the $computer variable to the -computername
parameter of the Get-WmiObject cmdlet. This allows you to connect remotely, if required.
This line of code follows. Notice that the line is continued onto the next line by using the
grave accent (`). This is done for readability purposes and has no effect on the actual code.
C12622791.fm Page 350 Wednesday, December 12, 2007 1:44 PM
Chapter 12 Troubleshooting Windows 351
$wmi = Get-WmiObject -Class win32_BootConfiguration `
-computername $computer
Finally, pass the resulting management object to the Format-List cmdlet. Use the range opera-
tor [a-z]* to select only properties that begin with an alphabetic character. This eliminates
all the system properties from the report. This line of code follows:
format-list -InputObject $wmi [a-z]*
The completed DisplayBootConfig.ps1 script is shown here.
DisplayBootConfig.ps1
param($computer="localhost", [switch]$help)
function funHelp()
{
$helpText=@"
DESCRIPTION:
NAME: DisplayBootConfig.ps1
Displays a boot up configuration of a Windows system
PARAMETERS:
-computer The name of the computer
-help prints help file
SYNTAX:
DisplayBootConfig.ps1 -computer munich
Displays boot up configuration of a computer
named munich
DisplayBootConfig.ps1
Displays boot up configuration on local
computer
DisplayBootConfig.ps1 -help
Displays the help topic for the script
"@
$helpText
exit
}
if($help){ "Obtaining help ..." ; funhelp }
$wmi = Get-WmiObject -Class win32_BootConfiguration `
-computername $computer
format-list -InputObject $wmi [a-z]*
C12622791.fm Page 351 Wednesday, December 12, 2007 1:44 PM
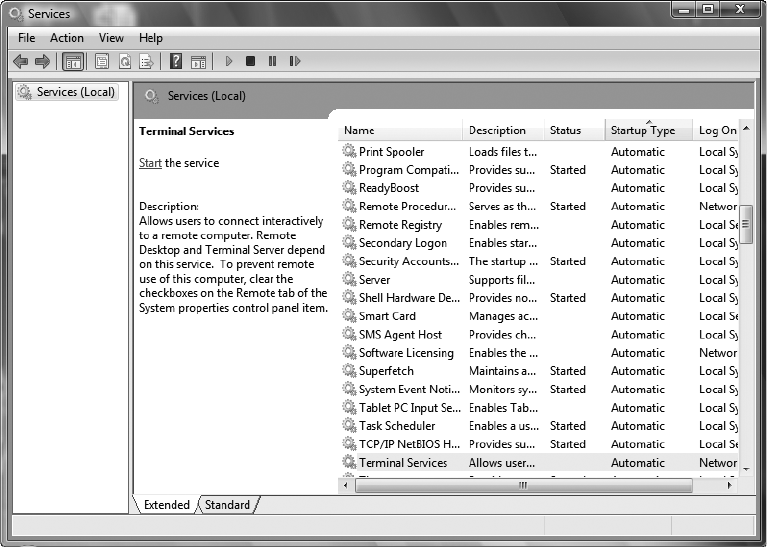
352 Windows PowerShell Scripting Guide
Examining Startup Services
There are many services that start automatically. When one of these automatic services fails to
start, it can lead to system instability or unpredictable results. When things go wrong, one of
the first checks is to open the Services, sort Startup Type by Automatic, and look for services
that are stopped. This is shown in Figure 12-1.
Figure 12-1 Checking for stopped automatic services is a basic troubleshooting step.
When working with the AutoServicesNotRunning.ps1 script, first use the Get-WmiObject
cmdlet to query the Win32_Service WMI class. Customize the query to return only services
that are set to start automatically, but that are not currently running. If there are no automatic
services in a stopped state, print a message to this effect.
Begin the AutoServicesNotRunning.ps1 script with the param statement.
param($computer="localhost", [switch]$help)
Next, use the funhelp function to assign a large here-string to the $helpText variable. In the
here-string, you’ll have a description, a parameter, and a syntax section that describes the use
C12622791.fm Page 352 Wednesday, December 12, 2007 1:44 PM
Chapter 12 Troubleshooting Windows 353
of the script. After creating the here-string, display the contents of the $helpText variable and
exit the script. The funhelp function is detailed here:
function funHelp()
{
$helpText=@"
DESCRIPTION:
NAME: AutoServicesNotRunning.ps1
Displays a listing of services that are set to
automatic, but are not presently running
PARAMETERS:
-computer The name of the computer
-help prints help file
SYNTAX:
AutoServicesNotRunning.ps1 -computer munich
Displays a listing of all non running services
that are set to automatically start on a computer
named munich
AutoServicesNotRunning.ps1
Displays a listing of all services that are set
to automatic, but are not presently running on
the local machine
AutoServicesNotRunning.ps1 -help
Displays the help topic for the script
"@
$helpText
exit
}
You must decide whether or not to display help. If the $help variable is present, it will display.
The $help variable is only present if the -help switch is supplied when the script is called. This
line of code is shown here:
if($help){ "Obtaining help ..." ; funhelp }
The next step is a WMI query. Use the Get-WmiObject cmdlet to query the Win32_Service
WMI class and use the -computername parameter to target both local and remote computer
systems. Use the -filter parameter to reduce the number of instances of the Win32_Service class
returned. Realize that you are only interested in services that aren’t running and that have the
Startup Type set to Automatic. This section of the script is shown here:
$wmi = Get-WmiObject -Class win32_service -computername $computer `
-filter "state <> 'running' and startmode = 'auto'"
C12622791.fm Page 353 Wednesday, December 12, 2007 1:44 PM
354 Windows PowerShell Scripting Guide
After the WMI query, you’ll need to evaluate the results. If the $wmi variable is null, there are
no automatic services stopped. This line of code is displayed here:
if($wmi -eq $null)
{ "No automatic services are stopped" }
If there are automatic services stopped, then you’ll print the name of each stopped service.
Begin with a count of the number of stopped automatic services and use the foreach statement
to print the name of each applicable service. This section of code is shown here:
Else
{
"There are $($wmi.count) automatic services stopped.
The list follows ... "
foreach($service in $wmi) { $service.name }
}
The completed AutoServicesNotRunning.ps1 script is shown here.
AutoServicesNotRunning.ps1
param($computer="localhost", [switch]$help)
function funHelp()
{
$helpText=@"
DESCRIPTION:
NAME: AutoServicesNotRunning.ps1
Displays a listing of services that are set to
automatic, but are not presently running
PARAMETERS:
-computer The name of the computer
-help prints help file
SYNTAX:
AutoServicesNotRunning.ps1 -computer munich
Displays a listing of all non running services
that are set to automatically start on a computer
named munich
AutoServicesNotRunning.ps1
Displays a listing of all services that are set
to automatic, but are not presently running on
the local machine
AutoServicesNotRunning.ps1 -help
Displays the help topic for the script
"@
$helpText
exit
C12622791.fm Page 354 Wednesday, December 12, 2007 1:44 PM
Chapter 12 Troubleshooting Windows 355
}
if($help){ "Obtaining help ..." ; funhelp }
$wmi = Get-WmiObject -Class win32_service -computername $computer `
-filter "state <> 'running' and startmode = 'auto'"
if($wmi -eq $null)
{ "No automatic services are stopped" }
Else
{
"There are $($wmi.count) automatic services stopped.
The list follows ... "
foreach($service in $wmi) { $service.name }
}
Displaying Service Dependencies
When one service fails to start, it can affect more than just the capabilities provided by that
particular service. This phenomenon is called service dependency and it is the way many
applications are built. As an example, consider the Zune device. When I installed software that
came with my Zune, it created a service on my computer. The service is called the Zune
Network Sharing Service. It uses the UPnP Device Host service to locate other Zune devices
on the network. If the UPnP Device Host service is not running, the Zune Network Sharing
Service will fail to start. But the Zune Network Sharing Service can also be used to communi-
cate with other devices over the Internet. To do this, it depends on the capabilities of the
HTTP service.
The advantage of using service dependency is that it makes it far easier for a developer to reuse
the capabilities of existing services defined on the computer. The disadvantage of service
dependency is that it becomes difficult to keep track of the somewhat nebulous relationships
between seemingly unrelated services.
You can use the Services console to garner this information. Do this by double-clicking the
service in question from the list that is presented in the console, then selecting the
Dependencies tab. This is shown in Figure 12-2.
If you are interested in seeing all the services and their associated dependencies at the same
time, use the ServiceDependencies.ps1 script.
Begin the script with the $erroractionpreference = “SilentlyContinue” command. This is
because there may be some services you won’t have access to, even as a member of the local
administrator group. And because you won’t want to change the security descriptor on such a
service, the easiest way to handle the resulting errors is to use the $erroractionpreference
automatic variable and assign the string SilentlyContinue to the variable. The following line
of code performs this action:
$erroractionpreference = "SilentlyContinue"
C12622791.fm Page 355 Wednesday, December 12, 2007 1:44 PM
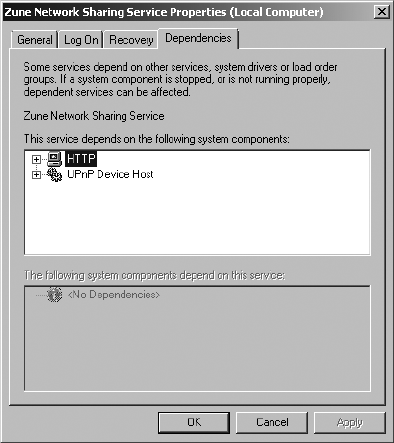
356 Windows PowerShell Scripting Guide
Figure 12-2 Service dependencies for a single service are presented in the Services console.
Use the param statement to define several command-line parameters for the script. The first
parameter is the -computer parameter, which is used to specify where the script will run. The
second parameter is actually a switch parameter, which is used to display help, if requested.
This line of code is shown here:
Param($computer = "localhost", [switch]$help)
Next, define the funline function, which is used to underline portions of the output display. To
do this, pass a string value to the function, which determines the length of the input string,
and then uses a for statement to count from one to the number of characters in the input
string. That number is used to concatenate an equivalent number of equal signs. This string of
equal signs is stored in the variable named $funline, which is then printed under the line of
text by using the Write-Host cmdlet. This section of code is listed here:
function funline ($strIN)
{
$num = $strIN.length
for($i=1 ; $i -le $num ; $i++)
{ $funline = $funline + "=" }
Write-Host -ForegroundColor yellow $strIN
Write-Host -ForegroundColor darkYellow $funline
}
Create the funhelp function, which is used to display help. The function consists mainly of a
here-string that is assigned to the variable $helpText. After the here-string is created and
C12622791.fm Page 356 Wednesday, December 12, 2007 1:44 PM
Chapter 12 Troubleshooting Windows 357
assigned to the $helpText variable, display the contents of the variable to the screen and exit
the script, as you see here:
function funHelp()
{
$helpText=@"
DESCRIPTION:
NAME: ServiceDependencies.ps1
Displays a listing of services and their dependencies
PARAMETERS:
-computer The name of the computer
-help prints help file
SYNTAX:
ServiceDependencies.ps1 -computer munich
Displays a listing of services and their dependencies
on a computer named munich
ServiceDependencies.ps1
Displays a listing of services and their dependencies
on the local machine
ServiceDependencies.ps1 -help
Displays the help topic for the script
"@
$helpText
exit
}
You must decide whether to display the help message; do this only if the $help variable is
present. You can use if to see if the variable is present. If it is, then print a string indicating that
you are obtaining the help text. Then call the funhelp function; the line of code is shown here:
if($help){ "Obtaining help ..." ; funhelp }
After determining you don’t need to display help, create two variables to hold a listing of prop-
erties. These variables are named $dependentProperty and $antecedentProperty. The properties
correspond to the properties you want to retrieve from the WMI classes that are pointed to
when you query WMI. Since you’re using an association class, the class does not return data
you are interested in. What you really want is the pointers returned from the query. Use these
pointers to retrieve information about the services. This section of code is shown here:
$dependentProperty = "name", "displayname", "pathname",
"state", "startmode", "processID"
$antecedentProperty = "name", "displayname",
"state", "processID"
C12622791.fm Page 357 Wednesday, December 12, 2007 1:44 PM

358 Windows PowerShell Scripting Guide
Next, evaluate the value stored in the $computer variable. The $computer variable is set in the
param statement to localhost, which refers to the local computer. If the script is run with the
-computer parameter, the value of the $computer variable is different than localhost. If the user
has not changed the value of $computer, use the actual name of the computer. Retrieve this
value by querying the environmental PS drive. This line of code is displayed here:
if($computer = "localhost") { $computer = $env:computername }
After checking the $computer variable, use the funline function to print a header for the report
of service dependencies. This header code is shown here:
funline("Service Dependencies on $($computer)")
Create a constant named c_padline by using the New-Variable cmdlet and using the -option
parameter. The -name parameter of the New-Variable cmdlet does not need the variable name
to begin with a dollar sign.
Note Numbers that are hard-coded into method calls are sometimes called magic numbers.
This is because when reading the code, you see that the method receives a number, yet there
is no documentation as to why the number is used—hence it “works like magic.” Avoiding
magic numbers is a sound programming principle.
The reason for creating the constant is to pad the line 14 spaces; this makes the code easier to
read and maintain:
New-Variable -Name c_padline -value 14 -option constant
Next, use the Get-WmiObject cmdlet to query the WMI class Win32_DependentService. This
WMI class is an association class that relates two WMI classes together. The two classes are
actually Win32_BaseService and Win32_BaseService. No, this is not a mistake; this class relates
itself to itself. In this way, you can find which services are dependent upon which other
services. Use the -computername parameter of the Get-WmiObject cmdlet to provide the ability
to query local or remote computers with the script. End the command with a pipeline object.
This line of code is shown here:
Get-WmiObject -Class Win32_DependentService -computername $computer |
Pipeline the resulting object to the ForEach-Object cmdlet. Because the output will be rather
long and can be confusing to read, it’s best to mark each set of related services. Do this by
building up a separator line that is as long as the longest property being displayed; print the
header to the output as is shown here:
Foreach-object `
{
"=" * ((([wmi]$_.dependent).pathname).length + $c_padline)
Write-Host -ForegroundColor blue "This service:"
C12622791.fm Page 358 Wednesday, December 12, 2007 1:44 PM
Chapter 12 Troubleshooting Windows 359
Use the [WMI] management object to retrieve the information about the dependent service
and pipeline the resulting management object:
[wmi]$_.Dependent |
Next, use the Format-List cmdlet to print all the properties stored in the $dependentproperty
variable. This line of code is shown here:
format-list -Property $dependentProperty
Change colors and print another header, this time working with the services that are
depended upon. These services will be found in the Antecedent property. Pipeline this
information as shown here:
Write-Host -ForegroundColor cyan "Depends on this service:"
[wmi]$_.Antecedent |
Now you must print the information about the service that is depended upon using the
Format-List cmdlet. The properties you’re interested in are stored in the $antecedentproperty
variable. Add the separator line to the bottom of the output as shown in this section of code:
format-list -Property $antecedentProperty
"=" * ((([wmi]$_.dependent).pathname).length + $c_padline) + "`n"
}
The completed ServiceDependencies.ps1 script is shown here.
ServiceDependencies.ps1
$erroractionpreference = "SilentlyContinue"
Param($computer = "localhost", [switch]$help)
function funline ($strIN)
{
$num = $strIN.length
for($i=1 ; $i -le $num ; $i++)
{ $funline = $funline + "=" }
Write-Host -ForegroundColor yellow $strIN
Write-Host -ForegroundColor darkYellow $funline
}
function funHelp()
{
$helpText=@"
DESCRIPTION:
NAME: ServiceDependencies.ps1
Displays a listing of services and their dependencies
PARAMETERS:
-computer The name of the computer
-help prints help file
SYNTAX:
C12622791.fm Page 359 Wednesday, December 12, 2007 1:44 PM
360 Windows PowerShell Scripting Guide
ServiceDependencies.ps1 -computer munich
Displays a listing of services and their dependencies
on a computer named munich
ServiceDependencies.ps1
Displays a listing of services and their dependencies
on the local machine
ServiceDependencies.ps1 -help
Displays the help topic for the script
"@
$helpText
exit
}
if($help){ "Obtaining help ..." ; funhelp }
$dependentProperty = "name", "displayname", "pathname",
"state", "startmode", "processID"
$antecedentProperty = "name", "displayname",
"state", "processID"
if($computer = "localhost") { $computer = $env:computername }
funline("Service Dependencies on $($computer)")
New-Variable -Name c_padline -value 14 -option constant
Get-WmiObject -Class Win32_DependentService -computername $computer |
Foreach-object `
{
"=" * ((([wmi]$_.dependent).pathname).length + $c_padline)
Write-Host -ForegroundColor blue "This service:"
[wmi]$_.Dependent |
format-list -Property $dependentProperty
Write-Host -ForegroundColor cyan "Depends on this service:"
[wmi]$_.Antecedent |
format-list -Property $antecedentProperty
"=" * ((([wmi]$_.dependent).pathname).length + $c_padline) + "`n"
}
Examining Startup Device Drivers
Device drivers are very similar to services in that they start automatically and provide func-
tionality to the computer. However, device drivers are as not as easy to discover as services,
and when found, it’s often difficult to understand what they actually do.
When using the CheckDeviceDrivers.ps1 script, begin with the param statement and define
three parameters. The first one is the -computer parameter, which is set to localhost by default.
The second is the -a parameter that is used to specify an action to perform. It is set to h by
C12622791.fm Page 360 Wednesday, December 12, 2007 1:44 PM
Chapter 12 Troubleshooting Windows 361
default, which causes the script to display a mini help message. The last parameter is a switch,
-help, that displays help when requested. This line of code is shown here:
param($computer="localhost", $a="h", [switch]$help)
Next, define a function named funhelp, used to display the help message when the script is
run with the -help switch specified. The help text consists of a here-string containing a
description, a parameter, and a syntax section. The contents of the here-string are stored in the
$helpText variable and are displayed just before exiting the funhelp function. This section of
code is displayed here:
function funHelp()
{
$helpText=@"
DESCRIPTION:
NAME: CheckDeviceDrivers.ps1
Displays a listing of system drivers that are set to
automatic, manual, boot, system or all drivers
PARAMETERS:
-computer The name of the computer
-a(ction) < a(ll), r(unning), s(topped), b(oot),
m(anual), au(to), sy(stem), h(elp) >
-help prints help file
SYNTAX:
CheckDeviceDrivers.ps1 -computer munich -a b
Displays a listing of all device drivers
that are set to start on boot on a computer
named munich
CheckDeviceDrivers.ps1 -a auto
Displays a listing of all device drivers on local
computer set to start up automatically
CheckDeviceDrivers.ps1 -computer munich -a m
Displays a listing of all device drivers
that are set to start manually on a computer
named munich
CheckDeviceDrivers.ps1 -help
Displays the help topic for the script
"@
$helpText
exit
}
C12622791.fm Page 361 Wednesday, December 12, 2007 1:44 PM

362 Windows PowerShell Scripting Guide
To detect whether you need to display the help string, use an if statement to look for the
existence of the $help variable. If the $help variable is present, display the help message by
calling the funhelp function. This line of code is shown here:
if($help){ "Obtaining help ..." ; funhelp }
Now you come to the switch statement. The switch statement in the CheckDeviceDrivers.ps1
script is rather extensive; it allows the user to specify a number of different queries related to
device drivers. To do this, the switch statement prints a status message and then assigns a
value to the $filter variable. The $filter variable is used to create the filter parameter for the
Get-WmiObject cmdlet.
You’ve not yet seen the $MyInvocation.MyCommand.Definition command as a way to print the
name of the running script. This is used in several switch statements when you want to refer to
the running script in your output message.
Tip If you have a function that you want to reuse in a number of scripts and yet you must
refer to the currently running script, you can use the $MyInvocation.MyCommand.Definition
command. The CheckDeviceDrivers.ps1 script uses this command to print a help string for
the user. The use of this construction is mentioned in Appendix D, “Scripting Guidelines.”
The completed switch statement is shown here:
switch($a)
{
"a" {
"Retrieving all device drivers"
$filter = "started = 'true' or started = 'false'"
}
"r" {
"Retrieving all running device drivers"
$filter = "started = 'true'"
}
"s" {
"Retrieving all stopped device drivers"
$filter = "started = 'false'"
}
"b" {
"Retrieving boot device drivers"
$filter = "startmode = 'boot'"
}
"m" {
"Retrieving manual device drivers"
$filter = "startmode = 'manual'"
}
"au" {
"Retrieving auto device drivers"
$filter = "startmode = 'auto'"
}
"sy" {
"Retrieving system device drivers"
C12622791.fm Page 362 Wednesday, December 12, 2007 1:44 PM
Chapter 12 Troubleshooting Windows 363
$filter = "startmode = 'system'"
}
"h" {
"You need to specify an action. The -a parameter is required"
"Try this: " + $MyInvocation.MyCommand.Definition + " -h"
exit
}
DEFAULT
{
"You need to specify an action. The -a parameter is required"
"Try this: " + $MyInvocation.MyCommand.Definition + " -h"
exit
}
}
After evaluating the value of the $a variable, move on to the Get-WmiObject cmdlet, which is
used to query the Win32_SystemDriver WMI class. Run the query against the computer that
is specified in the $computer variable, and use the filter created via the switch statement. This
section of code is shown here:
$wmi = Get-WmiObject -Class win32_systemdriver `
-computername $computer -filter $filter
Now you must format the output stored in the $wmi variable. To do this, use the Format-Table
cmdlet, using the -inputobject parameter and by supplying the management object stored in the
$wmi variable. Choose three properties and use the -autosize switch. This section of code is
displayed here:
format-table -InputObject $wmi -property `
displayname, pathname, name -autosize
The completed CheckDeviceDrivers.ps1 script is shown here.
CheckDeviceDrivers.ps1
param($computer="localhost", $a="h", [switch]$help)
function funHelp()
{
$helpText=@"
DESCRIPTION:
NAME: CheckDeviceDrivers.ps1
Displays a listing of system drivers that are set to
automatic, manual, boot, system or all drivers
PARAMETERS:
-computer The name of the computer
-a(ction) < a(ll), r(unning), s(topped), b(oot),
m(anual), au(to), sy(stem), h(elp) >
-help prints help file
SYNTAX:
CheckDeviceDrivers.ps1 -computer munich -a b
Displays a listing of all device drivers
C12622791.fm Page 363 Wednesday, December 12, 2007 1:44 PM
364 Windows PowerShell Scripting Guide
that are set to start on boot on a computer
named munich
CheckDeviceDrivers.ps1 -a auto
Displays a listing of all device drivers on local
computer set to start up automatically
CheckDeviceDrivers.ps1 -computer munich -a m
Displays a listing of all device drivers
that are set to start manually on a computer
named munich
CheckDeviceDrivers.ps1 -help
Displays the help topic for the script
"@
$helpText
exit
}
if($help){ "Obtaining help ..." ; funhelp }
switch($a)
{
"a" {
"Retrieving all device drivers"
$filter = "started = 'true' or started = 'false'"
}
"r" {
"Retrieving all running device drivers"
$filter = "started = 'true'"
}
"s" {
"Retrieving all stopped device drivers"
$filter = "started = 'false'"
}
"b" {
"Retrieving boot device drivers"
$filter = "startmode = 'boot'"
}
"m" {
"Retrieving manual device drivers"
$filter = "startmode = 'manual'"
}
"au" {
"Retrieving auto device drivers"
$filter = "startmode = 'auto'"
}
"sy" {
"Retrieving system device drivers"
$filter = "startmode = 'system'"
}
C12622791.fm Page 364 Wednesday, December 12, 2007 1:44 PM

Chapter 12 Troubleshooting Windows 365
"h" {
"You need to specify an action. The -a parameter is required"
"Try this: " + $MyInvocation.MyCommand.Definition + " -h"
exit
}
DEFAULT
{
"You need to specify an action. The -a parameter is required"
"Try this: " + $MyInvocation.MyCommand.Definition + " -h"
exit
}
}
$wmi = Get-WmiObject -Class win32_systemdriver `
-computername $computer -filter $filter
format-table -InputObject $wmi -property `
displayname, pathname, name -autosize
Investigating Startup Processes
Some processes start automatically. These processes can be added to the startup grouping in
several places on a computer running Windows Vista or Windows Server 2008. Windows
Defender, shown in Figure 12-3, can display startup programs and give you the ability to easily
change startup behavior.
Figure 12-3 Windows Defender can be used to control process startup.
C12622791.fm Page 365 Wednesday, December 12, 2007 1:44 PM
366 Windows PowerShell Scripting Guide
To identify these processes in a programmatic fashion, use the Win32_StartUpCommand WMI
class. In the DetectStartupPrograms.ps1 script, you can display startup programs on either
a local or a remote computer. You also have the option of obtaining either a basic or a full
display of the program information.
Begin by using the param statement to define the -computer parameter that is used to connect
to either a local or to a remote computer. Define two switch parameters: The first is -full, which
is used to tell the script to print in-depth process information; the second is -help, which
causes the script to print help information. This line of code is shown here:
param($computer="localhost", [switch]$full, [switch]$help)
Next, define the help function named funhelp. This function begins with assigning a here-
string to the $helpText variable. When the -help switch parameter is specified at run-time, then
the funhelp function is run. Display the contents of the $helpText variable and exit the script.
This function is displayed here:
function funHelp()
{
$helpText=@"
DESCRIPTION:
NAME: DetectStartUpPrograms.ps1
Displays a listing of programs that automatically start
PARAMETERS:
-computer the name of the computer
-full prints detailed information
-help prints help file
SYNTAX:
DetectStartUpPrograms.ps1 -computer munich -full
Displays name, command, location, and user information
about programs that automatically start on a computer
named munich
DetectStartUpPrograms.ps1 -full
Displays name, command, location, and user information
about programs that automatically start on the local
computer
DetectStartUpPrograms.ps1 -computer munich
Displays a listing of programs that automatically start
on a computer named munich
DetectStartUpPrograms.ps1 -help ?
Displays the help topic for the script
C12622791.fm Page 366 Wednesday, December 12, 2007 1:44 PM
Chapter 12 Troubleshooting Windows 367
"@
$helpText
exit
}
Now you must determine whether to call the funhelp function; you’ll do this only if the
$help variable is present. It will be available only if the script is run with the -help parameter
specified:
if($help){ "Obtaining help ..." ; funhelp }
Next, decide whether to present the extended process information. If the -full switch is
specified when the script is run, print the name, command, location, and user name.
Otherwise, display only the name of the command. This section of code is shared here:
if($full)
{ $property = "name", "command", "location", "user" }
else
{ $property = "name" }
Finally, call the Get-WmiObject cmdlet to retrieve all the startup commands. Pipeline the
resulting object to the Sort-Object cmdlet, where you sort on the name of the property. Use
the Format-List cmdlet to choose only the properties specified in the $property variable. This
section of code is detailed here:
Get-WmiObject -Class win32_startupcommand -computername $computer |
Sort-Object -property name |
format-list -property $property
The completed DetectStartupPrograms.ps1 script is shown here.
DetectStartupPrograms.ps1
param($computer="localhost", [switch]$full, [switch]$help)
function funHelp()
{
$helpText=@"
DESCRIPTION:
NAME: DetectStartUpPrograms.ps1
Displays a listing of programs that automatically start
PARAMETERS:
-computer the name of the computer
-full prints detailed information
-help prints help file
SYNTAX:
DetectStartUpPrograms.ps1 -computer munich -full
Displays name, command, location, and user information
about programs that automatically start on a computer
named munich
C12622791.fm Page 367 Wednesday, December 12, 2007 1:44 PM

368 Windows PowerShell Scripting Guide
DetectStartUpPrograms.ps1 -full
Displays name, command, location, and user information
about programs that automatically start on the local
computer
DetectStartUpPrograms.ps1 -computer munich
Displays a listing of programs that automatically start
on a computer named munich
DetectStartUpPrograms.ps1 -help ?
Displays the help topic for the script
"@
$helpText
exit
}
if($help){ "Obtaining help ..." ; funhelp }
if($full)
{ $property = "name", "command", "location", "user" }
else
{ $property = "name" }
Get-WmiObject -Class win32_startupcommand -computername $computer |
Sort-Object -property name |
format-list -property $property
Investigating Hardware Issues
Hardware issues are not always hardware related. Most electronic equipment lasts a very long
time if operated within its performance matrix. If the device is going to fail, it will usually do
so during the first few weeks of operation. This period of time is known as the burn-in phase.
After the burn-in phase, the device should operate OK. Of course, this does not say anything
about the software that is required to make the device function properly. Nearly all reputable
component manufacturers sign their device drivers with a digital signature. This is more than
an artist signing a fine piece of art; it is more about authentication that the driver is genuine.
This is vitally important as most device drivers run with elevated rights and permissions.
Caution Because of the potential for abuse, the driver signing policy on Windows Vista
and Windows Server 2008 was changed to prompt the user during installation of unsigned
drivers. There is no way around this policy. You should always insist on signed drivers from
any hardware manufacturer.
C12622791.fm Page 368 Wednesday, December 12, 2007 1:44 PM
Chapter 12 Troubleshooting Windows 369
Unsigned device drivers can be a major source of instability on Windows Vista and on
Windows Server 2008. To investigate these issues, you can use the CheckSignedDevice-
Drivers.ps1 script.
Begin the CheckSignedDeviceDrivers.ps1 script with the param statement. This param state-
ment is laid out differently than the other param statements you have learned about so far.
However, it performs the same task—to allow the user to modify the behavior of the script at
run time. The param statement defines four parameters. First is -computer, which governs the
target of the operation, followed by defining -unsigned as a switch parameter. When this
parameter is present, the script will only return unsigned drivers. Next is the -full switch,
which causes the script to produce a detailed listing of information. Finally, there is the -help
parameter, which causes the script to display the help file. The param statement is shown here:
param(
$computer="localhost",
[switch]$unsigned,
[switch]$full,
[switch]$help
)
The next function created is the funline function. You have seen this function previously in
this chapter. As shown here, it is used to underline certain portions of the text for visual and
spatial separation:
function funline ($strIN)
{
$num = $strIN.length
for($i=1 ; $i -le $num ; $i++)
{ $funline += "=" }
Write-Host -ForegroundColor green $strIN
Write-Host -ForegroundColor darkgreen $funline
}
Next on the agenda is the funhelp function, which displays help for the script. It is called by
the -help switch parameter. A here-string is used to format the help text that gets stored in the
$helpText variable. Print the contents of the $helptext variable and exit the script. This function
is shown here:
function funHelp()
{
$helpText=@"
DESCRIPTION:
NAME: CheckSignedDeviceDrivers.ps1
Displays a listing of device drivers that are
and whether they are signed or not
PARAMETERS:
-computer the name of the computer
-unsigned lists unsigned drivers
-full lists Description, driverProviderName,
C12622791.fm Page 369 Wednesday, December 12, 2007 1:44 PM
370 Windows PowerShell Scripting Guide
Driverversion,DriverDate, and infName
-help prints help file
SYNTAX:
CheckSignedDeviceDrivers.ps1 -computer munich -unsigned
Displays a listing of all unsigned drivers
on a computer named munich
CheckSignedDeviceDrivers.ps1 -unsigned -full
Displays a listing of all unsigned drivers on local
computer. Lists Description, driverProviderName,
Driverversion,DriverDate, and infName of the driver
CheckSignedDeviceDrivers.ps1 -computer munich -full
Displays a listing of all signed drivers
a computer named munich. Lists Description, driverProviderName,
Driverversion,DriverDate, and infName of the driver
CheckSignedDeviceDrivers.ps1 -help ?
Displays the help topic for the script
"@
$helpText
exit
}
You’ll need to decide whether to call the funhelp function to display help information. To make
the determination, check for the presence of the $help variable. If you find it, call the funhelp
function. This is displayed here:
if($help){ "Obtaining help ..." ; funhelp }
Next, check for the unsigned switch. If you find the $unsigned variable, assign the string
“isSigned = ‘false’” to the $filter variable. This variable will be used to supply the -filter
parameter of the Get-WmiObject cmdlet. Store a status message in the $mode variable to
indicate which WMI query you’re using. If the $unsigned variable is not present, then look for
signed drivers and not for unsigned ones. This section of code is shown here:
if($unsigned)
{ $filter = "isSigned = 'false'" ; $mode = "unsigned" }
ELSE
{ $filter = "isSigned = 'true'" ; $mode = "signed" }
Choose the properties you’re interested in by assigning the property names to an array. This
code is displayed here:
$property = "Description", "driverProviderName", `
"Driverversion","DriverDate","infName"
C12622791.fm Page 370 Wednesday, December 12, 2007 1:44 PM
Chapter 12 Troubleshooting Windows 371
The next step is to perform the WMI query, using the Get-WmiObject cmdlet to query the
Win32_PnPSignedDriver WMI class. Run the query against the computer specified in the
-computer parameter when the script is run. Choose the properties detailed previously, and
use the filter you chose. This section of code is highlighted here:
$wmi = Get-WmiObject -Class Win32_PnPSignedDriver `
-computername $computer -property $property -filter $filter
Use the Count property to determine how many drivers meet the criteria and use the
information in the printout from the script If there are no signed drivers on the computer,
then the value of count will be blank rather than reporting a zero. This section of the script is
shown here:
funline("There are $($wmi.count) $mode drivers listed below:")
You must determine the type of output to generate. If the -full switch is specified when the
script is run, then print all the properties contained in the $property variable. If you don’t need
the full output, then only print the Description property of the device driver. The code that
determines this action is shown here:
if($full)
{
format-list -InputObject $wmi -property `
$property
}
ELSE
{
format-table -inputobject $wmi -Property description
}
The completed CheckSignedDeviceDrivers.ps1 script is shown here.
CheckSignedDeviceDrivers.ps1
param(
$computer="localhost",
[switch]$unsigned,
[switch]$full,
[switch]$help
)
function funline ($strIN)
{
$num = $strIN.length
for($i=1 ; $i -le $num ; $i++)
{ $funline += "=" }
Write-Host -ForegroundColor green $strIN
Write-Host -ForegroundColor darkgreen $funline
}
function funHelp()
{
$helpText=@"
C12622791.fm Page 371 Wednesday, December 12, 2007 1:44 PM
372 Windows PowerShell Scripting Guide
DESCRIPTION:
NAME: CheckSignedDeviceDrivers.ps1
Displays a listing of device drivers that are
and whether they are signed or not
PARAMETERS:
-computer the name of the computer
-unsigned lists unsigned drivers
-full lists Description, driverProviderName,
Driverversion,DriverDate, and infName
-help prints help file
SYNTAX:
CheckSignedDeviceDrivers.ps1 -computer munich -unsigned
Displays a listing of all unsigned drivers
on a computer named munich
CheckSignedDeviceDrivers.ps1 -unsigned -full
Displays a listing of all unsigned drivers on local
computer. Lists Description, driverProviderName,
Driverversion,DriverDate, and infName of the driver
CheckSignedDeviceDrivers.ps1 -computer munich -full
Displays a listing of all signed drivers
a computer named munich. Lists Description, driverProviderName,
Driverversion,DriverDate, and infName of the driver
CheckSignedDeviceDrivers.ps1 -help ?
Displays the help topic for the script
"@
$helpText
exit
}
if($help){ "Obtaining help ..." ; funhelp }
if($unsigned)
{ $filter = "isSigned = 'false'" ; $mode = "unsigned" }
ELSE
{ $filter = "isSigned = 'true'" ; $mode = "signed" }
$property = "Description", "driverProviderName", `
"Driverversion","DriverDate","infName"
$wmi = Get-WmiObject -Class Win32_PnPSignedDriver `
-computername $computer -property $property -filter $filter
funline("There are $($wmi.count) $mode drivers listed below:")
if($full)
C12622791.fm Page 372 Wednesday, December 12, 2007 1:44 PM
Chapter 12 Troubleshooting Windows 373
{
format-list -InputObject $wmi -property `
$property
}
ELSE
{
format-table -inputobject $wmi -Property description
}
Troubleshooting Network Issues
One of the problems with troubleshooting networking issues in Windows Server 2008
and Windows Vista is the large number of items that the operating system treats as network
adapters.
To deal with this issue, use the GetActiveNicAndConfig.ps1 script. Begin with the param
statement, as you often do, but instead of evaluating the value of the $computer variable as in
previous scripts, this time set the default value of the $computer variable to be the name of the
computer contained in the env: system variable. The rest of the param statement is similar to
other scripts: Define a -help switch and a -full switch. This line of code is displayed here:
param($computer = $env:computername, [switch]$full, [switch]$help)
Define the funline function; in this case, it’s located in the FunLine3.ps1 script in the extras
folder on the companion CD-ROM. The difference between this funline function and others
you’ve seen previously is that here you take the length of the input string and use it to multiply
the line separator value. Store the results in the $strLine variable and print both the string and
the underline value. This section of code is shown here:
function funline ($strIN)
{
$strLine= "=" * $strIn.length
Write-Host -ForegroundColor yellow $strIN
Write-Host -ForegroundColor darkYellow $strLine
}
Next, create the funhelp function. There are no surprises in this funhelp function: Create a
here-string to contain the help text and assign it to the $helpText variable; print the value and
exit the script. This code is shown here:
function funHelp()
{
$helpText=@"
DESCRIPTION:
NAME: GetActiveNicAndConfig.ps1
Displays
PARAMETERS:
-computer the name of the computer
C12622791.fm Page 373 Wednesday, December 12, 2007 1:44 PM
374 Windows PowerShell Scripting Guide
-full prints complete information
-help prints help file
SYNTAX:
GetActiveNicAndConfig.ps1 -computer munich
Displays network adapter info and network
adapter configuration info on a computer
named munich
GetActiveNicAndConfig.ps1
Displays network adapter info and network
adapter configuration info on the local
machine
GetActiveNicAndConfig.ps1 -computer munich -full
Displays full network adapter info and full
network adapter configuration info on a computer
named munich
GetActiveNicAndConfig.ps1 -help ?
Displays the help topic for the script
"@
$helpText
exit
}
Check for the presence of the $help variable. If you find it, you’ll need to call the funhelp func-
tion by using this line of code:
if($help){ "Obtaining help ..." ; funhelp }
Next create a constant, which is used to hold the number indicating a network adapter is con-
nected to the network. This value comes from the Windows Software Development Kit (SDK).
This line of code is shown here:
New-Variable -Name c_netConnected -value 2 -option constant
At this time, you’ll make the connection into WMI. To do this, use the Get-WmiObject cmdlet
and choose the Win32_NetworkAdapter WMI class. Connect to the computer specified in the
$computer variable, and look only for network adapters that are currently connected. When
you find the connected network adapters, store the resulting management object in the $nic
variable. This line of code is displayed here:
$nic = Get-WmiObject -Class win32_networkadapter -computername $computer `
-filter "NetConnectionStatus = $c_netConnected"
Now, use the network adapter object stored in the $nic variable to help you find an associated
network adapter configuration object. Use the $nic.InterfaceIndex property because it is also
C12622791.fm Page 374 Wednesday, December 12, 2007 1:44 PM
Chapter 12 Troubleshooting Windows 375
available in the Win32_NetworkAdapterConfiguration WMI class. Store the resulting manage-
ment object in the $nicConfig variable. This section of code is shown here:
$nicConfig = Get-WmiObject -Class win32_networkadapterconfiguration `
-filter "interfaceindex = $($nic.interfaceindex)"
You must determine how much information to return. If the -full switch is used, then the
script was launched, and you’ll print complete network adapter information as well as
complete network adapter configuration information. Use the funline function to provide a
header between the two portions of output. This section of code is shown here:
if($full)
{
funline("Full Network adapter information for $($computer)")
format-list -InputObject $nic -property [a-z]*
funline("Full Network adapter configuration for $($computer)")
format-list -InputObject $nicConfig -property [a-z]*
}
However, if the -full switch was not specified, you’ll only print the default values of each WMI
class. Use the Format-List cmdlet to print the information. To do this, use the -inputobject
parameter because you already have objects representing the WMI information from earlier in
the script. This section of code is shown here:
ELSE
{
funline("Basic Network adapter information for $($computer)")
format-list -InputObject $nic
funline("Basic Network adapter configuration for $($computer)")
format-list -InputObject $nicConfig
}
The completed GetActiveNicAndConfig.ps1 script is shown here.
GetActiveNicAndConfig.ps1
param($computer = $env:computername, [switch]$full, [switch]$help)
function funline ($strIN)
{
$strLine= "=" * $strIn.length
Write-Host -ForegroundColor yellow $strIN
Write-Host -ForegroundColor darkYellow $strLine
}
function funHelp()
{
$helpText=@"
DESCRIPTION:
NAME: GetActiveNicAndConfig.ps1
Displays
PARAMETERS:
C12622791.fm Page 375 Wednesday, December 12, 2007 1:44 PM
376 Windows PowerShell Scripting Guide
-computer the name of the computer
-full prints complete information
-help prints help file
SYNTAX:
GetActiveNicAndConfig.ps1 -computer munich
Displays network adapter info and network
adapter configuration info on a computer
named munich
GetActiveNicAndConfig.ps1
Displays network adapter info and network
adapter configuration info on the local
machine
GetActiveNicAndConfig.ps1 -computer munich -full
Displays full network adapter info and full
network adapter configuration info on a computer
named munich
GetActiveNicAndConfig.ps1 -help ?
Displays the help topic for the script
"@
$helpText
exit
}
if($help){ "Obtaining help ..." ; funhelp }
New-Variable -Name c_netConnected -value 2 -option constant
$nic = Get-WmiObject -Class win32_networkadapter -computername $computer `
-filter "NetConnectionStatus = $c_netConnected"
$nicConfig = Get-WmiObject -Class win32_networkadapterconfiguration `
-filter "interfaceindex = $($nic.interfaceindex)"
if($full)
{
funline("Full Network adapter information for $($computer)")
format-list -InputObject $nic -property [a-z]*
funline("Full Network adapter configuration for $($computer)")
format-list -InputObject $nicConfig -property [a-z]*
}
ELSE
{
funline("Basic Network adapter information for $($computer)")
format-list -InputObject $nic
funline("Basic Network adapter configuration for $($computer)")
format-list -InputObject $nicConfig
}
C12622791.fm Page 376 Wednesday, December 12, 2007 1:44 PM
Chapter 12 Troubleshooting Windows 377
Summary
In this chapter, we examined several areas that are commonly investigated when troubleshoot-
ing Windows Vista or Windows Server 2008. The first topic we explored was the boot config-
uration settings. To do this, we used WMI to gather the boot directories and scratch locations
of the current Windows installation. Next, we looked at the startup services. While doing this,
we paid attention to services that were configured to start automatically but were not cur-
rently running.
While on the subject of services, we also looked at the service dependencies. This is really
important because if a parent service stops unexpectedly, the dependent service might be left
hanging.
Next, we looked for unsigned device drivers, and concluded the chapter by looking at the net-
work adapter configuration of the active network interface card (NIC). Along the way we
looked at multiplying strings and directly accessing the environment PSDrive. Additionally,
we developed a technique to produce both minimal listings and full listings of management
information. We saw how we can control this display by using a switch parameter from the
command line.
C12622791.fm Page 377 Wednesday, December 12, 2007 1:44 PM
C12622791.fm Page 378 Wednesday, December 12, 2007 1:44 PM

379
Chapter 13
Managing Domain Users
After completing this chapter, you will be able to:
■Create organizational units.
■Create domain users and groups.
■Modify domain users and groups.
■Add multiple users with multiple attributes.
On the Companion Disc All the scripts used in this chapter are located on the CD that
accompanies this book in the \scripts\chapter13 folder.
Creating Organizational Units
The most basic item in the Active Directory directory service is the organizational unit (OU).
It is a requirement for users to be in an OU before Group Policy can be applied to them to
control the thousands of minute details that are the province of network administrators the
world over. You can also place printer objects, file shares, computer accounts, groups, and a
wide variety of other items inside OUs. Indeed, you can even place OUs inside other OUs!
Begin by creating a script to create an OU. The procedure for creating an OU in Active
Directory is very similar to the procedure for creating users, groups, and other objects. You
make a connection to Active Directory, specify the type of object to create, specify the
object name, and commit the changes to Active Directory. The differences between creating an
OU and other creation procedures are simply the types of objects you’ll create and the names
of the attributes you’ll configure.
When working with the CreateOU.ps1 script, begin by using the param statement to assign
values to each of the arguments used to create the OU. You need the name, the OU where it
will be created, and the domain. The -ou parameter is optional, as you may want to create a top
level OU. Define the -help parameter; for the CreateOU.ps1 script, this is a switch parameter
that only has an effect if it is specified. The line of code is shown here:
param($name,$ou,$dc,[switch]$help)
Next, create the funhelp() function, which displays a string containing information about the
script, its parameters, and syntax. To do this, use a here-string construction to make it easier
to type help information into the script. The primary advantage of a here-string configuration
is that it allows you to ignore quoting rules. After the here-string is created and assigned to the
C13622791.fm Page 379 Wednesday, December 12, 2007 1:44 PM
380 Windows PowerShell Scripting Guide
$helpText variable, display the contents of the $helpText variable, and exit the script. The
funhelp() function is shown here:
function funHelp()
{
$helpText=@"
DESCRIPTION:
NAME: CreateOU.ps1
Creates a OrganizationalUnit
PARAMETERS:
-name name of the OrganizationalUnit to create
-ou ou to create OrganizationalUnit in
-dc domain to create OrganizationalUnit in
-help prints help file
SYNTAX:
CreateOU.ps1 -name "OU=MyNewOU" -ou "myOU" `
-dc "dc=nwtraders,dc=com"
Creates a OrganizationalUnit named MyNewOU in the myOU
organizational unit in the nwtraders.com domain
CreateOU.ps1 -name "ou=mynewou" -dc "dc=nwtraders,dc=com"
Creates a OrganizationalUnit named MyNewOU in the root
of the nwtraders.com domain
CreateOU.ps1 -help
Displays the help topic for the script
"@
$helpText
exit
}
You must decide if the help text will be displayed when the script is run. To do this, check for
the presence of the $help variable; if it’s present, print a string stating that you are obtaining
help, then call the funhelp() function. This line of code is displayed here:
if($help){ "Obtaining help ..." ; funhelp }
To avoid errors when the script is run, check for the presence of several required parameters.
It’s impossible to create an object in Active Directory if it doesn’t have a name; therefore, the
$name variable must be present. In the same vein, an object must reside someplace. Since the
$dc variable contains the full path to the domain where the organizational unit is created, then
the variable is required. If either the $name or the $dc variable is missing, then print a string
stating that a parameter is missing, and call the funhelp() function. This line of code is shown
here:
if(!$name -or !$dc) { "Missing parameter ..." ; funhelp }
C13622791.fm Page 380 Wednesday, December 12, 2007 1:44 PM
Chapter 13 Managing Domain Users 381
Check for the presence of the $ou variable; if it’s present, use it when connecting to Active
Directory. If the $ou variable is not present, then don’t include a space for it in the adsPath that
is used for the Active Directory connection. In either case, print the name and location of the
organizational unit you are creating. This section of code is listed here:
if($ou)
{ "Creating OU $name in LDAP://$ou,$dc"
$ADSI = [ADSI]"LDAP://$ou,$dc"
}
ELSE
{ "Creating OU $name in LDAP://$dc"
$ADSI = [ADSI]"LDAP://$dc"
}
You must specify the type of object you’re creating. Since you want to create an organizational
unit, the class name to use for Active Directory Services Interfaces (ADSI) is Organization-
alUnit. Hold this value in the $class variable, call the create() method, and supply the values
held in the $class and the $name variables. The object returned from this method call is stored
in the $OrganizationalUnit variable. Use the setinfo() method from this object to commit the
changes to Active Directory. This section of code is shown here:
$CLass = "OrganizationalUnit"
$OrganizationalUnit = $ADSI.create($Class, $Name)
$OrganizationalUnit.setInfo()
The complete CreateOU.ps1 script is shown here.
CreateOU.ps1
param($name,$ou,$dc,[switch]$help)
function funHelp()
{
$helpText=@"
DESCRIPTION:
NAME: CreateOU.ps1
Creates a OrganizationalUnit
PARAMETERS:
-name name of the OrganizationalUnit to create
-ou ou to create OrganizationalUnit in
-dc domain to create OrganizationalUnit in
-help prints help file
SYNTAX:
CreateOU.ps1 -name "OU=MyNewOU" -ou "myOU" `
-dc "dc=nwtraders,dc=com"
Creates a OrganizationalUnit named MyNewOU in the myOU
organizational unit in the nwtraders.com domain
CreateOU.ps1 -name "ou=mynewou" -dc "dc=nwtraders,dc=com"
Creates a OrganizationalUnit named MyNewOU in the root
C13622791.fm Page 381 Wednesday, December 12, 2007 1:44 PM
382 Windows PowerShell Scripting Guide
of the nwtraders.com domain
CreateOU.ps1 -help
Displays the help topic for the script
"@
$helpText
exit
}
if($help){ "Obtaining help ..." ; funhelp }
if(!$name -or !$dc) { "Missing parameter ..." ; funhelp }
if($ou)
{ "Creating OU $name in LDAP://$ou,$dc"
$ADSI = [ADSI]"LDAP://$ou,$dc"
}
ELSE
{ "Creating OU $name in LDAP://$dc"
$ADSI = [ADSI]"LDAP://$dc"
}
$Class = "OrganizationalUnit"
$OrganizationalUnit = $ADSI.create($CLass, $Name)
$OrganizationalUnit.setInfo()
Creating Domain Users
It goes without saying that creating users is fundamental to network management. In Win-
dows Server 2008, you can create a user object in Active Directory by using the create()
method and specifying a name, without supplying values for any of the attributes. When you
do this, the user account will be disabled and many of the attributes are populated with
seemingly random values. Your users may not want to log on using some of these values, but
this is a good way to create a large number of users; for example, for testing purposes in a
lab environment. This also allows you to quickly create the users in a single operation, letting
you “fill in the blanks” at a later time when more complete information is available.
When working with the CreateUser.ps1 script, use the param statement and declare four
different parameters. One of the parameters, the -help parameter, is actually a switch and is not
required to be present when the script is run. It is only used when the user wants to see the
help topic for the script. This line of code is shown here:
param($name,$ou,$dc,[switch]$help)
Then define the funhelp() function, which is used to display the help string when it is
requested from the command line by running the script with the -help parameter. The
funhelp() function uses a here-string to hold the help text in the variable $helpText. The here-
string allows you to type a large amount of text, skipping the usual opening and closing
quotes for the strings and `t for tabbing. It’s a useful technique when working with text. The
C13622791.fm Page 382 Wednesday, December 12, 2007 1:44 PM
Chapter 13 Managing Domain Users 383
funhelp() function describes the user, the parameters, and the syntax of the script. The
funhelp() function is detailed here:
function funHelp()
{
$helpText=@"
DESCRIPTION:
NAME: CreateUser.Ps1
Creates a user account
PARAMETERS:
-name name of the user to create
-ou ou to create user in
-dc domain to create user in
-help prints help file
SYNTAX:
CreateUser.Ps1 -name "CN=MyNewUser" -ou "ou=myOU" `
-dc "dc=nwtraders,dc=com"
Creates a user named MyNewUser in the myOU
organizational unit in the nwtraders.com domain
CreateUser.ps1 -name "cn=myuser" -ou "ou=ou2,ou=mytestou" `
-dc "dc=nwtraders,dc=com"
Creates a user named MyNewUser in the ou2 organizational
unit. A child OU of the mytestou Organizational unit
in the nwtraders.com domain
CreateUser.Ps1 -name "CN=MyNewUser" `
-dc "dc=nwtraders,dc=com"
Creates a user named MyNewUser in the users
container in the nwtraders.com domain
CreateUser.Ps1 -help
Displays the help topic for the script
"@
$helpText
exit
}
After the help function is created, look for the presence of the $help variable. If the variable is
present, print a message and call the funhelp() function. This line of code is shown here:
if($help){ "Obtaining help ..." ; funhelp }
Following that command, look for the presence of both the $name and the $dc variables. If
either of them is missing, it indicates the user didn’t supply the appropriate parameter when
the script was run. You can’t create a user without a name, and you can’t create a user if you
C13622791.fm Page 383 Wednesday, December 12, 2007 1:44 PM
384 Windows PowerShell Scripting Guide
don’t know how to connect to Active Directory. Call the funhelp() function if the required
parameters are absent. This line of code is written here:
if(!$name -or !$dc) { "Missing name parameter ..." ; funhelp }
To add flexibility to the script, look for the presence of the $ou variable. If it is present, include
the organizational unit contained in the $ou variable in the adsPath when you connect to
Active Directory. If the variable is not present, connect to the root domain. If the organiza-
tional unit is not supplied when the script is run, connect to Active Directory without using
one in the adsPath. This section of code is shown here:
if($ou)
{ "Creating user $name in LDAP://$ou,$dc"
$ADSI = [ADSI]"LDAP://$ou,$dc"
}
ELSE
{ "Creating user $name in LDAP://cn=users,$dc"
$ADSI = [ADSI]"LDAP://cn=users,$dc"
}
You must specify the type of object to create. In the CreateUser.ps1 script, specify user as the
type of object to make. Use the create() method to create a user object with the name specified
in the $name variable. After calling the setinfo() method, you’re done. This section of code is
shown here:
$CLass = "User"
$User = $ADSI.create($CLass, $Name)
$User.setInfo()
The completed CreateUser.ps1 script is shown here.
CreateUser.ps1
param($name,$ou,$dc,[switch]$help)
function funHelp()
{
$helpText=@"
DESCRIPTION:
NAME: CreateUser.Ps1
Creates a user account
PARAMETERS:
-name name of the user to create
-ou ou to create user in
-dc domain to create user in
-help prints help file
SYNTAX:
CreateUser.Ps1 -name "CN=MyNewUser" -ou "ou=myOU" `
-dc "dc=nwtraders,dc=com"
Creates a user named MyNewUser in the myOU
organizational unit in the nwtraders.com domain
C13622791.fm Page 384 Wednesday, December 12, 2007 1:44 PM

Chapter 13 Managing Domain Users 385
CreateUser.ps1 -name "cn=myuser" -ou "ou=ou2,ou=mytestou" `
-dc "dc=nwtraders,dc=com"
Creates a user named MyNewUser in the ou2 organizational
unit. A child OU of the mytestou Organizational unit
in the nwtraders.com domain
CreateUser.Ps1 -name "CN=MyNewUser" `
-dc "dc=nwtraders,dc=com"
Creates a user named MyNewUser in the users
container in the nwtraders.com domain
CreateUser.Ps1 -help
Displays the help topic for the script
"@
$helpText
exit
}
if($help){ "Obtaining help ..." ; funhelp }
if(!$name -or !$dc) { "Missing name parameter ..." ; funhelp }
if($ou)
{ "Creating user $name in LDAP://$ou,$dc"
$ADSI = [ADSI]"LDAP://$ou,$dc"
}
ELSE
{ "Creating user $name in LDAP://cn=users,$dc"
$ADSI = [ADSI]"LDAP://cn=users,$dc"
}
$CLass = "User"
$User = $ADSI.create($CLass, $Name)
$User.setInfo()
Modifying User Attributes
There are dozens of attributes available for user accounts. For most of these attributes, it is a
simple matter to identify the appropriate attribute and use the put() method to update the
value. Next you’ll learn about scripts that fill in the common attributes for each of the pages
associated with the user object in the Active Directory Users and Computers (ADUC)
Microsoft Management Console (MMC) snap-in.
Best Practices In this section there are five scripts that contain hard-coded values used to
populate attributes in Active Directory. In reality, you won’t use scripts written in this manner.
These five scripts illustrate the process of assigning values to the attributes. In fact, finding
the attribute names is perhaps the biggest challenge in using ADSI scripting. The best way to
populate the attributes depends on where the information comes from: a text file, a .csv file, a
Microsoft Excel spreadsheet, a Microsoft Access database, a Microsoft SQL Server database, or
even another directory can all be used as the source of the information needed for the script.
C13622791.fm Page 385 Wednesday, December 12, 2007 1:44 PM

386 Windows PowerShell Scripting Guide
Modifying General User Information
The General tab in the Active Directory Users and Computers MMC snap-in contains general
information about the user. This tab contains nine different attributes such as the user’s
first name, middle name, and last name. The problem is that the attributes stored in Active
Directory are not the same as the names displayed on the General tab in ADUC.
In Table 13-1, you’ll notice a mapping of the attribute names from Active Directory to the
display names as seen in ADUC. The names in the ADSI column are the names you need to
use in a script.
In the ModifyGeneralProperties.ps1 script, you assign values to all attributes shown on the
General tab in Active Directory and Computers. Use the [ADSI] accelerator and specify the
adsPath to the user object you want to modify. The adsPath consists of the distinguished name
attribute of the user object when it is preceded by the LDAP:// moniker. The LDAP:// moniker
is used to notify the ADSI that you want to connect to the directory using the Lightweight
Directory Access Protocol (LDAP) service provider. This binding string is shown here:
$objUser = [ADSI]"LDAP://cn=MyNewUser,ou=myTestOU,dc=nwtraders,dc=msft"
To assign values to each of the different attributes, use the put() method. Inside the smooth
parentheses, first specify the attribute you want to populate by using one of the special Active
Directory attribute names. Next, separated by a comma, supply the value you plan to insert
into Active Directory. You’ll have a single line in the script for each of the attributes you want
to populate. This section of the script is displayed here:
$objUser.put("SamaccountName", "myNewUser")
$objUser.put("givenName", "My")
$objUser.Put("initials", "N.")
$objUser.Put("sn", "User")
$objUser.Put("DisplayName", "My New User")
$objUser.Put("description" , "simple new user")
$objUser.Put("physicalDeliveryOfficeName", "RQ2")
Table 13-1 General Tab Name Mappings
General Tab Properties ADSI
First name givenName
Initials Initials
Last name Sn
Display name DisplayName
Description Description
Office physicalDeliveryOfficeName
Telephone number telephoneNumber
E-mail Mail
Web page wwwHomePage
C13622791.fm Page 386 Wednesday, December 12, 2007 1:44 PM

Chapter 13 Managing Domain Users 387
$objUser.Put("telephoneNumber", "999-222-1111")
$objUser.Put("mail", "mnu@hotmail.com")
$objUser.Put("wwwHomePage", "http://www.mnu.msn.com")
To commit the changes to Active Directory, use the setinfo() method, as shown here in this line
of code:
$objUser.setInfo()
The completed ModifyGeneralProperties.ps1 script is shown here.
ModifyGeneralProperties.ps1
$objUser = [ADSI]"LDAP://cn=MyNewUser,ou=myTestOU,dc=nwtraders,dc=msft"
$objUser.put("SamaccountName", "myNewUser")
$objUser.put("givenName", "My")
$objUser.Put("initials", "N.")
$objUser.Put("sn", "User")
$objUser.Put("DisplayName", "My New User")
$objUser.Put("description" , "simple new user")
$objUser.Put("physicalDeliveryOfficeName", "RQ2")
$objUser.Put("telephoneNumber", "999-222-1111")
$objUser.Put("mail", "mnu@hotmail.com")
$objUser.Put("wwwHomePage", "http://www.mnu.msn.com")
$objUser.setInfo()
Modifying the Address Tab
The Address tab in Active Directory Users and Computers on the user object displays six
attributes. Once again, the display names do not match up very well with the actual attribute
names stored in Active Directory. In Table 13-2, you’ll observe a list of attribute names and the
display names as shown in the Active Directory Users and Computers MMC. The names in
the right column are the ones you’ll use in the script.
The ModifyAddressProperties.ps1 script illustrates how each of these attributes found on
the Address tab of a user object in ADUC can be modified. Essentially, the ModifyAddress-
Properties.ps1 script is exactly the same as the ModifyGeneralProperties.ps1 script. Begin by
binding to an object in Active Directory, use the put() method, followed by the attribute name
Table 13-2 Address Tab Name Mapping
Address Tab Properties ADSI
Street streetAddress
P.O. box postOfficeBox
City L
State/province St
Zip/postal code postalCode
Country/region C,co,countryCode
C13622791.fm Page 387 Wednesday, December 12, 2007 1:44 PM

388 Windows PowerShell Scripting Guide
and the value for the attribute, and use setinfo() to commit the changes to Active Directory. The
ModifyAddressProperties.ps1 script is detailed here.
ModifyAddressProperties.ps1
$objUser = [ADSI]"LDAP://cn=MyNewUser,ou=myTestOU,dc=nwtraders,dc=msft"
$objUser.put("streetAddress", "123 main st")
$objUser.put("postOfficeBox", "po box 12")
$objUser.put("l", "Bedrock")
$objUser.put("st", "Arkansas")
$objUser.put("postalCode" , "12345")
$objUser.put("c", "US")
$objUser.put("co", "United States")
$objUser.put("countryCode", "840")
$objUser.setInfo()
Modifying the Profile Tab
The Profile tab contains information about a user’s profile. The user’s profile consists of
the storage path, the logon script, and the home drive and home directory information.
Table 13-3 maps the properties shown on the Profile tab in ADUC with the attributes stored
in Active Directory. These are the attribute names used in the ModifyProfileProperties.ps1
script. The property names displayed in ADUC map up fairly well with the actual ADSI
attribute names and, as a result, they are relatively easy to remember.
The ModifyProfileProperties.ps1 script illustrates modifying the values contained in Active
Directory associated with the user. The ModifyProfileProperties.ps1 script is essentially the
same as the ModifyGeneralProperties.ps1 script. Begin by binding to an object in Active Directory,
use the put() method, followed by the attribute name and the value for the attribute, and use
setinfo() to commit the changes to Active Directory. The complete ModifyProfileProperties.ps1
script is shown here.
ModifyProfileProperties.ps1
$objUser = [ADSI]"LDAP://cn=MyNewUser,ou=myTestOU,dc=nwtraders,dc=msft"
$objUser.put("profilePath", "\\London\profiles\myNewUser")
$objUser.put("scriptPath", "logon.vbs")
$objUser.put("homeDirectory", "\\london\users\myNewUser")
$objUser.put("homeDrive", "H:")
$objUser.setInfo()
Table 13-3 Profile Tab Name Mapping
Profile Tab Properties ADSI
Profile path profilePath
Logon script scriptPath
Local path homeDrive
Connect\to homeDirectory
C13622791.fm Page 388 Wednesday, December 12, 2007 1:44 PM

Chapter 13 Managing Domain Users 389
Modifying the Telephone Tab
The Telephone tab contains six fields that can be manipulated via Windows PowerShell.
Table 13-4 maps the property display names in Active Directory Users and Computers to
the attribute names stored in Active Directory. Use those ADSI attribute names in the Modify-
TelephoneProperties.ps1 script. These ADSI attribute names are all over the place in terms
of compatibility. Two of the attributes, pager and mobile, match up exactly. Others, such as fax
and notes, bear little resemblance to the reality stored in Active Directory.
The ModifyTelephoneProperties.ps1 script illustrates how to populate this tab; it’s essentially
the same as the ModifyGeneralProperties.ps1 script created at the beginning of this section.
Begin by binding to an object in Active Directory using the put() method, followed by the
attribute name and the value for the attribute; use setinfo() to commit the changes to Active
Directory. The complete ModifyTelephoneProperties.ps1 script is shown here.
ModifyTelephoneProperties.ps1
$objUser = [ADSI]"LDAP://cn=MyNewUser,ou=myTestOU,dc=nwtraders,dc=msft"
$objUser.Put("homePhone", "(215)788-4312")
$objUser.Put("pager", "(215)788-0112")
$objUser.Put("mobile", "(715)654-2341")
$objUser.Put("facsimileTelephoneNumber", "(215)788-3456")
$objUser.Put("ipPhone", "192.168.6.112")
$objUser.Put("info", "All contact information is confidential," `
+ "and is for official use only.")
$objUser.setInfo()
Modifying the Organization Tab
The Organization tab in Active Directory Users and Computers (ADUC) for the user object
has five fields. These display fields are not just simple write-the-value-to-the-attribute fields
like the other scripts in this section. This is because there are links between the user objects.
Table 13-5 lists the attribute names stored in Active Directory with the display names found in
ADUC.
Table 13-4 Telephone Tab Name Mapping
Telephone Tab Properties ADSI
Home homePhone
Pager Pager
Mobile Mobile
Fax facsimileTelephoneNumber
IP phone ipPhone
Notes Info
C13622791.fm Page 389 Wednesday, December 12, 2007 1:44 PM

390 Windows PowerShell Scripting Guide
The ModifyOrganizationProperties.ps1 script illustrates completing the Organization tab in
ADUC; it’s basically the same as the ModifyGeneralProperties.ps1 script created at the begin-
ning of this section. Begin by binding to an object in Active Directory, use the put() method
followed by the attribute name and the value for the attribute, and use setinfo() to commit the
changes to Active Directory. The complete ModifyOrganizationProperties.ps1 script is shown
here.
ModifyOrganizationProperties.ps1
$strDomain = "dc=nwtraders,dc=msft"
$strOU = "ou=myTestOU"
$strUser = "cn=MyNewUser"
$strManager = "cn=myBoss"
$objUser = [ADSI]"LDAP://$strUser,$strOU,$strDomain"
$objUser.put("title", "Mid-Level Manager")
$objUser.put("department", "sales")
$objUser.put("company", "North Wind Traders")
$objUser.put("manager", "$strManager,$strou,$strDomain")
$objUser.setInfo()
Modifying a Single User Attribute
Having a script for the profile page in ADUC and another script for the telephone page in
ADUC does not really make much sense in real terms. The ModifyUser.ps1 script returns to
scripts that accept command-line arguments. This script can be used from the network admin-
istrator’s desk to quickly and easily modify any attribute for any user in any organizational
unit in any domain.
The first action to perform in the ModifyUser.ps1 script is to use the param statement to
collect the information needed for the script. You must know the name of the object to modify,
which property to modify, the value to insert into the property, and the location of the user
object. To do this, use the -name parameter to identify the user to modify. Use the -property
and -value parameters to specify the property to modify, and use the -ou and -dc parameters to
assist in locating the user object. There is also the -help parameter, which is a switch parameter.
This line of code is shown here:
param($name,$property,$value,$ou,$dc,[switch]$help)
Table 13-5 Organization Tab Name Mapping
Organization Tab Properties ADSI
Title Title
Department Department
Company Company
Manager Manager
Direct reports DirectReports
C13622791.fm Page 390 Wednesday, December 12, 2007 1:44 PM
Chapter 13 Managing Domain Users 391
After the param statement, define the funhelp() function, which is used to print the help string
when the script is launched with the -help switch. This function basically creates a large here-
string, assigns it to the $helpText variable, prints the contents of the variable, and exits the
script. The funhelp() function is displayed here:
function funHelp()
{
$helpText=@"
DESCRIPTION:
NAME: ModifyUser.ps1
Modifies a user account
PARAMETERS:
-name name of the user to modify
-ou ou of the user
-dc domain of the user
-property attribute to modify
-value value of the attribute
-help prints help file
SYNTAX:
ModifyUser.ps1 -name "CN=MyNewUser" -ou "ou=myOU" `
-dc "dc=nwtraders,dc=com" `
-property "SamaccountName" `
-value "MyNewUser"
Modifies a user named MyNewUser in the myOU
organizational unit in the nwtraders.com domain
adds the SamaccountName attriute with a value
of MyNewUser
ModifyUser.ps1 -help
Displays the help topic for the script
"@
$helpText
exit
}
You need to detect when the script is run with the -help parameter. Do this by looking for the
$help variable; it is only present if the script is run with the -help parameter. When the $help
variable is detected, print a status message and call the funhelp() function, as you see here:
if($help){ "Obtaining help ..." ; funhelp }
After this, check for the existence of all required parameters. To do this, use an if statement. If
the required variables are not present, then print “Missing parameter …” and call the funhelp()
function. These two lines of code are displayed here:
if(!$name -or !$dc -or !$property -or !$value)
{ "Missing parameter ..." ; funhelp }
C13622791.fm Page 391 Wednesday, December 12, 2007 1:44 PM

392 Windows PowerShell Scripting Guide
Next, tell the $class variable that you’re creating a user object and print a status message
stating you’re modifying the user. Use the $name, $ou, and $dc variables to tell the user exactly
which user is modified.
Tip A nice improvement to the ModifyUser.ps1 script is to add a line that prints the
contents of $property and $value. This informs the user exactly which property is being
modified. You can even add a prompt to ask if the user wants the change made. To do the
prompting, use the Read-Host cmdlet with the -prompt parameter.
These two lines of code are listed here:
$Class = "User"
"Modifying $name,$ou,$dc"
Use the [ADSI] accelerator and provide the adsPath to the user you intend to modify. Store the
returned object in the $ADSI variable. This line of code is shared here:
$ADSI = [ADSI]"LDAP://$name,$ou,$dc"
Use the object stored in the $ADSI variable and use the put() method to put the value stored
in the $value variable into the property stored in the $property. After that, use the setinfo()
method from the object stored in the $ADSI variable. These two lines of code are shown here:
$ADSI.put($property, $value)
$ADSI.setInfo()
The completed ModifyUser.ps1 script is shown here.
ModifyUser.ps1
param($name,$property,$value,$ou,$dc,[switch]$help)
function funHelp()
{
$helpText=@"
DESCRIPTION:
NAME: ModifyUser.ps1
Modifies a user account
PARAMETERS:
-name name of the user to modify
-ou ou of the user
-dc domain of the user
-property attribute to modify
-value value of the attribute
-help prints help file
SYNTAX:
ModifyUser.ps1 -name "CN=MyNewUser" -ou "ou=myOU" `
-dc "dc=nwtraders,dc=com" `
-property "SamaccountName" `
-value "MyNewUser"
C13622791.fm Page 392 Wednesday, December 12, 2007 1:44 PM

Chapter 13 Managing Domain Users 393
Modifies a user named MyNewUser in the myOU
organizational unit in the nwtraders.com domain
adds the SamaccountName attriute with a value
of MyNewUser
ModifyUser.ps1 -help
Displays the help topic for the script
"@
$helpText
exit
}
if($help){ "Obtaining help ..." ; funhelp }
if(!$name -or !$dc -or !$property -or !$value)
{ "Missing parameter ..." ; funhelp }
$CLass = "User"
"Modifying $name,$ou,$dc"
$ADSI = [ADSI]"LDAP://$name,$ou,$dc"
$ADSI.put($property, $value)
$ADSI.setInfo()
Creating Users from a .csv File
There may be times when you prefer to use a comma-separated value (.csv) file as your source
file. There are several major advantages to taking this route. A .csv file is incredibly easy to
create, easy to manipulate, and very easy to work with in Windows PowerShell. When working
with a plain text file, you must read the line, and perhaps turn the line into an array if you
want to work with multiple elements in the line of text. With a .csv file, you gain the added
benefit of having column headers. These make the script utilizing the .csv file as a source file
much easier to read. An additional advantage to a .csv file is it requires no additional software
installed on the computer. It can be created and maintained with nothing more than Notepad.exe.
When using the CreateAndEnableUser.ps1 script, assign values for the Security Account
Manager (SAM) account name and the password, then enable the user account. By default,
Windows Server 2008 has a domain security policy that prohibits creating enabled user
accounts without a password. Because most of the code in the script is similar to the
CreateUser.ps1 script you examined earlier in this chapter, I’ll only dive into the more unique
aspects of the script here.
Note The SAM name attribute (samaccountname) is listed as being present for backwards
compatibility. This is somewhat misleading, as there are still applications that use this
attribute. Microsoft Exchange Server 2007 can use this attribute to retrieve e-mail. Users
can use this value to log onto the domain. The attribute is always present and populated. If
you do not supply a value for the samaccountname attribute, Windows Server 2008 will auto-
generate a value that bears close resemblance to a random 15-character name.
C13622791.fm Page 393 Wednesday, December 12, 2007 1:44 PM

394 Windows PowerShell Scripting Guide
Setting the Password
When a user account is created in Active Directory, the account is disabled. To enable the user
account, first set the password.
Best Practices Passwords are keys to unlocking network resources, and as such, network
administrators are very concerned about protecting these assets. In the CreateAndEnableUser.ps1
script, the password is hard-coded into the text file, which is a concern in some situations.
There are several ways to deal with the password issue: encrypt the script using the Encrypting
File System (EFS) features of Windows Vista and Windows Server 2008, store the password
in a separate file that is encrypted with EFS, or even use the Get-Credential Windows
PowerShell cmdlet.
In the CreateAndEnableUser.ps1 script, use the put() method to write the password into the
userPassword attribute in Active Directory. Obtain the password by reading the password
column from the EnabledUsers.csv file. When you read the column from the .csv file, you
must keep the password column from expanding into an object when reading it. To constrain
the behavior, use a subexpression to group the command by using a dollar sign in front of the
$strUser.Password portion. When you do this, put the code you want to execute first inside
another set of parentheses. This section of code is shown here:
User.put("userPassword", $($strUser.Password))
Enabling the User Account
Creating a disabled user account may be an interesting procedure, but it is not very useful.
For a user account to be of any value at all, it must be enabled. In Chapter 10, “Managing Post-
Deployment Issues,” you created the EnableDisableUser.ps1 script and assigned a User Account
Control value of 512 to the userflags attribute to enable the user account. That attribute does
not exist in Active Directory; it is only available via the WinNT provider. Using the ADSI type
accelerator, you can’t easily enable the user account. To get to the AccountDisabled ADSI
attribute, you’ll need to move beyond the abstraction that is performed by the ADSI type accel-
erator and work directly with the raw object. To do this, use a special Windows PowerShell
object named psbase. The psbase object has a method named invokeset(). This method allows you
to set a value for the AccountDisabled attribute. This line of code is displayed here:
$user.psbase.invokeset("AccountDisabled", "False")
The complete CreateAndEnableUser.ps1 script is shown here.
CreateAndEnableUser.ps1
param([switch]$help)
function funHelp()
{
$helpText=@"
C13622791.fm Page 394 Wednesday, December 12, 2007 1:44 PM
Chapter 13 Managing Domain Users 395
DESCRIPTION:
NAME: CreateAndEnableUser.Ps1
Creates an enabled user account by reading csv file
PARAMETERS:
-help prints help file
SYNTAX:
CreateAndEnableUser.Ps1
Creates an enabled user by reading a csv file
CreateAndEnableUser.Ps1 -help
Displays the help topic for the script
"@
$helpText
exit
}
if($help){ "Obtaining help ..." ; funhelp }
$aryUser= import-csv -Path c:\psbook\enabledusers.csv
$Class = "User"
$dc = "dc=nwtraders,dc=com"
foreach($strUser in $aryUser)
{
$ou = "ou="+$strUser.OU
$ADSI = [ADSI]"LDAP://$ou,$dc"
$cnuser="cn="+$($strUser.userName)
$User = $ADSI.create($CLass,$cnuser)
$User.put("SamaccountName", $($strUser.username))
$User.setInfo()
$User.put("userPassword", $($strUser.Password))
$user.psbase.invokeset("AccountDisabled", "False")
$User.setInfo()
}
Creating Domain Groups
After creating users, the next step is to create groups to store the users. The CreateGroup.ps1
script is similar to the CreateUser.ps1 script examined in the “Creating Domain Users” section
earlier in this chapter.
Begin the CreateGroup.ps1 script with a param() statement. Create one switch parameter
named -help, and three other parameters that are used to create the group. This line of code is
shown here:
param($name,$ou,$dc,[switch]$help)
C13622791.fm Page 395 Wednesday, December 12, 2007 1:44 PM
396 Windows PowerShell Scripting Guide
Next, create the funhelp() function, which is used to display help. The here-string contains the
description, parameters, and syntax of the script and is displayed when the script is run
with the -help switch. This section of code is shown here:
function funHelp()
{
$helpText=@"
DESCRIPTION:
NAME: CreateGroup.ps1
Creates a group
PARAMETERS:
-name name of the group to create
-ou ou to create group in
-dc domain to create group in
-help prints help file
SYNTAX:
CreateGroup.ps1 -name "CN=MyNewGroup" -ou "myOU" `
-dc "dc=nwtraders,dc=com"
Creates a group named MyNewGroup in the myOU
organizational unit in the nwtraders.com domain
CreateGroup.ps1 -name "CN=MyNewGroup" `
-dc "dc=nwtraders,dc=com"
Creates a group named MyNewGroup in the users
container in the nwtraders.com domain
CreateGroup.ps1 -help
Displays the help topic for the script
"@
$helpText
exit
}
Check for the presence of $help variable; if it’s present, it’s because the script was run with the
-help parameter. Check for the presence of the $name and $dc variables; if they are not present,
print a message, and call the funhelp function. This section of code is shared here:
if($help){ "Obtaining help ..." ; funhelp }
if(!$name -or !$dc) { "Missing name parameter ..." ; funhelp }
It is entirely possible that you might want to create a group within an organizational unit. It is
also possible that you might want to create a group off the root of the domain as well. To
handle these two needs, allow the -ou parameter to be optional. However, this flexibility
comes at the price of added complexity to the script. The reason is that the adsPath parameter
is unable to handle a null or empty parameter—necessitating two separate connection strings.
If the $ou variable is present, print a status message and make the connection into Active
C13622791.fm Page 396 Wednesday, December 12, 2007 1:44 PM
Chapter 13 Managing Domain Users 397
Directory using the supplied value for the organizational unit. If it is missing, then make a
different connection. This section of the script is shown here:
if($ou)
{ "Creating group $name in LDAP://$ou,$dc"
$ADSI = [ADSI]"LDAP://$ou,$dc"
}
ELSE
{ "Creating group $name in LDAP://cn=users,$dc"
$ADSI = [ADSI]"LDAP://cn=users,$dc"
}
The remainder of the script is rather straightforward. You must specify the class of object to
create, call the create() method, and use the setinfo() method to commit the changes to
Active Directory. This section of code is listed here:
$Class = "Group"
$Group = $ADSI.create($Class, $Name)
$Group.setInfo()
The completed CreateGroup.ps1 script is shown here.
CreateGroup.ps1
param($name,$ou,$dc,[switch]$help)
function funHelp()
{
$helpText=@"
DESCRIPTION:
NAME: CreateGroup.ps1
Creates a group
PARAMETERS:
-name name of the group to create
-ou ou to create group in
-dc domain to create group in
-help prints help file
SYNTAX:
CreateGroup.ps1 -name "CN=MyNewGroup" -ou "myOU" `
-dc "dc=nwtraders,dc=com"
Creates a group named MyNewGroup in the myOU
organizational unit in the nwtraders.com domain
CreateGroup.ps1 -name "CN=MyNewGroup" `
-dc "dc=nwtraders,dc=com"
Creates a group named MyNewGroup in the users
container in the nwtraders.com domain
CreateGroup.ps1 -help
Displays the help topic for the script
C13622791.fm Page 397 Wednesday, December 12, 2007 1:44 PM
398 Windows PowerShell Scripting Guide
"@
$helpText
exit
}
if($help){ "Obtaining help ..." ; funhelp }
if(!$name -or !$dc) { "Missing name parameter ..." ; funhelp }
if($ou)
{ "Creating group $name in LDAP://$ou,$dc"
$ADSI = [ADSI]"LDAP://$ou,$dc"
}
ELSE
{ "Creating group $name in LDAP://cn=users,$dc"
$ADSI = [ADSI]"LDAP://cn=users,$dc"
}
$Class = "Group"
$Group = $ADSI.create($Class, $Name)
$Group.setInfo()
Adding a User to a Domain Group
Groups are not really all that interesting. About the only details that get modified in groups
are the members. In this section, you’ll learn about the steps involved in assigning domain
users to domain groups.
The process of adding a user to a group is a little strange. Although it is true that groups have
a member attribute, it is not easy to connect to the group, add the distinguished name attribute
of the user to the member attribute, call the setinfo() method, and finish. Rather, the process
requires us to first connect to the group. Then, use the add() method to add the adsPath to the
member attribute, and then, don’t bother calling setinfo().
Begin the AddUserToGroup.ps1 script with the param() statement, supplying the name of the
user, the group, and the domain they both reside within. The -ou parameter is optional from
the Active Directory perspective, but the script still requires it to be there. This is to prevent an
ADSI error caused by a missing parameter; you’ll soon examine the code that makes it possi-
ble. The param statement is shown here:
param($name,$group,$ou,$dc,[switch]$help)
Move into the funhelp() function. This section of code, which follows, is a giant here-string that
is stored in the $helpText variable:
function funHelp()
{
$helpText=@"
DESCRIPTION:
NAME: AddUserToGroup.ps1
Adds a user account to a group
C13622791.fm Page 398 Wednesday, December 12, 2007 1:44 PM
Chapter 13 Managing Domain Users 399
PARAMETERS:
-name name of the user
-ou ou of the group
-dc domain of the user
-group group to modify
-help prints help file
SYNTAX:
AddUserToGroup.ps1 -name "cn=MyNewUser" -ou "ou=myOU" `
-dc "dc=nwtraders,dc=com" `
-group "cn=MyGroup"
Adds a user named MyNewUser in the myOU
organizational unit in the nwtraders.com domain
to the MyGroup group in the same OU.
AddUserToGroup.ps1 -help
Displays the help topic for the script
"@
$helpText
exit
}
Following the funhelp() function, use an if statement to see if the -help switch parameter is sup-
plied to the script when it runs. This is also where you check to see if all the mandatory param-
eters are supplied as well. These lines of code are listed here:
if($help){ "Obtaining help ..." ; funhelp }
if(!$name -or !$dc -or !$group -or !$ou)
{ "Missing parameter ..." ; funhelp }
Next is the actual “worker” section of the script. Print a status message to the user using the
variables to build up the string. Connect to the group and use the add() method to add the
user to the group. The unusual portion of the script is that you must use the adsPath, which
includes both the distinguishedName attribute and the LDAP:// moniker. This section of code
is displayed here:
"Modifying $name,$ou,$dc"
$ADSI = [ADSI]"LDAP://$group,$ou,$dc"
$ADSI.add("LDAP://$name,$ou,$dc")
The complete AddUserToGroup.ps1 script is shown here.
AddUserToGroup.ps1
param($name,$group,$ou,$dc,[switch]$help)
function funHelp()
{
$helpText=@"
DESCRIPTION:
NAME: AddUserToGroup.ps1
Adds a user account to a group
C13622791.fm Page 399 Wednesday, December 12, 2007 1:44 PM
400 Windows PowerShell Scripting Guide
PARAMETERS:
-name name of the user
-ou ou of the group
-dc domain of the user
-group group to modify
-help prints help file
SYNTAX:
AddUserToGroup.ps1 -name "cn=MyNewUser" -ou "ou=myOU" `
-dc "dc=nwtraders,dc=com" `
-group "cn=MyGroup"
Adds a user named MyNewUser in the myOU
organizational unit in the nwtraders.com domain
to the MyGroup group in the same OU.
AddUserToGroup.ps1 -help
Displays the help topic for the script
"@
$helpText
exit
}
if($help){ "Obtaining help ..." ; funhelp }
if(!$name -or !$dc -or !$group -or !$ou)
{ "Missing parameter ..." ; funhelp }
$CLass = "User"
"Modifying $name,$ou,$dc"
$ADSI = [ADSI]"LDAP://$group,$ou,$dc"
$ADSI.add("LDAP://$name,$ou,$dc")
Adding Multiple Users with Multiple Attributes
To create one user is not difficult: You can walk through the wizard in less than a minute. If
you begin to specify additional attributes, however, the amount of time involved begins to
escalate. If you need to create multiple users with multiple attributes, you are looking at a
scenario that can literally consume days, weeks, and even months. One way to manage the
creation of multiple users and attributes is to use an Excel spreadsheet.
To read an Excel spreadsheet, you first need to specify the path to the spreadsheet. Next,
create an instance of the Excel.Application COM object. This allows you to work with the
Excel automation model, which is sometimes easier than the alternative, using Active X Data
Objects (ADO). After creating the object, open the workbook and retrieve the values stored in
the cells. These cells are referenced by numbers with 1,1 being the upper-left row/column.
This is not the same as the letter/number combination displayed in Figure 13-1.
C13622791.fm Page 400 Wednesday, December 12, 2007 1:44 PM
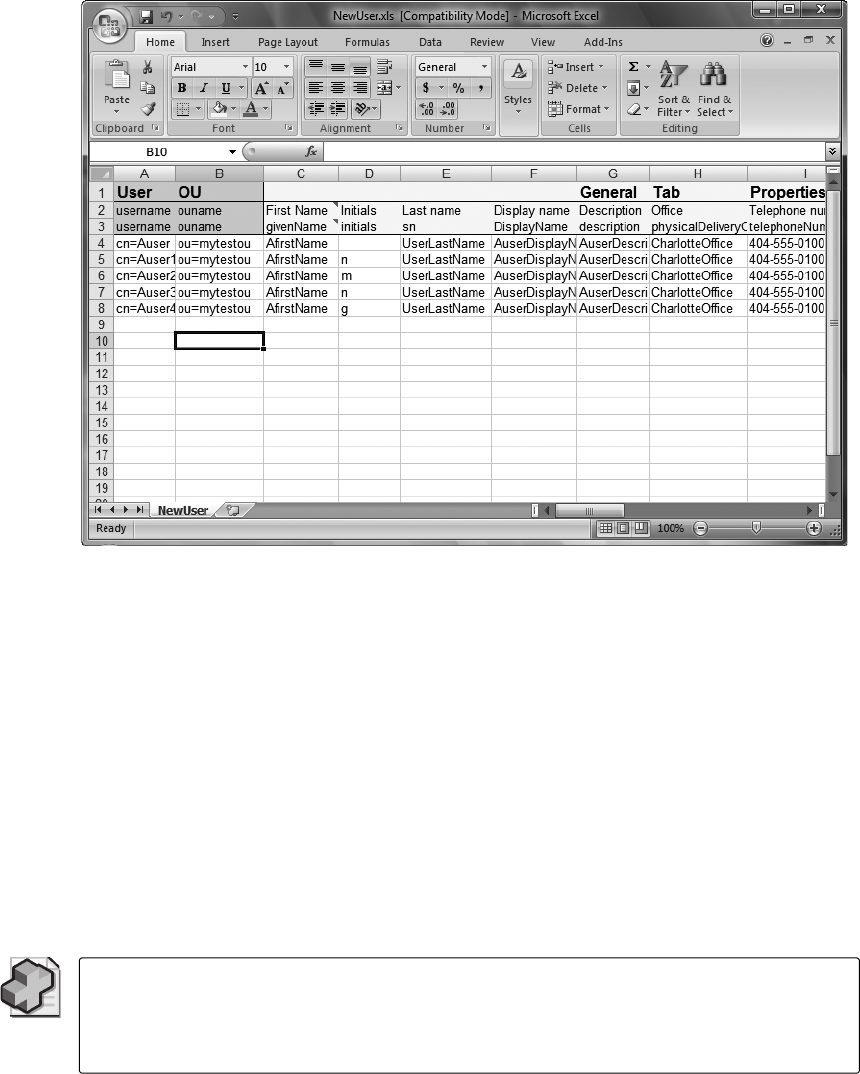
Chapter 13 Managing Domain Users 401
Figure 13-1 An Excel spreadsheet can be easily created to manage multiple users.
In the ReadExcelModifyUsers.ps1 script, begin by supplying the path to the Excel spread-
sheet:
$strPath="c:\Chapter13\NewUser.xls"
Next, create an instance of the Excel.Application COM object with the New-Object cmdlet,
specifying the -comobject parameter. Store the created object in the variable $objExcel as shown
here:
$objExcel=New-Object -ComObject Excel.Application
Using the following line of code, set the spreadsheet to invisible to make the script run faster,
use less memory, and be less distracting:
$objExcel.Visible=$false
Troubleshooting When using the Excel automation model with the visibility set to false, it
is sometimes hard to spot errors. Consider changing the visibility setting to true to aid in
troubleshooting. Also, you may need to check Windows Task Manager for multiple instances
of Excel.exe running.
C13622791.fm Page 401 Wednesday, December 12, 2007 1:44 PM
402 Windows PowerShell Scripting Guide
Use the open method to open the Excel spreadsheet pointed to by the string contained in the
$strPath variable and store the resulting workbook object in the $workbook variable, as is shown here:
$WorkBook=$objExcel.Workbooks.Open($strPath)
You must connect to a specific spreadsheet within the workbook. In this example, connect to
the newuser sheet:
$worksheet = $workbook.sheets.item("newuser")
Create and assign values to three variables that work with the rows in the script. The first vari-
able is $intRow. This is the first row in the spreadsheet that contains user data. The first three
rows are all header rows and contain various column headers. To find out how many users
need to be modified, use the Rows property from the UsedRange property of the worksheet.
UsedRange tells how many rows have been filled on the spreadsheet. Query the count and save
the number of rows in the $intRowMax variable. The $intHdrRow variable is used to store the
number of header rows on the Excel spreadsheet. This section of code is shown here:
$intRow = 4
$intRowMax = ($worksheet.UsedRange.Rows).count
$intHdrRow = 3
The remaining variables are initialized. The user’s first name is in the first column, and the
organizational unit to hold each user is found in column 2. The $lname variable is the user’s
last name and is stored in column 3 in the spreadsheet. This section of code is displayed here:
$intcolumn = $null
$lname = 3
$intName = 1
$intOU = 2
$Class = "User"
$dc = "dc=nwtraders,dc=com"
The next section of code walks through the spreadsheet. Use the item() method to retrieve the
data stored in the Value2 property. Store the user name and the OU name in the $name and
$ou variables. Print a status message and connect to Active Directory as shown here:
for($introw = 4 ; $intRow -le $intRowMax ; $intRow++)
{
$name = $worksheet.cells.item($intRow,$intName).value2
$ou = $worksheet.cells.item($intRow,$intOU).value2
"Modifying $name,$ou,$dc"
$ADSI = [ADSI]"LDAP://$name,$ou,$dc"
Next, check the value retrieved from the Excel spreadsheet. If the value is null, print a message
about a missing value and also print the missing user name. If the user object is found, update
the values in Active Directory and exit the script. This section of code is shared here:
for($intcolumn = 1 ; $intcolumn -le 30 ; $intcolumn++)
{
if ($worksheet.cells.item($intRow,$intcolumn).value2 -eq $null)
C13622791.fm Page 402 Wednesday, December 12, 2007 1:44 PM
Chapter 13 Managing Domain Users 403
{
"missing value for $($worksheet.cells.item($intHdrRow,$intcolumn).value2)" +
"for user $($worksheet.cells.item($intRow,$lname).value2)"
}
ELSE {
Write-host -ForegroundColor green
worksheet.cells.item($intHdrRow,$intcolumn).value2
$worksheet.cells.item($intRow,$intcolumn).value2
$ADSI.put($property, $value)
}
}
$ADSI.setInfo()
}
$objexcel.quit()
The completed ReadExcelModifyUsers.ps1 script is shown here.
ReadExcelModifyUsers.ps1
$strPath="c:\Chapter13\NewUser.xls"
$objExcel=New-Object -ComObject Excel.Application
$objExcel.Visible=$false
$WorkBook=$objExcel.Workbooks.Open($strPath)
$worksheet = $workbook.sheets.item("newuser")
$intRow = 4
$intRowMax = ($worksheet.UsedRange.Rows).count
$intHdrRow = 3
$intcolumn = $null
$lname = 3
$intName = 1
$intOU = 2
$Class = "User"
$dc = "dc=nwtraders,dc=com"
for($introw = 4 ; $intRow -le $intRowMax ; $intRow++)
{
$name = $worksheet.cells.item($intRow,$intName).value2
$ou = $worksheet.cells.item($intRow,$intOU).value2
"Modifying $name,$ou,$dc"
$ADSI = [ADSI]"LDAP://$name,$ou,$dc"
for($intcolumn = 1 ; $intcolumn -le 30 ; $intcolumn++)
{
if ($worksheet.cells.item($intRow,$intcolumn).value2 -eq $null)
{
"missing value for $($worksheet.cells.item($intHdrRow,$intcolumn).value2)" +
"for user $($worksheet.cells.item($intRow,$lname).value2)"
}
ELSE {
Write-host -ForegroundColor green
$worksheet.cells.item($intHdrRow,$intcolumn).value2
$worksheet.cells.item($intRow,$intcolumn).value2
$ADSI.put($property, $value)
}
}
C13622791.fm Page 403 Wednesday, December 12, 2007 1:44 PM
404 Windows PowerShell Scripting Guide
$ADSI.setInfo()
}
$objexcel.quit()
Summary
In this chapter, we examined the user account life cycle. We began by creating users in
Active Directory, then moved on to creating groups in Active Directory. Next, we looked
at modifying user accounts and modifying domain groups as well. We concluded the chapter
by reading an Excel spreadsheet and creating multiple users with multiple attributes.
C13622791.fm Page 404 Wednesday, December 12, 2007 1:44 PM
405
Chapter 14
Configuring the Cluster Service
After completing this chapter, you will be able to:
■Configure the networking requirements.
■Manage disk resources.
■Manage cluster resources.
■Troubleshoot cluster problems.
On the Companion Disc All the scripts used in this chapter are located on the CD that
accompanies this book in the \scripts\chapter14 folder.
Examining the Clustered Server
You can perform and report on a number of tasks using the WMI classes that are found in the
root\MSCluster WMI namespace. The advantage of using WMI is that it can be used both
locally and remotely. The primary WMI class used to discover information about the clustered
server is the MSCluster_Cluster WMI class.
Note All of the WMI classes to manage clustered servers are in the root\MSCluster WMI
namespace. All of the WMI classes to manage clustered servers begin with MSCluster.
Just knowing this should minimize the learning curve in using these WMI classes.
To obtain a listing of the WMI classes used to manage the Failover Clustering feature of
Windows Server 2008 Enterprise or Data Center edition, use the following Windows Power-
Shell command:
Get-WmiObject -Namespace root\mscluster –list
When you run this command, you are presented with an impressive—and possibly confusing—
listing of WMI classes somewhat like the following (this is a truncated listing of class names):
__IndicationRelated
__FilterToConsumerBinding
__EventConsumer
__AggregateEvent
__SystemEvent
__EventDroppedEvent
__EventQueueOverflowEvent
__QOSFailureEvent
C14622791.fm Page 405 Wednesday, December 12, 2007 1:45 PM

406 Windows PowerShell Scripting Guide
__ConsumerFailureEvent
MSCluster_Event
MSCluster_EventObjectRemove
MSCluster_EventObjectAdd
MSCluster_EventPropertyChange
MSCluster_EventRegistryChange
MSCluster_EventClusterCallback
MSCluster_EventStateChange
MSCluster_EventResourceStateChange
MSCluster_EventGroupStateChange
__EventGenerator
__SecurityDescriptor
__PARAMETERS
CIM_ManagedSystemElement
CIM_LogicalElement
CIM_System
CIM_ComputerSystem
CIM_Cluster
MSCluster_Cluster
CIM_UnitaryComputerSystem
MSCluster_Node
CIM_LogicalDevice
MSCluster_NetworkInterface
There are several problems with this listing of WMI class names. The first is that most of the
items displayed are of little interest to the average network administrator or consultant working
in the field. The second problem is that the list appears to be in no discernable order. To
improve on this situation, you can modify the command by adding a filter to the results and
a sort to the output. Store the revised command in the form of a script named ListCluster-
WMIClasses.ps1.
Tip The ListClusterWMIClasses.ps1 script is written to display cluster WMI classes. But the
-namespace parameter is available and you can use this script to display a filtered listing of
WMI classes from any of the WMI namespaces.
The ListClusterWMIClasses.ps1 script begins with the param statement. This allows you to
modify the way the script might run, and also to change namespace if you want. The three
parameters are -computer, -namespace, and the -help switched parameter. The param statement
is shown here:
param(
$computer = "localhost",
$namespace = "root\mscluster",
[switch]$help
)
Next, create the funhelp() function to display the help text when the script is run with the -help
parameter. The function begins with the function statement and uses the $helptext variable to
store the results of a here-string. The here-string begins with the @” characters and ends with
C14622791.fm Page 406 Wednesday, December 12, 2007 1:45 PM

Chapter 14 Configuring the Cluster Service 407
the “@ characters. In between the markers you don’t need to adhere to the rules of quoting
because everything is interpreted as a string. You can space, quote, and move items around
without worrying about how they will be syntactically typed. Organize the help text into three
groups: the description, the parameters, and the syntax. After creating the here-string, assign
it to the $helptext variable and display it. The script then calls the exit statement and quits the
script. The funhelp() function is shown here:
function funHelp()
{
$helpText=@"
DESCRIPTION:
NAME: ListClusterWMIClasses.ps1
Lists wmi classes in a wmi namespace
PARAMETERS:
-computer name of the computer
-namespace name of the wmi namespace
-help prints help file
SYNTAX:
ListClusterWMIClasses.ps1
Prints out a listing of all Cluster WMI classes
in the root\mscluster wmi namespace on the local
computer. Removes all cim and system classes.
ListClusterWMIClasses.ps1 -computer cluster1
Prints out a listing of all Cluster WMI classes
in the root\mscluster wmi namespace on a remote
computer named cluster1. Removes all cim and system
classes.
ListClusterWMIClasses.ps1 -help
Prints the help topic for the script
"@
$helpText
exit
}
Now check the WMI namespace before running the WMI commands. Create the funtestns()
function to hold the code required to test the namespace. The first step is to set the
$erroractionpreference automatic variable to SilentlyContinue. This will cause Windows Power-
Shell to hide error messages and to continue running the script if a problem occurs.
Note Setting the automatic variable $erroractionpreference="SilentlyContinue" is the same as
using on error resume next in VBScript. Don’t do this unless you make provisions for handling
any errors that may arise. If you are only reporting information, then it is safe. However, if
you are making changes to files or to information in Active Directory directory service, an
unhandled error can lead to disaster.
C14622791.fm Page 407 Wednesday, December 12, 2007 1:45 PM
408 Windows PowerShell Scripting Guide
To check for the existence of the namespace, create a COM object. Because you can’t use the
Test-Path cmdlet to determine if the WMI namespace exists, use this trick: Create a new
instance of the SWbemLocator object. The SWbemLocator object has a single method named
ConnectServer. This allows you to connect to a namespace and to check to see if the command
completed successfully. Use the [void] constraint to avoid seeing messages when the com-
mand connects. Use the automatic variable $? to see if the command completed successfully.
It reports true/false depending on the success or failure of the command.
In the funtestns function, if the command does not complete successfully, use the Write-Host
cmdlet and print a string in red that the namespace is not valid; then exit the script. Set the
$erroractionpreference automatic variable back to Continue, which is the default value. The
funtestns() function is shown here:
Function funTestNS()
{
$erroractionpreference="silentlycontinue"
$objWMI = New-Object -ComObject wbemscripting.swbemlocator
[void]$objWMI.ConnectServer($computer,$namespace)
if(!$?)
{
Write-host -foregroundcolor red "$namespace is not" `
"a valid wmi namespace on $computer"
exit
}
$erroractionpreference="continue"
}
The next step is the funwmiclass() function. First, use the Get-WmiObject cmdlet to connect to
the computer specified in the $computer variable and to the namespace specified in the
$namespace variable. Use the -list parameter. By default, the script will run against the local
computer and target the cluster namespace. But it can be altered via the command line by
specifying different values for the parameters. After retrieving the listing of WMI classes in the
specified namespace, store the result in the $wmiclasses variable, and print a listing including
a count of the number of classes identified.
Filter out all the system classes (those that begin with the double underscore (__) character).
Do this by specifying that the name will be like [a-z]*, which means the name will begin
with one of the letters a through z and will be followed by any other letter. The second part
of the query removes the abstract (or template) WMI classes. All of these classes begin with
the letters CIM (which stands for Common Information Model). Do this by using the -notlike
operator and stating that the name of the WMI class will not begin with the letters cim.
Choose only the Name property by using the Select-Object cmdlet and sort the list by using
the Sort-Object cmdlet. The funwmiclass() function is displayed here:
Function funWMIClass()
{
$wmiClasses = Get-wmiobject -computername $computer `
-namespace $namespace -list
"There are $($wmiclasses.count) classes in $namespace" `
C14622791.fm Page 408 Wednesday, December 12, 2007 1:45 PM
Chapter 14 Configuring the Cluster Service 409
+ " on $computer `nThe WMI classes are listed below: "
Get-WmiObject -computername $computer -Namespace $namespace -list |
Where-Object { $_.name -like '[a-z]*' -and $_.name -notlike 'cim*' } |
select-object -property name |
sort-object -property name
}
Check to see if the -help parameter was supplied when the script was run. Do this by looking
for the $help variable. If you find it, call the funhelp() function. If the $help variable is not
found, check the WMI namespace by calling the funtestns() function; if that test passes, call the
funwmiclass() function. This section of code is listed here:
if($help) { "obtaining help now ..." ; funhelp }
funTestNS
funWMIClass
The completed ListClusterWMIClasses.ps1 script is shown here.
ListClusterWMIClasses.ps1
param(
$computer = "localhost",
$namespace = "root\mscluster",
[switch]$help
)
function funHelp()
{
$helpText=@"
DESCRIPTION:
NAME: ListClusterWMIClasses.ps1
Lists wmi classes in a wmi namespace
PARAMETERS:
-computer name of the computer
-namespace name of the wmi namespace
-help prints help file
SYNTAX:
ListClusterWMIClasses.ps1
Prints out a listing of all Cluster WMI classes
in the root\mscluster wmi namespace on the local
computer. Removes all cim and system classes.
ListClusterWMIClasses.ps1 -computer cluster1
Prints out a listing of all Cluster WMI classes
in the root\mscluster wmi namespace on a remote
computer named cluster1. Removes all cim and system
classes.
ListClusterWMIClasses.ps1 -help
Prints the help topic for the script
C14622791.fm Page 409 Wednesday, December 12, 2007 1:45 PM
410 Windows PowerShell Scripting Guide
"@
$helpText
exit
}
Function funTestNS()
{
$erroractionpreference="silentlycontinue"
$objWMI = New-Object -ComObject wbemscripting.swbemlocator
[void]$objWMI.ConnectServer($computer,$namespace)
if(!$?)
{
Write-host -foregroundcolor red "$namespace is not" `
"a valid wmi namespace on $computer"
exit
}
$erroractionpreference="continue"
}
Function funWMIClass()
{
$wmiClasses = Get-wmiobject -computername $computer `
-namespace $namespace -list
"There are $($wmiclasses.count) classes in $namespace" `
+ " on $computer `nThe WMI classes are listed below: "
Get-WmiObject -computername $computer -Namespace $namespace -list |
Where-Object { $_.name -like '[a-z]*' -and $_.name -notlike 'cim*' } |
select-object -property name |
sort-object -property name
}
if($help) { "obtaining help now ..." ; funhelp }
funTestNS
funWMIClass
The results from using ListClusterWMIClasses.ps1 are much more useful than those obtained
previously by using the Get-WmiObject cmdlet and not filtering the results. The results of the
ListClusterWMIClasses.ps1 script are shown here. There are over 40 WMI classes returned
from the more than 130 classes in the unfiltered listing. As you can see from the listing that
follows, there are WMI classes related to the cluster, node, service, network interface, disk,
and other major portions of the clustered server.
MSCluster_AvailableDisk
MSCluster_Cluster
MSCluster_ClusterToAvailableDisk
MSCluster_ClusterToNetwork
MSCluster_ClusterToNetworkInterface
MSCluster_ClusterToNode
MSCluster_ClusterToQuorumResource
MSCluster_ClusterToResource
MSCluster_ClusterToResourceGroup
C14622791.fm Page 410 Wednesday, December 12, 2007 1:45 PM
Chapter 14 Configuring the Cluster Service 411
MSCluster_ClusterToResourceType
MSCluster_Disk
MSCluster_DiskPartition
MSCluster_DiskToDiskPartition
MSCluster_Event
MSCluster_EventClusterCallback
MSCluster_EventGroupStateChange
MSCluster_EventObjectAdd
MSCluster_EventObjectRemove
MSCluster_EventPropertyChange
MSCluster_EventRegistryChange
MSCluster_EventResourceStateChange
MSCluster_EventStateChange
MSCluster_LogicalElement
MSCluster_Network
MSCluster_NetworkInterface
MSCluster_NetworkToNetworkInterface
MSCluster_Node
MSCluster_NodeToActiveGroup
MSCluster_NodeToActiveResource
MSCluster_NodeToHostedService
MSCluster_NodeToNetworkInterface
MSCluster_Property
MSCluster_Property_Cluster_PrivateProperties
MSCluster_Property_Group_PrivateProperties
MSCluster_Property_NetInterface_PrivateProperties
MSCluster_Property_Node_PrivateProperties
MSCluster_Resource
MSCluster_ResourceGroup
MSCluster_ResourceGroupToPreferredNode
MSCluster_ResourceGroupToResource
MSCluster_ResourceToDependentResource
MSCluster_ResourceToDisk
MSCluster_ResourceToPossibleOwner
MSCluster_ResourceType
MSCluster_ResourceTypeToResource
MSCluster_Service
Reporting Cluster Configuration
You may want to report the current configuration of your Windows Server 2008 failover clus-
ter. This may be done from a documentation perspective for accounting purposes or it may be
done to compare the results with a baseline configuration. You can obtain detailed cluster
information easily by using the MSCluster_Cluster WMI class, as you’ll see in the ReportClus-
terConfig.ps1 script.
Begin the ReportClusterConfig.ps1 script with the param statement and create four parame-
ters: -computer, -namespace, -class, and -help. Assign default values to the first three parameters.
The -help parameter is a switched parameter and only has effect when specified from the
command line. If the script is run without specifying any of the parameters, the default values
C14622791.fm Page 411 Wednesday, December 12, 2007 1:45 PM
412 Windows PowerShell Scripting Guide
are such that the script will display the configuration of the local clustered server. The param
statement is shown here:
param(
$computer="localhost",
$namespace="root\mscluster",
$class = "mscluster_cluster",
[switch]$help
)
Next, create the funhelp() function, which begins with declaring the $helptext variable. Assign
the result of a here-string to the variable. The here-string consists of three separate
sections: the description of the script, the parameters the script accepts, and the syntax
required using the script. After adding the here-string to the $helptext variable, display the
contents of the variable and exit the script. The funhelp() function is shown here:
function funHelp()
{
$helpText=@"
DESCRIPTION:
NAME: ReportClusterConfig.ps1
Lists current cluster configuration
ARAMETERS:
-computer name of the computer
-namespace name of the wmi namespace
-class name of wmi class to query
-help prints help file
SYNTAX:
ReportClusterConfig.ps1
Prints out a listing of current cluster config
on local computer
ReportClusterConfig.ps1 -computer cluster1
Prints out a listing of current cluster config
on remote computer named cluster1
ReportClusterConfig.ps1 -help
Prints the help topic for the script
"@
$helpText
exit
}
Now create the funline() function, which accepts a string as input. It takes the length of the
string and stores the result in the $num variable. Use a for statement to count to the length of
the input string stored in the $num variable. Use the variable $i as the enumerator to keep
track of progress. Perform this operation as long as the value of $i is less than or equal to the
number stored in the $num variable. Use $i++ to increment the $i variable one number at a
time. Use the variable $funline to hold the result of concatenating a string of equal (=) signs.
C14622791.fm Page 412 Wednesday, December 12, 2007 1:45 PM
Chapter 14 Configuring the Cluster Service 413
The string of equal signs will be used to underline the string. To do this, use two Write-Host
cmdlets. The first Write-Host cmdlet prints the string and the second Write-Host cmdlet
prints the contents of the $funline variable. The funline() function is shown here:
function funline($strIN)
{
$num = $strIN.length
for($i=1 ; $i -le $num ; $i++)
{
$funline = $funline + "="
}
Write-Host -ForegroundColor yellow `n$strIN
Write-Host -ForegroundColor darkYellow $funline
}
Create the funwmi() function; begin by connecting to the namespace specified in the
-namespace parameter, the computer specified in the -computer parameter, and the class
specified in the -class parameter. The Get-WmiObject cmdlet uses each of these parameters to
make the connection into WMI to retrieve the information from the WMI class. Pipeline the
resulting WMI management object and send each instance to the ForEach-Object cmdlet. This
portion of the funwmi() function is displayed here:
Get-WmiObject -class $class -computername $computer `
-namespace $namespace |
foreach-object `
Call the funline() function and print a message that you are querying the class stored in the
$class variable on the computer named in the $computer variable. The length of the string
expression is measured by the funline() function; the string is printed and underlined. This is
shown here:
funLine("Querying: $class on $computer")
Now use the $_ automatic variable to refer to the current object on the pipeline and use the
.PSObject object to retrieve a listing of all the properties of the WMI class. Take each of these
properties and pass them over the pipeline as well. Once again use the ForEach-Object
cmdlet, and this time examine the value property of each property on each instance of the
MSCluster_Cluster class. This portion of the funwmi() function is shared here:
funLine("Querying: $class on $computer")
$_.psobject.properties |
foreach-object `
{
If($_.value)
If the value of the property matches the double underscore (__), don’t do anything. However,
if the value of the property does not match a double underscore, then you want to store both
the name of the property and the value contained in the property in a hash table. This will
allow you to easily store both the name and the corresponding value in a variable named
C14622791.fm Page 413 Wednesday, December 12, 2007 1:45 PM

414 Windows PowerShell Scripting Guide
$aryprop so you can easily use the array of property values. After storing the information in a
variable, print the value and exit the function.
Tip Because the funwmi() function is rather deeply nested—requiring a large number of
curly brackets—I’ve added comments to each of the levels to make troubleshooting
and future modifications easier for you.
This section of the function is listed here:
if ($_.name -match "__"){}
ELSE
{
$aryProp +=@{ $($_.name)=$($_.value) }
} #else
} #if($_.value)
} #foreach-object $_.psobject.properties
$aryProp
} #foreach-object mscluster_cluster
} #funwmi
The completed funwmi() function is shown here:
function funwmi($class)
{
Get-WmiObject -class $class -computername $computer `
-namespace $namespace |
foreach-object `
{
funLine("Querying: $class on $computer")
$_.psobject.properties |
foreach-object `
{
If($_.value)
{
if ($_.name -match "__"){}
ELSE
{
$aryProp +=@{ $($_.name)=$($_.value) }
} #else
} #if($_.value)
} #foreach-object $_.psobject.properties
$aryProp
} #foreach-object mscluster_cluster
} #funwmi
After creating the funwmi() function, check for the presence of the $help variable. If you find it,
call the funhelp() function. If the $help variable is not present, call the funwmi() function. This
section of the code is shown here:
if($help) { "obtaining help" ; funhelp }
funwmi($class)
C14622791.fm Page 414 Wednesday, December 12, 2007 1:45 PM
Chapter 14 Configuring the Cluster Service 415
The completed ReportClusterConfig.ps1 script is shown here.
ReportClusterConfig.ps1
param(
$computer="localhost",
$namespace="root\mscluster",
$class = "mscluster_cluster",
[switch]$help
)
function funHelp()
{
$helpText=@"
DESCRIPTION:
NAME: ReportClusterConfig.ps1
Lists current cluster configuration
PARAMETERS:
-computer name of the computer
-namespace name of the wmi namespace
-class name of wmi class to query
-help prints help file
SYNTAX:
ReportClusterConfig.ps1
Prints out a listing of current cluster config
on local computer
ReportClusterConfig.ps1 -computer cluster1
Prints out a listing of current cluster config
on remote computer named cluster1
ReportClusterConfig.ps1 -help
Prints the help topic for the script
"@
$helpText
exit
}
function funline($strIN)
{
$num = $strIN.length
for($i=1 ; $i -le $num ; $i++)
{
$funline = $funline + "="
}
Write-Host -ForegroundColor yellow `n$strIN
Write-Host -ForegroundColor darkYellow $funline
}
function funwmi($class)
{
Get-WmiObject -class $class -computername $computer `
-namespace $namespace |
foreach-object `
C14622791.fm Page 415 Wednesday, December 12, 2007 1:45 PM
416 Windows PowerShell Scripting Guide
{
funLine("Querying: $class on $computer")
$_.psobject.properties |
foreach-object `
{
If($_.value)
{
if ($_.name -match "__"){}
ELSE
{
$aryProp +=@{ $($_.name)=$($_.value) }
} #else
} #if($_.value)
} #foreach-object $_.psobject.properties
$aryProp
} #foreach-object mscluster_cluster
} #funwmi
if($help) { "obtaining help" ; funhelp }
funwmi($class)
Reporting Node Configuration
There are many special configuration issues for nodes of a Windows Server 2008 failover
cluster. Therefore, it may be interesting for you to produce a report detailing the configuration
of the nodes on the cluster. To do this, use the MSCluster_Node WMI class found in the
root\MSCluster WMI namespace. An example of this is the ReportNodeConfig.ps1 script.
Begin the script with the param statement, which defines four parameters. The first three,
-computer, -namespace, and -class, are all set to default values. This allows for ease of use, but
incorporates a nice amount of flexibility into the script as well. For instance, the script can
conceivably query any WMI class on any computer in any WMI namespace. It has not been
tested for this purpose, but it might work. The last parameter, the -help parameter, is switched
so it only has effect when it is present. The param statement is shown here:
param(
$computer="localhost",
$namespace="root\mscluster",
$class = "mscluster_node",
[switch]$help
)
Next, create the funhelp() function, used to display a help text message when the script is run
with the -help parameter. The first thing the funhelp() function does is to create a variable
named $helptext, used to hold the result of a here-string. The text contained in the here-string
is divided into three sections: the description, the parameters, and the syntax. The funhelp()
function is displayed here:
function funHelp()
{
$helpText=@"
DESCRIPTION:
C14622791.fm Page 416 Wednesday, December 12, 2007 1:45 PM
Chapter 14 Configuring the Cluster Service 417
NAME: ReportNodeConfig.ps1
Lists current cluster configuration
PARAMETERS:
-computer name of the computer
-namespace name of the wmi namespace
-class name of wmi class to query
-help prints help file
SYNTAX:
ReportNodeConfig.ps1
Lists node configuration for a cluster
ReportNodeConfig.ps1
Prints out a listing of node config for cluster
on local computer
ReportNodeConfig.ps1 -computer cluster1
Prints out a listing of node config for cluster
on remote computer named cluster1
ReportNodeConfig.ps1 -help
Prints the help topic for the script
"@
$helpText
exit
}
Create the funline() function. The funline() function is exactly the same one used in the
ReportClusterConfig.ps1 script. For details, review the “Reporting Cluster Configuration”
section earlier in this chapter. The funline() function is also shown here:
function funline($strIN)
{
$num = $strIN.length
for($i=1 ; $i -le $num ; $i++)
{
$funline = $funline + "="
}
Write-Host -ForegroundColor yellow `n$strIN
Write-Host -ForegroundColor darkYellow $funline
}
The funwmi() function is the next step. This funwmi() function is a little different than the one
used in the ReportClusterConfig.ps1 script. The ReportClusterConfig.ps1 script is designed
to handle the results of a single instance of the WMI class. This is fine, as there is only one
cluster on a Windows Server 2008 failover server. However, there is normally more than a single
node on a clustered server and it is essential that the script be capable of handling multiple
instances. Use the Get-WmiObject cmdlet to connect to the class, computer, and namespace
specified in the command-line parameters of the script. If the script is run with default values,
query the local host and the root\MSCluster WMI namespace and retrieve instances of the
MSCluster_Node WMI class.
C14622791.fm Page 417 Wednesday, December 12, 2007 1:45 PM

418 Windows PowerShell Scripting Guide
Note As with the ReportClusterConfig.ps1 script, all of the parameters required for the
ReportNodeConfig.ps1 script are accessible via command-line parameters. You can use
this script to query any class on any computer in any namespace. The advantage of doing
this is that the script filters out empty property values, and does not display them. The result
is a nice clean output without a lot of empty property values.
After returning the management object from the Get-WmiObject cmdlet, use the ForEach-
Object cmdlet to iterate through the collection of management objects. There may be one or
more; the ForEach-Object cmdlet walks through them. It does not generate an error when
working with a singleton. Use the funline() function to highlight the class being queried and
the name of the computer upon which the class resides. Obtain a collection of the properties
of the object by querying the Properties property on the underlying object. You must do this
for access to methods and properties of the base WMI object that have not been exposed
directly via the Get-WmiObject cmdlet. The Properties property from the PSObject returns an
object that represents all the properties of the WMI class. When you have the collection of
property names, use the ForEach-Object cmdlet and examine the value of each property. Use
the if statement to ensure that a value is present; if it isn’t, that means the property is empty
and you won’t print the value. Filter out property names that contain the double underscore
(__) to avoid cluttering the display with system properties. Once you’ve made it past these two
criteria, you’ll get the name and value of the property; store both in a hash table. After com-
pleting the hash table, print it, and move to the next management object. Continue this until
you have worked on each item returned as a result of the Get-WmiObject cmdlet. The com-
plete funwmi() function is shown here:
function funwmi($class)
{
Get-WmiObject -class $class -computername $computer `
-namespace $namespace |
foreach-object `
{
funLine("Querying: $class on $computer")
$_.psobject.properties |
foreach-object `
{
If($_.value)
{
if ($_.name -match "__"){}
ELSE
{
$aryProp +=@{ $($_.name)=$($_.value) }
} #else
} #if($_.value)
} #foreach-object $_.psobject.properties
$aryProp
$aryProp = $null
} #foreach-object mscluster_node
} #funwmi
C14622791.fm Page 418 Wednesday, December 12, 2007 1:45 PM
Chapter 14 Configuring the Cluster Service 419
Check for the presence of the $help variable. If you find it, call the funhelp() function. If the
$help variable is not present, call the funwmi() function. This section of code is shown here:
if($help) { "obtaining help" ; funhelp }
funwmi($class)
The completed ReportNodeConfig.ps1 script is shown here.
ReportNodeConfig.ps1
param(
$computer="localhost",
$namespace="root\mscluster",
$class = "mscluster_node",
[switch]$help
)
function funHelp()
{
$helpText=@"
DESCRIPTION:
NAME: ReportNodeConfig.ps1
Lists current cluster configuration
PARAMETERS:
-computer name of the computer
-namespace name of the wmi namespace
-class name of wmi class to query
-help prints help file
SYNTAX:
ReportNodeConfig.ps1
Lists node configuration for a cluster
ReportNodeConfig.ps1
Prints out a listing of node config for cluster
on local computer
ReportNodeConfig.ps1 -computer cluster1
Prints out a listing of node config for cluster
on remote computer named cluster1
ReportNodeConfig.ps1 -help
Prints the help topic for the script
"@
$helpText
exit
}
function funline($strIN)
{
$num = $strIN.length
for($i=1 ; $i -le $num ; $i++)
{
$funline = $funline + "="
C14622791.fm Page 419 Wednesday, December 12, 2007 1:45 PM
420 Windows PowerShell Scripting Guide
}
Write-Host -ForegroundColor yellow `n$strIN
Write-Host -ForegroundColor darkYellow $funline
}
function funwmi($class)
{
Get-WmiObject -class $class -computername $computer `
-namespace $namespace |
foreach-object `
{
funLine("Querying: $class on $computer")
$_.psobject.properties |
foreach-object `
{
If($_.value)
{
if ($_.name -match "__"){}
ELSE
{
$aryProp +=@{ $($_.name)=$($_.value) }
} #else
} #if($_.value)
} #foreach-object $_.psobject.properties
$aryProp
$aryProp = $null
} #foreach-object mscluster_node
} #funwmi
if($help) { "obtaining help" ; funhelp }
funwmi($class)
Querying Multiple Cluster Classes
One of the more interesting tasks you can undertake using Windows PowerShell is to query
multiple WMI classes at the same time. This is a relatively easy process because of the way
Windows PowerShell automatically handles arrays and automatically enumerates properties
of the WMI classes. In the ReportMultipleClasses.ps1 Windows PowerShell script, you’ll com-
bine these two features and create a very interesting tool. A sample of text produced running
the ReportMultipleClasses.ps1 script with the -all switch is found in the Cluster.txt file. This
switch causes the script to list all the WMI classes in the namespace, to automatically query
each class, and to write the result to a temporary text file.
If you are only interested in obtaining a listing of all the WMI classes in the namespace, run
the script with the -list switch. If you pair the -file and the -list switches, write the results to a
temporary text file instead. A sample of this output is found in the ClusterClasses.txt file.
The ReportMultipleClasses.ps1 script begins with the param statement. There are the usual
parameters: -computer, -namespace, and -class, but there are also some new switched parameters:
-file, which allows you to write the information to a file; -list, which produces a listing of all
the WMI classes in the namespace; and -all, which produces a listing of all the WMI classes in
C14622791.fm Page 420 Wednesday, December 12, 2007 1:45 PM
Chapter 14 Configuring the Cluster Service 421
the namespace. With each of these parameters, the script will query the class or classes and
write the results of the query to a file. This param statement is shown here:
param(
$computer="localhost",
$namespace="root\mscluster",
$class,
[switch]$file,
[switch]$list,
[switch]$all,
[switch]$help
)
Now create the funhelp() function. This function lists all the parameters of the script, some
samples of the syntax, and includes a description of the script. It stores this information in a
variable named $helptext and displays it when the script is run with the -help parameter. This
function is shown here:
function funHelp()
{
$helpText=@"
DESCRIPTION:
NAME: ReportMultipleClasses.ps1
Queries one or more wmi classes in clustered server.
Displays the output on screen, or writes to tmp text
file
PARAMETERS:
-computer name of the computer
-namespace name of the wmi namespace
-class name or names of wmi class to query
-file writes output to temp file, and displays
same in notepad
-list lists the wmi classes in the namespace
-all queries all wmi classes, output to temp
file
-help prints help file
SYNTAX:
ReportMultipleClasses.ps1
Displays a listing of wmi cluster classes on local
computer
ReportMultipleClasses.ps1 -class MSCluster_Network
Prints out a detailed information about the network
interface configuration of the current cluster
ReportMultipleClasses.ps1 -class mscluster_service, mscluster_cluster
Prints out information about the cluster service and the cluster
itself by querying two wmi classes: mscluster_service and the
mscluster_cluster wmi class. note: quotes are not required, but the
classes must be separated with a comma.
ReportMultipleClasses.ps1 -all
Queries every wmi class in the namespace and writes to a temp
C14622791.fm Page 421 Wednesday, December 12, 2007 1:45 PM
422 Windows PowerShell Scripting Guide
text file
ReportMultipleClasses.ps1 -list
Produces a listing of all the wmi classes in the namespace
ReportMultipleClasses.ps1 -list -file
Produces a listing of all the wmi classes in the namespace
and writes the result to a temp text file
ReportMultipleClasses.ps1 -class mscluster_service -file
Queries the mscluster_service wmi class on local machine and
writes the results to a temp text file
ReportMultipleClasses.ps1 -help
Prints the help topic for the script
"@
$helpText
exit
} #end function
The next step is the funline() function, the same funline() function used in earlier scripts in this
chapter. For a detailed discussion of the funline() function, look back at the ReportCluster-
Config.ps1 script in the “Reporting Cluster Configuration” section of this chapter. The fun-
line() function is shown here:
function funline($strIN)
{
$num = $strIN.length
for($i=1 ; $i -le $num ; $i++)
{
$funline = $funline + "="
}
Write-Host -ForegroundColor yellow `n$strIN
Write-Host -ForegroundColor darkYellow $funline
} #end function
Next is the funtestns() function, used to ensure the script is run against a WMI namespace that
actually exists. To do this, create an instance of the SWbemLocator object and use the Connect-
Server() method. This function is the same one used in the ListClusterWMIClasses.ps1 script
in the “Examining the Clustered Server” section of this chapter. For a detailed discussion of
this function, please refer to that script. The funtestns() function is shown here:
Function funTestNS()
{
$erroractionpreference="silentlycontinue"
$objWMI = New-Object -ComObject wbemscripting.swbemlocator
[void]$objWMI.ConnectServer($computer,$namespace)
if(!$?)
{
Write-host -foregroundcolor red "$namespace is not" `
C14622791.fm Page 422 Wednesday, December 12, 2007 1:45 PM

Chapter 14 Configuring the Cluster Service 423
"a valid wmi namespace on $computer"
exit
}
$erroractionpreference="continue"
} #end function
The funlist() function, next on the list, is similar to the one used in the ListClusterWMI-
Classes.ps1 script; however, there are some important differences. The first step in the funlist()
function is to call the funtestns() function to ensure that the WMI namespace is valid. Once
you’ve passed that check, use the Get-WmiObject cmdlet to connect to the computer named
in the -computer parameter, include the namespace mentioned in the -namespace parameter,
and use the -list switch from the Get-WmiObject cmdlet to produce a listing of all the WMI
classes in the namespace. By default, this WMI namespace is the root\MSCluster namespace.
Store the resulting listing of WMI classes in the $wmiclasses variable. Create a header for the
listing by using the Count property from the object stored in the $wmiclasses variable. The
header is a string that lists the number of WMI classes in the namespace and mentions the
namespace and computer name.
Note In the funlist() function in the ReportMultipleClasses.ps1 script, you must break the
header line for readability. To do this, use both the grave accent (`) and the plus (+) symbols
to continue and to concatenate the line. When using the Write-Host cmdlet to print informa-
tion, only the grave accent for line continuation is required.
The header is held in the $header variable. This portion of the funlist() function is shown here:
Function funList()
{
funtestNS
$wmiClasses = Get-wmiobject -computername $computer `
-namespace $namespace -list
$header = "There are $($wmiclasses.count) classes" `
+ " in $namespace on $computer
The WMI classes are listed below:
"
Check to see if the -file switch was supplied when the script was run. If it was, then print the
results of the operation to a file. To do this, take the value stored in the $header variable and
pipeline the results to the Out-File cmdlet. Use the -filepath parameter of the Out-File cmdlet,
give it the file name and path stored in the $tmpfile variable, which contains a temporary file
path and file name, and use the -append parameter to tell the file to not overwrite the contents
of the file. In this specific case, the -append switch is not required, but it also does not hurt any-
thing. This section of the code is shown here:
if($file)
{
$header |
out-file -filepath $tmpfile -append
}
C14622791.fm Page 423 Wednesday, December 12, 2007 1:45 PM
424 Windows PowerShell Scripting Guide
If you’re not using the -file switch from the command line, you won’t create a file because
you’ll display only the contents of the command on the screen. Therefore, you’ll print the
header created previously. Use the Get-WmiObject cmdlet and specify the -computername
and -namespace parameters and the -list switch. Pipeline the results to the Where-Object cmdlet
and filter out all the system classes and the classes beginning with the letters cim. Next choose
only the Name property and sort the list by name. Capture the results of the command in
the $classes variable. This portion of the funlist() function is shown here:
ELSE
{
$header
}
$classes = Get-WmiObject -computername $computer -Namespace `
$namespace -list |
Where-Object { $_.name -like '[a-z]*' -and $_.name -notlike 'cim*' } |
select-object -property name |
sort-object -property name
Once again, you need to make a distinction between running the script with the -file switch or
running the script without the -file switch. If the script was launched with the -file switch,
pipeline the collection of WMI class names contained in the $classes variable to the Out-File
cmdlet. Display the contents of the file by using Notepad. The file name and path used by
Out-File point to a temporary file in the temporary directory. If you’re not using the -file
switch, print the class listing to the screen. This section of the funlist() function is displayed
here:
if($file)
{
$classes |
out-file -filepath $tmpfile -append
notepad $tmpfile
}
ELSE
{
$classes
}
exit
} #end function funlist
The funall() function is up next. This function first calls the funtestns function to verify the
correct WMI namespace. Next it uses the Get-WmiObject cmdlet to connect to the namespace
listed in the $namespace variable and the -list switch to produce a listing of all the WMI classes
in the namespace. Take the list of WMI classes and pipeline it to the Where-Object cmdlet; at
this point, look for a name that begins with a letter (a through z), followed by any other letter.
However, you don’t want a name that begins with the letters cim. Pipeline the filtered object to
C14622791.fm Page 424 Wednesday, December 12, 2007 1:45 PM
Chapter 14 Configuring the Cluster Service 425
the ForEach-Object cmdlet and print only the name of the current pipeline character. This sec-
tion of the funall() function is listed here:
function funall()
{
funtestNS
Get-WmiObject -Namespace $namespace -list |
Where-Object { $_.name -like '[a-z]*' -and `
$_.name -notlike 'cim*' } |
foreach-object `
{
$_.name ;
After printing the name, use the Get-WmiObject cmdlet to query the class named in $_.name.
Continue to use the namespace indicated in the $namespace variable; pipeline the results to
the Out-File cmdlet and use the filepath stored in the $tmpfile variable. Use the -append switch
to ensure that you don’t overwrite the results. After querying every WMI class and storing the
results in the temporary file, use Notepad to open the temporary file and display the results.
Conclude the funall() function by using the exit statement to end the script. This section of the
funall() function is shown here:
Get-WmiObject -class $_.name -namespace $namespace |
out-file -filepath $tmpfile -append
}
notepad $tmpfile
exit
} #end function funall
Now it is time to create the funwmi() function. Begin by testing the WMI namespace by using
the funtestns function, then use the foreach statement to iterate through the collection of WMI
class names specified in the $class variable. Use the Get-WmiObject cmdlet to query each
WMI class whose name is stored in the $objclass variable. Connect to the computer named in
the $computer variable and use the namespace indicated in the $namespace variable. Pipeline
the resulting object to a ForEach-Object cmdlet and use the funline() function to underline the
WMI class name that is being queried. This section of the funwmi() function is shown here:
function funwmi($class)
{
funtestNS
Foreach($objClass in $class)
{
Get-WmiObject -class $objclass -computername $computer `
-namespace $namespace |
foreach-object `
{
funLine("Querying: $objclass on $computer")
After printing the WMI class name, query the System.Management.Automation.PSObject .NET
Framework class to retrieve the collection of properties from the underlying base object.
Because the PSObject .NET Framework class is used to encapsulate the WMI class to provide
C14622791.fm Page 425 Wednesday, December 12, 2007 1:45 PM
426 Windows PowerShell Scripting Guide
a consistent interface to the WMI class, you can query the PSObject class and retrieve the
collection of properties for the WMI class. When you have the collection of properties, pipe-
line the resulting collection to the ForEach-Object cmdlet. If the object has a value property,
check to see if there is a match for __ so you can filter the system properties. If there is no
match for the system property, take the name and the value of the property and create a hash
table named $aryprop. This section of the function is shown here:
$_.psobject.properties |
foreach-object `
{
If($_.value)
{
if ($_.name -match "__"){}
ELSE
{
$aryProp +=@{ $($_.name)=$($_.value) }
} #else
} #if($_.value)
} #foreach-object $_.psobject.properties
If the script was run with the -file switch, it will output the results to a text file. To do this, first
look for the presence of the $file variable; if it’s found, write the name of the WMI class to the
temporary file by using the Out-File cmdlet. Write the hash table—which contains the names
of all the properties and the values that are not null—to the text file as well. If the -file switch
was not specified, print the contents of the $aryprop variable to the screen and set the value
of $aryprop to $null. This cleans out the variable and allows you to reuse it the next time
through the loop. Close the loops, print the contents of the temporary file by using Notepad,
and end the funwmi() function. This section of the code is shown here:
If($file)
{
$($objClass) | out-file -filepath $tmpfile -append
$aryProp |
out-file -filepath $tmpfile -append
}
ELSE
{
$aryProp
}
$aryProp = $null
} #foreach-object mscluster_node
} #foreach $objClass
if($file) { notepad $tmpfile }
} #end function funwmi
You are nearly done with the ReportMultipleClasses.ps1 script, but you still must check the
command line. To do this, look for the $help variable. If you find it, call the funhelp() function.
If you find the $file variable, call the GetTempFileName() static method from the IO.Path .NET
Framework class. Store this temporary file name and path in the $tmpfile variable. If you find
the $list variable, call the funtestns() function to test the WMI namespace, and if that command
succeeds, then call the funlist() function. If the -all parameter was specified, then create the
C14622791.fm Page 426 Wednesday, December 12, 2007 1:45 PM
Chapter 14 Configuring the Cluster Service 427
temporary file name, test the WMI namespace, and call the funall() function. Finally, if there
was no class specified, call the funhelp() function; otherwise, call the funwmi() function and
pass it the class name held in the $class variable. This section of the ReportMultiple-
Classes.ps1 script is shown here:
if($help) { "obtaining help" ; funhelp }
if($file) { $tmpfile = [io.path]::getTempfilename() }
if($list) { "listing classes ..." ; funTestNS ; funList }
if($all) {
$tmpfile = [io.path]::getTempfilename()
"Querying all wmi classes in $namespace" ;
funTestNS ; funAll
}
if(!$Class) { "A class is required..." ; funhelp }
funwmi($class)
The completed ReportMultipleClasses.ps1 script is shown here.
ReportMultipleClasses.ps1
param(
$computer="localhost",
$namespace="root\mscluster",
$class,
[switch]$file,
[switch]$list,
[switch]$all,
[switch]$help
)
function funHelp()
{
$helpText=@"
DESCRIPTION:
NAME: ReportMultipleClasses.ps1
Queries one or more wmi classes in clustered server.
Displays the output on screen, or writes to tmp text
file
PARAMETERS:
-computer name of the computer
-namespace name of the wmi namespace
-class name or names of wmi class to query
-file writes output to temp file, and displays
same in notepad
-list lists the wmi classes in the namespace
-all queries all wmi classes, output to temp
file
-help prints help file
SYNTAX:
ReportMultipleClasses.ps1
Displays a listing of wmi cluster classes on local
computer
C14622791.fm Page 427 Wednesday, December 12, 2007 1:45 PM
428 Windows PowerShell Scripting Guide
ReportMultipleClasses.ps1 -class MSCluster_Network
Prints out a detailed information about the network
interface configuration of the current cluster
ReportMultipleClasses.ps1 -class mscluster_service, mscluster_cluster
Prints out information about the cluster service and the cluster
itself by querying two wmi classes: mscluster_service and the
mscluster_cluster wmi class. note: quotes are not required, but the
classes must be separated with a comma.
ReportMultipleClasses.ps1 -all
queries every wmi class in the namespace and writes to a temp
text file
ReportMultipleClasses.ps1 -list
Produces a listing of all the wmi classes in the namespace
ReportMultipleClasses.ps1 -list -file
Produces a listing of all the wmi classes in the namespace
and writes the result to a temp text file
ReportMultipleClasses.ps1 -class mscluster_service -file
Queries the mscluster_service wmi class on local machine and
writes the results to a temp text file
ReportMultipleClasses.ps1 -help
Prints the help topic for the script
"@
$helpText
exit
} #end function
function funline($strIN)
{
$num = $strIN.length
for($i=1 ; $i -le $num ; $i++)
{
$funline = $funline + "="
}
Write-Host -ForegroundColor yellow `n$strIN
Write-Host -ForegroundColor darkYellow $funline
} #end function funhelp
Function funTestNS()
{
$erroractionpreference="silentlycontinue"
$objWMI = New-Object -ComObject wbemscripting.swbemlocator
[void]$objWMI.ConnectServer($computer,$namespace)
if(!$?)
{
Write-host -foregroundcolor red "$namespace is not" `
"a valid wmi namespace on $computer"
C14622791.fm Page 428 Wednesday, December 12, 2007 1:45 PM
Chapter 14 Configuring the Cluster Service 429
exit
}
$erroractionpreference="continue"
} #end function funtestns
Function funList()
{
funtestNS
$wmiClasses = Get-wmiobject -computername $computer `
-namespace $namespace -list
$header = "There are $($wmiclasses.count) classes" `
+ " in $namespace on $computer
The WMI classes are listed below:
"
if($file)
{
$header |
out-file -filepath $tmpfile -append
}
ELSE
{
$header
}
$classes = Get-WmiObject -computername $computer -Namespace `
$namespace -list |
Where-Object { $_.name -like '[a-z]*' -and $_.name -notlike 'cim*' } |
select-object -property name |
sort-object -property name
if($file)
{
$classes |
out-file -filepath $tmpfile -append
notepad $tmpfile
}
ELSE
{
$classes
}
exit
} #end function funlist
function funall()
{
funtestNS
Get-WmiObject -Namespace $namespace -list |
Where-Object { $_.name -like '[a-z]*' -and `
$_.name -notlike 'cim*' } |
foreach-object `
{
$_.name ;
Get-WmiObject -class $_.name -namespace $namespace |
out-file -filepath $tmpfile -append
}
notepad $tmpfile
C14622791.fm Page 429 Wednesday, December 12, 2007 1:45 PM
430 Windows PowerShell Scripting Guide
exit
} #end function funall
function funwmi($class)
{
funtestNS
Foreach($objClass in $class)
{
Get-WmiObject -class $objclass -computername $computer `
-namespace $namespace |
foreach-object `
{
funLine("Querying: $objclass on $computer")
$_.psobject.properties |
foreach-object `
{
If($_.value)
{
if ($_.name -match "__"){}
ELSE
{
$aryProp +=@{ $($_.name)=$($_.value) }
} #else
} #if($_.value)
} #foreach-object $_.psobject.properties
If($file)
{
$($objClass) | out-file -filepath $tmpfile -append
$aryProp |
out-file -filepath $tmpfile -append
}
ELSE
{
$aryProp
}
$aryProp = $null
} #foreach-object mscluster_node
} #foreach $objClass
if($file) { notepad $tmpfile }
} #end function funwmi
if($help) { "obtaining help" ; funhelp }
if($file) { $tmpfile = [io.path]::getTempfilename() }
if($list) { "listing classes ..." ; funTestNS ; funList }
if($all) {
$tmpfile = [io.path]::getTempfilename()
"Querying all wmi classes in $namespace" ;
funTestNS ; funAll
}
if(!$Class) { "A class is required..." ; funhelp }
funwmi($class)
C14622791.fm Page 430 Wednesday, December 12, 2007 1:45 PM
Chapter 14 Configuring the Cluster Service 431
Managing Nodes
After the cluster is created, one task that needs to be performed from time to time is to add or
evict nodes on the cluster. To do this, use the MSCluster_Cluster WMI class and use either the
add() or evict() method. An example of a script that does this is the AddNodeEvictNode.ps1
script.
Adding and Evicting Nodes
Begin the AddNodeEvictNode.ps1 script with the param statement and define several com-
mand-line parameters for the script: the -computer, -namespace, and -help parameters, which
are included in all the scripts in this chapter. You’ll also have the -node parameter, which does
not have a default value assigned to it. You’ll also create several switch parameters: -add, -evict,
-list, -whatif, and -help. The use of the switch parameter makes the script easy to use. The param
statement is shown here:
param(
$computer="localhost",
$namespace="root\mscluster",
$node,
[switch]$add,
[switch]$evict,
[switch]$list,
[switch]$whatif,
[switch]$help
)
Next, create the funhelp() function, which displays help for the script when the -help parame-
ter is specified. The $helptext variable is used to hold the result of a here-string that contains a
listing of the parameters, description, and syntax of the script. After creating the here-string,
display the contents of the $helptext variable and exit the script. This is shown here:
function funHelp()
{
$helpText=@"
DESCRIPTION:
NAME: AddNodeEvictNode.ps1
List, Add or evict nodes on cluster
PARAMETERS:
-computer name of the computer
-namespace name of the wmi namespace
-node the cluster node name
-add add cluster node to cluster
-evict evict cluster node from cluster
-list list current node config
-whatif prototypes the command
-help prints help file
C14622791.fm Page 431 Wednesday, December 12, 2007 1:45 PM
432 Windows PowerShell Scripting Guide
SYNTAX:
AddNodeEvictNode.ps1
Displays missing parameter and calls help
AddNodeEvictNode.ps1 -list
Lists node configuration for a cluster
AddNodeEvictNode.ps1 -node node2 -evict
Evicts node2 from the cluster
AddNodeEvictNode.ps1 -node node2 -evict -whatif
Displays the following: what if: Perform
operation evict node node2
AddNodeEvictNode.ps1 -node node2 -add
Adds node2 to the cluster
AddNodeEvictNode.ps1 -help
Prints the help topic for the script
"@
$helpText
exit
} #end function funhelp
Now is the funwmi() function. Begin by creating a variable, $class, to hold the MSCluster_Node
WMI class name. Use the Get-WmiObject cmdlet to make the connection to WMI, and use
the ForEach-Object cmdlet to pipeline the results of the WMI query. Take the object and
retrieve the properties collection from the underlying base object; if the property has a value
and is not a system property, create a hash table of the names and values and display the
resulting table. Empty the hash table by assigning $null to it, and loop to the next item in the
collection. After reporting on all items in the collection, exit the script. The complete funwmi()
function is displayed here:
function funwmi()
{
$class = "mscluster_node"
Get-WmiObject -class $class -computername $computer `
-namespace $namespace |
foreach-object `
{
"Querying: $class on $computer"
$_.psobject.properties |
foreach-object `
{
If($_.value)
{
if ($_.name -match "__"){}
ELSE
{
$aryProp +=@{ $($_.name)=$($_.value) }
} #else
C14622791.fm Page 432 Wednesday, December 12, 2007 1:45 PM

Chapter 14 Configuring the Cluster Service 433
} #if($_.value)
} #foreach-object $_.psobject.properties
$aryProp
$aryProp = $null
} #foreach-object mscluster_node
exit
} #end function funwmi
After creating the funwmi() function, move to the funadd() function that is used to add a node
to the cluster. Begin the funadd() function by assigning the mscluster_cluster string to the
$class variable. Make the connection into WMI using the MSCluster_Cluster WMI class from
the root\MSCluster WMI namespace. When you have an instance of the management object
stored in the $objwmi variable, use the addnode() method to add a node with the name stored
in the $node variable, and exit the script. The funadd() function is shared here:
function funadd()
{
$class = "mscluster_cluster"
$objWMI = Get-wmiobject -namespace $namespace -class $class `
-computername $computer
$objwmi.addnode($node)
exit
} #end funadd
The funevict() function, which is used to remove a node from the cluster configuration, is the
next step. Begin by assigning the string “mscluster_cluster” to the $class variable, then use the
Get-WmiObject cmdlet to make the connection into WMI. Use the returned management
object to gain access to the evictnode() method from the MSCluster_Cluster WMI class. Finally,
call the exit statement to exit the script. The funevict() function is listed here:
function funevict()
{
$class = "mscluster_cluster"
$objWMI = Get-wmiobject -namespace $namespace -class $class `
-computername $computer
$objwmi.evictnode($node)
exit
} #end funevict
The funwhatif() function is used to model the commands that are processed when the script is
run without the -whatif switch.
Important When using scripts with multiple parameters to perform critical operations
such as evicting a node from a production cluster server, you may want to consider adding a
whatif function to display your intended command line. This simple technique could be a sig-
nificant time-saver in the future.
Begin the funwhatif() function by checking for the -evict parameter. If this is true, print a string
indicating that you are getting ready to evict the node, and use the $node value. If the -add
C14622791.fm Page 433 Wednesday, December 12, 2007 1:45 PM

434 Windows PowerShell Scripting Guide
parameter was supplied, print a string that indicates you’ll add the node listed in the $node
variable. Exit the script. The funwhatif() function is shown here:
function funwhatif()
{
if($evict)
{
"what if: Perform operation evict node $node"
}
if($add)
{
"what if: Perform operation add node $node"
}
exit
} #end funwhatif
Now you’ll need to examine the command line.
Important The order of these command-line checks is critical to the proper functioning of
this script.
The first step is check for the -help parameter; if you find the $help variable, call the funhelp()
function. Next, look for the -list parameter; if it’s found, call the funwmi() function. Next, look
for -whatif; if you find it, call the funwhatif() function. After passing the preliminary checks,
move to the operational checks. If you don’t find the $node variable, create an error and call
the funhelp() function to display usage information. If you find the $add switch, call the
funadd() function to add the node. Look for $evict and call funevict() if you locate it. Finally,
look for a combination of missing parameters and call the funhelp() function once again. This
section of the script is shown here:
if($help) { "obtaining help" ; funhelp }
if($list) { "listing node config" ; funwmi }
if($whatif) { funwhatif }
if(!$node) { "A node is required" ; funhelp }
if($add) { "Adding node $node" ; funadd }
if($evict) { "Evicting node $node" ; funevict }
if(!$add -or !$evict) { "missing parameter" ; funhelp }
The completed AddNodeEvictNode.ps1 script is shown here.
AddNodeEvictNode.ps1
param(
$computer="localhost",
$namespace="root\mscluster",
$node,
[switch]$add,
[switch]$evict,
[switch]$list,
[switch]$whatif,
[switch]$help
)
C14622791.fm Page 434 Wednesday, December 12, 2007 1:45 PM
Chapter 14 Configuring the Cluster Service 435
function funHelp()
{
$helpText=@"
DESCRIPTION:
NAME: AddNodeEvictNode.ps1
List, Add or evict nodes on cluster
PARAMETERS:
-computer name of the computer
-namespace name of the wmi namespace
-node the cluster node name
-add add cluster node to cluster
-evict evict cluster node from cluster
-list list current node config
-whatif prototypes the command
-help prints help file
SYNTAX:
AddNodeEvictNode.ps1
Displays missing parameter and calls help
AddNodeEvictNode.ps1 -list
Lists node configuration for a cluster
AddNodeEvictNode.ps1 -node node2 -evict
Evicts node2 from the cluster
AddNodeEvictNode.ps1 -node node2 -evict -whatif
Displays the following: what if: Perform
operation evict node node2
AddNodeEvictNode.ps1 -node node2 -add
Adds node2 to the cluster
AddNodeEvictNode.ps1 -help
Prints the help topic for the script
"@
$helpText
exit
} #end function funhelp
function funwmi()
{
$class = "mscluster_node"
Get-WmiObject -class $class -computername $computer `
-namespace $namespace |
foreach-object `
{
"Querying: $class on $computer"
$_.psobject.properties |
foreach-object `
C14622791.fm Page 435 Wednesday, December 12, 2007 1:45 PM
436 Windows PowerShell Scripting Guide
{
If($_.value)
{
if ($_.name -match "__"){}
ELSE
{
$aryProp +=@{ $($_.name)=$($_.value) }
} #else
} #if($_.value)
} #foreach-object $_.psobject.properties
$aryProp
$aryProp = $null
} #foreach-object mscluster_node
exit
} #end function funwmi
function funadd()
{
$class = "mscluster_cluster"
$objWMI = Get-wmiobject -namespace $namespace -class $class `
-computername $computer
$objwmi.addnode($node)
exit
} #end funadd
function funevict()
{
$class = "mscluster_cluster"
$objWMI = Get-wmiobject -namespace $namespace -class $class `
-computername $computer
$objwmi.evictnode($node)
exit
} #end funevict
function funwhatif()
{
if($evict)
{
"what if: Perform operation evict node $node"
}
if($add)
{
"what if: Perform operation add node $node"
}
exit
} #end funwhatif
if($help) { "obtaining help" ; funhelp }
if($list) { "listing node config" ; funwmi }
if($whatif) { funwhatif }
if(!$node) { "A node is required" ; funhelp }
if($add) { "Adding node $node" ; funadd }
if($evict) { "Evicting node $node" ; funevict }
if(!$add -or !$evict) { "missing parameter" ; funhelp }
C14622791.fm Page 436 Wednesday, December 12, 2007 1:45 PM
Chapter 14 Configuring the Cluster Service 437
Removing the Cluster
There may be times when you want to remove the clustered server. To do this, you can use the
MSCluster_Cluster WMI class. An example of using the MSCluster_Cluster WMI class can be
found in the RemoveCluster.ps1 script.
Begin the RemoveCluster.ps1 script by using the param statement, which incorporates the
usual -computer and -namespace parameters and supplies default values for them; also use the
-help parameter to display help information. There are a number of other switched parame-
ters: -remove to remove the cluster, -list to list current cluster configuration, -force to skip cer-
tain parameter checks, and -whatif to model the command. The param statement is displayed
here:
param(
$computer="localhost",
$namespace="root\mscluster",
[switch]$remove,
[switch]$list,
[switch]$force,
[switch]$whatif,
[switch]$help
)
The next step is to create the help function named funhelp(). Begin the function by creating a
variable named $helptext, and assign a here-string that contains the help information. The
here-string contains description, parameter, and syntax sections. After the $helptext variable is
populated, print the contents of the variable, and exit the script. The funhelp() function is
shown here:
function funHelp()
{
$helpText=@"
DESCRIPTION:
NAME: RemoveCluster.ps1
Removes a cluster
PARAMETERS:
-computer name of the computer
-namespace name of the wmi namespace
-remove removes the cluster
-list displays cluster info
-whatif prototypes the command
-help prints help file
SYNTAX:
RemoveCluster.ps1
Displays a parameter is required, and
calls help
RemoveCluster.ps1 -list
Lists cluster configuration info
C14622791.fm Page 437 Wednesday, December 12, 2007 1:45 PM
438 Windows PowerShell Scripting Guide
RemoveCluster.ps1 -remove
Removes the cluster
RemoveCluster.ps1 -remove -whatif
Displays the following: what if: Perform operation
Remove cluster
RemoveCluster.ps1 -help
Prints the help topic for the script
"@
$helpText
exit
} #end function funhelp
The next step is to create another function named funlist(), which connects to the
MSCluster_Cluster WMI class using the Get-WmiObject cmdlet. It returns all management
objects and prints the current configuration. The funlist() function then exits the script. The
entire funlist() function is shown here:
function funList()
{
$class = "mscluster_cluster"
$objWMI = Get-WmiObject -class $class `
-computername $computer `
-namespace $namespace
$objWMI
exit
} #end function funList
Now you come to the funcountresource() function, which is used to count the number of clus-
ter resources currently configured on the server. If there are any clustered resources on the
server, print an error and exit the script. However, if you feel confident in attempting to delete
the cluster, the help string suggests using the -force switch to see if the cluster will be removed.
The interesting thing about the funcountresource() function is the way the entire Get-WmiOb-
ject cmdlet and parameters are surrounded by smooth parentheses before calling the Count
property. The funcountresource() function is shown here:
function funCountResource()
{
$count = (Get-WmiObject -computername $computer -Namespace `
$namespace -Class mscluster_resource).count
if($count -gt 0)
{
"There are still $($count) resources on $computer"
"You should not attempt to delete the cluster with"
"published resources. If you are sure you "
"can use the -force to avoid this check"
C14622791.fm Page 438 Wednesday, December 12, 2007 1:45 PM
Chapter 14 Configuring the Cluster Service 439
}
exit
}
Next is the funremovecluster() function, which checks for the use of the -force parameter. If it is
found, then it skips the call to the funcountresource() function. Use the Get-WmiObject cmdlet
to connect to the MSCluster_Cluster WMI class in the root\MSCluster WMI namespace. After
making the connection, add special privileges by using the PSBase.Scope.Options.EnablePrivi-
leges property and setting it to true, then call the DestroyCluster() method and pass it the $true
Boolean value. After completing these steps, exit the script. The funremovecluster() function is
displayed here:
function funRemoveCluster()
{
if(!$force) { funCountResource }
$class = "mscluster_cluster"
$objWMI = Get-WmiObject -class $class `
-computername $computer `
-namespace $namespace
$objWMI.psbase.Scope.Options.EnablePrivileges = $true
$objWMI.DestroyCluster($true)
exit
} #end function funRemoveCluster
You now arrive at the funwhatif() function, which is used to test the command prior to execu-
tion. To do this, use the -computer and the -namespace parameters from the param statement
and pass the values to the Get-WmiObject cmdlet. Query the MSCluster_Cluster WMI class
and print the name of the cluster. This is what is removed when the DestroyCluster($true)
method is called. The funwhatif() function is shown here:
function funwhatif()
{
$class = "mscluster_cluster"
$objWMI = Get-WmiObject -class $class `
-computername $computer `
-namespace $namespace
"what if: Perform operation Remove cluster $($objwmi.name)"
exit
}
You must check the command line. First, look for -help, and call the funhelp() function if it is
found. Look for -list, and call the funlist() function if that parameter is found. Look for -whatif
and call the whatif() function if you find that parameter. Check for -remove and call the funre-
movecluster() function if you find it. Finally, look for the absence of $help, $list, or $remove and
if none of them are found, call the funhelp() function. This section of the script is shown here:
if($help) { "obtaining help" ; funhelp }
if($list) { "current config" ; funlist }
if($whatif) { funwhatif }
if($remove) { funRemoveCluster }
if(!$help -or !$list -or !$remove) { funhelp }
C14622791.fm Page 439 Wednesday, December 12, 2007 1:45 PM
440 Windows PowerShell Scripting Guide
The completed RemoveCluster.ps1 script is shown here.
RemoveCluster.ps1
param(
$computer="localhost",
$namespace="root\mscluster",
[switch]$remove,
[switch]$list,
[switch]$force,
[switch]$whatif,
[switch]$help
)
function funHelp()
{
$helpText=@"
DESCRIPTION:
NAME: RemoveCluster.ps1
Removes a cluster
PARAMETERS:
-computer name of the computer
-namespace name of the wmi namespace
-remove removes the cluster
-list displays cluster info
-whatif prototypes the command
-help prints help file
SYNTAX:
RemoveCluster.ps1
Displays a parameter is required, and
calls help
RemoveCluster.ps1 -list
Lists cluster configuration info
RemoveCluster.ps1 -remove
Removes the cluster
RemoveCluster.ps1 -remove -whatif
Displays the following: what if: Perform operation
Remove cluster
RemoveCluster.ps1 -help
Prints the help topic for the script
"@
$helpText
exit
} #end function funhelp
function funList()
C14622791.fm Page 440 Wednesday, December 12, 2007 1:45 PM
Chapter 14 Configuring the Cluster Service 441
{
$class = "mscluster_cluster"
$objWMI = Get-WmiObject -class $class `
-computername $computer `
-namespace $namespace
$objWMI
exit
} #end function funList
function funCountResource()
{
$count = (Get-WmiObject -computername $computer -Namespace `
$namespace -Class mscluster_resource).count
if($count -gt 0)
{
"There are still $($count) resources on $computer"
"You should not attempt to delete the cluster with"
"published resources. If you are sure you "
"can use the -force to avoid this check"
}
exit
}
function funRemoveCluster()
{
if(!$force) { funCountResource }
$class = "mscluster_cluster"
$objWMI = Get-WmiObject -class $class `
-computername $computer `
-namespace $namespace
$objWMI.psbase.Scope.Options.EnablePrivileges = $true
$objWMI.DestroyCluster($true)
exit
} #end function funRemoveCluster
function funwhatif()
{
$class = "mscluster_cluster"
$objWMI = Get-WmiObject -class $class `
-computername $computer `
-namespace $namespace
"what if: Perform operation Remove cluster $($objwmi.name)"
exit
}
if($help) { "obtaining help" ; funhelp }
if($list) { "current config" ; funlist }
if($whatif) { funwhatif }
if($remove) { funRemoveCluster }
if(!$help -or !$list -or !$remove) { funhelp }
C14622791.fm Page 441 Wednesday, December 12, 2007 1:45 PM
442 Windows PowerShell Scripting Guide
Summary
In this chapter, we examined some of the tasks involved in working with the Windows Server
2008 Failover Cluster. We first looked at identifying the WMI classes we could use to manage
the Windows Server 2008 Failover Cluster. Next we looked at reporting the current cluster
configuration, and then moved on to querying node configuration. The next step was to
examine a very powerful script that allows multiple class queries and will write the results to
a text file. We then moved on to adding nodes to the cluster and evicting nodes from the
cluster. We concluded this chapter by developing a script that can remove the cluster.
C14622791.fm Page 442 Wednesday, December 12, 2007 1:45 PM

443
Chapter 15
Managing Internet Information
Services
After completing this chapter, you will be able to:
■Report IIS configuration information.
■Create a new Web site.
■Modify an existing Web site.
■Back up a Web site.
■Modify IIS options.
On the Companion Disc All the scripts used in this chapter are located on the CD that
accompanies this book in the \scripts\chapter15 folder.
Enabling Internet Information Services Management
As with nearly everything in Windows Server 2008, most options in Microsoft Internet
Information Services (IIS) are optional. You have the option of installing IIS without any of
the management capabilities. This can be useful if you have a stand-alone Web server that
does not require much maintenance. As shown in Figure 15-1, IIS is installed on Windows
Server 2008 as a server role.
To enable remote administration when using Windows PowerShell, you have two options.
You can add the IIS 6 WMI Compatibility role service, or you can install the IIS Management
Scripts and Tools role service. If you install IIS Management Scripts and Tools role service,
you gain access to some new Windows Management Instrumentation (WMI) classes that are
installed in the root\WebAdministration WMI namespace. If you install the IIS 6 WMI Compat-
ibility role service, you gain access to the same WMI classes used to administrator IIS 6, which
are located in the root\MicrosoftIISv2 WMI namespace. These classes also work on IIS 7. This
is great news, as the same techniques used to manage IIS 7 also work with IIS 6.
C15622791.fm Page 443 Wednesday, December 12, 2007 1:46 PM
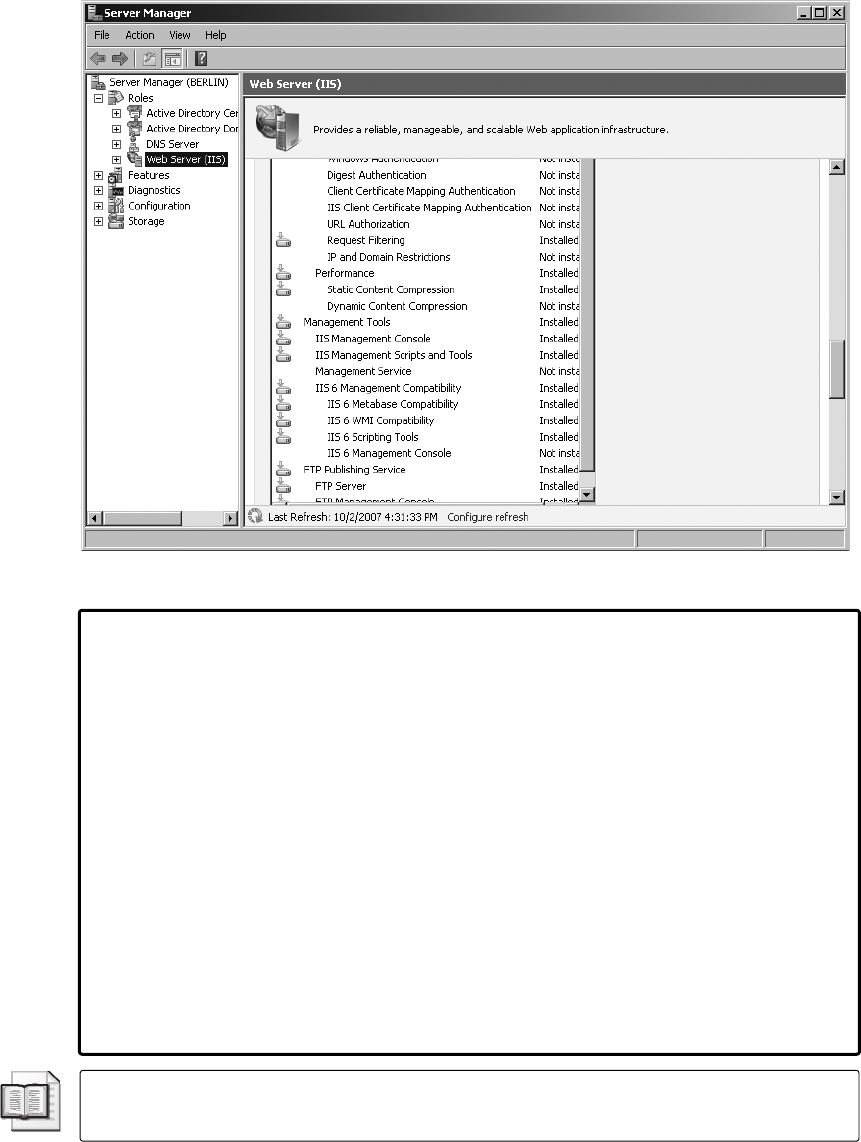
444 Windows PowerShell Scripting Guide
Figure 15-1 When installing IIS as a server role on Windows Server 2008, you may select many options.
Finding the Proper IIS 7 WMI Classes
With the large number of WMI classes in the root\WebAdministration WMI namespace,
you may ask yourself, “How in the world will I find my way through all those WMI
classes?” The answer is that it’s surprisingly easy to do; simply use a Windows Power-
Shell script. The FindIISClasses.ps1 WMI script allows you to search through the IIS 7
namespace and look for WMI classes that match the search criteria you provide. The
function is designed to search the names of all classes and return the match in a nice
little list. If you do a lot of IIS 7 WMI work, you may want to put this function in your
profile. The FindIISClasses.ps1 script is shown here.
FindIISClasses.ps1
function funIIS($strIN)
{
Get-WmiObject -Namespace root\webadministration -list |
where-object { $_.name -match $strIN }
}
funIIS("site")
More Info For more information on working with Windows PowerShell profiles see
Microsoft Windows PowerShell Step by Step (Microsoft Press, 2007).
C15622791.fm Page 444 Wednesday, December 12, 2007 1:46 PM
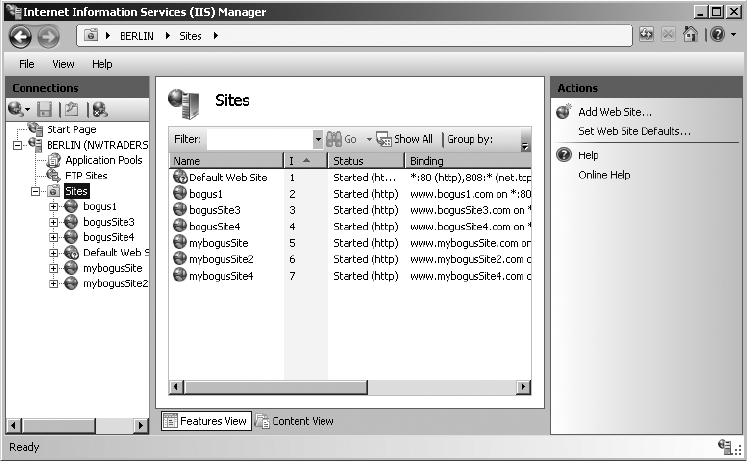
Chapter 15 Managing Internet Information Services 445
Reporting IIS Configuration
After the IIS management tools are installed, it’s important to examine the configuration of
the server. To do this, you need to examine some items, including the sites that are configured
on the IIS server and the application pools that may have been created.
Reporting Site Information
The first step is to find out which Web sites reside on the server in question using the Internet
Information Services (IIS) Manager console. This new and improved console has many desir-
able features, including a new look, as shown in Figure 15-2.
Figure 15-2 Web sites displayed in the Internet Information Services (IIS) Manager console.
To find the resident Web sites, use the GetSites.ps1 script using the Site WMI class from the
root\WebAdministration WMI namespace.
The GetSites.ps1 script begins with the param statement. This parameter statement is rather
simple as there are only two parameters: -computer for the computer target and -help to display
the script syntax. This line of code is shown here:
param($computer="localhost", [switch]$help)
The funhelp() function is next. It uses the here-string for ease of typing. Because the script
has only two parameters, -help and -computer, help doesn’t need to be extensive. After the
C15622791.fm Page 445 Wednesday, December 12, 2007 1:46 PM
446 Windows PowerShell Scripting Guide
here-string is created and stored in the $helptext variable, print the contents of the variable,
and exit the script. The funhelp() function is shown here:
function funHelp()
{
$helpText=@"
DESCRIPTION:
NAME: GetSites.ps1
Gets a listing of web sites on a local or remote machine.
PARAMETERS:
-computer Specifies the name of the computer to run the script
-help prints help file
SYNTAX:
GetSites.ps1
Gets a listing of web sites on local computer
GetSites.ps1 -computer "webserverII"
Gets a listing of web sites on web server named webserverII.
GetSites.ps1 -help
Prints the help topic for the script
"@
$helpText
exit
}
If the script is launched with the -help parameter specified, then the $help variable is present
on the stack. If you detect the presence of the $help variable, print the contents of the help file.
This line of code is displayed here:
if($help) { "Printing help now..." ; funHelp }
If you make it past the help file, make the query into WMI to retrieve the information about
the Web sites. Connect to the root\WebAdministration WMI namespace, and perform the
query to retrieve all objects related to the site object. Pipeline the resulting object to the
Format-Table cmdlet to clean up the output a bit. This section of code is shown here:
Get-WmiObject -Namespace root\webadministration `
-computername $computer -class site |
format-table -property name
The completed GetSites.ps1 script is shown here.
GetSites.ps1
param($computer="localhost", [switch]$help)
function funHelp()
C15622791.fm Page 446 Wednesday, December 12, 2007 1:46 PM
Chapter 15 Managing Internet Information Services 447
{
$helpText=@"
DESCRIPTION:
NAME: GetSites.ps1
Gets a listing of web sites on a local or remote machine.
PARAMETERS:
-computer Specifies the name of the computer to run the script
-help prints help file
SYNTAX:
GetSites.ps1
Gets a listing of web sites on local computer
GetSites.ps1 -computer "webserverII"
Gets a listing of web sites on web server named webserverII.
GetSites.ps1 -help
Prints the help topic for the script
"@
$helpText
exit
}
if($help) { "Printing help now..." ; funHelp }
Get-WmiObject -Namespace root\webadministration `
-computername $computer -class site |
format-table -property name
Reporting on Application Pools
Application pools were introduced to IIS in version 6.0 and they continue to be a popular way
of working with IIS. You can work with application pools by using the Internet Information
Services (IIS) Manager console as shown in Figure 15-3.
You can also use the new ApplicationPool WMI class residing in the root\WebAdministration
WMI namespace to work with application pools. In the GetAppPool.ps1 script, use the
ApplicationPool WMI class to retrieve information about all the application pools that reside
on the server.
Begin the GetAppPool.ps1 script by defining the param statement. The param statement
consists of two parameters: -computer, which has a default value of localhost, and -help, which
is a switched parameter. The completed param statement is shown here:
param($computer="localhost", [switch]$help)
C15622791.fm Page 447 Wednesday, December 12, 2007 1:46 PM
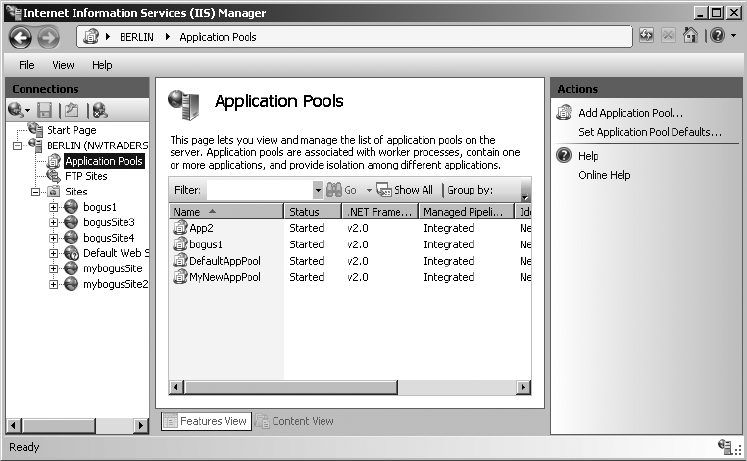
448 Windows PowerShell Scripting Guide
Figure 15-3 Application pools in the Internet Information Services (IIS) Manager utility.
Next, create the funhelp() function, which is used to display a help text to the screen when the
script is run with the -help switch. The funhelp() function begins with the function keyword, fol-
lowed by the name of the function. There are no input parameters to the function, so the
parentheses are left empty. Inside the code block, declare a variable, $helptext, and assign the
results of creating a here-string. The here-string begins with @” and ends with “@. Inside the
here-string, there is no need to use quotation marks. The advantage of creating a here-string is
that what you see on the screen is the output you get from the script. You are free to tab over
or include blank lines, yet all the text you enter is treated as a simple string. Define three sec-
tions: description, parameters, and syntax. After the here-string is created, display the con-
tents of the $helptext variable, and exit the script. The completed funhelp() function is
displayed here:
function funHelp()
{
$helpText=@"
DESCRIPTION:
NAME: GetAppPool.ps1
Gets a listing of application pools on a local or remote machine.
PARAMETERS:
-computer Specifies the name of the computer to run the script
-help prints help file
SYNTAX:
GetAppPool.ps1
C15622791.fm Page 448 Wednesday, December 12, 2007 1:46 PM

Chapter 15 Managing Internet Information Services 449
Gets a listing of application pools on local computer
GetAppPool.ps1 -computer "webserverII"
Gets a listing of application pools on a web server named
webserverII.
GetAppPool.ps1 -help
Prints the help topic for the script
"@
$helpText
exit
}
Check whether to run the script or to display the help text. To make this determination, look
for the presence of the $help variable. If you find the variable, then you’ll know the script was
run with the -help parameter specified. Print a status message and call the funhelp() function.
This line of code is shown here:
if($help) { "Printing help now..." ; funHelp }
The next portion of the script is the “worker” section that helps make a connection into
WMI to retrieve an instance of the ApplicationPool WMI class. Use the Get-Object cmdlet and
specify the root\WebAdministration WMI namespace. This is the location where the new
WMI classes for IIS 7.0 reside. Allow the user to use the -computername parameter, which will
accept a new computer name from the command line via the -computer parameter to the
script. Pipeline the resulting management object to the next cmdlet and use the line continu-
ation character (grave accent,`) to break the logical line into two pieces. This section of code
is shown here:
Get-WmiObject -Namespace root\webadministration `
-computername $computer -Class applicationpool |
Next is the output section of the script: Accept the pipelined object from the Get-WmiObject
cmdlet and feed it to the Format-Table cmdlet. Choose the Name and the AutoStart properties
on the first line of the command. Then use the line continuation character to create a hash table.
Tip A common question I receive is “How can I create a different table header when using
the Format-Table cmdlet?” The answer is to use a hash table, and supply values for label
and expression. The other common questions (and their associated answers) can be found
in Appendix C, “Frequently Asked Questions.”
The hash table allows you to create a more appropriate table label than managedruntimeversion.
For example, you may decide to call the third column .Net Version. To do this, first supply a value
for the label key. In this case, it is the desired table column header, .Net Version. Next, supply
a value for expression. Set it equal to the current pipelined value of the ManagedRuntimeVersion
C15622791.fm Page 449 Wednesday, December 12, 2007 1:46 PM
450 Windows PowerShell Scripting Guide
property. Continue the command and move to the next property, QueueLength, and choose the
autosize parameter. This completed section of code is shown here:
format-table -property name, autostart, `
@{
Label = ".Net Version" ;
Expression = { $_.ManagedRuntimeVersion }
}, `
QueueLength –autosize
The completed GetAppPool.ps1 script is shown here.
GetAppPool.ps1
param($computer="localhost", [switch]$help)
function funHelp()
{
$helpText=@"
DESCRIPTION:
NAME: GetAppPool.ps1
Gets a listing of application pools on a local or remote machine.
PARAMETERS:
-computer Specifies the name of the computer to run the script
-help prints help file
SYNTAX:
GetAppPool.ps1
Gets a listing of application pools on local computer
GetAppPool.ps1 -computer "webserverII"
Gets a listing of application pools on a web server named
webserverII.
GetAppPool.ps1 -help
Prints the help topic for the script
"@
$helpText
exit
}
if($help) { "Printing help now..." ; funHelp }
Get-WmiObject -Namespace root\webadministration `
-computername $computer -Class applicationpool |
format-table -property name, autostart, `
@{
Label = ".Net Version" ;
Expression = { $_.ManagedRuntimeVersion }
}, `
QueueLength –autosize
C15622791.fm Page 450 Wednesday, December 12, 2007 1:46 PM
Chapter 15 Managing Internet Information Services 451
Reporting on Application Pool Default Values
There are a number of default values that affect the way application pools operate at the Web
server level. These values control the way that all application pools behave in relation to the
autostart behavior, whether 32-bit applications are allowed to run on 64-bit hardware and
other behaviors as well. In general, the default values are okay for small applications, but for
more specialized applications you should be aware of the default values that affect all application
pools. Default values also affect the way the CPU is utilized as well.
In the GetApplicationPoolDefaults.ps1 script, use the Server WMI class that resides in the
root\WebAdministration WMI namespace to retrieve the default values that govern all application
pools on a specific server.
Begin the script with the param statement and define two parameters: -computer and -help.
The -computer parameter is set to the default value of localhost, and the -help parameter is a
switched parameter. This line of code is displayed here:
param($computer="localhost", [switch]$help)
Define the funhelp() function used to display the help content for the script. This function
displays the usage information for the script and samples of permitted syntax. After the help
information is displayed, the script calls the exit statement and ends the script. The funhelp()
function is displayed here:
function funHelp()
{
$helpText=@"
DESCRIPTION:
NAME: GetApplicationPoolDefaults.ps1
Gets a listing of application pool defaults on a local or remote
machine.
PARAMETERS:
-computer Specifies the name of the computer to run the script
-help prints help file
SYNTAX:
GetApplicationPoolDefaults.ps1
Gets a listing of application pool defaults on local computer
GetApplicationPoolDefaults.ps1 -computer "webserverII"
Gets a listing of application pool defaults on web server named
webserverII.
GetApplicationPoolDefaults.ps1 -help
Prints the help topic for the script
"@
C15622791.fm Page 451 Wednesday, December 12, 2007 1:46 PM
452 Windows PowerShell Scripting Guide
$helpText
exit
}
Other than the param line of code, the first line of script that executes in the script is the
portion that governs the display of the help text. Check for the presence of the $help variable.
If you find it, call the funhelp() function. If the $help variable is not found, then the line of code
has no effect on the script behavior. This line of code is shown here:
if($help) { "Printing help now..." ; funHelp }
Make the connection into WMI. To do this, use the Get-WmiObject cmdlet. Because the
IIS 7.0 WMI classes are in a nondefault WMI namespace, you must supply the -namespace
parameter and configure the script to use the root\WebAdministration WMI namespace. Use
the -computername parameter so you can choose a different computer than the local host,
then choose the Server WMI class. This section of the script is shared here:
$server = Get-WmiObject -Namespace root\webadministration `
-class server -computername $computer
Next is the output section of the script. When you query the Server WMI class, the application
pool default values are reported as an instance of the ApplicationPoolDefaults WMI class.
This is appended to the object returned that contains the Server WMI class. Each of the
properties that is reported—AutoStart, Enable32BitAppOnWin64, and others—are properties of the
ApplicationPoolDefaults WMI class, not properties of the Server class. The section of the code
that obtains this information is shown here:
$server.ApplicationPoolDefaults.autostart
$server.ApplicationPoolDefaults.Enable32BitAppOnWin64
$server.ApplicationPoolDefaults.ManagedPipelineMode
$server.ApplicationPoolDefaults.ManagedRuntimeVersion
$server.ApplicationPoolDefaults.Name
$server.ApplicationPoolDefaults.PassAnonymousToken
$server.ApplicationPoolDefaults.QueueLength
After reporting information from the ApplicationPoolDefaults WMI class, you work with the
CPU class. The CPU information for the application pool default value is reported as an
instance of the CPU WMI class, so you append an additional WMI class name. You now have
an instance of the Server WMI class reported in the $server variable. Next is the Application-
PoolDefaults WMI class; besides that, you are now in the CPU class. You can see this section of
code here; fortunately, it is significantly less complicated than it sounds:
$server.ApplicationPoolDefaults.cpu.Action
$server.ApplicationPoolDefaults.cpu.limit
$server.ApplicationPoolDefaults.cpu.resetinterval
$server.ApplicationPoolDefaults.cpu.SmpAffinitized
$server.ApplicationPoolDefaults.cpu.SmpAffinityMask
C15622791.fm Page 452 Wednesday, December 12, 2007 1:46 PM
Chapter 15 Managing Internet Information Services 453
The completed GetApplicationPoolDefaults.ps1 script is shown here.
GetApplicationPoolDefaults.ps1
param($computer="localhost", [switch]$help)
function funHelp()
{
$helpText=@"
DESCRIPTION:
NAME: GetApplicationPoolDefaults.ps1
Gets a listing of application pool defaults on a local or remote
machine.
PARAMETERS:
-computer Specifies the name of the computer to run the script
-help prints help file
SYNTAX:
GetApplicationPoolDefaults.ps1
Gets a listing of application pool defaults on local computer
GetApplicationPoolDefaults.ps1 -computer "webserverII"
Gets a listing of application pool defaults on web server named
webserverII.
GetApplicationPoolDefaults.ps1 -help
Prints the help topic for the script
"@
$helpText
exit
}
if($help) { "Printing help now..." ; funHelp }
$server = Get-WmiObject -Namespace root\webadministration `
-class server -computername $computer
$server.ApplicationPoolDefaults.autostart
$server.ApplicationPoolDefaults.Enable32BitAppOnWin64
$server.ApplicationPoolDefaults.ManagedPipelineMode
$server.ApplicationPoolDefaults.ManagedRuntimeVersion
$server.ApplicationPoolDefaults.Name
$server.ApplicationPoolDefaults.PassAnonymousToken
$server.ApplicationPoolDefaults.QueueLength
$server.ApplicationPoolDefaults.cpu.Action
$server.ApplicationPoolDefaults.cpu.limit
$server.ApplicationPoolDefaults.cpu.resetinterval
$server.ApplicationPoolDefaults.cpu.SmpAffinitized
$server.ApplicationPoolDefaults.cpu.SmpAffinityMask
C15622791.fm Page 453 Wednesday, December 12, 2007 1:46 PM
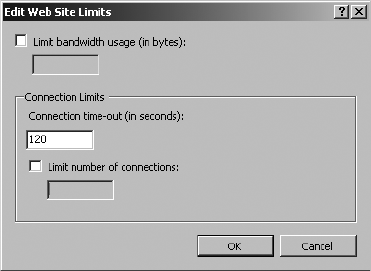
454 Windows PowerShell Scripting Guide
Reporting Site Limits
There are several limitations that can be placed on Web sites to ensure they do not tie up all
the resources on the server. In particular, you may be interested in knowing the maximum
number of connections specified for a Web site. A large number of connections could bring an
undersized server to its knees. You may also want to examine the connection time-out value.
This value is a double-edged sword: If you set the value too low, then every time a client
computer drops a connection, it must go through the entire process of creating a new connection.
This in turn uses both network traffic time and processor time. On the other hand, if the time-
out value is set too long, the number of connections awaiting time-out consumes computer
memory. Testing for your specific application is the watchword here.
The other site limit you may want to examine is the amount of bandwidth the Web site is
allowed to use. This check is obvious: You may have five Web sites on a server and if you
want each of them to share the bandwidth equally, you must grant each site 20 percent of the
available pipe coming into the data center. It is possible to view time-out and bandwith limits
in the IIS Manager as shown in Figure 15-4.
Figure 15-4 Site limit values shown in the IIS Manager console.
If you have more than one Web server, then you are likely interested in using a script to gather
the site limitations. This makes it easier to find the information, is faster to work with, and
of course, you can easily pipe the results to a text file or database to persist the information.
Begin the GetSiteLimits.ps1 script by defining the param statement. The param statement
receives only two parameters: -computer for the name of the computer to run the script, and
-help to display help. The -help parameter is a switched parameter and only has an effect when
present. The -computer parameter is set by default to the local computer. This line of code is
shown here:
param($computer="localhost", [switch]$help)
C15622791.fm Page 454 Wednesday, December 12, 2007 1:46 PM
Chapter 15 Managing Internet Information Services 455
Next, create the funhelp() function, which is used to print the help text when the script is run
with the -help parameter. To create the help text, use a here-string and store the result in the
$helptext variable. After the here-sting is created and assigned, display the contents of the
variable, and exit the script. There are three sections to the help text: description, parameters,
and syntax. The funhelp() function is shown here:
function funHelp()
{
$helpText=@"
DESCRIPTION:
NAME: GetSiteLimits.ps1
Gets a listing of site limits on a local or remote machine.
PARAMETERS:
-computer Specifies the name of the computer to run the script
-help prints help file
SYNTAX:
GetSiteLimits.ps1
Gets a listing of site limits on local computer
GetSiteLimits.ps1 -computer "webserverII"
Gets a listing of site limits on web server named webserverII.
GetSiteLimits.ps1 -help
Prints the help topic for the script
"@
$helpText
exit
Following the funhelp() function, determine if you need to display help. To do this, check to
see if the $help variable is present. The $help variable will only be present if the script was run
with the -help parameter. If the variable is detected, print a status message and call the funhelp()
function. This line of code follows; note that the semicolon placed between the message and the
line call to the function indicates that there are two separate commands on the same line:
if($help) { "Printing help now..." ; funHelp }
The next portion is the “worker” section of the script. Use the Get-WmiObject cmdlet to connect
to the root\WebAdministration WMI namespace. To do this, use the -namespace parameter; also
use the -computername parameter to allow connections to remote computers, if required. Use
the -class parameter to specify the Server WMI class. The resulting management object is
stored in the $server variable. This section of code is shown here:
$server = Get-WmiObject -Namespace root\webadministration `
-computername $computer -class server
C15622791.fm Page 455 Wednesday, December 12, 2007 1:46 PM

456 Windows PowerShell Scripting Guide
The output section of the script is a bit unusual, but it illustrates a feature of the new WMI
classes created by IIS 7.0. To display the value of the MaxConnections property, you must use
an intermediate WMI class.
Important With the WMI classes introduced in IIS 7, there is a high level of nesting or
inheritance. Very often when you query a core class, you are presented with embedded objects
as the result. Unfortunately, the Get-Member cmdlet is unable to unravel the mystery. As a
result, it is essential that you consult Windows Software Development Kit (SDK) documentation.
Actually, you’ll need to use several intermediate WMI classes. To find the site defaults, use the
SiteDefaults class. To find the site limits, use the Limits class. When you’re at the Limits class,
you can find the MaxConnections, ConnectionTimeout, and MaxBandwidth properties. This
section of code is shown here:
$server.SiteDefaults.limits.maxconnections
$server.SiteDefaults.limits.ConnectionTimeout
$server.SiteDefaults.limits.MaxBandwidth
The completed GetSiteLimits.ps1 script is shown here.
GetSiteLimits.ps1
param($computer="localhost", [switch]$help)
function funHelp()
{
$helpText=@"
DESCRIPTION:
NAME: GetSiteLimits.ps1
Gets a listing of site limits on a local or remote machine.
PARAMETERS:
-computer Specifies the name of the computer to run the script
-help prints help file
SYNTAX:
GetSiteLimits.ps1
Gets a listing of site limits on local computer
GetSiteLimits.ps1 -computer "webserverII"
Gets a listing of site limits on web server named webserverII.
GetSiteLimits.ps1 -help
Prints the help topic for the script
"@
$helpText
exit
}
C15622791.fm Page 456 Wednesday, December 12, 2007 1:46 PM

Chapter 15 Managing Internet Information Services 457
if($help) { "Printing help now..." ; funHelp }
$server = Get-WmiObject -Namespace root\webadministration `
-computername $computer -class server
$server.SiteDefaults.limits.maxconnections
$server.SiteDefaults.limits.ConnectionTimeout
$server.SiteDefaults.limits.MaxBandwidth
Listing Virtual Directories
Virtual directories are those used by IIS to map to a physical directory. Each Web application
in IIS 7 has a root virtual directory that maps the Web application to the physical directory.
A Web application can have more than one virtual directory, if needed. To retrieve information
about your virtual directories, use the IIS Manager console or the VirtualDirectory WMI class
from the root\WebAdministration WMI namespace.
In the ListVirtualDirectory.ps1 script, begin with the param statement. The param statement
collects arguments from the command line and is used to configure the way the script
behaves at runtime.
Tip Any parameter that is defined must have a value assigned to it or the script generates
an error. The way to control that behavior is through the use of one of two techniques.
The first is to assign a default value. The second method to make a parameter optional is to
make the parameter a switch via the [switch] constraint.
The param statement accepts two arguments. The -computer parameter is configured with a
default value of localhost, which refers to the local computer. The second parameter is the
-help parameter, which is used to call the funhelp() function. The -help parameter is a switched
parameter and must be present on the command line to take effect. There are no values
supplied to a switched parameter. It is a Boolean value with potential values such as true/
false, 0/-1, present/absent. The param statement is shown here:
param($computer="localhost", [switch]$help)
Next, the funhelp() function is used to display help to the user when the script is run with the
-help parameter supplied to the command line. Following the function declaration and working
inside the code block, declare a variable, $helptext, and assign a here-string to it. Inside the
here-string are three sections of the help text: the description, the parameters, and the syntax
of the script. After the $helptext variable is populated, print the value of the $helptext variable
and exit the script. The funhelp() function is shown here:
function funHelp()
{
$helpText=@"
DESCRIPTION:
NAME: ListVirtualDirectory.ps1
Gets a listing of virtual directories on a local or remote machine.
C15622791.fm Page 457 Wednesday, December 12, 2007 1:46 PM
458 Windows PowerShell Scripting Guide
PARAMETERS:
-computer Specifies the name of the computer to run the script
-help prints help file
SYNTAX:
ListVirtualDirectory.ps1
Gets a listing of virtual directories on local computer
ListVirtualDirectory.ps1 -computer "webserverII"
Gets a listing of virtual directories on web server named webserverII.
ListVirtualDirectory.ps1 -help
Prints the help topic for the script
"@
$helpText
exit
}
Following the funhelp() function is the section of the script to be executed following the param
statement. The function definition is skipped until it is called. Use the if statement to look
for the existence of the $help variable. If it’s found, print a status message and call the funhelp()
function. The line of code that checks for the presence of the $help variable and calls the
funhelp() function is displayed here:
if($help) { "Printing help now..." ; funHelp }
Next is the “worker” section of the script. First, use the Get-WmiObject cmdlet to connect to
the root\WebAdministration WMI namespace. Do this by using the -namespace parameter.
Choose the WMI class to query by using the -class parameter. In this script, use the Virtual-
Directory WMI class. Supply the contents of the $computer variable to the -computername
parameter and print the results. This section of the script is shown here:
Get-WmiObject -Namespace root\webadministration `
-class virtualdirectory -computername $computer
The completed ListVirtualDirectory.ps1 script is shown here.
ListVirtualDirectory.ps1
param($computer="localhost", [switch]$help)
function funHelp()
{
$helpText=@"
DESCRIPTION:
NAME: ListVirtualDirectory.ps1
Gets a listing of virtual directories on a local or remote machine.
PARAMETERS:
-computer Specifies the name of the computer to run the script
-help prints help file
C15622791.fm Page 458 Wednesday, December 12, 2007 1:46 PM
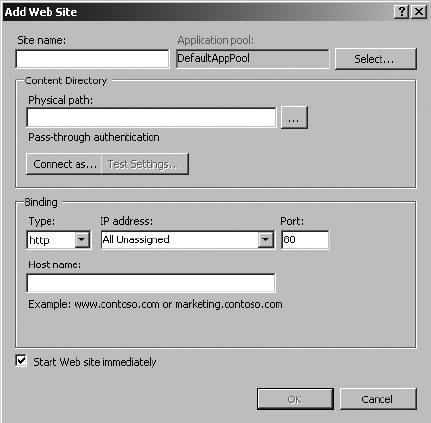
Chapter 15 Managing Internet Information Services 459
SYNTAX:
ListVirtualDirectory.ps1
Gets a listing of virtual directories on local computer
ListVirtualDirectory.ps1 -computer "webserverII"
Gets a listing of virtual directories on web server named webserverII.
ListVirtualDirectory.ps1 -help
Prints the help topic for the script
"@
$helpText
exit
}
if($help) { "Printing help now..." ; funHelp }
Get-WmiObject -Namespace root\webadministration `
-class virtualdirectory -computername $computer
Creating a New Web Site
For many companies, the process of creating a new Web site can be a complicated and
mysterious activity. Of course, the Add Web Site dialog box, shown in Figure 15-5, can help
you create a Web site, but if your duties require creation of more than one or two Web sites,
you should be very interested in the CreateSite.ps1 script.
Figure 15-5 The Add Web Site dialog box allows configuration of a new Web site.
C15622791.fm Page 459 Wednesday, December 12, 2007 1:46 PM
460 Windows PowerShell Scripting Guide
The CreateSite.ps1 script uses two of the new WMI classes found in the root\WebAdministration
WMI namespace. It uses the Site class to create the Web site, but it also requires the Binding-
Element WMI class to supply the Web site binding information. One interesting feature is that
the create method from the Site WMI class must be specified as an array. To do this, use the
[array] system to perform the type conversion.
Begin the CreateSite.ps1 script with the parameters. To make the script as easy to use as
possible, supply a number of default values for the parameters even though the only thing
you really must supply is the name of the site. Default the value of the -computer parameter to
localhost. This means that by default you’ll create a new Web site on the local computer. The
default path is the drive\inetpub\wwwroot directory. This is not a bad place to create Web
sites because you can rely on the default security to get you started in the right direction.
The default value for the -port parameter is 80, which is the default Web port. Only in special
situations should you choose a nondefault TCP port. The -tld parameter is set to com, which
is a pretty good guess for that value. The same goes for the -protocol parameter, which is set to
http. The last parameter is the switched -help parameter, which is used to display the help
topic for the script. The param statement is shown here:
param(
$sitename,
$computer="localhost",
$path="C:\inetpub\wwwroot",
$port=80,
$tld="com",
$protocol="http",
[switch]$help
)
Next is the funhelp() function, used to display the help text for the script when the script is
run with the -help parameter. The funhelp() function uses a here-string to specify the text to be
displayed. After the here-string is created, it is assigned to the variable $helptext. The contents
of the $helptext variable are displayed, and the script will exit. The funhelp() function is shown
here:
function funHelp()
{
$helpText=@"
DESCRIPTION:
NAME: CreateSite.ps1
Creates a web site on a local or remote machine.
PARAMETERS:
-computer Specifies the name of the computer to run the script
-sitename the name of the new web site
-path physical path to the web directory
-port port the web site listens to
-tld top level domain: com, net, org ...
-protocol the protocol to use: http, https ...
-help prints help file
C15622791.fm Page 460 Wednesday, December 12, 2007 1:46 PM
Chapter 15 Managing Internet Information Services 461
SYNTAX:
CreateSite.ps1 -sitename "nwtraders"
Creates a web site on the local machine named nwtraders. The path
to the web site files will be c:\inetpub\wwwroot. The connection
to the site will be port 80 to www.nwtraders.com. The new site
will respond to the http protocol.
CreateSite.ps1 -sitename "nwtraders" -computer "webserverII"
Creates a web site on web server named webserverII. The new web
site will be named nwtraders. The path to the web site files will
be c:\inetpub\wwwroot. The connection to the site will be port 80
to www.nwtraders.com. The new site will respond to the http protocol.
CreateSite.ps1 -sitename "nwtraders" -computer "webserverII" -port 8080
Creates a web site on web server named webserverII. The new web
site will be named nwtraders. The path to the web site files will
be c:\inetpub\wwwroot. The connection to the site will be port 8080
to www.nwtraders.com. The new site will respond to the http protocol.
CreateSite.ps1 -sitename "nwtraders" -path "d:\mywebdirectory"
Creates a web site on the local machine named nwtraders. The path
to the web site files will be d:\mywebdirectory. The connection
to the site will be port 80 to www.nwtraders.com. The new site
will respond to the http protocol.
CreateSite.ps1 -help
Prints the help topic for the script
"@
$helpText
exit
}
Next, check for the presence of certain parameters. The first one to check for is the -help parameter.
If it’s found, display a status message and call the funhelp() function. The other parameter to
check for is the only required parameter, the -sitename parameter. It is required because you
can’t create a Web site if you don’t know the name. Use the not operator (!) and place it in
front of the variable that is created when the -sitename parameter is specified. If you don’t find
the $sitename variable, print a status message, and call the funhelp() function. These two lines
of code are shown here:
if($help) { "Printing help now..." ; funHelp }
if(!$sitename) { "Missing the sitename ..." ; funHelp}
The next process is the site binding string. The format for the site binding string is documented
in the Windows SDK; this format consists of a wildcard, port number, www, the sitename, and
the top-level domain name. To make it easy to create this binding string, nearly everything is
C15622791.fm Page 461 Wednesday, December 12, 2007 1:46 PM
462 Windows PowerShell Scripting Guide
stored in a variable. The completed binding string and the associated variable assignment are
shown here:
$siteBinding = "*:$($port):www.$($sitename).$($tld)"
The worker section of the script comes next. First, get an instance of the Site WMI class using
the System.Management.ManagementObject ManagementClass .NET Framework class. The
shortcut for this .NET Framework class is [wmiclass]. This class allows you to retrieve an
instance of a WMI class. After obtaining an instance of the site class, call the create() method.
Tip If you were to use the Get-WmiObject cmdlet, you wouldn’t have access to the create()
method. Using [wmiclass] in this way is essentially the same as using the get() method from
the sWbemServices COM object. Keep this in mind when you are translating old VBScript
scripts.
As you create the path to the WMI namespace and the Site class, you may need to handle a
connection to a different computer. To allow for this, place a variable named $computer in
the first position of the path. The path consists of the computer, the namespace, and the
class. Because you must handle a connection to a remote computer, you’ll need to supply
the value in the first position. You are working with a nondefault WMI namespace, and
must include the information in the second position. If you were working with the
local computer and root\cimv2 (the default WMI namespace), the connection would be:
[wmiclass]“win32_service.”
The completed connection string to the site WMI class is shown here:
$site = [wmiclass]\\$computer\root\WebAdministration:site
You must create a new instance of the BindingElement WMI class. This WMI class is used to
supply the parameters to the create() method from the Site class. Use the [wmiclass] management
class to provide the ability to create a new instance of the BindingElement WMI class. After
connecting to the WMI class, call the createinstance() method to create a new instance of the
BindingElement class. This line of code is shown here:
Warning The following line of code that creates a new instance of the BindingElement
WMI class is shown using the line continuation character (grave accent). This line of code is
printed on two lines for readability. However, realize that the line of code won’t run if written
like this because you can’t break the flow of the code at this position by using the grave
accent here. Of course, the script works and displays the code on a single line.
$binding = ([wmiclass]\\$computer\root\WebAdministration: `
bindingElement).createinstance()
C15622791.fm Page 462 Wednesday, December 12, 2007 1:46 PM
Chapter 15 Managing Internet Information Services 463
Now supply the parameters for the binding information. The first item to supply is the
binding string you created and stored in the $sitebinding variable. Next, specify the protocol to
use. Finally, turn the elements of the $binding object into an array by using the [array] type
constraint. This section of code is shown here:
$binding.bindinginformation = $siteBinding
$binding.protocol = $protocol
$bindingArray = [array]$binding
After this, call the create() method, which takes three parameters: the name of the site, the
binding information stored in a new instance of the BindingElement WMI class, and the path
to the Web site files. This line of code is shown here:
$site.create($sitename, $bindingArray, $path)
The completed CreateSite.ps1 script follows.
CreateSite.ps1
param(
$sitename,
$computer="localhost",
$path="C:\inetpub\wwwroot",
$port=80,
$tld="com",
$protocol="http",
[switch]$help
)
function funHelp()
{
$helpText=@"
DESCRIPTION:
NAME: CreateSite.ps1
Creates a web site on a local or remote machine.
PARAMETERS:
-computer Specifies the name of the computer to run the script
-sitename the name of the new web site
-path physical path to the web directory
-port port the web site listens to
-tld top level domain: com, net, org ...
-protocol the protocol to use: http, https ...
-help prints help file
SYNTAX:
CreateSite.ps1 -sitename "nwtraders"
Creates a web site on the local machine named nwtraders. The path
to the web site files will be c:\inetpub\wwwroot. The connection
to the site will be port 80 to www.nwtraders.com. The new site
will respond to the http protocol.
C15622791.fm Page 463 Wednesday, December 12, 2007 1:46 PM
464 Windows PowerShell Scripting Guide
CreateSite.ps1 -sitename "nwtraders" -computer "webserverII"
Creates a web site on web server named webserverII. The new web
site will be named nwtraders. The path to the web site files will
be c:\inetpub\wwwroot. The connection to the site will be port 80
to www.nwtraders.com. The new site will respond to the http protocol.
CreateSite.ps1 -sitename "nwtraders" -computer "webserverII" -port 8080
Creates a web site on web server named webserverII. The new web
site will be named nwtraders. The path to the web site files will
be c:\inetpub\wwwroot. The connection to the site will be port 8080
to www.nwtraders.com. The new site will respond to the http protocol.
CreateSite.ps1 -sitename "nwtraders" -path "d:\mywebdirectory"
Creates a web site on the local machine named nwtraders. The path
to the web site files will be d:\mywebdirectory. The connection
to the site will be port 80 to www.nwtraders.com. The new site
will respond to the http protocol.
CreateSite.ps1 -help
Prints the help topic for the script
"@
$helpText
exit
}
if($help) { "Printing help now..." ; funHelp }
if(!$sitename) { "Missing the sitename ..." ; funHelp}
$siteBinding = "*:$($port):www.$($sitename).$($tld)"
$site = [wmiclass]"\\$computer\root\WebAdministration:site"
$binding = ([wmiclass]"\\$computer\root\WebAdministration: `
bindingElement").createinstance()
$binding.bindinginformation = $siteBinding
$binding.protocol = $protocol
$bindingArray = [array]$binding
$site.create($sitename, $bindingArray, $path)
Creating a New Application Pool
If you have a significant number of application pools to create on your new Web server, you’ll
probably want to create them using a script. This is usually true in spite of the fact that the
Add Application Pool dialog box, displayed in Figure 15-6, is easy to fill out. As important as
application pools are, they are very easy to create with a script; follow the instructions to see
how simple it is to create the CreateApplicationPool.ps1 script.
C15622791.fm Page 464 Wednesday, December 12, 2007 1:46 PM
Chapter 15 Managing Internet Information Services 465
Figure 15-6 Creating new application pools requires only a minimal amount of typing.
Begin the CreateApplicationPool.ps1 script with the param statement. For this script, you’ll
define four parameters. The first is the -appname parameter; it is a required parameter, as
you can’t create an application pool without a name. The next two parameters, -autostart and
-computer, have default values supplied and may be omitted when the script is run if the values
are acceptable. Finally, there is the -help switched parameter. The param statement is shown here:
param(
$appName,
$autoStart = $true,
$computer="localhost",
[switch]$help
)
The next step, the funhelp() function, displays help when the script is run with the -help
parameter. Create a here-string and assign it to the $helptext variable. The contents of the
variable are displayed and the script calls the exit statement to end the script. The funhelp()
function is shown here:
function funHelp()
{
$helpText=@"
DESCRIPTION:
NAME: CreateApplicationPool.ps1
Creates a new application pool on a local or remote machine.
PARAMETERS:
-appname Name of the application pool
-autostart Specifies whether the application pool starts
automatically
-computer Specifies the name of the computer to run the script
-help Prints help file
SYNTAX:
CreateApplicationPool.ps1 -appname MyNewAppPool
Creates a new application pool on local computer named MyNewAppPool.
The application pool autostarts.
C15622791.fm Page 465 Wednesday, December 12, 2007 1:46 PM
466 Windows PowerShell Scripting Guide
CreateApplicationPool.ps1 -computer "webserverII" -appname MyApp `
-autostart 0
Creates a new application pool named MyApp on a web server named
webserverII. The application pool will not autostart.
CreateApplicationPool.ps1 -help
Prints the help topic for the script
"@
$helpText
exit
}
You must check the parameters for the presence of the $help variable because once help is
displayed, the script ends; it is much more efficient to end the script early. Next, check for the
required parameter -appname, because the script cannot continue if the $appname variable is
not present. Call the funhelp() function if it is detected as missing. These two lines of code are
shown here:
if($help) { "Printing help now..." ; funHelp }
if(!$appname) { "Missing value for -appname." ; funHelp }
After ensuring the parameters are in good shape, make the connection into the WMI service.
The create() method is only available when you connect using the [wmiclass] accelerator.
You can’t gain access to the create() method using the Get-WmiObject cmdlet. The [wmiclass]
type accelerator accepts a WMI path as the argument. The WMI path specifies the name of
the computer, the namespace, and the WMI class. The object returned is an instance of an
ApplicationPool WMI class. Use the create() method and provide the name of the application
pool from the $appname variable and the value for the AutoStart property. This section of code
is shown here:
$AppPool = [wmiclass]"\\$computer\root\WebAdministration:applicationpool"
$appPool.Create($appName,$autostart)
The completed CreateApplicationPool.ps1 script is shown here.
CreateApplicationPool.ps1
param(
$appName,
$autoStart = $true,
$computer="localhost",
[switch]$help
)
function funHelp()
{
$helpText=@"
C15622791.fm Page 466 Wednesday, December 12, 2007 1:46 PM
Chapter 15 Managing Internet Information Services 467
DESCRIPTION:
NAME: CreateApplicationPool.ps1
Creates a new application pool on a local or remote machine.
PARAMETERS:
-appname Name of the application pool
-autostart Specifies whether the application pool starts
automatically
-computer Specifies the name of the computer to run the script
-help Prints help file
SYNTAX:
CreateApplicationPool.ps1 -appname MyNewAppPool
Creates a new application pool on local computer named MyNewAppPool.
The application pool autostarts.
CreateApplicationPool.ps1 -computer "webserverII" -appname MyApp `
-autostart 0
Creates a new application pool named MyApp on a web server named
webserverII. The application pool will not autostart.
CreateApplicationPool.ps1 -help
Prints the help topic for the script
"@
$helpText
exit
}
if($help) { "Printing help now..." ; funHelp }
if(!$appname) { "Missing value for -appname." ; funHelp }
$AppPool = [wmiclass]"\\$computer\root\WebAdministration:applicationpool"
$appPool.Create($appName,$autostart)
Starting and Stopping Web Sites
There are times when a Web site must be either stopped or started. You might stop a Web site
for maintenance or for security reasons. It is obvious why a Web site needs to be started: A
Web site that is not running is useless as a Web site! To stop or start a Web site, use the WMI
classes supplied by the IIS 7 WMI provider.
The StartStopSite.ps1 script is an example of a script that can be used to start and stop
Web sites. It begins with the param statement and defines a number of parameters. The -site
parameter names the Web site to be either stopped or started. The other parameters are
optional. The -start parameter is a switched parameter and, if present, causes the script to
start the Web site. The -stop parameter stops a Web site. They are mutually exclusive and
C15622791.fm Page 467 Wednesday, December 12, 2007 1:46 PM
468 Windows PowerShell Scripting Guide
cannot be used in the same command line. You have seen the other parameters before. The
param statement is displayed here:
param(
$site,
$computer="localhost",
[switch]$start,
[switch]$stop,
[switch]$help
)
The funhelp() function is used to display a help text when it is requested by the user. The
help text consists of a here-string assigned to the $helptext variable. When the here-string is
completed, the contents of the variable are displayed, and the script will exit. The funhelp()
function is shown here:
function funHelp()
{
$helpText=@"
DESCRIPTION:
NAME: StartStopSite.ps1
Starts or stops a web site on a local or remote machine.
PARAMETERS:
-site name of the site to start or to stop
-computer specifies the name of the computer to run the script
-start starts the web site
-stop stops the web site
-help prints help file
SYNTAX:
StartStopSite.ps1
Gets a listing of web sites on local computer
StartStopSite.ps1 -computer "webserverII"
Gets a listing of web sites on web server named webserverII
StartStopSite.ps1 -site mysite -stop
Stops a web site named mysite on local computer
StartStopSite.ps1 -site mysite -start -computer "webserverII"
Starts a web site named mysite on web server named webserverII
StartStopSite.ps1 -help
Prints the help topic for the script
"@
$helpText
exit
}
C15622791.fm Page 468 Wednesday, December 12, 2007 1:46 PM
Chapter 15 Managing Internet Information Services 469
Now you must check the parameters that were supplied to the script. First check to see if you
need to display the help text. If the $help variable is not present, go on to the next line. If
you find both the $start and the $stop variable, generate an error and inform the user you can’t
start and stop a Web site at the same time. Call the funhelp() function. These are the only two
conditions that call the funhelp() function. If neither $start nor $stop are present, print a listing
of the Web sites on the server and inform the user that you are using the default action. Be
sure to advise the user to seek help for additional options. This section of the code is shown
here:
if($help) { "Printing help now..." ; funHelp }
if($start -and $stop) {
"You cannot start and stop the $site"
"See help for allowed options" ;
funHelp
}
if(!$start -or !$stop)
{
"No action specified. Querying wmi sites. See help for options."
Get-WmiObject -Namespace root\webadministration `
-computername $computer -class site |
format-table -property name
exit
}
Following the parameter check, you’ll arrive at the portion of the script that performs
the method calls. If you find the $start variable, make a connection into WMI using the Get-
WmiObject cmdlet. Connect to the root\webadministration WMI namespace and query the
Site WMI class. Pipeline the resulting object to the Where-Object cmdlet and look for
the name that is equal to the name supplied to the -site parameter. Then, call the start()
method. This section of code is shown here:
if($start)
{
$objSite = Get-WmiObject -Namespace root\webadministration -class site `
-computername $computer|
Where-object { $_.name -eq $site }
$objSite.Start()
exit
}
If the user wants to stop the Web site, use the Get-WmiObject cmdlet to connect to the
root\WebAdministration WMI namespace and query the Site WMI class. When you have the
object, pipeline the results to the Where-Object cmdlet and filter on the name of the Web site.
Store the results in the $objsite variable, call the stop() method to stop the Web site, then exit
the script. This section of code is shown here:
if($stop)
{
$objSite = Get-WmiObject -Namespace root\webadministration -class site `
-computername $computer|
C15622791.fm Page 469 Wednesday, December 12, 2007 1:46 PM
470 Windows PowerShell Scripting Guide
Where-object { $_.name -eq $site }
$objSite.Stop()
exit
}
The completed StartStopSite.ps1 script is shown here.
StartStopSite.ps1
param(
$site,
$computer="localhost",
[switch]$start,
[switch]$stop,
[switch]$help
)
function funHelp()
{
$helpText=@"
DESCRIPTION:
NAME: StartStopSite.ps1
Starts or stops a web site on a local or remote machine.
PARAMETERS:
-site name of the site to start or to stop
-computer specifies the name of the computer to run the script
-start starts the web site
-stop stops the web site
-help prints help file
SYNTAX:
StartStopSite.ps1
Gets a listing of web sites on local computer
StartStopSite.ps1 -computer "webserverII"
Gets a listing of web sites on web server named webserverII
StartStopSite.ps1 -site mysite -stop
Stops a web site named mysite on local computer
StartStopSite.ps1 -site mysite -start -computer "webserverII"
Starts a web site named mysite on web server named webserverII
StartStopSite.ps1 -help
Prints the help topic for the script
"@
$helpText
exit
C15622791.fm Page 470 Wednesday, December 12, 2007 1:46 PM
Chapter 15 Managing Internet Information Services 471
}
if($help) { "Printing help now..." ; funHelp }
if($start -and $stop) {
"You cannot start and stop the $site"
"See help for allowed options" ;
funHelp
}
if($start)
{
$objSite = Get-WmiObject -Namespace root\webadministration -class site `
-computername $computer |
Where-object { $_.name -eq $site }
$objSite.Start()
exit
}
if($stop)
{
$objSite = Get-WmiObject -Namespace root\webadministration -class site `
-computername $computer |
Where-object { $_.name -eq $site }
$objSite.Stop()
exit
}
if(!$start -or !$stop)
{
"No action specified. Querying wmi sites. See help for options."
Get-WmiObject -Namespace root\webadministration `
-computername $computer -class site |
format-table -property name
exit
}
Summary
In this chapter we examined various activities involved in working with an IIS server. These
activities included documenting the existing configuration of the server, reporting on application
pool settings, examining the default values for application pools, and examining the site
limits. We also looked at the method to report virtual directories. We then moved on to
managing a Web server, first looking at creating a new Web site, then following up with creating
an application pool. We concluded the chapter by discussing starting and stopping Web sites.
C15622791.fm Page 471 Wednesday, December 12, 2007 1:46 PM
C15622791.fm Page 472 Wednesday, December 12, 2007 1:46 PM

473
Chapter 16
Working with the Certificate Store
After completing this chapter, you will be able to:
■Locate specific certificates in the certificate store.
■List certificate stores.
■List certificates.
■Locate expired certificates.
■Import certificates.
■Delete certificates.
On the Companion Disc All the scripts used in this chapter are located on the CD that
accompanies this book in the \scripts\chapter16 folder.
Locating Certificates in the Certificate Store
A number of certificate stores reside on any Windows Vista or Windows Server 2008
computer. As certificates become more important, the ability to manage them becomes critical.
One common problem with certificates is they aren’t easily discovered. If you use the Certificate
Manager Utility, as shown in Figure 16-1, you’re confronted with a confusing array of folders
with very little explanation and names that aren’t intuitive.
On the other hand, if you use the certificate provider from within Windows PowerShell, the
command is easy to use and does not cause the ubiquitous User Account Control dialog box
to appear.
You can use the Get-ChildItem cmdlet to retrieve information about the certificate store locations:
Get-ChildItem cert:\
After using this command, you’ll receive information about both the CurrentUser certificate store
location, and the LocalMachine certificate store location. This information is displayed here:
Location : CurrentUser
StoreNames : {UserDS, AuthRoot, CA, Trust...}
Location : LocalMachine
StoreNames : {AuthRoot, CA, Trust, Disallowed...}
C16622791.fm Page 473 Wednesday, December 12, 2007 1:47 PM
474 Windows PowerShell Scripting Guide
Figure 16-1 The Certificate Manager can be confusing because of the large number of folders.
While locating the CurrentUser certificate store location may be of interest, it becomes much
more important to be able to work with the various certificate stores under either the
current CurrentUser or the LocalMachine. To identify the various certificate stores for the
CurrentUser, use the following command:
Get-ChildItem cert:\CurrentUser
After you receive a listing of the certificate stores under the CurrentUser, obtain a listing that
is similar to the following. The actual certificate stores displayed will depend upon which
applications are installed and which certificate stores have been configured:
Name : UserDS
Name : AuthRoot
Name : CA
Name : Trust
Name : Disallowed
Name : My
Name : Root
Name : TrustedPeople
Name : ACRS
Name : TrustedPublisher
Name : REQUEST
To examine the specific certificates issued to the user, use the My certificate store. This
translates to the Personal certificate store shown in the Certificate Manager Utility.
The Personal certificate store is shown in Figure 16-2.
C16622791.fm Page 474 Wednesday, December 12, 2007 1:47 PM
Chapter 16 Working with the Certificate Store 475
Figure 16-2 Personal certificates are stored in CurrentUser Personal certificate store.
To obtain a listing of all the personal certificates issued to the current user, use this command:
Get-ChildItem cert:\CurrentUser\My
A typical result would look something like this:
Directory: Microsoft.PowerShell.Security\Certificate::CurrentUser\My
Thumbprint Subject
---------- -------
7D7F4414CCEF168ADF6BF40753B5BECD78375931 OU=Microsoft Corporation, CN=M..
77085D8E6E5645C42DDC31771F1090D54C92FF96 CN=Administrator
A more difficult problem is trying to find a certificate that has been issued for a particular use.
When a certificate is issued to a user, it’s often put in the CurrentUser\My certificate store.
The problem is that when using Windows PowerShell to locate the certificate, what is shown
in results to the previous command lists only the thumbprint and the subject fields. In
Figure 16-3 (found in the “Inspecting a Certificate” section, later in this chapter), when looking
at the Personal certificate store (the same as CurrentUser\My), the view is quite a bit different.
For example, you can readily identify which certificate is the code-signing certificate. To help
solve this problem, use the FindCertificates.ps1 script. The FindCertificates.ps1 script uses
the FriendlyName property from EnhancedKeyUses. These are exposed from the System.Security.
Cryptography.X509Certificates.X509ExtensionCollection Microsoft .NET Framework class.
Begin the FindCertificates.ps1 script with a param statement, which is used to collect
command-line arguments that control the way the script functions. There are two parameters
defined. The first is the -use parameter, used to collect the use name of the particular certificate
C16622791.fm Page 475 Wednesday, December 12, 2007 1:47 PM
476 Windows PowerShell Scripting Guide
in question. This can be any value related to certificate use, such as code signing, smart card
user, or digital signature. Since you are doing a regular expression match, you don’t need to
type the entire friendly name.
The -help parameter is a switched parameter and doesn’t need to be supplied. If it is passed to
the script at run time, then the script will display the help text and exit. The param line of
code is shown here:
param($use, [switch]$help)
Next, you must create the funhelp() function, used to display the help text for the script when
the script is launched with the -help parameter specified. In the code block for the function,
first create a variable named $helptext, and assign the results of creating a here-string to
the value of the variable. The here-string begins with the @” symbols and ends with the
“@ symbols. In between these two tags, you can ignore the Windows PowerShell quoting
rules. This makes it much easier to correctly type in large amounts of text. The help text is
divided into three categories: the description, the parameters, and the syntax. After completing
the here-string and assigning it to the $helptext variable, display the contents of the variable
and exit the script. The funhelp() function is shown here:
function funHelp()
{
$helpText=@"
DESCRIPTION:
NAME: FindCertificates.ps1
Finds certificates of a particular use on the local machine
PARAMETERS:
-use the purpose for the certificate ex: code signing
-help prints help file
SYNTAX:
FindCertificates.ps1
Gets a listing of all certificates in the my store
FindCertificates.ps1 -use "digital signature"
Gets a listing of certificates in my store that provide a digital
signature on local computer
FindCertificates.ps1 -use "code signing"
Gets a listing of certificates in my store that provide code
signing support
FindCertificates.ps1 -help
Prints the help topic for the script
"@
$helpText
exit
}
C16622791.fm Page 476 Wednesday, December 12, 2007 1:47 PM
Chapter 16 Working with the Certificate Store 477
You need to look for the presence of the $help variable. If you find it, the script was run with
the -help parameter specified and the user is looking for help. Print a short status message, and
call the funhelp() function. This line of code is shown here:
if($help) { "Printing help now..." ; funHelp }
Now, you must check for the presence of the $use variable. If it isn’t found, then it was not
supplied from the command line. Because you haven’t created a default value for $use, you
don’t have a default action for the script. Therefore, print a short status message, and call the
funhelp() function. This line of code is shown here:
if(!$use) { "A use is required..." ; funHelp }
Next is the worker section of the script. The first step is to obtain a collection of all the certif-
icate objects in the My certificate store and store them in a variable named $mycert for ease of
use. To do this, use the Get-ChildItem cmdlet, point it to the cert:\ PSDrive, and look inside
the CurrentUser\My certificate store. This line of code is displayed here:
$myCert = Get-ChildItem cert:\CurrentUser\My
Once you have a collection of certificate objects stored in the $mycert variable, you must iterate
through the collection. To do this, use the foreach statement with the variable $cert as the enu-
merator. Take each certificate object individually and call the get_extensions() method. This
returns a collection of extension objects, which are stored in the $certext variable. Then you
iterate through the collection of extension objects, this time using the variable $ext as the enu-
merator. Each extension object is made up of two properties, but you are interested only in the
FriendlyName property. Use the variable $name, and once again iterate through the collection.
This section of code is shown here:
ForEach( $cert in $myCert)
{
$certExt = $cert.get_extensions()
Foreach( $ext in $certExt )
{
foreach( $name in $ext.enhancedKeyUsages )
Inside the foreach loop, use the if statement and look at the FriendlyName property. If you find
a regular expression match to the string held in the $use variable (which was created from the
command line), print a string that includes a header telling the user that there are matches for
the string contained in the $use variable. Use a subexpression to expand the FriendlyName
value from the $name.friendlyname combination. The subexpression begins with a $, sur-
rounds the $name.friendlyname combination, and ends with a smooth parenthesis. Use the
grave accent (line continuation character, `) for ease in reading, and continue the command to
the next line. Use the `n character combination to indicate that a new line will be displayed.
C16622791.fm Page 477 Wednesday, December 12, 2007 1:47 PM
478 Windows PowerShell Scripting Guide
Use another subexpression and expand the value of the thumbprint and the subject from the
certificate object stored in the $cert variable. This section of code is shown here:
{
if($name.friendlyname -match $use)
{
"Certificates that match $use"
"$($name.friendlyname) certificate: `
`n$($cert.thumbprint) `n$($cert.subject)`n"
}
}
}
}
The completed FindCertificates.ps1 script is shown here.
FindCertificates.ps1
param($use, [switch]$help)
function funHelp()
{
$helpText=@"
DESCRIPTION:
NAME: FindCertificates.ps1
Finds certificates of a particular use on the local machine
PARAMETERS:
-use the purpose for the certificate ex: code signing
-help prints help file
SYNTAX:
FindCertificates.ps1
Gets a listing of specific certificates in the my store
FindCertificates.ps1 -use "digital signature"
Gets a listing of certificates in my store that provide a digital
signature on local computer
FindCertificates.ps1 -use "code signing"
Gets a listing of certificates in my store that provide code
signing support
FindCertificates.ps1 -help
Prints the help topic for the script
"@
$helpText
exit
}
if($help) { "Printing help now..." ; funHelp }
C16622791.fm Page 478 Wednesday, December 12, 2007 1:47 PM
Chapter 16 Working with the Certificate Store 479
if(!$use) { "A use is required..." ; funHelp }
$myCert = Get-ChildItem cert:\CurrentUser\My
ForEach( $cert in $myCert)
{
$certExt = $cert.get_extensions()
Foreach( $ext in $certExt )
{
foreach( $name in $ext.enhancedKeyUsages )
{
if($name.friendlyname -match $use)
{
"Certificates that match $use"
"$($name.friendlyname) certificate: `
`n$($cert.thumbprint) `n$($cert.subject)`n"
}
}
}
}
Listing Certificates
There are many times when you will want to simply list all the certificates that reside in a
particular certificate store. While you can use the Windows PowerShell certificate PSDrive,
you may want a little bit more control over the process. In the ListCertificates.ps1 script,
use the.NET Framework class X509Store. This .NET Framework class is found in the
System.Security.Cryptography.X509Certificates namespace. Use the New-Object cmdlet to
create an instance of this class. The ListCertificates.ps1 script is an example of this process.
The ListCertificates.ps1 script begins with the param statement; within the statement, create
three parameters. The first parameter is -store, which is used to control which certificate store
is used to provide the certificate listing. This parameter is set to default to the My certificate
store. Next is the switched -liststores parameter, which causes the script to provide a complete
listing of all the certificate stores on the local machine. The third parameter you’ll create is the
-help switched parameter, which is used to display help. This statement is shown here:
param($store="my", [switch]$listStores, [switch]$help)
Next is the funhelp() function, used to display help information. After declaring the function,
begin the code block by defining a variable $helptext and assigning the value of a here-string
to it. In the here-string, list the description, parameters, and syntax of the script. The
advantage of using a here-string is that it allows you to type in large amounts of text without
typing in quotation marks. The funhelp() function is displayed here:
function funHelp()
{
$helpText=@"
DESCRIPTION:
NAME: ListCertificates.ps1
Lists certificates on the current machine
C16622791.fm Page 479 Wednesday, December 12, 2007 1:47 PM
480 Windows PowerShell Scripting Guide
PARAMETERS:
-store the certificate store to search
-help prints help file
SYNTAX:
ListCertificates.ps1
Gets a listing of all certificates in the my store
ListCertificates.ps1 -store "authroot"
Gets a listing of certificates in authroot store on
local computer
ListCertificates.ps1 -store "my"
Gets a listing of certificates in my store on local
computer
ListCertificates.ps1 -help
Prints the help topic for the script
"@
$helpText
exit
}
Next is a function named funstore(), which provides a listing of all the certificate stores on the
local machine. Begin by using the Write-Host cmdlet to print a header in green for the Current-
User store location. Use the Get-ChildItem cmdlet and point it to the CurrentUser store on
the cert:\ PSDrive and do the same for the LocalMachine certificate location. The funstore()
function is shown here:
Function funstore()
{
write-host -foregroundcolor green "Listing currentuser stores:"
Get-ChildItem cert:\CurrentUser
write-host -foregroundcolor green "Listing localmachine stores:`n"
Get-ChildItem cert:\LocalMachine
exit
}
The next step is the parameter checks; that is, checking for the value of the parameter collection.
First look to see if you need to display help by looking for the $help variable. If you find it, call
the funhelp() function. Look for the presence of the $liststore variable. If you find this variable,
call the funstore() function to display the available certificate stores on the computer. These
two lines of code are:
if($help) { "Printing help now..." ; funHelp }
if($liststore) { funstore }
C16622791.fm Page 480 Wednesday, December 12, 2007 1:47 PM
Chapter 16 Working with the Certificate Store 481
You must declare a read-only variable, using the New-Variable cmdlet to create a variable
named userstore. Set the value of the variable to currentuser, and use the -option parameter to
make the variable read-only. Create another variable named $crypto, and set that one equal
to a string that represents the exact location of the x509Store .NET Framework class. Do
this to make the code a bit easier to read, as the combination of the class name and the
namespace is rather long. These two lines of code are shown here:
new-variable -name userStore -value "currentUser" -option readonly
$crypto = "System.Security.Cryptography.X509Certificates.X509Store"
Create a new instance of the .X509Store .NET Framework class. Pass the path to the class
along with the store location contained in the $store variable. Store the resulting object in the
$objstore variable, then open the certificate store in read-only mode by using the readonly key-
word and supplying it to the open() method. To produce a collection of all the certificates in
the certificate store, query the Certificates property; store the resulting collection of certificates
in the $colcerts variable. These three lines of code are listed here:
$objStore = new-object $crypto $store
$objstore.Open("Readonly")
$colcerts = $objstore.Certificates
To produce a header for the resulting listing of certificates, use the Write-Host cmdlet and
specify the -foreground parameter to be blue. Print a message and use a subexpression to
retrieve the number of certificates in the collection. Do this by prefacing the ColCerts.Count
property with the $ sign and enclosing all but the initial $ within parentheses. This configuration
looks like this: $($ColCerts.Count). This allows you to obtain the actual count of the certificates
instead of expanding the object name. The code that produces the header for our output is:
Write-Host -ForegroundColor blue
"
There are $($colcerts.count) certificates in the $store store.
They are listed below:
"
Because you have obtained a collection of certificates, you must use the foreach statement,
using the variable $cert as the enumerator. Use a subexpression for each of the properties you
want to query for each of the certificates found in the collection. After printing the properties,
close the store. This section of code is shown here:
foreach($cert in $colCerts)
{
"FriendlyName: $($cert.FriendlyName)"
"Serialnumber: $($cert.SerialNumber)"
"Thumbprint: $($cert.thumbprint)"
"Subject: $($cert.subject)`n"
}
$objstore.Close()
C16622791.fm Page 481 Wednesday, December 12, 2007 1:47 PM
482 Windows PowerShell Scripting Guide
The completed ListCertificates.ps1 script is shown here.
ListCertificates.ps1
param($store="my", [switch]$listStores, [switch]$help)
function funHelp()
{
$helpText=@"
DESCRIPTION:
NAME: ListCertificates.ps1
Lists certificates on the current machine
PARAMETERS:
-store the certificate store to search
-help prints help file
SYNTAX:
ListCertificates.ps1
Gets a listing of all certificates in the my store
ListCertificates.ps1 -store "authroot"
Gets a listing of certificates in authroot store on
local computer
ListCertificates.ps1 -store "my"
Gets a listing of certificates in my store on local
computer
ListCertificates.ps1 -help
Prints the help topic for the script
"@
$helpText
exit
}
Function funstore()
{
write-host -foregroundcolor green "Listing currentuser stores:"
Get-ChildItem cert:\CurrentUser
write-host -foregroundcolor green "Listing localmachine stores:`n"
Get-ChildItem cert:\LocalMachine
exit
}
if($help) { "Printing help now..." ; funHelp }
if($liststore) { funstore }
new-variable -name userStore -value "currentUser" -option readonly
$crypto = "System.Security.Cryptography.X509Certificates.X509Store"
$objStore = new-object $crypto $store
C16622791.fm Page 482 Wednesday, December 12, 2007 1:47 PM
Chapter 16 Working with the Certificate Store 483
$objstore.Open("Readonly")
$colcerts = $objstore.Certificates
Write-Host -ForegroundColor blue
"
There are $($colcerts.count) certificates in the $store store.
They are listed below:
"
foreach($cert in $colCerts)
{
"FriendlyName: $($cert.FriendlyName)"
"Serialnumber: $($cert.SerialNumber)"
"Thumbprint: $($cert.thumbprint)"
"Subject: $($cert.subject)`n"
}
$objstore.Close()
Locating Expired Certificates
As certificates become more prevalent, so too does the incidence of expired certificates. Nearly
everyone has connected to a Web site, perhaps to do online banking or to purchase some
item from an Internet store, only to be warned that the site has an expired certificate. As
a troubleshooting measure, you must be able to quickly and efficiently locate expired certificates.
To do this, once again use the certificate provider for Windows PowerShell. In the Find-
ExpiredCertificates.ps1 script, you first obtain the current date and then search the certificate
store that is identified by the user from the command line.
Begin the FindExpiredCertificates.ps1 script by using the param statement; this script is
designed to use four command-line parameters. The -store parameter is used to determine
which certificate store will be accessed by the script. It is a required parameter, as you haven’t
supplied a default value and it is not a switched parameter. However, if the user does not
supply a value when the script is run, then supply the My store as a default value. The reason
you don’t define the value in the param statement is because you want to inform the user
there are other options available by pointing to the help switch. You will also let the user know
you’re using the default value for the parameter. The other switch statements are -listcu, which
will list the certificate stores in the CurrentUser location; -listlm, which will list all the certificate
stores in the LocalMachine location; and the -help switch, which will print the help text. The
param statement is shown here:
param(
$store,
[switch]$listcu,
[switch]$listlm,
[switch]$help
)
Next is the funhelp() function, used to print the help text. To do this, begin by creating a
variable, $helptext, that is used to hold the help string. Use a here-string to create the help text.
C16622791.fm Page 483 Wednesday, December 12, 2007 1:47 PM
484 Windows PowerShell Scripting Guide
Store the here-string in the $helptext variable, print the contents of the variable, and exit the
script. The funhelp() function is shown here:
function funHelp()
{
$helpText=@"
DESCRIPTION:
NAME: FindExpiredCertificates.ps1
Finds expired certificates on the local machine
PARAMETERS:
-store the certificate store on the computer
-help prints help file
SYNTAX:
FindExpiredCertificates.ps1
Gets a listing of expired certificates in the my store of the
currentuser
FindExpiredCertificates.ps1 -store "currentuser\my"
Gets a listing of expired certificates in the my store of the
currentuser
FindExpiredCertificates.ps1 -store "currentuser\smartcardroot"
Gets a listing of expired certificates in the smartcardtoot store
of the currentuser
FindExpiredCertificates.ps1 -listcu
Gets a listing of certificate stores for the
currentuser
FindExpiredCertificates.ps1 -listlm
Gets a listing of certificate stores for the
localmachine
FindExpiredCertificates.ps1 -help
Prints the help topic for the script
"@
$helpText
exit
}
You must parse the command line and see what parameters have been supplied. The first
parameter to check for is the -help switch; if you find the $help variable, then the script was run
with the -help switch. Print a short message, and call the funhelp() function. This line of code
is shown here:
if($help) { "Printing help now..." ; funHelp }
C16622791.fm Page 484 Wednesday, December 12, 2007 1:47 PM

Chapter 16 Working with the Certificate Store 485
Look for the -listcu switch; if you find the $listcu variable, the script was launched with the
-listcu switch. Print a short status message, and use the Get-ChildItem cmdlet to produce a
listing of certificate stores in the CurrentUser location. Once this has been done, exit the
script. This section of code is shown here:
if($listcu) {
"Certificate stores in currentuser"
get-childitem cert:\currentuser ; exit
}
The -listlm switch is the next step. If you find the $listlm variable, the script was launched with
the -listlm switch. Print a status message, and use the get-ChildItem cmdlet to produce a
listing of certificate stores in the LocalMachine location. After this is completed, exit the
script. This section of code is shown here:
if($listlm) {
"Certificate stores in localmachine"
get-childitem cert:\localmachine ; exit
}
The next parameter, -store, is used to control which certificate store will be searched for
expired certificates. If the -store switch is not used; you will default to looking in the Current-
User\My store. Print a message that tells the user that you are using defaults, use the
$myinvocation.mycommand command to print the name of the script that is run, and suggest
using the -help switch to view additional examples. This line of code is shown here:
if(!$store) {
$store = "currentuser\my"
"Using default store: $store"
"See $($myinvocation.mycommand) -help" `
+ " for additional examples"
}
The FindExpiredCertificates.ps1 script provides coding to print the message for using the
default certificate store. Because the goal is for the output to be on a single line, close the quo-
tation marks and use the grave accent (line continuation or `) on the first line. Concatenate
the second line of text by using + for the remainder of the string. If you just continue the string
to the next line without closing the quotation marks, you’ll end up with two lines printed in
the console.
Next is the reference section of the script.
More Info The four parts of a script are detailed in my book Microsoft VBScript Step by Step
(Microsoft Press, 2006). Even though the book is about VBScript, it is an excellent primer on
scripting in general, and most of the same principles apply.
Obtain a datetime object by using the Get-Date cmdlet, and store the object in the $currentdate
variable. The second step is to use the Get-ChildItem cmdlet to retrieve a collection of all the
C16622791.fm Page 485 Wednesday, December 12, 2007 1:47 PM
486 Windows PowerShell Scripting Guide
certificates in the store pointed to by the value in the $store variable. The $colcert variable is
used to contain the collection of certificates. These two lines of code are shown here:
$currentDate = Get-Date
$colcert = Get-ChildItem cert:\$store
Now use the Write-Host cmdlet and specify the -foregroundcolor parameter to print a message
in cyan. Use the foreach statement to iterate through the collection of certificates, using the
variable $cert as the enumerator. Once you have an individual certificate stored in the $cert
variable, examine the NotAfter property to see if it is less than the value stored in the $current-
date variable. If it is, then print both the thumbprint and the date in which the certificate
expired. This section of code is shown here:
Write-host -foregroundcolor cyan "Expired Certificates in $store"
foreach($cert in $colcert)
{
if($cert.notafter -lt $currentDate)
{
Write-host `
"
$($cert.thumbprint) `t $($cert.Notafter)
"
}
}
The complete FindExpiredCertificates.ps1 script can be examined here.
FindExpiredCertificates.ps1
param(
$store,
[switch]$listcu,
[switch]$listlm,
[switch]$help
)
function funHelp()
{
$helpText=@"
DESCRIPTION:
NAME: FindExpiredCertificates.ps1
Finds expired certificates on the local machine
PARAMETERS:
-store the certificate store on the computer
-help prints help file
SYNTAX:
FindExpiredCertificates.ps1
Gets a listing of expired certificates in the my store of the
currentuser
FindExpiredCertificates.ps1 -store "currentuser\my"
C16622791.fm Page 486 Wednesday, December 12, 2007 1:47 PM
Chapter 16 Working with the Certificate Store 487
Gets a listing of expired certificates in the my store of the
currentuser
FindExpiredCertificates.ps1 -store "currentuser\smartcardroot"
Gets a listing of expired certificates in the smartcardtoot store
of the currentuser
FindExpiredCertificates.ps1 -listcu
Gets a listing of certificate stores for the
currentuser
FindExpiredCertificates.ps1 -listlm
Gets a listing of certificate stores for the
localmachine
FindExpiredCertificates.ps1 -help
Prints the help topic for the script
"@
$helpText
exit
}
if($help) { "Printing help now..." ; funHelp }
if($listcu) {
"Certificate stores in currentuser"
get-childitem cert:\currentuser ; exit
}
if($listlm) {
"Certificate stores in localmachine"
get-childitem cert:\localmachine ; exit
}
if(!$store) {
$store = "currentuser\my"
"Using default store: $store"
"See $($myinvocation.mycommand) -help" `
+ " for additional examples"
}
$currentDate = Get-Date
$colcert = Get-ChildItem cert:\$store
Write-host -foregroundcolor cyan "Expired Certificates in $store"
foreach($cert in $colcert)
{
if($cert.notafter -lt $currentDate)
{
Write-host `
"
$($cert.thumbprint) `t $($cert.Notafter)
"
}
}
C16622791.fm Page 487 Wednesday, December 12, 2007 1:47 PM
488 Windows PowerShell Scripting Guide
Identifying Certificates about to Expire
When you issue certificates to users, you’ll eventually run into a problem. That’s because, in
general, many user certificates are only good for only one or two years. This means that there
will nearly always be users who need to sign an e-mail, use a laptop, make a remote connection
to the network, sign some code, or encrypt a file; they may not be able to take these actions
because of an expired certificate.
That’s why proactive scripting has great potential. Using the FindCertificatesAboutToExpire.ps1
script, you can examine certificate expiration dates to see which will expire on or before
afuture date.
In the FindCertificatesAboutToExpire.ps1 script, begin with the param statement and create
five parameters. One parameter is required, one has a default value, and the other three are
switched. The -store parameter is the required one, and just like the FindExpiredCertifi-
cates.ps1 script, you must check for the presence of the $store variable and supply a value if it
is missing. The -days parameter is set to a default value of 30 days. The -listcu parameter is
used to list available certificate stores in the CurrentUser location. The -listlm parameter
produces a similar listing for the LocalMachine location. The -help parameter prints out help.
The param statement is shown here:
param(
$store,
$days=30,
[switch]$listcu,
[switch]$listlm,
[switch]$help
)
Next is the funhelp() function, which prints help for the script, including several samples of
the syntax. The funhelp() function first creates a $helptext variable to store the help text mes-
sage. To produce the help text, use a here-string, which allows you to avoid quoting issues.
Create the description, parameters, and syntax section of the help text, then print the con-
tents of the $helptext variable, and exit the script. The funhelp() function is shown here:
function funHelp()
{
$helpText=@"
DESCRIPTION:
NAME: FindCertificatesAboutToExpire.ps1
Finds certificates about to expire with in a certain
number of days on the local machine
PARAMETERS:
-store the certificate store on the computer
-days number of days in the future to evaluate for
certificate expiration
-help prints help file
SYNTAX:
FindCertificatesAboutToExpire.ps1
C16622791.fm Page 488 Wednesday, December 12, 2007 1:47 PM
Chapter 16 Working with the Certificate Store 489
Gets a listing of certificates about to expire within 30 days
in the my store of the currentuser
FindCertificatesAboutToExpire.ps1 -days 45
Gets a listing of certificates about to expire within 45 days
in the my store of the currentuser
FindCertificatesAboutToExpire.ps1 -store "currentuser\my" -days 60
Gets a listing of certificates about to expire within 60 days
in the my store of the currentuser
FindCertificatesAboutToExpire.ps1 -store "currentuser\smartcardroot"
Gets a listing of certificates about to expire within 30 days
in the smartcardroot store of the currentuser
FindCertificatesAboutToExpire.ps1 -listcu
Gets a listing of certificate stores for the
currentuser
FindCertificatesAboutToExpire.ps1 -listlm
Gets a listing of certificate stores for the
localmachine
FindCertificatesAboutToExpire.ps1 -help
Prints the help topic for the script
"@
$helpText
exit
}
After completing the funhelp() function, work on executing the first code. You’ll need to check
the parameters: The first one is the -help parameter; if it’s present, it allows you to call the
funhelp() function and execute the script. This line of code is shown here:
if($help) { "Printing help now..." ; funHelp }
If you find the $listcu variable, print a status message, use the Get-ChildItem cmdlet to pro-
duce a list of all the certificate stores in the CurrentUser location, and exit the script. Perform
a similar series of steps for the -listlm parameter: If you find the $listlm variable, print a status
message, call the Get-ChildItem cmdlet to produce a list of all the certificate stores in the
LocalMachine location, then exit the script. This section of code is shown here:
if($listcu) {
"Certificate stores in currentuser"
get-childitem cert:\currentuser ; exit
}
C16622791.fm Page 489 Wednesday, December 12, 2007 1:47 PM
490 Windows PowerShell Scripting Guide
if($listlm) {
"Certificate stores in localmachine"
get-childitem cert:\localmachine ; exit
}
If the required parameter, -store, is not supplied, then the $store variable will be absent. If you
detect this condition, use the My store for the query. However, you’ll also want to inform the
user that there are other options available. To do this, let the user know that you’re using a
default value, and use the $myinvocation.mycommand command to print the script name. To
obtain the script name, you must use a subexpression. Suggestion: Use help to see examples.
This section of code is shown here:
if(!$store) {
$store = "currentuser\my"
"Using default store: $store"
"See $($myinvocation.mycommand) -help" `
+ " for additional examples"
}
After checking the parameters, start on the worker portion of the script, first creating an
instance of the System.DateTime .NET Framework object and using the adddays() method to
add days to the current date. Store the future date in the variable named $currentdate. Obtain
a collection of certificates by using the Get-ChildItem cmdlet. These two lines of code are
shown here:
$currentDate = (Get-Date).adddays($days)
$colcert = Get-ChildItem cert:\$store
Print a header for the output. To do this, use the Write-Host cmdlet as shown here:
Write-host -foregroundcolor cyan "Certificates in $store that" `
" expire in $days days"
Use the foreach statement to iterate through the collection of certificates, using the $cert vari-
able as an enumerator to keep track of your location in the collection. Examine the NotAfter
property of each certificate, which is the expiration date. If the date is less than the future date
stored in the $currentdate variable, print the thumbprint and the expiration date. This section
of code is shown here:
foreach($cert in $colcert)
{
if($cert.notafter -lt $currentDate)
{
Write-host `
"
$($cert.thumbprint) `t $($cert.Notafter)
"
}
}
C16622791.fm Page 490 Wednesday, December 12, 2007 1:47 PM
Chapter 16 Working with the Certificate Store 491
The completed FindCertificatesAboutToExpire.ps1 script is shown here.
FindCertificatesAboutToExpire.ps1
param(
$store,
$days=30,
[switch]$listcu,
[switch]$listlm,
[switch]$help
)
function funHelp()
{
$helpText=@"
DESCRIPTION:
NAME: FindCertificatesAboutToExpire.ps1
Finds certificates about to expire with in a certain
number of days on the local machine
PARAMETERS:
-store the certificate store on the computer
-days number of days in the future to evaluate for
certificate expiration
-help prints help file
SYNTAX:
FindCertificatesAboutToExpire.ps1
Gets a listing of certificates about to expire within 30 days
in the my store of the currentuser
FindCertificatesAboutToExpire.ps1 -days 45
Gets a listing of certificates about to expire within 45 days
in the my store of the currentuser
FindCertificatesAboutToExpire.ps1 -store "currentuser\my" -days 60
Gets a listing of certificates about to expire within 60 days
in the my store of the currentuser
FindCertificatesAboutToExpire.ps1 -store "currentuser\smartcardroot"
Gets a listing of certificates about to expire within 30 days
in the smartcardroot store of the currentuser
FindCertificatesAboutToExpire.ps1 -listcu
Gets a listing of certificate stores for the
currentuser
FindCertificatesAboutToExpire.ps1 -listlm
Gets a listing of certificate stores for the
localmachine
C16622791.fm Page 491 Wednesday, December 12, 2007 1:47 PM
492 Windows PowerShell Scripting Guide
FindCertificatesAboutToExpire.ps1 -help
Prints the help topic for the script
"@
$helpText
exit
}
if($help) { "Printing help now..." ; funHelp }
if($listcu) {
"Certificate stores in currentuser"
get-childitem cert:\currentuser ; exit
}
if($listlm) {
"Certificate stores in localmachine"
get-childitem cert:\localmachine ; exit
}
if(!$store) {
$store = "currentuser\my"
"Using default store: $store"
"See $($myinvocation.mycommand) -help" `
+ " for additional examples"
}
$currentDate = (Get-Date).adddays($days)
$colcert = Get-ChildItem cert:\$store
Write-host -foregroundcolor cyan "Certificates in $store that" `
" expire in $days days"
foreach($cert in $colcert)
{
if($cert.notafter -lt $currentDate)
{
Write-host `
"
$($cert.thumbprint) `t $($cert.Notafter)
"
}
}
Managing Certificates
There are several tasks that fall under the purview of certificate management, including
importing certificates, inspecting certificates, and deleting certificates. This section examines
each of these tasks.
Inspecting a Certificate
Before importing a certificate, you may want to inspect it to ensure it is the correct certificate
for the operation at hand. The Certificate Manager utility that has been used in the past does
not have this capability. To inspect a certificate, use the .NET Framework class X509Certificate.
The X509Certificate class is located in the Security.Cryptography.X509Certificates .NET Framework
C16622791.fm Page 492 Wednesday, December 12, 2007 1:47 PM
Chapter 16 Working with the Certificate Store 493
namespace. The properties to inspect are the same properties shown in the Certificate Manager
utility, Figure 16-3. These same properties are examined in the InspectCertificate.ps1 script.
Figure 16-3 Certificate properties as observed in the Certificate Manager utility.
Begin the InspectCertificate.ps1 script with the param statement. There are two necessary
parameters for this script. The first one is the -cert parameter, which is used to include the full
path and name of the certificate to inspect. The second one is the -help parameter, which is a
switched parameter to display help if requested. The param statement is shown here:
param($cert, [switch]$help)
Next is the funhelp() function, which is used to display help information when the script is
launched with the -help parameter. First use the function statement to create the funhelp() func-
tion. Begin the code block for the function by using braces ({ }). Inside the code block, create
a variable, $helptext, and assign the results of a here-string to it. The here-string is created by
using the @” and “@ at the beginning and end of the string. Inside the here-string, you don’t
need quotation marks; this feature simplifies the creation of large text blocks. After the here-
string is created, print the contents of the $helptext variable, and exit the script by using the
exit statement. The funhelp() function is shown here:
function funHelp()
{
$helpText=@"
DESCRIPTION:
NAME: InspectCertificate.ps1
C16622791.fm Page 493 Wednesday, December 12, 2007 1:47 PM

494 Windows PowerShell Scripting Guide
Finds certificates of a particular use on the local machine
PARAMETERS:
-cert the full path to the certificate to inspect
-help prints help file
SYNTAX:
InspectCertificate.ps1
Generates an error that a certificate is required
InspectCertificate.ps1 -cert "c:\fso\filerecovery.cer"
Inspects a certificate called filerecovery in the c:\fso
directory. This certificate could be DER encoded or base -64
encoded .cer file.
InspectCertificate.ps1 -help
Prints the help topic for the script
"@
$helpText
exit
}
You now must look for command-line parameters. The first parameter checks for the presence
of the $help variable by using the if statement. In the code block for the if statement, print a
string, and call the funhelp() function. Placing a semicolon on the line allows you to place
two unrelated commands on the same line. Check for the absence of the $cert variable by
using the not operator (!). If the $cert variable is not found, call the funhelp() function as well.
These two lines of code are shown here:
if($help) { "Printing help now..." ; funHelp }
if(!$cert) { "A certificate is required..." ; funHelp }
Now, you must make the connection to the certificate, using the X509Certificate .NET Frame-
work class, which is in the Security.Cryptography.X509Certificates .NET Framework
namespace.
Working with .NET Framework Classes
In the InspectCertificate.ps1 script, you’ll use a shortcut method for creating an instance
of the X509Certificate class. You use the same method when you do typecasting. As
an example, if you want to create a string, you can cast it to the System.String type by using
the following syntax:
[string]"This is a string"
If you want to create an instance of the X509Certificate, use the same syntax as shown here:
$objCert=[security.cryptography.x509certificates.x509certificate]"$cert"
C16622791.fm Page 494 Wednesday, December 12, 2007 1:47 PM

Chapter 16 Working with the Certificate Store 495
To understand this in a bit more detail, examine the ThreeStrings.ps1 script, following.
First use the variable $a to hold a string in the usual fashion—by assigning the string to
the variable. Use the gettype() method to prove this is a System.String .NET Framework
class. Now use a short name, [string], to once again create a string. This time, assign it to
the variable $b, which also reports that the type of object is a System.String. Finally, use
the full name [system.string] within brackets ([ ]) and assign the result to the $c variable,
which once again reports System.String. The ThreeStrings.ps1 script is shown here.
ThreeStrings.ps1
$a = "`$a is a string"
$a
"$a : It is a $($a.gettype())`n"
$b = [string]"`$b is a string"
$b
"$b : It is a $($b.gettype())`n"
$c = [system.string]"`$c is a string"
$c
"$c : It is a $($c.gettype())`n"
"A $($c.gettype()) .NET framework class has the " `
+ "members"
$a | get-member
To connect to the certificate, use the $cert variable containing the certificate object and point
to the .NET Framework X509Certificate class. Store the new object in the $objcert variable. This
line of code is shown here:
$objCert=[security.cryptography.x509certificates.x509certificate]"$cert"
The remainder of the script uses subexpressions to print the results of several method calls.
This is the first instance shown of using a subexpression to return the result of a method
in a text string. The last two items in the output section of the script are properties: Issuer and
Subject. The entire output section of the script is shown here:
"HashString: $($objCert.GetCertHashString())"
"EffectiveDate: $($objCert.GetEffectiveDateString())"
"ExpirationDate: $($objCert.GetExpirationDateString())"
"HashCode: $($objCert.GetHashCode())"
"KeyAlgorithm: $($objCert.GetKeyAlgorithm())"
"KeyAlgorithmParameters: $($objCert.GetKeyAlgorithmParametersString())"
"Name: $($objCert.GetName())`n"
"PublicKey: $($objCert.GetPublicKeyString())`n"
"RawCertData: $($objCert.GetRawCertDataString())`n"
"SerialNumber: $($objCert.GetSerialNumberString())"
"Cert: $($objCert.ToString())"
"Issuer: $($objCert.Issuer)"
"Subject: $($objCert.Subject)"
C16622791.fm Page 495 Wednesday, December 12, 2007 1:47 PM
496 Windows PowerShell Scripting Guide
The completed InspectCertificate.ps1 script is shown here.
InspectCertificate.ps1
param($cert, [switch]$help)
function funHelp()
{
$helpText=@"
DESCRIPTION:
NAME: InspectCertificate.ps1
Finds certificates of a particular use on the local machine
PARAMETERS:
-cert the full path to the certificate to inspect
-help prints help file
SYNTAX:
InspectCertificate.ps1
Generates an error that a certificate is required
InspectCertificate.ps1 -cert "c:\fso\filerecovery.cer"
Inspects a certificate called filerecovery in the c:\fso
directory. This certificate could be DER encoded or base -64
encoded .cer file.
InspectCertificate.ps1 -help
Prints the help topic for the script
"@
$helpText
exit
}
if($help) { "Printing help now..." ; funHelp }
if(!$cert) { "A certificate is required..." ; funHelp }
$objCert=[security.cryptography.x509certificates.x509certificate]"$cert"
"HashString: $($objCert.GetCertHashString())"
"EffectiveDate: $($objCert.GetEffectiveDateString())"
"ExpirationDate: $($objCert.GetExpirationDateString())"
"HashCode: $($objCert.GetHashCode())"
"KeyAlgorithm: $($objCert.GetKeyAlgorithm())"
"KeyAlgorithmParameters: $($objCert.GetKeyAlgorithmParametersString())"
"Name: $($objCert.GetName())`n"
"PublicKey: $($objCert.GetPublicKeyString())`n"
"RawCertData: $($objCert.GetRawCertDataString())`n"
"SerialNumber: $($objCert.GetSerialNumberString())"
"Cert: $($objCert.ToString())"
"Issuer: $($objCert.Issuer)"
"Subject: $($objCert.Subject)"
C16622791.fm Page 496 Wednesday, December 12, 2007 1:47 PM
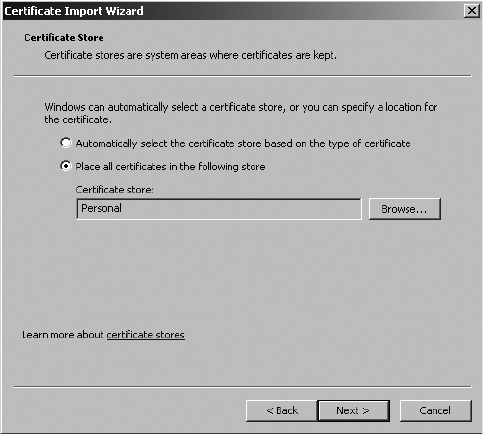
Chapter 16 Working with the Certificate Store 497
Importing a Certificate
After receiving a new certificate, you may want to import it into your certificate store. In
Figure 16-4, you can see the Certificate Import Wizard. You also can import a certificate by
using a Windows PowerShell script; there’s an example of this in the ImportCertificate.ps1 script.
Figure 16-4 The Certificate Import Wizard defaults to importing certificates to the Personal
certificate store.
Begin the ImportCertificate.ps1 script with the param statement, which defines four parame-
ters. The first one, -cert, holds the path to the certificate to import. The -store parameter
defaults to the My store, which Certificate Manager refers to as the Personal certificate store.
There are two switches. The first one, -liststores, lists available certificate stores in the currentuser
namespace. The last switch, -help, displays help. The param portion of the script is shown
here:
param(
$cert,
$store = "my",
[switch]$liststores,
[switch]$help
)
Next is the funhelp() function, which displays help for the script when it is called from the
command line by the -help switch. The funhelp() function consists of three sections inside a
giant here-string. The first section is the description, the second includes the parameters, and
the third section is the syntax. The results of the here-string are stored in the $helptext variable
C16622791.fm Page 497 Wednesday, December 12, 2007 1:47 PM
498 Windows PowerShell Scripting Guide
and are displayed at the end of the function. The funhelp() function then exits the script. This
function is shown here:
function funHelp()
{
$helpText=@"
DESCRIPTION:
NAME: ImportCertificate.ps1
Imports a certificate into a certificate store
PARAMETERS:
-cert path of certificate to import
-store the certificate store on the computer
-liststores lists certificate stores on local machine
-help prints help file
SYNTAX:
ImportCertificate.ps1
Prints error message a certificate is required, and displays
help
ImportCertificate.ps1 -cert "c:\fso\mycert.pfx"
Imports a certificate stored in the c:\fso folder named
mycert.pfx into the my store of the currentuser
ImportCertificate.ps1 -store "my" -cert
"c:\fso\mycert.pfx"
Imports a certificate stored in the c:\fso folder named
mycert.pfx into the my store of the currentuser
ImportCertificate.ps1 -store "smartcardroot"
-cert "c:\fso\mycert.pfx"
Imports a certificate stored in the c:\fso folder named
mycert.pfx into the smartcardroot store of the currentuser
ImportCertificate.ps1 -liststores
Gets a listing of certificate stores for the
currentuser
ImportCertificate.ps1 -help
Prints the help topic for the script
"@
$helpText
exit
}
Next is the funstore() function, used to display all the certificate stores on the current machine.
It begins with the CurrentUser store and ends with the LocalMachine store. To produce the
C16622791.fm Page 498 Wednesday, December 12, 2007 1:47 PM
Chapter 16 Working with the Certificate Store 499
list, use the Get-ChildItem cmdlet. To print the header for each listing, use the Write-Host
cmdlet. The funstore() function is shown here:
Function funstore()
{
write-host -foregroundcolor green "Listing currentuser stores:"
Get-ChildItem cert:\CurrentUser
write-host -foregroundcolor green "Listing localmachine stores:`n"
Get-ChildItem cert:\LocalMachine
exit
}
Check the command-line parameters. The first parameter to look for is the -help parameter. Do
this by checking for the existence of the $help variable. If you find the $help variable, print a
message, and call the funhelp() function. Look for the -liststores switch. If you find the $liststores
variable, call the funstore() function. Finally, check for the absence of the $cert variable. If the
-cert switch is not used and if you didn’t specify either the -help or the -liststores switches, print
an error message that a certificate is required, call the funhelp() function, and exit the script.
These three checks are shown here:
if($help) { "Printing help now..." ; funHelp }
if($liststores) { funStore }
if(!$cert) {
"A certificate path is required..." ;
funhelp
}
You must declare two variables. The first one to create is the $userstore variable. Set it to a value
of CurrentUser, and mark it as read-only. The second variable to create is $crypto. Assign it the
value of a string to represent the .NET Framework class you want to work with. These two
variable assignments are shown here:
new-variable -name userStore -value "currentUser" -option readonly
$crypto = "System.Security.Cryptography.X509Certificates.X509Store"
You must create an instance of the X509Store class. To do this, use the New-Object cmdlet and
pass it the string held in the $crypto variable, along with the store location contained in the
$store variable. The last parameter the X509Store class requires is the specific certificate store,
which is contained in the $userstore variable. Hold the returned X509Store object in the
$objstore variable. This line of code is shown here:
$objStore = new-object $crypto $store, $userStore
After creating the X509Store object, use the open() method and select the readwrite mode of
operation. Call the add() method and pass it the $cert variable, which contains an instance of
the certificate object. Finally, call the close() method. This section of code is shown here:
$objstore.Open("ReadWrite")
$objstore.Add($cert)
$objstore.Close()
C16622791.fm Page 499 Wednesday, December 12, 2007 1:47 PM
500 Windows PowerShell Scripting Guide
The completed ImportCertificate.ps1 script is shown here.
ImportCertificate.ps1
param(
$cert,
$store = "my",
[switch]$liststores,
[switch]$help
)
function funHelp()
{
$helpText=@"
DESCRIPTION:
NAME: ImportCertificate.ps1
Imports a certificate into a certificate store
PARAMETERS:
-cert path of certificate to import
-store the certificate store on the computer
-liststores lists certificate stores on local machine
-help prints help file
SYNTAX:
ImportCertificate.ps1
Prints error message a certificate is required, and displays
help
ImportCertificate.ps1 -cert "c:\fso\mycert.pfx"
Imports a certificate stored in the c:\fso folder named
mycert.pfx into the my store of the currentuser
ImportCertificate.ps1 -store "my" -cert
"c:\fso\mycert.pfx"
Imports a certificate stored in the c:\fso folder named
mycert.pfx into the my store of the currentuser
ImportCertificate.ps1 -store "smartcardroot"
-cert "c:\fso\mycert.pfx"
Imports a certificate stored in the c:\fso folder named
mycert.pfx into the smartcardroot store of the currentuser
ImportCertificate.ps1 -liststores
Gets a listing of certificate stores for the
currentuser
ImportCertificate.ps1 -help
Prints the help topic for the script
C16622791.fm Page 500 Wednesday, December 12, 2007 1:47 PM
Chapter 16 Working with the Certificate Store 501
"@
$helpText
exit
}
Function funstore()
{
write-host -foregroundcolor green "Listing currentuser stores:"
Get-ChildItem cert:\CurrentUser
write-host -foregroundcolor green "Listing localmachine stores:`n"
Get-ChildItem cert:\LocalMachine
exit
}
if($help) { "Printing help now..." ; funHelp }
if($liststores) { funStore }
if(!$cert) {
"A certificate path is required..." ;
funhelp
}
new-variable -name userStore -value "currentUser" -option readonly
$crypto = "System.Security.Cryptography.X509Certificates.X509Store"
$objStore = new-object $crypto $store, $userStore
$objstore.Open("ReadWrite")
$objstore.Add($cert)
$objstore.Close()
Deleting a Certificate
There are times when you will want to remove a certificate from the certificate store. This is
common when a certificate has expired, if you no longer trust the issuer of the certificate, or
if the certificate chain is broken. If you have only a few certificates to delete, you can easily use
the Certificate Manager utility. However, if you have many certificates, you’ll want to script the
removal of the offending certificates. To do this, use the DeleteCertificates.ps1 script.
To use the DeleteCertificate.ps1 script, begin with the param statement and four parameters.
The first parameter, -cert, is required. The second parameter, -store, is set to a default value
of the My store. Next come two switched parameters. The first one, -listcerts, causes the script
to print a listing of all the scripts in the selected certificate store. The last parameter is the -help
parameter, which prints a list of all the certificates in the select store. The param statement
is shown here:
param(
$cert,
$store = "my",
[switch]$listcerts,
[switch]$help
)
Next is the funhelp() function, which prints a help message when the script is run with the
-help parameter. To do this, create a variable named $helptext and assign the results of a
C16622791.fm Page 501 Wednesday, December 12, 2007 1:47 PM
502 Windows PowerShell Scripting Guide
here-string to it. In the here-string, create three sections: The first is the description section
that describes the purpose of the script. The second is the parameters section listing the parameters
supported by the script. The last is the syntax section that describes the syntax of the various
parameters. After the here-string is created, assign it to the $helptext variable, display the
contents of the variable, and exit the script. The funhelp() function is shown here:
function funHelp()
{
$helpText=@"
DESCRIPTION:
NAME: DeleteCertificate.ps1
Removes a certificate from a certificate store
PARAMETERS:
-store the certificate store on the computer
-cert certificate to delete
-listcerts lists certificates in specified store
-help prints help file
SYNTAX:
DeleteCertificate.ps1
Prints error message a certificate is required, and displays
help
DeleteCertificate.ps1 -cert "B67BAFECA1E77B8F3AEAB8EB9054D5D31C3C0A03"
Removes a certificate with thumbprint of
B67BAFECA1E77B8F3AEAB8EB9054D5D31C3C0A03 from the my store of
the currentuser
DeleteCertificate.ps1 -store "my" -cert "OU=EFS File Encryption
Certificate"
Removes a certificate with subject of
OU=EFS File Encryption Certificate from the my store
of the currentuser
DeleteCertificate.ps1 -store "smartcardroot"
-cert "E47F375796238DB54CB70DA7A5E88F79"
Removes a certificate with the serial number of
E47F375796238DB54CB70DA7A5E88F79 from the smartcardroot
store of the currentuser
DeleteCertificate.ps1 -listcerts
Gets a listing of certificates for the my store of the
currentuser
DeleteCertificate.ps1 -help
Prints the help topic for the script
C16622791.fm Page 502 Wednesday, December 12, 2007 1:47 PM
Chapter 16 Working with the Certificate Store 503
"@
$helpText
exit
}
Create the funcert() function by first creating a variable, $crypto, that holds a string represent-
ing the namespace and class name of the X509Store .NET Framework class. Do this only for
readability as the combination of the namespace and the class name is rather long. Use the
New-Object cmdlet to create a new instance of the X509Store class. The constructor for this
class needs both a store location and the name of a certificate store within that location. Use
the values contained in the $store variable and the $userstore variable, and hold the returned
X509Store object in the $objstore variable.
Next, use the open() method to open the certificate store; open the store in readwrite mode to
allow access to the certificates within the store. Create a collection of certificates by querying
the Certificates property and hold the collection of certificates in the $colcerts variable. Print
a header to the list of certificates by using the Write-Host cmdlet. This section of code is
shown here:
Function funcert()
{
$crypto = "System.Security.Cryptography.X509Certificates.X509Store"
$objStore = new-object $crypto $store, $userStore
$objstore.Open("ReadWrite")
$colcerts = $objstore.Certificates
Write-Host -ForegroundColor blue
"
There are $($colcerts.count) certificates in the $store store.
They are listed below:
"
After printing the list header, iterate through the collection of certificates contained in the
$colcerts variable. Use the variable $cert as the enumerator to keep track of the individual cer-
tificates as you move through the collection. After storing an individual certificate in the $cert
variable, print its Friendlyname, Serialnumber, Thumbprint, and Subject to the screen. After
making your way through the collection, close the store, and exit the script. This section of
code is shown here:
foreach($cert in $colCerts)
{
"FriendlyName: $($cert.FriendlyName)"
"Serialnumber: $($cert.SerialNumber)"
"Thumbprint: $($cert.thumbprint)"
"Subject: $($cert.subject)`n"
}
$objstore.Close()
exit
}
C16622791.fm Page 503 Wednesday, December 12, 2007 1:47 PM
504 Windows PowerShell Scripting Guide
Next is the findcert() function, where you search for a specific certificate. If you find the certif-
icate, store the returned certificate object in the global variable $mycert. Begin the findcert()
function by creating a variable, $crypto, to hold the string representing the .NET Framework
class X509Store and its associated namespace, System.Security.Cryptography.X509Certificates.
Use the New-Object cmdlet to create an instance of the X509Store object. To do this, provide
it the string representing the class path, the variable containing the name of the certificate
store location, and the variable containing the name of the certificate store. Store the returned
X509Store object in the $objstore variable. After creating the X509Store object, use the open()
method to open the certificate store. Supply the keyword readwrite to allow modification of
the certificate store. Query the Certificates property, which returns a collection of certificates in
the store. This section of code is shown here:
Function findcert($key)
{
$crypto = "System.Security.Cryptography.X509Certificates.X509Store"
$objStore = new-object $crypto $store, $userStore
$objstore.Open("ReadWrite")
$colcerts = $objstore.Certificates
Having obtained a collection of certificates, use the foreach cmdlet to iterate through the
collection contained in the $colcerts variable. Use the $cert variable as the enumerator as you
go through the collection. When there is a single variable contained in the $cert variable,
query the Thumbprint, SerialNumber, FriendlyName, and Subject properties of the certificate
object to see if you can match the value contained in the $key variable. After finding a match,
store the certificate object in the global variable $mycert. This section of code is shown here:
foreach($cert in $colCerts)
{
if($cert.thumbprint -match $key) { $global:mycert = $cert }
if($cert.serialnumber -match $key) { $global:mycert = $cert }
if($cert.friendlyname -match $key) { $global:mycert = $cert }
if($cert.subject -match $key) { $global:mycert = $cert }
}
}
After creating all these functions, you finally get to the first lines of code executed when the
script is run. First create a read-only variable named $userstore and assign the value Current-
User to it. Next, initialize the $mycert variable as a global variable and assign the value of null
to it. These two lines of code are shown here:
new-variable -name userStore -value "currentUser" -option readonly
$global:mycert = $null
It is now time to check the command-line parameters. The first one to check is the -help
parameter. If you find the $help variable, print a message string, and call the funhelp() func-
tion. If you find the $listcerts variable, call the funcert() function. Finally, check for the presence
C16622791.fm Page 504 Wednesday, December 12, 2007 1:47 PM
Chapter 16 Working with the Certificate Store 505
of the $cert variable. If you don’t find it, print an error message and call the funhelp() function.
These three parameter checks are shown here:
if($help) { "Printing help now..." ; funHelp }
if($listcerts) { "Listing certificates in $store" ; funcert }
if(!$cert) {
"A certificate is required..." ;
funhelp
}
When you’re certain that the command-line parameters are satisfactory, call the findcert()
function and pass it the certificate name contained in the $cert variable. After retrieving the
certificate object and storing it in the $mycert variable, create an instance of the X509Store
.NET Framework class, open the certificate store, and call the remove() method while passing
it the certificate object contained in the $mycert variable. After this, close the certificate store.
This section of code is shown here:
Findcert($cert)
$crypto = "System.Security.Cryptography.X509Certificates.X509Store"
$objStore = new-object $crypto $store, $userStore
$objstore.Open("ReadWrite")
$objstore.remove($mycert)
$objstore.Close()
The completed DeleteCertificate.ps1 script is shown here.
DeleteCertificate.ps1
param(
$cert,
$store = "my",
[switch]$listcerts,
[switch]$help
)
function funHelp()
{
$helpText=@"
DESCRIPTION:
NAME: DeleteCertificate.ps1
Removes a certificate from a certificate store
PARAMETERS:
-store the certificate store on the computer
-cert certificate to delete
-listcerts lists certificates in specified store
-help prints help file
SYNTAX:
DeleteCertificate.ps1
Prints error message a certificate is required, and displays
help
C16622791.fm Page 505 Wednesday, December 12, 2007 1:47 PM
506 Windows PowerShell Scripting Guide
DeleteCertificate.ps1 -cert "B67BAFECA1E77B8F3AEAB8EB9054D5D31C3C0A03"
Removes a certificate with thumbprint of
B67BAFECA1E77B8F3AEAB8EB9054D5D31C3C0A03 from the my store of
the currentuser
DeleteCertificate.ps1 -store "my" -cert "OU=EFS File Encryption
Certificate"
Removes a certificate with subject of
OU=EFS File Encryption Certificate from the my store
of the currentuser
DeleteCertificate.ps1 -store "smartcardroot"
-cert "E47F375796238DB54CB70DA7A5E88F79"
Removes a certificate with the serial number of
E47F375796238DB54CB70DA7A5E88F79 from the smartcardroot
store of the currentuser
DeleteCertificate.ps1 -listcerts
Gets a listing of certificates for the my store of the
currentuser
DeleteCertificate.ps1 -help
Prints the help topic for the script
"@
$helpText
exit
}
Function funcert()
{
$crypto = "System.Security.Cryptography.X509Certificates.X509Store"
$objStore = new-object $crypto $store, $userStore
$objstore.Open("ReadWrite")
$colcerts = $objstore.Certificates
Write-Host -ForegroundColor blue
"
There are $($colcerts.count) certificates in the $store store.
They are listed below:
"
foreach($cert in $colCerts)
{
"FriendlyName: $($cert.FriendlyName)"
"Serialnumber: $($cert.SerialNumber)"
"Thumbprint: $($cert.thumbprint)"
"Subject: $($cert.subject)`n"
}
$objstore.Close()
exit
C16622791.fm Page 506 Wednesday, December 12, 2007 1:47 PM
Chapter 16 Working with the Certificate Store 507
}
Function findcert($key)
{
$crypto = "System.Security.Cryptography.X509Certificates.X509Store"
$objStore = new-object $crypto $store, $userStore
$objstore.Open("ReadWrite")
$colcerts = $objstore.Certificates
foreach($cert in $colCerts)
{
if($cert.thumbprint -match $key) { $global:mycert = $cert }
if($cert.serialnumber -match $key) { $global:mycert = $cert }
if($cert.friendlyname -match $key) { $global:mycert = $cert }
if($cert.subject -match $key) { $global:mycert = $cert }
}
}
new-variable -name userStore -value "currentUser" -option readonly
$global:mycert = $null
if($help) { "Printing help now..." ; funHelp }
if($listcerts) { "Listing certificates in $store" ; funcert }
if(!$cert) {
"A certificate is required..." ;
funhelp
}
Findcert($cert)
$crypto = "System.Security.Cryptography.X509Certificates.X509Store"
$objStore = new-object $crypto $store, $userStore
$objstore.Open("ReadWrite")
$objstore.remove($mycert)
$objstore.Close()
Summary
In this chapter, we examined the various ways network administrators commonly work with
certificate services. We began by searching the certificate store to locate a specific certificate.
Next, we examined using the .NET Framework classes to list all of the certificates in a specific
namespace and then looked at locating expired and soon-to-expire certificates.
We then examined the tasks involved in managing certificates, first looking at inspecting a
certificate file, and then moving on to importing certificates. We concluded the chapter by
examining the process of deleting certificates from the certificate store.
C16622791.fm Page 507 Wednesday, December 12, 2007 1:47 PM
C16622791.fm Page 508 Wednesday, December 12, 2007 1:47 PM

509
Chapter 17
Managing the Terminal Services
Service
After completing this chapter, you will be able to:
■Configure the installation of Windows Terminal Services.
■Examine the terminal services networking protocols.
■Configure terminal server user settings.
On the Companion Disc All the scripts used in this chapter are located on the CD that
accompanies this book in the \scripts\chapter17 folder.
Configuring the Terminal Service Installation
When Windows Server 2008 is configured with the Terminal Services role, it provides access
to a desktop environment for users. As a result, there are numerous settings that can be
configured to provide greater performance, scalability, and richness of user experience. Unfor-
tunately, these settings can be mutually exclusive—depending on your environment. As a
result, network administrators spend a great deal of time trying to find the right combination
of settings to allow their users to obtain the best server experience for their particular needs.
Documenting Terminal Service Configuration
With the large number of settings that can be configured, it’s important to review the config-
uration of the Windows Server 2008 terminal server. You can do this by examining the Terminal
Services Configuration utility in Figure 17-1.
If you have quite a few terminal servers, you’ll need to write a script. To do this, employ the
WMI classes in the root\cimv2\terminalservices WMI namespace. The primary class you need
to utilize is the Win32_TerminalServiceSetting WMI class because it gives a good overview of
many of the more commonly configured settings. An example script built using the
Win32_TerminalServiceSetting WMI class is the ReportTerminalServiceSetting.ps1 script.
C17622791.fm Page 509 Wednesday, December 12, 2007 1:48 PM
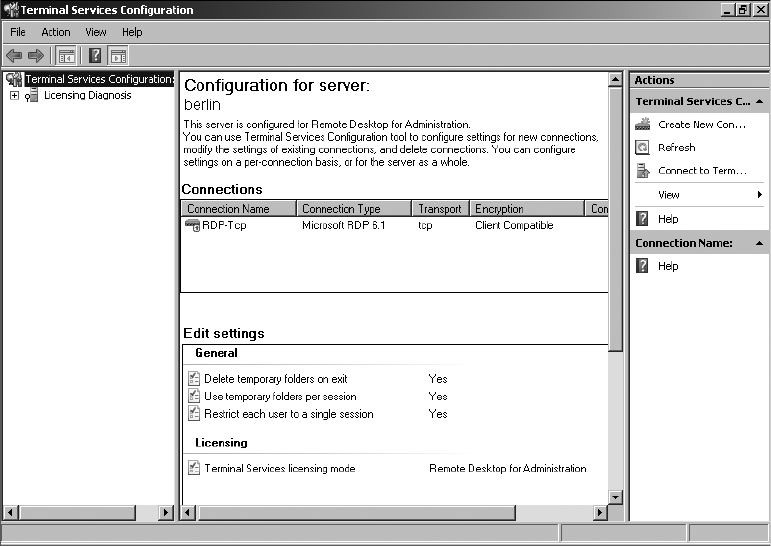
510 Windows PowerShell Scripting Guide
Figure 17-1 The Terminal Services Configuration utility provides convenient access to configuration
information.
Begin the ReportTerminalServiceSetting.ps1 script with the param statement, which is used
to pass values to the script when it is launched. This script has two parameters; the first is
used to name the computer that the script will connect to and the second is used to display a
help text. The -help parameter is a switched parameter, meaning it only has value when it is
present on the command line. Additionally, no values can be supplied for the switch as it is a
Boolean data type, and is either true/false, on/off, or -1/0. The param statement is shown here:
param(
$computer = "localhost",
[switch]$help
)
Next, create a function to display help information to the user. Begin by using the function
statement to create a new function and give the function the name of funhelp(). Inside the
code block for the function, create a variable named $helptext, and assign the result of a here-
string to the value of the variable. The here-string is a special convention that allows you to
create a string from arbitrary text. This allows you to use special characters and even quota-
tion marks inside the string; you won’t have to escape the special characters or use closing
quotes, and it doesn’t matter if you end a string in mid-sentence. Everything inside the
C17622791.fm Page 510 Wednesday, December 12, 2007 1:48 PM
Chapter 17 Managing the Terminal Services Service 511
here-string is simply a string value. The here-string begins with @”, ends with “@, and
contains three sections of text for the help message: description, parameters, and syntax. The
funhelp() function is shown here:
function funHelp()
{
$helpText=@"
DESCRIPTION:
NAME: ReportTerminalServiceSetting.ps1
Displays Terminal Server settings on a local or a remote
terminal server
PARAMETERS:
-computer the computer to target the script to
-help prints help file
SYNTAX:
ReportTerminalServiceSetting.ps1
Displays Terminal Server settings on local machine
ReportTerminalServiceSetting.ps1 -computer ts1
Reports Terminal Server settings on remote terminal server
named ts1
ReportTerminalServiceSetting.ps1 -help
Prints the help topic for the script
"@
$helpText
exit
}
The next step is to inspect the command-line parameters. The one you are seeking is the -help
parameter; if it is specified, then it creates a variable named $help. If the $help variable is
present, print a status message, and call the funhelp() function. This line of code is shown
here:
if($help) { "Printing help now ..." ; funHelp }
Create two variables: The first one, $namespace, is used to set the -namespace parameter for the
Get-WmiObject cmdlet. The second one, $class, is used to set the -class parameter for the Get-
WmiObject cmdlet. These two variable assignments are displayed here:
$namespace = "root\cimv2\TerminalServices"
$class = "win32_TerminalServiceSetting"
Finally, use the Get-WmiObject cmdlet to make a connection into the root\cimv2\terminalser-
vices WMI namespace. Connect to the computer named in the $computer variable, and return
an object containing instances of the Win32_TerminalServiceSetting WMI class. Take the object
C17622791.fm Page 511 Wednesday, December 12, 2007 1:48 PM
512 Windows PowerShell Scripting Guide
that is returned and pipeline it to the Format-List cmdlet; use a filter to return only items that
begin with the letters a through z. This section of the script is shown here:
get-wmiobject -namespace $namespace -computername $computer `
-class $class |
format-list [a-z]*
The completed ReportTerminalServiceSetting.ps1 script is shown here.
ReportTerminalServiceSetting.ps1
param(
$computer = "localhost",
[switch]$help
)
function funHelp()
{
$helpText=@"
DESCRIPTION:
NAME: ReportTerminalServiceSetting.ps1
Displays Terminal Server settings on a local or a remote
terminal server
PARAMETERS:
-computer the computer to target the script to
-help prints help file
SYNTAX:
ReportTerminalServiceSetting.ps1
Displays Terminal Server settings on local machine
ReportTerminalServiceSetting.ps1 -computer ts1
Reports Terminal Server settings on remote terminal server
named ts1
ReportTerminalServiceSetting.ps1 -help
Prints the help topic for the script
"@
$helpText
exit
}
if($help) { "Printing help now ..." ; funHelp }
$namespace = "root\cimv2\TerminalServices"
$class = "win32_TerminalServiceSetting"
get-wmiobject -namespace $namespace -computername $computer `
-class $class |
format-list [a-z]*
C17622791.fm Page 512 Wednesday, December 12, 2007 1:48 PM
Chapter 17 Managing the Terminal Services Service 513
Disabling Logons
There are many times when you want to configure the terminal server to no longer allow new
user logons. One such occasion is right before performing scheduled maintenance. Your goal
is to gracefully reduce the number of users connected to the server. As existing users log off,
new users aren’t permitted to log on. To easily configure this setting on the terminal server,
use the DisableLogons.ps1 script.
Begin the DisableLogons.ps1 script with the param statement. Four of the five parameters are
switched parameters. The remaining parameter is the one used for the computer name, and
it is set to the default value of localhost. If the -allow parameter is specified, logons are allowed.
If the -disallow parameter is used, then logons are disabled. The -list parameter is used to
produce a list of the current Terminal Services configuration. The -help parameter displays the
help text. The param statement is listed here:
param(
$computer = "localhost",
[switch]$allow,
[switch]$disallow,
[switch]$list,
[switch]$help
)
Next, create the funhelp() function, which will only be called if the $help variable is found
when the command line is parsed. In the funhelp() function, use a here-string to create the
help text, and assign the results to the $helptext variable. The contents of the variable are
displayed, and the function exits the script. The funhelp() function is shown here:
function funHelp()
{
$helpText=@"
DESCRIPTION:
NAME: DisableLogons.ps1
Configures client session settings for client
machine connecting to a local or remote terminal server
PARAMETERS:
-computer the computer to target the script to
-disallow disallows new logons to the terminal server
-allow allows new logons to the terminal server
-list displays current configuration
-help prints help file
SYNTAX:
DisableLogons.ps1
Displays an error that a setting must be supplied. Prints out
the help message
DisableLogons.ps1 -list
Lists the client session settings on local terminal server
C17622791.fm Page 513 Wednesday, December 12, 2007 1:48 PM
514 Windows PowerShell Scripting Guide
DisableLogons.ps1 -allow -computer TS2
Configures the remote terminal server named TS2 to allow
new connections
DisableLogons.ps1 -disallow
Configures the local terminal server to disallow
new connections
DisableLogons.ps1 -help
Prints the help topic for the script
"@
$helpText
exit
}
Creating the funlist() function is the next step. This function is used to produce a listing of the
current configuration. It is called when the script is run with the -list switched parameter
specified. Inside the funlist() function, use the Get-WmiObject cmdlet to connect to the
namespace specified in the $namespace variable. Use the value contained in the $computer vari-
able to determine which computer the WMI script connects to. Then use the value in the $class
variable to determine which WMI class is queried. The values for each of these variables are
defined later in the script, outside the function. Take the resulting WMI management object and
pipeline it to the Format-List cmdlet, ignoring the system properties that begin with the under-
score (_) character. After this is done, exit the script. The funlist() function is shown here:
Function funlist()
{
get-wmiobject -namespace $namespace -computername $computer `
-class $class |
format-list [a-z]*
exit
}
After creating the funlist() function, look to the funchange() function, which makes the config-
uration changes to the terminal server. It does this by using the Get-WmiObject cmdlet to con-
nect to the Win32_TerminalServiceSetting WMI class. This is the value contained in the $class
variable. The Win32_TerminalServiceSetting WMI class is in the root\cimv2\terminalservices
WMI namespace, the string stored in the $namespace variable. Complete the WMI connection
by connecting to the computer specified in the $computer variable, which by default is the
localhost. After making the connection into WMI, store the resulting management object in
the $objts variable. Query the Logons property, and assign the action that is specified in the
$action variable. Use the put() method to commit the changes to the WMI database, and exit
the script. The funchange() function is shown here:
Function Funchange()
{
$objTS = get-wmiobject -class $class -namespace $namespace `
C17622791.fm Page 514 Wednesday, December 12, 2007 1:48 PM
Chapter 17 Managing the Terminal Services Service 515
-computername $computer
$objTS.logons = $action
$objTS.put()
exit
}
You must create two variables. The first one, $namespace, is used to tell the Get-WmiObject
where to find the WMI class. The second variable is used to represent the WMI class that will
be queried. These two lines of code are shown here:
$namespace = "root\cimv2\TerminalServices"
$class = "win32_TerminalServiceSetting"
After creating the two variables, check the command-line parameters. If you find the $help
variable, call the funhelp() function. If the $list variable is present, call the funlist() function
and print the current configuration. If you find the $allow variable, assign the value of 1 to the
$action variable and call the funchange() function. If the $disallow variable is found, assign the
$action variable the value of 0 and call the funchange() function. If none of these variables is
found, print a suggestion to the user to examine the help text. This section of the script is
displayed here:
if($help) { "Printing help now..." ; funHelp }
if($list) { funlist }
if($allow) { $action = 1 ; funchange }
if($disallow) { $action = 0 ; funchange }
"No action specified. Try DisableLogons.ps1 -help"
The completed DisableLogons.ps1 script is shown here.
DisableLogons.ps1
param(
$computer = "localhost",
[switch]$allow,
[switch]$disallow,
[switch]$list,
[switch]$help
)
function funHelp()
{
$helpText=@"
DESCRIPTION:
NAME: DisableLogons.ps1
Configures client session settings for client
machine connecting to a local or remote terminal server
PARAMETERS:
-computer the computer to target the script to
-disallow disallows new logons to the terminal server
-allow allows new logons to the terminal server
-list displays current configuration
-help prints help file
C17622791.fm Page 515 Wednesday, December 12, 2007 1:48 PM
516 Windows PowerShell Scripting Guide
SYNTAX:
DisableLogons.ps1
Displays an error that a setting must be supplied. Prints out
the help message
DisableLogons.ps1 -list
Lists the client session settings on local terminal server
DisableLogons.ps1 -allow -computer TS2
Configures the remote terminal server named TS2 to allow
new connections
DisableLogons.ps1 -disallow
Configures the local terminal server to disallow
new connections
DisableLogons.ps1 -help
Prints the help topic for the script
"@
$helpText
exit
}
Function funlist()
{
get-wmiobject -namespace $namespace -computername $computer `
-class $class |
format-list [a-z]*
exit
}
Function Funchange()
{
$objTS = get-wmiobject -class $class -namespace $namespace `
-computername $computer
$objTS.logons = $action
$objTS.put()
exit
}
$namespace = "root\cimv2\TerminalServices"
$class = "win32_TerminalServiceSetting"
if($help) { "Printing help now..." ; funHelp }
if($list) { funlist }
if($allow) { $action = 1 ; funchange }
if($disallow) { $action = 0 ; funchange }
"No action specified. Try DisableLogons.ps1 -help"
C17622791.fm Page 516 Wednesday, December 12, 2007 1:48 PM
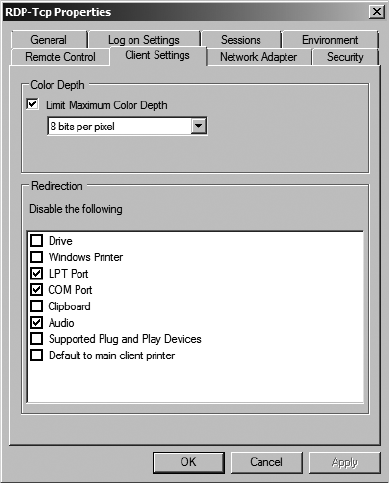
Chapter 17 Managing the Terminal Services Service 517
Modifying Client Properties
There are numerous client settings that can be modified. In the Terminal Services Configura-
tion utility, there are many tabs that control various aspects of the client configuration. As
shown in Figure 17-2, some of these settings control the mapping of peripheral devices.
Figure 17-2 Client settings displayed in the Terminal Services Configuration utility.
You can modify each of the settings shown in Figure 17-2 by using the ConfigureClientProp-
erties.ps1 script. The ConfigureClientProperties.ps1 script uses the Win32_TSClientSetting
WMI class from the root\cimv2\terminalservices WMI namespace. The script makes use
of several switch parameters to make it easier to use from the command line.
Begin the ConfigureClientProperties.ps1 script with the param statement, which is used to
create a number of parameters for the script. The first is the -computer parameter, which is set
to the localhost by default. The next parameter is -action, which is used to specify the action
to perform. Next there are two switch parameters, -enable and -disable, which are used to
modify the -action parameter. The next one, the -list parameter, lists the current configuration.
The -help parameter displays the help text. The param statement is shown here:
param(
$computer = "localhost",
$action,
[switch]$enable,
[switch]$disable,
[switch]$list,
[switch]$help
)
C17622791.fm Page 517 Wednesday, December 12, 2007 1:48 PM
518 Windows PowerShell Scripting Guide
Now, define the funhelp() function, which displays the contents of the $helptext variable when
the script is run with the -help parameter. The $helptext variable is used to hold a here-string
that details the usage of the script including the description, parameters, and the syntax of the
script. After the $helptext variable has been displayed, the script exits. The funhelp() function
is shown here:
function funHelp()
{
$helpText=@"
DESCRIPTION:
NAME: ConfigureClientProperties.ps1
Configures client settings for LPTPortMapping, COMPortMapping
AudioMapping, ClipboardMapping, DriveMapping,
WindowsPrinterMapping for client machine connecting to a
local or remote terminal server
PARAMETERS:
-computer the computer to target the script to
-action type of resource mapping
< lpt, com, audio, clip, drive, printer >
-enable enables the action
-disable disables the action
-list displays current configuration
-help prints help file
SYNTAX:
ConfigureClientProperties.ps1
Displays an error that a setting must be supplied. Prints out
the help message
ConfigureClientProperties.ps1 -list
Lists the current client settings on local terminal server
ConfigureClientProperties.ps1 -action com -disable -computer TS2
Configures the client setting on remote terminal server named
TS2 to disable client com port mapping
ConfigureClientProperties.ps1 -action lpt -enable
Configures the client setting on local terminal server
to enable client lpt port mapping
ConfigureClientProperties.ps1 -help
Prints the help topic for the script
"@
$helpText
exit
}
C17622791.fm Page 518 Wednesday, December 12, 2007 1:48 PM
Chapter 17 Managing the Terminal Services Service 519
Next is the funlist() function, which uses the Get-WmiObject cmdlet to connect to the
namespace specified in the $namespace variable. It connects to the computer named in the
$computer variable, and queries the class mentioned in the $class variable. It takes the resulting
object and pipelines the results to the Format-List cmdlet and exits the script. This code is
listed here:
Function funlist()
{
get-wmiobject -namespace $namespace -computername $computer `
-class $class |
format-list [a-z]*
exit
}
You must assign values to two of the variables used in the preceding function. The value of
the $namespace variable is set to root\cimv2\terminalservices. This is the namespace where
most of the WMI classes related to terminal services reside. Assign the WMI class name
Win32_TSClientSetting to the $class variable. This code is shown here:
$namespace = "root\cimv2\TerminalServices"
$class = "win32_TSClientSetting"
It’s now time to evaluate the command line. The first thing to check for is the existence of the
$help variable: if you find it, call the funhelp() function. If you find the $list variable, call the
funlist() function. If the $action variable is not present, call the funhelp() function. If you find
the $disable variable, assign $value as 0, and assign $value as 1 if you find the $enable variable.
This section of the script is displayed here:
if($help) { "Printing help now..." ; funHelp }
if($list) { funlist }
if(!$action) { "You must specify an action" ; funhelp }
if($disable) { $value = 0 }
if($enable) { $value = 1 }
The switch statement is next; use it to make the command line easier to understand and use.
Rather than requiring the user to type long names, create alias values for each of the property
values. These are the values passed to the $action parameter. The switch statement is shown
here:
switch($action)
{
"lpt" { $action = "LPTPortMapping" }
"com" { $action = "COMPortMapping" }
"audio" { $action = "AudioMapping" }
"clip" { $action = "ClipboardMapping" }
"drive" { $action = "DriveMapping" }
"printer" { $action = "WindowsPrinterMapping " }
}
C17622791.fm Page 519 Wednesday, December 12, 2007 1:48 PM
520 Windows PowerShell Scripting Guide
After assigning the appropriate value to the $action variable, call the WMI command. To do
this, use the Get-WmiObject to connect to the Win32_TSClientSetting WMI class in the
root\cimv2\terminalservices namespace on the computer specified in the $computer variable.
After storing the resulting object in the $objClient variable, call the SetClientProperty() method
and pass it the property contained in the $action variable and the on or off value stored in the
$value variable. This section of code is shown here:
$objClient=get-wmiobject -namespace $namespace -computername $computer `
-class $class
$objClient.SetClientProperty($action, $value)
The completed ConfigureClientProperties.ps1 script is shown here.
ConfigureClientProperties.ps1
param(
$computer = "localhost",
$action,
[switch]$enable,
[switch]$disable,
[switch]$list,
[switch]$help
)
function funHelp()
{
$helpText=@"
DESCRIPTION:
NAME: ConfigureClientProperties.ps1
Configures client settings for LPTPortMapping, COMPortMapping
AudioMapping, ClipboardMapping, DriveMapping,
WindowsPrinterMapping for client machine connecting to a
local or remote terminal server
PARAMETERS:
-computer the computer to target the script to
-action type of resource mapping
< lpt, com, audio, clip, drive, printer >
-enable enables the action
-disable disables the action
-list displays current configuration
-help prints help file
SYNTAX:
ConfigureClientProperties.ps1
Displays an error that a setting must be supplied. Prints out
the help message
ConfigureClientProperties.ps1 -list
Lists the current client settings on local terminal server
ConfigureClientProperties.ps1 -action com -disable -computer TS2
C17622791.fm Page 520 Wednesday, December 12, 2007 1:48 PM
Chapter 17 Managing the Terminal Services Service 521
Configures the client setting on remote terminal server named
TS2 to disable client com port mapping
ConfigureClientProperties.ps1 -action lpt -enable
Configures the client setting on local terminal server
to enable client lpt port mapping
ConfigureClientProperties.ps1 -help
Prints the help topic for the script
"@
$helpText
exit
}
Function funlist()
{
get-wmiobject -namespace $namespace -computername $computer `
-class $class |
format-list [a-z]*
exit
}
$namespace = "root\cimv2\TerminalServices"
$class = "win32_TSClientSetting"
if($help) { "Printing help now..." ; funHelp }
if($list) { funlist }
if(!$action) { "You must specify an action" ; funhelp }
if($disable) { $value = 0 }
if($enable) { $value = 1 }
switch($action)
{
"lpt" { $action = "LPTPortMapping" }
"com" { $action = "COMPortMapping" }
"audio" { $action = "AudioMapping" }
"clip" { $action = "ClipboardMapping" }
"drive" { $action = "DriveMapping" }
"printer" { $action = "WindowsPrinterMapping " }
}
$objClient=get-wmiobject -namespace $namespace -computername $computer `
-class $class
$objClient.SetClientProperty($action, $value)
Managing Users
There are many settings that can be applied directly to the user accounts that access the
Windows Server 2008 terminal server, including the ability to access the terminal server.
Other settings can influence both the quality of the user experience and the performance of
C17622791.fm Page 521 Wednesday, December 12, 2007 1:48 PM
522 Windows PowerShell Scripting Guide
the terminal server. These settings include—but are not limited to—the depth of the desktop
color and the use of active desktop features. These values will be examined in this section.
In the ReportClientSettings.ps1 script, you report the configuration information on client
objects. Begin by using the param statement, which creates two command-line parameters.
The first one is -computer; this parameter controls which computer the script runs on. The
other parameter is the -help parameter, which displays help. These two command-line param-
eters are defined here:
param(
$computer = "localhost",
[switch]$help
)
Next is the funhelp() function, which displays help information to the user when the script is
run with the -help option. Assign the contents of the $helptext variable via a here-string. The
$helptext consists of three parts. The first section of the $helptext variable is the description,
the next section includes the parameters, and the last is the syntax portion of the $helptext
variable. After the $helptext variable contents are displayed to the user, the script exits. The
funhelp() function is shown here:
function funHelp()
{
$helpText=@"
DESCRIPTION:
NAME: ReportClientSettings.ps1
Displays client configuration settings on a local or a remote
terminal server
PARAMETERS:
-computer the computer to target the script to
-help prints help file
SYNTAX:
ReportClientSettings.ps1
Displays client configuration settings on local machine
ReportClientSettings.ps1 -computer ts1
Reports client configuration settings on remote terminal server
named ts1
ReportClientSettings.ps1 -help
Prints the help topic for the script
"@
$helpText
exit
}
C17622791.fm Page 522 Wednesday, December 12, 2007 1:48 PM
Chapter 17 Managing the Terminal Services Service 523
Next, look for the $help variable; if you find it, call the funhelp() function as shown here:
if($help){ "Printing help now ..." ; funHelp }
You must create two variables to control the way the Get-WmiObject cmdlet behaves. The first
is the namespace, which dictates where the script will look for class information. The second
is the name of the WMI class to query. These two lines of code are displayed here:
$namespace = "root\cimv2\TerminalServices"
$class = "win32_TSClientSetting"
It’s time to make the connection to WMI. To do this, use the Get-WmiObject cmdlet and make
use of the -namespace parameter to connect to the namespace dictated in the $namespace vari-
able. Connect to the computer listed in the $computer variable, then specify to query the class
contained in the $class variable. Pipeline the object to the Format-List cmdlet for display to the
user. This section of code is listed here:
get-wmiobject -namespace $namespace -computername $computer `
-class $class |
format-list [a-z]*
The completed ReportClientSettings.ps1 script is shown here.
ReportClientSettings.ps1
param(
$computer = "localhost",
[switch]$help
)
function funHelp()
{
$helpText=@"
DESCRIPTION:
NAME: ReportClientSettings.ps1
Displays client configuration settings on a local or a remote
terminal server
PARAMETERS:
-computer the computer to target the script to
-help prints help file
SYNTAX:
ReportClientSettings.ps1
Displays client configuration settings on local machine
ReportClientSettings.ps1 -computer ts1
Reports client configuration settings on remote terminal server
named ts1
ReportClientSettings.ps1 -help
Prints the help topic for the script
C17622791.fm Page 523 Wednesday, December 12, 2007 1:48 PM
524 Windows PowerShell Scripting Guide
"@
$helpText
exit
}
if($help){ "Printing help now ..." ; funHelp }
$namespace = "root\cimv2\TerminalServices"
$class = "win32_TSClientSetting"
get-wmiobject -namespace $namespace -computername $computer `
-class $class |
format-list [a-z]*
Enabling Users to Access the Server
You must allow users to access the server. By default, users don’t have access to the terminal
server. To grant access permissions to those who need terminal server access, use the Grant-
UserTSPermission.ps1 script.
Begin the GrantUserTSPermission.ps1 script with the param statement. The first parameter to
create is -computer. Set a default value for this parameter by assigning the string localhost to
the $computer variable. Create a -user parameter and a -level parameter. These two parameters
are used to control which users have access, and what level of activity they are permitted. The
last parameter is the -help parameter, which will display a help string when requested. The
param statement is shown here:
param(
$computer = "localhost",
$user,
$level,
[switch]$help
)
Next is the funhelp() function, used to display the help string in response to the -help parame-
ter. Begin the function by creating a variable named $helptext and assigning a here-string to it.
The here-string is simple text that is organized into three groups: a description section, a
parameter section, and a syntax section. There is nothing special about these sections as they
are just made up of text. After the here-string has been completed, display the contents of the
$helptext variable, and exit the script. The funhelp() function is shown here:
function funHelp()
{
$helpText=@"
DESCRIPTION:
NAME: GrantUserTSPermission.ps1
Grants user access permission to a local or remote terminal server
PARAMETERS:
-computer the computer to target the script to
C17622791.fm Page 524 Wednesday, December 12, 2007 1:48 PM
Chapter 17 Managing the Terminal Services Service 525
-user the user to grant permission to
-level the level of access < guest, user, all >
-help prints help file
SYNTAX:
GrantUserTSPermission.ps1
Displays an error that a user must be supplied. Prints out
the help message
GrantUserTSPermission.ps1 -user bob -level guest
Grants user bob guest permission to the local terminal server
GrantUserTSPermission.ps1 -user sandra -level user -computer ts1
Grants user sandra user permission to remote terminal server
named ts1
GrantUserTSPermission.ps1 -user ed -level all
Grants user ed all permission to the local terminal server
GrantUserTSPermission.ps1 -help
Prints the help topic for the script
"@
$helpText
exit
}
Now you must check the command-line options. First look for the presence of the $help vari-
able. If you find it, print a message string and call the funhelp() function. Next, look for the
absence of the user. If you don’t find the $user variable, print a message string, and call the fun-
help() function. Perform the same action if the $level variable is missing. Therefore, there are
two parameters that are mandatory: the $user variable and the $level variable. This section of
code is shown here:
if($help) { "Printing help now ..." ; funHelp }
if(!$user) { "A user is required ..." ; funHelp }
if(!$level) { "Level of access is required ..." ; funHelp }
Now it’s time to parse the $level variable. There are three potential values allowed for the $level
variable. These correspond to the three levels of access permitted on the terminal server. The
WMI class needs the level value to be an integer. However, to make the script easier to use,
allow the guest, user, and all words to be supplied from the command line. The switch state-
ment is used to translate the user input into the appropriate value required by WMI. The
switch statement is shown here:
switch($level)
{
"guest" { $level = 0 }
C17622791.fm Page 525 Wednesday, December 12, 2007 1:48 PM
526 Windows PowerShell Scripting Guide
"user" { $level = 1 }
"all" { $level = 2 }
}
Create two variables. The first one is $namespace, which points to the WMI namespace of
root\cimv2\terminalservices, where the WMI terminal server classes reside. The next variable is
$class, which is the WMI class you’ll work with. These two variable assignments are shown
here:
$namespace = "root\cimv2\TerminalServices"
$class = "win32_TSPermissionsSetting"
Make the connection to WMI. To do this, use the Get-WmiObject cmdlet and supply values
for the -namespace, -computername, -class, and -filter parameters. Use the -filter parameter to
return only the terminal that has a name of rdp-tcp. This is because there are actually two ter-
minals: the console and the rdp-tcp terminal. You will be interested only in the rdp-tcp termi-
nal, because it is the one users will utilize. Once connected to WMI, use the addaccount()
method and give it the user name and the level of access. This section of code is shown here:
$objClient=get-wmiobject -namespace $namespace -computername $computer `
-class $class -filter "terminalName = 'rdp-tcp'"
$objClient.addAccount($user,$level)
The completed GrantUserTSPermission.ps1 script is shown here.
GrantUserTSPermission.ps1
param(
$computer = "localhost",
$user,
$level,
[switch]$help
)
function funHelp()
{
$helpText=@"
DESCRIPTION:
NAME: GrantUserTSPermission.ps1
Grants user access permission to a local or remote terminal server
PARAMETERS:
-computer the computer to target the script to
-user the user to grant permission to
-level the level of access < guest, user, all >
-help prints help file
SYNTAX:
GrantUserTSPermission.ps1
Displays an error that a user must be supplied. Prints out
the help message
C17622791.fm Page 526 Wednesday, December 12, 2007 1:48 PM
Chapter 17 Managing the Terminal Services Service 527
GrantUserTSPermission.ps1 -user bob -level guest
Grants user bob guest permission to the local terminal server
GrantUserTSPermission.ps1 -user sandra -level user -computer ts1
Grants user sandra user permission to remote terminal server
named ts1
GrantUserTSPermission.ps1 -user ed -level all
Grants user ed all permission to the local terminal server
GrantUserTSPermission.ps1 -help
Prints the help topic for the script
"@
$helpText
exit
}
if($help) { "Printing help now ..." ; funHelp }
if(!$user) { "A user is required ..." ; funHelp }
if(!$level) { "Level of access is required ..." ; funHelp }
switch($level)
{
"guest" { $level = 0 }
"user" { $level = 1 }
"all" { $level = 2 }
}
$namespace = "root\cimv2\TerminalServices"
$class = "win32_TSPermissionsSetting"
$objClient=get-wmiobject -namespace $namespace -computername $computer `
-class $class -filter "terminalName = 'rdp-tcp'"
$objClient.addAccount($user,$level)
Configuring Client Settings
There are several client settings than can be configured using WMI. These settings include
those such as color depth, active desktop, and the desktop wallpaper. In this section, you’ll
learn how to configure each of these items.
The ConfigureClientColor.ps1 script is a script that can be used to configure the user’s color
depth settings. To do this, begin with the param statement that creates several parameters.
The first one is -depth, which is used to control the level of color reproduced on the client com-
puter. The next is -computer; this parameter controls which server will run the script. Next is
C17622791.fm Page 527 Wednesday, December 12, 2007 1:48 PM
528 Windows PowerShell Scripting Guide
the -list parameter, which causes the script to query—rather than change—the information. The
last parameter is the -help switch, which will display help. The param statement is shown here:
param(
$depth,
$computer = "localhost",
[switch]$list,
[switch]$help
)
Next is the funhelp() function, used to display the help text. The help text is stored in the
$helptext variable; it is only displayed when requested by the user or in response to a missing
parameter from the command line. The $helptext holds the result of the here-string, which
stores the help information. The help information consists of three sections: description,
parameters, and syntax. After the $helptext variable is created, display the contents of the
variable and exit the script. The funhelp() function is shown here:
function funHelp()
{
$helpText=@"
DESCRIPTION:
NAME: ConfigureClientColor.ps1
Configures color depth settings for client machine connecting
to a local or remote terminal server
PARAMETERS:
-depth the desired color depth on the client machine
< 8, 15, 16, 24 >
-list displays current configuration
-help prints help file
SYNTAX:
ConfigureClientColor.ps1
Displays an error that a setting must be supplied. Prints out
the help message
ConfigureClientColor.ps1 -depth 8
Configures the client setting on local terminal server to allow
max color depth of 8 bits
ConfigureClientColor.ps1 -depth 24 -computer TS2
Configures the client setting on remote terminal server named TS2
to allow max color depth of 8 bits
ConfigureClientColor.ps1 -help
Prints the help topic for the script
"@
$helpText
exit
}
C17622791.fm Page 528 Wednesday, December 12, 2007 1:48 PM
Chapter 17 Managing the Terminal Services Service 529
Now you come to the funlist() function, which is called in response to the -list switch parameter.
In the funlist() function, you use the Get-WmiObject cmdlet to connect to the namespace
specified in the $namespace variable. The $computer variable, which is assigned via the param
statement, is supplied to the -computername parameter. The -class parameter is supplied via the
$class variable. Take the resulting object and pass it to the Format-List cmdlet, then exit the
script. The funlist() function is shown here:
Function funlist()
{
get-wmiobject -namespace $namespace -computername $computer `
-class $class |
format-list [a-z]*
exit
}
It’s time to declare a couple of variables. The first variable to create is $namespace. Assign the
string “root\cimv2\terminalservices” to the $namespace variable. The second variable is
$class, which receives the value Win32_TSClientSetting. These two variables are used by the
Get-WmiObject commands. This section of code is shown here:
$namespace = "root\cimv2\TerminalServices"
$class = "win32_TSClientSetting"
After the two variables are declared and have values assigned, you must check the command-
line arguments. Look first for the $help variable; if you find it, call the funhelp() function. Next,
look for the $list variable and call the funlist() function if it is found. Finally, look for the
absence of the $depth variable. If neither of the two previous variables are found and the
$depth variable is also missing, call the funhelp() function. These three lines of code are shown
here:
if($help) { "Printing help now..." ; funHelp }
if($list) { funlist }
if(!$depth) { "A depth value is required..." ; funHelp }
After checking the parameters, use the switch statement to evaluate the value that was sup-
plied for the -depth parameter. In the switch statement, look for the number 8. If you find it,
assign the number 1 to the $depth variable. Each of the different scenarios is listed. The reason
for this is that a user may want to set 8-bit color and could remember 8—however, knowing the
coded value of 1 is much more difficult. To promote usability, implement the switch construction.
This code is shown here:
switch($depth)
{
8 { $depth = 1 }
15 { $depth = 2 }
16 { $depth = 3 }
24 { $depth = 4 }
}
C17622791.fm Page 529 Wednesday, December 12, 2007 1:48 PM
530 Windows PowerShell Scripting Guide
Having evaluated the $depth variable, it’s now time to make the change to the color depth
setting. To make the color change, use the Get-WmiObject cmdlet to connect to the
root\cimv2\terminalservices namespace on the local computer or on the computer specified
in the $computer variable. Next, retrieve an instance of the Win32_TSClientSetting class. Store
the resulting object in the $objclient variable, call the setcolordepth() method, and give it the
value contained in the $depth variable. This section of code is shown here:
$objClient=get-wmiobject -namespace $namespace -computername $computer `
-class $class
$objClient.SetColorDepth($depth)
The completed ConfigureClientColor.ps1 script is shown here.
ConfigureClientColor.ps1
param(
$depth,
$computer = "localhost",
[switch]$list,
[switch]$help
)
function funHelp()
{
$helpText=@"
DESCRIPTION:
NAME: ConfigureClientColor.ps1
Configures color depth settings for client machine connecting
to a local or remote terminal server
PARAMETERS:
-depth the desired color depth on the client machine
< 8, 15, 16, 24 >
-list displays current configuration
-help prints help file
SYNTAX:
ConfigureClientColor.ps1
Displays an error that a setting must be supplied. Prints out
the help message
ConfigureClientColor.ps1 -depth 8
Configures the client setting on local terminal server to allow
max color depth of 8 bits
ConfigureClientColor.ps1 -depth 24 -computer TS2
Configures the client setting on remote terminal server named TS2
to allow max color depth of 8 bits
ConfigureClientColor.ps1 -help
C17622791.fm Page 530 Wednesday, December 12, 2007 1:48 PM
Chapter 17 Managing the Terminal Services Service 531
Prints the help topic for the script
"@
$helpText
exit
}
Function funlist()
{
get-wmiobject -namespace $namespace -computername $computer `
-class $class |
format-list [a-z]*
exit
}
$namespace = "root\cimv2\TerminalServices"
$class = "win32_TSClientSetting"
if($help) { "Printing help now..." ; funHelp }
if($list) { funlist }
if(!$depth) { "A depth value is required..." ; funHelp }
switch($depth)
{
8 { $depth = 1 }
15 { $depth = 2 }
16 { $depth = 3 }
24 { $depth = 4 }
}
$objClient=get-wmiobject -namespace $namespace -computername $computer `
-class $class
$objClient.SetColorDepth($depth)
You may need to configure the wallpaper settings on the terminal services client. To do this,
use the ConfigureClientEnvironment.ps1 script.
The ConfigureClientEnvironment.ps1 script begins with the param statement. The first
parameter, -action, is used to specify that you want to change the wallpaper. Next use the -value
parameter to supply the value of the wallpaper setting. Use -computer to specify the name of
the server to connect to and upon which to make the changes. Now you get to the first of the
two switched parameters: -list. This parameter is used to query the current settings. The sec-
ond switched parameter to specify is the -help parameter, which prints out help. The param
statement is viewed here:
param(
$action,
$value,
$computer = "localhost",
[switch]$list,
[switch]$help
)
C17622791.fm Page 531 Wednesday, December 12, 2007 1:48 PM
532 Windows PowerShell Scripting Guide
Next is the funhelp() function, which displays the help text. Store the results of the here-string
in the $helptext variable. Print the contents of the $helptext variable and exit the script. This
function can be observed here:
function funHelp()
{
$helpText=@"
DESCRIPTION:
NAME: ConfigureClientEnvironment.ps1
Configures Terminal Server Environment settings for the client on
either a local or remote Terminal server.
PARAMETERS:
-action the action to perform < wp(wallpaper) >
-value modifies the action to perform
-computer the computer upon which the script is to operate
-list lists client environment settings
-help prints help file
SYNTAX:
ConfigureClientEnvironment.ps1
Dispays an error that an action must be selected. Displays help
ConfigureClientEnvironment.ps1 -list
Lists Terminal Server Environment settings for the client on
either a local Terminal server.
ConfigureClientEnvironment.ps1 -action wp -value 1
Configures the local Terminal server to not display wall paper on terminal
services client machines
ConfigureClientEnvironment.ps1 -action wp -value 0
Configures the local Terminal server to display wall paper on terminal
services client machines
ConfigureClientEnvironment.ps1 -help
Prints the help topic for the script
"@
$helpText
exit
}
The funlist() function is next; it’s used to display the current configuration. To do this, use the
Get-WmiObject cmdlet and query the Win32_TSClientSetting WMI class on the computer
specified in the $computer variable. Format the output as a list and exit the script. The funlist()
function is shown here:
Function funlist()
{
get-wmiobject -namespace $namespace -computername $computer `
C17622791.fm Page 532 Wednesday, December 12, 2007 1:48 PM
Chapter 17 Managing the Terminal Services Service 533
-class $class |
format-list [a-z]*
exit
}
Create the funpaper() function, used to set the wallpaper settings on the client computer. This
is accomplished by using the setclientwallpaper() method. Obtain access to this method by
using the Get-WmiObject cmdlet. The difference in the Get-WmiObject command used here
as opposed to the one used in the funlist() function is that results are limited to only the
rdp-tcp terminal. In this way, you avoid working with the terminal server console. The funpaper()
function is shown here:
Function funpaper($strin)
{
$objClient=get-wmiobject -namespace $namespace -computername $computer `
-class $class -filter "terminalname = 'rdp-tcp'"
$objClient.SetClientWallPaper($strin)
exit
}
The next step is to create the two variables used in the various Get-WmiObject commands.
The first specifies the WMI namespace, and the second is used to determine the WMI class.
These two lines of code are shown here:
$namespace = "root\cimv2\TerminalServices"
$class = "win32_TSEnvironmentSetting"
You must now inspect the command line. First, look for the -help parameter and call the fun-
help() function if it is found. Next, look for the -list parameter and call the funlist() function if
it is found. Finally, look for the missing variable $action. If you don’t find the $action variable,
call the funhelp() function. This code is shown here:
if($help) { "Printing help now..." ; funHelp }
if($list) { funlist }
if(!$action -and !$list) { "You must select an action ..." ; funhelp }
The last section in the script is the switch statement; this is where you evaluate the value sup-
plied to the $action variable. If it is equal to wp, call the funpaper() function. This line of code
is shown here:
switch($action)
{
"wp" { funPaper($value) }
}
The completed ConfigureClientEnvironment.ps1 script is shown here.
ConfigureClientEnvironment.ps1
param(
$action,
$value,
$computer = "localhost",
C17622791.fm Page 533 Wednesday, December 12, 2007 1:48 PM
534 Windows PowerShell Scripting Guide
[switch]$list,
[switch]$help
)
function funHelp()
{
$helpText=@"
DESCRIPTION:
NAME: ConfigureClientEnvironment.ps1
Configures Terminal Server Environment settings for the client on
either a local or remote Terminal server.
PARAMETERS:
-action the action to perform < wp(wallpaper) >
-value modifies the action to perform
-computer the computer upon which the script is to operate
-list lists client environment settings
-help prints help file
SYNTAX:
ConfigureClientEnvironment.ps1
Dispays an error that an action must be selected. Displays help
ConfigureClientEnvironment.ps1 -list
Lists Terminal Server Environment settings for the client on
either a local Terminal server.
ConfigureClientEnvironment.ps1 -action wp -value 1
Configures the local Terminal server to not display wall paper on terminal
services client machines
ConfigureClientEnvironment.ps1 -action wp -value 0
Configures the local Terminal server to display wall paper on terminal
services client machines
ConfigureClientEnvironment.ps1 -help
Prints the help topic for the script
"@
$helpText
exit
}
Function funlist()
{
get-wmiobject -namespace $namespace -computername $computer `
-class $class |
format-list [a-z]*
exit
}
C17622791.fm Page 534 Wednesday, December 12, 2007 1:48 PM
Chapter 17 Managing the Terminal Services Service 535
Function funpaper($strin)
{
$objClient=get-wmiobject -namespace $namespace -computername $computer `
-class $class -filter "terminalname = 'rdp-tcp'"
$objClient.SetClientWallPaper($strin)
exit
}
$namespace = "root\cimv2\TerminalServices"
$class = "win32_TSEnvironmentSetting"
if($help) { "Printing help now..." ; funHelp }
if($list) { funlist }
if(!$action -and !$list) { "You must select an action ..." ; funhelp }
switch($action)
{
"wp" { funPaper($value) }
}
The last item to explore in this chapter is disabling active desktop features on the terminal ser-
vices clients. You’ll use the DisableActiveDesktop.ps1 script to do this.
Begin the DisableActiveDesktop.ps1 script with the param statement; you’ll define several
parameters. The first is -computer, which is used to control the computer that will execute the
WMI command. The remaining parameters are all switched parameters. There is -allow and
also -disallow. These parameters are used to turn on or turn off active desktop. Next is the -list
switch, which will display the current configuration. Finally, there’s the -help parameter,
which will print the help. The param statement is shown here:
param(
$computer = "localhost",
[switch]$allow,
[switch]$disallow,
[switch]$list,
[switch]$help
)
The next step is to create the funhelp() function, which displays the help information. Use a
here-string to create the text value that is assigned to the $helptext variable. The help informa-
tion contains the description, parameters, and syntax of the script. The funhelp() function is
shown here:
function funHelp()
{
$helpText=@"
DESCRIPTION:
NAME: DisableActiveDesktop.ps1
Configures client session settings for client
machine connecting to a local or remote terminal server
C17622791.fm Page 535 Wednesday, December 12, 2007 1:48 PM
536 Windows PowerShell Scripting Guide
PARAMETERS:
-computer the computer to target the script to
-disallow disallows active desktop in the current session
-allow allows active desktop in the current session
-list displays current configuration
-help prints help file
SYNTAX:
DisableActiveDesktop.ps1
Displays an error that a setting must be supplied. Prints out
the help message
DisableActiveDesktop.ps1 -list
Lists the active desktop client session settings on local
terminal server
DisableActiveDesktop.ps1 -allow -computer TS2
Configures the client to allow active desktop on remote
terminal server named TS2
DisableActiveDesktop.ps1 -disallow
Configures the client to disallow active desktop on local
terminal server
DisableActiveDesktop.ps1 -help
Prints the help topic for the script
"@
$helpText
exit
}
You’ve now come to the funlist() function. This function queries the current configuration
information and displays it as a formatted list. Use the Get-WmiObject cmdlet and give the
-namespace parameter the value contained in the $namespace variable. Supply the computer
name contained in the $computer variable and the class that is stored in the $class variable.
Format the output as a list, and exit the script. The funlist() function is shown here:
Function funlist()
{
get-wmiobject -namespace $namespace -computername $computer `
-class $class |
format-list [a-z]*
exit
}
You must assign values to the $namespace variable and the $class variable. These are straight-
forward string assignments, as displayed here:
$namespace = "root\cimv2\TerminalServices"
$class = "win32_TerminalServiceSetting"
C17622791.fm Page 536 Wednesday, December 12, 2007 1:48 PM
Chapter 17 Managing the Terminal Services Service 537
It is now time to evaluate the command-line parameters. When a command-line parameter is
specified, it creates a corresponding variable in memory; this allows you to search for specific
parameters. If the $help variable is found, the script was run with the -help parameter speci-
fied. So, you’ll call the funhelp() function. If you find the $list variable, call the funlist() func-
tion. If you find the $allow switch parameter, assign 1 as the value of the $action variable. If the
$disallow variable is found, assign the $action variable a 0. This section of code is shown here:
if($help) { "Printing help now..." ; funHelp }
if($list) { funlist }
if($allow) { $action = 1}
if($disallow) { $action = 0 }
You need to perform the specific action upon the ActiveDesktop property. To do this, use the
Get-WmiObject cmdlet and use the values for $class, $namespace, and $computer to fill the
appropriate parameters. Store the resulting WMI management object in the $objts variable.
Assign the value contained in the $action variable to the ActiveDesktop property of the manage-
ment object. To commit the change, use the put() method. This section of code is displayed
here:
$objTS = get-wmiobject -class $class -namespace $namespace `
-computername $computer
$objTS.ActiveDesktop = $action
$objTS.put()
The completed DisableActiveDesktop.ps1 script is shown here.
DisableActiveDesktop.ps1
param(
$computer = "localhost",
[switch]$allow,
[switch]$disallow,
[switch]$list,
[switch]$help
)
function funHelp()
{
$helpText=@"
DESCRIPTION:
NAME: DisableActiveDesktop.ps1
Configures client session settings for client
machine connecting to a local or remote terminal server
PARAMETERS:
-computer the computer to target the script to
-disallow disallows active desktop in the current session
-allow allows active desktop in the current session
-list displays current configuration
-help prints help file
C17622791.fm Page 537 Wednesday, December 12, 2007 1:48 PM
538 Windows PowerShell Scripting Guide
SYNTAX:
DisableActiveDesktop.ps1
Displays an error that a setting must be supplied. Prints out
the help message
DisableActiveDesktop.ps1 -list
Lists the active desktop client session settings on local
terminal server
DisableActiveDesktop.ps1 -allow -computer TS2
Configures the client to allow active desktop on remote
terminal server named TS2
DisableActiveDesktop.ps1 -disallow
Configures the client to disallow active desktop on local
terminal server
DisableActiveDesktop.ps1 -help
Prints the help topic for the script
"@
$helpText
exit
}
Function funlist()
{
get-wmiobject -namespace $namespace -computername $computer `
-class $class |
format-list [a-z]*
exit
}
$namespace = "root\cimv2\TerminalServices"
$class = "win32_TerminalServiceSetting"
if($help) { "Printing help now..." ; funHelp }
if($list) { funlist }
if($allow) { $action = 1}
if($disallow) { $action = 0 }
$objTS = get-wmiobject -class $class -namespace $namespace `
-computername $computer
$objTS.ActiveDesktop = $action
$objTS.put()
C17622791.fm Page 538 Wednesday, December 12, 2007 1:48 PM
Chapter 17 Managing the Terminal Services Service 539
Summary
In this chapter, we examined the various settings that are involved in configuring a Windows
Server 2008 server in the Terminal Services role. We looked at configuring the session settings
to enable a Windows Server 2008 Terminal server to scale beyond a few users. We also looked
at disabling logons to allow for maintenance at controlling the remapping of devices on a
client computer.
Next we looked at how we can grant users access to the terminal server and set the remote
control settings. We looked at configuring the color depth settings and wallpaper settings,
and turning off active desktop to conserve network bandwidth.
C17622791.fm Page 539 Wednesday, December 12, 2007 1:48 PM
C17622791.fm Page 540 Wednesday, December 12, 2007 1:48 PM

541
Chapter 18
Configuring Network Services
After completing this chapter, you will be able to:
■Report DNS settings.
■Configure DNS logging settings.
■Report root hints.
■Report DNS zones.
■Create DNS zones.
■Manage WINS and DHCP.
On the Companion Disc All the scripts used in this chapter are located on the CD that
accompanies this book in the \scripts\chapter18 folder.
Reporting DNS Settings
There are many settings in a Microsoft Domain Name System (DNS) configuration. While
many of these items are seldom changed, some are. Additionally, the DNS configuration
should be reviewed regularly to confirm that requirements haven’t changed or need updating.
While the DNS Manager console can be used to review these settings, it takes time to click all
the tabs, and it is easy to miss a seldom-used tab. As shown in Figure 18-1, the large number
of tabs makes it rather easy to miss something important.
This is where Windows PowerShell comes to your aid. The GetDNSServerConfig.ps1 script
will help ensure that you make all the required changes on your DNS server.
Begin the GetDNSServerConfig.ps1 script with the param() statement, and by defining three
command-line parameters. The first parameter, -computer, is assigned a default value of local-
host, which refers to the local computer. The second parameter is -query and it is required. If
no value is supplied for the $query variable, an error condition will exist. The last parameter is
a switched parameter, which indicates it simply needs to be present or absent to control the
way the script runs. As you might suspect, a switched parameter is a Boolean value and does
not accept an argument. The switched parameter defined here is -help, and is used to control
the display of the help information. This line of code is shown here:
param($computer="localhost",$query,[switch]$help)
C18622791.fm Page 541 Wednesday, December 12, 2007 1:48 PM
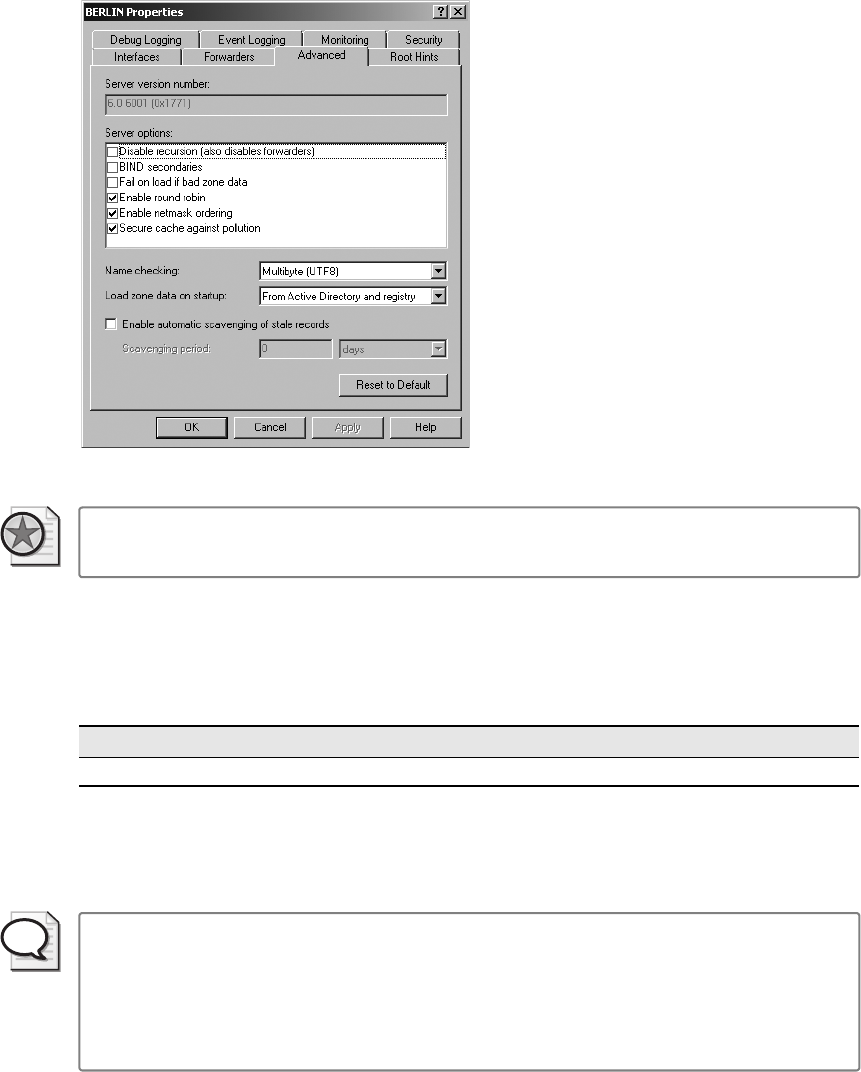
542 Windows PowerShell Scripting Guide
Figure 18-1 The DNS Manager console provides access to a large number of properties.
Best Practices When writing a script that can accept a large number of parameters, it is
very important to create a good help function to illustrate the syntax.
The next step is to define the funhelp() function, which is used to display the help text when
requested by the script user. As with all function definitions, there are three parts to this
function. These three parts are shown in Table 18-1.
Following the function definition, use the variable $helptext to hold the contents of a here-
string. The here-string begins with the characters @” and ends with the characters “@ to mark
the end of the here-string.
Tip The main advantage of defining a here-string is that you don’t have to worry about
quoting rules. For example, without a here-string, if you type a sentence and want quote
marks inside it, you need to escape the quotation mark or the script assumes it has reached
the end of the string. This double quoting—and in some cases triple and even quadruple
quoting—is a source of agony, frustration, and errors for many script writers. Using a here-
string avoids these sorts of errors when handling quotation marks in a string of text.
Table 18-1 Three Parts of a Function Declaration
Keyword Input Parameter Code Block
Function () { }
C18622791.fm Page 542 Wednesday, December 12, 2007 1:48 PM
Chapter 18 Configuring Network Services 543
The here-string is not a stand-alone piece of code, and therefore it must be stored in a variable.
Use the variable $helptext to do this. After adding all the content to the here-string, store the
resulting string in the $helptext variable, display the contents of the variable, and exit the
script. The funhelp() function is shown here:
function funHelp()
{
$helpText=@"
DESCRIPTION:
NAME: GetDNSServerConfig.ps1
Produces a listing of DNS Server configuration information
on a local or remote machine.
PARAMETERS:
-computer Specifies the name of the computer to run the script
-query the type of query < all, advanced, cache, forward,
interval, log, recurse >
-help prints help file
SYNTAX:
GetDNSServerConfig.ps1
Lists default DNS Server configuration on local computer
GetDNSServerConfig.ps1 -computer MunichServer -query advanced
Lists roundrobin, SecureResponses, EnableDnsSec, BindSecondaries
on a computer named MunichServer
GetDNSServerConfig.ps1 -computer MunichServer -query cache
Lists AutoCacheUpdate, EDnsCacheTimeout, MaxCacheTTL,
MaxNegativeCacheTTL on a computer named MunichServer
GetDNSServerConfig.ps1 -computer MunichServer -query forward
Lists ForwardDelegations, Forwarders, ForwardingTimeout
on a computer named MunichServer
GetDNSServerConfig.ps1 -computer MunichServer -query interval
Lists DefaultNoRefreshInterval, DefaultRefreshInterval,
DisjointNets, DsPollingInterval, DsTombstoneInterval,
ScavengingInterval on a computer named MunichServer
GetDNSServerConfig.ps1 -computer MunichServer -query log
Lists EventLogLevel, LogFileMaxSize, LogFilePath,
LogIPFilterList, LogLevel on a computer named MunichServer
GetDNSServerConfig.ps1 -computer MunichServer -query recurse
Lists NoRecursion, RecursionRetry, RecursionTimeout
on a computer named MunichServer
C18622791.fm Page 543 Wednesday, December 12, 2007 1:48 PM
544 Windows PowerShell Scripting Guide
GetDNSServerConfig.ps1 -computer MunichServer -query ALL
Lists all DNS Server configuration information on a computer
named MunichServer
GetDNSServerConfig.ps1 -help
Prints the help topic for the script
"@
$helpText
exit
}
Use the if statement to check for the presence of the $help variable. The $help variable will only
be present if the script was run with the -help switch parameter specified. When you detect
the $help variable, print a message about obtaining help, and call the funhelp() function. You
don’t need to pass a parameter when calling this function and, therefore, the parentheses are
omitted from the line of code shown here:
if($help) { "Printing help now..." ; funHelp }
Specify the WMI class to work with. To manage a DNS server, the best WMI class is the
MicrosoftDNS_Server class; assign this name to the $class variable as shown here:
$class="MicrosoftDNS_Server"
Add a list of property names to a group of variables. The advantage of this configuration is in
choosing property names that are related to logging, forwarding, recursion, caching, refresh
intervals, and even some advanced properties just “for fun.” This brings a sense of order to the
very large MicrosoftDNS_Server WMI class. This section of code is shown here:
$logProperty = "EventLogLevel","LogFileMaxSize","LogFilePath", `
"LogIPFilterList","LogLevel"
$forwardProperty = "ForwardDelegations", "Forwarders", `
"ForwardingTimeout"
$recurseProperty = "NoRecursion","RecursionRetry","RecursionTimeout"
$cacheProperty = "AutoCacheUpdate","EDnsCacheTimeout","MaxCacheTTL", `
"MaxNegativeCacheTTL"
$intervalProperty = "DefaultNoRefreshInterval", `
"DefaultRefreshInterval", "DisjointNets", `
"DsPollingInterval", "DsTombstoneInterval", `
"ScavengingInterval"
$advroperty = "roundrobin","SecureResponses","EnableDnsSec", `
"BindSecondaries"
Now it is time to evaluate the query. Just before you get to the evaluation of the query,
however, you first must check to ensure the -query parameter was specified at runtime. If it
was, then you must evaluate the value contained in the $query variable. If the value of the
$query variable is equal to log, choose the set of property names stored in the $logproperty
C18622791.fm Page 544 Wednesday, December 12, 2007 1:48 PM
Chapter 18 Configuring Network Services 545
variable. If the query indicates the user is interested in forwarders, then choose the set of
property names stored in the $forwardproperty variable. Continue through the switch state-
ment, evaluating the value of the $query and matching it with the appropriate set of property
names. After working through the main portion of the switch statement, there is a default
parameter, which is only used if the -query parameter was supplied with an unknown value. In
this case, perform an all items query, and return the value associated with every property of
the WMI class. The switch statement and its supporting code are displayed here:
if($query)
{
switch($query)
{
"log" { $query=$logProperty }
"forward" { $query=$forwardProperty }
"recurse" { $query= $recurseProperty }
"cache" { $query=$cacheProperty }
"interval" { $query=$intervalProperty }
"advanced" { $query=$advroperty }
"all" {
Get-WmiObject -class $class -computername $computer `
-namespace root\microsoftDNS| format-list * ;
exit
}
DEFAULT { "
Using default: all items. For options try this:
GetDNSServerConfig.ps1 -help
"
Get-WmiObject -class $class -computername $computer `
-namespace root\microsoftDNS| format-list * ;
exit
}
}
}
The next step is the else clause. If the -query parameter was not specified when the script was
launched, you’ll need to perform an all-items query. This section of the code is shown here:
ELSE
{
"
Using default: all items. For options try this:
GetDNSServerConfig.ps1 -help
"
Get-WmiObject -class $class -computername $computer `
-namespace root\microsoftDNS| format-list * ;
exit
}
Finally, it’s time to perform the actual WMI query based upon the value that was supplied at
runtime to the -query parameter. To do this query, use the Get-WmiObject cmdlet and use the
-class parameter. Give the -class parameter the value of the WMI class name stored in the $class
C18622791.fm Page 545 Wednesday, December 12, 2007 1:48 PM
546 Windows PowerShell Scripting Guide
variable. Connect to the WMI service running on the computer specified in the -computer
parameter, and change the working namespace to root\microsoftDNS. After retrieving all the
instances of the MicrosoftDNS_Server WMI class, pipeline the resulting object to the
Format-List cmdlet. Display only the values of the properties chosen via the -query parameter.
This WMI query command is shown here:
Get-WmiObject -class $class -computername $computer `
-namespace root\microsoftDNS |
format-list -property $query
The completed GetDNSServerConfig.ps1 script is shown here.
GetDNSServerConfig.ps1
param($computer="localhost",$query,[switch]$help)
function funHelp()
{
$helpText=@"
DESCRIPTION:
NAME: GetDNSServerConfig.ps1
Produces a listing of DNS Server configuration information
on a local or remote machine.
PARAMETERS:
-computer Specifies the name of the computer to run the script
-query the type of query < all, advanced, cache, forward,
interval, log, recurse >
-help prints help file
SYNTAX:
GetDNSServerConfig.ps1
Lists default DNS Server configuration on local computer
GetDNSServerConfig.ps1 -computer MunichServer -query advanced
Lists roundrobin, SecureResponses, EnableDnsSec, BindSecondaries
on a computer named MunichServer
GetDNSServerConfig.ps1 -computer MunichServer -query cache
Lists AutoCacheUpdate, EDnsCacheTimeout, MaxCacheTTL,
MaxNegativeCacheTTL on a computer named MunichServer
GetDNSServerConfig.ps1 -computer MunichServer -query forward
Lists ForwardDelegations, Forwarders, ForwardingTimeout
on a computer named MunichServer
GetDNSServerConfig.ps1 -computer MunichServer -query interval
Lists DefaultNoRefreshInterval, DefaultRefreshInterval,
DisjointNets, DsPollingInterval, DsTombstoneInterval,
ScavengingInterval on a computer named MunichServer
C18622791.fm Page 546 Wednesday, December 12, 2007 1:48 PM
Chapter 18 Configuring Network Services 547
GetDNSServerConfig.ps1 -computer MunichServer -query log
Lists EventLogLevel, LogFileMaxSize, LogFilePath,
LogIPFilterList, LogLevel on a computer named MunichServer
GetDNSServerConfig.ps1 -computer MunichServer -query recurse
Lists NoRecursion, RecursionRetry, RecursionTimeout
on a computer named MunichServer
GetDNSServerConfig.ps1 -computer MunichServer -query ALL
Lists all DNS Server configuration information on a computer
named MunichServer
GetDNSServerConfig.ps1 -help
Prints the help topic for the script
"@
$helpText
exit
}
if($help) { "Printing help now..." ; funHelp }
$class="MicrosoftDNS_Server"
$logProperty = "EventLogLevel","LogFileMaxSize","LogFilePath", `
"LogIPFilterList","LogLevel"
$forwardProperty = "ForwardDelegations", "Forwarders", `
"ForwardingTimeout"
$recurseProperty = "NoRecursion","RecursionRetry","RecursionTimeout"
$cacheProperty = "AutoCacheUpdate","EDnsCacheTimeout","MaxCacheTTL", `
"MaxNegativeCacheTTL"
$intervalProperty = "DefaultNoRefreshInterval", `
"DefaultRefreshInterval", "DisjointNets", `
"DsPollingInterval", "DsTombstoneInterval", `
"ScavengingInterval"
$advroperty = "roundrobin","SecureResponses","EnableDnsSec", `
"BindSecondaries"
if($query)
{
switch($query)
{
"log" { $query=$logProperty }
"forward" { $query=$forwardProperty }
"recurse" { $query= $recurseProperty }
"cache" { $query=$cacheProperty }
"interval" { $query=$intervalProperty }
"advanced" { $query=$advroperty }
"all" {
Get-WmiObject -class $class -computername $computer `
-namespace root\microsoftDNS| format-list * ;
exit
}
C18622791.fm Page 547 Wednesday, December 12, 2007 1:48 PM

548 Windows PowerShell Scripting Guide
DEFAULT { "
Using default: all items. For options try this:
GetDNSServerConfig.ps1 -help
"
Get-WmiObject -class $class -computername $computer `
-namespace root\microsoftDNS| format-list * ;
exit
}
}
}
ELSE
{
"
Using default: all items. For options try this:
GetDNSServerConfig.ps1 -help
"
Get-WmiObject -class $class -computername $computer `
-namespace root\microsoftDNS| format-list * ;
exit
}
Get-WmiObject -class $class -computername $computer `
-namespace root\microsoftDNS |
format-list -property $query
Configuring DNS Logging Settings
There are two separate logs that DNS can utilize. The first is the system event log and the
second is the diagnostic logging, which by default writes to the %Systemroot%\System32\
dns\dns.log file. This setting can be changed to a different location; however, it will not accept
a UNC path. If you want to store the DNS log in a UNC path, then you can easily write a
Windows PowerShell script—the ConfigureDNSLogging.ps1 script—that stops the DNS
service, copies the log to the network share, and restarts the service. The DNS log options are
shown in Figure 18-2.
Begin the ConfigureDNSLogging.ps1 script with the param statement. Since there are a large
number of parameters for this script, it makes sense to break the command into two separate
lines. The param statement allows you to easily pass command-line arguments to the script
when it’s launched.
Tip One of the nice features of Windows PowerShell is that, in general, when a statement
is evaluated as incomplete, Windows PowerShell continues to look to the next line for the
remaining elements of the command. Use this to your advantage with the param statement
to format code so it’s easier to read. Because the first line ends with a comma, Windows
PowerShell evaluates the line as incomplete and continues to the next line to finish the com-
mand. This makes breaking the code for readability purposes much easier.
C18622791.fm Page 548 Wednesday, December 12, 2007 1:48 PM
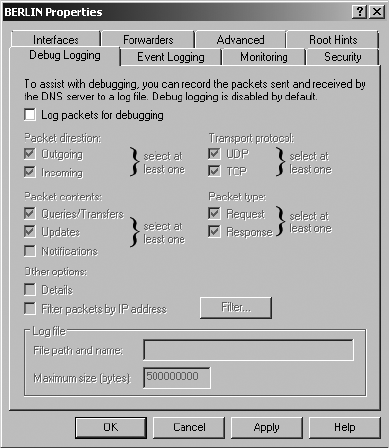
Chapter 18 Configuring Network Services 549
Figure 18-2 DNS logging consists of both event logs and diagnostic logs.
Set the -computer parameter to a default value of localhost. The next parameter, -change, allows
you to specify a value to change. The third parameter is -query; if the $query variable is present,
the script will run a default query and print the default logging settings. The -restart parameter
allows you to restart the DNS service. It is a parameter rather than a switch so you can
configure the amount of time allowed between stopping and starting service. The remaining
items— -stop, -start, and -help—are all switch parameters. This section of the code is shown here:
param(
$computer="localhost", $change, [switch]$query, $restart,
[switch]$stop, [switch]$start, [switch]$help
)
Next is the funhelp() function, which is used to display the help text when the user requests it.
The funhelp() function uses a here-string to store the help text. The here-string is divided into
the description section, the parameters, and the syntax of the commands. All of this informa-
tion is typed as free-form text and assigned to the $helptext variable. After the value of the
$helptext variable is set, display the contents of the $helptext variable, and exit the script. This
section of the script is shown here:
function funHelp()
{
$helpText=@"
DESCRIPTION:
NAME: ConfigureDNSLogging.ps1
Configures DNS Server logging information on a local
or remote machine.
C18622791.fm Page 549 Wednesday, December 12, 2007 1:48 PM
550 Windows PowerShell Scripting Guide
PARAMETERS:
-computer Specifies the name of the computer to run the script
-change Property to configure on the DNS server < LogLevel,
LogPath, LogSize, LogIPFilter, EventLogLevel >
-query List current logging configuration
-stop Stops the DNS server service
-start Starts the DNS server service
-restart Stops the DNS server service and waits for a specified
interval prior to starting the service backup
-help prints help file
SYNTAX:
ConfigureDNSLogging.ps1 -change loglevel,107009
Changes diagnostic logging to record all DNS queries
and responses, using TCP that are incoming to local computer
ConfigureDNSLogging.ps1 -computer MunichServer -change
logPath, "C:\fso"
Changes default DNS Server diagnostic logging directory
on a remote server named MunichServer to the c:\fso directory
ConfigureDNSLogging.ps1 -computer MunichServer -query
Queries a remote server named MunichServer to for all logging settings
ConfigureDNSLogging.ps1 -computer MunichServer -change eventloglevel, 4
Configures a remote server named MunichServer to record all events in
the system event log related to DNS
ConfigureDNSLogging.ps1 -computer MunichServer -restart 5
Causes a remote server named MunichServer restart the DNS service.
Waits For 5 seconds between stopping and starting the DNS service
ConfigureDNSLogging.ps1 -help
Prints the help topic for the script
"@
$helpText
exit
}
Next is the funchange() function, which embodies the main worker portion of the script.
The funchange() function accepts as input the value that is supplied to the -change parameter
when the script is run. Once inside the funchange() function, declare a variable named $class.
This variable holds the name of the WMI class you will query; in this case it is the
MicrosoftDNS_Server WMI class. Make a connection into the WMI database. To do this, use
the Get-WmiObject cmdlet. This cmdlet connects to the WMI class that is specified in the
C18622791.fm Page 550 Wednesday, December 12, 2007 1:48 PM
Chapter 18 Configuring Network Services 551
$class variable on the computer that is supplied in the -computer parameter when the script is
launched. The MicrosoftDNS_Server WMI class resides in the root\microsoftDNS WMI
namespace and this value is hard-coded into the parameters of the cmdlet. Store the resulting
object in the $dnsserver variable. This section of the code is shown here:
function funchange($change)
{
$class="MicrosoftDNS_Server"
$dnsServer=Get-WmiObject -class $class -computername $computer `
-namespace root\microsoftDNS
You next come to the switch statement that provides the logic for the funchange() function.
This switch statement evaluates the first element of the array contained in the $change variable.
If there is a match on the left side of the switch construction, the switch statement executes the
code contained in the code block for each of the switched values. When the match is found,
the switch statement takes the value contained in element 1 of the $change array, and puts it
into the appropriate property of the object contained in the $dnsserver object. Then use the
put() method to write the information back to the WMI database. This section of the code is
shown here:
switch($change[0])
{
"LogLevel" { $dnsServer.logLevel = $change[1] ; $dnsServer.put() }
"LogPath" { $dnsServer.logFilePath = $change[1] ; $dnsServer.put() }
"LogSize" { $dnsServer.LogFileMaxSize = $change[1] ; $dnsServer.put() }
"LogIPFilter" { $dnsServer.LogIPFilterList = $change[1] ; $dnsServer.put() }
"EventLogLevel" { $dnsServer.EventLogLevel = $change[1] ; $dnsServer.put() }
DEFAULT { "You must specify an action" ; funhelp }
}
}
Following the funchange() function is the funquery() function, which is used to perform a
default WMI query from the MicrosoftDNS_Server WMI class. To do this, use the Get-Wmi-
Object cmdlet and format the resulting object into a list. Use the wildcard character (*) to
allow you to choose multiple property names with a minimal amount of effort. After this is
run, exit the script by using the exit statement. This function is shown here:
function funQuery()
{
$class="MicrosoftDNS_Server"
Get-WmiObject -class $class -computername $computer `
-namespace root\microsoftDNS |
format-list -property Log*, *log*
exit
}
Following right on the heels of the funquery() function is the funstart() function. The funstart()
function is used to start the DNS service on the remote server. To do this, use the same WMI
command used in the funquery() function. The only difference is that rather than using the
C18622791.fm Page 551 Wednesday, December 12, 2007 1:48 PM
552 Windows PowerShell Scripting Guide
Format-List cmdlet to format the output of the object, use the startservice() method from the
object instead; then exit the script. This section of the script is shown here:
function funStart()
{
$class="MicrosoftDNS_Server"
$dnsServer = Get-WmiObject -class $class -computername $computer `
-namespace root\microsoftDNS
$dnsServer.StartService()
exit
}
Next, you come to the funstop() function. Guess what? The funstop() function is exactly the
same as the funstart() function with one exception: You use the stopservice() method instead of
the startservice() method. This section of the script is listed here for your perusal:
function funStop()
{
$class="MicrosoftDNS_Server"
$dnsServer = Get-WmiObject -class $class -computername $computer `
-namespace root\microsoftDNS
$dnsServer.StopService()
exit
}
You need several more functions; the first is the funrestart() function. There is no restart
method for the MicrosoftDNS_Server WMI class. However, a restart is essentially a stop and a
start method combined, so this is what you do. However, because of the variety of DNS
servers out there, there is no way to know how long you should pause between the start and
the stop method calls. To work around this issue, you’re allowed to specify how many seconds
you want to wait. Once again, you make the connection into WMI, and retrieve an object
representing the DNS server. Use the MicrosoftDNS_Server WMI class, and connect to the
root\microsoftDNS WMI namespace. Store the resulting management object in the $dnsserver
variable, then print a message stating you’re stopping the DNS service. Call the stopservice()
method and wait for the amount of time that was supplied to the -restart parameter when
the script was launched. To pass the time, doodle a series of dots on the screen; each dot
represents one second. To print these dots, use the for statement and call the Write-Host
cmdlet with the -nonewline parameter. After sleeping, call the startservice() method from the
MicrosoftDNS_Server WMI class. This section of the code can be inspected here:
function funRestart($restart)
{
$class="MicrosoftDNS_Server"
$dnsServer = Get-WmiObject -class $class -computername $computer `
-namespace root\microsoftDNS
"Stopping service ..."
$dnsServer.StopService()
for($i = 0 ; $i -le $restart ; $i++)
{
Start-Sleep -Seconds 1
C18622791.fm Page 552 Wednesday, December 12, 2007 1:48 PM
Chapter 18 Configuring Network Services 553
Write-Host "." -NoNewline
}
"Starting service ..."
$dnsServer.StartService()
exit
}
After creating the functions, you finally get to the entry point of the script. The first step is to
decide which function to run—a series of if statements helps you decide. If you find the $help
variable, call the funhelp() function. If the $query variable is lingering, call the funquery()
function. If, however, the variable you catch is the $change variable, then print a status message
letting the user know you intend to modify the property contained in element 0 of the $change
array to the value contained in element 1 of the $change array. Call the funchange() function
and pass along the entire $change array. This portion of the script is shown here:
if($help) { "Printing help now..." ; funHelp }
if($query) { "Printing the current DNS server log settings" ; funQuery }
if($change)
{
"Change $($change[0]) to $($change[1]) now ..." ;
funChange($change)
}
Suppose you strike out so far. In that case, continue to search for variables, such as the $start
variable. If you find it, call the funstart() function. If the $stop variable is begging for attention,
call the funstop() function. If, however, a restart is in the picture, then print a status message
letting the user know you’ll restart the DNS service in the number of seconds that was
supplied when the -restart parameter was specified. You then, of course, call the funrestart()
function while passing the value contained in the $restart variable. This section of the code
can be viewed here:
if($start) { "Starting DNS service now..." ; funStart }
if($stop) { "Stopping DNS service now..." ; funStop }
if($restart) { "Restarting DNS service in $($restart) seconds..."
;funRestart($restart) }
If no parameter is supplied to the script, print a message string stating that no action was
specified and call the funhelp() function as shown here in the else statement:
ELSE
{ "No action was specified..." ; funhelp }
The completed ConfigureDNSLogging.ps1 script is shown here.
ConfigureDNSLogging.ps1
param(
$computer="localhost", $change, [switch]$query, $restart,
[switch]$stop, [switch]$start, [switch]$help
)
function funHelp()
{
C18622791.fm Page 553 Wednesday, December 12, 2007 1:48 PM
554 Windows PowerShell Scripting Guide
$helpText=@"
DESCRIPTION:
NAME: ConfigureDNSLogging.ps1
Configures DNS Server logging information on a local
or remote machine.
PARAMETERS:
-computer Specifies the name of the computer to run the script
-change Property to configure on the DNS server < LogLevel,
LogPath, LogSize, LogIPFilter, EventLogLevel >
-query List current logging configuration
-stop Stops the DNS server service
-start Starts the DNS server service
-restart Stops the DNS server service and waits for a specified
interval prior to starting the service backup
-help prints help file
SYNTAX:
ConfigureDNSLogging.ps1 -change loglevel,107009
Changes diagnostic logging to record all DNS queries
and responses, using TCP that are incoming to local computer
ConfigureDNSLogging.ps1 -computer MunichServer -change
logPath, "C:\fso"
Changes default DNS Server diagnostic logging directory
on a remote server named MunichServer to the c:\fso directory
ConfigureDNSLogging.ps1 -computer MunichServer -query
Queries a remote server named MunichServer to for all logging settings
ConfigureDNSLogging.ps1 -computer MunichServer -change eventloglevel, 4
Configures a remote server named MunichServer to record all events in
the system event log related to DNS
ConfigureDNSLogging.ps1 -help
Prints the help topic for the script
"@
$helpText
exit
}
function funchange($change)
{
$class="MicrosoftDNS_Server"
$dnsServer=Get-WmiObject -class $class -computername $computer `
-namespace root\microsoftDNS
switch($change[0])
{
"LogLevel" { $dnsServer.logLevel = $change[1] ; $dnsServer.put() }
C18622791.fm Page 554 Wednesday, December 12, 2007 1:48 PM
Chapter 18 Configuring Network Services 555
"LogPath" { $dnsServer.logFilePath = $change[1] ; $dnsServer.put() }
"LogSize" { $dnsServer.LogFileMaxSize = $change[1] ; $dnsServer.put() }
"LogIPFilter" { $dnsServer.LogIPFilterList = $change[1] ; $dnsServer.put() }
"EventLogLevel" { $dnsServer.EventLogLevel = $change[1] ; $dnsServer.put() }
DEFAULT { "You must specify an action" ; funhelp }
}
}
function funQuery()
{
$class="MicrosoftDNS_Server"
Get-WmiObject -class $class -computername $computer `
-namespace root\microsoftDNS |
format-list -property Log*, *log*
exit
}
function funStart()
{
$class="MicrosoftDNS_Server"
$dnsServer = Get-WmiObject -class $class -computername $computer `
-namespace root\microsoftDNS
$dnsServer.StartService()
exit
}
function funStop()
{
$class="MicrosoftDNS_Server"
$dnsServer = Get-WmiObject -class $class -computername $computer `
-namespace root\microsoftDNS
$dnsServer.StopService()
exit
}
function funRestart($restart)
{
$class="MicrosoftDNS_Server"
$dnsServer = Get-WmiObject -class $class -computername $computer `
-namespace root\microsoftDNS
"Stopping service ..."
$dnsServer.StopService()
for($i = 0 ; $i -le $restart ; $i++)
{
Start-Sleep -Seconds 1
Write-Host "." -NoNewline
}
"Starting service ..."
$dnsServer.StartService()
exit
}
if($help) { "Printing help now..." ; funHelp }
if($query) { "Printing the current DNS server log settings" ; funQuery }
if($change)
C18622791.fm Page 555 Wednesday, December 12, 2007 1:48 PM
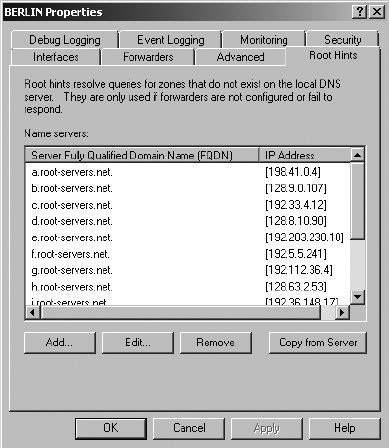
556 Windows PowerShell Scripting Guide
{
"Change $($change[0]) to $($change[1]) now ..." ;
funChange($change)
}
if($start) { "Starting DNS service now..." ; funStart }
if($stop) { "Stopping DNS service now..." ; funStop }
if($restart) { "Restarting DNS service in $($restart) seconds..." ;
funRestart($restart) }
ELSE
{ "No action was specified..." ; funhelp }
Reporting Root Hints
In general, root hints are not the purview of a typical network administrator. Indeed, many
network administrators get along just fine without ever knowing about root hints. So why are
we interested in reporting information about root hints? Well, if you ever need to troubleshoot
DNS name resolution problems, you may find that an out-of-date root hints configuration is
the culprit. Root hints are the mechanisms by which a DNS server can find the big authorita-
tive root DNS servers. These are the servers that “know about” .com, .net, and .org, for
example—the backbone of the Internet. Needless to say, these servers must remain rather
stable, and as a result, there should be minimal movement and few changes made to them.
In the Windows world, root hints are typically updated via service packs or when a critical
error is discovered, by a hotfix. The DisplayRootHints.ps1 script displays the root hints
configuration of a server. The root hints are shown in Figure 18-3.
Figure 18-3 Root hints as observed in DNS Manager.
The DisplayRootHints.ps1 script uses the Get-WmiObject cmdlet to connect to the
root\microsoftDNS namespace. Once in the namespace, the cmdlet looks up the
C18622791.fm Page 556 Wednesday, December 12, 2007 1:48 PM
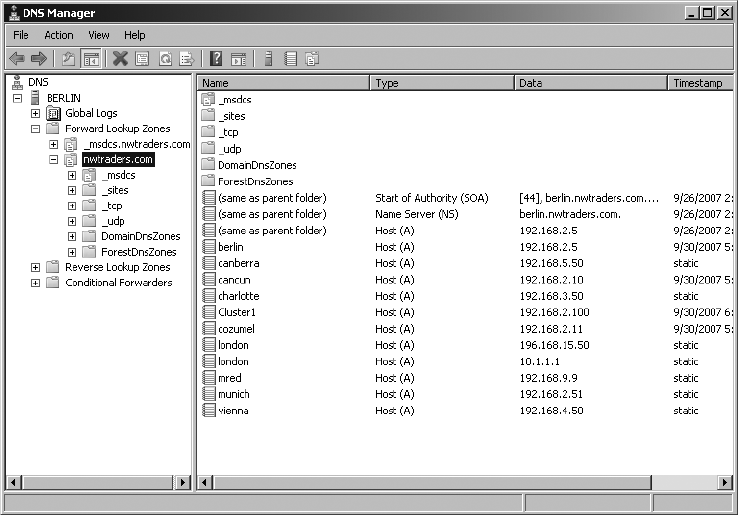
Chapter 18 Configuring Network Services 557
MicrosoftDNS_AType WMI class and retrieves all instances of the class. Pipeline the resulting
management object to the Where-Object cmdlet. In the codeblock for the Where-Object
cmdlet, use the $_ automatic variable, which represents the current object in the pipeline.
Examine the OwnerName property from the MicrosoftDNS_AType WMI class and look for a
match with the string root. If you find a match for the string root, pipeline the filtered object to
the Format-Table cmdlet and choose to display only the TextRepresentation property from the
MicrosoftDNS_AType WMI class. The completed DisplayRootHints.ps1 script is shown here.
DisplayRootHints.ps1
Get-WmiObject -Namespace root\microsoftdns -Class MicrosoftDNS_AType |
Where-Object { $_.ownerName -match 'root' } |
format-table textRepresentation
Querying “A” Records
In addition to querying for root hints, you may also want to query a specific DNS domain for
all A (Address) records. (An A record is used to map a domain name to an IP address). To do
this, use the same DNS class you used to obtain the root hints; however, this time filter results
and limit them to a specific domain. As there may be multiple DNS domains on a single DNS
server, add a command-line parameter to allow you to request records related to the specific
DNS domain. The resulting script is the QueryDNSARecords.ps1 script. A records are shown
in Figure 18-4.
Figure 18-4 A records displayed in DNS Manager.
C18622791.fm Page 557 Wednesday, December 12, 2007 1:48 PM
558 Windows PowerShell Scripting Guide
In the QueryDNSARecords.ps1 script, begin with the param statement. Because there are
generally several parameters that need modification, it’s better to use parameters rather than
requiring script edits. There are three parameters defined: the name of the computer
(-computer), the domain (-domain), and the request for help (-help). The param statement is
shown here:
param($computer="localhost",$domain,[switch]$help)
Next is the funhelp() function. Once again, use the here-string to simplify the construction of
the help information. The most important item in creating the help is the syntax required to
run the script; as a result, the syntax section is the longest part of the help text. Begin the here-
string by creating a brief description of the script and use of the script. Move to the parameters
and a description of their use in the script. The third section is the syntax, which includes
examples for each of the command parameters. After creating the here-string, assign the result
to the $helptext variable, display the contents of the variable, and exit the script. The resulting
funhelp() function is listed here:
function funHelp()
{
$helpText=@"
DESCRIPTION:
NAME: QueryDNSArecords.ps1
Queries for A records on a local or remote machine running the
Microsoft DNS service.
PARAMETERS:
-computer Specifies the name of the computer to run the script
-domain The specific domain's A records to retrieve
-help prints help file
SYNTAX:
QueryDNSArecords.ps1 -domain contoso.com
Retrieves A records from the contoso.com domain. Uses local computer
QueryDNSArecords.ps1 -domain nwtraders.com
Retrieves A records from the nwtraders.com domain. Uses local computer
QueryDNSArecords.ps1 -computer MunichServer -domain nwtraders.com
Connects to a computer named MunichServer which is running the Microsoft
DNS service. Retrieves A records from the nwtraders.com domain
QueryDNSArecords.ps1 -help
Prints the help topic for the script
"@
$helpText
exit
}
C18622791.fm Page 558 Wednesday, December 12, 2007 1:48 PM

Chapter 18 Configuring Network Services 559
It’s time to check the command-line parameters. For a change—to jazz it up a bit and make it
a little bit more interesting—use the if statement to see if the script was run with the -help
parameter by checking for the presence of the $help variable. If you find the variable, use a for
loop and make eight passes. Note that the command is $i = 0 ; $i –le 15 ; $i+=2. Count from 0
to 15, but do it by twos. The number range 0 through 15 corresponds to the number of colors
that the Write-Host cmdlet is able to produce. If you only use the numbers 0 through 7 in
the for statement, you will have only the four basic colors and several of their first cousins.
However, by skipping every other color, you get a sampling of the entire color range. The next
thing to do is use the automatic variable, $myinvocation.
What Are Automatic Objects?
The $myinvocation automatic variable is not found in the documentation accompanying
Windows PowerShell but it can easily be found on the variable:\ PSDrive by using the
Get-ChildItem cmdlet. The code to do this is shown here:
Get-ChildItem variable:\
The fact that $myinvocation resolves to an instance of a System.Management.Automation.
InvocationInfo Microsoft .NET Framework object should come as no surprise, because
there are several automatic variables that resolve to objects. Find this information by
using the following command:
get-childitem variable:\ |
where-object { $_.value -match 'system' }
After identifying the automatic variables that contain objects, use the Get-Member
cmdlet to explore the object in question, as is shown here:
$MyInvocation | Get-Member
After this, you’ll find that there are a number of very useful properties from the object
contained in the $myinvocation variable. This used to be confusing to me; I thought to
myself, “How can a variable have all of these properties and methods?” Then I realized
it is not just a variable; $myinvocation contains an actual object.
However, the fun doesn’t stop here. If you examine the $MyInvocation.MyCommand
object, you’ll see that it returns an additional object, the System.Management.Automation.
ScriptInfo object. Find this information by using the following command:
$MyInvocation.MyCommand | Get-Member
In the sidebar, “What Are Automatic Objects?” you discovered how to find the properties that
are configured on the $myinvocation automatic variable. Use the MyCommand property from
the $myinvocation automatic variable to print the name of the script. This is a very good way to
C18622791.fm Page 559 Wednesday, December 12, 2007 1:48 PM

560 Windows PowerShell Scripting Guide
verify the name of a running script. Use the Start-Sleep cmdlet to pause execution of the script
for a short time, and then use the Clear-Host cmdlet to clear the screen. By placing the
Clear-Host cmdlet inside the loop, you’ll obtain the illusion of motion. Following this, call
the funhelp() function. This section of code is shown here:
if($help) {
for($i = 0 ; $i -le 15 ; $i+=2)
{
write-host -foregroundcolor $i `
"Printing help now for $($myinvocation.mycommand)"
start-sleep -milliseconds 100
clear-host
}
funHelp
}
You must ensure that a -domain parameter was specified when the script was run by checking
for the presence of the $domain variable. If it is not present, display a message and call the
funhelp() function.
if(!$domain) { "Missing the -domain parameter ..." ; funHelp }
The main engine to the script is the Get-WmiObject cmdlet, used to connect to the root\
microsoftDNS WMI namespace. Use the -class parameter to specify the MicrosoftDNS_AType
WMI class name, and connect to the target computer by using the -computername parameter.
The tricky portion of the command is the filter.
Note Because of its reliance on WMI, Windows PowerShell uses a different syntax for the
filter than is used with the Where-Object cmdlet. The most obvious is the use of the equal
sign (=) instead of -eq that is utilized by other cmdlets. But the most difficult part of the filter
is the use of quotation marks around string values. To supply them for a variable, you must
escape the quotation marks by using the grave accent (`).
To allow the user to type the domain name to the -domain parameter without having to use
double-double quotes, I decided to include the double quotes required by WMI for the string
value inside the command. To do this, you must use the grave accent to escape the double
quotes. If you don’t, Windows PowerShell will think the string is ended when it reaches the
first set of double quotes preceding the $domain variable. Take the entire command and filter
and store the resulting management object in the $arydns variable. This section of the code is
shown here:
$arydns = Get-WmiObject -Namespace root\microsoftdns -Class MicrosoftDNS_AType `
-computername $computer -filter "domainName = `"$domain`" "
The next step is to print a header for the list of DNS names and addresses. You can use any
of the funline() functions included in the scripts in the extras folder on the accompanying
C18622791.fm Page 560 Wednesday, December 12, 2007 1:48 PM
Chapter 18 Configuring Network Services 561
CD-ROM; here, however, you’ll learn how to print a header by using inline code. Note that
there is a limitation to using this methodology. Depending on the length of the name of the
DNS server, the alignment may be off a little bit. This section of code prints a header message,
tabs over one stop, and retrieves the DnsServerName property from the first A record that is
returned by the query. Of course, the first A record is element 0 in the array of DNS records
that make up the management object that was returned by your WMI query. This section of
code is displayed here:
"*** A records from DNS server:
`t$($arydns[0].dnsServerName)
`t--------------------"
Finally, you must format your output. To do this, use the foreach statement and walk through
the array of management objects contained in the $aryDNS variable. Inside the code block,
create a hash table, which is like the dictionary object that is commonly used in VBScript and
other programming languages. The hash table is made up of a key/value pair. In your hash
table, add the DNS OwnerName property to the key in the hash table, and the RecordData
property to the value. Use the += construction to build a single output variable named $hash
that contains the completed hash table. Print the resulting hash table. This code is shown
here:
foreach($dns in $aryDNS)
{
$hash += @{ $dns.ownername = $dns.recordData }
}
$hash
The completed QueryDNSARecords.ps1 script is shown here.
QueryDNSARecords.ps1
param($computer="localhost",$domain,[switch]$help)
function funHelp()
{
$helpText=@"
DESCRIPTION:
NAME: QueryDNSArecords.ps1
Queries for A records on a local or remote machine running the
Microsoft DNS service.
PARAMETERS:
-computer Specifies the name of the computer to run the script
-domain The specific domain's A records to retrieve
-help prints help file
SYNTAX:
QueryDNSArecords.ps1 -domain contoso.com
Retrieves A records from the contoso.com domain. Uses local computer
C18622791.fm Page 561 Wednesday, December 12, 2007 1:48 PM
562 Windows PowerShell Scripting Guide
QueryDNSArecords.ps1 -domain nwtraders.com
Retrieves A records from the nwtraders.com domain. Uses local computer
QueryDNSArecords.ps1 -computer MunichServer -domain nwtraders.com
Connects to a computer named MunichServer which is running the Microsoft
DNS service. Retrieves A records from the nwtraders.com domain
QueryDNSArecords.ps1 -help
Prints the help topic for the script
"@
$helpText
exit
}
if($help) {
for($i = 0 ; $i -le 15 ; $i+=2)
{
write-host -foregroundcolor $i `
"Printing help now for $($myinvocation.mycommand)"
start-sleep -milliseconds 100
clear-host
}
funHelp
}
if(!$domain) { "Missing the -domain parameter ..." ; funHelp }
$arydns = Get-WmiObject -Namespace root\microsoftdns -Class MicrosoftDNS_AType `
-computername $computer -filter "domainName = `"$domain`" "
"*** A records from DNS server:
`t$($arydns[0].dnsServerName)
`t--------------------"
foreach($dns in $aryDNS)
{
$hash += @{ $dns.ownername = $dns.recordData }
}
$hash
Configuring DNS Server Settings
Rather than working with DNS server settings one at a time, it may be more advantageous to
work with the settings in a batch mode. Using the SetDNSServerConfig.ps1 script, you can
modify the script to accept any property and any value applicable to the DNS server configu-
ration. The modification also allows you to configure multiple parameters at the same time.
The script begins with a param statement, allowing you to supply values to the script at
runtime. The -computer parameter lets you target a local or a remote server. If you choose to
C18622791.fm Page 562 Wednesday, December 12, 2007 1:48 PM
Chapter 18 Configuring Network Services 563
run the script locally, because there is a set default value, no additional configuration is
required. If you must operate remotely, you’ll need to supply the -computer parameter and add
the name of the remote computer. The -change parameter is modified in this script to allow
you to supply an array of properties and associated values. The remaining parameters are
switched parameters. The param statement is shown here:
param($computer="localhost", $change, [switch]$query,
[switch]$list,[switch]$help)
Next is the funhelp() function. In this function, use a here-string to allow you to type the help
information without worrying about double and triple quotation marks. Use a variable
named $helptext to hold the result of the giant here-string. After completing the variable
assignment, print the contents of the $helptext variable and exit the script. The funhelp()
function is shown here:
function funHelp()
{
$helpText=@"
DESCRIPTION:
NAME: SetDNSServerConfig.ps1
Produces a listing of DNS Server configuration information
on a local or remote machine. Allows to set DNS server config.
PARAMETERS:
-computer Specifies the name of the computer to run the script
-list Prints the current configuration of the DNS server
-change The property and value to change
-help prints help file
SYNTAX:
SetDNSServerConfig.ps1 -list
Lists default DNS Server configuration on local computer
SetDNSServerConfig.ps1 -computer MunichServer -list
Lists default DNS Server configuration on a remote server
named MunichServer
SetDNSServerConfig.ps1 -computer MunichServer -change "RoundRobin",0
Configures a remote server named MunichServer to disallow RoundRobin
SetDNSServerConfig.ps1 -computer MunichServer -change "RoundRobin",-1,
"AllowUpdate",0,eventloglevel,1
Configures a remote server named MunichServer to allow RoundRobin,
configures AllowUpdate to unrestricted, and eventloglevel to errors only
SetDNSServerConfig.ps1 -help
C18622791.fm Page 563 Wednesday, December 12, 2007 1:48 PM
564 Windows PowerShell Scripting Guide
Prints the help topic for the script
"@
$helpText
exit
}
Following the funhelp() function is the funlist() function. This function is used to display a
listing of all the properties that can be set on the DNS Server. As this is a rather extensive
listing of properties, it makes the script a bit cleaner to not type all this information into a
here-string. The disadvantage is, of course, that the text file must be in the same location as
where the script is run. If this is not the case, the script will generate an error. Look for the
SetDNSServerConfigOptions.txt by using the Test-Path cmdlet. The Test-Path cmdlet will
return a true or a false. As there is a Boolean return value, you can put the entire test-path statement
into smooth parentheses and use the if statement to evaluate the return. Therefore, if the file
is found, you’ll print the contents using the default file association for a .txt file; in most cases
this will be notepad.exe. However, if the file isn’t found, use the Write-Host cmdlet and print
a message stating that you are unable to find the file. Use the -foregroundcolor parameter for
the cmdlet and print the message in red. This section of code is shown here:
function funList()
{
if(test-path .\SetDNSServerConfigOptions.txt)
{
.\SetDNSServerConfigOptions.txt
}
ELSE
{
Write-Host -foregroundcolor red `
"Unable to find SetDNSServerConfigOptions.txt"
}
}
Next in line is the funquery() function. This function queries the DNS server and produces a
listing of all the current settings on the server. Funquery() can also be used to verify the config-
uration of the DNS server after you make changes. Begin the funquery() function by specifying
the MicrosoftNDS_Server WMI class. Next, connect to WMI by using the Get-WmiObject
cmdlet. Use the class name stored in the $class variable and the computer name contained in
the $computer variable. Hard-code the root\microsoftDNS namespace because this is only place
this class can reside. Take the resulting object and pipeline it to the Format-List cmdlet. Print
only items that begin with a letter in the range from a to z, to avoid system properties. After
making the query, exit the script. This section of the code is shown here:
function funQuery()
{
$class="MicrosoftDNS_Server"
Get-WmiObject -class $class -computername $computer `
-namespace root\microsoftDNS |
C18622791.fm Page 564 Wednesday, December 12, 2007 1:48 PM
Chapter 18 Configuring Network Services 565
format-list [a-z]*
exit
}
The most complicated portion of the script is the funchange() function. Begin the funchange()
function by assigning the MicrosoftDNS_Server WMI class name to the $class variable and
make the connection into WMI by using the Get-WmiObject cmdlet. Store the object that is
returned in the $dnsserver variable. This part of the funchange() function is similar to other
operations and is shown here:
function funChange($change)
{
$class="MicrosoftDNS_Server"
$dnsServer=Get-WmiObject -class $class -computername $computer `
-namespace root\microsoftDNS
Then comes the hard part. To provide the ability to change multiple properties with different
values and still maintain a single parameter, you’ll break the line that was submitted to the
-change parameter. The easiest way to do this is to convert the array to a hash table. Use the for
statement, and continue to iterate through until you get to the number of elements in the
$change array. You must subtract 1 from this number because the array is zero based. The
clever part is to skip the $element variable by two. In this manner, you’ll retrieve every other
item from the array. Now create the hash table by taking the even element numbers and
placing them into the key position within the hash table. At the same time, take the odd
element numbers and place them into the value position within the hash table. By using the
+= operator, you are able to add each successive key/value pair to the hash table. The special
character combination of @{} defines a hash table. This section of the funchange() function is
shown here:
for ($element=0 ; $element -le $change.length-1 ; $element+=2)
{
$hash += @{ $change[$element]=$change[$element+1] }
}
Now you must iterate through the hash table. To do this, generate a collection of hash table
keys by querying the Keys property. To work with a single key from the collection, use the
foreach statement. Use the $prop variable to keep track of your position in the collection. In the
code block for the foreach statement, print a status message. Inside the double quotation
marks of the status message, expand the value contained in the $prop variable. The $prop
variable is used as the enumerator, the placeholder in the collection of hash keys. Use the `t
character sequence to tab over. To make two tab spots in the output, use `t`t. If you want
three tab spots, use `t`t`t. Use the $prop variable to retrieve the value from the hash table. To
print the value that goes with the property, use a subexpression as shown here:
$($hash[$prop])
C18622791.fm Page 565 Wednesday, December 12, 2007 1:48 PM
566 Windows PowerShell Scripting Guide
The subexpression causes the code inside the parentheses to be evaluated before the rest of
the line. Use the property name to retrieve the specific property from the DNS server and also
to access the value in the hash table. Assign the property value from the hash table to the
corresponding property in WMI. To complete the transaction, use the put() method to write it
to the WMI database. This section of code is displayed here:
foreach($prop in $hash.keys)
{ "Preparing to make the following changes: "
"$prop `t`t$($hash[$prop])"
$dnsServer.$prop = $hash[$prop]
$dnsServer.put()
}
}
When the script is run, it moves past all the functions and actually jumps to the bottom of the
script where there are four lonely commands. These humble commands provide the flexibility
for the script. The first command looks for the presence of the $help variable; if it’s present, it
calls the funhelp() function. Next is the $list variable; if it’s present, call the funlist() function
and exit the script. Then, it’s on to the $query variable; if you find it, call the funquery()
function. Finally, if you make it through the first three filters, you come to the $change variable;
if you find it, call the funchange() function. These four commands are listed here:
if($help) { "Printing help now..." ; funHelp }
if($list) { "Printing all changeable properties..." ; funList }
if($query) { "Printing the current DNS server configuration" ; funQuery }
if($change) { "Change $change now ..." ; funChange($change) }
The completed SetDNSServerConfig.ps1 script is shown here.
SetDNSServerConfig.ps1
param($computer="localhost", $change, [switch]$query,
[switch]$list,[switch]$help)
function funHelp()
{
$helpText=@"
DESCRIPTION:
NAME: SetDNSServerConfig.ps1
Produces a listing of DNS Server configuration information
on a local or remote machine. Allows to set DNS server config.
PARAMETERS:
-computer Specifies the name of the computer to run the script
-list Prints the current configuration of the DNS server
-change The property and value to change
-help prints help file
SYNTAX:
SetDNSServerConfig.ps1 -list
Lists default DNS Server configuration on local computer
C18622791.fm Page 566 Wednesday, December 12, 2007 1:48 PM
Chapter 18 Configuring Network Services 567
SetDNSServerConfig.ps1 -computer MunichServer -list
Lists default DNS Server configuration on a remote server
named MunichServer
SetDNSServerConfig.ps1 -computer MunichServer -change "RoundRobin",0
Configures a remote server named MunichServer to disallow RoundRobin
SetDNSServerConfig.ps1 -computer MunichServer -change "RoundRobin",-1,
"AllowUpdate",0,eventloglevel,1
Configures a remote server named MunichServer to allow RoundRobin,
configures AllowUpdate to unrestricted, and eventloglevel to errors only
SetDNSServerConfig.ps1 -help
Prints the help topic for the script
"@
$helpText
exit
}
function funList()
{
if(test-path .\SetDNSServerConfigOptions.txt)
{
.\SetDNSServerConfigOptions.txt
}
ELSE
{
Write-Host -foregroundcolor red `
"Unable to find SetDNSServerConfigOptions.txt"
}
}
function funQuery()
{
$class="MicrosoftDNS_Server"
Get-WmiObject -class $class -computername $computer `
-namespace root\microsoftDNS |
format-list [a-z]*
exit
}
function funChange($change)
{
$class="MicrosoftDNS_Server"
$dnsServer=Get-WmiObject -class $class -computername $computer `
-namespace root\microsoftDNS
for ($element=0 ; $element -le $change.length-1 ; $element+=2)
{
C18622791.fm Page 567 Wednesday, December 12, 2007 1:48 PM
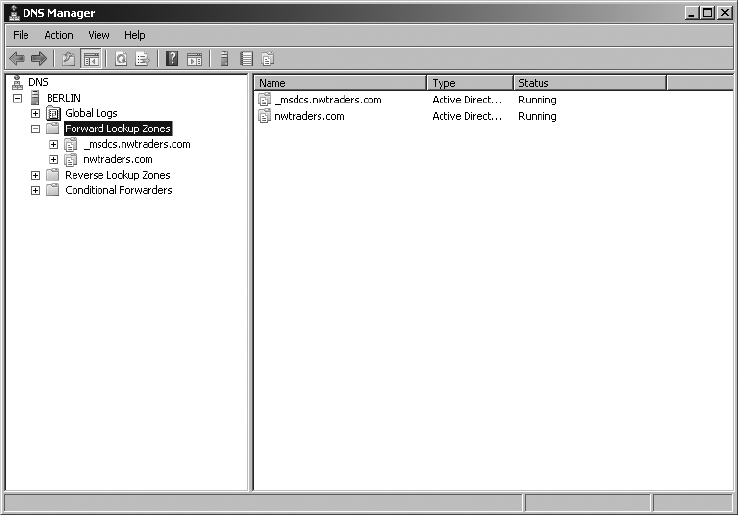
568 Windows PowerShell Scripting Guide
$hash += @{ $change[$element]=$change[$element+1] }
}
foreach($prop in $hash.keys)
{ "Preparing to make the following changes: "
"$prop `t`t$($hash[$prop])"
$dnsServer.$prop = $hash[$prop]
$dnsServer.put()
}
}
if($help) { "Printing help now..." ; funHelp }
if($list) { "Printing all changeable properties..." ; funList }
if($query) { "Printing the current DNS server configuration" ; funQuery }
if($change) { "Change $change now ..." ; funChange($change) }
Reporting DNS Zones
The proper configuration of DNS is vital to the proper functioning of Active Directory
directory service and other applications that require name resolution services to communicate
with other computers on the network. Of course, if you are running Active Directory, then you
already have a few zones created on your DNS server. A simple way to verify if the proper DNS
zones were created during installation is to run the ReportDNSZoneConfig.ps1 script. You
can, of course, use the DNS Manager console as shown in Figure 18-5.
Figure 18-5 DNS Manager provides easy access to DNS zone information.
C18622791.fm Page 568 Wednesday, December 12, 2007 1:48 PM

Chapter 18 Configuring Network Services 569
Troubleshooting There have been many times when I have seen a new installation of
Active Directory fail because of DNS issues. This is a relatively common occurrence when the
only Domain Controller is also the only DNS server. What happens is that the proper DNS
zones don’t get created correctly because of the DNS service being a bit slow to start. One
way to solve this problem is to stop the server service, wait for a few seconds (or minutes),
and then start the service again. This should force the creation of the various DNS zones.
In the ReportDNSZoneConfig.ps1 script, you’ll first come to the param statement. This param
statement is very simple: It allows you to change to a different computer or to print help.
That’s it. Here is the param statement:
param($computer="localhost", [switch]$help)
Next is the funhelp() function. In this function, begin by declaring the $helptext variable and
assigning a here-string to it. In the here-string, you’ll create a description for the script, detail
the parameters, and list some samples of syntax. After creating the here-string, print the
$helptext variable contents, and exit the script. The funhelp() function is displayed here:
function funHelp()
{
$helpText=@"
DESCRIPTION:
NAME: ReportDNSZoneConfig.ps1
Produces a listing of DNS Server Zone configuration information
on a local or remote machine.
PARAMETERS:
-computer Specifies the name of the computer to run the script
-help prints help file
SYNTAX:
ReportDNSZoneConfig.ps1
Produces a listing of DNS Server Zone configuration information
on a local machine.
SetDNSServerConfig.ps1 -computer MunichServer
Produces a listing of DNS Server Zone configuration information
on a remote machine named MunichServer.
ReportDNSZoneConfig.ps1 -help
Prints the help topic for the script
"@
$helpText
exit
}
C18622791.fm Page 569 Wednesday, December 12, 2007 1:48 PM
570 Windows PowerShell Scripting Guide
Following the funhelp() function, check for the presence of the $help variable. If you find the
$help variable, then you know the script was run with the -help parameter and you must call
the funhelp() function. This line of code is shown here:
if($help) { "Printing help now..." ; funHelp }
Next is the worker section of the script: Here you’ll make the connection into WMI by using
the Get-WmiObject cmdlet. Use the MicrosoftDNS_ZONE WMI class and retrieve all the
properties that begin with the letters a through z. This section of code is shown here:
Get-WmiObject -Class MicrosoftDNS_ZONE -computer $computer `
-Namespace root\microsoftDNS |
format-list [a-z]*
The completed ReportDNSZoneConfig.ps1 script is shown here.
ReportDNSZoneConfig.ps1
param($computer="localhost", [switch]$help)
function funHelp()
{
$helpText=@"
DESCRIPTION:
NAME: ReportDNSZoneConfig.ps1
Produces a listing of DNS Server Zone configuration information
on a local or remote machine.
PARAMETERS:
-computer Specifies the name of the computer to run the script
-help prints help file
SYNTAX:
ReportDNSZoneConfig.ps1
Produces a listing of DNS Server Zone configuration information
on a local machine.
SetDNSServerConfig.ps1 -computer MunichServer
Produces a listing of DNS Server Zone configuration information
on a remote machine named MunichServer.
ReportDNSZoneConfig.ps1 -help
Prints the help topic for the script
"@
$helpText
exit
}
C18622791.fm Page 570 Wednesday, December 12, 2007 1:48 PM
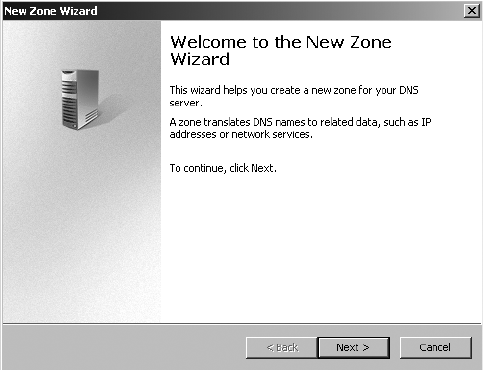
Chapter 18 Configuring Network Services 571
if($help) { "Printing help now..." ; funHelp }
Get-WmiObject -Class MicrosoftDNS_ZONE -computer $computer `
-Namespace root\microsoftDNS |
format-list [a-z]*
Creating DNS Zones
After documenting the existing DNS zones, you will more than likely decide you need to
create additional DNS zones. To do this, you can use the DNS Manager console or you can use
Windows PowerShell to do the work for you. If you decide to use the DNS Manager console,
you will be presented with a wizard as shown in Figure 18-6.
Figure 18-6 New DNS zones are easily created by walking through a seven-page wizard.
An example of using Windows PowerShell to create a DNS zone is found in the CreateDNS
Zone.ps1 script.
In the CreateDNSZone.ps1 script, begin with the param statement. This param statement is
rather complicated because of the various ways that a DNS zone can be implemented in a
Windows environment. Following the param statement, the first parameter to define is
-computer. Use the -computer parameter to specify the name of the computer to be targeted
for the operation. If the DNS zone is to be an Active Directory integrated DNS zone, the
target server can be any DNS server. By default, simply target the local computer. Next is the
-zonename parameter. This is used to supply the name of the new DNS zone to create. The
third parameter is the -action parameter that receives a value to specify the action the script is
to create. These actions are all documented when the script is run with the -help parameter.
The next two parameters, -datafile and -ipadd, are both set to $null. The reason for this is to
C18622791.fm Page 571 Wednesday, December 12, 2007 1:48 PM
572 Windows PowerShell Scripting Guide
allow the parameters to be present but to have optional parameters. Finally comes the -help
switch, which is used to display the online help file. This section of the code is shown here:
Param(
$computer="localhost",$ZoneName,
$action, Datafile=$null,
$IPaddr=$null,[switch]$help
)
Next comes the funhelp() function, which is used to display the help string when the script is
run with the -help parameter. This allows you to configure the help text in advance and to
display it when required. The funhelp() function uses a here-string to store information about
the description, parameters, and syntax of the script. The here-string is then stored in the
$helptext variable. After the here-string is created, the contents of the $helptext variable are
displayed, and the function exits the script. The funhelp() function is shown here:
function funHelp()
{
$helpText=@"
DESCRIPTION:
NAME: CreateDNSZone.ps1
Creates a DNS Zone on a local or remote machine.
PARAMETERS:
-computer Specifies the name of the computer to run the script
-action Type of DNS zone to configure:
adp AD integrated primary: -zoneName
ads AD integrated secondary: -zonename -ipaddr
adst Ad integrated stubby: -zonename
nadp NON AD primary: -zonename -datafile
nads NON AD secondary: -zonename -datafile -ipaddr
nadst NON AD stubby: -zonename -datafile
-zoneName Name of the zone to create
-datafile Used when not creating an AD integrated DNS zone
-IPaddr Used when creating a secondary DNS zone
-help prints help file
SYNTAX:
CreateDNSZone.ps1 -action adp -zonename vienna
Creates an AD integrated primary DNS zone on the local
machine with the name of vienna.
CreateDNSZone.ps1 -action ads -zonename vienna -ipaddr
"192.168.3.100"
Creates an AD integrated secondary zone named vienna on the
local machine with the master zone ip address of 192.168.3.100
CreateDNSZone.ps1 -computer MunichServer -action nadp -zonename
Vienna -datafile c:\windows\system32\dns\vienna.dns
Creates a non AD integrated primary zone named vienna on a remote
C18622791.fm Page 572 Wednesday, December 12, 2007 1:48 PM
Chapter 18 Configuring Network Services 573
machine named munichserver with a dns zone file
c:\windows\system32\dns\vienna.dns
CreateDNSZone.ps1 -help
Prints the help topic for the script
"@
$helpText
exit
}
Following the funhelp() function, you’ll move to the verification stage of the script. These are
actually among the first lines of code executed when the script runs. Following the execution
of the param statement, skip the other functions discussed previously and jump to these
two lines. First check to see if the $help variable is on the memory stack. If it is present, the
script was run with the -help parameter, and you’ll need to go to the funhelp() function and
print the help string. If either the $zonename or the $action variables is missing, print a status
string and immediately jump to the funhelp() function. These two lines of code are shown
here:
if($help) { "Printing help now..." ; funHelp }
if(!$zonename -or !$action) { "Missing parameters..." ; funHelp}
Initializing variables is the next procedure. To do this, define a Boolean variable named
$adintegrated; this variable is set to true. Next is another Boolean variable named $nonadintegrated.
This variable is set to false. Define the $primary variable as an integer and set it to 0. The
$secondary variable is set to 1, the $stuby variable to 2, and the $forwarder variable to 3. Each
of these values has special meaning in the worker section of the script. The IP address is
specified as an array. The values for this section of the script are found in the Windows
Software Development Kit (SDK). This section of the script is shown here:
[bool]$adintegrated = -1
[bool]$nonadintegrated = 0
[int32]$Primary = 0
$secondary = 1
$stuby = 2
$forwarder = 3
[array]$aryIP = $IPaddr
You must make a connection into WMI. This connection is a little different than the one made
using the Get-WmiObject cmdlet because of the requirement to retrieve a specific instance
of the WMI class. To do this, use the [wmiclass] type accelerator and connect directly to the
MicrosoftDNS_ZONE WMI class. The management object that is returned is stored in the
$dnsserver variable. This section of code is shown here:
$dnsServer = [wmiclass]"\\$computer\root\microsoftDNS:MicrosoftDNS_ZONE"
C18622791.fm Page 573 Wednesday, December 12, 2007 1:48 PM
574 Windows PowerShell Scripting Guide
After successfully connecting to the MicrosoftDNS_ZONE WMI class, you must evaluate the
action that was specified at runtime to the -action parameter. Each of the different conditions
calls the same createzone() method using different parameters. After the zone is created,
the script will exit. The default action of the switch statement is to call the funhelp() function
and print a help message. This section of the script is shown here:
Switch($action)
{
"adp" {
$dnsServer.createZone($ZoneName, $primary, $adintegrated) ;
exit
}
"ads" {
$dnsServer.createZone($ZoneName, $secondary, $adintegrated,
$null, $aryIP) ; exit
}
"adst" { $dnsServer.createZone($ZoneName, $stuby, $adintegrated) }
"nadp" {
$dnsServer.createZone($ZoneName, $primary, $nonadintegrated,
$Datafile) ; exit
}
"nads" {
$dnsServer.createZone($ZoneName, $secondary, $nonadintegrated,
$Datafile, $aryIP) ; exit
}
"nadst" {
$dnsServer.createZone($ZoneName, $stuby, $nonadintegrated,
$Datafile) ; exit
}
DEFAULT {
"No valid action was specified. Printing help now ..." ;
$funHelp
}
}
If the script receives an unknown parameter and misses the switch statement, then you’ll catch
it with the last line of the script and call the funhelp() function as shown here:
"No valid action was specified. Printing help now... ; $funhelp "
The completed CreateDNSZone.ps1 script is shown here.
CreateDNSZone.ps1
Param(
$computer="localhost",$ZoneName,
$action,$Datafile=$null,
$IPAddr=$null,[switch]$help
)
function funHelp()
{
$helpText=@"
DESCRIPTION:
NAME: CreateDNSZone.ps1
C18622791.fm Page 574 Wednesday, December 12, 2007 1:48 PM
Chapter 18 Configuring Network Services 575
Creates a DNS Zone on a local or or remote machine.
PARAMETERS:
-computer Specifies the name of the computer to run the script
-action Type of DNS zone to configure:
adp AD integrated primary: -zoneName
ads AD integrated secondary: -zonename -ipaddr
adst Ad integrated stubby: -zonename
nadp NON AD primary: -zonename -datafile
nads NON AD secondary: -zonename -datafile -ipaddr
nadst NON AD stubby: -zonename -datafile
-zoneName Name of the zone to create
-datafile Used when not creating an AD integrated DNS zone
-IPaddr Used when creating a secondary DNS zone
-help prints help file
SYNTAX:
CreateDNSZone.ps1 -action adp -zonename vienna
Creates an AD integrated primary DNS zone on the local
machine with the name of vienna.
CreateDNSZone.ps1 -action ads -zonename vienna -ipaddr
"192.168.3.100"
Creates an AD integrated secondary zone named vienna on the
local machine with the master zone ip address of 192.168.3.100
CreateDNSZone.ps1 -computer MunichServer -action nadp -zonename
Vienna -datafile c:\windows\system32\dns\vienna.dns
Creates a non AD integrated primary zone named vienna on a remote
machine named munichserver with a dns zone file
c:\windows\system32\dns\vienna.dns
CreateDNSZone.ps1 -help
Prints the help topic for the script
"@
$helpText
exit
}
if($help) { "Printing help now..." ; funHelp }
if(!$zonename -or !$action) { "Missing parameters..." ; funHelp}
[bool]$adintegrated = -1
$nonadintegrated = 0
[int32]$Primary = 0
$secondary = 1
$stuby = 2
$forwarder = 3
[array]$aryIP = $IPaddr
$dnsServer = [wmiclass]"\\$computer\root\microsoftDNS:MicrosoftDNS_ZONE"
Switch($action)
C18622791.fm Page 575 Wednesday, December 12, 2007 1:48 PM
576 Windows PowerShell Scripting Guide
{
"adp" {
$dnsServer.createZone($ZoneName, $primary, $adintegrated) ;
exit
}
"ads" {
$dnsServer.createZone($ZoneName, $secondary, $adintegrated,
$null, $aryIP) ; exit
}
"adst" { $dnsServer.createZone($ZoneName, $stuby, $adintegrated) }
"nadp" {
$dnsServer.createZone($ZoneName, $primary, $nonadintegrated,
$Datafile) ; exit
}
"nads" {
$dnsServer.createZone($ZoneName, $secondary, $nonadintegrated,
$Datafile, $aryIP) ; exit
}
"nadst" {
$dnsServer.createZone($ZoneName, $stuby, $nonadintegrated,
$Datafile) ; exit
}
DEFAULT {
"No valid action was specified. Printing help now ..." ;
$funHelp
}
}
"No valid action was specified. Printing help now... ; $funhelp "
Managing WINS and DHCP
For many network administrators, the Windows Internet Naming Service (WINS) continues
to cling to the network infrastructure like a misbehaving relative during a holiday celebration.
You simply cannot wait to get rid of the service, but you are afraid of untold consequences.
Indeed, many lucky network administrators are finding they can most certainly live without
the WINS service—and thereby reduce the efforts at backing up, restoring, and troubleshoot-
ing the service. WINS was great 25 years ago when computer networks consisted of 20 or 30
workstations running the NetBEUI protocol. Today with DNS, IPv4, and IPv6, WINS is not
needed for most modern applications, and is only required to support certain legacy applica-
tions—legacy applications that in most cases are mission critical, and therefore out of the
scope for experimentation. Unfortunately, since WINS is on its way out, there has not been
any additional effort made to add management and automation capabilities. All you can do is
retrieve the server configuration information.
The Dynamic Host Configuration Protocol (DHCP) service is essentially a “wash and wear”
service. Once it is set up properly, there is very little maintenance to be done. In addition, the
improvements made in DHCP for Windows Server 2008 reduce the primary concern network
administrators have about DHCP—running out of addresses by allowing for reduced lease
times for wireless access points.
C18622791.fm Page 576 Wednesday, December 12, 2007 1:48 PM
Chapter 18 Configuring Network Services 577
In the ManageWinsDHCP.ps1 script, you’ll obtain the configuration of both a WINS server
and a DHCP server. Additionally, you’ll be able to authorize and unauthorize a DHCP server
in Active Directory. These are main tasks confronted by modern network administrators
managing Windows Server 2008 networks.
Begin the ManageWinsDHCP.ps1 script with the param statement. This allows you to modify
the way the script operates at runtime and thereby avoid the need to edit the script. Four
parameters are defined: -computer, -ip, -action, and -help. The -computer parameter is used to
determine where the script will run. The -ip parameter is only used when authorizing or
de-authorizing a DHCP server in Active Directory. The -action parameter tells the script which
action to perform. The -help parameter is defined as a switch parameter and is used to display
the help text. The param statement is shown here:
param($computer, $ip, $action, [switch]$help)
Move on to the funhelp() function, which is used to display a help message when the script is
run with the -help switch specified. Essentially, the funhelp() function is a giant here-string
assigned to the $helptext variable. After the here-string has been assigned to the $helptext
variable, display the contents of the variable, and exit the script. There are three sections to the
here-string. The first is the description section, which contains a general overview of the script
functionality. The second section lists the command-line parameters for the script, and the
third portion of the here-string details the syntax of the script. The funhelp() function is shown
here:
function funHelp()
{
$helpText=@"
DESCRIPTION:
NAME: ManageWinsDHCP.ps1
Manages DHCP and WINS servers on a local or remote machine
PARAMETERS:
-computer Specifies the name of the server to run the script
-ip IP address of the server to run the script
-action Specifies action to perform < shoWins, shoDHCP,
shoAllDHCP, addDHCP, deleteDHCP >
-help prints help file
SYNTAX:
ManageWinsDHCP.ps1
Displays message an action must be specified, and lists help
ManageWinsDHCP.ps1 -computer MunichServer -action shoWins
Lists Wins Server configuration on a remote server
named MunichServer
ManageWinsDHCP.ps1 -computer MunichServer -action shoDHCP
C18622791.fm Page 577 Wednesday, December 12, 2007 1:48 PM
578 Windows PowerShell Scripting Guide
Lists DHCP Server configuration on a remote server
named MunichServer
ManageWinsDHCP.ps1 -action shoAllDHCP
Lists all authorized DHCP servers from Active Directory
ManageWinsDHCP.ps1 -action addDHCP -computer berlin -ip 192.168.1.1
Adds a DHCP server named berlin with ip address of 192.168.1.1 to be
authorized in Active Directory
ManageWinsDHCP.ps1 -action deleteDHCP -computer berlin -ip 192.168.1.1
Removes a previously authorized DHCP server named berlin with ip address
of 192.168.1.1 from Active Directory
ManageWinsDHCP.ps1 -help
Prints the help topic for the script
"@
$helpText
exit
}
There are three lines of code that inspect the command line for the existence of certain
parameters. If the $help variable is present, call the funhelp() function. If the $action variable is
not present, it means no action was specified when the script was run. You haven’t defined a
default action, so you’ll print an error message by using the Write-Error cmdlet. Call the
funhelp() function. If the -computer parameter isn’t supplied, the $computer variable won’t be
present. If this is the case, simply alert the user that you’ll be running the script locally—and
perhaps he or she may wish to target an additional server. The script will then use the local
computer for the target of operations. These three lines of code are listed here:
if($help) { "Printing help now..." ; funHelp }
if(!$action) {
Write-error "An action must be specified ..." ;
funHelp
}
if(!$computer) { Write-warning "Using default server..." }
Follow this with the switch statement. The switch statement provides the intelligence for the
script and is used to parse the command-line arguments. The only command-line argument
that is evaluated in this switch statement is the -action parameter. If the script is run with the
-action shoWins parameter, print the WINS server configuration. If the script is run with
the -action shoDHCP parameter, print the information about the current server.
You also can authorize a DHCP server in Active Directory by running the script with the
addDHCP parameter. This command needs both the DNS name of the server as well as the
IP address. To ensure the required parameters are supplied, use an if statement and look for
C18622791.fm Page 578 Wednesday, December 12, 2007 1:48 PM
Chapter 18 Configuring Network Services 579
the presence of both the $computer variable and the $ip variable. If they are not found, print a
message stating that both parameters are required. After the message is displayed, call the
funhelp() function. If both the -computer and the -ip parameters have been properly supplied,
then call the netsh command and authorize the DHCP server. This section of code is shown
here:
"addDHCP" {
if(!$computer -or !$ip)
{ "Both the computer name " +
"and the IP address must be specified ..." ;
funHelp
}
netsh dhcp add server $computer $ip
}
To remove a DHCP server from Active Directory, specify deleteDHCP to the -action parameter.
Just like adding a DHCP server to Active Directory, two values are required to remove a DHCP
server from Active Directory. You need both the IP address and the DNS host name of the
DHCP server. Once again, use the if statement to ensure that both the $computer variable and
the $ip variable are present. If they are absent, print a message stating the computer name and
the IP address are required, and print the help message. If the two required parameters are
present, call the appropriate netsh command. This section of code is displayed here:
"deleteDHCP" {
if(!$computer -or !$ip)
{ "Both the computer name " +
"and the IP address must be specified ..." ;
funHelp
}
netsh dhcp delete server $computer $ip
}
The entire switch statement can be viewed here:
switch($action)
{
"shoWins" { netsh wins dump $computer }
"shoDHCP" { netsh dhcp show server $computer }
"shoAllDHCP" { netsh dhcp show server }
"addDHCP" {
if(!$computer -or !$ip)
{ "Both the computer name " +
"and the IP address must be specified ..." ;
funHelp
}
netsh dhcp add server $computer $ip
}
"deleteDHCP" {
if(!$computer -or !$ip)
{ "Both the computer name " +
"and the IP address must be specified ..." ;
C18622791.fm Page 579 Wednesday, December 12, 2007 1:48 PM
580 Windows PowerShell Scripting Guide
funHelp
}
netsh dhcp delete server $computer $ip
}
}
The completed ManageWinsDHCP.ps1 script is shown here.
ManageWinsDHCP.ps1
param($computer, $ip, $action, [switch]$help)
function funHelp()
{
$helpText=@"
DESCRIPTION:
NAME: ManageWinsDHCP.ps1
Manages DHCP and WINS servers on a local or remote machine
PARAMETERS:
-computer Specifies the name of the server to run the script
-ip IP address of the server to run the script
-action Specifies action to perform < shoWins, shoDHCP,
shoAllDHCP, addDHCP, deleteDHCP >
-help prints help file
SYNTAX:
ManageWinsDHCP.ps1
Displays message an action must be specified, and lists help
ManageWinsDHCP.ps1 -computer MunichServer -action shoWins
Lists Wins Server configuration on a remote server
named MunichServer
ManageWinsDHCP.ps1 -computer MunichServer -action shoDHCP
Lists DHCP Server configuration on a remote server
named MunichServer
ManageWinsDHCP.ps1 -action shoAllDHCP
Lists all authorized DHCP servers from Active Directory
ManageWinsDHCP.ps1 -action addDHCP -computer berlin -ip 192.168.1.1
Adds a DHCP server named berlin with ip address of 192.168.1.1 to be
authorized in Active Directory
ManageWinsDHCP.ps1 -action deleteDHCP -computer berlin -ip 192.168.1.1
Removes a previously authorized DHCP server named berlin with ip address
of 192.168.1.1 from Active Directory
C18622791.fm Page 580 Wednesday, December 12, 2007 1:48 PM
Chapter 18 Configuring Network Services 581
ManageWinsDHCP.ps1 -help
Prints the help topic for the script
"@
$helpText
exit
}
if($help) { "Printing help now..." ; funHelp }
if(!$action) { "An action must be specified ..." ; funHelp }
if(!$computer) { "Using default server..." }
switch($action)
{
"shoWins" { netsh wins dump $computer }
"shoDHCP" { netsh dhcp show server $computer }
"shoAllDHCP" { netsh dhcp show server }
"addDHCP" {
if(!$computer -or !$ip)
{ "Both the computer name " +
"and the IP address must be specified ..." ;
funHelp
}
netsh dhcp add server $computer $ip
}
"deleteDHCP" {
if(!$computer -or !$ip)
{ "Both the computer name " +
"and the IP address must be specified ..." ;
funHelp
}
netsh dhcp delete server $computer $ip
}
}
Summary
In this chapter we examined the various activities involved in configuring network services
such as DNS, DHCP, and WINS. We began the chapter by looking at installing DNS on a
Windows Server 2008 computer. We then looked at creating DNS zones, records, and reporting
on current configuration. Then we moved to WINS, where we printed out the configuration
of our WINS database. Finally, we concluded the chapter by looking managing DHCP. In fact,
because both WINS and DHCP are often installed on the same server and are still considered
to be corresponding services, we developed a single script that manages both services.
C18622791.fm Page 581 Wednesday, December 12, 2007 1:48 PM
C18622791.fm Page 582 Wednesday, December 12, 2007 1:48 PM

583
Chapter 19
Working with Windows
Server 2008 Server Core
After completing this chapter, you will be able to:
■Join a domain.
■Set the static IP address.
■Set the DNS configuration.
■Name the server and reboot the server.
On the Companion Disc All the scripts used in this chapter are located on the CD that
accompanies this book in the \scripts\chapter19 folder.
Since the Windows operating system was first introduced, it has contained windows—the
feature that allows access to programs and applications via a graphical user interface. Now
there is a “Windows without windows.” There are many roles available for Windows Server
2008 Server Core, and each role has its own unique situations and requirements for both
installation and for monitoring. However, this chapter examines tasks that are somewhat
confusing and time-consuming; these tasks involve the configuration of a Windows Server
2008 Server Core installation. Nearly every role Windows Server 2008 Server Core fulfills
requires these same configuration tasks.
Initial Configuration
There are two tasks that must be performed on Windows Server 2008 Server Core that
cannot be performed using Windows PowerShell remotely. The first job is to enable remote
management through Windows Firewall. The second task is to obtain the IP address of the
server.
To enable remote management of Windows Server 2008 Server Core, use the netsh utility.
While it is possible to use the netsh command remotely, it will not make it through the firewall.
Therefore, you must run the following command locally:
netsh firewall set service remoteadmin enable
After this, you will be able to use Windows PowerShell to administer the server.
C19622791.fm Page 583 Wednesday, December 12, 2007 1:49 PM
584 Windows PowerShell Scripting Guide
Note There may be additional configuration information needed to connect to and
manage the remote server in addition to enabling remote administration in the firewall. If the
remote server is not joined to the domain, then certain WMI actions will require additional
configuration. The configuration required and the scenarios requiring them are documented
on Microsoft Developer Network (MSDN).
To connect to the server, you must discover the IP address that was assigned to the server
when the operating system (OS) was installed. To do this, use the following command:
IPconfig / all
Once you have the IP address and the firewall has been configured, use Windows PowerShell
to administer the server. To configure the server, use the IP address because it is much easier
to use than the randomly assigned computer name.
Joining the Domain
One of the first procedures with your server is to join it to the domain. This provides an
integrated security context and makes it much easier to utilize WMI to obtain information
and to manage the server. To join Windows Server 2008 Server Core to a domain, use the Join-
Domain.ps1 script.
Caution One thing to keep in mind when joining your server to the domain is the
possibility that the firewall policy will later be changed. If the default domain policy locks
down the firewall policy and if you haven’t made allowances to reconnect remotely to the
server, you could be stranded.
Begin the JoinDomain.ps1 script by defining several command-line parameters. To do this,
use the param statement. The first parameter to define is the -computer parameter, which is the
target computer. In this script, set -computer to a default value of localhost. The next parameter
is the -domainname parameter. This controls which domain the computer will attempt to
contact to join. Next, specify both the -username and the -password parameters, which will be
the credentials required to join the computer to the domain.
The next three parameters are switched parameters, and therefore they only take effect if they
are present on the command line. The first of these is the -unjoin parameter, which causes
the script to remove the computer from the domain. The next parameter is the -reboot switch.
It is used in combination with the -unjoin and -domainname parameters or by itself to simply
reboot a remote computer. The last parameter is the -help parameter, which displays help
information. The completed param statement is shown here:
param(
$computer="localhost",
$domainName,
C19622791.fm Page 584 Wednesday, December 12, 2007 1:49 PM
Chapter 19 Working with Windows Server 2008 Server Core 585
$username,
$password,
[switch]$unjoin,
[switch]$reboot,
[switch]$help
)
You need to create the funhelp() function. This function is very important for this script as it
has a rather large number of parameters, many of which must be presented in the correct
combination. Begin by creating a variable, $helptext. Assign a here-string to the $helptext
variable to allow you to type the help string and not worry about quoting rules. The help text
section is divided into description, parameters, and syntax. After the here-string is created
and assigned to the $helptext, display the contents of the variable, and exit the script. The
completed funhelp() function is shown here:
function funHelp()
{
$helpText=@"
DESCRIPTION:
NAME: JoinDomain.ps1
Joins computer to domain
PARAMETERS:
-computer Specifies the name of the computer upon which to run the script
-domainName name of the domain or workgroup
-username user credentials
-password user password
-unjoin unjoin domain or workgroup
-reboot reboots computer
-help prints help file
SYNTAX:
JoinDomain.ps1
Displays message you must supply an action. calls help
JoinDomain.ps1 -reboot
Reboots the local computer
JoinDomain.ps1 -reboot -computer MunichServer
Reboots the remote computer named MunichServer. Munich must be domain
joined for this command to work.
JoinDomain.ps1 -computer MunichServer -domainName nwtraders.com `
-username nwtraders\administrator -password Password1
Joins a remote computer named MunichServer to the nwtraders.com domain
using the nwtraders\administrator account and password of Password1.
When the join is complete, it will reboot the machine. The computer
account is placed in default location which is by default is the
computers container.
JoinDomain.ps1 -help
C19622791.fm Page 585 Wednesday, December 12, 2007 1:49 PM

586 Windows PowerShell Scripting Guide
Displays the help topic for the script
"@
$helpText
exit
}
To make the script easier to maintain and understand, the core functionality of the script is
contained in a series of functions. The first of these functions is the funreboot() function,
which begins with the function statement and the name of the function. Inside the code block,
use an if statement to see if the funreboot() function is supposed to reboot the local or the
remote computer.
Note Checking for the presence of alternate credentials is required because WMI must
operate locally with impersonation; it is not allowed to use alternate credentials for a local
connection. Even if the credentials are the same as the currently logged-on user, the mere
presence of the credentials on a local connection will generate an error.
If the name contained in the $computer variable is not equal to localhost, use the user name
contained in the $username variable if it is present. If the $username variable is present,
supply this in the -credential parameter to the Get-WmiObject cmdlet. When you call
the Get-WmiObject cmdlet, use the value contained in the $computer variable to supply to
the -computername parameter, and use the value in the $username variable to supply to the
-credential parameter. This causes the script to display a dialog box and request the password.
Now you must enable the shutdown privilege so you can perform the reboot. To do this, use
the EnablePrivileges property from the scope options that were assigned to the Microsoft .NET
Framework object that the WMI object is based upon. Set this option equal to true. Now call
the reboot() method. This section of the funreboot() function is shown here:
Function funReboot()
{
if($computer -ne "localhost")
{
if($username)
{
$objWMI = Get-WmiObject -Class Win32_operatingsystem `
-computername $computer -credential $username
$objWMI.psbase.Scope.Options.EnablePrivileges = $true
$objWMI.reboot()
}
If you don’t supply a user name, the code is a little easier. Connect to an instance of the
Win32_OperatingSystem WMI class by using the Get-WmiObject cmdlet. Specify the computer
that was indicated in the $computer variable and supply this value to the -computername
parameter of the Get-WmiObject cmdlet. Enable the special privileges and call the reboot()
method. This section of code is shown here:
C19622791.fm Page 586 Wednesday, December 12, 2007 1:49 PM

Chapter 19 Working with Windows Server 2008 Server Core 587
ELSE
{
$objWMI = Get-WmiObject -Class Win32_operatingsystem `
-computername $computer
$objWMI.psbase.Scope.Options.EnablePrivileges = $true
$objWMI.reboot()
}
In either case, whether the $username variable is present or not, exit the script However, if the
name of the computer is localhost then you don’t need to—and in fact can’t—use alternate cre-
dentials. In this situation, connect to the Win32_OperatingSystem WMI class using the Get-
WmiObject cmdlet. The $computer variable contains localhost, which is fine. Enable the spe-
cial privileges, call the reboot() method, and exit the script. This section of the reboot() func-
tion is shown here:
exit
}
ELSE
{
$objWMI = Get-WmiObject -Class Win32_operatingsystem `
-computername $computer
$objWMI.psbase.Scope.Options.EnablePrivileges = $true
$objWMI.reboot()
exit
}
}
Following the funreboot() function, you’ll work on the funjoindomain() function, which is used
to join the computer to the domain. It’s most likely true that the computer has not yet joined
the domain; this means there are special WMI considerations for performing remote manage-
ment within a workgroup. To avoid these considerations, use the netdom command to join the
computer to the network. The syntax of this command is a bit cumbersome to use, and the
online help can be somewhat confusing. Both of these problems beg for a scripting solution.
Note The netdom command is part of the Windows Administration Tools Pack. Some
server versions of Windows include the Administration Tools Pack by default, whereas some
workstation versions of Windows require the tools to be installed. The Windows Administration
Tools Pack can be downloaded from http://www.microsoft.com/downloads/
Begin the funjoindomain() function with the complete command, first calling the netdom
command and specifying the join parameter. Give it the computer name contained in the
$computer variable and the domain name contained in the $domainname parameter. The
domain parameter needs to be preceded with a slash mark (/) and not a hyphen (-). Following
the domain parameter name, the value is separated from the value with a colon. The domain
user account is called /userD and the password is /passwordD—each of which is also preceded
with a slash mark and followed with a colon (:).
C19622791.fm Page 587 Wednesday, December 12, 2007 1:49 PM
588 Windows PowerShell Scripting Guide
After a computer has joined the domain, you need to reboot it for the changes to take effect. To
do this, call the shutdown command and pass it the /m parameter and the computer name
contained in the $computer variable. This time the computer name must be preceded with two
slash marks (\\). Use the /r parameter to tell the shutdown command to reboot the computer,
and supply the comment parameter, /c, with the string “joined domain.” Please note that
there must be no separator between /c and the comment.
After the syntax of the two commands is created, run the join-domain command by using the
Invoke-Expression cmdlet. Pause the execution of the script for two seconds by using the
Start-Sleep cmdlet and shut down the computer by using the shutdown command contained
in the $sdcommand variable. Finally, exit the script. The funjoindomain() function is shown
here:
Function FunJoinDomain()
{
$command = "netdom join $computer /domain:$domainName " + `
"/userD:$userName /passwordD:$password"
$sdcommand = "shutdown /m \\$computer /r " + `
"/c" + "joined domain"
invoke-expression $command
start-sleep -seconds 2
"We will now reboot $computer"
Invoke-expression $sdcommand
exit
}
Now create the fununjoin() function, which is used to eject a computer from a domain. Since
the computer is a member of the domain, use WMI to perform this operation. Begin the
fununjoin() function by creating a variable named $option and assigning the value of 0. The
value of 0 is used to tell the script to remove the account when deleting the computer. A
value of 2 disables the account but doesn’t delete it.
Connect to the Win32_ComputerSystem WMI class by using the Get-WmiObject cmdlet.
Supply the name of the computer held in the $computer variable to the -computername
parameter. Store the WMI object that is returned in the $objwmi variable. Now request the
special privileges and call the UnjoinDomainOrWorkgroup() method. This method takes three
parameters: the password, the username, and the option. Each of these values is contained in
the appropriate variables. When the method returns, exit the script. The fununjoin() function
is displayed here:
Function FunUnjoin()
{
$option = 0 # 2 = disable but not delete account in AD
$objWMI = Get-WmiObject -Class Win32_computersystem `
-computername $computer
$objWMI.psbase.Scope.Options.EnablePrivileges = $true
$objWMI.UnjoinDomainOrWorkgroup($password,$userName,$option)
exit
}
C19622791.fm Page 588 Wednesday, December 12, 2007 1:49 PM
Chapter 19 Working with Windows Server 2008 Server Core 589
Next are the parameter checks; first look for the presence of the $help variable. If you find it,
the script was run with the -help option, so call the funhelp() function and exit the script. If you
find the $domainname variable, you’ll join a domain, and so you’ll call the funjoindomain()
function. If the -reboot switched parameter was used, then call the funreboot() function and
exit the script. Because of the order of the script, you can join the domain and not reboot the
computer. This causes the script to call the funjoindomain() function, and you’ll see the results
of the method call. However, the script will display help again because the command is sensed
as incomplete. If you only use the script to reboot a computer by using the -reboot parameter,
this is a complete command and so the help won’t display. The preferred way to run the script
is to use both the -domainname and the -reboot parameters at the same time. If you don’t
supply a parameter, the script will call the funhelp function. This section of code is shown here:
if($help) { "Obtaining help ..." ; funhelp }
if($domainName)
{
"Joining $computer to $domainName"
FunJoinDomain
}
if($reboot)
{
"Rebooting $computer now ..."
FunReboot
}
if(!$help -or !$domainname -or !$reboot)
{
"you must supply an action ..."
funhelp
}
The completed JoinDomain.ps1 script is shown here.
JoinDomain.ps1
param(
$computer="localhost",
$domainName,
$username,
$password,
[switch]$unjoin,
[switch]$reboot,
[switch]$help
)
function funHelp()
{
$helpText=@"
DESCRIPTION:
NAME: JoinDomain.ps1
Joins computer to domain
PARAMETERS:
-computer Specifies the name of the computer upon which to
run the script
C19622791.fm Page 589 Wednesday, December 12, 2007 1:49 PM
590 Windows PowerShell Scripting Guide
-domainName name of the domain or workgroup
-username user credentials
-password user password
-unjoin unjoin domain or workgroup
-reboot reboots computer
-help prints help file
SYNTAX:
JoinDomain.ps1
Displays message you must supply an action. calls help
JoinDomain.ps1 -reboot
Reboots the local computer
JoinDomain.ps1 -reboot -computer MunichServer
Reboots the remote computer named MunichServer. Munich must
be domain joined for this command to work.
JoinDomain.ps1 -computer MunichServer -domainName `
nwtraders.com -username nwtraders\administrator -password Password1
Joins a remote computer named MunichServer to the nwtraders.com domain
using the nwtraders\administrator account and password of Password1.
When the join is complete, it will reboot the machine. The computer
account is placed in default location which is by default is the
computers container.
JoinDomain.ps1 -help
Displays the help topic for the script
"@
$helpText
exit
}
Function funReboot()
{
if($computer -ne "localhost")
{
if($username)
{
$objWMI = Get-WmiObject -Class Win32_operatingsystem `
-computername $computer -credential $username
$objWMI.psbase.Scope.Options.EnablePrivileges = $true
$objWMI.reboot()
}
ELSE
{
$objWMI = Get-WmiObject -Class Win32_operatingsystem `
-computername $computer
$objWMI.psbase.Scope.Options.EnablePrivileges = $true
$objWMI.reboot()
}
exit
C19622791.fm Page 590 Wednesday, December 12, 2007 1:49 PM
Chapter 19 Working with Windows Server 2008 Server Core 591
}
ELSE
{
$objWMI = Get-WmiObject -Class Win32_operatingsystem `
-computername $computer
$objWMI.psbase.Scope.Options.EnablePrivileges = $true
$objWMI.reboot()
exit
}
}
Function FunJoinDomain()
{
$command = "netdom join $computer /domain:$domainName " + `
"/userD:$userName /passwordD:$password"
$sdcommand = "shutdown /m \\$computer /r " + `
"/c" + "joined domain"
invoke-expression $command
start-sleep -seconds 2
"We will now reboot $computer"
Invoke-expression $sdcommand
exit
}
Function FunUnjoin()
{
$option = 0 # 2 = disable but not delete account in AD
$objWMI = Get-WmiObject -Class Win32_computersystem `
-computername $computer
$objWMI.psbase.Scope.Options.EnablePrivileges = $true
$objWMI.UnjoinDomainOrWorkgroup($password,$userName,$option)
exit
}
if($help) { "Obtaining help ..." ; funhelp }
if($domainName)
{
"Joining $computer to $domainName"
FunJoinDomain
}
if($reboot)
{
"Rebooting $computer now ..."
FunReboot
}
if(!$help -or !$domainname -or !$reboot)
{
"you must supply an action ..."
funhelp
}
C19622791.fm Page 591 Wednesday, December 12, 2007 1:49 PM

592 Windows PowerShell Scripting Guide
Setting the IP Address
After joining the computer to the domain, you’ll need to set the static IP address. To do this,
use the Get-WmiObject cmdlet to retrieve a WMI class to assist this process. In the SetIP.ps1
Windows PowerShell script, set the IP address, the subnet mask, and the default gateway.
You can also obtain a listing of the current configuration of the network adapters; this is
beneficial from both a management and a configuration standpoint.
Begin the SetIP.ps1 script with the command-line parameters; create them by using the param
statement. First create the -computer parameter and set it to a default value of localhost to refer
to the local computer. Next, create the three parameters needed for a complete IP address
configuration: the -ip parameter, which holds the ip address; the -sm parameter to hold the
subnet mask; and -dg, for the default gateway. To add functionality to the script, add a switch
named -list. When the script is run with this switch enabled, perform two separate WMI
queries that list information about the network adapters and the configuration of the adapter.
Finally, add the -help switch, which is used to print online help. The completed param statement
is shown here:
param(
$computer="localhost",
$ip,
$sm,
$dg,
[switch]$list,
[switch]$help
)
Next create the help text. The first step is to create the $helptext variable, which is used to hold
the here-string that is created in the function.
Note Some script editors seem to have difficulty correctly interpreting the here-string. This
manifests itself when running the script from within the editor. When I find such a script, I
open the script in Notepad, remove the spaces between the $helptext = @” DESCRIPTION:,
and then resupply the new line character. After saving the script, it seems to run properly. At
this time, this problem manifests itself within several popular script editors.
In the here-string, create three separate sections: the description, the parameters, and the syn-
tax. Close the here-string with the “@ symbol, display the contents of the $funhelp variable,
and exit the script. The completed funhelp() function is shown here:
function funHelp()
{
$helpText=@"
DESCRIPTION:
NAME: SetIP.ps1
Sets a static IP address on a local or remote machine.
C19622791.fm Page 592 Wednesday, December 12, 2007 1:49 PM
Chapter 19 Working with Windows Server 2008 Server Core 593
PARAMETERS:
-computer Specifies the name of the computer upon which to run the script
-ip IP address to configure
-sm Subnet mask to configure
-dg Default gateway to configure
-list Queries all network adapters and reports their configuration
-help prints help file
SYNTAX:
SetIP.ps1
Displays message an action is required, and calls help
SetIP.ps1 -list -computer MunichServer
Lists all the network adapters and their configuration on a computer
named MunichServer
SetIP.ps1 -ip "10.0.0.1" -sm "255.0.0.0" -dg "10.0.0.5"
Sets the Ip address to 10.0.0.1 and the subnet mask to 255.0.0.0 and the default
Gateway to 10.0.0.5 on the local machine
SetIP.ps1 -help
Displays the help topic for the script
"@
$helpText
exit
}
Following the funhelp() function is the funevalrtn() function. This function consists of a switch
statement that is used to translate the return value from the method call from an integer to
a string that is more easily understood. The return value is supplied to the function via the
variable $rtn. Examine the ReturnValue property of the Error object that is contained in the
$rtn variable. If the value is 0, then there is no error, and you’ll use the Write-Host cmdlet to
print the fact in green. However, if there is any other value, print the message string in red. If
the value does not match any of the values listed in the switch statement, then the default
clause kicks in and you’ll print the error number in red. Once through the switch statement,
initialize all the variables to null. In addition to printing a string that directly translates the
error code, also include the value contained in the variable $strcall. This is used to inform the
user which method call was executed. The completed funevalrtn() function is shown here:
function FunEvalRTN($rtn)
{
Switch ($rtn.returnvalue)
{
0 { Write-Host -foregroundcolor green "No errors for $strCall" }
66 { Write-Host -foregroundcolor red "$strCall reports" `
" invalid subnetMask" }
C19622791.fm Page 593 Wednesday, December 12, 2007 1:49 PM
594 Windows PowerShell Scripting Guide
67 { Write-Host -foregroundcolor red "$strCall reports" `
" an error occurred processing request" }
70 { Write-Host -ForegroundColor red "$strCall reports" `
" invalid IP" }
71 { Write-Host -ForegroundColor red "$strCall reports" `
" invalid gateway" }
91 { Write-Host -ForegroundColor red "$strCall reports" `
" access denied"}
96 { Write-Host -ForegroundColor red "$strCall reports" `
" unable to contact dns server"}
DEFAULT { Write-Host -ForegroundColor red "$strCall service reports" `
" ERROR $($rtn.returnValue)" }
}
$rtn=$strCall=$null
}
Next is the funlist() function, used to perform two separate WMI queries. The first WMI query
is to retrieve information from the Win32_NetworkAdapter class. This class represents the
physical network adapter on the system. Use the Write-Host cmdlet to print a header and
specify the `n special character to create a new line. Use the Get-WmiObject cmdlet to con-
nect to the Win32_NetworkAdapter WMI class on the computer specified in the $computer vari-
able. Pipeline the information to the Format-List cmdlet where you’ll strip away all the system
properties by using the [a-z]* constraint. This constraint tells the Format-List cmdlet to only
print properties that begin with a letter in the range of a to z. Use the Get-WmiObject cmdlet
to connect to the Win32_NetworkAdapterConfiguration WMI class on the computer specified
in the $computer variable. Filter out the result set using the letters in the range of a to z. The
completed funlist() function is shown here:
Function funlist()
{
Write-host "Listing Network adapters on $($computer) `n"
Get-WmiObject -Class win32_networkadapter `
-computername $computer | format-list [a-z]*
Write-host "Listing network adapter configuration on " `
"$($computer) `n"
Get-WmiObject -Class win32_networkadapterconfiguration `
-computername $computer | format-list [a-z]*
exit
}
You must check the command-line parameters. Look first for the -help parameter; if the $help
variable is found, then the -help parameter was specified and you’ll call the funhelp() function.
If you find the $list variable, call the funlist() function and print the network adapter configu-
ration. Each of the two preceding actions exit the script by using the exit statement after the
function has completed running. If neither -list or -help was specified, you’ll need to configure
an IP address. To do this, you need an IP address, subnet mask, and default gateway. Check for
C19622791.fm Page 594 Wednesday, December 12, 2007 1:49 PM
Chapter 19 Working with Windows Server 2008 Server Core 595
the -ip, -sm, and -dg parameters. If one of them is missing, print a string and call the funhelp()
function. This section of the code is shown here:
if($help) { funhelp }
if($list) { funlist }
if(!$ip -or !$sm -or !$dg)
{ "An action is required ... " ; funhelp }
After checking the command-line parameters, it’s time to configure the IP address. First create
an instance of the Win32_NetworkAdapterConfiguration WMI class so you can work with the
configuration of the network adapter. To do this, use the Get-WmiObject cmdlet, specify the
Win32_NetworkAdapterConfiguration class, give it the computer name, and filter out only net-
work adapters that are bound to IP. Store the returned management object in the variable
$objwmi. This section of the code is shown here:
$global:RTN = $null
$metric = [int32[]]1
$objWMI = Get-WmiObject -Class win32_networkadapterconfiguration `
-computer $computer -filter "ipenabled = 'true'"
Now call the EnableStatic() method to create a static IP address. The EnableStatic() method
needs both an IP address as a string and a subnet mask, also as a string. Store the return value
in the $rtn variable, and call the funevalrtn() function while passing the $rtn variable. Create a
variable named $strcall that keeps track of the method call; use the $strcall variable when
printing the translation of the return value. This section of the code is displayed here:
$RTN=$objwmi.EnableStatic($ip, $sm)
$strCall="enable static IP and subnet mask"
FunEvalRTN($rtn)
The next step is to call the SetGateways() method to configure the default gateway. The Set-
Gateways() method in WMI is configured to require an array. When using Windows Power-
Shell, however, you don’t need to specify the [array] constraint on the value. Luckily, Windows
PowerShell handles the conversion seamlessly. In addition to an IP address for the default
gateway, the SetGateways() method also needs a metric value. In this script, this value is hard-
coded into the variable, $metric. Pass the return value from method call to the funevalrtn()
function. This section of the code is shown here:
$RTN=$objwmi.SetGateways($dg, $metric)
$strCall="enable set default gateway and metric"
FunEvalRTN($rtn)
The completed SetIP.ps1 script is shown here.
SetIP.ps1
param(
$computer="localhost",
$ip,
$sm,
$dg,
[switch]$list,
C19622791.fm Page 595 Wednesday, December 12, 2007 1:49 PM
596 Windows PowerShell Scripting Guide
[switch]$help
)
function funHelp()
{
$helpText=@"
DESCRIPTION:
NAME: SetIP.ps1
Sets a static IP address on a local or remote machine.
PARAMETERS:
-computer Specifies the name of the computer upon which to run the script
-ip IP address to configure
-sm Subnet mask to configure
-dg Default gateway to configure
-list Queries all network adapters and reports their configuration
-help prints help file
SYNTAX:
SetIP.ps1
Displays message an action is required, and calls help
SetIP.ps1 -list -computer MunichServer
Lists all the network adapters and their configuration on a computer
named MunichServer
SetIP.ps1 -ip "10.0.0.1" -sm "255.0.0.0" -dg "10.0.0.5"
Sets the Ip address to 10.0.0.1 and the subnet mask to 255.0.0.0 and the default
Gateway to 10.0.0.5 on the local machine
SetIP.ps1 -help
Displays the help topic for the script
"@
$helpText
exit
}
function FunEvalRTN($rtn)
{
Switch ($rtn.returnvalue)
{
0 { Write-Host -foregroundcolor green "No errors for $strCall" }
66 { Write-Host -foregroundcolor red "$strCall reports" `
" invalid subnetMask" }
67 { Write-Host -foregroundcolor red "$strCall reports" `
" an error occurred processing request" }
70 { Write-Host -ForegroundColor red "$strCall reports" `
" invalid IP" }
71 { Write-Host -ForegroundColor red "$strCall reports" `
" invalid gateway" }
91 { Write-Host -ForegroundColor red "$strCall reports" `
C19622791.fm Page 596 Wednesday, December 12, 2007 1:49 PM
Chapter 19 Working with Windows Server 2008 Server Core 597
" access denied"}
96 { Write-Host -ForegroundColor red "$strCall reports" `
" unable to contact dns server"}
DEFAULT { Write-Host -ForegroundColor red "$strCall service reports" `
" ERROR $($rtn.returnValue)" }
}
$rtn=$strCall=$null
}
Function funlist()
{
Write-host "Listing Network adapters on $($computer) `n"
Get-WmiObject -Class win32_networkadapter `
-computername $computer | format-list [a-z]*
Write-host "Listing network adapter configuration on " `
"$($computer) `n"
Get-WmiObject -Class win32_networkadapterconfiguration `
-computername $computer | format-list [a-z]*
exit
}
if($help) { funhelp }
if($list) { funlist }
if(!$ip -or !$sm -or !$dg) { "An action is required ... " ; funhelp }
$global:RTN = $null
$metric = [int32[]]1
$objWMI = Get-WmiObject -Class win32_networkadapterconfiguration `
-computer $computer -filter "ipenabled = 'true'"
$RTN=$objwmi.EnableStatic($ip, $sm)
$strCall="enable static IP and subnet mask"
FunEvalRTN($rtn)
$RTN=$objwmi.SetGateways($dg, $metric)
$strCall="enable set default gateway and metric"
FunEvalRTN($rtn)
Configuring the DNS Settings
You might also need to configure the Domain Name System (DNS) settings on a remote com-
puter. To do this, use WMI to configure several important DNS settings such as the search
order and search suffix, as well as the DNS server itself.
In the SetDNS.ps1 script, begin by creating the command-line parameters. The first parameter
is -computer, which is used to hold the name of the computer to connect to. The next parameter,
-dnsdomain, holds the name of the DNS domain to configure on the client computer. Then
comes the -dnsserver parameter, which holds the IP address of the primary DNS server. The
C19622791.fm Page 597 Wednesday, December 12, 2007 1:49 PM
598 Windows PowerShell Scripting Guide
final DNS parameter is the DNS suffix, which is supplied to the script via the -dnssuffix parameter.
The next parameters are two switched parameters. The first switched parameter is the -list
switch. When this is present, the script produces a listing of information about both the
physical network adapter and the network adapter IP configuration. The second switched
parameter is -help, which causes the script to display help information. The param statement
is shown here:
param(
$computer="localhost",
$dnsdomain,
$dnsServer,
$dnsSuffix,
[switch]$list,
[switch]$help
)
Next is the funhelp() function, which is called in response to the -help parameter. The funhelp()
function begins by creating the $helptext variable to hold the contents of a giant here-string
construction. The here-string allows you to ignore quoting rules when typing the text. This
allows much more freedom in typing the help information—without the concerns of opening
and closing text blocks. The first section of the here-string is the description of the script. Next
you come to a listing of the parameters, and finally the syntax section, which includes sample
command lines. After constructing the here-string, the contents of the $helptext variable are
displayed on the command line, and the script exits. The funhelp() function is shown here:
function funHelp()
{
$helpText=@"
DESCRIPTION:
NAME: SetDNS.ps1
Sets DNS configuration on a local or remote machine.
PARAMETERS:
-computer Specifies the name of the computer upon which to run the script
-list Queries all IP bound network adapters
-dnsserver Dns server
-dnsDomain DNS domain name
-dnsSuffix The dns suffix
-help prints help file
SYNTAX:
SetDNS.ps1
Displays a message an action is required and calls help
SetDNS.ps1 -list -computer MunichServer
Lists all the network adapters and configuration on a computer
named MunichServer
SetDNS.ps1 -dnsServer "10.0.0.2" -dnsDomain "nwtraders.com" `
-dnsSuffix "nwtraders.com"
C19622791.fm Page 598 Wednesday, December 12, 2007 1:49 PM

Chapter 19 Working with Windows Server 2008 Server Core 599
Sets the dns server to 10.0.0.2, the dnsDomain to nwtraders.com
the dns search suffix to nwtraders.com on the local machine
SetDNS.ps1 -dnsServer "10.0.0.2" -dnsDomain "nwtraders.com" `
-dnsSuffix "nwtraders.com" -computer munichServer
Sets the dns server to 10.0.0.2, the dnsDomain to nwtraders.com
the dns search suffix to nwtraders.com on a remote computer
named munichserver
SetDNS.ps1 -help
Displays the help topic for the script
"@
$helpText
exit
}
Now you must create a function to evaluate the return code from calling set DNS methods.
As these return codes are exactly the same ones used when setting the IP address (in fact,
you’ll even use the same WMI class), just copy the function from the SetIP.ps1 script without
modification. Please refer to the “Including Functions from Other Scripts” sidebar that follows
for a discussion of one way to approach function reuse issues.
Including Functions from Other Scripts
In the SetDNS.ps1 script, you don’t really need to copy the contents of the funevalrtn()
function and paste it into your script. Instead, you can use a technique that is sometimes
referred to as dot-sourcing. Some languages call the technique an include. There is a single
advantage to using the technique of including functions from other scripts: It saves you
the trouble of copying and pasting the function into your script.
There are, however, some significant issues with the technique. For example, the include
script must always accompany the calling script. This liability severely limits the porta-
bility of the script, because it must always have access to the included script. Another
problem with the technique is that troubleshooting is more difficult because you must
consider two script files rather than one. The third issue is that the script is harder to
read, because you must open both scripts to follow a potential problem.
However, despite the potential liabilities of the include technique, it remains popular
with some scripters. Many network administrators build libraries of scripts that hold
only functions that they use to extend the capability of Windows PowerShell.
Two demonstration scripts illustrate this technique. The first script, CallFunction-
Lib.ps1, calls the FunctionLib.ps1 script. It does this by using a period, a space, and the
path to the script, as is shown here:
. c:\fso\functionlib.ps1
C19622791.fm Page 599 Wednesday, December 12, 2007 1:49 PM

600 Windows PowerShell Scripting Guide
The FunctionLib.ps1 script functions are now available within the CallFunctionLib.ps1
script.
In the FunctionLib.ps1 script, there are two functions created, addOne() and addTwo().
After the functions are included in the calling script, the functions are called in exactly
the same way as a regular function, as is shown here:
addone(1)
addtwo(2)
The reason for this: They are placed on the function:\ drive as shown in the last line of
the script, as displayed here:
get-childitem function:\
The completed CallFunctionLib.ps1 script and the FunctionLib.ps1 script are both
shown here.
CallFunctionLib.ps1
. c:\fso\functionlib.ps1
addone(1)
addtwo(2)
get-childitem function:\
FunctionLib.ps1
function addOne($intIN)
{
$intIN ++
$intIN
}
function addTwo($intIN)
{
$intIn+=2
$intIn
}
To make the SetDNS.ps1 script completely portable, don’t place the funevalrtn() function in
an include file as discussed in the “Including Functions from Other Scripts” sidebar in this
chapter. If you want to modify the scripts to use a function library, the three common func-
tions are included in the WMIFunctions.ps1 script file on the companion CD-ROM. Instead of
doing this, copy and paste the funevalrtn() function into the SetDNS.ps1 script file. For a
detailed discussion of this function, review the SetIP.ps1 script in the “Setting the IP Address”
section of this chapter.
function FunEvalRTN($rtn)
{
Switch ($rtn.returnvalue)
{
0 { Write-Host -foregroundcolor green "No errors for $strCall" }
C19622791.fm Page 600 Wednesday, December 12, 2007 1:49 PM
Chapter 19 Working with Windows Server 2008 Server Core 601
66 { Write-Host -foregroundcolor red "$strCall reports" `
" invalid subnetMask" }
70 { Write-Host -ForegroundColor red "$strCall reports" `
" invalid IP" }
71 { Write-Host -ForegroundColor red "$strCall reports" `
" invalid gateway" }
91 { Write-Host -ForegroundColor red "$strCall reports" `
" access denied"}
96 { Write-Host -ForegroundColor red "$strCall reports" `
" unable to contact dns server"}
DEFAULT { Write-Host -ForegroundColor red "$strCall service reports" `
" ERROR $($rtn.returnValue)" }
}
$rtn=$strCall=$null
}
Next, create the funlist() function that produces a listing of all the network adapters and their
associated configurations. If you plan to use the include file technique discussed in the
“Including Functions from Other Scripts” sidebar in this chapter, this function is a good can-
didate, as it is another cut-and-paste job from the SetIP.ps1 script. For a detailed discussion of
the funlist() function following, refer to the “Setting the IP Address” section of this chapter;
also examine the discussion of the SetIP.ps1 script in this chapter.
Function funlist()
{
Write-host "Listing Network adapters on $($computer) `n"
Get-WmiObject -Class win32_networkadapter `
-computername $computer | format-list [a-z]*
Write-host "Listing network adapter configuration on " `
"$($computer) `n"
Get-WmiObject -Class win32_networkadapterconfiguration `
-computername $computer | format-list [a-z]*
exit
}
You need to evaluate the command-line parameters; the first one to look for is the -help parameter.
If you find the $help variable, call the funhelp() function. Next, look for the -list parameter. If
it was supplied at run time, the $list variable will be present on the stack, and you’ll call the
funlist() function. Check for missing arguments, as this script requires all three DNS configu-
ration items to be supplied. Look for the absence of $dnsdomain, $dnsserver, or $dnssuffix.
If any of these variables is missing, call the funhelp() function, which will display help and
exit the script. This section of the script is shown here:
if($help) { funhelp }
if($list) { funlist }
if(!$dnsdomain -or !$dnsServer -or !$dnsSuffix)
{ "An action is required ... " ; funhelp }
C19622791.fm Page 601 Wednesday, December 12, 2007 1:49 PM

602 Windows PowerShell Scripting Guide
Now declare two variables. The first is the $rtn variable; it is initialized as a global variable and
set equal to $null. Then create the $namespace variable and set it equal to the root\cimv2
namespace, which is the WMI namespace that stores the Win32_NetworkAdapterConfiguration
WMI class.
Note The WMI namespace root\cimv2 is the default WMI namespace on both Windows
Vista and Windows Server 2008, and as such, this parameter is not required in many WMI
scripts. However, as a best practice it should be included in scripts that use WMI. The reason:
It’s very easy to change the default WMI namespace, and some network administrators
routinely do this as a way of breaking certain malware and phishing Web sites. If a script
relies on the default WMI namespace and this value is changed, then of course the script will
fail. This can be a rather difficult item to troubleshoot.
Now it’s time to make the connection into WMI. But before doing this, you must create a
few variables. The first one is the $rtn variable; begin by initializing the $rtn variable as a
global variable and setting its value to null. Next, create a variable, $class, to hold the name of
the WMI class you’ll query: the Win32_NetworkAdapterConfiguration. Create the $namespace
variable, which holds the name of the WMI namespace that contains the
Win32_NetworkAdapterConfiguration WMI class. Set the $namespace variable to the string
“root\cimv2.” Now, you can finally proceed with the connection into WMI. To do this, use the
Get-WmiObject cmdlet and specify the class name contained in the $class variable, as well as
the namespace contained in the $namespace variable and the computer name contained in the
$computer variable. Use the -filter parameter to choose only network adapters that have the
TCP/IP protocol bound to them. The resulting WMI object is stored in the $objwmi variable.
This section of the code is shown here:
$global:RTN = $null
$class = "win32_networkadapterconfiguration"
$namespace = "root\cimv2"
$objWMI = Get-WmiObject -Class $class `
-namespace $namespace -computername $computer
-filter "ipenabled = 'true'"
Once you have a WMI object that represents the network adapter that is bound to the TCP/IP
protocol, call the SetDnsDomain() method and give it the domain named received from the
command line and stored in the $dnsdomain variable. The SetDnsDomain() method returns an
error object and you’ll pass the error object to the funevalrtn() function to see if the method
call was successful. Next, call the SetDnsServerSearchOrder() method and pass it the value
contained in the $dnsserver variable. Call the funevalrtn() function to see if the search order
setting was successful. This section of the script is shown here:
$RTN=$objwmi.SetDNSDomain($dnsdomain)
$strCall="Setting the DNS domain name"
FunEvalRTN($rtn)
$RTN=$objwmi.SetDNSServerSearchOrder($dnsServer)
$strCall="Set the dns server search order"
FunEvalRTN($rtn)
C19622791.fm Page 602 Wednesday, December 12, 2007 1:49 PM
Chapter 19 Working with Windows Server 2008 Server Core 603
The last step is to set the DNS suffix search order. To do this, use the SetDnsSuffixSearchOrder()
method from the Win32_NetworkAdapterConfiguration WMI class. To do this, use a different
methodology, as the SetDnsSuffixSearchOrder() method is not available via the Get-WmiObject
cmdlet. Instead, create an instance of the System.Management.ManagementObject.Management-
Class .NET Framework class and use it to access the SetDnsSuffixSearchOrder() method from
the Win32_NetworkAdapterConfiguration class.
The constructor for this class looks a little strange and is why I have decided to place every-
thing into variables. This makes it easier to reuse this portion of the code in other scripts.
Here’s what you need to do: Create a variable named $wmiclass that holds the path to the WMI
class, including the name of the computer, the namespace, and the name of the class. Create
an instance of the .NET Framework management class and give it the value contained in the
$wmiclass variable as the constructor. When you have the resultant management object, call
the SetDnsSuffixSearchOrder() method. This section of the code is shown here:
$wmiclass = "\\$computer" + "\" + $namespace + ":" + $class
$wmi = [wmiclass]"$wmiclass"
$rtn = $wmi.SetDNSSuffixSearchOrder($dnsSuffix)
$strCall="Set the dns suffix search order"
FunEvalRTN($rtn)
The completed SetDNS.ps1 script is shown here.
SetDNS.ps1
param(
$computer="localhost",
$dnsdomain,
$dnsServer,
$dnsSuffix,
[switch]$list,
[switch]$help
)
function funHelp()
{
$helpText=@"
DESCRIPTION:
NAME: SetDNS.ps1
Sets DNS configuration on a local or remote machine.
PARAMETERS:
-computer Specifies the name of the computer upon which to run the script
-list Queries all IP bound network adapters
-dnsserver Dns server
-dnsDomain DNS domain name
-dnsSuffix The dns suffix
-help prints help file
SYNTAX:
SetDNS.ps1
C19622791.fm Page 603 Wednesday, December 12, 2007 1:49 PM
604 Windows PowerShell Scripting Guide
Displays a message an action is required and calls help
SetDNS.ps1 -list -computer MunichServer
Lists all the network adapters and configuration on a computer
named MunichServer
SetDNS.ps1 -dnsServer "10.0.0.2" -dnsDomain "nwtraders.com" `
-dnsSuffix "nwtraders.com"
Sets the dns server to 10.0.0.2, the dnsDomain to nwtraders.com
the dns search suffix to nwtraders.com on the local machine
SetDNS.ps1 -dnsServer "10.0.0.2" -dnsDomain "nwtraders.com" `
-dnsSuffix "nwtraders.com" -computer munichServer
Sets the dns server to 10.0.0.2, the dnsDomain to nwtraders.com
the dns search suffix to nwtraders.com on a remote computer
named munichserver
SetDNS.ps1 -help
Displays the help topic for the script
"@
$helpText
exit
}
function FunEvalRTN($rtn)
{
Switch ($rtn.returnvalue)
{
0 { Write-Host -foregroundcolor green "No errors for $strCall" }
66 { Write-Host -foregroundcolor red "$strCall reports" `
" invalid subnetMask" }
70 { Write-Host -ForegroundColor red "$strCall reports" `
" invalid IP" }
71 { Write-Host -ForegroundColor red "$strCall reports" `
" invalid gateway" }
91 { Write-Host -ForegroundColor red "$strCall reports" `
" access denied"}
96 { Write-Host -ForegroundColor red "$strCall reports" `
" unable to contact dns server"}
DEFAULT { Write-Host -ForegroundColor red "$strCall service reports" `
" ERROR $($rtn.returnValue)" }
}
$rtn=$strCall=$null
}
Function funlist()
{
Write-host "Listing Network adapters on $($computer) `n"
C19622791.fm Page 604 Wednesday, December 12, 2007 1:49 PM
Chapter 19 Working with Windows Server 2008 Server Core 605
Get-WmiObject -Class win32_networkadapter `
-computername $computer | format-list [a-z]*
Write-host "Listing network adapter configuration on " `
"$($computer) `n"
Get-WmiObject -Class win32_networkadapterconfiguration `
-computername $computer | format-list [a-z]*
exit
}
if($help) { funhelp }
if($list) { funlist }
if(!$dnsdomain -or !$dnsServer -or !$dnsSuffix)
{ "An action is required ... " ; funhelp }
$global:RTN = $null
$class = "win32_networkadapterconfiguration"
$namespace = "root\cimv2"
$objWMI = Get-WmiObject -Class $class `
-namespace $namespace -computername $computer
-filter "ipenabled = 'true'"
$RTN=$objwmi.SetDNSDomain($dnsdomain)
$strCall="Setting the DNS domain name"
FunEvalRTN($rtn)
$RTN=$objwmi.SetDNSServerSearchOrder($dnsServer)
$strCall="Set the dns server search order"
FunEvalRTN($rtn)
$wmiclass = "\\$computer" + "\" + $namespace + ":" + $class
$wmi = [wmiclass]"$wmiclass"
$rtn = $wmi.SetDNSSuffixSearchOrder($dnsSuffix)
$strCall="Set the dns suffix search order"
FunEvalRTN($rtn)
Renaming the Server
Renaming a server using WMI can be somewhat of a challenge and may be better handled
locally or using some other mechanism. The reason for this is because of the restrictions
placed on the WMI methods. A server can’t be renamed if it is joined to a domain. If the
computer is not joined to the domain and you have not configured the security to allow for
workgroup access, then you will not be able to rename the server, either. Rebooting the
computer works fine as long as you have access rights to WMI.
In the RenameReboot.ps1 script, begin with the param statement, where you define
command-line parameters that enable you to control the script at run time rather than having
to edit the script file. The first parameter to create is -computer, which specifies the computer
to connect to. This value can be an IP address, and if your Windows Server 2008 Server Core
server has a randomly generated computer name, you will definitely want to use the IP
address to connect to your server.
C19622791.fm Page 605 Wednesday, December 12, 2007 1:49 PM

606 Windows PowerShell Scripting Guide
Caution If you don’t supply a value for the -computer parameter in the RenameReboot.ps1
script, the script will operate against your local computer. If you use the -newname parame-
ter, you could end up renaming your local computer. At a minimum, you may have to reboot
your local computer. Because the script is designed for automation purposes, there are no
prompts and no warnings about what you are about to do.
After the -computer parameter, you have the -newname parameter, which is used to hold the
new name to assign to the server. Then comes the credentials portion of the parameter set
with the -user and the -password parameters. There is also a -reboot switch and a -help switch.
The -reboot switch can be used with the -computer switch to reboot a remote server. You do not
have to assign a new name for the server to reboot it. The parameters section of the script is
displayed here:
param(
$computer="localhost",
$newName,
$user,
$password,
[switch]$reboot,
[switch]$help
)
Next, you come to the funhelp() function, which is used to display help when requested by the
user from the command line by using the -help switch. Begin the funhelp() function by creating
a variable named $helptext. Assign the result of a here-string to the $helptext variable. The here-
string contains the help text, and is divided into three portions: the description, the parame-
ters, and the syntax. The contents of the $helptext variable are printed to the console, and the
script exits. The funhelp() function is shared here:
function funHelp()
{
$helpText=@"
DESCRIPTION:
NAME: RenameReboot.ps1
Renames a local or remote machine.
PARAMETERS:
-computer Specifies the name of the computer upon which to run the script
-newname new name of the computer
-user user credentials
-password user password
-reboot reboots computer
-help prints help file
SYNTAX:
RenameReboot.ps1
Displays message you must supply an action. calls help
C19622791.fm Page 606 Wednesday, December 12, 2007 1:49 PM
Chapter 19 Working with Windows Server 2008 Server Core 607
RenameReboot.ps1 -reboot
Reboots the local computer
RenameReboot.ps1 -reboot -computer MunichServer
Reboots the remote computer named MunichServer
RenameReboot.ps1 -computer MunichServer -newname BerlinServer
Renames a local computer named MunichServer to BerlinServer
RenameReboot.ps1 -computer MunichServer -newname BerlinServer
-user munich\admin -password Password1
Renames a remote computer named MunichServer to BerlinServer. Uses
the credentials of the munich admin, with password of Password1.
RenameReboot.ps1 -computer MunichServer -newname BerlinServer
-user munich\admin -reboot
Renames a remote computer named MunichServer to BerlinServer. Uses
the credentials of the munich admin, with password supplied via
a popup dialog box. Then it reboots the newly named BerlinServer
RenameReboot.ps1 -help
Displays the help topic for the script
"@
$helpText
exit
Now it’s time to create the funrename() function, which uses the netdom command to rename
a computer. To do this, use the renamecomputer parameter from the netdom command. The
good thing about this is that you can use the command remotely to connect to another com-
mand and perform the rename operation. Use the /newname parameter from the netdom com-
mand and give it the new name that was specified in the $newname variable. Use the user
name and password from the command parameters to provide credentials for the operation.
The command is built up into a string and stored in the $command variable. To execute this
string, use the Invoke-Expression cmdlet and provide it with the string stored in the $com-
mand variable. The funrename() function is shown here:
Function funRename()
{
$command = "Netdom renamecomputer $($computer) /newname:$newname" + `
" /userD:$user /passwordD:$password"
Invoke-expression $command
}
The next step is the funreboot() function, which uses WMI to reboot the server. The funreboot()
function is exactly the same funreboot() function discussed in the JoinDomain.ps1 script
C19622791.fm Page 607 Wednesday, December 12, 2007 1:49 PM
608 Windows PowerShell Scripting Guide
under the “Joining the Domain” section in this chapter. Please refer to that discussion for
more coverage of this function. The funreboot() function is shown here:
Function funReboot()
{
if($computer -ne "localhost")
{
if($user)
{
$objWMI = Get-WmiObject -Class Win32_operatingsystem `
-computername $computer -credential $user
$objWMI.psbase.Scope.Options.EnablePrivileges = $true
$objWMI.reboot()
}
ELSE
{
$objWMI = Get-WmiObject -Class Win32_operatingsystem `
-computername $computer
$objWMI.psbase.Scope.Options.EnablePrivileges = $true
$objWMI.reboot()
}
exit
}
ELSE
{
$objWMI = Get-WmiObject -Class Win32_operatingsystem `
-computername $computer
$objWMI.psbase.Scope.Options.EnablePrivileges = $true
$objWMI.reboot()
exit
}
}
Now you must check for the command-line parameters. To do this, first look for the presence
of the $help variable. If you find it, call the funhelp() function. Next, look for the $newname
variable; if we find it, call the funrename() function. Check for the $reboot variable; if it is
present, the script was run with the -reboot switch specified and, therefore, you’ll call the
reboot() function. Next, check the absence of the three parameters; if none of them is found,
print a string and call the funhelp() function. This section of the script is shown here:
if($help) { "Obtaining help ..." ; funhelp }
if($newName)
{
"Renaming $computer to $newName"
FunRename
}
if($reboot)
{
"Rebooting $computer now ..."
FunReboot
}
if(!$help -or !$newname -or !$reboot)
{
C19622791.fm Page 608 Wednesday, December 12, 2007 1:49 PM
Chapter 19 Working with Windows Server 2008 Server Core 609
"you must supply an action ..."
funhelp
}
The completed RenameReboot.ps1 script is show here.
RenameReboot.ps1
param(
$computer="localhost",
$newName,
$user,
$password,
[switch]$reboot,
[switch]$help
)
function funHelp()
{
$helpText=@"
DESCRIPTION:
NAME: RenameReboot.ps1
Renames a local or remote machine.
PARAMETERS:
-computer Specifies the name of the computer upon which to run the script
-newname new name of the computer
-user user credentials
-password user password
-reboot reboots computer
-help prints help file
SYNTAX:
RenameReboot.ps1
Displays message you must supply an action. calls help
RenameReboot.ps1 -reboot
Reboots the local computer
RenameReboot.ps1 -reboot -computer MunichServer
Reboots the remote computer named MunichServer
RenameReboot.ps1 -computer MunichServer -newname BerlinServer
Renames a local computer named MunichServer to BerlinServer
RenameReboot.ps1 -computer MunichServer -newname BerlinServer
-user munich\admin -password Password1
Renames a remote computer named MunichServer to BerlinServer. Uses
the credentials of the munich admin, with password of Password1.
RenameReboot.ps1 -computer MunichServer -newname BerlinServer
-user munich\admin -reboot
C19622791.fm Page 609 Wednesday, December 12, 2007 1:49 PM
610 Windows PowerShell Scripting Guide
Renames a remote computer named MunichServer to BerlinServer. Uses
the credentials of the munich admin, with password supplied via
a popup dialog box. Then it reboots the newly named BerlinServer
RenameReboot.ps1 -help
Displays the help topic for the script
"@
$helpText
exit
}
Function funRename()
{
$command = "Netdom renamecomputer $($computer) /newname:$newname" + `
" /userD:$user /passwordD:$password"
Invoke-expression $command
}
Function funReboot()
{
if($computer -ne "localhost")
{
if($user)
{
$objWMI = Get-WmiObject -Class Win32_operatingsystem `
-computername $computer -credential $user
$objWMI.psbase.Scope.Options.EnablePrivileges = $true
$objWMI.reboot()
}
ELSE
{
$objWMI = Get-WmiObject -Class Win32_operatingsystem `
-computername $computer
$objWMI.psbase.Scope.Options.EnablePrivileges = $true
$objWMI.reboot()
}
exit
}
ELSE
{
$objWMI = Get-WmiObject -Class Win32_operatingsystem `
-computername $computer
$objWMI.psbase.Scope.Options.EnablePrivileges = $true
$objWMI.reboot()
exit
}
}
if($help) { "Obtaining help ..." ; funhelp }
if($newName)
{
"Renaming $computer to $newName"
FunRename
C19622791.fm Page 610 Wednesday, December 12, 2007 1:49 PM

Chapter 19 Working with Windows Server 2008 Server Core 611
}
if($reboot)
{
"Rebooting $computer now ..."
FunReboot
}
if(!$help -or !$newname -or !$reboot)
{
"you must supply an action ..."
funhelp
}
Managing Windows Server 2008 Server Core
There are many things you can do with WMI to manage your Windows Server 2008 Server
Core server. For example, you can report on disk space utilization by using the Get-WmiObject
cmdlet. In the most basic form, the command looks like this:
Get-wmiobject –class win32_volume –computername core
If you want to find out information about the CPU on the server, you can use a command such
as this one:
Get-wmiobject –class wi32_processor –computername core
And if you are interested in what processes are running on the server, use a command such as
this:
Get-wmiobject –class win32_process –computername core
More Info For more information on using Windows Management Instrumentation to
manage Windows Servers, see my book Microsoft Windows Scripting with WMI: Self-Paced
Learning Guide (Microsoft Press, 2005). Although the book is specifically targeted to Windows
Server 2003, all of the classes detailed in the book also exist on Windows Server 2008.
However, it might be a bit more efficient to incorporate the commands into a script that you
can use to monitor the server. A basic script to do this is shown in the MonitorServer.ps1
script.
Monitoring the Server
Begin the MonitorServer.ps1 script with the param statement, in which you define two param-
eters: -computer and -help. This statement is shown here:
Param($computer="localhost",[switch]$help)
C19622791.fm Page 611 Wednesday, December 12, 2007 1:49 PM
612 Windows PowerShell Scripting Guide
Next, create the funhelp() function, which is used to display help information if the script is
run with the -help switch. This function is shown here:
function funhelp()
{
$helptext=@"
Description:
MonitorServer.ps1 performs basic wmi queries
Parameters:
-computer name of computer to target
-help display help
Syntax:
MonitorServer.ps1
returns information about:processor, process,
disk, network, cpu and bios on local server
MonitorServer.ps1 -computer core
returns information about:processor, process,
disk, network, cpu and bios on a remote
computer named core
MonitorServer.ps1 -help
Displays this help topic
"@
$helptext
exit
}
Check the command line to see if the $help variable is present. If it is found, call the funhelp()
function. This is shown here:
if($help) { funhelp }
The body of the script does something new. To make it easier to type all the WMI class names,
simply create a string that contains each WMI class name, separated with a comma. This line
of code is shown here:
$aryclass = "win32_processor,win32_process,win32_volume" + `
",win32_networkadapter,win32_bios"
Create a temporary file name by using the static GetTempFileName() method from the Syste-
mIO.Path .NET Framework class. This method creates a temporary file name that points to the
temporary directory. Hold the name of the temporary file name and the path to the temporary
directory that is returned by this method in the $tempfilename variable. This is shown here:
$tmpfilename = [io.path]::getTempFileName()
Now you must turn the string of WMI class names into an array. To do this, use the split()
method from the System.String .NET Framework class. You don’t need to do anything special
here because the $aryclass variable already contains a string and the method is immediately
C19622791.fm Page 612 Wednesday, December 12, 2007 1:49 PM
Chapter 19 Working with Windows Server 2008 Server Core 613
available. Rather than storing this array into a separate variable, however, use the split()
method on the string on the right side of the foreach statement. Create a new variable, $class,
to use as the enumerator. This line of code is shown here:
foreach($class in $aryclass.split(","))
Finally, you arrive at the actual Get-WmiObject cmdlet. Use the $class variable to supply to the
-class parameter, and use the $computer variable to supply to the -computername parameter.
Pipeline the resulting object to the Format-List cmdlet and choose only the properties that
begin with the letters a through z. Pipeline that result to the Out-File cmdlet and use the
-filepath parameter to specify the file destination. Use the -append parameter to avoid overwriting
the results. Call Notepad to open and to display the results of the operation. This section of
the code is shown here:
{
Get-wmiobject -class $class -computername $computer |
format-list [a-z]* |
out-file -filepath $tmpfilename -append
}
"The results are stored in $tmpfilename. Displaying same ..."
Notepad $tmpfilename
The completed MonitorServer.ps1 script is shown here.
MonitorServer.ps1
Param($computer="localhost",[switch]$help)
function funhelp()
{
$helptext=@"
Description:
MonitorServer.ps1 performs basic wmi queries
Parameters:
-computer name of computer to target
-help display help
Syntax:
MonitorServer.ps1
returns information about:processor, process,
disk, network, cpu and bios on local server
MonitorServer.ps1 -computer core
returns information about:processor, process,
disk, network, cpu and bios on a remote
computer named core
MonitorServer.ps1 -help
Displays this help topic
"@
$helptext
C19622791.fm Page 613 Wednesday, December 12, 2007 1:49 PM
614 Windows PowerShell Scripting Guide
exit
}
if($help) { funhelp }
$aryclass = "win32_processor,win32_process,win32_volume" + `
",win32_networkadapter,win32_bios"
$tmpfilename = [io.path]::getTempFileName()
foreach($class in $aryclass.split(","))
{
Get-wmiobject -class $class -computername $computer |
format-list [a-z]* |
out-file -filepath $tmpfilename -append
}
"The results are stored in $tmpfilename. Displaying same ..."
Notepad $tmpfilename
Querying Event Logs
If you’re working on a local computer, it’s easy to query the event log. You use the Get-Event-
Log cmdlet as shown here:
Get-EventLog -LogName application |
Where-Object { $_.eventID -eq 25 }
When using the Get-EventLog cmdlet, you’ll notice you only need to specify the log name.
Pipe the resulting object to the Where-Object cmdlet to filter out by the event ID. This is a
wonderful technique with only one problem … it can’t remote to another computer. To make
up for this problem, use the same .NET Framework class the Get-EventLog cmdlet uses, but
provide the ability to connect to a remote computer. A script that does this is QueryRemote-
EventLog.ps1.
The QueryRemoteEventLog.ps1 script begins with the param statement where -computer, -log,
-id, and -help parameters are defined. The -log parameter is used to specify the name of the
event log to connect to, and the -id parameter specifies the event log entry ID number. The
param statement is shown here:
param(
$computer=".",
$log="system",
$ID,
[switch]$help
)
Create a help function named funhelp(), which is used to display the help text. The function
creates a variable named $helptext and assigns the result of a here-string to it. The funhelp()
function then displays the contents of the $helptext variable and exits the script. This function
is shown here:
C19622791.fm Page 614 Wednesday, December 12, 2007 1:49 PM
Chapter 19 Working with Windows Server 2008 Server Core 615
function funHelp()
{
$helpText=@"
DESCRIPTION:
NAME: QueryRemoteEventLog.ps1
Queries event log on a local or remote machine.
PARAMETERS:
-computer Specifies the name of the computer upon which to run the
script
-log event log to retrieve <application, system, security>
-id event log id number to retrieve
-help prints help file
SYNTAX:
QueryRemoteEventLog.ps1
Displays message an action is required, and calls help
QueryRemoteEventLog.ps1 -computer MunichServer -log system -id 1002
Lists all the id 1002 events (DHCP lease expired) entries from the
System log on a remote server MunichServer
QueryRemoteEventLog.ps1 -help
Displays the help topic for the script
"@
$helpText
exit
}
You must check for the presence of the $help variable. If you find it, call the funhelp() function.
Also look for the absence of the $id variable. You can’t search for an event in the event log if
you don’t know the event ID number. Therefore, $id is a mandatory parameter, and you’ll call
the funhelp() function if it is missing. This section of code is shown here:
if($help) { funhelp }
if(!$id) { "missing the ID parameter" ; funhelp }
Now create an instance of the System.Diagnostics.Eventlog .NET Framework class, and give it
both the name of the event log and the computer upon which to execute the command. These
two values make up the constructor for creating a new instance of the EventLog class. Store the
newly created EventLog object in the $objlog variable. Now use the Get_Entries() method and
pipeline the results to the Where-Object cmdlet. In the code block for the cmdlet, look for
event IDs that are equal to the number supplied at the command line for the -id argument.
This section of code is shown here:
$objlog = New-Object system.diagnostics.eventLog($Log, $computer)
$objlog.get_entries() |
Where-object { $_.eventID -eq $id }
C19622791.fm Page 615 Wednesday, December 12, 2007 1:49 PM
616 Windows PowerShell Scripting Guide
The completed QueryRemoteEventLog.ps1 script is shown here.
QueryRemoteEventLog.ps1
param(
$computer=".",
$log="system",
$ID,
[switch]$help
)
function funHelp()
{
$helpText=@"
DESCRIPTION:
NAME: QueryRemoteEventLog.ps1
Queries Eventlog on a local or remote machine.
PARAMETERS:
-computer Specifies the name of the computer upon which to run the script
-log event log to retrieve <application, system, security>
-id event log id number to retrieve
-help prints help file
SYNTAX:
QueryRemoteEventLog.ps1
Displays message an action is required, and calls help
QueryRemoteEventLog.ps1 -computer MunichServer -log system -id 1002
Lists all the id 1002 events (DHCP lease expired) entries from the system
log on a remote server MunichServer
QueryRemoteEventLog.ps1 -help
Displays the help topic for the script
"@
$helpText
exit
}
if($help) { funhelp }
if(!$id) { "missing the ID parameter" ; funhelp }
$objlog = New-Object system.diagnostics.eventLog($Log, $computer)
$objlog.get_entries() |
Where-object { $_.eventID -eq $id }
C19622791.fm Page 616 Wednesday, December 12, 2007 1:49 PM
Chapter 19 Working with Windows Server 2008 Server Core 617
Summary
In this chapter, we examined the configuration tasks that are involved in getting a Windows
Server 2008 Server Core server ready to manage. The first thing we looked at was the
Windows Firewall changes, which are required to be submitted locally before any management
traffic can even reach the server. After modifying the firewall, we looked at the steps required
to join the server to the domain. Next, we looked at setting the IP address, subnet mask,
and default gateway on the server so that the server can communicate with the management
pieces. We looked at configuring DNS server information, such as the primary DNS server,
domain suffix, and domain suffix search order, and we also examined renaming the server
and performing a remote reboot. We concluded the chapter by looking at two common
scenarios for managing a Windows Server 2008 Server Core server: examining a script that
queries WMI information and searching event logs.
C19622791.fm Page 617 Wednesday, December 12, 2007 1:49 PM
C19622791.fm Page 618 Wednesday, December 12, 2007 1:49 PM

619
Appendix A
Cmdlet Naming Conventions
The cmdlets installed with Windows PowerShell all follow a standard naming convention. In
general, they use a verb-noun pair. For example, there are four commands that start with the
verb Add. “Add what?” you may ask. This is where the noun comes into play: Add-Content,
Add-History, Add-Member, and Add-PSSnapin. When creating cmdlets, you should endeavor
to follow the same kind of naming convention. Understanding this naming convention is
helpful in learning the cmdlets that come with Windows PowerShell.
Table A-1 lists the number (count), verb, and usage of each cmdlet type currently included
with Windows PowerShell. To display the complete listing of cmdlets within Windows
PowerShell, type get-command.
Table A-1 Cmdlet Naming
Count Verb Example Usage
4 Add Add-Content, Add-History, Add-Member
4 Clear Clear-Content, Clear-Item
1CompareCompare-Object
1 ConvertFrom ConvertFrom-SecureString
1 Convert Convert-Path
2 ConvertTo ConvertTo-Html, ConvertTo-SecureString
2 Copy Copy-Item, Copy-ItemProperty
4 Export Export-Alias, Export-Clixml, Export-Console
1 ForEach ForEach-Object
4 Format Format-Custom, Format-List, Format-Table
29 Get Get-Acl, Get-Alias
1GroupGroup-Object
3 Import Import-Clixml, Import-Csv
3 Invoke Invoke-Expression, Invoke-History
1Join Join-Path
2 Measure Measure-Command, Measure-Object
2 Move Move-Item, Move-ItemProperty
8 New New-Alias, New-Item, New-ItemProperty
6 Out Out-Default, Out-File, Out-Host,
1 Pop Pop-Location
1 Push Push-Location
1 Read Read-Host
5 Remove Remove-Item, Remove-ItemProperty
Z01A622791.fm Page 619 Friday, December 14, 2007 12:37 PM

620 Windows PowerShell Scripting Guide
2 Rename Rename-Item, Rename-ItemProperty
1 Resolve Resolve-Path
1RestartRestart-Service
1 Resume Resume-Service
2 Select Select-Object, Select-String
13 Set Set-Acl, Set-Alias
1 Sort Sort-Object
1 Split Split-Path
3 Start Start-Service, Start-Sleep, Start-Transcript
3 Stop Stop-Process, Stop-Service, Stop-Transcript
1 Suspend Suspend-Service
1 Tee Tee-Object
1 Test Test-Path
1 Trace Trace-Command
2 Update Update-FormatData, Update-TypeData
1 Where Where-Object
7 Write Write-Debug, Write-Error, Write-Host
Table A-1 Cmdlet Naming (continued)
Count Verb Example Usage
Z01A622791.fm Page 620 Friday, December 14, 2007 12:37 PM

621
Appendix B
ActiveX Data Object Provider
Names
Several providers can be used when opening a connection to a database or some other data
source. These are listed in Table B-1. This list is not complete or comprehensive. This is
because many third-party software companies develop their own providers.
Each of these provider names can be used when opening a connection to a data source. The
code to this looks like the following:
$strDB = "c:\fso\configurationmaintenance.mdb"
$objConnection = New-Object -ComObject ADODB.Connection
$objConnection.Open("Provider = Microsoft.Jet.OLEDB.4.0; `
Data Source= $strDB")
An example of a script that uses Microsoft ActiveX Data Objects (ADO) to talk to a Microsoft
Access database is the AuditScreenSaverWriteToAccess.ps1 script discussed in Chapter 9,
“Configuring Desktop Settings.”
The provider names listed in Table B-1 are used for making a connection to diverse data
sources when using ADO.
Table B-1 ADO Provider Names
Provider Name Provider
ADSDSOObject Active Directory directory service
Microsoft.Jet.OLEDB.4.0 Microsoft Jet databases
MSDAIPP.DSO.1 Microsoft Internet Publishing
MSDAORA Oracle databases
MSDAOSP Simple text files
MSDASQL Microsoft OLE DB provider for ODBC
MSDataShape Microsoft Data Shape
MSPersist Locally saved files
SQLOLEDB Microsoft SQL Server
Z02B622791.fm Page 621 Friday, December 14, 2007 12:37 PM
Z02B622791.fm Page 622 Friday, December 14, 2007 12:37 PM
623
Appendix C
Frequently Asked Questions
This appendix covers a lot of topics. All of these questions have come up during the last year
or so that I have been teaching Windows PowerShell classes all around the world. I think this
FAQ format actually makes interesting reading. Reading over the list from time to time will
hopefully save you some of the hundreds of hours I spent trying to figure these things out.
When you see more than one answer, it is because there is more than one answer to some
questions (it is not a multiple-choice exam).
Q. How many cmdlets are available on a default Windows PowerShell installation?
A. 129
Q. How did you find out how many cmdlets are available on a default Windows
PowerShell installation?
A. The following three commands all return the same result:
(Get-Command).length
(Get-Command -CommandType cmdlet).count
Get-Command -CommandType cmdlet | foreach($_) { $i++ }
Q. What is the difference between a read-only variable and a constant?
A. A read-only variable has read-only content. However, it can be modified by using the Set-
Variable cmdlet with the -force parameter. It can also be deleted by using the Remove-Variable
cmdlet with the -force parameter. A constant variable cannot be deleted or modified, even
when using the -force parameter.
Q. What are the three most important cmdlets?
A. The three most important cmdlets are: Get-Command, Get-Help, and Get-Member.
Q. Which cmdlet can I use to work with event logs?
A. To work with event logs, use the Get-Eventlog cmdlet.
Q. How did you find that cmdlet?
A. I found it by executing the following command:
Get-Command -Noun eventlog.
Q. What .NET Framework class is employed by the Get-Eventlog cmdlet?
A. The System.Diagnostics.EventLogEntry class is employed by the Get-Eventlog cmdlet.
Z03C622791.fm Page 623 Friday, December 14, 2007 12:37 PM
624 Windows PowerShell Scripting Guide
Q. How would I find the above information?
A. You would find it by executing the following command:
Get-Eventlog application | Get-Member
Q. What is the most powerful command in Windows PowerShell?
A. The switch statement is the most powerful command in Windows PowerShell because it
allows you to test for multiple conditions, directing the script in the correct direction.
Q. What is `t used for?
A. This symbol-letter combination is used to create tabs.
Q. How would I use the `t in a script to produce a tab?
A. To produce a script, use this combination: “`thi”.
Q. That syntax above is ugly. What happens if I put a space between the t and the h like
this: “`t hi”?
A. If you include a space between the t and the h, the command causes the output to tab over
one tab position plus one additional space.
Q. Is the `t command (such as “`thi:”) case sensitive?
A. Yes. This command is one of the few that is case sensitive in Windows PowerShell. If you
capitalize `t as shown here, “`Thi”, the letters Thi will appear on the line.
Q. How do I run a script with a space in the path?
A. Use the following code:
PS > c:\my`folder\myscript.ps1
PS> &("c:\my folder\myscript.ps1")
Q. What is the easiest way to create an array?
A. The easiest way to create an array is:
$array = "1","2","3","4"
Q. How do I display a calculated value (that is, Megabytes instead of bytes) from a WMI
query when pipelining data into a Format-Table cmdlet?
A. Create a hash table in the position where you wish to display the data and perform the
calculation inside curly brackets. Assign the results to the expression parameter. An example is
shown here:
gwmi win32_logicaldisk -Filter "drivetype=3" | ft -Property name,
@{ Label="freespace"; expression={$_.freespace/1MB}}
Z03C622791.fm Page 624 Friday, December 14, 2007 12:37 PM
Appendix C Frequently Asked Questions 625
Q. Which parameter of the Get-WmiObject cmdlet takes the place of a WQL Where
clause?
A. That would be the -filter parameter, as shown here:
Get-wmiobject win32_logicaldisk -filter "drivetype = 3"
Q. Which command, when typed at the beginning of a script, will cause Windows
PowerShell to ignore errors and continue executing the code?
A. The command is:
$erroractionpreference=SilentlyContinue
Q. How can I display only the current year?
A. To display the current year, use the following line of code. (Note that yyyy is replaced by
the year.)
Get-Date -format yyyy
Q. What is Windows PowerShell, in 30 or fewer words?
A. Windows PowerShell is the next generation command prompt and scripting language
from Microsoft. It can be a replacement for VBScript and for the commnd prompt in most
circumstances.
Q. How can you be sure that you used 30 or fewer words?
A. By using the following code:
$a = "Windows PowerShell is the next generation cmd prompt and scripting
language from Microsoft. It can be a replacement for vbscript and for
the cmd prompt in most circumstances."
Measure-Object -InputObject $a -Word
Q. What are two ways of querying Active Directory from within Windows PowerShell?
A. Use ADO and perform an LDAP dialect query or use ADO and perform a SQL dialect
query.
Q. How can I print the amount of free space on a fixed disk in MB with two decimal
places?
A. Use a format specifier as shown here:
"{0:n2}"-f ((gwmi win32_logicaldisk -Filter "drivetype='3'").freespace/1MB)
Z03C622791.fm Page 625 Friday, December 14, 2007 12:37 PM
626 Windows PowerShell Scripting Guide
Q. I need to replace the 2 with 12 in the variable $array: $array = "1","2","3","4". How can
I do this?
A. To make the replacement, use this method:
$array=[regex]::replace($array,"2","12")
Q. I have the following switch statement, and I want to prevent the last line (Write-Host
“switched”) from being executed. How can I do this?
$a = 3
switch ($a) {
1 { "one detected" }
2 { "two detected" }
}
Write-Host "switched"
A. Add an exit statement to the default switch as shown here:
$a = 3
switch ($a) {
1 { "one detected" }
2 { "two detected"}
DEFAULT { exit}
}
Write-Host "switched
Q. How can I supply alternate credentials for a remote WMI call when using the
Get-WmiObject cmdlet?
A. Use the -credential parameter as shown here:
Get-WmiObject Win32_BIOS -ComputerName Server01 -Credential (get-credential
Domain01@User01)
Or use the -credential parameter as shown here:
$c = Get-Credential
Get-WmiObject Win32_DiskDrive -ComputerName Server01 -Credential $c
Q. How can I generate a random number?
A. Use the System.Random .NET Framework class, and call the next() method as shown here:
([random]5).next()
Q. How can I generate a random number between the values of 1 and 10?
A. Use the System.Random .NET Framework class, and call the next() method as shown here:
([random]5).next("1","10")
Z03C622791.fm Page 626 Friday, December 14, 2007 12:37 PM
Appendix C Frequently Asked Questions 627
Q. What Windows PowerShell commands support regular expressions?
A. You can use the Where-Object with -match as shown here:
get-process | where-object { $_.ProcessName -match "^p.*" }
Or you can use the switch statement with -regex as shown here:
switch -regex ("Hi there") { "hi" { "found" } }
Q. How can I create an audit file of all commands typed during a Windows PowerShell
session?
A. Use the Start-Transcript cmdlet as shown here:
Start-transcript -Path c:\fso\mylog.txt -Force
Q. How can I see how many seconds it takes to retrieve objects from the application log?
A. Use this command:
(Measure-Command { Get-EventLog application }).totalseconds
Q. When I open the Windows PowerShell console on an Exchange 2007 server, none of
the Microsoft Exchange cmdlets appear to be available. What is the problem and what is
the solution?
A. The problem is that the Exchange Management Shell snap-in has not been loaded. The
solution is to go to the Windows PowerShell console and type the following command:
add-psSnapin -Name microsoft.exchange.management.powershell.admin
Q. I want to get a list of all the snap-ins that are registered with Windows PowerShell on
my computer. How do I do this?
A. Inside a Windows PowerShell console, type the following command:
Get-PSSnapin -Registered
Q. I want to create an ASCII text file to hold the results of the Get-Process cmdlet. How
can I do this?
A. Pipeline the results to the Out-File cmdlet and use the -encoding parameter to specify ASCII.
Q. Someone told me the Write-Host cmdlet can use color for output. Can you give me
some samples of acceptable syntax?
A. Syntax samples:
write-host -ForegroundColor 12 "hi"
write-host -ForegroundColor 12 "hi" -BackgroundColor white
Z03C622791.fm Page 627 Friday, December 14, 2007 12:37 PM
628 Windows PowerShell Scripting Guide
write-host -ForegroundColor blue -BackgroundColor white
write-host -ForegroundColor 2 hi
write-host -backgroundcolor 2 hi
write-host -backgroundcolor ("{0:X}" -f 2) hi
for($i=0 ; $i -le 15 ; $i++) { write-host -foregroundcolor $i "hi" }
Q. How can I tell if a command completes successfully?
A. Query the $error automatic variable. If $error[0] reports no information, then no errors
have occurred, or query the $? automatic variable. If $? is equal to true, then the command
completed successfully.
Q. How can I split the string shown here in the $a variable?
$a = "atl-ws-01,atl-ws-02,atl-ws-03,atl-ws-04"
A. Use the split method :
$b = $a.split(",")
Q. How do I join an array, such as the one in the $a variable shown here?
$a = "h","e","l","l","o"
A. Use the join static method from the string class as is shown here:
$b = [string]::join("", $a)
Q. I need to build up a path to the Windows\System32 directory. How can I do this?
A. Use this code to build up a path:
Join-Path -path (g-t-item env:\windir).value -ChildPa-h system32
Q. How can l print the value of %systemroot%?
A: Print the value using this code:
(get-item Env:\systemroot).value
$env:systemroot
Q. I need to display process output at the Windows PowerShell prompt and also write
that same output to a text file. How can I do this?
A. Use this code:
Get-process | Tee-Object -FilePath c:\fso\proc.txt
Q. I would like to display the ASCII character associated with the ASCII value 56. How
can I do this?
A. Use this code:
[char]56
Z03C622791.fm Page 628 Friday, December 14, 2007 12:37 PM
Appendix C Frequently Asked Questions 629
Q. I want to create a strongly typed array of System.Diagnostics.Processes and store it in a
variable named $a. How can I do this?
A. Use this code:
[diagnostics.process[]]$a=get-process
Q. I want to display the number 1234 in hexadecimal. How can I do this?
A. Use this code:
"{0:x}" -f 1234
Q. I want to display the decimal value of the hexadecimal number 0x4d2. How can I do
this?
A. Use this code:
0x4d2
Q. I want to find out if a string contains the letter m. The string is stored in the variable $a
as shown here:
$a="northern hairy-nosed wombat"
A. Use this code to find out if the string contains the letter m:
[string]$a.contains("m")
$a.contains("m")
[regex]::match($a,"m")
([regex]::match($a,"m")).success
Q. How can I solicit input from the user?
A. Use the Read-Host cmdlet as shown here:
$in = Read-host "enter the data"
Q. Can I use a variable named $input to hold input from the Read-Host cmdlet?
A. $input is an automatic variable that is used for script blocks in the middle of a pipeline and,
as such, it would be a very poor choice. Name the variable $userInput (or a similar variable) if
you wish, but don’t name it $input!
Q. How can I cause the script to generate an error if a variable has not been declared?
A. Place the command Set-PSDebug -strict anywhere in the script. Any nondeclared variable
will generate an error when accessed.
Z03C622791.fm Page 629 Friday, December 14, 2007 12:37 PM
630 Windows PowerShell Scripting Guide
Q. How can I increase the size used by the Get-History buffer?
A. Assign the desired value to the $MaximumHistoryCount automatic variable as shown here:
$MaximumHistoryCount = 65
Q. How can I specify the number 1 as a 16-bit integer array?
A. Use this code:
$a=[int16[]][int16]1
Q. I have a string: “this`"is a string” and I want to replace the quotation mark (") with
nothing—no space, just nothing. Effectively, I want to remove the quotation mark (") from
the string. How do I do this?
A. Use the grave accent (backtick or `) to “escape” the quotation mark.
Q. How can I use the replace method to replace the quotation mark (") with nothing if the
string is held in a variable named $arr? I want the results to look like this: thisis a string.
A. Use the replace method from the System.String .NET Framework class as shown here:
$arr.Replace("`"","")
Or, use the ASCII value of the quotation mark and use the replace method from the
System.String .NET Framework class as shown here:
$arr.Replace([char]34,"")
Q. How can I use Invoke-Expression to run a script inside Windows PowerShell when the
path has spaces in it?
A. Escape the spaces with a grave accent (backtick or `) and surround the path and script
name in single quotes as shown here:
Invoke-Expression ('h:\LABS\extras\Run` With` Spaces.ps1')
Q. How can I create an array of byte values that contains hexadecimal values?
A. Use the [byte] type constraint but include the array character ([]) as shown here: [byte[]]. To
specify a hexadecimal number, use 0x format. The resulting line of code is shown here:
[byte[]]$mac = 0x00,0x19,0xD2,0x72,0x0E,0x2A
Q. How can I install the Microsoft Exchange Management Shell snap-in on my Windows
Vista computer?
A. You can’t. The Exchange Management Shell snap-in will only install with an Exchange
Server 2007 server. Search the Microsoft Help and Support Web site for KB 931903 for details.
Z03C622791.fm Page 630 Friday, December 14, 2007 12:37 PM
631
Appendix D
Scripting Guidelines
This appendix details scripting guidelines. These scripting guidelines have been collected
from more than a dozen script writers around the world. Most of them are Microsoft employ-
ees who are actively involved in the world of Windows PowerShell. Some are non-Microsoft
employees, such as network administrators and consultants, who use Windows PowerShell
on a daily basis to improve their work-life balance. Not every script adheres to all of these
guidelines; however, you will find that the closer you adhere to these guidelines, the easier
your scripts are to understand and maintain. They may not be easier to write, but they should
be easier to manage, and you will find that your total cost of ownership (TCO) on the script
should be lowered significantly. In the end, I only have three requirements for a script: that
it is easy to read, easy to understand, and easy to maintain.
General Script Construction
This section looks at some general considerations for the overall construction of your scripts.
This includes the use of functions and other considerations.
Include Functions in the Script that Calls the Function
While it is possible to use an include file or dot source function within Windows PowerShell,
it can become a support nightmare. If you know which function you want to use but don’t
know which script provides it, you have to search. If a script provides the function you want
but has other elements that you don’t want, it’s hard to pick and choose from the script file.
Additionally, you must be very careful when it comes to variable-naming conventions as you
may end up with conflicting variable names. When you use an include file, you no longer have
a portable script. It must always travel with the function library.
I use functions in my scripts because it makes the script easier to read and easier to maintain.
If I were to store these functions in separate files and then dot source them, then neither of my
two personal objectives of function use is really met.
There is one other consideration: When a script references an external script containing
functions, there now exists a relationship that must not be disturbed. For example, if you
decide to update the function, you may not remember how many external scripts are calling
this function, and you may not know how the updated function will affect their performance
and operation. If there is only one script calling the function, then the maintenance is easy:
Just copy the silly thing into the script file itself and be done with the whole business.
Z04D622791.fm Page 631 Friday, December 14, 2007 12:37 PM
632 Windows PowerShell Scripting Guide
Use Full Cmdlet Names and Full Parameter Names
There are several advantages to spelling out cmdlet names and avoiding the use of aliases in
scripts. First of all, it makes your script nearly self-documenting and is therefore much easier
to read. Second, it makes the script resilient to alias changes by the user and more compatible
with future versions of Windows PowerShell.
Understanding the Use of Aliases
There are three kinds of aliases in Windows PowerShell: compatibility aliases, canonical
aliases, and user-defined aliases.
You can identify the compatibility aliases by using this command:
Get-childitem alias: |
where-object {$_.options -notmatch "Readonly" }
The compatibility aliases are present in Windows PowerShell to provide an easier transition
from using older command shells. You can remove the compatibility aliases by using this
command:
Get-childitem alias: |
where-object {$_.options -notmatch "Readonly" } |
remove-item
Canonical aliases were created specifically to make the Windows PowerShell cmdlets easier to
use from within the Windows PowerShell console. Short length and ease of typing were the
primary driving factors in their creation. To find the canonical aliases, use this command:
Get-childitem alias: |
where-object {$_.options -match "Readonly" }
If You Must Use an Alias, Use Only Canonical Aliases in a Script
You are reasonably safe in using the canonical aliases in a script; however, they make the script
much harder to read and, because there are often several aliases for the same cmdlet, each
Windows PowerShell user may have a personal favorite. In addition, as the canonical aliases
are read-only, even a canonical alias can be removed, or worse, have the meaning radically
altered when the user redefines the alias with a different meaning.
Always Use the Description Property when Creating an Alias
When adding aliases to your profile, you may want to specify the read-only or constant option.
You should always include the Description property for your personal aliases and make the
description something that is relatively constant. Here is an example from my personal
Windows PowerShell profile:
New-Alias -Name gh -Value Get-Help -Description "mred alias"
New-Alias -Name ga -Value get-alias -Description "mred alias"
Z04D622791.fm Page 632 Friday, December 14, 2007 12:37 PM
Appendix D Scripting Guidelines 633
Use Get-Item to Convert Path Strings to Rich Types
This is actually a pretty cool trick. When working with a listing of files, you can use the
Get-Content cmdlet to read each line and use it as a path to work with. However, if you use
Get-Item, you’ll have an object with a corresponding number of both properties and methods
to work with. The following example illustrates this feature:
$files = Get-Content "filelist.txt" |
Get-Item $files |
Foreach-object { $_.Fullname }
General Script Readability
There are several things you can do to ensure your scripts are as readable as possible. In this
section we will look at some of the more important items.
■When creating an alias, include the -description parameter, and use it when searching for
your personal aliases. An example of this is shown here:
Get-Alias |
where-object { $_.description -match 'mred' } |
Format-Table -Property " ",name, definition -autosize `
-hideTableHeaders
■Scripts should accept -help and print a help text. You can implement -help as a named
parameter:
Param($help)
■Alternatively, you can implement the -help parameter as a switch statement. The switch is
easiest to implement:
Param([switch]$help)
■All procedures should begin with a brief comment describing what they do. This
description should not describe the implementation details (how it does it) because
these often change over time, resulting in unnecessary comment maintenance work, or
worse, erroneous comments.
■Arguments passed to a function should be described when their purpose is not obvious
and when the function expects the arguments to be within a specific range.
■Return values for variables that are changed by a function should also be described at the
beginning of each function.
■Every important variable declaration should include an inline comment describing the
use of the variable if the name of the variable is not obvious.
■Variables and functions should be named clearly to ensure that inline comments are
only needed for complex functions.
Z04D622791.fm Page 633 Friday, December 14, 2007 12:37 PM
634 Windows PowerShell Scripting Guide
■When creating a complex function with multiple code blocks, place an inline comment
for each closing curly bracket (}).
■At the beginning of the script, include an overview that describes the script, significant
objects and cmdlets, and any unique requirements for the script.
■When naming functions, use the verb-noun construction used by cmdlet names, but
avoid using the hyphen in the name. In this way, you can clearly distinguish between the
function and the cmdlet. This avoids confusion as to why tab expansion works for one
“cmdlet” and not for another.
■A script should use named parameters if it accepts more than one argument. If a script
only accepts a single argument, then it is OK to use an unnamed argument.
■Always assume that users will copy your script and modify it to meet their needs. Place
comments in the code to facilitate this process.
■Never assume the current path. Always use the full path, either via an environment vari-
able or an explicitly named path.
Formatting Your Code
Screen space should be conserved as much as possible while still allowing code formatting to
reflect logic structure and nesting. Here are a few suggestions:
■Indent standard nested blocks two spaces.
■Block overview comments for a function.
■Block the highest level statements, with each nested block indented an additional two
spaces.
■You must line up curly brackets. This makes it easier to follow the code flow.
■Avoid single-line statements. In addition to making it easier to follow the flow of the
code, this also makes it easier when you search for a missing curly bracket.
■Break each pipelined object at the pipe. Leave all pipes on the right.
■Avoid line continuation—the grave accent (backtick or `). The exception here is when it
would cause the user to have to scroll to read the code or the output—generally around
90 characters.
■Follow camel case (InterCapping) guidelines for long variable names within scripts.
■Use the Write-Progress cmdlet for scripts that take more than one or two seconds to run.
■Consider supporting the -whatif and -confirm parameters in your functions as well as in
your scripts, especially if they will change system state. An example using the -whatif
parameter follows. For a complete script example, review the AddNodeEvictNode.ps1
script in Chapter 14, “Configuring the Cluster Service.”
Z04D622791.fm Page 634 Friday, December 14, 2007 12:37 PM
Appendix D Scripting Guidelines 635
param(
[switch]$whatif
)
function funwhatif()
{
"what if: Perform operation xxxx"
}
if($whatif)
{
funwhatif #calls the funwhatif() function
}
■If your script does not accept a variable set of arguments, check the value of $args.count
and call the help function if the number is incorrect. Here is an example:
if($args.count -ge 0)
{
"wrong number of arguments"
Funhelp #calls the funhelp() function
}
■If your script does not accept any arguments, use code such as this:
If($args -ge 0) { funhelp }
Working with Functions
Functions in Windows PowerShell give us the ability to encapsulate pieces of code. This code
can be used to extend the capabilities of Windows PowerShell, or can merely be used to
arrange the script into a more readable fashion. In either case, here are some guidelines for
working with functions.
■Functions should handle mandatory parameter checking. Here is an example:
Function GetProcess ($name = ($paramMissing=$true))
{
if($local:paramMissing)
{
throw "USAGE: GetProcess Name <name>"
} #$local:paramMissing
Get-Process -name $name
} #end function GetProcess()
■Utility or shared functions can be placed into shared function libraries and then included
or dot sourced into scripts. The file name should be of the form Library-<noun or feature-
name>.ps1. Here is an example:
. c:\lib\Library-WmiFunctions.ps1
■If you are writing a function library script, consider using feature and parameter variable
names that incorporate a unique name to minimize the chances of conflict with other
variables in the scripts that call them.
Z04D622791.fm Page 635 Friday, December 14, 2007 12:37 PM
636 Windows PowerShell Scripting Guide
■Consider supporting the -erroraction parameter. This allows you to pass a parameter
more easily when calling the function. Here is an example:
function getProcess (
$name,
$ErrorAction=$ErrorActionPreference
)
{
$private:ErrorActionPreference = $ErrorAction
Get-Process -Name $name
"local error action preference is $ErrorActionPreference" #debug
} #end getProcess()
getProcess -name notepad -ErrorAction "stop"
■Consider supporting the -verbose common parameter. This will allow you to have two
levels of output from your function. Here is an example:
Function GetProcess
(
$name,
[switch]$verbose
)
{
If($verbose)
{
Get-Process -Name $name |
Format-List *
}
ELSE
{
Get-Process -Name $name
}
} #end getprocess()
getprocess -name notepad -verbose
■Consider implementing the -confirm common parameter when changing system state.
Here is an example:
Function StopProcess
(
$name,
[switch]$confirm
)
{
If($confirm)
{
$response = Read-Host -Prompt `
"Are you sure you want to stop $name ?
< y(es) n(o) >
"
switch($response)
{
"y" {
Z04D622791.fm Page 636 Friday, December 14, 2007 12:37 PM
Appendix D Scripting Guidelines 637
Stop-Process -Name $name
}
"n" {
"$name will not be stopped."
}
}
}
ELSE
{
Stop-Process -Name $name
}
} #end getprocess()
stopprocess -name notepad -confirm
Creating Template Files
Create templates that can be used for different types of scripts. Some examples might be
WMI scripts, ADSI scripts, and ADO scripts. When you are creating templates, consider the
following:
■Add common functions that you will use on a regular basis.
■Do not hard-code specific values that connection strings might require, such as server
names, input file paths, output file paths, and so on. Instead, contain these values within
variables.
■Do not hard-code version information into the template.
■Make sure you include comments where the template will require modification to be
made functional.
Writing Functions
When writing your own functions, here are some suggestions to consider:
■Create highly specialized functions. Good functions do one thing well.
■Make the function completely self-contained. Good functions should be portable.
■Alphabetize the functions in your script, if possible. This promotes both readability and
maintainability.
■Give your functions descriptive names, such as funhelp, funline, or funcomputepercentage.
I like prefixing my functions with the moniker fun to avoid the possibility of running into
a keyword and also to make the names easy to see and to read. You can spell out the
word function, but I think that is too much typing.
■Every function should have a single entry point.
■Every function should have a single output point.
Z04D622791.fm Page 637 Friday, December 14, 2007 12:37 PM
638 Windows PowerShell Scripting Guide
■Use parameters to avoid problems with local and global variable scopes.
■Implement the common parameters: -verbose, -debug, -whatif, and -confirm where
appropriate to promote reusability.
Creating and Naming Variables and Constants
When creating and naming variables and constants, here are some points to consider:
■Avoid “magic numbers.” When calling methods or functions, avoid hard-coding numeric
literals. Instead, create a constant that is descriptive enough so that anyone reading the
code will be able to figure out what the code is supposed to do. In the ServiceDependen-
cies.ps1 script, a number offsets the printout. This number is determined by the position
of a certain character in the output. Rather than just saying +14, create a constant with
a descriptive name. Refer to Chapter 12, “Troubleshooting Windows,” for more informa-
tion on this script. The applicable portion of the code is shown here:
New-Variable -Name c_padline -value 14 -option constant
Get-WmiObject -Class Win32_DependentService -computername $computer |
Foreach-object `
{
"=" * ((([wmi]$_.dependent).pathname).length + $c_padline)
■Do not “recycle” variables. Reused variables are referred to as unfocused variables.
Variables should serve a single purpose. These are called focused variables.
■Give variables descriptive names.
■Minimize variable scope. If you are only going to use a variable in a function, then declare
it in the function.
■When a constant is needed, use a read-only variable instead. Remember that constants
cannot be deleted, nor can their value change.
■Avoid hard-coding values into method calls or into the worker section of the script.
Instead, place values into variables.
■Whenever possible, group variables into a single section within each level of the script.
■Avoid using the “Hungarian notation” if it is not needed. Remember that everything in
Windows PowerShell is basically an object, so there is no value in naming a variable
$objWMI.
■There are times when it makes sense to use the following: bln, int, dbl, err, dte, or str. This
is because Windows PowerShell is a strongly typed language, even though it acts as if
it isn’t.
■Scripts should avoid populating the global variable space. Instead, consider passing
values to a function by reference [ref].
Z04D622791.fm Page 638 Friday, December 14, 2007 12:37 PM
639
Appendix E
General Troubleshooting Tips
This appendix contains a collection of general troubleshooting tips. They are not necessarily
in any particular order of importance.
Remember that spelling counts. Always look for misspelled cmdlet names, property names,
method calls, and so on. One feature of Windows PowerShell is that if you do not spell a
property name correctly, when you try to run the script, it doesn’t generate an error. In the
code below, note that there is no output typed inside the shell—no error, nothing to indicate
that you chose a bad property of the Win32_Service WMI class.
PS C:\> $wmi = Get-WmiObject -Class win32_service
PS C:\> $wmi.badproperty
PS C:\>
Don’t break the pipeline. This one is particularly easy to do. Start with a command typed at
the Windows PowerShell console. If you decide to add something else to it, arrow up and add
a pipeline character. You may decide you like it so much that you want a script, so the next
step is to “clean it up” and add a column header to the top of the printout (be sure you break
the pipeline). The following code illustrates this. In the Get-WmiObject statement, end the
line with a pipeline character, then call a function that prints the name of the computer.
The problem: This breaks the pipeline and the script will end with only the line “Service
Dependencies on localhost.” Since you called a function, the code does not generate an error.
Param($computer = "localhost")
function funline ($strIN)
{
$num = $strIN.length
for($i=1 ; $i -le $num ; $i++)
{ $funline = $funline + "=" }
Write-Host -ForegroundColor yellow $strIN
Write-Host -ForegroundColor darkYellow $funline
}
Get-WmiObject -Class Win32_DependentService -computername $computer |
funline("Service Dependencies on $($computer)")
Foreach-object `
{
[wmi]$_.Antecedent
[wmi]$_.Dependent
}
On the other hand, if you didn’t call the function, you’d generate an error. This is shown in
the following code. Note that just as in the previous code sample, after the Get-WmiObject
Z05E622791.fm Page 639 Friday, December 14, 2007 12:38 PM
640 Windows PowerShell Scripting Guide
cmdlet command, you end the line with a pipeline character. Break the pipeline by printing
the string “Dependent services on the local computer.”
Get-WmiObject -Class Win32_DependentService |
"Dependent services on the local computer"
Foreach-object `
{
[wmi]$_.Antecedent
[wmi]$_.Dependent
}
When the preceding code is run, an error is generated. The error, shown here, tells you that
you’re not allowed to use an expression in the middle of a pipeline, which of course is true.
Expressions are only permitted as the first element of a pipeline.
At C:\Users\EDWILS~1.NOR\AppData\Local\Temp\temp.ps1:4 char:44
+ "Dependent services on the local computer" <<<<
Use debug statements to see what’s going on with your script. If a script is producing some
strange results, print the value of the variable. I always try to include a debug statement behind
the variable so I will know it is safe to delete the variable when I am done testing my script. In
the example script that follows, I am trying to add two numbers. However, I want to make sure
the results that are printed are correct. To do this, use debug statements to allow confirmation
that the answer is actually correct. Once the script is fixed or is verified as working properly,
delete the lines containing the debug statements. If you always make your debug statements
the same, then it is easy to search for the statements. You can clean up the script by using the
Find and Replace feature of Notepad. The code is shown here:
$a = 5
$b = 4
'$a is ' + $a # debug
'$b is ' + $b # debug
$c = $a + $b
"The answer to `$a + `$b is $c"
Use the Test-Path cmdlet to verify that a file or other object actually exists when trying to
work with the object. Of course, make sure that you use a # debug statement following the
command if it is not an essential part of your script. An example of using the Test-Path
technique is shown in the following code:
$script = "c:\fso\mydebugscript.ps1"
Test-Path $script # debug
$debug = "# debug"
switch -regex -file $script
{
"debug" { $switch.current }
}
Z05E622791.fm Page 640 Friday, December 14, 2007 12:38 PM
Appendix E General Troubleshooting Tips 641
Initialize variables and set their value to $null or to 0 as appropriate. When using variables
to count the existence of items, if you remain inside the same Windows PowerShell console
session, the values of the variables can produce unexpected results if they aren’t properly
initialized. An example of this is shown in the ParseAppLog.ps1 script that follows. The
ParseAppLog.ps1 script is located on the CD that accompanies this book in the
\scripts\extras folder.
ParseAppLog.ps1
$tcp=$udp=$dns=$icmp=$PdnsServer=$SdnsServer=$web=$ssl=$null
$fwlog = get-content "C:\Windows\system32\LogFiles\Firewall\firewall.log"
switch -regex ($fwlog)
{
"65.53.192.15" { $PdnsServer+=1 }
"65.53.192.14" { $SdnsServer+=1 }
"tcp" { $tcp+=1 }
"udp" { $udp+=1 }
"icmp" { $icmp+=1 }
"\s53" { $dns+=1 }
"\s80" { $web+=1 }
"\s443" { $ssl+=1 ; $switch.current}
}
"`$PdnsServer $Pdnsserver"
"`$SdnsServer $SdnsServer"
"`$tcp $tcp"
"`$udp $udp"
"`$icmp $icmp"
"`$dns $dns"
"`$web $web"
"`$ssl $ssl"
Use $erroractionpreference to specify the action to take when data is written with Write-Error
in a script or Write-Error in a cmdlet or provider. Check scripts for $erroractionpreference =
“SilentlyContinue”. By default, Windows PowerShell issues an error message the moment
an error occurs. If you prefer that processing continue without displaying an error message,
set the value of the Windows PowerShell automatic variable $erroractionpreference to
SilentlyContinue.
Use $error to inspect error objects xxxxx. The xxxx $error object contains a record of all
errors that occur during a Windows PowerShell session. Here’s an example of working
with errors:
$erroractionpreference = "SilentlyContinue"
$a = New-Object foo #creates an error
$b = New-Object bar #creates another error
if ($error.count -eq 1)
{"There is currently 1 error"}
else
{"There are currently " + $error.count + " errors"}
Z05E622791.fm Page 641 Friday, December 14, 2007 12:38 PM
642 Windows PowerShell Scripting Guide
for ($i = 0 ; $error.count ; $i++)
{$error[$i].CategoryInfo
$error[$i].ErrorDetails
$error[$i].Exception
$error[$i].FullyQualifiedErrorId
$error[$i].InvocationInfo
$error[$i].TargetObject}
Use Set-PSDebug to turn script debugging features on and off, to set the trace level, and to
toggle strict mode. Here’s an example:
C:\PS>set-psdebug -step; foreach ($i in 1..3) {$i}
This command turns on stepping and then runs a script that displays the numbers 1, 2, and 3.
DEBUG:1+ Set-PsDebug -step; foreach ($i in 1..3) {$i}
Continue with this operation?
1+ Set-PsDebug -step; foreach ($i in 1..3) {$i}
[Y] Yes [A] Yes to All [N] No [L] No to All [S] Suspend [?] Help
(default is "Y"):a
DEBUG:1+ Set-PsDebug -step; foreach ($i in 1..3) {$i}
1
2
3
Remember that not all objects are created equal. Just because that old COM object had a
method called create() doesn’t mean it exists in Windows PowerShell.
Z05E622791.fm Page 642 Friday, December 14, 2007 12:38 PM

643
Index
A
a parameter, 290, 298, 300, 360
A records, 557–561
AcceptPause.ps1 script, 93
AcceptStop property, 99–100
Access 2007
audited shares report from, 130
comma separated value (.csv) files and, 84
disk space utilization on, 192–195
domain user attributes and, 385
of drive information, 175–178
PhyDisk table in, 175
printer inventory in, 152–156
screen saver information in, 257–262
service configurations listed in, 92–93
services documentation in, 85–90
share documentation in, 126–129
stopped services listed in, 91
Access-denied messages, 22
AccountDisabled ADSI attribute, 394
action parameter, 517, 531, 577–578
Active Directory. See Domain users
Active Directory Services Interface (ADSI), 300,
303–304, 308, 381, 389
Active Directory Users and Computers (ADUC),
385–387, 389–390
Active power scheme, 266
ActiveX Data Objects (ADO) technology, 86, 88, 127,
153, 193, 260, 400
Adapter settings for networking, 223–237
configurations for, 212–216
connected, 228–230
detecting multiple, 223
Dynamic Host Configuration Protocol (DHCP) in,
235–237
Excel spreadsheet for, 224–226
static IP address in, 230–233
troubleshooting, 373–375
AdapterType property, 223, 225
add parameter, 431, 433
Add-Content cmdlet, 151
addDHCP parameter, 578
addnew method, 88, 177
AddNodeEvictNode.ps1 script, 431–434
Address tab, of domain users, 387–388
AddUserToGroup.ps1 script, 398–399
Administrative shares, 126
Advanced Sharing dialog box, 123
Aliases
for cmdlets, 15–31
for data types, 53
all argument, 46
all switch, 420
allow parameter, 513, 535
AllSigned execution policy, 37
Alternate credentials, 586
append parameter, 423, 425
Application log event, 285–286
Application pools
creation of, 464–466
reporting IIS configuration on, 447–453
appname parameter, 465
ArgGetMultipleServices.ps1 script, 97
ArgsShare.ps1 script, 57, 160
Arguments. See also Command-line arguments
all, 46
computer, 187
constant, 341
default, 172–173
example, 13
file, 62
filter, 99
foregroundcolor, 65
free, 46
full, 15
groupby, 147–148
help, 47, 74, 271
id, 615
inputobject, 147
list, 65
logname, 70
match, 70–71
nonewline, 195
option, 40
path, 62
query, 272
scripts and, 39
wildcard, 62, 76
Attack surface reduction, 110
Auditing
AuditScreenSaver.ps1 script for, 246–251
AuditScreenSaverWriteToAccess.ps1 script for,
257–262
AuditUnauthorizedShares.ps1 script for,
132–133, 145
screen savers, 246–251
shares, 130–133
Z06I622791.fm Page 643 Friday, December 14, 2007 1:15 PM

644
Authentication, digital signatures for, 368
Auto start mode, 92
Automatic objects, 559
Automatic services, 352–354
Automatic unraveling of variables, 220–221
Automation, 44
AutoServicesNotRunning.ps1 script, 352–354
autosize parameter, 21, 24
in data management, 330
in Internet Information Services
management, 450
in share management, 116
in system restore, 345
in troubleshooting, 363
autostart parameter, 465
AutoStart property, 449, 451–452, 466
Available system restore points, 344–346
B
backgroundcolor parameters, 154
Backing up, 325–327. See also System restore
Backtick mark, 42
BackupFolderToServer.ps1 script, 325–327
Backward compatibility, 393
Bandwidth, 454, 456
begin parameter, 42–43
Binding, positional, 15
BindingElement WMI class, 460–463
Bold property, 224
Boot configuration, 349–351
Boot start mode, 92
Branching in scripts, 44
Burn-in phase, for hardware, 368
C
c_padline constant, 358
CallFunctionLib.ps1 script, 599–600
Capacity property, 191, 193
Caption property, 219
cert parameter, 501
Certificate Import Wizard, 497
Certificate store, 473–507
almost-expired certificates in, 488–491
deleting certificates from, 501–505
expired certificates in, 483–486
FindCertificates.ps1 script for, 475–478
importing certificates to, 497–500
inspecting certificates in, 492–496
listing certificates in, 479–482
terminology for, 473–475
change parameter, 549–551, 562, 565
ChangeLogSettings function, 74
ChangeModeThenStart.ps1 script, 104, 106
Character patterns, 55–56
CheckDeviceDrivers.ps1 script, 360–363
CheckServiceThenStart.ps1 script, 102–103
CheckServiceThenStop.ps1 script, 99–101
CheckSignedDeviceDrivers.ps1 script, 369–371
CheckStatusWMILog.ps1 script, 76
CheckStoppedServices.ps1 script, 109
CIM (Common Information Model), 408
class parameter
in cluster service, 411, 413, 416, 420
in data management, 330
in desktop maintenance, 174, 183, 185
in Internet Information Services management, 458
in network services configuration, 544–546
in terminal service management, 526, 529
in Windows Server 2008 Server Core, 613
Clear-Content cmdlet, 151
Clear-Host cmdlet, 132, 559
Cluster service, 405–442
ListClusterWMIClasses.ps1 script for,
405–410
node management in, 431–440
querying multiple classes of, 420–427
reporting configurations of, 411–415
reporting node configurations of, 416–419
CMD interpreter, 15
Cmdlets
Add-Content, 151
aliases to assign shortcut names to, 15–31
Clear-Content, 151
Clear-Host, 132, 559
common parameters for, 11
Compare-Object, 107–108
controlling execution of, 7–9
Copy-Item, 325, 327
Export-clixml, 62
Export-Console, 6
for formatting, 164
disk properties, 183
in data management, 330
in Internet Information Services management,
446, 449
in network services management, 545, 551, 556
in system restore, 345
in terminal service management, 514, 519,
523, 529
in troubleshooting, 359, 363, 367, 375
logical disk configuration, 187
logs, 68
network adapters, 216, 223
overview of, 17–24
printing, 147, 151, 159
services, 94, 96, 103
shares, 115–116, 125
Authentication, digital signatures for
Z06I622791.fm Page 644 Friday, December 14, 2007 1:15 PM

last top-level entry 645
for text manipulation, 150–151
ForEach-Object
in cluster service, 418, 424–426, 432
in desktop configuration, 255
in desktop maintenance, 198
in event log management, 71
in networking management, 219, 229–230
in scripting, 42
in service management, 87, 102, 109–110
in troubleshooting, 358
Get-Alias, 15, 17
Get-ChildItem
certificate stores and, 473, 477, 485, 489–490, 498
in desktop maintenance, 198
in network services management, 559
in printing management, 163–164
overview of, 17, 22–23
Get-Command, 16, 24–27
Get-Content, 108–110, 132, 150–151
Get-Credentials Windows PowerShell, 394
Get-Date, 43, 89, 280, 485
Get-EventLog
in log management, 66, 68–71
in Windows Server 2008 Server Core, 614
Get-Help, 12–14
Get-Member
in data management, 337
in desktop configuration, 249
in Internet Information Services
management, 456
in log management, 68
in network services management, 559
in scripting, 50–53
in shares management, 117
overview of, 27–31
Get-Process, 11
Get-Service, 81, 95–96
Get-WmiObject
credential parameter for, 317–318
for auditing screen savers, 249
for desktop settings, 254, 261
for disk performance, 202
for disk properties, 190, 193
for drive properties, 171, 174–175, 177
for logged-on users, 248
for logical disks, 185, 187
for network adapters, 216, 219, 223–224
for page faults, 204
for partitions, 183
for printing, 147, 151, 161
for services, 81, 85, 87, 99, 104, 109, 111
for shares, 115, 117–118, 125–126, 132
for time settings, 280
in cluster service, 408, 410, 413, 417, 423–425,
432–433, 438–439
in Internet Information Services management, 449,
452, 469
in network services management, 550–551, 556,
560, 564–565, 570, 573
in network troubleshooting, 374
in system restore, 341, 345
in terminal service management, 511, 514–515,
519–520, 523, 530, 532–533, 537
in troubleshooting, 350, 352–353, 358, 362, 367,
370–371
in Windows Server 2008 Server Core, 586–588,
592, 594, 602, 611, 613
in event logs, 78–79
Invoke-Expression, 588, 607
New-Item, 138
New-Object
certificate stores and, 499, 503–504
in desktop configuration, 266, 272
in desktop maintenance, 175, 193
in domain user management, 401
in log management, 72
in post-deployment issues, 286
in printing management, 152
in services management, 86, 88
in shares management, 122, 126
New-Timespan, 198
New-Variable, 341, 358
Out-File
in cluster service, 423–426
in printing management, 151
in services management, 108
in share management, 125
Out-String, 79
Read-Host, 392
Select-Object, 204, 250, 408
Set-Alias, 15
Set-Content, 151
Set-ExecutionPolicy, 37
Set-Location, 7
Set-Variable, 40
Sort-Object, 21–22, 45, 115, 164
Start-Sleep, 202, 588
Stop-Process, 10
supplying options for, 11–12
Test-Path, 138, 408, 564
Where-Object
in cluster service, 424
in desktop maintenance, 183, 187
in Internet Information Services management, 469
in log management, 69–71
in network services management, 556, 560
in printing management, 161, 164
in scripting, 42
in services management, 82
in Windows Server 2008 Server Core, 614
Cmdlets
Z06I622791.fm Page 645 Friday, December 14, 2007 1:15 PM

646
Write-Host, 149
certificate stores and, 480, 486, 490, 498
color parameters for, 154–155
for automatic unraveling of variables, 220
for disk properties, 189
for expired files, 198
for firewall configuration, 240
for logs, 65, 71–72
for progress indicator, 193, 195
for progress line, 261
for setting time, 278
for status indicator, 261
in cluster service, 408, 412, 423
in data management, 329, 332
in network services management, 559
in printing management, 151, 154, 156, 161, 164
in scripting, 43, 45, 47
in services management, 87, 89, 96, 98
in share management, 118, 129, 133
in Windows Server 2008 Server Core, 594
Color parameters, 154–155. See also foregroundcolor
parameter
Column headers, 224
column parameter, 24
COM object, 152–153
Comobject switch, 126
Comma separated value (.csv) files
domain users created by, 393–394
in services management, 84–85
populating attributes and, 385
Command shell and scripting language,
PowerShell as, 3
Command-line arguments
evaluating, 46–47
in domain user management, 390
in network services configuration, 548
in SetEventLogRetention Policy.ps1 script, 73
in system restore, 340
in terminal service management, 529
in translating return code, 135
network, 161, 578
script acceptance of, 41
setting service configurations by, 97
to report partitions, 183
using, 56–57
values in, 35
command-line parameters
in cluster service, 417–418, 431, 434
in networking management, 231
in terminal service management, 522, 525
in Windows Server 2008 Server Core, 592, 594, 597
Command-line utility, Windows Event, 76
commandType parameter, 27
Common parameters for cmdlets, 11
Community string passwords, 161
comobject parameter, 88, 122, 272
Company-mandated screen savers, 246
Compare-Object cmdlet, 107–108
CompareRunningServices.ps1 script, 110
CompareServicesTxt.ps1 script, 107–108
CompareShares.ps1 script, 131–132
Compatibility, backward, 393
computer argument, 187
Computer Management console, 303, 306–307
Computer Management Disk Management utility, 179
computer parameter
in cluster service, 406, 411, 416, 420, 423, 437, 439
in data management, 328, 332
in desktop configuration, 248–249, 252, 254
in desktop maintenance, 174, 182, 185, 190
in Internet Information Services management,
445–447, 451, 454, 465
in network services configuration, 544–546, 549,
558, 562, 571, 577–579
in networking management, 208
in post-deployment issues, 290–291, 298, 316
in system restore, 340–341
in terminal service management, 517, 522, 524, 527,
531, 535
in troubleshooting, 356, 358, 360, 371
in Windows Server 2008 Server Core, 592, 597,
605–606, 611–612, 614
computername environmental variable, 224, 240
computername parameter
in desktop configuration, 249, 261
in Internet Information Services management,
452, 455
in network services management, 560
in share management, 143
in terminal service management, 526, 529
in troubleshooting, 350, 358
in Windows Server 2008 Server Core, 586,
588, 613
ComputerName property, 86, 152, 266
computername statement, 353
computername variable, 330, 341
Computers
remote, 319–321
renaming, 316–318
Configuration of PowerShell, 6–7, 145
Configuration of services
confirming, 110
documenting, 92–93
maintaining, 107–110
setting, 94–106
by command-line arguments, 97
by GetMultipleService.ps1 script, 96
by GetSpecificService.ps1 script, 95
stopping, 97–101
starting, 101–106
Color parameters
Z06I622791.fm Page 646 Friday, December 14, 2007 1:15 PM

647
ConfigurationMaintenance.mdb file, 257
ConfigureClientColor.ps1 script, 527–530
ConfigureClientEnvironment.ps1 script,
531–533
ConfigureClientProperties.ps1 script, 517–520
ConfigureDNSLogging.ps1 script, 548–553
ConfigureScreenSaver.ps1 script, 310–314
confirm switch, 8–9, 12, 15
Connected adapter settings, 228–230
connection object
ADO, 88
close method of, 90, 177, 195
creating, 88, 127, 153, 175
open method of, 127, 175–176, 193, 260–261
connection parameter, 154
ConnectionTimeout property, 456
ConnectServer method, 408, 422
Console, in terminal service, 526
constant argument, 341
Constants
c_padline, 358
GB Windows PowerShell, 191
in scripts, 40–41
SecInDay, 341
Continue variable value, 284
Control Panel, 228, 309, 328
Copy-Item cmdlet, 325, 327
Count property, 198, 371, 423, 438
CountRunningServices.ps1 script, 82
CountServices.ps1 script, 82
CreateAndEnableUser.ps1 script, 393–394
CreateApplicationPool.ps1script, 465–466
CreateDNSZonesConfig.ps1 script,
571–574
CreateEventSource method, 77, 79
CreateGlobalVariableInFunction.ps1 script,
335–336
CreateGroup.ps1 script, 395–397
CreateLocalGroup.ps1 script, 306–308
CreateLocalUser.ps1 script, 303–305
CreateOU.ps1 script, 379–381
CreateShare.ps1 script, 137–139
CreateSite.ps1script, 460–463
CreateUser.ps1 script, 393
CreateVariableInFunction.ps1 script, 335
CreateVariableInFunctionAndOutsideFunction.ps1
script, 334
CreatMultipleShares.ps1 script, 141
CreatShare.ps1 script, 160
CreatUser.ps1 script, 382–384
credential parameter, 317–318, 321, 586
Credentials, 257, 586
.csv file. See Comma separated value (.csv) files
CurrentUser certificate store, 473–475, 480, 483,
497–499, 504
D
Data management, 325–347
backups in, 325–327
offline files in, 328–338
configuring, 328–330
enabling use of, 331–338
system restore for, 340–346
Data types, in scripts, 49–53
Databases, 85–90, 300. See also Access 2007
datafile parameter, 571
datetime object, 198, 485
days parameter, 488
debug parameter, 12
Decision-making statements, 44–49
Default gateway, 592, 594
Default switch, 215
DeleteCertificate.ps1 script, 501–505
DeleteEventSource.ps1 script, 80
DeleteFileAndFolder.txt command, 5
DeleteShare.ps1 script, 143–144
DeleteUnauthorizedShares.ps1 script, 145
Deleting shares, 143–145
DemoFormatWide.ps1 script, 24
DemoWriteHostColors.ps1 script, 155
Deployment. See Post-deployment issues
depth parameter, 527, 529
description option, 137
Description property
in post-deployment issues, 304
in share management, 115, 122, 133
in troubleshooting, 371
Design view, of databases, 89, 152, 194
Desired Configuration Maintenance (DCM), 145
Desktop maintenance, 171–205
Access database of drive information for, 175–178
disk space utilization for, 188–199
database for, 192–195
file longevity in, 196–199
MonitorVolumeSpace.ps1 script in, 189–192
drive inventorying for, 171–174
logical disks for, 184–188
partitions for
matching disks and, 181–183
working with, 179–181
performance monitoring for, 200–204
Desktop settings, 245–275
configuration issues in, 245
DisableActiveDesktop.ps1 script for, 535–537
for power, 263–267
for screen savers, 245–262
auditing, 246–251
properties with values for, 252–255
reporting secure, 256–262
power scheme changes in, 269–273
destination parameter, 325–327
destination parameter
Z06I622791.fm Page 647 Friday, December 14, 2007 1:15 PM

648
DestroyCluster method, 439
DetectStartupPrograms.ps1 script, 366–367
DeviceID property, 187
dg (default gateway) parameter, 592
differenceobject parameter, 108
Digital signatures, for authentication, 368
disable parameter, 517
DisableActiveDesktop.ps1 script, 535–537
Disabled start mode, 92
DisableLogons.ps1 script, 513–515
disallow parameter, 513, 535
disk parameter, 182–183
Disks
logical, 184–188
partitions matched to, 181–183
space utilization on, 188–199
database for, 192–195
file longevity in, 196–199
MonitorVolumeSpace.ps1 script in, 189–192
DisplayBootConfig.ps1 script, 349–351
DisplayComputerRoles.ps1 scripts, 46
DisplayLogSettings function, 74
DisplayRootHints.ps1 script, 556–557
distinguishedName attribute, 399
Distributed Management Task Force (DMTF) time
format, 280
DNS (Domain Name System)
server settings for, 562–566
settings for, 541–561
for logging, 546–553
GetDNSServerConfig.ps1 script for, 541–546
querying A records in, 557–561
reporting root hints in, 556–557
Windows Server 2008 Server Core settings in,
597–603
zones for, 568–574
creating, 571–574
reporting, 568–570
dnsdomain parameter, 597
DNSOwnerName property, 561
dnsserver parameter, 597
DnsServerName property, 560
dnssuffix parameter, 597
Documentation
of services, 81–93
by configuration, 92–93
counting running as, 82–83
database for, 85–90
stopped, 91
text file for, 83–85
of shares, 115–129
Access database for, 126–129
administrative, 126
ListShares.ps1 script for, 116–117
ListSharesDetailed.ps1 script for, 118–120
ListSharesDetailedTranslateShareType.ps1 script
for, 120–121
of users, 122–124
text files for, 124–125
WMI classes of, 117–118
of terminal service, 509–512
domain parameter, 558, 587
Domain property, 86
Domain users, 379–404. See also DNS (Domain Name
System)
.csv file creation of, 393–394
attributes of, 385–392
address tab in, 387–388
for single user, 390–392
general information in, 386–387
organization tab in, 389–390
profile tab in, 388
telephone tab in, 389
creating, 382–384
groups for
creating, 395–397
multiple users added to, 400–403
one user added to, 398–399
organizational units (OU) for, 379–381
domainname parameter, 584, 589
DomainRole property, 46
Domains, joining, 584–589
DoNotOverwrite retention policy, 72–73
Dot-sourcing, 599
Double quotation marks for variables, 219–221
Drivers
print
identifying, 163–164
in ListPrinters.ps1 script output, 148
installing, 165–169
signing policy for, 368–371
startup issues with, 360–363
Drives
Access 2007 for information on, 175–178
backing up files to, 325
environmental PS, 224, 240, 358
inventorying, 171–174
Dual-homed computers, 228
Dynamic Host Configuration Protocol (DHCP),
235–237, 576–580
E
else statement, 100, 545
Elseif, Else, If decision statement, 45–46, 57
enable method, 338
enable parameter, 517
enableDHCP method, 236
EnableDisableOfflineFiles.ps1 script, 332–334,
336–338
DestroyCluster method
Z06I622791.fm Page 648 Friday, December 14, 2007 1:15 PM

649
EnableDisableUser.ps1 script, 298–301, 394
EnabledUsers.csv file, 394
EnablePrivileges property, 320, 586
EnableRemoteAdmin.ps1 script, 241–242
EnableSharedFolders, 242
encoding parameter, 125, 151
Encrypting File System (EFS) features, 394
end parameter, 42–43
EnhancedKeyUses, 475
environment computername variable, 330, 341
Environment, client, 531–533
Environmental PS drive, 224, 240, 358
Error messages, 22–23
Error object, 593
erroraction parameter, 12, 23
errorvariable parameter, 12
Escape sequences, 54
Ethernet adapters, 225
EvaluateServicesAndCount.ps1 script, 111–112
Event logs
creating, 79–80
eventlog entry object for, 68–69
for time setting, 283–287
identifying, 59
managing, 71–74
of Windows Server 2008 Server Core, 614–616
reading, 60–64
searching, 68–71
Windows Management Instrumentation (WMI),
75–76
writing to, 77–79
Event Tracing for Windows (ETW) logs, 75–76
Event Viewer Microsoft Management Console
(MMC), 76
EventLogSpecificSource.ps1 script, 284
evict parameter, 431
examples argument, 13
Excel 2007, 63
comma separated value (.csv) files and, 84–85
domain user attributes and, 385
for multiple users and attributes, 400–403
for network adapter settings, 224–226
WriteUserSharesToExcel.ps1 for, 122–124
ExcelApplicationCOM object, 224
Exception reports, for services, 111–112
exclude parameter, 163
Execquery method, 1
Executable, call to, 2
Execution policy for scripts, 37
exit command, 247
exit statement
in desktop maintenance, 187
in Internet Information Services management, 451
in network services configuration, 551
in networking management, 210
Export-clixml cmdlet, 62
Export-Console cmdlet, 6
Exporting event logs, 61–64
ExportRunningServices.ps1 script, 85
Extensible Markup Language (XML). See XML
F
Failover Clustering feature. See Cluster service
Faults, page, 204
fax attribute, of domain users, 389
Fields.Item property, 88
file argument, 62
File longevity, 196–199
file parameter, 420, 423–424, 426
fileAndPrint service, 242
fileinfo object, 198
filepath parameter, 84, 108, 151, 613
filter parameter
in desktop configuration, 249
in desktop maintenance, 190
in networking management, 229
in services management, 85, 99
in share management, 126, 134
in terminal service management, 526
in troubleshooting, 353, 370–371
in Windows Server 2008 Server Core, 602
Filtering
event entries, 69
in printing management, 161
network settings, 218–222
FindCertificates.ps1script, 475–478
FindCertificatesAboutToExpire.ps1 script, 488
FindConfigurationOfConnected Adapters.ps1 script,
228–230
FindExpiredCertificates.ps1 script, 483–486
FindIISClasses.ps1 script, 444
FindMaxPageFaults.ps1 script, 204
FindPowerShell.vbs script, 1–2
FindPrinterDrivers.ps1 script, 164
FindPrinterPorts.ps1 script, 160–162
FindUSBEvents.ps1 script, 69–70
Firewalls
configuration of, 583–584
networking and, 207, 239–242
Flash memory cards, 325
Flow stream statements, 41–43
folderpath option, 137
Folders, shared, 242
for loop, 189, 218, 224, 247
For statement, 43–44
force parameter, 17, 437
foreach statement
in desktop maintenance, 177
in log management, 65
foreach statement
Z06I622791.fm Page 649 Friday, December 14, 2007 1:15 PM

650
in printing management, 151, 155
in services management, 98, 111
in share management, 118, 132
ForEach-Object cmdlet
in cluster service, 418, 424–426, 432
in desktop configuration, 255
in desktop maintenance, 198
in log management, 71
in networking management, 219, 229–230
in scripting, 42
in services management, 87, 102, 109–110
in troubleshooting, 358
foregroundcolor parameter, 65, 109, 154
Formatting cmdlets
for disk properties, 183
for Internet Information Services management,
446, 449
for logical disk configuration, 187
for logs, 66
for network adapter configurations, 216
for network adapters, 223
for printing, 147, 151, 159, 164
for services, 94, 96, 103
for shares, 115–116, 125
for tables, 330
in network services management, 545, 551, 556
in system restore, 345
in terminal service management, 514, 519, 523, 529
in troubleshooting, 359, 363, 367, 375
overview of, 17–24
free argument, 46
FreeSpace property, 191
FriendlyName property, certificate stores and,
475, 477–478
Fsutil.txt utility, 4
Full argument, 15
full parameter, 366–367, 371, 375
funadd function, 433–434
funall function, 424–425
funarg function, 46
funcert function, 503, 505
funchange function
in network services configuration, 550–551, 553,
565–566
in terminal service management, 514
funcountresource function, 438
FunctionLib.ps1 script, 599–600
funeval function, 311, 313
FunEvalRTN function, 104, 232–233, 236–237
funevict function, 433
funhelp function
certificate stores and, 476–477, 479–480, 483–484,
488, 493–494, 497–499, 501, 504
in cluster service, 406, 409, 412, 414, 416, 421, 426,
431, 434, 437, 439
in data management, 325–326, 330, 333–334
in desktop configuration, 247, 253, 260,
265–266, 270
in domain user management, 379–380, 382–384, 391,
396, 398–399
in Internet Information Services management, 445,
448, 451–452, 455, 457–458, 460–461, 465–466,
468–469
in network services configuration, 542–544, 549, 553,
558–600
in network troubleshooting, 373–374
in networking management, 210–211, 213,
231–232, 236
in post-deployment issues, 279–280, 290–291,
294–295, 298, 303–304, 307, 311–312, 316–317,
319–320
in printing management, 158–160
in share management, 137, 143
in system restore, 340, 344
in terminal service management, 510–511, 513, 515,
518–519, 522, 524–525, 527, 532–533, 535, 537
in troubleshooting, 350, 352, 356–357, 361–362, 366,
369–370
in Windows Server 2008 Server Core, 585, 589,
592–595, 598, 601, 606, 608, 612, 614–615
funjoindomain function, 587–589
funline function
in cluster service, 412–413, 417, 422
in data management, 329, 332, 336, 338
in desktop configuration, 247, 250, 252, 254, 258,
266, 270, 272
in desktop maintenance, 189, 197
in network services configuration, 560
in network troubleshooting, 373
in networking management, 210–211, 218–219, 221
in post-deployment issues, 278, 281–282, 286,
293–294, 296, 310
in system restore, 341, 345
in troubleshooting, 356, 358, 369
funlist function
in cluster service, 423–424, 438–439
in network services configuration, 566
in terminal service management, 514–515, 519, 529,
532, 536–537
in Windows Server 2008 Server Core,
594–595, 601
funlog function, 284, 286
funlookup function
in share management, 120–121, 136, 139
in system restore, 344
funpaper function, 533
funquery function, 551, 553, 564, 566
funreboot function, 586–587, 589, 607
funremovecluster function, 439
funrename function, 607–608
ForEach-Object cmdlet
Z06I622791.fm Page 650 Friday, December 14, 2007 1:15 PM

651
funstart function, 551–553
funstatus function, 208–209
funstop function, 552–553
funstore function, 480, 498–499
funtestns function, 407–409, 422, 425–426
funtranslatemethod function, 334, 336–337
funevalrtn function, 593, 595, 599–600, 602
funwhatif function, 433–434, 439
funwmi function, 413–414, 417–419, 425–426, 432–433
funwmiclass function, 408–409
G
GB Windows PowerShell constant, 191
General information tab of domain users, 386–387
General logs
multiple, 65–66
retrieving single entries to, 66–68
get_extensions method, 477
Get32ndEventLogEntry.ps1 script, 66
GetActiveNicAndConfig.ps1 script, 373–375
Get-Alias cmdlet, 15
GetApplicationEventLogs.ps1 script, 60
GetAppPool.ps1 script, 447–450
GetAppPoolDefaults.ps1 script, 451–453
Get-ChildItem cmdlet
certificate stores and, 473, 477, 485, 489–490, 498
in desktop maintenance, 198
in network services management, 559
in printing management, 163–164
overview of, 17, 22–23
Get-Command cmdlet, 16, 24–27
Get-Content cmdlet, 108–110, 132, 150–151
Get-Credentials Windows PowerShell cmdlet, 394
Get-Date cmdlet, 43, 89, 280, 485
GetDirAlias.txt, 17
GetDiskPerformance.ps1 script, 201–204
GetDNSServerConfig.ps1 script, 541–546
GetDrivesArgs.ps1 script, 46–47
Get-EventLog cmdlet
in log management, 66, 68–71
in Windows Server 2008 Server Core, 614
GetEventLogRetentionPolicy.ps1 script, 71–72
GetEventLogs.ps1 script, 59–60
GetFirstEntry.ps1 scripts, 67
GetHalfDuplex.psi script, 70–71
GetHardDiskDetails.ps1 script, 41
Get-Help cmdlet, 12–14
GetLastEvent.ps1 script, 68
GetLogSources.ps1 script, 71, 79
Get-Member cmdlet
in data management, 337
in desktop configuration, 249
in Internet Information Services management, 456
in log management, 68
in network services management, 559
in scripting, 50–53
in share management, 117
overview of, 27–31
GetMultipleServices.ps1 script, 96–97
GetNetAdapterConfig.ps1 script, 213–216
GetNetAdapterStatus.ps1 script, 207–211
GetNetID.ps1 script, 223
GetNewestLogEntries.ps1 script, 64–65
GetNewestLogEntriesAllLogs.ps1 script, 65–66
GetOfflineFiles.ps1 script, 328–330
Get-Process cmdlet, 11
GetProcessByID.ps1 script, 41
Get-Services cmdlet, 81, 94, 96
GetServiceStatus.ps1 script, 45
GetSetTime.ps1 script, 278–282
GetSetTimeWriteToEventLog.ps1 script, 283–287
GetSharesWithArgs.ps1 script, 35
GetSingleEventEntry.ps1 script, 66
GetSiteLimits.ps1 script, 454–456
GetSites.ps1 script, 445–446
GetSpecificServices.ps1 script, 94–95
GetStringValue, 295
GetSystemLogErrors.ps1 script, 70
GetSystemRestoreSettings.ps1 script, 340–342
GetTimeSource.ps1 script, 292–296
GetTopMemory.ps1 script, 44–45
GetWmiAndQuery.ps1 script, 42
GetWMILogLevel.ps1 script, 75
Get-WmiObject cmdlet
credential parameter for, 317–318
for auditing screen savers, 249
for desktop settings, 254, 261
for disk performance, 202
for disk properties, 190, 193
for drive properties, 171, 174–175, 177
for logged-on users, 248
for logical disks, 185, 187
for network adapters, 216, 219, 223–224
for page faults, 204
for partitions, 183
for printing, 147, 151, 161
for services, 81, 85, 87, 99, 104, 109, 111
for time settings, 280
in cluster service, 408, 410, 413, 417, 423–425,
432–433, 438–439
in Internet Information Services management,
449, 452, 469
in network services management, 550–551, 556, 560,
564–565, 570, 573
in network troubleshooting, 374
in share management, 115, 117–118, 125–126, 132
in system restore, 341, 345
in terminal service management, 511, 514–515,
519–520, 523, 529–530, 532–533, 537
Get-WmiObject cmdlet
Z06I622791.fm Page 651 Friday, December 14, 2007 1:15 PM

652
in troubleshooting, 350, 352–353, 358, 362, 367,
370–371
in Windows Server 2008 Server Core, 586–588, 592,
594, 602, 611, 613
Global variables, 335–336
GrantUserTSPermission.ps1 script, 523–526
Grave accent mark, 42–43
Greenwich Mean Time (GMT), 280
Group Policy
for deploying PowerShell, 2
for desktop configuration, 245
for retention, 71
for secure screen savers, 257
for Windows firewall, 240
organizational units (OU) and, 379
restricted execution policy and, 37
groupby argument, 147–148
Groups for domain users
creating, 395–397
multiple users added to, 400–403
one user added to, 398–399
H
Hardware, troubleshooting, 368–371
hashtable object, 198
help argument, 47, 74, 271
Help function, 159–160. See also funhelp function
Help message, 57
help parameter. See also funhelp function
certificate stores and, 476–477, 479, 483–484,
488–489, 493, 497–499, 501–502, 504
in cluster service, 406–407, 409, 411, 416, 431, 434,
437, 439
in data management, 325–326, 329–330, 332–333
in desktop configuration, 248, 252
in desktop maintenance, 182
in domain user management, 379, 382–383, 390–391,
395–396
in Internet Information Services management,
445–449, 451, 454–455, 457, 460–461, 465
in network services configuration, 541–542, 549,
558–559, 571–573, 577
in networking management, 208, 210
in post-deployment issues, 278–279, 290–291,
298, 316
in printing management, 158, 161
in system restore, 340, 344
in terminal service management, 510–511, 513,
517–518, 522, 524, 527–528, 531, 533, 535
in troubleshooting, 349, 353, 360, 366–367, 369
in Windows Server 2008 Server Core, 589, 592, 594,
597–598, 601, 606, 611, 614
Help-and-exit approach, 173
helpText variable, 137
Hidden files and folders, 17
Hints, root, 556–557
Hotfixes, 1–3
HTTP service, 355
I
id parameter, 614–615
if statement
in networking management, 214, 216
in scripting, 45–46, 57
in services management, 92, 100, 102
in share management, 145
ImportCertificate.ps1 script, 497–500
inputobject argument, 147
inputobject parameter, 151, 330, 342, 375
Inquire variable value, 284
InspectCertificate.ps1 script, 492–496
Installing PowerShell, 1–5
deployment in, 2–5
verifying with VBScript, 1–2
InstallPrinterDriverFull.ps1 script, 168–169
InstallPrinterDrivers.ps1 script, 165–167
InterfaceIndex property, 223
Internet Information Services (IIS), 443–471
application pool creation with, 464–466
enabling, 443–444
reporting configuration of, 445–458
application pools in, 447–453
site information in, 445–446
site limits in, 454–456
virtual directories in, 457–458
Web sites and
creation of, 459–463
starting and stopping, 467–470
Internet Protocol version 6 (IPv6), 207
Inventorying printers, 147–156
Access database for, 152–156
ListPrinters.ps1 script for, 147–148
logging to files for, 150–151
querying multiple computers for, 148–150
Invoke-Expression cmdlet, 588, 607
IO.Path .NET Framework class, 426
IP address
Dynamic Host Configuration Protocol (DHCP) for,
235–237
setting, 592–595
static, 230–233
ip parameter, 578, 592
ipadd parameter, 571
Item method, 123, 225
J
Jet.OLEDB 4.0 provider, 88, 127, 153, 193, 260
JoinDomain.ps1 script, 584–589
Global variables
Z06I622791.fm Page 652 Friday, December 14, 2007 1:15 PM

653
K
Keys property, 565
L
LastAccessTime property, 198
ld parameter
in Internet Information Services management, 460
Length property
in data management, 329, 332
in desktop maintenance, 189
in networking management, 210
in services management, 82
in share management, 132
Lightweight Directory Access Protocol (LDAP) service
provider, 386, 399
Like operator, 1
list argument, 65
list parameter. See also funlist function
in cluster service, 420–421, 423, 431, 434, 437, 439
in scripting, 42
in terminal service management, 513–514, 527,
531, 535
in Windows Server 2008 Server Core, 592, 597
List, Format-List cmdlet for
for system restore points, 344–346
ListAdminShares.ps1 script, 126
listcerts parameter, 501
ListClusterWMIClasses.ps1 script, 405–410
listcu parameter, 483, 485, 488
listlm parameter, 485, 488–489
ListNonAdminShares.ps1 script, 122
ListPerformanceCounterClasses.ps1 script, 200–201
ListPrinterPorts.ps1 script, 158–161
ListPrinters.ps1 script, 147–148
ListPrintersFromMultipleComputers.ps1 script,
148–149
ListPrintersFromMultipleComputersWriteToFile.ps1
script, 151
ListProcessesSortResults.ps1 script, 36
Lists, Format-List cmdlet for
in desktop maintenance, 183
in log management, 66, 68
in network services management, 545, 551
in printing management, 159
in services management, 94, 96, 103
in terminal service management, 514, 519, 523, 529
in troubleshooting, 359, 367, 375
logical disk configuration, 187
overview of, 18–20
ListShares.ps1 script, 116–117
ListSharesDetailed.ps1 script, 116–120
ListSharesDetailedTranslateShareType.ps1 script,
120–121
liststores parameter, 479, 497, 499
ListSystemRestorePoints.ps1script, 344–346
ListVirtualDirectory.ps1 script, 457–458
Local user accounts, 303–308
LocalDateTime property, 281
LocalMachine certificate store, 473, 483, 485
Locking mechanism, for database, 176
locking parameter, 154
Locking, optimistic, 127, 153
log parameter, 614
Log property, 65
LogDisplayName property, 72
Logical disks, 184–188
logname argument, 70
LogNameFromSourceName method, 80
Logons property, 514
Logs, 59–80. See also funlog function
DNS (Domain Name System) settings for, 546–553
event
creating, 79–80
identifying, 59
managing, 71–74
reading, 60–64
searching, 68–71
Windows Management Instrumentation (WMI),
75–76
writing to, 77–79
general, 64–68
multiple, 65–66
retrieving single entries to, 66–68
M
Magic numbers, 358
ManagedRuntimeVersion property, 449
management object
in data management, 330
in desktop maintenance, 175, 183, 192, 202
in Internet Information Services management, 449
in networking management, 224
in printing management, 166, 168
in services management, 105
in share management, 115, 132
in system restore, 342
in terminal service management, 537
in troubleshooting, 351, 359
Management.ManagementDateTimeConverter.NET
Framework class, 237, 280–282, 345
ManageWinsDHCP.ps1 script, 577–580
Manual start mode, 92
match argument, 70–71
match parameter, 161
match statements, 222
match static method, 56
matches method, 54
maxallowed option, 137
maxallowed option
Z06I622791.fm Page 653 Friday, December 14, 2007 1:15 PM

654
MaxBandwidth property, 456
MaxConnections property, 456
MaximumKiloBytes property, 72
MaximumAllowed property, 133
means parameter, 154, 176
Media access control (MAC) address, 223
member attribute, 398
Message collectors, 161
Message property, 70–71
Microsoft Consulting Services, 126
Microsoft Developer Network (MSDN), 31, 97, 584
Microsoft Management Console (MMC), 76, 199
MinimumRetentionDays policy, 72
mobile attribute, of domain users, 389
ModifyAddressProperties.ps1 script, 387–388
ModifyGeneralProperties.ps1 script, 386–387, 389
Modifying shares, 133–136
ModifyOrganizationProperties.ps1 script, 390
ModifyOverFlowPolicy method, 73
ModifyProfileProperties.ps1 script, 388
ModifyTelephoneProperties.ps1 script, 389
ModifyUser.ps1 script, 390–392
MonitorServer.ps1 script, 611–613
MonitorVolumeSpace.ps1 script, 189–192
moveTo method, 30
MyCommand property, 559
N
name parameter
in domain user management, 390
in services management, 98, 102
in troubleshooting, 358
Name property
in cluster service, 408, 424
in desktop configuration, 250, 254
in share management, 115, 133
overview of, 30
namespace parameter
in cluster service, 406, 411, 413, 416, 420, 423–424,
437, 439
in Internet Information Services management, 452
in system restore, 345
in terminal service management, 523, 526, 536
Naming conventions for cmdlets, 5
.NET Framework, 31
certificate stores and, 494–495
System.Diagnostics.EventLog class of, 71, 73, 77
system.string from, 132
Net Time command, 290–291
netdom command, 587, 607
netsh command
for Windows firewall, 240
in network services configuration, 579
in networking management, 241–242
in Windows Server 2008 Server Core, 583
network adapter configuration object, 374
Network and Sharing Center, 208–209, 212
network command-line argument, 161
Network services, 541–581
DNS server settings in, 562–566
DNS zones in, 568–574
creating, 571–574
reporting, 568–570
Domain Name System (DNS) settings in, 541–561
for logging, 546–553
GetDNSServerConfig.ps1 script for, 541–546
querying A records in, 557–561
reporting root hints in, 556–557
WINS and DHCP for, 576–580
NetworkAdapterConfigFiltered.ps1 script, 218–219,
221–222
Networking, 207–243. See also Windows Server 2008
Server Core
adapter settings for, 223–237
connected, 228–230
detecting multiple, 223
Dynamic Host Configuration Protocol (DHCP) in,
235–237
Excel spreadsheet for, 224–226
static IP address in, 230–233
settings for, 207–222
adapter configurations in, 212–216
filtering properties with values in, 218–222
reporting, 207–211
troubleshooting, 373–375
Windows firewall for, 239–242
New-Item cmdlet, 138
newname parameter, 316, 606
New-Object cmdlet
certificate stores and, 499, 503–504
in desktop configuration, 266, 272
in desktop maintenance, 175, 193
in domain user management, 401
in log management, 72
in post-deployment issues, 286
in printing management, 152
in services management, 86, 88
in share management, 122, 126
New-Timespan cmdlet, 198
New-Variable cmdlet, 341, 358
Nodes, in cluster service
configuration of, 416–419
management of, 431–440
nonewline argument, 195
nonewline switch, 129
NotAfter property, 486, 490
notes attribute, of domain users, 389
notlike operator, 408
notmatch operator, 225
NtpServer registry value, 295
MaxBandwidth property
Z06I622791.fm Page 654 Friday, December 14, 2007 1:15 PM

655
O
Objects, automatic, 559
Offline files
configuring, 328–330
enabling use of, 331–338
open method, 88, 154, 175–176
Optimistic locking, 127, 153
option argument, 40
option parameter
certificate stores and, 481
in system restore, 341
in troubleshooting, 358
in Windows Server 2008 Server Core, 588
Organization tab of domain users, 389–390
Organizational units (OU), 2, 379–381, 396
ou parameter, 379
outbuffer parameter, 12
Out-File cmdlet
in cluster service, 423–426
in printing management, 151
in services management, 108
in share management, 125
Out-String cmdlet, 79
outvariable parameter, 12
Overflow policies, 71
OverFlowAction property, 72
OverwriteAsNeeded retention policy, 72–73
OverwriteOlder retention policy, 72–73
OwnerName property, 556
P
Page faults, 204
pager attribute, of domain users, 389
param statement
certificate stores and, 475, 483, 488, 493, 497, 501
in cluster service, 406, 411, 416, 420, 431, 437, 439
in data management, 328
in desktop configuration, 252, 258, 264
in desktop maintenance, 182, 186
in domain user management, 382, 391, 395, 398
in Internet Information Services management, 445,
447, 451, 454, 457–458, 460, 465, 467
in network services configuration, 541, 548, 558,
562, 569, 571–573, 577
in network troubleshooting, 373
in networking management, 213, 231, 236
in post-deployment issues, 316
in printing management, 158
in share management, 135, 137
in terminal service management, 510, 513, 517, 522,
524, 527, 529, 531, 535
in troubleshooting, 349, 352, 356, 358, 360, 366, 369
in Windows Server 2008 Server Core, 584, 592,
597, 614
ParseAppTextLog.ps1 script, 61–62
ParseFWConfig.ps1 script, 240–241
Partitions
hidden, 171
matching disks and, 181–183
troubleshooting, 349
working with, 179–181
password parameter, 298, 316, 584, 588, 606
Passwords, setting, 394
path argument, 62
path parameter, 198
Path properties, 115
Pausing services, 93–94
Performance monitoring, 200–204
Personal certificate store, 474–475
PhyDisk table, 175
Physical Disk report, 178
PingsARange.ps1 scripts, 43–44
pipeline object, 358
port parameter, 460
Ports, printer, 157–162
Positional binding, 15
Post-deployment issues, 277–323
on user accounts
creating local, 303–308
enabling, 297–301
renaming computers as, 316–318
screen saver configuration as, 309–314
shutting down or rebooting remote computers as,
319–321
time setting as, 277–287
event log for, 283–287
remote, 278–282
time source as, 289–296
Net Time command for, 290–291
registry query for, 292–296
Power
desktop settings for, 263–267
scheme changes for, 269–273
PowerShell, 1–31
cmdlets in
aliases to assign shortcut names to, 15–31
Get-Help, 12–14
overview of, 5
supplying options for, 11–12
configuring, 6–7
installing, 1–5
security issues in, 7–11
Printing, 147–169
drivers for
identifying, 163–164
installing, 165–169
list of, 371
inventorying printers for, 147–156
Access database for, 152–156
Printing
Z06I622791.fm Page 655 Friday, December 14, 2007 1:15 PM

656
ListPrinters.ps1 script for, 147–148
logging to files for, 150–151
querying multiple computers for, 148–150
process information, 366
reporting on printer ports for, 157–162
service dependencies, 359
Privileges. See User Account Control (UAC)
Proactive scripting, 488
Process ID (PID), 42
process parameter, 42–43
ProcessUsbHub.ps1 script, 43
Profile tab of domain users, 388
Profile, for PowerShell, 6
Progress indicator, 129, 177, 193
Progress line, 261
prompt parameter, 392
Prompt-for-information method, 173
Properties property, 418
property parameter, 261, 342, 390
protocol parameter, 460
Prototype mode, of cmdlets, 8
psbase object, 221, 394
PSBase.Scope.Options.EnablePrivileges property, 439
Psconsole file, 6
PsIsContainer property, 30
PSObject.NET Framework class
in cluster service, 413, 418, 425
in desktop configuration, 250, 254
PSReference object, 293
Q
query argument, 272
query parameter
in desktop maintenance, 175
in network services configuration, 541, 544–546, 549
in networking management, 215
in printing management, 154
in services management, 87
in share management, 127
QueryDNSARecords.ps1 scripts, 557–561
QueryOldFile.ps1 script, 197–199
QueryRemoteEventLog.ps1 script, 614–616
question mark switch, 57
QueueLength property, 449
Quotation marks for variables, 219–221
R
raise method, 337
rdp-tcp terminal, 526
ReadExcelModifyUsers.ps1 script, 401–403
Read-Host cmdlet, 392
reboot function, 587, 608
reboot parameter, 584, 589, 606
Rebooting remote computers, 319–321
RebootRequired property, 338
RecordData property, 561
recordset object
addnew method of, 177
close method of, 90, 177, 195
creating, 88, 127, 153, 175, 260
open method of, 88, 127–128, 154, 176, 193, 261
StoppedServices table and, 91
update method of, 128, 177, 195
reference parameter, 176
referenceobject parameter, 108
regex parameter, 48–49
regex type accelerator, 56
RegExTab.ps1 script, 54–55
Registry query for time source, 292–296
Regular expressions
certificate stores and, 475, 477
in scripts, 53–56
match statements of, 222
network address match with, 161
switch statement with, 48–49
to match objects, 240
to parse messages in event logs, 70
to search event logs, 61
RegWhiteSpace.ps1 script, 56
Remote administration, for firewalls, 241–242
Remote computers
post-deployment issues with, 319–321
startup programs displayed on, 366
system restore for, 340
RemoteSigned execution policy, 37
RemoveCluster.ps1 script, 437–440
renamecomputer parameter, 607
RenameComputer.ps1 script, 316–318
RenameReboot.ps1 script, 605–609
ReportAvailableDrivers.ps1 script, 164
ReportClientSetting.ps1 script, 521–523
ReportClusterConfig.ps1 script, 411–415
ReportDesktopSettings.ps1 script, 252–255
ReportDiskDriveConfiguration.ps1 script,
171, 174
ReportDiskPartition.ps1 script, 179–181
ReportDNSZonesConfig.ps1 scripts, 568–570
Reporting
Access 2007 designer for, 152–153
cluster service configurations, 411–415
disk space, 195–196
exception, 111–112
IIS configuration
application pools in, 447–453
site information in, 445–446
site limits in, 454–456
virtual directories in, 457–458
network settings, 207–211
node configurations, 416–419
on Physical Disk, 178
Privileges
Z06I622791.fm Page 656 Friday, December 14, 2007 1:15 PM

657
on printer ports, 157–162
root hints, 556–557
secure screen savers, 256–262
ReportLogicalDiskConfiguration.ps1 script, 184–186
ReportMultipleClasses.ps1 script, 420–427
ReportNodeConfig.ps1 script, 416–419
ReportPowerConfig.ps1 script, 263–267
ReportSpecificDiskPartition.ps1 script, 181–183
ReportSpecificLogicalDisk.ps1 script, 187–188
Requires elevation string, 242
restart parameter, 549, 553
Restricted execution policy, 37
Retention policy, 71–74
Return code, translating, 135–136
ReturnValue property, 100, 105, 134
Root hints, 556–557
Rows property, 402
Running services, checking, 82–83
S
SAM account database, 300
Scoping, variable, 334–336
Scratch directory, 349
Screen savers, 245–262
auditing, 246–251
post-deployment configuration of, 309–314
properties with values for, 252–255
reporting secure, 256–262
Scripts, 33–58
AcceptPause.ps1, 93
AddUserToGroup.ps1, 398–399
ArgGetMultipleServices.ps1, 97
ArgsShare.ps1, 57, 160
AuditScreenSaver.ps1, 246–251
AuditUnauthorizedShares.ps1, 132–133, 145
AutoServicesNotRunning.ps1, 352–354
BackupFolderToServer.ps1, 325–327
CallFunctionLib.ps1, 599–600
ChangeModeThenStart.ps1, 104, 106
CheckDeviceDrivers.ps1, 360–363
CheckServiceThenStart.ps1, 102–103
CheckServiceThenStop.ps1, 99–101
CheckSignedDeviceDrivers.ps1, 369–371
CheckStatusWMILog.ps1, 76
CheckStoppedServices.ps1, 109
command-line arguments in, 56–57
CompareRunningServices.ps1, 110
CompareServicesTxt.ps1, 107–108
CompareShares.ps1, 131–132
ConfigureClientColor.ps1, 527–530
ConfigureClientEnvironment.ps1, 531–533
ConfigureClientProperties.ps1, 517–520
ConfigureDNSLogging.ps1, 548–553
ConfigureScreenSaver.ps1, 310–314
constants in, 40–41
CountRunningServices.ps1, 82
CountServices.ps1, 82
CreateAndEnableUser.ps1, 393–394
CreateApplicationPool.ps1, 465–466
CreateDNSZonesConfig.ps1, 571–574
CreateGlobalVariableInFunction.ps1, 335–336
CreateGroup.ps1, 395–397
CreateLocalGroup.ps1, 306–308
CreateLocalUser.ps1, 303–305
CreateOU.ps1, 379–381
CreateShare.ps1 script, 137–139
CreateSite.ps1, 460–463
CreateUser.ps1, 393
CreateVariableInFunction.ps1, 335
CreateVariableInFunctionAndOutsideFunction.ps1,
334
CreatMultipleShares.ps1, 141
CreatShare.ps1, 160
CreatUser.ps1, 382–384
data types in, 49–53
decision-making statements in, 44–49
DeleteCertificate.ps1, 501–505
DeleteEventSource.ps1, 80
DeleteShare.ps1, 143–144
DeleteUnauthorizedShares.ps1, 145
DemoFormatWide.ps1, 24
DemoWriteHostColors.ps1, 155
DetectStartupPrograms.ps1, 366–367
DisableActiveDesktop.ps1, 535–537
DisableLogons.ps1, 513–515
DisplayBootConfig.ps1, 349–351
DisplayComputerRoles.ps1, 46
DisplayRootHints.ps1, 556–557
EnableDisableOfflineFiles.ps1, 332–334,
336–338
EnableDisableUser.ps1, 394
EnableRemoteAdmin.ps1, 241–242
EvaluateServicesAndCount.ps1, 111–112
EventLogSpecificSource.ps1, 284
ExportRunningServices.ps1, 85
FindCertificates.ps1, 475–478
FindCertificatesAboutToExpire.ps1, 488
FindConfigurationOfConnected Adapters.ps1,
228–230
FindExpiredCertificates.ps1, 483–486
FindIISClasses.ps1, 444
FindMaxPageFaults.ps1, 204
FindPrinterDrivers.ps1, 164
FindPrinterPorts.ps1, 160–162
FindUSBEvents.ps1, 69–70
flow stream statements in, 41–43
For statement in, 43–44
FunctionLib.ps1, 599–600
Get32ndEventLogEntry.ps1, 66
GetActiveNicAndConfig.ps1, 373–375
GetApplicationEventLogs.ps1, 60
Scripts
Z06I622791.fm Page 657 Friday, December 14, 2007 1:15 PM

658
GetAppPoolDefaults.ps1, 451–453
GetDiskPerformance.ps1, 201–204
GetDNSServerConfig.ps1, 541–546
GetDrivesArgs.ps1, 46–47
GetEventLogRetentionPolicy.ps1, 71–72
GetEventLogs.ps1, 59–60
GetFirstEntry.ps1, 67
GetHardDiskDetails.ps1, 41
GetLastEvent.ps1, 68
GetLogSources.ps1, 71, 79
GetMultipleServices.ps1, 96–97
GetNetAdapterConfig.ps1, 213–216
GetNetAdapterStatus.ps1, 207–211
GetNetID.ps1, 223
GetNewestLogEntries.ps1, 64–65
GetNewestLogEntriesAllLogs.ps1, 65–66
GetOfflineFiles.ps1, 328–330
GetProcessByID.ps1, 41
GetServiceStatus.ps1, 45
GetSetTime.ps1, 278–282
GetSetTimeWriteToEventLog.ps1, 283–287
GetSharesWithArgs.ps1, 35
GetSingleEventEntry.ps1, 66
GetSiteLimits.ps1, 454–456
GetSites.ps1, 445–446
GetSpecificServices.ps1, 94–95
GetSystemLogErrors.ps1, 70
GetTimeSource.ps1, 292–296
GetTopMemory.ps1, 44–45
GetWmiAndQuery.ps1, 42
GetWMILogLevel.ps1, 75
GrantUserTSPermission.ps1, 523–526
Help function for, 159–160
ImportCertificate.ps1, 497–500
InspectCertificate.ps1, 492–496
InstallPrinterDriverFull.ps1, 168–169
InstallPrinterDrivers.ps1, 165–167
JoinDomain.ps1, 584–589
ListAdminShares.ps1, 126
ListClusterWMIClasses.ps1, 405–410
ListNonAdminShares.ps1, 122
ListPerformanceCounterClasses.ps1, 200–201
ListPrinterPorts.ps1, 158–161
ListPrinters.ps1 script, 147–148
ListPrintersFromMultipleComputers.ps1, 148–149
ListPrintersFromMultipleComputersWriteToFile.
ps1, 151
ListProcessesSortResults.ps1, 36
ListShares.ps1, 116–117
ListSharesDetailed.ps1, 116–120
ListSharesDetailedTranslateShareType.ps1, 120–121
ListSystemRestorePoints.ps1, 344–346
ListVirtualDirectory.ps1, 457–458
ManageWinsDHCP.ps1, 577–580
ModifyAddressProperties.ps1, 387–388
ModifyGeneralProperties.ps1, 386–387, 389
ModifyOrganizationProperties.ps1, 390
ModifyProfileProperties.ps1, 388
ModifyUser.ps1, 390–392
MonitorServer.ps1, 611–613
MonitorVolumeSpace.ps1, 189–192
NetworkAdapterConfigFiltered.ps1, 218–219,
221–222
parameters with, 134–135
ParseAppTextLog.ps1, 61–62
ParseFWConfig.ps1, 240–241
PingsARange.ps1, 43–44
policy for, 36–39
ProcessUsbHub.ps1, 43
QueryDNSARecords.ps1, 557–561
QueryOldFile.ps1, 197–199
QueryRemoteEventLog.ps1, 614–616
ReadExcelModifyUsers.ps1, 401–403
reasons for, 33–36
RegExTab.ps1, 54–55
regular expressions in, 53–56
RegWhiteSpace.ps1, 56
RemoveCluster.ps1, 437–440
RenameComputer.ps1, 316–318
ReportAvailableDrivers.ps1, 164
ReportClientSettings.ps1, 521–523
ReportDesktopSettings.ps1, 252–255
ReportDiskDriveConfiguration.ps1, 171, 174
ReportDiskPartition.ps1, 179–181
ReportDNSZonesConfig.ps1, 568–570
ReportLogicalDiskConfiguration.ps1, 184–186
ReportMultipleClasses.ps1, 420–427
ReportPowerConfig.ps1, 263–267
ReportSpecificDiskPartition.ps1, 181–183
ReportSpecificLogicalDisk.ps1, 187–188
running, 39
SearchByEventID.ps1, 68
SearchTypePerformanceCounterClasses.ps1, 201
ServiceDependencies.ps1, 355–359
SetDNS.ps1, 597–603
SetDNSServerConfig.ps1, 562–566
SetIP.ps1, 592–595
SetShareInfo.ps1, 133–135
SetShareInfoWithParameters.ps1, 135
SetShareInfoWithParametersTranslateRtnValue.ps1,
135–136
SetStaticIP.psi, 230–233
SetTimeSource.ps1, 290–291
SetWMILogLevel.ps1, 76
ShutdownRebootComputer.ps1, 319–321
StartMultipleServices.ps1, 101–102
StartService.ps1, 101
StartStopSite.ps1, 467–470
StopMultipleServices.ps1, 98–99
StopServices.ps1, 98
Scripts
Z06I622791.fm Page 658 Friday, December 14, 2007 1:15 PM

659
StringMethods.ps1, 248–249
SwitchRegEx.ps1, 48
ThreeStrings.ps1, 494–495
variables in, 39–40
VersionOfVista.ps1, 49
WMIFunction.ps1, 600
WorkWithDHCP.ps1, 236–237
WriteAppLogToText.ps1, 61
WriteAppLogToXML.ps1, 63
WriteDiskSpaceInfoToAccess.ps1, 192–195
WriteNetworkAdapterInfoToExcel.ps1, 224–226
WritePhysicalDriveInfoToAccess.ps1, 175–178
WritePrinterInfoToAccess.ps1, 156
WriteProcessesToAppLog.ps1, 78–79
WriteRunningServicesToAccess.ps1, 86, 90–91
WriteRunningServicesToTxt.ps1, 84
WriteServiceConfigToAccess.ps1, 92, 94
WriteServiceStatus.ps1, 107
WriteSharesToAccess.ps1, 126–129
WriteSharesToFile.ps1, 125, 131
WriteStoppedServices.ps1, 108
WriteToAppLogs.ps1, 77–78
WriteUserSharesToExcel.ps1, 122–124
SearchByEventID.ps1 script, 68
Searching event logs, 68–71
SearchTypePerformanceCounterClasses.ps1 script, 201
SecInDay constant, 341
Security. See also User Account Control (UAC)
administrative shares and, 126
attack surface reduction as, 110
documenting shares for, 115
dual-homed computers and, 228
of screen savers, 246, 256–262
overview of, 7–11
shares auditing for, 130
Simple Network Management Protocol (SNMP)
and, 161
Security Account Manager (SAM) name attribute, 393
Select case statement, 46, 48
Select statement, 215
Select-Object cmdlet, 204, 250, 408
Server system property, 191
ServerWMI class, 452
Service dependencies, 355–367
in startup device drivers, 360–363
in startup processes, 365–367
troubleshooting, 355–359
Service.Name property, 87
ServiceDependencies.ps1 script, 355–359
Services, 81–113. See also Cluster service; also Network
services; also Terminal service
confirming configurations for, 110
documenting, 81–93
configurations, 92–93
counting running as, 82–83
database for, 85–90
stopped, 91
text file for, 83–85
exception reports for, 111–112
fileAndPrint, 242
maintaining configurations for, 107–110
pausing, 93–94
setting configurations for, 94–106
by command-line arguments, 97
by GetMultipleService.ps1 script, 96
by GetSpecificService.ps1 script, 95
starting, 101–106
stopping, 97–101
startup, 352–354
Set-Alias cmdlet, 15
SetClientProperty method, 520
Set-Content cmdlet, 151
SetDNS.ps1 script, 597–603
SetDNSServerConfig.ps1 scripts, 562–566
SetEventLogRetention Policy.ps1 script,
73–74
Set-ExecutionPolicy cmdlet, 37
SetIP.ps1 script, 592–595
Set-Location cmdlet, 7
SetPowerConfig.ps1 script, 269–273
SetShareInfo.ps1 script, 133–135
SetShareInfoWithParameters.ps1 script, 135
SetShareInfoWithParametersTranslateRtnValue.ps1
script, 135–136
SetStaticIP.psi script, 230–233
SetTimeSource.ps1 script, 290–291
Set-Variable cmdlet, 40
Severity of event entries, 70
Share code translations, 119
Shared folders, 242
sharename option, 137
shareName parameter, 143
ShareName property, 147
Shares, 115–146
auditing, 130–133
creating, 137–141
deleting, 143–144
documenting, 115–129
Access database for, 126–129
administrative, 126
ListShares.ps1 script for, 116–117
ListSharesDetailed.ps1 script for, 118–120
ListSharesDetailedTranslateShareType.ps1
script for, 120–121
of users, 122–124
text files for, 124–125
WMI classes of, 117–118
file longevity and, 196
modifying, 133–136
unauthorized, 145
Shares
Z06I622791.fm Page 659 Friday, December 14, 2007 1:15 PM

660
Shortcut names for cmdlets, 15–31
creating, 16
for formatting, 17–24
Get-ChildItem, 17
Get-Command, 16, 24–27
Get-Member, 27–31
shutdown command, 588
ShutdownRebootComputer.ps1 script, 319–321
Shutting down remote computers, 319–321
SilentlyContinue variable, 23
in cluster service, 407
in post-deployment issues, 284
in troubleshooting, 355
Simple Network Management Protocol (SNMP),
161–162
Single quotation marks for variables, 220
site parameter, 467
SiteDefaults class, 456
sm (subnet mask) parameter, 592
Sort-Object cmdlet, 21–22, 45, 115, 164
source parameter, 325–326
SourceExists method, 77
Sources, in event logs, 69–71, 77–78
SQL Server 2007, 84, 385
start parameter, 467, 549
Starting services, 101–106
StartMode property, 92–93, 106, 111
StartMultipleServices.ps1 script, 101–102
StartService.ps1 script, 101
Start-Sleep cmdlet, 202, 588
StartStopSite.ps1script, 467–470
Startup issues
configuring options as, 6–7
in device drivers, 360–363
service dependencies in, 365–367
troubleshooting, 349–354
Static IP address, 230–233
Status indicator, 261
Status verification of services, 103
StatusCode property, 44
stop parameter, 467, 549
Stop variable value, 284
StopMultipleServices.ps1 script, 98–99
Stopping services, 91, 97–101
Stop-Process cmdlet, 10
StopServices.ps1 script, 98
Storage Area Network (SAN), 196
store parameter, 479, 483, 485, 488, 497, 501
String methods, 248–249
StringMethods.ps1 script, 248–249
Structured Query Language (SQL), 176
Subnet mask, 592, 594
substring method, 132
suspend switch, 8, 10–11
SWbemLocator object, 408
SWbemServices object, 1
switch statement
autosize, 116
comobject, 126
confirm, 8–9, 12, 15
for firewall configuration, 240
for power settings, 266
for shutting down or rebooting remote computers,
320–321
for stopService method, 100
for time settings, 286, 291
force, 17
in ChangeLogSettings function, 74
in CheckStatusWMILog.ps1, 76
in data management, 336
in DHCP, 237
in EvaluateServicesAndCount.ps1 script, 111
in funlookup function, 136
in funstatus function, 208
in network services, 544, 551, 574, 578–579
in screen saver configuration, 312
in scripting, 46–49
in share listings, 120
in static IP address setting, 232
in system restore, 344
in terminal service management, 517, 519,
525, 529
in troubleshooting, 356, 362, 366
in user account enabling, 300
in Windows Server 2008 Server Core, 593
list, 42
nonewline, 129
question mark, 57
select statement built from, 215
suspend, 8, 10–11
to convert time settings, 281–282
values assigned by, 57
whatif, 8–9, 12, 15
wildcards for, 47–48
with regular expressions, 48–49
SwitchIPConfig.ps1 script, 47–48
SwitchRegEx.ps1 script, 48
System files and folders, 17
System Management Server (SMS) package, 2
System restore, 340–346
System start mode, 92
System string object, 50
System.Diagnostics.EventLog
as .NET Framework class, 71
event log retention policy and, 73
for writing to event logs, 77, 79
New-Object cmdlet and, 72
System.Diagnostics.Eventlog.NET Framework class,
285–286, 615
System.Diagnostics.EventLogEntry, 68–69
Shortcut names for cmdlets
Z06I622791.fm Page 660 Friday, December 14, 2007 1:15 PM

661
System.Management.Automation.InvocationInfo
Microsoft .NET Framework, 559
System.Management.Automation.PSMemberSet
object, 221
System.Management.Automation.PSObject .NET
Framework class, 425
System.Management.Automation.ScriptInfo Microsoft
.NET Framework class, 559
System.Management.ManagementObject Microsoft
.NET Framework class, 337, 603
System.Security.Cryptography.X509Certificates
namespace, 475, 479, 492, 494, 504
System.String.NET Framework class, 132, 612
SystemIO.Path.NET Framework class, 612
SystemName property, 147
T
Tables
Access database design view of, 152
DiskSpace database, 194
Format-Table cmdlet for, 216
in data management, 330
in Internet Information Services management,
446, 449
in network services management, 556
in networking management, 223
in printing management, 147, 151, 164
in share management, 115–116, 125
in system restore, 345
in troubleshooting, 363
overview of, 20–23
PhyDisk, 175
Task Manager, 44
TCP-IP protocol, 602
TechNet, 97
Telephone tab of domain users, 389
Terminal service, 509–539
configuring, 509–520
client properties in, 517–520
disabling logons in, 513–515
documentation of, 509–512
managing users of, 521–537
client settings for, 527–537
ReportClientSetting.ps1 script for,
521–523
server access in, 524–526
Test-Path cmdlet, 138, 408, 564
Text
current and desired shares in, 131
documenting services as, 83–85
exporting event logs to, 61–62
manipulation cmdlets for, 150–151
shares documented as, 124–125
ThreeStrings.ps1 script, 494–495
throw statement, 300, 304, 308, 326, 337
Time setting, 277–287
event log for, 283–287
remote, 278–282
Time source, 289–296
Net Time command for, 290–291
registry query for, 292–296
Time stamps, 128, 202
Time-out value, 251
timeserver parameter, 290
timespan object, 198
Translating return code, 135–136
Troubleshooting, 349–377
hardware, 368–371
network issues, 373–375
service dependencies, 355–367
in startup device drivers, 360–363
in startup processes, 365–367
script for, 355–359
startup issues, 349–354
type constraint objects, 51
U
Unauthorized shares, 132–133, 145
Universal Time Coordinates (UTC) time format,
280, 286
unjoin parameter, 584
Unraveling, automatic, of variables,
220–221
Unrestricted execution policy, 37
Unsigned drivers, 368–371
update method, 177, 195
UPnP Device Host service, 355
Usage string, in scripts, 35
USB drives, 325
UsedRange property, 226, 402
User Account Control (UAC), 4
certificates and, 473
in event logs, 63
scripting and, 37
userflags attribute and, 394
User accounts. See also Domain users
creating local, 303–308
enabling, 297–301, 394
Security Account Manager (SAM) and, 393
User data. See Data management
user parameter, 298, 316, 524
User shares, 122–124, 133
UserDomain property, 153
UserFlags property, 300, 394
username parameter, 584, 588
UserName property, 248
userstore variable, 481
Utility scripts, help function for, 160
Utility scripts, help function for
Z06I622791.fm Page 661 Friday, December 14, 2007 1:15 PM

662
V
value parameter, 390, 531
Value property, 42, 221, 293–294
Variables
Continue value for, 284
counter, 62
double quotation marks and, 219–221
environment computername, 224, 330, 341
for documenting services as databases,
87–88
for opening databases, 127
for StoppedServices table, 91
for WriteRunningServicesToTxt.ps1 script, 84
helpText, 137
in CheckServiceThenStop.ps1 script, 99
in ExportRunningServices.ps1 script, 85
in functions, 120, 334–336
in GetHalfDuplex.psi script, 70
in retention policy, 73
in scripts, 39–40
in SetShareInfo.ps1 script, 134–135
Inquire value for, 284
Set-Variable cmdlet for, 40
SilentlyContinue, 284, 355, 407
Stop value for, 284
userstore, 481
VBScript, 1–2, 33, 295, 299, 462, 561
verbose parameter, 12
Verification, 1–2
VersionOfVista.ps1 script, 49
Virtual directories, 457–458
Visible property, 123, 224
W
Wallpaper settings, 531–533
Web sites
creation of, 459–463
IIS configuration and, 445–446
limits of, 454–456
starting and stopping, 467–470
whatif parameter
in cluster service, 431, 433–434, 437, 439
overview of, 8–9, 12, 15
Where-Object cmdlet
in cluster service, 424
in desktop maintenance, 183, 187
in Internet Information Services management, 469
in log management, 69–71
in network services management, 556, 560
in printing management, 161, 164
in scripting, 42
in services management, 82, 84
in Windows Server 2008 Server Core, 614
Wide formatting, 23–24
Wildcards
argument of, 62, 76
for cmdlets, 13, 18–19
switch, 47–48
to match property names, 222
Win_32PrinterDriver properties, 167–168
Win32_computersystem class, 46
Win32_QuickFixEngineering Windows Management
Instrumentation (WMI) class, 1
Windows Administration Tools Pack, 587
Windows Defender, 365
Windows Event Command-Line Utility
(Wevtutil.exe), 76
Windows Explorer, 171, 197
Windows firewall, 239–242
Windows Internet Naming Service (WINS), 576–580
Windows Management Instrumentation (WMI). See also
Cluster service; also Get-WmiObject cmdlet
date and time format for, 280
event logs of, 75–76
for printer inventorying, 147, 151
ForEach-Object cmdlet and, 42
IIS 7 classes of, 444
installing printer drivers and, 166
Internet Protocol version 6 and, 207
OfflineFilesWmiProvider of, 328
queries to, 44
remote administration and, 241
remote computer connection by, 278
remote querying by, 292
services and, 104–105, 110
share classes of, 117–118
Tester utility (wbemtest.exe) in, 117, 218
Win32_QuickFixEngineering in, 1
Windows Server 2008 Server Core, 583–617
initial configuration of, 583–611
DNS settings in, 597–603
joining domain in, 584–589
renaming server in, 605–609
setting IP address in, 592–595
managing, 611–616
by monitoring, 611–613
by querying event logs, 614–616
Windows Software Development Kit (SDK), 31
for data management, 337
for desktop configuration, 260
for Internet Information Services, 456
for network services management, 573
for networking management, 209
for post-deployment issues, 295, 299
for share management, 119
for troubleshooting, 374
Windows troubleshooting. See Troubleshooting
Windows Vista, 37, 49
Wireless network adapters, 223
value parameter
Z06I622791.fm Page 662 Friday, December 14, 2007 1:15 PM

663
WMI Query Language (WQL), 1, 87
WMIFunction.ps1 script, 600
Word 2007, 84
WorkWithDHCP.ps1 script, 236–237
Wrapping, of event logs, 67
WriteAppLogToText.ps1 script, 61
WriteAppLogToXML.ps1 script, 63
WriteDiskSpaceInfoToAccess.ps1 script, 192–195
WriteEntry method, 79
Write-Host cmdlet
certificate stores and, 480, 486, 490, 498
color parameters for, 154–155
for automatic unraveling of variables, 220
for disk properties, 189
for expired files, 198
for firewall configuration, 240
for logs, 65, 71–72
for printing, 149, 151, 154, 156, 161, 164
for progress indicator, 177, 193, 195
for progress line, 261
for setting time, 278
for status indicator, 261
in cluster service, 408, 412, 423
in data management, 329, 332
in network services management, 559
in scripting, 43, 45, 47
in services management, 87, 89, 96, 98
in share management, 118, 129, 133
in Windows Server 2008 Server Core, 594
WriteNetworkAdapterInfoToExcel.ps1 script,
224–226
WritePhysicalDriveInfoToAccess.ps1 script,
175–178
WritePrinterInfoToAccess.ps1 script, 156
WriteProcessesToAppLog.ps1 script, 78–79
WriteRunningServicesToAccess.ps1 script, 86, 90–91
WriteRunningServicesToTxt.ps1 script, 84
WriteServiceConfigToAccess.ps1 script, 92, 94
WriteServiceStatus.ps1 script, 107
WriteSharesToAccess.ps1 script, 126–129
WriteSharesToFile.ps1 script, 125, 131
WriteStoppedServices.ps1 script, 108
WriteStoppedServicesToAccess.ps1 script
WriteToAppLogs.ps1 script, 77–78
WriteUserSharesToExcel.ps1 script, 122–124
wscript.networkCom object, 266
wscript.network program ID, 86, 127
wshNetwork object, 86, 126, 152, 175, 272
X
XML, exporting event logs as, 62–64
Z
zonename parameter, 571
Zones. See DNS (Domain Name System)
Zune Network Sharing Service, 355
Zune Network Sharing Service
Z06I622791.fm Page 663 Friday, December 14, 2007 1:15 PM
Z06I622791.fm Page 664 Friday, December 14, 2007 1:15 PM

About the Author
Ed Wilson is a senior consultant at Microsoft
Corporation and a well-known scripting expert. He is
a Microsoft-certified trainer who delivers a popular
Windows PowerShell workshop to Microsoft Premier
customers worldwide. He has written several books
on Windows scripting, including Microsoft Windows
PowerShell Step by Step and Microsoft VBScript Step
by Step. Ed holds more than 20 industry certifications,
including Microsoft Certified Systems Engineer (MCSE)
and Certified Information Systems Security Professional
(CISSP).
Z07B622791.fm Page 665 Friday, December 14, 2007 11:15 AM
