Dploy A Stateful App On Kubernetes Windows Version Deploy Workshop Student Guide
User Manual:
Open the PDF directly: View PDF ![]() .
.
Page Count: 11
Whitney Kubernetes workshop February 16, 2019
Deploy a stateful app on Kubernetes
Student Guide for Windows
This workshop will make use of the VMware Cloud PKS. This provides Kubernetes clusters as a
managed cloud hosted service. For the workshop, you will have access to a Kubernetes cluster
running in the AWS public cloud.
This version of the instructions assumes you will utilize your own Windows laptop.
If you have not responded to your Invitation to VMware Cloud Services email, open it now. Find
the link labeled JOIN VMWARE CLOUD SERVICES in the email and open it.
Fill in your name and Whitney High School as the organization. Address is 16800 Shoemaker
Ave Cerritos 90703 Unites States California. Put in a phone number. Agree to terms and
conditions and do NOT check box for email communications.
You will get a second email with a link to set a password. Set the password to codeOPEN123!
Then log in to your account.
Pre-conditions for remainder of this workshop:
1. You have a VMware ID and login credentials.
2. A VKE Kubernetes Cluster has been pre-deployed and your account has been
authorized to use it. Your cluster id is used to replace <myclustername> in the
instructions below.
It is recommended that you open the built-in Windows “Notepad app” to save some items as we
go along. You can paste them in in later steps to save typing and potential errors. If you are
unfamiliar with Windows, Ctrl-C copies on Windows and Ctrl-V pastes. Typing Notepad in the
search box on lower left will find the app. You can cut and paste the content of the box below
into a savedsecrets.txt file.
My Student number: __
My VMware Cloud AcountId (email): _____________
My VMware Cloud Password: _____________
My Smart Cluster Name: cluster__
My VMware Cloud full org ID:
My VMware Cloud refresh token:
My cluster name (URL):
Whitney Kubernetes workshop February 16, 2019
At a Windows command prompt:
Create Directory
$ mkdir %UserProfile%\bin
$ set PATH=%PATH%;%UserProfile%\bin
add this permanently to your path if desired. On Windows 10, %UserProfile% is normally
C:\Users\yourname
In a browser (leave command prompt open for use again later):
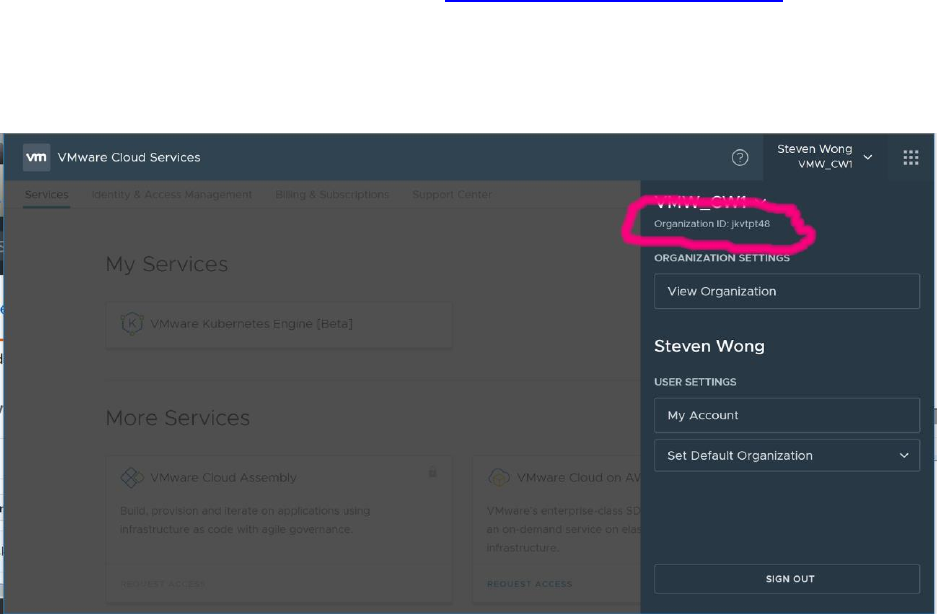
1. Launch the VMware Cloud Services console (https://console.cloud.vmware.com/) and
log in to your organization.
2. Click your user name in the toolbar. The drop-down menu displays an abbreviated
organization ID below your organization name.
Whitney Kubernetes workshop February 16, 2019
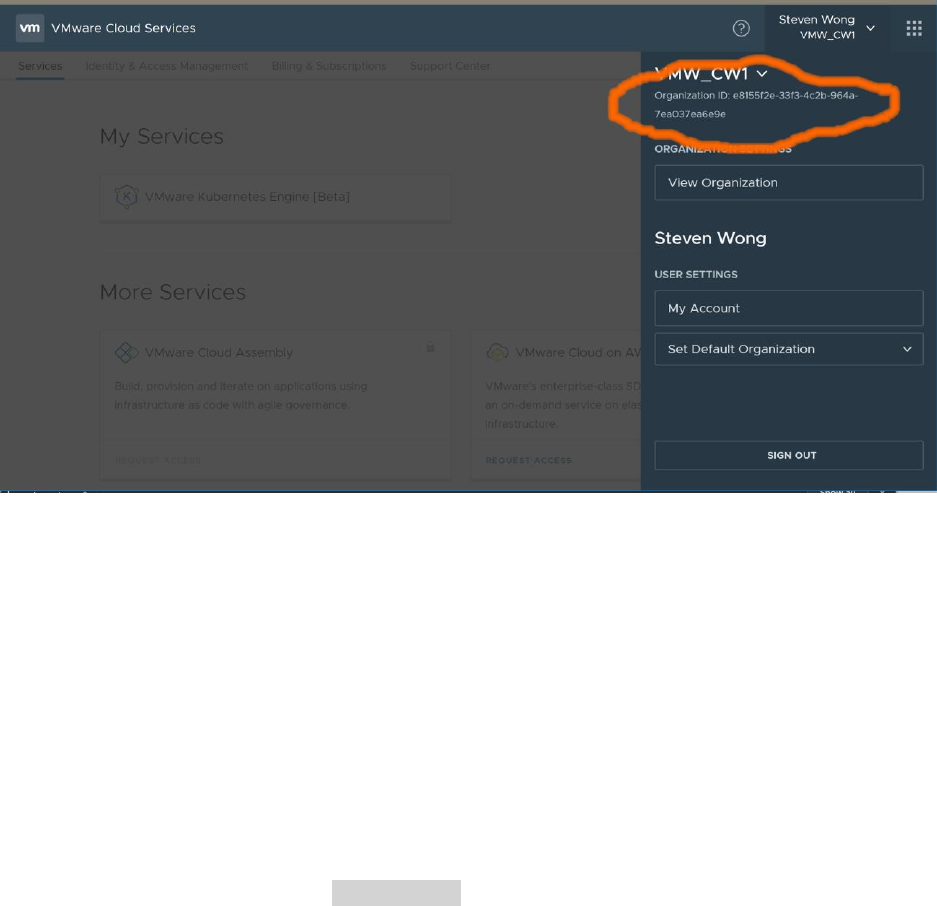
3. Click the abbreviated organization ID. Your full organization ID is displayed.
Save the organization ID to a “clipboard” file (you can use the notepad app for this) for
cut and paste later.
<my full org id>=___________________
4. To see your access key, click My Account in the drop-down menu. Your profile
information is displayed.
5. Still on the My Account page, select the API Tokens tab. From here, you can regenerate,
revoke, and copy your token. Save the Refresh Token to a “clipboard file for cut and
paste. You should treat this refresh token like a personal password.
<my refresh token>=_____________________
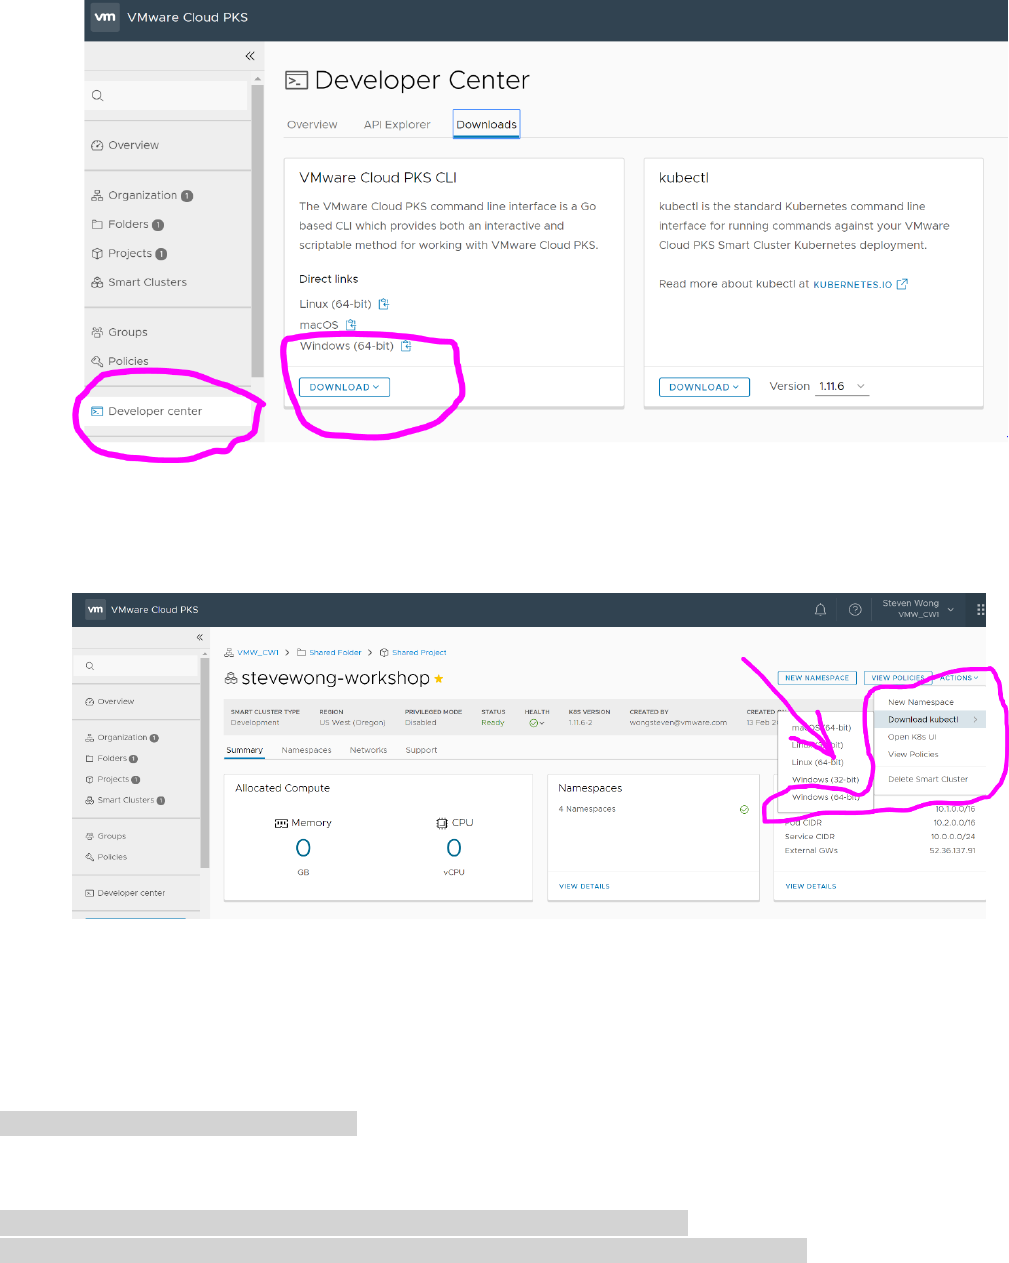
6. From 3x3 “grid” menu at upper right select VMware Cloud PKS tile. Choose Developer
Center tab on left side, then the Downloads tab.
Download Cloud PKS CLI using DOWNLOAD button - saving the Windows version to
%UserProfile%\bin.
Whitney Kubernetes workshop February 16, 2019
7. From “Smart Clusters” Tab at left, find your Kubernetes Cluster and “star” it (on right) to
make it a favorite. Go to Overview (Upper left) and Favorites tab, and click on your
cluster. Under “ACTIONS” tab in center screen, choose “Download kubectl” to get the
Windows version of the Kubernetes CLI - saving to %UserProfile%\bin.
Return to command prompt (leave browser open):
(assuming %UserProfile%\bin is in path, and vke and kubectl have been downloaded there)
Verify vke the VMware Cloud PKS CLI is present and working:
$ vke –version
vke version 0.9.4 (Build: ci-a7653d8)
Verify kubectl Kubernetes CLI is present and operational
$ kubectl version
Client Version: version.Info{Major:"1", Minor:"11", GitVersion:"v1.11.6",
GitCommit:"fc32d2f3698e36b93322a3465f63a14e9f0eaead", GitTreeState:"clean",
Whitney Kubernetes workshop February 16, 2019
BuildDate:"2018-03-26T16:55:54Z", GoVersion:"go1.9.3", Compiler:"gc",
Platform:"windows/amd64"}
Unable to connect to the server: No valid id-token, and cannot refresh without refresh-token
Log in and verify operation, using the credentials you save to a clipboard file.:
$ vke account login -t <my full org id> -r <my refresh token>
Login successful
$ vke cluster list
NAME …
<myclustername> ...
$ vke cluster show <myclustername>
Name: <myclustername>
. . . . . . . . . . . . . .
The Kubernetes CLI has a mechanism to use configuration files to identify and authenticate to
the API server of a cluster so that credentials and other parameters don’t have to be entered on
the command line each time you use it. The vke CLI will set up this configuration file for you.
Have vke set your kubectl configuration, and verify operation:
$ vke cluster auth setup <myclustername>
$ kubectl get node
NOTE – A login is only good for a limited amount of time. If your connection is lost or times out
during this workshop, repeat these to resume:
$ vke account login -t <my full org id> -r <my refresh token>
$ vke cluster auth setup <myclustername>
NOTE – If kubectl prompts for a user name, you likely have another version of kubectl
previously installed and in your path. These links may be helpful to resolve the situation:
https://kubernetes.io/docs/tasks/access-application-cluster/configure-access-multiple-clusters/
https://vsupalov.com/multiple-kubectl-versions/
Close your command prompt because we now have to run some commands as a Windows
administrator.
Open a cmd.exe shell as administrator (search for cmd, right mouse click on it and choose run
as administrator)
$ @"%SystemRoot%\System32\WindowsPowerShell\v1.0\powershell.exe" -NoProfile -
InputFormat None -ExecutionPolicy Bypass -Command "iex ((New-Object
System.Net.WebClient).DownloadString('https://chocolatey.org/install.ps1'))" && SET
"PATH=%PATH%;%ALLUSERSPROFILE%\chocolatey\bin"
Whitney Kubernetes workshop February 16, 2019
Close the command prompt window and start a new one, running as administrator again.
$ choco install kubernetes-helm
Return to a new non administrator command prompt
Close the administrator prompt and open a new regular cmd prompt. Change to the
%UserProfile%\bin directory
Install the Tiller server side component in your Kubernetes cluster
$ helm init
Verify tiller is deployed (may take a minute until AVAILABLE count shows 1 ) The web
UI can also be used for monitoring.
$ kubectl get deploy --namespace kube-system
$ helm version
Client: &version.Version{SemVer:"v2.9.1",
GitCommit:"20adb27c7c5868466912eebdf6664e7390ebe710", GitTreeState:"clean"}
Server: &version.Version{SemVer:"v2.9.1",
GitCommit:"20adb27c7c5868466912eebdf6664e7390ebe710", GitTreeState:"clean"}
Update Helm charts:
$ helm repo update
Hang tight while we grab the latest from your chart repositories...
...Skip local chart repository
...Successfully got an update from the "stable" chart repository
Update Complete. ⎈ Happy Helming!⎈
Whitney Kubernetes workshop February 16, 2019
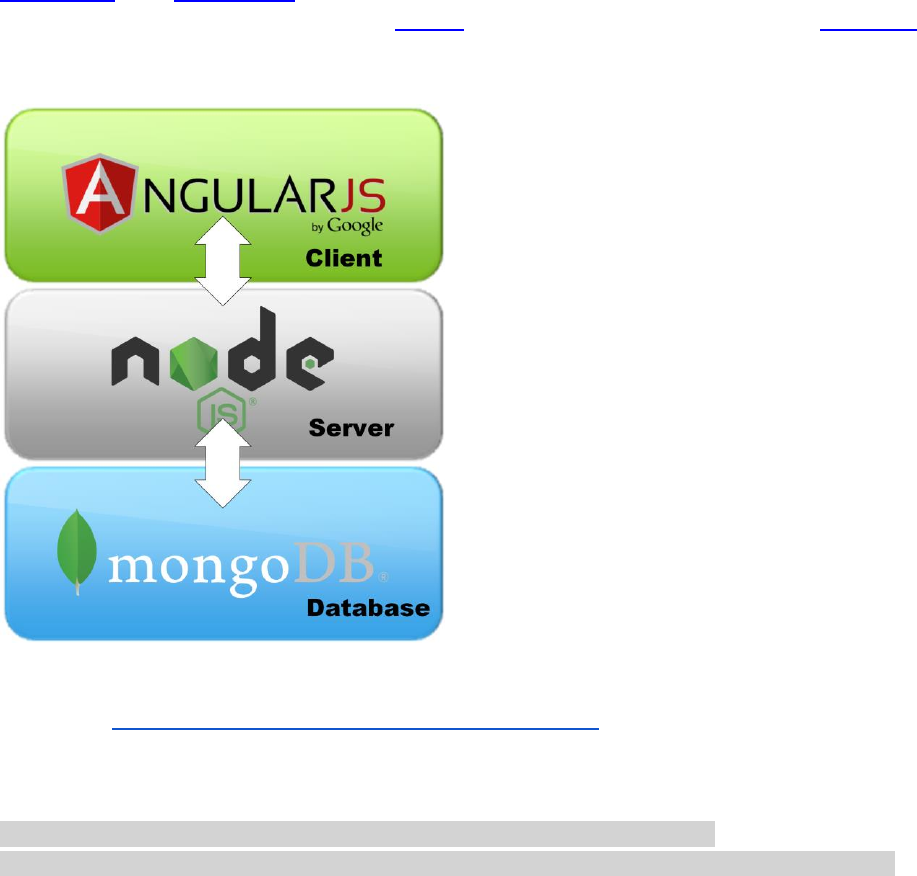
RocketChat is an open source multi-user messaging system that has many of the features of
Slack. It is built using the Node.js based Meteor web app framework. Meteor uses a MongoDB
NoSQL database as its backend to hold state.
Confirm that a RocketChat application helm chart is available in the repository you are using.
The one at https://kubernetes-charts.storage.googleapis.com/ is installed by default and is
called stable:
$ helm search rocketchat
NAME CHART VERSION APP VERSION DESCRIPTION
stable/rocketchat 0.1.3 0.56 Prepare to take off with the ultimate chat plat...
Whitney Kubernetes workshop February 16, 2019
The helm chart will deploy all the components of RocketChat on Kubernetes, front-end and
back-end. It supports easy deployments by making a lot of configuration choices automatically
for you – but it does leave you with a small group of mandatory and optional settings. Using
Helm to deploy an application is basically a tradeoff of giving you simpler deployment in
exchange for loss of full control of settings. Anything Helm does, you could also do without
using it, but for this workshop we are electing to use the “easy way”.
Display configurable values for the RocketChat Helm chart:
$ helm inspect values stable/rocketchat
## Rocket Chat image version
## ref: https://hub.docker.com/r/library/rocket.chat/tags/
##
image: rocket.chat:0.56
## Specify a imagePullPolicy
## Defaults to 'Always' if image tag is 'latest', else set to 'IfNotPresent'
## ref: http://kubernetes.io/docs/user-guide/images/#pre-pulling-images
##
# imagePullPolicy:
## Host for the application
##
# host:
…
Kubernetes cluster installations will generally have a default storage class configured. Confirm
there is a default storage class present in your cluster
$ kubectl get storageclass
NAME PROVISIONER AGE
default (default) kubernetes.io/vke-disk 1d
Helm charts typically define default values for deployments, but allow you to override these on
the command line, or in a file. We will use the default storage class, and make the volumes
larger than the default. We are also going to create a Kubernetes Ingress object to expose the
RocketChat application for public access on the Internet.

Whitney Kubernetes workshop February 16, 2019
Compose a myvals.yaml file, in your home directory, using editor of your choice, with this
content:
mongodb:
mongodbUsername: myname
mongodbPassword: mypw123!
mongodbDatabase: mydbname
persistence:
storageClass: default
size: 16Gi
persistence:
storageClass: default
size: 16Gi
ingress:
enabled: true
Get the public hostname to be used for your Ingress hostname. It will look like your clustername
concatenated with a GUID and .vke-user.com
$ vke cluster show <myclustername> | findstr Address
The address shown will be used as <hostname> in the next command. This will be a URL that is
resolved to your service, publicly exposed and running in the AWS cloud.
Deploy a release using the rocketchat chart (note there is a space between `set` and `host`
below)
$ helm install -f myvals.yaml --name student<mystudentnumber> --set host=<hostname> --
set ingress.enabled=true stable/rocketchat
The output will indicate the public URL for your deployment of RocketChat. This will take several
minutes to become available because storage and pods will get deployed.
You can open the Kubernetes UI using the “Open K8s UI” selection on your VKE cluster
dashboard. Examine the various Kubernetes objects (deployments, pods, etc.) that it deployed
in the default namespace. The UI will show the detailed configuration. You could have used the
kubectl CLI to do this too but it would have taken much more effort. When a helm chart is
available, it can improve your efficiency. Even if ultimately you choose to use kubectl with yaml
to gain more control, a helm deployment can be used to show you a sample deployment as an
example.
Deployment status can be monitored using the Kubernetes web UI for your cluster. You may
wish to refresh it periodically.
Whitney Kubernetes workshop February 16, 2019
Open the RocketChat URL in a browser tab. Create a new RocketChat account specifying a
username and password. Post a message in a channel such as the precreated #general
channel.
Send the URL to your cell phone and open RocketChat there. Create a second account using
your phone and verify that you have successfully created an n-tier stateful app exposed on the
Internet.
If you like you can delete the rocketchat front end pod and verify that Kubernetes will detect this
as a failure and redeploy the pod. (You can use the UI or kubectl delete pod <podname>) And
since we used an external volume mount for the stateful backend you can even delete the
MongoDB pod and watch the recovery.
Whitney Kubernetes workshop February 16, 2019
Post workshop Cleanup, using command line
List releases
$ helm list
Delete your release
$ helm delete --purge <myrelease>
