Wireless Network Security A Beginners Guide
Wireless%20Network%20Security%20A%20Beginners%20Guide
Wireless%20Network%20Security%20A%20Beginners%20Guide
User Manual:
Open the PDF directly: View PDF ![]() .
.
Page Count: 369 [warning: Documents this large are best viewed by clicking the View PDF Link!]
- Wireless Network Security A Beginner’s Guide
- About the Author
- Contents
- Acknowledgments
- Introduction
- Part I: Wireless Foundations
- Chapter 1: Introduction to the Wireless Security Mindset
- We’ll Cover
- What You Will Learn
- Security 101: The 11 Security Principles
- Principle 1: Security vs. Convenience
- Principle 2: It Is Impossible to Eliminate All Risks
- Principle 3: Rules of Risk Calculation and Mitigating Controls
- Principle 4: Not All Risks Must Be Mitigated
- Principle 5: Security Is Not Just Keeping the Bad Guys Out
- Principle 6: ROI Doesn’t Work for Security
- Principle 7: Defense In Depth
- Principle 8: Least Privilege
- Principle 9: CIA Triad
- Principle 10: Prevention, Detection, Deterrents
- Principle 11: Prevention Fails
- Wireless Networking Basics
- We’ve Covered
- Chapter 2: Wireless Tools and Gadgets
- Chapter 1: Introduction to the Wireless Security Mindset
- Part II: Know Thy Enemy
- Chapter 3: Theory of Attacks on Wireless Networks
- Chapter 4: Attacking Wireless Networks
- Chapter 5: Attacking Wireless Clients
- Part III: Real-World Wireless Security Defenses
- Chapter 6: Theory of Defense for Securing Wireless Networks
- We’ll Cover
- Setting the Stage
- Phases of Wireless Deployment
- Secure Design Principles for Wireless Networks
- Useless Defenses
- Good Wireless Defenses
- We’ve Covered
- Chapter 7: Understanding the WPA2-Enterprise with Certificates Architecture
- Chapter 8: Deploying a WPA-Enterprise Network with Certificates
- Chapter 9: Deploying Secure Wireless Networks
- Chapter 10: Handling Wireless Guest Access
- Chapter 11: Handling Rogue Access Points and the Future of Wireless Security
- Chapter 6: Theory of Defense for Securing Wireless Networks
- Appendix: Introduction to Linux: The Wireless Engineer’s Operating System of Choice
- Glossary
- Index
Secure Beginner’s Guide / Wireless Network Security: A Beginner’s Guide / Tyler Wrightson / 094-6 / Front Matter
Blind Folio: ii
About the Author
Tyler Wrightson (CISSP, CCSP, CCNA, CCDA, MCSE,
Linux+) is the founder and president of Leet Systems and
Frigdo.com. Tyler is currently a Senior Security Consultant
for Integralis, Inc., where he specializes in offensive security
engagements, penetration testing, vulnerability assessments,
social engineering, and physical penetration testing. Tyler
has over eleven years of experience in the IT security field,
with extensive experience deploying and securing wireless
networks. Tyler has also taught wireless and network
security classes for the CCNA. You can follow him on twitter
@tbwrightson or check out his security blog at http://blog.
leetsys.com.
About the Technical Editor
Brock Pearson (MCP +I, MCSE Windows NT 4.0, MCP
Windows 2000, CISSP, CRISC, A+, N+) holds a B.A. in
Information Systems and is currently pursuing his Certified
Ethical Hacking certification. He has been in the Information
Technology industry for over 19 years in varying capacities,
including network administrator and MIS manager for a
manufacturing firm in the South Florida area as well as
security consultant and manager for two of the top three
consulting firms in the world.
Brock has been involved in many SIEM installations
using his security experience and product knowledge to
aid large-scale implementations and to provide successful
outcomes. Within many of these engagements, Brock
provided solid product training, customized use-case
training, and advanced product customizations within the
security infrastructure.
00-FM.indd 2 4/9/12 3:55:46 PM
www.itbookshub.com

Secure Beginner’s Guide / Wireless Network Security: A Beginner’s Guide / Tyler Wrightson / 094-6 / Front Matter
Blind Folio: ii
Secure Beginner’s Guide / Wireless Network Security: A Beginner’s Guide / Tyler Wrightson / 094-6 / Front Matter
Blind Folio: iii
Wireless Network Security
A Beginner’s Guide
Tyler Wrightson
New York Chicago San Francisco
Lisbon London Madrid Mexico City
Milan New Delhi San Juan
Seoul Singapore Sydney Toronto
00-FM.indd 3 4/9/12 3:55:47 PM
www.itbookshub.com

Secure Beginner’s Guide / Wireless Network Security: A Beginner’s Guide / Tyler Wrightson / 094-6 / Front matter
Copyright © 2012 by The McGraw-Hill Companies. All rights reserved. Except as permitted under the United States
Copyright Act of 1976, no part of this publication may be reproduced or distributed in any form or by any means, or
stored in a database or retrieval system, without the prior written permission of the publisher.
ISBN: 978-0-07-176095-9
MHID: 0-07-176095-4
The material in this eBook also appears in the print version of this title: ISBN: 978-0-07-176094-2,
MHID: 0-07-176094-6.
McGraw-Hill eBooks are available at special quantity discounts to use as premiums and sales promotions, or for use in
corporate training programs. To contact a representative please e-mail us at bulksales@mcgraw-hill.com.
All trademarks are trademarks of their respective owners. Rather than put a trademark symbol after every occurrence of
a trademarked name, we use names in an editorial fashion only, and to the benefit of the trademark owner, with no
intention of infringement of the trademark. Where such designations appear in this book, they have been printed with
initial caps.
Information has been obtained by McGraw-Hill from sources believed to be reliable. However, because of the possibility
of human or mechanical error by our sources, McGraw-Hill, or others, McGraw-Hill does not guarantee the accuracy,
adequacy, or completeness of any information and is not responsible for any errors or omissions or the results obtained
from the use of such information.
TERMS OF USE
This is a copyrighted work and The McGraw-Hill Companies, Inc. (“McGrawHill”) and its licensors reserve all rights
in and to the work. Use of this work is subject to these terms. Except as permitted under the Copyright Act of 1976 and
the right to store and retrieve one copy of the work, you may not decompile, disassemble, reverse engineer, reproduce,
modify, create derivative works based upon, transmit, distribute, disseminate, sell, publish or sublicense the work or any
part of it without McGraw-Hill’s prior consent. You may use the work for your own noncommercial and personal use;
any other use of the work is strictly prohibited. Your right to use the work may be terminated if you fail to comply with
these terms.
THE WORK IS PROVIDED “AS IS.” McGRAW-HILL AND ITS LICENSORS MAKE NO GUARANTEES OR
WARRANTIES AS TO THE ACCURACY, ADEQUACY OR COMPLETENESS OF OR RESULTS TO BE OBTAINED
FROM USING THE WORK, INCLUDING ANY INFORMATION THAT CAN BE ACCESSED THROUGH THE
WORK VIA HYPERLINK OR OTHERWISE, AND EXPRESSLY DISCLAIM ANY WARRANTY, EXPRESS OR
IMPLIED, INCLUDING BUT NOT LIMITED TO IMPLIED WARRANTIES OF MERCHANTABILITY OR FITNESS
FOR A PARTICULAR PURPOSE. McGraw-Hill and its licensors do not warrant or guarantee that the functions
contained in the work will meet your requirements or that its operation will be uninterrupted or error free. Neither
McGraw-Hill nor its licensors shall be liable to you or anyone else for any inaccuracy, error or omission, regardless of
cause, in the work or for any damages resulting therefrom. McGraw-Hill has no responsibility for the content of any
information accessed through the work. Under no circumstances shall McGraw-Hill and/or its licensors be liable for any
indirect, incidental, special, punitive, consequential or similar damages that result from the use of or inability to use the
work, even if any of them has been advised of the possibility of such damages. This limitation of liability shall apply to
any claim or cause whatsoever whether such claim or cause arises in contract, tort or otherwise.
eBook copyright.indd 1 4/11/12 4:50:09 PM
www.itbookshub.com
Secure Beginner’s Guide / Wireless Network Security: A Beginner’s Guide / Tyler Wrightson / 094-6 / Front Matter
Blind Folio: iv
Secure Beginner’s Guide / Wireless Network Security: A Beginner’s Guide / Tyler Wrightson / 094-6 / Front Matter
Blind Folio: v
To my Family, my entire Family.
00-FM.indd 5 4/9/12 3:55:47 PM
www.itbookshub.com
Secure Beginner’s Guide / Wireless Network Security: A Beginner’s Guide / Tyler Wrightson / 094-6 / Front Matter
Blind Folio: vi
Secure Beginner’s Guide / Wireless Network Security: A Beginner’s Guide / Tyler Wrightson / 094-6 / Front Matter
vii
Contents
ACKNOWLEDGMENTS ............................................... xiii
INTRODUCTION ..................................................... xv
PART I Wireless Foundations
1 Introduction to the Wireless Security Mindset ..................... 3
What You Will Learn ................................................... 4
Security 101: The 11 Security Principles .................................... 5
Principle 1: Security Versus Convenience .............................. 5
Principle 2: It Is Impossible to Eliminate All Risks ....................... 6
Principle 3: Rules of Risk Calculation and Mitigating Controls ............. 7
Principle 4: Not All Risks Must Be Mitigated ........................... 11
Principle 5: Security Is Not Just Keeping the Bad Guys Out ................ 12
Principle 6: ROI Doesn’t Work for Security ............................. 13
Principle 7: Defense In Depth ........................................ 13
Principle 8: Least Privilege .......................................... 13
Principle 9: CIA Triad ............................................. 14
Principle 10: Prevention, Detection, Deterrents .......................... 14
Principle 11: Prevention Fails ........................................ 14
00-FM.indd 7 4/9/12 3:55:47 PM
www.itbookshub.com
Secure Beginner’s Guide / Wireless Network Security: A Beginner’s Guide / Tyler Wrightson / 094-6 / Front Matter
viii Wireless Network Security: A Beginner’s Guide
Wireless Networking Basics .............................................. 16
802.11a/b/g/n .................................................... 16
Access Points .................................................... 18
Autonomous vs. Controller Based .................................... 18
SSID, BSSID, MAC Address ........................................ 19
Beacons and Broadcasts ............................................ 20
Associating and Authenticating ...................................... 20
Encryption ....................................................... 20
2 Wireless Tools and Gadgets .................................... 23
A Lab of Your Own .................................................... 24
Client Devices ........................................................ 25
Phones .......................................................... 25
Printers ......................................................... 25
Access Points ......................................................... 25
DD-WRT ........................................................ 26
WRT54G ........................................................ 26
Apple Airport Express ............................................. 26
Mini Access Points ................................................ 26
Mobile Hotspots .................................................. 26
Smartphones ..................................................... 28
Enterprise-Grade Access Points ...................................... 29
Antennas ............................................................. 30
Types of Antennas ................................................. 30
Gadgets .............................................................. 33
GPS ............................................................ 33
Smartphones and PDAs ............................................ 34
Pocket Wireless Scanners ........................................... 34
Spectrum Analyzer ................................................ 34
Operating System of Choice .............................................. 35
PART II Know Thy Enemy
3 Theory of Attacks on Wireless Networks ......................... 41
Setting the Stage ....................................................... 42
Wireless Reconnaissance ........................................... 43
SSID Decloaking ................................................. 44
Passive Packet Captures ............................................ 45
Store and Crack at Your Convenience .................................. 47
Man-in-the-Middle Attacks ......................................... 47
MITM—OK, Now What? ........................................... 52
Authentication ........................................................ 53
WEP Authentication ............................................... 54
00-FM.indd 8 4/9/12 3:55:47 PM
www.itbookshub.com
Secure Beginner’s Guide / Wireless Network Security: A Beginner’s Guide / Tyler Wrightson / 094-6 / Front Matter
Secure Beginner’s Guide / Wireless Network Security: A Beginner’s Guide / Tyler Wrightson / 094-6 / Front Matter
Contents ix
Encryption ........................................................... 55
Stream Ciphers vs. Block Ciphers .................................... 56
How WEP Works ...................................................... 56
History of Breaking WEP ........................................... 60
Attacking WEP Encrypted Networks .................................. 62
How WPA Works ...................................................... 64
WPA-PSK ....................................................... 64
WPA-Enterprise .................................................. 64
WPA2 Encryption Algorithms ....................................... 65
Attacking WPA Protected Networks ................................... 65
So What Should I Use? ............................................. 69
4 Attacking Wireless Networks ................................... 71
Wireless Reconnaissance ................................................ 73
The iwlist Command ............................................... 75
Kismet .......................................................... 78
Kismac ......................................................... 84
Wardrive ........................................................ 84
Netstumbler ...................................................... 84
Actively Attacking Wireless Networks ...................................... 85
Cracking WEP Encryption .......................................... 85
Cracking a WPA Passphrase ......................................... 91
5 Attacking Wireless Clients ...................................... 97
Wireless World ........................................................ 99
Wireless Client Vulnerabilities ....................................... 100
Factors That Exacerbate Wireless Client Vulnerabilities ................... 101
Wireless Reconnaissance ................................................ 103
Kismet .......................................................... 103
Airodump ....................................................... 105
Sniffing Insecure Communications ........................................ 105
Capturing Packets ................................................. 109
Can We Force the Client to Talk to Us? ................................ 111
Creating a Linux Access Point ....................................... 113
Forcing the Client to Talk to Us ...................................... 117
Default Operations ..................................................... 117
Man-in-the-Middle Attacks .............................................. 118
DNS Spoofing .................................................... 119
Fake Webauth .................................................... 120
SSL MITM ...................................................... 122
SSL Stripping .................................................... 122
Fake AV Updates .................................................. 124
00-FM.indd 9 4/9/12 3:55:47 PM
www.itbookshub.com
Secure Beginner’s Guide / Wireless Network Security: A Beginner’s Guide / Tyler Wrightson / 094-6 / Front Matter
x Wireless Network Security: A Beginner’s Guide
PART III Real-World Wireless Security Defenses
6 Theory of Defense for Securing Wireless Networks ................ 129
Setting the Stage ....................................................... 130
Context ......................................................... 130
Reality .......................................................... 131
The Attacker Has the Advantage ..................................... 131
Phases of Wireless Deployment ........................................... 132
New Deployments ................................................. 132
Existing Wireless Networks ......................................... 133
Wireless Refresh .................................................. 136
Secure Design Principles for Wireless Networks .............................. 137
Defense In Depth ................................................. 137
Least Privilege ................................................... 138
Network Segmentation ............................................. 139
Wireless Assessments .............................................. 140
Secure the Infrastructure ............................................ 141
Rogue AP Detection ............................................... 141
Physical Security ................................................. 141
Change the Default Configurations ................................... 141
Due Diligence .................................................... 142
Confidentiality Integrity Availability (CIA) ............................. 142
Useless Defenses ...................................................... 145
Faraday Cage .................................................... 145
MAC Filtering .................................................... 146
SSID Cloaking ................................................... 146
WEP ........................................................... 147
WEP Cloaking ................................................... 147
Good Wireless Defenses ................................................. 148
Firewalls ........................................................ 148
Routers ......................................................... 150
Switches ........................................................ 151
Intrusion Detection Systems and Intrusion Prevention Systems ............. 153
Wireless Intrusion Detection and Intrusion Prevention Systems ............. 159
Honeypots ....................................................... 159
Web Authentication Gateways ....................................... 160
7 Understanding the WPA2-Enterprise with Certificates Architecture ... 163
Introduction to WPA2-Enterprise with Digital Certificates ...................... 164
Public Key Infrastructure and Digital Certificates ............................. 165
Public Key Cryptography: Asymmetric Encryption Algorithms ............. 166
Digital Certificates ................................................ 174
Microsoft Certificate Services ....................................... 182
00-FM.indd 10 4/9/12 3:55:47 PM
Secure Beginner’s Guide / Wireless Network Security: A Beginner’s Guide / Tyler Wrightson / 094-6 / Front Matter
Secure Beginner’s Guide / Wireless Network Security: A Beginner’s Guide / Tyler Wrightson / 094-6 / Front Matter
Contents xi
Remote Authentication Dial-In User Service ................................. 183
802.1x: Port-Based Access Control ........................................ 185
RADIUS and 802.1x ............................................... 186
WPA Enterprise Architecture ............................................. 188
8 Deploying a WPA-Enterprise Network with Certificates ............. 191
Install and Configure the Certification Authority .............................. 192
Install Active Directory Certificate Services ............................ 193
Configure the Certificate Template and Auto-Enrollment .................. 196
Allow Pre-logon Authentication ...................................... 206
Configure the RADIUS Server ............................................ 208
Configure the Wireless Access Point ....................................... 213
Authenticate to the Wireless Network ................................. 214
9 Deploying Secure Wireless Networks ............................ 217
WPA2-Enterprise Wireless Networks ...................................... 218
Configure the Network Policy Server (RADIUS) ........................ 219
Configure the Wireless Access Point .................................. 225
Configure the Wireless Client ........................................ 227
Troubleshooting PEAP Authentication ..................................... 231
Troubleshooting RADIUS Authentication .............................. 232
Securing Your Wireless Network .......................................... 236
Segmenting Wireless Networks ........................................... 236
Restricting Users .................................................. 236
Restricting Time .................................................. 237
Restricting Network Subnets and TCP Ports ............................ 237
10 Handling Wireless Guest Access ................................. 251
Guest Networks and Internet Access ....................................... 252
Authenticating Guest Users and Managing Guest Credentials ................... 253
Using Captive Web Portals .......................................... 255
Guest Users Only ................................................. 258
Encrypting Traffic ................................................. 258
Using Auto-Expiring Credentials ..................................... 259
Allowing Secure Access to Internal Resources ............................... 260
Authenticating Consultants .......................................... 260
Segmenting Guest Wireless Networks from Internal Networks .............. 261
DMZ with Jump Stations ........................................... 262
Virtual Private Networking .......................................... 264
11 Handling Rogue Access Points and the Future of Wireless Security ... 273
Handling Rogue Access Points ........................................... 274
Preventing Rogue Wireless Networks ................................. 275
Manually Detecting Rogue Wireless Networks .......................... 281
00-FM.indd 11 4/9/12 3:55:48 PM
Secure Beginner’s Guide / Wireless Network Security: A Beginner’s Guide / Tyler Wrightson / 094-6 / Front Matter
xii Wireless Network Security: A Beginner’s Guide
xiii
Tracing Malicious Rogue Access Points ............................... 285
Handling Rogue Access Points ....................................... 289
Automated Detection of Rogue Wireless Networks ....................... 291
Other Wireless Technologies ............................................. 293
Next-Gen Solutions .................................................... 293
Lightweight Wireless Solutions ...................................... 294
Cloud-based Wireless Solutions ...................................... 295
Dedicated Wireless IDS ............................................ 297
Client Protection ....................................................... 298
User Education ................................................... 298
Technical Solutions for Endpoint Security .............................. 299
Group Policy Objects .............................................. 299
A Introduction to Linux: The Wireless Engineer's
Operating System of Choice .................................. 303
The Linux Operating System ............................................. 304
BackTrack: Our Linux Distribution of Choice ........................... 306
Downloading and Burning BackTrack ................................. 306
Booting BackTrack from a USB Drive ................................. 307
Booting to BackTrack .............................................. 308
The Gnome Graphical Environment ....................................... 309
Basic Linux Commands ................................................. 310
Understanding the Linux Shell ....................................... 311
Running Commands ............................................... 311
Getting Help with Linux Commands .................................. 313
Navigating the Linux File System ......................................... 314
Installing Software on BackTrack ......................................... 315
Basic User Administration .......................................... 316
Basic Networking Configuration .......................................... 318
Understanding Linux File Permissions ................................. 321
Basic Scripting ................................................... 323
Conclusion ........................................................... 324
Glossary . . . . . . . . . . . . . . . . . . . . . . . . . . . . . . . . . . . . . . . . . . . . . . . . . . . . . 325
Index ........................................................ 333
00-FM.indd 12 4/9/12 3:55:48 PM
Secure Beginner’s Guide / Wireless Network Security: A Beginner’s Guide / Tyler Wrightson / 094-6 / Front Matter Secure Beginner’s Guide / Wireless Network Security: A Beginner’s Guide / Tyler Wrightson / 094-6 / Front Matter
xiii
Acknowledgments
I
would like to thank my fantastic team at McGraw-Hill. You were all so helpful during
this long project. I’m extremely grateful to Megg Morin for sticking with me and
guiding me through the entire process. Thanks, Megg, for helping me work through all
the missed deadlines. Thanks also go to Stephanie Evans and Amy Jollymore for all
their help. I’d also like to thank my technical editor, Brock Pearson, for the great and
sometimes funny feedback. Many thanks for the terrific illustrations from a fantastic artist,
Don Naylor. Finally, I must say thank you to my girlfriend for putting up with my constant
work on this book, even through several vacations.
00-FM.indd 13 4/9/12 3:55:48 PM
This page intentionally left blank
Secure Beginner’s Guide / Wireless Network Security: A Beginner’s Guide / Tyler Wrightson / 094-6 / Front Matter
Blind Folio: xiv
Secure Beginner’s Guide / Wireless Network Security: A Beginner’s Guide / Tyler Wrightson / 094-6 / Front Matter
xv
Introduction
Few technologies have so rapidly reached the ubiquitous level that wireless
technologies have. Just over ten years ago, wireless networks were still considered
expensive for consumers and something of a luxury for general business use. Then,
the market demanded access to data whenever and wherever, and wireless networks
exploded everywhere, permeating every aspect of our lives. Now almost every new device
(including many that don’t need it) is made with integrated wireless services.
This book is designed for IT professionals who need to quickly understand the risks
and vulnerabilities associated with deploying and managing a wireless network and need
a good foundation for designing and deploying secure wireless networks. This book does
more than just detail specific attacks; it provides an understanding of the underlying attack
vectors and techniques so that future attacks can be quickly understood.
This book is written as a no-nonsense guide to get you up to speed quickly without
glossing over the important technical details. I tried to provide you with enough technical
information without going into meaningless details. You, the reader, will be the best judge
of how successful I have been.
You will learn the attack vectors inherent in all wireless technologies, which will
remain true for technologies that haven’t even been released yet. We will cover specific
weaknesses in WEP and WPA as well as weaknesses in the operation of wireless client
devices. We will also cover the most common attack tools used to circumvent WEP and
WPA wireless networks.
00-FM.indd 15 4/9/12 3:55:48 PM
Secure Beginner’s Guide / Wireless Network Security: A Beginner’s Guide / Tyler Wrightson / 094-6 / Front Matter
xvi Wireless Network Security: A Beginner’s Guide
Next, you’ll learn about the real-world, actionable defenses you can put in place today
to make your wireless network as secure as possible. We’ll cover the implementation of
a secure WPA2-Enterprise network. You’ll also learn how to configure the “holy grail” of
secure wireless networks: WPA2-Enterprise with certificate-based authentication. We’ll
cover an entire deployment, including the configuration of a Microsoft RADIUS server,
Microsoft Certificate Services, certificate auto-enrollment, and Group Policy wireless
settings.
We’ll also cover some of the auxiliary technologies that can be used to support your
secure wireless design as well as strategic options for technologies you’re probably already
familiar with, such as firewalls, IDS/IPS, switches, and routers.
Wireless technologies are among the most interesting and fun technologies in wide use
today. My hope is that besides learning valuable information to help further your career,
you’ll have fun learning about the current attack vectors and appropriate defenses.
About the Series
I worked with the publisher to develop several special editorial elements for this series
that I hope you find helpful while navigating the book—and furthering your career.
Lingo
The Lingo boxes are designed to help you become familiar with common security
terminology so that you’re never held back by an unfamiliar word or expression.
IMHO
IMHO stands for In My Humble Opinion. When you come across an IMHO box, you’ll
be reading my frank, personal opinion based on experiences in the security industry.
Budget Note
The Budget Note sections are designed to help put you at ease when discussing security
budget requirements within your organization. They provide tips and ideas for initiating
successful, informed conversations about budgets.
In Actual Practice
Theory might teach us smart tactics for business, but there are in-the-trenches exceptions
to every rule. The In Actual Practice feature highlights how things actually get done in the
real world (as well as exceptions to the rule) and why.
00-FM.indd 16 4/9/12 3:55:48 PM
Secure Beginner’s Guide / Wireless Network Security: A Beginner’s Guide / Tyler Wrightson / 094-6 / Front Matter
Secure Beginner’s Guide / Wireless Network Security: A Beginner’s Guide / Tyler Wrightson / 094-6 / Front Matter
Introduction xvii
Your Plan
The Your Plan areas offer strategic ideas that can be helpful to review as you get into
planning mode, as you refine a plan outline, and as you embark on a final course of action.
Into Action
The Into Action lists help you in taking action on the job. These lists contain steps, tips,
and ideas to help you plan, prioritize, and work as effectively as possible.
00-FM.indd 17 4/9/12 3:55:48 PM
This page intentionally left blank

This page intentionally left blank

Secure Beginner’s Guide / Wireless Network Security: A Beginner’s Guide / Tyler Wrightson / 094-6 / Chapter 1
Blind Folio: 2
Secure Beginner’s Guide / Wireless Network Security: A Beginner’s Guide / Tyler Wrightson / 094-6 / Chapter 1
3
Introduction to the
Wireless Security
Mindset
ChaPter 1
01-ch01.indd 3 3/26/12 3:45:22 PM
Secure Beginner’s Guide / Wireless Network Security: A Beginner’s Guide / Tyler Wrightson / 094-6 / Chapter 1
4 Wireless Network Security: A Beginner’s Guide
We’ll Cover
What you will learn ●
The 11 security principles ●
Wireless networking basic concepts ●
Since their introduction, wireless technologies have quickly reached ubiquity in both
the commercial and residential space. One of the primary benefits of using wireless
technologies over traditional wired technologies is their ease of use. This ease of use, as
with many other technologies, comes with serious security concerns.
Based on some media reports, you might think that wireless technologies are riddled
with security holes that are almost impossible to plug. There have been reports of
“hackers” driving around town, laptops in hand and large antennas sticking from their
cars, who are able to penetrate any wireless network with the click of a button. Although
there is some truth to these reports, most of the time they are chock full of sensationalism.
In this book, you’ll learn the technical details of wireless vulnerabilities as well as how
to actually exploit them. I’ll also present real-world solutions and mitigating controls to
minimize these security risks.
If you are tasked with managing the security of your company’s existing wireless
network or with evaluating the risks associated with implementing a new wireless
network, you will find in this book the resources necessary to make sound decisions in
managing the risks associated with wireless technologies. Although this book is geared
toward the IT professional who wishes to get up to speed quickly on securing his wireless
network, if you have interest in current wireless security threats, how to exploit them, and
how to defend against them, you will likewise find this book interesting and enlightening.
The foundation for mitigating security risks is always a sound education. Your education
begins now.
What You Will Learn
In this book, you will not find a mind-melting array of technical details for implementing
wireless networks, you will also not find a review of networking in general. You are expected
to have a baseline understanding of the configuration and implementation of wireless
networks. For an introduction to wireless networking, see Bruce Hallberg’s book Networking:
A Beginner’s Guide, Fifth Edition (McGraw-Hill, 2009).
01-ch01.indd 4 3/26/12 3:45:22 PM
Secure Beginner’s Guide / Wireless Network Security: A Beginner’s Guide / Tyler Wrightson / 094-6 / Chapter 1
Secure Beginner’s Guide / Wireless Network Security: A Beginner’s Guide / Tyler Wrightson / 094-6 / Chapter 1
Chapter 1 Introduction to the Wireless Security Mindset 5
You will, however, find the information you need to quickly get up to speed on the
security issues and mitigating defenses for wireless technologies. You will also find easy-
to-follow real-world examples of attacks against wireless technologies and examples
of the applicable mitigating defenses. In addition, you will find real-world solutions to
common objectives for wireless networks. Whether you need a refresher in securing
wireless networks or want to add a new skill set to help advance your career, you will find
the information easy to digest and, above all, relevant to the real world.
Security 101: The 11 Security Principles
Despite your familiarity with security fundamentals, a quick review is essential, if for no
other reason than to ensure we are speaking the same language. Take your time in this
section and make sure you understand all the security principles before moving on.
Following are the 11 principles you will find relevant to any security process you
participate in. You will find most of these principles relevant to any security discussion,
regardless of the technology, whether it’s wireless networking, Bluetooth, network
security, or even physical and nontechnical security practices.
Security versus convenience.
1.
It is impossible to eliminate 2. all risks.
Rules of risk calculation and mitigating controls.
3.
Not 4. all risks must be mitigated.
Security is not just keeping the bad guys out.
5.
ROI doesn’t work for security.6.
Defense In Depth.7.
Least Privilege.8.
CIA triad.9.
Deterrents, prevention, detection.10.
Prevention fails.11.
Principle 1: Security vs. Convenience
Additional security is typically accompanied by additional inconvenience. There is much
debate on this topic, but at a very basic level you can always add more security by making
things more inconvenient. We won’t dive too deeply into this, but you should understand
the basic concept. A simple example will help clarify.
01-ch01.indd 5 3/26/12 3:45:22 PM

Secure Beginner’s Guide / Wireless Network Security: A Beginner’s Guide / Tyler Wrightson / 094-6 / Chapter 1
6 Wireless Network Security: A Beginner’s Guide
Suppose you have some personal papers that you lock in a small safe. To make it more
secure, you lock that safe in a larger safe. Now whenever you wish to access these papers,
you have the added inconvenience of needing to open two safes in addition to having to
remember two separate combinations.
However, a paradox manifests itself in the real world, as illustrated in Figure 1-1,
which shows what I like to call the security convenience bell curve. Typically, as you
increase the inconvenience factor, you also increase security, but there comes a point when
this inconvenience has an adverse effect on security.
An example of the security convenience bell curve would be a company’s “password
change frequency” policy. At first, the company’s policy requires users to change their
passwords every six months. In an attempt to make the company even more secure, the
policy is modified so that users must change their password every three months. However,
after a few times of changing their passwords, users find it difficult to remember them
and start writing them on sticky notes that are then stuck to their monitors or under their
keyboards. This is obviously not a good place for confidential data and ultimately makes
the business less secure.
Principle 2: It Is Impossible to Eliminate All Risks
First, let’s start with an accurate definition of risk. Per Dictionary.com, risk is the “exposure
to the chance of injury or loss” or “a hazard or dangerous chance.”
That’s relatively straightforward, so what’s all the confusion about? The confusion
comes from the fact that many people think that for a given security issue, there is a “fix”
that completely eliminates any risk from that issue. You must understand that it is, without
a doubt, 100 percent impossible to eliminate all risk from any technology, system, or
even situation. For every mitigating control there is a discrete level of risk, no matter how
Figure 1-1 Security convenience bell curve
Complexity
Security
01-ch01.indd 6 3/26/12 3:45:22 PM

Secure Beginner’s Guide / Wireless Network Security: A Beginner’s Guide / Tyler Wrightson / 094-6 / Chapter 1
Secure Beginner’s Guide / Wireless Network Security: A Beginner’s Guide / Tyler Wrightson / 094-6 / Chapter 1
Chapter 1 Introduction to the Wireless Security Mindset 7
minute. Risk is inherent in everything we do, in every choice we make, every single day.
The idea of risk versus return on investment (ROI) has been intimately involved in the
decision-making process of business owners for centuries; this same knowledge can be
applied to our latest technologies in the security realm.
This is best understood by looking at an example. As kids we were told to look both
ways before crossing the street, so let’s look at the risks associated with crossing the street.
Description
Risk Getting hit by a car
Mitigating Control Looking both ways before crossing the street
(It should be very easy to see that the mitigating control for crossing the street is
a worthwhile one. But does that eliminate all risk when crossing the street?)
Remaining Risks Slippery surface (fall and hurt yourself)
Distracted driver
Drive-by shooting
Falling airplane
Now, if you start glancing up at the sky every time you leave your house to look out
for falling airplanes, your friends might look at you a little funny—and rightly so. This is
simply to prove the point that you cannot eliminate 100 percent of all risks from any given
situation, no matter how unlikely it is that a particular threat might occur. Now you may be
thinking that to eliminate all these risks, you could simply stay home and never cross any
street. Well, in this case you run the risk of living an unfulfilling or unhealthy life, which
exposes you to health risks. Again, this might seem like a strange and extreme example, but
it is essential for you to understand that there are inherent risks in every choice we make.
It should also be noted that the purpose of analyzing risk is not always to choose
the path with the least risk. Rather, it is to make an informed decision that best suits the
person or organization. More on this later.
Principle 3: Rules of Risk Calculation
and Mitigating Controls
To appropriately compare different risks, we need a consistent method for calculating risk.
Although a multitude of different risk equations are available, the most basic equation is
as follows:
Risk = Consequence × Probability
Let’s look at each component of this equation individually and then apply the equation
to our previous examples of falling airplanes and distracted drivers.
01-ch01.indd 7 3/26/12 3:45:22 PM

Secure Beginner’s Guide / Wireless Network Security: A Beginner’s Guide / Tyler Wrightson / 094-6 / Chapter 1
8 Wireless Network Security: A Beginner’s Guide
Quantitative costs are anything you
can put a hard number to. For example,
in quantitative terms, the cost to replace a
$100 phone is—you guessed it—$100.
Qualitative costs are much more
subjective and harder to define and may
be drastically different between persons
or organizations. The easiest way to
understand qualitative costs is to think of
the emotional costs of an incident. For example, if you have a special gift that was given to
you, it may be worth only a few dollars if you were to try and sell it, but it might cause a
lot of emotional pain if it were lost. Thus, the qualitative cost of replacing it might be very
high. This is an extremely simplistic way to look at qualitative cost, but it should help you
grasp the concept quickly.
Here are few examples of quantitative impacts:
The impact of getting struck by a car ranges from “getting injured” to “death.”
●
The impact of your car getting a flat tire is the cost of the replacement tire. ●
The impact of your phone being stolen ●
is the cost of a replacement phone.
And here are a few examples of
qualitative impacts:
The impact of getting struck by a
●
car would be physical and emotional
pain as well as long-term recovery,
involving strenuous physical and
mental rehabilitation.
The impact of your car getting a
●
flat tire could include the headache
received from having to put the
replacement tire on during rush hour,
being late for an important interview,
and ruining your favorite suit while
replacing the tire.
LINGO
Consequence is the impact felt if a
particular vulnerability is exploited. This
can be expressed in both hard figures
(quantitative, such as “cost”) or more
ethereal terms (qualitative, such as
“suffering”).
LINGO
Probability is the likelihood that a
particular vulnerability will be exploited.
Obviously, in certain circumstances,
probability is much easier to define,
but in general the answer should be
relatively straightforward. For certain
calculations, you can look at historic
data to come up with a good answer
for probability.
For example, let’s say that in Kansas,
in the previous 10 years there have been
60 tornadoes. Sixty tornadoes over
10 years would be roughly six tornadoes
a year. Therefore, a good probability
exists that Kansas will experience roughly
six tornadoes next year.
01-ch01.indd 8 3/26/12 3:45:22 PM

Secure Beginner’s Guide / Wireless Network Security: A Beginner’s Guide / Tyler Wrightson / 094-6 / Chapter 1
Secure Beginner’s Guide / Wireless Network Security: A Beginner’s Guide / Tyler Wrightson / 094-6 / Chapter 1
Chapter 1 Introduction to the Wireless Security Mindset 9
The impact of your phone being stolen might be the loss of several key contacts, the ●
annoyance of having to wait for a replacement phone, and the fear of someone reading
your personal text messages.
The preceding calculation will result in the associated risk level. The actual label for
the risk level could be a number or a phrase from a corresponding risk matrix, like the one
shown in Figure 1-2.
To use the risk matrix in Figure 1-2 you simply identify the likelihood and impact of
a potential threat. For example, the likelihood of someone stealing a server might be low
and the impact might be low (if you encrypt your hard drives). You would then plot this
threat as existing in the lower left quadrant and have an overall threat of low. You could
then compare this to other threats and deal with them as your business dictates.
The actual naming convention or the numbers used in the calculation of each component
can be essentially arbitrary as long as the same system is used for each calculation. For
example, it doesn’t matter if you calculate probability in months, years, or decades, as long
as you use the same period for each calculation.
Figure 1-2 Risk matrix
Threat Level
Medium High Critical
High
High
Low
Medium
Medium
Im
p
act
Medium
Low
Li
k
e
l
i
h
oo
d
High
Low
Low
Low Medium
01-ch01.indd 9 3/26/12 3:45:23 PM

Secure Beginner’s Guide / Wireless Network Security: A Beginner’s Guide / Tyler Wrightson / 094-6 / Chapter 1
10 Wireless Network Security: A Beginner’s Guide
If you’re developing a security program for your own company, feel free to start from
scratch and come up with a numeric or naming system that fits your business. The key
here is consistency: As long as you’re identifying risk levels using a common system,
you’ll be able to identify areas that you wish to mitigate first. You can find plenty of
examples to choose from on the Internet, so look for one that fits your business. The
Department of Homeland Security provides many good resources at www.dhs.gov.
Now let’s use our previous examples to calculate the risk level associated with each.
We’ll define an arbitrary system for each component first. Impact will be a number
between 1 and 10, with 1 being the lowest impact and 10 being the highest. Probability
will be a yearly probability based on statistical information.
Vulnerability Falling Airplane
Impact 10 (Death)
Probability 0.000001 (one out of every 1,000,000 people dies from a falling airplane
every year in America)
Risk Level 0.00001 (10 ×0.000001)
Vulnerability Distracted Driver
Impact 10 (Death)
Probability 0.001 (one out of every 1,000 people die from a “distracted” driver every year)
Risk Level 0.01
As you can see, the risk level from distracted drivers is much greater than that of
falling airplanes. Therefore, you might want to protect yourself from distracted drivers
before worrying about falling airplanes.
The difficult part here is that different people might define different probabilities or
different vulnerability levels to the same threat. For example, the probability of getting
struck by a car while crossing the street is much higher for someone living in New York
City than it is for someone living in a rural community in Kansas.
Note
Various organizations and industries have slightly different risk formulas—whether
it’s just different naming conventions for each component or a different number of
components. This should not be seen as a bad thing; certain industries and businesses
can benefit from having more complex or more simplistic formulas. However,
understanding the current example will give you a strong baseline from which you can
approach other formulas.
01-ch01.indd 10 4/4/12 1:43:44 PM

Secure Beginner’s Guide / Wireless Network Security: A Beginner’s Guide / Tyler Wrightson / 094-6 / Chapter 1
Secure Beginner’s Guide / Wireless Network Security: A Beginner’s Guide / Tyler Wrightson / 094-6 / Chapter 1
Chapter 1 Introduction to the Wireless Security Mindset 11
Principle 4: Not All Risks Must Be Mitigated
Not all security risks must be mitigated. Yes, I know, as a fellow security fanatic it sounds
counter to what we believe. If there’s a security hole, plug it! But in reality, there are
plenty of risks that we don’t mitigate already. It’s relevant to bring these calculations to a
conscious level. You’ve already read an obvious example—the risk of falling planes. Now
let’s look at the cost to mitigate the risk of falling airplanes.
You could construct a house for a few million dollars that could withstand the impact
from a falling plane, but when you consider the extremely remote possibility of a falling
plane striking your house, you’ll probably come to the conclusion that it’s not worth the cost.
Yes, this is just another extreme example, so let’s look at a very simple business example.
A new regulation has come out that affects your business. If you fail to comply with
the regulation, you will be fined $5,000 every year. You’ve hired an external firm to assess
the cost to make you compliant with the regulation and they think at a bare minimum it
will cost you $2,000,000. It’s not hard to see here that it makes more business sense to just
pay the fine and not try to make your business compliant.
Into Action
Wondering how all this applies to wireless networking? Let’s take a look at a real-
world example.
Let’s assume you have 100 wireless access points deployed in your organization
with 1,000 wireless users. A new exploit is released that affects the version of
firmware currently running on all your access points. The exploit allows an
authenticated user to reboot the wireless access point. We’ll calculate the risk level
using a High/Medium/Low scheme used in Figure 1-2. (Remember that the risk
calculation is Risk = Consequence × Probability.)
Consequence
● This would be Low because a reboot would only temporarily
affect service to users.
Probability
● This is Low as well because only authenticated users can
successfully exploit this vulnerability.
Thus, the risk calculation would be Low × Low = Low Risk.
If it costs you four man-hours per access point to apply a patch for this
vulnerability, then it might not be worth the cost to mitigate this risk. Instead, it might
be more cost effective to live with this risk and use those 400-man hours elsewhere.
01-ch01.indd 11 3/26/12 3:45:23 PM
www.itbookshub.com

Secure Beginner’s Guide / Wireless Network Security: A Beginner’s Guide / Tyler Wrightson / 094-6 / Chapter 1
12 Wireless Network Security: A Beginner’s Guide
Four main approaches can be taken to manage risk: You can accept the risk, avoid the
risk, transfer the risk, or mitigate the risk. In the two previous examples, we’ve chosen
to accept the risk associated with each scenario. Now let’s look at our other options for
dealing with the risk of the new regulation.
Avoid Let’s imagine that the regulation only applies to companies doing business in Texas. If your
company can prosper without doing business in Texas, then you’ve just avoided the risk.
Transfer Maybe you can transfer the risk to a third party. If you could outsource the part of your
business that’s covered by the regulation and let the third party worry about it, then you’d
have transferred the risk.
Mitigate If instead of avoiding, transferring, or accepting the risk, you might decide to implement
controls to adhere to the regulation. Thus, you would have effectively mitigated the risk of
a fine due to the regulation.
Principle 5: Security Is Not Just
Keeping the Bad Guys Out
Security is not just about keeping the bad guys out. An extremely common misconception
is that the primary concern for security administrators is keeping malicious outsiders from
accessing critical systems. Of course, this is a vital component to a comprehensive security
plan; however, it is far from being the only concern. The problem with adopting a “keep
the bad guys out” mentality is the development of the so-called “candy” network, with a
hard outer shell and a delicious gooey center. We’ll address this topic in more detail later.
You may hear many reports stating that the majority of security breaches come from
internal personnel. Now, although I agree with this statement in theory, a little speculation
might help to clarify exactly what is meant by it. Here are the key points:
How do you define a security compromise?
● For example, an internal IT administrator
misusing his administrative privileges and reading private e-mails seems like a pretty
obvious internal security compromise. However, what about the user who has too many
privileges on a file share and by an accidental click of a button deletes all the files on
that share? I would define the latter as a security compromise, but maybe the person
writing the incident reports does not.
How do you define the actual root cause?
● As an example, what happens when an
end user accidentally infects her personal laptop while at home and then brings that
laptop into the office, infecting other business workstations. Would the root cause
of this compromise be attributed to the malicious user that wrote the virus or the
uneducated employee who unwittingly brought an infected machine into the corporate
environment? I’ll leave it up to you to decide for yourself.
01-ch01.indd 12 4/4/12 1:43:26 PM
Secure Beginner’s Guide / Wireless Network Security: A Beginner’s Guide / Tyler Wrightson / 094-6 / Chapter 1
Secure Beginner’s Guide / Wireless Network Security: A Beginner’s Guide / Tyler Wrightson / 094-6 / Chapter 1
Chapter 1 Introduction to the Wireless Security Mindset 13
What are accidental versus intended compromises? ● Using the previous two examples,
does the surveyor discriminate between intentional compromises of security and purely
accidental ones?
Does this mean we shouldn’t worry about our perimeter?
● Finally, do all these reports
stating that the vast majority of security compromises originate from internal personnel
mean that we should not bother protecting our perimeter and instead focus all our
attention on keeping internal users from wreaking havoc on our networks? Hardly!
The fact remains that very costly compromises do occur from external parties, and if we
were all to stop maintaining our perimeter security we would quickly see the number of
external compromises skyrocket!
Principle 6: ROI Doesn’t Work for Security
The traditional calculation of return on investment (ROI) doesn’t work for expenditures for
security. At a very basic level, the calculation for return on investment determines how much
profit will be produced if you invest X amount of money (or resources) into something.
Using the ROI model, you can compare multiple investments and determine which is
appropriate. Therefore, spending money on security cannot be justified with ROI, because it’s
not a revenue-generating business process. Instead, you’re spending money (and resources)
to protect a greater amount of money (or resources) from being lost. Also keep in mind the
qualitative risks, such as reputation, image, and the long-term effects of damage to these.
Principle 7: Defense In Depth
You can improve security via Defense In Depth. True security does not come from one
risk-mitigating control; instead, it comes from the implementation of many synergistic
solutions. One of the most basic examples of this is one we’re all very familiar with: a
bank. Banks don’t just rely on a big vault to keep all their assets safe; instead, they also
employ armed security guards, cameras, door locks, fences, educated employees, alarm
systems, and so on. This is the essence of Defense In Depth and the foundation for a more
secure environment.
Principle 8: Least Privilege
You can improve security with Least Privilege. One of the most important and often
overlooked methods for configuring security devices and implementing policies is that of
Least Privilege. Least Privilege means giving users the bare minimum rights they need to
perform their duties and then giving them additional privileges as necessary. The opposite way
(the most common) is to give the most amount of privileges and then remove “dangerous”
privileges one by one. This can also be referred to as blacklisting versus whitelisting.
01-ch01.indd 13 3/26/12 3:45:23 PM
Secure Beginner’s Guide / Wireless Network Security: A Beginner’s Guide / Tyler Wrightson / 094-6 / Chapter 1
14 Wireless Network Security: A Beginner’s Guide
Principle 9: CIA Triad
The CIA Triad is an industry-accepted model for securing systems (specifically, but not
exclusively, data). The acronym stands for Confidentiality, Integrity, Availability. Each of
these is vital to ensuring the security of data:
Confidentiality
● Ensure that only those with the rights to view the data have access to
do so, and prevent unauthorized disclosure of sensitive information.
Integrity
● Ensure that changes made to the data are made only by authorized individuals,
and prevent unauthorized modifications of systems and data.
Availability
● Ensure that access to the data is available when needed, and prevent
disruption of service and productivity.
Principle 10: Prevention, Detection, Deterrents
Within the security realm, most mitigating security controls fall into at least one of the
following three major categories. Going along with the Defense In Depth strategy, it is
wise to implement multiple types of security controls whenever possible.
Prevention
● Aims to stop a certain activity before it happens. Examples include locks
on doors, bars on windows, a firewall.
Detection
● Uncovers certain activities. Examples include motion-activated cameras
and an intrusion detection system (IDS).
Deterrents
● Used to restrict people from doing things they shouldn’t. Deterrents can
be physical or logical in nature. For example, an electric fence would deter people from
climbing it because they risk getting electrocuted. Security cameras can act as a logical
deterrent because evidence of wrongdoing could be used in litigation against a perpetrator.
Many security controls fall into multiple categories. For example, cameras both detect
and potentially deter criminal activity. An electric fence could both prevent someone from
walking onto your property as well as deter anyone from trying to scale it.
Principle 11: Prevention Fails
Another common theme in the security realm is the fact that (essentially) every prevention
measure will eventually fail (or is capable of failing). This doesn’t mean that every single
implementation of a preventative security measure will be bypassed by someone with
malicious intent, but only that it is possible. Another way to look at this is that, in the
01-ch01.indd 14 3/26/12 3:45:23 PM

Secure Beginner’s Guide / Wireless Network Security: A Beginner’s Guide / Tyler Wrightson / 094-6 / Chapter 1
Secure Beginner’s Guide / Wireless Network Security: A Beginner’s Guide / Tyler Wrightson / 094-6 / Chapter 1
Chapter 1 Introduction to the Wireless Security Mindset 15
security industry, the attackers and the defenders are always “one upping” each other.
Consider the following examples:
I have a fence installed to keep intruders out of my house.
●
The intruders scale the fence and come into my house.
I install razor wire at the top of my fence to prevent scaling of the fence.
●
The intruders toss a large mattress on top of the razor wire and scale over the fence.
I purchase guard dogs.
●
The intruders use tranquilizers to knock my dogs out.
Again, these examples are a bit comical, but they should prove the point that you can’t
rely entirely on prevention to secure your environment. Instead, you need a strong Defense
In Depth strategy that uses deterrent techniques and methods of detection well.
Definition of Hacker
The proper definition of the word hacker has been the source of much heated debate. I
choose to use the word to portray both those with and without malicious intent. For me,
the quintessential characteristic of a hacker is a tenacious and creative problem-solving
ability. Whether the person is malicious or a saint is irrelevant.
Note
Want to take your career to the next level? Start evaluating security expenditures with
the knowledge you’ve just obtained. C-level executives don’t think in terms of secure
versus insecure; they think in terms of risk mitigation and risk management (that is, is
this security technology going to prevent me from losing more money than it costs?). It’s
your job to be able to turn packet dumps and firewall configurations into terms of risk
management.
So in a business context you have two calculations to consider for risk:
Are the risks introduced by implementing a new technology worth the risk added to
●
your business?
Is the cost of a mitigating control less than the potential losses from the associated
●
risks?
For end users, there’s another component to the calculation that is slightly harder to
define because emotion is involved. For example, some people live in very safe neighborhoods
but still purchase guns for their houses. They might not need a gun to actually be secure,
but because emotionally it makes them feel more secure they are more apt to make
unnecessary expenditures.
01-ch01.indd 15 3/26/12 3:45:24 PM
Secure Beginner’s Guide / Wireless Network Security: A Beginner’s Guide / Tyler Wrightson / 094-6 / Chapter 1
16 Wireless Network Security: A Beginner’s Guide
Wireless Networking Basics
A brief introduction to the various wireless technologies is necessary to ensure we are
speaking the same language. If you feel comfortable with these topics, feel free to skip
ahead to the next chapter. In this section, we will look at a few definitions that represent
a vital, foundational understanding of wireless technologies. I won’t be providing any
information for actually configuring devices; however, the information provided should be
universal across devices.
802.11a/b/g/n
802.11 is the name for the working group from the Institute of Electrical and Electronic
Engineers (IEEE) for wireless local area networks. IEEE working groups are essentially
committees of experts who define standards of operation for specific technologies so
that manufacturers can build standards that can interoperate. Nowadays, there’s a virtual
alphabet soup of wireless technologies. We won’t focus too much on the differences
here; just understand that with each new generation generally you have an increase in
bandwidth and/or security features.
The IEEE identifies each standard with a letter. For example, 802.11a is different from
802.11b. Although there are some commonalities between technologies, there are also
differences, as well as advantages and disadvantages to choosing one technology over
the other. For the most part, the differences between standards are in speed, modulation
techniques, and whether they are backward compatible and a security technique that
works for one will work for the others. For example, even though 802.11g was developed
after 802.11b, it still supports WEP to ensure backward compatibility.
However, keep in mind that some specific tools will only work for a specific standard.
For example, if a program is written specifically to work with 802.11b, it might not work
for 802.11a or even 802.11g. Because the underlying protocols for how data is handled are
the same across standards, the attacks and defense in theory will be identical.
The 802.11 standards prescribe which frequencies these technologies use as well
as the channels available to them. For example, the 802.11b standard operates in the
2.4 GHz frequency and, in the United States, has 11 unique channels available for use
(labeled Channels 1 through 11). These unique channels assist in allowing networks to
be physically close and not interfere with each other. However, depending on the country,
the channels available for use may be different. For example, in Japan the channels are
actually 1 through 14. This has security implications because an access point operating on
Channel 14 may go completely unnoticed in the U.S. More on this later.
01-ch01.indd 16 3/26/12 3:45:24 PM

Secure Beginner’s Guide / Wireless Network Security: A Beginner’s Guide / Tyler Wrightson / 094-6 / Chapter 1
Secure Beginner’s Guide / Wireless Network Security: A Beginner’s Guide / Tyler Wrightson / 094-6 / Chapter 1
Chapter 1 Introduction to the Wireless Security Mindset 17
The following is a simple cheat sheet of the 802.11 standards.
Standard Frequency Speeds Interoperates With
802.11a 5 GHz 54 Mbps None
802.11b 2.4 GHz 11 Mbps None
802.11g 2.4 GHz 54 Mbps 802.11b
802.11n 2.4 GHz / 5 GHz 100 Mbps and higher 802.11b, 802.11g
In Actual Practice
Some of the components of wireless local area networks (LANs) have been reused in
other technologies. Most of the security issues that apply to wireless LANs are directly
applicable to other technologies. For example, eavesdropping attacks are a concern
for any wireless technology and may be mitigated differently based on the technology.
For instance, recent attacks have made it possible to intercept conversations between a
Bluetooth headset and a cell phone.
Various wireless LAN technologies are fairly similar, which is understandable
considering that each new generation of standard is typically backward compatible with its
predecessor. Technologies that are unique to a specific generation of wireless technologies
will be noted as such.
Wireless networks can operate in one of two basic modes: Infrastructure and Ad-Hoc.
In Infrastructure mode, clients connect to an access point. In Ad-Hoc mode, no access
point is involved; instead, clients communicate with each other (or end nodes). We’ll use
the term end node because nowadays a client can be anything from a laptop to a cell phone
to a printer with a built-in wireless network card.
In Actual Practice
It should be noted that operating in Ad-Hoc mode does not necessarily mean you do
not have connectivity past any of the clients. For example, one of the clients could be
configured to perform routing or Network Address Translation (NAT) and could be
providing Internet access for other clients. This is an important point to keep in mind
for security reasons, and we’ll touch on this again in Chapter 5.
01-ch01.indd 17 3/26/12 3:45:24 PM
Secure Beginner’s Guide / Wireless Network Security: A Beginner’s Guide / Tyler Wrightson / 094-6 / Chapter 1
18 Wireless Network Security: A Beginner’s Guide
Access Points
Access points are a vital component of any scalable wireless network. An access point
essentially connects two dissimilar technologies, and a wireless access point represents
the physical device that is the liaison between wireless communications and wired
communications. It is worth noting that back-end communication does not necessarily
have to be wired communication. For example, some cellular providers have started
offering access points with built-in cellular network cards to connect to their cellular
network. In this case, you would still connect to the access point but the access point itself
would not need a wired network connection.
Access points have come a very long way since their introduction. Many new features
(some existing and new) have been added to access points. For example, captive web
portals have existed for a long time before wireless networks became popular but they’ve
been implemented in many access points. We will not discuss every feature available,
but definitely keep in mind that from a security perspective all this added functionality
comes with its own inherent risks. For example, whereas you once could only configure
an access point from a web interface or a limited command line, now you have an almost
full-fledged command line with common network tools. Thus, tools such as Ping, Telnet,
SSH, and Traceroute make an access point an even more appealing target for an attacker
to leverage his position and infiltrate deeper into a network. Also keep in mind that
with added complexity comes a greater chance to misconfigure an access point. More
knowledge is required to securely configure an access point with more features. We’ll go
over this in more detail in Chapter 6.
Autonomous vs. Controller Based
Originally, access points were configured one at a time; such access points are referred to
as autonomous access points because they function as singular units. Obviously, for large-
scale deployments this requires too much time. Management systems were first introduced
to solve this problem, and now we have controller-based systems that make configuration
even easier.
A management system would typically be installed on a server (or desktop) and would
simply interact with existing management protocols, thus allowing administrators to
automate some of the more mundane tasks. Existing management protocols include tools
such as Telnet, SSH, and SNMP. An administrator could, for example, create a template
profile with a specified SSID, encryption method, and authentication method and apply
this template to an access point.
01-ch01.indd 18 3/26/12 3:45:24 PM
Secure Beginner’s Guide / Wireless Network Security: A Beginner’s Guide / Tyler Wrightson / 094-6 / Chapter 1
Secure Beginner’s Guide / Wireless Network Security: A Beginner’s Guide / Tyler Wrightson / 094-6 / Chapter 1
Chapter 1 Introduction to the Wireless Security Mindset 19
The management system would then telnet (or connect using another management
protocol) to the access point and apply the configuration. This, of course, requires that first
the administrator configure basic IP connectivity on the access point and enable Telnet.
Therefore, a level of administrative burden is associated with adding new access points.
To make things even easier on administrators, we have a new generation of access
points that are commonly referred to as lightweight access points. A few protocols deal
with lightweight access points, mainly the Cisco proprietary LWAPP (Lightweight Access
Point Protocol) and CAPWAP (Control And Provisioning of Wireless Access Points),
which is a standard, interoperable protocol based on LWAPP. It is not necessary to
understand the specifics of these protocols; they will be discussed in greater detail later.
Lightweight access points generally allow an administrator to perform 99 percent of
the configuration ahead of time, thus greatly reducing the total administrative effort. An
administrator can create a profile that completely configures an access point. When a new
access point is added to the network, it “discovers” the controller and “automagically”
downloads and applies the appropriate configuration. A myriad of different options are
available for how the access point discovers the controller and how it downloads its
configuration. We will be reviewing these options in Chapter 11. The important thing
to note is that you don’t even need an IP address configured on your lightweight access
points. You can literally take your shiny new lightweight access point out of the box, plug
it into your network, and it will be configured automagically and provide wireless services
within minutes.
Think about how beneficial this would be for large-scale deployments. However,
although this is the latest and greatest technology for configuring wireless access points,
it is not necessary for all new wireless deployments. You must still evaluate the return on
investment. In many cases, just configuring (a few) access points by hand can be a much
more cost-effective solution. We will evaluate the different options for using a controller-
based system in a few test scenarios in later chapters.
SSID, BSSID, MAC Address
The SSID, BSSID and MAC address are all essential unique identifiers for a wireless
network. The Service Set Identifier (SSID) is the human readable name associated with an
802.11 wireless network. It is often called the wireless “network name” and can be shared
by multiple access points. The Basic Service Set Identifier (BSSID) uniquely identifies a
specific access point and is in the same format as a MAC address; thus, most commonly, it
is the MAC address of the access point. The Extended Service Set Identifier (ESSID) can
essentially be thought of as a group of BSSIDs that share the same Layer 2 network and
the same SSID.
01-ch01.indd 19 3/26/12 3:45:24 PM
Secure Beginner’s Guide / Wireless Network Security: A Beginner’s Guide / Tyler Wrightson / 094-6 / Chapter 1
20 Wireless Network Security: A Beginner’s Guide
Beacons and Broadcasts
Access points send out beacons, which are radio broadcasts that advertise the wireless
settings for a specific BSSID. These settings typically contain the SSID, encryption
method, and so on. Many access points have an option to disable the broadcast of the
SSID. Enabling this option does not typically disable beacons but rather configures the
access points to send a beacon with a blank SSID. However, this does not prevent an
attacker from obtaining the SSID, which you will read about in Chapter 3.
Associating and Authenticating
Association and authentication are performed by clients when they want to join a wireless
network. Associating to an access point means that your client and the access point have
“agreed upon” which parameters to use to ensure proper communication. Things such as
the channel and encryption method have been verified to be the same. Authentication is
a way of verifying that you are authorized to connect to the network. There are multiple
methods of authentication, and authentication happens prior to association. We will
discuss the vulnerabilities with certain authentication mechanisms in Chapter 3 as well as
look at examples of more secure options.
Encryption
Encryption is utilized just as it is in any other technology. It obscures the data so that
only “authorized” people can view the actual data. You have many different choices for
encrypting network data; some are new implementations created for wireless technologies,
and others have been around for a while. In Chapters 3 and 4, we explore these encryption
options as well as crack some of them.
We’ve Covered
In this chapter, we covered the foundational knowledge you should have to get the most
from this book. We reviewed 11 different security principles that apply across many
scenarios, not just wireless networking. We also covered the fundamental components for
wireless communications, including the basics of wireless networking. We’ll refer to the
topics introduced here in more detail in future chapters, but you can always refer to this
chapter for a reference on the basics.
01-ch01.indd 20 3/26/12 3:45:24 PM
Secure Beginner’s Guide / Wireless Network Security: A Beginner’s Guide / Tyler Wrightson / 094-6 / Chapter 1
Secure Beginner’s Guide / Wireless Network Security: A Beginner’s Guide / Tyler Wrightson / 094-6 / Chapter 1
Chapter 1 Introduction to the Wireless Security Mindset 21
The 11 security principles
Security versus convenience. ●
It is impossible to eliminate ● all risks.
Rules of risk calculation and mitigating controls.
●
Not ● all risks must be mitigated.
Security is not just keeping the bad guys out.
●
ROI doesn’t work for security. ●
Defense in depth. ●
Least privilege. ●
CIA triad. ●
Deterrents, prevention, detection. ●
Prevention fails. ●
Wireless networking basic concepts
802.11a/b/g/n ●
Access points ●
Autonomous versus controller based ●
SSID, BSSID, and MAC address ●
Beacons and broadcasts ●
Associating and authenticating ●
Encryption ●
01-ch01.indd 21 3/26/12 3:45:24 PM
www.itbookshub.com
This page intentionally left blank

Secure Beginner’s Guide / Wireless Network Security: A Beginner’s Guide / Tyler Wrightson / 094-6 / Chapter 2
23
Wireless Tools
and Gadgets
Chapter 2
02-ch02.indd 23 3/27/12 4:57:07 PM
Secure Beginner’s Guide / Wireless Network Security: A Beginner’s Guide / Tyler Wrightson / 094-6 / Chapter 2
24 Wireless Network Security: A Beginner’s Guide
We’ll Cover
Creating a lab environment ●
Client devices ●
Access points ●
Antennas ●
Wireless gadgets ●
Choosing a wireless operating system ●
You are most likely already familiar with access points and wireless cards, but so many
more tools and “gadgets” are available today for securing, attacking, monitoring,
auditing, and accessing wireless networks. In this chapter, you’ll learn some of the product
offerings on the market today as well as some of the more exotic tools that have security
implications for wireless networks.
The discussion of tools in this chapter is not meant to be an exhaustive list of every
product offered on the market today. Instead, individual tools have been selected that
display specific capabilities or unique features. You definitely don’t want to skip this chapter;
not only will you be introduced to a lot of fun new toys, you’ll also receive a well-rounded
base of knowledge regarding wireless security.
A Lab of Your Own
To get the most out of this book, you definitely need to follow along with as many of the
examples as possible. To do that, you’ll need a good wireless test lab. The cost of wireless
equipment has dropped drastically since its introduction. Today, a very effective lab could
cost you as little as $500. Take into consideration that you (or the company you work for)
probably already has what you need to test almost everything you read about in this book.
At a minimum, you should have the following equipment:
Two wireless clients (laptops preferred, but you can use desktops) ●
Two wireless cards ●
One access point ●
02-ch02.indd 24 3/27/12 4:57:07 PM
Secure Beginner’s Guide / Wireless Network Security: A Beginner’s Guide / Tyler Wrightson / 094-6 / Chapter 2
Secure Beginner’s Guide / Wireless Network Security: A Beginner’s Guide / Tyler Wrightson / 094-6 / Chapter 2
Chapter 2 Wireless Tools and Gadgets 25
Client Devices
No, I’m not going to list every type of laptop you can buy. The wireless world has exploded
so rapidly that you need to understand the security implications of all the new types of
wireless clients. Ironically, some of the biggest security threats could come from client
devices simply because they’re most often overlooked or ignored.
Phones
Smartphones and PDAs are everywhere and are only becoming more ubiquitous. These
devices are covered in great detail later in the book, but for now consider that smartphones
and PDAs are not just clients on your network that attackers can target (typically housing
a large amount of sensitive data), but are also very stealthy attack tools for breaking into
your wireless network. These devices are able to run advanced wireless attack tools and
store the data while sitting neatly and covertly in a visitor’s pocket.
Printers
Many vendors offer printers with wireless technologies built right in. This provides a
very interesting attack vector for a would-be intruder. If you connect the printer to your
company’s otherwise secure network, does this provide an easy place to discover the
wireless encryption password? Is the password stored securely on the printer, or can you
simply print the configuration and view the password in plain text? If your printer is
connected to your network using wired technologies but is broadcasting a default ad-hoc
wireless SSID, can an attacker join the ad-hoc network and use the printer as a channel
onto your wired network?
Access Points
Access points have changed drastically since they first hit the market. Among other
things, they’ve changed in size, functionality, bandwidth, and range. From an attacker’s
perspective, two of the most interesting changes are that of physical size and feature set.
These new full-featured and compact access points provide a very easy attack scenario
with relatively low risk. You simply walk into a target organization, find an open network
data jack, plug in your access point, and walk out. You then finish all your nefarious
work from the parking lot, and the worst you’re risking is losing the access point if it’s
discovered.
02-ch02.indd 25 3/27/12 4:57:07 PM
Secure Beginner’s Guide / Wireless Network Security: A Beginner’s Guide / Tyler Wrightson / 094-6 / Chapter 2
26 Wireless Network Security: A Beginner’s Guide
DD-WRT
The DD-WRT website has the following to say about DD-WRT: “DD-WRT is a Linux-
based alternative OpenSource firmware suitable for a great variety of WLAN routers and
embedded systems.”
Basically, you can replace the default firmware on a very large list of popular wireless
routers and access points and make them Linux-based devices with a substantial feature
list. Some of the more impressive features include the following:
VPN (virtual private network) support ●
SSH (Secure Shell) daemon ●
Samba and CIFS client support ●
SIP (VoIP) routing ●
Traffic and bandwidth monitoring ●
WRT54G
One of the most popular access points in both the small business and home market is the
Linksys WRT54G (see Figure 2-1). The WRT54G retails for about $60 and supports the
DD-WRT firmware, making it perfect for many small business deployments as well as
small office/home office (SOHO) environments—or your home lab.
Apple Airport Express
The Apple Airport Express provides a beautiful and compact form factor perfect for an
attacker. It features a built-in plug for an electrical outlet, meaning you don’t need to carry
an additional external power adapter. It has some other interesting features, including a
USB port for a printer or USB drive.
Mini Access Points
Some vendors offer uber-portable access points perfect for dropping into a sensitive area.
Not the least of which is the D-Link DWL-G730AP, which can be purchased for as little
as $40. The D-Link DWL-G730AP is aptly named the “D-Link pocket router” because it
is about three inches square and less than an inch high. The only downside to this model is
the need for an external power adapter, which can be discovered or lost.
Mobile Hotspots
An interesting new product offering is what’s being called the “portable hotspot.” This
nifty access point’s back-end transmission medium is actually the cellular network.
02-ch02.indd 26 3/27/12 4:57:07 PM
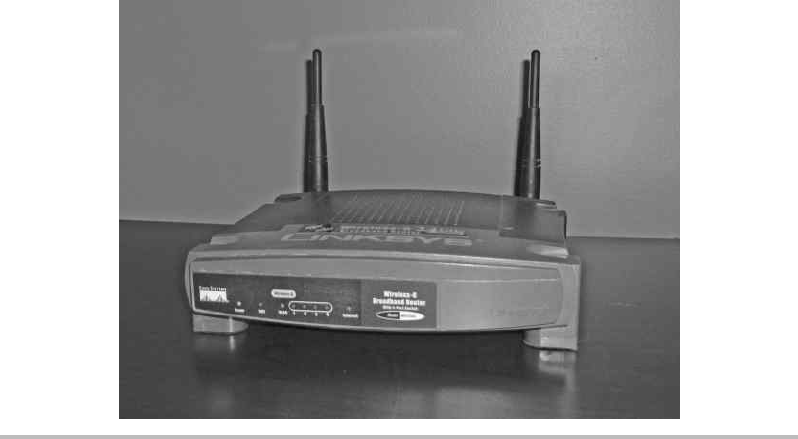
Secure Beginner’s Guide / Wireless Network Security: A Beginner’s Guide / Tyler Wrightson / 094-6 / Chapter 2
Secure Beginner’s Guide / Wireless Network Security: A Beginner’s Guide / Tyler Wrightson / 094-6 / Chapter 2
Chapter 2 Wireless Tools and Gadgets 27
An example is the Verizon 4G LTE mobile hotspot (see Figure 2-2). The back-end (or
Internet) connection is a 4G connection that can reach download speeds of 1 Gbps.
This device provides a very interesting attack vector. Consider the following scenario:
An attacker walks into your business complex with a mobile hotspot, configured with
an innocuous SSID such as “Free Wifi Access.” An employee of your company wishes
to access sites that are otherwise restricted on your network, so he connects to the “Free
Wifi Access” network. He checks his personal e-mail, his favorite personal networking
site, and maybe chats with some friends. Little does he know that all his traffic was just
intercepted by the owner of the mobile hotspot, and his passwords sent in plain text have
been captured. Just ponder how many users reuse their passwords and you can guess the
impact this could have for your business network.
Figure 2-1 Linksys WRT54G
02-ch02.indd 27 3/27/12 4:57:07 PM
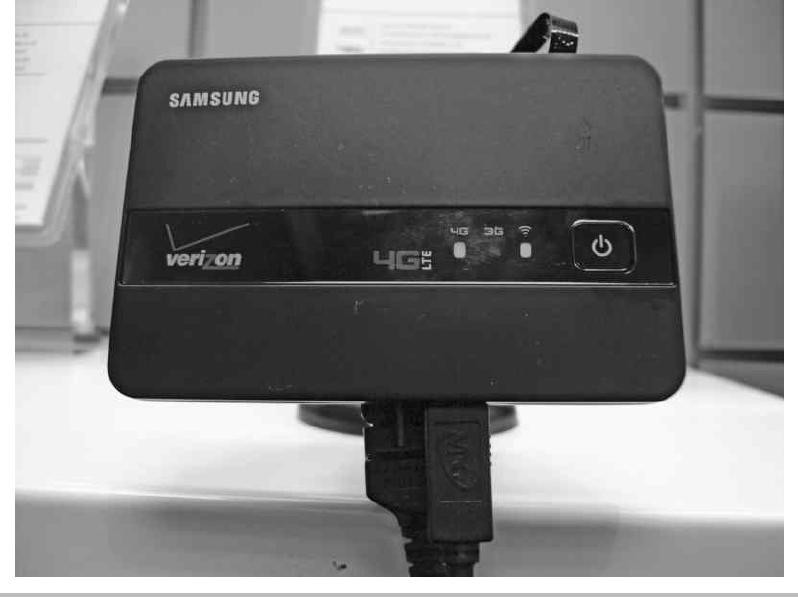
Secure Beginner’s Guide / Wireless Network Security: A Beginner’s Guide / Tyler Wrightson / 094-6 / Chapter 2
28 Wireless Network Security: A Beginner’s Guide
Smartphones
Smartphones are no longer just clients accessing wireless networks but are also full-
featured access points for other clients to connect to. Currently, the most versatile
operating system for smartphones is the Android OS by Google (www.android.com),
which is based on the Linux operating system. The processing power and storage
available on these little devices is astounding, and you might be surprised at some of
the tools already running on these phones. The previous scenario of an attacker offering
“free wireless services” is even easier on a phone such as the Google Galaxy Nexus by
Samsung, which has a 1.2 GHz dual-core processor, 1 GB of RAM and 16GB of storage!
So saving all the captured network traffic right to the phone and then walking out the door
is extremely easy—and, yes, Tcpdump has already been ported to work on the Android
operating system.
Figure 2-2 Verizon 4G LTE mobile hotspot
02-ch02.indd 28 3/27/12 4:57:08 PM

Secure Beginner’s Guide / Wireless Network Security: A Beginner’s Guide / Tyler Wrightson / 094-6 / Chapter 2
Secure Beginner’s Guide / Wireless Network Security: A Beginner’s Guide / Tyler Wrightson / 094-6 / Chapter 2
Chapter 2 Wireless Tools and Gadgets 29
In Actual Practice
Okay, this all sounds interesting, but does it really happen? You might be thinking,
“I doubt I have to worry about someone physically entering my premises to plant
an access point, right?” Wrong! I personally used this technique many times on
penetration tests. What’s more, it has been reported that some of the TJX attackers
may have physically entered some of their facilities to plant rogue access points. In
late 2006 the TJX Companies fell victim to hacking attacks in which over 45 million
customers were affected. The initial compromise is claimed to have been from
an unsecured wireless network after which the attackers might have planted their
own access points at additional locations.
Enterprise-Grade Access Points
Arguably the two biggest names in true enterprise-grade access points and wireless
systems are Cisco and Aruba. Both offer an extensive array of wireless products—
everything from antennas, access point enclosures, access points, access point controllers,
and even software to help manage your wireless infrastructure.
Surprisingly, not too many additional wireless features can be obtained from
enterprise-class wireless access points versus regular access points. Most of the core
functionality is the same between home/small business access points and enterprise-class
access points. Here are the main differences you can expect from business/enterprise-class
wireless products:
Much more rugged construction
●
Controller-based systems (lightweight operation) ●
Software management systems ●
Vendor support options ●
One of the most important features is the support option. If you rely on your wireless
network to support core business processes, you’re going to want to make sure you’re
covered in the event an access point or controller goes down. Most support contracts have
the option of 24/7 support with next-day hardware replacement, but keep in mind the cost
is in proportion to the level of support required.
02-ch02.indd 29 3/27/12 4:57:08 PM
Secure Beginner’s Guide / Wireless Network Security: A Beginner’s Guide / Tyler Wrightson / 094-6 / Chapter 2
30 Wireless Network Security: A Beginner’s Guide
Antennas
Antennas are an important component of any wireless assessment, and understanding how
they work will help you adjust your thinking about the physical security implications for
wireless transmissions. The most important fact to keep in mind is that antennas increase
the range for both sending and receiving data. This means that a laptop with an antenna
doesn’t just send a stronger signal to the access point, but it can actually pick up weaker
signals from the access point, thus increasing the distance it can be from that access point.
So why does this matter from a security perspective? Well, it should definitely make you
reconsider how much importance you place on the range of your access points. It always
makes me cringe when I hear someone say, “I don’t really secure my wireless network, but
it doesn’t matter because the signal dies once you hit the parking lot.” It isn’t uncommon to
be able to pick up wireless signals a few miles from their source with a good antenna.
Signal increase from antennas is typically measured in dBi, which stands for decibels
isotropic. I won’t bore you with the mathematical calculations behind antenna gain and
dBi. Just know that the higher the number, the better. Most consumer-grade antennas
range from 3dBi gain to 24dBi gain. Also keep in mind that the cable that connects the
antenna to the adapter is detrimental to the signal. If you use a cable that is too long, is
kinked, or is otherwise damaged, you can actually lose all the signal gain provided by the
antenna. The only other major consideration you need when selecting an antenna is to
make sure the connectors available will match that of your wireless card.
Types of Antennas
Antennas come in many different shapes and sizes, and some even have a few neat
features that help security assessors. The two most important types for the security tester
are directional and omnidirectional. Directional antennas, also commonly referred to as
yagi antennas, radiate basically straight forward (and typically slightly askew to one side).
They are best suited for “one-to-one” communication, where you can “point” at the target.
Omnidirectional antenna’s essentially radiate outward evenly from the horizontal plane of
the antenna. Take this with a grain of salt, though. In reality, the signal radiation pattern
looks most similar to a donut with the antenna sticking up through the center of the donut.
Mmm, delicious wireless technologies.
The quintessential wardriver’s antenna is arguably a small, magnetic, omnidirectional
antenna. It is typically no more than four inches high and includes a pretty strong magnet
on the bottom, allowing you to stick it to the top of your car. You can purchase such an
antenna on the Internet for as little as $15.
The other most popular antenna is the directional (or yagi) antenna. The radiation pattern
is basically straight ahead in the direction you are aiming the antenna, although oftentimes
02-ch02.indd 30 3/27/12 4:57:08 PM

Secure Beginner’s Guide / Wireless Network Security: A Beginner’s Guide / Tyler Wrightson / 094-6 / Chapter 2
Secure Beginner’s Guide / Wireless Network Security: A Beginner’s Guide / Tyler Wrightson / 094-6 / Chapter 2
Chapter 2 Wireless Tools and Gadgets 31
to get the best signal you’ll need to aim
slightly to the side of your target.
You can find plenty of videos and
resources on the Internet to help you build
your very own directional antenna for about
$10. However, if you’re looking for a quick
solution, you can find some good directional
antennas on the Internet for under $20 that
have a surprisingly good range.
Figure 2-3 shows an example of a
custom yagi antenna purchased on the
Internet for about $25.
One of the most popular antennas for
wireless enthusiasts will always be the
so-called cantenna, which not surprisingly
is a homebrew antenna made, in part,
Figure 2-3 Yagi directional antenna made from PVC
LINGO
Wardriving was originally coined as
a reference to war dialing, where a
range of phone numbers is dialed
automatically to find an interesting
target. Wardriving involves driving
around with a wireless client and
passively (sometimes actively) detecting
all wireless networks broadcasting their
existence. I’ve also seen accounts of
people “warbiking” and “warskating.”
And, if someone is caught in a place
they shouldn’t be, “warwalking” will
sometimes turn into “war-running.”
02-ch02.indd 31 3/27/12 4:57:08 PM
www.itbookshub.com
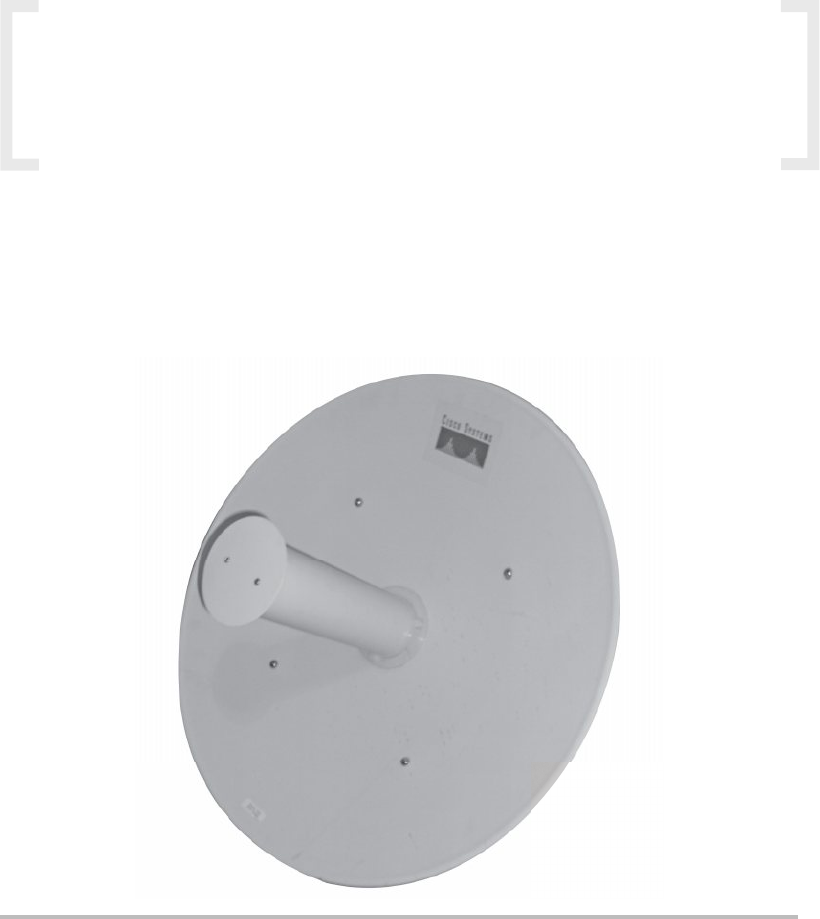
Secure Beginner’s Guide / Wireless Network Security: A Beginner’s Guide / Tyler Wrightson / 094-6 / Chapter 2
32 Wireless Network Security: A Beginner’s Guide
from a can. The can from Pringles potato chips is a favorite, but almost most any can will
do, including coffee cans. A cantenna is a yagi antenna and is thus a directional antenna.
IMHO
In my opinion, nowadays really good commercial antennas have
become very affordable. It used to be much more economical to build
your own cantenna, but now the main appeal is for the hobbyist.
Another very popular antenna you’re probably already familiar with is the parabolic
antenna (see Figure 2-4). The quintessential parabolic antenna is the satellite dish. The
parabolic antenna is a directional antenna, and you can find some very-high-gain parabolic
antennas, giving you the ability to pick up wireless signals from literally miles away.
Figure 2-4 Parabolic antenna
02-ch02.indd 32 3/27/12 4:57:09 PM

Secure Beginner’s Guide / Wireless Network Security: A Beginner’s Guide / Tyler Wrightson / 094-6 / Chapter 2
Secure Beginner’s Guide / Wireless Network Security: A Beginner’s Guide / Tyler Wrightson / 094-6 / Chapter 2
Chapter 2 Wireless Tools and Gadgets 33
Gadgets
A plethora of other fun and interesting gadgets can be used to enumerate or penetrate
wireless networks. Some of the more popular gadgets include the following:
GPS (Global Positioning System) ●
Smartphones and PDAs ●
Pocket wireless scanners ●
Spectrum analyzers ●
GPS
Many available GPS units can integrate with wardriving software, allowing you to pinpoint
where you first discovered and found the strongest signal for a wireless network. GPS devices,
including the well-known Garmin models, offer many options, including the newer USB
options. Figure 2-5 shows a Globalsat Bu-353 GPS, which is extremely compact easily fits
in your hand, and has a magnet on the base of the unit.
Figure 2-5 Globalsat Bu-353 GPS
02-ch02.indd 33 3/27/12 4:57:09 PM
Secure Beginner’s Guide / Wireless Network Security: A Beginner’s Guide / Tyler Wrightson / 094-6 / Chapter 2
34 Wireless Network Security: A Beginner’s Guide
Smartphones and PDAs
One of the most exciting and interesting new wireless-enabled devices by far is the
smartphone. The three main choices today for a smartphone with wireless tools are
iPhones, Windows-based smartphones, and Android-based smartphones.
I definitely prefer the flexibility and available software of the Android OS. Keep
in mind that the Android OS is based on Linux, so it might not be long until all the
wireless security software covered in this book can be run from your shirt pocket. In the
next chapter, we’ll cover some of the terrific software programs already available for
smartphones.
In addition to the huge list of software already available for smartphones, think about
all the features you already have in the palm of your hand. You can scan for wireless
networks while logging your position with a built-in GPS and recording what you see
with a video camera. All the data you gather can be saved locally to your smartphone on
a flashcard that has over 20GB of storage.
We’ll explore some of the very interesting attacks against smartphones in a later chapter.
Pocket Wireless Scanners
A few interesting little handheld devices work perfectly for the impromptu warwalking
adventure. Although most don’t provide a whole lot of detail, often the SSID can be enough
to enumerate an interesting target. For example, the Hotspotter device, retails for $50 from
Canary Wireless, can display the wireless channel, the signal strength levels, and the
encryption type in use. You can read more about the Hotspotter at Canarywireless.com.
Spectrum Analyzer
Although a spectrum analyzer’s core functionality isn’t necessarily security related,
some manufacturers bundle traffic-dumping software to allow you to see wireless
communications. Spectrum analyzers give you data on the physical communications on
a given wireless frequency. This can aid you in troubleshooting issues from congestion,
range, and physical topology. Spectrum analyzers used to be prohibitively expensive, but
nowadays very affordable and surprisingly easy-to-use options are available. One option
is the Wi-Spy by Metageek. Wi-Spy offers a few options that range from $99 to $1,000
and come with a USB wireless card and the software to display the information in a nice
graphical manner.
02-ch02.indd 34 3/27/12 4:57:09 PM
Secure Beginner’s Guide / Wireless Network Security: A Beginner’s Guide / Tyler Wrightson / 094-6 / Chapter 2
Secure Beginner’s Guide / Wireless Network Security: A Beginner’s Guide / Tyler Wrightson / 094-6 / Chapter 2
Chapter 2 Wireless Tools and Gadgets 35
Operating System of Choice
It might not be surprising that my operating system of choice for wireless security
assessments is Linux; however, many tools can still be run from Windows. Additionally,
many open-source tools can be run from the Mac OS, including some tools that are
exclusive to the Mac OS.
Most of the examples in this book use Linux, so it is highly recommended that you
familiarize yourself with it. For those readers who have zero experience with the Linux
operating system, don’t fret: Now is the perfect time to get some face time with the best
operating system available today.
For beginners I recommend either Ubuntu or BackTrack. Ubuntu is a great all-purpose
desktop operating system and comes with a decent list of preselected software packages
installed for everyday use. BackTrack is a great choice for security enthusiasts and
penetration testers. The makers of the BackTrack distribution describe it as “the complete
penetration testing arsenal for security professionals.” It comes with an enormous list of
security tools, including most of the wireless security tools we’ll be covering in this book.
Both Ubuntu and BackTrack can be run as live-CD distributions. This means that
the operating system actually launches right from the CD. You can save and manipulate
files on your hard drive, but you also have the option of leaving your hard drive alone
completely. When you’re done testing the operating system, you simply reboot your
system, remove the CD from your drive, and you’ll boot right back into your normal
operating system. The only real disadvantage to using a live-boot operating system is
that it tends to be a little slower, and any changes you make won’t be maintained during
reboots, unless specifically saved to external media (hard drive, USB drive, and so on).
One of the features that newcomers really enjoy is the apt utilities. Essentially,
centralized databases are maintained on the Internet that keep a list of all the files (and
typically default configurations) for an enormous amount of programs for the Linux
operating system. Users can search this database using locally installed apt utilities for
a program they wish to install, issue a single command to “install” the program, and the
program and all its supporting libraries are “automagically” downloaded and installed
on the system. If you’re unfamiliar with Linux, now might be a good time to read the
appendix on using BackTrack Linux.
Getting BackTrack running on your system is incredibly easy; just follow these simple
steps:
Grab the latest release of BackTrack from www.backtrack-linux.org/downloads/.1.
Burn the ISO image using a DVD-burning program.2.
02-ch02.indd 35 3/27/12 4:57:09 PM
Secure Beginner’s Guide / Wireless Network Security: A Beginner’s Guide / Tyler Wrightson / 094-6 / Chapter 2
36 Wireless Network Security: A Beginner’s Guide
Configure your computer BIOS to boot to the DVD drive. (Most modern computers 3.
have a key combination you can press to manually select your boot device; many
laptops use -.)
Select EDIT from the boot menu and select your DVD device.4.
Optionally, you can boot the BackTrack operating system from a USB thumb drive.
Directions on how to accomplish this can be found in the appendix.
We’ve Covered
In this chapter, we reviewed some of the fun toys available for connecting to, attacking, or
offering wireless networks. We also reviewed some interesting items such as smartphones,
miniature access points, and some unusual wireless clients. We reviewed some of the
options for antennas as well.
Make sure you have a good lab set up and ready to go so that you can follow along in
the upcoming chapters. You’ll get much more out of this book if you follow along with
the examples instead of just reading through them. These examples not only include the
appropriate wireless hardware but also the correct software you’ll need to use.
Creating a lab environment
Necessary hardware for an affordable lab ●
Client devices
Phones ●
Printers ●
Access points
DD-WRT ●
Linksys WRT54G ●
Apple Airport Express ●
Mini access points ●
Mobile hotspots ●
Antennas
Directional ●
Omnidirectional ●
02-ch02.indd 36 3/27/12 4:57:09 PM
Secure Beginner’s Guide / Wireless Network Security: A Beginner’s Guide / Tyler Wrightson / 094-6 / Chapter 2
Secure Beginner’s Guide / Wireless Network Security: A Beginner’s Guide / Tyler Wrightson / 094-6 / Chapter 2
Chapter 2 Wireless Tools and Gadgets 37
Wireless gadgets
GPS ●
Smartphones ●
Wireless scanners ●
Spectrum analyzers ●
Choosing a wireless operating system
Ubuntu Linux ●
Backtrack Linux ●
02-ch02.indd 37 3/27/12 4:57:09 PM
This page intentionally left blank

Secure Beginner’s Guide / Wireless Network Security: A Beginner’s Guide / Tyler Wrightson / 094-6 / Chapter 3
Blind Folio: 39
Know Thy Enemy
Part II
03-ch03.indd 39 4/5/12 4:23:39 PM
This page intentionally left blank

Secure Beginner’s Guide / Wireless Network Security: A Beginner’s Guide / Tyler Wrightson / 094-6 / Chapter 3
Blind Folio: 40
Secure Beginner’s Guide / Wireless Network Security: A Beginner’s Guide / Tyler Wrightson / 094-6 / Chapter 3
41
Theory of Attacks on
Wireless Networks
ChaPter 3
03-ch03.indd 41 4/5/12 4:23:40 PM
www.itbookshub.com
Secure Beginner’s Guide / Wireless Network Security: A Beginner’s Guide / Tyler Wrightson / 094-6 / Chapter 3
42 Wireless Network Security: A Beginner’s Guide
We’ll Cover
How WEP works ●
How WPA works ●
Attacking WEP encrypted networks ●
Attacking WPA encrypted networks ●
Common network attack techniques ●
In this chapter, you’ll gain the foundational knowledge you need to understand what the
attack tools discussed in the following chapters are doing. I highly recommend you don’t
skip this chapter. Understanding exactly how these attacks work as well as the potential
vulnerabilities will really help you to weigh the risks associated with wireless networks
and come up with your own appropriate mitigating controls. What’s more, you’ll be able
to quickly understand vulnerabilities in future technologies.
We will not discuss how to defend against these attacks until a later chapter. I’ve
always found it’s better to start with understanding how to break a system using specific
attacks and then learn how to defend against those attacks.
Setting the Stage
To adequately secure your wireless networks and devices, you need a healthy level of
respect for the various attacks in addition to the knowledge of how they work against a
wireless environment. You should also keep in mind that wireless technologies have no
real boundaries. All of your data is fluttering through the ether, just waiting for anyone to
grab it, analyze it, and potentially save it to perform a future attack.
The protections afforded by hardwired connections are no longer a factor when
dealing with a wireless infrastructure. Many of the attack techniques used against wireless
technologies have existed for years (if not decades) for wired networks. However, these
attacks are given new life by the fact that you can perform them far away from your target
and more anonymously than ever. Also keep in mind the ubiquity of wireless networks.
Nowadays every consumer electronic device comes with wireless capabilities, and users
rarely think of the security implications associated with using wireless networks.
You need to fully understand the real-world implications of wireless vulnerabilities.
The important thing to keep in mind is that this stuff really happens! Let me repeat that
03-ch03.indd 42 4/5/12 4:23:40 PM
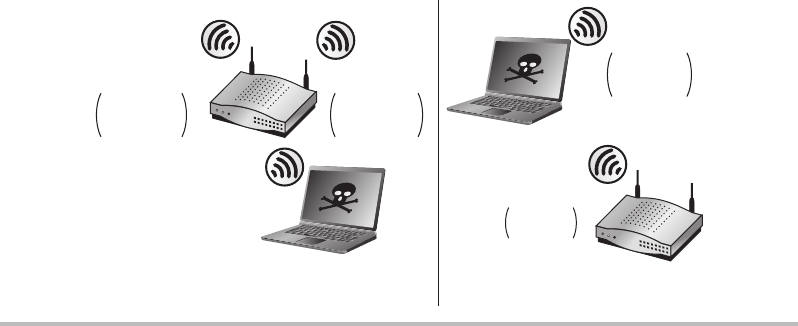
Secure Beginner’s Guide / Wireless Network Security: A Beginner’s Guide / Tyler Wrightson / 094-6 / Chapter 3
Secure Beginner’s Guide / Wireless Network Security: A Beginner’s Guide / Tyler Wrightson / 094-6 / Chapter 3
Chapter 3 Theory of Attacks on Wireless Networks 43
for emphasis: This stuff really happens! One of the worst thoughts a security administrator
can have is, “My insecure configuration is okay because the chances someone will actually
attack my network are extremely small.” You never want to have to explain to your boss
that someone has compromised the security of your network because “you didn’t think it
would actually happen.”
Wireless Reconnaissance
Wireless reconnaissance is the act of identifying available wireless networks, clients,
communications, and so on. It can take on many different forms. Generally, wireless
enumeration can be performed either passively or actively. When performing active
attacks, you are interacting with the target system in a way that makes your activities
noticeable to the target system. When performing a passive attack, your activities are not
directly viewable by the target system.
You can think of passively enumerating access points as just sitting quietly and listening
for an access point to shout out “Who wants wireless?” whereas active enumeration would
be you shouting “I’d like wireless, who’s out there?” This is illustrated in Figure 3-1.
In the case of 802.11 wireless networks, access points send out beacons multiple times
a second to announce their presence and capabilities. For active reconnaissance, a wireless
client can send a probe request, more commonly just called a probe. The programs we’ll
review for enumerating wireless networks are designed to monitor for beacons, and most
programs can also send probe requests. Using a network sniffer, we can actually view
these packets, which we’ll do in the next chapter.
Figure 3-1 Passive wireless reconnaissance versus active reconnaissance
AP
Shhh...
Passive Reconnaissance Active Reconnaissance
Who wants
wireless?
Who wants
wireless?
Is anyone
out there?
I’m here.
03-ch03.indd 43 4/5/12 4:23:43 PM

Secure Beginner’s Guide / Wireless Network Security: A Beginner’s Guide / Tyler Wrightson / 094-6 / Chapter 3
44 Wireless Network Security: A Beginner’s Guide
Wardriving is the process of driving
around commercial or residential areas
with wireless networking gear and
attempting to see what wireless networks
are available. This process is surprisingly
popular, probably for a few reasons. First,
it’s incredibly fun, even without malicious
intentions. It’s entertaining to drive around
in your car with an antenna stuck to your
roof and see networks popping up left and
right—I highly recommend it. Second,
there’s very little chance of getting
“caught” doing anything you shouldn’t.
If a cop pulls over a car full of geeks with
laptops and antennas, I doubt he’s going
to think they’re up to anything suspicious.
SSID Decloaking
Many network administrators feel it’s
enough to not broadcast the existence of
their wireless network. For most access
points, this is referred to as SSID cloaking.
LINGO
A network sniffer—also known as a
protocol analyzer—is a program that
allows you to see the network packets
behind your network communication.
Most sniffers allow you to view the
packets in different ways—as binary,
ASCII, hex, and so on. Some sniffers
can even understand application layer
protocols and show the data in very
consumable ways. For example, if
a sniffer understands HTTP, you can
actually view the web page from the
data within the packets.
A network sniffer is a critical tool for
you to familiarize yourself with. Over
the course of your security career, it will
prove to be absolutely priceless. We’ll
cover the use of the most popular and
extensive sniffer (Wireshark) in the next
chapter.
In Actual Practice
Want proof that people are out there doing this? In 2002, I was called by a new client
to take care of a simple wireless issue. They couldn’t connect to their wireless network
and needed someone to fix it. It took about five minutes to determine that they had
neglected to change the default password to secure their access point and someone
had logged in and changed their SSID to something comical, including some “hacker
lingo.”
Want to know the real kicker? I ended up meeting the people responsible for it!
Also, I should mention that this happened in a very small rural town. If people are
wardriving in cow country New York, do you think your business park might have
been visited by curious wireless enthusiasts?
03-ch03.indd 44 4/5/12 4:23:43 PM

Secure Beginner’s Guide / Wireless Network Security: A Beginner’s Guide / Tyler Wrightson / 094-6 / Chapter 3
Secure Beginner’s Guide / Wireless Network Security: A Beginner’s Guide / Tyler Wrightson / 094-6 / Chapter 3
Chapter 3 Theory of Attacks on Wireless Networks 45
This, technically, does not disable beacons being sent from your access point; instead, it
configures the access point to send beacons with a blank SSID field. In the next chapter,
you’ll see how this is trivial to circumvent and obtain the network SSID.
When a client connects to the target access point, it must send the SSID in cleartext in
the association request (see Figure 3-2). It is trivial for an attacker to capture packets and
wait for a client to associate to the access point. However, an impatient attacker can force
a client to retransmit the association request by spoofing a deauthentication message. This
is covered later in this chapter.
Passive Packet Captures
This section covers an extremely important point—one that you simply can’t escape when
using wireless networks. Your network traffic is being broadcasted for everyone to see!
Now don’t panic! Stay with me. Obviously, there are ways to secure this; otherwise, no
one would be using wireless technologies. However, let’s look at both the current security
implications and theoretical attacks associated with this fact.
For you to be able to capture traffic, you need to be within range of the target
communicating station. At this point, you should understand that with the assistance of
antennas, “within range” is a very flexible term. This means that as you’re sitting in your
favorite coffee shop, the websites you visit could be watched by someone sitting at the
next table, a building across the street, or even a few blocks away. Keep in mind that tests
have been performed that have successfully picked up wireless transmissions over a few
miles away with high-gain antennas.
Add to this the fact that, even to this day, many of the most popular network protocols
are still insecure by nature. Protocols that do not natively encrypt their data are known as
cleartext protocols. Using a network sniffer, you can view these packets and reconstruct
what people are viewing, the data they are sending, the messages they’re receiving, and
so on. Some of the more popular sniffers can even decode the data to make it very easy to
understand exactly what’s happening.
Figure 3-2 SSID sent in an association request
(Beacon SSID" ")
(Associate to
MYWIFI SSID)
03-ch03.indd 45 4/5/12 4:23:45 PM

Secure Beginner’s Guide / Wireless Network Security: A Beginner’s Guide / Tyler Wrightson / 094-6 / Chapter 3
46 Wireless Network Security: A Beginner’s Guide
Some common cleartext protocols include the following:
HTTP (Hypertext Transfer Protocol; websites) ●
SMTP (Simple Mail Transfer Protocol; sending e-mail) ●
FTP (File Transfer Protocol; file transfers) ●
POP3 (Post Office Protocol version 3; receiving e-mail) ●
IMAP (Internet Mail Access Protocol; receiving e-mail) ●
Most every chat system (AIM, Yahoo!, Facebook, IRC, and so on) ●
Not only does this mean that the data can be captured and viewed, but in many cases
the credentials (username and password) can be captured and viewed as well. Let’s look
at the aforementioned protocols and see how they transmit their credentials:
SMTP ● Sends all communications, including potential usernames and passwords, in
cleartext
FTP ● Sends all communications,
including usernames and passwords, in
cleartext
POP3 ● Sends all communications,
including usernames and passwords, in
cleartext
HTTP ● HTTP is unique in this regard.
Technically, most of the credentials are
sent in cleartext with straight HTTP
(as apposed to HTTPS); however,
some mechanisms can encrypt their
passwords. Cookies are typically sent
in cleartext, which can also contain
authentication credentials.
Chat systems ● Most chat systems
actually encrypt the usernames and
passwords transmitted; however, they
are typically vulnerable to a brute-force
attack, as explained next.
LINGO
As they apply to password cracking,
brute-force attacks are performed
when the attacker essentially tries every
possible password until she finds the
one that works. Brute-force attacks
are considered a relatively “low-tech”
hacking technique. It is possible to
perform a brute-force attack against a
password that has been encrypted using
a known encryption protocol.
Taking a basic mathematical
approach, the password-encryption
process would look like this:
Encryption_Function(Plaintext Password)
= Encrypted Password
A fictitious example is shown in
Figure 3-3.
03-ch03.indd 46 4/5/12 4:23:45 PM

Secure Beginner’s Guide / Wireless Network Security: A Beginner’s Guide / Tyler Wrightson / 094-6 / Chapter 3
Secure Beginner’s Guide / Wireless Network Security: A Beginner’s Guide / Tyler Wrightson / 094-6 / Chapter 3
Chapter 3 Theory of Attacks on Wireless Networks 47
Store and Crack at Your Convenience
Here’s an interesting attack vector to consider: What would happen if someone were to
capture all the network traffic they can, and then wait for an exploit to be made available
to crack that encryption? This is definitely something that needs to be considered for
environments that demand the highest level of security. The main thing that you need
to consider is the expiration date of the data traveling over your wireless network. For
example, consider a small business. If someone were to capture their network traffic and
crack it years later, the data might be worthless as all the passwords have expired and all
the communication is old news (hopefully).
Now consider a highly sensitive government agency. If an attacker were to capture
their network traffic and crack it later, the data could contain confidential information that
has no expiration date. For example: Social Security Numbers, government secrets, names
of undercover agents, Nuclear launch codes, etc.
Take into account that sniffing wireless traffic is a completely passive activity, which
means you have some serious concerns on your hand. This is one of the many reasons
why I’ve said for the longest time that wireless networking might not be suitable for all
environments, especially environments with the highest security concerns.
So what’s the moral of the story here? Assume that people with malicious intent can
see your wireless network and secure it from that perspective and you will go a long way
to securing your environment.
Man-in-the-Middle Attacks
Man-in-the-middle attacks (commonly abbreviated MITM) are a very serious type of
attack that you must fully understand to appreciate. The basic concept is that if an attacker
can view and manipulate the network data stream between two endpoints, he can do some
interesting things, such as view what the user is doing and manipulate what the user sees.
Figure 3-3 Example of password brute forcing
Encryption Process
Encryption Process
Encryption Process
Encryption Process
Password
MYPSASS
Test123
Changeme
TSL4ZPMD (No Match)
PMDAXP79 (No Match)
SDAMPCDD (No Match)
DAB79AQL (Success!)
Plaintext Password
BRUTEFORCING PASSWORD ‘Changeme’ DAB79AQ
L
03-ch03.indd 47 4/5/12 4:23:45 PM
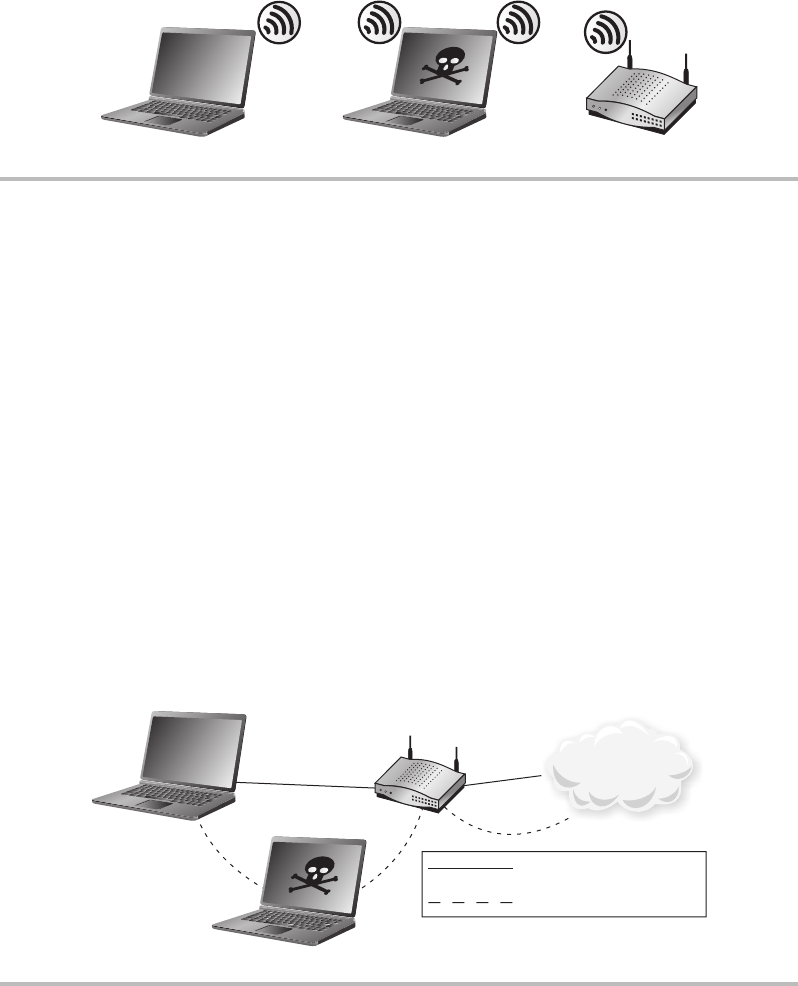
Secure Beginner’s Guide / Wireless Network Security: A Beginner’s Guide / Tyler Wrightson / 094-6 / Chapter 3
48 Wireless Network Security: A Beginner’s Guide
Figure 3-4 shows a basic example of a man-in-the-middle attack against a wireless client.
When you take a look at this figure, it’s obvious to see how the attack got its name. Simply
being somewhere in between the communication path, you can intercept the communication
and see what the user is doing. This is assuming that the communication isn’t encrypted,
which we’ll cover in more detail later.
However, the attacker is not required to be physically in between the communication
endpoints to perform the attack. In some cases, the attacker doesn’t even need to be
logically in the middle of the communication path. Some attacks can be just as effective
by seeing only one side of the communication (send or receive).
So if you’re not physically in the path of communication, how do you perform a
man-in-the-middle attack? Essentially, you insert yourself into the logical path of the two
endpoints (see Figure 3-5). There are many different options for doing this, and which
method you use can depend on many factors, including the network topology of the target
and the security technologies in place.
Figure 3-4 Man-in-the-middle (MITM) attack
MITM Attack
Client Attacker AP
Figure 3-5 MITM logical communication path
Client
Attacker
AP
Normal Communication Path
Hijacked Communication Path
Internet
03-ch03.indd 48 4/5/12 4:23:51 PM

Secure Beginner’s Guide / Wireless Network Security: A Beginner’s Guide / Tyler Wrightson / 094-6 / Chapter 3
Secure Beginner’s Guide / Wireless Network Security: A Beginner’s Guide / Tyler Wrightson / 094-6 / Chapter 3
Chapter 3 Theory of Attacks on Wireless Networks 49
Note
Sometimes when people describe attacks such as MITM, they say things like, “You
trick your victim into sending data through you.” Although from a human perspective
this makes sense, it is vital that you understand how this is a fundamentally incorrect
statement and can be explained by the following concept:
A computer only does exactly what it’s programmed to do.
This is true whether you’re talking about buffer overflows, denial of service, or man-
in-the-middle attacks. The only argument someone could make to oppose this is when
something is wrong with a physical component of a computer... but we won’t go there.
Therefore, for man-in-the-middle attacks, you need to understand that the
components involved—client computers, routers, switches, and so on—are only doing
exactly what they’re programmed to do.
The following are some of the more
common techniques for establishing a
man-in-the-middle attack:
ARP spoofing or ARP poisoning
●
Rogue DHCP server ●
ICMP redirects ●
Let’s look at each of these in more detail.
ARP Spoofing
ARP spoofing, also commonly called ARP poisoning, is probably the most common
technique for performing a man-in-the-middle attack against someone on the same LAN
segment, but that doesn’t mean it’s the best method. To understand how it works, you
need to understand some of the most basic communications processes a network node
will perform.
Let’s take a look at a very basic example. In the following example, the client computer
Neo wants to telnet to the server Morpheus. Let’s assume that Neo has an entry for Morpheus
in its host file and therefore doesn’t need to query a DNS server to resolve the name
Morpheus to an IP address. Because Morpheus is on the same LAN segment (Layer 2
network), Neo can send packets directly to Morpheus.
Here’s the interesting part. Neo will send a packet called an ARP request to determine
the Layer 2 (MAC) address of Morpheus. Because Neo doesn’t currently have the MAC
address of Morpheus, the ARP request will be sent as a Layer 2 broadcast, meaning
the destination MAC address will be FF:FF:FF:FF:FF:FF, which will be forwarded to
every host by the switch. When Morpheus receives this packet (which essentially asks,
LINGO
Buffer overflow attacks involve
providing too much data to a buffer in
a program, which can sometimes lead
to manipulating the execution of the
vulnerable program.
03-ch03.indd 49 4/5/12 4:23:51 PM

Secure Beginner’s Guide / Wireless Network Security: A Beginner’s Guide / Tyler Wrightson / 094-6 / Chapter 3
50 Wireless Network Security: A Beginner’s Guide
“Whoever has an IP address of 192.168.0.1, please send me your MAC address”), it will
respond to Neo with an ARP reply packet. The ARP reply packet essentially says, “I am
192.168.0.1 and here is my MAC address.” Now Neo has everything it needs to send its
packets to Morpheus and initiates a TCP connection to Morpheus (see Figure 3-6).
How does an attacker take advantage of this relatively straightforward process? Why,
he simply sends his own ARP response packet, claiming that his MAC address is the
address for 192.168.0.1, as illustrated in Figure 3-7. In fact, the attacker can continuously
send spoofed ARP packets to everyone on the LAN, essentially performing a man-in-the-
middle attack against every local host.
The perfect ARP spoofing attack has many more facets that we will not cover here. As
long as you understand the basic principles, you can let the tools we use handle the rest.
We’ll cover these tools in a later chapter.
Rogue DHCP
You should already be familiar with the basic operation of the Dynamic Host Configuration
Protocol (DHCP). When a host boots up and needs an IP address, this is often handled
by a DHCP server. The DHCP server also gives the host other settings, such as a default
gateway and Domain Name Servers (DNS) to use. What you might not know is that this
is another very simple vector for an attacker to establish a man-in-the-middle attack.
It’s as simple as setting up your own DHCP server and configuring your attacking
machine (or another machine under your control) as the default gateway within the DHCP
response (see Figure 3-8). You can use some simple command-line tools to perform this
attack rather than configuring a typical DHCP server.
Figure 3-6 Normal ARP process
1
2
Server Morpheus
Unicast to Neo: My MAC is
01:02:03:04:05:06.
Broadcast: What is the MAC for
192.168.0.1?
Norma
l
ARP Process
Client Neo
03-ch03.indd 50 4/5/12 4:23:52 PM
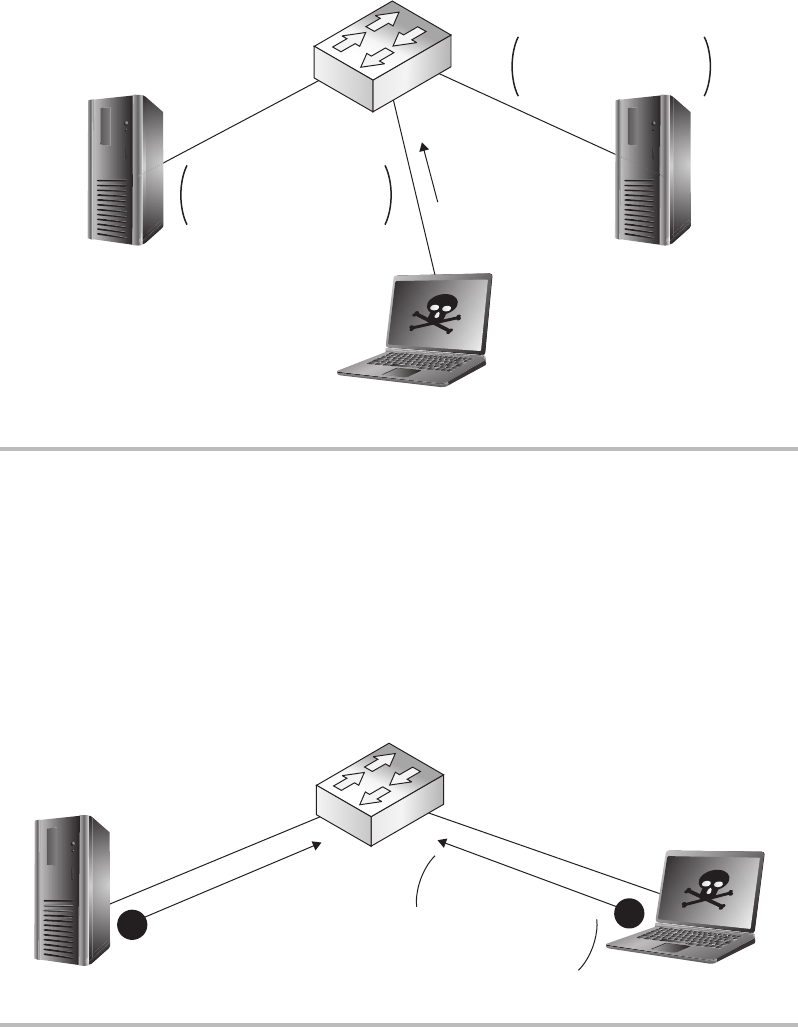
Secure Beginner’s Guide / Wireless Network Security: A Beginner’s Guide / Tyler Wrightson / 094-6 / Chapter 3
Secure Beginner’s Guide / Wireless Network Security: A Beginner’s Guide / Tyler Wrightson / 094-6 / Chapter 3
Chapter 3 Theory of Attacks on Wireless Networks 51
ICMP Redirects
Another effective technique for establishing a man-in-the-middle attack is to send spoofed
Internet Control Message Protocol (ICMP) redirects. ICMP redirects are typically only
seen in larger, more complex networks, but that doesn’t mean you can’t use this technique
on a small network. Figure 3-9 shows a basic example of how this technique would be
legitimately used.
Figure 3-7 Spoofed ARP response attack
Client Neo Morpheus
Unicast to Neo: My MAC is
01:02:03:04:05:06.
This is Morpheus. My MAC is
AB:AB:AB:AB:AB:AB.
ARP Spoong
3
Attacker
MAC AB:AB:AB:AB:AB:AB
Figure 3-8 Rogue DHCP server
DHCP Response
Default Gateway:192.165.0.5
DNS:192.168.0.5
Attacker
192.168.0.5
Rogue DHCP Server
(DHCP Request)
Client
2
1
03-ch03.indd 51 4/5/12 4:23:53 PM
www.itbookshub.com
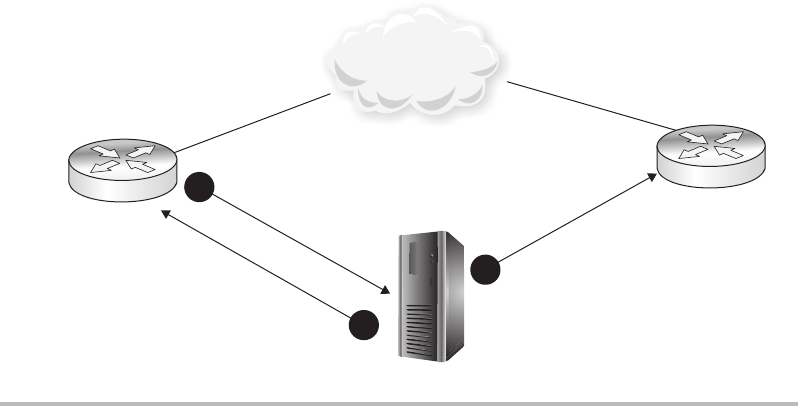
Secure Beginner’s Guide / Wireless Network Security: A Beginner’s Guide / Tyler Wrightson / 094-6 / Chapter 3
52 Wireless Network Security: A Beginner’s Guide
Figure 3-9 Normal ICMP redirect operation
Client
1
3
192.168.0.1 192.168.0.2
IP Trafc to
Internet Host
ICMP Redirect
Send Trafc
through 192.168.0.2
Normal ICMP Redirect
IP Trafc
to Internet Host
Internet
2
Here, Router1 is telling the client to send its packets through Router2. There are many
different configurations that could cause this, such as Router1 is reaching a threshold due
to too much traffic, it is load balancing all its connections, or a dynamic routing protocol
is telling Router1 that Router2 has a “better” path to the destination network.
So how can we use this to our advantage? You guessed it—spoofing an ICMP redirect
and pointing the client toward our attacking machine, just like in Figure 3-10.
MITM—OK, Now What?
You might be thinking, “Okay, I have my victim routing their traffic through my machine...
so what? All the juicy traffic is encrypted, right?” Well, as you’ll remember from a previous
section, many common protocols aren’t encrypted, which means you can see everything
that is happening—and you can even inject your own traffic. Even in the case where the
communications are encrypted, attacks are still available.
Two of the most interesting attacks with serious real-world implications are SSL MITM
attacks and SSL-stripping attacks. In an SSL MITM attack, the attacker substitutes his own
certificate for the certificate of the destination server, essentially establishing a separate
SSL connection between himself and the client and then another SSL connection between
himself and the server. The client will be alerted of an issue with the certificate of the
03-ch03.indd 52 4/5/12 4:23:55 PM
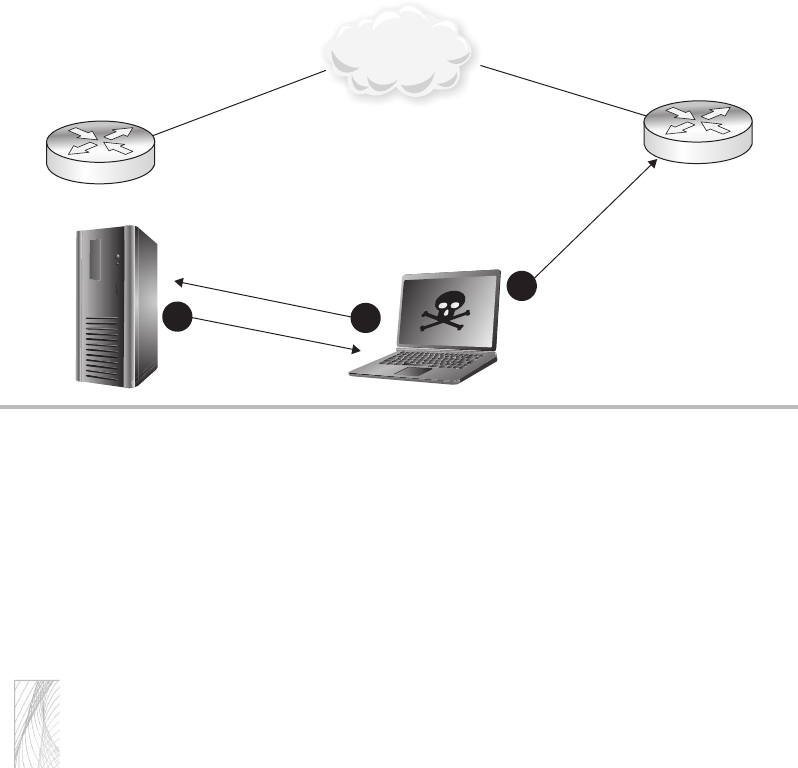
Secure Beginner’s Guide / Wireless Network Security: A Beginner’s Guide / Tyler Wrightson / 094-6 / Chapter 3
Secure Beginner’s Guide / Wireless Network Security: A Beginner’s Guide / Tyler Wrightson / 094-6 / Chapter 3
Chapter 3 Theory of Attacks on Wireless Networks 53
target server, but is given the option of continuing. I’ll let you guess how many users
understand exactly what the error message means and click Continue.
The other option is to just redirect the client to establish a standard HTTP connection
rather than HTTPS. The effectiveness of this attack relies on the fact that most users won’t
be alarmed if they visit their banking site use HTTP rather than HTTPS. Do you think most
users truly even understand the difference?
Note
From some of my previous comments, you might think that I believe all regular users of
computers are unintelligent. This is not the case; I’m merely speaking from experience
that most users simply don’t know the intricate workings of the security technologies
they rely on. It’s the exact same way I am with cars. I use a car almost every day, but if
it stopped working, I could probably be told it needs a new flux capacitor and I would
hand over the cash to get a new one.
Authentication
Another interesting security function of wireless networks is the authentication process.
Remember that authentication is essentially proving that you are who you claim to be—
and that you are someone who is authorized to connect to the network, most likely by
Figure 3-10 Spoofed ICMP redirect
192.168.0.1
IP Trafc to
Internet Host
Spoo
f
ed ICMP Redirect
IP Trafc to
Internet Host
Spoofed ICMP redirect from 192.168.0.1.
Send Trafc through 192.168.0.5.
Internet
1
3
192.168.0.2
2
03-ch03.indd 53 4/5/12 4:23:57 PM
Secure Beginner’s Guide / Wireless Network Security: A Beginner’s Guide / Tyler Wrightson / 094-6 / Chapter 3
54 Wireless Network Security: A Beginner’s Guide
having a piece of knowledge that only an “insider” would have (such as a password).
Here are the most common methods of authentication:
WEP key ●
WPA pre-shared key ●
Authentication to a central database ●
Two-factor authentication ●
WEP Authentication
WEP natively supports two very basic authentication mechanisms: shared-key
authentication and open authentication.
In shared-key authentication, the WEP key is used to verify whether the user should
have access to the wireless network. The access point and client go through what is called
a four-way handshake. The process for the four-way handshake is as follows:
The client sends an authentication request to the access point.1.
The access point sends the client a pseudo-random number (typically referred to as a 2.
nonce value).
The client encrypts the nonce value using the WEP key and sends it back to the access 3.
point.
The access point encrypts the same nonce value with the WEP key and compares it to 4.
what the client sent. If the values match, the client has the correct WEP key and the
access point acknowledges the authentication attempt.
In open authentication, there are essentially two messages:
The client sends an authentication request to the access point.1.
The access point sends back a message that the station is authenticated.2.
Wait, what? How does that actually authenticate the client? Good question! The answer
is that it doesn’t. The access point just relies on the fact that if the client sends packets to
the access point, and the access point can properly decrypt those packets using the WEP key,
then the client must have the correct WEP key and should be allowed to use the wireless
network.
So why does shared-key authentication exist if open authentication negates it? Also a
good question! The answer is that shared-key authentication is actually a horrible security
vulnerability in itself. The fact that an attacker sniffing the network has both the cleartext
03-ch03.indd 54 4/5/12 4:23:58 PM

Secure Beginner’s Guide / Wireless Network Security: A Beginner’s Guide / Tyler Wrightson / 094-6 / Chapter 3
Secure Beginner’s Guide / Wireless Network Security: A Beginner’s Guide / Tyler Wrightson / 094-6 / Chapter 3
Chapter 3 Theory of Attacks on Wireless Networks 55
nonce value and the encrypted response makes it extremely easy to obtain part of the
encryption key used. Generally speaking, having access to a plaintext message and its
encrypted form allows an attacker to attempt to obtain the encryption key used. Due to the
way the RC4 cipher works in WEP under the hood, this is an extremely simple operation
to reverse.
Note
You should not be using WEP nowadays—but if you are, you should never use shared-
key authentication. Always use open authentication instead.
Encryption
Encryption is the process of obscuring data so that any unauthorized person who intercepts
the data won’t be able to understand it. Encryption would be relatively meaningless without
being able to return the “jumbled” data to its original form. Thus, encryption is a two-way
process. Taking encrypted data and returning it to readable data is called decryption.
There are two main systems for encrypting data:
Shared-key encryption
●
Public Key encryption ●
Shared-key encryption is an extremely old technique for encrypting data, as it has
been used since the time of the Romans. Shared-key encryption uses the same key to both
encrypt and decrypt data and is therefore sometimes referred to as symmetric encryption.
You’re probably already familiar with WEP encryption, which uses a shared-key
encryption technology. You enter an encryption key on the access point and then enter the
same encryption key on any clients that need access to the network.
Public Key Infrastructure (also sometimes referred to as asymmetric encryption) uses
a separate key to encrypt and decrypt data. This can be a little confusing to people new
to PKI, but just understand that some pretty heavy-duty mathematics are used behind the
scenes. This is considered a very strong option for encrypting data.
The following table lists the general advantages for each technique:
Technology Advantages
Shared-key Fast
Less computing power needed
Very simple
Public Key Infrastructure Extremely secure
03-ch03.indd 55 4/5/12 4:23:58 PM
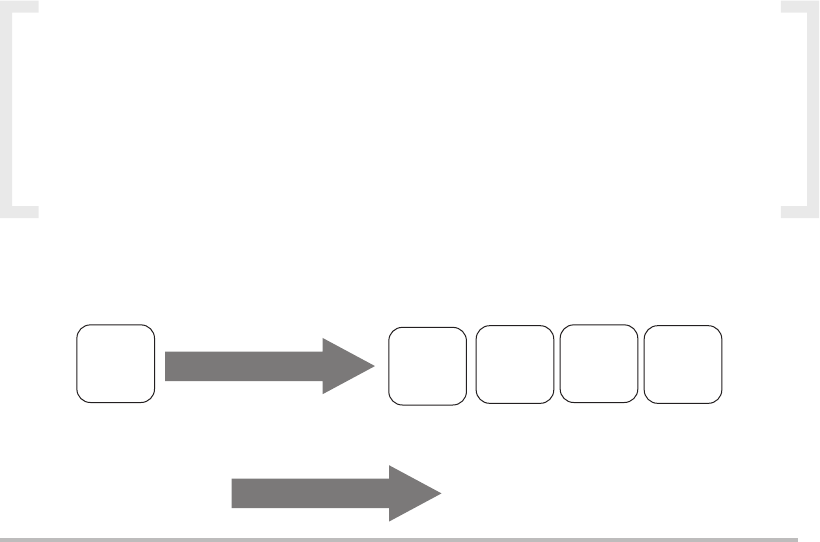
Secure Beginner’s Guide / Wireless Network Security: A Beginner’s Guide / Tyler Wrightson / 094-6 / Chapter 3
56 Wireless Network Security: A Beginner’s Guide
Stream Ciphers vs. Block Ciphers
The two basic methods for encrypting data are stream ciphers and block ciphers. In a
stream cipher, the data is typically encrypted one byte at a time and the output cipher text
is the same length (or very close) as the input plaintext. In a block cipher, the encryption
algorithm works on blocks of data of a fixed length. For example, if an encryption
algorithm works on blocks of data that are 32 bytes, a plaintext message of 128 bytes
would be split into four unique blocks of ciphertext (see Figure 3-11).
How WEP Works
Wired Equivalent Privacy (WEP) was part of the original 802.11 wireless standard
introduced in 1999. WEP provides encryption at Layer 2 of the OSI model, the MAC or
Link layer. WEP utilizes the RC4 encryption algorithm to encrypt data and uses a shared-
key system. WEP uses either a 40-bit or 104-bit WEP key to encrypt data. WEP, if you
don’t already know, has been absolutely unacceptable as a secure encryption algorithm for
some time now.
IMHO
It has always been my opinion that the mere name of WEP (Wired Equivalent
Privacy) implied that the designers’ train of thought was flawed from the
beginning. The simple fact of the matter is that there is no level of encryption that
can make wireless networks the equivalent of a wired network. Some people may
disagree with me, so I leave it up to you, the reader, to make up your own mind.
Figure 3-11 Block ciphers versus stream ciphers
Block Ciphers
Encryption
Encryption
32K
Cipher
Text
128K
USER
DATA
32K
Cipher
Text
32K
Cipher
Text
32K
Cipher
Text
Stream Cipher
DBALPSMYATIIWL5QZYEFWB
Unencrypted
User Data
03-ch03.indd 56 4/5/12 4:23:58 PM

Secure Beginner’s Guide / Wireless Network Security: A Beginner’s Guide / Tyler Wrightson / 094-6 / Chapter 3
Secure Beginner’s Guide / Wireless Network Security: A Beginner’s Guide / Tyler Wrightson / 094-6 / Chapter 3
Chapter 3 Theory of Attacks on Wireless Networks 57
WEP keys are configured by administrators and can be either 40 or 104 bits in length.
When we’re talking about encryption keys, the longer the key, essentially the stronger
security. The only real reason to choose 40-bit WEP over 104-bit WEP is that it’s easier to
remember because the key is shorter.
So what does it really mean that WEP “uses” the RC4 algorithm and why is it important?
Encryption algorithms are designed by very smart people, and the secure algorithms
get tested by many other very smart people. However, encryption algorithms are open
to be slightly different based on how someone chooses to implement them. This is
why sometimes you’ll hear someone state that an algorithm is secure, but a specific
implementation of the algorithm isn’t. This is absolutely the case with WEP and the
implementation of RC4.
RC4 was first designed in 1987 by Ron Rivest of RSA Security. RC4 is still a strong
encryption algorithm when implemented in a secure way for many other protocols you’re
probably familiar with, including the following:
WPA (Wi-Fi Protected Access)
●
TLS/SSL (Transport Layer Security and Secure Sockets Layer) ●
Microsoft Point-to-Point Encryption ●
Remote Desktop Protocol ●
Some implementations of SSH (Secure Shell) ●
Some implementations of Kerberos ●
Into Action
Most documentation will refer to WEP key lengths as 64-bit and 128-bit options.
Technically, this isn’t as accurate as stating that they’re 40 bit and 104 bit—the
other 24 bits come from a 24-bit value (Initialization Vector) that changes with
each packet, which you will learn about shortly. The main thing is to understand
the subtle difference and that in most documentation and configurations, 40 bit is
the same as 64 bit and 104 bit is the same as 128 bit.
03-ch03.indd 57 4/5/12 4:23:58 PM

Secure Beginner’s Guide / Wireless Network Security: A Beginner’s Guide / Tyler Wrightson / 094-6 / Chapter 3
58 Wireless Network Security: A Beginner’s Guide
Note
Another very important concept for any security technology is that of peer review. This
is especially true when it comes to encryption algorithms. When a new encryption
algorithm is released by a “security expert” or security company, it is not enough for
them to say, “Everyone can start using my new encryption algorithm; it’s very secure.”
The new encryption algorithm must be tested by other talented security professionals
and get their stamp of approval. Typically, encryption algorithms that have existed for a
while and have been tested by many people (that is to say, they have withstood the test
of time) should be given preference over shiny new algorithms.
WEP requires users to enter a key (password) on the access point and then enter the
same key on all devices that wish to access the wireless network; this is the quintessential
pre-shared key and is commonly referred to as the WEP key. This key serves as the
authentication credentials used to access the wireless network as well as provides the key
for the encryption process.
Note
The fact that the WEP key is used for authentication can be somewhat confusing because
there’s technically two distinct ways it’s used for authentication.
First, the original WEP standard used the WEP key as part of a challenge/response
authentication process, which was actually extremely insecure (as covered earlier in
this chapter).
Second, anyone with knowledge of the WEP key should be considered an “insider”
because they have knowledge that only an insider should have; this authenticates them as
someone authorized to join the network. This is what is meant by the “pre-shared” key.
In Actual Practice
You should also note that sharing the same key among many users has its own
inherent security failings and is basically the weakest kind of authentication.
Sharing the same key among many users does not allow an administrator to
(easily) authenticate specific users; meaning that if you have two users (let’s say
Bob and Mary) who authenticate with the same key, you can’t easily tell whether
a user who has authenticated to the access point is Bob or Mary. You’d have to
determine this information based on some external means.
Also, if any user compromises the key, then that key has been compromised for
everyone. Take the case where you share the WEP key among 100 users. If one of the
users leaves the company, the key must be changed and redistributed securely to the
other 99 users.
03-ch03.indd 58 4/5/12 4:23:58 PM

Secure Beginner’s Guide / Wireless Network Security: A Beginner’s Guide / Tyler Wrightson / 094-6 / Chapter 3
Secure Beginner’s Guide / Wireless Network Security: A Beginner’s Guide / Tyler Wrightson / 094-6 / Chapter 3
Chapter 3 Theory of Attacks on Wireless Networks 59
Because WEP uses the RC4 cipher (a stream cipher) to encrypt data, it is necessary
never to use the exact same key to encrypt two separate packets. This is an important
concept to grasp to understand one of the major flaws of WEP. To deal with the fact that
the key can never be exactly the same, every packet includes a 24-bit pseudo-random
number called an Initialization Vector (IV) so that the key is never the same for any packet.
Encryption Key = [Initialization Vector] [WEP-Key]
Note
Computers are essentially unable to create truly random numbers because the number
generated will always be based on a calculation that is technically possible to reverse.
Thus, “random” numbers are typically referred to as pseudo-random. Typically, a
pseudo-random number will be created using something that changes often, such
as the current time or the contents of memory. Of course, like most other security
techniques, take this with a grain of salt—there are stronger ways and weaker ways of
generating pseudo-random numbers on a computer, but the theory remains the same:
Under certain circumstances, a weak implementation may allow an attacker to “reverse
engineer” how a “random” number is generated.
You might be thinking, “Wait a minute, if the encryption key now has a random 24-
bit value on the end of it, how does the client know how to decrypt the packet given that
it won’t know the true key?” An excellent question, Young Grasshopper. I can see you’re
actually paying attention. For the receiver of the packet to know how to decrypt the
packet, he also needs to know the Initialization Vector value. So how do we get this to the
receiver? Simple. We send it as a cleartext field as part of each packet.
In Figure 3-12 you’ll see an example of a Wireshark packet capture session of WEP-
encrypted communications. Notice the field labeled “Initialization Vector” which is a 24-
bit numeric field. You can see that each packet has a different IV.
WEP was the standard for encrypting wireless networks even well after it had been
broken. As painful as it sounds, I still find many businesses that think it’s acceptable to use
WEP in certain situations. As you’ll soon understand, this simply isn’t the case, and WEP
should be avoided like the plague.
Here’s a quick refresher of all the major points of WEP for easy reference:
RC4 algorithm
●
Stream cipher ●
Shared secret ●
40-bit or 104-bit key length ●
Encryption at Layer 2 ●
03-ch03.indd 59 4/5/12 4:23:58 PM
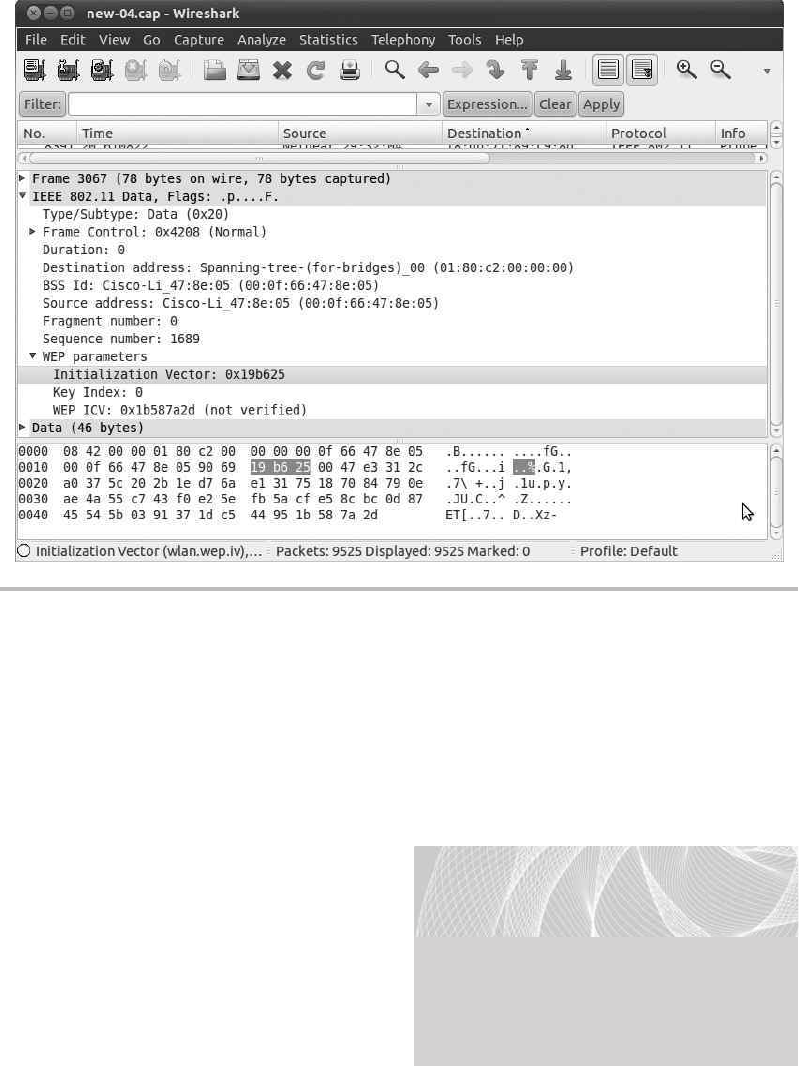
Secure Beginner’s Guide / Wireless Network Security: A Beginner’s Guide / Tyler Wrightson / 094-6 / Chapter 3
60 Wireless Network Security: A Beginner’s Guide
History of Breaking WEP
In 2001, WEP was cryptographically broken by three security researchers: Scott Fluhrer,
Itsik Mantin, and Adi Shamir. The attack is commonly known as the FMS attack, referring
to the last names of the researchers who discovered the vulnerability. At its core, the
vulnerability in WEP is due to its use of the 24-bit Initialization Vector, which you learned
about in the previous section.
The FMS attack allows an attacker
to discover the WEP key after passively
capturing encrypted packets. For the
attack to have a 50-percent success rate,
the user needs to capture around five
million encrypted packets. Keep in mind
that an attack might be successful with far
fewer packets, or it might require more
packets to be captured.
Figure 3-12 Wireshark capture showing IV Field
LINGO
The most sinister form of exploitation for
any cryptographic system is an attack
on how the underlying system actually
functions. You can essentially think of a
cryptographic break as a design flaw
within the encryption algorithm.
03-ch03.indd 60 4/9/12 3:32:20 PM

Secure Beginner’s Guide / Wireless Network Security: A Beginner’s Guide / Tyler Wrightson / 094-6 / Chapter 3
Secure Beginner’s Guide / Wireless Network Security: A Beginner’s Guide / Tyler Wrightson / 094-6 / Chapter 3
Chapter 3 Theory of Attacks on Wireless Networks 61
Note
Remember that passively capturing traffic is an extremely stealthy attack. There is no
way for the target of the attack to know their traffic is being captured.
A passive attack relies on capturing enough weak IVs from the normal
communications of wireless clients. Recall from the previous section that in a stream
cipher the key used to encrypt two packets can never be the same. Well, what happens
if two packets use the same Initialization Vector? You guessed it! Bad things happen.
Because WEP’s IV is 24 bits in length, there are 16,777,216 unique Initialization Vector
values. Yes, that sounds like a lot, but on a busy network you can easily send 16 million
packets in a very short period of time.
Note
There are certain key values that generate predictable patterns of encrypted data. The
encrypted packets that start with these patterns are said to be weak packets and the
associated IVs are Weak IVs.
Later in 2004, the Korek attack was introduced by a researcher using the same
pseudonym. The Korek attack essentially expands on the mathematical calculations of the
FMS attack to make the attack faster and more effective. Many times the two attacks will
be mentioned together as the FMS/Korek attack because the Korek attack builds on the
FMS attack.
Korek also detailed an attack known as the chop-chop attack, where an attacker can
decrypt a WEP-encrypted packet without knowing the encryption key, however decrypting
the packet does not give the attacker knowledge of the WEP key. This attack would have
received much more publicity if WEP hadn’t already been completely broken. Still, the
cryptographic implications are very interesting, and this attack style has seen new life with
WPA, which we will cover later.
In 2007, a completely new style of attack was introduced by researchers Pyshkin, Tews,
and Weinmann. This attack is not surprisingly referred to as the PTW attack. This attack
needs only around 40,000 packets for a 50-percent success rate, which is far fewer packets
than the original roughly five million needed for the FMS attack.
What does all this mean? In plain English, basically the designers of the WEP algorithm
didn’t create a large-enough IV. The IV being 24 bits means that on a busy network, multiple
packets will use the same IV. This allows an attack known as a related-key attack, where
essentially the attacker knows a portion of the key used to encrypt data and can find a
mathematical relationship between cyphertext.
03-ch03.indd 61 4/5/12 4:23:59 PM

Secure Beginner’s Guide / Wireless Network Security: A Beginner’s Guide / Tyler Wrightson / 094-6 / Chapter 3
62 Wireless Network Security: A Beginner’s Guide
Going into too much detail on exactly how WEP has been broken would definitely
not be helpful here. Just understand that any cryptographic system is based heavily on
relatively complex mathematics (and, ironically, also some very simple mathematics).
When any security protocol is cryptographically broken, there is an issue with the
underlying mathematical equations.
Attacking WEP Encrypted Networks
Now that you have an understanding of the history of WEP attacks, let’s dive into exactly
how these attacks would be carried out.
The basic attack flow would look like this:
Identify target wireless network.
1.
Passively monitor encrypted packets sent between the client and the access point using 2.
a sniffer.
Save around 50,000 encrypted packets to a file on the attacking laptop.
3.
Run the aircrack-ng program against the saved encrypted packets to determine WEP key.4.
Once you have successfully obtained the WEP key, either you can associate to the
access point or you can continue to passively monitor network traffic. Remember that
because WEP uses the same shared key among all hosts on the network, any host can
decrypt communications between any client. After associating to the access point, an
attacker could try to infiltrate deeper into the network.
Now this sounds great, but what if the target wireless network isn’t heavily utilized? It
might take us a surprising amount of time to get the necessary amount of packets to crack
the WEP key. Well, there is a solution—we simply make the wireless network generate
more traffic.
In Actual Practice
Every time someone first learns that cracking WEP is possible, they almost always
ask the same question: How long does it really take? The answer is simple: It depends.
However, I can say that in my personal experience, the fastest real-world time it has
taken me to crack a WEP key was about 15 minutes, from sniffing to obtaining the key.
03-ch03.indd 62 4/5/12 4:23:59 PM
Secure Beginner’s Guide / Wireless Network Security: A Beginner’s Guide / Tyler Wrightson / 094-6 / Chapter 3
Secure Beginner’s Guide / Wireless Network Security: A Beginner’s Guide / Tyler Wrightson / 094-6 / Chapter 3
Chapter 3 Theory of Attacks on Wireless Networks 63
So how does one incite the systems on the wireless network to generate more traffic?
Remember, we don’t know the WEP key, so we can’t create our own packet and encrypt it.
What we can do is replay a legitimate packet that we’ve captured on the wireless network.
Big deal, so we send a packet back to the access point that we captured and the packet will
have an IV that we’ve already captured. Not only that, but if we send a random packet, it
will probably be meaningless and just get dropped.
Say, for example, we replay the last packet in an HTTP request; all that’s going to
happen is the destination system will discard the packet because it’s either for a connection
that has already ended or for a segment that has already been received. Therefore, we have
two stumbling blocks: We need to send a packet that will generate a response from the
destination system and we need to choose this packet without being able to see its contents
(remember the packet is WEP encrypted with a key we don’t know).
Now you will have a new appreciation for the power of inference. Remember that
WEP is a stream cipher, which means the encrypted packet is (basically) the same length
as the unencrypted packet. So, if we can infer a packet is a specific type based on its
length, that might help, but which packet would also guarantee a response? How about
an ARP packet? Eureka! An ARP packet is a very specific size because there are no real
variable-length fields. It’s also a relatively unique size because it’s so small. And if we
send out an ARP request, the destination system should respond with an ARP reply! Wow,
this sounds too good to be true; it can’t actually work, can it? Well, guess what, it does!
This attack is referred to as a packet injection attack or an ARP replay attack and is
carried out using the aireplay-ng tool.
The modified attack flow would look like this:
Identify the target wireless network.1.
Passively monitor encrypted packets sent between the client and the access point using 2.
a sniffer.
Monitor for an ARP packet.3.
Continuously resend the ARP packet.4.
Every ARP response will have another unique IV.5.
Save around 50,000 encrypted packets to a file on the attacking laptop.6.
Run the aircrack-ng program against the saved encrypted packets to determine the 7.
WEP key.
03-ch03.indd 63 4/5/12 4:23:59 PM
Secure Beginner’s Guide / Wireless Network Security: A Beginner’s Guide / Tyler Wrightson / 094-6 / Chapter 3
64 Wireless Network Security: A Beginner’s Guide
How WPA Works
WPA, or Wi-Fi Protected Access, was developed as “WEP’s replacement.” There are two
versions of Wi-Fi Protected Access: WPA and WPA2. The original WPA standard was
intended as a temporary replacement for WEP while the 802.11i (WPA2) standard was
being developed. Because of the way WPA works, it was able to run on most existing
wireless cards and access points through a simple firmware update.
The technology that allows WPA to work on existing hardware is TKIP, the Temporal
Key Integrity Protocol. We won’t go too deeply into the details of how TKIP works, but
you should understand the basics. TKIP still uses the RC4 algorithm to encrypt data, which
is one of the reasons TKIP can run on existing hardware. TKIP encrypts every packet with
its own unique encryption key, which is still based on the root key (the pre-shared WEP key).
Essentially, TKIP is performing a more secure version of what WEP was intended to do
using a root WEP key and a “unique” IV for every packet. TKIP also provides a “re-keying
mechanism,” which is where it gets its name (because the encryption keys are only
“temporary”).
WPA is implemented in two basic ways:
WPA-PSK (Pre-Shared Key) ●
WPA-Enterprise ●
WPA-PSK
With WPA-PSK (Pre-Shared Key), also sometimes referred to as WPA-Personal, you assign
a key that is shared among all devices that wish to join the wireless network. Operationally,
this is identical to creating and distributing the WEP key. However, the key is now 256 bits
in length. This is clearly intended for home or small-office solutions, yet it is very widely
deployed even in enterprises.
WPA-Enterprise
WPA-Enterprise is much more complicated to configure compared to WPA-PSK. It
requires additional servers on the backend to perform authentication of each individual
user (typically this would be a RADIUS server). Although WPA-Enterprise is more
complicated to configure initially, you’ll see that it is much easier to administer for larger
organizations and provides a better layer of security. We’ll cover common WPA-Enterprise
configurations in a later chapter.
Remember the previous example of the WEP key that is shared among all users in
an organization? If you have 100 users and one of those users leaves the company, you
03-ch03.indd 64 4/5/12 4:23:59 PM

Secure Beginner’s Guide / Wireless Network Security: A Beginner’s Guide / Tyler Wrightson / 094-6 / Chapter 3
Secure Beginner’s Guide / Wireless Network Security: A Beginner’s Guide / Tyler Wrightson / 094-6 / Chapter 3
Chapter 3 Theory of Attacks on Wireless Networks 65
now have to change the WEP key and replace it on 99 systems. With WPA-Enterprise,
this is no longer an issue. Because every user has his or her own unique authentication
credentials, if one user leaves the company, you simply disable that user’s account.
WPA2 Encryption Algorithms
WPA2 still supports the TKIP encryption algorithm but has also introduced a new, more
secure option that’s typically referred to as CCMP or AES. Counter Mode with Cipher
Block Chaining Message Authentication Code Protocol (CCMP) uses the much more
secure and vetted AES encryption algorithm. AES, the Advanced Encryption Standard,
has been around for many years and has withstood the test of time. Whenever possible,
you should be configuring your access points and clients to use the WPA2 CCMP algorithm.
In Figure 3-13, you can see that WPA2 encompasses all the WPA technologies.
Attacking WPA Protected Networks
This is great, so all we have to do is replace all of our wireless equipment that uses WEP
with equipment that uses WPA and we’re completely secure, right? Well, not exactly.
Remember that every single technology has its own inherent limitations and weaknesses.
We’re going to look at the following vulnerabilities associated with the WPA protocol:
WPA-PSK cracking ●
WPA deauthentication spoofing ●
WPA denial of service ●
Attacks on TKIP ●
WPS Bruteforcing ●
Figure 3-13 WPA2 and WPA
WPA2 - 802.11i
CCMP AES
Certication Standard
WPA2
WPA
TKIP
WPA-PSK
WPA-Enterprise
03-ch03.indd 65 4/5/12 4:23:59 PM

Secure Beginner’s Guide / Wireless Network Security: A Beginner’s Guide / Tyler Wrightson / 094-6 / Chapter 3
66 Wireless Network Security: A Beginner’s Guide
Cracking the WPA Pre-Shared Key
Cracking the WPA pre-shared key is the simplest attack to understand. When a user connects
to an access point using WPA-PSK, that user goes through what is referred to as a four-way
handshake. This four-way handshake authenticates the user by verifying that he has the
correct WPA key. The basic process looks like this:
The access point sends the client a pseudo-random number (typically referred to as a
1.
nonce value).
The client encrypts the nonce value using the WPA key and sends it back to the access
2.
point.
The access point encrypts the same nonce value with the WPA key and compares it to
3.
what the client sent. If the values match, then the client has the correct WPA key and
the access point continues the association process by sending the client the group key.
The client acknowledges the transaction and says “Thank you” to the access point.
4.
Note
Because all the clients on a WPA network will be encrypting packets using their own
unique key, the clients need a more effective way to send out broadcasts and multicasts.
Otherwise, the access point would have to copy a broadcast and send directly to each
client on a wireless network. A complete discussion of the GTK (or Group Temporal Key)
is beyond the scope of this chapter. You should simply understand that it exists and what
its basic function is.
You should already be familiar with the vulnerability here because it is almost identical
to the authentication vulnerability in WEP. If an attacker can observe the unencrypted
nonce value sent to the client and can also observe the encrypted response sent back to the
access point, then the attacker has a perfect situation for brute-forcing the PSK.
Into Action
Remember that in a brute-force attack, the attacker simply tries all possible
combinations of characters until the correct key is found. Therefore, the length and
complexity of the WPA key is extremely important to the security of the network.
There’s also a specific type of brute-force attack called a dictionary attack, which
operates very similar, except that rather than trying every combination of characters,
an attacker simply tries all the words in a dictionary. These words are typically pulled
from an existing file referred to as a wordlist or dictionary file. Massive collections of
wordlists can be found online, in many different languages, and some are even geared
toward specific pop culture lists such as Star Wars and sports leagues.
03-ch03.indd 66 4/5/12 4:24:00 PM

Secure Beginner’s Guide / Wireless Network Security: A Beginner’s Guide / Tyler Wrightson / 094-6 / Chapter 3
Secure Beginner’s Guide / Wireless Network Security: A Beginner’s Guide / Tyler Wrightson / 094-6 / Chapter 3
Chapter 3 Theory of Attacks on Wireless Networks 67
The WPA standard actually includes the SSID as part of the encrypted nonce value,
which helps protect the handshake from a typical rainbow table attack. Thus, an attacker
would have to have rainbow tables that are specific to every SSID. The encrypted nonce
would look something like this:
Encrypted Handshake = Algorithm (SSID & Nonce)
WPA Handshake
Figure 3-14 WPA PSK Handshake Value
Thus, when a client associates and authenticates to the access point, we simply capture
the transaction and then crack it using the aircrack-ng program. We’ll be covering this in
detail in the next chapter.
WPA Deauthentication Spoofing
You may already be thinking that it might be a little annoying to sit around sniffing a
network waiting for someone new to associate so you can capture the WPA handshake.
Well, there is a solution, and it’s quite simple. We use a program called aireplay-ng to
spoof a deauthentication packet to the
client, forcing the client to disconnect and
reconnect to the wireless network.
Deauthenticating a client can
accelerate a WPA-PSK cracking session
because you don’t have to wait for a client
to connect naturally. However, there are
additional security concerns with this
attack. It can also be used maliciously
as a denial-of-service attack, if someone
simply wants to wreak a little havoc on
a wireless network and prevent users
from being able to connect; the attacker
can continuously disconnect anyone
who attempts to connect. In addition,
the attacker could use this tactic in
conjunction with a social engineering
attack and trick users into giving up
sensitive information. We’ll cover both of
these techniques in the next chapter.
LINGO
Rainbow table attacks are an
implementation of the time-memory
trade-off technique. In a brute-force
attack, you are using processing power
to actively encrypt many values and
comparing these to the encrypted
value you possess. Instead, you can
pre-compute these values and store
them in a file; this file is the rainbow
table. Many groups have pooled their
computing resources to create extremely
large rainbow tables.
Also of special note is the fact that
rainbow tables are available for some
of the most common SSIDs; therefore,
you should choose an SSID that is
guaranteed to be unique.
03-ch03.indd 67 4/5/12 4:24:00 PM

Secure Beginner’s Guide / Wireless Network Security: A Beginner’s Guide / Tyler Wrightson / 094-6 / Chapter 3
68 Wireless Network Security: A Beginner’s Guide
Also, keep in mind that if you wait for someone to connect to the access point naturally,
your attack is completely passive and extremely discrete. If you start deauthenticating
clients, your attack, although still very stealthy, is not 100 percent passive.
IMHO
In the real world, if I were a criminal, I would choose completely passive attacks
over even slightly active attacks. However, during penetration testing, these
slightly active attacks almost always go unnoticed by the target organization. If
an organization gets alerted on a few detected spoofed deauthentication packets
and can react in a timely manner, they probably have chosen an extremely secure
WPA key anyway.
Wi-Fi Protected Setup (WPS) Brute Forcing
Wi-Fi Protected Setup (WPS) is a certification program wireless vendors can choose to
implement that makes it easier for nontechnical users to implement security on wireless
networks. The PIN-External Registrar method requires users to enter an eight-digit
number into their computer that authenticates them to the access point, at which point the
access point will send the client device the WPA pre-shared key. This PIN is usually found
physically on the access point or in the documentation that came with the access point.
At the very end of December 2011, a security researcher named Stefan Viehböck
released a paper describing a new attack on the Wi-Fi Protected Setup. The flaw was
discovered in the PIN-External Registrar method used to authenticate client devices.
Viehböck discovered that when the client authenticates with the PIN, the PIN is
actually split into two separate four-digit pins, and to make matters worse, the final
eighth digit is actually used as a checksum for the PIN. This means that the eighth digit is
actually just a reflection of the previous seven digits and can be calculated based on the
previous seven digits.
So why exactly is that a problem? Well, this means that rather than the original number
of 100,000,000 possible PINs, there are actually only about 11,000. This drastically reduces
the time to brute force the PIN. Attack tools have already been released to exploit this, and
on average some take as little as a few hours to successfully brute force the PIN.
The good news is that WPS mode is typically only found on residential access points.
However, you should still be aware of the implications for any access points you might
find in your environment. If possible, you should disable WPS on any of your access
points. In addition, some access points have a lockout period, which can help to delay and
sometimes mitigate the risk from a brute-force attack.
03-ch03.indd 68 4/5/12 4:24:00 PM
Secure Beginner’s Guide / Wireless Network Security: A Beginner’s Guide / Tyler Wrightson / 094-6 / Chapter 3
Secure Beginner’s Guide / Wireless Network Security: A Beginner’s Guide / Tyler Wrightson / 094-6 / Chapter 3
Chapter 3 Theory of Attacks on Wireless Networks 69
WPA Denial of Service
We just looked at how an attacker could spoof deauthentication packets to cause a denial
of service, but other options are available as well. In addition, there’s a function within
WPA that essentially says that if the access point receives two invalid packets, it will
disconnect the clients and wait 60 seconds before resuming operation; this is to protect
the hardwired side of the network from attack, but opens the wireless side to a denial-of-
service attack. Also, as always, there’s the possibility of a physical denial of service by
flooding the wireless spectrum with junk.
Attacks on TKIP
Yes, believe it or not, the protocol designed to replace a weak protocol has its own
cryptographic weaknesses. Although these weaknesses are not technically as severe as
WEP, they still have some very serious implications.
The Beck-Tews attack is very similar to the chop-chop attack against WEP. Can you
guess where the attack gets its name? If you guessed the researchers names, then you’re
a winner! Martin Beck and Erik Tews released a paper in November of 2008 detailing the
attack. The attack allows an attacker to guess bytes in a packet and then continue guessing
the next byte, just like the chop-chop attack. Beck and Tews indicate that a successful attack
in which an attacker guesses an entire packet may be possible in as little as 12 minutes.
Once an attacker has successfully guessed an entire packet, she has the key used for
the packet and can then craft her own packets. WPA does have replay protection built
in, but this can be circumvented using Quality of Service (QoS), which essentially gives
priority to different types of packets to ensure quality for specific systems, such as voice
and video The attacker is limited to the size and number of packets she can send, but this
hardly seems like an issue for an ingenious hacker.
Later, Japanese researchers Toshihiro Ohigashi and Masakatu Morii revealed a simpler
and faster implementation of an attack similar to the Beck-Tews attack. The method uses a
man-in-the-middle attack and does not require the access point to have Quality of Service
enabled.
So What Should I Use?
At this point, you might be getting a little frustrated with the available security options for
wireless networks—and rightly so! Many people just want to know how to secure their
wireless network. The answer is the quintessential consultant answer: It depends. We’ll
cover some options to consider in a later chapter, but for now the short answer is that if
you have the option, stick with WPA2 and CCMP.
03-ch03.indd 69 4/5/12 4:24:00 PM
Secure Beginner’s Guide / Wireless Network Security: A Beginner’s Guide / Tyler Wrightson / 094-6 / Chapter 3
70 Wireless Network Security: A Beginner’s Guide
We’ve Covered
In this chapter, we’ve laid the groundwork for you to be able to understand how the attack
tools covered in the next chapter actually work. Nowadays plenty of attack tools are
available that are extremely easy to use without truly understanding the underlying attack.
Just using tools without understanding how they work does not lead you down a path of
mastering security.
How WEP works
Authentication and Encryption ●
How WPA works
WPA-PSK ●
WPA-Enterprise ●
WPA2 Encryption Algorithms ●
Attacking WEP encrypted networks
History of Cracking WEP ●
Cracking WEP Keys ●
FMS, Korek, chop-chop, PTW ●
Attacking WPA encrypted networks
Cracking the WPA Pre-Shared Key ●
WPA Deauthentication Spoofing ●
Wi-Fi Protected Setup Brute Forcing ●
WPA Denial of Service ●
Attacks on TKIP ●
Common network attack techniques
Man in the middle attacks ●
ARP Spoofing ●
Rogue DHCP Servers ●
Spoofing ICMP Redirects ●
Sniffing Wireless Traffic ●
03-ch03.indd 70 4/5/12 4:24:00 PM

Secure Beginner’s Guide / Wireless Network Security: A Beginner’s Guide / Tyler Wrightson / 094-6 / Chapter 4
71
Attacking Wireless
Networks
Chapter 4
04-ch04.indd 71 4/5/12 4:53:44 PM
Secure Beginner’s Guide / Wireless Network Security: A Beginner’s Guide / Tyler Wrightson / 094-6 / Chapter 4
72 Wireless Network Security: A Beginner’s Guide
We’ll Cover
● Wireless network reconnaissance
● Passive packet captures
● Cracking WEP encryption
● Cracking the WPA-PSK handshake
● Spoofing deauthentication packets
In this chapter, you’ll use the knowledge you just obtained from the previous chapter to
utilize the tools covered in this chapter. We’ll walk through some of the attacks covered
in the previous chapter and follow up with additional attacks in the next chapter.
The attacks covered in this chapter focus on identifying and attacking wireless access
points. In the next chapter, we’ll expand on these attacks to target wireless clients. In later
chapters, we’ll take a look at the options to defend against these attacks.
For each of the scenarios, we’ll use the following topology unless otherwise noted
(see Figure 4-1):
Access Point
● Mac address: 22:22:22:22:22:22
● IP address: 192.168.1.10
● SSID: INSECURE
Client Laptop
● Name: client
● Mac address: 44:44:44:44:44:44
● IP address: 192.168.1.20
Attacker Laptop
● Name: attacker
● Mac address: 00:11:22:33:44:55
● IP address: 192.168.1.50
All of the tools discussed in this chapter come preinstalled on BackTrack. For instructions
on installing a program on a different operating system, see the related website.
04-ch04.indd 72 4/5/12 4:53:44 PM
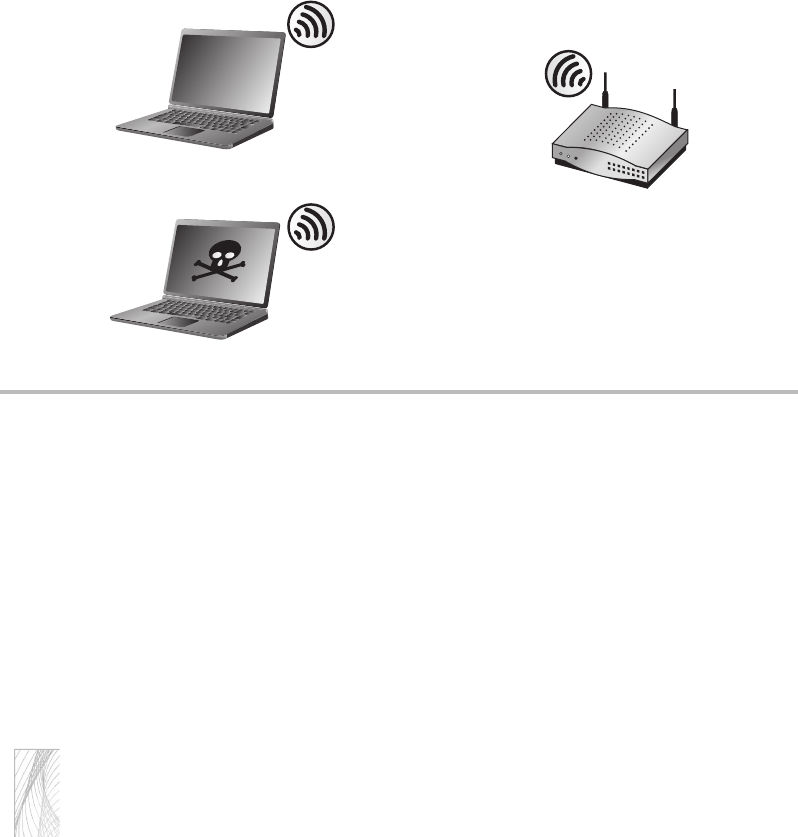
Secure Beginner’s Guide / Wireless Network Security: A Beginner’s Guide / Tyler Wrightson / 094-6 / Chapter 4
Secure Beginner’s Guide / Wireless Network Security: A Beginner’s Guide / Tyler Wrightson / 094-6 / Chapter 4
Chapter 4 Attacking Wireless Networks 73
Wireless Reconnaissance
Remember that wireless reconnaissance is the act of identifying available wireless devices,
networks, clients, communications, and so on. Just like in the previous chapter, we’re
going to focus on identifying wireless networks here. We’ll start with the most basic ways
of identifying wireless networks and then move on to more sophisticated methods.
I’d like to take this opportunity to remind you how much fun wardriving is. Make sure
you not only follow these examples at home or in your office, but also have some fun on
the road. It’s also relatively simple to set the tools to record the networks they find, which
allows you to drive around and then check the results later.
Note
Remember that we can’t possibly go over every option, flag, and capability of every
program we’re going to cover in this chapter. The point is to give you a taste of what’s
out there as well as some very useful things you can test today! As you find useful tools,
you should explore their functionality through online documentation, man pages, and
simply by playing with the tools and getting hands-on experience.
The most basic methods for identifying wireless networks are already built into most
of the operating systems or devices you’re likely to use. Most of these basic methods rely
on the Probe-Request and Probe-Response packets we discussed earlier. Therefore, most
of these tools would be considered active tools because the Probe-Request could be seen
by the target system.
Figure 4-1 Attack topology
Attacker
AP
Client MAC:44:44:44:44:44:44
IP:192.168.1.20
MAC:00:11:22:33:44:55
IP:192.168.1.50
MAC:22:22:22:22:22:22
IP:192.168.1.10
SSID:INSECURE
04-ch04.indd 73 4/5/12 4:53:47 PM
Secure Beginner’s Guide / Wireless Network Security: A Beginner’s Guide / Tyler Wrightson / 094-6 / Chapter 4
74 Wireless Network Security: A Beginner’s Guide
Most of the commands and tools covered here require root or administrative privileges.
We’ll take a look at the following tools to help enumerate wireless networks:
● iwlist A Linux command for identifying wireless networks
● Kismet A very popular Linux wireless detection suite
● Kismac A very popular Mac OS wireless network detection suite
● Wardrive A simple Android application to facilitate wardriving
● Netstumbler A very popular Windows wireless network detection suite
The very first thing you’ll want to do is identify the available wireless network cards
in your Linux system. Depending on the driver associated with the card, it can take on any
number of common prefixes. Here are some of the most common:
● ethX
● wlanX
● wifiX
● athX
The X represents a number to uniquely identify the network interface card (NIC) and
typically starts at zero. Therefore, the first card in your system might be wlan0 and the
next would be wlan1. The simplest way to identify the wireless cards in your system is
with the iwconfig command. Type the command with no arguments and you’ll get output
similar to Listing 4-1.
Listing 4-1: Output from the iwconfig Command
root@attacker:~#iwconfig
lo no wireless extensions.
eth0 no wireless extensions.
wlan0 IEEE 802.11abgn ESSID:off/any
Mode:Managed Access Point: Not-Associated Tx-Power=15 dBm
Retry long limit:7 RTS thr:off Fragment thr:off
Power Management:on
root@attacker:~#
In the attacking system, you can see that the first available wireless card is wlan0.
The card supports all of the major 802.11 standards (A, B, G, and N) and is currently not
associated to a wireless network.
04-ch04.indd 74 4/5/12 4:53:47 PM

Secure Beginner’s Guide / Wireless Network Security: A Beginner’s Guide / Tyler Wrightson / 094-6 / Chapter 4
Secure Beginner’s Guide / Wireless Network Security: A Beginner’s Guide / Tyler Wrightson / 094-6 / Chapter 4
Chapter 4 Attacking Wireless Networks 75
The iwlist Command
The first tool we’ll look at is the iwlist command in Linux. Take a look at the description
from the man page for iwlist in Listing 4-2. Remember that most of these commands
require root privileges.
Listing 4-2: The iwlist Man Page
DESCRIPTION
Iwlist is used to display some additional information from a wireless network
interface that is not displayed by iwconfig(8). The main argument is used to
select a category of information, iwlist displays in detailed form all infor-
mation related to this category, including information already shown by
iwconfig(8).
Manual page iwlist(8) line 24
If you type the command without any arguments, you can see the categories that are
referenced in the man page. These categories are used as arguments to the interface and
can provide a lot of helpful information about wireless networks in the area as well as
wireless configuration parameters for the specified wireless interface.
The option that will help us in performing reconnaissance on available wireless networks
is the scanning option. The essid and last switches for the scanning argument are optional.
So to get a quick snapshot of the available wireless networks, simply run the command
with the identified wireless interface and use the scanning option, like so:
#iwlist wlan0 scanning
As you can see in Listing 4-3, you can get a healthy amount of information using iwlist.
Let’s take a look at some of the more useful information:
Listing 4-3: Sample iwlist Output
Cell 11 - Address: 22:22:22:22:22:22
Channel:11
Frequency:2.462 GHz (Channel 11)
Quality=46/70 Signal level=-64 dBm
Encryption key:on
ESSID:"INSECURE"
Bit Rates:1 Mb/s; 2 Mb/s; 5.5 Mb/s; 11 Mb/s; 18 Mb/s
24 Mb/s; 36 Mb/s; 54 Mb/s
Bit Rates:6 Mb/s; 9 Mb/s; 12 Mb/s; 48 Mb/s
Mode:Master
04-ch04.indd 75 4/5/12 4:53:47 PM

Secure Beginner’s Guide / Wireless Network Security: A Beginner’s Guide / Tyler Wrightson / 094-6 / Chapter 4
76 Wireless Network Security: A Beginner’s Guide
Field Description
Cell The cell is a number within iwlist to uniquely identify each network.
Address Address is the BSSID, uniquely identifying the access point.
Channel The current wireless channel for this specific BSSID. You can also see the frequency
below this, which can be useful because some tools want the specific frequency and
not the channel.
Encryption Key Set to “on” in this case, which means that the access point is using WEP encryption.
ESSID The Extended Service Set ID, which in this case is “INSECURE.”
Mode Remember that if the mode is “Master,” you know the device is an access point;
otherwise, the mode would be Ad-Hoc.
Into Action
You’re probably thinking that to show the access point and clients as having a
unique MAC address I had to edit all the images in this chapter, but you would be
mistaken. You can actually change the MAC address on a Linux computer using
the ifconfig command. For the access point, I used a Linux WRT54G with the dd-
wrt firmware. As part of the dd-wrt firmware, you have the “clone MAC address”
feature, which lets you set the MAC address to anything you’d like.
For the Linux laptop, the interface must typically be brought down first to
change the MAC address. The ifconfig syntax is as follows:
#ifconfig wlan0 down
#ifconfig wlan0 hw ether 88:88:88:88:88:88
#ifconfig wlan0 up
I definitely recommend setting your MAC address and IP address statically
while testing security tools; this makes it very easy to remember and identify
machines in packet captures and the like. Also, you should be aware that some
cards don’t support changing the MAC address (although most today do), and
some cards have some minor restrictions. For example, the dd-wrt firmware states
that the second digit in the MAC address must be even. The wireless card in the
laptop I was using also had this requirement.
04-ch04.indd 76 4/5/12 4:53:47 PM

Secure Beginner’s Guide / Wireless Network Security: A Beginner’s Guide / Tyler Wrightson / 094-6 / Chapter 4
Secure Beginner’s Guide / Wireless Network Security: A Beginner’s Guide / Tyler Wrightson / 094-6 / Chapter 4
Chapter 4 Attacking Wireless Networks 77
In Listing 4-4, you’ll notice two network names appear as "\x00". That seems like a
pretty weird ESSID, doesn’t it? Well, that’s because it’s not actually the ESSID. This is
displayed when an access point is not broadcasting its ESSID.
Listing 4-4: Showing only discovered ESSIDs from iwlist
root@attacker:~# iwlist wlan0 scanning | grep ESSID
ESSID:"wlan-023fc"
ESSID:"SHome"
ESSID:"INSECURE"
ESSID:"MKB_WIRELESS"
ESSID:"wlan-ffdle"
ESSID:"wLan-2bll4"
ESSID:"\x00"
ESSID:"the_hizzle"
ESSID:"\x00"
ESSID:"Wink Internet"
ESSID:"\x00"
ESSID:"Wlan-d43b
root@attacker:~#
Into Action
Oftentimes there will be so many wireless networks in the area that using the iwlist
command will quickly scroll by in the terminal, making it very difficult to read. In
this case, I like to pipe the output to a file using the following command:
#iwlist wlan0 scanning >> networks.txt
Or even better, I’ll start by grepping for the available ESSIDs and then
investigate the interesting networks further. The grep command offers a myriad of
options to search input for a specific string of text. It is extremely flexible, but for
the most basic usage you can pipe the output of a command to grep and the only
argument you need to supply to grep is the word you wish to search for. By default,
grep is case sensitive, so you can search for the word “ESSID” like this:
#iwlist wlan0 scanning | grep ESSID
Listing 4-4 shows the results.
04-ch04.indd 77 4/5/12 4:53:47 PM

Secure Beginner’s Guide / Wireless Network Security: A Beginner’s Guide / Tyler Wrightson / 094-6 / Chapter 4
78 Wireless Network Security: A Beginner’s Guide
Kismet
We couldn’t possibly have a section on wireless reconnaissance without discussing
Kismet, which is the de facto tool for discovering available wireless networks. Kismet
has been around for quite some time now and has undergone very heavy development. It
offers an incredible amount of features, including the following:
● Passively identifying wireless networks
● Logging GPS coordinates of wireless networks
● Logging of captured packets and detected wireless networks
● Automatically decloaking detected wireless networks
● Logging to XML files for integration with other tools
We’ll focus on the wireless reconnaissance capabilities of Kismet in this chapter and
cover some of the additional functionality in a later chapter, including using Kismet as a
wireless IDS.
IMHO
Please, please, I’m begging you. Install and use Kismet. You will gain so much
real-world knowledge about how wireless technologies are used (and misused) by
simply spending a few fun-filled evenings driving around in your car with Kismet.
It is absolutely invaluable.
Kismet uses the ncurses library, which allows it to act as a terminal program but still
have some of the qualities of a graphical user interface (GUI), including the ability to interact
with Kismet using your mouse. To download Kismet or read any further documentation, visit
www.kismetwireless.net. Kismet will run on Linux, FreeBSD, NetBSD, OpenBSD, and Mac
OS X. You can also run the Kismet client under Cygwin in Windows.
In Actual Practice
Don’t get too excited about the ability to run the Kismet client on Windows. Getting
it to run under Cygwin can frankly be a little more than a headache for someone
unfamiliar with Linux. But, if you’re feeling adventurous, you can check out the
documentation on how to do so at www.kismetwireless.net.
04-ch04.indd 78 4/5/12 4:53:47 PM
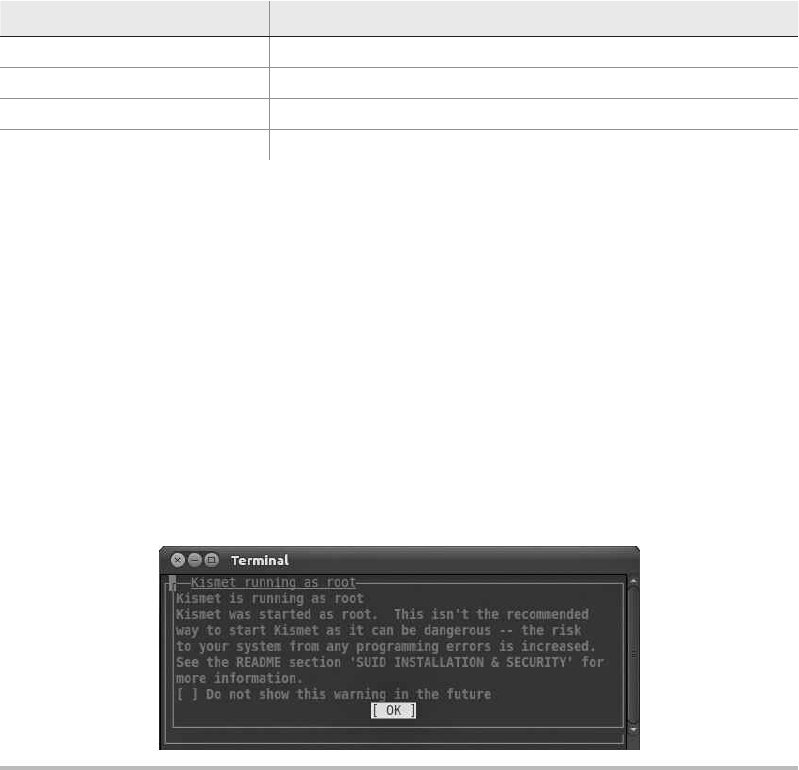
Secure Beginner’s Guide / Wireless Network Security: A Beginner’s Guide / Tyler Wrightson / 094-6 / Chapter 4
Secure Beginner’s Guide / Wireless Network Security: A Beginner’s Guide / Tyler Wrightson / 094-6 / Chapter 4
Chapter 4 Attacking Wireless Networks 79
Kismet uses a client/server model in which you can configure several Kismet “drones”
to forward information to the Kismet server. The Kismet server will see these drones as
independent capture sources and can be configured independently. More on this in a later
chapter.
Navigating within Kismet using your keyboard is easy, and I would recommend
getting used to not using your mouse. You’ll find that you can actually move around the
interface quickly using your keyboard. For most basic operations, you’ll need to use the
keys detailed in the following table:
Key Usage
e s c or ~Access the main menu
Arrow keys Navigate the menus
e n t e r or s p a c e b a r Select highlighted item
t a b Scroll between choices
Kismet is a snap to install and comes preloaded on BackTrack. Simply open a terminal
as the root user and type kismet at the command line. If you start Kismet as the root user,
you’ll see a message similar to the one in Figure 4-2. It is recommended that you run
Kismet as a regular user; however, you’ll need root privileges to start the Kismet server.
Next, you’ll see the prompt in Figure 4-3. This is simply telling you that the server
isn’t running (remember that Kismet has both a client and a server) and asks if you’d like
to start the server.
Following that, you will be prompted for any startup options, as seen in Figure 4-4.
You’ll also have the option of disabling the default logging here and setting up a prefix for
the log files generated. All of the default settings here are good, so select Start to continue.
Figure 4-2 Kismet root privileges warning
04-ch04.indd 79 4/5/12 4:53:47 PM

Secure Beginner’s Guide / Wireless Network Security: A Beginner’s Guide / Tyler Wrightson / 094-6 / Chapter 4
80 Wireless Network Security: A Beginner’s Guide
IMHO
I’ve found that using logging in security tools can be invaluable. On many
occasions I’ve had to go back and refresh my memory on what I had seen
previously in the interface. What’s more, using the logging feature can be
another helpful way to educate yourself on exactly how a tool functions and what
information you can obtain from it. You should get in the habit of enabling logging
functionality whenever you can.
Next, you’ll see the server console window as well as the option to close the console
window. All you’re seeing here is the backend information as to what the Kismet server is
doing. It is safe to choose the option to close the console window; the Kismet server will
continue to run.
Figure 4-3 Kismet can automatically start the Kismet server
Figure 4-4 Kismet logging options
04-ch04.indd 80 4/5/12 4:53:48 PM

Secure Beginner’s Guide / Wireless Network Security: A Beginner’s Guide / Tyler Wrightson / 094-6 / Chapter 4
Secure Beginner’s Guide / Wireless Network Security: A Beginner’s Guide / Tyler Wrightson / 094-6 / Chapter 4
Chapter 4 Attacking Wireless Networks 81
You’ll now see the No Sources dialog box shown in Figure 4-5, indicating that Kismet
doesn’t currently have any “packet sources” defined and asking you if you’d like to
define one. This very handy feature has been added in recent versions. In the past you
had to edit the Kismet configuration file by hand. Although editing the configuration file
is not a difficult task, if you’re new to Linux, editing the somewhat cryptic configuration
file can be a minor roadblock. Select Yes and you’ll be prompted with the Add Source
dialog box in Figure 4-6.
Fill in the fields similar to what you see in Figure 4-6. The Intf field is for the interface,
which we obtained earlier from the iwconfig command. The Name field can be anything
you’d like to uniquely identify this capture source. This comes in handy when using multiple
interfaces or using Kismet drones; for now, you can just give it the same name as the interface.
Okay, we’re finally there: the main Kismet interface. Take a minute to look at Figure 4-7
to see all the information you immediately have available. The main display on the top
left, which takes up most of the screen, shows the list of networks as well as some of the
more important information about the network.
Figure 4-5 Kismet prompts for a capture interface
Figure 4-6 Sample Kismet capture source
04-ch04.indd 81 4/5/12 4:53:48 PM
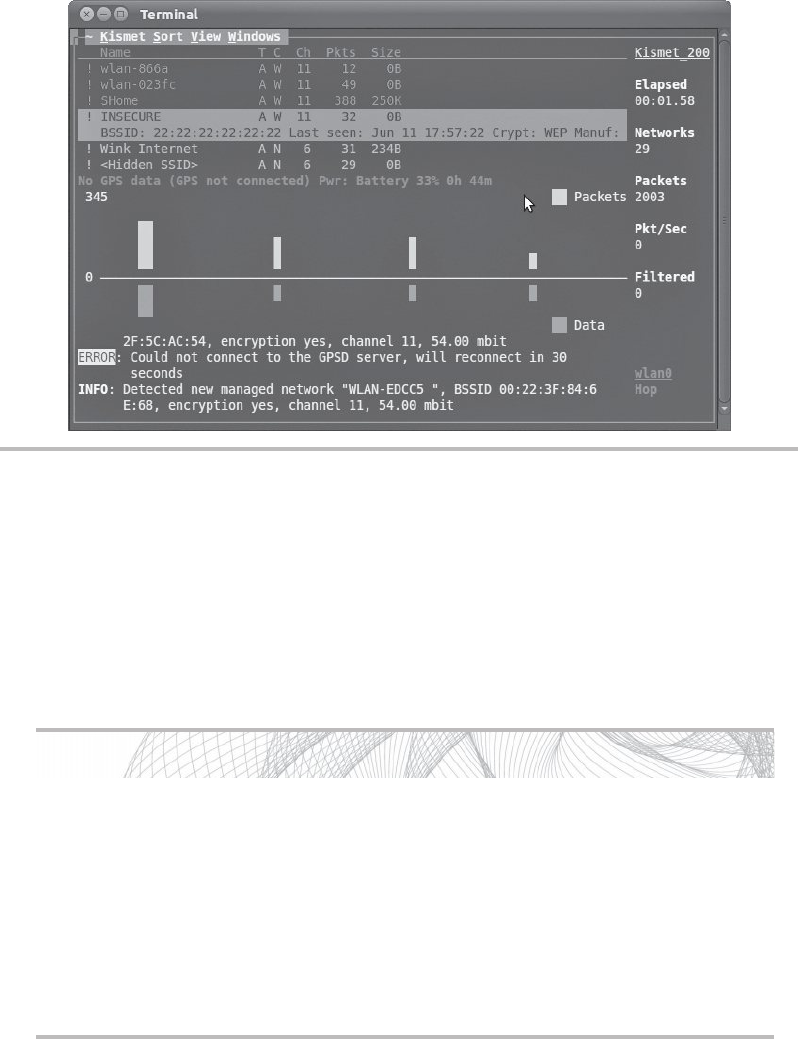
Secure Beginner’s Guide / Wireless Network Security: A Beginner’s Guide / Tyler Wrightson / 094-6 / Chapter 4
82 Wireless Network Security: A Beginner’s Guide
Into Action
We covered in the last chapter the fact that you need thousands and thousands
of packets to crack a WEP-encrypted network. From an attacker’s perspective, if
you can identify a wireless network that has many clients connected to it and lots
of data flying through the air, this might present a good network to attack. I am
definitely not suggesting that someone will attack your network only because he
sees lots of packets from your network. However, if an attacker has two potential
targets—one with no clients connected and the other with ten clients and a lot of
data—the latter might be the more obvious target.
The bar below the main display shows a scrolling graphical representation of packets
and data captured. Packets are on top in orange, and data is below the bar in red. Again,
this display doesn’t necessarily give you any real indication of the contents of the data, but
if you see a lot of data fly by, you can infer the usage of the network as well as determine
an interesting target.
Figure 4-7 Kismet’s main interface
04-ch04.indd 82 4/5/12 4:53:48 PM

Secure Beginner’s Guide / Wireless Network Security: A Beginner’s Guide / Tyler Wrightson / 094-6 / Chapter 4
Secure Beginner’s Guide / Wireless Network Security: A Beginner’s Guide / Tyler Wrightson / 094-6 / Chapter 4
Chapter 4 Attacking Wireless Networks 83
Most of the columns have a shorthand representation of their meaning. Here are the
most common ones:
Column Description
Name This should be relatively obvious: It is the ESSID of the detected network.
C The encryption setting detected:
W for WEP
●
O for other, which usually indicates WPA ●
N for None ●
Ch This is the channel the detected network is using.
Pkts This is the total number of packets captured for this network, which is a very good
indication of how busy the network might be.
Size The total sum of the packets captured; this can also be a good indication of a busy network.
If you highlight a specific network using the arrow keys, you’ll get more information
on the network. In Figure 4-7, you can see the following information:
● BSSID: 22:22:22:22:22:22
● Crypt: WEP (the cryptographic protocol detected)
● Manufacturer: Detected based on the MAC address
If you highlight a wireless network and hit the key, you’ll see a new window
with a lot more information, including the following:
● First and last time the network was seen
● Signal level
● Noise level
● The number of packets
Into Action
Want to know how to find the SSID for a cloaked network? It’s very simple—it
happens automatically! When Kismet captures the association request from a
client, it will automatically update the network with the appropriate SSID. If you’re
feeling impatient and there’s already a client associated with the cloaked network,
you can force the client to reassociate by spoofing a deauthentication message, as
covered later in this chapter.
04-ch04.indd 83 4/5/12 4:53:48 PM

Secure Beginner’s Guide / Wireless Network Security: A Beginner’s Guide / Tyler Wrightson / 094-6 / Chapter 4
84 Wireless Network Security: A Beginner’s Guide
Kismac
Kismac is a program that mirrors a lot of the Kismet functionality and runs—not
surprisingly—on the Mac OS. You can download Kismac from www.kismac-ng.org.
Here’s a list of some of the functionality Kismac provides:
● Enumerating cloaked SSIDs
● GPS support similar to Kismet
● Exporting and importing PCAP files
● Support for receiving data from a Kismet drone
Wardrive
Wardrive is an app available for the Android OS. In my experience it has proven to be the
best available app for actually wardriving with a smartphone. One of the coolest features
of using your smartphone as a wardriving tool is that it already has GPS functionality
built in!
Wardrive allows you to view the wireless networks on a map, including a satellite
view. You can also export the detected networks as a KML file, which is very similar to an
XML file. You can then import the KML file into Google Maps and view all the networks
on your computer. Very cool!
Netstumbler
Netstumbler is also an extremely popular wireless enumeration program. It runs on the
Windows operating system and is easy to install and use. Although Netstumbler does not
contain all the features of Kismet, some people actually prefer the Netstumbler interface
to Kismet’s.
In Actual Practice
From a security perspective, all the additional information is not necessarily helpful.
However, keep in mind that this information is available and might come in handy to
troubleshoot a problem someday.
04-ch04.indd 84 4/5/12 4:53:48 PM

Secure Beginner’s Guide / Wireless Network Security: A Beginner’s Guide / Tyler Wrightson / 094-6 / Chapter 4
Secure Beginner’s Guide / Wireless Network Security: A Beginner’s Guide / Tyler Wrightson / 094-6 / Chapter 4
Chapter 4 Attacking Wireless Networks 85
IMHO
With so many options for enumerating wireless networks, which one should you
choose? Again, it depends. Depending on the situation, you might find it easier
and more stealthy to use your phone. If it’s a long trip and you’re just curious
what’s out there, bringing Kismet on your laptop might be a good way to go.
During most penetration tests, I’ll find myself actually using the functionality of
airodump to find available wireless networks rather than Kismet. You’ll see in the
next chapter that the simple and straightforward output from airodump can be
very handy.
Actively Attacking Wireless Networks
Now that we’ve learned how an attacker would identify a network worth targeting, let’s
take the next step and try to actively attack the network. For our first example, we’ll target
a WEP-encrypted network and then move on to a WPA-protected network.
The tools we’ll use in this chapter are listed in the following table. Collectively these
tools are all in the aircrack-ng package.
Tool Description
airmon-ng A bash script designed to enable monitor mode on a wireless interface
airodump-ng A wireless packet capture tool for aircrack-ng
aireplay-ng Injects packets into a wireless network to generate traffic
aircrack-ng An 802.11 WEP or WPA-PSK key cracker
Cracking WEP Encryption
Cracking WEP requires the following basic steps:
1. Identify the target wireless network.
2. Put your wireless card into monitor mode using airmon-ng.
3. Start saving traffic on the channel associated with the target wireless network using
airodump-ng.
4. Attempt to crack WEP key using aircrack-ng.
5. If more traffic is needed, perform a packet replay attack using aireplay-ng.
6. Crack the WEP key using aircrack-ng.
04-ch04.indd 85 4/5/12 4:53:48 PM

Secure Beginner’s Guide / Wireless Network Security: A Beginner’s Guide / Tyler Wrightson / 094-6 / Chapter 4
86 Wireless Network Security: A Beginner’s Guide
Let’s take a look at each of these steps in detail and walk through the process of
cracking a WEP-encrypted network.
Identify the target wireless network.
Step 1.
We’ve already identified the target wireless network (INSECURE) using the iwlist
command. The network has a BSSID of 22:22:22:22:22:22 and is on channel 11,
as shown previously in Listing 4-3.
Put your wireless card into monitor mode using airmon-ng.
Step 2.
Next, we put our wlan0 interface into monitor mode. If we use airmon-ng without
any arguments, we will see the current status of any wireless interfaces in the
system. We basically only need one option, which is the interface on which to
enable monitor mode (see Listing 4-5).
Listing 4-5: An airmon-ng Example to Place wlan0 into Monitor Mode
# airmon-ng start wlan0
Start saving traffic on the channel associated with the target wireless network Step 3.
using airodump-ng.
Now we start saving all the traffic we see for the target network with the
airodump-ng program.
#airodump-ng -w OUT -c 11 ––bssid 22:22:22:22:22:22 mon0
● -w OUT tells airodump to name all the files starting with “OUT.”
● -c 11 tells airodump to stay on channel 11 rather than hopping between
channels.
● --bssid restricts airodump to focus just on the target BSSID.
● The final argument is the interface on which to listen.
Note
Notice that in Linux any command-line switch that is not a single character has two
dashes instead of just one.
Into Action
If you take a look at the man page for airodump, make sure you don’t confuse the
filter options with the regular options. This is a relatively common mistake and can
cause confusion when trying to execute an attack.
04-ch04.indd 86 4/5/12 4:53:48 PM

Secure Beginner’s Guide / Wireless Network Security: A Beginner’s Guide / Tyler Wrightson / 094-6 / Chapter 4
Secure Beginner’s Guide / Wireless Network Security: A Beginner’s Guide / Tyler Wrightson / 094-6 / Chapter 4
Chapter 4 Attacking Wireless Networks 87
In Listing 4-6, we can see a reflection of the switches we used. Most of the fields
are pretty self-explanatory. CH shows that we are monitoring only on channel 11.
The Elapsed section shows how much time has elapsed since we started the airodump
program (in this case, 36 seconds).
What we’re really looking for is the bottom half of the display to show what we
see here: a connected station (airodump refers to clients connected to the network
as stations). It is easy to spot here that the client machine with a MAC address
of 44:44:44:44:44:44 is connected, and so far we have seen 15 packets from this
host.
That’s it for this step. You should basically leave this window open while running
airodump until you have successfully cracked the WEP key.
Listing 4-6: An Example of airodump in Action
CH 11 ][ BAT: 31 mins ][ Elapsed: 36 s ][ 2011-06-11 18:08 ][ fixed channel mon0: -1
BSSID PWR RXQ Beacons #Data, #\s CH MB ENC CIPHER AUTH ESSID
22:22:22:22:22:22 -37 21 94 13 0 11 54e WEP WEP INSECURE
BSSID STATION PWR Rate Lost Packets Probes
22:22:22:22:22:22 44:44:44:44:44:44 -12 48 -36 8 15
Attempt to crack the WEP key using aircrack-ng.Step 4.
Remember that we need to capture at least a few thousand IVs to successfully
crack the WEP key. So, after waiting a few minutes, you can attempt to crack the
WEP key. You’re almost guaranteed that it’s not going to work this early, but it
wouldn’t hurt to see what an unsuccessful cracking attempt looks like.
Into Action
It is completely normal to see a host disappear from the list and then reappear. This
also doesn’t affect airodump saving the packets. Just continue to let airodump run,
and if you don’t see any connected stations for some time, try moving to a new
physical location to see if you get a better signal. Remember, to be most effective
you have to be able to see the client’s transmissions, not just the access point.
04-ch04.indd 87 4/5/12 4:53:48 PM

Secure Beginner’s Guide / Wireless Network Security: A Beginner’s Guide / Tyler Wrightson / 094-6 / Chapter 4
88 Wireless Network Security: A Beginner’s Guide
If you take a look at the directory you’re working in, you’ll see at least one CAP
file. These are the PCAP files, which you can actually open with Wireshark and
view for yourself. At this point, without the WEP key you won’t be able to see
much, but at least you know it’s just a normal PCAP file.
To attempt to crack the WEP key, we use the aircrack-ng program. You really
only need one option for aircrack, which is the PCAP files containing the WEP-
encrypted packets. If we’re in the directory with the PCAP files, we simply use
the following command:
#aircrack-ng *.cap
From the output of aircrack in Listing 4-7, you can see that we only have 631 IVs
in the PCAP files—clearly not enough to crack the WEP key. You can also see that
aircrack is suggesting that we wait until we have at least 5,000 IVs.
Listing 4-7: Aircrack-ng Failed to Crack the WEP Key Due to Insufficient IVs
Aircrack-ng l.l
[00:00:16] Tested 138139 keys (got 631 IVs)
KB depth byte(vote)
0 28/ 29 F6(12S0) 05(1024) 0B(1024) 12(1024)
1 25/ 1 FA(12S0) 01(1024) 11(1024) 12(1024)
2 10/ 27 FD(1536) 04(1280) 2A(1280) 36(1280)
3 6/ 3 BE(1536) 05(1286) 12(1280) 41(1280)
4 2/ 9 78(1792) 04(1536) 1C(1536) B6(1536)
Failed. Next try with 50OO IVs.
In Actual Practice
If you forgot to restrict the airodump program from hopping channels or from saving
only packets for a particular BSSID in Step 3, you might have a few different networks
in the PCAP files. In this case, the aircrack program doesn’t know which network to
attempt to crack the encryption on, and it’s nice enough to ask you which one you’d
like to target. It also will display how many IVs it has captured for each network,
which is a handy little feature.
04-ch04.indd 88 4/5/12 4:53:48 PM
Secure Beginner’s Guide / Wireless Network Security: A Beginner’s Guide / Tyler Wrightson / 094-6 / Chapter 4
Secure Beginner’s Guide / Wireless Network Security: A Beginner’s Guide / Tyler Wrightson / 094-6 / Chapter 4
Chapter 4 Attacking Wireless Networks 89
If more traffic is needed, perform a packet replay attack using aireplay-ng.Step 5.
So the next question is, do we wait to passively capture enough packets or do we
speed things up? Remember, if we’re trying to be completely stealthy we will just
wait until we’ve captured enough packets. If we’re not worried about an IDS or being
noticed, we can perform the ARP replay attack explained in the previous chapter.
To perform the ARP replay attack, we use the aireplay-ng program. The aireplay
program has many options, switches, and even attack methods. We’ll explore a
few of the uses in this book, but I highly recommend taking a look at the man
page and online documentation. To execute the ARP replay attack, we use the
following command:
#aireplay-ng --arpreplay -b 22:22:22:22:22:22 mon0
● --arpreplay is relatively obvious; it’s the attack method we’ve chosen.
● -b is the target BSSID of our attack.
● The final argument is the interface we’re using to inject the packets.
This method may take a little time, so be patient. We have to wait to actually
observe an ARP packet. If the client station has been connected for some time, we
might not see an ARP packet for a few minutes. The output in Listing 4-8 shows a
successful ARP replay attack.
The final line shows that we received two ARP packets and have successfully sent
over 3,700 packets at 500 pps (packets per second). The line above this, which
indicates that a deauth/disassociation packet was received, is normal. You should
take a look at the airodump output and notice a large spike in the packets seen
for the associated client. If you don’t see the packets increasing rapidly, you can
simply cancel the ARP replay attack with - and try again with the exact same
syntax. I find myself having to restart the ARP replay attack about half of the time.
Listing 4-8: Successful ARP Replay Attack Using aireplay-ng
root@attacker:~# aireplay-ng --arpreplay -b 22:22:22:22:22:22 mon0
No source MAC (-h) specified. Using the device MAC (00:22:FA:5F:04:C8)
12:55:54 Waiting for beacon frame (BSSID: 22:22:22:22:22:22) on channel 11
Saving ARP requests in replay_arp-0612-12560l.cap
You should also start airodump-ng to capture replies.
Notice: got a deauth/disassoc packet. Is the source MAC associated ?
Notice: got a deauth/disassoc packet. Is the source MAC associated ?
Read 33221 packets (got 2 ARP requests and 1604 ACKs), sent 3727 packets...(500 pps)
04-ch04.indd 89 4/5/12 4:53:49 PM

Secure Beginner’s Guide / Wireless Network Security: A Beginner’s Guide / Tyler Wrightson / 094-6 / Chapter 4
90 Wireless Network Security: A Beginner’s Guide
Crack the WEP key using aircrack-ng.Step 6.
Now it’s time to attempt to crack the key again. We’ll use the same command as
before:
#aircrack-ng *.cap
Success! Take a look at Listing 4-9. You can now see that with only 20,000
IVs we were able to successfully obtain the WEP key. And the entire cracking
attempt took only three seconds! The key, which is represented in hexadecimal, is
12:34:51:23:45. If the key is able to be converted to ASCII, the text representation
of the key will be displayed as well.
Listing 4-9: Successfully Obtaining the WEP Key Using aircrack-ng
Aircrack-ng 1.1
[00:00:93] Tested 67 keys (got 20958 IVs)
KB depth byte(vote)
0 2/ 8 12(26880) F6(26624) 2E(26368) 97(26368) D3(26368)
1 2/ 3 34(26624) 9F(25856) 07(25344) 43(25344) 01(25088)
2 0/ 2 EE(27648) 97(26880) 78(26368) 2A(26112) BF(25856)
3 1/ 2 23(26880) 30(26368) 6B(26368) 0A(26112) BC(25856)
4 0/ 1 45(33792) 71(29696) CB(26624) EF(26624) 58(26112)
KEY FOUND! [ 12:34:51:23:45 ]
Decrypted correctly: 100%
Cheat Sheet: Cracking WEP Encryption
Here’s a quick recap of all the commands we used to crack WEP:
● airmon-ng start wlan0 11
● airodump-ng -w OUT -c 11 –bssid 22:22:22:22:22:22 mon0
● aireplay-ng --arpreplay -b 22:22:22:22:22:22 mon0
● aircrack-ng *.cap
04-ch04.indd 90 4/5/12 4:53:49 PM

Secure Beginner’s Guide / Wireless Network Security: A Beginner’s Guide / Tyler Wrightson / 094-6 / Chapter 4
Secure Beginner’s Guide / Wireless Network Security: A Beginner’s Guide / Tyler Wrightson / 094-6 / Chapter 4
Chapter 4 Attacking Wireless Networks 91
Listing 4-10: Airdecap-ng Decrypting WEP-Encrypted Packets from
a PCAP File
# airdecap-ng -w 1234512345 out-01.cap
Total number of packets read 767836
Total number of WEP data packets 226475
Total number of WPA data packets 0
Number of plaintext data packets 1
Number of decrypted WEP packets 226475
Number of corrupted WEP packets 0
Number of decrypted WPA packets 0
Cracking a WPA Passphrase
Now we’re going to attempt to obtain the WPA passphrase from a WPA2-PSK-encrypted
network. The basic steps are as follows:
1. Identify the target wireless network.
2. Put your wireless card into monitor mode using airmon-ng.
3. Start saving traffic on the channel associated with the target wireless network using
airodump-ng.
4. Wait for the client to associate with the target network.
Into Action
As you’ll recall from the previous chapter, we discussed the fact that someone
could simply sniff packets, crack the encryption on the network, and then decrypt
the packets—all of which would be completely passive and unobservable to the
target network.
In the previous examples, if we chose not to perform the ARP replay attack, the
entire process would be passive. Not only that, but all the packets we’ve captured
can now be read using the obtained WEP key. We simply use the airdecap-ng
program, which is part of the aircrack-ng suite. The syntax is very simple. Here is
an example:
#airdecap-ng -w 1234512345 pcap-file.cap
The -w option is the WEP key in hexadecimal.
The only other option is the PCAP file from which to read the WEP-encrypted
packets. Take a look at the example in Listing 4-10. The program, by default, saves
the decrypted packets as a new PCAP file with a -dec.cap file extension. In this
example, the file would be out-01-dec.cap.
04-ch04.indd 91 4/5/12 4:53:49 PM
Secure Beginner’s Guide / Wireless Network Security: A Beginner’s Guide / Tyler Wrightson / 094-6 / Chapter 4
92 Wireless Network Security: A Beginner’s Guide
5. If the client is already associated, perform a deauthentication attack using aireplay-ng.
6. Crack the WPA key using aircrack-ng.
You might have noticed that Steps 1 through 3 look familiar. That’s because they are
identical to the previous steps for cracking WEP.
Identify the target wireless network.Step 1.
We’ve already identified the target wireless network (INSECURE), with a BSSID
of 22:22:22:22:22:22 on channel 11.
Put your wireless card into monitor mode using airmon-ng.Step 2.
Next we put our wlan0 interface into monitor mode. If we use airmon-ng without
any arguments, it will show us the current status of any wireless interfaces in the
system. We basically only need one option, which is the interface on which to
enable monitor mode.
Listing 4-11: Showing only discovered ESSIDs from iwlist
root@attacker:~# iwlist wlan0 scanning | grep ESSID
ESSID:"wlan-023fc"
ESSID:"SHome"
ESSID:"INSECURE"
ESSID:"MKB_WIRELESS"
ESSID:"wlan-ffdle"
ESSID:"wLan-2bll4"
ESSID:"\x00"
ESSID:"the_hizzle"
ESSID:"\x00"
ESSID:"Wink Internet"
ESSID:"\x00"
ESSID:"Wlan-d43b
root@attacker:~#
Start saving traffic on the channel associated with the target wireless network using Step 3.
airodump-ng.
Now we start saving all the traffic we see for the target network with the airodump-
ng program.
#airodump-ng -w OUT -c 11 –bssid 22:22:22:22:22:22 mon0
● -w OUT tells airodump to name all the files starting with “OUT.”
● -c 11 tells airodump to stay on channel 11 rather than hopping between channels.
● --bssid restricts airodump to focus just on the target BSSID.
● The final argument is the interface on which to listen.
04-ch04.indd 92 4/5/12 4:53:49 PM
Secure Beginner’s Guide / Wireless Network Security: A Beginner’s Guide / Tyler Wrightson / 094-6 / Chapter 4
Secure Beginner’s Guide / Wireless Network Security: A Beginner’s Guide / Tyler Wrightson / 094-6 / Chapter 4
Chapter 4 Attacking Wireless Networks 93
You can see how the output of airodump-ng is slightly different in Listing 4-12. Step 4.
Now it shows the same BSSID uses WPA2 as the encryption and PSK as the
authentication method. This is precisely what we want to target. We also see that
a client (44:44:44:44:44:44) is already associated to the network.
We have two choices here: Either we can wait stealthily for another client to
connect and authenticate, or we can deauthenticate this client and capture the WPA
handshake.
Listing 4-12: Airodump-ng Targeting a WPA2 Network
CH 11 ][ BAT: 2 hours 58 mins ][ Elapsed: 4 s ][ 2011-06-12 13:47 ][ WPA handshake: 22:22
BSSID PWR RXO Beacons #Data, #/s CH MB ENC CIPHER AUTH ESSID
22:22:22:22:22:22 -60 23 16 13 5 11 54e WPA2 TKIP PSK INSECURE
BSSID STATION PWR Rate Lost Packets Probes
22:22:22:22:22:22 44:44:44:44:44:44 -18 1 - 1 362 39
Since we’re feeling a little impatient, let’s deauthenticate this client. To do this, we Step 5.
use the aireplay-ng program with the –deauth argument. We’ll take a look at the
two most often used methods. The deauth argument needs one argument, which is
the number of deauthentication attempts to perform.
In Listing 4-13, you can see we only used the -a argument, which is the BSSID
of the target access point. If you only use the target access point argument, the
deauthentication messages will be sent to the broadcast address.
The command syntax used is
#aireplay-ng –deauth=2 -a 22:22:22:22:22:22 mon0
This probably won’t be the route you typically want to take for a couple reasons.
First, on a large network, deauthenticating all the clients at once can be a bit less
stealthy than you want. Second, some clients will ignore a deauth message sent to
the broadcast address.
Therefore, you’ll probably want to deauthenticate a specific client with the -c
argument, as shown in Listing 4-14. In Listing 4-14 STMAC represents the station
MAC address. The command syntax used is as follows:
#aireplay-ng –deauth=10 -a 22:22:22:22:22:22 -c
44:44:44:44:44:44 mon0
04-ch04.indd 93 4/5/12 4:53:49 PM
Secure Beginner’s Guide / Wireless Network Security: A Beginner’s Guide / Tyler Wrightson / 094-6 / Chapter 4
94 Wireless Network Security: A Beginner’s Guide
Listing 4-13: Using aireplay-ng to Deauthenticate all Clients using Broadcast
Address
root@attacker:~# aireplay-ng --deauth=2 -a 22:22:22:22:22:22 mon0
14:03:33 Waiting for beacon frame (BSSID: 22:22:22:22:22:22) on channel 11
NB: this attack is more effective when targeting a connected wireless client
(-c <client's mac>).
14:03:36 Sending DeAuth to broadcast -- BSSID: [22:22:22:22:22:22]
14:03:36 Sending DeAuth to broadcast -- BSSID: [22:22:22:22:22:22]
root@attacker:~#
Listing 4-14: Using aireplay-ng to Deauthenticate a Specific Client
root@attacker:~# aireplay-ng --deauth=10 -a 22:22:22:22:22:22 -c 44:44:44:44:44:44 mon0
14:02:26 Waiting for beacon frame (BSSID: 22:22:22:22:22:22) on channel 11
14:02:27 Sending 64 directed DeAuth. STMAC: [44:44:44:44:44:44] [ 0|41 ACKs]
14:02:27 Sending 64 directed DeAuth. STMAC: [44:44:44:44:44:44] [ 0|56 ACKs]
14:02:28 Sending 64 directed DeAuth. STMAC: [44:44:44:44:44:44] [ 0|55 ACKs]
14:02:29 Sending 64 directed DeAuth. STMAC: [44:44:44:44:44:44] [ 0|56 ACKs]
14:02:29 Sending 64 directed DeAuth. STMAC: [44:44:44:44:44:44] [ 0|53 ACKs]
14:02:30 Sending 64 directed DeAuth. STMAC: [44:44:44:44:44:44] [ 0|47 ACKs]
14:02:31 Sending 64 directed DeAuth. STMAC: [44:44:44:44:44:44] [ 0|51 ACKs]
14:02:31 Sending 64 directed DeAuth. STMAC: [44:44:44:44:44:44] [ 0|45 ACKs]
14:02:32 Sending 64 directed DeAuth. STMAC: [44:44:44:44:44:44] [ 0|46 ACKs]
14:02:32 Sending 64 directed DeAuth. STMAC: [44:44:44:44:44:44] [ 0|51 ACKs]
root@attacker:~#
Now that we’ve deauthenticated the client and we see that client back associated to Step 6.
the network, we have the authentication handshake in the PCAP file from airodump.
We’ll use the same aircrack program we used to crack the WEP encryption with
different arguments. The syntax to crack the WPA handshake is as follows:
#aircrack-ng *.cap -w /usr/share/dict/words
Note that the -w option points to the wordlist containing all the passwords to attempt.
As you can see in Listing 4-15, we were able to obtain the key after only four
seconds of testing. You can also see that aircrack was testing over 1,000 passwords
a second! Not too shabby.
Listing 4-15: Aircrack-ng Successfully Obtained the WPA Pre-shared Key
Aircrack-ng 1.1
[00:00:04] 5008 keys tested (1180.76 k/s)
KEY FOUND! [ Louisiana ]
04-ch04.indd 94 4/5/12 4:53:49 PM

Secure Beginner’s Guide / Wireless Network Security: A Beginner’s Guide / Tyler Wrightson / 094-6 / Chapter 4
Secure Beginner’s Guide / Wireless Network Security: A Beginner’s Guide / Tyler Wrightson / 094-6 / Chapter 4
Chapter 4 Attacking Wireless Networks 95
Master Key : 7F DD 87 33 7B D6 6F 25 83 F6 A8 C4 16 42 12 25
CF 6E 24 D6 9F DA El B4 0E 46 D8 12 94 59 98 A1
Transient Key : F1 19 2E D2 CF FB BB C1 33 84 20 75 9E 0F 0E 57
F3 8B 86 FO 90 4E 5D 27 B3 68 C5 54 22 FA 7C CF
EF 6F 9F IE 30 3E 3D 11 B0 24 76 0D 70 78 DE 19
EB D9 A3 6D AF AF C9 68 E4 27 06 0D 64 8C 79 FF
EAPOL HMAC : 46 85 37 F9 EF 02 FA E5 6B 63 D1 8E 30 4B C2 95
root@attacker:~#
We’ve Covered
In this chapter, you took the knowledge you obtained in Chapter 3 to enumerate and
exploit wireless networks. We looked at a few very useful tools for identifying wireless
networks for multiple platforms. You also learned the most common techniques for
cracking WEP encryption and WPA pre-shared keys. Congratulations, Young Grasshopper,
your Kung Fu is getting stronger.
Remember that blindly using tools without understanding how they work will not
make you a master of security. Make sure you not only read this chapter but follow along
with the examples—and then stray from the examples and try some variations on the
attacks. Explore all the options of the tools and above all else have fun with it!
Wireless network reconnaissance
● iwlist A Linux command for identifying wireless networks
● Kismet World class wireless network reconnaissance tool
Cheat Sheet: Cracking WPA Encryption
Here’s a quick recap of all the commands we used to crack the WPA pre-shared key:
● airmon-ng start wlan0 11
● airodump-ng -w OUT wlan0
● aireplay-ng –deauth=10 -a 22:22:22:22:22:22 -c 44:44:44:44:44:44 mon0
● aircrack-ng *.cap -w /usr/share/dict/words
04-ch04.indd 95 4/5/12 4:53:49 PM
Secure Beginner’s Guide / Wireless Network Security: A Beginner’s Guide / Tyler Wrightson / 094-6 / Chapter 4
96 Wireless Network Security: A Beginner’s Guide
● Kismac A Mac OS wireless enumeration tool
● Wardrive An Android wardriving app
● Netstumbler A popular Windows wireless enumeration tool
Passive packet captures
● Store and crack at your convenience
Cracking WEP encryption
● Identify target network
● Enter monitor mode
● Capture encrypted packets
● Expediting the process with an ARP replay attack using aireplay-ng
● Crack using aircrack-ng
Cracking the WPA-PSK handshake
● Identify target network
● Enter monitor mode
● Expediting the process by deauthenticating a client using aireplay-ng
● Capture WPA Authentication Handshake
● Crack using aircrack-ng
Spoofing deauthentication packets
● SSID decloaking: how to discover the SSID of a network not broadcasting its name
Directed and Broadcast Deauthentication ●
04-ch04.indd 96 4/5/12 4:53:49 PM

Secure Beginner’s Guide / Wireless Network Security: A Beginner’s Guide / Tyler Wrightson / 094-6 / Chapter 5
97
Attacking
Wireless Clients
Chapter 5
05-ch05.indd 97 3/30/12 9:35:17 AM

Secure Beginner’s Guide / Wireless Network Security: A Beginner’s Guide / Tyler Wrightson / 094-6 / Chapter 5
98 Wireless Network Security: A Beginner’s Guide
We’ll Cover
● Exotic wireless devices
● Wireless client vulnerabilities
● Wireless reconnaissance
● Sniffing insecure communications
● Can we force the client to talk to us?
● Default operations
● Man-in-the-middle attacks
In this chapter, we’re going to look at the security of your wireless assets from a different
perspective. Too often network administrators will only account for the security of their
networking infrastructure, leaving gaps that an attacker can exploit. I’m speaking, of
course, of your wireless client devices. In this chapter, we’ll use the network topology
shown in Figure 5-1 unless otherwise noted.
Figure 5-1 Attack topology
Attacker
AP
Client MAC:44:44:44:44:44:44
IP:192.168.1.44
MAC:88:88:88:88:88:88
IP:192.168.1.88
MAC:22:22:22:22:22:22
IP:192.168.1.1
05-ch05.indd 98 3/30/12 9:35:20 AM

Secure Beginner’s Guide / Wireless Network Security: A Beginner’s Guide / Tyler Wrightson / 094-6 / Chapter 5
Secure Beginner’s Guide / Wireless Network Security: A Beginner’s Guide / Tyler Wrightson / 094-6 / Chapter 5
Chapter 5 Attacking Wireless Clients 99
All of the tools discussed in this chapter come preinstalled on BackTrack. For
instructions on installing a program on a different operating system, see the related
website.
Note
Do not make the same mistake as so many network administrators do and neglect the
security of your client devices. By including client security into your thought process
when designing the security of your wireless infrastructure, you’ll avoid some serious
risks.
Wireless World
The better you understand the big picture of our wireless world, the better equipped you’ll
be to secure your business’s infrastructure. Let’s first start by setting the stage. Take a
minute to reflect on just how ubiquitous wireless devices are already in our world.
Why are you still reading? I said take a second to reflect!
Welcome back. Now I’m sure you thought of the obvious devices: laptops, computers,
and smartphones. But don’t forget some of the stranger devices:
● Televisions
● Video game systems
● Portable video game systems
● Printers
● Picture frames
● DVD players
● Security cameras
● Home management and automation systems
● Bathroom scales (I’m not making this up!)
You might be thinking, “Why the heck do I care about wireless bathroom scales?
Those will never be on my business network!” An excellent point, and hopefully you’re
correct and you never will have to support such a device on your business network.
Although you might not have to specifically support a bathroom scale on your wireless
network, it is important to understand the types of wireless devices that exist to fully
appreciate the security implications for all wireless clients.
05-ch05.indd 99 3/30/12 9:35:20 AM

Secure Beginner’s Guide / Wireless Network Security: A Beginner’s Guide / Tyler Wrightson / 094-6 / Chapter 5
100 Wireless Network Security: A Beginner’s Guide
However, keep in mind that some of these clients that seem obvious in a home setting
are already popping up in many business environments. These clients include the following:
● Televisions for conferencing systems
● DVD players for conference rooms and presentations
● Security cameras
I’ve also started to see extremely esoteric wireless client devices that have some very
serious security implications. These devices including the following:
● Medical devices
● Power management systems
● Industrial management systems
Tip
Remember that in the security field, you’re absolutely only as secure as your weakest
link. This is not just a cliché; this is reality. You can have the best firewalls, encryption,
and authentication mechanisms in place, but all it takes is one improperly secured client
device to bring your entire network to its knees.
Wireless Client Vulnerabilities
If we were to lump the vulnerabilities associated with wireless client devices into major
categories, we might come up with the following list:
● Are the client’s existing communications secure?
● Can we make the client talk to us?
● Are there default configurations that we can exploit?
Are the Client’s Existing Communications Secure?
If the network communications are not encrypted or are encrypted using a weak algorithm,
then a vulnerability exists in which an attacker can view the communications as they
travel through their medium. This goes for wired as well as wireless communications.
As we discussed in previous chapters, this vulnerability is only exacerbated by wireless
technologies.
You’ve already learned in Chapter 4 how to crack a wireless network encrypted using
WEP. Typically, once the initial layer of protection has been broken (that is, WEP), there
is very little protection to prevent a client from being completely exploited.
05-ch05.indd 100 3/30/12 9:35:20 AM

Secure Beginner’s Guide / Wireless Network Security: A Beginner’s Guide / Tyler Wrightson / 094-6 / Chapter 5
Secure Beginner’s Guide / Wireless Network Security: A Beginner’s Guide / Tyler Wrightson / 094-6 / Chapter 5
Chapter 5 Attacking Wireless Clients 101
This doesn’t just apply to Link layer encryption. If a client uses a strong encryption
algorithm at the Link layer but the underlying protocol is insecure or otherwise
unencrypted, a vulnerability may still exist.
Are There Default Configurations That We Can Exploit?
Insecure default configurations have long plagued many IT systems. Whether it’s default
usernames and passwords, unnecessary services enabled, or weak encryption settings,
many default configurations chosen by manufacturers have become operational headaches
for network administrators.
When considering the vulnerabilities associated specifically with wireless clients,
we’ll look at some of the default actions we can use to our advantage. Not only can a
wireless client be vulnerable based on poor default configurations, but it can also be
vulnerable based on core functionality that an attacker can target in creative ways that the
designers may not have considered.
Can We Make the Client Talk to Us?
In many cases, a client is considered secure because the communication between the
access point and the client is encrypted. If we can force the client to connect to us instead
of the “secure” access point, we may be able to do some interesting things.
Note
You should keep in mind that this is by no means a complete list of all the vulnerabilities
associated with wireless clients. One of the major categories we’re not emphasizing
as much as we could is that of physical security. We will touch on physical security;
however, keep in mind that one of the quintessential benefits of using mobile clients is
also one of the most difficult vulnerabilities to mitigate. Think about how easy it is
for someone to walk away with your smartphone or laptop, and you’ll understand
what I mean.
Factors That Exacerbate Wireless Client Vulnerabilities
In addition to the major categories just mentioned, several factors can exacerbate any
vulnerability on client devices. These factors can apply to any of the major categories.
Consider some of these facts:
● Wireless clients are everywhere.
● Wireless clients are constantly broadcasting their existence.
● Wireless clients are not monitored as closely as infrastructure devices.
● Physical security is often completely neglected.
05-ch05.indd 101 3/30/12 9:35:20 AM

Secure Beginner’s Guide / Wireless Network Security: A Beginner’s Guide / Tyler Wrightson / 094-6 / Chapter 5
102 Wireless Network Security: A Beginner’s Guide
Wireless Clients Are Everywhere
This fact alone makes client devices an interesting target for an attacker. Whether the
attacker wishes to target a specific company or just sit in a coffee shop and “see what he
can find,” there will never be a lack of client devices to target. The fact that an attacker can
test out new attacks against real systems almost completely anonymously without having
to wait to “find” a potential target means that exploits targeting wireless systems are in
constant development.
Wireless Clients Are Constantly Broadcasting Their Existence
Just like access points that are constantly broadcasting their existence through beacons,
wireless clients are observable by capturing the probe requests and association requests
they send. Not only can you see the client by its association requests, but when a client
is not associated to an access point, it will constantly be sending probe requests for
wireless networks it’s configured to connect to. Client devices that wish to connect to
wireless networks for which they do not see beacon packets send probe requests. These
probe requests contain the ESSID of the wireless network the client is “looking for.”
Wireless Clients Are Not Monitored as Closely as Infrastructure Devices
Think for a moment of the existing security controls and monitoring software you have in
place for your workstations, laptops, and smartphones. Not very much in place, is there?
This is the way it is at most organizations today. We spend so much money on monitoring
the main points of ingress and egress to our organizations that we completely forget about
our troops on the ground.
Into Action
Many terms are used to describe being an unlucky victim to a random security
assault. Phrases such as “crime of opportunity,” “low-hanging fruit,” and “spray
and pray” are not just catchy lingo; they indicate a real world threat that is constant
and pervasive.
You’re already familiar with one of the most common forms of non-directed
attacks: computer viruses. Most virus writers don’t write their viruses to target a
specific company; instead, they create them to impact as many hosts as possible
and then “release them into the wild.” Attacks on wireless clients can be very
similar. With an unending supply of wireless clients, an attacker doesn’t need to
target a specific person or organization to find vulnerable systems.
05-ch05.indd 102 3/30/12 9:35:20 AM
Secure Beginner’s Guide / Wireless Network Security: A Beginner’s Guide / Tyler Wrightson / 094-6 / Chapter 5
Secure Beginner’s Guide / Wireless Network Security: A Beginner’s Guide / Tyler Wrightson / 094-6 / Chapter 5
Chapter 5 Attacking Wireless Clients 103
I’m not saying we should completely shift our focus from the network to our client
devices, but there is a happy middle ground. We also have to look at the risks we’re
mitigating and how much it will cost us to do so. We’ll discuss client device security
options in a future chapter.
Physical Security Is Often Completely Neglected
Continuing the previous thought that most wireless clients simply aren’t given as much
attention as other devices, one of the quintessential benefits of wireless technology—
portability—can also be one of its greatest weaknesses. The obvious threat is of someone
walking away with your device while you’re not looking. Take a minute to think what
someone could get access to if she walked away with your laptop or smartphone while
you weren’t looking. Do you have sensitive files, e-mail accounts, personal messages?
Of course, this deserves some serious thought, but it is not the only threat. Consider
if an attacker wants to target one of your users but wants to be a little more stealthy than
simply stealing a laptop. Let’s imagine a scenario where a user is at a coffee house, and
the three cups of coffee are starting to weigh heavy on his bladder. He gets up to use the
restroom and neglects to lock his laptop. This is just the moment the attacker has been
waiting for. The attacker springs into action, inserts a USB thumb drive into the user’s
laptop, waits to verify the flash of a command prompt, indicating that his program has run,
removes the USB drive, and quietly slinks out of the coffee house.
When all is said and done, it takes the attacker all of ten seconds to install his malicious
program, which logs all the keystrokes on your user’s laptop, sends them back to the attacker,
and gives him complete access to any files on the system. Not bad considering he had three
minutes available while your user relieved himself in the men’s room.
Wireless Reconnaissance
In Chapter 4, we looked at the methods of enumerating wireless access points. Now we’ll
take a look at the methods an attacker can use to identify wireless clients. The tools and
procedures for identifying wireless clients are almost identical to those for identifying
wireless access points.
Kismet
Kismet automatically groups all the client’s unanswered probe requests it sees into the
“Autogroup Probe” network in the main interface. You can interact with this just like any
other network in the list. If you highlight the Autogroup Probe network, you will see a list of
clients below, as shown in Figure 5-2. If you highlight the Autogroup Probe network and
hit , you will see the details of all the networks probed for. Frankly, this information
can be a bit gratuitous, but it’s good to know it’s there.
05-ch05.indd 103 3/30/12 9:35:20 AM
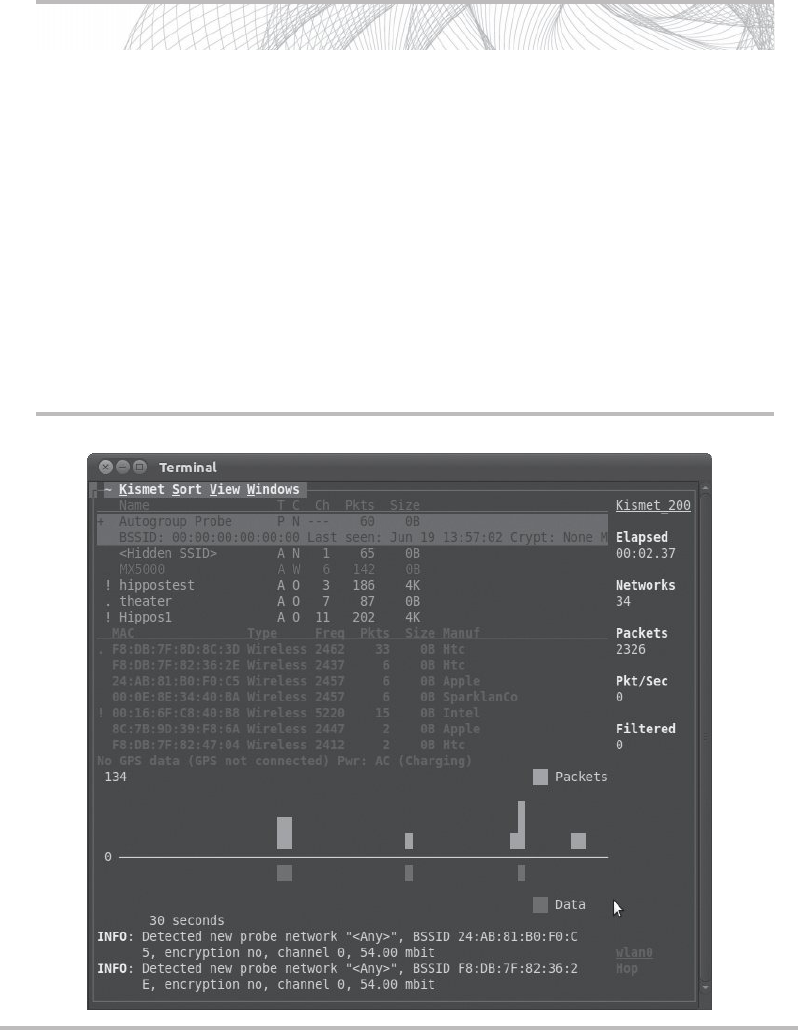
Secure Beginner’s Guide / Wireless Network Security: A Beginner’s Guide / Tyler Wrightson / 094-6 / Chapter 5
104 Wireless Network Security: A Beginner’s Guide
Figure 5-2 Using Kismet to view client probes
Into Action
When thinking about how an attacker would use these methods to his advantage,
there are basically two main attack vectors:
● Targeted attacks If an attacker wants to specifically target your company, all
she needs is a location with a good concentration of your client devices. What
better place than the wireless clients at one of your company’s sites—either
close range (your parking lot, your lobby, an office in the same complex) or long
range (an adjacent building, a block away with a high-gain antenna).
● Low-hanging fruit If the attacker isn’t targeting a specific company, she can
simply go to a target-rich environment and look for the easiest targets. Places
such as coffee houses, office complexes, airport terminals, and so on, all present
plenty of wireless clients to play with.
05-ch05.indd 104 3/30/12 9:35:21 AM
Secure Beginner’s Guide / Wireless Network Security: A Beginner’s Guide / Tyler Wrightson / 094-6 / Chapter 5
Secure Beginner’s Guide / Wireless Network Security: A Beginner’s Guide / Tyler Wrightson / 094-6 / Chapter 5
Chapter 5 Attacking Wireless Clients 105
Airodump
Typically, I prefer to use airodump when targeting client devices because the interface is
so clean and easy to use. In Listing 5-1, you can see a list of all the client devices that are
not currently associated with a network. Each client device will say “(not associated)” in
the BSSID network field. All the way to the right you’ll see the Probes column, which
lists any networks this client probes for. In Listing 5-1, you can see the client device with
a MAC address of 00:16:6F:AC:04:04 is not currently associated to any network, but has
probed for the wireless network BigWiFi.
Listing 5-1: Using airodump to Find Client Devices
BSSID STATION PWR Rate Lost Packets Probes
(not associated) 00:16:6F:AC:04:04 -24 0 – 1 0 4 BigWiFi
(not associated) 34:15:9E:E8:CC:B4 -74 0 – 1 0 1
00:0F:66:47:8E:05 88:88:88:88:88:88 -1 1 – 0 0 1
00:22:3F:1B:1F:F2 00:25:D3:F6:63:44 -48 0 -54 0 10
Sniffing Insecure Communications
So we’ve identified there are client devices in the area we’d like to target. We wish to
intercept their network communications and view their data. We’ll take a look at two
scenarios here:
● A client connected to a wireless network with no encryption.
● A client connected to a wireless network with weak encryption.
First, we’ll take a look at how trivial it is to view the data that is sent over an unencrypted
wireless network. In the first scenario, we see a client connected to the INSECURE SSID,
as shown in Listing 5-2. You can see the client has a MAC address of 44:44:44:44:44:44 and
has sent probe requests for the MyWiFi, NewYorkWiFi, and INSECURE networks.
Listing 5-2: Probe Requests from Clients in airodump
CH 11 ][ Elapsed: 5 mins ][ 2011-06-29 18:59
BSSID PWR Beacons #Data, #/s CH MB ENC CIPHER AUTH ESSID
00:0F:66:47:8E:05 -24 3218 268 0 11 54 WEP WEP SHome
22:22:22:22:22:22 -25 3138 338 0 11 54e OPN INSECURE
05-ch05.indd 105 3/30/12 9:35:21 AM

Secure Beginner’s Guide / Wireless Network Security: A Beginner’s Guide / Tyler Wrightson / 094-6 / Chapter 5
106 Wireless Network Security: A Beginner’s Guide
00:22:3F:1B:1F:F2 -70 2867 232 0 11 54 . WEP WEP wlan-023fc
00:24:B2:29:32:04 -74 799 0 0 11 54 . WPA2 CCMP PSK the hizzle
00:1F:33:3F:FD:1E -77 432 133 0 11 54 . WEP WEP wlan-ffdle
BSSID STATION PWR Rate Lost Packets Probes
00:0F:66:47:8E:05 88:88:88:88:88:88 0 1 -11 0 11
22:22:22:22:22:22 00:16:6F:AC:04:04 -33 1 - 1 0 168 INSECURE,NewYorkWiFi
22:22:22:22:22:22 44:44:44:44:44:44 -34 0 - 1 36 53 MyWiFi,INSECURE,NYWiFi
00:22:3F:1B:1F:F2 00:25:D3:F6:63:44 -52 0 - 1 4 439
There are two basic options here. We can associate to the target network and start sniffing
in promiscuous mode, or we can put our interface into monitor mode and start sniffing.
In promiscuous mode, if you’re not associated to a network, you won’t see any packets.
If you are associated to a wireless network while in promiscuous mode, you will see any
packets that are observable by your client. This means that if another station associated to
the same wireless network is within range and transmits packets to the access point, you
will be able to capture these packets on your system.
Into Action
Don’t underestimate how relevant this is. Although you may never deploy a
wireless network for your organization with no encryption, I can almost guarantee
you that you have used an open wireless network and that your company’s
employees will use open networks.
The most popular open networks? Guest networks and wireless “hotspot”
locations. As such, you need to understand the vulnerabilities associated with
open networks to come up with a strategy for mitigating the risks associated with
using them.
05-ch05.indd 106 3/30/12 9:35:21 AM

Secure Beginner’s Guide / Wireless Network Security: A Beginner’s Guide / Tyler Wrightson / 094-6 / Chapter 5
Secure Beginner’s Guide / Wireless Network Security: A Beginner’s Guide / Tyler Wrightson / 094-6 / Chapter 5
Chapter 5 Attacking Wireless Clients 107
Remember, for either scenario here,
you must be able to physically receive
the wireless signals from the sending
station. Take a look at the following
examples. In Figure 5-3, the attacker
will see data sent from the laptop, but
will be unable to see the data received
by the laptop. In Figure 5-4, the opposite
is true: The attacker will see data sent to
the laptop but not sent from the laptop.
Finally, in Figure 5-5, you can see that
the attacker is in an advantageous spot,
where he can see both the data sent from
the laptop and received by the laptop.
The first tactic is to simply associate
to the same network. This is slightly less
stealthy because there will be a record of
LINGO
When a wireless interface is put into
promiscuous mode, it captures packets
that are not destined to its own MAC
address. In promiscuous mode, your
computer will capture any packets it can
observe from stations associated to the
same SSID.
When a wireless interface is put
into monitor mode, the interface is
essentially put into promiscuous mode
at the RF level. In monitor mode, your
computer will display any 802.11
traffic, including beacons and data from
any wireless networks in the area.
Into Action
Also keep in mind that this doesn’t mean you have to be physically in between the
access point and the client device to view network traffic. You could be a good mile
away from both the AP and the client, and as long as you have a strong-enough
signal to both, you’ll still see both streams of communication.
Figure 5-3 Attacker sees only the client
Attac
k
er Sees On
l
y C
l
ient
Attacker AP
Client
05-ch05.indd 107 3/30/12 9:35:23 AM

Secure Beginner’s Guide / Wireless Network Security: A Beginner’s Guide / Tyler Wrightson / 094-6 / Chapter 5
108 Wireless Network Security: A Beginner’s Guide
you associating to the target network. Typically, this will be logged on the access point,
but it could also be logged on central logging devices, firewalls, IDS/IPS devices, and so
on. If you choose to put your card into monitor mode, there will not be a record of you
associating to the target network. The only “downside” to using monitor mode is that you
might capture a lot of data that is unimportant to you, such as wireless beacons and data
from other networks. You can restrict monitor mode to listen on only the target network’s
wireless channel to cut down on the amount of data, but depending on the wireless
landscape where you’re capturing packets, you might still see extra data.
Figure 5-4 Attacker sees only the access point
Attacker Sees Only AP
Attacker
AP
Client
Figure 5-5 Attacker sees both the client and the access point
Attac
k
er Sees Bot
h
AP & C
l
ient
AP
Client Attacker
05-ch05.indd 108 3/30/12 9:35:28 AM

Secure Beginner’s Guide / Wireless Network Security: A Beginner’s Guide / Tyler Wrightson / 094-6 / Chapter 5
Secure Beginner’s Guide / Wireless Network Security: A Beginner’s Guide / Tyler Wrightson / 094-6 / Chapter 5
Chapter 5 Attacking Wireless Clients 109
Capturing Packets
Remember in Chapter 4 when airodump automatically saved all the packets it received in
a PCAP file when we used the -w option? If you want to view the packets while you’re
capturing them, you can simply open the PCAP file with Wireshark. The only problem
with this is you’ll have to close the file and reopen it to see any new packets captured.
To see all the packets captured in real time, you’ll want to use Wireshark and start an
active capture session. You still have the option to save all the packets to a PCAP file from
within Wireshark.
Let’s take a look at what can be seen by simply associating to the INSECURE network
and using Wireshark in promiscuous mode. If your interface is not already in promiscuous
mode, you’ll have the option of enabling promiscuous mode from within Wireshark.
You’ll also need root privileges to enable promiscuous mode, so be sure to start Wireshark
as a root user.
Note
Just like many of the other tools covered in this book, we can’t possibly go over all the
options and features in Wireshark. A few books have been written on using Wireshark
and performing packet analysis. I recommend playing with Wireshark to get familiar
with its many options and decide if you need to further your education.
Once you’ve installed Wireshark, open a terminal and type wireshark. On the left side,
you’ll see the “Interface List” section. You can click the wireless interface on which you
wish to capture traffic (in this case, wlan0). Congratulations, you’re now capturing packets
in real time, in promiscuous mode, on your wireless interface. This is too easy, right? This
will use the default options for capturing, which are sufficient for most of what you’ll ever
need to do.
In Figure 5-6, we can see the client device (44:44:44:44:44:44) with an IP address of
192.168.1.44 is browsing a website with an IP address of 192.168.1.100. We can tell it’s
web traffic because the detected protocol is HTTP. In this area, we can see the protocol
but we can’t tell exactly what is being viewed.
We can see in the second half of the screen that the packet has been broken down
basically by OSI layer. Starting with the frame, we get basic information about the packet.
Next, the Ethernet header shows the source and destination MAC addresses. After that is
the IP layer, with the source and destination IP addresses. Then the TCP section shows
the source and destination TCP ports. The destination port listed here is typically what
Wireshark will use to make an educated guess as to what the higher-layer protocol is.
Next, you might see the Application layer data detected. Depending on the contents of the
packet and whether Wireshark has a protocol decoder for the detected data, this may or
may not be an option.
05-ch05.indd 109 3/30/12 9:35:29 AM
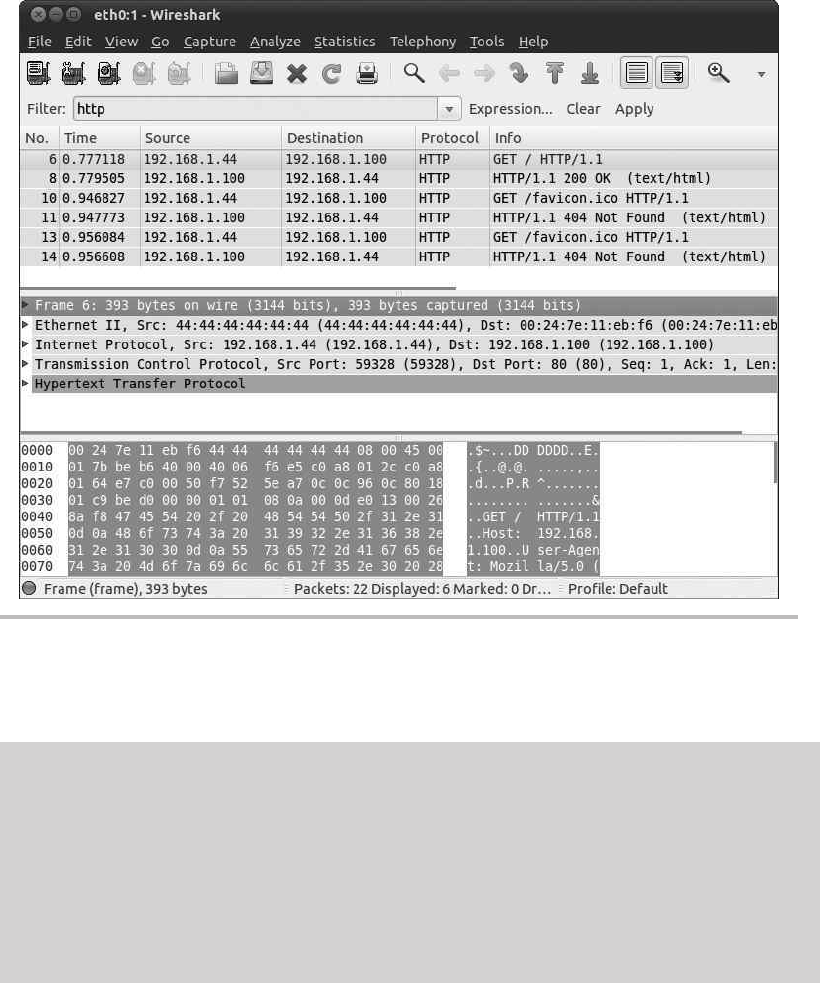
Secure Beginner’s Guide / Wireless Network Security: A Beginner’s Guide / Tyler Wrightson / 094-6 / Chapter 5
110 Wireless Network Security: A Beginner’s Guide
Figure 5-6 Wireshark, a network sniffer interface
How It Works
The Protocol column isn’t always 100 percent accurate. The protocol is typically
determined simply by the destination TCP port of the communications. So if someone
were to tunnel HTTP traffic over port 25, it would most likely show up as SMTP
communication in the Protocol field. This doesn’t necessarily affect any other
functionality of Wireshark, but you should rely on the contents of the packets to
determine exactly what you’re looking at.
05-ch05.indd 110 3/30/12 9:35:29 AM
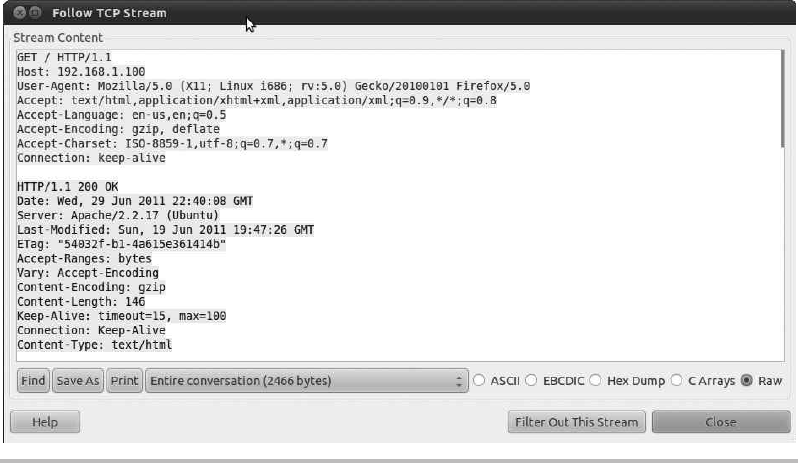
Secure Beginner’s Guide / Wireless Network Security: A Beginner’s Guide / Tyler Wrightson / 094-6 / Chapter 5
Secure Beginner’s Guide / Wireless Network Security: A Beginner’s Guide / Tyler Wrightson / 094-6 / Chapter 5
Chapter 5 Attacking Wireless Clients 111
If you right-click any of the HTTP packets and choose Follow TCP Stream, you’ll see
a window similar to Figure 5-7. This is an extremely handy feature for seeing the actual
data being transmitted during a TCP session. Wireshark will grab all the data from the
packets involved in the TCP session and put them in the correct order and display the data
in an easy-to-read format.
Let’s take a look at another example. In Figure 5-8, you’ll notice that Wireshark has
automatically detected the Application layer protocol as the File Transfer Protocol (FTP).
It has also used its built-in decoder for the protocol to list some of the more interesting
tidbits of information right in the main capture screen. You can see the user logged in with
the username TomJones and the password ItsNotUnusual. Remember we reviewed the
serious implications of cleartext protocols? Now you see some of the implications first hand.
Can We Force the Client to Talk to Us?
The next question is, if the client we wish to attack is already connected to an access point,
can we force it to talk to us instead? The answer is almost always yes. The process we’ll
use to accomplish this is quite simple. We’ll configure our attacking laptop to act as an
access point. Once the client has connected to our access point, we can continue with the
attacks we’ve already detailed, as well as some new attacks we’ll cover in the next section.
Figure 5-7 Wireshark’s Follow TCP Stream window
05-ch05.indd 111 3/30/12 9:35:29 AM
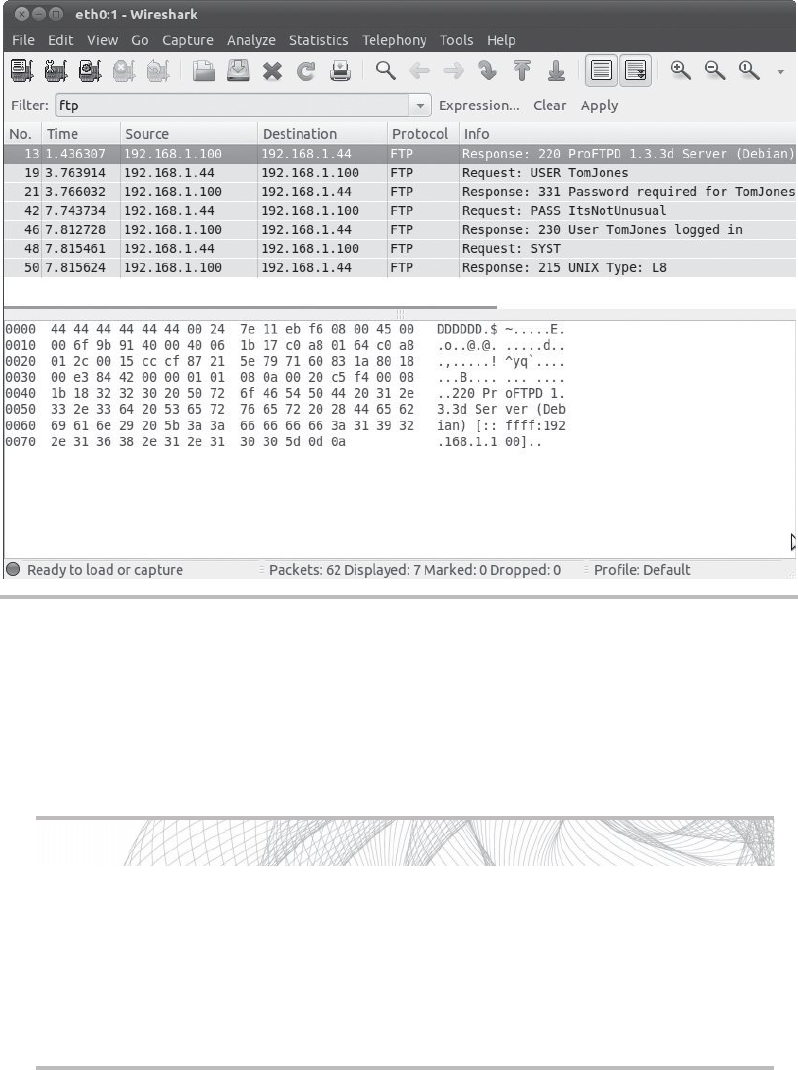
Secure Beginner’s Guide / Wireless Network Security: A Beginner’s Guide / Tyler Wrightson / 094-6 / Chapter 5
112 Wireless Network Security: A Beginner’s Guide
There is another option to accomplish the same thing; however, it’s not quite as mobile
or stealthy as using our laptop as an access point. We can simply use an access point and a
system configured as a traditional sniffer. Something similar to Figure 5-9 would allow us
to view all the traffic that passes between the client and the Internet.
Figure 5-8 Using Wireshark to capture FTP credentials
Into Action
If a malicious user wanted to, he could simply set up an access point and sniffer
similar to Figure 5-9 and save all the network traffic that passes through the access
point. The attacker could place this in a busy environment with no current wireless
access and gave it a tempting SSID, something along the lines of “FREE WIFI.” How
long do you think it would take for the attacker to start capturing interesting traffic?
Now do you still trust all the hotspots you use?
05-ch05.indd 112 3/30/12 9:35:29 AM
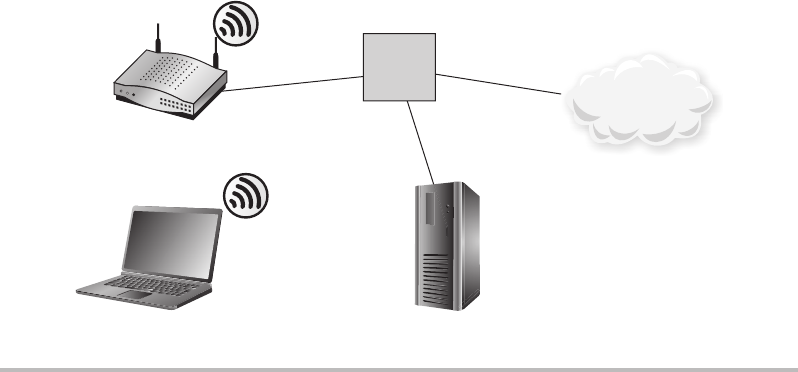
Secure Beginner’s Guide / Wireless Network Security: A Beginner’s Guide / Tyler Wrightson / 094-6 / Chapter 5
Secure Beginner’s Guide / Wireless Network Security: A Beginner’s Guide / Tyler Wrightson / 094-6 / Chapter 5
Chapter 5 Attacking Wireless Clients 113
Creating a Linux Access Point
Configuring your Linux laptop to act as an access point couldn’t be easier. You’ll need to
follow these basic steps:
1. Set the wireless card to monitor mode.
2. Configure the laptop as the access point using airbase-ng.
3. Configure the DHCP server on the laptop to hand out IP addresses.
4. Configure an IPTables firewall to pass traffic through laptop.
5. Sniff all the juicy traffic.
The airbase-ng program is also part of the aircrack-ng suite. The operation is very
similar to the other programs in the aircrack-ng suite and is extremely easy to work with.
Let’s look at each of these steps in detail.
Set the wireless card to monitor mode.Step 1.
You should be familiar with this command by now. As a refresher, to put the
wlan0 interface into monitor mode, you would use the following command:
#airmon-ng start wlan0
Figure 5-9 Logical location of hardwired IDS
Access Point & Sniffer
Attacker
Smiffer
Attacker
AP
Tap
Client
Internet
05-ch05.indd 113 3/30/12 9:35:31 AM

Secure Beginner’s Guide / Wireless Network Security: A Beginner’s Guide / Tyler Wrightson / 094-6 / Chapter 5
114 Wireless Network Security: A Beginner’s Guide
Configure the laptop as the access point using airbase-ng.Step 2.
Because we want to encourage as many people to connect to our malicious access
point as possible, we will not be using encryption. We basically need three things:
the ESSID to broadcast, the channel, and the wireless interface. An example
would look like this:
#airbase-ng -e "FREE WIFI" -c 11 mon0
● -e is the ESSID of “FREE WIFI.”
● -c assigns the access point to use channel 11.
● mon0 is the wireless interface.
In Listing 5-3, you’ll see that airbase automatically creates the at0 interface. The
at0 interface is a virtual interface that you can treat just like any other interface.
For airbase, the at0 interface represents the IP address of the access point, and it is
the interface to which we will bind the DHCP daemon.
For now, we’ll want to assign the at0 interface an IP address, as follows:
#ifconfig at0 10.0.0.1 netmask 255.255.255.0
You’ll want to keep the terminal window with airbase-ng open because you’ll see
some very interesting diagnostic information.
Listing 5-3: Using airbase-ng to Create an Access Point
# airbase-ng -e 'FREE WIFI' -c 11 mon0
22:39:58 Created tap interface at0
22:39:58 Trying to set MTU on at0 to 1500
22:39:58 Access Point with BSSID 00:22:FA:5F:04:C8 started.
Configure the DHCP server on the laptop to hand out IP addresses.Step 3.
Now when clients connect to the
access point, we need them to get
a legitimate IP address, which
means it’s our job to give it to
them. The only time when this
might not be the case is when
there’s an existing DHCP server
on the hardwired network that
your access point will bridge to.
LINGO
In the Linux world, a daemon is simply
a service that typically runs in the
background.
05-ch05.indd 114 3/30/12 9:35:32 AM

Secure Beginner’s Guide / Wireless Network Security: A Beginner’s Guide / Tyler Wrightson / 094-6 / Chapter 5
Secure Beginner’s Guide / Wireless Network Security: A Beginner’s Guide / Tyler Wrightson / 094-6 / Chapter 5
Chapter 5 Attacking Wireless Clients 115
Configuring the DHCP server on Linux is extremely easy. The default file
location you should use is /etc/dhcpd.conf. It’s just a simple text file that you
can save anywhere and then point the DHCP daemon at the file. Here’s a sample
configuration:
ddns-update-style ad-hoc;
default-lease-time 1200;
max-lease-time 7200;
subnet 10.0.0.0 netmask 255.255.255.0 {
option subnet-mask 255.255.255.0;
option broadcast-address 10.0.0.255;
option routers 10.0.0.1;
option domain-name-servers 4.2.2.2;
range 10.0.0.100 10.0.0.200;
}
All of the configuration for the DHCP server should be self-explanatory. Just be
sure to assign the “option routers” IP address to the IP address of your laptop’s
interface. Then, to start the DHCP daemon, simply run the following command:
#dhcpd3 -cf /etc/dhcpd.conf at0
● -cf points to the configuration file we just created.
at0
● is the interface created by airbase-ng.
Configure an IPTables firewall to pass traffic through your laptop and send on to Step 4.
your hardwired connection.
Now, IPTables is a beast in itself, and entire books have been written on it. We
won’t go into much detail here. Just understand that the first iptables --flush
command actually removes any existing rules. So, if for any reason you’re doing
this on a system that already has firewall rules set up, you might want to back up
the rules first.
Into Action
Depending on your Linux distribution, the dhcpd command may be slightly
different. The package you’ll most likely want to install is dhcp3-server.
05-ch05.indd 115 3/30/12 9:35:32 AM
Secure Beginner’s Guide / Wireless Network Security: A Beginner’s Guide / Tyler Wrightson / 094-6 / Chapter 5
116 Wireless Network Security: A Beginner’s Guide
The first command actually turns on basic IP forwarding functionality in the kernel.
In the following example, you’ll notice the final command forwards traffic to the
gateway on your hardwired connection, assuming your gateway is 192.168.1.1:
echo 1 > /proc/sys/net/ipv4/ip_forward
iptables --flush
iptables --table nat --flush
iptables --delete-chain
iptables --table nat --delete-chain
iptables --table nat --append POSTROUTING --out-interface wlan1
-j MASQUERADE
iptables --append FORWARD --in-interface at0 -j ACCEPT
iptables -t nat -A PREROUTING -p udp --dport 53 -j DNAT --to
192.168.1.1
Sniff all the juicy traffic.Step 5.
That’s it—your rogue access point is now broadcasting its existence and waiting
for users to connect. At this point, you should be well aware of how to sniff traffic
on your laptop using Wireshark. So sniff away—and have fun.
Remember I told you to keep the airbase-ng terminal window in mind?
Take a look at Listing 5-4 and you’ll see that a client with MAC address
44:44:44:44:44:44 has already connected to our rogue access point!
Listing 5-4: Client Associates to Airbase Access Point
23:13:25 Client 44:44:44:44:44:44 associated (unencrypted) to ESSID "FREE WIFI"
23:13:25 Client 44:44:44:44:44:44 associated (unencrypted) to ESSID "FREE WIFI"
23:13:25 Client 44:44:44:44:44:44 associated (unencrypted) to ESSID "FREE WIFI"
23:13:25 Client 44:44:44:44:44:44 associated (unencrypted) to ESSID "FREE WIFI"
05-ch05.indd 116 3/30/12 9:35:32 AM

Secure Beginner’s Guide / Wireless Network Security: A Beginner’s Guide / Tyler Wrightson / 094-6 / Chapter 5
Secure Beginner’s Guide / Wireless Network Security: A Beginner’s Guide / Tyler Wrightson / 094-6 / Chapter 5
Chapter 5 Attacking Wireless Clients 117
Forcing the Client to Talk to Us
One scenario we didn’t mention is when the client we wish to target is already connected
to a secure access point. What do we do in that case? Just give up? Of course not.
One possible solution is to deauthenticate the client from the current access point
using the aireplay-ng tool, which we covered in Chapter 4. While you continuously
deauthenticate the client from the existing access point, you broadcast an ESSID that
you witnessed the client probe for using airodump-ng.
The trick to this is that you’ll most likely need to have a stronger signal level than the
access point the client is currently connected to. However, this isn’t necessarily the case,
especially when you consider the social
engineering aspect of this technique. If
you continuously deauthenticate the client
from the legitimate access point, the user
might get so frustrated that she’ll choose
any other wireless network she can find,
just to get some work done!
Default Operations
Now let’s ponder a very important aspect to the security of our clients. That is the question
of what happens automatically behind the scenes, or operations that happen by default.
As you will see, many things happen behind the scenes without user interaction that can
seriously affect the security of your systems.
One of the simplest examples is one you’re probably already familiar with but might
not have considered the associated security implications. Many people have configured
their smartphones to access their e-mail accounts. When configuring their e-mail accounts,
many people choose to have the phone automatically check for new e-mail messages.
This can pose a very serious security issue when the smartphone has Wi-Fi capabilities.
We already discussed in a previous chapter the fact that many common protocols,
including a few associated with e-mail, are completely insecure, transmitting all the data
and credentials in cleartext. The real problem occurs when the smartphone is associating
with open wireless networks automatically and then logging into the configured e-mail
accounts. When you add this to the fact that the smartphone is constantly sending probe
requests for wireless networks that it wishes to associate with, this becomes a relatively
trivial attack to pull off.
LINGO
Social engineering can be used to
describe any form of attack that tries to
manipulate end users by deceiving them
in some way.
05-ch05.indd 117 3/30/12 9:35:32 AM

Secure Beginner’s Guide / Wireless Network Security: A Beginner’s Guide / Tyler Wrightson / 094-6 / Chapter 5
118 Wireless Network Security: A Beginner’s Guide
Now, also consider other processes that might be automatic and present a similar
attack vector to your client devices:
● Social media (Facebook, Twitter)
● Geo-location applications
● Backup systems
● RSS feeds
These systems may pose a very similar threat of being directly exploited if they use
weak authentication mechanisms. Keep in mind that weak authentication is not restricted
to cleartext authentication. However, there are additional possibilities for exploitation
beyond just obtaining login credentials.
Many systems rely on cookies or other session data to prove that a user is logged into
a website. If an attacker is able to sniff this data and send it to the remote system, he may
not need to authenticate at all.
We discussed in a previous chapter how a man-in-the-middle (MITM) attack works. In
addition to how the underlying attack works, you should understand some of the options an
attacker has once the client is routing traffic through a system under the attacker’s control.
Many people think that using a secure protocol such as SSL (Secure Sockets Layer) is
enough to prevent their data from being viewed; however, there are vulnerabilities you
should be aware of.
Man-in-the-Middle Attacks
When an attacker is in position to perform a man-in-the-middle attack, he essentially has
free reign to control exactly what the user sees. Frankly, an entire volume of books could
be written on all the possible ways for an attacker to exploit communications once he’s in
position to perform a man-in-the-middle attack. I’ve chosen a few select attack methods
Into Action
I have successfully used this attack during a penetration test. After configuring my
laptop to respond to beacons from a target smartphone, the client associated to my
laptop. After a short period of time, the smartphone logged into an e-mail account
not associated with the company. Lo and behold, the same password was used for
the company’s login account.
05-ch05.indd 118 3/30/12 9:35:32 AM
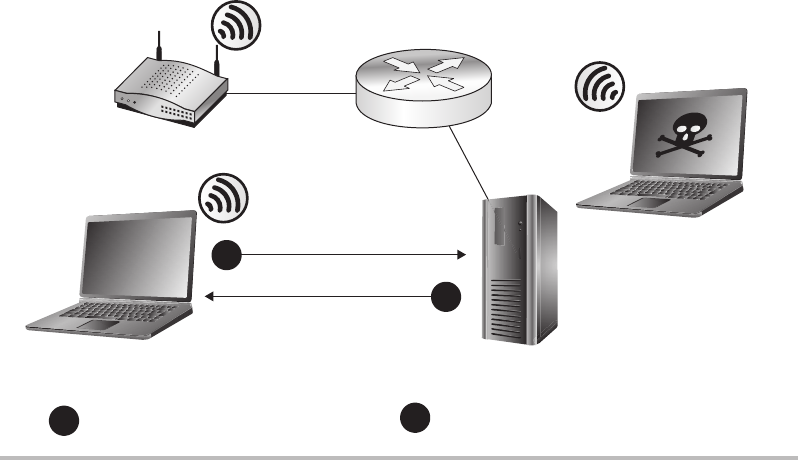
Secure Beginner’s Guide / Wireless Network Security: A Beginner’s Guide / Tyler Wrightson / 094-6 / Chapter 5
Secure Beginner’s Guide / Wireless Network Security: A Beginner’s Guide / Tyler Wrightson / 094-6 / Chapter 5
Chapter 5 Attacking Wireless Clients 119
here to demonstrate key concepts. This is some pretty scary stuff; bare with me for now
and we’ll cover appropriate defenses in a future chapter.
DNS Spoofing
One of the simplest ways for an attacker to control what a user sees is to redirect the user
to a system of her choosing using the Domain Name System (DNS). Let’s look at the
normal operation of a DNS lookup. If the client wishes to view a remote website (let’s call
it www.securewebsite.com), she’ll enter the website in her web browser. Her system will
first query the configured DNS server to find the IP address associated with this server.
The DNS server will send a very simple DNS response indicating the IP address of the
host www.securewebsite.com. Unfortunately, there is no true authentication performed
to verify that this reply comes from the DNS server. The system will then send its HTTP
request to the IP address returned. This process is shown in Figure 5-10.
The attacker in his position of power has a few choices. The simplest way is to respond
to the DNS query (spoofing the source IP address to that of the DNS server) and claim
that the securewebsite.com IP address is that of his machine hosting the malicious website
as in Figure 5-11. The response from the attacker may be only a few hundred milliseconds
faster than the legitimate response from the real DNS server, but that’s more than enough
time for the attack to succeed.
Figure 5-10 Normal DNS request and response
Normal DNS Operation
DNS Server
Attacker
Client asks server:What is the
IP address for www.securewebsite.com?
Server replies:IP address is
192.168.1.100 for host www.securewebsite.com.
1
1
2
2
AP
05-ch05.indd 119 3/30/12 9:35:35 AM
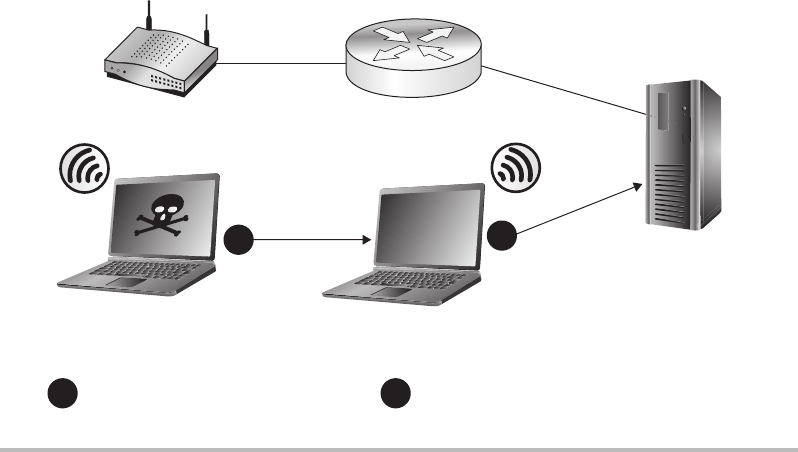
Secure Beginner’s Guide / Wireless Network Security: A Beginner’s Guide / Tyler Wrightson / 094-6 / Chapter 5
120 Wireless Network Security: A Beginner’s Guide
In this case, the attacker directed the client to connect to a web server on the attacker’s
machine. If the attacker wanted to target a specific website he knew the user would be
expecting, he could create a website that looked identical and save any credentials the user
entered on the website. Not only could the attacker save all the credentials, but he could
actually redirect the user to the legitimate website and the user would have no indication
of what happened.
Fake Webauth
Another interesting attack vector involves using a fake web authentication page. You’re
probably already familiar with webauth pages. If you’ve ever been to a coffee house,
bookstore, or airport, chances are you’ve seen a web authentication portal page. We’ll
actually walk through the proper use of a web authentication portal in a future chapter.
The basic functionality of the webauth is to present the users with a splash page
before they’re allowed to view any websites. The splash page usually details things such
as who is providing the wireless service as well as an acceptable use policy. There are
many different techniques for how a user is redirected to the webauth splash page, most of
which not surprisingly mimic MITM attacks. When the user tries to visit any website, he
is redirected to the web authentication portal. Typically, the user has to click a button or
check a box stating that he has read and accepted the acceptable use policy.
Figure 5-11 DNS spoofing attack
DNS Spoong Attack
Client asks server:What is the
IP address for www.securewebsite.com?
Before DNS server can reply, the ATTACKER
sends a response claiming to be from
DNS SERVER, stating IP address is:
192.168.1.88 for host www.securewebsite.com.
2
1
DNS Server
Attacker
1
2
AP
05-ch05.indd 120 3/30/12 9:35:38 AM
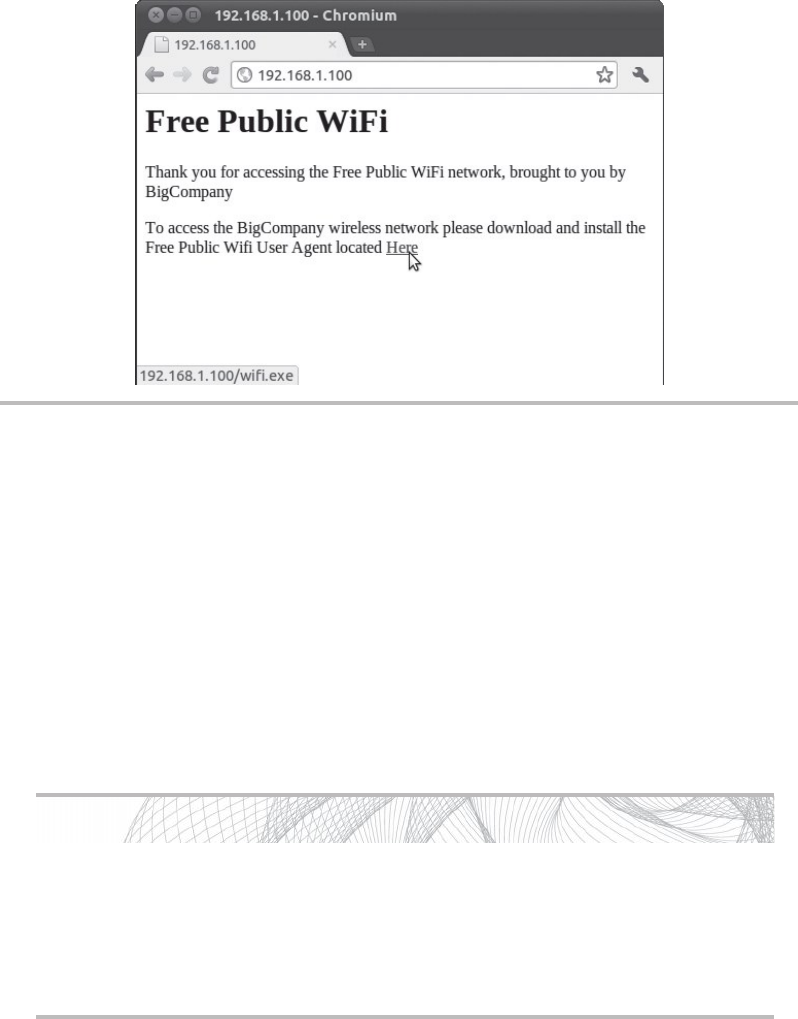
Secure Beginner’s Guide / Wireless Network Security: A Beginner’s Guide / Tyler Wrightson / 094-6 / Chapter 5
Secure Beginner’s Guide / Wireless Network Security: A Beginner’s Guide / Tyler Wrightson / 094-6 / Chapter 5
Chapter 5 Attacking Wireless Clients 121
So how do attackers use this to their advantage? Because people are so used to seeing
web authentication portals when using a guest network, many don’t think twice about
performing whatever task the portal requests of them. I’ve actually successfully used this
attack technique during penetration tests to force users to run a program that gives access
to their computer. You’d probably also be pretty surprised at how simple the website can
look to be effective. Take a look at Figure 5-12 to see an actual example of a webauth
portal I used during a penetration test. You’ll also notice in the status bar at the bottom
of the browser window that the name of the file to be downloaded is wifi.exe. Not very
elaborate, but extremely effective.
Figure 5-12 Fake captive web portal
Into Action
I know what you’re thinking: “That’s ridiculous. Why would anyone run an
executable to access a wireless network? It doesn’t make any sense and is
obviously a security threat!” Well, the answer is, I don’t need everyone in your
company to click the link—I just need one person to run the program. So maybe
you might not run the program, but someone will!
05-ch05.indd 121 3/30/12 9:35:38 AM

Secure Beginner’s Guide / Wireless Network Security: A Beginner’s Guide / Tyler Wrightson / 094-6 / Chapter 5
122 Wireless Network Security: A Beginner’s Guide
SSL MITM
An attacker in position to perform a man-in-the-middle attack can perform an additional
attack to view the contents of the SSL-encrypted network connection. We won’t go over
exactly how to perform this attack, but if you are interested you can look into the use of
the ettercap program.
Nowadays the attack is trivial to actually execute. Behind the scenes, the program
works by setting up two separate SSL connections—one between the client and the
attacker, and the other SSL connection between the attacker and the target system. This is
represented by Figure 5-13. In this position, the client sends data to the attacker encrypted
using the certificate from the attacker. The attacker is then free to view all the cleartext
data from the client and then forward that data to the remote server.
However, an SSL MITM attack is not the most stealthy attack because the user is
prompted that the certificate does not match the remote address. You can see what users of
Internet Explorer see in Figure 5-14. However, how many users do you think actually care
about this warning? That’s right, hardly any.
SSL Stripping
The other option is a slightly newer attack known as an SSL stripping attack. Rather
than substitute a fake certificate to the client, the attacker actually redirects the client to
use HTTP and relies on the user not noticing that the connection is no longer encrypted.
Just like the previous attack, the data is then transmitted to the true destination. As an
additional trick, the attacker can change the icon displayed as the website’s favicon to a
lock icon. This will further confuse users as to exactly how they’re accessing the website.
Figure 5-13 SSL MITM attack
Client
SSL MITM Attack
SSL connection between Client and Attacker
1
2
12
Web ServerAttacker
Separate SSL connection between Attacker and Server
05-ch05.indd 122 3/30/12 9:35:41 AM
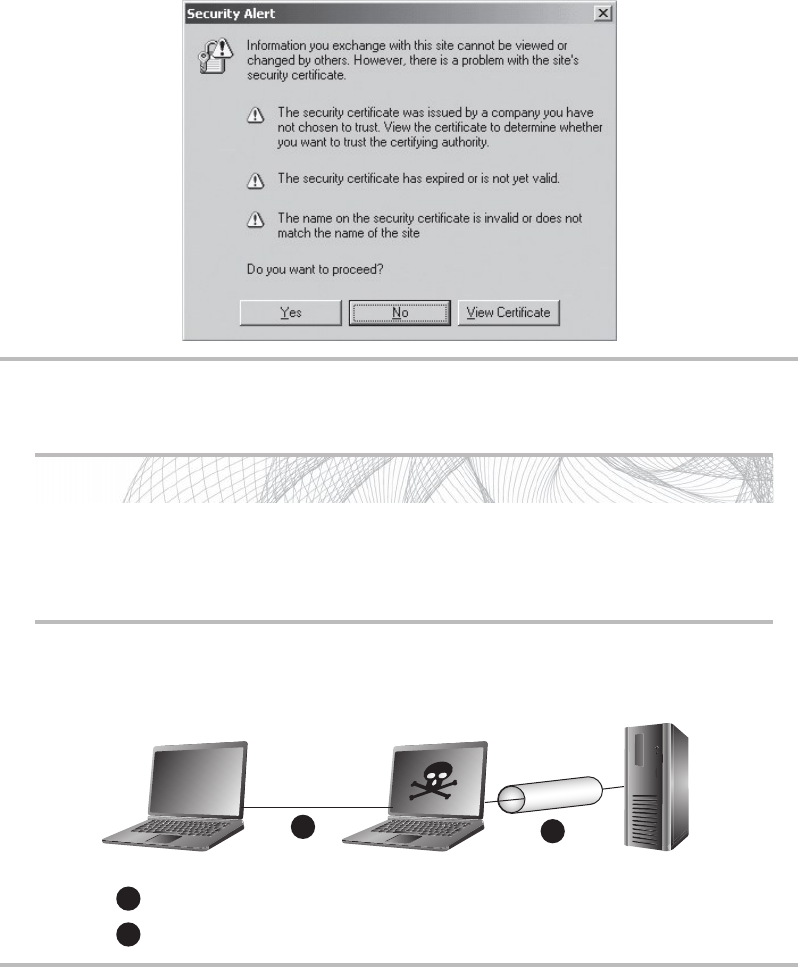
Secure Beginner’s Guide / Wireless Network Security: A Beginner’s Guide / Tyler Wrightson / 094-6 / Chapter 5
Secure Beginner’s Guide / Wireless Network Security: A Beginner’s Guide / Tyler Wrightson / 094-6 / Chapter 5
Chapter 5 Attacking Wireless Clients 123
Into Action
There’s no way a user can expect a secure connection and not notice that he’s
just using HTTP, right? Wrong! I’ve used this attack method so many times in
penetration tests that it’s getting boring... almost.
Figure 5-14 Invalid certificate warning
Figure 5-15 SSL stripping attack
Client
SSL Stripping Attac
k
Cleartext HTTP session to Attacker
1
2
12
Web ServerAttacker
SSL connection between Attacker and Server
05-ch05.indd 123 3/30/12 9:35:44 AM

Secure Beginner’s Guide / Wireless Network Security: A Beginner’s Guide / Tyler Wrightson / 094-6 / Chapter 5
124 Wireless Network Security: A Beginner’s Guide
Fake AV Updates
Another very interesting attack vector that can be considered an attack on automatic
operations is the manipulation of antivirus programs. Most antivirus programs are
configured to download antivirus
signatures and program updates
periodically, either from an internal server
or a server accessible over the Internet.
Either way, if an attacker is in position to
perform a man-in-the-middle attack, he
can abuse this process.
When the antivirus program tries
to download the signature updates
or program updates, the attacker will
substitute his malicious program that
will run much like a Trojan virus. There
is already publicly released code to do
exactly that.
We’ve Covered
In this chapter, we looked at a few of the more interesting and damaging attacks one can
perform against client wireless devices. Some of these attacks rely on stealth and cunning.
Others are downright garish and in your face. If nothing else, you should find them all
extremely interesting and entertaining.
Keep in mind that this chapter is not meant to be an exhaustive study of all the possible
attacks one can perform against wireless clients. Instead, we focused on the attack methods
and the underlying techniques so that you can recognize similar attack vectors in future
technologies.
Exotic wireless devices
● TVs, video game systems, printers, security cameras, etc.
Wireless client vulnerabilities
● Are the client’s existing communications secure?
● Can we make the client talk to us?
● Are there default configurations that we can exploit?
LINGO
Many people have different concepts
as to what constitutes a Trojan virus.
Oftentimes people somewhat familiar
with viruses will classify a program
as a Trojan virus only if it provides
remote access to an attacker. This is one
common type of Trojan, but I believe
the true definition is any malicious
program that purports to be a legitimate
program. I think a fake antivirus update
fits that bill nicely.
05-ch05.indd 124 3/30/12 9:35:44 AM
Secure Beginner’s Guide / Wireless Network Security: A Beginner’s Guide / Tyler Wrightson / 094-6 / Chapter 5
Secure Beginner’s Guide / Wireless Network Security: A Beginner’s Guide / Tyler Wrightson / 094-6 / Chapter 5
Chapter 5 Attacking Wireless Clients 125
● Wireless clients are constantly broadcasting their existence.
● Wireless clients are not monitored as closely as infrastructure devices.
● Physical security is often completely neglected.
Wireless reconnaissance
● Kismet
● Airodump
Sniffing insecure communications
● Clear-text protocols
Can we force the client to talk to us?
● Create a Linux access point.
● Force them to talk to us.
Default operations
● Automatic Associations
● Automatic Downloads & Logins
Man-in-the-middle attacks
● DNS spoofing
● Fake webauth
● SSL MITM
● SSL stripping
● Fake AV updates
05-ch05.indd 125 3/30/12 9:35:44 AM
This page intentionally left blank

Secure Beginner’s Guide / Wireless Network Security: A Beginner’s Guide / Tyler Wrightson / 094-6 / Chapter 6
Blind Folio: 127
PART III
Real-World Wireless
Security Defenses
06-ch06.indd 127 4/6/12 3:01:33 PM
This page intentionally left blank

Secure Beginner’s Guide / Wireless Network Security: A Beginner’s Guide / Tyler Wrightson / 094-6 / Chapter 6
Blind Folio: 128
Secure Beginner’s Guide / Wireless Network Security: A Beginner’s Guide / Tyler Wrightson / 094-6 / Chapter 6
129
Theory of Defense
for Securing Wireless
Networks
CHAPTER 6
06-ch06.indd 129 4/6/12 3:01:33 PM
Secure Beginner’s Guide / Wireless Network Security: A Beginner’s Guide / Tyler Wrightson / 094-6 / Chapter 6
130 Wireless Network Security: A Beginner’s Guide
We’ll Cover
Setting the stage ●
Phases of wireless deployment ●
Secure design principles for wireless networks ●
Useless defenses ●
Good wireless defenses ●
You should now have a thorough understanding of some of the many attack vectors
available to target wireless networks and clients. In this chapter, we’re going to cover
the concepts that will form the basis for securing your wireless networks. Then we’ll take
the concepts you learn in this chapter to design secure wireless networks to accomplish
common goals.
Setting the Stage
I’d like to set the stage for the defenses discussed in this and the remaining chapters
so that you can gain the most from this book. We will discuss a few important issues,
including those of context and reality. You should also understand that the attacker has
clear advantages in this fight. Although the attacker may have advantages, if you use
the defenses discussed in the remaining chapters of this book, you will have no problem
winning the fight.
Context
The one thing I can’t provide in this book that you must always keep in mind is context. I
simply can’t provide direct recommendations that fit the business context for every reader of
this book. Therefore, you need to take all the defenses outlined in this book and determine
if and how they fit into the context of your business needs.
Remember that every business accepts a certain level of risk (either directly or without
fully understanding it). You must determine the solutions for securing the wireless networks
you’re responsible for that make sense in the context of your environment.
06-ch06.indd 130 4/6/12 3:01:33 PM

Secure Beginner’s Guide / Wireless Network Security: A Beginner’s Guide / Tyler Wrightson / 094-6 / Chapter 6
Secure Beginner’s Guide / Wireless Network Security: A Beginner’s Guide / Tyler Wrightson / 094-6 / Chapter 6
Chapter 6 Theory of Defense for Securing Wireless Networks 131
Reality
After considering context, we should discuss reality. Don’t get frustrated when you can’t
implement every defensive technology we discuss in this book. If every organization had
an unlimited budget for securing their environment, we would live in a very different world.
Clearly, most organizations don’t have unlimited funds to spend on securing their wireless
networks, so they must choose which defenses are the most important and appropriate given
their environment and their budget.
IMHO
An example of applying context and reality to one of my recommendations would
be my recommendation for companies to use an intrusion detection system (IDS). I
highly recommend that, whenever possible, businesses utilize IDS technologies in
their networks. Does that mean you should immediately integrate an IDS into your
environment or turn of your wireless network? Of course not.
Some businesses simply can’t handle the administrative requirements of an
IDS. In this case, it should be a conscious decision in which you weigh the risks
of running a wireless network without an IDS versus the risk of lost operational
improvement from not using a wireless network.
The Attacker Has the Advantage
Something you must keep in mind when securing your environment is that the attacker
has a clear advantage over you. I think that needs repeating: You are in a disadvantageous
position to a potential attacker.
For an attacker to accomplish his goals, he needs to find only one hole in your defenses.
For you to accomplish your goal, you need to identify and patch every last exploitable
hole. Likewise, time is absolutely on the attacker’s side. You need to constantly be on your
game—patching vulnerabilities, ensuring clients are adhering to security policies, and
keeping your administrative credentials secure—whereas an attacker can sit and wait for
that one time when you slip up.
IMHO
So why do we as security professionals play a game where the odds are clearly
stacked against us? I think a cliché movie line pretty much sums it up: “We’re either
incredibly smart … or incredibly stupid.” I’ll let you decide which for yourself.
06-ch06.indd 131 4/6/12 3:01:33 PM

Secure Beginner’s Guide / Wireless Network Security: A Beginner’s Guide / Tyler Wrightson / 094-6 / Chapter 6
132 Wireless Network Security: A Beginner’s Guide
Phases of Wireless Deployment
At each phase of a wireless network’s life, you have an opportunity to integrate or reintroduce
security into the thought process. Let’s take a look at some of the nuances of security at each
phase, including new deployments, existing wireless networks, and wireless refresh projects.
New Deployments
When deploying a new wireless network, you are in a unique position to do things correctly
from the start. Trying to secure a wireless network after you’ve deployed it is never as
easy as just doing it from the start. Whether you’re tasked with designing the installation,
deploying the wireless network, managing and maintaining the installation, or securing it,
you need to voice your concerns from the beginning.
During the initial predeployment discussions, it is imperative to decide if a wireless
network is in fact the best solution for your organization, and security should be at the
forefront of this discussion. Wireless networking presents some unique security challenges
for organizations that you should now be fully aware of. Oftentimes, decision makers will
just assume that they “need” a wireless network, if for no other reason than the fact that
they’re ubiquitous.
I’ve had discussions with clients who wanted to deploy guest wireless services simply
because “everyone else” offered them, which leads me to my first point on the best way
to secure your wireless networks. To not use them! I know what you’re thinking—that’s
kind of an odd recommendation for a book that should be teaching you how to secure
your wireless networks, right? We’ll dive into the nitty-gritty of securing your wireless
networks soon, but first I want you to ponder whether or not you really need wireless
networking capabilities in your organization and whether that need outweighs the risks.
Even if you do decide wireless networking is the right option, make sure you’re not using
it gratuitously. Keep it confined to only the business needs that are necessary.
If you don’t need wireless, don’t use it!
Into Action
With so many organizations racing to deploy wireless networks simply because
they’re so ubiquitous, the classic question from the quintessential nagging mother
comes to mind: “If all your friends were jumping off a bridge, would you do
it, too?” So let me be the voice of your mother for a minute. Just because other
businesses are jumping on the bandwagon and deploying wireless networks
does not mean you have to do the same. Let them suffer the consequences of
unnecessary wireless networks.
06-ch06.indd 132 4/6/12 3:01:34 PM

Secure Beginner’s Guide / Wireless Network Security: A Beginner’s Guide / Tyler Wrightson / 094-6 / Chapter 6
Secure Beginner’s Guide / Wireless Network Security: A Beginner’s Guide / Tyler Wrightson / 094-6 / Chapter 6
Chapter 6 Theory of Defense for Securing Wireless Networks 133
Existing Wireless Networks
Many existing wireless networks out there need to be secured. Maybe you’ve just joined
a new organization and have been handed the joyful task of assessing the current wireless
network and providing recommendations for securing it. Or maybe you’ve managed the
wireless network since its inception and are now aware of security vulnerabilities that
need to be mitigated.
One of the biggest headaches you might face will be in convincing the people who
hold the checkbook to create a new budget for something that has operated without issue.
Many people have the mentality “If it ain’t broke, don’t fix it,” and consider security
expenditures akin to throwing dollars into a black hole. Therefore, it is your job to show
them the severity of not securing their wireless network.
IMHO
Is security really a black hole? Absolutely! Well, sort of. Let me explain. Remember
that we discussed in Chapter 1 that the calculation of return on investment simply
doesn’t work for security. You’re spending money (and resources, time, and more)
to protect other assets, or revenue-generating components of your business. So
you’re asking someone to spend money to secure something that has not caused a
security incident to date, but could end up being the source of a security incident
in the future.
In my experience, it’s better to agree with someone and then adjust them to
your way of thinking than to contradict them from the start. So when a budget
maker tells you, “We can’t give you money to secure a wireless network that has
been working fine for a while now.” You can say, “Yes, Mr. Executive, I completely
understand why you feel that way. I feel the same way, too. However, we’re not
spending this money to improve our network. Instead, we’re using it to protect our
assets and our image. If we don’t spend this money to secure our network, it will
cost us far more in the event of a compromise.”
So how do you go about convincing people to spend money on securing a wireless
network if they’re opposed to it? One way that works very well is to have a wireless
penetration test performed by an external company. There are many nuances in both
performing a penetration test and hiring a company to perform a penetration test for you,
but it can prove to be an invaluable tool for demonstrating real, tangible risk and thus
obtaining buy-in from executives to fund your security initiatives.
From the budget maker’s perspective, it can be a bit more moving to see a report
from an external company detailing how they were able to access confidential data via
the company’s wireless network in a short period of time than it is to hear the security
administrator “cry wolf” over potential risks.
06-ch06.indd 133 4/6/12 3:01:34 PM

Secure Beginner’s Guide / Wireless Network Security: A Beginner’s Guide / Tyler Wrightson / 094-6 / Chapter 6
134 Wireless Network Security: A Beginner’s Guide
If the goal of having a penetration test performed is to acquire ammunition for
obtaining a budget, make this absolutely clear to the company you hire. Depending on
your ultimate goals, a penetration test can be catered to deliver exactly what you need and
can be surprisingly affordable and cost effective.
Penetration Test vs. Vulnerability Assessment
Unfortunately, many people (including those in the security field) don’t actually
understand the difference between a penetration test and a vulnerability assessment
and when to perform each. In a vulnerability assessment, you are enumerating
vulnerabilities in a system (typically as many vulnerabilities as you can, but not
always). In a penetration test, you are proving vulnerability in a system by actually
exploiting discovered vulnerabilities. Typically, this is summarized as “simulating what
a person with malicious intent would do.”
So when should you have a penetration test performed and when should you
perform a vulnerability assessment? Here are the reasons to perform a penetration test:
To test the defenses in place for appropriate actions and responses ●
To prove vulnerabilities to upper management to obtain the necessary budget ●
And here are the reasons to perform a vulnerability assessment:
To identify all unknown vulnerabilities ●
To produce reports for audit requirements ●
You wouldn’t necessarily want a traditional goal-oriented penetration test
performed when you want to identify all the vulnerabilities in a system, because
typically penetration testers will not try to identify all the vulnerabilities in a system.
If they identify one vulnerability that gives them complete access to a system, they
have no real reason to continue identifying other vulnerabilities because their goal of
penetrating the system has already been reached.
Clearly, this is not an exhaustive list of the reasons to perform one test over the
other, but you should have a good understanding of the typical reasons for each. I find
myself performing hybrid assessments more often nowadays, taking the best of both
worlds while trying to maximize the dollars spent by my clients.
06-ch06.indd 134 4/6/12 3:01:34 PM

Secure Beginner’s Guide / Wireless Network Security: A Beginner’s Guide / Tyler Wrightson / 094-6 / Chapter 6
Secure Beginner’s Guide / Wireless Network Security: A Beginner’s Guide / Tyler Wrightson / 094-6 / Chapter 6
Chapter 6 Theory of Defense for Securing Wireless Networks 135
Keep in mind that a key reason for having a penetration test might not be to show your
technical team what vulnerabilities exist, but to display to your executives the real-world,
tangible security issues that exist in your systems. It definitely grabs people’s attention
when you say, “We successfully penetrated the network and could view all the company’s
e-mails,” much more so than saying someone could potentially penetrate the network.
The three basic flavors of penetration tests are black box, white box, and grey box.
Sometimes they go by slightly different names, but the concept is the same. In a black
box, the attacker has no insider knowledge of the company or technology in use. In a
white box, the attacker might be given confidential information or some level of access to
the wireless network. A grey box penetration test is somewhere in between the two. The
situations where you would prefer one to the other depend on your ultimate goals. You’ll
want to discuss your end goal with the team you hire, but ultimately you can consider a
black box to show what an outsider might be able to accomplish, whereas a white box
might show what an employee or ex-employee could accomplish.
IMHO
Many people think that there’s no reason to have a penetration test performed.
Their key argument is that IT administrators already know the vulnerabilities in
their systems and don’t need someone else to tell them, or that a vulnerability
assessment is sufficient. Although I tend to agree with some of this, there are still
times when a penetration test makes the most sense, and this will never change.
Remember that one of the key reasons for having a penetration test performed
can be to prove to nontechnical budget makers that serious vulnerabilities worth
spending money on exist in the environment. Another great reason for having a
penetration test instead of a vulnerability assessment can be when you actually
want to test your defenses against a determined attacker. Say, for example, you’ve
recently implemented an IDS and created policies and procedures for your support
staff to respond to attempted intrusions. A penetration test can be a great way to
test your staff’s response to a real-world attack without waiting to see if the process
is broken during an actual attack.
Some of the important points to consider when securing an existing wireless network
include how you will handle downtime, whether you will deploy a new network or a
network in tandem with your current wireless network, and the impact on wireless clients.
Dealing with Downtime
During implementations of new technologies or upgrading existing components, your
wireless network may be temporarily out of service. Depending on the size and scope of
your wireless network, you may need to account for how you will handle downtime. Some
06-ch06.indd 135 4/6/12 3:01:34 PM
Secure Beginner’s Guide / Wireless Network Security: A Beginner’s Guide / Tyler Wrightson / 094-6 / Chapter 6
136 Wireless Network Security: A Beginner’s Guide
options include reconfiguring the infrastructure and clients in phases by location. For
example, if you’re upgrading your network from WEP to WPA2-PSK, rather than doing it
in one shot, you could upgrade a few access points at a time and switch over the clients in
the vicinity at the same time.
New Wireless Network in Parallel
One option I’ve used in the real world is to deploy a new wireless network alongside an
existing wireless network and phase client devices over when possible. As in the previous
example of upgrading from a WEP network to a WPA2-PSK network, you could deploy
the new access points and leave the existing WEP network in place until all your clients
have been moved to the new network. This can greatly minimize the impact to your users
because you can move them to the new wireless network incrementally. What’s more, you
have the option to move them back if there are any issues.
Touch Every Wireless Client
For some security feature upgrades, you might have to spend a little time with every client
of your wireless network. For example, in the event you want to upgrade your current
wireless network from WEP to WPA-PSK, you might need desktop support personnel to
visit each client device and manually enter the new WPA key. Of course, you can send the
WPA key to users and have them enter it themselves, but this presents another opportunity
for the key to be handled inappropriately and potentially compromised. Either way,
you need to understand whether the new security settings you’re deploying will require
administrative time for each client.
Wireless Refresh
A project to refresh your existing wireless network or a gut-and-replace project to upgrade
your wireless infrastructure, or even just upgrading select components of your wireless
infrastructure, is a perfect opportunity to include security measures where they didn’t exist
before. You should treat any of these opportunities the same as a predeployment project
and integrate security from the beginning. In addition to integrating security from the start,
you should look for opportunities to reuse existing infrastructure.
Be sure to account for the following issues:
Who will manage the overall security of the wireless network? ●
Who will monitor security events? ●
Who will respond to intrusion events and deal with rogue access points? ●
Who will manage the security configuration of client devices? ●
Apply Least Privilege to whoever gets access to the wireless network. ●
06-ch06.indd 136 4/6/12 3:01:34 PM
Secure Beginner’s Guide / Wireless Network Security: A Beginner’s Guide / Tyler Wrightson / 094-6 / Chapter 6
Secure Beginner’s Guide / Wireless Network Security: A Beginner’s Guide / Tyler Wrightson / 094-6 / Chapter 6
Chapter 6 Theory of Defense for Securing Wireless Networks 137
Above all else, make sure you fully understand the true catalyst behind management’s
decision to deploy a wireless network. For example, if management is looking to
improve business efficiency by making a small group of the company mobile around the
office, can you identify all these users and build a more secure environment around that
understanding? Can you deploy fewer access points with more restrictive settings? Can
you quarantine off the wireless network from the internal network and give users access to
only the few servers they need access to? Can you train all the people who will be using
the wireless network on how to keep it as secure as possible? Keep in mind that business
needs should always drive technology deployments; you should never be implementing
technology just for technology’s sake.
Secure Design Principles for Wireless Networks
I introduced some of these secure network design principles in Chapter 1. Now we’ll take
a look at these principles as they apply directly to wireless networks. In the remaining
chapters, we’ll actually take these ideas and implement them into real-world solutions.
We’ll take a look at the following secure design principles in detail:
Defense In Depth ●
Least Privilege ●
Network segmentation ●
Wireless assessments ●
Secure the infrastructure itself ●
Rogue AP detection ●
Physical security ●
Change default configurations ●
Due diligence ●
CIA ●
Defense In Depth
Remember we discussed the principles of Defense In Depth in the first chapter. The core
idea behind Defense In Depth is to have multiple technologies in place to secure your
environment and not just rely on one. Too often network administrators will rely solely
on preventative technologies to keep attackers out—this is especially true of wireless
networks. A perfect example would be the typical setup where either WEP or WPA are
used and nothing else. Administrators assume they’ve prevented unwanted outsiders
06-ch06.indd 137 4/6/12 3:01:34 PM

Secure Beginner’s Guide / Wireless Network Security: A Beginner’s Guide / Tyler Wrightson / 094-6 / Chapter 6
138 Wireless Network Security: A Beginner’s Guide
from accessing their network and therefore don’t need to worry about any additional
security measures. One of the biggest pieces of the puzzle they’re missing is in deploying
technologies to detect attacks—both attempted and successful attacks.
Remember that the three main components of a Defense In Depth strategy are
Prevent ●
Detect ●
Deter ●
However, there’s a fourth quasi-tactic that is picking up steam in real-world
deployments: Frustrate. Some systems have capabilities whose sole purpose is to confuse
or frustrate an attacker. A honeypot system could be considered to have frustration and
diversion capabilities because attackers
would be wasting their time on systems
that lead nowhere and divert them away
from real targets. Some firewalls include
“stealth” capabilities to confuse port
scanners in which they report that all TCP
ports scanned are open.
The more you’re able to integrate
technologies that detect and deter as
well as prevent, the stronger the overall
security of your network will be. We’ll
take a look at real-world solutions using
a Defense In Depth strategy in later
chapters.
Least Privilege
The principle of Least Privilege is a very important component of any secure system.
Least Privilege means giving users and systems access to only the things they need.
Unfortunately, this is probably one of the most often overlooked principles in any system,
and most system administrators actually apply the antithesis of this principle and start by
granting users access to everything and then removing specific things one by one. This
can also be referred to as whitelisting and blacklisting, respectively.
When using a blacklist, you essentially configure a system so that users can access
anything they want except for items listed on the blacklist. When using a whitelist, you start
by saying users cannot access anything except for items on the whitelist. These principles
LINGO
Honeypot systems are a great
technology that frankly are not used
enough. A honeypot is essentially a
juicy-looking target (typically a server)
whose sole purpose is to attract bees
(attackers). Honeypots also typically
appear to have vulnerabilities on them
that would attract the attention of an
attacker. We’ll discuss honeypots and
good deployment locations for them in
a later chapter.
06-ch06.indd 138 4/6/12 3:01:34 PM

Secure Beginner’s Guide / Wireless Network Security: A Beginner’s Guide / Tyler Wrightson / 094-6 / Chapter 6
Secure Beginner’s Guide / Wireless Network Security: A Beginner’s Guide / Tyler Wrightson / 094-6 / Chapter 6
Chapter 6 Theory of Defense for Securing Wireless Networks 139
have been applied to almost every component of modern networks, including firewall access
control lists, operating system applications, web application internals, and now wireless
networks.
So how does this apply to wireless networks? The most obvious example would be
of Layer 3 or IP connectivity once associated to the wireless network. For example, if the
sole purpose of your wireless network is for the use of wireless barcode scanners, you
should not allow IP connectivity to all of the systems on your network from your wireless
network; instead, you should restrict access to only the backend system for the barcode
scanners. We’ll discuss specific applications of this rule for real-world wireless network
solutions in a future chapter.
Network Segmentation
The principle of Least Privilege leads very nicely into our next secure design principle
of proper network segmentation, where logical groups of systems are separated from
each other on one internal network. For example, you might create unique subnets for
your human resources department and a separate subnet for your billing department and
give them each access to only the systems they have a business need to access. Too often
networks and even wireless networks are one giant network, where every device can
communicate with every other device at both Layer 2 and Layer 3.
If you are unfamiliar with basic Layer 2 and Layer 3 concepts, I recommend picking up
Networking: A Beginner’s Guide, Fifth Edition (McGraw-Hill, 2009).
The most basic way of segmenting a network at Layer 2 and Layer 3 is with virtual
LANs and IP access control lists, respectively. A virtual LAN (VLAN) divides your physical
switches into multiple logical switches. This is a huge cost saver and is terrific for secure
configurations. Although there are ways to have hosts communicate across VLANs without
a router, the typical solution for inter-VLAN communication is to use a Layer 3 device
such as a firewall or router. Take a look at Figure 6-1 for how hosts on one VLAN might
communicate with hosts on another VLAN.
There are switches that operate at
Layer 2 and Layer 3, and these can be
perfect places to provide segmentation
between subnets. Physically the scenario
would look very different, but it would
operate exactly the same logically.
A basic example of network segmentation for a wireless network would be a company
that needs to provide wireless access to the Internet for guests and access to internal
resources for employees. Clearly, you don’t want these users on the same Layer 2 or
Layer 3 network. We will discuss secure solutions for this in a future chapter.
LINGO
Typically, a switch that also operates at
Layer 3 is (not surprisingly) referred to
as a Layer 3 switch!
06-ch06.indd 139 4/6/12 3:01:34 PM
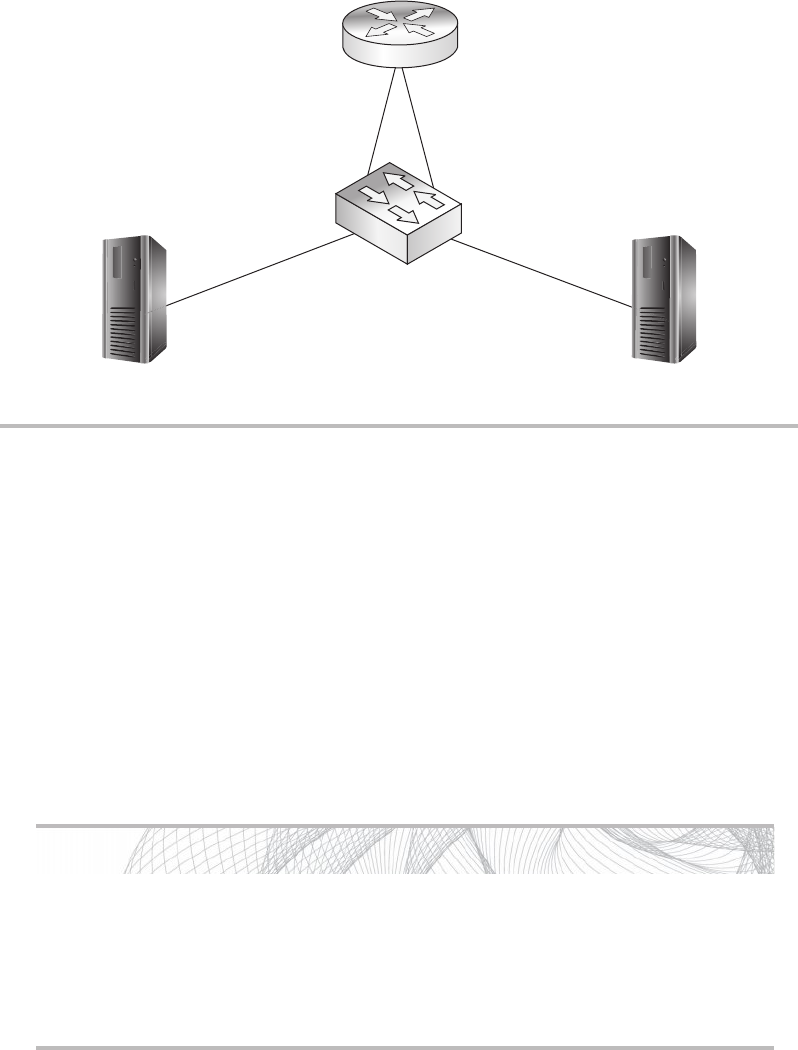
Secure Beginner’s Guide / Wireless Network Security: A Beginner’s Guide / Tyler Wrightson / 094-6 / Chapter 6
140 Wireless Network Security: A Beginner’s Guide
Wireless Assessments
It is absolutely critical that you don’t just assume your wireless network has been configured
correctly. Take a look at your wireless network from the viewpoint of an attacker. Spend
a day to go through the previous chapters on attacking wireless networks and see if any
of these attacks work against your network. The timeframe for how often you assess your
network is completely dependent on your company and what’s reasonable to do. If you
have the resources to test monthly, then by all means do so. Most companies should find
it reasonable to assess the current security of their wireless network at least once or twice
a year.
Into Action
You should perform security assessments against yourself as often as is reasonable.
However, this doesn’t mean you should not have an assessment performed by a
skilled third party. There are companies that specialize in penetration tests and
vulnerability assessments, and they are a good insurance policy for catching
anything you might have missed.
Figure 6-1 Dual-homed router
Dual-Homed Router
VLAN 10
10.0.10.99
VLAN 20
10.0.20.99
Interface VLAN 20
10.0.20.1
Interface VLAN 10
10.0.10.1
06-ch06.indd 140 4/6/12 3:01:35 PM
Secure Beginner’s Guide / Wireless Network Security: A Beginner’s Guide / Tyler Wrightson / 094-6 / Chapter 6
Secure Beginner’s Guide / Wireless Network Security: A Beginner’s Guide / Tyler Wrightson / 094-6 / Chapter 6
Chapter 6 Theory of Defense for Securing Wireless Networks 141
Secure the Infrastructure
On the topic of firewalls and routers, it is absolutely critical to secure all components of
your infrastructure. This should go without saying, but many times companies can do a
great job securing their servers and operating systems but then leave their infrastructure
devices open to direct exploitation. Make sure you consider every component of your
network and look at securing them. This includes the following devices:
Firewalls ●
Routers ●
Switches ●
Wireless access points ●
Wireless access controllers ●
We’ll look at real-world solutions for securing your wireless infrastructure in a future
chapter.
Rogue AP Detection
We discussed the security implications of rogue wireless networks in previous chapters.
You should be well aware of the havoc that could be caused by someone placing an
unauthorized wireless access point on one of your internal networks. Whether the access
point was placed on your network by a malicious intruder or by a well-meaning employee
shouldn’t matter to you. If it’s unauthorized, it should be identified and removed as quickly
as possible. Many wireless management systems have built-in capabilities to alert an
administrator of detected external wireless networks. We’ll look at options for rogue
access point detection, identification, and removal in Chapter 11.
Physical Security
Something that needs to be considered for all your wireless devices is that of physical
security. Hopefully, I have beaten this topic to death in the previous chapters on attacks;
however, I think it’s justified to repeat it one more time because too often this area is
completely overlooked. Securing physical access to your wireless devices, including
infrastructure devices, is paramount! Access points can be kept physically secure by
placing them out of reach or by keeping them in physically lockable units.
Change the Default Configurations
Another axiom that must be followed, especially in regard to your wireless networking
components, is to change the default configurations. Default configurations present a
very easy attack vector for a would-be attacker. Things such as default usernames and
06-ch06.indd 141 4/6/12 3:01:35 PM
Secure Beginner’s Guide / Wireless Network Security: A Beginner’s Guide / Tyler Wrightson / 094-6 / Chapter 6
142 Wireless Network Security: A Beginner’s Guide
passwords, default permissions, and even default enabled services can be very dangerous.
These default configurations are readily available to attackers through manuals and
documentation on the Internet. There is no universal fix for all default configurations;
you must acquaint yourself with the products you choose to deploy in your environment
and make sure you change any insecure default configurations.
Due Diligence
So how do we sum up all of our efforts? We must perform due diligence at all times to ensure
we’re not exposing our networks to unnecessary risks. As we discussed in Chapter 1,
securing your wireless network does not just mean keeping unauthorized users out, but
also preventing internal users from doing things they shouldn’t.
Confidentiality Integrity Availability (CIA)
We discussed the CIA triad in the first chapter, and applying the triad to any secure network
implementation is key—wireless networks being no exception. Remember, you want to
ensure the confidentiality of your users’ data, meaning only authorized users are able
to view it. You want to ensure the integrity of the data, meaning there haven’t been any
unauthorized changes or manipulations of the data. Lastly, you want to ensure the data is
available to the users who need access to it when they need access to it.
The two core technologies to meet the goals of confidentiality and integrity are
authentication and encryption. The 802.11 protocols contain options available that are
integrated right into the standard. WEP includes methods for both authentication and
encryption. (Although you know to never use WEP, right?) Likewise, WPA and WPA2
(802.11i) include methods for both authentication and encryption.
Ultimately, the best advice I can give you is to use technologies that have existed for
some time and are still considered secure. Remember, however, that security is not static;
it’s ever-changing and very dynamic. What’s secure today could be horribly insecure
tomorrow.
Encryption
The native encryption methods in WPA are TKIP and CCMP, which is based on AES.
For a complete refresher, see the section “How WPA Works” in Chapter 3. Remember that
as of today, some weaknesses are being revealed for some WPA TKIP implementations.
Therefore, when deploying WPA, you should choose WPA CCMP as your encryption
method of choice.
Other options are available as well. Just because WPA only supports two encryption
methods doesn’t mean you’re restricted to those. You can still use existing VPN technologies
such as IPSec and SSL VPNs. We’ll cover the integration options for them in a future chapter.
06-ch06.indd 142 4/6/12 3:01:35 PM

Secure Beginner’s Guide / Wireless Network Security: A Beginner’s Guide / Tyler Wrightson / 094-6 / Chapter 6
Secure Beginner’s Guide / Wireless Network Security: A Beginner’s Guide / Tyler Wrightson / 094-6 / Chapter 6
Chapter 6 Theory of Defense for Securing Wireless Networks 143
Authentication
You have a myriad of authentication
options available to you, many of which
are supported natively by WPA2. Most of
the authentication methods are based on
the Extensible Authentication Protocol
(EAP). EAP has many variations to
handle different needs and environments.
We’ll focus on the three most popular
EAP methods for WPA2 networks:
PSK (Pre-Shared Key) ●
PEAP (Protected Extensible ●
Authentication Protocol)
EAP-TLS (Extensible Authentication ●
Protocol–Transport Layer Security)
Pre-shared Key (PSK) You should
already be very familiar with the concept
of a pre-shared key, especially as it
relates to wireless networks and WPA2.
As it relates to WPA and WPA2, a pre-
shared key can be a maximum of 63
ASCII characters or a maximum of 64
hexadecimal characters in length. The pre-
shared key must be manually entered on
any device connecting to the WPA-PSK
network.
Protected Extensible Authentication Protocol (PEAP) PEAP stands for Protected
EAP, which gets its name because it sets up an encrypted tunnel to protect EAP from
eavesdropping attacks. This encrypted tunnel is very similar to encrypted tunnels for
secure websites.
There are actually a few PEAP versions, but the most popular uses Microsoft
Challenge Handshake Authentication Protocol version 2 (MS-CHAPv2) to handle
the actual authentication. This authentication method is integrated into Windows and
LINGO
WPA ● Wi-Fi Protected Access
TKIP ● Temporal Key Integrity Protocol
CCMP ● Counter Mode with
Cipher Block Chaining Message
Authentication Code Protocol, which
is based on the Advanced Encryption
Standard (AES)
IPSec ● Internet Protocol Security
extensions
SSL ● Secure Sockets Layer
Remember that WPA was released to
replace WEP due to WEP’s inherent
weaknesses. TKIP allowed WPA to work
on existing hardware that supported
WEP—all that was typically needed was
a firmware upgrade. On the other hand,
CCMP, which is based on an encryption
standard that has been around for some
time, is part of the official 802.11i
(WPA2) standard. For a full recap,
see the section “How WPA Works” in
Chapter 3.
06-ch06.indd 143 4/6/12 3:01:35 PM

Secure Beginner’s Guide / Wireless Network Security: A Beginner’s Guide / Tyler Wrightson / 094-6 / Chapter 6
144 Wireless Network Security: A Beginner’s Guide
requires relatively low effort to get up and working. PEAP provides the opportunity for
mutual authentication because the client will have the certificate for the authentication
server and the user authenticates to the server using the user’s domain username and
password. Mutual authentication occurs when both parties authenticate each other. You
should already be very familiar with a client authenticating to a server, but in mutual
authentication the client also authenticates that the server is the intended server.
Extensible Authentication Protocol–Transport Layer Security (EAP-TLS) EAP
Transport Layer Security relies on some of the same methods you’re already familiar
within the TLS protocol. The most notable is that it uses certificates to authenticate the
users. EAP-TLS can be considered the most secure implementation to date. However,
this security comes with more headaches and requires more time to deploy and manage
because a full Public Key Infrastructure (PKI) is needed. We’ll go over this configuration
in a future chapter.
802.1x The 802.1x protocol is an IEEE
standard for port-based authentication.
The 802.1x standard also defines the
implementation of the Extensible
Authentication Protocol Over LAN,
or EAPOL.
To better understand how 802.1x functions on a wireless network, you should understand
its roots in wired networks. 802.1x, or Port-Based Access Control, requires users to
authenticate to the switch they’re physically connected to before they’re granted access
to the network. Typically, this authentication will happen against a unique database that
resides on a server separate from the network device the user is directly connected to.
802.1x has its own unique nomenclature to identify each component in the authentication
process. 802.1x refers to these components as a supplicant, authenticator, and authentication
server. In a wireless network, a user’s laptop would be the supplicant, the wireless access
point would be the authenticator, and the RADIUS server would be the authentication
server. This basic architecture is shown in Figure 6-2.
Any client device (supplicant) that wishes to connect to the protected network must
support the 802.1x protocol in the form of client software, typically referred to as supplicant
software. Most modern operating systems come preinstalled with supplicant software;
however, you may need to install supplicant software, depending on your client devices
and authenticators.
LINGO
Remember not to confuse 802.1x
with 802.11x. The latter is a common
way to refer to all the 802.11 wireless
standards.
06-ch06.indd 144 4/6/12 3:01:35 PM
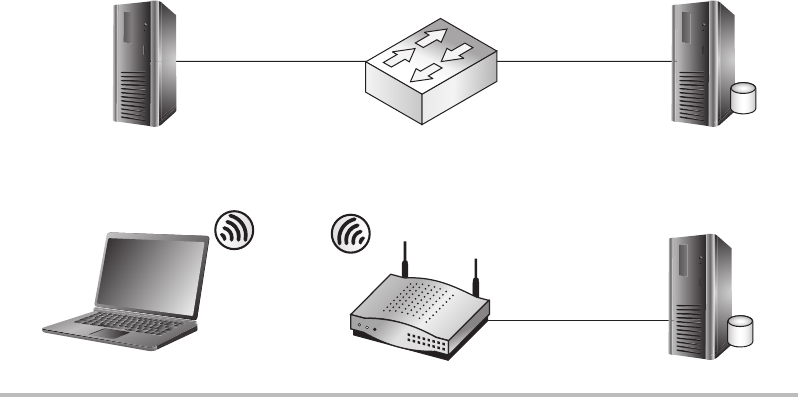
Secure Beginner’s Guide / Wireless Network Security: A Beginner’s Guide / Tyler Wrightson / 094-6 / Chapter 6
Secure Beginner’s Guide / Wireless Network Security: A Beginner’s Guide / Tyler Wrightson / 094-6 / Chapter 6
Chapter 6 Theory of Defense for Securing Wireless Networks 145
Useless Defenses
Let’s take this opportunity to discuss technologies I consider to be useless defenses.
Unfortunately, some of these techniques have seen widespread use, which has always
puzzled me. We’ll look at the pros and cons of each of these techniques and ask the
question, Does this actually make us more secure?
Faraday Cage
At the most basic level, you can think of a Faraday cage as a system for confining the
physical propagation of wireless signals. In the real world, typically this is accomplished
by putting up wireless mesh around a building or area so that wireless signals from the
outside can’t get in and wireless signals from the inside can’t get out. From a security
perspective, this just doesn’t cut it for me. As you’ve seen in previous examples, high-
gain antennas can be used to pick up very weak wireless signals. Also, the use of signal-
limiting systems seems to give people a false sense of security. Typically, this can be a
relatively costly endeavor for anything but the smallest areas for security that is easily
compromised.
Figure 6-2 802.1x topology and nomenclature
802.1X Nomenclature
802.1X Authentication
Client
Supplicant Authentication
Server
Authenticator
WIRED 802.1X Authentication
AP
06-ch06.indd 145 4/6/12 3:01:38 PM
Secure Beginner’s Guide / Wireless Network Security: A Beginner’s Guide / Tyler Wrightson / 094-6 / Chapter 6
146 Wireless Network Security: A Beginner’s Guide
Again, keep in mind that my dislike of Faraday cages is completely without context.
There are cases where they make perfect sense; however, I would argue that it’s never for
a security reason. The only real applications of a Faraday cage that make sense to me are
using it in areas where you don’t want the annoyance of devices such as cell phones or
for physically sensitive devices. I’ve seen places such as law offices and courtrooms use
Faraday cages to prohibit the use of cell phones. Medical and research environments can
also use Faraday cages for non-security-related reasons, if they’re dealing with sensitive
equipment or potentially harmful radiation that they don’t want to leave the area.
I would recommend you take a hard look at whether wireless technologies are the
right choice for you if you consider it necessary to use a Faraday cage to secure your
network.
MAC Filtering
MAC address filtering enables an administrator to define specific hosts that are allowed
to associate with the wireless network. The hosts are defined by the MAC address of their
wireless card. MAC filtering is the perfect example of a whitelist. Remember that a MAC
address is the hardcoded address that identifies your specific network card.
With MAC filtering, essentially you’re telling your access point to only allow devices
that exist on your whitelist to associate with your access points. This approved MAC list
is typically created by hand, although there are some options to “auto-discover” or import
a large number of MAC addresses. MAC filtering might conceptually make sense, but in
practice it affords no real security.
As far as I’m concerned, MAC address filtering might take the cake. This might very
well be the most useless defense for wireless networks. You’ve already seen in previous
chapters how trivial it is to sniff a wireless network and obtain the MAC address for a host
that is authorized to associate and then assign your network card to use that MAC address.
When you combine how trivial it is to bypass this “access control mechanism” with how
annoying it is to administer the system, you have a candidate for world’s worst defense.
Think of how annoying it would be if every time you added a new wireless device to your
network or changed a wireless network card, you had to wait for an administrator to add
your device to the approved list. Also, from the perspective of an administrator, it’s just
another hassle that he doesn’t need.
SSID Cloaking
As you’ll recall from Chapter 4, Service Set Identifier (SSID) cloaking allows an
administrator to prevent the network name from being included in beacon frames from
the access point. This is done to prevent wireless clients from “discovering” the wireless
06-ch06.indd 146 4/6/12 3:01:38 PM
Secure Beginner’s Guide / Wireless Network Security: A Beginner’s Guide / Tyler Wrightson / 094-6 / Chapter 6
Secure Beginner’s Guide / Wireless Network Security: A Beginner’s Guide / Tyler Wrightson / 094-6 / Chapter 6
Chapter 6 Theory of Defense for Securing Wireless Networks 147
network. SSID cloaking is another technology that conceptually makes sense but turns out
to be nothing more than a headache for administrators and legitimate users and provides
no real benefit.
However, in Chapter 4, you learned that tools are available to grab this information at
any time when there is an authenticated station on the wireless network. Therefore, this is
just another example of a wireless network defense that does nothing more than add more
work for the wireless network administrator and a very small hurdle for an attacker.
WEP
Wired Equivalent Privacy (WEP) was the original protection standard built into the 802.11
standard. WEP offers virtually no protection, as you learned in Chapter 4. If you didn’t
read that chapter, stop reading right now and go read it. I simply can’t stress this enough:
Under no circumstance are you to use WEP! Are we clear?
Now, I’m a realist: I understand that there will still be WEP networks around for some
time. The only possible argument that would appear to be somewhat valid would be if you
have to support a client device whose only available encryption method is WEP. We will
discuss in a later chapter how to potentially deal with a network of this nature; however,
nowadays it would seem pretty rare that a wireless device supports only WEP.
Keep in mind that even if you deploy other compensating controls such as an IDS,
an attacker could still passively capture all the network traffic, crack the WEP key, and
view the data from the captured packets. This means that no matter what you do to detect
possible intrusions onto a WEP-encrypted network, your efforts will be for naught because
an attacker can view the data contained in the captured packets.
WEP Cloaking
WEP cloaking, not to be confused with SSID cloaking, was meant to be a Band-Aid for
networks that use WEP. As you’ll recall from Chapter 4, cracking the WEP key requires
the attacker to capture a certain number of WEP-encrypted packets. What WEP cloaking
does is essentially send out “invalid” encrypted packets (or what is typically called chaff)
to confuse the WEP-cracking software when it attempts to crack the WEP key.
This is yet another example of a technique that makes sense on paper but simply
doesn’t work. Security researchers were quick to render this technique almost useless.
WEP cloaking typically only adds a few minutes to the total time to crack a WEP-
encrypted network.
06-ch06.indd 147 4/6/12 3:01:38 PM

Secure Beginner’s Guide / Wireless Network Security: A Beginner’s Guide / Tyler Wrightson / 094-6 / Chapter 6
148 Wireless Network Security: A Beginner’s Guide
Good Wireless Defenses
Now that we’ve detailed some of the less effective solutions for securing your wireless
networks, let’s look at some of the better solutions available to you. You’ll notice that for
the most part these technologies are not brand-new sparkling technologies. Instead, mostly
they’re either technologies that have withstood the test of time or just slight variations to
make them suitable for protecting wireless networks.
Firewalls
Firewalls may seem like an obvious component of any secure network design, but you
might be surprised how often they’re not integrated into wireless networks. Look for
opportunities to use firewalls to segment wireless traffic from internal networks (see
Figure 6-3) as well as segmenting wireless networks from each other (see Figure 6-4).
In addition, many firewalls today offer features other than just Layer 3 access control
lists. Some firewalls include things such as limited or full-blown IDS functionality,
antivirus functionality, and an understanding of some Application layer protocols to
Figure 6-3 Basic firewall segmentation
Interface Interface 1 2
Firewall Segmentation
Wireless
Network Internal
Network
Internet
06-ch06.indd 148 4/6/12 3:01:40 PM
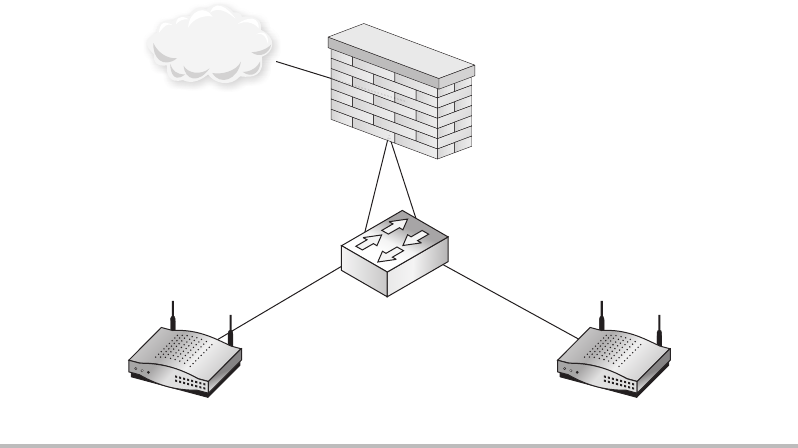
Secure Beginner’s Guide / Wireless Network Security: A Beginner’s Guide / Tyler Wrightson / 094-6 / Chapter 6
Secure Beginner’s Guide / Wireless Network Security: A Beginner’s Guide / Tyler Wrightson / 094-6 / Chapter 6
Chapter 6 Theory of Defense for Securing Wireless Networks 149
prevent common attacks. By routing your wireless networks through these firewalls, you
may be able to benefit from these additional features.
In Figure 6-3, you can see a basic example of how you could use a firewall to segment
your wireless network from your internal network and allow access to only the Internet. In
this case, you would configure the firewall interfaces as follows:
Interface 1 ● Drop traffic from wireless network to internal network.
Interface 2 ● Drop traffic from internal network to wireless network.
This is an important concept: Make sure when you configure your firewall access
control lists that you account for both directions. If the internal network doesn’t need
access to the wireless network, you should deny that traffic as well. Don’t assume that
just because the internal network is considered more “trusted” that users should have
access to things they don’t need. Again, keep in mind the concept of Least Privilege when
configuring firewall rules.
In Figure 6-4, you can see an example of segmenting two wireless networks from each
other. In later chapters, we’ll look at scenarios where it’s appropriate to have multiple
wireless networks, even multiple internal networks. Again, whenever two subnets don’t
need access to each other, you should deny access.
Figure 6-4 Using a firewall to segment two wireless networks
INT_WIFI
EXT_WIFI
Firewall Segmenting Two Wireless Networks
Internet
06-ch06.indd 149 4/6/12 3:01:41 PM

Secure Beginner’s Guide / Wireless Network Security: A Beginner’s Guide / Tyler Wrightson / 094-6 / Chapter 6
150 Wireless Network Security: A Beginner’s Guide
In this case, you would configure the firewall in an almost identical way as before.
We’ll take a look at examples of actual firewall configurations in future chapters.
Interface 1
● Drop traffic from EXT_WIFI network to INT_WIFI network.
Interface 2
● Drop traffic from INT_WIFI network to EXT_WIFI network.
Routers
There are many reasons why you might not be able to integrate firewalls into the design
of your wireless network. Maybe you only have one perimeter firewall, and it wouldn’t
make sense to route the wireless traffic through it. Or maybe your firewall can’t handle
the additional load from the wireless network. If you can’t use a firewall, you should at
least have some level of Layer 3 segmentation—and a router is the perfect platform to
accomplish this. Keep in mind that you don’t technically even need a router; you can use a
Layer 3 switch to achieve the same results. I’m using the term router to cover both here.
In Figure 6-5, you would configure the router identically to the firewalls in the
previous examples.
Interface 1
● Drop traffic from wireless network to internal network.
Interface 2
● Drop traffic from internal network to wireless network.
Budget Note
Look for ways to reuse existing infrastructure when feasible and appropriate to do
so. Saving money on hardware means you can use those funds on additional security
measures. Many places have the capabilities in their existing hardware and software
to be much more secure than they are today but don’t actually utilize this additional
functionality. Decision makers might be more likely to go for a new security solution
if you’re able to increase security while not having to invest in additional hardware or
software.
However, this doesn’t mean you should cut corners. If you have only one firewall
in your environment and it’s already reaching capacity, it makes more sense to buy new
equipment than to wait for your existing firewall to explode.
06-ch06.indd 150 4/6/12 3:01:41 PM
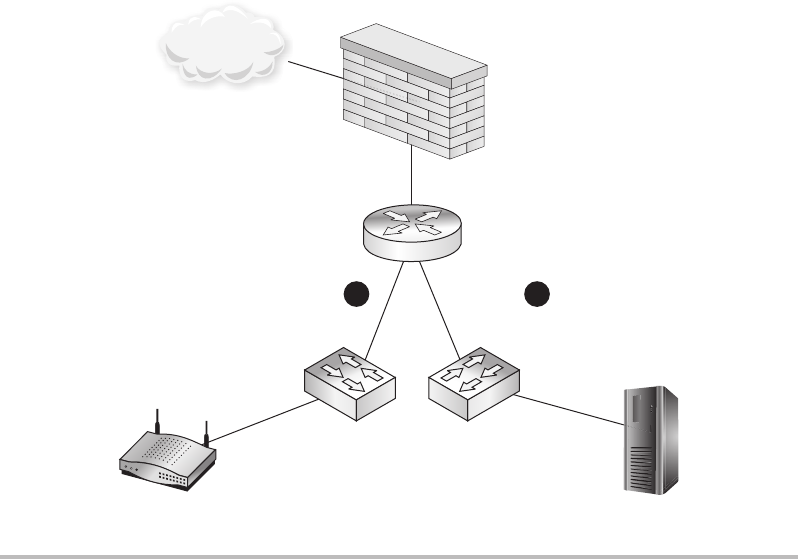
Secure Beginner’s Guide / Wireless Network Security: A Beginner’s Guide / Tyler Wrightson / 094-6 / Chapter 6
Secure Beginner’s Guide / Wireless Network Security: A Beginner’s Guide / Tyler Wrightson / 094-6 / Chapter 6
Chapter 6 Theory of Defense for Securing Wireless Networks 151
Switches
Yes, even your lowly switches can be configured to support your wireless network in a
secure way. The most basic way you can use your switches in a secure wireless network
is to segment your network at Layer 2 with virtual LANs. Remember that VLANs divide
your physical switch into multiple logical switches.
You would normally assign a unique IP subnet for each VLAN, and typically the only
way for devices on different VLANs to communicate would be using a Layer 3 gateway such
as a router or firewall. So in the previous example from Figure 6-5, it would logically operate
exactly the same; however, it would physically look closer to what’s shown in Figure 6-6.
A trunk is a special port that can actually carry traffic for multiple VLANs; you can
almost think of the trunk port as existing in all the VLANs configured to the trunk port.
We won’t cover all the technical details of how this works, but you should understand this
technology conceptually. So, in the previous example, you could actually use a port on the
switch configured as a trunk port and an interface on the router configured as a trunk port.
Figure 6-5 Using a router to segment wireless networks
Router and Perimeter Firewall
Wireless
Network
Internal
Network
Interface
Perimeter Firewall
Interface 12
Internet
06-ch06.indd 151 4/6/12 3:01:43 PM
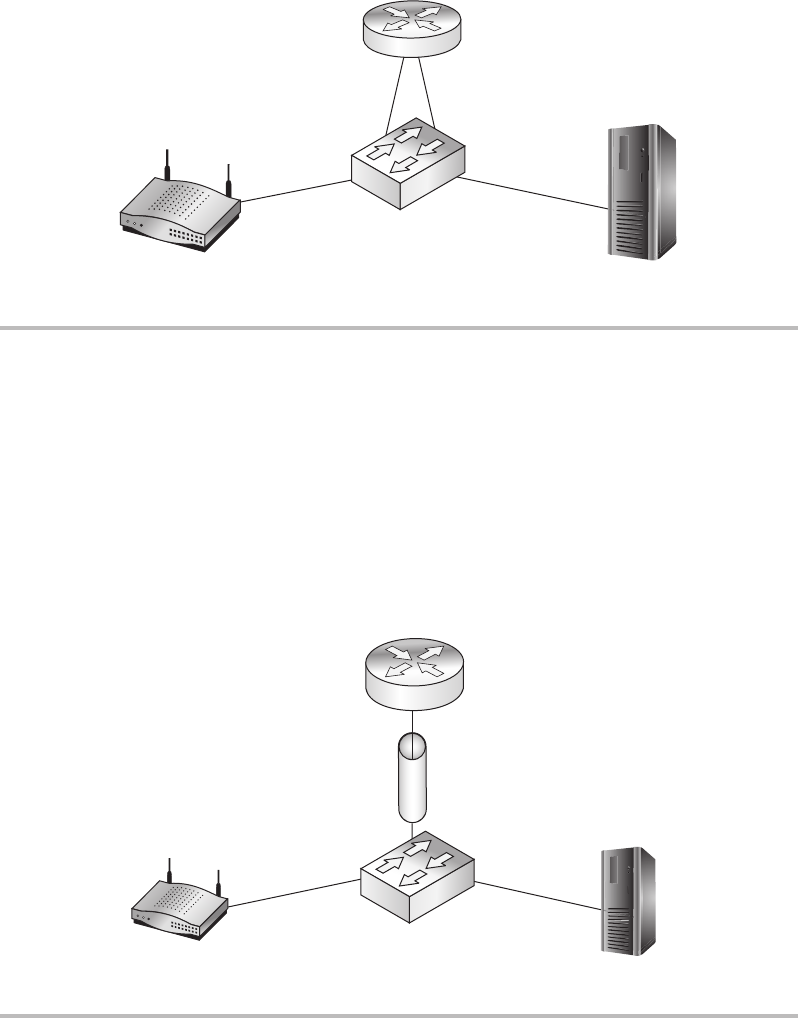
Secure Beginner’s Guide / Wireless Network Security: A Beginner’s Guide / Tyler Wrightson / 094-6 / Chapter 6
152 Wireless Network Security: A Beginner’s Guide
This would look something like what’s shown in Figure 6-7 and operate logically identical
to the previous examples.
So how can this assist you in creating a more secure wireless network? Modern
business-class access points allow you to create multiple SSIDs and assign them to unique
VLANs. Each unique SSID can have its own encryption and authentication settings. This
is the same concept as VLANs on a switch; essentially it allows you to create multiple
Figure 6-7 Using trunk ports to handle multiple VLANs
Router on a Stick
Internal WIFI
VLAN 10
Logical Interface
VLAN 20
Logical Interface
VLAN 10
Internal WIFI
VLAN 20
Figure 6-6 Using a VLAN to segment wireless networks
Router with Switch VLAN’D
Internal WIFI
VLAN 10
Internal WIFI
VLAN 20
06-ch06.indd 152 4/6/12 3:01:45 PM
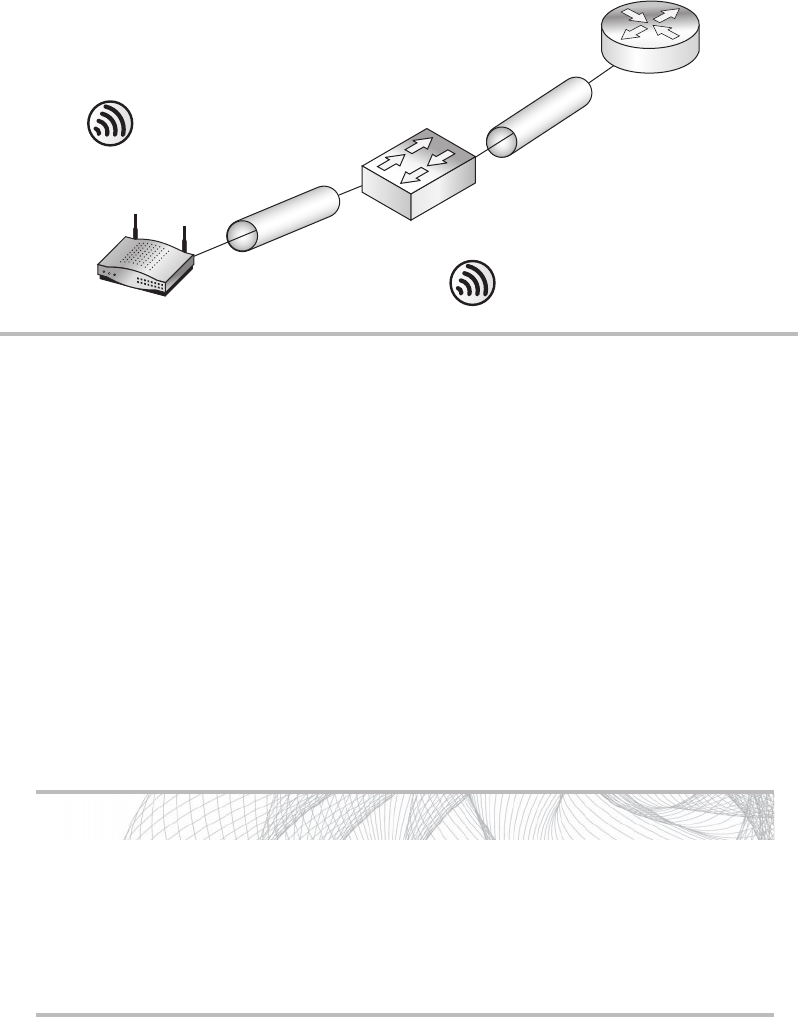
Secure Beginner’s Guide / Wireless Network Security: A Beginner’s Guide / Tyler Wrightson / 094-6 / Chapter 6
Secure Beginner’s Guide / Wireless Network Security: A Beginner’s Guide / Tyler Wrightson / 094-6 / Chapter 6
Chapter 6 Theory of Defense for Securing Wireless Networks 153
logical access points on one physical access point. Your switch and your access point need
to support trunk ports, but this is a very common capability for modern managed switches
as well as business-class access points.
In Figure 6-8, you can see that the port between the access point and the switch is a
trunk port. Just as in the previous examples, you’d want to create an ACL that restricts
access between the VLANs, which would be configured in exactly the same way.
Intrusion Detection Systems
and Intrusion Prevention Systems
Intrusion detection systems (IDS) and intrusion prevention systems (IPS) comprise
another great technology that doesn’t see as much use as it should. Intrusion detection and
Into Action
Trunk ports are actually relatively simple in how they operate. Each VLAN is
assigned a unique numerical ID. Essentially, every packet that is sent via a trunk port
is “tagged” with a VLAN ID indicating which VLAN the packet is destined for.
Again, keep in mind that some nuances can come into play, but this is basically
how trunk ports operate.
Figure 6-8 Multiple SSIDs using one access point and trunk port
Multiple SSID
VLAN 10
VLAN 20
SSID: Guest
Encryption: None
Authentication: None
AP
SSID: INT_WIFI
Encryption: WPA_CCMP
Authentication: WPA2_PEAP
VLAN 10
VLAN 20
06-ch06.indd 153 4/6/12 3:01:45 PM

Secure Beginner’s Guide / Wireless Network Security: A Beginner’s Guide / Tyler Wrightson / 094-6 / Chapter 6
154 Wireless Network Security: A Beginner’s Guide
prevention systems, as their names imply, are used to detect and potentially respond to
detected security events. These events can be suspicious network traffic, types of activity
on a computer, or even specific actions, depending on the type and location of the IDS/
IPS. These systems can be extremely complex, and entire books could be and have been
written on the subject. We can’t possibly cover the technical details of deploying and/or
managing an IDS/IPS, but we can make sure you understand some of the more important
decisions you need to consider before jumping into an IDS/IPS project:
When to use IDS versus IPS ●
Where on the network will it be located? ●
How will it receive traffic (SPAN, RSPAN, tap, hub)? ●
Who will manage the IDS/IPS? ●
What to look for when monitoring an IDS/IPS ●
IMHO
To me, intrusion detection system has always been somewhat of a misnomer.
Technically, the system doesn’t “detect intrusions.” Instead, it’s just another tool that
requires a skilled person to manage and interpret what the tool is indicating. Most
intrusion detection and prevention systems are signature based, meaning they look
for predefined things that match a specific signature. These signatures can be very
simple or extremely complex!
This is an important concept to appreciate. Many times I get the feeling that
people who are looking at an IDS think it will sit quietly on the network and
then alert an administrator when an “intrusion” (or potential intrusion) has been
“detected.” This, of course, is not only wrong, it’s counter to the very nature of
many intrusions. Let me explain.
In the case of a network-based IDS, it may alert you to network traffic that
could be indicative of a potential attack (let’s say a port scan against an internal
server). But then what happens when an attacker logs into the target system using
valid credentials that he compromised by another vector? Will the IDS alert you
to a successful login with valid credentials? The answer is almost always no. So
has the IDS alerted you to an actual intrusion or to events that might indicate a
potential attack?
My point is that you can’t simply deploy an IDS and let it sit on your network
and expect to get a meaningful addition to your security posture. You need to have
someone who not only can look at the data from the IDS but can also interpret and
prioritize the data and respond appropriately when necessary.
06-ch06.indd 154 4/6/12 3:01:45 PM
Secure Beginner’s Guide / Wireless Network Security: A Beginner’s Guide / Tyler Wrightson / 094-6 / Chapter 6
Secure Beginner’s Guide / Wireless Network Security: A Beginner’s Guide / Tyler Wrightson / 094-6 / Chapter 6
Chapter 6 Theory of Defense for Securing Wireless Networks 155
When to Use IDS vs. IPS
The main difference between an IDS and IPS is relatively straightforward, but the business
decisions of when to use one versus the other might be a little more complicated. An IDS
passively monitors traffic and alerts on data, whereas an IPS can take automated action
based on detected events. This is, of course, an extreme reduction of the differences, but
you get the point.
The typical argument for IPS over IDS is whether or not you can affect legitimate
users. The ultimate risk is in a false positive, where a legitimate user is denied access to
a resource because the IPS believes that person to be performing some task that appears
to be malicious. This can affect the availability of your systems, as mentioned in the CIA
triad. For example, in an e-commerce environment, where lost revenue could be the result,
this might not be appropriate. One of the most telling questions to ask from a business
perspective would be, Is it riskier to deny a legitimate user or let a potential attack
succeed? Answer that question, and you’ll have a pretty good idea of whether you should
lean toward an IDS or an IPS solution.
Where on the Network Will the IDS System Be Placed?
Historically, most IDS systems have been placed near network perimeter points. This still
makes sense, but there are additional locations from where we can harvest IDS events.
IDS software can now actually run right on access points and client devices and then
report the data back to a central server where it’s analyzed and alerted on. We’ll cover
more on IDS placement in a future chapter.
How Will the IDS Receive Network Traffic to Inspect?
Again, this has to do with where it’s placed and how the technology works (wired versus
wireless), but there are nuances to each. Some of the possibilities include the following:
Hub ●
Network tap ●
Port mirroring ●
RSPAN ●
Hubs are by far the simplest to understand and use. Hubs by their nature copy all packets
they receive on one port to all other ports. In Figure 6-9, you can see that a hub placed between
the perimeter firewall and router will be able to monitor all the ingress and egress traffic.
A network tap is specifically designed for copying data. It offers a few more specialized
features, such as being able to forward the received data and sent data to different physical
06-ch06.indd 155 4/6/12 3:01:45 PM
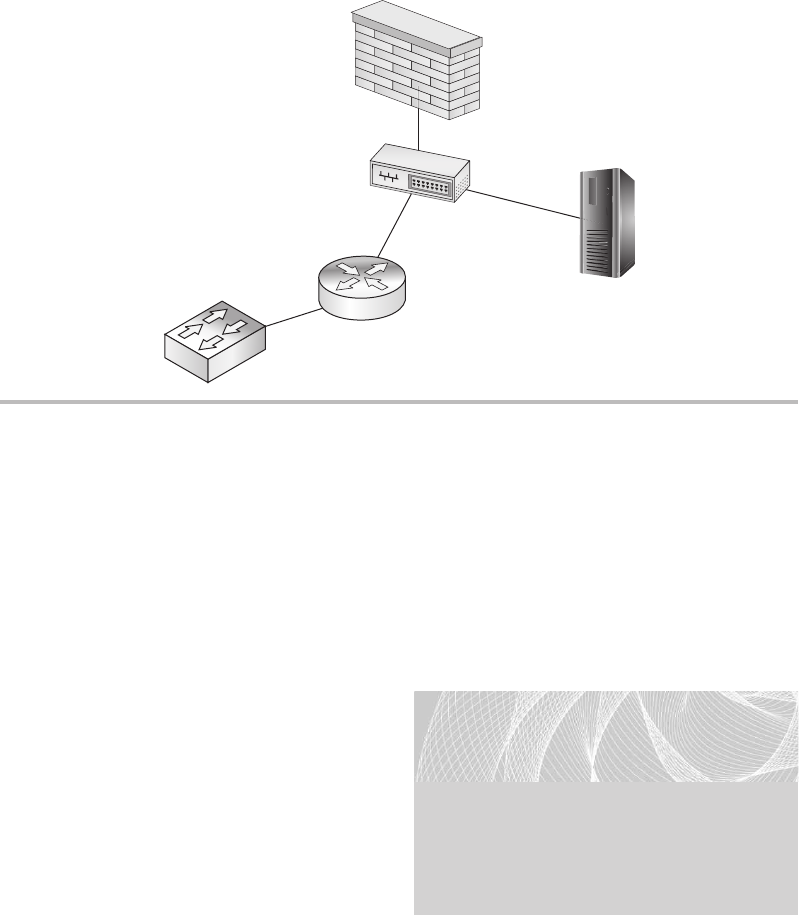
Secure Beginner’s Guide / Wireless Network Security: A Beginner’s Guide / Tyler Wrightson / 094-6 / Chapter 6
156 Wireless Network Security: A Beginner’s Guide
interfaces, as well as providing a certain level of fault tolerance. The biggest disadvantage
is its price. Typically, a network tap can cost you a few hundred dollars, where as a hub
today can be had for as little as ten dollars.
Port mirroring is a technology that can be configured on a Layer 2 switch to copy
data packets from one or more source ports to a destination port. This is relatively simple
to configure and allows you much more flexibility in your configuration. For example,
if you have a 24-port switch, you can choose to copy the data from all the ports on your
switch to the port that’s connected to your
IDS, or you can forward traffic from as
few as one port (for example, the port
connected to your perimeter firewall) to
the port that’s connected to your IDS.
You’ll want to look at the documentation
for your specific model of switch
because configuration will vary among
manufacturers.
Remote Switched Port Analyzer (RSPAN) is a very interesting technology that allows
you to copy traffic from multiple switches to one centralized port where you can monitor
the traffic. This can be a good solution for monitoring traffic on your wireless network
Figure 6-9 Using a hub to support an IDS
HUB for IDS
IDS Host
HUB
LINGO
Switched Port Analyzer (SPAN) ports
refer to the Cisco proprietary technology
for port mirroring. However, the term
SPAN port is used interchangeably
in the industry to refer to any port-
mirroring configuration.
06-ch06.indd 156 4/6/12 3:01:46 PM
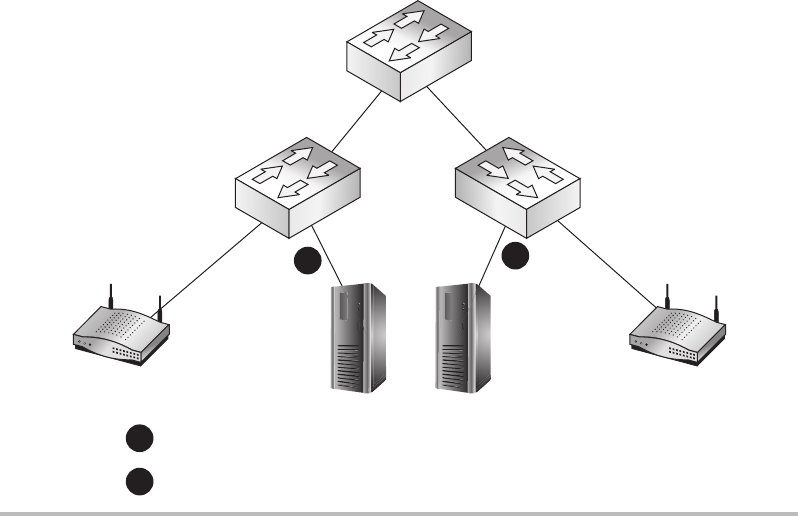
Secure Beginner’s Guide / Wireless Network Security: A Beginner’s Guide / Tyler Wrightson / 094-6 / Chapter 6
Secure Beginner’s Guide / Wireless Network Security: A Beginner’s Guide / Tyler Wrightson / 094-6 / Chapter 6
Chapter 6 Theory of Defense for Securing Wireless Networks 157
that’s spread across multiple switches. For example, in Figure 6-10, you can see we have
two wireless access points on two separate switches. Rather than configure port mirroring
on each switch separately and have two separate IDS servers or one server with two
interfaces, we can use RSPAN.
In Figure 6-11, you can see we’ve configured RSPAN to copy data from both switches
to one centralized port on the core switch. RSPAN essentially works by forwarding all the
data packets on one VLAN to another VLAN. You then configure a port on the destination
VLAN, and this is where you would place your IDS. This is another technology with a lot
of nuances and considerations, but now you understand the capability is there and you’ll
have to determine if it’s the correct solution for you.
Who Will Manage the IDS?
IDSs can require a lot of administrative overhead. Not only do you have to monitor the
system, but you also have to respond to detected events and tune the IDS. Tuning involves
tasks such as installing new and updated signatures, reviewing events and changing
signatures to prevent false positives, and whitelisting certain known activities.
Figure 6-10 Using unique SPAN configurations on multiple switches
Core Switch
IDS HOST
APAP
Port congured as destination for port mirroring
Port congured as destination for port mirroring
12
1
2
06-ch06.indd 157 4/6/12 3:01:48 PM
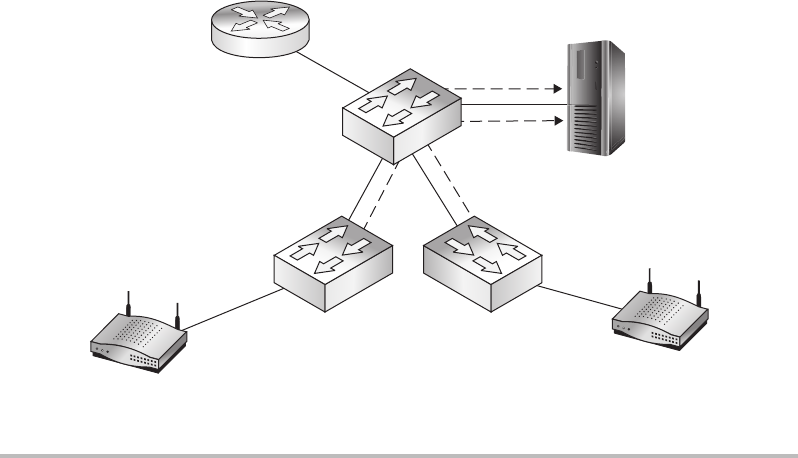
Secure Beginner’s Guide / Wireless Network Security: A Beginner’s Guide / Tyler Wrightson / 094-6 / Chapter 6
158 Wireless Network Security: A Beginner’s Guide
You need to account for this administrative time from the beginning and determine who
has the skills and the time to manage your IDS. Many excellent options are available for
outsourcing the management of your IDS. Be sure to investigate the costs as well as the
pros and cons of outsourcing the management of your IDS before deploying such a system.
What to Look for When Monitoring an IDS
Many people who could be tasked with managing the IDS are concerned that they won’t
know how to interpret the events or what to look for. In some situations an IDS certainly
requires an expert to install, tune, or manage the system; however, businesses can still
benefit from having a person monitor the device for anomalies.
For example, in the case of a WEP attack, if an alert to 10,000 ARP events is suddenly
received, this might be enough for someone with less knowledge to pick up the phone
and have someone investigate what is going on. This is a simple case of something being
better than nothing.
IDS can also be a great point for historical data. Even if you don’t have someone
monitoring the IDS daily, if you can look back at data to assemble the attack path and
timeframe of an intruder, this can be very helpful for incident responders.
Figure 6-11 Using RSPAN to forward packets to the destination VLAN
AP
AP
Access
Switch
Access
Switch
Core Switch
IDS Host
Access Switches forward trafc to RSPAN VLAN,
IDS Host connected to RSPAN VLAN
06-ch06.indd 158 4/6/12 3:01:48 PM

Secure Beginner’s Guide / Wireless Network Security: A Beginner’s Guide / Tyler Wrightson / 094-6 / Chapter 6
Secure Beginner’s Guide / Wireless Network Security: A Beginner’s Guide / Tyler Wrightson / 094-6 / Chapter 6
Chapter 6 Theory of Defense for Securing Wireless Networks 159
Wireless Intrusion Detection
and Intrusion Prevention Systems
Wireless IDS and IPS feel way more like new buzzwords to make sales than an actual
shiny, new technology. It is true that some of these systems actually use wireless interfaces
to monitor the airwaves for signs of different attacks, but I would like to pose a question:
Is that really necessary? I’ve had to deal with wireless-specific IDS alerts, and I can tell
you for the most part they’ve been relatively meaningless and inactionable. I lean toward
well-configured traditional intrusion detection systems being more meaningful than their
new wireless counterparts. For example, in a wireless IDS, you might receive alerts that
the system observed a client device probe for wireless networks but never join a network.
It is, of course, a very normal (and frequent) occurrence for a wireless client to probe to
join a network but not find a suitable network in the area.
Again, this doesn’t mean there’s no value in using a wireless-specific IDS—that
depends entirely on your business needs and objectives. New access points can actually
serve as IDS agents, which forward the events to a central system for analysis and
reporting. This is nice way to use existing wireless technologies to simulate a wireless
IDS. We’ll explore some of these technologies in a future chapter.
IMHO
My opinion is that most true wireless attacks are detectable with a traditional
IDS and don’t need to monitor the airwaves. For example, the ARP replay attack
against WEP is definitely detectable from the LAN side of the network.
In my experience, most of the wireless-specific signatures have been closer
to useless noise based on the way wireless networks and clients operate than
anything useful. For example, do you really need to know that a new client has
probed for wireless networks but hasn’t joined any? Keep in mind I’m not arguing
that a wireless IDS offers no value, but rather that you can get the same value from
existing (and probably less expensive) technologies.
Many people like the rogue access point detection capabilities of wireless IDS
systems, but again this can be accomplished (and potentially with more accuracy)
using a hardwired IDS. We’ll cover rogue access point detection in a future chapter.
Honeypots
Honeypots, as we discussed earlier, are systems that have been specifically configured
to attract the attention of a potential attacker. They can appear to have vulnerabilities
06-ch06.indd 159 4/6/12 3:01:48 PM
Secure Beginner’s Guide / Wireless Network Security: A Beginner’s Guide / Tyler Wrightson / 094-6 / Chapter 6
160 Wireless Network Security: A Beginner’s Guide
or specific applications of interest to an attacker. Therefore, they can prove to be good
diversions as well as provide evidence of an intended attack. If the sole purpose of your
honeypot is to sit quietly on the network, and you see attempts to log into this system, you
can be pretty sure it’s someone (or something) doing something they’re not supposed to.
Thus, you can alert on all events and get a good indication of potential attacks. We’ll look
at certain scenarios for implementing a honeypot in a future chapter.
Web Authentication Gateways
A web authentication gateway is a system that captures users’ sessions as they try to visit
a resource and redirects them to first perform authentication. You’re probably already
familiar with the web authentication gateway’s operation by way of many guest wireless
networks at coffee houses and transportation terminals. A web authentication gateway can
be a great tool from both a business security and technical security perspective. It gives
you the opportunity to authenticate users as well as present them with an acceptable use
policy, thus removing some liability from your business and placing it on the end user.
We’ll look at implementations of web authentication gateways in a future chapter.
We’ve Covered
In this chapter, we established a foundational understanding of the technologies you
should and should not use to secure your wireless networks. We looked at existing
technologies and how they can be configured to secure your wireless networks. We also
reviewed some common technologies that probably shouldn’t be as common as they are.
Setting the stage
Context must be considered for each defensive measure in this book. ●
Reality, as far as what is feasible for each defensive measure, must also be considered. ●
The attacker has the advantage of anonymity, time, and attack vectors. ●
Phases of wireless deployment
Considerations for each phase of your wireless network deployments, including the ●
following:
New deployments ●
Existing networks ●
Wireless refresh ●
06-ch06.indd 160 4/6/12 3:01:49 PM
Secure Beginner’s Guide / Wireless Network Security: A Beginner’s Guide / Tyler Wrightson / 094-6 / Chapter 6
Secure Beginner’s Guide / Wireless Network Security: A Beginner’s Guide / Tyler Wrightson / 094-6 / Chapter 6
Chapter 6 Theory of Defense for Securing Wireless Networks 161
If you don’t need wireless, don’t use it! ●
Penetration testing versus vulnerability assessment and differences between them ●
Secure design principles for wireless networks
Defense In Depth ● Using multiple defense mechanisms where possible
Least Privilege ● Allowing only what is necessary for users and systems
Network segmentation ● Restricting access between network hosts
Wireless assessments ● Assessing the security of your wireless network
Securing the infrastructure itself ● On all components of your wireless network,
including the access points
Rogue AP detection ● Detecting unauthorized wireless access points
Physical security ● Restricting physical access to infrastructure, including wireless
access points
Changing the default configurations ● On all systems, including wireless access points
Due diligence ● Staying proactive to secure your wireless network
Confidentiality Integrity Availability (CIA) ●
Encryption ●
Authentication ●
PSK ●
PEAP ●
EAP-TLS ●
802.1x ●
Useless defenses
Faraday cage ●
MAC filtering ●
SSID cloaking ●
WEP ●
WEP cloaking ●
06-ch06.indd 161 4/6/12 3:01:49 PM
Secure Beginner’s Guide / Wireless Network Security: A Beginner’s Guide / Tyler Wrightson / 094-6 / Chapter 6
162 Wireless Network Security: A Beginner’s Guide
Good wireless defenses
Firewalls ●
Routers ●
Switches ●
Intrusion detection systems and intrusion prevention systems ●
Wireless IDS/IPS ●
Honeypots ●
Web authentication gateways ●
06-ch06.indd 162 4/6/12 3:01:49 PM

Secure Beginner’s Guide / Wireless Network Security: A Beginner’s Guide / Tyler Wrightson / 094-6 / Chapter 7
163
Understanding the
WPA2-Enterprise
with Certificates
Architecture
Chapter 7
07-ch07.indd 163 4/6/12 2:59:56 PM
Secure Beginner’s Guide / Wireless Network Security: A Beginner’s Guide / Tyler Wrightson / 094-6 / Chapter 7
164 Wireless Network Security: A Beginner’s Guide
We’ll Cover
PKI and digital certificates ●
WPA-Enterprise example ●
In this chapter, we’ll cover the overall architecture for deploying the holy grail of secure
wireless networks: WPA-Enterprise using certificates for authentication. We’ve already
covered the majority of the components from a 20,000-foot view, so now it’s time to take
a much deeper look at how these technologies function and how they will cooperate in a
wireless environment.
Introduction to WPA2-Enterprise
with Digital Certificates
Before we dive into this chapter, let’s cover the reasons why we would choose to deploy
a WPA2-Enterprise network using digital certificates over other options. By using digital
certificates, we get the following benefits:
Digital certificates provide stronger authentication. ●
Digital certificates are typically harder to compromise (or steal). ●
The computer and the user can authenticate without any user action. ●
Digital certificates are considered to provide much stronger authentication than traditional
passwords. Because a digital certificate is an actual file, it’s typically harder to compromise
than a traditional password. Whereas a password might be written down in an insecure
location, spoken aloud, or just chosen poorly, a certificate does not have these problems.
Both the user and the computer can authenticate to the wireless network without
any interaction from the person at the keyboard. You’re probably familiar with cached
credentials for Windows systems. Using cached credentials, users can authenticate directly
to a system that they’ve authenticated to in the past without having network access to
query Active Directory. This is a common scenario for wireless networks. If you have
to wait for a user to log into a system before he can authenticate to the wireless network
using those same credentials, then what do you do if the user hasn’t logged into this
particular system before?
07-ch07.indd 164 4/6/12 2:59:56 PM

Secure Beginner’s Guide / Wireless Network Security: A Beginner’s Guide / Tyler Wrightson / 094-6 / Chapter 7
Secure Beginner’s Guide / Wireless Network Security: A Beginner’s Guide / Tyler Wrightson / 094-6 / Chapter 7
Chapter 7 Understanding the WPA2-Enterprise with Certificates Architecture 165
You can use digital certificates to have the workstation authenticate to the wireless
network before the user logs in. Thus, even if the user has never logged into this particular
system before, the system has access to authenticate to Active Directory. This can be
extremely handy for wireless devices that get passed around a lot.
In addition, using certificates we can provide mutual authentication. Mutual
authentication means that both parties are authenticating each other. In this case, the
client is authenticating the wireless network and the wireless network is authenticating
the client. This ensures that both parties are communicating with the intended party.
For these reasons, WPA2-Enterprise with digital certificates is considered the best
solution for environments demanding the most security from their wireless networks.
For the most challenging of environments,
you might consider using WPA2-
Enterprise with smart cards, but this is
beyond the scope of this book.
Public Key Infrastructure and Digital Certificates
Public Key Infrastructure (PKI) and digital certificate services are extremely complex
topics. By no means am I inferring that these topics are beyond your comprehension; on
the contrary, they are actually very easy to understand. There are just a lot of “moving
parts” and new concepts that you need to learn to fully appreciate them. So, take your time
and make sure you fully understand every section before moving on to the next. We will
lay the foundation for you to understand PKI and digital certificates and then focus on the
components and issues as they apply directly to a wireless infrastructure. Like many other
things in this book, I simply don’t have the space (or the patience) to cover every possible
configuration option for deploying certificate services. If you intend to use certificate
services to support additional initiatives, be sure you fully research the specific needs for
those technologies.
A Public Key Infrastructure is not simply the complex math and algorithms behind
public keys, private keys, and digital certificates; it is actually all of the technologies,
servers, systems, and even human processes that support digital certificates. Many times
people will incorrectly refer to PKI as the mathematics that make digital certificates
possible, but this is incorrect and doesn’t paint the entire picture. Typically, people are
actually referring to Public Key Cryptography, which is a component of an entire Public
Key Infrastructure. You can see some of the components that make up a Public Key
Infrastructure in Figure 7-1.
LINGO
A smart card is a physical device that
houses a digital certificate.
07-ch07.indd 165 4/6/12 2:59:56 PM

Secure Beginner’s Guide / Wireless Network Security: A Beginner’s Guide / Tyler Wrightson / 094-6 / Chapter 7
166 Wireless Network Security: A Beginner’s Guide
Public Key Cryptography:
Asymmetric Encryption Algorithms
Public Key Cryptography is the complex math behind public and private keys. Public Key
Cryptography is integral to a Public Key Infrastructure and digital certificates. Remember
that there are two main types of encryption algorithms: symmetric and asymmetric. In a
symmetric algorithm, the same key that is used to encrypt data is used to decrypt the data.
This is illustrated in Figure 7-2.
Figure 7-1 PKI components
PKI Components
CA
Servers
Human
Processes
Certication
Authorities
Certicates
Private Keys
Public Keys
Figure 7-2 Symmetric encryption algorithm
Symmetric Encryption Algorithms
Decryption
Encrypted
Data
Encryption
Clear Text
Data
Clear Text
Data
Encrypted
Data
Mykey
Mykey
07-ch07.indd 166 4/6/12 2:59:57 PM

Secure Beginner’s Guide / Wireless Network Security: A Beginner’s Guide / Tyler Wrightson / 094-6 / Chapter 7
Secure Beginner’s Guide / Wireless Network Security: A Beginner’s Guide / Tyler Wrightson / 094-6 / Chapter 7
Chapter 7 Understanding the WPA2-Enterprise with Certificates Architecture 167
Note
Any discussion of Public Key Cryptography should mention that the security and math
behind it is based on extremely large prime numbers.
In an asymmetric encryption algorithm, one key is used to encrypt the data and a
completely unique but corresponding key is used to decrypt the data (see Figure 7-3).
These two keys are typically called public and private keys. PKI is based heavily on the use of
public key cryptography and thus public and private keys. This is not difficult to understand,
but many people who are new to the concept tend to question how this can be secure.
Every entity in the digital world that wishes to authenticate using digital certificates
has two keys (which can be generated by a third party or generated by the entity itself).
The public key can be given to anyone else, and the private key is kept, well, private. Data
encrypted using the private key can only be decrypted using the public key. Conversely,
data encrypted using the public key can only be decrypted using the private key.
Into Action
Can your public key really be given to anyone, even an attacker? Absolutely.
Remember that the only thing an attacker could do with a public key is encrypt
data that can then only be read by you, or decrypt data that you’ve encrypted with
your private key. It is up to you upon receiving that data to verify whether that
communication is trustworthy, but the simple fact that the attacker has your public
key does not in any way directly impact the security of your private key.
Figure 7-3 Asymmetric encryption algorithm
Assymmetric Encryption Algorithms
Decryption
Encrypted
Data
Clear Text
Data Encryption
Clear Text
Data
Encrypted
Data
My Public Key
My Private Key
07-ch07.indd 167 4/6/12 2:59:58 PM

Secure Beginner’s Guide / Wireless Network Security: A Beginner’s Guide / Tyler Wrightson / 094-6 / Chapter 7
168 Wireless Network Security: A Beginner’s Guide
If an entity signs a message with their private key, they can then send this message to
anyone with their public key and that message can be verified as coming from the entity
using their public key. This does two things: It actually tells the recipient that the message
was sourced from the sender, and it also tells the recipient that the data has not been
changed in any way in transit. This proves the integrity of the message as well as who sent
the message. What does it mean “to sign” a message using a private key? Well, if I want to
send a message to someone and have this person be able to verify that the message came
from me and that it wasn’t changed in transit, I can digitally sign the data using my private
key. This process is shown in Figure 7-4.
The process is as follows:
I take every bit of the data and run it through a hashing algorithm (such as the MD5 1.
algorithm).
I take the output from the hashing algorithm and encrypt this using my private key.2.
I append this data (or otherwise just include it with the data) and send it over to my 3.
recipient.
Figure 7-4 Digital signature process
Hash Algorithm
E-mail
Message
E-mail Message
with
Digital
Signature
Resulting
Hash
Encrypt Hash with
Sender's Private Key
07-ch07.indd 168 4/6/12 2:59:58 PM
Secure Beginner’s Guide / Wireless Network Security: A Beginner’s Guide / Tyler Wrightson / 094-6 / Chapter 7
Secure Beginner’s Guide / Wireless Network Security: A Beginner’s Guide / Tyler Wrightson / 094-6 / Chapter 7
Chapter 7 Understanding the WPA2-Enterprise with Certificates Architecture 169
The recipient then follows a very similar process to verify that the data is from me and
hasn’t been changed in transit:
The recipient takes my public key, which she already has, and decrypts the signature to 1.
get the output that I, the sender, had from the hashing algorithm.
The recipient takes all the unencrypted data and runs it through the same hashing 2.
algorithm.
The recipient compares the two values: the unencrypted challenge and the hash that was 3.
derived. If they match, she knows that the data has not been tampered with because she
used my public key to obtain the same hash result.
A hash or “one-way hash” is an integral part of many cryptographic systems. A
hashing algorithm is very similar to an encryption algorithm, except that the resulting
cyphertext cannot be decrypted. That seems a little odd, doesn’t it? Let’s take a deeper
look at how this works and why it would be used.
Hash functions take in a variable amount of data and produce a fixed-length hash code,
or simply “hash.” The reason for this is simple: If we want to verify that two sets of data
are the same, we can run both sets of data through a hash algorithm and if the resulting hash
(which is much smaller and much easier to compare) is the same, we know the input data
was the same. Thus, a hash function will always produce the same hash value for the same
input data. The input data can be anything from a binary program file, an entire e-book,
or an e-mail with three words in it. The resulting hash will still be the same fixed length.
The hash function cannot be reversed, meaning you can’t take the resulting hash
value, run it through a “reverse hashing algorithm” and come up with the original data.
This is where the term one-way hash comes from. Arguably the two most popular hashing
algorithms today are Secure Hash Algorithm (SHA) and Message Digest Five (MD5). MD5
produces a 128-bit output, whereas SHA-1 produces a 160-bit hash value. In Figure 7-5,
you’ll see that although two input files are vastly different in size they both produce the
same output length from the hash function.
Many password systems use a hashing algorithm to store the “encrypted” value of
the password on the system. Both Unix and Windows systems store passwords as hashed
values. If an attacker obtained these hashed values, he couldn’t directly reverse them.
Although you can’t reverse a hashed password, you can obtain a password via brute
forcing. Remember that brute forcing a password involves running a list of cleartext
passwords through the hashing algorithm; if the resultant hash matches the user’s hash,
you have ascertained the password.
07-ch07.indd 169 4/6/12 2:59:58 PM

Secure Beginner’s Guide / Wireless Network Security: A Beginner’s Guide / Tyler Wrightson / 094-6 / Chapter 7
170 Wireless Network Security: A Beginner’s Guide
Into Action
We’ll take a look at an example of obtaining the MD5 hash of a simple text file.
The commands we’ll use are available by default on BackTrack, so be sure to
follow along. You can see in Listing 7-1 that we check the contents of the secret.txt
file, which shows it’s just a simple text file with the contents “My Secret Message.”
We then run the md5sum command and give it the file for which we want to have
the MD5 hash.
Listing 7-1: md5sum
root@bt:~# cat secret.txt
My Secret Message
root@bt:~#
root@bt:~# md5sum secret.txt
f7a8879e2e1649629a10410aaf598438 secret.txt
We then add a single character to the end of our message, as shown in
Listing 7-2. We’ve changed the message to “My Secret Message1,” and then we
rerun the md5sum tool. You’ll notice that now the resulting MD5 hash is vastly
different.
Listing 7-2: md5sum2
root@bt:~# cat secret.txt
My Secret Message1
root@bt:~#
root@bt:~# md5sum secret.txt
ee072765ba776a0a912b83b5d894c198 secret.txt
Figure 7-5 Hash function explanation
Hash Function T96AS120MLKTNBP
C1BA27ABMTPAPGES
Hash Function
Hash Function
MD5
MD5
128-Bit Hash Value (16 bytes)
2MB Data
1GB Data
07-ch07.indd 170 4/6/12 2:59:59 PM

Secure Beginner’s Guide / Wireless Network Security: A Beginner’s Guide / Tyler Wrightson / 094-6 / Chapter 7
Secure Beginner’s Guide / Wireless Network Security: A Beginner’s Guide / Tyler Wrightson / 094-6 / Chapter 7
Chapter 7 Understanding the WPA2-Enterprise with Certificates Architecture 171
So now you understand that a person can use Public Key Cryptography to send a
message and have the recipient verify the authenticity and integrity of that message. Let’s
take a look at some of the practical points of how a person would use a public and private
key to send a secure message. Let’s take two fictitious people who want to e-mail each
other securely over an untrusted network; we’ll call them Neo and Morpheus. Neo and
Morpheus are close buddies. One day, before they part ways, they exchange their public
keys with each other on USB thumb drives. Therefore, Morpheus knows he can trust the
public key as coming from Neo because Neo physically handed it to him.
When Neo composes an e-mail and addresses it to Morpheus, he signs the e-mail
using his private key. Remember that to sign the message, the e-mail program Neo is
using will run the entire e-mail through a hash algorithm and then encrypt the resultant
hash value using Neo’s private key. Neo then appends this signature value to the end of
the e-mail and sends it on its way to Morpheus.
When Morpheus receives the message from Neo with details of their next rendezvous
point, Morpheus wants to verify that the e-mail has come from Neo and that the message
has not been tampered with by anyone. To do this, he takes Neo’s public key and decrypts
the signature on the e-mail to come up with the encrypted hash value. He then creates
a hash value for himself and compares this with the hash value from Neo’s signature.
If the values match, Morpheus knows the message is from Neo and that it has not been
changed.
Into Action
You should note that it is not a necessity to physically hand someone a copy of
your public key. However, it’s typically advisable for you to send your public key
using an “out-of-band” method. That is to say, you wouldn’t want to send your
public key using the same communication path you wish to be secure. For example,
if you want to use Public Key Cryptography to secure e-mail communications, you
wouldn’t necessarily want to first e-mail someone your public key.
Why exactly wouldn’t you want to do that? It’s simple: If an attacker is
intercepting your communications at that point, he can simply substitute his
own public key for yours and your recipient would have no way of knowing this
happened. Of course, there are ways for a human to verify this, but from your
computer’s perspective, it would be a difficult attack to detect.
07-ch07.indd 171 4/6/12 2:59:59 PM

Secure Beginner’s Guide / Wireless Network Security: A Beginner’s Guide / Tyler Wrightson / 094-6 / Chapter 7
172 Wireless Network Security: A Beginner’s Guide
Note
Keep in mind that e-mail is not the only system with which one can use public
and private keys to authenticate messages. Public and private keys can be used to
authenticate any message for any protocol. You could use them to digitally sign a file
before you upload it to an FTP server or you could use them to authenticate every
packet for an instant messaging system.
You should now understand that certificates provide a better means for authentication.
Another very good reason to use certificates to authenticate to a wireless network is that
users don’t need to enter a password. The authentication can happen automatically without
any intervention from the user. If we configure the user’s system to authenticate using the
computer certificate, we can authenticate to the wireless network before the user logs into
the computer.
Attacking Public Key Crypto-Secured Messages
You may have a nagging voice in the back of your mind telling you that there has to
be a way for an attacker to circumvent or break the protection offered by Public Key
Cryptography. Let’s look at a few scenarios an attacker might attempt to tamper with
data in transit. Let’s say that our attacker, Mr. Smith, is performing a man-in-the-middle
attack, as shown in Figure 7-6. Mr. Smith could change the data of the message, remove
the digital signature, or change the digital signature. Let’s see what would happen to the
message under the following scenarios:
The attacker changes the data in the message.
●
The attacker removes the digital signature. ●
The attacker changes the digital signature. ●
Into Action
You should note that this process of using a private key to create a signature and
attaching it to the e-mail message is typically done automatically. It would be a
little too cumbersome for the average user to be expected to manually perform all
these tasks.
Likewise, the receiver of the e-mail message wouldn’t manually decrypt the
signature and compare the hashes; this, too, would be done automatically.
07-ch07.indd 172 4/6/12 2:59:59 PM

Secure Beginner’s Guide / Wireless Network Security: A Beginner’s Guide / Tyler Wrightson / 094-6 / Chapter 7
Secure Beginner’s Guide / Wireless Network Security: A Beginner’s Guide / Tyler Wrightson / 094-6 / Chapter 7
Chapter 7 Understanding the WPA2-Enterprise with Certificates Architecture 173
If Mr. Smith changes the actual data in the message and forwards the message on to
Morpheus, what will happen? Morpheus receives the message and decrypts the signature
using Neo’s public key. So far, so good. This message did in fact come from Neo. However,
when Morpheus runs the data through a hashing algorithm and compares that to the hash
from the digital signature, they will not match. Therefore, Morpheus will know something
is wrong with the message—it was changed either on purpose or accidentally while in
transit. Either way, the message is no longer valid, and Morpheus should disregard the
message.
So the attacker can’t simply change the data and leave the digital signature, so what
can he do? What if the attacker changes the data in the e-mail and also removes the digital
signature from the e-mail and then sends it on to the recipient. If Morpheus receives the
e-mail and it does not contain a digital signature, the source simply can’t be verified and
Morpheus should completely disregard the message.
It would appear Mr. Smith’s only choice is to manipulate the data in the message as
well as change the digital signature. So, one last time, Mr. Smith changes the message
body and tries changing a few bits in the digital signature. Once Morpheus receives the
message and tries to decrypt the digital signature using Neo’s public key, it will fail to
decrypt the digital signature, so Morpheus knows he can’t trust the validity of this message.
In the previous examples, we started with the caveat that Neo physically handed
Morpheus his public key. In the real world, it would be completely feasible to physically
hand someone your public key. In this case, this person doesn’t need a certificate because
he knows you personally and has verified the source of the public key for himself.
But what about on the Internet or even just a large network where there are potentially
thousands of users? Do you really want to figure out a way to obtain, organize, and keep
Figure 7-6 Mr. Smith’s MITM attack
Morpheus
Smith
Neo
Untrusted
Network
07-ch07.indd 173 4/6/12 3:00:03 PM

Secure Beginner’s Guide / Wireless Network Security: A Beginner’s Guide / Tyler Wrightson / 094-6 / Chapter 7
174 Wireless Network Security: A Beginner’s Guide
secure thousands of public keys? Unless you’re a complete masochist, the answer should
be no. So how do we manage a situation where we can’t possibly personally verify the
validity of public keys? The answer is digital certificates, of course, and that is our next topic.
Digital Certificates
A certificate can be thought of as a digital ID card. The ID card says who you are as
well as who verified your identity, and it includes your public key. Your identity can
be an individual user, a system on a
network, or even a specific process on
a computer. So who exactly does the
certifying? A Certificate Authority (CA)
is responsible for verifying identities and
issuing certificates.
Let’s first take a minute to ponder what real-world problem we are trying to solve
with digital certificates. We’re trying to authenticate that a person (or system) is who they
say they are. Certificates can provide a strong solution to this problem, and PKI is the
infrastructure that supports the secure distribution and authorization of digital certificates.
Note
Keep this concept in mind during this entire chapter: The main reason why we use
digital certificates is to solve the real-world problem of authenticating identities in a
digital world. The identity we’re referring to can be either an individual human or a
computer system on a network.
The process of verifying a user’s or a computer system’s identity can involve humans
actually verifying information or it can be completely automatic based on existing network
credentials. We’ll look at both scenarios shortly.
Let’s first start with a very basic example of how a computer system would use a
digital certificate to authenticate itself and then move on to a deeper understanding of
exactly how the technologies behind the scenes work. The example everyone is familiar
with involves visiting an e-commerce website on the Internet. How do you know the
website you’re visiting is the actual intended website and not a website hosted by a
malicious attacker that looks completely identical to the legitimate website, waiting
to grab your credit card details? Also, how does the owner of the e-commerce website
convince you (the potential shopper) that their site belongs to a legitimate business that is
reputable to some degree and that your communications are with the intended party.
The e-commerce website will have a digital certificate that states their identity as well as
who has verified their information. The certificate presented to you by the e-commerce
LINGO
Certificate Authority can refer to either
the organization that issues digital
certificates or the actual computer
system that issues digital certificates.
07-ch07.indd 174 4/6/12 3:00:03 PM

Secure Beginner’s Guide / Wireless Network Security: A Beginner’s Guide / Tyler Wrightson / 094-6 / Chapter 7
Secure Beginner’s Guide / Wireless Network Security: A Beginner’s Guide / Tyler Wrightson / 094-6 / Chapter 7
Chapter 7 Understanding the WPA2-Enterprise with Certificates Architecture 175
website will be digitally signed by a “trusted” third-party known as an Internet Certificate
Authority. There are many Certificate Authorities available to the owner of the e-commerce
website to sign their digital certificate and thus prove the identity of the website.
Note
Some of the most popular Internet Certificate Authorities include VeriSign, Thawte, and
Entrust, among others.
So how does an individual obtain the public key for the issuing Certificate Authority?
Every modern operating system (and modern browser) comes with the public keys for the
major Internet Certificate Authorities already installed. The operating system or browser is
also configured to “trust” any certificates signed by these certificate authorities. From your
computer’s perspective, it will not alert you for any certificates it receives if it “trusts” the
signing Certificate Authority. In Figure 7-7, you can see the lock icon that indicates the
Chrome browser trusts the Certificate Authority who issued the certificate for the website.
On the other hand, if your computer (or browser) is not configured to trust a particular
Certificate Authority, it will warn you with an error similar to the one shown in Figure 7-8.
The locations on your computer where certificates are saved are known as certificate
stores. The Trusted Root Certification Authorities Store is the location of all the Certificate
Authorities your computer is configured to trust.
Figure 7-7 Accepted certificate in a browser
Into Action
Remember from the previous section on Public Key Cryptography that digital
signatures rely on having the public key of the entity that digitally signed the
certificate. Therefore, if a certificate has a signature from a Certificate Authority,
to verify the authenticity of that certificate, you’d need the public key from the
Certificate Authority.
07-ch07.indd 175 4/6/12 3:00:03 PM

Secure Beginner’s Guide / Wireless Network Security: A Beginner’s Guide / Tyler Wrightson / 094-6 / Chapter 7
176 Wireless Network Security: A Beginner’s Guide
IMHO
Trust is an integral concept in any discussion of information security, and nowhere
else is this more apparent than in a discussion of digital certificates and PKI.
When first introduced to digital certificates, people can often get pretty confused
due to an inefficient or incomplete explanation of how they work. One of the
biggest components often left out of the digital certificates conversation is that of
the human element.
Unlike many other security protocols, there’s actually a considerable amount of
human processes (or administrative work) involved with digital certificates. These
processes manifest themselves in users’ interaction with their own certificates as
well as certificates from “unknown” servers, server administrators configuring and
distributing certificates, and even third-party administrators working behind the
scenes handling verification processes and certificate distribution (you’ll probably
never even meet them).
I’ll point out when we’re reviewing human processes versus logical computer
processes, as well as the distinction between human trust and the computer vernacular.
Figure 7-8 Untrusted CA certificate warning
07-ch07.indd 176 4/6/12 3:00:03 PM

Secure Beginner’s Guide / Wireless Network Security: A Beginner’s Guide / Tyler Wrightson / 094-6 / Chapter 7
Secure Beginner’s Guide / Wireless Network Security: A Beginner’s Guide / Tyler Wrightson / 094-6 / Chapter 7
Chapter 7 Understanding the WPA2-Enterprise with Certificates Architecture 177
So here’s where the real-world problem presents itself. Yes, your computer is
preconfigured to trust VeriSign and thus trust certificates signed by VeriSign, but does that
mean that you (a flesh and blood person) should actually trust VeriSign, and what exactly
does that even mean (to trust a company)? Ultimately, if you as a flesh and blood person
trust VeriSign, that would tend to imply that you trust VeriSign’s processes for thoroughly
verifying the identity of the people and businesses they provide digital IDs for. This, of
course, is a difficult thing for many reasons. First of all, people who don’t work for a
Certificate Authority will probably not know the inner workings of how the Certificate
Authority actually verifies identities. Second, these verification processes have proven to
have flaws, where individuals and businesses that should not have passed the verification
process have received digital certificates.
Remember that we’re talking about the process that employees of Certificate Authorities
follow to verify identities. Whenever there is human involvement in a security process, your
ears should perk up, because humans are far more prone to error than computers.
The vast majority of digital certificates today are in the format of an X.509 certificate,
which is currently in version 3 (X.509 v3). The X.509 standard utilizes the X.500 naming
convention. The X.500 standard has its own hierarchical naming convention, which
we’ll look at later. You might already be familiar with the X.500 standard, which deals
with electronic directory services. The Lightweight Directory Access Protocol (LDAP),
which is a component of Microsoft Active Directory, has a similar hierarchical naming
convention.
Digital Certificates contain important information, including the owner of the certificate,
the issuer of the certificate, and the public key of the owner. Remember that all of this
information is signed using the issuing Certificate Authority’s private key. Thus, if anyone,
including the owner of the certificate, tries to change any of the information, the signature
will indicate that something is wrong with the certificate.
Into Action
There have been cases of people being approved for a certificate even though they
submitted entirely fake information. This, of course, is a serious flaw that impacts
the very foundation of digital certificates. Of course, after such a certificate is
identified, it is revoked.
07-ch07.indd 177 4/6/12 3:00:03 PM

Secure Beginner’s Guide / Wireless Network Security: A Beginner’s Guide / Tyler Wrightson / 094-6 / Chapter 7
178 Wireless Network Security: A Beginner’s Guide
In Figure 7-9, you’ll see the major fields in a typical digital certificate. The following
table lists the fields shown in Figure 7-9.
Field Description
Serial Number Uniquely identifies the certificate.
Issuer The issuing Certificate Authority.
Valid Dates The certificate is only valid between these dates.
Subject Who the certificate is assigned to (for example, www.website.com
or user@domain.com).
Public Key Algorithm The algorithm of Subject’s public key.
Public Key The Subject’s actual public key.
In Figure 7-10, you can see the certificate for www.google.com. You can see the
Common Name (CN) is www.google.com; this is synonymous with the Subject. You can
also see that Thawte is the company that issued this certificate.
In Figure 7-11, you can see a few of the entries in the giant list of trusted Certificate
Authorities that the Chrome browser trusts by default. You can manually add trusted
Certificate Authorities to this list.
Figure 7-9 Certificate with fields
Certicates
Serial Number
Issuer
Valid Dates
Subject
Public Key Algorithm
Public Key
07-ch07.indd 178 4/6/12 3:00:04 PM
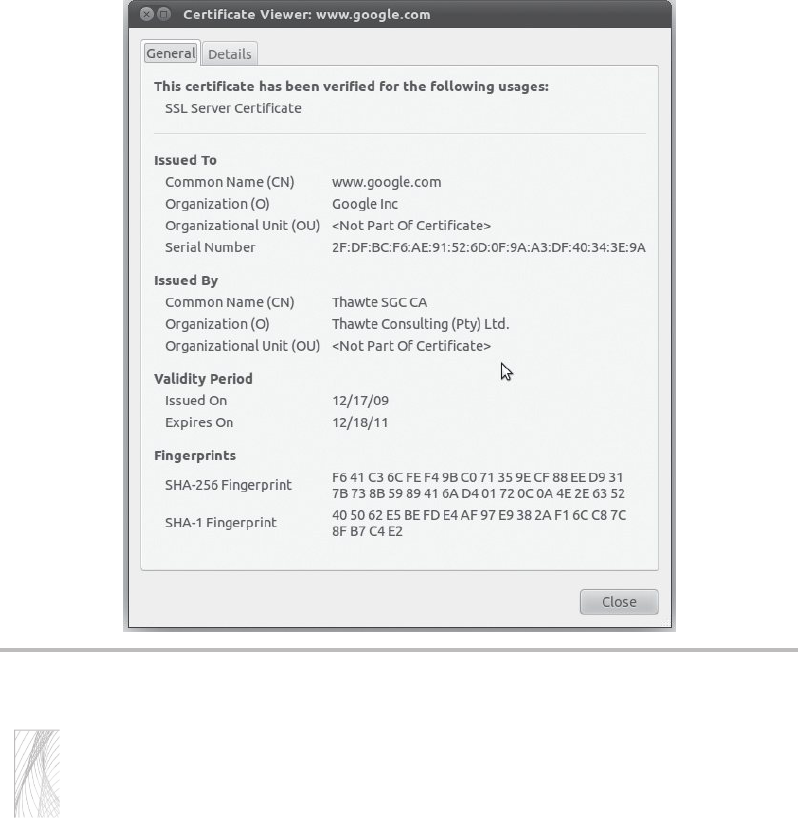
Secure Beginner’s Guide / Wireless Network Security: A Beginner’s Guide / Tyler Wrightson / 094-6 / Chapter 7
Secure Beginner’s Guide / Wireless Network Security: A Beginner’s Guide / Tyler Wrightson / 094-6 / Chapter 7
Chapter 7 Understanding the WPA2-Enterprise with Certificates Architecture 179
Note
Another important benefit to using certificates is known as nonrepudiation. Essentially, if
you sign a message using your digital signature, this proves that only someone with your
private key (which should only be you) created the message. This means that you can’t
deny (or repudiate) that you had approved the message. This can be a very good thing
when dealing with legal contracts (and other critical communications) in a digital world;
however, it doesn’t necessarily directly relate to authentication, so we won’t cover it further.
Authenticating as a user to your wireless network is slightly different from an
e-commerce website authenticating to you. Conceptually, though, it’s almost identical. You
will present your certificate to an authentication server on your network. Your certificate will
contain your public key and the signature of a Certificate Authority that your authentication
server is configured to trust. We’ll cover this in more detail later in the chapter.
Figure 7-10 Google certificate
07-ch07.indd 179 4/6/12 3:00:04 PM
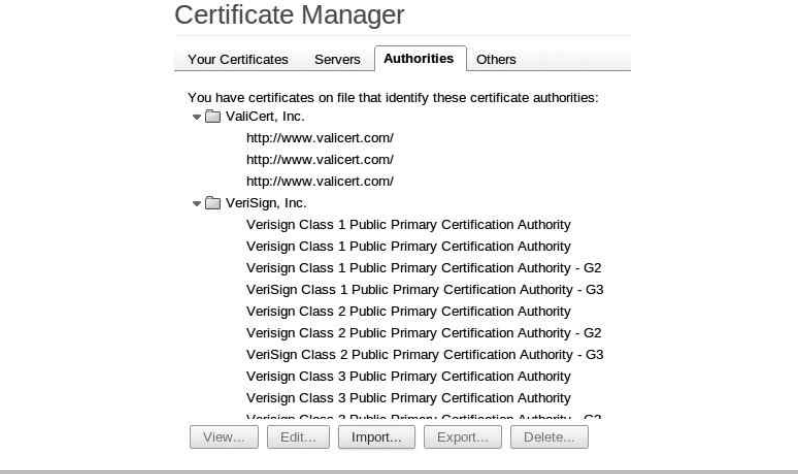
Secure Beginner’s Guide / Wireless Network Security: A Beginner’s Guide / Tyler Wrightson / 094-6 / Chapter 7
180 Wireless Network Security: A Beginner’s Guide
Certificate Authority Server Structure
The infrastructure that supports certificates is built on a hierarchy of Certificate
Authorities, with a root CA at the highest point in the hierarchy and Certificate Authorities
underneath the root CA known as subordinate CAs or intermediate CAs. This is shown in
Figure 7-12. This highly segmented hierarchy makes sense for large-scale deployments
and Internet Certificate Authorities, but most businesses and enterprises will find that a
much smaller hierarchy makes sense for their environment.
You can think of each of the subordinate CAs as a child to the higher-level CA.
The parent CA would sign that child’s certificate, at which point the child could sign
certificates using its own certificate (or private key). It is typically advised to take the
root CA offline once you have deployed your intermediate CAs to ensure the security
of your entire CA hierarchy. A compromise of any of the Certificate Authorities would
compromise all of the CAs beneath it in the hierarchy. Many times segmentation makes
sense to separate CAs with different functions. For example, you might have one CA that
issues only authentication certificates while another CA issues certificates used solely for
secure e-mail.
Figure 7-11 Chrome Certificate Authorities
07-ch07.indd 180 4/6/12 3:00:04 PM
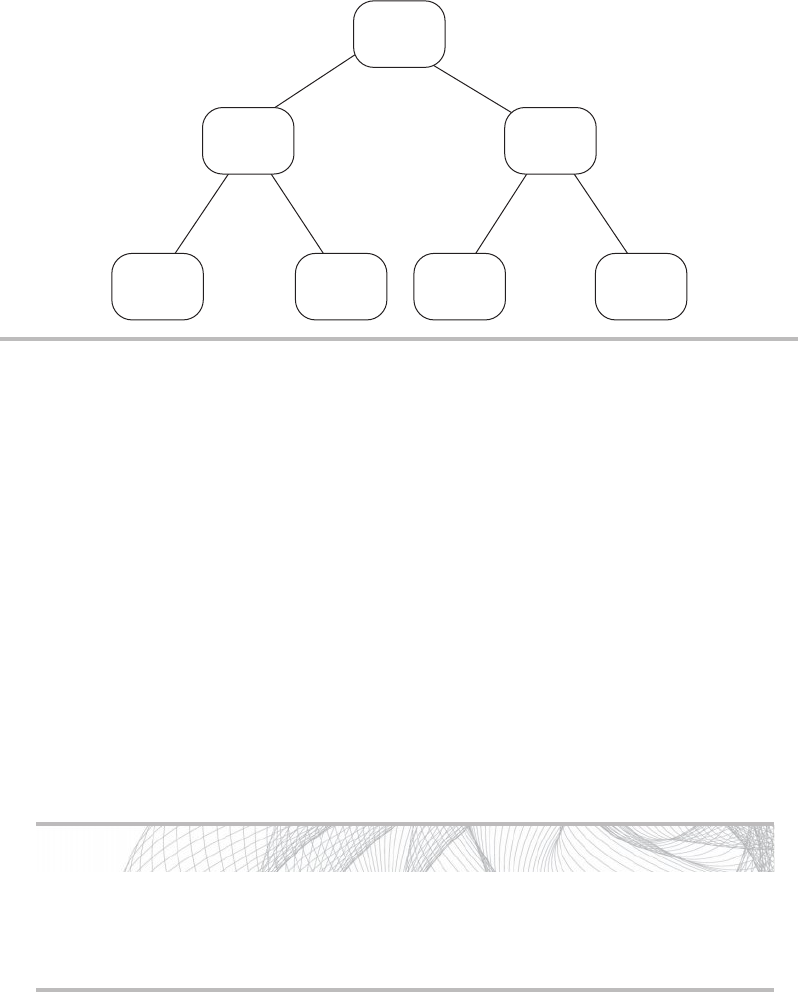
Secure Beginner’s Guide / Wireless Network Security: A Beginner’s Guide / Tyler Wrightson / 094-6 / Chapter 7
Secure Beginner’s Guide / Wireless Network Security: A Beginner’s Guide / Tyler Wrightson / 094-6 / Chapter 7
Chapter 7 Understanding the WPA2-Enterprise with Certificates Architecture 181
Handling Compromised Certificates
What happens if a certificate is compromised? How do we alert users to no longer trust
that certificate? To do this, Certificate Authorities will use Certificate Revocation Lists
(CRLs) or the Online Certificate Status Protocol (OCSP). A CRL is literally just a list of
certificates that have been revoked. The Certificate Authority that issued the certificate
will be responsible for revoking the certificate. An administrator of the issuing CA will
mark the certificate as revoked. Any certificates that have been revoked are listed by serial
number in a file that is publicly available. The problem with CRLs is that they can grow to
be very large and a little cumbersome to manage. OCSP was developed to deal with these
shortcomings. OCSP is a simpler request/response protocol typically handled over HTTP
to determine the status of individual certificates.
Into Action
If your root CA is compromised, you’ll have to revoke all of your certificates and
redeploy all of your enterprise Certificate Authorities. Therefore, either powering
off your root CA or otherwise removing it from the network is advisable.
Figure 7-12 Certificate Authority Hierarchy
CA Hierarchy
E-mail
CA
Auth
CA
Web
Certs
CA
E-mail
CA
Root
CA
Sub
CA
Sub
CA
Subordinate
CAs
Issuing
CAs
Issuing
CAs
07-ch07.indd 181 4/6/12 3:00:04 PM
Secure Beginner’s Guide / Wireless Network Security: A Beginner’s Guide / Tyler Wrightson / 094-6 / Chapter 7
182 Wireless Network Security: A Beginner’s Guide
Supporting Services
Certificate services rely heavily on the Domain Name System (DNS) and the Network
Time Protocol. Clearly, if your system time differs greatly from that of your Certificate
Authority, you may incorrectly believe a certificate to be expired. Likewise, DNS needs
to be functioning properly for many aspects of certificates, including communication with
your Certificate Authorities, Active Directory domain controllers, and domain systems.
Microsoft Certificate Services
Microsoft is clearly the dominant player in enterprise directory services. We’ll take a look
at configuring Microsoft Certificate Services to support authentication for your wireless
network in the next chapter. For now you need to understand a few of the nuances of
Microsoft Certificate Services. Microsoft refers to its certificate servers as either “stand-
alone” or “enterprise” servers. A stand-alone Certificate Authority is not integrated into
Active Directory, and Microsoft recommends that it not even be a member of your Active
Directory domain.
An enterprise certificate server, on the other hand, has to be a member of an Active
Directory domain. This integration with Active Directory allows for additional features
and greater flexibility. The following are the defining characteristics of an enterprise
certificate server, straight from Microsoft:
Requires access to Active Directory Domain Services (AD DS) ●
Uses Group Policy to propagate its certificate to the Trusted Root Certification ●
Authorities certificate store for all users and computers in the domain
Publishes user certificates and Certificate Revocation Lists (CRLs) to AD DS ●
Auto-Enrollment and Certificate Templates
In previous discussions on creating certificates, I explained that an administrator is required
to verify the user’s identity that is requesting the certificate. As you might have guessed,
this can quickly become cumbersome for a large organization. If you had to manually
create and potentially verify delivery of each certificate, you could quickly become
overwhelmed. Microsoft Certificate Services includes functionality called certificate auto-
enrollment to automatically create and distribute certificates to users.
Wait a minute, doesn’t that run completely counter to everything we just discussed about
issuing certificates? If we have a server automatically sending people certificates, how do
we know that it’s giving the certificates to the appropriate people? An excellent question.
07-ch07.indd 182 4/6/12 3:00:04 PM

Secure Beginner’s Guide / Wireless Network Security: A Beginner’s Guide / Tyler Wrightson / 094-6 / Chapter 7
Secure Beginner’s Guide / Wireless Network Security: A Beginner’s Guide / Tyler Wrightson / 094-6 / Chapter 7
Chapter 7 Understanding the WPA2-Enterprise with Certificates Architecture 183
In this case, because we’re configuring an enterprise Certificate Authority, which integrates
with Active Directory, we just rely on the fact that the users have already authenticated
themselves with their Active Directory
credentials and are on clients that are
members of our domain.
In addition, because an enterprise CA
has access to write to Active Directory, it
can publish the root certificate to Active
Directory as well as the Certificate
Revocation List. The root certificate for the domain will then propagate down to each
member of the AD domain to the Trusted Root Certification Authority Store on that
system.
Microsoft also defines certificate templates, which are a necessary component for using
auto-enrollment. Creating a template defines the type of certificate, the key size, the hash
algorithm used, what the certificate will be used for, and so on. You then select the users
who are allowed to automatically obtain certificates using that template. We will cover the
steps to configure automatic enrollment and certificate templates in the next chapter.
Remote Authentication Dial-In User Service
Remote Authentication Dial-In User Service (RADIUS) is a very flexible authentication
protocol. RADIUS is an IETF standard; the Internet Engineering Task Force is very
similar in nature to the IEEE. Clearly, based on its name, RADIUS has been around for
some time. However, RADIUS is not restricted to just authenticating users in a dial-up
network. Instead, RADIUS offers the flexibility to authenticate users for a variety of
scenarios and technologies.
RADIUS provides authentication, authorization, and accountability (or AAA). Therefore,
the RADIUS server is sometimes referred to as a “Triple-A server.” It’s easy to understand
how RADIUS provides authentication, as this may be considered its primary purpose.
Authorization can be performed and is closely related to authentication. Authorization can
stipulate specific actions that the user can perform or certain resources the user can access.
In addition, the server can keep an audit log of a user’s activity, which would provide
accountability of the user’s actions.
Your RADIUS server can be a stand-alone system that authenticates users against a
local database, or it can authenticate users against an external database such as Active
Directory. In Figure 7-13, you’ll see an example of a RADIUS server using a database on
LINGO
Remember from previous discussions
that the Trusted Root Certification
Authority Store holds the certificates of
the root CAs that the computer trusts.
07-ch07.indd 183 4/6/12 3:00:05 PM
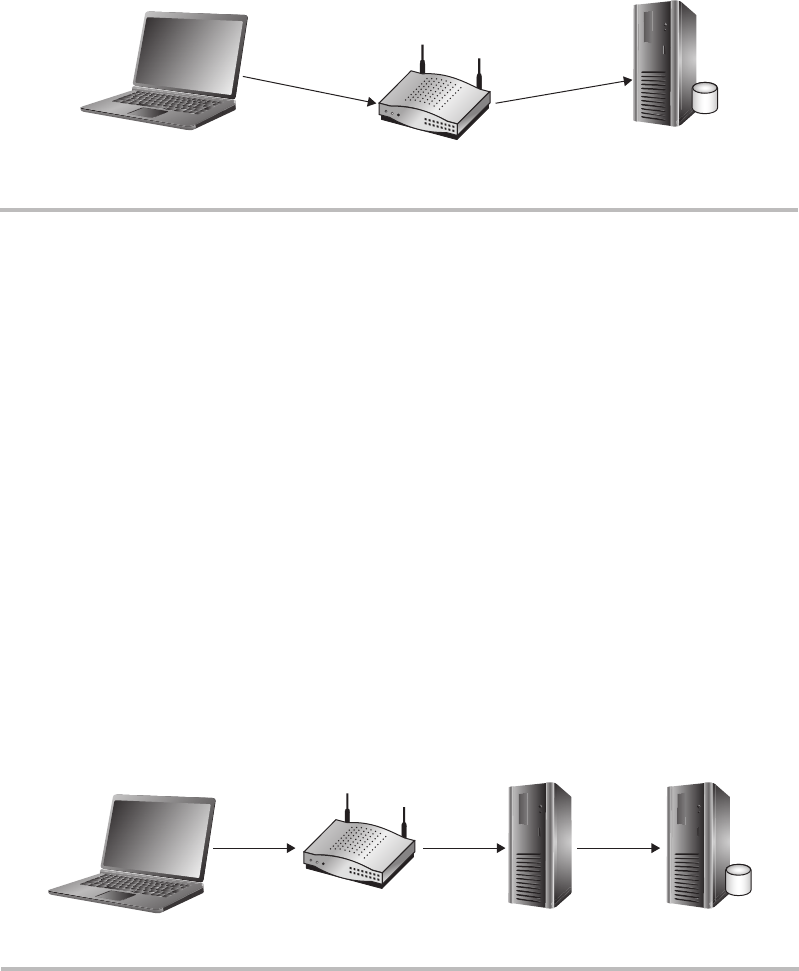
Secure Beginner’s Guide / Wireless Network Security: A Beginner’s Guide / Tyler Wrightson / 094-6 / Chapter 7
184 Wireless Network Security: A Beginner’s Guide
the same system which holds the user credentials. In Figure 7-14, you’ll see an example
of a RADIUS server authenticating to a separate server which holds the database of user
credentials, such as Active Directory.
RADIUS is assigned UDP ports 1812 and 1813 by the Internet Assigned Numbers
Authority (IANA). Port 1812 is used for authentication, whereas port 1813 is used for
accounting. However, before the official UDP ports had been assigned by IANA, many
vendors had settled on using UDP port 1645 for authentication and UDP port 1646 for
authentication. Therefore, some RADIUS servers listen to both sets of UDP ports by
default. Microsoft RADIUS servers default to using UDP ports 1812 and 1813. You
should check the documentation for your specific RADIUS server to determine which
UDP ports it listens on by default. However, the protocol operates completely identical
no matter which UDP port the server is configured for. The administrator of the RADIUS
server configures a shared secret, which must be entered on the authenticator to ensure it’s
also an authorized agent.
Figure 7-13 RADIUS local database
RADIUS Authenticate to Local Database
Auth Auth
RADIUS
W/Local
Database
Figure 7-14 RADIUS Active Directory
Auth Auth Auth
Active
Directory
07-ch07.indd 184 4/6/12 3:00:09 PM

Secure Beginner’s Guide / Wireless Network Security: A Beginner’s Guide / Tyler Wrightson / 094-6 / Chapter 7
Secure Beginner’s Guide / Wireless Network Security: A Beginner’s Guide / Tyler Wrightson / 094-6 / Chapter 7
Chapter 7 Understanding the WPA2-Enterprise with Certificates Architecture 185
The communication between the clients, the authenticator, and the authentication
server happen using the Extensible Authentication Protocol (EAP), which we discussed
in Chapter 6. Essentially, the authenticator (in our case, the access point) is relaying the
messages between the supplicant and the authentication server and doesn’t necessarily
understand the messages being exchanged. It just waits to see an authentication success
message from the authentication server, at which point it grants access to the wireless client.
Note
Keep in mind that you have the option to configure RADIUS to use a unique database
to authenticate users, but you can also accomplish the same thing by using Active
Directory and granting specific users and groups rights to authenticate to the wireless
network. We’ll cover this in more detail in the next chapter.
802.1x: Port-Based Access Control
The 802.1x protocol is an IEEE standard
for port-based authentication. The 802.1x
standard also defines the implementation
of the Extensible Authentication Protocol
Over LAN, or EAPOL. We covered
different EAP methods in Chapter 6.
To better understand how 802.1x functions on a wireless network, you should
understand its roots in wired networks. 802.1x, or Port-Based Access Control, requires
users to authenticate to the switch they’re physically connected to before they’re granted
access to the network. Typically, this authentication will happen against a unique
database that resides on a server separate from the network device the user is directly
connected to. 802.1x has its own unique nomenclature to identify each component in the
authentication process. 802.1x refers to these components as a supplicant, authenticator,
and authentication server. In a wireless network, a user’s laptop would be the supplicant,
the wireless access point would be the authenticator, and the RADIUS server would be the
authentication server. This basic architecture is shown in Figure 7-15.
Any client device (supplicant) that wishes to connect to the protected network
must support the 802.1x protocol in the form of client software, typically referred to as
supplicant software. Most modern operating systems come preinstalled with supplicant
software; however, you may need to install supplicant software, depending on your client
devices and authenticators.
LINGO
Remember not to confuse 802.1x with
802.11x, which is a common way to
refer to all the 802.11 wireless standards.
07-ch07.indd 185 4/6/12 3:00:09 PM
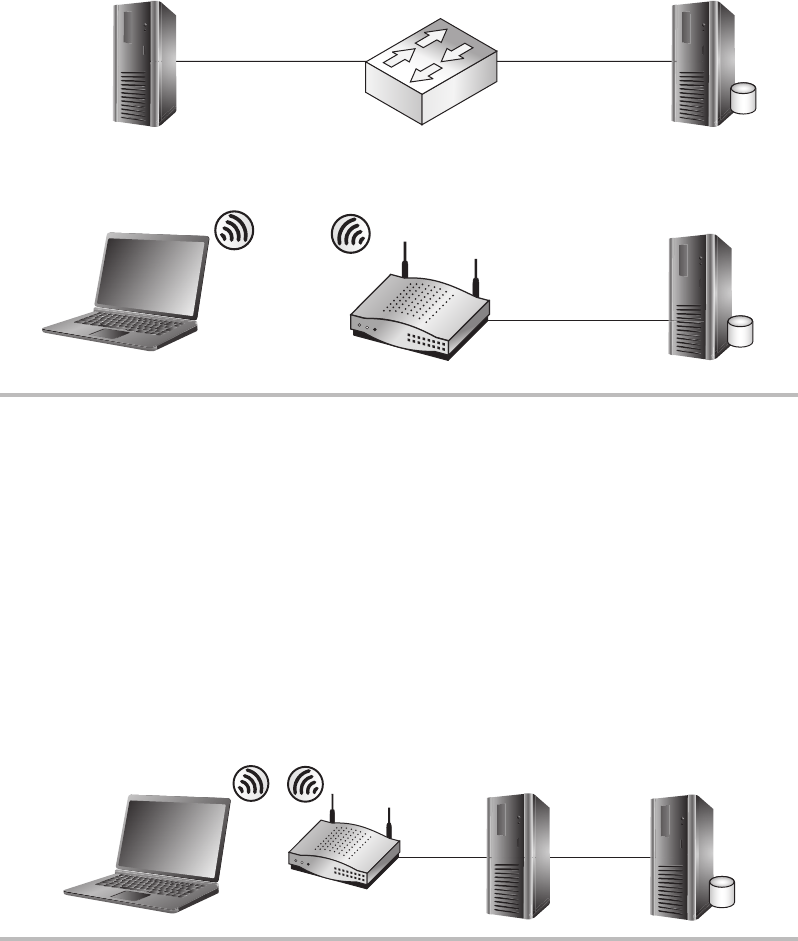
Secure Beginner’s Guide / Wireless Network Security: A Beginner’s Guide / Tyler Wrightson / 094-6 / Chapter 7
186 Wireless Network Security: A Beginner’s Guide
RADIUS and 802.1x
RADIUS and 802.1x will typically go hand in hand when an 802.1x solution is being
deployed. Remember that 802.1x encompasses the three components of the core
architecture—client, network device, and server—whereas RADIUS deals with actually
authenticating the user’s credentials. This is shown in Figure 7-16.
Figure 7-15 802.1x topology and nomenclature
802.1X Nomenclature
802.1X Authentication
Client
Supplicant Authentication
Server
Authenticator
WIRED 802.1X Authentication
AP
Figure 7-16 802.1x authenticates to RADIUS
AP
802.1X W/RADIUS
RADIUS
Active
Directory
07-ch07.indd 186 4/6/12 3:00:13 PM
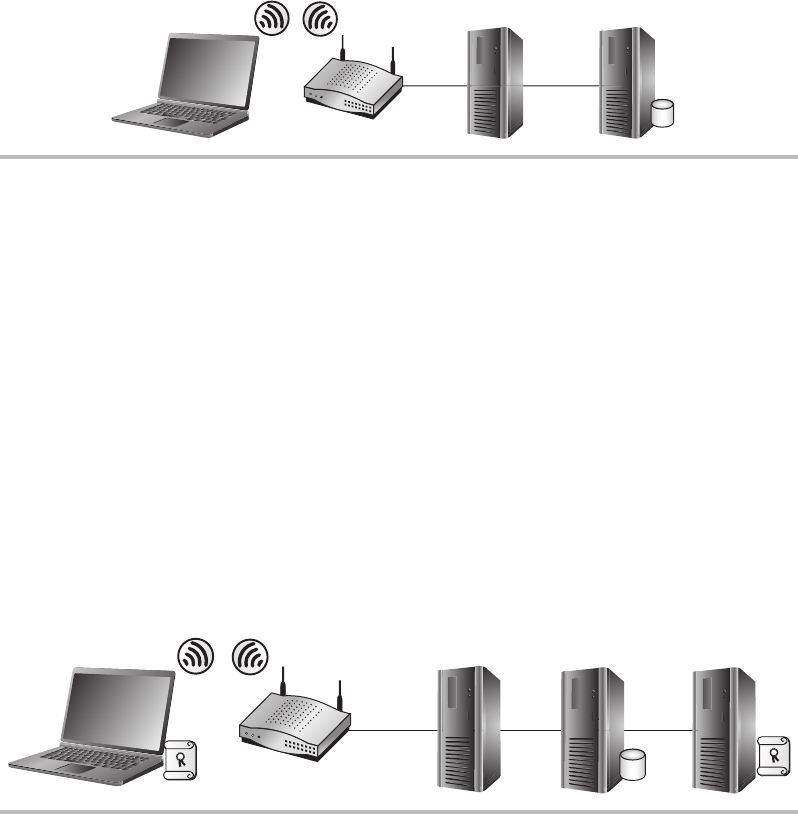
Secure Beginner’s Guide / Wireless Network Security: A Beginner’s Guide / Tyler Wrightson / 094-6 / Chapter 7
Secure Beginner’s Guide / Wireless Network Security: A Beginner’s Guide / Tyler Wrightson / 094-6 / Chapter 7
Chapter 7 Understanding the WPA2-Enterprise with Certificates Architecture 187
Both RADIUS and 802.1x are highly versatile systems. Remember that as well as being
able to operate separately, these two systems handle much more than just authentication for
wireless clients. You could employ an identical design using switches to authenticate users
before they’re allowed access to the wired LAN. In some documentation, you may see
WPA-Enterprise referred to as WPA-802.1x
Also remember that certificates are optional in a WPA-Enterprise network. The core
architecture is the same except for the addition of the Certificate Authority. This is shown
in Figures 7-17 and 7-18, respectively. We’ll cover the configuration of WPA-Enterprise
without certificates in Chapter 9.
Figure 7-17 WPA-Enterprise components without a CA
WPA Enterprise Without CA
Active Directory
Domain Controller
AP
RADIUS
Server
Figure 7-18 WPA-Enterprise with a CA
AP
WPA Enterprise with Certicates
RADIUS
Server
Domain
Controller
Certicate
Authority
07-ch07.indd 187 4/6/12 3:00:18 PM
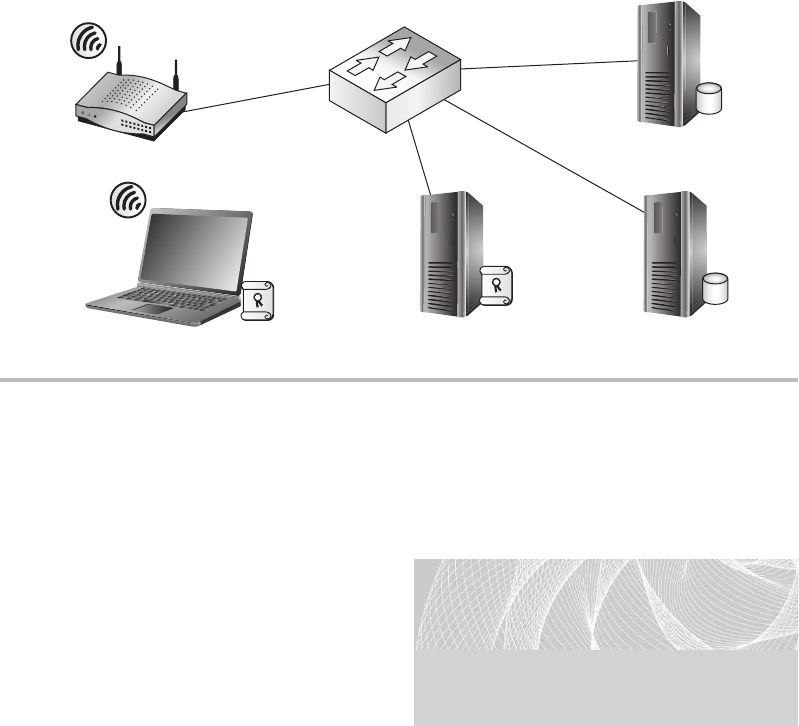
Secure Beginner’s Guide / Wireless Network Security: A Beginner’s Guide / Tyler Wrightson / 094-6 / Chapter 7
188 Wireless Network Security: A Beginner’s Guide
WPA Enterprise Architecture
So how do we tie all of these technologies
together to support our secure wireless
network? In Figure 7-19, you can see the
overall topology for a WPA-Enterprise
network using certificates to authenticate
users. In the next chapter, we’ll look at
actually implementing this. For now let’s
discuss the nuances of implementing these
technologies to support a wireless network.
The major steps we would follow to deploy a WPA2-Enterprise network using certificates
for authentication would look like the following:
Deploy the enterprise CA.1.
Configure the certificate templates.a.
Deploy the root certificate to laptops (laptops plugged in).b.
Deploy the user certificate to laptops.c.
LINGO
In this case, you’re probably safe to
substitute nuances with “headaches.”
Don’t worry, though, we’ll get through
this together.
Figure 7-19 Overall architecture with all components
WPA Enterprise With Certicates
RADIUS
Server
Domain
Controller
CA Server
07-ch07.indd 188 4/6/12 3:00:21 PM
Secure Beginner’s Guide / Wireless Network Security: A Beginner’s Guide / Tyler Wrightson / 094-6 / Chapter 7
Secure Beginner’s Guide / Wireless Network Security: A Beginner’s Guide / Tyler Wrightson / 094-6 / Chapter 7
Chapter 7 Understanding the WPA2-Enterprise with Certificates Architecture 189
Configure the RADIUS server.2.
Create a RADIUS client entry for the access point.a.
Create a connection request policy.b.
Create a Network Policy.c.
Configure the access point.3.
Configure for WPA2-Enterprise.a.
Configure the RADIUS server to authenticate users against.b.
Test the authentication.c.
We’ll start by deploying our enterprise Certificate Authority. In our example, we’ll
install the service on our domain controller, but the process is identical if you’re installing
on a stand-alone server. We’ll then configure certificate templates and choose the groups
that are allowed to obtain certificates via auto-enrollment. We’ll then obtain the CA
certificate on the client computer and obtain the user’s certificate for authentication.
You should understand that for a client computer to download the certificate for the
CA, it must have network access to Active Directory, meaning that this can’t happen over
the same wireless network the user wants to authenticate to without having previously
obtained the certificate. Therefore, you must ensure that the computer is connected to the
network via hardwire or a different wireless network before attempting to authenticate to
the wireless network to allow the computer to download the CA certificate. The same is
true for the user’s certificate obtained through auto-enrollment.
Before we go any further, we’ll do exactly that. We’ll connect our laptop to our LAN
and verify that it was able to download both the Certificate Authority certificate and the
user certificate to be used for authentication to the wireless network. We’ll then configure
our RADIUS server. In Windows 2008, the RADIUS functionality is under the role of the
Network Policy Server (NPS).
A connection request policy is a policy on the NPS that designates which RADIUS
clients we’ll accept requests for and what we’ll do with them. In our case, the RADIUS
client is our access point, and we will accept authentication requests from this client. We
then create a Network Policy that combines the connection request policy and assigns the
users and the conditions that allow them to authenticate successfully.
Finally, we’ll configure our wireless access points, which is probably the easiest part.
We’ll configure the access point to use WPA2-Enterprise and configure it to authenticate
to the IP address of the RADIUS server we configured. Then we’ll test authentication
from our client device to the access point. After successful authentication, you can pour
yourself a huge glass of your favorite drink and take a much-deserved vacation!
07-ch07.indd 189 4/6/12 3:00:21 PM
Secure Beginner’s Guide / Wireless Network Security: A Beginner’s Guide / Tyler Wrightson / 094-6 / Chapter 7
190 Wireless Network Security: A Beginner’s Guide
We’ve Covered
In this chapter, we covered all the technologies necessary to implement a WPA2-Enterprise
network using digital certificates for authentication. You can clearly see that this solution
is not something you just roll out without any forethought. Successfully deploying it takes
marked consideration and should not be done in haste.
In this chapter, we looked at the following topics:
PKI and digital certificates
Public key cryptography ●
Public key algorithms ●
Hash algorithms ●
Digital certificates ●
CA hierarchy ●
CRLs and OCSP ●
Microsoft Certificate Services ●
Auto-enrollment ●
RADIUS ●
802.1x ●
Authentication process and topology ●
WPA-Enterprise example
The big picture ●
07-ch07.indd 190 4/6/12 3:00:21 PM

Secure Beginner’s Guide / Wireless Network Security: A Beginner’s Guide / Tyler Wrightson / 094-6 / Chapter 8
191
Deploying a WPA-
Enterprise Network
with Certificates
Chapter 8
08-ch08.indd 191 3/28/12 4:55:07 PM
Secure Beginner’s Guide / Wireless Network Security: A Beginner’s Guide / Tyler Wrightson / 094-6 / Chapter 8
192 Wireless Network Security: A Beginner’s Guide
We’ll Cover
Configure the Certification Authority ●
Configure the RADIUS server ●
Configure the wireless access point ●
In this chapter, we’ll implement the architecture covered in the previous chapter. This
includes the implementation of every technology necessary to support this network. The
only prerequisite is that you have an Active Directory domain in place.
We’ll start by deploying our enterprise Certification Authority. In our example, we’ll
install the service on our domain controller, but the process is identical if you’re installing
on a stand-alone server that’s part of your domain. We’ll then configure certificate
templates and choose the groups that are allowed to obtain and automatically enroll for
the certificates. We’ll then obtain the CA certificate on the client computer and obtain the
user’s certificate for authentication.
We’ll then move on to installing the RADIUS server and configuring it to accept
authentication requests from our access points. We’ll then configure our access points to
authenticate users against the RADIUS server and test authentication.
Install and Configure the Certification Authority
We’ll start by installing the Certification Authority and configuring certificate auto-
enrollment. Next, we’ll create a certificate template for client auto-enrollment and then
enable the template on the Certification Authority. Finally, we’ll configure group policy to
enable clients to automatically obtain certificates. The major steps in configuring the CA
are as follows:
Install Active Directory Certificate Services.1.
Copy the certificate template and modify it to fit our needs.2.
Issue the certificate template on the CA.3.
Configure a Group Policy Object to enable certificate auto-enrollment.4.
Log onto a workstation covered by the Group Policy Object.5.
08-ch08.indd 192 3/28/12 4:55:07 PM

Secure Beginner’s Guide / Wireless Network Security: A Beginner’s Guide / Tyler Wrightson / 094-6 / Chapter 8
Secure Beginner’s Guide / Wireless Network Security: A Beginner’s Guide / Tyler Wrightson / 094-6 / Chapter 8
Chapter 8 Deploying a WPA-Enterprise Network with Certificates 193
Install Active Directory Certificate Services
Let’s dive right into installing and configuring our Windows Certificate Services server
on a Windows 2008 server. The default settings for Active Directory Certificate Services
should be fine for most installations. To install Active Directory Certificate Services (AD
CS), open Server Manager, right-click Roles, and choose Add Roles.
The welcome screen is a generic screen you’ll see whenever adding a role to the
server. Simply choose Next at the welcome screen. On the next screen, check the box
for Active Directory Certificate Services. You’ll notice that the column on the left side
now indicates all the steps necessary to configure AD CS (see Figure 8-1). Click Next to
continue.
The next screen is mostly informational, but it does include links to help topics for
installing and managing Active Directory Certificate Services. Take the time to at least
click the links and get an idea for the type of information that’s available to you from
Windows Help. Click Next to continue.
In the next screen, you only need to check the box for Certification Authority. The
other options are not necessary for our installation. If you highlight the other options,
you’ll notice a description for each on the right side of the window.
In the next screen, you’ll see the two options for the different types of Certification
Authorities we discussed in the previous chapter. You’ll also remember that we need to
install an Enterprise Certification Authority to integrate with Active Directory and allow
auto-enrollment. Select Enterprise and choose Next.
You’ll see the option to install a new root CA or a subordinate CA for an existing
CA infrastructure. We’ll assume that you don’t have any Certification Authorities in your
environment and install a root CA. Select the Root CA option and choose Next.
Into Action
I have deployed WPA2-Enterprise with certificates many times, and I don’t think I
can remember a time when everything worked perfectly right away. Give yourself
plenty of time and understand that because there are so many moving parts, you
might have to retrace your steps and troubleshoot an issue or two.
If you have the resources, you should absolutely configure all of these
technologies in a lab before installing them in a production environment. You should
make sure you’re familiar with each component of a WPA2-Enterprise network.
08-ch08.indd 193 3/28/12 4:55:07 PM
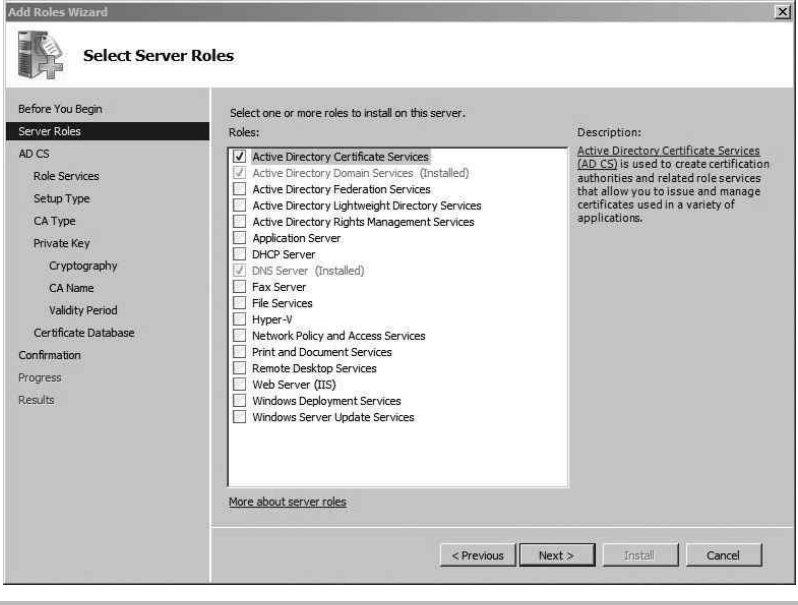
Secure Beginner’s Guide / Wireless Network Security: A Beginner’s Guide / Tyler Wrightson / 094-6 / Chapter 8
194 Wireless Network Security: A Beginner’s Guide
We’ll also assume you don’t have an existing private key. Therefore, in the next screen,
select Create a New Private Key and choose Next.
In the next screen, shown in Figure 8-2, you’ll see the cryptographic options to generate
the new private key, which will be used to sign all the generated certificates. The defaults
here are acceptable, so you can choose Next to continue.
In the next screen, shown in Figure 8-3, you’ll see the options to name the Certification
Authority, which will also show up in every certificate this CA generates. The defaults here
should also be sufficient. Choose Next to continue.
In the next screen, you can configure the validity period of the certificate of the new
Enterprise Certification Authority. Keep in mind that you won’t be able to issue any
certificates past the time when the Certification Authority’s certificate expires. Therefore,
I typically extend the period to ten years. Once you’ve entered the time period that’s
sufficient for your network, choose Next.
Figure 8-1 Adding the Server role
08-ch08.indd 194 3/28/12 4:55:07 PM
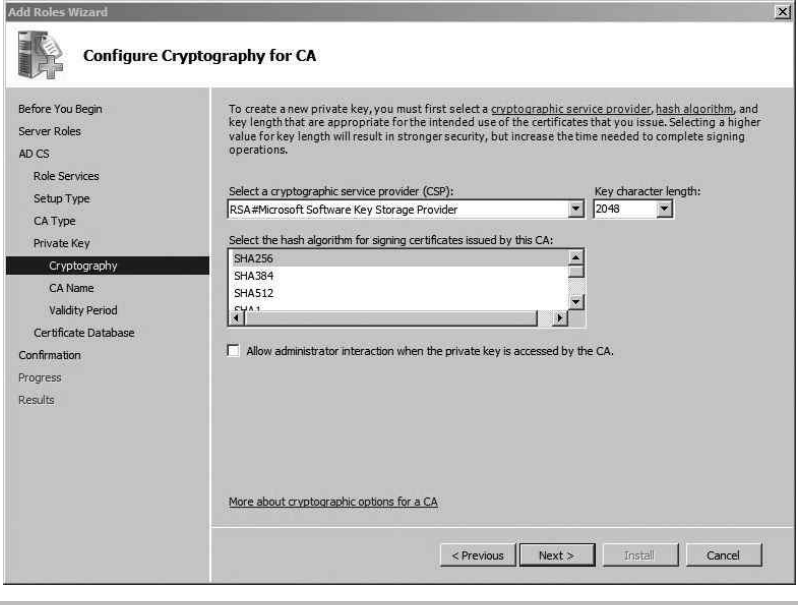
Secure Beginner’s Guide / Wireless Network Security: A Beginner’s Guide / Tyler Wrightson / 094-6 / Chapter 8
Secure Beginner’s Guide / Wireless Network Security: A Beginner’s Guide / Tyler Wrightson / 094-6 / Chapter 8
Chapter 8 Deploying a WPA-Enterprise Network with Certificates 195
The next screen, shown in Figure 8-4, gives you the option of changing the default
certificate database and certificate database log locations. If you have a separate disk or
partition you use for log files, you should select that location; otherwise, the defaults are
sufficient. Click Next to continue.
The next screen, shown in Figure 8-5, gives you a summary of all the configuration options
you chose during the installation. You should save this information whenever you add a role to
your server, or you can even just take a screenshot. You never know when it might be helpful,
when you’re troubleshooting an issue, to quickly look back at the options you chose during
installation. Save the information and then click Install to install the Certification Services.
Once the installation is complete, you’ll be presented with the results screen. All this
should say is that the installation was successful. Click Close to exit out of the Add Roles
Wizard.
Congratulations, you’ve now successfully installed Microsoft Certification Services and
are ready to start deploying certificates. At this point, you can manually create and distribute
Figure 8-2 Configuring the private key cryptography settings
08-ch08.indd 195 3/28/12 4:55:07 PM
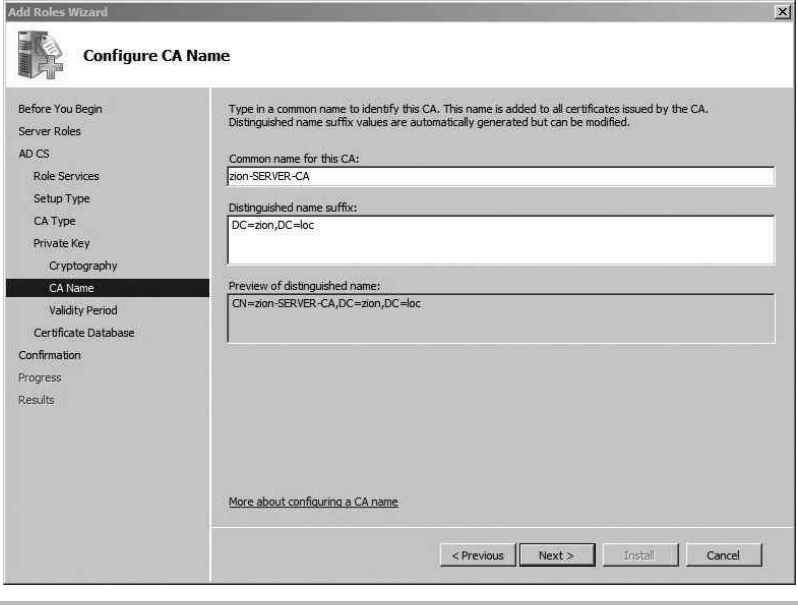
Secure Beginner’s Guide / Wireless Network Security: A Beginner’s Guide / Tyler Wrightson / 094-6 / Chapter 8
196 Wireless Network Security: A Beginner’s Guide
certificates, but that is not our ultimate goal. Next, we’ll look at configuring certificate
templates and configuring which users are allowed to automatically obtain certificates.
Configure the Certificate Template and Auto-Enrollment
Now we’ll move on to configuring the certificate template, which defines the specific
settings for the certificate, what the certificate will be used for, and who can obtain the
certificate. In the following examples, we’ll create new Organizational Units and user groups
to really define and restrict who is able to obtain the certificates necessary to authenticate
to the wireless network. We’ll then assign the correct user permissions to the certificate
template for the Wireless group to allow the members of that group to automatically obtain
that certificate. Here are the steps we’ll take in this process:
Create the Wireless Organizational Unit and the WirelessUsers group.1.
Create the Wireless Group Policy Object.2.
Figure 8-3 Configuring the Certificate Authority name
08-ch08.indd 196 3/28/12 4:55:07 PM

Secure Beginner’s Guide / Wireless Network Security: A Beginner’s Guide / Tyler Wrightson / 094-6 / Chapter 8
Secure Beginner’s Guide / Wireless Network Security: A Beginner’s Guide / Tyler Wrightson / 094-6 / Chapter 8
Chapter 8 Deploying a WPA-Enterprise Network with Certificates 197
Apply the Group Policy Object to the Wireless Organizational Unit.3.
Create and issue the certificate template.4.
Log onto the workstation and obtain the user certificate.5.
Create the Wireless Organizational Unit and the WirelessUsers Group
Creating the Wireless Organizational Unit and the Wireless users group are common
Active Directory administration tasks, but I’ll cover them here in case you need a quick
refresher. Open Server Manager | Roles | Active Directory Domain Services | Active
Directory Users and Computers. In our example, we’ll create an Organizational Unit
right in the root of our domain. To do this, right-click the domain and choose New |
Organizational Unit. In Figure 8-6, you can see we’ve named this Organizational Unit
“Wireless” and we’ve created a standard Windows group called WirelessUsers.
Figure 8-4 Configuring the certificate database location
08-ch08.indd 197 3/28/12 4:55:07 PM

Secure Beginner’s Guide / Wireless Network Security: A Beginner’s Guide / Tyler Wrightson / 094-6 / Chapter 8
198 Wireless Network Security: A Beginner’s Guide
Figure 8-5 Certification Authority installation settings
Figure 8-6 The Wireless Organizational Unit and the WirelessUsers group
08-ch08.indd 198 3/28/12 4:55:07 PM
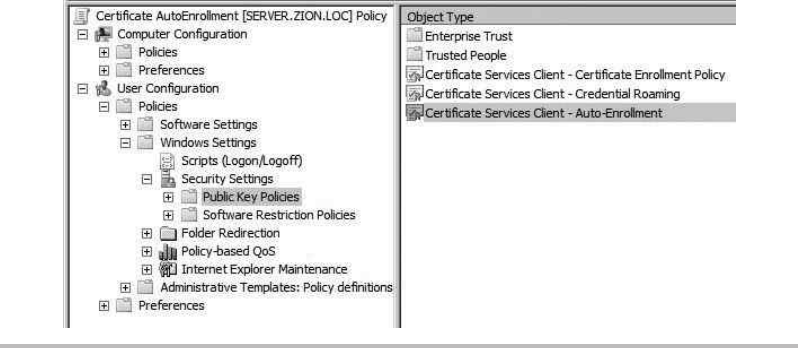
Secure Beginner’s Guide / Wireless Network Security: A Beginner’s Guide / Tyler Wrightson / 094-6 / Chapter 8
Secure Beginner’s Guide / Wireless Network Security: A Beginner’s Guide / Tyler Wrightson / 094-6 / Chapter 8
Chapter 8 Deploying a WPA-Enterprise Network with Certificates 199
Create the Wireless Group Policy Object
Now we’ll add a Group Policy Object that enables the clients to automatically enroll in
the available certificates. The Group Policy can be configured to allow users, computers,
or both to automatically enroll in certificates. You should also keep in mind that certificate
templates are specific to users and computers. Therefore, certificate templates that allow
users to automatically enroll in certificates can’t be used by computers to automatically
obtain certificates.
To configure the Group Policy Object, open Server Manager, expand Features,
Group Policy Management, expand your forest (zion.loc, in our example), right-click
the Wireless Organizational Unit, and choose “Create a GPO in this domain, and link it
here.” Name the Group Policy Object something logical (in this example, we’ve named it
WirelessCertAutoEnroll) and then click OK. Right-click the newly created Group Policy
Object and choose Edit.
Apply the Group Policy Object to the Wireless Organizational Unit
The location for configuring certificate auto-enrollment for users is User Configuration |
Policies | Windows Settings | Security Settings | Public Key Policies, as shown in Figure 8-7.
Double-click “Certificate Services Client – Auto-Enrollment” to configure the policy.
You’ll want to use the settings shown in Figure 8-8. To enable auto-enrollment, change
the Configuration Model setting to Enabled. Check all three boxes and then click OK to
continue.
Figure 8-7 Auto-enrollment Group Policy location
08-ch08.indd 199 3/28/12 4:55:07 PM
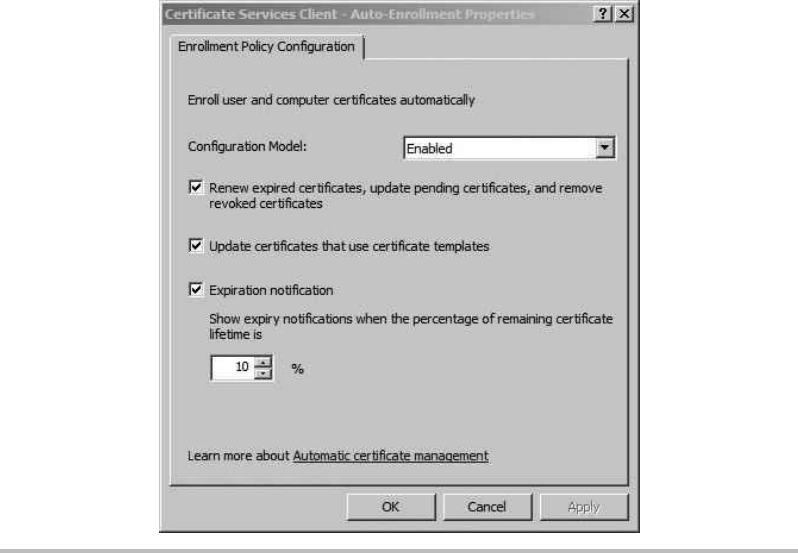
Secure Beginner’s Guide / Wireless Network Security: A Beginner’s Guide / Tyler Wrightson / 094-6 / Chapter 8
200 Wireless Network Security: A Beginner’s Guide
Next, double-click the “Certificate Services Client – Certificate Enrollment Policy”
setting. Change the Configuration Model setting to Enabled and then click Apply. You’ll
notice that the policy shows that auto-enrollment is enabled, as shown in Figure 8-9.
To configure the computer account to automatically obtain certificates, you configure
the same policy under Computer Configuration. The only option that isn’t available is
to notify about pending certificate expiration. This doesn’t matter because there’s no
reason to notify a computer of a pending certificate’s expiration. Remember that to allow
a computer to authenticate to the wireless network, before a user has logged on, we’ll
need to enable the computer to automatically obtain certificates. The location of the group
policy settings for a computer account is; Computer Configuration | Policies | Windows
Settings | Security Settings | Public Key Policies.
Create and Issue the Certificate Templates
Now that we’ve created the Group Policy settings to enable computers to automatically
obtain certificates, we need to configure our Certification Authority with the certificates
that users can obtain. This is a key step that can be a little confusing. To start, we configure
our certificate templates and then configure the CA to issue certificates for these templates.
Figure 8-8 Auto-enrollment settings
08-ch08.indd 200 3/28/12 4:55:07 PM
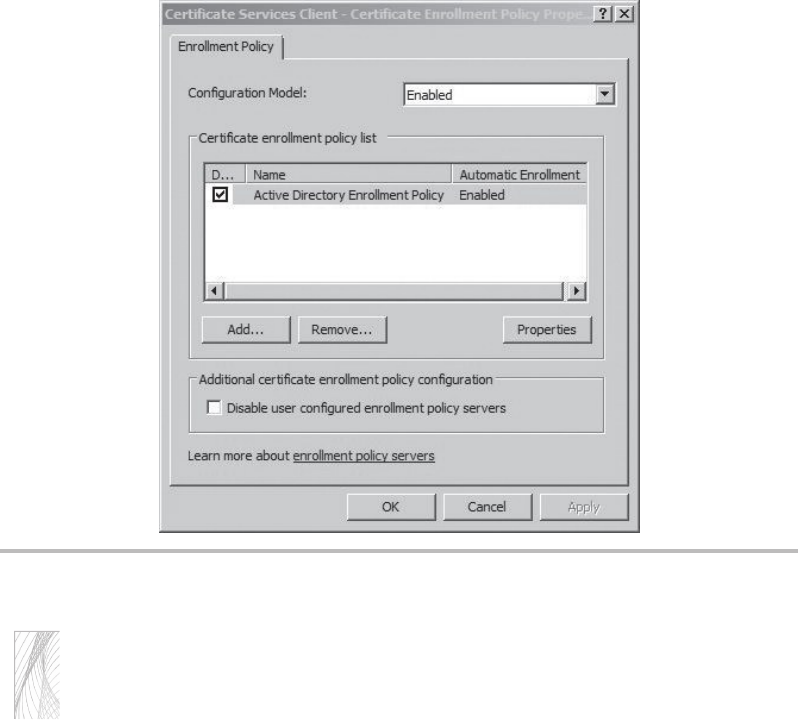
Secure Beginner’s Guide / Wireless Network Security: A Beginner’s Guide / Tyler Wrightson / 094-6 / Chapter 8
Secure Beginner’s Guide / Wireless Network Security: A Beginner’s Guide / Tyler Wrightson / 094-6 / Chapter 8
Chapter 8 Deploying a WPA-Enterprise Network with Certificates 201
Tip
Be careful when choosing and configuring templates. Choosing the wrong type of
certificate template doesn’t present itself in obvious ways. You need to make sure you
follow along carefully and choose the correct type of certificate template for the type of
deployment you’re planning.
Open Server Manager, expand Roles | Active Directory Certificate Services, and also
expand the server name. You should see a structure similar to what’s shown in Figure 8-10.
You’ll notice that in Microsoft’s infinite wisdom, they decided to create two items labeled
“Certificate Templates.” The first Certificate Templates item directly under Active Directory
Certificate Services is the location of the actual templates we will configure. The Certificate
Templates item under the server (in this case, zion-SERVER-CA) holds the actual templates
that this Certification Authority will issue certificates for.
If you click the first Certificate Templates item, you’ll see all the preconfigured templates
that will assist us in creating our certificate templates. You can actually manipulate these
Figure 8-9 Certificate enrollment policy
08-ch08.indd 201 3/28/12 4:55:08 PM

Secure Beginner’s Guide / Wireless Network Security: A Beginner’s Guide / Tyler Wrightson / 094-6 / Chapter 8
202 Wireless Network Security: A Beginner’s Guide
templates directly; however, for the sake of keeping everything organized, we’ll just copy
a template and rename it to something logical. The two templates we’ll configure are
User Signature Only ●
Computer ●
Locate the two templates labeled “User Signature Only” and “Computer.” The difference
between the User template and the User Signature Only template is that the User template
enables the certificate to be used for the Encrypting File System. I’ll let you decide if this
additional functionality is necessary for your environment. If you only need your users to
authenticate to the wireless network using this certificate, then the “User Signature Only”
template is sufficient.
Right-click the User Signature Only template and choose Duplicate Template. If you
have any Windows 2003 Certificate Servers in your environment, choose that option in
the resultant dialog box (see Figure 8-11) and then click OK. Otherwise, select Windows
Server 2008 Enterprise and click OK.
In the General tab of the Properties of New Template dialog box, name the template
using something indicative of what it will be used for. In our example, we’ve named our
template “Zion – Wireless User.” Next, click the Security tab and add the group that we
want to have the ability to auto-enroll for certificates using this template. In our example,
we’ve added the WirelessUsers group. Assign this group the Read, Enroll, and Auto-Enroll
permissions and then click OK (see Figure 8-12).
Figure 8-10 Certificate Services under Server Manager
08-ch08.indd 202 3/28/12 4:55:08 PM
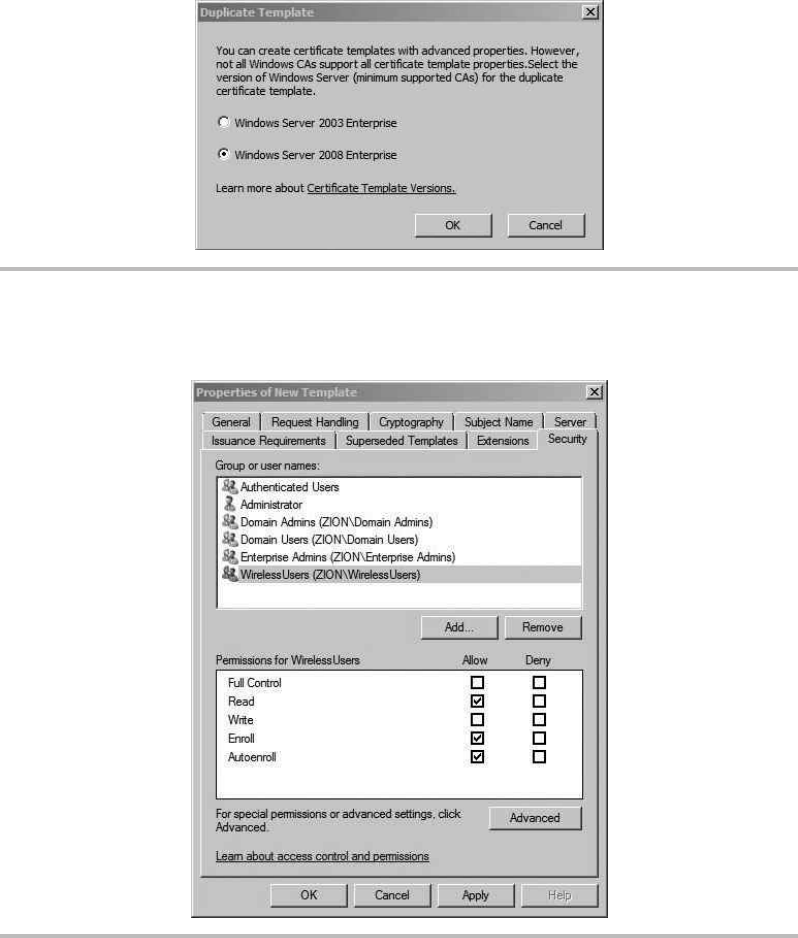
Secure Beginner’s Guide / Wireless Network Security: A Beginner’s Guide / Tyler Wrightson / 094-6 / Chapter 8
Secure Beginner’s Guide / Wireless Network Security: A Beginner’s Guide / Tyler Wrightson / 094-6 / Chapter 8
Chapter 8 Deploying a WPA-Enterprise Network with Certificates 203
Figure 8-11 The Duplicate Template dialog box
Figure 8-12 Configuring the group’s ability to auto-enroll
08-ch08.indd 203 3/28/12 4:55:08 PM
Secure Beginner’s Guide / Wireless Network Security: A Beginner’s Guide / Tyler Wrightson / 094-6 / Chapter 8
204 Wireless Network Security: A Beginner’s Guide
After you’ve created the certificate template, you need to issue it on your CA. Right-
click the Certificate Templates folder under your CA name and choose New | Certificate
Template to Issue. Find the newly created template and click OK. At this point, we are
completely set for the users to obtain their certificate.
Let’s continue by creating the certificate template for computers to obtain certificates
and then we’ll discuss the details of obtaining the certificates through auto-enrollment. The
process is exactly the same as the previous template; however, we’ll apply the permissions
to the group WirelessComputers. Right-click the Computer certificate template and choose
Duplicate. Select the CA type for your environment. Name the template appropriately.
On the Security tab, add the WirelessComputers group and give it the Read, Enroll, and
Auto-Enroll permissions. Then click OK.
Log onto the Workstation and Obtain the User Certificate
Now if you log onto a workstation that’s a member of the WirelessComputers group, the
computer will automatically obtain the computer certificate. Likewise, if you log onto any
domain computer using an account that is a member of the WirelessUsers group, that user
will automatically obtain the certificate. Because these settings are pushed out via Group
Policy, you’ll need to make sure the Group Policy gets pushed to the client computer. You
can force this by running gpupdate /force at a command prompt.
The auto-enrollment process is triggered upon user logon, so if you’re already logged
on, you need to log out and log back into the computer to trigger the auto-enrollment
process. You should understand that for a client computer to download the certificate
for the CA and the user’s certificate, the computer must have network access to Active
Directory. This means that the computer can’t initially download the certificate necessary
to authenticate to the wireless network over the same wireless network. The user must
have previously obtained the certificate. Therefore, you must ensure that the computer is
connected to the network either hardwire or a different wireless network before attempting
to authenticate to the wireless network to allow the computer to download the CA
certificate and obtain the certificate.
After logging into the computer, we can view the certificate store on the client computer
using the Microsoft Management Console. Click Start | Run, type mmc.exe, and hit .
Click File | Add/Remove Snapin and then double-click the Certificates item. Click OK to
close the dialog box. Expand the path Certificates | Current User | Personal and you’ll see
something similar to Figure 8-13.
You’ll notice the issuing CA is the name of the Certification Authority we configured.
If you scroll to the right, you’ll also see the certificate template that was used to create
this certificate. This can be very handy information when you’re troubleshooting
08-ch08.indd 204 3/28/12 4:55:08 PM
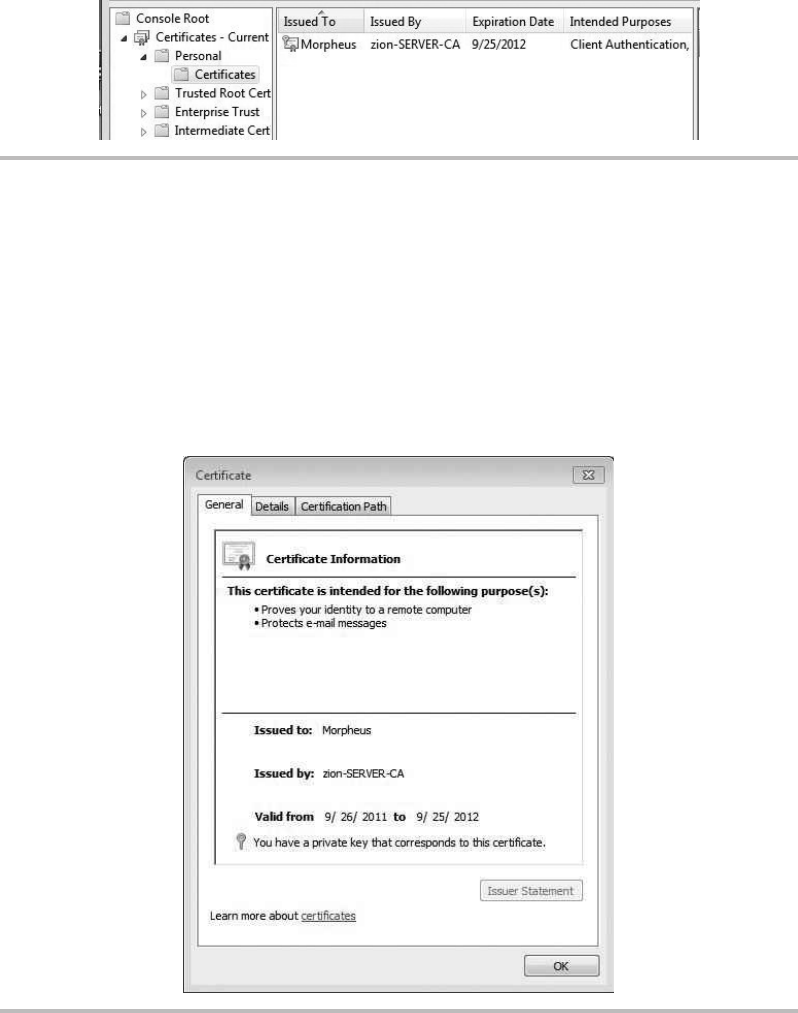
Secure Beginner’s Guide / Wireless Network Security: A Beginner’s Guide / Tyler Wrightson / 094-6 / Chapter 8
Secure Beginner’s Guide / Wireless Network Security: A Beginner’s Guide / Tyler Wrightson / 094-6 / Chapter 8
Chapter 8 Deploying a WPA-Enterprise Network with Certificates 205
auto-enrollment issues. Now expand the node for Trusted Root Certification Authorities
and click Certificates. Scroll down to find the certificate for your Certification Authority.
If you double-click the certificate, you’ll notice that it’s issued to and issued by the same
entity.
Figure 8-14 shows an example of the certificate issued to Morpheus from the zion-
server-CA Certification Authority.
Figure 8-13 Certificate MMC console
Figure 8-14 Certificate issued to domain user Morpheus
08-ch08.indd 205 3/28/12 4:55:08 PM
Secure Beginner’s Guide / Wireless Network Security: A Beginner’s Guide / Tyler Wrightson / 094-6 / Chapter 8
206 Wireless Network Security: A Beginner’s Guide
Allow Pre-logon Authentication
We discussed the advantages of configuring the computer to connect to the wireless network
before the user has authenticated to the computer. There are many benefits to this, not the
least of which is the fact that users who have not logged onto the workstation before can
authenticate directly to Active Directory without having to be hardwired to the network.
You’ve already configured the majority of what you need from the client’s perspective.
You only have one more task. You need to configure a wireless network that the computer
will connect to without user intervention using Group Policy. You can choose to create
a new Group Policy or add to the certificate auto-enrollment policy we created earlier. I
typically recommend creating a new Group Policy Object, but you can decide for yourself.
By creating a new Group Policy, you can avoid any confusion later as to what the Group
Policy does. If you choose to add these settings to another Group Policy and later decide
to remove that policy (forgetting that the wireless settings are there), you’ve just created
an unnecessary headache for yourself.
Create a new Group Policy Object and navigate to Computer Configuration | Policies |
Windows Settings | Security Settings | Wireless Network (IEEE 802.11) Policies. If you
right-click the Wireless Network (IEEE 802.11) Policies node, you’ll see two options:
Create a New Wireless Network Policy for Windows Vista and Later Releases ●
Create a New Windows XP Policy ●
The configuration options are almost identical between the two. We’ll focus on the
Windows XP policy because Windows XP is currently the most popular Windows desktop
operating system. In Figure 8-15, you’ll see the configuration options on the General tab.
Most of the configuration here is self-explanatory: Give the policy a name and configure it
to connect to infrastructure networks only.
Next, click the Preferred Networks tab and click Add to add the settings specific to your
wireless network. You’ll see the New Preferred Setting Properties window in Figure 8-16.
Again, most of this is straightforward, and you’re really just configuring it to match the SSID,
authentication, and encryption settings of your wireless network.
Next, click the IEEE 802.1x tab to configure the authentication settings. This is where we
configure the computer to authenticate to the network using certificates. Your configuration
should look similar to Figure 8-17.
08-ch08.indd 206 3/28/12 4:55:08 PM
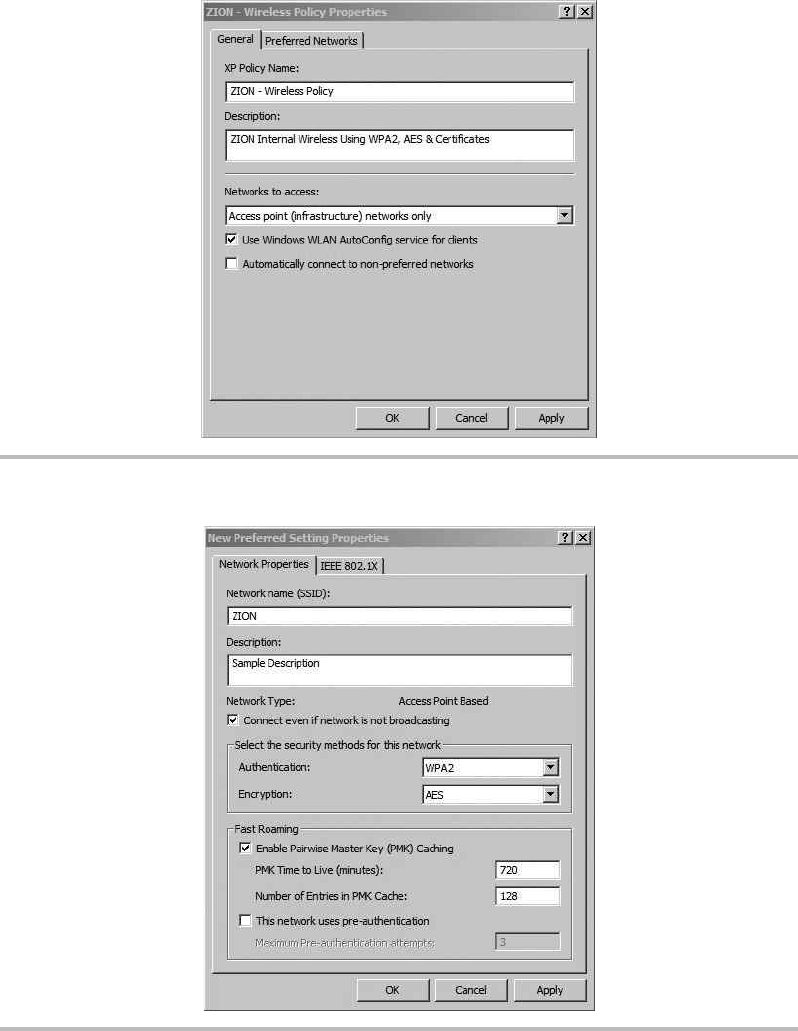
Secure Beginner’s Guide / Wireless Network Security: A Beginner’s Guide / Tyler Wrightson / 094-6 / Chapter 8
Secure Beginner’s Guide / Wireless Network Security: A Beginner’s Guide / Tyler Wrightson / 094-6 / Chapter 8
Chapter 8 Deploying a WPA-Enterprise Network with Certificates 207
Figure 8-15 Wireless 802.11 policy
Figure 8-16 Adding a preferred wireless network
08-ch08.indd 207 3/28/12 4:55:08 PM

Secure Beginner’s Guide / Wireless Network Security: A Beginner’s Guide / Tyler Wrightson / 094-6 / Chapter 8
208 Wireless Network Security: A Beginner’s Guide
Configure the RADIUS Server
Now we’ll move on to configuring our RADIUS server. We’ll install the service on our
server and configure a connection request. Each of the steps below could be performed
manually; however, once the RADIUS service is installed, there’s a very handy wizard
which will walk us through the required steps.
Install RADIUS Service.1.
Create a RADIUS client entry for the access point.2.
Create a connection request policy.3.
Create a Network Policy.4.
To install the RADIUS service, we need to install the Network Policy and Access
Services role. Start the Server Manager, right-click Roles, and choose Add Role. Select the
Network Policy and Access Services check box, shown in Figure 8-18, and then click Next.
The next screen is purely informational. Feel free to take the time to view the types
of information available to you. Click Next to continue. Select the Network Policy Server
check box and click Next to continue.
Figure 8-17 Configuring the Policy 802.1x settings
08-ch08.indd 208 3/28/12 4:55:08 PM
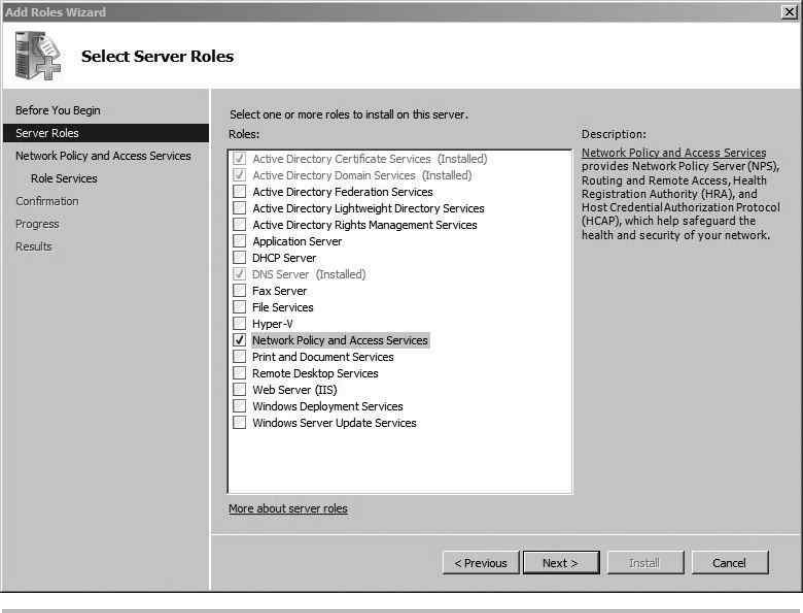
Secure Beginner’s Guide / Wireless Network Security: A Beginner’s Guide / Tyler Wrightson / 094-6 / Chapter 8
Secure Beginner’s Guide / Wireless Network Security: A Beginner’s Guide / Tyler Wrightson / 094-6 / Chapter 8
Chapter 8 Deploying a WPA-Enterprise Network with Certificates 209
The next screen provides a summary of the options you’ve chosen to install. Click
Install. The next screen should indicate that the installation has succeeded. Click Close to
exit this screen.
Now we’ll configure our newly installed Network Policy Server. Open Server Manager
and expand Roles, and you’ll see a new entry for “Network Policy and Access Services.”
If you highlight the first node, labeled “NPS (Local),” you’ll see a screen similar to
Figure 8-19. The easiest way to configure our NPS to perform RADIUS authentication for
our wireless network is with the 802.1x configuration wizard. To start the wizard, click the
drop-down box and select “RADIUS server for 802.1x Wireless or Wired Connections,”
and then click Configure 802.1x.
In the next screen, select the Secure Wireless Connections radio button and provide an
appropriate name in the text box. In Figure 8-20, you can see we’ve named ours “Secure
Wireless Connections.” Not too creative, but it gets the job done.
Figure 8-18 Selecting the Network Policy server roles
08-ch08.indd 209 3/28/12 4:55:08 PM
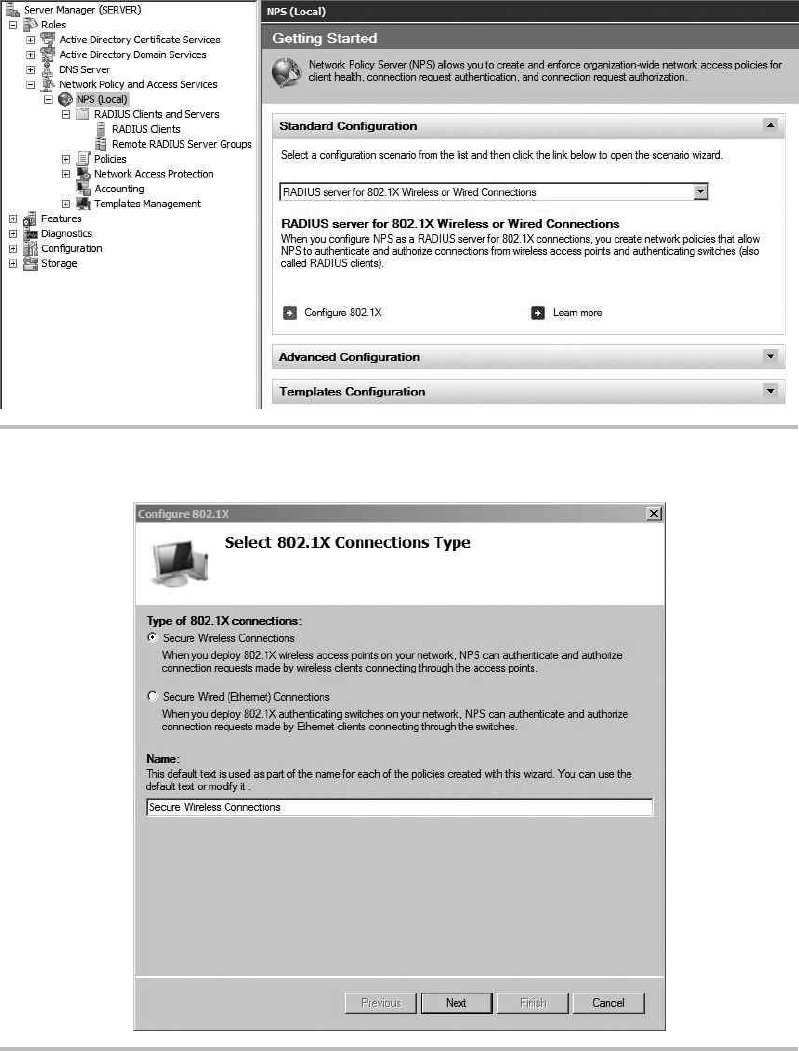
Secure Beginner’s Guide / Wireless Network Security: A Beginner’s Guide / Tyler Wrightson / 094-6 / Chapter 8
210 Wireless Network Security: A Beginner’s Guide
Figure 8-19 The Network Policy Server
Figure 8-20 802.1x configuration wizard
08-ch08.indd 210 3/28/12 4:55:08 PM
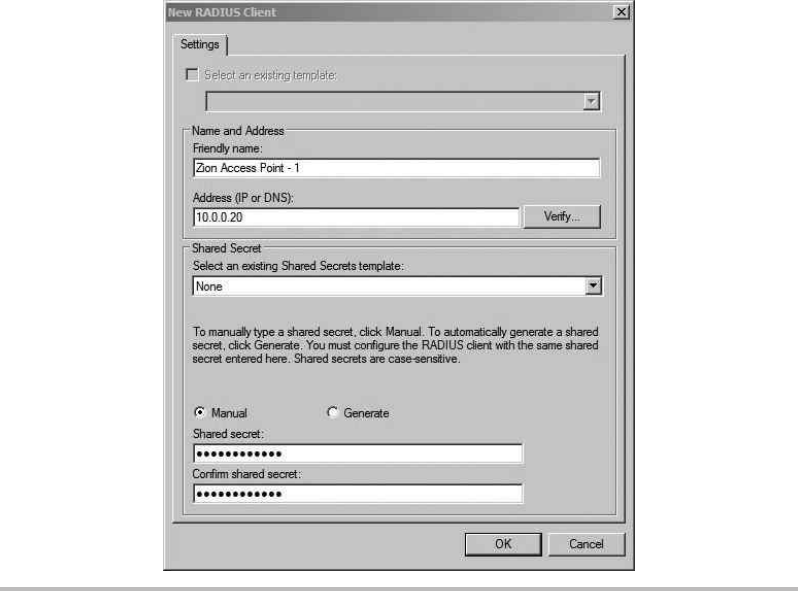
Secure Beginner’s Guide / Wireless Network Security: A Beginner’s Guide / Tyler Wrightson / 094-6 / Chapter 8
Secure Beginner’s Guide / Wireless Network Security: A Beginner’s Guide / Tyler Wrightson / 094-6 / Chapter 8
Chapter 8 Deploying a WPA-Enterprise Network with Certificates 211
In the next screen, we’re going to add the 802.1x authenticators. For our wireless
network, the authenticators are the access points. Click Add and fill in the information
for each individual access point. You should create a shared secret that is unique to each
access point. Your entry should look similar to Figure 8-21. Click OK to continue. Click
Add and enter any additional access points you have.
When you’re finished adding your access points, click Next. The next window allows
you to set the authentication method that clients will be using. In this case, we want our
client systems to use certificates, so choose the drop-down menu and select “Microsoft:
Smart Card or other certificate.” Click Next to continue.
In the next screen, shown in Figure 8-22, you can configure the groups that are
allowed to successfully authenticate against this policy. Click Add and add the groups that
are allowed to authenticate. Keep in mind that the users don’t have to be a member of all
the groups in this list to authenticate; they only need to be a member of one of the groups.
In our example, we’ve kept everything nice and organized and created a group called
WirelessUsers. Click Next to continue.
Figure 8-21 Adding the RADIUS client
08-ch08.indd 211 3/28/12 4:55:08 PM
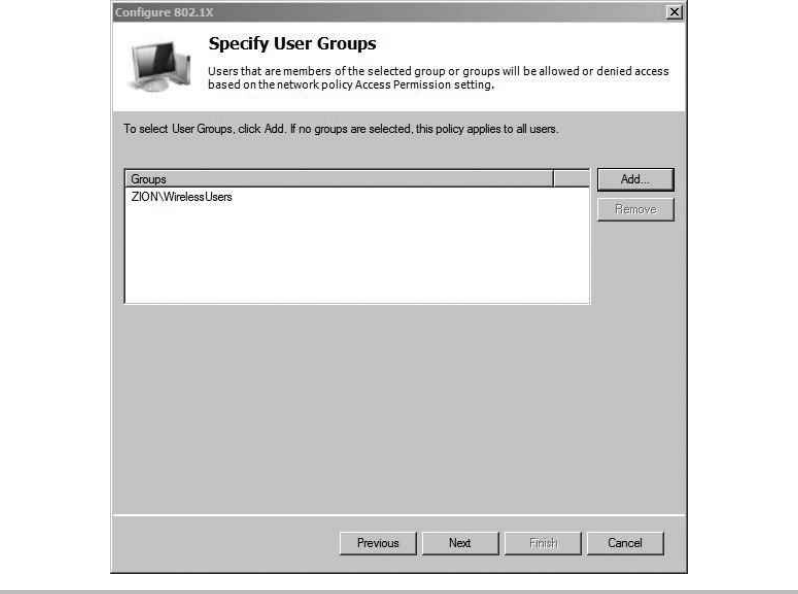
Secure Beginner’s Guide / Wireless Network Security: A Beginner’s Guide / Tyler Wrightson / 094-6 / Chapter 8
212 Wireless Network Security: A Beginner’s Guide
In the next screen, you can configure traffic-control attributes if your access points
support it. This is not a standard configuration, so click Next to continue. In the next
screen, you can see a summary of the configuration options. This is actually a helpful
screen. Take a minute to look at it. Not only does it show all the access points you
configured, but also the name of the Connection Request Policy and the Network Policy.
The Network Policy Server states the following for each type of policy:
Connection Request Policies allow you to designate whether connection requests are ●
processed locally or forwarded to remote RADIUS servers.
Network Policies allow you to designate who is authorized to connect to the network ●
and the circumstances under which they can or cannot connect.
Figure 8-22 Configuring the user groups to apply the policy to
08-ch08.indd 212 3/28/12 4:55:08 PM
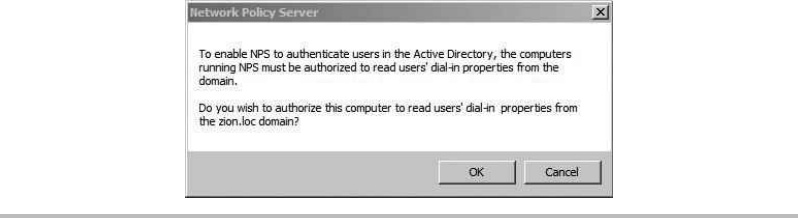
Secure Beginner’s Guide / Wireless Network Security: A Beginner’s Guide / Tyler Wrightson / 094-6 / Chapter 8
Secure Beginner’s Guide / Wireless Network Security: A Beginner’s Guide / Tyler Wrightson / 094-6 / Chapter 8
Chapter 8 Deploying a WPA-Enterprise Network with Certificates 213
For the Network Policy, we configured the following conditions: the request comes
from an 802.11 device, the user belongs to the WirelessUsers group, and the user is
authenticating with a certificate. If the user successfully authenticates and these conditions
are met, the user is granted access to the network.
At this point, your NPS is configured, but you have one final task to allow it to start
processing requests. Right-click the “NPS (Local)” node again and choose Register Server
in Active Directory. You’ll then see the message in Figure 8-23.
We’re almost there. You have the most complex configuration behind you. Now it’s
time to configure the access point and test authentication.
Configure the Wireless Access Point
Ironically, the configuration of the wireless access point is typically the easiest part of
this project. We won’t cover the configuration of the basic wireless settings because you
should be very familiar with those at this point. Items such as the SSID and channel are
assumed to be configured.
In Figure 8-24, you can see the configuration of a Linksys WRT54G running the
dd-wrt firmware. Keep in mind that although the interface for your access point may be
different, the configuration should be just as simple. You’ll notice that Security Mode is
set to WPA2 Enterprise, which brings up the option to configure a RADIUS server. We’ve
also configured the WPA algorithm as AES, as opposed to the less cryptographically
secure TKIP protocol.
All you need to authenticate your clients is the IP address of the RADIUS server as
well as the RADIUS shared secret you configured previously. That’s it! Keep in mind
Figure 8-23 Registering the NPS in Active Directory!
08-ch08.indd 213 3/28/12 4:55:08 PM
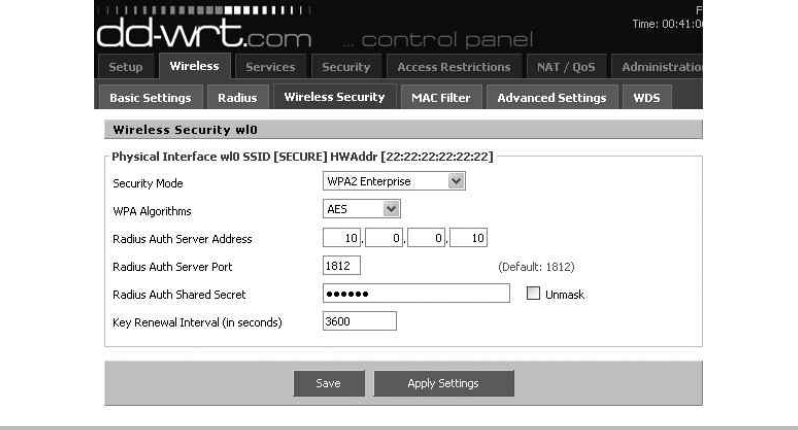
Secure Beginner’s Guide / Wireless Network Security: A Beginner’s Guide / Tyler Wrightson / 094-6 / Chapter 8
214 Wireless Network Security: A Beginner’s Guide
that the RADIUS authenticator (in this case, the access point) is completely unaware of
how you authenticate to the destination RADIUS server. Whether you use certificates or
simple passwords, the configuration is the same on your access point because the actual
authentication is handled on the RADIUS server.
Authenticate to the Wireless Network
Now that we’ve configured all the infrastructure components to support our wireless
network, the only thing we have left to do is authenticate. Because we’ve already verified
that the user certificate is installed on the client machine, virtually no user interaction
should be required to connect to the wireless network. If you haven’t configured the
wireless network to auto-connect using Group Policy, all the user has to do is double-click
the wireless network to connect to. When connecting, you should briefly see the message
shown in Figure 8-25, indicating that the user’s identity is being validated.
Once successfully connected, you should see the familiar “connected” message.
Figure 8-24 Access point WPA2 configuration
08-ch08.indd 214 3/28/12 4:55:08 PM
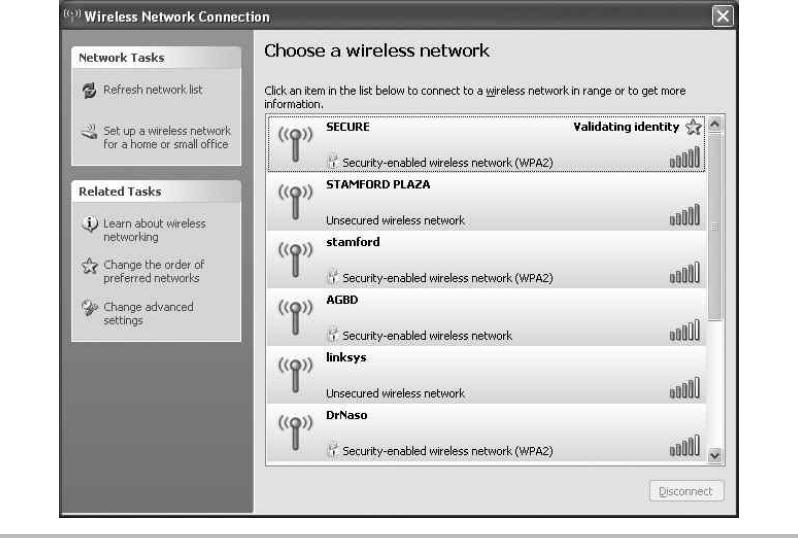
Secure Beginner’s Guide / Wireless Network Security: A Beginner’s Guide / Tyler Wrightson / 094-6 / Chapter 8
Secure Beginner’s Guide / Wireless Network Security: A Beginner’s Guide / Tyler Wrightson / 094-6 / Chapter 8
Chapter 8 Deploying a WPA-Enterprise Network with Certificates 215
We’ve Covered
In this chapter, we walked through the installation of an entire infrastructure to support
WPA2-Enterprise wireless networks using certificates for authentication. Remember that
if you have the opportunity to implement this configuration in a lab environment before
going to production, you absolutely should.
Configure the Certification Authority
Copy Certificate Templates and modify to fit our needs ●
Issue Certificate Template on CA ●
Configure Group Policy Object to enable Certificate Auto-Enrollment ●
Log on to workstation covered by Group Policy Object and observed certificates ●
Figure 8-25 Authenticating to WPA2 with a certificate
08-ch08.indd 215 3/28/12 4:55:08 PM
Secure Beginner’s Guide / Wireless Network Security: A Beginner’s Guide / Tyler Wrightson / 094-6 / Chapter 8
216 Wireless Network Security: A Beginner’s Guide
Configure the RADIUS server
Create a RADIUS client entry for the access point ●
Create connection request policy ●
Create a Network Policy ●
Configure the wireless access point
Configure WPA2-Enterprise with AES ●
Configure IP address of RADIUS server that will authenticate users ●
Test Authentication ●
08-ch08.indd 216 3/28/12 4:55:09 PM

Secure Beginner’s Guide / Wireless Network Security: A Beginner’s Guide / Tyler Wrightson / 094-6 / Chapter 9
217
Deploying Secure
Wireless Networks
Chapter 9
09-ch09.indd 217 3/28/12 5:00:59 PM
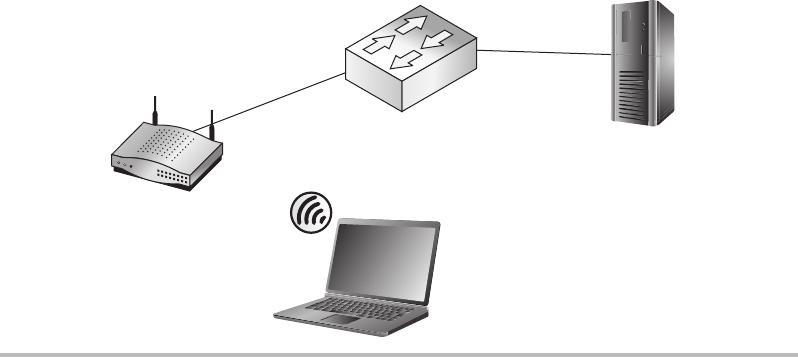
Secure Beginner’s Guide / Wireless Network Security: A Beginner’s Guide / Tyler Wrightson / 094-6 / Chapter 9
218 Wireless Network Security: A Beginner’s Guide
We’ll Cover
Configuring a WPA2-Enterprise network with PEAP authentication ●
Configuring a Microsoft Windows 2008 Network Policy Server ●
Strategies for segmenting wireless networks ●
In this chapter, we’ll start by deploying a WPA2-Enterprise wireless network with PEAP
authentication to a Microsoft Windows 2008 RADIUS server. We’ll then apply a few of
the secure design concepts covered in Chapter 6 to our wireless network.
WPA2-Enterprise Wireless Networks
Despite the myriad of technical details working behind the scenes when you’re using a
WPA2-Enterprise wireless network, it’s actually incredibly easy to configure. Let’s review
the components briefly and then move on to configuring them.
As you can see in Figure 9-1, the two main pieces of this architecture are the wireless
access point and the RADIUS authentication server. The wireless access point prevents
the wireless client from accessing any internal network resources until an “Authentication
Successful” message has been received from the RADIUS server.
Figure 9-1 Basic WPA2-Enterprise network
AP
Windows XP
Laptop on Domain
WPA2-ENTERPRISE
PEAP Authentication
Windows 2008
NPS (RADIUS)
Domain Controller
09-ch09.indd 218 3/28/12 5:01:00 PM
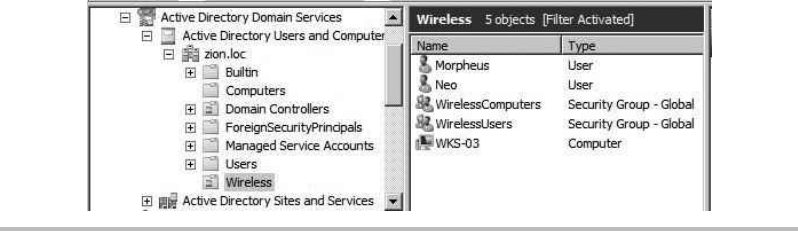
Secure Beginner’s Guide / Wireless Network Security: A Beginner’s Guide / Tyler Wrightson / 094-6 / Chapter 9
Secure Beginner’s Guide / Wireless Network Security: A Beginner’s Guide / Tyler Wrightson / 094-6 / Chapter 9
Chapter 9 Deploying Secure Wireless Networks 219
The RADIUS server could be configured to authenticate users against a central database
such as Active Directory. Alternatively, the RADIUS server could authenticate users against
a unique database used only for wireless clients.
The high-level steps to configure a WPA2-Enterprise wireless network are as follows:
Configure the Network Policy Server (RADIUS).1.
Create a RADIUS client entry for the access point.a.
Create the connection request policy.b.
Create a Network Policy.c.
Configure the wireless access point.2.
Configure for WPA2-Enterprise.a.
Configure the RADIUS server that will authenticate users.b.
Configure the wireless client (manually or automatically).3.
Configure auto-connect with Group Policy.a.
We’re going to assume you’ve already created an Active Directory group called
WirelessUsers, which is in an Organizational Unit called Wireless. This can be seen in
Figure 9-2.
Configure the Network Policy Server (RADIUS)
We’ll start with configuring our RADIUS server. The Windows Network Policy Server
(NPS) implements the RADIUS functionality in Windows 2008. We’ll install the service
on our server and then configure a connection request and a network policy. We’ll install
Figure 9-2 Active Directory WirelessUsers group
09-ch09.indd 219 3/28/12 5:01:00 PM

Secure Beginner’s Guide / Wireless Network Security: A Beginner’s Guide / Tyler Wrightson / 094-6 / Chapter 9
220 Wireless Network Security: A Beginner’s Guide
the NPS on a Windows 2008 server; however, the installation is very similar on other
versions of Windows. Here are the steps:
Create a RADIUS client entry for the access point.1.
Create a connection request policy.2.
Create a Network Policy.3.
To install the RADIUS service, we need to install the Network Policy and Access
Services role. Start the Server Manager, right-click Roles, and choose Add Role. Select
the Network Policy and Access Services check box and then click Next (see Figure 9-3).
The next screen is purely informational. Feel free to take the time to view the types
of information available to you. Click Next to continue. Select the Network Policy Server
check box and then click Next to continue (see Figure 9-4).
Figure 9-3 Selecting the server roles
09-ch09.indd 220 3/28/12 5:01:01 PM
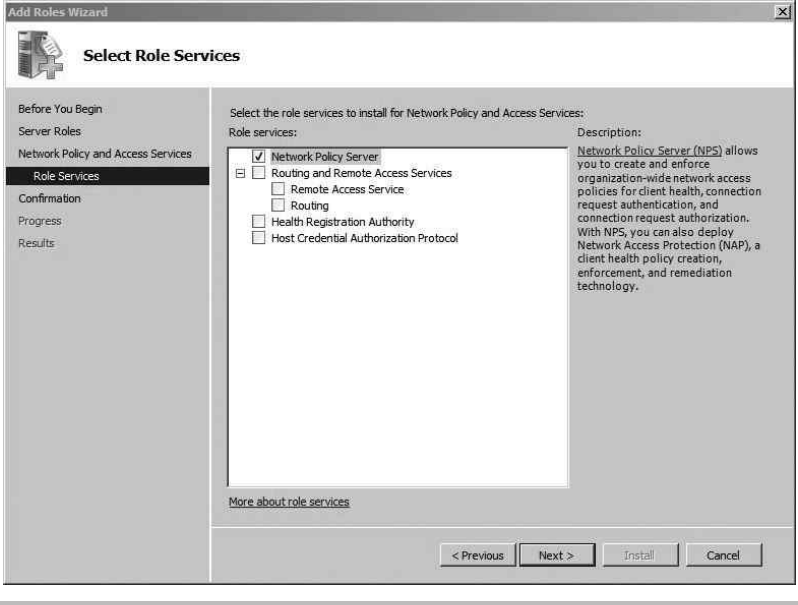
Secure Beginner’s Guide / Wireless Network Security: A Beginner’s Guide / Tyler Wrightson / 094-6 / Chapter 9
Secure Beginner’s Guide / Wireless Network Security: A Beginner’s Guide / Tyler Wrightson / 094-6 / Chapter 9
Chapter 9 Deploying Secure Wireless Networks 221
The next screen is a summary of the options you’ve chosen to install; simply click Install.
The next screen should indicate that the installation has succeeded. Click Close to exit
this screen.
Now we’ll configure our newly installed Network Policy Server. Open Server Manager
and expand Roles, and you’ll see a new entry labeled “Network Policy and Access Services.”
If you highlight the first node labeled “NPS (Local),” you’ll see a screen similar
to Figure 9-5. The easiest way to configure our NAP server to perform RADIUS
authentication for our wireless network is with the NAP configuration wizard. To start
the wizard, click the drop-down box and select “RADIUS server for 802.1x Wireless or
Wired Connections.” Then click the Configure 802.1X link.
In the next screen, select the Secure Wireless Connections radio button and then provide
an appropriate name in the provided text box. In Figure 9-6, you can see we’ve named ours
“Secure Wireless Connections.” Not too creative, but it gets the job done.
Figure 9-4 Selecting the role services
09-ch09.indd 221 3/28/12 5:01:01 PM
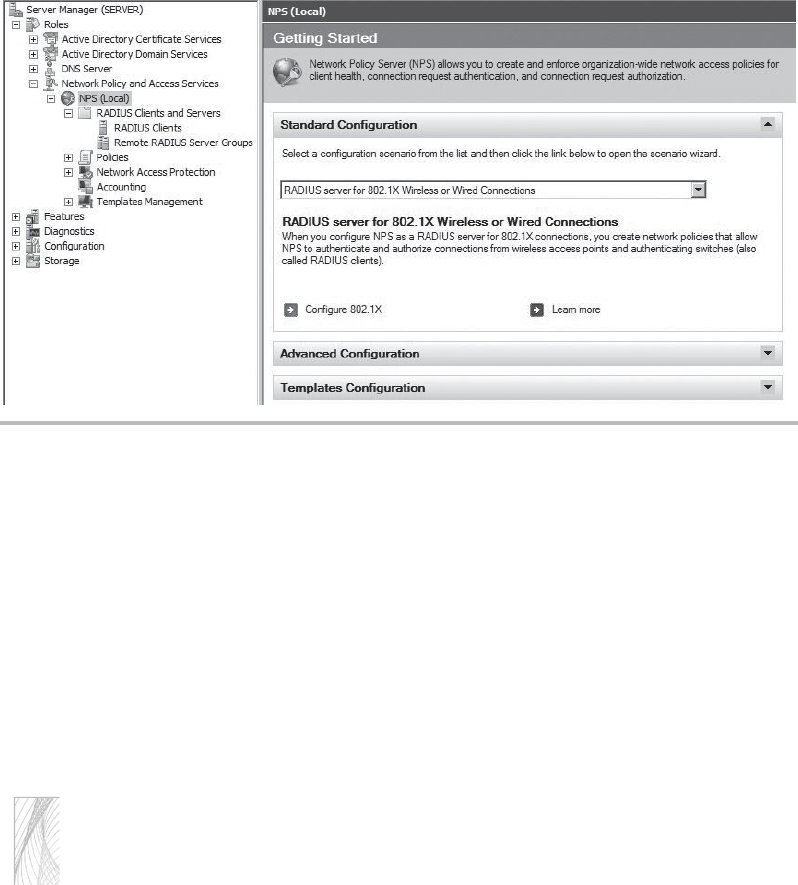
Secure Beginner’s Guide / Wireless Network Security: A Beginner’s Guide / Tyler Wrightson / 094-6 / Chapter 9
222 Wireless Network Security: A Beginner’s Guide
In the next screen, we’re going to add the 802.1x authenticators. For our wireless
network, the authenticators are the access points. Click Add and then fill in the information
for each individual access point. You should create a shared secret that is unique to each
access point. Your entry should look similar to Figure 9-7. Click OK to continue. Click
Add and enter any additional access points you have.
When you’re finished adding your access points, click Next. The next window allows
you to set the authentication method that clients will be using (see Figure 9-8). In this case,
we want our client to authenticate with their domain credentials, so choose the drop-down
menu and select “Microsoft: Protected EAP (PEAP).” Click Next to continue.
TIP
Don’t be confused by the two options presented to you here:
Microsoft: Protected EAP (PEAP)
Microsoft: Secured Password (EAP MS-CHAPv2)
You might remember that under the hood, PEAP uses MS-CHAPv2, but it does this over
an encrypted tunnel. You don’t want to choose regular EAP MS-CHAPv2 because this is
much less secure than PEAP.
Figure 9-5 802.1x configuration wizard
09-ch09.indd 222 3/28/12 5:01:01 PM
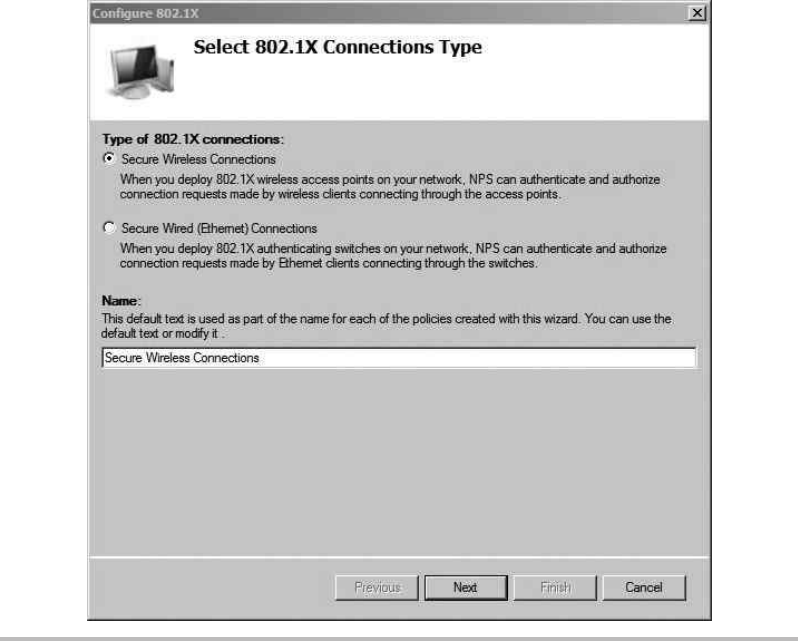
Secure Beginner’s Guide / Wireless Network Security: A Beginner’s Guide / Tyler Wrightson / 094-6 / Chapter 9
Secure Beginner’s Guide / Wireless Network Security: A Beginner’s Guide / Tyler Wrightson / 094-6 / Chapter 9
Chapter 9 Deploying Secure Wireless Networks 223
In the next screen, you can configure the groups that are allowed to successfully
authenticate against this policy (see Figure 9-9). Click Add and then add the groups that
are allowed to authenticate. Keep in mind that the users don’t have to be a member of all
the groups in this list to authenticate; they only need to be a member of one of the groups.
In our example, we’ve kept everything nice and organized and created a group called
WirelessUsers. Click Next to continue.
In the next screen, you can configure traffic-control attributes if your access points
support it. This is not a standard configuration, so click Next to continue. In the next screen,
you can see the summary of the wizard. This is actually a helpful screen. Take a minute
to review it. Not only does it show all the access points you configured, but it also shows
the name of the Connection Request Policy and the Network Policy.
Figure 9-6 802.1x connection types
09-ch09.indd 223 3/28/12 5:01:01 PM
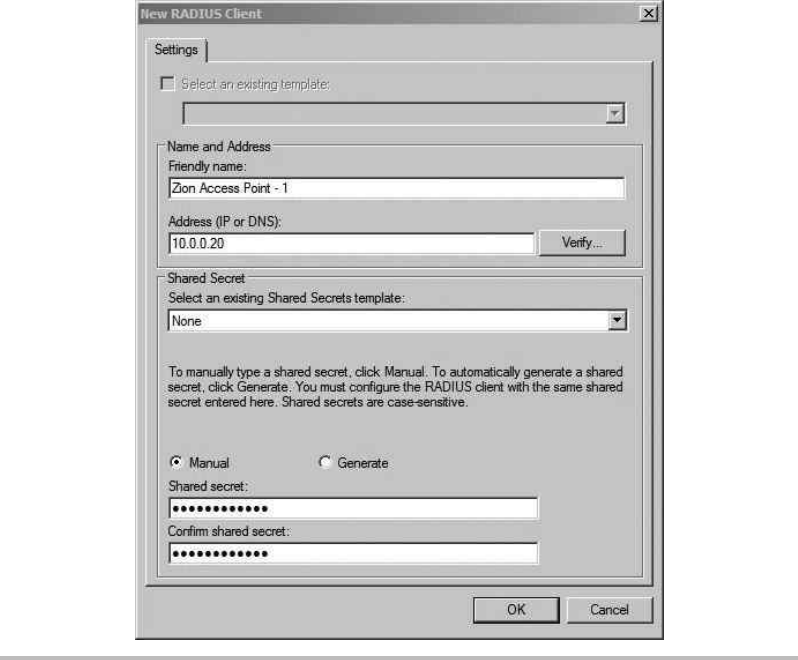
Secure Beginner’s Guide / Wireless Network Security: A Beginner’s Guide / Tyler Wrightson / 094-6 / Chapter 9
224 Wireless Network Security: A Beginner’s Guide
The Network Policy Server says the following for each type of policy:
Connection Request Policies allow you to designate whether connection requests are ●
processed locally or forwarded to remote RADIUS servers.
Network Policies allow you to designate who is authorized to connect to the network ●
and the circumstances under which they can or cannot connect.
For the Network Policy we configured, the conditions are that the request comes
from an 802.11 device, the user belongs to the WirelessUsers group, and the user is
authenticating with PEAP. If the user authenticates successfully and these conditions are
met, he is granted access to the network.
Figure 9-7 Adding a wireless AP as a RADIUS client
09-ch09.indd 224 3/28/12 5:01:01 PM
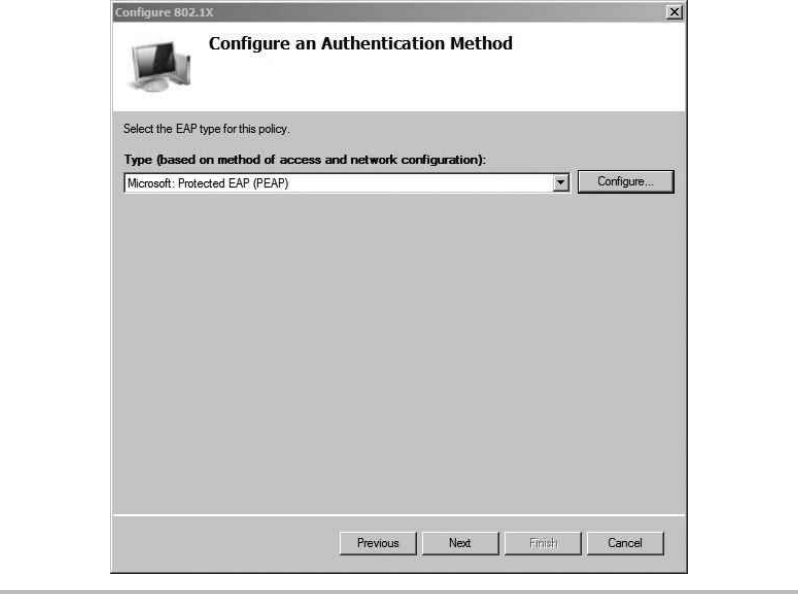
Secure Beginner’s Guide / Wireless Network Security: A Beginner’s Guide / Tyler Wrightson / 094-6 / Chapter 9
Secure Beginner’s Guide / Wireless Network Security: A Beginner’s Guide / Tyler Wrightson / 094-6 / Chapter 9
Chapter 9 Deploying Secure Wireless Networks 225
At this point, your NPS is configured but you have one final task to allow it to start
processing requests. Right-click the “NPS (Local)” node again and choose Register Server
in Active Directory. You’ll then see the message in Figure 9-10.
Configure the Wireless Access Point
Ironically, the configuration of the wireless access point is typically the easiest part of these
projects. We won’t cover the configuration of the basic wireless settings—you should be
very familiar with those at this point. Items such as the SSID and channel are assumed to
be configured.
In Figure 9-11, you can see the configuration of a Linksys WRT54G running the dd-wrt
firmware. Keep in mind that although the interface for your access point may be different,
the configuration should be just as simple. You’ll notice that Security Mode is set to WPA2
Enterprise, which brings up the option to configure a RADIUS server. We’ve also configured
the WPA algorithm as AES as opposed to the less cryptographically secure TKIP protocol.
Figure 9-8 Selecting the PEAP authentication method
09-ch09.indd 225 3/28/12 5:01:01 PM

Secure Beginner’s Guide / Wireless Network Security: A Beginner’s Guide / Tyler Wrightson / 094-6 / Chapter 9
226 Wireless Network Security: A Beginner’s Guide
Figure 9-9 The Active Directory Group the policy will apply to
Figure 9-10 Register NPS message
09-ch09.indd 226 3/28/12 5:01:01 PM
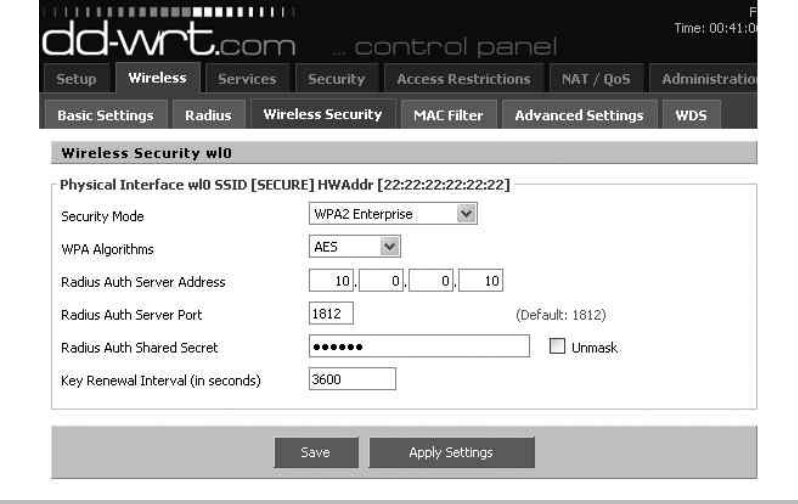
Secure Beginner’s Guide / Wireless Network Security: A Beginner’s Guide / Tyler Wrightson / 094-6 / Chapter 9
Secure Beginner’s Guide / Wireless Network Security: A Beginner’s Guide / Tyler Wrightson / 094-6 / Chapter 9
Chapter 9 Deploying Secure Wireless Networks 227
All you need to authenticate your clients is the IP address of the RADIUS server as
well as the RADIUS shared secret you configured previously. That’s it! Keep in mind that
the RADIUS authenticator (in this case, the access point) is completely unaware of how
you authenticate to the destination RADIUS server. Whether you use PEAP, certificates,
or any other method, the configuration is the same on your access point because the actual
authentication is handled on the RADIUS server.
Configure the Wireless Client
Configuring your wireless client is extremely easy. In the case where the client is connecting
manually, there really isn’t any configuration. If the user is a member of the Active Directory
domain, the user’s credentials will be used automatically to authenticate to the RADIUS server.
If we want to configure the clients to connect automatically without having to
configure a wireless network or even double-clicking the available wireless network, we
can configure a Group Policy Object (GPO). You can choose to create a new group policy
or add to an existing GPO. I typically recommend creating a new Group Policy Object, but
you can decide for yourself. Keeping each GPO unique to a general set of tasks is a good
system for avoiding human error.
Figure 9-11 Basic WPA2-Enterprise access point configuration
09-ch09.indd 227 3/28/12 5:01:01 PM
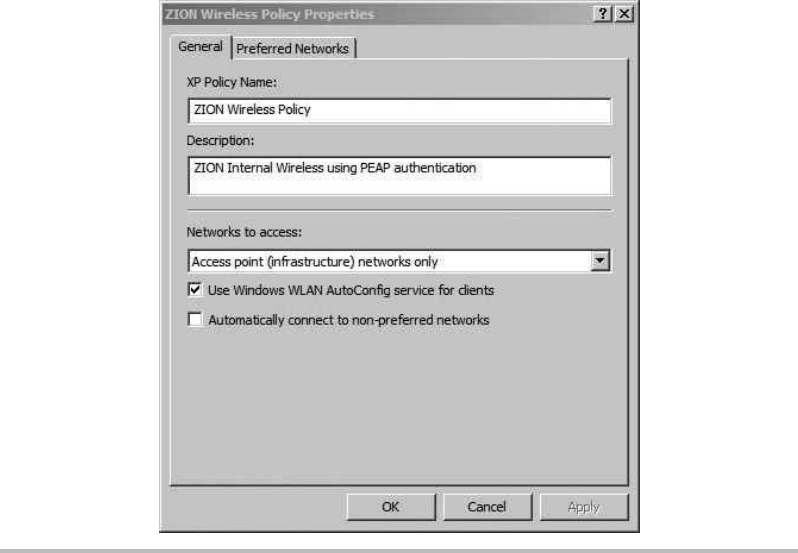
Secure Beginner’s Guide / Wireless Network Security: A Beginner’s Guide / Tyler Wrightson / 094-6 / Chapter 9
228 Wireless Network Security: A Beginner’s Guide
Open Server Manager and navigate to Features | Group Policy Management, expand
Domains, and then expand your domain. Find the Organizational Unit you’d like to apply
the GPO to, right-click, and then choose “Create a GPO in this domain, and link it here.”
Right-click the new GPO and choose Edit, navigate to Computer Configuration |
Policies | Windows Settings | Security Settings | Wireless Network (IEEE 802.11) Policies.
If you right-click the Wireless Network (IEEE 802.11) Policies node, you’ll see two options:
Create a New Wireless Network Policy for Windows Vista and Later Releases
●
Create a New Windows XP Policy ●
The configuration options are almost identical between the two. We’ll focus on the
Windows XP policy because Windows XP is currently the most popular Windows desktop
operating system. In Figure 9-12, you can see the configuration options on the General tab.
Most of the configuration here is self-explanatory: Give the policy a name and configure
it to connect to infrastructure networks only.
Figure 9-12 GPO New Wireless Policy
09-ch09.indd 228 3/30/12 1:39:18 PM
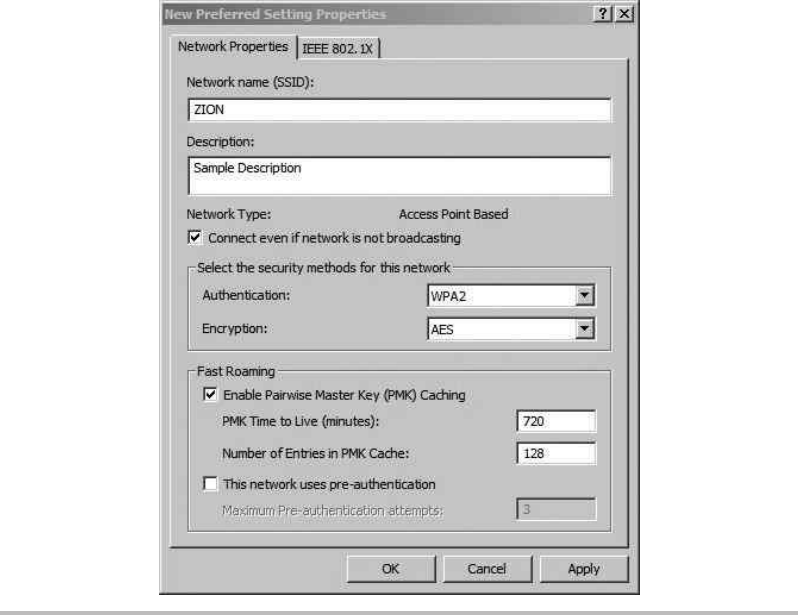
Secure Beginner’s Guide / Wireless Network Security: A Beginner’s Guide / Tyler Wrightson / 094-6 / Chapter 9
Secure Beginner’s Guide / Wireless Network Security: A Beginner’s Guide / Tyler Wrightson / 094-6 / Chapter 9
Chapter 9 Deploying Secure Wireless Networks 229
Next, click the Preferred Networks tab and click Add to add the settings specific to
your wireless network. You’ll see the New Preferred Settings Properties window shown in
Figure 9-13. Again, most of this is straightforward, and you’re really just configuring it to
match the SSID, authentication, and encryption settings of your wireless network.
Next, click the IEEE 802.1x tab to configure authentication settings. Choose “Microsoft:
Protected EAP (PEAP)” as the EAP type. You can uncheck the option “Authenticate as
computer when computer information is available” if you choose. Your configuration window
should look something like Figure 9-14.
If you click the Settings button in this window, you’ll see the window shown in
Figure 9-15. You’ll notice here that as part of the PEAP configuration, the option
Figure 9-13 GPO Add Preferred Wireless Network
09-ch09.indd 229 3/28/12 5:01:01 PM
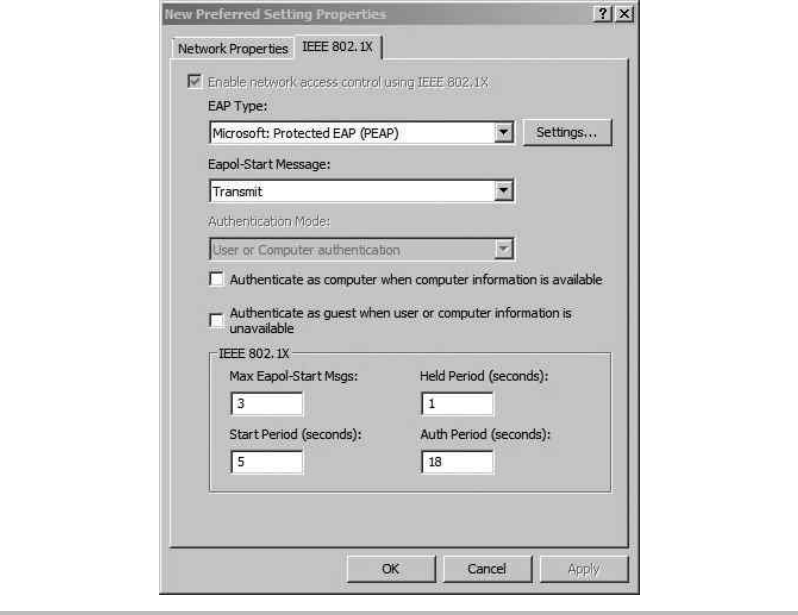
Secure Beginner’s Guide / Wireless Network Security: A Beginner’s Guide / Tyler Wrightson / 094-6 / Chapter 9
230 Wireless Network Security: A Beginner’s Guide
“Validate server certificate” is configured. Remember from Chapter 6 that this provides
mutual authentication. The server is authenticating the client with the client’s credentials,
and the client is authenticating the server with the server certificate. You’ll also notice that
under the hood PEAP is using the MS-CHAPv2 protocol. Click OK to close out of the
open windows.
That’s it. Now if you log onto an appropriate machine, it will automatically connect
to the wireless network. Remember that for all of this to work for a user, the user must
be a member of the WirelessUsers group and her computer must be in the Wireless
Organizational Unit (to obtain the GPO). Also, be sure that the client computer is configured
to use the wireless zero configuration utility and not the utility provided with their
wireless driver.
Figure 9-14 GPO Configure Preferred Wireless Network 802.1x
09-ch09.indd 230 3/28/12 5:01:01 PM
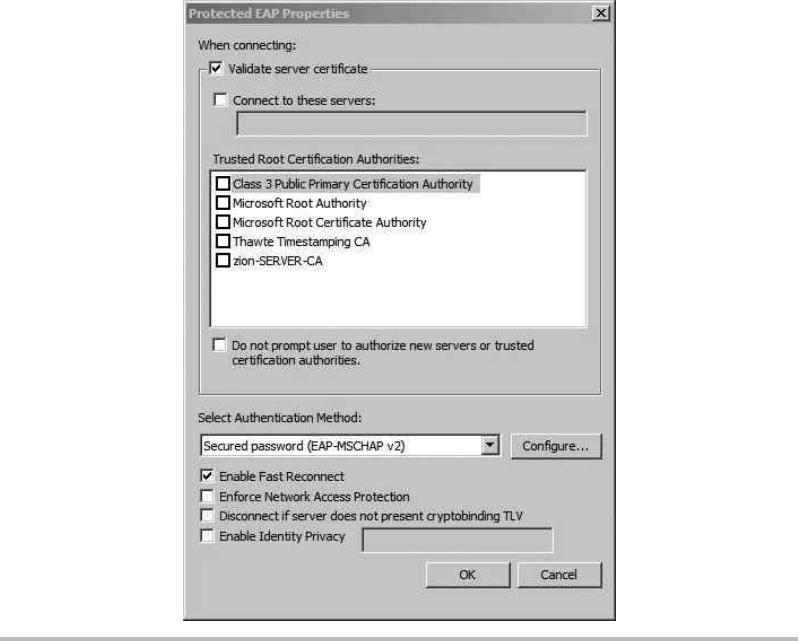
Secure Beginner’s Guide / Wireless Network Security: A Beginner’s Guide / Tyler Wrightson / 094-6 / Chapter 9
Secure Beginner’s Guide / Wireless Network Security: A Beginner’s Guide / Tyler Wrightson / 094-6 / Chapter 9
Chapter 9 Deploying Secure Wireless Networks 231
Troubleshooting PEAP Authentication
Unfortunately, there may come a time when you have to troubleshoot a client’s access to
your wireless network. From my experience, problems with authenticating to your wireless
network are rarely an issue with the client. It’s typically an issue with the backend systems,
including the RADIUS communications between the wireless access point and the server
or an issue with the configuration of the NPS itself.
That doesn’t mean you shouldn’t start with the most basic and simple troubleshooting
steps you can. For example, you want to make sure that you’re typing the password
Figure 9-15 GPO Preferred Wireless Network PEAP Settings
09-ch09.indd 231 3/28/12 5:01:01 PM
Secure Beginner’s Guide / Wireless Network Security: A Beginner’s Guide / Tyler Wrightson / 094-6 / Chapter 9
232 Wireless Network Security: A Beginner’s Guide
correctly when using WPA-PSK or that you’re typing your credentials correctly when
authenticating to a WPA-Enterprise network. Typically, the debugging information you’ll
get on a client device is very limited and extremely generic (which makes it not terribly
helpful). Not only is the logging information not usually helpful, but the client device’s
actions can be misleading.
For example, let’s suppose that on more than one occasion while you are
troubleshooting authentication failures to a WPA-Enterprise network, the RADIUS server
denies access to the client (logging a failure event on the RADIUS server), but the client
displays the message “obtaining an IP address.” Typically, the client would only show the
“obtaining an IP address” message after authentication has succeeded. After about 15 seconds,
the client times out and shows “not connected” to the wireless network. This can lead you
down the wrong path in troubleshooting, making you think it might be an issue with your
DHCP server. Instead, the resolution is to grant the client access to authenticate to the
RADIUS server.
Troubleshooting RADIUS Authentication
The best place to troubleshoot RADIUS authentication issues is on the RADIUS server
itself. You can view the events logged for the RADIUS server by opening Server Manager,
expanding Roles, and clicking the main “Network Policy and Access Services” node. In
the middle portion of the screen, you’ll see the events logged for this service. You can
also view the same events by opening Event Viewer (click Start, type eventvwr, and
hit ). Now browse to Custom Views | Server Roles | Network Policy and Access
Services. Looking at the events through the event viewer can be a little more helpful
because you have a bit more room to view the events list.
We’ll look at a few common scenarios you’ll see when working with the Windows
RADIUS server.
Bad RADIUS Authenticator
In Figure 9-16, you can see an example of an error on the RADIUS server. This error indicates
that an access point is trying to authenticate to the RADIUS server, but the RADIUS server
does not have that device listed as a valid client. The solution is simple: Just add the client
under Server Manager | Roles | Network Policy and Access Services | NPS (Local) | RADIUS
Clients and Servers | RADIUS Clients. Right-click RADIUS Clients and choose New.
In addition, you should ensure that the RADIUS shared secret on the client and server
match.
09-ch09.indd 232 3/28/12 5:01:01 PM

Secure Beginner’s Guide / Wireless Network Security: A Beginner’s Guide / Tyler Wrightson / 094-6 / Chapter 9
Secure Beginner’s Guide / Wireless Network Security: A Beginner’s Guide / Tyler Wrightson / 094-6 / Chapter 9
Chapter 9 Deploying Secure Wireless Networks 233
Client Access Denied
Troubleshooting the exact reason why the RADIUS server is denying a client access
can be a slightly annoying task, to say the least. This is exacerbated by the fact that the
RADIUS server’s log also has relatively generic failure events.
As an example, take a look at Figure 9-17. In this error, we can see the generic
message “Network Policy Server denied access to a user.” If you scroll to the bottom
of the event, you’ll see the text display in Figure 9-18. The error explains that the dial-
in properties of the user account in Active Directory are responsible for denying access
for this user. You can either adjust the settings in Active Directory or through the NPS
Network Policy.
The Network Policy we configured earlier was to allow access for any user in the
WirelessUsers group. In this case, the user JustinKennedy is being denied access because
he is not a member of the WirelessUsers group. To resolve this issue and allow this user
Figure 9-16 Error on RADIUS server from server lacking configuration
09-ch09.indd 233 3/28/12 5:01:01 PM
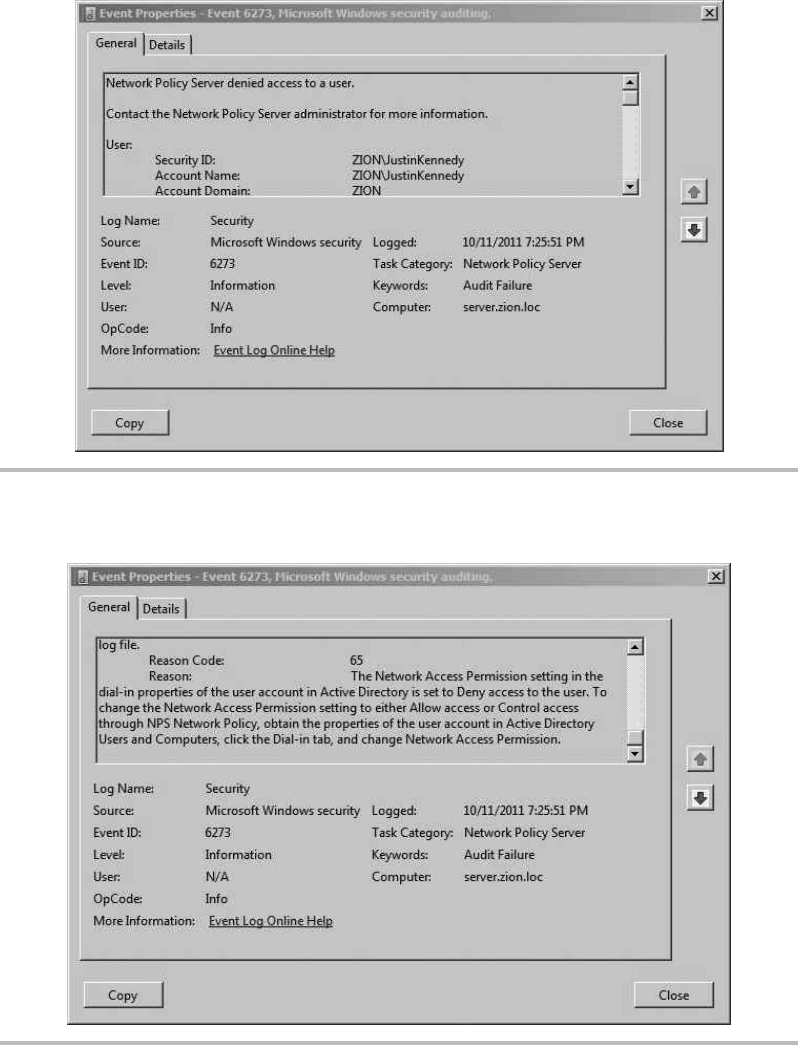
Secure Beginner’s Guide / Wireless Network Security: A Beginner’s Guide / Tyler Wrightson / 094-6 / Chapter 9
234 Wireless Network Security: A Beginner’s Guide
Figure 9-17 RADIUS Audit Log Deny User Access
Figure 9-18 The details of the RADIUS Audit Log Deny User Access
09-ch09.indd 234 3/28/12 5:01:02 PM
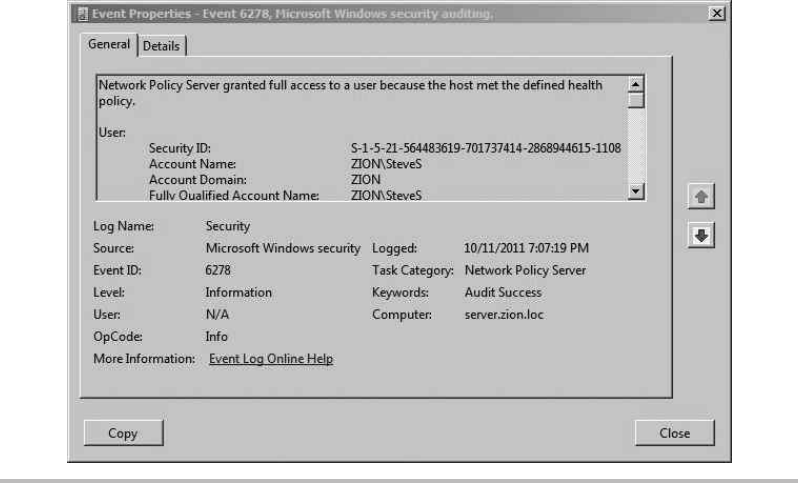
Secure Beginner’s Guide / Wireless Network Security: A Beginner’s Guide / Tyler Wrightson / 094-6 / Chapter 9
Secure Beginner’s Guide / Wireless Network Security: A Beginner’s Guide / Tyler Wrightson / 094-6 / Chapter 9
Chapter 9 Deploying Secure Wireless Networks 235
to authenticate to the wireless network, you would simply add the user account to the
WirelessUsers group. Does that really come across in the event log? I’ll let you be the judge.
In Figure 9-19, you can see a successful authentication message for the user SteveS. At
this point in the communications, as far as the NPS server is concerned, the user has been
granted access to the wireless network. If you see this message on the RADIUS server but
the client is still unable to access the wireless network, you should look into issues on the
client or access point.
When All Else Fails
Don’t forget to follow the standard Windows troubleshooting steps as well. If you’re
having strange issues, make sure you’ve stopped and restarted the NPS service. You can
do this through Server Manager: Right-click NPS(Local) and choose Stop NPS Service.
Then right-click and choose Start NPS Service.
Also, don’t be afraid to delete both the Network Policy and Connection Request
Policy. It can be helpful to run through the 802.1x configuration wizard again. Be sure to
take your time and make sure all the options you have chosen are the ones you intended.
Figure 9-19 RADIUS Audit Log Grant User Access
09-ch09.indd 235 3/28/12 5:01:02 PM
Secure Beginner’s Guide / Wireless Network Security: A Beginner’s Guide / Tyler Wrightson / 094-6 / Chapter 9
236 Wireless Network Security: A Beginner’s Guide
Securing Your Wireless Network
Securing your wireless network further than the measures provided by the 802.11i standard
is a critical step. We’ll take some of the concepts you learned in Chapter 6 and show
examples of them here. Remember that whether you’re dealing with one access point or
100 access points, the core concepts remain the same. There are some additional concerns
as well as added benefits of having more access points, which we’ll discuss shortly.
Segmenting Wireless Networks
Remember from Chapter 6 that you should design your wireless networks with the
concept of Least Privilege. This means that no two wireless networks will be exactly the
same, because the requirements of your wireless network will be unique to your network.
You can apply the concept of Least Privilege in a few places for your wireless
network, including the following:
Restrictions on which users can access the wireless network ●
Restrictions on the time users are allowed to associate to the wireless network ●
Restrictions on destination IP subnets ●
Restrictions on destination TCP ports ●
Restricting Users
Creating restrictions on which users are allowed to access the wireless network is a
relatively easy task, but is often overlooked. Typically, organizations just assume that
everyone in the company should have access to log onto the wireless network. Even small
companies with just a few users can benefit from only allowing the necessary users access
to the wireless network. If you treat every account as another potential for compromise,
you can’t go wrong.
Restricting the users who can authenticate to your wireless network is a relatively
easy task. Remember from Figure 9-9 that we configured the group WirelessUsers to be
granted access to the wireless network. Make sure you follow a similar system and only
add members to this group who need access to the wireless network. Don’t make the
mistake of either configuring the policy to allow access to the Domain Users group or
adding everyone in your organization to the WirelessUsers group.
You should also understand that using WPA2-Enterprise provides far better restrictions
than WPA-PSK. You may be thinking that with WPA2-PSK you can accomplish the
09-ch09.indd 236 3/28/12 5:01:02 PM
Secure Beginner’s Guide / Wireless Network Security: A Beginner’s Guide / Tyler Wrightson / 094-6 / Chapter 9
Secure Beginner’s Guide / Wireless Network Security: A Beginner’s Guide / Tyler Wrightson / 094-6 / Chapter 9
Chapter 9 Deploying Secure Wireless Networks 237
same thing by only giving the preshared key to the users you choose. Although this is
true, remember that you don’t receive any accounting information. There’s no way for
you to natively distinguish one user from the other. Therefore, if you need to deny access
to a single user, you’d have to change the PSK and redistribute it to all users except the
one user, as opposed to just removing that user from a group in Active Directory with
WPA2-Enterprise. Also, remember that if you choose to allow your users to enter the PSK
themselves, users do not typically treat the PSK as sensitively as their own credentials.
Restricting Time
Restricting the time of day that users are allowed to access your wireless network is another
great way to add a layer of security to your wireless network. In certain cases this could be
very difficult to administer, but any level of restriction on time can be a benefit. Start with
the obvious times that you can deny and then work from there. For example, do you ever
have anyone using the wireless network over the weekend? If not, deny access over the
weekends. Do you ever have anyone using the wireless network between 9 .. and 6 ..
during the week? If not, deny access at those times.
Also, keep in mind that if you have individual users who absolutely require access
at these unusual times, you could create two separate Network Policies within your
RADIUS configuration. The first policy could apply to the majority of your users and
only give them access to the wireless network during normal business hours, whereas the
second policy could grant access to the wireless network to only a subset of users during
nonbusiness hours.
To configure time and date restrictions, open Server Manager. Navigate to Roles |
Network Policy and Access Services | NPS (Local) | Policies | Network Policies. You
should see the Secure Wireless Connections policy we created earlier; right-click this policy
and choose Properties. Click the Constraints tab and choose Day and Time Restrictions.
Check the box “Allow access only on these days and at these times” and then choose Edit
to select the times. Choose OK and then OK again to close both windows.
As you can see in Figure 9-20, you can get very granular in your restrictions. Notice
all the white boxes? Those are times when an attacker will be wasting his time trying to
authenticate to the wireless network.
Restricting Network Subnets and TCP Ports
Restricting the network flows of wireless users is a relatively simple task, and yet so few
organizations actual do it. Designing and configuring firewall access lists has become
such a common task that you should have no problem with it.
09-ch09.indd 237 3/28/12 5:01:02 PM

Secure Beginner’s Guide / Wireless Network Security: A Beginner’s Guide / Tyler Wrightson / 094-6 / Chapter 9
238 Wireless Network Security: A Beginner’s Guide
A quick introduction to the Cisco access list syntax will help you to follow along.
Here is the basic syntax for an access list entry:
access-list name extended action protocol source destination eq port
Syntax Description
name The name of the access list.
extended A keyword to designate which type of access list we’re creating. You have more options
available to you when configuring an extended access list, so all of our examples here
will use an extended access list.
action The action is either permit or deny to define whether we allow or drop the traffic
matching this access list entry.
Figure 9-20 Controlling access times with Network Policy
09-ch09.indd 238 3/28/12 5:01:02 PM

Secure Beginner’s Guide / Wireless Network Security: A Beginner’s Guide / Tyler Wrightson / 094-6 / Chapter 9
Secure Beginner’s Guide / Wireless Network Security: A Beginner’s Guide / Tyler Wrightson / 094-6 / Chapter 9
Chapter 9 Deploying Secure Wireless Networks 239
Syntax Description
protocol The protocol can be IP, TCP, or UDP. If you choose IP, you only specify the source and
destination host or subnets. If you choose TCP or UDP, you can also define a TCP or UDP
port to filter on.
source The source host or source subnet. If the source is a host, you can use the host keyword
followed by the IP address. If the source is a network, you specify the subnet followed by
the subnet mask.
destination The destination host or subnet. If the destination is a host, you can use the host keyword
followed by the IP address. If the destination is a network, you specify the subnet
followed by the subnet mask.
eq A keyword that stands for “equals.” It allows you to define the destination TCP or UDP
port.
port The destination TCP or UDP port.
Here’s an example:
access-list MY-ACL extended permit tcp host 10.0.0.10 192.168.0.0 255.255.255.0 eq 80
In this example, we created an access list called MY-ACL. We’re permitting any TCP
traffic from the host with an IP address 10.0.0.10 destined for the 192.168.0.0/24 subnet
with a destination TCP port of 80 (HTTP).
Here’s one more example:
access-list NEW-ACL extended deny ip 192.168.0.0 255.255.0.0 host 10.0.0.10
In this example, we created an access list called NEW-ACL. This access list is only
looking at the IP address, so we don’t define any TCP or UDP ports. In this case, we’re
blocking any packets from 192.168.0.0/16 to the host 10.0.0.10.
In addition, you can use the “any” keyword for most arguments, including source,
destination, and port, to match, well, anything.
Let’s start with an extreme example and move on from there. Let’s assume we’ve
created a wireless network for our internal users and the only thing they’d ever need
access to is a single secure web application living on an internal server with an IP address
of 10.0.0.100. The architecture is shown in Figure 9-21.
In this example, you can see that the server exists on the same network as other internal
systems. Rather than giving users of the wireless network access to the entire 10.0.0.0/24
subnet, we’ll restrict them to only access this server on port 443 (Secure HTTP).
09-ch09.indd 239 3/28/12 5:01:02 PM
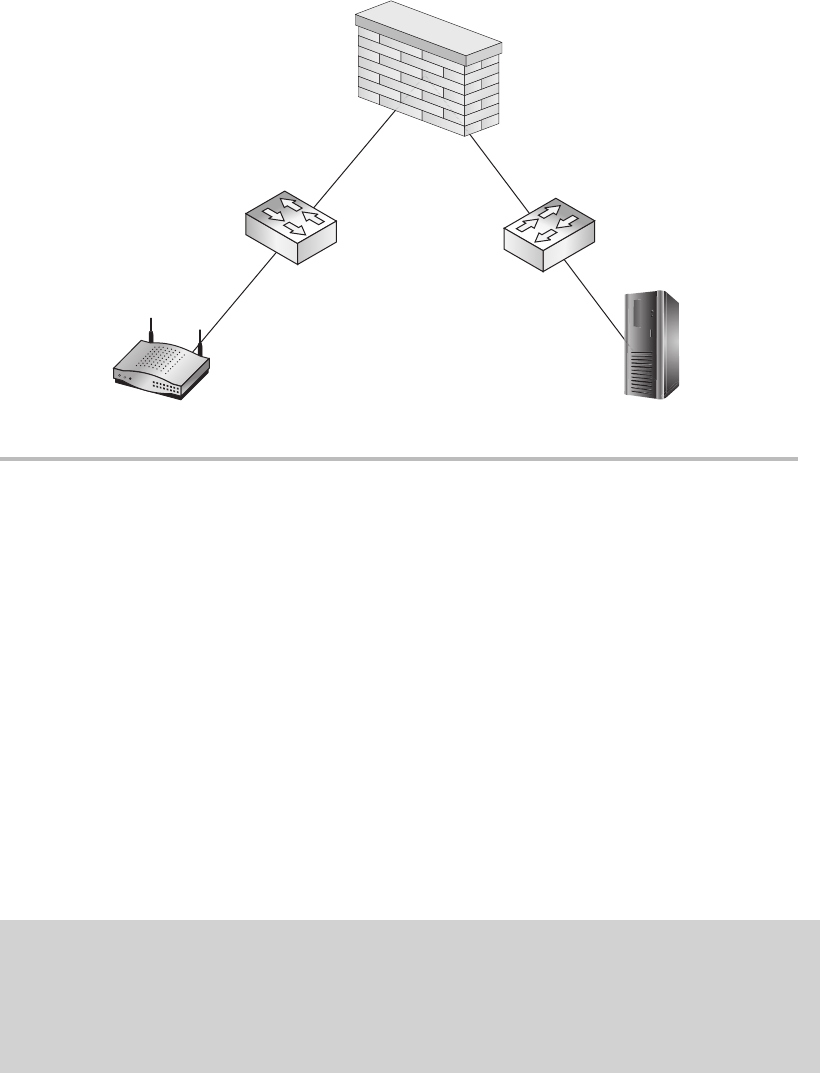
Secure Beginner’s Guide / Wireless Network Security: A Beginner’s Guide / Tyler Wrightson / 094-6 / Chapter 9
240 Wireless Network Security: A Beginner’s Guide
The most logical point to create the access lists is on the firewall. The firewall has an
interface in both the wireless LAN subnet (10.0.2.1) and the internal subnet (10.0.0.1).
The relevant firewall configuration would look something like this:
Interface Ethernet0/1
ip address 10.0.0.1 255.255.255.0
nameif INTERNAL
Interface Ethernet0/2
ip address 10.0.2.1
nameif WIRELESSLAN
access-list WIFI-ACL extended permit tcp 10.0.2.0 255.255.255.0
10.0.0.100 eq 443
access-group WIFI-ACL in interface WIRELESSLAN
How It Works
You should also note that the default final rule in most firewall access lists is a “deny
any source to any destination.” Thus, even though you don’t see it here, the last rule is
a “deny any any.”
Figure 9-21 Single destination on an internal network for wireless users
AP
10.0.2.0/24
10.0.2.1 10.0.0.1
Internal
Network
Web Server
10.0.0.100
SSID
INTWIFI
09-ch09.indd 240 3/28/12 5:01:03 PM

Secure Beginner’s Guide / Wireless Network Security: A Beginner’s Guide / Tyler Wrightson / 094-6 / Chapter 9
Secure Beginner’s Guide / Wireless Network Security: A Beginner’s Guide / Tyler Wrightson / 094-6 / Chapter 9
Chapter 9 Deploying Secure Wireless Networks 241
The configuration looks pretty straightforward, right? You’re right, but we missed a
few things. In this example, how will the access point actually authenticate the users?
Remember that the access point needs to communicate with the RADIUS server using
one of the two RADIUS ports (UDP 1812 or UDP 1645). In our case, the server is
using port 1812, so we’ll allow that as well. Also, what about DNS? Sure, the user
could enter the IP address of the server and not the domain name, but how often does
that really happen? Therefore, we’ll also have to add UDP port 53 for DNS lookups.
One other potential oversight is the fact that many times users don’t enter the URL
using “https://” and instead just type the name into their browser. This redirection is
typically handled via an HTTP redirect on the server itself, so we’ll also have to allow
port 80 to the web server.
Now our access list, which started as one line, looks more like this:
access-list WIFI-ACL extended permit tcp 10.0.2.0 255.255.255.0 host 10.0.0.100 eq 443
access-list WIFI-ACL extended permit tcp 10.0.2.0 255.255.255.0 host 10.0.0.100 eq 80
access-list WIFI-ACL extended permit udp 10.0.2.0 255.255.255.0 host 10.0.0.90 eq 53
access-list WIFI-ACL extended permit udp host 10.0.2.10 host 10.0.0.90 eq 1812
And what about the opposite direction? Our current access list restricts access from
the wireless LAN to the internal LAN, but not the opposite direction. In this very simple
scenario, we can probably deny access from the internal LAN to the wireless LAN
completely. The only connections we might need to add are administration protocols to
Into Action
To really accomplish this, you need a full understanding of all the applications in
play. This alone can be a very daunting task. If you’re unfamiliar with which TCP
or UDP ports a particular application uses, be sure to start with the documentation
for the application. If you’re still not positive of any additional ports, you can
always analyze the traffic using a network sniffer such as Wireshark.
09-ch09.indd 241 3/28/12 5:01:03 PM

Secure Beginner’s Guide / Wireless Network Security: A Beginner’s Guide / Tyler Wrightson / 094-6 / Chapter 9
242 Wireless Network Security: A Beginner’s Guide
the access point itself. You’re using a secure management protocol such as SSH, aren’t you?
Therefore, our access list might look something like this:
access-list LAN-ACL extended permit tcp any host 10.0.2.10 eq 22
access-list LAN-ACL extended deny ip any 10.0.2.0 255.255.255.0
access-list LAN-ACL extended permit ip any any
Our final firewall configuration would look like this:
Interface Ethernet0/1
ip address 10.0.0.1 255.255.255.0
nameif INTERNAL
Interface Ethernet0/2
ip address 10.0.2.1
nameif WIRELESSLAN
access-list WIFI-ACL extended permit tcp 10.0.2.0 255.255.255.0 host 10.0.0.100 eq 443
access-list WIFI-ACL extended permit tcp 10.0.2.0 255.255.255.0 host 10.0.0.100 eq 80
access-list WIFI-ACL extended permit udp 10.0.2.0 255.255.255.0 host 10.0.0.90 eq 53
access-list WIFI-ACL extended permit udp host 10.0.2.10 host 10.0.0.90 eq 1812
access-list LAN-ACL extended permit tcp any host 10.0.2.10 eq 22
access-list LAN-ACL extended deny ip any 10.0.2.0 255.255.255.0
access-list LAN-ACL extended permit ip any any
access-group WIFI-ACL in interface WIRELESSLAN
access-group LAN-ACL in interface INTERNAL
In the Real World
You’ll also notice that the final line is a “permit any” rule. This is to allow the internal
LAN subnet to access the Internet. This last line in the access list clearly violates the
principle of Least Privilege, but we’re focusing on the components that relate directly
to the wireless network. In the real world, make sure your access list for outbound
access to the Internet is just as tight as your wireless LAN ACL.
09-ch09.indd 242 3/28/12 5:01:03 PM

Secure Beginner’s Guide / Wireless Network Security: A Beginner’s Guide / Tyler Wrightson / 094-6 / Chapter 9
Secure Beginner’s Guide / Wireless Network Security: A Beginner’s Guide / Tyler Wrightson / 094-6 / Chapter 9
Chapter 9 Deploying Secure Wireless Networks 243
This is a very simple example that could work depending on your environment.
Something like this makes perfect sense for wireless point of sale systems or wireless
inventory systems where handheld devices typically only need to communicate with one
backend system. But what about more complex wireless networks? Let’s see how our
firewall configuration might change.
Let’s take the previous example and add two caveats: that the wireless users also need
access to the Internet and that the internal network is larger than one subnet. In this case,
because the wireless network is also used for access to internal resources, we can’t simply
deny access to the internal subnet. In this case, you might think that a “permit ip any
any” entry at the bottom of our access list might do the trick, but that would not have the
desired effect.
The following illustrates an incorrect way of creating an access list:
access-list WIFI-ACL extended permit tcp 10.0.2.0 255.255.255.0 host 10.0.0.100 eq 443
access-list WIFI-ACL extended permit tcp 10.0.2.0 255.255.255.0 host 10.0.0.100 eq 80
access-list WIFI-ACL extended permit udp 10.0.2.0 255.255.255.0 host 10.0.0.90 eq 53
access-list WIFI-ACL extended permit udp host 10.0.2.10 host 10.0.0.90 eq 1812
access-list WIFI-ACL extended permit ip any any
Instead of allowing access to the Internet, this would allow access to every internal
resource. To accomplish our goal, we first need to deny access to all internal subnets and
then allow any other destination subnets. A common way of accomplishing this is to deny
access to all RFC 1918 addresses and then permit any.
LINGO
RFC 1918 (which stands for Request For Comment 1918) defines “private IP
addressing” that is not routed over the Internet. You’re probably familiar with the
networks defined in the RFC. Here they are straight from the RFC:
10.0.0.0 - 10.255.255.255 (10/8 prefix)
172.16.0.0 - 172.31.255.255 (172.16/12 prefix)
192.168.0.0 - 192.168.255.255 (192.168/16 prefix)
For good bedside reading, check out the RFC at http://tools.ietf.org/html/rfc1918.
09-ch09.indd 243 3/28/12 5:01:03 PM

Secure Beginner’s Guide / Wireless Network Security: A Beginner’s Guide / Tyler Wrightson / 094-6 / Chapter 9
244 Wireless Network Security: A Beginner’s Guide
So the correct access list would look something like this:
access-list WIFI-ACL extended permit tcp 10.0.2.0 255.255.255.0 host 10.0.0.100 eq 443
access-list WIFI-ACL extended permit tcp 10.0.2.0 255.255.255.0 host 10.0.0.100 eq 80
access-list WIFI-ACL extended permit udp 10.0.2.0 255.255.255.0 host 10.0.0.90 eq 53
access-list WIFI-ACL extended permit udp host 10.0.2.10 host 10.0.0.90 eq 1812
access-list WIFI-ACL extended deny ip 10.0.2.0 255.255.255.0 10.0.0.0 255.0.0.0
access-list WIFI-ACL extended deny ip 10.0.2.0 255.255.255.0 172.16.0.0 255.240.0.0
access-list WIFI-ACL extended deny ip 10.0.2.0 255.255.255.0 192.168.0.0 255.255.0.0
access-list WIFI-ACL extended permit ip any any
You’ll notice that after the final deny statement, we have to add the entry for “permit
ip any any.” As we discussed previously, there is an implied “deny ip any any” rule at the
end of the access list, so we must include this rule to allow outbound access.
Internal DMZ
We’ve looked at a simple scenario where wireless users only need access to a single
internal system and the Internet. What if wireless users need access to a slew of internal
machines? What is the best way for handling such a situation?
One option you might already be familiar with is the use of a demilitarized zone
(DMZ). You can create separate subnets dedicated to resources that both internal and
wireless users need access to. You then create firewall rules that restrict each group of
users to only the systems and services they need access to. In Figure 9-22, you can see a
diagram for a basic network with a DMZ.
In this example, we can see that the DMZ has a subnet of 10.0.3.0/24. Both the wireless
network and the internal network need access to the DMZ. Like the previous examples,
Into Action
Some wireless access points allow you to create access lists on the access point itself.
This might make sense for very small deployments, but imagine the administrative
headaches involved with updating access lists on even a few access points.
09-ch09.indd 244 3/28/12 5:01:03 PM
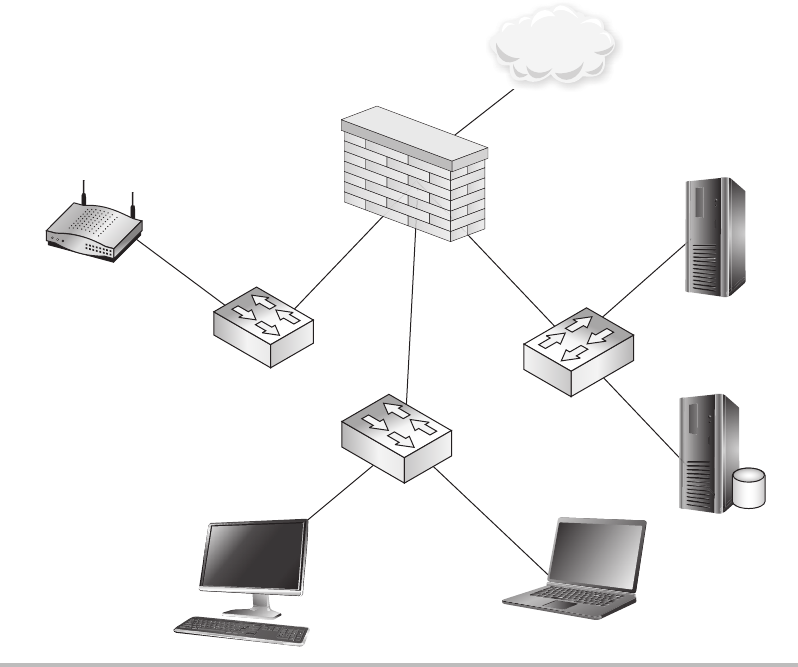
Secure Beginner’s Guide / Wireless Network Security: A Beginner’s Guide / Tyler Wrightson / 094-6 / Chapter 9
Secure Beginner’s Guide / Wireless Network Security: A Beginner’s Guide / Tyler Wrightson / 094-6 / Chapter 9
Chapter 9 Deploying Secure Wireless Networks 245
you should also configure the firewall to block outbound access from the DMZ to either of
these subnets. The firewall configuration might look something like this:
Interface Ethernet0/1
ip address 10.0.1.1 255.255.255.0
nameif INTERNAL
Interface Ethernet0/2
ip address 10.0.2.1
nameif WIRELESSLAN
Interface Ethernet0/3
ip address 10.0.3.1 255.255.255.0
nameif DMZLAN
Figure 9-22 Demilitarized zone for internal and wireless access
AP
10.0.2.1 10.0.3.1
INT WIFI
10.0.2.0/24
10.0.1.1
Internal Network
10.0.1.0/24
DMZ
10.0.3.0/24
Internet
09-ch09.indd 245 3/28/12 5:01:06 PM
Secure Beginner’s Guide / Wireless Network Security: A Beginner’s Guide / Tyler Wrightson / 094-6 / Chapter 9
246 Wireless Network Security: A Beginner’s Guide
access-list INTERNAL-ACL extended permit ip 10.0.1.0 255.255.255.0 10.0.3.0 255.255.255.0
access-list INTERNAL-ACL extended deny ip 10.0.1.0 255.255.255.0 10.0.0.0 255.0.0.0
access-list INTERNAL-ACL extended permit ip any any
access-list WIFI-ACL extended permit ip 10.0.2.0 255.255.255.0 10.0.3.0 255.255.255.0
access-list WIFI-ACL extended deny ip 10.0.2.0 255.255.255.0 10.0.0.0 255.0.0.0
access-list WIFI-ACL extended permit ip any any
access-list DMZ-ACL extended deny ip 10.0.3.0 255.255.255.0 any
access-group INTERNAL-ACL in interface INTERNAL
access-group WIFI-ACL in interface WIRELESSLAN
access-group DMZ-ACL in interface DMZLAN
In the previous configuration, you’ll notice that each interface has an access list
applied to it. The first line of the access list allows the subnet of that interface to access
the DMZ subnet. The second line of the access list denies access to every other subnet
in the 10.0.0.0 subnet. Finally, the last line permits the source subnet to access anything
on the Internet.
You’ll also notice that we denied the DMZ hosts access to anything. This is also a
good idea, and it really depends on the function of the servers. For example, some of your
servers might require updates from the manufacturer and therefore would need access to
the Internet to obtain these updates. In the previous example, we also gave the wireless
clients complete access to the DMZ; however, depending on the size of the DMZ, it would
still be advisable to create an access list to restrict access further.
Multiple Wireless Networks (SSIDs)
Adding multiple SSIDs for a single access point is logically no different from the previous
example. Your configuration will vary slightly just because you now have to deal with
virtual LANs (VLANs) and trunking protocols (such as 802.1q). However, your design
would operate identically. In Figure 9-23, you’ll see the layout of a basic network using
multiple SSID’s on a single access point and 802.1q trunks back to a layer 3 device.
There are many reasons why you would create multiple wireless networks. You can
view this almost identical to logically dividing a switch using VLANs. You could create
multiple wireless networks to separate users by job function, role, privilege level, and so
on. In our example, we’ve created two wireless networks called INTWIFI and CONSWIFI
09-ch09.indd 246 3/28/12 5:01:07 PM

Secure Beginner’s Guide / Wireless Network Security: A Beginner’s Guide / Tyler Wrightson / 094-6 / Chapter 9
Secure Beginner’s Guide / Wireless Network Security: A Beginner’s Guide / Tyler Wrightson / 094-6 / Chapter 9
Chapter 9 Deploying Secure Wireless Networks 247
to be used by consultants to access the DMZ only. Here’s the firewall configuration:
Interface Ethernet0/1
ip address 10.0.1.1 255.255.255.0
nameif INTERNAL
Interface Ethernet0/2.20
ip address 10.0.2.1
vlan 20
nameif INT-WIFI-LAN
Figure 9-23 Multiple SSIDs with distinct access to the same DMZ
INT WIFI
VLAN 20
10.0.2.0/24
Internal Network
10.0.1.0/24
CONS WIFI
VLAN 40
10.0.4.0/24
802.IQ
TRUNK
802.IQ
TRUNK
DMZ
10.0.3.0/24
09-ch09.indd 247 3/28/12 5:01:09 PM
Secure Beginner’s Guide / Wireless Network Security: A Beginner’s Guide / Tyler Wrightson / 094-6 / Chapter 9
248 Wireless Network Security: A Beginner’s Guide
interface Ethernet0/2.40
ip address 10.0.4.1
vlan 40
nameif CONS-WIFI-LAN
Interface Ethernet0/3
ip address 10.0.3.1 255.255.255.0
nameif DMZLAN
access-list INTERNAL-ACL extended permit ip 10.0.1.0 255.255.255.0 10.0.3.0 255.255.255.0
access-list INTERNAL-ACL extended deny ip 10.0.1.0 255.255.255.0 10.0.0.0 255.0.0.0
access-list INTERNAL-ACL extended permit ip any any
access-list WIFI-ACL extended permit ip 10.0.2.0 255.255.255.0 10.0.3.0 255.255.255.0
access-list WIFI-ACL extended deny ip 10.0.2.0 255.255.255.0 10.0.0.0 255.0.0.0
access-list WIFI-ACL extended permit ip any any
access-list CONS-ACL extended permit ip 10.0.4.0 255.255.255.0 10.0.3.0 255.255.255.0
access-list CONS-ACL extended deny ip any any
access-list DMZ-ACL extended deny ip 10.0.3.0 255.255.255.0 any
access-group INTERNAL-ACL in interface INTERNAL
access-group WIFI-ACL in interface INT-WIFI-LAN
access-group CONS-ACL in interface CONS-WIFI-LAN
access-group DMZ-ACL in interface DMZLAN
You’ll notice that the CONS-ACL access list grants the consultant subnet access to
the DMZ subnet and then denies access to everything else. You’ll also notice that the
interfaces now have a VLAN assigned for each of the wireless networks. The access point
configuration would mirror this, with the INTWIFI network being assigned to VLAN 20
and the CONSWIFI network assigned to VLAN 40. The configuration on a Cisco wireless
access point would look something like the following:
dot11 ssid INTWIFI
vlan 20
dot11 ssid CONSWIFI
vlan 40
The configuration for the access point will vary based on the manufacturer of the
access point. Just keep in mind that the VLAN is assigned to the SSID, so you’ll typically
find the VLAN configuration area on the SSID configuration page.
09-ch09.indd 248 3/28/12 5:01:09 PM

Secure Beginner’s Guide / Wireless Network Security: A Beginner’s Guide / Tyler Wrightson / 094-6 / Chapter 9
Secure Beginner’s Guide / Wireless Network Security: A Beginner’s Guide / Tyler Wrightson / 094-6 / Chapter 9
Chapter 9 Deploying Secure Wireless Networks 249
How It Works
Keep in mind that the VLAN information is never sent to the client devices. Instead,
it’s completely internal to the access point. The access point simply associates each
unique BSSID with the VLAN.
Remote Wireless Networks
Deploying multiple access points, including access points in remote locations, does not
really change any of the principles. You still need to determine exactly what your wireless
clients need access to and restrict them as much as possible.
We’ve Covered
In this chapter, we covered the steps for configuring a WPA2-Enterprise network using
PEAP for authentication. This included the backend authentication server, which was
handled by the Windows 2008 NPS service. We then discussed effective measures to
segment your wireless traffic using firewall access control lists.
Configuring a WPA2-Enterprise network with PEAP authentication
Configure WPA2 on access point using AES and RADIUS authentication to the Windows ●
NPS server.
Configure the Microsoft Windows 2008 Network Policy Server
Configuring Network Policies and Connection Request Policies to define which users are ●
allowed access to the wireless network and from which RADIUS clients to accept requests.
Configure Group policy to define the wireless network, which the clients should connect ●
to automatically.
Strategies for segmenting wireless networks
Blocking traffic in both directions ●
Wireless DMZ networks ●
Multiple wireless networks ●
09-ch09.indd 249 3/28/12 5:01:09 PM
This page intentionally left blank

Secure Beginner’s Guide / Wireless Network Security: A Beginner’s Guide / Tyler Wrightson / 094-6 / Chapter 10
251
Handling Wireless
Guest Access
Chapter 10
10-ch10.indd 251 4/5/12 4:06:09 PM
Secure Beginner’s Guide / Wireless Network Security: A Beginner’s Guide / Tyler Wrightson / 094-6 / Chapter 10
252 Wireless Network Security: A Beginner’s Guide
We’ll Cover
Authenticating guest users and managing guest credentials ●
Using captive web portals ●
Segmenting guest wireless networks from internal networks ●
Allowing secure access to internal resources ●
In this chapter, we’ll discuss the various methods for dealing with guest access. We’ll
discuss the opportunities for you to reuse your guest wireless network to allow access to
internal network resources for guest users such as consultants. You’ll learn the key issues
you need to consider when designing guest wireless networks.
Guest Networks and Internet Access
Many times organizations will just deploy an open wireless network, give it an SSID that
includes the word guest, firewall it off from the network, and consider themselves done.
Unfortunately, some security issues with this design may not have been considered. As
in previous examples, one of the most important questions you can ask yourself first is,
“Do I really need to deploy guest wireless functionality, and what exactly am I trying to
accomplish?”
For example, if your goal is to provide “guest” access for consultants or vendors for
your company, the design of your wireless network might look very different than if you
are wanting to provide Internet access for visitors or customers of your business. Either
way, you want to clearly define exactly what is needed, and how wireless functionality
will fill those needs.
Providing Internet access to patrons and visitors of your business may seem like a very
easy task, but you should take into consideration certain issues before deploying a solution.
The major concerns of hosting an open wireless network include the following:
Attacks originating from your Internet connection ●
Illegal content being hosted on your Internet connection ●
Illegal content being downloaded using your Internet connection ●
Private internal information being sent over unencrypted wireless ●
10-ch10.indd 252 4/5/12 4:06:09 PM

Secure Beginner’s Guide / Wireless Network Security: A Beginner’s Guide / Tyler Wrightson / 094-6 / Chapter 10
Secure Beginner’s Guide / Wireless Network Security: A Beginner’s Guide / Tyler Wrightson / 094-6 / Chapter 10
Chapter 10 Handling Wireless Guest Access 253
You need to understand the implications of people doing something they’re not
supposed to from your Internet connection. Imagine a situation where someone actually
uses your open wireless network to attack another organization. The other organization
could then make it your problem—and potentially bring a lawsuit against you.
If someone were to send or receive illegal content that could ultimately be traced
back to your network, you might be on the hook. Illegal content doesn’t even have to be
as serious as you might think. Organizations such as the Motion Picture Association of
America (MPAA) and the Recording Industry Association of America (RIAA) have really
cracked down on illegal downloading of movies and music. Your organization might be
completely innocent of anything illegal, but it might be costly to prove this point. This is
a perfect example of an ounce of prevention being worth a pound of cure.
Here are some tips for securing guest Internet access:
Authenticate guest users, where feasible. ●
Use unique credentials, where feasible. ●
Restrict access to guest users only (no internal users!). ●
Encrypt the traffic. ●
Use auto-expiring credentials. ●
Authenticating Guest Users
and Managing Guest Credentials
One solution to combat the issues presented with a guest network is to authenticate your
guests in one form or another. You have several options when it comes to authenticating
your guests, and at this point you should be familiar with most of the options. Let’s look
at the different options available and the advantages of each.
In the Real World
Remember that even though you might be able to prove an employee isn’t at fault,
your company might ultimately be responsible for any illegal activity that occurs from
an Internet connection it owns. There have been some very serious reports of people
getting into trouble for what other users have done using their open wireless networks.
One extreme example involved a man being arrested for someone else using his open
wireless network to download child pornography. Ultimately the man proved his
innocence, but it’s probably not a situation anyone would like to find themselves in.
10-ch10.indd 253 4/5/12 4:06:09 PM

Secure Beginner’s Guide / Wireless Network Security: A Beginner’s Guide / Tyler Wrightson / 094-6 / Chapter 10
254 Wireless Network Security: A Beginner’s Guide
Your technical options for authenticating users of your guest network include the
following:
Shared password using integrated wireless capabilities (WPA Pre-Shared Key)
●
Unique authentication credentials (WPA-Enterprise) ●
Captive web portal systems ●
The benefits of using a shared key as opposed to unique credentials for each user are
the same for guest networks as they are for any other network. The advantage of using
unique credentials is that you can more easily identify exactly who is authenticating to
your network and thus audit access and usage. The main disadvantage of using unique
credentials for every guest user is a significant increase in administrative overhead.
The administrative overhead manifests itself in someone needing to actually create the
username and password for every guest and delivering the credentials to them. This isn’t
as difficult as it may sound, but it’s still work.
Many organizations actually give this task to nontechnical employees (such as
receptionists). Thanks to Role-Based Access Control (RBAC), many wireless administration
systems allow users to create guest user accounts without having access to change any other
aspects of the wireless system.
Many companies lean toward using one password that is shared among all guests. This
isn’t always the best solution because it doesn’t allow for tracking and auditing of usage.
Most users typically don’t treat shared guest credentials as confidential, sharing them with
anyone who asks. Conversely, most people are not as quick to share credentials that are
assigned specifically to them.
In certain situations, controlling guest access tightly by creating a unique user for
each guest might be too unreasonable. For example, if a busy hospital wished to provide
Internet access to guests and visitors, it might be unreasonable to ask every guest to
Into Action
Role-Based Access Control (RBAC) is a generic term for assigning privileges
based on a person’s role in a system. Many times wireless management systems
have a simple web interface that many users are familiar with and can interact
with. In our example, we could give our receptionist an account in the wireless
management system to create guest login IDs and not perform anything else. This
“role” might be labeled “guest administrator,” for example.
10-ch10.indd 254 4/5/12 4:06:09 PM

Secure Beginner’s Guide / Wireless Network Security: A Beginner’s Guide / Tyler Wrightson / 094-6 / Chapter 10
Secure Beginner’s Guide / Wireless Network Security: A Beginner’s Guide / Tyler Wrightson / 094-6 / Chapter 10
Chapter 10 Handling Wireless Guest Access 255
request a user ID and password to access the guest network. This could easily turn into a
full-time job for the person responsible for creating the guest accounts.
Most places authenticate guest users by having them just physically visit a specific
area such as the front desk and asking for the guest wireless password. Depending on your
business, this might not be enough authentication. The people responsible for handing out
the guest credentials should be trained on how and when to give out guest credentials as
well as to whom.
Using Captive Web Portals
You’re probably already very familiar with captive portals. Captive portals are systems
that “trap” a user’s HTTP request and then redirect the user to an authentication page
where she has to authenticate before being allowed access to the Internet. This “portal
page” the user is redirected to typically resides on the captive portal host, but can also be
handled by a central server, sometimes located on the Internet.
Into Action
Remember that by the very nature of users being “guests,” they are hard to
authenticate, but that doesn’t mean it’s impossible. Think about what you’re
trying to avoid by authenticating your guest users. Typically, you’re trying to
prevent people who are not actually guests from using your wireless network.
Therefore, even though an authentication method might not be perfect, it could
be good enough to accomplish this task. By requiring users to do something that
someone who wants to use your guest wireless network for malicious purposes
wouldn’t do, you can weed out a would-be attacker. Here are some possible solutions:
Provide alternative ID (driver’s license, student ID card, and so on)
●
Leave something for guest access (car keys, credit card, and so on) ●
Call a helpdesk to obtain credentials ●
Visit the reception desk to obtain credentials ●
Of these choices, the easiest and most effective method appears to be having
guests request credentials from somewhere they have to physically visit. This will
definitely not stop a determined attacker, but if you also have a video camera in
the area to maintain a record of who has requested credentials, you might have
mitigated most of the risk.
10-ch10.indd 255 4/5/12 4:06:09 PM

Secure Beginner’s Guide / Wireless Network Security: A Beginner’s Guide / Tyler Wrightson / 094-6 / Chapter 10
256 Wireless Network Security: A Beginner’s Guide
Typically, the user is “forced” to authenticate once she tries to visit a website. The
end user typically enters her authentication credentials manually into an web page form.
This authentication can be a simple shared password or can be unique credentials. Many
captive portals even allow for a user to request credentials or sign up for an account.
Captive portals operate very similar to 802.1x, but are more apparent to the end user.
Just like 802.1x, a captive portal will not let a user reach any network resources until
the user has successfully authenticated. Unlike 802.1x, captive portals do not typically
authenticate the user automatically upon associating to the wireless network. Instead, a
user is allowed to completely associate to a wireless network and obtain an IP address
before being “forced” to authenticate.
You should also understand that by a captive portal allowing even seemingly innocent
protocols such as DNS and ICMP through, there potentially could be a security problem.
If a malicious user were to encapsulate traffic within the DNS or ICMP packets, he could
potentially bypass the need to authenticate to your captive portal. This would require the
attacker to set up a server ahead of time to receive the covert DNS messages and send
back the appropriate content to look like a DNS message as in Figure 10-1. However,
programs already exist to accomplish exactly that.
Some captive portals will use slightly different techniques to redirect the user, but the end
result is the same. You have an insane amount of options when it comes to choosing a captive
portal. Plenty of open source, free, and commercial options are available. In addition, many
captive portal services exist that handle authentication, account creation, and even billing.
Many existing captive portal systems have been included in firmware, such as the
OpenWRT and DD-WRT projects. Many newer access points, access point managers and
lightweight access point systems, include captive portal functionality right out of the box.
In Figure 10-2, you’ll see an example of an access point redirecting a user to an Internet-
based captive portal system. The agent on the access point is very compact and simply
waits for the authorization message from the Internet server, which indicates the user has
authenticated successfully.
Into Action
Although it seems like the captive portal blocks all user traffic before the users
authenticate, you should understand some of the nuances to this. For example, most
captive portals still allow DNS queries to pass through to the Internet so that the
user can look up Internet hosts, try to access the website, and then be redirected to
the authentication page. Typically, captive portals will also let ICMP through for
troubleshooting purposes.
10-ch10.indd 256 4/5/12 4:06:09 PM
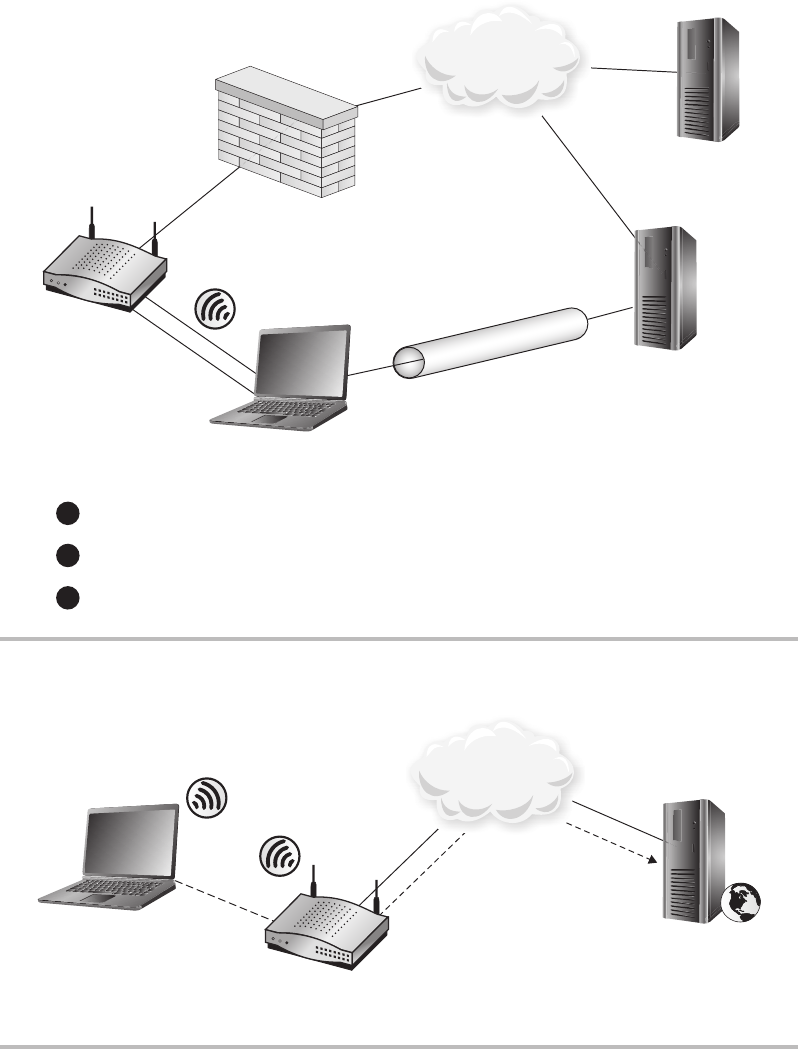
Secure Beginner’s Guide / Wireless Network Security: A Beginner’s Guide / Tyler Wrightson / 094-6 / Chapter 10
Secure Beginner’s Guide / Wireless Network Security: A Beginner’s Guide / Tyler Wrightson / 094-6 / Chapter 10
Chapter 10 Handling Wireless Guest Access 257
Figure 10-2 Captive portal with Internet authentication server
AP
Lightweight
Captive Portal
Cleint
HTTP
Authentication
Page
Internet
Figure 10-1 Tunneling IP traffic through DNS packets
AP
Client sends HTTP request, encapsulated in DNS Trafc.
DNS Trafc
WWW Server
Attacker Server
Terminates
DNS Tunnel
HTTP Trafc
2
1
3
DNS tunnel server receives trafc and makes
legitimate HTTP request.
HTTP server responds to DNS tunnel server.
Tunnel server sends res
p
onse to client encoded in DNS trafc.
Internet
10-ch10.indd 257 4/5/12 4:06:15 PM
Secure Beginner’s Guide / Wireless Network Security: A Beginner’s Guide / Tyler Wrightson / 094-6 / Chapter 10
258 Wireless Network Security: A Beginner’s Guide
Guest Users Only
This may seem a little obvious, but you should understand exactly why only guest users
should use a guest network. Specifically, you want to prevent internal employees from
using your guest wireless network. The main reason you don’t want internal users on the
guest network is because it introduces unnecessary risk. Even when the guest network is
secured using encryption and you’re authenticating guest users, you should consider your
guest network a quasi-hostile network.
If an internal employee connects to a guest network, other users of that guest network
can now target both the client device as well as the network communication from that
device. As you’ll remember from Chapter 5, we have discussed the many ways to attack a
wireless client system.
You may even feel confident that any sensitive network communications from the
client device will be encrypted and therefore you have nothing to be concerned about.
Even though most of the wireless client communications may be secure, all it takes is
one insecure protocol for the client to be completely compromised, which could then
become a foothold into your internal network. Even secure protocols such as SSL can be
circumvented or even broken. For a refresher on some of the attack vectors available, refer
to Chapter 5.
In addition, some of the major security systems in place on your internal network
might not be in place on your guest network. For example, you might force your users to
use a web proxy on your internal network, but not guest users. This would allow internal
users to access potentially harmful or inappropriate websites while on the guest network.
This is another prime example of why you want to authenticate guest users. You not
only want to ensure that the users are in fact authorized to use the guest wireless network,
but you also want to verify they are in fact only guests, and not internal employees.
Encrypting Traffic
Just because a wireless network is intended to be used by nonemployees does not mean
that encryption can’t be used. Encrypting the traffic ensures that people who aren’t
supposed to see the traffic can’t. The fact that potential attackers will not be able to inject
traffic or manipulate client traffic only helps to make the guest wireless network a less
hostile network.
For the reasons previously mentioned, using a WPA2-PSK network with a shared key
can be a very good option for some guest wireless networks. Another great option is to
create a WPA2-Enterprise network and only allow users of a “guest group” to authenticate
to the network. The steps would be identical as the ones covered in Chapter 8.
10-ch10.indd 258 4/5/12 4:06:15 PM
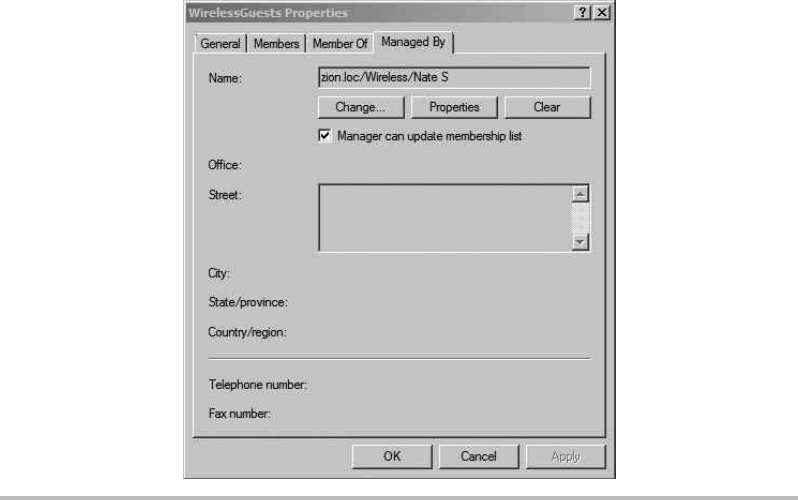
Secure Beginner’s Guide / Wireless Network Security: A Beginner’s Guide / Tyler Wrightson / 094-6 / Chapter 10
Secure Beginner’s Guide / Wireless Network Security: A Beginner’s Guide / Tyler Wrightson / 094-6 / Chapter 10
Chapter 10 Handling Wireless Guest Access 259
What’s more, you could leverage additional functionality already built into Windows
to allow regular users to create guest user accounts while not allowing them any additional
privileges. It’s actually very simple to configure this in Active Directory. Open Active Directory
Users and Computers and create a wireless guest group. Right-click the group and choose
Properties. Click the Managed By tab and click the Change button (see Figure 10-3).
Enter the name of the user who you want to manage group membership for this group.
Check the box labeled “Manager can update membership list” and then click Apply.
As you can see in Figure 10-3, we’ve granted the user Nate S the ability to manage the
group called WirelessGuests. Now all we have to do is create a Microsoft Management
Console (MMC) on Nate’s desktop and train him on how to add users to the WirelessGuests
group.
Using Auto-Expiring Credentials
All of the user accounts in your organization should be set to automatically expire after
an appropriate amount of time. This is definitely true of guest accounts. Make sure you
think through this and determine a reasonable time period for your accounts to be enabled
Figure 10-3 Configuring group management in Active Directory
10-ch10.indd 259 4/5/12 4:06:15 PM
Secure Beginner’s Guide / Wireless Network Security: A Beginner’s Guide / Tyler Wrightson / 094-6 / Chapter 10
260 Wireless Network Security: A Beginner’s Guide
before being automatically disabled. Generally speaking, for shared accounts you should
try to expire them as quickly as possible, and for unique credentials you can extend the
time period. Many places find it easy to have shared accounts expire on a weekly or even
daily schedule. Of course, like everything else, you need to determine what makes the
most sense for your specific needs.
Allowing Secure Access to Internal Resources
Providing internal network access to consultants via a “guest” wireless network presents
its own set of challenges. This should be considered more of a tightly controlled portal
into your network rather than a traditional guest network, very similar in concept to a
DMZ. You have a few options here, and the solution that works best for your environment
might be based mostly on the resources on your internal network that the consultants need
access to. Some of your best options include the following:
Authenticating consultants ●
Network segmentation with demilitarized zone (DMZ) ●
DMZ with jump stations ●
Virtual private networking ●
Using systems such as VPN and jump stations allows you to reuse your wireless
guest network for guest access to the Internet to allow guest users access to select internal
resources. This can be a great cost savings because you only need to configure one wireless
network for guest users, but it must be configured with security in mind.
Authenticating Consultants
Authenticating external users who require access to any internal resources is extremely
important. It is definitely advisable to steer clear of using shared credentials for consultants.
Assigning unique credentials for external users provides for much better auditing capabilities
and much tighter access control.
Keep in mind that typically you can’t guarantee that external users will treat their accounts
with the same level of caution as one of your employees. Therefore, even successful logon
events from consultant accounts should be more closely monitored. Unfortunately, the
built-in functionality to monitor and alert on specific events in Windows is extremely
limited. Typically, you’ll need some sort of log management solution to accomplish this.
You should also set any consultant accounts to be automatically disabled after a specific
10-ch10.indd 260 4/5/12 4:06:15 PM

Secure Beginner’s Guide / Wireless Network Security: A Beginner’s Guide / Tyler Wrightson / 094-6 / Chapter 10
Secure Beginner’s Guide / Wireless Network Security: A Beginner’s Guide / Tyler Wrightson / 094-6 / Chapter 10
Chapter 10 Handling Wireless Guest Access 261
period of time. Auto-disabling the accounts doesn’t necessarily have to be when you
know the consultant will no longer need his account. Creating all your accounts with a
predetermined auto-disable period (for example, three months) is a very good practice.
The most reasonable time period will depend on your specific situation.
You should understand the role of the wireless authentication options and how they
might help you or hinder you in both authenticating and controlling consultants’ access
to your internal network. For example, if you use WPA-PSK to authenticate consultants
to your wireless network, you’d need an additional system for authenticating them
individually to other systems. This may or may not be an issue, but consider that if you’re
already creating separate (and individual) accounts in another system (Active Directory,
for example), it might be worth the extra effort to configure WPA2-Enterprise and also
audit each consultant’s individual access to the wireless network.
This could also be a perfect time to use a stand-alone RADIUS database. If, for example,
the consultants do not need access to any Active Directory services or domain servers, you
could keep all of their systems completely separate, including the authentication server.
Segmenting Guest Wireless Networks
from Internal Networks
Network segmentation alone is one possible solution to providing consultants access to
internal resources, but again this depends entirely on the resources the consultants need
access to. We won’t cover this in much depth here because we covered many sample
configurations of network segmentation in Chapter 9. However, you should remember that
in this scenario, the consultant network should be thought of as a DMZ and treated as a very
sensitive area.
Remember that here we’re only talking about restricting what resources the consultants can
access; this doesn’t mean you shouldn’t still authenticate the users and encrypt their traffic.
In Figure 10-4, you can see that we’re relying on WPA2 to provide both the authentication
of the consultants as well as the encryption of their traffic. Remember that in this scenario,
you don’t have control on a per-user basis what the users get access to. This solution is best
when that level of granularity is not needed and all external people need access to the same
resources.
Note
It is absolutely not advisable to give outsiders complete unrestricted access to your
internal network unless it is absolutely necessary.
10-ch10.indd 261 4/5/12 4:06:15 PM
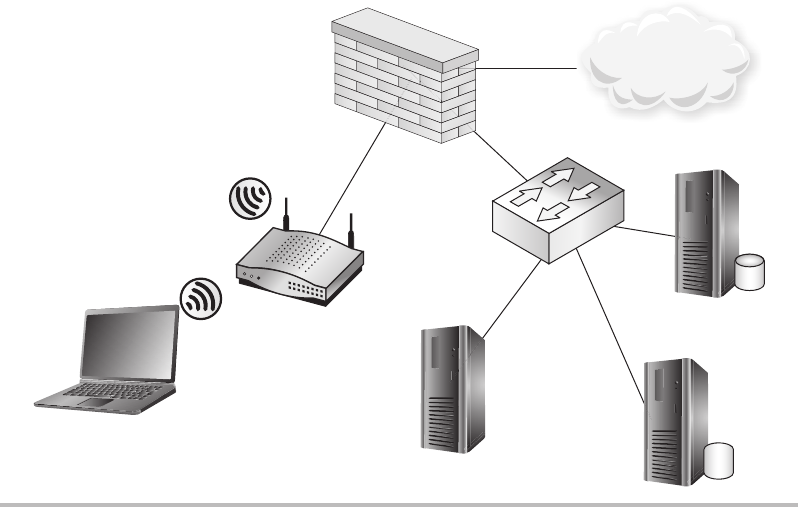
Secure Beginner’s Guide / Wireless Network Security: A Beginner’s Guide / Tyler Wrightson / 094-6 / Chapter 10
262 Wireless Network Security: A Beginner’s Guide
Figure 10-4 Consultants wireless network
AP
Internal
Network
Guest
Wireless
User
WPA2-PSK
Internet
DMZ with Jump Stations
Another option for providing access to internal resources that operates very similarly to a
VPN involves using jump stations. A jump station refers to a system you connect to that
you then connect to your target system, very much like a proxy. Jump stations can take
on many forms and do not reference any specific technology. Typically, you would use a
service that gives you an interactive session on the remote machine such as Secure Shell
(SSH), Remote Desktop Protocol (RDP), or Citrix. In Figure 10-5, you can see we have
our jump station on an RDP server in our DMZ.
Citrix and RDP are typically used on Windows systems to give you access to a
Windows desktop interface from which you could then run regular executables. SSH
would give you a text command-line interface to the remote system, but it’s extremely
flexible (see Figure 10-6). One of the advantages of using jump stations is that typically
you don’t need anything preinstalled on the client system. For example, you might choose
to use RDP for your jump station because every modern version of Windows comes
preinstalled with an RDP client.
10-ch10.indd 262 4/5/12 4:06:18 PM
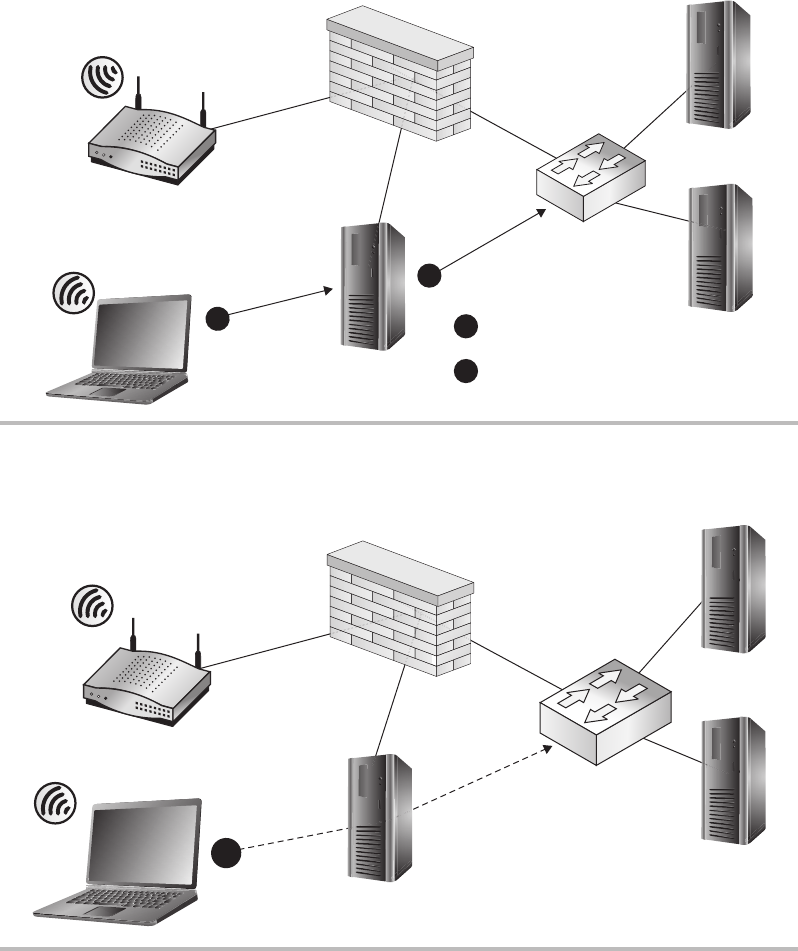
Secure Beginner’s Guide / Wireless Network Security: A Beginner’s Guide / Tyler Wrightson / 094-6 / Chapter 10
Secure Beginner’s Guide / Wireless Network Security: A Beginner’s Guide / Tyler Wrightson / 094-6 / Chapter 10
Chapter 10 Handling Wireless Guest Access 263
Figure 10-6 DMZ with an SSH jump station
AP
Internal
Network
SSH
Server
1
DM2
Figure 10-5 DMZ with an RDP jump station
Internal
Network
RDP
Server
Client RDP’S to server.
2
1
RDP server connects to
internal resources.
1
2
AP
WPA2-PSK
10-ch10.indd 263 4/5/12 4:06:23 PM
Secure Beginner’s Guide / Wireless Network Security: A Beginner’s Guide / Tyler Wrightson / 094-6 / Chapter 10
264 Wireless Network Security: A Beginner’s Guide
In Figure 10-6, you can see we’re using an SSH server as our jump station. SSH
gives us a few advanced options, such as the ability to create a pseudo-VPN tunnel. This
SSH tunnel would allow the client system the ability to route traffic over the encrypted
SSH tunnel and be routed directly to end systems to which the SSH server has access.
Therefore, you would want to configure your firewall ACLs to restrict access from this
system to other portions of your network. You should note that in the case of SSH tunnels,
the source IP would still be that of the SSH server, so you would only have to create one
firewall ACL to control access to internal resources.
Regardless of the system you choose to use as a jump station, make sure it gives access
to only the services and functions to which the consultants need access. This can be a very
tricky task. For example, the RDP server and many SSH servers allow users to transfer files
by default. Both of these systems give you the ability to restrict this functionality, but this is
something you need to take into consideration when designing your jump station solution.
Virtual Private Networking
Virtual private networking is definitely a technology that has withstood the test of time.
Virtual private network (VPNs) create “virtual” secure networks over a less secure network
by encrypting (and authenticating) the traffic between endpoints. The quintessential example
for a VPN is a host that needs to communicate with another host over the Internet.
Because the Internet is considered a public network, which can’t be completely trusted, we
can set up an encrypted tunnel to secure our communication against people who might try to
eavesdrop.
There are basically two modes of operation for a VPN: Network and Host. In Host mode,
our end station connects to a single host and all communication between those two end points
is encrypted, as in Figure 10-7. Host A has a VPN that terminates directly on Host B.
10-ch10.indd 264 4/5/12 4:06:24 PM
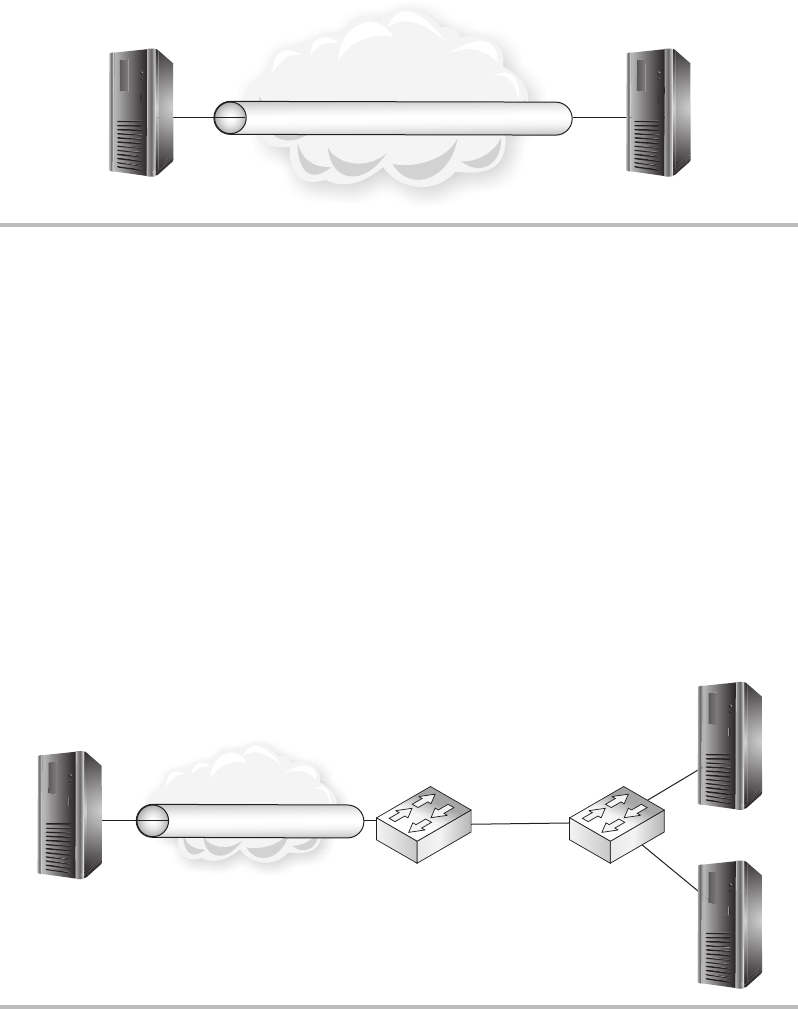
Secure Beginner’s Guide / Wireless Network Security: A Beginner’s Guide / Tyler Wrightson / 094-6 / Chapter 10
Secure Beginner’s Guide / Wireless Network Security: A Beginner’s Guide / Tyler Wrightson / 094-6 / Chapter 10
Chapter 10 Handling Wireless Guest Access 265
In Network mode, our end station connects to a VPN gateway and then has access to
multiple nodes after the VPN gateway. You’ll notice that typically the network traffic is
encrypted only up to the VPN gateway; after that, the traffic is unencrypted and sent to the
intended end station. In Figure 10-8, you see that Host A communication is encrypted to
the VPN gateway and then is sent unencrypted directly to the intended hosts at Site B.
You can also set up a network VPN between VPN gateway devices. This would give
you the option of encrypting traffic between many hosts over an untrusted network, as in
Figure 10-9. Hosts at Site A that wish to communicate with any hosts at Site B will have
their traffic encrypted as it travels over the Internet.
You must understand where the secure connection for a VPN starts and where it ends.
For example, using an appliance-to-appliance VPN but still sending your network traffic
Figure 10-7 Host-to-host VPN
Internet
Host A Host B
VPN
Figure 10-8 Host-to-gateway Tunnel mode VPN
Internet
VPN Encrypted
Site B
Cleartext
VPN
Gateway
Host A
10-ch10.indd 265 4/5/12 4:06:27 PM
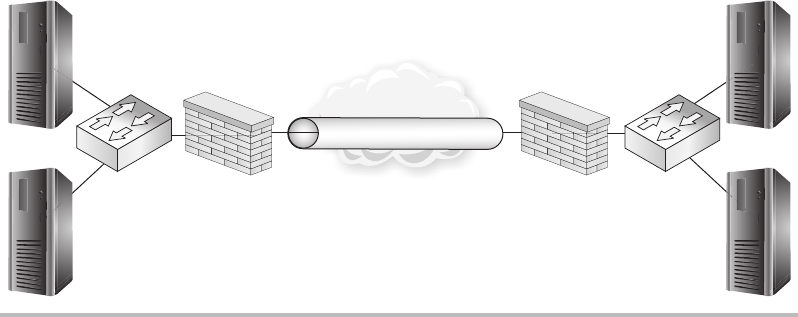
Secure Beginner’s Guide / Wireless Network Security: A Beginner’s Guide / Tyler Wrightson / 094-6 / Chapter 10
266 Wireless Network Security: A Beginner’s Guide
unencrypted over a wireless network doesn’t add any real benefit for securing traffic over
the VPN.
You have an enormous amount of choices when it comes to VPN appliances and
protocols, but the underlying technologies come down to only a handful of choices.
Here are the most popular protocols for creating VPN tunnels:
Secure Sockets Layer/Transport Layer Security (SSL/TLS) ●
Internet Protocol Security Extensions (IPSec) ●
Point-to-Point Tunneling Protocol (PPTP) ●
Secure Shell (SSH) ●
Secure Sockets Layer (SSL) is something you’re already very familiar with. SSL is
the technology used to secure your communications with web servers over the Internet.
Transport Layer Security (TLS) is the next-generation protocol meant to replace SSL.
Almost every website you visit that uses HTTPS will be secured using SSL or TLS.
The difference between SSL communications over the Internet and an SSL VPN is
that typically you’ll have access to more than one TCP port (or network service) on the
destination network with an SSL VPN. SSL VPNs have picked up a lot of steam in the
past few years. The biggest advantage to using SSL VPNs is that they’re extremely easy to
configure. Not only is the SSL server itself typically very easy to configure, but the client
is extremely easy to install and very lightweight. Many users are already familiar with
visiting a website using HTTPS, and typically an SSL VPN is easier for users to work
Figure 10-9 Gateway-to-gateway Tunnel mode VPN
Internet
Encrypted Tunnel Site B
Site A
VPNVPN
10-ch10.indd 266 4/5/12 4:06:30 PM

Secure Beginner’s Guide / Wireless Network Security: A Beginner’s Guide / Tyler Wrightson / 094-6 / Chapter 10
Secure Beginner’s Guide / Wireless Network Security: A Beginner’s Guide / Tyler Wrightson / 094-6 / Chapter 10
Chapter 10 Handling Wireless Guest Access 267
with. The main disadvantage is that it hasn’t seen as widespread integration into existing
appliances because it is still a somewhat young technology for VPNs, and might typically
be a little more expensive than other VPN technologies.
SSL VPNs also have the advantage of allowing portal-style VPNs. With an SSL VPN
appliance, you can actually create a portal that operates very similar to a typical secure
website. Once logged into the portal, users can access other systems and applications by
clicking links in the portal. This portal needs to be configured by an administrator, but it
adds another method by which users can easily access the systems they need.
Secure Shell, which is typically used to securely manage Unix and Linux systems (and
more recently networking appliances), is another great option for creating a VPN. Many
people are familiar with using SSH for secure administration but might not know how
versatile it actually is. Using standard SSH clients and servers, you can create both Host
and Network VPNs, although it’s much more common to see Host VPNs if SSH is used.
Internet Protocol Security Extensions (IPSec) extends TCP/IP to add encryption and
authentication of IP packets. The main advantage of using IPSec over other technologies
is its ubiquity. IPSec has long been the VPN technology. Many existing products such as
routers and firewalls that added VPN functionality did so with the IPSec protocol. The
main disadvantage to using IPSec is that
it requires much more configuration and
a better understanding of the underlying
protocol when compared to SSL or
SSH. IPSec can terminate both Host and
Network VPNs. A complete coverage of
IPSec and its configuration options are
beyond the scope of this book.
Point-to-Point Tunneling Protocol (PPTP) is another great option available for creating
VPNs. Most versions of Windows natively support PPTP; therefore, PPTP has seen heavy
deployment in Windows environments. PPTP operates very similarly to IPSec but is
typically used for Host-to-Network VPNs.
You have an unbelievable amount of choices when it comes to selecting your VPN
termination technology. Many “appliance” solutions are available that perform VPN
termination as their primary function. These are typically referred to as VPN gateways
or VPN concentrators. VPN technology has become so commonplace that most firewall
vendors include some level of VPN functionality in their firewall products. This is another
great opportunity to reuse existing security infrastructure to support your wireless network.
LINGO
When configuring IPSec, the terms
Transport mode and Tunnel mode are
typically used to describe Host VPNs
and Network VPNs, respectively. There
are subtle nuances with the terms
Transport and Tunnel.
10-ch10.indd 267 4/5/12 4:06:30 PM
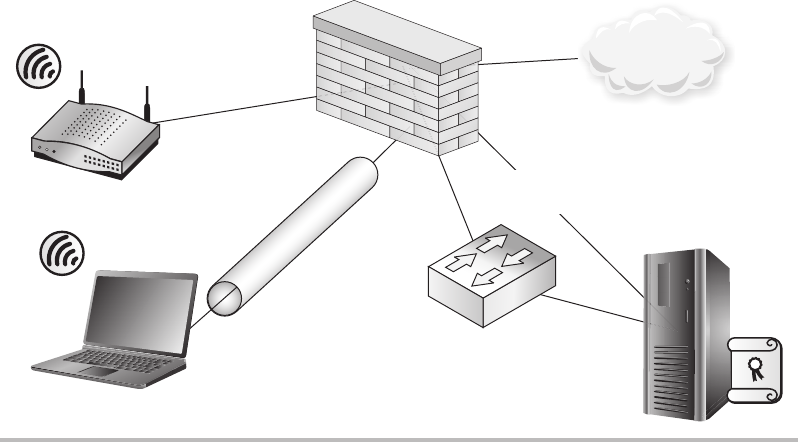
Secure Beginner’s Guide / Wireless Network Security: A Beginner’s Guide / Tyler Wrightson / 094-6 / Chapter 10
268 Wireless Network Security: A Beginner’s Guide
VPN Options for Wireless Networks
VPN gateway devices can be a perfect solution for providing secure access to your internal
network. When choosing a VPN gateway device that makes the most sense for your
environment, you’ll want to consider which devices you have in place today as well as the
services and systems to which consultants need access. You should also consider future
needs and not just your immediate needs.
Some of your options for terminating VPN connections include firewalls, routers, VPN
appliances, Windows servers, and Unix servers. Each system will have its own advantages
and disadvantages. When you’re using infrastructure devices such as firewalls, routers, and
VPN appliances, it’s typically easier to implement access control lists (ACLs) to limit which
systems and services a VPN client can access.
Most VPN appliances allow you to authenticate users against standard external databases,
typically using something like RADIUS. This, of course, allows you to authenticate users based
on their group, just like in WPA2-Enterprise networks. Depending on your needs, you could
create a local database of users that only exists on your VPN device.
In Figure 10-10, you can see an example of using an existing infrastructure to support
our needs for secure consultant access to internal resources. We’ve created an open wireless
network to allow consultants access to the Internet. The only thing necessary to access
the Internet is a shared guest account for the captive web portal. Then, to access internal
Figure 10-10 An IPSec VPN to a firewall over an open wireless network
AP
VPN to
Firewall
Open WIFI Radius
Authentication
Internet
10-ch10.indd 268 4/5/12 4:06:33 PM

Secure Beginner’s Guide / Wireless Network Security: A Beginner’s Guide / Tyler Wrightson / 094-6 / Chapter 10
Secure Beginner’s Guide / Wireless Network Security: A Beginner’s Guide / Tyler Wrightson / 094-6 / Chapter 10
Chapter 10 Handling Wireless Guest Access 269
resources, a consultant would have to create a VPN tunnel to the firewall. In this case, we’re
using an IPSec VPN tunnel to the firewall.
Because we’re using a firewall to terminate our VPN, we can configure access control
lists to restrict what VPN users can access. In this case, we’re allowing access to our entire
DMZ subnet and then blocking access to all other Internal resources. Typically, VPN users
will be assigned an IP address in a unique subnet that does not overlap with other network
segments.
The previous example works well for situations where the resources that consultants
need access to are not confined to one subnet. You can still create an ACL that restricts
consultants to specific services on servers spread across your entire organization.
In Figure 10-11, you can see that instead of the VPN tunnel terminating on the firewall,
we’re using a PPTP VPN tunnel that terminates on an internal Windows server.
Again, the reasons for choosing to use an internal system as opposed to an
infrastructure device depend entirely on your situation. Maybe you don’t have a firewall
that supports terminating a VPN connection. Maybe you’re unfamiliar with configuring
Figure 10-11 A PPTP VPN to a Windows server in a DMZ
Windows
VPN Server
AP
Internet
10-ch10.indd 269 4/5/12 4:06:37 PM

Secure Beginner’s Guide / Wireless Network Security: A Beginner’s Guide / Tyler Wrightson / 094-6 / Chapter 10
270 Wireless Network Security: A Beginner’s Guide
a VPN on infrastructure devices and feel more comfortable configuring a PPTP VPN on
a Windows server.
In the case you choose to use a device other than your firewall, you have a few choices
for how the user will see (and connect to) the VPN system. You can choose to keep the
system behind your firewall and forward the appropriate TCP ports through the firewall,
and thus the VPN will tunnel through the firewall as shown in Figure 10-11.
Alternatively, you can choose to give the system a second network connection and
place this in the Wireless subnet. In some situations you should absolutely avoid this, and
then in other situations it might make the most sense. Generally speaking, you should
avoid doing this if you choose to use a server as your VPN termination device. Exposing
an entire system to a potentially hostile network is not a good idea, especially in the case
where you use an open wireless network and authenticate guests with something like
a captive portal. Yes, you could of course use a host-based firewall to secure the host,
disable unnecessary services on the interface connected to the wireless network, and
otherwise secure the host, but this is still not an optimal solution.
On the other hand, configuring a VPN concentrator device to be dual-homed is a
solution worth considering (see Figure 10-12). Generally speaking, infrastructure devices
Figure 10-12 Dual-homed VPN gateway appliance
Internal
Network
VPN
Concentrator
Internet
10-ch10.indd 270 4/5/12 4:06:40 PM
Secure Beginner’s Guide / Wireless Network Security: A Beginner’s Guide / Tyler Wrightson / 094-6 / Chapter 10
Secure Beginner’s Guide / Wireless Network Security: A Beginner’s Guide / Tyler Wrightson / 094-6 / Chapter 10
Chapter 10 Handling Wireless Guest Access 271
are more suited for this task. You should note that just because the VPN gateway has a
connection to the internal network and potentially other network segments, it doesn’t
mean that someone who has access to VPN to the gateway will have unrestricted access to
those segments. You can, of course, grant them unrestricted access or you can create very
restrictive network access control lists, just as in a firewall.
We’ve Covered
In this chapter, we covered the options for creating guest networks and networks to be
used by external personnel. Remember that you have many options for how to design a
guest network and the solution will be based mostly on your needs as well as the existing
network topology.
Authenticating guest users and managing guest credentials
Identifying Guest Users ●
Shared Credentials ●
Unique Credentials ●
Using captive web portals
Internal Authentication ●
External Authentication ●
Segmenting guest wireless networks from internal networks
Using Demilitarized Zones ●
Ensuring Least Privilege ●
Allowing secure access to internal resources
Using Jump Stations ●
Using Virtual Private Networks ●
10-ch10.indd 271 4/5/12 4:06:40 PM
This page intentionally left blank

Secure Beginner’s Guide / Wireless Network Security: A Beginner’s Guide / Tyler Wrightson / 094-6 / Chapter 11
273
Handling Rogue Access
Points and the Future
of Wireless Security
Chapter 11
11-ch11.indd 273 4/5/12 4:11:11 PM
Secure Beginner’s Guide / Wireless Network Security: A Beginner’s Guide / Tyler Wrightson / 094-6 / Chapter 11
274 Wireless Network Security: A Beginner’s Guide
We’ll Cover
Handling rogue access points ●
Other wireless technologies ●
Next-gen solutions ●
Client protection ●
In this chapter, we’ll discuss the various methods for dealing with rogue access points.
We’ll discuss ways to manually identify rogue access points and track them down on your
network. You’ll learn about some of the technologies available to automatically enumerate
and respond to rogue wireless networks.
We’ll also cover the methods for securing your client devices from rogue wireless
networks as well as using group policy to restrict which wireless networks they can
associate to. We’ll discuss strategies for creating your own security education programs
and how to get the most from your program.
You may have some questions about other wireless technologies. We’ll briefly cover
the application of your new security knowledge to other wireless technologies as well
as future wireless technologies. You’ll also be introduced to two of the most interesting
technologies for deploying and managing wireless networks: lightweight wireless systems
and cloud based wireless systems.
Handling Rogue Access Points
Rogue access points have become a sort of hot-button issue. Rogue access points are any
wireless access points that exist on your network without the consent of the business. Even
“secure” rogue access points that are connected to your network can pose a security risk.
Preventing rogue access points can be a little tricky, although not impossible. Not only
is it critical for you to find and remove rogue access points from your network, but it can
actually be pretty fun!
We discussed in previous chapters the many different types of devices that could be
used to create rogue wireless networks, as well as the potential for these devices to be
deliberately or accidentally placed on your network. Remember that regardless of the
intent, a rogue access point does pose serious security risks.
11-ch11.indd 274 4/5/12 4:11:11 PM

Secure Beginner’s Guide / Wireless Network Security: A Beginner’s Guide / Tyler Wrightson / 094-6 / Chapter 11
Secure Beginner’s Guide / Wireless Network Security: A Beginner’s Guide / Tyler Wrightson / 094-6 / Chapter 11
Chapter 11 Handling Rogue Access Points and the Future of Wireless Security 275
Preventing Rogue Wireless Networks
There are actually very reliable ways to prevent rogue wireless networks from working
on your network. You should note that I didn’t say “prevent them from being plugged into
your network.” There’s really no way to truly prevent rogue wireless devices from being
plugged into your network. The best you can do is educate your users on the dangers of
plugging rogue devices into your network and back up the policy with administrative
discipline if users don’t comply. As far as preventing outsiders from placing rogue devices
on your network for malicious purposes, you have to rely on your physical security to do
this. In addition, you should educate your users to notify the IT department if they notice
anything plugged into a network jack that doesn’t look like it belongs there.
Therefore, if you can’t rely on preventing the devices from being plugged into your
network, you should focus on preventing them from functioning properly once they are
plugged in. Here are your best solutions for preventing them from operating:
802.1x (Port-Based Access Control)
●
Network Access Control ●
Port Security ●
802.1x Port-Based Access Control
Yes, good old 802.1x. You should be very familiar with it at this point. Remember that
802.1x does not allow a device to communicate past the authenticator (in this case, a
network switch) until after the device has authenticated. For a more in-depth refresher
of 802.1x, you should revisit Chapter 9. In this case, the network switch would play a
Into Action
Rogue wireless networks have received so much attention that some compliance
standards require businesses to specifically address them. For example, the
Payment Card Industry (PCI) Data Security Standard, which is the security
standard that companies that process credit card information must comply with, has
the following requirement:
PCI-DSS 2.0: 11.1 Test for the presence of wireless access points and detect
unauthorized wireless access points on a quarterly basis.
Even though your organization might not have to comply with PCI, this is still
a great process to adopt.
11-ch11.indd 275 4/5/12 4:11:12 PM

Secure Beginner’s Guide / Wireless Network Security: A Beginner’s Guide / Tyler Wrightson / 094-6 / Chapter 11
276 Wireless Network Security: A Beginner’s Guide
role similar to that of an access point configured for WPA2-Enterprise, and would be
considered our 802.1x authenticator.
Just as with 802.1x for wireless networks, we have the flexibility to authenticate
against a variety of backend systems. In Figure 11-1, you can see we’re authenticating
to a RADIUS server, which authenticates the user against Active Directory. The same
restrictions we covered in previous chapters can be configured here—restrictions based on
user, group, or even time of day to grant or deny access to the network.
If you configure your switches to require 802.1x authentication, how will this prevent
an unauthorized wireless network from operating on your network? The first and most
important point is that an attacker should not have valid credentials for your network. Even
if an attacker plugs a device with an 802.1x supplicant (client software) into your network,
he won’t be able to authenticate, and therefore the port will be useless to the attacker.
Most access points today don’t have 802.1x supplicant software, so that prevents most
devices from being able to even operate on your network. This would also prevent most
regular inside users who try to plug a regular access point into the network because it
would simply not work.
There is one situation that 802.1x would not help to prevent. If an insider (most likely
with malicious intent) were to use a device such as a laptop to act as an access point, the
user could authenticate to the switch using her credentials and then configure the wireless
card on the laptop to provide wireless services to other users (see Figure 11-2). In this
scenario, 802.1x alone would have no way of preventing this action. You should note,
however, that this is an extreme scenario, and if you have an inside user capable of doing
this, you probably have bigger issues on your hands.
We’ll now look at the most basic example of configuring 802.1x on a Cisco switch.
After entering configuration mode, we define our RADIUS server with the radius-server
command. In this example, our RADIUS server is 10.0.0.10 and we’re using a RADIUS
password of RadPassword1.
Figure 11-1 802.1x network switches
807.1X with Network Switches
Authenticator
Authentication
Server
Radius
Authentication
Supplicant
11-ch11.indd 276 4/5/12 4:11:12 PM
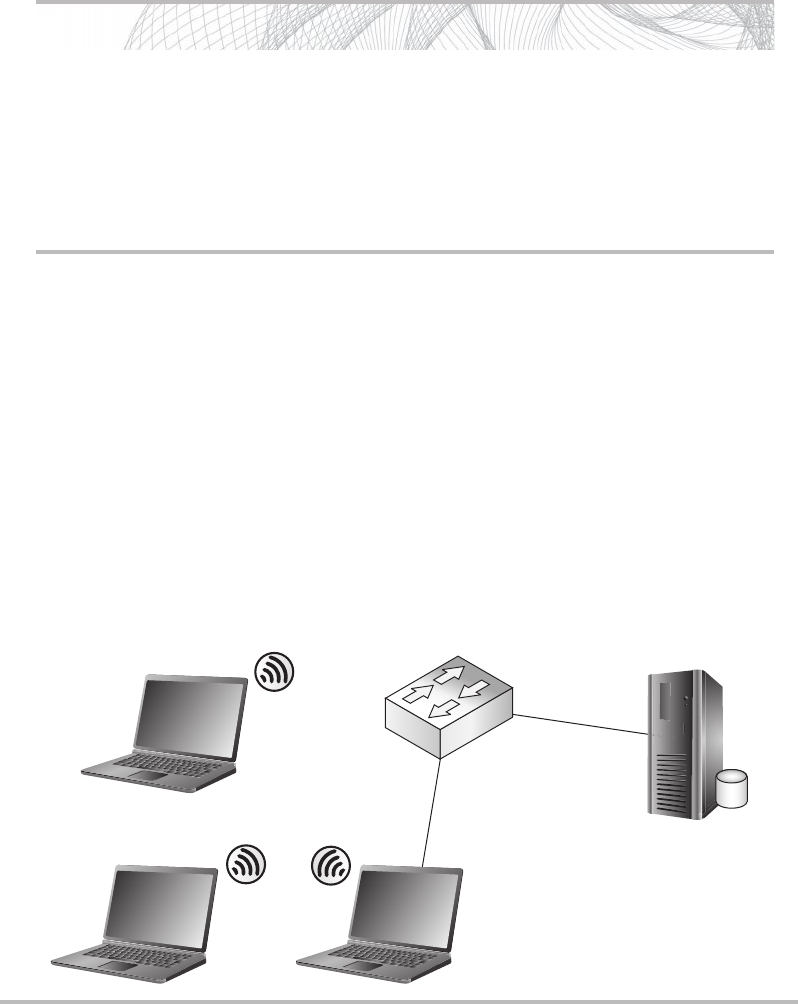
Secure Beginner’s Guide / Wireless Network Security: A Beginner’s Guide / Tyler Wrightson / 094-6 / Chapter 11
Secure Beginner’s Guide / Wireless Network Security: A Beginner’s Guide / Tyler Wrightson / 094-6 / Chapter 11
Chapter 11 Handling Rogue Access Points and the Future of Wireless Security 277
Next, we use the aaa new-model command, which enables AAA services on the device.
We then configure dot1x to use the configured list of RADIUS servers. In this example, we
have only one RADIUS server configured, so the switch will authenticate to this server.
ZionSw# configure terminal
ZionSw(config)#radius-server host 10.0.0.10 auth-port 1812 key
RadPassword1
ZionSw(config)# aaa new-model
ZionSw(config)# aaa authentication dot1x default group radius
ZionSw(config)# interface fastethernet0/9
ZionSw(config-if)# dot1x port-control auto
ZionSw(config-if)# end
Into Action
If enabling 802.1x on a network switch prevents an access point from working,
you might be wondering if this will also prevent your access points from working.
Remember that you enable 802.1x for a network switch on a per-port basis. Thus,
you’d simply disable 802.1x for any port connected to an authorized access point.
This is also true of uplinks to other devices that don’t support 802.1x, such as other
switches, printers, and so on.
Figure 11-2 Inside user employing a laptop to bypass 802.1x and set up an access point
Inside User Laptop AP
802.1X
Authenticated
Ad-hoc
Network
11-ch11.indd 277 4/5/12 4:11:16 PM
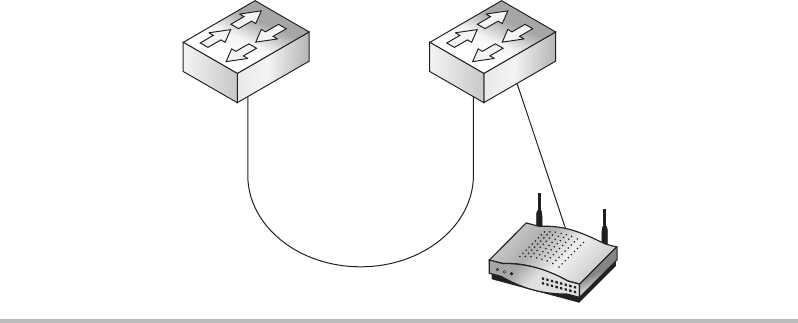
Secure Beginner’s Guide / Wireless Network Security: A Beginner’s Guide / Tyler Wrightson / 094-6 / Chapter 11
278 Wireless Network Security: A Beginner’s Guide
Next, we configure the interface fastethernet 0/9. To enable 802.1x authentication for
this port, we simply use the command dot1x port-control auto. Voila! Now any device
connected to interface fa0/9 will have to authenticate to the Zion switch before being
allowed access to the network.
ZionSw2# configure terminal
ZionSw2(config)#radius-server host 10.0.0.10 auth-port 1812 key
RadPassword1
ZionSw2(config)# aaa new-model
ZionSw2(config)# aaa authentication dot1x default group radius
ZionSw2(config)# interface range fastethernet0/3 - 24
ZionSw2(config-if)# dot1x port-control auto
ZionSw2(config-if)# end
As you can see in Figure 11-3, we have two switches connected together via interface
FastEthernet0/1. We also have an access point on interface FastEthernet0/2 on the second
switch. We could go through and manually apply the dot1x port-control auto command
to each interface; however, we make things easier by using the interface range command.
By using the interface range command, we apply the commands that follow to all of the
interfaces specified. A full walkthrough of configuring 802.1x on your network switches is
beyond the scope of this book. For a more detailed configuration guide, check your switch
manufacturer’s website.
Figure 11-3 Multiple switches with 802.1x
802.1X with Switch Uplink
ZionSw1 ZionSw2
Fao/1 Fao/1
No 802.1X
Fao/2
No 802.1X
11-ch11.indd 278 4/5/12 4:11:17 PM

Secure Beginner’s Guide / Wireless Network Security: A Beginner’s Guide / Tyler Wrightson / 094-6 / Chapter 11
Secure Beginner’s Guide / Wireless Network Security: A Beginner’s Guide / Tyler Wrightson / 094-6 / Chapter 11
Chapter 11 Handling Rogue Access Points and the Future of Wireless Security 279
Network Access Control
Network Access Control is a terrific technology that operates similarly to 802.1x and
really expands on the idea of authenticating endpoints before they’re allowed to use your
network. NAC builds on 802.1x by allowing you to examine endpoints and make sure
they are compliant with certain technical policies configured. These technical policies can
include verifying that the endpoint has up-to-date antivirus software installed, up-to-date
operating system patches or service packs, and even specific registry settings and configuration
options and many other options.
In the event a user plugs an unauthorized access point into your network that is restricted
by NAC, you would have a similar situation to the one previously described with 802.1x.
A lot of this ultimately depends on exactly how you’ve configured your NAC policies.
For example, some NAC solutions allow you to quarantine unauthenticated devices into
a restricted VLAN. This restricted VLAN could give these devices access to only specific
resources, such as the Internet, or nothing at all.
Now, this isn’t to say that you should go out and deploy NAC to combat the risk of
rogue wireless networks. However, if you already have NAC or are considering deploying
NAC, it’s good to know that it can also mitigate the risk from rogue access points. There
are many choices for NAC solutions and an insane number of ways to configure them.
Into Action
Typically, but not always, NAC will actually use 802.1x on the backend to facilitate
authentication of the client device. Other NAC options can be agent based, where
the end station must install client software to verify settings and allow clients onto
the network.
In Actual Practice
Network Access Protection (NAP) is Microsoft’s answer to NAC competitors. NAP
operates very similarly to NAC in that it enforces defined policies on endpoint systems.
However, it currently does not integrate (well) with your network equipment, so
unfortunately NAP won’t help you to prevent rogue access points.
11-ch11.indd 279 4/5/12 4:11:17 PM
Secure Beginner’s Guide / Wireless Network Security: A Beginner’s Guide / Tyler Wrightson / 094-6 / Chapter 11
280 Wireless Network Security: A Beginner’s Guide
Port Security
Port security allows you to configure MAC address restrictions on physical switch ports.
The restrictions can limit the total number of MAC addresses allowed to come into a
particular port or the port can be restricted to allow only specific MAC addresses. You can
also configure the action taken if either of these restrictions is violated. The action can be
to disable the port and /or alert an administrator. Alternatively, you can drop any packets
that are not from an allowed source MAC address. If you configure port security to disable
the port, an administrator would have to manually enable the port to return it to a functional
state.
You need to understand the operation and limitations of port security if you’re going to
use it. Typically, you won’t want to enable port security on uplinks between switches. To
support our goal of preventing rogue wireless access points, we’ll want to configure port
security only on “edge” ports, or ports that connect to end devices. Let’s look at a few simple
scenarios. First, we’ll configure our switch to only allow one MAC address on the port:
ZionSw1# configure terminal
ZionSw1(config)# interface fastethernet0/10
ZionSw1(config-if)# switchport mode access
ZionSw1(config-if)# switchport port-security
ZionSw1(config-if)# end
In the preceding example, you can see that the only command we need to enable port
security on interface FastEthernet0/10 is the switchport port-security command. This uses
the default configuration of only allowing one dynamically learned MAC address on the
port. If more than one MAC address is learned on the port, the interface will be disabled.
If someone were to plug an access point into a port that restricted the total number of
MAC addresses to one, let’s see what would happen. As you can see in the listing below,
the interface Fa0/10 has changed to a down state (in this case, err-disabled) because of a
port security violation. In this mode, it is not allowing any packets to traverse this port.
Now you have to consider why this is the case. In this example, even though there’s only one
client connected to the wireless access point, the switch has seen traffic from the access
point itself (MAC address 2222.2222.2222) as well as the client system and therefore has
two MAC addresses entries learned from this interface, so it disables the port.
%PM-4-ERR_DISABLE: psecure-violation error detected on Fa0/10, putting
Fa0/10 in err-disable state
%PORT_SECURITY-2-PSECURE_VIOLATION: Security violation occurred, caused by
MAC address 2222.2222.2222 on port FastEthernet0/10.
%LINEPROTO-5-UPDOWN: Line protocol on Interface FastEthernet0/10, changed
tate to down
%LINK-3-UPDOWN: Interface FastEthernet0/10, changed state to down
11-ch11.indd 280 4/5/12 4:11:17 PM

Secure Beginner’s Guide / Wireless Network Security: A Beginner’s Guide / Tyler Wrightson / 094-6 / Chapter 11
Secure Beginner’s Guide / Wireless Network Security: A Beginner’s Guide / Tyler Wrightson / 094-6 / Chapter 11
Chapter 11 Handling Rogue Access Points and the Future of Wireless Security 281
We could also choose to only allow specific MAC addresses to enter the switch through
the configured ports. The MAC addresses that are allowed on a specific port are referred to
as secure MAC addresses. You can either manually define the MAC addresses allowed on
a port, learn them dynamically, or a combination of the two.
Port security actually has many more configuration options. We’ve covered a few of
the most common scenarios for configuring port security. For a more in depth look at the
configuration options available, check out the Cisco website.
Manually Detecting Rogue Wireless Networks
Manually detecting rogue wireless networks is currently the most prevalent method of
detection. Of course, one of the core methods for manually detecting rogue wireless
networks involves some of the skills you learned in Chapter 4. Essentially, you’ll be
wardriving in your office area, even though you might not be in your car.
First, how do we define a rogue wireless network and what should you do if you find
one? A rogue access point is any unauthorized wireless device that is connected to your
network. Once you enumerate a potential wireless device, you need to determine whether
it’s connected to your network.
The first step is to choose the wireless enumeration tool you wish to use. Remember,
you can’t rely solely on the built-in tools in your operating system because they won’t
show you wireless networks that aren’t broadcasting their SSID. In addition, you’ll want
a tool that can show you the MAC address of the access point as well as has the ability
to capture traffic and show associated client devices. Why do you want the ability to
Into Action
As you can see from the previously mentioned technologies, a common security
method is to disable a port if it violates one of the configured policies. One way to
add another layer of security to your switches is to simply disable any unused ports.
Now this isn’t a perfect solution in itself, but it’s definitely a good practice to adopt.
Again, this will add more administrative work because you’ll have to manually
enable a port when you need to connect a new device, but this is a relatively easy
task and pretty common in some industries. Keep in mind, though, this alone
doesn’t prevent an attacker from stealing a network connection from an operational
jack and plugging an access point into it. To prevent this, you’d want to use
multiple security measures, such as using 802.1x and disabling unnecessary ports.
11-ch11.indd 281 4/5/12 4:11:17 PM
Secure Beginner’s Guide / Wireless Network Security: A Beginner’s Guide / Tyler Wrightson / 094-6 / Chapter 11
282 Wireless Network Security: A Beginner’s Guide
capture traffic? The more information you can obtain about the target network, the better.
This includes client MAC addresses associated with the rogue wireless network and IP
addresses of clients and destinations.
You’ll also want to account for different technologies as well 802.11a/b/g/n, for
example. If you’re scanning your environment with an 802.11n card, you won’t be able to
enumerate any 802.11a wireless networks in your area. Therefore, let’s choose the tool to
use. As you’ll remember from Chapter 4, your best choices are the following:
Kismet ● Open source, runs on Linux, very flexible
Netstumbler ● Windows based, GUI oriented, very easy to use
MacStumbler ● Mac OS, GUI oriented
If you enumerate an open rogue network, you have a few choices for determining
where it terminates. The simplest way to determine whether it’s on your network is to
associate to it. Once you’re associated, you should check your IP address to see if it’s an
internal address on your network. You shouldn’t stop there, however, because the access
point could be performing Network Address Translation (NAT). You should try to ping
or browse to an internal server, and as a last resort you can always check the current IP
address of the Internet connection by browsing to a website such as Whatismyip.com.
If you enumerate an encrypted rogue network, what should you do? Based on
everything you’ve learned, don’t assume that just because a wireless network is encrypted
that you should ignore it. Remember that a crafty attacker might secure the wireless
network to prevent eavesdroppers from seeing what he’s doing. Even if an employee were
responsible for placing the encrypted access point on your network, it could still pose a
security risk. What if the encryption key chosen is very weak or, even worse, a default?
Therefore, you should even take measures to determine whether an encrypted network is
connected to your network.
How do you go about gathering enough intelligence on an encrypted wireless network
without attempting to crack the encryption? Easy. Remember that even though the
network is encrypted, you can still see the MAC addresses of clients associated to the
network as well as that of the access point itself. If you search your network switches for
those MAC addresses, you can determine whether they are on your network.
Remember that MAC addresses are a total of six bytes, usually represented as 12
hexadecimal digits. The first three bytes represent the organizationally unique identifier
(OUI). The last three bytes are specific and unique to the end station (see Figure 11-4).
This technique offers an effective way to track down wireless access points without
using wireless technologies and using only your switching infrastructure. If you’ve
11-ch11.indd 282 4/5/12 4:11:17 PM

Secure Beginner’s Guide / Wireless Network Security: A Beginner’s Guide / Tyler Wrightson / 094-6 / Chapter 11
Secure Beginner’s Guide / Wireless Network Security: A Beginner’s Guide / Tyler Wrightson / 094-6 / Chapter 11
Chapter 11 Handling Rogue Access Points and the Future of Wireless Security 283
already identified a wireless network you suspect might be connected to your network,
you can scan for the MAC address (or the OUI of the MAC address) on the CAM tables
of your switches (CAM stands for content addressable memory). These tables are the ones
on your switches that list which MAC addresses exist off of which ports. This is what
allows your switch to operate more efficiently than a hub and send traffic to specific ports
rather than to every port.
With Cisco switches, you use the command show mac-address-table, which will show
you all the MAC addresses the switch has seen as well as which ports it has seen them on,
as in the following example, where you’ll notice that only five MAC addresses have been
seen on this switch:
Zion-Switch#show mac-address-table dynamic
Mac Address Table
-------------------------------------------
Vlan Mac Address Type Ports
---- ----------- -------- -----
1 0004.5a21.9427 DYNAMIC Fa0/9
1 109a.dd70.0881 DYNAMIC Fa0/9
1 00e0.4cad.2284 DYNAMIC Fa0/22
1 8888.8888.8888 DYNAMIC Fa0/4
1 0008.7420.8519 DYNAMIC Fa0/5
Total Mac Addresses for this criterion: 5
Zion-Switch#
The first column shows the VLAN the associated MAC address is on. In this example,
it looks like the switch might not have any VLANs configured because all the MAC
addresses are on VLAN 1 (the default VLAN). The next column is the MAC address using
periods instead of colons to split the MAC address into three groups of two hexadecimal
digits. Don’t ask me why, but it’s common to find MAC addresses in this format in
networking equipment. The next column shows whether this MAC address was learned
dynamically or was statically assigned to the port (in this case, all these MAC addresses
Figure 11-4 MAC address structure
Mac Address Structure
OUI
Manufacturer ID
12AD34 CD56EF
Device ID
11-ch11.indd 283 4/5/12 4:11:18 PM

Secure Beginner’s Guide / Wireless Network Security: A Beginner’s Guide / Tyler Wrightson / 094-6 / Chapter 11
284 Wireless Network Security: A Beginner’s Guide
were learned dynamically). The final column shows the actual port where the switch has
seen source traffic from this MAC address.
In this example, you can see we have two MAC addresses on port Fa0/9. If this were a
stand-alone switch, we would not expect to see any ports with more than one MAC address
on them, so let’s dig deeper. First, let’s start by doing a lookup on the OUI of the MAC
addresses to see if we can gather a little information on what these devices might be. You
can search the IEEE website at http://standards.ieee.org/develop/regauth/oui/public.html. If
you enter the OUI of the MAC address (the first six hexadecimal digits) and click Search,
you’ll see the company responsible for these MAC addresses. For the first MAC address,
we search for 00045a and find that this is a Linksys device. Next, if we search for 109add,
we find that this is associated with an Apple device. Now we’re getting somewhere. Based
on this, we might conclude that a Linksys access point with an Apple client is connected
to our network. However, remember that an attacker can change the MAC address, so we
shouldn’t base our assumptions solely on the OUI of the MAC address.
The next step would be to trace out port Fa0/9 on the switch to determine where it
physically terminates. This process can be very different, depending on your environment.
Some companies are good about keeping an up-to-date list of where cables physically
terminate in their organization, but more often than not this information is not complete or
current. You should note that an access point is not the only reason why you’d see multiple
MAC addresses on a single port. For example, in Figure 11-5 we have two switches
connected to each other. Let’s see what the CAM table on switch 1 would look like as
compared to switch 2.
Zion-Switch1#show mac-address-table dynamic
Mac Address Table
-------------------------------------------
Vlan Mac Address Type Ports
---- ----------- -------- -----
Into Action
An effective method for tracing rogue access points can be to search your CAM
tables for just the OUI of an observed access point. For example, in the previous
example, we could use the command show mac-address-table | include 0004.5a,
which would show any MAC address beginning with 0004.5a that we’ve identified
as a potential Linksys device.
11-ch11.indd 284 4/5/12 4:11:18 PM
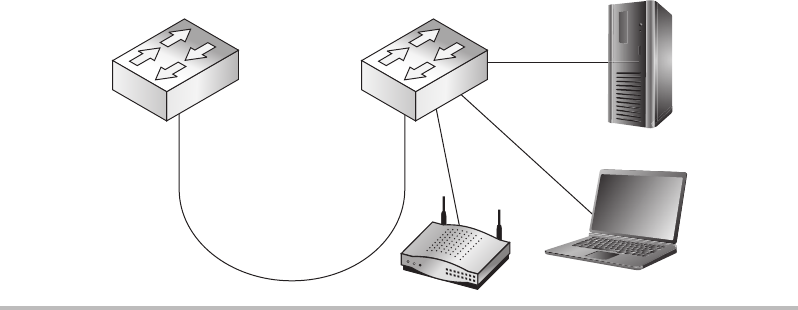
Secure Beginner’s Guide / Wireless Network Security: A Beginner’s Guide / Tyler Wrightson / 094-6 / Chapter 11
Secure Beginner’s Guide / Wireless Network Security: A Beginner’s Guide / Tyler Wrightson / 094-6 / Chapter 11
Chapter 11 Handling Rogue Access Points and the Future of Wireless Security 285
1 0004.5a21.9427 DYNAMIC Fa0/1
1 109a.dd70.0881 DYNAMIC Fa0/1
1 00e0.4cad.2284 DYNAMIC Fa0/1
Total Mac Addresses for this criterion: 3
Zion-Switch1#
Zion-Switch2#show mac-address-table dynamic
Mac Address Table
-------------------------------------------
Vlan Mac Address Type Ports
---- ----------- -------- -----
1 0004.5a21.9427 DYNAMIC Fa0/9
1 109a.dd70.0881 DYNAMIC Fa0/18
1 00e0.4cad.2284 DYNAMIC Fa0/15
Total Mac Addresses for this criterion: 3
Zion-Switch2#
You can see that the first switch sees all three MAC addresses as being off port Fa0/1.
If we trace this port, we’ll notice that it is the uplink to the Zion-Switch2. Then, if we
check the CAM table of Zion-Switch2, we’ll see exactly where these devices terminate.
Tracing Malicious Rogue Access Points
In the previous example, we started with a scenario where we didn’t know whether a
rogue wireless access point was connected to our environment and set out on a quest to
find one by querying the CAM tables of our switch and looking for any ports that had
Figure 11-5 MAC addresses across switch uplinks
802.1X with Switch Uplink
ZionSw1 ZionSw2
Fao/1 Fao/1
11-ch11.indd 285 4/5/12 4:11:20 PM
Secure Beginner’s Guide / Wireless Network Security: A Beginner’s Guide / Tyler Wrightson / 094-6 / Chapter 11
286 Wireless Network Security: A Beginner’s Guide
more than one MAC address on them. This is not a foolproof system, as stated previously.
What if the access point were put there maliciously and a crafty attacker has disabled the
access point itself from sending any traffic or configured NAT so that the edge switch
would only see one MAC address on that port.
We need a way of identifying access points in the worst-case scenario. Let’s say an
attacker has configured an access point for the most aggressive stealth possible. He has
changed the MAC address of both his client and access point, configured the access point
to use channel 12, is using NAT so that we only see one MAC address in our CAM tables
(that of the access point), is not broadcasting his SSID, and is using an SSID with an
innocuous-sounding name. How in the world will we ever find this access point? First,
we start by firing up one of our favorite wireless network detection tools. We’ll choose
airodump for the examples here. For a refresher on using airodump, see Chapter 4. In
Listing 11-1, you can see that we’ve enumerated a wireless network with a hidden SSID
of INSECURE.
Listing 11-1: Using airodump to enumerate MAC addresses
CH11 ][ BAT: 2 hours 58 mins ][ Elapsed: 4 s ][ 2011-06-12 13:47 ][ WPA handshake: 22:22
BSSID PWR RXQ Bracons #Data, #/s CH MB ENC CIPHER AUTH ESSID
22:22:22:22:22:22 -60 23 16 13 5 11 54e WPA2 TKIP PSK INSECURE
BSSID STATION PWR Rate Lost Packets Probes
22:22:22:22:22:22 44:44:44:44:44:44 -18 1 – 1 362 39
In this example, you can see that the access point has a MAC address of
22:22:22:22:22:22, and the client has a MAC address of 44:44:44:44:44:44. Clearly, these
MAC addresses are not legitimate and are used here for illustrative purposes. If an attacker
wished to be even stealthier, he might choose misleading MAC addresses such as those
that might indicate a printer or other computer.
Now that we have the MAC address of both a client and an access point, we can search
our CAM tables for these two specific addresses. To search our CAM tables for a specific
MAC address, we can run the show mac-address-table command as usual and pipe it to
“include” to search only for lines that match our search string. In the following example,
you can see that we search for the string “2222,” which would match the MAC address of
the access point. However, this returns nothing. We then search for “4444,” which is the
MAC address of the client device. You can see that this MAC address is located on port
Fa0/19.
11-ch11.indd 286 4/5/12 4:11:20 PM

Secure Beginner’s Guide / Wireless Network Security: A Beginner’s Guide / Tyler Wrightson / 094-6 / Chapter 11
Secure Beginner’s Guide / Wireless Network Security: A Beginner’s Guide / Tyler Wrightson / 094-6 / Chapter 11
Chapter 11 Handling Rogue Access Points and the Future of Wireless Security 287
You will also notice that the header for the output of this command, indicating what
the columns are, is no longer there. This is normal because the include command will only
show lines that match exactly what we have entered.
Zion-Switch#show mac-address-table | include 2222
Zion-Switch#
Zion-Switch#show mac-address-table | include 4444
1 4444.4444.4444 DYNAMIC Fa0/19
Zion-Switch#
So what if the attacker is really crafty and used an entirely different MAC address
for the Ethernet port on his wireless access point and used NAT to hide the client MAC
address? In that case, we can’t use this method and our best bet is the old-fashioned way
of simply tracking down the wireless access point based on signal strength.
Specialty wireless devices are available for exactly this task, but it’s debatable whether
they provide any real benefit over simply using Netstumbler or Kismet. Both Netstumbler
and Kismet have functionality to display signal strength and map it as it changes over
time. The Netstumbler signal interface is shown in Figure 11-6.
Figure 11-6 Netstumbler signal strength
In the Real World
I used to work in network operations for a Fortune 10 company. Tracking down MAC
addresses to physical ports was a very common task on such a large network. You
should become proficient in this process because it comes in very handy in many
situations.
11-ch11.indd 287 4/5/12 4:11:20 PM

Secure Beginner’s Guide / Wireless Network Security: A Beginner’s Guide / Tyler Wrightson / 094-6 / Chapter 11
288 Wireless Network Security: A Beginner’s Guide
You should keep in mind that sometimes the signal strength alone can be a little
misleading. Although it would be extremely rare for you to be sent on a wild goose chase
very far from your target network, sometimes the raw signal chart can be a little misleading.
Once you have a generally strong signal strength, you should look in the vicinity for the
target access point.
You should also take into account that typically when the device is placed right side up
with the antennas facing upward, the wireless signal tends to propagate stronger in a half
bubble shape, as shown in Figure 11-7. Therefore, in some scenarios, if someone were to
place an access point flat on the ceiling tile, you might get a stronger signal directly over
the access point on the floor above rather than directly under the access point on the floor
below. Again, this shouldn’t provide any challenges other than taking slightly longer to
find the access point.
You also need to be able to account for wireless frequencies that are out of the range
of your wireless equipment. You’ll remember that in the United States you are allowed to
use the channels 1 through 11. However, most hardware is capable of supporting channels
1 through 14. So, if an attacker has configured an access point for channel 14 and placed
it on your network, how will you detect it? Wireless cards are available that allow you to
scan these other frequencies as well (the Alfa USB wireless card, for example). The Alfa
wireless cards are very popular for their ability to manually set the power and configure
channels up to 14.
Figure 11-7 Typical access point radiation pattern
2nd
Floor
1st
Floor
11-ch11.indd 288 4/5/12 4:11:21 PM

Secure Beginner’s Guide / Wireless Network Security: A Beginner’s Guide / Tyler Wrightson / 094-6 / Chapter 11
Secure Beginner’s Guide / Wireless Network Security: A Beginner’s Guide / Tyler Wrightson / 094-6 / Chapter 11
Chapter 11 Handling Rogue Access Points and the Future of Wireless Security 289
Handling Rogue Access Points
So you’ve successfully located the rogue access point. Now what do you do? Do you just
unplug it and congratulate yourself on a job well done? This is another decision that’s best
handled by someone who can make executive decisions. More often than not, the answer
should be not to unplug it from your network; instead, you need to gather evidence for
potential legal matters. You’ll also want to try and track down exactly who is using the
wireless network and what they’re doing.
What are the best ways of determining how a malicious access point is being used?
Once you’ve physically tracked down the access point, you should look into monitoring
the traffic entering your network through the access point. You can do this by configuring
a SPAN port to copy all the traffic that enters the switch from the access point to another
port, which you can then connect a sniffer to and monitor (as well as save) all the packets
traversing that link. SPAN ports were covered in detail in Chapter 6. The configuration to
apply a SPAN port is typically pretty straightforward; the following is a simple example
for a Cisco switch:
Zion-Switch1(config)#monitor session 1 source interface
fastethernet0/9
Zion-Switch1(config)#monitor session 1 destination interface
fastethernet0/20
In this example, we’re instructing the switch to copy every packet that enters or
exits the fastethernet0/9 interface and send a copy of these packets to fastethernet0/20.
It doesn’t matter where a packet is destined to; if it comes in from the access point or is
destined for that port, we will be able to view it. Remember that the configuration for your
Into Action
Any time you’re dealing with a potential legal issue, you need to treat every
decision and action with special care. Keeping a detailed log of the decisions and
actions you take, along with the time and date, is critical. Even with something
as simple as handling a single rogue access point, you can quickly become
overwhelmed. Don’t be afraid to call in a professional Incident Response Team
to assist. You need to watch out for a lot of pitfalls to make sure the evidence
you gather can actually be used in any legal action. And don’t forget: document,
document, document.
11-ch11.indd 289 4/5/12 4:11:22 PM

Secure Beginner’s Guide / Wireless Network Security: A Beginner’s Guide / Tyler Wrightson / 094-6 / Chapter 11
290 Wireless Network Security: A Beginner’s Guide
model of switch might be different but it’s typically not much more complicated. Another
option is to simply plug a network hub between the access point and your network switch.
You can then plug your network sniffer into any port on the hub and view all the packets
from the attacker.
You should also consider the best way to physically track down anyone using the
wireless network. Running into your parking lot and frantically looking into every car
might tip off someone that you’re on to them. Instead, you should first decide whether law
enforcement should be involved. If you’ve decided to wait to contact law enforcement,
you should carefully but quickly determine your strategy for finding the person who’s using
the network.
Into Action
What do you do if there are no clients currently associated to the rogue wireless
network? Do you just assume it was placed there accidentally and forgotten? Are
you then okay to remove the access point without investigating any further? The
answer of course is, it depends. You need to decide what makes the most sense for
your environment, including the potential risk of leaving the access point in place.
However, keep in mind that simply removing the access point does not give you
any insight into who placed it there or why. You should consider putting a network
sniffer or IDS in place to monitor any activity from the access point. If nothing is
observed within a reasonable amount of time (two to four weeks, for example), you
should consider removing the access point.
Into Action
Many of us wouldn’t mind living like we’re in a spy thriller, tracking down the
attacker who’s trying to break into our network. But before you kick down the
door to your parking lot and run out guns blazing, be sure the access point wasn’t
placed there by an employee. Checking with other IT staff and even simply asking
employees near the location where you discovered the access point might be the
best place to begin.
11-ch11.indd 290 4/5/12 4:11:22 PM

Secure Beginner’s Guide / Wireless Network Security: A Beginner’s Guide / Tyler Wrightson / 094-6 / Chapter 11
Secure Beginner’s Guide / Wireless Network Security: A Beginner’s Guide / Tyler Wrightson / 094-6 / Chapter 11
Chapter 11 Handling Rogue Access Points and the Future of Wireless Security 291
Alerting your fellow IT staff to keep an eye out for any strange behavior is a good
way to start. In fact, alerting other employees to be on their toes and telling them whom
to contact if they see anything suspicious can be very helpful. If you have a wireless
management system, it might be able to aid you by giving an approximate location of
any client devices associated to the rogue access point. If you don’t have a wireless
management system, you’re pretty much stuck with the old-fashioned method, which
involves walking around and looking for the culprit.
Although you could employ some technological methods to help you, it might be
easier to just look in obvious places first. If you have a shared office, this might be a little
more difficult because the attacker could potentially be located in an area you can’t easily
get to. Regardless, start with the obvious places. Also, if you have security cameras, be
sure to leverage them to inconspicuously look for the culprit.
Automated Detection of Rogue Wireless Networks
Besides relying on the manual approach, you can also use certain technologies to assist in
finding rogue wireless networks. Some of these technologies will simply aid you, whereas
some of the more sophisticated technologies will almost handle the entire job for you.
Many solutions use your existing wireless infrastructure to scan the wireless
frequencies and alert you to any rogue access points. Lightweight access point solutions
typically have this functionality built right into the access points and controllers. Many of
these systems offer really interesting functionality beyond simple alerting. For example,
they might allow you to estimate an approximate position of the rogue access point based
on the signal strength from multiple access points.
You would accomplish this by first uploading an image of a map of the area where
you have deployed your access points. This can be a blueprint of a building, an image
of a campus, or even an image saved from a service such as Google maps. You would
Into Action
I’ve used the following method many times during penetration tests: Walk into
the target organization, plant an access point, walk out, and start penetrating the
network from the parking lot. Therefore, looking for someone in a parked car with
a laptop is probably a good place to start. Ironically, I haven’t been caught, yet.
Hopefully someday if I’m hired to penetrate your network, you’ll make short work
of finding me!
11-ch11.indd 291 4/5/12 4:11:22 PM
Secure Beginner’s Guide / Wireless Network Security: A Beginner’s Guide / Tyler Wrightson / 094-6 / Chapter 11
292 Wireless Network Security: A Beginner’s Guide
then typically draw a line on the map (using a tool on the appliance) to set the scale
of the image, such as one inch on the screen being ten feet in reality. Now, when
your lightweight access point system detects a rogue access point, it can display the
approximate location on the map.
Such a system can also alert an administrator once it detects a rogue access point.
Most systems give you the ability to whitelist a specific BSSID, once you verify that the
particular BSSID is not connected to your network, to stop being alerted to its presence.
Some systems even give you the ability to deauthenticate clients from the rogue network.
This can be a great feature for preventing your own internal clients from associating to an
insecure wireless network.
Non-wireless-centric systems can also help you to identify when a rogue device has
been placed on your network. Some of your best options include an intrusion detection
system and arpwatch.
Arpwatch is an open source program that allows you to monitor your network for
“ARP events.” It keeps a database of current IP address and MAC address pairings and
can alert you to any changes. In addition, it can alert you to any new MAC addresses
it observes. Arpwatch is very easy to install and configure; in fact, it is preinstalled on
BackTrack. Arpwatch is very similar to an IDS in that it is very noisy when you first
install it. However, once you have it configured and running for a short period of time, it’s
extremely low maintenance and very helpful.
To run arpwatch on BackTrack and have it alert you of events via e-mail, you first need
to install the sendmail program using apt-get install sendmail. You can then run arpwatch
and specify any e-mail address to send alerts to. In the following example, we’ve configured
arpwatch to monitor the eth0 interface and alert admin@zion.com of any events.
root@bt:~# apt-get install sendmail
root@bt:~# arpwatch –i eth0 –m admin@zion.com
Next, you see an example of an e-mail alert for a new MAC address detected on
the eth0 interface. You should note that the Ethernet vendor information is pulled
automatically from a database based on the OUI and therefore is not always accurate.
The alert also provides the time this MAC address was first seen, which can be great
information for your records.
hostname: <unknown>
ip address: 10.0.0.201
interface: eth0
ethernet address: 08:00:27:f7:24:c1
ethernet vendor: CADMUS COMPUTER SYSTEMS
timestamp: Sunday, November 13, 2011 17:41:10 -0500
11-ch11.indd 292 4/5/12 4:11:22 PM
Secure Beginner’s Guide / Wireless Network Security: A Beginner’s Guide / Tyler Wrightson / 094-6 / Chapter 11
Secure Beginner’s Guide / Wireless Network Security: A Beginner’s Guide / Tyler Wrightson / 094-6 / Chapter 11
Chapter 11 Handling Rogue Access Points and the Future of Wireless Security 293
Other Wireless Technologies
You may have questions about how other wireless technologies will impact the security
of your organization. The fact is that you already have most of your answers. The same
security issues that plague 802.11a/b/g/n need to be dealt with no matter what the
underlying wireless technology is. Systems such as Bluetooth, long-range wireless, and
broadband wireless (802.16) need to ensure the confidentiality, integrity, and availability
of their clients and systems.
The specific attacks will be unique to each technology, but the attack vectors are the
same. For instance, Bluetooth (802.15), which is a short-distance technology used to
create “wireless personal area networks,” or WPANs, is vulnerable to the same type of
attacks as traditional 802.11 wireless networks. For example, if the communication is
unencrypted, someone can easily sniff the data and eavesdrop on communications.
Bluetooth operates in the 2.4GHz frequency, which is the same as 802.11
technologies, but it has a much shorter range (by design). Bluetooth is geared toward
consumer electronic devices such as keyboards, mice, headsets, and so on. Researchers
have demonstrated that with high-gain antennas, they can communicate with Bluetooth
devices from very far away, up to a few miles in some cases. This, of course, has the same
implications as it does for other wireless systems in that you can’t rely on the signals not
being accessible to potential attackers.
Zigbee is a wireless protocol for very short-range and low-power devices. Zigbee
operates in a few frequencies, including support for 2.4GHz. The main target for
using Zigbee is within smaller appliance solutions such as home appliances. Wireless
technologies in the future will become available that are not based on anything available
today, so they too will have to provide security measures for the following attack vectors:
Eavesdropping ●
Denial of service ●
Cryptographic security ●
Next-Gen Solutions
Two wireless systems really represent the future of wireless solutions. They are
lightweight wireless solutions and cloud wireless solutions. These systems don’t really
change the fundamentals you have learned in this chapter but instead make deployment
and management of large-scale wireless networks considerably easier.
Another emerging technology is wireless Intrusion Detection Systems (IDS). You’ll
remember that we touched upon these systems in Chapter 6. Although my view is that you
11-ch11.indd 293 4/5/12 4:11:22 PM
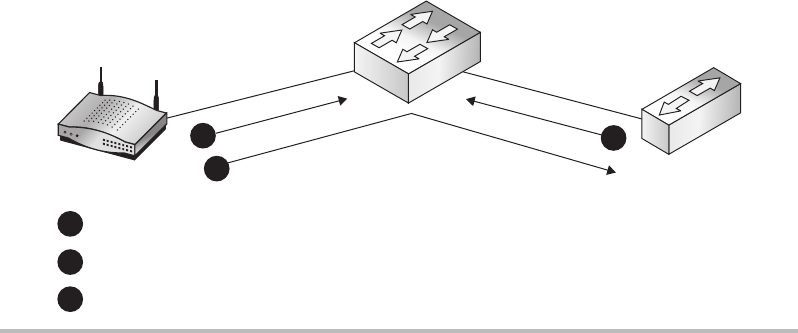
Secure Beginner’s Guide / Wireless Network Security: A Beginner’s Guide / Tyler Wrightson / 094-6 / Chapter 11
294 Wireless Network Security: A Beginner’s Guide
can gain almost all of the same benefits from a traditional wired IDS, technology is always
changing and wireless IDS systems are starting to offer some interesting features. It’s your
job to figure out if these features are worth the additional cost.
Lightweight Wireless Solutions
Lightweight wireless solutions are definitely the way to go for any medium-to-large-scale
deployments of wireless networks. Lightweight wireless solutions allow you to deploy
access points and have them automatically configured based on profiles you create. Most
lightweight solutions today are based on either the Lightweight Access Point Protocol
(LWAPP) or the Control and Provisioning of Wireless Access Points (CAPWAP) protocol.
In fact, many existing wireless access points can be upgraded (with a simple firmware
update) to “lightweight” to gain some of the management advantages of lightweight
technologies. The two leaders for lightweight wireless solutions today are Cisco and
Aruba. We won’t go into the specifics of either offering here but instead discuss how
LWAPP systems operate.
When you receive a new LWAPP access point from the manufacturer, you can take
it right out of the box and plug it into your network. Assuming the controller has been
configured correctly, the access point will query for the wireless controller, download
its configuration, and start serving wireless automatically within minutes. This general
process is shown in Figure 11-8. There are a few ways for the access point to “find” the
wireless controller. The two most popular ways are for the access point to broadcast at
Layer 2 for the controller or to obtain the IP address for the controller via DHCP. This is
done by configuring option 43 in your DHCP scope to the IP address of your controller.
Figure 11-8 Controller-based access points discovery
Controller-based AP
Wireless
Controller
AP broadcasts on ethernet connection looking for controller.
2
1
Controller responds, “Here I am.”
3
12
3
Access point downloads conguration from controller.
11-ch11.indd 294 4/5/12 4:11:22 PM

Secure Beginner’s Guide / Wireless Network Security: A Beginner’s Guide / Tyler Wrightson / 094-6 / Chapter 11
Secure Beginner’s Guide / Wireless Network Security: A Beginner’s Guide / Tyler Wrightson / 094-6 / Chapter 11
Chapter 11 Handling Rogue Access Points and the Future of Wireless Security 295
Alternatively, you can create a DNS entry for the wireless controller, which the access
points can query for. For example, for Cisco LWAPP access points, you would create a
DNS record for cisco-lwapp-controller.localdomain that points to your controller.
You should keep in mind that using lightweight wireless systems doesn’t really
change any of the fundamentals you’ve learned in this book. You still configure the same
recommended encryption and authentication settings and apply them to your access
points; the backend management and configuration of the access points is really all that
changes. Typically, you would manage the controller (and thus the configuration profiles
for access points) through a web interface on the controller.
Controller-based systems really ease the management of wireless access points as
well. As mentioned earlier, most management systems have the ability to upload an image,
set the scale, and then mark the locations where you’ve installed your access points. The
controller can then show you approximate locations of associated clients, rogue access
points, and even rogue client devices. You can also view a heat map, which shows an
approximation of the wireless strength in different areas on the map. In addition, built-in
wireless IPS functionality can be leveraged from all the access points.
Cloud-Based Wireless Solutions
Cloud-based wireless solutions comprise a new breed of wireless access points that are
currently taking the benefits of LWAPP access points a step further. The number-one cloud
based wireless provider today is Meraki (www.meraki.com). It’s important to understand
that these access points are not LWAPP access points but rather operate in a similar way.
Instead of the access point querying the local network to find a controller, the access point
is preconfigured with the address of the Meraki controller located on the Internet.
Arguably the most complex part of deploying an LWAPP solution is configuring the
actual controller. With cloud-based wireless solutions, you don’t need to configure and
deploy the controller itself. The controller already exists (in the Cloud) and is ready to
configure and control your wireless access points.
Into Action
The Cloud is a new buzzword for something that has existed for a very long time—
services hosted on the Internet. In recent years, many existing technologies have
been moved to the Cloud that had never been offered in such a way before. For
cloud wireless services, you take the access point controller, which used to exist on
your local network, and move it to a hosted location on the Internet.
11-ch11.indd 295 4/5/12 4:11:22 PM
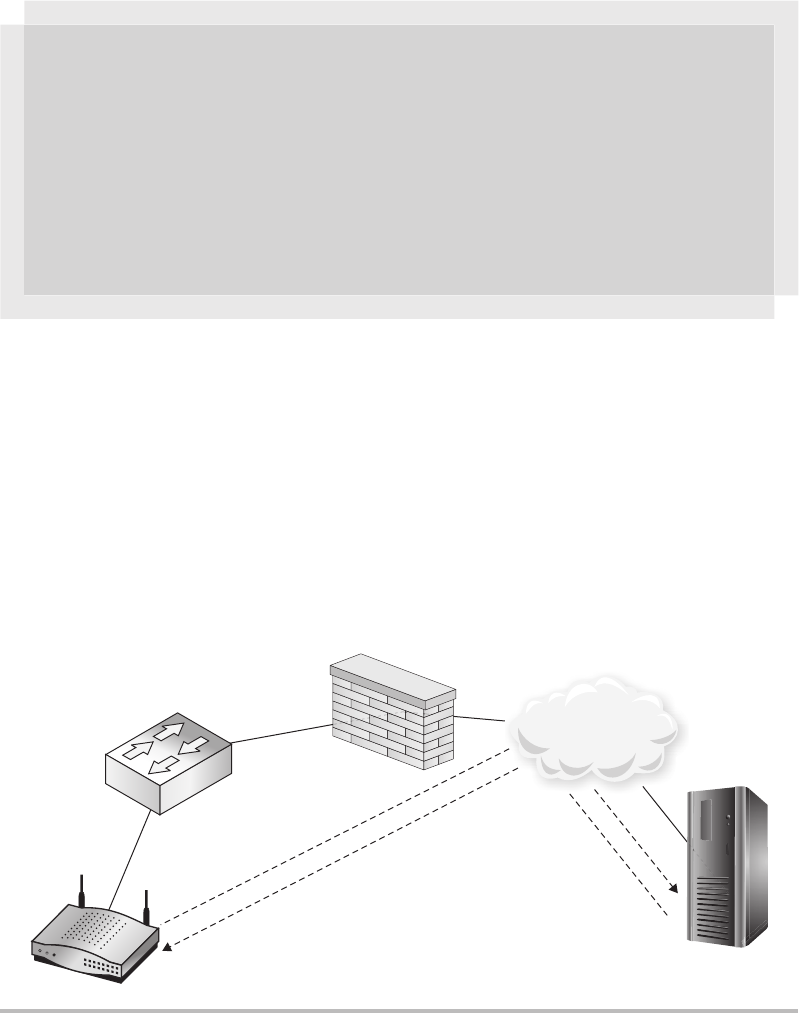
Secure Beginner’s Guide / Wireless Network Security: A Beginner’s Guide / Tyler Wrightson / 094-6 / Chapter 11
296 Wireless Network Security: A Beginner’s Guide
You manage your access points through a web interface and you have all the configuration
options you’re used to. Once you plug an access point into your network, it downloads its
configuration from the controller on the Internet and operates exactly as a normal access
point. In Figure 11-9, you can see the general topology of a cloud based wireless solution.
If the controller is inaccessible, the access point will still function as normal; however,
you won’t be able to view statistics for the access point or reconfigure it until you restore
communications to the controller.
Budget Note
The fact that you no longer have to pay for a controller means that potential cost
savings can be realized in going with a cloud-based wireless solution. However, you
need to make sure you account for all the costs of both solutions if cost is a concern.
The main advantage is that you don’t have the cost of the controller or the cost of
having the controller configured (education or consulting). The main disadvantage is
that you will have the ongoing subscription cost of the service as well as being locked
into whatever pricing structure the provider chooses.
Figure 11-9 Cloud-based access points
Cloud-Based Wireless
Wireless
Controller
Internet
11-ch11.indd 296 4/5/12 4:11:24 PM
Secure Beginner’s Guide / Wireless Network Security: A Beginner’s Guide / Tyler Wrightson / 094-6 / Chapter 11
Secure Beginner’s Guide / Wireless Network Security: A Beginner’s Guide / Tyler Wrightson / 094-6 / Chapter 11
Chapter 11 Handling Rogue Access Points and the Future of Wireless Security 297
You might think that cloud-based wireless access points wouldn’t be as robust as
traditional access points, but they offer identical services that you can configure from a
pretty slick web interface. Some of the services include the following:
Rogue access point detection ●
Mapping functionality ●
Quality of Service ●
Content filtering ●
Traffic shaping (limiting bandwidth) ●
Splash pages and captive portals ●
Dedicated Wireless IDS
Wireless intrusion detection systems perform the same function as a traditional IDS,
except they have the added benefit of monitoring the airwaves for indications of attacks.
With wireless IDS systems, you don’t have the same placement decisions as traditional
intrusion detection systems. Instead, you have to come up with a physical deployment
strategy to effectively monitor the airspace of locations where you need to monitor.
As far as commercial wireless IDS systems go, there’s currently no competing with
Fluke Networks Airmagnet Enterprise. Airmagnet uses dedicated wireless scanning devices
that unsurprisingly look very similar to many wireless access points. It supports scanning
beyond the frequencies of any wireless card you can find—well beyond channels 1 to 14.
For a complete list of all the functionality provided by Airmagnet, check out the Fluke
website at http://www.flukenetworks.com.
You can also use Kismet as a dedicated wireless IDS system. It operates very similar
to what you’re used to from a wardriving program; in fact, you can get a good look at its
operation as an IDS by running it from your laptop. You can use a wireless interface in the
IDS computer or you can use Kismet drone devices to send information to the Kismet server.
Kismet has a good list of IDS signatures. Some of the signatures include detection of
the following:
Access point spoofing (alerts if a beacon or probe response is sent from a new MAC ●
address)
Changes to the channel on which an access point operates ●
Deauthentication floods ●
Disassocation sent to a broadcast address ●
Detection of active scanning tools such as Netstumbler ●
11-ch11.indd 297 4/5/12 4:11:24 PM
Secure Beginner’s Guide / Wireless Network Security: A Beginner’s Guide / Tyler Wrightson / 094-6 / Chapter 11
298 Wireless Network Security: A Beginner’s Guide
Client Protection
Protecting your wireless endpoints should obviously be a priority. In Chapter 5, we
discussed a myriad of ways to exploit and compromise end systems as well as their
network communication. There are technical and nontechnical solutions for ensuring the
integrity of your endpoint systems. Not surprisingly, you might mitigate a majority of your
risks by properly educating the users who will be using your wireless systems.
User Education
One of the most important things you can do to increase the security of your endpoints
is to properly train the people responsible for them! Many companies offer automated
training (typically via videos accessible over the Internet) or classroom-based training.
However, after reading this book, you now have all the information you need to craft a
great security-awareness training program.
Be sure to tailor all of your training to fit the specific needs of your business. You
should make the information practical for the users, both in their personal and work lives.
Providing value by helping users to protect themselves from being exploited in everyday
life will really help ensure they pay attention and get the most out of the training. In
addition to making the information applicable to your attendees, you should make it
interesting. Most of the attacks detailed in this book are pretty darn interesting! If you
explain to users the attacks that are currently possible (and in wide use) and back it up
with some cool-looking demonstrations, you’re sure to capture their attention.
Here are some of the specific topics you might want to cover:
The security implications of using hotspots ●
The ability for attackers to view unencrypted communications ●
The importance of SSL and how to detect anomalies ●
When and where users should see corporate wireless connections (only at corporate ●
facilities)
Reporting wireless devices that are not authorized ●
The importance of not sharing passwords and other secure information ●
Dealing with common and uncommon security-related issues (antivirus warnings, virus ●
detection, IDS notices, and so on)
Whom to contact with security questions and potential security issues ●
11-ch11.indd 298 4/5/12 4:11:24 PM
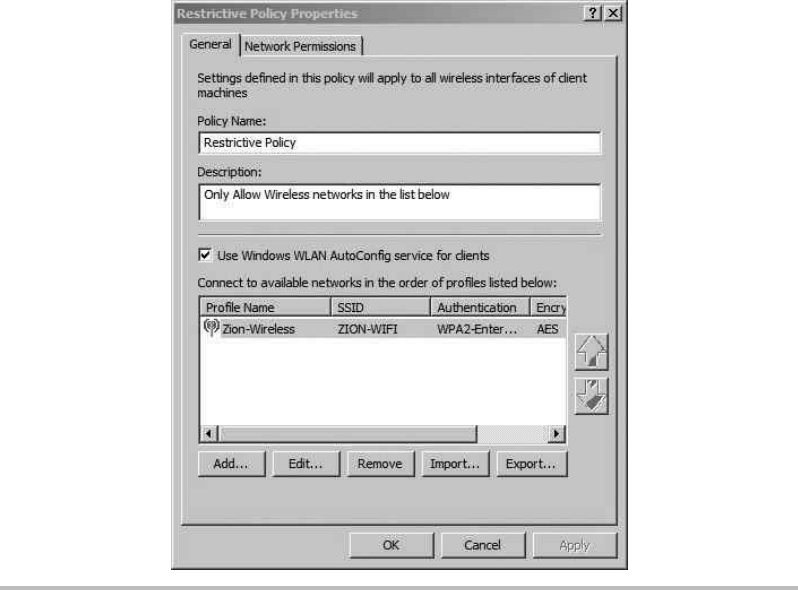
Secure Beginner’s Guide / Wireless Network Security: A Beginner’s Guide / Tyler Wrightson / 094-6 / Chapter 11
Secure Beginner’s Guide / Wireless Network Security: A Beginner’s Guide / Tyler Wrightson / 094-6 / Chapter 11
Chapter 11 Handling Rogue Access Points and the Future of Wireless Security 299
Technical Solutions for Endpoint Security
The topic of endpoint security has become a hot button issue and the industry has
responded with a lot of choices for ensuring the security of endpoints. Traditional
endpoint security systems should not be overlooked, and you should understand how they
all operate together to ensure that wireless devices remain secure. Non-wireless-centric
systems such as antivirus, intrusion detection systems, and intrusion prevention systems
are at the top of the list.
Group Policy Objects
You can use the Windows wireless settings within Group Policy to restrict what users are
able to connect to. Create a new Group Policy Object and expand Computer Configuration
| Policies | Security Settings | Wireless Network (IEEE 802.11) Policies. Then right-click
in the right screen and choose Create a New Wireless Network Policy for Windows Vista
and Later Releases. The first window you’ll see is similar to Figure 11-10. In this window,
add any of the wireless networks you want this client to be able to connect to.
Figure 11-10 Restrictive wireless GPO
11-ch11.indd 299 4/5/12 4:11:24 PM
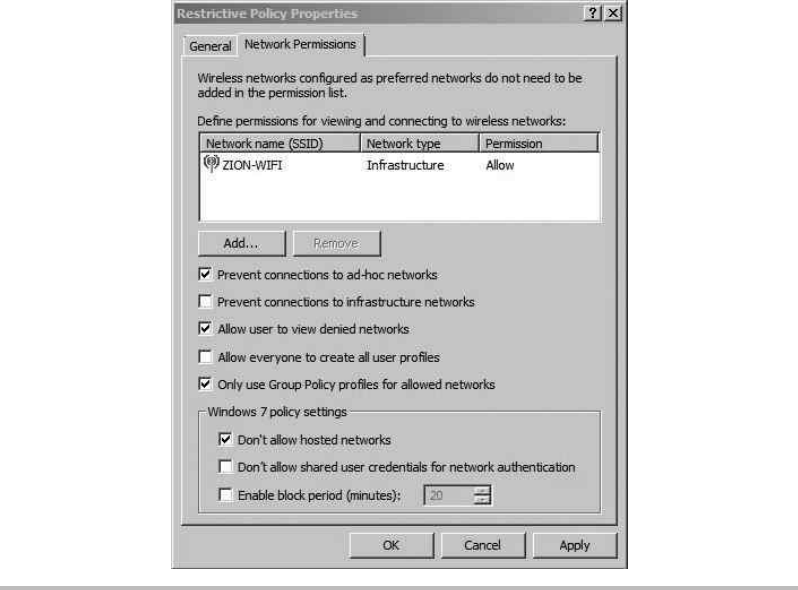
Secure Beginner’s Guide / Wireless Network Security: A Beginner’s Guide / Tyler Wrightson / 094-6 / Chapter 11
300 Wireless Network Security: A Beginner’s Guide
Next, click the Network Permissions tab, and you’ll see a window similar to Figure 11-11.
The options at the top portion of this screen are pretty straightforward. The first option
prevents the system from associating to ad-hoc wireless networks. If you have specifically
denied any wireless networks, you can disable the user from even viewing the wireless
networks in the wireless network list of the Windows WLAN Configuration utility. The
fourth option allows users to create wireless profiles that any other user of the local
computer can use. This, of course, is a moot point if the fifth check box is also checked.
The option Only Use Group Policy Profiles for Allowed Networks is an important one. If
this is enabled, users can only connect to wireless networks that have been configured by
Group Policy.
The last three options, under Windows 7 Policy Settings, only apply to Windows 7—go
figure! The first option is important because it prohibits the users from turning their
machine into an access point (a new feature to Windows 7). The second option prohibits
Figure 11-11 Restrictive wireless GPO settings
11-ch11.indd 300 4/5/12 4:11:24 PM
Secure Beginner’s Guide / Wireless Network Security: A Beginner’s Guide / Tyler Wrightson / 094-6 / Chapter 11
Secure Beginner’s Guide / Wireless Network Security: A Beginner’s Guide / Tyler Wrightson / 094-6 / Chapter 11
Chapter 11 Handling Rogue Access Points and the Future of Wireless Security 301
the computer from storing user credentials to then use to authenticate to wireless networks
when no user is logged on. The final option configures the amount of time a computer will
wait before automatically connecting to a preferred network.
Remember to think through all your choices and determine exactly which risks you are
mitigating by deploying a specific security solution. In the case of configuring a GPO to
restrict which wireless networks a client can associate to, what exactly are you preventing?
By only allowing users to connect to configured wireless networks, you’re preventing the
user from connecting to potentially malicious networks.
Keep in mind, however, that if you have configured preferred wireless networks
with weak authentication methods, it’s probably not doing you much good against an
attacker. Remember from Chapter 5 that an attacker can respond to beacons from the
client computer claiming to be any wireless network requested. Thus, if you’ve configured
a preferred wireless network with no encryption or authentication, an attacker can spoof
this network wherever the user may be. Also keep in mind that if you’re using WPA2-
Enterprise and not authenticating the access point, your users might still be vulnerable.
We’ve Covered
In this chapter, we covered ways for you to deal with rogue wireless networks. You learned
ways to prevent a rogue device from operating properly on your network as well as ways to
logically and physically track down rogue devices. In addition, we covered the following
topics:
Handling rogue access points
Preventing rogue devices from operating on your network using ●
802.1x Port-based Access Control ●
Network Access Control ●
Port security ●
Using the arpwatch program to monitor your network for new clients and suspicious ●
ARP traffic
Manually detecting rogue wireless networks using wireless enumeration tools ●
Tracing rogue devices by querying the CAM tables on your switches ●
Other wireless technologies
Understanding recurring attack vectors ●
11-ch11.indd 301 4/5/12 4:11:24 PM
Secure Beginner’s Guide / Wireless Network Security: A Beginner’s Guide / Tyler Wrightson / 094-6 / Chapter 11
302 Wireless Network Security: A Beginner’s Guide
Next-gen solutions
Lightweight access point solutions (using controllers on your local network to manage ●
lightweight access points)
Cloud-based wireless solutions (Internet-based systems to configure and manage ●
wireless access points)
Wireless Intrusion Detection Systems ●
Client protection
User education ●
Group Policy restrictions ●
11-ch11.indd 302 4/5/12 4:11:24 PM

Secure Beginner’s Guide / Wireless Network Security: A Beginner’s Guide / Tyler Wrightson / 094-6 / Appendix
303
Introduction to
Linux: The Wireless
Engineer’s Operating
System of Choice
Appendix
12-Appendix.indd 303 4/5/12 4:19:24 PM
Secure Beginner’s Guide / Wireless Network Security: A Beginner’s Guide / Tyler Wrightson / 094-6 / Appendix
304 Wireless Network Security: A Beginner’s Guide
The Linux Operating System
During your career, you will invariably come across multiple operating systems regardless
of your job role. Only a handful of operating systems dominate the IT world, and Linux
is definitely part of that group. If you never had the opportunity to work with Linux, now
is the perfect time to do so. There are many wireless security tools available for Linux
that simply do not run on Windows or the Mac OS. The Linux operating system not only
makes a perfect desktop OS for wireless users, but is also a dominant player in the server
market. Familiarizing yourself with Linux will prove to be a huge benefit to you in your
career.
Linux is a free and open source operating system (kernel) released under the GNU
Public License model. The term open source means that the underlying code is available
for anyone to view and manipulate. This is in direct contrast with most commercial
software, which is closed source, meaning the source code is not available to the public.
Different variations or “flavors” of Linux are referred to as Linux distributions. Trying
to grasp why there are so many Linux distributions, what the real differences are, and
why to choose one over the other can be a little confusing. After spending some time
with a few different distributions, you’ll quickly understand what makes each distribution
unique and start developing your own preference for different distributions. Technically,
Linux derives its name from the kernel of the operating system, created by Linus Torvalds.
However, many people refer to the operating system itself and any of its distributions as
“Linux,” which is perfectly acceptable.
Here are some of the main differences between the various Linux distributions:
The default software available upon install ●
The support available from a commercial company ●
The software management programs ●
The installation processes ●
Arguably the two most important differences are the support available from a commercial
company as well as the default programs installed. Many businesses will only allow open
source software be used in their environment if they can count on support being available.
Some Linux distributions, including RedHat and SuSe, offer commercial (and very good)
support. For an extremely extensive list of Linux distributions, check out the Distrowatch.
com website. Here’s a list of the most popular Linux distributions (in no particular order):
BackTrack ●
RedHat ●
12-Appendix.indd 304 4/5/12 4:19:24 PM

Secure Beginner’s Guide / Wireless Network Security: A Beginner’s Guide / Tyler Wrightson / 094-6 / Appendix
Secure Beginner’s Guide / Wireless Network Security: A Beginner’s Guide / Tyler Wrightson / 094-6 / Appendix
Appendix Introduction to Linux: The Wireless Engineer’s Operating System of Choice 305
SuSe ●
Debian ●
Ubuntu ●
Gentoo ●
Slackware ●
Fedora ●
If you’re new to Linux or have never even touched it before, don’t worry! Don’t worry
even the littlest bit. Despite Linux being extremely extensive, it’s actually quite easy to
get used to. The graphical environment has been designed in such a way that it’s intuitive
for people familiar with Windows to navigate. I installed Linux on my girlfriend’s laptop
(who is not a technical person), and she had zero problems getting everything done that
she needed to. Connecting to a wireless network, browsing the Internet, downloading files,
writing documents—she had no problem doing all these things without any help.
In this book, we’ll cover many tools and utilities that work only on Linux, but this really
doesn’t make it any more difficult to use. You’ll find Linux to be a very logically configured
operating system, maybe even more so than the commercial operating systems you’re used
to using.
BackTrack: Our Linux Distribution of Choice
All of the attack tools covered in Chapters 4 and 5 come preinstalled on BackTrack.
Some of the tools of defense covered in Chapter 6 come preinstalled on the BackTrack
distribution of Linux. At the time of this writing, BackTrack version 5 R1 is currently
offered. BackTrack can be run on both 32-bit and 64-bit Intel computers.
In addition to all of the wireless-centric tools, BackTrack comes with an insane
amount of other security tools preinstalled. If you’re responsible for the security of your
organization, or even if security is just a hobby, you’ll find BackTrack’s large list of tools
helpful. BackTrack is based on the Debian distribution of Linux, which means it uses the
apt set of utilities for program installation. The apt group of commands makes installing,
uninstalling, upgrading, and otherwise managing the programs installed on your computer
incredibly easy.
Note
If you’re unsure whether your computer is 32 or 64 bit, you can find out by viewing the
processor information in the BIOS. Alternatively, if you’re using the Windows operating
system, you can right-click My Computer and choose Properties to find this information.
12-Appendix.indd 305 4/5/12 4:19:24 PM
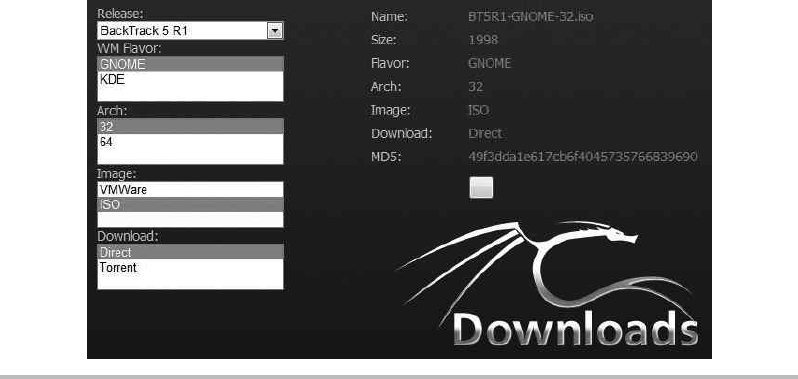
Secure Beginner’s Guide / Wireless Network Security: A Beginner’s Guide / Tyler Wrightson / 094-6 / Appendix
306 Wireless Network Security: A Beginner’s Guide
Downloading and Burning BackTrack
You can download the BackTrack operating system from the BackTrack download page
(http://www.backtrack-linux.org/downloads/). On the download page, you may be prompted
to register. If you wish to give your e-mail address, feel free to do so; however, it’s not
necessary.
Choose the release you wish to download (currently the newest release is BackTrack
5 R1). Under the WM flavor, choose Gnome. This field indicates which window manager
to download. Window managers implement the look and feel of the Linux graphical
environment. The various window managers will look different and give you different
configuration options for changing your graphical environment. Gnome and KDE are
arguably the two most popular choices. Both greatly resemble the Windows desktop
you’re probably familiar with.
Choose the architecture of the computer you’ll be running BackTrack on. Under the
Image section, choose ISO. An ISO is essentially an “image” of an entire DVD in one
file. Most DVD-burning programs allow you to burn an ISO directly to a DVD. If you’re
familiar with BitTorrent, you can choose the Torrent option; otherwise, choose Direct to
download the file directly from backtrack-linux.org. The file size is just over 2GB, so it
won’t fit on a CD.
Your browser should look something like Figure A-1.
Figure A-1 BackTrack download page
12-Appendix.indd 306 4/5/12 4:19:24 PM
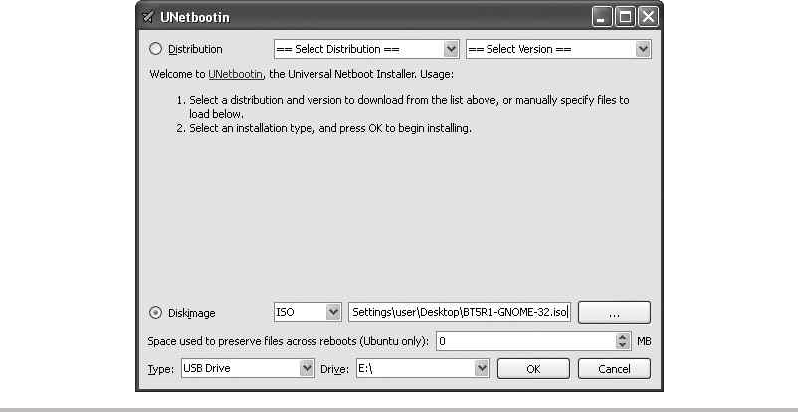
Secure Beginner’s Guide / Wireless Network Security: A Beginner’s Guide / Tyler Wrightson / 094-6 / Appendix
Secure Beginner’s Guide / Wireless Network Security: A Beginner’s Guide / Tyler Wrightson / 094-6 / Appendix
Appendix Introduction to Linux: The Wireless Engineer’s Operating System of Choice 307
Once you’ve downloaded the BackTrack ISO, you need to burn it to a DVD to be able
to boot to the operating system. Most DVD-burning programs have an option such as “Burn
a DVD Image” or “Burn a Bootable DVD.” If you choose to burn a regular data DVD, your
computer will not be able to boot to the DVD. Make sure you understand exactly which
options to choose with your particular burning program to make the DVD bootable.
Booting BackTrack from a USB Drive
As an alternative to burning a bootable DVD, you can use a program called UNetbootin to
extract the ISO file to a USB drive and make the drive bootable (see Figure A-2). To create
a bootable Linux USB drive, download UNetbootin from http://unetbootin.sourceforge.net.
Click the large Download button for the operating system you’ll be running UNetbootin
from.
UNetbootin includes a feature that downloads the operating system and then copies it
to the USB drive. Because we’ve already downloaded the ISO, we don’t need to use this
feature. I’ve found that it’s a little more reliable to download the ISO separately and then
copy it to a USB drive using UNetbootin.
Instead of choosing the distribution in the upper portion of UNetbootin, click the
Diskimage radio button in the bottom portion. Choose ISO and browse to the location of
Figure A-2 UNetbootin makes a bootable USB drive
12-Appendix.indd 307 4/5/12 4:19:24 PM
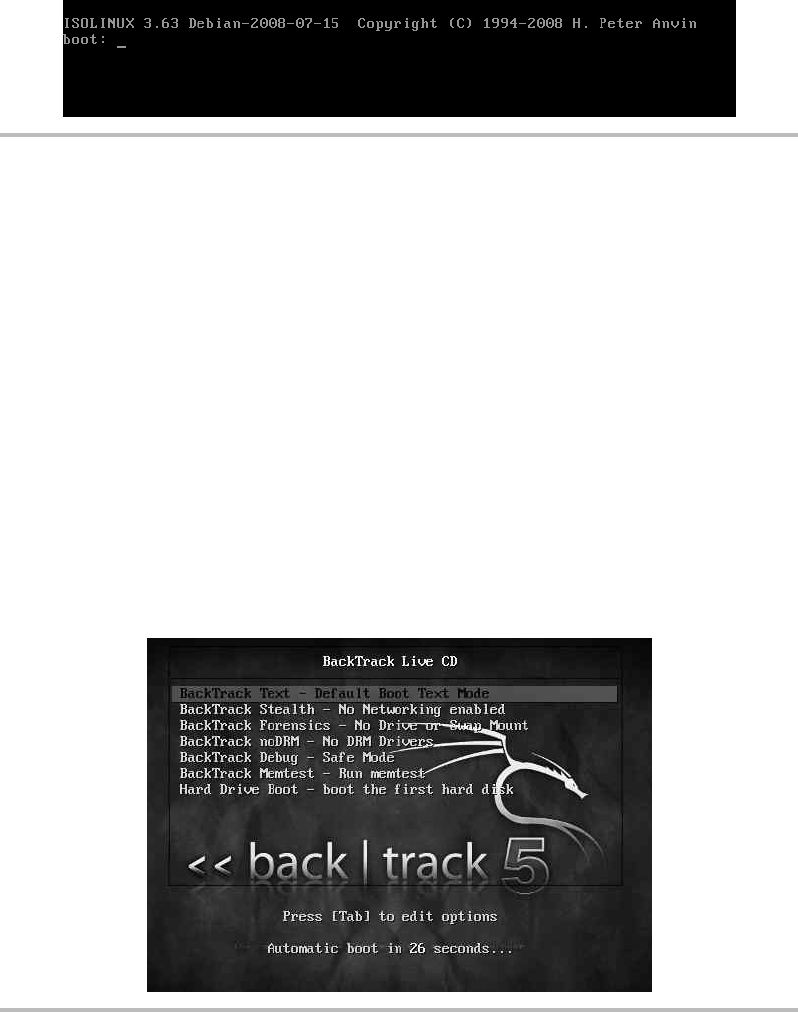
Secure Beginner’s Guide / Wireless Network Security: A Beginner’s Guide / Tyler Wrightson / 094-6 / Appendix
308 Wireless Network Security: A Beginner’s Guide
the BackTrack ISO. In the boxes below, choose USB Drive for the Type setting and select
the drive letter in the Drive box. Click the OK button and the USB drive, and when the
ISO is finished being copied you will have a bootable USB drive.
Booting to BackTrack
Booting to your new BackTrack DVD or USB drive is very straightforward. When you
first boot up, you’ll see a boot prompt similar to Figure A-3. You can simply press
at this screen to see the boot selection menu, shown in Figure A-4.
At the boot selection menu, you have a few choices that change how BackTrack loads.
For all of our work in this book, you can choose the first option: BackTrack Text – Default
Boot Text Mode. The third option, BackTrack Forensics, is great for performing forensic
analysis of a system and does not “touch” any of the physical drives by default. You can also
Figure A-3 BackTrack boot screen
Figure A-4 BackTrack boot menu
12-Appendix.indd 308 4/5/12 4:19:24 PM
Secure Beginner’s Guide / Wireless Network Security: A Beginner’s Guide / Tyler Wrightson / 094-6 / Appendix
Secure Beginner’s Guide / Wireless Network Security: A Beginner’s Guide / Tyler Wrightson / 094-6 / Appendix
Appendix Introduction to Linux: The Wireless Engineer’s Operating System of Choice 309
boot to your computer’s operating system by choosing the last option, Hard Drive Boot. The
other options are definitely worth exploring, but won’t help you with the examples.
Once BackTrack is finished booting, you’ll see a terminal prompt similar to the
following:
root@root:~#
You’ll notice two notes above the terminal prompt instructing you that the default
root password is toor (simply root backwards) and that the command to start the graphical
environment is startx. To start the graphical environment, you type startx, which loads X.
Linux, unlike Windows, is not deeply tied to a graphical environment and can be run even
without loading the graphical environment. The graphical environment, referred to as X
or X11, is very basic. On top of X you run a window manager, which adds features and
makes Linux look even “prettier.”
The Gnome Graphical Environment
The Linux interface is very intuitive, and in very little time you’ll be moving around like a
pro. The bar at the bottom of the screen shows you all your open windows, very much like
the taskbar in Windows. These bars are referred to as panels in Gnome. Unlike Windows,
the button at the bottom left is not the Start button; instead, it minimizes all the currently
open windows (very handy). Also, you’ll notice four squares along the right side of the
same bar. These represent virtual desktops, which keep your open windows separate. This
can be extremely handy when you have many windows open. You can open windows
designated for a specific task on one desktop and then switch through the other desktops
by clicking the corresponding icons in the bottom right.
The dragon icon in the upper-left corner operates very similar to the Windows Start
button. Click it to view a list of groupings of common programs. From the Internet group,
you can launch the Firefox browser or open Wicd Network Manager. The Wicd program
is used to configure your wireless and wired network interfaces through a simple-to-use
graphical interface. If you’ve used the Windows wireless configuration tool, you’ll have
no problem using Wicd.
You’ll also see a Places button on the main panel. It includes shortcuts to local
“places” such as your home folder and any locally attached drives. To the right of this
you’ll see the System button, which contains many of the tasks you’d expect to find under
the Control Panel in Windows, such as configuring your mouse, keyboard, sound, power
management, and so on.
12-Appendix.indd 309 4/5/12 4:19:24 PM

Secure Beginner’s Guide / Wireless Network Security: A Beginner’s Guide / Tyler Wrightson / 094-6 / Appendix
310 Wireless Network Security: A Beginner’s Guide
To the right of System, you’ll see the icon shown in Figure A-5. This is a shortcut to the
gnome-terminal. The gnome-terminal adds a few handy graphical features to the standard
X terminal. For example, you can highlight any text in the terminal, choose Edit | Copy,
and then paste the text anywhere you need it. You can also open multiple terminals in one
window by using multiple tabs. To create a new tab, click File and then choose Open Tab.
Basic Linux Commands
Historically, people think of Linux as being a somewhat difficult operating system to use,
partly because it’s command line centric. In the past it was true that the graphical environments
weren’t half as intuitive as they are today; however, most of the power of Linux comes from
the fact that you can perform any task you need right from the command line. This also means
that every task is also scriptable, making common tasks much, much faster.
Let’s discuss some of the most basic tasks you’ll have to perform in Linux:
Understanding the Linux shell ●
Running commands ●
Getting help ●
Navigating Linux file system ●
Installing software on BackTrack ●
Basic user administration ●
Basic networking configuration ●
Understanding file permissions ●
Basic scripting ●
Figure A-5 The gnome-terminal icon
12-Appendix.indd 310 4/5/12 4:19:24 PM

Secure Beginner’s Guide / Wireless Network Security: A Beginner’s Guide / Tyler Wrightson / 094-6 / Appendix
Secure Beginner’s Guide / Wireless Network Security: A Beginner’s Guide / Tyler Wrightson / 094-6 / Appendix
Appendix Introduction to Linux: The Wireless Engineer’s Operating System of Choice 311
Understanding the Linux Shell
In Windows, you’re used to running cmd.exe if you want to use command-line tools. In
Linux, you actually have a few options for command-line interfaces. At the most basic
level, most shells are nearly the same. The only time you see a real difference is when you
start creating scripts for different shells. We’ll cover scripting more in depth shortly.
The most popular shell is the Bourne Again Shell, or bash. This is a play on words on
the A Shell, or ash. Each shell has different built-in commands; for example, cd (short for
change directory) is built into the shell rather than an external binary program.
Running Commands
Running a command from a shell is extremely easy—just type the command. You need to be
aware of the PATH variable, which tells the shell which folders to look in for the programs
you’re trying to run. In the bash shell, your path is configured with the $PATH variable. To
view your current path, simply type echo $PATH (note that variables are case sensitive).
The most basic commands to move around the file system are the same as they are in
Windows, as shown in the following table. You use cd to change to a directory, and you
can use dir to list the contents of your current directory. However, you should get used
to using the ls command, which stands for list. The ls command is basically the Linux
version of dir. Many systems have a command alias configured so that when a user types
the dir command, the ls command is actually run.
Command Description
cd Used to change directory (for example, cd /home/).
ls Used to list contents of directory (for example, ls /home/).
cat Used to concatenate files or output file contents (for example, cat file.txt).
whereis Used to show location of binary or file (for example, whereis vi).
pwd Present Working Directory. Used to show the current directory (for example, pwd).
alias Used to create a command alias (for example, alias l="ls –l –color").
grep Used to search for lines matching a specified pattern.
The alias command is probably one of the most useful, yet under-utilized tools on a
Linux system. The alias command is built right into the bash shell and allows you to create
a sort of command shortcut. When you start exploring Linux and using it more often,
you’ll see that you type the same commands with the same arguments often. Wouldn’t it
be nice if you could type far fewer characters and have the same action performed? With
the alias command, you can do exactly that!
12-Appendix.indd 311 4/5/12 4:19:24 PM

Secure Beginner’s Guide / Wireless Network Security: A Beginner’s Guide / Tyler Wrightson / 094-6 / Appendix
312 Wireless Network Security: A Beginner’s Guide
Let’s start with the most basic example. In Figure A-6, you can see that we first try to
run the command p and are informed that it is not a valid command. Then we configure p
to be an alias for the pwd program (Present Working Directory). Then when we enter p,
the pwd program runs, showing us our current working directory.
To view the current aliases, just run the alias command. In Figure A-7, you can see the
default aliases configured for your BackTrack shell.
Now let’s look at a slightly more complex example. What if we want to create an alias
for a command as well as the arguments to the command? We can simply enclose the entire
command in quotes, as in the following example:
root@bt:~# alias l='ls –l –color'
Another command you should definitely familiarize yourself with is the grep command.
The grep command allows you to search for a specific pattern within any text output. The
grep command is extremely flexible, and we will barely scratch the surface here. The most
basic example would be to show the contents of a file using the cat command and pipe the
output to grep and search for the word root. The command might look like this:
cat file.txt | grep root
Figure A-6 An alias command example
Figure A-7 Default alias commands
12-Appendix.indd 312 4/5/12 4:19:24 PM
Secure Beginner’s Guide / Wireless Network Security: A Beginner’s Guide / Tyler Wrightson / 094-6 / Appendix
Secure Beginner’s Guide / Wireless Network Security: A Beginner’s Guide / Tyler Wrightson / 094-6 / Appendix
Appendix Introduction to Linux: The Wireless Engineer’s Operating System of Choice 313
The pipe is a special character you can use between commands to send the output
of one command to be the input for the other command. The pipe character looks like
a straight vertical line. The pipe character key is typically above the key on your
keyboard. In the previous example, we took the output of the cat command and sent it as
the input for the grep command.
Getting Help with Linux Commands
Obtaining help and additional information on Linux programs and systems is extremely
easy to do. Beside the usual Internet resources, such as forums and websites, you have a
few built-in options for obtaining help. The three most helpful commands for obtaining
help for a known program are man, info, and help. The man command stands for manual,
and you simply provide the name of the program as the argument. For example, to see the
manual page for the nslookup command, you would type the following:
man nslookup
A newer version of the man command is the info command, which typically will
give you more information than man. The syntax is exactly the same; simply provide the
name of the program as the argument. There’s also the help command, which will give
you helpful information about the bash shell. This can be particularly useful when you are
creating bash scripts.
You can also use the apropos and find commands if you just need a point in the right
direction. The apropos command searches the manual pages for the keyword you provide.
For example, if you use the following command, apropos will find any man pages for
wireless-related tools (very handy):
apropos wireless
Likewise, you should familiarize yourself with the find command. The find command
simply searches the path you specify for any keywords you specify, much like the Windows
search functionality. A very basic example would be the following:
find / -iname "passwd"
The first argument is the directory to search; in this case, we’re starting from the root
directory and searching all subdirectories. The final argument is the name of the file we’re
searching for. The iname argument tells the find command to search for any file named
passwd regardless of case (case insensitive). Like most Linux commands, the find command
has many options available that make it extremely flexible. You can also use the special
characters you’re used to using in Windows. For example, to search for any file with
12-Appendix.indd 313 4/5/12 4:19:25 PM

Secure Beginner’s Guide / Wireless Network Security: A Beginner’s Guide / Tyler Wrightson / 094-6 / Appendix
314 Wireless Network Security: A Beginner’s Guide
“passwd” anywhere in the filename, you could use *passwd*. You should research some of
the other options available using the man command.
The following table summarizes the basic Linux commands.
Command Description
man View the manual page for the given command
info View the information page for the given command
help View help for functions built into shell
apropos Search manual pages for keywords
find Search the file system for specified keywords
Navigating the Linux File System
The Linux file system is very straightforward, and in time you’ll find it much easier to
use than the Windows file system. In Windows, you’re probably used to the C drive being
your root partition; in Linux, the root partition is referred to by a single forward slash.
Everything, including other drives, are mounted somewhere under the root folder.
The following table lists some of the most important folders in the default BackTrack
installation.
Folder Description
/ The root directory, which contains all other directories
/etc Contains many configuration files, both for the system and individual programs
/bin Contains very basic binary programs
/sbin Contains system binaries
/lib Contains shared libraries, similar to DLLs in Windows
/home Contains user directories, similar to C:\Documents and Settings\ in Windows
/root The root user’s home directory
/proc Contains dynamic information about processes and the current state of your system
/pentest A BackTrack-specific directory with many of the security tools mentioned in this book
/mnt Contains mount points of other drives, including CD drives, USB drives, and so on
A period represents your current working directory. Therefore, to list the contents of
your current directory, you could run the following command:
ls ./
12-Appendix.indd 314 4/5/12 4:19:25 PM
Secure Beginner’s Guide / Wireless Network Security: A Beginner’s Guide / Tyler Wrightson / 094-6 / Appendix
Secure Beginner’s Guide / Wireless Network Security: A Beginner’s Guide / Tyler Wrightson / 094-6 / Appendix
Appendix Introduction to Linux: The Wireless Engineer’s Operating System of Choice 315
To represent the directory above your current directory, you can use two periods. Thus,
your parent directory would be as follows:
../
You can also move up a directory like so:
cd ../
Installing Software on BackTrack
BackTrack is based on the Debian distribution of Linux, which means the core system for
installing software is the apt group of tools. It couldn’t be any easier to install software on
a Debian-based operating system. You can search for a program, and once you’ve identified
the name of the package, you simply run the apt program, which automatically downloads
the program, along with any necessary files from a list of defined (and approved) servers,
and installs it on your system.
Using apt, you can even upgrade your entire operating system automatically. This is
sort of like typing one command and having your Windows XP computer upgraded to
Windows 7 over the Internet! Pretty slick, if you ask me. Most of the tools and programs
mentioned in this book actually come preinstalled on BackTrack, making it the perfect
distribution for our needs. However, let’s look at a simple example of installing pidgin,
a popular multiprotocol chat client.
The first thing we must do is make sure the list of software available for us to download is
up to date. To do this, we run the apt-get command with the update argument, as shown here:
root@root:~# apt-get update
For apt to be able to update all of its indexes, you need to be connected to the Internet.
You’ll see a lot of output; don’t worry about what each line individually says. At the end
of the output, you’ll most likely see a line similar to the following:
W: Some index files failed to download, they have been ignored,
or old ones used instead.
This is completely normal; it simply means that some of the servers in our list might
be unreachable at this time. Next, we search for the name of the program we wish to
install using apt-cache search. In this case, we know the name of the program, so we run
the following command:
root@root:~# 'apt-cache search pidgin'
12-Appendix.indd 315 4/5/12 4:19:25 PM
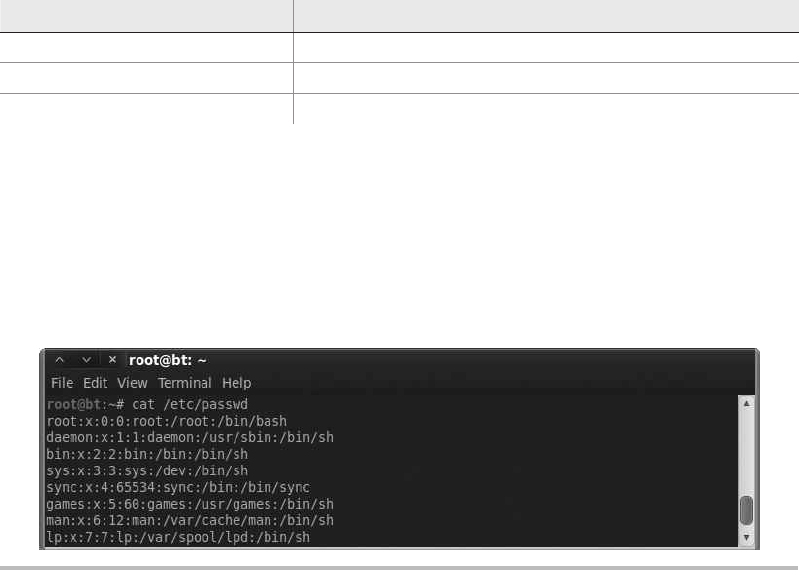
Secure Beginner’s Guide / Wireless Network Security: A Beginner’s Guide / Tyler Wrightson / 094-6 / Appendix
316 Wireless Network Security: A Beginner’s Guide
On the left side of the output is the name of the package we can install. You’ll notice
that there are many results when we search for pidgin. That’s because the search results
include anything that references pidgin, not just the pidgin program itself. Typically, you’ll
have to search through the list to find the most likely candidate for the package you wish
to install. Other times you might be following a tutorial, which will tell you exactly which
package to install.
In this case, we see a package simply labeled “pidgin.” That seems a likely candidate,
so let’s install it. We install it using the apt-get install option:
root@root:~# apt-get install pidgin
You’ll notice that before the program is installed, you are informed of how much
disk space is necessary to install the program. In this case, a measly 36.9MB of disk
space is required. Type y to acknowledge this, and you’ll see the program is downloaded
and installed. When it’s finished, you are returned to your terminal and you can run the
program. Type pidgin to run the pidgin program.
The following is an apt program installation cheat sheet:
Command Description
apt-get update Update the index files for apt sources.
apt-cache search Search apt index files for specific package.
apt-get install Download and install the specified package.
Basic User Administration
Users and groups are created and managed a little differently than in Windows systems. User
accounts are stored in the /etc/passwd file (called the password file). The password file is a
text-based file with each account on a separate line. Let’s take a look at a few of the entries
in the passwd file (see Figure A-8).
Figure A-8 Contents of passwd file
12-Appendix.indd 316 4/5/12 4:19:25 PM

Secure Beginner’s Guide / Wireless Network Security: A Beginner’s Guide / Tyler Wrightson / 094-6 / Appendix
Secure Beginner’s Guide / Wireless Network Security: A Beginner’s Guide / Tyler Wrightson / 094-6 / Appendix
Appendix Introduction to Linux: The Wireless Engineer’s Operating System of Choice 317
The fields are separated by colons, and the first field is the username. In Figure A-8,
you’ll see the first entry is for the root account. The second field, which is simply the letter x,
denotes that the password is stored elsewhere. Ironically, passwords are no longer stored
in the password file. Because the password file is readable by every user on the system, it
makes sense to store the passwords in a separate file.
The last field shows the default shell for the user; the root user uses the bash shell
located at /bin/bash. The field before that identifies the user’s home directory (/root for the
root user). The field before that lists the name of the primary group the user is a member of.
The passwords are stored in encrypted form in the /etc/shadow file. In Figure A-9, you’ll
see we grep the shadow file for an entry for root. You’ll notice that the password is hashed.
Changing your password is very simple. From a terminal, type the passwd command
with no arguments; it prompts you for your old password and to enter your new password
twice. You can also reset a password for another user account by providing the login name
as an argument to the passwd program. For example, to change the password to user
account jsmith, you’d type the following:
passwd jsmith
To create new user accounts, you can use the useradd program or the adduser script.
You supply the adduser script with a username you’d like to add, and it prompts you for
the rest of the information. You can see in Figure A-10 that we run
adduser neo
and are prompted for the rest of the necessary information.
Figure A-9 The root entry in shadow file
12-Appendix.indd 317 4/5/12 4:19:25 PM
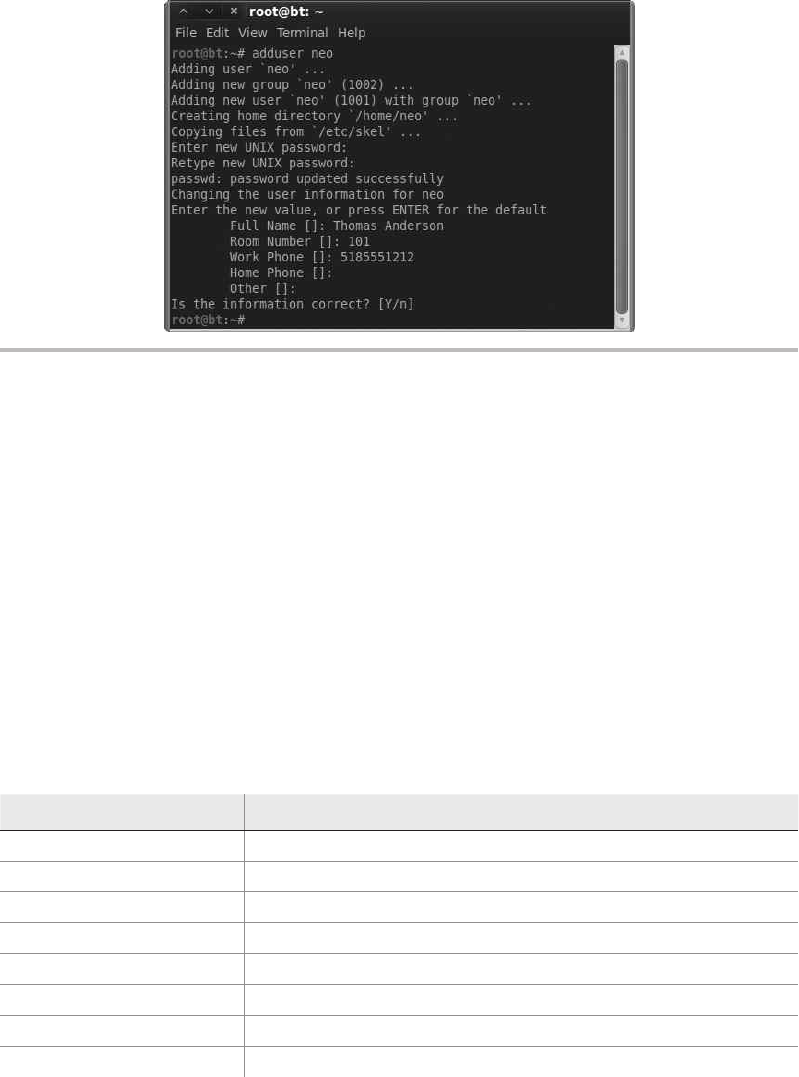
Secure Beginner’s Guide / Wireless Network Security: A Beginner’s Guide / Tyler Wrightson / 094-6 / Appendix
318 Wireless Network Security: A Beginner’s Guide
Basic Networking Configuration
Linux is an extremely network-centric operating system. This is great news for you, given that
you’re reading a book on networking! Numerous built-in commands and default programs
are installed to perform a myriad of networking tasks, including the ability to script every
network configuration you can think of.
Some of the command-line tools you’re used to using on Windows exist on Linux,
and most of them include enhancements that provide additional functionality or even just
make them operate better or faster than their Windows counterparts. Commands such as
ping, nslookup, and telnet operate almost exactly the same as the Windows versions.
We clearly can’t go over all the networking commands and all the available arguments
and their uses; however, the following table provides a good list to get you started. Be sure
to play with each of the commands; if you need help, remember the skills you learned
earlier about getting help.
Command Description
ifconfig Network interface configuration
ping Basic ICMP echo request
traceroute Traces the network path to a remote host
telnet Telnet client
ssh Full-featured SSH client
nc Netcat network Swiss army knife
wget Fetches files via HTTP and FTP
nslookup DNS resolution program
Figure A-10 An adduser command example
12-Appendix.indd 318 4/5/12 4:19:25 PM
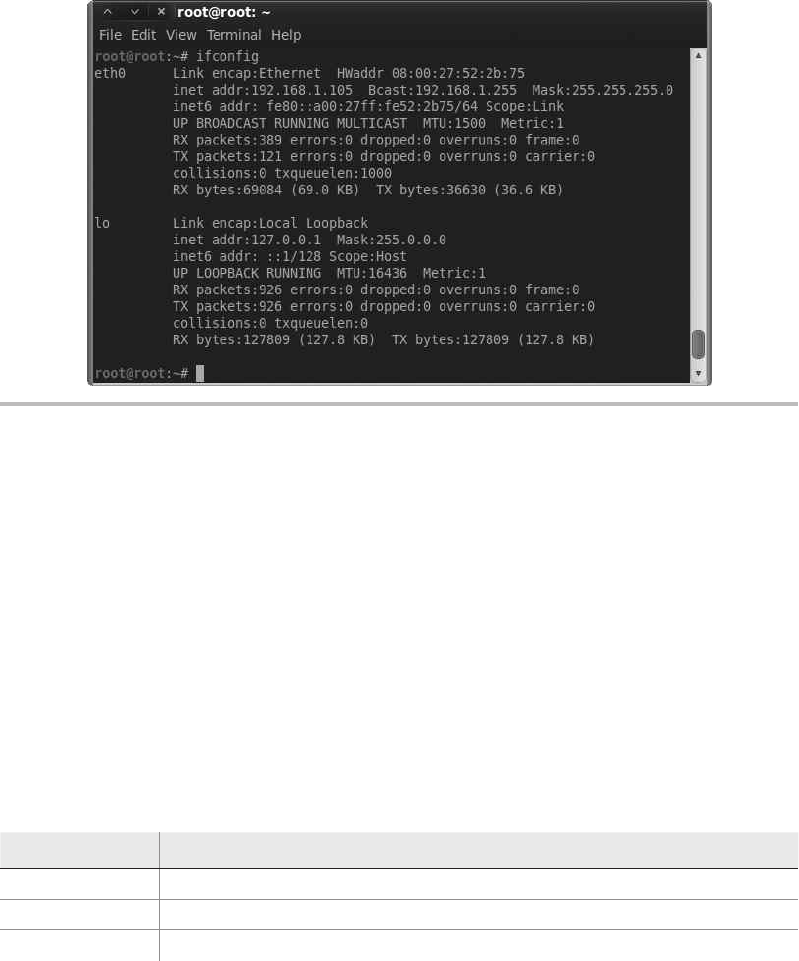
Secure Beginner’s Guide / Wireless Network Security: A Beginner’s Guide / Tyler Wrightson / 094-6 / Appendix
Secure Beginner’s Guide / Wireless Network Security: A Beginner’s Guide / Tyler Wrightson / 094-6 / Appendix
Appendix Introduction to Linux: The Wireless Engineer’s Operating System of Choice 319
The ifconfig command (short for interface configuration) is the most basic command
for configuring a network interface on a Linux computer. As you can see in Figure A-11,
just running the command by itself will show you all the interfaces currently enabled (but
not necessarily connected).
Most of the time, hardwired Ethernet interfaces are referred to as ethX, where X is a
unique number. However, sometimes other network interfaces, including wireless interfaces,
will have an ethX name. In Figure A-11, you can see that the first Ethernet interface (eth0)
has an IP address of 192.168.1.105 and a MAC address of 08:00:27:52:2b:75. To show all of
the interfaces (and even the currently shutdown interfaces), use the –a option. To enable an
interface, use the up keyword. Here’s an example:
#ifconfig eth1 up
Option Description
-a Show all interfaces
up Enable the specified interface (for example, ifconfig eth1 up)
down Disable the specified interface (for example, ifconfig eth1 down)
Figure A-11 The ifconfig network configuration command
12-Appendix.indd 319 4/5/12 4:19:25 PM

Secure Beginner’s Guide / Wireless Network Security: A Beginner’s Guide / Tyler Wrightson / 094-6 / Appendix
320 Wireless Network Security: A Beginner’s Guide
To configure a static IP address, type the IP address followed by the netmask keyword
and then the network mask, as in the following example.
root@root:~# ifconfig eth0 192.168.1.10 netmask 255.255.255.0
To view and manipulate the routing table, use the route command. The route command
without any options will show you the current routing table. As you can see in Figure A-12,
the default gateway is configured as 192.168.1.1.
You can add a static route using the route command with the add keyword. The keywords
“default gateway” can also be used to add a default gateway, as in the following example:
root@root:~# route add default gateway 192.168.1.10
The DNS servers are typically stored in the /etc/resolv.conf file. Using the cat command
we learned earlier, we’ll take a look at the existing /etc/resolv.conf file. In Figure A-13, you
can see that we have two DNS servers configured using the nameserver command and that
our default domain to search is zion.loc.
However, all the previous methods are the manual way of configuring your basic
network settings. If you prefer a graphical configuration method, you can open the
Wicd network configuration manager by clicking Applications | Internet | Wicd Network
Manager. You might receive an error stating that you could not connect to Wicd’s D-Bus.
This can be safely ignored; click OK to close. Then click Properties under the interface
type you wish to configure (hardwired or wireless) and click Properties.
Figure A-12 Viewing the routing table on a Linux host
Figure A-13 DNS resolution file resolv.conf
12-Appendix.indd 320 4/5/12 4:19:25 PM
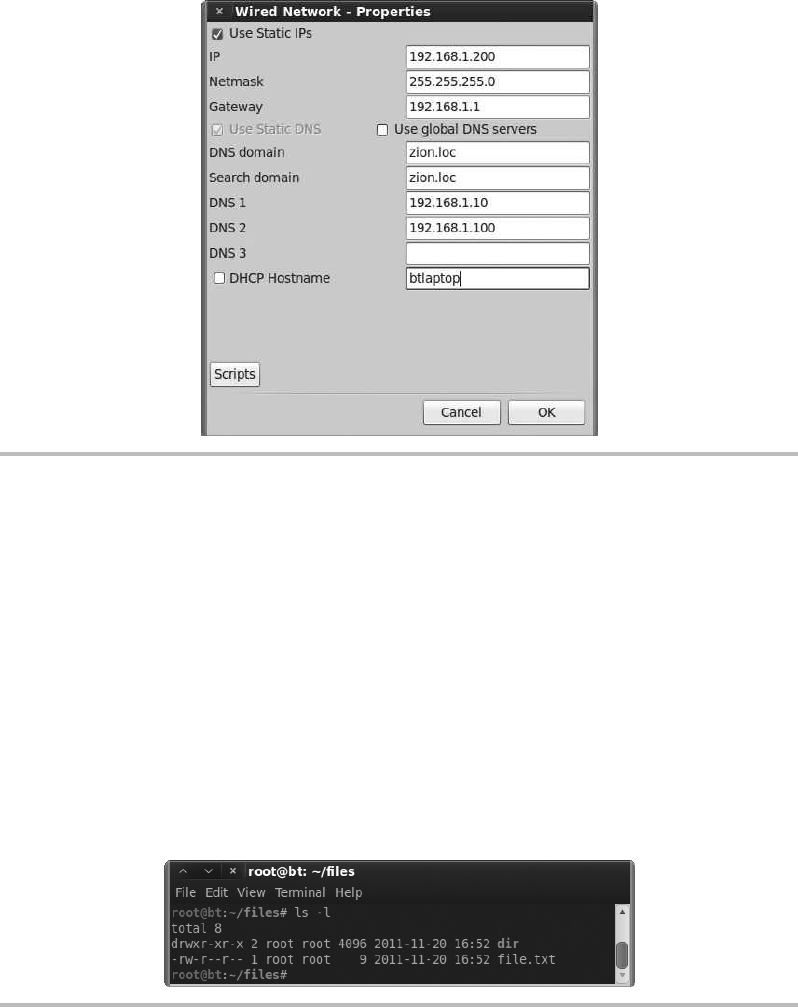
Secure Beginner’s Guide / Wireless Network Security: A Beginner’s Guide / Tyler Wrightson / 094-6 / Appendix
Secure Beginner’s Guide / Wireless Network Security: A Beginner’s Guide / Tyler Wrightson / 094-6 / Appendix
Appendix Introduction to Linux: The Wireless Engineer’s Operating System of Choice 321
Figure A-14 Graphical network configuration using Wicd
In Figure A-14, you’ll see a window that looks very similar to the Windows IP
Configuration window. Simply fill in the appropriate entries and click OK to apply the
configuration. A very handy feature is the ability to create different connection profiles.
If you find yourself on a few networks frequently and wish to save your IP address info,
you can create separate profiles and apply them with a simple click of the mouse.
Understanding Linux File Permissions
Linux file permissions are very different from Windows file permissions. This can be a little
tricky for new comers, but it’s easy once you get used to it. To view the permissions for a file or
directory, simply use the –l argument for ls. Figure A-15 shows a directory with two results.
Figure A-15 Viewing file permissions from the command line
12-Appendix.indd 321 4/5/12 4:19:25 PM

Secure Beginner’s Guide / Wireless Network Security: A Beginner’s Guide / Tyler Wrightson / 094-6 / Appendix
322 Wireless Network Security: A Beginner’s Guide
The line for each file starts with a possible ten bits; if a bit is set, you will see a character.
If it is not set, you will see a dash. The first entry in Figure A-15 is for a directory; we can
tell it’s a directory because the first entry is “d,” whereas for a file it would be just a dash.
Following the directory bit are three groups of three bits. The bits are the read bit, write bit,
and execute bit, which are shown as r, w, and x, respectively, if they are set. The three groups
of bits represent the permissions for the specified user, the specified group, and all other
users of the system, respectively.
The user and group follow the permissions for the file. In Figure A-15, the owner of
the file is the root user and the group is the root group. The first block of permissions is
set to rwx, meaning that the root user has read, write, and execute permissions on this
directory. The second block of permissions is set to r-x, meaning any member of the root
group can read and execute this directory. Finally, the last block is also set to r-x, meaning
every other user on the system can read and execute this directory. You should note that
the execute bit must be set on a directory for a user to actually enter that directory.
To adjust the permissions of a file or directory, you use the chmod command, which
stands for change mode. First, you designate the users you wish to change the permissions
for and then you specify which permissions to add or remove. The letters used for the users
are u, g, o, and a. These letters represent the following users:
Char Description
u The file’s owner
g The file’s group
o All other users on the system
a All users (file owner, file group, and all other users)
Permissions are represented with rwx. You add permissions with a plus sign (+) and
remove permissions with a minus sign (–).
Char Description
r Read bit
w Write bit
x Execute bit
Let’s look at a few examples. To remove all permissions on a file called file.txt, you
would start with the following command:
chmod a-rwx file.txt
12-Appendix.indd 322 4/5/12 4:19:25 PM
Secure Beginner’s Guide / Wireless Network Security: A Beginner’s Guide / Tyler Wrightson / 094-6 / Appendix
Secure Beginner’s Guide / Wireless Network Security: A Beginner’s Guide / Tyler Wrightson / 094-6 / Appendix
Appendix Introduction to Linux: The Wireless Engineer’s Operating System of Choice 323
To then allow only the file owner to read and write the file, you would use this command:
chmod u+rw file.txt
Any program you wish to run needs to have the execute bit set. Thus, to allow any user
on the system the ability to execute the program, use the following command:
chmod a+x ./program
Although there is more you need to know when configuring permissions on files and
directories, this is enough to get you started.
Basic Scripting
Scripts are extremely easy to create to perform even very complicated tasks. The most
basic scripts use the native shell of choice; however, more robust languages such as Perl
exist to handle more advanced tasks. Using scripts, you can call any external program by
simply typing it exactly as you normally would, with all the same arguments.
Let’s take a look at a basic script. Open the gedit program by typing gedit in a terminal
or by opening Applications | Accessories | gedit Text Editor. Enter the following text and
save the file as script.sh:
#!/bin/bash
echo "== Checking Current Date =="
date
echo "== Currently logged in users =="
who
Finally, give this file execute permissions with the following command:
chmod a+x script.sh
In Figure A-16, you can see we first check for the permissions of the file to ensure it
is executable. We do this by running ls with the –lh options and then grep for our file. We
can see that the execute bit is set. We then run our script, which gives us some nice output
as well as the date and who commands included in it. You’ll notice that for two lines we
included the echo command, which simply prints the text we include into the terminal.
The double equals signs don’t mean anything special; we just add them to make our
output a little easier to read.
If you find yourself frequently typing the same commands over again, you should
considering creating a custom script to save yourself some keystrokes.
12-Appendix.indd 323 4/5/12 4:19:25 PM

Secure Beginner’s Guide / Wireless Network Security: A Beginner’s Guide / Tyler Wrightson / 094-6 / Appendix
324 Wireless Network Security: A Beginner’s Guide
Conclusion
You’re now armed with enough knowledge to start using Linux as a desktop operating
system with the details in this appendix. From connecting to and configuring network
settings, to adding new user accounts and creating scripts to perform common tasks
quickly, you’ll find you can easily perform most of the tasks you’re familiar with in the
Windows operating system. Most operating systems include many configuration options—
enough to fill entire books—and Linux is no exception. If you plan on making Linux
your OS of choice, be sure to check out Linux: The Complete Reference, Sixth Edition,
by Richard Petersen (McGraw-Hill, 2007), or Linux Administration: A Beginner's Guide,
Sixth Edition, by Wale Soyinka (McGraw-Hill, 2012).
Figure A-16 The output of our sample script
12-Appendix.indd 324 4/5/12 4:19:25 PM

Secure Beginner’s Guide / Wireless Network Security: A Beginner’s Guide / Tyler Wrightson / 094-6 / Glossary
325
Glossary
13-Glossary.indd 325 3/28/12 4:19:49 PM

Secure Beginner’s Guide / Wireless Network Security: A Beginner’s Guide / Tyler Wrightson / 094-6 / Glossary
326 Wireless Network Security: A Beginner’s Guide
802.1x Port-based authentication. 802.1x denies users access to a network segment
to which they are physically connected until the user has authenticated.
802.11x Shorthand for referring to all the 802.11 technologies: 802.11a, 802.11b, 802.11g,
and 802.11n.
AES Advanced Encryption Standard. A symmetric-key encryption algorithm used
by various technologies.
ARP Address Resolution Protocol. A Layer 2 protocol used to determine the Layer 2
(MAC) address for a given Layer 3 address.
audit A formal check to determine policy compliance, typically performed either by
internal auditors at an organization or by an independent third party.
availability The degree to which information is available when it is needed by
authorized parties. Availability may be measured as the percentage of time information
is available for use by authorized websites. For example, a business website may strive
for availability above 99 percent.
Balanced Scorecard (BSC) A performance measurement framework that is intended
to enrich traditional financial performance measures with strategic nonfinancial
performance measures, thereby giving a more balanced view of organizational
performance. Developed in the 1990s by Dr. Robert Kaplan (Harvard Business School)
and Dr. David Norton. (For additional information, see www.balancedscorecard.org.)
Black Swan event An event that is highly improbable and therefore likely to end
up at the bottom of the list of priorities to address. See The Black Swan: The Impact of the
Highly Improbable, by Nassim Taleb, for further reading on the theory of Black Swan
events.
botnet A malicious botnet is a network of compromised computers that is used to
transmit information, send spam, or launch denial-of-service (DoS) attacks on the
attacker’s specified target. Essentially, a malicious botnet is a group of computers, acting
as a supercomputer, created by and managed by a hacker, fraudster, or cybercriminal.
brute force A somewhat nontechnical approach to obtaining a password in which
every combination of possible choices is attempted until the correct value is obtained.
BSS Basic Service Set. The most basic group of wireless stations communicating to
form a wireless network.
BSSID Basic Service Set Identifier. A unique identifier for a BSS. It takes the same
format as a MAC address.
captive portal A technology that intercepts a user’s network session and prevents
him from reaching the intended service until he has performed a specified task such
as accepting the terms of service or providing authentication information.
13-Glossary.indd 326 3/28/12 4:19:49 PM

Secure Beginner’s Guide / Wireless Network Security: A Beginner’s Guide / Tyler Wrightson / 094-6 / Glossary
Secure Beginner’s Guide / Wireless Network Security: A Beginner’s Guide / Tyler Wrightson / 094-6 / Glossary
Glossary 327
CAPWAP Control And Provisioning of Wireless Access Points. An open standard
based on LWAPP for the configuration and management of wireless access points
from a central controller.
CCMP Counter Mode with Cipher Block Chaining Message Authentication Control
Protocol (CCM Protocol). An encryption technology used with WPA2 to replace the
weaker TKIP protocol.
charter A document that describes the specific rights and privileges granted from
the organization to the information security team.
CIA Confidentiality, integrity, and availability. CIA is an industry-standard acronym
used to describe three of the most important concepts for a secure information system
(sometimes referred to as the CIA triad).
cloud computing As defined by the National Institute of Standards and Technology
(NIST), cloud computing is a model for enabling ubiquitous, convenient, on-demand
network access to a shared pool of configurable computing resources (for example,
networks, servers, storage, applications, and services) that can be rapidly provisioned
and released with minimal management effort or service provider interaction. This
cloud model promotes availability and is composed of five essential characteristics,
three service models, and four deployment models.
compliance Adherence to a set of policies and standards. Two broad categories of
compliance are compliance with internal policies (specific to a particular organization)
and compliance with external or regulatory policies, standards, or frameworks.
confidentiality The prevention of disclosure of information to unauthorized parties.
consultant A subject matter expert who is contracted to perform a specific set of
activities. Typically, a statement of work outlines the deliverables to be completed by
the consultant and the deadlines for each deliverable.
core competencies The fundamental strengths of a program that add value. They
are the primary functions of a program and cannot or should not be done by outside
groups or partners.
data cleansing The actions performed on a set of data in order to improve the data
quality and achieve better accuracy, completion, or consistency.
dirty data Data that has unacknowledged correlation or undocumented origins
or that is biased, non-independent, internally inconsistent, inaccurate, incomplete,
unsuitable for integration with data from other important sources, unsuitable for
consumption by tools that automate computation and visualization, or lacking
integrity in some other respect.
EAP Extensible Authentication Protocol. A protocol framework used to carry
various authentication method used in WPA and WPA2.
13-Glossary.indd 327 3/28/12 4:19:49 PM

Secure Beginner’s Guide / Wireless Network Security: A Beginner’s Guide / Tyler Wrightson / 094-6 / Glossary
328 Wireless Network Security: A Beginner’s Guide
ESSID Extended Service Set Identifier. Identifies one or more connected Basic Service
Sets, typically referred to as the human readable network name.
false negative A result that indicates no problem exists where one actually does
exist, such as occurs when a vulnerability scanner incorrectly reports no vulnerabilities
exist on a system that actually has a vulnerability.
false positive A result that indicates a problem exists where none actually exists,
such as occurs when a vulnerability scanner incorrectly identifies a vulnerability that
does not exist on a system.
GPS Global Positioning System. A global system that uses satellites to determine
the precise location on Earth of GPS receivers.
honeypot A system designed to lure a specific type of user, typically an attacker, by
mimicking the attributes of a vulnerable system.
information classification standards Standards that specify the treatment of data
(requirements for storage, transfer, access, encryption, and so on) according to the data’s
classification (public, private, confidential, sensitive, and so on).
information security The protection of information and information systems from
unauthorized access, use, disclosure, modification, or destruction. Also commonly
referred to as data security, computer security, or IT security.
integrity The prevention of data modification by unauthorized parties.
intercept of a line Identifies the point where the line crosses the vertical y-axis. An
intercept is typically expressed as a single value (b) but can also be expressed as the
point (0, b).
IV Initialization Vector. A 24-bit value prepended to the WEP key used to provide
entropy so that the same WEP key is never used twice.
LWAPP Lightweight Access Point Protocol. A protocol used to configure and manage
multiple access points from a central controller.
MAC address Media Access Control address. The address that uniquely identifies
a node on a network at Layer 2.
metrics project distance The amount of a change you want to achieve in your target
measurement by the end of the metrics project.
metrics project timeline How long you want to spend to achieve the metrics project
distance.
mission statement Outlines an information security program’s overall goals and
provides guidelines for its strategic direction.
13-Glossary.indd 328 3/28/12 4:19:49 PM

Secure Beginner’s Guide / Wireless Network Security: A Beginner’s Guide / Tyler Wrightson / 094-6 / Glossary
Secure Beginner’s Guide / Wireless Network Security: A Beginner’s Guide / Tyler Wrightson / 094-6 / Glossary
Glossary 329
MITM attack Man-in-the-middle attack. An attack in which an attacker is placed
in the logical path between an end station and its destination in order to view or
manipulate their communications.
objective desired direction The direction in which you want the metrics project
measurement to go to achieve the benefits of an information security metrics
program, especially the benefit of improvement.
offshoring Contracting work to resources in a different country (either third party
or in-house).
online analytical processing (OLAP) A specific type of data storage and retrieval
mechanism that is optimized for swift queries that involve summarization of data
along multiple factors or dimensions.
orchestration The administrative oversight that ensures the workflow is executed as
specified. Orchestration includes functions such as signing off on a metric definition,
deploying its implementation, scheduling its calculation at regular intervals, and
executing and delivering updates. See also workflow.
outsourcing Contracting work to a third-party vendor.
PEAP Protected EAP. An implementation of the EAP protocol within an encrypted
TLS tunnel.
penetration test An authorized test used to simulate the efforts of an attacker to
determine weaknesses in a given system.
PKI Public Key Infrastructure. The technology, servers, systems, and human processes
that support public key cryptography and digital certificates.
PPTP Point-to-Point Tunneling Protocol. A virtual private networking technology
commonly seen on Windows platforms.
prioritization An exercise in determining the relative importance of tasks, projects,
and initiatives.
project management Defining an end goal and identifying the activities, milestones,
and resources necessary to reach that end goal.
project scope Indicates project coverage, typically by identifying the different
regions, different networks, and/or different groups of people the project encompasses.
quartiles The division of all observations into four equal groups that hold the
lowest one-fourth of all observed values (first quartile), the highest one-fourth of all
observed values (fourth quartile), and the two middle fourths—one-fourth above and
one-fourth below the median value (or the value that divides the set of observations
into two equal halves).
13-Glossary.indd 329 3/28/12 4:19:49 PM

Secure Beginner’s Guide / Wireless Network Security: A Beginner’s Guide / Tyler Wrightson / 094-6 / Glossary
330 Wireless Network Security: A Beginner’s Guide
RADIUS Remote Authentication Dial-In User Service. A flexible system for
authenticating users against a central database.
RASCI A project management methodology for assigning roles in projects that
involve many people and teams. Each letter in RASCI stands for a different type of
role: Responsible, Approver, Supporter, Consultant, and Informed. Each role has
corresponding responsibilities.
RBAC Role-Based Access Control. A system for determining access to a system based
on a user’s role within a system.
Request for Proposal (RFP) A document that an organization uses to solicit
proposals for a project that has specific requirements. The organization can then use
the responses to the RFP to evaluate and compare the proposals of multiple vendors.
ROI Return on investment. The ratio of benefit to be gained to the cost of a given
investment.
RSPAN Remote Switch Port Analyzer. A system for forwarding traffic to a remote
switch where it can be analyzed by packet-sniffing devices.
sacred cow An idiom for a practice that is implemented simply because it is “how
it’s always been done,” without regard for its usefulness or whether it can help achieve
a target goal or outcome.
slope of a line A value that represents how fast the y values are rising or falling as
the x values of the line increase.
Slope of line = (y2 – y1) / (x2 – x1), where (x1, y1) and (x2, y2) are any two points on
the line
sniffer Hardware and/or software that is capable of capturing and analyzing
network traffic.
SPAN Switch Port Analyzer. A network switch technology used to copy packets
from one or more source ports to one or more destination ports, typically for the
purposes of analyzing network traffic.
SSID Service Set Identifier. Identifies one or more connected Basic Service Sets,
typically referred to as the human readable network name.
SSL Secure Sockets Layer. A cryptographic protocol used to create secure tunnels
over an insecure network. Commonly used for creating secure HTTP connections over
the Internet.
stakeholders Leaders responsible for critical decision-making and key supporters
who will drive change throughout the organization.
13-Glossary.indd 330 3/28/12 4:19:49 PM

Secure Beginner’s Guide / Wireless Network Security: A Beginner’s Guide / Tyler Wrightson / 094-6 / Glossary
Secure Beginner’s Guide / Wireless Network Security: A Beginner’s Guide / Tyler Wrightson / 094-6 / Glossary
Glossary 331
threat analysis An alternative approach to risk management that involves
identifying and analyzing potential attacks, threats, and risks and preparing
countermeasures accordingly.
TKIP Temporal Key Integrity Protocol. A temporary solution to help mitigate the
risks from the cryptographic weaknesses in WEP.
TLS Transport Layer Security. The next-generation replacement for the SSL protocol.
VLAN Virtual local area network. A technology for creating multiple virtual
networks at Layer 2 from one physical Layer 2 device.
VPN Virtual private network. A technology that creates a secured virtual link
between end systems over an insecure network.
wardriving A method of discovering all the wireless networks available in a given
area by “driving” in the area with appropriate wireless equipment.
WEP Wired Equivalent Privacy. A technology used for authentication and
encryption of communications for 802.11 networks
workflow A collection of rules that govern the relationship of steps required
to complete a process. Relationships might include sequence order, branching
conditions, looping, and number of repetitions.
WPA Wi-Fi Protected Access. A wireless security standard designed to completely
mitigate the vulnerabilities in the WEP protocol.
13-Glossary.indd 331 3/28/12 4:19:49 PM
This page intentionally left blank

333
Secure Beginner’s Guide / Wireless Network Security: A Beginner’s Guide / Tyler Wrightson / 094-6 / Index
Index
Symbols
| (pipe), running Linux commands and, 313
Numbers
11 security principles. See security principles
32-bit, BackTrack versions, 305
40-bit WEP, 57
64-bit, BackTrack versions, 305
104-bit WEP, 57
802.1q (trunking protocol), 246
802.1x (port-based access control)
adding authenticators for wireless network,
222–224
applying authentication to wireless networks,
144–145
authentication using, 326
captive portals compared with, 256
configuring authentication settings, 206–208
installing RADIUS server and, 210–211
overview of, 185–186
preventing rogue wireless networks, 275–278
RADIUS and, 186–188
reconfiguration as troubleshooting
approach, 235
802.11x
creating new policy, 206–207
defined, 326
monitor mode and, 107
overview of, 16–17
802.15 (Bluetooth), 293
80211i (WPA2 standard), 64
A
AAA (authentication, authorization, and
accountability)
enabling AAA services, 277
in RADIUS, 183
access control
allowing guest access to internal
resources, 260
based on time, 237
firewall access lists and, 237–239
restricting access from internal LAN to
wireless LAN, 241–244
restricting access from wireless LAN to
internal LAN, 239–241
restricting guest networks to guest
users only, 258
user access and, 236–237
14-Index.indd 333 4/9/12 2:37:40 PM
Secure Beginner’s Guide / Wireless Network Security: A Beginner’s Guide / Tyler Wrightson / 094-6 / Index
334 Wireless Network Security: A Beginner’s Guide
access control lists. See ACLs (access control lists)
access points. See also rouge access points
as authenticators in wireless network, 222–224
autonomous vs. controller based, 18–19
beacons and, 20
configuring for wireless network, 213–214
configuring for WPA2-Enterprise network,
225–227
configuring Linux laptop to act as, 113–116
creating for WPA2-Enterprise network, 189
detecting rouge, 141
multiple SSIDs for single access point, 246–249
overview of, 18
types of, 25–29
accountability
enabling AAA services, 277
in RADIUS, 183
ACLs (access control lists)
firewalls, 237–239
network segmentation and, 139
providing guest access to internal
resources, 264
VPN clients and, 268–269
Active Directory Certificate Services (AD CS),
193–196
Active Directory Domain Services (AD DS), 182
Active Directory Users and Computers, 259
Address Resolution Protocol. See ARP
(Address Resolution Protocol)
adduser command, user administration in Linux, 318
Ad-Hoc mode, wireless operating modes, 17
AES (Advanced Encryption Standard)
configure access points, 225
defined, 326
encryption algorithms in WPA2, 65
encryption methods in WPA, 142
airbase, configuring Linux laptop as access point,
113–116
aircrack
attempting to crack WEP key, 87–88
cracking WPA-PSK, 94–95
airdecap, decrypting WEP packets, 91
aireplay
deauthenticating clients, 93–94
packet replay attack and, 89
airmon, putting wireless card into monitor
mode, 86, 92
airodump
saving captured wireless traffic, 86–87, 92–93
sniffing insecure communications, 105–106
targeting wireless clients, 105
tracing or enumerating MAC addresses of
rogue networks, 286–288
alias command, 311–312
Android OS
smartphones and, 28, 34
Wardrive app, 84
antennas
overview of, 30
types of, 30–32
antivirus updates, faking, 124
Apple Airport Express, 26
apropos command, 313–314
apt utilities
in BackTrack, 305
installing software on BackTrack and, 315–316
Linux OSs and, 35
ARP (Address Resolution Protocol)
ARP replay attacks, 63, 89–90
ARP spoofing (poisoning) attacks, 49–51
defined, 326
arpwatch, for detecting rogue networks, 292
Aruba wireless products, 29
association, with access points, 20
asymmetric algorithms, 166–167
attackers, advantages of, 131
attacks
ARP spoofing attacks, 49–51
authentication and, 53–54
cracking WPA pre-shared key, 66–67
defending against. See defending
against attacks
encryption and, 55–56
history of breaking WEP, 59–62
how WEP works, 56–59
how WPA works, 64–65
ICMP redirect attacks, 51–52
MITM (man-in-the-middle) attacks, 47–49
overview of, 42–43
passive packet capture, 45–47
rogue DHCP attacks, 50–51
SSID cloaking, 44–45
SSL MITM and SSL-stripping attacks, 52–53
storing data and cracking as convenient, 47
summary, 69–70
on TKIP, 69
WEP authentication and, 54–55
on WEP encrypted networks, 62–63
wireless reconnaissance, 43–44
WPA deauthentication spoofing, 67–68
WPA denial of service, 69
WPA encryption algorithms and, 65
on WPA protected networks, 65–66
WPS brute force attacks, 68
audit logs, client access denied, 234
audits, 326
14-Index.indd 334 4/9/12 2:37:40 PM

Secure Beginner’s Guide / Wireless Network Security: A Beginner’s Guide / Tyler Wrightson / 094-6 / Index
Secure Beginner’s Guide / Wireless Network Security: A Beginner’s Guide / Tyler Wrightson / 094-6 / Index
Index 335
authentication
802.1x and, 185–186
access points and, 20
applying to wireless networks, 143–144
choosing authentication method, 222–225
of consultants, 260–262
guest access and, 253–256
overview of, 53–54
pre-logon, 205–208
RADIUS (Remote Authentication Dial-In
User Service). See RADIUS (Remote
Authentication Dial-In User Service)
using digital certificates, 167, 174–175
WEP (Wired Equivalent Privacy) and, 54–55
of wireless network, 172, 214–215
WPA deauthentication spoofing attacks, 67–68
authentication, authorization, and accountability (AAA)
enabling AAA services, 277
in RADIUS, 183
authorization
enabling AAA services, 277
in RADIUS, 183
auto-enrollment
applying GPOs to Organizational Units,
199–200
configure, 196–197
log onto workstation and obtain user
certificate, 204–205
Microsoft Certificate Services and, 182–183
auto-expiring credentials, guest access and, 259–260
Autogroup Probe network, Kismet, 103
autonomous access points, 18–19
availability. See also CIA (Confidentiality, integrity,
and availability)
in CIA triad, 14
defined, 326
B
BackTrack
booting to, 308–309
downloading and installing, 306–307
installing software on, 315–316
Linux OS distributions, 35–36
navigating file system, 314–315
Balanced Scorecard (BSC), 326
bash (Bourne Again Shell), 311
Basic Service Set (BSS), 326
Basic Service Set Identifier. See BSSIDs
(Basic Service Set Identifiers)
beacons
access points and, 20
wireless clients and, 102
Beck-Tews attack, on TKIP, 69
black box tests, types of penetration tests, 135
Black Swan events, 326
The Black Swan: The Impact of the Highly Improbable
(Taleb), 326
blacklists, Least Privilege and, 138–139
block ciphers, vs. stream ciphers, 56
Bluetooth (802.15), 293
boot menu, BackTrack, 308
bootable USB drive
booting to BackTrack, 308–309
for Linux OS, 307–308
botnet, 326
Bourne Again Shell (bash), 311
broadcasts
disabling broadcast of SSID, 20
wireless clients and, 102
brute force attacks
defined, 326
dictionary attacks, 66
on passwords, 46–47
WPS brute forcing, 68
BSC (Balanced Scorecard), 326
BSS (Basic Service Set), 326
BSSIDs (Basic Service Set Identifiers)
broadcasts and, 20
defined, 326
overview of, 19
white lists, 292
buffer overflow attacks, 49
C
CA (Certificate Authority)
configure certificate template and
auto-enrollment, 196–197
create and issue certificate templates, 200–204
create Group Policy Object and apply to
Organizational Unit, 199–200
create Organization Units and users group,
197–198
CRLs (Certificate Revocation Lists), 181
deploying enterprise CA, 188
DNS supporting communication with, 182
install Active Directory Certificate Services,
193–196
install and configure, 192–193
log onto workstation and obtain user
certificate, 204–205
obtaining public keys from, 175, 179–180
overview of, 174
server structure, 180–181
14-Index.indd 335 4/9/12 2:37:40 PM

Secure Beginner’s Guide / Wireless Network Security: A Beginner’s Guide / Tyler Wrightson / 094-6 / Index
336 Wireless Network Security: A Beginner’s Guide
CA (Cont.)
Thawte as, 178
untrusted certificate warning, 176
VeriSign as, 177
cantennas, 31–32
captive portals
defined, 326
guest access and, 255–257
CAPWAP (Control And Provisioning of Wireless Points)
defined, 327
Next-Gen solutions, 294
protocols for lightweight access points, 19
CCMP (Counter Mode with Cipher Block Chaining
Message Authentication Control Protocol)
defined, 327
encryption methods in WPA, 142
WPA2 encryption algorithms, 65
cd (change directory) command, 311
Certificate Authority. See CA (Certificate Authority)
Certificate Revocation Lists (CRLs)
overview of, 181
use by Microsoft Certificate Services, 182
certificate services
install Active Directory Certificate Services,
193–196
Microsoft Certificate Services, 182–183
services supporting, 182
certificate stores
accessing from Microsoft Management
Console, 204
overview of, 175
certificate templates
configure, 196–197
creating and issuing, 200–204
deploying, 188
Microsoft Certificate Services and, 182–183
charters, 327
chat systems, cleartext protocols and, 46
chmod command, 322–323
chop-chop attack, breaking WEP and, 61
CIA (Confidentiality, integrity, and availability)
applying to wireless networks, 142
defined, 327
overview of, 14
Cisco wireless products, 29
Citrix, for interactive sessions on remote machines, 262
cleartext protocols, 45–46
clients. See wireless clients
cloud computing
defined, 327
Next-Gen solutions, 295–297
commands, Linux
getting help, 313–314
networking configuration, 318–321
running, 311–313
shell options, 311
communication
checking security of wireless clients, 100–102
forcing clients to talk to us, 101
sniffing insecure, 105–108
compliance, 327
confidentiality. See also CIA (Confidentiality, integrity,
and availability)
in CIA triad, 14
defined, 327
configuration
changing default settings, 141–142
default configurations that can be exploited,
101, 117–118
Connection Request policy, 235
consequences (impact), of vulnerability exploitation,
8, 10–11
consultants
authentication of, 260–262
defined, 327
securing access to internal resources,
268–269
context, in defense, 130–131
Control And Provisioning of Wireless Points. See
CAPWAP (Control And Provisioning of Wireless
Points)
controller based access points
Next-Gen solutions, 294–295
overview of, 18–19
convenience, security convenience bell curve, 5–6
core competencies, 327
credentials, FTP, 112
credentials, user
auto-expiring, 259–260
managing for guest access, 253–255
CRLs (Certificate Revocation Lists)
overview of, 181
use by Microsoft Certificate Services, 182
cryptographic breaks, 60
D
daemons, Linux, 114–115
data
cleansing, 327
storing and cracking as convenient, 47
Data Security Standard, PCI (Payment Card
Industry), 275
dBi (decibels isotropic), antenna signal strength
measured in, 30
DD-WRT firmware, 26
14-Index.indd 336 4/9/12 2:37:40 PM

Secure Beginner’s Guide / Wireless Network Security: A Beginner’s Guide / Tyler Wrightson / 094-6 / Index
Secure Beginner’s Guide / Wireless Network Security: A Beginner’s Guide / Tyler Wrightson / 094-6 / Index
Index 337
Debian distribution
BackTrack based on, 305
installing software on BackTrack and, 315
decibels isotropic (dBi), antenna signal strength
measured in, 30
default configurations
changing, 141–142
that can be exploited, 101, 117–118
default operations, wireless clients and, 117–118
defending against attacks
assessment of wireless networks, 140–144
attackers advantage, 131
context and reality in, 130–131
Defense in Depth, 13, 137–138
design principles, 137
in existing networks, 133–136
firewalls, 148–150
honeypots, 159–160
IDS/IPS systems, 153–159
Least Privilege, 138–139
network segmentation, 139–140
in new deployments, 132
overview of, 130
refreshing existing network, 136–137
routers in, 150
switches in, 151–153
useful (good) defenses, 148
useless defenses, 145–147
web authentication gateways, 160
Defense in Depth
components of strategy, 137–138
overview of, 13
demilitarized zone. See DMZ (demilitarized zone)
denial of service attacks, 67–69
design principles, defending against attacks, 137
detection
automated detection of rogue networks,
291–292
Defense in Depth, 138
manually detecting rogue networks, 281–285
of rouge access points, 141
security principles, 14
deterrents
Defense in Depth, 138
security principles, 14
DHCP (Dynamic Host Control Protocol), rogue DHCP
attacks, 50–51
dictionary attacks, 66
dictionary files, 66
digital certificates
authentication using, 174–175
deploying, 188
digitally signing data using private keys,
168–169
handling compromised certificates, 181
log onto workstation and obtain user
certificate, 204–205
major fields in, 178
nonrepudiation and, 179
public and private keys in, 167–168
trust and, 176
X.509 standard and, 177
digital signatures, 168–169
dir (directory) command, 311
directional antennas
parabolic, 32
yagi, 30–32
dirty data, 327
D-Link G730AP access point, 26
DMZ (demilitarized zone)
creating internal, 244–246
with jump stations for guest access, 262–264
multiple SSIDs and, 246–249
segmenting guest network from internal
network, 261
DNS (Domain Name System)
captive portals and, 256–257
certificate services supported by, 182
DHCP and, 50
DNS lookup, 119
DNS spoofing attacks, 119–120
resolution file (resolv.conf), 320
downloading BackTrack, 306–307
downtime, dealing with, 135–136
dual-homed routers, 140
due diligence, in wireless security, 142
DVD drive, booting to BackTrack, 308–309
DVD players, wireless clients in business
environments, 100
Dynamic Host Control Protocol (DHCP), rogue DHCP
attacks, 50–51
E
EAP (Extensible Authentication Protocol). See also
PEAP (Protected EAP)
authentication in wireless networks, 143
defined, 327
RADIUS using, 185
EAP-TLS (Extensible Authentication
Protocol-Transport Layer Security), 143–144
encryption
algorithms in WPA2, 65
applying to wireless networks, 142
attacking WEP, 62–63
cracking WEP, 85–91
14-Index.indd 337 4/9/12 2:37:40 PM

Secure Beginner’s Guide / Wireless Network Security: A Beginner’s Guide / Tyler Wrightson / 094-6 / Index
338 Wireless Network Security: A Beginner’s Guide
encryption (Cont.)
overview of, 55
stream ciphers vs. block ciphers, 56
of traffic on guest networks, 258–259
WEP. See WEP (Wired Equivalent Privacy)
wireless networking, basics, 20
WPA. See WPA (Wi-Fi Protected Access)
endpoint security, technical solutions for, 299
ESSID (Extended Service Set Identifier)
defined, 328
overview of, 19
showing from iwlist, 77
of wireless clients, 102
Ethernet interfaces, showing all with ifconfig
command, 319
Extended Service Set Identifier. See ESSID (Extended
Service Set Identifier)
Extensible Authentication Protocol. See EAP
(Extensible Authentication Protocol)
Extensible Authentication Protocol-Transport Layer
Security (EAP-TLS), 143–144
F
false negatives, 328
false positives, 328
Farady cages, 145–146
File Transfer Protocol (FTP)
capturing FTP credentials, 112
cleartext protocols, 46
files, Linux
navigating file system, 314–315
permissions, 321–323
find command, 313–314
firewalls
access control lists, 237–239
configuring IPTables firewall, 115
creating internal DMZ, 244–246
multiple SSIDs and, 247–248
options for terminating VPN connections, 268
overview of, 148–150
Fluke Networks Airmagnet Enterprise, as dedicated
IDS, 297
FMS attack, breaking WEP and, 60
folders, navigating Linux file system, 314–315
four-way handshake
in WEP authentication, 54
in WPA-PSK, 66
FTP (File Transfer Protocol)
capturing FTP credentials, 112
cleartext protocols, 46
G
G730AP access points, D-Link, 26
Garmin GPSs, 33
gedit program, 323
Global Positioning System (GPS), 33, 328
Globalsat Bu-353 GPS, 33
Gnome
choosing window manager for BackTrack, 306
graphical environment, 309–310
GNU Public License, 304
GPOs (Group Policy Objects)
allow pre-logon authentication, 205
applying to Organization Units, 199–200
configuring wireless clients, 227–231
creating, 199
securing wireless clients, 299–301
GPS (Global Positioning System), 33, 328
grep command, 312
grey box penetration tests, 135
Group Policy
allow pre-logon authentication, 205
Microsoft Certificate Services and, 182
Group Policy Objects. See GPOs (Group Policy
Objects)
groups, user administration in Linux, 316–318
guest access
allowing access to internal resources, 260
authenticating consultants, 260–262
authentication and credential management,
253–255
auto-expiring credentials, 259–260
captive portals, 255–257
DMZ with jump stations for, 262–264
encrypting traffic on guest networks, 258–259
overview of, 252–253
restricting to guest users only, 258
segmenting guest network from internal
network, 261
VPN options for wireless networks, 268–271
VPNs (virtual private networks), 264–267
H
hackers, 15
hash functions
exercise obtaining MD5 hash of simple text
file, 170
overview of, 169–170
heat map, of wireless access points, 295
help command, 314
14-Index.indd 338 4/9/12 2:37:40 PM

Secure Beginner’s Guide / Wireless Network Security: A Beginner’s Guide / Tyler Wrightson / 094-6 / Index
Secure Beginner’s Guide / Wireless Network Security: A Beginner’s Guide / Tyler Wrightson / 094-6 / Index
Index 339
honeypots
defined, 328
overview of, 138
when to use, 159–160
Host mode, VPNs (virtual private networks), 264–265
Hotspotter, pocket wireless scanner, 34
HTTP (Hypertext Transfer Protocol)
captive portals trapping user HTTP
requests, 255
cleartext protocols and, 46
I
IANA (Internet Assigned Numbers Authority), 184
ICMP (Internet Control Message Protocol)
captive portals and, 256
ICMP redirect attacks, 51–52
IDS/IPS (intrusion detection system/intrusion
protection system)
automated detection of rogue networks, 292
considerations before setting up, 154
dedicated wireless IDS, 297
detection measures in security, 14
managing, 157–158
monitoring with, 158
Next-Gen solutions, 293–294
options for receiving network traffic, 155–157
overview of, 153–159
when to use and where to place, 155
wireless systems, 159
IEEE (Institute of Electrical and Electronic Engineers)
802.1x (port-based access control), 185–188
802.11x wireless standards, 16–17
IETF (Internet Engineering Task Force), 183
ifconfig command, 319
IMAP (Internet Mail Access Protocol), 46
info command, 313–314
information classification standards, 328
information security, 328
Infrastructure mode, wireless operating modes, 17
infrastructure security, 141
Initialization Vectors. See IVs (Initialization Vectors)
Institute of Electrical and Electronic Engineers (IEEE)
802.1x (port-based access control), 185–188
802.11x wireless standards, 16–17
integrity. See also CIA (Confidentiality, integrity, and
availability)
in CIA triad, 14
defined, 328
intercept of a line, 328
intermediate CAs, 180
internal network resources
allowing guest access to, 260
breaches of security, 12
creating internal DMZ, 244–246
jump stations providing guest access to,
262–264
restricting access from internal LAN to
wireless LAN, 241–244
restricting access from wireless LAN to
internal LAN, 239–241
securing consultant access to, 268–269
segmenting guest network from internal
network, 261
Internet Assigned Numbers Authority
(IANA), 184
Internet Control Message Protocol (ICMP)
captive portals and, 256
ICMP redirect attacks, 51–52
Internet Engineering Task Force (IETF), 183
Internet Mail Access Protocol (IMAP), 46
Internet Protocol Security (IPSec)
creating VPN tunnels, 266–267
securing consultant access to internal
resources, 268–269
intrusion detection system. See IDS/IPS (intrusion
detection system/intrusion protection system)
intrusion protection system. See IDS/IPS (intrusion
detection system/intrusion protection system)
IP addresses
arpwatch monitoring changes to, 292
configuring static, 320
manually detecting rogue networks
and, 282
RFC 1918 (private IP addressing), 243
ipconfig command, 76
iPhones, 34
IPSec (Internet Protocol Security)
creating VPN tunnels, 266–267
securing consultant access to internal
resources, 268–269
IPTables firewall, 115
IVs (Initialization Vectors)
cracking fails due to insufficient
number of, 88
defined, 328
vulnerability of WEP and, 60–61
WEP keys and, 59
iwconfig command, 74
iwlist command
defined, 74
man page for, 75
output from, 75–77
14-Index.indd 339 4/9/12 2:37:41 PM

Secure Beginner’s Guide / Wireless Network Security: A Beginner’s Guide / Tyler Wrightson / 094-6 / Index
340 Wireless Network Security: A Beginner’s Guide
J
jump stations, providing guest access to internal
resources, 262–264
K
KDE window manager, 306
Kismac tool
defined, 74
features of, 84
Kismet tool
as dedicated IDS, 297
defined, 74
downloading and installing, 78–79
features of, 78
main interface, 81–82
manually detecting rogue networks, 282
startup and logging options, 79–80
targeting wireless clients, 103–104
tracing or enumerating MAC address of rogue
access point with airodump, 287
viewing packets and captured data, 82–83
Korek attack, breaking WEP and, 61
L
Layer 2
network segmentation, 139
WEP encryption at, 56
Layer 3
network segmentation and, 139
switches, 139, 150
LDAP (Lightweight Directory Access Protocol), 177
Least Privilege
principle of, 13
securing wireless network, 138–139, 236
lightweight access points. See also CAPWAP (Control
And Provisioning of Wireless Points); LWAPP
(Lightweight Access Point Protocol)
Next-Gen solutions, 294–295
overview of, 19
Lightweight Directory Access Protocol (LDAP), 177
Linksys WRT54G access points. See WRT54G
access point
Linux OSs
booting to BackTrack, 308–309
configuring Linux laptop as access point,
113–116
creating bootable USB drive, 307–308
daemons, 114–115
downloading and installing BackTrack,
306–307
file permissions, 321–323
Gnome graphical environment, 309–310
help with commands, 313–314
installing software on BackTrack, 315–316
Kismet compatibility with, 78
list of popular distributions, 304–305
navigating file system, 314–315
networking configuration, 318–321
options for terminating VPN connections, 268
overview of, 304
running commands, 311–313
scripts, 323–324
shell options, 311
user administration, 316–318
wireless security and, 35
logging, Kismet options, 80
ls (list) command, 311
LWAPP (Lightweight Access Point Protocol)
cloud-based solutions and, 295–296
defined, 328
Next-Gen solutions, 294–295
protocols for lightweight access points, 19
M
MAC (Media Access Control) addresses
arpwatch monitoring changes to, 292
changing with ifconfig command, 76
defined, 328
filtering, 145–146
manually detecting rogue networks and,
282–285
overview of, 19
port security and, 280–281
tracing or enumerating MAC address of rogue
access point with airodump, 286–288
Mac OSs
Kismac tool and, 84
Kismet compatibility with, 78
wireless security and, 35
MacStumbler, manually detecting rogue networks, 282
man command, 313–314
man-in-the-middle attacks. See MITM
(man-in-the-middle) attacks
MD5 (Message Digest Five), 169
Media Access Control (MAC) addresses. See MAC
(Media Access Control) addresses
medical devices, wireless clients in business
environments, 100
14-Index.indd 340 4/9/12 2:37:41 PM

Secure Beginner’s Guide / Wireless Network Security: A Beginner’s Guide / Tyler Wrightson / 094-6 / Index
Secure Beginner’s Guide / Wireless Network Security: A Beginner’s Guide / Tyler Wrightson / 094-6 / Index
Index 341
Meraki cloud-based solutions, 295
Message Digest Five (MD5), 169
metrics project distance, 328
metrics project timeline, 328
Microsoft Certificate Services
auto-enrollment and certificate templates,
182–183
overview of, 182
Microsoft Management Console (MMC), 204–205
mini access points, 26
mission statements, 328
mitigation, of risk, 11–12
MITM (man-in-the-middle) attacks
ARP spoofing attacks, 49–51
attacking public key crypto-secured messages,
172–174
defined, 329
DNS spoofing attacks, 119–120
fake antivirus updates, 124
fake web authentication page, 120–121
ICMP redirect attacks, 51–52
overview of, 47–49
Rogue DHCP attacks, 50–51
SSL MITM and SSL-stripping attacks, 52–53
SSL MITM attacks, 122
SSL stripping attacks, 122–123
wireless clients and, 118–119
MMC (Microsoft Management Console), 204–205
mobile hotspots
features of, 26
Verizon 4G LTE, 28
monitor mode, 802.11 traffic, 107
monitoring
access points for malicious use, 289
wireless clients, 102–103
MS-CHAPv2, 230
N
NAC (Network Access Control), 279
NAP (Network Access Protection), 279
NAT (Network Address Translation)
Ad-Hoc mode and, 17
hiding MAC addresses, 287
manually detecting rogue networks, 282
netmask, configuring static IP addresses, 320
Netstumbler
defined, 74
features of, 84
manually detecting rogue networks, 282
tracing or enumerating MAC address of rogue
access point with airodump, 287
Network Access Control (NAC), 279
Network Access Protection (NAP), 279
Network Address Translation. See NAT (Network
Address Translation)
Network mode, VPNs, 264–265
Network Policy
configuring for WPA2-Enterprise network,
224–225
resetting, 235
restricting network access based on time, 237
Network Policy and Access Services role
installing, 220–221
installing RADIUS server and, 208–213
Network Policy Server. See NPS (Network Policy
Server)
network segmentation
in defense of wireless networks, 139–140
firewalls in, 148–150
routers in, 150
securing WPA2-Enterprise network, 236
separating guest network from internal
network, 261
switches in, 151–153
network sniffers
decoding cleartext protocols, 45
overview of, 44
Networking: A Beginner's Guide (Hallberg), 4
networking configuration, Linux OS, 318–321
Next-Gen solutions
cloud-based solutions, 295–297
dedicated wireless IDS, 297
lightweight solutions, 294–295
overview of, 293–294
nonce value (pseudo random numbers), four-way
handshake in WPA and, 66
nonrepudiation, digital certificates and, 179
NPS (Network Policy Server)
client access denied, 233–235
configure RADIUS server as, 189, 219–225
restarting as troubleshooting step, 235
O
objective desired direction, 329
OCSP (Online Certificate Status Protocol), 181
offshoring, 329
OLAP (online analytical processing), 329
omnidirectional antennas, 30
one-way hash, 169
online analytical processing (OLAP), 329
Online Certificate Status Protocol (OCSP), 181
open authentication, WEP support for, 54
14-Index.indd 341 4/9/12 2:37:41 PM

Secure Beginner’s Guide / Wireless Network Security: A Beginner’s Guide / Tyler Wrightson / 094-6 / Index
342 Wireless Network Security: A Beginner’s Guide
open source, Linux OS as, 304
open wireless network, concerns related to, 252–253
operating systems, 35–36, 78. See also by individual
types
orchestration, 329
Organization Units. See OUs (Organization Units)
organizationally unique identifier (OUI), of MAC
address, 282–284
OUI (organizationally unique identifier), of MAC
address, 282–284
OUs (Organization Units)
apply Group Policy Object to, 199–200
configuring wireless clients and, 230
creating for wireless network, 197–198
outsourcing, 329
P
packet injection attacks, attacks on WEP, 63
packets
capturing client packets, 109–111
passive packet capture, 45–47
panels, Gnome, 309
parabolic antennas, 32
parallel deployment, of new wireless network, 136
passphrase, cracking WPA, 91–95
passwd file, user administration in Linux, 316–317
passwords
authenticating guest users, 254
brute force attacks on, 46–47
hashing algorithm for storing encrypted
value of, 169
PATH variable, running Linux commands and, 311
PCAP file, 109
PCI (Payment Card Industry), Data Security
Standard, 275
PDAs, 34
PEAP (Protected EAP)
applying authentication to wireless networks,
143–144
bad RADIUS authenticator, 232–233
choosing authentication method for wireless
network, 222–225
client access denied, 233–235
configuring wireless clients and, 229–230
defined, 329
restarting NPS Service, 235
troubleshooting, 231–232
penetration tests
defined, 329
types of, 134
vs. vulnerability assessment, 134
permissions, Linux file, 321–323
physical security
assessment of, 141
of wireless clients, 103
pipe (|), running Linux commands and, 313
PKI (Public Key Infrastructure)
asymmetric encryption in, 55
defined, 329
overview of, 165–166
Public Key Cryptography and, 166–167
trust and, 176
pocket wireless scanners, 34
Point-to-Point Protocol. See PPTP (Point-to-Point
Protocol)
POP3 (Post Office Protocol), 46
portable hotspots, 26
ports
preventing rogue wireless networks, 280–281
restricting network access and, 237–239
Post Office Protocol (POP3), 46
power management systems, 100
PPTP (Point-to-Point Protocol)
creating VPN tunnels, 266–267
defined, 329
VPN to Windows server, 269–270
prevention
Defense in Depth, 138
failure of, 14–15
principle of, 14
rouge wireless networks, 275
prioritization, 329
private IP addressing (RFC 1918), 243
private keys
in asymmetric encryption, 167–168
sending secure messages, 171–172
probability, of vulnerability exploitation, 8, 10–11
Probe-Request packets, 73
Probe-Response packets, 73
probes
Kismet, 103–104
in wireless reconnaissance, 43
project management, 329
project scope, 329
promiscuous mode, packet capture in, 107
Protected EAP. See PEAP (Protected EAP)
protocol analyzers, 44
pseudo random numbers (nonce value), four-way
handshake in WPA and, 66
PSK (pre-shared keys)
applying authentication to wireless
networks, 143
authenticating guest users, 254
cracking WPA, 66–67
14-Index.indd 342 4/9/12 2:37:41 PM

Secure Beginner’s Guide / Wireless Network Security: A Beginner’s Guide / Tyler Wrightson / 094-6 / Index
Secure Beginner’s Guide / Wireless Network Security: A Beginner’s Guide / Tyler Wrightson / 094-6 / Index
Index 343
encrypting guest traffic, 258
securing wireless network, 236–237
WEP keys, 58
WPA, 64
PTW attack, breaking WEP and, 61
public key (asymmetric) encryption, 55
Public Key Cryptography
attacking public key crypto-secured messages,
172–174
digital signature process, 168–169
example sending a secure message, 171–172
hash functions and, 169–171
symmetric and asymmetric algorithms, 166–167
Public Key Infrastructure. See PKI (Public Key
Infrastructure)
public keys
in asymmetric encryption, 167–168
obtaining from CA (Certificate Authority),
175–180
sending secure messages, 171–172
Q
QoS (quality of service), attacks on TKIP and, 69
qualitative costs, in calculating risk, 8
quantitative costs, in calculating risk, 8
quartiles, 329
R
RADIUS (Remote Authentication Dial-In
User Service)
authentication against Active Directory,
276–277
for authentication with VPN appliances, 268
client access denied, 233–235
configure RADIUS server, 189, 208–213,
219–225
defined, 330
overview of, 183–185
troubleshooting bad RADIUS authenticator,
232–233
using with 802.1x port-based access control,
186–188
rainbow table attacks, 67
RASCI (Responsible, Approver, Supporter, Consultant,
and Informed), 330
RBAC (Role-Based Access Control)
authenticating guest users, 254
defined, 330
RC4 cipher
TKIP using, 64
use in security protocols, 57
in WEP authentication, 55–56, 59
RDP (Remote Desktop Protocol), 262–263
reality, in defense, 130–131
related-key attack, breaking WEP and, 61
Remote Authentication Dial-In User Service. See
RADIUS (Remote Authentication Dial-In User
Service)
Remote Desktop Protocol (RDP), 262–263
Remote Switch Port Analyzer (RSPAN)
defined, 330
port-mirroring and, 156–158
remote wireless networks, securing, 249
resolv.conf (resolution file), DNS, 320
Responsible, Approver, Supporter, Consultant, and
Informed (RASCI), 330
return on investment. See ROI (return on
investment)
RFC (Request for Comment), 243
RFP (Request for Proposal), 330
risk matrix, 8
risks
calculation of, 7–10, 15
impossibility of eliminating all, 6–7
not all risks must be mitigated, 11–12
Rogue DHCP attacks, 50–51
ROI (return on investment)
balancing risk against, 7
defined, 330
not applicable to security, 13
rouge access points
802.1x (port-based access control), 275–278
assessment of, 141
automated detection of, 291–292
detecting, 141
handling, 274–275, 289–291
manual detection of, 281–285
NAC (Network Access Control) and, 279
overview of, 274
port security and, 280–281
preventing, 275
tracing, 285–288
route command, manipulating routing table with, 320
routers
dual-homed, 140
options for terminating VPN connections, 268
overview of, 150
RSPAN (Remote Switch Port Analyzer)
defined, 330
port-mirroring and, 156–158
14-Index.indd 343 4/9/12 2:37:41 PM

Secure Beginner’s Guide / Wireless Network Security: A Beginner’s Guide / Tyler Wrightson / 094-6 / Index
344 Wireless Network Security: A Beginner’s Guide
S
sacred cows, 330
satellite dish, as parabolic antenna, 32
scanning option, iwlist, 75
scripts, Linux OS, 323–324
Secure Hash Algorithm (SHA), 169
Secure Shell. See SSH (Secure Shell)
Secure Sockets Layer. See SSL (Secure Sockets Layer)
Secure Sockets Layer/Transport Layer Security
(SSL/TLS), 266–267
security cameras, wireless clients in business
environments, 100
security compromises, internal vs. external, 12–13
security principles
CIA (Confidentiality, integrity, and
availability), 14
Defense in Depth, 13
impossibility of eliminating all risk, 6–7
Least Privilege, 13
not all risks must be mitigated, 11–12
not just about keeping the bad guys
out, 12–13
overview of, 5
prevention, detection, and deterrents, 14
prevention fails, 14–15
risk calculation and mitigation
controls, 7–10
ROI not applicable to risk, 13
security vs. convenience, 5–6
Service Set Identifiers. See SSIDs
(Service Set Identifiers)
SHA (Secure Hash Algorithm), 169
shared-key (symmetric) encryption, 55
shared-key authentication, 54–55
shell options, Linux OS, 311
Simple Mail Transfer Protocol (SMTP), 46
slope of a line, 330
small office/home office (SOHO), 26
smartphones, 34
SMTP (Simple Mail Transfer Protocol), 46
sniffers
defined, 330
sniffing insecure communications, 105–108
social engineering, 117
software, installing on Linux OSs, 315–316
SOHO (small office/home office), 26
SPAN (Switch Port Analyzer)
defined, 330
monitoring access points for
malicious use, 289
port-mirroring and, 156–157
spectrum analyzers, 34
SSH (Secure Shell)
creating VPN tunnels, 266–267
for interactive sessions on remote machines,
262–264
restricting access from internal LAN to
wireless LAN, 242
SSID cloaking
overview of, 44–45
useless strategies in defending wireless
networks, 146–147
using Kismet to find cloaked network, 83
SSIDs (Service Set Identifiers)
adding multiple for single access point,
246–249
defined, 330
overview of, 19
rainbow table attacks and, 67
SSL (Secure Sockets Layer)
circumventing or breaking, 258
defined, 330
MITM attacks and, 52–53, 122
SSL-stripping attacks, 52–53, 122–123
SSL MITM attacks, 52–53, 122
SSL stripping attacks, 122–123
SSL-stripping attacks, 52–53
SSL/TLS (Secure Sockets Layer/Transport Layer
Security), 266–267
stakeholders, 330
stream ciphers
vs. block ciphers, 56
RC4 cipher. See RC4 cipher
subnets, restricting network access and, 237–239
subordinate CAs, 180
supplicants, 802.1x, 185–186
Switch Port Analyzer. See SPAN (Switch Port Analyzer)
switches
as 802.1x authenticator, 276–278
Layer 3, 139
network segmentation and, 139
overview of, 151–153
showing MAC addresses, 283
symmetric algorithms, 166–167
T
TCP ports, restricting network access and, 237–239
Tcpdump, Android OS and, 28
televisions, wireless clients in business
environments, 100
Temporal Key Integrity Protocol. See TKIP (Temporal
Key Integrity Protocol)
test lab, creating, 24
14-Index.indd 344 4/9/12 2:37:41 PM

Secure Beginner’s Guide / Wireless Network Security: A Beginner’s Guide / Tyler Wrightson / 094-6 / Index
Secure Beginner’s Guide / Wireless Network Security: A Beginner’s Guide / Tyler Wrightson / 094-6 / Index
Index 345
text editor, gedit program as, 323
Thawte, 178
threat analysis, 331
time, restricting network access based on, 237
TJX Companies, hacking example, 29
TKIP (Temporal Key Integrity Protocol)
attacking, 69
defined, 331
encryption methods in WPA, 142
WPA based on, 64
TLS (Transport Layer Security)
defined, 331
SSL/TLS, 266–267
Transport Layer Security (TLS)
defined, 331
SSL/TLS, 266–267
Trojan viruses, 124
trunks, VLAN, 151–153
Trusted Root Certification Authorities Store,
175, 183, 205
U
Ubuntu, Linux OS options, 35
UDP ports, assigned to RADIUS, 184
UNetbootin, making bootable USB drive, 307
USB drive, bootable USB drive for Linux OS,
307–308
users
access restrictions in WPA2-Enterprise
network, 236–237
administration, Linux OS, 316–318
creating user groups for wireless network,
197–198
educating, 298
specifying user groups for access policies, 226
V
VeriSign, 177
virtual local area networks. See VLANs (virtual local
area networks)
virtual private networks. See VPNs (virtual private
networks)
viruses, 124
VLANs (virtual local area networks)
defined, 331
dividing physical switch into logical switches,
151–153
MAC addresses associated with, 283
multiple SSIDs and, 246–249
NAC (Network Access Control) and, 279
network segmentation and, 139
VPN appliances, 268
VPN gateways (concentrators), 267
VPNs (virtual private networks)
defined, 331
between gateway devices, 265–266
Host and Network modes, 264–265
jump stations compared to, 262
options for wireless networks, 268–271
overview of, 264
protocols for creating VPN tunnels, 266–267
vulnerabilities
assessment vs. penetration tests, 134
consequences and probabilities, 8, 10–11
factors exacerbating client vulnerabilities,
101–103
of wireless clients, 100–101
W
Wardrive app
defined, 74
features of, 84
wardriving
defined, 331
overview of, 31
pocket wireless scanners and, 34
in wireless reconnaissance, 44
web authentication gateways, 160
web authentication page, faking, 120–121
WEP (Wired Equivalent Privacy)
attacking WEP encrypted networks, 62–63
authentication and, 54–55
cracking WEP encryption, 85–91
defined, 331
history of breaking, 59–62
how it works, 56–59
support in 802.11b, 16
useless in defending wireless networks, 147
WEP cloaking, 147
WEP key
attempt to crack, 87–88
cracking, 90–91
white box tests, types of penetration tests, 135
Wicd program
configuring wireless and wired interfaces, 309
for graphical network configuration, 321
Wi-Fi Protected Access. See WPA (Wi-Fi Protected
Access)
Wi-Fi Protected Setup (WPS), brute force attacks, 68
window managers (WMs), choosing for BackTrack, 306
14-Index.indd 345 4/9/12 2:37:41 PM
Secure Beginner’s Guide / Wireless Network Security: A Beginner’s Guide / Tyler Wrightson / 094-6 / Index
346 Wireless Network Security: A Beginner’s Guide
Windows OSs
configuring wireless clients and, 227–231
guest account privileges, 259
interactive sessions on remote machines, 262
Kismet compatibility with, 78
Netstumbler and, 84
securing wireless clients, 299–301
smartphones and, 34
wireless security and, 35
Windows servers
install Active Directory Certificate Services
on, 193–196
installing NPS on, 220
options for terminating VPN connections, 268
Wired Equivalent Privacy. See WEP (Wired Equivalent
Privacy)
wireless clients
airodump for targeting, 105
capturing packets, 109–111
configuring for WPA2-Enterprise network,
227–231
configuring Linux laptop to act as an access
point, 113–116
default operations and, 117–118
DNS spoofing attacks, 119–120
factors exacerbating vulnerabilities of, 101–103
fake antivirus updates, 124
fake web authentication page, 120–121
forcing communication with, 111–113, 117
GPOs for securing, 299–301
Kismet targeting, 103–104
MITM (man-in-the-middle) attacks, 118–119
phones and printers as client devices, 25
protecting, 298
sniffing insecure communications, 105–108
SSL MITM attacks, 122
SSL stripping attacks, 122–123
technical solutions for endpoint security, 299
troubleshooting access denied problem,
233–235
types of wireless devices, 99–100
user education and, 298
vulnerabilities of, 100–101
wireless reconnaissance and, 103
wireless devices, types of, 99–100
wireless LANs (WLANs)
restricting access from internal LAN to
wireless LAN, 241–244
restricting access from wireless LAN to
internal LAN, 239–241
wireless networking, basics
802.11x wireless standards, 16–17
access points, 18
association and authentication, 20
autonomous vs. controller-based access
points, 18–19
beacons and broadcasts, 20
encryption, 20
identifiers (SSID, BSSID, and MAC
addresses), 19
overview of, 16
wireless personal area networks (WPANs), 293
wireless reconnaissance
active and passive, 43–44
iwlist command for, 75–77
Kismac tool, 84
Kismet tool for, 78–83
Netstumbler, 84
overview of, 73–74
Wardrive app, 84
wireless clients and, 103
wireless technologies
cloud-based solutions, 295–297
dedicated wireless IDS, 297
impacting organizational security, 293
lightweight solutions, 294–295
Next-Gen solutions, 293–294
wireless test lab, creating, 24
wireless tools/gadgets
antennas, 30–32
client devices, 25
GPS units, 33
operating systems, 35–36
overview of, 24
pocket wireless scanners, 34
smartphones and PDAs, 34
spectrum analyzers, 34
types of access points, 25–29
Wireshark
capturing client packets, 109–111
capturing FTP credentials, 112
Wi-Spy spectrum analyzer by Metageek, 34
WLANs (wireless LANs)
restricting access from internal LAN to
wireless LAN, 241–244
restricting access from wireless LAN to
internal LAN, 239–241
WMs (window managers), choosing for BackTrack, 306
wordlists, dictionary attacks, 66
workflows, 331
WPA (Wi-Fi Protected Access)
attacking WPA protected networks, 65–66
authenticating guest users in
WPA-Enterprise, 254
cracking WPA passphrase, 91–95
cracking WPA pre-shared key, 66–67
14-Index.indd 346 4/9/12 2:37:41 PM

Secure Beginner’s Guide / Wireless Network Security: A Beginner’s Guide / Tyler Wrightson / 094-6 / Index
Secure Beginner’s Guide / Wireless Network Security: A Beginner’s Guide / Tyler Wrightson / 094-6 / Index
Index 347
defined, 331
encryption methods in, 142
how it works, 64–65
WPA deauthentication spoofing, 67–68
WPA denial of service, 69
WPS brute forcing, 68
WPA2
encrypting guest traffic, 258
encryption algorithms, 65
versions of WPA, 64
WPA-PSK compared with WPA2-Enterprise,
236–237
WPA2-Enterprise network, architecture of
802.1x and, 185–188
attacking public key crypto-secured messages,
172–174
authentication using digital certificates,
174–175
Certificate Authority server structure, 180–181
deploying, 188–189
digital signature process, 168–169
handling compromised certificates, 181
hash functions and, 169–170
introduction to, 164–165
Microsoft Certificate Services and, 182–183
obtaining public keys from Certificate
Authority, 175–180
PKI and, 165–166
public and private keys for sending secure
messages, 171–172
RADIUS and, 183–188
services supporting Certificate services, 182
symmetric and asymmetric algorithms,
166–167
WPA2-Enterprise network, configuring
configure access points, 225–227
configure RADIUS server as Network Policy
Server, 219–225
configure wireless clients, 227–231
overview of, 218–219
WPA2-Enterprise network, deploying
allow pre-logon authentication, 205–208
authenticate network, 214–215
configure access point, 213–214
configure certificate template and
auto-enrollment, 196–197
configure RADIUS server, 208–213
create and issue certificate templates, 200–204
create Group Policy Object and apply to
Organizational Unit, 199–200
create Organization Units and users group,
197–198
install Active Directory Certificate Services,
193–196
install and configure CA, 192–193
log onto workstation and obtain user
certificate, 204–205
overview of, 192
WPA2-Enterprise network, securing
adding multiple SSIDs for single access point,
246–249
creating internal DMZ, 244–246
firewall access lists, 237–239
network segmentation, 236
overview of, 236
remote networks and, 249
restricting access based on time, 237
restricting access from internal LAN to
wireless LAN, 241–244
restricting access from wireless LAN to
internal LAN, 239–241
restricting user access, 236–237
WPANs (wireless personal area networks), 293
WPA-PSK
authenticating guest users, 254
encrypting guest traffic, 258
overview of, 64
WPA2-Enterprise compared with, 236–237
WPS (Wi-Fi Protected Setup), brute force attacks, 68
WRT54G access points
configuring, 213–214, 225–227
overview of, 26–27
X
X terminal, Gnome, 310
X.500 standard, 177
X.509 standard, 177
Y
yagi antennas, 30–32
Z
Zigbee, 293
14-Index.indd 347 4/9/12 2:37:41 PM

Secure Beginner’s Guide / Wireless Network Security: A Beginner’s Guide / Tyler Wrightson / 094-6 / Index
The Secure Beginner’s Guides
SECURITY SMARTS FOR THE SELF-GUIDED IT PROFESSIONAL
The Secure Beginner’s
Guides offer trusted, hands-
on coverage of current and
emerging security topics.
Written by experts in the field,
these books make it easy to
put security concepts into
practice now.
TM
Security Metrics: A Beginner’s Guide
978-0-07-174400-3
Wireless Network Security: A Beginner’s Guide
978-0-07-176094-2
Computer Forensics: A Beginner’s Guide
978-0-07-174245-0
Web Application Security: A Beginner’s Guide
978-0-07-177616-5
Available in print and e-book format.
Follow us @MHComputing
14-Index.indd 348 4/9/12 2:37:51 PM

Secure Beginner’s Guide / Wireless Network Security: A Beginner’s Guide / Tyler Wrightson / 094-6 / Index
Secure Beginner’s Guide / Wireless Network Security: A Beginner’s Guide / Tyler Wrightson / 094-6 / Index
Available in print and ebook formats.
CISSP All-in-One Exam Guide,
Fifth Edition
Shon Harris
0-07-160217-8
CISSP Practice Exams
Shon Harris
0-07-170139-7
CSSLP Certification All-in-One Exam Guide
Wm. Arthur Conklin and Daniel Shoemaker
0-07-176026-1
CISA Certified Information Systems Auditor
All-in-One Exam Guide, Second Edition
Peter Gregory
0-07-176910-2
The Best in Security Certification Prep
CISSP Boxed Set
Shon Harris
0-07-176845-9
Follow us @MHComputing
14-Index.indd 349 4/9/12 2:37:51 PM

Secure Beginner’s Guide / Wireless Network Security: A Beginner’s Guide / Tyler Wrightson / 094-6 / Index
Stop Hackers in Their Tracks
Hacking Exposed
Malware & Rootkits
Hacking Exposed Computer
Forensics, 2nd Edition
Hacking Exposed Linux,
3rd Edition
IT Auditing,
2nd Edition
IT Security Metrics Gray Hat Hacking,
2nd Edition
Hacking Exposed Wireless,
2nd Edition
Hacking Exposed:
Web Applications, 3rd Edition
Available in print and ebook formats
Hacking Exposed, 7th Edition
@MHcomputing
14-Index.indd 350 4/9/12 2:37:51 PM
