Wix 3.6 A Developers Guide To Windows In
Wix_3.6_a_developers_guide_to_windows_in
User Manual:
Open the PDF directly: View PDF ![]() .
.
Page Count: 488 [warning: Documents this large are best viewed by clicking the View PDF Link!]
- Cover
- Copyright
- Credits
- About the Author
- About the Reviewers
- www.PacktPub.com
- Table of Contents
- Preface
- Chapter 1: Getting Started
- Chapter 2: Creating Files and Directories
- Chapter 3: Putting Properties and AppSearch to Work
- Chapter 4: Improving Control with Launch Conditions and Installed States
- Chapter 5: Understanding the Installation Sequence
- Chapter 6: Adding a User Interface
- Chapter 7: Using UI Controls
- Chapter 8: Tapping into Control Events
- Chapter 9: Working from the Command Line
- Chapter 10: Accessing the Windows Registry
- Chapter 11: Controlling Windows Services
- Chapter 12: Localizing Your Installer
- Chapter 13: Upgrading and Patching
- Chapter 14: Extending WiX
- Chapter 15: Bootstrapping Prerequisites with Burn
- Chapter 16:
Customizing the Burn UI
- Burn extension points
- Creating the class library
- Extending the BootstrapperApplication class
- Defining the model
- Implementing the viewmodel
- Marking up the view
- Referencing the UI in a Burn bundle
- Passing user input to a bundled MSI
- Displaying progress
- Downloading packages
- Collecting command-line arguments
- Summary
- Index

WiX 3.6: A Developer's Guide to Windows Installer XML
Copyright © 2012 Packt Publishing
All rights reserved. No part of this book may be reproduced, stored in a retrieval
system, or transmitted in any form or by any means, without the prior written
permission of the publisher, except in the case of brief quotations embedded in
critical articles or reviews.
Every effort has been made in the preparation of this book to ensure the accuracy
of the information presented. However, the information contained in this book is
sold without warranty, either express or implied. Neither the author, nor Packt
Publishing, and its dealers and distributors will be held liable for any damages
caused or alleged to be caused directly or indirectly by this book.
Packt Publishing has endeavored to provide trademark information about all of the
companies and products mentioned in this book by the appropriate use of capitals.
However, Packt Publishing cannot guarantee the accuracy of this information.
First published: October 2010
Second edition: December 2012
Production Reference: 1051212
Published by Packt Publishing Ltd.
Livery Place
35 Livery Street
Birmingham B3 2PB, UK.
ISBN 978-1-78216-042-7
www.packtpub.com
Cover Image by Abhishek Pandey (abhishek.pandey1210@gmail.com)
www.it-ebooks.info

Credits
Author
Nick Ramirez
Reviewers
Neil Sleightholm
Martin Oberhammer
Paul Michniewicz
Roel van Bueren
ENG. Nir Bar
Acquisition Editor
Usha Iyer
Lead Technical Editor
Dayan Hyames
Technical Editor
Jalasha D'costa
Project Coordinator
Arshad Sopariwala
Proofreader
Maria Gould
Indexer
Rekha Nair
Production Coordinator
Arvindkumar Gupta
Cover Work
Arvindkumar Gupta
www.it-ebooks.info

About the Author
Nick Ramirez is a software developer living in Columbus, Ohio. As a believer that
deployment shouldn't be a moment of terror, he has become a big fan of technologies
such as WiX. Other related interests include build automation, software architecture,
and playing Portal 2. Nick lives with his wife and two cats.
I would like to thank the hard-working folks at Packt Publishing.
Their organization and planning make all the difference! I would
also like to thank the dedicated people of the WiX community, who
tirelessly volunteer their time to answer questions. Finally, I would
like to thank the developers who contribute source code to the WiX
project. Their expertise and commitment have gone towards making
the best Windows deployment tool on the market.
www.it-ebooks.info
About the Reviewers
Neil Sleightholm is an IT consultant working in the UK. He has an engineering
background with experience in software development, application architecture,
electronics development, and mechanical engineering.
His current focus is on conguration management, build automation, installation
development, and deployment.
Neil has worked with most of the Microsoft platform technologies and has
programmed in C, C++, C#, Visual Basic, .NET, SQL, ASP.NET, and ASP. In the
build and source control eld he has experience with NAnt, MSBuild, TeamBuild,
Subversion (SVN), TFS, VSS, Mercurial, and CVS. He has written installation systems
using Windows Installer, Windows Installer XML (WiX), Windows Installer Custom
Actions (using DTF), dotNetInstaller, InnoSetup, and Wise Installation System.
Neil has worked with open source projects and has been a contributor to
Windows Installer XML (WiX), dotNetInstaller, and the AlienBBC plugin
for Logitech Squeezebox.
In his spare time he is a petrol head and keen motorcyclist.
If you want to know more about him, you can check out his LinkedIn prole at:
http://www.linkedin.com/in/neilsleightholm.
Martin Oberhammer currently works as a Software Engineer at Sophos in
Vancouver, BC.
He studied computer science at the Johannes Kepler University in Linz, Austria,
where he graduated in 2002. His rst job in software deployment was at Utimaco
Safeguard AG. In 2008, he moved to the USA and then to Canada, where he now
resides. Nick and Martin where at one point colleagues and created a software
installer using WiX technology.
www.it-ebooks.info
Paul Michniewicz is a software developer and educational consultant with
diverse experiences in academia, government, and industry.
As a developer, Paul has spent more than 12 years in software development and
testing. Much of that time was spent in conguration management where he has
managed source control systems, developed build and test automation strategies,
and authored several installers in the enterprise space for companies such as
JetForm and Adobe.
As an educational consultant, Paul has developed and delivered introductory
Java courses to professionals and students. He currently runs a tutoring business
where he teaches mathematics, physical sciences, and software development to
students of all ages. Paul has a special interest in working with students who have
developmental needs.
Paul lives in Ottawa, Canada with his wife Anne and two children Zygmunt
and Moira. He is currently a stay-at-home dad and homeschools his son. To know
more about Paul, you can check out his LinkedIn prole at ca.linkedin.com/in/
pmichnie.
Roel van Bueren works as senior consultant, trainer, and developer for
ROVABU NetWorks BV and ROVABU Software BV. Roel is specialized in Software
Packaging using Windows Installer and Flexera AdminStudio, Application and
Desktop Management by using Microsoft System Center Conguration Manager and
Novell ZENworks Conguration Management, Desktop Deployment of Microsoft
Windows XP, Windows 7, and Windows 8 by using Microsoft SCCM/MDT, Novell
ZENworks Conguration Management, ENGL Imaging Toolkit, and also Microsoft
.NET/C# development and application virtualization.
His latest projects involve "Bundle Commander" for Novell ZENworks
Conguration Management and "Setup Commander" for Microsoft System Center
Conguration Manager 2012, Microsoft Deployment Toolkit, and other deployment
solutions such as Dell KACE and RES Automation Manager, for which customized
transform les are needed to deploy MSI packages or silent switches to deploy
legacy setups.
www.it-ebooks.info

ENG. Nir Bar is a computer engineer, and graduate of Technion – Israel Institute
of Technology.
Nir Bar has over 13 years experience in software and hardware development.
He has worked with RAFAEL – Advanced Defense Systems, Marvell Technology
Group, Agilent Technologies, Applied Materials, McKesson, and other leading high
tech companies. He has worked in the Microsoft platform technologies and has
programmed in C, C++, C# .NET, and SQL Server.
In the Linux platform, Nir Bar has programmed in C, C++, and PERL.
He is also experienced in pre-Silicon verication methodologies and tools.
Currently, Nir is an independent software consultant, developer, and tutor.
He consults and develops software products from the idea stage through
analysis, design, development stages, and to ready-to-market products.
Nir Bar tutors Windows Installer technology to Israeli software companies.
To contact Nir Bar you can drop an e-mail to: nir.bar@panel-sw.co.il.
To my wife Sarit and to my sons Itay and Yehonathan for their love,
support, and encouragement.
www.it-ebooks.info

www.PacktPub.com
Support les, eBooks, discount offers and more
You might want to visit www.PacktPub.com for support les and downloads related
to your book.
Did you know that Packt offers eBook versions of every book published, with PDF
and ePub les available? You can upgrade to the eBook version at www.PacktPub.
com and as a print book customer, you are entitled to a discount on the eBook copy.
Get in touch with us at service@packtpub.com for more details.
At www.PacktPub.com, you can also read a collection of free technical articles, sign
up for a range of free newsletters and receive exclusive discounts and offers on Packt
books and eBooks.
http://PacktLib.PacktPub.com
Do you need instant solutions to your IT questions? PacktLib is Packt's online
digital book library. Here, you can access, read and search across Packt's entire
library of books.
Why Subscribe?
• Fully searchable across every book published by Packt
• Copy and paste, print and bookmark content
• On demand and accessible via web browser
Free Access for Packt account holders
If you have an account with Packt at www.PacktPub.com, you can use this to access
PacktLib today and view nine entirely free books. Simply use your login credentials
for immediate access.
www.it-ebooks.info

Table of Contents
Preface 1
Chapter 1: Getting Started 7
Introducing Windows Installer XML 8
What is WiX? 8
Is WiX for you? 9
Where can I get it? 10
Visual Studio package (Votive) 13
A word about GUIDs 16
Your rst WiX project 16
XML declaration and Wix element 17
The Product element 18
The Package element 20
The MediaTemplate element 21
The Media element 22
The Directory element 23
The Component element 27
The File element 29
The Feature element 30
Start menu shortcuts 33
Putting it all together 37
Adding a user interface 40
Viewing the MSI database 41
Orca.exe 41
Turning logging on during installation 42
Other resources 43
Summary 43
www.it-ebooks.info
Table of Contents
[ ii ]
Chapter 2: Creating Files and Directories 45
The File element 45
The DirectoryRef element 48
The ComponentGroup element 49
The Fragment element 51
Harvesting les with heat.exe 55
Copying and moving les 61
Copying les you install 61
Copying existing les 63
Moving existing les 64
Installing special-case les 64
Adding assembly les to the GAC 65
Installing a TrueType font 66
Installing 64-bit les 67
Creating an empty folder 69
Setting le permissions 70
Speeding up le installations 74
Summary 75
Chapter 3: Putting Properties and AppSearch to Work 77
Custom properties 77
Declaring and setting properties 78
Referencing properties 79
Property visibility and scope 80
Secure properties 82
Property data types 84
Predened Windows Installer properties 86
Implied properties 87
Cited properties 88
AppSearch 90
DirectorySearch 91
FileSearch 94
ComponentSearch 95
RegistrySearch 97
IniFileSearch 100
Summary 103
Chapter 4: Improving Control with Launch
Conditions and Installed States 105
The syntax of conditions 105
Condition syntax 106
Launch conditions 107
www.it-ebooks.info
Table of Contents
[ iii ]
Feature conditions 113
Component conditions 116
Action state 119
Installed state 121
Summary 122
Chapter 5: Understanding the Installation Sequence 123
InstallUISequence 123
UI standard actions 125
FindRelatedProducts 125
AppSearch 125
LaunchConditions 125
ValidateProductID 125
CostInitialize 125
FileCost 126
CostFinalize 126
MigrateFeatureStates 126
ExecuteAction 126
InstallExecuteSequence 126
Execute standard actions 128
InstallValidate 128
InstallInitialize 128
ProcessComponents 128
UnpublishFeatures 128
RemoveRegistryValues 128
RemoveShortcuts 129
RemoveFiles 129
InstallFiles 129
CreateShortcuts 129
WriteRegistryValues 129
RegisterUser 129
RegisterProduct 129
PublishFeatures 130
PublishProduct 130
InstallFinalize 130
Immediate versus deferred 130
Custom actions 131
Setting a Windows Installer property 133
Setting the location of an installed directory 134
Running embedded VBScript or JScript 135
Calling an external VBScript or JScript le 137
Calling a function from a dynamic-link library 138
Triggering an executable 140
Sending an error that stops the installation 142
Rollback custom actions 143
Accessing properties in a deferred action 144
www.it-ebooks.info
Table of Contents
[ iv ]
Adding conditions to custom actions 146
Deployment Tools Foundation 147
The session object 147
Getting and setting properties 148
Logging 148
Showing a message box 149
Accessing feature and component states 150
Querying the MSI database 151
Inserting rows into the MSI database 151
Summary 153
Chapter 6: Adding a User Interface 155
WiX standard dialog sets 155
WixUI_Advanced 156
WixUI_FeatureTree 158
WixUI_InstallDir 159
WixUI_Mondo 160
Customizing a standard dialog set 161
Creating your own dialogs 163
ICE20 errors 163
Adding dialog les 164
The Dialog element 165
Scheduling dialogs 166
Adding TextStyle elements 167
Adding a tabbable control 169
Adding a progress dialog 172
Modal windows 175
ICE20 revisited 177
FilesInUse 177
Error 179
FatalError 181
UserExit 182
Exit 183
Summary 185
Chapter 7: Using UI Controls 187
Attributes common to all controls 187
Specic control syntax 189
PushButton 189
Text 192
ScrollableText 193
Line 194
www.it-ebooks.info
Table of Contents
[ v ]
GroupBox 195
Bitmap 195
Icon 197
Edit 197
MaskedEdit 199
PathEdit 201
CheckBox 202
RadioButtonGroup 203
ComboBox 205
ListBox 206
ListView 207
DirectoryList 208
DirectoryCombo 211
SelectionTree 212
VolumeCostList 215
VolumeSelectCombo 216
Billboard 218
ProgressBar 222
Summary 226
Chapter 8: Tapping into Control Events 227
Publishing control events 227
Subscribing to control events 231
Publish events 232
DoAction 233
EndDialog 234
NewDialog 235
AddLocal 236
Publishing a property 239
Subscribe events 239
ScriptInProgress 240
SelectionAction 242
TimeRemaining 243
Summary 246
Chapter 9: Working from the Command Line 247
Candle.exe 247
Response les 249
.wixobj les 250
Command-line arguments (compiling) 250
-arch 251
-d 251
-ext 251
www.it-ebooks.info

Table of Contents
[ vi ]
-ps 251
-I 251
-nologo 252
-o 252
-p 252
-pedantic 252
-sfdvital 252
-ss 252
-sw 253
-trace 253
-v 253
-wx 253
Compile-time variables 253
Custom compiler variables 253
Environment variables 254
System variables 255
Conditional statements and iterations 255
if...elseif...else 255
ifdef 256
ifndef 256
Iterations 257
Errors and warnings 258
Preprocessor extensions 258
Light.exe 264
Command-line arguments (linking) 265
-b 265
-bf 265
-binder 265
-cultures 266
-d 266
-dut 266
-ext 266
-loc 266
-nologo 266
-notidy 267
-o[ut] 267
-pedantic 267
-sadmin 267
-sadv 267
-sloc 267
-sma 267
-ss 268
-sts 268
-sui 268
-sv 268
-sw[N] 268
-usf <output.xml> 269
www.it-ebooks.info
Table of Contents
[ vii ]
-v 269
-wx[N] 269
-xo 269
Command-line arguments (binding) 269
-bcgg 269
-cc <path> 270
-ct <N> 270
-cub <le.cub> 270
-dcl:level 270
-eav 270
-fv 270
-ice <ICE> 271
-pdbout <output.wixpdb> 271
-reusecab 271
-sa 271
-sacl 271
-sf 272
-sh 272
-sice: <ICE> 272
-sl 272
-spdb 272
-sval 272
Link-time variables 273
Localization variables 273
Binder variables 273
Custom linker variables 275
Building an installer without Visual Studio 276
Summary 278
Chapter 10: Accessing the Windows Registry 279
Reading from the registry 280
Writing to the registry 282
Writing a single value 283
Writing multiple values 284
Setting NeverOverwrite 287
Removing registry values 287
Remove all keys recursively 287
Removing a single value 288
Copying registry values 289
Registry permissions 290
Summary 292
Chapter 11: Controlling Windows Services 293
Creating a simple Windows service 293
Using sc.exe 296
Using WiX to install a service 298
www.it-ebooks.info

Table of Contents
[ viii ]
Starting, stopping, and uninstalling a service 300
Setting the service's user account 303
Adding service dependencies 307
Service recovery with Util:ServiceCong 310
Summary 313
Chapter 12: Localizing Your Installer 315
WiX localization les 315
The role of Light.exe 319
Setting language and code page attributes 321
The Package element 322
The Product element 325
Localizing the UI 326
Error messages 326
Progress bar messages 329
EULA 332
Resizing controls 334
Creating a multi-language MSI 336
Summary 339
Chapter 13: Upgrading and Patching 341
Planning for updates 341
Choosing an update type 342
Per-user or per-machine 343
Preparing a major upgrade 343
The minor upgrade 350
Authoring a .wixmsp le 350
Creating a patch from .wixpdb les 353
Creating a patch from .wixout les 356
The small update 358
Summary 358
Chapter 14: Extending WiX 359
Building a custom WiX extension 359
Setting the stage 360
Extending the CompilerExtension class 360
Adding an XML schema 362
Parsing custom elements 365
Creating a new MSI table 370
Extending the WixExtension class 372
Using the extension in a WiX project 374
Tying a custom action to the custom element 376
Summary 383
www.it-ebooks.info
Table of Contents
[ ix ]
Chapter 15: Bootstrapping Prerequisites with Burn 385
Using the Bootstrapper Project template 386
Describing the Bundle element 387
Restricting the install by the operating system 389
UpgradeCode and detecting related bundles 391
Updating existing bundles 391
Finding other related bundles 396
Where the packages are cached 397
Chaining packages 398
The Chain element 398
The MsiPackage element 400
The ExePackage element 402
The MspPackage element 405
The MsuPackage element 406
Downloading packages 407
Counting package references 410
Rollback boundaries 412
PackageGroups 413
The Standard Bootstrapper UI 415
The RtfLicense user interface 415
The HyperlinkLicense user interface 416
Summary 418
Chapter 16: Customizing the Burn UI 419
Burn extension points 419
Creating the class library 420
Extending the BootstrapperApplication class 422
Dening the model 425
Implementing the viewmodel 427
Declaring the properties and elds 432
Dening the constructor 434
Setting up the event handlers 435
Helper methods 438
Marking up the view 439
Referencing the UI in a Burn bundle 441
Passing user input to a bundled MSI 442
Displaying progress 444
Downloading packages 446
Collecting command-line arguments 447
Summary 448
Index 449
www.it-ebooks.info
Preface
Since Rob Mensching offered up the WiX toolset as the rst open source project
from Microsoft in 2004, it has been quietly gaining momentum and followers.
Today, thousands use it to build Window Installer packages from simple XML
elements. Gone are the days when you would have had to pay for software to
build an installer for you. Now, you can do it yourself for cheap.
Not only that, but WiX has matured into a fairly slick product that's sufciently easy
to use. Best of all, it has the bells and whistles you want, including functionality to
add user interface wizards, Start menu shortcuts, control Windows services, and
read and write to the registry.
This new edition, WiX 3.6: A Developer's Guide to Windows Installer XML, brings
you up-to-date on the latest changes to the toolset. Whether you're new to WiX or
an established pro, you're likely to nd new insights. Each chapter gets straight to
the point, giving you hands-on experience, so you'll master the technology quickly.
What this book covers
Chapter 1, Getting Started, explains how after downloading and installing the WiX
toolset, you'll start using it right away to create a simple installer. Then, you'll see
how to add a basic user interface to it, install it with logging turned on, and view its
internal database.
Chapter 2, Creating Files and Directories, gives you a deeper understanding of how les
are installed and the best way to organize them in your project. You'll then use the
tool Heat.exe to generate WiX markup. Last, you'll learn about copying and moving
les, and installing special-case les.
www.it-ebooks.info

Preface
[ 2 ]
Chapter 3, Putting Properties and AppSearch to Work, introduces you to Windows
Installer properties, including those that are dened automatically and those that are
invented by you. Afterwards, you'll check the end user's computer for specic les,
directories, registry keys, and INI le settings using AppSearch.
Chapter 4, Improving Control with Launch Conditions and Installed States, teaches you to
leverage conditional statements to set prerequisites for running your installer or to
exclude particular features or components from the install. You'll also discover how
to check the action state and installed state of your features and components.
Chapter 5, Understanding the Installation Sequence, gives you a clear picture of how the
whole installation process works as you examine the order and meaning of installer
actions. You will then create custom actions and add them to this built-in sequence.
Then, you'll learn the basics of using the Deployment Tools Foundation library for
writing custom action code in C#.
Chapter 6, Adding a User Interface, after giving you a quick introduction to the
standard dialogue wizards that come with the WiX toolset, shows how to build
your own from scratch. You'll learn all of the required elements for displaying
dialogs and linking them together. You'll also see how to display common messages
such as errors and cancellation conrmations.
Chapter 7, Using UI Controls, gives you hands-on experience with each type of
UI control including buttons, textboxes, and progress bars.
Chapter 8, Tapping into Control Events, breathes life into your UI controls by having
them publish and subscribe to events. We'll get details on what each event does and
take a closer look at those you'll use on a routine basis.
Chapter 9, Working from the Command Line, emphasizes the fact that we don't
particularly need Visual Studio to compile our projects. We'll cover the commands
necessary to build an installer from the command line using Candle.exe, our
compiler, and Light.exe, our linker/binder. We will also explore how to use
preprocessor statements and how to create a custom preprocessor extension.
Chapter 10, Accessing the Windows Registry, illustrates how our installer may read
and write to the Windows Registry. We'll add and remove keys, copy values, and
set permissions.
Chapter 11, Controlling Windows Services, provides some solid examples for installing
and interacting with Windows services. You'll see how to set the service's user
account, add service dependencies, and set failure recovery.
Chapter 12, Localizing Your Installer, tackles how to render your UI for different
languages and how Light.exe, the WiX linker, plays a role. You'll then get involved
in making a single multi-language installer.
www.it-ebooks.info

Preface
[ 3 ]
Chapter 13, Upgrading and Patching, covers the all-so-important topic of upgrading
and patching. You'll get the low down on major upgrades, minor upgrades, and
small updates.
Chapter 14, Extending WiX, jumps into adding new, custom XML elements for
extending the core functionality of WiX. We'll write a library, using C#, that takes
our installer to places it's never been.
Chapter 15, Bootstrapping Prerequisites with Burn, discusses the new bootstrapping
functionality called Burn. We'll create a single executable that installs all necessary
prerequisites for our software.
Chapter 16, Customizing the Burn UI, solves the problem of customizing our Burn user
interface by crafting a new one using C# and WPF. We'll discover the places where
we can hook into the bootstrapper engine and how best to pass information from the
user to our installation packages.
What you need for this book
In order to both write and run the code demonstrated in this book, you will need
the following:
• Visual Studio 2005 or newer (Standard Edition or higher)
• The WiX toolset, which can be downloaded from http://wixtoolset.org/
Who this book is for
If you are a developer and want to create installers for software targeting the
Windows platform, then this book is for you. Those new to WiX and Windows
Installer should feel right at home as we start with the basics and gradually work
up to more complex subjects. Others with more experience will benet as we
catalog the new features in WiX 3.6. If you're coming from an earlier version of WiX,
you'll be happy to know that for the most part, things that used to work will still
work. However, several tasks, such as implementing a major upgrade, have been
simplied. We'll highlight the big changes, but keep an eye on familiar elements as
some subtle changes have been made.
www.it-ebooks.info

Preface
[ 4 ]
Conventions
In this book, you will nd a number of styles of text that distinguish between
different kinds of information. Here are some examples of these styles, and an
explanation of their meaning.
Code words in text are shown as follows: "If you would like conditions to be
re-evaluated during a re-install, you should set the Transitive attribute on
the parent component to yes."
A block of code is set as follows:
<Feature Id="MainFeature"
Title="Main Feature"
Level="1">
<ComponentRef Id="CMP_InstallMeTXT" />
<Condition Level="0">
<![CDATA[NOT REMOVE = "ALL" AND MyProperty = "some value"]]>
</Condition>
</Feature>
When we wish to draw your attention to a particular part of a code block, the
relevant lines or items are set in bold:
<Property Id="MyProperty"
Value="1" />
<Component Id="CMP_InstallMeTXT"
Guid="7AB5216B-2DB5-4A8A-9293-F6711FFAAA83">
<File Id="FILE_InstallMeTXT"
Source="InstallMe.txt"
KeyPath="yes" />
<Condition>MyProperty = 1</Condition>
</Component>
Any command-line input or output is written as follows:
msiexec /i myInstaller.msi /l*v install.log
www.it-ebooks.info
Preface
[ 5 ]
New terms and important words are shown in bold. Words that you see on the
screen, in menus or dialog boxes for example, appear in the text like this: "using the
Add Reference option in Solution Explorer".
Warnings or important notes appear in a box like this.
Tips and tricks appear like this.
Reader feedback
Feedback from our readers is always welcome. Let us know what you think about
this book—what you liked or may have disliked. Reader feedback is important for
us to develop titles that you really get the most out of.
To send us general feedback, simply send an e-mail to feedback@packtpub.com,
and mention the book title through the subject of your message.
If there is a topic that you have expertise in and you are interested in either writing
or contributing to a book, see our author guide on www.packtpub.com/authors.
Customer support
Now that you are the proud owner of a Packt book, we have a number of things to
help you to get the most from your purchase.
Downloading the example code
You can download the example code les for all Packt books you have purchased
from your account at http://www.packtpub.com. If you purchased this book
elsewhere, you can visit http://www.packtpub.com/support and register to have
the les e-mailed directly to you.
www.it-ebooks.info

Preface
[ 6 ]
Errata
Although we have taken every care to ensure the accuracy of our content, mistakes
do happen. If you nd a mistake in one of our books—maybe a mistake in the text or
the code—we would be grateful if you would report this to us. By doing so, you can
save other readers from frustration and help us improve subsequent versions of this
book. If you nd any errata, please report them by visiting http://www.packtpub.
com/support, selecting your book, clicking on the errata submission form link, and
entering the details of your errata. Once your errata are veried, your submission
will be accepted and the errata will be uploaded to our website, or added to any list
of existing errata, under the Errata section of that title.
Piracy
Piracy of copyright material on the Internet is an ongoing problem across all media.
At Packt, we take the protection of our copyright and licenses very seriously. If you
come across any illegal copies of our works, in any form, on the Internet, please
provide us with the location address or website name immediately so that we can
pursue a remedy.
Please contact us at copyright@packtpub.com with a link to the suspected
pirated material.
We appreciate your help in protecting our authors, and our ability to bring you
valuable content.
Questions
You can contact us at questions@packtpub.com if you are having a problem with
any aspect of the book, and we will do our best to address it.
www.it-ebooks.info

Getting Started
Windows Installer XML (WiX) is a free, open source XML markup that's used to
author installation packages for Windows-based software. The underlying technology
is called Windows Installer, which is the established standard for installing to any
Windows operating system. Until recently, WiX was a Microsoft offering, but is
now supported by the non-prot Outercurve Foundation. It is used by countless
companies around the world. Microsoft uses it to deploy its own software including
Microsoft Ofce and Visual Studio. In fact, Microsoft uses WiX for these products.
Windows Installer has many features, but how do you leverage them? How do you
even know what they are? This book will help you by making you more familiar
with the wide range of capabilities that are available. The good news is that WiX
makes many of the arcane and difcult-to-understand aspects of the Windows
Installer technology simple to use. This book will teach you the WiX syntax so that
you can create a professional-grade installer that's right for you.
In this chapter, we will cover the following topics:
• Getting WiX and using it with Visual Studio
• Creating your rst WiX installer
• Examining an installer database with Orca
• Logging an installation process
• Adding a simple user interface
www.it-ebooks.info

Getting Started
[ 8 ]
Introducing Windows Installer XML
In this section, we'll dive right in and talk about what WiX is, where to get it, and
why you'd want to use it when building an installation package for your software.
We'll follow up with a quick description of the WiX tools and the new project types
made available in Visual Studio.
What is WiX?
Creating a Windows Installer, or MSI package, has always been a challenging task. The
package is actually a relational database that describes how the various components of
an application should be unpacked and copied to the end user's computer.
In the past you had two options:
• You could try to author the database yourself—a path that requires a
thorough knowledge of the Windows Installer API.
• You could buy a commercial product such as InstallShield to do it for you.
These software products will take care of the details, but you'll forever be
dependent on them. There will always be parts of the process that are
hidden from you.
WiX offers a route that exists somewhere in the middle. Abstracting away the
low-level function calls while still allowing you to write much of the code by hand,
WiX is a framework for building an installer in ways that mere mortals can grasp.
Best of all, it's free. As an open source product, it has quickly garnered a wide user
base and a dedicated community of developers. Much of this has to do not only with
its price tag but also with its simplicity. It can be authored in a simple text editor
(such as Notepad) and compiled with the tools provided by WiX. As it's a avor of
XML, it can be read by humans, edited without expensive software, and lends itself
to being stored in source control where it can be easily merged and compared.
The examples in this rst chapter will show how to create a simple installer with
WiX using Visual Studio. However, later chapters will show how you can build your
project from the command line using the compiler and linker from the WiX toolset.
The WiX source code is available for download, so you can be assured that nothing
about the process will be hidden if you truly need to know more about it.
www.it-ebooks.info

Chapter 1
[ 9 ]
Is WiX for you?
It's fairly simple to copy les to an end user's computer. If that's all your product
needs, then the Windows Installer technology might be overkill. However, there are
many benets to creating an installable package for your customers, some of which
might be overlooked. The following is a list of features that you get when you author
a Windows Installer package with WiX:
• All of your executable les can be packaged into one convenient bundle,
simplifying deployment
• Your software is automatically registered with Programs and Features
• Windows takes care of uninstalling all of the components that make up your
product when the user chooses to do so
• If les for your software are accidently removed, they can be replaced by
right-clicking on the MSI le and selecting Repair
• You can create different versions of your installer and detect which version
has been installed
• You can create patches to update only specic areas of your application
• If something goes wrong while installing your software, the end user's
computer can be rolled back to a previous state
• You can create Wizard-style dialogs to guide the user through the installation
Many people today simply expect that your installer will have these features. Not
having them could be seen as a real decit. For example, what is a user supposed to
do when they want to uninstall your product but can't nd it in the Programs and
Features list and there isn't an uninstall shortcut? They're likely to remove les in a
haphazard manner and wonder why you didn't make things easy for them.
Maybe you've already gured that Windows Installer is the way to go, but why WiX?
One of my favorite reasons is that it gives you greater control over how things work.
You get a much ner level of control over the development process. Commercial
software that does this for you also produces an MSI le but hides the details about
how it was done. It's analogous to crafting a website. You get much more control when
you write the HTML yourself as opposed to using a WYSIWYG software.
Even though WiX gives you more control, it doesn't make things overly complex.
You'll nd that making a simple installer is very straightforward. For more
complicated projects, the parts can be split up into multiple XML source les to
make it easier to work with. Going further, if your product is made up of multiple
applications that will be installed together as a suite, you can compile the different
chunks into libraries that can be merged together into a single MSI le. This allows
each team to isolate and manage its part of the installation package.
www.it-ebooks.info
Getting Started
[ 10 ]
WiX is a stable technology, having been rst released to the public in 2004, so you
don't have to worry about it disappearing. It's also had a steady progression of version
releases. These are just some of the reasons why you might choose to use WiX.
Where can I get it?
You can nd the latest version of WiX at http://wixtoolset.org/, which has
both stable releases and weekly builds. The current release is Version 3.6. Once
you've downloaded the WiX installer package, double-click on it to launch it.
It relies on having an Internet connection to download the .NET 4.0 platform,
if it's not already installed.
If you want to install on a computer that isn't connected to the Internet, rst download
the installer on a computer that is and then open a command prompt and run the WiX
executable with the following command wix36.exe /layout LayoutDirectory.
The layout option takes the name of a target directory where the WiX les will be
downloaded to. You can then take these les (which include a new installer) to the
computer that doesn't have an Internet connection and use them there.
www.it-ebooks.info
Chapter 1
[ 11 ]
This installs all of the necessary les needed to build WiX projects. You'll also get the
WiX SDK documentation and the settings for Visual Studio IntelliSense and project
templates. Version 3.6 supports Visual Studio versions 2005 through 2012, although
not the Express editions.
WiX comes with the tools outlined in the following table:
Tool What it does
Candle.exe Compiles WiX source files (.wxs) into intermediate object
files (.wixobj)
Light.exe Links and binds .wixobj files to create a final .msi file.
Also creates cabinet files and embeds streams in an MSI
database
Lit.exe Creates WiX libraries (.wixlib) that can be linked together
by Light
Dark.exe Decompiles an MSI file into WiX code
Heat.exe Creates a WiX source file that specifies components from
various inputs
Insignia.exe Inscribes an MSI with the digital signatures that its external
CAB files are signed with
Melt.exe Converts a merge module (.msm) into a component group in
a WiX source file
Torch.exe Generates a transform file used to apply changes to an
in-progress installation or to create a patch file
Shine Creates a DGML diagram from an MSI
Smoke.exe Runs validation checks on an MSI or MSM file
Pyro.exe Creates a patch file (.msp) from .wixmsp and .wixmst files
WixCop.exe Converts Version 2 WiX files to Version 3
WixUnit.exe Validates WiX source files
Lux.exe and Nit.exe Authors and runs unit tests on custom actions
www.it-ebooks.info
Getting Started
[ 12 ]
In order to use some of the functionality in WiX, you may need to download a
more recent version of Windows Installer. You can check your current version
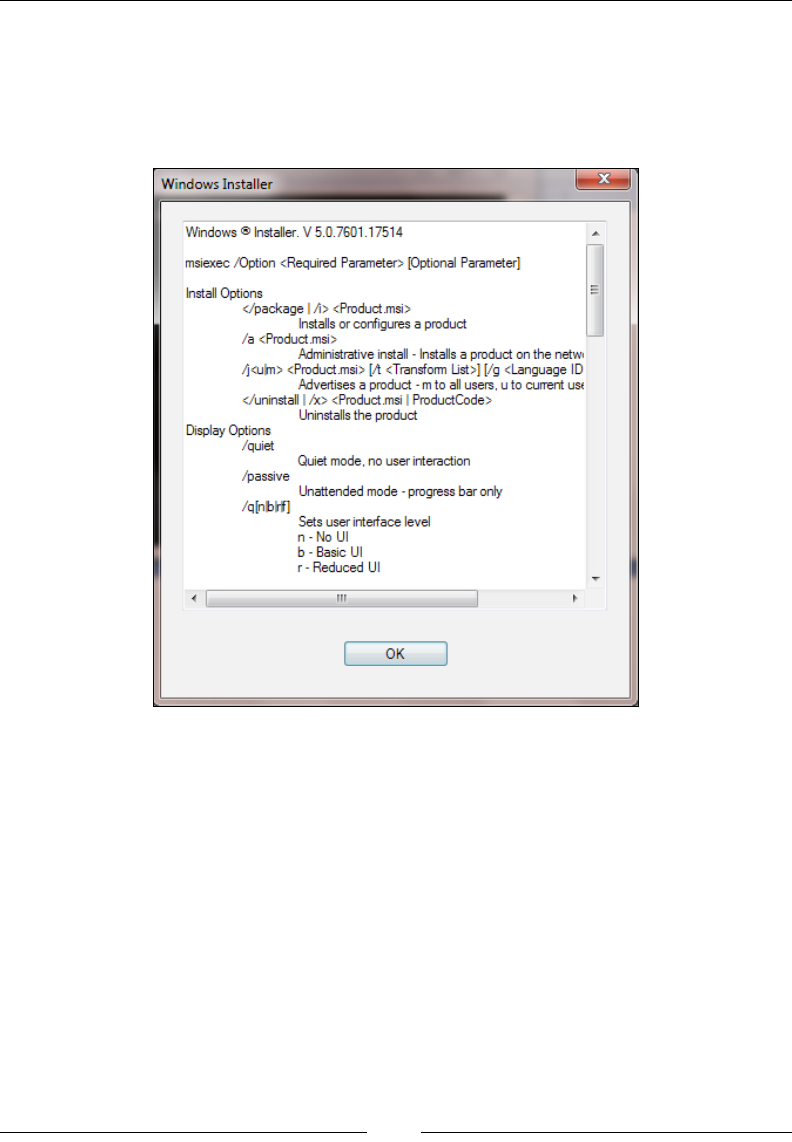
by viewing the help le for msiexec.exe, which is the Windows Installer service.
Open a Windows command prompt and then type msiexec /? to bring up a
window, as shown in the following screenshot:
If you'd like to install a newer version of Windows Installer, you can get it from the
Microsoft Download Center website. Go to:
http://www.microsoft.com/downloads/en/default.aspx
Search for Windows Installer. The current version for Windows XP, Vista, Server
2003, and Server 2008 is 4.5. Windows 7, Windows Server 2008 R2, and Windows 8
can support Version 5.0. Each new version is backwards compatible and includes the
features from earlier editions.
www.it-ebooks.info
Chapter 1
[ 13 ]
Visual Studio package (Votive)
The WiX toolset provides les that update Visual Studio to provide new WiX
IntelliSense and project templates. Together these features, which are installed for
you along with the other WiX tools, are called Votive. You must have Visual Studio
2005 or newer. Votive won't work on the Express versions. Refer to the WiX site for
more information:
http://wix.sourceforge.net/votive.html
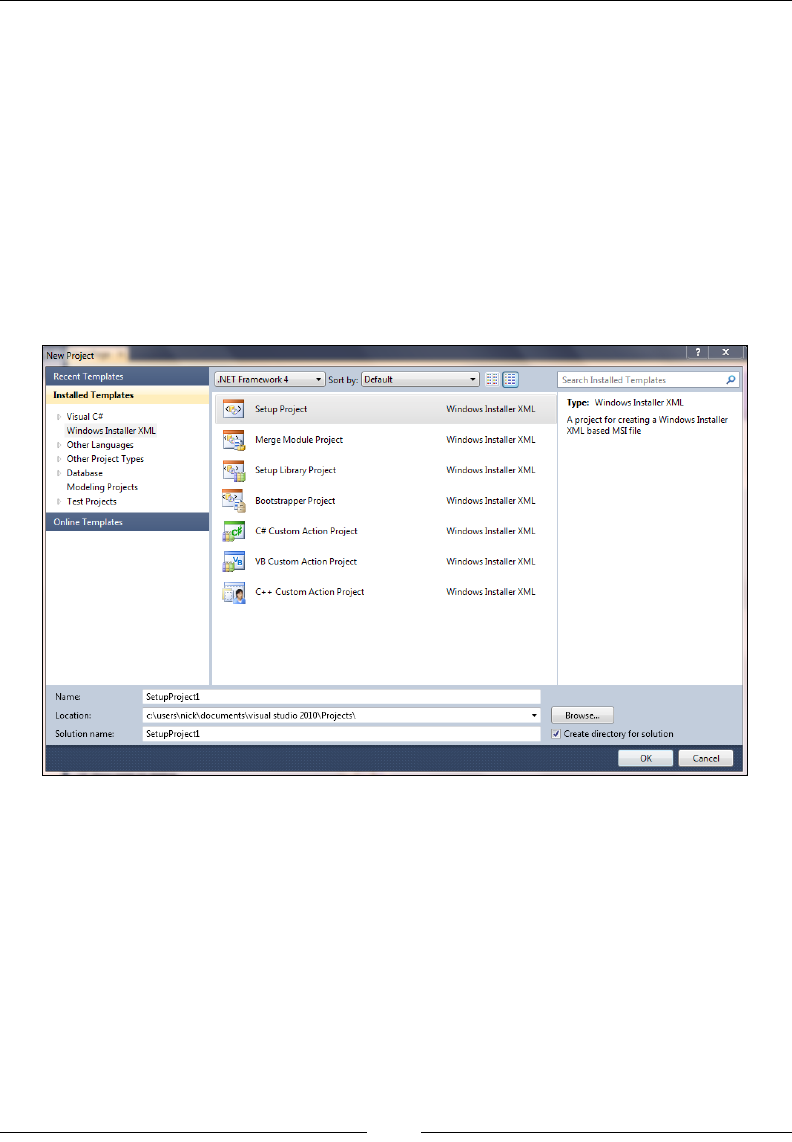
After you've installed WiX, you should see a new category of project types in
Visual Studio labeled under the title Windows Installer XML, as shown in the
following screenshot:
There are seven new project templates:
• Setup Project: Creates a Windows Installer package from one or more
WiX source les
• Merge Module Project: Creates a merge module (MSM) le
• Setup Library Project: Creates a .wixlib library
• Bootstrapper Project: Creates a prerequisite bootstrapper
• C# Custom Action Project: Creates a .NET custom action in C#
• C++ Custom Action Project: Creates an unmanaged C++ custom action
• VB Custom Action Project: Creates a VB.NET custom action
www.it-ebooks.info
Getting Started
[ 14 ]
Using these templates is certainly easier than creating the les on your own with
a text editor. To start creating your own MSI installer, select the template Setup
Project. This will create a new .wxs (WiX source le) for you to add XML markup
to. Once we've added the necessary markup, you'll be able to build the solution by
selecting Build Solution from the Build menu or by right-clicking on the project
in the Solution Explorer and selecting Build. Visual Studio will take care of calling
candle.exe and light.exe to compile and link your project les.
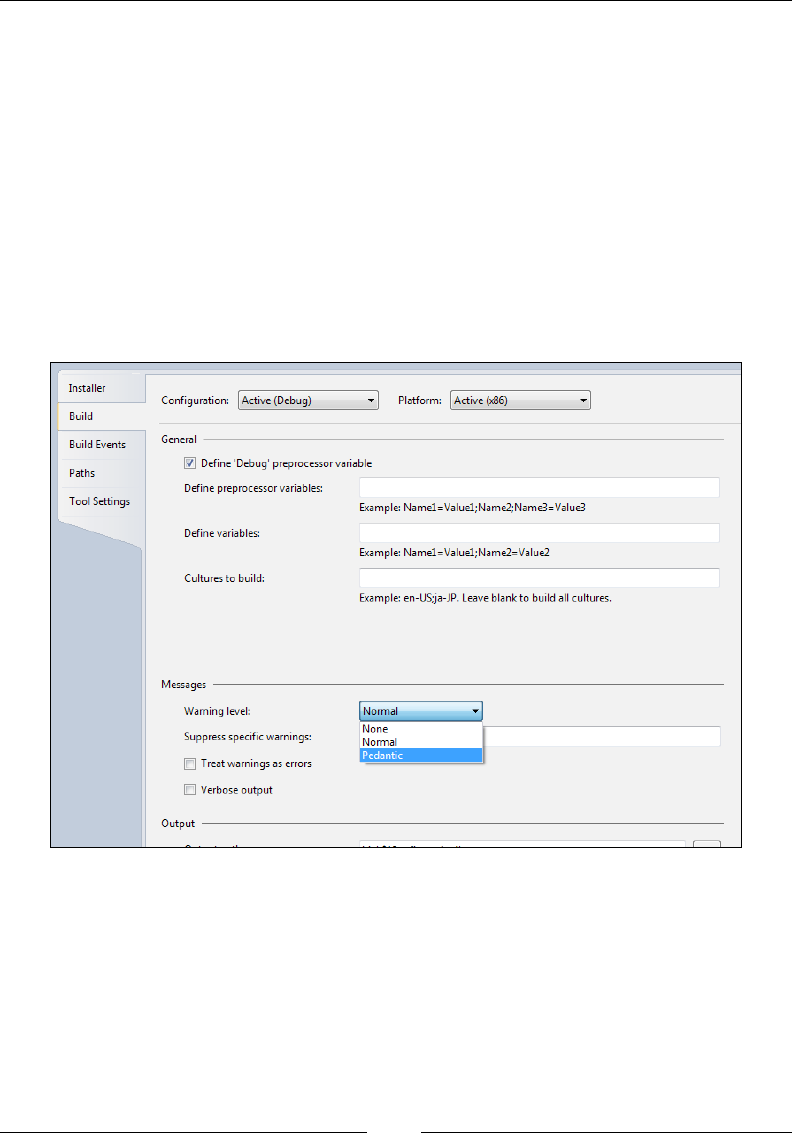
If you right-click on your WiX project in Solution Explorer and select Properties,
you'll see several screens where you can tweak the build process. One thing you'll
want to do is set the amount of information that you'd like to see when compiling
and linking the project, and how non-critical messages are treated. Refer to the
following screenshot:
Here we're selecting the level of messages that we'd like to see. To see all warnings
and messages, set Warning Level to Pedantic. You can also check the Verbose
output checkbox to get even more information. Checking Treat warnings as errors
will cause warning messages that normally would not stop the build to be treated as
fatal errors.
www.it-ebooks.info
Chapter 1
[ 15 ]
You can also choose to suppress certain warnings. You'll need to know the specic
warning message number though. If you get a build-time warning, you'll see the
warning message, but not the number. One way to get it is to open the WiX source
code (available at http://wix.codeplex.com/releases/view/93929) and view the
messages.xml le in the src\wix\Data folder. Search the le for the warning and
from there you'll see its number. Note that you can suppress warnings but not errors.
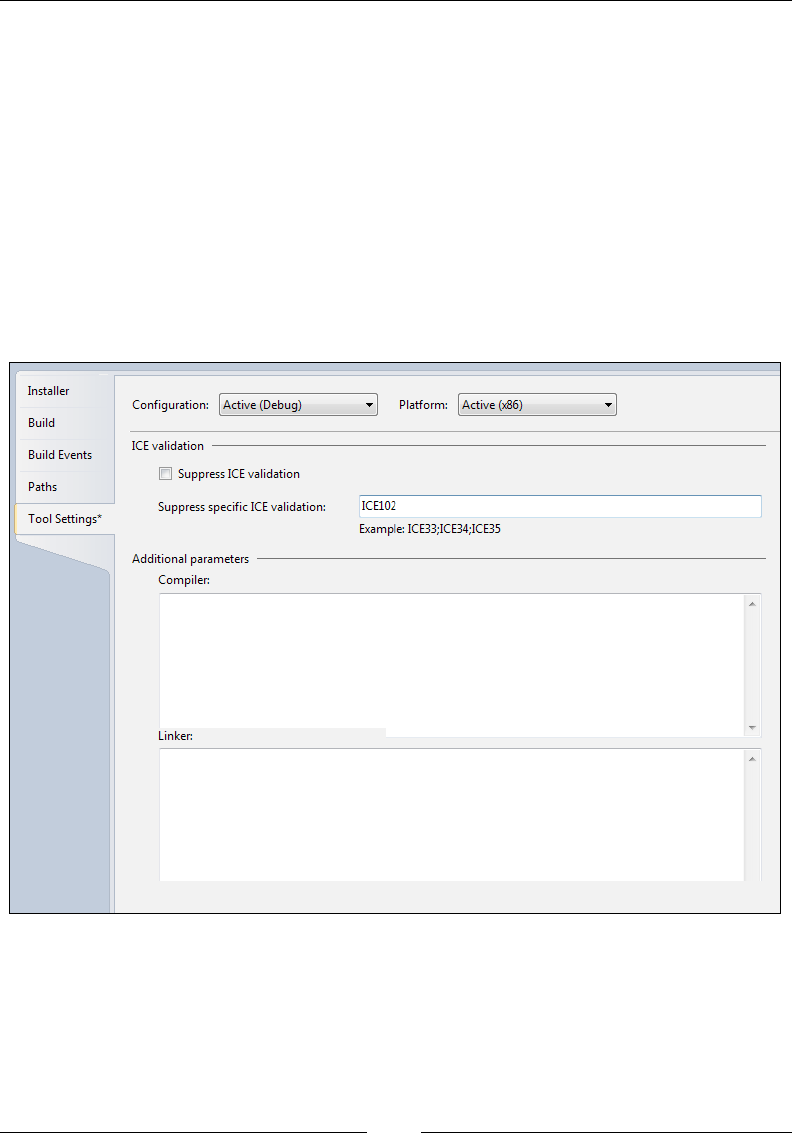
Another feature of WiX is its ability to run validity checks on the MSI package.
Windows Installer uses a suite of tests called Internal Consistency Evaluators (ICEs)
for this. These checks ensure that the database as a whole makes sense and that
the keys on each table join correctly. Through Votive, you can choose to suppress
specic ICE tests. Use the Tools Setting page of the project's properties as shown in
the following screenshot:
In this example, ICE test 102 is being suppressed. You can specify more than one test
by separating them with semicolons. To nd a full list of ICE tests, go to MSDN's ICE
Reference web page at:
http://msdn.microsoft.com/en-us/library/aa369206%28VS.85%29.aspx
www.it-ebooks.info

Getting Started
[ 16 ]
The Tool Settings screen also gives you the ability to add compiler or linker
command-line ags. Simply add them to the textboxes at the bottom of the screen.
We will discuss command-line arguments for Candle and Light later in the book.
A word about GUIDs
In various places throughout WiX, you'll be asked to provide a GUID, which is a
Globally Unique Identier. This is so that when your product is installed on the end
user's computer, references to it can be stored in the Windows Registry without the
chance of having name conicts. By using GUIDs, Windows Installer can be sure that
every software application, and even every component of that software, has a unique
identity on the system.
Each GUID that you create on your computer is guaranteed to be different from a
GUID that someone else would make. Using this, even if two pieces of software, both
called "Amazing Software", are installed on the same computer, Windows will be
able to tell them apart.
Visual Studio 2010 provides a way to create a GUID. Go to Tools | Create GUID
and copy a new GUID using Registry Format. WiX can accept a GUID with or
without curly brackets around it, as 01234567-89AB-CDEF-0123-456789ABCDEF or
{01234567-89AB-CDEF-0123-456789ABCDEF}. In this book, I'll display real GUIDs,
but you should not re-use them as then your components will not be guaranteed to
be unique.
Your rst WiX project
To get started, download the WiX toolset. It can be found at:
http://wixtoolset.org/
Once you've downloaded and installed it, open Visual Studio and select New
Project | Windows Installer XML | Setup Project. This will create a project with a
single .wxs (WiX source) le. Visual Studio will usually call this le Product.wxs,
but the name could be anything as long as it ends with .wxs.
Even the most minimal installer must have the following XML elements:
• An XML declaration
• A Wix element that serves as the root element in your XML document
• A Product element that is a child to the Wix element, but all other elements
are children to it
• A Package element
www.it-ebooks.info
Chapter 1
[ 17 ]
• A Media or MediaTemplate element
• At least one Directory element with at least one child Component element
• A Feature element
XML declaration and Wix element
Every WiX project begins with an XML declaration and a Wix element:
<?xml version="1.0" encoding="UTF-8"?>
<Wix xmlns="http://schemas.microsoft.com/wix/2006/wi">
</Wix>
Downloading the example code
You can download the example code les for all Packt books you have
purchased from your account at http://www.packtpub.com. If you
purchased this book elsewhere, you can visit http://www.packtpub.
com/support and register to have the les e-mailed directly to you.
The xmlns, or XML namespace, just brings the core WiX elements into the local scope
of your document. At the bottom of the le you'll have to close the Wix element, of
course. Otherwise, it's not valid XML. The Wix element is the root element of the
document. It comes rst and last. All other elements will be nested inside of it.
For the most part, knowing only the basic rules of writing a
well-formed XML document will be enough to get you up
and running using WiX. The major points are as follows,
as recommended by the W3C:
• The document must begin and end with the same root
element
• All elements must have a matching closing tag or be
closed themselves
• XML tags are case sensitive
• Elements must be properly nested, with inner elements
not overlapping outer elements
• XML attributes should be quoted
At this point, you could also add the RequiredVersion attribute to the Wix
element. Given a WiX toolset version number, such as "3.6.3303.0", it won't let
anyone compile the .wxs le unless they have that version or higher installed.
If, on the other hand, you're the only one compiling your project, then it's no
big deal.
www.it-ebooks.info

Getting Started
[ 18 ]
The Product element
Next, add a Product element.
<Wix ... >
<Product Id="3E786878-358D-43AD-82D1-1435ADF9F6EA"
Name="Awesome Software"
Language="1033"
Version="1.0.0.0"
Manufacturer="Awesome Company"
UpgradeCode="B414C827-8D81-4B4A-B3B6-338C06DE3A11">
</Product>
</Wix>
This is where you dene the characteristics of the software you're installing: its
name, language, version, and manufacturer. The end user will be able to see these
properties by right-clicking on your MSI le, selecting Properties, and viewing the
Summary tab. Most of the time, these values will stay the same from one build of
your project to the next. The exception is when you want to increment the software's
version to indicate that it's an upgrade of a previous installation. In that case, you
need to only change the Version attribute, and sometimes the Id attribute. We'll talk
more about upgrading previous installations later on in the book.
The Product element's Id attribute represents the so-called ProductCode of your
software. It's always a unique number—a GUID—that Windows will use to uniquely
identify your software (and tell if it's already installed on the computer). You can
either hardcode it, like here, or just put an asterisk. That way, WiX will pick a new
GUID for you each time you compile the project.
<Wix ... >
<Product Id="*"
Name="Awesome Software"
Language="1033"
Version="1.0.0.0"
Manufacturer="Awesome Company"
UpgradeCode="B414C827-8D81-4B4A-B3B6-338C06DE3A11">
</Product>
</Wix>
The Name attribute denes the name of the software. In addition to being displayed
in the MSI le's Properties page, it will also be shown in various places throughout
the user interface of your installer—that is, once you've added a user interface, which
we'll touch on at the end of this chapter.
www.it-ebooks.info
Chapter 1
[ 19 ]
The Language attribute is used to display error messages and progress information
in the specied language to the user. It's a decimal language ID (LCID). A full list can
be found on Microsoft's LCID page at:
http://msdn.microsoft.com/en-us/goglobal/bb964664.aspx
The previous example used "1033", which stands for "English-United States". If your
installer uses characters not found in the ASCII character set, you'll also need to add
a Codepage attribute set to the code page that contains those characters. Don't worry
too much about this now. We'll cover languages and code pages later in the book
when we talk about localization.
The Version attribute is used to set the version number of your software. It can
accept up to four numbers separated by periods. Typically, when you make a big
enough change to the existing software, you'll increment the number. Companies
often use the [MajorVersion].[MinorVersion].[Build].[Revision] format, but
you're free to use any numbering system you like.
During upgrade scenarios, the fourth digit in the Version
attribute is ignored and won't make a difference when detecting
previously installed software.
The Manufacturer attribute tells the user who this software is from and usually
contains the name of your company. This is another bit of information that's
available via the MSI le's Properties page.
The nal attribute to consider is UpgradeCode. This should be set to a GUID and will
identify your product across releases. It remains constant for a product line, even
among different product versions. Think: Microsoft Ofce 2007 and Ofce 2010. Both
would have the same UpgradeCode. Therefore, it should stay the same even when
the ProductCode and Version change.
Windows will use this number in its efforts to keep track of all the software installed
on the machine. WiX has the ability to search for previously installed versions of not
only your own software, but also those created by others and it uses UpgradeCode to
do it. Although, technically, this is an optional attribute, you should always supply it.
www.it-ebooks.info

Getting Started
[ 20 ]
The Package element
Once you've dened your Product element, the next step is to nest a Package
element inside. An example is shown as follows:
<Wix ... >
<Product ... >
<Package InstallerVersion="301"
Compressed="yes"
InstallScope="perMachine"
Manufacturer="Awesome Company"
Description="Installs Awesome Software"
Keywords="Practice,Installer,MSI"
Comments="(c) 2012 Awesome Company" />
</Product>
</Wix>
Of the attributes shown in this example, only Compressed is really required. By
setting Compressed to yes, you're telling the installer to package all of the MSI's
resources into CAB les. Later, you'll dene these CAB les with Media elements
or a MediaTemplate element.
Technically, an Id attribute is also required, but by omitting it you're letting WiX
create one for you. You'd have to create a new one anyway since every time you
change your software or the installer in any way, the package (the MSI le) has
changed and so the package's ID must change. This really, in itself, emphasizes what
the Package element is. Unlike the Product element, which describes the software
that's in the installer, the Package element describes the installer itself. Once you've
built it, you'll be able to right-click on the MSI and select Properties to see the
attributes you've set here.
The InstallerVersion attribute can be set to require a specic version of msiexec.
exe (the Windows Installer service that installs the MSI when you double-click on it)
to be installed on the end user's computer. If they have an older version, Windows
Installer will display a dialog telling them that they need to upgrade. It will also
prevent you from compiling the project unless you also have this version installed
on your own computer. The value can be found by multiplying the major version
by 100 and adding the minor version. So, for Version 4.5 of msiexec.exe, you'd set
InstallerVersion to 405.
www.it-ebooks.info

Chapter 1
[ 21 ]
The InstallScope attribute can be set to either perMachine or perUser. The former
means that your software will be installed in the "All Users" context, meaning that
all users will be able to access your application. As such, the person performing the
install will need elevated privileges on a UAC enabled system such as Windows 7 to
continue the installation. The latter means that it will be installed only for the current
user. Behind the scenes this is setting a WiX property called ALLUSERS that we'll
cover in more detail later when we discuss properties.
The rest of the attributes shown provide additional information for the MSI
le's Properties window. Manufacturer is displayed in the Author text eld,
Description is shown as Subject, Keywords show up as Keywords, and Comments
show as Comments. It's usually a good idea to provide at least some of this
information, if just to help you distinguish one MSI package from another.
The MediaTemplate element
The les that you intend to install are compressed into CAB les and shipped along
with the installer. You decide whether to embed them inside the MSI or provide
them visibly alongside it. In WiX 3.6, a single MediaTemplate element handles all the
details for you, intelligently splitting your les into the prescribed number of CAB
les. Add it after the Package element, as shown in the following code snippet:
<Wix …>
<Product … >
<Package … />
<MediaTemplate EmbedCab="yes" />
</Product>
</Wix>
The EmbedCab attribute is optional and sets whether the CAB les will be embedded
inside the MSI, the default being to not embed them. Either way, WiX will create up
to 999 CAB les, each holding a maximum of 200 MB of data. You can change that
limit with the MaximumUncompressedMediaSize attribute, set to a size in megabytes.
If a single le is bigger than the maximum, it will be placed into its own CAB le
with enough space to accommodate it.
If you want to split your installation up into several physical disks—conjure up
images of "Please insert disk 2"—you want to use the Media element instead.
www.it-ebooks.info

Getting Started
[ 22 ]
The Media element
The Media element is an older element that was replaced by MediaTemplate and if
you use one you can't use the other. However, in some cases, the Media element is
the only thing for the job. For each Media element that you add to your WiX markup,
a new CAB le will be created.
<Wix ... >
<Product ... >
<Package ... />
<Media Id="1"
Cabinet="media1.cab"
EmbedCab="yes" />
</Product>
</Wix>
Each Media element gets a unique Id attribute to distinguish it in the MSI Media
table. It must be a positive integer. If the les that you add to your installation
package don't explicitly state which CAB le they wish to be packaged into, they'll
default to using a Media element with an Id value of 1. Therefore, your rst Media
element should always use an Id value of 1.
The Cabinet attribute sets the name of the CAB le. You won't actually see this unless
you set EmbedCab to no, in which case the le will be shipped alongside the MSI. This
is atypical, but might be done to split the installation les onto several disks.
If you do choose to split the installation up into several physical disks (or even
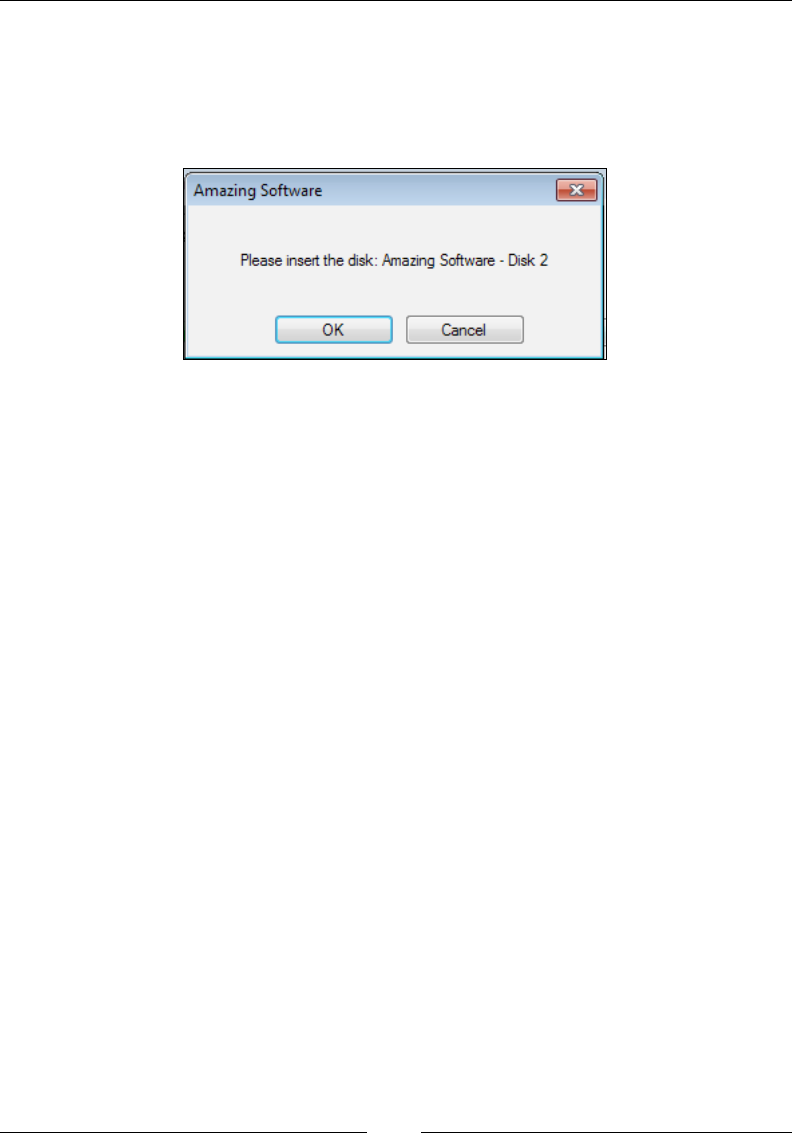
virtual ISO images), you'll want to add the DiskPrompt and VolumeLabel attributes.
In the following example, I've added two Media elements instead of one. I've also
added a Property element above them, which denes a variable called DiskPrompt
with a value of Amazing Software - [1].
<Property Id="DiskPrompt"
Value="Amazing Software - [1]" />
<Media Id="1"
Cabinet="media1.cab"
EmbedCab="no"
DiskPrompt="Disk 1"
VolumeLabel="Disk1" />
<Media Id="2"
Cabinet="media2.cab"
EmbedCab="no"
DiskPrompt="Disk 2"
VolumeLabel="Disk2" />
www.it-ebooks.info
Chapter 1
[ 23 ]
The Property element will be used as the text in the message box the end user
sees, prompting them to insert the next disk. The text in the DiskPrompt attribute
is combined with the text in the property's value, switched with [1], to change the
message for each subsequent disk. Make sure you give this property an Id value
of DiskPrompt.
So that Windows will know when the correct disk is inserted, the VolumeLabel
attribute must match the "Volume Label" of the actual disk, which you'll set with
whichever CD or DVD burning program you use. Once you've built your project,
include the MSI le and the rst CAB le on the rst disk. The second CAB le
should then be written to a second disk.
Although we haven't described the File element yet, it's used to add a le to the
installation package. To include one in a specic CAB le, add the DiskId attribute,
set to the Id attribute of the corresponding Media element. The following example
includes a text le called myFile.txt in the media2.cab le:
<File Id="fileTXT"
Name="myFile.txt"
Source="myFile.txt"
KeyPath="yes"
DiskId="2" />
We'll discuss the File element in more detail later on in the chapter. If you're only
using one Media element, you won't need to specify the DiskId attribute on your
File elements.
The Directory element
So, now we've dened the identity of the product, set up its package properties, and
told the installer to create a CAB le to package up the things that we'll eventually
install. Then, how do you decide where your product will get installed to on the end
user's computer? How do we set the default install path, for example, to some folder
under Program Files?
www.it-ebooks.info
Getting Started
[ 24 ]
When you want to install to C:\Program Files, you can use a sort of shorthand.
There are several directory properties provided by Windows Installer that will be
translated to their true paths at install time. For example, ProgramFilesFolder
usually translates to C:\Program Files. The following is a list of these built-in
directory properties:
Directory property Actual path
AdminToolsFolder Full path to directory containing administrative tools
AppDataFolder Full path to roaming folder for current user
CommonAppDataFolder Full path to application data for all users
CommonFiles64Folder Full path to the 64-bit Common Files folder
CommonFilesFolder Full path to the Common Files folder for current user
DesktopFolder Full path to the Desktop folder
FavoritesFolder Full path to the Favorites folder for current user
FontsFolder Full path to the Fonts folder
LocalAppDataFolder Full path to folder containing local (non-roaming)
applications
MyPicturesFolder Full path to the Pictures folder
NetHoodFolder Full path to the NetHood folder
PersonalFolder Full path to the Documents folder for current user
PrintHoodFolder Full path to the PrintHood folder
ProgramFiles64Folder Full path to the 64-bit Program Files folder
ProgramFilesFolder Full path to 32-bit Program Files folder
ProgramMenuFolder Full path to Program Menu folder
RecentFolder Full path to Recent folder
SendToFolder Full path to the SendTo folder for current user
StartMenuFolder Full path to the Start Menu folder
StartupFolder Full path to the Startup folder
System16Folder Full path to the 16-bit system DLLs folder
System64Folder Full path to the System64 folder
SystemFolder Full path to the System folder for current user
TempFolder Full path to the Temp folder
TemplateFolder Full path to the Template folder for current user
WindowsFolder Full path to the Windows folder
www.it-ebooks.info
Chapter 1
[ 25 ]
This list can also be found at:
http://msdn.microsoft.com/en-us/library/windows/
desktop/aa370905(v=vs.85).aspx
The easiest way to add your own directories is to nest them inside one of the
predened ones. For example, to create a new directory called Install Practice
inside the Program Files folder, you could add it as a child to ProgramFilesFolder.
To dene your directory structure in WiX, use Directory elements:
<Wix ... >
<Product ... >
<Package ... />
<MediaTemplate ... />
<Directory Id="TARGETDIR"
Name="SourceDir">
<Directory Id="ProgramFilesFolder">
<Directory Id="MyProgramDir"
Name="Install Practice" />
</Directory>
</Directory>
</Product>
</Wix>
One thing to know is that you must start your Directory elements hierarchy
with a Directory element with an Id attribute of TARGETDIR and a Name value of
SourceDir. This sets up the "root" directory of your installation. Therefore, be sure
to always create it rst and nest all other Directory elements inside.
By default, Windows Installer sets TARGETDIR to the local hard drive with the
most free space—in most cases, the C: drive. However, you can set TARGETDIR
to another drive letter during installation. You might, for example, set it with a
VolumeSelectCombo user interface control. We'll talk about setting properties
and UI controls later in the book.
A Directory element always has an Id attribute that will serve as a primary key on
the Directory table. If you're using a predened name, such as ProgramFilesFolder,
use that for Id. Otherwise, you can make one up yourself. The previous example
creates a new directory called Install Practice, inside the Program Files folder. Id,
MyProgramDir, is an arbitrary value.
www.it-ebooks.info
Getting Started
[ 26 ]
When creating your own directory, you must provide the Name attribute. This sets
the name of the new folder. Without it, the directory won't be created and any les
that were meant to go inside it will instead be placed in the parent directory—in
this case, Program Files. Note that you do not need to provide a Name attribute for
predened directories.
You can nest more subdirectories inside your folders by adding more Directory
elements. The following is an example:
<Directory Id="TARGETDIR"
Name="SourceDir">
<Directory Id="ProgramFilesFolder">
<Directory Id="MyProgramDir"
Name="Install Practice">
<Directory Id="MyFirstSubDir"
Name="Subdirectory 1">
<Directory Id="MySecondSubDir"
Name="Subdirectory 2" />
</Directory>
</Directory>
</Directory>
</Directory>
Here, a subdirectory called Subdirectory 1 is placed inside the Install Practice
folder. A second subdirectory, called Subdirectory 2, is then placed inside
Subdirectory 1, giving us two levels of nested directories under Install Practice.
If you've been following along using the Visual Studio Setup
Project template, you'll notice that it places its boilerplate
Directory elements inside of a Fragment element. We
will discuss Fragment in the next chapter.
Before jumping into how to add les to your new directories, we should cover the
elements that dene the les themselves. The next section covers how to create
components, which are the containers for the les you want to install.
www.it-ebooks.info
Chapter 1
[ 27 ]
The Component element
Once you've mapped out the directories that you want to target or create during the
installation, the next step is to copy les into them. To really explain things, we'll
need something to install. So let's create a simple text le and add it to our project's
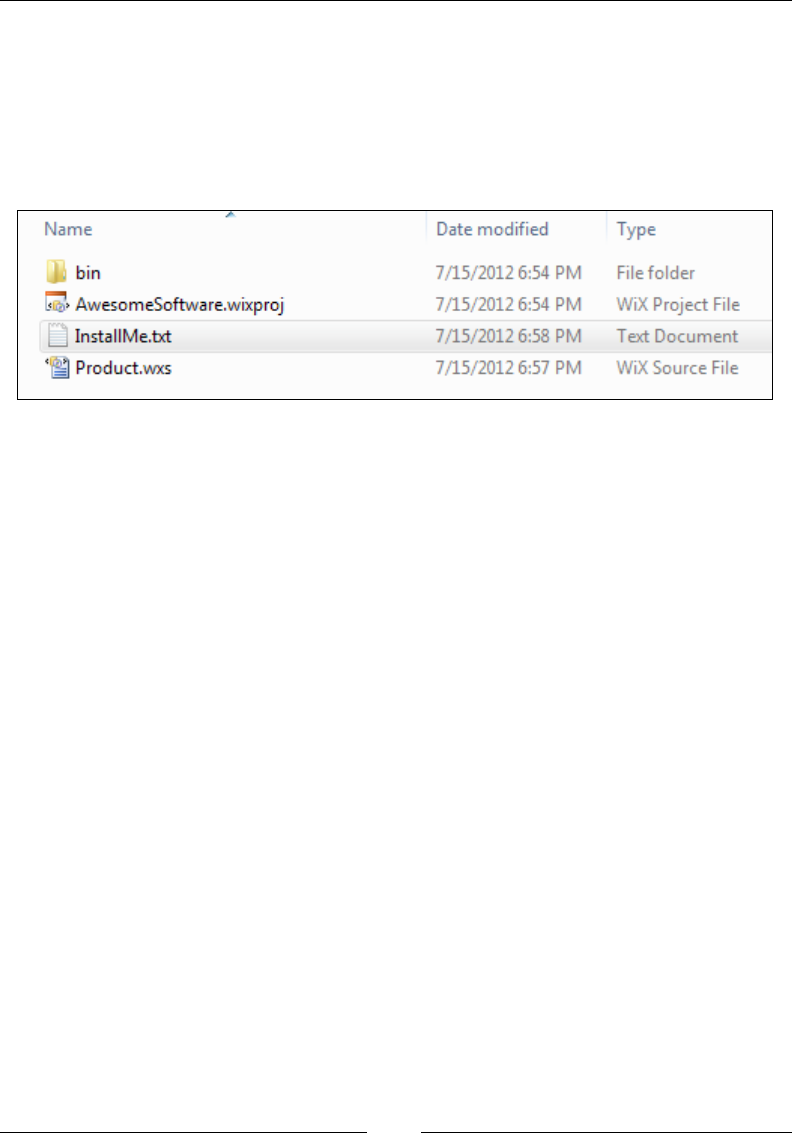
directory. We'll call it InstallMe.txt. For our purposes, it doesn't really matter
what's in the text le. We just need something for testing.
Windows Installer expects every le to be wrapped up in a component before
it's installed. It doesn't matter what type of le it is either. Each gets its own
Component element.
Components, which always have a unique GUID, allow Windows to track every
le that gets installed on the end user's computer. During an installation, this
information is stored away in the registry. This lets Windows nd every piece of
your product during an uninstall so that your software can be completely removed.
It also uses it to replace missing les during a repair, which you can trigger by
right-clicking on an MSI le and selecting Repair.
Each Component element gets a unique GUID via its Guid attribute. To create a GUID
in Visual Studio, go to Tools | Create GUID and copy a new GUID using the registry
format. The component's Id attribute is up to you. It will serve as the primary key for
the component in the MSI database, so each one must also be unique:
<Component Id="CMP_InstallMeTXT"
Guid="E8A58B7B-F031-4548-9BDD-7A6796C8460D">
<File Id="FILE_MyProgramDir_InstallMeTXT"
Source="InstallMe.txt"
KeyPath="yes" />
</Component>
In the preceding code snippet, I've created a new component called
CMP_InstallMeTXT. I've started it with CMP_ to label it as a component, which
is just a convention that I like to use. Although it isn't required, it helps to prex
components in this way so that it's always clear what sort of element it refers to.
www.it-ebooks.info

Getting Started
[ 28 ]
The File element inside the component references the le that's going to be
installed. Here, it's the InstallMe.txt le located in the current directory (which
is the same directory as your WiX source le). You can specify a relative or absolute
path with the Source attribute.
You should always mark a File element as the KeyPath le and you should only
ever include one File inside a component. A KeyPath le will be replaced if it's
missing when the user triggers a repair (Windows Installer documentation calls this
resiliency). Placing more than one File element inside a single Component element,
at least in most cases, is not recommended. This is because only one le can be the
KeyPath le, so the other les wouldn't be covered by a repair. You would really
only ever place more than one File in a component if you didn't want the extra les
to be resilient.
To add a component to a directory, you have several options. The rst, which is the
simplest, is to add your Component elements directly inside the target Directory
element, as given in the following code snippet:
<Directory Id="TARGETDIR"
Name="SourceDir">
<Directory Id="ProgramFilesFolder">
<Directory Id="MyProgramDir"
Name="Install Practice">
<Component Id="CMP_InstallMeTXT"
Guid="E8A58B7B-F031-4548-9BDD-7A6796C8460D">
<File Id="FILE_MyProgramDir_InstallMeTXT"
Source="InstallMe.txt"
KeyPath="yes" />
</Component>
</Directory>
</Directory>
</Directory>
In the previous code snippet, I've instructed the installer to copy the InstallMe.txt
le to the %ProgramFiles%\Install Practice folder that we're creating on the end
user's computer. Although this is the simplest solution, it isn't the cleanest. For one
thing, if you're installing more than a handful of les, the XML le can begin to
look tangled.
www.it-ebooks.info

Chapter 1
[ 29 ]
Another approach is to use a DirectoryRef element to reference your directories.
This has the benet of keeping the markup that denes your directories independent
from the markup that adds les to those directories. The following is an example:
<Directory Id="TARGETDIR"
Name="SourceDir">
<Directory Id="ProgramFilesFolder">
<Directory Id="MyProgramDir"
Name="Install Practice" />
</Directory>
</Directory>
<DirectoryRef Id="MyProgramDir">
<Component ...>
<File ... />
</Component>
</DirectoryRef>
A third option is to group your components inside of a ComponentGroup and use
its Directory attribute to set the target directory. We will cover component groups
in more detail in the next chapter, but the following snippet will give you an idea:
<ComponentGroup Id="ProductComponents"
Directory="MyProgramDir">
<Component ...>
<File ... />
</Component>
</ComponentGroup>
The File element
As you've seen, the actual les inside components are declared with File elements.
The File elements can represent everything from simple text les to complex DLLs
and executables. Remember, you should only place one le into each component.
The following example would add a le called SomeAssembly.dll to the
installation package:
<Component ... >
<File Id="FILE_MyProgramDir_SomeAssemblyDLL"
Name="Some Assembly.dll"
Source="SomeAssembly.dll"
KeyPath="yes" />
</Component>
www.it-ebooks.info

Getting Started
[ 30 ]
A File element should always get the Source attribute. Source denes the path to
the le during compilation. I've listed a relative path here, but you could also specify
an absolute path.
Id, Name, and KeyPath are optional. The Id attribute becomes the primary key for
a row in the MSI database. It should be something unique, but you might consider
starting it with FILE to make it clear that it refers to a File element. If not set, the Id
value will match the lename. Name gives you a chance to change the name of the le
once it's been copied to the end user's computer. By default, it will use the name in
the Source attribute.
To mark a le as important (and that it should be replaced if it goes missing), set it as
the KeyPath le for the component. Since you should only ever place one le inside a
component, in almost all cases that le should be the KeyPath le. If not set, the rst
le in the component will be the KeyPath le automatically.
A few other optional but useful attributes for the File element include:
• Hidden: Set to yes to have the le's Hidden ag set. The le won't be visible
unless the user sets the directory's options to show hidden les.
• ReadOnly: Set to yes to have the le's Read-only ag set. The user will be
able to read the le, but not modify it unless they change the le's properties.
• Vital: Set to no to continue even if this le isn't installed successfully.
The Feature element
After you've dened your components and the directories that they'll be copied into,
the next step is to dene features. A feature is a group of components that the user
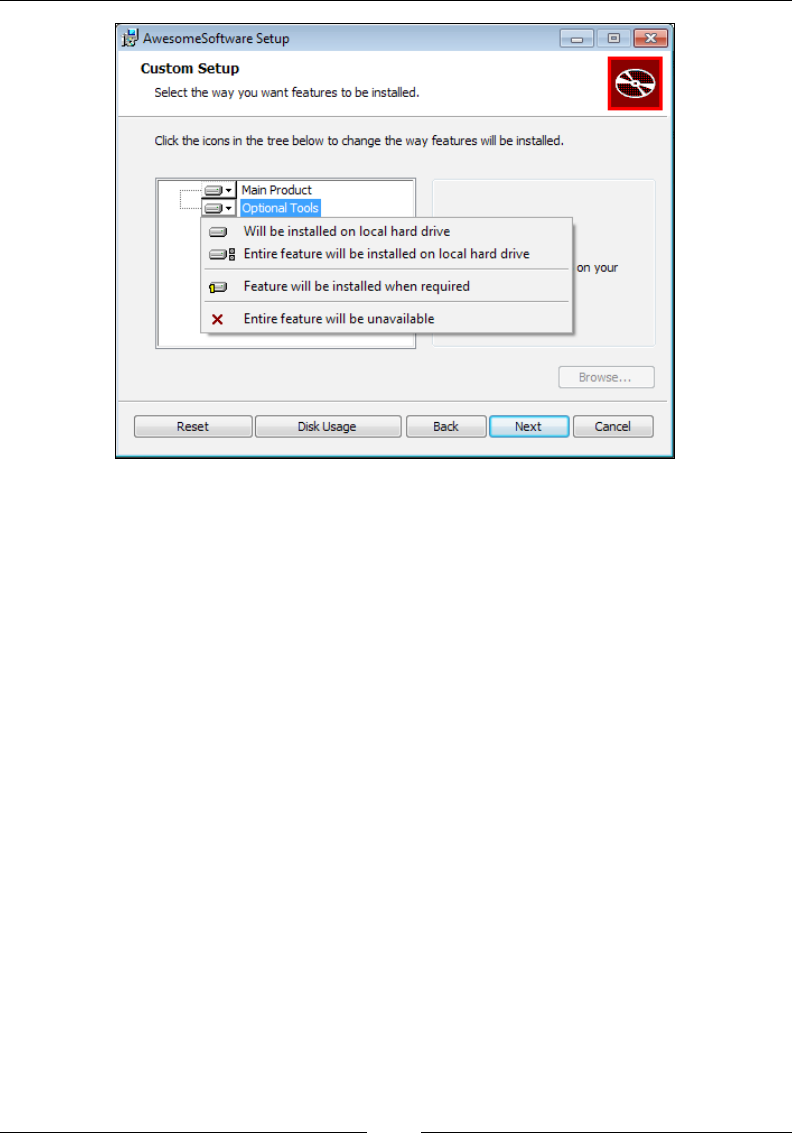
can decide to install all at once. You'll often see these in an installation dialog as a
list of modules, called a feature tree, where each is included or excluded from the
installation. The following is an example of such a tree that has two features – Main
Product and Optional Tools:
www.it-ebooks.info
Chapter 1
[ 31 ]
Every component must be included in a feature. Generally, you should group
together components that rely on one another or that form a complete, self-sufcient
unit. That way, if a feature is disabled, you won't have orphaned les (les that aren't
being used) installed onto the computer. In many instances, if your product doesn't
have any optional parts, you'll only want to create one feature.
If you've included a feature tree dialog (which we'll explain later in the book),
such as the one shown, the user can simply click a feature to exclude it. However,
even without this, they can select features from the command line. The following
command only installs a feature called MainProduct:
msiexec /i myInstaller.msi ADDLOCAL=MainProduct
Here, we're using the msiexec program to launch an installer. The /i ag targets
the MSI le to install. The ADDLOCAL property is set to the names of the features we
want to include. If more than one, use commas to separate the names. To install all
available features set ADDLOCAL=ALL, as shown:
msiexec /i myInstaller.msi ADDLOCAL=ALL
www.it-ebooks.info

Getting Started
[ 32 ]
To create a new feature in your WiX le, add a Feature element inside the
Product element. The following example installs three components under the
feature MainProduct. Another feature called OptionalTools installs another
component. Components are included in a feature with the ComponentRef element.
The Id attribute of ComponentRef targets the Id attribute from the corresponding
Component element:
<Feature Id="MainProduct"
Title="Main Product"
Level="1">
<ComponentRef Id="CMP_MyAppEXE" />
<ComponentRef Id="CMP_ReadMeTXT" />
<ComponentRef Id="CMP_StartMenuShortcuts" />
</Feature>
<Feature Id="OptionalTools"
Title="Optional Tools"
Level="1">
<ComponentRef Id="CMP_ToolsEXE" />
</Feature>
The Feature element's Id attribute uniquely identies the feature and is what you'll
reference when using the ADDLOCAL property on the command line. The Title
attribute is used to set a user-friendly name that can be displayed on dialogs. Setting
the Feature element's Level attribute to 1 means that that feature will be included
in the installation by default. The end user will still be able to remove it through the
user interface or via the command line. If, on the other hand, Level is set to 0, that
feature will be removed from the feature tree and the user won't be able to install it.
If you wanted to, you could create a more complex tree with features nested inside
features. You could use this to create more categories for the elements in your product
and give the user more options concerning what gets installed. You would want
to make sure that all possible congurations function correctly. Windows Installer
makes this somewhat manageable in that if a parent feature is excluded, its child
features will be too. The following is an example of a more complex feature setup:
<Feature Id="MainProduct"
Title="Main Product"
Level="1">
<ComponentRef Id="CMP_MyAppEXE" />
<ComponentRef Id="CMP_StartMenuShortcuts" />
<Feature Id="SubFeature1"
Title="Documentation"
Level="1">
www.it-ebooks.info

Chapter 1
[ 33 ]
<ComponentRef Id="CMP_ReadMeTXT" />
</Feature>
</Feature>
<Feature Id="OptionalTools"
Title="Optional Tools"
Level="1">
<ComponentRef Id="CMP_ToolsEXE" />
</Feature>
In the preceding code snippet, I've moved the ReadMe.txt le used in the previous
examples into its own feature called Documentation that's nested inside the
MainProduct feature. Disabling its parent feature (MainProduct) will also disable it.
However, you could enable MainProduct and disable Documentation.
You have the ability to prevent the user from excluding a particular feature. Just
set the Absent attribute to disallow. You might do this for the main part of your
product where excluding it wouldn't make sense.
You might also consider adding the Description attribute, which can be set to a
string that describes the feature. This could be displayed in your dialog alongside
the feature tree, if you decide to use one. We'll cover feature trees and adding a user
interface later in the book.
Start menu shortcuts
Having a working installer is good, but wouldn't it be nice to add some shortcuts to
the Windows Start menu? First, add another Directory element that references the
Start menu via the built-in ProgramMenuFolder property:
<Directory Id="TARGETDIR"
Name="SourceDir">
<Directory Id="ProgramFilesFolder">
<Directory Id="MyProgramDir"
Name="Awesome Software" />
</Directory>
<Directory Id="ProgramMenuFolder">
<Directory Id="MyShortcutsDir"
Name="Awesome Software" />
</Directory>
</Directory>
www.it-ebooks.info

Getting Started
[ 34 ]
In the previous code snippet we're adding a new folder to the Start menu called
Awesome Software. Now, we can use a DirectoryRef element to reference our new
shortcuts folder, as in the following code snippet:
<DirectoryRef Id="MyShortcutsDir">
<Component Id="CMP_DocumentationShortcut"
Guid="33741C82-30BF-41AF-8246-44A5DCFCF953">
<Shortcut Id="DocumentationStartMenuShortcut"
Name="Awesome Software Documentation"
Description="Read Awesome Software Documentation"
Target="[MyProgramDir]InstallMe.txt" />
</Component>
</DirectoryRef>
Each Shortcut element has a unique identier set with the Id attribute. The Name
attribute denes the user-friendly name that gets displayed. Description is set to a
string that describes the shortcut and will appear when the user moves their mouse
over the shortcut link.
The Target attribute denes the path on the end user's machine to the actual le
being linked to. For that reason, you'll often want to use properties that update as
they're changed, instead of hardcoded values. In the previous example, the main
installation directory is referenced by placing the Id attribute of its corresponding
Directory element in square brackets, which is then followed by the name of the
le. Even if the path of MyProgramDir changes, it will still lead us to the InstallMe.
txt le.
Two things that should accompany a shortcut are a RemoveFolder element
and a RegistryValue element. RemoveFolder ensures that the new Start menu
subdirectory will be removed during an uninstall. It uses an Id attribute to uniquely
identify a row in the MSI RemoveFile table and an On attribute to specify when to
remove the folder. You can set On to install, uninstall, or both. You can specify
a Directory attribute as well to set to the Id attribute of a Directory element to
remove. Without one, though, the element will remove the directory dened by the
parent DirectoryRef or ComponentGroup element.
www.it-ebooks.info

Chapter 1
[ 35 ]
The RegistryValue element is needed simply because every component must
have a KeyPath item. Shortcuts aren't allowed to be KeyPath items as they aren't
technically les. By adding a RegistryValue, a new item is added to the registry
and this is marked as KeyPath. The actual value itself serves no other purpose. We
will cover writing to the registry in more detail later.
<DirectoryRef Id="MyShortcutsDir">
<Component Id="CMP_DocumentationShortcut"
Guid="33741C82-30BF-41AF-8246-44A5DCFCF953">
<Shortcut Id="DocumentationStartMenuShortcut"
Name="Awesome Software Documentation"
Description="Read Awesome Software Documentation"
Target="[MyProgramDir]InstallMe.txt" />
<RemoveFolder Id="RemoveMyShortcutsDir"
On="uninstall" />
<RegistryValue Root="HKCU"
Key="Software\Microsoft\AwesomeSoftware"
Name="installed"
Type="integer"
Value="1"
KeyPath="yes" />
</Component>
</DirectoryRef>
There's actually another reason for using a RegistryValue element as KeyPath. The
shortcut we're creating is being installed to a directory specic to the current user.
Windows Installer requires that you always use a registry value as the KeyPath item
when doing this in order to simplify uninstalling the product when multiple users
have installed it.
Another type of shortcut to add is one that uninstalls the product. For this, add a
second Shortcut element to the same component. This shortcut will be different
in that it will have its Target set to the msiexec.exe program, which is located in
the System folder. The following example uses the predened System64Folder
directory name because it will automatically map to either the 64-bit or 32-bit System
folder, depending on the end user's operating system.
www.it-ebooks.info

Getting Started
[ 36 ]
By setting Target to the path of an executable, you're telling Windows to launch
that program when the user clicks the shortcut. The msiexec program can remove
software by using the /x argument followed by the ProductCode attribute of
the product you want to uninstall. The ProductCode attribute is the Id attribute
specied in the Product element.
<DirectoryRef Id="ProgramMenuFolder">
<Component Id="CMP_DocumentationShortcut"
Guid="33741C82-30BF-41AF-8246-44A5DCFCF953">
<Shortcut Id="DocumentationStartMenuShortcut"
Name="Awesome Software Documentation"
Description="Read Awesome Software Documentation"
Target="[MyProgramDir]InstallMe.txt" />
<Shortcut Id="UninstallShortcut"
Name="Uninstall Awesome Software"
Description=
"Uninstalls Awesome Software and all of its components"
Target="[System64Folder]msiexec.exe"
Arguments="/x [ProductCode]" />
<RemoveFolder Id="RemoveMyShortcutsDir"
On="uninstall" />
<RegistryValue Root="HKCU"
Key="Software\Microsoft\AwesomeSoftware"
Name="installed"
Type="integer"
Value="1"
KeyPath="yes" />
</Component>
</DirectoryRef>
Notice that we don't have to use the GUID from the Product element to get
the ProductCode value. We can reference it using the built-in property called
ProductCode surrounded by square brackets. If you'd like to add an icon to your
shortcut, rst add an Icon element as another child to the Product element. Then,
reference that icon with the Icon attribute on the Shortcut element, as shown in the
following code snippet:
<Icon Id="icon.ico" SourceFile="myIcon.ico"/>
<DirectoryRef ... >
<Component ... >
<Shortcut Id="DocumentationStartMenuShortcut"
www.it-ebooks.info

Chapter 1
[ 37 ]
Name="Awesome Software Documentation"
Description="Read Awesome Software Documentation"
Target="[MyProgramDir]InstallMe.txt"
Icon="icon.ico" />
<RemoveFolder ... />
<RegistryValue ... />
</Component>
</DirectoryRef>
Be sure to add the new component that contains the shortcuts to one of your features:
<Feature Id="ProductFeature"
Title="Main Product"
Level="1">
<ComponentRef Id=" CMP_InstallMeTXT" />
<ComponentRef Id="CMP_DocumentationShortcut" />
</Feature>
Putting it all together
Now that you've seen the different elements used to author an MSI package, the
following is the entire .wxs le:
<?xml version="1.0" encoding="UTF-8"?>
<Wix xmlns="http://schemas.microsoft.com/wix/2006/wi">
<Product Id="3E786878-358D-43AD-82D1-1435ADF9F6EA"
Name="Awesome Software"
Language="1033"
Version="1.0.0.0"
Manufacturer="Awesome Company"
UpgradeCode="B414C827-8D81-4B4A-B3B6-338C06DE3A11">
<Package InstallerVersion="301"
Compressed="yes"
InstallScope="perMachine"
Manufacturer="Awesome Company"
Description="Installs Awesome Software"
Keywords="Practice,Installer,MSI"
Comments="(c) 2012 Awesome Company" />
<MediaTemplate EmbedCab="yes" />
<!--Directory structure-->
www.it-ebooks.info

Getting Started
[ 38 ]
<Directory Id="TARGETDIR"
Name="SourceDir">
<Directory Id="ProgramFilesFolder">
<Directory Id="MyProgramDir"
Name="Awesome Software" />
<Directory Id="ProgramMenuFolder">
<Directory Id="MyShortcutsDir"
Name="Awesome Software" />
</Directory>
</Directory>
</Directory>
<!--Components-->
<DirectoryRef Id="MyProgramDir">
<Component Id="CMP_InstallMeTXT"
Guid="E8A58B7B-F031-4548-9BDD-7A6796C8460D">
<File Id="FILE_InstallMeTXT"
Source="InstallMe.txt"
KeyPath="yes" />
</Component>
</DirectoryRef>
<!--Start Menu Shortcuts-->
<DirectoryRef Id="MyShortcutsDir">
<Component Id="CMP_DocumentationShortcut"
Guid="33741C82-30BF-41AF-8246-44A5DCFCF953">
<Shortcut Id="DocumentationStartMenuShortcut"
Name="Awesome Software Documentation"
Description="Read Awesome Software Documentation"
Target="[MyProgramDir]InstallMe.txt" />
<Shortcut Id="UninstallShortcut"
Name="Uninstall Awesome Software"
Description="Uninstalls Awesome Software"
Target="[System64Folder]msiexec.exe"
Arguments="/x [ProductCode]" />
<RemoveFolder Id="RemoveMyShortcutsDir"
On="uninstall" />
<RegistryValue Root="HKCU"
Key="Software\Microsoft\AwesomeSoftware"
Name="installed"
www.it-ebooks.info
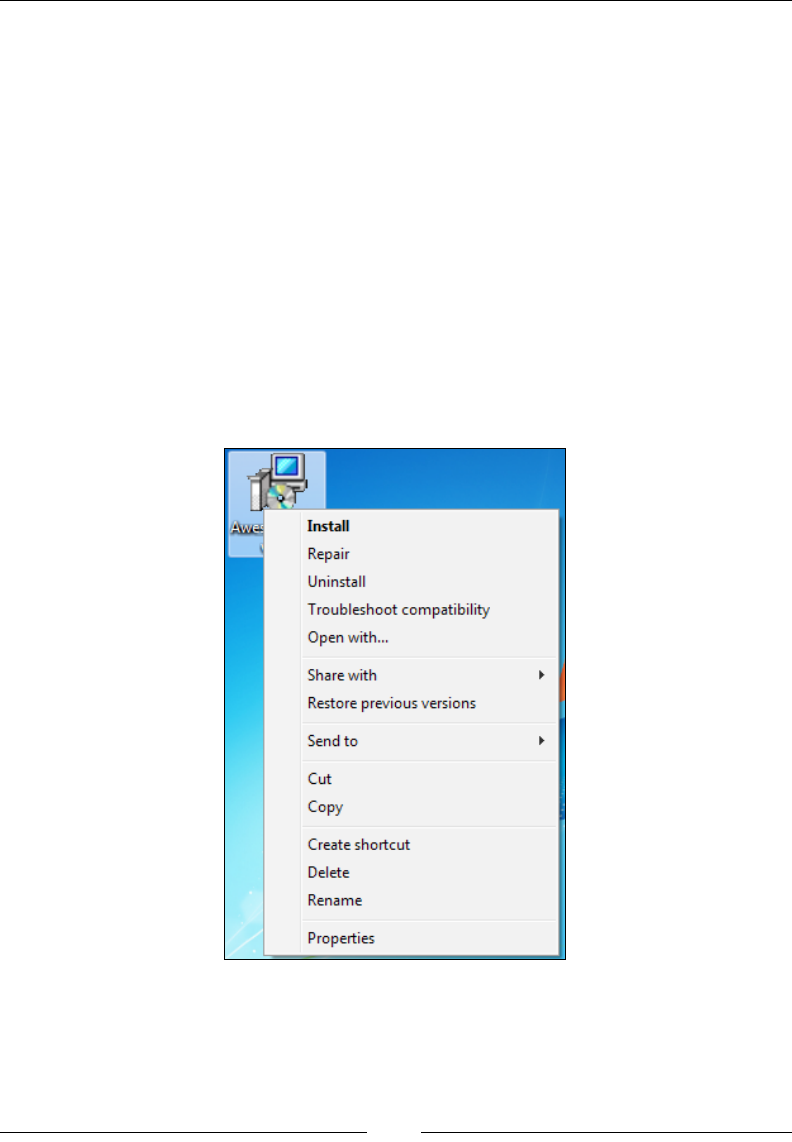
Chapter 1
[ 39 ]
Type="integer"
Value="1"
KeyPath="yes" />
</Component>
</DirectoryRef>
<!--Features-->
<Feature Id="ProductFeature"
Title="Main Product"
Level="1">
<ComponentRef Id="CMP_InstallMeTXT" />
<ComponentRef Id="CMP_DocumentationShortcut" />
</Feature>
</Product>
</Wix>
Compile the project in Visual Studio and you should get a new MSI le:
www.it-ebooks.info
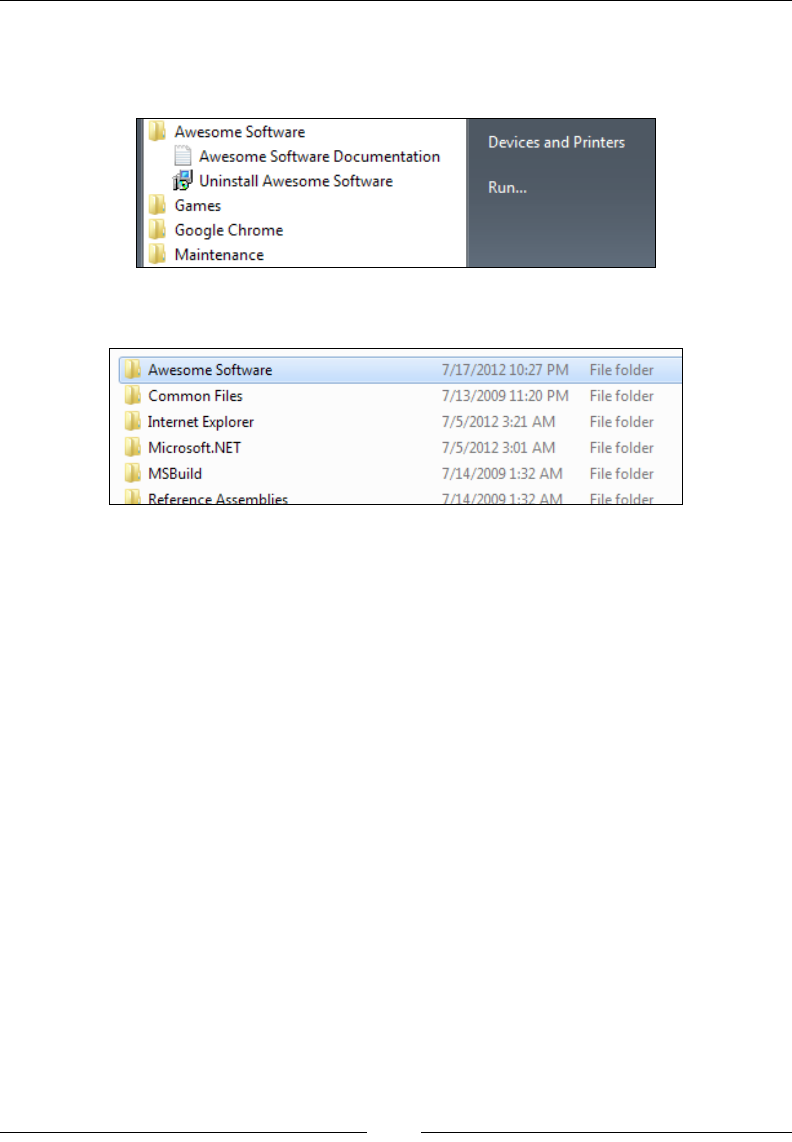
Getting Started
[ 40 ]
You can double-click on it or right-click and select Install to install the software.
Doing so should create a subfolder for your program in the Start menu, as shown
in the following screenshot:
You should also nd a new folder under Program Files:
To uninstall the software, you have several options:
• Use the uninstall shortcut from the Start menu
• Right-click on the MSI le and select Uninstall
• Uninstall it from Programs and Features
• From a command prompt, navigate to the directory where the MSI le is and
use the following command:
msiexec /x AwesomeSoftware.msi
Adding a user interface
Although you'll eventually want to add your own dialogs to gather information from
the user that's important for your own application, you may want to use one of WiX's
built-in dialog sequences in the meantime. All of them are stored in an assembly called
WixUIExtension.dll. You can add a reference to this le with Visual Studio's Add
a Reference screen. The le exists in WiX's Program Files folder. You may have to
navigate to C:\Program Files (x86)\WiX Toolset v3.6\bin.
www.it-ebooks.info

Chapter 1
[ 41 ]
Once you've added the new reference, add the following line to your WiX source le.
It doesn't matter exactly where, as long as it's a child to the Product element:
<UIRef Id="WixUI_Minimal" />
This will insert the Minimal dialog set into your installation sequence. It shows a
single dialog screen containing a license agreement and an Install button. Feel free
to try any of the other dialog sets. Just replace WixUI_Minimal, with one of the other
names in the UIRef element. WixUI_Advanced and WixUI_InstallDir require some
further setup to really work properly. You can try out the following attributes:
• WixUI_Advanced
• WixUI_FeatureTree
• WixUI_InstallDir
• WixUI_Mondo
We will explore these standard dialogs in more detail later and also explain how to
create your own.
Viewing the MSI database
I mentioned before that an MSI le is really a sort of relational database. WiX does
all the work of creating tables, inserting rows, and matching up keys in this database.
However, as we progress through the rest of the book, I encourage you to explore
how it looks behind the scenes. For example, we discussed the File and Component
elements. Sure enough, there are two tables called File and Component in the MSI
package that contain the denitions you've set with your XML markup. To get inside
the installer, you'll need a tool called Orca.
Orca.exe
Once you've compiled your project in Visual Studio, you'll have a working MSI
package that can be installed by double-clicking on it. If you'd like to see the
database inside, install the MSI viewer, Orca.exe. Orca is provided as part of
the Windows SDK and despite the icon of a whale on the shortcut, it stands for
One Really Cool App. You can nd versions of the SDK at Microsoft's Windows
Development Center website:
http://msdn.microsoft.com/en-us/windows/bb980924.aspx
www.it-ebooks.info
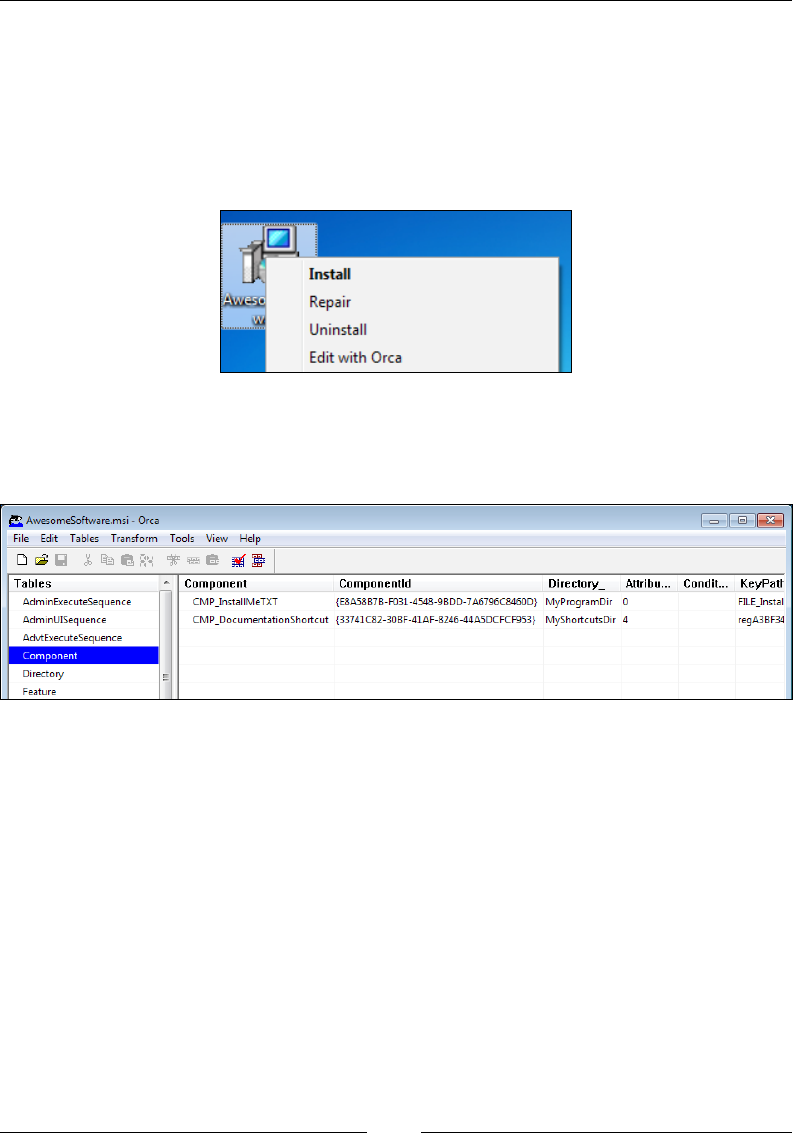
Getting Started
[ 42 ]
After you've installed the SDK (specically, the .NET tools that are included), you
can nd the installer for Orca—Orca.msi—in the Microsoft SDKs folder in Program
Files. On my machine, it can be found in C:\Program Files\Microsoft SDKs\
Windows\v7.0\Bin.
Install Orca and then right-click on your MSI le and select Edit with Orca, as shown
in the following screenshot:
Orca lets you view the database structure of your installer. This can be a big help in
troubleshooting problems or just to get a better idea about how different elements
work together. The following is a screenshot of the Component database:
If you wanted to, you could edit your MSI package directly with Orca. This is helpful
when learning or trying out different concepts. You'll need to know exactly which
tables and rows to modify. Sometimes, though, you'll be able to just change a single
value and check its effect.
Turning logging on during installation
If you get into trouble with your installer, it may help to run it with logging turned
on. To do so, install your package from a command prompt using msiexec with the
arguments /l*v, and the name of a le to write the log to. For example, if you had an
installer called myInstaller.msi, you could use this command to write a log during
the installation to a le called myLog.txt:
msiexec /i myInstaller.msi /l*v myLog.txt
www.it-ebooks.info
Chapter 1
[ 43 ]
Every event that occurs during installation will be recorded here. It works for
uninstalls too. Simply use the /x argument instead of /i. The log can be pretty
helpful, but also very verbose. If your installer fails midway through, you might try
searching the log for the text return value 3. This indicates that an action returned
a status of failure. Often, you'll also see a specic MSI error code. You can nd its
meaning by searching for that number in the MSI SDK Documentation help le
that comes with WiX.
You can also turn on logging for all MSI packages by editing the
HKEY_LOCAL_MACHINE\Software\Policies\Microsoft\
Windows\Installer key in the Windows Registry. This should
be used with care though so as not to use too much disk space.
See http://support.microsoft.com/kb/223300 for more
information.
Other resources
If you have specic questions about WiX, you'll nd additional resources at the
following websites:
• WiX users mailing list:
http://sourceforge.net/mailarchive/forum.php?forum_name=wix-
users
• Microsoft Windows Installer documentation:
http://msdn.microsoft.com/en-us/library/cc185688(VS.85).aspx
Summary
In this chapter, we discussed downloading the WiX toolset and its various features.
Creating a simple MSI package is relatively easy. There are only a handful of XML
elements needed to get started. As we explore more complex setups, you'll be
introduced to elements that are more specialized.
Throughout the rest of this book, I'll make references to the structure of the MSI
database. Orca is an excellent tool for seeing this structure yourself. Although this
book focuses on WiX and not the underlying Windows Installer technology, it helps
sometimes to see how the mechanics of it work. You may nd it useful to consult
Microsoft's MSI documentation too, which can be found online or in a help le
provided by WiX, to get a deeper understanding of the properties and constructs
we will discuss.
www.it-ebooks.info

Creating Files and Directories
In the previous chapter, we saw that creating a WiX installer isn't so tough. Less
than seventy lines of code and you've got a professional-looking deployment solution.
One of the things we covered was how to copy les and create directories on the end
user's computer. We've covered the basics, but now it's time to dig deeper.
In this chapter you will learn how to:
• Organize your File and Directory elements using the DirectoryRef and
ComponentGroup elements
• Split your WiX markup using Fragment elements to keep it manageable
• Use heat.exe to create the Component markup
• Install special case les such as installing to the GAC
The File element
The File element, as you've seen, is used to designate each le that you plan to copy
to the end user's computer. At a minimum, it should contain a Source attribute that
identies the path to the le on your development machine, as shown:
<Component Id="CMP_MyProgramEXE"
Guid="2C34F22F-1F48-4949-B68B-939F852F8B35">
<File Source="MyProgram.exe" />
</Component>
www.it-ebooks.info
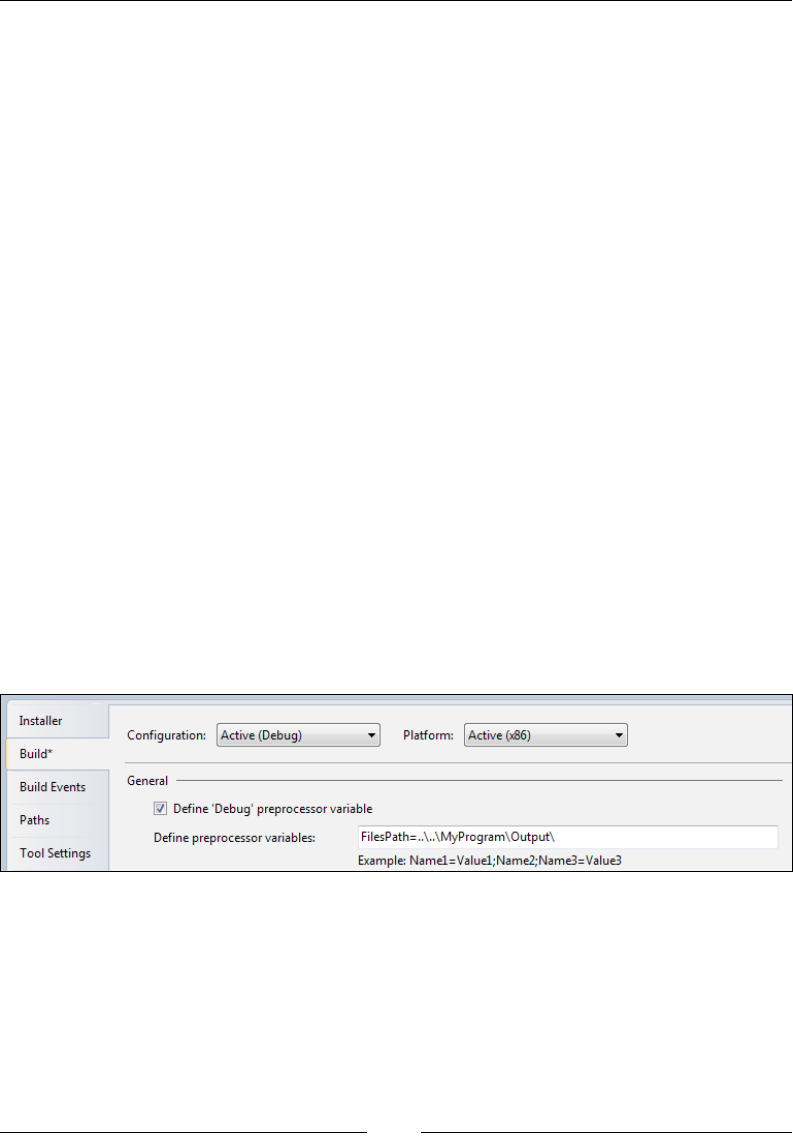
Creating Files and Directories
[ 46 ]
There are a number of optional attributes available. The Name attribute tells the
installer what the le will be called after it's installed. If omitted, the le will retain
its original name as specied in the Source attribute. The KeyPath attribute explicitly
marks the le as the keypath for the component, although if there is only one File
element in Component it will, by default, be the keypath. The Id attribute uniquely
identies the le in the MSI database's File table. The following is an example that
demonstrates these attributes:
<Component Id="CMP_MyProgramEXE"
Guid="E8A58B7B-F031-4548-9BDD-7A6796C8460D">
<File Id="FILE_MyProgramEXE"
Source="MyProgram.exe"
Name="NewName.exe"
KeyPath="yes" />
</Component>
<Component Id="CMP_AnotherFileDLL"
Guid="E9D74961-DF9B-4130-8FBC-1669A6DD288E">
<File Id="FILE_AnotherFileDLL"
Source="..\..\AnotherFile.dll"
KeyPath="yes" />
</Component>
This example includes two les, MyProgram.exe and AnotherFile.dll, in the
installation package. Both use relative paths for their Source attributes. The rst le
is located in the current directory while the second is two directories up. Another
option is to use a preprocessor variable to store the location of your les.
www.it-ebooks.info

Chapter 2
[ 47 ]
Preprocessor variables are evaluated at compile time and are replaced in the nal
MSI le with the strings that they've been set to. Here, I've added a variable called
FilesPath on the Build page of my WiX project's Properties page, and set it to
..\..\myProgram\Output\. In this case, the Output directory is where the les I
plan to install are located on my computer. We can insert this variable in the markup
by using $(var.FilesPath), as in the following snippet:
<Component Id="CMP_MyProgramEXE"
Guid="E8A58B7B-F031-4548-9BDD-7A6796C8460D">
<File Id="FILE_MyProgramEXE"
Source="$(var.FilesPath)MyProgram.exe"
KeyPath="yes" />
</Component>
At compile time, the variable will be replaced with the path that we've dened. You
can dene more than one preprocessor variable on the Build page by separating
them with semicolons.
You can also refer to other projects in your Visual Studio solution using preprocessor
variables. For example, let's say you had a class library project in the same solution
as your WiX setup. If you were to add that class library as a reference in the WiX
project, you could then refer to its output directory using $(var.ProjectName.
TargetDir), as in the following example:
<Component Id="CMP_MyAssembly"
Guid="{F53BAFE0-9BB1-44E6-BC93-D3BD0514BE14}">
<File Source="$(var.MyAssembly.TargetDir)MyAssembly.dll" />
</Component>
Here, after we've added a project reference to the MyAssembly project, we are able to
reference its output directory via the $(var.MyAssembly.TargetDir) variable. You
can see other variables that are made available when adding a project reference in
this way at:
http://wix.sourceforge.net/manual-wix3/votive_project_references.htm
A File element is always wrapped in its own Component element. Doing so will
allow you to mark every le that you're installing as a KeyPath le. This allows
them to be replaced if they're accidentally deleted. The process of replacing missing
les is known as a repair. Repairs are triggered by right-clicking on an MSI le and
selecting Repair. A component can have only one keypath le, but every component
should have one. Although it's possible to put more than one le in the same
component, it's considered bad practice.
www.it-ebooks.info

Creating Files and Directories
[ 48 ]
Before moving on, two other helpful attributes on the File element are Hidden and
ReadOnly. Setting the rst to yes causes the installed le to be hidden from view.
The second turns on the le's read-only ag.
The DirectoryRef element
In the previous chapter, you saw that to dene which directories to copy your les
into, you use Directory elements. These take an Id value and, if it's a new directory
that you're creating, a Name attribute. You can use any of the built-in IDs to reference
one of the common Windows directories. For example, suppose we wanted to add
an XML conguration le for our software to the %PROGRAMDATA% folder. We'd add a
reference to it using the built-in CommonAppDataFolder property as Directory Id:
<Directory Id="TARGETDIR" Name="SourceDir">
<Directory Id="CommonAppDataFolder">
<Directory Id="MyCommonAppDataFolder"
Name="Awesome Software" />
</Directory>
</Directory>
Here we are placing a new folder called Awesome Software inside the %PROGRAMDATA%
folder. The new folder gets a Name attribute to label it. The Id attribute is up to us and
uniquely identies the directory in the MSI database. To add a le to our directory we
add a new DirectoryRef, as shown in the following code snippet:
<DirectoryRef Id="MyCommonAppDataFolder">
<Component Id="CMP_SettingsXML"
Guid="{F8901638-9E76-44F6-B755-155CBE135CF5}">
<File Source="Settings.xml" />
</Component>
</DirectoryRef>
The DirectoryRef element matches the Directory element that we used before.
If you wanted to, you could use a new DirectoryRef element for each le.
However, it's easier to use one DirectoryRef and place multiple Component
elements inside of it:
<DirectoryRef Id="MyCommonAppDataFolder">
<Component Id="CMP_GeneralSettingsXML"
Guid="{971674AC-D9EB-4344-BA43-B685BA82EE56}">
<File Source="GeneralSettings.xml" />
</Component>
<Component Id="CMP_DatabaseSettingsXML"
Guid="{72D97E16-FA5E-4EAA-99DC-415BCBEED907}">
www.it-ebooks.info

Chapter 2
[ 49 ]
<File Source="DatabaseSettings.xml" />
</Component>
</DirectoryRef>
You could, for example, place hundreds of les inside the MyCommonAppDataFolder
directory using only one DirectoryRef element.
The ComponentGroup element
The ComponentGroup element is used to group Component elements, which is
helpful as it offers a way to reference all of your components with a single element.
For example, when adding components to Feature (which you must always do),
you could use ComponentRef elements directly. This is the technique we used in the
previous chapter:
<Feature Id="ProductFeature"
Title="Main Product"
Level="1">
<ComponentRef Id="CMP_MyProgramEXE" />
<ComponentRef Id="CMP_AnotherFileDLL" />
</Feature>
However, by creating ComponentGroup, you can reference multiple components with
a single ComponentGroupRef element. This is shown in the following snippet:
<Feature Id="ProductFeature"
Title="Main Product"
Level="1">
<ComponentGroupRef Id="MyComponentGroup" />
</Feature>
Try it out by adding a new CompontGroup element to your .wxs le. It can go
anywhere inside the Product element. Then, you have a choice. You can either nest
Component elements inside it or use ComponentRefs to reference your components
indirectly. For example, here we use Component elements inside ComponentGroup:
<ComponentGroup Id="MyComponentGroup">
<Component Id="CMP_MyProgramEXE"
Guid="E8A58B7B-F031-4548-9BDD-7A6796C8460D"
Directory="INSTALLLOCATION">
<File Id="FILE_MyProgramEXE"
Source="MyProgram.exe"
KeyPath="yes" />
www.it-ebooks.info

Creating Files and Directories
[ 50 ]
</Component>
<Component Id="CMP_AnotherFileDLL"
Guid="E9D74961-DF9B-4130-8FBC-1669A6DD288E"
Directory="INSTALLLOCATION">
<File Id="FILE_AnotherFileDLL"
Source="AnotherFile.dll"
KeyPath="yes" />
</Component>
</ComponentGroup>
Since the components aren't wrapped in a DirectoryRef element anymore, we're
adding Directory attributes to the Component elements to set the target directory.
This has the same effect though. It will tell the installer where to copy these les
to. You can also put a Directory attribute on the ComponentGroup element itself,
setting the target directory for all child components:
<ComponentGroup Id="MyComponentGroup"
Directory="INSTALLLOCATION">
<Component ... />
<Component ... />
</ComponentGroup>
The other option is to continue to nest Component elements inside the DirectoryRef
elements and then use the ComponentRef elements to include them in a group:
<DirectoryRef Id="INSTALLLOCATION">
<Component Id="CMP_MyProgramEXE"
Guid="E8A58B7B-F031-4548-9BDD-7A6796C8460D">
<File Id="FILE_MyProgramEXE"
Source="MyProgram.exe"
KeyPath="yes" />
</Component>
<Component Id="CMP_AnotherFileDLL"
Guid="E9D74961-DF9B-4130-8FBC-1669A6DD288E">
<File Id="FILE_AnotherFileDLL"
Source="AnotherFile.dll"
KeyPath="yes" />
</Component>
</DirectoryRef>
<ComponentGroup Id="MyComponentGroup">
<ComponentRef Id="CMP_MyProgramEXE" />
<ComponentRef Id="CMP_AnotherFileDLL" />
</ComponentGroup>
www.it-ebooks.info

Chapter 2
[ 51 ]
The usefulness of ComponentGroup becomes more obvious when your program
needs to copy more than a few les to the end user's machine. You'll be able to
include, remove, or move entire sets of components from a feature simply by
moving the ComponentGroupRef element.
The Fragment element
Up to this point, we've been adding all of our WiX elements to the Product.wxs
le. When your installer packages hundreds of les, you'll nd that having all of
your code in one place makes reading it difcult. You can split your elements up
into multiple .wxs les for better organization and readability. Whereas your main
source le, Product.wxs, nests everything inside a Product element, your additional
.wxs les will use Fragment elements as their roots.
The Fragment element doesn't need any attributes. It's simply a container. You can
place just about anything inside of it, such as all of your Directory elements or all
of your Component elements. For the next example, add a new WiX source le to
your project and place the following markup inside it. Here, we're using the same
ComponentGroup that we discussed earlier. You can call the le Components.wxs,
and it should look something like the following code snippet:
<?xml version="1.0" encoding="UTF-8"?>
<Wix xmlns="http://schemas.microsoft.com/wix/2006/wi">
<Fragment>
<ComponentGroup Id="MyComponentGroup"
Directory="INSTALLLOCATION">
<Component Id="CMP_MyProgramEXE"
Guid="E8A58B7B-F031-4548-9BDD-7A6796C8460D">
<File Id="FILE_MyProgramEXE"
Source="MyProgram.exe"
KeyPath="yes" />
</Component>
<Component Id="CMP_AnotherFileDLL"
Guid="E9D74961-DF9B-4130-8FBC-1669A6DD288E">
<File Id="FILE_AnotherFileDLL"
Source="AnotherFile.dll"
KeyPath="yes" />
</Component>
</ComponentGroup>
</Fragment>
</Wix>
www.it-ebooks.info

Creating Files and Directories
[ 52 ]
Now, the markup for the components is contained within a separate le. We've used
ComponentGroup to group them, but of course, that's optional. To include this group
in Product.wxs, reference it with a ComponentGroupRef element in one of your
Feature elements, as shown:
<Feature Id="ProductFeature"
Title="Main Product"
Level="1">
<ComponentGroupRef Id="MyComponentGroup" />
</Feature>
Although the ComponentGroup element is optional, it allows us to reference our
fragment back in our main source le. Referencing any single element from a
fragment like this will pull all of the elements in the fragment into the scope of your
project. For components, this doesn't make much difference since you still have
to reference all of them—or at least a ComponentGroup element of them—inside a
Feature element. However, it makes more of a difference for other elements.
For example, properties, which are variables that you can use to store data, are
represented by Property elements and could be stored in a separate le within
a Fragment element. Then, by referencing just one of them in your main source
le with a PropertyRef element, you'd pull all of them into your project. With
fragments, it's all or nothing. Referencing one element in the fragment references
them all.
Other elements that don't have a corresponding Ref counterpart need a little more
help. For example, there's no reference element for the Media element. There's no
such thing as a "MediaRef". However, if you included a Property element in the
same fragment as your Media elements, you could pull them in too by referencing
that property with PropertyRef. The Media.wxs le would look like the following
code snippet:
<?xml version="1.0" encoding="UTF-8"?>
<Wix xmlns="http://schemas.microsoft.com/wix/2006/wi">
<Fragment>
<Property Id="MediaProperty"
Value="1" />
<Media Id="1" Cabinet="media1.cab" EmbedCab="yes" />
<Media Id="2" Cabinet="media2.cab" EmbedCab="yes" />
<Media Id="3" Cabinet="media3.cab" EmbedCab="yes" />
</Fragment>
</Wix>
www.it-ebooks.info

Chapter 2
[ 53 ]
To reference the Media elements in your project, reference the property that's with
them. This is done by adding the following code to Product.wxs:
<?xml version="1.0" encoding="UTF-8"?>
<Wix xmlns="http://schemas.microsoft.com/wix/2006/wi">
<Product Id="3E786878-358D-43AD-82D1-1435ADF9F6EA"
Name="Awesome Software"
Language="1033"
Version="1.0.0.0"
Manufacturer="Awesome Company"
UpgradeCode="B414C827-8D81-4B4A-B3B6-338C06DE3A11">
<Package InstallerVersion="301"
Compressed="yes" />
<PropertyRef Id="MediaProperty" />
<Directory Id="TARGETDIR"
Name="SourceDir">
<Directory Id="ProgramFilesFolder">
<Directory Id="MyProgramDir"
Name="Awesome Software" />
</Directory>
</Directory>
<DirectoryRef Id="MyProgramDir">
<Component Id="CMP_InstallMeTXT"
Guid="E8A58B7B-F031-4548-9BDD-7A6796C8460D">
<File Id="FILE_InstallMeTXT"
Source="InstallMe.txt"
KeyPath="yes" />
</Component>
</DirectoryRef>
<Feature Id="ProductFeature"
Title="Main Product"
Level="1">
<ComponentRef Id="CMP_InstallMeTXT" />
</Feature>
</Product>
</Wix>
www.it-ebooks.info

Creating Files and Directories
[ 54 ]
Fragments are a great way of splitting up your code to make it more manageable.
As we've seen, it's easy to pull them into the scope of your project. You could even
pull one fragment into another and then pull that one into your main source le.
WiX will take care of running the validity checks to make sure that everything links
together properly.
Note that it's possible to have more than one Fragment element in the same source
le. In that case, you must use a reference element for each one. They're sort of like
islands. They're isolated from one another. However, it's often simpler to stick to one
fragment per le. The following le denes two fragments:
<?xml version="1.0" encoding="UTF-8"?>
<Wix xmlns="http://schemas.microsoft.com/wix/2006/wi">
<Fragment>
<Property Id="MediaProperty"
Value="1" />
<Media Id="1"
Cabinet="media1.cab"
EmbedCab="yes" />
</Fragment>
<Fragment>
<Property Id="MediaProperty2"
Value="1" />
<Media Id="2"
Cabinet="media2.cab"
EmbedCab="yes" />
</Fragment>
</Wix>
Referencing the MediaProperty property with PropertyRef will only pull in the
elements in the rst fragment. To get those in the second fragment, you'd have to
also reference the MediaProperty2 property.
The Fragment element is so helpful that the WiX team has employed its use for an
even bigger type of project organization: .wixlib les. These are separate projects
that by default contain a single fragment and compile into a WiX library (.wixlib)
that can be added as a reference in your main WiX project. This allows other teams to
handle their own WiX code and send it to you already compiled. To try it out, create
a new project in your solution using the Setup Library Project template.
www.it-ebooks.info
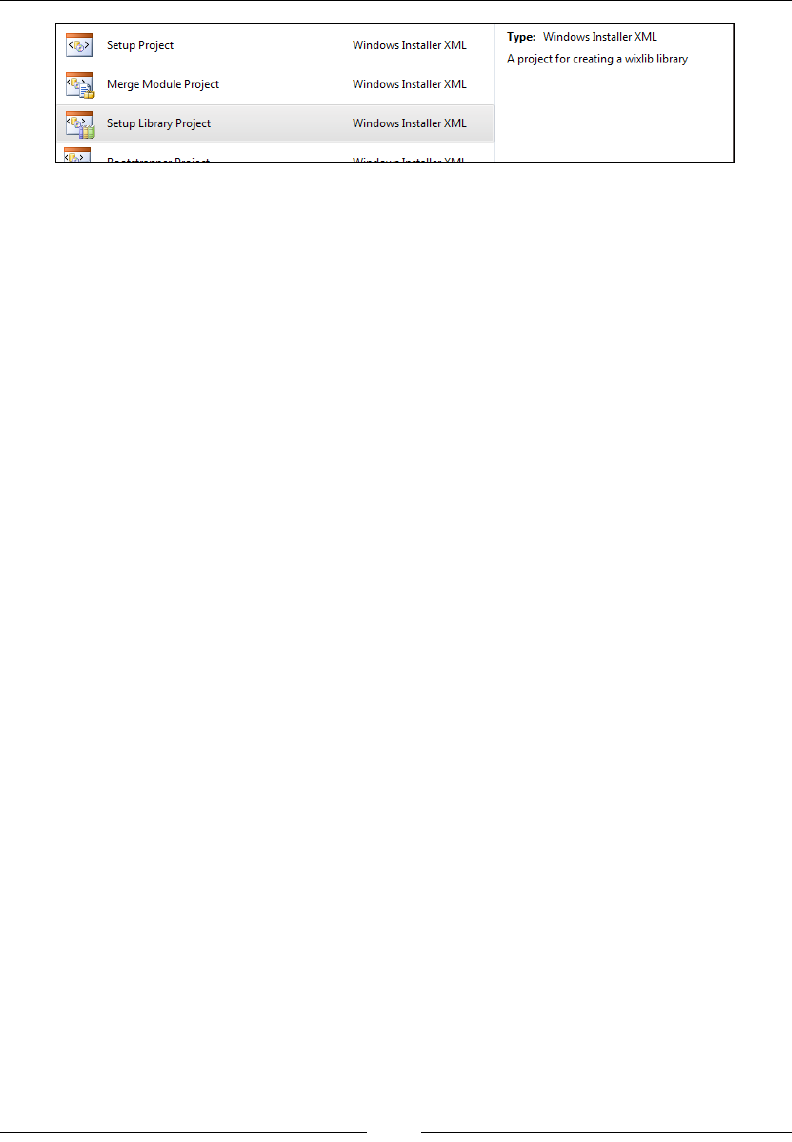
Chapter 2
[ 55 ]
The contents of this type of project aren't anything you haven't seen before. It's
simply a fragment. You'll start off with the following markup:
<?xml version="1.0" encoding="UTF-8"?>
<Wix xmlns="http://schemas.microsoft.com/wix/2006/wi">
<Fragment>
<!-- TODO: Put your code here. -->
</Fragment>
</Wix>
You can add properties, components, and anything else you'd ordinarily be able to
add to a fragment. When it's compiled, you'll have a .wixlib le that can be added as
a reference in your main WiX project. Use the Add Reference option in your Solution
Explorer window. Like other fragments, you'll be able to reference the .wixlib le's
contents by using a reference element such as PropertyRef. This is a great tool that
allows multiple teams to work on the installer without stepping on one another's toes.
In the past, installation developers often used merge modules (.msm) to separate
installation code. Merge modules, much like WiX libraries, contain compiled installer
code and offer a way of splitting up large projects. WiX libraries, which are easier to
author, can serve as a replacement for merge modules.
WiX does provide an XML element called Merge for importing a merge module
into your project. You'd probably only need to use this to install a third-party
component. However, even for dependencies such as Microsoft's Visual C++
Runtime, you may be able to avoid using a merge module and use an executable
installer instead. An installer for the Visual C++ Runtime is available and by using
WiX's new bootstrapper technology, Burn, it can be installed as a prerequisite before
your own software is installed. We'll cover Burn later in the book.
Harvesting les with heat.exe
When your project contains many les to install, it can be a chore to create File and
Component elements for all of them. Instead, WiX can do it for you. One of the tools
that ships with the toolset is called heat.exe. You can nd it in the bin directory of
the WiX program les. Navigate to WiX's bin directory from a command prompt
and type heat.exe -? to see information about its usage.
www.it-ebooks.info
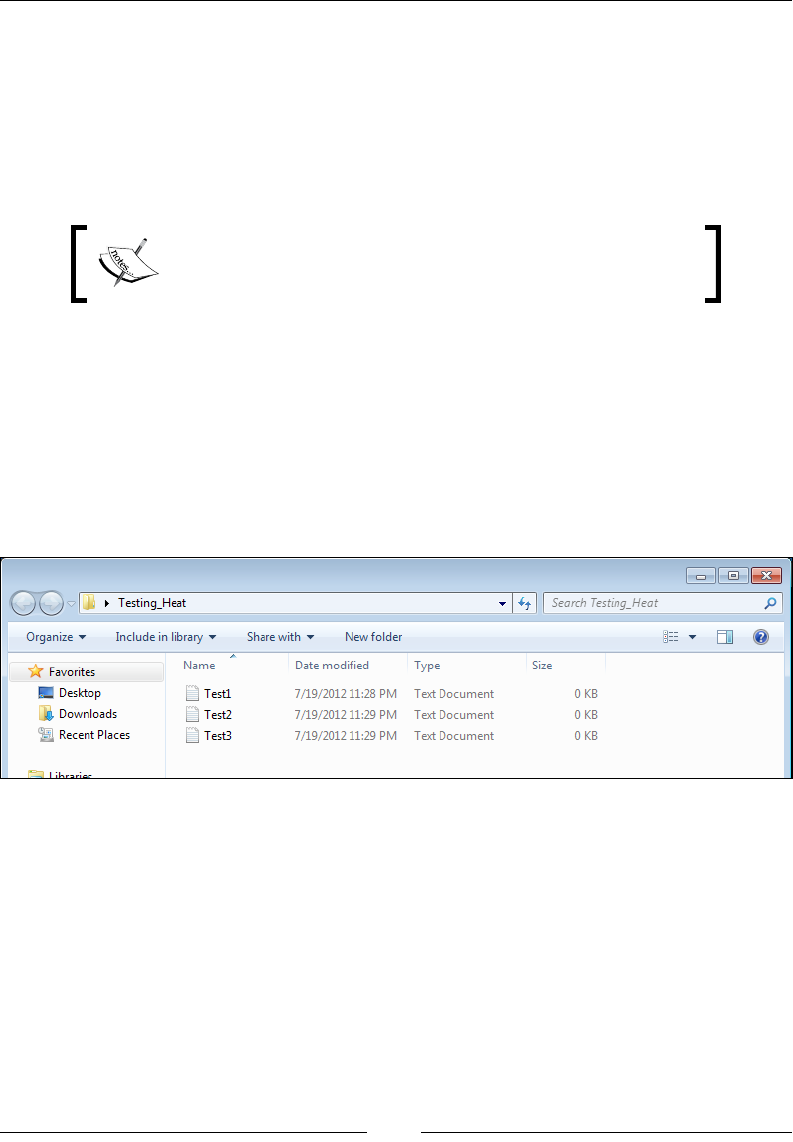
Creating Files and Directories
[ 56 ]
To make things easy, consider adding the path to the WiX bin directory to your
computer's PATH environment variable so that you won't have to reference the
full path to the executable each time you use it. You can do this on Windows 7 by
right-clicking on My Computer in your Start Menu and then going to Properties |
Advanced system settings | Environment Variables. From there, you can add the
WiX bin path, C:\Program Files (x86)\WiX Toolset v3.6\bin, to PATH by
nding PATH in the list of system variables and clicking on Edit.
Note that WiX, during its installation, adds an environment
variable called WIX, but this references the bin folder's
parent directory. You could add %WIX%bin to PATH.
The following is the general syntax for Heat:
heat.exe harvestType harvestSource <harvester arguments>
-o[ut] sourceFile.wxs
Heat can look at a directory, evaluate all of the les in it, and create a .wxs le
dening the components you'd need to install all of those les. First, let's create a
new directory and then add some empty text les in it. You can create it anywhere
you like.
Open a command prompt and navigate to this directory. I'll assume that the WiX bin
directory has been added to your PATH environment variable and won't reference
the full path to heat.exe. The rst argument that you have to give to Heat is a
harvestType, which can be one of the following:
• dir: This type harvests a directory
• file: This type harvests a le
• payload: This type harvests a bundle payload as RemotePayload
• perf: This type harvests performance counters
www.it-ebooks.info

Chapter 2
[ 57 ]
• project: This type harvests output of a VS project
• reg: This type harvest a .reg le
• website: This type harvests an IIS website
We'll be harvesting all the les from the directory we've created, so we'll use dir.
The second argument is the path to the directory. It can be a relative or absolute
path and should not end in a backslash. I'll truncate it in this example for the sake
of clarity. The last argument, which is preceded by the -out ag, is the name of a
source le that Heat will create. So, our Heat command looks like this so far:
heat.exe dir "C:\Testing_Heat" -out ".\HeatFile.wxs"
We've asked it to create a le called HeatFile.wxs in the current directory. The
following is what it would contain:
<?xml version="1.0" encoding="utf-8"?>
<Wix xmlns="http://schemas.microsoft.com/wix/2006/wi">
<Fragment>
<DirectoryRef Id="TARGETDIR">
<Directory Id="dirB81CE037F36D241058F8A43AAFDFE612"
Name="Testing_Heat" />
</DirectoryRef>
</Fragment>
<Fragment>
<DirectoryRef Id="dirB81CE037F36D241058F8A43AAFDFE612">
<Component Id="cmp154B5D55534D51EA6679BF67168C1D72"
Guid="PUT-GUID-HERE">
<File Id="filB2F0330A7280060ACCD0CFAF56B40DA8"
KeyPath="yes"
Source="SourceDir\Test1.txt" />
</Component>
</DirectoryRef>
</Fragment>
<Fragment>
<DirectoryRef Id="dirB81CE037F36D241058F8A43AAFDFE612">
<Component Id="cmp735C6BDA70156318193CB4A6C649FC6A"
Guid="PUT-GUID-HERE">
<File Id="fil0719BEF9518EFD5FC8C9C75E5A670F00"
KeyPath="yes"
Source="SourceDir\Test2.txt" />
</Component>
</DirectoryRef>
www.it-ebooks.info
Creating Files and Directories
[ 58 ]
</Fragment>
<Fragment>
<DirectoryRef Id="dirB81CE037F36D241058F8A43AAFDFE612">
<Component Id="cmpC9439409E8A1642355A4FDF410CC7EFD"
Guid="PUT-GUID-HERE">
<File Id="filE46FE85CD981AEB0AD645246FCB018B3"
KeyPath="yes"
Source="SourceDir\Test3.txt" />
</Component>
</DirectoryRef>
</Fragment>
</Wix>
It created WiX markup for us. However, things aren't quite as good as they could
be. For one thing, it has created a Directory element with a Name attribute of
Testing_Heat, the same as my impromptu folder. This will create a directory
called Testing_Heat on the end user's computer. That's not what I wanted. Also,
it has set the Guid attribute on each Component to PUT-GUID-HERE. Although this
could be useful in some circumstances, I'd much rather it created the GUIDs for me.
It has also set the Source attribute on each File element to SourceDir\FILENAME.
This means that when we build the project, the compiler will expect to nd the text
les in the same directory where the HeatFile.wxs le is. Finally, it hasn't made it
easy for us to reference the components that it created. It would have been nice to see
all of these components grouped into a ComponentGroup element.
To x these problems, we'll just add some more arguments to our call to Heat,
as outlined in the following table:
Argument What it does
-cg <ComponentGroup> Add the -cg flag with a name to use for a new
ComponentGroup element. Heat will then group the
components.
-dr <DirectoryName> Use the -dr flag with the name of one of the directories you
actually wanted to create. That way, the components will be
copied into that directory during the installation.
-gg To have Heat create GUIDs for us, add the -gg flag.
-g1 To have the GUIDs not have curly brackets, use the -g1 flag.
This is just a preference.
-sfrag By default, Heat puts each component and your directory
structure in separate Fragment elements. Adding -sfrag
puts these elements into the same Fragment element.
www.it-ebooks.info

Chapter 2
[ 59 ]
Argument What it does
-srd There's not really any reason to harvest the folder where the
files are, so add the -srd flag.
-var <VarName> We can use the -var flag with the name of a preprocessor
variable (preceded by var) to insert in place of SourceDir.
Later on, we can set the variable from within the project's
Properties settings or on the command line.
Now, our call to Heat will look something like the following command:
heat.exe dir "C:\New Folder" -dr MyProgramDir -cg NewFilesGroup
-gg -g1 -sf -srd -var "var.MyDir" -out ".\HeatFile.wxs"
The new HeatFile.wxs looks like the following code snippet:
<?xml version="1.0" encoding="utf-8"?>
<Wix xmlns="http://schemas.microsoft.com/wix/2006/wi">
<Fragment>
<DirectoryRef Id="MyProgramDir" />
</Fragment>
<Fragment>
<ComponentGroup Id="NewFilesGroup">
<Component Id="cmp6E6E0088162FB06CBCEA9A4AA7CBC603"
Directory="MyProgramDir"
Guid="94CB90AB-C291-4D2D-B9B1-DED3FA5DB93A">
<File Id="filCA67D5B125E878518FEA8F7FB62EF550"
KeyPath="yes"
Source="$(var.MyDir)\Test1.txt" />
</Component>
<Component Id="cmpC3D97EF2ADF77EB61AEF04285A25C2D2"
Directory="MyProgramDir"
Guid="9D73E105-CF60-4665-9CA4-7682859E6034">
<File Id="filA2FD0B78B439D62B0C28A829A9508C01"
KeyPath="yes"
Source="$(var.MyDir)\Test2.txt" />
</Component>
<Component Id="cmp5B1A530DE50F4D3437F2171E2CAB91A6"
Directory="MyProgramDir"
Guid="1949BEDC-8B91-424A-8977-A5C8F85FAE92">
<File Id="fil3C980C5A1D26D4B12D481104B14E98D2"
KeyPath="yes"
Source="$(var.MyDir)\Test3.txt" />
</Component>
</ComponentGroup>
</Fragment>
</Wix>
www.it-ebooks.info
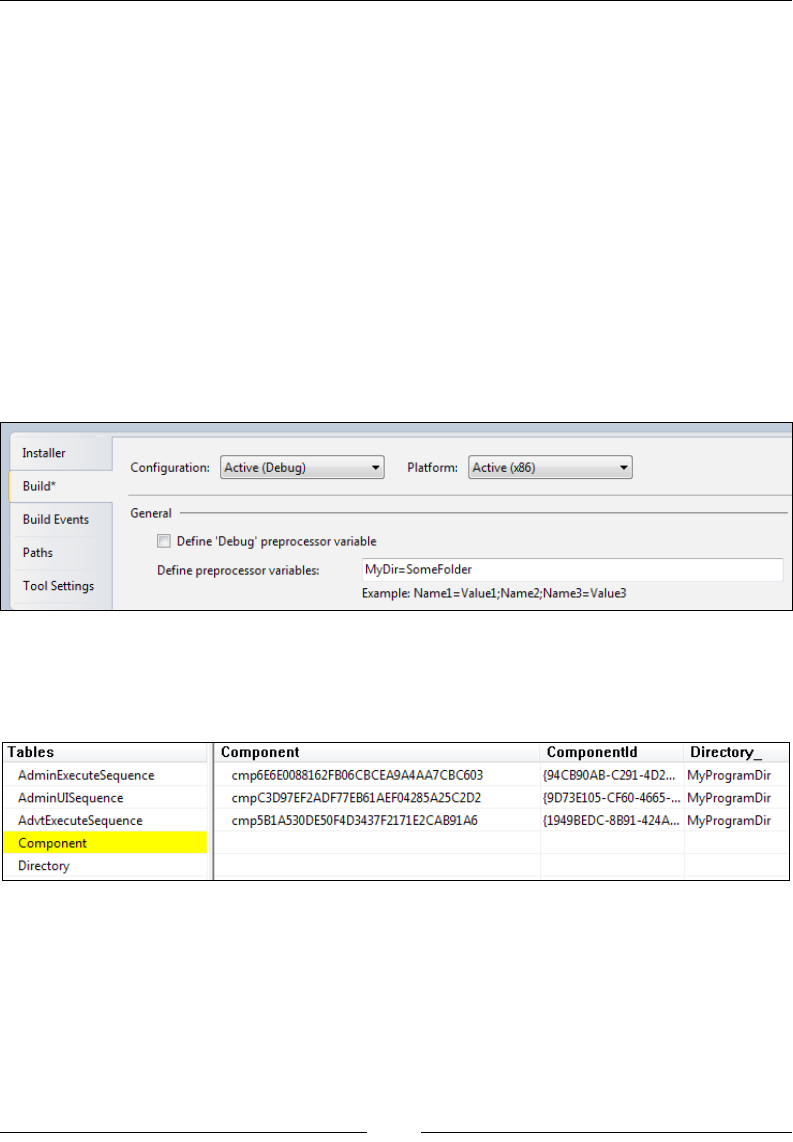
Creating Files and Directories
[ 60 ]
This looks a lot better. Now, the components are grouped, each Component has a
GUID and is being installed into the MyProgramDir folder that I'm creating, and the
File elements are using the $(var.MyDir) variable in their Source attributes. To
include these new components in Product.wxs, add a reference to ComponentGroup
with a ComponentGroupRef element inside one of the features:
<Feature Id="ProductFeature"
Title="Main Product"
Level="1">
<ComponentRef Id="CMP_InstallMeTXT" />
<ComponentGroupRef Id="NewFilesGroup" />
</Feature>
Also, be sure to add a value for the MyDir variable. Here, we set it to a folder named
SomeFolder in our project's directory (assuming we move our text les there before
compiling the project):
After you've compiled the project, you can use Orca to look at the MSI data that this
produces. The Component table will show the new components and the File table
will show the new les:
Remember that every time you run Heat on a directory, and you've set the -gg ag,
it will create new GUIDs for your components. If you've already shipped a version
of your software to customers, then these GUIDs should not be changed. To do so
would prevent Windows from accurately keeping track of them. Heat will also create
new Id attributes for File and Component elements each time you use it. This is just
something to keep in mind, especially if other parts of your installer expect the Id
attribute to stay the same from one day to the next.
www.it-ebooks.info

Chapter 2
[ 61 ]
Copying and moving les
File and Component elements allow you to add new les to the end user's computer.
However, WiX also provides ways to copy and move les. For these tasks, you'll use
the CopyFile element. We'll discuss how to use it in the following sections.
Copying les you install
The CopyFile element can copy a le that you're installing and place it in another
directory. You'll nest it inside the File element of the le you want to duplicate.
First, we'll add a subdirectory to the MyProgramDir folder that we're already creating
under Program Files. The new directory will be called Copied Files.
<Directory Id="TARGETDIR"
Name="SourceDir">
<Directory Id="ProgramFilesFolder">
<Directory Id="MyProgramDir"
Name="Awesome Software">
<Directory Id="CopiedFiles"
Name="Copied Files" />
</Directory>
</Directory>
</Directory>
Now, we can nest a CopyFile element inside the File element of the le we want to
copy. Here, we're copying the InstallMe.txt le to the Copied Files folder and
renaming it to InstallMeCOPY.txt. Notice that we use the DestinationDirectory
attribute to specify the Id attribute of the Copied Files directory. We use the
DestinationName attribute to specify the new lename. Every CopyFile element
has to have a unique ID, so we set that too:
<!--Components-->
<DirectoryRef Id="MyProgramDir">
<Component Id="CMP_InstallMeTXT"
Guid="E8A58B7B-F031-4548-9BDD-7A6796C8460D">
<File Id="FILE_InstallMeTXT"
Source="InstallMe.txt"
KeyPath="yes">
<CopyFile Id="Copy_InstallMeTXT"
DestinationDirectory="CopiedFiles"
DestinationName="InstallMeCOPY.txt" />
</File>
</Component>
</DirectoryRef>
www.it-ebooks.info

Creating Files and Directories
[ 62 ]
That's all you need. During installation, the InstallMe.txt le will be copied to the
Copied Files folder and named InstallMeCOPY.txt. If you wanted to, you could
nest multiple CopyFile elements under the same File element and copy that le to
several places. Just be sure to give each CopyFile element a unique ID.
If you don't want to hardcode the destination directory, you can use the
DestinationProperty attribute instead of DestinationDirectory to reference a
directory at install time. DestinationProperty accepts the name of a property that's
set to a directory path. The following is an example:
<Property Id="CopiedFilesFolder"
Value="C:\CopiedFiles" />
<DirectoryRef Id="MyProgramDir">
<Component Id="CMP_InstallMeTXT"
Guid="E8A58B7B-F031-4548-9BDD-7A6796C8460D">
<File Id="FILE_InstallMeTXT"
Source="InstallMe.txt"
KeyPath="yes">
<CopyFile Id="Copy_InstallMeTXT"
DestinationProperty="CopiedFilesFolder"
DestinationName="InstallMeCOPY.txt" />
</File>
</Component>
</DirectoryRef>
So here we've hardcoded the path again. It's just that this time we used a property to
do it instead of a Directory element. The DestinationProperty attribute is most
useful when you can set the property dynamically. There are various ways that you
can do this:
• Ask the user for it on a UI dialog and then set the property with the result.
We'll talk about setting properties from dialogs later in the book.
• Set the property from a custom action. This is something else we'll
cover later. The action that you create must be executed before the
DuplicateFiles action in InstallExecuteSequence.
• Set the property from the command line. We'll cover this in the next chapter.
• Use AppSearch, which we'll cover, to nd the directory you want and set the
property with it.
www.it-ebooks.info

Chapter 2
[ 63 ]
Copying existing les
In addition to being able to copy les that you're installing, you can also copy les
that already exist on the end user's computer. For this, you'll nest the CopyFile
element inside its own Component element and not inside a File element. The
following is an example that copies a le called TEST.txt that's on the desktop
to a folder called Copied Files:
<!--Directory structure-->
<Directory Id="TARGETDIR"
Name="SourceDir">
<Directory Id="ProgramFilesFolder">
<Directory Id="MyProgramDir"
Name="Awesome Software">
<Directory Id="CopiedFiles"
Name="Copied Files" />
</Directory>
</Directory>
<Directory Id="DesktopFolder" />
</Directory>
<!--Components-->
<DirectoryRef Id="MyProgramDir">
<Component Id="CMP_CopyTestTXT"
Guid="E25E8584-D009-43bE-99E9-A46D58105DD0"
KeyPath="yes">
<CopyFile Id="CopyTest"
DestinationDirectory="CopiedFiles"
DestinationName="TESTCopy.txt"
SourceDirectory="DesktopFolder"
SourceName="TEST.txt" />
</Component>
</DirectoryRef>
We've added a Directory element to reference the Desktop folder so that we
can reference it later in the CopyFile element. The Component element that holds
the CopyFile has its KeyPath attribute set to yes. We did this because we're not
installing anything with this component and something has to be the keypath. In
cases such as this, when there's nothing else to serve the purpose, it's ne to mark the
component itself as the KeyPath le.
www.it-ebooks.info

Creating Files and Directories
[ 64 ]
The CopyFile element here has the DestinationDirectory and DestinationName
attributes like before, but it also has the SourceDirectory and SourceName
attributes. SourceDirectory is set to the Id attribute of a Directory element where
the le you want to copy is. SourceName is the name of the le you want to copy.
If you wanted to, you could use the DestinationProperty attribute instead of
DestinationDirectory, and SourceProperty instead of SourceDirectory. These
are used to set the directory paths at installation time, as discussed before.
Moving existing les
Suppose you didn't want to copy a le that already existed, but rather move it to
some other folder. All you need to do is add the Delete attribute to your CopyFile
element. This will delete the le from its current location and copy it to the new
location. So, that's another way of saying "move". The following is an example:
<DirectoryRef Id="MyProgramDir">
<Component Id="CMP_MoveTestTXT"
Guid="E25E8584-D009-43bE-99E9-A46D58105DD0"
KeyPath="yes">
<CopyFile Id="MoveTest"
DestinationDirectory="CopiedFiles"
DestinationName="TESTCopy.txt"
SourceDirectory="DesktopFolder"
SourceName="TEST.txt"
Delete="yes" />
</Component>
</DirectoryRef>
Unfortunately, when you uninstall the software, it doesn't move the le back. It just
removes it completely from its current location.
Installing special-case les
In the following sections, we'll take a look at installing les that are different from
other types that we've talked about so far. Specically, we'll cover how to install an
assembly le (.dll) to the Global Assembly Cache and how to install a TrueType
font le.
www.it-ebooks.info
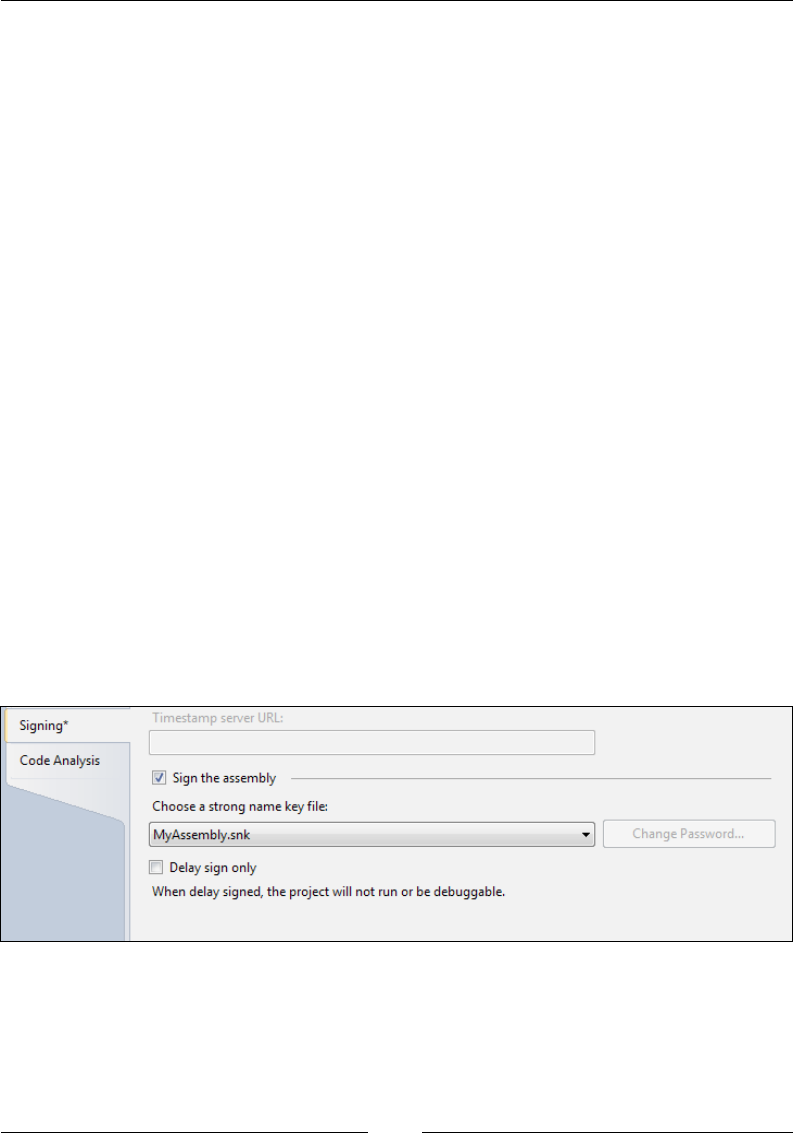
Chapter 2
[ 65 ]
Adding assembly les to the GAC
The Global Assembly Cache (GAC) is a central repository in Windows where you
can store .NET assembly les so that they can be shared by multiple applications.
You can add a .NET assembly to it with WiX by setting the File element's Assembly
attribute to .net. The following example installs an assembly le to the GAC:
<DirectoryRef Id="MyProgramDir">
<Component Id="CMP_MyAssembly"
Guid="4D98D593-F4E0-479B-A7DA-80BBB78B54CB">
<File Id="File_MyAssembly"
Assembly=".net"
Source="MyAssembly.dll"
KeyPath="yes" />
</Component>
</DirectoryRef>
Even though we've placed this component inside a DirectoryRef element, that
references the MyProgramDir directory, it won't really be copied there since we're
installing it to the GAC. Another approach is to create a dummy folder called GAC
that's used solely for this purpose. In that case, you wouldn't give that Directory a
Name attribute, which would prevent it from truly being created.
I'm using an assembly called MyAssembly.dll in this example, that I created with a
separate Visual Studio project. Any DLL that you want to install to the GAC must
be strongly signed. You can do this by opening the Properties page for that project
in Visual Studio, viewing the Signing page, checking the box that says Sign the
assembly, and creating a new .snk le, as shown in the following screenshot:
www.it-ebooks.info
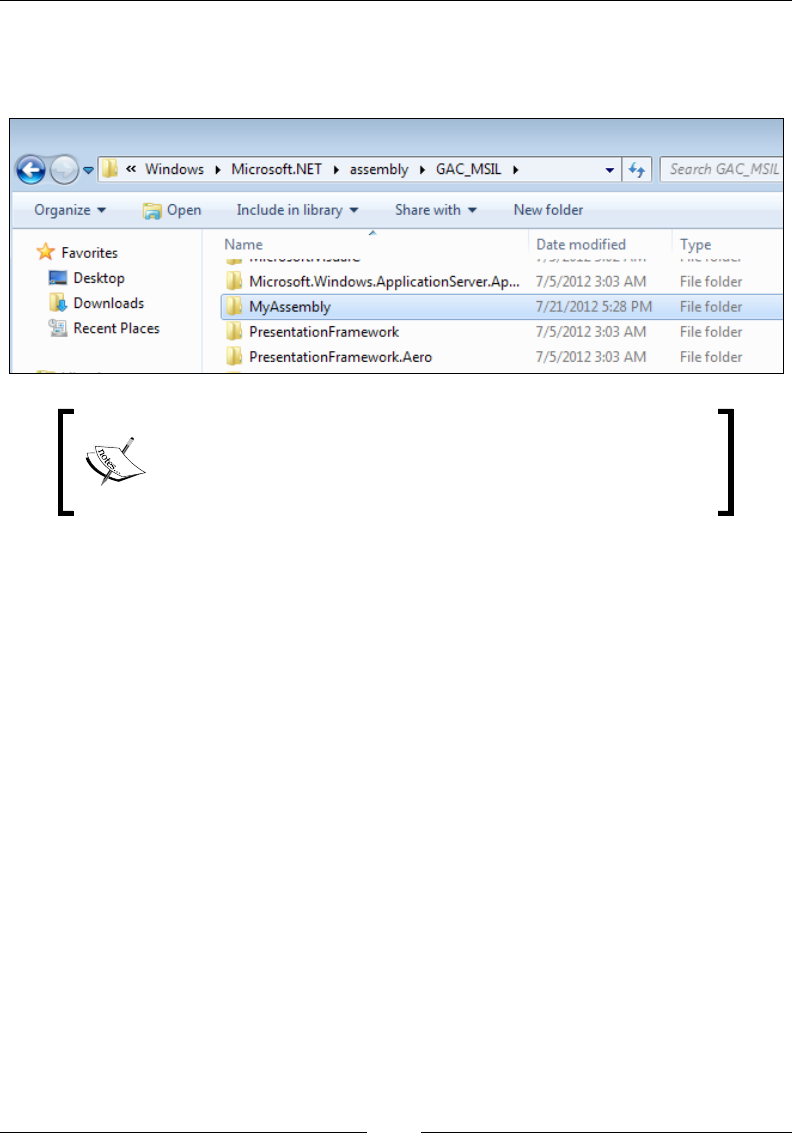
Creating Files and Directories
[ 66 ]
Once you've installed the package that now contains the strongly-signed assembly,
you'll be able to check if the DLL le actually made it into the GAC. Navigate to the
GAC assembly folder to see a list of installed assemblies:
Assemblies that target the .NET 4 Framework will use the
new GAC folders under C:\Windows\Microsoft.NET\
assembly. Assemblies targeting an earlier framework will be
placed in C:\Windows\assembly.
The nice thing is that when the user uninstalls the software the assembly will be
removed from the GAC—that is, unless another software product is still using it.
Windows keeps a count of products using each assembly and deletes your .dll only
when the count reaches zero.
Installing a TrueType font
To install a TrueType font onto the system, set the File element's Source attribute
to the location of a TTF le on your build machine and the TrueType attribute to
yes. The File element is nested inside a Component element that targets the built-in
FontsFolder directory. In the following example, we add a Directory element with
an Id value of FontsFolder and reference it with DirectoryRef:
<Directory Id="TARGETDIR"
Name="SourceDir">
<Directory Id="ProgramFilesFolder">
<Directory Id="MyProgramDir"
Name="Awesome Software" />
</Directory>
<Directory Id="FontsFolder" />
www.it-ebooks.info

Chapter 2
[ 67 ]
</Directory>
<DirectoryRef Id="FontsFolder">
<Component Id="CMP_MyFont"
Guid="CFF27814-D7A8-4054-B3B1-F5DB44CD5AB9">
<File Id="myFontFile"
Source="myFont.TTF"
TrueType="yes"
KeyPath="yes" />
</Component>
</DirectoryRef>
In the preceding code snippet, the File element is using the TrueType attribute to
signify that this le is a font le. It will include myFont.TTF from the current build
directory, in the install package and copy it to the end user's C:\WINDOWS\Fonts
folder.
Installing 64-bit les
Let's say that you have a .NET assembly that's targeting the x64 platform and
you want the installer for it to place that le into the 64-bit Program Files folder
(available on 64-bit Windows operating systems). For the uninitiated: you can set the
platform for the assembly using Visual Studio's Conguration Manager, as shown in
the following screenshot:
www.it-ebooks.info
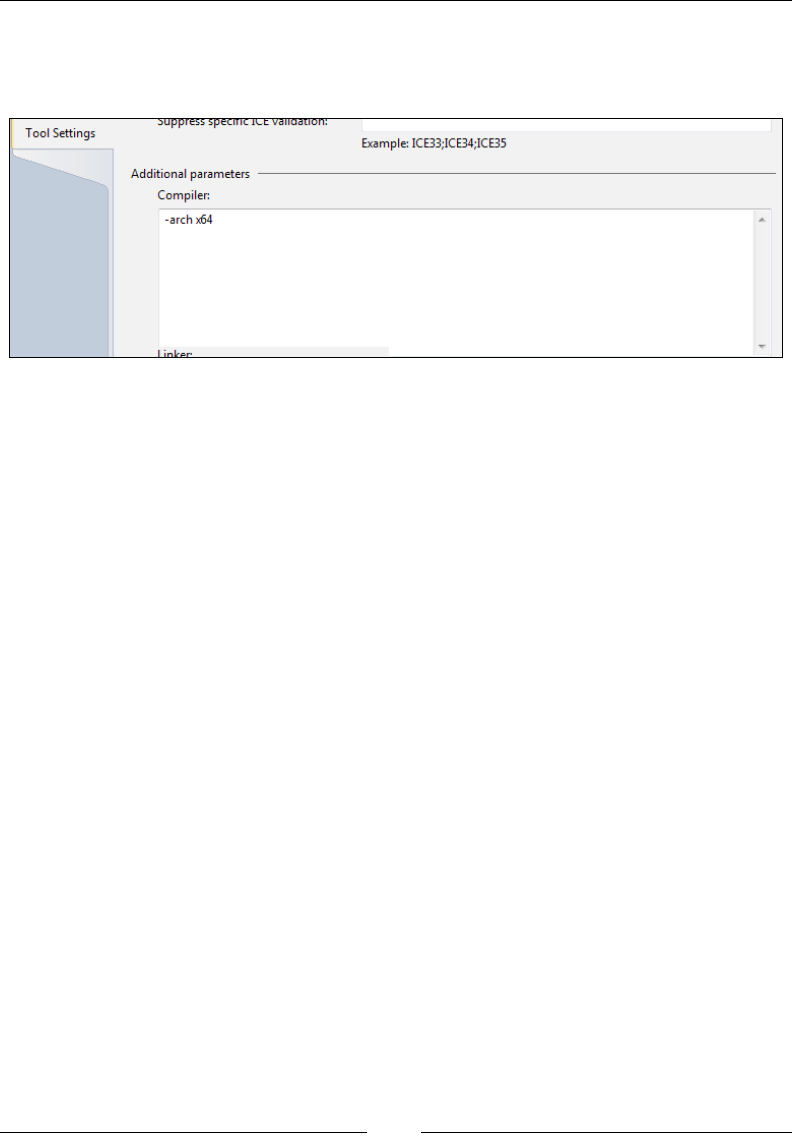
Creating Files and Directories
[ 68 ]
The rst thing to do is to open Properties for the WiX project and, on the Tools
Settings tab, add –arch x64 to the Compiler parameters, as shown in the
following screenshot:
Next, change the Directory element that is referencing ProgramFilesFolder to
instead reference ProgramFiles64Folder, given as follows:
<Directory Id="TARGETDIR" Name="SourceDir">
<Directory Id="ProgramFiles64Folder">
<Directory Id="INSTALLFOLDER" Name="My Software" />
</Directory>
</Directory>
Now your 64-bit assembly can be put into this directory. WiX detects the architecture
of the .NET assemblies for you. You'll get a compile-time error if you try to put a 64-
bit le into a 32-bit folder, or vice versa.
www.it-ebooks.info

Chapter 2
[ 69 ]
Creating an empty folder
Ordinarily, Windows Installer won't let you create empty folders. However, there
is a way: Use the CreateFolder element inside an otherwise empty Component
element. First, you'll dene the name of your empty directory with a Directory
element. Follow this example:
<Directory Id="TARGETDIR"
Name="SourceDir">
<Directory Id="ProgramFilesFolder">
<Directory Id="MyProgramDir"
Name="Awesome Software">
<Directory Id="MyEmptyDir"
Name="Empty Directory" />
</Directory>
</Directory>
</Directory>
In the example, we've added a new Directory element named Empty Directory
inside our main application folder. The next step is to add a component to this
directory by using a DirectoryRef element. Notice that we've set the KeyPath
attribute on the component to yes, as there will be no le to serve this purpose:
<DirectoryRef Id="MyEmptyDir">
<Component Id="CMP_MyEmptyDir"
Guid="85DAD4AE-6404-4A40-B713-43538091B9D3"
KeyPath="yes">
<CreateFolder />
</Component>
</DirectoryRef>
The only thing inside the component is a CreateFolder element. This tells Windows
Installer that the folder will be empty, but that it should still create it during the
install. As always, be sure to add this new component to a feature, as given in the
following code snippet:
<Feature Id="ProductFeature"
Title="Main Product"
Level="1">
<ComponentRef Id="CMP_InstallMeTXT" />
<ComponentRef Id="CMP_MyEmptyDir" />
</Feature>
www.it-ebooks.info
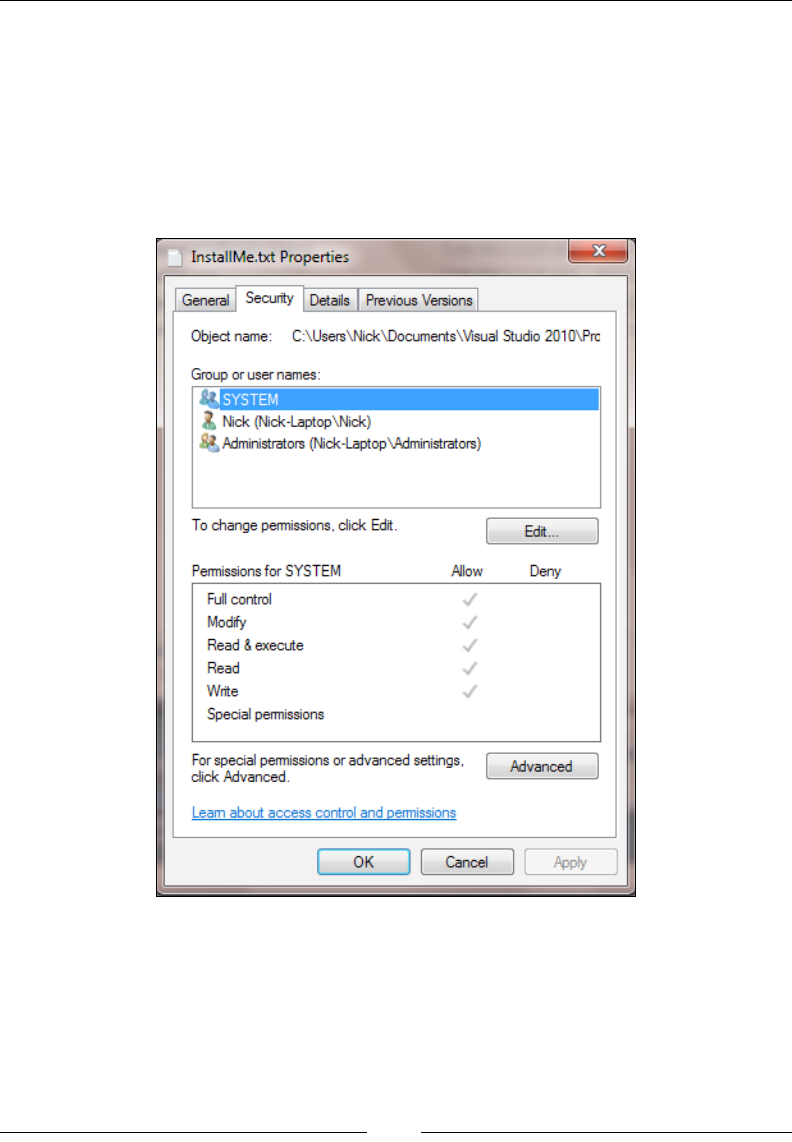
Creating Files and Directories
[ 70 ]
Setting le permissions
WiX allows you to set the permissions that Windows users and groups have to the
les that you install. You can see these permissions by right-clicking on a le and
selecting the Security tab. On Windows XP, you may have to congure your system
so that this tab is visible. In Windows Explorer, open the folder that you want to
congure and go to Tools | Folder Options | View. Then, uncheck the box that says
Use simple le sharing. The following is an example of the Security tab on a le:
www.it-ebooks.info
Chapter 2
[ 71 ]
To set the permissions for a le that you're installing, nest a PermissionEx element
inside the corresponding File element. This element, which is available from
WixUtilExtension, has various attributes that can be used to dene le permissions.
Before you can use it, you'll need to add a reference to WixUtilExtension.dll in your
project. Go to Add Reference in Solution Explorer and select the WiXUtilExtension
assembly. Next, add the following namespace to your Wix element:
<Wix xmlns="http://schemas.microsoft.com/wix/2006/wi"
xmlns:util="http://schemas.microsoft.com/wix/UtilExtension">
The following attributes are available to the PermissionEx element. Each can be set
to either yes or no:
Attribute What it does
GenericAll Gives the user all permissions.
GenericRead Must have at least one other permission specified. Grants all
Read privileges: "Read Data", "Read Attributes", "Read Extended
Attributes", and "Read Permissions".
GenericWrite Grants "Write Data, "Append Data", "Write Attributes", and "Read
Permissions".
GenericExecute Grants "Execute File", "Read Attributes", and "Read Permissions".
Read Grants "Read Data".
Write Grants "Write Data".
Execute Grants "Execute File" permission.
Append Grants "Append Data".
Delete Grants "Delete".
ChangePermission Grants "Change Permissions".
ReadPermission Grants "Read Permissions".
TakeOwnership Grants "Take Ownership".
Synchronize If "yes", then threads must wait their turn before accessing the file.
The following example references the util namespace from the Wix element and uses
its PermissionEx element to set le permissions on the InstallMe.txt le. Notice
that I'm also using another element from WixUtilExtension called User. This can
be used to create a new Windows user on the target computer. The Product.wxs le
would look something like the following code content:
<?xml version="1.0" encoding="UTF-8"?>
<Wix xmlns="http://schemas.microsoft.com/wix/2006/wi"
xmlns:util="http://schemas.microsoft.com/wix/UtilExtension">
<Product Id="3E786878-358D-43AD-82D1-1435ADF9F6EA"
www.it-ebooks.info

Creating Files and Directories
[ 72 ]
Name="Awesome Software"
Language="1033"
Version="1.0.0.0"
Manufacturer="Awesome Company"
UpgradeCode="B414C827-8D81-4B4A-B3B6-338C06DE3A11">
<Package InstallerVersion="301"
Compressed="yes"
InstallScope="perMachine" />
<MediaTemplate EmbedCab="yes" />
<!--Directory structure-->
<Directory Id="TARGETDIR"
Name="SourceDir">
<Directory Id="ProgramFilesFolder">
<Directory Id="MyProgramDir"
Name="Awesome Software" />
</Directory>
</Directory>
<!--Components-->
<DirectoryRef Id="MyProgramDir">
<Component Id="CMP_InstallMeTXT"
Guid="E8A58B7B-F031-4548-9BDD-7A6796C8460D">
<!--Creates new user-->
<util:User Id="MyNewUser"
CreateUser="yes"
Name="nickramirez"
Password="password"
PasswordNeverExpires="yes"
RemoveOnUninstall="yes"
UpdateIfExists="yes" />
<File Id="FILE_InstallMeTXT"
Source="InstallMe.txt" KeyPath="yes">
<!--Sets file permissions for user-->
<util:PermissionEx User="nickramirez"
GenericAll="yes" />
</File>
</Component>
www.it-ebooks.info
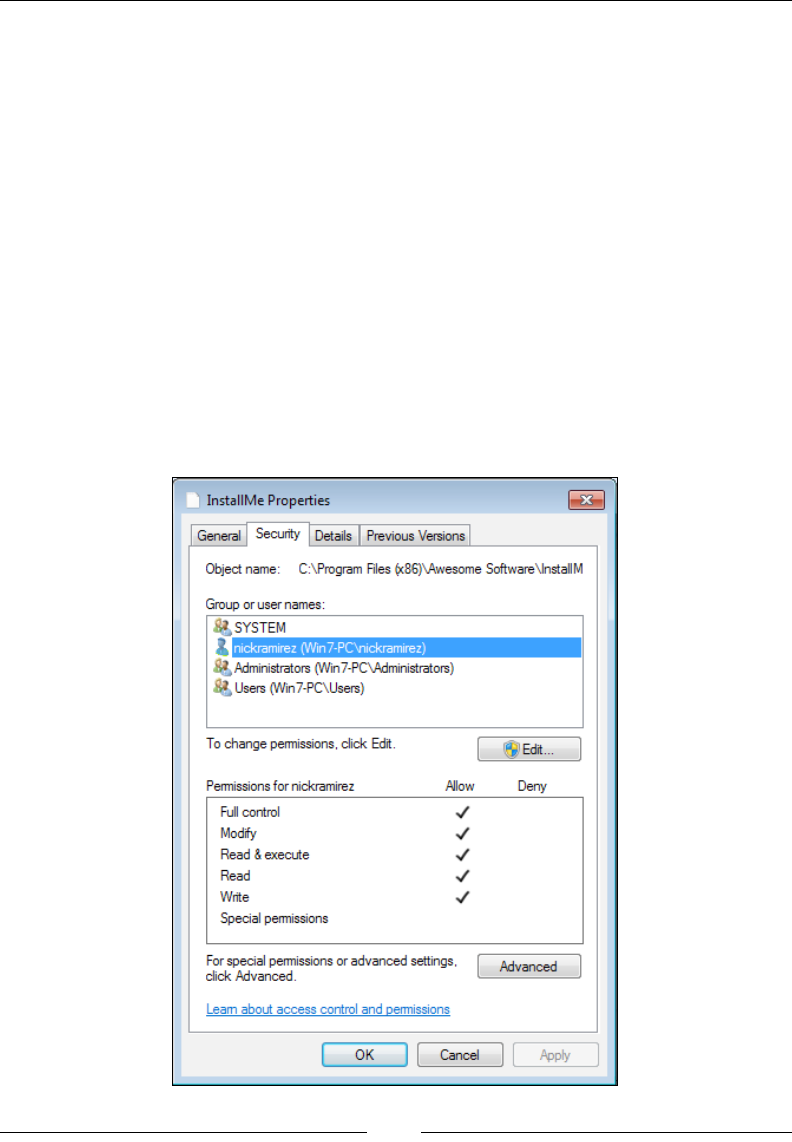
Chapter 2
[ 73 ]
</DirectoryRef>
<!--Features-->
<Feature Id="ProductFeature"
Title="Main Product"
Level="1">
<ComponentRef Id="CMP_InstallMeTXT" />
</Feature>
</Product>
</Wix>
In this example, we've given all privileges to the user we just created, nickramirez.
You can see all of the users for a computer by going to your Start Menu, right-clicking
on Computer, selecting Manage, and viewing the Local Users and Groups node. The
PermissionEx element's GenericAll attribute gives the user all possible privileges.
Just so you know, any users that you create during an installation will be removed
during an uninstallation if you set the User element's RemoveOnUninstall attribute
to yes.
www.it-ebooks.info
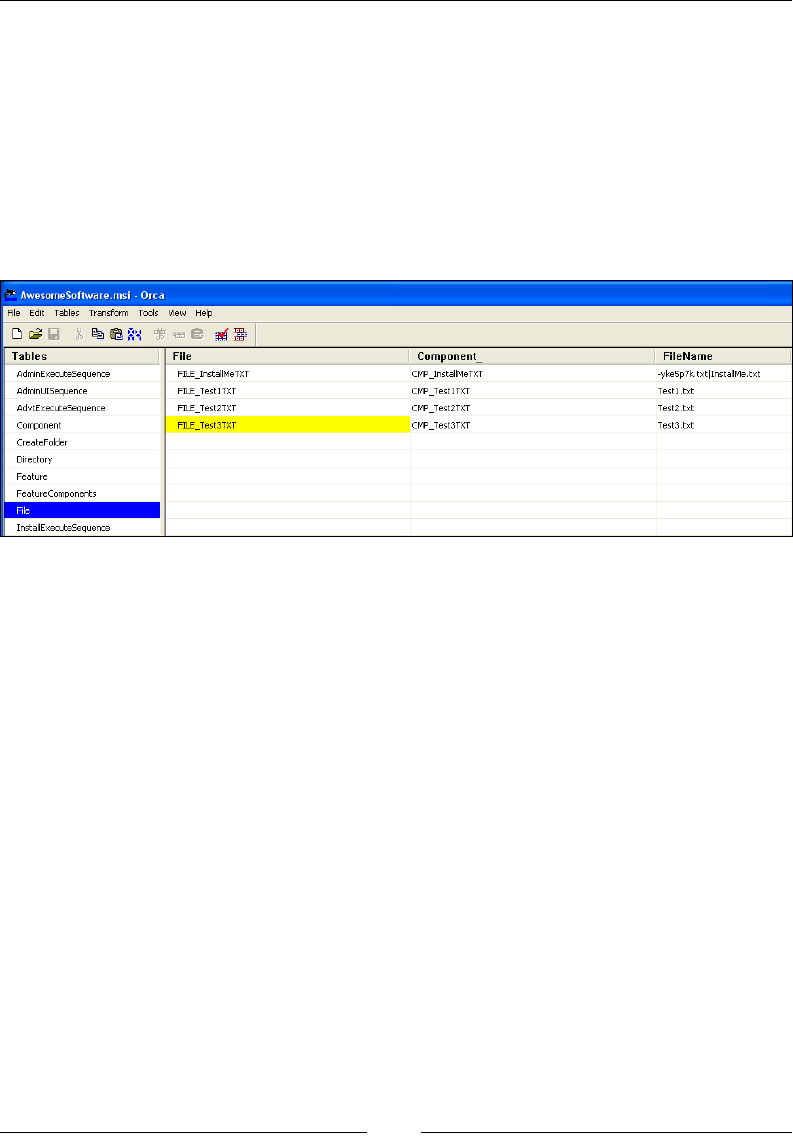
Creating Files and Directories
[ 74 ]
Speeding up le installations
We haven't talked too much about how the les and directories that you author in your
WiX source les are stored in the MSI database's tables. The les are stored in a table
called File, the directories in a table called Directory, and the components in a table
called Component. You can see this by opening the MSI package with Orca.exe.
In the following example, I have four les that are being installed. I've used the
convention of prexing my le IDs with FILE_, giving me FILE_InstallMeTXT,
for example:
Each le in the File table is sorted alphabetically by the Id value you gave to it via
the File element. This is the order in which the les are copied to the end user's
computer. So, how can you make things faster? You can give your les IDs that will
cause WiX to sort them more efciently.
The le copy process takes longer when Windows has to write to one directory and
then switch to another and then another and so on. If it could copy all of the les that
belong to a certain directory at the same time and then move to another location, the
process would be more efcient. As it is, Windows may leave and return to the same
directory several times as it goes through the alphabetical list.
To speed things up, we should add the name of the directory where the le is set to go
to the Id attribute of the le. To be effective, this should come at the beginning of Id.
That way, les going to the same place will appear next to each other in the list. So, in
addition to prexing our le IDs with FILE_, we could also indicate the directory that
each is being copied to. For example, FILE_MyProgramDir_InstallMeTXT signies
that this le is being copied to the MyProgramDir directory. Any other les being
copied to the same place should also get MyProgramDir in their IDs.
www.it-ebooks.info
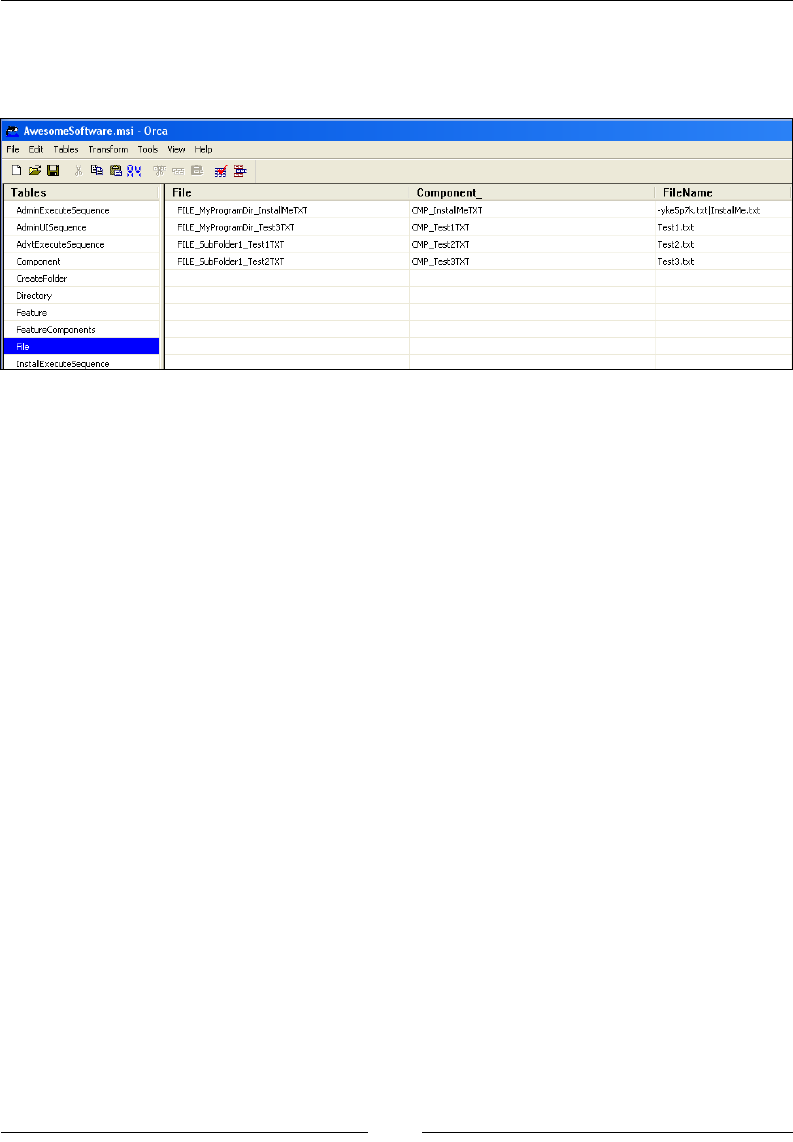
Chapter 2
[ 75 ]
The following example displays a list that is better organized. It uses the name of
the destination directory as part of the les' IDs. Files going to the same place will be
grouped together in the alphabetical list, as shown in the following screenshot:
I've used underscores to separate the prexes, but it's also common to use periods.
So, I could have named the rst le FILE.MyProgramDir.InstallMe.Txt instead of
FILE_MyProgramDir_InstallMeTXT. It's really just a matter of preference.
Summary
In this chapter, we discussed the elements used to install les and create directories.
The File, Directory, and Component elements play vital roles here, but you may also
benet from using ComponentGroup to group your components. This allows you to
better organize your markup and even to separate it into multiple WiX source les.
The heat.exe tool can create Component elements for you. You simply need to
point it at a certain directory. However, it's best to ne-tune its arguments so that
the output that you get is optimal. We discussed a few other topics such as how to
copy a le, how to set le permissions, and how to organize your File element Id
attributes for maximum installation speed.
In the next chapter, we'll move on to discuss WiX properties and the various ways of
searching the end user's system for les, directories, and settings.
www.it-ebooks.info

Putting Properties and
AppSearch to Work
When using WiX, properties are the variables that store any temporary data during
an install. As such, they provide denitions for various predened and custom-made
installer settings, store input from the user, and provide a means of transferring
information from one task to another. Additionally, they can store the results of
searching the user's computer for les, directories, registry keys, and settings.
In this chapter, you will learn:
• The syntax for declaring and setting properties
• How to reference properties in other parts of your markup
• The built-in properties that Windows Installer sets for you
• What AppSearch is and how to use it to search the end user's computer for
installed components, registry keys, and so on
Custom properties
You'll often need to dene and set custom properties to hold your install time data.
In the following sections, we will explore the meaning of WiX properties and how
best to use them. I should say that properties are not just a feature of WiX, but are
innate to Windows Installer itself. So, additional information about them can be
found in the Windows Installer documentation.
www.it-ebooks.info

Putting Properties and AppSearch to Work
[ 78 ]
Declaring and setting properties
To declare a property, add a Property element to your WiX markup. A Property
element only needs two attributes: Id and Value. The Id attribute sets the name of
the property, and the Value attribute sets the data contained inside. The following
example creates a new property called myProperty and sets its value to the string
my value. Note that this can go anywhere inside the Product element.
<Property Id="myProperty"
Value="my value" />
Id should begin with either a letter or underscore and consist of only lower and
uppercase letters, numbers, underscores, and periods. When referencing it, it's case
sensitive. So, MyPropertyId is not the same as MyPropertyID.
The data in Value can be almost any string. If you need to use double quotes in the
value, you can either surround it with single quotes, as in the following example:
<Property Id="myProperty"
Value='Do you see the "quotes"?' />
Or you can use the XML entity " in place of the double quotes:
<Property Id="myProperty"
Value="Do you see the "quotes"?" />
If you omit the Value attribute, the property will be set to null. During compilation,
properties with null values are left out of the MSI package. It will be as if you hadn't
declared them at all.
You can also set the value of a Property element by adding inner text to it, as in the
following example:
<Property Id="myProperty">my value</Property>
Properties can also be set from the command line. If you do, you're not required to
declare the property in your WiX markup rst. Declaring them on the command line
creates them dynamically. When dening properties on the command line, their IDs
must be uppercase. This is to make them "public", which we'll discuss later in the
chapter. To add a property in this way, add the name and value of your property,
separated by an equals sign, after the msiexec command.
msiexec /i myInstaller.msi PROPERTY1=100 PROPERTY2="my value"
www.it-ebooks.info

Chapter 3
[ 79 ]
Here we're declaring two properties at install time, PROPERTY1 and PROPERTY2, and
setting their respective values. You can add more than one property by separating
them with spaces, as we've done here. Literal string values that have spaces in them
should be surrounded by double quotes. If the value itself has double quotes in it,
you can escape them by using two double quotes instead of one:
msiexec /i myInstaller.msi PROPERTY1="Game title: ""Starcraft""."
You can clear a property by setting its value to an empty string, such as:
msiexec /i myInstaller.msi PROPERTY1=""
Properties declared on the command line override those set in your WiX markup.
So, you could declare a WiX Property element in your XML to give it a default
value, and then override that value from the command line.
Referencing properties
One of the common uses of properties is to reference them in another WiX element.
There is a limited list of elements that can reference a property, including the following:
• Control: This references a Text attribute
• ListItem: This references a Text attribute
• Dialog: This references a Title attribute
• Shortcut: This references Target, Arguments, and Description attributes
• Condition: This references Message attribute
• RegistryValue: This references Name and Value attributes
Generally, any attribute on an element that becomes something the end user will see
in the UI (text on dialogs, labels on buttons, items in lists, and so on) or the names
of shortcuts and registry keys will have the ability to interpret it. In the element's
attribute, add the Id attribute of the property with square brackets around it. For
example, to refer to a property called USERNAME, you'd use [USERNAME]. You'll run
across more elements like this throughout the rest of the book.
In the next example, we'll create a property called myProperty that has a value of
0. A Condition element that follows checks the value to see if it's equal to 1. Notice
that I'm using the square bracket notation in the Message attribute to reference
myProperty:
<Property Id="myProperty"
Value="0" />
<Condition Message=
www.it-ebooks.info
Putting Properties and AppSearch to Work
[ 80 ]
"Value of myProperty is [myProperty]. Should be 1">
<![CDATA[Installed OR myProperty = "1"]]>
</Condition>
The Message attribute is used to show a modal window to the user. In this case,
they'll see Value of myProperty is 0. Should be 1.
Conversely, when you use a property in the inner text of an element, you don't
need the square brackets. Conditional statements, such as those found inside the
Condition element, are a good example. Look back at the previous example to see
that myProperty is referenced in the inner text of the Condition element without
using square brackets.
<![CDATA[Installed OR myProperty = "1"]]>
The Installed keyword is a built-in property set by WiX that
signies that the product is already installed. By checking it, we
ensure that the second half of our condition will only be evaluated if
the product is not currently installed.
Declaring properties in your main .wxs le is ne if you only have a few. Once
you've got a good number it's easier to move them into their own source le and
nest them inside a Fragment element. To access these in your main .wxs le, add a
PropertyRef element with the Id attribute of one of the properties. A PropertyRef
element brings that property, and all others dened in the fragment, into the scope of
your project.
<Product ... >
...
<PropertyRef Id="myProperty" />
</Product>
<Fragment>
<Property Id="myProperty" Value="my value" />
</Fragment>
Property visibility and scope
Two things to consider when working with properties are visibility and scope.
With regards to visibility, consider that when you install an MSI package it's simple
to get a log of the process. You can see this log by installing from the command line
with logging turned on.
www.it-ebooks.info
Chapter 3
[ 81 ]
You can also turn on logging by changing keys in the registry or
through Group Policy. Refer to the following web page for more
information: http://support.microsoft.com/kb/223300.
The following command installs a package called myInstaller.msi and writes a
verbose log using the /l*v ag:
msiexec /i myInstaller.msi /l*v log.log
When you submit this command, it will log every event that happens during the
install to a text le called log.log. At the end of the log, all properties with their
values will be listed in plain text. This isn't a good thing if one of your properties
contains a password or other sensitive data. To prevent a specic property from
showing in the install log, mark it as Hidden:
<Property Id="MY_PASSWORD"
Value="some value"
Hidden="yes" />
Set the Hidden attribute to yes if you don't want to show the property as an entry in
the log. Marking a property as hidden does not, however, prevent it from displaying
its value in the MSI database's Property table. Therefore, you probably shouldn't
set the literal value of a password directly in a property, as in the previous example.
Instead, set the value from the command line or collect it from the user via the UI.
That way, it is dened dynamically and the user cannot see it by opening the MSI
package with Orca.exe.
Scope is another consideration. By default, properties are not public, meaning that
they are not available when the installer runs through its execution phase (when
changes are made to the end user's system). We'll talk more about this phase later
on. For now, just know that if you plan on using your properties when writing to the
registry, laying down les, or during any other act that changes the user's computer,
then those properties must be made public.
Making a property public is just a matter of making its Id value all uppercase. The
property MY_PASSWORD is public, while my_Password is not. One example of when to
do this is when you collect information from the user with a dialog and then want to
take some action on it during the execution phase, such as store it in the registry.
The following property, because it's uppercase, will persist throughout the entire
installation.
<Property Id="MY_PROPERTY"
Value="my string" />
www.it-ebooks.info

Putting Properties and AppSearch to Work
[ 82 ]
However, this will not:
<Property Id="My_Property"
Value="my string" />
You could consider this a private property. It will only last during the current
session. We will discuss the install phases in detail in Chapter 5, Understanding the
Installation Sequence.
Secure properties
Ordinarily, an installer will prompt a non-admin user to elevate their privileges, or in
other words enter the password of an administrator account, before performing tasks
that change directories and registry keys outside their permissions zone. However,
administrators can, through various means discussed shortly, allow non-admin users
to install approved software without being asked to elevate their privileges.
This has the benet of simplifying distribution of software on a company network,
for example, but comes at a price. Windows Installer may mark the installation as
restricted. This means that the properties you set could be ignored. The following
scenarios may set this in motion:
• The user performing the install is not an administrator
• The install is marked as per-machine instead of per-user, meaning the
ALLUSERS property is set to 1 in your markup or the Package element's
InstallScope attribute is set to perMachine
• Through various means, discussed shortly, the user does not need to enter
an administrator's password to elevate their permissions like they normally
would to complete the install
There are several ways to allow a non-administrator to continue an installation without
elevating. The rst is when an administrator publishes the MSI to all computers in an
Active Directory domain using Group Policy. This allows non-admin users to go to
Programs and Features and install the MSI from the network without the need to enter
an administrator's password. More information can be found at http://support.
microsoft.com/kb/816102. The user would see packages available for install, as in
the following example:
www.it-ebooks.info
Chapter 3
[ 83 ]
Another scenario is when an administrator has advertised the MSI for non-admin
users to install on that same computer. This is done by using the /jm command-line
option to advertise the package for all users. An admin calls:
msiexec /jm \\PCName\MyShare\AwesomeInstaller.msi
This advertises the installer. A user can then install the MSI without needing to
elevate their privileges.
A third scenario is when the AlwaysInstallElevated value has been set to 1 in the
following registry keys:
• HKEY_CURRENT_USER\Software\Policies\Microsoft\Windows\Installer
• HKEY_LOCAL_MACHINE\Software\Policies\Microsoft\Windows\
Installer
This lets non-admin users install any MSI without using an administrator's password.
When one of these scenarios happens, the installer, marking that actions are being
done by a non-administrator, labels the whole process as restricted. In that case, only
a small list of approved properties is allowed to be passed to the Execute sequence,
which is the phase during which changes are made to the computer. To add more
properties to that list, you'll need to mark them as Secure, as shown in the following
code snippet:
<Property Id="MY_PROPERTY"
Value="my string"
Secure="yes" />
You can nd a list of the default secure properties at
http://msdn.microsoft.com/en-us/library/
windows/desktop/aa371243(v=vs.85).aspx.
www.it-ebooks.info

Putting Properties and AppSearch to Work
[ 84 ]
You can tell when you need to use the Secure attribute if, in the install log, you see
that the RestrictedUserControl property has been set automatically. You'll also
see some of your properties, if they're used in the execute sequence, being ignored.
The following is a sample log of that happening:
MSI (s) (C8:BC) [23:49:58:906]:
Machine policy value 'EnableUserControl' is 0
MSI (s) (C8:BC) [23:49:58:906]: PROPERTY CHANGE:
Adding RestrictedUserControl property. Its value is '1'.
MSI (s) (C8:BC) [23:49:58:906]:
Ignoring disallowed property MYPROPERTY
Notice that there's another property called EnableUserControl. If you set it to 1 in
your markup, all properties will be marked as Secure.
Property data types
The properties in WiX are not strongly typed, meaning that you don't need to specify
whether a property is an integer or a string. Most of the time, you'll be setting
properties by using the WiX Property element. The alternative is to set them from
the command line or set them dynamically with a UI control or custom action. Using
a Property element always implicitly casts the property as a string. Therefore, you
can always treat these properties as string values. However, depending on how you
reference it, it's possible for WiX to interpret your property as an integer.
If, in a conditional statement, you compare your property to an integer (a whole
number without quotes around it), WiX will assume that your property is an integer
too. For example, here I compare a property to the number 3 without quotes around
it. WiX will cast my property to an integer and then perform the comparison:
<Property Id="MyProperty"
Value="5" />
<Condition Message="Some message if condition is false." >
<![CDATA[MyProperty > 3]]>
</Condition>
The same is true when comparing a property to a string. WiX will assume your
property is a string and perform the comparison:
<Property Id="MyProperty"
Value="5" />
<Condition Message="Some message if condition is false.">
<![CDATA[MyProperty = "5"]]>
</Condition>
www.it-ebooks.info
Chapter 3
[ 85 ]
The following table shows the comparison operators and examples for integers and
strings that evaluate to true:
Operator Meaning Integer example String example
<Less than 1 < 2 "abc" < "def"
>Greater than 2 > 1 "b" > "a"
<= Less than or equal to 2 <= 3 "a" <= "b"
>= Greater than or equal to 3 >= 2 "b" >= "a"
=Equal to 2 = 2 "a" = "a"
<> Not equal to 2 <> 1 "a" <> "b"
>< Left string contains right string
(strings only)
n/a "abc" >< "b"
<< Left string starts with right string
(strings only)
n/a "abcde" << "ab"
>> Left string ends with right string
(strings only)
n/a "abcde" >> "de"
With the "greater than" and "less than" signs, a string is considered less than another
if, from left to right, one of its characters comes before the character in the other
string. For example, the string "abc" is less than "abd" because "c" comes before "d".
Note that if the property is a decimal, such as 2.0, then you can't compare it to a
numeric value unless you put quotes around that value. This is because WiX has no
concept of decimals and so must evaluate them as strings. For example, the following
statement, unexpectedly, evaluates to false:
<Property Id="myNum"
Value="2.0" />
<Condition Message="myNum must be > 1.">
<![CDATA[myNum > 1]]>
</Condition>
However, by putting quotes around 1, it evaluates to true as it should:
<Property Id="myNum"
Value="2.0" />
<Condition Message="myNum must be > 1.">
<![CDATA[myNum > "1"]]>
</Condition>
www.it-ebooks.info

Putting Properties and AppSearch to Work
[ 86 ]
Normally, when you compare two string values, the case counts. However, if
you prex the comparison operator with a tilde (~), the case will be ignored. The
following condition evaluates to true:
<Property Id="MyProperty"
Value="sample string" />
<Condition Message="Some message if condition is false.">
<![CDATA[MyProperty ~= "SAMPLE STRING"]]>
</Condition>
Something else you can do is check if a property is dened at all. Evaluating a
property by itself checks that it has been set, as in the following example:
<Condition Message="Some message if condition is false">
<![CDATA[MY_PROPERTY]]>
</Condition>
Placing the NOT keyword in front of the property checks that the property is not set:
<Condition Message="Some message if condition is false">
<![CDATA[NOT MY_PROPERTY]]>
</Condition>
WiX data types are very simplistic. After all, if you were to look at the MSI's
Property table, you'd see only two columns: property and value. There's no extra
column to tell what type of data it is. Take this into account when planning the
conditional statements that you write.
Predened Windows Installer properties
You've seen that you can dene your own properties, but there are also a number
that come predened for you. Quite a few are created automatically as part of the
install process. For example, there's the property called Installed that's set if the
product is already installed locally. Looking through the install log will uncover
many more.
In this section, you'll be introduced to some of these automatic properties. You'll also
see that some properties, although their Id attributes are dened for you, only come
to life when you instantiate them with Property elements.
www.it-ebooks.info

Chapter 3
[ 87 ]
Implied properties
There are certain properties that don't need to be set with a Property element.
They're implied. They're set for you. First, there are those that are created when you
set attributes on the Product element. So, for example, the following code snippet:
<Product Id="3E786878-358D-43AD-82D1-1435ADF9F6EA"
Name="Awesome Software"
Language="1033"
Version="1.0.0.0"
Manufacturer="Awesome Company"
UpgradeCode="B414C827-8D81-4B4A-B3B6-338C06DE3A11">
This creates the following properties:
• ProductCode
• ProductName
• ProductLanguage
• ProductVersion
• Manufacturer
• UpgradeCode
You can use these properties just as you would those you create yourself. They're
available to you in all phases of the install. They can be accessed in the attributes and
inner text of other elements just like normal.
Another set of implied properties are directories. We discussed the built-in
directory properties in Chapter 1, Getting Started. They're given names such as
ProgramFilesFolder. In addition to using them in your Directory elements, you
can use these names anywhere that other properties are used. Also, any directories
that you create with Directory elements are also available as properties. The
directory's Id attribute becomes the ID of the property.
Another set of implied properties are those that guide how Windows Installer does
its job. For example, there's the Installed property, which tells you that the product
is already installed. You'll usually see it during an uninstall or if the product is in
maintenance mode. Another is the Privileged property, which is set when the
install is performed by an administrator. Another example is the REMOVE property,
which is only set during an uninstall. Taking a look at the install log will reveal many
of these.
www.it-ebooks.info
Putting Properties and AppSearch to Work
[ 88 ]
Cited properties
Most of the properties that are built into Windows Installer aren't implied. You have
to set them explicitly with a Property element. They're different from the properties
that you'll create yourself, in that the Id attribute must match the predened name
and they're generally used to toggle various Windows Installer settings. There is a
fairly long list of these available. Check the Property Reference in the MSI SDK help
le that comes with WiX by searching in it for the phrase "Property Reference". You
can also nd them at:
http://msdn.microsoft.com/en-us/library/aa370905%28v=VS.85%29.aspx
I won't list them all here, but to give you an idea, here are properties that affect what
gets shown in Programs and Features once your product has been installed. Your
product will automatically show up in the list without the use of properties, but
these provide extra information or disable the default functionality:
Property Description
ARPAUTHORIZEDCDPREFIX URL of the update channel for the application
ARPCOMMENTS Provides comments for Add/Remove Programs
ARPCONTACT Provides the contact for Add/Remove Programs
ARPINSTALLLOCATION Fully qualified path to the application's primary folder
ARPHELPLINK URL for technical support
ARPHELPTELEPHONE Technical support phone numbers
ARPNOMODIFY Prevents displaying a Change button for the product
in Add/Remove Programs
ARPNOREMOVE Prevents displaying a Remove button for the product
in Add/Remove Programs
ARPNOREPAIR Disables the Repair button in Add/Remove Programs
ARPPRODUCTICON Identifies the icon to display for the product in Add/
Remove Programs
ARPREADME Provides the ReadMe for Add/Remove Programs
ARPSIZE Estimated size of the application in kilobytes
ARPSYSTEMCOMPONENT Prevents the application from displaying at all in Add/
Remove Programs
ARPURLINFOABOUT URL for the application's home page
ARPURLUPDATEINFO URL for the application's update information
www.it-ebooks.info

Chapter 3
[ 89 ]
The following are a few examples of how these properties would be set:
<Icon Id="myIcon"
SourceFile="..\myIcon.ico" />
<Property Id="ARPPRODUCTICON"
Value="myIcon" />
<Property Id="ARPCOMMENTS"
Value="(c) Amazing Software" />
<Property Id="ARPNOREPAIR"
Value="1" />
<Property Id="ARPCONTACT"
Value="Nick Ramirez" />
<Property Id="ARPHELPLINK" Value="http://www.MYURL.com/
AmazingSoftware/support.html"/>
<Property Id="ARPREADME" Value="http://www.MYURL.com/
AmazingSoftware/readme.html" />
As you can see, setting a built-in property is just like setting your own custom
properties except that the Id value must use the predened name.
One other built-in property that you should know about is ALLUSERS. You can set
it to a 1, 2, or an empty string (""). A 1 means that the install will be performed in
the per-machine context. This means that its components will be installed to folders
accessible to anyone that uses the system. Setting ALLUSERS to an empty string tells
the installer to use the per-user context, meaning that its components will be installed
only for the current user. A value of 2 means that the installer will sometimes be in
the user context and sometimes in the machine context, depending on whether or
not the user who initiated it has administrator rights. However, even this rule varies
based upon the operating system.
In general, you should set ALLUSERS to 1, the per-machine context. Setting it to
the per-user context can only be done if you're certain that no registry keys or les
will be installed to machine-level locations. This is rarely the case. A value of 2
usually causes scenarios that are too complex to plan for. So, it's best to avoid it. The
following example sets the ALLUSERS property to 1:
<Property Id="ALLUSERS"
Value="1" />
The reason that this property is important is that during an upgrade, you'll want
to nd out if a previous version of the software is already installed. For that, the
ALLUSERS property must be set to the same value as it was originally. Otherwise, the
installer may look in the wrong place and fail to detect the software, even if it's there.
So, keep it consistent. Always set it to the same value, preferably 1.
www.it-ebooks.info

Putting Properties and AppSearch to Work
[ 90 ]
One thing to note is that you can also set the InstallScope attribute on the Package
element to either perMachine or perUser. This will have the same effect as setting
the ALLUSERS property directly. If you do, you should remove any Property element
that sets it.
AppSearch
Windows Installer lets you search the computer during an install for specic les,
directories, and settings. Collectively, these fall under the category of AppSearch,
which is the name of the MSI database table where search tasks are stored.
There are ve types of searches:
• DirectorySearch: This searches for the existence or path of a directory
• FileSearch: This searches for a specic le
• ComponentSearch: This searches for a le by its component GUID
• RegistrySearch: This searches the Windows Registry for a key
• IniFileSearch: This searches inside INI les for conguration settings
Each of these types refers to the WiX element that you'd use to perform the search.
Each is the child element of a Property element. So, you'll start off with a Property
element whose value will be set to the result of the search.
There's an attribute of the Property element, ComplianceCheck, that can be used
when doing an AppSearch. When set to yes, an error dialog will be shown if the
search isn't successful. It will then end the installation.
The error message you get is very generic though. You're better off detecting whether
or not a certain le exists, setting a property based on the result, and crafting a
targeted message if it isn't found (using a launch condition, discussed later). That
way, users will know what wasn't found. Although there's nothing stopping you
from creating a custom launch condition and setting ComplianceCheck to yes, it isn't
necessary since the install will end if the launch condition fails and launch conditions
always come before the compliance check is performed.
www.it-ebooks.info

Chapter 3
[ 91 ]
DirectorySearch
You may want to check if a directory exists on a computer and, if it does, get its path.
You can do this by using a DirectorySearch element. A DirectorySearch element
is nested inside of a Property element, as shown in the following code snippet:
<Property Id="NPP_PATH">
<DirectorySearch Path=" C:\Program Files (x86)\Notepad++"
Depth="0"
AssignToProperty="yes"
Id="NppFolderSearch"/>
</Property>
In this example, we're seeing if the popular text editor Notepad++ has been installed
by checking for a directory called Notepad++ in the Program Files folder. We start
by declaring a Property and giving it an Id attribute of our choosing. If the search
nds a directory that matches, based on the Path attribute, it will set this property's
value to the path. Otherwise, the property will be null.
The AssignToProperty attribute tells the installer to use this DirectorySearch
element to set the property. This becomes more valuable when you've got
DirectorySearch elements nested inside other DirectorySearch elements, as
you'll see.
Notice that this search is pretty specic about where this directory should be: we've
given an absolute path to the directory we're looking for. The Depth attribute is set to
zero to signify that there's no need to drill down into any subfolders.
What if I didn't know exactly where this directory was, though? For example,
suppose we didn't want to assume that the user has a C:? We could be more generic
with the search criteria. We could, for example, just give the name of the folder we're
looking for:
<Property Id="NPP_PATH">
<DirectorySearch Path="Notepad++"
Depth="5"
AssignToProperty="yes"
Id="NppFolderSearch" />
</Property>
Here we've set the Path attribute to just Notepad++ and the Depth attribute to 5.
Now we're telling the installer to search for a folder called Notepad++ and that we're
willing to go ve directories deep to nd it. Because we haven't explicitly told it
where to start the search from it will search all attached drives starting at their root
directories (such as C:\, D:\, and others).
www.it-ebooks.info

Putting Properties and AppSearch to Work
[ 92 ]
Because our search is so generic, you might be in for a wait. Worse, on Vista or
Windows 7, you'll probably get an error as the installer tries to search through the
hidden, restricted junction point C:\Documents and Settings.
In cases such as this, you should tell Windows Installer where to start searching by
nesting the DirectorySearch elements inside one another. Then, the outer-most
DirectorySearch becomes the starting point and the child becomes the directory
you're searching for. As in the following example:
<Property Id="NPP_PATH">
<DirectorySearch Path="[ProgramFilesFolder]"
Depth="0"
AssignToProperty="no"
Id="ProgramFilesFolderSearch">
<DirectorySearch Path="Notepad++"
Depth="0"
AssignToProperty="yes"
Id="NppFolderSearch"/>
</DirectorySearch>
</Property>
Now we're searching inside the Program Files folder for the Notepad++ folder.
Note that the rst DirectorySearch element has its AssignToProperty attribute
set to no. We want the inner DirectorySearch element to be the only one to set
the property. Also note that we could have set the Depth attribute of the inner
DirectorySearch element to a number greater than zero. It would then search that
many folders deep inside Program Files until it either found what it was looking
for or ran out of folders to look through.
The following is another example that uses three DirectorySearch elements to nd
the Notepad++ plugins folder:
<Property Id="NPP_PATH">
<DirectorySearch Path="[ProgramFilesFolder]"
Depth="0"
AssignToProperty="no"
Id="ProgramFilesFolderSearch">
<DirectorySearch Path="Notepad++"
Depth="0"
AssignToProperty="no"
Id="NppFolderSearch">
<DirectorySearch Path="plugins"
Depth="0"
AssignToProperty="yes"
Id="pluginsSearch" />
www.it-ebooks.info
Chapter 3
[ 93 ]
</DirectorySearch>
</DirectorySearch>
</Property>
The Path attribute actually gives you quite a few options. It can accept any of
the following:
• A WiX property
• A Windows share, such as \\myshare\myFolder
• A path relative to the top-level directory for any attached drives,
such as \temp
• An absolute path, such as C:\temp
• The name of a folder, such as temp
• An environment variable (using WiX preprocessor syntax), such as
$(env.ALLUSERSPROFILE)
You should know that if the installer can't nd the path you set in the parent
element, it will skip it and use its default—every attached drive's root directory.
Although it seems superuous, each DirectorySearch element must get its own ID.
Windows Installer uses these Id attributes to tie all of the elements together into one
cohesive search. It's interesting to look inside the MSI package and see how all of this
is stored. Directory searches are found in the DrLocator table. The following is what
you'd nd for the previous search:
Signature Parent Path Depth
pluginsSearch NppFolderSearch plugins 0
NppFolderSearch ProgramFiles
FolderSearch
Notepad++ 0
ProgramFiles
FolderSearch
[ProgramFilesFolder] 0
The table structure mirrors the parent-child relationship seen in WiX. In the
AppSearch table, you'd see a row with the property NPP_PATH mapped to the
signature pluginsSearch.
www.it-ebooks.info
Putting Properties and AppSearch to Work
[ 94 ]
FileSearch
There may be times when you want to nd a specic le instead of just a directory.
For this, you'll still use a DirectorySearch element, but you'll nest a FileSearch
element inside it. This tells the installer that you're looking for a le inside
that directory:
<Property Id="README_FILE">
<DirectorySearch Path="C:\Program Files (x86)\Notepad++"
Depth="0"
AssignToProperty="no"
Id="NppSearch">
<FileSearch Name="readme.txt"
Id="readmeFileSearch" />
</DirectorySearch>
</Property>
The FileSearch element names the le you're looking for with its Name attribute. If
it's found, the property will be populated with the absolute path to the le. In this
case, it will be set to C:\Program Files (x86)\Notepad++\readme.txt. You can
use any of the various denitions for the DirectorySearch element's Path attribute
discussed in the last section as well as nesting DirectorySearch elements. Or if you
omit the Path attribute altogether, you'll be telling the installer to look at all attached
drives for the le you specify. Set the AssignToProperty attribute to no on the
DirectorySearch elements.
Be wary of accidentally putting a space in front of the value in
Path, such as Path=" C:\". The search will fail and you'll be
hard pressed to nd out why.
The FileSearch element can't do recursive searches through subfolders. So, its
parent DirectorySearch element must name the exact folder where the le is
supposed to be, if it species a path with the Path attribute.
You can add other attributes to the FileSearch element to rene your search, such
as the MinSize and MaxSize attributes for a range of le sizes (in bytes), MinDate
and MaxDate for range of modication dates, and MinVersion and MaxVersion for a
range of le versions. This is shown in the following snippet:
<FileSearch Name="readme.txt"
Id="readmeFileSearch"
MinSize="100"
MaxSize="200"
MinVersion="1.5.0.0"
www.it-ebooks.info

Chapter 3
[ 95 ]
MaxVersion="2.0.0.0"
MinDate="2009-12-20T12:30:00"
MaxDate="2009-12-25T12:30:00" />
Note that MinDate and MaxDate must use the format, "YYYY-MM-DDTHH:mm:ss",
where "YYYY" is the year, "MM" the month, "DD" the day, "HH" the hour, "mm"
the minute, and "ss" the second. "T" is actually the letter "T". You can also add
a Language attribute to limit the search to les with a specic language ID. For
example, "1033" is "English, United States". To specify more than one language,
separate them by commas.
You can see the searches you've set up in the MSI database under the Signature
table. There, the lename, version, size, date, and language are listed. An Id value on
that table is joined to the DrLocator table where the directory structure is dened.
The entire search is referenced on the AppSearch table, where it is linked with a
property. You can probably see how dening the structure and data of the MSI is
greatly simplied by using WiX's declarative markup.
ComponentSearch
A second way to search for les installed on the end user's computer is to use a
ComponentSearch element. Like other search elements, ComponentSearch is nested
inside a Property element. If the le you're looking for is found, the path of its
folder will be saved to the property. Note that it won't be the full path to the le
itself, but close enough.
To understand ComponentSearch, you have to remember that Windows Installer
uses components with unique GUIDs as containers for the les that get copied to
a computer. ComponentSearch looks for the GUID that was set on a component or
more specically, the le that was marked as the keypath in that component. So, as
long as you know the GUID, you can nd the le. In fact, you can even look for les
installed by other programs, as long as you know the GUID.
Use Orca.exe to open an MSI installer and check the Component table for a le's
GUID. It's marked as ComponentId. The actual lename is available on the File table
and is mapped to the Component table via the Component column. To set the GUID in
the ComponentSearch element, use the Guid attribute. The following is an example
that, as a very simple case, searches for the path to the Orca.exe tool itself:
<Property Id="ORCA_PATH">
<ComponentSearch Id="orcaSearch"
Guid="{BE928E10-272A-11D2-B2E4-006097C99860}" />
</Property>
www.it-ebooks.info

Putting Properties and AppSearch to Work
[ 96 ]
Here, we are looking for the orca.exe le. The MSI for it can be found after
installing the Windows SDK. If you've installed Orca, this search should return a
path to the executable, something like C:\Program Files (x86)\Orca\.
ComponentSearch has several uses. You might use it to nd out where the user
installed your software, as it returns the absolute path to the directory where the
specied le is. You could also use it to check if someone else's software is installed.
To make such a check reliable, be sure to look for a le that's denitely going to
be there. The downside to ComponentSearch is that you're relying on the GUIDs
staying the same. This is pretty safe when it's your own software, but can be risky
with anyone else's.
There's one other optional attribute of the ComponentSearch element: Type. The
Type attribute can be set to either file, its default, or directory. Setting it to le
causes it to do what it normally does—look for the KeyPath le of the component
and return its parent directory. You would set Type to directory only when your
search involves a component that did not specify a le as its KeyPath. Take the
following example:
<DirectoryRef Id="INSTALLLOCATION">
<Directory Id="newDir" Name="New Directory">
<Component Id="newDirComp"
Guid="EA8062E0-E9C2-49E7-B76D-32161923F9F9"
KeyPath="yes">
<CreateFolder />
</Component>
</Directory>
</DirectoryRef>
Here, we've created a component that is tasked with creating an empty folder called
New Directory in the install directory. There are no les in the component to make a
keypath out of. So, we've set the KeyPath attribute to yes on the Component element
itself. If we don't specify a KeyPath value at all, the component will be assumed to be
the keypath by default.
www.it-ebooks.info

Chapter 3
[ 97 ]
When there's no le specied as the keypath, you can set the ComponentSearch
element's Type attribute to directory and it will return the path to the component's
parent directory—just like normal. Otherwise, we get the strange behavior of
ComponentSearch returning the directory above the parent directory. For example, if
we set the Type to file (or leave it out), we get the install directory, INSTALLLOCATION,
back. If we set Type to directory, we get the component's parent directory, newDir.
So, it's basically something you have to do just to get the expected behavior.
<!--Returns INSTALLLOCATION: C:\Program Files\mySoftware\-->
<Property Id="MY_DIRECTORY_PATH ">
<ComponentSearch Id="myCompSearch"
Guid="{EA8062E0-E9C2-49E7-B76D-32161923F9F9}"
Type="file" />
</Property>
<!--Returns newDir: C:\Program Files\mySoftware\New Directory-->
<Property Id="MY_DIRECTORY_PATH ">
<ComponentSearch Id="myCompSearch"
Guid="{EA8062E0-E9C2-49E7-B76D-32161923F9F9}"
Type="directory" />
</Property>
Of course, if there is a KeyPath le, setting the ComponentSearch element's
Type attribute to directory will cause the search to return null. In general, the
applications for this confusing logic are so few that you'll rarely have to worry
about using the Type attribute.
RegistrySearch
WiX lets you read values from the Windows Registry with its RegistrySearch
element. Like the previous search types, RegistrySearch has a Property element as
its parent. If the registry value you're looking for is found, its value will be saved to
the property. The following is an example:
<Property Id="DIRECTX_VERSION">
<RegistrySearch Id="DirectX_Version"
Root="HKLM"
Key="SOFTWARE\Microsoft\DirectX"
Name="Version"
Type="raw" />
</Property>
www.it-ebooks.info

Putting Properties and AppSearch to Work
[ 98 ]
This searches for the version of DirectX installed on the user's computer. The version
number is located in the registry as a value called Version in the HKEY_LOCAL_
MACHINE\SOFTWARE\Microsoft\DirectX key. If the search nds it, it saves the value
to the property DIRECTX_VERSION, which is an arbitrary name.
To get there with RegistrySearch, set the Root attribute to the abbreviated version
of HKEY_LOCAL_MACHINE, which is HKLM. Your possible values for Root are:
• HKLM: For HKEY_LOCAL_MACHINE
• HKCR: For HKEY_CLASSES_ROOT
• HKCU: For HKEY_CURRENT_USER
• HKU: For HKEY_USERS
The Key attribute is the registry path beneath Root to the item you're looking for.
In this example, it's set to SOFTWARE\Microsoft\DirectX. This path is not case
sensitive. The Name attribute is the value in the key that you want to read. This is also
not case sensitive.
The Type attribute tells the installer what sort of data it can expect to nd in
this registry item. You have three options here: directory, file, or raw. Using
directory or file lets you combine RegistrySearch with either FileSearch or
DirectorySearch. It's used as a way to search the computer's directory structure for
a le or directory after it gets the location of it from the registry.
Suppose you want to read a value from the registry and that value is the path to a
le. You then want to check that the le is truly where it says it is on the lesystem.
As an example, assume that there's a registry item HKLM\SOFTWARE\WIXTEST\
PathToFile that's set to the value C:\Program Files\mySoftware\myFile.txt.
You can get this value from the registry by using the RegistrySearch element, as in
the following example:
<Property Id="MY_PROPERTY">
<RegistrySearch Id="myRegSearch"
Root="HKLM"
Key="SOFTWARE\WIXTEST"
Name="PathToFile"
Type="file">
<FileSearch Id="myFileSearch" Name="[MY_PROPERTY]" />
</RegistrySearch>
</Property>
www.it-ebooks.info
Chapter 3
[ 99 ]
Here, the RegistrySearch element nds the item in the registry and sets the
value of MY_PROPERTY. Next, the nested FileSearch element can now read that
property and use it to nd the le on the computer. If it nds it, it replaces the value
of MY_PROPERTY with the location of the le—which should be the same. If it doesn't
nd it, it sets the value to null.
In order for this to work, you have to set the RegistrySearch element's Type
attribute to file. This tells the installer that it should expect to nd the path to a
le in the registry and that you intend to nest a FileSearch element inside the
RegistrySearch element.
You can do something similar with DirectorySearch. Take this example, assuming
there is another registry item called PathToDirectory where the value is the path to
the directory C:\Program Files\mySoftware\myDirectory\:
<Property Id="MY_PROPERTY">
<RegistrySearch Id="myRegSearch"
Root="HKLM"
Key="SOFTWARE\WIXTEST"
Name="PathToDirectory"
Type="directory">
<DirectorySearch Id="myDirSearch"
Path="[MY_PROPERTY]" />
</RegistrySearch>
</Property>
Here, Type is set to directory allowing you to nest a DirectorySearch element
inside RegistrySearch. This type also tells the installer that it should expect the
registry value to hold the path to a directory. Like the FileSearch example, this
one uses the RegistrySearch result to set a property and then uses that property to
search the lesystem. This time, it's looking for a directory instead of a le. If it nds
it, it will set the property to the path. If not, the property will be set to null.
Setting Type to raw lets you read the registry value and set a property, but nothing
more. In many cases, this will be all you want. Be aware that Windows Installer will
add special characters to the value to distinguish different data types. The following
table explains what it will add to different kinds of values. This only applies when
Type is set to raw:
Type of data Characters added
DWORD Starts with "#" optionally followed by "+" or "-"
REG_BINARY Starts with "#x" and the installer converts and saves each
hexadecimal digit as an ASCII character prefixed by "#x"
www.it-ebooks.info

Putting Properties and AppSearch to Work
[ 100 ]
Type of data Characters added
REG_EXPAND_SZ Starts with "#%"
REG_MULTI_SZ Starts with "[~]" and ends with "[~]"
REG_SZ No prefix, but if the first character of the registry value is "#", the
installer escapes the character by prefixing it with another "#"
All of the attributes mentioned so far—Id, Key, Root, Name, and Type—are required.
There is one optional attribute though called Win64. When set to yes, it will search
the 64-bit portion of the registry instead of the 32-bit one. Of course, this only applies
to 64-bit operating systems. The following is an example:
<Property Id="MY_PROPERTY">
<RegistrySearch Id="myRegSearch"
Root="HKLM"
Key="SOFTWARE\WIXTEST"
Name="myRegistryItem"
Type="raw"
Win64="yes" />
</Property>
Registry searches are represented in the MSI database on the RegLocator table.
There you'll nd a column for the Root, Key, Name, and Type attributes. The Id
attribute is listed under the Signature column and is referenced by various
other tables including AppSearch, DrLocator, and Signature. For complex
searches where FileSearch or DirectorySearch elements are nested inside
RegistrySearch, these tables are joined together by this Id.
IniFileSearch
The last type of search in the WiX arsenal is IniFileSearch, which lets you search
INI conguration les for settings. An INI le is a text le with an .ini extension
that uses a simple syntax to list conguration settings. The following is a sample
INI le:
; Test INI file
[section1]
name=Nick Ramirez
occupation=software developer
[section2]
car=Mazda3
miles=70000
[section3]
breakfast=yogurt
www.it-ebooks.info

Chapter 3
[ 101 ]
WiX always searches the %windir% directory, which is usually C:\Windows for INI
les. So, save this code as myConfigFile.ini in that directory.
In an INI le, you can comment out text by putting a semicolon at the beginning
of the line. Mark different sections by putting brackets around the name. In each
section, create key-value pairs separated by equal signs. And there you have it,
pretty simple stuff.
An IniFileSearch uses four attributes: Id, Name, Section, and Key. Let's look
at an example:
<Property Id="MY_PROPERTY">
<IniFileSearch Id="myIniSearch"
Name="myConfigFile.ini"
Section="section1"
Key="name"
Type="raw" />
</Property>
The Id attribute species the primary key of the item in the MSI database
IniLocator table. It's also referenced on the AppSearch table where it's tied to
the MY_PROPERTY property. The Name attribute is the name of the INI le. Section
refers to the bracketed section name and Key is the left-hand side of one of the
key-value pairs under that section. This particular search will set the property
to "Nick Ramirez". That's the value of the name key in the section1 section.
The Type attribute can be file, directory, or raw. Raw is the simplest as it just
returns the literal value of the key. Unlike RegistrySearch, there won't be any
special characters added to it. This is what you'll use in most cases.
If you set Type to file, Windows Installer will expect the INI value to be the path
to a le. Once it nds this value, it will use it to set the parent property. After that,
you're free to use that property in a nested FileSearch element to conrm that the
le exists. If it doesn't, the property will be set to null.
[section1]
filePath=C:\Program Files\mySoftware\myFile.txt
Product.wxs
<Property Id="MY_PROPERTY">
<IniFileSearch Id="myIniSearch"
Name="myConfigFile.ini"
Section="section1"
Key="filePath"
www.it-ebooks.info

Putting Properties and AppSearch to Work
[ 102 ]
Type="file">
<FileSearch Id="myFileSearch"
Name="[MY_PROPERTY]" />
</IniFileSearch>
</Property>
Here, the installer searches for the INI le, nds it, and uses the specied key to set
the value of the property. It then uses that property in the FileSearch element's
Name attribute to check if the le is where MY_PROPERTY says it is.
Setting the Type attribute to directory works the same way except that you nest
a DirectorySearch element instead. In this case, the DirectorySearch element
checks that the directory in the property exists.
myConfigFile.ini
[section1]
directoryPath=C:\Program Files\mySoftware\
Product.wxs
<Property Id="MY_PROPERTY">
<IniFileSearch Id="myIniSearch"
Name="myConfigFile.ini"
Section="section1"
Key="dirPath"
Type="directory">
<DirectorySearch Id="myDirSearch"
Path="[MY_PROPERTY]" />
</IniFileSearch>
</Property>
In this example, the directoryPath key in the INI le is set to C:\Program Files\
mySoftware\. The DirectorySearch element checks that this directory really exists
once it has been set as the property value. If it does, the property will keep the path
as its value. Otherwise, it will be set to null.
www.it-ebooks.info

Chapter 3
[ 103 ]
Summary
In this chapter, we discussed Windows Installer properties and the AppSearch
feature. Properties allow you to store information during the course of the
installation. Properties are referenced with square brackets when used in the
attribute of another element. Be sure to look up whether or not a particular element
attribute can interpret the square bracket notation. When used in the inner text of
another element, the square brackets aren't needed.
We talked about some of the built-in Windows Installer properties. There are
actually quite a few of these and we'll probably cover many more as we continue
on. You've seen some that affect things such as the Add/Remove Programs list, but
there are also less ashy ones that Windows Installer uses just to do its job. However,
knowing about them can be to your advantage when it comes to debugging or even
creating conditional statements based upon them.
Windows Installer can do a variety of searches with its AppSearch feature: le,
directory, registry, component, and INI le searches. These go hand-in-hand with
properties as the result of the searches are saved to properties. Probably one of the
handiest uses for AppSearch is to nd out if a particular bit of software is installed.
You can use this as part of a prerequisite check before installing your own software.
You can also use them to nd if directories or les exist, and if so, where they are. In
the next chapter, we'll cover conditional statements and how to read the install state
of features and components.
www.it-ebooks.info

Improving Control with
Launch Conditions and
Installed States
We've covered how to store data in properties and how to search the target computer
for les, directories, and settings using AppSearch. All by itself that makes WiX an
attractive solution for deploying software. However, things are about to get more
interesting. We're going to discuss how to use the information you've collected to
control what gets installed and if the installer will continue past its initial startup.
WiX gives you a powerful tool that allows you to make these decisions—conditions.
In this chapter, you will learn to:
• Set launch conditions to require prerequisites for your install
• Utilize feature and component conditions to prevent a portion of your
software from being installed
• Read the action state and installed state of your features and components
The syntax of conditions
There are several types of conditions examined in this chapter and all use the
Condition element to house their logic. The meaning of this element changes
depending on where it's placed relative to other elements and which attributes
it uses. We'll discuss three types: launch conditions, feature conditions, and
component conditions.
www.it-ebooks.info
Improving Control with Launch Conditions and Installed States
[ 106 ]
Launch conditions check for prerequisites at the beginning of the installation and
prevent it from continuing if their requirements aren't met. They're placed anywhere
inside either the Product element in your main.wxs le, or a Fragment element in
a separate le.Feature conditions and component conditions are child elements to
Feature and Component elements, respectively. Both prevent a specic feature or
component from being installed if a condition isn't satised.
First, we'll take a look at the generic syntax of conditional statements and then move
on to discussing each of the three types.
Condition syntax
Conditions contain statements that evaluate to either true or false. In most cases
you'll be comparing a property to some value. We discussed the logical operators
that you can use for comparisons in the previous chapter. The following is a table
that summarizes each one:
Operator Meaning
<Less than
>Greater than
<= Less than or equal to
>= Greater than or equal to
=Equal to
<> Not equal to
>< Left string contains right string (strings only)
<< Left string starts with right string (strings only)
>> Left string ends with right string (strings only)
OR Combines two conditions; if either is true, the condition passes
You can use a single property as a condition to check that that property has been
dened. Use the NOT keyword before it to check that it has not been dened. Or,
getting more complex, you can use the AND and OR operators to string several
conditional statements together. The following examples should give you an idea
about the different statements you can make:
• PropertyA: This returns true if PropertyA has been set to any value
including 0 or false
• NOT PropertyA: This returns true if PropertyA has not been set
• PropertyA < PropertyB: This returns true if PropertyA is less than
PropertyB
www.it-ebooks.info

Chapter 4
[ 107 ]
• PropertyA <> "1": This returns true if PropertyA is not equal to 1, which
is also the case if PropertyA is not set
• PropertyA = "1" AND PropertyB = "2": This returns true if PropertyA
equals 1 and PropertyB equals 2
• PropertyA = "1" OR PropertyB = "2": This returns true if PropertyA
equals 1 or PropertyB equals 2
These statements are the inner text of the Condition element. It's a good idea to
always place them inside CDATA tags so that the XML parser won't mistake them for
XML elements. The following is an example that uses CDATA tags:
<Condition ... >
<![CDATA[PropertyA < PropertyB]]>
</Condition>
As you can see, the conditional statement is placed inside a Condition element.
As we cover different types of conditions, we'll look at the attributes that are used
in each case.
Launch conditions
The MSI database for an installer has a table called LaunchCondition that lists
rules that the end user must comply with in order to install the software. Each
rule is called a launch condition. To add one, place a Condition element inside
your Product element. You'll nd that this table is evaluated early on, right after
AppSearch is performed. This makes it the second thing to happen during the
installation process. This is good in two ways. It lets you inform the user that they're
missing something before they get too far along and it allows you to use the results
from AppSearch in your conditions.
Examples of launch conditions include requiring that a version of .NET is installed,
that the computer has a certain operating system, or that the user is an administrator.
You should know that although WiX allows you to create a long list of conditions,
you cannot control the order in which they're evaluated. Therefore, you should try
to think of each one as having equal weight. If any one of them fails, the installation
will abort. The order should be thought of as inconsequential. You can add more
conditions by adding more Condition elements.
www.it-ebooks.info
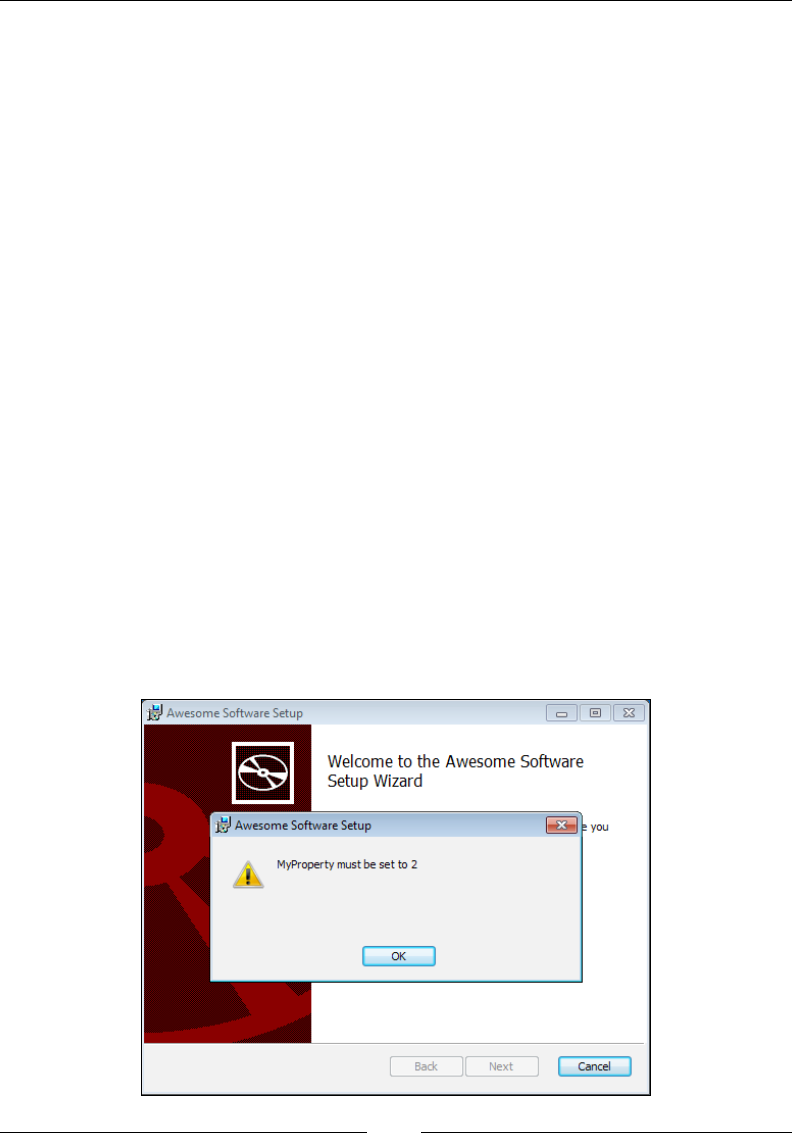
Improving Control with Launch Conditions and Installed States
[ 108 ]
The following example shows a launch condition that checks the value of a property.
In a real-world scenario this property would contain something useful such as the
result of a component or le search. It shows the basic structure though:
<?xml version="1.0" encoding="UTF-8"?>
<Wix ... >
<Product ... >
<Package ... />
<MediaTemplate ... />
<Property Id="MyProperty"
Value="3" />
<Condition Message="MyProperty must be set to 2">
<![CDATA[Installed OR MyProperty = 2]]>
</Condition>
</Product>
</Wix>
In the preceding example, we're setting a property called MyProperty to a value
of 3. The condition checks that the variable is set to 2. When it evaluates to false,
a message box will pop up and display the text we've set in the Condition element's
Message attribute.
Notice that we've used the predened Installed property to say that we only want to
evaluate this condition if the software has not already been installed. Otherwise, it will
be evaluated during both install and uninstall. The last thing you want is to prevent
the user from uninstalling the software because they're missing a prerequisite. The
following screenshot is what the user will see when the condition fails:
www.it-ebooks.info
Chapter 4
[ 109 ]
In real-world conditional statements, you'll use properties that were set during the
course of the installation, such as during AppSearch or by a custom action. We'll talk
about using custom actions in the next chapter.
A great thing about WiX is that there are already a lot of properties dened for you
that you could use in your launch conditions. Some of these, as you've seen, are
available from the get-go. Others become available after you've added a reference to
one of the WiX extensions, such as WixNetFxExtension.
Throughout the book we'll make use of the extensions that come with
the WiX toolset. These add various bits of functionality that aren't
found in the core XML elements or, as with WixNetFxExtension,
dene additional properties. Extensions are packaged as .NET class
libraries (.dll) and can be added as references in your Setup project.
Once added, you'll be able to immediately use the new functionality.
In some cases, you'll need to add a new namespace to the root Wix
element rst, but I'll mention it if that's the case. Later in the book,
you'll see how to create your own extension.
The next example checks that .NET 4.0 has been installed by using the
NETFRAMEWORK40FULL property from WixNetFxExtension. Begin by adding a
reference in your project to WixNetFxExtension.dll, found in the WiX bin
directory. The Votive plugin has gotten pretty slick in that, by default, the Add
Reference window starts off in the WiX bin directory. Then add the following
markup to check that the NETFRAMEWORK40FULL property has been set:
<PropertyRef Id="NETFRAMEWORK40FULL"/>
<Condition Message=
"You must install Microsoft .NET Framework 4.0 or higher.">
<![CDATA[Installed OR NETFRAMEWORK40FULL]]>
</Condition>
www.it-ebooks.info
Improving Control with Launch Conditions and Installed States
[ 110 ]
Since the property is only set when that version of the .NET Framework is
installed, we only need to check for its existence. Notice that we pull the property
into the scope of our project by using a PropertyRef element. This is because
in WixNetFxExtension, the property is dened within a Fragment element.
WixNetFxExtension denes other properties for checking other versions of .NET,
as shown in the following table:
Property name Meaning
NETFRAMEWORK10 .NET Framework 1.0 is installed
NETFRAMEWORK20 .NET Framework 2.0 is installed
NETFRAMEWORK20INSTALLROOTDIR Location of the .NET 2.0 install root
directory
NETFRAMEWORK20INSTALLROOTDIR64 Location of the x64 .NET 2.0 install root
directory
NETFRAMEWORK30 .NET Framework 3.0 is installed
NETFRAMEWORK35 .NET Framework 3.5 is installed
NETFRAMEWORK40FULL .NET Framework 4.0 is installed
NETFRAMEWORK40CLIENT .NET Framework 4.0 client profile is
installed
NETFRAMEWORK40FULLINSTALLROOTDIR Location of the .NET 4.0 Full install root
directory
NETFRAMEWORK40FULLINSTALLROOTDIR64 Location of the x64 .NET 4.0 Full install
root directory
NETFRAMEWORK45 .NET Framework 4.5 is installed
WINDOWSSDKCURRENTVERSION The Windows SDK current active
version
There's also WixPSExtension that denes the POWERSHELLVERSION property. You
can use it to check the version of Windows PowerShell that's installed. Add a
reference in your project to WixPSExtension and then use the following snippet:
<PropertyRef Id="POWERSHELLVERSION" />
<Condition Message="You must have PowerShell 1.0 or higher.">
<![CDATA[Installed OR POWERSHELLVERSION >= "1.0"]]>
</Condition>
Notice here that I had to put quotes around 1.0 in the condition because
POWERSHELLVERSION returns a decimal number. In that case, you must quote
the value you compare it to.
www.it-ebooks.info
Chapter 4
[ 111 ]
In addition to the WiX extension les, such as WixNetFxExtension and
WixPSExtension, Windows Installer also provides many built-in properties.
For these, you don't have to reference any additional les or use PropertyRefs
to gain access to them. A useful one is VersionNT, which can be used to check the
operating system. Its value is an integer that corresponds to a particular OS. Refer to
the following table:
Operating system VersionNT value
Windows 2000 500
Windows XP 501
Windows Server 2003 502
Windows Vista 600
Windows Server 2008 600
Windows Server 2008 R2 601
Windows 7 601
Windows 8 602
With VersionNT, the numbers get higher with each new OS, so you can use "greater
than or equal to" comparisons to make sure that an OS is greater than or equal to
a certain product. The following is an example that checks if the system is running
Windows Vista or newer:
<Condition Message=
"OS must be Windows Vista, Server 2008, or higher.">
<![CDATA[Installed OR VersionNT >= 600]]>
</Condition>
You might also use the VersionNT64 property to check if the OS is 64-bit and if so,
get its version number. There's also the ServicePackLevel property for detecting
which service pack for that OS is installed. The next example checks that the
operating system is Windows XP with Service Pack 2:
<Condition Message=
"This install requires Windows XP Service Pack 2.">
<![CDATA[
Installed OR
VersionNT = 501 AND
ServicePackLevel >= 2
]]>
</Condition>
www.it-ebooks.info

Improving Control with Launch Conditions and Installed States
[ 112 ]
Two more useful ones are MsiNTProductType and Privileged, as shown in
this table:
Property name Meaning
MsiNTProductType Tells you if the end user's computer is a workstation (value of 1),
domain controller (2), or server that isn't a domain controller (3)
Privileged If set, installation is being performed with elevated privileges, such
as by an administrator
Other Windows Installer properties can be seen at the MSDN site:
http://msdn.microsoft.com/en-us/library/aa370905(VS.85).aspx
You can also use environment variables in conditional statements. Prex the variable
with a percent sign (%) to reference it. The following example shows this:
<Condition Message=
"You need at least two processors. You have [%NUMBER_OF_PROCESSORS]">
<![CDATA[Installed OR %NUMBER_OF_PROCESSORS >= 2]]>
</Condition>
This condition checks that at least two processors exist on the computer. Notice
how the greater-than-or-equal-to operator is used. This may be counterintuitive
since we're trying to nd out if the computer has less than two, not more than. With
launch conditions, though, you only want to show the error message when the
condition evaluates to false. Sometimes, this means thinking backwards.
Ordinarily, you place Condition elements for launch conditions inside the Product
element in your main .wxs le. However, if you'd rather be more modular you can
separate your launch conditions into their own .wxs le. There you can nest the
Condition elements inside a Fragment element; the LaunchConditions.wxs le
would look like the following code snippet:
<?xml version="1.0" encoding="UTF-8"?>
<Wix xmlns="http://schemas.microsoft.com/wix/2006/wi">
<Fragment>
<Property Id="LaunchConditionsFile"
Value="1" />
<Condition Message=
"OS must be Windows Vista, Server 2008, or higher.">
<![CDATA[Installed OR VersionNT >= 600]]>
</Condition>
</Fragment>
</Wix>
www.it-ebooks.info

Chapter 4
[ 113 ]
Before these launch conditions can be included in the MSI database they have to
be referenced in your main WiX le. You can add a property, as in the previous
example, that can be referenced in the main le with a PropertyRef element.
The LaunchConditionsFile property we have here can be referenced with a
PropertyRef element to pull in the Condition statement; the Product.wxs le
would include the following line:
<PropertyRef Id="LaunchConditionsFile" />
This one line will bring all of the launch conditions in the separate Fragment element
into the scope of your project. It's not a bad idea to use different source les to better
organize your code, especially for large projects.
Feature conditions
A feature condition is where a Condition element is placed inside a Feature
element. There, it can change whether or not that feature gets installed depending on
if the statement evaluates to true.
Recall that features contain ComponentRef or ComponentGroupRef elements and are
used to group a set of related les that the end user may install independently. For
example, you may have a feature called "Documentation" that installs documentation
les for your product. The user can choose to turn this feature off and not copy those
les to their computer through the user interface or from the command line.
Feature conditions take this decision somewhat out of the end user's hands, allowing
you as the developer to have the nal say in whether it is appropriate to install a
particular feature. In most cases, you'll evaluate properties in these statements,
maybe those set from AppSearch or from a custom action.
Feature conditions work by changing the Level attribute of the parent Feature
element. Every feature has a level. It's a number that tells the installer whether or not
this feature should be "on". In a simple setup, having a level of 1 would include the
feature in the install, a 0 would exclude it. So, if our condition sets the level to 0, the
feature will not be installed. The following is an example:
<Feature Id="MainFeature"
Title="Main Feature"
Level="1">
<ComponentRef Id="CMP_InstallMeTXT" />
<Condition Level="0">
<![CDATA[NOT REMOVE = "ALL" AND MyProperty = "some value"]]>
</Condition>
</Feature>
www.it-ebooks.info

Improving Control with Launch Conditions and Installed States
[ 114 ]
This feature starts off with a level set to 1, meaning that by default the components
that it contains will be copied to the computer. However, our condition checks that
the property MyProperty equals some value. If it does, meaning the condition
evaluates to true, the feature's level will be changed to 0. This is specied by the
Condition element's Level attribute. Notice that we also check the REMOVE
property so that our feature will be enabled during an uninstall so that it can be
properly removed no matter what.
When you change a feature's level with a feature condition, it doesn't just disable
that feature. It removes it completely from the list shown in the user interface. To
see this in action, add the WixUI_FeatureTree dialog set from WixUIExtension. It
has a dialog with a feature tree, showing which features are available. You'll need to
add a project reference to WixUIExtension.dll using the Add Reference option in
Solution Explorer.
<?xml version="1.0" encoding="UTF-8"?>
<Wix xmlns="http://schemas.microsoft.com/wix/2006/wi">
<Product Id="B55596A8-93E3-47EB-84C4-D7FE07D0CAF4"
Name="Awesome Software"
Language="1033"
Version="2.0.0.0"
Manufacturer="Awesome Company"
UpgradeCode="B414C827-8D81-4B4A-B3B6-338C06DE3A11">
<Package InstallerVersion="301" Compressed="yes" />
<Media Id="1" Cabinet="media1.cab" EmbedCab="yes" />
<!--Directory structure-->
<Directory Id="TARGETDIR"
Name="SourceDir">
<Directory Id="ProgramFilesFolder">
<Directory Id="INSTALLLOCATION"
Name="Awesome Software" />
</Directory>
</Directory>
<!--Components-->
<DirectoryRef Id="INSTALLLOCATION">
<Component Id="CMP_InstallMeTXT"
Guid="E8A58B7B-F031-4548-9BDD-7A6796C8460D">
<File Id="FILE_InstallMeTXT"
Source="InstallMe.txt"
KeyPath="yes" />
</Component>
www.it-ebooks.info

Chapter 4
[ 115 ]
</DirectoryRef>
<Property Id="MyProperty" Value="some value" />
<Feature Id="MainFeature"
Title="Main Feature"
Level="1">
<ComponentRef Id="CMP_InstallMeTXT" />
<Condition Level="0">
<![CDATA[NOT REMOVE = "ALL" AND MyProperty = "some value"]]>
</Condition>
</Feature>
<!--UI-->
<UIRef Id="WixUI_FeatureTree" />
</Product>
</Wix>
Here, the condition is checking the MyProperty property for a specic value. You
can change this property's value in your markup to see different results in the UI. If
the condition evaluates to true, then the MainFeature feature will disappear from
the feature tree.
The reason for this is that the installer evaluates feature conditions early in the
installation process, before any dialogs are shown. Specically, they're evaluated
during the FileCost action, during which the installer checks how much disk space
is going to be needed to copy your les to the system. It only makes sense for it to
factor in features that won't be installed at this time. So, by the time the user sees
your feature tree in a dialog, the excluded features have been removed from the list.
If you only want to show the feature as disabled but still visible, set the ADDLOCAL
property to a comma-delimited list of the Feature element ID's to enable, as shown:
<Property Id="ADDLOCAL"
Value="MainFeature,SecondFeature" />
Here, two features are enabled by default: MainFeature and SecondFeature. Any
others will still be visible in the feature tree, but disabled. The user will be able to
turn them back on if they want to. Be warned that setting ADDLOCAL will give you a
compile-time warning due to the ICE87 validation check that prefers ADDLOCAL to
only be set from the command line.
www.it-ebooks.info

Improving Control with Launch Conditions and Installed States
[ 116 ]
An alternative way to deactivate a feature is to set its Level value to a number
higher than the built-in INSTALLLEVEL property—whose default value is 1. This will
deactivate the feature but not remove it. The following is an example that deactivates
the feature without using ADDLOCAL by using a Condition element to set the
feature's level to 2 (1 higher than INSTALLLEVEL):
<Property Id="MyProperty" Value="some value" />
<Feature Id="MainFeature"
Title="Main Feature"
Level="1">
<ComponentRef Id="CMP_InstallMeTXT" />
<Condition Level="2">
<![CDATA[MyProperty = "some value"]]>
</Condition>
</Feature>
The INSTALLLEVEL property serves an important function. Every feature's level
is compared to this number. We've said that you can change a Feature element's
Level attribute, but be aware that it can accept an integer value anywhere between
0 and 32767. If the level is less than or equal to INSTALLLEVEL, but greater than zero,
it will be enabled. If it's enabled, it gets installed. You can change INSTALLLEVEL
yourself with a Property element to give it a different default value or change it
dynamically with a custom action or from the command line.
You could use this to create a dialog with a button that says Typical Install and
another one that says Full Install. "Full" might set INSTALLLEVEL to 100 when
clicked on and consequently install all of the features with a level of 100 or less.
"Typical", on the other hand, might set INSTALLLEVEL to 50 and only install some of
the features. This assumes you're not showing a feature tree where the user could
reactivate each individual feature themselves. That is, unless you provide a Custom
Install button that allows the user to do just that.
Component conditions
Component conditions are a lot like feature conditions except that they affect
whether or not a single component gets installed. In this case, you add a Condition
element inside a Component element. You don't need to specify a Level attribute. In
fact, these conditions don't expect any attributes. The following example only installs
the CMP_InstallMeTXT component if the property MyProperty equals 1:
<Property Id="MyProperty"
Value="1" />
www.it-ebooks.info

Chapter 4
[ 117 ]
<Component Id="CMP_InstallMeTXT"
Guid="7AB5216B-2DB5-4A8A-9293-F6711FFAAA83">
<File Id="FILE_InstallMeTXT"
Source="InstallMe.txt"
KeyPath="yes" />
<Condition>MyProperty = 1</Condition>
</Component>
Again, I've hardcoded the property's value but in practice you'd set it dynamically.
The benet of component conditions is that they are much more granular than
feature conditions. You're able to target a single le, folder, or registry key. For
example, if the user does not have Windows PowerShell installed you could disable
a component that installs a PowerShell script and instead enable one that installs a
CMD shell script. The following code is how it would look:
<PropertyRef Id="POWERSHELLVERSION" />
<DirectoryRef Id="INSTALLLOCATION">
<Component Id="CMP_psShellScript"
Guid="7E348141-0005-4203-A1FE-D9264EBA7E50">
<File Id="psScript" Source="script.ps1" KeyPath="yes" />
<Condition>POWERSHELLVERSION</Condition>
</Component>
<Component Id="CMP_cmdShellScript"
Guid="C1CE3886-2081-4F62-9E58-0B1E8080143D">
<File Id="cmdScript"
Source="script.cmd"
KeyPath="yes" />
<Condition>NOT POWERSHELLVERSION</Condition>
</Component>
</DirectoryRef>
The rst thing we have to do to use this example is add a reference in our
project to the WiX extension WixPSExtension. We're then able to pull in the
POWERSHELLVERSION property with PropertyRef. This contains the version number
of PowerShell that's installed. In the CMP_psShellScript component,the Condition
element checks simply if POWERSHELLVERSION exists. If it does then the PowerShell
component is installed. Otherwise, CMP_cmdShellScript is chosen. Notice that I've
used the opposite condition there, so there's no ambiguity about which should be
used. It's always either one or the other.
www.it-ebooks.info

Improving Control with Launch Conditions and Installed States
[ 118 ]
Ordinarily, component conditions are only evaluated during an installation and not
during a re-install. To re-install an MSI package, completely replacing all features,
install from the command line and set the REINSTALL property to ALL.
msiexec /i myInstaller.msi REINSTALL=ALL
If you would like conditions to be re-evaluated during a re-install, you should set
the Transitive attribute on the parent component to yes. In the following example,
the Component elements are marked as transitive, causing their conditions to be
re-evaluated during a re-install:
<Component Id="CMP_vistaDLL"
Guid="7E348141-0005-4203-A1FE-D9264EBA7E50"
Transitive="true">
<File Id="vistaDll"
Source="library_vista.dll"
Name="library.dll"
KeyPath="yes" />
<Condition>VersionNT = 600</Condition>
</Component>
<Component Id="CMP_win7DLL"
Guid="C1CE3886-2081-4F62-9E58-0B1E8080143D"
Transitive="true">
<File Id="win7Dll"
Source="library_win7.dll"
Name="library.dll"
KeyPath="yes" />
<Condition>VersionNT = 601</Condition>
</Component>
Here there are two components. The rst has a condition to only install itself if
the operating system is Windows Vista (VersionNT=600) and the other only if it's
Windows 7 (VersionNT=601). Only one of the components will be true and be
allowed to copy its le to the system. However, since we've added the Transitive
attribute, these conditions will be checked again during a re-install. So, if the Vista
le had originally been installed and the end user has since upgraded to Windows 7,
the CMP_Win7DLL component will replace the CMP_VistaDLL one.
www.it-ebooks.info

Chapter 4
[ 119 ]
Action state
We talked about the Level attribute on Feature elements and how it's used to
enable or disable features. Behind the scenes, what you're doing is setting the action
state of the feature. The action state is the thing that stores whether or not the end
user has requested that the feature be installed. The same exists for components since
we can enable and disable them too. It can have any of the following values:
• Unknown: This indicates that the state is not known, usually because costing
has not taken place. No action will be taken on the component or feature.
• Advertised: This indicates that the feature will be installed as advertised,
meaning install on demand. This doesn't exist for components.
• Absent: This indicates that the feature or component will not be installed.
• Local: This indicates that the feature or component will be installed to the
local hard disk.
• Source: This indicates that the feature or component will be run from source,
such as from a network share.
Action state is initially unknown until costing has taken place. Costing is the process
of nding out how much space for your software will be required on the hard drive.
Action state is set during costing, specically during a step called CostFinalize. We'll
talk about many of the install steps in detail in the next chapter.
Once it's available after costing, you can get the action state for your features and
components by using a special syntax. To get the action state of a feature, place
an ampersand (&) in front of its name. For components, use a dollar sign ($).
For example, the following statement checks if the feature that has an ID of
MainFeature is set to be installed locally:
&MainFeature = 3
To check a component's action state, use a dollar sign:
$ComponentA = 3
You might be tempted to use this in your feature and component conditions. It
won't work though. The reason is that component and feature conditions are
evaluated during the FileCost action but action state isn't available until after the
CostFinalize action has run. If you attempt to access it in one of these conditions,
you'll always get a value of "Unknown".
www.it-ebooks.info

Improving Control with Launch Conditions and Installed States
[ 120 ]
So where can you use it? You can use it anywhere after CostFinalize, such as, in
custom actions that you schedule later in the installation process. You can also use
them in conditional statements that affect UI controls, which we'll cover later in the
book. You can pair these statements with "NOT Installed" to have Windows Installer
evaluate them only during installation.
Earlier, I checked the action state against the number three. The ve possible action
states each correspond to a number, as listed in the following table:
Action state Meaning
-1 Unknown
1Advertised
2Absent
3Local
4Source
Note that you don't have to use the equals sign. You can use any of the conditional
operators that can be used with launch conditions. For example, you might use the
"greater than" operator, as in:
&MainFeature > 2
This checks if a feature is set to be installed locally or to source. During an install,
you can see the action state being written to the install log. Use the l*v ag to record
to a logle, as shown:
msiexec /i myInstaller.msi /l*v install.log
The following snippet from the log shows a feature called ProductFeature with a
Request:Local. That's its action state. The component, similarly, has Request:Local.
The Action is what ultimately happened during the install such as Action:Local.
Action ended 0:25:17: CostFinalize. Return value 1.
MSI (s) (C0:F0) [00:25:17:452]: Doing action: InstallValidate
MSI (s) (C0:F0) [00:25:17:452]: Note: 1: 2205 2: 3: ActionText
Action 0:25:17: InstallValidate. Validating install
Action start 0:25:17: InstallValidate.
MSI (s) (C0:F0) [00:25:17:452]: Feature: ProductFeature;
Installed: Absent; Request: Local; Action: Local
MSI (s) (C0:F0) [00:25:17:452]: Component: CMP_InstallMeTXT;
Installed: Absent; Request: Local; Action: Local
Checking the log can help out when it's unclear why a certain feature or component
isn't getting installed.
www.it-ebooks.info
Chapter 4
[ 121 ]
Installed state
While Windows Installer uses action state to determine if a feature or component
should be installed, it uses the installed state to see if a feature or component has
already been installed by a previous installation. In other words, does it currently
exist on the computer?
Unlike the action state, the value of installed state can be used in feature and
component conditions. For features, you'll prex the feature's Id attribute with
an exclamation mark (!), as shown:
!MainFeature = 3
For components, you'll use a question mark (?):
?ComponentA = 3
This allows you to include features and components based on whether they
were installed before. You can also use them in custom actions and UI control
conditions, such as to change which dialogs are displayed. Windows Installer
uses this functionality itself, at least in regards to features, when you use the
feature tree control. During a re-install, it will show the features as enabled that
have been selected before and disables those that haven't. This makes for a better
user experience.
The same values apply for installed state as for action state. For example, 3 refers to
a component or feature that was installed to the local hard disk. The following table
gives you the installed state and its corresponding meaning:
Installed state Meaning
-1 Unknown
1Feature was installed as Advertised
2Feature or component was Absent (not installed)
3Feature or component was installed Local, to the hard disk
4Feature or component was installed to Source
Often, you will pair the action state with the installed state in a condition. Although
we haven't discussed custom actions yet, you should know that you can place a
conditional statement inside of the Custom element to control whether a custom
action gets executed. You might check that a component has been installed to the
local hard disk, but is now being uninstalled, as a condition of running the action:
<Custom Action="MyCustomAction" ...>
<![CDATA[$ComponentA = 2 AND ?ComponentA = 3]]>
</Custom>
www.it-ebooks.info

Improving Control with Launch Conditions and Installed States
[ 122 ]
Summary
In this chapter, we talked about the meaning of launch conditions and how they
can be used to prevent an install on a system that doesn't meet the minimum
requirements you've set. When paired with AppSearch or the built-in Windows
Installer properties, launch conditions are able to detect the operating system,
.NET version, and whether or not required software is installed.
We touched on feature and component conditions and how they allow you to
exclude a specic feature or component from the install. These conditions take the
decision out of the hands of the end user and lets you have the nal say. You saw
that using feature conditions to set Level to 0 will completely remove a feature from
a feature tree list. You may prefer to use the ADDLOCAL property instead or change
the feature's level to a number higher than INSTALLLEVEL to disable it without
hiding it.
Towards the end, we discussed what action and installed state is. An action state
can't be used in feature and component conditions like installed state can, but it can
still come in handy in other types of conditions such as those used in custom actions.
In the next chapter, we'll discuss custom actions and learn how they allow you to
extend the behavior of WiX.
www.it-ebooks.info

Understanding the
Installation Sequence
In order to coordinate the use of the WiX elements that we've seen and the jobs
that they do, there are two tables in the MSI database, InstallUISequence and
InstallExecuteSequence, that contain the order in which installation events should
occur. For example, AppSearch always happens before launch conditions.
In this chapter, we'll talk about how these tables work. Specically, we'll cover:
• The events that happen during the UI sequence and how to access them
• The events that happened during the Execute sequence and how to
access them
• How to author and schedule your own custom actions
• Some tips on writing C# custom actions via the Deployment Tools
Foundation (DTF) library
InstallUISequence
The InstallUISequence is both the name of a database table in the MSI package and
a way of referring to the rst half of the installation. During this time, we can show a
graphical user interface and execute tasks that don't alter the user's computer, such
as using AppSearch and evaluating launch conditions.
www.it-ebooks.info
Understanding the Installation Sequence
[ 124 ]
If you use Orca to look inside your MSI package, as described in Chapter 1, Getting
Started, you'll nd a table called InstallUISequence. This is where the actions that
happen during the rst half of the installation are dened. The following screenshot
shows what it will look like:
The table contains three columns: Action, Condition, and Sequence. For now, we're
just interested in Action and Sequence. Action is the name of the standard action
to run. A standard action is a task that's already dened by Windows Installer.
Sequence is the order in which it happens in relation to other actions. You can sort
the Sequence column from lowest to highest by clicking on the column header. This
is the order as it happens.
You're likely to see the following standard actions in your list:
• FindRelatedProducts
• AppSearch
• LaunchConditions
• ValidateProductID
• CostInitialize
• FileCost
• CostFinalize
• MigrateFeatureStates
• ExecuteAction
You've already seen some of these, but we'll go over each in the next section.
www.it-ebooks.info

Chapter 5
[ 125 ]
UI standard actions
We'll take a moment here to describe each of the standard actions we've listed in the
order in which they'd be executed.
FindRelatedProducts
The FindRelatedProducts action looks through a table in the MSI called Upgrade.
This table lists upgrade codes, version numbers, and languages that the installer uses
as criteria when searching for prior versions of your software. If it nds a match,
Windows Installer properties specied in that table are set to the product codes of
the found software. These properties can then be checked to discover whether the
current install is an upgrade or a downgrade.
AppSearch
The AppSearch action reads the AppSearch table, which holds the signatures of the
searches you've authored in your WiX markup. During this phase, you could look for
les and directories on the end user's system, read registry values, or peek inside INI
conguration les. The AppSearch table utilizes various other tables for this including
(and in this order) CompLocator, RegLocator, IniLocator, and DrLocator.
LaunchConditions
The LaunchConditions action references the table called LaunchCondition that lists
conditional statements that must be true before the installer can continue. This is
how prerequisites are dened, such as requiring the .NET Framework.
ValidateProductID
You can collect a software registration key from the end user and store it in a
property called PIDKEY. During the ValidateProductID action, this property is
compared to another property you've set called PIDTemplate, that denes a pattern
PIDKEY must match. If everything checks out, a third property called ProductID is
set for you. After ValidateProductID has run, you may check for the existence of
ProductID to see if the key that was entered is in the valid format.
CostInitialize
The CostInitialize action starts the "costing" process wherein the disk space
needed for your product is calculated. At this point, the Component and Feature
tables are loaded into memory, which sets the stage for the installer to check which
components and features will be installed.
www.it-ebooks.info

Understanding the Installation Sequence
[ 126 ]
FileCost
During the FileCost action, the installer starts the cost calculation. The rows in the
File table are examined to see how much hard drive space they require. If one of the
les already exists on the end user's system due to a prior installation of the same
parent Component, it will only be replaced if the le's version is newer. In that case,
the size of the le will be added to the disk space needed.
CostFinalize
During the CostFinalize action, the costing calculation takes into consideration
the components and features that shouldn't be installed because of a component or
feature-level condition. It then veries that all target directories are writable. This
phase ends the costing process.
MigrateFeatureStates
If a previous version of your software was installed, the MigrateFeatureStates
action checks which features were installed last time and then sets the action state of
those features to the same state in the current installer. That way, the new installer
will show a feature tree with the corresponding features enabled or disabled.
ExecuteAction
The last standard action in the UI sequence is called ExecuteAction. It looks at a
property called EXECUTEACTION to see which table to pass control to. As this is a
normal installation that started off by reading InstallUISequence, the property will
be set to INSTALL and this action will pass control to the InstallExecuteSequence
table. For other scenarios, EXECUTEACTION may be set to ADMIN or ADVERTISE.
InstallExecuteSequence
After ExecuteAction has red in InstallUISequence, the installation continues
into InstallExecuteSequence. During this phase, changes are made to the
computer such as laying down les, updating the registry, and adding a new
entry in Programs and Features. This part of the installation is called the "server
side" and the InstallUISequence table is called the "client side", which is a way
of conceptualizing that the two are run in different sessions and with different
privileges. The client side runs as the user who launched the MSI while the server
side is run as the LocalSystem user.
www.it-ebooks.info

Chapter 5
[ 127 ]
If you install with logging turned on you can see the split between the client
and server. Actions that occur during the rst half start with MSI (c), as shown
in the following example:
MSI (c) (64:80) [13:41:32:203]: Switching to server:
That's the last entry from the client before switching to the server. Then you'll see log
entries begin with MSI (s).
MSI (s) (D0:4C) [13:41:32:218]: Grabbed execution mutex.
By taking ownership of the execution mutex, the server side is saying that no other
MSI package can be run while the execution phase is in progress. The following
actions are scheduled here:
• AppSearch
• LaunchConditions
• ValidateProductId
• CostInitialize
• FileCost
• CostFinalize
• InstallValidate
• InstallInitialize
• ProcessComponents
• UnpublishFeatures
• RemoveRegistryValues
• RemoveShortcuts
• RemoveFiles
• InstallFiles
• CreateShortcuts
• WriteRegistryValues
• RegisterUser
• RegisterProduct
• PublishFeatures
• PublishProduct
• InstallFinalize
www.it-ebooks.info

Understanding the Installation Sequence
[ 128 ]
The rst six are repeats from the UI phase and will be skipped if they've already run.
Note that you can skip the UI portion and go straight to execute by setting the quiet
ag on the command line. People sometimes do this for unattended installs.
msiexec /i myInstaller.msi /quiet
In the next section, we'll discuss the standard actions that are new.
Execute standard actions
Now, let's look at each of the standard actions that are unique to the Execute sequence.
InstallValidate
The InstallValidate action uses the total calculated by the costing phase to verify
that there's enough disk space available, and whether any running processes have a
lock on les needed by the MSI.
InstallInitialize
The InstallInitialize action marks the beginning of the "deferred" stage of the
Execute sequence. Any actions between it and InstallFinalize are included in a
transaction, and can be rolled back if an error occurs. This prevents leaving the user's
computer in a half-nished state.
ProcessComponents
The ProcessComponents action makes note of the components that are in your
installer and stores their GUIDs in the registry. It tracks which le is the keypath
for each component.
UnpublishFeatures
During uninstallation, UnpublishFeatures removes component-to-feature mappings
in the registry and discards information about which features were selected.
RemoveRegistryValues
The RemoveRegistryValues action looks at the MSI's Registry and
RemoveRegistry tables to nd registry items to remove during an uninstall.
www.it-ebooks.info

Chapter 5
[ 129 ]
RemoveShortcuts
The RemoveShortcuts action removes any shortcuts during uninstallation that your
installer created.
RemoveFiles
During uninstallation, the RemoveFiles action deletes les and folders that were
copied to the system. You can add les and folders for it to remove by using the
RemoveFolder and RemoveFile elements. These elements may also delete les
during install by setting their On attributes to install or both.
InstallFiles
The InstallFiles action uses information from the Directory and File tables to
copy les and folders into their appropriate locations. It's smart enough to know that
if a le already exists from a previous install and its component GUID and version
haven't changed to leave the le as is.
CreateShortcuts
During installation, CreateShortcuts adds shortcuts as specied in the Shortcut
table. Refer back to Chapter 1, Getting Started, for a discussion on how to author
shortcuts into the Windows Start menu.
WriteRegistryValues
You can use the WiX elements RegistryKey and RegistryValue to write to the
registry. The WriteRegistryValues action does the work.
RegisterUser
The RegisterUser action records to the registry who the user was who initiated
the installation.
RegisterProduct
The RegisterProduct action registers your product with Programs and Features
and stores a copy of the MSI package in the Windows Installer Cache, found at
%WINDIR%\Installer.
www.it-ebooks.info

Understanding the Installation Sequence
[ 130 ]
PublishFeatures
During the PublishFeatures action, the installed state (installed, advertised, or
absent) is written to the registry and components are mapped to features.
PublishProduct
Used only by an advertised installation, the PublishProduct action "publishes"
the product to a computer, or in other words makes it available to be installed
on-demand by non-administrator users.
InstallFinalize
The InstallFinalize action marks the end of the rollback-protected stage called
the deferred phase. If your installation gets this far it means that it was successful.
Immediate versus deferred
There are reasons for separating the installation into two parts. The biggest is to
have an obvious time during which the end user should expect changes to be made
to the system. During the UI phase, they can safely ll information into the UI's
dialogs without the fear that their computer will be altered. Typically, it isn't until
they click a button labeled Install that changes begin to take effect. Therefore, the
standard actions only make system changes during the second half, during the
Execute sequence.
By keeping all system changes in one area, Windows Installer is able to offer
something else: rollback protection if an error occurs. It works in the following
way: no changes to the system are made when the Execute phase starts. At rst, the
installer reads what actions are in the InstallExecuteSequence table and prepares
itself by storing a script of what's to be done. All actions between InstallInitialize
and InstallFinalize are included. This initial phase, when the script is prepared
but the rollback protection hasn't started yet, is called the Execute sequence's
immediate phase.
Once things actually start happening, it's called the deferred stage. If an error occurs,
the installer will use the script it created to roll back the actions that had taken place
up to that point. Only the deferred stage has rollback protection. The UI sequence
does not have this feature and so actions that alter the system should never take
place there.
www.it-ebooks.info

Chapter 5
[ 131 ]
In the next section, you'll learn about creating custom actions that you can add
to either the UI or the Execute phase. Take special care to mark those actions that
make system changes as "deferred" and schedule them to run somewhere after the
InstallInitialize action and before InstallFinalize in the Execute phase.
As you'll see, you'll need to create your own rollback actions to complement your
deferred custom actions.
Custom actions
Knowing what the standard actions do and when prepares you for what's next:
making your own actions, called custom actions, and scheduling them appropriately.
Any custom action that changes the system, whether it involves changing les,
setting up databases, or adjusting user rights, should happen during the deferred
stage of the Execute sequence. Otherwise, you're free to place them where you like
during either the UI or the Execute sequence.
Custom actions are declared with the CustomAction element. Use its Execute
attribute to dene how it should run, and its Return attribute to tell how its
return status should be treated. For example, this would declare a custom action
called MyAction that runs during the deferred stage and is checked for success
upon completion:
<CustomAction Id="MyAction" Execute="deferred"
Return="check" ... />
That's the basics, although there are seven specic types of custom actions that add
their own necessary attributes. We'll cover each of the following types:
• Setting a Windows Installer property
• Setting the location of a directory
• Running embedded VBScript or JScript code
• Calling an external VBScript or JScript le
• Calling a method from a dynamic-link library
• Running an executable
• Sending an error that stops the installation
To add our custom action to the Execute sequence, we'll use the
InstallExecuteSequence element and the Custom element.
<?xml version="1.0" encoding="UTF-8"?>
<Wix xmlns="http://schemas.microsoft.com/wix/2006/wi">
<Product ... >
www.it-ebooks.info

Understanding the Installation Sequence
[ 132 ]
<Package ... />
<Media ... />
<CustomAction Id="MyAction" Execute="deferred"
Return="check" ... />
<InstallExecuteSequence>
<Custom Action="MyAction" After="InstallInitialize" />
</InstallExecuteSequence>
</Product>
</Wix>
The Custom element's Action attribute refers to the Id attribute of the CustomAction
element we want to run. We can use its After attribute to schedule the action to
run after InstallInitialize in the Execute sequence. You can also use the Before
attribute to schedule it before some action, or the Sequence attribute, which sets a
specic number to use in the InstallExecuteSequence table's Sequence column.
You can even schedule your custom actions based on other custom actions, as in the
next example:
<InstallExecuteSequence>
<Custom Action="MyAction" After="InstallInitialize" />
<Custom Action="Action2" After="MyAction" />
</InstallExecuteSequence>
To schedule actions during the UI sequence use the InstallUISequence element
instead. It works in the same way:
<CustomAction Id="MyUIAction" Execute="immediate" Return="ignore" ...
/>
<InstallUISequence>
<Custom Action="MyUIAction" After="CostFinalize" />
</InstallUISequence>
The CustomAction element gives you control over when it is executed through its
Execute attribute, which you'll usually set to "immediate", "deferred", "rollback",
or "commit". The last three only apply to the Execute sequence. Setting Execute to
"commit" schedules the action to be run once the installation has completed. We'll
cover rollback actions in detail later in the chapter.
Note that you can run the same custom action in both sequences if needed. You
might do that to accommodate silent installs, in which the UI sequence is skipped.
If you set the Execute attribute to firstSequence, the action will only be run once—
the rst time it's encountered. Setting it to secondSequence will cause it to be run
during the Execute sequence only if it has already been run in the UI sequence.
www.it-ebooks.info
Chapter 5
[ 133 ]
The Return attribute tells the installer whether it should wait for the custom action
to complete its processing before continuing, and whether the return code should be
evaluated. These values are available for the Return attribute:
Return value Meaning
asyncNoWait The custom action will run asynchronously and execution may continue
after the installer terminates.
asyncWait The custom action will run asynchronously but the installer will wait for
the return code at sequence end.
check The custom action will run synchronously and the return code will be
checked for success. This is the default.
ignore The custom action will run synchronously and the return code will not be
checked.
During the deferred stage, if a custom action returns failure and the Return attribute
is check or asyncWait, a rollback will occur, reverting any changes made up to that
point. During the immediate phase, failure will end the installation on the spot.
For the rest of this section, we'll look at the different types of custom actions.
Setting a Windows Installer property
You aren't limited to setting a property with a Property element or from the
command line. You can, through the use of a Type 51 custom action, set one at any
point during the installation. These "Type" numbers come from the Type column
in the CustomAction table. To set a property, use the CustomAction element's
Property and Value attributes.
<CustomAction
Id="rememberInstallDir"
Property="ARPINSTALLLOCATION"
Value="[INSTALLLOCATION]" />
This is a useful example that uses the built-in ARPINSTALLLOCATION property to
save the install directory. Any directory property you save to it will be stored for
you in the registry and can be recalled later during uninstallation or repair. By using
square brackets around the ID of my install directory, here called INSTALLLOCATION,
I'm referencing that directory's path. That's a special case using a built-in property,
but you can set the value of any of your custom properties using the same type of
custom action.
www.it-ebooks.info

Understanding the Installation Sequence
[ 134 ]
Next, schedule the custom action so that it happens after InstallValidate in the
Execute sequence—that's when directories are checked for write access and truly set.
<InstallExecuteSequence>
<Custom Action="rememberInstallDir"
After="InstallValidate" />
</InstallExecuteSequence>
You can, during uninstallation for example, access this property using another type
of custom action—one in a C# assembly, which we'll discuss later—by using the
ProductInstallation class in your C# code, as shown in the following code snippet:
ProductInstallation install =
new ProductInstallation(session["ProductCode"]);
string installDir = install.InstallLocation;
When it comes to writing C# that can interact with your installer, there's a lot to
cover. We'll hit some of the major points when we talk about the Deployment
Tools Foundation library at the end of this chapter. It's what provides access to the
underlying installer functionality.
There's a second, short-hand way of declaring a Type 51 custom action: use
the SetProperty element. In the following example, we will set a property
called MyProperty to the value 123 after the InstallInitialize action in
the Execute sequence:
<SetProperty Id="MyProperty"
Value="123"
After="InstallInitialize"
Sequence="execute" />
Behind the scenes, a custom action will be created called SetMyProperty. You can
use a different name by adding the Action attribute set to the name you want the
custom action to have.
Setting the location of an installed directory
A Type 35 custom action sets the path of a Directory element. Use the
CustomAction element's Directory and Value attributes, as shown in the following
code snippet:
<CustomAction Id="SetAppDataDir"
Directory="DataDir"
Value="[CommonAppDataFolder]MyProduct" />
www.it-ebooks.info

Chapter 5
[ 135 ]
Assuming we've already dened a Directory element with an Id of DataDir, this
action will change its location to a folder called MyProduct in the C:\Documents
and Settings\All Users\Application Data folder on Windows XP or C:\
ProgramData on Windows 7. To test this out, you'll need to add a Directory
element with an Id of DataDir and place at least one component inside it.
You should schedule this type of custom action to run during the Execute sequence
before InstallFiles or, if you're installing empty folders using the CreateFolder
element, before the CreateFolders action.
<InstallExecuteSequence>
<Custom Action="SetAppDataDir" Before="InstallFiles" />
</InstallExecuteSequence>
You may also change a directory by using the SetDirectory element as shown in the
following code snippet:
<SetDirectory Id="DataDir"
Value="[CommonAppDataFolder]MyProduct"
Sequence="execute" />
Its Id attribute points to the Id attribute of a Directory element. Value sets the path
to the new folder and Sequence controls whether the action will be run during the
Execute or UI sequence. It can be set to one of the following values: execute, ui,
both, or first. Using both will run the action in both sequences and first will
execute it during the UI sequence ordinarily, but during the Execute sequence if the
UI sequence is skipped.
Running embedded VBScript or JScript
A Type 37 (JScript) or Type 38 (VBScript) custom action executes embedded script.
You'll dene the script as the inner text of the CustomAction element and declare its
type with the Script attribute set to either vbscript or jscript. The following is an
example that displays two message boxes and returns success:
<CustomAction Id="testVBScript" Script="vbscript"
Execute="immediate" >
<![CDATA[
msgbox "this is embedded code..."
msgbox "MyProperty: " & Session.Property("MyProperty")
]]>
</CustomAction>
www.it-ebooks.info

Understanding the Installation Sequence
[ 136 ]
Note that you can access existing WiX properties using Session.Property. Then,
we just need to schedule it to run. For this example, we'll display the message boxes
during the UI sequence after LaunchConditions:
<InstallUISequence>
<Custom Action="testVBScript" After="LaunchConditions" />
</InstallUISequence>
Accessing installer data always starts with the Session object. You can learn more at:
http://msdn.microsoft.com/en-us/library/windows/desktop/
aa371675(v=vs.85).aspx
The following are a few example usages:
<CustomAction Id="testVBScript" Script="vbscript"
Execute="immediate" >
<![CDATA[
' Write a message to the install log
Dim rec
Set rec = Session.Installer.CreateRecord(0)
rec.StringData(0) = "My log message"
Session.Message &H04000000, rec
' Change the install level
Session.SetInstallLevel(1000)
' Get properties set by the Product element
Dim productName
productName = Session.ProductProperty("ProductName")
' Get the target path of a Directory element
Dim installFolder
installFolder = Session.TargetPath("INSTALLFOLDER")
]]>
</CustomAction>
There have been a number of voices in the Windows Installer community, including
Rob Mensching the project lead of the WiX toolset, warning against the use of
VBScript and JScript custom actions. Reasons for this include the lack of debugging
support and better tooling for other languages such as C++ and C#.
www.it-ebooks.info
Chapter 5
[ 137 ]
Calling an external VBScript or JScript le
A Type 5 (JScript) or Type 6 (VBScript) custom action calls a subroutine or function
from an external script le. Let's say we have a le called myScript.vbs that
contains a function called myFunction:
Function myFunction()
If Session.Property("MY_PROPERTY") = "1" Then
msgbox "Property is 1. Returning success!"
myFunction = 1
Exit Function
End If
msgbox "Property not 1. Returning failure."
myFunction = 3
Exit Function
End Function
Note that returning 1 from the function indicates success, while returning 3 indicates
failure, and will abort the install. In our WiX markup, we must reference this le
with a Binary element. This will store the le inside the MSI.
<Binary Id="myScriptVBS" SourceFile=".\myScript.vbs" />
Then, our CustomAction element uses the BinaryKey and VBScriptCall, or
JScriptCall if this had been a JScript le, attributes to access the function:
<CustomAction
Id="myScript_CA"
BinaryKey="myScriptVBS"
VBScriptCall="myFunction"
Execute="immediate"
Return="check" />
Be sure to schedule it during one of the sequences. Remember, any code that alters
the system should be marked with an Execute attribute of deferred, and scheduled
during InstallExecuteSequence.
If you are creating your JScript or VBScript les in Visual Studio, beware
that by default it encodes text les as UTF-8. However, Windows
Installer won't be able to interpret this encoding. An easy way to correct
this is to open the le with Notepad, choose Save As, and then change
Encoding to ANSI. Otherwise, you may get an error at install time
regarding unexpected characters found at the beginning of the le.
www.it-ebooks.info

Understanding the Installation Sequence
[ 138 ]
Calling a function from a dynamic-link library
A Type 1 custom action calls a method from a dynamic-link library (.dll). The
Votive plugin for Visual Studio provides a template you can use.
We will be writing our custom action using .NET code in C#. Technically, a Type
1 custom action means authoring an unmanaged C/C++ DLL. Windows Installer
cannot natively support a .NET custom action. The template we're using allows us to
write a managed code that will build the C/C++ DLL for us when we compile. This
unmanaged library will wrap our .NET code. In the end, that is what our installer
will reference. Be aware that the end user will need to have the targeted version of
the .NET Framework installed. If that's not an option for you, WiX also provides a
template for a C++ custom action.
Create a new C# Custom Action Project and you'll get a source le that references
the Microsoft.Deployment.WindowsInstaller namespace. This contains
helpful classes like Session that allow you to access the properties, features, and
components of your installer.
myCustomActions.cs
using System;
using Microsoft.Deployment.WindowsInstaller;
namespace myLibrary
{
public class CustomActions
{
[CustomAction]
www.it-ebooks.info

Chapter 5
[ 139 ]
public static ActionResult MyFunction(Session session)
{
string myProperty = session["myProperty"];
return ActionResult.Success;
}
}
}
The signature for the method has a return value of type ActionResult. Use this
to notify the installer that the custom action succeeded or failed. The method
is decorated with the CustomAction attribute and has a Session object as its
parameter. You're free to name the method, class, and namespace whatever you like.
There's a cap on the number of custom actions you can dene in a single .NET
assembly. It used to be 16, as dened by the WiX source code in the src\DTF\Tools\
SfxCA\EntryPoints.h le, but in WiX 3.6 it has been raised to 128. If you do exceed
the limit, you can add another custom action project and keep on going.
All of this comes from a framework called the Deployment Tools Foundation
(DTF). DTF is a library that allows you to write .NET code that can interact with
the lower-level Windows Installer technology. It provides a number of useful
classes under the Microsoft.Deployment.WindowsInstaller namespace.
We'll cover some basics at the end of the chapter.
When you compile this project you'll end up with two les: one that ends in .dll
and one that ends .CA.dll. It's the second that you'll reference in your WiX project
as it has the unmanaged code that can be understood by the MSI.
There are two ways to reference this DLL. The rst is to not use the Add a Reference
screen, but simply copy the le to your WiX project and reference it with a Binary
element. Use a relative path to the .CA.dll le. Back in our WiX markup, we'd add
the following to Product.wxs:
<Binary Id="myCustomActionsDLL"
SourceFile=".\myCustomActions.CA.dll" />
As you can see, once the DLL has been copied to our WiX project's folder, it can be
referenced with a relative path.
A second way is to use the Add a Reference screen to reference the C# project in
your WiX project and then use the $(var.ProjectName.TargetDir) preprocessor
variable to point to the referenced project's output directory:
<Binary Id="myCustomActionsDLL"
SourceFile=
"$(var.myCustomActions.TargetDir)myCustomActions.CA.dll" />
www.it-ebooks.info

Understanding the Installation Sequence
[ 140 ]
You'll then use the CustomAction element's BinaryKey and DllEntry attributes to
specify the C# method to call.
<CustomAction
Id="CA_myCustomAction"
BinaryKey="myCustomActionsDLL"
DllEntry="MyFunction"
Execute="immediate"
Return="check" />
Then, schedule it to run:
<InstallUISequence>
<Custom Action="CA_myCustomAction" After="CostFinalize" />
</InstallUISequence>
Any of these script les, DLLs, or executables that we're using to dene custom
actions will not be installed to the end user's computer. They perform their action
during the install, but stay packaged inside the MSI.
Triggering an executable
There are three ways to run an executable le (.exe) from a custom action. The rst,
a Type 2, uses the Binary element to store the le inside the MSI and calls it from
there. That way, it doesn't need to be copied to the end user's computer.
Here we're referencing a le called MyProgram.exe. $(sys.SOURCEFILEDIR)
is a system variable dened by WiX that points to your project's directory. For
a change, we'll be running this custom action during the deferred phase of
InstallExecuteSequence:
<Binary
Id="myProgramEXE"
SourceFile="$(sys.SOURCEFILEDIR)myProgram.exe" />
<CustomAction
Id="myProgramEXE_CA"
BinaryKey="myProgramEXE"
Impersonate="yes"
Execute="deferred"
ExeCommand=""
Return="check" />
www.it-ebooks.info

Chapter 5
[ 141 ]
The CustomAction element's Impersonate attribute tells the installer whether to
impersonate the user who launched the installer. The default is no, meaning that
the custom action, when launched during the Execute sequence, should run as the
LocalSystem user—an all-powerful, built-in account that has the privileges needed
to make changes to the user's computer. If you don't need that, set it to yes to run
the custom action in the context of the current user. You'll only ever use this ag for
a deferred custom action. Immediate custom actions don't run as LocalSystem and
you'll get an ICE68 warning if you set Impersonate to no on one.
The ExeCommand attribute takes any command-line arguments you'd want to pass to
the executable. You should always specify this, even if it's set to an empty string. It's
a required attribute.
We can schedule this to run during the Execute sequence:
<InstallExecuteSequence>
<Custom Action="myProgramEXE_CA"
Before="InstallFinalize" />
</InstallExecuteSequence>
The second way of calling an executable, called a Type 18 custom action, is by
copying it to the end user's computer rst. Let's say that we're going to copy a le
called MainApp.exe to the INSTALLLOCATION folder, as shown here:
<DirectoryRef Id="INSTALLLOCATION">
<Component Id="CMP_MainAppEXE"
Guid="7AB5216B-2DB5-4A8A-9293-F6711FFAAA83">
<File Id="mainAppEXE"
Source="MainApp.exe"
KeyPath="yes" />
</Component>
</DirectoryRef>
Our CustomAction element can then use the FileKey attribute to specify the ID of
our File element, thereby executing it.
<CustomAction
Id="RunMainApp"
FileKey="mainAppEXE"
ExeCommand=""
Execute="commit"
Return="ignore" />
www.it-ebooks.info
Understanding the Installation Sequence
[ 142 ]
For illustration purposes, I've decided not to run this during the deferred stage. By
marking it as commit, it will only run if the install is successful. Also, by setting the
Return attribute to ignore we're saying that we don't care if the job succeeds or fails.
If you want to run an executable, but prevent it from displaying,
such as for a command window, consider using the QtExec action
from WixUtilExtension. More information can be found at
http://wix.sourceforge.net/manual-wix3/qtexec.htm.
The last way, called a Type 34 custom action, is to use the Directory attribute,
targeting the directory where the executable is on the end user's computer. The
ExeCommand attribute should also reference this directory and the name of the .exe
le including any command-line arguments.
<CustomAction
Id="RunMainApp"
Directory="INSTALLLOCATION"
ExeCommand="[INSTALLLOCATION]Main_App.exe –myArg 123"
Execute="commit"
Return="ignore" />
Sending an error that stops the installation
A Type 19 custom action sends an error to the installer and ends it. It uses the Error
attribute and looks like the following code snippet:
<Property Id="myProperty" Value="0" />
<CustomAction Id="ErrorCA" Error="Ends the installation!" />
<InstallUISequence>
<Custom Action="ErrorCA" Before="ExecuteAction">
<![CDATA[
myProperty <> 1
]]>
</Custom>
</InstallUISequence>
I've placed a conditional statement inside the Custom element so that this error
will only be triggered if myProperty is not equal to 1. Note that these types of
custom actions can only be run during the immediate phase. So, the Execute
attribute is unnecessary.
www.it-ebooks.info
Chapter 5
[ 143 ]
You can add a conditional statement inside any of your Custom
elements. For example, you might check the Installed property to
only run your action when the product hasn't been installed yet.
Rollback custom actions
Custom actions that are scheduled as "deferred" execute during the Execute
sequence's rollback-protected phase. To give those actions rollback capabilities, you'll
need to author separate custom actions that undo the work. These are scheduled as
"rollback". Rollback custom actions are scheduled before the action they're meant to
revert to in case of an error. The following is an example:
<CustomAction Id="systemChangingCA" Execute="deferred"
Script="vbscript">
msgbox "Imagine this changes the system in some way"
</CustomAction>
<CustomAction Id="myRollbackCA" Execute="rollback"
Script="vbscript">
msgbox "Imagine this undoes the changes"
</CustomAction>
<CustomAction Id="causeError" Execute="deferred"
Script="vbscript">
Err.Raise 507
</CustomAction>
We'll schedule these during the Execute sequence:
<InstallExecuteSequence>
<Custom Action="myRollbackCA" Before="systemChangingCA" />
<Custom Action="systemChangingCA" After="InstallInitialize" />
<Custom Action="causeError" After="systemChangingCA" />
</InstallExecuteSequence>
Now, systemChangingCA will run during the deferred phase of
InstallExecuteSequence. When the causeError action runs afterwards it
causes an exception to be thrown, which triggers a rollback. Then, myRollbackCA
runs. Deferred and rollback actions are always scheduled somewhere between
InstallInitalize and InstallFinalize.
www.it-ebooks.info

Understanding the Installation Sequence
[ 144 ]
The WiX toolset provides its own custom action for stimulating a rollback called
WixFailWhenDeferred. It's available as part of the WixUtilExtension and you
can nd more information at http://wix.sourceforge.net/manual-wix3/
wixfailwhendeferred.htm. You could use it to test your rollback methods.
Having a rollback action for every deferred one that alters the user's system is a good
idea. It covers you in case of an error. Of course, you'll need to author the code of
your rollback action so that it really does revert what you've done.
Accessing properties in a deferred action
If you try to access a property from a custom action during the Execute sequence's
deferred stage, you'll nd that you get an error. This is because only a nite number
of properties are available here. As a workaround, you can store the values of
your properties in another property called CustomActionData and pass that to the
deferred custom action.
There are two ways to do this: from your WiX code, or from inside another C#
custom action. For the rst, use a Type 51 custom action to set the value of the
CustomActionData property.
In the next example, we want to pass a property called MYPROPERTY to a custom
action called myDeferredCA. So, we create another action called SetProperty
that sets a property also called myDeferredCA to the value of MYPROPERTY. It's
important that the name of the property you're setting matches the name of
the deferred custom action.
<Property Id="MYPROPERTY" Value="my value" />
<CustomAction Id="SetProperty"
Property="myDeferredCA"
Value="[MYPROPERTY]" />
<InstallExecuteSequence>
<Custom Action="SetProperty" Before="myDeferredCA" />
<Custom Action="myDeferredCA" After="InstallInitialize" />
</InstallExecuteSequence>
www.it-ebooks.info

Chapter 5
[ 145 ]
Now, myDeferredCA will have access to our MYPROPERTY property, indirectly,
through the Session object's CustomActionData.
[CustomAction]
public static ActionResult myDeferredCA(Session session)
{
string myProperty = session.CustomActionData;
return ActionResult.Success;
}
You can also store several properties in CustomActionData by separating them with
semi-colons.
<Property Id="PROP1" Value="abc123" />
<Property Id="PROP2" Value="def567" />
<Property Id="PROP3" Value="ghi890" />
<CustomAction
Id="SetProperty"
Property="myDeferredCA"
Value="Prop1=[PROP1];Prop2=[PROP2];Prop3=[PROP3]" />
We have changed our SetProperty custom action so that its Value is set to a list
of key-value pairs separated by semi-colons. You can then access each value in
CustomActionData in the following way:
[CustomAction]
public static ActionResult myDeferredCA(Session session)
{
ICollection<string> values =
session.CustomActionData.Values;
foreach (string value in values)
{
// shows 3 message boxes:
// abc123, def567 and ghi890
MessageBox.Show(value);
}
return ActionResult.Success;
}
www.it-ebooks.info

Understanding the Installation Sequence
[ 146 ]
Notice that we are accessing the Values property on CustomActionData. You could
also access the key-value pairs we've set using hash table syntax:
MessageBox.Show(session.CustomActionData["Prop1"]);
MessageBox.Show(session.CustomActionData["Prop2"]);
MessageBox.Show(session.CustomActionData["Prop3"]);
It's also possible to set the data directly in an immediate C# custom action. So,
instead of setting a property using a CustomAction element, you could set the
CustomActionData value from code:
[CustomAction]
public static ActionResult myImmediateCA(Session session)
{
CustomActionData data = new CustomActionData();
data["property1"] = "abc";
data["property2"] = "def";
data["property3"] = "ghi";
session["myDeferredCA"] = data.ToString();
return ActionResult.Success;
}
You can then access the data from within your deferred custom action as follows:
[CustomAction]
public static ActionResult myDeferredCA(Session session)
{
CustomActionData data = session.CustomActionData;
string property1 = data["property1"];
return ActionResult.Success;
}
Adding conditions to custom actions
After you've dened your custom actions and scheduled them into either
InstallUISequence or InstallExecuteSequence, you have the option of adding
conditions to them. These are added as the inner text of the Custom element and
prevent the action from running if the condition is false. A common use for this is to
only run the action during installation by using the NOT Installed condition.
<InstallExecuteSequence>
<Custom Action="myCustomAction" After="InstallInitialize">
www.it-ebooks.info

Chapter 5
[ 147 ]
NOT Installed
</Custom>
</InstallExecuteSequence>
Other common conditions are Installed, which is true if the software is already
installed, and REMOVE="ALL", which is true if the product is being uninstalled.
You can also use the action state and installed state of features and components or
check the values of your custom properties. Look back to Chapter 4, Improving Control
with Launch Conditions and Installed States, to review the discussion about these types of
conditional statements. It's a good idea to try out an installation and uninstallation of
your product just to make sure your custom actions are running only when you expect
them to. You can see this in the install log by looking for the words "Doing action".
Deployment Tools Foundation
Writing custom actions with .NET code means making use of the Deployment Tools
Foundation (DTF). Here, we'll touch on some of the more common parts of the DTF
library. However, you should also take a look at the DTF documentation that comes
with WiX if you'd like to explore some of its other features. For example, although
we won't cover it here, DTF has support for LINQ and CAB le compression.
The examples in this section draw from DTF's Microsoft.Deployment.
WindowsInstaller namespace.
The session object
When the InstallUISequence and InstallExecuteSequence tables run through
their lists of actions, they're doing so in their own memory space—called a session.
You've seen how this requires you to mark WiX properties as public (uppercase) to
get them from one session to the other. In DTF, the Session object is your pipeline
into each sequence's running state. Every .NET custom action method receives
session in its parameter list. If you recall, the generic signature of one of these
custom actions is this:
[CustomAction]
public static ActionResult CustomAction1(Session session)
You'll use Session as the starting place for almost everything you do when working
with the WindowsInstaller namespace. Its methods and properties return the
various other objects that DTF provides. The following sections each use this object
in some way to accomplish a task.
www.it-ebooks.info

Understanding the Installation Sequence
[ 148 ]
Getting and setting properties
To access a WiX property, such as those set with the Property element, use the
Session object's indexer. The following is an example:
[CustomAction]
public static ActionResult CustomAction1(Session session)
{
string myProperty = session["MY_PROPERTY"];
return ActionResult.Success;
}
Setting properties is just as easy. You'll set the value by referencing the key with the
name of your property. Here's an example:
[CustomAction]
public static ActionResult CustomAction1(Session session)
{
session["MY_PROPERTY"] = "abc";
return ActionResult.Success;
}
If the property doesn't exist when you set it, it will be created. Similarly, you can
clear a property by settings its value to null. Creating or changing property values
from a custom action doesn't stop the installer from displaying those properties in
the install log. So, if a property holds information that has to be hidden, you're better
off declaring it in your WiX markup rst and setting its Hidden attribute to yes:
<Property Id="MY_PROPERTY" Hidden="yes" />
Logging
You can add your own messages to the install log by using the Session object's
Log method. The simplest way is to just pass it a string, as shown in the following
code snippet:
session.Log("This will show up in the log.");
You can also pass it a formatted string, as in the next example:
string currentTime =
System.DateTime.Now.ToString("HH:mm:ss",
CultureInfo.CurrentCulture);
string functionName = "CustomAction1";
string message = "This will show up in the log.";
session.Log("{0} : Method = {1}: {2}", currentTime,
functionName, message);
www.it-ebooks.info
Chapter 5
[ 149 ]
This will produce the following message in the log:
18:05:19 : Method = CustomAction1: This will show up in the log.
You can also use the Message method for the same effect. You'll need to create a
Record object that contains your text and pass it, along with InstallMessage.Info,
to the method. Here's an example:
Record record = new Record(0);
record[0] = "This will show up in the log";
session.Message(InstallMessage.Info, record);
Be aware that the Log and Message methods don't work when the custom action is
called from a UI control such as a button click. You'll learn about calling custom actions
from UI controls using the DoAction event in Chapter 8, Tapping into Control Events.
Showing a message box
The Message method can also be used to display a message box to the user. All
you need to do is change the rst parameter to InstallMessage.Warning or
InstallMessage.Error. Either will show a message box, although the icon used
may differ, depending on the operating system.
The following example displays a warning message to the user:
[CustomAction]
public static ActionResult CustomAction1(Session session)
{
Record record = new Record(0);
record[0] = "This is a warning!";
session.Message(InstallMessage.Warning, record);
return ActionResult.Success;
}
The following is the result:
www.it-ebooks.info

Understanding the Installation Sequence
[ 150 ]
To show an error message box, use InstallMessage.Error instead:
[CustomAction]
public static ActionResult CustomAction1(Session session)
{
Record record = new Record(0);
record[0] = "This is an error!";
session.Message(InstallMessage.Error, record);
return ActionResult.Success;
}
Note that these only provide an OK button. If you need more than that, you'll need
to use something like a Windows Forms dialog, which you can do by adding the
appropriate .NET assembly reference. Something else to consider is that, as we did
when logging, we're using the Message method here. So, it will not work if called
from a UI control.
Accessing feature and component states
To access a feature's action or installed state, use the Features collection. You can
look up a feature by name.
FeatureInfo productFeature =
session.Features["ProductFeature"];
//will return "Absent" during an installation
InstallState installedState = productFeature.CurrentState;
//will return "Local" during an installation
InstallState actionState = productFeature.RequestState;
Here, we're using the FeatureInfo object's CurrentState for installed state and
RequestState for action state. You can do the same thing for components by using
the Components collection, as shown in the following code snippet:
ComponentInfo cmpInfo = session.Components["cmp_myFile"];
InstallState cmpCurrentState = cmpInfo.CurrentState;
InstallState cmpRequestState = cmpInfo.RequestState;
www.it-ebooks.info

Chapter 5
[ 151 ]
Querying the MSI database
You can read any of the data that's in the MSI database. First, get a reference to
the MSI database with the Session object's Database property. Be aware that you
cannot access the Database property during a deferred custom action. In that case,
you may set up CustomActionData, as described earlier, during an immediate
custom action and pass the information to the deferred phase that way. In the
following example, we access the Session object's Database property:
Database db = session.Database;
Next, if you just want to get one value from a table, use the ExecuteScalar method.
This will return the value from the column in your SQL query. Here's an example:
string property = "ProductName";
string value = (string)db.ExecuteScalar(
"SELECT `Value` FROM `Property` WHERE `Property` = '{0}'",
property);
db.Close();
Notice that I cast the result to a string. This works in this example because the Value
column on the Property table contains strings. If, on the other hand, the column had
contained integers I would have had to cast the result to an integer.
If you'd like to get multiple rows back from your query, use the ExecuteQuery
method. It returns a collection of type System.Collections.IList.
string query =
"SELECT `Property` FROM `Property` ORDER BY `Property`";
System.Collections.IList result = db.ExecuteQuery(query);
db.Close();
Inserting rows into the MSI database
You can't insert new data into the MSI database while it's installing and
unfortunately, that's often exactly when you want to! To get around this, you can
make temporary inserts using the View object's InsertTemporary method. You can
get a View by calling the OpenView method on the Database object, passing in a
SELECT statement of the data you want to work with. Here's an example that adds a
new property, called NEW_PROPERTY, to the Property table:
Database db = session.Database;
View view = db.OpenView("SELECT * FROM `Property`");
Record rec = new Record("NEW_PROPERTY", "new_value");
view.InsertTemporary(rec);
db.Close();
www.it-ebooks.info

Understanding the Installation Sequence
[ 152 ]
The rst thing we did here was use the Database object's OpenView method to get a
View. We selected all of the existing rows from the Property table and then inserted
a new row with InsertTemporary. It's perfectly acceptable to get a smaller view by
adding a WHERE clause to the SQL query.
You'll need to know the number and order of the columns in the table you're
working with before you start inserting new rows. When you create your Record
object, you have to place the values in the same order as the columns. You can omit
columns you don't use as long as they come at the end.
Another example is to add a new control to a dialog during the course of the install.
Just be sure to add it before CostInitialize in the UI phase or your change will go
unnoticed. In the following example, we'll add a Text control to the ProgressDlg
dialog. This is assuming you're using one of WiX's built-in dialog sets and that
ProgressDlg exists.
[CustomAction]
public static ActionResult AddControl(Session session)
{
Database db = null;
try
{
db = session.Database;
//create control on ProgressDlg:
View view = db.OpenView("SELECT * FROM `Control`");
Record record = new Record(
"ProgressDlg",
"MyText",
"Text",
"20",
"150",
"150",
"15",
"1");
view.InsertTemporary(record);
//subscribe that control to the ActionData event:
View view2 =
db.OpenView("SELECT * FROM `EventMapping`");
Record record2 = new Record("ProgressDlg",
www.it-ebooks.info

Chapter 5
[ 153 ]
"MyText", "ActionData", "Text");
view2.InsertTemporary(record2);
}
catch (Exception err)
{
session.Log(err.Message + ": " + err.StackTrace);
return ActionResult.Failure;
}
finally
{
if (db != null)
{
db.Close();
}
}
return ActionResult.Success;
}
First, we get a handle to the MSI database by using session.Database. Next, we
insert a new temporary record into the Control table. That will be our Text control.
To make things interesting, we've also added a record to the EventMapping table,
subscribing our Text control to the ActionData event. We'll discuss control events in
more detail later. For now, know that this will cause the Text control to automatically
update itself with any status messages of actions that occur during the installation.
It's a good idea to catch any exceptions that might happen and return
ActionResult.Failure after we've logged the error. This is better than allowing
uncaught exceptions to bubble up and kill the installation. This also allows us to
log exactly what went wrong.
Summary
In this chapter, we began by discussing standard actions, which are actions that are
built into Windows Installer. Knowing the order and function of these events can be
a big help in understanding and debugging the installer. We saw that there are two
sequences, InstallUISequence and InstallExecuteSequence, and how we can
access them from our WiX markup. We explored how to create custom actions and
schedule them into a sequence. We also covered the major points of the Deployment
Tools Foundation library.
In the next chapter, we will cover the fundamentals of adding a user interface to help
guide users through the install process. We will start by using the dialogs that come
with WiX and then branch out to creating our own.
www.it-ebooks.info

Adding a User Interface
The WiX toolset ships with several user interface wizards that are ready to use
out of the box. You can drop one into your installer by rst adding a reference
to WixUIExtension.dll and then adding a UIRef element with the name of the
wizard. We'll briey discuss each of the available dialog sets and then move on to
learning how to create your own from scratch. In this chapter, you'll learn about:
• Adding dialogs into InstallUISequence
• Linking one dialog to another to form a complete wizard
• Getting basic text and window styling working
• Including necessary dialogs such as those needed to display errors
WiX standard dialog sets
The wizards that come prebuilt with WiX won't t every need, but they're a good
place to get your feet wet. To begin with, use the Add a Reference screen in Visual
Studio to add a reference to WixUIExtension.dll. It can be found in the bin
directory of the WiX program les.
Adding this reference is like adding a new WiX source le. This one contains dialogs.
To use one you'll need to use a UIRef element to pull the dialog into the scope of
your project. For example, this line, anywhere inside the Product element, will add
the "Minimal" wizard to your installer:
<UIRef Id="WixUI_Minimal" />
www.it-ebooks.info
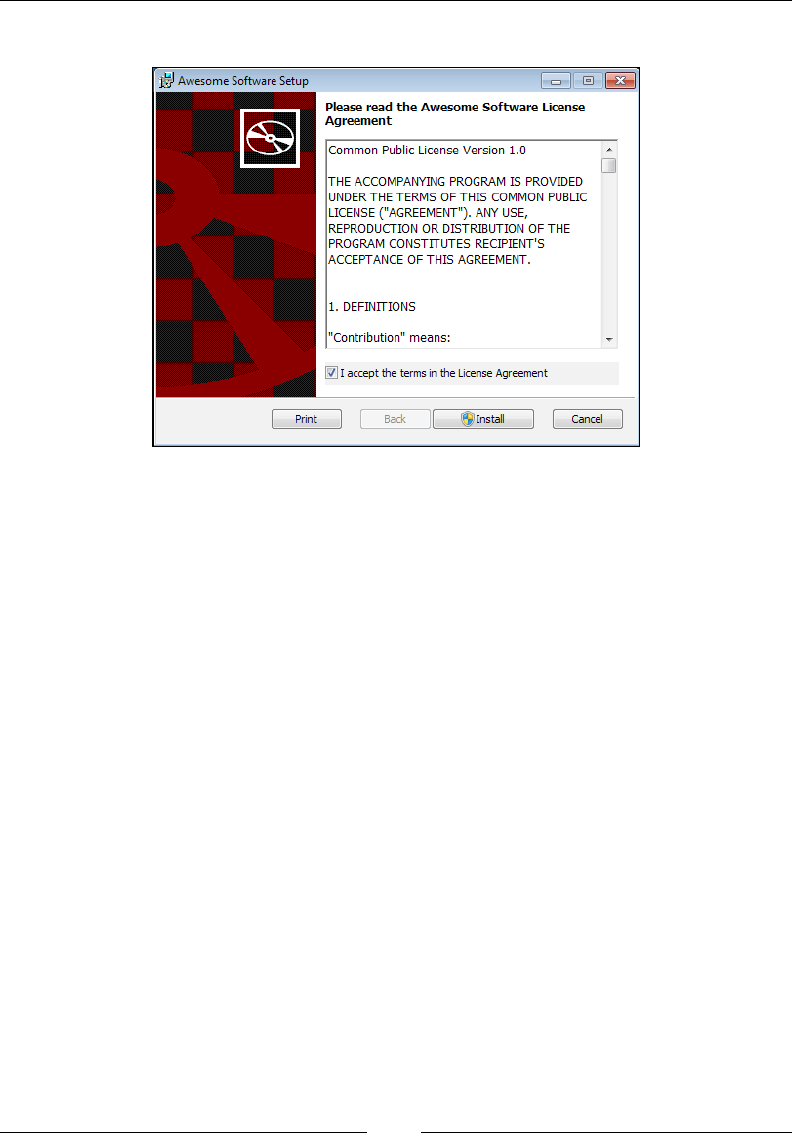
Adding a User Interface
[ 156 ]
It's denitely minimal, containing just one screen.
It gives you a license agreement, which you can change by adding a WixVariable
element with an Id value of WixUILicenseRtf and a Value attribute that points to a
Rich Text Format (.rtf) le containing your new license agreement:
<WixVariable Id="WixUILicenseRtf"
Value="newLicense.rtf" />
You can also override the background image (red CD on the left, white box on the
right) by setting another WixVariable called WixUIDialogBmp to a new image. The
dimensions used are 493 x 312. The other available wizards offer more and we'll
cover them in the following sections.
WixUI_Advanced
The "Advanced" wizard adds a few more dialogs to the mix, in addition to the
EULA. The user can choose to install right away or to congure the advanced
options. You'll need to change your UIRef element to use WixUI_Advanced, as
shown here:
<UIRef Id="WixUI_Advanced" />
You'll also have to make sure that your install directory has an Id attribute of
APPLICATIONFOLDER, as in this example:
<Directory Id="TARGETDIR"
Name="SourceDir">
www.it-ebooks.info
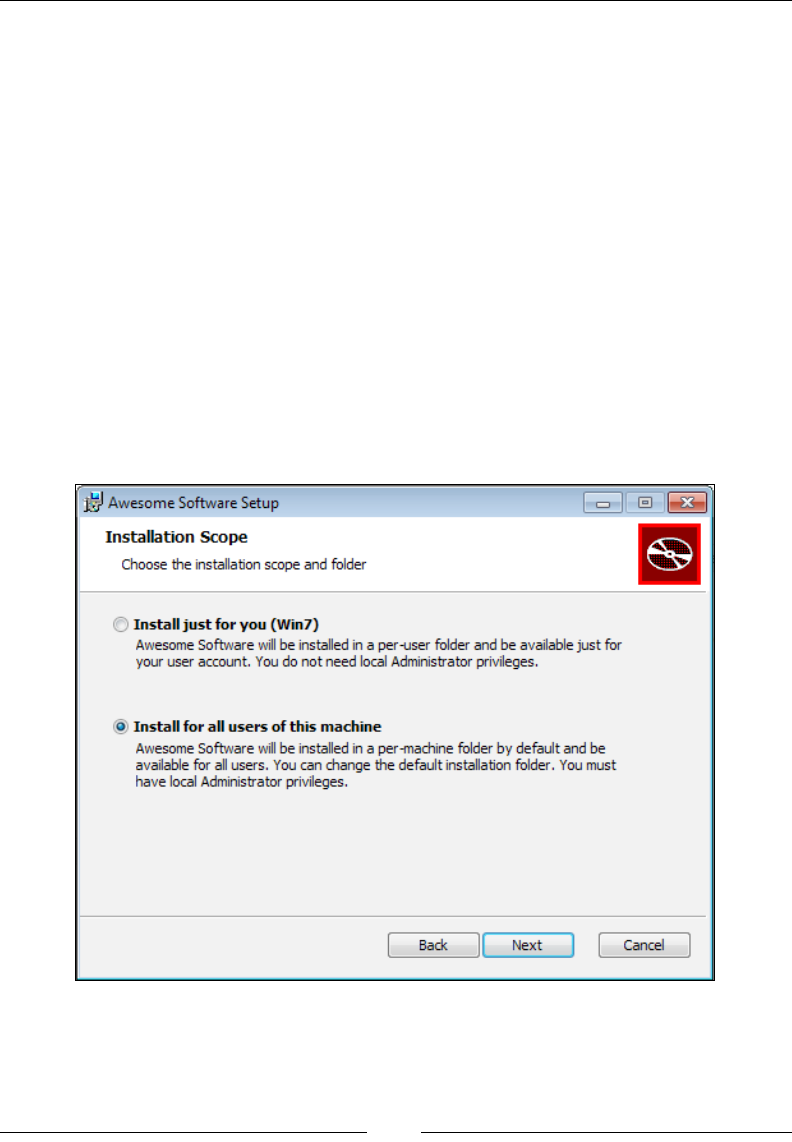
Chapter 6
[ 157 ]
<Directory Id="ProgramFilesFolder">
<Directory Id="APPLICATIONFOLDER"
Name="My Program" />
</Directory>
</Directory>
Next, set two properties: ApplicationFolderName and WixAppFolder. The rst sets
the name of the install directory as it will be displayed in the UI. The second sets
whether this install should default to being per user or per machine. It can be set to
either WixPerMachineFolder or WixPerUserFolder.
<Property Id="ApplicationFolderName"
Value="My Program" />
<Property Id="WixAppFolder"
Value="WixPerMachineFolder" />
The new screens include the Installation Scope screen, where the user can choose
to install for all users or just for him or herself. The default will be set by the
WixPerMachineFolder property, as shown in the following screenshot:
www.it-ebooks.info
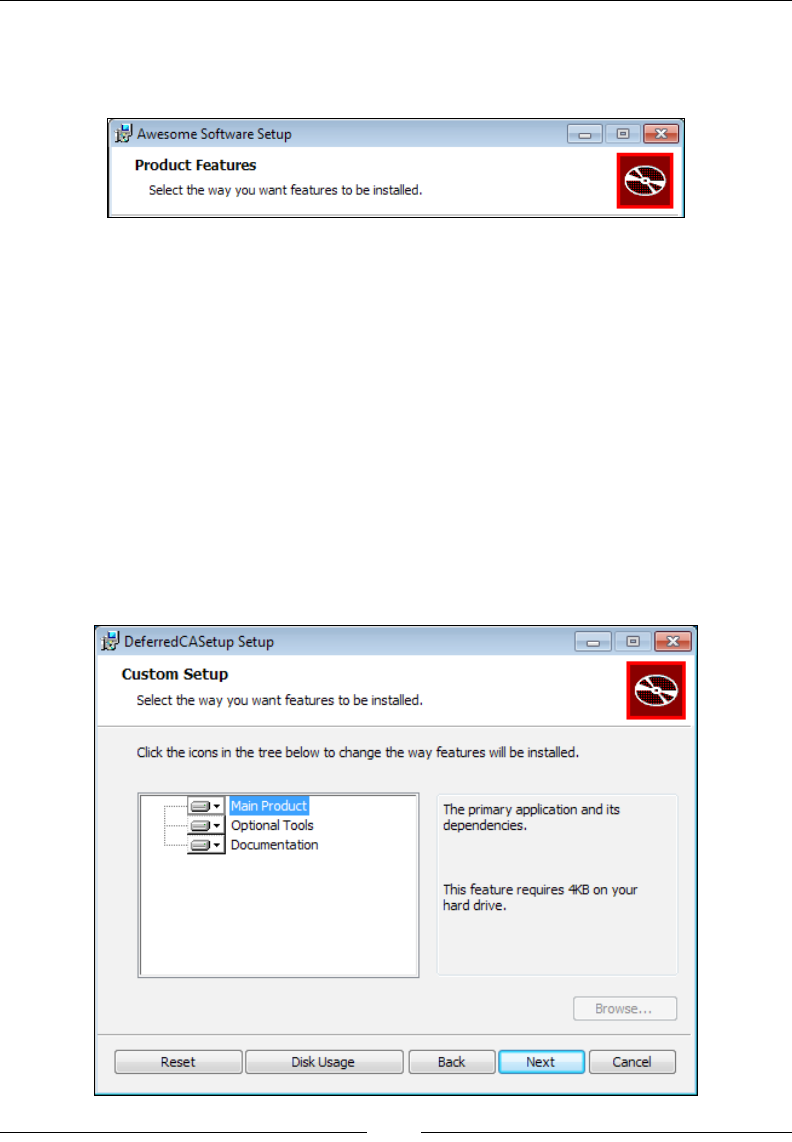
Adding a User Interface
[ 158 ]
There's also a screen for changing the install directory's path and another for
changing which features will get installed. You'll notice that many of these screens
have a banner at the top (white background with the familiar red CD to the right).
You can replace it with your own image by setting the WixUIBannerBmp variable. Its
dimensions are 493 x 58. You can set it in the following way:
<WixVariable Id="WixUIBannerBmp"
Value="myBanner.bmp" />
WixUI_FeatureTree
The WixUI_FeatureTree wizard shows a feature tree same as the Advanced wizard,
but it doesn't have the Install Scope or Install Path dialogs. To use it, you only need
to set the UIRef to WixUI_FeatureTree, like so:
<UIRef Id="WixUI_FeatureTree" />
Here's what the feature tree dialog looks like:
www.it-ebooks.info
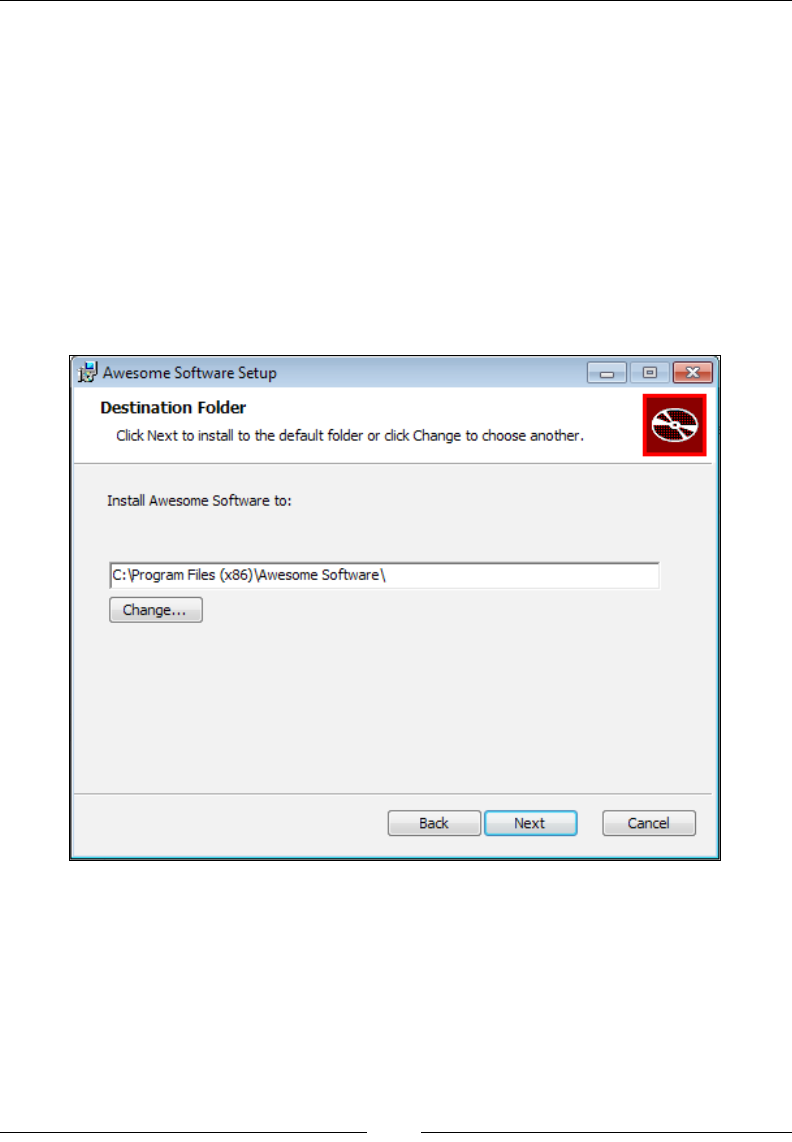
Chapter 6
[ 159 ]
Notice that in the image, the Browse button is disabled. If any of your Feature
elements have the ConfigurableDirectory attribute set to the ID of a Directory
element then this button will allow you to change where that particular feature gets
installed to. The Directory element's Id attribute must be all uppercase.
WixUI_InstallDir
WixUI_InstallDir shows a dialog where the user can change the installation path.
Change the UIRef to WixUI_InstallDir, like so:
<UIRef Id="WixUI_InstallDir" />
Here, the user can choose the installation path. This is seen in the following screenshot:
You'll have to set a property called WIXUI_INSTALLDIR to the Id attribute you gave
your install directory. So, if your directory structure used INSTALLLDIR for the Id
attribute of the main install folder, use that as the value of the property, as given in
the following code snippet:
<Directory Id="TARGETDIR"
Name="SourceDir">
<Directory Id="ProgramFilesFolder">
<Directory Id="INSTALLDIR"
www.it-ebooks.info
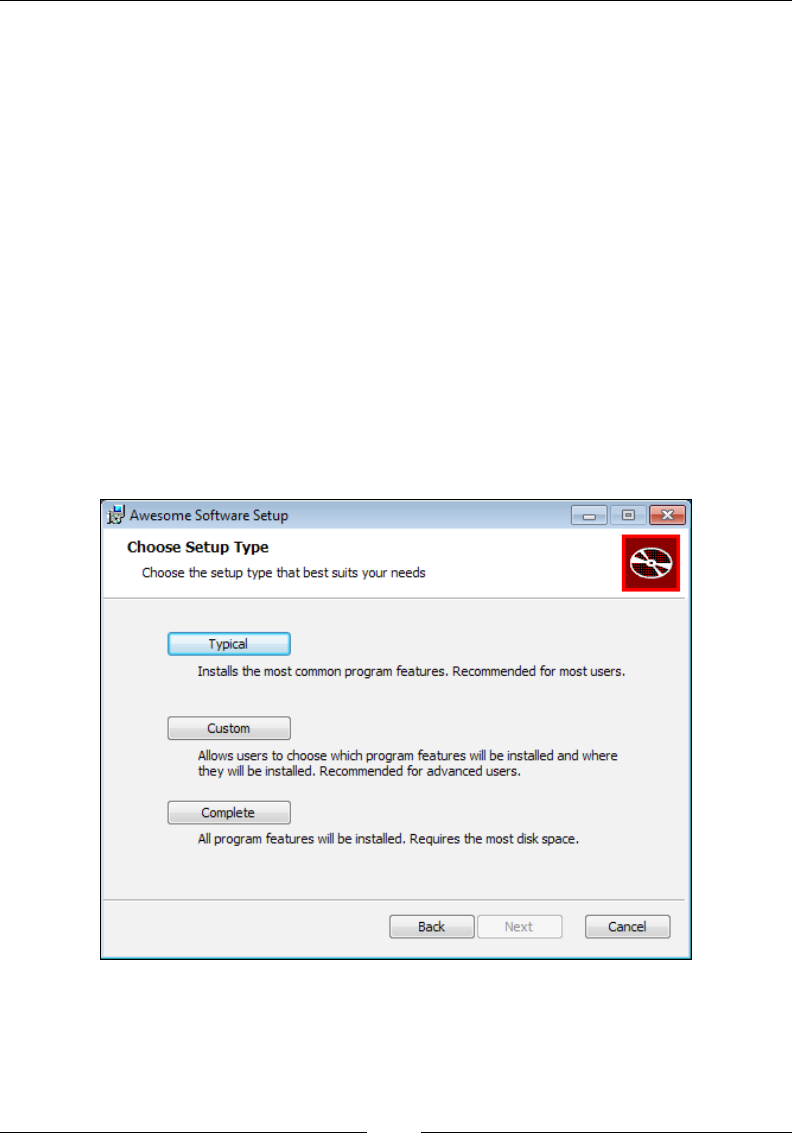
Adding a User Interface
[ 160 ]
Name="My Program" />
</Directory>
</Directory>
<Property Id="WIXUI_INSTALLDIR"
Value="INSTALLDIR" />
WixUI_Mondo
The WixUI_Mondo wizard gives the user the option of installing a Typical, Complete,
or Custom install. Typical sets the INSTALLLEVEL property to 3 while Complete sets
it to 1000. You can set the Level attribute of your Feature elements accordingly
to include them in one group or the other. Selecting a Custom install will display a
feature tree dialog where the user can choose exactly what they want. To use this
wizard, change your UIRef element to WixUI_Mondo:
<UIRef Id="WixUI_Mondo" />
This would result in a window like the following screenshot:
Recall that features that have a Level value less than or equal to INSTALLLEVEL will
be installed.
www.it-ebooks.info

Chapter 6
[ 161 ]
Customizing a standard dialog set
Each of the dialog sets shown can be customized by adding screens, removing some,
or changing the look and text. Usually, this means downloading the WiX source code
from wix.codeplex.com and changing the markup in the dialogs. You can nd them
under the src\ext\UIExtension\wixlib folder of the source code.
The general procedure is to copy the .wxs le that has the name of the wizard, such
as WixUI_Minimal.wxs, to your project with a different name such as Custom_
Minimal.wxs. Then, add or remove DialogRef elements from that le to add or
remove dialogs. DialogRefs are the references to the dialogs in the other les. Files
such as WixUI_Minimal.wxs just tie them all together into a wizard. For example,
here's part of what you'd nd in the Minimal wizard's main source le:
<DialogRef Id="ErrorDlg" />
<DialogRef Id="FatalError" />
<DialogRef Id="FilesInUse" />
<DialogRef Id="MsiRMFilesInUse" />
<DialogRef Id="PrepareDlg" />
<DialogRef Id="ProgressDlg" />
<DialogRef Id="ResumeDlg" />
<DialogRef Id="UserExit" />
<DialogRef Id="WelcomeEulaDlg" />
Here, you could remove the welcome dialog from the wizard by removing the
WelcomeEulaDlg line. The Minimal wizard is pretty small to begin with so you're
probably better off customizing a set such as Mondo.
Scanning through the rest of the le, you'll nd that it uses the Publish elements to
dene where the Next button on each dialog takes you to. You can, in your custom
le, change that. Here's what you'd nd in WixUI_Mondo.wxs:
<Publish Dialog="WelcomeDlg"
Control="Next"
Event="NewDialog"
Value="LicenseAgreementDlg">1</Publish>
<Publish Dialog="LicenseAgreementDlg"
Control="Back"
Event="NewDialog"
Value="WelcomeDlg">1</Publish>
<Publish Dialog="LicenseAgreementDlg"
www.it-ebooks.info

Adding a User Interface
[ 162 ]
Control="Next"
Event="NewDialog"
Value="SetupTypeDlg"
Order="2">LicenseAccepted = "1"</Publish>
This is all unfamiliar still and we'll go over the Publish element in more detail
when we talk about creating our own dialogs. For now, notice that we pair Dialog
and Control attributes to nd a particular UI control, such as a button, on a specic
dialog. The rst Publish element, for example, nds the Next button on the
WelcomeDlg dialog. Use the Event attribute to add an event such as NewDialog to
the button.
Here, we're saying we want the Next button to re the NewDialog event with Value
of LicenseAgreementDlg. This means that when the button is clicked, WelcomeDlg
will be replaced with LicenseAgreementDlg. You can customize any control on any
dialog from here, usually to change where the Next and Back buttons take you. This
allows you to insert new dialogs or skip one you don't want.
Here's an example that inserts a custom dialog called MyDialog between WelcomeDlg
and LicenseAgreementDlg. Add this to your Custom_Mondo.wxs le:
<Publish Dialog="WelcomeDlg"
Control="Next"
Event="NewDialog"
Value="MyDialog">1</Publish>
<Publish Dialog="MyDialog"
Control="Back"
Event="NewDialog"
Value="WelcomeDlg">1</Publish>
<Publish Dialog="MyDialog"
Control="Next"
Event="NewDialog"
Value="LicenseAgreementDlg">1</Publish>
<Publish Dialog="LicenseAgreementDlg"
Control="Back"
Event="NewDialog"
Value="MyDialog">1</Publish>
www.it-ebooks.info
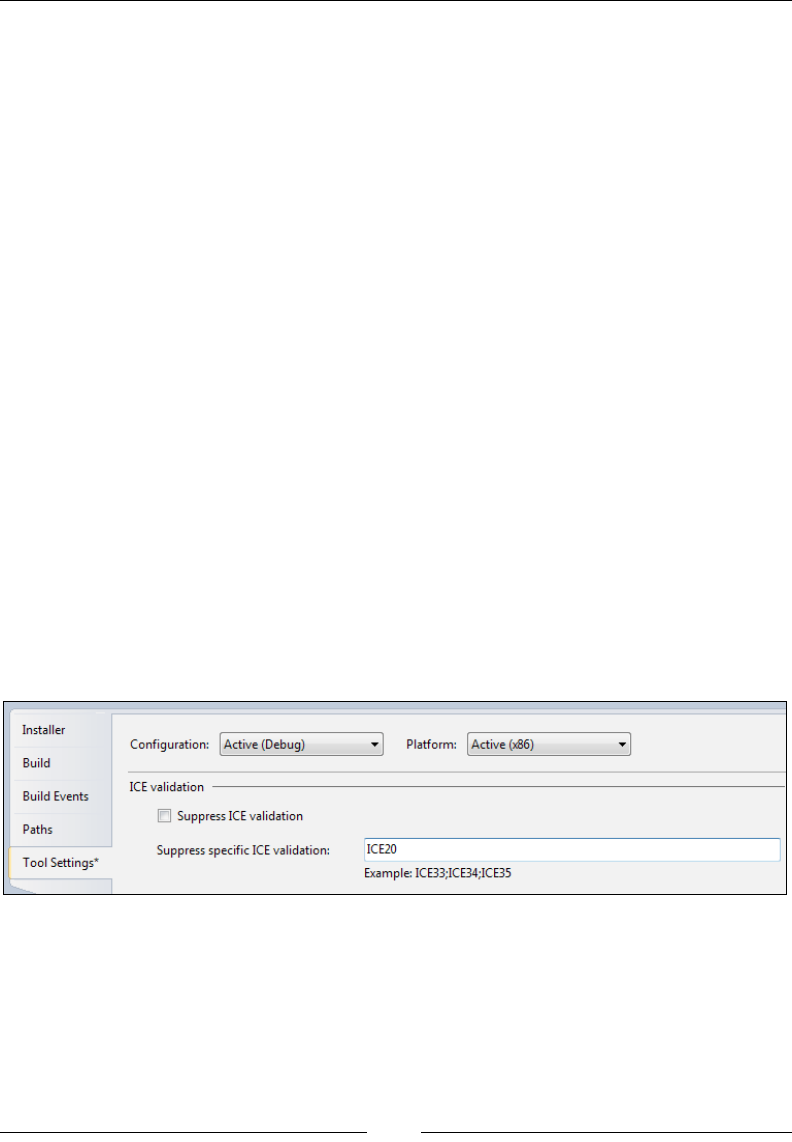
Chapter 6
[ 163 ]
Remember, you'd need to get the original WixUI_Mondo.wxs le from the WiX source
and rename it to something like Custom_Mondo.wxs before adding it to your project.
You'll then reference the custom le with UIRef.
<UIRef Id="Custom_Mondo" />
Be sure to change the UI element in the Custom_Mondo.wxs le to match.
<Wix xmlns="http://schemas.microsoft.com/wix/2006/wi">
<Fragment>
<UI Id="Custom_Mondo">
We'll explain more about referencing dialog sets when we discuss creating dialogs
from scratch.
Creating your own dialogs
In this section, we'll discard the premade dialogs and create our own. This should
give you a much deeper understanding of how things work.
ICE20 errors
For these rst exercises, you'll have to ignore some of WiX's warnings. Go to the
Properties page for the project, select Tools Settings and add a rule to ignore the
validation test ICE20. This test checks that you've added the FilesInUse, Error,
FatalError, UserExit, and Exit dialogs. That's a lot to start out with, so for now
just ignore those rules.
What are these dialogs? They are all windows that show an error message or indicate
that the install has been completed successfully. They show up automatically when
they're needed. Later in the chapter, I'll show how you can create these dialogs to
meet the requirements of ICE20.
www.it-ebooks.info

Adding a User Interface
[ 164 ]
Adding dialog les
Let's remove the reference to WixUIExtension.dll and UIRef that points to a
standard dialog. We'll be creating everything ourselves now to get the best working
knowledge. Each dialog window that you create should be placed into its own WiX
source le (.wxs). In Visual Studio, you can right-click on your project and select
Add | New Item | WiX File.
This will create an XML le containing a Wix root element and a Fragment element.
Fragments can be used to split your code into separate les and as such can be used
for many different purposes. To create a dialog out of one, you'll need to add two
more elements: UI and Dialog. In this example, I've added a UI element and given it
an Id value of CustomWizard. Inside that, I've nested a Dialog element, which I've
called InstallDlg. You could name this le InstallDlg.wxs and it should now
look like the following snippet:
<Wix xmlns="http://schemas.microsoft.com/wix/2006/wi">
<Fragment>
<UI Id="CustomWizard">
<Dialog Id="InstallDlg">
<!--Controls like buttons and text go here-->
</Dialog>
</UI>
</Fragment>
</Wix>
This is the basic structure that you'll use for each new dialog. The rst dialog that
you create can serve as the entry point for the others. If, for example, we created a
second dialog called SecondDlg, we could set it up in the same way. On additional
dialogs, you can omit the UI element's Id attribute, but be sure to change the Dialog
element's Id attribute to something new. Use the following snippet to build your
SecondDlg.wxs le:
<Wix xmlns="http://schemas.microsoft.com/wix/2006/wi">
<Fragment>
<UI>
<Dialog Id="SecondDlg">
<!--Controls like buttons and text go here-->
</Dialog>
</UI>
</Fragment>
</Wix>
www.it-ebooks.info

Chapter 6
[ 165 ]
Then, to reference SecondDlg in our rst dialog, add a DialogRef element to our
InstallDlg.wxs le:
<Wix xmlns="http://schemas.microsoft.com/wix/2006/wi">
<Fragment>
<UI Id="CustomWizard">
<DialogRef Id="SecondDlg"/>
<Dialog Id="InstallDlg">
</Dialog>
</UI>
</Fragment>
</Wix>
To add both dialogs to our project, use a UIRef element in your main source le.
Its Id attribute should match the Id attribute value you gave to your UI element in
InstallDlg. Add the following line to Product.wxs:
<UIRef Id="CustomWizard"/>
The Dialog element
Our InstallDlg won't work properly yet. We still need to add more attributes to the
Dialog element to set its size, title, and whether or not it can be minimized:
<Dialog Id="InstallDlg"
Width="370"
Height="270"
Title="Amazing Software"
NoMinimize="no">
You can set Width and Height larger or smaller, but 370 and 270 are the dimensions
used by the WiX dialog sets. Together, these dene the size of the window. The
Title attribute sets the text that will be displayed at the top of the window. Setting
NoMinimize to no means that the user will be able to minimize the dialog. This is the
default so specifying it isn't strictly necessary. There's one other attribute that you're
likely to use early on and that's Modeless, which can be set to yes. This will make
the dialog not wait for user input and is often used for progress bar dialogs. We'll
cover it later in the chapter.
www.it-ebooks.info

Adding a User Interface
[ 166 ]
Scheduling dialogs
For now, we only need to schedule one of our dialogs in the UI sequence. To do that,
place a Show element inside an InstallUISequence element with a Dialog attribute
set to the Id attribute of the InstallDlg le's Dialog element. Then add a Before
attribute and schedule it before ExecuteAction. The following snippet shows this,
which we can place inside the InstallDlg.wxs le, inside the Fragment element:
<InstallUISequence>
<Show Dialog="InstallDlg"
Before="ExecuteAction" />
</InstallUISequence>
Now, when the installer is launched our rst dialog will be shown. To get from our
rst dialog to our second one, we'll add a Next button that takes us there. We'll cover
buttons in detail in the next chapter, but basically, you'll add a Control element of
Type = "PushButton" inside the InstallDlg le's Dialog element. It will, in turn,
contain another element called Publish that closes the current dialog and opens the
second. The InstallDlg.wxs le will contain this code:
<Dialog ...>
<Control Id="Next"
Type="PushButton"
X="245"
Y="243"
Width="100"
Height="17"
Text="Next">
<Publish Event="NewDialog"
Value="SecondDlg" />
</Control>
</Dialog>
This technique can be used to navigate from one dialog to another, or even to go
back via Back buttons. You only need to change the value of the Publish element's
Value attribute to the Id attribute of a different Dialog element. We could add a
Back button on our SecondDlg le that takes us back to InstallDlg:
<Dialog ...>
<Control Id="Back"
Type="PushButton"
X="180"
Y="243"
Width="100"
Height="17"
Text="Back">
www.it-ebooks.info
Chapter 6
[ 167 ]
<Publish Event="NewDialog"
Value="InstallDlg" />
</Control>
</Dialog>
If you add more than one button to the same dialog, you'll also need to change the
Id attribute of the Control element and change its X and Y attributes. Otherwise,
all of your buttons would sit on top of one another and have the same key in MSI's
Control table. The following is a screenshot of a dialog that has both Back and
Next buttons:
Adding TextStyle elements
Our dialog isn't useable yet. It needs at least one TextStyle element to set the
default font for the text on the window. You'll only need to do this for the rst
dialog you create. The other dialogs can re-use the styles you set there. A TextStyle
element uses the FaceName, Size, Bold, Italic, and Underline attributes to set
a font. The following example creates a vanilla 8pt Tahoma font to be used as our
default:
<TextStyle Id="Tahoma_Regular"
FaceName="Tahoma"
Size="8" />
<Property Id="DefaultUIFont"
Value="Tahoma_Regular" />
Since this will be our default font, we have to add a Property element with an Id
attribute set to DefaultUIFont and a Value attribute set to the ID of our TextStyle
element. These will go inside our UI element as siblings to our Dialog element. You
can add more TextStyle elements for titles, ne print, and so on.
<Wix xmlns="http://schemas.microsoft.com/wix/2006/wi">
<Fragment>
<UI Id=»InstallDlg_UI»>
<TextStyle Id="Tahoma_Regular"
FaceName="Tahoma"
Size="8" />
<Property Id="DefaultUIFont"
www.it-ebooks.info
Adding a User Interface
[ 168 ]
Value="Tahoma_Regular" />
<TextStyle Id="Tahoma_Bold"
FaceName="Tahoma"
Size="8"
Bold="yes" />
<TextStyle Id="Tahoma_Italic"
FaceName="Tahoma"
Size="8"
Italic="yes" />
<TextStyle Id="Tahoma_Title"
FaceName="Tahoma"
Size="12"
Underline="yes" />
<Dialog Id="InstallDlg"
Width="370"
Height="270"
Title="Amazing Software"
NoMinimize=»no»>
</Dialog>
</UI>
</Fragment>
</Wix>
You can use these styles on, for example, a Control element of Type = "Text", which
displays a label, by adding the TextStyle element's Id attribute in curly brackets to
the Control element's Text attribute. Prex it with a backslash as shown:
<Control Id="myText"
Type="Text"
X="10" Y="10"
Width="200"
Height="17"
Text="{\Tahoma_Bold}Here is some text" />
The following table lists the possible attributes for your TextStyle elements:
Attribute Meaning
Blue Set to a number between 0 and 255 of how blue the text should be.
Green Set to a number between 0 and 255 of how green the text should be.
Red Set to a number between 0 and 255 of how red the text should be.
Italic If yes, the text will be italic.
www.it-ebooks.info
Chapter 6
[ 169 ]
Attribute Meaning
Bold If yes, the text will be bold.
Size Sets the numeric size of the text.
Strike If yes, the text will have a line through it.
Underline If yes, the text will be underlined.
FaceName The font face of the text.
Here is an example that uses several TextStyle elements in Text controls:
Adding a tabbable control
Our InstallDlg still isn't ready. We need to add at least one control that can be
tabbed to inside our Dialog element. For a simple, one screen wizard, we can just
add a button that, when clicked, continues the installation. It could say Install on
it. For that, we'll create a button that publishes the EndDialog event with a Value
attribute of Return. This is illustrated in the following code snippet:
<Control Id="InstallButton"
Type="PushButton"
Text="Install"
Height="17"
Width="56"
X="245"
Y="243">
<Publish Event="EndDialog"
Value="Return" />
</Control>
www.it-ebooks.info
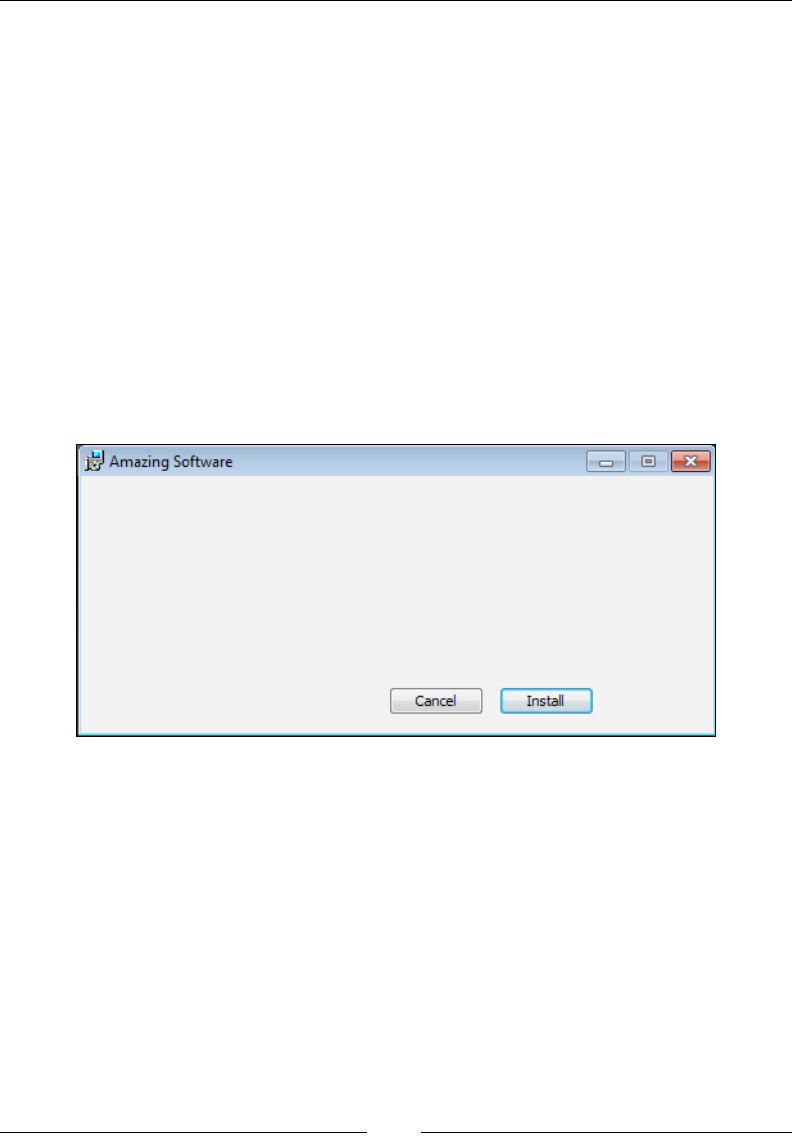
Adding a User Interface
[ 170 ]
We can also add a button that says Cancel. It will also publish the EndDialog event,
but with a Value attribute of Exit. If we add the Cancel attribute to it, this button
will be triggered if the user clicks the X button on the window or presses Esc.
<Control Id="CancelButton"
Type="PushButton"
Text="Cancel"
Height="17"
Width="56"
X="180"
Y="243"
Cancel="yes">
<Publish Event="EndDialog"
Value="Exit" />
</Control>
Here's our InstallDlg now, ready for use:
The following is the entire markup:
<?xml version=»1.0» encoding=»UTF-8»?>
<Wix xmlns=»http://schemas.microsoft.com/wix/2006/wi»>
<Fragment>
<UI Id="CustomWizard">
<TextStyle Id="Tahoma_Regular"
FaceName="Tahoma"
Size="8" />
<Property Id="DefaultUIFont"
Value="Tahoma_Regular" />
<Dialog Id="InstallDlg"
Width="370"
www.it-ebooks.info

Chapter 6
[ 171 ]
Height="270"
Title="Amazing Software"
NoMinimize="no">
<Control Id="InstallButton"
Type="PushButton"
Text="Install"
Height="17"
Width="56"
X="245"
Y="243">
<Publish Event="EndDialog"
Value="Return" />
</Control>
<Control Id="CancelButton"
Type="PushButton"
Text="Cancel"
Height="17"
Width="56"
X="180"
Y="243"
Cancel="yes">
<Publish Event="EndDialog"
Value="Exit" />
</Control>
</Dialog>
<InstallUISequence>
<Show Dialog="InstallDlg"
Before="ExecuteAction" />
</InstallUISequence>
</UI>
</Fragment>
</Wix>
Don't forget to add a UIRef element to your Product.wxs le to reference
your wizard:
<Product ...>
<Package ... />
<MediaTemplate ... />
...
<UIRef Id="CustomWizard" />
</Product>
www.it-ebooks.info

Adding a User Interface
[ 172 ]
When adding controls it's important to know that the order in which they appear in
your XML markup (from top to bottom) will be their tab order on the window. So,
you should place the button you'd want to receive the focus rst at the top of your
markup, followed by the control that you'd want to receive the focus next, down
the line. In our example, the Install button would be focused when the window rst
loads and pressing Tab would take you to the Cancel button.
You can prevent a control from being the default focused control by setting its
TabSkip attribute to yes. In that case, the next control in line will be focused when
the screen is rst displayed.
Note that TabSkip only prevents a control from having
the focus when the dialog is rst shown. The user will
still be able to tab to that control.
Adding a progress dialog
So what happens when we click the Install button? It installs but there's no
indication that anything has happened. We need a dialog that shows a progress
bar to inform the user that the install is happening. Add a new WiX source le to
your project and call it ProgressDlg.wxs. Add a UI element, like before, and then a
Dialog element with the Id attribute set to "ProgressDlg" to differentiate it in the
MSI database. The ProgressDlg.wxs le will look like the following code:
<Wix xmlns="http://schemas.microsoft.com/wix/2006/wi">
<Fragment>
<UI>
<Dialog Id="ProgressDlg"></Dialog>
</UI>
</Fragment>
</Wix>
Back in InstallDlg.wxs, add a DialogRef element inside the UI element to
reference this new le:
<Fragment>
<UI Id="CustomWizard">
<DialogRef Id="ProgressDlg" />
www.it-ebooks.info
Chapter 6
[ 173 ]
The Dialog element in ProgressDlg.wxs will use the Modeless attribute to signify
that it shouldn't wait for user interaction. The installation process will continue, but
it will allow this dialog to remain up for the remainder of the installation. This allows
the dialog to respond to events that re during the Execute sequence, which will
enable the dialog's progress bar to increment itself.
<Dialog Id="ProgressDlg"
Width="370"
Height="270"
Title="Amazing Software"
Modeless="yes">
If you like, you can add a Cancel button to this dialog, just in case the user decides
to cancel at this point. Refer back to InstallDlg for the markup. We'll also add a
Control element of type ProgressBar that uses the Subscribe element to receive
progress updates:
<Control Id="MyProgressBar"
Type="ProgressBar"
X="70"
Y="150"
Width="200"
Height="20"
ProgressBlocks="yes">
<Subscribe Event="SetProgress"
Attribute="Progress" />
</Control>
By subscribing to the SetProgress event, the progress bar is able to increment itself
as actions occur. The following screenshot is what it will look like:
www.it-ebooks.info
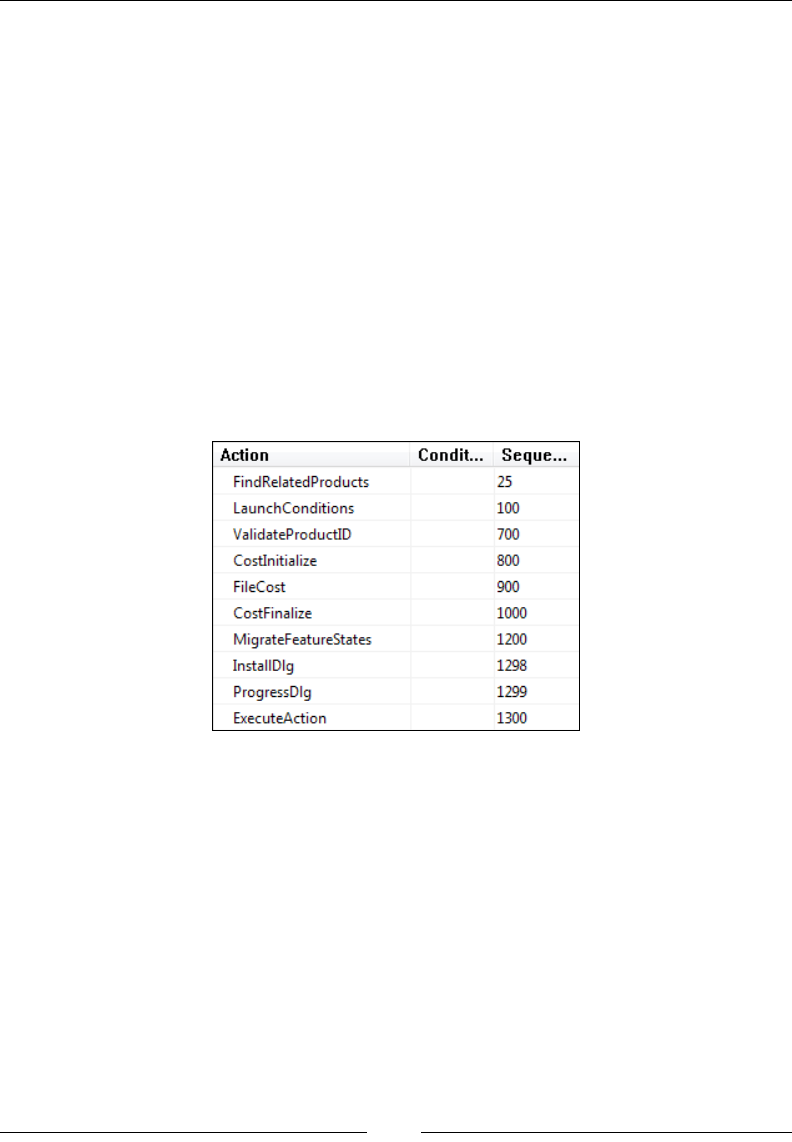
Adding a User Interface
[ 174 ]
Before, when we talked about adding a Next button to take us to a second dialog,
there would have been no need to explicitly add that dialog to the UI sequence.
The button takes us to it. It would have been up to that second dialog to then have
an Install button that ended the dialog wizard and allowed the rest of the install
to continue. In other words, we must always end with a button that publishes the
EndDialog event with a Value of Return. Usually, that button is marked Install.
Our ProgressDlg, however, will remain up as the rest of the install continues. It's
"modeless". Therefore, we should schedule it to run after InstallDlg and before
ExecuteAction. This is shown in the following code:
<InstallUISequence>
<Show Dialog="ProgressDlg"
After="InstallDlg" />
</InstallUISequence>
If you look at the InstallUISequence table in Orca, you can see how things look:
Even if we'd had a second, third, and fourth dialog, each arrived at by clicking
a Next button on the dialog before, we wouldn't see any of them in this table.
The InstallDlg is our entry point. When it closes, via the EndDialog event,
ProgressDlg pops up. Since ProgressDlg is Modeless, ExecuteAction res
immediately and takes us into the Execute sequence. The following is a complete
sample for the progress dialog:
<?xml version=»1.0» encoding=»UTF-8»?>
<Wix xmlns=»http://schemas.microsoft.com/wix/2006/wi»>
<Fragment>
<UI>
<Dialog Id="ProgressDlg"
Width="370"
Height="270"
www.it-ebooks.info

Chapter 6
[ 175 ]
Title="Amazing Software"
Modeless="yes">
<Control Id="CancelButton"
Type="PushButton"
TabSkip="no"
Text="Cancel"
Height="17"
Width="56"
X="180"
Y="243"
Cancel="yes">
<Publish Event="EndDialog"
Value="Exit" />
</Control>
<Control Id="MyProgressBar"
Type="ProgressBar"
X="70"
Y="150"
Width="200"
Height="20"
ProgressBlocks="yes">
<Subscribe Event="SetProgress"
Attribute=»Progress» />
</Control>
</Dialog>
<InstallUISequence>
<Show Dialog="ProgressDlg"
After="InstallDlg" />
</InstallUISequence>
</UI>
</Fragment>
</Wix>
Modal windows
Up to this point, closing one dialog opened another in its place. You can also create
"modal" windows that pop up on top of the current window. Instead of publishing
the NewDialog event inside a button, such as with our Next button, we can publish
the SpawnDialog event.
www.it-ebooks.info

Adding a User Interface
[ 176 ]
Modal windows are usually a little bit smaller in size than normal windows so that
the parent window can be seen in the background. Suppose we had a dialog called
PopupDlg, such as in the following snippet:
<?xml version=»1.0» encoding=»UTF-8»?>
<Wix xmlns=»http://schemas.microsoft.com/wix/2006/wi»>
<Fragment>
<UI>
<Dialog Id="PopupDlg"
Width="300"
Height="200"
Title="Amazing Software">
<Control Id="OkButton"
Type="PushButton"
Text="OK"
Height="17"
Width="56"
X="200"
Y="175">
<Publish Event="EndDialog"
Value="Return" />
</Control>
</Dialog>
</UI>
</Fragment>
</Wix>
We could use the SpawnDialog event to open it modally. Typically, modal windows
have an OK button that publishes the EndDialog event with a Value attribute of
Return. This allows them to be closed and have focus return to the parent window.
The following is what a button on InstallDlg would look like if it were set to open
PopupDlg modally:
<Control Id="PopupButton"
Type="PushButton"
Text="Show Popup"
Height="17"
Width="56"
X="100"
Y="243"
Default="yes">
<Publish Event="SpawnDialog"
Value="PopupDlg" />
</Control>
www.it-ebooks.info
Chapter 6
[ 177 ]
Here's what the result looks like:
ICE20 revisited
ICE20 is the validation check that makes sure you have the necessary dialogs
dened to handle things such as showing a friendly message when the user cancels
the install. We initially suppressed this check in the project's properties. Now, let's
remove that suppression and add these dialogs. Note that all are dened in the WiX
source les and you may nd it easier to simply copy them to your project.
We need to dene ve dialogs: FilesInUse, Error, FatalError, UserExit,
and Exit.
FilesInUse
The FilesInUse dialog allows the user to shut down applications that are accessing
les the installer needs to update or delete. The MSI nds this dialog by looking
in the MSI Dialog table for a dialog with an Id attribute of FilesInUse. So, in our
new WiX source le, the Dialog element's Id attribute must match this name. The
FilesInUseDlg.wxs le will look like the following snippet:
<?xml version=»1.0» encoding=»UTF-8»?>
<Wix xmlns=»http://schemas.microsoft.com/wix/2006/wi»>
www.it-ebooks.info

Adding a User Interface
[ 178 ]
<Fragment>
<UI>
<Dialog Id="FilesInUse"
Width="370"
Height="270"
Title="Amazing Software">
</Dialog>
</UI>
</Fragment>
</Wix>
To show which applications are using the les, we need to add a ListBox control
that uses a property called FilesInUseProcess.
<Control Id="InUseFiles"
Type="ListBox"
Width="300"
Height="150"
X="30"
Y="60"
Property="FileInUseProcess"
Sorted="yes" />
We also need to add three buttons, Ignore, Retry, and Exit. Set the EndDialog event
to these values:
<Control Id="Retry"
Type="PushButton"
X="304"
Y="243"
Width="56"
Height="17"
Default="yes"
Cancel="yes"
Text="Retry">
<Publish Event="EndDialog"
Value="Retry">1</Publish>
</Control>
<Control Id="Ignore"
Type="PushButton"
X="235"
Y="243"
Width="56"
Height="17"
www.it-ebooks.info

Chapter 6
[ 179 ]
Text="Ignore">
<Publish Event="EndDialog"
Value="Ignore">1</Publish>
</Control>
<Control Id="Exit"
Type="PushButton"
X="166"
Y="243"
Width="56"
Height="17"
Text="Cancel">
<Publish Event="EndDialog"
Value="Exit">1</Publish>
</Control>
Remember to add a DialogRef element to this dialog in your InstallDlg.wxs le:
<DialogRef Id="FilesInUseDlg" />
Error
An installer uses the Error dialog to display error messages. Create a new source
le and call it ErrorDlg.wxs. This le should set a property called ErrorDialog to
the value you've set the Dialog element's Id attribute to. In addition, the Dialog
element should set the ErrorDialog attribute to yes. The le should contain the
following snippet:
<?xml version="1.0" encoding="UTF-8"?>
<Wix xmlns="http://schemas.microsoft.com/wix/2006/wi">
<Fragment>
<UI>
<Property Id="ErrorDialog"
Value="ErrorDlg" />
<Dialog Id="ErrorDlg"
Width="370"
Height="270"
Title="Amazing Software"
ErrorDialog="yes">
</Dialog>
</UI>
</Fragment>
</Wix>
www.it-ebooks.info

Adding a User Interface
[ 180 ]
You'll also need to add a Text control inside the Dialog element and set its Id
attribute to ErrorText. This will be used to display the error message:
<Control Id="ErrorText"
Type="Text"
X="50"
Y="15"
Width="200"
Height="60" />
Next, add seven new buttons. Each will publish the EndDialog event with one of the
following values:
• ErrorAbort
• ErrorCancel
• ErrorIgnore
• ErrorNo
• ErrorOk
• ErrorRetry
• ErrorYes
For example, here's the rst that sets the ErrorAbort button:
<Control Id="A"
Type="PushButton"
X="100"
Y="80"
Width="56"
Height="17"
TabSkip="yes"
Text="Cancel">
<Publish Event="EndDialog"
Value="ErrorAbort">1</Publish>
</Control>
You can change the Text attribute of each button so that it matches the type, such
as Yes for ErrorYes and No for ErrorNo. The X and Y attributes can remain the
same. Remember to reference this new dialog with a DialogRef element in your
InstallDlg le.
www.it-ebooks.info

Chapter 6
[ 181 ]
FatalError
The FatalError dialog is shown when an unrecoverable error is encountered
during the install, causing a premature end. Add a new WiX source le and call it
FatalErrorDlg.wxs. The message will always be the same so you can add a Text
control that displays a static message, as in the following example:
<?xml version=»1.0» encoding=»UTF-8»?>
<Wix xmlns=»http://schemas.microsoft.com/wix/2006/wi»>
<Fragment>
<UI>
<Dialog Id="FatalErrorDlg"
Width="370"
Height="270"
Title="Amazing Software">
<Control Id="Description"
Type="Text"
X="50"
Y="70"
Width="220"
Height="80"
Text="[ProductName] Setup Wizard ended prematurely
because of an error. Your system has not been modified. To install
this program at a later time, run Setup Wizard again." />
<Control Id="Finish"
Type="PushButton"
X="180"
Y="243"
Width="56"
Height="17"
Default="yes"
Cancel="yes"
Text="Finish">
<Publish Event="EndDialog"
Value="Exit" />
</Control>
</Dialog>
</UI>
<InstallUISequence>
<Show Dialog="FatalErrorDlg"
OnExit="error" />
www.it-ebooks.info

Adding a User Interface
[ 182 ]
</InstallUISequence>
<AdminUISequence>
<Show Dialog="FatalErrorDlg"
OnExit="error" />
</AdminUISequence>
</Fragment>
</Wix>
The Text control uses the Text attribute to set the message to display. You may
notice that I'm using [ProductName] to reference a WiX property. The syntax, when
referencing a property in an attribute, is to surround the property's name with
square brackets. You should also add a button that publishes the EndDialog event
with a Value attribute of Exit to allow the user to quit the install.
We've added this dialog into two sequences: InstallUISequence and
AdminUISequence. This is required even if you aren't supporting administrative
installs. In both cases, set the Show element's OnExit attribute to error. This will
schedule the dialog in the appropriate place in those sequences.
UserExit
The UserExit dialog appears when the user cancels the install. Typically, it
contains some text and a Finish button that publishes the EndDialog event with
a Value attribute of Exit. Like the FatalError dialog, it must appear in both
InstallUISequence and AdminUISequence. This time, we'll set the Show element's
OnExit attribute to cancel.
The following is an example:
<?xml version=»1.0» encoding=»UTF-8»?>
<Wix xmlns=»http://schemas.microsoft.com/wix/2006/wi»>
<Fragment>
<UI>
<Dialog Id="UserExitDlg"
Width="370"
Height="270"
Title="Amazing Software">
<Control Id="Description"
Type="Text"
X="50"
Y="70"
Width="220"
Height="80"
www.it-ebooks.info

Chapter 6
[ 183 ]
Text="[ProductName] setup was interrupted. Your
system has not been modified. To install this program at a later time,
please run the installation again." />
<Control Id="Finish"
Type="PushButton"
X="180"
Y="243"
Width="56"
Height="17"
Default="yes"
Cancel="yes"
Text="Finish">
<Publish Event="EndDialog"
Value="Exit" />
</Control>
</Dialog>
</UI>
<InstallUISequence>
<Show Dialog="UserExitDlg"
OnExit="cancel" />
</InstallUISequence>
<AdminUISequence>
<Show Dialog="UserExitDlg"
OnExit="cancel" />
</AdminUISequence>
</Fragment>
</Wix>
Exit
The Exit dialog is shown at the end of a successful installation. Typically, it contains
some text and a Finish button. It must also be added to both InstallUISequence
and AdminUISequence. Here, set the Show element's OnExit attribute to success as
in the following example:
<?xml version=»1.0» encoding=»UTF-8»?>
<Wix xmlns=»http://schemas.microsoft.com/wix/2006/wi»>
<Fragment>
<UI>
<Dialog Id="ExitDlg"
Width="370"
www.it-ebooks.info

Adding a User Interface
[ 184 ]
Height="270"
Title="Amazing Software">
<Control Id="Description"
Type="Text"
X="50"
Y="70"
Width="220"
Height="80"
Text="[ProductName] setup has completed
successfully. Click 'Finish' to exit the
Setup Wizard." />
<Control Id="Finish"
Type="PushButton"
X="180"
Y="243"
Width="56"
Height="17"
Default="yes"
Cancel="yes"
Text="Finish">
<Publish Event="EndDialog"
Value="Exit" />
</Control>
</Dialog>
</UI>
<InstallUISequence>
<Show Dialog="ExitDlg"
OnExit="success" />
</InstallUISequence>
<AdminUISequence>
<Show Dialog="ExitDlg" OnExit="success" />
</AdminUISequence>
</Fragment>
</Wix>
www.it-ebooks.info

Chapter 6
[ 185 ]
Summary
In this chapter, we covered the basics of making simple dialogs. There are a few
required dialogs, as enforced by the ICE20 validation check, but for the most part
you're free to create as many of your own customized dialogs as you want.
In the next chapter, we'll explore UI controls such as buttons, text, and lists. This
should give you plenty of options when designing your install wizard.
www.it-ebooks.info

Using UI Controls
Now that you've seen how to create windows for your user interface, it's time to
explore the controls you can use on them. Controls are the buttons, textboxes, lists,
and images that we've all interacted with before and that make up any graphical UI.
In this chapter, we'll discuss the following topics:
• The Control element and its basic attributes
• The various types of controls and their unique features
Attributes common to all controls
Placing a Control element inside a Dialog element adds a new control to
that window. You'll use its Type attribute to specify which kind of control it
is: PushButton, Text, and so on. Beware that these names are case sensitive.
"Pushbutton" isn't the same as "PushButton" and will give you an install time error.
Positioning and sizing are always the same: Use the X and Y attributes to place your
control at a specic coordinate on the window and the Width and Height attributes
to size it. You must also always give it an Id attribute that uniquely identies it on
that dialog. So, you can have two buttons with the same ID if they're on two different
dialogs, but not if they're on the same dialog.
Disabling or hiding a control is straightforward. Set the Disabled attribute to yes
to prevent the user from interacting with it. Similarly, set Hidden to yes to hide the
control. You can also toggle these values at install time. Place a Condition element
inside the Control element. This uses an Action attribute to enable/disable or
hide/show your control, depending upon the state of some property.
www.it-ebooks.info
Using UI Controls
[ 188 ]
To give you an idea, the following example disables a button if a property called
MyProperty is set to abc. Otherwise, it's enabled. To set this property at install time,
we'll add a checkbox that when checked, sets MyProperty to abc. When unchecked,
the property's value is cleared. That way, by checking and unchecking the box, you'll
see the button enabled and disabled.
<!--Checkbox that enables the button-->
<Control Id="myCheckbox"
Type="CheckBox"
Property="MyProperty"
CheckBoxValue="abc"
Text="Enable the button!"
X="50"
Y="25"
Height="10"
Width="150" />
<!--The button that is enabled/disabled-->
<Control Id="myButton"
Type="PushButton"
Text="A buton to enable"
Height="17"
Width="100"
X="50"
Y="50">
<Condition Action="enable">
<![CDATA[MyProperty = "abc"]]>
</Condition>
<Condition Action="disable">
<![CDATA[MyProperty <> "abc"]]>
</Condition>
<Publish Event="EndDialog" Value="Exit" />
</Control>
The following screenshot displays the result:
www.it-ebooks.info
Chapter 7
[ 189 ]
The interesting parts are where we set MyProperty with the checkbox, using its
Property attribute. Then, within the second control, which is our button, we nest
two Condition elements. The rst checks whether MyProperty is equal to "abc". If it
is, its Action tells the control to enable itself. The other condition does the opposite.
I could also set Action attributes to hide and show to toggle the button's visibility.
This sort of thing is used in the WiX dialog sets to enable the Next button when the
end user license agreement is accepted.
Specic control syntax
In the following sections, we will explore each type of control. We'll begin with the
simpler types such as PushButton and Text, and then move on to complex controls
such as SelectionTree and ProgressBar.
PushButton
A button is one of the most basic types of controls and the one you'll probably
use the most. In WiX, it's created by setting the Control element's Type attribute
to PushButton. Use the Text attribute to set its label:
<Control
Id="MyButton"
Type="PushButton"
Text="Click Me!"
X="50"
Y="50"
Height="17"
Width="75">
<Publish Event="EndDialog" Value="Exit" />
</Control>
The following screenshot is what it looks like:
www.it-ebooks.info
Using UI Controls
[ 190 ]
You always need to add a Publish element inside it or else the button won't do
anything. The Publish element executes an action, called a control event, when the
button is clicked. In the last example, I'm calling the EndDialog event with a value
of Exit to quit the install. A value of Return would have continued the install. There
are many control events available and we will explore them in the next chapter.
As far as styling your buttons, reference a text style in the Text attribute to use a
particular font:
<Control
Id="MyButton"
Type="PushButton"
Text="{\Tahoma_Bold}Click me!"
... >
You can also use an icon instead of text. In that case, set the Text attribute to the ID
of a Binary element that uses its SourceFile attribute to point to an .ico le. Also,
set the Control element's Icon attribute to yes and its IconSize to the size of your
icon: 16, 32, or 48:
<Binary Id="myIcon" SourceFile="iconFile.ico" />
<Dialog ...>
<Control
Id="myButton"
Type="PushButton"
Text="myIcon"
Icon="yes"
IconSize="48"
Height="50"
Width="50"
X="50"
Y="50">
<Publish Event="EndDialog"
Value="Exit" />
</Control>
</Dialog>
Here's the result:
www.it-ebooks.info
Chapter 7
[ 191 ]
Something else to consider is whether to add a keyboard shortcut for your button.
To do so, add an ampersand (&) in front of one of the letters in the Text attribute.
Then, pressing Alt and that letter will trigger the button. You'll want to use the Text
element inside your control instead of the Text attribute, so that you can surround
the text with CDATA tags.
<Control
Id="InstallButton"
Type="PushButton"
... >
<Text><![CDATA[&Install]]></Text>
<Publish Event="EndDialog" Value="Return" />
</Control>
One last attribute for the PushButton control is called ElevationShield:
<Control Id="Install"
ElevationShield="yes"
Type="PushButton"
Text="Install"
Height="20"
Width="70"
... >
If you set ElevationShield to yes then on systems that have UAC, such as
Windows Vista and newer, if the user doesn't have elevated privileges a shield
icon will be added to the button, as shown in the following screenshot:
The shield will not be shown if the user has elevated privileges, such as from being
an administrator.
www.it-ebooks.info
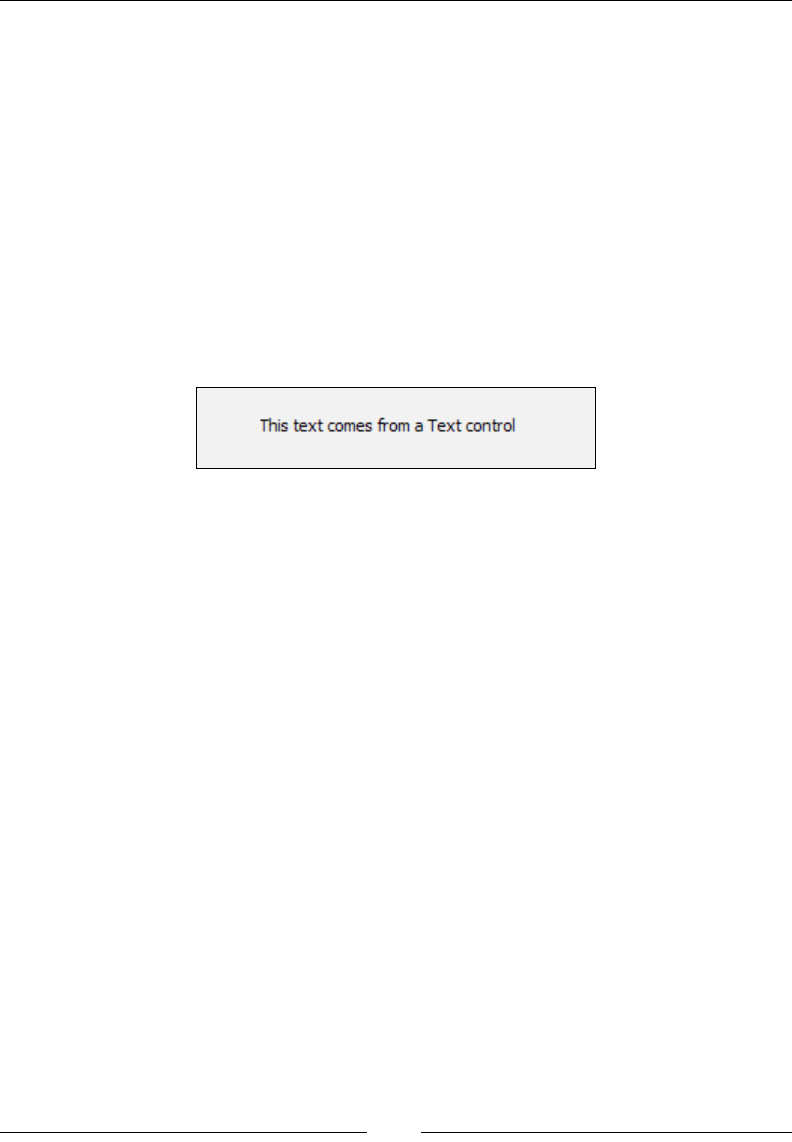
Using UI Controls
[ 192 ]
Text
A Text control places a block of text on the dialog. The following code snippet is
an example:
<Control
Id="SampleText"
Type="Text"
Text="This text comes from a Text control"
Height="17"
Width="200"
X="50"
Y="50" />
This is what it will look like:
Be sure to make it wide enough so that the text isn't clipped. Another option is to
make the height bigger and then set the NoWrap attribute to no so that the text wraps
to a new line when it runs out of width space. If the text runs out of height space it
gets clipped and will be replaced with an ellipsis (...).
Recall from the last chapter that you can use the TextStyle elements to format the
text. The following example creates a new style and applies it to the control:
<TextStyle Id="TahomaBold"
FaceName="Tahoma"
Size="12"
Bold="yes"/>
<Dialog ... >
<Control Id="SampleText"
Type="Text"
Text="{\TahomaBold}Isn't this bold?"
Height="17"
Width="200"
X="50"
Y="50" />
www.it-ebooks.info
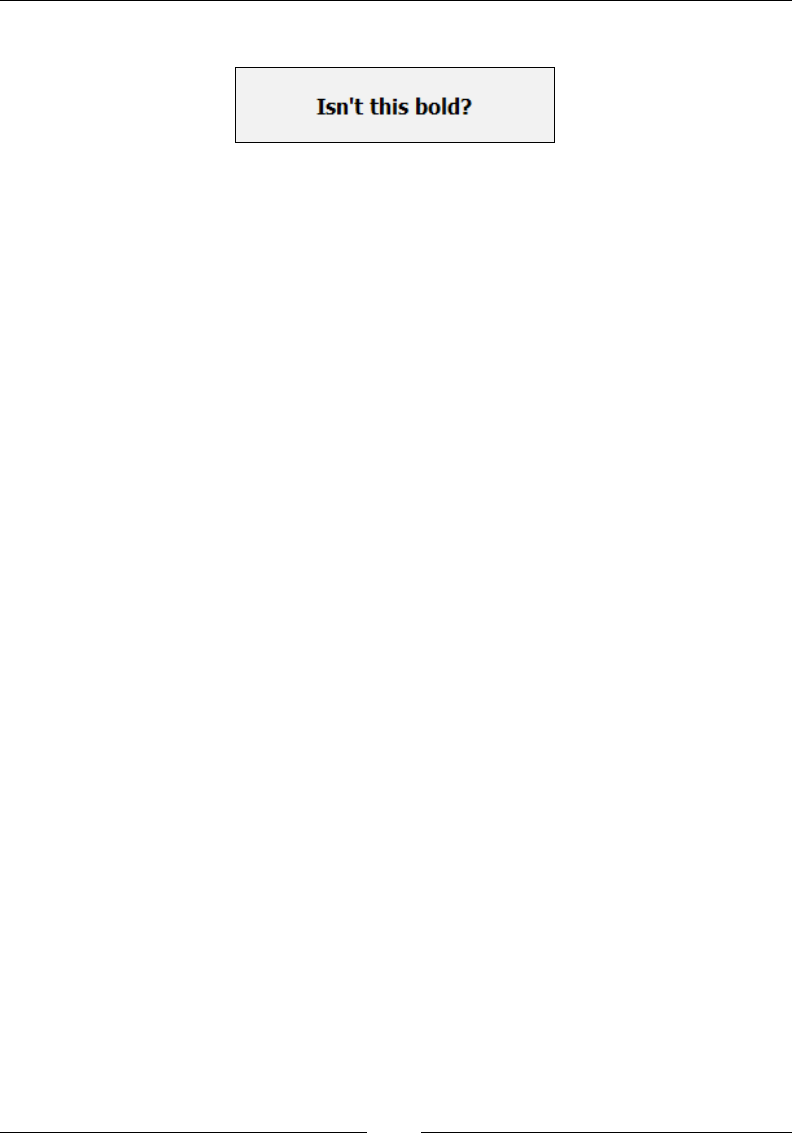
Chapter 7
[ 193 ]
This produces the following stylized result:
Two other useful attributes are Transparent and RightAligned. The Transparent
attribute allows any background behind the control, such as a bitmap image, to show
through. RightAligned right justies the text.
ScrollableText
The ScrollableText control is used to display large amounts of text that wouldn't
t on the dialog window otherwise. It creates a read-only textbox with a scroll bar
and is often used to show a license agreement. To set the text, you can use a Text
element that points to a Rich Text Format (.rtf) le:
<Control
Id="myScrollableText"
Type="ScrollableText"
Height="150"
Width="300"
X="50"
Y="50"
Sunken="yes">
<Text SourceFile="Document.rtf" />
</Control>
Or you can add the RTF text directly inside the Text element:
<Control
Id="myScrollableText"
Type="ScrollableText"
Height="150"
Width="300"
X="50"
Y="50"
Sunken="yes">
<Text><![CDATA[{\rtf1\ansi\ansicpg1252\deff0\deflang1033{\fonttbl{\f0\
fswiss\fcharset0 Arial;}}
{\*\generator Msftedit5.41.21.2500;}\viewkind4\uc1\pard\f0\fs20 This
is a bunch of text...\par
}]]>
</Text>
</Control>
www.it-ebooks.info
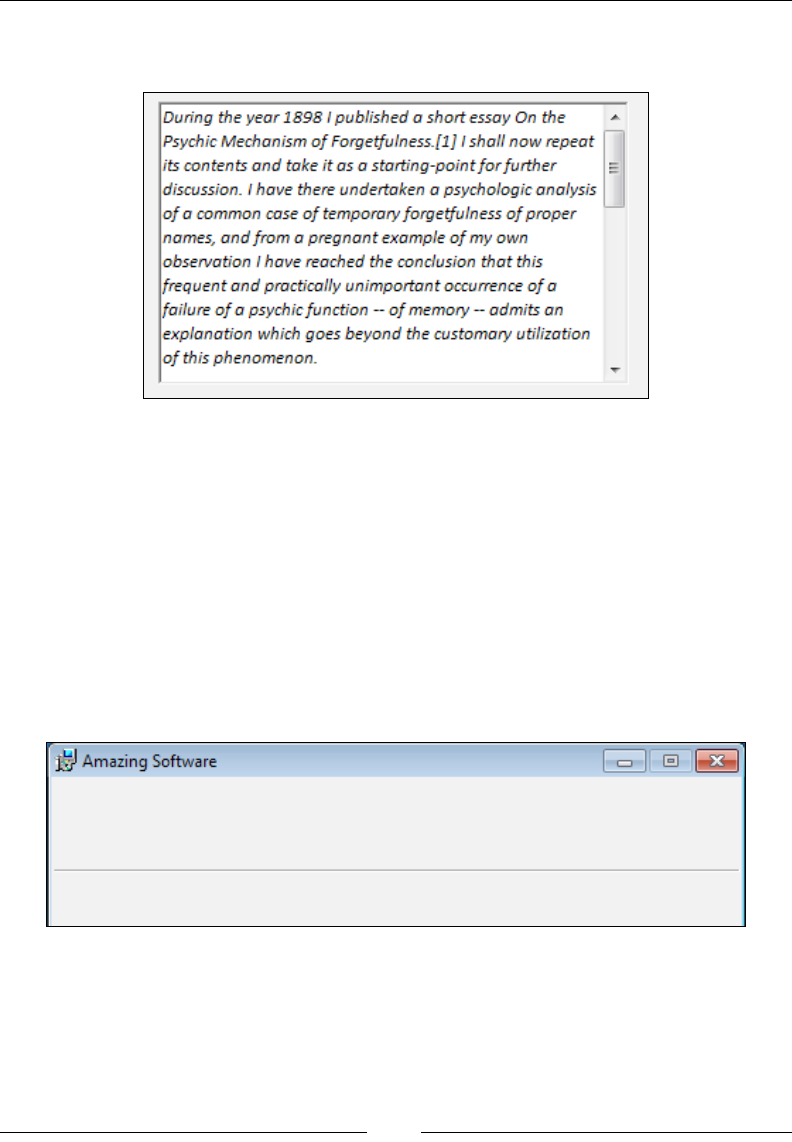
Using UI Controls
[ 194 ]
The RTF text created by Microsoft's WordPad tends to work better than that created
by Microsoft Word. The following screenshot is what it might look like:
If you'd rather see the scroll bar on the left, set the LeftScroll attribute to yes.
Line
A Line control is denitely the simplest of all. It creates a visible horizontal line
starting at the point specied by X and Y, and stretching the length specied by
Width. You can set Height to 0, as the attribute is ignored.
<Control Id="sampleLine" Type="Line" Height="0" Width="370"
X="2" Y="50" />
It looks like this:
You might use this to separate bold title text on your dialogs from other content such
as text elds and buttons.
www.it-ebooks.info
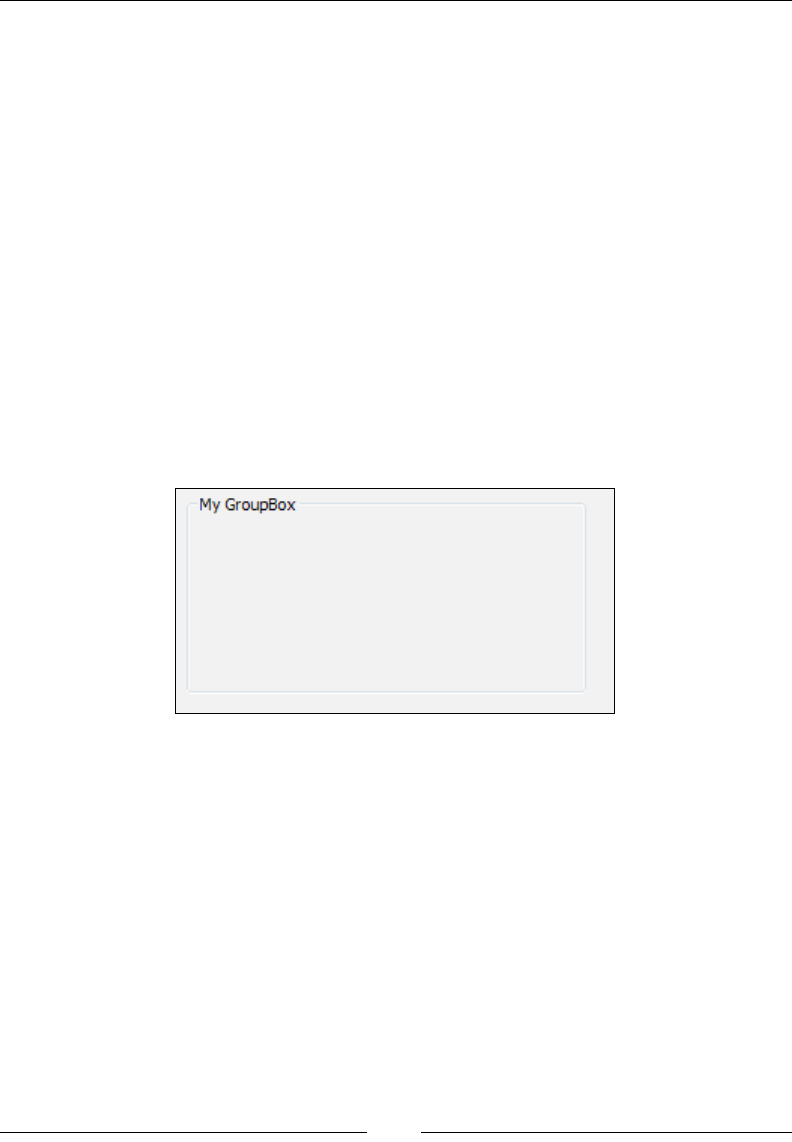
Chapter 7
[ 195 ]
GroupBox
A close relative to the Line control is the GroupBox control. It creates a rectangle that
you can use to visually group other controls. You have the option of displaying a
caption at the top by setting the Text attribute. The following is an example:
<Control
Id="myGroupBox"
Type="GroupBox"
Text="My GroupBox"
X="10"
Y="10"
Height="100"
Width="200" />
To have controls appear inside the box, you'll have to position them there manually
using the X and Y attributes of each one. The GroupBox control doesn't offer any true
functionality. You can, however, stylize its caption by referencing a text style in its
Text attribute. The following is what a basic GroupBox looks like:
Bitmap
Bitmap controls show images on your dialog. You could use this to show a
picture on only a portion of the window or to skin the entire area. First, you must
use a Binary element to point to an image le. Then, reference that element's ID in
your control's Text attribute. Note that the image must be a raster graphics image,
so BMP and JPEG les will work but not vector graphics images such as PNGs.
<UI>
<Binary Id="myPic" SourceFile="gradientBackground.jpg" />
<Dialog ... >
<Control
Id="myBitmap"
www.it-ebooks.info
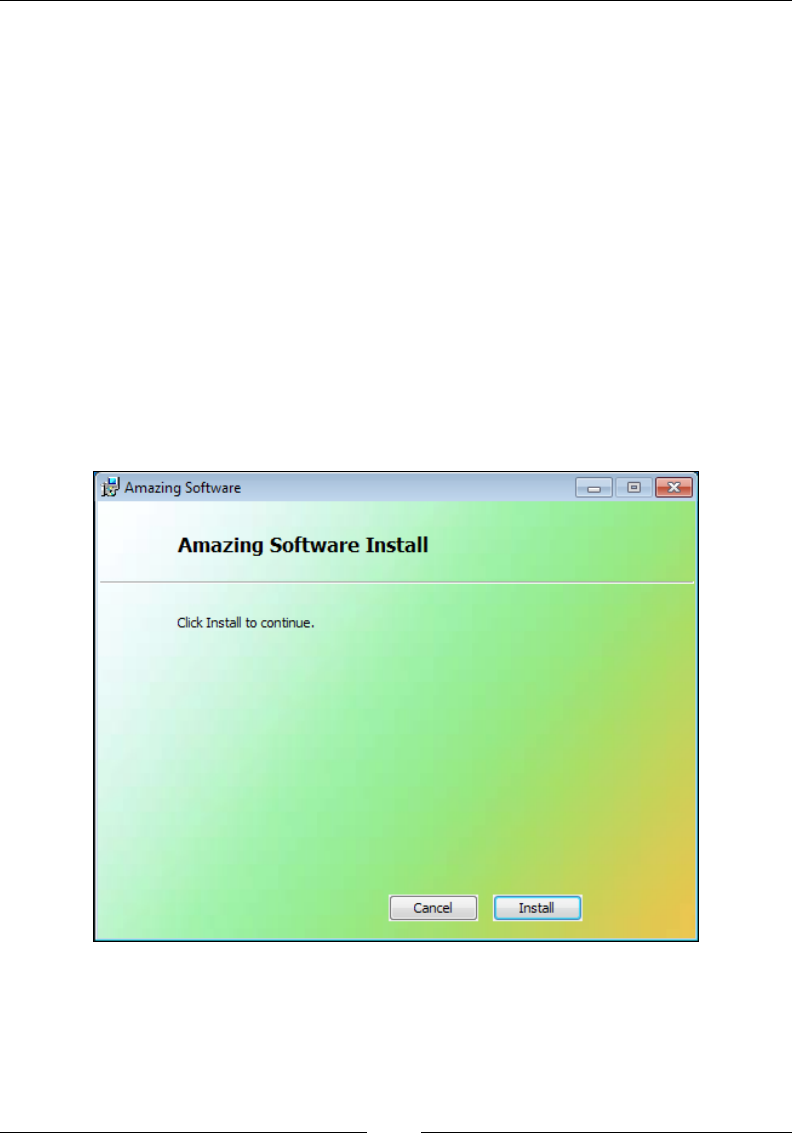
Using UI Controls
[ 196 ]
Type="Bitmap"
Text="myPic"
Height="270"
Width="370"
X="0"
Y="0"
TabSkip="no" />
Here, we're using an image that will cover the entire window. So, we set X and Y to
0 so that it will line up with the top-left corner. The image that you use will scale up
or down to the size you've set with Width and Height. Content that overows the
window's bounds will be clipped.
If you add Text controls positioned over an image, set their Transparent attributes
to yes so that the background can be seen behind them. Things also tend to work
out better when you place the Bitmap control rst in the markup and set its TabSkip
attribute to no. The following screenshot is what it might look like, with several other
elements on top:
www.it-ebooks.info

Chapter 7
[ 197 ]
Icon
The Icon control is used to display an .ico image on your dialog. Like the Bitmap
control, you'll need to rst reference the .ico le with a Binary element as shown:
<Binary Id="myIcon" SourceFile="myIcon.ico" />
Then, add a Control element of type Icon and reference the Binary element's ID in
the Text attribute. Use the IconSize attribute to specify the size of the icon: 16, 32,
or 48:
<Control
Id="myIcon"
Type="Icon"
Text="myIcon"
X="50"
Y="50"
Height="48"
Width="48"
IconSize="48" />
The following screenshot is what it might look like:
Edit
An Edit control creates a textbox that the user can type into. You'll use its Property
attribute to set the value of a property to what the user types. It isn't necessary to
declare this property beforehand, as it will be created on the y. The following is an
example that sets a property called USER_NAME. Make the property public, so that it
will be available during the Execute sequence, by using uppercase letters:
<Control
Id="myEdit"
Type="Edit"
Property="USER_NAME"
www.it-ebooks.info

Using UI Controls
[ 198 ]
Height="17"
Width="100"
X="50"
Y="50" />
It looks like the following screenshot:
You can see this property being created by keeping a log of the install and then
searching it for the name of the property. Here's the entry:
MSI (c) (54:98) [13:33:25:734]: PROPERTY CHANGE: Adding USER_NAME
property. Its value is 'Nick'.
If you're collecting a password or other sensitive data, you can hide the user's input
by setting the Control element's Password attribute to yes. This will only show
asterisks (*) as the user types. To be even more secure, you can declare the property
before and set its Hidden attribute to yes. That way, the value won't be visible in the
install log either:
<Control
Id="myPassword"
Type="Edit"
Property="USER_PASSWORD"
Password="yes"
Height="17"
Width="100"
X="50"
Y="50" />
You can also limit the number of characters that the user can enter by adding
the maximum number in curly brackets to the Text attribute. This could even be
combined with a text style, as in the next example:
<Control
Id="myEdit"
Type="Edit"
Text="{\Tahoma_Bold}{50}"
Height="17"
Width="100"
X="50"
Y="50"
Property="MY_PROPERTY" />
www.it-ebooks.info
Chapter 7
[ 199 ]
The Edit control has another attribute called Multiline that when set to yes should,
according to the Windows Installer documentation, create a multi-line edit control
with a vertical scroll bar. It's best avoided, however, because of its unconventional
operation. What you'll actually get is a textbox that adds a new line if you press
Ctrl + Enter, and adds a scroll bar if you run out of vertical space. It won't be what
users are expecting.
MaskedEdit
The MaskedEdit control is used with the ValidateProductID standard action to
validate a product serial number. To use it you'll rst need to dene a mask, which
is the pattern that the user's input must match. You'll dene this with a property
named PIDTemplate. Be sure to mark it as Hidden so that the user can't see the mask
in the install log.
The following is a mask that says the user must enter three numbers; a dash, three
numbers, another dash, and then four numbers. The pound signs (#) stand for
numbers and the dashes are literal characters.
<Property Id="PIDTemplate" Hidden="yes">
<![CDATA[<###-###-####>]]>
</Property>
The following table explains the characters that have special meaning in a mask:
Symbol Meaning
#It can be any number.
&It can be any letter.
?It can be a number or letter.
^It can be any letter, but it will always be converted to uppercase.
@It creates a random number. This is only used in the "hidden" part of the mask.
<It marks the beginning of the visible textbox (visible part of the mask).
>It marks the end of the visible textbox.
In the previous example, our mask began with the less-than sign (<) and ended with
the greater-than sign (>). These mark the beginning and end of the part of the mask
that the user must match. You can also add characters before and after this part, and
these extra characters will be added to what the user enters. For example, the next
mask prepends "12345" to the beginning of the user's input and ve random numbers
to the end.
12345<###-###-####>@@@@@
www.it-ebooks.info
Using UI Controls
[ 200 ]
To use this in a MaskedEdit control, set the Control element's Text attribute to the
ID of the property. Surround it with square brackets as shown:
<Control
Id="myMaskedEdit"
Type="MaskedEdit"
Text="[PIDTemplate]"
Property="PIDKEY"
Height="17"
Width="150"
X="50"
Y="50" />
Here's what it looks like:
As we're using a property called PIDKEY and a mask called PIDTemplate, the
ValidateProductID action will run and check the value. If it's a match, a new
property called ProductID will be set that combines the user's input with the hidden
characters in the mask. If not, that property won't be set. Either way, you'll know if
the user's input was valid. You would expect to see this in the log:
Property(C): PIDKEY = 123-456-7890
Property(C): ProductID = 12345-123-456-7890-64010
From here, you could execute a custom action that truly checks the serial number.
For example, you could write a C# method that calls a web service, passing it the
serial number, to evaluate its validity. You'd likely add a conditional statement
to this custom action so that it only runs if ProductID has been set. Be aware
that because you're collecting the number during the UI, ValidateProductID
won't have a chance to validate it until it runs in the Execute sequence. So, your
custom action should run after that. That's not to say that you couldn't forgo the
ValidateProductID action altogether and roll your own validation to be run during
the UI sequence.
www.it-ebooks.info
Chapter 7
[ 201 ]
PathEdit
A PathEdit control is used to change the path that one of your Directory elements
points to. To use it, the Directory element must have an ID that's a public property,
meaning it must be uppercase. Suppose that this was our directory structure:
<Directory Id="TARGETDIR" Name="SourceDir">
<Directory Id="ProgramFilesFolder">
<Directory Id="INSTALLLOCATION"
Name="Amazing Software" />
</Directory>
</Directory>
Here, our main install directory has an ID of INSTALLLOCATION. Now, we can
reference this directory in the Property attribute of our control:
<Control
Id="myPathEdit"
Type="PathEdit"
Property="INSTALLLOCATION"
Height="17"
Width="200"
X="50"
Y="50" />
Here's what it looks like:
The user can edit this and when they do the installation path will be changed.
There's just one thing: The installer won't know that it's changed. To alert it, we need
to re the SetTargetPath event and pass it our new path. This is best called by a
PushButton control so let's add one:
<Control Id="OKButton"
Type="PushButton"
Height="17"
Width="56"
X="50"
Y="70"
www.it-ebooks.info
Using UI Controls
[ 202 ]
Text="OK">
<Publish Event="SetTargetPath"
Value="INSTALLLOCATION"
Order="1">1</Publish>
<!--Other Publish element to go to next dialog-->
</Control>
The PushButton control publishes the SetTargetPath event with Value set to the
ID of our directory. When the user clicks it, the new path will be set. This event does
some basic validation on the path such as checking that the drive letter exists or, if
it's a UNC path, the remote location can be reached.
CheckBox
A CheckBox control is a checkbox that the user can click to set a property. You'll
specify which property to set with the Property attribute and what to set it to with
the CheckBoxValue attribute. If you want to stress that this value is meant to be a
number, set the Integer attribute to yes. Here's an example:
<Control
Id="myCheckbox"
Type="CheckBox"
Property="myCheckboxResult"
CheckBoxValue="my value"
Text="Check the box please."
X="50"
Y="50"
Height="10"
Width="150" />
The Text attribute is the text that appears to the right of the checkbox and explains
what the box is for. Be sure to make the control wide enough to t all of this text in.
Here's what it looks like:
www.it-ebooks.info

Chapter 7
[ 203 ]
When the user checks the box, the property myCheckboxResult will be set to my
value. Deselecting the box will delete the property. If you declare the property
beforehand with a Property element, the box will be checked by default:
<Property Id="myCheckboxResult" Value="my value" />
RadioButtonGroup
A RadioButtonGroup control creates a list of radio buttons, only one of which can
be selected at a time. As one of the buttons has to be selected by default, you must
create a Property element rst and reference it on the control. In the following, a
Property element is created with a value of 1. The radio button with that value will
be selected as the default.
<Property Id="buttonGroup" Value="1" />
To reference this property, set the Control element's Property attribute to its ID:
<Control
Id="myRadioGroup"
Type="RadioButtonGroup"
Property="buttonGroup"
Height="100"
Width="100"
X="50"
Y="50">
</Control>
Now to add our radio buttons. Although you can dene them outside of the Control
element—placing them inside the UI element instead—it's more common to add
them as children to the control. Each button is created by a RadioButton element
whose Text attribute sets its label. The property will be changed by each button's
Value attribute. All of the radio buttons are held inside a RadioButtonGroup
element that, such as the Control element, references our property.
Here's our control with three radio buttons nested inside:
<Control
Id="myRadioGroup"
Type="RadioButtonGroup"
Property="buttonGroup"
Width="100"
Height="100"
X="50"
www.it-ebooks.info
Using UI Controls
[ 204 ]
Y="50">
<RadioButtonGroup Property="buttonGroup">
<RadioButton Value="1"
Text="One"
Height="17"
Width="50"
X="0"
Y="0" />
<RadioButton Value="2"
Text="Two"
Height="17"
Width="50"
X="0"
Y="20" />
<RadioButton Value="3"
Text="Three"
Height="17"
Width="50"
X="0"
Y="40" />
</RadioButtonGroup>
</Control>
The following is what it looks like:
Selecting a different radio button will set the buttonGroup property to that
button's value.
You can change the look of the buttons with the Control element's HasBorder,
Sunken, and RightAligned attributes. HasBorder will put a GroupBox control
around the buttons, although you should then change the X and Y attributes of the
RadioButton elements so that they have some padding. Sunken will place a sunken
border edge around the buttons. RightAligned will place the labels (One, Two,
Three) on the left-hand side of the buttons.
www.it-ebooks.info

Chapter 7
[ 205 ]
You also have the option of displaying icons next to your radio buttons instead of
text. For that, replace the Text attribute on the RadioButton control with an Icon
attribute set to the ID of a Binary element pointing to an .ico le.
ComboBox
A ComboBox control creates a drop-down list of selectable items. First, create a
Control element of type ComboBox and set its Property attribute to the name of a
property that will store the item the user selects from the list. If you want your items
to be sorted alphabetically, set the Sorted attribute to yes. Also, be sure to always
set the ComboList attribute to yes. Here's an example where the option the user
selects will be stored in a property called selectedItem:
<Control
Id="myComboBox"
Type="ComboBox"
Width="100"
Height="50"
X="50"
Y="50"
Property="selectedItem"
ComboList="yes"
Sorted="yes">
</Control>
The items in your list are dened with the ListItem elements nested inside a
ComboBox element. Although you can place this outside of the Control element, it's
clearer to place it directly inside. The ComboBox element uses its Property attribute
to tie it to the control. Each ListItem sets a Text attribute, which is what gets
displayed, and a Value attribute that sets the value of the item. Let's add three items
to our list:
<Control ... >
<ComboBox Property="selectedItem">
<ListItem Text="One" Value="1" />
<ListItem Text="Two" Value="2" />
<ListItem Text="Three" Value="3" />
</ComboBox>
</Control>
www.it-ebooks.info

Using UI Controls
[ 206 ]
If you want to set one of the items as the default, set a Property element with an
ID that matches the property name we're using in our control and a Value attribute
that matches the value of ListItem. This, for example, would set the default item
selected to ListItem that has a Value attribute of 2:
<Property Id="selectedItem" Value="2" />
This is what it will look like:
ListBox
A ListBox control is similar to a ComboBox control except that the options are all
displayed at once. Create a Control element and set its Type attribute to ListBox.
This control also uses the Property and Sorted attributes such as a ComboBox. You
can add list items in the same way as before, using ListItem elements, except that
this time they'll be contained inside a ListBox element:
<Control
Id="myListBox"
Type="ListBox"
Width="100"
Height="45"
X="50"
Y="50"
Property="selectedItem"
Sorted="yes">
<ListBox Property="selectedItem">
<ListItem Text="One" Value="1" />
<ListItem Text="Two" Value="2" />
<ListItem Text="Three" Value="3" />
</ListBox>
</Control>
www.it-ebooks.info
Chapter 7
[ 207 ]
If you want to set a default selected item, create a Property element with an ID that
matches your ListBox element's property and a Value attribute that's the same as
the value of a ListItem.
<Property Id="SelectedItem" Value="2" />
It looks like the following screenshot:
You can also add the Sunken attribute, set to yes, to give your list box a sunken border.
ListView
A ListView control is like a ListBox control except that it displays an icon and text
for each selectable option. For each item, you'll need to dene a Binary element that
points to an icon le.
<Fragment>
<UI>
<Binary Id="face1" SourceFile="icons/alien1.ico" />
<Binary Id="face2" SourceFile="icons/alien2.ico" />
<Binary Id="face3" SourceFile="icons/alien3.ico" />
The next step is to create a Control element of type ListView and set the IconSize
attribute to the size of your icons: 16, 32, or 48. Also, set its Property attribute to
store the option the user selects:
<Control
Id="myComboBox"
Type="ListView"
Width="200"
Height="150"
X="10"
Y="10"
Property="selectedItem"
IconSize="32">
<ListView Property="selectedItem">
<ListItem Text="Alien 1" Icon="face1" Value="1" />
www.it-ebooks.info
Using UI Controls
[ 208 ]
<ListItem Text="Alien 2" Icon="face2" Value="2" />
<ListItem Text="Alien 3" Icon="face3" Value="3" />
</ListView>
</Control>
Here, we've added a ListView element inside the control with ListItem for each
option. Each one gets a Text attribute for the label, an Icon attribute that references
one of the Binary elements, and a Value attribute to hold the value of the item. The
following is what it looks like:
To set a default selected item, set a Property element with an ID that matches your
control's Property attribute to the value of one of your ListItems. As you can see
from this example, the image quality is usually poor, even if your .ico les are good.
DirectoryList
A DirectoryList control displays a directory and the folders that are in it. It can
be used to set the path of one of your Directory elements. Here's one that sets a
Directory element with an ID of INSTALLLOCATION:
<Control
Id="myDirectoryList"
Type="DirectoryList"
Property="INSTALLLOCATION"
Height="150"
Width="320"
X="10"
Y="30" />
www.it-ebooks.info
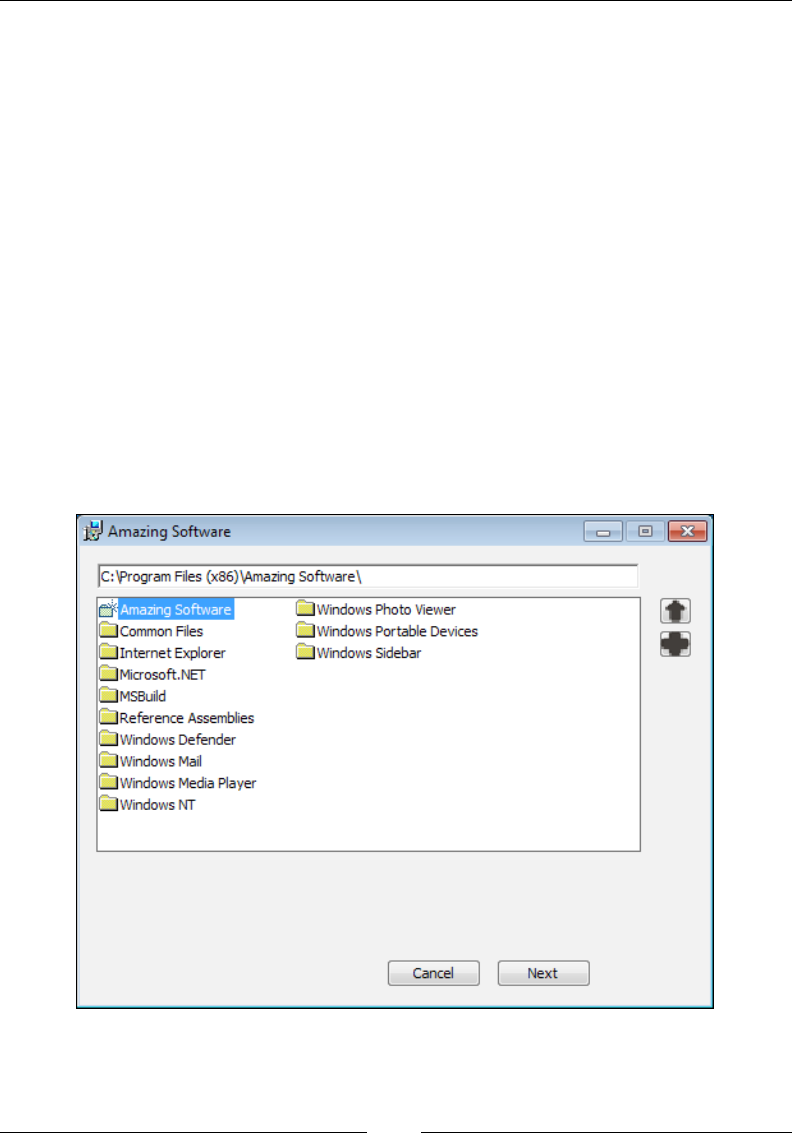
Chapter 7
[ 209 ]
If you add this to one of your dialogs, you won't be very impressed with the
result. All you'll see is a blank box. That's because you're looking inside the
INSTALLLOCATION directory—a directory that hasn't been installed yet and no folders
exist inside it.
To get some benet from this, we need to add some more controls around it to alert
the user to where they are in the folder hierarchy. At the very least, you should add
a PathEdit control that displays the current directory. For example, this could be
something like the following code snippet:
<Control
Id="myPath"
Type="PathEdit"
Height="17"
Width="320"
X="10"
Y="10"
Property="INSTALLLOCATION" />
The following screenshot shows a dialog with even more bells and whistles:
www.it-ebooks.info

Using UI Controls
[ 210 ]
Here, the giant directory list in the middle of the dialog is showing the Program Files
folder after we navigated out of INSTALLLOCATION (whose friendly name is Amazing
Software). Creating a button that navigates up one directory is done by adding a
PushButton control to the same dialog as your directory list and having it publish
the DirectoryListUp event with a value of 0. In this example, it uses an icon that
looks like an arrow pointing up:
<Control
Id="DirUpButton"
Type="PushButton"
Height="17"
Width="20"
X="340"
Y="30"
Icon="yes"
Text="upIcon"
IconSize="16">
<Publish Event="DirectoryListUp" Value="0" />
</Control>
There's also a button for creating new directories (labeled with a plus sign). It
publishes the DirectoryListNew event:
<Control
Id="NewDirButton"
Type="PushButton"
Height="17"
Width="20"
X="340"
Y="50"
Icon="yes"
Text="addIcon"
IconSize="16">
<Publish Event="DirectoryListNew" Value="0" />
</Control>
Once the user has highlighted the directory that they want to set the path to, you'll
need to save it. To do that, add a Publish element inside a Next button with a
SetTargetPath event and a value set to the ID of the target Directory element.
Here, I add such a button and also have it open the next dialog as shown in the
following code snippet:
<Control Id="NextButton"
www.it-ebooks.info
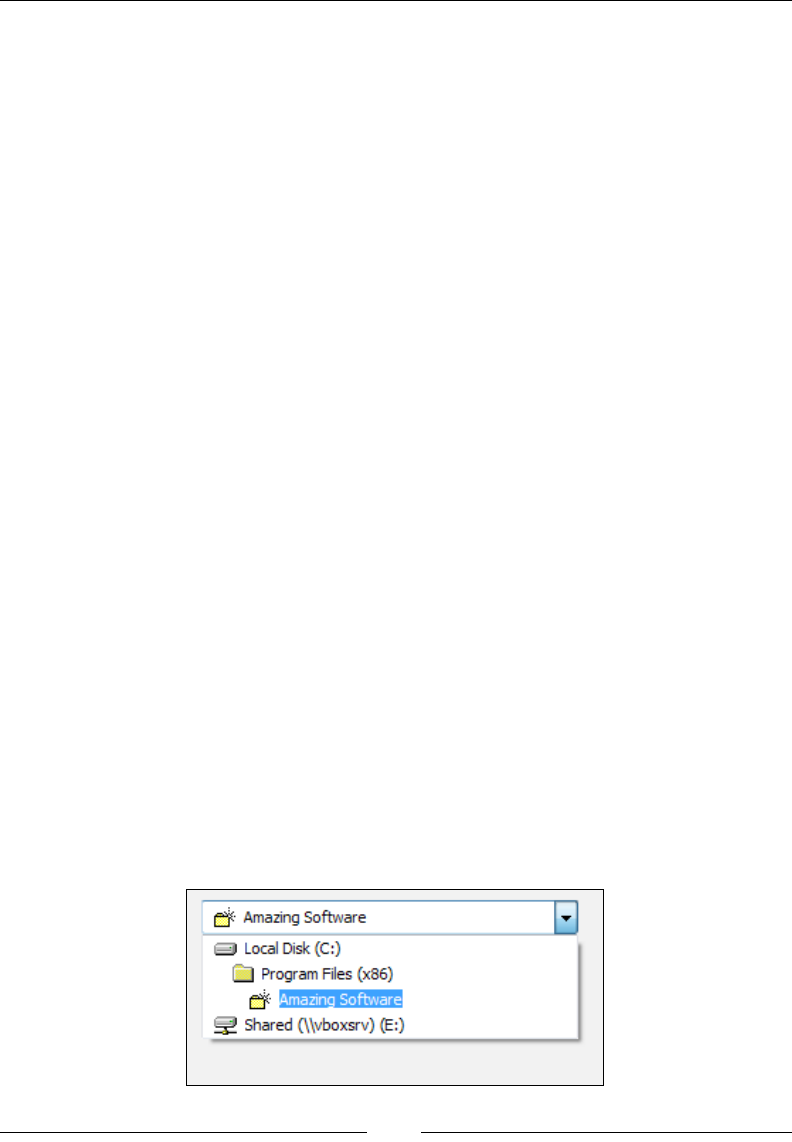
Chapter 7
[ 211 ]
Type="PushButton"
Text="Next"
Height="17"
Width="56"
X="245"
Y="243">
<Publish Event="SetTargetPath"
Value="INSTALLLOCATION"
Order="1">1</Publish>
<Publish Event="NewDialog"
Value="SecondDlg"
Order="2">1</Publish>
</Control>
DirectoryCombo
A DirectoryCombo control displays a drop-down list of directories and drives. You
can use it to show the install directory and other drives it can be changed to. The next
example shows the INSTALLLOCATION directory and any remote and xed drives that
are accessible:
<Control
Id="myDirectoryCombo"
Type="DirectoryCombo"
Property="INSTALLLOCATION"
Fixed="yes"
Remote="yes"
X="10"
Y="10"
Width="200"
Height="100" />
Here's the result:
www.it-ebooks.info
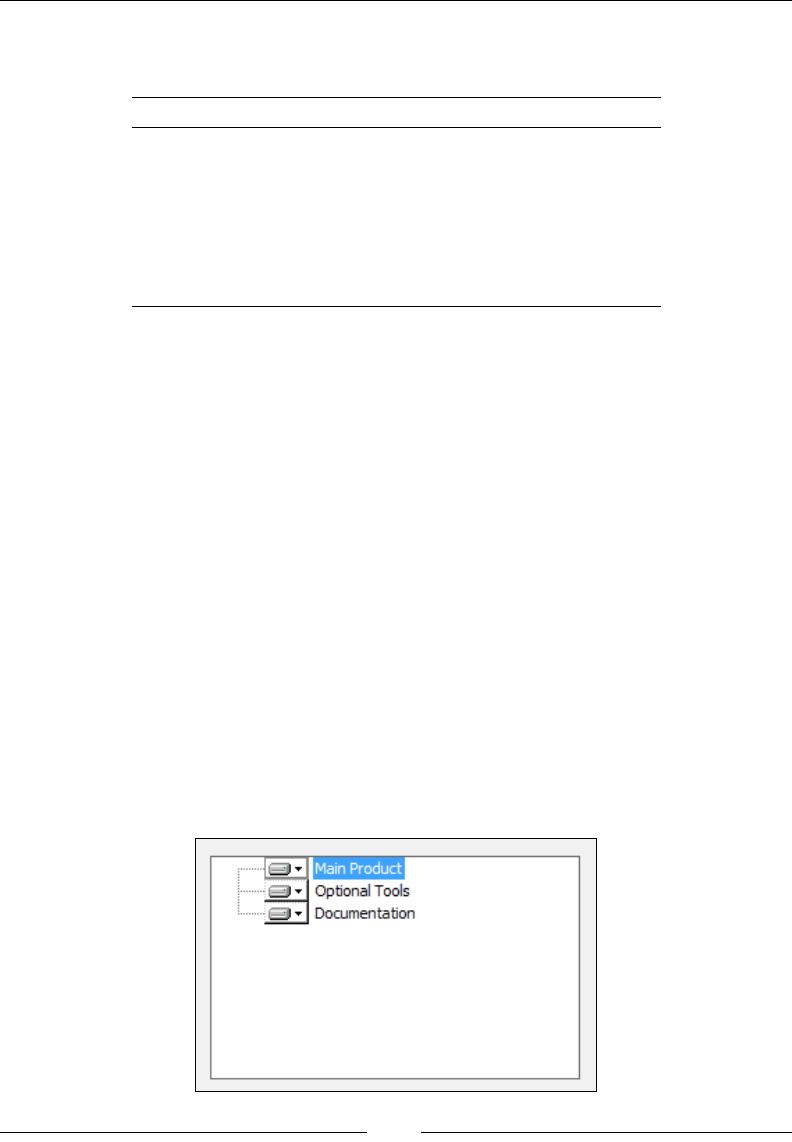
Using UI Controls
[ 212 ]
This example displays the available xed (otherwise known as internal) and remote
drives. The following table explains all of your options:
Attribute Description
Fixed Lists the fixed internal hard drives.
Remote Lists the remote volumes.
Removable Lists the removable drives.
CDROM Lists the CD-ROM volumes.
Floppy Lists the floppy drives.
RAMDisk Lists the RAM disks.
A DirectoryCombo control by itself cannot drill down into drives and their
directories. Therefore, it works best when paired with another control that
can, such as a DirectoryList.
SelectionTree
A SelectionTree displays a tree of the features dened in your installer. The user
can use this to include or exclude certain features at install time. Be sure to add the
Property attribute to the Control element, specifying your main install directory.
<Control
Id="MySelectionTree"
Type="SelectionTree"
Property="INSTALLLOCATION"
X="10"
Y="30"
Width="200"
Height="120" />
Here is what it looks like:
www.it-ebooks.info
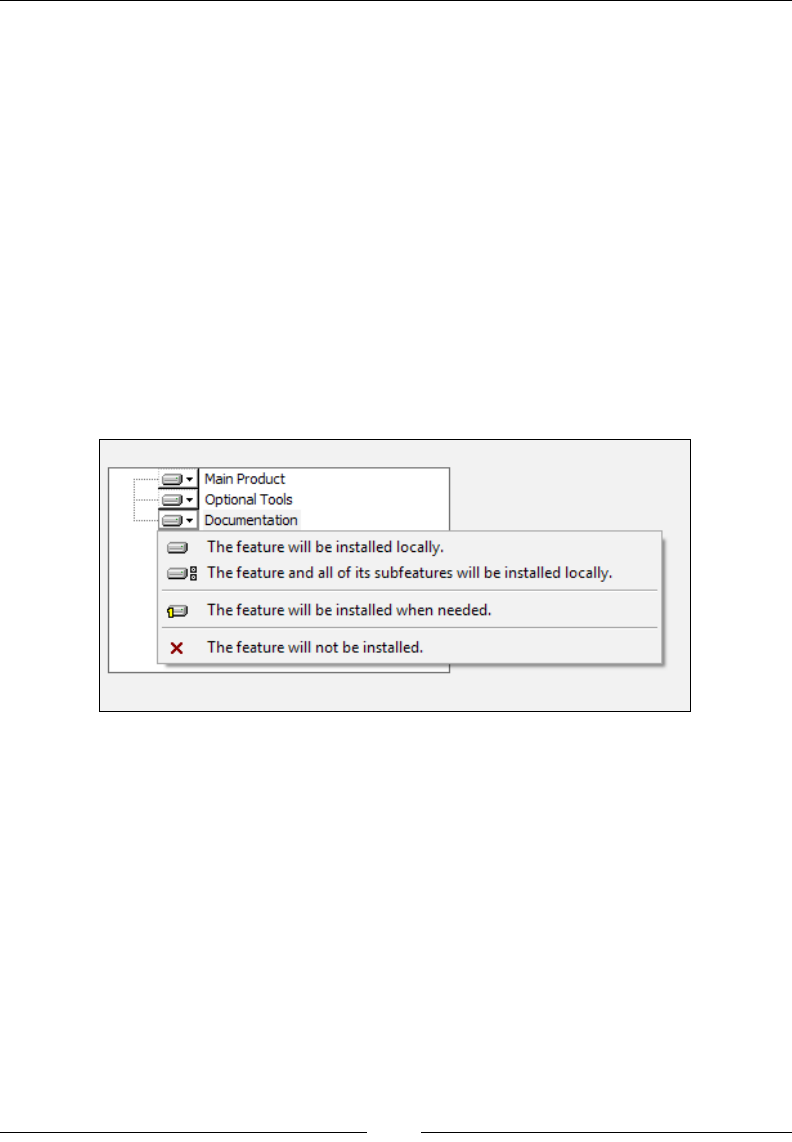
Chapter 7
[ 213 ]
When you click on one of the features you're given the option to install it locally,
install it as an advertised feature, or to not install it. The text for these options has
to be dened by the UIText elements inside the UI element. Dene the following
elements: MenuLocal, MenuAllLocal, MenuAdvertise, and MenuAbsent:
<UIText Id="MenuLocal">The feature will be installed locally.</UIText>
<UIText Id="MenuAllLocal">The feature and all of its subfeatures will
be installed locally.</UIText>
<UIText Id="MenuAdvertise">The feature will be installed when
needed.</UIText>
<UIText Id="MenuAbsent">The feature will not be installed.</UIText>
When you click on a feature you'll see these options, as shown in the
following screenshot:
Your Feature elements, dened in your main .wxs le, can use the Description
attribute to show information about what they contain, as in this example:
<Feature Id="ProductFeature"
Title="Main Product"
Level="1"
Description="The main feature for the product">
<ComponentRef Id="cmp_myFile" />
</Feature>
www.it-ebooks.info

Using UI Controls
[ 214 ]
To show this on the dialog that has your SelectionTree, add a Text control
that subscribes to the SelectionDescription event. The Subscribe element's
Attribute must be set to Text. You can also show the size of the feature by
subscribing another Text control to the SelectionSize event.
<Control Id="MySelectionDescription"
Type="Text"
X="220"
Y="30"
Width="100"
Height="30">
<Subscribe Event="SelectionDescription" Attribute="Text" />
</Control>
<Control Id="MySelectionSize"
Type="Text"
X="220"
Y="70"
Width="100"
Height="50">
<Subscribe Event="SelectionSize" Attribute="Text" />
</Control>
When you use SelectionSize, you have to dene a few more UIText elements:
<UIText Id="Bytes">Bytes</UIText>
<UIText Id="KB">KB</UIText>
<UIText Id="MB">MB</UIText>
<UIText Id="GB">GB</UIText>
<UIText Id="SelChildCostPos">Feature will use [1] on your hard
drive.</UIText>
<UIText Id="SelChildCostNeg">Feature will free [1] on your
hard drive.</UIText>
<UIText Id="SelChildCostPending">Figuring space needed for
this feature...</UIText>
www.it-ebooks.info
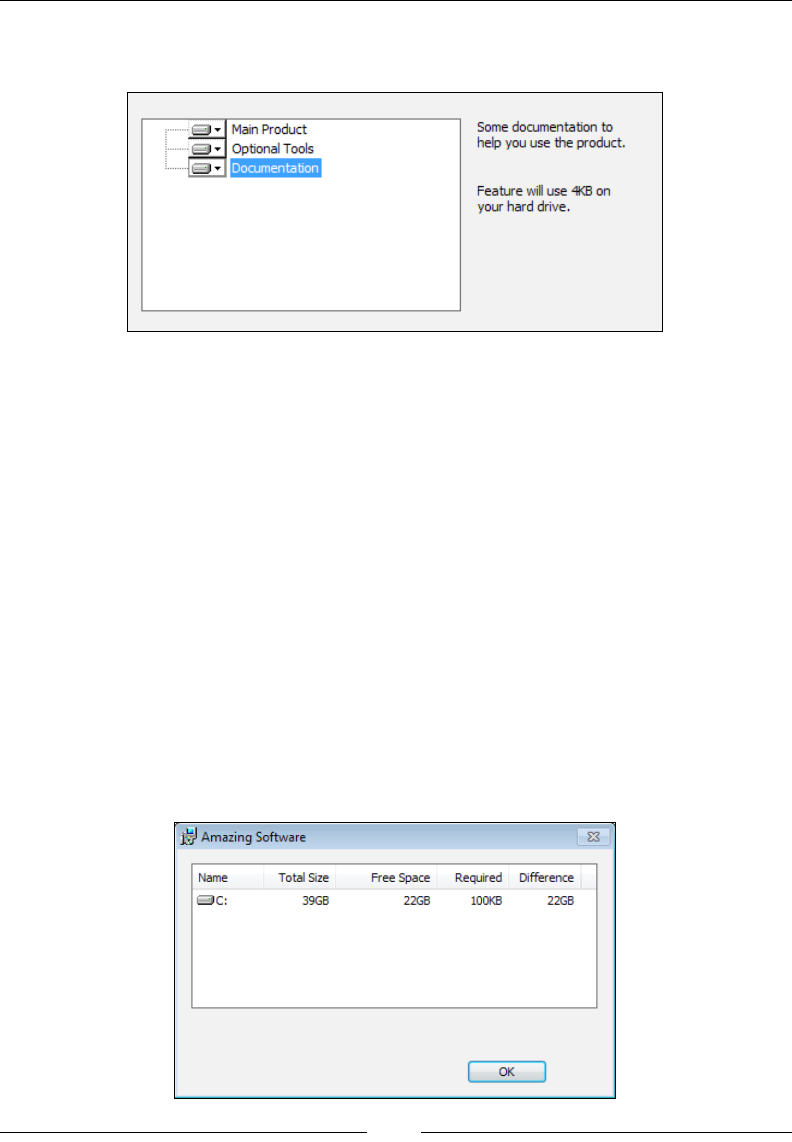
Chapter 7
[ 215 ]
The format for these messages is dened by Windows Installer, which will insert the
applicable value where you've placed [1]. Here's the nal result:
VolumeCostList
A VolumeCostList control displays available hard drives and the amount of disk
space your installation will require on them.
<Control
Id="myVolumeCostList"
Type="VolumeCostList"
Fixed="yes"
Text="{50}{50}{70}{50}{50}"
X="10"
Y="10"
Width="300"
Height="100" />
In this example, we're only showing the space required on the xed drives.
Any of the attributes available to the DirectoryCombo control are also available
to VolumeCostList. The Text attribute sets the widths of each column in
VolumeCostList. Here's what it looks like:
www.it-ebooks.info
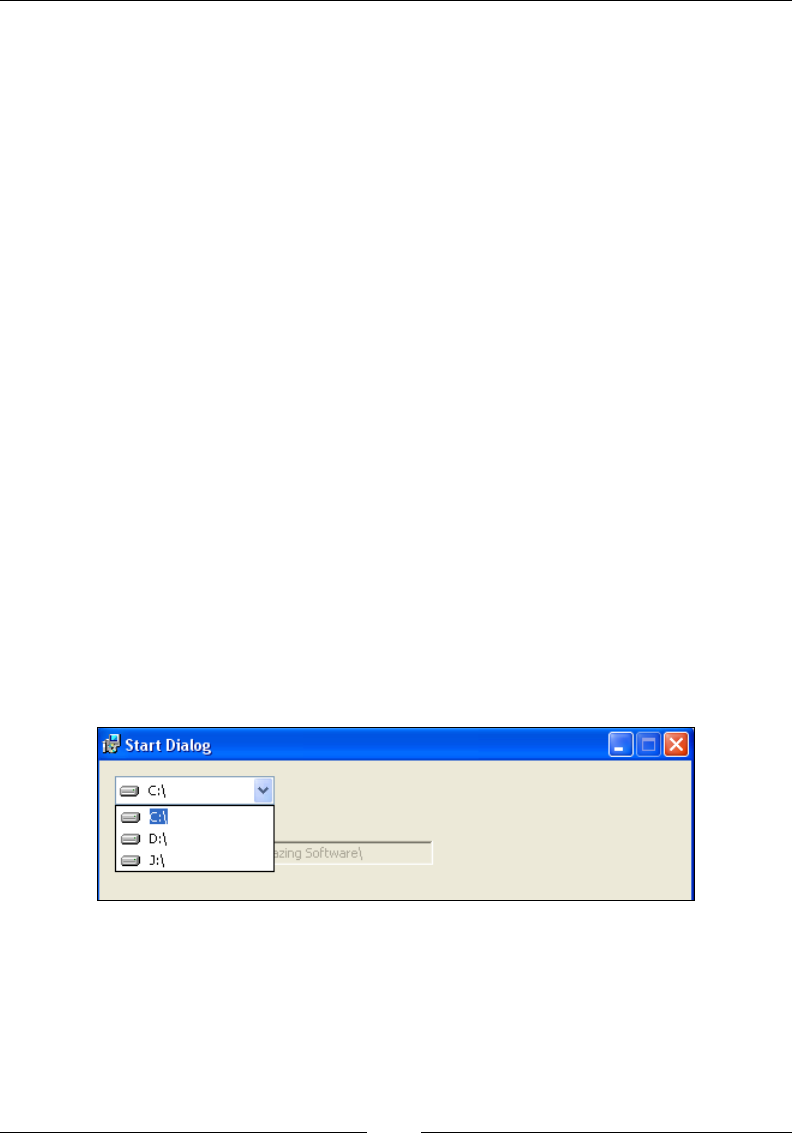
Using UI Controls
[ 216 ]
You'll need to dene the following UIText elements inside the UI element, some of
which are repeats from the SelectionTree control:
<UIText Id="Bytes">Bytes</UIText>
<UIText Id="KB">KB</UIText>
<UIText Id="MB">MB</UIText>
<UIText Id="GB">GB</UIText>
<UIText Id="VolumeCostAvailable">Free Space</UIText>
<UIText Id="VolumeCostDifference">Difference</UIText>
<UIText Id="VolumeCostRequired">Required</UIText>
<UIText Id="VolumeCostSize">Total Size</UIText>
<UIText Id="VolumeCostVolume">Name</UIText>
Typically, this control is shown on a modal window during the installation. The
user may click a button that says something like "Disk Cost" on the main window
and the modal window will be displayed over the top. There's a practical reason for
doing this. If you try to show VolumeCostList too soon, such as on the very rst
dialog, the numbers won't be calculated yet. You'd likely see a column of zeroes in
the Required column. This is because these numbers aren't available until several
properties, including CostingComplete, have been set. This happens during the
costing phase at the beginning of the install.
VolumeSelectCombo
A VolumeSelectCombo control is a drop-down list that shows available drives. Using
the TARGETDIR property, you might use this to change the drive that your les are
installed to. In the following example, I display all xed drives in the list:
www.it-ebooks.info
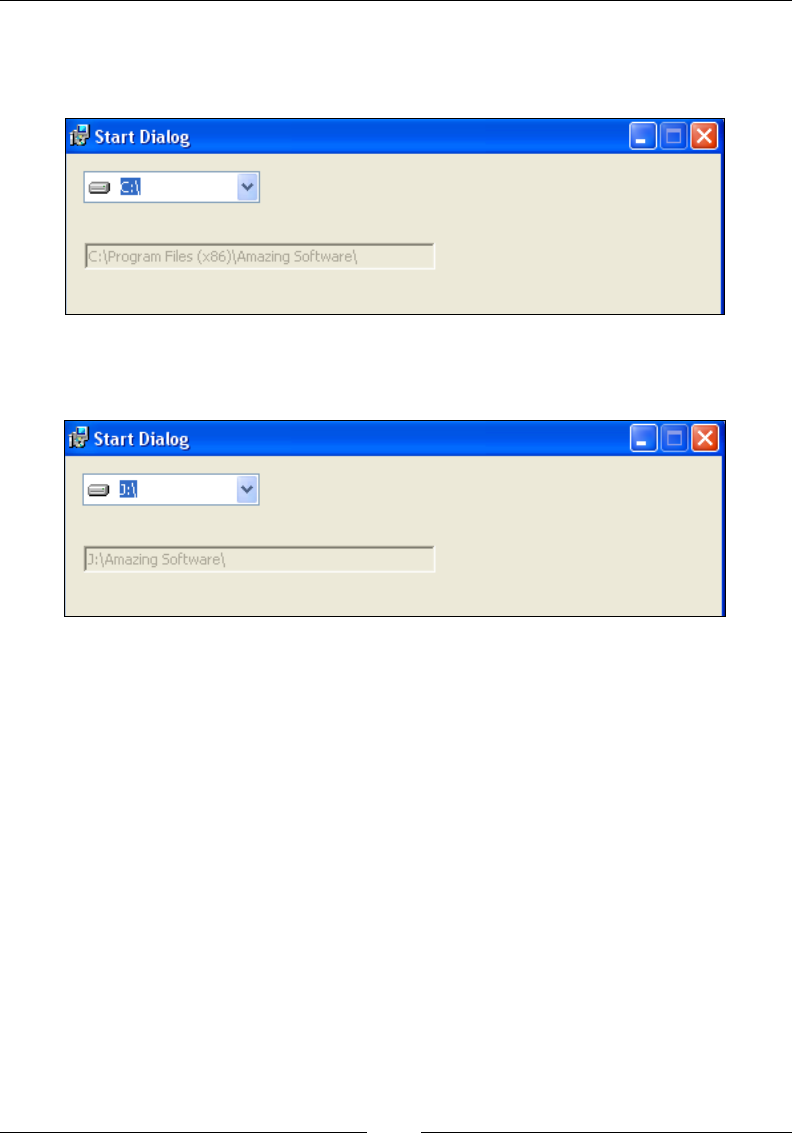
Chapter 7
[ 217 ]
You might pair it with a PathEdit control that shows the user what the install path
is currently set to. If you don't want to let the user edit the PathEdit control, set its
Disabled attribute to yes:
When the user selects a new option, the install path will be changed to use that drive
as shown:
Notice that if they select D:\ or J:\ in this example, we don't target the Program
Files folder as that only exists on the C:\. Instead, we just install to the root folder
of that drive. Here's the control's markup:
<Control
Id="myVolumeSelectCombo"
Type="VolumeSelectCombo"
Property="TARGETDIR"
Fixed="yes"
Remote="yes"
X="10"
Y="10"
Width="100"
Height="17">
<Publish
Property="INSTALLLOCATION"
Value="[ProgramFilesFolder]Amazing Software\"
Order="1">
www.it-ebooks.info

Using UI Controls
[ 218 ]
<![CDATA[TARGETDIR << %SYSTEMDRIVE]]>
</Publish>
<Publish
Property="INSTALLLOCATION"
Value="[TARGETDIR]Amazing Software\"
Order="2">
<![CDATA[NOT (TARGETDIR << %SYSTEMDRIVE)]]>
</Publish>
<Publish Event="SetTargetPath"
Value="INSTALLLOCATION"
Order="3">1</Publish>
</Control>
In the Control element we've set the Type attribute to VolumeSelectCombo, and the
Property to TARGETDIR. By using the Fixed attribute, we're saying we only want to
see that type of drive in the list.
So that we aren't hardcoding C:\ in our conditions, we use the << operator to check
that the left side of the condition starts with the string on the right side. So, we'll be
checking if TARGETDIR starts with %SYSTEMDRIVE, which is the drive letter where the
Program Files folder is stored—usually the C: drive.
The rst Publish element sets the property INSTALLLOCATION to the path
[ProgramFilesFolder]Amazing Software\, but only if the user has selected the
%SYSTEMDRIVE, a.k.a. C:\. The second Publish element is only used if the user has
not chosen the C:\. In that case, we set INSTALLLOCATION to [TARGETDIR]Amazing
Software\, which would be J:\Amazing Software, for example.
The last Publish element calls the SetTargetPath event to save the new install
path to the installation session. Without that, the change wouldn't really be noticed
by the installer.
Billboard
A Billboard control displays a slideshow to entertain the user while the installation
is in progress. Unlike the other controls we've seen, which are shown during the UI
sequence, a Billboard control can only be used during the deferred stage of the
Execute sequence. Therefore, you'll need to place it on a "Modeless" dialog shown at
the end of your wizard, just like the progress dialog we saw in the last chapter.
www.it-ebooks.info

Chapter 7
[ 219 ]
Remember, to create this type of dialog, set the Dialog element's Modeless attribute
to yes:
<Wixxmlns="http://schemas.microsoft.com/wix/2006/wi">
<Fragment>
<UI>
<Dialog Id="BillboardDlg"
Width="370"
Height="270"
Title="Amazing Software"
NoMinimize="no"
Modeless="yes">
<!--Our Billboard will go here-->
</Dialog>
<InstallUISequence>
<Show Dialog="BillboardDlg" After="InstallDlg" />
</InstallUISequence>
</UI>
</Fragment>
</Wix>
We've set up a new dialog called BillboardDlg and set it to be shown after
InstallDlg. This will allow it to stay up as the installer enters the Execute phase.
Remember to add a DialogRef element to this dialog in InstallDlg:
<DialogRef Id="BillboardDlg" />
Now to add our Billboard control: Add a Control element of Type set to
Billboard inside your new dialog and have it subscribe to the SetProgress event.
This allows it to change its picture as the install progresses. Make sure that the
Control element's Width and Height attributes are big enough for your images to t
into. In this example, the image will ll the entire space of the dialog:
<Dialog Id="BillboardDlg"...>
<Control Id="MyBillboard"
Type="Billboard"
X="0"
Y="0"
Height="270"
Width="370">
<Subscribe Event="SetProgress" Attribute="Progress" />
</Control>
</Dialog>
www.it-ebooks.info

Using UI Controls
[ 220 ]
To set the images to display on the billboard, add Binary elements that point to your
image les:
<Binary Id="Billboard1" SourceFile="BillboardImage1.jpg" />
<Binary Id="Billboard2" SourceFile="BillboardImage2.jpg" />
<Binary Id="Billboard3" SourceFile="BillboardImage3.jpg" />
Next, add a BillboardAction element inside the UI element. Its Id attribute
will determine during which Execute standard action the billboards will be shown.
For example, BillboardAction will be displayed during the InstallFiles action.
Here, we've scheduled two billboards to be displayed while InstallFiles is
happening. However, we can add more within that same BillboardAction and
they will be shown in sequence:
<BillboardAction Id="InstallFiles">
<Billboard Id="BB1" Feature="ProductFeature">
<Control Id="InstallFilesBillboard1"
Type="Bitmap"
X="0"
Y="0"
Height="270"
Width="370"
Text="Billboard1" />
</Billboard>
<Billboard Id="BB2" Feature="ProductFeature">
<Control Id="InstallFilesBillboard2"
Type="Bitmap"
X="0"
Y="0"
Height="270"
Width="370"
Text="Billboard2" />
</Billboard>
</BillboardAction>
The Billboard element inside BillboardAction contains a Bitmap control
that points to the image to display. You can think of this as being one slide in the
slideshow. By adding more Billboard elements, we get more slides—but only during
the InstallFiles action in this case. To cover other actions, you'll need to add more
BillboardAction elements. The result is shown in the following screenshot:
www.it-ebooks.info
Chapter 7
[ 221 ]
The Billboard element's Feature attribute tells the installer to only show this set
of slides if that feature is being installed. The Bitmap control inside sets its X and
Y attributes to 0 to line it up with the top-left corner of the Billboard control. It's
possible to have one Billboard element contain multiple controls, such as Text
controls positioned over Bitmap controls. This would give you a layered effect of text
and images.
Often, it takes a moment for anything in your billboard to be displayed because the
Execute sequence rst runs through its immediate phase, gathering information
before proceeding to the deferred stage. During this immediate phase, your billboard
won't be displayed. For that reason, you may decide to add a Bitmap control or some
text that is displayed from the very start. This will be replaced by the billboard when
it's ready. The Bitmap control can be positioned in the same spot as where your
Billboard will go:
<Dialog Id="BillboardDlg" ...>
<Control Id="StartingBillboard"
Type="Bitmap"
X="0"
Y="0"
Height="200"
Width="300"
Text="Billboard1" />
www.it-ebooks.info
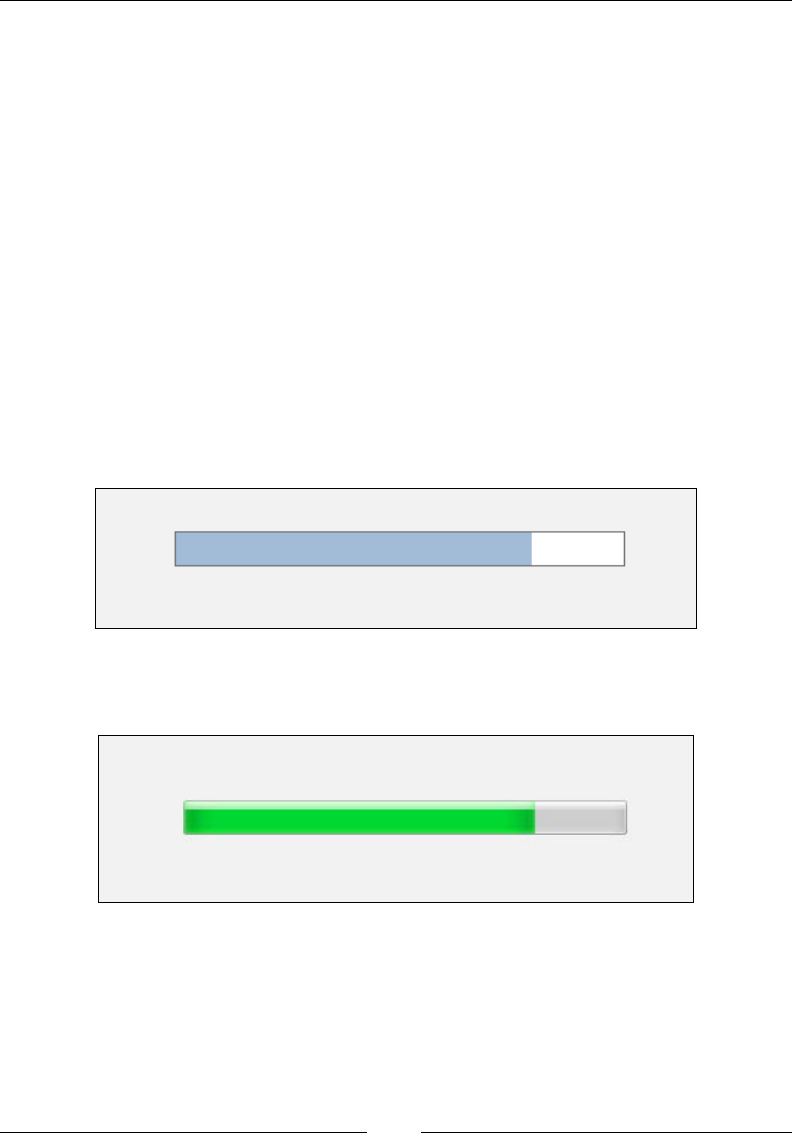
Using UI Controls
[ 222 ]
ProgressBar
A ProgressBar control is a bar that incrementally lls with tick marks to illustrate
the installation's progress. Like the Billboard control, a ProgressBar control
should appear on a modeless dialog that's sequenced as the last dialog during the
UI phase. That way, it can remain up during the Execute sequence and show the
progress of the deferred stage. The markup looks like the following code snippet:
<Control Id="MyProgressBar"
Type="ProgressBar"
X="50"
Y="150"
Width="250"
Height="20">
<Subscribe Event="SetProgress" Attribute="Progress" />
</Control>
This control should subscribe to the SetProgress event so that it can update itself as
the install continues. It looks like the following screenshot:
If you set the ProgressBlocks attribute to yes the look changes, as shown in the
following screenshot:
www.it-ebooks.info

Chapter 7
[ 223 ]
It's possible to reset and increment a ProgressBar control from a C# custom
action. This is done by using the Session object's Message method. This method can
accept a variety of message types, including a progress message. We'll use a Record
object, which is a type of collection, to set our message. You can nd documentation
about setting Record objects at http://msdn.microsoft.com/en-us/library/
aa370354%28VS.85%29.aspx. The following code, where the rst value in the record
is 0, resets the ProgressBar control:
private static void ResetProgress(Session session)
{
Record record = new Record(4);
record[1] = "0"; // "Reset" message
record[2] = "1000"; // total ticks
record[3] = "0"; // forward motion
record[4] = "0"; // execution is in progress
session.Message(InstallMessage.Progress, record);
}
The Message method sets its type through the InstallMessage enumeration,
which we've set to Progress. To increment the bar a certain number of ticks, set the
record's rst value to 2, and its second to the number of ticks to add:
private static void IncrementProgress(
Session session, int ticks)
{
Record record = new Record(2);
record[1] = "2"; // "Increment" message
record[2] = ticks.ToString(); // ticks to increment
session.Message(InstallMessage.Progress, record);
}
You could then call these methods in your custom action:
[CustomAction]
public static ActionResultMyCustomAction(Session session)
{
// reset bar
ResetProgress(session);
//do some stuff for the custom action...
//add 100 tick marks
www.it-ebooks.info

Using UI Controls
[ 224 ]
IncrementProgress(session, 100);
returnActionResult.Success;
}
If you'd rather have things happen more or less on their own without you having
to specify each time how many tick marks to add, then we'll need to do things
differently. This other way goes hand-in-hand with displaying info about what's
happening in a Text control above the ProgressBar control.
First, add a Text control to your dialog that subscribes to the ActionData event:
<Control Id="InfoText"
Type="Text"
X="50"
Y="130"
Width="250"
Height="17">
<Subscribe Event="ActionData" Attribute="Text" />
</Control>
<Control Id="MyProgressBar"
Type="ProgressBar"
X="50"
Y="50"
Width="250"
Height="20">
<Subscribe Event="SetProgress" Attribute="Progress" />
</Control>
This new control will display messages about what's going on at any point
during the install. To get a message about your custom actions to show up, add a
ProgressText element to your dialog, inside the UI element:
<ProgressText Action="MyCustomAction"
Template="Doing Stuff: [1]" />
Its Action attribute tells the installer when to show this message (during which
action) and Template is what to display. The [1] in the template is where your
messages will ll in as your custom action executes.
Now, at the beginning of your custom action, set up how many tick marks to add for
each update you send. The following is a method that does that:
private static void NumberOfTicksPerActionData(
Session session, int ticks)
www.it-ebooks.info

Chapter 7
[ 225 ]
{
Record record = new Record(3);
record[1] = "1"; // Bind progress bar to progress messages
record[2] = ticks.ToString(); // ticks to add each time
record[3] = "1"; // enable
session.Message(InstallMessage.Progress, record);
}
The next method we create will do two things: display a message in the Text control
and increment the ProgressBar control:
private static void DisplayActionData(
Session session, string message)
{
Record record = new Record(1);
record[1] = message;
session.Message(InstallMessage.ActionData, record);
}
Here's a custom action that illustrates how they're used. So that you have time to
see the messages get displayed, we'll have the code sleep for two seconds between
each update:
[CustomAction]
public static ActionResultMyCustomAction(Session session)
{
ResetProgress(session);
NumberOfTicksPerActionData(session, 100);
DisplayActionData(session, "Sleeping for two seconds...");
System.Threading.Thread.Sleep(2000);
DisplayActionData(session, "Sleeping two more seconds...");
System.Threading.Thread.Sleep(2000);
DisplayActionData(session, "This is my third message");
System.Threading.Thread.Sleep(2000);
returnActionResult.Success;
}
www.it-ebooks.info
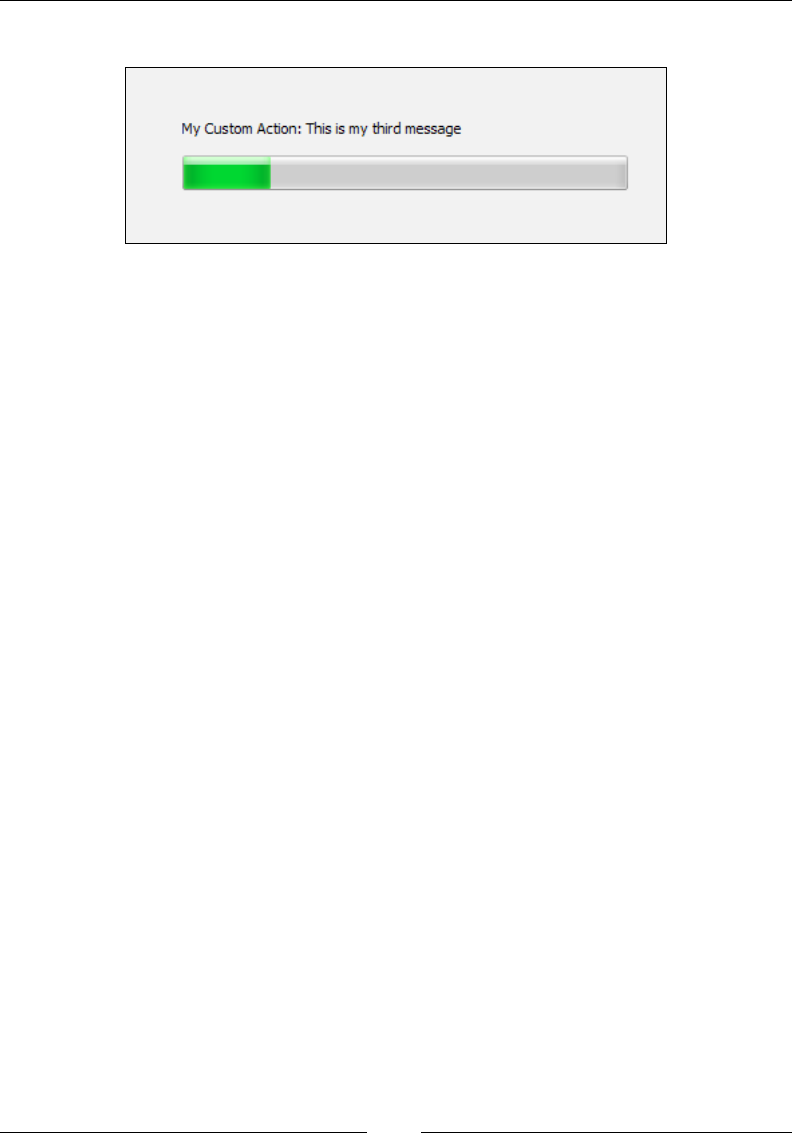
Using UI Controls
[ 226 ]
Here's the result:
Summary
In this chapter, we discussed all of the available controls that you can use on your WiX
dialogs. They range from simple lines and buttons to progress bars and billboards.
With this knowledge, you can either create your own dialogs from scratch or add new
controls to the dialogs that come with the WiX toolset's WixUIExtension library.
In the next chapter, we'll dig into the meaning of control events. These are used
to subscribe a control to a particular Windows Installer event or to have a control
publish one itself.
www.it-ebooks.info

Tapping into Control Events
Windows Installer denes a limited number of events that your UI controls can
listen out for or trigger. For example, a progress bar can listen for actions that say
progress has taken place, and then react by showing more ticks. Or, a button can
trigger an action that closes the current window. Listening for an event is known as
subscribing and triggering one is known as publishing.
Because these events happen within the Control elements they're known as Control
Events. We've covered several examples of control events already in Chapter 7, Using
UI Controls, but we'll cover others that you haven't seen and show how the whole
process works. In this chapter, we will:
• Use the Publish and Subscribe elements to connect to events
• Get some hands-on experience with both types
Publishing control events
To trigger an event, nests a Publish element inside a Control element. The Event
attribute identies the action that you want to publish and the Value attribute sets
the required argument for that action. For example, to cause a PushButton control
to open a new modal window, add a Publish element inside it that species the
SpawnDialog event with Value set to the name of the dialog to open, as in the
following snippet:
<Control Id="ShowPopupButton"
Type="PushButton"
Text="Show Popup"
Height="17"
Width="56"
X="245"
Y="243"
www.it-ebooks.info
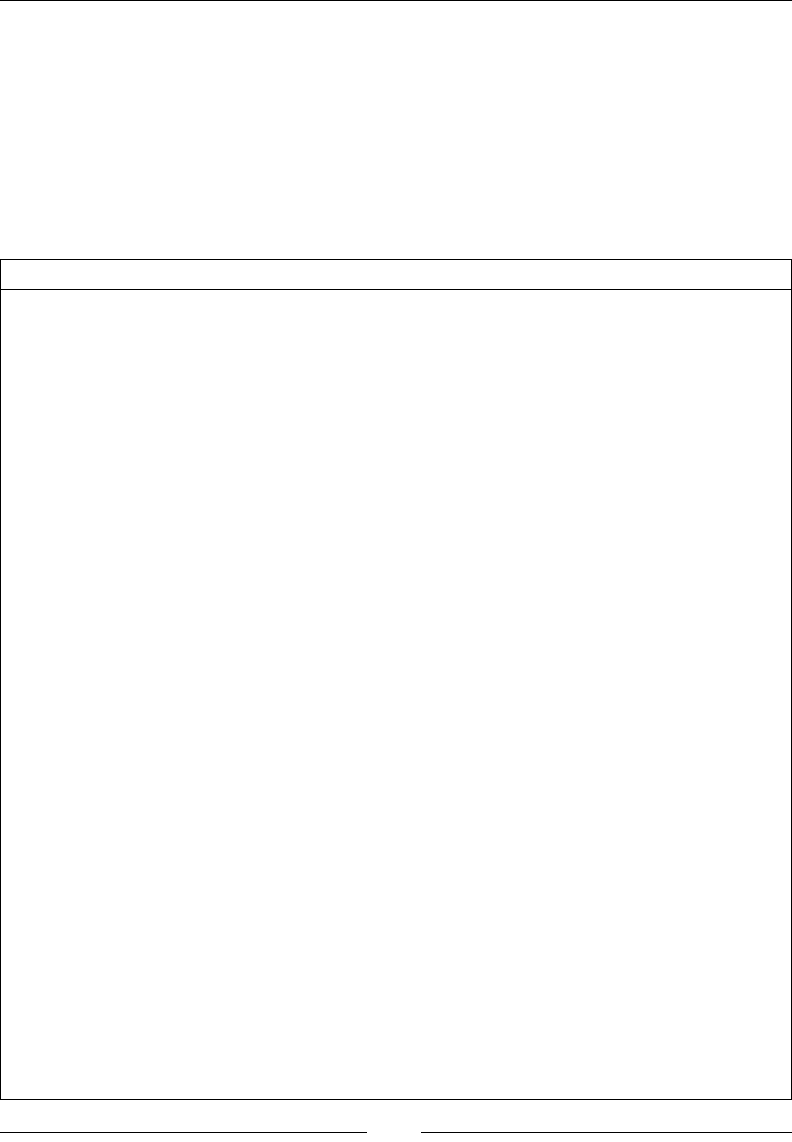
Tapping into Control Events
[ 228 ]
Default="yes">
<Publish Event="SpawnDialog"
Value="PopupDlg" />
</Control>
You'll nd that different events require different arguments in the Value attribute.
Here, Value takes the ID of the Dialog element you want to open. Also, only certain
events can be published by certain controls. The following table lists the events that
can be published and which controls can use them:
Event Used by What it does
AddLocal PushButton
CheckBox
SelectionTree
Sets which features to install
locally.
AddSource PushButton
CheckBox
SelectionTree
Sets which features to install
and run from source.
CheckExistingTargetPath PushButton
SelectionTree
Checks if an existing path,
given in Value, can be written
to.
CheckTargetPath PushButton
SelectionTree
Given a file path via the Value
attribute, checks if it's a valid
path.
DirectoryListNew PushButton Creates a new folder in a
DirectoryList control.
Value set to 0.
DirectoryListOpen PushButton Selects a folder in a
DirectoryList control.
Value set to 0.
DirectoryListUp PushButton Moves up one directory in
a DirectoryList control.
Value set to 0.
DoAction PushButton
CheckBox
SelectionTree
Executes the custom action
specified by Value.
EnableRollback PushButton
SelectionTree
Turns rollback on or off,
depending on if Value is True
or False.
EndDialog PushButton
SelectionTree
Closes the current dialog
window. Value can be exit,
retry, ignore, or return.
www.it-ebooks.info
Chapter 8
[ 229 ]
Event Used by What it does
NewDialog PushButton
SelectionTree
Closes current dialog and
shows dialog specified by
Value.
Reinstall PushButton
SelectionTree
Sets which features to
re-install.
ReinstallMode PushButton
SelectionTree
Specifies a string defining the
type of re-install to do.
Remove PushButton
CheckBox
SelectionTree
Sets which features to remove.
Reset PushButton
SelectionTree
Undoes any changes on
controls on the current
window. Value set to 0.
SelectionBrowse PushButton Spawns a Browse dialog.
SetInstallLevel PushButton
SelectionTree
Sets an integer that defines the
install level for features.
SetTargetPath PushButton
SelectionTree
Sets the selected path.
Value set to the Directory
element's Id attribute.
SpawnDialog PushButton
SelectionTree
Displays the modal dialog
window specified by Value.
SpawnWaitDialog PushButton
SelectionTree
Displays a dialog while a
condition is false.
ValidateProductID PushButton
SelectionTree
Validates the ProductID
property.
It's possible to stack several Publish elements inside a single control. This, of course,
will cause several events to re. As a contrived example, let's say that when we
clicked a button we wanted to re a custom action before moving to the next dialog.
We could publish the DoAction event to execute the custom action and then publish
NewDialog to navigate to the next dialog. Use the Order attribute to set which event
occurs rst.
www.it-ebooks.info

Tapping into Control Events
[ 230 ]
Something else to watch out for: if you have more than one Publish event, they
must have conditional statements as their inner text. Otherwise, all of the events
simply won't be published. In the next example, our condition is simply 1, which will
always be true. The inner text is the place to perform real conditional rules though,
such as checking that a property has been set. If the rule evaluates to false, the event
won't be published:
<Control Id="Next"
Type="PushButton"
Text="Next"
Height="17"
Width="56"
X="245"
Y="243"
Default="yes">
<Publish Event="DoAction"
Value="MyCustomAction"
Order="1">1</Publish>
<Publish Event="NewDialog"
Value="AnotherDlg"
Order="2">1</Publish>
</Control>
If the MyCustomAction custom action had set a property, we could have evaluated it
in the inner text of the NewDialog event. If the conditional statement then evaluated
to false, the NewDialog event wouldn't be called.
<Control Id="Next"
Type="PushButton"
Text="Next"
Height="17"
Width="56"
X="245"
Y="243"
Default="yes">
<!--Assume MyCustomAction sets SomeProperty-->
<Publish Event="DoAction"
Value="MyCustomAction"
Order="1">1</Publish>
<!--Go to next dialog if SomeProperty equals "abc"-->
www.it-ebooks.info
Chapter 8
[ 231 ]
<Publish Event="NewDialog"
Value="AnotherDlg"
Order="2">SomeProperty = "abc"</Publish>
</Control>
Notice that both Publish elements in this example use an Order attribute, causing
the DoAction event to be called rst.
Subscribing to control events
Some events can't be published, only listened for. In that case, you'll use a Subscribe
element inside a Control element. Like we did when publishing an event, use its
Event attribute to specify the event to listen for, but this time use Attribute to set
the required argument.
The next example shows a ProgressBar control that subscribes to the SetProgress
event. Whenever a standard or custom action noties the installer that progress has
been made, the ProgressBar control will know about it and add more ticks:
<Control Id="MyProgressBar"
Type="ProgressBar"
X="50"
Y="50"
Width="200"
Height="20"
ProgressBlocks="yes">
<Subscribe Event="SetProgress"
Attribute="Progress" />
</Control>
Unlike the Publish element, the Subscribe element can't have a conditional
statement as its inner text. A single control can, however, subscribe to more than one
event. One example is to subscribe a Text control to both the ScriptInProgress and
TimeRemaining events. The rst will display a message while the Execute sequence
is being loaded and the second will show the time left until completion.
The following table lists the events that can be subscribed to and their
required arguments:
Event Used by Attribute argument
ActionData The Text control to show info about
latest action.
Text
ActionText The Text control to show name of
latest action.
Text
www.it-ebooks.info
Tapping into Control Events
[ 232 ]
Event Used by Attribute argument
IgnoreChange DirectoryCombo to not update
itself if folder is highlighted but
not opened in the neighboring
DirectoryList.
IgnoreChange
ScriptInProgress The Text control to show a message
while the Execute sequence loads up.
Visible
SelectionAction The Text control to describe the
highlighted item in a neighboring
SelectionTree.
Text
SelectionDescription The Text control to display the
description of a highlighted feature in
a neighboring SelectionTree.
Text
SelectionNoItems PushButton to disable itself if no
items are present in a neighboring
SelectionTree (Personally, I've
found that this event has no effect).
Enabled
SelectionPath The Text control to display the
path of the highlighted item in a
neighboring SelectionTree.
Works if the item is set to be run from
source.
Text
SelectionPathOn The Text control to display
whether or not there's a path for the
highlighted item in a neighboring
SelectionTree.
Visible
SelectionSize The Text control to display the
size of the highlighted item in a
neighboring SelectionTree.
Text
SetProgress ProgressBar to increment ticks. Progress
TimeRemaining The Text control to display time
remaining for installation.
TimeRemaining
Publish events
In the following sections, we'll take a look at several events that you can publish.
This should give you a good idea about how the Publish element works.
www.it-ebooks.info
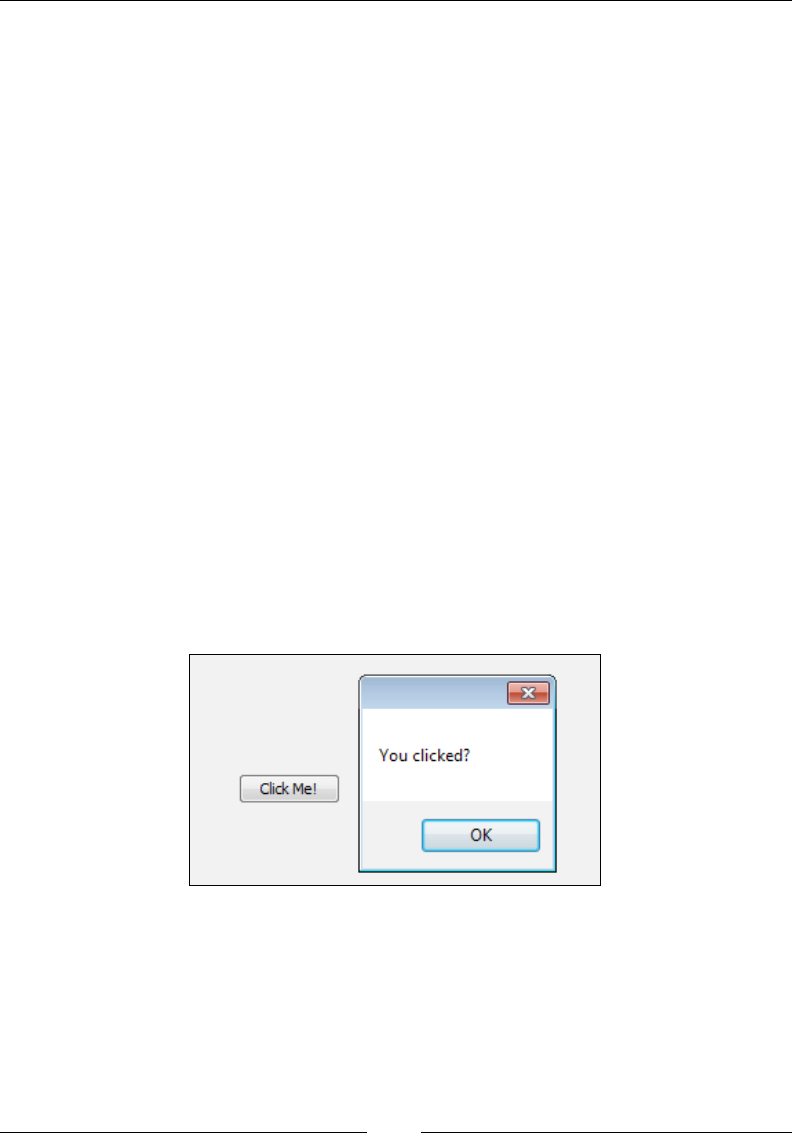
Chapter 8
[ 233 ]
DoAction
The DoAction event calls a custom action that you've declared elsewhere in your
markup. For example, suppose we'd dened a custom action called CA_ShowMessage
that simply displays a message box with the text You clicked?:
<CustomAction Id="CA_ShowMessage"
Script="vbscript"
Execute="immediate">
<![CDATA[msgbox "You clicked?"]]>
</CustomAction>
We could then trigger this action with a PushButton by publishing the DoAction
event with a value of CA_ShowMessage.
<Control Id="DoActionButton"
Type="PushButton"
X="120"
Y="100"
Width="56"
Height="17"
Text="Click Me!">
<Publish Event="DoAction"
Value="CA_ShowMessage" />
</Control>
Clicking on the button will show the following message:
Often, you'll use this technique to validate a property or set one before other events
are triggered. Recall that if you use more than one Publish element inside of a control,
you must add an Order attribute and nest a condition statement inside each one.
www.it-ebooks.info

Tapping into Control Events
[ 234 ]
EndDialog
The EndDialog event, which is used on a PushButton control, is used to close
the current dialog window and can accept one of four values: Exit, Retry, Ignore,
or Return.
In practice, you'll only ever use Exit or Return. The other two are used by the
FilesInUse dialog and don't have much application elsewhere. Exit closes the
current dialog and ends the installation. It's usually used on a Cancel button, as in
this example:
<Control Id="CancelButton"
Type="PushButton"
Text="Exit"
Height="17"
Width="56"
X="180"
Y="243"
Cancel="yes">
<Publish Event="EndDialog"
Value="Exit" />
</Control>
A Value of Return closes the current window, but continues the installation. It's
usually used on an Install button on the last dialog in your UI. You'll also use it to
close modal dialog windows and return control to the parent window. Here's an
example Install button:
<Control Id="InstallButton"
Type="PushButton"
Text="Install"
Height="17"
Width="56"
X="245"
Y="243"
Default="yes">
<Publish Event="EndDialog"
Value="Return" />
</Control>
www.it-ebooks.info

Chapter 8
[ 235 ]
NewDialog
The NewDialog event closes the current window and opens the one specied by the
Value attribute. Typically, you'll use this for Next and Back buttons that move you
from one dialog to another. For example, the following PushButton control opens a
dialog called NextDlg:
<Control Id="NextButton"
Type="PushButton"
Text="Next"
Height="17"
Width="56"
X="180"
Y="243">
<Publish Event="NewDialog"
Value="NextDlg" />
</Control>
This is the perfect place to add a conditional statement so that the user may
see one dialog instead of another depending on the state of some property.
In the next example, if the property USE_SQLSERVER is set, then the dialog
SetSqlCredentialsDlg is shown; otherwise, we show the NoSqlDlg dialog:
<Control Id="NextButton"
Type="PushButton"
Text="Next"
Height="17"
Width="56"
X="180"
Y="243">
<Publish Event="NewDialog"
Value="SetSqlCredentialsDlg"
Order="1">
USE_SQLSERVER
</Publish>
<Publish Event="NewDialog"
Value="NoSqlDlg"
Order="2">
NOT USE_SQLSERVER
</Publish>
</Control>
www.it-ebooks.info

Tapping into Control Events
[ 236 ]
Here, I use a different conditional statement for each Publish element. The rst
evaluates to true only if the USE_SQLSERVER property has been set and the second
only if it hasn't.
AddLocal
The SelectionTree control can be used to show the available features in your install
package, and give the user the ability to select which ones they want. Windows
Installer keeps track of which features to install through the ADDLOCAL property,
which is a comma-delimited list of features to install locally. When it comes to the
SelectionTree control, all of the logic of setting the ADDLOCAL property is handled
for you behind the scenes. However, if you wanted to, you could do away with
SelectionTree and create your own device for including features. For that, you'd
publish the AddLocal control event.
AddLocal, like the property by the same name, can be used to set which features get
installed. You'll set the Publish element's Value attribute to either the Id attribute of
a single Feature element, or the string ALL, which will include all features. You can
publish the event more than once to include additional features.
The next example puts this into action. Two CheckBox controls set properties
indicating a certain feature to be installed. Later, we'll evaluate whether or not these
checkboxes were checked via these properties, and set the value of the AddLocal
event accordingly:
<Control Id="Feat1Box"
Type="CheckBox"
X="20"
Y="120"
Width="75"
Height="10"
Text="Main Product"
Property="MainProductFeatureChecked"
CheckBoxValue="on" />
<Control Id="Feat2Box"
Type="CheckBox"
X="20"
Y="140"
Width="75"
www.it-ebooks.info

Chapter 8
[ 237 ]
Height="10"
Text="Optional Tools"
Property="OptionalToolsFeatureChecked"
CheckBoxValue="on" />
Now, use a PushButton control to trigger the AddLocal event to include only the
features in the install for which a box was checked. We use conditional statements
inside the Publish elements for this:
<Control Id="OKButton"
Type="PushButton"
Text="OK"
Height="17"
Width="56"
X="220"
Y="173">
<Publish Event="Remove"
Value="ALL"
Order="1">1</Publish>
<Publish Event="AddLocal"
Value="ProductFeature"
Order="2">
MainProductFeatureChecked
</Publish>
<Publish Event="AddLocal"
Value="OptionalTools"
Order="3">
OptionalToolsFeatureChecked
</Publish>
<Publish Event="EndDialog"
Value="Return"
Order="4">1</Publish>
</Control>
www.it-ebooks.info
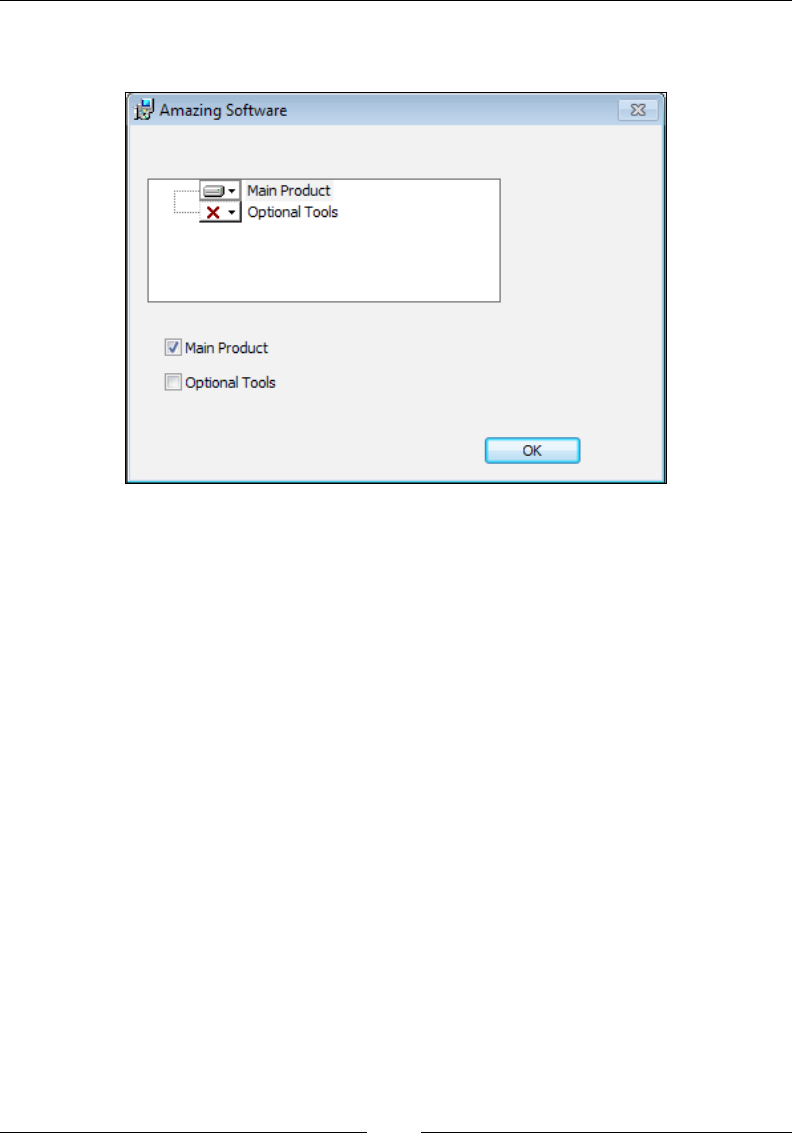
Tapping into Control Events
[ 238 ]
If we add these controls to a modal dialog window, with a SelectionTree control so
that we can see the changes, it would look like the following screenshot:
When you click on the OK button, the checkboxes will be evaluated, the AddLocal
event called, features set, and the window will close. You must re-open the modal
window to see the changes in the SelectionTree control since dialog windows
aren't smart enough to redraw themselves dynamically.
So, what happened? Here's the process in detail:
• The rst Publish element triggers an event called Remove to remove all
features from the install. This gets us to a clean state:
<Publish Event="Remove"
Value="ALL"
Order="1">1</Publish>
• The second Publish element checks if the MainProductFeatureChecked
property has been set and if it has, calls the AddLocal event for the
ProductFeature feature. This adds that feature to the list to install:
<Publish Event="AddLocal"
Value="ProductFeature"
Order="2">
MainProductFeatureChecked
</Publish>
www.it-ebooks.info

Chapter 8
[ 239 ]
• The third Publish element does the same for the OptionalTools feature:
<Publish Event="AddLocal"
Value="OptionalTools"
Order="3">
OptionalToolsFeatureChecked
</Publish>
• The last Publish element calls the EndDialog event with a value of Return,
which closes the modal window:
<Publish Event="EndDialog"
Value="Return"
Order="4">1</Publish>
Publishing a property
There's another event that you can publish, called SetProperty, that's used to
assign a property's value. However, in WiX you won't set it in the normal way, but
rather use the Publish element's Property and Value attributes. For example, the
following is a button that sets the value of a property called MYPROPERTY to 123:
<Control Id="MyButton"
Type="PushButton"
Text="Click me!"
Height="17"
Width="56"
X="50"
Y="50">
<Publish Property="MYPROPERTY"
Value="123">1</Publish>
</Control>
Many of the controls such as Edit, PathEdit, CheckBox, and RadioButton already
have a mechanism for setting a property. However, if you need to set more than one
or set a property with a button, the Publish element provides that capability.
Subscribe events
In the following sections, we'll look at the Subscribe element. We covered
several subscribable control events in the last chapter, including those used by the
SelectionTree and ProgressBar. We'll take a look at some others that we missed.
www.it-ebooks.info
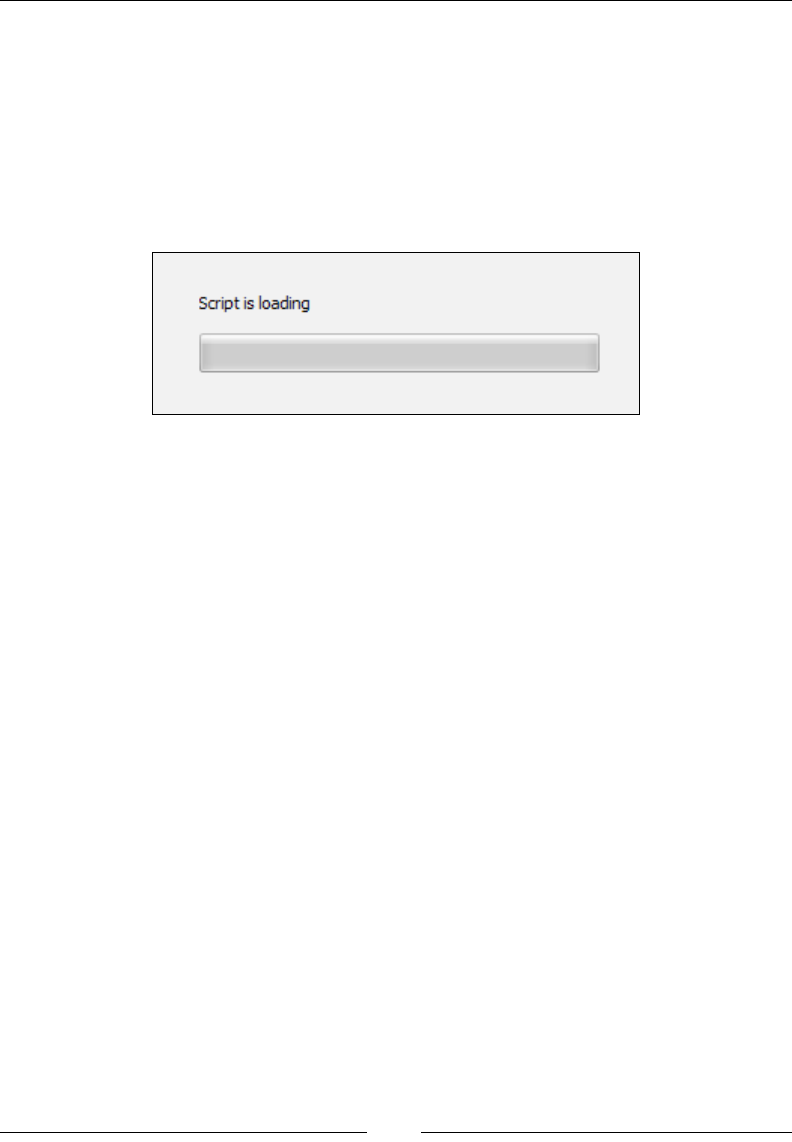
Tapping into Control Events
[ 240 ]
ScriptInProgress
You can subscribe a Text control to the ScriptInProgress event so that its text
is only shown during the "immediate" phase of InstallExecuteSequence. This
is when that sequence prepares itself for its "deferred" stage by creating a rollback
script containing all of the actions it will need to perform.
You'd use this technique on a progress bar dialog. As you can see in the following
example, all it does is show some text telling the user that things are gearing up:
Here, we have a dialog called ProgressDlg that is shown during
InstallExecuteSequence. It contains the following markup:
<?xml version="1.0" encoding="UTF-8"?>
<Wix xmlns="http://schemas.microsoft.com/wix/2006/wi">
<Fragment>
<UI>
<Dialog Id=»ProgressDlg»
Width="370"
Height="270"
Title="Awesome Software"
Modeless="yes">
<Control Id="CancelButton"
Type="PushButton"
TabSkip="no"
Text="Cancel"
Height="17"
Width="56"
X="180"
Y="243"
Cancel="yes">
<Publish Event="EndDialog" Value="Exit" />
www.it-ebooks.info

Chapter 8
[ 241 ]
</Control>
<Control Id="MyProgressBar"
Type="ProgressBar"
X="70"
Y="150"
Width="200"
Height="20"
ProgressBlocks="yes">
<Subscribe Event="SetProgress"
Attribute="Progress" />
</Control>
<Control Id="InfoText"
Type="Text"
X="70"
Y="130"
Width="200"
Height="17"
Text="Script is loading">
<Subscribe Event="ScriptInProgress"
Attribute="Visible" />
</Control>
</Dialog>
<InstallUISequence>
<Show Dialog="ProgressDlg"
Before="ExecuteAction" />
</InstallUISequence>
</UI>
</Fragment>
</Wix>
The control named InfoText on ProgressDlg subscribes to the ScriptInProgress
event. Attribute is set to Visible. Even though we're using a Text control to
subscribe to this event, it only works if there's a ProgressBar control nearby. This is
often the case with the Subscribe element. There must be a neighboring control that
gives the event its meaning.
www.it-ebooks.info
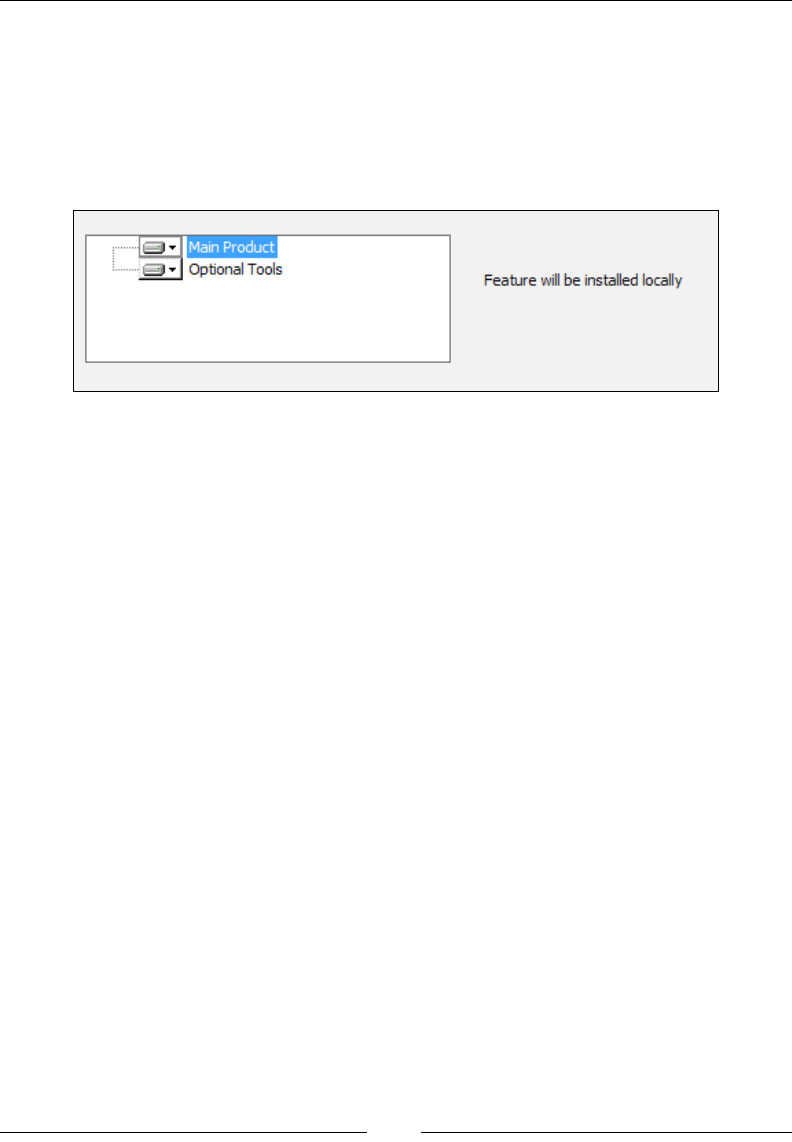
Tapping into Control Events
[ 242 ]
SelectionAction
The SelectionAction event is used by a Text control to display the current action
state of the highlighted feature in a neighboring SelectionTree. In the following
example, a feature called Main Product has been set to be installed locally. A Text
control to the right displays the message Feature will be installed locally. It subscribes
to SelectionAction:
The rst thing to do is add three new UIText elements inside the UI element on your
dialog. These should have the following Id values:
• SelAbsentLocal
• SelAbsentAdvertise
• SelAbsentAbsent
These will contain the generic text to display as the user changes the action state of a
feature. We can set them as follows:
<UIText Id="SelAbsentLocal">
Feature will be installed locally
</UIText>
<UIText Id="SelAbsentAdvertise">
Feature will be installed as advertised
</UIText>
<UIText Id="SelAbsentAbsent">
Feature will not be installed
</UIText>
Our Text control, which must be on the same dialog as SelectionTree, subscribes
to SelectionAction, and sets the Subscribe element's Attribute to Text, as in the
following code:
<Control Id="SelectionAction"
Type="Text"
www.it-ebooks.info
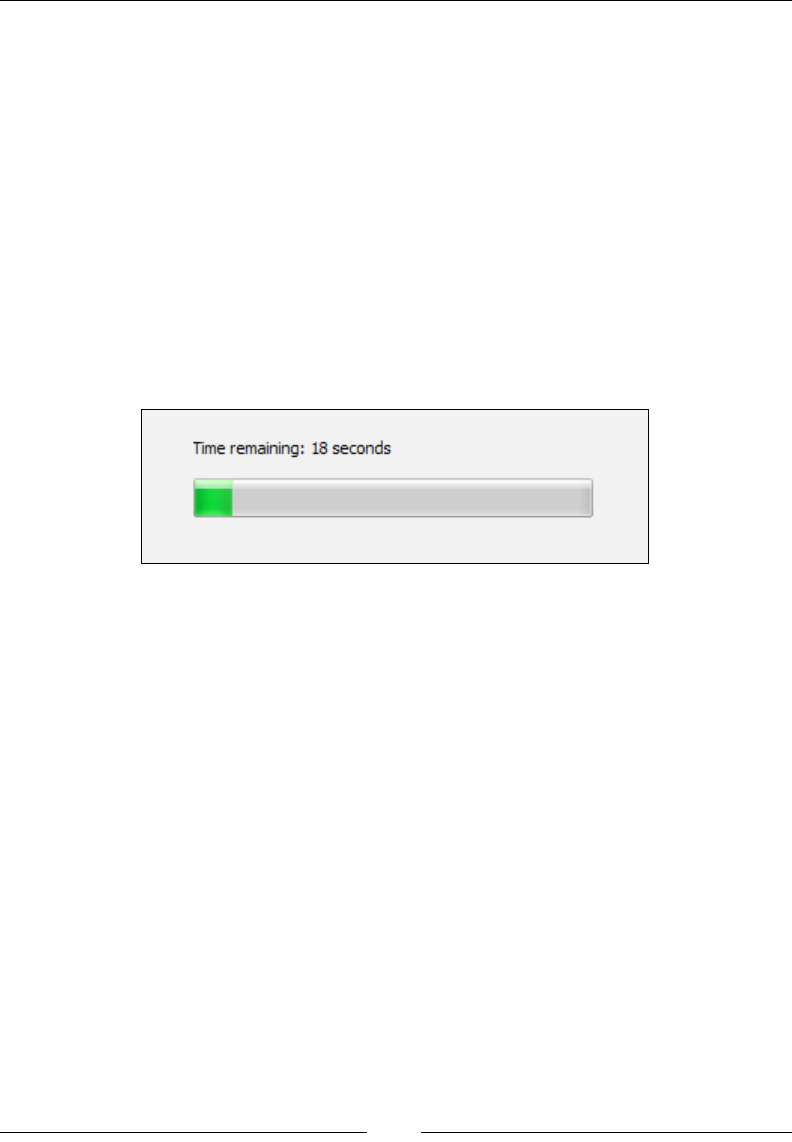
Chapter 8
[ 243 ]
X="210"
Y="40"
Height="50"
Width="150">
<Subscribe Event="SelectionAction"
Attribute="Text" />
</Control>
As the user changes a feature's inclusion in the SelectionTree control, the text will
change to reect the new status.
TimeRemaining
The TimeRemaining event allows you to display the time left before the installation
is complete. It looks like the following screenshot:
You'll need to add a UIText element with an Id attribute of TimeRemaining and
inner text dening the text to show. It should follow this format:
<UIText Id="TimeRemaining">
<![CDATA[Time remaining: {[1] minutes }{[2] seconds}]]>
</UIText>
The inner text denes a template in which the minutes and seconds of the remaining
time are shown. As you can see, if there is less than a minute of time left, only the
seconds will be shown. Next, add a Text control that subscribes to the TimeRemaining
event. Its Publish element should set Attribute to TimeRemaining too:
<Control Id="TimeRemaining"
Type="Text"
X="70"
Y="130"
Width="200"
Height="17">
<Subscribe Event="TimeRemaining"
Attribute="TimeRemaining" />
</Control>
www.it-ebooks.info

Tapping into Control Events
[ 244 ]
The standard actions in InstallExecuteSequence don't publish any TimeRemaining
data. So, to see the effect, you'll have to publish it yourself from a custom action. Add a
new C# custom action project to your solution and add the following code to it:
namespace CustomAction1
{
usingMicrosoft.Deployment.WindowsInstaller;
public class CustomActions
{
[CustomAction]
public static ActionResult ShowTime(Session session)
{
ResetProgress(session);
NumberOfTicksPerActionData(session, 100);
DisplayActionData(session, "Message 1");
System.Threading.Thread.Sleep(2000);
DisplayActionData(session, "Message 2");
System.Threading.Thread.Sleep(2000);
DisplayActionData(session, "Message 3");
System.Threading.Thread.Sleep(2000);
returnActionResult.Success;
}
private static void ResetProgress(Session session)
{
Record record = new Record(4);
record[1] = "0";
record[2] = "1000";
record[3] = "0";
record[4] = "0";
session.Message(InstallMessage.Progress, record);
}
private static void NumberOfTicksPerActionData(
Session session, int ticks)
{
Record record = new Record(3);
record[1] = "1";
record[2] = ticks.ToString();
record[3] = "1";
www.it-ebooks.info

Chapter 8
[ 245 ]
session.Message(InstallMessage.Progress, record);
}
private static void DisplayActionData(
Session session, string message)
{
Record record = new Record(1);
record[1] = message;
session.Message(InstallMessage.ActionData, record);
}
}
}
This sets up a custom action called ShowTime and three methods to support
it. The rst, ResetProgressBar, resets the ticks in the ProgressBar control to
zero and sets up how many tick marks there should be in total. The second,
NumberOfTicksPerActionData, sets up how many ticks to add for each action
performed. The third, DisplayActionData, shows a message that any controls
subscribing to the ActionData event will pick up. The TimeRemaining event uses all
of this information to gauge how much time it should allot for this custom action.
When you add this custom action to the deferred stage of InstallExecuteSequence,
you'll see that our Text control that's monitoring the TimeRemaining event will
update itself with the approximate time left. Here's the markup to add to your
main .wxs le to include this new custom action, assuming the C# project is named
CustomAction1:
<Binary Id="CA_DLL"
SourceFile="CustomAction1.CA.dll" />
<CustomAction Id="CA_ShowTime"
BinaryKey="CA_DLL"
DllEntry="ShowTime"
Execute="deferred"
Return="check" />
<InstallExecuteSequence>
<Custom Action="CA_ShowTime"
After="InstallInitialize">NOT Installed</Custom>
</InstallExecuteSequence>
www.it-ebooks.info

Tapping into Control Events
[ 246 ]
Summary
In this chapter, we looked at the Publish and Subscribe elements that are used to
trigger and listen for control events. Knowing the exact arguments to use for each
event can be tricky, so be sure to consult the Windows Installer SDK to get specics.
Probably one of the most powerful events is DoAction, which lets you publish your
own custom action. Pairing this with the ability to stack several events inside one
control and to set the order in which they're called gives you quite a bit of power.
In the next chapter, we will explore the WiX command line. This will give you the
knowledge to compile and link your project even without Visual Studio.
www.it-ebooks.info

Working from the
Command Line
Creating an MSI le with WiX takes two steps: compiling your source les and then
linking and binding them into a single package. A tool called Candle handles the
compiling, transforming your .wxs les into .wixobj les. The linking and binding
phases are handled by a tool called Light.
In this chapter, we'll discuss the following topics:
• The arguments to use when calling Candle and Light from the command line
• Compile-time and link-time variables
• How to build an MSI without using Visual Studio
Candle.exe
Candle, the WiX compiler, can be run from the command line to build your WiX
source les (.wxs). Behind the scenes, Visual Studio is really just calling this tool for
you. Compiling a WiX source le creates a WiX object le (.wixobj). These are later
processed by Light, the WiX linker/binder, to create the nal MSI. A simple example
of using Candle would be where we simply pass it the path to a .wxs le:
"%WIX%bin\candle" Product.wxs
This will compile the Product.wxs le that's in the current directory and create
an object le called Product.wixobj. I've used the %WIX% environment variable
that expands to C:\Program Files (x86)\WiX Toolset v3.6\. This variable is
available after you've installed WiX. The candle.exe le is located in the WiX bin
directory, though, so we need to include that folder in the path.
www.it-ebooks.info
Working from the Command Line
[ 248 ]
To make accessing the WiX command-line tools easy, you should
consider adding %WIX%bin to your PATH environment variable.
Right-click on Computer in your Start menu, select Properties, and
then the Advanced system settings link. Click on Environment
Variables and from there, you can edit the Path variable and append
%WIX%bin. From then on, you will be able to use Candle, Light, or any
of the other WiX tools without specifying the path to the bin directory.
You can see more information about Candle by opening a command prompt and
typing candle -?. From here on out, I won't specify the path to Candle, but will
assume that you're either including the path or have added %WIX%bin to the PATH
environment variable. Using the -? argument brings up the documentation and
you'll see that the general syntax is as follows:
candle.exe [-?] [-nologo] [-out outputFile] sourceFile [sourceFile ...]
[@responseFile]
As indicated, you could specify an output le, via the -out ag, to give a name to the
.wixobj le that's created. By default, the .wixobj le will have the same name as
the .wxs. Yet if we wanted to change the name of the output le, we could do so, in
the following manner:
candle Product.wxs -out AnotherName.wixobj
The sourceFile argument refers to the name of the .wxs le that we're compiling.
You may give more than one, separated by spaces:
candle Product.wxs Directories.wxs Components.wxs
You could also use a wildcard (*) to compile all .wxs les in a directory and then
output the .wixobj les to another directory. Here's an example that sends the
compiled output to a directory called "wixobj":
candle *.wxs -out wixobj\
Notice that we must end the "wixobj" directory with a trailing backslash or Candle will
think we're using the -out argument to rename a le rather than name a directory.
www.it-ebooks.info

Chapter 9
[ 249 ]
You could also provide the -arch ag, set to x64 or x86, to set the target
architecture of your software, although it defaults to x86. This is essential if
you're installing les to the 64-bit Program Files folder, for example. Also, if
you've used any WiX extensions, such as the WixUIExtension, you should add
them with the -ext ag. Here's a simple example that includes an extension and
explicitly sets the target architecture:
candle Product.wxs -arch x86 -out wixobj\ -ext WixUIExtension
If you are using more than one extension, pass an -ext ag for each one.
Response les
Sometimes, your calls to Candle will be simple and it won't be much trouble entering
them on the command line. However, as you start adding more optional arguments
you could easily see them span several rows of the console window. In that case, you
may nd it easier to store your arguments in a response le, which can be a simple
text le. The following is an example called MyCommands.txt that contains several
compiler arguments:
-out wixobj\
-dConfig=Release
-trace
-arch x86
-ext WixUtilExtension
-ext WixUIExtension
You reference a response le by prexing its name with the @ symbol.
Here's an example:
candle.exe Product.wxs @MyCommands.txt
It is permissible to override the arguments in the response le by passing them on
the command line:
candle.exe Product.wxs @MyCommands.txt -dConfig=Debug
We will explore the meaning of the arguments we haven't discussed yet later in
the chapter.
www.it-ebooks.info

Working from the Command Line
[ 250 ]
.wixobj les
The compilation process ultimately produces a .wixobj le for every .wxs le. The
linking phase will later combine all of the .wixobj les into a single MSI package.
A .wixobj le consists of XML code with mainly table, row, and eld elements.
Together, these elements describe the rows in each table of the MSI database. The
top-level element of a .wixobj le is wixObject.
<?xml version="1.0" encoding="utf-8"?>
<wixObject version="3.0.2002.0"
xmlns="http://schemas.microsoft.com/wix/2006/objects">
Nested inside of the wixObject element are references to various MSI tables. The
following is a section describing the File table with a single row for a text le
called ReadMe.txt. The sourceLineNumber attribute of the row element has been
truncated for space:
<table name="File">
<row sourceLineNumber="C:\InstallPractice\Product.wxs*21">
<field>file_readmeTXT</field>
<field>cmp_readmeTXT</field>
<field>ReadMe.txt</field>
<field>0</field>
<field />
<field />
<field>512</field>
<field />
</row>
</table>
You should never need to alter these les directly, but knowing how they work
should help you to understand what the compiling stage does.
Command-line arguments (compiling)
In this section, we'll cover all of the optional arguments that you're likely to use with
Candle. In addition to setting them on the command line, you may also set them
within Visual Studio via your project's Properties page via the Tool Settings tab.
There you'll nd a textbox for Candle arguments, labeled Compiler, and another for
Light, labeled Linker.
The following are quick descriptions of Candle's arguments:
www.it-ebooks.info

Chapter 9
[ 251 ]
-arch
The -arch ag sets the architecture for the build. This is important because certain
elements in the MSI package, such as components, need to be marked as 64-bit if
they are to be installed in a computer's 64-bit directories. This ag, if set to x64, also
causes the compiler to check that you've specied an installer version of 2.0.0 or
higher, as this is the minimum version needed for a 64-bit package.
-d
This -d ag, which stands for "dene", allows you to set compile-time variables.
These are replaced with the values that they've been set to when Candle creates the
.wixobj le. We'll discuss this in more detail later in the chapter. The basic syntax is,
with no space between the -d ag and the name of the variable:
-dVariableName=VariableValue
-ext
This ag is used to include a WiX extension, such as WixUIExtension or
WixUtilExtension. Include it when your source le depends on a WiX extension.
-ps
Enabling the FIPS compliant algorithms with the -fips ag causes the installer to
switch its hashing algorithm from MD5 to SHA1. FIPS, which stands for Federal
Information Processing Standards Publications, is a governmental standard for
ensuring security and interoperability when hashing data.
-I
A WiX include le (.wxi) contains preprocessor variables and conditional
statements. There's a Visual Studio template for creating one. Although you can add
each include le explicitly to your WiX project, a more dynamic way is to add the
-I ag on the command line, set to the path of a directory that contains .wxi les.
Candle will search that directory during compilation.
Let's say that one of your WiX source les references an include le via the
include tags:
<?xml version="1.0" encoding="UTF-8"?>
<Wix xmlns="http://schemas.microsoft.com/wix/2006/wi">
<?include SomeIncludeFile.wxi ?>
...
www.it-ebooks.info

Working from the Command Line
[ 252 ]
We'll get to what goes into an include le in the next section. If SomeIncludeFile.
wxi was in C:\Includes, we could reference it by referencing that folder, as follows:
candle Product.wxs -IC:\Includes -trace
I have also given the -trace ag, which instructs Candle to display any errors
during compilation, such as failure to nd the Includes directory. The included
directory may be an absolute or relative path.
-nologo
Candle prints its version number and copyright at the top of its output. However, if
you supply the -nologo ag this will be suppressed.
-o
The -o or -out argument tells Candle where to place the new .wixobj le after
compiling the WiX source code and, if compiling a single source le, what the name
of that le will be.
-p
An intermediate step performed by Candle is to process your .wxs le into a
well-formed XML document. You can see this intermediate XML document by
adding the -p ag.
-pedantic
The -pedantic ag tells the compiler to show messages that you wouldn't normally
see. The examples include, not explicitly setting a keypath for a component.
-sfdvital
Ordinarily, all File elements in WiX are marked as "Vital". This means that if, during
an installation, a le cannot be copied to the end user's system, the installer won't be
able to proceed. Setting the -sfdvital ag switches this default behavior off.
-ss
As Candle compiles your project, it validates it against the WiX schema found in
wix.xsd. You can turn this validation off by adding the -ss ag.
www.it-ebooks.info

Chapter 9
[ 253 ]
-sw
If you don't care much about compiler warnings (maybe you only care about errors),
you can suppress them with the -sw ag. Without any argument, all warnings will
be suppressed. To exclude only a specic warning, reference its ID, such as -sw1009.
You can nd a full list of errors and their message IDs by downloading the WiX
source les, and then opening the Wix solution and looking at messages.xml.
-trace
If you get a compile-time error, such as when an include le cannot be found, you
may consider turning on trace logging.
-v
The -v ag, which stands for "verbose", tells the compiler to display the Information
level messages during processing.
-wx
To treat all compile-time warnings as errors, add the -wx ag. You can also supply a
specic message ID (from messages.xml in the WiX source les) to elevate only that
particular warning to error status.
Compile-time variables
WiX lets you specify variables that are evaluated at compile time. You might use this
to get environmental variables from the build machine, get the directory where your
source les are, or access custom variables you've set up in a separate WiX include
le (.wxi).
WiX has three classications for compile-time (otherwise known as preprocessor)
variables: Custom, Environment, and System. We'll discuss each in the
following sections.
Custom compiler variables
To set your own compile-time variables, also known as preprocessor variables, use
the <?define ?> directive in your WiX markup:
<?define myVar = "myvalue" ?>
www.it-ebooks.info

Working from the Command Line
[ 254 ]
Although you can do this in any of your .wxs les, it's common to do it in a separate
include le (.wxi) le, for which there is a Visual Studio template. The include
les allow you to gather your preprocessor statements into a single place. At
compile time, your variables will be inserted into your source les wherever you've
referenced them. Here's an example .wxi le called MyVariables.wxi:
<?xml version="1.0" encoding="utf-8"?>
<Include>
<?define Config = "Debug" ?>
<?define ProductId = "{89CC4C03-1059-4523-8670-50DEA04B9892}" ?>
<?define UpgradeCode = "{49D09A05-12D9-461E-8DEE-9DD5615AF9FE}" ?>
<?define Version = "1.0.0.0" ?>
</Include>
As I mentioned, we dene compile-time variables with the <?define ?> directive.
Begin and end the le with an Include element. This le can then be referenced in
your .wxs les using an <?include ?> directive. Variables are inserted using the
$(var.VariableName) syntax, such as:
<?include MyVariables.wxi ?>
<Product Id="$(var.ProductId)"
Name="Amazing Software"
Language="1033"
Version="$(var.Version)"
Manufacturer="Amazing Software Inc."
UpgradeCode="$(var.UpgradeCode)">
You can also dene variables from the command line by using the -d ag. They will
be referenced in the same way:
candle.exe Product.wxs –dVersion="1.0.0.0"
There are other preprocessor statements at your disposal, such as if and foreach.
We'll cover those soon, but for now let's discuss the two other types of compile-time
variables: Environment and System.
Environment variables
Environment variables are set in the environment where the build process is
running, usually from the command prompt. The following statement sets an
environment variable called myVar to the value myvalue. This uses the basic
Windows command, set.
set myVar=myvalue
www.it-ebooks.info

Chapter 9
[ 255 ]
To pass this to your WiX project, build your .wxs les from the same command
window using Candle. Now access the environment variable in your markup by
using a dollar sign and parentheses, prexing the variable name with env. The
following is an example:
<Property Id="property1" Value="$(env.myVar)" />
System variables
System variables are a lot like environment variables. They have a similar syntax
(in this case you'll prex the variable name with sys), but there are a nite number
of them, and they're dened for you. The following system variables, which are
always uppercase, are available:
• CURRENTDIR: The current directory where the build process is running
• SOURCEFILEDIR: The directory containing the le being processed
• SOURCEFILEPATH: The full path to the le being processed
• PLATFORM: The platform (Intel, x64, Intel64) this package is compiled for
(set by the –arch ag)
The rst two, which contain directory paths, always end in a backslash. So, you can
use them in the following way:
$(sys.SOURCEFILEDIR)myFile.wxs
Conditional statements and iterations
In this section, we'll take a look at the conditional and looping statements that are
available at compile time.
if...elseif...else
The if statement checks whether a preprocessor variable is set to a certain value. If
it is, the markup between the opening if statement and the closing endif will be
compiled. Optionally, it can be followed by an elseif or else statement, allowing
you to compile other code if the initial condition is false. The entire block must end
with endif. The following snippet is an example that only compiles a Property
element if the preprocessor variable myVar is equal to 10:
<?if $(var.myVar) = 10 ?>
<Property Id="newProperty" Value="5" />
<?endif?>
www.it-ebooks.info

Working from the Command Line
[ 256 ]
Here's a more complex example that utilizes the elseif and else statements:
<?if $(var.myVar) = 10 ?>
<Property Id="newProperty" Value="5" />
<?elseif $(var.myVar) > 10?>
<Property Id="newProperty" Value="6" />
<?else?>
<Property Id="newProperty" Value="7" />
<?endif?>
Other conditional operators are available, including not equal to (!=), greater
than (>), greater than or equal to (>=), less than (<), and less than or equal to (<=).
In addition, you can use the Or and And keywords to combine conditions. Use the
Not keyword to negate a conditional statement:
<?if Not $(var.myVar) = 10 And Not $(var.myVar) = 11 ?>
<Property Id="newProperty" Value="5" />
<?endif?>
ifdef
The ifdef statement is used to check whether a preprocessor variable is dened. If
it is, the WiX markup that follows will be compiled. The variable should be the name
only, not the $(var.myVariable) syntax. Here is an example that checks if myVar is
dened:
<?ifdef myVar ?>
<Property Id="newProperty" Value="1" />
<?endif?>
ifndef
The ifndef statement is similar to the ifdef statement, except that it checks if a
variable is not dened. Here's an example:
<?ifndef myVar ?>
<Property Id="newProperty" Value="1" />
<?endif?>
www.it-ebooks.info

Chapter 9
[ 257 ]
Iterations
WiX has a preprocessor statement, foreach, that you can use to repeat a block of code
a number of times. For example, you might loop through a list of directory names
and create a new Directory element for each one; maybe to create a directory for
each language your software supports.
First, you'll need to dene a list to iterate through in the form of a string containing
several values, each separated by a semicolon. To keep things clear, you could dene
a preprocessor variable to hold it, as in the following example:
<?define myLanguages=en_us;de_de;it_it?>
Next, dene a top-level folder to hold all of your new directories. Here, we'll call it
languages and place it inside our INSTALLLOCATION directory:
<DirectoryRef Id="INSTALLLOCATION">
<Directory Id="languagesFolder" Name="languages" />
</DirectoryRef>
Now you can use a foreach statement to loop through each value in the
myLanguages string. For each iteration, the current value is stored in a temporary
variable called tempVar.
<?foreach tempVar in $(var.myLanguages)?>
<DirectoryRef Id="languagesFolder">
<Directory Id="$(var.tempVar)" Name="$(var.tempVar)">
<Component Id="MyComponent.$(var.tempVar)" Guid="*">
<File Id="$(var.tempVar)File"
Source="..\$(var.tempVar).xml"
KeyPath="yes" />
</Component>
</Directory>
</DirectoryRef>
<?endforeach?>
For each language, a new Directory element is created under the languagesFolder
directory. We set the directory's Id and Name attributes to the tempVar variable's
value. We also use it to set the ID of the Component element. By using an asterisk
(*) as Guid, WiX will auto-generate a new one for each component. Then, we use
the temporary variable again for the Id and Source attributes of the language-
specic XML le. Be sure that the les en_us.xml, de_de.xml, and it_it.xml really
exist! Otherwise, you'll get a compile-time error. The entire structure ends with an
endforeach statement.
www.it-ebooks.info

Working from the Command Line
[ 258 ]
The last thing to do is to add all of our new components to a feature. Here, we can
use another foreach:
<Feature Id="MainFeature" Title="Main Feature" Level="1">
<?foreach tempVar in $(var.myLanguages)?>
<ComponentRef Id="MyComponent.$(var.tempVar)"/>
<?endforeach?>
</Feature>
If you were to install this MSI package, you'd get a languages folder containing an
en_us, de_de, and it_it folder. Each would hold a single XML le corresponding to
that locality.
Errors and warnings
Another thing that WiX gives you is the ability to trigger compile-time errors and
warnings. For this, use the <?error error-message ?> and <?warning warning-
message?> syntax. An error stops the compilation and shows the error in the build
log. A warning, on the other hand, will show up in the log, but won't stop the build.
Here's an example that triggers an error if the preprocessor variable myVariable isn't
dened:
<?ifndef myVariable ?>
<?error myVariable must be defined ?>
<?endif?>
Adding warnings and errors like this allows you to keep a closer eye on things,
making sure that critical variables are dened like they should be. The example
that we just saw used an error, which stops the build if hit. A warning works the
same way, but won't stop the build. Here's an example:
<?ifndef myVariable ?>
<?warning myVariable should be defined ?>
<?endif?>
Preprocessor extensions
You can create your own variable prexes (remember var, env, and sys?) and even
call C# methods at compile time by writing a preprocessor extension. You'll need
to make a new C# class library. We'll walk through each step and then look at the
complete code afterwards.
www.it-ebooks.info

Chapter 9
[ 259 ]
Understand that a preprocessor extension is only executed during compilation to
insert data into your WiX markup. So, the end user of your installer will never see it.
Also, a preprocessor extension is different than extensions such as WixUIExtension,
which are technically compiler extensions. We'll get to make a compiler extension later
in the book.
First, in your new class library, add a reference to Wix.dll from the WiX bin
directory, and add a using statement for Microsoft.Tools.WindowsInstallerXml.
Next, add a class that extends the WixExtension class. Here, we've called it
MyWixExtension:
using Microsoft.Tools.WindowsInstallerXml;
namespace MyPreprocessorExtension
{
public class MyWixExtension : WixExtension
{
//our extension code will go here
}
}
The purpose of this class is to override the PreprocessorExtension property from
the WixExtension class so that instead of returning null, it returns an instance of
the next class we'll be creating—which we'll call MyPreprocessorExtension. We'll
dene that class in a moment. Add this property to the MyWixExtension class:
private PreprocessorExtension preprocessorExtension;
public override PreprocessorExtension PreprocessorExtension
{
get
{
if (this.preprocessorExtension == null)
{
this.preprocessorExtension = new
MyPreprocessorExtension();
}
return this.preprocessorExtension;
}
}
www.it-ebooks.info

Working from the Command Line
[ 260 ]
The next step is to dene the MyPreprocessorExtension class. It must extend the
PreprocessorExtension base class and set up the prexes you want to use for your
new compile-time variables. Here's where we do that:
public class MyPreprocessorExtension : PreprocessorExtension
{
private static string[] prefixes = { "AmazingCo" };
public override string[] Prefixes
{
get { return prefixes; }
}
This sets our prex to be AmazingCo, although you'll likely use the actual name
of your company or something else more inspired. As you can see, the prefixes
variable is an array of strings so if you wanted to, you could create multiple new
prexes here.
The next step is to override the GetVariableValue method, which sets up a switch
statement that returns a value for the preprocessor variable you'll have passed in
from your WiX markup. In other words, we can't set the values of these variables
dynamically, they are all hardcoded here.
public override string GetVariableValue(
string prefix, string name)
{
string result = null;
switch (prefix)
{
case "AmazingCo":
switch (name)
{
// define all the variables under
// this prefix here...
case "myvar":
result = "myvalue";
break;
}
break;
}
return result;
}
www.it-ebooks.info

Chapter 9
[ 261 ]
For this example, there's only one variable dened under the AmazingCo prex:
myVar, which has a value of myvalue. In your WiX markup, you could access this
using the dollar sign and parentheses syntax:
<Property Id="myVar" Value="$(AmazingCo.myvar)" />
If you want to get fancy, you can add code that calls a preprocessor method. For this,
you must override EvaluateFunction:
public override string EvaluateFunction(
string prefix, string function, string[] args)
{
string result = null;
switch (prefix)
{
case "AmazingCo":
switch (function)
{
// add any functions that you can
// call with your prefix...
case "sayHelloWorld":
result = "Hello, World!";
break;
}
break;
}
return result;
}
In this example, we've added a function called sayHelloWorld to our AmazingCo
prex. When called in WiX, it will return the string "Hello, World!". In real-world
scenarios, it might return a version number of some other string that you'd like to
perform some calculation to get.
In WiX, we can now call this function as follows:
<Property Id="checkVar"
Value="$(AmazingCo.sayHelloWorld())" />
www.it-ebooks.info

Working from the Command Line
[ 262 ]
If you'd like to pass arguments to this method, alter EvaluateFunction so that it
uses its args parameter. Here's a simple example that turns the rst parameter that
was passed in to uppercase and then returns it:
case "sayHelloWorld":
if(args.Length > 0)
{
result = args[0].ToUpper();
}
else
{
result = String.Empty;
}
break;
}
return result;
Before your new extension will work, you'll need to do one more thing: add
the following using statement and attribute to the AssemblyInfo.cs le of
the class library:
using Microsoft.Tools.WindowsInstallerXml;
[assembly: AssemblyDefaultWixExtension(typeof(
MyPreprocessorExtension.MyWixExtension))]
Of course, you'll want to replace MyPreprocessorExtension.MyWixExtension with
whatever names you gave to your class and its namespace. Then, compile the project
to create a new .dll le. The nal step is to add a reference to it in your WiX project.
Be careful not to include the project, if it's in the same solution as your WiX project.
You must reference the built .dll le.
This is the complete code for the preprocessor extension:
using Microsoft.Tools.WindowsInstallerXml;
namespace MyPreprocessorExtension
{
public class MyWixExtension : WixExtension
{
private MyPreprocessorExtension preprocessorExtension;
public override PreprocessorExtension
PreprocessorExtension
{
get
www.it-ebooks.info

Chapter 9
[ 263 ]
{
if (this.preprocessorExtension == null)
{
this.preprocessorExtension =
new MyPreprocessorExtension();
}
return this.preprocessorExtension;
}
}
}
public class MyPreprocessorExtension :
PreprocessorExtension
{
private static string[] prefixes = { "AmazingCo" };
public override string[] Prefixes
{
get
{
return prefixes;
}
}
public override string GetVariableValue(
string prefix, string name)
{
string result = null;
switch (prefix)
{
case "AmazingCo":
switch (name)
{
// define all the variables under
// this prefix here...
case "myvar":
result = "myvalue";
break;
}
break;
}
www.it-ebooks.info

Working from the Command Line
[ 264 ]
return result;
}
public override string EvaluateFunction(
string prefix, string function, string[] args)
{
string result = null;
switch (prefix)
{
case "AmazingCo":
switch (function)
{
// add any functions that you can
// call with your prefix...
case "sayHelloWorld":
result = "Hello, World!";
break;
}
break;
}
return result;
}
}
}
Light.exe
Light is the WiX linker and binder. Its job is to rst resolve all of the references to
les, directories, and so on that are stored in the .wixobj les (the linking phase)
and then to stream all of that data into the MSI le, compressing it along the way (the
binding phase). To see information about its usage type light -? at the command
prompt; the following is what you should see:
light.exe [-?] [-b bindPath] [-nologo]
[-out outputFile] objectFile [objectFile ...] [@responseFile]
You'll use the -out ag to give a name to the resulting MSI package. You must
then reference all of the .wixobj les, either individually or with an asterisk (*).
For example, this creates an MSI le out of three .wixobj les that are in the
current directory:
light.exe -out myInstaller.msi Product.wixobj Fragment1.wixobj Fragment2.
wixobj
www.it-ebooks.info

Chapter 9
[ 265 ]
We can also use an asterisk:
light.exe -out myInstaller.msi *.wixobj
If you've created any .wixlib les, you can reference them in the same way:
light.exe -out myInstaller.msi *.wixobj LibraryOne.wixlib LibraryTwo.
wixlib
If you're using any WiX extensions, reference them using the –ext ag:
light.exe -out myInstaller.msi *.wixobj -ext WixUIExtension
In the following sections, we'll cover the rest of the arguments that you can pass to
Light. Although some affect linking and others binding, you'll specify both during
the same call to Light.
Command-line arguments (linking)
In this section, we will explore the arguments that you can pass to Light that affect
linking. Linking is the process whereby the symbols in the .wixobj les created
by Candle are validated to make sure that they will resolve correctly. At this point,
elements such as components and features are hooked together and if an undened
symbol is found, an exception will be thrown.
-b
The -b ag, which can be set to a directory path, tells Light where to look for the
.wixobj les. You can add more than one directory by adding more -b ags.
-bf
The -bf ag is always used with the -xo ag, which tells Light to output a
.wixout le instead of an MSI le. The .wixout format is XML as opposed to
binary. However, by adding the -bf ag, the binary data that would be stored
in the MSI le is included with the XML.
-binder
You can dene a custom binder in a WiX extension DLL. Use the -binder ag to
identify the class that represents your custom binder that will be used to replace
the default Microsoft.Tools.WindowsInstallerXml.Binder class. This is an
advanced topic and won't be covered in this book.
www.it-ebooks.info

Working from the Command Line
[ 266 ]
-cultures
The -cultures ag tells WiX which .wxl les to load for localization. It accepts a
culture string, such as en-us. Only one culture, and in turn one language, can be
specied here. This is because an MSI le can only be localized for a single language.
-d
Use the -d ag to dene a linker variable. Linker variables can be referenced with the
!(wix.VariableName) syntax. Unlike compile-time preprocessor variables, linker
variables are evaluated and resolved at link time. They're often used to reference les
late in the build process. We'll discuss these in detail later in the chapter.
-dut
The WiX compiler and linker use extra tables, peculiar to WiX, to store metadata
about how elements get grouped together. These extra tables don't exist in the MSI
specication, and they're not used in the nal MSI le. So, they're called unreal
tables. You can drop these tables from the .wixout or .wixpdb les by adding the
-dut ag.
-ext
Use the -ext ag to link in WiX extensions, such as the WixUIExtension.dll le.
This loads all of the C# code and .wxs les found in that extension.
-ext "%WIX%bin\WixUIExtension.dll"
-loc
When you've created .wxl les that contain localized strings for your MSI le, you'll
link them in (specify their paths and lenames) with -loc ags. Those with a culture
that matches the -cultures ag will be used.
-nologo
Light prints a message at the top of the console window when you use it showing its
version and copyright information. You can stop this by adding the -nologo ag.
www.it-ebooks.info

Chapter 9
[ 267 ]
-notidy
Light produces some temporary les during the course of its processing. It ordinarily
cleans up after itself, deleting these les once it's nished. However, by adding the
-notidy ag, these les will not be deleted. You'll need to add the -v ag to see
where the temporary les are being stored. Look for an entry in the verbose log that
says something like temporary directory located at....
-o[ut]
Use the -o or -out ag to tell Light the name of the resulting MSI or .wixout le.
-pedantic
To see extra linking information, usually of low importance, add the -pedantic ag.
-sadmin
Often, you won't use the AdminExecuteSequence or AdminUISequence tables during
your install. To prevent those tables from being created in the MSI database, add the
-sadmin ag.
-sadv
The AdvtExecuteSequence table is used for advertised installations. If you don't
need it, you can suppress its creation by adding the -sadv ag.
-sloc
To prevent Light from processing localized variables in your .wxs les, add the
-sloc ag. Then, output a le with the .wixout extension via the -o ag. It will
contain the variables, such as !(loc.myVariable), instead of the literal value that it
would have been expanded to. However, if you specify the -loc or -cultures ag,
-sloc will be ignored. You must also specify the -xo ag when you want the output
with the .wixout format.
-sma
You can tell your installer to load a le into the Global Assembly Cache by setting
the Assembly attribute on that le's File element. This will add two new tables
to your MSI: MsiAssembly and MsiAssemblyName. It will also add a new action to
InstallExecuteSequence called MsiPublishAssemblies. To suppress this action
and these tables from being processed, add the -sma ag.
www.it-ebooks.info

Working from the Command Line
[ 268 ]
-ss
Light performs schema validation, using the XML schema found in outputs.xsd, to
check that the syntax of the .wixout or .wxipdb le is correct. You can suppress this
validation by adding the -ss ag.
-sts
Light uses GUIDs to identify row elements in .wixout and .wixpdb les. You can
stop Light from showing these GUIDs in these les by adding the -sts ag.
-sui
You can choose to suppress the UI phase of the install by adding the -sui ag. This
will remove the InstallUISequence and AdminUISequence tables from the MSI
database. You might do this to simplify an MSI database that has no user interface.
-sv
The output from Light can be represented in the XML format in either a .wixout or
.wixpdb le. These les represent an intermediate state of the data before it's turned
into an MSI le by Light's binding process. They always contain an element called
wixOutput that has a version attribute. When Light reads these intermediate XML
les and transforms them into a nished MSI le, it checks that the version attribute
in the le matches the version of Light that's installed. That way, it can be sure that
the data can be processed correctly.
Imagine, however, that you've stored .wixout les that you plan on creating an
MSI out of sometime in the future. After all, it's possible to build an MSI le from a
.wixout le at a later time and your version of Light may have changed. You can
suppress this validation by adding the -sv ag.
-sw[N]
Light produces several warnings and errors if les can't be found or things can't
be linked properly. To turn off all warnings, add the -sw ag. You can also specify
a particular warning to suppress by setting -sw to that warning's number. These
numbers can be found in messages.xml in the WiX source code.
www.it-ebooks.info

Chapter 9
[ 269 ]
-usf <output.xml>
Use the -usf ag with the name of an XML le, such as -usf unrefSymbols.xml
to log the symbols from Light's output that were not referenced. For example, adding
the WixUIExtension but not using any of its dialogs will cause some
symbols to be orphaned.
-v
In order to see what's going on behind the scenes with Light, you'll need to add the
-v ag. This displays Light's logging messages such as ICE validation, le copying,
and CAB le creation.
-wx[N]
Ordinarily, warnings from Light don't stop the linking process. However, by
adding the -wx ag, warnings will be treated as errors, which do stop the process.
You can also specify a specic warning message to treat as an error by adding its
message number.
-xo
When you add the -xo ag to Light, it outputs XML in the .wixout format. So, you'll
need to also specify a .wixout lename with the -out ag. You may also want to
add the -bf ag to append binary data for the installer to the .wixout le.
Command-line arguments (binding)
In this section, we will explore the arguments that affect Light's binding phase.
Binding is the process whereby the binary data from your source les that were
resolved during the linking phase are compressed into CAB les that are potentially
stored in the MSI.
-bcgg
When creating a Component element in WiX, you'll usually specify a GUID to
uniquely identify it. However, you can specify an asterisk (*) instead, in which case
Light will choose the GUID for you. The default algorithm Light uses to create a
GUID involves the SHA1 hash. However, by adding the -bcgg ag, you're telling it
to use the older MD5 hash. This is a more backwards compatible algorithm, but is
rarely needed.
www.it-ebooks.info

Working from the Command Line
[ 270 ]
-cc <path>
The binding process creates a .cab le, a type of le that holds compressed data,
to store the les that the MSI will install. If you plan on calling Light several times,
you can save some time by caching the .cab le and reusing it. To cache it, specify
the -cc ag and the path to cache it to. Later on, you can add the -reusecab ag
to tell Light to look for the .cab le in the path you've specied. For example, you
could specify that the .cab le be cached to a directory called cabcache like this:
-cc ".\cabcache".
-ct <N>
You can change the number of threads Light uses when creating .cab les. The
default is to use the number stored in the %NUMBER_OF_PROCESSORS% environment
variable. You can change it by setting the -ct ag to a number.
-cub <le.cub>
Windows Installer uses les with the .cub extension to store ICE validation checks.
There are two les it uses routinely: darice.cub (for MSIs) and mergemod.cub (for
MSMs). To add your own .cub le with new ICE tests, specify the path to it with the
-cub ag. We won't cover how to create custom ICE checks in this book.
-dcl:level
By default, Light uses MSZIP to compress .cab les. You can change the
compression by adding the -dcl ag and setting it to one of the following: low,
medium, high, none, or mszip.
-eav
Light uses a workaround to prevent Windows Installer from complaining if
the version stored in the MsiAssemblyName table doesn't t the fileVersion
column created by the -fv ag. By specifying -eav, you're telling Light to not
use this workaround.
-fv
If you add the -fv ag, Light will add a column called fileVersion to the
MsiAssemblyName table. This is a table used to install assemblies to the GAC.
The recommended way to update an assembly in the GAC is to install the new
version with a new strong name. You'd use -fv when you want to ignore this
recommendation and update an assembly in the GAC without changing its
strong name.
www.it-ebooks.info

Chapter 9
[ 271 ]
-ice <ICE>
If you've created your own ICE checks and referenced their containing le with the
-cub ag, you'll need to specify which to use with the -ice ag. For example, to add
a test called ICE9999, and add the following: -ice:ICE9999. Specify the number of
the test after a semicolon. Refer to the MSDN documentation for more information
about creating your own ICE checks: http://msdn.microsoft.com/en-us/
library/aa372423%28VS.85%29.aspx.
-pdbout <output.wixpdb>
Light ordinarily creates a .wixpdb le that has the same name as the MSI that you're
creating. However, you can change the name of the .wixpdb le by specifying it with
the -pdbout ag.
-reusecab
If you've used the -cc ag to cache the .cab les that Light creates, you can tell Light
to re-use those cabinets by adding the -reusecab ag. You'll need to specify the -cc
ag again, which tells Light where the .cab les have been cached. If Light can't nd
the .cab les there, it will resort to creating them again.
-sa
When storing an assembly in the GAC, Light nds the le information on the .dll
le for you (culture, name, architecture, public key token, and version) and stores it
in a table called MsiAssemblyName. You can suppress this by adding the -sa ag.
Light can't use reection on .NET assemblies that use a newer version of the
Common Language Runtime (CLR) than was available when Light was built. You
can see the supported runtimes by opening light.exe.config, found in the WiX
bin folder, in a text editor and searching for the supportedRuntime element.
In such a situation, you may be better off using -sa and adding the assembly
information to the MsiAssemblyName table yourself. That is, unless there's a newer
version of Light available for download.
-sacl
During Light's binding phase, it copies the nished MSI le to your output folder.
If the le can't be copied because its permissions (its ACLs) are too restrictive
(adopted from the permissions of the source directory), then Light changes the le's
permissions to be Full Control for the current user.
www.it-ebooks.info

Working from the Command Line
[ 272 ]
Once it has copied the le to the output folder, it sets things right again by giving the
MSI le the permissions of the output folder. If you add the -sacl ag, Light will skip
this step and the MSI le will be left with the unrestricted permissions. You might
do this if the permissions of the output folder are also too restrictive. For example, if
you're sending the output to a network share, but you don't want the MSI le to adopt
the permissions of that share.
-sf
The -sf ag has the same behavior as the -sa and -sh ags added together.
-sh
If you add the -sh ag, Light will not add the MsiFileHash table to the nal MSI.
This table is used to eliminate the unnecessary copying of a le if the end user's
computer already has a le that's scheduled to be installed.
-sice: <ICE>
You can suppress a specic ICE validation check by adding its number after the
-sice ag. You should specify a new -sice ag for each check that you want to
suppress. For example, to suppress ICE20, add the following: -sice:ICE20.
-sl
By adding the -sl ag, you're telling Light to not embed the CAB le in the
MSI package. Once the MSI is built, you can check the Media table and see that
the Cabinet column's value does not start with a pound sign (#), showing that
the CAB le is not embedded.
-spdb
The -spdb ag tells WiX to not create a .wixpdb le.
-sval
To prevent Light from running any of the ICE validation checks, add the -sval ag.
www.it-ebooks.info

Chapter 9
[ 273 ]
Link-time variables
Like Candle, Light allows you to specify variables that will be interpreted when your
project is built. Here, however, the variables are processed at link time. There are
three types of link-time variables: localization, binder, and custom. We will take a
look at each in the following sections.
Localization variables
WiX gives you something unique in the MSI-building world—a way to re-use one
set of .wxs les for many different languages. The way to do it is to use a variable
anywhere that you'd normally place text, such as on dialog controls, feature labels,
directory names, and so on. At link time, these localization variables will be swapped
with the text specic to the language you're building.
Use the !(loc.VariableName) syntax in your WiX markup, as follows:
<Directory Id="TARGETDIR" Name="SourceDir">
<Directory Id="ProgramFilesFolder">
<Directory Id="INSTALLLOCATION"
Name="!(loc.InstallDirName)" />
</Directory>
</Directory>
Here, we're not setting the name of our install directory in stone. We're using a
variable instead and will swap it out with real text at link time. You can then create a
.wxl le to store the language-specic value of your variable. One .wxl le for each
language. We'll talk more about this later in the book when we discuss localization.
For now, it's enough to know that these variables are expanded at link time.
Binder variables
There are a number of binder variables that are predened for you and that
become available just before Light creates the nal output. You'll use the !(bind.
VariableName.FileID) syntax to access them.
www.it-ebooks.info
Working from the Command Line
[ 274 ]
The following list shows the variables that are available. You'll replace FileID
with the ID of the File element you're trying to get information about. The rst
two are available to all of the les that you add with the File element. The remainder
is only available to those that specied the Assembly attribute and set it to either
.net or win32.
Variable name Example
bind.fileLanguage.FileID !(bind.fileLanguage.MyFile)
bind.fileVersion.FileID !(bind.fileVersion.MyFile)
bind.assemblyCulture.FileID !(bind.assemblyCulture.MyAssembly)
bind.assemblyFileVersion.
FileID
!(bind.assemblyFileVersion.
MyAssembly)
bind.assemblyFullName.FileID !(bind.assemblyFullName.
MyAssembly)
bind.assemblyName.FileID !(bind.assemblyName.MyAssembly)
bind.
assemblyProcessorArchitecture.
FileID
!(bind.
assemblyProcessorArchitecture.
MyAssembly)
bind.assemblyPublicKeyToken.
FileID
! (bind.assemblyPublicKeyToken.
MyAssembly)
bind.assemblyType.FileID !(bind.assemblyType.MyAssembly)
bind.assemblyVersion.FileID !(bind.assemblyVersion.MyAssembly)
Grabbing information off of incoming les as they're bound into the MSI could be
valuable in a number of ways. One potential use is to reference the le version of
your software's EXE to set the version of the MSI. So, assuming you have dened a
File element with an Id attribute of MyApplicationEXE, given as follows:
<Component Id="CMP_MyApplicationEXE"
Guid="28FC0A8D-3E8A-4414-9413-E12B98DE668E">
<File Id="MyApplicationEXE" Source="MyApplication.exe" />
</Component>
www.it-ebooks.info

Chapter 9
[ 275 ]
You could use that le's version in the Product element's Version attribute:
<Product Id="*"
Name="PracticeWix"
Language="1033"
Version="!(bind.fileVersion.MyApplicationEXE)"
Manufacturer="Awesome Company"
UpgradeCode="3c1789e3-5b3d-4cb5-9c73-a03f2cc09c26">
Now the version of the MSI is tied to the version of your software.
Custom linker variables
If you were to look back to Chapter 6, Adding a User Interface, where we covered
the standard WiX user interfaces, you'd see that we set linker variables to pull in a
custom RTF license agreement or to change the images that are shown. These link-
time variables are perfect for pulling in a le dynamically, rather than setting it in
stone. It is possible to set your own linker variables as well.
There are two ways to dene a custom variable: via the command line with the -d
ag or in your WiX markup with the WixVariable element. When using the -d ag,
you can specify the variable name and its value, separated by an equals sign:
-dmyVariable="some value"
When using the WixVariable element, you'll use its Id attribute to dene its name
and its Value attribute to dene its value:
<WixVariable Id="myVariable" Value="my value" />
Either way, the variable can be referenced elsewhere in your markup by using the
!(wix.VariableName) syntax. The following example inserts the value of a variable
as the name of a le that's scheduled to be installed.
<Component Id="cmp_myFile"
Guid="8E74ECD6-782F-45e7-9432-6F4FB4E08CED">
<File Id="file_myFile"
Source="!(wix.myVariable)"
KeyPath="yes" />
</Component>
You can only set a custom variable in one place. So, you can't set it with both a
WixVariable element and on the command line. Doing so will cause a link-time error.
www.it-ebooks.info
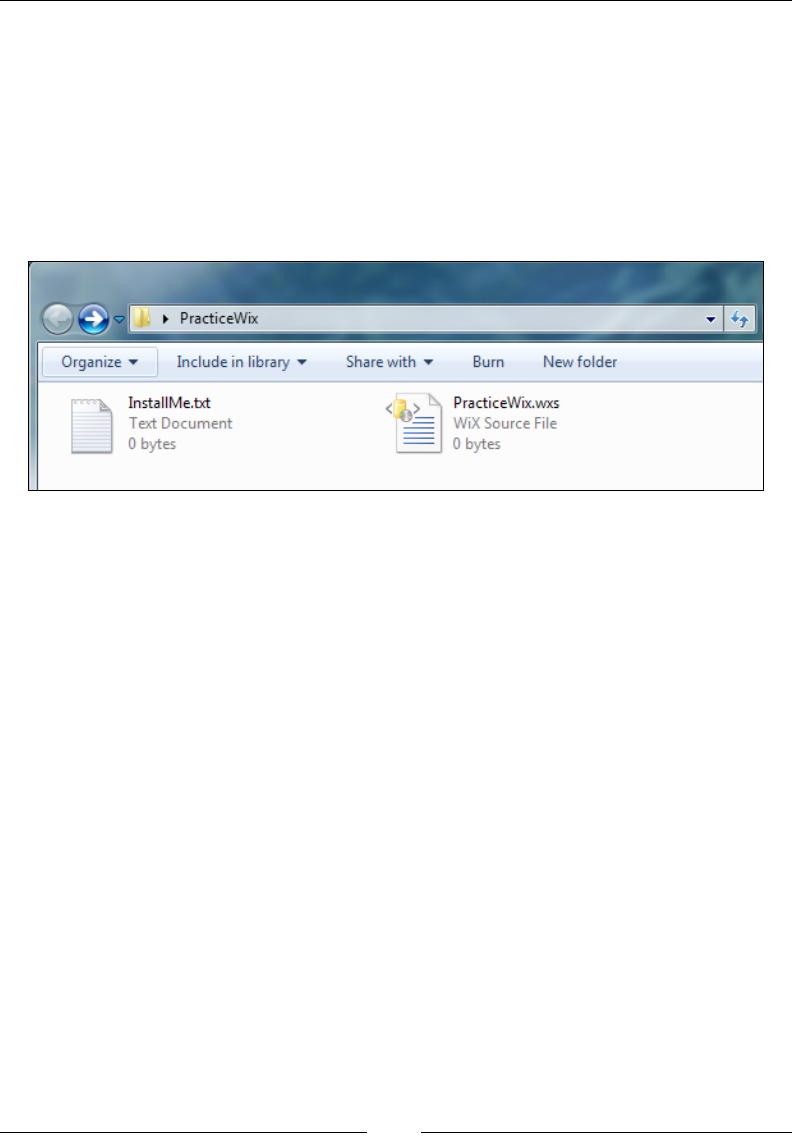
Working from the Command Line
[ 276 ]
Building an installer without Visual
Studio
Now that you've been shown Candle and Light, it may help to see a complete
example of compiling and linking a WiX project to get an MSI. First off, create a new
directory for your project and call it PracticeWix. Next, add a text le to it called
InstallMe.txt. This will give us something to install. Then, create a le with the
.wxs extension and call it PracticeWix.wxs, as shown in the following screenshot:
Open PracticeWix.wxs with a text editor such as Notepad and add the following
markup. It will install the text le to a directory called PracticeWix. We'll add one
of the built-in WiX dialogs too.
<?xml version="1.0"?>
<Wix xmlns="http://schemas.microsoft.com/wix/2006/wi">
<Product
Id="*"
Name="PracticeWix"
Language="1033"
Version="1.0.0.0"
Manufacturer="Awesome Company"
UpgradeCode="B9B82C37-34EC-4F50-9D0E-0DF8F06F1F64">
<Package Compressed="yes" InstallScope="perMachine" />
<MediaTemplate EmbedCab="yes" />
<Directory Id="TARGETDIR" Name="SourceDir">
<Directory Id="ProgramFilesFolder">
<Directory Id="INSTALLFOLDER"
Name="PracticeWix" />
</Directory>
www.it-ebooks.info

Chapter 9
[ 277 ]
</Directory>
<ComponentGroup Id="MainComponents"
Directory="INSTALLFOLDER">
<Component
Id="CMP_InstallMeTXT"
Guid="825F0C9A-AACC-4E37-B8A2-30A452EB58F9">
<File Id="FILE_InstallMeTXT"
Source="InstallMe.txt"
KeyPath="yes" />
</Component>
</ComponentGroup>
<Feature Id="PracticeWix" Title="PracticeWix" Level="1">
<ComponentGroupRef Id="MainComponents" />
</Feature>
<UIRef Id="WixUI_Minimal" />
</Product>
</Wix>
Now, to compile it, open a command prompt window and navigate to the
PracticeWix folder. Assuming you've added the WiX bin directory to your
PATH environment variable, the following command will call Candle to build
our one .wxs le:
candle.exe -v -ext WixUIExtension -out PracticeWix.wixobj PracticeWix.wxs
This will create a new le in the PracticeWix folder called PracticeWix.wixobj.
Next, use Light to turn that into an MSI:
light.exe -v -ext WixUIExtension -out PracticeWix.msi PracticeWix.wixobj
You should see a fairly long output of the linking process, including the ICE
validation checks. In the end, this should create the MSI le. Go ahead and double-
click on it to launch the installer.
www.it-ebooks.info

Working from the Command Line
[ 278 ]
Summary
In this chapter, we discussed the command line tools Candle, the WiX compiler, and
Light, the linker/binder. Although Visual Studio uses them for you, you can call
them from the command prompt without using Visual Studio at all.
In the next chapter, we'll switch gears and cover something completely different:
how to read and write to the Windows Registry at install time.
www.it-ebooks.info

Accessing the
Windows Registry
Where to store software conguration settings in Windows has been a moving target
for a long time. Although using the registry for this purpose has fallen out of favor,
developers lean more towards using XML conguration les in the application's
directory or storing them in %APPDATA%, %PROGRAMDATA%, or in Isolated Storage,
it's still useful to know the ins and outs of reading and writing to the registry.
Several of the WiX extensions query the registry for an array of data, such as nding
the installed version of .NET, and you're bound to run into Windows settings
that can only be found in the registry. You might also nd it useful to store small
amounts of installer-specic data, such as the application's install path.
In this chapter, we'll discuss the following topics:
• Reading data stored in the registry
• Writing to the registry
• Performing miscellaneous tasks in the registry such as setting user
permissions for registry keys
www.it-ebooks.info
Accessing the Windows Registry
[ 280 ]
Reading from the registry
To read data stored in the registry, you'll use the RegistrySearch element. If the
value you're looking for exists, it will be saved into a property you'll have placed as
a parent element to RegistrySearch. Here's an example that looks for the myValue
value stored in HKEY_CURRENT_USER\Software\MyCompany and stores it in a
property called REGISTRY_RESULT. Whichever property you decide to use, make sure
that it is public (uppercase). An example is as follows:
<Property Id="REGISTRY_RESULT">
<RegistrySearch Id="MyRegistrySearch"
Root="HKCU"
Key="Software\MyCompany"
Name="myValue"
Type="raw" />
</Property>
By placing the RegistrySearch element inside of a Property element we're saying
that we want the registry value to be stored in that property. The attributes on the
RegistrySearch element mostly tell Windows Installer where to look for the value.
The Id attribute gives the search a unique identity in the MSI database and can be set
to whatever you like.
The Root attribute sets which top-level node, or hive, in the registry to look under.
Your options are described in the following table:
Set Root to Stands for Description
HKLM HKEY_LOCAL_MACHINE Contains data used to support the
operating system and settings for
installed software that is accessible by all
users
HKCR HKEY_CLASSES_ROOT Provides information regarding
registered COM objects, mostly for
backwards compatibility with 16-bit
systems
HCKU HKEY_CURRENT_USER Gives a view of the currently logged-on
user's profile settings as well as software
configuration specific to that user
HKU HKEY_USERS Stores profile and software settings for
all active users
www.it-ebooks.info
Chapter 10
[ 281 ]
The Key attribute sets what registry key to look for and Name sets the value to read
inside that key. So, in the last example, we want to read the myValue value in the
MyCompany key. The Type attribute tells the installer what sort of data is stored in
myValue. Most of the time, you'll set this to raw.
Setting Type to raw, as opposed to file or directory, which we'll discuss next,
means that the data you get back will contain extra characters to help you distinguish
what kind of data it is. If you've worked with the registry before, you know that
there are several types of data you can store: DWORD, REG_BINARY, REG_SZ, and so
on. The following is a table that explains the special characters that are added to the
value once you've retrieved it:
Type of data Characters added to value
DWORD A # sign is added to the beginning, which may be followed by a +
or -.
REG_BINARY A #x is added to the beginning and each hexadecimal digit is shown
as an ASCII character prefixed with another #x.
REG_EXPAND_SZ A #% is added to the beginning.
REG_MULTI_SZ A [~] is added to the beginning.
REG_SZ No extra characters are added. Any # signs in the value, however,
will be escaped by turning them into two # signs.
Setting Type to either file or directory is used when what is stored in the value is
the path to a le or directory on the local machine. Use this when you want to check
if that le or directory actually exists. For example, this would check if the le path
stored in pathToFile really exists:
<Property Id="MY_PROPERTY">
<RegistrySearch Id="myRegSearch"
Root="HKLM"
Key="Software\WIXTEST"
Name="PathToFile"
Type="file">
<FileSearch Id="myFileSearch" Name="[MY_PROPERTY]" />
</RegistrySearch>
</Property>
www.it-ebooks.info

Accessing the Windows Registry
[ 282 ]
If the path doesn't exist, the property won't be set. Notice that we have to add
a FileSearch element to do the checking. Simply set its Name attribute to the
Id attribute of your property surrounded by brackets. You can also check if a
directory exists, as in the next example, by setting Type to directory and adding a
DirectorySearch element:
<Property Id="MY_PROPERTY">
<RegistrySearch Id="myRegSearch"
Root="HKLM"
Key="Software\WIXTEST"
Name="PathToDirectory"
Type="directory">
<DirectorySearch Id="myDirSearch"
Path="[MY_PROPERTY]" />
</RegistrySearch>
</Property>
Here, if the directory can't be found the property MY_PROPERTY won't be set.
Another attribute that you can add to the RegistrySearch element is Win64.
When set to yes, your installer will read from the 64-bit portion of the registry
on a 64-bit system. Most of the time, WiX handles this for you, setting this ag if
you've built your project to target a 64-bit platform. Setting it manually allows you
to explicitly choose where to search. For example, you may set it to no to search the
32-bit portion on a 64-bit system. The 32-bit registry is located in the Wow6432Node
found at HKEY_LOCAL_MACHINE\SOFTWARE\Wow6432Node and HKEY_
CURRENT_USER\Software\Wow6432Node.
Writing to the registry
To write to the registry, you'll use the RegistryValue element by itself or paired
with a RegistryKey element. By itself, RegistryValue can perform simple writes.
Writing multiple things to the same place is easier when you use RegistryKey. We'll
discuss both of these in the next sections. Writing occurs during the deferred stage of
the Execute sequence during an action called WriteRegistryValues.
www.it-ebooks.info

Chapter 10
[ 283 ]
Writing a single value
Writing to the registry is sort of like installing something on the end user's computer.
So, you'll have to place your RegistryValue element inside a Component element.
This is actually a good thing as it gives you the opportunity to set component-level
conditions to enable or disable the writing. You could use this to only record to the
registry if a certain condition is met. Refer back to Chapter 4, Improving Control with
Launch Conditions and Installed States, for a discussion on component-level conditions.
Just like when you're installing a le, you must mark something inside the
component as the KeyPath item. In this case, we can mark RegistryValue itself.
Here's an example that writes to a value called myValue in the HKLM\Software\
WixTest\Test key:
<ComponentGroup Id="RegistryComponents"
Directory="INSTALLLOCATION">
<Component Id="CMP_WriteToRegistry"
Guid="DA01C245-8633-4147-92F0-C063003DB493">
<RegistryValue Id="myRegistryValue"
KeyPath="yes"
Action="write"
Root="HKLM"
Key="Software\WixTest\Test"
Name="myValue"
Value="my value"
Type="string" />
</Component>
</ComponentGroup>
Because the element is packaged inside a Component element, it will be removed
for us during an uninstall, freeing us from that responsibility. The RegistryValue
element's Id attribute simply serves to uniquely identify it in the MSI database. We
use the KeyPath attribute to mark it as the keypath for the component.
The Action attribute can take one of three values: append, prepend, or write. You'd
use append or prepend when the type of data you're storing is REG_MULTI_SZ and
you aren't creating a new value, but rather updating an existing one. REG_MULTI_SZ
is a type that contains multiple items of data in a single value. If you use either of
these and there isn't an existing value, one will be created. Setting Action to write
tells the installer to overwrite any existing value or to otherwise create a new one.
www.it-ebooks.info

Accessing the Windows Registry
[ 284 ]
The Root, Key, and Name attributes set the path in the registry to write to. Root can
be set to any of the values available to RegistrySearch with one addition—HKMU.
This is a registry hive that's only related to installs. It means that if this is a per-user
install, the value will be written under HKEY_CURRENT_USER. If it's a per-machine
install it will be written under HKEY_LOCAL_MACHINE.
Set the Value attribute to the data to store in the specied registry value.
You'll establish what type of data it is with the Type attribute, which can be
one of the following:
• string: This means a REG_SZ type
• integer: This means a REG_DWORD type
• binary: This means a REG_BINARY type
• expandable: This means a REG_EXPAND_SZ type
• multiString: This means a REG_MULTI_SZ type
When writing more than one value to the same registry key, it's easier to use the
RegistryKey element, which we'll cover in the next section.
Writing multiple values
With the RegistryKey element, you can set the key you want to write to once, and
then nest several RegistryValue elements inside. Use its Root and Key attributes to
set the key, as in this example:
<Component ...>
<RegistryKey Root="HKCU"
Key="Software\MyCompany">
<RegistryValue Name="myValue"
Action="write"
Value="myValue"
Type="string"
KeyPath="yes" />
<!--Other RegistryValues under the same key-->
</RegistryKey>
</Component>
www.it-ebooks.info

Chapter 10
[ 285 ]
Here, we've set the RegistryKey element to write to the HKCU\Software\MyCompany
key. The child RegistryValue element species what to set the myValue value to.
Now, to write to more values in the same key simply add more RegistryValue
elements. Notice that we've set the RegistryValue element in the previous example
as the KeyPath item. If you add more values, you should set their KeyPath attributes
to no. Also notice that neither element requires an Id attribute.
The RegistryKey element has two other optional attributes:
ForceDeleteOnUninstall and ForceCreateOnInstall. By setting
ForceDeleteOnUninstall to yes, during an uninstall not only will the values you've
written during the install be removed—which is the behavior you get just for having
your RegistryKey inside a Component element—but also all other sub keys that are
children to that key. This is probably not the desired behavior in most cases, but might
come in handy under special circumstances, such as when your software has added
keys that you'd like to remove at uninstall time. The following is an example:
<Component ...>
<RegistryKey Root="HKCU"
Key="Software\MyCompany"
ForceDeleteOnUninstall="yes">
<RegistryValue Name="myValue"
Action="write"
Value="myValue"
Type="string"
KeyPath="yes" />
</RegistryKey>
</Component>
The ForceCreateOnInstall attribute allows you to create an empty key without
any values. Without it, the installer won't create the key. It can be a little tricky
getting this to work if you're targeting the HKCU hive. This is because of the ICE38
validation test that checks that you've marked a registry value as the keypath. In
our case, we don't want to create any values. One solution is to nest the key under
another key that does have a RegistryValue marked as the keypath, as in the
following example:
<ComponentGroup Id="RegistryComponents"
Directory="PersonalFolder">
<Component Id="CMP_RegistryWrite"
Guid="3BF28DC8-4AFC-43E8-B605-AA6456B06921">
<RegistryKey Root="HKCU"
Key="Software\MyCompany">
<RegistryValue Type="string"
Action="write"
www.it-ebooks.info

Accessing the Windows Registry
[ 286 ]
Name="myValue"
Value="123"
KeyPath="yes" />
<RegistryKey Key="Subkey1"
ForceCreateOnInstall="yes" />
</RegistryKey>
</Component>
</ComponentGroup>
Another use for RegistryKey is to set a REG_MULTI_SZ value. Remember that this
type of value can hold multiple items of data. This technique looks just like the last
example except that the Name attribute of each RegistryValue element stays the
same to signify that they're writing data to the same place. Here's an example that
writes two values to myValue:
<Component ... >
<RegistryKey Root="HKLM"
Key="SOFTWARE\MyCompany">
<RegistryValue Id="myRegistryValue"
Name="myValue"
Value="first value"
Type="multiString"
KeyPath="yes" />
<RegistryValue Id="myRegistryValue2"
Name="myValue"
Action="append"
Value="second value"
Type="multiString"
KeyPath="no" />
</RegistryKey>
</Component>
In this example, both RegistryValue elements have their Type attributes set to
multiString to show that they are writing to a REG_MULTI_SZ value. Notice that
the second one has an Action attribute of append. You could set this on both the
elements, but for the rst it isn't necessary. You can also use prepend to add a string
to the beginning of the value.
www.it-ebooks.info

Chapter 10
[ 287 ]
Setting NeverOverwrite
When writing to the registry, you have the option of specifying that you only
want to create the key or value if it doesn't already exist. For this, you'll add the
NeverOverwrite attribute to the parent Component element. The next example only
adds the registry value myValue if it doesn't exist:
<Component Id="CMP_regvalue"
Guid="7088AC98-898E-4FB4-98A6-6549AD3495E8"
NeverOverwrite="yes">
<RegistryValue Root="HKLM"
Key="Software\MyCompany"
Name="myValue"
Value="a new value"
Type="string"
Action="write"
KeyPath="yes"/>
</Component>
Removing registry values
When it comes to uninstalling your product, you don't need to worry too much
about the registry keys you've created. Windows Installer will make sure that all
components, including registry keys, are cleaned up. However, in case you want to
remove items from the registry that you didn't create—perhaps they were created by
one of your other products—WiX provides a way to do it.
Two elements are used to remove data from the registry: RemoveRegistryKey and
RemoveRegistryValue. We'll cover both in the following sections.
Remove all keys recursively
You'll use the RemoveRegistryKey element when you want to remove a key from
the registry and all of its sub keys. It must be placed inside a Component element, as
in this example:
<ComponentGroup Id="RegistryComponents"
Directory="INSTALLLOCATION">
<Component Id="CMP_RemoveRegistryKey"
Guid="3B0C6FD9-D73A-4CE9-8053-BBBB2BE8716B"
KeyPath="yes">
<RemoveRegistryKey Id="MyRemoveRegistryKey"
www.it-ebooks.info

Accessing the Windows Registry
[ 288 ]
Root="HKLM"
Key="Software\WixTest\myKey"
Action="removeOnInstall" />
</Component>
</ComponentGroup>
Here, the Component element is marked as the keypath since you cannot do this with
the RemoveRegistryKey element. The RemoveRegistryKey element's Id attribute
sets the unique key for this entry in the MSI database. Root species the hive where
the key we're removing is located and Key lists the path to it. You can, via the Action
attribute, specify when to remove this key. It can be set to either removeOnInstall
or removeOnUninstall.
Removing a single value
Whereas RemoveRegistryKey removes a key and all of its sub keys, the
RemoveRegistryValue element is more targeted. It allows you to remove a specic
value inside a particular key. It should be placed inside a Component element, as in
the following code snippet:
<ComponentGroup Id="RegistryComponents"
Directory="INSTALLLOCATION">
<Component Id="CMP_RemoveRegistryValue"
Guid="A07AEF74-C9A9-4D61-8852-A4EC3F9E13F9"
KeyPath="yes">
<RemoveRegistryValue Id="MyRemoveRegistryValue"
Root="HKLM"
Key="Software\WixTest\MyKey"
Name="myValue" />
</Component>
</ComponentGroup>
The syntax of RemoveRegistryValue is very similar to RemoveRegistryKey except
that it adds a Name attribute to specify the value to remove from the key. Notice that
there's no Action attribute because you don't have the option of removing a value
during an uninstall.
www.it-ebooks.info

Chapter 10
[ 289 ]
Copying registry values
WiX doesn't provide a specic element for copying data from one registry value
to another. However, you can accomplish this task by pairing a RegistrySearch
element with RegistryValue. First, you'll store the value in a property by using a
RegistrySearch element. Then, you'll reference that property in the Value attribute
of the RegistryValue element. Here's an example:
<Property Id="MY_REG_VALUE">
<RegistrySearch Id="MyRegistrySearch"
Root="HKLM"
Key="Software\MyCompany\MyKey"
Name="MyDWORDValue"
Type="raw" />
</Property>
<ComponentGroup Id="RegistryComponents"
Directory="INSTALLLOCATION">
<Component Id="CMP_CopyRegValue"
Guid="747965AA-90F4-4262-BE55-3C1F4F7F65B4">
<RegistryValue Id="MyRegistryValue"
KeyPath="yes"
Root="HKLM"
Key="Software\MyCompany\MyKey"
Name="MyCopiedValue"
Value="[MY_REG_VALUE]"
Action="write"
Type="string" />
</Component>
</ComponentGroup>
The rst thing we did was use a RegistrySearch element to look up MyDWORDValue
stored in the HKLM\Software\MyCompany\MyKey key. Its value is then stored in a
property called MY_REG_VALUE.
Next, we create a new component and add a RegistryValue element to it. It
species that it will create a new registry value under the same key as the original,
but called MyCopiedValue. We set its value with the Value attribute, which
references the MY_REG_VALUE property in square brackets.
www.it-ebooks.info

Accessing the Windows Registry
[ 290 ]
Notice that we can set the Type to string here even though the value we're copying
is actually of type DWORD. Because the value stored in the property is retrieved using
the raw type, it will contain special characters to denote its data type. When we
copy it to our new value, Windows will infer the data type by this. So, in essence,
it doesn't matter what you put for the RegistryValue element's Type attribute.
Windows can gure out on its own what type it should be.
Registry permissions
Every key in the registry has a set of permissions saved to it that affects which
users can read or write to it. You can see this in the Registry Editor by going to Run
| regedit, right-clicking on a key, and selecting Permissions. WiX allows you to
change these permissions with its PermissionEx element.
PermissionEx isn't in the default WiX namespace, but rather in WixUtilExtension.
So, you'll need to add a reference in your project to WixUtilExtension, found in the
WiX bin directory, and add the UtilExtension namespace to your Wix element.
Here's the updated Wix element:
<Wixxmlns="http://schemas.microsoft.com/wix/2006/wi"
xmlns:util="http://schemas.microsoft.com/wix/UtilExtension">
We've assigned the UtilExtension namespace to the prex util. Now, when
we create a registry key with a RegistryKey element, we'll nest a PermissionEx
element inside it to set its permissions. The next example sets the permissions of a
key called MyKey so that a user named nickramirez has all permissions to it:
<DirectoryRef Id="INSTALLLOCATION">
<Component Id="CMP_WriteToRegistry"
Guid="DA01C245-8633-4147-92F0-C063003DB493">
<RegistryKey Id="MyRegistryKey"
Root="HKLM"
Key="Software\MyCompany\MyKey">
<RegistryValue ... />
<util:PermissionEx User="nickramirez"
GenericAll="yes" />
</RegistryKey>
</Component>
</DirectoryRef>
www.it-ebooks.info
Chapter 10
[ 291 ]
Use the User attribute to set the name of the Windows user account to apply
permissions to the account. We've given them the GenericAll permission. The
following table lists all of your options:
Attribute As seen on the key What it does
GenericAll Full Control Gives user all permissions.
GenericRead Read Grants QueryValue,
EnumerateSubkeys, Notify, and
ReadControl. Must have at least one
other permission specified.
GenericExecute n/a Same privileges as GenericRead, but
it can be specified alone.
GenericWrite n/a Grants SetValue, CreateSubkey,
and ReadControl.
ChangePermission Write DAC Allows the user to read the
discretionary access control list for the
key.
CreateLink Create Link Allows the user to create symbolic links
to the key.
CreateSubkeys Create Sub key Allows the user to create new sub keys
inside the key.
Delete Delete Allows the user to delete the key.
EnumerateSubkeys Enumerate Sub keys Allows the user to identify all of the sub
keys in the key.
Notify Notify Allows the user to receive an audit
message about the key.
Read Query Value Allows the user to read the values in the
registry key.
ReadPermission Read Control Allows the user to read the information
in the key's access control list (ACL).
Synchronize n/a Sets whether to wait to access the
key until another thread has finished
accessing it.
TakeOwnership Write Owner Makes the user the owner of the key.
Write Set Value Allows the user to set the values of the
registry key.
www.it-ebooks.info

Accessing the Windows Registry
[ 292 ]
You can nest several PermissionEx elements inside a single RegistryKey element
to set access levels for various users. Be sure not to be so restrictive that no user has
enough rights to remove the key. That would cause problems during an uninstall.
You can also nest a PermissionEx element inside a RegistryValue element to apply
rights to that value's parent key.
Summary
In this chapter, we discussed how to read from and write to the Windows Registry
at install time. Reading stores a value from the registry in a Windows Installer
property that you can then use elsewhere in your markup. Writing is done with the
RegistryKey and RegistryValue elements. The former is used for writing multiple
values and the latter for writing a single value. You have the option of setting
permissions on these values and specifying whether or not to remove existing keys
that weren't included in your MSI.
In the next chapter, we'll cover how to interact with Windows services. WiX gives
you the capability to create, start, stop, and remove services. We'll also see how to
congure a service's user account and recovery options.
www.it-ebooks.info

Controlling Windows Services
A Windows service is an application that runs continuously in the background
and doesn't interact with the user of the computer. They typically start up when
the computer is booted. You can see a list of installed services in Windows 7 by
navigating in your Start menu to Control Panel | Administrative Tools | Services,
or by selecting Run from your Start menu and entering services.msc.
During an installation, your MSI package may need to interact with services that
already exist on the end user's computer or even install and congure its own. In this
chapter, we'll cover the WiX elements that allow you to do this. Specically, we'll
cover the following topics:
• Creating a simple Windows service
• Registering and conguring services with the sc.exe utility
• Installing a service with the ServiceInstall element
• Using ServiceControl to start, stop, and remove a service
• Setting a user account, dependencies, and recovery options
Creating a simple Windows service
A Windows service always maps back to an executable le that's stored on the local
hard drive. Although that executable could host a sophisticated program such as
a Windows Communication Foundation service, here we'll create one that's much
simpler. Our service will simply write to a log le periodically.
www.it-ebooks.info
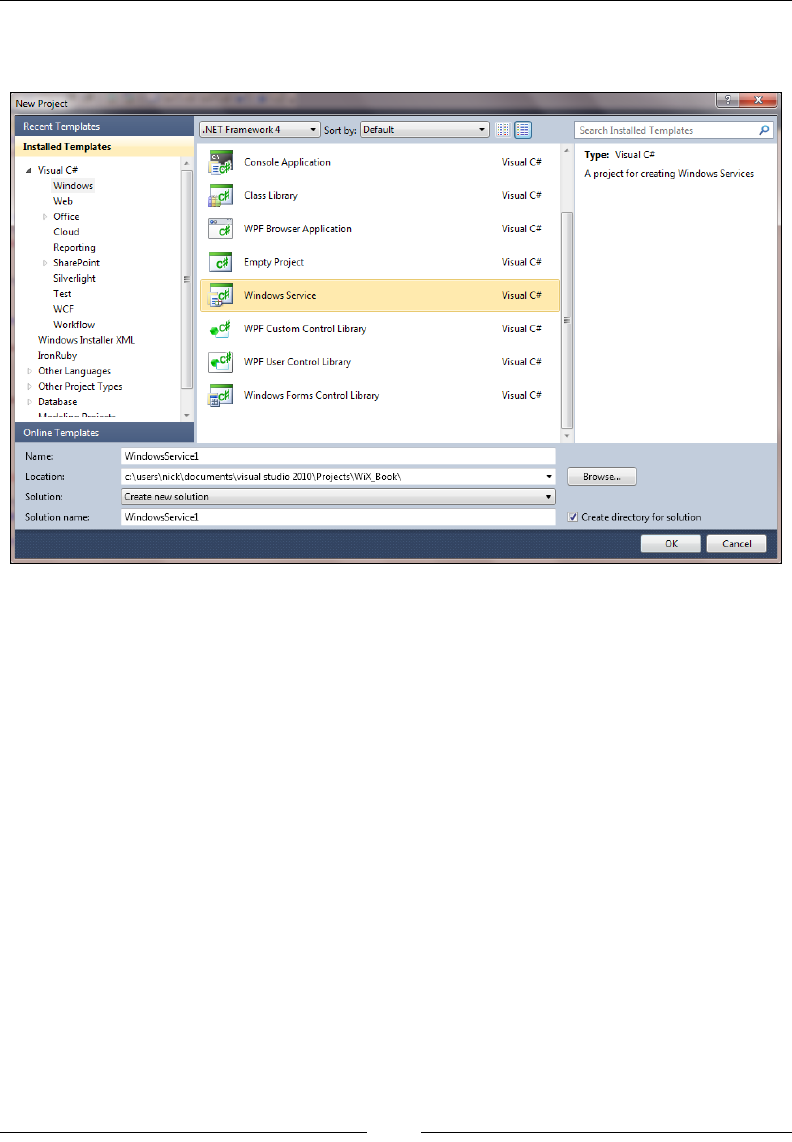
Controlling Windows Services
[ 294 ]
Visual Studio provides a project template for creating a Windows service. Go to File
| New | Project | Windows | Windows Service.
Once you've created this new project, right-click on the Service1.cs le in the
SolutionExplorer and select ViewCode. The C# code that you'll see displays a class,
here named Service1, that is derived from System.ServiceProcess.ServiceBase.
It overrides the OnStart and OnStop methods.
These are the methods that every Windows service must implement so that they
can be started and stopped by the Service Control Manager (SCM). The SCM is
a process that tracks which services are installed and monitors their individual
status. Later on, we'll cover how to issue some basic commands to the SCM from
the command line.
The following code in Service1.cs adds the functionality necessary to write to a log
le every ve seconds:
namespace WindowsService1
{
using System;
using System.IO;
using System.ServiceProcess;
www.it-ebooks.info

Chapter 11
[ 295 ]
using System.Threading;
public partial class Service1 : ServiceBase
{
private Thread thread;
private bool threadActive;
public Service1()
{
InitializeComponent();
}
protected override void OnStart(string[] args)
{
this.threadActive = true;
ThreadStart job = new ThreadStart(this.WriteToLog);
this.thread = new Thread(job);
this.thread.Start();
}
protected override void OnStop()
{
this.threadActive = false;
this.thread.Join();
}
protected void WriteToLog()
{
string appDataDir = Environment.GetFolderPath(
Environment.SpecialFolder.CommonApplicationData);
string logDir = Path.Combine(appDataDir,
"TestInstallerLogs");
string logFile = Path.Combine(logDir,
"serviceLog.txt");
while (this.threadActive)
{
if (!Directory.Exists(logDir))
{
Directory.CreateDirectory(logDir);
www.it-ebooks.info
Controlling Windows Services
[ 296 ]
}
using (var sw = new StreamWriter(logFile, true))
{
sw.WriteLine("Log entry at {0}", DateTime.Now);
}
Thread.Sleep(5000);
}
}
}
}
As you can see, we spin up a new thread in the OnStart method. This begins
the writing to a le called serviceLog.txt under the C:\ProgramData\
TestInstallerLogs directory. An easy way to get to that directory in the Windows
le explorer is to enter the %PROGRAMDATA% environment variable into the explorer's
address bar. The OnStop method sets a Boolean value to wind down the worker
thread, and then joins it to the main thread. A private method called WriteToLog
handles the actual logic. We separate the job into its own thread so that the service
can start in a timely manner without getting hung up.
Compile the project to get the executable le for our service. Next, we'll see how to
use the SCM to register and congure it.
Using sc.exe
To communicate with the Service Control Manager, you can use a command-line tool
called sc.exe. Note that you ought to be logged in as an administrator before running
this utility. To register our executable as a service, we'll use its create command.
Every service gets a behind-the-scenes short name such as testsvc. Specify the new
name as the rst parameter to create. The binPath parameter sets the path to the
executable. Be sure that the equal sign has no spaces before it and one after it. Follow
this convention with all sc.exe parameters that use an equal sign.
sc create testsvc binPath= "C:\WindowsService1.exe"
On Windows 8, this requirement of having a space after the
equals sign has been removed.
www.it-ebooks.info
Chapter 11
[ 297 ]
After running this command, you'll see the new service in the services management
console (services.msc) among the other installed services. Yours will show up
as testsvc. It won't be started yet for you. You'll have to start it manually, either
through the services management console or with the sc.exe tool's start command.
sc start testsvc
You'll always have to start your service the rst time. However, you can change
how it starts from then on. For example, you could have it start up each time the
computer is turned on. To do that, add the start argument to the create command,
as shown in the following code snippet:
sc create testsvc binPath= "C:\WindowsService1.exe" start= auto
The following table lists the possible values for the start argument:
Start value Meaning
demand This is the default argument. Service must be started manually.
auto Starts the service each time the computer is restarted.
boot Mostly used for device drivers. Starts the service at boot time.
system Mostly used for device drivers. Starts the service at kernel
initialization.
disabled The service cannot be started.
Something more that the create command can do is set a more user-friendly name
to be displayed in the services management console. So, if you'd rather have users
see "Test Service" instead of testsvc, you can add the DisplayName argument to
the create command.
sc create testsvc binPath= "C:\WindowsService1.exe" start= auto
DisplayName= "Test Service"
If you need to stop the service, you can use the stop command. Here is an example:
sc stop testsvc
To delete the service, use the delete command:
sc delete testsvc
www.it-ebooks.info

Controlling Windows Services
[ 298 ]
Notice that even if you've assigned the service a display name, you still have to
reference the testsvc name when issuing commands. You can nd the service name
of any installed service by right-clicking on it in the services management console
and selecting Properties. You can also nd it with sc.exe's GetKeyName command
which takes the DisplayName as a value and returns the service name, among other
information. The following example looks up the service name for the Test Service
service, returning the result testsvc.
sc GetKeyName "Test Service"
Something else to look at is how to set dependencies for your services. You'd use
this if your service required other services to be running before it could be started.
As an example, suppose testsvc couldn't start unless dependencySvc was already
running. You could specify that by adding the depend argument:
sc create testsvc binPath= "C:\WindowsService1.exe" depend= dependencySvc
You can specify more than one dependency by separating each name with a forward
slash (/). Windows will make sure that each service is started up in the correct order
if it depends upon another.
One nal thing to look at is setting the error logging level of your service. By default,
this is set to normal, meaning that when the computer is powered on, if there is an
error while trying to start the service, it will be logged and a message box will be
displayed to the user. You may decide to change this to either ignore, in which case
the error is logged but the user doesn't see a message box, or critical, meaning
that if the service can't be started, the computer will try to restart with the last known
good conguration. This is set with the create command's error argument.
sc create testsvc binPath= "C:\WindowsService1.exe" error= ignore
Using WiX to install a service
Now that you know how to install a service from the command line, let's look at how
to do it with an installer. WiX has an element called ServiceInstall that you can use
to add a new service to the services management console. This assumes that you've
already created the executable le that will become the end point for your service, as
discussed earlier.
www.it-ebooks.info

Chapter 11
[ 299 ]
First of all, we'll use the familiar Component and File elements to install the .exe to
the install directory on the target machine. Add the following code to your WiX
project:
<DirectoryRef Id="INSTALLFOLDER">
<Component
Id="CMP_WindowsService1"
Guid="3D3DE5C1-7154-4c61-9816-248A85F6DEBF">
<File
Id="WindowsService1.exe"
Name="WindowsService1.exe"
KeyPath="yes"
Source=".\WindowsService1.exe" />
</Component>
</DirectoryRef>
Next, add a ServiceInstall element to the same component to register the
WindowsService1.exe le as a service. Notice that a lot of the functionality from
sc.exe is present here, such as setting DisplayName, the startup type, and error
logging level. Each of the attributes shown is required except for DisplayName:
<DirectoryRef Id="INSTALLFOLDER">
<Component
Id="CMP_WindowsService1"
Guid="3D3DE5C1-7154-4c61-9816-248A85F6DEBF">
<File
Id="WindowsService1.exe"
Name="WindowsService1.exe"
KeyPath="yes"
Source=".\WindowsService1.exe" />
<ServiceInstall
Id="InstallWindowsService1"
Name="testsvc"
DisplayName="Test Service"
Start="auto"
ErrorControl="normal"
Type="ownProcess" />
</Component>
</DirectoryRef>
www.it-ebooks.info
Controlling Windows Services
[ 300 ]
When Type is set to ownProcess, it means that the service will execute in its
own Windows process. When set to shareProcess, it can be grouped into the
same process as other services running in the same executable. If you choose
shareProcess, then if even one of the services in the process fails, all of the services
in that process will fail. It is safer to separate services into their own processes, if
possible. Of course, that may be up to the team writing the service.
There are several other optional attributes available, some of which we'll discuss in
more detail later in the chapter. They are as follows:
Attribute name Description
Arguments Specify any command-line arguments required to run the service.
Account The account under which to start the service, valid only when
ServiceType is ownProcess.
Password The password for the account, valid only when the account has a
password.
Description The text that will be under the Description label for your
service in the services management console.
Vital Either yes or no, the overall installation should fail if this service
can't be installed.
LoadOrderGroup A group of services that your service can join (or create) to be
started when the computer starts up.
Be aware that the ServiceInstall element behaves a bit differently than other WiX
elements in that it won't automatically remove your Windows service during an
uninstall. That task, along with sending start and stop messages, is handled by the
ServiceControl element, which we'll discuss in the following section.
Starting, stopping, and uninstalling a
service
The ServiceInstall element works well for installing a service, but doesn't provide
a way to start, stop, or uninstall one. For that, you'll use the ServiceControl element.
It can be added to the same component as the ServiceInstall element thereby
sending signals to the testsvc test service you're installing.
www.it-ebooks.info

Chapter 11
[ 301 ]
The following example starts the service during install and stops and removes
it during uninstall. These actions happen during the deferred stage of the
Execute sequence:
<DirectoryRef Id="INSTALLFOLDER">
<Component ... >
<File ... />
<ServiceInstall ... />
<ServiceControl
Id="sc_WindowsService1"
Name="testsvc"
Start="install"
Stop="both"
Remove="uninstall"
Wait="yes" />
</Component>
</DirectoryRef>
The Name attribute species the service that you want to control. Start, Stop, and
Remove can each be set to one of the following values: install, uninstall, or both.
In this example, we've set Stop to both so that if our service is already installed
(from a previous install), we'll stop it before installing the new version and starting it
up again. It is essential that you set the Remove attribute or else the service won't be
removed during an uninstall.
WiX schedules these actions during the Execute sequence in the following order:
• StopServices
• DeleteServices
• RemoveFiles
• InstallFiles
• InstallServices
• StartServices
Notice that other actions that deal with installing and removing les are performed
after services have been stopped and deleted, and before services are installed and
started. That way, those processes are freed up before the underlying executable les
are modied.
www.it-ebooks.info
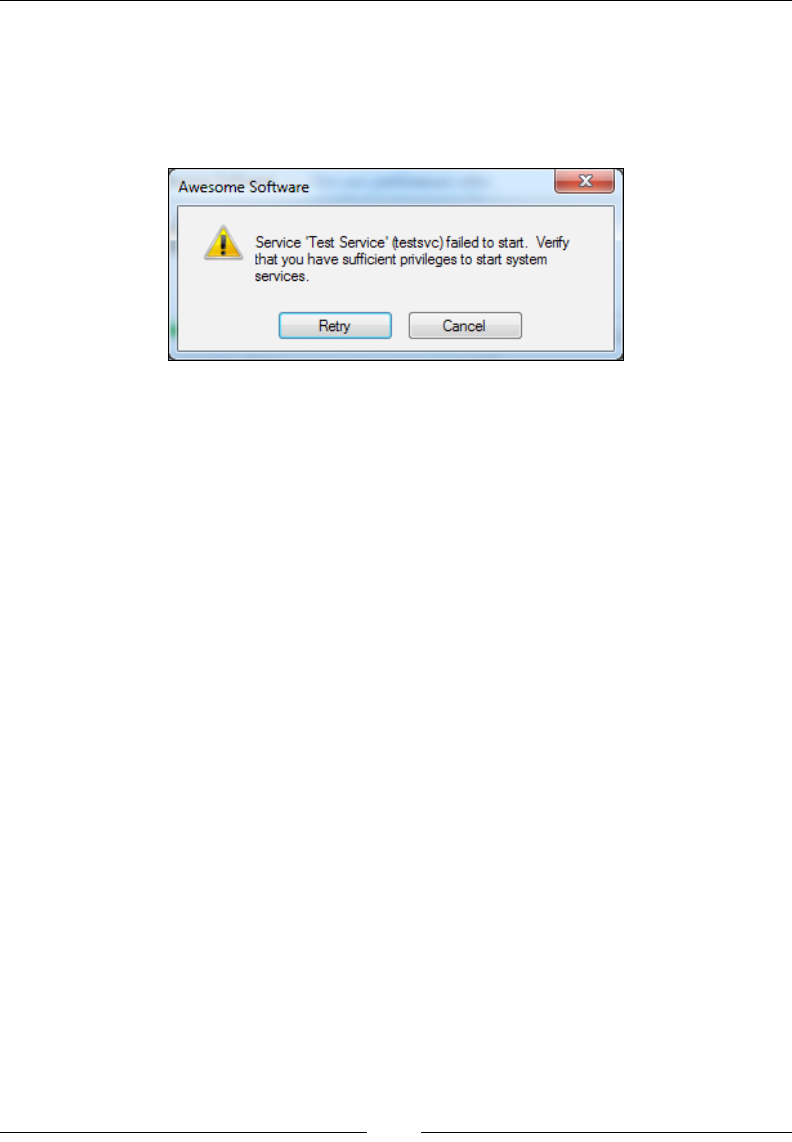
Controlling Windows Services
[ 302 ]
Getting back to the previous example, the Wait attribute tells the installer whether
it should pause and wait for each action to complete before moving on. If the rest
of your install depends on your service being in a certain state, then you should set
Wait to yes. Setting Wait to yes will also cause the installer to show a message box
to the user asking whether they'd like or retry to cancel if the service can't be started:
The ServiceControl element isn't limited to sending signals to services you're
installing. It can do the same for any service that's installed on the end user's
computer. All you have to do is change the Name attribute. For example, if we wanted
to stop the DHCP Client service (named Dhcp) before installing les and start it up
again afterwards, we could do so by adding a ServiceControl element with a Name
attribute of Dhcp:
<Directory ... >
<Component ... >
<File ... />
<ServiceControl
Id="startAndStopDhcp"
Name="Dhcp"
Start="both"
Stop="both"
Wait="yes" />
</Component>
</Directory>
Notice that we don't have to include a ServiceInstall element to use
ServiceControl. Also, ServiceControl here doesn't use the Remove
attribute, which tells the installer when to uninstall the service. We should
leave the DHCP Client service after our application has been uninstalled.
www.it-ebooks.info

Chapter 11
[ 303 ]
Setting the service's user account
Ordinarily, when you install a service, it runs under the LocalSystem account. You
can see this by opening the services management console, right-clicking on a service,
selecting Properties, and choosing Log On tab. LocalSystem is a special account
used by the SCM that gives wide-ranging privileges to interact with the computer.
If you'd like to give your service more limited access, you can assign it to another
user account.
Two accounts that you might consider are LocalService and NetworkService.
These accounts have fewer privileges than LocalSystem, but are still built-in and
ready to use. To set a new user account for your service, add the Account and
Password attributes to ServiceInstall. If the account doesn't have a password,
which is the case with LocalService and NetworkService, you can omit the
Password attribute. Here's an example:
<DirectoryRef Id="INSTALLFOLDER">
<Component
Id="CMP_WindowsService1"
Guid="3D3DE5C1-7154-4c61-9816-248A85F6DEBF">
<File
Id="WindowsService1.exe"
Name="WindowsService1.exe"
KeyPath="yes"
Source=".\WindowsService1.exe" />
<ServiceInstall
Id="InstallWindowsService1"
Name="testsvc"
DisplayName="Test Service"
Description="Test service for WiX"
Start="auto"
ErrorControl="normal"
Type="ownProcess"
Account="NT AUTHORITY\LocalService" />
<ServiceControl
Id="sc_WindowsService1"
Name="testsvc"
Start="install"
Stop="both"
Remove="uninstall"
Wait="yes" />
</Component>
</DirectoryRef>
www.it-ebooks.info

Controlling Windows Services
[ 304 ]
We've added the Account attribute to the ServiceInstall element and set it
to NT AUTHORITY\LocalService. You'll be able to see this after installing the
MSI by opening the services management console, right-clicking on the new
service, selecting Properties, and clicking on the Log On tab, as shown in the
following screenshot:
Hardcoding NT AUTHORITY\LocalService or NT AUTHORITY\NetworkService
won't work on non-English operating systems, as the names won't translate.
So, you should instead use WiX properties that will be translated into the proper
user account names at install time. WixUtilExtension offers these properties.
You can nd a list at http://wix.sourceforge.net/manual-wix3/osinfo.htm.
Here's an example that uses the WIX_ACCOUNT_LOCALSERVICE property in place of NT
AUTHORITY\LocalService. You must rst add a PropertyRef element to reference
the property in your project:
<PropertyRef Id="WIX_ACCOUNT_LOCALSERVICE"/>
<DirectoryRef Id="INSTALLFOLDER">
<Component ...>
<File ... />
<ServiceInstall
Id="InstallWindowsService1"
Name="testsvc"
DisplayName="Test Service"
Description="Test service for WiX"
www.it-ebooks.info

Chapter 11
[ 305 ]
Start="auto"
ErrorControl="normal"
Type="ownProcess"
Account="[WIX_ACCOUNT_LOCALSERVICE]" />
<ServiceControl ... />
</Component>
</DirectoryRef>
You can also set the account to a local user or domain user. Be sure to always include
the domain name or computer name, such as DomainName\UserName. For the next
example, we'll create a new user during the course of the install and then assign that
account to the service.
To create a new local user, use the User element from WixUtilExtension. After
adding a reference in your project to WixUtilExtension.dll, add the following
namespace to your Wix element:
<Wix xmlns="http://schemas.microsoft.com/wix/2006/wi"
xmlns:util="http://schemas.microsoft.com/wix/UtilExtension"
>
Now, you can use the User element in your markup. This new component will add
JoeUser as a local user account:
<Property Id="MY_PASSWORD" Hidden="yes" Value="password" />
<DirectoryRef Id="INSTALLFOLDER">
<Component
Id="CMP_NewUser"
Guid="29019429-AA87-401C-AF87-5BA4798EE6F1"
KeyPath="yes">
<util:User
Id="addNewUser"
LogonAsService="yes"
CreateUser="yes"
Name="JoeUser"
UpdateIfExists="yes"
Password="[MY_PASSWORD]"
PasswordNeverExpires="yes"
RemoveOnUninstall="yes" />
</Component>
</DirectoryRef>
www.it-ebooks.info

Controlling Windows Services
[ 306 ]
In order to create a Windows service that starts automatically, the assigned
user account must have the Logon as a Service right from the computer's local
security policy. You can give the new account this by setting the User element's
LogonAsService attribute to yes. Without this, the system won't be able to log in as
the account and an error will occur. You can check permission-related errors in the
Windows event log.
The CreateUser attribute tells the installer to create this user account if it doesn't
exist. Name sets the account's name. UpdateIfExists tells the installer to only update
the account's settings if it does already exist. For example, if the account exists but does
not have the Logon as a Service permission, it will be updated to have it. Password sets
the password for the account. Here, we're using a hardcoded property, but in practice
you'd probably gets its value from the user. The PasswordNeverExpires attribute
prevents the password from ever expiring and RemoveOnUninstall ensures that the
account will be deleted when the product is uninstalled.
Now, we can use this account in the ServiceInstall element:
<DirectoryRef Id="INSTALLFOLDER">
<Component
Id="CMP_WindowsService1"
Guid="3D3DE5C1-7154-4c61-9816-248A85F6DEBF">
<File
Id="WindowsService1.exe"
Name="WindowsService1.exe"
KeyPath="yes"
Source=".\WindowsService1.exe" />
<ServiceInstall
Id="InstallWindowsService1"
Name="testsvc"
DisplayName="Test Service"
Description="Test service for WiX"
Start="auto"
ErrorControl="normal"
Type="ownProcess"
Account=".\JoeUser"
Password=[MY_PASSWORD] />
<ServiceControl
Id="sc_WindowsService1"
Name="testsvc"
Start="install"
www.it-ebooks.info

Chapter 11
[ 307 ]
Stop="both"
Remove="uninstall"
Wait="yes" />
</Component>
</DirectoryRef>
You can use .\ before the account name to reference the local computer name, if you
don't know it. You can also specify a domain account here by prexing the name
with the domain name. You should also know that a local user account can only start
a service if the ServiceInstall element has an Interactive attribute set to no,
which is the default, and a Type set to ownProcess.
Adding service dependencies
If your service requires that other services be started before it can function properly,
you can use the ServiceDependency element to add those services as dependencies.
You'll place it inside the ServiceInstall element. Here's an example that states
that the DNS Client service, named Dnscache, must be started before starting our
Test Service:
<ServiceInstall
Id="InstallWindowsService1"
Name="testsvc"
DisplayName="Test Service"
Description="Test service for WiX"
Start="auto"
ErrorControl="normal"
Type="ownProcess">
<ServiceDependency Id="Dnscache" />
</ServiceInstall>
The ServiceDependency element's Id attribute sets the name of the service to
depend on. Now, Windows will make sure that the DNS Client service is started
before the Test Service. You can add more ServiceDependency elements for
additional dependencies.
www.it-ebooks.info

Controlling Windows Services
[ 308 ]
You can also set Id to the Name attribute of another ServiceInstall element. That
way, if you're installing two services, you can specify that one should be started
before the other. Here's an example:
<DirectoryRef Id="INSTALLFOLDER">
<Component ... >
<File ... />
<ServiceInstall
Id="InstallWindowsService1"
Name="testsvc1"
DisplayName="Test Service 1"
Start="auto"
ErrorControl="normal"
Type="ownProcess" />
<ServiceControl ... />
</Component>
<Component ... >
<File ... />
<ServiceInstall
Id="InstallWindowsService2"
Name="testsvc2"
DisplayName="Test Service 2"
Start="auto"
ErrorControl="normal"
Type="ownProcess">
<ServiceDependency Id="testsvc1" />
</ServiceInstall>
<ServiceControl ... />
</Component>
</DirectoryRef>
Here, the service called TestService2 will be started after TestService1 has
been started.
www.it-ebooks.info

Chapter 11
[ 309 ]
Another thing you can do is add one of your services to a load order group and
then start that entire group before starting one of your other services. A load order
group is simply a category under which several services are grouped. You can use
the ServiceInstall element's LoadOrderGroup attribute to join an existing group.
If that group name doesn't exist, it will be created for you. The next example joins the
TestService1 service to the TestGroup group:
<ServiceInstall
Id="InstallWindowsService1"
Name="testsvc1"
DisplayName="Test Service 1"
Start="auto"
ErrorControl="normal"
Type="ownProcess"
LoadOrderGroup="TestGroup" />
If we then had another service, we could specify, via the ServiceDependency
element, that all services in TestGroup should be started rst. You'd add the Group
attribute, set to yes, to signify that the Id attribute in the ServiceDependency
element refers to a group name:
<ServiceInstall
Id="InstallWindowsService2"
Name="testsvc2"
DisplayName="Test Service 2"
Start="auto"
ErrorControl="normal"
Type="ownProcess">
<ServiceDependency Id="TestGroup" Group="yes" />
</ServiceInstall>
When you set a dependency for a service, be aware that if the dependency can't
be started, an error will occur. If this happens during the install, then the user will
be given the option to retry or cancel. In the next section, we'll tackle what should
happen if the service fails during the normal course of its life. You can tell Windows
what to do when this happens with the ServiceConfig element.
www.it-ebooks.info
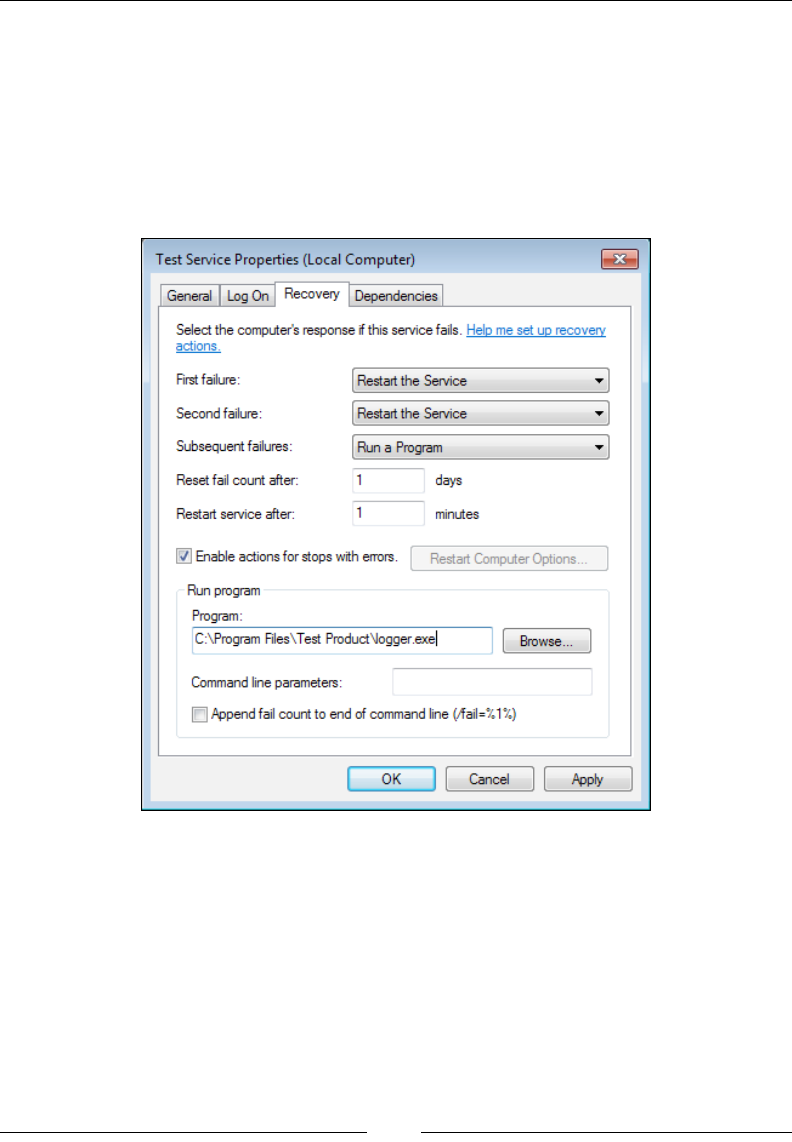
Controlling Windows Services
[ 310 ]
Service recovery with Util:ServiceCong
Windows allows you to set actions to be taken if your service fails at some point
while it's running. Note that at this point, we're handling errors that crash the service
during its lifetime and not errors during the installation. Your three options are: try
to restart the service, run an executable le or script, or reboot the machine. You can
see these settings in the services management console by viewing Properties of your
service and clicking on the Recovery tab.
First, let's alter the original Windows service that we created by changing the
WriteToLog function so that it throws an error the third time it prints a message.
As this error is uncaught, it will cause the service to stop running. This will give
the failure recovery actions a chance to kick in. The following is the new code for
WriteToLog:
protected void WriteToLog()
{
int count = 0;
string appDataDir = Environment.GetFolderPath(
www.it-ebooks.info

Chapter 11
[ 311 ]
Environment.SpecialFolder.CommonApplicationData);
string logDir = Path.Combine(appDataDir,
"TestInstallerLogs");
string logFile = Path.Combine(logDir, "serviceLog.txt");
while (this.threadActive)
{
count++;
if (count >= 3)
{
throw new Exception("Service failed.");
}
if (!Directory.Exists(logDir))
{
Directory.CreateDirectory(logDir);
}
using (var sw = new StreamWriter(logFile, true))
{
sw.WriteLine("Log entry at {0}", DateTime.Now);
}
Thread.Sleep(5000);
}
}
Now the service will fail after writing to the log twice. Going back to our WiX
project, let's add a project reference to WixUtilExtension, if it's not already there. Be
sure to add the util namespace:
<Wix xmlns="http://schemas.microsoft.com/wix/2006/wi"
xmlns:util="http://schemas.microsoft.com/wix/UtilExtension"
>
www.it-ebooks.info

Controlling Windows Services
[ 312 ]
This allows us to use the ServiceConfig element through which we can set the
failure recovery options. If you want to set the options for a service that's already
installed, place the ServiceConfig element inside its own Component element.
If, however, you want to set the options of a new service you're installing, place it
inside that ServiceInstall element, as in the following example:
<ServiceInstall
Id="InstallWindowsService1"
Name="testsvc"
DisplayName="Test Service"
Description="Test service for WiX"
Start="auto"
ErrorControl="normal"
Type="ownProcess">
<util:ServiceConfig
ServiceName="testsvc"
FirstFailureActionType="restart"
SecondFailureActionType="restart"
ThirdFailureActionType="runCommand"
RestartServiceDelayInSeconds="5"
ProgramCommandLine=
"C:\Program Files\Test Product\logger.exe"
ResetPeriodInDays="1" />
</ServiceInstall>
Here, we've set recovery actions for the testsvc service. The rst time it fails, the
action specied by the FirstFailureActionType attribute will be performed.
The second time, it will be the action in SecondFailureActionType and then
ThirdFailureActionType the third time. Each should be set to one of three values:
restart, runCommand, or reboot.
Specifying restart means that Windows will attempt to restart the service after a
delay time of seconds specied by the RestartServiceDelayInSeconds attribute.
Here, we've set it up so that the service will restart ve seconds after it fails.
Notice that we've set both the rst and second action types to restart, meaning that
the service will try to restart itself twice before running the command specied by
the ProgramCommandLine attribute. You may also use a property to set the path to
the program to execute:
<util:ServiceConfig
ServiceName="testsvc"
FirstFailureActionType="restart"
SecondFailureActionType="restart"
www.it-ebooks.info

Chapter 11
[ 313 ]
ThirdFailureActionType="runCommand"
RestartServiceDelayInSeconds="5"
ProgramCommandLine=
""[INSTALLFOLDER]logger.exe""
ResetPeriodInDays="1" />
Notice that we must place the XML entity " around the value so that the spaces
in the path are preserved. Another option is to set a property with a custom action,
perhaps with the SetProperty element, and then reference that property in the
ProgramCommandLine attribute. The following is an example where we create the
property with a custom action:
<SetProperty Id="SERVICE_RECOVERY_CMD"
Value=""[INSTALLFOLDER]logger.exe""
After="InstallInitialize"
Sequence="execute" />
You can also set an action to reboot in which case the computer will reboot. You can
add the RebootMessage attribute, set to a string, to show a custom message to the
user telling them that the system will restart. Or, you can omit it to keep the default.
Often, however, this message isn't shown. It's all up to the operating system.
We've set the ResetPeriodInDays attribute to 1, meaning that it will be one full
day before the error count is reset to zero. This, unfortunately, doesn't give you the
ne-grained control that you get with sc.exe, which lets you specify the value in
seconds. If the error count goes higher than three, it just keeps executing the action
specied by the ThirdFailureActionType attribute. Resetting the count brings you
back to the FirstFailureActionType attribute.
Summary
In this chapter, we discussed Windows Services both from the standpoint of working
with them via the command line with the sc.exe utility and with WiX. WiX lets
you add a new service to the services management console and congure its startup,
error logging level, and user account. Services can also be congured so that they
depend on other services and have failure recovery. Having all of this functionality
built-in can really simplify things.
In the next chapter, we will discuss how to localize an install package for different
languages. WiX simplies this process by allowing you to use variables in place of
text that can be swapped out for each language and culture. With the arrival of WiX
3.6, this experience has even been improved with the new ability to tailor the sizing
and positioning of user interface elements.
www.it-ebooks.info
Localizing Your Installer
Localization is the process of making a piece of software, or in this case an installer,
suitable for the culture and region where it will be used. This can include changing
the language of displayed text, making sure that images and colors are culturally
appropriate, and resizing UI elements to t longer or shorter words.
In this chapter, we'll cover the following aspects of localization:
• Setting the language and code page attributes of your Product
and Package elements
• Adding WiX localization les
• How to use Light.exe to localize an MSI
• Translating built-in error messages and the end-user license agreement
• Creating a single multi-language installer
WiX localization les
Suppose, to create an MSI for each language, you had to maintain a separate Visual
Studio project for each one. That would become a hassle pretty quickly. With WiX
localization les (.wxl), you can re-use the same WiX markup, but swap out the text
for each language you build. Light, the WiX linker, lets you specify a .wxl le to use.
A .wxl le contains strings for a particular language. These can be swapped
with placeholders (localization variables) when Light runs, creating an MSI
with language-specic text. To create a new .wxl le, right-click on your WiX
project in Visual Studio's Solution Explorer and select Add | New Item | WiX
Localization File.
www.it-ebooks.info

Localizing Your Installer
[ 316 ]
The convention is to name each .wxl le using an IETF language tag—such as
en-us.wxl—corresponding to the language it contains. Allow me to give a little
more background on this naming scheme. The rst half is a two-letter abbreviation of
the language such as "en" for English, "fr" for French, or "es" for Spanish. The second
half is a region such as "us" for United States to specify a regional dialect of the
language. You can also have a neutral-language tag by omitting the region portion,
such as simply en.wxl to mean English spoken anywhere.
The following is an example .wxl le that contains several strings localized for
English; the le will be named as en-us.wxl:
<?xml version="1.0" encoding="utf-8"?>
<WixLocalization
Culture="en-us"
Codepage="1252"
xmlns= «http://schemas.microsoft.com/wix/2006/localization»>
<String Id=»ProductName»>Awesome Software</String>
<String Id=»Comments»>(c) All rights reserved</String>
<String Id=»InstallButtonText»>Install</String>
</WixLocalization>
The root element is called WixLocalization and references a specialized namespace:
http://schemas.microsoft.com/wix/2006/localization. This element's
Culture attribute accepts a language tag, such as "en-us", to label the strings within
the le. If your strings contain characters that aren't included in the ASCII character
set, add the Codepage attribute to specify a numeric code page that includes them.
It overrides the code page on the Product element if you've set one. We'll cover that
later on.
Inside the WixLocalization element are String elements that dene the text
you want to localize. Each will become a variable that you can then use in your
WiX markup. For example, the rst String element, which has an Id attribute of
ProductName and a value of Awesome Software, can be used to give localized names
to our targeted install folder:
<Directory Id="TARGETDIR" Name="SourceDir">
<Directory Id="ProgramFilesFolder">
<Directory Id="INSTALLFOLDER"
Name="!(loc.ProductName)" />
</Directory>
</Directory>
www.it-ebooks.info

Chapter 12
[ 317 ]
Of course, you could use this variable in multiple places in your markup. The syntax
for using a localization variable is !(loc.PropertyName). Everywhere that you
would use normal text you can use a localization variable: labels on UI controls,
feature titles and feature descriptions, directory names, and so on. Then, simply by
switching the .wxl le you reference, the values of those variables change.
The String element has two optional attributes: Localizable and Overridable.
Localizable is purely for documentation purposes. It tells the person translating
the text into another language that this string doesn't need to be localized. You might
set it to no on String elements that don't contain actual words, but rather non-words
such as code page numbers that you're storing in the .wxl le. For example, you may
store a different code page for each version of the installer, as follows:
<String Id="Codepage" Localizable="no">1252</String>
You could then set the Package element's SummaryCodepage attribute like so:
<Package InstallerVersion="200"
Compressed="yes"
InstallScope="perMachine"
SummaryCodepage="!(loc.Codepage)" />
Setting Overridable to yes lets you set two String elements with the same Id
attribute. Ordinarily, doing so would cause an error. However, if one of the String
elements is Overridable, then it will be overwritten by the other. For example,
suppose you have two .wxl les that specify the same culture and each denes
a String element with an Id attribute of MyString. If one has the Overridable
attribute set to yes and the other doesn't, the element that doesn't will be used. The
UI dialogs that come with the WiX toolset dene .wxl les for many languages, and
they set the Overridable attribute on all of their strings. This allows you to replace
the default strings with your own by adding your own .wxl les.
The standard dialogs from WixUIExtension use localization variables extensively.
Here's some of the markup they use for the WelcomeDlog dialog. You can see several
localization variables at work:
<Dialog Id="WelcomeDlg"
Width="370"
Height="270"
Title="!(loc.WelcomeDlg_Title)">
<Control Id="Next"
Type="PushButton"
X="236"
Y="243"
Width="56"
www.it-ebooks.info

Localizing Your Installer
[ 318 ]
Height="17"
Default="yes"
Text="!(loc.WixUINext)" />
<Control Id="Cancel"
Type="PushButton"
X="304"
Y="243"
Width="56"
Height="17"
Cancel="yes"
Text="!(loc.WixUICancel)">
<Publish Event="SpawnDialog"
Value="CancelDlg">1</Publish>
</Control>
<Control Id="Bitmap"
Type="Bitmap"
X="0"
Y="0"
Width="370"
Height="234"
TabSkip="no"
Text="!(loc.WelcomeDlgBitmap)" />
The WiX source code that's compiled into WixUIExtension contains the .wxl les
that dene these variables. Here's a sample from the Spanish version:
<String Id="WelcomeDlgTitle"
Overridable="yes">
{\WixUI_Font_Bigger}
Le damos la bienvenida a la Instalación de
[ProductName].
</String>
<String Id="WixUINext"
Overridable="yes">&Siguiente</String>
<String Id="WixUICancel"
Overridable="yes">Cancelar</String>
<String Id="WelcomeDlgBitmap"
Overridable="yes">WixUI_Bmp_Dialog</String>
www.it-ebooks.info

Chapter 12
[ 319 ]
I've added whitespace to make the le easier to read, but in practice you should
remove all beginning and trailing whitespace from your strings. Otherwise, it will
be included in the nal value. WixUIExtension comes with .wxl les for more than
thirty languages including Spanish, German, French, Hungarian, Polish, Japanese,
and Russian. Remember, you can override these strings by creating your own .wxl
les and adding String elements with Id attributes that match those dened by
WiX. You can also make your own UI and localize it with completely new strings.
The role of Light.exe
If you've added a .wxl le to your WiX project in Visual Studio, or maybe several
.wxl les—perhaps en-us.wxl for English and es-es.wxl for Spanish—building
the project will create an installer for each one. They'll be stored in the bin folder
under separate subfolders. This is without declaring which languages you want to
build for. By default, Visual Studio detects all of the languages you've added and
creates an MSI for each one.
The commands used to build the MSIs are the same that you learned about in Chapter
9, Working from the Command Line. First, Visual Studio calls Candle to compile the
.wxs source code les into .wixobj object les. Then, it makes a distinct call to Light
for each .wxl le, passing the -loc and -cultures ags. The following is the build
process, truncated and formatted for readability:
Candle.exe -out obj\Debug\ -arch x86 Product.wxs
Light.exe -out "bin\Debug\en-us\MyInstaller.msi"
-cultures:en-us
-loc en-us.wxl
-loc es-es.wxl
obj\Debug\Product.wixobj
Light.exe -out "bin\Debug\es-es\MyInstaller.msi"
-cultures:es-es
-loc en-us.wxl
-loc es-es.wxl
obj\Debug\Product.wixobj
www.it-ebooks.info
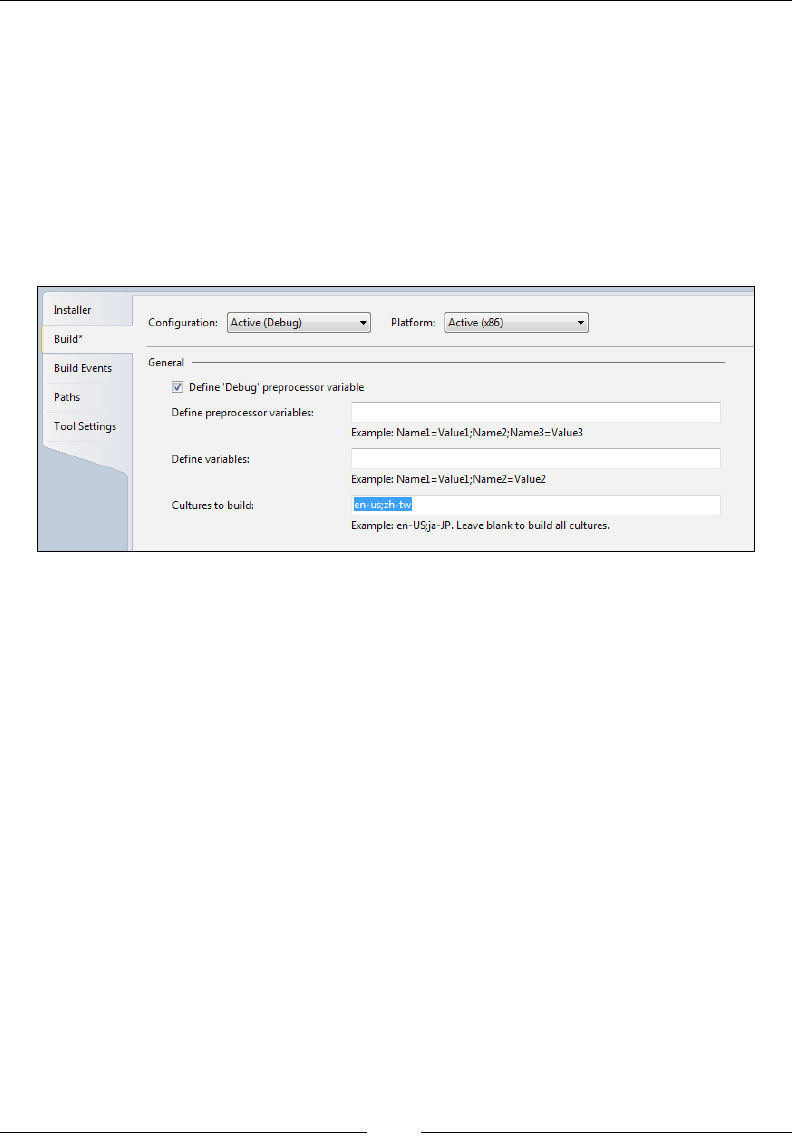
Localizing Your Installer
[ 320 ]
Each time that Light is called, all of the detected .wxl les are provided via the -loc
ags. However, recall that each .wxl contains a WixLocalization element. Only
those with a Culture attribute on their WixLocalization element that matches the
language tag set by the -cultures ag will be used. In this example, the rst call to
Light builds an installer with the "en-us" strings. The second uses the "es-es" strings.
You can also limit the languages to build in the project's Properties. Visual Studio
has a Cultures to build text eld on the Build page. You can set one or more
language tags here. Visual Studio will build a separate installer for each language
you specify. It does this by calling Light multiple times.
You can set more than one language by separating them with semicolons. If you
leave this eld blank, Visual Studio will build an MSI for every .wxl le you have in
the project.
Now, let's inspect the syntax of the -loc and -cultures ags a little more. Candle
doesn't do any processing on .wxl les. It leaves that up to Light. So, any localization
variables that you've inserted into your markup will remain unresolved in the
.wixobj les until Light is called.
Light looks for -loc and -cultures ags given to it on the command line. You can
specify more than one -loc ag, each pointing to a .wxl le. The -cultures ag
tells WiX which .wxl le(s) to use. Any that have a matching Cultures attribute on
their WixLocalization element will be used. Here's an example that might be run
directly from the command line (formatted for readability):
Light.exe -out myInstaller.msi
-cultures:en-us
-loc en-us.wxl
-loc en-us2.wxl
-loc de-de.wxl
"*.wixobj"
www.it-ebooks.info

Chapter 12
[ 321 ]
Here we've specied that we want to build our MSI using the en-us culture.
Assuming that en-us.wxl and en-us2.wxl both have that culture, both will be
used. The de-de.wxl le will be ignored. You can specify more than one culture by
separating each with a semi-colon, as in the following example:
Light.exe -out myInstaller.msi
-cultures:de-de;en-us
-loc en-us.wxl
-loc de-de.wxl
"*.wixobj"
The effect is different than when setting multiple cultures in Visual Studio's Cultures
to build text eld. In this context, it will set the rst culture as the primary one to use
and those that follow it as the fallback in case a particular string isn't dened in the
rst. The next example builds the installer using German strings ("de-de"), but falls
back to English strings if a localization variable isn't dened in German. If neither
denes it, then you'll get a build-time error.
Setting language and code page
attributes
When you localize your MSI package, you'll need to alter your Product and Package
elements to suit. To do so, you'll leverage code pages and locale identiers (LCIDs).
So the rst thing to do is dene what we mean by these terms.
A locale identier is an ID used to classify a particular language and the region
where it's spoken. It serves the same purpose as an IETF language tag, such as
"en-us", but is formatted as a number. For example, "1033" means English as spoken
in the United States. A full chart of LCIDs can be found at Microsoft's MSDN web site
by searching for locale ID. The URL is:
http://msdn.microsoft.com/en-us/goglobal/bb964664.aspx
Although that page also provides LCIDs in hexadecimal form, you should always
use the decimal form in WiX.
www.it-ebooks.info

Localizing Your Installer
[ 322 ]
A code page is an add-on of extra printable characters that aren't covered in the basic
set of 128 ASCII characters. I might as well break the news that WiX does not use
Unicode. It has to do with the fact that Windows Installer itself doesn't have strong
support for Unicode. For most tasks, this shouldn't present much of a problem.
ASCII covers all of the English alphabet and common punctuation marks. You can
see a chart displaying ASCII at:
http://msdn.microsoft.com/en-us/library/60ecse8t%28VS.80%29.aspx
However, it doesn't cover non-Latin characters (such as Chinese) or characters with
accents over them such as those found in French and Spanish. So, to print the accents
marks over Spanish letters, you'll need a code page. Without it, your installer won't
know how to render the characters you want. A full list of code pages can be found
at Microsoft's MSDN website:
http://msdn.microsoft.com/en-us/library/dd317756
As an example, you could specify a code page of "950" to make Traditional Chinese
characters available. In the following sections, we'll see how the Product and
Package elements make use of LCIDs and code pages.
The Package element
First, let's look at the Package element. Its job is to sum up details about the installer
such as who the author is and what platform it supports. Another important piece of
information it publishes is the language that's supported. An MSI package only lists
one supported language and it does so by setting the Package element's Languages
attribute. The attribute name is plural because the Package element is also used in
merge modules and they can list multiple supported languages. Here's an example
that sets the supported language to 1033 (English - United States):
<Package Compressed="yes"
InstallerVersion="301"
Manufacturer="Awesome Company"
Description="Installs Awesome Software"
Languages="1033" />
When the end user launches the installer, their computer looks to the Package
element to nd out what the supported language is. If that language isn't installed
locally, an error will be displayed telling the user so.
www.it-ebooks.info
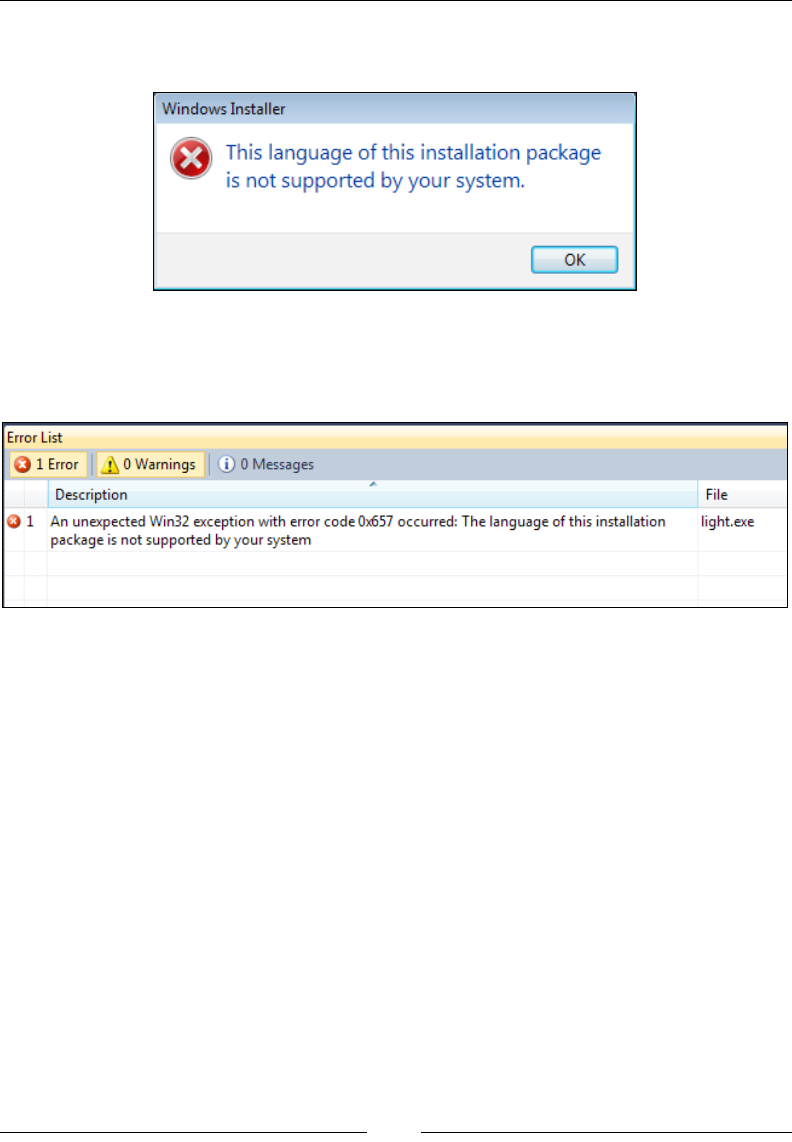
Chapter 12
[ 323 ]
Here's a message I got when I tried to install an MSI package that specied an LCID
of 1085, Yiddish, as the supported language:
Also, if your own development computer doesn't have that language installed, an
exception will be thrown when you try to build the WiX project, as shown in the
following screenshot:
Windows Installer stores the supported language in something called the Template
Summary property. You can nd more information about it at the following website:
http://msdn.microsoft.com/en-us/library/Aa372070
Open your MSI with Orca and select View | Summary Information to see it. It will
be listed as the Platform and Languages elds.
Getting back to the Languages attribute on the Package element, you have the
option of using a localization variable instead of a hardcoded value, as in the
following example:
<Package Compressed="yes"
InstallerVersion="301"
Manufacturer="Awesome Company"
Description="Installs Awesome Software"
Languages="!(loc.LocaleId)" />
www.it-ebooks.info

Localizing Your Installer
[ 324 ]
Here, we've specied the variable !(loc.LocaleId) for the Languages attribute.
The value for this variable will be lled in by a WiX localization le (.wxl). Here's a
sample .wxl le that denes this variable for Spanish localization:
<?xml version="1.0" encoding="utf-8"?>
<WixLocalization Culture="es-es" Codepage="1252"
xmlns="http://schemas.microsoft.com/wix/2006/localization">
<String Id="LocaleId">1034</String>
<!--Other strings defined here-->
</WixLocalization>
The Package element has another attribute called SummaryCodepage that's used to
set the code page for the summary properties. Summary properties are the details
shown when you right-click on an MSI le and view its Properties. If any of these
use characters outside of the ASCII set, they'll need a code page to display them.
You could set a hardcoded value, as in this example:
<Package Compressed="yes"
InstallerVersion="301"
Manufacturer="Awesome Company"
Description="Installs Awesome Software"
Languages="!(loc.LocaleId)"
SummaryCodepage="1252" />
Here we've specied that the code page to use is 1252, which is the code page
containing additional Latin character such as the copyright symbol and characters
with accents. If you don't specify the SummaryCodepage attribute it defaults to 1252.
You might explicitly set this attribute if you use extended characters such as those
for Chinese. If we had used Chinese characters in, for example, the Description
attribute, we would have had to specify a code page such as 950.
You can also use a localization variable like this:
<Package Compressed="yes"
InstallerVersion="301"
Platform="x86"
Manufacturer="Awesome Company"
Description="Installs Awesome Software"
Languages="!(loc.LocaleId)"
SummaryCodepage="!(loc.SummaryCodepage)" />
www.it-ebooks.info

Chapter 12
[ 325 ]
The Product element
While the Package element publishes the summary properties that describe the MSI,
the Product element contains the MSI's actual content. As such, setting its language
and code page properties affects the characters stored in any of the tables in the
installer and any error messages shown to the end user.
The Product element has an attribute called Language that denes the language used
by the installer. Note the difference between it and the Languages attribute on the
Package element which denes the supported language for the installer. Unlike the
Package element's Languages attribute, which is optional, you must always set the
Product element's Language attribute. Here's an example that sets Language to 1033:
<Product Id="3E786878-358D-43AD-82D1-1435ADF9F6EA"
Name="Awesome Software"
Language="1033"
Version="1.0.0.0"
Manufacturer="Awesome Company"
UpgradeCode="B414C827-8D81-4B4A-B3B6-338C06DE3A11">
To make life easy when localizing your package for more than one language, use a
localization variable that can then be dened in .wxl les:
<Product Id="3E786878-358D-43AD-82D1-1435ADF9F6EA"
Name="Awesome Software"
Language="!(loc.LocaleId)"
Version="1.0.0.0"
Manufacturer="Awesome Company"
UpgradeCode="B414C827-8D81-4B4A-B3B6-338C06DE3A11">
The Product element is also responsible for setting the code page for the
characters used throughout the MSI database. You can set its Codepage attribute,
as in this example:
<Product Id="3E786878-358D-43AD-82D1-1435ADF9F6EA"
Name="Awesome Software"
Language="!(loc.LocaleId)"
Codepage="1252"
Version="1.0.0.0"
Manufacturer="Awesome Company"
UpgradeCode="B414C827-8D81-4B4A-B3B6-338C06DE3A11">
www.it-ebooks.info

Localizing Your Installer
[ 326 ]
This attribute cannot take a localization variable. However, setting the Codepage
attribute on the WixLocalization element in your .wxl le will override the value.
To see this for yourself, change the code page using the WixLocalization element's
Codepage attribute and then inspect your MSI with Orca. Navigate to Tools | Code
Page to verify that it has been set.
One last thing to note: There are a number of experts who agree that you should
change the Product element's Id attribute for each different language. Luckily, that
attribute can accept a localization variable. That's probably the best way to go if you
want to keep strict control over your product codes. However, you may also put an
asterisk (*) to request that WiX create a new GUID for you each time you build.
Localizing the UI
As you've seen, you can use localization les and variables to handle most of the
text in your installer, whether that be labels on controls, the names of directories, or
the titles and descriptions of your features. So what's left? In the next few sections
we'll expand our scope to include the error messages that are baked into Windows
Installer, the status messages that are shown over a progress bar, the end-user license
agreement, and the size of user interface controls.
Error messages
Windows Installer responds to certain errors by displaying a message box with text
about what went wrong. You can see a list of these errors at:
http://msdn.microsoft.com/en-us/library/aa372835(VS.85).aspx
Unfortunately, they're always in English. You can see an example of this by
triggering the Source not found error. Follow these steps:
1. Create a simple .wxs le, but set the EmbedCab attribute on the
MediaTemplate element to no. This means that the installer won't embed
the CAB le in the MSI. Windows Installer will expect to nd it in the same
directory as the installer during installation. The MediaTemplate element
will look like this:
<MediaTemplate EmbedCab="no" />
2. Add a project reference to WixUIExtension and add one of the standard
dialog sets, such as WixUI_Minimal:
<UIRef Id="WixUI_Minimal" />
www.it-ebooks.info
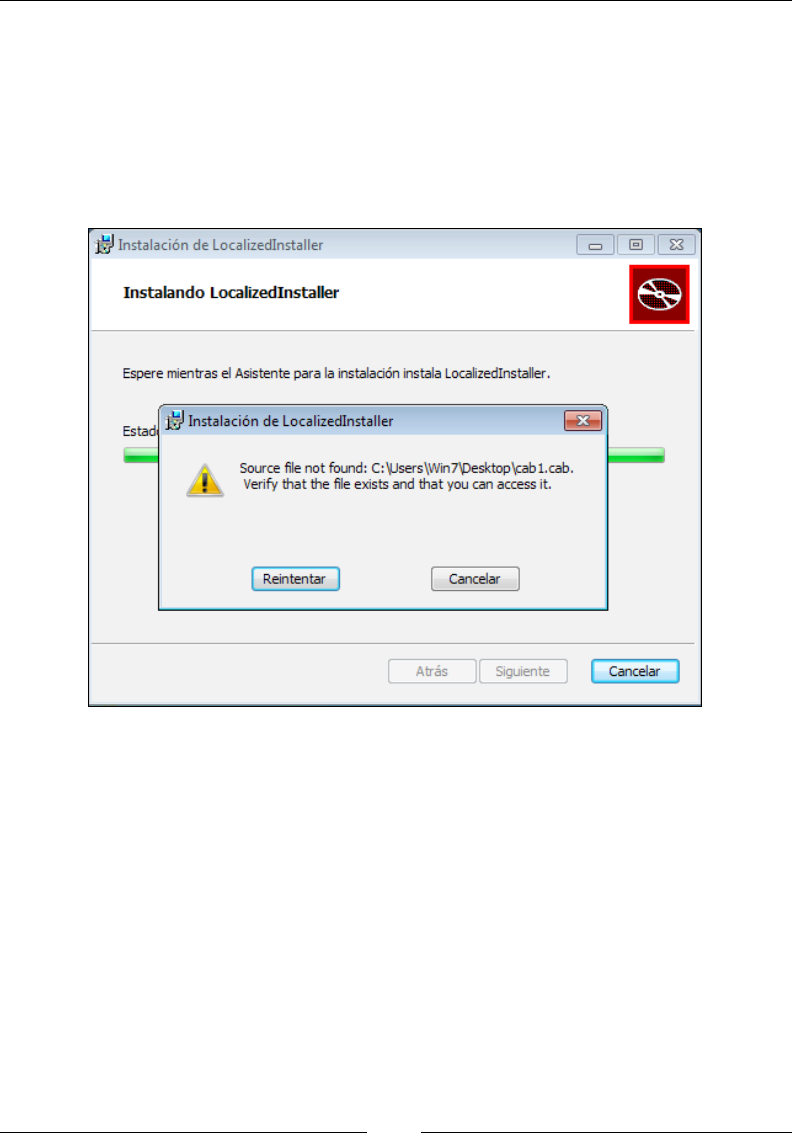
Chapter 12
[ 327 ]
3. On the Build page of the project's Properties, set Cultures to build to es-es.
WixUI_Minimal has a .wxl le for Spanish already baked in.
4. Compile the .wxs le into an MSI and then remove the CAB le from the
output directory.
5. Launch the installer, accept the license agreement, and click Instalar.
You'll see a message like in the following screenshot:
By setting Cultures to build to es-es, we've said that we want to use the Spanish
.wxl les from WixUIExtension. This means that most of the text in the UI will be
translated for us. However, the error message, which comes from the underlying
Windows Installer, isn't.
To correct this problem, we'll have to replace the default error message with a
localized one. Each message is identied by a number. For Source not found, it's
1311. To override the message, add an Error element inside a UI element in your
.wxs le. Set its Id attribute to the error number and the inner text to the localized
message. Here's an example:
<UI>
<Error Id="1311">Archivo no encontrado: [2].Compruebe que el archivo
existe y que puedes acceder a él.</Error>
</UI>
www.it-ebooks.info
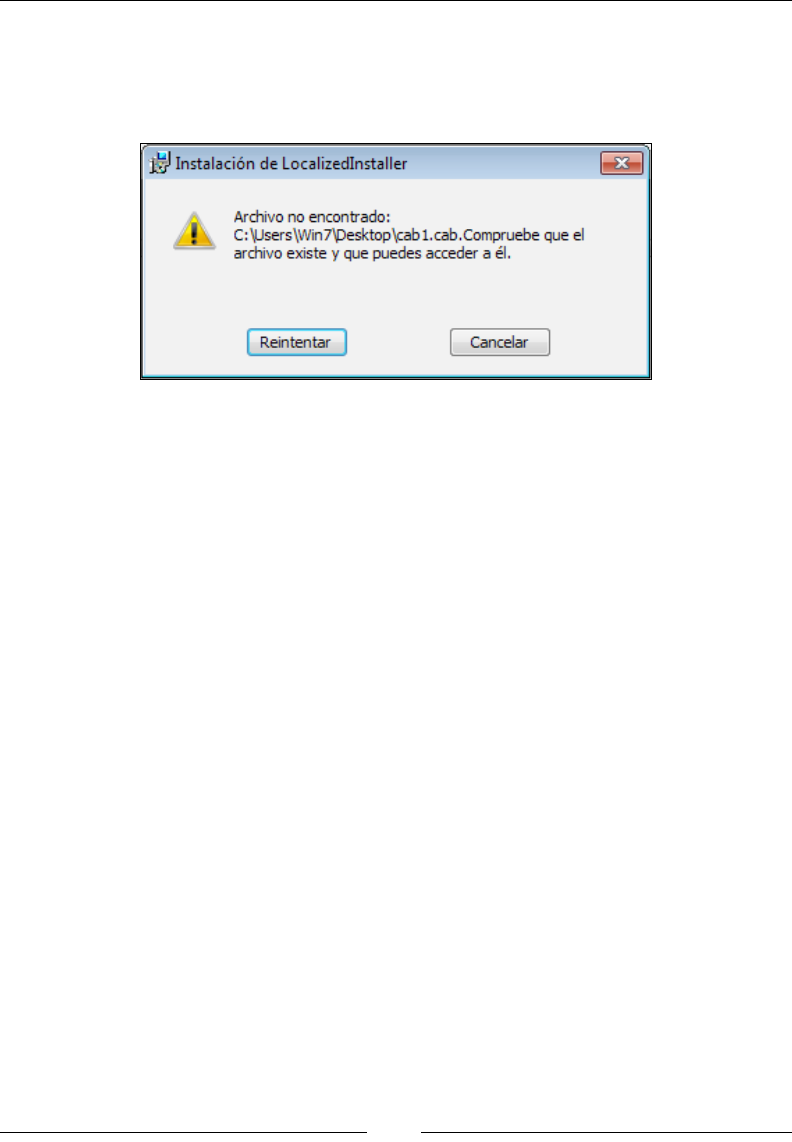
Localizing Your Installer
[ 328 ]
Trusting that Google Translate knows its stuff (lean towards having a professional
translator if you can), this should be the Spanish translation of the original message.
Rebuild the MSI, delete the CAB le, and try to install. You should see the new
message, as shown in the following screenshot:
Notice that we used [2] as a placeholder for the missing le's path. Windows
Installer lls in the information for us. Refer to the MSDN site for the template to use
for each error.
There's one thing left to do. We've hardcoded the Spanish translation for the
message. What we should really do is place that into a Spanish .wxl le and use a
localization variable inside the Error element. That way, we can have translations
for all of the languages we support. Follow this example:
<?xml version="1.0" encoding="utf-8"?>
<WixLocalization Culture="es-es" xmlns="http://schemas.
microsoft.com/wix/2006/localization">
<String Id="Error_1311">Archivo no encontrado: [2]. Compruebe que el
archivo existe y que puedes acceder a él.</String>
</WixLocalization>
Now we can use a localization variable:
<UI>
<Error Id="1311">!(loc.Error_1311)</Error>
</UI>
This variable can be replaced for each different language.
www.it-ebooks.info

Chapter 12
[ 329 ]
Now the good news is that WixUIExtension has translated these error
messages for you. By adding a reference to the extension and then adding a
UIRef to WixUI_ErrorProgressText, you'll let WiX do the heavy lifting for you.
Add the following markup to your main WiX source le:
<?xml version="1.0" encoding="UTF-8"?>
<Wix xmlns="http://schemas.microsoft.com/wix/2006/wi">
<Product ...>
<Package ... />
<UIRef Id="WixUI_ErrorProgressText"/>
<UIRef Id="WixUI_Minimal"/>
This technique will work when using one of the dialog sets that comes with WiX,
as we've done here, or when using a custom UI. You can also override these error
messages if you like. Add localized strings that match those set in WixUIExtension.
They look like the following code snippet:
<String Id="Error0" Overridable="yes">{{Error irrecuperable: }}</
String>
<String Id="Error1" Overridable="yes">{{Error [1]. }}</String>
<String Id="Error2" Overridable="yes">Advertencia [1]. </String>
<String Id="Error4" Overridable="yes">Información [1]. </String>
Progress bar messages
For the upcoming examples, create a WiX project and add a reference to
WixUIExtension. Then, add one of the dialog sets, such as WixUI_Minimal:
<UIRef Id="WixUI_Minimal"/>
Add a component to install, such as a text le:
<ComponentGroup Id="ProductComponents"
Directory="INSTALLFOLDER">
<Component Id="cmpInstallMeTXT"
Guid="9B29875D-7311-4E64-933F-A54D316777C0">
<File Source="InstallMe.txt" />
</Component>
</ComponentGroup>
www.it-ebooks.info
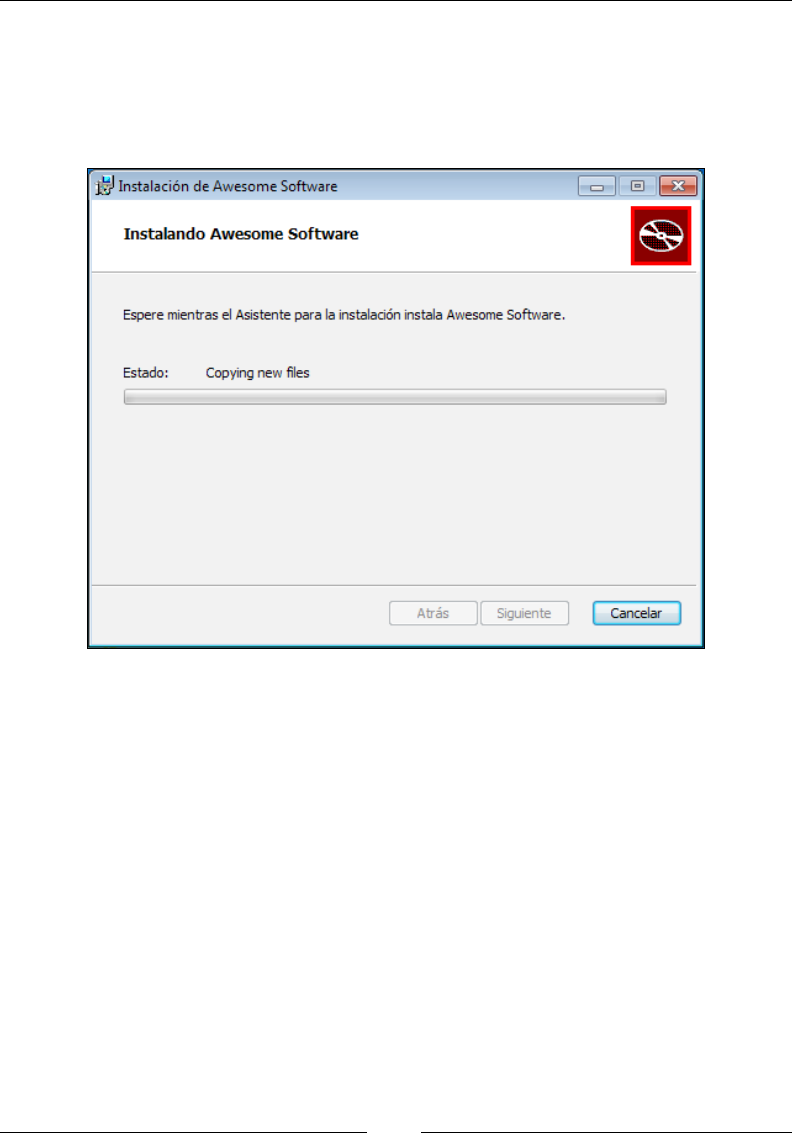
Localizing Your Installer
[ 330 ]
Open the project's Properties page and specify that you want to build the es-es
culture using the Build tab's Cultures to build text eld. Build the project and
launch the resulting Spanish installer. As you watch the progress bar, you may notice
that the text over it is in English, despite the rest of the window being in Spanish,
as shown in the following screenshot:
Custom progress messages are dened by a table in the MSI called ActionText.
However, by default this table isn't included. Without it, the messages, as you've
seen, are the stock English versions.
To add the ActionText table with strings for your progress messages, add a
ProgressText element inside a UI element for each standard action found in the
Execute sequence. For example, to add a localized message for the InstallFiles
action, add the following markup to one of your .wxs les:
<UI>
<ProgressText Action="InstallFiles"
Template="!(loc.InstallFilesTemplate)">
!(loc.InstallFiles)
</ProgressText>
</UI>
www.it-ebooks.info
Chapter 12
[ 331 ]
The Action attribute identies the action to associate the message with. The
Template attribute sets the format for the part of the message that Windows Installer
will ll in the blanks for. To see the format to use for each action, consult the MSI
SDK documentation that was installed with WiX. It's also available online at:
http://msdn.microsoft.com/en-us/library/windows/desktop/
aa372023(v=vs.85).aspx
The inner text of the ProgressText element sets the so-called Description for the
action and will be displayed over the progress bar along with the Template message.
In the next snippet, we'll set the localization variables that we used in the last
example to display a custom message for the InstallFiles action.
<?xml version="1.0" encoding="utf-8"?>
<WixLocalization Culture="en-us" xmlns="http://schemas.microsoft.com/
wix/2006/localization">
<String Id="InstallFiles">Tractor beam files!</String>
<String Id="InstallFilesTemplate">File: [1], Size: [6], Directory:
[9]</String>
</WixLocalization>
Here's the result:
www.it-ebooks.info
Localizing Your Installer
[ 332 ]
Now that you understand the concept of the ProgressText element, you should
also know that WixUIExtension denes all of them for you, in many different
languages. Simply add a UIRef element to your Product.wxs le that points to
WixUI_ErrorProgressText:
<UIRef Id="WixUI_ErrorProgressText"/>
Rebuild the project, launch the Spanish installer, and you'll see that the progress
messages are now translated.
EULA
All of the dialogs sets from WixUIExtension display an end-user license agreement
(EULA). It's always in English, defaulting to an RTF le called License.rtf
that's embedded within the extension. You'll want to replace this with your own
agreement and at the same time localize it. Luckily, all you have to do is specify
a path to your own RTF le with the link-time variable WixUILicenseRtf. The
following line, which you can place in your main .wxs le, replaces the default
license agreement with a custom one:
<WixVariable Id="WixUILicenseRtf"
Value="CustomAgreement.rtf" />
www.it-ebooks.info
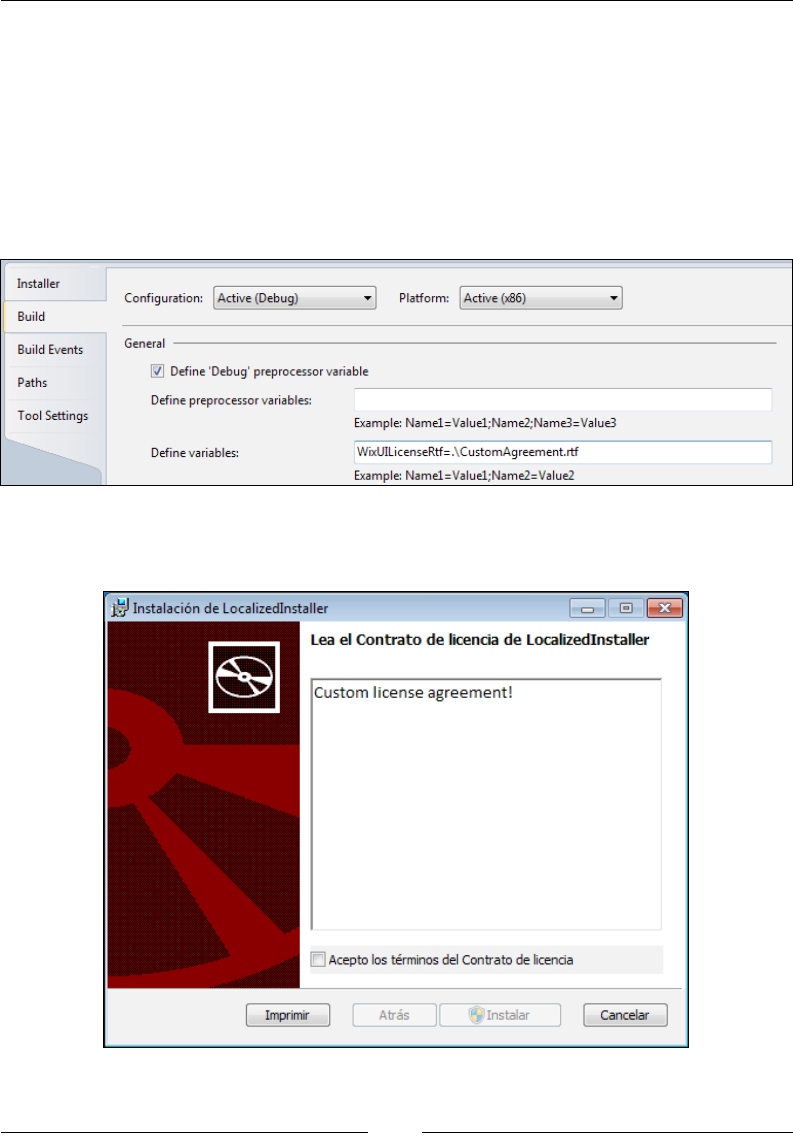
Chapter 12
[ 333 ]
You can also set this value from the command line when calling Light via the -d ag:
Light.exe -dWixUILicenseRtf=CustomAgreement.rtf -loc es_es.wxl
-cultures:es-es -ext WixUIExtension.dll
-out "es-es\AwesomeSoftware.msi" .\*.wixobj
Another option is to set it from within Visual Studio. Right-click on the project, select
Properties, and add the variable in the text eld labeled Dene variables, as shown
in the following screenshot:
Once you've pointed this variable to the new le, you'll see your RTF text for the
license agreement, as shown in the following screenshot:
www.it-ebooks.info

Localizing Your Installer
[ 334 ]
You can use this technique to create a language-specic EULA for each localized
MSI. Another way of localizing the EULA is to create a custom dialog that displays
the license agreement and then use a localization variable for the license content.
That way, you can store your RTF text in a .wxl le. This gives you more control
than using WixVariable. Here's an example of a ScrollableText control that uses a
localization variable to display a localized license agreement:
<Control Id="LicenseText"
Type="ScrollableText"
X="20"
Y="60"
Width="330"
Height="140"
Sunken="yes"
TabSkip="no">
<Text>!(loc.LicenseText)</Text>
</Control>
Now you can create a String element in your .wxl le that contains the RTF text,
as shown:
<String Id="LicenseText">
<![CDATA[
{\rtf1\ansi\ansicpg1252\deff0\deflang1033
{\fonttbl{\f0\fswiss\fcharset0 Arial;}}
{\*\generator Msftedit 5.41.21.2500;}
\viewkind4\uc1\pard\f0\fs20 Custom License Agreement\par}]]>
</String>
Resizing controls
Something that we've gained in WiX 3.6 is the ability to resize user interface controls
with localization variables. This is a great addition because words in, say, German
can be much longer than those in English. Take the English word "Install". In German
we get "Installieren". If we were to use a one-size ts all button for both, we might be
left with a label that crowds or overows the space available. Here's the markup that
sets a hardcoded value for a PushButton control's Width attribute:
<Control Id="Install"
Type="PushButton"
Text="Install"
Height="17"
Width="56"
X="50"
Y="50"
www.it-ebooks.info
Chapter 12
[ 335 ]
Default="yes">
<Publish Event="EndDialog" Value="Return" />
</Control>
The English version MSI looks ok:
However, the German version looks a little cramped:
Let's replace the hardcoded Width with a localization variable, as follows:
<Control Id="Install"
Type="PushButton"
Text="!(loc.Install)"
Height="17"
Width="!(loc.InstallButtonWidth)"
X="50"
Y="50"
Default="yes">
<Publish Event="EndDialog" Value="Return" />
</Control>
We'll then add an en-us.wxl le with the following markup:
<?xml version="1.0" encoding="utf-8"?>
<WixLocalization Culture="en-us" xmlns="http://schemas.microsoft.com/
wix/2006/localization">
<String Id="Install">Install</String>
<String Id="InstallButtonWidth">56</String>
</WixLocalization>
www.it-ebooks.info
Localizing Your Installer
[ 336 ]
Add a de-de.wxl le as well:
<?xml version="1.0" encoding="utf-8"?>
<WixLocalization Culture="de-de" Codepage="1252" xmlns="http://
schemas.microsoft.com/wix/2006/localization">
<String Id="Install">Installieren</String>
<String Id="InstallButtonWidth">66</String>
</WixLocalization>
Now the button in German is a little bit wider:
Width isn't the only attribute you can localize. You may also change a control's
Height attribute or move it with the X and Y attributes.
Creating a multi-language MSI
In addition to being able to create multiple separate MSIs for each language, it's also
possible to create a single MSI that shows a different language depending on the end
user's language settings. The process is automatic for the user. They don't need to
choose the language.
Note that the procedure you'll learn here isn't supported
by Microsoft, but is widely used.
To get started, build separate MSIs for each language. For a simple example, add a
project reference to WixUIExtension. Then add a UIRef element to your markup
to reference one of the standard dialog sets and set Cultures to Build in Visual
Studio to es-es;en-us;de-de. This will build Spanish, English, and German installers
using the .wxl les that are embedded in WixUIExtension. This is depicted in the
following screenshot:
www.it-ebooks.info
Chapter 12
[ 337 ]
Build the project. Visual Studio, by default, sends the output of each localized MSI to
its own folder.
Each folder contains an MSI for a different language. To merge these installers into
one, you'll need to verify that your project's Product.wxs le has the following:
• The Product element has a Language attribute set to a localized variable. We
will call it !(loc.ProductLanguage).
• Add .wxl les to your project for each language: en-us.wxl, es-es.wxl, and
de-de.wxl. Next, add a String element to each one with an Id attribute of
ProductLanguage, setting it to the LCID that matches that language: 1033
for en-us, 1034 for es-es, and 1031 for de-de.
Rebuild if necessary. Now, we're ready to merge the various MSIs into one. We'll
embed each language-specic MSI inside a single installer. Basically, we're going to
create transform les that will enable us to alter the language of our installer at the
time the user runs it. A transform le (.mst) contains a comparison between two MSIs.
Often they're used when building patches. However, they work for our needs too.
We'll compare each language-specic MSI against the English version (our base) to
produce a transform le that contains the differences between the two languages.
We'll then bundle all of the transform les inside the English MSI and when the
end user launches it, it will dynamically choose which transform le to apply. The
transform will alter the MSI (sort of like a patch) then and there at install time so that
the language of the transform replaces all of the current strings.
To make the comparison between English and each other language and make our
transform les, we'll use a tool that ships with WiX called Torch. Torch takes an
input le, an updatedInput le to compare it to, and an output le as parameters.
Here is the general syntax:
torch.exe [-?] [options] targetInput updatedInput -out outputFile
[@responseFile]
www.it-ebooks.info

Localizing Your Installer
[ 338 ]
Here's an example that compares the English and Spanish versions and creates a
transform le called es-es.mst:
torch.exe -t language "en-us\MyInstaller.msi"
"es-es\MyInstaller.msi" -out "transforms\es-es.mst"
It's a good idea to name your .mst les so that it's obvious which language they
contain. Include the -t ag, set to language. The -t stands for template and
without it you won't be able to compare MSIs that have different code pages. In this
example, we're storing the output in a folder called transforms. Make sure that this
folder exists before you call Torch.
The next step is to embed all of the transforms inside the English MSI. WiX doesn't
have a tool to do this, so we'll have to look elsewhere. The Windows SDK comes
with several VBScript les that perform various MSI-related tasks. You may need to
download the SDK from the MSDN website. The scripts are included in the Win32
samples. You can nd more information at:
http://msdn.microsoft.com/en-us/library/aa372865%28VS.85%29.aspx
The VBScript le we're interested in is called WiSubStg.vbs and can usually be
found in the Samples directory of the Windows SDK. On my computer, it's located
at C:\Program Files\Microsoft SDKs\Windows\v7.0\Samples\sysmgmt\msi\
scripts. Once you've found it, copy it to your project's directory and execute the
following command:
WiSubStg.vbs "en-us\TestInstaller.msi" "transforms\es-es.mst" 1034
The rst argument is the path to the English version MSI. The second is the path
to one of the transform les. You'll need to repeat this call for each one. The third
parameter gives a name to the transform for when it's embedded inside the MSI. The
convention is to name it the LCID of the language, such as 1034 for Spanish. This
process embeds each transform le inside the English MSI.
The next step is to set the value of the Languages attribute on the Package element
so that it publishes all of the languages that the MSI now supports. We don't have
to alter the MSI directly. We can use another tool from the Windows SDK called
WiLangId.vbs. Copy WiLangId.vbs to your project's directory. The following
command will set the Languages attribute to the three languages we've embedded
inside the MSI: 1033 (English), 1034 (Spanish), and 1031 (German).
WiLangId.vbs "en-us\TestInstaller.msi" Package 1033,1034,1031
www.it-ebooks.info
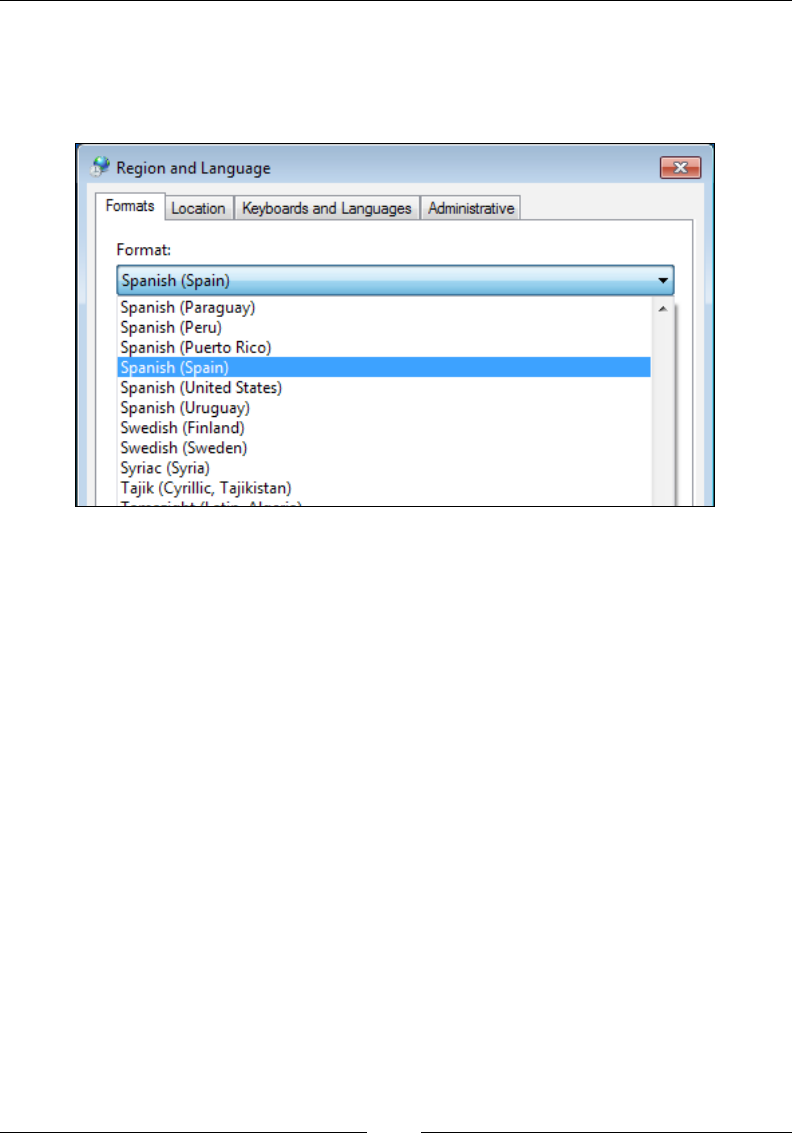
Chapter 12
[ 339 ]
That's it. The MSI is now a multi-language MSI. To test it out, change the
language settings of your user prole to Spanish. Go to Control Panel | Region
and Language, select the Formats tab, and select Spanish (Spain) as your language,
as shown in the following screenshot:
Launch the MSI and it should be the Spanish version. If you change your language
back to English, the MSI should then display itself in English. If the user's preferred
language is not one of the languages supported by your MSI, it will default to
showing English since that was the base MSI without any transforms applied to it.
The downside, however, is that Summary Properties will always be in English since
the transform is applied when the MSI is launched. Right-clicking on the installer
and viewing its properties won't activate the transform.
Summary
In this chapter, we discussed how to localize a WiX installer. Localization les make
this task much simpler and faster, saving you from having to maintain a separate
project for each language. Localization may encompass many aspects including
changing the text shown in the user interface, altering the sizing and position of
controls, and publishing the language that the installer supports. WiX handles all of
these tasks with style.
In the next chapter, we'll cover how to plan for and perform software upgrades using
WiX markup. There are a number of different types of upgrades and it pays to get to
know your options early on. The good news is that WiX 3.6 has simplied the XML
element you need to get the job done.
www.it-ebooks.info
Upgrading and Patching
In this chapter, we'll discuss planning for and authoring updates for your software.
Windows Installer offers an impressive set of functionality in this area and it pays to
learn your options early on, before the rst version of your software is released into
the wild. As you'll learn, building your initial MSI with updates in mind will make
your job much easier when it nally comes to sending out changes.
We'll cover the following topics:
• Planning for updates, including choosing the type of update to perform
• Authoring a major upgrade
• Deploying a minor upgrade or small update with a patch
Planning for updates
In the Windows Installer world, people tend to categorize updates into three groups:
major upgrades, minor upgrades, and small updates. The primary distinction
between these groups is the size of the update, or in other words, the number of
changes that will take place. Speaking at a high level, a major upgrade completely
replaces the existing software with a new set of les, registry keys, and so on. By
contrast, minor upgrades and small updates only replace some of the les and leave
the rest as they are.
In this section, we'll discuss how to plan for an update. It's benecial to do this from
the start before you actually need to author an update. In some cases, if you haven't
authored your original installer in a way that supports updates, you'll nd the task
much harder later on.
www.it-ebooks.info

Upgrading and Patching
[ 342 ]
Choosing an update type
A major upgrade is the simplest type of update to set up. It's really a complete MSI,
just like any other you've created previously, with all of the components of your
software included just like the original install. The difference is that if it detects an
older version, it removes it.
You should use a major upgrade if any of the following are true:
• Enough of the product has changed to warrant completely replacing it.
• You've removed a feature from the install or moved it in the feature
hierarchy—for example, made it a child to another feature.
• You've moved a component from one feature to another or deleted one.
• You simply want to keep things simple. Major upgrades are easier to
implement than any other option.
A major upgrade changes the installer's ProductCode property (the Product
element's ID) to indicate that this is a completely new product. However, as it's
still the same type of product—as in, you're replacing one calculator with another
calculator—you'll keep the installer's UpgradeCode attribute the same. For the
lifetime of a product, through all of its incarnations, the UpgradeCode attribute
should never change. You'll also increment the Product element's Version attribute.
A minor upgrade updates existing les without uninstalling the original product.
It can be used to x bugs or add features and components. Instead of changing the
ProductCode property, you'll only increment the product's version number. That
way, you're saying that this is still the same product, but with changes. It can be
distributed as a patch le (.msp) or, like a major upgrade, as an MSI. Although
you can add new features and components with a minor upgrade, you should not
re-organize the feature-component tree.
A small update is distributed as a patch. It's smaller in scope than a minor upgrade,
typically only changing a few les. It has so few changes that you won't even need to
bother changing the version number.
The following table sums up when you'll need to change the Product element's
Version and Id attributes:
Update type Change product version? Change product ID?
Major upgrade Yes Yes
Minor upgrade Yes No
Small update No No
www.it-ebooks.info

Chapter 13
[ 343 ]
Per-user or per-machine
When your update is going to remove a previous version of your software, such as
during a major upgrade, Windows searches the registry to nd information about the
previous product such as its ProductCode property, and the location of its features
and components. If your original install was installed as per-machine, meaning not for
a specic user, then your update will have to do the same. Otherwise, the installer
may look in the wrong section of the registry, the part belonging to the current user,
and not nd the product. To keep things consistent, you should always set this
scope, even in your original installer.
You can set the ALLUSERS property as follows:
<Property Id="ALLUSERS" Value="1" />
When set to 1, the install is per-machine. When set to an empty string, it uses
the per-user context. If set to a 2, the context will be per-machine if the user
has administrative rights, otherwise it will be per-user. However, this isn't a
hard-and-fast rule and changes depending on the operating system. View
the MSI documentation for more information.
You can also use the Package element's InstallScope attribute to the same effect.
Behind the scenes it will set the ALLUSERS property for you. You can set it to
perMachine or perUser. If you go this route, be sure to remove any markup that sets
ALLUSERS directly:
<Package InstallerVersion="301"
Compressed="yes"
InstallScope="perMachine" />
Preparing a major upgrade
A major upgrade is a full installation package that removes any older versions of the
same product. To create one, you'll need to do the following:
• Change the Product element's Id attribute to a new GUID
• Increment the Product element's Version attribute
• Add and congure a MajorUpgrade element
We'll go over each step. Before we get to that, let's make an MSI that will install the
old software—the software to update. You can use the following markup in a new
WiX project called OldInstaller.
www.it-ebooks.info

Upgrading and Patching
[ 344 ]
You may recall that you can use an asterisk (*) for Id in the Product element, and
WiX will choose a new GUID for you each time you compile the project. You can
do that here, if you choose to. However, we will use a hardcoded GUID to draw
attention to that we are denitely changing it during a major upgrade. As you'll see,
we will not be changing it when making a minor upgrade or small update:
<?xml version="1.0" encoding="UTF-8"?>
<Wix xmlns="http://schemas.microsoft.com/wix/2006/wi">
<Product
Id="3E786878-358D-43AD-82D1-1435ADF9F6EA"
Name="Awesome Software"
Language="1033"
Version="1.0.0.0"
Manufacturer="Awesome Company"
UpgradeCode="B414C827-8D81-4B4A-B3B6-338C06DE3A11">
<Package InstallerVersion="301"
Compressed="yes"
InstallScope="perMachine" />
<MediaTemplate EmbedCab="yes" />
<Directory Id="TARGETDIR" Name="SourceDir">
<Directory Id="ProgramFilesFolder">
<Directory Id="INSTALLFOLDER"
Name="Awesome Software" />
</Directory>
</Directory>
<ComponentGroup Id="ProductComponents"
Directory="INSTALLFOLDER">
<Component
Id="CMP_InstallMeTXT"
Guid="E8A58B7B-F031-4548-9BDD-7A6796C8460D">
<File Id="FILE_InstallMeTXT"
Source="InstallMe.txt"
KeyPath="yes" />
</Component>
</ComponentGroup>
<Feature Id="ProductFeature"
Title="Main Product"
Level="1">
<ComponentGroupRef Id="ProductComponents" />
</Feature>
</Product>
</Wix>
www.it-ebooks.info
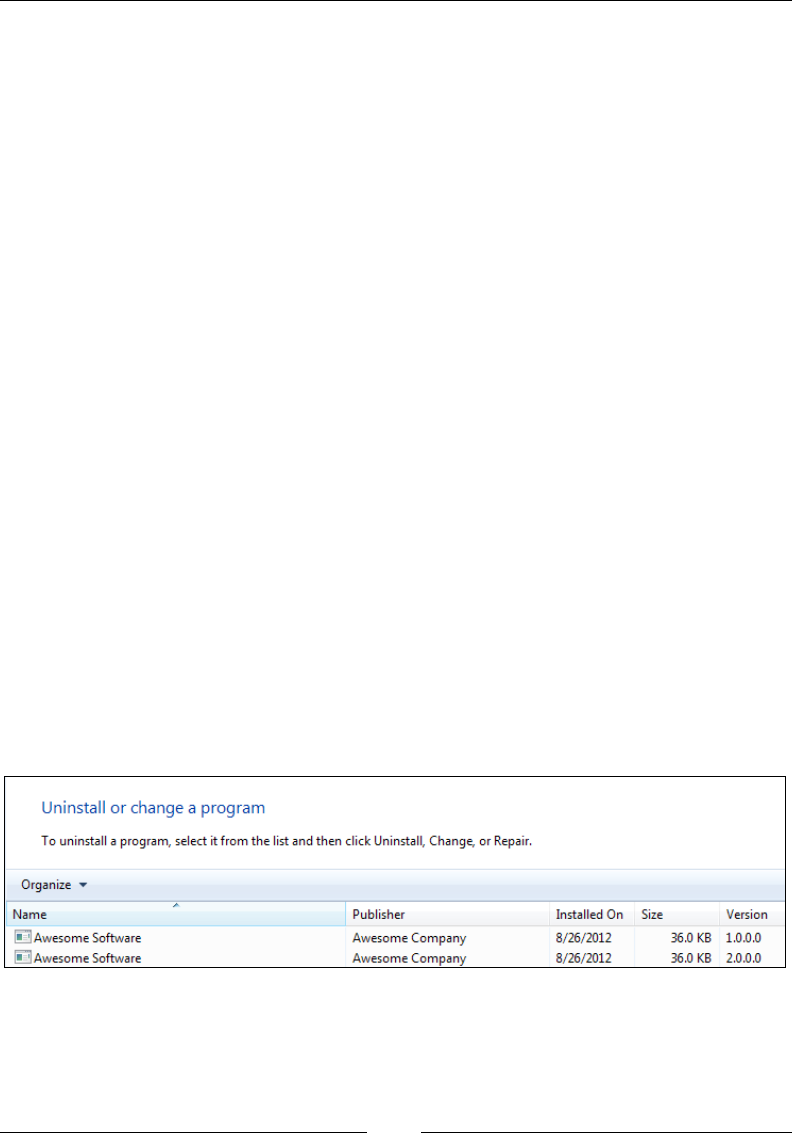
Chapter 13
[ 345 ]
Notice that the Product element's Version attribute is 1.0.0.0. We'll be
incrementing that number in the upgrade. This MSI installs a text le called
InstallMe.txt, so be sure to add one to your project. To show that this is the old
version, you could write some text in InstallMe.txt such as This file comes
from the old version. During the upgrade, we'll replace this le with a new one.
Build this example and install it. Later on, when we have the upgraded version,
we'll have this older version to replace. Next, create a new WiX project and call it
NewInstaller. You can re-use the entire markup from the previous example except
for the Product element's Id and Version attributes which need to be changed.
<Product
Id="B55596A8-93E3-47EB-84C4-D7FE07D0CAF4"
Name="Awesome Software"
Language="1033"
Version="2.0.0.0"
Manufacturer="Awesome Company"
UpgradeCode="B414C827-8D81-4B4A-B3B6-338C06DE3A11">
By changing the Id attribute, we're setting up a major upgrade. We'll be replacing the
old product with a new one. We've also changed the Version attribute to 2.0.0.0 to
show that this is the newer product. Windows Installer ignores the fourth digit when
detecting other versions of your software, so you should only rely on the rst three.
Next, change the text inside the InstallMe.txt le to say something like This file
comes from the new version. The component's GUID should stay the same. If
you wanted to, you could add or remove components, but in this example we're
replacing an existing one.
At this point, if we installed both the old and the new package, the old would not be
removed. You'd be able to see both in Programs and Features.
www.it-ebooks.info
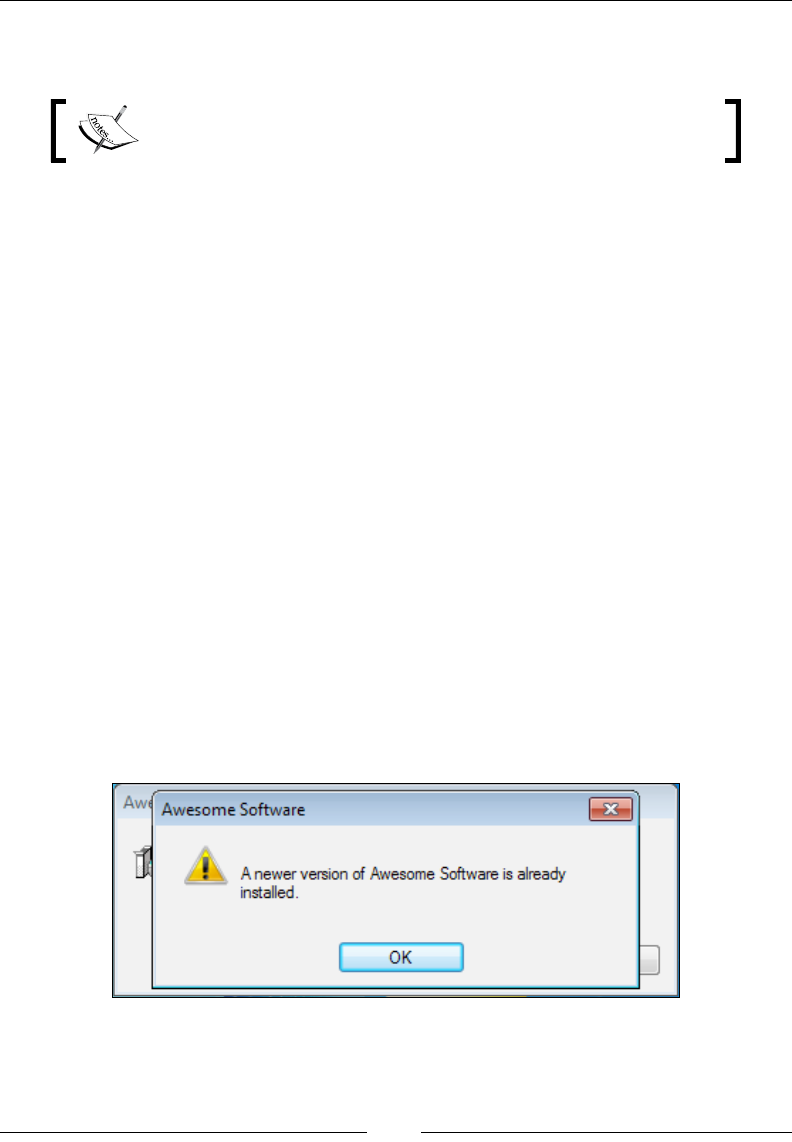
Upgrading and Patching
[ 346 ]
We can remove the older version before installing the new one by adding a
MajorUpgrade element to the NewInstaller project as a child to the Product element.
It doesn't hurt to have a MajorUpgrade element in all of your
installers, even in our so-called OldInstaller.
Here's an example that shows adding a MajorUpgrade element to the NewInstaller
project's Product.wxs le:
<?xml version="1.0" encoding="UTF-8"?>
<Wix xmlns="http://schemas.microsoft.com/wix/2006/wi">
<Product
Id="B55596A8-93E3-47EB-84C4-D7FE07D0CAF4"
Name="Awesome Software"
Language="1033"
Version="2.0.0.0"
Manufacturer="Awesome Company"
UpgradeCode="B414C827-8D81-4B4A-B3B6-338C06DE3A11">
...
<MajorUpgrade DowngradeErrorMessage="A newer version of [ProductName]
is already installed."/>
By adding the DowngradeErrorMessage attribute, we're dealing with the question,
"What happens if the user tries to install an older version than the one that they've
already got installed?" By default, the MajorUpgrade element prevents this from
happening and displays the text from the DowngradeErrorMessage attribute to them
instead. The following is what the user would see when trying to downgrade:
If you want to allow the user to downgrade their software to an older version,
remove this attribute and set the AllowDowngrades attribute to yes.
www.it-ebooks.info
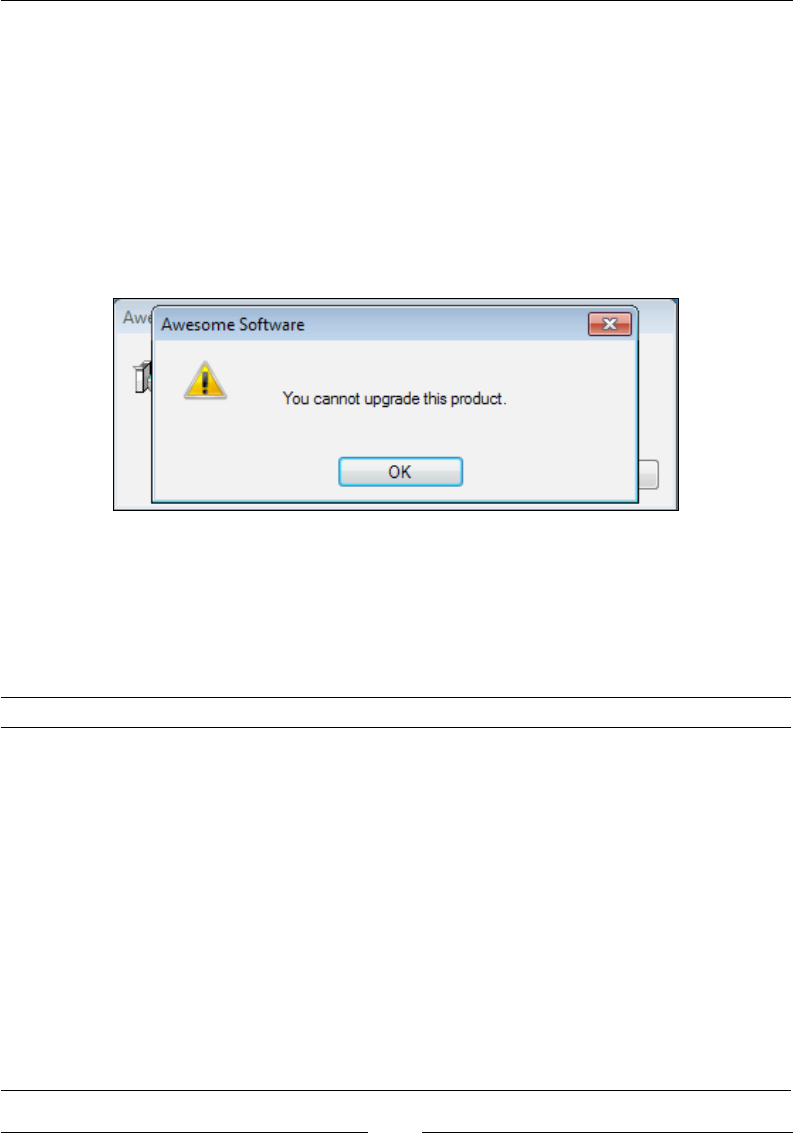
Chapter 13
[ 347 ]
The inverse of this scenario is prohibiting the user from upgrading to a newer
version. In the next example, we allow downgrades but not upgrades:
<MajorUpgrade
AllowDowngrades="yes"
Disallow="yes"
DisallowUpgradeErrorMessage="You cannot upgrade this product." />
The Disallow attribute prevents upgrades and DisallowUpgradeErrorMessage is
the message to show to the user. The following screenshot is the result when trying
to run the NewInstaller MSI:
When allowing upgrades, you have several options of how the old package is
removed. The removal happens during a standard action in the Execute sequence
called RemoveExistingProducts. The following table explains how scheduling this
action to run at different times will give you different results, especially if an error
happens during the installation:
Scheduled when Effect
After
InstallInitialize
Installer removes the old version completely before installing
the new one. If the install fails, a rollback will cause the old
version to be brought back. This should not be used if you're
installing files to the GAC or the WinSxS folder, as there is a
bug: http://support.microsoft.com/kb/905238.
Before
InstallInitialize
Installer removes the old version completely before installing
the new one. If the install of the new version fails, the old
version will not be brought back.
Before
InstallFinalize
The new version is installed and then the old version is
removed. If the install fails, a rollback will bring the old
version back (it may not have even been removed at that
point). This is more efficient because files that haven't
changed don't need to be replaced. To use this sequence,
you must also schedule InstallExecute before
RemoveExistingProducts.
www.it-ebooks.info
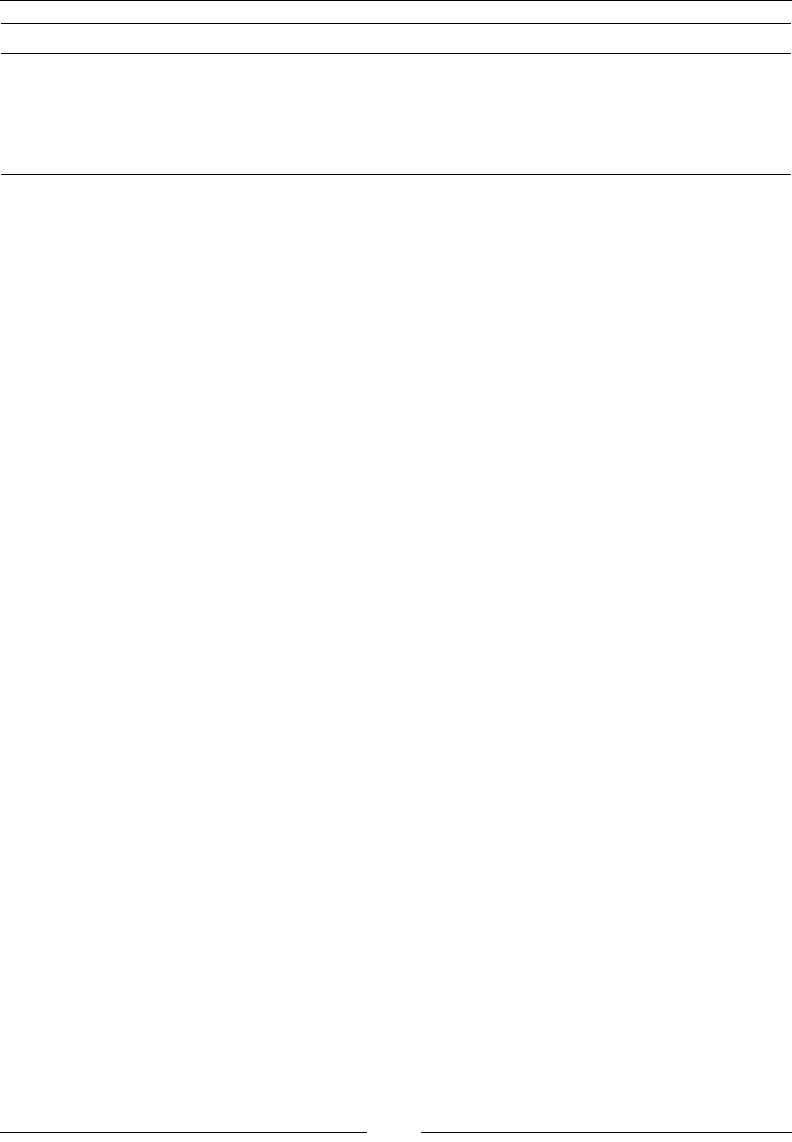
Upgrading and Patching
[ 348 ]
Scheduled when Effect
After InstallFinalize The new version is installed and then the old version is
removed. If the uninstall of the old version fails, the new
version remains and the old version is also kept. On the
other hand, if the install of the new version fails, only the old
version will remain.
By default, the MajorUpgrade element schedules the removal before
InstallInitialize (specically by scheduling it after the InstallValidate
action). You can change this by setting the Schedule attribute to one of the
following values:
• afterInstallValidate (default): This schedules the removal before
InstallInitialize.
• afterInstallInitialize: This schedules the removal after
InstallInitialize.
• afterInstallExecute: This schedules the removal before
InstallFinalize. It handles scheduling InstallExecute for you.
• afterInstallFinalize: This schedules the removal after InstallFinalize.
• afterInstallExecuteAgain: This schedules the removal after
InstallExecuteAgain. It works the same as afterInstallExecute.
The following is an example that schedules the upgrade before InstallFinalize,
which is arguably the most efcient way to do it:
<MajorUpgrade
...
Schedule="afterInstallExecute" />
If you'd like to ignore a failed attempt to remove the existing software then set the
IgnoreRemoveFailure attribute to yes. In other words, a rollback won't be triggered
if it otherwise would have been.
Two other interesting attributes are MigrateFeatures and RemoveFeatures. Setting
MigrateFeatures to yes, which is the default, enables only those features that were
installed last time. Setting it to no means that the currently installed features will
have no effect on what gets enabled this time around. The RemoveFeatures attribute
can be set to a comma-delimited list of features to remove before beginning the
upgrade. By omitting it, all features are removed. The benet of utilizing this is that
if some features and their components have not changed, it could be more efcient to
leave them in place and only replace what needs replacing.
www.it-ebooks.info

Chapter 13
[ 349 ]
Now you're ready to build the NewInstaller project and install it. It should remove
the older version. You'll notice that there are no dialogs that tell the user that the old
version is being removed. From their perspective, it's a seamless process.
The following is the full markup for our new installer:
<?xml version="1.0" encoding="UTF-8"?>
<Wix xmlns="http://schemas.microsoft.com/wix/2006/wi">
<Product
Id="B55596A8-93E3-47EB-84C4-D7FE07D0CAF4"
Name="Awesome Software"
Language="1033"
Version="2.0.0.0"
Manufacturer="Awesome Company"
UpgradeCode="B414C827-8D81-4B4A-B3B6-338C06DE3A11">
<Package InstallerVersion="301"
Compressed="yes"
InstallScope="perMachine" />
<MediaTemplate EmbedCab="yes" />
<Directory Id="TARGETDIR" Name="SourceDir">
<Directory Id="ProgramFilesFolder">
<Directory Id="INSTALLFOLDER"
Name="Awesome Software" />
</Directory>
</Directory>
<ComponentGroup Id="ProductComponents"
Directory="INSTALLFOLDER">
<Component
Id="CMP_InstallMeTXT"
Guid="E8A58B7B-F031-4548-9BDD-7A6796C8460D">
<File Id="FILE_InstallMeTXT"
Source="InstallMe.txt"
KeyPath="yes" />
</Component>
</ComponentGroup>
<Feature Id="ProductFeature"
Title="Main Product"
Level="1">
<ComponentGroupRef Id="ProductComponents" />
www.it-ebooks.info

Upgrading and Patching
[ 350 ]
</Feature>
<MajorUpgrade Schedule="afterInstallExecute"
DowngradeErrorMessage="A newer version of
[ProductName] is already installed." />
</Product>
</Wix>
The minor upgrade
Although a minor upgrade, like a major upgrade, can be distributed as a full MSI, in
this chapter we'll focus on the more efcient methods of distributing it as a patch le
(.msp). In this case, a minor upgrade doesn't uninstall the previous version. It only
replaces some of the existing les or adds new ones. I'll show you two ways to make
a patch, the rst using .wixpdb les and the second using .wixout les.
Before we get to that, let's discuss the WiX source le that denes your patch. A
.wixmsp denes the characteristics of your patch, setting elds such as Description
and Comments that will appear in the patch le's properties. This le also sets up the
sequencing of all of the patches for a particular product so that, say, patch 1.0.2.0
will be applied after 1.0.1.0. In this way, even if a user installs a patch out of order, it
won't overwrite a newer patch that's already been applied. This le also denes the
CAB les to embed in the patch and which product it applies to.
Authoring a .wixmsp le
To create a patch le, we need to make a new WiX source le that will dene the
patch's characteristics. Create a new .wxs le and call it Patch.wxs. Don't add it to
your MSI project. It should exist on its own outside of your installer. The following is
the markup to add to it:
<?xml version="1.0" encoding="UTF-8"?>
<Wix xmlns="http://schemas.microsoft.com/wix/2006/wi">
<Patch
AllowRemoval="yes"
Classification="Update"
Comments="Patch for Awesome Software v. 1.0.0.0"
Description="Updates Awesome Software to v. 1.0.1.0"
DisplayName="Awesome Software Patch 2012-09-01"
Manufacturer="Awesome Company"
MoreInfoURL="http://www.mysite.com/patchinfo.html"
www.it-ebooks.info
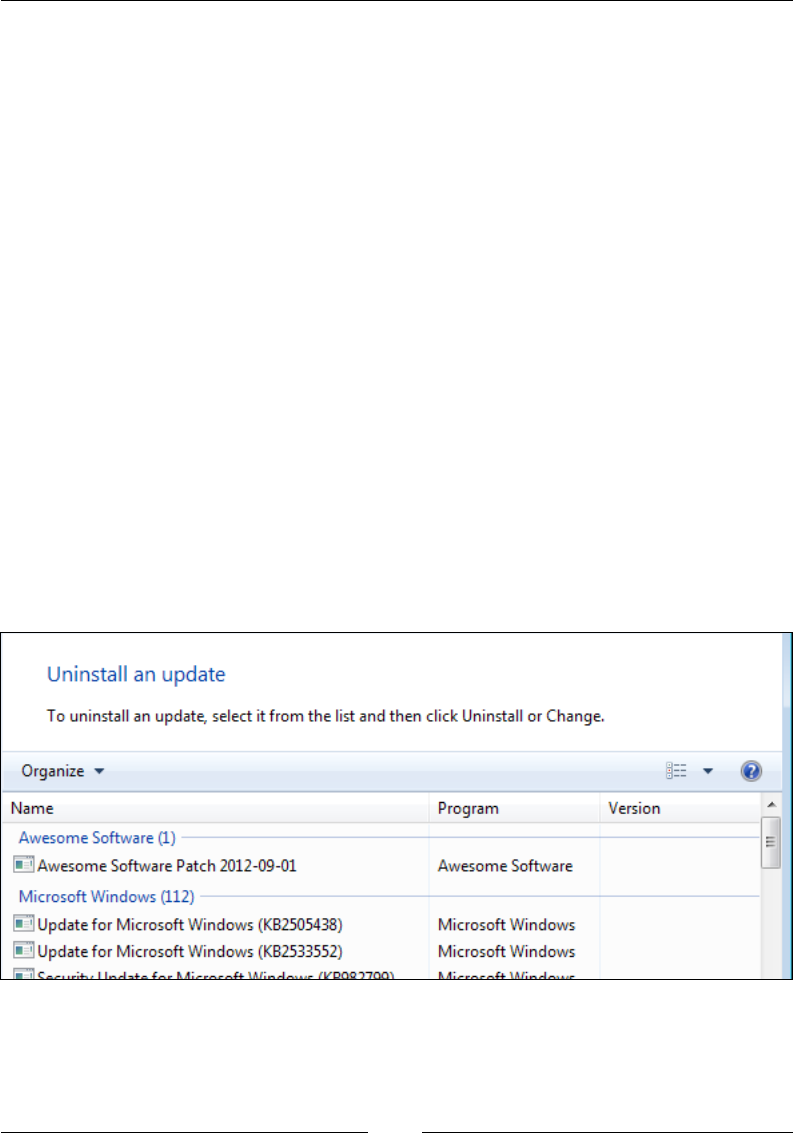
Chapter 13
[ 351 ]
TargetProductName="Awesome Software">
<Media Id="1000" Cabinet="MyPatch.cab">
<PatchBaseline Id="MyPatch" />
</Media>
<PatchFamily
Id="MyPatchFamily"
Version="1.0.1.0"
ProductCode="44139BED-5F1A-4C1E-BE12-C7148BE11189"
Supersede="yes" />
</Patch>
</Wix>
The Patch element is the root element in this le. Its AllowRemoval attribute
congures the patch so that it can be removed after it's been applied without having
to uninstall the entire product. So you know, you can uninstall a patch le from the
command line by setting the MSIPATCHREMOVE property to the path of the patch le.
You use msiexec as follows:
msiexec /i MyInstaller.msi MSIPATCHREMOVE=C:\MyPatch.msp
You can also go to Programs and Features and click on the View Installed Updates
link to see a list of patch updates that have been installed. The resultant screenshot is
given as follows:
Classication contains the category for the patch. It's up to you what to set this to,
but your options are: Critical Update, Hotx, Security Rollup, Security Update, Service
Pack, Update, and Update Rollup.
www.it-ebooks.info

Upgrading and Patching
[ 352 ]
The Comments and Description attributes let you add additional information
about the patch and will be displayed in the le's Properties page. DisplayName
also appears in Properties and should be set to a user-friendly name for the le.
Manufacturer should be set to the name of your company.
You can use the MoreInfoURL attribute, which is also displayed in the le's
Properties page, to provide a website address where customers can get more
information about the patch. The TargetProductName attribute can be set to the
name of the software that this patch applies to. If this .wxs le contains characters
that rely on a code page, you can set the optional CodePage attribute.
Next, inside the Patch element, add a Media element with a child PatchBaseline
element.
<Media Id="1000" Cabinet="MyPatch.cab">
<PatchBaseline Id="MyPatch" />
</Media>
The Media element's Id attribute should be higher than any Media record used in the
MSI package you want to update. So, it's safer to use a high number such as 1000.
You can give the CAB le any name you like using the Cabinet attribute.
The PatchBaseline element is used to dene a name that we can reference later as
we're building the patch le. I've given it the same name as the CAB le.
The last thing to do in this le is add a PatchFamily element. This will dene
the product that this patch applies to and whether or not earlier patches should
be overwritten.
<PatchFamily
Id="MyPatchFamily"
Version="1.0.1.0"
ProductCode="44139BED-5F1A-4C1E-BE12-C7148BE11189"
Supersede="yes" />
A PatchFamily contains the updates of your patch. The Id attribute gives your new
PatchFamily a name. The Version attribute is used to sequence your changes in
relation to other patches and could be set to the version number of your Product
element. However, the Version attribute here has no relation to the target product's
ProductVersion. So, you could come up with an unrelated numbering scheme, such
as 0.0.0.100, 0.0.0.200, 0.0.0.300, and so on. Behind the scenes, patches are ordered
rst by the Product element's Version number and then by the PatchFamily
element's Version. This allows you, as you'll see, to provide an order for small
update patches that don't change the Product element's Version attribute at all.
www.it-ebooks.info

Chapter 13
[ 353 ]
You can use the ProductCode attribute to target a specic product to patch. It should
match the Id attribute of the Product element in your MSI project. If you don't
set it, the patch can be applied to any targeted product, as identied by the Patch
element's TargetProductName attribute. Supersede, when set to yes, signals that
this patch should override other earlier patches.
You have the option of nesting ComponentRef elements inside the PatchFamily
element to pull in only specic les that you want to update. Otherwise, omit the
ComponentRefs as we've done here and the patch will nd all of the les that have
changed. Note that, like when working with the Fragment elements in other areas,
pulling in one component will pull in all neighboring components from the same
Fragment or Product element.
We're now ready to build our patch, which we'll have to do from the command line.
We'll discuss this in the next section.
Creating a patch from .wixpdb les
When you compile your WiX source les with Candle and then link them together
with Light, you get an MSI le and a .wixpdb le. The .wixpdb le contains the
paths to your source les, but not the data that's in them. In other words, the les are
not bound into the .wixpdb le like they are into the MSI. So, when building a patch
with .wixpdb les, you must have the original source les.
For the next example, create a folder called MinorUpgrade and then create three
subfolders named Old, New, and Patch. Add a le called Product.wxs to the Old
directory and ll in the following markup:
<?xml version="1.0" encoding="UTF-8"?>
<Wix xmlns="http://schemas.microsoft.com/wix/2006/wi">
<Product
Id="44139BED-5F1A-4C1E-BE12-C7148BE11189"
Name="Awesome Software"
Language="1033"
Version="1.0.0.0"
Manufacturer="Awesome Company"
UpgradeCode="3de16078-12fd-472d-8b3d-eb857b75d467">
<Package InstallerVersion="200"
Compressed="yes"
InstallScope="perMachine" />
www.it-ebooks.info

Upgrading and Patching
[ 354 ]
<MajorUpgrade DowngradeErrorMessage="A newer version of
[ProductName] is already installed." />
<MediaTemplate EmbedCab="yes" />
<Feature Id="ProductFeature"
Title="Main Product" Level="1">
<ComponentGroupRef Id="ProductComponents" />
</Feature>
</Product>
<Fragment>
<Directory Id="TARGETDIR" Name="SourceDir">
<Directory Id="ProgramFilesFolder">
<Directory Id="INSTALLFOLDER"
Name="OldInstaller" />
</Directory>
</Directory>
</Fragment>
<Fragment>
<ComponentGroup Id="ProductComponents"
Directory="INSTALLFOLDER">
<Component
Id="CMP_InstallMeTXT"
Guid="5EE3620A-0C41-470D-9B48-434885EBA6AD">
<File Id="FILE_InstallMeTXT"
Source="InstallMe.txt"
KeyPath="yes" />
</Component>
</ComponentGroup>
</Fragment>
</Wix>
This is a simple installer that will serve as the original package that we want to patch.
It installs a text le called InstallMe.txt. Next, add a text le to the same directory
and name it InstallMe.txt. Write something in it such as This comes from the
old installer.
www.it-ebooks.info

Chapter 13
[ 355 ]
The next step is to create a second pair of MSI and .wixpdb les that we'll compare
the original against. Copy both les from the Old directory into the New directory but
change the Version attribute of the Product element to 1.0.1.0 and change the text
in the text le to This comes from the patch. The following is a snippet from the
new Product.wxs le:
<Product Id="44139BED-5F1A-4C1E-BE12-C7148BE11189"
Name="Awesome Software"
Language="1033"
Version="1.0.1.0"
Manufacturer="Awesome Company"
UpgradeCode="3de16078-12fd-472d-8b3d-eb857b75d467">
Next, add a Patch.wxs le like we discussed earlier to the Patch directory.
Your directory structure should look like this:
MinorUpgrade\
Old\
Product.wxs
InstallMe.txt
New\
Product.wxs
InstallMe.txt
Patch\
Patch.wxs
Now we're ready to open a command prompt, navigate to the MinorUpgrade
directory and start compiling our les. First, use Candle and Light against the Old
and New WiX source les to create MSI and .wixpdb les. We can send the output
to a folder called Output. This assumes that you've added %WIX%bin to your PATH
environment variable. See Chapter 9, Working from the Command Line, for details.
candle Old\Product.wxs -out Old\
light Old\Product.wixobj -out Output\Old.msi
candle New\Product.wxs -out New\
light New\Product.wixobj -out Output\New.msi
You can do the same for the Patch.wxs le to create a .wixmsp le:
candle Patch\Patch.wxs -out Patch\
light Patch\Patch.wixobj -out Output\Patch.wixmsp
www.it-ebooks.info

Upgrading and Patching
[ 356 ]
The next step is to record the differences between the two .wixpdb les and store
them in a transform le. Our transform le here will be in XML format, a .wixmst
le. Use torch.exe, which comes with the WiX toolset:
torch -p -xi Output\Old.wixpdb Output\New.wixpdb
-out Output\Differences.wixmst
The last step is to join the transform le with the .wixmsp le to create a patch
(.msp). We'll use another tool from the WiX toolset called pyro.exe.
pyro Output\Patch.wixmsp -t MyPatch Output\Differences.wixmst
-out Output\Patch.msp
The -t argument accepts the Id attribute we gave to the PatchBaseline element
in our Patch.wxs le. This is followed by the name of the .wixmst le created by
Torch. The -out argument allows us to name the resulting .msp le.
In the end, our Output folder has quite a few les in it, but the important ones are
the Old.msi le, which is our original product, and Patch.msp, which is the patch
shown in the following screenshot:
Patch.msp is a le that looks like an MSI, can be read with Orca, and that the
end user can double-click to install. It's smaller than an MSI though. Running
the patch applies the changes. This is our minor upgrade. It can also be run from
the command line:
msiexec /p Patch.msp
Creating a patch from .wixout les
There's a downside to using .wixpdb les: the binary data from your software isn't
bundled up into them. These les only contain the paths to your les. That means
that you need to keep copies of your sources les (both old and new) when making
a patch. Also, it can be cumbersome to get Pyro to resolve the paths correctly if the
.wixmst and .wixmsp les aren't in the correct directory relative to the source les.
www.it-ebooks.info

Chapter 13
[ 357 ]
An alternative is to use .wixout les. These do bundle up the binary data of your
software, allowing them to be moved around or backed up for later. They're just like
MSI les, but in an XML format that makes them easy to make a patch out of. Instead
of making an MSI out of your WiX source les, you output .wixout les.
When compiling your old and new Product.wxs les, you can use the markup from
our .wixpdb example, provide the -bf, -xo, and -out ags to Light. You can add
these ags to Light either in your Visual Studio project's Tool Settings properties or
directly on the command line.
candle Old\Product.wxs -out Old\
light Old\Product.wixobj -bf -xo -out Output\Old.wixout
candle New\Product.wxs -out New\
light New\Product.wixobj-bf-xo -out Output\New.wixout
Once you've created a .wixout le for your old and new software, run Torch on
them:
torch -p -xi Output\Old.wixout Output\New.wixout
-out Output\Differences.wixmst
Followed by Pyro, using the .wixmsp le created from the Patch.wxs le, like
before:
candle Patch\Patch.wxs -out Patch\
light Patch\Patch.wixobj -out Output\Patch.wixmsp
pyro Output\Patch.wixmsp -t MyPatch Output\Differences.wixmst
-out Output\Patch.msp
You'll end up with an .msp le, just like when using .wixpdb les. The difference is
that you can move the intermediate .wixout les around or back them up for later
without worrying that the paths to your software's les will fail to resolve when you
want to make a patch.
www.it-ebooks.info

Upgrading and Patching
[ 358 ]
The small update
A small update is like a minor upgrade except that it's usually smaller in scope.
You might use it when only a few les have changed and you don't intend to change
the Product element's version number.
The steps to create it are the same as when creating a minor upgrade patch with the
exception of not changing the Product element's Version. They are as follows:
1. Using Candle and Light, compile and link your original installer into
a .wixout le.
2. Make changes to your software's les and then create a second .wixout le.
Do not change the Product element's Id or Version attribute.
3. Make a Patch.wxs le and, using Candle and Light, compile and link it to
create a .wixmsp le. Set the PatchFamily element's Version attribute so
that this patch will be sequenced correctly related to other patches.
4. Use Torch to create a .wixmst le that contains the differences between your
two .wixout les.
5. Use Pyro to combine the .wixmsp and .wixmst les into a nal .msp
patch le.
This gives you a patch le that when used will update les, but won't change the
software's ProductCode or Version values.
Summary
In this chapter, we talked about the three types of updates. Major upgrades are the
easiest to do, but are the least efcient for small sets of changes. They perform a
complete uninstall of any older versions of your software. Minor upgrades and small
updates are typically delivered as patch les and are smaller in scope. They only
replace some of the existing les and add new features, but don't take any away.
These can be an ideal method for keeping customers up-to-date on bug xes.
In the next chapter, we'll see how to add new functionality to WiX by building
our own WiX extension. It will be of the same variety as WixUIExtension or
WixUtilExtension. You'll see that once you've associated your custom WiX
elements with custom actions, the sky is the limit.
www.it-ebooks.info

Extending WiX
WiX facilitates plenty of use cases out of the box. However, there are tasks that just
don't come built into Windows Installer by default. Thankfully, the WiX team and
others have extended WiX to cover a range of extra functionality such as installing
websites, creating users, and editing XML les. In this chapter, we will cover how
you can join in the fun by building your own extensions. This allows you to craft
custom WiX elements that bind to custom actions to perform complex tasks, but stay
consistent with the WiX declarative, XML style.
We will explore the following topics:
• Hooking into the WiX extension model using classes from the Microsoft.
Tools.WindowsInstallerXml namespace
• Dening an XML schema for new WiX elements
• Parsing those elements when they're used in a WiX project and storing the
result in the MSI database
• Associating the elements with custom actions to be run at install time
Building a custom WiX extension
You've been exposed to several of the WiX extensions already. WixUIExtension
adds a premade user interface. WixNetFxExtension gives you information about the
version of .NET that's installed. WixUtilExtension provides a number of elements
for jobs such as adding users, editing XML les, and setting Internet shortcuts.
www.it-ebooks.info
Extending WiX
[ 360 ]
There are also other extensions that we haven't covered, including WixSqlExtension
that can set up an MSSQL database, WixIIsExtension for adding websites, app
pools and virtual directories to IIS, and WixDifxAppExtension for installing
Windows drivers. For more information about these extensions, check out the WiX
documentation at http://wix.sourceforge.net/manual-wix3/schema_index.
htm. In this chapter, you will learn to make your own extension and bend WiX to
your will for fortune and glory.
To get started, let's dene what an extension is and what it would take to make one.
Setting the stage
A WiX extension is a .NET assembly that, when added to a WiX Setup project,
provides new XML elements for additional functionality. As such we will need
to create a new C# class library project and reference wix.dll from the WiX bin
directory. For the example in this chapter I will name the project AwesomeExtension.
Extending the CompilerExtension class
The rst thing we'll do is add a new class to our project and call it AwesomeCompiler.
This class should extend the CompilerExtension class. Be sure to add a using
statement targeting the Microsoft.Tools.WindowsInstallerXml namespace.
We will immediately override a property called Schema that returns an instance
of XmlSchema:
namespace AwesomeExtension
{
www.it-ebooks.info

Chapter 14
[ 361 ]
using System.Reflection;
using System.Xml;
using System.Xml.Schema;
using Microsoft.Tools.WindowsInstallerXml;
public class AwesomeCompiler : CompilerExtension
{
private XmlSchema schema;
public AwesomeCompiler()
{
this.schema =
CompilerExtension.LoadXmlSchemaHelper(
Assembly.GetExecutingAssembly(),
"AwesomeExtension.AwesomeSchema.xsd");
}
public override XmlSchema Schema
{
get
{
return this.schema;
}
}
}
}
The Schema property returns an object of type XmlSchema, which is an in-memory
representation of an XSD le. The XSD le, which we'll add to our project soon, will
dene the syntax for our custom XML elements such as the names of the elements,
the attributes they can have, and where they can be placed in an XML document
relative to other elements.
We are setting this property in the class's constructor using a static method called
LoadXmlSchemaHelper from the base class. The rst parameter to this method is the
currently executing assembly and the second is the name of the XSD le. We will
be embedding the XSD le in the class library so to reference it you should prex
the le's name with the project's default namespace, such as AwesomeExtension.
AwesomeSchema.xsd. This is assuming you place the XSD in the root folder of the
project. If you decide to place it in a subfolder, include the name of that folder in the
string. For example, if you place it in a folder called Schemas, you would reference
AwesomeExtension.Schemas.AwesomeSchema.xsd. You can know for sure what to
use by compiling your project and opening the outputted assembly with ILDASM,
the .NET disassembler. There you can see the names of all embedded resources by
looking inside the manifest.
www.it-ebooks.info
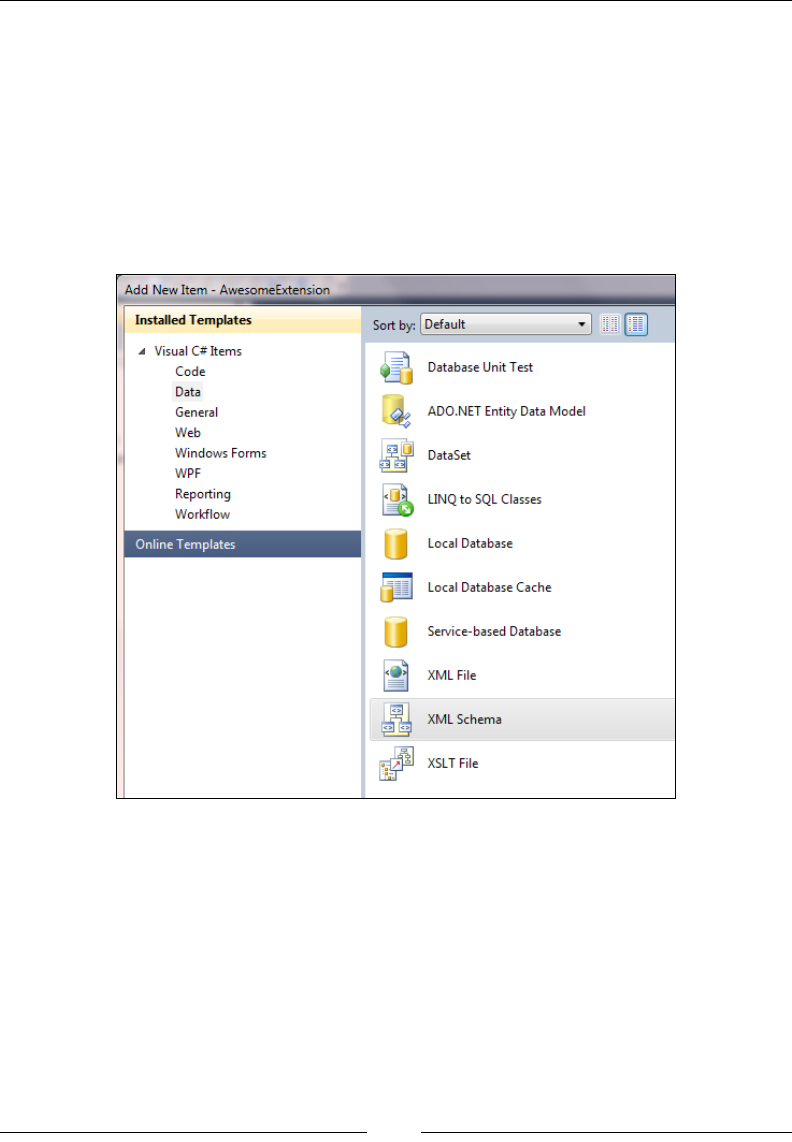
Extending WiX
[ 362 ]
In the next section, we'll see how to make an XML schema and embed it in
our assembly.
Adding an XML schema
Visual Studio comes with a template for adding an XSD le to your project.
Right-click on your project and select Add | New Item | Data | XML Schema.
In this example, I'll be adding it to the root folder of the project and calling it
AwesomeSchema.xsd.
Once you have it, right-click on the le in Solution Explorer and select Properties.
Change Build Action to Embedded Resource. Next, right click on the le again and
choose View Code. You should see a schema element with various XML namespaces
dened. I would modify it to use the XmlSchemaExtension namespace for dening
parent-child relationships of elements. Also, change the domain name to use
something other than tempuri.org.
<?xml version="1.0" encoding="utf-8"?>
<xs:schema
elementFormDefault="qualified"
targetNamespace="http://www.mydomain.com/AwesomeSchema"
www.it-ebooks.info

Chapter 14
[ 363 ]
xmlns="http://www.mydomain.com/AwesomeSchema"
xmlns:xs="http://www.w3.org/2001/XMLSchema"
xmlns:xse=
"http://schemas.microsoft.com/wix/2005/XmlSchemaExtension"
>
</xs:schema>
The next step is to dene our custom WiX elements. These will go inside the schema
element. Add the following markup:
<?xml version="1.0" encoding="utf-8"?>
<xs:schema ...>
<xs:annotation>
<xs:documentation>
The schema for the Awesome WiX Extension
</xs:documentation>
</xs:annotation>
<xs:element name="SuperElement">
<xs:annotation>
<xs:appinfo>
<xse:parent namespace="http://schemas.microsoft.com/wix/2006/
wi" ref="Product" />
<xse:parent namespace="http://schemas.microsoft.com/wix/2006/
wi" ref="Fragment" />
</xs:appinfo>
<xs:documentation>
A custom element for declaring level of awesomeness.
</xs:documentation>
</xs:annotation>
<xs:complexType>
<xs:attribute name="Id"
use="required"
type="xs:string">
<xs:annotation>
<xs:documentation>The ID for the element.</xs:documentation>
</xs:annotation>
</xs:attribute>
<xs:attribute name="Type" use="required">
<xs:annotation>
<xs:documentation>The type of awesomeness: Super,
TotallySuper or RockStar.</xs:documentation>
www.it-ebooks.info

Extending WiX
[ 364 ]
</xs:annotation>
<xs:simpleType>
<xs:restriction base="xs:string">
<xs:enumeration value="Super" />
<xs:enumeration value="TotallySuper" />
<xs:enumeration value="RockStar" />
</xs:restriction>
</xs:simpleType>
</xs:attribute>
</xs:complexType>
</xs:element>
</xs:schema>
Use the annotation and documentation elements to give helpful descriptions
to your elements and attributes. We use them in various places in this example
including at the top of the document to convey the purpose of the schema.
<xs:annotation>
<xs:documentation>
The schema for the Awesome WiX Extension
</xs:documentation>
</xs:annotation>
Use the appinfo and parent elements to dene the WiX elements yours should be
placed within. For example, a SuperElement should only be placed within a Product
or Fragment element, as shown:
<xs:appinfo>
<xse:parent namespace="http://schemas.microsoft.com/wix/2006/wi"
ref="Product" />
<xse:parent namespace="http://schemas.microsoft.com/wix/2006/wi"
ref="Fragment" />
</xs:appinfo>
When dening attributes for your elements you can stick to the simple data types
such as strings, shown here for the Id attribute:
<xs:attribute name="Id"
use="required"
type="xs:string"/>
www.it-ebooks.info

Chapter 14
[ 365 ]
Alternatively, you can also build complex types such as enumerated values. In the
example shown, we are dening an attribute called Type that can be set to Super,
TotallySuper, or RockStar:
<xs:attribute name="Type" use="required">
<xs:simpleType>
<xs:restriction base="xs:string">
<xs:enumeration value="Super" />
<xs:enumeration value="TotallySuper" />
<xs:enumeration value="RockStar" />
</xs:restriction>
</xs:simpleType>
</xs:attribute>
Now that we have our schema, let's jump back to our AwesomeCompiler class and
add a method for parsing our SuperElement element when someone uses it in a
WiX project.
Parsing custom elements
Next, we need to add logic to our AwesomeCompiler class to parse our new element
when it's used. Override the ParseElement method from the base class:
public override void ParseElement(
SourceLineNumberCollection sourceLineNumbers,
XmlElement parentElement,
XmlElement element,
params string[] contextValues)
{
switch (parentElement.LocalName)
{
case "Product":
case "Fragment":
switch (element.LocalName)
{
case "SuperElement":
this.ParseSuperElement(element);
break;
default:
this.Core.UnexpectedElement(
parentElement,
element);
break;
}
break;
www.it-ebooks.info

Extending WiX
[ 366 ]
default:
this.Core.UnexpectedElement(
parentElement,
element);
break;
}
}
When someone uses our extension in their WiX project and then compiles it, Candle
will call the ParseElement method. Our override parses only SuperElements that are
children to Product or Fragment elements. In your own extension, feel free to add
more case statements for all of the elements you've dened in your schema. We'll be
calling a method called ParseSuperElement to handle the specic parsing logic. You
should call the UnexpectedElement method if the element passed in isn't recognized
so that Candle will throw an error.
The ParseSuperElement method takes an XmlNode object—our SuperElement. The
following is the code to add:
private void ParseSuperElement(XmlNode node)
{
SourceLineNumberCollection sourceLineNumber =
Preprocessor.GetSourceLineNumbers(node);
string superElementId = null;
string superElementType = null;
foreach (XmlAttribute attribute in node.Attributes)
{
if (attribute.NamespaceURI.Length == 0 ||
attribute.NamespaceURI == this.schema.TargetNamespace)
{
switch (attribute.LocalName)
{
case "Id":
superElementId = this.Core.GetAttributeIdentifierValue(
sourceLineNumber,
attribute);
break;
case "Type":
superElementType =
this.Core.GetAttributeValue(
sourceLineNumber,
attribute);
www.it-ebooks.info

Chapter 14
[ 367 ]
break;
default:
this.Core.UnexpectedAttribute(
sourceLineNumber,
attribute);
break;
}
}
else
{
this.Core.UnsupportedExtensionAttribute(
sourceLineNumber,
attribute);
}
}
if (string.IsNullOrEmpty(superElementId))
{
this.Core.OnMessage(
WixErrors.ExpectedAttribute(
sourceLineNumber,
node.Name,
"Id"));
}
if (string.IsNullOrEmpty(superElementType))
{
this.Core.OnMessage(
WixErrors.ExpectedAttribute(
sourceLineNumber,
node.Name,
"Type"));
}
if (!this.Core.EncounteredError)
{
Row superElementRow =
this.Core.CreateRow(
sourceLineNumber,
"SuperElementTable");
superElementRow[0] = superElementId;
superElementRow[1] = superElementType;
}
}
www.it-ebooks.info

Extending WiX
[ 368 ]
All parsing methods follow a similar structure. First, use the Preprocessor.
GetSourceLineNumbers method to get a SourceLineNumberCollection object.
This will be used in various places throughout the rest of the function.
private void ParseSuperElement(XmlNode node)
{
SourceLineNumberCollection sourceLineNumber =
Preprocessor.GetSourceLineNumbers(node);
}
Next, loop through each item in the node object's Attributes collection to get
each attribute that was set on our SuperElement. There are quite a few specialized
functions for retrieving the value of different types of attributes, but the simplest
is GetAttributeValue, which returns the value as a string. I'm also using
GetAttributeIdentifierValue, which does some additional validation checks to
make sure the Id attribute contains valid characters for an ID.
Call the UnexpectedAttribute method as a fallback in case an unrecognized
attribute is used on our SuperElement. You should also call the
UnsupportedExtensionAttribute method if an attribute is prexed with a
namespace that isn't our schema's target namespace.
foreach (XmlAttribute attribute in node.Attributes)
{
if (attribute.NamespaceURI.Length == 0 ||
attribute.NamespaceURI == this.schema.TargetNamespace)
{
switch (attribute.LocalName)
{
case "Id":
superElementId =
this.Core.GetAttributeIdentifierValue(
sourceLineNumber,
attribute);
break;
case "Type":
superElementType =
this.Core.GetAttributeValue(
sourceLineNumber,
attribute);
break;
default:
this.Core.UnexpectedAttribute(
sourceLineNumber,
attribute);
www.it-ebooks.info

Chapter 14
[ 369 ]
break;
}
}
else
{
this.Core.UnsupportedExtensionAttribute(
sourceLineNumber,
attribute);
}
}
After extracting each attribute's value, we will do some validation to make sure
all required attributes have been set. You can use the OnMessage method to have
Candle display an error if the mandatory attribute is missing, as shown in the
following code:
if (string.IsNullOrEmpty(superElementId))
{
this.Core.OnMessage(
WixErrors.ExpectedAttribute(
sourceLineNumber,
node.Name,
"Id"));
}
if (string.IsNullOrEmpty(superElementType))
{
this.Core.OnMessage(
WixErrors.ExpectedAttribute(
sourceLineNumber,
node.Name,
"Type"));
}
Finally, use the CreateRow method to add the data from the element to the MSI
database. Given the name of the table you want to create and the source line number
where the element was parsed, you'll get a Row object that you can treat as an array.
Each index in the array is associated with column in the row. In this example, we're
creating a row in a table called SuperElementTable and setting the rst column to
the element's Id attribute and the second to its Type attribute, given as follows:
if (!this.Core.EncounteredError)
{
Row superElementRow =
www.it-ebooks.info

Extending WiX
[ 370 ]
this.Core.CreateRow(
sourceLineNumber,
"SuperElementTable");
superElementRow[0] = superElementId;
superElementRow[1] = superElementType;
}
Next, let's dig into how to declare the structure of this table.
Creating a new MSI table
Assuming the WiX compiler can successfully parse our element, we need to dene
how that data is going to be stored in the MSI. This part is actually pretty simple.
We just need to add an XML le that establishes the structure of a table in the MSI
called SuperElementTable. Each SuperElement that's used will be added as a row
in this table.
Add an XML le to your class library project and call it TableDefinitions.xml.
As we did for the XSD, set the Build Action option of this le to Embedded
Resource. The root element will be called tableDefinitions and should reference
the XML namespace http://schemas.microsoft.com/wix/2006/tables. Add the
following markup:
<?xml version="1.0" encoding="utf-8" ?>
<tableDefinitions
xmlns="http://schemas.microsoft.com/wix/2006/tables">
<tableDefinition
name="SuperElementTable"
createSymbols="yes">
</tableDefinition>
</tableDefinitions>
Inside the tableDefinitions element, we've added a tableDefinition element
with a name attribute set to SuperElementTable. That's what we're calling the new
table in the MSI. The createSymbols attribute should be set to yes.
www.it-ebooks.info

Chapter 14
[ 371 ]
Next, add a columnDefinition element for each attribute dened by SuperElement.
These will dene the columns in the table. They are shown as follows:
<?xml version="1.0" encoding="utf-8" ?>
<tableDefinitions
xmlns="http://schemas.microsoft.com/wix/2006/tables">
<tableDefinition
name="SuperElementTable"
createSymbols="yes">
<columnDefinition
name="Id"
type="string"
length="72"
primaryKey="yes"
category="identifier"
description="Primary key for this element" />
<columnDefinition
name="Type"
length="72"
type="string"
category="formatted"
nullable="no"
description="Type of SuperElement" />
</tableDefinition>
</tableDefinitions>
Here we are adding columns for the Id and Type attributes. Marking the Id attribute
as a primaryKey means that it can't be duplicated by another row and that it will
serve as the primary key on the table.
You can also mark a column as a foreign key by setting the keyTable attribute to
the name of another table and keyColumn attribute to the number, counting from
left to right, of the column on that table to reference. The WiX linker will do some
validation on the foreign keys including checking that the referenced column exists
and that the foreign key isn't also a primary key. If you run into an error about
modularization types, just make sure that your columnDefintion element sets an
attribute called modularize to the same as it is on the referenced column. The error
message will tell you what it has to be.
www.it-ebooks.info
Extending WiX
[ 372 ]
The type attribute can be set to one of the values described in the following table:
Column Type Meaning
string Column is a string.
localized Column is a localizable string.
number Column is a number.
object Column is a binary stream.
preserved Column is a string that is preserved in transforms.
The category attribute can be set to a valid column data type. You can nd a list in
the section titled Column Data Types (Windows) in the MSI SDK documentation that
came with WiX. A list can also be found at:
http://msdn.microsoft.com/en-us/library/windows/desktop/
aa367869(v=vs.85).aspx
In our example, Id has a Category attribute of identifier, meaning that it can only
contain ASCII characters, underscores, and periods. Type has a Category attribute
of formatted, meaning that it can accept a WiX property value as well as a string.
One last useful attribute: if you want to allow nulls in a column, set the nullable
attribute to yes.
You can get a good idea about the syntax to use in your table denitions by looking
at those dened by WiX. Download the source code and check out the src\wix\
Data\tables.xml le.
Extending the WixExtension class
The next step is to add a class that extends the WixExtension class. The purpose
of this class is to return an instance of our AwesomeCompiler and also our table
denitions. Add a new class to your project and call it AwesomeWixExtension. It
should override the CompilerExtension property to return an instance of our
AwesomeCompiler class:
namespace AwesomeExtension
{
Using System.Reflection;
using Microsoft.Tools.WindowsInstallerXml;
public class AwesomeWixExtension : WixExtension
{
www.it-ebooks.info

Chapter 14
[ 373 ]
private CompilerExtension compilerExtension;
public override CompilerExtension CompilerExtension
{
get
{
if (this.compilerExtension == null)
{
this.compilerExtension =
new AwesomeCompiler();
}
return this.compilerExtension;
}
}
}
}
Next, override the TableDefinitions property and use the
LoadTableDefinitionHelper method to get the table denitions from our XML le:
private TableDefinitionCollection tableDefinitions;
public override TableDefinitionCollection TableDefinitions
{
get
{
if (this.tableDefinitions == null)
{
this.tableDefinitions =
WixExtension.LoadTableDefinitionHelper(
Assembly.GetExecutingAssembly(),
"AwesomeExtension.TableDefinitions.xml");
}
return this.tableDefinitions;
}
}
One last thing to do: open your project's AssemblyInfo.cs le and add the
following attribute:
[assembly: AssemblyDefaultWixExtension(typeof(
AwesomeExtension.AwesomeWixExtension))]
www.it-ebooks.info
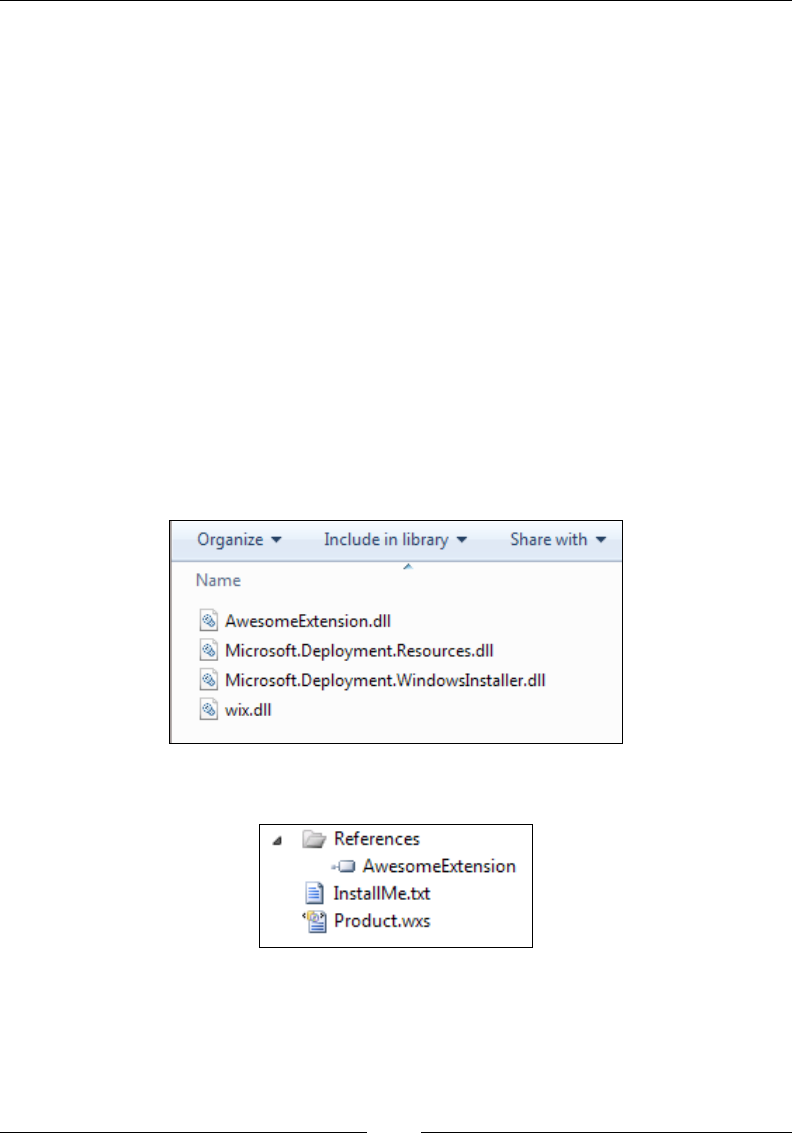
Extending WiX
[ 374 ]
This will mark our new AwesomeWixExtension class as the default WiX extension in
the assembly.
Using the extension in a WiX project
At this point, you could use your extension in a WiX project to get a feel for what
it will do. So far, we've added code to parse SuperElement and store it in the MSI.
Later on we will tie a custom action to SuperElement so that when someone uses it
the action will be run during the installation. To use the extension, follow these steps:
1. Copy the extension assembly and its dependencies to a WiX project.
2. Add the extension as a project reference.
3. Use the custom XML namespace in the WiX project's Wix element.
4. Add SuperElement to the markup and compile.
Step 1 is to copy the output from our AwesomeExtension to a folder in a WiX project.
I'll assume you've created a simple WiX project. A common strategy is to add a lib
folder to the WiX project and copy the output les there:
Then, add AwesomeExtension.dll as a project reference:
www.it-ebooks.info
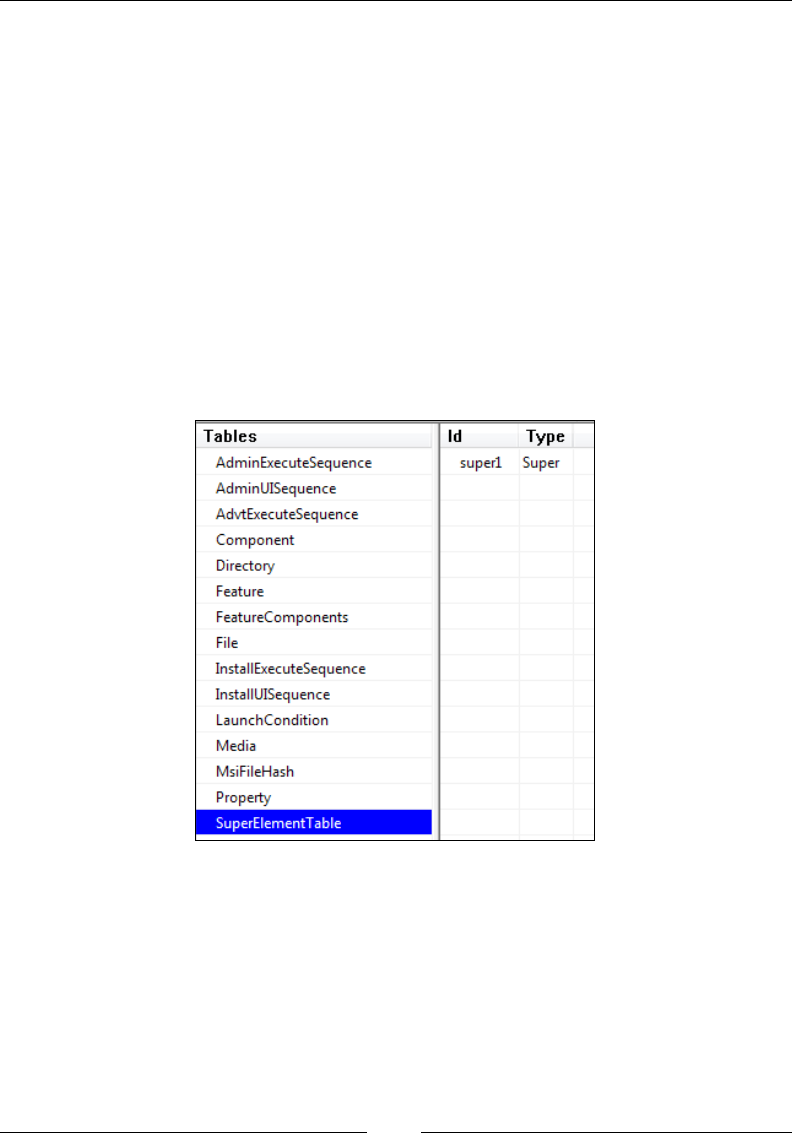
Chapter 14
[ 375 ]
You can accomplish the same thing from the command line by passing the –ext ag
to Candle and Light, followed by the path to the assembly.
Now that we have a reference to the extension we can include our custom XML
namespace. Change the Wix element in your main WiX source le so that it contains
http://www.mydomain.com/AwesomeSchema.
<Wix xmlns="http://schemas.microsoft.com/wix/2006/wi"
xmlns:awesome="http://www.mydomain.com/AwesomeSchema">
You're then able to use SuperElement, like so:
<awesome:SuperElement Id="super1" Type="Super" />
This element can be placed within the Product element or a Fragment element.
Compile the WiX project and use Orca.exe to see that the custom table has
been added:
www.it-ebooks.info
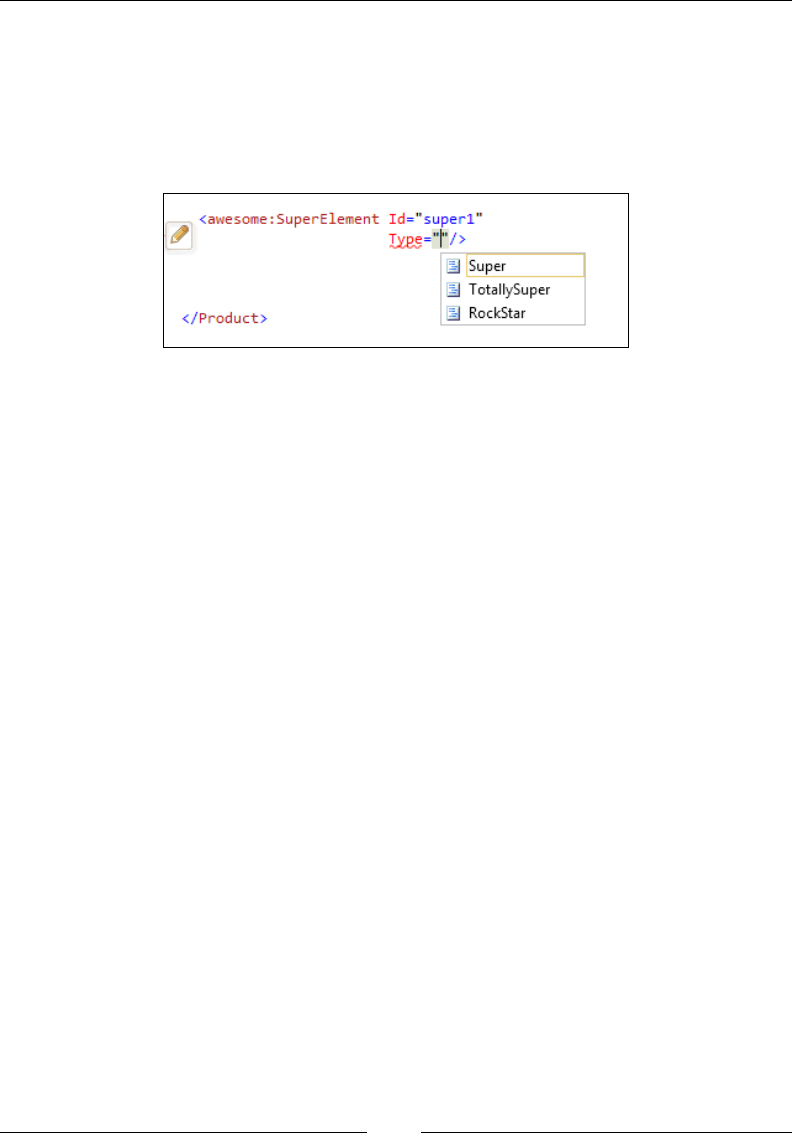
Extending WiX
[ 376 ]
You should see a row in the table containing the data from SuperElement. If you'd
like to see Visual Studio IntelliSense when typing the custom element, copy the
AwesomeSchema.xsd le we created into Visual Studio's Xml/Schemas folder. If
using Visual Studio 2010, it can be found at C:\Program Files (x86)\Microsoft
Visual Studio 10.0\Xml\Schemas. Close and re-open Visual Studio and you
should see the parameter information pop up as you type:
Tying a custom action to the custom
element
Having a table full of rows in the MSI gets us halfway. The other half is dening
a custom action that reads from that table and does something useful with the
data at install time. The extensions that come with WiX already do all sorts of
handy things, such as create SQL databases and tables, edit XML les, add users
and set permissions, add websites to IIS, and so on. Your extension will add
to this list, allowing an installer to do new, uncharted things! However, in this
example we'll keep it simple and only display a message box for each row in the
SuperElementTable table.
This is going to be a three-step process. First, we'll dene the custom action in C#.
Then, we'll embed the custom action DLL inside a WiX library (.wixlib). Finally,
we'll embed that library inside our extension. In the same Visual Studio solution
where we dened our extension, add a new project using the C# Custom Action
Project template. Call it SuperElementActions.
Now, if we were going to perform our custom action during the immediate phase of
the UI or Execute sequence, things would be pretty simple. Let's assume, however,
that we are making an action that changes the end users' computer and so should
only be run during the deferred stage of the Execute sequence. This gives us an extra
challenge: we can't read the MSI database during the deferred stage.
www.it-ebooks.info

Chapter 14
[ 377 ]
The trick is to read the database during the immediate phase, store the results in a
property, and then read that property during the deferred phase. In short, we need
two custom actions. The rst will read the database and looks like the following
code snippet:
namespace SuperElementActions
{
using System;
using System.Collections.Generic;
using Microsoft.Deployment.WindowsInstaller;
public class CustomActions
{
[CustomAction]
public static ActionResult ShowMessageImmediate(Session session)
{
Database db = session.Database;
try
{
View view = db.OpenView("SELECT `Id`, `Type` FROM
`SuperElementTable`");
view.Execute();
CustomActionData data = new CustomActionData();
foreach (Record row in view)
{
data[row["Id"].ToString()] = row["Type"].ToString();
}
session["ShowMessageDeferred"] = data.ToString();
return ActionResult.Success;
}
catch (Exception ex)
{
session.Log(ex.Message);
return ActionResult.Failure;
}
finally
{
db.Close();
}
}
}
}
www.it-ebooks.info

Extending WiX
[ 378 ]
In the ShowMessageImmediate method, we're reading from the currently executing
MSI database by accessing session.Database, calling OpenView on it to select the
rows from our custom table, and then Execute on the view that's returned. We then
iterate over each row in the table by using a foreach statement on the view.
The data is stored in a new CustomActionData object. This class can be used like a
hash table, so I'm using each SuperElement element's Id attribute as the key and
the Type attribute as the value. After we've set all of the key-value pairs in the hash
table, we serialize it out to a new session property called ShowMessageDeferred. By
naming the property that, a custom action with the same name can have access to the
data. It's a way of passing data from the immediate phase to the deferred phase.
The next step is to dene the deferred custom action. Add a new method to the same
class and call it ShowMessageDeferred. The following is the code:
[CustomAction]
public static ActionResult ShowMessageDeferred(Session session)
{
try
{
CustomActionData data = session.CustomActionData;
foreach (KeyValuePair<string, string> datum in data)
{
DisplayWarningMessage(
session,
string.Format("{0} => {1}", datum.Key, datum.Value));
}
return ActionResult.Success;
}
catch (Exception ex)
{
session.Log(ex.Message);
return ActionResult.Failure;
}
}
private static void DisplayWarningMessage(Session session, string
message)
{
Record record = new Record(0);
record[0] = message;
session.Message(InstallMessage.Warning, record);
}
www.it-ebooks.info
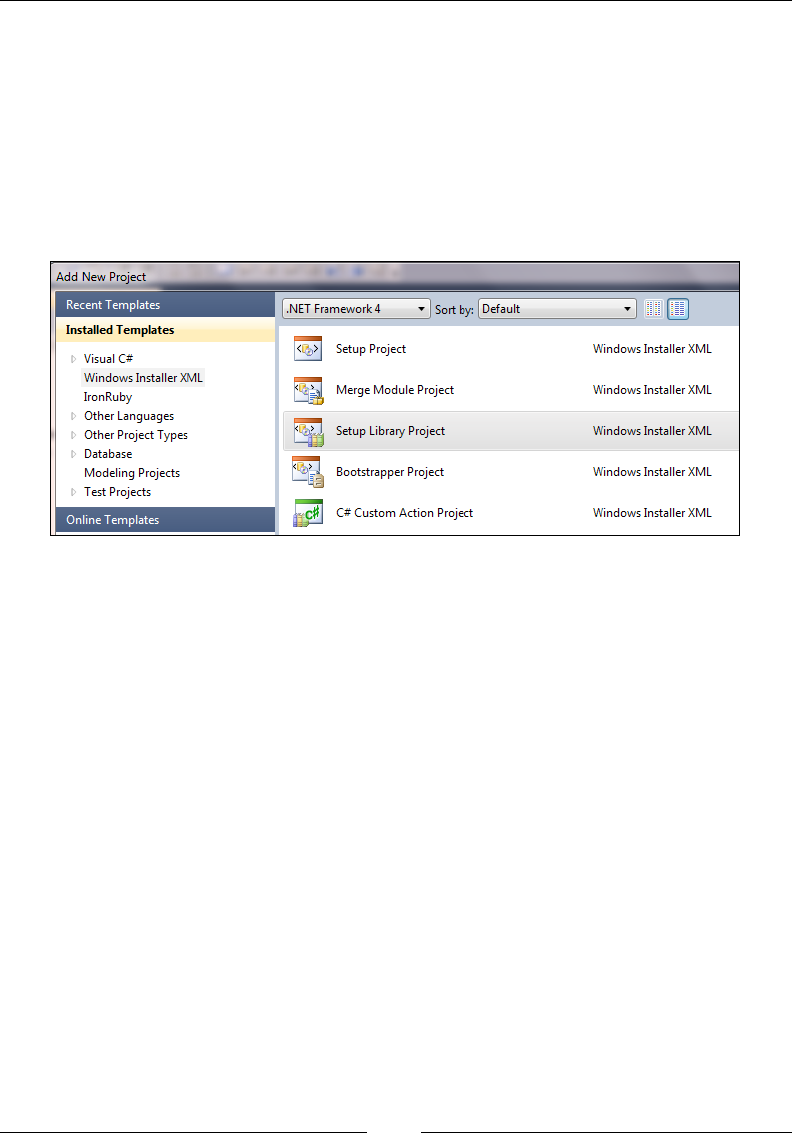
Chapter 14
[ 379 ]
Here we're reading from the CustomActionData property on the Session object to
get the SuperElement data that was set by the other custom action. We use another
foreach statement to iterate over each item and display it in a message box, using a
small helper function called DisplayWarningMessage.
Now we can move on to storing these custom actions in a WiX library. The reason
is so that we can schedule the custom actions using WiX markup. Add a new Setup
Library Project template to your solution and call it AwesomeLibrary, as shown in
the following screenshot:
The setup library will contain a le called Library.wxs. We can modify it to point to
our C# custom actions:
<?xml version="1.0" encoding="UTF-8"?>
<Wix xmlns="http://schemas.microsoft.com/wix/2006/wi">
<Fragment>
<Binary Id="CA_DLL"
SourceFile="SuperElementActions.CA.dll" />
<CustomAction Id="ShowMessageImmediate"
BinaryKey="CA_DLL"
DllEntry="ShowMessageImmediate"
Execute="immediate"
Return="check" />
<CustomAction Id="ShowMessageDeferred"
BinaryKey="CA_DLL"
DllEntry="ShowMessageDeferred"
Execute="deferred"
Return="check" />
<InstallExecuteSequence>
www.it-ebooks.info
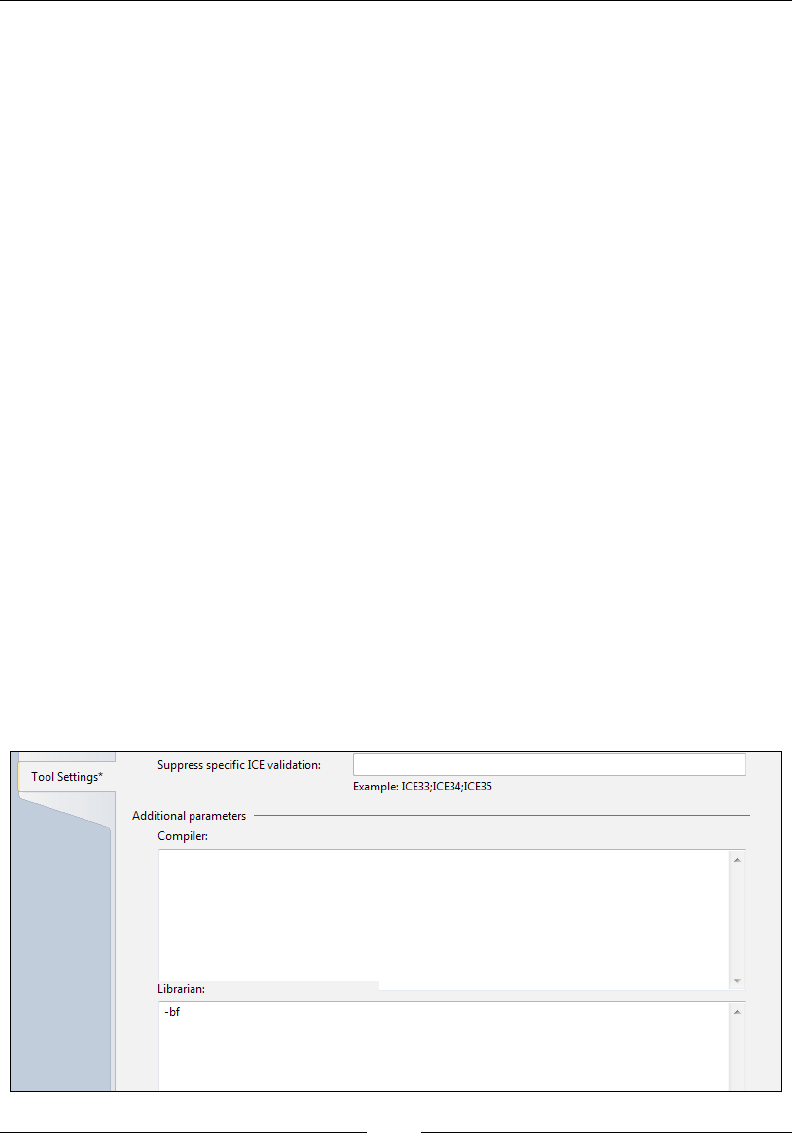
Extending WiX
[ 380 ]
<Custom Action="ShowMessageImmediate"
Before="ShowMessageDeferred">
NOT Installed</Custom>
<Custom Action="ShowMessageDeferred"
After="InstallInitialize">
NOT Installed</Custom>
</InstallExecuteSequence>
</Fragment>
</Wix>
Note that the Binary element references a DLL called SuperElementActions.
CA.dll. The easiest way to make that true is to add the custom actions project as
a reference in the AwesomeLibrary project. Then, use preprocessor variables to
reference the DLL from that project's output folder. Update the Binary element in
the following manner:
<Binary Id="CA_DLL"
SourceFile=
"$(var.SuperElementActions.TargetDir)SuperElementActions.CA.dll" />
The two custom actions are both scheduled to run during InstallExecuteSequence,
but the rst will run during the immediate phase and the other during the deferred
phase. I've added a condition to each Custom element so that these actions will only
run during an install and not during an uninstall or repair.
Because we don't want to have to deploy our custom actions' DLL separately
from our extension, we should embed it inside the WIXLIB. To do so you can
add the -bf ag to the Librarian settings of the project's properties, as shown
in the following screenshot:
www.it-ebooks.info
Chapter 14
[ 381 ]
Alternatively, check the box labelled Bind les into the library le on the properties'
Build page:
Copy the output from this .wixlib project to the AwesomeExtension project's folder.
You'll probably want to use a post-build step in Visual Studio to do this. Add the
AwesomeLibrary.wixlib le to the AwesomeExtension project using the Solution
Explorer window and change its Build Action value to Embedded Resource.
You should now have three projects: AwesomeExtension, AwesomeLibrary, and
SuperElementActions, as shown in the following screenshot:
www.it-ebooks.info

Extending WiX
[ 382 ]
I'll summarize the steps we take to link them together:
• Use a project reference to SuperElementActions in the AwesomeLibrary
project and preprocessor variables to include SuperElementActions.CA.dll
in a Binary variable.
• Copy AwesomeLibrary.wixlib to the AwesomeExtension project's folder.
Consider using a post-build action to do this.
• Add the AwesomeLibrary.wixlib le to the AwesomeExtension project, and
change its Build Action value to Embedded Resource.
We'll need to add another method to the AwesomeWixExtension.cs le called
GetLibrary. This will retrieve the WiX library from the extension. The following is
the code to add:
private Library library;
public override Library GetLibrary(
TableDefinitionCollection tableDefinitions)
{
if (this.library == null)
{
this.library =
WixExtension.LoadLibraryHelper(
Assembly.GetExecutingAssembly(),
"AwesomeExtension.AwesomeLibrary.wixlib",
tableDefinitions);
}
return this.library;
}
The LoadLibraryHelper method takes the currently executing assembly, the name
of the embedded WIXLIB, and the table denitions collection that was passed into
the method and returns the library.
Next, add a call to CreateWixSimpleReferenceRow to the end of the
ParseSuperElement method. This will create a relationship between our WIXLIB
and the MSI, sort of like pulling a Fragment element into a project, by referencing
one of the elements in the library. I'm referencing the ShowMessageImmediate action
from the CustomAction table here to make this link:
this.Core.CreateWixSimpleReferenceRow(
sourceLineNumber,
"CustomAction",
"ShowMessageImmediate");
www.it-ebooks.info
Chapter 14
[ 383 ]
Now when you use SuperElement in a WiX project, the ShowMessageImmediate and
ShowMessageDeferred custom actions will be added to the CustomAction table in
the MSI. All other elements in the WIXLIB will also be pulled in.
When you install the MSI you will see a message displayed for each SuperElement,
as shown in the following screenshot:
Summary
In this chapter, we discussed how to extend WiX to perform custom operations at
install time. Our extension provided new WiX elements that tie to custom actions.
All of this is bundled up into a .NET assembly so that others can use it too. With this
knowledge, you've opened the door to advanced WiX functionality for yourself and
possibly the WiX community at large.
In the next chapter, we will have a look at the new Burn engine that was introduced
in WiX 3.6. Burn provides bootstrapping capabilities that allow us to bundle our
software and its dependencies into a single setup executable. The potential uses for
this are many and we'll dig into what you need to know to get started.
www.it-ebooks.info

Bootstrapping Prerequisites
with Burn
If you're like most of us, your software relies on some framework, third-party
component, database, or process. Maybe it's the .NET Framework, the Java runtime,
or SQL Server. Up until now, we would use a launch condition to show the user
a friendly error message if the required prerequisite wasn't found, swiftly ending
our installation. What we needed is a bootstrapper—a mechanism for getting those
prerequisites installed prior to installing our own software. With the arrival of WiX
3.6, we have one.
Burn is a new tool in the WiX arsenal that lls the bootstrapper gap, but its feature
set extends well beyond that of a simple bootstrapper. In this chapter, we'll cover the
following topics:
• The ins and outs of getting your prerequisites installed using the new
Bootstrapper Project template available in Visual Studio
• Displaying a single progress bar while installing multiple installation
packages
• Downloading installers from the Internet at runtime
• Bundling patches together with your MSI to get your software up-to-date
from the start
www.it-ebooks.info
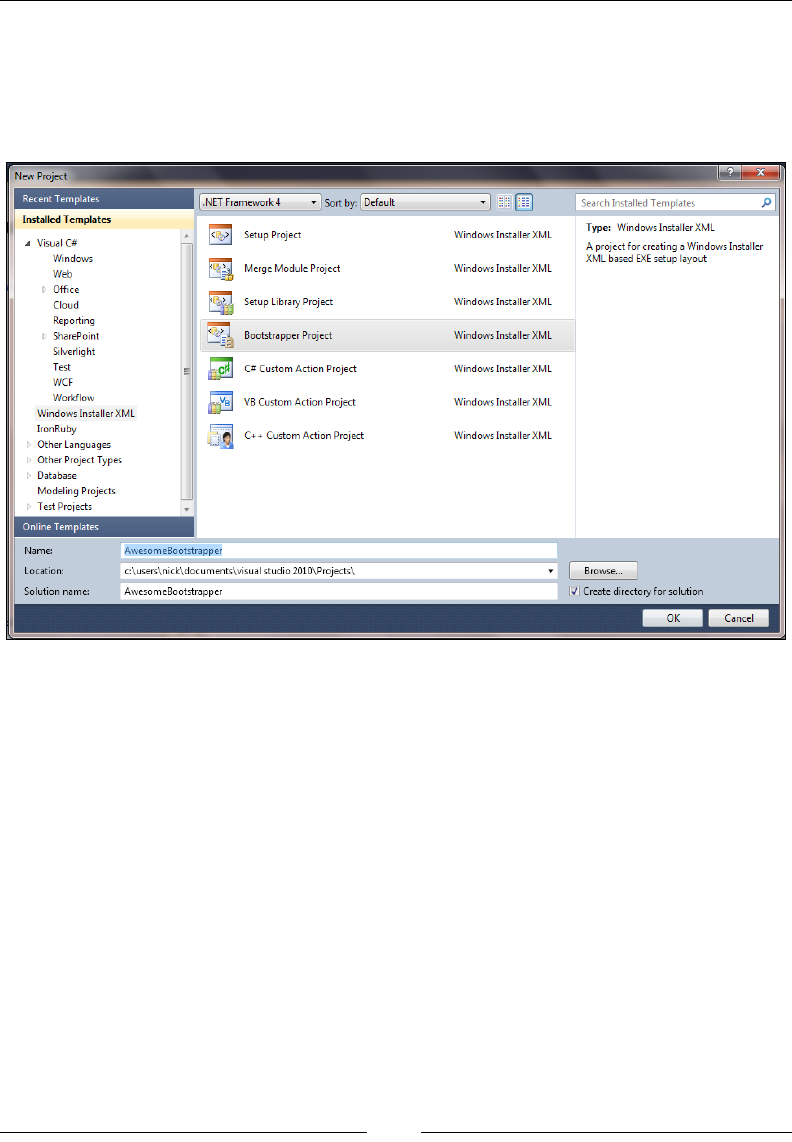
Bootstrapping Prerequisites with Burn
[ 386 ]
Using the Bootstrapper Project template
Create a new project in Visual Studio using the Bootstrapper Project template
that's installed with the WiX toolset. Go to New Project | Windows Installer XML |
Bootstrapper Project.
It will contain a le called Bundle.wxs with the following markup:
<?xml version="1.0" encoding="UTF-8"?>
<Wix xmlns="http://schemas.microsoft.com/wix/2006/wi">
<Bundle Name="Awesome Software"
Version="1.0.0.0"
Manufacturer="Awesome Company"
UpgradeCode="c352f5c7-1dbe-416c-820d-685b058270d5">
<BootstrapperApplicationRef
Id="WixStandardBootstrapperApplication.RtfLicense" />
<Chain>
<!--TODO: Define the list of chained packages.-->
</Chain>
</Bundle>
</Wix>
www.it-ebooks.info

Chapter 15
[ 387 ]
The root element is called Bundle. The name reects a major aspect of Burn in
that it bundles your installer with its prerequisites into a single, tidy executable.
Double-clicking on that executable will install each installation package in turn.
The Chain element sets up which packages are embedded and the order in which
they're installed.
In the following sections we will discuss the Bundle and Chain elements in
more detail.
Describing the Bundle element
The Bundle element has several attributes at its disposal for describing what
eventually gets shown in Programs and Features. When the end user installs a
Burn bundle, it will be added as an entry in the programs list. This presents a single
point at which a piece of software and all of its dependencies can be uninstalled or
repaired. The advantage of this design is that it simplies these tasks for the user.
The following snippet sets these attributes:
<Bundle Name="Awesome Software"
Version="1.0.0.0"
Manufacturer="Awesome Company"
HelpTelephone="123-456-7890"
HelpUrl="http://www.mydomain.com/help"
UpdateUrl="http://www.mydomain.com/update"
AboutUrl="http://www.mydomain.com/about"
... >
You may also use localization variables. Localization works the same as it does for an
MSI. The following is an example:
<Bundle Name="!(loc.BundleName)"
Version="1.0.0.0"
Manufacturer="!(loc.Manufacturer)"
HelpTelephone="!(loc.HelpPhone)"
HelpUrl="!(loc.HelpUrl)"
UpdateUrl="!(loc.UpdateUrl)"
AboutUrl="!(loc.AboutUrl)"
... >
www.it-ebooks.info

Bootstrapping Prerequisites with Burn
[ 388 ]
Then, add a .wxl le to your bootstrapper project:
<?xml version="1.0" encoding="utf-8"?>
<WixLocalization Culture="en-us"
xmlns="http://schemas.microsoft.com/wix/2006/localization">
<String Id="Manufacturer">Awesome Software Company</String>
<String Id="BundleName">Awesome Software Bundle</String>
<String Id="HelpPhone">123-456-7890</String>
<String Id="HelpUrl">www.mysite.com/help</String>
<String Id="UpdateUrl">www.mysite.com/update</String>
<String Id="AboutUrl">www.mysite.com/about</String>
</WixLocalization>
A few of these attributes deserve more explanation. The Name attribute will be the
name of the software in the programs list.Version is comprised of four integers, each
between 0 and 65534, separated by dots. In addition to being displayed in Programs
and Features, it comes into play when detecting previously installed versions of
the same bundle. We'll touch on that more shortly. The rest of the attributes shown
give additional contact information or links to online resources. Different operating
systems show these attributes in their own particular way. You may see some or all
of them.
Ordinarily, Programs and Features gives you the option to uninstall, modify,
or repair your software. You can disable each with the DisableRemove,
DisableModify, and DisableRepair attributes. Each takes a yes value to remove
that particular option. Additionally, if you set DisableModify to button then you'll
get a single Uninstall/Change button instead of two separate buttons.
Other attributes are also available, not related to Programs and Features. The
Copyright attribute can be set to your copyright text to be displayed in the
executable le's properties. Setting Compressed to no will prevent the packages,
such as your MSI and its dependencies, from being compressed inside the bundle.
Instead, they will be copied to the output folder along with the executable. The
IconSourceFile attribute can be set to the path to an ICO le. The icon will be
displayed on the executable le itself and in Programs and Features.
www.it-ebooks.info
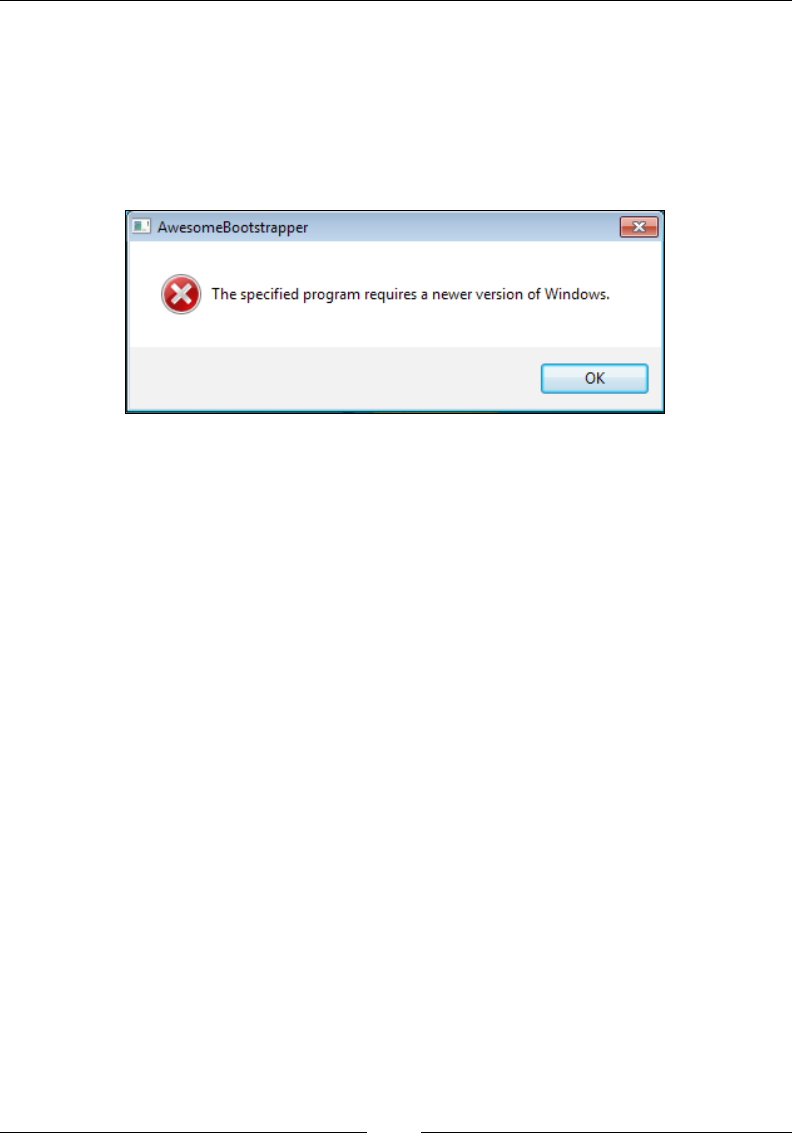
Chapter 15
[ 389 ]
Restricting the install by the operating
system
A nal attribute to consider is Condition. You'll set this to a conditional statement
that, should it evaluate to false, the system will display an error dialog and abort the
installation. The dialog's text is unchangeable and looks like the following screenshot:
Because the condition is evaluated early on, you can only use built-in variables listed
at the following URL:
http://wix.sourceforge.net/manual-wix3/bundle_built_in_variables.htm
However, because you can't change the error message, and the error message always
says that the program requires a newer version of Windows, you should really
only be checking the operating system version. A variable t for this purpose is
VersionNT. Compare it to an OS version number, formatted as a decimal preceded
by v. For example, Windows 7 is Version 6.1. The following example checks that the
operating system is Windows 7:
<Bundle Name="Awesome Software"
Condition="VersionNT = v6.1"
... >
Note that the format for the VersionNT Burn variable is different than the
VersionNT property used in a WiX setup project, where the values are whole
numbers that aren't preceded by v. You can view a list of operating system version
numbers at the following site:
http://msdn.microsoft.com/en-us/library/windows/desktop/
ms724832(v=vs.85).aspx
www.it-ebooks.info
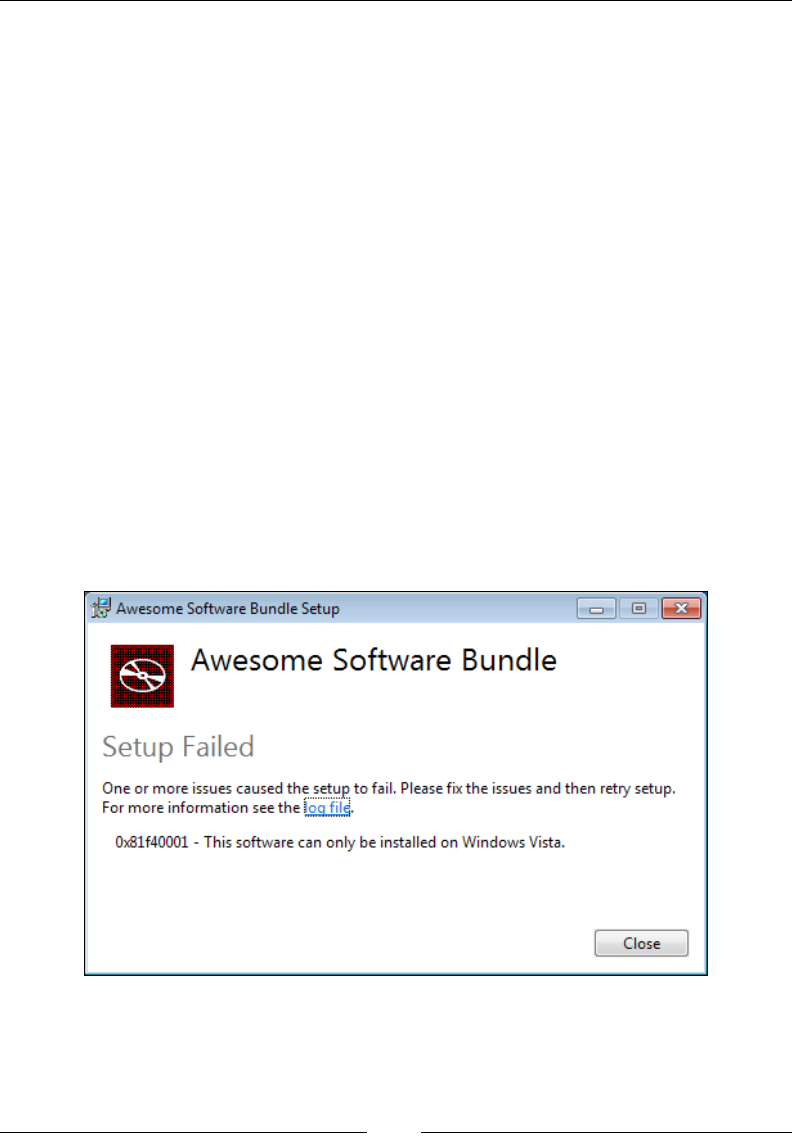
Bootstrapping Prerequisites with Burn
[ 390 ]
Although the Condition attribute's error message can't be changed, you may use
a child element called Condition that allows custom text. This element comes as
a part of BalExtension. The BalExtension element provides hooks into the Burn
engine for customizing the bootstrapper's UI and logic. First, add the BalExtension
namespace to the Wix element and then nest the new Condition element inside
Bundle, as shown in the following code snippet:
<Wixxmlns="http://schemas.microsoft.com/wix/2006/wi"
xmlns:bal="http://schemas.microsoft.com/wix/BalExtension">
<Bundle Name="Awesome Software"
Version="1.0.1.0"
Manufacturer="Awesome Company"
Copyright="(c) All rights reserved."
UpgradeCode="3601032C-A8C9-4323-88E0-1967A9C2145E">
<bal:Condition Message="This software can only be installed on
Windows Vista.">
<![CDATA[VersionNT = v6.0]]>
</bal:Condition>
In this case, if the operating system isn't Windows Vista, you'll get an error like the
one shown in the following screenshot:
As with the Condition attribute, you can only use the built-in Burn variables
mentioned before.
www.it-ebooks.info

Chapter 15
[ 391 ]
UpgradeCode and detecting related
bundles
In this section we will nd out how to detect and update older versions of your bundle.
Updating existing bundles
Each time that you compile your bootstrapper project in Visual Studio, it is assigned
a new identity—a GUID called BundleId that you cannot change. In this respect,
every bundle that you create is unique. The UpgradeCode attribute allows us to link
two bootstrappers, making them related bundles. This relationship allows one bundle
to detect and upgrade the installed packages of the other.
The UpgradeCode attribute is set on the Bundle element, as shown:
<Bundle Name="Awesome Software Bundle"
Version="1.0.0.0"
Manufacturer="Awesome Company"
Copyright="(c) All rights reserved."
UpgradeCode="3601032C-A8C9-4323-88E0-1967A9C2145E">
Now, having two bundle executables with the same UpgradeCode attribute does not
mean that one will automatically replace the other. Their versions have a big part to
play. Two bundles with the same UpgradeCode attribute and the same version will
simply be installed side-by-side. You could try this out for yourself by installing a
bundle, recompiling the project, installing again, and then checking Programs and
Features. You'll see both bundles listed. For one to replace the other, its Bundle
element's Version attribute must be higher.
After you've incremented the bundle's Version, during installation the bootstrapper
will search for any previously installed bundles that have the same UpgradeCode
attribute. If it nds one, it will check if the MSI packages installed by that bundle
are older (by version) than the one it is installing. If they are older, it replaces them.
If not, it leaves them as they are. No need to replace a package that's already up-to-
date, after all.
Let's try this out. Create two new WiX setup projects. These will compile into two
MSIs that we'll install with our bootstrapper. This goes to show that Burn can install
more than just prerequisites. It can also install a group of software applications, as in
a suite. I will call my MSIs Awesome1 and Awesome2. The following is the markup for
Awesome1. Note that it is installing a single text le:
<?xml version="1.0" encoding="UTF-8"?>
<Wix xmlns="http://schemas.microsoft.com/wix/2006/wi">
www.it-ebooks.info

Bootstrapping Prerequisites with Burn
[ 392 ]
<Product
Id="*"
Name="Awesome1"
Language="1033"
Version="1.0.0.0"
Manufacturer="Awesome Company"
UpgradeCode="9b380bd4-cb7c-40a2-9c15-fb38c862a7e7">
<Package InstallerVersion="200"
Compressed="yes"
InstallScope="perMachine" />
<MajorUpgrade DowngradeErrorMessage="A newer version of
[ProductName] is already installed." />
<MediaTemplate EmbedCab="yes" />
<Feature Id="ProductFeature"
Title="Awesome1"
Level="1">
<ComponentGroupRef Id="ProductComponents" />
</Feature>
</Product>
<Fragment>
<Directory Id="TARGETDIR" Name="SourceDir">
<Directory Id="ProgramFilesFolder">
<Directory Id="INSTALLFOLDER" Name="Awesome1" />
</Directory>
</Directory>
</Fragment>
<Fragment>
<ComponentGroup Id="ProductComponents"
Directory="INSTALLFOLDER">
<Component
Id="CMP_InstallMeTXT"
Guid="F643B5B5-59A8-428E-8E7A-FB4BDC024F83">
<File Id="FILE_InstallMeTXT"
Source="InstallMe.txt"
KeyPath="yes" />
</Component>
www.it-ebooks.info

Chapter 15
[ 393 ]
</ComponentGroup>
</Fragment>
</Wix>
You can imagine that Awesome2 is the same except that it will have a different
UpgradeCode and ProductId. It should also install a different text le with a
different component GUID.
To the same Visual Studio solution, add Bootstrapper Project and call it
AwesomeBootstrapper. The Bundle element should make sense to you now.
The Chain element, which we'll discuss in more detail later on, adds the two
MSIs to our bootstrapper:
<?xml version="1.0" encoding="UTF-8"?>
<Wixxmlns="http://schemas.microsoft.com/wix/2006/wi"
xmlns:bal="http://schemas.microsoft.com/wix/BalExtension">
<Bundle Name="Awesome Software"
Version="1.0.0.0"
Manufacturer="Awesome Company"
Copyright="(c) All rights reserved."
UpgradeCode="3601032C-A8C9-4323-88E0-1967A9C2145E">
<BootstrapperApplicationRef
Id="WixStandardBootstrapperApplication.RtfLicense" />
<Chain>
<MsiPackageSourceFile="Awesome1.msi" />
<MsiPackageSourceFile="Awesome2.msi" />
</Chain>
</Bundle>
</Wix>
This markup assumes that the MSIs have been copied to the bootstrapper project's
folder. You could also add the setup projects as references in the bootstrapper
project. Then, use preprocessor variables to access their output:
<Chain>
<MsiPackageSourceFile=
"$(var.Awesome1.TargetDir)Awesome1.msi" />
<MsiPackageSourceFile=
"$(var.Awesome2.TargetDir)Awesome2.msi" />
</Chain>
www.it-ebooks.info
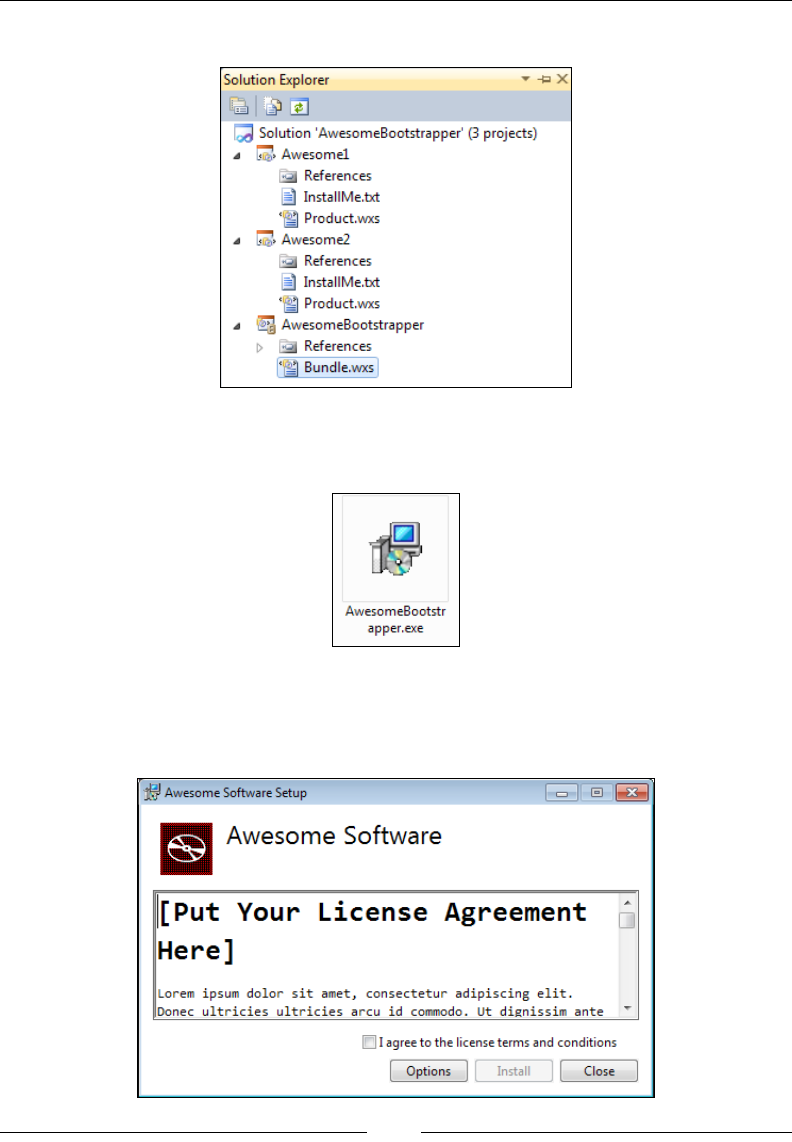
Bootstrapping Prerequisites with Burn
[ 394 ]
In any case, your solution ought to look like the following screenshot:
When you build the solution, the bootstrapper project will compress the two MSIs
into its output executable, as shown in the following screenshot:
Launch this executable (I prefer to do this on a virtual machine, in case something
goes wrong and I'm not able to uninstall) and you'll see the default user interface, as
shown in the following screenshot:
www.it-ebooks.info
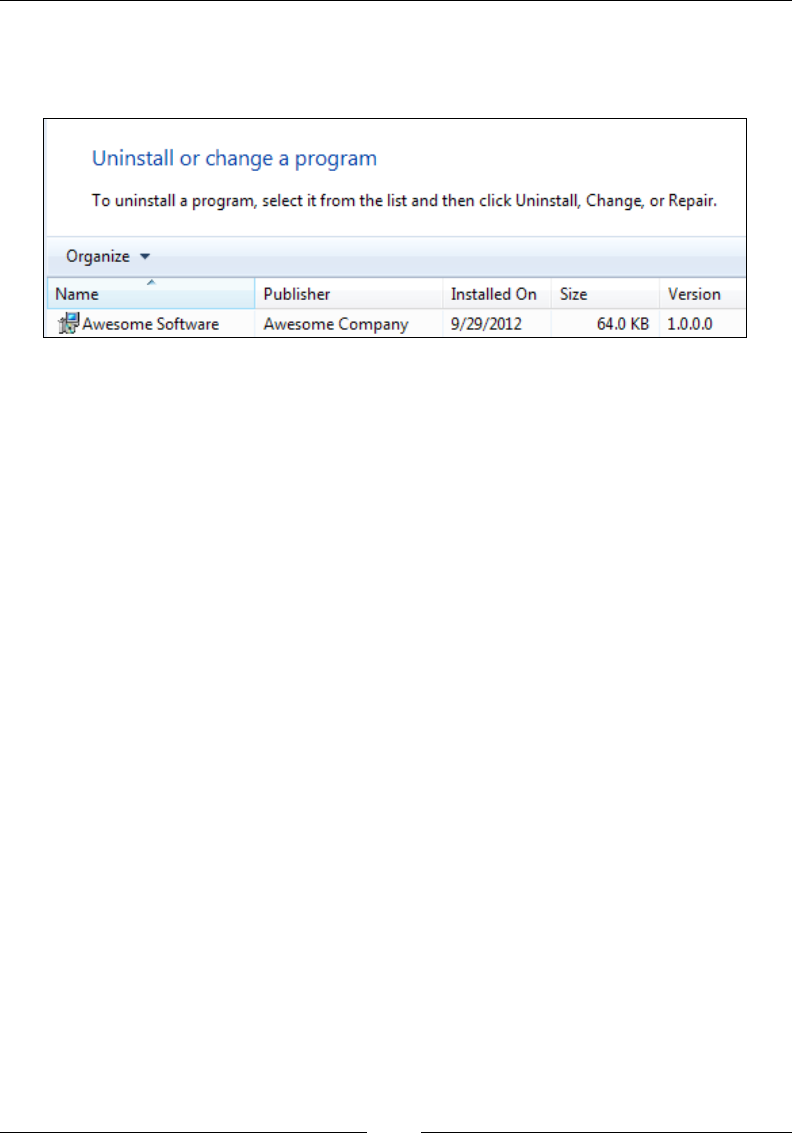
Chapter 15
[ 395 ]
Complete the install and you'll nd that the text les of the two MSI packages
were installed under Program Files. You'll also notice, if you look in Programs and
Features, that there is only a single entry. This is depicted in the following screenshot:
Now, let's create a second bootstrapper that upgrades our les. To make things
interesting, we'll only change the text le—perhaps alter its text to say Installed
by the new version!—and the version of our Awesome1 installer. The second MSI,
Awesome2, we'll keep the same. Here is the updated Product element for Awesome1
where we update the Version to 1.0.1.0:
<Product Id="*"
Name="Awesome1"
Language="1033"
Version="1.0.1.0"
Manufacturer="Awesome Company"
UpgradeCode="9b380bd4-cb7c-40a2-9c15-fb38c862a7e7">
Update the bootstrapper bundle version too. If we don't, the new bundle will be
installed side-by-side with the existing one:
<Bundle Name="Awesome Software"
Version="1.0.1.0"
Manufacturer="Awesome Company"
Copyright="(c) All rights reserved."
UpgradeCode="3601032C-A8C9-4323-88E0-1967A9C2145E">
You may recall that Windows Installer ignores the fourth digit of the Product
element's Version attribute when detecting previously installed packages. However,
the Bundle element does not have this behavior. Its fourth digit is signicant.
Build the solution again and install to the same machine where you installed the
last bundle. This time, the process is going to take a little longer. That's because the
bootstrapper is detecting and replacing the outdated Awesome1 MSI with the new
version. It will nd that the version of Awesome2 hasn't changed and will skip it.
www.it-ebooks.info
Bootstrapping Prerequisites with Burn
[ 396 ]
Installation logs for Burn can be found in the %TEMP% directory. Here's what you'll
nd in the le that logged the new bundle being installed:
Detect 2 packages
Detected related bundle: {c1526489-bd4c-4732-835f-0b3819bfea17},
type: Upgrade, scope: PerMachine, version: 1.0.1.0, operation: None
Detected related package: {94625113-C05E-4FED-97BE-21B49F32CB48},
scope: PerMachine, version: 1.0.1.0, language: 0 operation: Downgrade
Detected package: Awesome1.msi, state: Obsolete, cached: Complete
Detected package: Awesome2.msi, state: Present, cached: Complete
Detect complete, result: 0x0
Plan 2 packages, action: Uninstall
Will not uninstall package: Awesome2.msi, found dependents: 1
Notice that it labels Awesome1.msi as obsolete, but Awesome2.msi is present and
up-to-date. It then decides that Awesome2 does not need to be uninstalled.
Burn stores logs in the %TEMP% folder, incorporating the name of
the bundle into the log le's name, such as Awesome_Software_
Bundle_20121105154610.log. You'll also nd logs for
the MSIs that you're installing, such as Awesome Software
Bundle_20121105154610_0_Awesome1.msi.
Finding other related bundles
So you have now seen that having two bundles with the same UpgradeCode attribute
creates a relationship between the two. If one has a higher version than the other, it
can upgrade the previously installed les. You can also relate two bundles that have
different upgrade codes by using the RelatedBundle element. The following is an
example that forms a relationship with another bundle that has an UpgradeCode of
8A5496B3-0BFA-4C2B-8129-7C8A7E3F51D9:
<Bundle Name="Awesome Software"
Version="1.0.0.0"
Manufacturer="Awesome Company"
Copyright="(c) All rights reserved."
UpgradeCode="3601032C-A8C9-4323-88E0-1967A9C2145E">
<RelatedBundle Id="8A5496B3-0BFA-4C2B-8129-7C8A7E3F51D9"
Action="Upgrade" />
www.it-ebooks.info
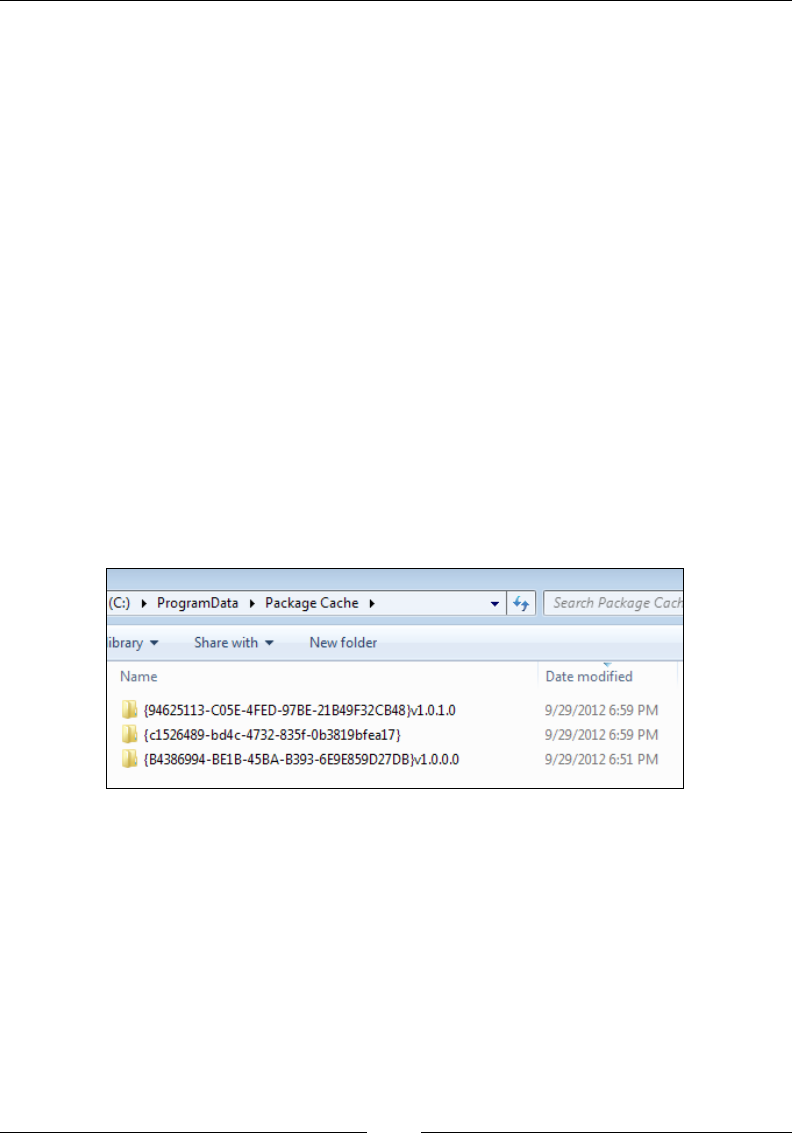
Chapter 15
[ 397 ]
The RelatedBundle element's Id matches the UpgradeCode attribute of the other
bundle. The Action attribute, when set to Upgrade, informs the bootstrapper
that it should upgrade the previously installed bundle if it nds it. When you set
UpgradeCode on the Bundle element, behind the scenes Burn is really just creating a
RelatedBundle element on your behalf.
Where the packages are cached
Another interesting thing to watch is the so-called Package Cache. Look for the
Package Cache folder under the %ProgramData% or %AppData% directory, depending
on whether the installed MSI was perMachine or perUser. After we installed the
bundle the rst time, Burn cached the two MSIs there. This allows for easier repair
of the software's les without having to prompt for source, or in other words
requesting the original installation media. The second time we installed the bundle,
it replaced the obsolete, cached MSI with the newer one.
If you tried out the last example, you should see that Awesome2, the MSI that did
not have its version changed, is still at Version 1.0.0.0. In other words, it was left as
it is. Awesome1 and the bootstrapper executable were replaced in the cache. This is
further proof that Burn optimizes the upgrade process to only replace what needs
to be replaced.
You can elect to turn off package caching on a per-package basis by setting the
Cache attribute to no. We'll cover the various types of packages in detail later
in the chapter.
www.it-ebooks.info

Bootstrapping Prerequisites with Burn
[ 398 ]
Chaining packages
You briey saw that we use the Chain element to identify the MSI packages we'd like
to install with our bootstrapper. However, MSIs aren't the only thing that can
be referenced. The list may also contain patch les (MSPs), executables, and
Microsoft updates (MSUs). Before getting to the specics, let's take a look at the
Chain element itself.
The Chain element
The Chain element enumerates the packages that you want to install together. This
may include a suite of products that you'd like to install in one go, a single MSI with
its prerequisites, or a group of patches, just to name a few possibilities. The packages
are installed in the same order as they're listed in the markup. For example, here,
Awesome1 is installed before Awesome2:
<Bundle ... >
<Chain>
<MsiPackage SourceFile="Awesome1.msi" />
<MsiPackage SourceFile="Awesome2.msi" />
</Chain>
You can change that order either by changing which element comes before the other
or by adding the After attribute to the package. The following is an example where
we keep the same arrangement of elements but add an After attribute to control the
installation order:
<Chain>
<MsiPackage Id="Awesome1"
SourceFile="Awesome1.msi"
After="Awesome2" />
<MsiPackage Id="Awesome2"
SourceFile="Awesome2.msi" />
</Chain>
The Chain element has three optional attributes: DisableRollback,
DisableSystemRestore, and ParallelCache. If you set DisableRollback to
yes, should a package fail to install properly only it will be rolled back. The other
packages that had been installed up to that point will remain installed. The default,
no, signals that if a package fails all previously installed packages should also be
rolled back.
www.it-ebooks.info
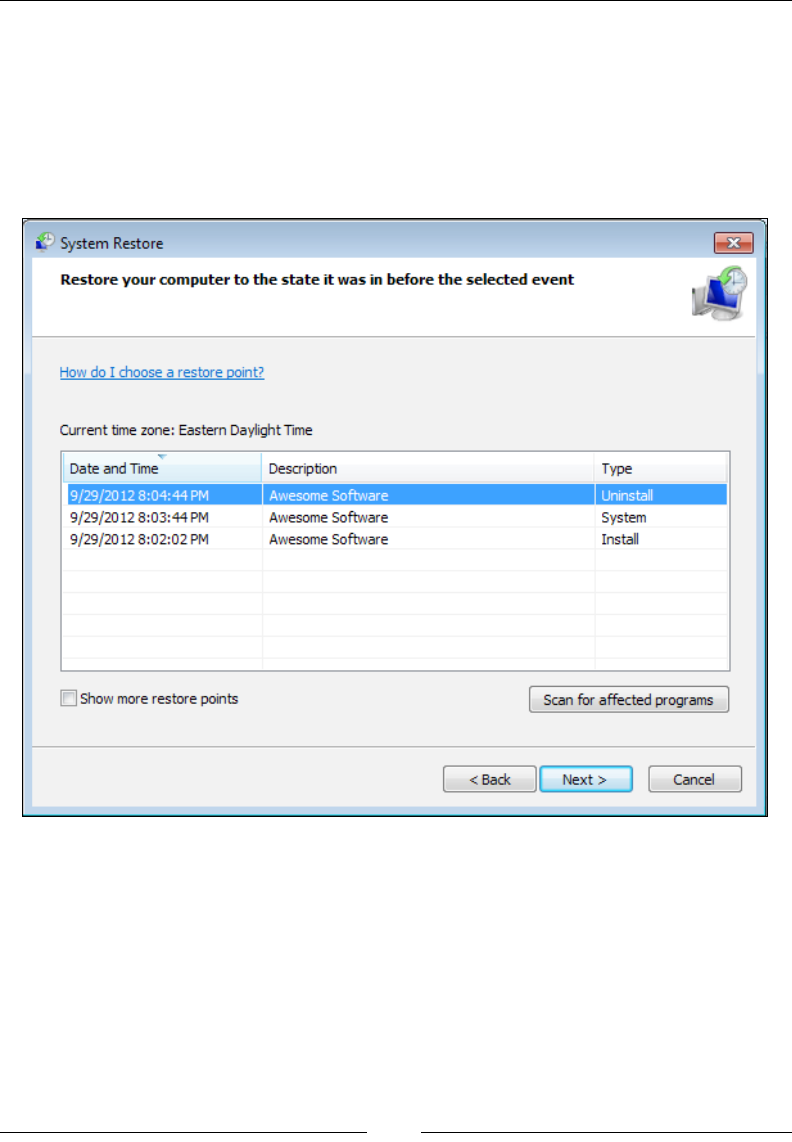
Chapter 15
[ 399 ]
Setting DisableSystemRestore to yes prevents a system restore point from being
created when the end user installs, uninstalls, modies, or repairs your bundle.
Ordinarily, each of these actions creates a restore point. You can see this by
navigating in your Windows Start menu to All Programs | Accessories | System
Tools | System Restore. When the utility opens, select the Choose a different
restore point option to see a list of restore points. The following is what it might
look like after a few actions have been performed on our bundle:
The DisableSystemRestore attribute stops these restoration points from
being created.
The last attribute, ParallelCache, offers a slight optimization to the installation
process. When set to yes, packages will start to install themselves without waiting
for all of the other packages to be added to the package cache. In the following
sections, we will explore the different types of packages that can be added to the
bootstrapper's chain.
www.it-ebooks.info

Bootstrapping Prerequisites with Burn
[ 400 ]
The MsiPackage element
The MsiPackage element is used to add an MSI installer to a bundle. Here's an
example that includes Awesome.msi in the chain:
<Chain>
<MsiPackageSourceFile="Awesome1.msi" />
There's a good number of optional attributes, common to all of the package elements,
that will ne-tune how Burn interacts with the installer. These attributes could be
used on any of the package elements we'll describe. The Cache attribute, when set
to no, will prevent the package from being stored in the Package Cache. Setting
Compressed to no will stop it from being compressed inside the bootstrapper
executable. Instead, it will be deployed alongside it. You will also set Compressed
to no when downloading packages from the Internet at install time. We'll cover that
later in the chapter.
Another attribute available to all package elements is called Vital and sets whether
the bootstrapper should abort and rollback if the package fails to install. The default
is yes. By setting it to no, the installation will continue on even if the package fails.
A nal interesting attribute I'd like to mention is InstallCondition. It can be set to
a conditional statement that, should it evaluate to false, stops that particular package
from being installed. Additionally, if the bundle is being repaired or modied and
the condition is false the package will be uninstalled. That is, unless you've set the
MsiPackage element's Permanent attribute to yes. The Permanent attribute is used
to mark packages that should not be uninstalled. You may use Burn variables in the
condition, which can be set directly with the Variable element, like so:
<Variable Name="MyVar" Value="false"/>
<Chain>
<MsiPackage SourceFile="Awesome1.msi"
InstallCondition="MyVar = "true"" />
</Chain>
In this example, I've used the Variable element to declare a Burn variable called
MyVar and set it to false. The InstallCondition attribute checks this variable
against a value of true. I've used the XML entity " in place of double quotes
so that the XML parser doesn't get confused. Note that to reference myVar, we simply
state the name. No other special notation is required.
www.it-ebooks.info
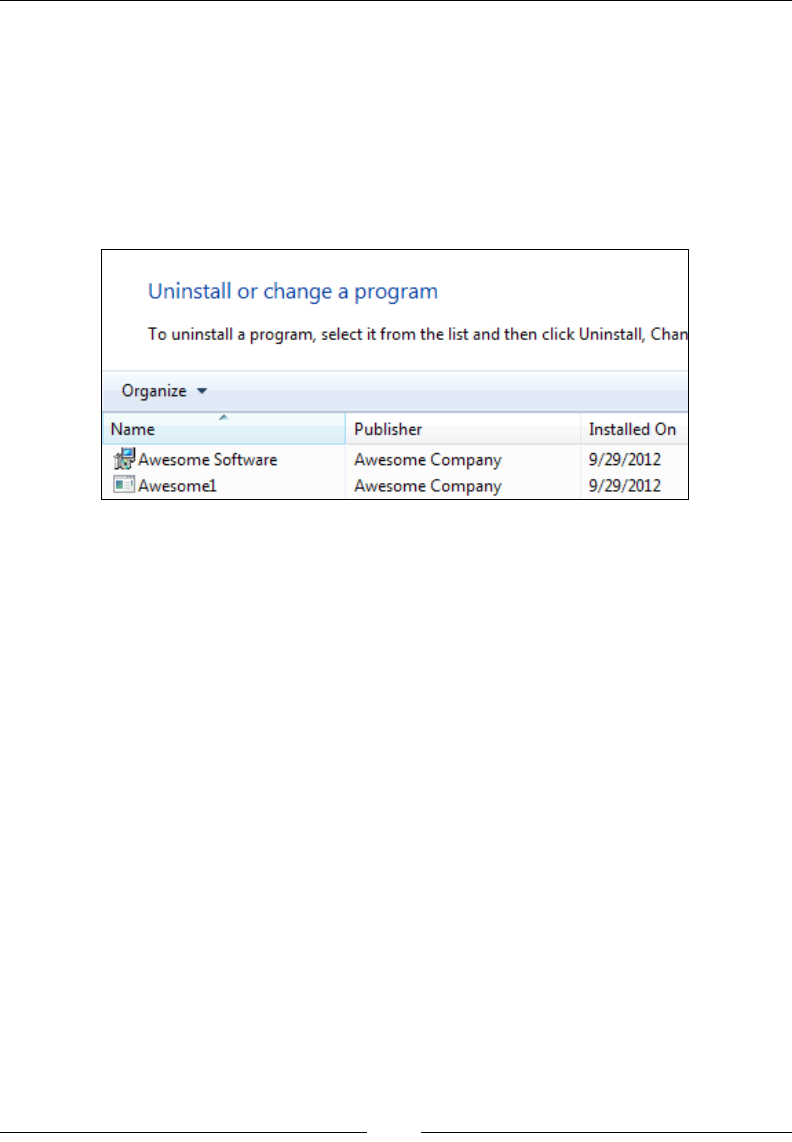
Chapter 15
[ 401 ]
The Visible attribute, which is unique to the MsiPackage element, sets whether
the MSI should be shown in Programs and Features. When set to yes, it will be
displayed in Programs and Features instead of only showing the Burn bundle.
Here's an example that sets the Visible attribute:
<MsiPackage SourceFile="Awesome1.msi" Visible="yes" />
The result is that both the bundle and the MSI are listed in Programs and Features,
as shown in the following screenshot:
This may come in handy if your requirements dictate that each package in the bundle
must be displayed, but for most situations showing a single entry in Programs and
Features is probably preferable.
If you need to set a Windows Installer property on the MSI package, use the
MsiProperty element. The following example demonstrates setting a property
called MY_PROPERTY on the Awesome1.msi package. To make things interesting,
we'll set the property to the value held in the MyVar Burn variable. Notice that we
must use the square bracket notation to reference the variable, as shown in the
following code snippet:
<Variable Name="MyVar" Value="abc" />
<Chain>
<MsiPackage SourceFile="Awesome1.msi">
<MsiProperty Name="MY_PROPERTY" Value="[MyVar]" />
</MsiPackage>
</Chain>
www.it-ebooks.info
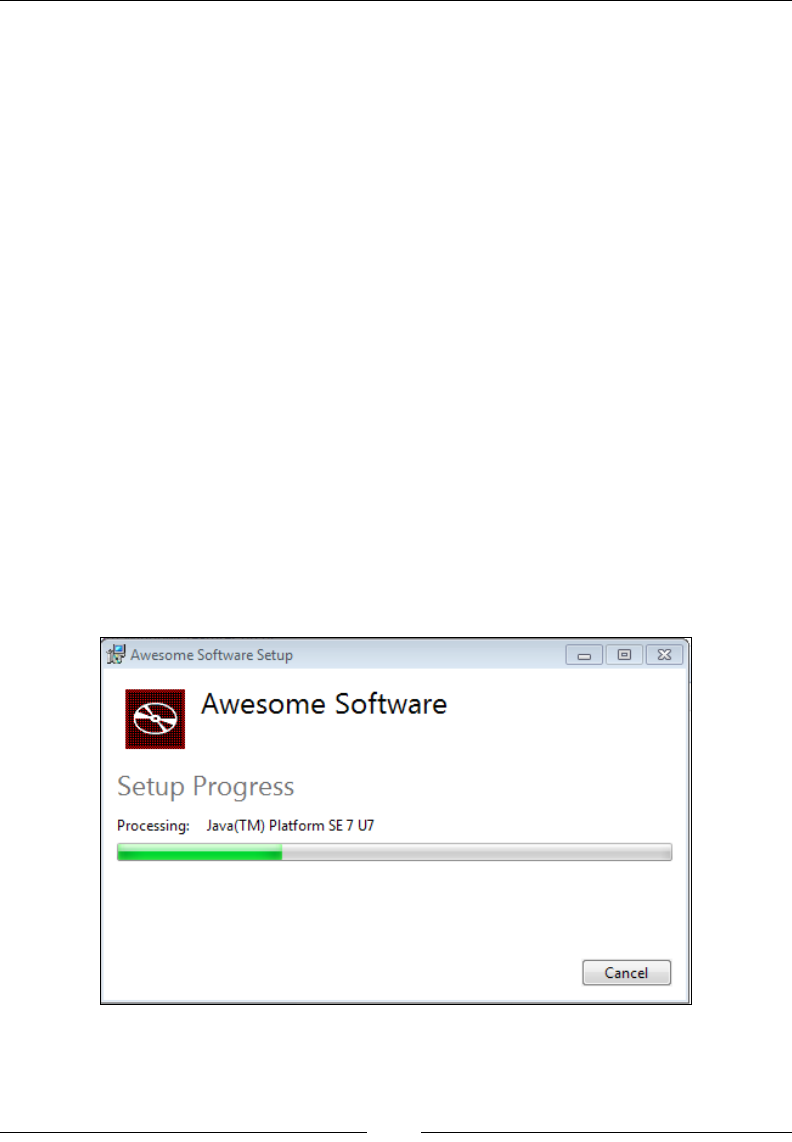
Bootstrapping Prerequisites with Burn
[ 402 ]
The ExePackage element
The ExePackage element adds an executable package to the bootstrapper's install
chain. As an example, let's say we wanted to install the Java Runtime Environment
(JRE). It can be downloaded from Oracle's site as an executable le. The URL is
http://www.oracle.com/technetwork/java/javase/downloads/index.html.
The following example installs the JRE:
<Chain>
<ExePackage SourceFile="jre-7u7-windows-x64.exe" />
</Chain>
There are two version of the JRE installer—one for 64-bit systems and another for
32-bit systems. We can compress both installers into our bootstrapper but use install
conditions to install only the appropriate one, like so:
<ExePackage SourceFile="jre-7u7-windows-x64.exe"
InstallCondition="VersionNT64" />
<ExePackage SourceFile="jre-7u7-windows-i586.exe"
InstallCondition="NOT VersionNT64" />
Here we're checking for the VersionNT64 variable. Since it is only set on 64-bit
systems, we use it to prevent the 32-bit JRE from being installed on machines with
that architecture. The Burn UI is nice enough to display a progress bar for us:
www.it-ebooks.info
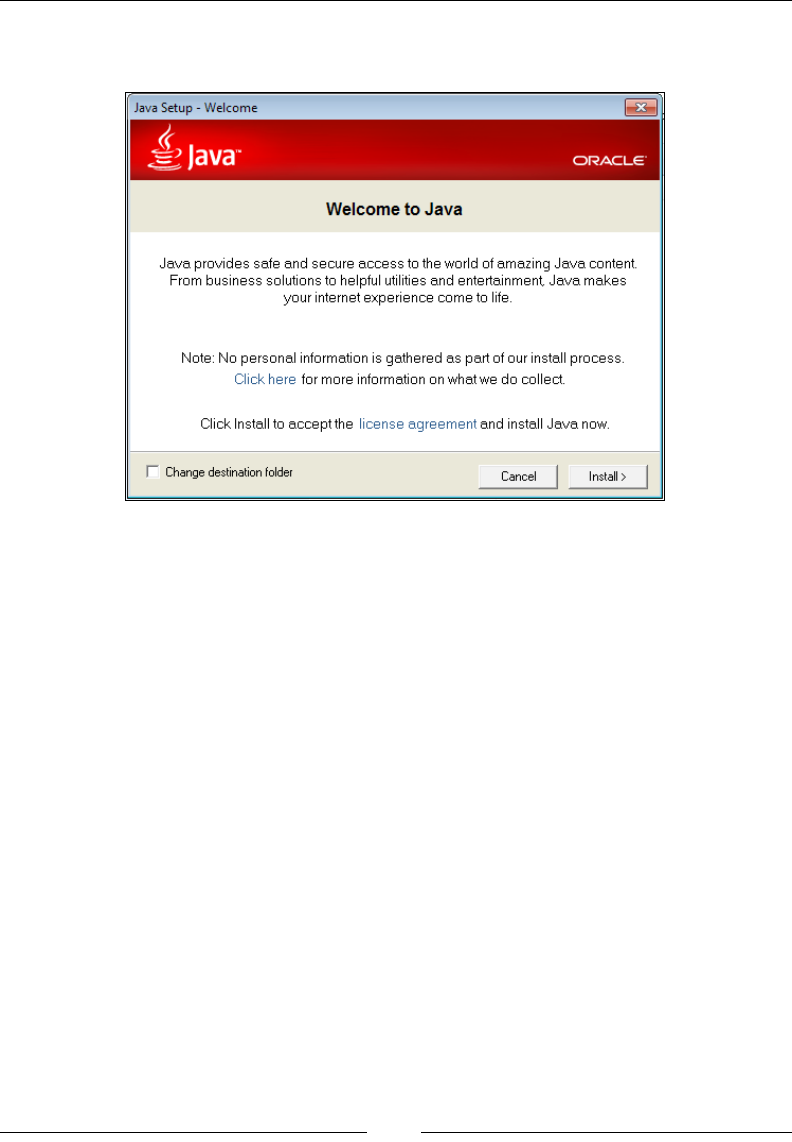
Chapter 15
[ 403 ]
However, we did not pass any ags to the JRE installer and its default behavior is to
display its own UI over the top of our own:
We can suppress this by passing the appropriate ags to the executable via the
InstallCommand attribute. In this case, for a silent install, we would pass the /s ag,
as shown in the following snippet:
<ExePackage SourceFile="jre-7u7-windows-x64.exe"
InstallCondition="VersionNT64"
InstallCommand="/s" />
Our next step is to handle uninstallation. When the user decides to uninstall the
bundle we'll need to tell Burn how to detect if the JRE has been installed. We
can do this by searching the Windows Registry for keys installed by the JRE.
WixUtilExtension provides new search elements that can be used in your Burn
markup. We'll use the new RegistrySearch element to search for a key located at
HKEY_LOCAL_MACHINE\SOFTWARE\JavaSoft\Java Runtime Environment\1.7. If it
is found, we will know that JRE 1.7 is currently installed.
Start by adding a reference in your project to WixUtilExtension and adding the
util namespace to the Wix element, as shown in the following snippet:
<Wixxmlns="http://schemas.microsoft.com/wix/2006/wi"
xmlns:util="http://schemas.microsoft.com/wix/UtilExtension">
www.it-ebooks.info

Bootstrapping Prerequisites with Burn
[ 404 ]
Next, add RegistrySearch elements to check if the JRE has been installed.
The results will be stored in Burn variables called JavaInstalled_x64 and
JavaInstalled_x86.
<Bundle ...>
<util:RegistrySearch
Root="HKLM"
Key="SOFTWARE\JavaSoft\Java Runtime Environment\1.7"
Result="exists"
Variable="JavaInstalled_x64"
Win64="yes"/>
<util:RegistrySearch
Root="HKLM"
Key="SOFTWARE\JavaSoft\Java Runtime Environment\1.7"
Result="exists"
Variable="JavaInstalled_x86" />
Here we are using the Root and Key attributes to navigate within the Windows
Registry to the key that we want to nd. You can also use the Value attribute to
check for a specic value within the key. The result will be stored in the variable
identied by the Variable attribute. I have set the Result attribute to exists to
indicate that I want the variable to be set to 1 or 0, depending on if the key exists.
Finally, by setting Win64 to yes, the search will check the 64-bit portion of the registry
for the keys set by the 64-bit installer. You may recall from our discussion about the
registry in Chapter 10, Accessing the Windows Registry, that Windows stores keys for
32-bit software under the HKEY_LOCAL_MACHINE\SOFTWARE\Wow6432Node
and HKEY_CURRENT_USER\Software\Wow6432Node keys on a 64-bit system.
We could then set the DetectCondition attribute on the ExePackage elements
using these variables. Burn uses DetectCondition to determine if the EXE package
is installed. That way, it can make sensible decisions regarding whether the
package is eligible for install or uninstall. The following is an example that sets the
DetectCondition attribute using the two variables we dened earlier:
<ExePackage SourceFile="jre-7u7-windows-x64.exe"
InstallCommand="/s"
InstallCondition="VersionNT64"
DetectCondition="JavaInstalled_x64" />
<ExePackage SourceFile="jre-7u7-windows-i586.exe"
InstallCommand="/s"
InstallCondition="NOT VersionNT64"
DetectCondition="JavaInstalled_x86" />
www.it-ebooks.info

Chapter 15
[ 405 ]
When I uninstall the bundle, the log le afrms that the JRE has been detected:
Setting numeric variable 'JavaInstalled_x64' to value 1
Condition 'JavaInstalled_x64' evaluates to true.
Detected package: jre_7u7_windows_x64.exe, state: Present, cached: Complete
The last step would ordinarily be to add the UninstallCommand attribute to be run
during uninstallation. Burn will pass any ags specied to the original executable,
which would have been cached on the user's machine. The JRE installer doesn't
provide any uninstall ags, so we're at a bit of a loss when it comes to uninstalling
it. An alternative might be to extract the MSI from the EXE package, and use
MsiPackage instead. Burn is able to uninstall MSIs without a problem. However,
let's imagine that the JRE did provide an /uninstall ag. The markup would have
looked like the following code:
<ExePackage SourceFile="jre-7u7-windows-x64.exe"
InstallCommand="/s"
UninstallCommand="/s /uninstall"
InstallCondition="VersionNT64"
DetectCondition="JavaInstalled_x64" />
As we've seen, the JRE does not support a command-line uninstall. However, you
might be thinking to yourself that you wouldn't want to uninstall the JRE anyway.
You would want to be able to uninstall your own software while leaving the JRE
intact. The good news is that Burn provides a way to do package ref counting so that if
another bundle has also installed the JRE, it won't be removed until all bundles that
rely on it have been removed. We will see how later in the chapter. Of course, if you
want to prevent your bundle from even attempting to uninstall the JRE, simply add
the Permanent attribute, set to yes, to the ExePackage element.
Before moving on, note that there is also a RepairCommand attribute for passing
command-line ags to the executable when a repair is triggered.
The MspPackage element
As you may recall, an MSP le is a patch le. Burn lets you deploy patches in a
streamlined way, grouping related patches for example, or deploying patches with
the original software they're meant to update. The latter scenario is known as patch
slipstreaming and comes with some specialized support in Burn. The idea is to
install your software and then immediately apply a patch or set of patches to it.
www.it-ebooks.info

Bootstrapping Prerequisites with Burn
[ 406 ]
The next example adds an MSI package to the installation chain, followed by two
patch les that immediately update it:
<Chain>
<MsiPackage SourceFile="OriginalProduct.msi" />
<MspPackage SourceFile="Patch1.msp" Slipstream="yes" />
<MspPackage SourceFile="Patch2.msp" Slipstream="yes"/>
</Chain>
The MspPackage element's SourceFile attribute points to the patch le to add to
the chain. The Slipstream attribute is needed or else the patch won't be applied to
the OriginalProduct.msi. The nice thing here is that we don't have to specify that
Patch1 and Patch2 apply to OriginalProduct. By using the Slipstream attribute,
Burn gures out that you want them to apply to an MSI that's in the same bundle.
An alternate syntax is to nest SlipstreamMsp elements inside the MsiPackage:
<Chain>
<MsiPackage SourceFile="OriginalProduct.msi">
<SlipstreamMsp Id="Patch1"/>
<SlipstreamMsp Id="Patch2"/>
</MsiPackage>
<MspPackage Id="Patch1" SourceFile="Patch1.msp" />
<MspPackage Id="Patch2" SourceFile="Patch2.msp" />
</Chain>
Patches in the chain are also allowed to update software that has already been
installed. In that case, you would not slipstream them. Also, because patches contain
the information they need to detect and update the software that they apply to, it is
not necessary to specify that information on the MspPackage element.
The MsuPackage element
An MSU le is a Microsoft Update standalone installer. These types of les can be
installed on Windows Vista or later, and typically contain some sort of update to
the Windows operating system or tools. Should you need to install one as a part of
your bootstrapper chain, you can use the MsuPackage element. The following is an
example that installs an MSU le:
<Chain>
<MsuPackage SourceFile="Windows6.1-KB2656373-v2-x64.msu"
KB="KB2656373" />
</Chain>
www.it-ebooks.info

Chapter 15
[ 407 ]
The MSU le in this case is a security update for .NET 3.5 on Windows 7 SP1. We
specify the MSU with the SourceFile attribute. The KB attribute allows the le to be
uninstalled later and identies the knowledge base article (KB) that documents the
problems that the update is meant to resolve.
Downloading packages
If you can nd an installer, which could be any of the package types we've seen
(MSI, EXE, MSP, or MSU), that can be easily downloaded from the Internet or a
local network, you may choose to download it at the time of installation. That way,
the bootstrapper executable that you give to your users will be smaller in size. So,
instead of compressing the prerequisite into your bundle you'll provide a link to
where it can be downloaded and Burn will get it for you at install time.
You will still need to download the package locally while you do your development.
Burn needs to reference it during compilation. However, you'll set the Compressed
attribute to no, and provide a DownloadUrl value where the package can be found.
Here is an example that downloads and installs SQL Server 2012 Express:
<ExePackage Id="SQLSERVER"
DownloadUrl="$(var.SqlDownloadUrl)"
Name="SQLEXPR_x64_ENU.exe"
Compressed="no"
DetectCondition="SqlInstanceFound"
InstallCommand="$(var.SqlInstallCommand)"
UninstallCommand="$(var.SqlUninstallCommand)"
RepairCommand="$(var.SqlRepairCommand)">
<RemotePayload
Description="Microsoft SQL Server 2012 Express Edition"
ProductName="Microsoft SQL Server 2012 Express Edition"
Version="11.0.2100.60"
Size="138412032"
Hash="e4561d5caa761a5d1daa0d305f4fecedc6a0d39c" />
</ExePackage>
www.it-ebooks.info
Bootstrapping Prerequisites with Burn
[ 408 ]
Notice that instead of using a SourceFile parameter to point to the package, we're
using Name. It must also point to a local le, but when paired with DownloadUrl, just
acts as a placeholder for the le while in development. For readability, I am using
preprocessor variables for the attributes that can get pretty long. The following is
how I would dene them for a basic install:
<?define SqlServerInstance=TEST ?>
<?define
SqlDownloadUrl=http://download.microsoft.com/download/8/D/D/8DD7BDBA-
CEF7-4D8E-8C16-D9F69527F909/ENU/x64/SQLEXPR_x64_ENU.exe ?>
<?define SqlInstallCommand=/ACTION=Install /Q /
IACCEPTSQLSERVERLICENSETERMS /FEATURES=SQLEngine /INSTANCENAME=$(var.
SqlServerInstance) /SQLSYSADMINACCOUNTS=BUILTIN\Administrators /
SECURITYMODE=SQL /SAPWD=password1 ?>
<?define SqlUninstallCommand=/ACTION=Uninstall /Q /FEATURES=SQLEngine
/INSTANCENAME=$(var.SqlServerInstance) ?>
<?define SqlRepairCommand=/ACTION=Repair /Q /FEATURES=SQLEngine /
INSTANCENAME=$(var.SqlServerInstance) /FEATURES=SQLENGINE ?>
These preprocessor directives can go at the top of your Burn le, above the Bundle
element. The ExePackage element is also using a DetectCondition attribute
to check if SQL Server has already been installed. I dene the search with a
RegistrySearch element from WixUtilExtension, as shown in the following
code snippet:
<util:RegistrySearch
Id="SqlInstanceFound"
Root="HKLM"
Key=
"SOFTWARE\Microsoft\Microsoft SQL Server\Instance Names\SQL"
Value="$(var.SqlServerInstance)"
Result="exists"
Variable="SqlInstanceFound" />
If an instance is found, the SqlInstanceFound variable will be set to 1.
SQL Server 2012 Express requires Service Pack 1 and .NET 3.5
or later on a Windows 7 64-bit system. You may want to add
a Condition element to check that the target system has this
installed or include them as packages in your bootstrapper.
www.it-ebooks.info

Chapter 15
[ 409 ]
Inside ExePackage, we've added a RemotePayload element:
<RemotePayload
Description="Microsoft SQL Server 2012 Express Edition"
ProductName="Microsoft SQL Server 2012 Express Edition"
Version="11.0.2100.60"
Size="138412032"
Hash="e4561d5caa761a5d1daa0d305f4fecedc6a0d39c" />
This serves as a validation check on the package that is to be downloaded, as
specied by the ExePackage element's DownloadUrl attribute. Description,
ProductName, Version, and Size (in bytes) can often be found on the executable
itself. To get a hash of the le, you may want to use a tool such as Microsoft File
Checksum Integrity Verier, which can be downloaded at:
http://www.microsoft.com/en-us/download/details.aspx?id=11533.
It's a command-line utility that can create a SHA1 hash for an executable le.
Downloading MsiPackage benets from a simpler syntax because Burn can extract
more attributes on its own from an MSI package than it can from an EXE package.
The following is an example that downloads the Python installer and runs it:
<MsiPackage
Id="PYTHON"
SourceFile="python-2.7.3.msi"
DownloadUrl=
"http://www.python.org/ftp/python/2.7.3/python-2.7.3.msi"
Compressed="no" />
The DownloadUrl attribute serves the same purpose as when used on ExePackage.
It sets the location where the package can be downloaded from. Otherwise, we only
need to specify the SourceFile and Compressed attributes. SourceFile will point
to a local copy of the MSI. Compressed should be set to no, so that the MSI is not
embedded inside the bootstrapper.
If you author your bootstrapper to download packages, what happens if the end
user doesn't have an Internet connection? One option is to pass the /layout ag to
your bundle when an Internet connection is available. Burn adds in this functionality
automatically. The /layout ag downloads the packages and copies them to a local
directory. The end user can then take these les to the computer that doesn't have an
Internet connection and install them. As an example, if this command were run when
a connection was available, it would create a new bootstrapper that could be run
without a connection:
AwesomeBootstrapper.exe /layout "Local Bootstrapper"
www.it-ebooks.info
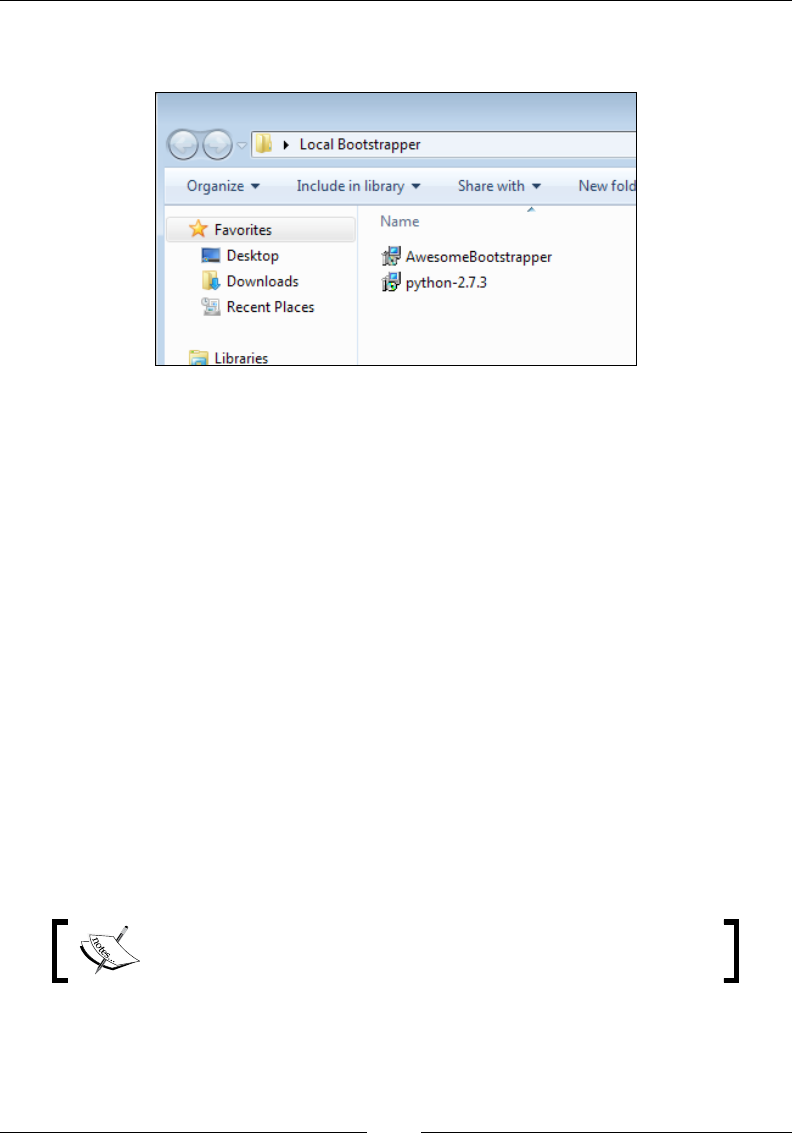
Bootstrapping Prerequisites with Burn
[ 410 ]
This will copy the bootstrapper to a folder called Local Bootstrapper along with
all packages downloaded and extracted. This is shown in the following screenshot:
Counting package references
Some of the dependencies you install, such as SQL Server, may be used by several
different software bundles. For example, you might have an application that stores
customer records in the database. Later on, another piece of software is installed
that stores log information in that same SQL Server instance. You may not want to
remove it until all interested parties have been uninstalled. For example, uninstalling
the logging piece shouldn't remove the SQL instance because the customer records
software is still using it.
To solve these sorts of dependency issues, Burn provides an element for package
reference counting as part of its DependencyExtension. To use it, rst add a
reference in your Burn project to DependenyExtension. Then, update the Wix
element to contain the new namespace, as shown:
<Wix xmlns="http://schemas.microsoft.com/wix/2006/wi" xmlns:dep=
"http://schemas.microsoft.com/wix/DependencyExtension">
Next, add a Provides element inside the ExePackage element—in this case a SQL
Server Express package—that your bundles will share a reference to.
Note that the MsiPackage element does not need to use this
functionality because it already has reference counting built-in.
<ExePackage Id="SQLSERVER"
SourceFile="SQLEXPR_x64_ENU.exe"
DetectCondition="SqlInstanceFound"
InstallCommand="$(var.SqlInstallCommand)"
www.it-ebooks.info
Chapter 15
[ 411 ]
UninstallCommand="$(var.SqlUninstallCommand)"
RepairCommand="$(var.SqlRepairCommand)">
<dep:Provides Key="SqlServerExpress_TEST"
Version="11.0.2100.60" />
</ExePackage>
When you install the bundle—let's say in addition to having the SQL Server package,
it also contains an MsiPackage element for the customer records software—a new
entry will be created in the Windows Registry. Look under the HKCR\Installer\
Dependencies key to see the SQL Server package and its dependencies.
Here you can see that we've added the bundle as a dependency to the SQL Server
instance. If you were then to install a different bootstrapper, containing different
Name and UpgradeCode elements—let's say this is our logging software—and add
the same SQL Server ExePackage with the Provides element, you would notice
(in the following screenshot) that the entry in the registry gets another dependency:
Now the SQL Server package has two bundles, the customer records software and
logging software, that are dependent upon it. We can see their bundle IDs listed
below the Dependents node within the SqlServerExpress_TEST key in the registry.
www.it-ebooks.info

Bootstrapping Prerequisites with Burn
[ 412 ]
Uninstalling one of the bundles would not remove the SQL Server instance. It will
only be removed when all software that is dependent on it is uninstalled. Each time
that a dependent bundle is removed, the registry is updated.
It's likely that you will always want to nest a Provides element inside of an
ExePackage element. Otherwise, when you upgrade the bundle, and the old bundle
is removed, you may nd that the dependency, such as the SQL Server instance,
is removed unexpectedly. Maintaining a reference count protects you against this
during bundle upgrades.
Rollback boundaries
Let's say you've included three MSIs in your install chain. The user launches the
bootstrapper, the rst two MSIs install successfully but the third fails. You may
decide to keep the rst two but roll back only the third. By default, all three will roll
back. Use RollbackBoundary elements to create checkpoints past which the install
won't roll back. The following is an example:
<Chain>
<MsiPackage... />
<MsiPackage ... />
<RollbackBoundary />
<MsiPackage... />
</Chain>
If the third MSI package fails, only it will be rolled back. The rst two packages
will remain installed. Another scenario is to roll back a failed install and then skip
past it to the next rollback boundary. In the next example, if the second MSI fails,
it will skip forward to the next RollbackBoundary and continue. The key is to add
the Vital attribute on a RollbackBoundary element, set to no, that precedes the
MsiPackage element:
<Chain>
<MsiPackage ... />
<RollbackBoundary Vital="no" />
<MsiPackage ... />
<RollbackBoundary />
<MsiPackage ... />
</Chain>
www.it-ebooks.info

Chapter 15
[ 413 ]
Here, if the second MSI fails, it will roll back to the boundary that preceded it.
Because we've marked it as not vital, it will then skip forward to the next boundary
and continue installing. This is almost equivalent to marking the MsiPackage
element itself as not vital:
<Chain>
<MsiPackage ... />
<MsiPackage Vital="no" ... />
<MsiPackage ... />
</Chain>
The difference is that marking the package as not vital means that if it fails, the
bootstrapper simply continues on. If the MSI rolls itself back that's all ne and good.
However, when a RollbackBoundary element is marked as not vital, Burn explicitly
tries to uninstall the failed packages before skipping ahead to the next boundary.
PackageGroups
To split your package denitions up for more modularity, place them within
PackageGroup elements. You can then reference the group within your Chain element
with PackageGroupRef. The following is an example where we separate the detection
(via RegistrySearch) and installation of SQL Server into its own fragment:
<Bundle Name="Awesome Software Bundle"
Version="1.0.0.0"
Manufacturer="Awesome Company"
Copyright="(c) All rights reserved."
UpgradeCode="3601032C-A8C9-4323-88E0-1967A9C2145E">
<BootstrapperApplicationRef
Id="WixStandardBootstrapperApplication.RtfLicense" />
<Chain>
<PackageGroupRef Id="SQL_SERVER_2012_EXPRESS"/>
</Chain>
</Bundle>
<Fragment>
<util:RegistrySearch
Id="SqlInstanceFound"
Root="HKLM"
Key="SOFTWARE\Microsoft\Microsoft SQL Server\Instance Names\SQL"
Value="$(var.SqlServerInstance)"
Result="exists"
www.it-ebooks.info

Bootstrapping Prerequisites with Burn
[ 414 ]
Variable="SqlInstanceFound" />
<PackageGroup Id="SQL_SERVER_2012_EXPRESS">
<ExePackage
Id="SQLSERVER"
DownloadUrl="$(var.SqlDownloadUrl)"
Name="SQLEXPR_x64_ENU.exe"
Compressed="no"
DetectCondition="SqlInstanceFound"
InstallCommand="$(var.SqlInstallCommand)"
UninstallCommand="$(var.SqlUninstallCommand)"
RepairCommand="$(var.SqlRepairCommand)">
<RemotePayload
Description=
"Microsoft SQL Server 2012 Express Edition"
ProductName=
"Microsoft SQL Server 2012 Express Edition"
Version="11.0.2100.60"
Size="138412032"
Hash="e4561d5caa761a5d1daa0d305f4fecedc6a0d39c" />
</ExePackage>
</PackageGroup>
</Fragment>
The PackageGroup element, which I've included in a separate Fragment element,
contains the ExePackage element that installs SQL Server. We can then reference this
package group within our Chain element using the PackageGroupRef element. Its Id
attribute should match the Id attribute on the PackageGroup element.
WixNetFxExtension contains several package groups for installing versions of the
.NET Framework. To include .NET 4, you could reference the NetFx40Web package
group, as shown in the following snippet:
<Chain>
<PackageGroupRef Id="NetFx40Web"/>
</Chain>
You can also install the .NET Framework 4.5 using NetFx45WebPackageGroup.
www.it-ebooks.info
Chapter 15
[ 415 ]
The Standard Bootstrapper UI
Burn comes with two built-in user interfaces. The main purpose is to display a single
progress bar while the packages within the Chain element are being installed.
If you'd rather show the UI from your MSI package, set the
DisplayInternalUI attribute on the MsiPackage element to "yes".
The rst is called WixStandardBootstrapperApplication.RtfLicense and the other
WixStandardBootstrapperApplication.HyperlinkLicense. We will discuss each one
in the following sections.
The RtfLicense user interface
Start off by adding the BootstrapperApplicationRef element to your Burn
markup. The following snippet adds the RtfLicense UI to our bootstrapper:
<Bundle ... >
<BootstrapperApplicationRef
Id="WixStandardBootstrapperApplication.RtfLicense" />
This provides you with a dialog containing an end-user license agreement
that can be customized with your own RTF text le. To customize the text,
reference the BalExtension namespace in your Wix element and then
add a WixStandardBootstrapperApplication element inside of your
BootstrapperApplicationRef. The license is specied with the LicenseFile
attribute:
<Wixxmlns="http://schemas.microsoft.com/wix/2006/wi"
xmlns:bal="http://schemas.microsoft.com/wix/BalExtension">
<Bundle ... >
<BootstrapperApplicationRef
Id="WixStandardBootstrapperApplication.RtfLicense">
<bal:WixStandardBootstrapperApplication
LicenseFile="customEula.rtf" />
</BootstrapperApplicationRef>
www.it-ebooks.info
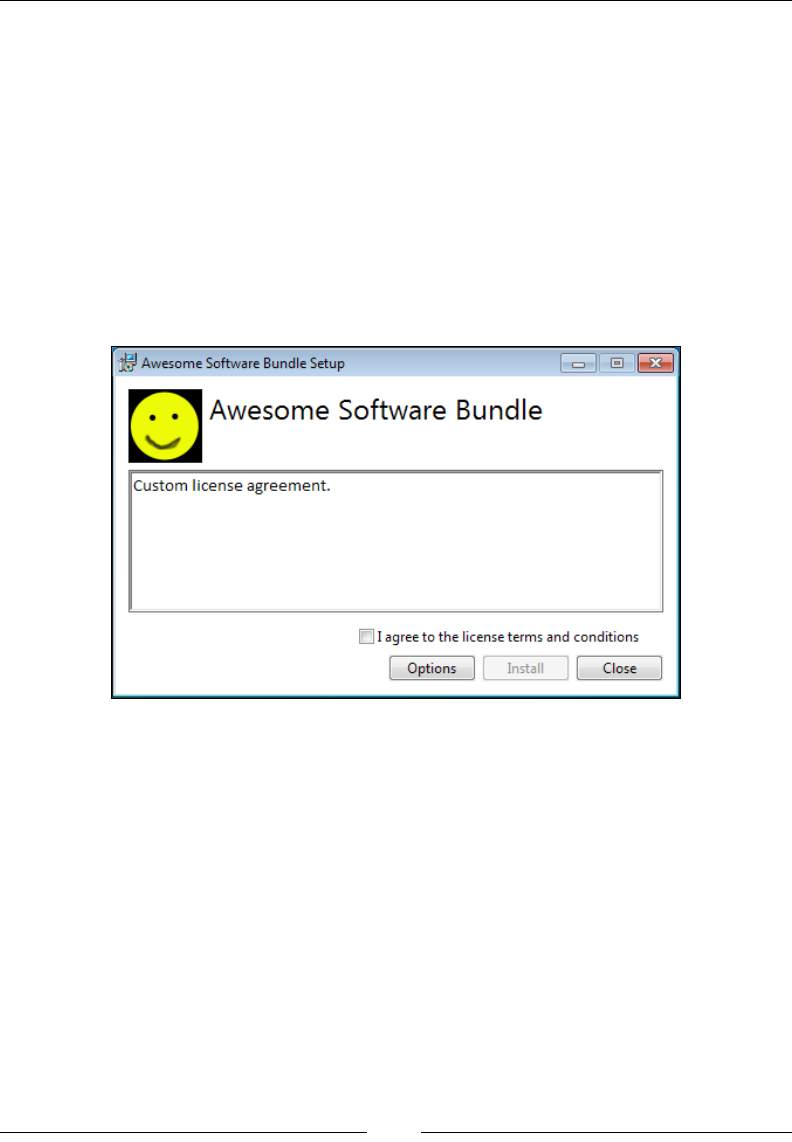
Bootstrapping Prerequisites with Burn
[ 416 ]
While we're at it, we might as well change the logo that's shown on the dialog. The
default image is a PNG 63 x 63 pixels in size. Use the LogoFile attribute to point to a
new image, as shown in the following snippet:
<BootstrapperApplicationRef
Id="WixStandardBootstrapperApplication.RtfLicense">
<bal:WixStandardBootstrapperApplication
LicenseFile="customEula.rtf"
LogoFile="customLogo.png" />
</BootstrapperApplicationRef>
Here is the result:
The Options button lets the end user change the targeted install directory.
You can hide this button by setting the SuppressOptionsUI attribute on the
WixStandardBootstrapperApplication element to yes.
The HyperlinkLicense user interface
The HyperlinkLicense UI is similar to RtfLicense except that instead of
referencing a local RTF le for the license agreement and displaying it in a textbox,
it provides a link to it. Set the LicenseUrl attribute to a URL where your license
agreement is hosted. The following is an example:
<BootstrapperApplicationRef
Id="WixStandardBootstrapperApplication.HyperlinkLicense">
<bal:WixStandardBootstrapperApplication
www.it-ebooks.info
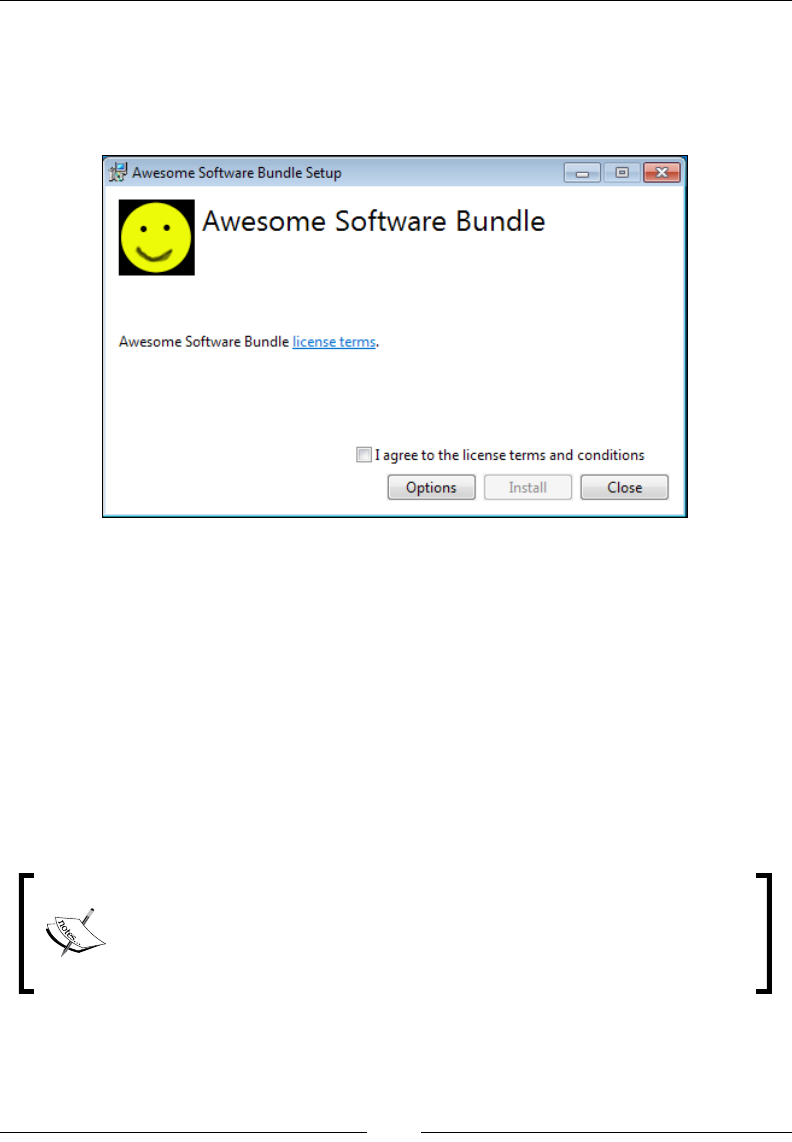
Chapter 15
[ 417 ]
LicenseUrl="http://www.mydomain.com/CustomEula.rtf"
LogoFile="customLogo.png" />
</BootstrapperApplicationRef>
This produces the following result:
It's possible to customize the look of these themes by adding a new THM le to
your project and referencing it with the WixStandardBootstrapperApplication
element's ThemeFile attribute. At the time of this writing there's no way to add, as
an example, a textbox to the UI and set a variable with its value. Burn does provide
a textbox control, called Editbox, but there isn't a way to set a variable with what
the user types into it. To do so, you'd need to alter and recompile BalExtension to
accept the new input. You can, however, make cosmetic changes to the theme.
If you'd like to go down this route, download the WiX source code and copy either
the RtfTheme.xml or HyperlinkTheme.xml from the src\ext\BalExtension\
wixstdba\Resources folder to your project. Set the ThemeFile attribute on the
WixStandardBootstrapperApplication element to point to this new le.
Theme les can have either the .thm or .xml extension. You could use
the ThmViewer utility found in the WiX bin folder to view theme les.
Beware that if there is an error in the theme le's markup or if one of its
dependencies cannot be found, such as a .wxl le, logo image, or RTF
le, then ThmViewer will not display the theme.
www.it-ebooks.info

Bootstrapping Prerequisites with Burn
[ 418 ]
You may then change the attributes of the dialogs such as the size of the window,
background color, or fonts. Refer to the XML schema src\dutil\xsd\thmutil.xsd
for more information about the format of the elements found in the theme le. You'll
nd that each window in the theme is dened by a Page element that contains the UI
controls displayed. The following is the markup for the initial Install window found
in RtfLicense:
<Page Name="Install">
<Richedit Name="EulaRichedit" X="11" Y="80" Width="-11" Height="-70"
TabStop="yes" FontId="0" HexStyle="0x800000" />
<Checkbox Name="EulaAcceptCheckbox" X="-11" Y="-41" Width="260"
Height="17" TabStop="yes" FontId="3" HideWhenDisabled="yes">#(loc.
InstallAcceptCheckbox)</Checkbox>
<Button Name="OptionsButton" X="-171" Y="-11" Width="75"
Height="23" TabStop="yes" FontId="0" HideWhenDisabled="yes">#(loc.
InstallOptionsButton)</Button>
<Button Name="InstallButton" X="-91" Y="-11" Width="75" Height="23"
TabStop="yes" FontId="0">#(loc.InstallInstallButton)</Button>
<Button Name="WelcomeCancelButton" X="-11" Y="-11" Width="75"
Height="23" TabStop="yes" FontId="0">#(loc.InstallCloseButton)</
Button>
</Page>
As you can see, a Richedit control is used to show the EULA and a Checkbox
control allows the user to accept the license terms. You might change the size of
these elements or their position on the dialog.
Summary
In this chapter, we discussed the structure of the bootstrapper bundle and how
to chain different types of installers into it. We touched on how to download
packages from the Internet, slipstream patches, and control rollback behavior
and command-line ags passed to the installers.
In the next chapter, we will discover how to fully customize the Burn install wizard
via a custom WPF user interface. This will allow you to collect new user input and
add dialogs.
www.it-ebooks.info

Customizing the Burn UI
In the last chapter, we learned that for many bootstrapping tasks the standard
user interfaces, RtfLicense and HyperlinkLicense, will be more than adequate.
However, we are limited on how much we can customize the design and workow
of these dialogs. We're also limited in that the standard UIs do not allow us to collect
information from the end user and store them in Burn variables.
In this chapter, we will build our own user interface using Windows Presentation
Foundation (WPF) and C#. We will cover the following topics:
• The extension points offered by Burn and how to hook into them
• How to organize our code using the MVVM pattern
• Events to handle when communicating with the Burn engine
• Collecting user input and storing it in Burn variables
Burn extension points
When you install the WiX toolset, you are given an assembly called
BootstrapperCore.dll. You'll nd it in the WiX SDK directory, which, on my
computer, is located at C:\Program Files (x86)\WiX Toolset v3.6\SDK. This
library is all we need to plug a new user interface into the Burn engine. It contains
base classes for us to override in our own code, events to hook into, and methods
that allow us to control the bootstrapper.
www.it-ebooks.info
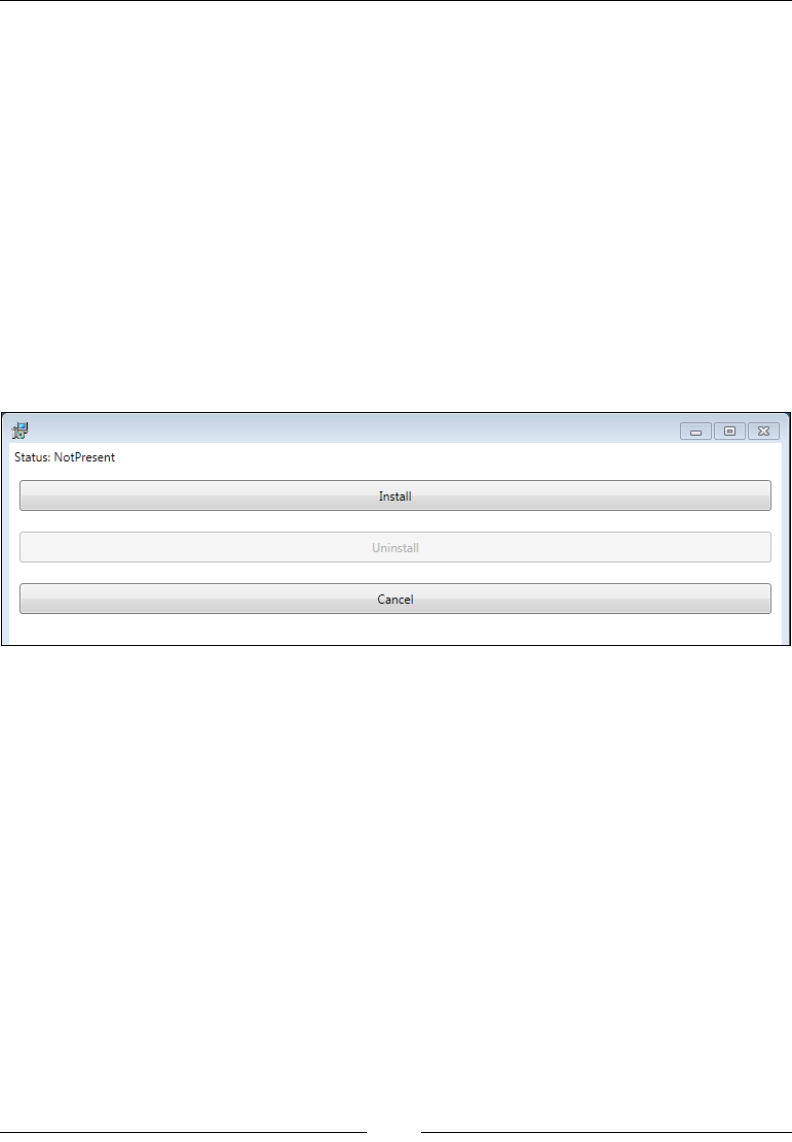
Customizing the Burn UI
[ 420 ]
In this chapter, we will build a UI using WPF and C#. WPF uses an XML markup
called XAML for designing its interface. This allows designers to work on the layout
of the window while developers work on the C# business logic separately. WPF
has a number of other benets including strong support for data binding, reusable
styles, and a variety of containers for organizing UI controls. That's not to say this is
our only option. We could use Windows Forms or unmanaged code if we chose to.
However, WiX's own installer is written with WPF and offers a good example for
how to proceed. If you want more examples, I highly recommend downloading the
WiX source code and looking at the WiX setup. It can be found in the src\Setup\
WixBA folder.
The UI we will build won't be fancy. Nor will it be as sophisticated as the WiX
installer. As a basic example, it will simply be able to install the packages that are
in our bundle's chain, uninstall those packages, and cancel either of those two
operations. In the end, here's what it will look like:
Creating the class library
So how do we begin to extend the Burn UI? In short, we will build a C# class library
(.dll) that references BootstrapperCore.dll. Our class library will then be
referenced within our bootstrapper markup. When the bootstrapper starts up, it will
have been congured to use this assembly. Our assembly will have WPF code inside
of it, ready to show a window as it simultaneously drives forward the Burn engine.
Clicking a button on our UI will call methods provided by BootstrapperCore.
Simple, right? Let's dive into it.
Create a new C# Class Library project in Visual Studio and name it CustomBA. Once
you have it, add a reference to BootstrapperCore.dll, which can be found in the WiX
SDK directory. To use WPF, we'll also need to reference the following .NET assemblies:
• PresentationCore
• PresentationFramework
www.it-ebooks.info

Chapter 16
[ 421 ]
• System.Xaml
• WindowsBase
We'll be using the Model-View-ViewModel (MVVM) pattern to organize the code.
This will allow us to keep our UI and backend layers decoupled, and usually results in
cleaner markup and code. MVVM is a design pattern for decoupling the presentation
and business logic of a Windows application that has become popular with the WPF
crowd. In a large part, this has to do with WPF being so well-suited for it.
When it comes to implementing the MVVM pattern, there are several libraries
available that make it easy. I like to use Prism because it adds several convenient
classes such as DelegateCommand, a class that allows you to bind events such as
mouse clicks to handler functions that aren't in the code-behind class. You can either
download it from http://compositewpf.codeplex.com or, easier in my opinion,
install it via NuGet. NuGet is a package manager for Visual Studio. It comes built
into Visual Studio 2012, but can be downloaded from Codeplex, http://nuget.
codeplex.com, for Visual Studio 2010. Once you've got it, the NuGet command for
installing Prism is simply:
Install-Package Prism
The most important assembly you'll need from this library is Microsoft.
Practices.Prism. This contains the classes, such as DelegateCommand, that we will
use in this chapter. If you're using NuGet, all necessary references will be added to
your project.
Next, to pave the way for a well-organized project, create three subfolders: Models,
ViewModels, and Views. This folder structure will help keep us sane as we add
additional les. We also need to add the XML conguration le that will tell Burn
to use our new assembly. It must be called BootstrapperCore.config and you
can copy an existing version of it from the WiX SDK folder to your project. Be sure to
change its properties in Visual Studio so that the Copy to Output Directory setting is
set to Copy if newer. Open it and replace the host element's assemblyName attribute
with the name of our assembly, CustomBA. The following is what it should look like:
<configuration>
<configSections>
<sectionGroup name="wix.bootstrapper" type="Microsoft.
Tools.WindowsInstallerXml.Bootstrapper.BootstrapperSectionGroup,
BootstrapperCore">
<section name="host" type="Microsoft.Tools.
WindowsInstallerXml.Bootstrapper.HostSection, BootstrapperCore" />
</sectionGroup>
</configSections>
<startup useLegacyV2RuntimeActivationPolicy="true">
www.it-ebooks.info

Customizing the Burn UI
[ 422 ]
<supportedRuntime version="v4.0" />
<supportedRuntime version="v2.0.50727" />
</startup>
<wix.bootstrapper>
<host assemblyName="CustomBA" />
</wix.bootstrapper>
</configuration>
Our CustomBA.dll, BootstrapperCore.config, and Microsoft.Practices.
Prism.dll class libraries will eventually need to be copied to our bootstrapper
project so that they can be referenced and embedded within the executable. We'll
cover that in more detail further on in the chapter.
The last part of our setup is to add an attribute called
BootstrapperApplicationAttribute to the Properties\AssemblyInfo.cs le:
using CustomBA;
using Microsoft.Tools.WindowsInstallerXml.Bootstrapper;
[assembly: BootstrapperApplication(
typeof(CustomBootstrapperApplication))]
This identies the class in our assembly that extends the BootstrapperApplication
class. Burn looks for this class and automatically calls its Run method. That will be
our jumping-on point into the Burn process. In the next section, we will dene this
CustomBootstrapperApplication class.
Extending the BootstrapperApplication
class
The rst class we'll add to our project will provide the bridge between
our code and the Burn engine. Add a new C# class le and name it
CustomBootstrapperApplication. It should extend the BootstrapperApplication
class from the Microsoft.Tools.WindowsInstallerXml.Bootstrapper
namespace. Add the following code:
using CustomBA.Models;
using CustomBA.ViewModels;
using CustomBA.Views;
using Microsoft.Tools.WindowsInstallerXml.Bootstrapper;
using System;
using System.Windows.Threading;
namespace CustomBA
www.it-ebooks.info

Chapter 16
[ 423 ]
{
public class CustomBootstrapperApplication :
BootstrapperApplication
{
public static Dispatcher Dispatcher { get; set; }
protected override void Run()
{
Dispatcher = Dispatcher.CurrentDispatcher;
var model = new BootstrapperApplicationModel(this);
var viewModel = new InstallViewModel(model);
var view = new InstallView(viewModel);
model.SetWindowHandle(view);
this.Engine.Detect();
view.Show();
Dispatcher.Run();
this.Engine.Quit(model.FinalResult);
}
}
}
We're using a few classes, such as InstallViewModel, which will
process commands triggered by the view and pass data to the model, and
BootstrapperApplicationModel, which will wrap the calls to the Burn engine, that
we haven't dened yet. Don't worry; we'll get to those soon.
The rst thing we do is override the Run method. This is our UI's primary entry
point. It will be called by the Burn engine. Within this method, we instantiate a new
Dispatcher object and store it in a static property. A Dispatcher object provides
a means for sending messages between the UI thread and any backend threads.
It provides a handy Invoke method that we can use to update the state of our UI
controls. Without it, the UI thread would ignore our attempts to interact with it from
another thread.
Next we create model, viewmodel, and view objects. The purpose of the model is to
encapsulate some of the calls to the bootstrapper. It's essentially a wrapper, further
separating the UI logic from the bootstrapper logic. The viewmodel gets data from
and calls methods on the model while also responding to events triggered by the
view. It's the workhorse of the three, acting as the middleman. Up last is the view.
It is mostly written in XAML and contains the structure of the visible window
displayed to the user.
www.it-ebooks.info

Customizing the Burn UI
[ 424 ]
The MVVM pattern provides mechanisms such as commands and data binding for
handling communication between the layers in a decoupled way. In this chapter,
the intended design is for the viewmodel to have knowledge of the model, but not
vice versa. Furthermore, the viewmodel should not have any direct knowledge to
the view object. Similarly, the view object's only tie to viewmodel will come through
data binding. You can see that we've reinforced this design by passing an instance of
the model object into the viewmodel object's constructor and then viewmodel into
the view object's constructor:
var model = new BootstrapperApplicationModel(this);
var viewModel = new InstallViewModel(model);
var view = new InstallView(viewModel);
An improved design would use interfaces or abstract classes to further decouple
the objects that are being passed around from their implementation. To keep things
simple I am using the objects directly.
The next thing we do is pass the view into a helper method we've yet to dene
called SetWindowHandle. This goes against the grain of our MVVM design, but is
a necessary evil dictated by the BootstrapperCore library. This method will get a
handle to the WPF window, which is needed by the Burn engine when performing
the install or uninstall.
model.SetWindowHandle(view);
Next, we start the ball rolling by calling the Detect method:
this.Engine.Detect();
This gives Burn the go-ahead to check if our bundle is already installed. That way,
when our window is shown, we'll know whether we need to present an Install
button or an Uninstall button. Note that we are calling this after instantiating our
view, viewmodel, and model objects. That's because the viewmodel needs to set
up some event handlers and if we re Detect too quickly, it will miss the boat.
Specically, it will miss the event handler that res when Detect is complete.
The last thing we do is call Show on the view to display the WPF window. Immediately
afterward we call Dispatcher.Run(), which halts execution of this method at that line
until the Dispatcher is shut down. In the meantime, the Dispatcher object will loop
in place, waiting for messages and providing methods for communicating with the UI
thread—which is the current thread. Calling Dispatcher.Run() prevents our own Run
method from exiting prematurely, which would terminate our process:
view.Show();
Dispatcher.Run();
this.Engine.Quit(model.FinalResult);
www.it-ebooks.info

Chapter 16
[ 425 ]
When we decide to shut down the window, we'll call InvokeShutdown on the
Dispatcher object, causing our Run method to continue its execution. At that
point, Engine.Quit will be called with whatever status code we've collected at
that point (be it an error code or a success code) and gracefully wind down the
bootstrapping process.
Dening the model
Our model class is going to be fairly small. Its main purpose will be to encapsulate
calls to the bootstrapper so as to present a simplied API to the viewmodel. Add a
new C# class le to the Models folder and name it BootstrapperApplicationModel.
Update it with the following code:
using Microsoft.Tools.WindowsInstallerXml.Bootstrapper;
using System;
using System.Windows;
using System.Windows.Interop;
namespace CustomBA.Models
{
public class BootstrapperApplicationModel
{
private IntPtr hwnd;
public BootstrapperApplicationModel(
BootstrapperApplication bootstrapperApplication)
{
this.BootstrapperApplication =
bootstrapperApplication;
this.hwnd = IntPtr.Zero;
}
public BootstrapperApplication BootstrapperApplication { get;
private set; }
public int FinalResult { get; set; }
public void SetWindowHandle(Window view)
{
this.hwnd = new WindowInteropHelper(view).Handle;
}
public void PlanAction(LaunchAction action)
{
www.it-ebooks.info

Customizing the Burn UI
[ 426 ]
this.BootstrapperApplication.Engine.Plan(action);
}
public void ApplyAction()
{
this.BootstrapperApplication.Engine.Apply(this.hwnd);
}
public void LogMessage(string message)
{
this.BootstrapperApplication.Engine.Log(
LogLevel.Standard,
message);
}
}
}
The constructor of this class expects a parameter of type BootstrapperApplication.
As you saw earlier, we are passing our CustomBootstrapperApplication class in
here. Several of the methods in this model, such as PlanAction, ApplyAction, and
LogMessage only serve to wrap calls to this object:
public BootstrapperApplicationModel(
BootstrapperApplication bootstrapperApplication)
{
this.BootstrapperApplication = bootstrapperApplication;
this.hwnd = IntPtr.Zero;
}
Also in the constructor, we are initializing the pointer to our WPF window,
which will be needed by the ApplyAction method. The true pointer is set when
SetWindowHandle is called by the CustomBootstrapperApplication class in its Run
method. For now, we only set it to zero.
Quick descriptions of PlanAction and ApplyAction are that the former is given a
task to prepare for, such as installation, uninstallation, repair, or modify, and the
latter executes that task.
public void PlanAction(LaunchAction action)
{
this.BootstrapperApplication.Engine.Plan(action);
}
public void ApplyAction()
{
this.BootstrapperApplication.Engine.Apply(this.hwnd);
}
www.it-ebooks.info

Chapter 16
[ 427 ]
Therefore, the usual workow is that when a button is clicked on the UI, we call
PlanAction, passing in the task that we want to execute. Once planning has
completed, we invoke ApplyAction. Plan and Apply, along with Detect, are among
the most important events you'll interact with.
Another method that we're dening is a helper for appending messages to the
bootstrapper's log, which can be found in the %TEMP% directory.
public void LogMessage(string message)
{
this.BootstrapperApplication.Engine.Log(
LogLevel.Standard,
message);
}
A nal point of interest is the FinalResult property. We will use this to store the
exit status code that the Burn engine returns after the bootstrapper has nished.
public int FinalResult { get; set; }
This status code will be passed to the Engine.Quit(model.FinalResult) method
at the end of the Run method in our CustomBootstrapperApplication class. As we
saw earlier, this will be used to nalize the installation and end the process.
Implementing the viewmodel
Now let's move on to viewmodel. Add a new C# class le to the ViewModels folder
and name it InstallViewModel. Add the following code:
using CustomBA.Models;
using Microsoft.Practices.Prism.Commands;
using Microsoft.Practices.Prism.ViewModel;
using Microsoft.Tools.WindowsInstallerXml.Bootstrapper;
using System;
using System.Windows.Input;
namespace CustomBA.ViewModels
{
public class InstallViewModel : NotificationObject
{
public enum InstallState
{
Initializing,
Present,
NotPresent,
www.it-ebooks.info

Customizing the Burn UI
[ 428 ]
Applying,
Cancelled
}
private InstallState state;
private string message;
private BootstrapperApplicationModel model;
public ICommand InstallCommand { get; private set; }
public ICommand UninstallCommand { get; private set; }
public ICommand CancelCommand { get; private set; }
public string Message
{
get
{
return this.message;
}
set
{
if (this.message != value)
{
this.message = value;
this.RaisePropertyChanged(() => this.Message);
}
}
}
public InstallState State
{
get
{
return this.state;
}
set
{
if (this.state != value)
{
this.state = value;
this.Message = this.state.ToString();
this.RaisePropertyChanged(() => this.State);
www.it-ebooks.info

Chapter 16
[ 429 ]
this.Refresh();
}
}
}
public InstallViewModel(
BootstrapperApplicationModel model)
{
this.model = model;
this.State = InstallState.Initializing;
this.WireUpEventHandlers();
this.InstallCommand = new DelegateCommand(() =>
this.model.PlanAction(LaunchAction.Install),
() => this.State == InstallState.NotPresent);
this.UninstallCommand = new DelegateCommand(() =>
this.model.PlanAction(LaunchAction.Uninstall),
() => this.State == InstallState.Present);
this.CancelCommand = new DelegateCommand(() =>
{
this.model.LogMessage("Cancelling...");
if (this.State == InstallState.Applying)
{
this.State = InstallState.Cancelled;
}
else
{
CustomBootstrapperApplication.Dispatcher
.InvokeShutdown();
}
}, () => this.State != InstallState.Cancelled);
}
protected void DetectPackageComplete(
object sender,
DetectPackageCompleteEventArgs e)
{
if (e.PackageId.Equals(
"MyInstaller.msi", StringComparison.Ordinal))
{
this.State = e.State == PackageState.Present ?
www.it-ebooks.info

Customizing the Burn UI
[ 430 ]
InstallState.Present : InstallState.NotPresent;
}
}
protected void PlanComplete(
object sender, PlanCompleteEventArgs e)
{
if (this.State == InstallState.Cancelled)
{
CustomBootstrapperApplication.Dispatcher
.InvokeShutdown();
return;
}
this.model.ApplyAction();
}
protected void ApplyBegin(
object sender, ApplyBeginEventArgs e)
{
this.State = InstallState.Applying;
}
protected void ExecutePackageBegin(
object sender, ExecutePackageBeginEventArgs e)
{
if (this.State == InstallState.Cancelled)
{
e.Result = Result.Cancel;
}
}
protected void ExecutePackageComplete(
object sender, ExecutePackageCompleteEventArgs e)
{
if (this.State == InstallState.Cancelled)
{
e.Result = Result.Cancel;
}
}
protected void ApplyComplete(
object sender, ApplyCompleteEventArgs e)
{
www.it-ebooks.info

Chapter 16
[ 431 ]
this.model.FinalResult = e.Status;
CustomBootstrapperApplication.Dispatcher
.InvokeShutdown();
}
private void Refresh()
{
CustomBootstrapperApplication.Dispatcher.Invoke(
(Action)(() =>
{
((DelegateCommand)this.InstallCommand)
.RaiseCanExecuteChanged();
((DelegateCommand)this.UninstallCommand)
.RaiseCanExecuteChanged();
((DelegateCommand)this.CancelCommand)
.RaiseCanExecuteChanged();
}));
}
private void WireUpEventHandlers()
{
this.model.BootstrapperApplication.DetectPackageComplete
+= this.DetectPackageComplete;
this.model.BootstrapperApplication.PlanComplete += this.
PlanComplete;
this.model.BootstrapperApplication.ApplyComplete += this.
ApplyComplete;
this.model.BootstrapperApplication.ApplyBegin += this.
ApplyBegin;
this.model.BootstrapperApplication.ExecutePackageBegin +=
this.ExecutePackageBegin;
this.model.BootstrapperApplication.ExecutePackageComplete
+= this.ExecutePackageComplete;
}
}
}
There's quite a bit happening here so let's take it one piece at a time. Within the next
few sections we will dissect this class into logic parts.
www.it-ebooks.info

Customizing the Burn UI
[ 432 ]
Declaring the properties and elds
The InstallViewModel class extends a base class called NotificationObject.
This is a helper class from the Prism library that facilitates notifying the view
when a property is updated in the viewmodel. Within the class we dene an
enum named InstallState.
public class InstallViewModel : NotificationObject
{
public enum InstallState
{
Initializing,
Present,
NotPresent,
Applying,
Cancelled
}
This will track which phase of the bootstrapping process we are in so that we can
enable and disable buttons as appropriate. It will also allow us to track whether the
user has canceled the install. If they have, and we're already installing—otherwise
known as Applying—we will know to not immediately shut down the process, but
rather send a ag to the bootstrapper so that it can roll back any installed packages.
If, on the other hand, we have not begun the Apply phase, it is safe to shut down the
bootstrapper immediately.
We then dene three private elds:
private InstallState state;
private string message;
private BootstrapperApplicationModel model;
The rst, state, is used to hold the current status of the installation, utilizing the
enumeration that we just dened. The second is called message and stores text that
we want to display on the WPF window. The last one is a reference to our model
class and is simply called model.
Next we set up properties of type ICommand. The view will bind to these so that
when a button is clicked, one of these commands will be executed. We will dene
them later on in this class' constructor.
public ICommand InstallCommand { get; private set; }
public ICommand UninstallCommand { get; private set; }
public ICommand CancelCommand { get; private set; }
www.it-ebooks.info

Chapter 16
[ 433 ]
Next we set up two more properties: Message and State. These are the publicly
accessible versions of the message and state elds we dened before. We make
them public so that the view can bind to them as shown in the following snippet:
public string Message
{
get
{
return this.message;
}
set
{
if (this.message != value)
{
this.message = value;
this.RaisePropertyChanged(() => this.Message);
}
}
}
public InstallState State
{
get
{
return this.state;
}
set
{
if (this.state != value)
{
this.state = value;
this.Message = "Status: " +
this.state.ToString();
this.RaisePropertyChanged(() => this.State);
this.Refresh();
}
}
}
www.it-ebooks.info

Customizing the Burn UI
[ 434 ]
Each property checks that it's being set to something different than what it's already
set to before performing the update. That way, we save some processing power if the
change isn't needed. To notify the view that the property has been changed, we call
the RaisePropertyChanged method, passing in a lambda expression that identies
the property.
The State property also calls a private method called Refresh that will enable
or disable our UI's buttons depending on InstalledState. We will describe that
method later in the chapter. Also note that the State property sets the Message
property to a stringied version of itself. I do this just to show something changing
on the view as we progress through the phases.
Dening the constructor
Our viewmodel's constructor looks like this:
public InstallViewModel(BootstrapperApplicationModel model)
{
this.model = model;
this.State = InstallState.Initializing;
this.WireUpEventHandlers();
this.InstallCommand = new DelegateCommand(() =>
this.model.PlanAction(LaunchAction.Install),
() => this.State == InstallState.NotPresent);
this.UninstallCommand = new DelegateCommand(() =>
this.model.PlanAction(LaunchAction.Uninstall),
() => this.State == InstallState.Present);
this.CancelCommand = new DelegateCommand(() =>
{
this.model.LogMessage("Cancelling...");
if (this.State == InstallState.Applying)
{
this.State = InstallState.Cancelled;
}
else
{
CustomBootstrapperApplication.Dispatcher
.InvokeShutdown();
}
},
() => this.State != InstallState.Cancelled);
}
www.it-ebooks.info

Chapter 16
[ 435 ]
Our constructor accepts an instance of BootstrapperApplicationModel, our model
class, in its list of parameters. We store this in the instance variable model. We'll be
able to use it to call any of the model's methods.
Next, we set the initial value of the State property to Initializing and then call a
helper method called WireUpEventHandlers. As you'll see, this method associates
event handlers with the events that are red by the bootstrapper.
We then move on to initializing our command objects. We are using the
DelegateCommand class, which comes from the Prism library. The rst parameter
to DelegateCommand is an anonymous method to invoke when the command is
executed. The second parameter is another anonymous method that returns a
Boolean value that signies whether the command, and all UI controls that are
bound to it, should be enabled. In each case, we are basing this check on the current
value of the State property.
Taking a closer look, InstallCommand and UninstallCommand call the model's
PlanAction method when they are executed. As you'll remember, by passing the
type of action we want to perform to PlanAction, we initiate the bootstrapper's
workow, to be completed later when ApplyAction is called.
When CancelCommand is executed, we either shut the UI and bootstrapper down
immediately, via the Dispatcher.InvokeShutdown method or, if changes are
already being applied, we set State to Cancelled so that other event handlers
down the line can gracefully wind down the process.
Setting up the event handlers
Next, we'll examine the event handlers. First up is the DetectPackageComplete
method. You'll see later on that we wire up these events handlers in a helper method
called WireUpEventHandlers.
protected void DetectPackageComplete(
object sender,
DetectPackageCompleteEventArgs e)
{
if (e.PackageId.Equals(
"MyInstaller.msi",
StringComparison.Ordinal))
{
this.State = e.State == PackageState.Present ?
InstallState.Present : InstallState.NotPresent;
}
}
www.it-ebooks.info

Customizing the Burn UI
[ 436 ]
This method is called when the Detect method that we called in the
CustomBootstrapperApplication class' Run method completes. We begin by
checking the DetectPackageCompleteEventArgs object to see if the package that
was detected was an installer called MyInstaller.msi. You would substitute
this with the name of your own software's installer. If it nds a match, we then
check whether that package is currently installed on the end user's computer via
the PackageState enumeration. If it is Present, we set the State property to
InstallState.Present, otherwise it is set to InstallState.NotPresent.
The Present/NotPresent value will be used by the InstallCommand and
UninstallComand properties to enable or disable the UI controls that are bound
to them. If it isn't present, we enable the Install button. Otherwise, we enable the
Uninstall button. A quick glance back at those two commands shows this to be
the case:
this.InstallCommand = new DelegateCommand(() =>
this.model.PlanAction(LaunchAction.Install),
() => this.State == InstallState.NotPresent);
this.UninstallCommand = new DelegateCommand(() =>
this.model.PlanAction(LaunchAction.Uninstall),
() => this.State == InstallState.Present);
Remember that after we've called PlanAction to kick off the installation or
uninstallation and planning has completed, we then want to trigger ApplyAction.
This hand off is performed in the PlanComplete event handler. Additionally, if the
user has canceled the install—and at this stage we haven't applied any changes to
the computer—we are free to simply call InvokeShutdown on the Dispatcher object,
essentially stopping before we've even begun:
protected void PlanComplete(
object sender,
PlanCompleteEventArgs e)
{
if (this.State == InstallState.Cancelled)
{
CustomBootstrapperApplication.Dispatcher
.InvokeShutdown();
return;
}
this.model.ApplyAction();
}
www.it-ebooks.info

Chapter 16
[ 437 ]
The ApplyBegin method is very simple. It sets the State property to Applying once
the Apply phase has begun, as illustrated in the following snippet:
protected void ApplyBegin(
object sender,
ApplyBeginEventArgs e)
{
this.State = InstallState.Applying;
}
The next two methods, ExecutePackageBegin and ExecutePackageComplete, are
triggered before and after each package in the chain is installed or uninstalled. They
provide excellent hooks for us to check for the Cancelled state:
protected void ExecutePackageBegin(
object sender,
ExecutePackageBeginEventArgs e)
{
if (this.State == InstallState.Cancelled)
{
e.Result = Result.Cancel;
}
}
protected void ExecutePackageComplete(
object sender,
ExecutePackageCompleteEventArgs e)
{
if (this.State == InstallState.Cancelled)
{
e.Result = Result.Cancel;
}
}
If we nd that the bootstrapper has been canceled, we set the Result property
on EventArgs to Result.Cancel. This will inform Burn that it should roll back
any packages that have been installed up to that point. This is a graceful way of
handling a cancelation, rather than shutting down the process outright.
The last event hander is ApplyComplete. It's called, as you might have guessed,
when the installation is fully complete and the planned action has been applied. At
this point, we store the bootstrapper's nal status code in the FinalResult property
and call InvokeShutdown on the Dispatcher object:
protected void ApplyComplete(
object sender, ApplyCompleteEventArgs e)
www.it-ebooks.info

Customizing the Burn UI
[ 438 ]
{
this.model.FinalResult = e.Status;
CustomBootstrapperApplication.Dispatcher
.InvokeShutdown();
}
Helper methods
The remainder of the InstallViewModel class includes private helper methods:
private void Refresh()
{
CustomBootstrapperApplication.Dispatcher.Invoke(
(Action)(() =>
{
((DelegateCommand)this.InstallCommand)
.RaiseCanExecuteChanged();
((DelegateCommand)this.UninstallCommand)
.RaiseCanExecuteChanged();
((DelegateCommand)this.CancelCommand)
.RaiseCanExecuteChanged();
}));
}
private void WireUpEventHandlers()
{
this.model.BootstrapperApplication.DetectPackageComplete +=
this.DetectPackageComplete;
this.model.BootstrapperApplication.PlanComplete +=
this.PlanComplete;
this.model.BootstrapperApplication.ApplyComplete +=
this.ApplyComplete;
this.model.BootstrapperApplication.ApplyBegin +=
this.ApplyBegin;
this.model.BootstrapperApplication.ExecutePackageBegin +=
this.ExecutePackageBegin;
this.model.BootstrapperApplication.ExecutePackageComplete +=
this.ExecutePackageComplete;
}
www.it-ebooks.info

Chapter 16
[ 439 ]
The Refresh method calls RaiseCanExecuteChanged on each of the command
properties. This allows the UI to update the enabled/disabled status of buttons
that are bound to these commands. Notice that we've nested these calls inside
Dispatcher.Invoke. We must do this because it's likely that the Refresh method
will be called by a background thread that won't have access to the UI thread. The
Dispatcher ferries messages between the two.
The WireUpEventHandlers method wires our event handling methods to the events
red by the Burn engine. There are actually quite a few other events that we could
respond to, but this bare-bones set will get us most of what we need.
Marking up the view
The last piece of the puzzle is the WPF window itself, which we are calling, in
MVVM parlance, the view. Add a WPF User Control le called InstallView to
the Views folder. We will need to change the le to use the Window element instead
of the UserControl element. Replace the markup in the InstallView.xaml le with
the following code:
<Window x:Class="CustomBA.Views.InstallView"
xmlns=
"http://schemas.microsoft.com/winfx/2006/xaml/presentation"
xmlns:x="http://schemas.microsoft.com/winfx/2006/xaml"
xmlns:mc=
"http://schemas.openxmlformats.org/markup-compatibility/2006"
xmlns:d=
"http://schemas.microsoft.com/expression/blend/2008"
mc:Ignorable="d"
d:DesignHeight="300" d:DesignWidth="300">
<Window.Resources>
<Style TargetType="{x:Type Button}">
<Setter Property="Margin" Value="10" />
<Setter Property="Height" Value="30" />
</Style>
</Window.Resources>
<Grid>
<StackPanel>
<Label Content="{Binding Message}" />
<Button Command="{Binding InstallCommand}">
www.it-ebooks.info

Customizing the Burn UI
[ 440 ]
Install</Button>
<Button Command="{Binding UninstallCommand}">
Uninstall</Button>
<Button Command="{Binding CancelCommand}">
Cancel</Button>
</StackPanel>
</Grid>
</Window>
In an attempt to keep things simple, we are only using some basic styles in our
XAML. This is just a bare-bones implementation, but it should give you a good
starting point.
We have added a Label element that is bound to Message. Later, when we set the
DataContext object for the view, this will match up with the Message property on
our InstallViewModel class. That way, when we update that property's text in the
viewmodel logic, it will be redrawn here.
The three buttons are similarly bound to our three command objects. Using Prism's
DelegateCommand class is an improvement over the built-in RoutedCommand, which
would have forced us to associate each command with an event handling method in
the XAML le's code-behind.
Now that we've set up our XAML, let's open the code-behind le, InstallView.
xaml.cs, and add the following code:
using CustomBA.ViewModels;
using System.Windows;
namespace CustomBA.Views
{
public partial class InstallView : Window
{
public InstallView(InstallViewModel viewModel)
{
this.InitializeComponent();
this.DataContext = viewModel;
this.Closed += (sender, e) =>
viewModel.CancelCommand.Execute(this);
}
}
}
www.it-ebooks.info

Chapter 16
[ 441 ]
We've changed the class' constructor to inherit from the Window class instead of
the UserControl class. We've also added a parameter of type InstallViewModel.
We will use the viewmodel that's passed in as the DataContext object for our
window. That way, the buttons and label in the XAML are bound to a concrete
implementation. A refactoring of this code might have the viewmodel implement
an interface and then change the view to accept that interface for better decoupling
between view and viewmodel.
The last part of the method sets an anonymous method for the window's Closed
event. This will be called if the user closes the window instead of clicking on the
Cancel button. Our method guides the code to execute our CancelCommand. At this
point, we have everything we need to compile our custom user interface and try it
out in a Burn bundle. We'll discuss the steps for doing so in the next section.
Referencing the UI in a Burn bundle
When you compile the CustomBA project you should see the CustomBA.dll, the
Prism library assemblies, and the CoreBootstrapper.config le copied to the
output folder. You could either copy these les to a new bootstrapper project or add
CustomBA as a project reference. Then you'll be able to use preprocessor variables to
reference the les you need in Bundle.wxs.
Create a new project in Visual Studio using the Bootstrapper Project template and call
it MyBootstrapper. Add CustomBA as a project reference. Next, update the markup in
the Bundle.wxs le in the bootstrapper project to contain the following code:
<?xml version="1.0" encoding="UTF-8"?>
<Wix xmlns="http://schemas.microsoft.com/wix/2006/wi">
<Bundle Name="MyBootstrapper"
Version="1.0.0.0"
Manufacturer="WiX Tests"
UpgradeCode="416b6bbf-2beb-4187-9f83-cdb764db2840">
<BootstrapperApplicationRef
Id="ManagedBootstrapperApplicationHost">
<Payload
SourceFile="$(var.CustomBA.TargetDir)CustomBA.dll" />
<Payload SourceFile=
"$(var.CustomBA.TargetDir)BootstrapperCore.config" />
<Payload SourceFile=
"$(var.CustomBA.TargetDir)Microsoft.Practices.Prism.dll" />
</BootstrapperApplicationRef>
<WixVariable Id="WixMbaPrereqLicenseUrl" Value=""/>
www.it-ebooks.info

Customizing the Burn UI
[ 442 ]
<WixVariable Id="WixMbaPrereqPackageId" Value=""/>
<Chain>
<MsiPackage SourceFile="Lib\MyInstaller.msi" />
</Chain>
</Bundle>
</Wix>
I've added an MsiPackage element inside the Chain element, simply to have
something to install. The important thing about it is that it is named MyInstaller.
msi. Recall that the DetectPackageComplete method in our viewmodel is watching
for a package with this name. So, if you change it here, be sure to change it there too.
The reason for having the viewmodel check for a specic package is that we need
a constant to focus our detection on. The WiX installer does the same thing for its
Wix package.
The bigger focus here is on the BootstrapperApplicationRef element. Setting its
Id attribute to ManagedBootstrapperApplicationHost will pull in prerequisites
such as the BootstrapperCore.dll library. Our own assemblies should be
referenced using Payload elements. The Payload element will embed assemblies
and other types of resources into the bundle. In this example, we are referencing
CustomBA.dll, BootstrapperCore.config, and Microsoft.Practices.Prism.dll.
We must also set two WixVariable elements: WixMbaPrereqLicenseUrl
and WixMbaPrereqPackageId. The reason we need to do this is that the
ManagedBootstrapperApplicationHost expects them. However, we aren't using
them in our WPF application so it's safe to set them to empty strings. Compile the
project and you'll get a bootstrapper executable that, when run, will display our new
user interface.
Passing user input to a bundled MSI
One reason for authoring a new user interface is to collect user information that the
standard Burn UI doesn't enable us to. For example, suppose we wanted to collect a
username? This is actually quite easy. We will use the StringVariables property on
the Engine class. This property is a collection of key-value pairs and can be used to
set a Burn variable.
www.it-ebooks.info

Chapter 16
[ 443 ]
We could start off by adding a new method to our BootstrapperApplicationModel
class called SetBurnVariable. The following is the code:
public void SetBurnVariable(string variableName, string value)
{
this.BootstrapperApplication.Engine
.StringVariables[variableName] = value;
}
This method will now accept the name of the variable that we want to set and the
value to set it to. It passes this information to the StringVariables property, which
passes it to the bootstrapper.
To use this we might add a new TextBox control to our view to collect a username.
The following is the markup for a TextBox control:
<WrapPanel>
<Label VerticalAlignment="Center">Username:</Label>
<TextBox Text="{Binding Username}"
Margin="10"
MinWidth="150" />
</WrapPanel>
We will be binding the TextBox control to a property called Username, which we'll
dene on the viewmodel in the following manner:
private string username;
public string Username
{
get
{
return this.username;
}
set
{
this.username = value;
this.model.SetBurnVariable("Username", this.username);
}
}
www.it-ebooks.info

Customizing the Burn UI
[ 444 ]
We see that when the Username property is set, we call SetBurnVariable. Back in
our Burn bundle, we can nest an MsiProperty element inside of an MsiPackage
element, using the Username variable to set a WiX property called USERNAME, shown
as follows:
<Chain>
<MsiPackage SourceFile="Lib\MyInstaller.msi">
<MsiProperty Name="USERNAME" Value="[Username]"/>
</MsiPackage>
</Chain>
We do not need to declare the Username Burn variable in our markup. Setting it
through CustomBA will do the job.
Displaying progress
If you'd like to show a progress bar during the installation, you can handle two
events: CacheAcquireProgress and ExecuteProgress. The former will give you a
percentage completed for caching the packages. The latter will give you a percentage
for packages executed. To get a total progress percentage, we add them both together
and divide by two—if we didn't divide by two we'd end up with a nal result of 200
since both events count up to 100.
First, let's add a Label control to our view that displays the percentage as text and
also a ProgressBar control to go with it. Here's the markup to add to our XAML le:
<WrapPanel Margin="10" >
<Label VerticalAlignment="Center">Progress:</Label>
<Label Content="{Binding Progress}" />
<ProgressBar Width="200"
Height="30"
Value="{Binding Progress}"
Minimum="0"
Maximum="100" />
</WrapPanel>
Our Label and ProgressBar controls are bound to a property called Progress. We'll
dene that on our viewmodel in the following manner:
private int progress;
public int Progress
{
www.it-ebooks.info
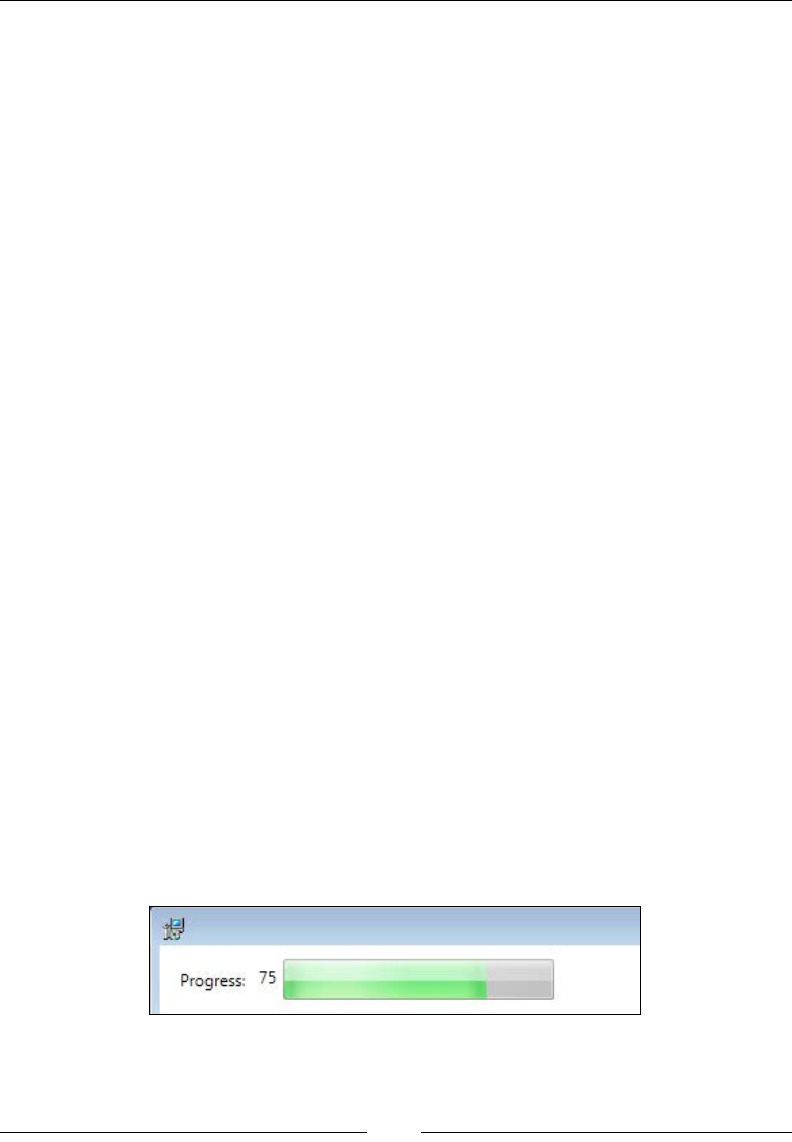
Chapter 16
[ 445 ]
get
{
return this.progress;
}
set
{
this.progress = value;
this.RaisePropertyChanged(() => this.Progress);
}
}
Next, we'll add event handlers for the CacheAcquireProgress and
ExecuteProgress events. Add elds for storing the two types of progress:
private int cacheProgress;
private int executeProgress;
Add the following code to the viewmodel's constructor:
this.model.BootstrapperApplication.CacheAcquireProgress +=
(sender, args) =>
{
this.cacheProgress = args.OverallPercentage;
this.Progress =
(this.cacheProgress + this.executeProgress) / 2;
};
this.model.BootstrapperApplication.ExecuteProgress +=
(sender, args) =>
{
this.executeProgress = args.OverallPercentage;
this.Progress =
(this.cacheProgress + this.executeProgress) / 2;
};
Our new controls will now update themselves during the installation, as shown in
the following screenshot:
www.it-ebooks.info

Customizing the Burn UI
[ 446 ]
Downloading packages
As we saw in the previous chapter, we can download a package from the Internet or
a local network, as in the following example where we use the NetFx40Web package
from WixNetFxExtension to download the .NET Framework:
<Chain>
<PackageGroupRef Id="NetFx40Web"/>
<MsiPackage SourceFile="Lib\MyInstaller.msi" />
</Chain>
In order for our custom UI to allow this download to proceed, we must handle the
ResolveSource event. The following is an example that uses an anonymous method
in our viewmodel's constructor:
this.model.BootstrapperApplication.ResolveSource +=
(sender, args) =>
{
if (!string.IsNullOrEmpty(args.DownloadSource))
{
// Downloadable package found
args.Result = Result.Download;
}
else
{
// Not downloadable
args.Result = Result.Ok;
}
};
We check if the package has a DownloadSource attribute and if it does, we set the
Result property to Result.Download. This will allow the download to continue.
Otherwise, we set Result to Result.Ok. The WiX Setup takes this a bit further by
trying to download a failed package up to three times before calling it a day and
moving on, setting Result to Result.Ok. It keeps track of which package has failed,
based on ResolveSourceEventArgs.PackageOrContainerId.
www.it-ebooks.info
Chapter 16
[ 447 ]
Collecting command-line arguments
To accept command-line arguments passed to your UI, use the Command.
GetCommandLineArgs method, accessible via the BootstrapperApplication class.
For example, we could add a method to our model class called GetCommandLine,
like so:
public string[] GetCommandLine()
{
return this.BootstrapperApplication.Command
.GetCommandLineArgs();
}
Internally, this method will call the GetCommandLineArgs method, which returns
an array of strings. Each index in the array will contain one of the arguments passed
to the bootstrapper. If the user were then to pass an argument called "foo" to our
executable, such as:
MyBootstrapper.exe /foo
Then /foo would be stored in the string array. Note, however, that the Burn engine
intercepts some common command-line arguments and stores them in the Command
object's Action property. We would use the Action property to access these
arguments. For example, if the user passed /?, which is commonly known to be a
request for a help screen, we could discover it like so:
public bool HelpRequested()
{
return this.BootstrapperApplication.Command.Action ==
LaunchAction.Help;
}
Our viewmodel might call this method and show a message box if it returns true, as
shown in the following screenshot:
www.it-ebooks.info
Customizing the Burn UI
[ 448 ]
Flags that are intercepted by Burn include the following—each is set to a
LaunchAction value:
Command-line argument LaunchAction value
/layout Layout
/help or /? Help
/uninstall Uninstall
/install or no argument sent Install
/modify Modify
/repair Repair
If you check the Action property, it's up to you to take the appropriate steps to make
the action work.
Summary
In this chapter, we explored how to create a customized user interface to plug into
the Burn engine. We went about it by using WPF and C#. We saw that there are a
number of events published by the bootstrapper that we can handle. There are also
a few methods that we must call, such as Detect, Plan and Apply, to drive the
process forward.
By no means have we covered all of the possibilities available when it comes to
customizing Burn. For more examples, I recommend downloading the WiX source
code and digging through the WiX Setup. Also, post your questions on the WiX Users
mailing list at http://wix.sourceforge.net/mailinglists.html. Hopefully
you've gained enough knowledge to start building your own unique dialogs.
www.it-ebooks.info
Index
Symbols
^ 199
? 199
@ 199
/? 448
& 199
# 199
< 85, 106, 199
<< 85, 106
<= 85, 106
<> 85, 106
= 85, 106
> 85, 106, 199
>< 85, 106
>= 85, 106
>> 85, 106
64-bit les
installing 67, 68
-arch ag 251
-bcgg ag 269
-bf ag 265
-b ag 265
-binder ag 265
-cc <path> ag 270
-cg <ComponentGroup> argument 58
-ct <N> ag 270
-cub <le.cub> ag 270
-cultures ag 266
-dcl:level ag 270
-d ag 251, 266
-dr <DirectoryName> argument 58
-dut ag 266
-eav ag 270
-ext ag 251, 266
-ps ag 251
/foo 447
-fv ag 270
-g1 argument 58
-gg argument 58
/help 448
-ice<ICE> ag 271
-I ag 251
/install 448
/layout 448
-loc ag 266
/modify 448
.msp le 357
-nologo ag 252
-notidy ag 267
-o ag 252
-o[ut] ag 267
-pdbout <output.wixpdb> ag 271
-pedantic ag 252, 267
-p ag 252
PushButton PushButton 189
/repair 448
-reusecab ag 271
-sacl ag 271
-sadmin ag 267
-sadv ag 267
-sa ag 271
-sfdvital ag 252
-sf ag 272
-sfrag argument 58
-sh ag 272
-sice
<ICE> ag 272
-sl ag 272
-sloc ag 267
-sma ag 267
-spdb ag 272
www.it-ebooks.info

[ 450 ]
-srd argument 59
-ss ag 252, 268
-sts ag 268
-sval ag 272
-sw ag 253
-t 338
-trace ag 253
/uninstall 448
-var <VarName> argument 59
-v ag 253
-wx ag 253
A
Account attribute 300
Action attribute 224
ActionData event 231
action state
-1 120
1 120
2 120
3 120
4 120
about 119, 120
absent 119
advertised 119
local 119
numbers 120
source 119
unknown 119
ActionText event 231
AddLocal event 228, 236, 238
AddSource event 228
AdminToolsFolder property 24
AllowRemoval attribute 351
AppDataFolder property 24
Append attribute 71
ApplyBegin method 437
AppSearch
about 62, 90, 125
ComponentSearch 90, 95
DirectorySearch 90, 91
FileSearch 90, 94
IniFileSearch 90, 100
RegistrySearch 90, 97
Arguments attribute 300
ARPAUTHORIZEDCDPREFIX 88
ARPCOMMENTS 88
ARPCONTACT 88
ARPHELPLINK 88
ARPHELPTELEPHONE 88
ARPINSTALLLOCATION 88
ARPINSTALLLOCATION property 133
ARPNOMODIFY 88
ARPNOREMOVE 88
ARPNOREPAIR 88
ARPPRODUCTICON 88
ARPREADME 88
ARPSIZE 88
ARPSYSTEMCOMPONENT 88
ARPURLINFOABOUT 88
ARPURLUPDATEINFO 88
AssignToProperty attribute 91
asyncNoWait 133
asyncWait 133
attributes, File element
Hidden 30
ReadOnly 30
Vital 30
AwesomeCompiler class 365
B
Before attribute 132
Billboard 218-221
Bitmap 195, 196
Blue attribute 168
Bold attribute 169
bootstrapper 385
BootstrapperApplicationAttribute 422
BootstrapperApplication class
extending 422-424
BootstrapperCore.dll 419
Bootstrapper Project template 441
using 386, 387
Build page 47
bundled MSI
user input, passing 442, 443
Bundle element
about 387
describing 387, 388
bundles
Package Cache 397
related bundles, nding 396
www.it-ebooks.info

[ 451 ]
updating 391-395
Burn 55, 385
Burn bundle
UI, referencing 441, 442
C
Cabinet attribute 22
CacheAcquireProgress event 445
Candle 247
Candle.exe
about 247, 248
-arch ag 251
command-line arguments 250
-d ag 251
-ext ag 251
-ps ag 251
-I ag 251
-nologo ag 252
-o ag 252
-pedantic ag 252
-p ag 252
Response les 249
-sfdvital ag 252
-ss ag 252
-sw ag 253
-trace ag 253
-v ag 253
.wixobj les 250
-wx ag 253
Category attribute 372
CDROM attribute 212
Chain element 387-399
ChangePermission attribute 71, 291
check 133
CheckBox 202, 203
CheckExistingTargetPath event 228
CheckTargetPath event 228
cited properties
about 88
ARPAUTHORIZEDCDPREFIX 88
ARPCOMMENTS 88
ARPCONTACT 88
ARPHELPLINK 88
ARPHELPTELEPHONE 88
ARPINSTALLLOCATION 88
ARPNOMODIFY 88
ARPNOREMOVE 88
ARPNOREPAIR 88
ARPPRODUCTICON 88
ARPREADME 88
ARPSIZE 88
ARPSYSTEMCOMPONENT 88
ARPURLINFOABOUT 88
ARPURLUPDATEINFO 88
Classication 351
class library (.dll)
creating 420-422
CLR 271
code page 322
ComboBox 205, 206
command-line arguments
/? 448
collecting 447, 448
/help 448
/install 448
/layout 448
/modify 448
/repair 448
/uninstall 448
command-line arguments(binding)
-bcgg ag 269
-cc <path> ag 270
-ct <N> ag 270
-cub <le.cub> ag 270
-dcl:level ag 270
-eav ag 270
-fv ag 270
-ice<ICE> ag 271
-pdbout <output.wixpdb> ag 271
-reusecab ag 271
-sacl ag 271
-sa ag 271
-sf ag 272
-sh ag 272
-sice
<ICE> ag 272
-sl ag 272
-spdb ag 272
-sval ag 272
command-line arguments(linking)
-bf ag 265
-b ag 265
-binder ag 265
www.it-ebooks.info

[ 452 ]
-cultures ag 266
-d ag 266
-dut ag 266
-ext ag 266
-loc ag 266
-nologo 266
-notidy ag 267
-o[ut] ag 267
-pedantic ag 267
-sadmin ag 267
-sadv ag 267
-sloc ag 267
-sma ag 267
-ss ag 268
-sts ag 268
-sui ag 268
-sv ag 268
-sw[N] ag 268
-usf <output.xml> ag 269
v ag 269
-wx[N] ag 269
-xo ag 269
Comments attribute 352
CommonAppDataFolder property 24
CommonFiles64Folder property 24
CommonFilesFolder property 24
Common Language Runtime. See CLR
compile-time variables
about 253
custom compiler variables 253, 254
environment variables 254
system variables 255
component condition 116-118
Component database 42
ComponentGroup element 49, 51
components 26
ComponentSearch 95, 97
conditional statements
errors 258
ifdef 256
if...elseif...else 255
ifndef 256
Iterations 257, 258
warning 258
conditions
adding, to custom actions 146
component conditions 106
feature conditions 106
launch conditions 106
syntax 106
types 105
control attributes 187, 189
control event 190
control syntax
about 189
Billboard 218-221
Bitmap 195, 196
CheckBox 202, 203
ComboBox 205, 206
DirectoryCombo 211, 212
DirectoryList 208-210
Edit 197-199
GroupBox 195
Icon 197
Line 194
ListBox 206, 207
ListView 207, 208
MaskedEdit 199, 200
PathEdit 201, 202
ProgressBar 222-226
PushButton 189-191
RadioButtonGroup 203, 204
ScrollableText 193, 194
SelectionTree 212-214
Text 192, 193
VolumeCostList 215, 216
VolumeSelectCombo 216-218
CopyFile element 64
CostFinalize 119, 126
costing 119
CostInitialize 125
CreateFolder element 69
CreateLink attribute 291
CreateRow method 369
CreateShortcuts action 129
CreateSubkeys attribute 291
CustomActionData property 144
custom actions
about 131-133
conditions, adding 146
embedded VBScript or JScript, running
135, 136
Error attribute, using 142
executable le, triggering 140, 141
www.it-ebooks.info

[ 453 ]
external VBScript or JScript le, calling 137
function calling, from dynamic-link library
138-140
installed directory location, setting 135
typing, to custom element 376-383
Windows Installer property, setting 133
CustomBootstrapperApplication class 426
custom properties
about 77
declaring 78, 79
property data types 84-86
referencing 79, 80
scope 80, 81
secure properties 82, 83
setting 78, 79
visibility 80, 81
custom WiX extension
building 359, 360
custom elements, parsing 365-369
extending 360-362
new MSI table, creating 370-372
stage, setting 360
WixExtension class, extending 372-374
XML schema, adding 362-365
D
deferred action
properties, accessing 144-146
deferred stage 130, 221
DelegateCommand class 421, 435
Delete attribute 71, 291
DependencyExtension 410
DeploymentToolsFoundation. See DTF
Description attribute 33, 300, 352
DesktopFolder property 24
DestinationProperty attribute 62
Detect method 436
DetectPackageComplete method 435
Dialog attribute 166
directories 87
DirectoryCombo 211, 212
Directory element 25
DirectoryList 208-210
DirectoryListNew event 228
DirectoryListOpen event 228
Directory property
AdminToolsFolder 24
AppDataFolder 24
CommonAppDataFolder 24
CommonFiles64Folder 24
CommonFilesFolder 24
DesktopFolder 24
FavoritesFolder 24
FontsFolder 24
LocalAppDataFolder 24
MyPicturesFolder 24
NetHoodFolder 24
PersonalFolder 24
PrintHoodFolder 24
ProgramFiles64Folder 24
ProgramFilesFolder 24
ProgramMenuFolder 24
RecentFolder 24
SendToFolder 24
StartMenuFolder 24
StartupFolder 24
System16Folder 24
System64Folder 24
SystemFolder 24
TempFolder 24
TemplateFolder 24
WindowsFolder 24
DirectoryRef element 48
DirectorySearch 91-94
DisableSystemRestore attribute 399
Dispatcher.InvokeShutdown method 435
Dispatcher.Run() 424
DisplayInternalUI attribute 415
DoAction event 228, 233
DownloadUrl attribute 409
DTF
about 139, 147
component states, accessing 150
feature, accessing 150
logging 148
message box, showing 149, 150
MSI database, querying 151
properties, getting 148
properties, setting 148
rows, inserting into MSI database 151, 153
session object 147
DWORD 281
www.it-ebooks.info

[ 454 ]
E
Edit 197-199
EmbedCab attribute 21
empty folder
creating 69
EnableRollback event 228
EndDialog event 170, 174, 228, 234
end-user license agreement. See EULA
EnumerateSubkeys attribute 291
en-us.wxl le 335
eral Information Processing Standards
Publications. See FIPS
Error dialog 179
EULA 332
ExeCommand attribute 141
ExecuteAction 126
Execute attribute 71
ExecuteScalar method 151
ExePackage element 402-405
Exit dialog 183, 184
extension
about 109
using, in WiX project 374-376
F
FaceName attribute 169
FatalError 181
FavoritesFolder property 24
feature 30
feature condition 113-116
feature tree 30
FileCost 115, 126
File element 45, 47
le installations
speeding up 74, 75
FileKey attribute 141
le permissions
setting 70-73
les
copying, for installation 61, 62
existing les, copying 63
existing les, moving 64
harvesting, heat.exe used 55-60
FilesInUse dialog 177
FilesInUseDlg.wxs le 177
File table 74
FinalResult property 427, 437
FindRelatedProducts 125
FIPS 251
Fixed attribute 212
Floppy attribute 212
FontsFolder property 24
ForceCreateOnInstall attribute 285
Formats tab 339
Fragment element 51-55
G
GAC 65
GenericAll attribute 71, 291
GenericExecute attribute 71, 291
GenericRead attribute 71, 291
GenericWrite attribute 71, 291
GetCommandLineArgs method 447
GetVariableValue method 260
Global Assembly Cache. See GAC
Globally Unique Identier. See GUID
green attribute 168
GroupBox 195
GUID 16
H
heat.exe
about 55
arguments, adding 58
les, harvesting 55-60
HyperlinkLicense user interface 416-418
I
ICE20
about 177
Error 179, 180
Exit 183
FatalError 181, 182
FilesInUse 177, 179
UserExit 182, 183
Icon 197
Icon attribute 36
Id attribute 101
if statement 255
ignore 133
www.it-ebooks.info

[ 455 ]
IgnoreChange event 232
immediate phase 130, 221
include le (.wxi) 253
INI le 100
IniFileSearch 100-102
installation
logging, turn on 42
restricting, by operating system 389, 390
Installation Scope screen 157
Install button 174
InstallCommand attribute 403
Installed keyword 80
Installed property 108, 143
installed state
-1 121
1 121
2 121
3 121
4 121
about 121
installer
building, without Visual Studio 276, 277
InstallerVersion attribute 20
InstallExecuteSequence
about 123-128
deferred 130
Immediate 130
standard actions, executing 128
UI standard actions 125
InstallFiles action 129
InstallInitialize action 128
InstallScope attribute 21
InstallUISequence 123
InstallValidate action 128
InstallViewModel class 432
Italic attribute 168
J
Java Runtime Environment. See JRE
JRE 402
K
KB attribute 407
Key attribute 281
KeyPath le 28
L
Language 325
launch condition
about 107-112
examples 107, 108
LaunchConditions 125
Librarian settings 380
Light
about 247, 264
Command-line arguments 265
Light.exe
about 319
role 320, 321
Line 194
Linking 265
link-time variables
about 273
binder variables 273, 274
custom linker variables 275
localization variables 273
ListBox 206, 207
ListView 207, 208
LoadLibraryHelper method 382
load order group 309
LoadOrderGroup attribute 300
LocalAppDataFolder property 24
locale identier 321
Localizable attributes 317
localization 315
LocalService 303
LocalSystem account 303
logical operators 106
M
major update
about 342
preparing 343-350
using, criteria 342
Manufacturer attribute 19
mask 199
MaskedEdit 199, 200
media element 22
MediaProperty property 54
MediaTemplate element 21
merge modules (.msm) 55
www.it-ebooks.info

[ 456 ]
Message method 223
Message property 434, 440
Microsoft Download Center website 12
Microsoft.Practices.Prism 421
MigrateFeatureStates 126
minor update
about 342, 350
patch, creating from .without les 356, 357
patch, creating from .wixpdb les 353-356
.wixmsp le, authoring 350-353
modal windows 175, 177
model
about 423
dening 425-427
Modeless attribute 173
Model-View-ViewModel. See MVVM
MSDN website 322
MSI database
about 41
Orca 41
Orca.exe 41, 42
MsiNTProductType property 112
MsiPackage element 400, 401
MspPackage element 405, 406
MsuPackage element 406, 407
MVVM 421
MyPicturesFolder property 24
N
Name attribute 388
Name sets 281
NETFRAMEWORK10 property 110
NETFRAMEWORK20INSTALL
ROOTDIR64 property 110
NETFRAMEWORK20INSTALLROOTDIR
property 110
NETFRAMEWORK20 property 110
NETFRAMEWORK30 property 110
NETFRAMEWORK35 property 110
NETFRAMEWORK40CLIENT property 110
NETFRAMEWORK40FULLINST
ALLROOTDIR64 property 110
NETFRAMEWORK40FULLINST
ALLROOTDIR property 110
NETFRAMEWORK40FULL
property 109, 110
NETFRAMEWORK45 property 110
NetHoodFolder property 24
NetworkService 303
NewDialog event 229, 235
Notify attribute 291
NOTPropertyA 106
NoWrap attribute 192
NuGet 421
O
One Really Cool App 41
OnExit attribute 182
operating system 111
Options button 416
OR 106
Orca tool 41
Overridable attribute 317
own dialogs, creating
about 163
dialog element 165
dialog les, adding 164
dialogs, scheduling 166
ICE20 errors 163
progress dialog, adding 172-174
tabbable control, adding 169-172
TextStyle elements, adding 167, 168
P
Package Cache 397
package element 20, 322-324
PackageGroup elements 413, 414
package references
counting 410, 411
packages
downloading 407-409, 446
packages chaining
Chain element 398, 399
ExePackage element 402-405
MsiPackage element 400, 401
MspPackage element 405, 406
MsuPackage element 406, 407
ParseSuperElement method 366
Password attribute 300
Patch element 351
patch le 350
www.it-ebooks.info

[ 457 ]
patch slipstreaming 405
PathEdit 201, 202
PermissionEx element
attributes 71
PersonalFolder property 24
PlanAction method 435
predened properties, Windows Installer
cited properties 88, 89
implied properties 87
preprocessor extension 258-264
preprocessor variable 46
PrintHoodFolder property 24
Prism 421
private property 82
Privileged property 112
ProcessComponents action 128
ProductCode 18
ProductCode attribute 36
product element 18, 325
ProgramCommandLine attribute 312
ProgramFiles64Folder property 24
ProgramFilesFolder property 24
ProgramMenuFolder property 24
progress bar
displaying 444, 445
ProgressBar 222-226
progress dialog
adding 170, 172
ProgressDlg dialog 152
properties 52, 77
PropertyA 106
PropertyA <> "1" 107
PropertyA = "1" AND PropertyB = "2" 107
PropertyA<PropertyB 106
Property attribute 197
Property element 23
Publish element 190
about 227, 229
AddLocal event 228
AddSource event 228
CheckExistingTargetPath event 228
CheckTargetPath event 228
DirectoryListNew event 228
DirectoryListOpen event 228
DirectoryListUp event 228
DoAction event 228
EnableRollback event 228
EndDialog event 228
NewDialog event 229
ReinstallMode event 229
Remove event 229
Reset event 229
SelectionBrowse event 229
SetInstallLevel event 229
SetTargetPath event 229
SpawnDialog event 229
SpawnWaitDialog event 229
ValidateProductID event 229
Publish events
about 232
AddLocal 236-239
DoAction 233
EndDialog 234
NewDialog 235
property, publishing 239
PublishFeatures action 130
publishing 227
PublishProduct action 130
PushButton 190, 191
pyro.exe 356
R
RadioButtonGroup 203, 204
RaisePropertyChanged method 434
RAMDisk attribute 212
Raw 101
Read attribute 71, 291
ReadPermission attribute 71, 291
RecentFolder property 24
Red attribute 168
REG_BINARY 281
REG_EXPAND_SZ 281
RegisterProduct action 129
registry
multiple value, writing 284-286
NeverOverwrite, setting 287
permissions 290-292
reading from 280-282
single value, writing 283
writing to 282
RegistryKey element 284
RegistrySearch element 97-100, 280
RegistryValue element 35
www.it-ebooks.info

[ 458 ]
registry values
all keys, removing 287, 288
copying 289, 290
removing 287
single value, removing 288
REG_MULTI_SZ 281
REG_SZ 281
ReinstallMode event 229
Remote attribute 212
Removable attribute 212
Remove event 229
RemoveFiles action 129
REMOVE property 114
RemoveRegistryKey element 287
RemoveShortcuts action 129
repair 27, 47
RequiredVersion attribute 17
Reset event 229
ResetPeriodInDays attribute 313
resiliency 28
ResolveSource event 446
resources, WiX 43
response le 249
Result property 437
Return attribute 133
RollbackBoundary elements 412, 413
rollback custom actions 143
Root attribute 280
RtfLicense user interface 415, 416
Run method 425
S
sc.exe
using 296-298
ScriptInProgress event 232, 240, 241
ScrollableText 193, 194
Security tab 70
SelectionAction event 232, 242, 243
SelectionBrowse event 229
SelectionDescription event 232
SelectionNoItems event 232
SelectionPath event 232
SelectionPathOn event 232
SelectionSize event 232
SelectionTree 212-214
SendToFolder property 24
service
starting 300-302
stopping 300-302
uninstalling 300-302
user account, setting 303-307
Service Control Manager (SCM) 294
service dependencies
adding 307-309
ServiceInstall 298
ServicePackLevel property 111
SetInstallLevel event 229
SetProgress event 173, 232
SetProperty element 134
ShowMessageImmediate method 378
simple Windows service
creating 293-296
size attribute 169
small update 342, 358
SomeAssembly.dll 29
Source attribute 58
SourceFile attribute 407
Source not found error 326
SpawnDialog event 176, 229
SpawnWaitDialog event 229
special-case les
assembly les, adding to GAC 65, 66
installing 64
TrueType font, installing 66
src\Setup\WixBA folder 420
standard actions, InstallExecuteSequence
CreateShortcuts 129
InstallFiles 129
InstallFinalize 130
InstallInitialize 128
InstallValidate 128
ProcessComponents 128
PublishFeatures 130
PublishProduct 130
RegisterProduct 129
RegisterUser 129
RemoveFiles 129
RemoveRegistryValues 128
RemoveShortcuts 129
UnpublishFeatures 128
WriteRegistryValues 129
Standard Bootstrapper UI
about 415
www.it-ebooks.info

[ 459 ]
HyperlinkLicense user interface 416-418
RtfLicense user interface 415, 416
standard dialog sets, WiX
about 155, 156
customizing 161, 162
WixUI_Advanced 156, 158
WixUI_FeatureTree 158
WixUI_InstallDir 159
WixUI_Mondo 160
StartMenuFolder property 24
StartupFolder property 24
strike attribute 169
Subscribe element
about 231
ActionData event 231
ActionText event 231
events 232
IgnoreChange event 232
ScriptInProgress event 232
SelectionAction event 232
SelectionDescription event 232
SelectionNoItems event 232
SelectionPath event 232
SelectionPathOn event 232
SelectionSize event 232
SetProgress event 232
TimeRemaining event 232
Subscribe events
about 239
ScriptInProgress 240, 241
SelectionAction 242, 243
TimeRemaining 243-245
subscribing 227
Synchronize attribute 71, 291
System16Folder property 24
System64Folder property 24
SystemFolder property 24
T
TakeOwnership attribute 71, 291
Target attribute 34
TempFolder property 24
TemplateFolder property 24
Template Summary property 323
Text 192, 193
ThemeFile attribute 417
ThmViewer utility 417
TimeRemaining event 232-245
Tools Settings tab 68
tools, WiX
Candle.exe 11
Dark.exe 11
Heat.exe 11
Insignia.exe 11
Light.exe 11
Lit.exe 11
Lux.exe 11
Melt.exe 11
Nit.exe 11
Pyro.exe 11
Shine 11
Smoke.exe 11
Torch.exe 11
WixCop.exe 11
WixUnit.exe 11
Torch 337
transform les 337
Type 2 140
Type 5 (JScript) 137
Type 6 (VBScript) 137
Type 19 custom action 142
Type 34 custom action 142
Type 35 custom action 134
Type 37(VBScript) 135
Type 38 (JScript) 135
Type 51custom action 133
Type attribute
about 102, 281
data 284
U
UI
localizing 326
UI localization
about 326
controls, resizing 334-336
error messages 326-329
EULA 332-334
multi-language MSI, creating 336-339
progress bar messages 329-332
UI standard actions
about 125
www.it-ebooks.info

[ 460 ]
AppSearch 125
CostFinalize 126
CostInitialize 125
ExecuteAction 126
FileCost 126
FindRelatedProducts 125
LaunchConditions 125
MigrateFeatureStates 126
ValidateProductID 125
Underline attribute 169
UnexpectedAttribute method 368
UnexpectedElement method 366
Uninstall button 424
UninstallCommand attribute 405
UnpublishFeatures action 128
unreal tables 266
UnsupportedExtensionAttribute
method 368
update
per-machine 343
per-user 343
update planning
about 341
major updates 341
minor updates 341
small updates 341
update type, choosing 342
UpgradeCode attribute 391
User 71
UserExit dialog 182
user interface
adding 40, 41
Util:ServiceCong
service recovery 310-313
util namespace 71
V
ValidateProductID 125
ValidateProductID event 229
Value attribute 284
Version attribute 19, 388
view
about 423
marking up 439-441
viewmodel
about 423
implementing 427
viewmodel implementation
about 427-431
constructor, dening 434, 435
event handlers, setting up 435-437
elds, declaring 432, 434
helper methods 438, 439
properties, declaring 432, 434
Vital attribute 300, 400
VolumeCostList 215, 216
VolumeSelectCombo 216-218
Votive 13
W
Window class 441
WindowsFolder property 24
Windows Installer
about 12
predened properties 86
Visual Studio package 13
Windows Installer XML. See WiX
Windows Presentation Foundation. See
WPF
WINDOWSSDKCURRENTVERSION
property 110
WireUpEventHandlers method 439
WiX
about 7, 8
features 7, 9
GUIDs 16
latest version 10
localization les 315
new version, installing 12
options 8
project 16
project templates 13
resources 43
standard dialog sets 155
tools 11
using, for service installation 298, 300
Visual Studio package 13-16
WiX extension 360
WixFailWhenDeferred 144
WiX library (.wixlib) 54
WiX localization les
about 315
www.it-ebooks.info

[ 461 ]
example 316-318
WixNetFxExtension 109
WiX project
about 17
component element 27, 29
directory element 23-26
extension, using 374,-376
feature element 30-33
le element 29, 30
media element 22, 23
media template element 21
package element 20, 21
product element 18, 19
Start Menu shortcuts 33-36
summing up 37-40
Wix element 17
XML declaration 17
WiX toolset 155
WixUI_Advanced attribute 41, 156-158
WixUI_FeatureTree attribute 41, 158
WixUI_InstallDir attribute 41, 159
WixUI_Mondo attribute 41, 160
WPF 419
Write attribute 71, 291
WriteRegistryValues action 129
X
XAML 420
xmlns 17
www.it-ebooks.info

Thank you for buying
WiX 3.6: A Developer's Guide to Windows
Installer XML
About Packt Publishing
Packt, pronounced 'packed', published its rst book "Mastering phpMyAdmin for Effective
MySQL Management" in April 2004 and subsequently continued to specialize in publishing
highly focused books on specic technologies and solutions.
Our books and publications share the experiences of your fellow IT professionals in adapting
and customizing today's systems, applications, and frameworks. Our solution based books
give you the knowledge and power to customize the software and technologies you're using
to get the job done. Packt books are more specic and less general than the IT books you have
seen in the past. Our unique business model allows us to bring you more focused information,
giving you more of what you need to know, and less of what you don't.
Packt is a modern, yet unique publishing company, which focuses on producing quality,
cutting-edge books for communities of developers, administrators, and newbies alike. For
more information, please visit our website: www.packtpub.com.
About Packt Open Source
In 2010, Packt launched two new brands, Packt Open Source and Packt Enterprise, in order to
continue its focus on specialization. This book is part of the Packt Open Source brand, home
to books published on software built around Open Source licences, and offering information
to anybody from advanced developers to budding web designers. The Open Source brand
also runs Packt's Open Source Royalty Scheme, by which Packt gives a royalty to each Open
Source project about whose software a book is sold.
Writing for Packt
We welcome all inquiries from people who are interested in authoring. Book proposals
should be sent to author@packtpub.com. If your book idea is still at an early stage and you
would like to discuss it rst before writing a formal book proposal, contact us; one of our
commissioning editors will get in touch with you.
We're not just looking for published authors; if you have strong technical skills but no writing
experience, our experienced editors can help you develop a writing career, or simply get some
additional reward for your expertise.
www.it-ebooks.info
WiX: A Developer's Guide to
Windows Installer XML
ISBN: 978-1-84951-372-2 Paperback: 348 pages
Create a hassle-free installer for your Windows
software using WiX
1. Package your software into a single-le,
double-click MSI for easy installation
2. Read and write to the Windows Registry and
create, start, and stop Windows Services during
installation
3. Write .NET code that performs specic tasks
during installation via custom actions
4. Learn how the WiX command-line tools work
to build and link your project
XNA 4.0 Game Development by
Example: Beginner's Guide
ISBN: 978-1-84969-066-9 Paperback: 428 pages
Create exciting games with Microsoft XNA 4.0
1. Dive headrst into game creation with XNA
2. Four different styles of games comprising a
puzzler, a space shooter, a multi-axis shoot 'em
up, and a jump-and-run platformer
3. Games that gradually increase in complexity
to cover a wide variety of game development
techniques
4. Focuses entirely on developing games with the
free version of XNA
Please check www.PacktPub.com for information on our titles
www.it-ebooks.info
Microsoft Windows Azure
Development Cookbook
ISBN: 978-1-84968-222-0 Paperback: .392 pages
Over 80 advanced recipes for developing scalable
services with the Windows Azure platform
1. Packed with practical, hands-on cookbook
recipes for building advanced, scalable
cloud-based services on the Windows
Azure platform explained in detail to
maximize your learning
2. Extensive code samples showing how to use
advanced features of Windows Azure blobs,
tables and queues.
3. Understand remote management of Azure
services using the Windows Azure Service
Management REST API
Learning SQL Server 2008
Reporting Services
ISBN: 978-1-84719-618-7 Paperback: 512 pages
A step-by-step guide to getting the most of Microsoft
SQL Server Reporting Services 2008
1. Everything you need to create and deliver
data-rich reports with SQL Server 2008
Reporting Services as quickly as possible
2. Packed with hands-on-examples to learn and
improve your skills
3. Connect and report from databases,
spreadsheets, XML Data, and more
4. No experience of SQL Server Reporting
Services required
Please check www.PacktPub.com for information on our titles
www.it-ebooks.info
