Woo Commerce Installation Guide
User Manual:
Open the PDF directly: View PDF ![]() .
.
Page Count: 15
WooCommerce Odoo Connector
Installation Guide
Note: WooCommerce Odoo Connector is compatible with the latest version of wordpress
4.4 and WooCommerce version 3.0.x and later.
Export feature will not work correctly if WooCommerce version is earlier than 3.0.x.
Table Of Content:
1. WooCommerce Odoo Connector Installation
1.1 Activating Developer Mode
1.2 Installing Module
2. Configure WooCommerce Odoo Connector
2.1 WooCommerce Api Key Generation
2.2 Configure WooCommerce Settings
3. Create Multiple Instance of WooCommerce
WooCommerce Odoo Connector Installation
Step 1. Place WooCommerce Odoo Connector module With its Dependencies
=>Multi Channel Sale
into Odoo addons directory
Notice:Install woocommerce python api before installing module
cmd: pip install woocommerce
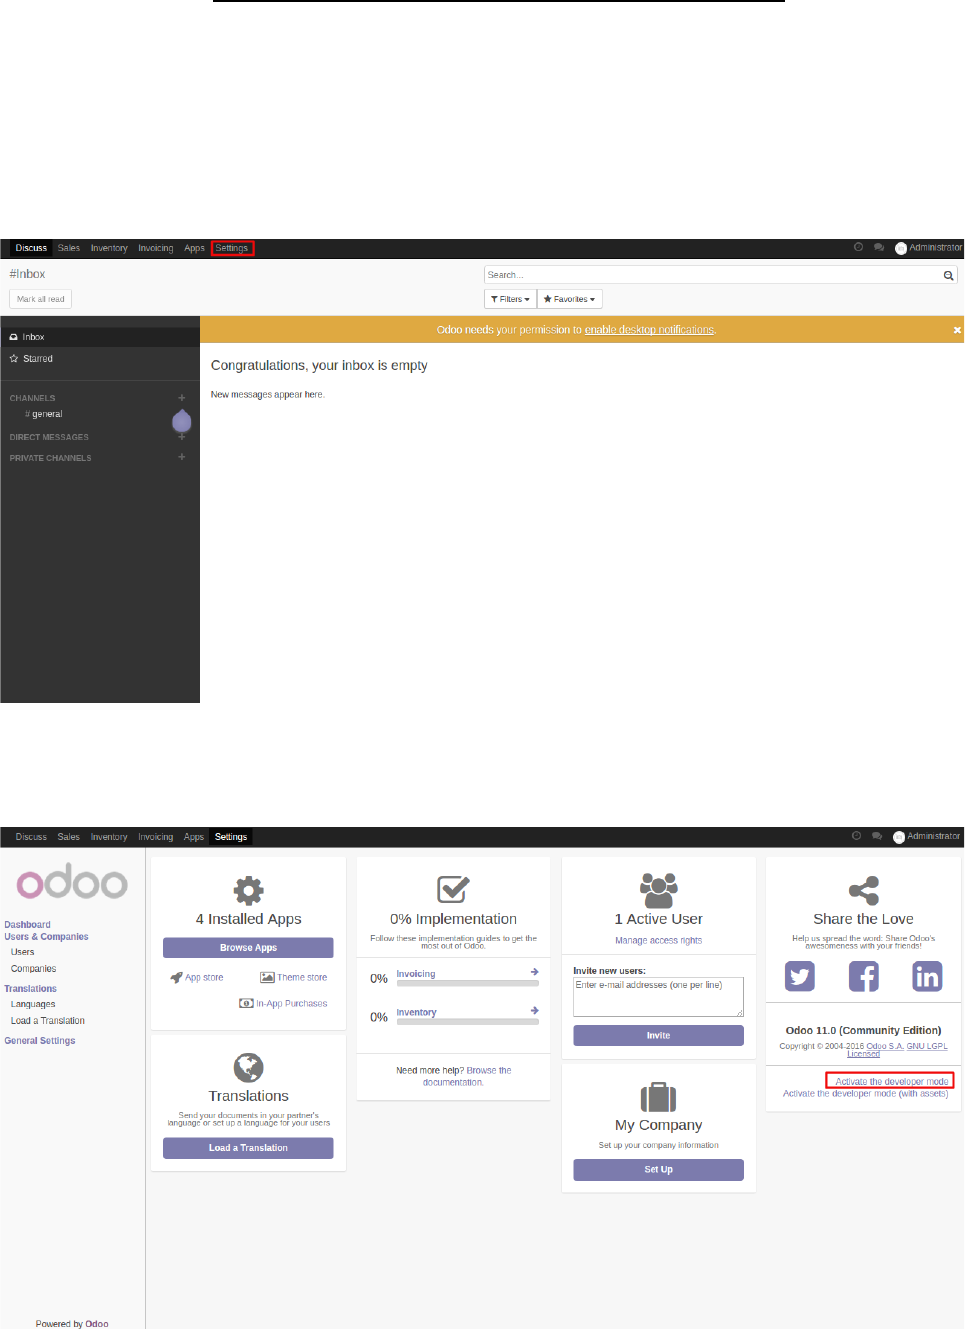
Step 2. Go to Settings
=> Activate Developer mode
2.3 click on activate developer mode
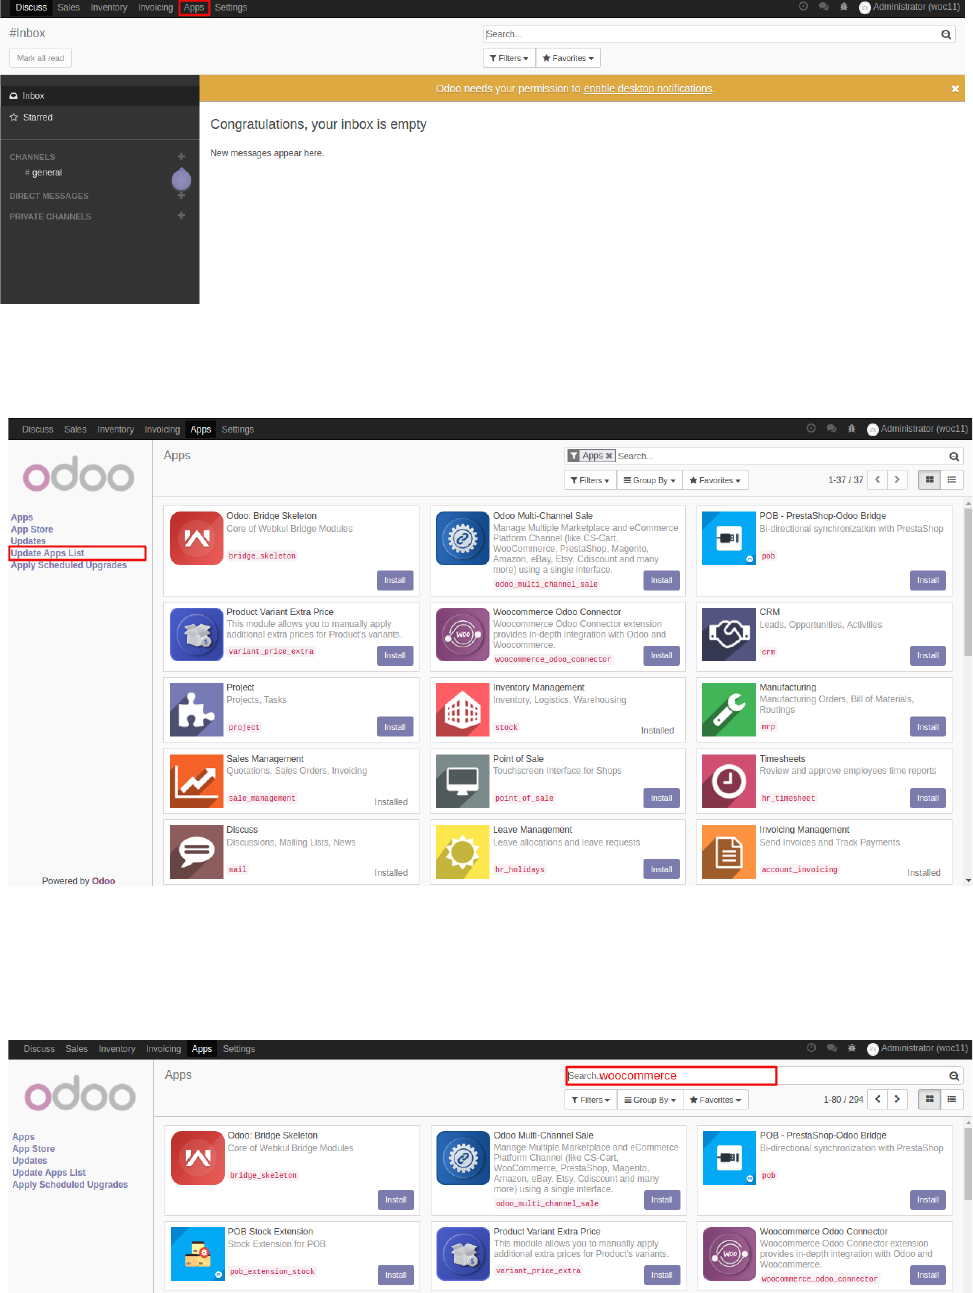
Step 1. Go to Apps
Step 2. Click on Update Apps List.
Update Apps list so that newly added module will become visible.
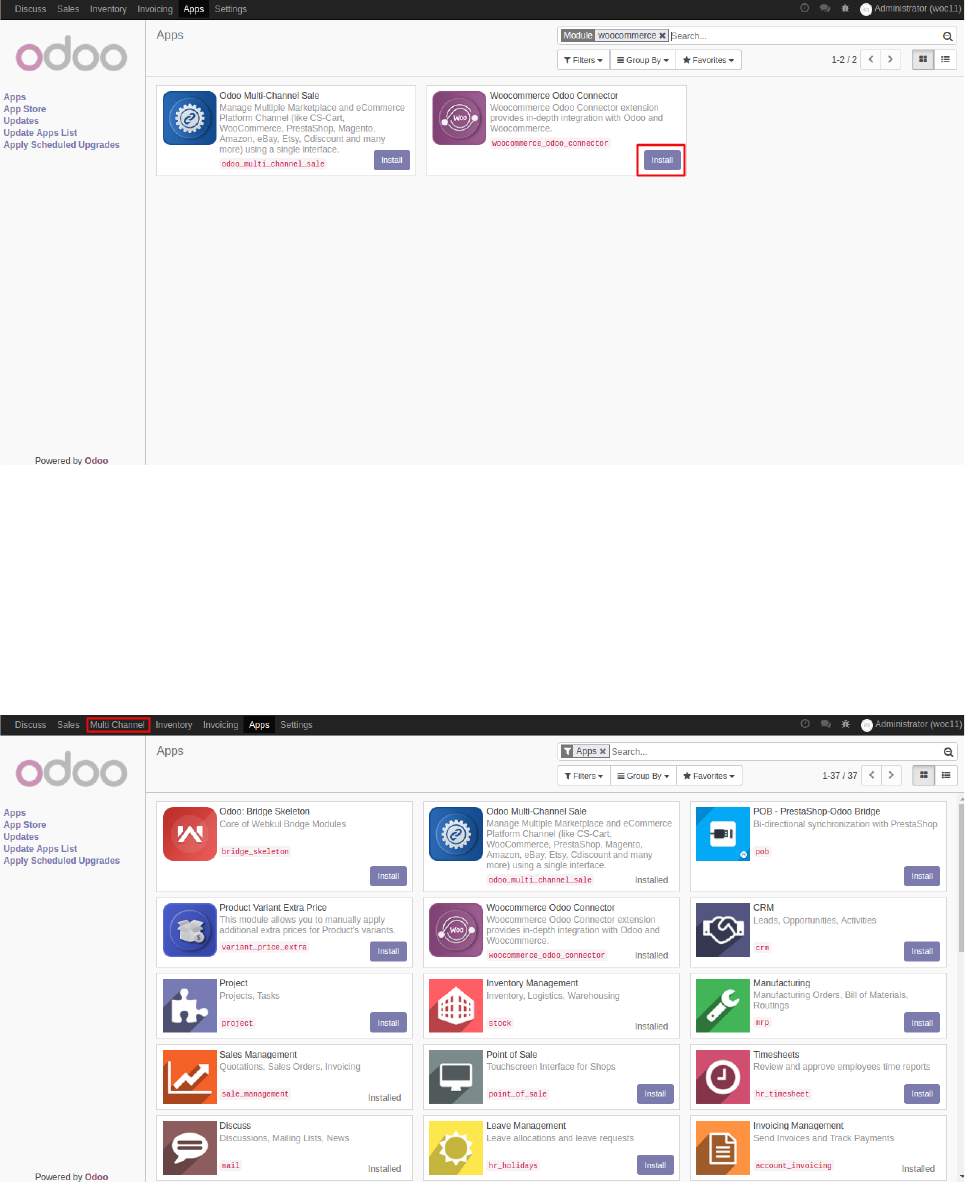
Step 3. If WooCommerce is not visible then remove app filter and type WooCommerce in search
bar.
Step 6. When WooCommerce Odoo Connector installed then you will find WooCommerce
instance in multi channel menu
Step 7. Click on Multi Channel menu
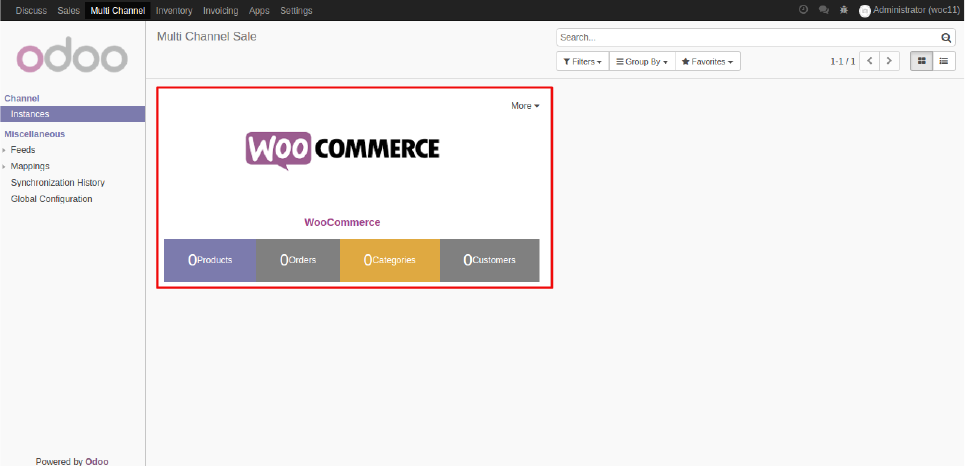
Step 8. Then navigate to WooCommerce instance
Configure WooCommerce Odoo Connector
2.1 Generate Api Keys for WooCommerce:
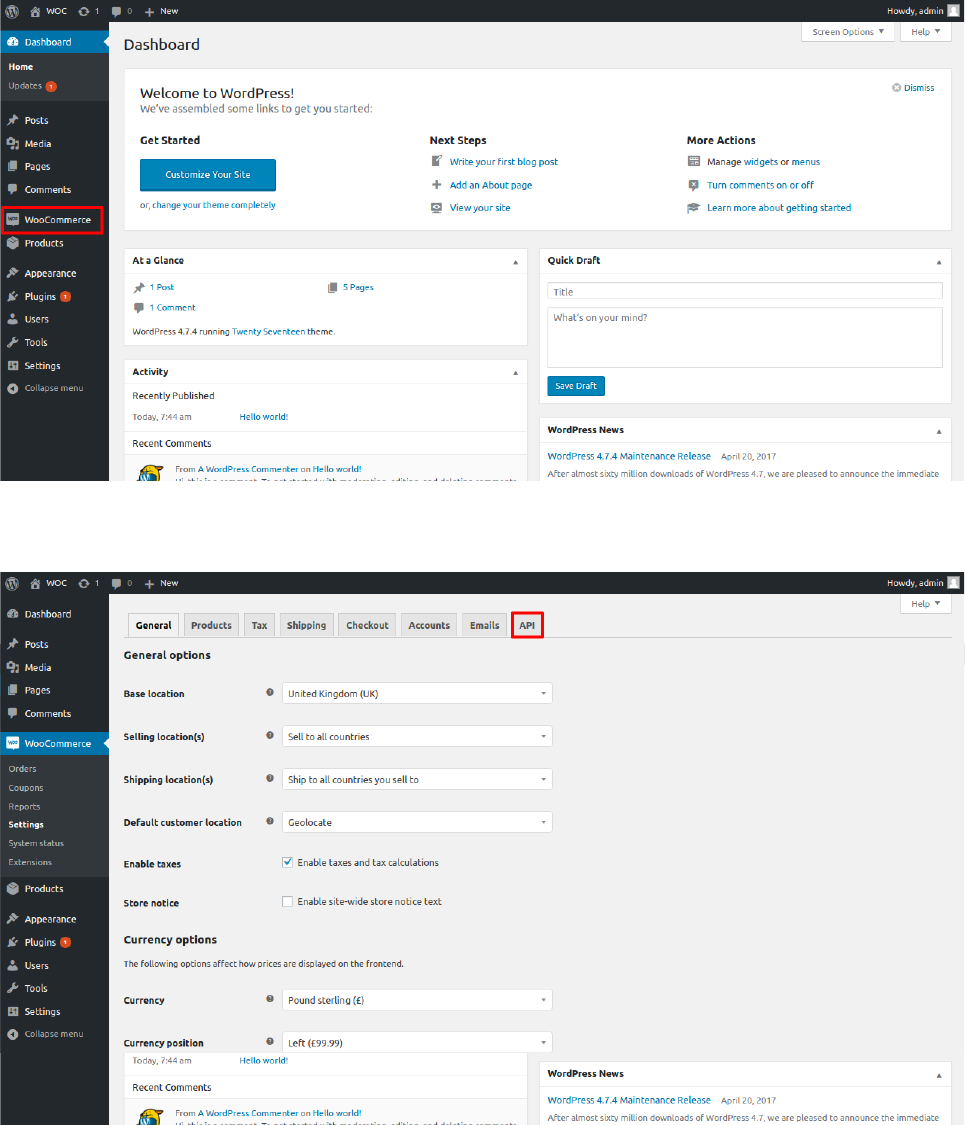
Step 1. Go to WooCommerce Settings
Step 2. Go to “Api” tab
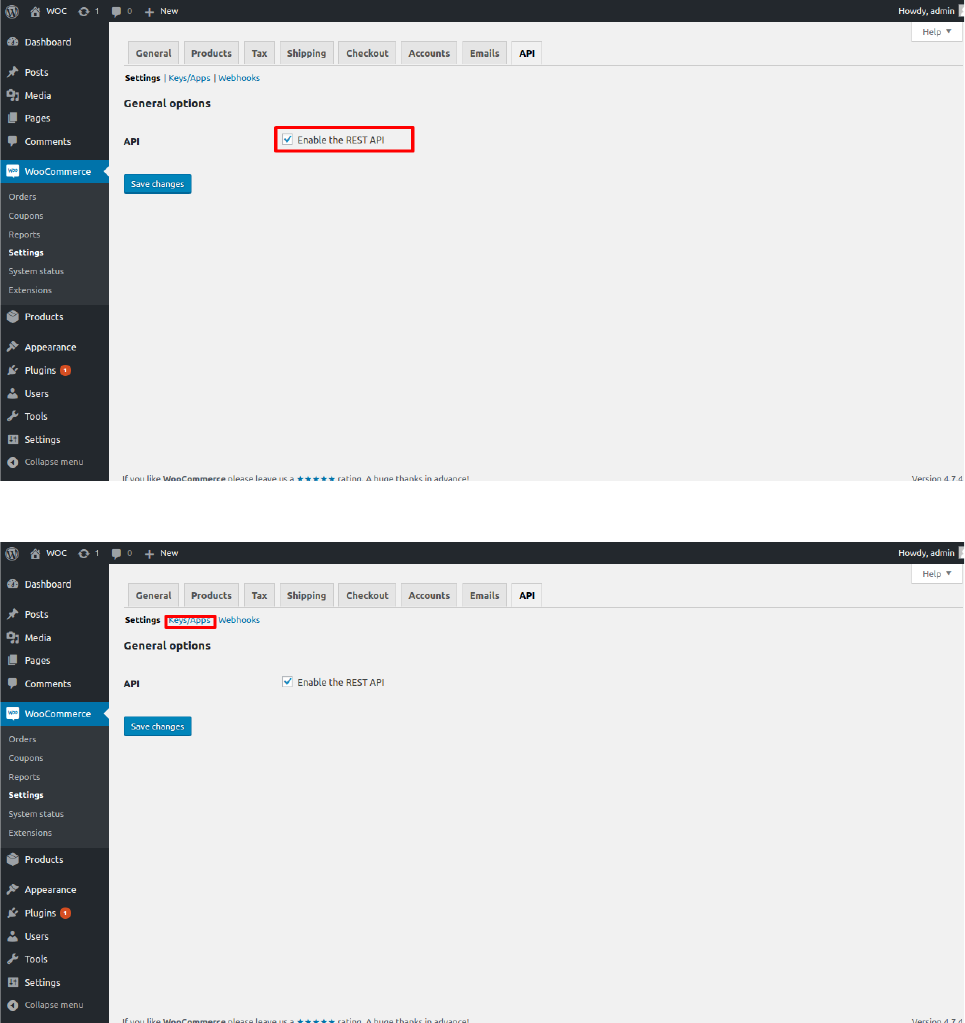
Step 3. Make sure “REST API is enabled”
Step 4. Click on “keys/Apps”
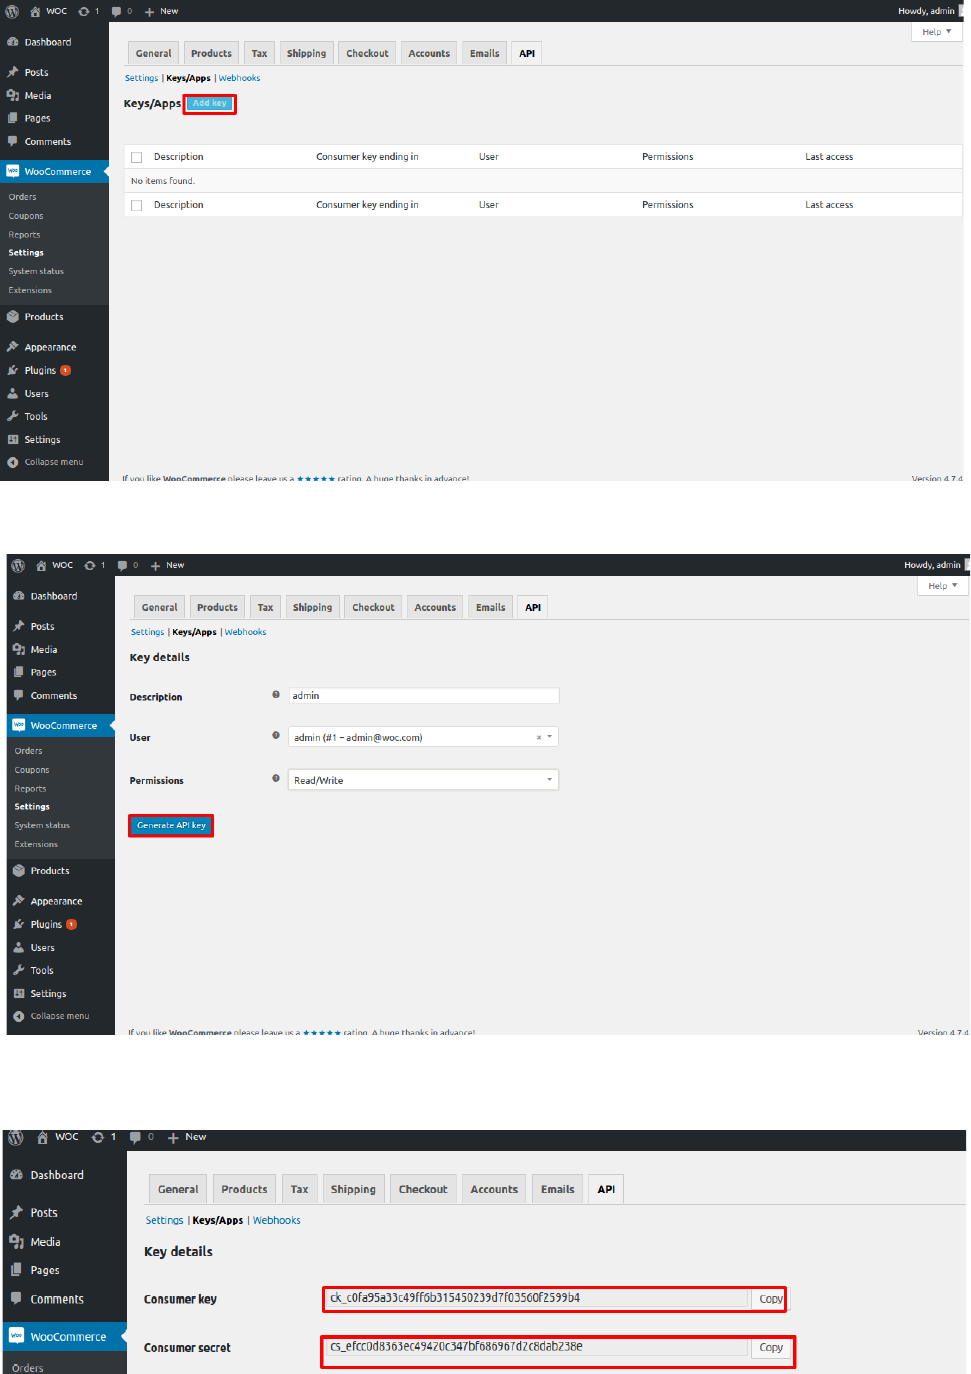
Step 5. Click on “Add Key”
Step 6. Set “Description” for Key , set “read/write” permissions and click on “Generate Api key”
Step 7. Copy “consumer key” and “secret key” for configuring WooCommerce_odoo_connector
instance

2.2 Configure WooCommerce Settings
Step 1. Enter WooCommerce Credentials
“Url” => url of shop of WooCommerce eg: www.xyz.com
“Consumer Key” and “Secret Key” both keys are generated during api setup at WooCommerce site.
Step 2. Configuration Default Settings
1)Set “Default Category”: Category set as main category of imported product
2)Set “Default Warehouse”:Warehouse used for stock maintainance of imported product
3)Set “Default Stock Location”:Location used for stock maintainance of imported product
4)Set “Sale Team”: Team responsible for sales
5)Set “Discount Product”: product used as discount
6)Set “Default Pricelist”:Pricelist for managing prices of all imported product from that channel.
6)Enable “Auto Evaluate Feed”: Auto Evaluate will evaluate feeds by cron.
7)Enable ”Auto Sunc Stock”:Enable to for real time stock synchronization from odoo to
woocommerce
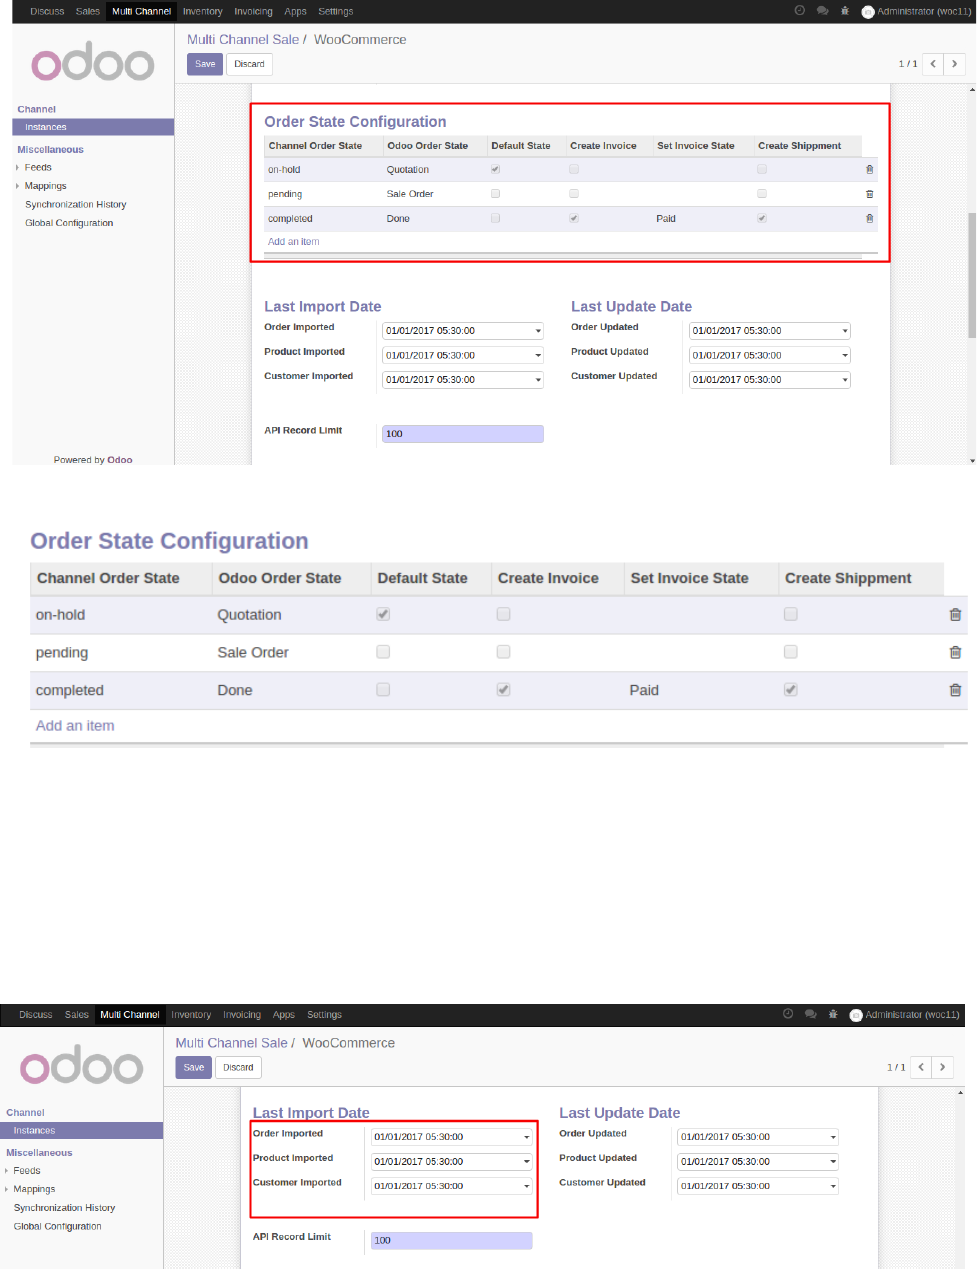
Step 3. Configure Order State
Map WooCommerce order status with Odoo sale order state according to your need
Step 4. Configure WooCommerce Settings
When an api call is triggered it gets data of all products, customers, orders.In order to prevent that
we have used date filter.
=>Product, Customers, Orders can be imported from provided date to current date.
=>Set date from which you want WooCommerce Odoo Connector to import products, customers,
and orders.
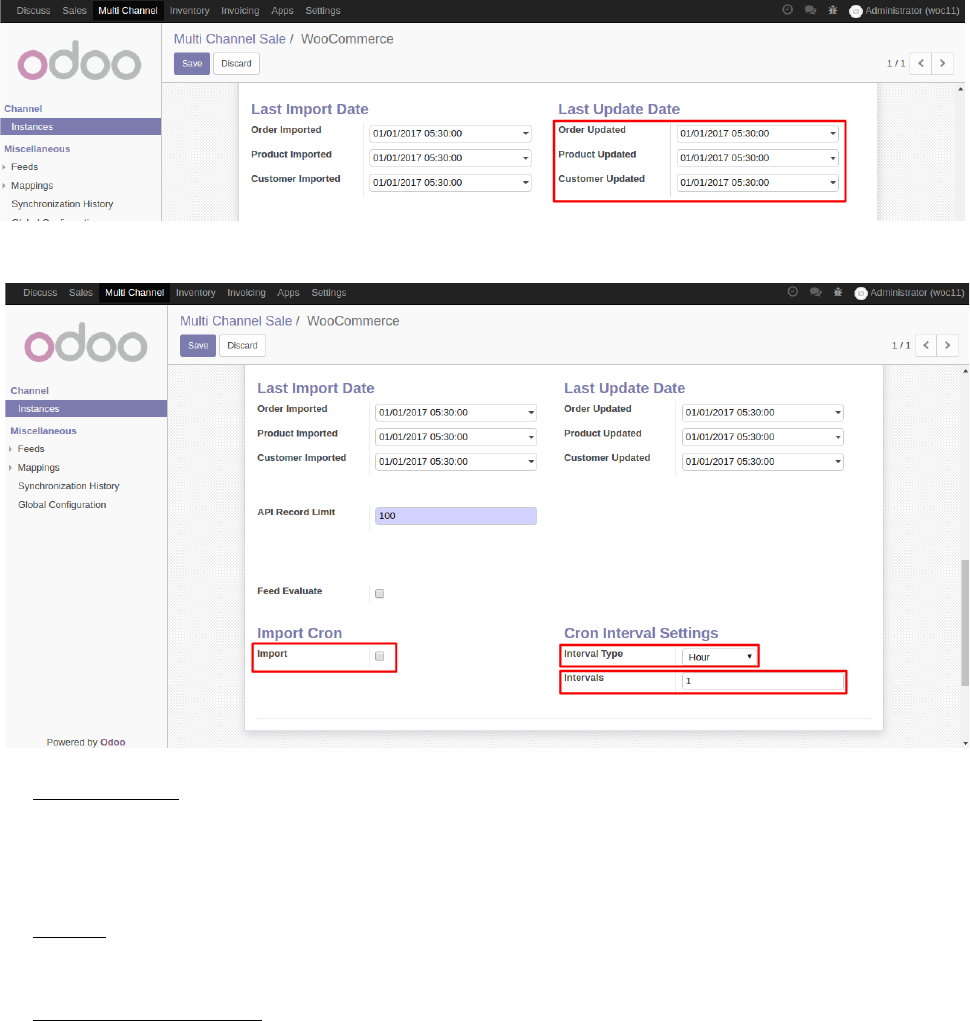
Step 5. WooCommerce Import Update Configuration
When an api call is triggered it gets data of all products in order to prevent that we have used date
filter
=>Product, Customers, Orders are updated at odoo end from WooCommerce between defined date
and current date.
=>Define date from which you want WooCommerce Odoo Connector import updates for products,
customers and orders from WooCommerce to odoo.
Notice:For Orders, it only updates order status.
Step 6. Cron Settings
=>Feed Evaluate:
When products,customer,orders etc are imported then these are imported in feeds. When feeds are
evaluated then these are created at odoo end.
If you haven't enabled Auto Evaluate Feed and you want to evaluate feed after some time using cron
then enable this setting.
=>Import:
Enable this setting to start cron. It will import and update orders to Odoo from WooCommerce.
In Update it only update order status.
=>Cron Interval Settings:
Set Interval and Interval type for cron (Import and Export)
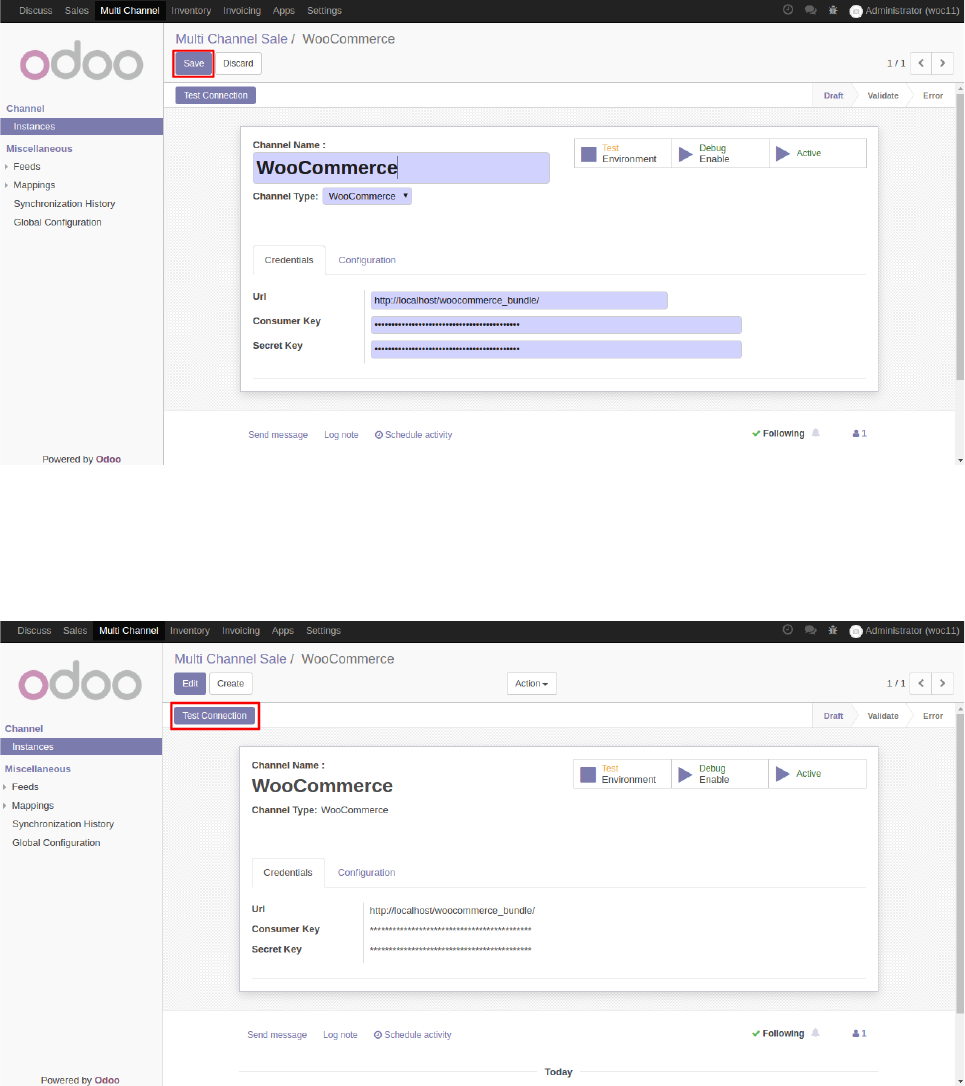
Step 7. After configuration save the records
Step 8. Click on Test Connection
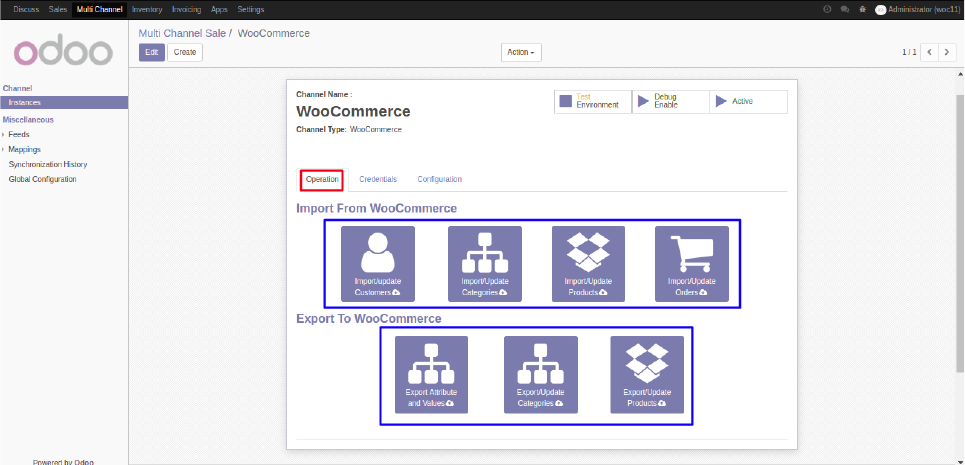
Step 9. If all crendentials and configuration are filled correctly then you will get a success message
and a new operation tab will be visible on your WooCommerce instance page.
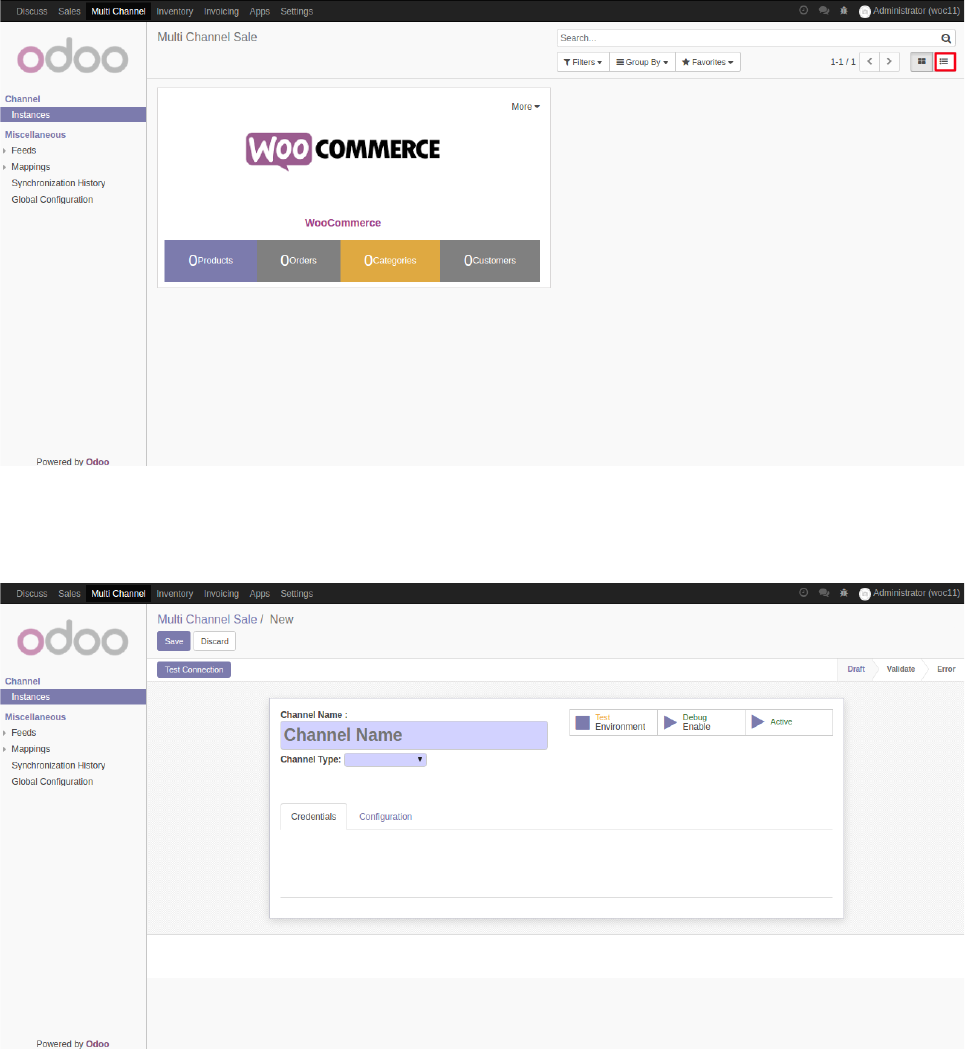
WooCommerce Multi Instance
If you have multiple WooCommerce Sites then you can also manage them by creating
multiple instances of WooCommerce at Odoo.
Step 1. Switch to tree view or form view.
Step 2.Create New Instance and Configure the Instance

Step 4. Save it and Now you have another instance of WooCommerce at Odoo
In this way you can manage as many instances as you want.
