World Editor Manual
User Manual:
Open the PDF directly: View PDF ![]() .
.
Page Count: 17
Page | 1
TEAM a.r.g.
Presents:
The World ediTor
For Arduboy Games
Created by: Gavin Atkin
Page | 2
DISCLAIMER:
THIS TOOL IS MEANT TO ASSIST IN THE DEVELOPMENT OF LARGE WORLD GAMES FOR THE ARDUBOY,
SOME FEATURES MAY BE INCOMPLETE. WHILE UPDATES MAY BE PROVIDED FOR BUG FIXES AND
ADDITIONAL FEATURES, THIS SOFTWARE IS PROVIDED ‘AS IS’ WITHOUT SUPPORT AND SHOULD ONLY
BE USED AT THE USER’S OWN RISK. NEITHER TEAM A.R.G. NOR GAVIN ATKIN SHALL BE HELD
RESPONSIBLE FOR ANY DAMAGES RESULTING FROM THE USE OF THIS SOFTWARE.
Page | 3
Table of Contents
1. The Basics ........................................................................................................................................ 4
1.1. Main Window ................................................................................................................................. 4
1.2. File Menu ....................................................................................................................................... 6
1.3. Placement Tools ............................................................................................................................. 7
1.4. View Options .................................................................................................................................. 7
1.4.1. Regions ...................................................................................................................................... 8
1.4.2. Solid .......................................................................................................................................... 8
1.4.3. Chunks ...................................................................................................................................... 9
1.4.4. Objects ...................................................................................................................................... 9
1.4.5. Asset Editors .......................................................................................................................... 10
2. Asset Editors .................................................................................................................................. 11
2.1. Chunk Editor ................................................................................................................................. 11
2.1.1. Chunk Selector ........................................................................................................................ 11
2.1.2. Chunk Tile Editor .................................................................................................................... 11
2.1.3. Chunk Tile Select .................................................................................................................... 12
2.2. Region Editor .................................................................................................................................. 13
2.2.1. Select ....................................................................................................................................... 13
2.2.2. Modify ..................................................................................................................................... 14
3. Doors .............................................................................................................................................. 17
Page | 4
1. The Basics
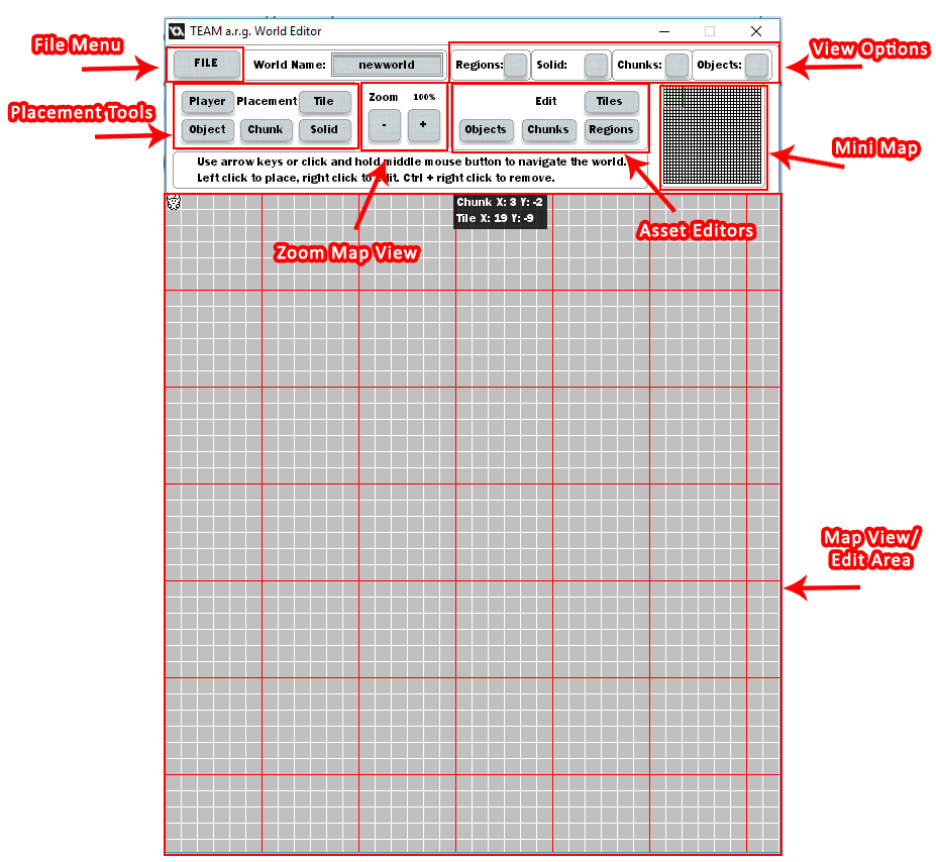
1.1. Main Window
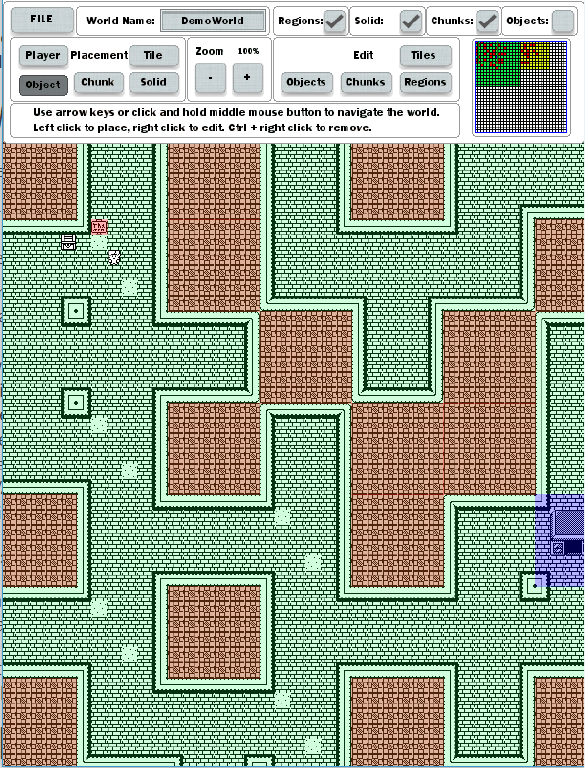
When you first open the editor, this is the window you will see this window:
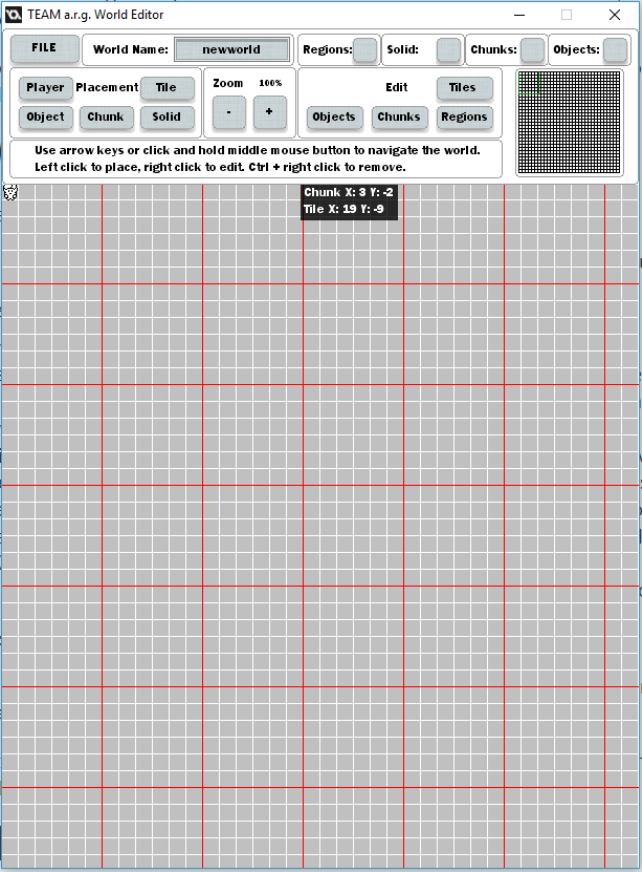
Page | 5
Page | 6
1.2. File Menu:
• New: Clear the current map and start again with an empty map.
• Open: Open a previously saved map.
• Save: Save the current map.
• Save As: Save the map with a new name creating a new file if it doesn’t already
exist.
• Export: Export the map into code with additional options.
o Export Name: The name of the map to use when exported.
o Save Image: Whether or not to save a full size image of the entire map.
o Export Copy: Whether or not to copy the exported code to another
location.
o Object Switch: Not implemented.
Page | 7
Note: The Exported code and image will be saved in the folder:
<user>/AppData/WorldEditor/saves/
1.3. Placement Tools:
• Player: Set the initial location of the player.
• Object: Place various objects with an Instance Identity number (IID).
• Chunk: Place a specifically located chunk, this overrides regional chunks.
• Solid: Designate a chunk as solid or empty. This only applies to regional chunks,
not specifically placed chunks.
• Tile: Place a specifically placed tile, this overrides specifically placed chunks and
regional chunks.
Note: Every individual specifically placed chunk and tile creates a switch case which will
use additional bytes of code. Use these sparingly.
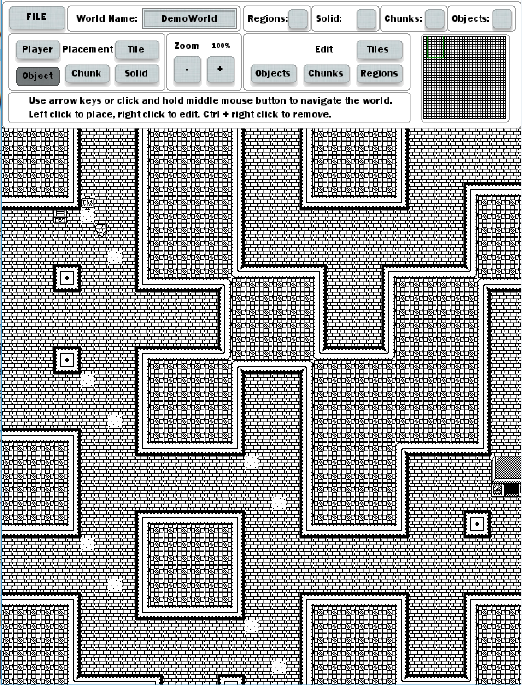
1.4. View Options:
With no options selected the map looks as follows:
Page | 8
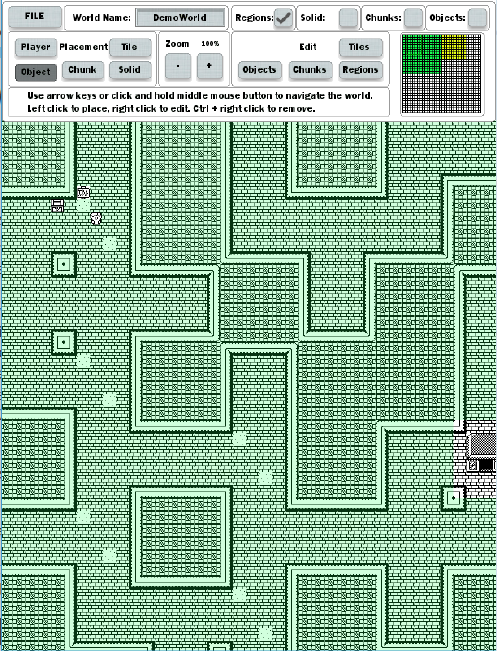
1.4.1. Regions:
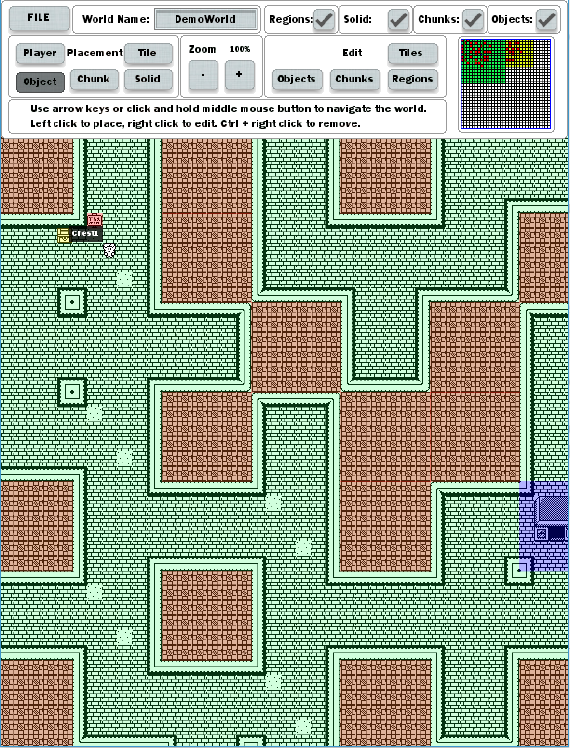
When the Regions checkbox is checked it highlights the regions with their
selected color:
This region in the view area is green. Notice how the specific chunk with a house
is not green, neither is the tile for the sign, the player, and the chest (object). In
the mini map another yellow region is now visible.
1.4.2. Solid:
When the Solid checkbox is checked it becomes:
Now chunks that have been marked as solid are visible with a red tint in both the
view area and the mini map.
Page | 9
1.4.3. Chunks:
When the Chunks checkbox is checked it becomes:
Now the specifically placed chunk with the house has a blue-ish tint. Notice this
also gave the specifically placed tile (the sign next to the player) an orange-ish
tint.
1.4.4. Objects:
The last checkbox for Objects adds:
Page | 10
A yellow highlight over the chest object placed near the player.
1.4.5. Asset Editors:
o Objects: Create and edit the objects that can be placed.
o Chunks: Create and edit the chunks that can be used in regions and
placed individually.
o Regions: Create and edit the coverage, type, and chunks for a region.
Regions should be the primary way the map is build to be most efficient.
o Tiles: Load a tileset, or change which tiles are considered solid or empty
for collisions.
Important: Objects besides Doors are not fully implemented. For chests it is
recommended to place them as tiles instead of objects and use Arduventure’s
source code as a reference for implementation.
Page | 11
2. Asset Editors
2.1. Chunk Editor
The chunk editor is made of three parts, the chunk selector, chunk tile editor,
and chunk tile selector.
2.1.1. Chunk Selector:
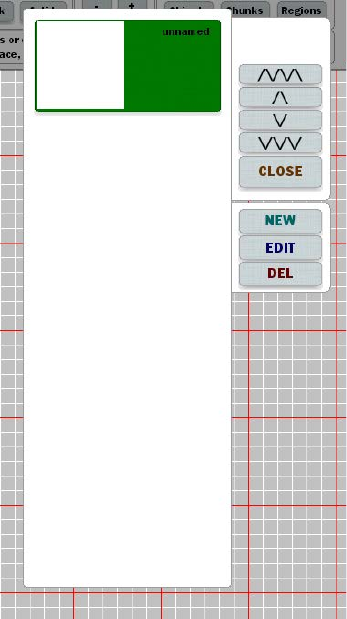
The chunk selector looks like this:
The left side shows all chunks created, in this image there is one chunk created.
When the list gets long, use the arrow buttons on the right to scroll the list.
The control buttons are:
New: Create a new, blank chunk.
Edit: Edit the currently selected chunk (it will be highlighted green
if it is selected). Left click a chunk on the left to select it.
Del: Delete the currently selected chunk. A warning message will
pop up confirming your choice because this cannot be reversed.
2.1.2. Chunk Tile Editor:
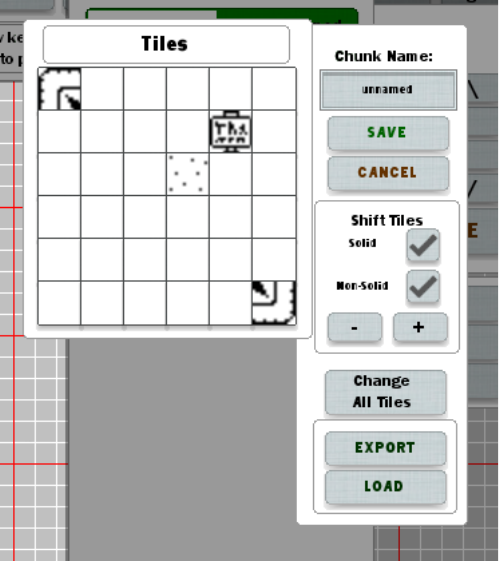
After clicking the Edit button this window will appear:
Page | 12
On the left are the individual tiles of the chunk. Left click on one to open the
Chunk Tile Selector.
On the right are a number of buttons and options:
Chunk Name: Input box for the name of the chunk.
Save: Save changes to the chunk and close this window.
Cancel: Discard changes to the chunk and close this window.
Shift Tiles: + and – increment and decrement all the tiles
respectively if Soild and Non-Solid are both checked. Unchecking
Solid will prevent tiles that are designated solid from shifting,
likewise, unchecking Non-Solid will prevent tiles designated as
Non-Solid or Empty from shifting.
Change All Tiles: Select a single tile to fill all tiles. This overrides
every tile regardless of their current state so use carefully.
Export: Save the current state of the chunk to a tile.
Load: Load a previously saved chunk from a file.
These two options can be used to speed up creation of chunks that are
similar to each other.
2.1.3. Chunk Tile Select:
When a tile is left clicked, it opens the following window:
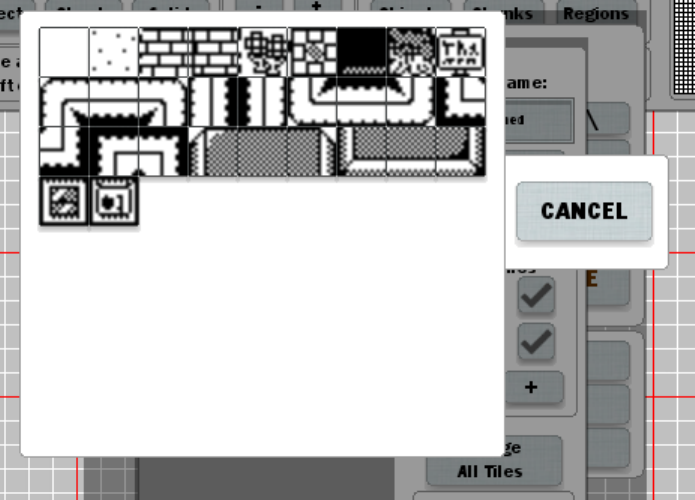
Page | 13
Simply left click the desired tile to select it, or click Cancel to close the window
without changing the tile.
2.2. Region Editor
The Region Editor is a powerful and efficient way to populate a large map while
taking very little of the Arduboy’s ROM. It uses calculations based of the
surrounding chunks to determine which chunk to draw, then the chunk
determines which tiles to draw.
The Region Editor has two windows: select and modify.
2.2.1. Select:
When the Region Editor is selected from the Asset Editors, the following window
opens:
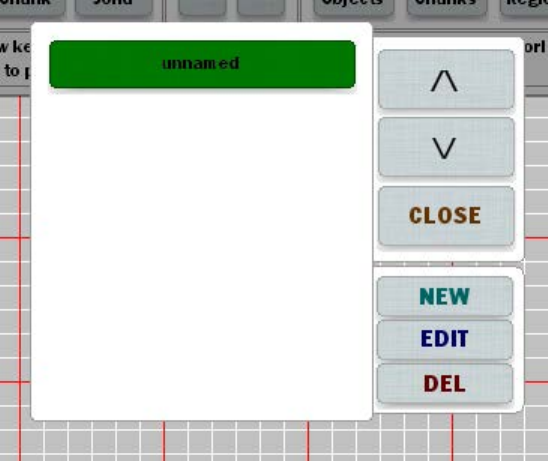
Page | 14
Just like the Chunk Selector, the regions are listed to the left, with controls on
the right.
Left click on a region to select it.
Options:
Arrow Buttons: scroll through the existing regions.
Close: Close the selector window.
New: Create a new, blank region.
Edit: Open the region modifier window.
Del: Delete the currently selected region.
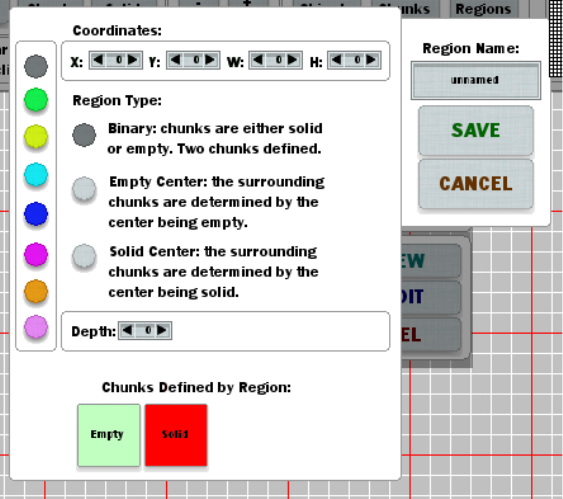
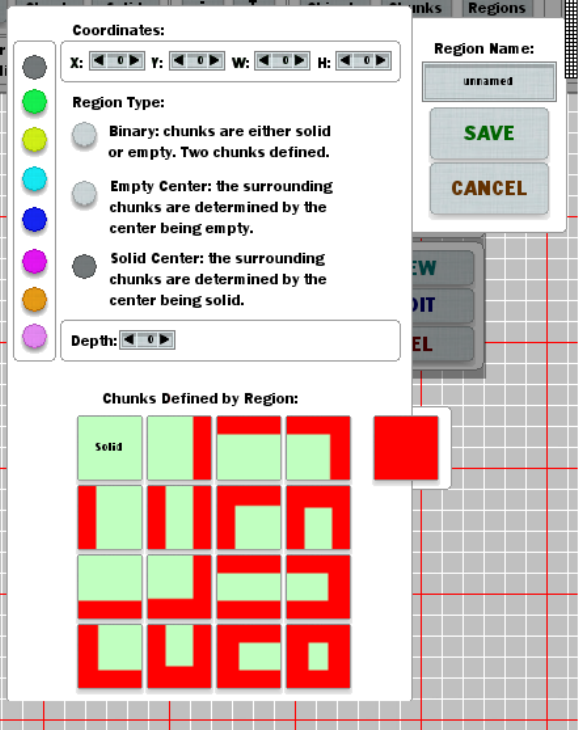
2.2.2. Modify:
Regions are the most customizable and probably confusing component to the
World Editor.
The window has 3 different versions. One for each type of chunk renderer. I’ll
first go over the common options between all of them.
Coordinates:
X: The starting x position (in chunks) on the map where the region
starts.
Y: The starting y position (in chunks) on the map where the region
starts.
W: The width of the region (in chunks) or how many chunks wide
the region is.
Page | 15
H: The height of the region (in chunks) or how many chunks heigh
the region is.
Colors:
On the left are a series of colored dots. When the Region checkbox is selected in
the main toolbar, regions will be drawn with this selected color tint to make
identifying them easier.
Depth:
Here the depth of the regions can be set. This way a large region could be
defined with a smaller region inside of it for instance.
Region Type:
1) Binary
This is the simplest way to define regions. Chunks are either solid, or empty,
without considering the neighboring chunks. There is not a lot of variation,
but it can work for simple areas.
2) Empty Center
This is where it starts to get a little more difficult to construct a region. Up-to
17 chunks can be selected for different configurations of solid and empty
chunks. The top left chunk is used when a chunk is empty, and all four
adjacent chunks are also empty. The far right top chunk (all red) is used when
the chunk is solid. All the rest are different combinations. Green means this
chunk is empty, red means the chunk to this side of the chunk is solid. For
example, the top second from the left chunk is green with a line of right to
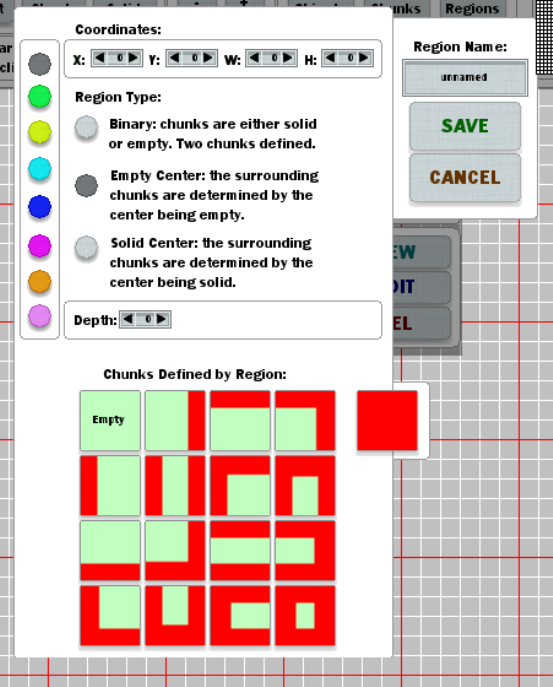
Page | 16
the right, this means this chunk is empty, but to the right of it is a solid
chunk.
3) Solid Center
Much like Empty Center, Solid Center lets you create a series of rules based
on the state of solid and empty chunks. However, now instead of the current
chunk being empty for most of the cases, it is now solid. It might make since
to choose this option if you want less walls with more open space, whereas
Empty Center might make more sense for smaller corridors with lots of walls.
Page | 17
3. Doors
Doors allow the player to teleport between two points in the world. Internally, there are
two types of doors: internal, and external. External doors are doors with an array index
that is even, while internal doors have array indexes that are odd.
The work flow should be as follows:
1) Create the door object (select the bottom right ‘door’ image when creating the object).
2) Select ‘Object’ from the placement menu.
3) Left-click where you’d like to place the EXTERNAL door (player enters from below).
4) Select the Door object.
5) Give it a name (this will show in the exported code).
6) Left-click the ‘Use’ button.
7) Left-click where you’d like to place the INTERNAL door (player enters from above).
8) Repeat steps 4-6.
Important! If the doors are not created in this order, the player may not be teleported
where intended. If teleportation is broken, it is recommended you delete all broken doors
and re-create them in the correct order.
