XLing Paper PAWSQuick Reference Guide
XLingPaperPAWSQuickReferenceGuide
User Manual:
Open the PDF directly: View PDF ![]() .
.
Page Count: 5
1
XLingPaper Quick Reference Guide
for Editing PAWS Starter Kit Output using the XMLmind XML Editor
Andy Black
27 September 2012
1 Open a section or subsection
Click on the blue boxed plus sign just to the left of the blue section number. Alternatively, you can click in the section title and
then press the Esc key (let it go) and then type the slash /character.
2 Close a section or subsection
Click on the blue boxed minus sign just to the left of the blue section number. Alternatively, you can click in a paragraph and then
press the Esc key (let it go) and then type the slash /character.
3 Remove the red comment text
1. Click in the red text section.
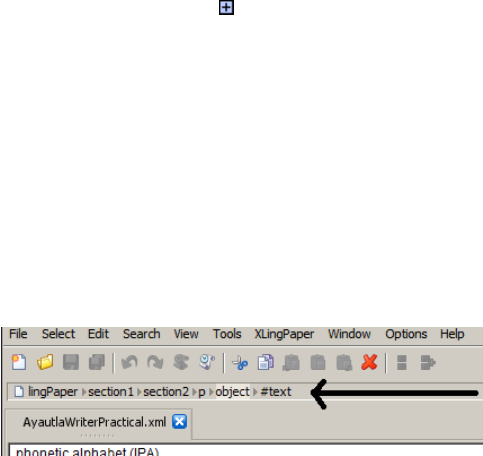
2. In the Node Path Bar (see the black arrow in example (1)), click on the word “object” (this should then have a thin red line
around the entire text and even the gray part at the front)
3. Use Edit menu item / Delete.
(1)
4 Replace ENTER... text with correct content
1. Use the mouse to select the entire text of the prompt (alternatively, you can select it via the keyboard using the Shift and arrow
keys or click at the beginning and then hold down the Shift key while pressing the End key).
2. Type the correct content.
5 Edit a table
5.1 Delete a row
1. Click in a table cell in the row.
2. Use XLingPaper menu item / Table Row /Delete.
5.2 Insert a row
1. Click in a table cell in the row before where you need to insert (if you need to insert a row at the beginning, click in a cell in the
first row).
2. Use XLingPaper menu item / Table Row /Copy.
3. Use XLingPaper menu item / Table Row /Paste After (if you need to insert a row at the beginning, use Paste Before).
4. Now edit the contents of each cell in the newly created row.
5.3 Delete a column
1. Click in a table cell in the column.
2. Use XLingPaper menu item / Table Column /Delete.
XLingPaper Quick Reference Guide 2
5.4 Insert a column
1. Click in a table cell in the column before where you need to insert (if you need to insert a column at the beginning, click in a cell
in the first column).
2. Use XLingPaper menu item / Table Column /Copy.
3. Use XLingPaper menu item / Table Column /Paste After (if you need to insert a column at the beginning, use Paste Before).
4. Now edit the contents of each cell in the newly created column.
5.5 Quickly increase size of the table
Use the XLingPaper menu item / Increase Table Size command.
6 Interlinear
6.1 Enter interlinear text content
Using the method suggested in section 4, select the content in each of the last three lines and type in the correct content for the
example you keyed with a space between each word.
Finally, do what is discussed in section 6.2.
6.2 Convert interlinear to special wrd form
1. Click in the example text you keyed (the first line).
2. Use XLingPaper menu item / Convert interlinear line to wrd elements or hold the Shift key down while pressing the F10 key.
After converting, this will put the cursor at the beginning of the next line in the interlinear.
3. Repeat step 2. This will put the cursor at the beginning of the morpheme gloss line.
4. Repeat step 2 one final time.
6.3 Add words to an interlinear
1. In the vernacular line, click in the word before where you want to add a new word (if you need to add a word at the beginning,
click in the first word).
2. In the Node Path Bar (see example (1)), click on “wrd”.
3. Copy (Edit menu item / Copy).
4. Use Edit menu item / Paste After (if you need to add a word at the beginning, use Edit menu item / Paste Before).
5. Replace the copied word content with the new content.
6. Repeat steps 1-5 for the word gloss line.
7. Repeat steps 1-5 for the morpheme gloss line.
6.4 Delete a word in an interlinear
1. In the vernacular line, click in the word you want to delete.
2. In the Node Path Bar (see example (1)), click on “wrd”.
3. Delete (Edit menu item / Delete).
4. Repeat steps 1-3 for the word gloss line.
5. Repeat steps 1-3 for the morpheme gloss line.
7 Abbreviations
7.1 Convert gloss text to use abbreviation(s)
1. Click in the abbreviation that needs to be converted.
2. Use XLingPaper menu item / Convert any abbreviations in gloss to abbrRefs or hold the Shift and Ctrl keys down while pressing
the F10 key.
XLingPaper Quick Reference Guide 3
7.2 Correct an abbreviation
1. Open up the second Abbreviations section (the first one is where the abbreviations used in your grammar will appear in the
output). See section 1 for how to open up a section.
2. Scan down the list of abbreviations until you find the place where your abbreviation is.
3. Click in the abbreviation and change it.
7.3 Add a new abbreviation
1. Open up the second Abbreviations section (the first one is where the abbreviations used in your grammar will appear in the
output). See section 1 for how to open up a section.
2. Scan down the list of abbreviations until you find the place where your new abbreviation will alphabetize correctly.
3. Click on the yellow part of the abbreviation before it (if it's the first, click on the first one).
4. Use Edit menu item / Insert After (if it's the first one and you need to add it before, use Insert Before).
5. Press the Enter key. This inserts a new, blank abbreviation.
6. Click in the yellow part, just after the v and type in a unique identifier (please note that this should use just a-z, A-Z, and
number characters - no blanks and no punctuation).
7. Click in the first hash box (just before the equals sign).
8. Type the abbreviation you need.
9. Click in the hash box after the equals sign.
10. Type in the description of the abbreviation.
8 Output
8.1 Produce web page output
To produce the web page output for your grammar, use XLingPaper menu item / Produce Webpage or press the F7 key.
8.2 See web page output
To see the web page output for your grammar, use XLingPaper menu item / Show Webpage or press the F8 key. This will show
the web page in your browser. Note that if you already are viewing the web page in a browser, then you can reload (or refresh) the
page in your browser after producing the web page again (see section 8.1).
8.3 Produce PDF output
To produce the PDF output for your grammar, use XLingPaper menu item / Produce PDF or press the F9 key.
9 Inserting new material
9.1 Insert new paragraph
The key thing to keep in mind is that you need to “select” the structure after which (or before which) a paragraph can go. Do this:
If you are inserting a paragraph immediately after another paragraph, merely click at the end of the paragraph and press the Enter
key. This will start a new paragraph.
If, on the other hand, you want to insert a new paragraph after something like an example, do this:
1. Click in the material before which you want to insert the new paragraph.
2. In the Node Path Bar (see example (1)), click on what comes immediately after the last “section” item (the section items have a
number after them: 1-6 indicating the nesting depth of the section).
3. Use Edit menu item / Insert After and choose “p” (for paragraph) in the Edit Tool (upper right hand corner).
4. Press the Enter key.

XLingPaper Quick Reference Guide 4
9.2 Insert a new section or subsection
If you want to insert a section at the same level as the current section you are editing, do this:
1. Click on the number in blue background of the current section.
2. Use Edit menu item / Insert After and choose “section” in the Edit Tool (upper right hand corner). (Note that the word “section”
will have a number after it which indicates the nesting level of this section.)
3. Press the Enter key.
4. You'll see something that will look a bit like this:
5. Type the title of the section in the hash area.
6. Click in the blue section just after the “s” and enter a unique identification for this section. Use a-z, A-Z, and digits for this
identification.
7. Open up the section (see section 1).
If you want to insert a subsection at the end of the current section, do this:
1. Click in the last part of the current section (the last paragraph, example, etc.).
2. In the Node Path Bar (see example (1)), click on what comes immediately after the last “section” item (the section items have a
number after them: 1-6 indicating the nesting depth of the section).
3. Use Edit menu item / Insert After and choose “section” in the Edit Tool (upper right hand corner). (Note that the word “section”
will have a number after it which indicates the nesting level of this section.)
4. Press the Enter key.
5. You'll see something that will look a bit like this:
6. Type the title of the section in the hash area.
7. Click in the blue section just after the “s” and enter a unique identification for this section. Use a-z, A-Z, and digits for this
identification.
8. Open up the section (see section 1).
9.3 Insert a new interlinear example
1. Click in the material before which you want to insert the new interlinear example.
2. In the Node Path Bar (see example (1)), click on what comes immediately after the last “section” item (the section items have a
number after them: 1-6 indicating the nesting depth of the section).
3. Use Edit menu item / Insert After and choose “example(interlinear_l_g_g_free)” (for example which is an interlinear that has
a line for the language, two lines of gloss, and a free translation) in the Edit Tool (upper right hand corner). Or possibly
example(listInterlinear_l_g_g_free) for a list of related interllinear examples.
4. Press the Enter key.
5. Type your language data in the first line with a space between each word.
6. Type the word gloss in the second line.
7. Type the morpheme gloss in the third line.
8. Type the free translation in the fourth line.
9. See section 6.2 for converting this to the special “wrd” format.
10 Citations and References
For complete details on how to enter reference material and citations to reference material, see sections 4.5 “References” and 8
“Citations” in the XLingPaper User Documentation (see section 11 for how to get this documentation). This documentation is
currently only available in English.
Feel free to ask for help on this.
11 See the XLingPaper user documentation
To see the XLingPaper user documentation, use XLingPaper menu item / Show XLingPaper User Documentation.
XLingPaper Quick Reference Guide 5
Index
Abbreviation 2
Add a new abbreviation 3
Automatic conversion to abbrRef element 2
Correct abbreviation 3
Add a word in an interlinear 2
Citation 4
Close a section 1
Delete a word in an interlinear 2
Documentation 4
ENTER... 1
Insert
Interlinear example 4
Paragraph 3
Section 4
Interlinear 2
Add a new word 2
Convert to wrd elements. 2
Delete a word 2
Insert a new interlinear example 4
Open a section 1
Output
Produce PDF 3
Produce Web page 3
See web page 3
Paragraph, insert a new 3
PDF output 3
Reference material 4
Remove tComment item with red text 1
Replace ENTER... with content 1
Section
Close 1
Insert a new section 4
Open 1
Table 1
Change size 2
Delete column 1
Delete row 1
Insert column 2
Insert row 1
tComment item with red text, how to delete it 1
Web page output
Produce 3
See or show 3
XLingPaper documentation 4
