HeliTrim Manual Xchecklist User
XchecklistUserManual
User Manual:
Open the PDF directly: View PDF ![]() .
.
Page Count: 25
- History
- Feature List
- Installation Instructions
- Xchecklist Setup
- X-Plane 10 Joystick buttons setup
- X-Plane 10 Keystrokes setup
- X-Plane 11 Joystick buttons setup
- X-Plane 11 Keystrokes setup
- Checklist files
- Checklist file structure
- Additions to the Xchecklist dataref expressions syntax
- closer_than function example
- Coloured Text
- Number of Lines Per Page
- Checker
- Create Dictionary
- Troubleshooting
Xchecklist Reference Manual
Michal & Bill
February 10, 2019
1.34

Contents Contents
Contents
1 History 3
2 Feature List 3
3 Installation Instructions 4
4 Xchecklist Setup 5
5 X-Plane 10 Joystick buttons setup 7
6 X-Plane 10 Keystrokes setup 9
7 X-Plane 11 Joystick buttons setup 11
8 X-Plane 11 Keystrokes setup 12
9 Checklist files 13
10 Checklist file structure 13
10.1 sw_item ...................................... 13
10.2 Dataref expressions ................................ 14
10.2.1 Basic building blocks ........................... 14
10.2.2 The right side ............................... 15
10.2.3 Available functions ............................ 16
10.2.4 Compound dataref expressions ...................... 16
10.3 sw_iteminfo .................................... 16
10.4 sw_itemvoid .................................... 16
10.5 sw_remark ..................................... 17
10.6 sw_show ...................................... 17
10.7 sw_continue .................................... 17
10.7.1 New in 1.26 ................................ 18
10.8 sw_rcolsize .................................... 18
11 Additions to the Xchecklist dataref expressions syntax 19
12 closer_than function example 20
13 Coloured Text 21
14 Number of Lines Per Page 22
Page 2 of 24


2 FEATURE LIST
1 History
Xchecklist started out as a Linux checklist program to fill a void that was there in fall of 2010.
Michal and I worked on it and initially was only in the forums and then it was in the download
section. It looks like there is another void as there is no 64 bit checklist program.
In the beginning of August 2013 I contacted Michal and told him I would like to port our Xcheck-
list to be multi-platform and 32/64 bit. He was on board and now we have a version that does
work on all three platforms and is 32/64bit.
2 Feature List
• Drop-in replacement for snailpup’s checklister plugin
• Win/Mac/Lin 32/64 bit & 9.70 compatible
• Features speaking "copilot" saying checklist items for you
• Features native speech for each platform to allow more options
• Copilot may also check some actions for you as you perform them
• Actions (Check, Prev, Next, Hide, Reload) can be mapped to key/joystick button of choice
• Enforces strictly sequential checklist flow
• Allow colored text for some items in a checklist
• Support popping out windows to second monitor using X-Plane 11.30r2+
Page 4 of 24

3 INSTALLATION INSTRUCTIONS
3 Installation Instructions
Unpack the archive and place the folder Xchecklist to ’.../Resources/plugins’ then fire up XPlane
and if the plane you fly has a checklist, you should see it..
If you are using a version previous to 1.34 please delete the ../Resources/plugins/Xchecklist
folder and install the new one as the folder structure has changed with this version.
The checklist file is called clist.txt and should be put in the aircraft folder which is the same
place the *.acf file resides.
You may also have a checklist file named aircraftname_clist.txt which will be searched for first
then it will search for clist.txt. The default Cessna would be Cessna_172SP_clist.txt. This al-
lows you to have multiple aircraft in one folder like a float and a wheeled version.
Also in the archive is a folder called Xchecklist/Checker that has test programs for your plat-
form and bitsize.
Paths are bgood/xchecklist/check_item, bgood/xchecklist/next_checklist, bgood/xchecklist/prev_checklist,
bgood/xchecklist/toggle_checklist and bgood/xchecklist/reload_checklist.
If you have any ideas, comments or bug reports, don’t hesitate and let us know...
Kind regards,
Michal & Bill
Page 5 of 24

4 XCHECKLIST SETUP
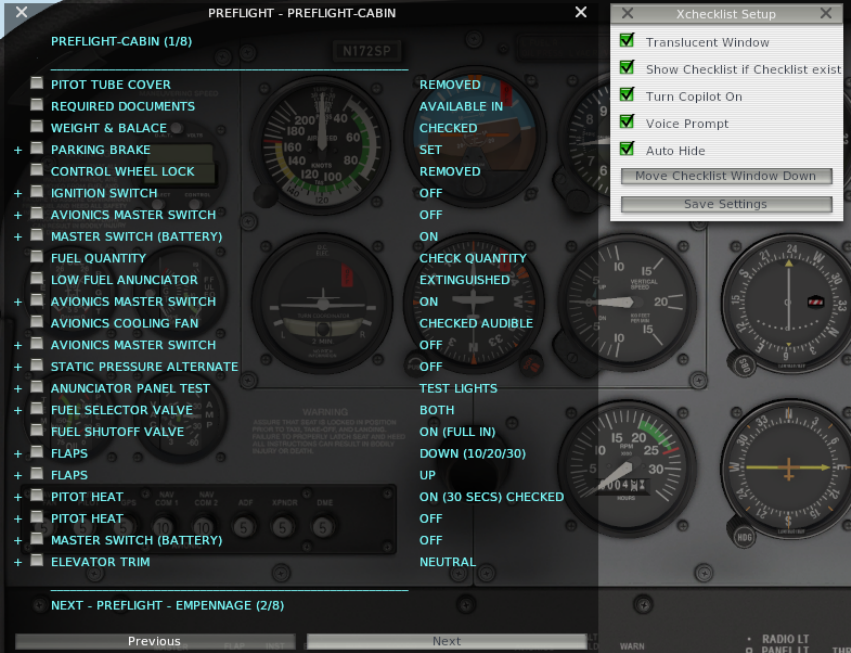
4 Xchecklist Setup
The "Xchecklist Setup" dialog box will be explained first and can be found by clicking on the
Plugins menu item and selecting Xchecklist from the drop down list.
Translucent Window when checked makes the checklist translucent.
Unchecked the checklist is solid.
Show Checklist if Checklist exist when checked if there is a clist.txt for the aircraft loaded it
will display the checklist.
Unchecked it will not display the checklist.
Turn Copilot On when checked will automatically check in order items that have data refs in
the clist.txt. These items are marked with a + sign in front of the check box.
Unchecked you have to check each item yourself.
Voice Prompt when checked will speak a prompt for the upcoming item.
Unchecked it is quiet.
Auto Hide when checked will automatically hide the checklist after it is complete and a small
delay.
Unchecked it will not hide.
Page 6 of 24

4 XCHECKLIST SETUP
Show Widget when checked shows the older widget checklist.
Show GUI when checked shows the new GUI checklist that can be scaled and popped to a sec-
ond display. It is also the checklist widow type that is used in VR but in VR it has a transparent
background.
Move Checklist Window Down will move the checklist window down so you can grab it with
the mouse if it is up under the top menu bar.
Save Settings will save your settings including the window position of the checklist in a prefer-
ence file. Before saving the window position it will make sure that what is saved is within the
current screen. As a side benefit if you changed screen resolution and part of the checklist is
outside the current screen pressing this button will put it back inside the screen.
Page 7 of 24
5 X-PLANE 10 JOYSTICK BUTTONS SETUP
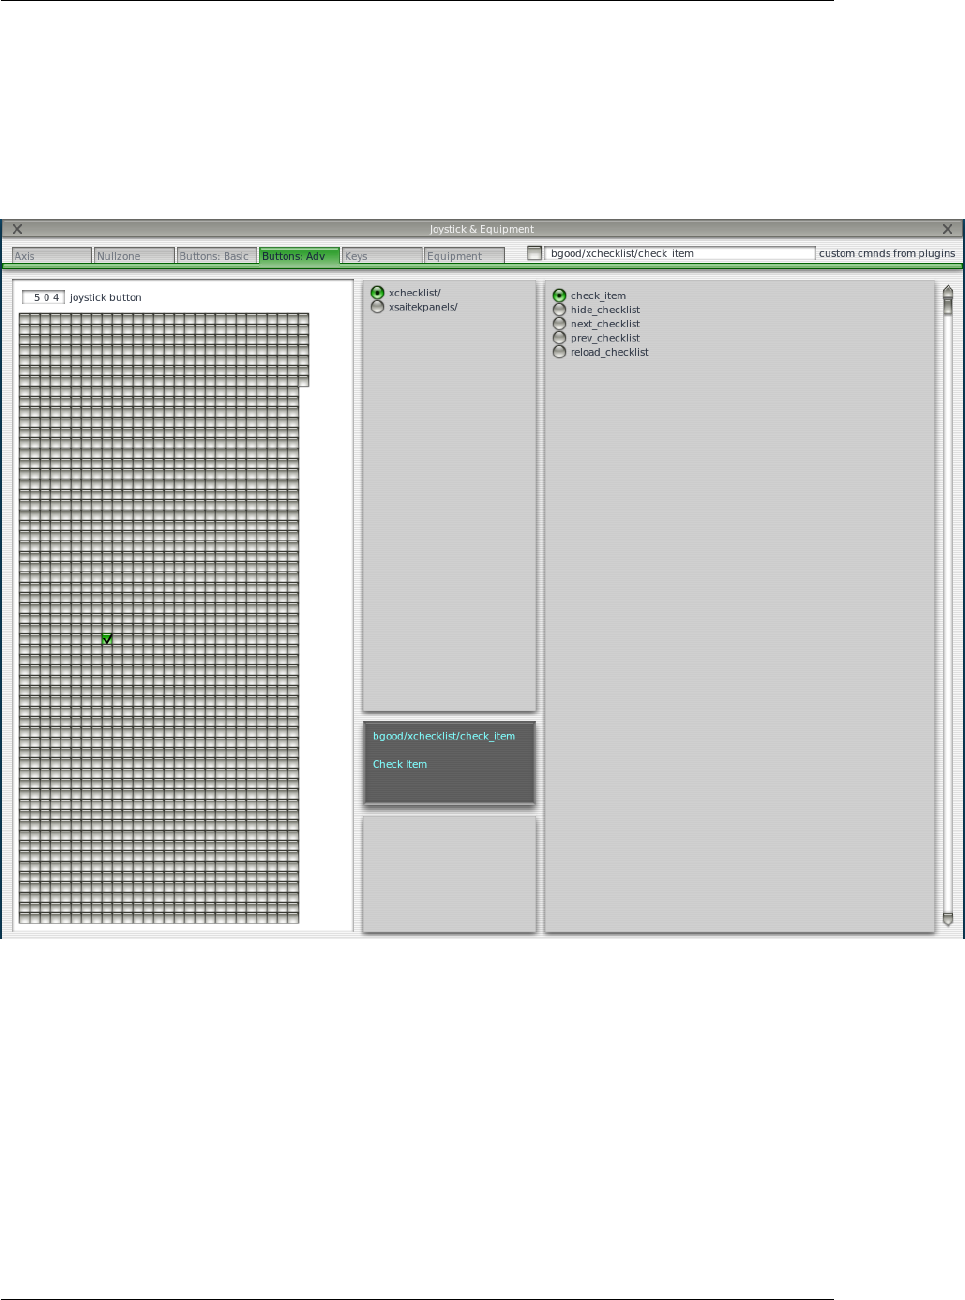
5 X-Plane 10 Joystick buttons setup
Joystick buttons are setup using Buttons : Adv pane in the Joystick & Equipment window, that
is accessible through Settings / Joystick, Keys & Equipment menu.
Please note the four items in the right box - these are the four actions, that allow you to control
the Xchecklist.
Now just press the desired joystick button, in the upper middle box select xchecklist/ and in the
right box select the appropriate action.
Repeat those steps and when done, just close the window and the new bindings should be active.
First item is ’check_item’ that checks a item.
Page 8 of 24

5 X-PLANE 10 JOYSTICK BUTTONS SETUP
Next item is ’next_checklist’ that moves to the next page of the checklist. If the checklist is
hidden it will also un hide it without moving to the next page.
Next item is ’prev_checklist’ that moves to the prev page of the checklist.
Next item is ’hide_checklist’ as it says hides the checklist.
Reload item is ’reload_checklist’ as it says reloads the checklist.
Page 9 of 24
6 X-PLANE 10 KEYSTROKES SETUP
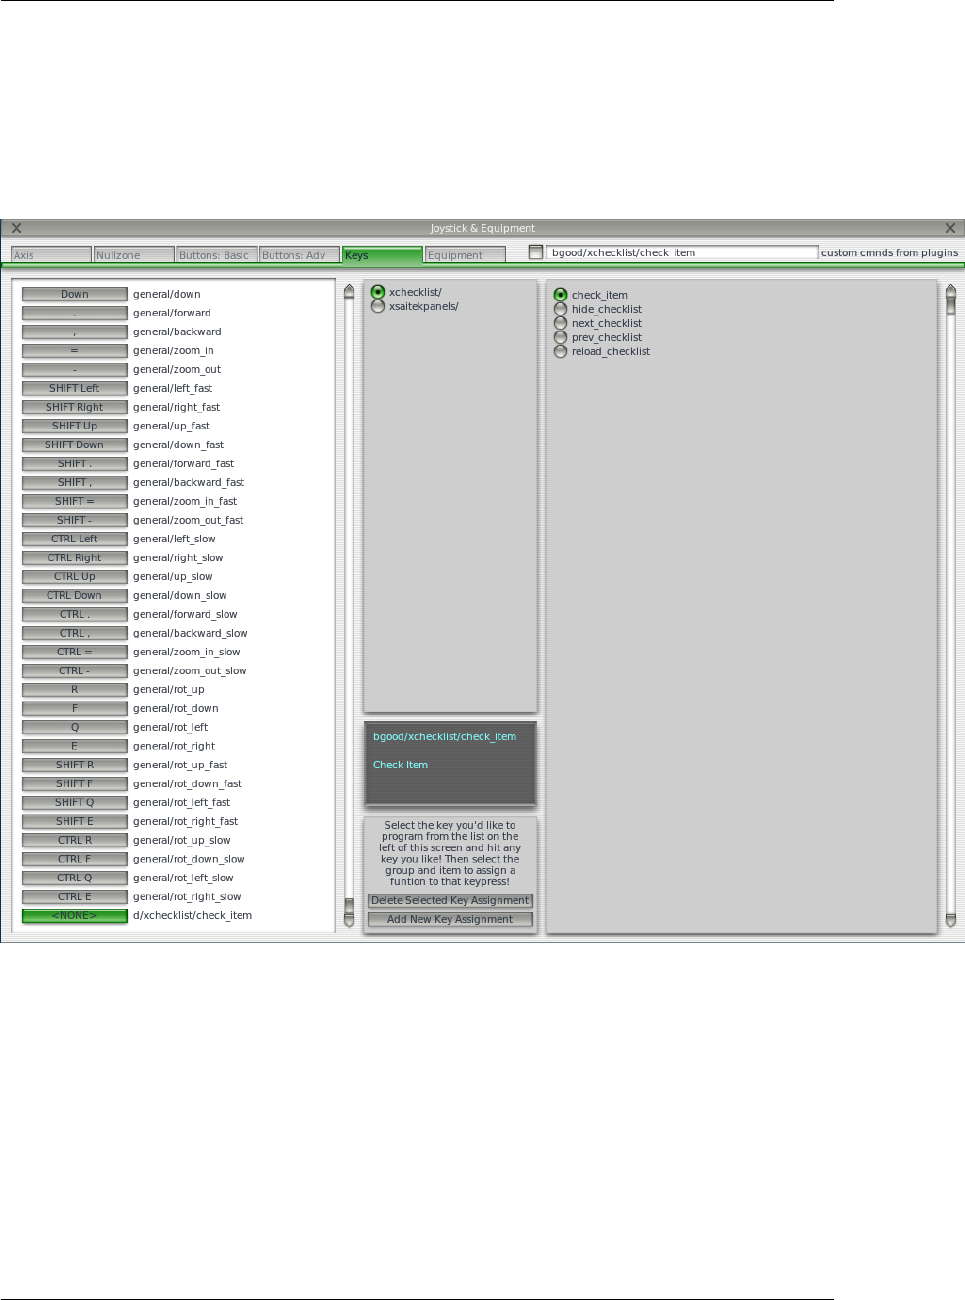
6 X-Plane 10 Keystrokes setup
Keystrokes are setup using Keys pane in the Joystick & Equipment window, that is accessible
through Settings / Joystick, Keys & Equipment menu.
Please note the four items in the right box - these are the four actions, that allow you to control
the Xchecklist.
Now just press the desired keystroke, in the left box select xchecklist/ and in the right box select
the appropriate action.
Repeat those steps and when done, just close the window and the new bindings should be ac-
tive.
First item is ’check_item’ that checks a item.
Page 10 of 24

6 X-PLANE 10 KEYSTROKES SETUP
Next item is ’next_checklist’ that moves to the next page of the checklist. If the checklist is
hidden it will also un hide it without moving to the next page.
Next item is ’prev_checklist’ that moves to the next page of the checklist.
Next item is ’hide_checklist’ as it says hides the checklist.
Last item is ’reload_checklist’ as it says reloads the checklist.
Page 11 of 24

7 X-PLANE 11 JOYSTICK BUTTONS SETUP
7 X-Plane 11 Joystick buttons setup
Joystick buttons are setup using Settings dialog window which can be accessed through the
Settings button on the first screen. Use the Joystick menu.
Please note the four items in the right box - these are the four actions, that allow you to control
the Xchecklist.
Now just press the desired joystick button, on the right hand side you will see the button hi light.
Click on the Edit button and type bg in the search box. Select the action you want to map and
then click on the Apply button. Repeat these steps for the remaining actions. When you are done
press the Done button.
First item is ’check_item’ that checks a item.
Next item is ’next_checklist’ that moves to the next page of the checklist. If the checklist is
hidden it will also un hide it without moving to the next page.
Next item is ’prev_checklist’ that moves to the prev page of the checklist.
Next item is ’hide_checklist’ as it says hides the checklist.
Reload item is ’reload_checklist’ as it says reloads the checklist.
Page 12 of 24
8 X-PLANE 11 KEYSTROKES SETUP
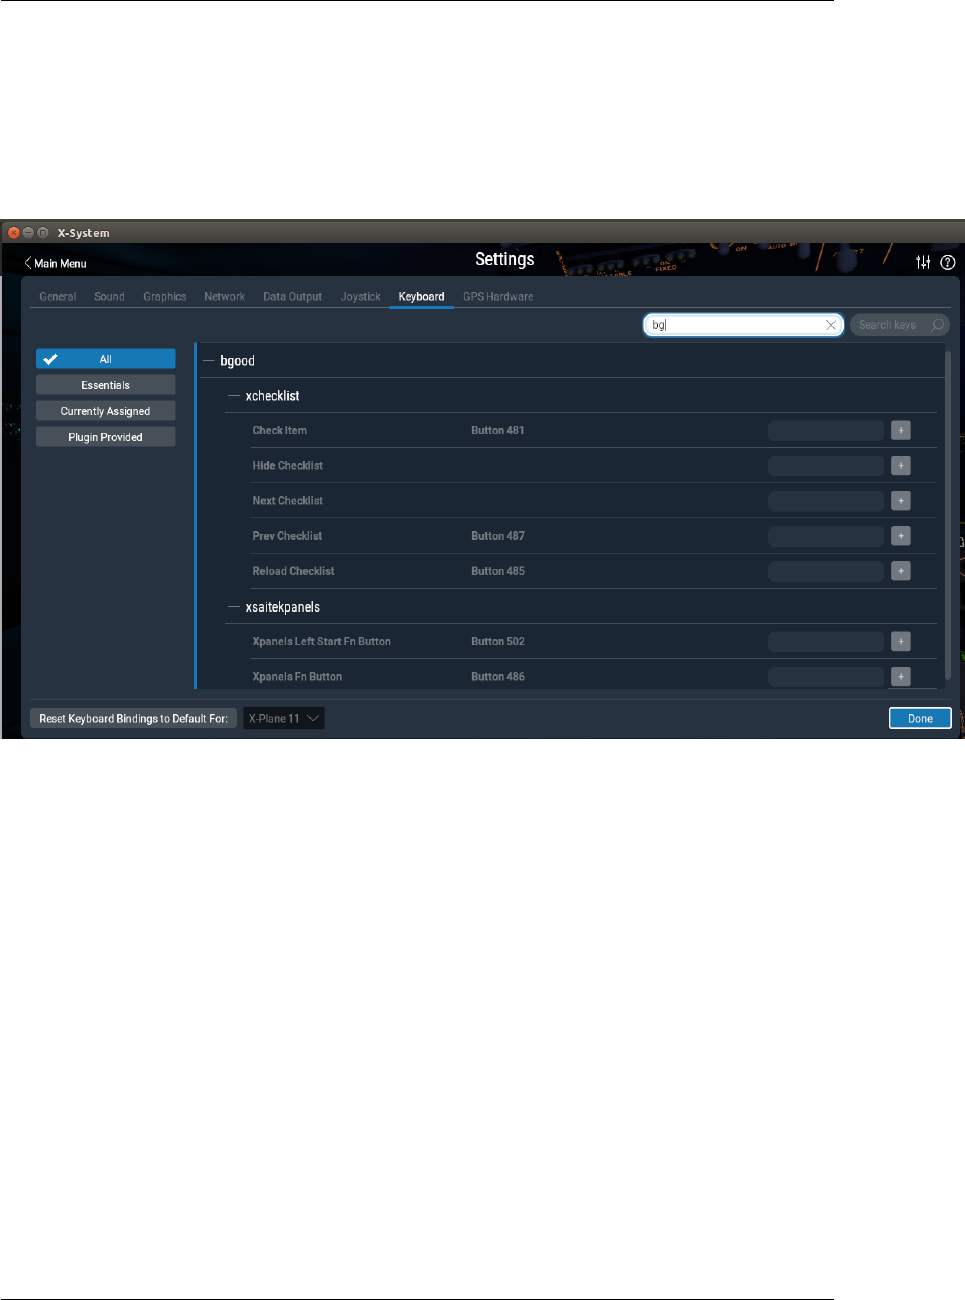
8 X-Plane 11 Keystrokes setup
Keystrokes are setup using Settings dialog window which can be accessed through the Settings
button on the first screen.Use the Keyboard menu.
After typing bg in the search box you should see the items you can map to Xchecklist.
Now just click on the gray box to the left of the + sign of the item you want to map. When you
do this the gray box will turn white and will say “Record keystroke(s)” . Record your keystrokes
and the box will turn gray again with your recorded keystrokes in the gray box. You will now
also see a + sign and a – sign.
Repeat those steps and when done, press the done button.
First item is ’check_item’ that checks a item.
Next item is ’next_checklist’ that moves to the next page of the checklist. If the checklist is
hidden it will also un hide it without moving to the next page.
Next item is ’prev_checklist’ that moves to the next page of the checklist.
Next item is ’hide_checklist’ as it says hides the checklist.
Last item is ’reload_checklist’ as it says reloads the checklist.
Page 13 of 24

10 CHECKLIST FILE STRUCTURE
9 Checklist files
When the X-Plane loads a plane, Xchecklist looks to the airplane’s directory and tries to load the
acf specific checklist first (acfName_clist.txt), and if not found, the generic clist.txt is loaded.
10 Checklist file structure
The checklist file contains series of checklists for the given aircraft.
Each checklist starts with the sw_checklist. This statement specifies the title of the checklist, and
optionally the name, under which it appears in the XChecklist’s menu (when the optional part is
missing, the menu item is not created). This way the "entry points" of multi-page checklists are
accessible via menu, without cluttering the menu with the interim pages.
sw_checklist:Checklist name
textstyleSourceTextsw_checklist:Checklist name:Menu name
The checklist itself can contain several types of statements:
•sw_item - normal checklist item - spoken by copilot, checkable both manually and auto-
maticaly
•sw_iteminfo - checklist item, checkable only by fulfilling the condition
•sw_itemvoid - noncheckable checklist item; ignored by copilot
•sw_remark - remarks spoken by copilot (no condition, non-checkable)
•sw_show - when no checklist is displayed and a condition is fulfilled, the checklist pops
up
•sw_continue - designates which checklist should come next, when the current one finishes
•sw_rcolsize - specifies the size of the "right column" of the checklist
10.1 sw_item
This is the most used checklist item. There are several forms of this item:
sw_item:Item text
sw_item:Item text|Checked text
This form displays a checkbox with the "Item text" caption; if the text contains
a colon character,
Page 14 of 24

10.2 Dataref expressions 10 CHECKLIST FILE STRUCTURE
the text following it is displayed on the right side, otherwise the text "CHECK"
is used.
The checkbox must be checked by the pilot.
sw_item:Item text:dataref expression
This form allows the "copilot" check the item for you based on the dataref expression
10.2 Dataref expressions
Dataref expressions allows the "copilot" to check the checklist item or pop up a checklist based
on the conditions/pilot actions. The expression can range for simple dataref value equality test
to fairly complex expressions.
10.2.1 Basic building blocks
test/dataref:1
test/dataref:=1
true when the dataref "test/dataref" equals to 1
test/dataref:!1
true when the dataref "test/dataref" is not equal to 1
test/dataref:<1
true when the dataref "test/dataref" is lower than 1
test/dataref:>1
true when the dataref "test/dataref" is greater than 1
test/dataref:<=1
true when the dataref "test/dataref" is lower than or equal to 1
test/dataref:>=1
true when the dataref "test/dataref" is greater than or equal to 1
test/dataref:+>1
true when the dataref "test/dataref" grows more than 1 after the item is activated
test/dataref:-<1
true when the dataref "test/dataref" shrinks more than 1 after the item is activated
test/dataref:><1
Page 15 of 24

10.2 Dataref expressions 10 CHECKLIST FILE STRUCTURE
true when the dataref "test/dataref" changes by more than 1 after the item is
activated
test/dataref:10|20
true when the "test/dataref" is in the interval of 10 to 20.
test/dataref:10:20
true when the "test/dataref" changes from lower than 10 to higher than 20. If
the dataref’s
value is not lower than 10 when the check is activated, it has to get below
10 first.
10.2.2 The right side
The right side of the dataref expression can be a simple number, or it can involve arithmetic,
datarefs and several functions.
test/dataref:((1+2)*3)**4
Valid operations are addition, subtraction, multiplication, division and power
(**). Also
parentheses can be used to enforce different priority.
test/dataref:{test/other_dataref}+1
Expression can contain datarefs too
test/dataref:(float)1
Datarefs typa can be explicitly stated in case the dataref exists in more than
one variant.
Available types are int, float and double
test/dataref:round({test/other_dataref})
Expressions can call one of several functions (round, step, closer_than)
Page 16 of 24

10.3 sw_iteminfo 10 CHECKLIST FILE STRUCTURE
10.2.3 Available functions
round(value)
rounds the value to the nearest integer
step(value)
equals to 1 when value >= 0, 0 otherwise
closer_than(value1, value2, epsilon)
returns 1.0 when value1 and value2 differ by less than epsilon, 0.0 otherwise
Should you need more, please contact the developers.
10.2.4 Compound dataref expressions
Several dataref expressions can be combined using boolean operations.
(expression1)&&(expression2)
true when both expressons are true
(expression1)||(expression2)
true when either one(or both) of the expressions are true
All of the above can be combined together to form very elaborate constructions. With that
said, try to avoid the "when the tool I have is a hammer, then every problem looks like a nail"
problem. Sometimes it might be good to consider to use some other methods (lua helper plugin
computing those expressions and publishing the results in datarefs) to keep the complexity in
reasonable limits. It will help with the overall readability and maintainability of the checklist.
10.3 sw_iteminfo
This item behaves mostly like the sw_item, with one distinction - user can’t check it manually.
That means that it has to have the dataref expression specified.
sw_iteminfo:Item label|Check label:test/dataref:1
10.4 sw_itemvoid
This item is usefull for adding delimiters, welcome messages and other parts of checklist, that
are just displayed. Also they aren’t read by the speech synthesizer.
sw_itemvoid:Item label|Check label
Page 17 of 24

10.5 sw_remark 10 CHECKLIST FILE STRUCTURE
10.5 sw_remark
This item is somewhat similar to the sw_itemvoid, with the only distinction that it is read by the
speech synthesizer. It can be used for example to compliment the pilot...
sw_remark:You did nicely!
10.6 sw_show
This item doesn’t show up on the checklist, but allows a checklist to pop up when a specified
condition if fulfilled. The sw_show conditions aren’t checked when another checklist is being
displayed (so it doesn’t interrupt it).
Disclaimer: The following paragraphs are just a view of one of the authors, so think about it
and feel free to ignore it if you see fit...
sw_show seem like a very convenient feature, which allows construction of very clever checklists.
It might for example pop up after take off checklist when you reach certain altitude, or pop up
a relevant checklist when a fire alarm sounds, ... Unfortunately there seems to be a downside
to this kind of automation - in my view the pilot should know when a certain checklist is due
and he should open it by himself - that way his memory is exercised and I think it also adds to
the realism of the simulation (checklists don’t pop up automaticaly in real plane either)... Also
inflight emergencies might be a good example of this view - the pilot should be able to identify
the source of the problem, while if the correct emergency checklist pops up by itself, it is a sort
of giveaway...
On the other hand, some people might argue that when a checklist pops up automaticaly, it
remindes the pilot _to perform it, so when in the real plane, he/she will remember to perform the
checklist. _
So feel free to use sw_show, just think whether it will really help pilots learning...
10.7 sw_continue
This is another item that doesn’t show on the checkist, but it allows creation of "seamless"
multipage checklists. If this statement is specified for a given checklist, then when the said
checklist is finished, the checklist spacified by the sw_continue is opened up automaticaly. When
no label is specified, next checklist is used, otherwise a checklist with a given label (first field of
sw_checklist) is displayed.
sw_continue
sw_continue:Checklist name
Page 18 of 24

10.8 sw_rcolsize 10 CHECKLIST FILE STRUCTURE
10.7.1 New in 1.26
Since 1.26 there is a possibility to attach a dataref condition to the sw_continue and several
sw_continue statements can be attached to a checklist. This allows you to create a conditional
"detours" in the checklist flow - for example when some equipment is used optionally, you can
add a checklist page that reflects its usage.
The sw_continue statement conditions are analyzed from the top to the bottom and the first one
whose condition is true (or without a condition) is followed. Since the conditions are checked
only at the moment the checklist is finished, dataref conditions analyzing dataref evolution in
time ("+>", "-<", "><", ...) can’t be used, as they always evaluate false when checked for the
first time.
sw_continue:Start with GPU:sim/cockpit/electrical/gpu_on:1
sw_continue:Start without GPU
10.8 sw_rcolsize
Checklist window width is determined automatically from the length of items displayed. Item
sw_rcolsize explicitly specifies width of the right side field, which helps to keep checklist from
changing width when differnet pages are displayed.
sw_rcolsize : 150
#
Any line starting with a # will be treated like a comment and not processed.
Page 19 of 24

11 ADDITIONS TO THE XCHECKLIST DATAREF EXPRESSIONS SYNTAX
11 Additions to the Xchecklist dataref expressions syntax
Basic Xchecklist syntax for dataref expressions is somewhat limiting and some of the resulting
constructs are a bit cumbersome. For this reason we tried to extend the syntax to make those
expressions more readable and flexible, while maintaining the backward compatibility.
The old syntax used the following system for the dataref expressions:
sw_item:text:dataref_expression:value
The dataref_expression can be either a dataref name or an expression combining several con-
ditions using logical operators. For example:
sw_item:text:(sim/dataref1:1) && ((sim/dataref2:2) k(sim/dataref3:3))
The value field could contain expressions combining numbers, datarefs and even some functions
to compute the actual value. For example:
sw_item:text:sim/dataref1:round(1+{sim/dataref2})
The first addition to the syntax is the possibility to use a constant instead of the dataref_expression.
This makes it possible to compare a dataref expression (which can be only in the value part) to
a constant. For example:
sw_item:text:1:closer_than({sim/dataref1}, {sim/dataref2}, 10)
The second addition is an extension of the syntax of the value part; now it can contain complete
"tests". For example:
sw_item:text::({sim/dataref1} == 1) && ({sim/dataref2} != 2)
Note the double colon (effectively the dataref_expression part is missing) - that enables the new
expression syntax! Also note that to avoid confusion concerning the priorities of the arithmetic
vs. logical operators, the operands of the logical oprators must be enclosed in the parentheses.
You can use usual comparison operators: == for equality, ! =for inequality, >for greater than,
<for lower than, >=for greater or equal, <=lower or equal. Only bear in mind, that testing
floting point values for equality or inequality can give you unexpected results! For comparing
floating point values preferably use the closer_than construct.
Hopefully these new possibilities will make the dataref expressions much more readable.
To silence a line, just prepend it with the ’@’ sign and nothing will be spoken...
Page 20 of 24

12 CLOSER_THAN FUNCTION EXAMPLE
12 closer_than function example
Here is a example provided by user per0ni that shows how he is using the closer_than function
in his checklist.
sw_item:Sync Altimeter|SYNCED:sim/cockpit/misc/barometer_setting:sim/cockpit/misc/barometer_setting*closer_than(sim/cockpit/misc/barometer_setting,
sim/weather/barometer_sealevel_inhg, 0.03)
Page 21 of 24

13 COLOURED TEXT
13 Coloured Text
Starting with version 1.34 we can now have some items in a checklist use coloured text. The
first two items to use this feature will be a new item called sw_item_c and sw_itemvoid_c which
will be in addition to the original item sw_item and sw_itemvoid.
For this to work you need to define some colours using the new item called sw_define_colour
that you can define any RGB colour you want using the following format.
sw_define_colour:red:1.0,0.0,0.0 sw_define_colour:green:0.0,1.0,0.0 sw_define_colour:yellow:1.0,1.0,0.0
sw_define_colour:darkorange:1.0,0.54,0.0
This will define a variable called ’red’ that you have given it the correct RGB values. You can
have as many as you need in your checklist and can be put before any other checklist items. Here
is a example of you to use in a checklist.
sw_item_c:\red\Red item|\green\Green item
sw_itemvoid_c:\yellow\Yellow item|\darkorange\Darkorange item
Page 22 of 24

14 NUMBER OF LINES PER PAGE
14 Number of Lines Per Page
It was brought to my attention that starting with version 1.29 if you had to many lines per page
you would corrupt the text in the setup widget. With the release of version 1.32 this is resolved
but in doing testing I have found some issues so will give some guide lines.
If you are using the widget display I am not sure if there are any limits to the number of lines.
If you are using the GUI display in 2d then the limit is less than 49 lines.
If you are in VR then the limit is less that 30 lines which I have no control over.
When I am talking about lines this is all lines displayed blank or not.
So to the Xchecklist authors my recommendation is to keep your number of lines below 30 to
allow all users to fully use your checklist.
Page 23 of 24

15 CHECKER
15 Checker
Checker is a command line program that allows you to make sure your clist.txt has the proper
syntax so it will work correctly with Xchecklist. This is a stand alone program so it can be
run anywhere you like. It comes in three versions to match the platform and bit size you are
running.
On 64 bit Linux the syntax would be “lin_checker_64bit clist.txt 1”
The first argument is the name of the checklist you want to check.
With only the checklist name as a first argument and no second argument, the checker performs
a simple syntax check with minimal output, most useful during checklist development.
The second argument is optional and is a number 1 – 4.
1 Will print out parser internal working (good for parser/lexer development).
2 Will evaluate expressions.
3 Will do both 1 & 2.
4 Will do regression testing. Look in regres_test1.txt for explanation and examples.
The way I have been using the checker is I have a folder called Xchecklist_Checker where the
checker and a dataref dictionary or dictionaries reside.
A dataref dictionary is a text file starting with clist_dict_ that is a list of datarefs like DataRefTool’s
drt_last_run_datarefs.txt found in X-Plane Output/preferences. In this case the dictionary would
be named clist_dict_drt_last_run_datarefs.txt and put in a folder named Xchecklist_Checker.
To execute properly, you need to set the active working directory to the directory where all
the files (checker, checklist and dictionary) are located. The following procedure simplifies the
process:
Open terminal window and type CD, followed by a space. Then drag the Xchecklist_Checker
folder into the terminal window. Press enter. You have just set the active directory
Next drag the checker file into the terminal window. This will type the checker command with
its pathname for you.
Next drag the checklist name which can be from anywhere you are going to test into the terminal
and press enter.
Page 24 of 24

17 TROUBLESHOOTING
16 Create Dictionary
Checker uses a dictionary to help make sure that all the datarefs are correct. To help with this
there is a menu selection “Plugins/Xchecklist/Create Dictionary” that will automatically create
a custom dictionary that will match the aircraft you are creating a checklist for.
Since this tool uses a file created by DataRefTool it will need to be installed and can be found at
https://github.com/leecbaker/datareftool/releases When X-Plane starts DataRefTool
runs and parses many files to find default and custom datarefs and creates a file of datarefs called
Output/preferences/drt_last_run_datarefs.txt
When you click on “Create Dictionary” it reads the drt_last_run_datarefs.txt file line by line.
If it finds a non array dataref it will write that dataref to the dictionary file. If it finds a array
dataref it will find the length and then create the proper datarefs needed for the dictionary to
work corectly.
The dictionary will be called Resources/plugins/Xchecklist/clist_dict_drt_last_run.txt
17 Troubleshooting
In writing Xchecklist we tried to mimic checklister so most clist.txt checklists should work but
if the one you are trying to use did not follow the syntax of checklister there may issues. We
will be trying to improve the parsing to remove many of these but in the meanwhile please use
the following information to help you resolve them yourself.
If you are having a issue please look in your Log.txt file and search for Xchecklist: to find any
errors that might have been logged.
Errors about "unexpected TOKEN_ITEM, expecting TOKEN_STRING" mean that there is
some issue with the syntax so look at the line it is pointing to and compare it to the examples of
syntax in the section above.
Remove extraneous text that is obviously not part of the script. To quickly do this you can put a
# as the first character on a line and that line will not be processed.
Page 25 of 24
