IM00092a Zener MSC 3 User Manual
User Manual: Zener MSC-3 User User Manual
Open the PDF directly: View PDF ![]() .
.
Page Count: 48

MSC-3
Instruction Manual

MSC-3 User’s Manual
ZENER TECHNOLOGY AND QUALITY ASSURANCE
Since 1978 Zener Electric has supplied many thousands of AC drives to industry. These drives have
been installed into numerous applications resulting in a wealth of in house experience. The Zener MSC-3
AC variable speed controller is the culmination of this experience, modern technology and industrial
application requirements. The Zener Quality Assurance program ensures that every MSC-3
manufactured has proven to operate correctly in the production test bay before dispatch.
MSC-3 PRODUCT WARRANTY
Zener Electric warranty the MSC-3 against defective workmanship and materials for a period of 24
months from the date of dispatch. Such defects will be rectified free of charge for both labour and
material, at Zener Electric’s premises subject to:
1. Zener Electric's customer raising an order upon Zener for service and/or repairs, subject to a
warranty claim. The order is to state particulars of the model and serial number, the date of
original purchase and invoice/delivery docket number.
2. All damage resulting from incorrect installation or use other than in accordance with the
instruction manuals issued by Zener Electric is excluded from this warranty.
3. The Warranty being rendered invalid if the product is misused or if any unauthorised alteration,
modification or substitution of any part of the product be made or the serial number of the
product is defaced or altered.
4. The cost of transportation (both ways) is to be met by the owner if it's necessary to return the
product, or any part of it, to Zener Electric’s premises.
5. A charge being accepted by the owner for travelling time and expenses incurred in connection
with warranty service at the user's site as requested by the owner.
6. If the product was not purchased from Zener Electric directly, then a warranty claim must be
lodged with the original supplier in the first instance. Repairs will not be effected by Zener
Electric unless approved by the original supplier. Goods not of our own manufacture
incorporated in our supply or sold by us, carry their maker's warranty only.
7. Goods returned for claim under warranty will be accepted on the condition that should the claim
be rejected then all costs, including inspection, will be charged to the customer's account.
8. Zener Electric is not liable for any consequential loss.
SAFETY
Your MSC-3 must be applied, installed and operated in a safe manner. It is the responsibility of the user
to ensure compliance with all regulations and practices covering the installation and wiring of your MSC-
3. The instruction manual should be completely read and understood before attempting to connect or
operate the MSC-3. Only skilled personnel should install this equipment.
THE CONTENTS OF THIS MANUAL ARE SUBJECT TO CHANGE WITHOUT NOTICE

MSC-3 User’s Manual
IM00092A Page 1
Contents
WARNING...........................................................................................................................................................3
RECEIVING.........................................................................................................................................................3
SOFTWARE........................................................................................................................................................3
MSC-3 MECHANICAL INSTALLATION DIAGRAM ...............................................................................................4
3 PHASE MSC-3 ELECTRICAL INSTALLATION DIAGRAM. ................................................................................7
SINGLE PHASE MSC-3 ELECTRICAL INSTALLATION .......................................................................................8
INDUSTRIAL TERMINALS TYPICAL CONNECTION DIAGRAM – CONFIG 1......................................................9
HVAC TERMINALS TYPICAL CONNECTION DIAGRAM – CONFIG 3...............................................................10
QUICK SETUP FOR CONFIG 1.........................................................................................................................11
QUICK SETUP FOR CONFIG 3.........................................................................................................................13
QUICK SETUP FOR CONFIG 4.........................................................................................................................15
MSC-3 START UP.............................................................................................................................................17
MSC-3 RUN MODE ...........................................................................................................................................17
MSC-3 MENU MODE.........................................................................................................................................19
CONTROL CONSOLE MENU............................................................................................................................19
A00 DISPLAY....................................................................................................................................................19
A01 RUN VARIABLE...............................................................................................................................19
A02 RUN SCALE ....................................................................................................................................19
A03 RUN UNITS .....................................................................................................................................19
A04 MENU PROTECT ............................................................................................................................20
A05 SET CTL DEFS................................................................................................................................20
B00 MOTOR......................................................................................................................................................20
B01 MOTOR VOLTS...............................................................................................................................20
B02 MOTOR AMPS ................................................................................................................................20
B03 MOTOR HZ .....................................................................................................................................20
B04 MOTOR RPM ..................................................................................................................................20
C00 PERFORMANCE........................................................................................................................................21
C01 MIN HZ............................................................................................................................................21
C02 MAX HZ...........................................................................................................................................21
C03 RAMP...................................................................................................................................21
C04 ACCEL TIME ........................................................................................................................22
C05 DECEL TIME ........................................................................................................................22
C06 S TIME .................................................................................................................................22
C07 FLUX PLUS %.................................................................................................................................22
C08 HI SPD FLUX+ ................................................................................................................................22
C09 SLIP COMP.....................................................................................................................................23
C11 AUDIBLE FREQ ..............................................................................................................................23
D00 PROTECTION............................................................................................................................................24
D01 CURRENT LIM ................................................................................................................................24
D02 I2T...................................................................................................................................................24
D02 I2T........................................................................................................................................24
D03 I2T ZERO HZ ........................................................................................................................24
D04 I2T CNR HZ...........................................................................................................................25
D05 REVERSE .......................................................................................................................................25
D08 DC INPUT .......................................................................................................................................25
E00 STOP/START.............................................................................................................................................25
E01 STOPPING......................................................................................................................................25
E06 DYNAMIC BRK................................................................................................................................25
E07 AUTO RESTART .............................................................................................................................26
E08 A/RS ALLOWED..............................................................................................................................26
E09 A/R CLR TIME.................................................................................................................................26
E10 RESET BY PF .................................................................................................................................26
F00 REFERENCES ...........................................................................................................................................27
F01 REMOTE .........................................................................................................................................27
F02 LOCAL.............................................................................................................................................27
F03 ESO.................................................................................................................................................27
F04 JOGFWD.........................................................................................................................................27
F05 JOGREV..........................................................................................................................................27
SPEED REFERENCES......................................................................................................................................28
R00 AN1.................................................................................................................................................28
MSC3 ANALOG INPUT SCALING .....................................................................................................................28
R01 REF AT 0% .....................................................................................................................................29
R02 REF AT 100%..................................................................................................................................29
R03 PRESET..........................................................................................................................................29
R04 MOTORIZD POT.............................................................................................................................29
R07 CONSOLE REF...............................................................................................................................29

MSC-3 User’s Manual
Page 2 IM00092A
G00 INPUT/OUTPUT........................................................................................................................................ 30
STANDARD TERMINAL CONFIGURATIONS.................................................................................................... 30
G02 CONFIG 1 INDUSTRIAL................................................................................................................. 30
G03 CONFIG 2 VSC2000....................................................................................................................... 31
G04 CONFIG 3 HVAC............................................................................................................................ 31
G05 CONFIG 4 ...................................................................................................................................... 31
G06 CONFIG 5 ...................................................................................................................................... 31
G07 CONFIG 6 ...................................................................................................................................... 32
G08 CONFIG 7 ...................................................................................................................................... 32
G09 CONFIG 8 ...................................................................................................................................... 32
G10 ENABLE/RESET............................................................................................................................. 32
G11 DIG IN1 .......................................................................................................................................... 33
G12 DIG IN2 .......................................................................................................................................... 33
G13 DIG IN3 .......................................................................................................................................... 33
G14 DIG IN4 .......................................................................................................................................... 33
CONTROL TERMINAL FUNCTIONS ........................................................................................... 34
G15 RELAY1.......................................................................................................................................... 36
G16 RELAY2.......................................................................................................................................... 36
RELAY OUTPUT FUNCTIONS .................................................................................................... 36
DISPLAY MESSAGES ...................................................................................................................................... 37
MSC-3 TROUBLE SHOOTING GUIDE.............................................................................................................. 38
YOUR MSC-3 SETUP NOTES .......................................................................................................................... 41
MSC-3 SPECIFICATIONS................................................................................................................................. 42
MSC-3 OUTPUT CURRENT SPECIFICATIONS................................................................................................ 44
APPENDIX A - MSC-3 CHARACTER SET......................................................................................................... 45

MSC-3 User’s Manual
IM00092A Page 3
Warning
Please note the following:
Your MSC-3 must be applied, installed and operated in a safe manner in accordance with all local rules
and regulations.
The MSC-3 is intended for use only in fixed wiring applications. It is not intended for use on a flexible
supply cable.
The MSC-3 contains a substantial EMC line filter and as a result it is unsuitable for use on earth leakage
protected circuits.
The MSC-3 contains capacitors that take greater than one minute to discharge below 50Vdc. The voltage
across these capacitors should be measured before any work is carried out inside the enclosure.
The MSC-3 contains high energy circuits that may be hazardous. Do not operate the MSC-3 with the
door or enclosure open.
Receiving
Inspect the MSC-3 for any shipping damage. If any damage is found, report it to the carrier immediately.
Access the inside of the controller and visually check for any damage.
Do not attempt to operate the MSC-3 if any obvious damage exists.
After the initial inspection, the MSC-3 can be repacked and stored in a clean, dry location until it is
required for use. DO NOT store this equipment in an area where the ambient temperature will fall below
-20°C (-4°F) or rise above 70°C (158°F). DO NOT store this equipment in areas of high condensation or
corrosive atmosphere. Proper storage is necessary to ensure satisfactory controller start up and
performance.
Software
This manual applies to MSC-3 software revision 1.38. The software revision is displayed briefly at power
up.
MSC-3 User’s Manual
Page 4 IM00092A
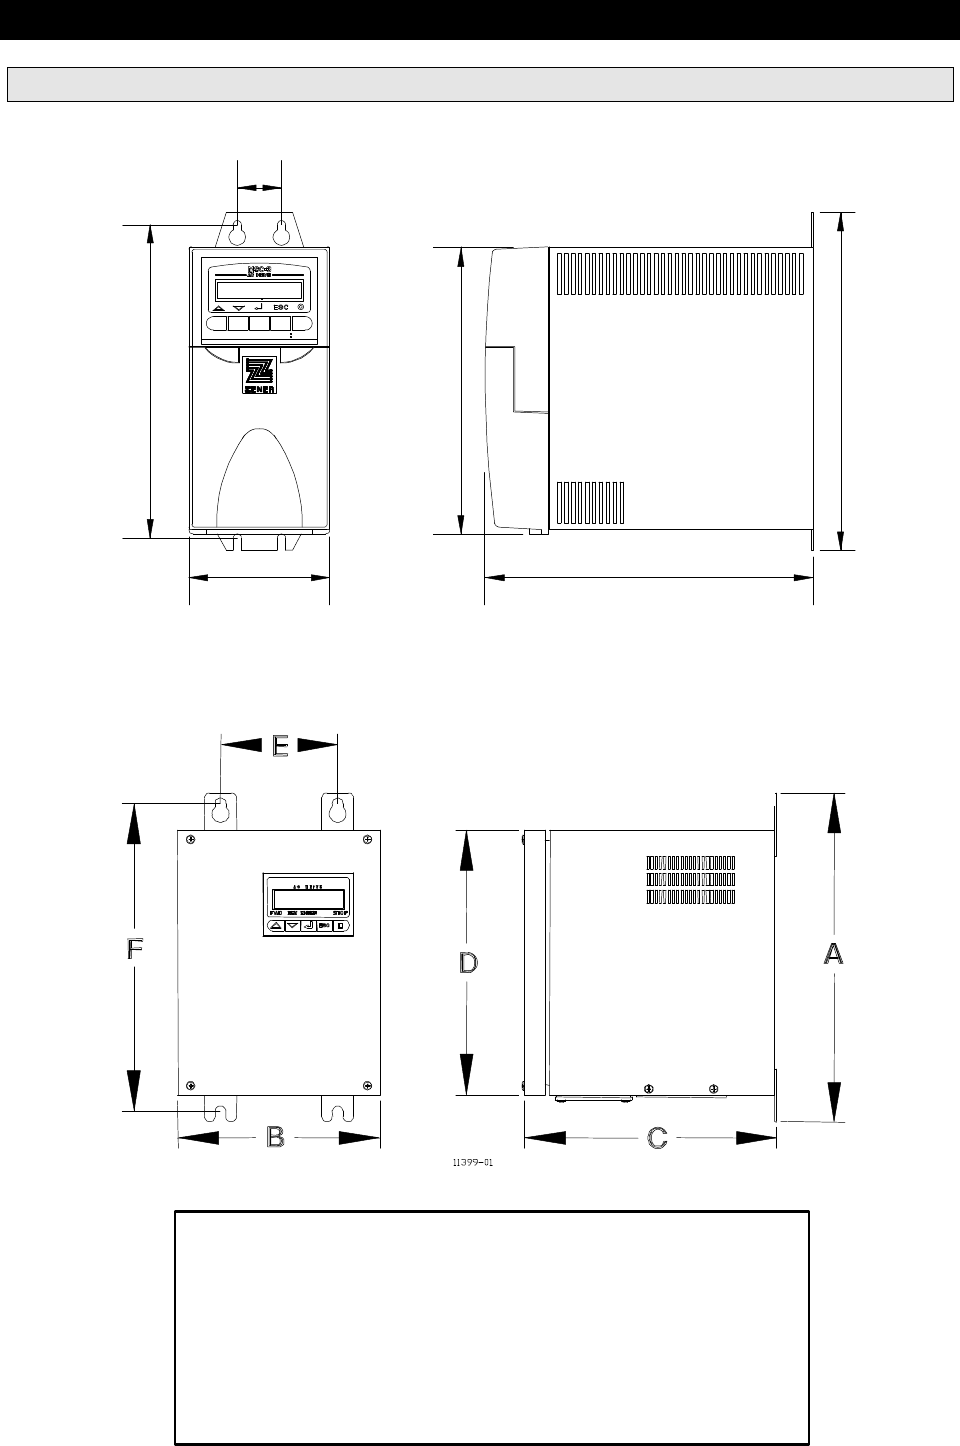
MSC-3 Mechanical Installation Diagram
D
B
C
A
E
F
Chassis A IP30 / NEMA1
Chassis A IP66 / NEMA 4
• Mounting holes are 6 mm (0.25”) diameter.
• Packaging sizes:
IP30
280 x 300 x 184 mm, 11.0 x 11.8 x 7.5 in
add: 0.5kg, 1.1lbs
IP66
330 x 387 x 380 mm,13.0 x 15.2 x 15.0 in
add: 1.4kg, 3.1lbs
• Allow 50mm above, below and either side of the enclosure for ventilation.
MSC-3 User’s Manual
IM00092A Page 5
Chassis A Chassis B
IP30 IP66 IP30 IP66
Dimensions
mm in mm in mm in mm in
A 248 9.8 310 12.2 459 18.1 459 18.1
B 102 4.0 190 7.5 234 9.2 234 9.2
C 237 9.3 236 9.3 243 9.6 243 9.6
D 208 8.2 250 9.8 400 15.8 400 15.8
E 32 1.3 108 4.3 130 5.1 130 5.1
F 230 9.1 287 11.3 436 17.1 436 17.1
Weight
(without
Choke)
3.5kg 7.7lbs 5.7kg 12.5lbs 15 – 30 Amp models – 17.4kg/38.3lbs
40 Amp models – 18kg/40lbs
DC Bus
choke
weight
3.7kg 8.1lbs 2.9kg 6.4lbs 15 – 30 Amp models – 5.5kg/12lbs
40 Amp models – 6.8kg/15lbs
DC Bus Choke adds 72mm (2.8”) to dimension C in Chassis A, IP30 only.
DC Bus choke must be used with MSC-3Jxx (600VAC) models
• Mounting holes are 6 mm (0.25”) diameter.
• Packaging sizes:
IP30 and IP66
540 x 400 x 360 mm, 21.3 x 15.7 x 14.2 in
add: 2.7kg, 6.0 lbs
•
Allow 75 mm above, below and either side of the
enclosure for ventilation.
Chassis B
MSC-3 User’s Manual
Page 6 IM00092A
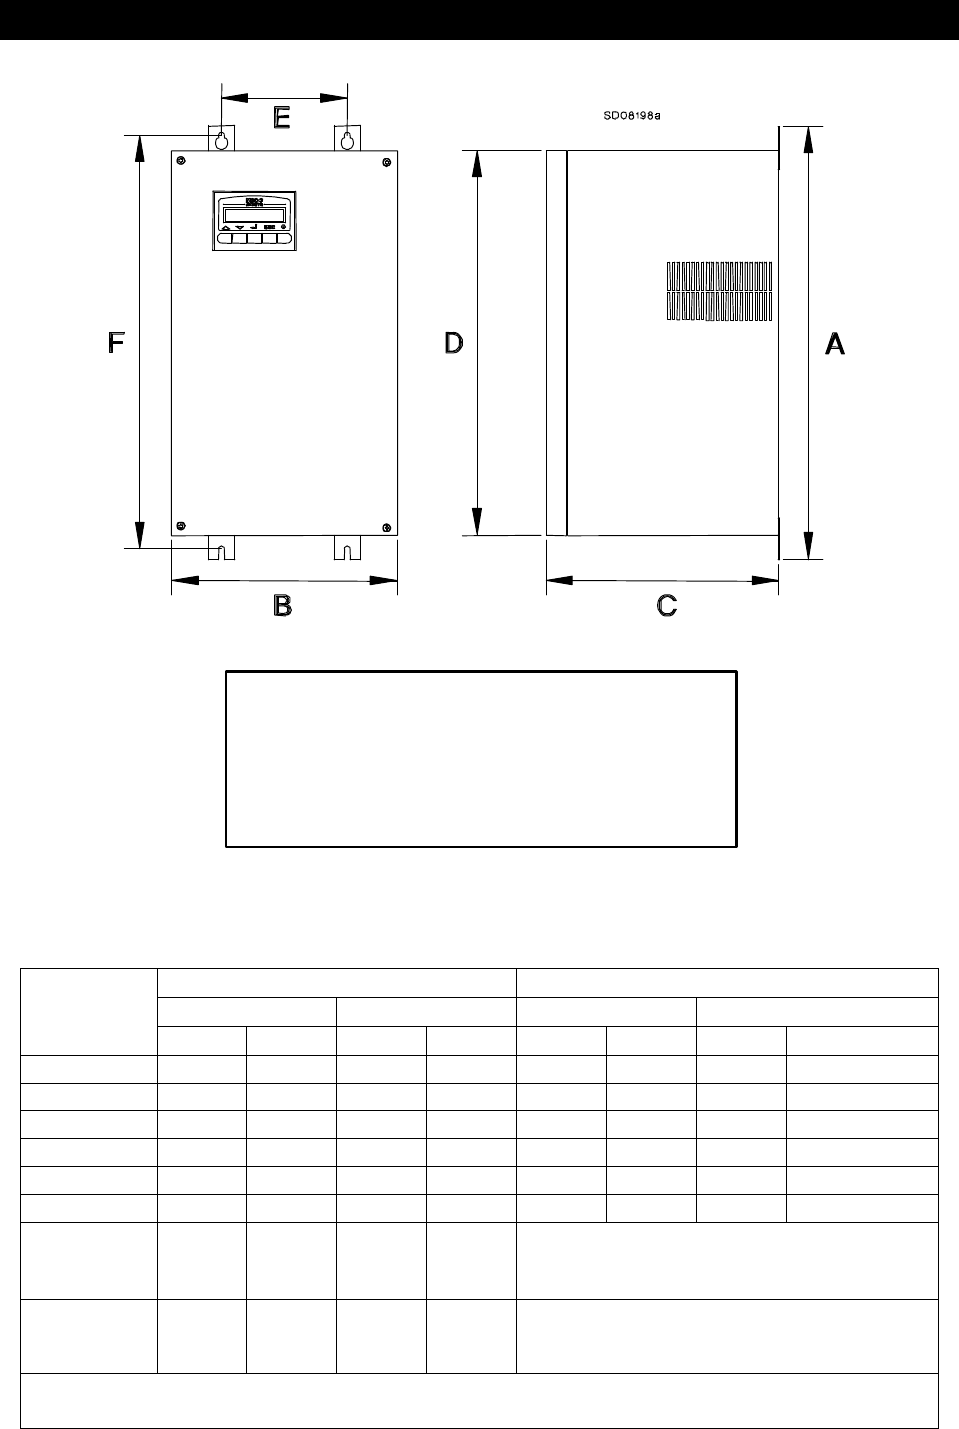
Chassis C
IMPORTANT NOTES FOR ALL CHASSIS SIZES
• The MSC-3 must be mounted in a vibration free location.
• Mount the MSC-3 vertically, away from heat radiating sources.
• Do not mount the MSC-3 in direct sunlight or on hot surfaces.
• If the MSC-3 is mounted inside another enclosure, the total heat dissipation must be allowed for.
• Remove gland plate before drilling cable holes.
• Do not allow metal shavings or any other conductive material to enter the enclosure or damage may
result.
• Dimension tolerance is ±1.0mm (±0.04”).
• DC Bus choke is mandatory with MSC-3Jxx (600VAC) models
• The optional DC Bus choke is fitted inside the MSC-3 in all models except Chassis A, IP30. For these
models, the DC bus choke is located in an additional enclosure fitted to the rear face of the MSC-3.
The wiring between the MSC-3 and the choke is internal.
Dimensions
mm inch
A 715 28.1
B 470 18.5
C 290 11.4
D 620 24.4
E 330 13.0
F 667 26.7
Dimensions for the IP 30
and IP66 chassis’ are
identical.
Drive Weights
Drive kg lbs
x55 42 92
x82 44 97
x109 46 101
x140 50 110
DC Bus Choke weighs
20kg (44lbs) on top of
above weights.
600V drives must have a
bus choke
• Mounting Holes are 12mm (0.47”) diameter
• Packaging size IP30 and IP66:
520 x 750 x 440mm (20.5 x 29.5 x 17.3 inches)
add 10kg (22lbs)
• Allow 100mm above, below and either side of the
enclosure for ventilation.
MSC-3 User’s Manual
IM00092A Page 7
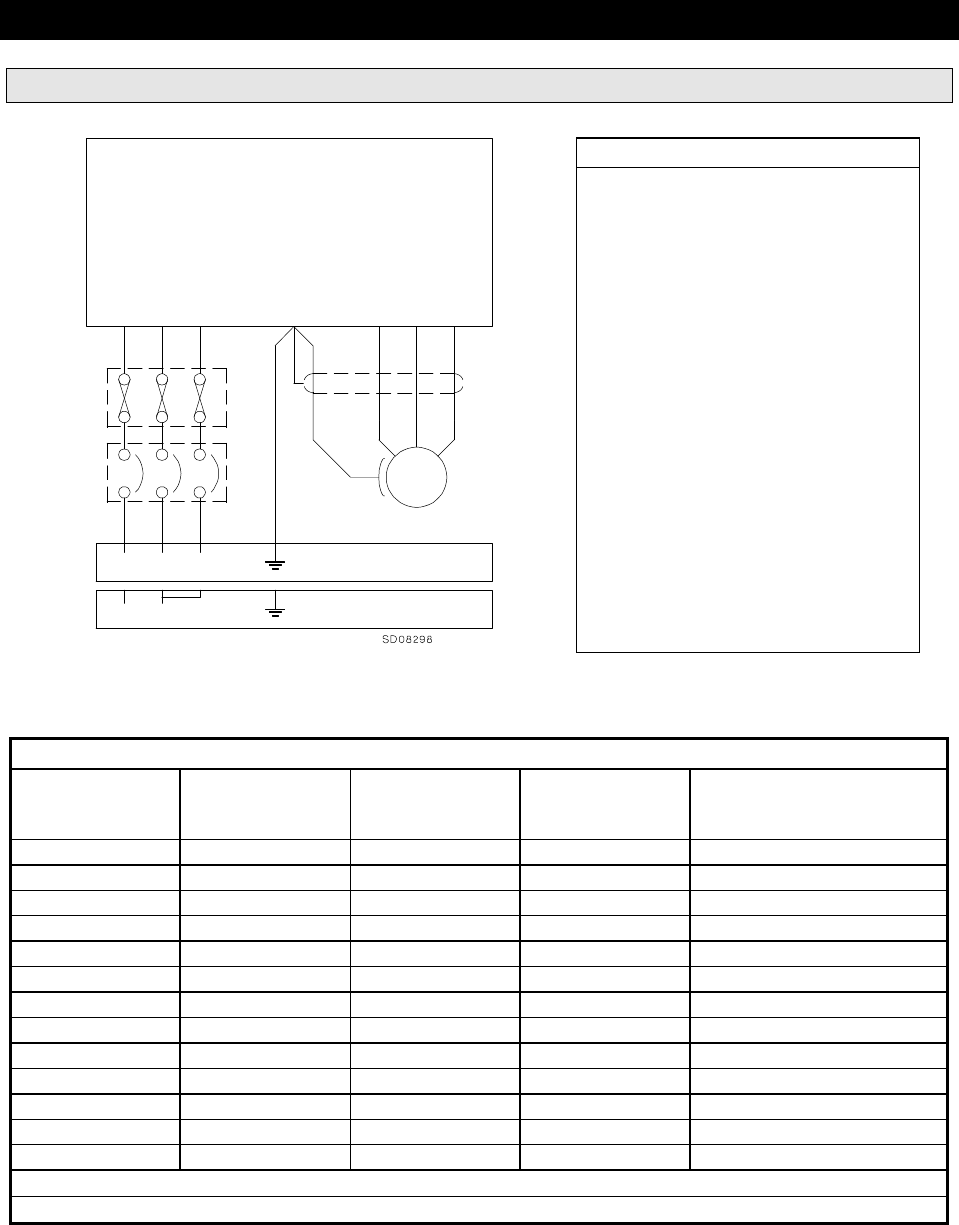
3 Phase MSC-3 Electrical Installation Diagram.
IMPORTANT
1. Either fuses or a circuit breaker
should be connected as shown. Fast
semiconductor fuses are not required.
2. UL compliant installations must use
UL listed fuses as per the table below.
3. Cable sizes should be selected
according to local wiring rules using
the currents given in the table below.
4. For complete motor thermal
protection microtherms or thermistors
should be installed in the motor
winding.
5. For compliance with EMC standards,
the motor wiring and ground
conductor must be enclosed in a
continuous metallic sheath or conduit,
which has good contact to both the
motor and inverter chassis. The
sheath should contain only the wiring
from one inverter and its associated
motor cables. No other conductors
may be included.
Fuse and Circuit Breaker Ratings For All 3 Phase MSC-3
Model Chassis Maximum Recommended UL Class Fuse
Numbers Size RMS Input Fuse or C/B for UL compliant
Current (A) Rating (A) installation (A)
MSC-3*3 A 4.1 10 10A, Class J
MSC-3*5 A 6.9 10 10A, Class J
MSC-3*7 A 9.6 16 15A, Class J
MSC-3*11 A 15.1 20 20A, Class J
MSC-3*15 B 22.5 32 30A, Class T
MSC-3*20 B 30.4 40 40A, Class T
MSC-3*23 B 33.0 40 40A, Class T
MSC-3*30 B 43.1 63 60A, Class T
MSC-3*40 B 55.0 63 60A, Class T
MSC-3*55 C 78.0 100 100A, Class T
MSC-3*82 C 108.0 125 125A, Class T
MSC-3*109 C 148.0 160 175A, Class T
MSC-3*140 C 179.0 200 200A, Class T
* is any 3 phase MSC, either MSC-3R, MSC-3L or MSC-3J
To operate the MSC-3 from a DC supply multiply these currents by 1.35
L1 L2 L3
+ -
L1 L2 L3
M1 M2 M3
E
MSC-3
Three Phase Input
3 Phase Supply
DC Supply
MSC-3 User’s Manual
Page 8 IM00092A
Single Phase MSC-3 Electrical Installation
Any model MSC-3 can be operated from a single phase supply. The constraints on single phase
operation are as follows:
• The single phase supply voltage must be within the 3 phase supply voltage limits for the MSC-3
model to be used. For example, use an MSC-3Lxx model for a 240VAC single phase supply or a
MSC-3Rxx model for a 480VAC single phase supply.
• A standard 3 phase motor of a voltage rating appropriate to the MSC-3 model should be used. See
the specifications section of this manual for output voltages.
• If the optional DC bus choke is fitted to an MSC-3 powered from a single phase supply, the
maximum available output voltage will decrease to 95% of the RMS input voltage. This means that
the available motor torque at full speed will be reduced to approximately 90% of the motor rated
torque. This is simply a consequence of operating the motor at lower than rated voltage. This de-
rating does not apply if the optional DC bus choke is not fitted. De-rating can also be avoided if the
single phase input voltage is 1.05 times the rated motor voltage.
• The MSC-3 is unsuitable for use with single phase motors.
• Terminals L2 and L3 should be connected together and the single phase supply should be
connected to L1 and L2. In all other respects the connections are the same as for a 3 phase supply.
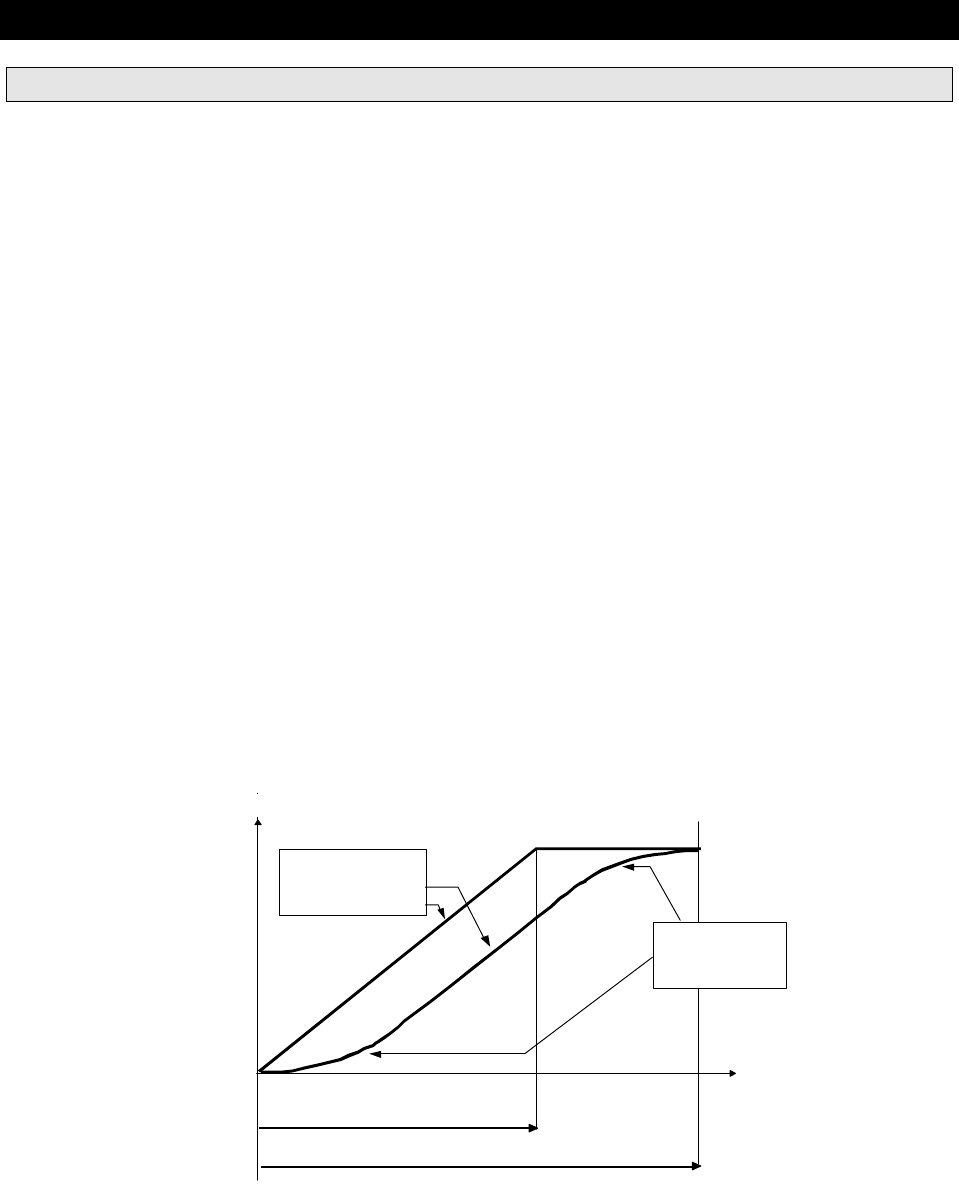
• The continuous output current rating is reduced from the values stated for 3 phase supply operation
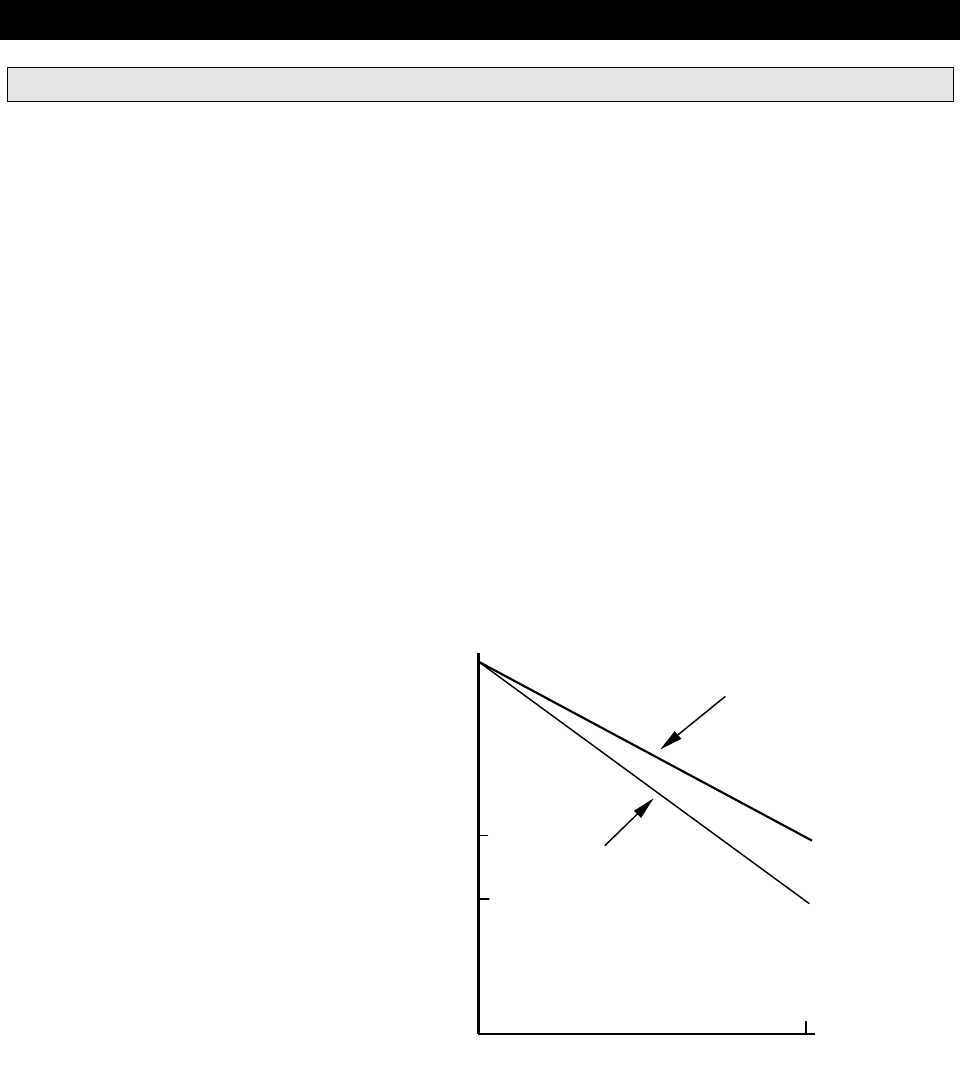
according to the graph below.
33%
100%
50%
0%
0% 100% Speed
Output Current Rating
for Single Phase
AC Supply
With optional DC bus
choke
Without optional DC
bus choke
MSC-3 User’s Manual
IM00092A Page 9
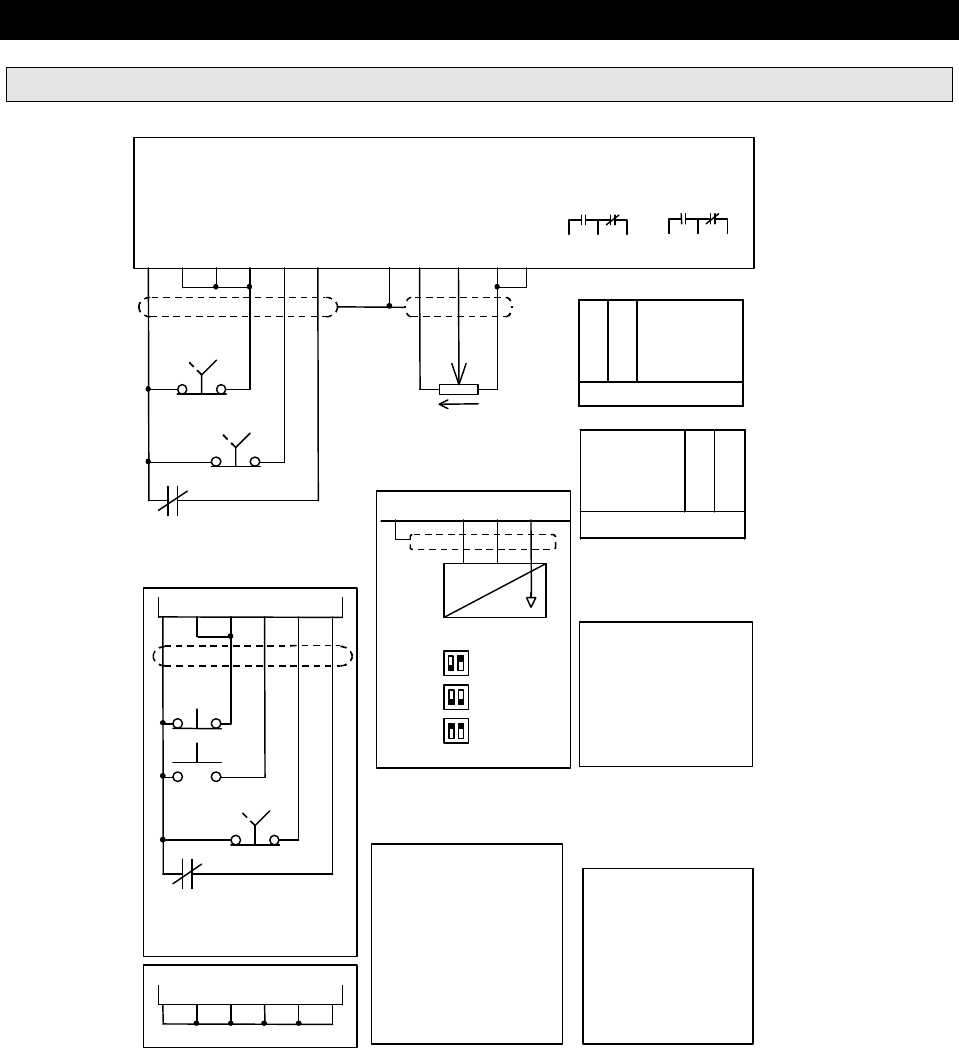
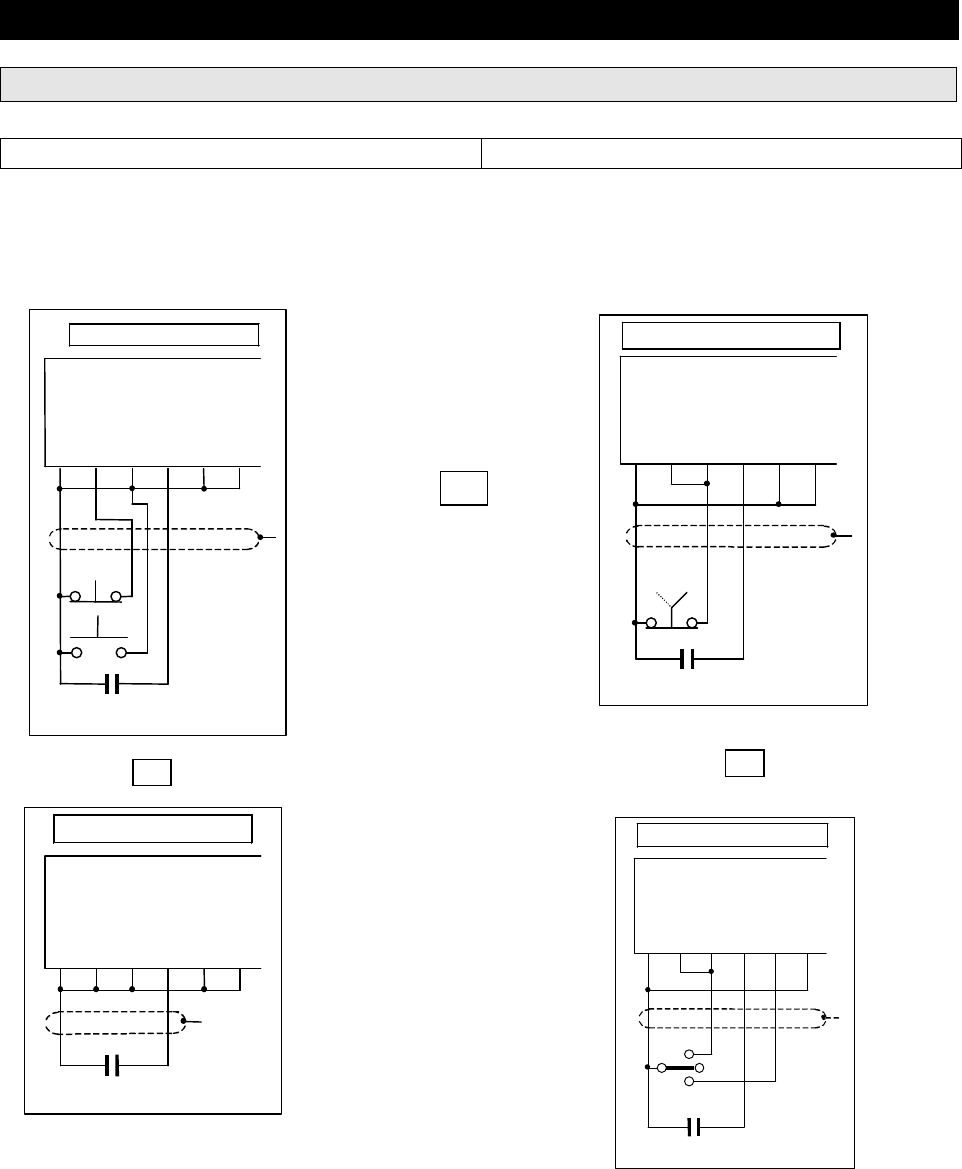
Industrial Terminals Typical Connection Diagram – Config 1
RL1 RL2
+5V D1 D2 D3 D4 EN DIG SCN Vref IN+ IN- AN
COM COM
8 9 10 11 12
+ -
SW1
SW1
SW1
Input reference source
0..5V
0..10V
0..20mA
4..20mA
Single direction
2 wire control
MSC-3 Control Board
1 2 3 4 5 6 7 8 9 10 11 12 13 14 15 16 17 18
Stop/
Reset
Run
Local
Remote
Optional Output Disable
1 2 3 4 5 6
Local
Remote
Stop/
Reset
Start
Optional Output Disable
Power up start up
1 2 3 4 5 6
Single direction 3
wire control
1k to 10k ohm
potentiometer
O C No Power
O C Power On and
Stopped
C O Power On and
Drive running
RL1 - Run
No Power O C
Power On and
not tripped O C
Power On,
Drive Tripped C O
RL2 - Trip
Optional
Optional
For 4-
20mA signals
the analog input
“REF AT 0%”
should be set to
-25%. See Speed
References section
for details
Local / Remote
In “local” the MSC-
3
is controlled from
the front panel
console. In
“remote”, the MSC-
3 is controlled from
the terminal strip.
Optional Wiring
If selection between
local and remote is not
required, place a link
between terminals 1
and 5. If the output
disable is not required
place link between
terminals 1 and 6.
MSC-3 User’s Manual
Page 10 IM00092A
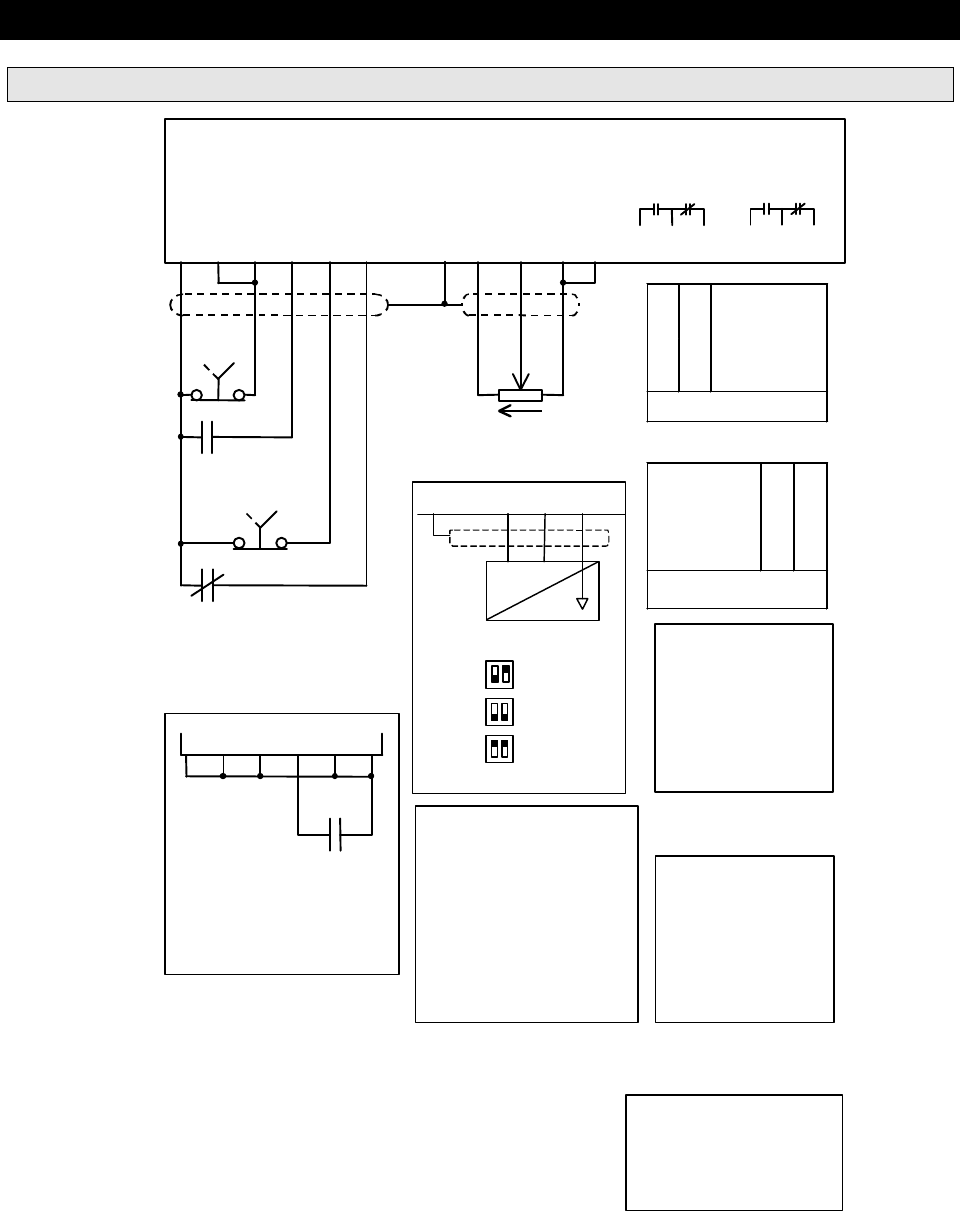
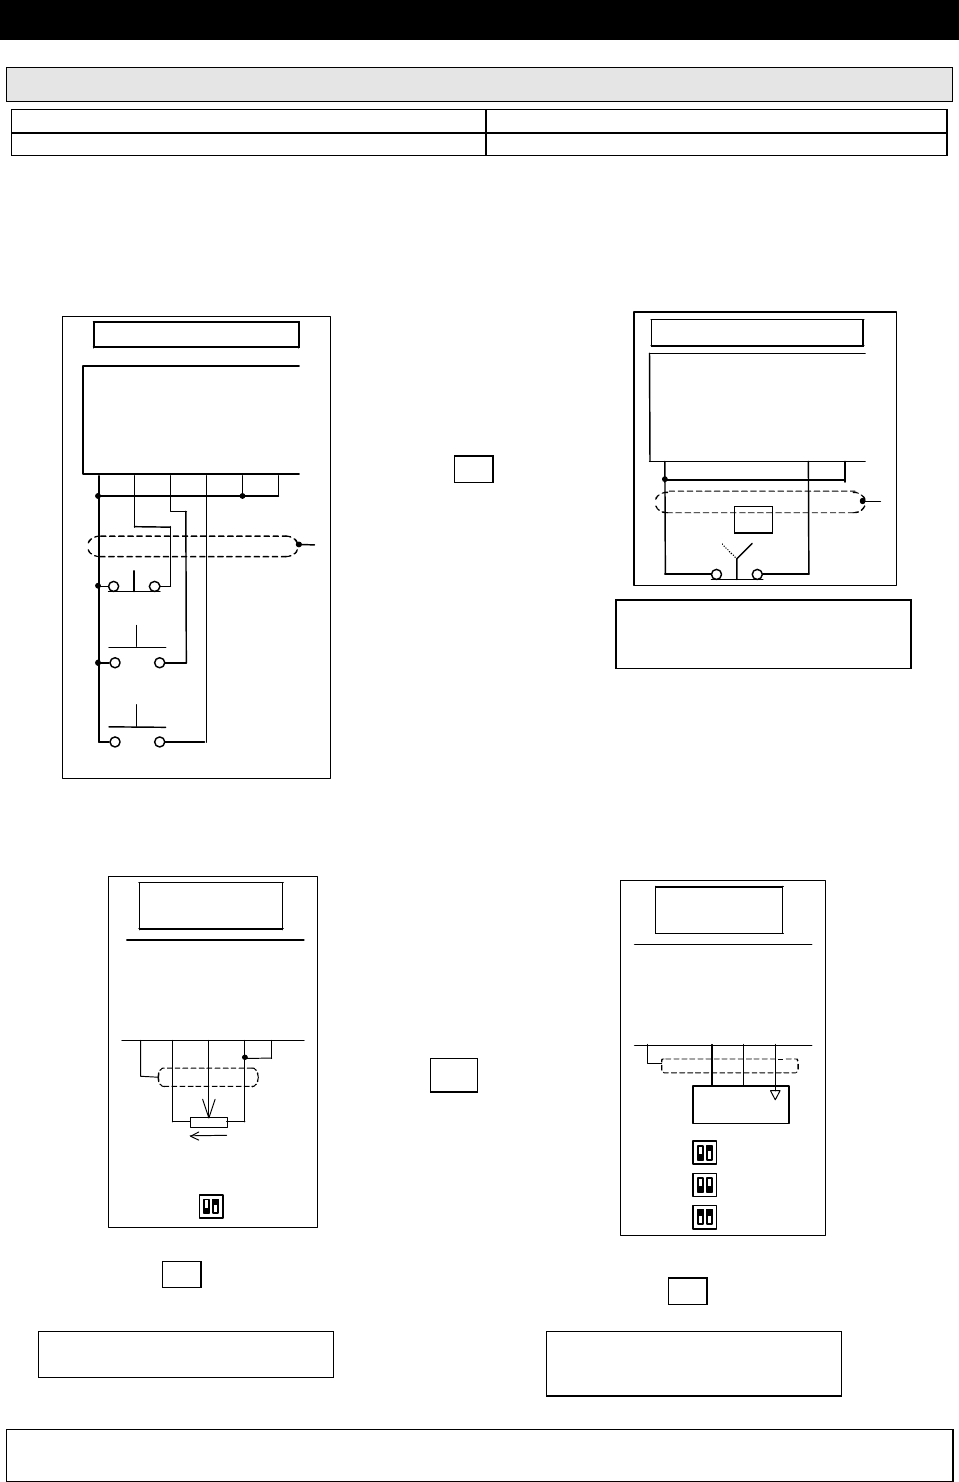
HVAC Terminals Typical Connection Diagram – Config 3
RL1 RL2
+5V D1 D2 D3 D4 EN DIG SCN Vref IN+ IN- AN
COM COM
Input reference source
8 9 10 11 12
+ -
SW1
SW1
SW1
0..5V
0..10V
0..20mA
4..20mA
MSC-3 Control Board
1 2 3 4 5 6 7 8 9 10 11 12 13 14 15 16 17 18
Stop
Run
1k to 10k ohm
potentiometer
Single direction
2 wire control
with ESO
Local
Remote
Optional Output Disable
Essential
Services Override
Power up start up
with ESO
1 2 3 4 5 6
Essential Services
Override
O C No Power
O C Power On and
Tripped
C O Power On, Drive
Enabled and not
tripped
RL1 - Proof
No Power O C
Power On and
not operating in
ESO mode
O C
Power On and,
ESO operating C O
RL2 - ESO
Optional
For 4-20mA signals the
analog input “ZERO%”
should be set to 20%. See
Speed References section
for details
For 4-
20mA signals
the analog i
nput
“REF AT 0%” should
be set to
-25%.
See Speed
References section
for details
Local / Remote
In “local” the MSC-3
is controlled from the
front panel console.
In “remote”, the
MSC-
3 is controlled
from the terminal
strip.
Optional Wiring
If selection between local
and remote is not required,
place a link between
terminals 1 and 5.
If the output disable is not
required place link between
terminals 1 and 6.
MSC-3 User’s Manual
IM00092A Page 11
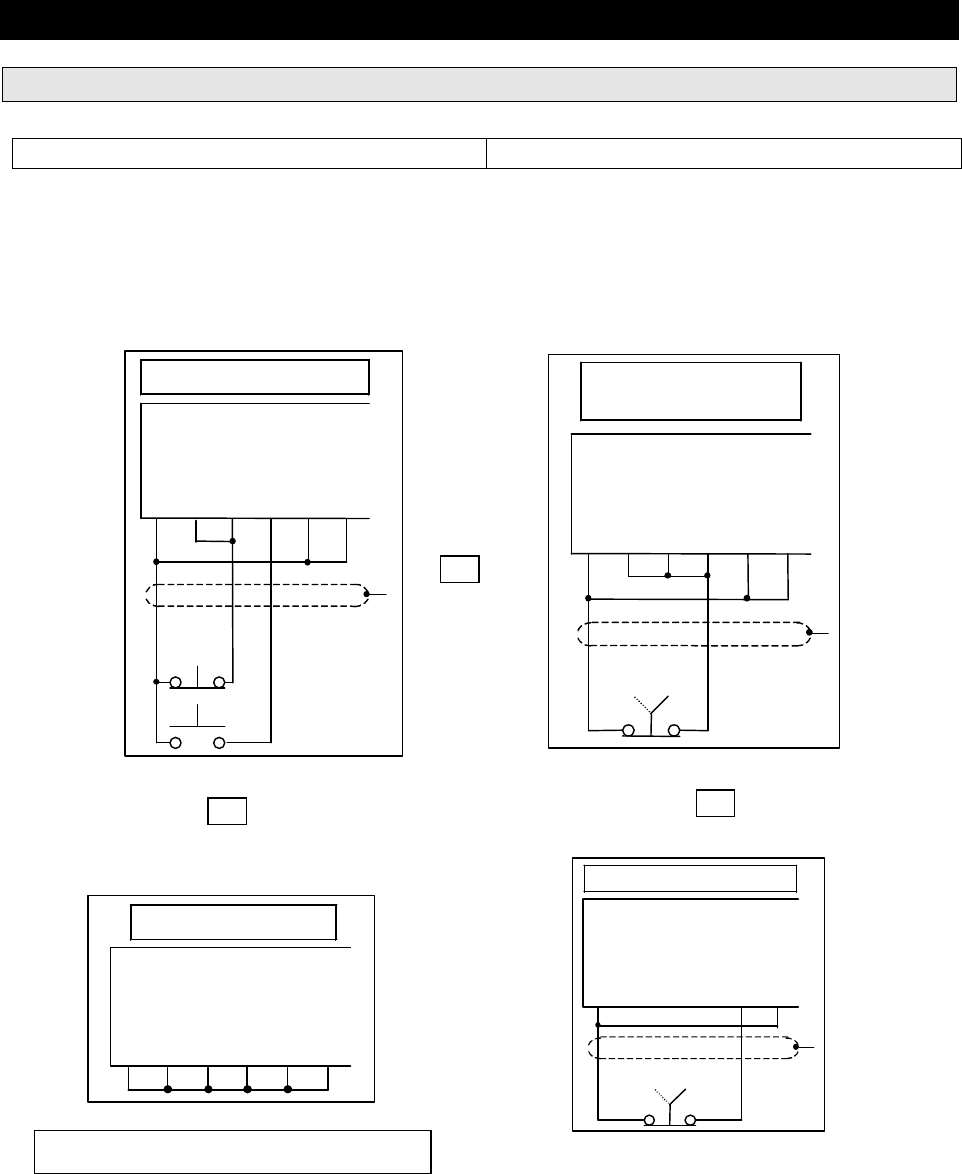
Quick Setup for Config 1.
Features
Forward Operation Select between Local and Remote
This terminal configuration gives single direction control from the terminal strip. This uses the MSC-3
default terminal configuration, Config 1.
STEP 1. Wire your supply into the L1, L2, L3 and Earth terminals. Wire your motor into the M1, M2, M3 and Earth
terminals. See page 7 of the instruction manual for recommended fuse or circuit breaker ratings.
STEP 2. Choose your control method from one of the following. Connect your control wiring as shown.
The Local/Remote Selection can be used on any of the
above circuits. Wire terminals 5 and 6 as shown.
Switch or Contact
Control
1 2 3 4 5 6
Stop/
Reset Run
+5V D1 D2 D3 D4 EN
MSC-3 Control Board
2 Wire
Control
Power up Start
1 2 3 4 5 6
+5V D1 D2 D3 D4 EN
MSC-3 Control Board
1 2 3 4 5 6
Local/Remote Selection
Local
Remote
+5V D1 D2 D3 D4 EN
MSC-3 Control Board
OR
OR
OR
Start
1 2 3 4 5 6
Push Button Control
Stop/
Reset
+5V D1 D2 D3 D4 EN
MSC-3 Control Board
3 Wire
Control
MSC-3 User’s Manual
Page 12 IM00092A
STEP 3. Choose your speed reference and connect it as shown.
OR
OR OR
Preset Speed.
Operation at a fixed speed Console Reference.
Use the Up and Down arrows on the front
panel to control the speed.
To use either the Preset Speed or the Console Reference select REMOTE from the REFERENCES menu.
Use the arrows to display the options. Press Enter when the one you require is displayed.
STEP 4. Setup your motor parameters in the MOTOR menu using the motor nameplate information.
STEP 5. From the PERFORMANCE menu setup your MIN and MAX speeds and your RAMP times.
STEP 6. From the PROTECTION menu setup your current limit and I2t currents.
Set SW1 as shown. If a 4 to 20mA reference is to be used, select REMOTE from the REFERENCES menu. AN1
should be displayed. Press Enter. Set the REF AT 0% to –25%. Press Enter.
SW1
0 to 5V
8 9 10 11 12
External
Potentiometer
SCN +5V IN+ IN- COM
MSC-3 Control Board
1k to 10k ohm
potentiometer
8 9 10 11 12
+ -
SW1
SW1
SW1
External
Reference
0..5V
0..10V
0..20mA
4..20mA
SCN +5V IN+ IN- COM
MSC-3 Control Board
MSC-3 User’s Manual
IM00092A Page 13
Quick Setup for Config 3.
Features
Forward Operation Hand/Off/Auto Operation
STEP 1. Wire your supply into the L1, L2, L3 and Earth terminals. Wire your motor into the M1, M2, M3 and Earth
terminals. See page 7 of the instruction manual for recommended fuse or circuit breaker ratings.
STEP 2. Choose your control method from one of the following. Connect your control wiring as shown. Do not
connect the wire into terminal 6 yet.
OR
ESO
Switch or Contact Control
1 2 3 4 5 6
Stop
Run
+5V D1 D2 D3 D4 EN
MSC-3 Control Board
OR
ESO
Start
1 2 3 4 5 6
Push Button Control
Stop
+5V D1 D2 D3 D4 EN
MSC-3 Control Board
OR
ESO
Power up start up
1 2 3 4 5 6
+5V D1 D2 D3 D4 EN
MSC-3 Control Board
1 2 3 4 5 6
ESO
Off
Hand/Off Auto Operation
Auto
Hand
+5V D1 D2 D3 D4 EN
MSC-3 Control Board
MSC-3 User’s Manual
Page 14 IM00092A
STEP 3. Choose your speed reference and connect it as shown
SW1
0 to 5V
8 9 10 11 12
External
Potentiometer
SCN +5V IN+ IN- COM
MSC-3 Control Board
1k to 10k ohm
potentiometer
8 9 10 11 12
+ -
SW1
SW1
SW1
External
Reference
0..5V
0..10V
0..20mA
4..20mA
SCN +5V IN+ IN- COM
MSC-3 Control Board
OR
OR
OR
Preset Speed.
Operation at a fixed speed
Console Reference.
Use the Up and Down arrows on the front
panel to control the speed.
To use either the Preset Speed or the Console Reference select REMOTE from the REFERENCES menu. Use
the arrows to display the options. Press Enter when the one you require is displayed.
Set SW1 as shown. If a 4 to 20mA reference is to be used, select REMOTE from the REFERENCES menu.
AN1should be displayed. Press Enter. Set the REF AT 0% to
-25%. Press Enter.
STEP 4. From the INPUT/OUTPUT menu select Terminal CFG. Use the up and down arrows until
CONFIG 3 is displayed. Press ENTER. Now connect the wire to terminal 6.
STEP 5. Setup your motor parameters in the MOTOR menu using the motor nameplate information.
STEP 6. From the PERFORMANCE menu setup your MIN and MAX speeds and your RAMP times.
STEP 7. From the PROTECTION menu setup your current limit and I2t currents.
MSC-3 User’s Manual
IM00092A Page 15
.
Quick Setup for Config 4.
Features Select between Local and Remote
Forward Operation Reverse Operation
STEP 1. Wire your supply into the L1, L2, L3 and Earth terminals. Wire your motor into the M1, M2, M3 and Earth
terminals. See page 7 of the instruction manual for recommended fuse or circuit breaker ratings.
STEP 2. Choose your control method from one of the following. Connect your control wiring as shown. Do not
connect the wire into terminal 6 yet.
STEP 3. Choose your speed reference and connect it as shown.
OR
OR
Reverse
Forward
1 2 3 4 5 6
Push Button Control
Stop
+5V D1 D2 D3 D4 EN
MSC-3 Control Board
1 2 3 4 5 6
Local/Remote Selection
Local
Remote
+5V D1 D2 D3 D4 EN
MSC-3 Control Board
If Local/Remote Selection is
required wire terminals 5 and 6 as
shown.
OR
Preset Speed.
Operation at a fixed speed Console Reference.
Use the Up and Down arrows on the front
panel to control the speed.
OR OR
To use either the Preset Speed or the Console Reference select REMOTE from the REFERENCES
menu. Use the arrows to display the options. Press Enter when the one you require is displayed.
SW1 0 to 5V
8 9 10 11 12
External
Potentiometer
SCN +5V IN+ IN- COM
MSC-3 Control Board
1k to 10k ohm
potentiometer
8 9 10 11 12
+ -
SW1
SW1
SW1
External
Reference
0..5V
0..10V
0..20mA
4..20mA
SCN +5V IN+ IN- COM
MSC-3 Control Board

MSC-3 User’s Manual
Page 16 IM00092A
STEP 4. From the INPUT/OUTPUT menu select Terminal CFG. Use the up and down arrows until
CONFIG 4 is displayed. Press ENTER. Connect the wire to terminal 6 now.
STEP 5. Setup your motor parameters in the MOTOR menu using the motor nameplate information.
STEP 6. From the PERFORMANCE menu setup your MIN and MAX speeds and your RAMP times.
STEP 7. From the PROTECTION menu setup your current limit and I2t currents.
STEP 8. From the PROTECTION menu enable the REVERSE direction.
Set SW1 as shown. If a 4 to 20mA reference is to be used select REMOTE from the REFERENCES
menu. AN1should be displayed. Press Enter. Set the REF AT 0% to -25%. Press Enter.
MSC-3 User’s Manual
IM00092A Page 17
MSC-3 Start up
Connect the input and motor wiring in accordance with the Electrical Installation Diagram. Select the
terminal configuration you require from the table on page 30. Connect the control wiring according to the
appropriate Control Wiring Diagram or follow a quick setup. The MSC-3 is now ready to run. Before
applying power ensure that rotation of the motor shaft will not cause injury or damage.
After applying power it is recommended that you at least go through the MOTOR, PERFORMANCE and
the INPUT/OUTPUT menus to set up the MSC-3 before running the motor to prevent any unexpected
motor operation. The MSC-3 is supplied with a link between the En terminal and the +5V terminal which
is all that is required to run the MSC-3 from the console. A connection between these two terminals must
always be made for the motor to run.
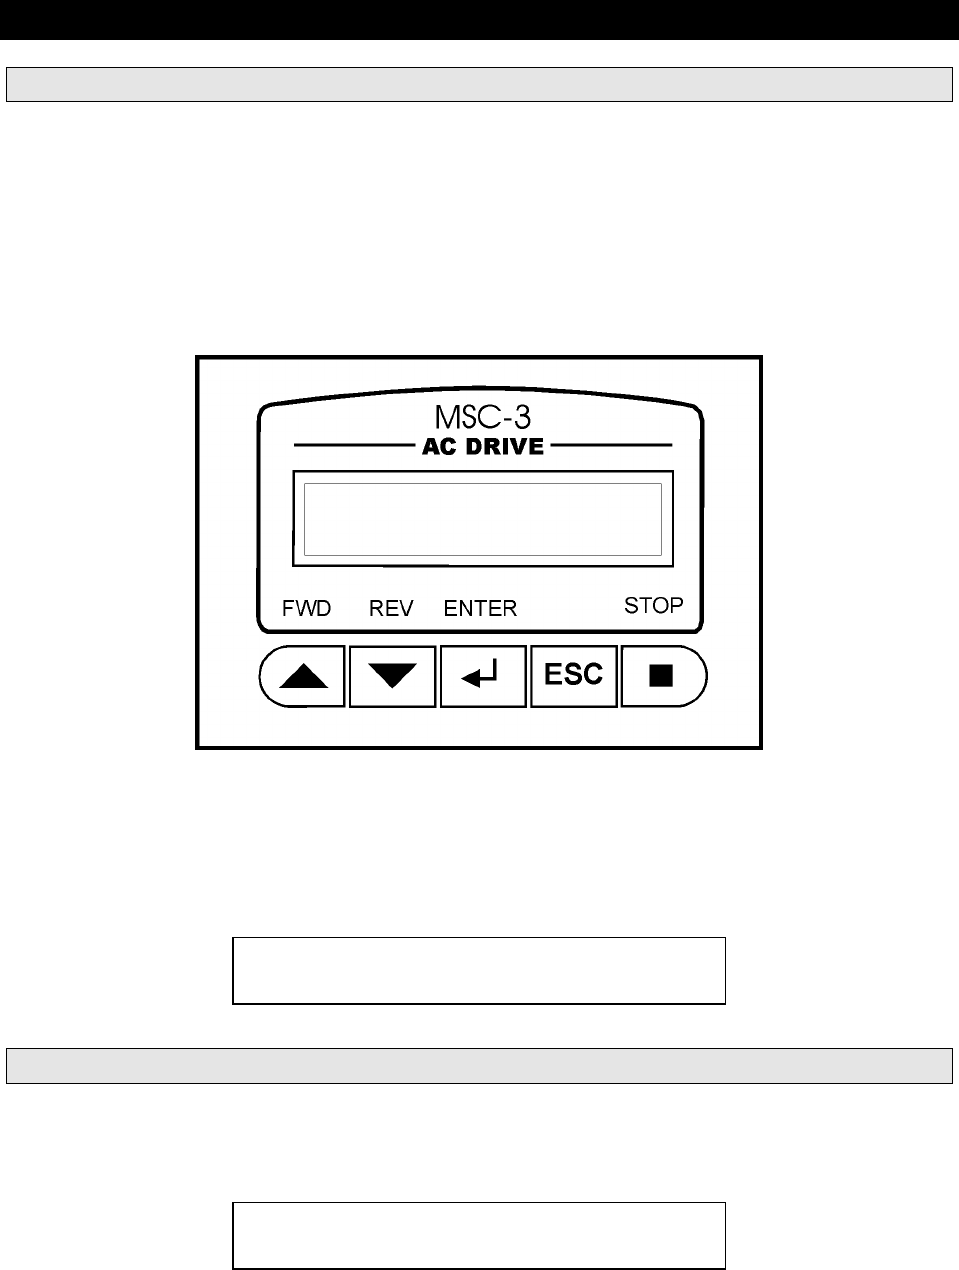
The five pushbuttons and display form a console through which drive features and settings are altered to
suit the application. When the MSC-3 is first powered up, the start banner is displayed for approximately
2 seconds. An example of the start banner is shown below. It displays the drive size, software version
and the temperature of the MSC-3 hardware. While the banner is displayed the internal fan is switched
on to verify its operation. If the fan is not required it will then be turned off.
R11
V1.38 23°C
MSC-3 Run mode
Once the start banner is removed the display is set in the Run Mode. The top line contains the run
variable. The second line contains the speed reference and the drive status. An example of the Run
Mode display is shown below:
25.0 Hz
50.0 FWD
The example shows that the desired output speed is 50 Hz and the motor is rotating at 25 Hz in the
forward direction as indicated by the status.
To start the drive, select a direction by pressing either of the run buttons: p FWD or qREV button. Use
the p FWD button to increase the speed reference and the q REV button to decrease it. The motor
should rotate up to the desired speed. If it does not, refer to the Trouble Shooting Guide at the end of this
manual.
If the motor shaft spins in the wrong direction remove the input power, wait for the MSC-3 to discharge
and swap any two motor phase wires. Re-apply input power and select a direction by pressing p FWD or
q REV.

MSC-3 User’s Manual
Page 18 IM00092A
Operation and access to the Run Mode and Menu Mode is done with the console push buttons. The
action of each push button changes with the mode of operation and the state of the drive. The following
table describes how the console push buttons affect the drive control.
Console Push Button operations
Console Mode Motor Running Motor Stopped
Menu mode
used for entering
setup information.
• Pressing STOP will stop the motor
• Pressing p or q will either select
another menu item or adjust a
setting
• Pressing ↵ will select the
displayed menu item or accept the
value being adjusted.
• Pressing ESC will abort value
adjustment or the current menu. If
the current menu is the top of the
menu tree, the console changes
mode to the Run Display mode
• Pressing STOP will not reset trip
conditions to allow trip messages to be
viewed after exiting menu mode
• Pressing p or q will either select
another menu item or adjust a setting
• Pressing ↵ will select the displayed
menu item or accept the value being
adjusted.
• Pressing ESC will abort value
adjustment or the current menu. If the
current menu is the top of the menu
tree, the console changes mode to the
Run Display mode
Run Display mode
-when the
CONSOLE REF is
the active speed
source
• Pressing STOP will stop the motor
• Pressing p or q will either
increase or decrease the motor
speed
• Pressing ↵ will have no effect
• Pressing ESC will abort the Run
Display mode and the console
changes to the Menu mode
• Pressing STOP will reset any trip
condition
• If no trip is present, pressing p or q
will either start the motor running
forward or reverse (internally latched).
• If a trip is present, p and q adjust the
speed reference without running the
motor.
• Pressing ↵ will have no effect
• Pressing ESC will abort the Run
Display mode and the console changes
to the Menu mode
Run Display mode
-when the
CONSOLE REF is
not the active
speed source
• Pressing STOP will stop the motor
• Pressing p,q or ↵↵ will have no
effect
• Pressing ESC will abort the Run
Display mode and the console
changes to the Menu mode
• Pressing STOP will reset any trip
condition.
• Pressing p, q or 88 will have no
effect.
• Pressing ESC will abort the Run
Display mode and the console changes
to the Menu mode.

MSC-3 User’s Manual
IM00092A Page 19
MSC-3 Menu mode
The Menu mode is entered from the Run mode by pressing the ESC push button (pressing ESC again
will return to Run mode). Use the p and q push buttons to display each menu item. To enter the menu
press the ↵↵ push button. This action will either display another menu or display a setting ready for
adjustment.
Control Console Menu
A00 DISPLAY
This menu allows selection of run variables and in the case of output frequency adjustment of its display
format and units. It also provides a restore factory defaults function.
A01 RUN VARIABLE
A single run variable is selected from this menu for display on the run screen.
• V01 Hz Output frequency
• V02 rpm Motor speed
• V03 % Load Relative motor load
• V04 Amps Drive output current
• V05 Volts DC DC link voltage
• V06 kW Drive output power
• V07 Volts AC Drive output voltage
• V08 °C Power circuit temperature (Celsius)
• V09 °F Power circuit temperature
(Fahrenheit)
• V10 I2t used Motor thermal overload level
A02 RUN SCALE
Default Value: 50.0
The default run variable is output frequency in Hz. This is the only run variable that may be re-scaled. It
can be changed to any number from 1.0 to 9999 (or 999.9 with one decimal place).
With A02 RUN SCALE displayed on the top line, press enter and the run scale value is displayed ready
for edit. Use the up and down push buttons to adjust each individual digit. Press Enter to move to the
next digit. To abandon the adjustment at any time, press the ESC push button.
Once the last digit has been adjusted, press Enter. The value remains on the display and is waiting for
decimal point assignment. Use the up and down push buttons to shift the decimal point and Enter to
accept the position.
Press ESC to return to A00 DISPLAY.
A03 RUN UNITS
Default Value: Hz
The MSC-3 is able to display the output frequency in user defined units. The default setting is Hz, but it
can be changed, so that the display will show user preferred units. For example, mtr/min, Cans/hr or
anything else up to 8 characters. The output frequency is the only run variable whose units can be
changed. The available characters are found in Appendix A
With A03 RUN UNITS displayed on the top line press Enter and the existing run units are displayed on
the second line. Use the up and down push buttons to select a different character.
When the desired character is displayed, press Enter and the next character may now be adjusted.
Repeat this seven more times. Changes to the run units can be abandoned at any point by pressing the
ESC push button.
When the eighth character is selected, pressing Enter will accept the new units setting.

MSC-3 User’s Manual
Page 20 IM00092A
A04 Menu Protect
The feature protects the entire menu mode with a code so that settings and configurations are protected
from unauthorized changes. After you enable this feature, return to the Run Screen. The next time
anyone presses ESC to enter the Menu mode the following message will appear:
A07 Enter Code
0
Use the up and down buttons to adjust the code value to the number 1470. Press Enter to accept. If
entered correctly, the familiar menu mode will be displayed. If the correct code is not entered you are
returned back to the run screen.
A05 SET CTL DEFS
This menu allows the factory default parameters to be reinstalled. The MSC-3 must be disabled before
you can restore the defaults. Pressing the Enter button will cause the message A06 CHECK WIRING
to be displayed. This is intended as a warning and an opportunity to confirm that terminal wiring is suited
to the default settings, otherwise unexpected drive operation may result.
Pressing the ENTER button again will cause the defaults to be loaded.
B00 MOTOR
This menu allows you to enter motor nameplate information. Press the Enter button to view and modify
Motor Volts, Motor Amps, Motor Hz and Motor rpm.
B01 MOTOR VOLTS
Default value: 230, 240, 415, 460 or 575 V (depends on model)
Range: 200..900 V
Use the up or down push buttons to adjust this setting to the motor nameplate voltage. Press Enter when
finished and the motor nameplate current is displayed or ESC to abort the adjustment
B02 MOTOR AMPS
Default value: drive nominal current
Range: 18 to 137% of drive overload current listed in the MSC-3 Output Current Specifications
table on page 44.
Use the up or down push buttons to adjust this setting to the motor nameplate current in amps. Press
Enter when finished and the motor frequency is displayed or ESC to abort the adjustment.
Entering the Nameplate Current of your motor determines the operation points for the Flux Plus and Slip
Comp features. This setting is not used to limit the output current of the MSC-3. Refer to D01 CURRENT
LIMIT for that particular feature.
B03 MOTOR Hz
Default value: 50 or 60 Hz
Range: 30..200 Hz
Use the up or down push buttons to adjust this setting to the motor nameplate frequency (Hz). Press
Enter when finished or ESC to abort the adjustment. This setting does not affect the minimum or the
maximum frequency output of the MSC-3. Refer to C01 MIN Hz and C02 MAX Hz for those features.
B04 MOTOR RPM
Default value: 1465 or 1765 rpm
Range: 500..60 times the Motor Hz entered previously, in rpm
Use the up or down push buttons to adjust this setting to the motor nameplate speed (rpm). 60 times the
Motor Hz is the two pole speed for an unloaded motor. Press Enter when finished or ESC to abort the
adjustment.
MSC-3 User’s Manual
IM00092A Page 21
C00 PERFORMANCE
This section allows you to set the motor performance characteristics.
C01 MIN Hz
Default value: 0 Hz
Range: 0 to 195Hz
This sets the frequency that the MSC-3 will run when given a run signal. The value is entered in Hz.
There must be a difference of at least 5Hz between the MIN Hz and the MAX Hz setting. For example, if
MAX Hz is set to 45Hz, then the largest allowed value for MIN Hz is 40Hz. Use the up or down push
buttons to adjust the MIN Hz value, press Enter to accept the value or press ESC to abort the
adjustment. It is possible to use the full span of the analog input to adjust the speed reference through
the remaining reduced speed range. For example: Max Hz = 50Hz and Min Hz = 20Hz, the analog input
“R01 Ref at 0%” should be set to 40%. Zero at the analog input will produce a reference of 20Hz. Full
span at the input will produce a reference of 50Hz.
C02 MAX Hz
Default value: 50 or 60Hz (depends on model)
Range: 5Hz to 200Hz
This sets the frequency that the drive will run with the speed reference at maximum. There must be a
difference of at least 5Hz between the MIN Hz and the MAX Hz setting. This value is scaled by the Run
Scale value and so is always entered in user defined units. Use the up or down push buttons to adjust the
MAX Hz value, press Enter to accept the value or press ESC to abort the adjustment.
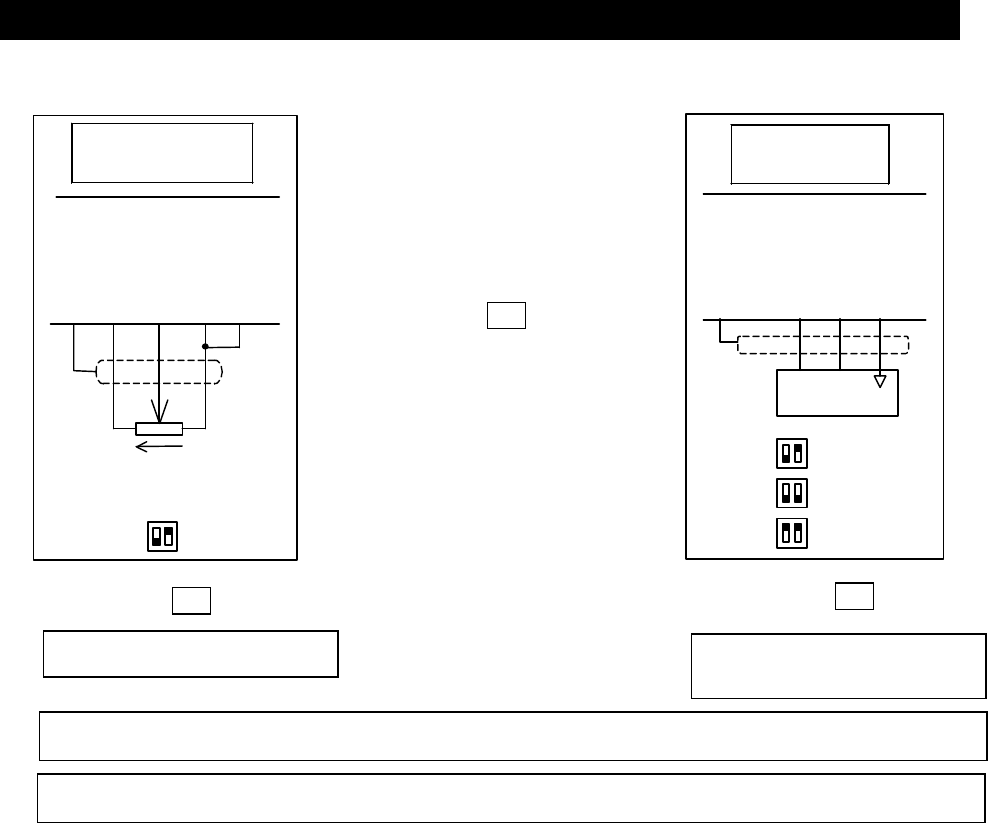
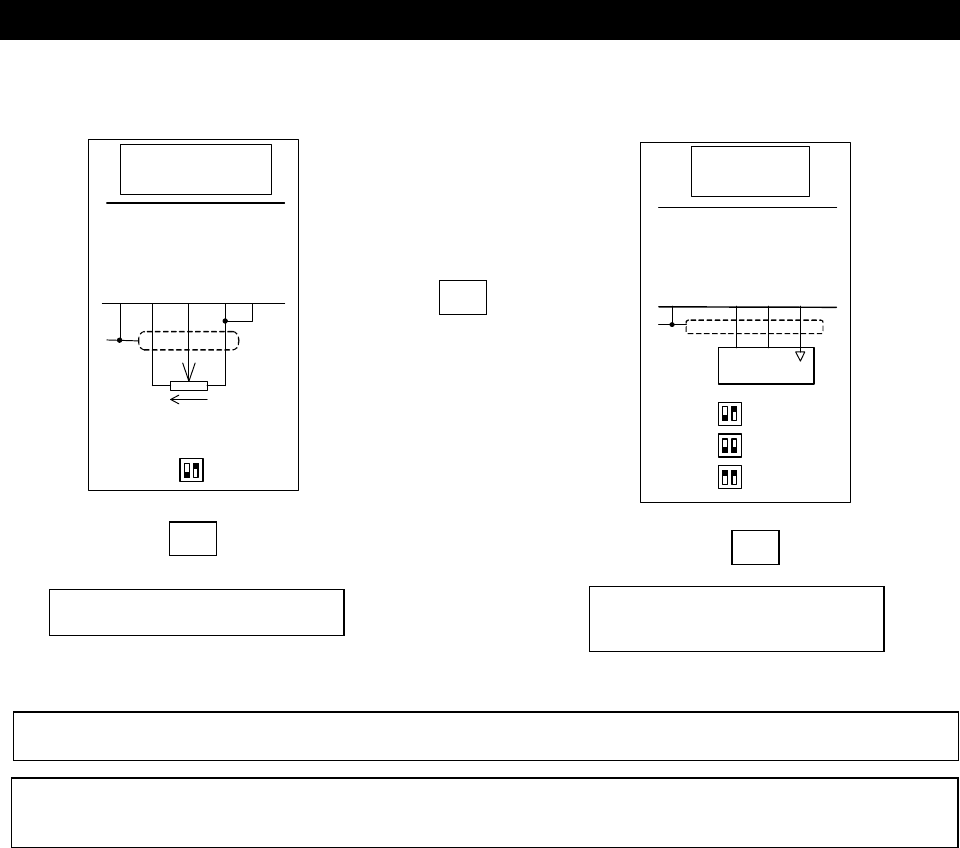
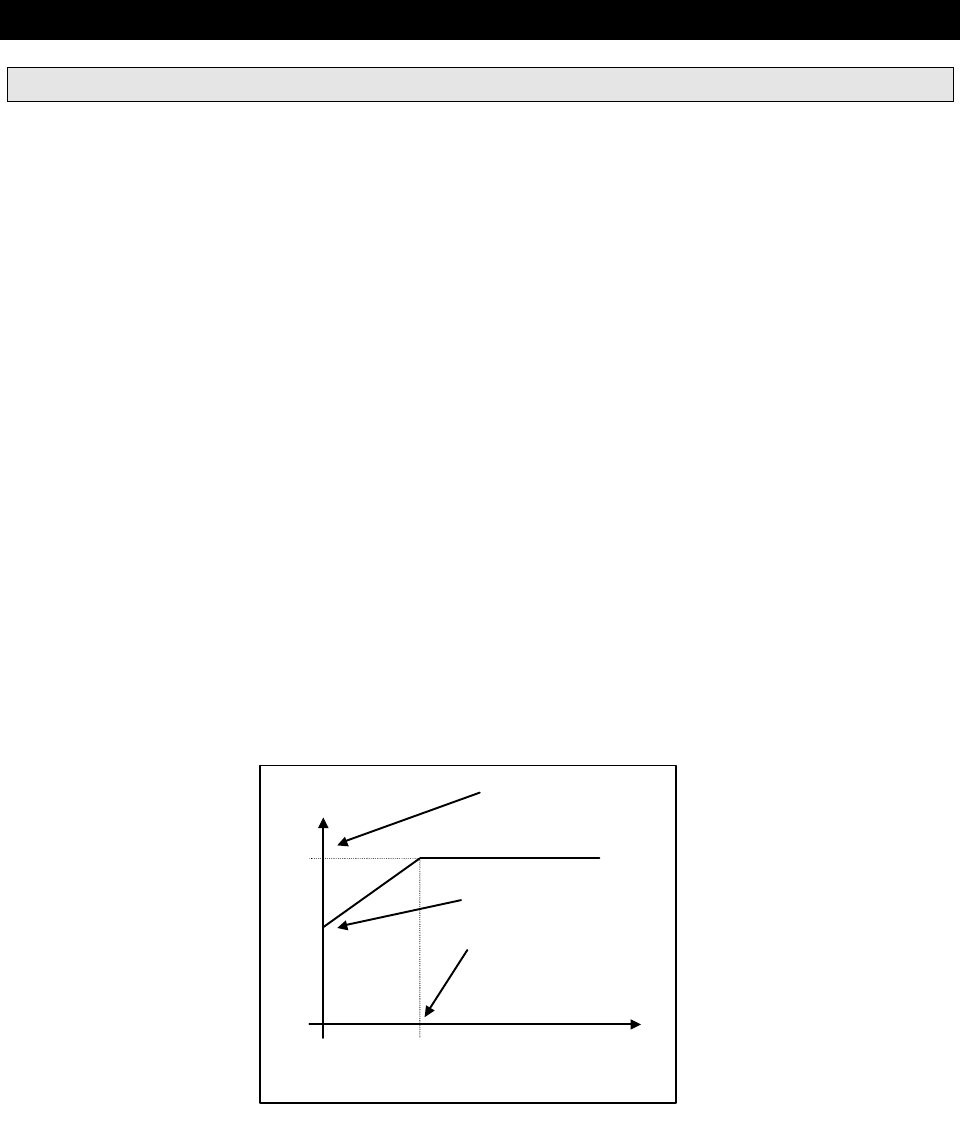
C03 Ramp
The MSC-3 has a programmable Ramp with adjustable acceleration, deceleration and S-curve rates.
Individual settings are provided for the linear and curved portions of the ramp.
When the motor accelerates, the ACCEL TIME and S TIME settings are used. When the motor
decelerates, the DECEL TIME and S TIME settings are used. Press Enter to adjust these parameters.
NOTE: Alterations to any ramp parameter is not permitted while the drive is operating in ESO mode,
(see page 35 for more information on ESO)
Acceleration Rate
Adjusting the linear
setting changes the
slope of this line
0
Ramp time with S time set to 0.01
Ramp time with S time set to a value greater than zero
Frequency
time
S time S time
S- curve same
at both ends of
linear ramp

MSC-3 User’s Manual
Page 22 IM00092A
C04 ACCEL TIME
Default value: 10 sec
Range: 0.5 to 600 sec
The ACCEL TIME is the time taken for the motor to go from zero speed up to motor rated speed
(assuming minimum S TIME). An MSC-3 with Motor Hz set to 50 Hz and an ACCEL TIME of 10 seconds
will take 10 seconds to go from 0 Hz to 50 Hz. Use the up or down buttons to adjust the ACCEL TIME or
press ESC to abort adjustment.
C05 DECEL TIME
Default value: 10 sec
Range: 0.5 to 600 sec
The DECEL TIME is the time taken for the motor to go from motor rated speed down zero speed
(assuming minimum S TIME). An MSC-3 with Motor Hz set to 50 Hz and an DECEL TIME of 10 seconds
will take 10 seconds to go from 50 Hz to 0 Hz. Use the up or down buttons to adjust the DECEL TIME or
press ESC to abort adjustment.
C06 S TIME
Default value: 0.01 sec
Range: 0.01 to 40.00 sec
The S TIME is the time taken for the motor to reach the limit of acceleration (as set by the rated speed
and the ACCEL TIME or DECEL TIME). Using the S TIME ensures smooth speed increases and
decreases. The longer the S TIME, the smoother the speed transition.
The S TIME will extend the ramp time as set by the ACCEL and DECEL TIME. The ramp time is now
roughly equal to the S TIME plus ACCEL TIME or DECEL TIME.
C07 Flux plus %
Default value: 25%
Range: 0 to 150% of adjustment range
The MSC-3 uses a sensorless flux vector control algorithm to control the motor operation. This control
algorithm provides independent control of motor flux throughout the speed range and is highly robust
against motor parameter changes. It uses the motor nameplate parameters entered in the B00 MOTOR
menu as the basis for its calculations to produce the correct flux in the motor. For a motor to produce full
torque it must have the correct flux applied to it. This is particularly critical at low speed. Flux Plus
adjusts the motor flux estimate to provide additional control where specific adjustments to the motor
torque response are required.
This feature enables an adjustment in the flux vector algorithm that can increase motor flux to produce
more torque for the same motor current. The amount of extra torque produced will vary from motor to
motor depending on motor size, efficiency and the operating speed.
Increase the value to produce more torque. This should be done in small steps to ensure the drive does
not go into Current Limit. If the drive does go into current limit decrease the Flux Plus value slightly.
This is the maximum torque that the motor can produce.
Use the up or down buttons for the adjustment. Press Enter when adjusted or ESC to abort adjustment.
C08 Hi Spd Flux+
Available Choices: H00 ENABLE
H01 DISABLE (default)
When this is disabled the flux plus decreases with increasing speed. This allows more efficient operation
of the MSC-3 on loads that have a high starting torque but do not require any extra torque during normal
operation. If your load requires high torque throughout the entire speed range Enable Hi Spd Flux+.
Press Enter to view the setting. Use the up or down push button to enable or disable Hi Spd Flux+. Press
Enter to accept the new setting or ESC to abandon.

MSC-3 User’s Manual
IM00092A Page 23
C09 SLIP COMP
Default value: 0%
Range: 0 to 150% of slip speed
Motor slip is the difference between the shaft speed and the frequency applied to the motor (synchronous
speed) and is dependent on load. Slip Comp can provide compensation for this varying slip to produce
constant shaft speed under varying loads. The MSC-3 estimates the slip of the motor using the
parameters entered in the MOTOR parameters menu and the motor load. A value of 100% will make the
shaft speed equal the synchronous speed. Flux Plus may be used in conjunction with Slip Comp to
provide increase output torque at low speeds. Press Enter then use the up and down buttons to adjust
the amount of SLIP COMP. When adjusted, press Enter to accept the new setting or ESC to abort the
adjustment.
C11 AUDIBLE FREQ
Available Choices: C12 2kHz
C13 4kHz
C14 8kHz
C15 16kHz
C16 Auto select (default)
This value sets the maximum frequency that the drive uses in the creation of its PWM output voltage.
This frequency is noticeable as an audible sound that the motor makes. Usually higher settings produce
less audible noise but increase the switching losses which produces more heat in the drive. For most
efficient operation select 2 kHz. Press Enter then use the up or down buttons to choose the AUDIBLE
FREQ. Press Enter when finished to accept the choice or ESC to abort.
MSC-3 User’s Manual
Page 24 IM00092A
D00 PROTECTION
This section lets you set the motor protection features.
D01 CURRENT LIM
Default value: drive overload current.
Range: 18 to100% of Drive Overload Current listed in MSC-3 Output Current Specifications
table on page 44, entered in amps.
This sets the maximum output current of the MSC-3. If excessive load is applied to the motor, the drive
will only apply this amount of current to the motor until the overload condition is removed. Current
limiting is achieved by reducing the speed of the motor. The Current Limit value cannot be set higher
than the maximum output current for the drive.
Press Enter then use the up or down buttons to adjust the CURRENT LIM. Press Enter when finished to
accept the adjustment or ESC to abort.
D02 I2t
The I
2t feature estimates the heating of the motor according to the motor load. When the estimated
heating exceeds I2t setting, the drive will trip on I2t. For a motor running at 110% of its I2t current this will
take approximately two minutes. The time to trip will shorten the further the motor current exceeds the I2t
value.
If power is removed from the drive after an I2t trip, the motor should be allowed to cool down before the
inverter is restarted. Motors running highly loaded at low speeds should have external cooling and an
external motor thermal sensing device such as microtherms or thermistors for protection.
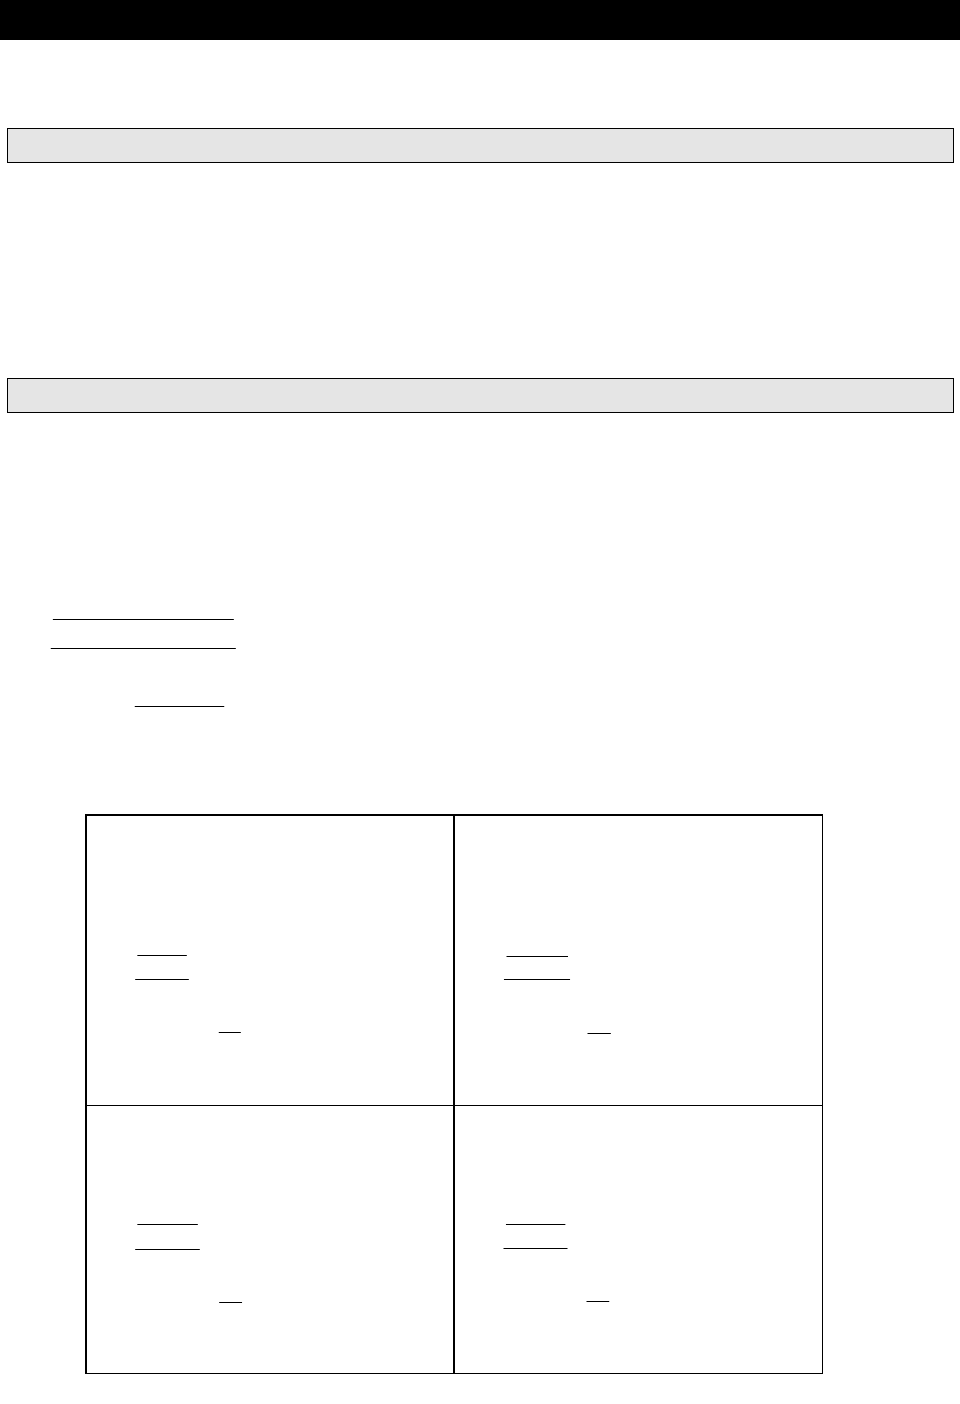
The I2t feature has the ability to set the trip threshold as a function of output frequency. This allows the I2t
to protect motors that have reduced cooling at low speeds because they are not externally cooled. The
diagram below is an example of the I2t trip threshold profile.
D02 I2t
Default value: drive nominal current
Range: 18% to 100% of drive Overload Current listed in MSC-3 Output Current Specifications
table on page 44, entered in amps.
This sets the upper limit of I2t and is entered in amps. This is equivalent to the usual I2t setting. Use the
up and down push buttons to adjust the D02 I2t value and press Enter to accept the value or ESC to
abandon changes.
D03 I2t zero Hz
Default value: drive nominal current
Range: 18% to 100% of drive Overload Current listed in MSC-3 Output Current Specifications
table on page 44, entered in amps.
Hz
I
2
t used
D02 I
2
t %
D03 I2t zero Hz %
D04 I2t cnr Hz
I
2
t speed profile
I2t trip threshold

MSC-3 User’s Manual
IM00092A Page 25
This sets the trip threshold when the speed is zero (e.g. DC HOLD). This value cannot be set higher than
the D02 I2t value set above. Use the up and down push buttons to adjust the D03 I2t zero Hz value and
press Enter to accept the value or ESC to abandon changes.
D04 I2t cnr Hz
Default value: 10Hz
Range: 2 to 200Hz
The D04 I2t cnr Hz value sets the frequency above which the profile uses the trip threshold as set by
D02 I2t. Below this frequency the I2t value is set by the slope on the I2t profile. Use the up and down
push buttons to adjust the D04 I2t value and press Enter to accept the value or ESC to abandon
changes.
D05 Reverse
Available Choices: H00 ENABLE
H01 DISABLE (default)
The MSC-3 is shipped with its reverse direction disabled to prevent damage to mechanical devices or
hazardous equipment operation caused by the motor running backwards. Press Enter to view the setting.
Use the up or down push button to enable or disable Reverse. Press Enter to accept the new setting or
ESC to abandon.
D08 DC INPUT
Available Choices: H00 ENABLE
H01 DISABLE (default)
This feature allows the MSC-3 to operate from a DC Input Supply. The DC Supply voltage should be at
least 1.414 times higher than the motor voltage. Press Enter to view the setting. Use the up or down
push button to enable or disable DC Input. Press Enter to accept the new setting or ESC to abandon.
E00 STOP/START
This section sets the motor stopping and starting modes.
E01 STOPPING
Available Choices: E02 RAMP TO STOP (default)
E03 COAST
This controls the operation of the MSC-3 when any stop signal is given.
RAMP TO STOP means that the MSC-3 will continue to control the motor in order to bring it to a stop in
the time set by the DECEL TIME and S TIME.
COAST means that the MSC-3 will stop controlling the motor and allow it to coast to a stop, just as if the
power supply had been disconnected.
E06 DYNAMIC BRK
Available Choices: H00 ENABLE
H01 DISABLE (default)
Dynamic Braking provides the means for dissipating the motor regenerative energy into an external
resistor. This may be required when the MSC-3 experiences regenerative currents from an overhauling
load or a high inertia load that is required to decelerate rapidly. Dynamic Braking requires the dynamic
braking option to be connected to the MSC-3. Please see the dynamic braking instruction manual for
resistor sizing and dynamic braking application information.
Use the up or down buttons to select either Enable or Disable. Press Enter to accept the selection or
ESC to abort.

MSC-3 User’s Manual
Page 26 IM00092A
E07 AUTO RESTART
Auto Restart allows the MSC-3 to automatically attempt to restart after a trip occurs. If the MSC-3 trips it
will wait 10 seconds then attempt to clear the fault. If it is unsuccessful it will keep trying every ten
seconds. It will do this the number of times specified in A/Rs ALLOWED. If the fault is cleared and the
drive runs without tripping for the A/R CLR TIME the number of auto restarts attempted will start counting
from 1 again. If the trip is cleared by any other means the fault count will start from 1 again.
Note: Alteration to any of the Auto Restart parameters is not permitted while the MSC-3 is operating in
ESO mode.
E08 A/Rs ALLOWED
Default value: 0
Range: 0 to 15 restarts
This number indicates how many times the MSC-3 will attempt to restart after a trip. For the motor to run
after the trip is cleared, the drive must be given a valid run command. Select 0 restarts in order to de-
activate Auto Restart.
Use the up or down buttons to adjust A/Rs ALLOWED. Press Enter to accept the adjustment or ESC to
abort.
E09 A/R CLR TIME
Default value: 20 min
Range: 0.1 to 20 min
If the MSC-3 operates for the A/R CLR TIME without any trips occurring the number of restarts is reset to
the value of A/Rs ALLOWED. Set the A/R CLR TIME to 0.1min for infinite auto restarts.
Use the up or down buttons to adjust A/R CLR TIME. Press Enter to accept the adjustment or ESC to
abort.
E10 Reset by PF
Available Choices: H00 ENABLE
H01 DISABLE (default)
Enabling this facility allows the MSC-3 to reset all trips when a momentary power failure occurs. This
feature is useful in power-up start applications because trips may be cleared without any extra switch
logic by turning the power off and straight back on again without waiting for the drive to completely power
down.
Use the up or down buttons to select either Enable or Disable. Press Enter to accept the selection or
ESC to abort.

MSC-3 User’s Manual
IM00092A Page 27
F00 REFERENCES
This lets you set the speed references for all the MSC-3 operating modes. Various options may allow the
connection of a different speed source from those listed for the standard MSC-3. When these options are
fitted the extra input options will appear where the word “Options” appears in the lists below. More preset
speeds or a second analog input are examples of this.
For more information on the different drive operating modes see the Control Terminal Functions on Page
34
F01 REMOTE
Default value: Analog Input 1
Other Choices: Preset
Motorized Pot
Console Ref
Options
When the drive is operating in remote mode it will take its speed reference from this source. Use the up and down
push buttons to select a reference and press Enter to accept the selection or ESC to abandon.
F02 LOCAL
Default value: Console Ref
Other Choices: Analog Input 1
Preset
Motorized Pot
Options
When the drive is operating in local mode it will take its speed reference from this source. Use the up
and down push buttons to select a reference and press Enter to accept the selection or ESC to abandon.
F03 ESO
Default value: Preset
Other Choices: Analog Input 1
Motorized Pot
Console Ref
Options
When the drive is operating in ESO mode it will take its speed reference from this source. Use the up
and down push buttons to select a reference and press Enter to accept the selection or ESC to abandon.
If Reverse operation is required in ESO enter the desired speed as a negative value.
F04 JOGFWD
Default value: Preset
Other Choices: Analog Input 1
Motorized Pot
Console Ref
Options
When the drive is running in JOGFWD it will take its speed reference from this source. Use the up and
down push buttons to select a reference and press Enter to accept the selection or ESC to abandon.
F05 JOGREV
Default value: Preset
Other Choices: Analog Input 1
Motorized Pot
Console Ref
Options
MSC-3 User’s Manual
Page 28 IM00092A
When the drive is running in JOGREV it will take its speed reference from this source. Use the up and
down push buttons to select a reference and press Enter to accept the selection or ESC to abandon.
Speed References
R00 AN1
When the Analog Input is selected as a speed reference for any of the different operating modes, two
parameters need to be checked. The MSC-3 will let you do this every time the analog input is selected
as a reference. They are R01 REF AT 0% and R02 REF AT 100%. Use the up or down buttons to
change the values (if required). Press enter to accept the value or ESC to abort.
MSC3 Analog Input Scaling
To calculate the values for REF AT 0% and REF AT 100% you need to know the following:
• Two analog input values and the speed required at each value
• The maximum speed.
• The input range, 5V, 10V or 20mA
Now use the following formulae to calculate the values for REF AT 0% and REF AT 100%
Examples:
Standard 4-20mA
At 4mA input we want 0Hz and at 20mA
input we want 50Hz, maximum speed
50Hz using the 0-20mA input range.
Bipolar Input
At 1V input we want 40Hz in reverse and
at 4V input we want 30Hz in forward,
maximum speed 40Hz using the 0-5V
input range.
m
REFAT
REFAT
=
−
−=
= − = −
= − =
50 0
50
20 4 00625
0% 50
50 00625 20 100 25
100% 100 00625 20 25 100
.
(.*)*
*.*
m
REFAT
REFAT
=
+
−=
= − = −
= − =
30 40
40
4 1 0583
0% 30
40 0583 4 100 158
100% 100 0583 5 158 133
.
(.*)*
*.*
Reduced Input Range
At 2V input we want 30Hz and at 4V input
we want 40Hz, maximum speed 60Hz
using the 0-10V input range.
Inverse Acting Bipolar Input
At 10V input we want 60Hz in reverse and
at 0V input we want 60Hz, maximum
speed 60Hz using the 0-10V input range.
m
REFAT
REFAT
=
−
−=
= − =
= + =
40 30
60
4 2 0083
0% 40
60 0 083 4 100 33
100% 100 0083 10 33 117
.
(.*)*
*.*
m
REFAT
REFAT
=
+
−= −
= + =
= − + = −
60 60
60
0 10 02
0% 60
60 02 0 100 100
100% 100 02 10 100 100
.
(.*)*
*.*
m
highspeed lowspeed
speed
highinput lowinput
REFAT highspeed
speed mhighinput
REFAT minputrange REFAT
=
−
−
= −
= +
max
(max *)*
* *
0% 100
100% 100 0%

MSC-3 User’s Manual
IM00092A Page 29
R01 REF AT 0%
Default value: 0%
Range: - 1000% to 1000%
This value specifies what the reference will be when 0% of the input signal is present at the analog input
terminals. For a 4 to 20mA input signal, R01 REF AT 0% must be set to –25%.
R02 REF AT 100%
Default value: 100%
Range: -1000 to 1000% of input span
This value specifies what the reference will be when 100% of the input signal present at the analog input
terminals.
R03 PRESET
Default value: 60%
Range: -100% to 100% of CO2 MAX Hz
If PRESET is chosen as the speed source you must enter the preset speed value. Use the up or down
buttons to adjust the preset speed. The preset speed is entered in % of CO2 MAX Hz. Press Enter to
accept the speed value or press ESC to abort.
R04 MOTORIZD POT
Motorised Pot operation requires two input terminals, Up and Down. If the Up terminal is energised the
drive speed will increase. If the Down terminal is energised the speed will decrease. If neither is
energised the drive maintains a constant speed. If MOTORIZD POT is selected as the speed source you
must select the mode of operation.
Available choices: R05 PersistENT
R06 RESET (default)
Use the up or down buttons to select either R05 PERSISTENT or R06 RESET. Press Enter to accept the
selection or ESC to abort.
In PERSISTENT mode the Motorized Pot speed will be remembered when power is removed. The
Motorized Pot reference will return to this value the next time the MSC-3 is run.
In RESET mode the Motorized Pot speed will not be remembered when power is removed. The
Motorized Pot reference will always start from zero after power is applied.
R07 CONSOLE REF
When this is selected, the reference is set from the console using the up and down arrows when the
MSC-3 is in the run mode.
MSC-3 User’s Manual
Page 30 IM00092A
G00 INPUT/OUTPUT
There are two ways to assign terminal strip functions in the MSC-3.
The user can choose a standard terminal configuration from the standard list.
The user can create a custom terminal configuration.
The simplest way to set a terminal configuration is to choose from one of the standard terminal
configurations tabulated below. From the console menu press enter. Use the up arrow and down arrow
buttons to move through the list of standard terminal configurations CONFIG 1 - CONFIG 8. When you
have chosen a configuration press the enter button. Selecting one of these loads the terminals with the
listed functions. The MSC-3 does not remember which configuration was selected but remembers
the individual terminal functions. It does this so that you can then modify any of the terminals to suit
your specific application. This also means that every time you go to the G01 Terminal CFG menu, the
first option displayed is G02 CONFIG 1. To see the terminal configuration you must look at each terminal
individually.
Note: The MSC-3 must be disabled to select another terminal configuration.
Remember if you make a mistake press the escape button twice. This will take you out of the menu
mode and move you into the run mode.
Standard Terminal Configurations
Term Config. D1
2
D2
3
D3
4
D4
5
EN
6
RL1
13,14,15
RL2
16,17,18
refer to
page
G02 CONFIG 1
Industrial RESET ~STOP FWD &
LATCH REMOTE ENABLE RUN TRIP 30
G03 CONFIG 2
VSC 2000 RESET ~STOP FWD &
LATCH REV &
LATCH ENABLE RUN TRIP 31
G04 CONFIG 3
HVAC ~STOP FWD &
LATCH ESO REMOTE ENABLE /
RESET PROOF ESO 31
G05 CONFIG 4 ~STOP FWD &
LATCH REV &
LATCH REMOTE ENABLE /
RESET RUN TRIP 31
G06 CONFIG 5 ~STOP FWD &
LATCH JOGFWD
REMOTE ENABLE /
RESET RUN TRIP 31
G07 CONFIG 6 FWD REV JOGFWD
JOGREV ENABLE /
RESET RUN TRIP 32
G08 CONFIG 7 ~STOP FWD &
LATCH UP DOWN ENABLE /
RESET RUN TRIP 32
G09 CONFIG 8 FWD UP DOWN REMOTE ENABLE /
RESET RUN TRIP 32
~ STOP means the logical inverse of STOP i.e. this input must have 5V applied for the drive to run.
G02 CONFIG 1 Industrial
Terminal. D1
2
D2
3
D3
4
D4
5
EN
6
RL1
13,14,15
RL2
16,17,18
Function RESET ~STOP FWD &
LATCH REMOTE ENABLE RUN TRIP
1. Sets the REMOTE speed reference to AN1.
2. Sets the LOCAL speed reference to the CONSOLE REF.
3. To change either of the above references go to A35 DIG IN 4 in the menu and select an alternate
after you have selected this terminal configuration.
4. See page 9 for typical examples of wiring for this terminal configuration.

MSC-3 User’s Manual
IM00092A Page 31
G03 CONFIG 2 VSC2000
Terminal. D1
2
D2
3
D3
4
D4
5
EN
6
RL1
13,14,15
RL2
16,17,18
Function RESET ~STOP FWD &
LATCH REV &
LATCH ENABLE
RUN TRIP
1. The MSC-3 only runs in remote. The remote reference can be set to any available option.
2. AN1 is the default speed reference.
3. To run the drive in reverse the Reverse Direction must be enabled.
G04 CONFIG 3 HVAC
Terminal. D1
2
D2
3
D3
4
D4
5
EN
6
RL1
13,14,15
RL2
16,17,18
Function ~STOP FWD &
LATCH ESO REMOTE ENABLE
/ RESET PROOF ESO
1. Sets the REMOTE speed reference to AN1.
2. Sets the LOCAL speed reference to the CONSOLE REF.
3. To change either of the above references go to A35 DIG IN 4 in the menu and select an alternate
after you have selected this terminal configuration.
4. Sets the ESO speed reference to the PRESET speed. To change this reference go to A34 DIG IN 3
in the menu to select an alternate speed source.
5. See page 10 for typical examples of wiring for this terminal configuration.
G05 CONFIG 4
Terminal. D1
2
D2
3
D3
4
D4
5
EN
6
RL1
13,14,15
RL2
16,17,18
Function ~STOP FWD &
LATCH REV &
LATCH REMOTE ENABLE
/ RESET RUN TRIP
1. Sets the REMOTE speed reference to AN1.
2. Sets the LOCAL speed reference to the CONSOLE REF.
3. To change either of the above references go to A35 DIG IN 4 in the menu and select an alternate
after you have selected this terminal configuration.
G06 CONFIG 5
Terminal. D1
2
D2
3
D3
4
D4
5
EN
6
RL1
13,14,15
RL2
16,17,18
Function ~STOP FWD &
LATCH JOGFWD REMOTE ENABLE
/ RESET RUN TRIP
1. Sets the REMOTE speed reference to AN1.
2. Sets the LOCAL speed reference to the CONSOLE REF.
3. To change either of the above references go to A35 DIG IN 4 in the menu and select an alternate
after you have selected this terminal configuration.
4. JOGFWD uses the internal PRESET as the jog speed source. Go to A34 DIG IN 3 to change
JOGFWD speed reference.

MSC-3 User’s Manual
Page 32 IM00092A
G07 CONFIG 6
Terminal. D1
2
D2
3
D3
4
D4
5
EN
6
RL1
13,14,15
RL2
16,17,18
Function FWD REV JOGFWD JOGREV ENABLE
/ RESET RUN TRIP
1. The MSC-3 only runs in remote.
2. Analog Input 1 is the speed reference for FWD and REV.
3. JOGFWD and JOGREV use the internal PRESET as the jog speed source. Go to A34 DIG IN 3 or
A35 DIG IN 4 to change the jog speed or source after you have selected this terminal configuration.
4. The FWD and REV inputs are non latching. This means a direction signal must be held continuously
to make the motor run.
G08 CONFIG 7
Terminal. D1
2
D2
3
D3
4
D4
5
EN
1
RL1
13,14,15
RL2
16,17,18
Function ~STOP FWD &
LATCH UP DOWN ENABLE
/ RESET RUN TRIP
1. The MSC-3 only runs in remote.
2. The Motorised potentiometer in persistent mode is the speed reference in remote.
3. How fast you can change the Motorized Pot reference is defined by the ramp settings.
G09 CONFIG 8
Terminal. D1
2
D2
3
D3
4
D4
5
EN
6
RL1
13,14,15
RL2
16,17,18
Function FWD UP DOWN REMOT
E ENABLE
/ RESET RUN TRIP
1. Sets the REMOTE speed reference to the Motorized Potentiometer. The UP and DOWN buttons on
the console operate in parallel to the Up and Down terminals. They will change the value of the
motorized pot but will not start the motor.
2. Sets the LOCAL speed reference to the CONSOLE REF. The console then behaves as normal.
3. To change either of the above references, go to A35 DIG IN 4 in the menu and select an alternate
after you have selected this terminal configuration.
4. FWD input is non latching.
G10 Enable/Reset
Available Choices: H00 ENABLE
H01 DISABLE (Default)
This sets the operation of the Enable terminal between being purely an enable terminal and also being
able to reset a trip condition. When set to ENABLED, applying a positive edge to the ENABLE input will
attempt to reset a trip condition. When this feature is set to DISABLED the ENABLE input cannot reset
the MSC-3 after a trip.
Use the up and down push buttons to select ENABLED or DISABLED. Press Enter to accept the setting
or Esc to abort.

MSC-3 User’s Manual
IM00092A Page 33
G11 DIG IN1
G12 DIG IN2
G13 DIG IN3
G14 DIG IN4
These four menu items permit an individual function assignment to each input terminal. Pressing enter
on these menu items presents a list of input functions with the currently assigned function being
presented first. These terminals are all active high.
Some input functions require the selection of one or more speed references. When these functions are
selected the choice of speed reference will follow with the currently assigned reference displayed first.
The list of speed references is as per the F00 REFERENCES menu item.
Use the up and down push buttons to move through the list, press Enter to select the new function or Esc
to abort.

MSC-3 User’s Manual
Page 34 IM00092A
Control Terminal Functions
Function Description Parameters
I00
FWD&LATCH A momentary contact closure on this input will start the motor
in the forward direction.
When the input is removed the motor continues to run in the
forward direction (latching). It requires an I02 STOP function
to be assigned in order to break the latch and stop the motor.
None
I01 REV&
LATCH A momentary contact closure on this input will start the motor
in the reverse direction.
When the input is removed the motor continues to run in the
reverse direction (latching). It requires I02 STOP function to
be assigned in order to break the latch and stop the motor.
The reverse direction must be enabled for the motor to run
backwards.
None
I02 ~STOP This input is required to be held for the motor to run. If it is
opened any latched input is cleared and the motor will stop
running.
This is used with FWD&LATCH and REV&LATCH to stop the
motor.
None
I03 FWD While this input is held the motor will run in the forward
direction. When the input is removed the motor will stop
running (non latching).
The I03FWD function disregards the state of the I02 ~ STOP
input and the drive will not stop while I03 FWD input is
present and the Enable input is wired to +5V.
Both I03 FWD & I04 REV inputs must be wired to +5 to
activate bipolar operation.
None
I04 REV While this input is held the motor will run in the reverse
direction. When the input is removed the motor will stop
running (non latching).
The I04 REV function disregards the state of the I02 ~ STOP
input and the drive will not stop while I04 REV input is
present and the Enable input is wired to +5V.
Both I03 FWD & I04 REV inputs must be wired to +5 to
activate bipolar operation.
None
IO5 UP Increases the motorised pot reference. None
I06 DOWN Decreases the motorised pot reference.
For the UP and Down terminals to have an effect the
motorised pot must be selected as a speed source. They
also require other terminals to stop and start the motor.
None
I07 RESET Will attempt to reset a trip condition. None

MSC-3 User’s Manual
IM00092A Page 35
Function Description Parameters
I08 ESO While this input is held the MSC-3 will operate in essential
services override (ESO). After selecting this function you will
be asked for a speed source to be selected.
When this input is activated:
• The motor runs at the selected ESO speed,
• The following trips are ignored:
• Supply Fail I2t Trip
• Over Temp
• Infinite auto restart of all other trips is enabled
• The ramp acceleration and deceleration times are set to
10 seconds
• Auto Restart and Ramp parameters cannot be changed
whilst ESO is in operation
• Bipolar reference mode is activated
• Reverse operation may occur and is dependent on speed
source. Refer to F03 ESO of the F00 REFERENCES
menu for ESO speed source selection.
ESO speed
reference
I09 JOGFWD Contact closure on this input will run the motor forward at the
JOGFWD speed. It will also clear any latched inputs. When
the contact is opened the motor will stop. After selecting this
function you will be asked for a speed reference to be
selected.
JOGFWD speed
reference
I10 JOGREV Contact closure on this input will run the motor reverse at the
JOGREV speed. It will also clear any latched inputs. When
the contact is opened the motor will stop. After selecting this
function you will be asked for a speed reference to be
selected.
JOGREV speed
reference
I11 REMOTE Contact closure on this input means that the MSC-3 will
follow the control inputs on the terminal strip and the motor
will run at the speed set by the Remote speed reference.
When the contact is opened the MSC-3 will be controlled
from the console and will run at the speed set by the Local
speed reference.
This input requires other terminals to stop and start the
motor. After selecting this function you will be asked for a
Remote speed reference and a Local speed reference to be
selected.
If the I11 REMOTE function is not assigned to an input
terminal, remote mode operation is assumed.
2 speed references

MSC-3 User’s Manual
Page 36 IM00092A
G15 RELAY1
G16 RELAY2
These two menu items permit an individual function assignment to each relay output. Pressing enter on
these menu items presents a list of output functions with the currently assigned function being presented
first.
Some relay functions require a value to be set. When these functions are selected the chance to set the
value will follow with the current value displayed first.
Use the up and down push buttons to move through the list, press Enter to select the new function or Esc
to abort.
Relay Output Functions
Function Indication when energised Parameters
O00 RUN Indicates that the drive is running in either forward or reverse. none
O01 TRIP Indicates the presence of a trip that has stopped the output of
the drive none
O02 ESO Indicates that the MSC-3 is in the essential services mode. none
O03 PROOF Indicates that the MSC-3 is enabled and not tripped. none
O04 ZERO SPEED Indicates that the MSC-3 is at zero speed. none
O05 AT SPEED Indicates that the motor speed is equal to the reference speed. none
O06 UNDER
SPEED % Indicates that the motor speed is below the entered value. % of CO2
MAX Hz
O07 OVER SPEED
% Indicates that the motor speed is above the entered value. % of CO2
MAX Hz
O08 ON The relay is energized. none
O09 OFF The relay is de-energised. none
O10 A/R FAIL Indicates that the drive could not auto restart as all restarts have
been exhausted. none
O11 FWD Indicates that the motor is running in the forward direction. none
O12 REV Indicates that the motor is running in the reverse direction. none
O13 ENABLED Indicates that the MSC-3 is enabled. none
O14 I2t TRIP Indicates that the I2t motor overload feature has activated. none
O15 OVER TEMP Indicates that the MSC-3 is too hot for safe operation. none

MSC-3 User’s Manual
IM00092A Page 37
Display Messages
The MSC-3 displays a variety of messages on the second line of its display to indicate the drive status.
These messages may be divided into two types, trip messages and run messages.
The MSC-3 will protect itself under a variety of fault conditions. When one of these conditions is
experienced the MSC-3 will trip, shut down the motor output and display one of the following messages.
The message will be displayed until the fault is cleared and a reset signal is applied.
Trip Message Meaning
OPT SC An output short circuit has been detected. This is caused by either
an Over Current or a Ground Fault on the motor terminals.
OV The DC Bus voltage has exceeded its maximum value.
OC The output current has exceeded the MSC-3’s continuous output
current rating.
DC LOW The DC Bus voltage has fallen below its minimum threshold.
PWR FAIL All input phases on the input power supply are either low or
missing.
SUPPLY F There is a problem with the input power supply. One phase is
either partially or totally missing and motor operation will be
impaired.
OT The MSC-3 is too hot.
I2T TRIP An I2t trip has occurred.
The following messages indicate the current operating condition of the MSC-3.
Run Message Meaning
CHARGING The MSC-3 is waiting for the DC Bus capacitors to be fully charged
before running the motor.
OPTION TRIP Option Trip Messages
C LIMIT The motor is drawing its maximum overload current.
V LIMIT The motor is regenerating or the input voltage is too high.
ESO The MSC-3 is operating in Essential Services Override mode
OPTION STATUS Option Status Messages
FWD The MSC-3 is running in the FWD direction.
REV The MSC-3 is running in the REV direction.
ENABLED The MSC-3 has an enable signal but no direction selected.
NOT EN The MSC-3 is ON but has no enable signal so it is not able to turn a
motor.

MSC-3 User’s Manual
Page 38 IM00092A
MSC-3 Trouble Shooting Guide
Symptom Cause Remedy
Front Display does not
illuminate. Input power wiring not
connected properly.
Input voltage not within
specification.
Check input power wiring, refer to the MSC-3
Electrical Installation Diagram.
Measure the input voltage at the MSC-3 input
terminals. Check with specifications.
Motor does not rotate
when UP button on the
Console is pressed.
Enable signal is not
active. Check that the EN terminal is connected to +5V
Check that the ENABLED message is displayed.
MSC-3 is in REMOTE Check that if you have a remote terminal it is not at
+5V with respect to DIG COM
Speed is set to
minimum Increase speed by holding down the UP button
Motor does not rotate
when remote START
signal is activated.
Incorrect control signal
wiring. Check control wiring to terminals and the terminal
functions assigned. Refer to Control Wiring
Diagrams and Terminal Configurations.
Enable signal is not
active. Check that the EN terminal is connected to +5V
Check that the ENABLED message is displayed.
MSC-3 is in LOCAL Check that your remote terminal is at +5V with
respect to DIG COM.
A direction has not
been selected. Check that either a FWD or a REV terminal has
been assigned and that it is at +5V with respect to
DIG COM.
If the reverse direction is selected ensure that
reverse is enabled from the Protection menu.
Speed signal is not
correctly connected. Check the REMOTE speed source in the
References menu. Ensure that this source is not at
zero.
Motor does not
accelerate in the time
set by the ACCEL
ramp and C LIMIT
message appears .
Current limit circuit is
operating. This is a normal operating mode for the MSC-3.
When the load is being accelerated too fast, the
MSC-3 limits current drawn by the motor by
extending the acceleration ramp time. A faster
Accel time is not possible with this Current Limit
setting. Increase the ACCEL time until the C LIMIT
message disappears
CURRENT LIM set too
low. Increase CURRENT LIM value so that the MSC-3 is
not prematurely limiting current. Check that the
motor will not be overheated with the new setting.
C LIMIT message
appears continuously Motor mechanically
overloaded. Check the actual load is within the motor’s capacity
at the required speed.
Motor shaft jammed. Check the mechanical drive system.
Fault in motor or motor
wiring. Check that motor is wired correctly.
Incorrect motor voltage
selected. Enter correct motor voltage from the MOTOR
menu.
Incorrect motor
frequency selected. Enter correct motor frequency from the MOTOR
menu.
FLUX PLUS is set too
high. Reduce the FLUX PLUS setting.

MSC-3 User’s Manual
IM00092A Page 39
Symptom Cause Remedy
Motor does not
decelerate in the time
set by the DECEL
ramp and V LIMIT
message appears.
Voltage limit circuit is
operating. This is a normal operating mode for the MSC-3.
When the load is being decelerated too fast, the
MSC-3 limits the voltage regenerated by the motor
by extending the deceleration ramp time. Increase
the DECEL time to make this message disappear.
If faster or controlled deceleration is required fit a
dynamic braking module.
V LIMIT message
appears continuously. Input voltage has
exceeded maximum
rating.
See MSC-3 General Specifications for input voltage
ratings.
OPT SC message
appears Short circuit on motor
terminals. Check wiring to motor terminals.
Earth Fault on motor
terminals Check wiring to motor terminals.
OC Motor current was
greater than the MSC-
3’s maximum current.
Check drive and motor current ratings.
OV
message appears. Input voltage has
exceeded maximum
ratings.
See general specification and check the input is
within ratings.
Check input supply for voltage transients. Fix the
external source.
Motor is overhauling. Ensure load cannot overdrive the motor. If
necessary fit dynamic braking.
OT message. Ventilation problem. Ensure operating ambient temperature is within
specification.
Check fans are rotating freely and there is no build
up of dust or debris in blades.
Visually examine the heatsink fins for build up of
dust and debris.
Drive is constantly
overloaded. Check the MSC-3 continuous current and ambient
temperature rating.
Motor is unstable. SLIP COMP is set too
high. Check that MOTOR NAMEPLATE RPM setting is
equal to the motor rated speed.
Check that NAMEPLATE CURRENT setting is
equal to the motor nameplate current.
Reduce SLIP COMP setting.
FLUX PLUS set too
high. Reduce FLUX PLUS setting.
Incorrect motor voltage
selected. Enter correct MOTOR VOLTAGE from the MOTOR
menu.
Incorrect motor
frequency selected. Enter correct MOTOR FREQUENCY from the
MOTOR menu.
CURRENT LIMIT is set
too low. Increase CURRENT LIMIT setting.

MSC-3 User’s Manual
Page 40 IM00092A
Symptom Cause Remedy
Excessive Motor
Heating. Motor is running at low
speeds for long times. Do not run the motor heavily loaded at low speeds
for long periods unless the motor has been suitably
de-rated or is force cooled.
Motor damaged or
incorrectly wired. Check the motor and motor wiring for faults.
Incorrect motor voltage
selected. Enter correct MOTOR VOLTAGE from the MOTOR
menu.
Incorrect motor
frequency selected. Enter correct MOTOR FREQUENCY from the
MOTOR menu.

MSC-3 User’s Manual
IM00092A Page 41
Your MSC-3 Setup Notes
Photocopy this page or complete in pencil
User Parameters Date..........................
DISPLAY User Default STOP/START User Default
Run variable Hz Stopping RAMP
Run Scale 50.0 Dynamic Brk Disabled
Run Units Hz A/R allowed 0
Menu protect Disabled A/R clr time 20
MOTOR Reset by PF Disabled
Motor Voltage. * REFERENCES
Motor Amps * REMOTE AN1
Motor Hz * LOCAL CONSOLE
Motor RPM * ESO PRESET %
PERFORMANCE JOGFWD PRESET %
Min Hz 0 JOGREV PRESET %
Max Hz * INPUT/OUTPUT
Accel Time 10.0 Terminal Config 1
Decel Time 10.0 OR
S Time 0.01 ENABLE/RESET Disabled
Flux Plus 25 DIG IN1 RESET
High Speed Flux
Plus Disabled DIG IN2 STOP
Slip Comp 0 DIG IN3 FWD + L
Audible Freq AUTO DIG IN4 REMOTE
PROTECTION RELAY 1 RUN
Current Limit * RELAY 2 TRIP
I2t * REF AT 0% 0
I2t zero Hz * REF AT 100% 100
I2t corner Hz 10 PRESET Speed 60
Reverse Disabled
MOTORIZED POT
RESET
Imbal Trip Disabled
DC Input Disabled
Serial No.: Designator e.g. SF1
* Drive Specific
MSC-3 User’s Manual
Page 42 IM00092A
MSC-3 Specifications
Input Supply Voltage
MSC-3R 380 to 480Vac, 3Ø
MSC-3J 440 to 600Vac, 3Ø
MSC-3L 208 to 240Vac, 3Ø
All these voltages have a tolerance of –15% to +10%
Input Frequency
48 to 62Hz
Output Voltage
MSC-3R 0 to 480Vac, 3Ø
MSC-3J 0 to 600Vac, 3Ø
MSC-3L 0 to 240Vac, 3Ø
The output voltage cannot be higher than the input
voltage
Output Frequency
Range: 0 to 200Hz
Resolution: 0.1%
Linearity: 0.2% of maximum frequency
Enclosure Rating
IP30 (NEMA 1)
IP66 (NEMA 4)
Environmental Rating
Storage Temperature:
-20 to +70º C -4 to 158º F
Operating Temperature:
0 to 40º C 32 to 104º F
0 to 50º C † 32 to 122º C †
Dependent on load current
Relative Humidity: 5 to 95%
Non condensing
Altitude: 0 to 1000m
0 to 3281 feet
Standards Compliance
Models marked with this symbol
comply with the Australian EMC
Framework requirements
UL 508C
Local Controls
Up, Down, Enter, Escape, Stop/Reset
Terminal Strip
Digital Inputs
+5V and DIG COM
5Vdc supply,
40mA max current
D1 to D4 and EN Digital Inputs
Logic High 3 to 5Vdc
Logic Low 0 to 2Vdc
Analog Input
Vref and AN COM
+5Vdc Supply
5mA max current
IN+ and IN-
Differential Input
0 to 5V range
0 to 10V range
0 to 20mA range
4 to 20mA range
Common mode range
± 25Vdc to AN COM
Relay Outputs
2 Form C Outputs (Single pole change over
contacts)
Contact Rating (Resistive load)
5A@250Vac
5A@30Vdc
Contact Rating (Inductive load)
2A@ 250Vac
2A@30Vdc
User Parameters
Motor Voltage 200 to 900V
The output voltage cannot exceed the input voltage
Motor Current
20 to 150% of max. continuous current
Motor Frequency 30 to 200Hz
Motor Speed
500 to 60 x Motor Frequency in rpm
Minimum Frequency 0 TO 195HZ
Maximum Frequency 5 to 200Hz
Acceleration time 0.5 TO 600S
Deceleration time 0.5 TO 600S
S time 0.01 to 40s
Flux Plus 0 to 150%
Slip Comp
0 to 150% of slip speed
DC Hold
0 to 50% of drive rated current
Audible
Frequency
2 to 16kHz
Current Limit
20 to 110% of max cont current
I2t 20 to 110% of max cont current
I2t Zero Hz
20 to 100% of max cont
current
I2t cnr Hz 2 to 200Hz
Drive Stopping
Ramp to stop
Coast to stop
Dynamic Braking
Auto Restart
Number of restarts
0 to 20
Reset time:
0.1 to 20 minutes
References
Analog Input
Console Reference
Preset
Motorized Potentiometer
The following functions can be enabled or disabled:
Menu Protect
Reverse Direction
High Speed Flux Plus
DC Input
Dynamic Braking
Reset by Power Failure
Power Failure Ride Through

MSC-3 User’s Manual
IM00092A Page 43
Model Max. Supply
Short Circuit
Rating
(Amps rms
Symmetrical)
Max. Fuse
Size Fuse
Class Max. Wire Size Max. Tightening
Torque
240V
MSC-3L3 18,000A , 240V 20 J 10 A.W.G (6mm2) 15.6 in.lb (1.76 Nm)
MSC-3L5 18,000A , 240V 20 J 10 A.W.G (6mm2) 15.6 in.lb (1.76 Nm)
MSC-3L7 18,000A , 240V 20 J 10 A.W.G (6mm2) 15.6 in.lb (1.76 Nm)
MSC-3L11 18,000A , 240V 20 J 10 A.W.G (6mm2) 15.6 in.lb (1.76 Nm)
MSC-3L15 18,000A , 240V 60 T 6 A.W.G (16mm2) 16 in.lb (1.8 Nm)
MSC-3L20 18,000A , 240V 60 T 6 A.W.G (16mm2) 16 in.lb (1.8 Nm)
MSC-3L23 18,000A , 240V 60 T 6 A.W.G (16mm2) 16 in.lb (1.8 Nm)
MSC-3L30 18,000A , 240V 60 T 6 A.W.G (16mm2) 16 in.lb (1.8 Nm)
MSC-3L40 18,000A , 240V 60 T 6 A.W.G (16mm2) 16 in.lb (1.8 Nm)
MSC-3L55 † 18,000A , 240V 200 T 2/0 A.W.G. (70mm2) 120 in.lb (13.6Nm)
MSC-3L82 † 18,000A , 240V 200 T 2/0 A.W.G. (70mm2) 120 in.lb (13.6Nm)
MSC-3L109 † 18,000A , 240V 200 T 2/0 A.W.G. (70mm2) 120 in.lb (13.6Nm)
MSC-3L140 † 18,000A , 240V 200 T 2/0 A.W.G. (70mm2) 120 in.lb (13.6Nm)
480V
MSC-3R3 18,000A , 480V 20 J 10 A.W.G (6mm2) 15.6 in.lb (1.76 Nm)
MSC-3R5 18,000A , 480V 20 J 10 A.W.G (6mm2) 15.6 in.lb (1.76 Nm)
MSC-3R7 18,000A , 480V 20 J 10 A.W.G (6mm2) 15.6 in.lb (1.76 Nm)
MSC-3R11 18,000A , 480V 20 J 10 A.W.G (6mm2) 15.6 in.lb (1.76 Nm)
MSC-3R15 18,000A , 480V 60 T 6 A.W.G (16mm2) 16 in.lb (1.8 Nm)
MSC-3R20 18,000A , 480V 60 T 6 A.W.G (16mm2) 16 in.lb (1.8 Nm)
MSC-3R23 18,000A , 480V 60 T 6 A.W.G (16mm2) 16 in.lb (1.8 Nm)
MSC-3R30 18,000A , 480V 60 T 6 A.W.G (16mm2) 16 in.lb (1.8 Nm)
MSC-3R40 18,000A , 480V 60 T 6 A.W.G (16mm2) 16 in.lb (1.8 Nm)
MSC-3R55 † 18,000A , 480V 200 T 2/0 A.W.G. (70mm2) 120 in.lb (13.6Nm)
MSC-3R82 † 18,000A , 480V 200 T 2/0 A.W.G. (70mm2) 120 in.lb (13.6Nm)
MSC-3R109 † 18,000A , 480V 200 T 2/0 A.W.G. (70mm2) 120 in.lb (13.6Nm)
MSC-3R140 † 18,000A , 480V 200 T 2/0 A.W.G. (70mm2) 120 in.lb (13.6Nm)
600V
MSC-3J3 18,000A , 600V 20 J 10 A.W.G (6mm2) 15.6 in.lb (1.76 Nm)
MSC-3J5 18,000A , 600V 20 J 10 A.W.G (6mm2) 15.6 in.lb (1.76 Nm)
MSC-3J7 18,000A , 600V 20 J 10 A.W.G (6mm2) 15.6 in.lb (1.76 Nm)
MSC-3J11 18,000A , 600V 20 J 10 A.W.G (6mm2) 15.6 in.lb (1.76 Nm)
MSC-3J15 18,000A , 600V 60 T 6 A.W.G (16mm2) 16 in.lb (1.8 Nm)
MSC-3J20 18,000A , 600V 60 T 6 A.W.G (16mm2) 16 in.lb (1.8 Nm)
MSC-3J23 18,000A , 600V 60 T 6 A.W.G (16mm2) 16 in.lb (1.8 Nm)
MSC-3J30 18,000A , 600V 60 T 6 A.W.G (16mm2) 16 in.lb (1.8 Nm)
MSC-3J40 18,000A , 600V 60 T 6 A.W.G (16mm2) 16 in.lb (1.8 Nm)
MSC-3J55 † 18,000A , 600V 200 T 2/0 A.W.G. (70mm2) 120 in.lb (13.6Nm)
MSC-3J82 † 18,000A , 600V 200 T 2/0 A.W.G. (70mm2) 120 in.lb (13.6Nm)
MSC-3J109 † 18,000A , 600V 200 T 2/0 A.W.G. (70mm2) 120 in.lb (13.6Nm)
MSC-3J140 † 18,000A , 600V 200 T 2/0 A.W.G. (70mm2) 120 in.lb (13.6Nm)
• Inverse-time circuit breakers can be used provided that the let-through energy (I2t) and peak let
through current (Ip) is less than that of the maximum fuse rating specified.
• Use Copper Conductors Only.
MSC-3 Specifications
DC Supply Voltage
MSC-3R 400 to 680Vdc †
MSC-3J 550 to 850Vdc †
MSC-3L 200 to 340Vdc †
All these voltages have a tolerance of
-15% to +10%
Output Voltage
MSC-3R 0 to 480Vac, 3Ø
MSC-3J 0 to 600Vac, 3Ø
MSC-3L 0 to 240Vac, 3Ø
The output voltage cannot be higher than the input
voltage divided by 1.414
† Rating not included in UL listing.

MSC-3 Users Manual
Page 44 IM00092A
MSC-3 Output Current Specifications
MSC-3 40ºC (104ºF) Ambient 50ºC (122ºF) Ambient
Continuous Current for Continuous Current for
General
Purpose
Rating
Extended
Duty Rating
Over Load
Current* General
Purpose
Rating
Extended
Duty Rating
Over Load
Current*
x3 3.6 2.7 4.7 3.0 2.2 4.7
x5 5.0 3.6 6.3 4.1 3.0 6.3
x7 7.1 5.2 8.9 6.0 4.4 8.9
x11 10.7 7.8 13.4 9.0 6.6 13.4
x15 14.9 10.9 19.0 12.4 9.1 19.0
x20 19.7 14.5 25.0 16.5 12.1 25.0
x23 22.5 16.5 28.6 18.8 13.8 28.6
x30 30.1 22.1 38.4 25.0 18.3 38.4
x40 40.3 29.6 51.1 33.8 24.8 51.1
x55 55.0 40.3 70.0 46.0 33.7 70.0
x82 82.0 60.1 104 69.1 50.7 104
x109 109 79.9 139 91.3 67.0 139
x140 140 102.7 178 119 87.2 178
These currents apply to all ranges MSC-3 independent of the input voltage.
• 60 Second Rating
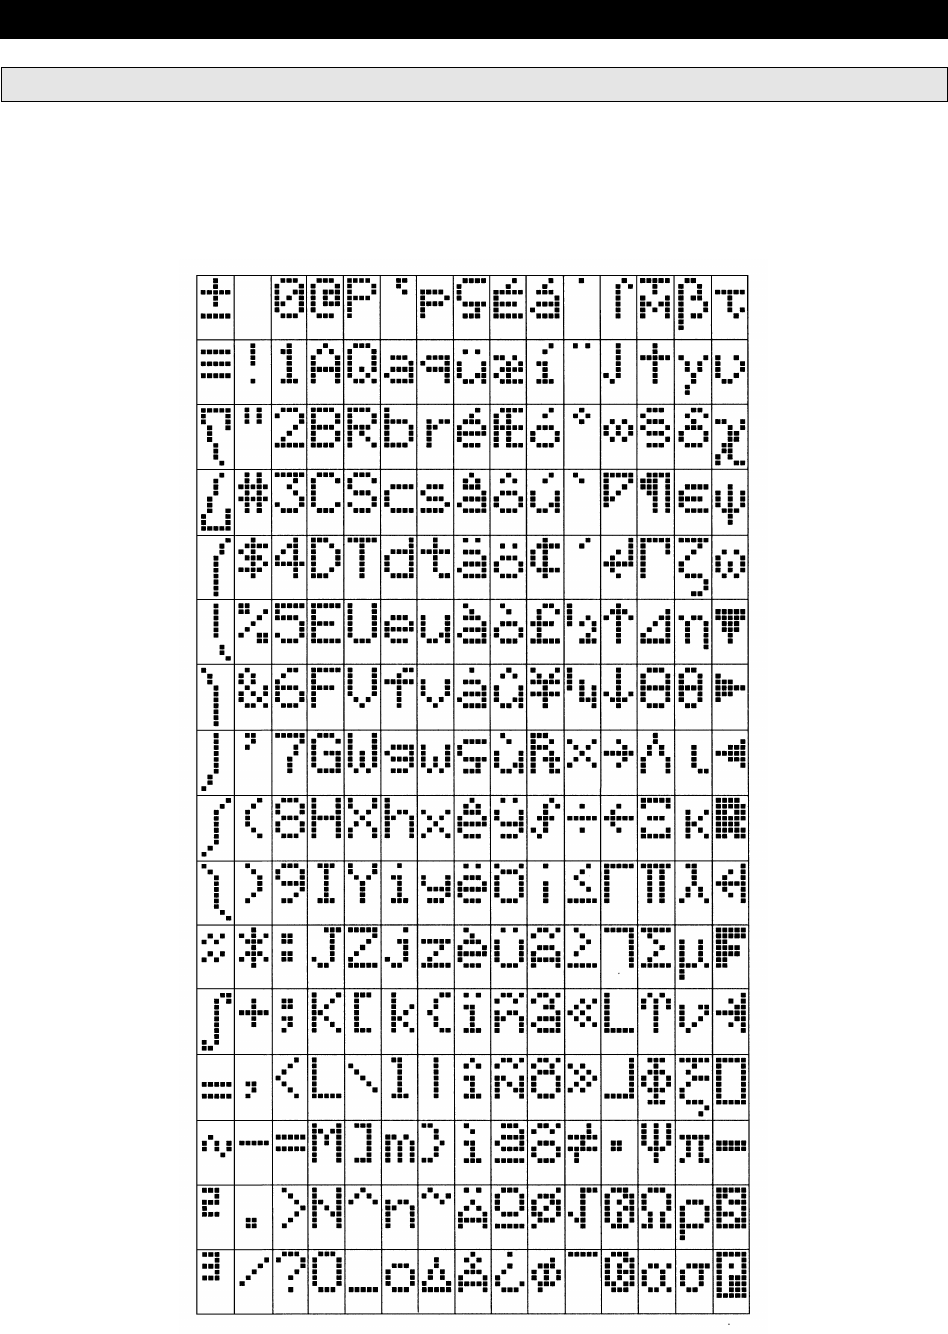
MSC-3 User’s Manual
IM00092A Page 45
Appendix A - MSC-3 Character Set

http://www.zener.net
© Zener Electric Pty Limited 2001
IM00092A
23 November 2001
Australian
Manufacturers ZENER ELECTRIC PTY LIMITED
ACN 001 595 428
DELIVERY ADDRESS POSTAL ADDRESS
366 Horsley Road
MILPERRA
NSW 2214
AUSTRALIA
P.O. Box 4462
MILPERRA DC
NSW 1891
AUSTRALIA
Tel: +61-2 - 9795 3600
Fax: +61-2 - 9795 3611
Email: zener@zener.net
