Zenoss Developer's Guide Developers 08 102010 3.0 V01
Zenoss_Developers_Guide_08-102010-3.0-v01
Zenoss_Developers_Guide_08-102010-3.0-v01
User Manual:
Open the PDF directly: View PDF ![]() .
.
Page Count: 146 [warning: Documents this large are best viewed by clicking the View PDF Link!]
- Zenoss Developer's Guide
- Table of Contents
- Chapter 1. Introduction
- Chapter 2. Getting Started
- Chapter 3. ZenPacks
- 3.1. Overview
- 3.2. Creating a ZenPack
- 3.3. ZenPack Structure and Contents
- 3.4. Developing the ZenPack
- 3.5. Building and Distributing ZenPacks
- 3.6. Development Mode
- 3.7. Where to Get More Information
- Chapter 4. Zenoss Data Stores
- Chapter 5. Events
- Chapter 6. Configuration Property Management
- Chapter 7. Creating New Jobs
- Chapter 8. Device Management
- Chapter 9. Extending the Model
- Chapter 10. Zenoss Daemons
- Chapter 11. Add a Performance Daemon
- Chapter 12. Adding a Device Type
- 12.1. Overview
- 12.2. Add the MIB
- 12.3. Add a Device Organizer
- 12.4. Create a Modeler
- 12.5. Create a Performance Collector
- 12.6. Create the Template
- 12.7. Map Events
- 12.8. Adding SSH Monitoring Tests
- Chapter 13. Extending the User Interface
- Chapter 14. ZenPack Conversion Tasks for Version 3.0
- Chapter 15. Reports
- Chapter 16. Migrating Zenoss Code
- Chapter 17. Testing
- Appendix A. Event Database Dictionary
- Appendix B. TALES Expressions
- Glossary

Zenoss Developer's Guide
Copyright © 2010 Zenoss, Inc., 275 West St. Suite 204, Annapolis, MD 21401, U.S.A. All rights reserved.
This work is licensed under a Creative Commons Attribution Share Alike 3.0 License. To view a copy of this license, visit http://
creativecommons.org/licenses/by-sa/3.0/; or send a letter to Creative Commons, 171 2nd Street, Suite 300, San Francisco, California, 94105,
USA.
The Zenoss logo is a registered trademark of Zenoss, Inc. Zenoss and Open Enterprise Management are trademarks of Zenoss, Inc. in the
U.S. and other countries.
Flash is a registered trademark of Adobe Systems Incorporated.
Java is a registered trademark of Oracle and/or its affiliates. Other names may be trademarks of their respective owners.
Linux is a registered trademark of Linus Torvalds.
Oracle and the Oracle logo are registered trademarks of the Oracle Corporation.
SNMP Informant is a trademark of Garth K. Williams (Informant Systems, Inc.).
Sybase is a registered trademark of Sybase, Inc.
Tomcat is a trademark of the Apache Software Foundation.
Windows is a registered trademark of Microsoft Corporation in the United States and other countries.
All other companies and products mentioned are trademarks and property of their respective owners.
Part Number: 08-102010-3.0-v01

iii
1. Introduction ............................................................................................................................................. 1
1.1. Overview ...................................................................................................................................... 1
1.1.1. Key Tenets ........................................................................................................................ 1
1.2. Architecture and Technologies ....................................................................................................... 2
1.2.1. User Layer ......................................................................................................................... 3
1.2.2. Data Layer ......................................................................................................................... 3
1.2.3. Process Layer .................................................................................................................... 4
1.2.4. Collection Layer ................................................................................................................. 4
2. Getting Started ........................................................................................................................................ 5
2.1. Working with the Source Code ...................................................................................................... 5
2.1.1. Getting the Source Code .................................................................................................... 5
2.1.1.1. Getting Subversion for the Appliance ........................................................................ 5
2.1.2. Keeping Code Updated ...................................................................................................... 6
2.1.3. Getting Patches ................................................................................................................. 6
2.1.4. Style Guidelines ................................................................................................................. 6
2.1.4.1. Docstrings ............................................................................................................... 6
2.1.5. Generating Diffs for new Fixes ............................................................................................ 8
2.1.6. Submitting a Fix ................................................................................................................. 8
2.2. Development Toolchain Requirements ........................................................................................... 8
2.2.1. Appliance ........................................................................................................................... 8
2.3. Programming Techniques ............................................................................................................ 10
2.3.1. Calling Methods Using REST ............................................................................................ 10
2.3.1.1. How to Call Methods Using REST .......................................................................... 10
2.3.1.2. Sending an Event .................................................................................................. 11
2.3.2. Miscellaneous Notes ......................................................................................................... 13
2.3.2.1. pkg_resources ....................................................................................................... 13
2.3.2.2. urllib2 Workarounds ............................................................................................ 13
2.4. zendmd: Command-line Access to the Device Management Database (DMD) ................................. 14
2.5. Programming Documentation ....................................................................................................... 16
2.5.1. Python ............................................................................................................................. 16
2.5.2. Zenoss API ...................................................................................................................... 16
2.5.3. Other Resources .............................................................................................................. 16
2.5.4. Contributing to the Documentation .................................................................................... 16
3. ZenPacks .............................................................................................................................................. 17
3.1. Overview .................................................................................................................................... 17
3.2. Creating a ZenPack .................................................................................................................... 17
3.2.1. ZenPack Names ............................................................................................................... 17
3.2.2. Specifying Dependencies .................................................................................................. 18
3.2.3. Locating ZenPack Source Outside of Zenoss ..................................................................... 18
3.2.4. Community ZenPack Subversion Access ........................................................................... 18
3.3. ZenPack Structure and Contents ................................................................................................. 18
3.4. Developing the ZenPack ............................................................................................................. 21
3.4.1. Base ZenPack Class ........................................................................................................ 21
3.4.2. Storing Objects in the ZODB ............................................................................................. 21
3.4.3. Providing DataSource classes ........................................................................................... 21
3.4.4. Monitoring Template Checklist .......................................................................................... 22
3.4.4.1. Data Sources ........................................................................................................ 22
3.4.4.2. Data Points ........................................................................................................... 22
3.4.4.3. Thresholds ............................................................................................................ 23
3.4.4.4. Graph Definitions ................................................................................................... 23
3.4.4.5. Graph Points ......................................................................................................... 23
3.4.5. Providing Performance Collector Plugins ........................................................................... 23
3.4.6. Referencing Collector Plugins in ZenPacks ........................................................................ 23
3.4.7. Providing Daemons .......................................................................................................... 24

Zenoss Developer's Guide
iv
3.4.8. setuptools and the zenpacksupport ................................................................................... 24
3.5. Building and Distributing ZenPacks .............................................................................................. 24
3.5.1. Migrating between versions ............................................................................................... 25
3.5.2. Converting older ZenPacks to ZenPack eggs ..................................................................... 25
3.6. Development Mode ..................................................................................................................... 25
3.6.1. Source ZenPacks ............................................................................................................. 25
3.6.2. Converting .egg Files to Development Mode ...................................................................... 25
3.7. Where to Get More Information ................................................................................................... 26
4. Zenoss Data Stores ............................................................................................................................... 27
4.1. Zope Object Database (ZODB) .................................................................................................... 27
4.2. MySQL Event database ............................................................................................................... 29
4.2.1. Connecting to the Database .............................................................................................. 29
4.2.2. MySQL in 60 Seconds ...................................................................................................... 29
4.3. Python Pickle Files ...................................................................................................................... 30
4.4. Round-Robin Database ............................................................................................................... 31
5. Events ................................................................................................................................................... 33
5.1. Understanding an Event Entry ..................................................................................................... 33
5.1.1. Event Design ................................................................................................................... 33
5.2. Sending an Event ....................................................................................................................... 33
5.3. Adding an Event Class ................................................................................................................ 34
5.3.1. Add to ZenEventClasses .................................................................................................. 34
5.3.2. Add the class to the import XML ....................................................................................... 34
5.3.3. Write a migrate script ....................................................................................................... 35
6. Configuration Property Management ....................................................................................................... 36
6.1. Adding a Configuration Property .................................................................................................. 36
6.1.1. Adding a Configuration Property to an Event ..................................................................... 36
6.1.2. Adding a Configuration Property to a Device ...................................................................... 36
6.2. Migrating the Configuration Property Code ................................................................................... 36
7. Creating New Jobs ................................................................................................................................ 38
7.1. Job Requirements ....................................................................................................................... 38
7.2. Running a Job ............................................................................................................................ 38
7.3. Life Cycle of a Job ...................................................................................................................... 38
7.4. Shell Command Jobs .................................................................................................................. 39
7.5. Logging ...................................................................................................................................... 39
8. Device Management .............................................................................................................................. 40
8.1. Adding Devices Programatically ................................................................................................... 40
8.1.1. Using a REST call ............................................................................................................ 40
8.1.2. Example: Using an XML-RPC Call from Python ................................................................. 40
8.1.3. XML-RPC Attributes ......................................................................................................... 40
8.2. Editing Device Information ........................................................................................................... 41
8.2.1. Using a REST call ............................................................................................................ 41
8.2.2. Using an XML-RPC Call from Python ................................................................................ 41
8.3. Deleting A Device ....................................................................................................................... 42
8.3.1. Using a REST call ............................................................................................................ 42
8.3.2. Using an XML-RPC Call from Python ................................................................................ 42
8.4. Checking If A Device Exists ........................................................................................................ 42
8.4.1. Using a REST call ............................................................................................................ 42
8.4.2. Using an XML-RPC Call from Python ................................................................................ 42
8.5. Exporting a Device List ............................................................................................................... 43
9. Extending the Model .............................................................................................................................. 44
9.1. Add a ZenModel Relationship ...................................................................................................... 44
9.1.1. One-to-One (1:1) Relationships ......................................................................................... 44
9.2. One-to-Many (1:N) Relationships ................................................................................................. 45
9.3. Many-to-Many (M:N) Relationships ............................................................................................... 46

Zenoss Developer's Guide
v
9.3.1. One-to-Many (1:N) Container Relationships ....................................................................... 47
9.4. Zenoss XML Schema .................................................................................................................. 48
9.4.1. object ............................................................................................................................... 50
9.4.1.1. Example ................................................................................................................ 50
9.4.1.2. Attributes ............................................................................................................... 50
9.4.1.3. Children ................................................................................................................ 50
9.4.2. objects ............................................................................................................................. 51
9.4.2.1. Example ................................................................................................................ 51
9.4.2.2. Children ................................................................................................................ 51
9.4.3. property ........................................................................................................................... 51
9.4.3.1. Example ................................................................................................................ 51
9.4.3.2. Attributes ............................................................................................................... 52
9.4.4. tomany ............................................................................................................................. 52
9.4.4.1. Example ................................................................................................................ 52
9.4.4.2. Attributes ............................................................................................................... 52
9.4.4.3. Children ................................................................................................................ 52
9.4.5. tomanycont ...................................................................................................................... 52
9.4.5.1. Example ................................................................................................................ 52
9.4.5.2. Attributes ............................................................................................................... 53
9.4.5.3. Children ................................................................................................................ 53
9.4.6. toone ............................................................................................................................... 53
9.4.6.1. Example ................................................................................................................ 53
9.4.6.2. Attributes ............................................................................................................... 53
9.4.7. link .................................................................................................................................. 53
9.4.7.1. Example ................................................................................................................ 53
9.4.7.2. Attributes ............................................................................................................... 53
9.5. Zenoss Permissions .................................................................................................................... 53
9.5.1. Adding New Permissions .................................................................................................. 54
9.5.2. Assigning Permissions to a Method ................................................................................... 54
9.5.3. Checking Links ................................................................................................................. 54
10. Zenoss Daemons ................................................................................................................................. 55
10.1. Twisted Network Programming Overview .................................................................................... 55
10.1.1. Understanding NJobs, Driver and DeferredList ................................................................. 55
10.1.1.1. DeferredList ......................................................................................................... 55
10.1.1.2. NJobs ................................................................................................................. 56
10.1.1.3. Driver .................................................................................................................. 56
10.1.1.4. A Simple Example ............................................................................................... 57
10.2. Zenoss Daemon Overview ......................................................................................................... 59
10.3. zenhub: Daemon to ZODB management .................................................................................... 60
10.3.1. Daemon to ZODB management ...................................................................................... 60
10.3.2. Heartbeats and other Events ........................................................................................... 61
10.3.3. Pluggable Daemon Services ........................................................................................... 61
10.4. ZenRender and Graphs ............................................................................................................. 61
10.5. Developing a Daemon ............................................................................................................... 62
10.5.1. Command-line Options ................................................................................................... 62
10.5.2. Add the Daemon Control Script ....................................................................................... 62
10.5.3. Set Up ZenHub Communications .................................................................................... 63
10.5.3.1. Registering Services with the Hub ........................................................................ 63
11. Add a Performance Daemon ................................................................................................................ 64
11.1. Overview ................................................................................................................................... 64
11.2. DataMaps ................................................................................................................................. 64
11.3. Performance Collection .............................................................................................................. 66
11.3.1. Connecting Collectors and Services ................................................................................ 66
11.4. Creating a New Collector ........................................................................................................... 66

Zenoss Developer's Guide
vi
11.4.1. Constructor .................................................................................................................... 66
11.4.2. Getting a List of Devices ................................................................................................. 67
11.4.2.1. Thresholds .......................................................................................................... 68
11.4.3. fetchConfig() ................................................................................................................ 69
11.4.4. Collector's ZenHub Service ............................................................................................. 70
11.4.5. Miscellaneous Functions ................................................................................................. 70
11.4.6. Collect the Performance Data ......................................................................................... 71
12. Adding a Device Type .......................................................................................................................... 74
12.1. Overview ................................................................................................................................... 74
12.2. Add the MIB ............................................................................................................................. 74
12.3. Add a Device Organizer ............................................................................................................ 74
12.4. Create a Modeler ...................................................................................................................... 75
12.4.1. Verify the SNMP connectivity and OIDs ........................................................................... 76
12.4.2. Common SNMP Issues ................................................................................................... 76
12.4.3. Modeler Code ................................................................................................................ 76
12.4.4. Testing the Modeler ........................................................................................................ 79
12.5. Create a Performance Collector ................................................................................................. 79
12.5.1. Performance Data Collector Code ................................................................................... 79
12.5.2. Writing Your Own Command Parser ................................................................................ 80
12.6. Create the Template ................................................................................................................. 82
12.6.1. Create the DataSource ................................................................................................... 82
12.6.2. Create a Threshold ......................................................................................................... 82
12.6.3. Create a Graph .............................................................................................................. 82
12.7. Map Events .............................................................................................................................. 82
12.8. Adding SSH Monitoring Tests .................................................................................................... 83
12.8.1. Overview ........................................................................................................................ 83
12.8.2. Modeling Plugin Test Data .............................................................................................. 83
12.8.2.1. Test Data for an ObjectMap .................................................................................. 83
12.8.2.2. Test Data for a RelationshipMap .......................................................................... 84
12.8.2.3. Test Data for a List of Data Maps ......................................................................... 84
12.8.3. Data Point Parser Test Data ........................................................................................... 84
12.8.3.1. Test Data for Device-Level Parsers ....................................................................... 84
12.8.3.2. Test Data for Component Parsers ......................................................................... 85
12.8.4. Running the Tests .......................................................................................................... 85
13. Extending the User Interface ................................................................................................................ 86
13.1. About Zenoss UI Technologies .................................................................................................. 86
13.1.1. HyperText Markup Language (HTML) .............................................................................. 86
13.1.2. Cascading Style Sheets (CSS) ........................................................................................ 86
13.1.3. Zope 2, ZPT and TAL ..................................................................................................... 86
13.1.4. ZPT and Macro Expansion for TAL (METAL) ................................................................... 87
13.1.5. JavaScript / AJAX ........................................................................................................... 87
13.1.6. JavaScript Library: Ext JS ............................................................................................... 87
13.2. Customizing the Navigation Bar ................................................................................................. 87
13.2.1. Example: Simple HTML Page ......................................................................................... 88
13.2.2. Example: Simple TAL and METAL Page .......................................................................... 88
13.3. Customizing the Logo ................................................................................................................ 89
13.4. Zope 2 Page Templates, TAL and METAL and Zenoss ............................................................... 89
13.4.1. Tips ............................................................................................................................... 91
13.5. Zope 3 Views Explained ............................................................................................................ 92
13.5.1. The Zope 2 Way ............................................................................................................ 92
13.5.2. The Zope 3 Way ............................................................................................................ 93
13.6. Other Customizations ................................................................................................................ 95
13.6.1. Adding Tabs ................................................................................................................... 95
13.6.2. Adding a Dialog .............................................................................................................. 97

Zenoss Developer's Guide
vii
13.6.3. Adding a New Menu or Menu Item .................................................................................. 99
13.6.4. Creating a Table Using ZenTableManager ..................................................................... 100
13.6.5. Creating an Editable Table ............................................................................................ 102
13.6.6. How to Save Properties via an Edit Screen .................................................................... 102
13.7. Creating a Dashboard Portlet ................................................................................................... 104
13.7.1. Create a ZenPack ........................................................................................................ 104
13.7.2. Write the Python Back-End Code .................................................................................. 105
13.7.3. Write the JavaScript Portlet ........................................................................................... 106
13.7.4. Register the Portlet ....................................................................................................... 111
13.8. Debugging Tips ....................................................................................................................... 112
14. ZenPack Conversion Tasks for Version 3.0 ......................................................................................... 113
14.1. About ZenPack Conversion ...................................................................................................... 113
14.1.1. What Has Changed? .................................................................................................... 113
14.1.1.1. Redesigned Pages ............................................................................................. 113
14.1.2. Updating Page Templates ............................................................................................. 114
14.1.3. Updating Page-Level Dialogs ........................................................................................ 114
14.1.4. Updating Data Sources ................................................................................................. 115
14.1.4.1. Modify the MANIFEST.in File .............................................................................. 115
14.1.4.2. Create an Interface for the Data Source .............................................................. 115
14.1.4.3. Create an info Object ......................................................................................... 116
14.1.4.4. Write an Adapter ................................................................................................ 117
14.1.5. Updating Thresholds ..................................................................................................... 117
14.1.6. Custom "Add Device" Widget ........................................................................................ 117
14.1.7. Custom Columns on the Component Grid (Device Summary) .......................................... 118
15. Reports .............................................................................................................................................. 120
15.1. Adding a Report ...................................................................................................................... 120
15.2. Plugins .................................................................................................................................... 121
15.3. Adding Export Buttons to Reports ............................................................................................ 121
16. Migrating Zenoss Code ...................................................................................................................... 123
16.1. Introduction and Steps ............................................................................................................. 123
16.2. How It Works .......................................................................................................................... 123
16.3. What You Write ....................................................................................................................... 123
16.3.1. Implement cutover() ...................................................................................................... 124
16.3.2. Supporting Code ........................................................................................................... 124
16.3.3. Testing and Deployment ............................................................................................... 124
17. Testing .............................................................................................................................................. 125
17.1. Zenoss Unit Tests ................................................................................................................... 125
17.1.1. Introduction .................................................................................................................. 125
17.1.2. doctest Testing ............................................................................................................. 125
17.1.3. Zenoss' Test Runner ..................................................................................................... 126
17.1.3.1. An Example Unit Test ........................................................................................ 127
17.1.4. Integrating With Buildbot ............................................................................................... 130
17.1.5. JavaScript Test Framework ........................................................................................... 130
17.2. Functional User Interface Testing ............................................................................................. 130
17.2.1. Introduction .................................................................................................................. 130
17.2.2. Installing and Running .................................................................................................. 130
17.2.2.1. Installing and Configuring Mac OS X ................................................................... 130
17.3. Where to Get More Information ................................................................................................ 131
A. Event Database Dictionary ................................................................................................................... 132
B. TALES Expressions ............................................................................................................................. 133
B.1. Examples ................................................................................................................................. 133
B.1.1. ping ............................................................................................................................... 133
B.1.2. DNS forward lookup ....................................................................................................... 133
B.1.3. DNS reverse lookup ....................................................................................................... 133

Zenoss Developer's Guide
viii
B.1.4. snmpwalk ...................................................................................................................... 133
B.2. TALES Device Attributes ........................................................................................................... 133
B.3. TALES Event Attributes ............................................................................................................. 134
Glossary .................................................................................................................................................. 136
1
Chapter 1. Introduction
1.1. Overview
The Zenoss system provides full stack coverage of networks, servers, applications, services, and virtualization.
Functionally, it provides complete operational awareness by combining discover and inventory, availability and per-
formance monitoring, event management, and reporting.
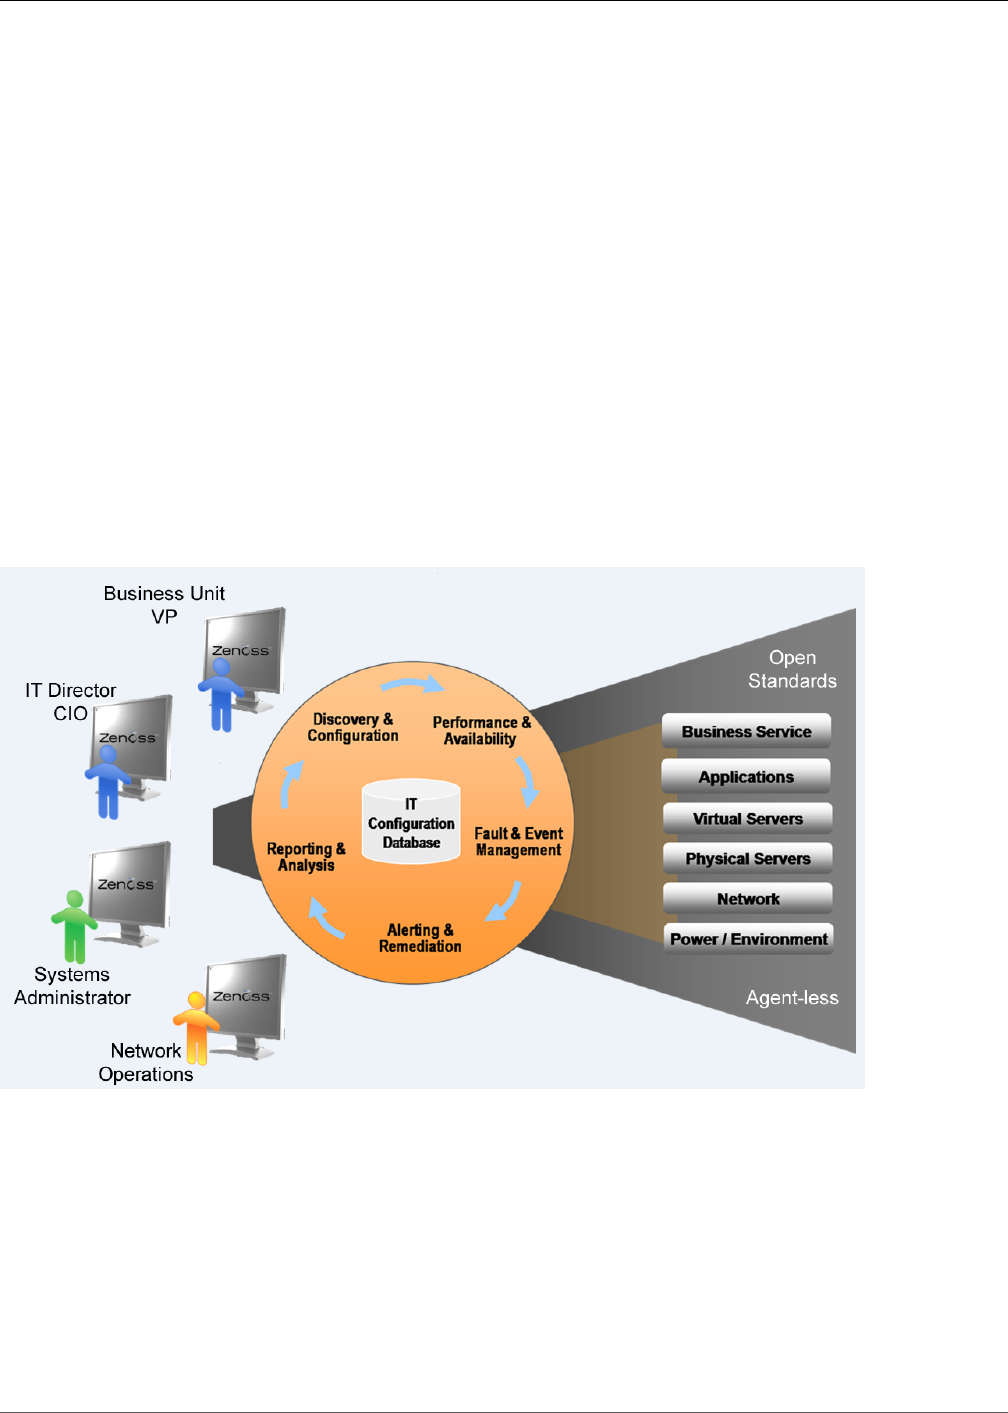
At its highest level, the system comprises these major areas:
• Discovery and configuration
• Performance and availability
• Fault and event management
• Alerting and remediation
• Reporting
Zenoss unifies these areas into a single system with a modern, interactive Web user interface.
Figure 1.1. High-Level view
1.1.1. Key Tenets
Zenoss was designed with these important ideas at its core:
•Modeling
The system's model enables it to understand the environment in which it operates. Through sophisticated and
detailed analysis, Zenoss determines how to monitor and manage complex IT environments. The core of the

Introduction
2
standard model describes basic information about each device's operating system and hardware. The model is
object-based, and is easily extended through object inheritance.
•Discovery
With a sophisticated model, manual input and maintenance of data is challenging. To address this challenge,
Zenoss uses discovery to populate the model. During discovery, the system accesses each monitored device in
your infrastructure and interrogates it in detail, acquiring information about its components, network integration,
and dependencies.
•Normalization
Because Zenoss collects information from different platforms and through different protocols, the amount and
format of available information varies. For example, file system information gathered from a Linux server differs
from similar information gathered from a Windows server. Zenoss standardizes the data gathered so that you
can perform valid comparisons of metrics gathered by different methods and for different systems.
•Agentless Data Collection
To gather information, Zenoss relies on agent-less data collection. By communicating with a device through one
of several protocols (including SNMP, SSH, Telnet, and WMI), it minimizes the impact on monitored systems.
•Full IT Infrastructure
Unlike other tools, the system's inclusive approach unifies all areas of the IT infrastructure--network, servers,
and applications--to eliminate your need to access multiple tools.
•Configuration Inheritance
Zenoss extends the concept of inheritance in object-oriented languages to configuration. All core configuration
parameters (configuration properties) and monitoring directions (monitoring templates) use inheritance to de-
scribe how a device should be monitored. Inheritance allows you to describe, at a high level, how devices should
be monitored. It also supports ongoing refinements to the configuration. (For detailed information on inheritance
and templates, refer to the chapter titled "Properties and Templates.")
•Cross-Platform Monitoring
Zenoss monitors the performance and availability of heterogeneous operating systems (including Windows,
Linux, and Unix), SNMP-enabled network devices (such as Cisco), and a variety of software applications (such
as WebLogic and VMware).
•Scale
You can deploy the system on a single server to manage hundreds of devices. The Enterprise version allows
you to manage large, distributed systems by using horizontal scaling of its collectors.
•Extensibility
The system's extension mechanism, ZenPacks, allow for rapid addition and modification to customize your
environment.
1.2. Architecture and Technologies
The following diagram illustrates the system architecture.

Introduction
3
Figure 1.2. Architecture
Zenoss is a tiered system with four major parts:
• User layer
• Data layer
• Processing layer
• Collection layer
1.2.1. User Layer
Built around the Zope Web application environment, the user layer is manifested as a Web portal. It uses several
JavaScript libraries, Mochi Kit, YUI, and extJS to provide a rich application experience.
Through the user interface, you access and manage key components and features. From here, you can:
• Watch the status of your enterprise, using the Dashboard
• Work with devices, networks, and systems
• Monitor and respond to events
• Manage users
• Create and run reports
The user layer Interacts with the data layer and translates the information for display in the user interface.
1.2.2. Data Layer
Configuration and collection information is stored in the data layer, in three separate databases:
•ZenRRD - Utilizing RRDtool, stores time-series performance data. Because RRD files are stored locally to each
collector, no bottlenecks result from writing to a single database as new collectors are added.
•ZenModel - Serves as the core configuration model, which comprises devices, their components, groups, and
locations. It holds device data in the ZEO back-end object database.
•ZenEvents - Stores event data in a MySQL database.

Introduction
4
1.2.3. Process Layer
The process layer manages communications between the collection and data layers. It also runs back-end, periodic
jobs, as well as jobs initiated by the user (ZenActions and ZenJobs).The process layer utilizes Twisted PB (a bi-
directional RPC system) for communications.
1.2.4. Collection Layer
The collection layer comprises services that collect and feed data to the data layer. These services are provided by
numerous daemons that perform modeling, monitoring, and event management functions.
The modeling system uses SNMP, SSH, and WMI to collect information from remote machines. The raw information
is fed into a plugin system (modeling plugins) that normalizes the data into a format that matches the core model.
Monitoring daemons track the availability and performance of the IT infrastructure. Using multiple protocols, they
store performance information locally in RRD files, thus allowing the collectors to be spread out among many col-
lector machines. Status and availability information, such as ping failures and threshold breaches, are returned
through ZenHub to the event system.
For more information about system daemons, see the appendix in the Zenoss Administration guide titled "Daemon
Commands and Options."

5
Chapter 2. Getting Started
2.1. Working with the Source Code
2.1.1. Getting the Source Code
If all that you would like to do is browse through the source code, then go to the Trac/Subversion page at:
http://dev.zenoss.com/trac/browser
The version control system used by Zenoss is Subversion. Subversion has excellent documentation in the form of
an O'Reilly book. For the moment, we will just provide the minimum number of commands to get started.
The absolute latest version of Zenoss can be accessed directly through the Subversion repository. This code should
not be used for production purposes as there are changes actively being made which may not have been thoroughly
tested.
From a command line prompt, go to a directory where you want the source code delivered. Here's a sample com-
mand to get the source code:
$ svn co http://dev.zenoss.org/svn/trunk/Products
This will create a directory called Products in the current directory and check out the source code. This repository
is readable anonymously, so no credentials are required.
To see which other portions of the code are available, such as ZenPacks or support utilities, you can look by using
the following Subversion command:
$ svn ls http://dev.zenoss.org/svn/trunk
Other tools are available that can be used to view or check out the source code for different platforms. See the
Subversion Web site for more details.
2.1.1.1. Getting Subversion for the Appliance
The rPath appliance does not ship with the svn binaries, but you can still obtain them.
Procedure 2.1. Installing Subversion on Appliances
1. Edit the /etc/conaryrc file:
• For the Community version, look for the line that looks like this:
installLabelPath zenoss-project.zenoss.loc@zenoss:core-2.3
Change the above line to this (note that this should be all one line and has been modified to make it look
better in print):
installLabelPath zenoss-project.zenoss.loc@zenoss:core-2.3
conary.rpath.com@rpl:1
• For the Enterprise version, look for the line that looks like this:
installLabelPath zenoss-project.zenoss.loc@zenoss:enterprise-2.3
Change the above line to this (note that this should be all one line and has been modified to make it look
better in print):
installLabelPath zenoss-project.zenoss.loc@zenoss:enterprise-2.3
conary.rpath.com@rpl:1
Getting Started
6
2. Now you should be able to obtain the subversion package by using the conary update command:
[root@localhost ~] conary update --resolve subversion
For more information about rPath commands, see their documentation wiki. There are also a set of blog entries
Conary Uncorked has been put together by a dedicated rPath user that introduces some of the conary commands
much more gently.
2.1.2. Keeping Code Updated
The following command, issued from the base directory where you checked out the Zenoss code, will update all
code from that directory and all subdirectories and bring it up to date with what is current in the Subversion repository
(and therefore apply all of the current patches to the code you checked out previously):
$ svn update
If you have modified any code in this directory, these changes will be merged with the latest code updates. If there
are differences that Subversion cannot automatically resolve, Subversion will tell you that there is a problem by
showing the updated file is in conflict (for example, showing a 'C' beside the file when you run svn status).
You can tell if you have modified any of the files in the checked-out directory by typing the following:
$ svn status
If you are interested in modifying only one file, you can specify that one file:
$ svn udpate filename
2.1.3. Getting Patches
For issue tracking, bug reports and linking patches to bug reports, Zenoss uses Trac to manage issues. The Zenoss
Trac server is found at this location:
http://dev.zenoss.com/trac/report
You can click Search at the top right of the page and enter a search term to look for keywords in the tickets. This
will then present you with the ability to search for changesets (for example, Subversion revisions), trouble tickets,
or the Wiki.
Alternatively, from the start page you can click on the Custom Query which will allow you to view the results from
your customized query.
Once you have found a patch that applies to your system, use the zenpatch command to apply the patch. (As
mentioned previously, if you use the svn update commands, you will already be at the latest patched level.)
$ zenpatch revision_number
2.1.4. Style Guidelines
These following guidelines are targeted at Python files. HTML files, Zope Page Template (ZPT) files, shell scripts,
etc should adhere to these as much as is reasonable and conventional in those languages. Currently, we follow
Guido's Style Guide for Python Code which is detailed in PEP 8 (Python Enhancement Proposals).
Any style conventions that stray from PEP-8 should be annotated in this document.
2.1.4.1. Docstrings
Every method and function definition within Zenoss should include a docstring. The docstring is usually composed
of two parts: the explanatory text and the doctest code. The explanation usually includes a description of all or most
of the following aspects of the function:

Getting Started
7
• The function's purpose
• The context in which the function is usually called
• What parameters it expects
• What it returns
• Any side effects of the function
This explanatory text should scale in size with the complexity and significance of the function.
The second part of the docstring is the doctest section. This is composed of zendmd commands and expected
output from those commands. The commands are run as part of the testing process and output is compared to the
output lines. This code serves two primary purposes. First it is a working example of how the function should be
called and what it returns. Second it serves as a basic test to ensure the function is not horribly broken. This is not
intended as a replacement for unit tests. Thorough testing of boundary cases and unusual situations still belongs in
unit tests whereas the doctests are much simpler and more instructional in nature.
Docstrings begin on the line immediately following the function definition and are indented one level from the def-
inition. The first and last lines of the docstring are three double quotes and a newline. One blank line separates
the description from the epydoc section. epydoc can take specially formatted text in the docstrings and use them
to create API documentation. The Zenoss API documentation is located on the Zenoss Web site and is updated
every release.
Another blank line separates the epydoc section from the doctest section. The code for the function begins on the
line immediately following the docstring. For example:
def TruncateStrings(longStrings, maxLength):
"""
Foo truncates all the strings in a list to a maximum length.
longStrings is any iterable object which returns zero or more
strings. maxLength is the length to which each element from
longStrings should be truncated.
@param longStrings: an iterable object which returns zero or more strings
@type longStrings: Python iterable
@param maxLength: max length of each element in longStrings
@type maxLength: int
@return: longStrings in the same order but possibly truncated
@rtype: list
@todo: Add more epydoc attributes!
>>> from Products.SomeModule import TruncateStrings
>>> TruncateStrings(['abcd', 'efg', 'hi', ''], 3)
['abc', 'efg', 'hi', '']
>>> TruncateStrings([], 5)
[]
"""
return [s[:maxLength] for s in longStrings]
The easiest way to create the doctest portion is from within zendmd. Except for the indentation, the docstring should
exactly match commands and output from a zendmd session.
Use the available epydoc fields where they are applicable. Some of the useful common fields are:
Commonly-used epydoc fields
@param param_name Describe the parameter
@type data_type Data type of the parameter
@return Describe the return value

Getting Started
8
@rtype Data type of the return value
@permission Zope permission that the method requires
@todo Todo for this method
Note
Within the description section of the docstring, you may use the string DEPRECATED on its own line to denote that
the method is deprecated.
2.1.5. Generating Diffs for new Fixes
Once you have determined how to fix something, or have found a way to add a feature, modify the source code in
your checkout directory. Once that is complete, generate a diff starting from the base of the checkout directory.
To generate a diff of all files in the current directory and all subdirectories:
$ svn diff > mychanges.diff
To produce a diff for just a single file:
$ svn diff source_file > mychanges.diff
2.1.6. Submitting a Fix
Zenoss accepts user contributions using the following procedure:
1. Complete the form to allow Zenoss to accept your code.
2. Create a ticket in our ticketing system.
3. Add the keyword contribute to the ticket.
4. Attach your patch (in diff format) or code to the ticket.
Note
All contributions will be accepted under the terms of the Zenoss Contribution Agreement.
2.2. Development Toolchain Requirements
There are a number of other tools that are required to build Zenoss from source (a toolchain). Among them are a
C compiler, the make command, and other associated tools.
2.2.1. Appliance
The Zenoss appliance is based on the rPath Linux 1 (rp11) distribution.
Troves (like the gcc toolchain) that are not available on the Zenoss update repository server are generally available
from install labels, such as:
conary.rpath.com@rpl:1
The trove candy store is rBuilder Online. Zenoss recommends that you obtain an account there. It provides good
search capabilities for packages of interest, and offers forums to assist with appliance-specific questions.
For a gcc toolchain, try this as the root user:
# conary update --resolve autoconf automake make which \

Getting Started
9
--install-label="conary.rpath.com@rpl:1"
# conary update --resolve gcc=conary.rpath.com@rpl:1 \
--install-label="conary.rpath.com@rpl:devel"
The binutils trove should already be on the box.
An actual install sequence looked like the ouput below. If the --info switch is used, it is possible to see if everything
is going to resolve nicely. And if you are really paranoid, use the --test flag which runs through the update but does
not commit the result.
# conary update autoconf automake make which --resolve --info \
--install-label="conary.rpath.com@rpl:1"
Install autoconf(:data :doc :runtime)=2.59-7-0.1
Install automake(:data :doc :runtime)=1.9.6-3-0.1
Install m4(:runtime)=1.4.3-4-0.1
Install make(:doc :locale :runtime)=3.80-7.2-1
Install which(:doc :runtime)=2.16-3-0.1
# conary update autoconf automake make which --resolve \
--install-label="conary.rpath.com@rpl:1"
Including extra troves to resolve dependencies:
m4:runtime=1.4.3-4-0.1
Applying update job:
Install autoconf(:data :doc :runtime)=2.59-7-0.1
Install automake(:data :doc :runtime)=1.9.6-3-0.1
Install m4(:runtime)=1.4.3-4-0.1
Install make(:doc :locale :runtime)=3.80-7.2-1
Install which(:doc :runtime)=2.16-3-0.1
# conary update --info --resolve gcc=conary.rpath.com@rpl:1 \
--install-label="conary.rpath.com@rpl:devel"
Install gcc(:devel :devellib :doc :lib :locale :runtime)=3.4.4-9.4-1
Install libgcc(:devellib)=4.1.2-11-1[~!gcc.core]
# conary update --resolve gcc=conary.rpath.com@rpl:1 \
--install-label="conary.rpath.com@rpl:devel"
Including extra troves to resolve dependencies:
libgcc:devellib=4.1.2-11-1
Applying update job:
Install gcc(:devel :devellib :doc :lib :locale :runtime)=3.4.4-9.4-1
Install libgcc(:devellib)=4.1.2-11-1[~!gcc.core]
Generally try to find something on the rpl:1 branch name and do not mix rpl:2 stuff with the rpl:1 stuff. In some
cases, you may have to resort to pulling a trove from the rpl:devel branch if it cannot find it elsewhere. That's what
happened above when trying to resolve the libgcc dependency for the gcc trove. Adding the extra --install-label
option was necessary so that libgcc could be found. How could you know it was on rpl:devel? Go to rBuilder Online
and search for that package and it should tell you.
If you want to see where the files for a trove are installed:
# conary q trove_name --lsl
[code]# conary q gcc --lsl
...
lrwxrwxrwx 1 root root 3 2004-07-07 17:04:44 UTC /usr/bin/cc -> gcc
-rwxr-xr-x 1 root root 81452 2006-06-19 18:02:30 UTC /usr/bin/gcc
-rwxr-xr-x 1 root root 16134 2005-10-15 07:22:42 UTC /usr/bin/gccbug
...
Lastly, conary makes it relatively easy to run-away if you're not happy with a trove you've installed. Use conary
rblist to see what packages have been committed to the conary stack.
# conary rblist | more
Getting Started
10
r.3:
installed: gcc(:devel :devellib :doc :lib :locale :runtime)
conary.rpath.com@rpl:1/3.4.4-9.4-1
installed: libgcc(:devellib) conary.rpath.com@rpl:devel/4.1.2-11-1
r.2:
installed: autoconf(:data :doc :runtime) conary.rpath.com@rpl:1/2.59-7-0.1
installed: automake(:data :doc :runtime) conary.rpath.com@rpl:1/1.9.6-3-0.1
installed: m4(:runtime) conary.rpath.com@rpl:1/1.4.3-4-0.1
r.1:
updated: info-raa-web(:user) products.rpath.com@rpath:raa-2/1-1.1-2 ->
1-1.3-2
...
Here is how you would remove the gcc trove that was just installed:
# conary rb r.3
Applying update job:
Erase gcc(:devel :devellib :doc :lib :locale :runtime)=3.4.4-9.4-1
Erase libgcc(:devellib)=4.1.2-11-1[~!gcc.core]
# conary q gcc
gcc was not found
Be careful which troves you remove!
2.3. Programming Techniques
2.3.1. Calling Methods Using REST
REpresentational State Transfer (REST) is a method of marshaling data types and calling functions using HTTP.
Zope supports a number of different Remote Procedure Call (RPC) mechanisms, including REST.
This section describes some more advanced Zenoss concepts that we have encountered as the product has rolled
out. Some may be appropriate for your environment. Usually they require at least a little coding experience, but
they are really not that hard.
2.3.1.1. How to Call Methods Using REST
Zenoss' Web interface will let you run any method of any object by using a simple URL. Calls are in the following
format:
USERNAME:PASSWORD@MY_ZENOSS_HOST:8080/PATH_TO_OBJECT/METHOD_NAME?ARG=VAL
where:
•USERNAME is the user with rights to view this information.
•PASSWORD is the user's password.
•MY_ZENOSS_HOST is the hostname or IP address of your Zenoss instance
•PATH_TO_OBJECT is the full path of the object you want to access
•METHOD_NAME is the object's method you want to run
•ARG is the method's parameter name
•VAL is the method's parameter value
The following example provides the most recent load average of a Linux server:

Getting Started
11
http://USERNAME:PASSWORD@MY_ZENOSS_HOST:8080/zport/dmd/
Devices/Server/Linux/devices/angel/getRRDValue?dsname=laLoadInt5_laLoadInt5
Note these things about this URL:
• /zport/dmd/Devices/Server/Linux/devices/angle is the full path to the object you want to access.
• getRRDValue is the method in the Device object you want to run.
• dsname is a parameter to the getRRDValue method.
• laLoadInt5_laLoadInt5 is the value of dsname, which is the name of the data source we are interested in
Watching the URLs as you browse the Web interface can give you a place to start searching.
2.3.1.2. Sending an Event
Events can be sent to Zenoss through the Web interface as well as through using zensendevent, but also through
a programmatic interface.
2.3.1.2.1. Using a REST Call
Sending an event through a rest call can be done by a simple web get. In this example we will use wget to send an
event. If you use wget don't for get to escape the "&" or wrap the URL in single quotes.
[zenos@zenoss $] wget --auth-no-challenge 'http://admin:zenoss@MYHOST:8080/zport/dmd/ZenEventManag-
er/manage_addEvent?
device=MYDEVICE&component=MYCOMPONENT&summary=MYSUMMARY&severity=4&eventclass=EVENTCLASS'
2.3.1.2.2. Using XML-RPC
To send an event to Zenoss using XML-RPC you will first need to create a dictionary (in Perl a hash) that will
represent the event. Zenoss will need at a minimum the following fields:
Event fields
device the name of the device from which this event originates
component the sub-component of the device (for example, eth0 or http)
summary the text message of the event
severity an integer between 0 and 5 with higher numbers being higher severity. Zero is clear.
You can send an event to Zenoss via an interactive session with the Python interpreter as follows:
>>> from xmlrpclib import ServerProxy
>>> myurl= 'http://admin:zenoss@MYHOST:8080/zport/dmd/ZenEventManager'
>>> serv = ServerProxy( myurl )
>>> evt = {'device':'mydevice', 'component':'eth0',
... 'summary':'eth0 is down','severity':4, 'eventClass':'/Net'}
>>> serv.sendEvent(evt)
See below for examples in other languages.
2.3.1.2.3. Example Usage in Other Languages
Please note that we are a Python shop and may not be able to answer specific questions about XML-RPC clients
written in other languages.
2.3.1.2.3.1. Perl
Send an event via Perl using RPC::XML::Client

Getting Started
12
require RPC::XML;
require RPC::XML::Client;
$serv = RPC::XML::Client->new('http://YOURZENOSS:8081/');
%evt = ('device' => 'mydevice2', 'component' => 'eth1',
'summary' => 'eth1 is down', 'severity' => 4);
$args = RPC::XML::struct->new(%evt);
$serv->simple_request('sendEvent', $args);
2.3.1.2.3.2. Ruby
This is an example of an Interactive Ruby (IRB) session (the returns have been omitted for the sake of clarity). Note,
however, that the Ruby standard library is under active development in general, and specifically, the XML-RPC lib
in Ruby is not stable. As of Feb 2007, there is a great deal of on-going discussion regarding XML-RPC in Ruby by
Ruby developers and contributors. The following is known to work in previous versions of Ruby:
require "xmlrpc/client"
url='user:pass@http://YOURZENOSS:8080/zport/dmd/DeviceLoader')
server = XMLRPC::Client.new2( url )
evt = {'device' => 'mydevice3', 'component' => 'eth2',
'summary' => 'eth2 is down', 'severity' => 4}
server.call('sendEvent', evt)
2.3.1.2.3.3. PHP
<?php
include("xmlrpc.inc");
function ifInOutBps($host, $port, $user, $pass, $device, $interface) {
$ifInOctets = 'ifInOctets_ifInOctets';
$ifOutOctets = 'ifOutOctets_ifOutOctets';
# base url $url = '/zport/dmd/Devices';
# message $msg = new xmlrpcmsg(
$device.'.os.interfaces.'.$interface.'.getRRDValues', array());
$xifInOctets = new xmlrpcVal($ifInOctets);
$xifOutOctets = new xmlrpcVal($ifOutOctets);
$xifOctets = new xmlrpcVal(array($xifInOctets, $xifOutOctets), 'array');
$msg->addParam($xifOctets);
# client $clt = new xmlrpc_client($url, $host, $port);
# $clt->setCredentials($user, $pass);
# get response $rsp = $clt->send($msg);
# any error? if ($rsp->faultCode()) {
die('ifInOutBps - Send error: '.$rsp->faultString().'
'); }
# convert to data structure $dst = xmlrpc_decode($rsp->serialize());
return(array('in'=>$dst[$ifInOctets]*8, 'out'=>$dst[$ifOutOctets]*8));
}
?>

Getting Started
13
2.3.1.2.3.4. Java
This example uses the Apache XML-RPC library and Java 6 to send an event to the Zenoss server.
Required jars on the classpath (all available from the Apache download):
•xmlrpc-client-3.1.jar
•ws-commons-util-1.0.2.jar
•xmlrpc-common-3.1.jar
import java.net.URL;
import java.util.HashMap;
import org.apache.xmlrpc.client.XmlRpcClient;
import org.apache.xmlrpc.client.XmlRpcClientConfigImpl;
public class JavaRPCExample {
public static void main(String[] args) throws Exception {
XmlRpcClientConfigImpl config = new XmlRpcClientConfigImpl();
url= "http://MYHOST:8080/zport/dmd/ZenEventManager"
config.setServerURL(new URL(url));
config.setBasicUserName("admin");
config.setBasicPassword("zenoss");
XmlRpcClient client = new XmlRpcClient();
client.setConfig(config);
HashMap<String,Object> params = new HashMap<String,Object>();
params.put("device", "mydevice");
params.put("component", "eth0");
params.put("summary", "eth0 is down");
params.put("severity", 4);
params.put("eventClass", "/Net");
client.execute("sendEvent", new Object[]{params});
}
}
2.3.2. Miscellaneous Notes
2.3.2.1. pkg_resources
Should one need to use pkg_resources, it would normally be imported like this:
import pkg_resources
To avoid the mysterious warning
_xmlplus UserWarning
use the following import line:
import Products.ZenUtils.PkgResources
2.3.2.2. urllib2 Workarounds
There is a bug in the standard Python urllib2 library that prevents HTTPS requests through a proxy from working.
This affects ZenWebTx and any other Python code that might attempt to make HTTPS calls. Zenoss installs a
Python egg named httpsproxy_urllib2-1.0 which provides modified versions of the Python httplib and urllib2

Getting Started
14
modules. These replacement modules are used anytime Zenoss code imports httplib or urllib2. More information
regarding this module is available at PyPi.
Directions for configuring your environment to use an HTTP and HTTPS proxy are available in Zenoss Extended
Monitoringin the chapter on ZenWebTX.
2.4. zendmd: Command-line Access to the Device Management
Database (DMD)
Zenoss uses the Zope database (ZODB) to store its information. Since the ZODB is an object-oriented database,
this is not organized by tables, rows and columns, but by objects. The object that Zenoss uses to store the basic
model of your network is in the Device Management Database (DMD) object.
You can access the DMD through an interactive, programmable interpreter: zendmd. zendmd is the Python inter-
preter, with a handle to the database stored in the default namespace, and a few handy functions.
To start zendmd and see how the interpreter works, use the following commands:
$ zendmd
>>> 1 + 2
3
>>> len('hello there')
11
>>> for i in range(5):
... print i
0
1
2
3
4
These are all basic Python interpreter features. zendmd adds in a reference to the root of the object tree which is
known as dmd. You can see this root name in the URLs used to refer to objects when using Zenoss from the browser.
There is a built-in function that can be used to find devices.
$ zendmd
>>> print dmd
<DataRoot at /zport/dmd>
>>> find('localhost.localdomain')
<Device at /zport/dmd/Devices/Server/Linux/devices/localhost.localdomain>
The find() function also takes wildcards:
>>> find('local*')
<Device at /zport/dmd/Devices/Server/Linux/devices/localhost.localdomain>
You can perform scripting at the command prompt. For example, we can count the number of interfaces on our
device:
>>> d = find('local*')
len(d.os.interfaces())
5
You can inspect the objects:
>>> d.getManageIp()
'127.0.0.1'
Getting Started
15
for i in d.os.interfaces():
... for a in i.ipaddresses():
... print a.name(), a.getIpAddress()
eth0 192.168.1.148/24
You can perform low-level checks such as re-indexing all the objects:
>>> reindex()
Or check/repair relationships on all devices:
>>> for d in dmd.Devices.getSubDevices():
... d.checkRelations(repair=True)
...
Finally, after making changes you can commit them to the database:
>>> commit()
or synch against the database and restore the old state to your interpreter, reverting any changes:
>>> synch()
Zendmd can be used to automate repetitive tasks. For example, you can enter in a large list of devices. First, create
a text file containing the names of those devices:
$ cat >lotsOfDevices.txt
device1
myhost.mydomain.com
host2.mydomain.com
^D
Of course, the data could come from an inventory list or other database. Then, you can use the dmd to process
the file:
$ zendmd
for line in file('lotsOfDevices.txt'):
... d = dmd.Devices.Server.Linux.createInstance(line.strip())
... commit()
... d.collectDevice()
You can feed zendmd commands on stdin:
$ zendmd < AddDevices.py
You can also import scripts:
$ zendmd
import MyScripts
MyScripts.loadDevices(dmd)
If you want to create a stand-alone command, reading the $ZENHOME/ZenModel/zendmd.py file is a good start.
The full list of zendmd names is described below.
zendmd Name Description
dmd Device Management Database, the root persistent object
app The Zope Application, the root of the database
zport Zenoss Portal, the portal that contains Zenoss
find() Look up devices by name, and by address; supports wildcards

Getting Started
16
zendmd Name Description
devices Equivalent to dmd.Devices
sync() Revert the objects in zendmd back to the state in the ZODB
commit() Push object changes to the persistent store
abort() Undo any object changes and refresh from persistent storage
me a reference to the machine running zendmd, if it can be found
reindex() recreates the indexes against the objects
login() sets the security context of the given user
logout() removes any security context
Table 2.1. zendmd Names and Descriptions
2.5. Programming Documentation
2.5.1. Python
If you are new to Python here are a few resources to get you started:
• The official Python documentation contains a tutorial and the reference guide for the standard libraries that ship
with Python. Zenoss currently uses Python 2.6.
• Dive Into Python is an excellent book if you are familiar with other programming languages and contains lots
of great examples.
2.5.2. Zenoss API
As mentioned previously, more detailed information is gathered using the epydoc documentation system, and the
results are in the Application Programming Interface (API) documentation.
2.5.3. Other Resources
Discussion regarding development of Zenoss takes place on the Zenoss forums, at:
http://community.zenoss.org/community/forums
2.5.4. Contributing to the Documentation
If you find errors or omissions in the documentation, you can submit a ticket (see Section 2.1.6, “Submitting a Fix”)
or send an e-mail to docs@zenoss.com.

17
Chapter 3. ZenPacks
3.1. Overview
A ZenPack is a package that adds new functionality to Zenoss. For basic information on ZenPacks see the chapter
titled "ZenPacks" in Zenoss Administration. The following information pertains to the creation of more complex
ZenPacks that contain skins, Python classes, and daemons.
ZenPacks are packaged as Python eggs, which are the standard mechanism for packaging and distributing code.
Note
The zenpack command should be used for installation and removal of ZenPacks, not the easy_install command
that is frequently used with non-ZenPack Python eggs.
The use of dotted names for ZenPacks (see Section 3.2.1, “ZenPack Names” below) was also introduced in this
version. Zenoss 2.2 and later supports installation and use of pre-2.2 ZenPacks, but all new ZenPacks are created
in the new format. This document relates to ZenPacks created in the new style. For documentation on ZenPacks
predating Zenoss 2.2, please see previous versions of this document and Zenoss Administration.
Zenoss currently does not support installation or use pre-2.2 ZenPacks. If you have older ZenPacks that you want to
convert to egg-style ZenPacks, see the section titled Section 3.5.2, “Converting older ZenPacks to ZenPack eggs”.
3.2. Creating a ZenPack
ZenPacks can be created through the Zenoss user interface:
1. From the navigation menu, select Advanced > Settings.
2. Select ZenPacks in the left panel.
The list of loaded ZenPacks appears.
3. Select Create a ZenPack from the Action menu.
4. Enter the ZenPack name, and then click OK.
The ZenPack is created on the file system at $ZENHOME/ZenPacks/zenpackid and installed on the system.
3.2.1. ZenPack Names
ZenPack names consist of at least three strings joined by periods. The first of these strings is always "ZenPacks."
Each of these strings must start with a letter and contain only letters, numbers and underscores. The reason for this
naming scheme is that the ZenPack will set up namespaces in Python that reflect these names. There is a Python
namespace called ZenPacks. Within that namespace are packages representing the second part of all the installed
ZenPack and so on. So for example if you have a ZenPack named ZenPacks.MyCompany.MyZenPack then it can be
imported in Python (and zendmd) as:
import ZenPacks.MyCompany.MyZenPack
A data source class provided by this example might be accessed as:
from ZenPacks.MyCompany.MyZenPack.datasources.MyDataSourceClass \
import MyDataSourceClass
The advantage of these namespaces is that they help prevent namespace conflicts among different organizations
authoring ZenPacks. So if a third party wants to develop an HTTP monitoring ZenPack, then they could name it
ZenPacks.OurCompany.HttpMonitor and it would not conflict with the ZenPacks.zenoss.HttpMonitor Core ZenPack.
ZenPacks
18
3.2.2. Specifying Dependencies
The ZenPack edit page allows you to specify versions of Zenoss with which your ZenPack is compatible, as well as
dependencies on other ZenPacks. The first item in the Dependencies section of the page is the version of Zenoss
that is required. If that field is blank then your ZenPack can be installed under any version of Zenoss version 2.2
or later. If you enter a specific version number then the ZenPack will run only under that exact version of Zenoss,
this is usually not desirable. The most typical version requirement is to specify that the ZenPack is compatible
with any version of Zenoss equal to or greater than a specific version. The syntax for this is ">=X" where X is the
minimum version the ZenPack requires. For example, if a ZenPack requires Zenoss version 2.2.1 or greater the
version specification would be >=2.2.1.
Below the Zenoss version specification is a list of all other ZenPack eggs installed. Old-style (non-egg) ZenPacks
cannot be listed as dependencies and do not appear in this list. If your ZenPack requires another ZenPack to be
installed, then select the option in the Required column next to the required ZenPack. You also can give a version
specification for each ZenPack you require.
3.2.3. Locating ZenPack Source Outside of Zenoss
For any non-trivial ZenPacks we recommend maintaining the source code somewhere other than $ZENHOME/Zen-
Packs. There are a couple reasons for this:
• Performing a zenpack --remove deletes the ZenPack's directory from $ZENHOME/ZenPacks. If you do not have
the files copied in another location you can easily lose all or some of your work.
• If your ZenPack source is maintained in a version control system it is frequently easier to keep the code within
a larger checkout directory elsewhere on the filesystem.
To move a ZenPack source directory out of $ZENHOME/ZenPacks you can simply copy the directory to the new location
then run install again using the --link option. This will remove the $ZENHOME/ZenPacks/YourZenPackId directory.
cp -r $ZENHOME/ZenPacks/YourZenPackId SomeOtherDirectory
zenpack --link --install SomeOtherDirectory/YourZenPackId
3.2.4. Community ZenPack Subversion Access
There is a Community ZenPack development site at:
http://community.zenoss.org/community/developers/zenpack_development
This site hosts Subversion source code control access to all contributed Community ZenPacks. Accounts are grant-
ed by request and offered to ZenPack contributors. The goal of this site is to encourage ZenPack development and
open up improvements to all ZenPacks to a greater audience.
The Community ZenPack development site contains instructions for:
• working with Community ZenPacks from Subversion
• building and modifying ZenPacks
• converting old-style ZenPacks to Python egg ZenPacks
3.3. ZenPack Structure and Contents
This section describes the files and directory structures that make up most ZenPacks. A more detailed source of
information about Python eggs, entry points and other technical details of building eggs is found here.
ZenPacks
19
Note
The $ZENHOME/Products/ZenModel/ZenPackTemplate directory contains the template files and directories used
when Zenoss creates a ZenPack. If you decide to change these files, note that these changes will not be pre-
served across upgrades.
A ZenPack has the concept of a namespace, so that multiple people or organizations can create similar ZenPack
names without their code colliding with each other. In this example, the name of the ZenPack is ZenPacks.pkg.zpid,
where pkg is the package name and zpid is the ZenPack id.
In the $ZENHOME/ZenPacks/ directory, you will find the directory ZenPacks.pkg.zpid with the following contents (ab-
breviated for clarity):
build
build/bdist.linux-i686
build/lib
build/lib/ZenPacks
...
dist
dist/ZenPacks.pkg.zpid-version_id-py2.4.egg
INSTALL.txt
README.txt
setup.py
ZenPacks
ZenPacks/__init__.py
ZenPacks/pkg
ZenPacks/pkg/__init__.py
ZenPacks/pkg/zpid
ZenPacks/pkg/zpid/__init__.py
ZenPacks/pkg/zpid/daemons
ZenPacks/pkg/zpid/datasources
ZenPacks/pkg/zpid/datasources/__init__.py
ZenPacks/pkg/zpid/lib
ZenPacks/pkg/zpid/lib/__init__.py
ZenPacks/pkg/zpid/libexec
ZenPacks/pkg/zpid/migrate
ZenPacks/pkg/zpid/migrate/__init__.py
ZenPacks/pkg/zpid/modeler
ZenPacks/pkg/zpid/modeler/__init__.py
ZenPacks/pkg/zpid/modeler/plugins
ZenPacks/pkg/zpid/modeler/plugins/__init__.py
ZenPacks/pkg/zpid/objects
ZenPacks/pkg/zpid/objects/objects.xml
ZenPacks/pkg/zpid/parsers
ZenPacks/pkg/zpid/parsers/__init__.py
ZenPacks/pkg/zpid/reports
ZenPacks/pkg/zpid/services
ZenPacks/pkg/zpid/services/__init__.py
ZenPacks/pkg/zpid/skins
ZenPacks/pkg/zpid/skins/ZenPacks.pkg.zpid
ZenPacks.pkg.zpid.egg-info
ZenPacks.pkg.zpid.egg-info/entry_points.txt
ZenPacks.pkg.zpid.egg-info/namespace_packages.txt
ZenPacks.pkg.zpid.egg-info/not-zip-safe
ZenPacks.pkg.zpid.egg-info/PKG-INFO
ZenPacks.pkg.zpid.egg-info/SOURCES.txt
ZenPacks.pkg.zpid.egg-info/top_level.txt
ZenPacks
20
This directory is created by Python when the ZenPack is exported to an egg file or when it is installed from
source. This directory can safely be deleted at any time if you wish and need not be kept within any version
control system.
This directory is created when the ZenPack is exported to an egg file. The egg file is initially created within
here then copied to the $ZENHOME/export directory. This directory can safely be deleted at any time if you wish
and need not be kept within any version control system.
This file contains parameters for use by setuptools and distutils in creating eggs and doing source installs.
Zenoss creates an appropriate setup.py when a ZenPack is created. ZenPack developers should usually edit
this information through the ZenPack edit page within Zenoss rather than directly in the setup.py file.
Any time a ZenPack is saved or exported via the GUI Zenoss will modify certain values at the top of the setup.py
file. The lines that Zenoss modifies are clearly commented and segregated at the top of the file. If you wish to
make changes to setup.py you can safely do so as long as you leave those lines intact.
This directory mirrors the dotted name structure of your ZenPack name. For example, if your ZenPack name is
ZenPacks.MyCompany.MyZenPack then this directory will contain a directory named MyCompany which will contain
a MyZenPack directory. This last directory with the same name as the last part of your ZenPack name is where
most of the ZenPack code resides. The structure of that directory is very similar to that of previous non-egg
ZenPacks.
This is the directory whose name is that of the last part of your dotted ZenPack name.
This file contains any code that needs to be executed when the ZenPack is loaded. Zenoss loads all installed
ZenPacks on startup. Typically this file contains a few lines that will register a skins directory if the ZenPack
provides one. Also, if this class contains a class named ZenPack then on installation Zenoss will create an
instance of that class rather than the base ZenPack class in the object database.
See below for more details on providing daemons in ZenPacks.
See below for more details on providing data source classes in ZenPacks.
This directory is intended to hold any 3rd party modules or other code your ZenPack depends on. A module
named Foo in this directory would be imported with
import ZenPacks.MyCompany.MyZenPack.lib.Foo
This directory is intended to hold plugins, such as Nagios-style or Cacti-style plugins.
See below for more details on migrating between versions of your ZenPack.
See below for more details on providing modeler plugins in ZenPacks.
Database objects such as device classes and monitoring templates that are added to the ZenPack via the GUI
are exported to an objects.xml file in this directory. When the ZenPack is installed on another system those
objects will be copied into that object database.
This directory contains any command parsers provided by the ZenPack. See the section that discusses new
platform command parsers for more details.
This directory contains any report plugins provided by the ZenPack.
Zenoss daemons usually communicate with zenhub to retrieve their configuration, send events, and write
performance data. If a ZenPack provides a daemon then it typically will also provide a ZenHub service for that
daemon. See the section on ZenHub for further details.
This directory contains any skins directories that should be added to Zope. Note that this contains directories
of skins, not the skin files themselves. If you include skins directories make sure that the __init__.py file in
the directory above skins is registering this directory. (The default __init__.py file provided in new ZenPacks
does this for you.)
This directory contains files which describe the egg meta-data. This is created when the egg file is generated
or the ZenPack is installed from source. This directory can safely be deleted at any time if you wish and need
not be kept within any version control system.
This file is updated every time a ZenPack is edited and saved. ZenPack developers should normally not edit
this file manually.

ZenPacks
21
3.4. Developing the ZenPack
3.4.1. Base ZenPack Class
$ZENHOME/Products/ZenModel/ZenPack.py contains the base ZenPack class. When a ZenPack is installed Zenoss
inspects YourZenPackId/ZenPacks/..../LastPartOfName/__init__.py to see if it contains a class named ZenPack.
If it does then Zenoss instantiates it, otherwise Zenoss instantiates the base ZenModel.ZenPack.ZenPack class. That
instance is then added to the dmd.ZenPackManager.packs tree.
There are several attributes and methods of ZenPack that subclasses might be interested in overriding:
Interesting ZenPack properties and methods
packZProperties is a mechanism for easily adding configuration properties. packZProperties is a
list of tuples, with each tuple containing three strings in this order:
• name of the configuration property
• default value of the configuration property
• type of configuration property (such as string or int)
Zenoss will automatically create these when the ZenPack is installed and remove
them when the ZenPack is removed. See ZenPacks.zenoss.MySqlMonitor for an
example of this usage.
install(self, app) parais called when the ZenPack is installed. If you override this be sure to call
the inherited method within your code.
remove(self, app, leaveOb-
jects)
is called when the ZenPack is removed. As with install(), make sure you call
the inherited method if you override.
3.4.2. Storing Objects in the ZODB
ZenPacks can provide Python classes for objects that will be stored in the object database. The most frequent
example of this is DataSource subclasses. When a ZenPack is removed those classes are no longer accessible
so the objects in the database are broken. (Zeo needs to have the appropriate Python class in order to unpickle
an object from the database.) In previous versions of Zenoss there was not an easy way to associate instances
of a ZenPack-provided class with the ZenPack that provided the class. As a result ZenPack removal could easily
cause broken objects to remain in the database. If Zope had already loaded a class into the interpreter the objects in
question might continue to function until Zope was restarted, making diagnosis of such problems even more difficult.
In Zenoss 2.2 and later the ZenPackPersistance class aims to remedy this problem. Any Python class pro-
vided by a ZenPack should subclass the ZenModel.ZenPackPersistence.ZenPackPersistence class. Zenoss
maintains a catalog of all ZenPackPersistence instances in the database. When a ZenPack is removed,
the catalog is queried to determine which objects need to be deleted. Any ZenPack-provided Python class
that might be instantiated in the object database should subclass ZenPackPersistence and define ZEN-
PACKID in the class as the name of the ZenPack providing the class. For an example of this see the
ZenPacks.zenoss.MySqlMonitor.datasources.MySqlMonitorDataSource ZenPack.
3.4.3. Providing DataSource classes
ZenPacks can provide new classes of DataSources by subclassing the ZenModel.RRDDataSource.RRDDataSource
class. If you include only one DataSource class per file, name the modules after the class the contain (for
example, MyDataSource.py contains the class MyDataSource), and place those modules in the ZenPack's da-
ta sources directory then they will automatically be discovered by Zenoss. If you want to customize this be-
havior take a look at the ZenPack.getDataSourceClasses() function. See the ZenPacks.zenoss.HttpMonitor and
ZenPacks.zenoss.MySqlMonitor ZenPacks for examples of ZenPacks that provide custom DataSource classes.

ZenPacks
22
When creating a custom DataSource class one of the first decisions you have to make is whether you want zencom-
mand to process these DataSources for you or whether you will provide a custom collector daemon to process them.
The zencommand daemon is a very versatile mechanism for executing arbitrary commands either on the Zenoss
server or on the device being monitored, processing performance data returned by the DataSource and generating
events in Zenoss as appropriate. zencommand expects the command it executes be compatible with the Nagios
plug-in API. Specifically two aspects of that API are of most importance:
•Return code -The command should exit with a return code of 0, 1, 2 or 3. See here in the Nagios plug-in API
for more detail.
•Performance data -- If the command returns performance data then that data can be pulled into Zenoss by
creating DataPoints with the same names used in the command output. See here in the Nagios plug-in API
for more detail.
If you want zencommand to handle instances of your custom DataSource class then several methods in RRD-
DataSource are of particular interest:
•getDescription(self) - This returns a string describing the DataSource instance. This string is displayed next to
the DataSource on the RRDTemplate view page.
•getCommand(self, context, cmd=None) - This returns the string that is the command for zencommand to ex-
ecute. context is the device or component to be collected. If you need to evaluate TALES expressions in the
command to replace things like ${dev/id} and so forth you can call the parent class's getCommand() and pass
your command as the cmd argument. (cmd will not be passed into your method, it exists specifically for sub-
classes to pass their commands to the parent for TALES evaluation.)
• checkCommandPrefix(self, context, cmd) - Zenoss will check the string you return from getCommand() to see if it
is a relative or absolute path to a command. If the string starts with '/' or '$' then Zenoss assumes it is absolute.
Otherwise the configuration property zCommandPath from the context is prepended to the cmd string. You can
override checkCommandPrefix() if you want to alter this behavior.
Make sure that your DataSource subclasses also subclass ZenPackPersistence and list it first among the parent
classes. See the section on ZenPackPersistence.py for more details.
3.4.4. Monitoring Template Checklist
Monitoring templates are one of the easiest places to make a real user experience difference when new features
are added to Zenoss. Spending a very small amount of time to get the templates right goes a long way towards
improving the overall user experience.
3.4.4.1. Data Sources
• Can your data source be named better?
• Is it a common metric that is being collected from other devices in another way? If so, name yours the same.
This makes global reporting much easier.
• camelCaseNames are the standard. Use them.
• Never use absolute paths for COMMAND data source command templates. This will end up causing problems on
one of the three platforms we deal with. Link your plugin into zenPath('libexec') instead.
3.4.4.2. Data Points
• Using a COUNTER? You might want to think otherwise.
• Unnoticed counter rollovers can result in extremely skewed data.
• Using a DERIVE with a minimum of 0 will record unknown instead of wrong data.
• Enter the minimum and/or maximum possible values for the data point if you know them.
• This again will allow unknown to be recorded instead of bad data.
ZenPacks
23
3.4.4.3. Thresholds
• Don't include a number in your threshold's name.
• This makes people have to recreate the threshold if they want to change it.
3.4.4.4. Graph Definitions
• Have you entered the units? Do it!
• This will become the y-axis label and should be all lowercase.
• Always use the base units. Never kbps or MBs. bps or bytes are better.
• Do you know the minimum/maximum allowable values? Enter them!
• Common scenarios include percentage graphing with minimum 0 and maximum 100.
• Think about the order of your graph points. Does it make sense?
• Are there other templates that show similar data to yours? If so, you should try hard to mimic their appearance
to create a consistent experience.
3.4.4.5. Graph Points
• Have you changed the legend? Do it!
• Adjust the format so that it makes sense.
•%5.2lf%s is good for values you want RRDTool to auto-scale.
•%6.2lf%% is good for percentages.
•%4.0lf is good for four digit numbers with no decimal precision or scaling.
• Should you be using areas or lines?
• Lines are good for most values.
• Areas are good for things that can be thought of as a volume or quantity.
• Does stacking the values to present a visual aggregate make sense?
3.4.5. Providing Performance Collector Plugins
When providing performance collectors in a ZenPack (for example, Nagios-style plugins), the suggested method
for referencing the collector in the Command Template area is the following TALES expression:
${here/ZenPackManager/packs/ZenPacks.pkg.zpid/path}/libexec/myplugin.sh
3.4.6. Referencing Collector Plugins in ZenPacks
While modeler plugins are stored in the ZenPack's modeler/plugins directory, collector plugins are, by convention,
stored in the libexec directory. Because Zenoss can be installed in multiple ways, and a ZenPack's directory name,
when installed, includes a version number, Zenoss offers a more portable and "future-proof" way of referencing a
plugin.
In the Command Template section of the data source, you can reference a plugin by using a TALES expression,
such as:
${here/ZenPackManager .....}.../file.sh
For example:
${here/ZenPackManager .....}.../MyCollectorPlugin.sh ${dev/manageIp} ${dev/zSnmpCommunity} OtherParameters

ZenPacks
24
After adding the monitoring template containing the data source to a ZenPack, and then exporting the ZenPack, the
ZenPack's object/objects.xml file will contain an entry similar to:
<property .....>
${here/ZenPackManager .....}.../MyCollectorPlugin.sh ${dev/manageIp} ${dev/zSnmpCommunity} OtherParameters </property>
3.4.7. Providing Daemons
ZenPacks can provide new performance collectors and event monitors. This is a somewhat complex undertaking,
so before deciding to write your own daemons make sure that zencommand and a custom DataSource class won't
fit your needs (see Section 3.4.3, “Providing DataSource classes” above.) Any file in a ZenPack's daemons directory
is symlinked in $ZENHOME/bin when the ZenPack is installed. Also, the Zenoss script that controls the core daemons
will attempt to manage your daemon too. So a zenoss start, for example, will attempt to start your daemon as well
as the core daemons.
Custom daemons usually subclass the ZenHub.PBDaemon.PBDaemon class. This class provides the basic framework
for communicating with zenhub. See the section "Writing a Performance Collector" for more details.
3.4.8. setuptools and the zenpacksupport
Zenoss requires a Python module called setuptools to create and install eggs. The setuptools module is installed
by the Zenoss installer in the $ZENHOME/lib/python directory. Zenoss also provides a module named zenpacksupport
which extends setuptools. The zenpacksupport class defines additional metadata that is written to and read from
ZenPack eggs. This metadata is provided through additional options passed to the setup() call in a ZenPack's
setup.py file. Those arguments are:
compatZenossVers This is the version specification representing the required Zenoss version from the
ZenPack's Edit page.
prevZenPackName This is the name of the old-style (non-egg) ZenPack that this ZenPack replaces. If a ZenPack
with this name is installed in Zenoss then it is upgraded and replaced when this ZenPack is
installed. For example, if HttpMonitor is installed and then ZenPacks.zenoss.HttpMonitor is
installed (which has prevZenPackName=HttpMonitor) then ZenPacks.zenoss.HttpMonitor
will replace HttpMonitor. All packable objects in the database that are included in Http-
Monitor will be added to ZenPacks.zenoss.HttpMonitor instead. A migrate script is usually
required to set __class__ correctly on instances of ZenPack-provided classes in the object
database. The ZenPacks.zenoss.HttpMonitor ZenPack has an example of this in its migrate
directory, in the ConvertHttpMonitorDataSources.py file.
3.5. Building and Distributing ZenPacks
From your ZenPack's page in the GUI select the Export ZenPack... menu item to create an egg file. The file is first
created in your ZenPack's dist directory then copied to the $ZENHOME/export directory.
You can optionally also download the egg file through your web browser when doing the export. As part of the export
process Zenoss exports database objects to the objects/objects.xml file in your ZenPack source directory. If you
don't need to update the objects.xml file you can create the egg from the command line instead:
cd YourZenPackDirectory
python setup.py bdist_egg
This creates the egg file in the ZenPack's dist directory.
Users who install your egg file will not be able to edit the ZenPack or re-export it. These functions require the setup.py
file which is not usually distributed within the egg file itself. In most cases this is desirable because end-users should
usually not be making changes and redistributing a different version of your ZenPack than the one you developed.
ZenPacks
25
There are times when you want to allow others to develop a ZenPack with you. In these cases you must provide
them with the entire source directory, not just an egg file.
3.5.1. Migrating between versions
Any time a ZenPack is installed Zenoss looks in the ZenPack's migrate directory for steps whose version is
greater than or equal to the version of the ZenPack being installed. Migrate steps are classes that subclass
ZenModel.ZenPack.ZenPackMigration. This mechanism allows ZenPacks to modify items in the object database that
were created by previous versions of the ZenPack and need updating. The ZenPacks.zenoss.MySqlMonitor Core
ZenPack includes good examples of how migrate steps are written.
3.5.2. Converting older ZenPacks to ZenPack eggs
Zenoss 2.2 and later includes a new script called eggifyzenpack which automates much or all of the process of
converting a pre-2.2 ZenPack to an egg ZenPack. The script is in $ZENHOME/bin so is usually on the zenoss user's
path already. The --newid option is required and specifies the new name of the ZenPack. (See the section above
on ZenPack names.) the sole positional argument to eggifyzenpack is the current name of the installed ZenPack
to be converted. Zeo must be running prior to invoking the script.
eggifyzenpack --newid ZenPacks.MyCompany.MyZenPackName MyOldZenPackName
This will create a ZenPack with the name given with --newid in $ZENHOME/ZenPacks. The old ZenPack that
was converted is uninstalled and removed from $ZENHOME/Products. ZenPacks converted in this way have
PREV_ZENPACK_NAME in their setup.py set to the name of the old ZenPack that they replace. When a user with the
old ZenPack installed installs the new egg ZenPack it will be processed as an upgrade and the older ZenPack will
be removed.
3.6. Development Mode
New ZenPacks can be created in Zenoss by navigating to Advanced > Settings > ZenPacks and select-
ing Create a ZenPack from the Action menu. This creates the ZenPack on the file system at $ZENHOME/Zen-
Packs/ZenPacks.community.YourZenPack and installs it into Zenoss. You may then proceed to add device classes,
templates, and MIBs to the ZenPack. (This is known as "development mode" for the ZenPack.) Once you are happy
with your ZenPack, you can export it for others to use. However, once you install a freshly exported .egg ZenPack
on another system (or uninstall and re-install your new ZenPack) you can no longer add things to the ZenPack.
3.6.1. Source ZenPacks
If you have the source for the ZenPack available you can simply attach to the source tree. Assuming that the source
directory is ZenPacks.community.YourZenPack, install the ZenPack with the following commands:
zenpack --link --install ZenPacks.community.YourZenPack
zopectl restart
Your ZenPack should now be usable and back in development mode. Changes made to the ZenPack will be per-
sisted back to the source tree, you may still export and download as necessary. When you are satisfied with your
changes, you may commit them back to the Subversion repository.
3.6.2. Converting .egg Files to Development Mode
If you wish to convert an already installed ZenPack, or to install and convert an .egg ZenPack, follow these steps.
1. Install the .egg as you would normally.
2. Restart Zope with the command:
zopectl restart

ZenPacks
26
3. Copy the ZenPack development files into the .egg's directory (the CONTENTS directory is unnecessary):
cp $ZENHOME/Products/ZenModel/ZenPackTemplate/* \
$ZENHOME/ZenPacks/ZenPacks.community.YourZenPack-1.0.2-py2.4.egg/
4. You can now make any modifications to the ZenPack, such as updating the version number or adding new
device classes.
5. Go into the ZenPack (from Advanced > Settings, select ZenPack from the left panel, and then click the ZenPack).
6. Export the ZenPack (select Export ZenPack from the Action menu). The changes will be persisted to the new
.egg and the file system.
Note
There is a minor bug in the export and download functions. The new version saved in the export directory will
have the correct name with all the updates (for example, ZenPacks.community.YourZenPack-1.0.3-py2.4.egg).
If you choose to export and download the ZenPack, it will have the original name despite the updated version
(for example, ZenPacks.community.YourZenPack-1.0.2-py2.4.egg) or it may fail to download. Use the version in
the export directory.
3.7. Where to Get More Information
Discussion regarding development of ZenPacks takes place on the Zenoss Community forums, at:
http://community.zenoss.org/community/zenpacks

27
Chapter 4. Zenoss Data Stores
There are a few data stores used by Zenoss:
Data Stores
ZODB Object-oriented database for Python objects
MySQL The Event database where event information is stored.
Pickle files Python pickle files are used to cache information otherwise obtained from zenhub.
RRD files Round Robin Database that stores performance information.
Figure 4.1. Datastores Overview
4.1. Zope Object Database (ZODB)
The ZODB is an object-oriented database used by Zope to store Python objects and their states. For example,
modelers maintain information about devices and their configuration in the ZODB.
Zenoss uses ZEO, which is a layer between Zope and the ZODB. ZEO allows for multiple Zope servers to connect
to the same ZODB. The ZODB is started and stopped by zeoctl.
Note
ZODBs can be clustered using ZEO, but Zenoss Enterprise customers should contact Customer Support before
investigating clustering.
Here is a simple example of using transactions in the ZODB:

Zenoss Data Stores
28
...
import transaction
...
trans= transaction.get()
# Determine that bad things have happened
if bad_thing:
trans.abort()
# ... any other cleanup required inside the function eg 'return'
# Life is good!
# NB: Username or program name -- it's just a text field
trans.setUser( "zenmodeler" )
trans.note( "Added good things to xyz object" )
trans.commit()
The setUser() and note() functions are responsible for creating entries that can be found under the Modifications
tab or menu-item.
There are restrictions on what data can be stored, specifically data types that can be pickled. Basic Python data
types such as strings, numbers, lists and dictionaries can be pickled, but Python code objects cannot be pickled.
In addition, files and sockets cannot be pickled.
Note
The ZODB cannot detect changes to mutable types like lists and dictionaries. In order for changes to be detected,
not only is commit() afterwards, but you must explicitly tell the ZODB about the change by modifying a Persistent
objects _p_changed attribute.
# The following imports shouldn't be required in code
# as it should already be taken care of for you. These are
# included merely to explicitly show the class dependencies.
import ZODB
from Persistence import Persistent
import transaction
...
class myExampleClass( Persistent ):
"""
An example class to be used to demonstrate the use of the
modifying a list and then notifiying ZODB that work needs
to be done through the _p_changed attribute.
"""
def __init__(self):
"""
Initializer
"""
self.mylist= []
def addToMyList( self, listItem ):
"""
Track the listItems that we need
"""
self.mylist.append( listItem )
self._p_changed= True # Notify ZODB
transaction.commit()
As a general rule, use commit() whenever you want other processes to have access to your database changes. So
if a daemon is collecting and Zope needs to do something with the data, run commit() first from the daemon.
This should be enough information to get you started. See ZODB for Python Programmers for more details.
Zenoss Data Stores
29
4.2. MySQL Event database
MySQL is an open-source relational database that Zenoss uses to store events. Configuration information about
the MySQL database can be maintained by going to Events > Event Manager from the navigation bar when you
are logged in as a user with ZenManager privileges.
MySQL-level performance tweaking can substantially improve Zenoss' ability to handle events. One tool that can
be used to improve your database performance is MySQLTuner (http://blog.mysqltuner.com/).
If you need a connection to the MySQL events database, here is how to retrieve a connection and how to put it
back into the pool.
DbConnectionPool is hidden and is accessed through DbAccessBase. It follows the Singleton design pattern, so it'll on-
ly actually create one DbConnectionPool. It extends the Python class Queue, so DbConnectionPool is also a synchro-
nized queue and should be thread-safe. DbAccessBase is extended by EventManagerBase>?, so if you have access to
the ZenEventManager (located at /zport/dmd/ZenEventManager) you'll have the ability to get a database connection.
4.2.1. Connecting to the Database
First you'll need to get an instance of ZenEventManager OR an instance of a class that extends DbAccessBase. Within
Zenoss, a ZenEventManager should already be instantiated.
Next is the try block which should include ANY database calls. This is where you'll get a connection from the pool
with the connect() method. You may pass this around to other methods or create a cursor and make some database
transactions. The try block MUST be completed with a finally block that includes the close() method. You MUST
pass the connection object to the close() method. This will ensure that even if the code within the try breaks, we
are not leaking database connections. If you create more than one connection (ie more than one connect() call in
your try block) you will need to have a corresponding close() call. There is ALWAYS a one-to-one relationship
between connect() and close() calls.
Here is a block of code that illustrates best practices for using the DbConnectionPool
...
zem = self.dmd.ZenEventManager
try:
conn1 = zem.connect()
conn2 = zem.connect()
curs1 = conn1.cursor()
...
curs2 = conn2.cursor()
...
# do work
...
curs3 = conn1.cursor()
...
finally:
zem.close(conn1)
zem.close(conn2)
...
...
Take a look at EventManagerBase.py for some examples of code using the DbConnectionPool.
4.2.2. MySQL in 60 Seconds
To start an interactive session with MySQL, run the mysql as the zenoss user. The following example is from a
default install of Zenoss where there is no password for the MySQL root user.
$ mysql -uroot

Zenoss Data Stores
30
Welcome to the MySQL monitor. Commands end with ; or \g.
Your MySQL connection id is 17799
Server version: 5.0.45 Source distribution
Type 'help;' or '\h' for help. Type '\c' to clear the buffer.
mysql>
Once we've logged into MySQL, we can see the various databases and see the tables that are available. The events
database is maintained by Zenoss.
mysql> show databases;
+--------------------+
| Database |
+--------------------+
| information_schema |
| events |
| mysql |
| test |
+--------------------+
4 rows in set (0.03 sec)
mysql> use events;
Reading table information for completion of table and column names
You can turn off this feature to get a quicker startup with -A
Database changed
mysql> show tables;
+------------------+
| Tables_in_events |
+------------------+
| alert_state |
| detail |
| heartbeat |
| history |
| log |
| status |
+------------------+
6 rows in set (0.00 sec)
From here we can determine what information is in what table. For instance, the log table.
mysql> describe log;
+----------+-------------+------+-----+-------------------+-------+
| Field | Type | Null | Key | Default | Extra |
+----------+-------------+------+-----+-------------------+-------+
| evid | char(25) | NO | MUL | | |
| userName | varchar(64) | YES | | NULL | |
| ctime | timestamp | NO | | CURRENT_TIMESTAMP | |
| text | text | YES | | NULL | |
+----------+-------------+------+-----+-------------------+-------+
4 rows in set (0.00 sec)
4.3. Python Pickle Files
Python's native storage for storing data is called a Pickle. Pickle files are used by zenperfsnmp for caching configura-
tion information gathered from zenhub. This is a performance enhancement for dealing with startup communications
with zenhub, as larger sites with hundreds or more devices could experience enough of a delay during initialization
that Zenoss would have difficulty functioning until the configuration information had been gathered. Every update
from the Zenoss server (which is dealt with by zenhub) causes zenperfsnmp to update the pickle files.
The pickle files are kept in the $ZENHOME/perf/Devices/devicename/ directory, and are named collector-
config.pickle. These pickle files are only read during startup and are periodically recreated, so it is safe to delete
them, and it is not necessary to back them up.

Zenoss Data Stores
31
4.4. Round-Robin Database
RRD is used by Zenoss to store and graph performance collection data. These data files have a fixed format that
is decided at their creation time, and record data points at set intervals. This data is later consolidated into coarser
time units (so as to reduce the total size of data files) and the RRD toolset also contains code to create graphs.
A few other interesting facts:
• Zenoss is a gold-level sponsor of RRD.
• The Renderserver sends RRD graphics to Web browsers.
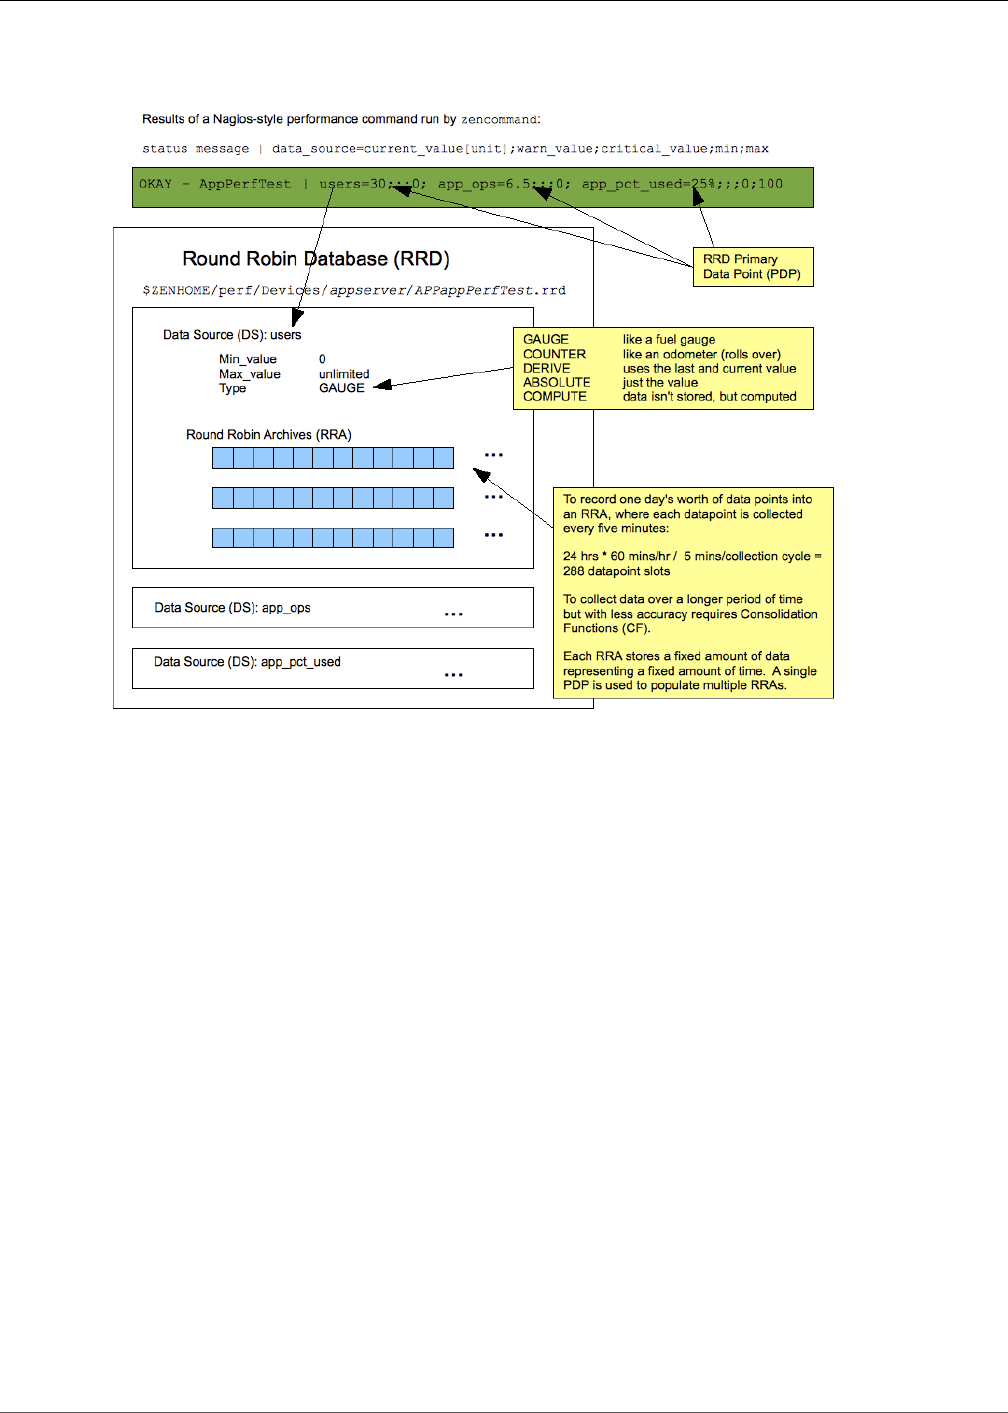
Zenoss Data Stores
32
Figure 4.2. RRD Overview

33
Chapter 5. Events
5.1. Understanding an Event Entry
From a Python programming perspective, an event is essentially a dictionary of keyword/value pairs that gets passed
up to zenhub to be stored and parsed. A description of the standard fields used in Zenoss can be found in the
section titled Event Database Dictionary.
From the user's perspective, the events can be found in the event console. To view an event's information, dou-
ble-click it in the list of events. The standard keyword and value pairs are presented to the user in the Details area.
5.1.1. Event Design
There are a few requirements for events:
• Event objects need to be persisted in the MySQL database.
• On queries from within Zope these queries must use the Zope security mechanisms to allow controlled access
to the data.
• Events must be constructed outside of a Zope framework as well.
To meet these requirements there are three types of event:
Event an event that lives outside of a Zope context and can go in and out of MySQL.
ZEvent event in a Zope context inherits from Event and has a subset of its fields populated as defined
by resultFields in a getEventList() query.
ZEventDetail full event information (all fields, detail, and log)
5.2. Sending an Event
Events can be created through a number of different ways:
• From the command line (zensendevent)
• Through the user interface (Add Event)
• By daemons, which convert their messages into events (such as zentrap)
• From daemons and programs that have detected error conditions
• From an external source (using, for example, XML-RPC)
Regardless of what program generates the event, or from which protocol the event is sent to Zenoss, the following
fields (at a minimum) should be specified:
Event fields
device the name of the device from which this event originates
component the sub-component of the device (for instance eth0, http, etc)
summary the text message of the event
severity an integer between 0 and 5 with higher numbers being higher severity. Zero is clear. Note that for
Python code, that mappings to names are provided (see example below).
Here is an example using Python from within a program that connects to zenhub:
# Import severities (eg Clear, Debug, Info, Warning, Error Critical) and

Events
34
# some event classes into our namespace
from Products.ZenEvents.ZenEventClasses import *
class exampleClass(PBDaemon):
def examplefunc( self ):
event= {}
event[ 'component' ]= 'eth0'
event[ 'severity' ]= Warning
event[ 'summary' ]= 'eth0 is down'
event[ 'message' ]= 'Received error code 0xa7 from listen()'
self.sendEvent( event, device='mydevice' )
Using XML-RPC in Python:
from xmlrpclib import ServerProxy
myurl= 'http://admin:zenoss@MYHOST:8080/zport/dmd/ZenEventManager'
serv = ServerProxy( myurl )
evt = {'device':'mydevice', 'component':'eth0', 'summary':'eth0 is down',
'severity':4, 'eventClass':'/Net'
}
serv.sendEvent(evt)
Tip
Some suggested non-standard fields for adding to your event are:
resolution Describe a method of fixing the situation that might have caused the event, or suggest a course
of action for diagnosing the condition.
explanation Describe in more detail the impact of this event on the computing environment. For instance,
does the condition which generates this event prevent a service from starting or being moni-
tored?
5.3. Adding an Event Class
Event classes can be added easily through the UI. If you need to use an event class internally, however, you need
to make sure that class will always be available, which involves several more steps.
5.3.1. Add to ZenEventClasses
Add a definition of the name of your new event class to Products/ZenEvents/ZenEventClasses:
...
My_New_Class = "/My/New/Class"
Now your event class is centralized and can be imported wherever you need to use it, e.g.:
...
from Products.ZenEvents.ZenEventClasses import My_New_Class
...
if thing.evclass == My_New_Class:
...
5.3.2. Add the class to the import XML
Several event classes are imported from XML by zenload just after the ZODB is created. To include your new event
class in this import, add an <object> element describing it to Products/ZenModel/data/events.xml. Be sure to nest
it inside the classes that already exist, if appropriate. For example, if your new class is "/Status/NewClass", you
would add it inside the <object id='Status'> that already exists:
...

Events
35
<object id='Status' module='Products.ZenEvents.EventClass' class='EventClass'>
<!--This event exists already -->
...
<object id='NewClass' module='Products.ZenEvents.EventClass' class='EventClass'>
<!--This is your new event -->
</object>
></object>
5.3.3. Write a migrate script
Since your code is no longer backwards-compatible, you need to add the new event class to databases that have
already been created by writing a migrate script. (See the section on migrating for more detailed information). Create
a new script in Products/ZenModel/migrate with an unique name (here neweventclasses.py). Here's an example:
__doc__="""Add new classes to EventManager
"""
...
import Migrate
...
class NewEventClasses(Migrate.Step):
version = Migrate.Version(1, 1, 0) # Replace this with the correct version
def cutover(self, dmd):
dmd.Events.createOrganizer("/My/Event/Class")
dmd.Events.createOrganizer("/My/Event/Class2") # Add multiple new classes in the same migrate script
dmd.ZenEventManager.buildRelations()
NewEventClasses()
Next, add your migrate script to Products/ZenModel/migrate/__init__.py:
...
import neweventclasses
Now
zenmigrate --dont-commit
to make sure your class is created properly.
Once you're satisfied with your changes, make the changes permanent with zenmigrate.
$ zenmigrate
36
Chapter 6. Configuration Property
Management
6.1. Adding a Configuration Property
6.1.1. Adding a Configuration Property to an Event
In EventClass.py...
...
def buildZProperties(self):
edict = self.getDmdRoot("Events")
edict._setProperty("zNewProperty", "default value")
edict._setProperty("zNewIntegerProperty", -1, type="int")
edict._setProperty("zNewFloatProperties", 10.01, type="float")
edict._setProperty("zNewListProperty", ["default value", \
"another default value"], type="lines")
edict._setProperty("zNewBooleanProperty", False, type="boolean")
...
Adding a new property to the EventClass is as easy adding a new line to the buildZProperties method. You need
to set a new property at the "Events" level.
6.1.2. Adding a Configuration Property to a Device
In DeviceClass.py
...
def buildDeviceTreeProperties(self):
devs= self.getDmdRoot("Devices")
...
devs._setProperty("zNewProperty", "default value")
devs._setProperty("zNewIntegerProperty", -1, type="int")
devs._setProperty("zNewFloatProperties", 10.01, type="float")
devs._setProperty("zNewListProperty", ["default value", \
"another default value"], type="lines")
devs._setProperty("zNewBooleanProperty", False, type="boolean")
...
...
Adding a new property to the DeviceClass is as easy adding a new line to the buildDeviceTreeProperties method.
You need to set a new property at the "Devices" level.
6.2. Migrating the Configuration Property Code
Create a new file in $ZENHOME/Products/ZenModel/migrate/zNewProperty.py
__doc__='''
Add zNewProperty to DeviceClass.
'''

Configuration Property Management
37
import Migrate
class zNewProperty( Migrate.Step ):
version= Migrate.Version(1, 1, 0)
def cutover(self, dmd):
if not dmd.Devices.hasProperty( "zNewProperty" ):
dmd.Devices._setProperty( "zNewProperty", "default value here" )
zNewProperty()
When a zenmigrate is executed, this code will create the new configuration property for all Devices. Do not forget
to update the Migrate.Version to your current working version. For more information on migrating: see the section
on Chapter 16, Migrating Zenoss Code.

38
Chapter 7. Creating New Jobs
Creating a Job class to encompass an asynchronous process is fairly straightforward. A simple subclass defining
a single method is usually all that is required.
7.1. Job Requirements
Jobs should subclass Products.Jobber.jobs.Job. At a minimum, a Job must implement its own run() method, which
should perform the actions specific to the job and call back to the finished() method reporting success or failure.
Example 7.1. A Job that cleans up the history table in the events database
from Products.Jobber.jobs import Job
from Products.Jobber.status import SUCCESS, FAILURE
class CleanHistoryJob(Job):
"""
Delete all events of a certain age from the
history table.
"""
def __init__(self, agedDays=7):
self.agedDays = agedDays
super(CleanHistoryJob, self).__init__()
def run(self, r):
zem = self.dmd.ZenEventManager
try:
zem.manage_deleteHistoricalEvents(
agedDays=self.agedDays)
except:
self.finished(FAILURE)
else:
self.finished(SUCCESS)
7.2. Running a Job
dmd.JobManager is a tool that, predictably, manages jobs. To add a job to the queue to be run by the zenjobs
daemon, call dmd.JobManager.addJob, passing in the job class as the first argument, followed by arguments to the
job's constructor. For example, to run the example CleanHistoryJob:
dmd.JobManager.addJob(CleanHistoryJob, agedDays=7)
7.3. Life Cycle of a Job
When zenjobs runs a Job, it calls the start() method, which calls run() and returns a Deferred that will fire when
the Job finishes; setup steps that can't happen in run() for whatever reason should occur here. run() should, as
mentioned above, call finished(); Jobs that require post-run actions may override finished() to provide them.
Creating New Jobs
39
Example 7.2. A Job that sends an email when starting and finishing
class EmailSendingJob(Job):
def start()
self.preRun()
return super(EmailSendingJob, self).start()
def run(self, r):
# Do whatever
self.finished(SUCCESS)
def finished(self, r):
self.postRun()
return super(EmailSendingJob, self).finished(r)
def preRun(self):
sendEmail("Job %s is starting" % self.id)
def postRun(self):
sendEmail("Job %s has finished" % self.id)
A Job may provide an interrupt() method that halts the job. The implementation of this method in the base class
does nothing at all.
7.4. Shell Command Jobs
Products.Jobber.jobs.ShellCommandJob is a useful base class for Jobs that run commands in a child shell. Sub-
classes should set the cmd attribute on the instance. A ShellCommandJob can also be scheduled directly, passing in
a list representing the command as the first argument.
Example 7.3. A Job that models a device in the background
from Products.Jobber.jobs import ShellCommandJob
class ModelDeviceJob(ShellCommandJob):
def __init__(self, devname):
self.cmd = ['zenmodeler', 'run', '-d', devname]
super(ShellCommandJob, self).__init__()
# Or, to run a command as a one-off:
def modelDevice(dmd, devname):
dmd.JobManager.addJob(ShellCommandJob,
['zenmodeler', 'run', '-d', devname])
ShellCommandJob's implementation of the interrupt() method kills the child process (kindly, if possible).
7.5. Logging
Jobs can write text to disk so that it is accessible by other processes, using a specialized LogFile object. Simply
call Job.getLog() to get the log, then use log.write(text) to write a line. This LogFile is streamed to the UI in
the job detail view.
40
Chapter 8. Device Management
8.1. Adding Devices Programatically
You can add devices to Zenoss through its user interface and through a programmatic interface. This section pro-
vides more information about adding devices through the programmatic interface.
8.1.1. Using a REST call
Adding a device through a rest call can be done by a simple Web get. For example:
$ wget --auth-no-challenge
'http://admin:zenoss@MYHOST:8080/zport/dmd/DeviceLoader/loadDevice\
?deviceName=NEWDEVICE&devicePath=/Server/Linux'
Note
When using wget, you must escape ampersands (&) and wrap the URL in single quotes.
The result of this command will be the log of auto-discovery. Look in this log for the string "NEWDEVICE loaded!"
to see if the add was successful. Possible failure messages are: "NEWDEVICE exists" and "no snmp found."
8.1.2. Example: Using an XML-RPC Call from Python
This example shows how to add a device by using Python. Because XML-RPC can be used from any language,
your use may differ. The important information is the base URL in ServerProxy, passing positional parameters, and
calling loadDevice on your proxy object.
>>> from xmlrpclib import ServerProxy
>>> url = 'http://admin:zenoss@MYHOST:8080/zport/dmd/DeviceLoader'
>>> serv = ServerProxy(url)
>>> serv.loadDevice('NEWDEVICE', '/Server/Linux')
You can check on the device with another XML-RPC call:
>>> from xmlrpclib import ServerProxy
>>> cp = 'Devices/Server/Linux/devices'
>>> url = 'http://admin:zenoss@MYHOST:8080/zport/dmd/%s/NEWDEVICE' % cp
>>> serv = ServerProxy(url)
>>> print serv.getManageIp()
8.1.3. XML-RPC Attributes
XML-RPC Attributes Description
deviceName the name or IP of the device. If it's a name it must resolve in DNS
devicePath the device class where the first "/" starts at "/Devices" like "/Server/Linux" the default
is "/Discovered"
tag the tag of the device
serialNumber the serial number of the device
zSnmpCommunity SNMP community to use during auto-discovery if none is given the list zSnmpCom-
munities will be used
zSnmpPort SNMP port to use default is 161
Device Management
41
XML-RPC Attributes Description
zSnmpVer SNMP version to use default v1 other valid values are v2
rackSlot the rack slot of the device.
productionState production state of the device default is 1000 (Production)
comments any comments about the device
hwManufacturer hardware manufacturer this must exist in the database before the device is added
hwProductName hardware product this must exist in the manufacturer object specified
osManufacturer OS manufacturer this must exist in the database before the device is added
osProductName OS product this must exist in the manufacturer object specified
locationPath path to the location of this device like "/Building/Floor" must exist before device is
added
groupPaths list of groups for this device multiple groups can be specified by repeating the attribute
in the URL
systemPaths list of systems for this device multiple groups can be specified by repeating the attribute
in the URL
statusMonitors list of status monitors (zenping) for this device default is "localhost"
performanceMonitor performance monitor to use default is "localhost"
discoverProto discovery protocol default is "snmp" other possible value is "none"
Table 8.1. XML-RPC Attributes and Descriptions
8.2. Editing Device Information
Devices can be edited through the UI but also through a programmatic interface. This how to will describe editing
device info using that interface.
8.2.1. Using a REST call
Editing device info through a rest call can be done by a simple web get. In this example we will use wget to add a
device. If you use wget don't forget to escape the "&" or wrap the URL in single quotes.
$ wget --auth-no-challenge 'http://admin:zenoss@MYHOST:8080/zport/dmd/Devices/\
Server/Linux/devices/MYDEVICE/manage_editDevice?serialNumber=MYSERIALNUM\
&tag=MYTAG'
The result of this command will change the Serial Number to MYSERIALNUM and the Tag to MYTAG for device, MYDEVICE.
8.2.2. Using an XML-RPC Call from Python
This is an example of how to edit device info using Python. Because XML-RPC can be used from any language
feel free to use your favorite. What is important here is the base URL in ServerProxy, passing named parameters,
and calling editDevice on your proxy object.
>>> from xmlrpclib import ServerProxy
>>> url = 'http://admin:zenoss@MYHOST:8080/zport/dmd/Devices/'
'Server/Linux/devices/MYDEVICE'
>>> serv = ServerProxy(url)
>>> serv.manage_editDevice('MYTAG', 'MYSERIALNUM')
Here is the signature of manage_editDevice() from Device.py

Device Management
42
def manage_editDevice( self, tag="", serialNumber="",
zSnmpCommunity="", zSnmpPort=161, zSnmpVer="v1",
rackSlot=0, productionState=1000, comments="",
hwManufacturer="", hwProductName="",
osManufacturer="", osProductName="",
locationPath="", groupPaths=[], systemPaths=[],
statusMonitors=["localhost"], performanceMonitor="localhost",
priority=3, REQUEST=None):
8.3. Deleting A Device
Devices can be deleted through the UI but also through a programmatic interface.
8.3.1. Using a REST call
Deleting a device through a rest call can be done by a simple web get. In this example we will use wget to delete a
device. If you use wget don't forget to escape the "&" or wrap the URL in single quotes.
$ wget --auth-no-challenge 'http://admin:zenoss@MYHOST:8080/zport/dmd/Devices/\
Server/Linux/devices/MYDEVICE/deleteDevice'
The result of this command will delete the device MYDEVICE.
8.3.2. Using an XML-RPC Call from Python
This is an example of how to delete a device using Python. Because XML-RPC can be used from any language
feel free to use your favorite. What is important here is the base URL in ServerProxy, passing named parameters,
and calling deleteDevice on your proxy object.
>>> from xmlrpclib import ServerProxy
>>> cp = 'Devices/Server/Linux/devices'
>>> url = 'http://admin:zenoss@MYHOST:8080/zport/dmd/%s/NEWDEVICE' % cp
>>> serv = ServerProxy(url)
>>> serv.deleteDevice()
8.4. Checking If A Device Exists
Devices can be checked for existence through the UI but also through a programmatic interface. This how to will
describe how to check if a device exists using that interface.
8.4.1. Using a REST call
Checking if a device exists through a rest call can be done by a simple web get. In this example we will use wget to
check of the existence of a device. If you use wget don't for get to escape the "&" or wrap the URL in single quotes.
$ wget --auth-no-challenge 'http://admin:zenoss@MYHOST:8080/zport/dmd/Devices/Server\
/Linux/devices/MYDEVICE'
If this command results with an exit code of 1 and a server response code of 404, then MYDEVICE does not exist
in Zenoss. If this command results with an exit code of 0 and a server response code of 200, the MYDEVICE does
exist in Zenoss.
8.4.2. Using an XML-RPC Call from Python
This is an example of how to check if a device exists using Python. Because XML-RPC can be used from any
language feel free to use your favorite. What is important here is the base URL in ServerProxy.

Device Management
43
>>> from xmlrpclib import ServerProxy
>>> cp = 'Devices/Server/Linux/devices'
>>> url = 'http://admin:zenoss@MYHOST:8080/zport/dmd/%s/NEWDEVICE' % cp
>>> serv = ServerProxy(url)
>>> try:
>>> serv.getId()
>>> exists = True
>>> except:
>>> exists = False
8.5. Exporting a Device List
To export a device list:
1. Go to the ZMI:
http://localhost:8080/zport/dmd/Devices/manage
2. Make a script object called getMyDeviceList().
3. Put the following line into the body of the script:
return [ d.id for d in context.getSubDevices() ]
4. Call it like this:
http://localhost:8080/zport/dmd/Devices/getMyDeviceList
Alternatively, enter the following line to return all device IP addresses:
return [ d.manageIp for d in context.getSubDevices() ]
You can call this method from different parts of the tree to limit the list of devices:
http://localhost:8080/zport/dmd/Devices/Server/Linux/getMyDeviceList
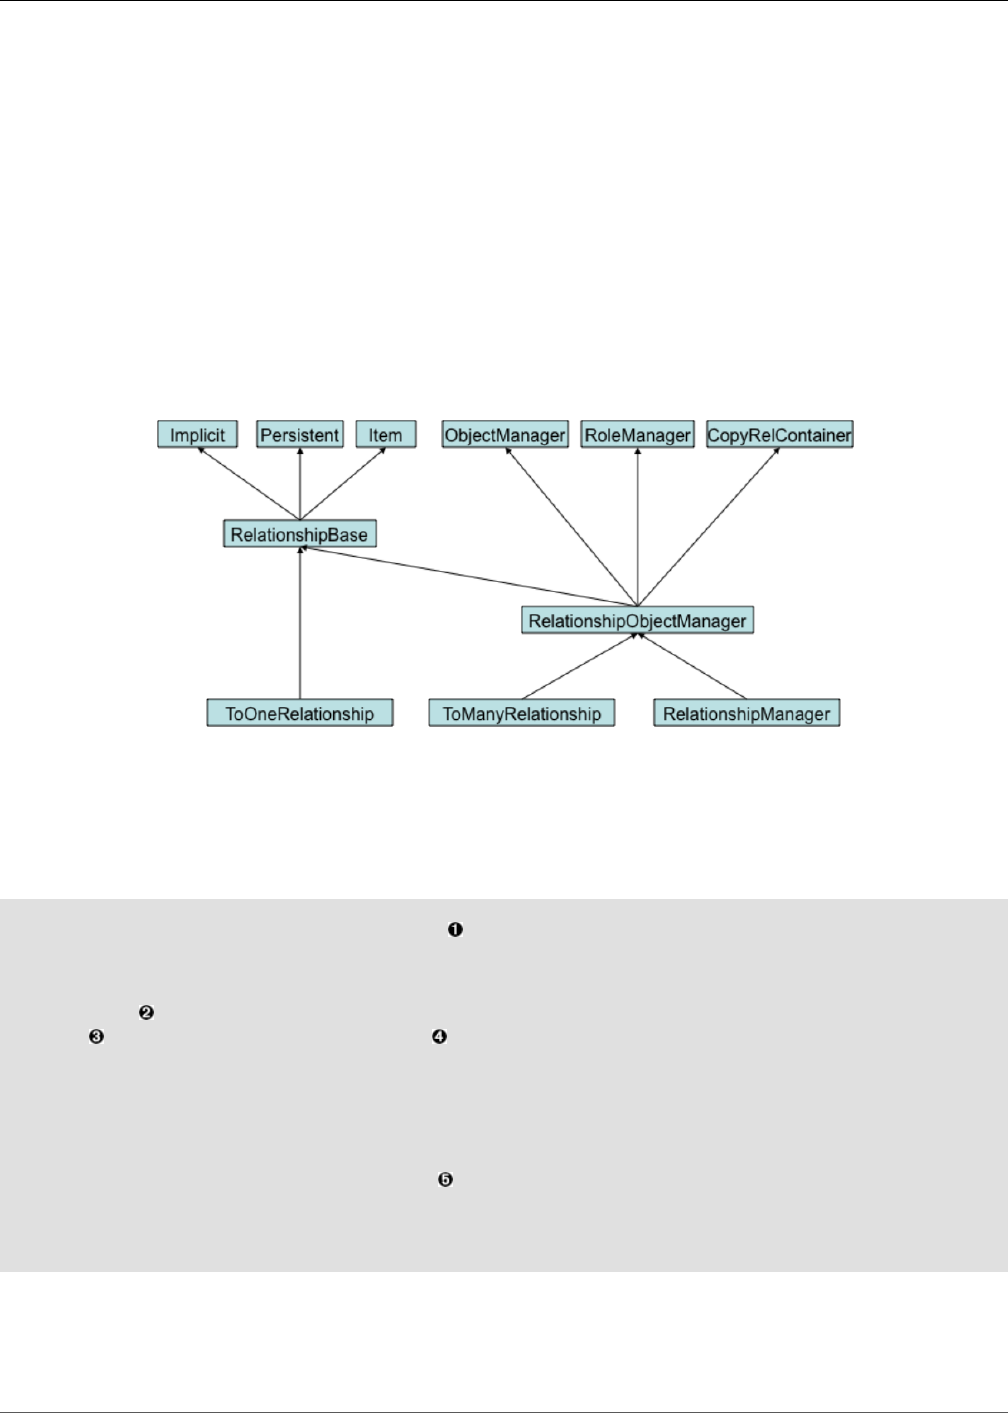
44
Chapter 9. Extending the Model
9.1. Add a ZenModel Relationship
The ZenRelations class allows Zope objects to form bi-directional relationships. There are four different types of
relationships possible:
ONE_TO_ONE only one object at each end of the relationship
ONE_TO_MANY classic parent-child relation, no containment objects have different primary paths
ONE_TO_MANY_CONT one-to-many containment relation (but bi-directional)
MANY_TO_MANY many objects on both ends of relationship
Figure 9.1. ZenRelations
9.1.1. One-to-One (1:1) Relationships
Example of 1:1 Server to Admin Relationship
...
from Products.ZenRelations.RelSchema import *
...
class Server(Device):
...
_relations = (
("admin" , ToOne(ToOne, "Admin", "server") ),
) + Device._relations
...
...
class Admin(TestBaseClass):
...
_relations = (
("server", ToOne(ToOne, "Server", "admin")),
)
...
...
...
The Server object is an example of a class that inherits from Device. According to this relationship there can be only
one Admin assigned to a Server and only one Server assigned to an Admin. This relationship is created by:

Extending the Model
45
Importing ToOne from Products.ZenRelations.RelSchema.
Appending a two-item tuple to the _relations attribute
The first item in the tuple is a "string" object which is the local name
The second item in the tuple is a "RelSchema" object which represents the relationship to another class. In
this case the ToOne constructor creates/returns that "RelSchema" object
ToOne constructors takes three parameters:
• The first parameter is a "type" object, "remoteType" which represents the relationship from another class.
The "type" should be of a class derived from RelSchema
• The second parameter is a "string" object, "remoteClass" which is the class name of the relative. In this
case it is again a ToOne relationship.
• The third parameter is a "string" object, "remoteName" which the remote name of itself.
Appending a complementary two item tuple to the _relations attribute in the relative class.
9.2. One-to-Many (1:N) Relationships
This is a real example which illustrates a one-to-many relationship between one Location and many Devices.
From Device.py
...
from Products.ZenRelations.RelSchema import *
...
class Device(ManagedEntity, Commandable):
...
event_key= portal_type = meta_type = 'Device'
default_catalog= "deviceSearch" #device ZCatalog
relationshipManagerPathRestriction = '/Devices'
...
_relations = ManagedEntity._relations + (
("location", ToOne(ToMany, "Location", "devices")),
)
...
From Location.py
...
from Products.ZenRelations.RelSchema import *
...
class Location(DeviceOrganizer):
...
# Organizer configuration
dmdRootName = "Locations"
portal_type = meta_type = event_key = 'Location'
_relations = DeviceOrganizer._relations + (
("devices" , ToMany(ToOne,"Device","location")),
)
...
According to this relationship there can be only one Location assigned to a Device but more than one Device
assigned to a Location. This relationship is created by:
Importing ToOne and ToMany from Products.ZenRelations.RelSchema.
Appending a two-item tuple to the _relations attribute
The first item in the tuple is a "string" object which is the local name

Extending the Model
46
The second item in the tuple is a RelSchema object which represents the relationship to another class.
RelSchema constructors takes three parameters:
• The first parameter is a "type" object, "remoteType" which represents the relationship from another class.
The "type" should be of a class derived from RelSchema
• The second parameter is a "string" object, "remoteClass" which is the class name of the relative.
• The third parameter is a "string" object, "remoteName" which the remote name of itself.
Appending a complementary two item tuple to the _relations attribute in the relative class.
9.3. Many-to-Many (M:N) Relationships
This is a real example from Device.py which illustrates a many-to-many relationship between many Devices and
many Device Groups.
...
from Products.ZenRelations.RelSchema import *
...
class Device(ManagedEntity, Commandable):
...
event_key = portal_type = meta_type = 'Device'
default_catalog = "deviceSearch" #device ZCatalog
relationshipManagerPathRestriction = '/Devices'
...
_relations = ManagedEntity._relations + (
("groups", ToMany(ToMany, "DeviceGroup", "devices")),
)
...
From DeviceGroup.py
...
from Products.ZenRelations.RelSchema import *
...
class DeviceGroup(DeviceOrganizer):
...
# Organizer configuration
dmdRootName = "Groups"
portal_type = meta_type = event_key = 'DeviceGroup'
_relations = DeviceOrganizer._relations + (
("devices", ToMany(ToMany,"Device","groups")),
)
...
According to this relationship there can be more than one Device assigned to a Device Group and more than one
Device Group assigned to a Device. This relationship is created by:
• Importing ToMany from Products.ZenRelations.RelSchema.
• Appending a two-item tuple to the _relations attribute
• The first item in the tuple is a "string" object which is the local name
• The second item in the tuple is a RelSchema object which represents the relationship to another class. In this
case the ToMany constructor creates/returns the RelSchema object.
The RelSchema constructors take three parameters

Extending the Model
47
• The first parameter is a "type" object, "remoteType" which represents the relationship from another
class. The "type" should be of a class derived from RelSchema
• The second parameter is a "string" object, "remoteClass" which is the class name of the relative. In this
case it is again the ToMany relationship.
• The third parameter is a "string" object, "remoteName" which the remote name of itself.
• Appending a complementary two-item tuple to the _relations attribute in the relative class.
9.3.1. One-to-Many (1:N) Container Relationships
Device to Hard Drives
This is a real example which illustrates a one-to-many relationship between one DeviceHW and many HardDrives
where a DeviceHW object contains HardDrives.
From DeviceHW.py
...
from Products.ZenRelations.RelSchema import *
...
class DeviceHW(Hardware):
...
meta_type = "DeviceHW"
...
_relations = Hardware._relations + (
("harddisks", ToManyCont(ToOne, "HardDisk", "hw")),
)
...
From HardDisk.py
...
from Products.ZenRelations.RelSchema import *
...
class HardDisk(HWComponent):
...
portal_type = meta_type = 'HardDisk'
...
_relations = HWComponent._relations + (
("hw", ToOne(ToManyCont, "DeviceHW", "harddisks")),
)
...
According to this relationship there can be only one DeviceHW assigned to a HardDisk but more than one HardDisk
assigned to a DeviceHW. This relationship is created by:
1. Importing ToOne and ToManyCont from Products.ZenRelations.RelSchema.
2. Appending a two-item tuple of to the _relations attribute
1. The first item in the tuple is a "string" object which is the local name
2. The second item in the tuple is a RelSchema object which represents the relationship to another class.
RelSchema constructors take three parameters
1. The first parameter is a "type" object, "remoteType" which represents the relationship from another class.
The "type" should be of a class derived from RelSchema
2. The second parameter is a "string" object, "remoteClass" which is the class name of the relative.
3. The third parameter is a "string" object, "remoteName" which the remote name of itself.
3. Appending a complementary two-item tuple to the _relations attribute in the relative class.

Extending the Model
48
Specifying the remoteClass in a Relationship
The remoteClass parameter can be specified in a relationship by two methods.
("admin", ToOne(ToOne, "Admin", "server"))
In the example above "Admin" is the remote class on the relationship. For this to work properly the module "Admin"
must be in the python path and it must contain a class named "Admin".
This behavior can be modified by using the attribute zenRelationsBaseModule. For instance if Admin was located
in the path Products.ZenModel you could set zenRelationsBase = "Products.ZenModel". Now the remote class is
in the module Products.ZenModel.Admin and the class must be Named "Admin".
If you wish to put multiple classes into one module and use them in relations you can add the class name to the end
of the remoteClass value. For instance "Admin.Test" would access the module Admin with the class Test.
If the two classes in a relation are in a different packages then you can use the fully qualified path to the
class. For instance here are the definitions of two classes in different packages: Products.ZenWidgets.Menu and
Products.ZenModel.DeviceOrganizer.
In Products.ZenWidget.Menu.py
...
class Menu(ZenModelRM):
...
_relations = (
("deviceOrg",
ToOne(ToManyCont,
"Products.ZenModel.DeviceOrganizer",
"menus")),
)
...
In Products.ZenModel.DeviceOrgaizer.py
...
class DeviceOrganizer(ZenModelRM):
...
_relations = (
("menus",
ToManyCont(ToOne,
"Products.ZenWidget.Menu",
"deviceOrg")),
)
...
9.4. Zenoss XML Schema
This XML schema describes the output of the zendump command.
<?xml version="1.0" encoding="UTF-8" ?>
<xs:schema xmlns:xs="http://www.w3.org/2001/XMLSchema">
<xs:element name="link">
<xs:complexType>
<xs:attribute name="objid" type="xs:string" use="required" />
</xs:complexType>
</xs:element>
<xs:element name="object">
<xs:complexType>
<xs:choice>
<xs:element ref="object" />

Extending the Model
49
<xs:element ref="property" />
<xs:element ref="tomany" />
<xs:element ref="tomanycont" />
<xs:element ref="toone" />
</xs:choice>
<xs:attribute name="module" type="xs:NMTOKEN" use="required" />
<xs:attribute name="class" type="xs:NMTOKEN" use="required" />
<xs:attribute name="id" type="xs:string" use="required" />
</xs:complexType>
</xs:element>
<xs:element name="objects">
<xs:complexType>
<xs:sequence>
<xs:element ref="object" />
</xs:sequence>
</xs:complexType>
</xs:element>
<xs:element name="property">
<xs:complexType mixed="true">
<xs:attribute name="type" type="xs:NMTOKEN" use="required" />
<xs:attribute name="visible" use="optional">
<xs:simpleType>
<xs:restriction base="xs:NMTOKEN">
<xs:enumeration value="True" />
</xs:restriction>
</xs:simpleType>
</xs:attribute>
<xs:attribute name="mode" type="xs:string" use="optional" />
<xs:attribute name="setter" type="xs:NMTOKEN" use="optional" />
<xs:attribute name="select_variable" use="optional">
<xs:simpleType>
<xs:restriction base="xs:NMTOKEN">
<xs:enumeration value="lineTypes" />
<xs:enumeration value="rrdtypes" />
<xs:enumeration value="sourcetypes" />
</xs:restriction>
</xs:simpleType>
</xs:attribute>
<xs:attribute name="id" type="xs:NMTOKEN" use="required" />
</xs:complexType>
</xs:element>
<xs:element name="tomany">
<xs:complexType>
<xs:sequence>
<xs:element ref="link" />
</xs:sequence>
<xs:attribute name="id" type="xs:NMTOKEN" use="required" />
</xs:complexType>
</xs:element>
<xs:element name="tomanycont">
<xs:complexType>
<xs:sequence>
<xs:element ref="object" maxOccurs="unbounded" />
</xs:sequence>
<xs:attribute name="id" type="xs:NMTOKEN" use="required" />
</xs:complexType>
</xs:element>
<xs:element name="toone">
<xs:complexType>
<xs:attribute name="objid" type="xs:string" use="required" />

Extending the Model
50
<xs:attribute name="id" type="xs:NMTOKEN" use="required" />
</xs:complexType>
</xs:element>
</xs:schema>
9.4.1. object
<xs:element name="object">
<xs:complexType>
<xs:choice>
<xs:element ref="object" />
<xs:element ref="property" />
<xs:element ref="tomany" />
<xs:element ref="tomanycont" />
<xs:element ref="toone" />
</xs:choice>
<xs:attribute name="module" type="xs:NMTOKEN" use="required" />
<xs:attribute name="class" type="xs:NMTOKEN" use="required" />
<xs:attribute name="id" type="xs:string" use="required" />
</xs:complexType>
</xs:element>
9.4.1.1. Example
<object id='deleteActionRuleWindows' module='Products.ZenModel.ZenMenuItem'
class='ZenMenuItem'>
<property type="text" id="description" mode="w" >
Delete Rule Windows...
</property>
<property type="text" id="action" mode="w" >
dialog_deleteActionRuleWindows
</property>
<property type="boolean" id="isglobal" mode="w" >
True
</property>
<property type="lines" id="permissions" mode="w" >
('Change Alerting Rules',)
</property>
<property type="boolean" id="isdialog" mode="w" >
True
</property>
<property type="float" id="ordering" mode="w" >
80.0
</property>
</object>
The object element is an XML representation of a Zope object. The example above is the XML representation of
a ZenMenuItem object.
9.4.1.2. Attributes
• id - the unique identifier for the object instance
• class - the classname of the object instance
• module - the module in which this object's class is defined
9.4.1.3. Children
• object - an object may also have objects as children
• property - (see property element section below)
• tomany - (see tomany element section below)
Extending the Model
51
• tomanycont - (see tomanycont element section below)
• toone - (see toone element section below)
9.4.2. objects
<xs:element name="objects">
<xs:complexType>
<xs:sequence>
<xs:element ref="object" />
</xs:sequence>
</xs:complexType>
</xs:element>
9.4.2.1. Example
<objects>
<object id='deleteActionRuleWindows' module='Products.ZenModel.ZenMenuItem'
class='ZenMenuItem'>
<property type="text" id="description" mode="w" >
Delete Rule Windows...
</property>
</object>
</objects>
The object element is an XML representation of a Zope object. The example above is the XML representation of
a ZenMenuItem object.
9.4.2.2. Children
• object - the objects element may also have object as children
9.4.3. property
<xs:element name="property">
<xs:complexType mixed="true">
<xs:attribute name="type" type="xs:NMTOKEN" use="required" />
<xs:attribute name="visible" use="optional">
<xs:simpleType>
<xs:restriction base="xs:NMTOKEN">
<xs:enumeration value="True" />
</xs:restriction>
</xs:simpleType>
</xs:attribute>
<xs:attribute name="mode" type="xs:string" use="optional" />
<xs:attribute name="setter" type="xs:NMTOKEN" use="optional" />
<xs:attribute name="select_variable" use="optional">
<xs:simpleType>
<xs:restriction base="xs:NMTOKEN">
<xs:enumeration value="lineTypes" />
<xs:enumeration value="rrdtypes" />
<xs:enumeration value="sourcetypes" />
</xs:restriction>
</xs:simpleType>
</xs:attribute>
<xs:attribute name="id" type="xs:NMTOKEN" use="required" />
</xs:complexType>
</xs:element>>
9.4.3.1. Example
<property type="float" id="ordering" mode="w" >
80.0
Extending the Model
52
</property>
The property element represents a property of an object in Zope. The example above represents an "ordering"
property of an object. The value of the "ordering" property is 80.0 and is of type float.
9.4.3.2. Attributes
• id - the unique identifier of this property
• type - the datatype of the property's value
• visible - an optional boolean, a flag used to display or hide the property
• mode - read/write permission of this property
• setter - the name of the method to set this property
• select_variable - the name of the list which hold the possible values of this property
9.4.4. tomany
<xs:element name="tomany">
<xs:complexType>
<xs:sequence>
<xs:element ref="link" />
</xs:sequence>
<xs:attribute name="id" type="xs:NMTOKEN" use="required" />
</xs:complexType>
</xs:element>
9.4.4.1. Example
<tomany id='devices'>
<link objid='/zport/dmd/Devices/Server/Linux/devices/MYDEVICE'/>
</tomany>
The tomany element represent a ToManyRelationship object in Zope. The example above is of the "devices" to
many relationship on an object.
9.4.4.2. Attributes
• id - unique name of the to many relationship
9.4.4.3. Children
• link - (see link element below) These links are the XML representations of the references to related objects
9.4.5. tomanycont
<xs:element name="tomanycont">
<xs:complexType>
<xs:sequence>
<xs:element ref="object" maxOccurs="unbounded" />
</xs:sequence>
<xs:attribute name="id" type="xs:NMTOKEN" use="required" />
</xs:complexType>
</xs:element>
9.4.5.1. Example
<tomanycont id='instances'>
<object id='dropbear' module='Products.ZenEvents.EventClassInst'
class='EventClassInst'>
<property type="string" id="eventClassKey" mode="w" >

Extending the Model
53
dropbear
</property>
<property type="int" id="sequence" mode="w" >
1
</property>
...
</tomanycont>
9.4.5.2. Attributes
• id - the name of the to many cont relationship
9.4.5.3. Children
• object - the tomanycont element may have objects elements as children, these subobjects are the XML repre-
sentations of these related objects
9.4.6. toone
<xs:element name="toone">
<xs:complexType>
<xs:attribute name="objid" type="xs:string" use="required" />
<xs:attribute name="id" type="xs:NMTOKEN" use="required" />
</xs:complexType>
</xs:element>
9.4.6.1. Example
<toone id='perfServer' objid='/zport/dmd/Monitors/Performance/localhost'/>
The toone element represents a ToOneRelationship on an object. The example above is a toone relationship named
"perfServer". It represents a device's relationship to only one performance server "localhost."
9.4.6.2. Attributes
• id - the name of the toone relationship of an object
• objid - the path to the related object
9.4.7. link
<xs:element name="link">
<xs:complexType>
<xs:attribute name="objid" type="xs:string" use="required" />
</xs:complexType>
</xs:element>
9.4.7.1. Example
<link objid='/zport/dmd/Devices/Server/Linux/devices/MYDEVICE'/>
The link is a reference to another object element rather than a new instance of an object element.
9.4.7.2. Attributes
• objid - is the path to the object
9.5. Zenoss Permissions
In this example we'll be adding a new permission named "Example Permission", assigning it to a method, then
checking for that permission.

Extending the Model
54
9.5.1. Adding New Permissions
1. Add the new permission to $ZENHOME/Products/ZenModel/ZenossSecurity.py
ZenossSecurity.py is a file where all the string constants for Zenoss permissions are held. By adding this line
to ZenossSecurity.py we've made a new constant that will be used to assign to a method.
ZEN_EXAMPLE_PERMISSION='Example Permission'
2. Now that we have a "name" for the permission available, we should add the permission to Zope. In $ZEN-
HOME/Products/ZenModel/ZentinalPortal.py there is a class named PortalGenerator. There is a method
named setupPermissions() defined in PortalGenerator.
Here you'll see a group of calls to manage_permissions. Add a new line to this method that adds your new
permission.
mp(ZEN_EXAMPLE_PERMISSION, [ZEN_MANAGER_ROLE, MANAGER_ROLE], 1)
The first parameter is the permission. In this example the permission being managed is
ZEN_EXAMPLE_PERMISSION. The second parameter is the list of default roles assigned to the permission.
In this example ZEN_MANAGER_ROLE and MANAGER_ROLE are set as defaults. The third argument is the
acquired flag. When the flag is set to true, the permissions will be acquired in addition to the ones specified.
3. To make your permission official you'll need to use this permission. Apply your newly added permission to a
method. See the next section on assigning permissions to a method. Your permission must be declared and
used by a method to make it a valid permission.
9.5.2. Assigning Permissions to a Method
1. Import your new permission:
from Products.ZenModel.ZenossSecurity import *
2. Import ClassSecurityInfo. In most cases we have set ClassSecurityInfo to security
from AccessControl import ClassSecurityInfo
security = ClassSecurityInfo()
3. Above the method definition add this line of code
security.declareProtected(ZEN_EXAMPLE_PERMISSION, 'exampleMethod')
def exampleMethod(self):
...
The first parameter to declareProtected() is the permission to be set on the method. In this case the permission
is ZEN_EXAMPLE_PERMISSION. The second parameter is the name of the method. In this case the name of the
method is exampleMethod().
9.5.3. Checking Links
1. To check permission on a object, call checkRemotePerm().
self.checkRemotePerm(ZEN_EXAMPLE_PERMISSION, foo)
The first parameter is the permission to check. In this case the permission is ZEN_EXAMPLE_PERMISSION. The
second parameter is the object being checked. In this case the name of the object is foo. This call will check
if foo has the ZEN_EXAMPLE_PERMISSION.

55
Chapter 10. Zenoss Daemons
10.1. Twisted Network Programming Overview
Zenoss relies heavily on the Twisted network Python libraries. Twisted provides an asynchronous, layered network-
ing stack that is used by Zenoss for daemon communications as well as for contacting devices. The main Twisted
documentation can provide a more detailed background.
One of the central concepts in Twisted is not a multi-threaded design, but an asynchronous design. This means that
it is event-driven (the next function to be called depends on what data is received) with co-operative multi-tasking
(such as a badly behaved function that sleeps or takes a long time to execute can stall an entire application). The
unit of co-operative multi-tasking is a deferred object. A simplified overview is that a Twisted program starts a bunch
of deferred tasks and then waits for timers to expire and network events to happen.
Daemons communicate with ZenHub via Twisted Perspective Broker (PB), which is a library for transferring objects
over the network. The most important PB concepts for our purposes are these:
• Methods that start with remote_ are callable from the daemons.
• There are restrictions on what type of objects can be passed back and forth between the service and the dae-
mon. Passing native Python types is supported, as well as some support for more simple objects (classes
without methods). Simple objects can be marked using the PB method pb.setUnjellyableForClass() to help
accomplish this goal.
10.1.1. Understanding NJobs, Driver and DeferredList
Writing scalable, single-threaded communications servers requires an event-driven programming approach. Small,
simple I/O steps are connected by callbacks, rather than normal control flow. For example, instead of just sending a
request and waiting for the response you have to create the request, queue it for delivery, send it when the network
flow-control says it has space, wait for the response, reading it piecemeal, as it arrives, and then correlating it to
the sent message. Fortunately, we use a comprehensive library that performs many of these steps for us, so the
underlying steps are not as small. But, once you have queued your request, you must head back to the main event
loop so that I/O from many different parts of your application can complete in a reactive manner. The fundamental
callback mechanism is the Twisted library's Deferred. There are three common tasks that our data collectors perform
in an asynchronous environment. They are:
1. Perform these tasks, in any order, and report to me when they are complete.
2. Perform this long list of tasks, but do not do more than N of them at a time.
3. Perform a sequence of related activities in the correct order.
10.1.1.1. DeferredList
Lets say you need to perform I/O requests in parallel, and you don't care which finishes first, so long as they all
complete before the next step. For this problem, we gather up the deferreds from each step as we initiate it, and we
hand them to a DeferredList. Once they have all fired (with callbacks or errbacks) the DeferredList will return a list
of the results, along with a boolean value indicating success or failure.
from twisted.internet.defer import DeferredList
d1 = task1()
d2 = task2()
d3 = task3()
d = DeferredList([d1, d2, d3])
d.addCallback(printResults)
def printResults(results):

Zenoss Daemons
56
for success, value in results:
if success:
print "Callback successful:", value
else:
print "Errback: ", value
Each task runs in parallel, completing at its own pace. This approach is useful for knowing when a number of
unrelated requests have completed. For example, fetching the initial configuration may have several requests that
are not interrelated. These may be done in parallel, so long as they all complete before collection begins.
10.1.1.2. NJobs
Each collector can overwhelm existing resources if it does not limit itself. For example, file descriptors in a process
are normally limited to approximately a thousand. Unless you change the operating system's default it is not possible
to talk to more than a thousand devices at one time if each requires its own file descriptor. So, we normally wish
to a talk to as many as we can concurrently, but not so many that we run out of local resources. NJobs takes a
callable that takes a single argument and returns a deferred, and a sequence of items, along with a value N, such
that only N of the callables are outstanding at each time.
from Products.ZenUtils.NJobs import NJobs
jobs = NJobs(10, collectDevice, devices)
d = jobs.start()
d.addCallback(printResults):
def printResults(results):
for result in results:
print "Result is", results
The callable is called on the sequence list in the order given, but each call may complete out-of-order. Therefore,
the results may also have a different order than the input sequence. NJobs prevents us from having to write a built-
in limit to each type of asynchronous collector.
10.1.1.3. Driver
The most difficult to understand of the asynchronous tools that uses Deferreds is Driver. First let's understand the
basic problem. We have a sequence of asynchronous activities we want to link together, but each step requires
some intervening computation or organization. If the activities were synchronous, they might look like this:
config = readConfig()
self.updateConfig(config)
for d in self.config:
clearStatus(d.id)
collect(self.config)
sendHeartbeat()
Each of these steps must be completed in order. Using just deferreds we might right something like this:
d = readConfig()
d.addCallback(updateConfig)
def clearStatuses(self):
d = DeferredList([clearStatus(d.id) for d in self.config])
d.addCallback(collect)
d.addCallback(heartbeat)
d.addCallback(clearStatuses)
The interleaving of synchronous calls (the for loop) and asynchronous calls twists the code around the callback
mechanism. There is a mechanism in Python that can be used to straighten out a convoluted sequence of actions
to produce a stream of results. Like a tokenizer, which uses yield to produce tokens as they have been discovered
in an input stream, Driver uses yield to produce deferreds as they come up. Driver consumes the deferreds and
resumes computation when they complete. So lets see what this code looks like when we yield a deferred whenever
we have one:
Zenoss Daemons
57
yield readConfig()
self.updateConfig(results)
for d in self.config:
yield clearStatus(d.id)
yield self.config()
yield sendHeartbeat()
What remains is very much like the normal synchronous control flow, except the result from the deferreds are
missing. The value results in the 2nd line of the example is a stand-in for some mechanism to get the results of
the last deferred that was returned by yield.
Here's the example in a more complete fragment:
from Products.ZenUtils.Driver import drive
def cycle(driver):
yield readConfig()
self.updateConfig(driver.next())
for d in self.config:
yield clearStatus(d.id)
driver.next()
yield self.config(); driver.next()
yield sendHeartbeat(); driver.next()
drive(cycle)
So, when we drive one of these deferred-generating-sequences, we get a reference to the driver. The driver keeps
the last value returned by a deferred result, so that it is available to the iterator. Construction is difficult to understand,
but understanding is not necessary to use Driver. If you have a sequence of code, where deferreds keep cropping
up and preventing your workflow from, well, flowing, you can use Driver to make flow like the synchronous version.
First, you need a generator which takes a single argument. If you don't have one, you can make one right in the
body of the function:
def f(a, b, c, d):
def inner(drive):
yield g(a, b, c, d)
drive.next()
return drive(inner)
Next, just yield the deferreds as they come up, and get the result with driver.next(). It's good to call driver.next()
even if you don't use the result, because if the result was an exception, driver.next() will throw the exception.
Finally, drive returns a deferred, so be sure to perform callback handling on it. The callback value of the deferred
is the last value from the last deferred.
drive(function).addBoth(self.handleResult)
10.1.1.4. A Simple Example
The following code is a simple example of the usage of a Twisted client / server code as well as the Zenoss driver()
code.
#! /usr/bin/env python
__doc__= """
Simple example of using ZenUtils Driver and Twisted Perspective Broker (PB).
Sums all of the numbers that are given as command line arguments by repeatedly
calling a remote add method on the server-side object.
"""
from twisted.spread import pb
from twisted.internet import reactor
import Globals
from Products.ZenUtils.Driver import drive

Zenoss Daemons
58
class Server(pb.Root):
"""
This is the server-side object.
"""
def __init__(self, port):
"""
Listen on the specified port.
@param port: the TCP/IP port to listen on
@type port: positive integer
"""
reactor.listenTCP(port, pb.PBServerFactory(self))
def remote_add(self, x, y):
"""
Add the two parameters together and return the result.
@param x: first operand
@type x: number
@param y: second operand
@type y: number
@return: the sum of x and y
@rtype: number
"""
return x + y
class Client(object):
"""
This is the client-side object.
"""
def __init__(self, port, numbers, callback):
"""
Connect to the server and drive the sum method.
@param port: TCP/IP port number on which a server is listening
@type port: positive integer
@param numbers: numbers to add
@type numbers: list of numbers
@param callback: a callable that accepts an argument
@type callback: Twisted callback object
"""
self.numbers = [int(n) for n in numbers]
self.clientFactory = pb.PBClientFactory()
drive(self.sum).addCallback(callback)
reactor.connectTCP('localhost', port, self.clientFactory)
def sum(self, driver):
"""
Get the root object. Call the remote add method repeatedly keeping
track of the total.
This is a Python iterable.
@param driver: a driver of the iterables
@param driver: Zenoss driver() class
@return: deferred to track the returned number
@rtype: Twisted deferred object
"""
yield self.clientFactory.getRootObject()
root = driver.next()
total = 0
for n in self.numbers:
yield root.callRemote('add', total, n)

Zenoss Daemons
59
total = driver.next()
def main(numbers):
"""
Assign a port. Create the client and server. Run the reactor.
@param numbers: numbers to add
@type numbers: list of numbers
"""
port = 7691
# Add the server to the reactor
Server(port)
def callback(total):
"""
A simple callback to return the total and stop the reactor
@param total: the total, as returned by the server
@param total: number
"""
print total
reactor.stop()
# Add the client to the reactor
Client(port, numbers, callback)
reactor.run()
if __name__ == '__main__':
import sys
if len(sys.argv) > 1:
main(sys.argv[1:])
else:
print 'Usage: %s <number> [number...]' % __file__
10.2. Zenoss Daemon Overview
There are a few general types of daemon types in Zenoss:
Types of Daemons found in Zenoss
zenhub Each instance of zenhub opens a connection to the ZODB. All other daemons connect to
the hub in order to receive and transmit changes to the ZODB.
modeler daemons These daemons attempt to construct a model of devices and networks using Zenoss ob-
jects, and associate components with devices to prepare for performance data collection.
collector daemons Collector daemons are concerned with gathering performance data for each of the mod-
eled components and storing the results in RRD files. The RRD data is always stored lo-
cally to the host that runs the collector daemon.
event daemons An event daemon converts messages received from devices using whatever method the
device supports, and converts the messages into Zenoss events.
zenrender A render server takes a request for an RRD graph, renders the graphic and sends the
graphic back. A render server will be found where collectors run, as the collectors generate
the RRD files.
Zenoss Enterprise users also have the option of using Distributed Collectors, which can create hubs and collectors
on different hosts in order to monitor devices. With Distributed Collectors there may be multiple zenhub daemons
(one per hub, naturally), and for a host with collector daemons there will also be a renderserver.
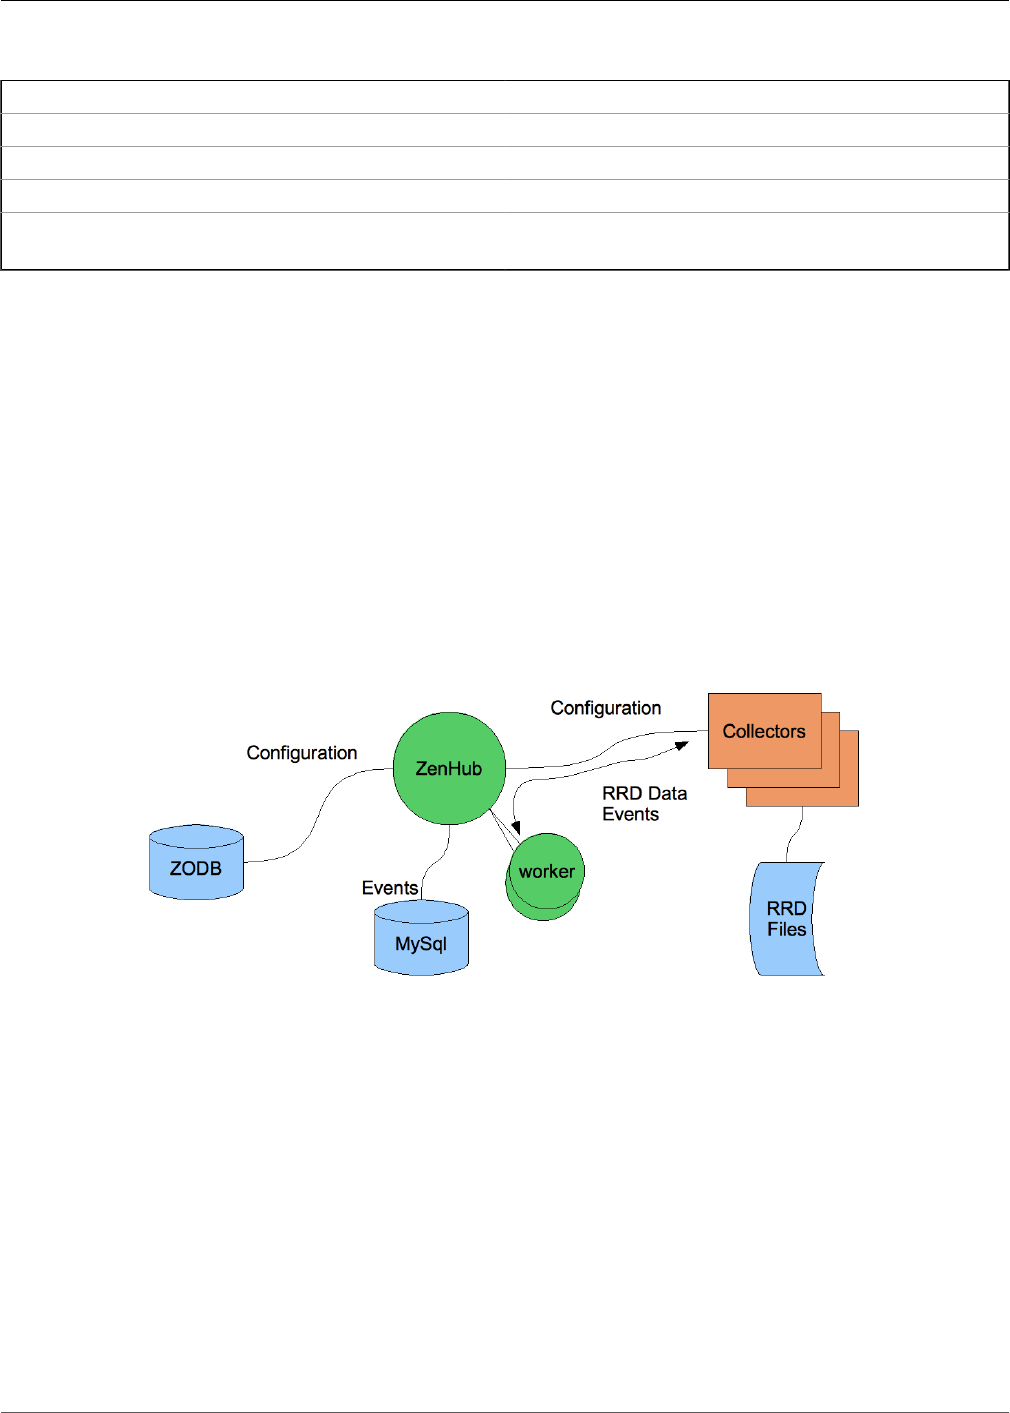
Zenoss Daemons
60
From a programming perspective, most daemons will choose one of the following classes:
Class Features
CmdBase Logging and option parsing
ZenDaemon Logging and option parsing, daemon
ZCmdBase Logging and option parsing, daemon, ZODB connection
PBDaemon Logging and option parsing, daemon, PB communica-
tions
10.3. zenhub: Daemon to ZODB management
The zenhub daemon (aka the Hub or ZenHub) is a single-threaded and asynchronous daemon that provides the
following features:
• Connections between daemons and the ZODB for persistent object management (for example, configuration
loading). Writes to the ZODB are synchronous operations.
• Connections between daemons and the MySQL event database for events and event management. Writes to
MySQL are synchronous operations.
• Connections between daemons and performance data in RRD files
• Pluggable Daemon Services
• User-interactive RRD graph fetching (such as renderserver functionality)
• Loading configuration
Figure 10.1. ZenHub, Daemon and the ZODB
The Hub (as of Zenoss version 2.3) can be split out some of its tasks by creating workers (a configuration file option).
Requests from collectors are farmed out to the worker processes to spread out some of the load.
Note
Propagating configuration changes and fetching RRD Data is not pushed through workers! This means that large
configuration downloads will still affect the user experience. Some sort of caching on the daemon's side may be
necessary for large sites.
10.3.1. Daemon to ZODB management
The zenhub daemon manages updates to the object database (ZODB) to any daemons that connect to zenhub
(in practice this means all Zenoss daemons). The Hub watches for changes to the ZODB database (for example,

Zenoss Daemons
61
the use of the commit() function) and initiates change notifications to any affected daemons. zenhub also provides
daemons access to the object database for loading configuration items and posting events.
10.3.2. Heartbeats and other Events
Another management function that zenhub provides is the ability to send notifications (for example, Zenoss events).
An event will be provided from the daemon to the Hub which then stores the event in the event database (ie a
MySQL table) and then the event is processed according to any mappings that match the event. In this way an
event generated by an error condition can be cleared by another event.
Each daemon should post an event when it is shutdown, so that the console is kept informed of intentional shut-
downs. However, these events should be cleared by matching start events. Start/shutdown events should only be
sent when the server is daemon-ized.
Each daemon should post a periodic Heartbeat event. If a heartbeat event is not updated the Zenoss GUI will
indicate a problem with the daemon. Ideally, a daemon only sends a heartbeat event after each successful operating
cycle (after each performance data collection). It is not acceptable to just post events in a separate thread or timer
unless that thread also does some minimal testing for internal status and health.
If the daemon cannot talk to the Hub (zenhub is down) then events are queued up. When communications are
restored the queued events are then delivered.
10.3.3. Pluggable Daemon Services
To implement these features, zenhub has a collection of Services that it is willing to provide to other daemons.
A daemon will connect and request a particular Service. ZenHub will create that Service, and send future object
change notices to the Service, which in turn can decide how best to notify the daemon. Some daemons, such as
zenping, have a very simple configuration that doesn't change very often. Others, such as the zenperfsnmp, have
a much more complex configuration that must be kept up-to-date with model changes.
Each Service is implemented as a class that zenhub can import. Using Twisted's Perspective Broker (PB) facilities,
a daemon can request that the Hub perform some action (ie a class method) and return the results to the daemon,
and vice versa. In other words, the Service acts as the interface between the daemon and the Hub. The services
directory in a ZenPack directory structure is where the Service class is kept.
10.4. ZenRender and Graphs
ZenRender provides access to RRD files (and rrdtool) stored on a remote collector from a user's browser, and
allows this even with firewalls. Zenrender can implement rendering methods via PB and HTTP.
ZenHub maintains a connection from zenrender, so an HTTP request to ZenHub and back through to the remote
zenrender is an option. zenrender can implement all the RenderServer methods via HTTP requests, too.
You can use the following default URLs to get a graph:
Default URL Description
http://hostname:8080/zport/RenderServer The Zope RenderServer (original mechanism)
http://zenoss:8090/collector ZenHub, where collector is the name of the collector de-
fined in the model. This port number can only be changed
by editing the Render hub service.
http://hostname:8091 A direct reference to zenrender at the given hostname.
The port number is configurable at each zenrender serv-
er.

Zenoss Daemons
62
10.5. Developing a Daemon
10.5.1. Command-line Options
Each daemon should support:
$ mydaemon start
This should daemon-ize the new daemon, running it forever in the background.
$ mydaemon stop
This should find the collector and stop it with a graceful shutdown.
$ mydaemon run
The new daemon should run for one cycle (if it has a cycle), and should not daemon-ize and log to stderr.
Thankfully most of this infrastructure is taken care of for you. Should you require more command-line options, here's
how you should take advantage of the existing code:
from Products.ZenHub.PBDaemon import PBDaemon
class myclass(PBDaemon)
...
def buildOptions(self):
"""Build our list of command-line options
"""
PBDaemon.buildOptions(self)
self.parser.add_option( '--newoption',
dest='dest_var', action="store_true", default=False,
help="Do something really interesting")
The option formats are as specified in the Python optparse library.
Other features taken care of with the Zenoss daemon infrastructure is reading from configuration files, the --genconf
flag (which produces a configuration file populated with all options, comments and default values) as well as the --
genxmltable flag (which produces a DocBook XML table showing command-line switches). As other features can
be added to the base class, if you follow this recommendation there are more things your daemon gets for free.
Note
The code to allow commands to get command-line option values out of a config file in $ZENHOME/etc/ currently
can only set values on lower-case options. Please be aware of this when you create new command-line options.
10.5.2. Add the Daemon Control Script
The daemons directory should contain a file with the name of your daemon (the one that should appear under the
Daemons selection in Advanced > Settings). This file is an executable shell script which should contain the following:
#! /usr/bin/env bash
. $ZENHOME/bin/zenfunctions
MYPATH=`python -c "import os.path; print os.path.realpath('$0')"`
THISDIR=`dirname $MYPATH`
PRGHOME=`dirname $THISDIR`
PRGNAME=mydaemon.py

Zenoss Daemons
63
CFGFILE=$CFGDIR/mydaemon.conf
generic "$@"
Of course, the PRGNAME and CFGFILE variables don't necessarily need to be contain the same name as the daemon.
However, keeping the same name will certainly make things much less confusing.
The mydaemon.py file is assumed to live at the base of the ZenPack.
10.5.3. Set Up ZenHub Communications
The basics of daemon communications are these.
Procedure 10.1. Daemon to ZenHub Communication Steps
1. A daemon connects to ZenHub. The raw mechanics of this are handled by the PBDaemon classes so we don't
need to explicitly code anything.
2. The daemon requests specific Services by name from ZenHub. The Services are classes either already known
to ZenHub or classes provided in the services directory in a ZenPack and are loaded by ZenHub at runtime.
3. The daemon calls remote_ methods on the Service objects from ZenHub to receive configuration information
or perform other work.
4. The Services can also call remote_ methods on the daemon to provide updates, etc.
10.5.3.1. Registering Services with the Hub
The services directory needs to be created at the base directory of your ZenPack. Included in this directory is the
__init__.py file. The __init__.py can be empty, but it must exist or any service class files cannot be loaded by
zenhub.
zenhub imports Services (a daemon-to-Hub interface class) and the daemons can then use their own Service
to perform actions. Look for the example closest to your needs from the $ZENHOME/Products/ZenHub/services/
directory as well as from other ZenPacks (such as HelloWorldZenPack or ZenJMX).
A basic Service class can be found in the Products.ZenHub.HubService.HubService class. More complex daemons
doing data collection may want to subclass Products.ZenHub.PerformanceConfig.PerformanceConfig instead to
take advantage of some additional infrastructure there.

64
Chapter 11. Add a Performance Daemon
11.1. Overview
Zenoss is designed to be an extensible platform for integrating new performance collectors. Basically, this should
be a simple matter of getting the list of devices and sending/receiving data over the network to collect new values.
Essentially, this is what every collector does.
Each collector should post values to RRD files and execute thresholds against those updates. The Python class
RRDUtil supports writing values to RRD files. The Python class Thresholds will simplify the execution of thresholds
on each RRD update.
Data collection needs to work in a wide variety of networking infrastructures, so it needs to have acceptable per-
formance in light of high latency wide-area networks. Collectors should intentionally interleave requests to multiple
devices to reduce the overall time necessary to walk the list of devices. Collectors should not overload a single
device by sending multiple outstanding requests to that device.
In order to debug collection, the collector should be capable of logging detailed debugging output at each step of
collection, as well as posting events about collection failure. In particular, logging raw values and errors from devices
helps find errors in post-processing. Any performance information about total devices collected, or total collect time
should be posted at the informational level (above debug).
Since the collectors are generally going to run long-term, cached values and other stored and pre-computed values
should be periodically purged in order to synchronize the collectors' state with the real world, as well to eliminate
possible memory leaks.
If the collector monitors device components as well as whole devices, it may be necessary to load the device
configuration information in an incremental way. If it takes 30 minutes to gather the configuration information, this is
simply too slow and unresponsive. The collector should load its configuration information incrementally, performing
collection against those devices it knows about. It can cache the configuration information persistently to provide
a larger "initial set" of configuration upon start-up.
Many collectors benefit from "pre-failing" their devices. They get the list of devices presently marked down by the
ping tester, and they skip those devices during collection. This eliminates unnecessary longer delays as collectors
run against devices that are just unreachable.
11.2. DataMaps
Zenoss divides data collection into two parts: modeling, and performance collection. During the modeling, or discover
step, the external world is sampled through a series of plug-ins. The result of the discovery step is a generic "Map":
a nested data structure that mimics the structure of the components within a device.
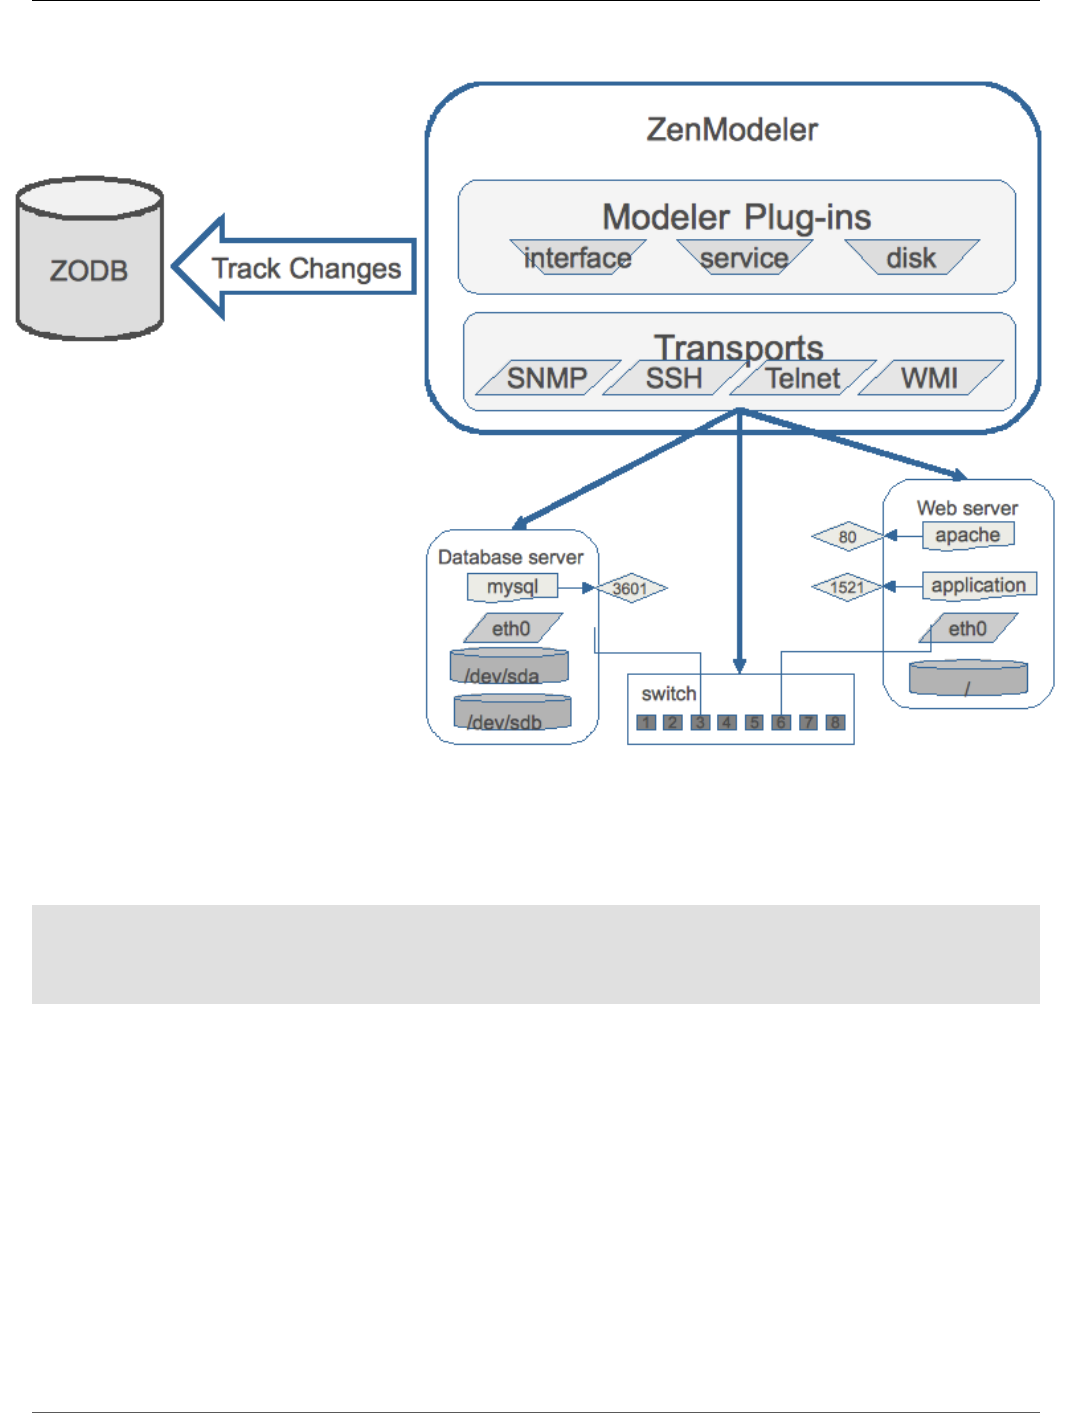
Add a Performance Daemon
65
Figure 11.1. Modeling Overview
For example, we can query the list of network interfaces on a device using SNMP. We will map that into a data
structure to mimic the path on the device:
{ 'os' : { 'interfaces' { 'eth0': { 'type': 'ethernetCsmacd',
'speed': ... }
{ 'eth1': { 'type': 'ethernetCsmacd',
'speed': ... }
These dictionaries of collected data are called DataMaps. There is a set of recursive functions that walk the maps
and apply the values to the device, creating components and setting values on them. In this way, a remote collector
can push updated configuration back to the central database without concern as to what the current configuration
is, and what exactly should be updated.
The Zenoss plugins are specialized to easily create these maps. Typically they consist of a single method process()
to transform SNMP query results into DataMaps. The plugin specifies the SNMP tables to be scanned, and the
process method is used to transform the results into data maps. Some plugins can test their applicability to a specific
device. For example, the plugin may only be appropriate if the device supports SNMPv2, or has a particular agent
OID. These plugins have a "test" method which is run before the plugin is used by the modeler.
SSH plugins, which are very much like SNMP plugins, transform output of various commands into data maps. For
example, the output of the Unix df command is transformed into a map to create and update file system information.

Add a Performance Daemon
66
11.3. Performance Collection
Modeling updates the object database model with information about what data to collect. As an example, if the
modeler detects three network interfaces, it creates slots for each network interface, and each of these slots is
referenced by an index. It is now up to the data collector to fill each of these slots with performance data.
When the performance collectors read their configuration, the devices are matched against templates, and each
template contains each data sources (for example, which data points (such as SNMP OIDs) and their slot to collect)
and thresholds. In addition, any information necessary to read the performance data (such as configuration prop-
erties that contain login information) is retrieved. This information is usually organized by device, and is loaded by
the collector when it is started.
When devices change configuration (and therefore change the performance data that needs to be collected), the
model must be refreshed either with an explicit selection of Model Device on the device, or by the periodic runs of
a modeler (such as zenmodeler).
11.3.1. Connecting Collectors and Services
All collectors (and the modelers) are sub-classed from PBDaemon. PBDaemon will automatically connect to zenhub and
re-connect as needed. It provides an easy-to-use Event Service.
The configuration format and API for getting and updating any specific collector will depend on the Service it uses.
There are a few caveats about forwarding configuration to collectors:
1. Change notifications are very "bursty."
2. A sequence of updates in a burst will often update the same object many times.
3. The configuration for thousands of devices can take a long time to extract. The configuration should be pushed
or pulled incrementally.
Caveats 1 and 2 mean that we often delay sending updates by several seconds to reduce the number of changes
sent. Caveat 3 makes for complex exchanges between a service and the collector. There are classes to support
delayed evaluation of configuration (Procrastinator). There is support for determining the type of object change:
the deletion of a device, the update of a template, and the update of a monitor's configuration (PerformanceConfig).
11.4. Creating a New Collector
For this section, we will contemplate a new collector that will collect ping performance data. We will want to create
a new data source type with several built-in data points, such as Average Ping Time, and Fastest Ping Time.
11.4.1. Constructor
The following example is a simple network ping-performance collector. It relies on the availability of fping to perform
the actual ping test.
class pingperf(RRDDaemon):
initialServices = RRDDaemon.initialServices + [
'ZenPacks.zenoss.PingPerf.PingConfig'
]
configCycleInterval = 20*60
pingCycleInterval = 5*60
The class pingperf is derived from a base class that supports writing to RRD files. It is a also PBDaemon, which
means that it will connect to ZenHub to fetch its configs and post events. PingConfig is the module/class that will be
loaded in ZenHub to satisfy zenperf's configuration requests. We also configure reasonable default values for two
cycles: the time between configuration refreshes and the time between ping tests.
Add a Performance Daemon
67
def __init__(self):
RRDDaemon.__init__(self, 'pingperf')
self.devices = {} # device id -> ip address
self.running = False
The constructor for this class calls the base's constructor, passing our name. We will need to hold the configuration
between cycles, so we initialize an empty configuration. If the ping testing takes longer than one configuration cycle,
we won't want to start a second test. We set a flag to note that we aren't running a ping test (yet).
When the base class is started, it attempts to connect to ZenHub and get remote references to the services is
will use. Most collectors have two services: EventService and a collector-specific service that scans the model
for configuration. Our service will be PingConfig. After the service reference are loaded, the base class calls a
connected() method.
def connected(self):
def inner(driver):
log.debug("fetching config")
yield self.fetchConfig()
driver.next()
driveLater(self.configCycleInterval, inner)
drive(inner).addCallbacks(self.pingDevices, self.errorStop)
This method uses a technique to serialize a callback chain. See the ZenUtils/Driver.py for details on how this
works. The effect is that the config is loaded with the fetchConfig() method, and the inner function is called repeat-
edly after configCycleInterval seconds.
Once the inner function completes the first time, it either calls pingDevices() on success or errorStop() on failure.
11.4.2. Getting a List of Devices
When the collector connects, and requests its config from the Service, the service will walk the list of all the devices
for that monitor, and extract out the ping data sources:
def remote_getDevices(self):
config = []
monitor = self.dmd.Monitors.Performance._getOb(self.name)
for dev in self.monitor.devices():
for templ in dev.getRRDTemplates():
dataSources = templ.getRRDDataSources('Ping')
if dataSources:
break
else:
continue
config.append(
(dev.id, # name of the device
dev.getManageIp(), # the IP to ping
dev.getThresholdInstances('Ping')
# any thresholds on the ping
)
)
To make this configuration load incremental, the Service can send just the name of the devices to load, and then
the collector can use a different method to load the configuration of each device at a later time. For such a simple
configuration, it may not be worth the extra complexity.
When this code is placed into a class that is a sub-class of HubService, it can be loaded by name, when the collector
loads it services. PBDaemon will automatically connect you to this service, if the name of the service is provided
in the class configuration.
The call to get this configuration in our new collector looks like this:
d = self.getService('some.package.PingService').callRemote('getDevices')
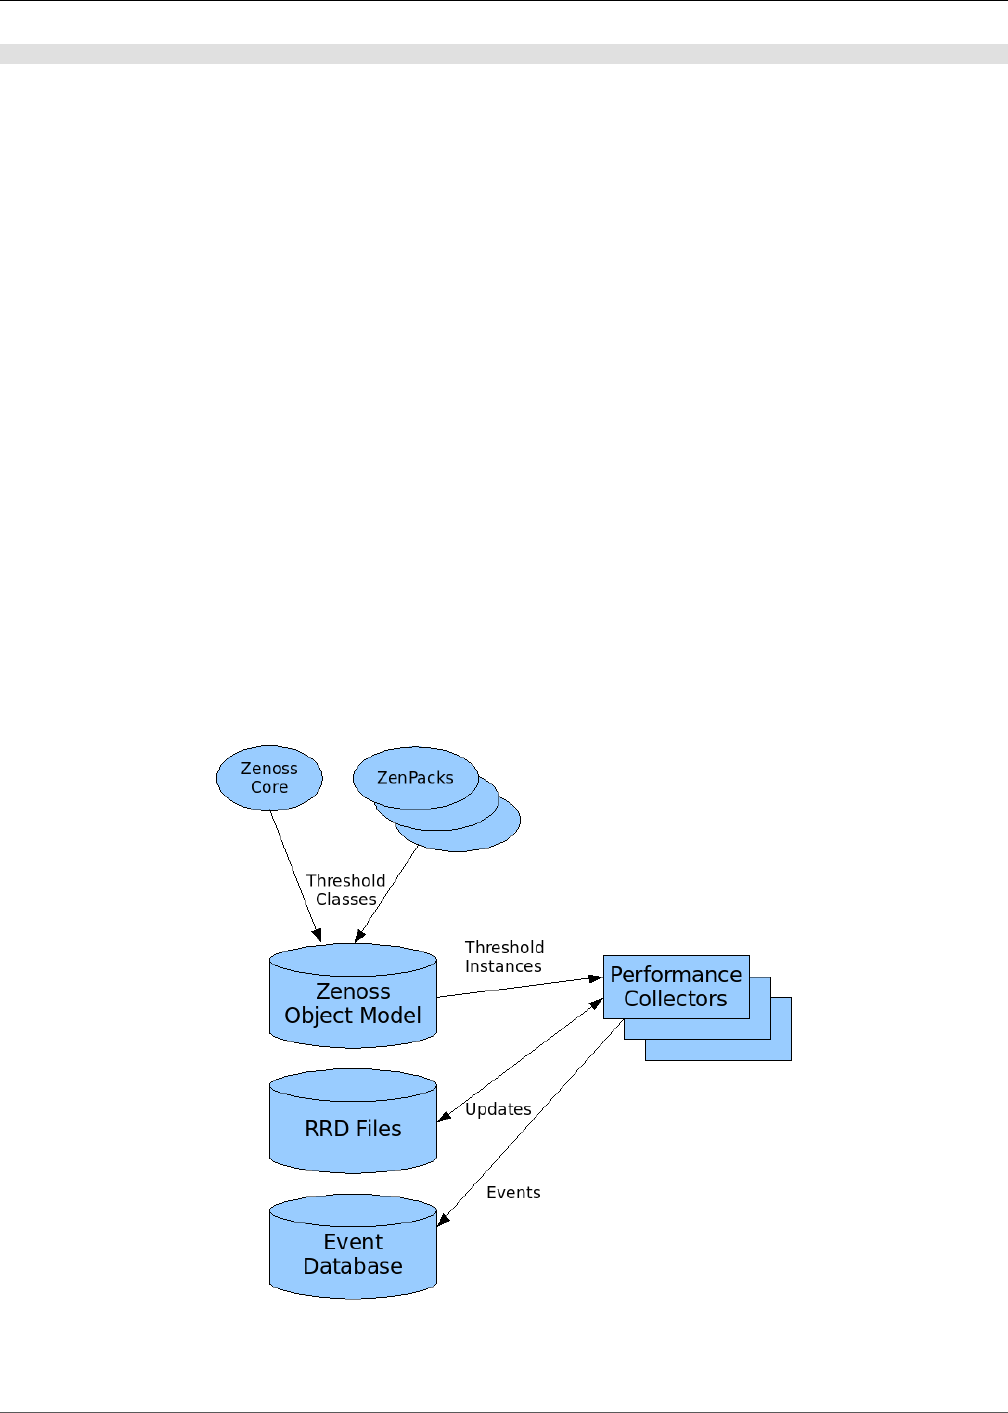
Add a Performance Daemon
68
d.addCallback(self.startCollection)
Note
1. PBDaemon has already connected you to the service some.package.PingService class.
2. getDevices becomes remote_getDevices in the hub.
3. The protocol for getting configurations is anything you like: you can control both sides of the communications.
4. Requests and responses are asynchronous and will involve callback objects.
5. The communications are heavily dependent on the Prospective Broker (PB) library in Twisted. Please refer
to the Perspective Broker (PB) documentation for how the calls to remote objects work.
11.4.2.1. Thresholds
As each collector reads updated performance data it will evaluate any thresholds associated with those updates.
The classes representing those thresholds must be loaded before the thresholds may loaded evaluated. So, each
collector asks ZenHub for the names of all of the thresholds that can be monitored and imports them for future use.
The management of Thresholds within the collector is complex. There exists a class (Thresholds) to manage the
thresholds and transform performance updates into events.
11.4.2.1.1. Complex Thresholds
A complex threshold allows Zenoss to produce an event:
• When user time and system time is over 80%
• When value A is 80% of value B
• On a different RRD consolidation function from AVERAGE
• When a file system is X% full, and a critical event is Y% full
Figure 11.2. Complex Thresholds
Add a Performance Daemon
69
Thresholds are not “min/max value checkers” but “transformers of values into events”. As new values come in,
the Threshold will look at the value and determine if an event is warranted. Because of the inheritable template
mechanism, we have two separate tasks for Thresholds. The first is to represent the configuration for a threshold
within the template. A value like “80” in the case of “File System at 80% full” is part of the configuration. However,
when applied to a context, such as file system “C:\\” on device “WINXYZ” the value becomes “96000 blocks”. The
value “96000 blocks” needs to transfer from the Zenoss object model, to the collector, so that values can be evaluated
with the given context, without referring to the entire object model.
This leads us to separate thresholds into two components: one that hold the configuration and user intent, and
another that can travel as part of the collector configuration to the collector. This “Threshold with Context” object
is then executed when new values for data points are collected. The first type of threshold (for configuration) is
called ThresholdClass, and the second type, which evaluates a value with context is called a ThresholdInstance.
The Zenoss data model will load ThresholdClass classes from Zenoss and installed ZenPacks. These objects are
responsible for creating the ThresholdInstance objects that are sent via the collector configuration for evaluation in
the collector. Templates refer to derived versions of ThresholdClass, which when given a context, create Thresh-
oldInstance objects.
To reduce the effort when writing a performance collector, support classes are used to hold ThresholdInstances
and map updates to data points into threshold evaluation and event generation. The classes MinMaxThreshold and
MinMaxThresholdInstance replaced the previous Threshold and flattening mechanism defined for data points and
collectors in Zenoss version 2.0.X.
Presently, collectors are generally ignorant of context (device, or component), and almost certainly ignorant of
DataSources and DataPoints. They are given the parameters necessary to fetch a value and store it into an RRD file.
ThresholdsInstances wish to work on distinguished DataSource/DataPoint names within a context. So, to map from
RRD files back to Thresholds, we use the RRD filename. When a collector updates a file, it notifies the Thresholds
class (the utility class for all collectors to hold threshold information). This class maintains a mapping of file names
to Threshold and DataPoint. Eventually, it might be worth translating the collectors so that they know about context
and DataPoint.
Known Problems with Complex Thresholds
To send classes from Server to Client, the client has to expect and approve them. We will need to transfer
the list of approved ThresholdInstance sub-classes before a client can load those thresholds. The collector
will then have to approve and import these sub-classes at start-up.
11.4.3. fetchConfig()
Let's look at fetchConfig():
def fetchConfig(self):
'Get configuration values from ZenHub'
def inner(driver):
yield self.model().callRemote('getDefaultRRDCreateCommand')
createCommand = driver.next()
yield self.model().callRemote('propertyItems')
self.setPropertyItems(driver.next())
self.rrd = RRDUtil(createCommand, self.pingCycleInterval)
yield self.model().callRemote('getThresholdClasses')
self.remote_updateThresholdClasses(driver.next())
yield self.model().callRemote('getCollectorThresholds')
self.rrdStats.config(self.options.monitor,

Add a Performance Daemon
70
self.name,
driver.next(),
createCommand)
devices = []
if self.options.device:
devices = [self.options.device]
yield self.model().callRemote('getDevices', devices)
update = driver.next()
if not isinstance(update, dict):
log.error("getDevices returned: %r" % update)
else:
self.devices = update
return drive(inner)
Here the same drive/inner technique is used to serialize a bunch of asynchronous remote method calls. The base
class provides a method called model() which returns a remote reference to the collector-specific configuration class.
We call several remote methods, most of which are inherited from a base ZenHub service class.
We must get the default RRD create command. Then we copy the collector properties, which provides updated
values for pingCycleInterval and configCycleInterval. In order to execute thresholds, we need to know the set of all
threshold classes and get them imported. After the threshold classes are installed, we have to get the thresholds for
this collector. These thresholds do not belong to the data points to be collected (ping response time), but for values
like "total cycle time" that are based on the collectors performance.
Finally we call the remote method getDevices() which returns a mapping of device id to IP address. We make
allowances for the simple one-device invocation:
pingperf -v 10 -d someDevice
11.4.4. Collector's ZenHub Service
Here's our ZenHub service:
from Products.ZenHub.services.PerformanceConfig import PerformanceConfig
class PingConfig(PerformanceConfig):
"""
A very simple service for fetching device data
"""
def getDeviceConfig(self, device):
return (device.id, device.getManageIp())
def sendDeviceConfig(self, listener, config):
listener.callRemote('updateDevice', config)
def remote_getDevices(self, devices):
result = {}
for d in self.config.getDevices():
if not devices or d.id in devices:
result[d.id] = d.getManageIp()
return result
Most of the implementation for this class is in the base class. The base class determines the devices affected when
database changes occur. It then uses the methods getDeviceConfig and sendDeviceConfig to figure out how to
send the changes to the collector.
11.4.5. Miscellaneous Functions
Back to the collector, here are the methods that are called by ZenHub to update the collector with changes:
Add a Performance Daemon
71
def remote_deleteDevice(self, doomed):
log.debug("Async delete device %s" % doomed)
try:
del self.devices[doomed]
except KeyError:
pass
def remote_updateDevice(self, cfg):
log.debug("Async config update for %s", cfg.name)
d, ip = cfg
self.devices[d] = ip
11.4.6. Collect the Performance Data
The only method left in our simple collector is to actually ping some devices, post the timings to a configuration file,
send any resulting events, and send a heartbeat.
def pingDevices(self, ignored=None):
def inner(driver):
reactor.callLater(self.configCycleInterval, self.pingDevices)
if not self.options.cycle:
self.stop()
if self.running:
log.error("Ping is still running")
return
self.running = True
log.debug("Pinging %s..." % (" ".join(self.devices.keys())[:100]))
start = time.time()
revMap = dict([(ip, d) for d, ip in self.devices.items()])
fd, fname = mkstemp()
fp = os.fdopen(fd, "w")
log.debug("Writing devices to tempfile %s." % fname)
fp.write('\n'.join(revMap.keys()) + '\n')
fp.close()
from twisted.internet.utils import getProcessOutput
fping = os.path.join(os.path.dirname(__file__), "fping.sh")
log.debug("starting %s" % fping)
yield getProcessOutput(fping, (fname,))
log.debug("fping returned: %s" % driver.next())
for line in driver.next().split('\n'):
if not line: continue
match = parseLine.match(line)
if not match:
log.debug("%s does not match expected output" % line)
continue
ip = match.group(IP)
ms = float(match.group(MS))
if not revMap.has_key(ip):
continue
device = revMap.pop(ip)
path = 'Devices/%s/ping_time' % device
ms = self.rrd.save(path, ms, 'GAUGE')
for ev in self.thresholds.check(path, time.time(), ms):
self.sendThresholdEvent(**ev)
os.unlink(fname)
self.heartbeat()
cycle = self.pingCycleInterval
self.rrdStats.gauge('devices', cycle, len(self.devices))
self.rrdStats.gauge('down', cycle, len(revMap))
self.rrdStats.gauge('cycleTime', cycle, time.time() - start)
d = drive(inner)
def clearRunning(arg):

Add a Performance Daemon
72
self.running = False
if isinstance(arg, Failure):
log.error("Error pinging devices: %s" % (arg,))
return arg
d.addBoth(clearRunning)
return d
This is a long method, so let's take it in parts. Let's take everything outside of the inner() function:
def inner():
# ....
d = drive(inner)
def clearRunning(arg):
self.running = False
if isinstance(arg, Failure):
msg = "Error occurred in pingperf collection: %s" % (arg.value,)
self.sendEvent(WARNING_EVENT, summary=msg)
return arg
self.running = True
d.addBoth(clearRunning)
return d
Again we are using the same drive/inner approach to serialize asynchronous calls. We also want to track the fact
that we are running the inner method so that we can detect cases where our collection cycle is taking too long. The
clearRunning() function is added to the callback chain to ensure that the running flag is reset however the inner
function completes. It was also a convenient place to report on any errors. Here's the definition of WARNING_EVENT
to remove any mystery about its value:
The following is a constant definition used to send an event if the collector has an error:
WARNING_EVENT = dict(eventClass=Status_Ping,
component="ping",
device=socket.getfqdn(),
severity=Warning)
The inner function does all the work:
def inner(driver):
reactor.callLater(self.configCycleInterval, self.pingDevices)
if not self.options.cycle:
self.stop()
if self.running:
log.error("Ping is still running")
return
This bit of code controls the ping cycle. By starting the timer call chain immediately we are ensured to repeat the
call in the future even if an error occurs or the collection takes too long.
log.debug("Pinging %s..." % (" ".join(self.devices.keys())[:100]))
start = time.time()
revMap = dict([(ip, d) for d, ip in self.devices.items()])
fd, fname = mkstemp()
fp = os.fdopen(fd, "w")
log.debug("Writing devices to tempfile %s." % fname)
fp.write('\n'.join(revMap.keys()) + '\n')
fp.close()
Our implementation for pinging all the devices is farmed out to an external process (fping). So we write a config file
for fping (a list of IP addresses) into a temporary file. Next, we run fping and collect the results:
from twisted.internet.utils import getProcessOutput
fping = os.path.join(os.path.dirname(__file__), "fping.sh")

Add a Performance Daemon
73
log.debug("starting %s" % fping)
yield getProcessOutput(fping, (fname,))
log.debug("fping returned: %s" % driver.next())
The next loop parses each line of output using a regular expression:
log.debug("fping returned: %s" % driver.next())
for line in driver.next().split('\n'):
if not line: continue
match = parseLine.match(line)
if not match:
log.debug("%s does not match expected output" % line)
continue
ip = match.group(IP)
ms = float(match.group(MS))
if not revMap.has_key(ip):
continue
When a match is found, we determine the device from the IP address and post the value to an RRD file:
device = revMap.pop(ip)
path = 'Devices/%s/ping_time' % device
ms = self.rrd.save(path, ms, 'GAUGE')
We use the resulting value (which may have been averaged in with other data from the RRD file) to check thresholds:
for ev in self.thresholds.check(path, time.time(), ms):
self.sendThresholdEvent(**ev)
Finally, we remove the temporary file, send a heartbeat, and report statistics on the total number of devices, the
devices that did not report, and the total time to process the device list.
os.unlink(fname)
self.heartbeat()
cycle = self.pingCycleInterval
self.rrdStats.gauge('devices', cycle, len(self.devices))
self.rrdStats.gauge('down', cycle, len(revMap))
self.rrdStats.gauge('cycleTime', cycle, time.time() - start)

74
Chapter 12. Adding a Device Type
In this example we'll add platform support for AIX, which uses vendor extensions to store MIB data which Zenoss
does not understand. To simplify things a little, we'll say that our Zenoss server name is zenoss1.
12.1. Overview
Adding support for a new platform can be broken down into a number of easily-defined steps:
• Add the platform-specific MIB to make it easier to find items to collect SNMP information and map numeric
OIDs to names.
• Add a device organizer for the platform to create a tidy place to store platform-specific information.
• Create modelers to gather information that does not change often (such as network cards or file system names)
• Create performance data collectors which will be used to gather current usage statistics (how full the file system
is now).
• Create templates which will be used to store the results from the data collectors and use the data for graphing.
This also allows us to set thresholds so that we can generate events when certain conditions are met (such as
when the file system is 95% full).
• Create event mappings to create reasonable responses to events coming from the devices. Additionally, if the
new device warrants it, create a new event organizer to manage new events.
If the data is collected through an API or network protocol that Zenoss doesn't natively support, it may be necessary
to create a daemon that understands that protocol. This daemon might allow Zenoss to model, collect performance
data and event information, and then store that information.
12.2. Add the MIB
MIBs are used by Zenoss as a way to convert trap output from numeric OIDs to named OIDs. Once you add the
MIB it should be easy to point your device's trapsink to the Zenoss server and from the Zenoss server convert the
traps into Zenoss events.
The AIX MIB which is stored in the /usr/lib/samples/snmp/aix.my MIB file on any AIX server. Copy the MIB file
to your Zenoss server and add it with the command:
zenmib run $ZENHOME/share/mibs/site/aix.my
Verify that the MIB is in the management page at:
http://zenoss1:8080/zport/dmd/Mibs
To add a Python-ized MIB (saved from a previous run of zenmib) to the DMD, use the --evalSavedPython flag.
For example:
zenmib run -v10 --evalSavedPython=/tmp/isis.py
12.3. Add a Device Organizer
If you want to create a device organizer so that it is easy to differentiate between other types of devices and the
type that you're adding, feel free to do so. In the case of AIX, there are a couple of types of setups:
Generic AIX Definitions
Standalone This describes the case where the entire pSeries server is dedicated to running
one instance of AIX.
Adding a Device Type
75
Logical PARtition (LPAR) Some AIX pSeries servers are capable of running multiple instances of AIX. An
AIX instance (LPAR in IBM speak) is equivalent to a VMware image.
Frames AIX LPARs are hosted on physical hardware (ie a pSeries server), which is re-
ferred to as a frame. These frames are capable of being run as either a stan-
dalone server or as a bunch of LPARs. The frame is like a VMware host.
Virtual IO (VIO) Server A VIO server is a special LPAR that allows you to consolidate IO hardware (eg
Ethernet, Fibre Channel cards) and share virtualized hardware with other LPARs.
This is one of the key technologies required in order to perform VMotion-style
activities for AIX LPARs.
A separate server (called a Hardware Management Console (HMC)) is used to manage standalone devices, frames
and LPARs (including VIO servers). The HMC is actually a Linux server with a custom configuration to support AIX.
In this example, we'll just add the AIX parts and ignore the HMC.
Add a device class for AIX in the /Devices/Server/AIX class:
1. From Infrastructure > Devices, select Server in the tree view.
2. click (below the tree view) to add a device class.
The Add Device Class dialog appears.
3. Enter a name and description, and then click Submit.
Under the newly created /Server/AIX organizer, repeat the previous steps to create the LPAR class. Under that
class, create a VIO class.
In this newly created scheme, we're intending on putting standalone servers and frames in the /Server/AIX class,
any LPARs in the /Server/AIX/LPAR class, and any VIO servers (which are a special type of LPAR) under the /
Server/AIX/LPAR/VIO class. If we wanted to have each frame contain its own tab showing the LPARs that it hosts,
we would need to create new ZenModel objects (complete with relations), instantiate them at the base of /Server/AIX
and then write more ZPTs to handle our custom behaviors.
Another situation where we might be forced to write our own device class Python code is where we want to add
properties that don't exist in other devices. For instance, we may want to record whether or not a Fibre Channel
device supports N-Port ID Virtualization (NPIV). This extra property would need to be subclassed from the ZenModel
class and the object initialized from within our ZenPack's __init__.py file.
12.4. Create a Modeler
When you navigate to a particular host, select Modeler Plugins from the left panel, and then select Model Device
from the Action menu, the system runs all of the associated modelers. What we need to do is copy and customize
an existing modeler plugin from $ZENHOME/Products/DataCollector/plugins/zenoss/snmp and then add that plugin
to our list of plugins that our platform's device class will use.
We'll start with creating a Filesystem modeler plugin. We'll copy the HRFileSystemMap plugin and call our plugin
AIXFileSystemMap.py. Using the information in the MIB, we can find the place where it stores the list of file systems.
Name Required? Description
condition() N Returns True or False to indicate whether or not to run the other functions
preprocess() N This will get called before the process() function
process() Y This is the actual function that processes any information retrieved from a
query and converts it into a format suitable for updating the device model.
Table 12.1. Modeler Functions

Adding a Device Type
76
12.4.1. Verify the SNMP connectivity and OIDs
First, verify that your server's SNMP daemon is functional and that you have the correct SNMP version and creden-
tials. We'll assume that we're using SNMP version 1 and are using the public community, and that your new host
will allow connections from our Zenoss server.
Run the snmpwalk command from the Zenoss monitoring server:
snmpwalk -v1 -c public myaixbox.example.com 1.3.6.1.4.1.2.6.191.1 | head
This produces a lot of output that we've truncated to save patience and space.
SNMPv2-SMI::enterprises.2.6.191.1.1.1.0 = INTEGER: 5
SNMPv2-SMI::enterprises.2.6.191.1.1.2.0 = ""
SNMPv2-SMI::enterprises.2.6.191.1.1.3.0 = INTEGER: 2
SNMPv2-SMI::enterprises.2.6.191.1.1.4.0 = Gauge32: 0
SNMPv2-SMI::enterprises.2.6.191.1.1.5.0 = INTEGER: 0
SNMPv2-SMI::enterprises.2.6.191.1.1.6.0 = INTEGER: 2
SNMPv2-SMI::enterprises.2.6.191.1.1.7.0 = STRING:
"The current used percentage 93 of the file system /mnt has gon"
SNMPv2-SMI::enterprises.2.6.191.1.1.9.0 = INTEGER: 0
SNMPv2-SMI::enterprises.2.6.191.1.1.10.0 = INTEGER: 0
SNMPv2-SMI::enterprises.2.6.191.1.1.11.0 = INTEGER: 0
If you do not see output like that above, nothing else will work. Find the issue and fix it.
The Zenoss community Web site has a ZenPack with a graphical MIB browser that might help for these steps.
12.4.2. Common SNMP Issues
Following is a list of some common reasons why snmpwalk may not return any data:
• SNMP daemon on the remote system is not running.
• SNMP daemon on the remote system has different security credentials than what you are using (for example,
version 1 instead of version 2c, wrong community name).
• SNMP daemon on the remote system allows connections only from certain IP addresses or IP address ranges,
and the Zenoss server does not meet that criteria.
• SNMP daemon on the remote allows queries only to certain portions of certain MIBs, and you have specified
something not allowed by that policy.
• Firewall or firewalls between the Zenoss server and the remote system to not allow UDP or SNMP traffic.
• Firewall on the Zenoss server does not allow UDP or SNMP traffic outbound or inbound.
• Firewall on the remote system does not allow UDP or SNMP traffic outbound or inbound.
As a first sanity check, try the snmpwalk command on the remote host. For example:
snmpwalk -v1 -c public localhost 1.3.6.1.4.1.2.6.191.1 | head
12.4.3. Modeler Code
Multiple modelers for different components of a system can be created, or one huge modeler for everything can
be created. Smaller modelers are preferred for maintenance reasons. The following modeler is for the file systems,
and would live in the modeler/plugins/ directory of your ZenPack.
Python requires that __init__.py files be in both the modeler/ and the modeler/plugins/ directories. If they are
missing your modeler will not load.
__doc__ = """AIXFileSystemMap

Adding a Device Type
77
This modeler determines the filesystems on the device and updates
appropriately. It is up to the monitoring template that must be
named 'Filesystems' to collect the actual performance data
(eg free/available blocks).
"""
import re
from Products.ZenUtils.Utils import unsigned
from Products.DataCollector.plugins.CollectorPlugin import SnmpPlugin, \
GetTableMap
from Products.DataCollector.plugins.DataMaps import ObjectMap
class AIXFileSystemMap(SnmpPlugin):
maptype = "FileSystemMap"
compname = "os"
relname = "filesystems"
modname = "Products.ZenModel.FileSystem"
deviceProperties = \
SnmpPlugin.deviceProperties + ('zFileSystemMapIgnoreNames',)
#
# These column names are for the aixFsTable from the
# /usr/samples/snmpd/aixmib.my MIB file located on your AIX hosts.
# (It's in the bos.net.tcp.adt fileset.)
#
columns = {
'.1': 'snmpindex', # aixFsIndex
'.2': 'storageDevice', # aixFsName
'.3': 'mount', # aixFsMountPoint
'.4': 'type', # aixFsType
'.5': 'totalBlocks', # aixFsSize - a value in MB
#
# Comment out the following entries to reduce the amount
# of stuff that we need to send. They are listed here
# for reference and completeness.
#
# '.6': 'aixFsFree',
# '.7': 'aixFsNumINodes',
# '.8': 'aixFsUsedInodes',
# '.9': 'aixFsStatus',
# '.10': 'aixFsExecution',
# '.11': 'aixFsResultMsg',
}
snmpGetTableMaps = (
GetTableMap('aixFsTable', '.1.3.6.1.4.1.2.6.191.6.2.1', columns),
)
#
# This table is included for reference
#
aixFsType = {
1: 'jfs',
2: 'jfs2',
3: 'cdrfs',
4: 'procfs',
5: 'cachefs',
6: 'autofs',
7: 'afs',
8: 'dfs',
9: 'nfs',
10: 'nfs3',

Adding a Device Type
78
11: 'other',
}
def process(self, device, results, log):
"""Gather data from the standard AIX snmpd + friends"""
log.info('processing %s for device %s', self.name(), device.id)
getdata, tabledata = results
#
# Gather the data using SNMP and just exit if there's an SNMP
# issue. If we don't, the filesystem table will get
# wiped out. Ouch!
#
fstable = tabledata.get( "aixFsTable" )
if not fstable:
log.warn('No SNMP response from %s for the %s plugin',
device.id, self.name() )
log.warn( "Data= %s", getdata )
log.warn( "Columns= %s", self.columns )
return
skipfsnames = getattr(device, 'zFileSystemMapIgnoreNames', None)
maps = []
rm = self.relMap()
for fs in fstable.values():
if not fs.has_key("totalBlocks"):
continue # Ignore blank entries
if not self.checkColumns(fs, self.columns, log):
log.warn( "Data= %s", getdata )
log.warn( "Columns= %s", self.columns )
continue
log.debug( "Found %s", fs['mount'] )
#
# Ensure that we only check on local disk
# NB: it may make sense to report on AFS/DFS volumes....
#
fstype = self.aixFsType.get( fs['type'], None)
if fstype not in ( 'jfs', 'jfs2' ):
continue
if fs['totalBlocks'] > 0 and (not skipfsnames or \
not re.search(skipfsnames,fs['mount'])):
om = self.objectMap(fs)
#
# The internal id that Zenoss uses can be used in URLs,
# while Unix filesystem names cannot.
# Map to an URL-safe name.
#
om.id = self.prepId(om.mount)
#
# Map our MIB data to what Zenoss expects
#
om.blockSize = 1024**2; # ie MB
rm.append(om)
maps.append(rm)
#
# As a final sanity check, see if we found anything. If we
# didn't find anything, that's probably an error so just return.

Adding a Device Type
79
#
if len(maps) == 0:
log.warn( "No filesystems found by %s for %s",
self.name(), device.id)
return
return maps
Note
Because this question occurs so often in the mailing lists, the following information bears repeating. The function
name required of any modeler is the process() function.
12.4.4. Testing the Modeler
To test your new modeler plugin, add it to the list of modeler plugins. With the newly created AIX device class
selected, click Details, and then select Modeler Plugins. Add the appropriate plugin from the list, and then click Save.
You can test your new plugin by using zenmodeler from the command line:
zenmodeler run -d myaixbox.example.com -v 10
For testing purposes, you may want to add this and only this modeler plugin to one particular host and make it the
only plugin. Any syntax errors or exceptions will be visible so that you can hopefully debug them.
Once you are satisfied that everything is working correctly, verify everything by modeling the device and then nav-
igating to the device overview page. If everything is correct, you'll see your list of file systems, but with unknown for
everything except the total size of the file systems. The actual usage numbers of the file system is collected by a
different mechanism -- a performance data collector.
Keep in mind that a modeler is run infrequently (such as once a day or once a week, depending on your settings),
while a performance data collector is run every five or ten minutes.
12.5. Create a Performance Collector
A performance data collector gathers the current statistics of items such as the amount of space used in a file
system. The data can be collected using either a script or an SNMP command. For our Filesystem data, we must
create a new data collector called Filesystem (this is a special name) that will return a property called usedBlocks
(another special name).
If your operating system's MIB provides a usedBlocks (or something named like that) value, then we can make use
of existing Zenoss infrastructure and just collect that data using SNMP. Otherwise, you need to create a script to
take the total size of the filesystem (totalBlocks) and subtract the freeBlocks value. Unfortunately, AIX only provides
freeBlocks, so we need to create a command.
12.5.1. Performance Data Collector Code
Multiple collectors for different components of a system can be created, or one huge collectors for everything can
be created. Smaller collectors are preferred for maintenance reasons. The following collector is for calculating file
system free space, and would live in the libexec/ directory of your ZenPack.
#!/usr/bin/env python
"""Gather used disk space statistics for AIX"""
import sys
import re
from subprocess import *

Adding a Device Type
80
base_fs_table_oid= "1.3.6.1.4.1.2.6.191.6.2.1"
def process_disk_stats( device, community, totalBlocks_oid, freeBlocks_oid ):
"""Gather OID info and sanitize it"""
cmd= "snmpwalk -v1 -c %s -On %s %s %s" % ( community, device, \
totalBlocks_oid, freeBlocks_oid )
proc= Popen( cmd, shell=True, stdout=PIPE, stderr=PIPE )
#
# Check to make sure that we don't have any hangups in
# executing our smidump
#
if not proc.stdout:
print "Couldn't open pipe to stdout for %s" % cmd
return
if not proc.stderr:
print "Couldn't open pipe to stderr for %s" % cmd
return
( line1, line2 )= proc.stdout.readlines()
totalBlocks= line1.split()[-1]
freeBlocks= line2.split()[-1]
usedBlocks= totalBlocks - freeBlocks
return totalBlocks, freeBlocks, usedBlocks
if __name__ == "__main__":
if len(sys.argv) < 4:
print "Need device, community and fs_index arguments!"
sys.exit(1)
(device, community, fs_index )= sys.argv[1:]
totalBlocks_oid= ".".join( base_fs_table_oid, 5, fs_index )
freeBlocks_oid= ".".join( base_fs_table_oid, 6, fs_index )
totalBlocks, freeBlocks, usedBlocks= process_disk_stats( device, \
community, totalBlocks_oid, freeBlocks_oid )
print "totalBlocks:%s freeBlocks:%s usedBlocks:%s" % ( totalBlocks, \
freeBlocks, usedBlocks )
sys.exit(0)
12.5.2. Writing Your Own Command Parser
Zencommand may be used to execute commands on remote hosts using the SSH protocol. This provides secure
and flexible performance monitoring for Unix-style systems such as AIX, Solaris, OS X (Darwin) and Linux servers.
When the remote host has commands that show data in a format already understood by Zencommand (such
as Nagios or Cacti plugins), Zencommand can process the results and update the ZODB. However, if you are
monitoring servers that have not had these commands installed, you need to extend Zencommand with new parsers
to understand the results.
The basic data flow for Zencommand is this:
1. A collector starts Zencommand with a collector name, like localhost or collector2.
2. Zencommand contacts zenhub and loads the commands to be run against the devices for that configuration.
The command configuration includes details such as "use SSH" to run the command on the remote box and
credentials to allow access to the remote host. The command configuration also includes a specification for the
parser to use on the data that is returned by the command.

Adding a Device Type
81
3. Zencommand runs the command on the remote host, and when the command finishes, a parser is created and
the results are passed to the processResults() method of the parser. The processResults() method is passed
the command configuration fetched from ZenHub, and an object into which parsed results will be placed. The
parser is also used to copy any data needed by Zencommand during the parsing.
4. Zencommand takes the returned Python dictionary from the parser and updates the ZODB.
Consider the Unix df command. It can be used to determine free disk space on a device's file systems. Here's a
typical output format from Linux:
Filesystem 1K-blocks Used Available Use% Mounted on
/dev/sda6 57669700 34162636 20577616 63% /
/dev/sda7 71133144 28824804 38694924 43% /home
/dev/mmcblk1 3924476 536 3923940 1% /media/disk
The Zenoss data modeler (zenmodeler) will have created components under this device for the file systems. The
mapping of data to the component must use the mount point information. ZenHub must copy mount point information
from the model data stored in the ZODB into the configuration for this command. To know what data may be needed
for parsing, ZenHub creates the parser that will be used by Zencommand, and calls the dataForParser() method.
Remember, this happens in ZenHub, and not Zencommand, and it happens before any command is run.
The result of dataForParser() is a Python dictionary that is stored as data in the command configuration passed to
Zencommand. When the parser is invoked in Zencommand, it will have access to this information.
Note
• After the parser digests the results of running the command, it can produce performance information and
events.
• The result object is a simple Python class that contains two lists, one called values and the other called events.
• The events item contains a dictionary of string to value mappings which are turned into events. Zencommand
will update the event with the device name, but the rest of the fields (such as component, severity, etc) are
up to the parser to fill in.
• The values item is a list of two-element tuples. The first element is the data point, and the second is a value,
which is a Python number or None. None is always ignored.
• Every command run by Zencommand comes with a list of data points that correspond to that command.
In our df example, the datapoints may include percentUsed and blocksFree, along with any thresholds or
parser-specific data, such as mount point.
• Thresholds will be tested by Zencommand, and threshold events automatically generated.
• The command's exit code is available at parse time, too.
Parsers will be available to Zenoss when they are placed in the $ZENHOME/Products/ZenRRD/parsers directory or
in a ZenPack's $ZENHOME/ZenPacks.pkg.zpid-version_id-py2.4.egg/Zenpacks/pkg/zpid/parsers directory. Each
parser should be a sub-class of the Products.ZenRRD.CommandParser.CommandParser class.
A command like df is a very common case. Unix commands will often emit easily-parsed, line-oriented records.
There are some useful subclasses of CommandParser that perform much of the parsing if you provide these parsers
with the right details, such as regular expressions. They are:
Name Description
componentScanner A regular expression that finds details about a component that can be used to map
back to the component known to the Zenoss model. It must return a match named
component using the Python regular expression syntax ?P<component>
scanners An iterable list of regular expressions that will pull out numerical values from the output
of the command.

Adding a Device Type
82
Name Description
componentScanValue The data to be copied to the data point needed to match the component to the output
results.
Table 12.2. CommandParser Helper Parsers
Let's examine what these values might be for our df command, and its example output.
1. For the componentScanner, we want to find the mount-point data and extract it, so that we can match the Unix
file separator ('/') to the component file system that has the id "_". We can use something like:
% (?P<component>/.*)$
2. For the scanners, we'll use a tuple of regular expressions to pull out the numerical values we want:
( r' (?P<availableBlocks>\d+) +(?P<percentUsed>\d+)%' )
3. For the componentScanValue, we'll specify mount so that the mount point information is copied to the command
configuration by ZenHub and matched against the component value parsed by the componentScanner regular
expression.
12.6. Create the Template
A monitoring template is essentially a wrapper around reading and manipulating the data from RRD database files.
The template has the same constraints as RRD. An example of a constraint is that if you decide that you wish to
change the collection frequency, or perform some function on returned data and store that computed value into the
RRD file, you need to remove the old RRD file and create a new one.
12.6.1. Create the DataSource
To create a monitoring template, go to the AIX device class organizer and display the monitoring templates. Add
a template and provide an ID of Filesystem (yes, there should already be one there, but from the /Devices/Server
path).
In the Data Sources area, create the special usedBlocks data source. If your operating system's MIB provides a
usedBlocks (or something named like that) value, then select a type of SNMP. Otherwise, you need to create a
script to take the total size of the filesystem (ie totalBlocks) and subtract the freeBlocks value. Unfortunately, AIX
only provides freeBlocks, so we needed to create a command like we did in the earlier section.
12.6.2. Create a Threshold
Defining a threshold on a data point does two things: it can be used to define a line on a graph showing the threshold
value and it can create an event when the threshold is passed and cleared. In this example for Filesystem, we could
create a threshold that would alert us when we've gone past 95% utilization on a filesystem.
12.6.3. Create a Graph
From the device class (/Devices/Server/AIX), select Monitoring Templates. Click on the template and go to Graph
Definitions, and then add a graph. You will be prompted for the name of your new graph. Add the data points of
interest to create a graph and then click Submit. Note that if you're interested in doing something more complicated
than just adding data points, then you need to start browsing the RRDtool site.
12.7. Map Events
If our new platform provides a reporting log that doesn't get passed into Zenoss, then we can write a daemon to
extract these messages and create events from these messages. As an example, AIX records certain low-level

Adding a Device Type
83
events such as hardware issues and core dumps into a circular log. If we wanted to extract this information using
a tool like errpt, then we would need to write a daemon that is capable of recording the last time that we saw an
event, log into the AIX server and grab the errpt information and convert that entry into a Zenoss event.
Once we have events coming into Zenoss, we might become aware of certain peculiarities in our events such a
certain informational message actually indicates that any previous critical failures are over. In order to cut down on
the amount of false alarms, we should create an event mapping that would examine informational messages and
clear out any critical events.
12.8. Adding SSH Monitoring Tests
12.8.1. Overview
The SSH Monitoring ZenPacks include an unit-testing framework that is easily extensible with the command output
from various hosts. This extensibility can be used to add command output found in the field that trigger issues in
the parsers.
Each SSH Monitoring ZenPack has a testPlugins.py and testParsers.py file in its tests directory. These test
scripts walk the plugindata and parserdata directories to find test data.
To create a new test you need to create a new directory with the name of the host under the appropriate test data
directory (e.g. tests/plugindata/aix/test-aix61). In that new directory place two files. Both files share the same
name; one has no extension and the other has a .py extension.
The file with no extension must contain the command on the first line, and the output of the command on the sub-
sequent lines. The file with the .py extension contains a Python dictionary with expected values that were manually
parsed from the command output. The format of these dictionaries is slightly different depending on the type of test
(modeling plugin or data point parser). The formats will be covered in sections later in this document.
Note
If you are adding the first test data files for a parser, then you must edit testPlugins.py or testParsers.py to
import the parser module and add the module to the list of tested modules.
12.8.2. Modeling Plugin Test Data
Multiple modeling plugins can parse the same command. The first level of keys in the dictionary is the name of the
modeling plugin class.
Modeling plugins can return values of the following types (which are defined in $ZENHOME/Products):
•ObjectMap
•RelationshipMap
• List of the above data map classes
The test data for each of these return types is in different formats.
12.8.2.1. Test Data for an ObjectMap
The test data is formatted as a simple dictionary that maps the attribute names of that ObjectMap to the expected
values.
{
"lsps_s": # the parser
{"totalSwap": 536870912}
Adding a Device Type
84
}
12.8.2.2. Test Data for a RelationshipMap
RelationshipMaps contain many ObjectMaps. The test data is formatted as a two-level nested dictionary. The first
level of keys is the ID that identifies the ObjectMap under test. The second level dictionary maps the attribute names
of that ObjectMap to the expected values.
{
"lslpp": { # the parser
"ICU4C.rte 6.1.0.0": dict(
setProductKey=("ICU4C.rte 6.1.0.0", "IBM"),
setDescription="International Components for Unicode",
setInstallDate="2008/12/16 13:56:29",
),
"Java5.sdk 5.0.0.130": dict(
setProductKey=("Java5.sdk 5.0.0.130", "IBM"),
setDescription="Java SDK 32-bit",
setInstallDate="2008/12/16 14:22:26",
),
"cdrecord 1.9-7": dict(
setProductKey=("cdrecord 1.9-7", "IBM"),
setDescription="A command line CD/DVD recording program.",
setInstallDate="2008/12/16 19:17:11",
),
},
}
12.8.2.3. Test Data for a List of Data Maps
The test data is formatted as a list of dictionaries. The dictionaries are flat for ObjectMaps or two-level nested for
RelationshipMaps.
{
"prtconf": # the parser
[
{"setHWProductKey": ("9114-275", "IBM"),
"setHWSerialNumber": "10E03AE"},
{"proc1": dict(
clockspeed=1000,
cacheSizeL2=1536,
setProductKey=('PowerPC POWER4, 64-bit, 1000 MHz', 'IBM'),),},
{"totalMemory": 2147483648}
],
}
12.8.3. Data Point Parser Test Data
Data point parsers differ in their return values. They can either return device-level data points or component data
points. The test data is formatted differently based on the return type of the parser.
12.8.3.1. Test Data for Device-Level Parsers
The test data for a device-level parser is formatted as a simple dictionary. The keys are the IDs of the data points
returned by the parser.

Adding a Device Type
85
{
"read": 171409 * 1024,
"written": 530600 * 1024,
}
12.8.3.2. Test Data for Component Parsers
The test data for a component parser is formatted as a two-deep nested dictionary. The first-level keys are the IDs
of the components under test. The second-level dictionary maps the IDs of the data points to the expected values.
{
'/': dict(
totalBlocks=131072,
usedBlocks=108052,
availBlocks=23020,
percentUsed=83,
usedInodes=7505,
availableInodes=5962,
percentInodesUsed=56,
),
'/opt': dict(
totalBlocks=131072,
usedBlocks=84496,
availBlocks=46576,
percentUsed=65,
usedInodes=1645,
availableInodes=10753,
percentInodesUsed=14,
),
}
12.8.4. Running the Tests
To run all the tests in a ZenPack Use the last part of the ZenPack name
runtests --type unit AixMonitor
To run a single test
runtests --type unit --name testAixPlugins AixMonitor
You might notice that tests are run redundantly from the build directory of the ZenPack in addition to being run from
the source directory. To keep this from happening do the following:
find build -name tests -delete

86
Chapter 13. Extending the User Interface
13.1. About Zenoss UI Technologies
The Zenoss user interface is built on top of Zope. Zope provides a framework on which progressively more sophis-
ticated functionality can be built. You can layer the user interface using multiple technologies, as well as mix and
match:
• HyperText Markup Language (HTML)
• Cascading Style Sheets (CSS)
• Zope 2, Zope Page Templates (ZPT) and the Template Attribute Language (TAL)
• ZPT and Macro Expansion for TAL (METAL)
• JavaScript/AJAX (Sencha Ext JS Library)
13.1.1. HyperText Markup Language (HTML)
HTML is the most basic formatting language available on the Web. Some version of HTML is understood by every
Web browser. HTML is, in practice, a limited variant of eXtensible Markup Language (XML), which divides up a
page into elements (designated by tags such as title, head or h3) and content.
Tip
If you are converting an existing Web page, verify it by using the free HTML validation service at:
http://validator.w3.org/
13.1.2. Cascading Style Sheets (CSS)
Web browsers take HTML and convert elements such as h1 (a heading at level 1) and convert them into what each
browser thinks is appropriate for that element. The way a page displays is different on each browser. Style sheets
are a way for the Web page designer to tell the browser that a certain element should have a certain style, such
as font type, weight, or color.
The 'cascading' part of CSS means that stylesheets can build on each other. Practically, that means that the order
in which you load CSS information can lead to different results.
13.1.3. Zope 2, ZPT and TAL
Zope 2 is essentially a Web server with brains. The brains part are the Python programming language and the
object-oriented database (ZODB), which are used to create Web pages in a structured way.
Note
Keep in mind when looking at Zope material that you need Zope 2, not Zope 3.
Zope Page Templates are in essence HTML pages that are well-formed, with extra XML attributes (the bits after
the element name in-between the < and > characters). The extra XML bits (attributes) are not a part of any HTML
standard and are ignored by HTML editors, meaning that ZPT pages live happily with HTML. These attributes and
the programming functionality that they deliver are called the Template Attribute Language (TAL).
The TAL attributes allow you to add dynamic content by using information from inside the Zope database (ZODB).
From a Zenoss perspective, this allows you to write a query that you can use to build a table, or show different
items depending on which objects or devices exist in a particular state. In other words, TAL is the Zope way of
accomplishing what you would normally need to do in a CGI inside of a plain Web server like Apache.

Extending the User Interface
87
It should be noted that inside of TAL it is also possible to use a restricted subset of Python. The restrictions include
not being able to load certain standard libraries, as well as operations like reading and writing to disk. This is done
intentionally for security reasons.
13.1.4. ZPT and Macro Expansion for TAL (METAL)
TAL is the programming language of Zope, allowing you to use parts of the database and programatically work with
data. Because TAL is hidden inside HTML, there is no way to reuse blocks of HTML and TAL for your site just by
using TAL. Instead, macro expressions are used to make reusable blocks of HTML and TAL.
13.1.5. JavaScript / AJAX
Let's get one thing out of the way: Java and JavaScript only share the 'Java' part, and that's only for marketing
reasons. Really. They're totally different. Technically, JavaScript is actually called ECMAScript, but that's something
that's much worse than JavaScript so everyone calls it JavaScript.
JavaScript can be written directly on the Web page inside of a script element anywhere in an HTML page, or it can
be stored on a server and accessed from a script element using the name specified in the src attribute.
So what's the AJAX part? Originally, AJAX was shorthand for "Asynchronous JavaScript And XML", a set of tech-
niques for writing JavaScript. So AJAX is a state of mind rather than a standard. Generally, something is considered
AJAX if it uses the JavaScript XMLHttpRequest() function to retrieve data from a server and presents the returned
XML document in a interactive way to the user.
13.1.6. JavaScript Library: Ext JS
The Zenoss Web interface extensively uses the Ext JS JavaScript library from Sencha. This framework is used to
make a desktop-style user application within the constraints of HTML/CSS and JavaScript.
13.2. Customizing the Navigation Bar
The navigation bar in Zenoss is generated by Zope configuration (ZCML) files. To edit or add a menu item, open the
navigation.zcml file located at $ZENHOME/Products/ZenUI3/browser. In this file, you will see a series of declarations,
each defining a menu item. Here is an example of both primary and secondary navigation items:
<browser:viewlet
name="Events"
url="/zport/dmd/Events/evconsole"
weight="2"
manager="..navigation.interfaces.IPrimaryNavigationMenu"
class="..navigation.menuitem.PrimaryNavigationMenuItem"
permission="zenoss.View"
layer="..navigation.interfaces.IZenossNav"
/>
<browser:viewlet
name="History"
url="/zport/dmd/Events/evhistory"
weight="1"
parentItem="Events"
manager="..navigation.interfaces.ISecondaryNavigationMenu"
class="..navigation.menuitem.SecondaryNavigationMenuItem"
permission="zenoss.Common"
layer="..navigation.interfaces.IZenossNav"
/>
These two declarations generate the 'Events' primary nav item and a 'History' secondary navigation item under
'Events.' The parts of the viewlet element that can be customized are:

Extending the User Interface
88
•name - Text of the navigation item (for example, Dashboard or Events)
•url - URL to link to
•weight - Order of the navigation item (lowest numbers to the left)
•parentItem - The "parent" of a secondary navigation item (see the previous example)
•manager/class - Should be identical to the examples, using the appropriate manager/class for your primary
or secondary navigation item
13.2.1. Example: Simple HTML Page
Note
This procedure is valid for 2.x versions only. See the chapter titled "ZenPack Conversion Tasks for 3.0" for more
additional compatibility information.
To create a simple Web page, follow this example.
1. Browse to the following location:
http://yourzenossserver:8080/zport/portal_skins/custom/manage
The ZMI appears, starting with the portal_skins/custom folder.
2. From the list of options (located near the top right of the page), select Page Template, and then click Add.
The Add Page Template page appears.
3. Enter a page name in the ID field (for example, helloWorld), and then click Add and Edit.
The Page Template edit page appears.
4. Delete the contents of the page and replace it with the following HTML markup:
<html>
<head>
<title>Hello World</title>
</head>
<body>
<h1>Hello world!</h1>
<p>My test page</p>
</body>
</html>
5. Click Save Changes.
To view the sample Web page, browse to:
http://yourzenossserver:8080/zport/helloWorld
The location where you saved the file has absolutely no relation to where in the path you can reference the new
page. That's a Zope thing. Since the page doesn't use any Zope features, you can put it anywhere. If you were to
use some of Zope's TAL you might need to be more concerned. The next section will illustrate this behaviour.
13.2.2. Example: Simple TAL and METAL Page
Follow this example to create a simple TAL and METAL page.
1. Use Steps 1-3 from the previous section to create a new page template called helloWorld2.
2. From the Page Template edit page, delete the contents of the page, and then add the following lines.

Extending the User Interface
89
<tal:block metal:use-macro="here/templates/macros/page1">
<tal:block metal:fill-slot="contentPane">
<h1>Hello world!</h1>
<p>My test page</p>
</tal:block>
</tal:block>
Note
The /zport/portal_skins/zenmodel/templates file contains the METAL definitions used by Zenoss pages.
One of the page1, page2, or page3 macros will probably be a good start for what you want. Look through the
templates page to see how it's built. Our example above uses the page1 macro.
After you've saved the page, you can try it out:
http://yourzenossserver:8080/zport/dmd/helloWorld2
Now you can see your page within all of the Zenoss page elements. There's a navigation bar, the logo, the server
time, search bar and everything else. Now try the following URL:
http://yourzenossserver:8080/zport/dmd/Devices/helloWorld2
Now the breadcrumb path showing that you are in the Devices part of Zenoss shows up. What happens now if you
go to the base of Zenoss?
http://yourzenossserver:8080/zport/hello/World2
Oops! That didn't look good, you've got an error screen. If you look in the View Error Details part, you'll notice that
it's complaining about missing here/breadCrumbs. That's because the breadCrumbs function isn't on every object,
just some of them.
From this point forward is a matter of examining other pages, seeing where they run from and trying out new things.
The functions that Zenoss provides are written in Python, so you'll need to learn more Python in order to take
advantage of Zope. See the Section 13.4, “Zope 2 Page Templates, TAL and METAL and Zenoss” section for more
details.
13.3. Customizing the Logo
Here is how to change the logo that appears in Zenoss to a custom logo of your choosing:
1. Go to http://yourzenoss:8080/zport/portal_skins/EnterpriseSkin/manage
a. Click on zenterprise.css and then its Customize button
b. Find zent-img/zenoss-logo-enterprise.png in the stylesheet and change it to zenoss-lo-
go-enterprise.png
c. Save the Changes.
2. Go to http://yourzenoss:8080/zport/portal_skins/EnterpriseSkin/zent-img/manage
a. Click on zenoss-logo-enterprise.png and then its Customize button
b. Upload your replacement image. It should be 318x35 pixels in size.
13.4. Zope 2 Page Templates, TAL and METAL and Zenoss
Templates live in layers which, due to Zope magic (acquisition), are available anywhere in the object tree. As is
the case with most templating languages, Zope templates are context-agnostic, meaning that they may be used

Extending the User Interface
90
as views on any object. When the name of a template is called against a particular context, the skins tool (/zport/
portal_skins in Zenoss) will supply the appropriate template object, determined by the priority of the layers -- given
two templates with the same name, that in the higher priority layer will prevail. This allows Zope products to override
the templates of other products to provide different functionality. It also can result in total confusion as to the source
of a template as this process is in no way transparent.
Templates may be created in the ZODB, or they may live on the file system; the latter is preferable for all but the most
ad hoc situations. Typically, a Zope product that provides templates will register a skins directory, which includes
one or more layers. When the product is initialized, the layers it provides are added to the skins tool under the skin
specified. Zenoss has a single skin, so only the order of the layers determines template inheritance.
The Zenoss UI comprises several layers, mostly for the purposes of organization. The ZenModel and ZenEvents
products each have a folder (named zenmodel and zenevents, respectively), the ZenUtils product has one (inex-
plicably located at ZenUtils/js), and the ZenWidgets product has two (zentablemanager and zenui). zenmodel and
zenevents generally contain templates applicable to classes provided by their respective products. The zenui folder
contains most of the dialog templates, nearly all of the CSS, JavaScript (including the YUI library), image files and
other templates that don't necessarily belong to a single product. The zentablemanager layer provides resources
related to ZenTableManager. The ZenUtils/js layer provides the MochiKit library and a few JavaScript utilities. Both
the zentablemanager folder and the ZenUtils/js layer are deprecated and should not be modified. All new templates
should go in one of the other three, and all static browser resources should go in zenui.
Beginning with Version 3.0, the Zenoss user interface is driven primarily by the Sencha ExtJS library, making the
Web interface primarily AJAX-based. Most of this new code is registered under ZenUI3, including the new base
templates with HTML, CSS, and JavaScript files. If customizing these files, Zenoss recommends you put your
changes in an external ZenPack, as these files will change from release to release. Editing and extending the
ExtJS-based AJAX interface is covered later in this chapter.
Directory Notes
zenmodel Contains the majority of the templates.
zenevents Event-specific templates.
zentablemanager Deprecated.
zenui Most of the dialog templates, nearly all of the CSS, JavaScript (including the YUI
library), image files and other templates that do not necessarily belong to a single
product.
ZenUtils/js Deprecated.
ZenUI3 Unified place for all browser-facing UI files for the Zenoss Version 3.x interface. In-
cludes all HTML/TAL templates, CSS, and JavaScript.
Table 13.1. Zenoss portal_skins Directories
Zope page templates are a combination of METAL, TAL and TALES, each of which is summarized more succinctly
than one familiar with them might expect here.
In short, METAL allows templates to define macros (which are essentially sub-templates that may be called by other
templates) and slots (which may be filled by other templates). For example, one wishing to have a title on all pages
might create the following base.pt:
<html metal:define-macro="base_template">
<head>
<title>Zenoss: <tal:block metal:define-slot="subtitle">
Default Subtitle</tal:block>
</title>
</head>
<body>
Extending the User Interface
91
<tal:block metal:define-slot="content">Default Content</tal:block>
</body>
</html>
Then on a template that might be used to view an object, one could:
<tal:block metal:use-macro="here/base/macros/base_template">
<tal:block metal:fill-slot="subtitle">My Subtitle</tal:block>
<tal:block metal:fill-slot="content">My Content</tal:block>
</tal:block>
This allows for relatively complex abstraction.
Zenoss has a base template providing several basic page types that include global CSS and JavaScript re-
sources, the basic page structure, and optionally the tab pane. This template is located at ZenModel/skins/zenmod-
el/templates.pt. When creating a new template, find another like it and copy the templates.pt macro reference
used there.
TAL comprises a set of attributes for page elements allowing for iteration loops, dynamic attribute mutation, and
other dynamic content. The above resource will summarize these more fully.
TALES allows access to the template's namespace. Some useful properties available on all templates:
Commonly-Used Zope Properties in ZPT
here the context object
container the folder containing the context object
template the template object
root the portal object (zport)
user the current authenticated user object
request the current HttpRequest object
portal_url the base URL of the portal (eg http://localhost:8080/zport)
TALES accepts paths (e.g. here/id) which it resolves into object properties. It will attempt to resolve the final path
element as a key index, a key name, an attribute, or a callable. For example, if mydict is a dictionary on the context,
here/mydict/mykey will return mydict[mykey]. If getSomething() is a method on the context, here/getSomething will
return the result of that method. However, if python:here.getSomething() returns a dictionary, one cannot do here/
getSomething/mykey.
The path resolution is fairly limited -- for example, one cannot pass arguments to methods.
In case something more complex is needed, one can use python: followed by arbitrary Python
code. For example, python:here.mydict[mykey] will return the same thing as here/mydict/mykey, while
python:here.getSomething(template.id) is not possible using a path. The previous paragraph's impossible here/
getSomething/mykey can be resolved this way: python:here.getSomething()[mykey].
Finally, if one wishes to generate a string, one may prepend the argument with string:. Everything after that will be
treated as a string, unless contained within ${}, in which case it will be evaluated as a TALES path. For example:
<span tal:content='string:The name of this
template is ${template/id}'/>
13.4.1. Tips
• ZPT ignores everything inside a script element, although it does not ignore TAL defined on the element itself.
This can make dynamic JavaScript problematic. One way around this, however, is like this:
<script tal:content="string:

Extending the User Interface
92
var templateId = '${template/id}';
"></script>
This is obviously unwieldy, especially in the case of several levels of nested quotes, but it at least allows
JavaScript access to the template's namespace.
• Slots on macros are not inherited unless specifically defined. For example, if one has a template base.pt:
<tal:block metal:define-macro="base">
My Base Template
<span metal:define-slot="content">Default Content</span>
</tal:block>
from which one wishes to create a more specific base template, plaintext.pt:
<tal:block metal:define-macro="plaintext">
<style>body{font-family:Courier,monospace}</style>
<tal:block metal:use-macro="here/base/macros/base"/>
</tal:block>
templates calling here/plaintext/macros/plaintext will not be able to fill here/base/macros/base's 'content' slot.
One must chain the slots, defining a plaintext content slot inside the fill of base's content slot:
<tal:block metal:define-macro="plaintext">
<style>body{font-family:Courier,monospace}</style>
<tal:block metal:use-macro="here/base/macros/base">
<tal:block metal:fill-slot="content">
<tal:block metal:define-slot="content">
</tal:block>
</tal:block>
</tal:block>
</tal:block>
• Thanks to Zope's magical acquisition, templates can be treated as methods on objects. If an object may be
viewed at /zport/dmd/object/mytemplate, then calling object.mytemplate() in a Python file will return the
HTML that template generates. In this case, however, there's no request object, so templates that ask for one
will throw an error. This is both a blessing and a curse; many man-hours have been wasted searching for meth-
ods that do not exist.
• Generally, unless a specific tag is required, use <tal:block> for purely logical structures, as it will produce no
side effects (whereas using <div> could easily do so).
13.5. Zope 3 Views Explained
In an effort to decouple the model layer from the UI layer, we've taken to implementing Zope 3 views in Zenoss. So
far, we've just done the JSON-providing methods that feed the portlets, event console, etc., but ideally we would
like to move the entire application to this style.
Let's say you're adding a new screen to Zenoss. This screen shows a list of components under a Device and their
event pills (the actual worth of this screen is both nonexistent and irrelevant). Here's how you'd do it, the old way
and the new way.
13.5.1. The Zope 2 Way
1. Add a method to the relevant class that assembles and delivers your data. In this case, you'd probably add a
method to the Products.ZenModel.Device.Device class that walks components under self and generates an
event pill for each. We'll call it getComponentList. If your method should logically be broken up into several
methods, for organization or otherwise, you'll add those to the class as well, or find a way to use nested functions.
Extending the User Interface
93
2. Create a page template that calls the method and renders the data. Your template would be, say, ZenMod-
el/skins/zenmodel/viewDeviceComponents.pt. Surrounding the content block, you'd have something like:
<tal:block tal:define="componentdata here/getComponentList">...</tal:block>
3. Link to your template. Either by adding a tab to the Device class, or by dropping a link in another template,
you're going to point to a URL that describes a Device instance and your template:
<a tal:attributes="href string:${here/absolute_url_path}/viewDeviceComponents">
Component List</a>
And you're done! Now, here are the problems with this approach:
• You've added a method used only for the UI layer to a class in the model layer, which leads to bloated classes
and a terrible time reading dir().
• Another developer will have a difficult time figuring out why the method is there, unless they grep templates
for a call.
• There's nothing identifying the template as being applicable to a particular class or group of classes.
• If your method is applicable to another class, or if you want your template to apply to different kinds of objects,
you either need to define the same method on the other classes, or create a mixin and modify your classes to
inherit from it. In the first case, you've got to (remember to) update methods in two places if changes are ever
desired. In the second case, you add to the already terrible Zope class inheritance tree (plus, where do you
draw the line? Should we really have forty-seven mixins for a class if only the UI demands it?).
• Calling your template on another object will get you a traceback. Not a 404, a traceback.
13.5.2. The Zope 3 Way
1. Create a BrowserView class to contain logic and load the template. Instead of inflating model classes with view
methods, make yourself a BrowserView, which will adapt the context to add logic you need to render the template.
That is, when a view is the result of traversal, the view class will be instantiated, passing the context into the
constructor (it will be available on the view instance as self.context; the request object will be self.request).
You'll put something like this in ZenModel/browser/DeviceViews.py (browser is a convention):
from Products.Five.browser import BrowserView
from Products.Five.pagetemplatefile import ViewPageTemplateFile
class ComponentListView(BrowserView):
__call__ = ViewPageTemplateFile('viewDeviceComponents.pt')
def getComponentList(self):
... do things with self.context and self.request ...
BrowserViews are called when they're the result of a traversal, so that's your hook. ViewPageTemplateFile() is
a callable, so the assignment is fine. If, instead of rendering a template, you just wanted to return some text
(for example, JSON), you could do:
from Products.Five.browser import BrowserView
from Products.Five.pagetemplatefile import ViewPageTemplateFile
class ComponentListView(BrowserView):
def __call__(self):
... do things with self.context and self.request ...
Extending the User Interface
94
return results
2. Create a page template that calls the method and renders the data. This is the same as the Zope 2 way, except
for one key difference: view is now a global, and that's how you can access your custom method (here is still
available and still refers to the context, just as before).
<tal:block tal:define="componentdata view/getComponentList">
...
</tal:block>
Another difference is that you don't render the template by traversing to a template against a context; instead,
you traverse to a BrowserView, which knows which template to use. This is great, especially when you want to
use the same template for radically different contexts; as long as you have two BrowserViews that know how
to provide the methods the template wants, you're good.
3. Wire everything up with ZCML. This is where most people start scoffing. It's okay. It actually makes sense.
So you have a view, but you don't have a way to call that view; there isn't a URL that will resolve to an instance
of your BrowserView. To fix that, you register the view.
When Zope starts up, it looks inside every Product for a file called configure.zcml. In Zenoss, most Products
don't have one (though some do now). You can do a bunch of stuff with these, but we're going to ignore
everything except registration of views.
You would, in this case, modify Products/ZenModel/browser/configure.zcml (because Device is in ZenModel;
it doesn't actually matter where you register the view, but you should try to keep Products pluggable), adding
the registration of your view:
<browser:page
for="Products.ZenModel.Device.Device"
name="componentlist"
class=".DeviceViews.ComponentListView"
permission="zope2.View"
/>
Notice that your view is defined as being applicable only to instances of the Device class. Were you to attempt to
call componentlist against an IpInterface instance, for example, you'd get a 404 -- not so if componentlist were
a mere template. Also notice the relative import in the class attribute; .DeviceViews will look for the DeviceViews
module in the current package, that is, ZenModel.browser.
So, the whole request workflow progresses thusly:
1. Someone asks for /zport/dmd/Devices/devices/mydevice/componentlist
2. Zope resolves mydevice; that's the context in which it'll attempt to resolve componentlist
3. Zope attempts to resolve componentlist as an attribute of mydevice, then a method of mydevice, then a dictionary
key of mydevice, then starts looking up registered views.
4. We find a view in the ZCML. Does it match?
name="componentlist": Check.
Context class="Products.ZenModel.Device.Device": Check.
We want the view DeviceViews.ComponentListView.
5. Zope makes sure the user has zope2.View in this context. We'll assume they do; if not, kicked out to login screen.
6. Zope instantiates ComponentListView(mydevice), then calls it, which renders the template file.
Extending the User Interface
95
7. The template is rendered, using view and here, and returned as the response.
So much better! No bloated classes; no ridiculous class inheritance; great code organization. Define a method in
one place, then adapt objects to provide it, instead of modifying many classes with the same method. If you want to
see the screens available for a Device, just go look in the ZCML -- no need to remember which page templates are
applicable to which objects. Also, you can adapt many different objects for the same template with different views.
There are a few other things that could be mentioned, but they all require a discussion of interfaces, which will
deferred to a later section. Briefly, the Zope Component Architecture, and its aspect-oriented approach, saves a
lot of hackery. Also it's the rules now.
13.6. Other Customizations
Some of these options may be deprecated or provide altered functionality in Zenoss 3.0. See the chapter titled
"ZenPack Conversion Tasks for 3.0" for additional compatibility information.
13.6.1. Adding Tabs
This section will show how to add a new tab in Zenoss (prior to Version 3.0) or add a selection to the (Action
menu) (Version 3.0 or later), or modify an existing one by means of a ZenPack or zendmd.
A tab in Zenoss is an object property that resides within the following structure:
factory_type_information = (
{
'immediate_view' : 'deviceOrganizerStatus',
'actions' :
(
{ 'id' : 'status'
, 'name' : 'Status'
, 'action' : 'deviceOrganizerStatus'
, 'permissions' : (permissions.view,)
},
)
},
)
For example, tabs in the Locations screen are created from the Python class definition
Location(DeviceOrganizer, ZenPackable)
which resides in the module Location.py in the $ZENPATH/Products/ZenModel directory.
Zenoss works with class instances which are created runtime by Zope. These objects are packed within database
which is called ZODB. If you want to modify some object properties you should connect to ZODB and get the object
first, modify it and save your changes.
The following example shows the procedure for adding a new tab to Locations screen. This code is executed from
__init__.py of an example ZenPack.
import Globals
import transaction
import os.path
skinsDir = os.path.join(os.path.dirname(__file__), 'skins')
from Products.CMFCore.DirectoryView import registerDirectory
if os.path.isdir(skinsDir):
registerDirectory(skinsDir, globals())

Extending the User Interface
96
from AccessControl import Permissions as permissions
from Products.ZenModel.ZenPack import ZenPackBase
from Products.ZenUtils.Utils import zenPath
from Products.ZenModel.ZenossSecurity import *
from Products.ZenUtils.ZenScriptBase import ZenScriptBase
class ZenPack(ZenPackBase):
olMapTab = { 'id' : 'olgeomaptab'
, 'name' : 'OpenLayers Map'
, 'action' : 'OLGeoMapTab'
, 'permissions' : (permissions.view,)
}
def _registerOLMapTab(self, app):
# Register new tab in locations
dmdloc = self.getDmdRoot('Locations')
finfo = dmdloc.factory_type_information
actions = list(finfo[0]['actions'])
for i in range(len(actions)):
if(self.olMapTab['id'] in actions[i].values()):
return
actions.append(self.olMapTab)
finfo[0]['actions'] = tuple(actions)
dmdloc.factory_type_information = finfo
transaction.commit()
def _unregisterOLMapTab(self, app):
dmdloc = self.getDmdRoot('Locations')
finfo = dmdloc.factory_type_information
actions = list(finfo[0]['actions'])
for i in range(len(actions)):
if(self.olMapTab['id'] in actions[i].values()):
actions.remove(actions[i])
finfo[0]['actions'] = tuple(actions)
dmdloc.factory_type_information = finfo
transaction.commit()
def install(self, app):
ZenPackBase.install(self, app)
self._registerOLMapTab(app)
def upgrade(self, app):
ZenPackBase.upgrade(self, app)
self._registerOLMapTab(app)
def remove(self, app, junk):
ZenPackBase.remove(self, app, junk)
zpm = app.zport.ZenPortletManager
self._unregisterOLMapTab(app)
The class method _registerOLMapTab(self, app) registers the modified property of object Locations , which resides
in /zport/dmd/Locations in the ZODB.
The function getDmdRoot('Locations') returns the class instance of class Location which is in ZopeDB. Next we
get the dictionary of its factory_type_information property. Modify this, so that a new dictionary defining the tab is
appended to it. The tab structure is defined in olMapTab dictionary. The id field is the identification name of this
tab. You can put any string here. The name field is the string that is shown on your new tab, action points to the
template that is executed when you click on the tab and should be accessible in Zope. The permissions field is default
permissions for zenoss user to execute the template this tab points to. This line dmdloc.factory_type_information
= finfo is very important because Zope won't detect any change to the persistent object and transaction.commit()
won't save any modifications to the object. The rule here is that commit() saves only modifications of object that
executes its setattr() method.

Extending the User Interface
97
Of course every step shown above can be done manually within the zendmd prompt. The following session shows
adding new tab to Locations in zendmd:
zenoss@db-server:/home/geonick$ zendmd
Welcome to zenoss dmd command shell!
use zhelp() to list commands
>>> from AccessControl import Permissions as permissions
>>> locobj = dmd.getDmdRoot('Locations')
>>> locobj
<Location at /zport/dmd/Locations>
>>> finfo = locobj.factory_type_information
>>> finfo
({'immediate_view': 'deviceOrganizerStatus',
'actions': ({'action': 'deviceOrganizerStatus',
'id': 'status', 'name': 'Status', 'permissions': ('View',)},
{'action': 'viewEvents', 'id': 'events',
'name': 'Events', 'permissions': ('View',)},
{'action': 'deviceOrganizerManage', 'id': 'manage', 'name'
: 'Administration', 'permissions': ('Manage DMD',)},
{'action': 'locationGeoMap', 'id': 'geomap', 'name
: 'Map', 'permissions': ('View',)})},)
>>> actions = list(finfo[0]['actions'])
>>> olMapTab = {'id': 'olgeomaptab', 'name': 'OpenLayers Map',
'action': 'OLGeoMapTab','permissions': (permissions.view,)}
>>> for i in range(len(actions)):
... if(olMapTab['id'] in actions[i].values()):
... break
...
>>> actions.append(olMapTab)
>>> finfo[0]['actions'] = tuple(actions)
>>> locobj.factory_type_information = finfo
>>> locobj.factory_type_information
({'immediate_view': 'deviceOrganizerStatus', 'actions': (
{'action': 'deviceOrganizerStatus',
'id': 'status', 'name': 'Status', 'permissions': ('View',)},
{'action': 'viewEvents',
'id': 'events', 'name': 'Events', 'permissions': ('View',)},
{'action': 'deviceOrganizerManage',
'id': 'manage', 'name': 'Administration', 'permissions': ('Manage DMD',)},
{'action': 'locationGeoMap',
'id': 'geomap', 'name': 'Map', 'permissions': ('View',)},
{'action': 'OLGeoMapTab', 'permissions': ('View',),
'id': 'olgeomaptab', 'name': 'OpenLayers Map'})},)
>>>commit()
After commit() the new tab should be in Locations. Don't forget to provide the template file.
(Submitted by Nikolai Georgiev)
13.6.2. Adding a Dialog
Note
This procedure is valid for pre-3.0 versions only.
The dialog container exists on every page in Zenoss; it's a DIV element with the id attribute of dialog. Loading a
dialog performs two actions:
1. Fetching (via an XHR) HTML to display inside the dialog container
2. Showing the dialog container. These can be accomplished by calling the show() method on the dialog container,
passing the event and an URL that will return the contents:

Extending the User Interface
98
$('dialog').show(this.event, 'dialog_MyDialog')
The dialog can then be hidden with, predictably, $('dialog').hide(). Since dialogs are almost always loaded via
clicking on a menu item, menu items whose isdialog attribute is True will generate the JavaScript to show the
dialog automatically. See the Section 13.6.3, “Adding a New Menu or Menu Item” section of this guide for more
information.'
As for the dialog box contents themselves, any valid HTML will do, but certain conventions exist. Dialogs should
have a header:
<h2>Perform Action</h2>
Dialogs should also provide a cancel button:
<input id="dialog_cancel" type="button" value="Cancel"
onclick="$('dialog').hide()"/>
The main wrinkle with dialogs occurs in the area of form submission. Some dialogs are self-contained, and can
carry their own form that is created and submitted just like any other form. Other dialogs, however, submit forms
that exist elsewhere on the page -- for example, dialogs that perform actions against multiple rows checked in a
table. These dialogs may use the submit_form method on the dialog container, which submits the form surrounding
the menu item that caused the dialog to be loaded to the url passed in to the method. Thus for a table surrounded
by a <form> and containing several checkboxes, dialogs loaded by menu items in the table's menu may submit the
table's form to a url by providing a button:
<input type="submit" name="doAction:method" value="Do It"
tal:attributes="onclick string:
$('dialog').submit_form('${here/absolute_url_path}')"/>
See the section on Section 13.1.3, “Zope 2, ZPT and TAL” for more information about tal:attributes and the ${here/
absolute_url_path} syntax.
Finally, dialogs that create objects should validate the desired id before submitting. A method on the dialog con-
tainer called submit_form_and_check(), which accepts the same parameters as submit_form() (URL), will do this.
It requires:
1. A text box with the id 'new_id', the value of which will be checked
2. A hidden input field with the id checkValidIdPath, with a value containing the path in which the id should be
valid (for example, creating a device under /zport/dmd/Devices will require checking that no other devices in /
zport/dmd/Devices has the same id, so the value of checkValidIdPath should be "/zport/dmd/Devices". here/
getPrimaryUrlPath works well for most cases).
3. An element with the id errmsg into which the error message from the validation method, if any, will be put
For example, a generic object creation dialog:
<h2>Create Object</h2>
<span id="errmsg" style="color:red;"></span>
<br/>
<span>ID: </span>
<input id="new_id" name="id"/>
<input type="hidden" id="checkValidIdPath"
tal:attributes="value here/getPrimaryUrlPath"/>
<br/>
<input tal:attributes="onclick string:
return $$('dialog').submit_form_and_check('${here/getPrimaryUrlPath}')"
id="dialog_submit"
type="submit"
value="Create"
name="createObject:method"/>
<input id="dialog_cancel" type="button" value="Cancel"

Extending the User Interface
99
onclick="$('dialog').hide()"/>
These examples will cover most cases; generally, a good idea is to look at other dialog templates that contain similar
elements or perform similar actions.
13.6.3. Adding a New Menu or Menu Item
Note
This procedure is valid for pre-3.0 versions only.
Classes that inherit from the ZenMenuable mixin have a method called getMenus, which traverses up the object's
path aggregating ZenMenuItem objects owned by its ancestors. These objects comprise an action to be executed, a
human-readable description, and various attributes restricting the objects to which the item is applicable.
For example, imagine basic menus exist on dmd and dmd.Devices:
dmd
More (menu)
See more... (menu item)
Do more...
Manage
Manage object...
dmd.Devices
More
See more...
Do less...
A call to dmd.Devices.getMenus() will return:
More
See more... (from dmd.Devices)
Do more... (from dmd)
Do less... (from dmd.Devices)
Manage
Manage object... (from dmd)
As you can see, menu items inherit their ancestors' unless they define their own, which override when their ancestors'
conflict.
In theory, all ZenMenuables (which includes nearly all objects in Zenoss) may own menu items; in practice, all but
a few menus live on /zport/dmd.
Adding a new menu item is fairly straightforward. Because menu items are persistent objects, modifications must
happen in a migrate script (or be included as XML in a ZenPack). The method ZenMenuable.buildMenus() accepts
a dictionary of menus, each of which is a list of dictionaries representing the attributes of menu items. Instructions
on writing migrate scripts can be found elsewhere in this guide.
1. Find the id of the menu to which you wish to add items. The simplest way to do this is to locate the menu_ids
definition on the page template that renders the menu. Tables will have a single menu id. The page menu may
have several, which will be rendered as sub-menus. The TopLevel menu is a special case; it appears in the
page menu, but its items are rendered as siblings of the other menus.
2. If activating the menu item will require a dialog, create one. See the Section 13.6.2, “Adding a Dialog” section
of this guide for more info.
3. Determine the objects for which the menu item should be visible. Menu items will use several criteria for deter-
mining whether to apply:
• allowed_classes: A list of strings of class names for which the menu item should be rendered.
Extending the User Interface
100
• banned_classes: A list of strings of class names for which the menu item should not be rendered.
• banned_ids: A list of strings of object ids for which the menu item should not be rendered.
• isglobal: Whether the menu item should be inherited by children of the menu item's owner.
• permissions: The permissions the current user must have for the context in order for the item to render.
4. Figure out the action the menu item will perform. If it's a dialog, then the action is the name of the dialog template,
and the isdialog attribute of the menu item should be True. If it's a regular link, the action should be the URL or
"javascript:" you would normally have as the href attribute of an anchor.
5. Now build the dictionary. It should look like this, where MenuId is the menu from step 1:
menus = { 'MenuId': [
{ 'id': 'myUniqueId',
'description': 'Perform My Action...',
'action': 'dialog_myAction',
'isdialog': True,
'allowed_classes': ('MyGoodClass',),
'banned_classes': ('MyBadClass',),
'banned_ids': ('Devices',),
'ordering': 50.0,
'permissions': (ZenossSecurity.ZEN_COMMON,)
},
]}
'ordering' is a float determining the item's relative position in the menu. Greater numbers mean the item will be
placed higher. Also notice that it's almost certainly pointless to set both allowed_classes and banned_classes;
it was done here only as an example. The permission ZEN_COMMON is a standard Zenoss permission -- see the
new permissions section of this guide for more information.
If you have more menu items in the same menu, you can add them to that list; if you have more menus, you
can create more keys in the menus dictionary.
6. Finally, use the dmd.buildMenus() method to create the MenuItems:
dmd.buildMenus(menus)
13.6.4. Creating a Table Using ZenTableManager
Note
This procedure is valid for 2.x versions and for re-skinned pages in version 3.x. See the chapter titled "ZenPack
Conversion Tasks for 3.0" for additional compatibility information.
ZenTableManager is a Zope product that helps manage and display large sets of tabular data. It allows for column
sorting, breaking down the set into pages, and filtering of elements in the table.
Here's a sample of a table listing all devices under the current object along with their IPs. First we set up the form
that will deal with our navigation form elements:
...
<form method="post" tal:attributes="action here/absolute_url_path"
name="[MYFORM]">
<script type="text/javascript"
src="/zport/portal_skins/zenmodel/submitViaEnter.js"></script>
Extending the User Interface
101
Next, we set up our table, defining the objects we want to list (in this case, here/devices/getSubDevicesGen). We
then pass those objects, along with a unique tableName, to ZenTableManager, which will return a batch of those
objects of the right size (for paging purposes):
<table class="zentable"
tal:define="objects here/devices/getSubDevicesGen;
tableName string:myDeviceTable;
batch python:here.ZenTableManager.getBatch(tableName, objects)"
tal:condition="python:batch or
here.ZenTableManager.getTableState(tableName, 'filter')">
Next, a table header and a couple of hidden fields:
<tr>
<th class="tabletitle" colspan="2"> <!--Colspan will of course change with the number of fields you show-->
My Devices
</th>
</tr>
<input type='hidden' name='tableName' tal:attributes='value tableName' />
<input type='hidden' name='zenScreenName' tal:attributes='value template/id' />
Now we add the rows that describe our devices. First we need to set up the column headers so that they'll
be clickable for sorting. For that, we use ZenTableManager.getTableHeader(tableName, fieldName, fieldTitle,
sortRule="cmp").
<tbody>
<tr>
<!--We want to sort by names using case-insensitive comparison-->
<th tal:replace="structure python:here.ZenTableManager.getTableHeader(
tableName, 'primarySortKey', 'Name', 'nocase')">name</th>
<!--Default sortRule is fine for IP sorting-->
<th tal:replace="structure python:here.ZenTableManager.getTableHeader(
tableName, 'getDeviceIp', 'IP')">ip</th>
</tr>
Now the data themselves. In order to have our rows alternate colors, we'll use the useful TALES attribute odd, which
is True for every other item in a tal:repeat loop.
<tal:block tal:repeat="device batch">
<tr tal:define="odd repeat/device/odd"
tal:attributes="class python:test(odd, 'odd', 'even')">
<td class="tablevalues">
<a class="tablevalues" href="href"
tal:attributes="href device/getDeviceUrl"
tal:content="device/id">device
</a>
</td>
<td class="tablevalues"
tal:content="device/getDeviceIp">ip</td>
</tr>
</tal:block>
</tbody>
Finally, let's add the navigation tools we need and close off our tags.
<tr>
<td colspan="2" class="tableheader">
<span metal:use-macro="here/zenTableNavigation/macros/navbodypagedevice" />
</td>
</tr>
</table>
</form>
Extending the User Interface
102
13.6.5. Creating an Editable Table
Note
This procedure is valid for 2.x versions and for re-skinned pages in version 3.x. See the chapter titled "ZenPack
Conversion Tasks for 3.0" for additional compatibility information.
But what if you want to be able to edit devices from this table? The process is simple. First, you add a checkbox
to the first column of your device list:
<td class="tablevalues" align="left">
<!--Now add your checkbox, defining the list of devices as "deviceNames"-->
<input tal:condition="here/editableDeviceList"
type="checkbox" name="deviceNames:list"
tal:attributes="value device/getRelationshipManagerId"/>
<!--Then the first column contents as above-->
<a...>device</a>
</td>
Now that we can choose devices from the list, we need the controls to edit them. In this case, we'll use a macro
defining controls that allow a device to be moved to a different device class. Just add the macro call to the end
of your table:
...
</tr>
<!--Add controls here-->
<tal:block tal:condition="here/editableDeviceList"
tal:define="numColumns string:5"> <!--This macro includes the <tr> tag, so we need to pass it colspan-->
<span metal:use-macro="here/deviceListMacro/macros/deviceControl" />
</tal:block>
</table>
</form>
13.6.6. How to Save Properties via an Edit Screen
Note
This procedure is valid for 2.x versions and for re-skinned pages in version 3.x. See the chapter titled "ZenPack
Conversion Tasks for 3.0" for additional compatibility information.
Creating a new Edit Form.
Add form input fields
Add a boolean type:
...
<select class="tablevalues"
tal:attributes="name MyBooleanProperty:boolean">
<option tal:repeat="boolProp python:(True,False)" tal:content="boolProp"
tal:attributes="value boolProp;
selected python:boolProp==here.getMyBooleanProperty()"/>
</select>
...
This block of code creates a select dropdown with two options: True and False. The select dropdown is pre-popu-
lated with the value returned by getMyBooleanProperty(). The value of this form field will be stored in the attribute
MyBooleanProperty.
Add a text box type:

Extending the User Interface
103
...
<textarea class="tablevalues" rows='5' cols="33"
tal:attributes="name MyTextProperty:text"
tal:content="here/getMyTextProperty">
</textarea>
...
This block of code creates a text box. The text box is pre-populated with the string value returned by getMyTextBox-
Property(). The value of this form field will be stored in the attribute MyTextBoxProperty.
Add a text type:
...
<input class="tablevalues" type="text" size="40"
tal:attributes="value here/getMyStringProperty; name MyStringProperty"/>
...
This block of code creates a text field. The text field is pre-populated with the string value returned by getMyString-
Property(). The value of this form field will be stored in the attribute MyStringProperty.
Add a select dropdown type:
...
<select class="tablevalues"
tal:attributes="name MySelectProperty">
<option tal:repeat="propOption here/getMySelectPropertyOptions"
tal:content="propOption"
tal:attributes="value propOption;
selected python:propOption==getMySelectProperty()" />
</select>
...
This block of code creates a select dropdown where the option value and displayed option string are the same. A list
of option values are returned by getMySelectPropertyOptions. The select dropdown is pre-populated by the value
in getMySelectProperty. The value of this form field will be stored in the attribute MySelectProperty.
...
<select class="tablevalues"
tal:attributes="name MySelectProperty:int">
<option tal:repeat="propOptionTuple here/getMySelectPropertyOptionTuples"
tal:content="python:propOptionTuple[0]"
tal:attributes="value propOptionTuple[1];
selected python:propOptionTuple[1]==getMySelectProperty()" />
</select>
...
This block of code creates a select dropdown where the option value is an integer and displayed option is a string. A
list of tuples containing the option values and displayed option string are returned by getMySelectPropertyOption-
Tuples. The select dropdown is pre-populated by the value in getMySelectProperty. The value of this form field will
be stored in the attribute MySelectProperty.
Add the form action
...
<form id='MyForm' method="post" tal:attributes="action here/absolute_url_path">
...
The form action should be set to a function (i.e. here/absolute_url_path) that returns the path to the object being
edited.
...
<input class="tableheader" type="submit"
name="saveProperties:method" value=" Save " />
...
Extending the User Interface
104
This submit button name will be in the format saveProperties:method. saveProperties is the method name that will
be executed when the submit button is clicked.
Add the save() method
...
def saveProperties(self, REQUEST=None):
"""Save all Properties found in the REQUEST.form object. """
for name, value in REQUEST.form.items():
if getattr(self, name, None) != value:
self.setProperty(name, value)
return self.callZenScreen(REQUEST)
...
Create a saveProperty() method in the effective object.
13.7. Creating a Dashboard Portlet
There are just a few distinct steps to creating a custom dashboard portlet:
• Create the ZenPack as a container to hold everything
• Write the Python code that will define the back-end data methods
• Write the JavaScript code defining the portlet
• Testing the new ZenPack
This tutorial will walk through examples of each of these in the creation of a simple portlet that provides a table
listing links to reports under a given ReportClass.
13.7.1. Create a ZenPack
First, set up the directory structure by going into Zenoss, and from the navigation bar, go to the Settings area. From
here, click on the ZenPacks tab and from the page menu select the Create a ZenPack... menu item.
For the sake of our example, we'll use the name ZenPacks.myexample.portlet as the name for our
new ZenPack. When we take a look at the ZenPack from the filesystem level in the $ZENHOME/Zen-
Packs/ZenPacks.myexample.portlet/Zenpacks/myexample/portlet, directory, we should see the following
ReportListPortletPack/
__init__.py
ReportListPortlet.js
Next, add the following Python code to __init__.py:
import Globals
import os.path
skinsDir= os.path.join( os.path.dirname(__file__), 'skins' )
from Products.CMFCore.DirectoryView import registerDirectory
if os.path.isdir(skinsDir):
registerDirectory("skins", globals())
This satisfies the ZenPack requirements for the skins directory.
The skins directory is required, although you won't be using it in this portlet. Normally it contains Zope templates
specific to your ZenPack.
The __init__.py is a requirement for Python modules (of which Zope products, and by extension ZenPacks, are a
type). When the ZenPack is loaded on Zenoss startup, code in __init__.py will be run. This is where you'll place
Extending the User Interface
105
the back-end functions so that your portlet gets attached to the Zenoss portal object and made available to the
portlet front-end.
Finally, you'll need to make a ZenPack object so that you can hook into installation, upgrade and removal methods,
as well as to register and unregister your portlet. Add the following code into __init__.py:
from Products.ZenModel.ZenPack import ZenPackBase
class ZenPack(ZenPackBase):
"""
Portlet ZenPack class
"""
def install(self, app):
"""
Initial installation of the ZenPack
"""
ZenPackBase.install(self, app)
def upgrade(self, app):
"""
Upgrading the ZenPack procedures
"""
ZenPackBase.upgrade(self, app)
def remove(self, app, leaveObjects=False ):
"""
Remove the ZenPack from Zenoss
"""
# NB: As of Zenoss 2.2, this function now takes three arguments.
ZenPackBase.remove(self, app, leaveObjects)
As you can see, nothing special has been done yet; that will come later.
13.7.2. Write the Python Back-End Code
Since the ReportListPortlet will present its information as tabular data, you'll be using the JavaScript YUI library's
TableDatasource on the front-end (more about that in the next section). That data source accepts data as a JSON
object with the following structure:
{
'columns': ['Column1', 'Column2'],
'data': [
{
'Column1':'row 1 value',
'Column2':'another row 1 value'
},
{
'Column1':'row 2 value',
'Column2':'another row 2 value'
}
]
}
Thus you need a method in Zenoss to structure your list of reports accordingly and serialize it as JSON. You then
need to place that method in Zenoss so that it's accessible to the browser via an ordinary HTTP request. This method
should accept a path to a ReportClass whose reports are to be listed.
Here's the final method (we'll go through it piece by piece in a moment):
Extending the User Interface
106
import json
def getJSONReportList(self, path='/Device Reports'):
"""
Given a report class path, returns a list of links to child
reports in a format suitable for a TableDatasource.
"""
# This function will be monkey-patched onto zport, so
# references to self should be taken as referring to zport
# Add the base path to the path given
path = '/zport/dmd/Reports/' + path.strip('/')
# Create the empty structure of the response object
response = { 'columns': ['Report'], 'data': [] }
# Retrieve the ReportClass object for the path given. If
# nothing can be found, return an empty response
try:
reportClass = self.dmd.unrestrictedTraverse(path)
except KeyError:
return json.dumps(response)
# Get the list of reports under the class as (url, title) pairs
reports = reportClass.reports()
reportpairs = [(r.absolute_url_path(), r.id) for r in reports]
# Iterate over the reports, create links, and append them to
# the response object
for url, title in reportpairs:
link = "<a href='%s'>%s</a>" % (url, title)
row = { 'Report': link }
response['data'].append(row)
# Serialize the response and return it
return json.dumps(response)
# Monkey-patch onto zport
from Products.ZenModel.ZentinelPortal import ZentinelPortal
ZentinelPortal.getJSONReportList = getJSONReportList
This function will be defined in __init__.py.
First, you'll need json to serialize the response:
import json
That's it for the method. This should now be in __init__.py. Next, set up the monkey-patch by importing zport's
class:
from Products.ZenModel.ZentinelPortal import ZentinelPortal
Then set your function as a class method:
ZentinelPortal.getJSONReportList = getJSONReportList
And that's it! Now this method is accessible wherever zport is; for example, via HTTP:
http://myzenoss:8080/zport/getJSONReportList?path=Device%20Reports
13.7.3. Write the JavaScript Portlet
While Zenoss portlets can use elements of both the MochiKit and Yahoo! UI JavaScript libraries, if you are adding a
portlet in Version 3.x, you should use the Sencha Ext library. JavaScript is a prototype-based language, not a class-

Extending the User Interface
107
based language; as a result, innumerable efforts have been made to create class-like JavaScript objects. Zenoss
is no exception. It does not use YUI's class-like objects, but instead its own constructor, based on the Prototype
library's Class, that allows simple subclassing.
Similarly, Zenoss uses its own Datasource object that wraps around YUI's DataSource component; this allows for
the use of datasource subclassing, as well as simple JSON serialization.
As a result of using these custom components, creating a new Portlet is fairly straightforward. Each portlet must
have a corresponding Datasource, which handles communication with the server.
The ReportListPortlet will use the predefined TableDatasource, so no separate datasource class definition is need-
ed. See $ZENHOME/Products/ZenWidgets/ZenossPortlets/GoogleMapsPortlet.js for an example of a customized
datasource.
The global YAHOO object defines a namespace; YAHOO.zenoss is where all custom Zenoss components are stored.
The complete portlet definition, which should be placed in ReportListPortlet.js, follows. As before, we'll go over
it step by step in a moment.
var ReportListPortlet = YAHOO.zenoss.Subclass.create(
YAHOO.zenoss.portlet.Portlet);
ReportListPortlet.prototype = {
// Define the class name for serialization
__class__:"YAHOO.zenoss.portlet.ReportListPortlet",
// __init__ is run on instantiation (feature of Class object)
__init__: function(args) {
// args comprises the attributes of this portlet, restored
// from serialization. Take them if they're defined,
// otherwise provide sensible defaults.
args = args || {};
id = 'id' in args? args.id : getUID('ReportList');
title = 'title' in args? args.title: "Reports";
bodyHeight = 'bodyHeight' in args? args.bodyHeight:200;
// You don't need a refresh time for this portlet. In case
// someone wants one, it's available, but default is 0
refreshTime = 'refreshTime' in args? args.refreshTime: 0;
// The datasource has already been restored from
// serialization, but if not make a new one.
datasource = 'datasource' in args? args.datasource :
new YAHOO.zenoss.portlet.TableDatasource({
// Query string will never be that long, so GET
// is appropriate here
method:'GET',
// Here's where you call the back end method
url:'/zport/getJSONReportList',
// Set up the path argument and set a default ReportClass
queryArguments: {'path':'/Device Reports'}
});
// Call Portlet's __init__ method with your new args
this.superclass.__init__(
{id:id,
title:title,
datasource:datasource,

Extending the User Interface
108
refreshTime: refreshTime,
bodyHeight: bodyHeight
}
);
// Create the settings pane for the portlet
this.buildSettingsPane();
},
// buildSettingsPane creates the DOM elements that populate the
// settings pane.
buildSettingsPane: function() {
// settingsSlot is the div that holds the elements
var s = this.settingsSlot;
// Make a function that, given a string, creates an option
// element that is either selected or not based on the
// settings you've already got.
var getopt = method(this, function(x) {
opts = {'value':x};
path = this.datasource.queryArguments.path;
if (path==x) opts['selected']=true;
return OPTION(opts, x); });
// Create the select element
this.pathselect = SELECT(null, null);
// A function to create the option elements from a list of
// strings
var createOptions = method(this, function(jsondoc) {
forEach(jsondoc, method(this, function(x) {
opt = getopt(x);
appendChildNodes(this.pathselect, opt);
}));
});
// Wrap these elements in a DIV with the right CSS class,
// and give it a label, so it looks pretty
mycontrol = DIV({'class':'portlet-settings-control'}, [
DIV({'class':'control-label'}, 'Report Class'),
this.pathselect
]);
// Put the thing in the settings pane
appendChildNodes(s, mycontrol);
// Go get the strings that will populate your select element.
d = loadJSONDoc('/zport/dmd/Reports/getOrganizerNames');
d.addCallback(method(this, createOptions));
},
// submitSettings puts the current values of the elements in
// the settingsPane into their proper places.
submitSettings: function(e, settings) {
// Get your ReportClass value and put it in the datasource
var mypath = this.pathselect.value;
this.datasource.queryArguments.path = mypath;
// Call Portlet's submitSettings
this.superclass.submitSettings(e, {'queryArguments':
{'path': mypath}
});
}

Extending the User Interface
109
}
YAHOO.zenoss.portlet.ReportListPortlet = ReportListPortlet;
The dashboard template loads all the dependencies for portlets, including the two important ones:
YAHOO.zenoss.Subclass and YAHOO.zenoss.portlet.Portlet.
First, create your ReportListPortlet as a subclass of YAHOO.zenoss.portlet.Portlet (which is defined in $ZEN-
HOME/Products/ZenWidgets/skins/zenui/javascript/portlet.js, if you care to look at its code):
var ReportListPortlet = YAHOO.zenoss.Subclass.create(
YAHOO.zenoss.portlet.Portlet);
Most of the Portlet class's options are fine here; you'll be adding a select element to the settings pane, to select
the base report class, and defining a TableDatasource, to get data from your server-side method. To customize
the subclass, modify the prototype object of the portlet. When ReportListPortlet is called as a constructor, the
attributes of Portlet's prototype are copied to ReportListPortlet, except for those that ReportListPortlet has
defined itself. Portlet's prototype is also made available as ReportListPortlet.superclass.
ReportListPortlet.prototype = {
The __class__ attribute will be used when the portlet is restored from serialization. It points to the correct code, so
define it as the eventual place of your Portlet in the YAHOO.zenoss namespace.
__class__:"YAHOO.zenoss.portlet.ReportListPortlet",
The __init__ method is called when a ReportListPortlet is created (a feature of YAHOO.zenoss.Class). The entity
that restores portlets from saved settings will pass in an object containing those settings as attributes, so you'll need
to go through those, making any changes necessary and supplying defaults if settings don't exist.
__init__: function(args) {
args = args || {};
id = 'id' in args? args.id : getUID('ReportList');
title = 'title' in args? args.title: "Reports";
bodyHeight = 'bodyHeight' in args? args.bodyHeight:200;
refreshTime = 'refreshTime' in args? args.refreshTime: 0;
In the process of iterating over settings, the method will come across the datasource. If it doesn't exist yet, you'll
need to create one. Since these are tabular data, you'll use TableDatasource.
datasource = 'datasource' in args? args.datasource :
new YAHOO.zenoss.portlet.TableDatasource({
method:'GET',
Set the data source's URL to the path to the method on zport that you wrote previously:
url:'/zport/getJSONReportList',
And set up the arguments that get passed to that method, providing a default:
this.superclass.__init__(
{id:id,
title:title,
datasource:datasource,
refreshTime: refreshTime,
bodyHeight: bodyHeight
}
);
Since you're going to have a modified settings pane, containing the select element by which the base ReportClass
is chosen, you'll need to call a method to add that to the default elements.

Extending the User Interface
110
this.buildSettingsPane();
},
Now write that method, since you've finished the initialization.
buildSettingsPane: function() {
Portlet.settingsSlot is the reference to the div element that contains the settings pane.
var s = this.settingsSlot;
Since your settings pane will include a select element, you'll need to create options to be chosen, using MochiKit's
OPTION(); also, you want the select element to show the current value. This function will accept a string representing
an existing ReportClass and build an option element, setting it as selected if it matches the current value.
var getopt = method(this, function(x) {
opts = {'value':x};
path = this.datasource.queryArguments.path;
if (path==x) opts['selected']=true;
return OPTION(opts, x); });
Now create the select element to hold the options, again using MochiKit's SELECT():
this.pathselect = SELECT(null, null);
Set up the function that accepts a list of strings and iterates over them, turning them into options and appending
them to your select element:
var createOptions = method(this, function(jsondoc) {
forEach(jsondoc, method(this, function(x) {
opt = getopt(x[0]);
appendChildNodes(this.pathselect, opt);
}));
});
Now put the (currently empty) select element into a div with the proper CSS class defined, so that it will organize
itself properly in the settings pane, and have a label:
mycontrol = DIV({'class':'portlet-settings-control'}, [
DIV({'class':'control-label'}, 'Report Class'),
this.pathselect
]);
appendChildNodes(s, mycontrol);
Finally, you're ready to get the data for all of your option elements. You'll use MochiKit's handy loadJSONDoc(), which
accepts a URL, fires off an XHR, parses the response text as JSON, and returns a JavaScript object, with which
you'll call back to your option-building method:
d = loadJSONDoc('/zport/dmd/Reports/getOrganizerNames');
d.addCallback(method(this, createOptions));
},
Lastly, you need to hook into the method that saves changed settings, so it will include your ReportClass string:
submitSettings: function(e, settings) {
var mypath = this.pathselect.value;
this.datasource.queryArguments.path = mypath;
// Call Portlet's submitSettings
this.superclass.submitSettings(e, {'queryArguments':
{'path': mypath}

Extending the User Interface
111
});
}
}
All that's left is to assign the ReportListPortlet constructor to the YAHOO.zenoss namespace:
YAHOO.zenoss.portlet.ReportListPortlet = ReportListPortlet;
13.7.4. Register the Portlet
Now you need to tell Zenoss about the portlet and assign permissions. Open up __init__.py again, and add the
following Python code to the top:
from Products.ZenModel.ZenossSecurity import ZEN_COMMON
from Products.ZenUtils.Utils import zenPath
Next, modify the ZenPack class you defined way back in step 1. Since upgrading and installing the portlet will amount
to the same thing, create a method on your ZenPack class to cover those steps:
def _registerReportListPortlet(self, app):
zpm = app.zport.ZenPortletManager
portletsrc = zenPath('Products', 'ReportListPortletPack',
'ReportListPortlet.js')
zpm.register_portlet(
sourcepath=portletsrc,
id='ReportListPortlet',
title='Report List',
permission=ZEN_COMMON)
That method will let ZenPortletManager, the object on zport that, unsurprisingly, manages portlets, know about the
portlet source code. The zenPath() function is a utility that joins strings together to create a file system path under
$ZENHOME -- in this case, pointing to the directory where your ZenPack will be installed. When registering a portlet,
you provide an id, a title, and the permissions for the portlet (as this portlet should be visible to everyone, ZEN_COMMON
is the appropriate permission).
Now you can modify your install(), upgrade() and remove() methods:
def install(self, app):
ZenPackBase.install(self, app)
self._registerReportListPortlet(app)
def upgrade(self, app):
ZenPackBase.upgrade(self, app)
self._registerReportListPortlet(app)
def remove(self, app):
ZenPackBase.remove(self, app) zpm =
app.zport.ZenPortletManager
zpm.unregister_portlet('ReportListPortlet')
Save and exit. You can test your ZenPack at this point by navigating to the parent directory of ReportListPortletPack
and running:
zenpack --install ReportListPortletPack
Load up the Zenoss UI in your browser and click Add Portlet on your dashboard. Make sure the Report List portlet
appears as an option. If so, add one and check that you can change the base ReportClass. Also make sure it shows
reports.

Extending the User Interface
112
Now all that's left is to export the ZenPack from Zenoss. From the ZenPacks tab under Settings, click on your new
ZenPack. From the page menu, select the Export ZenPack... menu item. That will create a new egg file called
ZenPacks.myexample.portlet.egg. Distribute away!
13.8. Debugging Tips
There are quite a number of components used in order to create the Zenoss interface, and it can be quite a challenge
to understand what's happening and how to fix issues. The following are a list of some simple debugging tips:
• Use page templates rather than full HTML pages whenever possible. There are a number of dependencies
between CSS, JavaScript and other components, and doing it the hard way can be really hard. Trying to do things
the hard way in a cross-browser fashion is exceptionally difficult. As a side benefit, using the page templates
means that your pages will benefit from any improvements in the base product.
• Run Firefox Version 3.x or later, and examine the Error Console to find out what JavaScript errors are occurring.
There will be tons of CSS issues coming from different CSS pages (it's annoying, but not fatal), but you can
safely ignore them.
• The Firefox Error Console will not tell you if Firefox wasn't able to find or load a JavaScript file (if the path
you've specified in your Web page to get to the JavaScript file is incorrect). In order to determine if Zope was
given a path to a filename that it couldn't find, you'll need to go into Zope's ZMI, go to the error log (http://
yourzenossserver:8080/error_log/manage) and remove all of the error log filters. After you do that, retry the
operation and you can see what files Zope wasn't able to find and fix the paths in your page.

113
Chapter 14. ZenPack Conversion Tasks for
Version 3.0
14.1. About ZenPack Conversion
Zenoss Version 3.0 (Core and Enterprise) offers a significantly changed user interface. As a result of these changes,
some of your ZenPack customizations may no longer be compatible with the product.
Read the following sections for more information about changes to the interface, and for conversion procedures
to help you update:
• Page templates
• Page-level dialogs
• Data sources
• Thresholds
• Custom "add device" widgets
• Custom columns on the component grid
14.1.1. What Has Changed?
In Version 3.0, some of the Core Zenoss interface pages have been redesigned. Others are re-skinned for consistent
appearance and navigation.
No changes to your ZenPacks are needed if it:
• Adds tabs
• Adds dialogs to a re-skinned page
However, you must modify your ZenPack for compatibility if it:
• Overrides the page template of a redesigned page
• Adds a page-level dialog
• Includes custom data sources and thresholds
The following information and procedures explain how you should modify your ZenPacks for the updated product.
14.1.1.1. Redesigned Pages
The following pages are redesigned in Version 3.0.
Pre-3.0 Version 3.0
Device List, Devices Class,
Systems, Groups, Locations Devices
Device Status Device Detail
Event Console Event Console
Services Class IP Services, Windows Services
Templates Monitoring Templates
Networks Networks

ZenPack Conversion Tasks for Version 3.0
114
Pre-3.0 Version 3.0
Processes Class Processes
Reports Reports
14.1.2. Updating Page Templates
If your ZenPack overrides the page template of a re-skinned page, then no changes are needed. If it overrides the
page template of a redesigned page, then you must modify it for compatibility.
The new interface does not allow a ZenPack to override the base Zenoss pages; however, you can register your
page template as a separate selection that can be accessed from the new interface.
The following example adds a new selection in the left panel of the Device Details page.
Add the following code to the __init__.py file of the ZenPack:
tab = { 'id' : 'customtab',
'name' : 'Custom',
'action' : 'customaction', #action is usually the name of the pt file
'permissions' : (permissions.view,)
}
Device.factory_type_information[0]['actions'] += (tab,)
14.1.3. Updating Page-Level Dialogs
If your ZenPack adds a page-level dialog to a redesigned page, it will appear but will not behave properly. For
compatibility, you must:
• Add an ID to the form
• Delete the submit
• Add JavaScript to initialize the dialog
Following are examples of "old" and "new" content for the Products/ZenModel/skins/zenmod-
el/dialog_clearHeartbeats.pt dialog.
Old Dialog
1 <h2>Clear Heartbeats></h2>
2 <br/>
3 <p>
4 Are you sure you want to clear heartbeats for this device?<br/>
5 </p>
6 <br/>
7 <form method="post" tal:attributes="action here/absolute_url">
8 <input type="hidden" name="zenScreenName" value="here/absolute_url">
9 <div id="dialog_buttons">
10 <input tal:attributes="type string:submit;
11 value string:OK"
12 name="manage_deleteHeartbeat:method" />
13 <input tal:attributes="id string:dialog_cancel;
14 type string:button;
15 value string:Cancel;
16 onclick string:$$('dialog').hide()" />
17 </div>
18 </form>
New Dialog
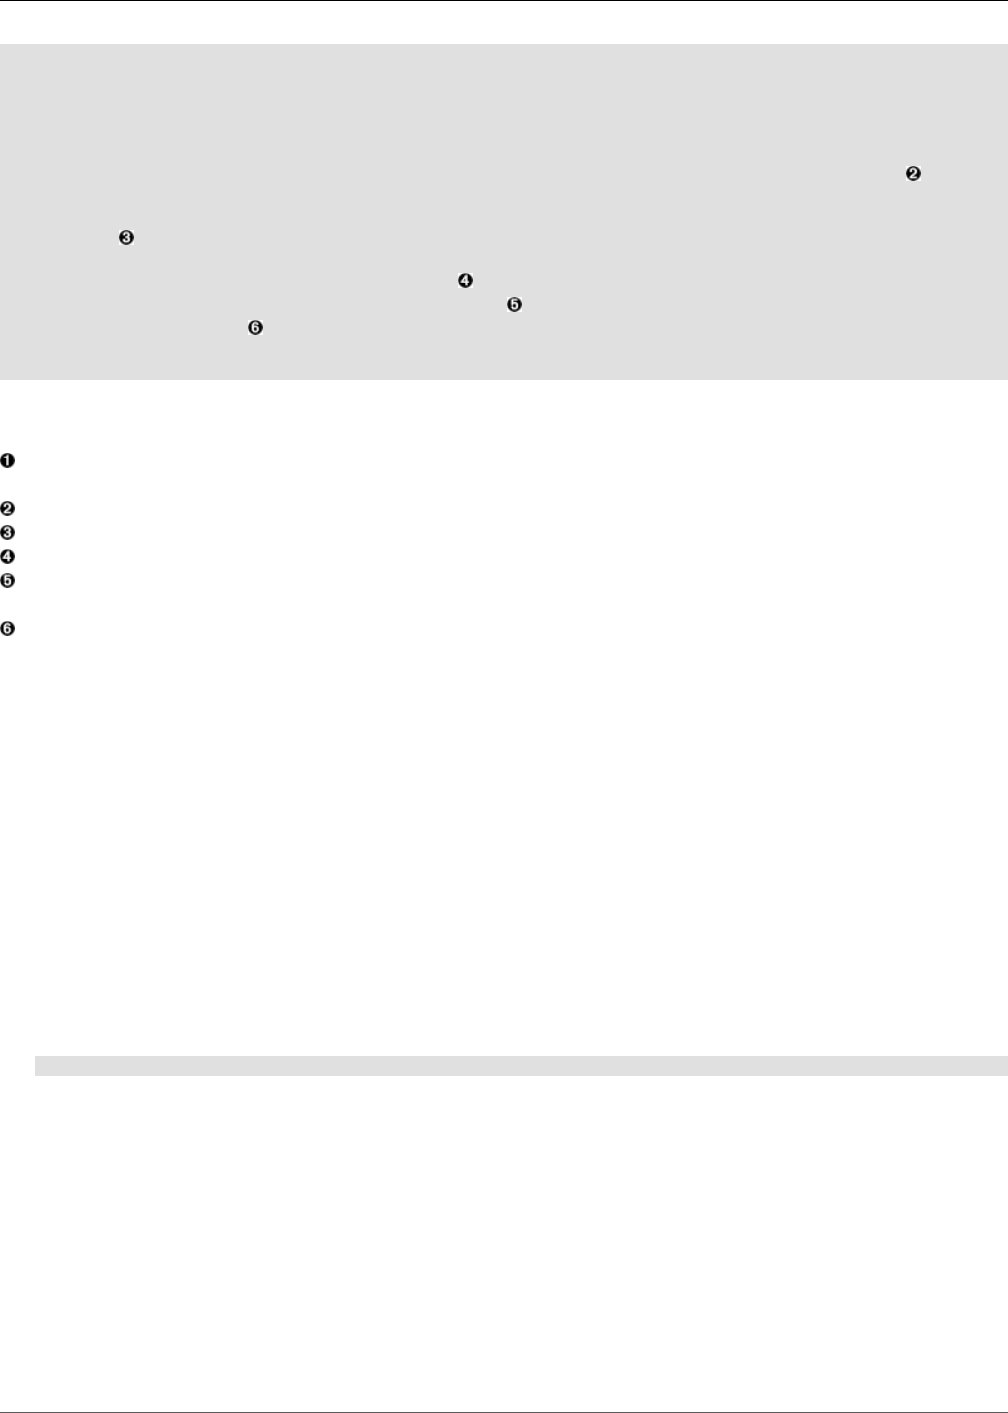
ZenPack Conversion Tasks for Version 3.0
115
1 <h2>Clear Heartbeats</h2>
2 <br/>
3 <p>
4 Are you sure you want to clear heartbeats for this device?<br/>
5 </p>
6 <br/>
7 <form method="post" id="clear_heartbeat_form" tal:attributes="action here/absolute_url">
8 <input type="hidden" name="zenScreenName" value="here/absolute_url">
9 </form>
10 <script>
11 var clear_heartbeat_form = new Zenoss.dialog.DialogFormPanel({
12 existingFormId: 'clear_heartbeat_form',
13 submitName: 'manage_deleteHeartbeat:method',
14 jsonResult: false
15 });
16 </script>
Comparison
Lines 9 through 17 from the pre-3.0 dialog were removed. These contained the old submit button and the
method submitted to.
Line 7 adds an ID to the new dialog.
Lines 10 through 16 add JavaScript to the new dialog, to initialize it.
Line 12 of the new dialog identifies the form that will be submitted, and should match the ID for the form.
Line 13 of the new dialog is the method to which the form will be submitted, and matches the value from the
old dialog.
Line 14 identifies the return type from the submit. Most of the old submits did not return json-formatted results.
14.1.4. Updating Data Sources
To update data sources for Version 3.0 compatibility, you must:
• Modify the MANIFEST.in file
• Create an interface for the data source
• Create an info object to expose the properties of the data source
• Write an adapter for the class to the info object and its interface
14.1.4.1. Modify the MANIFEST.in File
The configure.zcml file must be included when an .egg file is created for the ZenPack. To ensure its inclusion:
1. Make sure there is a MANIFEST.in file at the root of your ZenPack. If not, then create the file.
2. Add the following line to the file:
graft ZenPacks
14.1.4.2. Create an Interface for the Data Source
You must create an interface and a descriptive accessor object for the data source. The new user interface uses
this information to automatically create form fields so a user can view and update data source properties.
Create three files in the ZenPacks/CompanyName/ZenPackName directory:
•info.py
•interfaces.py
•configure.zcml

ZenPack Conversion Tasks for Version 3.0
116
An example of an interface is:
...
class IMySqlMonitorDataSourceInfo(IBasicDataSourceInfo):
usessh = schema.Bool(title=_t(u'Use SSH'))
timeout = schema.Int(title=_t(u'Timeout (seconds)'))
...
This interface describes the form fields to the user interface by using the Zope schema (zope.schema) library. It
describes two fields:
•usessh - (Boolean) Rendered as an option (checkbox) on the user interface. The value of title is the field
label. The _t() function allows you to provide translations for multiple languages.
•timeout - (Integer) Rendered as an input that allows only numbers.
14.1.4.2.1. Options Available to the Schema
The user interface is translated into ExtJs fields that are rendered on the client side. It uses a modified subset of
the Zope schema library to perform these translations.
The interface accepts the following parameters:
•title - Required.
•xtype - Ext Js field definition type. Typically, this is derived from the schema type. For example, schema.Text
translates to textfield as the xtype.
•description - Used to document the field. Not used on the client side.
•readonly - Renders the field as a label if true.
•order - Order in which the fields appear.
•group - Groups the fields into the same fieldset.
•vtype - ExtJs validator used to validate the field.
•required - Specifies whether blanks are allowed on this field.
14.1.4.3. Create an info Object
After you set up the interface, you must provide an info object for the data source. The info object is a "clean"
representation of the data source that you provide for third-party developers. It allows them to work with the data
source without the extra complication of a Zope object.
An example of an info object is:
...
class MySqlMonitorDataSourceInfo(BasicDataSourceInfo):
implements(IMySqlMonitorDataSourceInfo)
usessh = ProxyProperty('usessh')
timeout = ProxyProperty('timeout')
...
The info object "wraps" the Zope RRD data source object and exposes the necessary attributes of the data source
as Python properties.
The "ProxyProperty" method shuttles data from the Zope object to the info object. When returning information from
an API layer, you should always return the info object, as it can be easily serialized.
The info object implements the IMySqlMonitorDataSourceInfo interface. This means that the fields provided by the
interface must match the properties provided by the info object. This is necessary because the form builder will
inspect the interface provided by this info object when looking for the form fields to render.
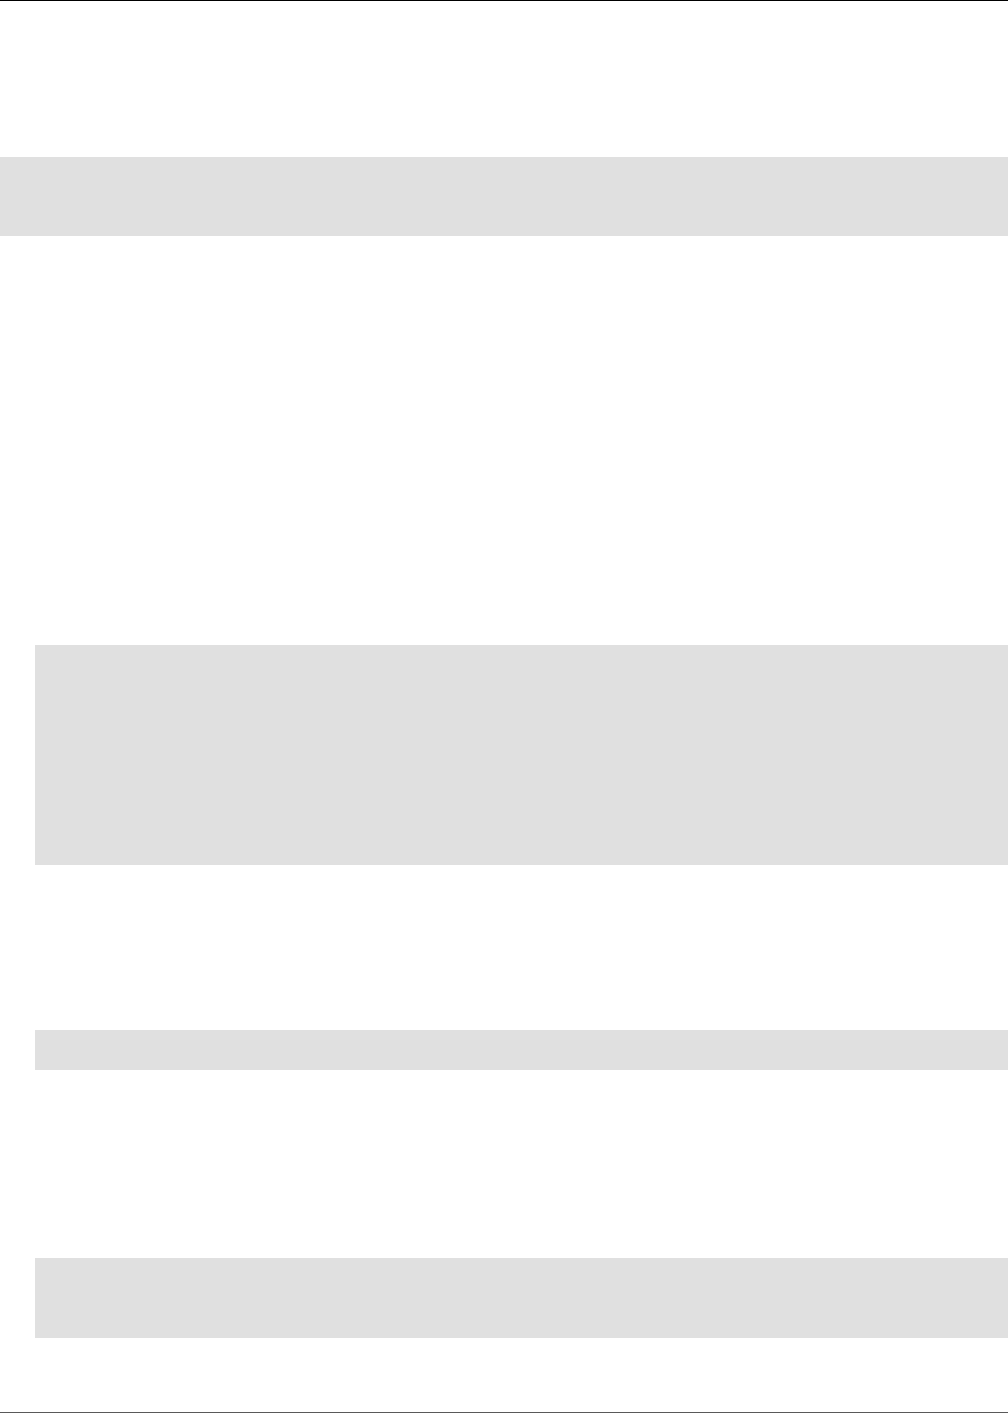
ZenPack Conversion Tasks for Version 3.0
117
14.1.4.4. Write an Adapter
You must create an adapter for your new info object and its interface. An example of the adapter for the MySqlMonitor
data source is:
<adapter factory=".info.MySqlMonitorDataSourceInfo"
for=".datasources.MySqlMonitorDataSource.MySqlMonitorDataSource"
provides=".interfaces.IMySqlMonitorDataSourceInfo"
/>
This automatically hooks up the data source with the info object. For a complete example, see the MySqlMonitor
data source used as an example or take a look at the HTTPMonitor data source in the Web Page Response Time
(HTTP) ZenPack.
14.1.5. Updating Thresholds
Updates needed to thresholds for 3.0 are similar to those required for data sources. MinMaxThreshold (in Zenoss
Core) is a good example to follow when updating thresholds in your ZenPacks.
14.1.6. Custom "Add Device" Widget
If your ZenPack needs to register a custom method to add a device, then you must register a new JavasScript-based
dialog to appear when you select an Add Device option. To do this, follow these steps:
1. Extend Zenoss.Action in JavaScript. For example, the following example script creates the Add Multiple Devices
selection in Zenoss Core:
addMultiDevicePopUP = new Zenoss.Action({
text: _t('Add Multiple Devices') + '...',
id: 'addmultipledevices-item',
permission: 'Manage DMD',
handler: function(btn, e){
Ext.util.Cookies.set('newui', 'yes');
window.open('/zport/dmd/easyAddDevice', "multi_add",
"menubar=0,toolbar=0,resizable=0,height=580, width=800,location=0");
}
})
This action (taken from Zenoss Core directory Products/ZenUI3/browser/resources/js/zenoss/itinfrastruc-
ture) opens a dialog, although this behavior is not required. Refer to the "Add a Single Device" action in the
same file for a more detailed example.
2. Register the new action. To do this, append your action object to the Zenoss.extensions.adddevice array.
Following the previous example, add the following code:
Ext.ns('Zenoss.extensions');
Zenoss.extensions.adddevice.push(addMultiDevicePopUP);
Note
The code should reside in a .js file in your ZenPack. (Depending on how your ZenPack is organized, in the
skins or resources directories.)
3. Modify the configure.zcml file in the ZenPack. Add the following code, modifying the values of the weight and
permission fields as desired.
<browser:viewlet
name="js-ZENPACKNAME"
paths="/path/to/yourfile.js"
weight="10"
ZenPack Conversion Tasks for Version 3.0
118
manager="Products.ZenUI3.browser.interfaces.IJavaScriptSrcManager"
class="Products.ZenUI3.browser.javascript.JavaScriptSrcBundleViewlet"
permission="zope2.Public"
/>
14.1.7. Custom Columns on the Component Grid (Device Summary)
If you want to customize the way your ZenPack defined device component is rendered on a device details page,
you must implement these changes to your ZenPack:
1. Define an adapter for the device component's info object (in the configure.zcml file):
<adapter factory=".info.MyZenPackComponentInfo"
for=".MyZenPackComponent.MyZenPackComponent"
provides=".interfaces.IMyZenPackComponentInfo"
/>
This adapter assumes that the ZenPack directory contains these files:
•interface.py - Requires only a "barebones" interface:
class IMyZenPackComponentInfo(IComponentInfo):
"""
Info adapter for MyZenPackComponent components.
"""
pass
•info.py - Must include:
class MyZenPackComponentInfo(ComponentInfo):
implements(IMyZenPackComponentInfo)
@property
def customProperty(self):
return self._object.getCustomProperty()
where customProperty is replaced by the item you want to expose in the components grid.
2. Modify your JavaScript to include the custom device component grid definition. This JavaScript should be located
in the ZenPack and be registered in a configure.zcml file. (See Step 3 of the previous section, Custom "Add
Device" Widget.)
The following code is for IpInterface components (as defined in Zenoss Core file /ZenUI3/browser/re-
sources/js/zenoss/ComponentPanel.js.) You will change IpInterfacePanel to your custom device component:
ZC.IpInterfacePanel = Ext.extend(ZC.ComponentGridPanel, {
constructor: function(config) {
config = Ext.applyIf(config||{}, {
componentType: 'IpInterface',
fields: [
{name: 'uid'},
{name: 'severity'},
{name: 'status'},
{name: 'name'},
{name: 'ipAddress'},
{name: 'network'},
{name: 'macaddress'},
{name: 'status'},
{name: 'monitored'},
{name: 'locking'}
],
columns: [{
id: 'severity',
dataIndex: 'severity',
header: _t('Events'),

ZenPack Conversion Tasks for Version 3.0
119
renderer: Zenoss.render.severity,
width: 60
},{
id: 'name',
dataIndex: 'name',
header: _t('IP Interface')
},{
id: 'ipAddress',
dataIndex: 'ipAddress',
header: _t('IP Address'),
renderer: render_link
},{
id: 'network',
dataIndex: 'network',
header: _t('Network'),
renderer: function(network){
// network is the marshalled Info object
if (network) {
return Zenoss.render.link(network.uid, null, network.name);
}
}
},{
id: 'macaddress',
dataIndex: 'macaddress',
header: _t('MAC Address'),
width: 120
},{
id: 'status',
dataIndex: 'status',
header: _t('Status'),
renderer: Zenoss.render.pingStatus,
width: 60
},{
id: 'monitored',
dataIndex: 'monitored',
header: _t('Monitored'),
width: 60
},{
id: 'locking',
dataIndex: 'locking',
header: _t('Locking'),
renderer: Zenoss.render.locking_icons
}]
});
ZC.IpInterfacePanel.superclass.constructor.call(this, config);
}
});
Note
When you register from a ZenPack, you should declare before the definition:
var ZC = Ext.ns('Zenoss.component');
and after the definition:
Ext.reg('IpInterfacePanel', ZC.IpInterfacePanel);
For more specific needs, see the Zenoss Core code in:
• Products/ZenUI3/browser/resources/js/zenoss/ComponentPanel.js
• Products/Zuul/infos/component/*
• Products/Zuul/interfaces/component.py
120
Chapter 15. Reports
15.1. Adding a Report
Zenoss reports are simply HTML pages that use TALES markup. For a more thorough discussion, see Chapter 13,
Extending the User Interface.
New pages can be created using the Zope Management Interface (ZMI) interface. Navigate to this URL on your
Zenoss server:
http://yourzenossserver:8080/zport/dmd/Reports
You can add a report at this point in the Reports tree by adding "/manage" to the URL in your browser:
http://yourzenossserver:8080/zport/dmd/Reports/manage
Here you can select Report from the menu on the right, and add a report. Name it "test" and save it. After you see your
new "test" report, leave the ZMI by selecting the "test" object, and then selecting the Test tab at the top of the page.
You will then see a sample page:
Reports
This is Page Template test.
If we use some TALES templates, we can get a test page that has the Zenoss look and feel. Navigate back to our
test page under the ZMI:
http://localhost:8080/zport/dmd/Reports/test/manage
Now change the text to this:
<tal:block metal:use-macro="here/reportMacros/macros/exportableReport">
<tal:block metal:fill-slot="report">
<tal:block metal:use-macro="here/templates/macros/page1">
<tal:block metal:fill-slot="breadCrumbPane">
<span metal:use-macro="here/miscmacros/macros/reportBreadCrumbsList"/>
</tal:block>
<tal:block metal:fill-slot="contentPane">
<h1>Reports</h1>
This is Page Template <i tal:content='here/title_or_id'/>.
</tal:block>
</tal:block>
</tal:block>
</tal:block>
The meat of a report goes here:
<tal:block metal:fill-slot="contentPane">
...
</tal:block>
Typically, a list of records is pulled from the database, summarized, and then shown in a table using the TALES
markup.

Reports
121
Although you can make changes and save them using the web interface, it is a cumbersome editor. It is simpler to
make the changes to an external file and reload it. If you store your file in the $ZENHOME/Products/ZenReports/re-
ports directory, you can load it in with the ReportLoader?:
$ cd $ZENHOME/Products/ZenReports
$ python ReportLoader.py --force
15.2. Plugins
Reports are often summaries which are not tied to a particular object. Instead of adding code to objects to make
them available in the page template, you can put the python code for a report in the $ZENHOME/Products/ZenRe-
ports/plugin directory.
You can execute a plugin using this tal:block:
<tal:block tal:define="
objects python:here.ReportServer.plugin('cpu', here.REQUEST);
"
...
</tal:block>
Plugins are executed every time a report is run, and do not require a Zope restart to get pick up changes. With help
from the ZenReports? Plugin module, you can even test the reports from the command line. This further reduces
the number of times that Zope is used as a development environment.
See the examples in the plugins directory.
15.3. Adding Export Buttons to Reports
Adding an Export All button to a report is fairly straightforward. The overall format of the report markup looks some-
thing like this:
<tal:block tal:define="
objects python:here.ZenUsers.getAllThingsForReport();
objects python: (hasattr(request, 'doExport') and list(objects)) or objects;
tableName string: thisIsTheTableName;
batch python:here.ZenTableManager.getBatch(tableName,objects,
sortedHeader='getUserid');
exportFields python:['getUserid', 'id', 'delay',
'enabled', 'nextActiveNice', 'nextDurationNice',
'repeatNice', 'where'];
">
<tal:block metal:use-macro="here/reportMacros/macros/exportableReport">
<tal:block metal:fill-slot="report">
The normal report markup goes here
</tal:block>
</tal:block>
</tal:block

Reports
122
The first definition is a call to some method that retrieves the objects for the report. This might be a list, tuple or
an iterable class.
If we are doing an export then we need this to be a list, so the second tal:define line makes sure we have a list
in the event that we are doing an export. It's good to not do this if we are not doing an export. Large reports might
run into performance issues if an iterable is converted to a list unnecessarily.
tablename is defined here for use by the getBatch() call that follows.
exportFields is a list of data to be included in the export. These can be attribute names or names of methods to
call. See DataRoot.writeExportRows() for more details on what can be included in this list.
Within the <tal:block metal:fill-slot="report"></tal:block> block goes the report markup you would use
when not including the export functionality.
Note
If the Export All button is mysteriously not doing anything you may need to be using zenTableNavigation/macros/
navtool rather than zenTableNavigation/macros/navbody in your report. The former includes the <form> tag, the
latter does not. If you are not providing a <form> tag then you need to use navtool so the export button is within
a form.

123
Chapter 16. Migrating Zenoss Code
Note
This section is not intended for ZenPack writers but for people modifying the core code (eg files under the $ZEN-
HOME/Products/ directory). If you are migrating code in a ZenPack, see the section on migrating zenpacks.
16.1. Introduction and Steps
If you have added new functionality to Zenoss that will break backwards compatibility, you need to provide code for
your version that will allow users to upgrade without breakage.
Here's a breakdown of everything you will need to do in order to create your migration code and move your new
code into production:
1. Create your code in the $ZENHOME/Products/ZenModel/migrate/migrate package directory.
2. Add an import statement to __init__.py
3. Run zenmigrate --dont-commit iteratively to test
16.2. How It Works
The first place to look is in Products/ZenModel/migrate. For starters, examine the code in migrate.Migrate
and note the Step class - this is what you will subclass when writing your migration code. The
migrate.Migrate.Migration.main() method is what is called from the zenmigrate.py script and is what fires off the
whole process.
To further understand the process, note the global variable allSteps: this is appended to every time Migrate.Step
is instantiated.
But, you ask, how does my code get into allSteps?
Once your migration code is complete, you will do a couple things: add your file to the migrate directory and then
add an import statement to migrate/__init__.py. When migrate.Migrate is imported in the zenmigrate.py script, the
__init__.py code is run. Each module imported by this file has a class that gets instantiated at the end of its module
(see the Migrate.Step.__init__() method). It is through this mechanism that each custom migration module in the
migrate directory is added to allSteps (sorted by name and version number).
When migrate.Migrate.main() is called, allSteps is iterated and checks are performed to see if each migration
step needs to be run or not. main() calls cutover(), which calls migrate(), and this is where the actual work of
migration occurs, where your code gets executed.
16.3. What You Write
As noted, your migration code will subclass migrate.Migrate.Step. You can stub your migration file out like this:
__doc__='''My migration code'''
from Acquisition import aq_base
import Migrate
class MyMigrateCode(Migrate.Step):
version = Migrate.Version(1, 1, 0)

Migrating Zenoss Code
124
# The above needs to be updated to the appropriate version
# ie a version above the previously-released version of Zenoss
def cutover(self, dmd):
pass
MyMigrateCode()
You will need to do the following to this code:
1. Fill in the doc string
2. Update the version passed to Migrate.Version
3. Update the cutover() method with actual code
4. Add any supporting code you might need that doesn't strictly belong in cutover()
16.3.1. Implement cutover()
Implementation is very straight-forward: you get the dmd object passed into the cutover() method, thus giving you
access to nearly every part of Zenoss. The only thing you don't have direct access to is the portal object. But you
can easily get that by calling dmd.getPhysicalRoot().
Implementation details are 100% dependent upon what part of Zenoss you are migrating -- if you look at the current
migration scripts (in trunk), you will get a good sense of the diversity as well as many examples from which to work.
Changes made to the ZODB database (dmd and associated objects hierarchies) are committed back to the database
unless the --dont-commit flag is passed to zenmigrate. The --dont-commit lets the developer repeatedly run a
script and debug without making permanent changes to the database. If your migrate script makes changes outside
of the Zope database it should probably implement Step.revert() to undo any changes it has made.
16.3.2. Supporting Code
Supporting code is just modularization. If you're going to be using a function (or method) more than once, just break
it out of the cutover() method. This will make maintenance easier and will allow those who come after you to see
the intent of the migration code more quickly.
16.3.3. Testing and Deployment
Once your code meets with your approval (and that of the Zenoss development team), you are free to name it
something appropriate and save it to Products/ZenModel/migrate. Upon adding your migration module, you must
now edit Products/ZenModel/migrate/__init__.py so that it gets imported when zenmigrate.py is run.
After adding your script (and after every change you make to your new script), be sure to run zenmigrate run. Here
are some things you can do to help ensure quality:
1. Load Zenoss in a web browser, and navigate to the part of the application that was impacted by your migration
script
2. Look at the log files for error output
3. Load up zendmd from the command line and make sure that no errors are generated when using the part of
the API impacted by the change
After someone reviews the changes, your migration code is ready for deployment.
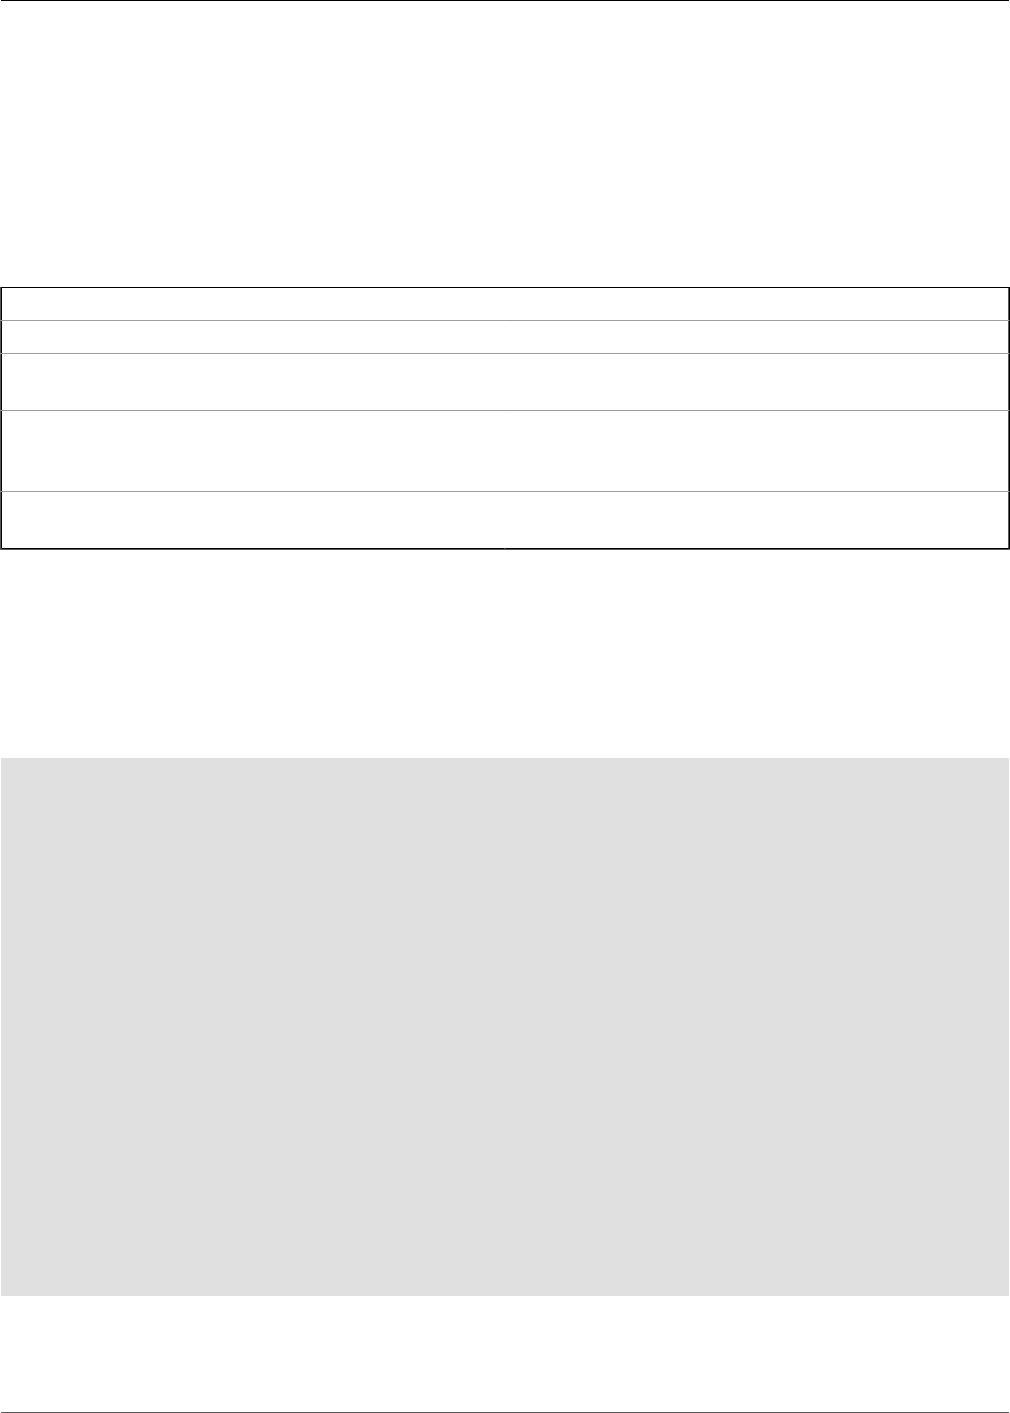
125
Chapter 17. Testing
17.1. Zenoss Unit Tests
17.1.1. Introduction
There are different types of test strategies which attempt to determine changes in behavior and errors.
Test Type Description
Python doctest Simple tests in the documentation for a function
Unit tests Test functions in a module together using the runtests
command
Functional testing Try to test the software as the user would use the soft-
ware. Selenium is used to test multiple Web browsers to
simulate actual use.
Load testing Attempts to determine how many operations the system
is capable of performing with the provided configuration.
17.1.2. doctest Testing
A handy feature of Python is the ability to include simple tests in the docstring for a function. This allows the pro-
grammer to see some of the normal cases and boundary conditions, but it also allows the programmer to run sanity
checks on the function by running the Python doctest utilities.
First, a complete sample file (blue.py) to illustrate:
import os
from exceptions import ValueError
def myfunc( a, b):
"""
Determine if a likes b.
>>> myfunc( 0, 0)
True
>>> myfunc( 0, 1)
False
# Comments in-between tests should be separated with an extra line,
# otherwise doctest will notify you of an error.
# This should raise an exception
>>> myfunc( 0, "bad" )
Traceback (most recent call last):
ValueError: Argument is bad
"""
if a == "bad" or b == "bad":
raise ValueError( "Argument is bad" )
return a == b
if __name__ == "__main__":
import doctest
doctest.testmod()
Now we can test our module by running Python with the -v flag:
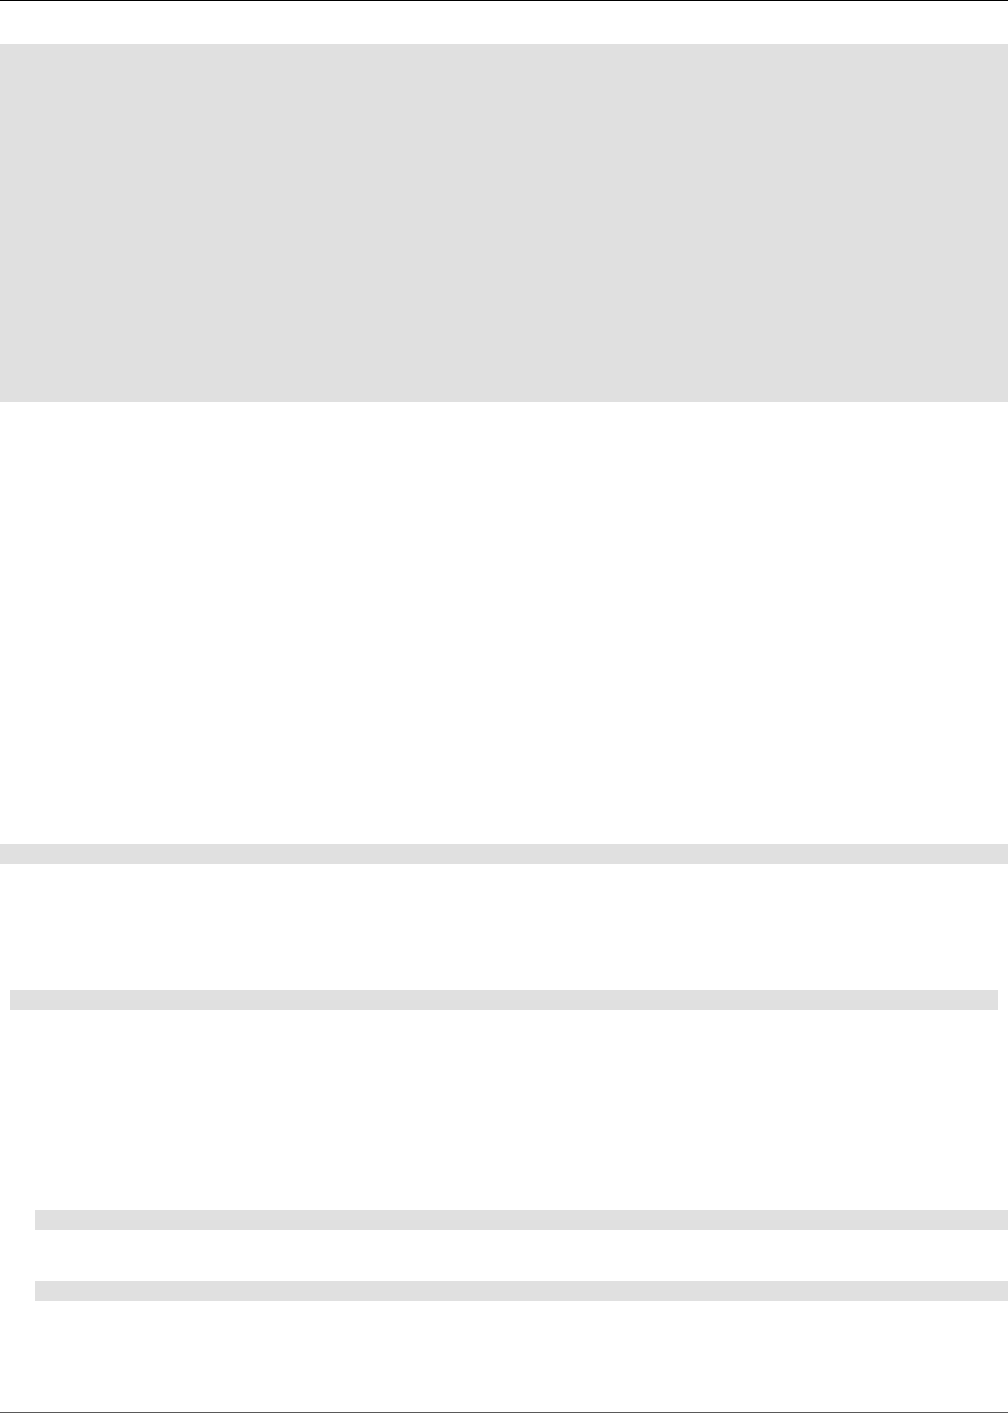
Testing
126
$ python blue.py -v
Trying:
myfunc( 0, 0)
Expecting:
True
ok
Trying:
myfunc( 0, 1)
Expecting:
False
ok
1 items had no tests:
__main__
1 items passed all tests:
2 tests in __main__.myfunc
2 tests in 2 items.
2 passed and 0 failed.
Test passed.
Note
The -v flag gets passed to your program, not to Python!
17.1.3. Zenoss' Test Runner
Zenoss has a Zope product, ZenTestRunner, whose sole purpose it to run a specific group of tests. We did this
in order to avoid running all the tests in the Products directory if you only want to run tests on a specific portion
of Zenoss.
Note
Do NOT run unit tests on a production server!
Some of the tests are destructive in nature (eg 'delete all events') and are intended to be used only on a devel-
opment server.
All of our examples should be run as the zenoss user. If you really want to run all of the tests:
$ runtests -t unit
Tip
If you are running a Selenium server, then you can use runtests to run the unit tests and the Selenium tests.
To run the Selenium tests on there own:
$ runtests -t selenium
To run all of the ZenModel tests:
runtests ZenModel
All that is required by developers is that they add tests into the tests directory that has a __init__.py contained
inside that directory.
1. Run the existing tests to make sure that you know what to expect:
runtests -t unit
2. Go to the tests directory inside of the directory with the classes you want tested:
cd $ZENHOME/Products/ZenModel/tests
3. Copy one of the existing tests to a name reflecting the product for which you are adding tests:

Testing
127
cp testZenModel.py
testZenNewProduct.py
Note
Your new test script must contain the prefix test in the filename. So testmytest.py will work, but not mytest
or mytest.py.
4. Change the import line in the new file to reflect the new product name:
from Products import ZenNewProduct as product
5. Save and quit, then run the test suites to make sure everything is passing:
$ runtests -t unit ZenModel
Note
Follow the same procedures as above for ZenPacks, with the following differences:
• Make sure that your ZenPack has the tests directory in it (eg $ZENHOME/ZenPacks/ZenPacks.org.zpname-ver-
sion info.egg/ZenPacks/org/zpname/tests ), containing an __init__.py file and your new test script.
• The runtests doesn't currently understand Python egg-style namespaces, so only the last part of the ZenPack
name is used. For example, if our ZenPack's name was ZenPacks.org.zpname
$ runtests -t unit zpname
17.1.3.1. An Example Unit Test
This first unit test deliberately has an error it, but we'll show what happens and how we can make it better.
from xmlrpclib import ServerProxy
from Products.ZenTestCase.BaseTestCase import BaseTestCase
class TestXmlRpc(BaseTestCase):
def setUp(self):
self.baseUrl = 'http://admin:zenoss@NotExistServer:8080/zport/dmd/'
self.testdev = 'xmlrpc_testdevice'
def testSendEvent(self):
serv = ServerProxy( self.baseUrl + 'ZenEventManager' )
evt = {
'device':'xmlrpcTestDevice',
'component':'eth0',
'summary':'eth0 is down',
'severity':4,
'eventClass':'/Net'
}
serv.sendEvent(evt)
def test_suite():
from unittest import TestSuite, makeSuite
suite = TestSuite()
suite.addTest(makeSuite(TestXmlRpc))
return suite
First, notice that our test has to fail as the server that we're trying to reach (NotExistServer) doesn't exist. Here's
the output when we run it from the command-line.
$ runtests -t unit -n testXMLRPC ZenModel
Running tests via: /opt/zenoss/bin/python /opt/zenoss/bin/test.py -v
Testing
128
--config-file /opt/zenoss/etc/zope.conf --libdir /opt/zenoss/Products/ZenModel
testXMLRPC
Running unit tests at level 1
Running unit tests from /opt/zenoss/Products/ZenModel
Parsing /opt/zenoss/etc/zope.conf
E
======================================================================
ERROR: testSendEvent (tests.testXMLRPC.TestXmlRpc)
----------------------------------------------------------------------
Traceback (most recent call last):
File "/opt/zenoss/lib/python/Testing/ZopeTestCase/profiler.py", line 98,
in __call__
testMethod()
File "/opt/zenoss/Products/ZenModel/tests/testXMLRPC.py", line 34,
in testSendEvent
serv.sendEvent(evt)
File "/opt/zenoss/lib/python2.4/xmlrpclib.py", line 1153, in __call__
return self.__send(self.__name, args)
File "/opt/zenoss/lib/python2.4/xmlrpclib.py", line 1440, in __request
verbose=self.__verbose
File "/opt/zenoss/lib/python2.4/xmlrpclib.py", line 1186, in request
self.send_content(h, request_body)
File "/opt/zenoss/lib/python2.4/xmlrpclib.py", line 1300, in send_content
connection.endheaders()
File "/opt/zenoss/lib/python2.4/httplib.py", line 798, in endheaders
self._send_output()
File "/opt/zenoss/lib/python2.4/httplib.py", line 679, in _send_output
self.send(msg)
File "/opt/zenoss/lib/python2.4/httplib.py", line 646, in send
self.connect()
File "/opt/zenoss/lib/python2.4/httplib.py", line 614, in connect
socket.SOCK_STREAM):
gaierror: (-2, 'Name or service not known')
----------------------------------------------------------------------
Ran 1 test in 0.007s
FAILED (errors=1)
While that does tell us that we do have a problem (Name or service not known), it's a lot of output for one problem.
And the note at the bottom that tells us that we have errors (ie in our tests scripts) rather than failures (ie issues in
our code). If this happens if every test that fails to trap exceptions or conditions generated this much output (there
are over 140 unit tests in ZenModel alone!) we'd be drowned in a sea of output!
An improved example:
import traceback
from xmlrpclib import ServerProxy
from Products.ZenTestCase.BaseTestCase import BaseTestCase
class TestXmlRpc(BaseTestCase):
"Test basic XML-RPC services against our Zenoss server"
def setUp(self):
self.baseUrl = 'http://admin:zenoss@localhost:8080/zport/dmd/'
self.testdev = 'xmlrpc_testdevice'
def testSendEvent(self):
"Send an XML-RPC event"
serv = ServerProxy( self.baseUrl + 'ZenEventManager' )
evt = {
'device':'xmlrpcTestDevice',
'component':'eth0',
'summary':'eth0 is down',
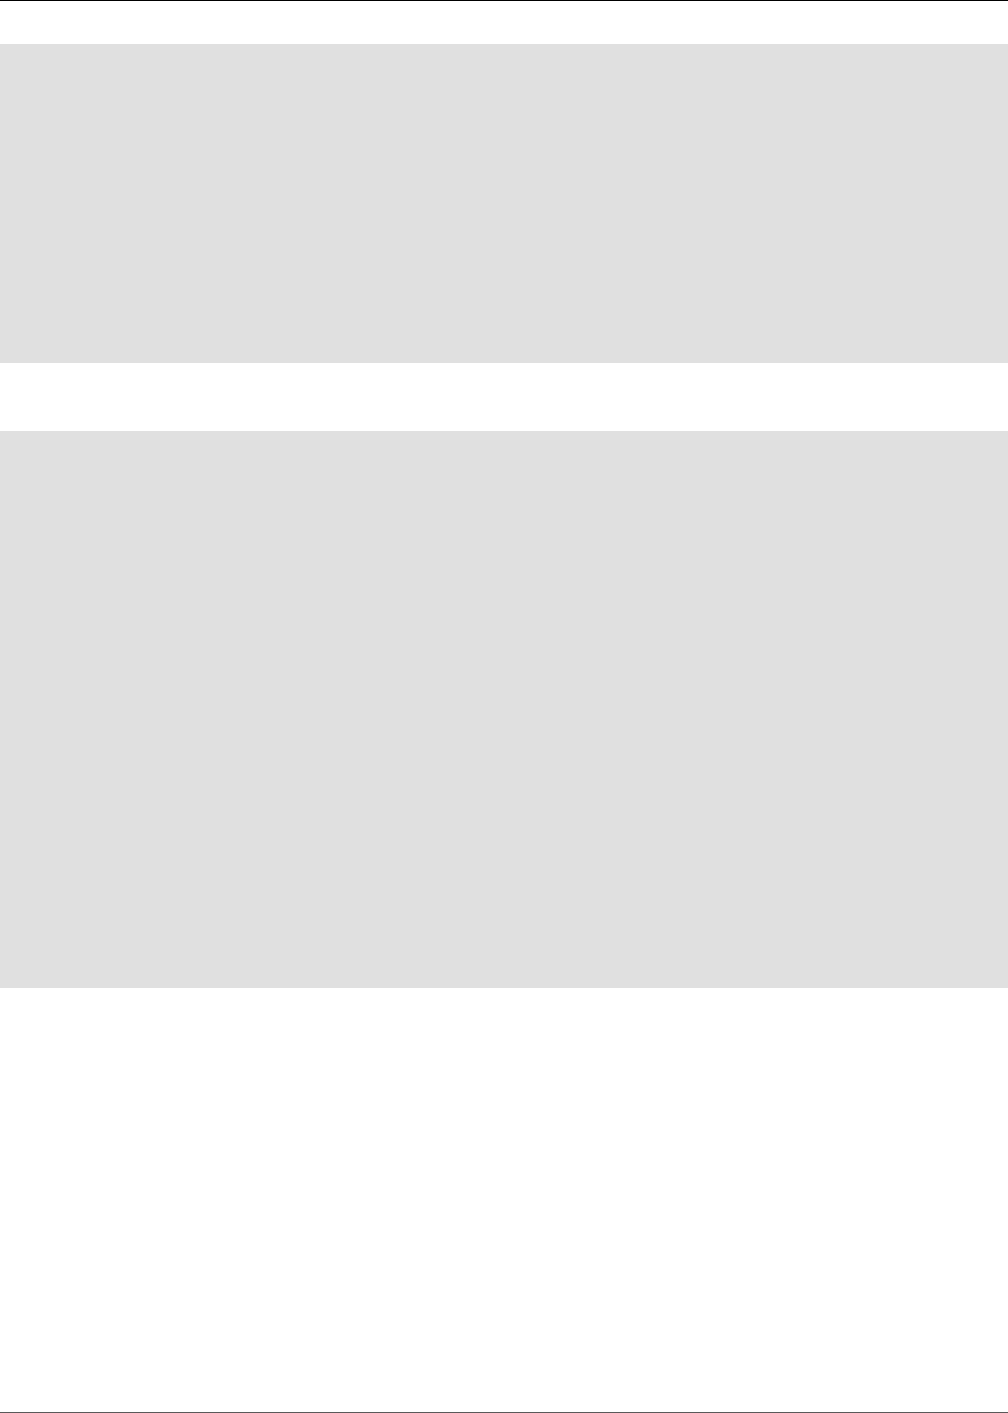
Testing
129
'severity':4,
'eventClass':'/Net'
}
try:
serv.sendEvent(evt)
except:
msg= traceback.format_exc(limit=0)
self.fail( msg )
def test_suite():
from unittest import TestSuite, makeSuite
suite = TestSuite()
suite.addTest(makeSuite(TestXmlRpc))
return suite
This time the output looks like this:
$ runtests -t unit -n testXMLRPC ZenModel
Running tests via: /opt/zenoss/bin/python /opt/zenoss/bin/test.py -v
--config-file /opt/zenoss/etc/zope.conf --libdir /opt/zenoss/Products/ZenModel
testXMLRPC
Running unit tests at level 1
Running unit tests from /opt/zenoss/Products/ZenModel
Parsing /opt/zenoss/etc/zope.conf
F
======================================================================
FAIL: Send an XML-RPC event
----------------------------------------------------------------------
Traceback (most recent call last):
File "/opt/zenoss/lib/python/Testing/ZopeTestCase/profiler.py", line 98,
in __call__
testMethod()
File "/opt/zenoss/Products/ZenModel/tests/testXMLRPC.py", line 41,
in testSendEvent
self.fail( msg )
File "/opt/zenoss/lib/python2.4/unittest.py", line 301, in fail
raise self.failureException, msg
AssertionError: Traceback (most recent call last):
gaierror: (-2, 'Name or service not known')
----------------------------------------------------------------------
Ran 1 test in 0.004s
FAILED (failures=1)
Here are the differences, from the top down:
• We have a nicer description of what the test is testing (Send an XML-RPC event).
• The output is (slightly) shorter but still provides us with the underlying error message that we need to know. The
more levels of stack in the function, the greater the savings.
• We see that we have one failure condition detected, as opposed to an error in our unit test.
Note
To get the above example to work, change the Zenoss server in the URL to be the localhost server.

Testing
130
17.1.4. Integrating With Buildbot
The Buildbot program is a Python-based build and test system used at Zenoss Inc in order to perform nightly builds
of the various architectures, run unit tests and sanity check the code with PyFlakes.
Note
The Buildbot configuration is not visible outside of Zenoss.
17.1.5. JavaScript Test Framework
YUI includes a full unit test framework. Most of the specifics are best explained by them.
Zenoss-specific tests should all be located in $ZENHOME/Products/ZenWidgets/skins/zenui/javascript/tests di-
rectory. Each test script should then be registered in the getLoader() function in zenoss-core.js, using the naming
scheme test_description.
These tests may then be run on any page using the runtests() function. For example, the dashboard tests should
be registered as test_dashboard, and can then be run as:
runtests('dashboard')
This will pop up a logger window that will print test results.
An example test script has been provided. Please see:
•$ZENHOME/Products/ZenWidgets/skins/zenui/javascript/tests/ test_example.js
•$ZENHOME/Products/ZenWidgets/skins/zenui/javascript/zenoss-core.js
Also run in the JavaScript console of your browser:
runtests('example')
17.2. Functional User Interface Testing
17.2.1. Introduction
Functional testing refers to testing of the task-oriented features (aka functions) as opposed to the much lower-level
unit-tests. A good unit test will tell you if a piece of code is working within specifications, while a good functional test
will tell you if the entire program works as expected for a particular task.
17.2.2. Installing and Running
Selenium is a suite of tools used to create tests and record their results. These regression tests are intended to be
run against multiple different browsers in order to verify the targeted web application.
17.2.2.1. Installing and Configuring Mac OS X
Selenium uses Firefox by default, so you need to make sure that firefox-bin is in your search path:
which firefox-bin
If that returns nothing, then you need to add the path to firefox-bin to PATH. For example:
export
PATH=$PATH:/Applications/Internet/Firefox.app/Contents/MacOS/


132
Appendix A. Event Database Dictionary
Event Field Description
dedupid events will deduplicate based on the value of this field.
by default: device, component, eventClass, eventKey,
severity
device name of device
component name of component (like eth0, httpd, etc)
eclass eventClass (if not specified maybe added by rule process
if this fails will be /Unknown)
eventKey if a component needs further deduplication specification
this field maybe used
summary message text truncated at 150 characters
message full message text
severity number from 0 to 5
eventState state of event 0 = new, 1 = acknowledged, 2 = sup-
pressed
eventClassKey key by which rules processing begins. Often equal to
component.
eventGroup logical group of event source (syslog, ping, nteventlog
etc)
stateChange last time event changed automatically updated
firstTime unix timestamp when event is received.
lastTime last time an event was received
count number of times an event has repeated
prodState prodState of the device context
suppid id of event that suppressed this event
manager fqdn of the collector from which this event came
agent collector name from which event came (zensyslog, zen-
trap, etc)
DeviceClass device class from device context
Location device location from device context
Systems device systems from device context separated by |
DeviceGroups device systems from device context separated by |
ipAddress ip from which event came
facility syslog facility of this is syslog event
priority syslog priority of this is syslog event
ntevid nt event id if this is nt eventlog event.
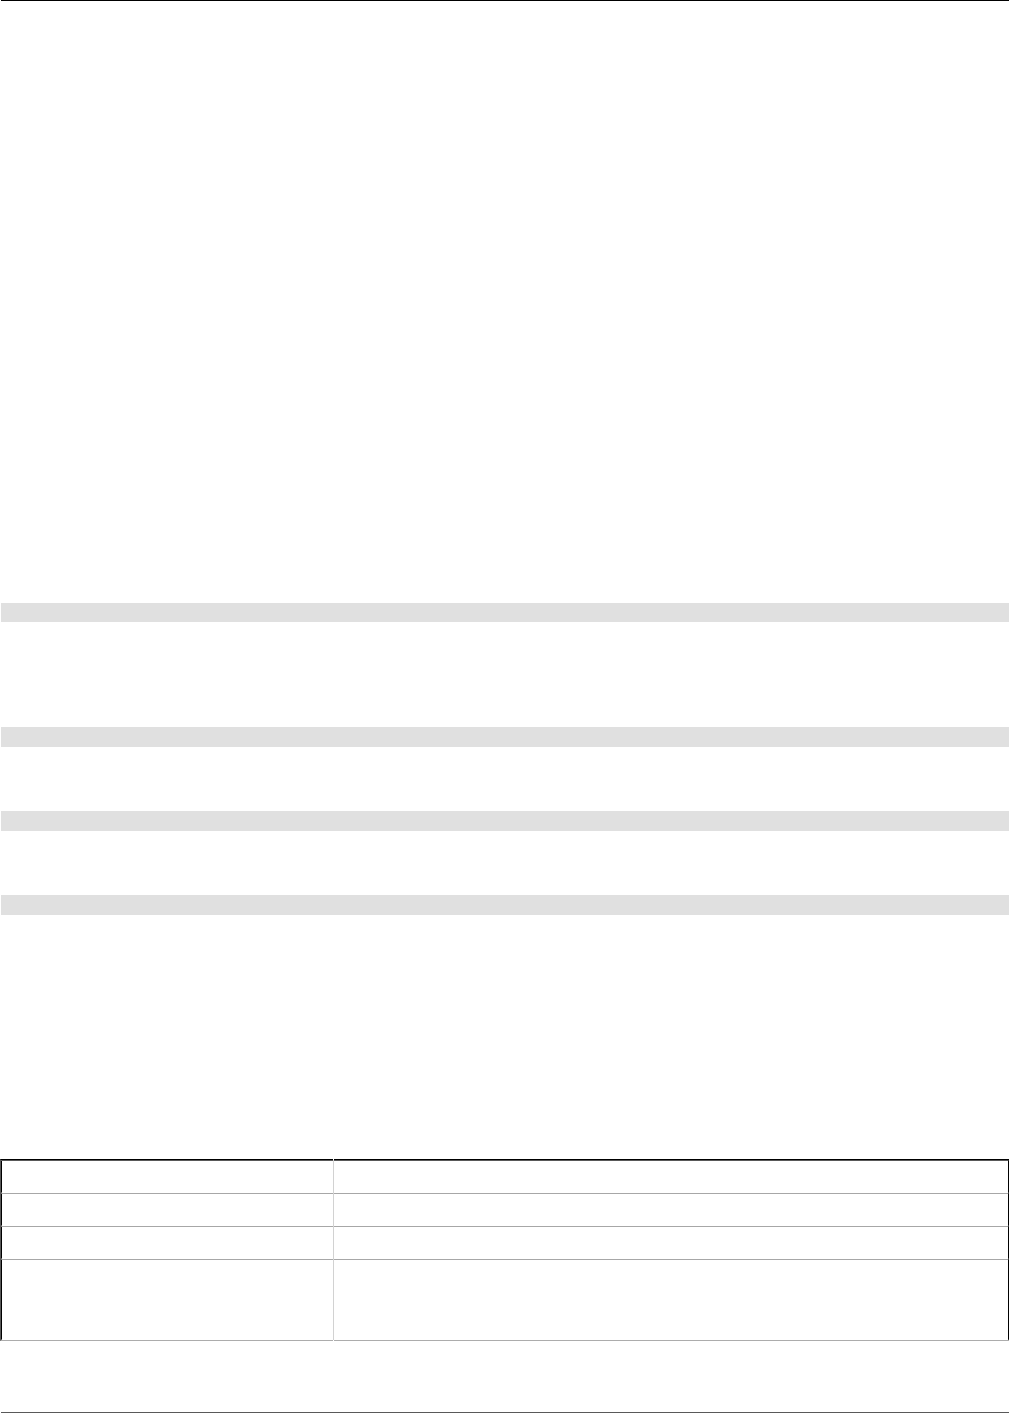
133
Appendix B. TALES Expressions
TALES is syntax you can use to retrieve values call methods on Zenoss objects. Several fields in Zenoss accept
TALES syntax, including command templates, event mapping transforms, user commands, event commands, con-
figuration properties, and zLinks.
Commands (those associated with devices as well as those associated with events) can use TALES expressions
to incorporate data from the related devices and/or events. TALES is a syntax for specifying expressions that let
you access the attributes of certain objects such as a device or an event in Zenoss. For additional documentation
on TALES syntax please see the TALES section in the Zope book.
Depending on the context you may have access to a device and/or an event. Below is a list of the attributes and
methods you may wish to use on device and event objects. The syntax for accessing device attributes and methods
is ${dev/attributename}, so for example to get the manageIp of a device you would use ${dev/manageIp}. For events,
the syntax is ${evt/attributename}
B.1. Examples
B.1.1. ping
A command to ping a device might look like this. The ${..} is a TALES expression to get the manageIp value for
the device.
ping -c 10 ${dev/manageIp}
B.1.2. DNS forward lookup
Assuming that the ${device/id} is a resolvable name
host ${device/id}
B.1.3. DNS reverse lookup
host ${device/manageIp}
B.1.4. snmpwalk
snmpwalk -v1 -c${device/zSnmpCommunity} ${here/manageIp} system
Configuration properties are also available for devices and events using the same syntax as above.
To use these expressions effectively you need to know which objects, attributes and methods are available to you
in which contexts. Usually there is a dev and/or device which allows you access the device in a particular context.
Contexts related to a particular event usually have evt and/or event defined. Some available attributes for each of
these classes are listed below. List items with parenthesis after them are methods and much have the parenthesis
included in the TALES expression to function correctly.
B.2. TALES Device Attributes
Device Attribute Description
getId The primary means of identifying a device within Zenoss
getManageIp The IP address used to contact the device in most situations
productionState The production status of the device: Production, Pre Production, Test, Main-
tenance or Decommissioned. This attribute is a numeric value, use getPro-
ductionStateString for a textual representation.

TALES Expressions
134
Device Attribute Description
getProductionStateString Returns a textual representation of the productionState
snmpAgent The agent returned from SNMP collection
snmpDescr The description returned by the SNMP agent
snmpOid The OID returned by the SNMP agent
snmpContact The contact returned by the SNMP agent
snmpSysName The system name returned by the SNMP agent
snmpLocation The location returned by the SNMP agent
snmpLastCollection When SNMP collection was last performed on the device. This is a DateTime
object.
getSnmpLastCollectionString Textual representation of snmpLastCollection
rackSlot The slot name/number in the rack where this physical device is installed
comments User entered comments regarding the device
priority A numeric value: 0 (Trivial), 1 (Lowest), 2 (Low), 3 (Normal), 4 (High), 5
(Highest)
getPriorityString A textual representation of the priority
getHWManufacturerName Name of the manufacturer of this hardware
getHWProductName Name of this physical product
getHWProductKey Used to associate this device with a hardware product class
getOSManufacturerName Name of the manufacturer of this device's operating system
getOSProductName Name of the operating system running on this device
getOSProductKey Used to associate the operating system with a software product class
getHWSerialNumber Serial number for this physical device
getLocationName Name of the Location assigned to this device
getLocationLink Link to the Zenoss page for the assigned Location
getSystemNames A list of names of the Systems this device is associated with
getDeviceGroupNames A list of names of the Groups this device is associated with
getOsVersion Version of the operating system running on this device
getLastChangeString When the last change was made to this device
getLastPollSnmpUpTime Uptime returned from SNMP
uptimeStr Textual representation of the SNMP uptime for this device
getPingStatusString Textual representation of the ping status of the device
getSnmpStatusString Textual representation of the SNMP status of the device
Table B.1. TALES Device Attributes
B.3. TALES Event Attributes
TALES Event Attribute Description
agent The name of the daemon from which this event came (eg zensyslog, zentrap)
component The component of the associated device, if applicable

TALES Expressions
135
TALES Event Attribute Description
count Number of times this event has been seen
dedupid A key used to correlate duplicate events
device The id of the associated device, if applicable
evid A unique id for the event
eventClass The event class associated with this device
eventGroup The logical group of event source (syslog, ping, nteventlog etc)
eventKey The eventKey is the primary criteria for mapping events into event classes
facility The Unix syslog facility if this is a syslog event
firstTime The first time this event was seen
ipAddress The IP address of the associated device, if known
lastTime The last time this event was seen
manager Fully-qualified domain name of the collector from which this event came
priority The syslog priority if this is a syslog event
prodState The production state of the device
severity One of 0 (Clear), 1 (Debug), 2 (Info), 3 (Warning), 4 (Error) or 5 (Critical)
stateChange When the MySQL record for this event was last modified
summary Text description of the event
Table B.2. TALES Event Attributes
Configuration properties are also available for devices and events using the same syntax as above.

136
Glossary
Glossary
Asynchronous JavaScript
And XML AJAX is a set of techniques for writing JavaScript. So AJAX is a state of mind rather
than a standard. Generally, something is considered AJAX if it uses the JavaScript
XMLHttpRequest() function to retrieve data from a server and presents the returned
XML document in a interactive way to the user.
Component A component is a Zenoss code abstraction for something attached to a device.
Examples of components: network interfaces, fans, CPUs, and hard disks.
Daemon In Unix, a daemon is a computer program that runs in the background rather than
under the direct control of a user. Systems often start daemons at boot time: they
often serve the function of responding to network requests, hardware activity, or
other programs by performing some task.
Device A device is defined as a Zenoss code abstraction for a combination of a networked
resources hardware and that hardware's operating system. Examples of devices:
printers, servers, routers, and switches.
Device Management
Database The DMD is the area inside of the ZODB where Zenoss stores device and network
configuration information.
GNU General Public License The GPL is a widely used free software license.
Internet Control Message
Protocol An extension to the Internet Protocol (IP) defined by RFC 792. ICMP supports pack-
ets containing error, control, and informational messages. The PING command, for
example, uses ICMP to test an Internet connection.
Macro Expansion for TAL While TAL is used to allow Zope to dynamically add content for a single HTML
page, TAL logic can't be shared by multiple pages. METAL macros allow for TAL
to be used in multiple places with variable passing (called slots).
Management Information
Base A MIB is a description of the OIDs that an SNMP agent supports, and are used to
provide human-friendly names and descriptions for OIDS (much like DNS provides
human-friendly names for IP addresses). In addition, the a MIB entry also defines
the data types of the OID and other meta-data. MIBs are defined using a subset of
Abstract Syntax Notation One (ASN.1) defined in "Structure of Management Infor-
mation Version 2 (SMIv2)" RFC 2578. The software that converts a human-read-
able MIB into a computer-readable entity is called an MIB compiler. MIBs are hier-
archical (tree structured). Notable RFCs are: RFC 1155, "Structure and Identifica-
tion of Management Information for TCP/IP based Internets", and its two compan-
ions, RFC 1213, "Management Information Base for Network Management of TCP/
IP-based Internets", and RFC 1157, "A Simple Network Management Protocol."
Modeling A model is the collection of code abstractions (python objects) that represents ac-
tual networked resources. Modeling (creating a model of a) a piece of hardware in
your system consists of gathering all of that date possible about that device and
creating a device profile based upon that data. This model can be supplemented
by hand entered data that is of particular use in creating a more accurate profile
(model) of the device. This information can also be re-used to assist in the model-
ing of hardware producing similar data.

Glossary
137
Monitoring Template A monitoring template defines how performance data is to be collected. A tem-
plate defines the data sources to collect, any thresholds and how the data sources
should be graphed. There are two types of monitoring templates: device-level and
component.
A device-level template is usually defined manually (the device template being an
obvious exception) and do not rely on modeling information. A device-level tem-
plate must be bound manually and data sources configured.
A component-level template relies on modeling data to determine what and how to
monitor a component. A component-level template must not be bound manually or
there will be undefined results. Examples of component-level tempates: network
interfaces, disks, CPUs.
The rule of thumb to determine if a monitoring template is a device-level or com-
ponent-level template is to see if zenmodeler models the component. If you can
see new elements in the GUI after running zenmodeler, then a component-level
template will be automatically bound. If zenmodeler doesn't find something, then
you have a device-level template.
Object Identifier In the context of SNMP, consists of the object identifier for an object in a Manage-
ment Information Base (MIB).
Simple Network Manage-
ment Protocol A set of protocols for managing complex networks. The first versions of SNMP were
developed in the early 80s. SNMP works by sending messages, called protocol
data units (PDUs), to different parts of a network. SNMP-compliant devices, called
agents, store data about themselves in Management Information Bases (MIBs) and
return this data to the SNMP requesters.
SNMP Trap When a condition is met on a remote device that is recognized by the SNMP agent
on that remote device (eg bad login attempts, processor on fire), the SNMP protocol
allows for the remote device to inform the SNMP manager of this event. The SNMP
protocol uses the term trap to refer to the alert sent from the agent to the manager.
SNMP Walk The operation performed using SNMP to gather information about a specific device.
sudo sudo (substitute user [or superuser] do), is a program in Unix-like operating sys-
tems that allows users to run programs with the security privileges of another user
(normally the system's superuser) in a secure manner. Users must confirm their
identity to sudo by supplying their password before running the target program.
Once authentication has taken place, and if the /etc/sudoers file is configured to
give the user access to the command requested, then the system allows the com-
mand, but logs it. Because sudo is very particular about the format of this configu-
ration file, and errors could cause serious problems, editing should always be done
with the provided visudo or sudoedit tool, which checks for correctness before
saving.
Template Attribute Lan-
guage TAL is a set of XML elements and tags used by Zope and are incorporated into
HTML pages. These XML elements and tags (inside of the tal namespace) allow
Zope to programmatically extend a static HTML page and dynamically include con-
tent.
Virtual Appliance A virtual appliance is a minimalist virtual machine image designed to run under
VMware, providing network applications such as Web servers. Virtual appliances
are a subset of the broader class of software appliances. Like software appliances,
virtual appliances are aimed to eliminate the installation, configuration and main-

Glossary
138
tenance costs associated with running complex stacks of software. A key concept
that differentiates a virtual appliance from a virtual machine is that a virtual appli-
ance is a fully pre-installed and pre-configured application and operating system
environment whereas a virtual machine is, by itself, without software Typically a
virtual appliance will have a web interface to configure the inner workings of the
appliance. A virtual appliance is usually built to host a single application, and so
represents a new way of deploying network applications.
ZEO ZEO is a layer between Zope and the ZODB, and allows multiple Zope servers to
share the same ZODB. zenhub (the Zenoss Hub) attaches to the ZODB through
ZEO. The terms ZEO (a mechanism to attach to the ZODB) and the ZODB (the
actual data store) are used almost synonymously in the text.
Zope Configuration Manage-
ment Language ZCML is an XML file that contains information about configuring Zope and Zope
Products (such as Zenoss).
Zope Management Interface The ZMI refers to the user interface provided by the Zope system to create and
manage Zope products (Zenoss being a Zope product). The ZMI on a Zenoss sys-
tem can be accessed by going to the URL of your Zenoss server and adding the
name manage to the end. For example: http://yourzenossserver:8080/zport/manage
Zope Object DataBase The ZODB is the Object-Oriented DataBase (OODB) used by Zope. The OODB
part means that data is not stored in terms of tables, rows and columns, but instead
as objects.
