Installation And User's Guide Zowe User
User Manual:
Open the PDF directly: View PDF ![]() .
.
Page Count: 102 [warning: Documents this large are best viewed by clicking the View PDF Link!]
- Contents
- About this documentation
- Release notes for Open Beta
- Chapter 1. Zowe overview
- Chapter 2. Installing Zowe
- Installation roadmap
- System requirements
- Obtaining installation files
- Installing the Zowe Application Framework, explorer server, and API Mediation Layer
- Installing Zowe CLI
- Troubleshooting the installation
- Uninstalling Zowe
- Chapter 3. Configuring Zowe
- Chapter 4. Using Zowe
- Using the Zowe Desktop
- Using APIs
- API Catalog
- Using Zowe CLI
- Chapter 5. Extending the Zowe Application Framework (zLUX)
- Creating application plug-ins
- zLUX plug-ins definition and structure
- zLUX dataservices
- Zowe Desktop and window management
- Configuration Dataservice
- URI Broker
- Application-to-application communication
- Error reporting UI
- Logging utility
- Chapter 6. Extending Zowe CLI

Open Beta for Zowe
Installation and User's Guide

Contents
About this documentation................................................................................... vii
Who should read this documentation.......................................................................................................vii
How to send your feedback on this documentation................................................................................ vii
Sending a GitHub pull request.............................................................................................................vii
Opening an issue for the documentation............................................................................................vii
Release notes for Open Beta................................................................................ ix
Version 0.9.1 (October 2018).................................................................................................................... ix
What's new............................................................................................................................................ ix
What's changed...................................................................................................................................... x
Version 0.9.0 (August 2018)...................................................................................................................... xi
What's new............................................................................................................................................ xi
What's changed..................................................................................................................................... xi
What's removed.....................................................................................................................................xi
Known issues......................................................................................................................................... xi
Chapter1.Zowe overview.....................................................................................1
Zowe Application Framework..................................................................................................................... 1
Explorer server.............................................................................................................................................2
Zowe CLI...................................................................................................................................................... 2
Zowe CLIcapabilities.............................................................................................................................2
Zowe CLI Third-Party software agreements.........................................................................................3
API Mediation Layer.................................................................................................................................... 4
Key features............................................................................................................................................4
API Mediation Layer architecture..........................................................................................................4
Components............................................................................................................................................5
Zowe API Mediation Layer Third-Party software agreements............................................................. 6
Chapter2.Installing Zowe.................................................................................... 9
Installation roadmap................................................................................................................................... 9
System requirements................................................................................................................................ 10
z/OSMF requirements.......................................................................................................................... 10
System requirements for the Zowe Application Framework, explorer server, and API Mediation
Layer................................................................................................................................................ 13
System requirements for Zowe CLI.................................................................................................... 14
Obtaining installation files........................................................................................................................ 16
Installing the Zowe Application Framework, explorer server, and API Mediation Layer........................ 18
Installing the Zowe runtime on z/OS..................................................................................................18
Starting and stopping the Zowe runtime on z/OS..............................................................................20
Verifying installation............................................................................................................................ 21
Installing Zowe CLI................................................................................................................................... 23
Methods to install Zowe CLI............................................................................................................... 23
Creating a Zowe CLI profile.................................................................................................................24
Testing Zowe CLI connection to z/OSMF............................................................................................25
Troubleshooting the installation...............................................................................................................25
Troubleshooting installing the Zowe runtime.....................................................................................25
Troubleshooting installing Zowe CLI...................................................................................................28
Uninstalling Zowe...................................................................................................................................... 30
Uninstalling the Zowe Application Framework...................................................................................30
Uninstalling explorer server................................................................................................................ 30
Uninstalling API Mediation Layer........................................................................................................31
iii
Uninstalling Zowe CLI..........................................................................................................................32
Chapter3.Configuring Zowe............................................................................... 35
Zowe Application Framework (zLUX) configuration.................................................................................35
Setting up terminal application plug-ins............................................................................................ 35
Configuring the zLUX Proxy Server and ZSS.......................................................................................35
Zowe Application Framework logging.................................................................................................37
Configuring Zowe CLI................................................................................................................................ 38
Setting environment variables for Zowe CLI...................................................................................... 38
Chapter4.Using Zowe........................................................................................ 41
Using the Zowe Desktop........................................................................................................................... 41
Navigating the Zowe Desktop............................................................................................................. 41
Using Explorers within the Zowe Application Framework................................................................. 41
Zowe Application Framework application plug-ins............................................................................42
Using the Workflows application plug-in............................................................................................43
Using APIs................................................................................................................................................. 44
Using explorer server REST APIs........................................................................................................45
Programming explorer server REST APIs........................................................................................... 48
Using explorer server WebSocket services........................................................................................ 50
API Catalog................................................................................................................................................ 50
View Service Information and API Documentation in the API Catalog............................................. 50
Using Zowe CLI..........................................................................................................................................52
Display Zowe CLI help.........................................................................................................................52
Zowe CLI command groups................................................................................................................ 53
Chapter5.Extending the Zowe Application Framework (zLUX)............................. 57
Creating application plug-ins....................................................................................................................57
Setting the environment variables for plug-in development............................................................. 57
Using the sample application plug-in................................................................................................. 57
zLUX plug-ins definition and structure.....................................................................................................58
Application plug-in filesystem structure.............................................................................................58
Location of plug-in files....................................................................................................................... 59
Plug-in definition file........................................................................................................................... 59
Plug-in attributes................................................................................................................................. 60
zLUX dataservices..................................................................................................................................... 61
Defining a dataservice......................................................................................................................... 61
Dataservice API....................................................................................................................................62
Zowe Desktop and window management................................................................................................63
Loading and presenting application plug-ins..................................................................................... 64
Plug-in management............................................................................................................................64
Application management.....................................................................................................................64
Windows and Viewports...................................................................................................................... 64
Viewport Manager................................................................................................................................65
Injection Manager................................................................................................................................ 65
Configuration Dataservice......................................................................................................................... 67
Resource Scope................................................................................................................................... 67
REST API.............................................................................................................................................. 68
Application API.................................................................................................................................... 70
Internal and bootstrapping................................................................................................................. 70
Plug-in definition..................................................................................................................................71
Aggregation policies.............................................................................................................................71
URI Broker................................................................................................................................................. 72
Accessing the URI Broker................................................................................................................... 72
Functions.............................................................................................................................................. 72
Application-to-application communication..............................................................................................73
Why use application-to-application communication?........................................................................73
iv
Actions.................................................................................................................................................. 74
Recognizers.......................................................................................................................................... 75
Dispatcher............................................................................................................................................ 76
Registry.................................................................................................................................................77
Pulling it all together in an example...................................................................................................77
Error reporting UI......................................................................................................................................77
ZluxPopupManagerService.................................................................................................................. 77
ZluxErrorSeverity..................................................................................................................................78
ErrorReportStruct.................................................................................................................................78
Implementation....................................................................................................................................78
Logging utility.............................................................................................................................................79
Logging objects.................................................................................................................................... 80
Logger IDs............................................................................................................................................ 80
Accessing logger objects..................................................................................................................... 80
Logger API............................................................................................................................................ 80
Component Logger API........................................................................................................................81
Log Levels.............................................................................................................................................81
Logging verbosity................................................................................................................................. 82
Chapter6.Extending Zowe CLI........................................................................... 83
Installing plug-ins......................................................................................................................................83
Setting the registry.............................................................................................................................. 83
Meeting the prerequisites....................................................................................................................83
Installing plug-ins................................................................................................................................ 83
Validating plug-ins............................................................................................................................... 84
Updating plug-ins.................................................................................................................................84
Uninstalling plug-ins............................................................................................................................ 85
Zowe CLI Plug-in for IBM CICS................................................................................................................ 85
Use cases............................................................................................................................................. 85
Prerequisites.........................................................................................................................................86
Installing...............................................................................................................................................86
Setting up profiles................................................................................................................................86
Commands............................................................................................................................................87
v
vi
About this documentation
This documentation describes how to install, configure, use, and extend Open Beta for Zowe.
Who should read this documentation
This documentation is intended for system programmers who are responsible for installing and
configuring Zowe, application developers who want to use Zowe to improve z/OS user experience, and
anyone who wants to understand how Zowe works or is interested in extending Zowe to add their own
plug-ins or applications.
The information provided assumes that you are familiar with the mainframe and z/OSMF configuration.
How to send your feedback on this documentation
We value your feedback. If you have comments about this documentation, you can use one of the
following ways to provide feedback:
• Send a GitHub pull request to provide a suggested edit for the content by clicking the Propose content
change in GitHub link on each documentation page.
• Open an issue in GitHub to request documentation to be updated, improved, or clarified by providing a
comment.
Sending a GitHub pull request
You can provide suggested edit to any documentation page by using the Propose content change in
GitHub link on each page. After you make the changes, you submit updates in a pull request for the Zowe
content team to review and merge.
Follow these steps:
1. Click Propose content change in GitHub on the page that you want to update.
2. Click the Edit the file icon .
3. Make the changes to the file.
4. Scroll to the end of the page and enter a brief description about your change.
5. Optional: Enter an extended description.
6. Select Propose file change.
7. Select Create pull request.
Opening an issue for the documentation
You can request the documentation to be improved or clarified, report an error, or submit suggestions and
ideas by opening an issue in GitHub for the Zowe content team to address. The content team tracks the
issues and works to address your feedback.
Follow these steps:
1. Click the GitHub link at the top of the page.
2. Select Issues.
3. Click New issue.
4. Enter a title and description for the issue.
5. Click Submit new issue.
viiiOpen Beta for Zowe: Installation and User's Guide
Release notes for Open Beta
Learn about what is new, changed, removed, and known issues in Open Beta for Zowe.
Zowe Open Beta includes the following releases:
• Version 0.9.1 (October 2018)
• Version 0.9.0 (August 2018)
Version 0.9.1 (October 2018)
Version 0.9.1 contains the following changes since the last version.
What's new
New in the Zowe Application Framework
The Workflows application plug-in was added to the Zowe Application Framework (zLUX).
The API Catalog plug-in was added to the Zowe Application Framework. This plug-in lets you view API
services that have been discovered by the API Mediation Layer.
Angular application plug-ins can be internationalized utilizing the ngx-i18n library.
New in Zowe CLI
Zowe CLI contains the following new features:
•Zowe CLI Plug-in for IBM® CICS®
The new plug-in lets you extend Zowe CLI to interact with CICS programs and transactions. It uses the
IBM CICS Management Client Interface (CMCI) API to achieve the interaction with CICS.
As an application developer, you can use the plug-in to perform various CICS-related tasks, such as the
following:
– Deploy code changes to CICS applications that were developed with COBOL.
– Deploy changes to CICS regions for testing or delivery.
– Automate CICS interaction steps in your CI/CD pipeline with Jenkins Automation Server or TravisCI.
For more information, see Zowe CLI Plug-in for IBM CICS.
•zos-jobs and zos-files commands and command options
Zowe CLI contains the following new commands and command options:
–zowe zos-jobs delete job command: Lets you cancel a job and purge its output by providing
the JOB ID.
–zowe zos-files upload file-to-uss command: Lets you upload a local file to a file on USS.
–zowe zos-files download uss-file command: Lets you download a file on USS to a local file.
–zowe zos-jobs submit local-file command: Lets you submit a job contained in a local file on
your PC rather than a data set.
–zowe zos-jobs download output command: Lets you download the complete spool output for a
job to a local directory on your PC.
– The zowe zos-jobs submit data-set command and the zowe zos-jobs submit local-
file command now contain a --view-all-spool-content option. The option lets you submit a
job and view its complete spool output in one command.

New in API Mediation Layer
You can now view the status of API Mediation Layer from the Zowe Desktop App (zLUX plug-in).
Enhanced JES Explorer
A full-screen job output view is now available. You can view a single job output file in a full-screen text
area, which removes the need to navigate via the job tree.Note that this view is currently only available
via direct access to the explorer. It is not accessible via the Zowe Desktop app in this release. To open a
file in full screen, you can use the following URL/parameters: https://host:explorerSecurePort/explorer-
jes/#/?jobName=SAMPLEJOB&jobId=JOB12345&fileId=102
What's changed
Naming
MVD is renamed to Zowe Desktop.
JES Explorer
Fixed an issue where text would fall out of line in the content viewer caused by special characters. This fix
includes migration to the orion-editor-component as the content viewer.
MVS Explorer
Fixed an issue where deletion of a dataset member fails.
Zowe CLI
Important! Zowe CLI in Version 0.9.1 contains breaking changes. A breaking change can cause problems
with existing functionality when you upgrade to Zowe CLI Version 0.9.1. For example, scripts that you
wrote previously might fail, user profiles might become invalid, and the product might not integrate with
plug-ins properly.
You will be impacted by the following changes if you update your version of Zowe to Version 0.9.1:
• The home directory for Zowe CLI, which contains the Zowe CLI logs, profiles, and plug-ins, was changed
from ~/.brightside to ~/.zowe. The character "~" denotes your home directory on your computer,
which is typically C:/Users/<yourUserId> on Windows operating systems. When you update to
Zowe CLI Version 0.9.1 and issue zowe commands, the profiles that you created previously will not be
available.
To correct this behavior and migrate from an older version Zowe CLI, complete the following steps:
1. Issue any bright command to create the ~/.zowe home directory.
2. After you create the directory, copy the complete contents of the ~/.brightside directory to the
newly created ~/.zowe directory. Copying the contents of the ~/.brightside directory to the
~/.zowe directory restores the profiles you created previously.
3. To help ensure that your plug-ins function properly, reinstall the plug-ins that you installed with older
versions of Zowe CLI.
• The environment variables that control logging and the location of your home directory were previously
prefixed with BRIGHTSIDE_. They are now prefixed with ZOWE_. If you were not using the environment
variables before this change, no action is required. If you were using the environment variables, update
any usage of the variables.
The following environment variables are affected:
–BRIGHTSIDE_CLI_HOME changed to ZOWE_CLI_HOME
–BRIGHTSIDE_IMPERATIVE_LOG_LEVEL changed to ZOWE_IMPERATIVE_LOG_LEVEL
–BRIGHTSIDE_APP_LOG_LEVEL changed to ZOWE_APP_LOG_LEVEL
xOpen Beta for Zowe: Installation and User's Guide

Version 0.9.0 (August 2018)
Version 0.9.0 is the first Open Beta version for Zowe. This version contains the following changes since
the last Closed Beta version.
What's new
New component - API Mediation Layer
Zowe now contains a component named API Mediation Layer. You install API Mediation Layer when you
install the Zowe runtime on z/OS. For more information, see API Mediation Layer and Installing the Zowe
Application Framework, explorer server, and API Mediation Layer.
What's changed
Naming
• The project is now named Zowe.
• Zoe Brightside is renamed to Zowe CLI.
Installation
• The System Display and Search Facility (SDSF) of z/OS is no longer a prerequisite for installing explorer
server.
• The name of the PROC is now ZOWESVR rather than ZOESVR.
zLUX
The mainframe account under which the ZSS server runs must have UPDATE permission on the
BPX.DAEMON and BPX.SERVER facility class profiles.
Explorer server
The URL to access the explorer server UI is changed from https://<your.server>:<atlasport>/
ui/#/ to the following ones:
•https://<your.server>:<atlasport>/explorer-jes/#/
•https://<your.server>:<atlasport>/explorer-mvs/#/
•https://<your.server>:<atlasport>/explorer-uss/#/
What's removed
Removed all references to SYSLOG.
Known issues
Security message when you open the Zowe Desktop
When you initially open the Zowe Desktop, a security message alerts you that you are attempting to
open a site that has an invalid HTTPS certificate. Other applications within the Zowe Desktop might also
encounter this message. To prevent this message, add the URLs that you see to your list of trusted sites.
Note: If you clear the browser cache, you must add the URL to your trusted sites again.
Message ICH408I during runtime
During runtime, the information message ICH408I may present identifying insufficient write authority to a
number of resources, these resources may include:
•zowe/explorer-server/wlp/usr/servers/.pid/Atlas.pid
•zowe/zlux-example-server/deploy/site/plugins/
•zowe/zlux-example-server/deploy/instance/plugins/
Release notes for Open Betaxi
Note: This should not affect the runtime operations of Zowe. This is a known issue and will be addressed
in the next build.
Zowe Application Framework APIs
Zowe Application Framework APIs exist but are under development. Features might be reorganized if it
simplifies and clarifies the API, and features might be added if applications can benefit from them.
xiiOpen Beta for Zowe: Installation and User's Guide

Chapter 1. Zowe overview
Zowe offers modern interfaces to interact with z/OS and allows you to work with z/OS in a way that is
similar to what you experience on cloud platforms today. You can use these interfaces as delivered or
through plug-ins and extensions that are created by clients or third-party vendors.
Zowe consists of the following main components.
•Zowe Application Framework: Contains a Web user interface (UI) that provides a full screen interactive
experience. The Web UI includes many interactions that exist in 3270 terminals and web interfaces
such as IBM z/OSMF.
•Explorer server: Provides a range of APIs for the management of jobs, data sets and z/OS UNIX System
Services files.
•API Mediation Layer: Provides an API abstraction layer through which APIs can be discovered,
catalogued, and presented uniformly.
•Zowe CLI: Provides a command-line interface that lets you interact with the mainframe remotely
and use common tools such as Integrated Development Environments (IDEs), shell commands, bash
scripts, and build tools for mainframe development. It provides a set of utilities and services for
application developers that want to become efficient in supporting and building z/OS applications
quickly.
For details of each component, see the corresponding section.
Zowe Application Framework
The Zowe Application Framework modernizes and simplifies working on the mainframe. With the Zowe
Application Framework, you can create applications to suit your specific needs. The Zowe Application
Framework contains a web UI that has the following features:
• The web UI works with the underlying REST APIs for data, jobs, and subsystem, but presents the
information in a full screen mode as compared to the command line interface.
• The web UI makes use of leading-edge web presentation technology and is also extensible through web
UI plug-ins to capture and present a wide variety of information.
• The web UI facilitates common z/OS developer or system programmer tasks by providing an editor for
common text-based files like REXX or JCL along with general purpose data set actions for both Unix
System Services (USS) and Partitioned Data Sets (PDS) plus Job Entry System (JES) logs.
The Zowe Application Framework consists of the following components:
•Zowe Desktop
The desktop, accessed through a browser.
•Zowe Application Server
The Zowe Application Server runs the Zowe Application Framework. It consists of the Node.js server
plus the Express.js as a webservices framework, and the proxy applications that communicate with the
z/OS services and components.
•ZSS Server
The ZSS Server provides secure REST services to support the Zowe Application Server.
•Application plug-ins
Several application-type plug-ins are provided. For more information, see Using the Zowe Application
Framework application plug-ins.

Explorer server
The explorer server is a z/OS® RESTful web service and deployment architecture for z/OS microservices.
The server is implemented as a Liberty Profile web application that uses z/OSMF services to provide a
range of APIs for the management of jobs, data sets and z/OS UNIX™ System Services (USS) files.
These APIs have the following features:
• These APIs are described by the Open API Specification allowing them to be incorporated to any
standard-based REST API developer tool or API management process.
• These APIs can be exploited by off-platform applications with proper security controls.
Any client application that calls RESTful APIs directly can use the explorer server.
As a deployment architecture, the explorer server accommodates the installation of other z/Tool
microservices into its Liberty instance. These microservices can be used by explorer server APIs and
client applications.
Zowe CLI
Zowe CLIis a command-line interface thatlets applicationdevelopers interact with the mainframe in a
familiar format.Zowe CLIhelpsto increase overall productivity,reduce the learning curve for developing
mainframe applications, and exploit the ease-of-use of off-platform tools.Zowe CLI lets application
developers use common tools such asIntegrated Development Environments (IDEs), shell commands,
bash scripts, and build tools for mainframe development. It providesaset of utilities and servicesfor
application developers that want to become efficient in supporting and building z/OS applications quickly.
Zowe CLIprovides the following benefits:
• Enables and encourages developers with limited z/OS expertise to build, modify, and debugz/OS
applications.
• Fosters the development of new and innovative tools from a PC that can interact with z/OS.
• Ensurethat business critical applications running on z/OS can be maintained and supported by existing
and generally available software development resources.
• Provides a more streamlined way to build software that integrates with z/OS.
The following sections explain the key features and details forZowe CLI:
Note: For information about prerequisites, software requirements, installing and upgrading Zowe CLI, see
Installing Zowe.
Zowe CLIcapabilities
WithZowe CLI,you caninteract with z/OS remotely in the following ways:
•Interact with mainframe files: Create, edit, download, and upload mainframe files (data sets) directly
fromZowe CLI.
•Submit jobs: Submit JCL from data sets or local storage, monitor the status, and view and download the
output automatically.
•Issue TSO and z/OS console commands: Issue TSO and console commands to the mainframe directly
fromZowe CLI.
•Integrate z/OS actions into scripts: Build local scripts that accomplish both mainframe and local
tasks.
•Produce responses as JSON documents: Return data in JSON format on request for consumption in
other programming languages.
For more information about the available functionality inZowe CLI, seeZowe CLI Command Groups.
2Open Beta for Zowe: Installation and User's Guide

Zowe CLI Third-Party software agreements
Zowe CLIuses the following third-party software:
Third-party Software Version File name
chalk 2.3.0 Legal_Doc_00002285_56.pdf
cli-table2 0.2.0 Legal_Doc_00002310_5.pdf
dataobject-parser 1.2.1 Legal_Doc_00002310_36.pdf
find-up 2.1.0 Legal_Doc_00002310_33.pdf
glob 7.1.1 Legal_Doc_00001713_45.pdf
js-yaml 3.9.0 Legal_Doc_00002310_16.pdf
jsonfile 4.0.0 Legal_Doc_00002310_40.pdf
jsonschema 1.1.1 Legal_Doc_00002310_17.pdf
levenshtein 1.0.5 See UNLICENSE
log4js 2.5.3 Legal_Doc_00002310_37.pdf
merge-objects 1.0.5 Legal_Doc_00002310_34.pdf
moment 2.20.1 Legal_Doc_00002285_25.pdf
mustache 2.3.0 Legal_Doc_mustache.pdf
node.js 6.11.1 Legal_Doc_nodejs.pdf
node-ibm_db 2.3.1 Legal_Doc_00002310_38.pdf
node-mkdirp 0.5.1 Legal_Doc_00002310_35.pdf
node-progress 2.0.0 Legal_Doc_00002310_7.pdf
prettyjson 1.2.1 Legal_Doc_00002310_22.pdf
rimraf 2.6.1 Legal_Doc_00002310_8.pdf
Semver 5.5.0 Legal_Doc_00002310_42.pdf
stack-trace 0.0.10 Legal_Doc_00002310_10.pdf
string-width 2.1.1 Legal_Doc_00002310_39.pdf
wrap-ansi 3.0.1 Legal_Doc_00002310_12.pdf
yamljs 0.3.0 Legal_Doc_00002310_13.pdf
yargs 8.0.2 Legal_Doc_00002310_1.pdf
Note:All trademarks, trade names, service marks, and logos referenced herein belong to their respective
companies.
To read each complete license, navigate to the GitHub repository and download the file named
Zowe_CLI_TPSRs.zip. The .zip file contains the licenses for all of the third-party components that Zowe
CLI uses.
More Information:
• System requirements for Zowe CLI
• Installing Zowe CLI
Zowe overview3

API Mediation Layer
The API Mediation Layer provides a single point of access for mainframe service REST APIs. The layer
offers enterprise, cloud-like features such as high-availability, scalability, dynamic API discovery,
consistent security, a single sign-on experience, and documentation. The API Mediation Layer facilitates
secure communication across loosely coupled microservices through the API Gateway. The API Mediation
Layer includes an API Catalog that provides an interface to view all discovered microservices, their
associated APIs, and Swagger documentation in a user-friendly manner. The Discovery Service makes it
possible to determine the location and status of microservice instances running inside the ecosystem.
More Information: - Onboard an existing Spring Boot REST API service using Zowe API Mediation Layer -
Using API Catalog
Key features
• High availability of services in which application instances on a failing node are distributed among
surviving nodes
• Microservice UIs available through the API Gateway and API Catalog by means of reverse proxying
• Support for standardization and normalization of microservice URLs and routing to provide API
Mediation Layer users with a consistent way of accessing microservices.
• Minimal effort to register a microservice with the gateway (configuration over code)
• Runs on Windows, Linux, and z/OS (target platform)
• Written in Java utilizing Spring Boot (2.x), Angular 5, and the Netflix CloudStack
• Supports multiple client types for discovery (including Spring Boot, Java, and NodeJS)
• Contains enablers that allow for easy discovery and exposure of REST APIs and Swagger documentation
for each microservice
API Mediation Layer architecture
The following diagram illustrates the single point of access with the API Gateway and the interactions
between the API Gateway, API Catalog, and the Discovery Service:
4Open Beta for Zowe: Installation and User's Guide

Components
The API Layer consists of the following key components:
API Gateway
The microservices that are contained within the ecosystem are located behind a reverse proxy. Clients
interact with the gateway layer (reverse proxy). This layer forwards API requests to the appropriate
corresponding service through the microservice endpoint UI. The gateway is built using Netflix Zuul and
Spring Boot technology.
Discovery Service
The Discovery service is the central point in the API Gateway infrastructure that accepts "announcements
of REST services" and serves as a repository of active services. Back-end microservices register with this
service either directly by using a Eureka client. Non-Spring Boot applications register with the Discover
Service indirectly through a Sidecar. The Discovery Service is built on Eureka and Spring Boot technology.
API Catalog
The API Catalog is the catalog of published APIs and their associated documentation that are
discoverable or can be available if provisioned from the service catalog. The API documentation is
visualized using the Swagger UI. The API Catalog contains APIs of services available as product versions.
A service can be implemented by one or more service instances, which provide exactly the same service
for high-availability or scalability.
Zowe overview5

More Information: - Onboard an existing Spring Boot REST API service using Zowe API Mediation Layer -
Using API Catalog
Zowe API Mediation Layer Third-Party software agreements
Zowe API Mediation Layer uses the following third-party software:
Third-party Software Version File name
angular 5.2.0 Legal_Doc_00002377_15.pdf
angular2-notifications 0.9.5 Legal_Doc_00002499_11.pdf
Apache Tomcat 8.0.39 Legal_Doc_00001505_6.pdf
Bootstrap 3.0.3 Legal_Doc_12955_5.pdf
Bootstrap 3.3.7 Legal_Doc_00001682_11.pdf
bootstrap-submenu 2.0.4 Legal_Doc_00001456_44.pdf
Commons Validator 1.6.0 Legal_Doc_00002105_1.pdf
copy-webpack-plugin 4.4.1 Legal_Doc_00002499_13.pdf
core-js 2.5.3 Legal_Doc_corejs_MIT.pdf
eureka-client 1.8.6 Legal_Doc_00002499_3.pdf
eventsource 1.0.5 Legal_Doc_00002499_9.pdf
google-gson 2.8.2 Legal_Doc_00002252_4.pdf
Guava 23.2-jre Legal_Doc_00002499_22.pdf
H2 1.4.196 Legal_Doc_00002499_19.pdf
hamcrest 1.3 Legal_Doc_00001170_33.pdf
httpclient 4.5.3 Legal_Doc_00001843_2.pdf
jackson 2.9.2 Legal_Doc_00002259_6.pdf
jackson 2.9.3 Legal_Doc_00001505_16.pdf
javamail 1.4.3 Legal_Doc_00000439_22.pdf
javax servlet api 3.1.0 Legal_Doc_00002499_23.pdf
javax.validation 2.0.1.Final Legal_Doc_00002499_27.pdf
Jersey 2.26 Legal_Doc_00002499_2.pdf
Jersey Media JSON Jackson 2.26 Legal_Doc_00002019_68.pdf
jquery 2.0.3 Legal_Doc_00000379_69.pdf
JSON Web Token 0.8.0 Legal_Doc_00002499_21.pdf
json-path 2.4.0 Legal_Doc_00001454_30.pdf
lodash 4.17.5 Legal_Doc_00002499_8.pdf
Logback 1.0.1 Legal_Doc_00002499_1.pdf
lombok 1.16.20 Legal_Doc_00002499_18.pdf
mockito 2.15.0 Legal_Doc_00002499_28.pdf
netflix-infix 0.3.0 Legal_Doc_00002499_4.pdf
6Open Beta for Zowe: Installation and User's Guide

Third-party Software Version File name
ng2-cookies 1.0.12 Legal_Doc_00002499_15.pdf
ng2-destroy-subscribers 0.0.28 Legal_Doc_00002499_16.pdf
ng2-simple-timer 1.3.3 Legal_Doc_00002499_17.pdf
NPM 5.6.0 Legal_Doc_00002499_10.pdf
powermock 1.7.3 Legal_Doc_00002499_25.pdf
reactor-core 3.0.7.RELEASE Legal_Doc_00001938_51.pdf
Roaster 2.20.1.Final Legal_Doc_00002499_20.pdf
RxJS 5.5.6 Legal_Doc_rxjs_Apache.pdf
Spring Cloud Config 2.0.0.M9 Legal_Doc_00002499_33.pdf
Spring Hateoas 0.23.0.RELEASE Legal_Doc_00002377_10.pdf
Spring Retry 1.2.2 Legal_Doc_00002499_14.pdf
spring security 5.0.3.RELEASE Legal_Doc_00002499_29.pdf
spring-boot 2.0.0.RELEASE Legal_Doc_spring_boot_Apache.pdf
Spring-Cloud-Netflix 2.0.0.M8 Legal_Doc_00002499_30.pdf
Springfox 2.8.0 Legal_Doc_00002499_31.pdf
spring-ws 3.0.0.RELEASE Legal_Doc_00002499_32.pdf
swagger-core 1.5.18 Legal_Doc_00002499_24.pdf
swagger-jersey2-jaxrs 1.5.17 Legal_Doc__00001528_32.pdf
swagger-schema-ts 2.0.8 Legal_Doc_00002499_12.pdf
zone.js 0.8.20 Legal_Doc_zonejs_MIT.pdf
Note:All trademarks, trade names, service marks, and logos referenced herein belong to their respective
companies.
To read each complete license, navigate to the GitHub repository and download the file named
Zowe_APIML_TPSRs.zip. The .zip file contains the licenses for all of the third-party components that
Zowe API Mediation Layer uses.
Zowe overview7
8Open Beta for Zowe: Installation and User's Guide
Chapter 2. Installing Zowe
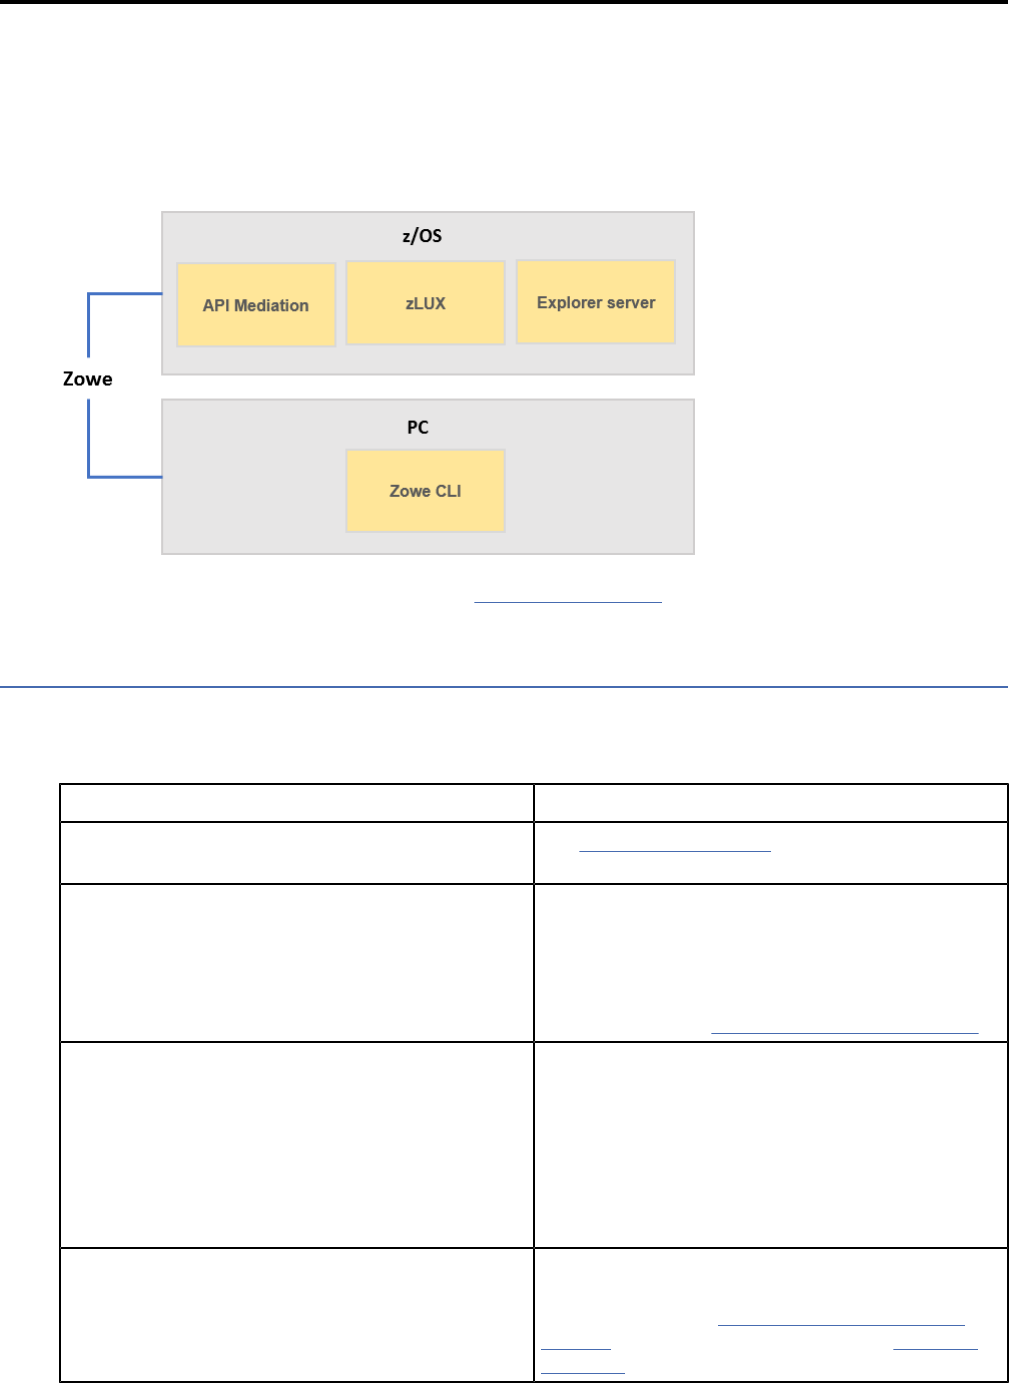
Zowe consists of four main components: the Zowe Application Framework (zLUX), the explorer server, API
Mediation Layer, and Zowe CLI. You install the Zowe Application Framework, the explorer server, and API
Mediation on z/OS and install Zowe CLI on PC. The installations on z/OS and on PC are independent.
To get started with installing Zowe, review the Installation roadmap topic.
Installation roadmap
Installing Zowe involves several steps that you must complete in the appropriate sequence. Review the
following installation roadmap that presents the task-flow for preparing your environment and installing
and configuring Zowe before you begin the installation process.
Tasks Description
1. Prepare your environment to meet the
installation requirements.
See System requirements.
2. Obtain the Zowe installation files. The Zowe installation files are released in a PAX
file format. The PAX file contains the runtimes and
the scripts to install and launch the z/OS runtime,
as well as the Zowe CLI package. For information
about how to download, prepare, and install the
Zowe runtime, see Obtaining the installation files.
3. Allocate enough space for the installation. The installation process requires approximately
1 GB of available space. Once installed on z/
OS, API Mediation Layer requires approximately
150MB of space, the Zowe Application Framework
requires approximately 50 MB of space before
configuration, and explorer server requires
approximately 200 MB. Zowe CLI requires
approximately 200 MB of space on your PC.
4. Install components of Zowe. To install Zowe runtime (Zowe Application
Framework, explorer server, and API Mediation
Layer) on z/OS, see Installing the Zowe runtime
on z/OS. To install Zowe CLI on PC, see Installing
Zowe CLI.
Tasks Description
5. Verify that Zowe is installed correctly. To verify that the Zowe Application Framework,
explorer server, and API Mediation Layer are
installed correctly, see Verifying installation. To
verify that Zowe CLI is installed correctly, see
Testing connection to z/OSMF.
6. Optional: Troubleshoot problems that occurred
during installation.
See Troubleshooting the installation.
To uninstall Zowe, see Uninstalling Zowe.
System requirements
Before installing Zowe, ensure that your environment meets all of the prerequisites.
1. Ensure that IBM z/OS Management Facility (z/OSMF) is installed and configured correctly. z/OSMF is
a prerequisite for the Zowe microservice that must be installed and running before you use Zowe. For
details, see z/OSMF requirements.
2. Review component specific requirements.
• System requirements for the Zowe Application Framework, explorer server, and API Mediation
• System requirements for Zowe CLI
z/OSMF requirements
The following information contains procedures and tips for meeting z/OSMF requirements. For complete
information, go to IBM Knowledge Center and read the following documents.
• IBM z/OS Management Facility Configuration Guide
• IBM z/OS Management Facility Help
z/OS requirements
Ensure that the z/OS system meets the following requirements:
Requirements Description Resources in IBM Knowledge
Center
AXE (System REXX) z/OS uses AXR (System REXX)
component to perform Incident
Log tasks. The component
enables REXX executable files to
run outside of conventional TSO
and batch environments.
System REXX
Common Event Adapter (CEA)
server
The CEA server, which is a
co-requisite of the Common
Information Model (CIM) server,
enables the ability for z/OSMF to
deliver z/OS events to C-language
clients.
Customizing for CEA
Common Information Model
(CIM) server
z/OSMF uses the CIM server to
perform capacity-provisioning
and workload-management
tasks. Start the CIM server before
you start z/OSMF (the IZU*
started tasks).
Reviewing your CIM server setup
10Open Beta for Zowe: Installation and User's Guide
Requirements Description Resources in IBM Knowledge
Center
CONSOLE and CONSPROF
commands
The CONSOLE and CONSPROF
commands must exist in the
authorized command table.
Customizing the CONSOLE and
CONSPROF commands
IBM z/OS Provisioning Toolkit The IBM® z/OS® Provisioning
Toolkit is a command line utility
that provides the ability to
provision z/OS development
environments. If you want
to provision CICS or Db2
environments with the Zowe CLI,
this toolkit is required.
What is IBM Cloud Provisioning
and Management for z/OS?
Java level IBM® 64-bit SDK for z/OS®, Java
Technology Edition V7.1 or later
is required.
Software prerequisites for z/
OSMF
TSO region size To prevent exceeds maximum
region size errors, verify that the
TSO maximum region size is a
minimum of 65536 KB for the z/
OS system.
N/A
User IDs User IDs require a TSO segment
(access) and an OMVS segment.
During workflow processing
and REST API requests, z/
OSMF might start one or more
TSO address spaces under the
following job names: userid;
substr(userid, 1, 6) CN (Console).
N/A
Configuring z/OSMF
1. From the console, issue the following command to verify the version of z/OS:
/D IPLINFO
Part of the output contains the release, for example,
RELEASE z/OS 02.02.00.
2. Configure z/OSMF.
z/OSMF is a base element of z/OS V2.2 and V2.3, so it is already installed. But it might not be
configured and running on every z/OS V2.2 and V2.3 system.
In short, to configure an instance of z/OSMF, run the IBM-supplied jobs IZUSEC and IZUMKFS, and
then start the z/OSMF server. The z/OSMF configuration process occurs in three stages, and in the
following order: - Stage 1 - Security setup - Stage 2 - Configuration - Stage 3 - Server initialization
This stage sequence is critical to a successful configuration. For complete information about how to
configure z/OSMF, see Configuring z/OSMF if you use z/OS V2.2 or Setting up z/OSMF for the first time if
V2.3.
Note: In z/OS V2.3, the base element z/OSMF is started by default at system initial program load (IPL).
Therefore, z/OSMF is available for use as soon as you set up the system. If you prefer not to start z/OSMF
automatically, disable the autostart function by checking for START commands for the z/OSMF started
procedures in the COMMNDxx parmlib member.
Installing Zowe11
The z/OS Operator Consoles task is new in Version 2.3. Applications that depend on access to the
operator console such as Zowe CLI's RestConsoles API require Version 2.3.
1. Verify that the z/OSMF server and angel processes are running. From the command line, issue the
following command:
/D A,IZU*
If jobs IZUANG1 and IZUSVR1 are not active, issue the following command to start the angel process:
/S IZUANG1
After you see the message ""CWWKB0056I INITIALIZATION COMPLETE FOR ANGEL"", issue the
following command to start the server:
/S IZUSVR1
The server might take a few minutes to initialize. The z/OSMF server is available when the message
""CWWKF0011I: The server zosmfServer is ready to run a smarter planet."" is displayed.
2. Issue the following command to find the startup messages in the SDSF log of the z/OSMF server:
f IZUG349I
You could see a message similar to the following message, which indicates the port number:
IZUG349I: The z/OSMF STANDALONE Server home page can be accessed at https://
mvs.hursley.ibm.com:443/zosmf after the z/OSMF server is started on your system.
In this example, the port number is 443. You will need this port number later.
Point your browser at the nominated z/OSMF STANDALONE Server home page and you should see its
Welcome Page where you can log in.
z/OSMF REST services for the Zowe CLI
The Zowe CLI uses z/OSMF Representational State Transfer (REST) APIs to work with system resources
and extract system data. Ensure that the following REST services are configured and available.
z/OSMF REST services Requirements Resources in IBM knowledge
Center
Cloud provisioning services Cloud provisioning services
are required for the Zowe CLI
CICS and Db2 command groups.
Endpoints begin with /zosmf/
provisioning/
Cloud provisioning services
TSO/E address space services TSO/E address space services
are required to issue TSO
commands in the Zowe CLI.
Endpoints begin with /zosmf/
tsoApp
TSO/E address space services
z/OS console services z/OS console services are
required to issue console
commands in the Zowe CLI.
Endpoints begin with /zosmf/
restconsoles/
z/OS console
12Open Beta for Zowe: Installation and User's Guide
z/OSMF REST services Requirements Resources in IBM knowledge
Center
z/OS data set and file REST
interface
z/OS data set and file REST
interface is required to work
with mainframe data sets and
UNIX System Services files in the
Zowe CLI. Endpoints begin with /
zosmf/restfiles/
z/OS data set and file interface
z/OS jobs REST interface z/OS jobs REST interface is
required to use the zos-jobs
command group in the Zowe CLI.
Endpoints begin with /zosmf/
restjobs/
z/OS jobs interface
z/OSMF workflow services z/OSMF workflow services is
required to create and manage
z/OSMF workflows on a z/OS
system. Endpoints begin with /
zosmf/workflow/
z/OSMF workflow services
Zowe uses symbolic links to the z/OSMF bootstrap.properties,
jvm.security.override.properties, and ltpa.keys files. Zowe reuses SAF, SSL, and LTPA
configurations; therefore, they must be valid and complete.
For more information, see Using the z/OSMF REST services in IBM z/OSMF documentation.
To verify that z/OSMF REST services are configured correctly in your environment, enter the REST
endpoint into your browser. For example: https://mvs.ibm.com:443/zosmf/restjobs/jobs
Note:
• Browsing z/OSMF endpoints requests your user ID and password for defaultRealm; these are your TSO
user credentials.
• The browser returns the status code 200 and a list of all jobs on the z/OS system. The list is in raw JSON
format.
System requirements for the Zowe Application Framework, explorer server, and API
Mediation Layer
The Zowe Application Framework, explorer server, and API Mediation Layer are installed together. Before
the installation, make sure your system meets the following requirements:
• z/OS® Version 2.2 or later.
• 64-bit Java™ 8 JRE or later.
• 833 MB of HFS file space.
• Supported browsers:
– Chrome 54 or later
– Firefox 44 or later
– Safari 11 or later
– Microsoft Edge
• Node.js Version 6.11.2 or later on the z/OS host where you install the Zowe Application Server.
1. To install Node.js on z/OS, follow the procedures at https://developer.ibm.com/node/sdk/ztp. Note
that installation of the C/C++ compiler is not necessary for running the Zowe Application Framework.
2. Set the NODE_HOME environment variable to the directory where Node.js is installed. For example,
NODE_HOME=/proj/mvd/node/installs/node-v6.11.2-os390-s390x.
Installing Zowe13

• npm 5.4 or later for building Zowe Application Framework applications.
To update npm, issue the following command:
npm install -g npm
Planning for installation
The following information is required during the installation process. Make the decisions before the
installtion.
• The HFS directory where you install Zowe, for example, /var/zowe.
• The HFS directory that contains a 64-bit Java™ 8 JRE.
• The z/OSMF installation directory that contains derby.jar, for example, /usr/lpp/zosmf/lib.
• The z/OSMF configuration user directory that contains the following z/OSMF files:
–/bootstrap.properties
–/jvm.security.override.properties
–/resources/security/ltpa.keys
• The HTTP and HTTPS port numbers of the explorer server. By default, they are 7080 and 7443.
• The API Mediation Layer HTTP and HTTPS port numbers. You will be asked for 3 unique port numbers.
• The user ID that runs the Zowe started task.
Tip: Use the same user ID that runs the z/OSMF IZUSVR1 task, or a user ID with equivalent
authorizations.
• The mainframe account under which the ZSS server runs must have UPDATE permission on the
BPX.DAEMON and BPX.SERVER facility class profiles.
System requirements for Zowe CLI
Before you install Zowe CLI, make sure your system meets the following requirements:
Supported platforms
You can install Zowe CLI on any Windows or Linux operating system. For more information about known
issues and workarounds, see Troubleshooting installing Zowe CLI.
Important!
• Zowe CLI is not officially supported on Mac computers. However, Zowe CLI might run successfully on
some Mac computers.
• Oracle Linux 6 is not supported.
Free disk space
Zowe CLI requires approximately 100 MB of free disk space. The actual quantity of free disk space
consumed might vary depending on the operating system where you install Zowe CLI.
Prerequisite software
Zowe CLI is designed and tested to integrate with z/OSMF running on IBM z/OS Version 2.2 or later.
Before you can use Zowe CLI to interact with the mainframe, system programmers must install and
configure IBM z/OSMF in your environment. This section provides supplemental information about Zowe
CLI-specific tips or requirements that system programmers can refer to.
Before you install Zowe CLI, also install the following prerequisite software depending on the system
where you install Zowe CLI:
Note: It's highly recommended that you update Node.js regularly to the latest Long Term Support (LTS)
version.
14Open Beta for Zowe: Installation and User's Guide

Windows operating systems
Windows operating systems require the following software:
• Node.js V8.0 or later
Click here to download Node.js.
• Node Package Manager (npm) V5.0 or later
Note: npm is included with the Node.js installation.
• Python V2.7
The command that installs C++ Compiler also installs Python on Windows.
• C++ Compiler (gcc 4.8.1 or later)
From an administrator command prompt, issue the following command:
npm install --global --production --add-python-to-path windows-build-tools
Mac operating systems
Mac operating systems require the following software:
• Node.js V8.0 or later
Click here to download Node.js.
• Node Package Manager (npm) V5.0 or later
Note: npm is included with the Node.js installation.
Tip: If you install Node.js on a macOS operating system, it's highly recommended that you follow the
instructions on the Node.js website (using package manager) to install nodejs and nodejs-legacy.
For example, you can issue command sudo apt install nodejs-legacy to install nodejs-
legacy. With nodejs-legacy, you can issue command node rather than nodejs.
• Python V2.7
Click here to download Python 2.7.
• C ++ Compiler (gcc 4.8.1 or later)
The gcc compiler is included with macOS. To confirm that you have the compiler, issue the command
gcc –help.
Linux operating systems
Linux operating systems require the following software:
• Node.js V8.0 or later
Click here to download Node.js.
• Node Package Manager (npm) V5.0 or later
Note: npm is included with the Node.js installation.
Tip: If you install Node.js on a Linux operating system, it's highly recommended that you follow the
instructions on the Node.js website (using package manager) to install nodejs and nodejs-legacy.
For example, you can issue command sudo apt install nodejs-legacy to install nodejs-
legacy. With nodejs-legacy, you can issue command node rather than nodejs.
• Python V2.7
Included with most Linux distributions.
• C ++ Compiler (gcc 4.8.1 or later)
Gcc is included with most Linux distributions. To confirm that gcc is installed, issue the command gcc
–version.
Installing Zowe15

To install gcc, issue one of the following commands:
– Red Hat
sudo yum install gcc
– Debian/Ubuntu
sudo apt-get update
sudo apt-get install build-essential
– Arch Linux
sudo pacman -S gcc
• Libsecret
To install Libsecret, issue one of the following commands:
– Red Hat
sudo yum install libsecret-devel
– Debian/Ubuntu
sudo apt-get install libsecret-1-dev
– Arch Linux
sudo pacman -S libsecret
• Make
Make is included with most Linux distributions. To confirm that Make is installed, issue the command
make –-version.
To install Make, issue one of the following commands:
– Red Hat
sudo yum install devtoolset-7
– Debian/Ubuntu
sudo apt-get install build-essential
– Arch Linux
sudo pacman -S base-devel
Obtaining installation files
The Zowe installation files are distributed as a PAX file that contains the runtimes and the scripts to install
and launch the z/OS runtime and the runtime for the command line interface. For each release, there is a
PAX file named zowe-v.r.m.pax, where
•v indicates the version
•r indicates the release number
•m indicates the modification number
The numbers are incremented each time a release is created so the higher the numbers, the later the
release. Use your web browser to download the PAX file by saving it to a folder on your desktop.
16Open Beta for Zowe: Installation and User's Guide

You can download the PAX file from the Zowe website. After you obtain the PAX file, verify the PAX file and
prepare it to install the Zowe runtime.
Follow these steps:
1. Verify the downloaded PAX file.
After you download the PAX file, verify the integrity of the PAX file to ensure that the file you download
is officially distributed by the Zowe project.
Notes:
• The commands in the following steps are tested on both Mac OS X V10.13.6 and Ubuntu V16.04 and
V17.10.
• Ensure that you have GPG installed. Click here to download and install GPG.
• The v.r.m in the commands of this step is a variable. You must replace it with the actual PAX file
version, for example, 0.9.0.
a. Verify the hash code.
Download the hash code file zowe-v.r.m.pax.sha512 from the Zowe website. Then, run the
following commands to check:
(gpg --print-md SHA512 zowe-v.r.m.pax > zowe-v.r.m.pax.sha512.my) && diff
zowe-v.r.m.pax.sha512.my zowe-v.r.m.pax.sha512 && echo matched || echo "not
match"
When you see "matched", it means the PAX file that you download is the same one that is officially
distributed by the Zowe project. You can delete the temporary "zowe-v.r.m.pax.sha512.my" file.
You can also use other commands such as sha512, sha512sum, or openssl dgst -sha512
to generate SHA512 hash code. These hash code results are in a different format from what Zowe
provides but the values are the same.
b. Verify with signature file.
In addition to the SHA512 hash, the hash is also verifiable. This is done by digitally signing the hash
text file with a KEY from one of the Zowe developers.
Follow these steps:
a. Download the signature file zowe-v.r.m.pax.asc from Zowe website, and download the public
key KEYS from https://github.com/zowe/release-management/.
b. Import the public key with command gpg --import KEYS.
c. If you never use gpg before, generate keys with command gpg --gen-key.
d. Sign the downloaded public key with command gpg --sign-key DC8633F77D1253C3.
e. Verify the file with command gpg --verify zowe-v.r.m.pax.asc zowe-v.r.m.pax.
f. Optional: You can remove the imported key with command: gpg --delete-key
DC8633F77D1253C3.
When you see output similar to the followin one, it means the PAX file that you download is the same
one that is officially distributed by the Zowe project.
gpg: Signature made Tue 14 Aug 2018 08:29:46 AM EDT gpg: using RSA key
DC8633F77D1253C3 gpg: Good signature from "Matt Hogstrom (CODE SIGNING KEY)
" [full]
2. Transfer the PAX file to z/OS.
a. Open a terminal in Mac OS/Linux, or command prompt in Windows OS, and navigate to the directory
where you downloaded the Zowe PAX file.
b. Connect to z/OS using SFTP. Issue the following command:
sftp <userID@ip.of.zos.box>
Installing Zowe17

If SFTP is not available or if you prefer to use FTP, you can issue the following command instead:
ftp <userID@ip.of.zos.box>
Note: When you use FTP, switch to binary file transfer mode by issuing the following command:
bin
c. Navigate to the target directory that you wish to transfer the Zowe PAX file into on z/OS.
Note: After you connect to z/OS and enter your password, you enter into the Unix file system. The
following commands are useful:
• To see what directory you are in, type pwd.
• To switch directory, type cd.
• To list the contents of a directory, type ls.
• To create a directory, type mkdir.
d. When you are in the directory you want to transfer the Zowe PAX file into, issue the following
command:
put <pax-file-name>.pax
Where pax-file-name is a variable that indicates the full name of the PAX file you downloaded.
Note: When your terminal is connected to z/OS through FTP or SFTP, you can prepend commands with
l to have them issued against your desktop. To list the contents of a directory on your desktop, type
lls where ls will list contents of a directory on z/OS.
3. When the PAX file is transferred, expand the PAX file by issuing the following command in an ssh
session:
pax -ppx -rf <pax-file-name>.pax
Where pax-file-name is a variable that indicates the name of the PAX file you downloaded.
This will expand to a file structure.
/files
/install
/scripts
...
Note: The PAX file will expand into the current directory. A good practice is to keep the installation
directory apart from the directory that contains the PAX file. To do this, you can create a directory
such as /zowe/paxes that contains the PAX files, and another such as /zowe/builds. Use SFTP
to transfer the Zowe PAX file into the /zowe/paxes directory, use the cd command to switch into
/zowe/builds and issue the command pax -ppx -rf ../paxes/<zowe-v.r.m>.pax. The /
install folder will be created inside the zowe/builds directory from where the installation can be
launched.
Installing the Zowe Application Framework, explorer server, and API
Mediation Layer
You install the Zowe Application Framework, explorer server, and API Mediation Layer on z/OS.
Before you install the runtime on z/OS, ensure that your environment meets the requirements. See
System requirements.
Installing the Zowe runtime on z/OS
To install API Mediation Layer, the Zowe Application Framework, and explorer server, you install the Zowe
runtime on z/OS.
18Open Beta for Zowe: Installation and User's Guide
Follow these steps:
1. Navigate to the directory where the installation archive is extracted. Locate the /install directory.
/install
/zowe-install.sh
/zowe-install.yaml
2. Review the zowe-install.yaml file which contains the following properties:
•install:rootDir is the directory that Zowe will be installed into to create a Zowe runtime. The
default directory is ~/zowe/0.9.1. The user's home directory is the default value to ensure that the
installing user has permission to create the directories that are required for the install. If the Zowe
runtime will be maintained by multiple users it might be more appropriate to use another directory,
such as /var/zowe/v.r.m.
You can run the installation process multiple times with different values in the zowe-install.yaml
file to create separate installations of the Zowe runtime. The directory that Zowe is installed into must
be empty. The install script exits if the directory is not empty and creates the directory if it does not
exist.
• API Mediation Layer has three ports - two HTTP ports and one HTTPS port, each for a micro-service.
• Explorer-server has two ports - one for HTTP and one for HTTPS. The liberty server is used for the
explorer-ui components.
• zlux-server has three ports - the HTTP and HTTPS ports that are used by the Zowe Application
Server, and the port that is used by the ZSS Server.
install:
rootDir=/var/zowe/0.9.1
api-mediation:
catalogHttpPort=7552
discoveryHttpPort=7553
gatewayHttpsPort=7554
explorer-server:
httpPort=7080
httpsPort=7443
# http and https ports for the node server
zlux-server:
httpPort=8543
httpsPort=8544
zssPort=8542
If all of the default port values are acceptable, then you do not need to change them. The ports must
not be in use for the Zowe runtime servers to be able to allocate them.
To determine which ports are not available, follow these steps:
• To display a list of ports that are in use, issue the following command:
TSO NETSTAT
• To display a list of reserved ports, issue the following command:
TSO NETSTAT PORTLIST
The zowe-install.yaml also contains the telnet and SSH port with defaults of 23 and 22. If your
z/OS LPAR is using different ports, edit the values. This is to allow the TN3270 terminal desktop
application to connect as well as the VT terminal desktop application. Unlike the ports needed by the
Zowe runtime for its Zowe Application Framework and explorer server which must be unused, the
terminal ports are expected to be in use.
# Ports for the TN3270 and the VT terminal to connect to
terminals:
sshPort=22
Installing Zowe19
telnetPort=23
3. Execute the zowe-install.sh script.
With the current directory being the /install directory, execute the script zowe-install.sh by
issuing the following command:
zowe-install.sh
You might receive the following error that the file cannot be executed.
zowe-install.sh: cannot execute
The error is due to that the install script does not have execute permission. To add execute permission,
issue the following command:
chmod u+x zowe-install.sh.
4. Configure Zowe as a started task.
The ZOWESVR must be configured as a started task (STC) under the IZUSVR user ID.
• If you use RACF, issue the following commands:
RDEFINE STARTED ZOWESVR.* UACC(NONE) STDATA(USER(IZUSVR) GROUP(IZUADMIN) PRIVILEGED(NO)
TRUSTED(NO) TRACE(YES))
SETROPTS REFRESH RACLIST(STARTED)
• If you use CA ACF2, issue the following commands:
SET CONTROL(GSO)
INSERT STC.ZOWESVR LOGONID(IZUSVR) GROUP(IZUADMIN) STCID(ZOWESVR)
F ACF2,REFRESH(STC)
• If you use CA Top Secret, issue the following commands:
TSS ADDTO(STC) PROCNAME(ZOWESVR) ACID(IZUSVR)
5. Add the users to the required groups, IZUADMIN for administrators and IZUUSER for standard users.
• If you use RACF, issue the following command:
CONNECT (userid) GROUP(IZUADMIN)
• If you use CA ACF2, issue the following commands:
ACFNRULE TYPE(TGR) KEY(IZUADMIN) ADD(UID(<uid string of user>) ALLOW)
F ACF2,REBUILD(TGR)
• If you use CA Top Secret, issue the following commands:
TSS ADD(userid) PROFILE(IZUADMIN)
TSS ADD(userid) GROUP(IZUADMGP)
When the zowe-install.sh script runs, it performs a number of steps broken down into sections.
These are covered more in the section Troubleshooting the installation.
Starting and stopping the Zowe runtime on z/OS
Zowe has three runtime components on z/OS, the explorer server, the Zowe Application Server, and API
Mediation Layer. When you run the ZOWESVR PROC, it starts all these components. The Zowe Application
Server startup script also starts the zSS server, so starting the ZOWESVR PROC starts all the four servers,
and stopping it stops all four.
20Open Beta for Zowe: Installation and User's Guide
Starting the ZOWESVR PROC
To start the ZOWESVR PROC, run the zowe-start.sh script at the Unix Systems Services command
prompt:
cd $ZOWE_ROOT_DIR/scripts
./zowe-start.sh
where $ZOWE_ROOT_DIR is the directory where you installed the Zowe runtime. This script starts the
ZOWESVR PROC for you so you don't have to log on to TSO and use SDSF.
Note: The default startup allows self signed and expired certificates from the Zowe Application
Framework proxy data services such as the explorer server.
If you prefer to use SDSF to start Zowe, start ZOWESVR by issuing the following operator command in
SDSF:
/S ZOWESVR
By default, Zowe uses the runtime version that you most recently installed. To start a different runtime,
specify its server path on the START command:
/S ZOWESVR,SRVRPATH='$ZOWE_ROOT_DIR/explorer-server'
To test whether the explorer server is active, open the URL https://<hostname>:7443/explorer-
mvs.
The port number 7443 is the default port and can be overridden through the zowe-install.yaml file
before the zowe-install.sh script is run. See Installing Zowe runtime on z/OS.
Stopping the ZOWESVR PROC
To stop the ZOWESVR PROC, run the zowe-stop.sh script at the Unix Systems Services command
prompt:
cd $ZOWE_ROOT_DIR/scripts
./zowe-stop.sh
If you prefer to use SDSF to stop Zowe, stop ZOWESVR by issuing the following operator command in
SDSF:
/C ZOWESVR
Either of the methods will stop the explorer server, the Zowe Application Server, and the zSS server.
When you stop the ZOWESVR, you might get the following error message:
IEE842I ZOWESVR DUPLICATE NAME FOUND- REENTER COMMAND WITH 'A='
This is because there is more than one started task named ZOWESVR. To resolve the issue, stop the
required ZOWESVR instance by issuing the following commands:
/C ZOWESVR,A=asid
You can obtain the asid from the value of A=asid when you issue the following commands:
/D A,ZOWESVR
Verifying installation
After you complete the installation of API Mediation, Zowe Application Framework, and explorer server,
use the following procedures to verify that the components are installed correctly and are functional.
Installing Zowe21

Verifying Zowe Application Framework installation
If the Zowe Application Framework is installed correctly, you can open the Zowe Desktop from a
supported browser.
From a supported browser, open the Zowe Desktop at https://myhost:httpsPort/ZLUX/plugins/
com.rs.mvd/web/index.html
where:
•myHost is the host on which you installed the Zowe Application Server.
•httpPort is the port number that is assigned to node.http.port in zluxserver.json.
•httpsPort is the port number that is assigned to node.https.port in zluxserver.json. For example, if
the Zowe Application Server runs on host myhost and the port number that is assigned to node.http.port
is 12345, you specify https://myhost:12345/ZLUX/plugins/com.rs.mvd/web/index.htm.
Verifying explorer server installation
After explorer server is installed and the ZOWESVR procedure is started, you can verify the installation
from an Internet browser by using the following case-sensitive URL:
https://<your.server>:<atlasport>/Atlas/api/system/version
where your.server is the host name or IP address of the z/OS® system where explorer server is installed,
and atlasport is the port number that is chosen during installation. You can verify the port number in
the server.xml file that is located in the explorer server installation directory, which is /var/zowe/
explorer-server/wlp/usr/servers/Atlas/server.xml by default. Look for the httpsPort
assignment in the server.xml file, for example: httpPort="7443".
This URL sends an HTTP GET request to the Liberty Profile explorer server. If explorer server is installed
correctly, a JSON payload that indicates the current explorer server application version is returned. For
example:
{ "version": "V0.0.1" }
Note: The first time that you interact with the explorer server, you are prompted to enter an MVS™ user ID
and password. The MVS user ID and password are passed over the secure HTTPS connection to establish
authentication.
After you verify that explorer server is successfully installed, you can access the UI at the following URLs:
•https://<your.server>:<atlasport>/explorer-jes/#/
•https://<your.server>:<atlasport>/explorer-mvs/#/
•https://<your.server>:<atlasport>/explorer-uss/#/
If explorer server is not installed successfully, see Troubleshooting installation for solutions.
Verifying the availability of explorer server REST APIs
To verify the availability of all explorer server REST APIs, use the Liberty Profile's REST API discovery
feature from an internet browser with the following URL. This URL is case-sensitive.
https://<your.server>:<atlasport>/ibm/api/explorer
With the discovery feature, you can also try each discovered API. The users who verify the availability
must have access to their data sets and job information by using relevant explorer server APIs. This
ensures that your z/OSMF configuration is valid, complete, and compatible with the explorer server
application. For example, try the following APIs:
Explorer server: JES Jobs APIs
GET /Atlas/api/jobs
This API returns job information for the calling user.
Explorer server: Data set APIs
22Open Beta for Zowe: Installation and User's Guide
GET /Atlas/api/datasets/userid.**
This API returns a list of the userid.** MVS data sets.
Verifying API Mediation installation
Use your preferred REST API client to review the value of the status variable of the API Catalog service
that is routed through the API Gateway using the following URL:
https://hostName:basePort/api/v1/apicatalog/application/state
The hostName is set during install, and basePort is set as the gatewayHttpsPort parameter.
Example:
The following example illustrates how to use the curl utility to invoke API Mediation Layer endpoint and
the grep utility to parse out the response status variable value
$ curl -v -k --silent https://hostName:basePort/api/v1/apicatalog/application/state 2>&1 | grep
-Po '(?<=\"status\"\:\")[^\"]+'
UP
The response UP confirms that API Mediation Layer is installed and is running properly.
Installing Zowe CLI
As a systems programmeror application developer, you install Zowe CLIon your PC.
Methods to install Zowe CLI
You can use either of the following methods to install Zowe CLI. - InstallZowe CLI from local package -
Install Zowe CLI from Bintray registry
InstallingZowe CLI from local package
InstallZowe CLIon PCs that are running a Windows, Linux, or macOS operating system.
Follow these steps:
1. Address the prerequisites.
2. Obtain the Zowe installation files, which includes the zowe-cli-bundle.zip file. Use FTP to distribute the
zowe-cli-bundle.zip file to client workstations.
3. Open a command line window. For example, Windows Command Prompt. Browse to the directory
where you downloaded theZowe CLIinstallation bundle (.zip file). Issue the following command to
unzip the files:
unzip zowe-cli-bundle.zip
The command expands four TGZ packages into your working directory - Zowe CLI, one plug-in, and the
odbc_cli folder.
4. Issue the following command to install Zowe CLI on your PC:
npm install -g zowe-cli-2.0.0-next.201809251404
Note: On Windows, you must run as an Administrator to install the product and plug-ins.
Note: On Linux, you might need to prepend sudo to your npm commands so that you can issue the
install and uninstall commands. For more information, seeTroubleshooting installing Zowe CLI.
Zowe CLI is installed on your PC. See Installing Plug-ins for information about the commands for
installing plug-ins from the package.
5. Create azosmfprofile so that you can issuecommands that communicate with z/OSMF.
Installing Zowe23

Note: For information about how to create a profile, see Creating a Zowe CLI profile.
Tip: Zowe CLI profiles contain information that is required for the product to interact with remote
systems. For example, host name, port, and user ID. Profiles let you target unique systems, regions, or
instances for a command. MostZowe CLI command groups require a Zowe CLI zosmf profile.
After you install and configureZowe CLI, you can issue thezowe --helpcommand to view a list of
available commands. For more information, seeDisplay Help.
Installing Zowe CLI from Bintray registry
If your PC is connected to the Internet, you can use the following method to install Zowe CLI from an npm
registry.
Follow these steps:
1. Issue the following command to set the registry to theZowe CLI scoped package on Bintray. In
addition to setting the scoped registry, your non-scoped registry must be set to an npm registry that
includes all of the dependencies for Zowe CLI, such as the global npm registry:
npm config set @brightside:registry https://api.bintray.com/npm/ca/brightside
2. Issue the following command to installZowe CLIfrom the registry:
npm install -g @brightside/core@next
Note: On Windows, you must run as an Administrator to install the product and plug-ins.
Zowe CLIis installed on your PC. For information about plug-ins for Zowe CLI, see Extending Zowe CLI.
3. (Optional) To install all available plug-ins to Zowe CLI, issue the following command:
bright plugins install @brightside/cics@next
4. Create azosmfprofile so that you can issuecommands that communicate with z/OSMF. For
information about how to create a profile, see Creating a Zowe CLI profile.
Tip: Zowe CLI profiles contain information that is required for the product to interact with remote
systems. For example, host name, port, and user ID. Profiles let you target unique systems, regions, or
instances for a command. MostZowe CLI command groups require a Zowe CLI zosmf profile.
After you install and configureZowe CLI, you can issue thezowe --helpcommand to view a list of
available commands. For more information, seeHow to display Zowe CLI help.
Note: You might encounter problems when you attempt to install Zowe CLI depending on your operating
system and environment. For more information and workarounds, see Troubleshooting installing Zowe
CLI.
Creating a Zowe CLI profile
Profiles are aZowe CLI functionality that let you store configuration information for use on multiple
commands. You can create a profile that contains your username, password, and connection details for a
particular mainframe system, then reuse that profile to avoid typing it again on every command. You can
switch between profiles to quickly target different mainframe subsystems.
Important! Azosmfprofile is required to issue mostZowe CLIcommands. The first profile that you
create becomes your default profile.When you issue any command that requires azosmfprofile, the
command executes using your default profile unless you specify a specific profile name on that command.
Follow these steps:
1. To create azosmfprofile, issue the following command. Refer to the available options in the help text
to define your profile:
zowe profiles create zosmf-profile --help
24Open Beta for Zowe: Installation and User's Guide
Note: After you create a profile, verify that it can communicate with z/OSMF. For more information, see
(#Testing Zowe CLI connection to z/OSMF).
Testing Zowe CLI connection to z/OSMF
After you configure a Zowe CLIzosmfprofile to connect to z/OSMF on your mainframe systems, you
canissue a command at any time to receive diagnostic information from the server and confirm that your
profile can communicate with z/OSMF.
Tip: In this documentation we provide command syntax to help you create a basic profile. We recommend
that you append --help to the end of commands in the product to see the complete set of commands
and options available to you. For example, issue zowe profiles --help to learn more about how to
list profiles, switch your default profile, or create different profile types.
After you create a profile,run a test to verify thatZowe CLIcan communicate properly with z/OSMF. You
can test your default profile and any other Zowe CLI profile that you created.
Default profile
• Verify that you can use your defaultprofileto communicate with z/OSMF by issuing the following
command:
zowe zosmf check status
Specific profile
• Verify that you can usea specificprofileto communicate with z/OSMF by issuing the following
command:
zowe zosmf check status --zosmf-profile <profile_name>
The commands return a success or failure message and display information about your z/OSMF server.
For example, the z/OSMF version number and a list of installed plug-ins. Report any failure to your
systems administrator and use the information for diagnostic purposes.
Troubleshooting the installation
Review the following troubleshooting tips if you have problems with Zowe installation.
Troubleshooting installing the Zowe runtime
1. Environment variables
To prepare the environment for the Zowe runtime, a number of ZFS folders need to be located for
prerequisites on the platform that Zowe needs to operate. These can be set as environment variables
before the script is run. If the environment variables are not set, the install script will attempt to locate
default values.
•ZOWE_ZOSMF_PATH: The path where z/OSMF is installed. Defaults to /usr/lpp/zosmf/lib/
defaults/servers/zosmfServer
•ZOWE_JAVA_HOME: The path where 64 bit Java 8 or later is installed. Defaults to /usr/lpp/java/
J8.0_64
•ZOWE_EXPLORER_HOST: The IP address of where the explorer servers are launched from. Defaults
to running hostname -c
The first time the script is run if it has to locate any of the environment variables, the script will add
lines to the current user's home directory .profile file to set the variables. This ensures that the
next time the same user runs the install script, the previous values will be used.
Note: If you wish to set the environment variables for all users, add the lines to assign the variables
and their values to the file /etc/.profile.
Installing Zowe25
If the environment variables for ZOWE_ZOSMF_PATH, ZOWE_JAVA_HOME are not set and the install
script cannot determine a default location, the install script will prompt for their location. The install
script will not continue unless valid locations are provided.
2. Expanding the PAX files
The install script will create the Zowe runtime directory structure using the install:rootDir value
in the zowe-install.yaml file. The runtime components of the Zowe server are then unpaxed into
the directory that contains a number of directories and files that make up the Zowe runtime.
If the expand of the PAX files is successful, the install script will report that it ran its install step to
completion.
3. Changing Unix permissions
After the install script lay down the contents of the Zowe runtime into the rootDir, the next step is to
set the file and directory permissions correctly to allow the Zowe runtime servers to start and operate
successfully.
The install process will execute the file scripts/zowe-runtime-authorize.sh in the Zowe
runtime directory. If the script is successful, the result is reported. If for any reason the script fails
to run because of insufficient authority by the user running the install, the install process reports
the errors. A user with sufficient authority should then run the zowe-runtime-authorize.sh. If
you attempt to start the Zowe runtime servers without the zowe-runtime-authorize.sh having
successfully completed, the results are unpredictable and Zowe runtime startup or runtime errors will
occur.
4. Creating the PROCLIB member to run the Zowe runtime
Note: The name of the PROCLIB member might vary depending on the standards in place at each z/OS
site, however for this documentation, the PROCLIB member is called ZOWESVR.
At the end of the installation, a Unix file ZOWESVR.jcl is created under the directory where the
runtime is installed into, $INSTALL_DIR/files/templates. The contents of this file need to
be tailored and placed in a JCL member of the PROCLIB concatenation for the Zowe runtime to be
executed as a started task. The install script does this automatically, trying data sets USER.PROCLIB,
other PROCLIB data sets found in the PROCLIB concatenation and finally SYS1.PROCLIB.
If this succeeds, you will see a message like the following one:
PROC ZOWESVR placed in USER.PROCLIB
Otherwise you will see messages beginning with the following information:
Failed to put ZOWESVR.JCL in a PROCLIB dataset.
In this case, you need to copy the PROC manually. Issue the TSO oget command to copy the
ZOWESVR.jcl file to the preferred PROCLIB:
oget '$INSTALL_DIR/files/templates/ZOWESVR.jcl' 'MY.USER.PROCLIB(ZOWESVR)'
You can place the PROC in any PROCLIB data set in the PROCLIB concatenation, but some data sets
such as SYS1.PROCLIB might be restricted, depending on the permission of the user.
You can tailor the JCL at this line
//ZOWESVR PROC SRVRPATH='/zowe/install/path/explorer-server'
to replace the /zowe/install/path with the location of the Zowe runtime directory that contains
the explorer server. Otherwise you must specify that path on the START command when you start
Zowe in SDSF:
/S ZOWESVR,SRVRPATH='$ZOWE_ROOT_DIR/explorer-server'
Troubleshooting installing the Zowe Application Framework
To help Zowe research any problems you might encounter, collect as much of the following information as
possible and open an issue in GitHub with the collected information.
26Open Beta for Zowe: Installation and User's Guide
• Zowe version and release level
• z/OS release level
• Job output and dump (if any)
• Javascript console output (Web Developer toolkit accessible by pressing F12)
• Log output from the Zowe Application Server
• Error message codes
• Screenshots (if applicable)
• Other relevant information (such as the version of Node.js that is running on the Zowe Application
Server and the browser and browser version).
Troubleshooting installing explorer server
If explorer server REST APIs do not function properly, check the following items:
• Check whether your Liberty explorer server is running.
You can check this in the Display Active (DA) panel of SDSF under ISPF. The ZOWESVR started task
should be running. If the ZOWESVR task is not running, start the explorer server by using the following
START operator command:
/S ZOWESVR
You can also use the operator command /D A,ZOWESVR to verify whether the task is active, which
alleviates the need for the DA panel of SDSF. If the started task is not running, ensure that your
ZOWESVR procedure resides in a valid PROCLIB data set, and check the task’s job output for errors.
• Check whether the explorer server is started without errors.
In the DA panel of SDSF under ISPF, select the ZOWESVR job to view the started task output. If the
explorer server is started without errors, you can see the following messages:
CWWKE0001I: The server Atlas has been launched.
CWWKF0011I: The server Atlas is ready to run a smarter planet.
If you see error messages that are prefixed with "ERROR" or stack traces in the ZOWESVR job output,
respond to them.
• Check whether the URL that you use to call explorer server REST APIs is correct. For example: https://
your.server:atlasport/Atlas/api/system/version. The URL is case-sensitive.
• Ensure that you enter a valid z/OS® user ID and password when initially connecting to the explorer
server.
• If testing the explorer server REST API for jobs information fails, check the z/OSMF IZUSVR1 task
output for errors. If no errors occur, you can see the following messages in the IZUSVR1 job output:
CWWKE0001I : The server zosmfServer has been launched.
CWWKF0011I: The server zosmfServer is ready to run a smarter planet.
If you see error messages, respond to them.
For RESTJOBS, you can see the following message if no errors occur:
CWWKZ0001I: Application IzuManagementFacilityRestJobs started in n.nnn seconds.
You can also call z/OSMF RESTJOBS APIs directly from your Internet browser with a URL, for example,
https://your.server:securezosmfport/zosmf/restjobs/jobs
where the securezosmfport is 443 by default. You can verify the port number by checking the
izu.https.port variable assignment in the z/OSMF bootstrap.properties file.
Installing Zowe27
You might get error message IZUG846W, which indicates that a cross-site request forgery (CSRF) was
attempted. To resolve the issue, update your browser by adding the X-CSRF-ZOSMF-HEADER HTTP
custom header to every cross-site request. This header can be set to any value or an empty string ("").
For details, see the z/OSMF documentation. If calling the z/OSMF RESTJOBS API directly fails, fix z/
OSMF before explorer server can use these APIs successfully.
• If testing the explorer server REST API for data set information fails, check the z/OSMF IZUSVR1 task
output for errors and confirm that the z/OSMF RESTFILES services are started successfully. If no errors
occur, you can see the following message in the IZUSVR1 job output:
CWWKZ0001I: Application IzuManagementFacilityRestFiles started in n.nnn seconds.
You can also call z/OSMF RESTFILES APIs directly from your internet browser with a URL, for example,
https://your.server:securezosmfport/zosmf/restfiles/ds?dslevel=userid.**
where the securezosmfport is 443 by default. You can verify the port number by checking the
izu.https.port variable assignment in the z/OSMF bootstrap.properties file.
You might get error message IZUG846W, which indicates that a cross-site request forgery (CSRF) was
attempted. To resolve the issue, update your browser by adding the X-CSRF-ZOSMF-HEADER HTTP
custom header to every cross-site request. This header can be set to any value or an empty string ("").
For details, see the z/OSMF documentation. If calling the z/OSMF RESTFILES API directly fails, fix z/
OSMF before explorer server can use these APIs successfully.
Tip: The z/OSMF installation step of creating a valid IZUFPROC procedure in your system PROCLIB
might be missed. For more information, see the z/OSMF Configuration Guide.
The IZUFPROC member resides in your system PROCLIB, which is similar to the following sample:
//IZUFPROC PROC ROOT='/usr/lpp/zosmf' /* zOSMF INSTALL ROOT */
//IZUFPROC EXEC PGM=IKJEFT01,DYNAMNBR=200
//SYSEXEC DD DISP=SHR,DSN=ISP.SISPEXEC
// DD DISP=SHR,DSN=SYS1.SBPXEXEC
//SYSPROC DD DISP=SHR,DSN=ISP.SISPCLIB
// DD DISP=SHR,DSN=SYS1.SBPXEXEC
//ISPLLIB DD DISP=SHR,DSN=SYS1.SIEALNKE
//ISPPLIB DD DISP=SHR,DSN=ISP.SISPPENU
//ISPTLIB DD RECFM=FB,LRECL=80,SPACE=(TRK,(1,0,1))
// DD DISP=SHR,DSN=ISP.SISPTENU
//ISPSLIB DD DISP=SHR,DSN=ISP.SISPSENU
//ISPMLIB DD DISP=SHR,DSN=ISP.SISPMENU
//ISPPROF DD DISP=NEW,UNIT=SYSDA,SPACE=(TRK,(15,15,5)),
// DCB=(RECFM=FB,LRECL=80,BLKSIZE=3120)
//IZUSRVMP DD PATH='&ROOT./defaults/izurf.tsoservlet.mapping.json'
//SYSOUT DD SYSOUT=H
//CEEDUMP DD SYSOUT=H
//SYSUDUMP DD SYSOUT=H
//
Note: You might need to change paths and data sets names to match your installation.
A known issue and workaround for RESTFILES API can be found at TSO SERVLET EXCEPTION
ATTEMPTING TO USE RESTFILE INTERFACE.
• Check your system console log for related error messages and respond to them.
If the explorer server cannot connect to the z/OSMF server, check the following item:
By default, the explorer server communicates with the z/OSMF server on the localhost address. If your
z/OSMF server is on a different IP address to the explorer server, for example, if you are running z/OSMF
with Dynamic Virtual IP Addressing (DVIPA), you can change this by adding a ZOSMF_HOST parameter to
the server.env file. For example: ZOSMF_HOST=winmvs27.
Troubleshooting installing Zowe CLI
The following topics contain information that can help you troubleshoot problems when you encounter
unexpected behavior using Zowe CLI.
28Open Beta for Zowe: Installation and User's Guide

npm install -gCommand Fails Due to an EPERM Error
Valid on Windows
Symptom:
This behavior is due to a problem with Node Package Manager (npm). There is an open issue on the npm
GitHub repository to fix the defect.
Solution:
If you encounter this problem, some users report that repeatedly attempting to installZowe CLIyields
success. Some users also report success using the following workarounds:
• Issue thenpm cache cleancommand.
• Uninstall and reinstallZowe CLI. For more information, seeInstall Zowe CLI.
•Add the--no-optionalflag to the end of thenpm installcommand.
Sudo syntax required to complete some installations
Valid on Linux
Symptom:
The installation fails on Linux.
Solution:
Depending on how you configured Node.js on Linux or Mac, you might need to add the prefixsudobefore
thenpm install -gcommand or thenpm uninstall -gcommand. This step gives Node.jswrite
access to the installation directory.
npm install -g command fails due to npm ERR! Cannot read property 'pause' of undefined error
Valid on Windows or Linux
Symptom:
You receive the error messagenpm ERR! Cannot read property 'pause' of undefined when
you attempt to install the product.
Solution:
This behavior is due to a problem with Node Package Manager (npm). If you encounter this problem,
revert to a previous version of npm that does not contain this defect. To revert to a previous version of
npm, issue the following command:
npm install npm@5.3.0 -g
Node.js commands do not respond as expected
Valid on Windows or Linux
Symptom:
You attempt to issue node.js commands and you do not receive the expected output.
Solution:
There might be a program that is named*node*on your path. The Node.js installer automatically
adds a program that is named*node*to your path. When there are pre-existing programs that are
named*node*on your computer, the program that appears first in the path is used. To correct this
behavior, change the order of the programs in the path so that Node.js appears first.
Installation fails on Oracle Linux 6
Valid on Oracle Linux 6
Symptom:
Installing Zowe29
You receive error messages when you attempt to install the product on an Oracle Linux 6 operating
system.
Solution:
Install the product on Oracle Linux 7 or another Linux or Windows OS.Zowe CLIis not compatible with
Oracle Linux 6.
Uninstalling Zowe
You can uninstall Zowe if you no longer need to use it. Follow these procedures to uninstall each Zowe
component.
• Uninstalling the Zowe Application Framework
• Uninstalling explorer server
• Uninstalling API Mediation Layer
• Uninstalling Zowe CLI
Uninstalling the Zowe Application Framework
Follow these steps:
1. The Zowe Application Server (zlux-server) runs under the ZOWESVR started task, so it should
terminate when ZOWESVR is stopped. If it does not, use one of the following standard process signals
to stop the server:
•SIGHUP
•SIGTERM
•SIGKILL
2. Delete or overwrite the original directories. If you modified the zluxserver.json file so that it points
to directories other than the default directories, do not delete or overwrite those directories.
Uninstalling explorer server
Follow these steps:
1. Stop your Explorer Liberty server by running the following operator command:
C ZOWESVR
2. Delete the ZOWESVR member from your system PROCLIB data set.
To do this, you can issue the following TSO DELETE command from the TSO READY prompt or from
ISPF option 6:
delete 'your.zowe.proclib(zowesvr)'
Alternatively, you can issue the TSO DELETE command at any ISPF command line by prefixing the
command with TSO:
tso delete 'your.zowe.proclib(zowesvr)'
To query which PROCLIB data set that ZOWESVR is put in, you can view the SDSF JOB log of ZOWESVR
and look for the following message:
IEFC001I PROCEDURE ZOWESVR WAS EXPANDED USING SYSTEM LIBRARY your.zowe.proclib
If no ZOWESVR JOB log is available, issue the /$D PROCLIB command at the SDSF COMMAND INPUT
line and BROWSE each of the DSNAME=some.jes.proclib output lines in turn with ISPF option 1,
30Open Beta for Zowe: Installation and User's Guide

until you find the first data set that contains member ZOWESVR. Then issue the DELETE command as
shown above.
3. Remove RACF® (or equivalent) definitions with the following command:
RDELETE STARTED (ZOWESVR.*)
SETR RACLIST(STARTED) REFRESH
REMOVE (userid) GROUP(IZUUSER)
where userid indicates the user ID that is used to install Zowe.
4. Delete the z/OS® UNIX™ System Services explorer server directory and files from the explorer server
installation directory by issuing the following command:
rm -R /var/zowe #*Explorer Server Installation Directory*
Or
rm -R /var/zowe/<v.r.m> #*Explorer Server Installation Directory*
Where <v.r.m> indicates the package version such as 0.9.0.
Notes:
• You might need super user authority to run this command.
• You must identify the explorer server installation directory correctly. Running a recursive remove
command with the wrong directory name might delete critical files.
Uninstalling API Mediation Layer
Note: Be aware of the following considerations:
• You might need super-user authority to run this command.
• You must identify the API Mediation installation directory correctly. Running a recursive remove
command with the incorrect directory name can delete critical files.
Follow these steps:
1. Stop your API Mediation Layer services using the following command:
C ZOWESVR
2. Delete the ZOWESVR member from your system PROCLIB data set.
To do this, you can issue the following TSO DELETE command from the TSO READY prompt or from
ISPF option 6:
delete 'your.zowe.proclib(zowesvr)'
Alternatively, you can issue the TSO DELETE command at any ISPF command line by prefixing the
command with TSO:
tso delete 'your.zowe.proclib(zowesvr)'
To query which PROCLIB data set that ZOWESVR is put in, you can view the SDSF JOB log of ZOWESVR
and look for the following message:
IEFC001I PROCEDURE ZOWESVR WAS EXPANDED USING SYSTEM LIBRARY your.zowe.proclib
If no ZOWESVR JOB log is available, issue the /$D PROCLIB command at the SDSF COMMAND INPUT
line and BROWSE each of the DSNAME=some.jes.proclib output lines in turn with ISPF option 1,
until you find the first data set that contains member ZOWESVR. Then issue the DELETE command as
shown above.
Installing Zowe31
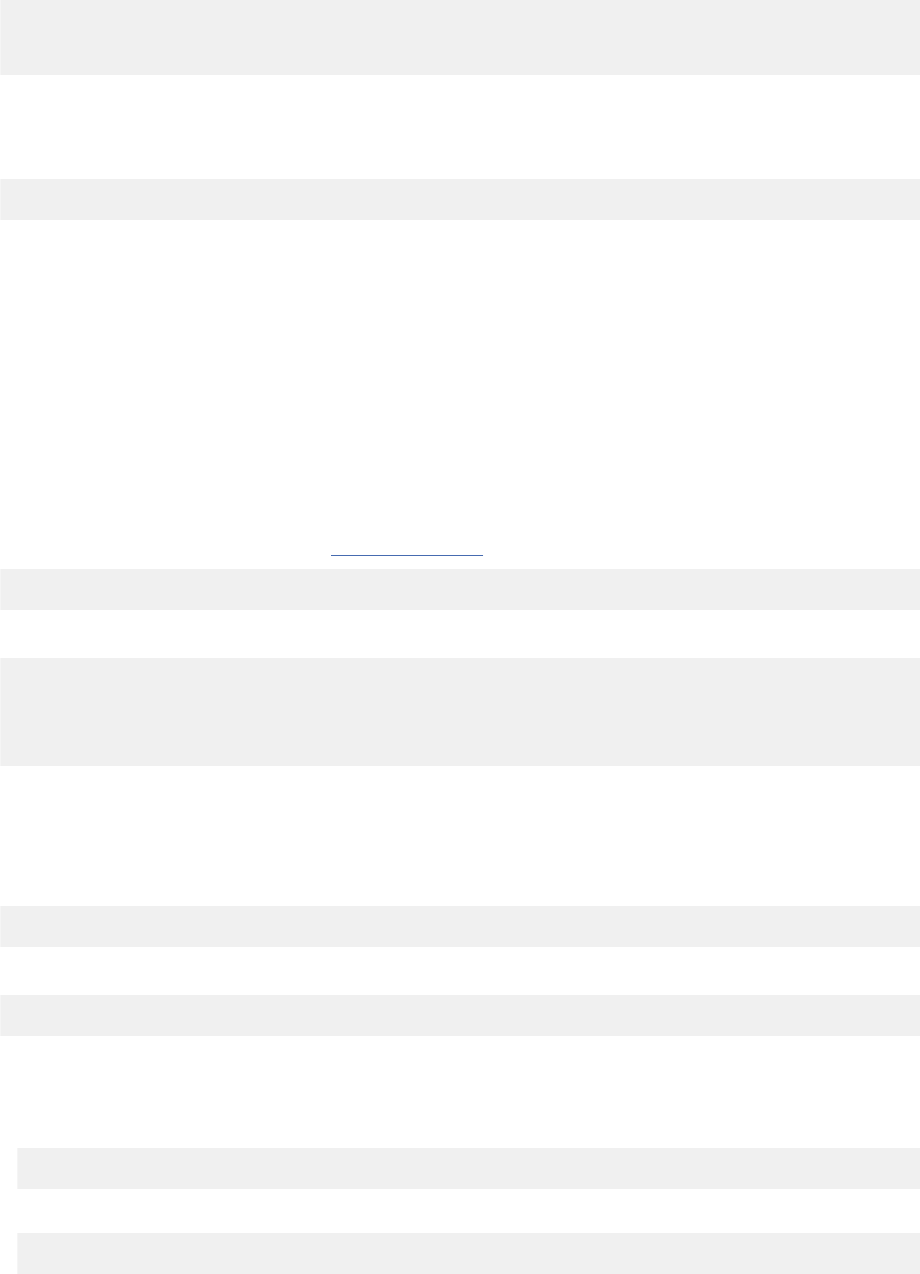
3. Remove RACF® (or equivalent) definitions using the following command:
RDELETE STARTED (ZOWESVR.*)
SETR RACLIST(STARTED) REFRESH
REMOVE (userid) GROUP(IZUUSER)
where userid indicates the user ID that is used to install Zowe.
4. Delete the z/OS® UNIX™ System Services API Mediation Layer directory and files from the API
Mediation Layer installation directory using the following command:
rm -R /var/zowe_install_directory/api-mediation #*Zowe Installation Directory*
Uninstalling Zowe CLI
Important! The uninstall process does not delete the profiles and credentials that you created when
using the product from your PC. To delete the profiles from your PC, delete them before you uninstall
Zowe CLI.
The following steps describe how to list the profiles that you created, delete the profiles, and uninstall
Zowe CLI.
Follow these steps:
1. Open a command line window.
Note: If you do not want to delete the Zowe CLI profiles from your PC, go to Step 5.
2. List all profiles that you created for a Command Groupby issuing the following command:
zowe profiles list <profileType>
Example:
$ zowe profiles list zosmf
The following profiles were found for the module zosmf:
'SMITH-123' (DEFAULT)
smith-123@SMITH-123-W7 C:\Users\SMITH-123
$
3. Delete all of the profiles that are listed for the command group by issuing the following command:
Tip: For this command, use the results of the list command.
Note: When you issue the delete command, it deletes the specified profile and its credentials from
the credential vault in your PC's operating system.
zowe profiles delete <profileType> <profileName> --force
Example:
zowe profiles delete zosmf SMITH-123 --force
4. Repeat Steps 2 and 3 for all Zowe CLI command groups and profiles.
5. Uninstall Zowe CLIby issuing one of the following commands:
• If you installed Zowe CLI from the package, issue the following command
npm uninstall --global @brightside/core
• If you installed Zowe CLI from the online registry, issue the following command:
npm uninstall --global brightside
The uninstall process removes all Zowe CLIinstallation directories and files from your PC.
32Open Beta for Zowe: Installation and User's Guide

6. Delete the C:\Users\<user_name>\.brightside directory on your PC. The directory contains the
Zowe CLIlog files and other miscellaneous files that were generated when you used the product.
Tip: Deleting the directory does not harm your PC.
7. If you installed Zowe CLI from the online registry, issue the following command to clear your scoped
npmregistry:
npm config set @brightside:registry
Installing Zowe33
34Open Beta for Zowe: Installation and User's Guide
Chapter 3. Configuring Zowe
Follow these procedures to configure the components of Zowe.
Zowe Application Framework (zLUX) configuration
After you install Zowe, you can optionally configure the terminal application plug-ins or modify the Zowe
Application Server (zLUX Proxy Server) and ZSS configuration, if needed.
Setting up terminal application plug-ins
Follow these optional steps to configure the default connection to open for the terminal application plug-
ins.
Setting up the TN3270 mainframe terminal application plug-in
_defaultTN3270.json is a file in tn3270-ng2/, which is deployed during setup. Within this file, you
can specify the following parameters to configure the terminal connection:
"host": <hostname>
"port": <port>
“security”: {
type: <”telnet” or “tls”>
}
Setting up the VT Terminal application plug-in
_defaultVT.json is a file in vt-ng2/, which is deployed during setup. Within this file, you can specify
the following parameters to configure the terminal connection:
“host”:<hostname>
“port”:<port>
“security”: {
type: <”telnet” or “ssh”>
}
Configuring the zLUX Proxy Server and ZSS
Configuration file
The zLUX Proxy Server and ZSS rely on many parameters to run, which includes setting up networking,
deployment directories, plug-in locations, and more.
For convenience, the zLUX Proxy Server and ZSS read from a JSON file with a common structure. ZSS
reads this file directly as a startup argument, while the zLUX Proxy Server as defined in the zlux-proxy-
server repository accepts several parameters, which are intended to be read from a JSON file through
an implementer of the server, such as the example in the zlux-example-server repository, the
js/zluxServer.js file. This file accepts a JSON file that specifies most, if not all, of the parameters
needed. Other parameters can be provided through flags, if needed.
An example JSON file can be found in the zlux-example-server repository, in the zluxserver.json in
the config directory.
Note: All examples are based on the zlux-example-server repository.
Network configuration
Note: The following attributes are to be defined in the server's JSON configuration file.
The zLUX Proxy Server can be accessed over HTTP, HTTPS, or both, provided it has been configured for
either (or both).
HTTP
To configure the server for HTTP, complete these steps:
1. Define an attribute http within the top-level node attribute.
2. Define port within http. Where port is an integer parameter for the TCP port on which the server will
listen. Specify 80 or a value between 1024-65535.
HTTPS
For HTTPS, specify the following parameters:
1. Define an attribute https within the top-level node attribute.
2. Define the following within https:
•port: An integer parameter for the TCP port on which the server will listen. Specify 443 or a value
between 1024-65535.
•certificates: An array of strings, which are paths to PEM format HTTPS certificate files.
•keys: An array of strings, which are paths to PEM format HTTPS key files.
•pfx: A string, which is a path to a PFX file which must contain certificates, keys, and optionally Certificate
Authorities.
•certificateAuthorities (Optional): An array of strings, which are paths to certificate authorities files.
•certificateRevocationLists (Optional): An array of strings, which are paths to certificate revocation list
(CRL) files.
Note: When using HTTPS, you must specify pfx, or both certificates and keys.
Network example
In the example configuration, both HTTP and HTTPS are specified:
"node": {
"https": {
"port": 8544,
//pfx (string), keys, certificates, certificateAuthorities, and certificateRevocationLists
are all valid here.
"keys": ["../deploy/product/ZLUX/serverConfig/server.key"],
"certificates": ["../deploy/product/ZLUX/serverConfig/server.cert"]
},
"http": {
"port": 8543
}
}
Deploy configuration
When the zLUX Proxy Server is running, it accesses the server's settings and reads or modifies the
contents of its resource storage. All of this data is stored within the Deploy folder hierarchy, which is
spread out into a several scopes:
•Product: The contents of this folder are not meant to be modified, but used as defaults for a product.
•Site: The contents of this folder are intended to be shared across multiple zLUX Proxy Server
instances, perhaps on a network drive.
•Instance: This folder represents the broadest scope of data within the given zLUX Proxy Server
instance.
•Group: Multiple users can be associated into one group, so that settings are shared among them.
•User: When authenticated, users have their own settings and storage for the application plug-ins that
they use.
These directories dictate where the Configuration Dataservice stores content.
36Open Beta for Zowe: Installation and User's Guide
Deploy example
// All paths relative to zlux-example-server/js or zlux-example-server/bin
// In real installations, these values will be configured during the installation process.
"rootDir":"../deploy",
"productDir":"../deploy/product",
"siteDir":"../deploy/site",
"instanceDir":"../deploy/instance",
"groupsDir":"../deploy/instance/groups",
"usersDir":"../deploy/instance/users"
Application plug-in configuration
This topic describes application plug-ins that are defined in advance.
In the configuration file, you can specify a directory that contains JSON files, which tell the server what
application plug-in to include and where to find it on disk. The backend of these application plug-ins use
the server's plug-in structure, so much of the server-side references to application plug-ins use the term
plug-in.
To include application plug-ins, define the location of the plug-ins directory in the configuration file,
through the top-level attribute pluginsDir.
Note: In this example, the directory for these JSON files is /plugins. Yet, to separate configuration
files from runtime files, the zlux-example-server repository copies the contents of this folder into /
deploy/instance/ZLUX/plugins. So, the example configuration file uses the latter directory.
Plug-ins directory example
// All paths relative to zlux-example-server/js or zlux-example-server/bin
// In real installations, these values will be configured during the install process.
//...
"pluginsDir":"../deploy/instance/ZLUX/plugins",
Logging configuration
For more information, see Logging Utility.
ZSS configuration
Running ZSS requires a JSON configuration file that is similar or the same as the one used for the zLUX
Proxy Server. The attributes that are needed for ZSS, at minimum, are:*rootDir*, productDir, siteDir,
instanceDir, groupsDir, usersDir, pluginsDir and zssPort. All of these attributes have the same meaning as
described above for the server, but if the zLUX Proxy Server and ZSS are not run from the same location,
then these directories can be different.
The zssPort attribute is specific to ZSS. This is the TCP port on which ZSS listens in order to be contacted
by the zLUX Proxy Server. Define this port in the configuration file as a value between 1024-65535.
Connecting the zLUX Proxy Server to ZSS
When you run the zLUX Proxy Server, specify the following flags to declare which ZSS instance the Zowe
Application Framework will proxy ZSS requests to:
•-h: Declares the host where ZSS can be found. Use as "-h <hostname>"
•-P: Declares the port at which ZSS is listening. Use as "-P <port>"
Zowe Application Framework logging
The Zowe Application Framework log files contain processing messages and statistics. The log files are
generated in the following default locations:
• Zowe Proxy Server: zlux-example-server/log/nodeServer-yyyy-mm-dd-hh-mm.log
• ZSS: zlux-example-server/log/zssServer-yyyy-mm-dd-hh-mm.log
Configuring Zowe37
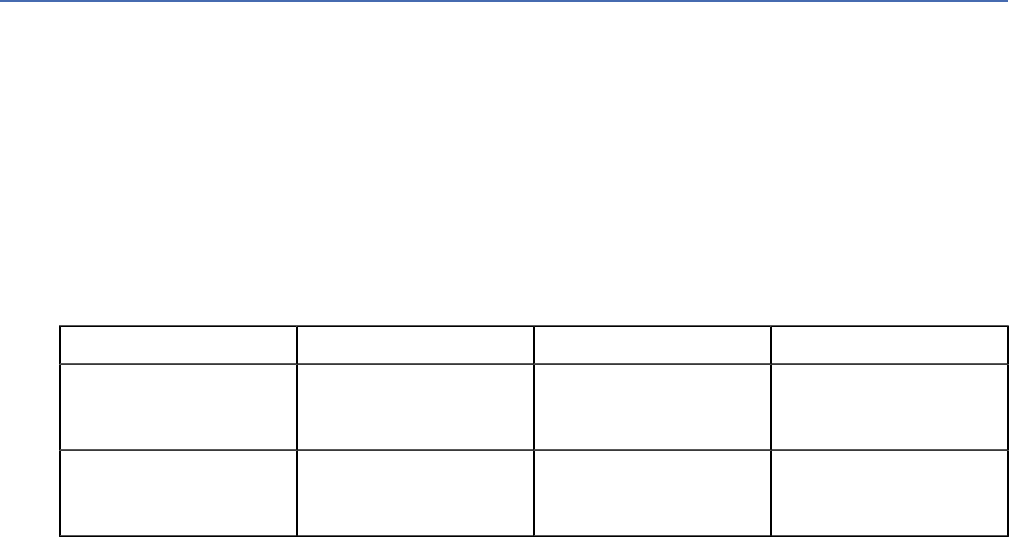
The logs are timestamped in the format yyyy-mm-dd-hh-mm and older logs are deleted when a new log is
created at server startup.
Controlling the logging location
The log information is written to a file and to the screen. (On Windows, logs are written to a file only.)
ZLUX_NODE_LOG_DIR and ZSS_LOG_DIR environment variables
To control where the information is logged, use the environment variable ZLUX_NODE_LOG_DIR, for the
zLUX Proxy Server, and ZSS_LOG_DIR, for ZSS. While these variables are intended to specify a directory, if
you specify a location that is a file name, Zowe will write the logs to the specified file instead (for example:
/dev/null to disable logging).
When you specify the environment variables ZLUX_NODE_LOG_DIR and ZSS_LOG_DIR and you specify
directories rather than files, Zowe will timestamp the logs and delete the older logs that exceed the
ZLUX_NODE_LOGS_TO_KEEP threshold.
ZLUX_NODE_LOG_FILE and ZSS_LOG_FILE environment variables
If you set the log file name for the zLUX Proxy Server by setting the ZLUX_NODE_LOG_FILE environment
variable, or if you set the log file for ZSS by setting the ZSS_LOG_FILE environment variable, there will only
be one log file, and it will be overwritten each time the server is launched.
Note: When you set the ZLUX_NODE_LOG_FILE or ZSS_LOG_FILE environment variables, Zowe will not
override the log names, set a timestamp, or delete the logs.
If the directory or file cannot be created, the server will run (but it might not perform logging properly).
Retaining logs
By default, the last five logs are retained. To specify a different number of logs to retain, set
ZLUX_NODE_LOGS_TO_KEEP (zLUX Proxy Server logs) or ZSS_LOGS_TO_KEEP (ZSS logs) to the number of
logs that you want to keep. For example, if you set ZLUX_NODE_LOGS_TO_KEEP to 10, when the eleventh
log is created, the first log is deleted.
Configuring Zowe CLI
After you install Zowe, you can optionally perform Zowe CLI configurations.
Setting environment variables for Zowe CLI
You can setenvironment variables on your operating system to modifyZowe CLIbehavior,such as the log
level and the location of the .brightside directory, where the logs, profiles, and plug-ins are stored.Refer
to your PC operating system documentation for information about how to set environmental variables.
Setting log levels
You can set the log level to adjust the level of detail that is written to log files:
Important! Setting the log level to TRACE or ALL might result in "sensitive" data being logged. For
example, command line arguments will be logged when TRACE is set.
Environment Variable Description Values Default
BRIGHTSIDE\_APP
\_LOG\_LEVEL
Zowe CLI logging level Log4JS log levels (OFF,
TRACE, DEBUG, INFO,
WARN, ERROR, FATAL)
DEBUG
BRIGHTSIDE
\_IMPERATIVE\_LOG
\_LEVEL
Imperative CLI
Framework logging level
Log4JS log levels (OFF,
TRACE, DEBUG, INFO,
WARN, ERROR, FATAL)
DEBUG
38Open Beta for Zowe: Installation and User's Guide

Setting the .brightside directory
You canset the location on your PC where Zowe CLI creates the .brightside directory, which contains log
files, profiles, and plug-ins for the product:
Environment Variable Description Values Default
BRIGHTSIDE\_CLI
\_HOME
Zowe CLI home
directory location
Any valid path on your
PC
Your PC default home
directory
Configuring Zowe39
40Open Beta for Zowe: Installation and User's Guide

Chapter 4. Using Zowe
After you install and start Zowe, you can perform tasks with each component. See the following sections
for details.
Using the Zowe Desktop
You can use the Zowe Application Framework to create application plug-ins for the Zowe Desktop. For
more information, see Exending the Zowe Application Framework.
Navigating the Zowe Desktop
From the Zowe Desktop, you can access Zowe applications.
Accessing the Zowe Desktop
From a supported browser, open the Zowe Desktop at https://myhost:httpsPort/ZLUX/plugins/
com.rs.mvd/web/index.html
where:
•myHost is the host on which you are running the Zowe Application Server.
•httpsPort is the value that was assigned to node.https.port in zluxserver.json. For example, if
you run the Zowe Application Server on host myhost and the value that is assigned to node.https.port
in zluxserver.json is 12345, you would specify https://myhost:12345/ZLUX/plugins/
com.rs.mvd/web/index.html.
Logging in and out of the Zowe Desktop
1. To log in, enter your mainframe credentials in the Username and Password fields.
2. Press Enter. Upon authentication of your user name and password, the desktop opens.
To log out, click the the avatar in the lower right corner and click Sign Out.
Pinning applications to the task bar
1. Click the Start menu.
2. Locate the application you want to pin.
3. Right-click the on the application icon and select Pin to taskbar.
Using Explorers within the Zowe Application Framework
The explorer server provides a sample web client that can be used to view and manipulate the Job Entry
Subsystem (JES), data sets, z/OS UNIX System Services (USS), and System log.
The following views are available from the explorer server Web UI and are accessible via the explorer
server icon located in the application draw of Zowe Desktop (Navigation between views can be performed
using the menu draw located in the top left corner of the explorer server Web UI):
JES Explorer
Use this view to query JES jobs with filters, and view the related steps, files, and status. You can also
purge jobs from this view.
Data set Explorer
Use this view to browse the MVS™ file system by using a high-level qualifier filter. With the Dataset
Explorer, you can complete the following tasks:

• List the members of partitioned data sets.
• Create new data sets using attributes or the attributes of an existing data set ("Allocate Like").
• Submit data sets that contain JCL to Job Entry Subsystem (JES).
• Edit sequential data sets and partitioned data set members with basic syntax highlighting and content
assist for JCL and REXX.
• Conduct basic validation of record length when editing JCL.
• Delete data sets and members.
• Open data sets in full screen editor mode, which gives you a fully qualified link to that file. The link is
then reusable for example in help tickets.
UNIX file Explorer
Use this view to browse the USS files by using a path. With the UNIX file Explorer, you can complete the
following tasks:
• List files and folders.
• Create new files and folders.
• Edit files with basic syntax highlighting and content assist for JCL and REXX.
• Delete files and folders.
Zowe Application Framework application plug-ins
Application plug-ins are applications that you can use to access the mainframe and to perform various
tasks. Developers can create application plug-ins using a sample application as a guide. The following
application plug-ins are installed by default:
Hello World Sample
The Hello World sample application plug-in for developers demonstrates how to create a dataservice and
how to create an application plug-in using Angular.
IFrame Sample
The IFrame sample application plug-in for developers demonstrates how to embed pre-made webpages
within the desktop as an application and how an application can request an action of another application
(see the source code for more information).
z/OS Subsystems
This z/OS Subsystems plug-in helps you find information about the important services on the mainframe,
such as CICS, Db2, and IMS.
TN3270
This TN3270 plug-in provides a 3270 connection to the mainframe on which the Zowe Application Server
runs.
VT Terminal
The VT Terminal plug-in provides a connection to UNIX System Services and UNIX.
API Catalog
The API Catalog plug-in lets you view API services that have been discovered by the API Mediation
Layer. For more information about the API Mediation Layer, Discovery Service, and API Catalog, see API
Mediation Layer Overview.
Workflows
From the Workflows application plug-in you can create, manage, and use z/OSMF workflows to manage
your system.
42Open Beta for Zowe: Installation and User's Guide
Using the Workflows application plug-in
The Workflows application plug-in is available from the Zowe Deskstop Start menu. To launch Workflows,
click the Start menu in the lower-left corner of the desktop and click the Workflows application plug-in
icon. The Users/Tasks Workflows window opens.
To refresh the display, click the circular arrow in the upper right corner of the window.
Configuration
From the Configuration tab, you can view, add, and remove servers.
Adding a z/OSMF server
Complete these steps to add a new z/OSMF server:
1. Click the Configuration tab.
2. Click the plus sign (+) on the left side of the window.
3. In the Host field, type the name of the host.
4. In the Port field, type the port number.
5. Click OK.
To test the connection, click Test. When the server is online the Online indicator next to the server Host
and Port is green.
Setting a server as the default z/OSMF server
Complete these steps to set a default z/OSMF server:
1. Click Set as default.
2. Enter your user ID and password.
3. Click Sign in.
Note: You must specify a default server.
Removing a server
To remove a server, click x next to the server in the list that you want to remove.
Workflows
Click the Workflows tab to display all workflows on the system.
Tip: To search for a particular workflow, type the search string in the search box in the upper right portion
of the tab.
The following information is displayed on the Workflows tab.
Workflow
The name of the workflow.
Description
The description of the workflow.
Version
The version number.
Owner
The user ID of the workflow owner.
System
The system identifier.
Using Zowe43

Status
The status of the workflow (for example, In progress, Completed, and so on.)
Progress
Progress indicator.
Defining a workflow
Complete these steps to define a workflow: 1. From the Workflows tab, click Action in the upper left
corner of the tab. 2. Click New workflow. 3. Specify the Name, Workflow definition file, System, and
Owner. 4. Click OK.
Viewing tasks
To view your tasks, click the My Tasks tab. This tab displays Workflow tasks that belong to you. You can
choose to view Pending, Completed, or All tasks. Workflows that have tasks that are assigned to you are
shown on the left side of the window. For each workflow, you can click the arrow to expand or collapse
the task list. Your assigned tasks display below each workflow. Hovering over each task displays more
information about the task, such as the status and the owner.
Each task has a indicator of PERFORM (a step needs to be performed) or CHECK (Check the step that was
performed). Clicking CHECK or PERFORM opens a work area on the right side of the window.
Note: When a task is complete, a green clipboard icon with a checkmark is displayed.
Hovering over the task description in the title bar of the work area window on the right side displays more
information corresponding workflow and the step description.
Task work area
When you click CHECK or PERFORM a work area on the right side of the window is displayed.
• When you click CHECK, you can view the JESMSGLG, JESJCL, JESYSMSG, or SYSTSPRT that is
associated with the selected task.
• When you click PERFORM, you can use the work area to perform the steps associated with the selected
task. Click Next to advance to the next step for the task.
Viewing warnings
Click the Warnings tab to view any warning messages that were encountered.
The following information is displayed on the Warnings tab.
Message Code
The message code that is associated with the warning.
Description
A description of the warning.
Date
The date of the warning.
Corresponding Workflow
The workflow that is associated with the warning.
Using APIs
Access and modify your z/OS resources such as jobs, data sets, z/OS UNIX System Services files by using
APIs.
44Open Beta for Zowe: Installation and User's Guide

Using explorer server REST APIs
Explorer server REST APIs provide a range of REST APIs through a Swagger defined description, and a
simple interface to specify API endpoint parameters and request bodies along with the response body
and return code. With explorer server REST APIs, you can see the available API endpoints and try the
endpoints within a browser. Swagger documentation is available from an Internet browser with a URL, for
example, https://your.host:atlas-port/ibm/api/explorer.
Data set APIs
Use data set APIs to create, read, update, delete, and list data sets. See the following table for the
operations available in data set APIs and their descriptions and prerequisites.
REST API Description Prerequisite
GET /Atlas/api/datasets/
{filter}
Get a list of data sets by filter.
Use this API to get a starting
list of data sets, for example,
userid.**.
z/OSMF restfiles
GET /Atlas/api/datasets/
{dsn}/attributes
Retrieve attributes of a data
set(s). If you have a data set
name, use this API to determine
attributes for a data set name.
For example, it is a partitioned
data set.
z/OSMF restfiles
GET /Atlas/api/datasets/
{dsn}/members
Get a list of members for a
partitioned data set. Use this
API to get a list of members of a
partitioned data set.
z/OSMF restfiles
GET /Atlas/api/datasets/
{dsn}/content
Read content from a data set
or member. Use this API to
read the content of a sequential
data set or partitioned data set
member. Or use this API to return
a checksum that can be used
on a subsequent PUT request to
determine if a concurrent update
has occurred.
z/OSMF restfiles
PUT /Atlas/api/datasets/
{dsn}/content
Write content to a data set or
member. Use this API to write
content to a sequential data set
or partitioned data set member.
If a checksum is passed and it
does not match the checksum
that is returned by a previous GET
request, a concurrent update has
occurred and the write fails.
z/OSMF restfiles
POST /Atlas/api/datasets/
{dsn}
Create a data set. Use this API to
create a data set according to the
attributes that are provided. The
API uses z/OSMF to create the
data set and uses the syntax and
rules that are described in the z/
OSMF Programming Guide.
z/OSMF restfiles
Using Zowe45

REST API Description Prerequisite
POST /Atlas/api/datasets/
{dsn}/{basedsn}
Create a data set by using the
attributes of a given base data
set. When you do not know the
attributes of a new data set, use
this API to create a new data set
by using the same attributes as
an existing one.
z/OSMF
DELETE /Atlas/api/
datasets/{dsn}
Delete a data set or member. Use
this API to delete a sequential
data set or partitioned data set
member.
z/OSMF restfiles
Job APIs
Use Jobs APIs to view the information and files of jobs, and submit and cancel jobs. See the following
table for the operations available in Job APIs and their descriptions and prerequisites.
REST API Description Prerequisite
GET /Atlas/api/jobs Get a list of jobs. Use this API to
get a list of job names that match
a given prefix, owner, or both.
z/OSMF restjobs
GET /Atlas/api/jobs/
{jobName}/ids
Get a list of job identifiers for a
given job name. If you have a list
of existing job names, use this
API to get a list of job instances
for a given job name.
z/OSMF restjobs
GET /Atlas/api/jobs/
{jobName}/ids/{jobId}/
steps
Get job steps for a given job. With
a job name and job ID, use this
API to get a list of the job steps,
which includes the step name,
the executed program, and the
logical step number.
z/OSMF restjobs
GET /Atlas/api/jobs/
{jobName}/ids/{jobId}/
steps/{stepNumber}/dds
Get data set definitions (DDs)
for a given job step. If you know
a step number for a given job
instance, use this API to get a list
of the DDs for a given job step,
which includes the DD name, the
data sets that are described by
the DD, the original DD JCL, and
the logical order of the DD in the
step.
z/OSMF restjobs
GET /Atlas/api/jobs/
{jobName}/ids/{jobId}/
files
Get a list of output file names
for a job. Job output files have
associated DSIDs. Use this API
to get a list of the DSIDs and
DD name of a job. You can use
the DSIDs and DD name to read
specific job output files.
z/OSMF restjobs
46Open Beta for Zowe: Installation and User's Guide

REST API Description Prerequisite
GET /Atlas/api/jobs/
{jobName}/ids/{jobId}/
files/{fileId}
Read content from a specific job
output file. If you have a DSID or
field for a given job, use this API
to read the output file's content.
z/OSMF restjobs
GET /Atlas/api/jobs/
{jobName}/ids/{jobId}/
files/{fileId}/tail
Read the tail of a job's output file.
Use this API to request a specific
number of records from the tail of
a job output file.
z/OSMF restjobs
GET /Atlas/api/jobs/
{jobName}/ids/{jobId}/
subsystem
Get the subsystem type for a job.
Use this API to determine the
subsystem that is associated with
a given job. The API examines the
JCL of the job to determine if the
executed program is CICS®, Db2®,
IMS™, or IBM® MQ.
z/OSMF restjobs
POST /Atlas/api/jobs Submit a job and get the job ID
back. Use this API to submit a
partitioned data set member or
UNIX™ file.
z/OSMF restjobs
DELETE /Atlas/api/jobs/
{jobName}/{jobId}
Cancel a job and purge its
associated files. Use this API to
purge a submitted job and the
logged output files that it creates
to free up space.
z/OSMF Running Common
Information Model (CIM) server
System APIs
Use System APIs to view the version of explorer server. See the following table for available operations
and their descriptions and prerequisites.
REST API Description Prerequisite
GET /Atlas/api/system/
version
Get the current explorer server
version. Use this API to get the
current version of the explorer
server microservice.
None
USS File APIs
Use USS File APIs to create, read, update, and delete USS files. See the following table for the available
operations and their descriptions and prerequisites.
REST API Description Prerequisite
POST /Atlas/api/uss/files Use this API to create new USS
directories and files.
z/OSMF restfiles
DELETE /Atlas/api/uss/
files{path}
Use this API to delete USS
directories and files.
z/OSMF resfiles
GET /Atlas/api/files/
{path}
Use this API to get a list of files in
a USS directory along with their
attributes.
z/OSMF restfiles
GET /Atlas/api/files/
{path}/content
Use this API to get the content of
a USS file.
z/OSMF restfiles
Using Zowe47
REST API Description Prerequisite
PUT /Atlas/api/files/
{path}/content
Use this API to update the
content of a USS file.
z/OSMF resfiles
z/OS System APIs
Use z/OS system APIs to view information about PARMLIB, SYSPLEX, and USER. See the following table
for available operations and their descriptions and prerequisites.
REST API Description Prerequisite
GET /Atlas/api/zos/
parmlib
Get system PARMLIB
information. Use this API to
get the PARMLIB data set
concatenation of the target z/OS
system.
None
GET /Atlas/api/zos/
sysplex
Get target system sysplex and
system name. Use this API to get
the system and sysplex names.
None
GET /Atlas/api/zos/
username
Get current userid. Use this API
to get the current user ID.
None
Programming explorer server REST APIs
You can program explorer server REST APIs by referring to the examples in this section.
Sending a GET request in Java
Here is sample code to send a GET request to explorer server in Java™.
public class JobListener implements Runnable {
/*
* Perform an HTTPs GET at the given jobs URL and credentials
* targetURL e.g "https://host:port/Atlas/api/jobs?owner=IBMUSER&prefix=*"
* credentials in the form of base64 encoded string of user:password
*/
private String executeGET(String targetURL, String credentials) {
HttpURLConnection connection = null;
try {
//Create connection
URL url = new URL(targetURL);
connection = (HttpURLConnection) url.openConnection();
connection.setRequestMethod("GET");
connection.setRequestProperty("Authorization", credentials);
//Get Response
InputStream inputStream = connection.getInputStream();
BufferedReader bufferedReader = new BufferedReader(new
InputStreamReader(inputStream));
StringBuilder response = new StringBuilder();
String line;
//Process the response line by line
while ((line = bufferedReader.readLine()) != null) {
System.out.println(line);
}
//Cleanup
bufferedReader.close();
//Return the response message
return response.toString();
} catch (Exception e) {
//handle any error(s)
} finally {
//Cleanup
if (connection != null) {
48Open Beta for Zowe: Installation and User's Guide
connection.disconnect();
}
}
}
}
Sending a GET request in JavaScript
Here is sample code written in JavaScript™ using features from ES6 to send a GETrequest to explorer
server.
const BASE_URL = 'hostname.com:port/Atlas/api';
// Call the jobs GET api to get all jobs with the userID IBMUSER
function getJobs(){
let parameters = "prefix=*&owner=IBMUSER";
let contentURL = `${BASE_URL}/jobs?${parameters}`;
let result = fetch(contentURL, {credentials: "include"})
.then(response => response.json())
.catch((e) => {
//handle any error
console.log("An error occoured: " + e);
});
return result;
}
Sending a POST request in JavaScript
Here is sample code written in JavaScript™ using features from ES6 to send a POST request to explorer
server.
// Call the jobs POST api to submit a job from a data set (ATLAS.TEST.JCL(TSTJ0001))
function submitJob(){
let payload = "{\"file\":\"'ATLAS.TEST.JCL(TSTJ0001)'\"}";
let contentURL = `${BASE_URL}/jobs`;
let result = fetch(contentURL,
{
credentials: "include",
method: "POST",
body: payload
})
.then(response => response.json())
.catch((e) => {
//handle any error
console.log("An error occoured: " + e);
});
return result;
}
Extended API sample in JavaScript
Here is an extended API sample that is written using JavaScript™ with features from ES62015 (map).
/////////////////////////////////////////////////////////////////////////////
// Extended API Sample
// This Sample is written using Javascript with features from ES62015 (map).
// The sample is also written using JSX giving the ability to return HTML elements
// with Javascript variables embedded. This sample is based upon the codebase of the
// sample UI (see- hostname:port/explorer-mvs) which is written using Facebook's React, Redux,
// Router and Google's material-ui
/////////////////////////////////////////////////////////////////////////////
// Return a table with rows detailing the name and jobID of all jobs matching
// the specified parameters
function displayJobNamesTable(){
let jobsJSON = getJobs("*","IBMUSER");
return (<table>
{jobsJSON.map(job => {
return <tr><td>{job.name}</td><td>{job.id}</td></tr>
})}
</table>);
}
// Call the jobs GET api to get all jobs with the userID IBMUSER
Using Zowe49
function getJobs(owner, prefix){
const BASE_URL = 'hostname.com:port/Atlas/api';
let parameters = "prefix=" + prefix + "&owner=" + owner;
let contentURL = `${BASE_URL}/jobs?${parameters}`;
let result = fetch(contentURL, {credentials: "include"})
.then(response => response.json())
.catch((e) => {
//handle any error
console.log("An error occoured: " + e);
});
return result;
}
Using explorer server WebSocket services
The explorer server provides WebSocket services that can be accessed by using the WSS scheme. With
explorer server WebSocket services, you can view the system log in the System log UI that is refreshed
automatically when messages are written. You can also open a JES spool file for an active job and view its
contents that refresh through a web socket.
Server Endpoint Description Prerequisites
/api/sockets/jobs/
{jobname}/ids/{jobid}/
files/{fileid}
Tail the output of an active job.
Use this WSS endpoint to read
the tail of an active job's output
file in real time.
z/OSMF restjobs
API Catalog
As an application developer, use the API Catalog to view what services are running in the API Mediation
Layer. Through the API Catalog, you can also view the associated API documentation corresponding
to a service, descriptive information about the service, and the current state of the service. The tiles
in the API Catalog can be customized by changing values in the mfaas.catalog-ui-tile section defined
in the application.yml of a service. A microservice that is onboarded with the API Mediation Layer and
configured appropriately, registers automatically with the API Catalog and a tile for that service is added
to the Catalog.
Note: For more information about how to configure the API Catalog in the application.yml, see: Add API
Onboarding Configuration.
View Service Information and API Documentation in the API Catalog
Use the API Catalog to view services, API documentation, descriptive information about the service, the
current state of the service, service endpoints, and detailed descriptions of these endpoints.
Note: Verify that your service is running. At least one started and registered instance with the Discovery
Service is needed for your service to be visible in the API Catalog.
Follow these steps:
1. Use the search bar to find the service that you are looking for. Services that belong to the same product
family are displayed on the same tile.
Example: Sample Applications, Endevor, SDK Application
2. Click the tile to view header information, the registered services under that family ID, and API
documentation for that service.
Notes:
• The state of the service is indicated in the service tile on the dashboard page. If no instances of the
service are currently running, the tile displays a message displays that no services are running.
• At least one instance of a service must be started and registered with the discovery service for it to
be visible in the API Catalog. If the service that you are onboarding is running, and the corresponding
50Open Beta for Zowe: Installation and User's Guide
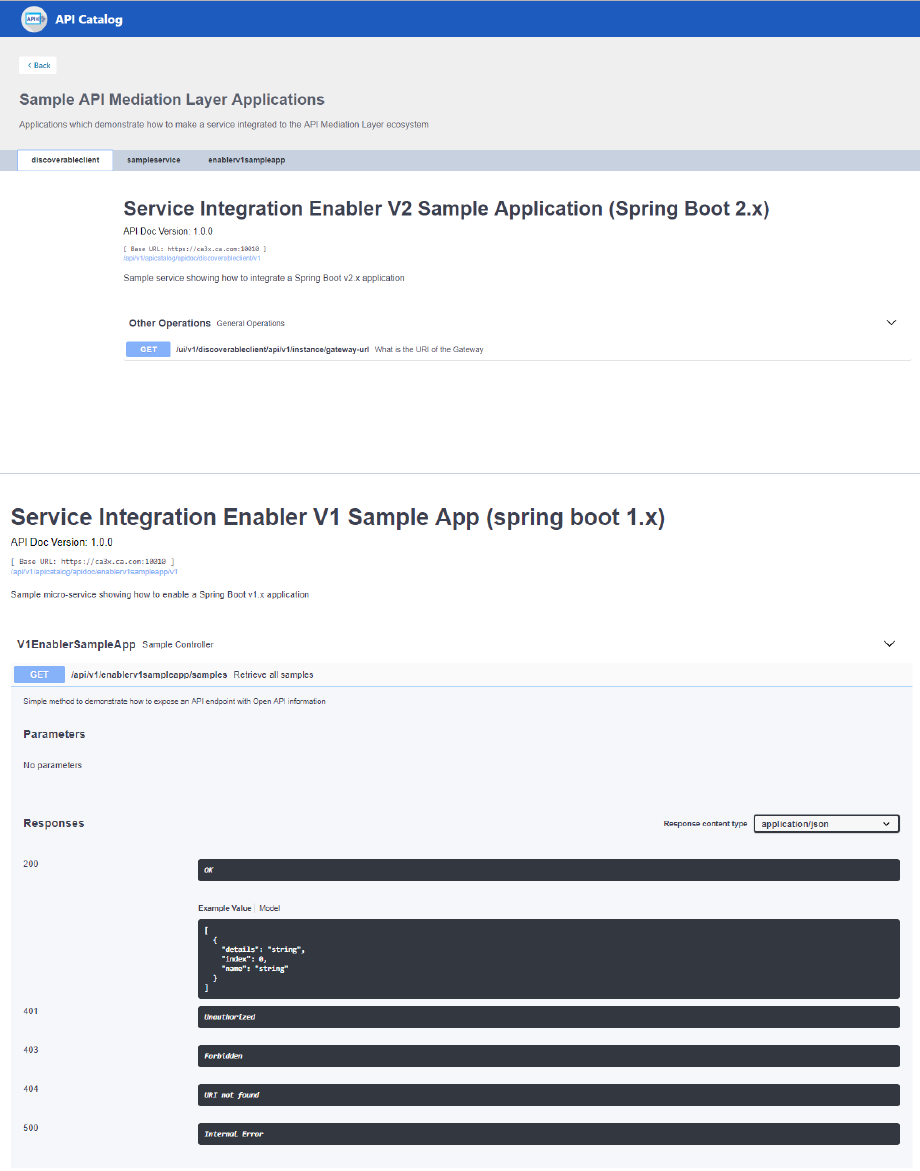
API documentation is displayed, this API documentation is cached and remains visible even when
the service and all service instances stop.
• Descriptive information about the service and a link to the home page of the service is displayed.
Example:
3. Expand the endpoint panel to see a detailed summary with responses and parameters of each
endpoint, the endpoint description, and the full structure of the endpoint.
Example:
Notes:
• If a lock icon is visible on the right side of the endpoint panel, the endpoint requires authentication.
Using Zowe51
• The structure of the endpoint is displayed relative to the base URL.
• The URL path of the abbreviated endpoint relative to the base URL is displayed in the following
format:
Example:
/api/v1/{yourServiceId}/{endpointName}
The path of the full URL that includes the base URL is also displayed in the following format:
https://hostName:basePort/api/v1/{yourServiceId}/{endpointName}
Both links target the same endpoint location.
Using Zowe CLI
This section contains the following articles about using Zowe CLI.
Display Zowe CLI help
Zowe CLIcontains a help system that is embedded directly into the command-line interface. When you
want help with Zowe CLI, you issue help commands that provide you with information about the product,
syntax, and usage.
Display top-level help
To begin using the product, open a command line window and issue the following command to view the
top-level help descriptions:
zowe --help
Tip: The commandzoweinitiates the product on a command line. AllZowe CLIcommands begin
withzowe.
Help structure
The help displays the following types of information:
•Description: An explanation of the functionality for the command group, action, or option that you
specified in a --help command.
•Usage: The syntax for the command. Refer to usage to determine the expected hierarchical structure of
a command.
•Options: Flags that you can append to the end of a command to specify particular values or booleans.
For example, the volume size for a data set that you want to create.
•Global Options: Flags that you can append to any command inZowe CLI. For example, the --help flag
is a global option.
Displaying command group, action, and object help
You can use the --help global option get more information about a specific command group, action,
or object. Use the following syntax to display group-level help and learn more about specific command
groups (for example, zos-jobs and zos-files):
zowe <group, action, or object name> --help
zowe zos-files create --help
52Open Beta for Zowe: Installation and User's Guide
Zowe CLI command groups
Zowe CLI contains command groups that focus on specific business processes. For example, the zos-
files command group provides the ability to interact with mainframe data sets. This article provides you
with a brief synopsis of the tasks that you can perform with each group. For more information, seeDisplay
Zowe CLI Help.
The commands available in the product are organized in a hierarchical structure. Command groups (for
example, zos-files) contain actions (for example, create) that let you perform actions on specific
objects (for example, a specific type of data set). For each action that you perform on an object, you can
specify options that affect the operation of the command.
Important! Before you issue these commands, verify that you completed the steps in Create a Zowe CLI
profile andTest Connection to z/OSMF to help ensure that Zowe CLI can communicate with z/OS systems.
Zowe CLI contains the following command groups:
plugins
The plugins command group lets you install and manage third-party plug-ins for the product. Plug-ins
extend the functionality ofZowe CLI in the form of new commands.
With the plugins command group, you can perform the following tasks:
• Install or uninstall third-party plug-ins.
• Display a list of installed plug-ins.
• Validate that a plug-in integrates with the base product properly.
Note: For more information about plugins syntax, actions, and options, open Zowe CLI and issue the
following command:
zowe plugins -h
profiles
The profiles command group lets you create and manage profiles for use with other Zowe CLI command
groups. Profiles allow you to issue commands to different mainframe systems quickly, without specifying
your connection details with every command.
With the profiles command group, you can perform the following tasks:
• Create, update, and delete profiles for any Zowe CLI command group that supports profiles.
• Set the default profile to be used within anycommand group.
• List profile names and details for anycommand group, including the default active profile.
Note: For more information about profiles syntax, actions, and options, open Zowe CLI, and issue the
following command:
zowe profiles -h
provisioning
The provisioning command group lets you perform IBM z/OSMF provisioning tasks with templates and
provisioned instances fromZowe CLI.
With the provisioning command group, you can perform the following tasks:
• Provision cloud instances using z/OSMF Software Services templates.
• List information about the available z/OSMF Service Catalog published templates and the templates
that you used to publish cloud instances.
• List summary information about the templates that you used to provision cloud instances. You can filter
the information by application (for example, DB2 and CICS) and by the external name of the provisioned
instances.
Using Zowe53

• List detail information about the variables used (and their corresponding values) on named, published
cloud instances.
Note: For more information about provisioning syntax, actions, and options, open Zowe CLI and issue the
following command:
zowe provisioning -h
zos-console
The zos-console command group lets you issue commands to the z/OS console by establishing an
extended Multiple Console Support (MCS) console.
With the zos-console command group, you can perform the following tasks: Important!Before you issue
z/OS console commands with Zowe CLI, security administrators should ensure that they provide access
to commands that are appropriate for your organization. - Issue commands to the z/OS console. - Collect
command responses and continue to collect solicited command responses on-demand.
Note: For more information about zos-console syntax, actions, and options, open Zowe CLI and issue
the following command:
zowe zos-console -h
zos-files
The zos-files command group lets you interact with data sets on z/OS systems.
With the zos-files command group, you can perform the following tasks:
• Create partitioned data sets (PDS) with members,physical sequential data sets (PS), and other types of
data sets from templates. You can specify options to customize the data sets you create.
• Download mainframe data sets and edit them locally in your preferred Integrated Development
Environment (IDE).
• Upload local files to mainframe data sets.
• List available mainframe data sets.
• Interact with VSAM data sets directly, or invoke Access Methods Services (IDCAMS) to work with VSAM
data sets.
Note: For more information about zos-files syntax, actions, and options, open Zowe CLI and issue the
following command:
zowe zos-files -h
zos-jobs
The zos-jobs command group lets you submit jobs and interact with jobs on z/OS systems.
With the zos-jobs command group, you can perform the following tasks:
• Submit jobs from JCL that resides on the mainframe or a local file.
• List jobs and spool files for a job.
• View the status of a job or view a spool file from a job.
Note: For more information about zos-jobs syntax, actions, and options, open Zowe CLI and issue the
following command:
zowe zos-jobs -h
zos-tso
The zos-tso command group lets you issue TSO commands and interact with TSO address spaces on z/OS
systems.
54Open Beta for Zowe: Installation and User's Guide
With the zos-tso command group, you can perform the following tasks:
• Excecute REXX scripts
• Create a TSO address space and issue TSO commands to the address space.
• Review TSO command response data in Zowe CLI.
Note: For more information about zos-tso syntax, actions, and options, open Zowe CLI and issue the
following command:
zowe zos-tso -h
zosmf
The zosmf command group lets you work with Zowe CLI profiles and get general information about z/
OSMF.
With the zosmf command group, you can perform the following tasks:
• Create and manage yourZowe CLI zosmf profiles. You must have at least one zosmf profile to issue
most commands. Issue thezowe help explain profilescommand inZowe CLI to learn more
about using profiles.
• Verify that your profiles are set up correctly to communicate with z/OSMF on your system. For more
information, seeTest Connection to z/OSMF.
• Get information about the current z/OSMF version, host, port, and plug-ins installed on your system.
Note: For more information about zosmf syntax, actions, and options, open Zowe CLI and issue the
following command:
zowe zosmf -h
Using Zowe55
56Open Beta for Zowe: Installation and User's Guide
Chapter 5. Extending the Zowe Application
Framework (zLUX)
You can create plug-ins to extend the capabilities of the Zowe Application Framework.
Creating application plug-ins
An application plug-in is an installable set of files that present resources in a web-based user interface, as
a set of RESTful services, or in a web-based user interface and as a set of RESTful services.
Before you build an application plug-in, you must set the UNIX environment variables that support the
plug-in environment.
Setting the environment variables for plug-in development
To set up the environment, the node must be accessible on the PATH. To determine if the node is already
on the PATH, issue the following command from the command line:
node --version
If the version is returned, the node is already on the PATH.
If nothing is returned from the command, you can set the PATH using the NODE_HOME variable. The
NODE_HOME variable must be set to the directory of the node install. You can use the export command
to set the directory. For example:
export NODE_HOME=node_installation_directory
Using this directory, the node will be included on the PATH in nodeServer.sh. (nodeServer.sh is
located in zlux-example-server/bin).
Using the sample application plug-in
You can experiment with the sample application plug-in called sample-app that is provided.
To build the sample application plug-in, node and npm must be included in the PATH. You can use the
npm run build or npm start command to build the sample application plug-in. These commands are
configured in package.json.
Note:
• If you change the source code for the sample application, you must rebuild it.
• If you want to modify sample-app, you must run _npm install_ in the Zowe Desktop and the
sample-app/webClient. Then, you can run _npm run build_ in sample-app/webClient.
• Ensure that you set the MVD_DESKTOP_DIR system variable to the Zowe Desktop plug-in location. For
example: <ZLUX_CAP>/zlux-app-manager/virtual-desktop.
1. Add an item to sample-app. The following figure shows an excerpt from app.component.ts:
export class AppComponent { items = ['a', 'b', 'c', 'd'] title = 'app';
helloText: string; serverResponseMessage: string;
2. Save the changes to app.component.ts.
3. Issue one of the following commands:
• To rebuild the application plug-in, issue the following command: npm run build

• To rebuild the application plug-in and wait for additional changes to app.component.ts, issue the
following command: npm start
4. Reload the web page.
5. If you make changes to the sample application source code, follow these steps to rebuild the
application:
a. Navigate to the sample-app subdirectory where you made the source code changes.
b. Issue the following command: npm run build
c. Reload the web page.
zLUX plug-ins definition and structure
The zLUX Application Server (zlux-proxy-server) enables extensiblity with application plug-ins.
Application plug-ins are a subcategory of the unit of extensibility in the server called a plug-in.
The files that define a plug-in are located in the pluginsDir directory.
Application plug-in filesystem structure
An application plug-in can be loaded from a filesystem that is accessible to the zLUX Application Server,
or it can be loaded dynamically at runtime. When accessed from a filesystem, there are important
considerations for the developer and the user as to where to place the files for proper build, packaging,
and operation.
Root files and directories
The root of an application plug-in directory contains the following files and directories.
pluginDefinition.json
This file describes an application plug-in to the zLUX Application Server. (A plug-in is the unit of
extensibility for the zLUX Application Server. An application plug-in is a plug-in of the type "Application",
the most common and visible type of plug-in.) A definition file informs the server whether the application
plug-in has server-side dataservices, client-side web content, or both.
Dev and source content
Aside from demonstration or open source application plug-ins, the following directories should not be
visible on a deployed server because the directories are used to build content and are not read by the
server.
nodeServer
When an application plug-in has router-type dataservices, they are interpreted by the zLUX Application
Server by attaching them as ExpressJS routers. It is recommended that you write application plug-ins
using Typescript, because it facilitates well-structured code. Use of Typescript results in build steps
because the pre-transpilation Typescript content is not to be consumed by NodeJS. Therefore, keep
server-side source code in the nodeServer directory. At runtime, the server loads router dataservices
from the lib directory.
webClient
When an application plug-in has the webContent attribute in its definition, the server serves static
content for a client. To optimize loading of the application plug-in to the user, use Typescript to write the
application plug-in and then package it using Webpack. Use of Typescript and Webpack result in build
steps because the pre-transpilation Typescript and the pre-webpack content are not to be consumed by
the browser. Therefore, separate the source code from the served content by placing source code in the
webClient directory.
58Open Beta for Zowe: Installation and User's Guide

Runtime content
At runtime, the following set of directories are used by the server and client.
lib
The lib directory is where router-type dataservices are loaded by use in the zLUX Application Server. If
the JS files that are loaded from the lib directory require NodeJS modules, which are not provided by
the server base (the modules ZLUX-proxy-server requires are added to NODE_PATH at runtime), then
you must include these modules in lib/node_modules for local directory lookup or ensure that they
are found on the NODE_PATH environment variable. nodeServer/node_modules is not automatically
accessed at runtime because it is a dev and build directory.
web
The web directory is where the server serves static content for an application plug-in that includes the
webContent attribute in its definition. Typically, this directory contains the output of a webpack build.
Anything you place in this directory can be accessed by a client, so only include content that is intended to
be consumed by clients.
Location of plug-in files
The files that define a plug-in are located in the pluginsDir directory.
pluginsDir directory
At startup, the server reads from the pluginsDir directory. The server loads the valid plug-ins that are
found by the information that is provided in the JSON files.
Within the pluginsDir directory are a collection of JSON files. Each file has two attributes, which serve
to locate a plug-in on disk:
location: This is a directory path that is relative to the server's executable (such as zlux-example-
server/bin/nodeServer.sh) at which a pluginDefinition.json file is expected to be found.
identifier: The unique string (commonly styled as a Java resource) of a plug-in, which must match what is
in the pluginDefinition.json file.
Plug-in definition file
pluginDefinition.json is a file that describes a plug-in. Each plug-in requires this file, because it
defines how the server will register and use the backend of an application plug-in (called a plug-in in
the terminology of the proxy server). The attributes in each file are dependent upon the pluginType
attribute. Consider the following pluginDefinition.json file from sample-app:
{
"identifier": "com.rs.mvd.myplugin",
"apiVersion": "1.0",
"pluginVersion": "1.0",
"pluginType": "application",
"webContent": {
"framework": "angular2",
"launchDefinition": {
"pluginShortNameKey": "helloWorldTitle",
"pluginShortNameDefault": "Hello World",
"imageSrc": "assets/icon.png"
},
"descriptionKey": "MyPluginDescription",
"descriptionDefault": "Base MVD plugin template",
"isSingleWindowApp": true,
"defaultWindowStyle": {
"width": 400,
"height": 300
}
},
"dataServices": [
{
"type": "router",
"name": "hello",
Extending the Zowe Application Framework (zLUX)59

"serviceLookupMethod": "external",
"fileName": "helloWorld.js",
"routerFactory": "helloWorldRouter",
"dependenciesIncluded": true
}
]
}
Plug-in attributes
There are two categories of attributes: General and Application.
General attributes
identifier
Every application plug-in must have a unique string ID that associates it with a URL space on the server.
apiVersion
The version number for the pluginDefinition scheme and application plug-in or dataservice requirements.
The default is 1.0.0.
pluginVersion
The version number of the individual plug-in.
pluginType
A string that specifies the type of plug-in. The type of plug-in determines the other attributes that are
valid in the definition.
•application: Defines the plug-in as an application plug-in. Application plug-ins are composed of a
collection of web content for presentation in the zLUX web component (such as the Zowe Desktop), or a
collection of dataservices (REST and websocket), or both.
•library: Defines the plug-in as a library that serves static content at a known URL space.
•node authentication: Authentication and Authorization handlers for the zLUX Application Server.
Application attributes
When a plug-in is of pluginType application, the following attributes are valid:
webContent
An object that defines several attributes about the content that is shown in a web UI.
dataServices
An array of objects that describe REST or websocket dataservices.
configurationData
An object that describes the resource structure that the application plug-in uses for storing user, group,
and server data.
Application web content attributes
An application that has the webContent attribute defined provides content that is displayed in a zLUX web
UI.
The following attributes determine some of this behavior:
framework
States the type of web framework that is used, which determines the other attributes that are valid in
webContent.
•angular2: Defines the application as having an Angular (2+) web framework component. This is the
standard for a "native" framework zLUX application.
60Open Beta for Zowe: Installation and User's Guide

•iframe: Defines the application as being external to the native zLUX web application environment, but
instead embedded in an iframe wrapper.
launchDefinition
An object that details several attributes for presenting the application in a web UI.
•pluginShortNameDefault: A string that gives a name to the application when i18n is not present. When
i18n is present, i18n is applied by using the pluginShortNameKey.
•descriptionDefault: A longer string that specifies a description of the application within a UI. The
description is seen when i18n is not present. When i18n is present, i18n is applied by using the
descriptionKey.
•imageSrc: The relative path (from /web) to a small image file that represents the application icon.
defaultWindowStyle
An object that details the placement of a default window for the application in a web UI.
•width: The default width of the application plug-in window, in pixels.
•height: The default height of the application plug-in window, in pixels.
IFrame application web content
In addition to the general web content attributes, when the framework of an application is "iframe", you
must specify the page that is being embedded in the iframe. To do so, incude the attribute startingPage
within webContent. startingPage is relative to the application's /web directory.
Specify startingPage as a relative path rather than an absolute path because the
pluginDefinition.json file is intended to be read-only, and therefore would not work well when the
hostname of a page changes.
Within an IFrame, the application plug-in still has access to the globals that are used by zLUX for
application-to-application communication; simply access window.parent.RocketMVD.
zLUX dataservices
Dataservices are a dynamic component of the backend of a zLUX application. Dataservices are optional,
because the proxy server might only serve static content for a particular application. However, when
included in an application, a dataservice defines a URL space for which the server will run the extensible
code from the application. Dataservices are primarily intended to be used to create REST APIs and
Websocket channels.
Defining a dataservice
Within the sample-app repository, in the top directory, you will find a pluginDefinition.json file.
Each zLUX application requires this file, because it defines how the server registers and uses the backend
of an application (called a plug-in in the terminology of the proxy server).
Within the JSON file, there is a top level attribute, dataServices:
"dataServices": [
{
"type": "router",
"name": "hello",
"serviceLookupMethod": "external",
"fileName": "helloWorld.js",
"routerFactory": "helloWorldRouter",
"dependenciesIncluded": true
}
]
Dataservices defined in pluginDefinition
The following attributes are valid for each dataservice in the dataServices array:
Extending the Zowe Application Framework (zLUX)61

type
Specify one of the following values:
•router: Router dataservices are dataservices that run under the proxy server, and use ExpressJS
Routers for attaching actions to URLs and methods.
•service: Service dataservices are dataservices that run under ZSS, and utilize the API of ZSS
dataservices for attaching actions to URLs and methods.
name
The name of the service that must be unique for each pluginDefinition.json file. The name is used
to reference the dataservice during logging and it is also is used in the construction of the URL space that
the dataservice occupies.
serviceLookupMethod
Specify external unless otherwise instructed.
fileName
The name of the file that is the entry point for construction of the dataservice, relative to the application's
/lib directory. In the case of sample-app, upon transpilation of the typescript code, javascript files are
placed into the /lib directory.
routerFactory (Optional)
When you use a router dataservice, the dataservice is included in the proxy server through a require()
statement. If the dataservice's exports are defined such that the router is provided through a factory of a
specific name, you must state the name of the exported factory using this attribute.
dependenciesIncluded
Must be true for anything in the pluginDefinition.json file. (This setting is false only when adding
dataservices to the server dynamically.)
Dataservice API
The API for a dataservice can be categorized as Router-based or ZSS-based, and Websocket or not.
Note: Each Router dataservice can safely import express, express-ws, and bluebird without requiring
the modules to be present, because these modules exist in the proxy server's directory and the
NODE_MODULES environment variable can include this directory.
Router-based dataservices
HTTP/REST router dataservices
Router-based dataservices must return a (bluebird) Promise that resolves to an ExpressJS router upon
success. For more information, see the ExpressJS guide on use of Router middleware: Using Router
Middleware.
Because of the nature of Router middleware, the dataservice need only specify URLs that stem from a
root '/' path, as the paths specified in the router are later prepended with the unique URL space of the
dataservice.
The Promise for the Router can be within a Factory export function, as mentioned in the
pluginDefinition specification for routerFactory above, or by the module constructor.
An example is available in sample-app/nodeServer/ts/helloWorld.ts
Websocket router dataservices
ExpressJS routers are fairly flexible, so the contract to create the Router for Websockets is not
significantly different.
62Open Beta for Zowe: Installation and User's Guide

Here, the express-ws package is used, which adds websockets through the ws package to ExpressJS. The
two changes between a websocket-based router and a normal router are that the method is 'ws', as in
router.ws(<url>,<callback>), and the callback provides the websocket on which you must define
event listeners.
See the ws and express-ws topics on www.npmjs.com for more information about how they work, as the
API for websocket router dataservices is primarily provided in these packages.
An example is available in zlux-proxy-server/plugins/terminal-proxy/lib/
terminalProxy.js
Router dataservice context
Every router-based dataservice is provided with a Context object upon creation that provides definitions
of its surroundings and the functions that are helpful. The following items are present in the Context
object:
serviceDefinition
The dataservice definition, originally from the pluginDefinition.json file within a plug-in.
serviceConfiguration
An object that contains the contents of configuration files, if present.
logger
An instance of a zLUX Logger, which has its component name as the unique name of the dataservice
within a plug-in.
makeSublogger
A function to create a zLUX Logger with a new name, which is appended to the unique name of the
dataservice.
addBodyParseMiddleware
A function that provides common body parsers for HTTP bodies, such as JSON and plaintext.
plugin
An object that contains more context from the plug-in scope, including:
•pluginDef: The contents of the pluginDefinition.json file that contains this dataservice.
•server: An object that contains information about the server's configuration such as:
–app: Information about the product, which includes the productCode (for example: ZLUX).
–user: Configuration information of the server, such as the port on which it is listening.
Zowe Desktop and window management
The Zowe Desktop is a web component of Zowe, which is an implementation of MVDWindowManagement,
the interface that is used to create a window manager.
The code for this software is in the zlux-app-manager repository.
The interface for building an alternative window manager is in the zlux-platform repository.
Window Management acts upon Windows, which are visualizations of an instance of an application plug-
in. Application plug-ins are plug-ins of the type "application", and therefore the Zowe Desktop operates
around a collection of plug-ins.
Note: Other objects and frameworks that can be utilized by application plug-ins, but not related to
window management, such as application-to-application communication, Logging, URI lookup, and Auth
are not described here.
Extending the Zowe Application Framework (zLUX)63
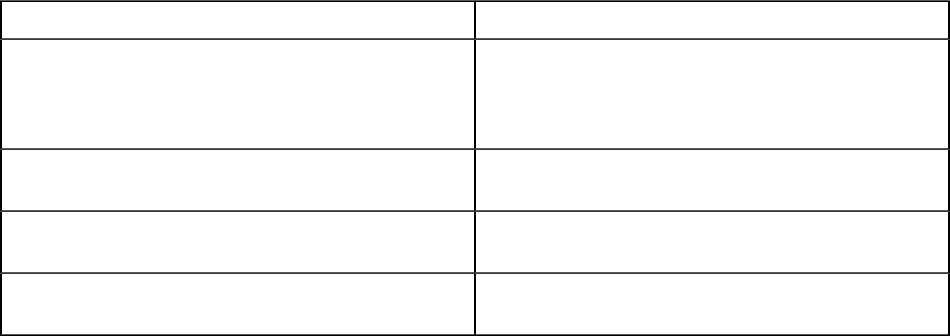
Loading and presenting application plug-ins
Upon loading the Zowe Desktop, a GET call is made to /plugins?type=application. The GET call
returns a JSON list of all application plug-ins that are on the server, which can be accessed by the user.
Application plug-ins can be composed of dataservices, web content, or both. Application plug-ins that
have web content are presented in the Zowe Desktop UI.
The Zowe Desktop has a taskbar at the bottom of the page, where it displays each application plug-in as
an icon with a description. The icon that is used, and the description that is presented are based on the
application plug-in's PluginDefinition's webContent attributes.
Plug-in management
Application plug-ins can gain insight into the environment in which they were spawned through the Plugin
Manager. Use the Plugin Manager to determine whether a plug-in is present before you act upon the
existence of that plug-in. When the Zowe Desktop is running, you can access the Plugin Manager through
RocketMVD.PluginManager
The following are the functions you can use on the Plugin Manager:
• getPlugin(pluginID: string)
• Accepts a string of a unique plug-in ID, and returns the Plugin Definition Object
(DesktopPluginDefinition) that is associated with it, if found.
Application management
Application plug-ins within a Window Manager are created and acted upon in part by an Application
Manager. The Application Manager can facilitate communication between application plug-ins, but
formal application-to-application communication should be performed by calls to the Dispatcher. The
Application Manager is not normally directly accessible by application plug-ins, instead used by the
Window Manager.
The following are functions of an Application Manager:
Function Description
spawnApplication(plugin:
DesktopPluginDefinition,
launchMetadata: any):
Promise<MVDHosting.InstanceId>;
Opens an application instance into the Window
Manager, with or without context on what actions it
should perform after creation.
killApplication(plugin:ZLUX.Plugin,
appId:MVDHosting.InstanceId): void;
Removes an application instance from the Window
Manager.
showApplicationWindow(plugin:
DesktopPluginDefinitionImpl): void;
Makes an open application instance visible within
the Window Manager.
isApplicationRunning(plugin:
DesktopPluginDefinitionImpl): boolean;
Determines if any instances of the application are
open in the Window Manager.
Windows and Viewports
When a user clicks an application plug-in's icon on the taskbar, an instance of the application plug-in is
started and presented within a Viewport, which is encapsulated in a Window within the Zowe Desktop.
Every instance of an application plug-in's web content within Zowe is given context and can listen on
events about the Viewport and Window it exists within, regardless of whether the Window Manager
implementation utilizes these constructs visually. It is possible to create a Window Manager that only
displays one application plug-in at a time, or to have a drawer-and-panel UI rather than a true windowed
UI.
When the Window is created, the application plug-in's web content is encapsulated dependent upon its
framework type. The following are valid framework types:
64Open Beta for Zowe: Installation and User's Guide

•"angular2": The web content is written in Angular, and packaged with Webpack. Application plug-in
framework objects are given through @injectables and imports.
•"iframe": The web content can be written using any framework, but is included through an iframe tag.
Application plug-ins within an iframe can access framework objects through parent.RocketMVD and
callbacks.
In the case of the Zowe Desktop, this framework-specific wrapping is handled by the Plugin Manager.
Viewport Manager
Viewports encapsulate an instance of an application plug-in's web content, but otherwise do not add
to the UI (they do not present Chrome as a Window does). Each instance of an application plug-in is
associated with a viewport, and operations to act upon a particular application plug-in instance should be
done by specifying a viewport for an application plug-in, to differentiate which instance is the target of an
action. Actions performed against viewports should be performed through the Viewport Manager.
The following are functions of the Viewport Manager:
Function Description
createViewport(providers:
ResolvedReflectiveProvider[]):
MVDHosting.ViewportId;
Creates a viewport into which an application plug-
in's webcontent can be embedded.
registerViewport(viewportId:
MVDHosting.ViewportId, instanceId:
MVDHosting.InstanceId): void;
Registers a previously created viewport to an
application plug-in instance.
destroyViewport(viewportId:
MVDHosting.ViewportId): void;
Removes a viewport from the Window Manager.
getApplicationInstanceId(viewportId:
MVDHosting.ViewportId):
MVDHosting.InstanceId | null;
Returns the ID of an application plug-in's instance
from within a viewport within the Window Manager.
Injection Manager
When you create Angular application plug-ins, they can use injectables to be informed of when an action
occurs. iframe application plug-ins indirectly benefit from some of these hooks due to the wrapper acting
upon them, but Angular application plug-ins have direct access.
The following topics describe injectables that application plug-ins can use.
Plug-in definition
@Inject(Angular2InjectionTokens.PLUGIN_DEFINITION) private pluginDefinition:
ZLUX.ContainerPluginDefinition
Provides the plug-in definition that is associated with this application plug-in. This injectable can be used
to gain context about the application plug-in. It can also be used by the application plug-in with other
application plug-in framework objects to perform a contextual action.
Logger
@Inject(Angular2InjectionTokens.LOGGER) private logger: ZLUX.ComponentLogger
Provides a logger that is named after the application plug-in's plugin definition ID.
Launch Metadata
@Inject(Angular2InjectionTokens.LAUNCH_METADATA) private launchMetadata: any
Extending the Zowe Application Framework (zLUX)65

If present, this variable requests the application plug-in instance to initialize with some context, rather
than the default view.
Viewport Events
@Inject(Angular2InjectionTokens.VIEWPORT_EVENTS) private viewportEvents:
Angular2PluginViewportEvents
Presents hooks that can be subscribed to for event listening. Events include:
resized: Subject<{width: number, height: number}>
Fires when the viewport's size has changed.
Window Events
@Inject(Angular2InjectionTokens.WINDOW_ACTIONS) private windowActions:
Angular2PluginWindowActions
Presents hooks that can be subscribed to for event listening. The events include:
Event Description
maximized: Subject<void> Fires when the Window is maximized.
minimized: Subject<void> Fires when the Window is minimized.
restored: Subject<void> Fires when the Window is restored from a
minimized state.
moved: Subject<{top: number, left:
number}>
Fires when the Window is moved.
resized: Subject<{width: number,
height: number}>
Fires when the Window is resized.
titleChanged: Subject<string> Fires when the Window's title changes.
Window Actions
@Inject(Angular2InjectionTokens.WINDOW_ACTIONS) private windowActions:
Angular2PluginWindowActions
An application plug-in can request actions to be performed on the Window through the following:
Item Description
close(): void Closes the Window of the application plug-in
instance.
maximize(): void Maximizes the Window of the application plug-in
instance.
minimize(): void Minimizes the Window of the application plug-in
instance.
restore(): void Restores the Window of the application plug-in
instance from a minimized state.
setTitle(title: string):void Sets the title of the Window.
setPosition(pos: {top: number,
left: number, width: number, height:
number}): void
Sets the position of the Window on the page and
the size of the window.
66Open Beta for Zowe: Installation and User's Guide

Item Description
spawnContextMenu(xPos: number, yPos:
number, items: ContextMenuItem[]):
void
Opens a context menu on the application plug-in
instance, which uses the Context Menu framework.
registerCloseHandler(handler: () =>
Promise<void>): void
Registers a handler, which is called when the
Window and application plug-in instance are
closed.
Configuration Dataservice
The Configuration Dataservice is an essential component of the zLUX framework, which acts as a
JSON resource storage service, and is accessible externally by REST API and internally to the server by
dataservices.
The Configuration Dataservice allows for saving preferences of applications, management of defaults and
privileges within a zLUX ecosystem, and bootstrapping configuration of the server's dataservices.
The fundamental element of extensibility of the zLUX framework is a plug-in. The Configuration
Dataservice works with data for plug-ins. Every resource that is stored in the Configuration Service is
stored for a particular plug-in, and valid resources to be accessed are determined by the definition of each
plug-in in how it uses the Configuration Dataservice.
The behavior of the Configuration Dataservice is dependent upon the Resource structure for a plug-in.
Each plug-in lists the valid resources, and the administrators can set permissions for the users who can
view or modify these resources.
Resource Scope
Data is stored within the Configuration Dataservice according to the selected Scope. The intent of Scope
within the Dataservice is to facilitate company-wide administration and privilege management of zLUX
data.
When a user requests a resource, the resource that is retrieved is an override or an aggregation of the
broader scopes that encompass the Scope from which they are viewing the data.
When a user stores a resource, the resource is stored within a Scope but only if the user has access
privilege to update within that Scope.
Scope is one of the following:
Product
Configuration defaults that come with the product. Cannot be modified.
Site
Data that can be used between multiple instances of the zLUX Server.
Instance
Data within an individual zLUX Server.
Group
Data that is shared between multiple users in a group.
User
Data for an individual user.
Note: While Authorization tuning can allow for settings such as GET from Instance to work without login,
User and Group scope queries will be rejected if not logged in due to the requirement to pull resources
from a specific user. Because of this, User and Group scopes will not be functional until the Security
Framework is available.
Extending the Zowe Application Framework (zLUX)67
Where Product is the broadest scope and User is the narrowest scope.
When you specify Scope User, the service manages configuration for your particular username, using the
authentication of the session. This way, the User scope is always mapped to your current username.
Consider a case where a user wants to access preferences for their text editor. One way they could do this
is to use the REST API to retrieve the settings resource from the Instance scope.
The Instance scope might contain editor defaults set by the administrator. But, if there are no defaults in
Instance, then the data in Group and User would be checked.
Therefore, the data the user receives would be no broader than what is stored in the Instance scope, but
might have only been the settings they saved within their own User scope (if the broader scopes do not
have data for the resource).
Later, the user might want to save changes, and they try to save them in the Instance scope. Most likely,
this action is rejected because of the preferences set by the administrator to disallow changes to the
Instance scope by ordinary users.
REST API
When you reach the Configuration Service through a REST API, HTTP methods are used to perform the
desired operation.
The HTTP URL scheme for the configuration dataservice is:
<Server>/plugins/com.rs.configjs/services/data/<plugin ID>/<Scope>/<resource>/
<optional subresources>?<query>
Where the resources are one or more levels deep, using as many layers of subresources as needed.
Think of a resource as a collection of elements, or a directory. To access a single element, you must use
the query parameter "name="
REST query parameters
Name (string)
Get or put a single element rather than a collection.
Recursive (boolean)
When performing a DELETE, specifies whether to delete subresources.
REST HTTP methods
Below is an explanation of each type of REST call.
Each API call includes an example request and response against a hypothetical application called the
"code editor".
GET
GET /plugins/com.rs.configjs/services/data/<plugin>/<scope>/<resource>?
name=<element>
• This returns JSON with the attribute "content" being a JSON resource that is the entire configuration
that was requested. For example:
/plugins/com.rs.configjs/services/data/org.openmainframe.zowe.codeeditor/user/
sessions/default?name=tabs
The parts of the URL are:
• Plugin: org.openmainframe.zowe.codeeditor
• Scope: user
• Resource: sessions
68Open Beta for Zowe: Installation and User's Guide
• Subresource: default
• Element = tabs
The response body is a JSON config:
{
"_objectType" : "com.rs.config.resource",
"_metadataVersion" : "1.1",
"resource" : "org.openmainframe.zowe.codeeditor/USER/sessions/default",
"contents" : {
"_metadataVersion" : "1.1",
"_objectType" : "org.openmainframe.zowe.codeeditor.sessions.tabs",
"tabs" : [{
"title" : "TSSPG.REXX.EXEC(ARCTEST2)",
"filePath" : "TSSPG.REXX.EXEC(ARCTEST2)",
"isDataset" : true
}, {
"title" : ".profile",
"filePath" : "/u/tsspg/.profile"
}
]
}
}
GET /plugins/com.rs.configjs/services/data/<plugin>/<scope>/<resource>
This returns JSON with the attribute content being a JSON object that has each attribute being another
JSON object, which is a single configuration element.
GET /plugins/com.rs.configjs/services/data/<plugin>/<scope>/<resource>
(When subresources exist.)
This returns a listing of subresources that can, in turn, be queried.
PUT
PUT /plugins/com.rs.configjs/services/data/<plugin>/<scope>/<resource>?
name=<element>
Stores a single element (must be a JSON object {...}) within the requested scope, ignoring aggregation
policies, depending on the user privilege. For example:
/plugins/com.rs.configjs/services/data/org.openmainframe.zowe.codeeditor/user/
sessions/default?name=tabs
Body:
{
"_metadataVersion" : "1.1",
"_objectType" : "org.openmainframe.zowe.codeeditor.sessions.tabs",
"tabs" : [{
"title" : ".profile",
"filePath" : "/u/tsspg/.profile"
}, {
"title" : "TSSPG.REXX.EXEC(ARCTEST2)",
"filePath" : "TSSPG.REXX.EXEC(ARCTEST2)",
"isDataset" : true
}, {
"title" : ".emacs",
"filePath" : "/u/tsspg/.emacs"
}
]
}
Response:
{
"_objectType" : "com.rs.config.resourceUpdate",
"_metadataVersion" : "1.1",
"resource" : "org.openmainframe.zowe.codeeditor/USER/sessions/default",
"result" : "Replaced item."
}
Extending the Zowe Application Framework (zLUX)69
DELETE
DELETE /plugins/com.rs.configjs/services/data/<plugin>/<scope>/<resource>?
recursive=true
Deletes all files in all leaf resources below the resource specified.
DELETE /plugins/com.rs.configjs/services/data/<plugin>/<scope>/<resource>?
name=<element>
Deletes a single file in a leaf resource.
DELETE /plugins/com.rs.configjs/services/data/<plugin>/<scope>/<resource>
• Deletes all files in a leaf resource.
• Does not delete the directory on disk.
Administrative access and group
By means not discussed here, but instead handled by the server's authentication and authorization code,
a user might be privileged to access or modify items that they do not own.
In the simplest case, it might mean that the user is able to do a PUT, POST, or DELETE to a level above
User, such as Instance.
The more interesting case is in accessing another user's contents. In this case, the shape of the URL is
different. Compare the following two commands:
GET /plugins/com.rs.configjs/services/data/<plugin>/user/<resource>
Gets the content for the current user.
GET /plugins/com.rs.configjs/services/data/<plugin>/users/<username>/<resource>
Gets the content for a specific user if authorized.
This is the same structure that is used for the Group scope. When requesting content from the Group
scope, the user is checked to see if they are authorized to make the request for the specific group. For
example:
GET /plugins/com.rs.configjs/services/data/<plugin>/group/<groupname>/
<resource>
Gets the content for the given group, if the user is authorized.
Application API
Retrieves and stores configuration information from specific scopes.
Note: This API should only be used for configuration administration user interfaces.
ZLUX.UriBroker.pluginConfigForScopeUri(pluginDefinition: ZLUX.Plugin, scope:
string, resourcePath:string, resourceName:string): string;
A shortcut for the preceding method, and the preferred method when you are retrieving configuration
information, is simply to "consume" it. It "asks" for configurations using the User scope, and allows the
configuration service to decide which configuration information to retrieve and how to aggregate it. (See
below on how the configuration service evaluates what to return for this type of request).
ZLUX.UriBroker.pluginConfigUri(pluginDefinition: ZLUX.Plugin,
resourcePath:string, resourceName:string): string;
Internal and bootstrapping
Some dataservices within plug-ins can take configuration that affects their behavior. This configuration is
stored within the Configuration Dataservice structure, but it is not accessible through the REST API.
70Open Beta for Zowe: Installation and User's Guide

Within the deploy directory of a Zowe installation, each plug-in might optionally have an _internal
directory. An example of such a path is:
deploy/instance/ZLUX/pluginStorage/<pluginName>/_internal
Within each _internal directory, the following directories might exist:
•services/<servicename>: Configuration resources for the specific service.
•plugin: Configuration resources that are visible to all services in the plug-in.
The JSON contents within these directories are provided as Objects to dataservices through the
dataservice context Object.
Plug-in definition
Because the Configuration Dataservices stores data on a per-plug-in basis, each plug-in must define their
resource structure to make use of the Configuration Dataservice. The resource structure definition is
included in the plug-in's pluginDefinition.json file.
For each resource and subresource, you can define an aggregationPolicy to control how the data of
a broader scope alters the resource data that is returned to a user when requesting a resource from a
narrower scope.
For example:
"configurationData": { //is a direct attribute of the pluginDefinition JSON
"resources": { //always required
"preferences": {
"locationType": "relative", //this is the only option for now, but later absolute paths
may be accepted
"aggregationPolicy": "override" //override and none for now, but more in the future
},
"sessions": { //the name at this level represents the name used within a URL, such as /
plugins/com.rs.configjs/services/data/org.openmainframe.zowe.codeeditor/user/sessions
"aggregationPolicy": "none",
"subResources": {
"sessionName": {
"variable": true, //if variable=true is present, the resource must be the only
one in that group but the name of the resource is substituted for the name given in the REST
request, so it represents more than one
"aggregationPolicy": "none"
}
}
}
}
}
Aggregation policies
Aggregation policies determine how the Configuration Dataservice aggregates JSON objects from
different Scopes together when a user requests a resource. If the user requests a resource from the User
scope, the data from the User scope might replace or be merged with the data from a broader scope such
as Instance, to make a combined resource object that is returned to the user.
Aggregation policies are defined by a plug-in developer in the plug-in's definition for the Configuration
Service, as the attribute aggregationPolicy within a resource.
The following policies are currently implemented:
•NONE: If the Configuration Dataservice is called for Scope User, only user-saved settings are sent,
unless there are no user-saved settings for the query, in which case the dataservice attempts to send
data that is found at a broader scope.
•OVERRIDE: The Configuration Dataservice obtains data for the resource that is requested at the
broadest level found, and joins the resource's properties from narrower scopes, overriding broader
attributes with narrower ones, when found.
Extending the Zowe Application Framework (zLUX)71

URI Broker
The URI Broker is an object in the application plug-in web framework, which facilitates calls to the zLUX
Application Server by constructing URIs that use the context from the calling application plug-in.
Accessing the URI Broker
The URI Broker is accessible independent of other frameworks involved such as Angular, and is also
accessible through iframe. This is because it is attached to a global when within the Zowe Desktop. For
more information, see Zowe Desktop and window management. Access the URI Broker through one of
two locations:
Natively:
window.RocketMVD.uriBroker
In an iframe:
window.parent.RocketMVD.uriBroker
Functions
The URI Broker builds the following categories of URIs depending upon what the application plug-in is
designed to call.
Accessing an application plug-in's dataservices
Dataservices can be based on HTTP (REST) or Websocket. For more information, see zLUX dataservices.
HTTP Dataservice URI
pluginRESTUri(plugin:ZLUX.Plugin, serviceName: string, relativePath:string):
string
Returns: A URI for making an HTTP service request.
Websocket Dataservice URI
pluginWSUri(plugin: ZLUX.Plugin, serviceName:string, relativePath:string):
string
Returns: A URI for making a Websocket connection to the service.
Accessing application plug-in's configuration resources
Defaults and user storage might exist for an application plug-in such that they can be retrieved through
the Configuration Dataservice.
There are different scopes and actions to take with this service, and therefore there are a few URIs that
can be built:
Standard configuration access
pluginConfigUri(pluginDefinition: ZLUX.Plugin, resourcePath:string,
resourceName?:string): string
Returns: A URI for accessing the requested resource under the user's storage.
Scoped configuration access
pluginConfigForScopeUri(pluginDefinition: ZLUX.Plugin, scope: string,
resourcePath:string, resourceName?:string): string
Returns: A URI for accessing a specific scope for a given resource.
72Open Beta for Zowe: Installation and User's Guide
Accessing static content
Content under an application plug-in's web directory is static content accessible by a browser. This can be
accessed through:
pluginResourceUri(pluginDefinition: ZLUX.Plugin, relativePath: string): string
Returns: A URI for getting static content.
For more information about the web directory, see Application plug-in filesystem structure.
Accessing the application plug-in's root
Static content and services are accessed off of the root URI of an application plug-in. If there are other
points that you must access on that application plug-in, you can get the root:
pluginRootUri(pluginDefinition: ZLUX.Plugin): string
Returns: A URI to the root of the application plug-in.
Server queries
A client can find different information about a server's configuration or the configuration as seen by the
current user by accessing specific APIs.
Accessing a list of plug-ins
pluginListUri(pluginType: ZLUX.PluginType): string
Returns: A URI, which when accessed returns the list of existing plug-ins on the server by type, such as
"Application" or "all".
Application-to-application communication
zLUX application plug-ins can opt-in to various application framework abilities, such as the ability to have
a Logger, use of a URI builder utility, and more. One ability that is unique to a zLUX environment with
multiple application plug-ins is the ability for one application plug-in to communicate with another. The
application framework provides constructs that facilitate this ability. The constructs are: the Dispatcher,
Actions, Recognizers, Registry, and the features that utilize them such as the framework's Context menu.
1. Why use application-to-application communication?
2. Actions
3. Recognizers
4. Dispatcher
Why use application-to-application communication?
When working with a computer, people often use multiple applications to accomplish a task, for example
checking a dashboard before digging into a detailed program or checking email before opening a bank
statement in a browser. In many environments, the relationship between one program and another is not
well defined (you might open one program to learn of a situation, which you solve by opening another
and typing or pasting in content). Or perhaps a hyperlink is provided or an attachment, which opens
program by using a lookup table of which the program is the default for handling a certain file extension.
The application framework attempts to solve this problem by creating structured messages that can
be sent from one application plug-in to another. An application plug-in has a context of the information
that it contains. You can use this context to invoke an action on another application plug-in that is better
suited to handle some of the information discovered in the first application plug-in. Well-structured
messages facilitate knowing what application plug-in is "right" to handle a situation, and explain in detail
what that application plug-in should do. This way, rather than finding out that the attachment with the
extension ".dat" was not meant for a text editor, but instead for an email client, one application plug-
in might instead be able to invoke an action on an application plug-in, which can handle opening of an
Extending the Zowe Application Framework (zLUX)73

email for the purpose of forwarding to others (a more specific task than can be explained with filename
extensions).
Actions
To manage communication from one application plug-in to another, a specific structure is needed. In the
application framework, the unit of application-to-application communication is an Action. The typescript
definition of an Action is as follows:
export class Action implements ZLUX.Action {
id: string; // id of action itself.
i18nNameKey: string; // future proofing for I18N
defaultName: string; // default name for display purposes, w/o I18N
description: string;
targetMode: ActionTargetMode;
type: ActionType; // "launch", "message"
targetPluginID: string;
primaryArgument: any;
constructor(id: string,
defaultName: string,
targetMode: ActionTargetMode,
type: ActionType,
targetPluginID: string,
primaryArgument:any) {
this.id = id;
this.defaultName = defaultName;
// proper name for ID/type
this.targetPluginID = targetPluginID;
this.targetMode = targetMode;
this.type = type;
this.primaryArgument = primaryArgument;
}
getDefaultName():string {
return this.defaultName;
}
}
An Action has a specific structure of data that is passed, to be filled in with the context at runtime, and
a specific target to receive the data. The Action is dispatched to the target in one of several modes, for
example: to target a specific instance of an application plug-in, an instance, or to create a new instance.
The Action can be less detailed than a message. It can be a request to minimize, maximize, close, launch,
and more. Finally, all of this information is related to a unique ID and localization string such that it can be
managed by the framework.
Action target modes
When you request an Action on an application plug-in, the behavior is dependent on the instance of the
application plug-in you are targeting. You can instruct the framework how to target the application plug-in
with a target mode from the ActionTargetMode enum:
export enum ActionTargetMode {
PluginCreate, // require pluginType
PluginFindUniqueOrCreate, // required AppInstance/ID
PluginFindAnyOrCreate, // plugin type
//TODO PluginFindAnyOrFail
System, // something that is always present
}
Action types
The application framework performs different operations on application plug-ins depending on the type
of an Action. The behavior can be quite different, from simple messaging to requesting that an application
plug-in be minimized. The types are defined by an enum:
export enum ActionType { // not all actions are meaningful for all target modes
Launch, // essentially do nothing after target mode
Focus, // bring to fore, but nothing else
Route, // sub-navigate or "route" in target
Message, // "onMessage" style event to plugin
74Open Beta for Zowe: Installation and User's Guide
Method, // Method call on instance, more strongly typed
Minimize,
Maximize,
Close, // may need to call a "close handler"
}
Loading actions
Actions can be created dynamically at runtime, or saved and loaded by the system at login.
Dynamically
You can create Actions by calling the following Dispatcher method: makeAction(id: string,
defaultName: string, targetMode: ActionTargetMode, type: ActionType,
targetPluginID: string, primaryArgument: any):Action
Saved on system
Actions can be stored in JSON files that are loaded at login. The JSON structure is as follows:
{
"actions": [
{
"id":"org.zowe.explorer.openmember",
"defaultName":"Edit PDS in MVS Explorer",
"type":"Launch",
"targetMode":"PluginCreate",
"targetId":"org.zowe.explorer",
"arg": {
"type": "edit_pds",
"pds": {
"op": "deref",
"source": "event",
"path": [
"full_path"
]
}
}
}
]
}
Recognizers
Actions are meant to be invoked when certain conditions are met. For example, you do not need to open
a messaging window if you have no one to message. Recognizers are objects within the application
framework that use the context that the application plug-in provides to determine if there is a condition
for which it makes sense to execute an Action. Each recognizer has statements about what condition to
recognize, and upon that statement being met, which Action can be executed at that time. The invocation
of the Action is not handled by the Recognizer; it simply detects that an Action can be taken.
Recognition clauses
Recognizers associate a clause of recognition with an action, as you can see from the following class:
export class RecognitionRule {
predicate:RecognitionClause;
actionID:string;
constructor(predicate:RecognitionClause, actionID:string){
this.predicate = predicate;
this.actionID = actionID;
}
}
A clause, in turn, is associated with an operation, and the subclauses upon which the operation acts. The
following operations are supported:
export enum RecognitionOp {
AND,
OR,
Extending the Zowe Application Framework (zLUX)75

NOT,
PROPERTY_EQ,
SOURCE_PLUGIN_TYPE, // syntactic sugar
MIME_TYPE, // ditto
}
Loading Recognizers at runtime
You can add a Recognizer to the application plug-in environment in one of two ways: by loading from
Recognizers saved on the system, or by adding them dynamically.
Dynamically
You can call the Dispatcher method, addRecognizer(predicate:RecognitionClause,
actionID:string):void
Saved on system
Recognizers can be stored in JSON files that are loaded at login. The JSON structure is as follows:
{
"recognizers": [
{
"id":"<actionID>",
"clause": {
<clause>
}
}
]
}
clause can take on one of two shapes:
"prop": ["<keyString>", <"valueString">]
Or,
"op": "<op enum as string>",
"args": [
{<clause>}
]
Where this one can again, have subclauses.
Recognizer example
Recognizers can be simple or complex. The following is an example to illustrate the mechanism:
{
"recognizers":[
{
"id":"org.zowe.explorer.openmember",
"clause": {
"op": "AND",
"args": [
{"prop":["sourcePluginID","com.rs.mvd.tn3270"]},{"prop":["screenID","ISRUDSM"]}
]
}
}
]
}
In this case, the Recognizer detects whether it is possible to run the org.zowe.explorer.openmember
Action when the TN3270 Terminal application plug-in is on the screen ISRUDSM (an ISPF panel for
browsing PDS members).
Dispatcher
The dispatcher is a core component of the application framework that is accessible through the Global
ZLUX Object at runtime. The Dispatcher interprets Recognizers and Actions that are added to it at
76Open Beta for Zowe: Installation and User's Guide
runtime. You can register Actions and Recognizers on it, and later, invoke an Action through it. The
dispatcher handles how the Action's effects should be carried out, acting in combination with the Window
Manager and application plug-ins themselves to provide a channel of communication.
Registry
The Registry is a core component of the application framework, which is accessible through the Global
ZLUX Object at runtime. It contains information about which application plug-ins are present in the
environment, and the abilities of each application plug-in. This is important to application-to-application
communication, because a target might not be a specific application plug-in, but rather an application
plug-in of a specific category, or with a specific featureset, or capable of responding to the type of Action
requested.
Pulling it all together in an example
The standard way to make use of application-to-application communication is by having Actions and
Recognizers that are saved on the system. Actions and Recognizers are loaded at login, and then later,
through a form of automation or by a user action, Recognizers can be polled to determine if there is an
Action that can be executed. All of this is handled by the Dispatcher, but the description of the behavior
lies in the Action and Recognizer that are used. In the Action and Recognizer descriptions above, there are
two JSON definitions: One is a Recognizer that recognizes when the Terminal application plug-in is in a
certain state, and another is an Action that instructs the MVS Explorer to load a PDS member for editing.
When you put the two together, a practical application is that you can launch the MVS Explorer to edit a
PDS member that you have selected within the Terminal application plug-in.
Error reporting UI
The zLUX Widgets repository contains shared widget-like components of the Zowe Desktop, including
Button, Checkbox, Paginator, various pop-ups, and others. To maintain consistency in desktop styling
across all applications, use, reuse, and customize existing widgets to suit the purpose of the application's
function and look.
Ideally, a program should have little to no logic errors. Once in a while a few occur, but more commonly an
error occurs from misconfigured user settings. A user might request an action or command that requires
certain prerequisites, for example: a proper ZSS-Server configuration. If the program or method fails, the
program should notify the user through the UI about the error and how to fix it. For the purposes of this
discussion, we will use the Workflow application plug-in in the zlux-workflow repository.
ZluxPopupManagerService
The ZluxPopupManagerService is a standard popup widget that can, through its reportError()
method, be used to display errors with attributes that specify the title or error code, severity,
text, whether it should block the user from proceeding, whether it should output to the logger,
and other options you want to add to the error dialog. ZluxPopupManagerService uses both
ZluxErrorSeverity and ErrorReportStruct.
`export declare class ZluxPopupManagerService {`
eventsSubject: any;
listeners: any;
events: any;
logger: any;
constructor();
setLogger(logger: any): void;
on(name: any, listener: any): void;
broadcast(name: any, ...args: any[]): void;
processButtons(buttons: any[]): any[];
block(): void;
unblock(): void;
getLoggerSeverity(severity: ZluxErrorSeverity): any;
reportError(severity: ZluxErrorSeverity, title: string, text: string, options?: any):
Rx.Observable<any>;
Extending the Zowe Application Framework (zLUX)77

`}`
ZluxErrorSeverity
ZluxErrorSeverity classifies the type of report. Under the popup-manager, there are the following
types: error, warning, and information. Each type has its own visual style. To accurately indicate the type
of issue to the user, the error or pop-up should be classified accordingly.
`export declare enum ZluxErrorSeverity {`
ERROR = "error",
WARNING = "warning",
INFO = "info",
`}`
ErrorReportStruct
ErrorReportStruct contains the main interface that brings the specified parameters of
reportError() together.
`export interface ErrorReportStruct {`
severity: string;
modal: boolean;
text: string;
title: string;
buttons: string[];
`}`
Implementation
Import ZluxPopupManagerService and ZluxErrorSeverity from widgets. If you are using
additional services with your error prompt, import those too (for example, LoggerService to print to the
logger or GlobalVeilService to create a visible semi-transparent gray veil over the program and pause
background tasks). Here, widgets is imported from node_modules\@zlux\ so you must ensure zLUX
widgets is used in your package-lock.json or package.json and you have run npm install.
import { ZluxPopupManagerService, ZluxErrorSeverity } from '@zlux/widgets';
Declaration
Create a member variable within the constructor of the class you want to use it for. For example,
in the Workflow application plug-in under \zlux-workflow\src\app\app\zosmf-server-
config.component.ts is a ZosmfServerConfigComponent class with the pop-up manager service
variable. To automatically report the error to the console, you must set a logger.
`export class ZosmfServerConfigComponent {`
constructor(
private popupManager: ZluxPopupManagerService, )
{ popupManager.setLogger(logger); } //Optional
`}`
Usage
Now that you have declared your variable within the scope of your program's class, you are ready to use
the method. The following example describes an instance of the reload() method in Workflow that
catches an error when the program attempts to retrieve a configuration from a configService and set
it to the program's this.config. This method fails when the user has a faulty zss-Server configuration
and the error is caught and then sent to the class' popupManager variable from the constructor above.
`reload(): void {`
this.globalVeilService.showVeil();
this.configService
.getConfig()
78Open Beta for Zowe: Installation and User's Guide
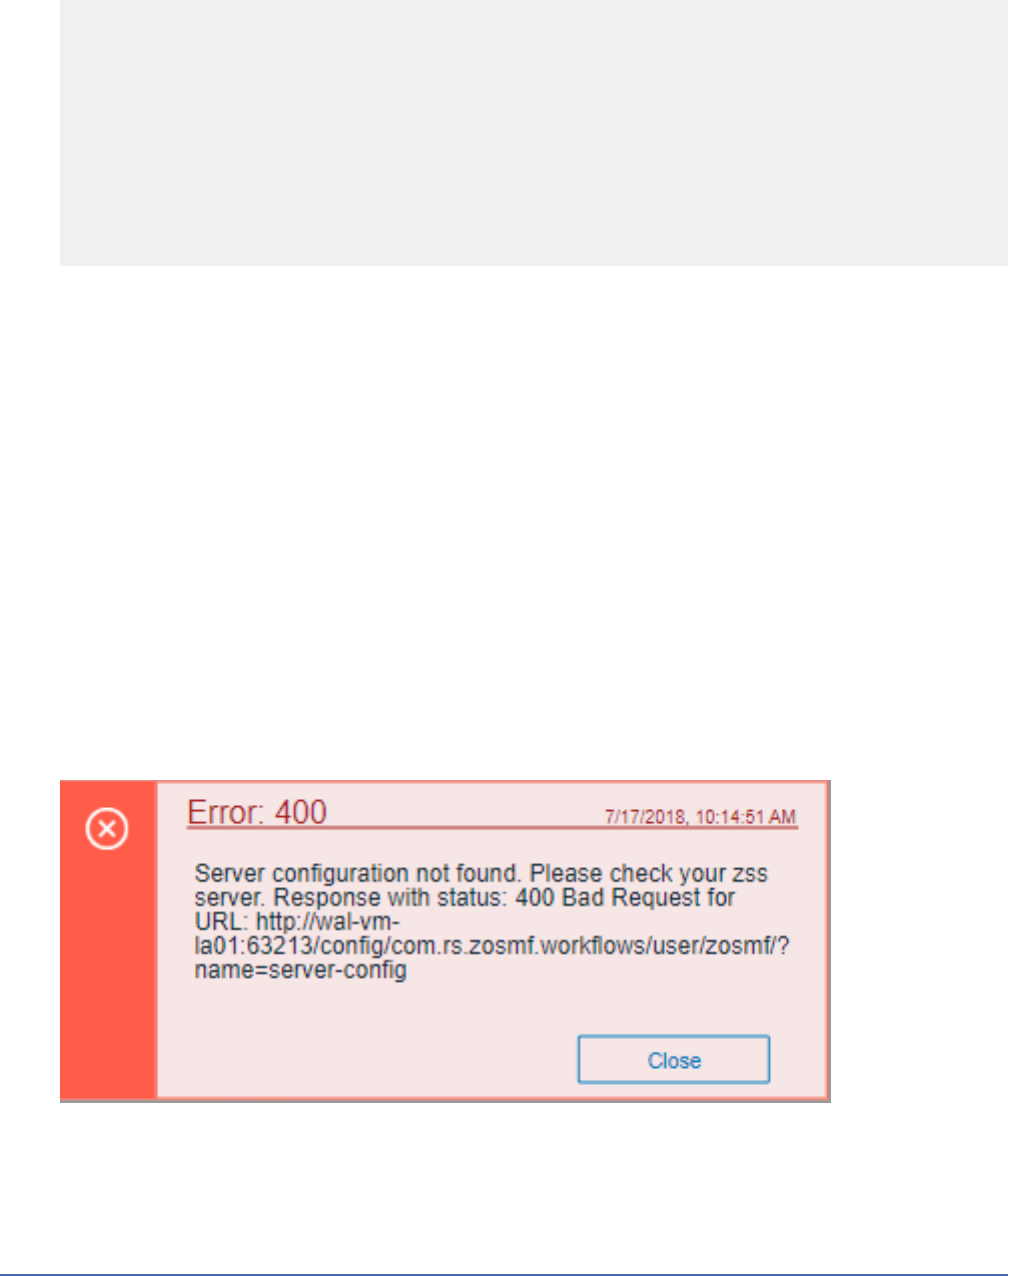
.then(config => (this.config = config))
.then(_ => setTimeout(() => this.test(), 0))
.then(_ => this.globalVeilService.hideVeil())
.catch(err => {
this.globalVeilService.hideVeil()
let errorTitle: string = "Error";
let errorMessage: string = "Server configuration not found. Please check your zss
server.";
const options = {
blocking: true
};
this.popupManager.reportError(ZluxErrorSeverity.ERROR, errorTitle.toString()+":
"+err.status.toString(), errorMessage+"\n"+err.toString(), options);
});
`}`
Here, the errorMessage clearly describes the error with a small degree of ambiguity as to account
for all types of errors that might occur from that method. The specifics of the error are then generated
dynamically and are printed with the err.toString(), which contains the more specific information
that is used to pinpoint the problem. The this.popupManager.report() method triggers
the error prompt to display. The error severity is set with ZluxErrorSeverity.ERROR and the
err.status.toString() describes the status of the error (often classified by a code, for example:
404). The optional parameters in options specify that this error will block the user from interacting with
the application plug-in until the error is closed or it until goes away on its own. globalVeilService is
optional and is used to create a gray veil on the outside of the program when the error is caused. You must
import globalVeilService separately (see the zlux-workflow repository for more information).
HTML
The final step is to have the recently created error dialog display in the application plug-in. If you do
this.popupManager.report() without adding the component to your template, the error will not be
displayed. Navigate to your component's .html file. On the Workflow application plug-in, this file will be
in \zlux-workflow\src\app\app\zosmf-server-config.component.html and the only item left
is to add the popup manager component alongside your other classes.
<zlux-popup-manager></zlux-popup-manager>
So now when the error is called, the new UI element should resemble the following:
The order in which you place the pop-up manager determines how the error dialog will overlap in your
UI. If you want the error dialog to overlap other UI elements, place it at the end of the .html file. You can
also create custom styling through a CSS template, and add it within the scope of your application plug-in.
Logging utility
The zlux-shared repository provides a logging utility for use by dataservices and web content for an
application plug-in.
Extending the Zowe Application Framework (zLUX)79

Logging objects
The logging utility is based on the following objects:
•Component Loggers: Objects that log messages for an individual component of the environment, such
as a REST API for an application plug-in or to log user access.
•Destinations: Objects that are called when a component logger requests a message to be logged.
Destinations determine how something is logged, for example, to a file or to a console, and what
formatting is applied.
•Logger: Central logging object, which can spawn component loggers and attach destinations.
Logger IDs
Because Zowe application plug-ins have unique identifiers, both dataservices and an application plug-in's
web content are provided with a component logger that knows this unique ID such that messages that are
logged can be prefixed with the ID. With the association of logging to IDs, you can control verbosity of logs
by setting log verbosity by ID.
Accessing logger objects
Logger
The core logger object is attached as a global for low-level access.
App Server
NodeJS uses global as its global object, so the logger is attached to:
global.COM_RS_COMMON_LOGGER
Web
Browsers use window as the global object, so the logger is attached to:
window.COM_RS_COMMON_LOGGER
Component logger
Component loggers are created from the core logger object, but when working with an application plug-
in, allow the application plug-in framework to create these loggers for you. An application plug-in's
component logger is presented to dataservices or web content as follows.
App Server
See Router Dataservice Context in the topic zLUX dataservices.
Web
(Angular App Instance Injectible). See Logger in Zowe Desktop and window management.
Logger API
The following constants and functions are available on the central logging object.
Attribute Type Description Arguments
makeComponentLogger function Creates a component
logger - Automatically
done by the application
framework for
dataservices and web
content
componentIDString
80Open Beta for Zowe: Installation and User's Guide
Attribute Type Description Arguments
setLogLevelForComponentNamefunction Sets the verbosity of
an existing component
logger
componentIDString,
logLevel
Component Logger API
The following constants and functions are available to each component logger.
Attribute Type Description Arguments
SEVERE const Is a const for logLevel
WARNING const Is a const for logLevel
INFO const Is a const for logLevel
FINE const Is a const for logLevel
FINER const Is a const for logLevel
FINEST const Is a const for logLevel
log function Used to write a log,
specifying the log level
logLevel,
messageString
severe function Used to write a SEVERE
log.
messageString
warn function Used to write a
WARNING log.
messageString
info function Used to write an INFO
log.
messageString
debug function Used to write a FINE log. messageString
makeSublogger function Creates a new
component logger with
an ID appended by the
string given
componentNameSuffix
Log Levels
An enum, LogLevel, exists for specifying the verbosity level of a logger. The mapping is:
Level Number
SEVERE 0
WARNING 1
INFO 2
FINE 3
FINER 4
FINEST 5
Note: The default log level for a logger is INFO.
Extending the Zowe Application Framework (zLUX)81
Logging verbosity
Using the component logger API, loggers can dictate at which level of verbosity a log message should be
visible. You can configure the server or client to show more or less verbose messages by using the core
logger's API objects.
Example: You want to set the verbosity of the org.zowe.foo application plug-in's dataservice, bar to show
debugging information.
logger.setLogLevelForComponentName('org.zowe.foo.bar',LogLevel.DEBUG)
Configuring logging verbosity
The application plug-in framework provides ways to specify what component loggers you would like to set
default verbosity for, such that you can easily turn logging on or off.
Server startup logging configuration
The server configuration file allows for specification of default log levels, as a top-level attribute
logLevel, which takes key-value pairs where the key is a regex pattern for component IDs, and the value
is an integer for the log levels.
For example:
"logLevel": {
"com.rs.configjs.data.access": 2,
//the string given is a regex pattern string, so .* at the end here will cover that service
and its subloggers.
"com.rs.myplugin.myservice.*": 4
//
// '_' char reserved, and '_' at beginning reserved for server. Just as we reserve
// '_internal' for plugin config data for config service.
// _unp = universal node proxy core logging
//"_unp.dsauth": 2
},
For more information about the server configuration file, see Zowe Application Framework (zLUX)
configuration.
82Open Beta for Zowe: Installation and User's Guide

Chapter 6. Extending Zowe CLI
You can install plug-ins to extend the capabilities ofZowe CLI. Plug-ins add functionality to the product in
the form of new command groups, actions, objects, and options.
Important!Plug-ins can gain control of your CLI application legitimately during the execution of every
command. Install third-party plug-ins at your own risk. We make no warranties regarding the use of third-
party plug-ins.
Note: For information about how to install, update, and validate a plug-in, see Installing Plug-ins.
The following plug-ins are available:
CA Brightside Plug-in for IBM® CICS®
The Zowe CLI Plug-in for IBM CICS lets you extend Zowe CLI to interact with CICS programs and
transactions. The plug-in uses the IBM CICS® Management Client Interface (CMCI) API to achieve
the interaction with CICS. For more information, see CICS management client interface on the IBM
Knowledge Center.
For more information, see CA Brightside Plug-in for IBM CICS.
Installing plug-ins
Use commands in thepluginscommand group to install and manage plug-ins forZowe CLI.
Important!Plug-ins can gain control of your CLI application legitimately during the execution of every
command. Install third-party plug-ins at your own risk. We make no warranties regarding the use of third-
party plug-ins.
You can install the following plug-ins: - Zowe CLI Plug-in for IBM CICS Use @brightside/cics in your
command syntax to install, update, and validate the plug-in.
Setting the registry
If you installed Zowe CLI from the zowe-cli-bundle.zip distributed with the Zowe PAX media, proceed to
the Install step.
If you installed Zowe CLI from a registry, confirm that NPM is set to target the registry by issuing the
following command:
npm config set@brightside:registry https://api.bintray.com/npm/ca/brightside
Meeting the prerequisites
Ensure that you meet the prerequisites for a plug-in before you install the plug-in toZowe CLI. For
documentation related to each plug-in, seeExtending Zowe CLI.
Installing plug-ins
Issue aninstallcommand to install plug-ins toZowe CLI. The install command contains the
following syntax:
zowe plugins install [plugin...] [--registry <registry>]
Note: On Windows, you must run as an Administrator to install the product and plug-ins.
•[plugin...] (Optional) Specifies the name of a plug-in, an npm package, or a pointer to a (local or
remote) URL. When you do not specify a plug-in version, the command installs the latest plug-in version
and specifies the prefix that is stored in npm save-prefix. For more information, seenpm save prefix.
For more information about npm semantic versioning, seenpm semver. Optionally, you can specify a
specific version of a plug-in to install. Forexample, zoweplugin install pluginName@^1.0.0.
Tip:You can install multiple plug-ins with one command. For example, issuezowe plugin install
plugin1 plugin2 plugin3
•[--registry <registry>] (Optional) Specifies a registry URL from which to install a plug-in when
you do not use npm config set to set the registry initially.
Examples: Install plug-ins
• The following example illustrates the syntax to use to install a plug-in that is distributed with the zowe-
cli-bundle.zip. If you are using zowe-cli-bundle.zip, issue the following command for each plug-in .tgz
file:
zowe plugins install ./zowe-cli-db2-1.0.0-next.20180531.tgz
• The following example illustrates the syntax to use to install a plug-in that is named "my-plugin" from a
specified registry:
zowe plugins install @brightside/my-plugin
• The following example illustrates the syntax to use toinstall a specific version of "my-plugins"
zowe plugins install @brightside/my-plugin@"^1.2.3"
Validating plug-ins
Issue the plug-in validation command to run tests against all plug-ins (or against a plug-in that you
specify) to verify that the plug-ins integrate properly withZowe CLI. The tests confirm that the plug-in
does not conflict with existing command groups in the base application. The command response provides
you with details or error messages about how the plug-ins integrate withZowe CLI.
Perform validation after you install the plug-ins to help ensure that it integrates with Zowe CLI.
Thevalidatecommand has the following syntax:
zowe plugins validate [plugin]
•[plugin] (Optional) Specifies the name of the plug-in that you want to validate. If you do not specify
a plug-in name, the command validates all installed plug-ins. The name of the plug-in is not always the
same as the name of the NPM package.
Examples: Validate plug-ins
• The following example illustrates the syntax to use tovalidate a specified installed plug-in:
zowe plugins validate @brightside/my-plugin
• The following example illustrates the syntax to use tovalidate all installed plug-ins:
zowe plugins validate
Updating plug-ins
Issue the update command to install the latest version or a specific version of a plug-in that you installed
previously. Theupdatecommand has the following syntax:
zowe plugins update [plugin...] [--registry <registry>]
•[plugin...]
84Open Beta for Zowe: Installation and User's Guide
Specifies the name of an installed plug-in that you want to update. The name of the plug-in is not always
the same as the name of the NPM package. You can use npm semantic versioning to specify a plug-in
version to which to update.For more information, seenpm semver.
•[--registry <registry>]
(Optional) Specifies a registry URL that is different from the registry URL of the original installation.
Examples: Update plug-ins
• The following example illustrates the syntax to use toupdate an installed plug-in to the latest version:
zowe plugins update @brightside/my-plugin@latest
• The following example illustrates the syntax to use toupdate a plug-in to a specific version:
zowe plugins update @brightside/my-plugin@"^1.2.3"
Uninstalling plug-ins
Issue the uninstall command to uninstall plug-ins from a base application. After the uninstall process
completes successfully, theproductno longer contains the plug-in configuration.
Tip:The command is equivalent to usingnpm uninstallto uninstall a package.
Theuninstallcommand contains the following syntax:
zowe plugins uninstall [plugin]
•[plugin] Specifies the plug-in name to uninstall.
Example: Uninstall plug-ins
• The following example illustrates the syntax to use touninstall a plug-in:
zowe plugins uninstall @brightside/my-plugin
Zowe CLI Plug-in for IBM CICS
The Zowe CLI Plug-in for IBM® CICS® lets you extend Zowe CLI to interact with CICS programs and
transactions. The plug-in uses the IBM CICS® Management Client Interface (CMCI) API to achieve the
interaction with CICS.For more information, see CICS management client interface on the IBM Knowledge
Center.
• Use Cases
• Prerequisites
• Installing
• Setting up profiles
• Commands
Use cases
As an application developer, you can useZowe CLI Plug-in for IBM CICS to perform the following tasks:
• Deploy code changes to CICS applications that were developed with COBOL.
• Deploy changes to CICS regions for testing or delivery. See the define command for an example of how
you can define programs to CICS to assist with testing and delivery.
• Automate CICS interaction steps in your CI/CD pipeline with Jenkins Automation Server or TravisCI.
• Deploy build artifacts to CICS regions.
• Alter, copy, define, delete, discard, and install CICS resources and resource definitions.
Extending Zowe CLI85
Prerequisites
Before you install the plug-in, meet the following prerequisites:
• Install Zowe CLI on your PC.
• Verify thatIBM® CICS® Management Client Interface (CMCI)API is installed and configured on your
mainframe systems.
Installing
There are two methods that you can use to install the Zowe CLI Plug-in for IBM CICS - install from Bintray
or install from the Zowe package.
Installing from Bintray
If you installed Zowe CLI from Bintray, complete the following steps:
1. Open a command line window and issue the following command:
zowe plugins install@brightside/cics
1. After the command execution completes, issue the following command to validate that the installation
completed successfully.
zowe plugins validate cics
Successful validation of the IBM CICS plug-inreturnsthe response:Successfully validated.
To validate that the plug-in installed successfully, issue the following command:
zowe plugins validate@brightside/cics
Note: For detailed information about how to install multiple plug-ins, update to a specific version of a
plug-ins, and install from specific registries, see Install Plug-ins.
Installing from local package
If you downloaded the Zowe installation package from Github, complete the following steps:
1. Open a command line window and change the directory to the location where you extracted the zowe-
cli-bundle.zip file. If you do not have the zowe-cli-bundle.zip file, see the topic Install Zowe
CLI from local package in Installing Zowe CLI for information about how to obtain and extract it.
2. Issue the following command to install the plug-in:
zowe plugins install zowe-cli-cics-1.1.0-next.201809271925.tgz
3. After the command execution completes, issue the following command to validate that the installation
completed successfully.
zowe plugins validate cics
Successful validation of the IBM Db2 plug-in returns the response: Successfully validated.
Setting up profiles
A cics profile is required to issue commands in the CICS group that interact with CICS regions. The cics
profile contains your host, port, username, and password for the IBM CMCI server of your choice.You can
create multiple profiles and switch between them as needed.
Issue the following command to create a cics profile:
zowe profiles create cics <profile name> -H <host> -P <port> -u <user> -p <password>
86Open Beta for Zowe: Installation and User's Guide
Note:For more information about the` syntax, actions, and options, for aprofiles create`
command, open Zowe CLI and issue the following command:
zowe profiles create cics -h
The result of the command displays as a success or failure message. You can use your profile when you
issue commands in thecics command group.
Commands
TheZowe CLI Plug-in for IBM CICS adds the following commands to Zowe CLI:
• Defining resources to CICS
• Deleting CICS resources
• Discarding CICS resources
• Getting CICS resources
• Installing resources to CICS
• Refreshing CICS programs
Defining resources to CICS
The define command lets you define programs and transactions to CICS so that you can deploy and test
the changes to your CICS application. To display a list of possibleobjects and options, issue the following
command:
zowe cics define -h
Example:
Define a program named myProgram to the region named myRegion in the CICS system definition (CSD)
group myGroup:
zowe cics define programmyProgram myGroup --region-name myRegion
Deleting CICS resources
The delete command lets you delete previously defined CICS programs or transactions to help you deploy
and test the changes to your CICS application. To display a list of possibleobjects and options, issue the
following command:
zowe cics delete -h
Example:
Delete a program named PGM123 from the CICS region named MYREGION:
zowe cics delete program PGM123 --region-name MYREGION
Discarding CICS resources
The discard command lets you remove existing CICS program or transaction definitions to help you
deploy and test the changes to your CICS application. To display a list of possibleobjects and options,
issue the following command:
zowe cics discard -h
Example:
Discard a program named PGM123 from the CICS region named MYREGION:
zowe cics discard program PGM123 --region-name MYREGION
Extending Zowe CLI87
Getting CICS resources
The get command lets you get a list of programs and transactions that are installed in your CICS region so
that you can determine if they were installed successfully and defined properly. To display a list of objects
and options, issue the following command:
zowe cics get -h
Example:
Return a list of program resources from a CICS region named MYREGION:
zowe cics get resource CICSProgram --region-name MYREGION
Installing resources to CICS
The install command lets you install resources, such as programs and transactions, to a CICS region so
that you can deploy and test the changes to your CICS application. To display a list of possibleobjects and
options, issue the following command:
zowe cics install -h
Example:
Install a transaction named TRN1 to the region named MYREGION in the CSD group named MYGRP:
zowe cics install transaction TRN1 MYGRP --region-name MYREGION
Refreshing CICS programs
The refresh command lets you refresh changes to a CICS program so that you can deploy and test the
changes to your CICS application. To display a list of objects and options, issue the following command:
zowe cics refresh -h
Example:
Refresh a program named PGM123 from the region named MYREGION:
zowe cics refresh PGM123 --region-name MYREGION
88Open Beta for Zowe: Installation and User's Guide
