Linux Administration II//Linux As A Network Client Adm2 En Manual
User Manual:
Open the PDF directly: View PDF ![]() .
.
Page Count: 217 [warning: Documents this large are best viewed by clicking the View PDF Link!]
- Contents
- List of Tables
- List of Figures
- Preface
- System Logging
- System Logging with Systemd and ``The Journal''
- TCP/IP Fundamentals
- Linux Network Configuration
- Network Troubleshooting
- *inetd and *xinetd
- Network services with systemd
- System Time
- Printing on Linux
- The Secure Shell
- Electronic Mail
- Introduction to GnuPG
- Linux and Security: An Introduction
- Sample Solutions
- LPIC-1 Certification
- Command Index
- Index

Version 4.0
Linux Administration II
Linux as a Network Client
$ echo tux
tux
$ ls
hallo.c
hallo.o
$ /bin/su -
Password:
tuxcademy – Linux and Open Source learning materials for everyone
www.tuxcademy.org ⋅info@tuxcademy.org

This training manual is designed to correspond to the objectives of the LPI-102 (LPIC-1, version
4.0) certification exam promulgated by the Linux Professional Institute. Further details are
available in Appendix B.
The Linux Professional Institute does not endorse specific exam preparation materials or tech-
niques. For details, refer to
info@lpi.org
.
The tuxcademy project aims to supply freely available high-quality training materials on
Linux and Open Source topics – for self-study, school, higher and continuing education
and professional training.
Please visit
http://www.tuxcademy.org/
! Do contact us with questions or suggestions.
Linux Administration II Linux as a Network Client
Revision:
adm2:0cd011e4d0e3d9e9:2015-08-21
adm2:0cd20ee1646f650c:2015-08-21
1–13, B
adm2:D6IMdRN77OjUKOKAMJE2Cq
© 2015 Linup Front GmbH Darmstadt, Germany
© 2015 tuxcademy (Anselm Lingnau) Darmstadt, Germany
http://www.tuxcademy.org
⋅
info@tuxcademy.org
Linux penguin “Tux” © Larry Ewing (CC-BY licence)
All representations and information contained in this document have been com-
piled to the best of our knowledge and carefully tested. However, mistakes cannot
be ruled out completely. To the extent of applicable law, the authors and the tux-
cademy project assume no responsibility or liability resulting in any way from the
use of this material or parts of it or from any violation of the rights of third parties.
Reproduction of trade marks, service marks and similar monikers in this docu-
ment, even if not specially marked, does not imply the stipulation that these may
be freely usable according to trade mark protection laws. All trade marks are used
without a warranty of free usability and may be registered trade marks of third
parties.
This document is published under the “Creative Commons-BY-SA 4.0 Interna-
tional” licence. You may copy and distribute it and make it publically available as
long as the following conditions are met:
Attribution You must make clear that this document is a product of the tux-
cademy project.
Share-Alike You may alter, remix, extend, or translate this document or modify
or build on it in other ways, as long as you make your contributions available
under the same licence as the original.
Further information and the full legal license grant may be found at
http://creativecommons.org/licenses/by-sa/4.0/
Authors: Anselm Lingnau, Tobias Elsner
Technical Editor: Anselm Lingnau ⟨
anselm@tuxcademy.org
⟩
English Translation: Anselm Lingnau
Typeset in Palatino, Optima and DejaVu Sans Mono

$ echo tux
tux
$ ls
hallo.c
hallo.o
$ /bin/su -
Password:
Contents
1 System Logging 13
1.1 The Problem . . . . . . . . . . . . . . . . . . . . . 14
1.2 The Syslog Daemon . . . . . . . . . . . . . . . . . . . 14
1.3 Log Files . . . . . . . . . . . . . . . . . . . . . . . 17
1.4 Kernel Logging . . . . . . . . . . . . . . . . . . . . 18
1.5 Extended Possibilities: Rsyslog . . . . . . . . . . . . . . . 18
1.6 The “next generation”: Syslog-NG. . . . . . . . . . . . . . 22
1.7 The
logrotate
Program..................26
2 System Logging with Systemd and “The Journal” 31
2.1 Fundamentals . . . . . . . . . . . . . . . . . . . . . 32
2.2 Systemd and journald . . . . . . . . . . . . . . . . . . 33
2.3 Log Inspection . . . . . . . . . . . . . . . . . . . . . 35
3 TCP/IP Fundamentals 41
3.1 History and Introduction . . . . . . . . . . . . . . . . . 42
3.1.1 The History of the Internet . . . . . . . . . . . . . . 42
3.1.2 Internet Administration . . . . . . . . . . . . . . . 42
3.2 Technology . . . . . . . . . . . . . . . . . . . . . . 44
3.2.1 Overview . . . . . . . . . . . . . . . . . . . . 44
3.2.2 Protocols . . . . . . . . . . . . . . . . . . . . . 45
3.3 TCP/IP.......................47
3.3.1 Overview . . . . . . . . . . . . . . . . . . . . 47
3.3.2 End-to-End Communication: IP and ICMP . . . . . . . . 48
3.3.3 The Base for Services: TCP and UDP . . . . . . . . . . . 51
3.3.4 The Most Important Application Protocols. . . . . . . . . 54
3.4 Addressing, Routing and Subnetting . . . . . . . . . . . . . 56
3.4.1 Basics . . . . . . . . . . . . . . . . . . . . . . 56
3.4.2 Routing . . . . . . . . . . . . . . . . . . . . . 57
3.4.3 IP Network Classes . . . . . . . . . . . . . . . . . 58
3.4.4 Subnetting . . . . . . . . . . . . . . . . . . . . 58
3.4.5 Private IP Addresses . . . . . . . . . . . . . . . . 59
3.4.6 Masquerading and Port Forwarding . . . . . . . . . . . 60
3.5 IPv6.........................61
3.5.1 IPv6 Addressing . . . . . . . . . . . . . . . . . . 62
4 Linux Network Configuration 67
4.1 Network Interfaces . . . . . . . . . . . . . . . . . . . 68
4.1.1 Hardware and Drivers . . . . . . . . . . . . . . . . 68
4.1.2 Configuring Network Adapters Using
ifconfig
.......69
4.1.3 Configuring Routing Using
route
............70
4.1.4 Configuring Network Settings Using
ip
..........72
4.2 Persistent Network Configuration . . . . . . . . . . . . . . 73
4.3 DHCP........................76
4.4 IPv6 Configuration . . . . . . . . . . . . . . . . . . . 77
4.5 Name Resolution and DNS . . . . . . . . . . . . . . . . 78

4 Contents
5 Network Troubleshooting 83
5.1 Introduction. . . . . . . . . . . . . . . . . . . . . . 84
5.2 Local Problems. . . . . . . . . . . . . . . . . . . . . 84
5.3 Checking Connectivity With
ping
..............84
5.4 Checking Routing Using
traceroute
And
tracepath
........87
5.5 Checking Services With
netstat
And
nmap
...........90
5.6 Testing DNS With
host
And
dig
...............93
5.7 Other Useful Tools For Diagnosis . . . . . . . . . . . . . . 95
5.7.1
telnet
and
netcat
..................95
5.7.2
tcpdump
......................97
5.7.3
wireshark
.....................97
6
inetd
and
xinetd
99
6.1 Offering Network Services with
inetd
.............100
6.1.1 Overview . . . . . . . . . . . . . . . . . . . . 100
6.1.2
inetd
Configuration . . . . . . . . . . . . . . . . . 100
6.2 The TCP Wrapper—
tcpd
.................101
6.3
xinetd
........................104
6.3.1 Overview . . . . . . . . . . . . . . . . . . . . 104
6.3.2
xinetd
Configuration. . . . . . . . . . . . . . . . . 104
6.3.3 Launching
xinetd
..................105
6.3.4 Parallel Processing of Requests . . . . . . . . . . . . . 106
6.3.5 Replacing
inetd
by
xinetd
...............106
7 Network services with systemd 109
7.1 Introductory Remarks . . . . . . . . . . . . . . . . . . 110
7.2 Persistent Network Services . . . . . . . . . . . . . . . . 110
7.3 Socket Activation . . . . . . . . . . . . . . . . . . . . 112
8 System Time 117
8.1 Introduction. . . . . . . . . . . . . . . . . . . . . . 118
8.2 Clocks and Time on Linux. . . . . . . . . . . . . . . . . 118
8.3 Time Synchronisation with NTP . . . . . . . . . . . . . . 120
9 Printing on Linux 127
9.1 Overview. . . . . . . . . . . . . . . . . . . . . . . 128
9.2 Commands for Printing . . . . . . . . . . . . . . . . . 129
9.3 CUPS Configuration. . . . . . . . . . . . . . . . . . . 133
9.3.1 Basics . . . . . . . . . . . . . . . . . . . . . . 133
9.3.2 Installing and Configuring a CUPS Server . . . . . . . . . 135
9.3.3 Miscellaneous Hints . . . . . . . . . . . . . . . . . 139
10 The Secure Shell 141
10.1 Introduction. . . . . . . . . . . . . . . . . . . . . . 142
10.2 Logging Into Remote Hosts Using
ssh
............142
10.3 Other Useful Applications:
scp
and
sftp
............145
10.4 Public-Key Client Authentication . . . . . . . . . . . . . . 146
10.5 Port Forwarding Using SSH . . . . . . . . . . . . . . . . 148
10.5.1 X11 Forwarding . . . . . . . . . . . . . . . . . . 148
10.5.2 Forwarding Arbitrary TCP Ports . . . . . . . . . . . . 149
11 Electronic Mail 153
11.1 Fundamentals . . . . . . . . . . . . . . . . . . . . . 154
11.2 MTAs for Linux . . . . . . . . . . . . . . . . . . . . 154
11.3 Basic Functionality . . . . . . . . . . . . . . . . . . . 155
11.4 Managing The Mail Queue . . . . . . . . . . . . . . . . 156
11.5 Local Delivery, Aliases And User-Specific Forwarding . . . . . . 156

5
12 Introduction to GnuPG 159
12.1 Asymmetric Cryptography and the “Web of Trust” . . . . . . . 160
12.2 Generating and Managing GnuPG Keys. . . . . . . . . . . . 163
12.2.1 Generating Key Pairs . . . . . . . . . . . . . . . . 163
12.2.2 Publishing a Public Key . . . . . . . . . . . . . . . 165
12.2.3 Importing and Signing Public Keys . . . . . . . . . . . 166
12.3 Encrypting and Decrypting Data . . . . . . . . . . . . . . 169
12.4 Signing Files and Verifying Signatures . . . . . . . . . . . . 171
12.5 GnuPG Configuration . . . . . . . . . . . . . . . . . . 173
13 Linux and Security: An Introduction 175
13.1 Introduction. . . . . . . . . . . . . . . . . . . . . . 176
13.2 File System Security . . . . . . . . . . . . . . . . . . . 176
13.3 Users and Files. . . . . . . . . . . . . . . . . . . . . 179
13.4 Resource Limits . . . . . . . . . . . . . . . . . . . . 182
13.5 Administrator Privileges With
sudo
..............186
13.6 Basic Networking Security . . . . . . . . . . . . . . . . 190
A Sample Solutions 193
B LPIC-1 Certification 203
B.1 Overview. . . . . . . . . . . . . . . . . . . . . . . 203
B.2 Exam LPI-102 . . . . . . . . . . . . . . . . . . . . . 203
B.3 LPI Objectives In This Manual . . . . . . . . . . . . . . . 204
C Command Index 211
Index 213

$ echo tux
tux
$ ls
hallo.c
hallo.o
$ /bin/su -
Password:
List of Tables
1.1
syslogd
facilities .............................. 15
1.2
syslogd
priorities (with ascending urgency) . . . . . . . . . . . . . . 15
1.3 Filtering functions for Syslog-NG . . . . . . . . . . . . . . . . . . . . 24
3.1 Common application protocols based on TCP/IP . . . . . . . . . . . 55
3.2 Addressingexample ........................... 57
3.3 Traditional IP Network Classes . . . . . . . . . . . . . . . . . . . . . 58
3.4 SubnettingExample............................ 59
3.5 Private IP address ranges according to RFC 1918 . . . . . . . . . . . 59
4.1 Options within
/etc/resolv.conf
..................... 79
5.1 Important
ping
options .......................... 86
6.1 Text substitutions in command entries in
/etc/hosts.allow
and
/etc/
hosts.deny
..................................102
6.2 Attributes in the
/etc/xinetd.conf
file ..................105
6.3
xinetd
andsignals .............................106
13.1 Access codes for processes with
fuser
..................181

$ echo tux
tux
$ ls
hallo.c
hallo.o
$ /bin/su -
Password:
List of Figures
1.1 Example configuration for
logrotate
(Debian GNU/Linux 8.0) . . . 27
2.1 Complete log output of
journalctl
.................... 38
3.1 Protocols and service interfaces . . . . . . . . . . . . . . . . . . . . . 46
3.2 ISO/OSI reference model . . . . . . . . . . . . . . . . . . . . . . . . 46
3.3 Structure of an IP datagram . . . . . . . . . . . . . . . . . . . . . . . 49
3.4 Structure of an ICMP packet . . . . . . . . . . . . . . . . . . . . . . . 50
3.5 Structure of a TCP Segment . . . . . . . . . . . . . . . . . . . . . . . 51
3.6 Starting a TCP connection: The Three-Way Handshake . . . . . . . 52
3.7 Structure of a UDP datagram . . . . . . . . . . . . . . . . . . . . . . 53
3.8 The
/etc/services
file(excerpt)...................... 54
4.1
/etc/resolv.conf
example ......................... 79
4.2 The
/etc/hosts
file(SUSE)......................... 80
7.1 Unit file for Secure Shell daemon (Debian 8) . . . . . . . . . . . . . . 114
9.1 The
mime.types
file(excerpt)........................133
9.2 The
/etc/cups/mime.convs
file(excerpt)..................134
9.3 The CUPS web interface . . . . . . . . . . . . . . . . . . . . . . . . . 135
9.4 The CUPS web interface: Printer management . . . . . . . . . . . . 136
9.5 The CUPS web interface: Adding a printer . . . . . . . . . . . . . . 136
9.6 An
/etc/cups/printers.conf
file (excerpt) . . . . . . . . . . . . . . . . . 138

$ echo tux
tux
$ ls
hallo.c
hallo.o
$ /bin/su -
Password:
Preface
This training manual deals with the knowledge necessary to configure and oper-
ate a Linux workstation as part of an (existing) local area network.
It is aimed towards advanced Linux administrators and presumes knowledge
on a level tested in the LPI-101 exam. This includes solid experience using the
shell, a text editor, and the fundamental Linux commands as well as the basics
of Linux administration. In addition, this training manual builds on the manual
Advanced Linux, which covers topics such as shell programming,
sed
and
awk
,
cron
,
and
at
.
After an introduction to the system logging service, the fundamentals of
TCP/IP and Linux network configuration, this manual covers the details of net-
work troubleshooting and explains how to start services using
inetd
and
xinetd
. In
addition, we cover topics like managing the system time, printing and important
network services such as the secure shell and connecting a client to a mail server.
The manual closes with an introduction to encrypting files using GnuPG and an
overview of Linux security.
The successful completion of this manual or comparable knowledge are a pre-
requisite for making the most of additional Linux courses and for obtaining Linux
Professional Institute certification.
This courseware package is designed to support the training course as effi-
ciently as possible, by presenting the material in a dense, extensive format for
reading along, revision or preparation. The material is divided in self-contained
chapters detailing a part of the curriculum; a chapter’s goals and prerequisites chapters
goals
prerequisites
are summarized clearly at its beginning, while at the end there is a summary and
(where appropriate) pointers to additional literature or web pages with further
information.
BAdditional material or background information is marked by the “light-
bulb” icon at the beginning of a paragraph. Occasionally these paragraphs
make use of concepts that are really explained only later in the courseware,
in order to establish a broader context of the material just introduced; these
“lightbulb” paragraphs may be fully understandable only when the course-
ware package is perused for a second time after the actual course.
AParagraphs with the “caution sign” direct your attention to possible prob-
lems or issues requiring particular care. Watch out for the dangerous bends!
CMost chapters also contain exercises, which are marked with a “pencil” icon exercises
at the beginning of each paragraph. The exercises are numbered, and sam-
ple solutions for the most important ones are given at the end of the course-
ware package. Each exercise features a level of difficulty in brackets. Exer-
cises marked with an exclamation point (“!”) are especially recommended.
Excerpts from configuration files, command examples and examples of com-
puter output appear in
typewriter type
. In multiline dialogs between the user and
the computer, user input is given in
bold typewriter type
in order to avoid misun-
derstandings. The “” symbol appears where part of a command’s output
had to be omitted. Occasionally, additional line breaks had to be added to make

12 Preface
things fit; these appear as “
”. When command syntax is discussed, words enclosed in angle brack-
ets (“⟨Word⟩”) denote “variables” that can assume different values; material in
brackets (“[
-f
⟨file⟩]”) is optional. Alternatives are separated using a vertical bar
(“
-a
|
-b
”).
Important concepts are emphasized using “marginal notes” so they can be eas-Important concepts
ily located; definitions of important terms appear in bold type in the text as well
definitions as in the margin.
References to the literature and to interesting web pages appear as “[GPL91]”
in the text and are cross-referenced in detail at the end of each chapter.
We endeavour to provide courseware that is as up-to-date, complete and error-
free as possible. In spite of this, problems or inaccuracies may creep in. If you
notice something that you think could be improved, please do let us know, e.g.,
by sending e-mail to
info@tuxcademy.org
(For simplicity, please quote the title of the courseware package, the revision ID
on the back of the title page and the page number(s) in question.) Thank you very
much!
LPIC-1 Certification
These training materials are part of a recommended curriculum for LPIC-1 prepa-
ration. Refer to Appendix B for further information.

$ echo tux
tux
$ ls
hallo.c
hallo.o
$ /bin/su -
Password:
1
System Logging
Contents
1.1 The Problem . . . . . . . . . . . . . . . . . . . . . 14
1.2 The Syslog Daemon . . . . . . . . . . . . . . . . . . . 14
1.3 Log Files . . . . . . . . . . . . . . . . . . . . . . . 17
1.4 Kernel Logging . . . . . . . . . . . . . . . . . . . . 18
1.5 Extended Possibilities: Rsyslog . . . . . . . . . . . . . . . 18
1.6 The “next generation”: Syslog-NG. . . . . . . . . . . . . . 22
1.7 The
logrotate
Program..................26
Goals
• Knowing the syslog daemon and how to configure it
• Being able to manage log file using
logrotate
• Understanding how the Linux kernel handles log messages
Prerequisites
• Basic knowledge of the components of a Linux system
• Handling configuration files
adm2-syslog.tex
(
0cd20ee1646f650c
)

14 1 System Logging
1.1 The Problem
Application programs need to tell their users something now and then. The com-
pletion of a task or an error situation or warning must be reported in a suitable
manner. Text-oriented programs output appropriate messages on their “termi-
nal”; GUI-based programs might use “alert boxes” or status lines whose content
changes.
The operating system kernel and the system and network services running in
the background, however, are not connected to user terminals. If such a process
wants to output a message, it might write it to the system console’s screen; on X11,
such messages might show up in the
xconsole
window.
In multi-user mode, writing a system message to the system console only is
not sufficient. Firstly, it is not clear that the message will actually be read by
root
,
secondly, these screen messages cannot be saved and may easily get lost.
1.2 The Syslog Daemon
The solution of this problem consists of the syslog daemon or
syslogd
. Instead of
outputting a message directly, system messages with a specific meaning can be
output using the
syslog()
function, which is part of the Linux C runtime library.
Such messages are accepted by
syslogd
via the local socket
/dev/log
.
BKernel messages are really handled by a different program called
klogd
. This
program preprocesses the messages and usually passes them along to
sys-
logd
. See section 1.4.
syslogd
proves very useful when debugging. It logs the different system messageslog
and is—as its name suggests—a daemon program. The
syslogd
program is usually
started via an init script while the system is booted. When it receives messages, it
can write them to a file or sends them on across the network to another computer
which manages a centralised log.
BThe common distributions (Debian GNU/Linux, Ubuntu, Red Hat Enter-
prise Linux, Fedora, openSUSE, …) have all been using, for various lengths
of time, a package called “Rsyslog”, which is a more modern implementa-
tion of a
syslogd
with more room for configuration. The additional capabil-
ities are, however, not essential for getting started and/or passing the LPI
exam. If you skip the first part of the Rsyslog configuration file, the remain-
der corresponds, to a very large extent, to what is discussed in this chapter.
There is more about Rsyslog in section 1.5.
Instead of
syslogd
, certain versions of the Novell/SUSE distributions, in par-
ticular the SUSE Linux Enterprise Server, use the Syslog-NG package in-
stead of
syslogd
. This is configured in a substantially different manner. For
the LPIC-1 exam, you need to know that Syslog-NG exists and roughly what
it does; see section 1.6.
The administrator decides what to do with individual messages. The configu-
ration file
/etc/syslog.conf
specifies which messages go where.
/etc/syslog.conf
BBy default, Rsyslog uses
/etc/rsyslog.conf
as its configuration file. This is
largely compatible to what
syslogd
would use. Simply ignore all lines start-
ing with a dollar sign (
$
).
The configuration file consists of two columns and might look like this:
kern.warn;*.err;authpriv.none /dev/tty10
kern.warn;*.err;authpriv.none |/dev/xconsole
*.emerg *

1.2 The Syslog Daemon 15
Table 1.1:
syslogd
facilities
Facility Meaning
authpriv
Confidential security subsystem messages
cron
Messages from
cron
and
at
daemon
Messages from daemon programs with no more specific facility
ftp
FTP daemon messages
kern
System kernel messages
lpr
Printer subsystem messages
mail
Mail subsystem messages
news
Usenet news subsystem messages
syslog syslogd
messages
user
Messages about users
uucp
Messages from the UUCP subsystem
local
𝑟(0≤𝑟≤7) Freely usable for local messages
Table 1.2:
syslogd
priorities (with ascending urgency)
Priority Meaning
none
No priority in the proper sense—serves to exclude all messages from
a certain facility
debug
Message about internal program states when debugging
info
Logging of normal system operations
notice
Documentation of particularly noteworthy situations during normal
system operations
warning
(or
warn
) Warnings about non-serious occurrences which are not se-
rious but still no longer part of normal operations
err
Error messages of all kinds
crit
Critical error messages (the dividing line between this and
err
is not
strictly defined)
alert
“Alarming” messages requiring immediate attention
emerg
Final message before a system crash
*.=warn;*.=err -/var/log/warn
*.crit /var/log/warn
*.*;mail.none;news.none -/var/log/messages
The first column of each line determines which messages will be selected, and the
second line says where these messages go. The first column’s format is
⟨facility⟩
.
⟨priority⟩[
;
⟨facility⟩
.
⟨priority⟩]
…
where the ⟨facility⟩denotes the system program or component giving rise to the facilities
message. This could be the mail server, the kernel itself or the programs managing
access control to the system. Table 1.1 shows the valid facilities. If you specify an
asterisk (“
*
”) in place of a facility, this serves as placeholder for any facility. It
is not easily possible to define additional facilities; the “local” facilities
local0
to
local7
should, however, suffice for most purposes.
The ⟨priority⟩specifies how serious the message is. The valid priorities are priorities
summarised in Table 1.2.
BWho gets to determine what facility or priority is attached to a message?
The solution is simple: Whoever uses the
syslog()
function, namely the de-
veloper of the program in question, must assign a facility and priority to
their code’s messages. Many programs allow the administrator to at least
redefine the message facility.

16 1 System Logging
A selection criterion of the form
mail.info
means “all messages of the mail sub-selection criteria
system with a priority of
info
and above”. If you just want to capture messages
of a single priority, you can do this using a criterion such as
mail.=info
. The as-
terisk (“
*
”) stands for any priority (you could also specify “
debug
”). A preceding
!
implies logical negation:
mail.!info
deselects messages from the mail subsystem
at a priority of
info
and above; this makes most sense in combinations such as
mail.*;mail.!err
, to select certain messages of low priority.
!
and
=
may be com-
bined;
mail.!=info
deselects (exactly) those messages from the mail subsystem with
priority
info
.
You may also specify multiple facilites with the same priority like
mail,news.info
;Multiple facilities—same priority
this expression selects messages of priority
info
and above that belong to the
mail
or
news
facilities.
Now for the right-hand column, the messages’ targets. Log messages can beactions
handled in different ways:
• They can be written to a file. The file name must be specified as an absolute
path. If there is a
-
in front of the path, then unlike normal
syslogd
oper-
ation, the file will not immediately be written to on disk. This means that
in case of a system crash you might lose pending log messages—for fairly
unimportant messages such as those of priority
notice
and below, or for mes-
sages from “chatty” facilities such as mail and news, this may not really be
a problem.
The file name may also refer to a device file (e.g.,
/dev/tty10
in the example
above).
• Log messages can be written to a named pipe (FIFO). The FIFO name must
be given as an absolute path with a preceding “
|
”. One such FIFO is
/dev/
xconsole
.
• They can be passed across the network to another
syslogd
. This is specified
as the name or IP address of the target system with a preceding
@
character.
This is especially useful if a critical system state occurs that renders the local
log file inaccessible; to deprive malicious crackers from a way to hide their
traces; or to collect the log messages of all hosts in a network on a single
computer and process them there.
On the target host, the
syslogd
must have been started using the
-r
(“remote”)
option in order to accept forwarded messages. How to do that depends on
your Linux distribution.
• They can be sent directly to users. The user names in question must be given
as a comma-separated list. The message will be displayed on the listed
users’ terminals if they are logged in when the message arrives.
• They can be sent to all logged-in users by specifying an asterisk (“
*
”) in place
of a login name.
As a rule, after installation your system already contains a running
syslogd
andChanging configuration
a fairly usable
/etc/syslog.conf
. If you want to log more messages, for example
because specific problems are occurring, you should edit the
syslog.conf
file and
then send
syslogd
a
SIGHUP
signal to get it to re-read its configuration file.
BYou can test the
syslogd
mechanism using the
logger
program. An invocation
of the form
$logger -p local0.err -t TEST "Hello World"
produces a log message of the form
Aug 7 18:54:34 red TEST: Hello World
Most modern programming languages make it possible to access the
sys-
log()
function.

1.3 Log Files 17
Exercises
C1.1 [2] Find out when somebody last assumed
root
’s identity using
su
.
C1.2 [!2] Reconfigure
syslogd
such that, in addition to the existing configura-
tion, it writes all (!) messages to a new file called
/var/log/test
. Test your
answer.
C1.3 [3] (Requires two computers and a working network connection.) Recon-
figure
syslogd
on the first computer such that it accepts log messages from
the network. Reconfigure
syslogd
on the second computer such that it sends
messages from facility
local0
to the first computer. Test the configuration.
C1.4 [2] How can you implement a logging mechanism that is safe from at-
tackers that assume control of the logging computer? (An attacker can al-
ways pretend further messages from being logged. We want to ensure that
the attacker cannot change or delete messages that have already been writ-
ten.)
1.3 Log Files
Log files are generally created below
/var/log
. The specific file names vary—refer
/var/log
to the
syslog.conf
file if you’re in doubt. Here are some examples:
Debian GU/Linux collects all messages except those to do with authentica-
tion in the
/var/log/syslog
file. There are separate log files for the
auth
,
daemon
,
kern
,
lpr
,
mail
,
user
, and
uucp
facilities, predictably called
auth.log
etc. On top
of that, the mail system uses files called
mail.info
,
mail.warn
, and
mail.err
,
which respectively contain only those messages with priority
info
etc. (and
above). Debugging messages from all facilities except for
authpriv
,
news
, and
mail
end up in
/var/log/debug
, and messages of priority
info
,
notice
, and
warn
from all facilities except those just mentioned as well as
cron
and
daemon
in
/var/log/messages
.
The defaults on Ubuntu correspond to those on Debian GNU/Linux.
On Red Hat distributions, all messages with a priority of
info
or above,
except those from
authpriv
and
cron
, are written to
/var/log/messages
, while
messages from
authpriv
are written to
/var/log/secure
and those from
cron
to
/var/log/cron
. All messages from the mail system end up in
/var/log/maillog
.
OpenSUSE logs all messages except those from
iptables
and the
news
and
mail
facilities to
/var/log/messages
. Messages from
iptables
go to
/var/log/
firewall
. Messages that are not from
iptables
and have priority
warn
,
err
,
or
crit
are also written to
/var/log/warn
. Furthermore, there are the
/var/
log/localmessages
file for messages from the
local*
facilities, the
/var/log/
NetworkManager
file for messages from the
NetworkManager
program, and the
/var/log/acpid
file for messages from the ACPI daemon. The mail sys-
tem writes its log both to
/var/log/mail
(all messages) and to the files
mail.info
,
mail.warn
, and
mail.err
(the latter for the priorities
err
and
crit
),
while the news system writes its log to
news/news.notice
,
news/news.err
, and
news/news.crit
(according to the priority)—there is no overview log file for
news. (If you think this is inconsistent and confusing, you are not alone.)
ASome log files contain messages concerninig users’ privacy and should thus
only be readable by
root
. In most cases, the distributions tend to err towards
caution and restrict the access rights to all log files.

18 1 System Logging
You can peruse the log files created by
syslogd
using
less
;
tail
lends itself toInspecting log files
long files (possibly using the
-f
option). There are also special tools for reading
log files, the most popular of which include
logsurfer
and
xlogmaster
.
The messages written by
syslogd
normally contain the date and time, the hostmessages
name, a hint about the process or component that created the message, and the
message itself. Typical messages might look like this:
Mar 31 09:56:09 red modprobe: modprobe: Can't locate ...
Mar 31 11:10:08 red su: (to root) user1 on /dev/pts/2
Mar 31 11:10:08 red su: pam-unix2: session started for ...
You can remove an overly large log file using
rm
or save it first by renaming it
with an extension like
.old
. A new log file will be created when
syslogd
is next
restarted. However, there are more convenient methods.
1.4 Kernel Logging
The Linux kernel does not send its log messages to
syslogd
but puts them into
an internal “ring buffer”. They can be read from there in various ways—via a
specialised system call, or the
/proc/kmsg
“file”. Traditionally, a program called
klogd
is used to read
/proc/kmsg
and pass the messages on to
syslogd
.
BRsyslog gets by without a separate
klogd
program, because it takes care of
kernel log messages directly by itself. Hence, if you can’t find a
klogd
on your
system, this may very likely be because it is using rsyslog.
During system startup,
syslogd
and possibly
klogd
are not immediately available—
they must be started as programs and thus cannot handle the kernel’s start mes-
sages directly. The
dmesg
command makes it possible to access the kernel log buffer
retroactively and look at the system start log. With a command such as
#dmesg >boot.msg
you can write these messages to a file and send it to a kernel developer.
BUsing the
dmesg
command you can also delete the kernel ring buffer (
-c
op-
tion) and set a priority for direct notifications: messages meeting or exceed-
ing this priority will be sent to the console immediately (
-n
option). Kernel
messages have priorities from 0to 7corresponding to the
syslogd
priorities
from
emerg
down to
debug
. The command
#dmesg -n 1
for example causes only
emerg
messages to be written to the console directly.
All messages will be written to
/proc/kmsg
in every case—here it is the job of
postprocessing software such as
syslogd
to suppress unwanted messages.
Exercises
C1.5 [2] What does
dmesg
output tell you about the hardware in your com-
puter?
1.5 Extended Possibilities: Rsyslog
Rsyslog by Rainer Gerhards has replaced the traditional BSD
syslogd
on most com-
mon Linux distributions. Besides greater efficiency, rsyslog’s goal is supporting
various sources and sinks for log messages. For example, it writes messages not
just to text files and terminals, but also a wide selection of databases.

1.5 Extended Possibilities: Rsyslog 19
BAccording to its own web site, “rsyslog” stands for “rocket-fast syslog”.
Of course one should not overestimate the value of that kind of self-
aggrandisement, but in this case the self-praise is not entirely unwarranted.
The basic ideas behind rsyslog are basically as follows:
• “Sources” pass messages on to “rulesets”. There is one standard built-in
ruleset (
RSYSLOG_DefaultRuleset
), but you as the user get to define others.
• Every ruleset may contain arbitrarily many rules (even none at all, even
though that does not make a great deal of sense).
• A rule consists of a “filter” and an “action list”. Filters make yes-no deci-
sions about whether the corresponding action list will be executed.
• For each message, all the rules in the ruleset will be executed in order from
the first to the last (and no others). All rules will always be executed, no
matter how the filter decisions go, although there is a “stop processing”
action.
• An action list may contain many actions (at least one). Within an action
list, no further filters are allowed. The actions determine what happens to
matching log messages.
• The exact appearance of log messages in the output may be controlled
through “templates”.
Rsyslog’s configuration can be found in the
/etc/rsyslog.conf
file. In this file you
may use three different styles of configuration setting in parallel:
• The traditional
/etc/syslog.conf
syntax (“sysklogd”).
• An obsolete rsyslog syntax (“legacy rsyslog”). You can recognise this by the
commands that start with dollar signs (
$
).
• The current rsyslog syntax (“RainerScript”). This is best suited for complex
situations.
The first two flavours are line-based. In the current syntax, line breaks are irrele-
vant.
For very simple applications you can still—and should!—use the sysklogd syn-
tax (as discussed in the previous sections). If you want to set configuration pa-
rameters or express complex control flows, RainerScript is more appropriate. You
should avoid the obsolete rsyslog syntax (even if various Linux distributions don’t
do this in their default configurations), except that various features of rsyslog are
only accessible using that syntax.
BAs usual, empty lines and comment lines will be ignored. Comment lines
include both lines (and parts of lines) that start with a
#
(the comment then
stops at the end of the line) and C-style comments that reach from a
/*
,
disregarding line breaks, until a
*/
.
BC-style comments may not be nested1, but
#
comments may occur inside C-
style comments. That makes C-style comments particularly useful to “com-
ment out” large swathes of a configuration file in order to make it invisible
to rsyslog.
Rsyslog offers various features that surpass those of BSD
syslogd
. For example,
you can use extended filter expressions for messages:
:msg, contains, "FOO" /var/log/foo.log
1You don’t get to do that in C, either, so it shouldn’t be a major nuisance.

20 1 System Logging
Extended filter expressions always consist of a colon at the left margin, a “prop-
erty” that rsyslog takes from the message, a filter operator (here,
contains
), and a
search term. In our example, all log messages whose text contains the character
sequence
FOO
will be written to the
/var/log/foo.log
file.
BApart from
msg
(the log message proper), the “properties” you may use in-
clude, for example,
hostname
(the name of the computer sending the mes-
sage),
fromhost
(the name of the computer that forwarded the message to
rsyslog),
pri
(the category and priority of the message as an undecoded
number),
pri-text
(the category and priority as a text string, with the num-
ber appended, as in “
local0.err<133>
”),
syslogfacility
and
syslogseverity
as
well as
syslogfacility-text
and
syslogseverity-text
for direct access to the cat-
egory and priority,
timegenerated
(when the message was received) or
input-
name
(the rsyslog module name of the source of the message). There are
various others; look at rsyslog’s documentation.
BThe allowable comparison operators are
contains
,
isequal
,
startswith
,
regex
,
and
eregex
. These speak for themselves, except for the latter two—
regex
con-
siders its parameter as a simple and
eregex
as an “extended” regular expres-
sion according to POSIX. All comparison operators take upper and lower
case into account.
AThe
startswith
comparison is useful because it is considerably more efficient
than a regular expression that is anchored to the start of the message (as
long as you’re looking for a constant string, anyway). You should, however,
be careful, because what you consider the start of the message and what
rsyslog thinks of that can be quite different. If rsyslog receives a message
via the syslog service, this will, for example, look like
<131>Jul 22 14:25:50 root: error found
As far as rsyslog is concerned,
msg
does not start (as one might naively as-
sume) at the
e
of
error
, but with the space character in front of it. So if you
are looking for messages that start with
error
, you should say
:msg, startswith, " error" /var/log/error.log
BThere is a nice addition on the “action side” of simple rules: With traditional
syslogd
, you have already seen that an entry like
local0.* @red.example.com
will forward log messages to a remote host via the (UDP-based) syslog pro-
tocol. With rsyslog, you may also write
local0.* @@red.example.com
to transmit log messages via TCP. This is potentially more reliable, especially
if firewalls are involved.
BAt the other end of the TCP connection, of course, there must be a suitably
configured rsyslog listening for messages. You can ensure this, for example,
via
module(load="imtcp" MaxSessions="500")
input(type="imtcp" port="514")
In the obsolete syntax,

1.5 Extended Possibilities: Rsyslog 21
$ModLoad imtcp
$InputTCPMaxSessions 500
$InputTCPServerRun 514
does the same thing.
ADo consider that only the UDP port 514 is officially reserved for the syslog
protocol. The TCP port 514 is really used for a different purpose2. You can
specify a different port just in case:
local0.* @@red.example.com:10514
(and that works for UDP, too, if necessary). The changes required on the
server side will be easy for you to figure out on your own.
The next level of complexity are filters based on expressions that may contain
arbitrary Boolean, arithmetic, or string operations. These always start with an
if
at the very left of a new line:
if $syslogfacility-text == "local0" and $msg startswith " FOO"
and ($msg contains "BAR" or $msg contains "BAZ")
then /var/log/foo.log
(in your file this should all be on one line). With this rule, messages of category
local0
will be written to the
/var/log/foo.log
file as long as they start with
FOO
and
also contain either
BAR
or
BAZ
(or both). (Watch for the dollar signs at the start of
the property names.)
Rsyslog supports a large number of modules that determine what should hap-
pen to log messages. You might, for example, forward important messages by
e-mail. To do so, you might put something like
module(load="ommail")
template(name="mailBody" type="string" string="ALERT\\r\\n%msg%")
if $msg contains "disk error" then {
action(type="ommail" server="mail.example.com" port="25"
mailfrom="rsyslog@example.com" mailto="admins@example.com"
subject.text="disk error detected"
body.enable="on" template="mailBody"
action.execonlyonceeveryinterval="3600")
}
into your
/etc/rsyslog.conf
.
BIf you have an older version of rsyslog (before 8.5.0) you will need to use the
obsolete syntax to configure the
ommail
module. That might, for example,
look like
$ModLoad ommail
$ActionMailSMTPServer mail.example.com
$ActionMailFrom rsyslog@example.com
$ActionMailTo admins@example.com
$template mailSubject,"disk error detected"
$template mailBody,"ALERT\\r\\n%msg%"
$ActionMailSubject mailSubject
$ActionExecOnlyOnceEveryInterval 3600
if $msg contains "disk error" then :ommail:;mailBody
$ActionExecOnlyOnceEveryInterval 0q
2… even though nobody nowadays is still interested in the remote-shell service. Nobody reason-
able, anyway.

22 1 System Logging
BRsyslog’s SMTP implementation is fairly primitive, since it supports neither
encryption nor authentication. This means that the mail server you specify
in the rsyslog configuration must be able to accept mail from rsyslog even
without encryption or authentication.
By the way, rsyslog can handle Linux kernel log messages directly. You simply
need to enable the
imklog
input module:
module(load="imklog")
or (obsolete syntax)
$ModLoad imklog
A separate
klogd
process is not necessary.
Detailed information on rsyslog is available, for example, in the online docu-
mentation [rsyslog].
Exercises
C1.6 [!3] (If your distribution doesn’t use rsyslog already.) Install rsyslog and
create a configuration that is as close to your existing
syslogd
configuration
as possible. Test it with (for example)
logger
. Where do you see room for
improvement?
C1.7 [2] PAM, the login and authentication system, logs sign-ons and sign-
offs in the following format:
kdm: :0[5244]: (pam_unix) session opened for user hugo by (uid=0)
kdm: :0[5244]: (pam_unix) session closed for user hugo
Configure rsyslog such that whenever a particular user (e. g. you) logs on
or off, a message is displayed on the system administrator’s (
root
’s) terminal
if they are logged on. (Hint: PAM messages appear in the
authpriv
category.)
C1.8 [3] (Cooperate with another class member if necessary.) Configure rsys-
log such that all log messages from one computer are passed to another
computer by means of a TCP connection. Test this connection using
logger
.
1.6 The “next generation”: Syslog-NG
Syslog-NG (“NG” for “new generation”) is a compatible, but extended reim-
plementation of a syslog daemon by Balazs Scheidler. The main advantages ofmain advantages
Syslog-NG compared to the traditional
syslogd
include:
• Filtering of messages based on their content (not just categories and priori-
ties)
• Chaining of several filters is possible
• A more sophisticated input/output system, including forwarding by TCP
and to subprocesses
The program itself is called
syslog-ng
.
BFor syslog clients there is no difference: You can replace a
syslogd
with
Syslog-NG without problems.
You can find information about Syslog-NG in its manual pages as well as on
[syslog-ng]. This includes documentation as well as a very useful FAQ collection.

1.6 The “next generation”: Syslog-NG 23
Configuration file Syslog-NG reads its configuration from a file, normally
/etc/
syslog-ng/syslog-ng.conf
. Unlike
syslogd
, Syslog-NG distinguishes various “entry entry types
types” in its configuration file.
Global options These settings apply to all message sources or the Syslog-NG
daemon itself.
Message sources Sylog-NG can read messages in various ways: from Unix-
domain sockets or UDP like
syslogd
, but also, for example, from files, FIFOs,
or TCP sockets. Every message source is assigned a name.
Filters Filters are Boolean expressions based on internal functions that can, for
example, refer to the origin, category, priority, or textual content of a log
message. Filters are also named.
Message sinks Syslog-NG includes all logging methods of
syslogd
and then some.
Log paths A “log path” connects one or several message sources, filters, and
sinks: If messages arrive from the sources and pass the filter (or filters),
they will be forwarded to the specified sink(s). At the end of the day, the
configuration file consists of a number of such log paths.
Options You can specify various “global” options that control Syslog-NG’s gen-
eral behaviour or determine default values for individual message sources or
sinks (specific options for the sources or sinks take priority). A complete list is
part of the Syslog-NG documentation. The general options include various set-
tings for handling DNS and the forwarding or rewriting of messages’ sender host
names.
BIf Syslog-NG on host 𝐴receives a message from host 𝐵, it checks the
keep_hostnames()
option. If its value is
yes
,𝐵will be kept as the host name for
the log. If not, the outcome depends on the
chain_hostnames()
option; if this
is
no
, then 𝐴will be logged as the host name, if it is
yes
, then Syslog-NG will
log 𝐵
/
𝐴. This is particularly important if the log is then forwarded to yet
another host.
Message Sources In Syslog-NG, message sources are defined using the
source
keyword. A message source collects one or more “drivers”. To accomplish the
same as a “normal”
syslogd
, you would include the line
source src { unix-stream("/dev/log"); internal(); };
in your configuration; this tells Syslog-NG to listen to the Unix-domain socket
/dev/log
.
internal()
refers to messages that Syslog-NG creates by itself.
BA Syslog-NG message source corresponding to the
-r
option of
syslogd
might
look like this:
source s_remote { udp(ip(0.0.0.0) port(514)); };
Since that is the default setting,
source s_remote { udp(); };
would also do.
BWith
ip()
, you can let Syslog-NG listen on specific local IP addresses only.
With
syslogd
, this isn’t possible.
The following source specification lets Syslog-NG replace the
klogd
program:
source kmsg { file("/proc/kmsg" log_prefix("kernel: ")); };
BAll message sources support another parameter,
log_msg_size()
, which spec-
ifies the maximum message length in bytes.

24 1 System Logging
Table 1.3: Filtering functions for Syslog-NG
Syntax Description
facility(
⟨category⟩[
,
⟨category⟩
…
]
)
Matches messages with one of the listed
categories
level(
⟨priority⟩[
,
⟨priority⟩
…
]
)
Matches messages with one of the listed
priorities
priority(
⟨priority⟩[
,
⟨priority⟩
…
]
)
Same as
level()
program(
⟨regex⟩
)
Matches messages where the name of the
sending program matches ⟨regex⟩
host(
⟨regex⟩
)
Matches messages whose sending host
matches ⟨regex⟩
match(
⟨regex⟩
)
Matches messages which match the ⟨regex⟩
themselves
filter(
⟨name⟩
)
Invokes another filtering rule and returns
its value
netmask(
⟨IP address⟩
/
⟨netmask⟩
)
Checks whether the IP address is in the
given network
Filters Filters are used to sift through log messages or distribute them to various
sinks. They rely on internal functions that consider specific aspects of messages;
these functions can be joined using the logical operators,
and
,
or
, and
not
. A list of
possible functions is shown in table ??.
You might, for example, define a filter that matches all messages from host
green
containing the text
error
:
filter f_green { host("green") and match("error"); };
BWith the
level()
(or
priority()
function, you can specify either one or more
priorities separated by commas, or else a range of priorities like “
warn ..
emerg
”.
Message Sinks Like sources, sinks consist of various “drivers” for logging meth-
ods. For example, you can write messages to a file:
destination d_file { file("/var/log/messages"); };
You can also specify a “template” that describes in which format the message
should be written to the sink in question. When doing so, you can refer to
“macros” that make various parts of the message accessible. For instance:
destination d_file {
file("/var/log/$YEAR.$MONTH.$DAY/messages"
template("$HOUR:$MIN:$SEC $TZ $HOST [$LEVEL] $MSG\n")
template_escape(no)
create_dirs(yes)
);
};
The
$YEAR
,
$MONTH
, etc. macros will be replaced by the obvious values.
$TZ
is the cur-
rent time zone,
$LEVEL
the message priority, and
$MSG
the messaeg itself (including
the sender’s process ID). A complete list of macros is part of Syslog-NG’s docu-
mentation.
BThe
template_escape()
parameter controls whether quotes (
'
and
"
) should
be “escaped” in the output. This is important if you want to feed the log
messages to, say, an SQL server.

1.6 The “next generation”: Syslog-NG 25
Unlike
syslogd
, Syslog-NG allows forwarding messages using TCP. This is not
just more convenient when firewalls are involved, but also ensures that no log
messages can get lost (which might happen with UDP). You could define a TCP
forwarding sink like this:
destination d_tcp { tcp("10.11.12.13" port(514); localport(514)); };
BAlso very useful is forwarding messages to programs using
program()
.
Syslog-NG starts the program when it is started itself, and keeps it run-
ning until itself is stopped or it receives a
SIGHUP
. This is not just to increase
efficiency, but serves as a precaution against denial-of-service attacks—if
a new process is started for every new message, an attacker could shut off
logging by sending large amounts of matching log messages. (Other mes-
sages that would point to these shenanigans might then be dropped to the
floor.)
Log paths Log paths serve to bring sources, filters, and sinks together and to ac-
tually evaluate messages. They always start with the
log
keyword. Here are a few
examples based on rules you know already from our
/etc/syslog.conf
discussion:
# Prerequisites
source s_all { internal(); unix-stream("/dev/log"); };
filter f_auth { facility(auth, authpriv); };
destination df_auth { file("/var/log/auth.log"); };
# auth,authpriv.* /var/log/auth.log
log {
source(s_all);
filter(f_auth);
destination(df_auth);
};
This rule causes all messages to do with authentication to be written to the
/var/
log/auth.log
file. Of course, with
syslogd
, this can be done in one line …
Here is a somewhat more complex example:
# kern.warn;*.err;authpriv.none /dev/tty10
filter f_nearly_all {
(facility(kern) and priority(warn .. emerg))
or (not facility(authpriv,kern));
};
destination df_tty { file("/dev/tty10"); };
log {
source(s_all);
filter(f_nearly_all);
destination(df_tty);
};
Here, too,
syslogd
’s version is a little more compact, but on the other hand this
description might be easier to follow.
BEvery message passes through all log paths, and will be logged by all match-
ing ones (this behaviour equals that of
syslogd
). If you want a message to not
be further considered after it has passed a particular log path, you can add
the
flags(final)
option to that path.
B
flags(final)
does not mean that the message is logged just once; it might
have been logged by other paths before the path in question.

26 1 System Logging
BWith
flags(fallback)
, you can declare a path to be the “default path”. This
path will only be considered for log messages that did not match any paths
that were not marked
flags(fallback)
.
Exercises
C1.9 [!3] Install Syslog-NG and create a configuration that is as close to your
existing
syslogd
configuration as possible. Test it with (for example)
logger
.
Where do you see room for improvement?
C1.10 [2] PAM, the login and authentication system, logs sign-ons and sign-
offs in the following format:
kdm: :0[5244]: (pam_unix) session opened for user hugo by (uid=0)
kdm: :0[5244]: (pam_unix) session closed for user hugo
Configure Syslog-NG such that whenever a particular user (e. g. you) logs
on or off, a message is displayed on the system administrator’s (
root
’s) ter-
minal if they are logged on. (Hint: PAM messages appear in the
authpriv
category.)
C1.11 [3] (Cooperate with another class member if necessary.) Configure
rsyslog such that all log messages from one computer are passed to another
computer by means of a TCP connection. Test this connection using
logger
.
Experiment with different settings for
keep_hostnames()
and
chain_hostnames()
.
1.7 The
logrotate
Program
Depending on the number of users and the number and type of running services,
the log files can grow fairly large fairly quickly. To keep the system from inun-
dation by garbage, you should on the one hand try to put the relevant directories
(e. g.,
/var/log
or
/var
) on their own partitions. On the other hand there is software
which checks the log files periodically according to various criteria such as the
size, truncates them and removes or archives old log files. This process is called
“rotation”, and one such program is
logrotate
.
logrotate
is not a daemon, but will usually be executed once a day (or so) using
cron
—or a similar service.
B
logrotate
refuses to modify a log file more than once a day, except if the
decision depend on the size of the log file, you’re using the
hourly
criterion,
or the
--force
option (
-f
for short) was specified with
logrotate
.
According to convention,
logrotate
is configured using the
/etc/logrotate.conf/etc/logrotate.conf
file and the files within the
/etc/logrotate.d
directory. The
/etc/logrotate.conf
file
/etc/logrotate.d
sets up general parameters, which can be overwritten by the files in
/etc/logrotate.
d
if necessary. In
/etc/logrotate.conf
, there is in particular the “
include /etc/logro-
tate.d
” parameter, which causes the files from that directory to be read in that
place as if they were part of the
/etc/logrotate.conf
file.
BIn principle,
logrotate
reads all the files named on the command line as con-
figuration files, and the content of files mentioned later overwrites that of
files mentioned earlier. The
/etc/logrotate.conf
thing is just a (reasonable)
convention which is put into action by means of a suitable invocation of
logrotate
in
/etc/cron.daily/logrotate
(or something equivalent).

1.7 The
logrotate
Program 27
/var/log/syslog
{
rotate 7
daily
missingok
notifempty
delaycompress
compress
postrotate
invoke-rc.d rsyslog rotate >/dev/null
endscript
}
Figure 1.1: Example configuration for
logrotate
(Debian GNU/Linux 8.0)
BWe mention this here because it gives you the basic possibility to perform,
without undue hassle, separate
logrotate
runs for log files which aren’t part
of the regular configuration. If, for example, you have an extremely fast-
growing log file of, say, a popular web server, you can manage this using a
separate
logrotate
instance that runs more often than once a day.
logrotate
watches all files that it is told about by the aforementioned configu-
ration files, not just those created by
syslogd
. By way of example, figure 1.1 shows
an excerpt of a configuration file for rsyslog from Debian GNU/Linux 8.
The first line of the example specifies the files that this configuration applies
to (here,
/var/log/syslog
). You may enumerate several files or specify shell search
patterns. After that, inside curly braces, there is a block of directives that define
how
logrotate
should deal with the given files.
BTypically,
/etc/logrotate.conf
contains directives that are outside of a brace-
delimited block. These directives serve as defaults that apply to all log files
in the configuration, unless something more specific is given in their own
blocks of directives.
“
rotate 7
” means that at most seven old versions of each log file will be kept. old versions
When this maximum is reached, the oldest version of the log file will be deleted.
BIf you specify an address using
mail
, files will not be deleted but instead be
sent to the address in question.
B“
rotate 0
” deletes “rotated” log messages outright without keeping them at
all.
The rotated files are numbered in sequence, this means that if the current version
of the file is called
/var/log/syslog
, the immediately preceding version will be
/var/
log/syslog.1
, the version preceding that will be
/var/log/syslog.2
, and so on.
BYou may use the date instead of the sequential numbers. This means that
if today is July 20, 2015, and your
logrotate
run takes place daily in the
wee hours, the immediately preceding version of the file is not called
/var/
log/syslog.1
but
/var/log/syslog-20150720
, the version preceding that will be
called
/var/log/syslog-20150719
, and so on. To use this you must specify the
“
dateext
” directive.
BUsing “
dateformat
”, you can control exactly how the date-based file exten-
sion should look like. To do so, you need to specify a string that may con-
tain the
%Y
,
%m
,
%d
, and
%s
keys. These stand for the (four-digit) year, calendar
month, and calendar day (in each case two digits and, if necessary, with a
leading zero) and the seconds since 1st January 1970, 12:00 am UTC. As you
can surmise from the previous paragraph, the default is “
-%Y%m%d
”.

28 1 System Logging
BWhen you use
dateformat
, you should note that
logrotate
does a lexicographic
sort of file names when rotating in order to find out which file is the oldest.
This works with “
-%Y%m%d
”, but not with “
-%d%m%Y
”.
“
daily
” means that log files should be rotated daily. Together with “
rotate 7
”Time periods
this implies that you always have access to last week’s logs.
BThere are also
weekly
,
monthly
, and
yearly
. With
weekly
, the file will be rotated
when the current day of the week is earlier than the day of the week of the
last rotation, or more than one week has passed since the last rotation (in
the end, this means that rotation will take place on the first day of the week,
which according to US custom is the Sunday). With
monthly
, the file will be
rotated on the first
logrotate
run of the month (usually on the first of the
month). With
yearly
, rotation takes place on the first
logrotate
run of the
year. Theoretically,
hourly
rotates the log file every hour, but since
logrotate
is normally only run once a day, you will have to arrange for it to be run
frequently enough.
BAn alternative criterion is “
size
”. This will rotate a log file when a certain
size has been exceeded. The file size is given as a parameter—without a
unit, it will be taken to mean bytes, while the units
k
(or
K
),
M
, and
G
stand for
kibibytes (210 bytes), mebibytes (220 bytes), or gibibytes (230 bytes), respec-
tively.
B“
size
” and the time-based criteria are mutually exclusive. This means that
if you specify a “
size
” criterion, rotation will depend solely on file size, no
matter when the file was last rotated.
BFile size and time can be used together by means of the “
maxsize
” and
“
minsize
” criteria. With “
maxsize
”, you can specify a size which will cause
logrotate
to rotate the file even if the next official date has not been reached.
With “
minsize
”, the file will only be rotated at the specified point in time if
it has exceeded the given size (small files will be skipped).
“
missingok
” suppresses error messages if a log file could not be found. (The defaulterror messages
is “
nomissingok
”.) “
notifempty
” does not rotate a file if it is empty (the default here
is “
ifempty
”).
“
compress
” lets you specify that rotated versions of the log file should be com-
pressed.
BThis is by default done with
gzip
unless you request a different command
using “
compresscmd
”. Options for that command (which you would otherwise
pass on its command line) can be defined with “
compressoptions
”. The default
for
gzip
is “
-6
”.
The “
delaycompress
” directive ensures that a freshly rotated file is not compressed
immediately after the rotation but only on the next run. While usually the se-
quence of files would look like
/var/log/syslog /var/log/syslog.1.gz /var/log/syslog.2.gz …
“
delaycompress
” would get you the sequence
/var/log/syslog /var/log/syslog.1 /var/log/syslog.2.gz …
(in other words,
/var/log/syslog.1
remains uncompressed). You need this setting
if there is a chance that the logging program (like rsyslog) might append data
to the file after it has been renamed (rotated)—this can happen because rsyslog
keeps the logfile open, and renaming the file is irrelevant as far as writing to it is
concerned.
This implies that you need to notify rsyslog that there is a new log file. This is
what the

1.7 The
logrotate
Program 29
postrotate
invoke-rc.d rsyslog rotate >/dev/null
endscript
directive is for. The shell commands between “
postrotate
” and “
endscript
” are ex-
ecuted by
logrotate
whenever the log file has been rotated.
The command itself is basically irrelevant (the idea counts), but what hap-
pens in the end is that rsyslog’s init script will be invoked, and it will send
SIGHUP
to the program. Other distributions also have their ways and means.
BThe
SIGHUP
then causes rsyslog to reread its configuration file and close and
reopen all log files. Since
/var/log/syslog
was renamed earlier on, rsyslog
opens a new log file under that name.—At this point,
logrotate
could com-
press the
/var/log/syslog.1
file, but it has no way of knowing when rsyslog
is really done with the file. This is why this is postponed until the file gets
rotated again.
Between “
postrotate
” and “
endscript
” there may be several lines with commands.
logrotate
concatenates them all and passes them to the shell (
/bin/sh
) as a whole.
The commands is passed the name of the log file as a parameter, and that is avail-
able there in the customary fashion as “
$1
”.
BThe
postrotate
commands are executed once for every log file enumerated at
the start of the configuration block. This means that the commands will per-
haps be executed several times. You can use the “
sharedscripts
” directive to
ensure that the commands are executed at most once for all files that match
the search pattern (or not at all, if none of the files needed to be rotated).
You can use “
create
” to make sure that the log file is recreated immediately after
the rotation and before the
postrotate
commands are executed. This uses the name
of the old file. The file mode, owner, and group derive from the parameters to
create
; the three possibilities are
create 600 root adm
File mode, user, and group
create root adm
Just user and group
create
Nothing at all
Unspecified file properties are taken from the previous version of the file.
This is just a selection of the most important configuration parameters. Study
logrotate
(8) to see the full list.
Exercises
C1.12 [!1] Which system-wide defaults does
logrotate
establish in your distri-
bution?
C1.13 [C]onsult
/etc/logrotate.conf
(and possibly
logrotate
(8)).
C1.14 [3] Configure
logrotate
such that your new
/var/log/test
log file will be
rotated once it exceeds a length of 100 bytes. 10 rotated versions should be
kept, these older versions should be compressed and should use a name
containing the date of their creation. Test your configuration.

30 1 System Logging
Commands in this Chapter
klogd
Accepts kernel log messages
klogd
(8) 14, 18
logger
Adds entries to the system log files
logger
(1) 16
logrotate
Manages, truncates and “rotates” log files
logrotate
(8) 26
logsurfer
Searches the system log files for important events
www.cert.dfn.de/eng/logsurf/
17
syslogd
Handles system log messages
syslogd
(8) 14
tail
Displays a file’s end
tail
(1) 17
xconsole
Displays system log messages in an X window
xconsole
(1) 14
xlogmaster
X11-based system monitoring program
xlogmaster
(1),
www.gnu.org/software/xlogmaster/
17
Summary
• The
syslogd
daemon can accept log messages from various system compo-
nents, write them to files, or pass them on to users or other computers.
• Log messages may belong to diverse facilities and can have various priori-
ties.
• Messages can be sent to
syslogd
using the
logger
command.
• Log files are generally placed in the
/var/log
directory.
• Syslog-NG is a compatible, but extended, reimplementation of a syslog dae-
mon.
•
logrotate
can be used to manage and archive log files.
Bibliography
RFC3164 C. Lonvick. “The BSD syslog Protocol”, August 2001.
http://www.ietf.org/rfc/rfc3164.txt
rsyslog “Welcome to Rsyslog”.
http://www.rsyslog.com/doc/v8-stable/index.html
syslog-ng “syslog-ng – Log Management Software”.
http://www.balabit.com/products/syslog_ng/

$ echo tux
tux
$ ls
hallo.c
hallo.o
$ /bin/su -
Password:
2
System Logging with Systemd and
“The Journal”
Contents
2.1 Fundamentals . . . . . . . . . . . . . . . . . . . . . 32
2.2 Systemd and journald . . . . . . . . . . . . . . . . . . 33
2.3 Log Inspection . . . . . . . . . . . . . . . . . . . . . 35
Goals
• Understanding the fundamentals of journald
• Being able to configure journald
• Being able to issue simple journal queries
• Understanding how journald handles log files
Prerequisites
• Basic knowledge of Linux system components
• Ability to handle configuration files
• Knowledge of the traditional system log service (chapter 1)
• Knowledge about systemd
adm2-journald.tex
(
0cd20ee1646f650c
)

32 2 System Logging with Systemd and “The Journal”
2.1 Fundamentals
Systemd is a far-reaching renewal of the software that ensures the basic operation
of a Linux computer. In a stricter sense, systemd is about starting and tracking
services and managing resources. Systemd also contains an approach to system
logging that is markedly different from the traditional syslogd method, the “jour-
nal”, and the software components necessary to implement it.
While in the traditional approach the syslog daemon accepts log messages on
UDP port 514 or the
/dev/log
socket, and (typically) writes them to text files (or
forwards them to other hosts where they are written to text files), in the systemd
world background services can simply write log messages to their standard error
output channel and systemd will arrange for them to be passed to the logging
service1. With systemd, log files are not text files (where every message is possibly
written to several files), but messages are written to a (binary) database that can
then be queried according to diverse criteria.
BFor example, it is quite easy to display all messages logged by a specific
service during a specific period of time. In the traditional system this is
fairly difficult.
BIn fairness, we should point out that the modern syslog implementations
such as Rsyslog or Syslog-NG are, in principle, capable of writing log mes-
sages to a database. However, it will be your own responsibility to come
up with a suitable database schema, to configure Rsyslog or Syslog-NG ac-
cordingly, and to develop software that allows you convenient access to the
log messages. Systemd includes all this “out of the box”.
BThe Journal isn’t confined to textual log messages. It is, for instance, per-
fectly possible to store core dumps of crashed programs in the Journal (as
long as they aren’t ginormously oversized). Whether that is a unqualified
great idea is, of course, debatable, and the systemd developers have already
thought of an alternative method.
Systemd’s log system can also interoperate with the traditional approach. If de-
sired, it logs messages that arrive on
/dev/log
or UDP port 512, and can pass mes-
sages on to a traditional syslog daemon (or a modern reimplementation).
You have the Journal to thank, too, for the (very convenient) circumstance that
“
systemctl status
” will show you the most recent log messages by the service in
question:
#systemctl status ssh
● ssh.service - OpenBSD Secure Shell server
Loaded: loaded (/lib/systemd/system/ssh.service; enabled)
Active: active (running) since Mo 2015-07-27 13:37:22 CEST; 8h ago
Main PID: 428 (sshd)
CGroup: /system.slice/ssh.service
└─428 /usr/sbin/sshd -D
Jul 27 13:37:23 blue sshd[428]: Server listening on 0.0.0.0 port 22.
Jul 27 13:37:23 blue sshd[428]: Server listening on :: port 22.
Jul 27 13:56:50 blue sshd[912]: Accepted password for hugo from ...sh2
Jul 27 13:56:50 blue sshd[912]: pam_unix(sshd:session): session ...=0)
Hint: Some lines were ellipsized, use -l to show in full.
As the final line of the output suggests, overlong lines are shortened such that they
just fit on the screen. If you want to see them in full, you must invoke
systemctl
with the
-l
option.
1Systemd also offers its own API for log messages

2.2 Systemd and journald 33
Exercises
C2.1 [2] What are the advantages and disadvantages of the traditional ap-
proach (text files in
/var/log
) compared to the database-like approach of the
Journal?
2.2 Systemd and journald
The Journal is an integrated part of systemd. In the simplest case, systemd uses
a limited-size ring buffer in
/run/log/journal
to store a certain number of log mes-
sages in RAM (which is sufficient if you want to pass the messages to a traditional
log service). To take advantage of all Journal features, you should ensure that the
log messages are permanently stored on disk. This is simply done by creating the
directory for storage:
#mkdir -p /var/log/journal
#systemctl --signal=USR1 kill systemd-journald
(the
SIGUSR1
gets systemd to transfer the RAM-based Journal to the new file on
disk).
BThe systemd component that takes care of the Journal is called
systemd-
journald
(or journald to its friends).
The Journal is configured by means of the
/etc/systemd/journald.conf
file. The
[Journal]
section of this file (the only one) contains, for example, the
Storage
pa-
rameter, which can assume any of the following values:
volatile
Log messages are stored only in RAM (in
/run/log/journal
), even if
/var/
log/journal
exists.
persistent
Log messages are preferably stored on disk (in
/var/log/journal
). The
directory will be created if it doesn’t exist. During early boot and if the disk
is not writable, systemd falls back onto
/run/log/journal
.
auto
Similar to
persistent
, but the existence of the
/var/log/journal
directory deter-
mines whether a persistent Journal will be written—if the directory does
not exist, the volatile Journal in RAM will have to do.
none
No log messages will be stored in the Journal at all. You can still pass mes-
sages to a traditional syslog service.
BThere are a few other interesting parameters.
Compress
specifies whether
log files (at least those exceeding a certain size) will be transparently com-
pressed; the default value is
yes
.
Seal
lets you ensure that persistent Journal
files are protected against clandestine manipulation by means of a crypto-
graphic signature. You will only need to furnish a key (the document ex-
plains how).
BThe
RateLimitInterval
and
RateLimitBurst
parameters are supposed to make it
more difficult to flood the log with messages. If a service produces more
than
RateLimitBurst
messages during a period of time given by
RateLimitIn-
terval
, then all further messages until that period of time is over will be
ignored (the log will contain only one message detailing the number of ig-
nored messages). By default, the limit is 1000+messages in 30 seconds; if
you set either of the parameters to zero, the limitation will be lifted.
B
SyncIntervalSec
specifies how often the Journal will be synced to disk. The
Journal will always be saved immediately after a message of priority
crit
(or
above) has been logged; as long as no such message arrives, journald will
wait for the interval specified by
SyncIntervalSec
before saving it again. The
default value is “5 minutes”.

34 2 System Logging with Systemd and “The Journal”
Use the
journalctl
command to inspect the log:
#journalctl
-- Logs begin at Mo 2015-07-27 13:37:14 CEST, end at Mo 2015-07-27
22:20:47 CEST. --
Jul 27 13:37:14 blue systemd-journal[138]: Runtime journal is using 4.
Jul 27 13:37:14 blue systemd-journal[138]: Runtime journal is using 4.
Jul 27 13:37:14 blue kernel: Initializing cgroup subsys cpuset
Jul 27 13:37:14 blue kernel: Initializing cgroup subsys cpu
Jul 27 13:37:14 blue kernel: Initializing cgroup subsys cpuacct
Jul 27 13:37:14 blue kernel: Linux version 3.16.0-4-amd64 (debian-kern
Jul 27 13:37:14 blue kernel: Command line: BOOT_IMAGE=/boot/vmlinuz-3.
The output strongly resembles what you would find in
/var/log/messages
, but in
fact includes various improvements (which are, unfortunately, less than obvious
in a printed training manual):
• The log is displayed using your favourite display program for text files (typ-
ically
less
). Using
less
, you can look at the ends of over-long lines by using
the horizontal arrow keys.
BThis is determined by the value of the
SYSTEMD_PAGER
environment vari-
able, failing that the value of
PAGER
, failing that
less
. Using the
SYS-
TEMD_LESS
environment variable you can specify options for
less
(if you
don’t use the system default, this variable is ignored, but then again
you can put options into
SYSTEMD_PAGER
directly).
BIf you invoke
journalctl
with the
--no-pager
option or set
SYSTEMD_PAGER
to
cat
or an empty string, the output will not be displayed page by page.
• The output includes all accessible log files, even rotated ones (we’ll talk
more about that later).
• Time stamps are in local (zone) time, not UTC.
• Log messages of priority
notice
or
warning
are displayed in bold face.
• Log messages of priority
error
(or higher) appear in red.
systemd-journald
tries to make sensible use of the available space. This means
that new messages are normally appended to the Journal, but if a certain upper
limit for the size of the Journal is reached, it tries to remove old log messages.
BYou can specify the
SystemMaxUse
and
RuntimeMaxUse
parameters in the
/etc/
systemd/journald.conf
file. These parameters describe how much space the
Journal may take up under
/var/log/journal
and
/run/log/journal
, respec-
tively. The
SystemKeepFree
and
RuntimeKeepFree
parameters, on the other hand,
determine how much space must be kept free on the file systems in ques-
tion.
systemd-journald
takes into account both values (
…MaxUse
and
…KeepFree
)
and confines itself to the minimum size dictated by both.
BThe
Runtime
… values are used when the system is booting or no persistent
Journal is used. The
System
… values apply to the persistent Journal if the
system has been booted far enough. When determining the space used by
the Journal, only files whose names end in
.journal
will be considered.
BYou may specify amounts in bytes or append one of the (binary) units
K
,
M
,
G
,
T
,
P
or
E
2.
2We assume it will still be some time before you will have to specify a limit for the Journal in
exbibytes (260 bytes), but it is reassuring that the systemd developers are apparently planning for the
future.

2.3 Log Inspection 35
BThe default value for
…MaxUse
is 10% and the one for
…KeepFree
is 15% of the
file system in question. If there is less space available when
systemd-journald
starts than the
…KeepFree
value dictates, the limit is reduced even further such
that space for other material remains.
Like
logrotate
, systemd “rotates” the Journal to make room for new messages.
To do so, the available space is subdivided into a number of files, so the oldest
can be discarded from time to time. This rotation is transparent to users, because
systemd-journald
does it of its own accord when required and
journalctl
always eval-
uates the full Journal, no matter how many files it consists of.
BThe subdivision is governed by the
SystemMaxFileSize
and
RuntimeMaxFileSize
parameters within the
/etc/systemd/journald.conf
file. They specify how large
individual Journal files may become—the default is “one eighth of the total
space available for the Journal”, so you will always have a “prehistory” of
seven files and the current file.
BYou may also make the log file rotation depend on time:
MaxFileSec
deter-
mines the maximum time period before systemd starts a new log file. (Usu-
ally the size-based rotation is perfectly adequate.) You can use
MaxRetention-
Sec
to specify an upper limit for how long old log messages are kept around.
The default value for
MaxFileSec
is
1month
(
0
means “unlimited”) and that for
MaxRetentionSec
is 0 (the mechanism is disabled).
In
/etc/systemd/journald.conf
you can also configure log forwarding to a tradi- log forwarding
tional syslog system. To do so, simply set
[Journal]
ForwardToSyslog=yes
Exercises
C2.2 [!2] Configure your computer such that the Journal is stored persistently
on disk. Ensure that this really works (e. g., by writing a message to the log
using
logger
, rebooting the computer and then checking that the message is
still there).
C2.3 [2] Does your computer still have a traditional syslog daemon? If not,
then install one (BSD
syslogd
or Rsyslog suggest themselves) and cause log
messages to be forwarded to it. Convince yourself (e. g., using
logger
) that it
works.
2.3 Log Inspection
You may use
journalctl
to direct very detailed queries to the Journal. We will
investigate this further in this section, but here are a few introductory remarks.
Access rights While as
root
you get to see the complete log, as an ordinary user
you will only be able to peruse your own log, namely the messages submitted by
programs that you started yourself (or that the computer started on your behalf).
If you want to have full access even as an ordinary user—we do recommend that
even as an administrator you should, as far as possible, use a non-privileged user
account, after all—you will need to ensure that you are part of the
adm
group:
#usermod -a -G adm hugo
BYou must log out and in again before this change will actually become effec-
tive.

36 2 System Logging with Systemd and “The Journal”
Real-time Journal monitoring By analogy to the popular “
tail -f
” command, you
can watch new messages being written to the Journal:
$journalctl -f
This, too, will display 10 lines’ worth of output before
journalctl
waits for further
messages to arrive. As with the good old
tail
, you can set the number of lines
using the
-n
option, and that works even without the
-f
.
Services and priorities You can use the
-u
option to restrict the output to those
log messages written by a specific systemd unit:
$journalctl -u ssh
-- Logs begin at Mo 2015-07-27 13:37:14 CEST, end at Di 2015-07-28
09:32:08 CEST. --
Jul 27 13:37:23 blue sshd[428]: Server listening on 0.0.0.0 port 22.
Jul 27 13:37:23 blue sshd[428]: Server listening on :: port 22.
Jul 27 13:56:50 blue sshd[912]: Accepted password for hugo from 192.16
Jul 27 13:56:50 blue sshd[912]: pam_unix(sshd:session): session opened
BInstead of a specific unit name you can also give a shell search pattern to
include several units. Or simply specify several
-u
options.
To only display messages of certain priorities, use the
-p
option. This takes ei-
ther a single numerical or textual priority (
emerg
has the numerical value 0,
debug
7)
and limits the output to messages of that priority or above (below, if you go for
numerical values). Or specify a range in the form
$journalctl -p warning..crit
to see only those messages whose priority is in that range.
BOf course you may combine the
-u
and
-p
options, too:
$journalctl -u apache2 -p err
displays all error messages (or worse) from Apache.
The
-k
option limits the output to messages logged by the operating system
kernel. This considers only messages written since the last system boot.
Time If you’re only interested in messages from a certain period of time, you
can limit the output accordingly. The
--since
and
--until
options let you specify a
date or time in the “
2015-07-27 15:36:11
” format, and only messages written since
or until that point in time will be output.
BYou can leave off the time completely, in which case “
00:00:00
” will be as-
sumed. Or leave off just the seconds, then “
:00
” is implied. If you leave off
the date (which of course requires a time, with or without seconds),
jour-
nalctl
will assume “today”.
BThe
yesterday
,
today
, and
tomorrow
keywords stand for “
00:00:00
” yesterday,
today, or tomorrow, respectively.
BRelative time specifications are also allowed: “
-30m
” stands for “half an hour
ago”. (“
+1h
” stands for “in one hour”, but it is unlikely that your system log
will contain entries from the future3.
3Unless you’re the Doctor and are querying the Journal of the TARDIS.

2.3 Log Inspection 37
Every system boot is assigned a unique identifier, and you can limit your search
to the part of the Journal between one boot and the next. In the simplest case,
“
journalctl -b
” will consider only messages from the current run:
$journalctl -b -u apache2
With the
--list-boots
option,
journalctl
will output a list of boot identifiers to be
found in the current Journal, together with the periods of time for which there are
log entries:
$journalctl --list-boots
-1 30eb83c06e054feba2716a1512f64cfc Mo 2015-07-27 22:45:08 CEST—
Di 2015-07-28 10:03:31 CEST
0 8533257004154353b45e99d916d66b20 Di 2015-07-28 10:04:22 CEST—
Di 2015-07-28 10:04:27 CEST
You may refer to specific boots by passing to
-b
their index (
1
stands for the chrono-
logically first boot in the log,
2
for the second, and so on) or the negative offset in
the first column of the output of “
journalctl --list-boots
” (
0
refers to the current
boot,
-1
the one before, and so on).
BYou may also specify the 32-character alphanumeric boot ID from the sec-
ond column of “
journalctl --list-boots
” to search the Journal for that boot
only. That, too, lets you add a positive or negative offset to identify boots
before or after it: In the example above,
$journalctl -b 8533257004154353b45e99d916d66b20-1
is a roundabout way of saying
$journalctl -b 1
Arbitrary search operations If you specify a path name as a parameter,
journalctl
tries to do something reasonable with it:
• If it refers to an executable file, it looks for Journal entries made by that
program.
• If it refers to a device file, it looks for entries concerning the device in ques-
tion.
These search operations are special cases of a more general search mechanism
offered by the Journal. Systemd does in fact log much more information than
the traditional syslog mechanism4. You see that by invoking
journalctl
with the
--output=verbose
option (see figure 2.1.)
BThe first line in figure 2.1 is a time stamp for the message together with
a “cursor”. The cursor identifies the message inside the Journal and is
needed, for example, to store log entries on remote computers.
BThe subsequent lines are Journal fields that refer to the message in question.
Field names without a leading underscore derive from information submit-
ted by the logging program, and as such are not necessarily trustworthy
(the program could, for example, attempt to lie about its PID or its name—
in
SYSLOG_IDENTIFIER
). Field names with a leading underscore are supplied by
systemd and cannot be manipulated by the logging program.
4Again, in fairness, we must mention that these can do rather more than they must—even if they
have sometimes acquired that functionality only very recently, in order to catch up with systemd’s
Journal.

38 2 System Logging with Systemd and “The Journal”
Mo 2015-07-27 13:37:23.580820 CEST [s=89256633e44649848747d32096fb42
68;i=1ca;b=30eb83c06e054feba2716a1512f64cfc;m=11a1309;t=51bd9c6f
8812e;x=f3d8849a4bcc3d87]
PRIORITY=6
_UID=0
_GID=0
_SYSTEMD_SLICE=system.slice
_BOOT_ID=30eb83c06e054feba2716a1512f64cfc
_MACHINE_ID=d2a0228dc98041409d7e68858cac6aba
_HOSTNAME=blue
_CAP_EFFECTIVE=3fffffffff
_TRANSPORT=syslog
SYSLOG_FACILITY=4
SYSLOG_IDENTIFIER=sshd
SYSLOG_PID=428
MESSAGE=Server listening on 0.0.0.0 port 22.
_PID=428
_COMM=sshd
_EXE=/usr/sbin/sshd
_CMDLINE=/usr/sbin/sshd -D
_SYSTEMD_CGROUP=/system.slice/ssh.service
_SYSTEMD_UNIT=ssh.service
_SOURCE_REALTIME_TIMESTAMP=1437997043580820
Figure 2.1: Complete log output of
journalctl
B
PRIORITY
,
SYSLOG_FACILITY
,
SYSLOG_IDENTIFIER
,
SYSLOG_PID
, and
MESSAGE
derive from
the syslog protocol and are pretty self-explanatory.
_UID
,
_GID
,
_HOSTNAME
,
_PID
,
and
_SYSTEMD_UNIT
also explain themselves.
_BOOT_ID
is the identifier of the
current boot, and
_MACHINE_ID
identifies the logging computer according to
its entry in
/etc/machine-id
.
_CAP_EFFECTIVE
specifies the special capabilities
of the logging process, and
_TRANSPORT
describes how the message reached
systemd (apart from
syslog
, common sources are
stdout
for messages that
the program wrote to its standard output or standard error output, or
ker-
nel
for messages submitted by the operating system kernel via
/dev/klog
).
_COMM
,
_EXE
, and
_CMDLINE
all describe the command being executed.
_SYS-
TEMD_SLICE
and
_SYSTEMD_CGROUP
specify where in systemd’s internal process
management the logging process may be found. A more detailed explana-
tion is available from
systemd.journal-fields
(7).
You may search for all of these fields simply by specifying them on
journalctl
’s
command line:
$journalctl _HOSTNAME=red _SYSTEMD_UNIT=apache2.service
BSearch terms using different fields are implicitly joined using AND. If the
same field appears in several search terms, these are implicitly joined using
OR.
BThere is also an explicit OR:
$journalctl _HOSTNAME=red _UID=70 + _HOSTNAME=blue _UID=80
shows all processes with the UID 70 on the host
red
as well as all processes
with the UID 80 on the host
blue
. (Naturally this only works if you consoli-
date both these Journals on your computer.)

2.3 Log Inspection 39
BOf course you can combine these search terms freely with options, e. g., to
set up time limits or save typing:
$journalctl -u apache2 _HOSTNAME=red
If (like us) you can never remember which values a search term could assume,
you can simply ask the Journal:
$journalctl -F _SYSTEMD_UNIT
session-2.scope
udisks2.service
session-1.scope
polkitd.service
dbus.service
user@1000.service
As a further simplification, command line completion works for field names and
values:
$journalctl _SYS
Tab becomes
$journalctl _SYSTEMD_
Tab
_SYSTEMD_CGROUP= _SYSTEMD_OWNER_UID= _SYSTEMD_SESSION= _SYSTEMD_UNIT=
$journalctl _SYSTEMD_U
Tab becomes
$journalctl _SYSTEMD_UNIT=
Tab Tab
acpid.service lightdm.service ssh.service
anacron.service networking.service systemd-journald.service
$journalctl _SYSTEMD_UNIT=ss
Tab becomes
$journalctl _SYSTEMD_UNIT=ssh.service
The Journal and
journald
are immensely flexible and powerful and let the tra-
ditional method (text files in
/var/log
) appear pretty primitive in comparison.
.
Exercises
C2.4 [!2] Experiment with
journalctl
. How many different user identities have
sent messages to the Journal on your computer? Did anything interesting
happen yesterday between 1 p.m and 2 p. m.? What were the last 10 mes-
sages of priority
warning
? Think of some interesting questions yourself and
answer them.
Summary
• The “Journal” is a modern system logging service made available by sys-
temd. It relies on binary, database-like log files.
• The Journal is stored either in
/run/log/journal
or (for persistent logging to
disk) in
/var/log/journal
.
• Within systemd,
systemd-journald
takes care of the Journal. You can access
the Journal using
journalctl
.
•
journalctl
allows very sophisticated queries of the Journal

$ echo tux
tux
$ ls
hallo.c
hallo.o
$ /bin/su -
Password:
3
TCP/IP Fundamentals
Contents
3.1 History and Introduction . . . . . . . . . . . . . . . . . 42
3.1.1 The History of the Internet . . . . . . . . . . . . . . 42
3.1.2 Internet Administration . . . . . . . . . . . . . . . 42
3.2 Technology . . . . . . . . . . . . . . . . . . . . . . 44
3.2.1 Overview . . . . . . . . . . . . . . . . . . . . 44
3.2.2 Protocols . . . . . . . . . . . . . . . . . . . . . 45
3.3 TCP/IP.......................47
3.3.1 Overview . . . . . . . . . . . . . . . . . . . . 47
3.3.2 End-to-End Communication: IP and ICMP . . . . . . . . 48
3.3.3 The Base for Services: TCP and UDP . . . . . . . . . . . 51
3.3.4 The Most Important Application Protocols. . . . . . . . . 54
3.4 Addressing, Routing and Subnetting . . . . . . . . . . . . . 56
3.4.1 Basics . . . . . . . . . . . . . . . . . . . . . . 56
3.4.2 Routing . . . . . . . . . . . . . . . . . . . . . 57
3.4.3 IP Network Classes . . . . . . . . . . . . . . . . . 58
3.4.4 Subnetting . . . . . . . . . . . . . . . . . . . . 58
3.4.5 Private IP Addresses . . . . . . . . . . . . . . . . 59
3.4.6 Masquerading and Port Forwarding . . . . . . . . . . . 60
3.5 IPv6.........................61
3.5.1 IPv6 Addressing . . . . . . . . . . . . . . . . . . 62
Goals
• Knowing the basic structure of the TCP/IP protocol family
• Knowing the fundamentals of IP addressing
• Understanding the concepts of subnetting and routing
• Knowing the most important properties of and differences between TCP,
UDP, and ICMP
• Knowing about the most important TCP and UDP services
• Knowing the most relevant differences between IPv4 and IPv6
Prerequisites
• Basic knowledge of computer networks and TCP/IP services from a user’s
point of view is helpful
adm2-internet.tex
(
0cd20ee1646f650c
)

42 3 TCP/IP Fundamentals
3.1 History and Introduction
3.1.1 The History of the Internet
The history of networking computers reaches back almost to the beginning of the
“computer age”. Most of the early techniques are all but forgotten today—the “In-
ternet” has won the day. But what is “the Internet”, anyway, and where does it
come from? In this section, we give a brief overview of its history and the devel-
opment of world-wide computer communications. If you already know this from
elsewhere, feel free to skip to the next section. Thank you very much.
The progenitor of today’s Internet is ARPAnet, whose development wasARPAnet
funded by the American defence department. It’s the late 1960s.
BThe original object was not, as is often claimed, the construction of a com-
munication infrastructure for the eventuality of nuclear war, but merely re-
search into data communications, while at the same time improving com-
munications between the corporations and universities engaged in defence
research.
In 1969, the ARPAnet consisted of 4 nodes; from 1970 until 1972 the Network Con-
trol Protocol (NCP) was implemented as the basic communication standard on theNCP
ARPAnet. The most important service at the time was electronic mail.
In the 1970s, the idea of an “internet” that was supposed to connect already
existing networks gained traction. Researchers tried to implement “TCP”, a reli-
able communication protocol based on an unreliable transmission protocol (the
idea of making available an unreliable communication protocol in the shape of
UDP only came along later, which explains where the name “TCP/IP” (rather
than “TCP/UDP/IP” or something similar) comes from). The first TCP imple-
mentations appeared in the early 1970s on “large” systems such as TOPS-20 or
Tenex; shortly afterwards it was proved that it was possible to implement TCP
even on workstation-class computers like the Xerox Alto, such that these comput-
ers could also be part of the Internet. The first ethernet was also developed at
Xerox PARC in 1973.
Today’s basic TCP/IP standards appeared in the early 1980s. They were trialled
in BSD—the Unix variant developed at the University of California at Berkeley–,
which led to its popularity among users and computer manufacturers. On 1 Jan-“TCP/IP Flag Day”
uary 1983, the ARPAnet was converted from NCP to TCP/IP. Soon afterwards, the
original ARPAnet was divided administratively into the two components, MILnetMILnet
(for military applications) and ARPAnet (for defence research). Also in 1983, theARPAnet
development of DNS laid the groundworks for future expansion. In the subse-
quent years—1984 to 1986—, more TCP/IP-based networks were created, such as
the National Science Foundation’s NSFNET, and the notion of “the Internet” asNSFNET
the totality of all interconnected TCP/IP networks established itself.
At the end of 1989, Australia, Germany, Israel, Italy, Japan, Mexico, the Nether-
lands, New Zealand, and the United Kingdom were connected to the Internet. It
now consisted of more than 160,000 nodes.
In 1990 the ARPAnet was officially decommissioned (it had been assimiliated
into the Internet for a very long time), and in 1991 NFSNET was opened to com-
mercial users. Commercial providers mushroomed. Today most of the network
infrastructure is privately held.
Today we have a global network of interconnections with a uniform address
space. We use open protocols and uniform communication methods, so everyone
can join in the development and the net is available to anybody. Development of
the Internet is far from finished, though; future improvements will try to address
pressing problems such as address scarcity and the increased need for security.
3.1.2 Internet Administration
A global network like the Internet cannot function without administrative struc-
tures. These started out in the USA, since in the beginning most interconnected

3.1 History and Introduction 43
networks were deployed in that country. It still remains there today, more pre-
cisely with the American Department of Commerce.
BVarious people are irked by the dominance of the USA as far as the Inter-
net is concerned. Unfortunately it is very difficult to figure out what to do
about it, as the Americans are not willing to pass the baton formally. On
the other hand, the Department of Commerce pursues a marked laissez-faire
approach, so the opponents can arrange themselves to a certain degree with
the status quo.
Theoretically, control of the Internet rests in the hands of the “Internet Society” Internet Society
(ISOC), an international non-profit organisation founded in 1992. Its members
consist of governments, corporations, universities, other organisations and even
individuals (anybody may join).
BThe main goal of ISOC was to give a formal framework to somewhat vaguely
defined institutions such as the IETF (see below) as well as to ensure their
financial support. In addition, ISOC holds copyright to the RFCs, the nor-
mative documents for the Internet, which are freely available to everybody
who is interested.
ISOC’s activities fall into three broad categories:
Standards ISOC is the overarching structure for a number of organisations deal-
ing with the technical development of the Internet. These include:
• The Internet Architecture Board (IAB) is the committee in charge of over-
seeing technical development of the Internet. The IAB takes care of
publishing the RFCs and counsels ISOC leadership on technical mat-
ters.
BThe IAB currently has about a dozen members (humans) who have
been selected by the “IETF nominating committee”, one chairper-
son also selected by the IETF nominating committee, and a few
ex-officio members and representatives of other organisations.
• The Internet Engineering Task Force (IETF) is tasked with actually devel-
oping Internet standards and, while doing so, cooperates closely with
institutions like ISO/IEC and the World Wide Web Consortium (W3C).
The IETF is an open organisation without membership, which is oper-
ated by “volunteers” (whose employers usually foot the bill). Within
IETF there is a large number of “working groups” that arrange them-
selves into “areas” according to their subject matter. Every area has one
or two “area directors” who together with the IETF chair form the In-
ternet Engineering Steering Group (IESG). This committee is responsible
for the IETF’s activities.
BOwing to its amorphous structure it is difficult to say how large
IETF is at any given time. In the first years after its institution in
1986, attendance at its regular meetings changed between 30 and
120 people. Since the explosive growth of the Internet in the 1990s
the circle has become somwhat larger, even though after the burst-
ing of the “dot-com bubble” it dropped from 3000 people in 2000
down to about 1200 today.
BThe IETF’s mantra is “rough consensus and running code”—it
does not require unanimous decisions but does want to see most
of the group behind winning ideas. There is also a big empha-
sis on solutions that actually work in practice. This and the fact
that most of the work is performed by volunteers can lead to IETF
working groups taking very long to deliver results—especially
if there are too few or too many interested people who want to
contribute.

44 3 TCP/IP Fundamentals
• The Internet Corporation for Assigned Names and Numbers, ICANN for
short, is another non-profit organisation that was incorporated in 1998
to take over some things that, previously, other organisations (in par-
ticular IANA, see the next bullet) had been taking care of on behalf of
the US government. In particular, this means the assignment of IP ad-
dresses and DNS top-level domain names. Especially the latter is an
extremely political issue and every so often brooks conflict.
• The Internet Assigned Numbers Authority (IANA) is in charge of actually
assigning IP addresses and operating the DNS root servers. Adminis-
tratively, IANA is part of ICANN. In addition, IANA is responsible for
the management of all globally unique names and numbers in Internet
protocols published as RFCs. In that respect it cooperates closely with
IETF and the RFC editors.
BIANA delegates the assignment of IP addresses further to so-
called Regional Internet Registries (RIRs), which each handle “dis-
tribution” (usually) to ISPs in some part of the world. Currently
there are five RIRs, with RIPE NCC being in charge of Europe.
Education ISOC runs conferences, seminars, and workshops on important Inter-
net issues, supports local Internet organisations and, through financial aid,
enables experts in developing countries to take part in the discussion and
development of the Internet.
Political Lobbying ISOC cooperates with governments and national and inter-
national bodies in order to further its ideas and values. The declared goal
of ISO is “a future in which people in all parts of the world may use the
Internet to improve their quality of life”.
3.2 Technology
3.2.1 Overview
Computers process digital information. In the “real world”, however, this infor-
mation is represented by means of physical phenomena such as voltage, charge, or
light, and the real world remains fiercely “analogue”. The first challenge of data
communication, then, is to transform the digital information inside the computer
into something analogue—like, for example, a sequence of electrical impulses on
a wire—for transmission to another computer, and transforms that back to digital
information at the other end. The next challenge is to make this work if the first
computer is in Berlin and the other one in New Zealand.
BYou can divide data networks very roughly, and without actually looking
at the technology involved, into two groups: Local area networks (LANs)Local area networks
connect a small number of nodes in a geographically limited area, wide areawide area networks
networks (WANs) a potentially large number of nodes in a geographically
very large ara.
BWith LANs, the owner (a company or other organisation or—frequently
today—a household) is usually also the operator and the sole user, and the
network offers high bandwidth (100 MBit/s and more). WANs, on the other
hand, connect a multitude of different users who generally do not own the
network, bandwidth is less, and usage more expensive.
There are many different networking technologies for very diverse require-
ments, ranging from very-short-range wireless connections (Bluetooth) and typi-
cal LAN technology like Ethernet to fiber connections based on ATM for WANs.
As programmers and system administrators we do not want to be bothered with
their gory electrical engineering details. Hence we talk about a “protocol stack”

3.2 Technology 45
and try to separate cleanly its individual components—the “electrical” part, the
basic communication between computers on the same network, the basic commu-
nication between computers on different networks, and finally concrete “services”
such as electronic mail or the World Wide Web. But first things first.
3.2.2 Protocols
A “protocol” is an agreed scheme governing how two (or more) nodes on a net-
work talk to one another. The spectrum of possible protocols ranges from rules
for electrical signals on an Ethernet cable or radio signals in a WLAN up to (for
example) protocols governing access to an SQL database server. Protocols can be
roughly divided into three classes:
Transmission protocols (often also called “access methods”) govern data trans-
mission essentially at the level of network cards and physical connections.
Their make-up depends on the physical properties and restrictions arising
from their implementation in “hardware”. For example, the communica-
tion between two computers across a serial “null modem cable” is com-
pletely different from the transmission of data via a radio connection on
a WLAN, and the transmission protocols used follow completely different
requirements.
BThe most common transmission protocol in LANs is Ethernet, even
though current Ethernet has hardly anything to do with the epony-
mous original of 1973 (O. K,̇ both involve electricity, but the resem-
blance stops about there). Other standards such as token-ring or field
bus systems only come up for special applications. Also popular today
are WLAN access methods like IEEE 802.11.
Communication protocols serve to organise the communication between com-
puters in different networks without presupposing detailed knowledge of
the medium access methods used. To use your home PC in Germany to
view a web site on kangaroos served by a server at a university in Australia,
you do not want to have to know that your PC is connected via Ethernet
to your home router, which talks ATM to the DSLAM in the telecom shed
across the road, which passes data through fiber around a few corners to
Australia and so on—you just enter
www.roos-r-us.au
in your browser. It is
thanks to communications protocols that your PC can find the remote web
server and exchange data with it.
BCommunication protocols are supposed to prevent you from having to
mess with transmission protocols, but of course they cannot exist with-
out those. The goal of communication protocols is to hide the transmis-
sion protocols’ gory details from you—just like your car’s accelerator
pedal is used to protect you from having to know the precise control
data for its electronic fuel injection control system.
BThe communication protocols of interest to us are, of course, IP, TCP,
and UDP. We shall also look at ICMP as an “infrastructure protocol”
providing diagnosis, control, and error notification.
Application protocols implement actual services like electronic mail, file trans-
fer, or Internet telephony based on communication protocols. If communi-
cation protocols are useful to send random bits and bytes to Australia and
get others back, application protocols let you make sense of these bits and
bytes.
BTypical application protocols that you as a Linux administrator might
be confronted with include SMTP, FTP, SSH, DNS, HTTP, POP3, or
IMAP, possibly with “secure”, that is, authenticated and encrypted,

46 3 TCP/IP Fundamentals
Layer 𝑛+1 ⟵Layer 𝑛+1protocol ⟶Layer 𝑛+1
⇕Service Interface Service Interface ⇕
Layer 𝑛⟵Layer 𝑛protocol ⟶Layer 𝑛
⇕Service Interface Service Interface ⇕
Layer 𝑛−1 ⟵Layer 𝑛−1protocol ⟶Layer 𝑛−1
⇕ ⇕
Physical medium
Figure 3.1: Protocols and service interfaces
Station 1 OSI Layers Station 2
Application Application Application
protocols Presentation protocols
(FTP, HTTP, …) Session (FTP, HTTP, …)
Communication Transport Communication
protocols (IP, TCP) Network protocols (IP, TCP)
Medium access Data Link Medium access
(Ethernet, …) Physical (Ethernet, …)
Figure 3.2: ISO/OSI reference model
offshoots. All of these protocols are used by application programs such
as mail clients or web browsers, and are based on communication pro-
tocols such as TCP or UDP.
BThe data exchanged via a protocol are abstractly called protocol data units—protocol data units
depending on the protocol they may have more specific names like “pack-
ets”, “datagrams”, “segments”, or “frames”.
The fact that communication protocols are meant to hide the details of trans-
mission protocols, and that application protocols are meant to hide the details of
communication protocols lets us construct a “layer model” (Figure 3.1) where thelayer model
transmission protocols take up the lowest and the application protocols the high-
est layer. (This is incidentally where the term “protocol stack” comes from.) Every
layer on the sender’s side receives data “from above” and passes it “below”; on
the receiver’s side it is received “from below” and passed on “above”. Conceptu-
ally we still say that two nodes communicate “via HTTP”, when in fact the HTTP
data flow across TCP, IP, and a whole zoo of possible transmission protocols from
one node to the next and still must pass the IP and TCP layers upwards before
becoming visible again as HTTP data.
Technically, within each layer on the sender side, the corresponding protocol
receives a “protocol data unit” at its service interface from the layer above and
adds a “header” containing all the information important for its operation beforeheader
passing it on across the service interface of the layer below. The layer below con-
siders everything it receives on the service interface as data; the previous proto-
col’s header is of no concern to the lower layer. On the receiving side, packets pass
through the same layers in reverse order, and every layer removes “its” header be-
fore passing the “payload data” upwards.
The most well-known layer model is the “ISO/OSI reference model” (Fig-ISO/OSI reference model
ure 3.2). ISO/OSI (short for “Internation Organisation for Standardisation/Open
Systems Interconnection”) used to be the basis of a protocol family proposed by
CCITT, the world organisation of telecommunications agencies and corporations.
BThe ISO/OSI network standards never caught on—they were too baroque
and impractical to be useful, and the standards documents were difficult to

3.3 TCP/IP 47
get hold of—, but the reference model with its seven (!) layers has remained
and is popularly used to explain the goings-on of data transmission.
Many protocol stacks cannot be directly mapped to the ISO/OSI reference
model. On the one hand, this results from the fact that not every manufacturer
adheres to the definitions made by the model, on the other hand various protocol
stacks predate the OSI model. Nor should you commit the mistake of confus-
ing the ISO/OSI reference model with a binding “standard” for the structure of
networking software, or even a set of instructions for networking software imple-
mentation. The ISO/OSI reference model is merely a clarification of the concepts
involved and makes them easier to discuss. Even so, here is a brief overview of
the layers in the model:
• Layers 1 and 2 (physical and data link layers) describe how data is sent on
the “wire”. This includes the medium access scheme as well as the encoding
of the data.
• Layer 3 (the network layer) defines the functions required for routing, in-
cluding requisite addressing.
• The transport of application data is described in layer 4 (transport layer).
This distinguishes between connection-oriented and connectionless ser-
vices.
• The layers 5, 6 and 7 (session, presentation, and application layers) are often
not explicitly discriminated in practice (e. g., with the TCP/IP protocols).
These describe the system-independent representation of data within the
network and the interfaces to application protocols.
• In addition, Andy Tanenbaum [Tan02] postulates ĺayers 8 and 9 (the finan-
cial and political layers). While these layers are well-known in practice, they
have so far not been incorporated into the official ISO/OSI reference model.
Exercises
C3.1 [2] Review briefly the differences between transmission, communica-
tion, and application protocols. Name examples for the various types. (Do
you know ones that are not part of the TCP/IP world?)
C3.2 [1] What is the main difference between ISO/OSI layers 2 and 3?
3.3 TCP/IP
3.3.1 Overview
TCP/IP stands for “Transmission Control Protocol/Internet Protocol” and is cur-
rently the most wide-spread method of transferring data in computer networks
ranging from two computers in a local network up to the world-wide Internet.
TCP/IP is not just a single protocol but a plethora of different protocols built upon
one another with possibly very different applications. This is called a “protocol
family”.
The protocols from the TCP/IP protocol family can roughly be placed in the
context of the ISO/OSI layer model shown in figure 3.2. Here, in brief, are the
most important ones:
Medium access layer Ethernet, IEEE 802.11, PPP (these are, strictly speaking, not
TCP/IP protocols)
Internet layer IP, ICMP, ARP
Transport layer TCP, UDP, …

48 3 TCP/IP Fundamentals
Application layer HTTP, DNS, FTP, SSH, NIS, NFS, LDAP, …
In order tounderstand better the process of data communication, and to be able
to localise and find errors that may occur, it is very useful to know the structure of
the most important protocols and the make-up of the protocol data units involved.
We shall now explain the most important TCP/IP protocols from the internet and
transport layers.
Exercises
C3.3 [2] Which other protocols of the TCP/IP protocol family can you think
of? Which of the four layers do they belong to?
3.3.2 End-to-End Communication: IP and ICMP
IP IP connects two nodes. As an ISO/OSI layer 3 protocol it is responsible for
the data finding its way across the Internet from the sender to the receiver. The
catch is that this way can involve very long distances consisting of diverse inde-
pendent sections using markedly different networking technologies and exhibit-
ing markedly different communication parameters. Consider a user “surfing” the
Internet at home. Their computer is connected via an analogue modem and the
phone network, using PPP, to a dial-in computer on an ISP’s premises which pro-ISP
vides the actual connection to the Internet. The user’s web requests are then sent
half-way around the world by means of ATM on fiber optics lines before arriving
in a university’s computing center, from where they are passed across the FDDI-
based campus network to a departmental router, which transmits the data to the
web server connected by Ethernet. The web page content then takes the reverse
way back. The various parts of the route use not only different networking tech-
nologies, but also different “local” addresses—-while no addressing is necessary
at all using PPP (there are only two communication stations), Ethernet is based
on 48-bit “MAC” addresses.
One of the achievements of IP is to make available a “global” address spaceaddress space
which assigns a unique address to every node connected to the Internet, by which
that node can be identified. IP also provides routing from one system to anotherrouting
without regard to the actual networking technology in use.
IP is a connectionless protocol, that is, unlike the traditional telephony net-connectionless protocol
work (for example) it provides no fixed connection (a “wire”) for two systems to
communicate1, but the data to be transmitted is divided up in small pieces, the
so-called datagrams, which can then be addressed and delivered independentlydatagrams
from each other. In principle, every datagram can take a different path to the re-
ceiver than the previous one; this makes IP resilient to failure of connections or
routers as long as one route can be found from the source to the target node. IP
does not give guarantees that all transmitted data will actually reach the receiving
system, nor does it guarantee that the data which does in fact arrive will do so in
the order in which it was sent. It is up to “higher-level” protocols to sort this out
if the application requires it.
BImagine you want to send a long body of text to your aunt in Australia2. To
do this “à la IP”, you would write the text on a large number of individual
postcards. Chances are that on the way down under your postcards will be
mixed up, and the postman there is unlikely to drop them in your aunt’s
letter box in precisely the same order that you posted them here. It is also
quite possible for the odd postcard to be delayed or lost somewhere on the
way.
1Even the telephone network—affectionately called POTS (for “plain old telephone system”)—no
longer works this way.
2Read “Germany” if you are reading this in Australia.

3.3 TCP/IP 49
0 3 47815 16 18 19 31
Version Hdr
Len Type of Service Total length
Identification Flags Fragment Offset
Time to Live Protocol Header checksum
Source Address
Target Address
Options (optional)
⎫
⎪
⎪
⎪
⎪
⎪
⎪
⎪
⎬
⎪
⎪
⎪
⎪
⎪
⎪
⎪
⎭
Header
Data
hhhhhhhhhhhhhhhhhhhhhhhhhhhh
h
h
h
h
h
h
h
h
h
h
h
h
h
h
h
h
h
h
h
h
h
h
h
h
h
h
h
h
h
h
Figure 3.3: Structure of an IP datagram. Every line corresponds to 32 bits.
BWhy is this an advantage? The traditional telephone network with its wires
connected from one end to the other was very susceptible to disturbances—
if any segment on the way failed, the whole conversation broke down and
needed to be reconstructed (a big deal, back in the days of manually pre-
pared connections). If a problem or interruption develops during connec-
tionless transmission, the network can look for alternative routes for future
datagrams that detour around the damaged part. Methods like TCP make
it possible to detect which data was lost due to the problem and arrange for
it to be retransmitted.
Besides, IP takes care of fragmentation. IP datagrams may be up to 65535 fragmentation
bytes long, but most transmission protocols only allow much shorter protocol data
units—with Ethernet, for example, at most 1500 bytes. Thus longer datagrams
need to be “fragmented”—for transmission across such a medium the datagram is
taken apart, split up into numbered fragments, and reassembled later. IP ensures
that only datagrams with no missing fragments are officially considered received.
BThe official specification of IP is [RFC0791]. You do not need to read this but
it may be helpful against insomnia.
BFigure 3.3 shows the structure of an IP datagram. We should briefly explain
at least two of the fields:
• The “time to live” (or TTL) states the maximum life span of the data-
gram. It is set by the sender and decremented (reduced by 1) by each
node the datagram passes through on its way to the recipient. If the
TTL reaches zero, the datagram is dropped, and the sender is noti-
fied. This serves to prevent “flying Dutchmen”—datagrams that due
to routing errors run in circles on the Internet without ever reaching
their destination. (A common default value is 64, which considering
the current extent of the Internet is usually more than enough.)
• The “type of service” (TOS) specifies the quality of service desired for
the datagram. Theoretically you get to pick, in addition to one of seven
precedence levels (which will be ignored), any of the attributes “low la-
tency”, “high throughput”, “high reliability”, or “low cost”. Whether
this makes any difference whatsoever as far as the actual transmission
is concerned is anybody’s guess, since these options are only advisory
and routers like to ignore them altogether. (If that wasn’t the case,

50 3 TCP/IP Fundamentals
07815 16 23 24 31
Type Code Checksum
Type-dependent data structure
Type-dependent data structure
Figure 3.4: Structure of an ICMP packet
then probably all datagrams would have all these desirable options
switched on.)
ICMP Another important protocol, is the “Internet Control Message Protocol”,
or ICMP for short (see figure 3.4). It is used for network management and to re-
port network problems, such as a failed connection or an unreachable subnet. The
very well-known
ping
program, for example, uses two special ICMP messages (
echo
request
and
echo reply
). The ICMP packet is encapsulated as data inside an IP data-
gram and contains further data fields depending on the code.
IP and Transmission Protocols To be able to use IP to transmit data regardless
of the actual network technology used, we need to define on a case-by-case basis
how IP datagrams are forwarded across the network in question—whether that is
Ethernet, PPP over an analogue telephone line, ATM, WLAN, …
With Ethernet, for example, all nodes are connected (if only conceptually) to a
shared medium—in “classic” Ethernet, a single long coaxial cable running from
one node to the next, today more often using twisted-pair cables and a common
star hub or switch. Everything a node sends is received by all the other nodes, but
these usually pick up only those protocol data units that are actually addressed to
them (today, switches help by “pre-sorting” the traffic). If two nodes transmit si-
multaneously, a collision occurs, which is handled by both nodes stopping trans-collision
mission, waiting for a random period of time, and trying again. Such a shared
Ethernet medium is also called a “segment”.segment
Every Ethernet interface has a unique address, the 48-bit “MAC address” (short
MAC address for “medium access control”). Ethernet protocol data units, the so-called frames,
frames can be sent either to particular other nodes within the segment by specifying their
MAC address as the recipient—the frame will be seen by all nodes but ignored by
all but the addressed node—, or else broadcast to all other nodes on the segment.broadcast
BEthernet adapters usually also support a so-called “promiscuous mode”,
in which all frames—even the ones that would otherwise be ignored as
uninteresting—are passed to the operating system. This is used by inter-
esting applications such as network analysis programs and cracker tools.
This is used to integrate IP and Ethernet. If a node (let’s call it 𝐴) wants to
communicate with another node (𝐵) whose IP address it knows, but whose MAC
address it doesn’t know, it asks all connected nodes by Ethernet broadcast:
Node 𝐴: Who here has IP address
203.177.8.4
?
Node 𝐵: I do, and my MAC address is
00:06:5B:D7:30:6F
This procedure follows the “Address Resolution Protocol” (ARP, [RFC0826]).ARP
Once node 𝐴has received node 𝐵’s MAC address, it stores it for a certain time
in its “ARP cache” in order to not have to repeat the query for every frame; IPARP cache
datagrams to nodes whose IP and MAC addresses are part of the ARP cache can
be addressed directly at the Ethernet level by embeddng them as “payload data”
into Ethernet frames. You can access the ARP cache using the
arp
command—not
just to read, but also to write new entries.
arp
output could look like this:

3.3 TCP/IP 51
0 3 4910 11 12 13 14 15 16 23 24 31
Source Port Destination Port
Sequence Number
Acknowledgement Number
Offset Reserved U
R
G
A
C
K
P
S
H
R
S
T
S
Y
N
F
I
NWindow
Checksum Urgent Pointer
Options Padding
Data
hhhhhhhhhhhhhhhhhhhhhhhhhhhh
h
h
h
h
h
h
h
h
h
h
h
h
h
h
h
h
h
h
h
h
h
h
h
h
h
h
h
h
h
h
Figure 3.5: Structure of a TCP Segment
#arp
Address Hwtype Hwaddress Flags Mask Iface
server.example.org ether 00:50:DB:63:62:CD C eth0
Datagrams addressed to IP addresses that do not belong to nodes on the same
Ethernet segment must be routed (Section 3.4.2). Routing
Exercises
C3.4 [3] Estimate the minimal TTL that is necessary to be able to reach all
other nodes on the Internet from your computer. How would you go about
determining the minimal TTL required to reach a specific node? Is that
number constant?
3.3.3 The Base for Services: TCP and UDP
TCP The “Transmission Control Protocol” (TCP) is a reliable, connection-oriented
protocol defined in [RFC0793] (among others). Unlike the connectionless IP, TCP
supports operations to open and tear down connections, which arrange for a “vir-
tual” connection between the source and destination nodes—since TCP data, like
all other data, is transmitted based on IP, the actual data transmission still hap-
pens unreliably and on a connectionless basis. TCP achieves reliability by means
of the destination node acknowledging the receipt of each packet (“segment”, in
TCP parlance). Each of the two communicating nodes annotates its segments with
sequence numbers, which the other node declares “received” in one of its next sequence numbers
segments. If there is no such acknowlegement within a certain defined period of
time, the sending node retries sending the segment in order to perhaps receive
an acknowledgement then. To avoid loss of performance, a “sliding window”
protocol is used so a number of segments can remain unacknowledged at the
same time. Even so, TCP is considerably slower than IP.
BIn point of fact, TCP acknowledgements are based on octets (popularly
known as bytes) rather than segments—but for our purposes the difference
is mostly academic.
Every TCP segment contains a header of at least 20 bytes (figure 3.5) in addi-
tion to the IP header. (Remember: The TCP segment including the TCP header

52 3 TCP/IP Fundamentals
SENDER RECIPIENT
-
Synchronisation request
Flags:
SYN
Acknowledgement and Synchronisation
Flags:
ACK
,
SYN
-
Acknowledgement (and Data)
Flags:
ACK
Acknowledgement and Data
Flags:
ACK
Figure 3.6: Starting a TCP connection: The Three-Way Handshake
is considered “data” by IP, the protocol of the layer below.) Errors in the data
can be detected based on a checksum. Every system supports many independent,
simultaneous TCP connections distinguished based on port numbers.port numbers
BThe combination of an IP address and a port number together with the IP
address and the port number of the “peer” is called a “socket”. (The same
TCP port on a node may take part in several TCP connections to different
peers—defined by the peer’s IP address and port number.)
The virtual connection is built using the three-way handshake (see figure 3.6).three-way handshake
Using the three-way handshake, the communication peers agree on the sequence
numbers to be used. Two flags in the TCP header,
SYN
and
ACK
, play an importantflags
role in this. The first data segment sent to the recipient has the
SYN
flag set and
the
ACK
flag cleared. Such a segment indicates a connection request. The recipient
acknowledges this using a TCP segment that has both the
SYN
and
ACK
flags set.
The sender in turn acknowledges this segment using one that has the
ACK
flag set
but not the
SYN
flag. At this point the connection has been established. Subsequent
TCP segments also have the
ACK
flag set only.—At the end of the communication,
the connection is torn down by means of a two-way handshake using the
FIN
flag.
BThe two nodes need to agree about the start of a connection, but a connection
can be torn down unilaterally. In fact this feature is required for commands
like the following to work:
$cat bla | ssh blue sort
This uses the Secure Shell (see chapter 10) to run the
sort
command on node
blue
, and feeds data into its standard input. (
ssh
reads its standard input lo-
cally, forwards the data to the remote computer, and passes it to the
sort
command on its standard input.)
sort
, however, works by reading all of its
standard input, then sorting the data it read, and writing the sorted data to
its standard output, which is then passed by
ssh
back to the local computer
(and the screen).—The problem is that
ssh
needs to signal the remote
sort
that all the input has been read, and that it can start sorting and outputting
the data. This happens by closing the connection “to” the remote computer.
The part of the connection reading “from” the remote computer, however,
remains open and can transport the
sort
output back—if a connection tear-
down always affected both directions, this application would not work.

3.3 TCP/IP 53
015 16 31
Source Port Destination Port
Length Checksum
Data
hhhhhhhhhhhhhhhhhhhhhhhhhhhh
h
h
h
h
h
h
h
h
h
h
h
h
h
h
h
h
h
h
h
h
h
h
h
h
h
h
h
h
h
h
Figure 3.7: Structure of a UDP datagram
BOf course, after a unilateral teardown data are still passed between the
nodes in both directions, since the node that tore down the connection
must still acknowledge the data it receives via the remaining part of the
connection. It can no longer send payload data across the connection,
though.
UDP Unlike TCP, the “User Datagram Protocol” (UDP) [RFC0768] is a connec-
tionless and unreliable protocol. In fact it isn’t much more than “IP with ports”,
since, like TCP, a node can support at most 65535 communication end points (UDP
and TCP may use the same port number simultaneously for different purposes).
UDP requires neither the connection initialisiation of TCP nor the acknowledge-
ments, hence the protocol is much “faster”—the price to pay is that, as with IP,
data can get lost or mixed up.
BUDP is used either where there is only very little data to transmit, so that
the cost of a TCP connection initialisation is very high in comparison—cue
DNS—or where not every single bit counts but delays are unacceptable.
With Internet telephony or video transmission, lost datagrams call attention
to themselves through cracking noises or “snow” in the picture; a longer
hiatus like the ones common with TCP would be much more obnoxious.
Ports TCP and UDP support the idea of ports, which allow a system to maintain
more than one connection at any given time (OK, there are no “connections” with
UDP, but even so …). There are 65536 ports each for TCP and UDP, which however
cannot all be used sensibly: Port number 0is a signal to the system’s TCP/IP stack
to pick an otherwise unused port.
Most ports are freely available to users of the system, but various ports are offi-
cially asigned to particular services. We distinguish well-known ports and reg- well-known ports
registered ports
istered ports. For example, the rules say that TCP port 25 on a system is reserved
for its mail server, which is listening there to accept connections according to the
“Simple Mail Transfer Protocol” (SMTP). Similarly, the TCP port 21 is reserved
for the FTP server and so on. These assignments are published on a regular basis
by IANA and can be found, for example, at
http://www.iana.org/assignments/port-
numbers
.
BAccording to IANA, the “well-known ports” are ports 0to 1023, while the
“registered ports” are ports 1024 to 49151. If you want to release a program
offering a new service, you should request one or more port numbers from
IANA.
BThe remaining ports—from 49152 up to 65535—are called “dynamic and/or
private ports” in IANA jargon. These are used for the client side of connec-
tions (it is unlikely that your system will need to maintain more than 16.000

54 3 TCP/IP Fundamentals
# Network services, Internet style
echo 7/tcp
echo 7/udp
discard 9/tcp sink null
discard 9/udp sink null
systat 11/tcp users
daytime 13/tcp
daytime 13/udp
netstat 15/tcp
qotd 17/tcp quote
chargen 19/tcp ttytst source
chargen 19/udp ttytst source
ftp-data 20/tcp
ftp 21/tcp
fsp 21/udp fspd
ssh 22/tcp # SSH Remote Login Protocol
ssh 22/udp # SSH Remote Login Protocol
telnet 23/tcp
smtp 25/tcp mail
Figure 3.8: The
/etc/services
file (excerpt)
connection to TCP servers at the same time) or for the implementation of
“private” servers.
BWhen IANA reserves a port number for a TCP-based protocol, it tends to
reserve the same port number for UDP as well, even though the TCP pro-
tocol in question makes no sense with UDP, and vice versa. For example,
port 80 is reserved for HTTP both as a TCP and a UDP port, even though
UDP-based HTTP is not currently an interesting topic. This leaves elbow
room for future extensions.
On a Linux system, a table of assignments is available in the
/etc/services
file
(figure 3.8). This table is used, for example, by the Internet daemon (
inetd
or
xinetd
)
or the C library function
getservbyname()
to find the port corresponding to a given
service name.
BYou can change
/etc/services
, e. g., to support your own services. Do watch
for updates of the file by your distribution.
On Unix-like systems, ports 0to 1023 are privileged—only
root
may open them.privileged ports
This is a security precaution against arbitrary users launching, e. g., their own web
server on an otherwise unused port 80 in order to appear official.
3.3.4 The Most Important Application Protocols
In the previous section we introduced the idea of a “service”. While communica-
tion protocols like TCP and UDP are concerned with moving data from one node
to another, “services” usually rely on application protocols that assign meaning
to the data exchanged using the communication protocol. If, for example, you
send an e-mail message using SMTP, your computer contacts the remote SMTP
server (via TCP on port 25), identifies itself, sends your address as well as that of
the recipient (or recipients) and the actual message—in each case after the remote
server prompted for them. The details of this conversation are specified by the
application protocol, SMTP.

3.3 TCP/IP 55
Table 3.1: Common application protocols based on TCP/IP
Port C Prot Name Explanation
20 TCP FTP File transfer (data connections)
21 TCP FTP File transfer (control connections)
22 TCP SSH Secure (authenticated and encrypted) login to remote computers;
secure file transfer
23 TCP TELNET Login to remote computers (insecure and obsolete)
25 TCP SMTP Electronic mail transfer
53 UDP/TCP DNS Name and address resolution and related directory services
80 TCP HTTP World Wide Web resource access
110 TCP POP3 Access to remote e-mail mailboxes
123 UDP/TCP NTP Network Time Protocol (time synchronisation)
137 UDP NETBIOS NetBIOS name service
138 UDP NETBIOS NetBIOS datagram service
139 TCP NETBIOS NetBIOS session service
143 TCP IMAP Access to e-mail stored remotely
161 UDP SNMP Network management
162 UDP SNMP Traps for SNMP
389 TCP LDAP Directory service
443 TCP HTTPS HTTP via SSL (authenticated/encrypted)
465 TCP SSMTP SMTP via SSL (obsolete, don’t use!)*
514 UDP Syslog Logging service
636 TCP LDAPS LDAP via SSL (authenticated/encrypted)*
993 TCP IMAPS IMAP via SSL (authenticated/encrypted)*
995 TCP POP3S POP3 via SSL (authenticated/encrypted)*
* These services may also be accessed via connections that are first established in the clear and then
“upgraded” to authenticated and encrypted connections later on.

56 3 TCP/IP Fundamentals
B“Services” and “protocols” are not exactly equivalent. A “service” is some-
thing you want to use the computer for, such as e-mail, web access, or print-
ing on a remote printer server. For many services on the Internet there are
“canonical” protocols that recommend themselves—for e-mail, for exam-
ple, there are hardly any alternatives to SMTP—, but some services use the
same underlying protocol as others. The Web is usually accessed via HTTP
and remote printer servers via the “Internet Printing Protocol” (IPP). How-
ever, if you look closely enough you will notice that IPP, as used today, is
really glorified HTTP. The only difference is that HTTP uses TCP port 80
while IPP uses TCP port 631.
Table 3.1 shows a summary of some important application protocols. We will
encounter several of them later on in this manual; others will covered in other
Linup Front training manuals.
Bad news for LPIC-1 candidates: LPI wants you to know the port numbers
and services from table 3.1 by heart (LPI objective 109.1). Have fun swotting
up.
3.4 Addressing, Routing and Subnetting
3.4.1 Basics
Every network interface in a system on a TCP/IP network has at least one IP ad-
dress. In this case, an “interface” is that part of a system that is able to send and
receive IP datagrams. A single system can contain more than one such interface
and then generally uses more than one IP address. With
$/sbin/ifconfig
or
$/sbin/ip addr show
you can list the configured interfaces or network devices.
IP addresses are 32 bits long and are usually written as “dotted quads”—theyIP addresses
are viewed as a sequence of four eight-bit numbers written in decimal notation as
values between 0 and 255, like “
203.177.8.4
”3. Each IP address is assigned to be
globally unique and denotes a node in a particular network on the Internet. To do
so, IP addresses are split into a network and a host part. This split is variable and
can be adapted to the number of node addresses required in a network. If the host
part takes 𝑛bits, 32 − 𝑛 bits remain for the network part. The split is documented
by the network mask, which contains a binary 1for each bit in the IP addressnetwork mask
belonging to the network part, and a binary 0for each bit of the host part. The
network mask is notated either as a dotted quad or—frequently—as the number
of ones. “
203.177.8.4/24
” is thus an address in a network with a network mask of
“
255.255.255.0
”.
By way of an example, let’s assume a 28-node network. The next higher power
of 2is 32 = 25. This means that 5bits are required to number all the nodes. The
remaining 27 bits (32 − 5) identify the network and are the same in all systems on
that network. The network mask is
255.255.255.224
, since the top three bits are set
in the final “quad”—those with values 128,64, and 32, or 224 altogether.
By convention, the first and last IP addresses in a network are reserved for
special purposes: The first address (host part all binary zeroes) is the networknetwork address
address, the last address (host part all binary ones) the broadcast address. In thebroadcast address
3Incidentally, it is quite legal and supported by most programs to give an IP address as a decimal
number that has been “multiplied out”—in our example, 3417376772instead of
203.177.8.4
. This is the
key ingredient to “trick URLs” of the form
http://www.microsoft.com@3417376772/foo.html
.

3.4 Addressing, Routing and Subnetting 57
Table 3.2: Addressing example
IP Address
Meaning binary decimal
Network mask
11111111 11111111 11111111 11100000 255.255.255.224
Network address
11001011 10110001 00001000 00000000 203.177.8.0
Host addresses
11001011 10110001 00001000 00000001 203.177.8.1
⋮ ⋮ ⋮
11001011 10110001 00001000 00011110 203.177.8.30
Broadcast address
11001011 10110001 00001000 00011111 203.177.8.31
example above,
203.177.8.0
is the network address and
203.177.8.31
the broadcast
address. The numbers 1 to 30 are available for nodes (Table 3.2).
BThe address
255.255.255.255
is a broadcast address, but not for all of the In-
ternet, but the local network segment (for example, all the stations on the
same Ethernet). This address is used if no more precise address is known,
for example if a node wants to obtain an IP address and network mask via
DHCP.
3.4.2 Routing
Routing is used to send IP datagrams that cannot be delivered directly within
the local network on to the correct destination4. In fact, you might argue that
routing is the central property that sets TCP/IP apart from “toy protocols” such
as NetBEUI and Appletalk, and which made the Internet, as we know it, possible
in the first place.
Routing applies where the recipient of an IP datagram cannot be found within
the same network as the sender. The sender can figure this out straightforwardly
based on the desired recipient’s IP address, by considering that part of the desti-
nation address that is “covered” by its own network mask and checking whether
this matches its own network address. If this is the case, the recipient is “local”
and can be reached directly (Section 3.3.2 on page 50).
If the recipient cannot be reached directly, the node (at least if it is a Linux host)
consults a routing table which should contain at least a “default gateway”, i. e., a routing table
node that takes care of forwarding datagrams that cannot be delivered outright.
(This node usually needs to be reachable directly.) Such a node is called a “router”
and is either a computer in its own right or else a special appliance manufactured
for the purpose.
BIn principle, the router proceeds just like we described: It contains vari-
ous network interfaces, each of which is assigned an address and a network
mask, and can deliver datagrams immediately to nodes that according to
the network masks of its interfaces can be identified as being part of one of
“its” networks. Other directly reachable nodes acting as routers are called
upon for more forwarding if necessary.
BIn real life, routing tables can be considerably more complex. For example,
it is possible to forward datagrams directed to particular nodes or networks
to other routers that are not the default gateway.
An important observation is that a node (PC or router) usually determines just
the directly following routing step (also called “hop”), instead of specifying the
complete path from the original sender of the datagram to the final recipient. This
4This was already foreseen in the Old Testament: “He leadeth me in the paths of righteousness for
his name’s sake.” (Psalm 23:3) Of course on the Internet there are few better methods of completely
ruining your reputation than a spectacularly wrong router misconfiguration.

58 3 TCP/IP Fundamentals
Table 3.3: Traditional IP Network Classes
Class Network part Number of networks Hosts per network Addresses
Class A 8 Bit 128 – 126 usable 16.777.214 (224 − 2)
0.0.0.0
–
127.255.255.255
Class B 16 Bit 16.384 (214) 65.534 (216 − 2)
128.0.0.0
–
191.255.255.255
Class C 24 Bit 2.097.152 (221)254 (28− 2)
192.0.0.0
–
223.255.255.255
Class D - - -
224.0.0.0
–
239.255.255.255
Class E - - -
240.0.0.0
–
254.255.255.255
means that it is up to each router between the sender and recipient to pick that
hop that it considers most sensible. Well-configured routers talk to their “neigh-
bours” and can base their routing decisions on information about network load
and possibly known blockages elsewhere in the network. A detailed discussion
of this topic is beyond the scope of this manual.
BIn fact it is possible for a datagram to specify the complete path it wants
to take to its destination. This is called “source routing”, is universally
frowned upon, and will be completely ignored by large parts of the net-
work infrastructure, because on the one hand it is at odds with the idea of
dynamic load distribution, and on the other hand it is a common vehicle for
security issues.
3.4.3 IP Network Classes
Traditionally, the set of IP addresses from
0.0.0.0
to
255.255.255.0
was divided into
several network classes which were called “class A”, “class B”, and “class C”.network classes
BThere are also “class D” (multicast addresses) and “class E” (experimental)
addresses, but these are of little interest to the assignment of IP addresses
to nodes.
Classes A to C differ by their network masks, which amounts to the number of
networks available per class and the number of hosts available in these networks.
While a class A address has an 8-bit network part, a class B address uses 16 bits,
and a class C address 24. A fixed range of IP addresses was assigned to each of
the network classes. (Table 3.3)
Due to the increasing scarcity of IP addresses the division of the IP address
space into the three address classes was abandoned during the 1990s. Now we
are using “classless inter-domain routing” (CIDR) according to [RFC1519]. While
according to the “old” scheme the boundary between the network and host ad-
dresses could only occur in one of three different places, CIDR makes it possible
to assign arbitrary network masks and thus fine-tune the size of the address range
made available to a customer (usually an ISP) as well as work against the “explo-
sion” of routing tables. An installation with sixteen adjacent “class C” networks
(network mask “
/24
” can be viewed for routing purposes as one network with a
/20
netmask—a considerable simplification, since routing tables can be that much
simpler. On the Internet, addresses whose network part is more than 19 bits long
are no longer routed directly; in general you must arrange for a provider to man-
age all of the addresses and forwards the IP datagrams suitably.
3.4.4 Subnetting
Frequently a large network is too imprecise or makes no sense otherwise. Hence
operators often divide their networks into several smaller networks. This hap-
pens by adding another fixed part to the fixed network part of an IP address. In
our previous example,
subnetting
might work approximately like this: Instead of a
“large” network with 32 addresses (for 30 nodes) you might prefer two “smaller”

3.4 Addressing, Routing and Subnetting 59
Table 3.4: Subnetting Example
IP Address
Meaning binary decimal
Network mask
11111111 11111111 11111111 11110000 255.255.255.240
Network address (1)
11001011 10110001 00001000 00000000 203.177.8.0
Host addresses (1)
11001011 10110001 00001000 00000001 203.177.8.1
⋮ ⋮ ⋮
11001011 10110001 00001000 00001110 203.177.8.14
Broadcast address (1)
11001011 10110001 00001000 00001111 203.177.8.15
Network address (2)
11001011 10110001 00001000 00010000 203.177.8.16
Host addresses (2)
11001011 10110001 00001000 00010001 203.177.8.17
⋮ ⋮ ⋮
11001011 10110001 00001000 00011110 203.177.8.30
Broadcast address (2)
11001011 10110001 00001000 00011111 203.177.8.31
Table 3.5: Private IP address ranges according to RFC 1918
Adressraum from to
Class A
10.0.0.0
–
10.255.255.255
Class B
172.16.0.0
–
172.31.255.255
Class C
192.168.0.0
–
192.168.255.255
networks with up to 16 addresses (up to 14 nodes), for example to be able to de-
ploy separate Ethernet cables for security. You can lengthen the network mask
by 1 bit; the network, host, and broadcast addresses can be derived from this as
above (Table 3.4).
BIt isn’t necessary for all subnets to have the same size. The
203.177.8.0/24
net- subnets of different size
work, for example, could straightforwardly be subdivided into one subnet
with 126 host addresses (e. g.,
203.177.8.0/25
with the host addresses
203.177.
8.1
to
203.177.8.126
and the broadcast address
203.177.8.127
) and two subnets
with 62 host addresses (e. g.,
203.177.8.128/26
and
203.177.8.192/26
with the
respective host addresses of
203.177.8.192
up to
203.177.8.190
as well as
203.
177.8.193
up to
203.177.8.255
and the broadcast addresses
203.177.8.191
and
203.177.8.255
).
BThe smallest possible IP network has a 30-bit network part and a 2 bit station smallest possible IP network
part. This amounts to a total of four addresses, one of which is the network
address and one is the broadcast address, so two addresses are left over for
statues. You will find this arrangement every so often with point-to-point
links via modem or ISDN.
3.4.5 Private IP Addresses
IP addresses are globally unique and must therefore be administered centrally. Globally unique distribution of
IP addresses
Hence you cannot pick your own e-mail address arbitrarily, but must apply for
one—usually to your ISP, who in turn has been assigned a block of IP addresses
by a national or international body (Section 3.1.2). The number of internationally
possible network addresses is, of course, limited.
BAt the beginning of February 2011, IANA assigned the last five available
/8
address ranges to the five regional registries. It is probable that APNIC
(Asia Pacific Network Information Centre) will run out of IP addresses first,
possibly in mid-2011. After that, the only solutions will be begging or IPv6.
According to [RFC1918], special IP address ranges, the private addresses, are private addresses

60 3 TCP/IP Fundamentals
reserved for systems that are not connected to the Internet. These addresses will
not be routed on the Internet at large (Table 3.5).
You can use these addresses with impunity within your local networks—
including subnetting and all other bells and whistles.
3.4.6 Masquerading and Port Forwarding
IP addresses are a scarce resource today, and that will remain so until we have
all converted to IPv6 (Section 3.5). Therefore it is highly probable that you will
be assigned only one “official” (i.e., non-RFC 1918) address to connect all of your
network to the Internet—with home networks or ones in small companies this is
even the rule. The solution (an euphemism for “lame kludge”) consists of “mas-
querading” as well as “port forwarding”. Both approaches are based on the fact
that only your router is connected to the Internet by means of a public IP address.
All other nodes within your network use addresses according to [RFC1918]. Mas-Masquerading
querading implies that your router rewrites datagrams that nodes within your
network send “outside” in order to replace those nodes’ IP addresses by its own,
and forwards the corresponding response datagrams to the proper senders. Both
the nodes inside your network and “the Internet” are not aware of the fact—the
former assume that they are talking directly to the Internet, while the latter only
gets to see the (official) IP address of your router. Conversely, port forwardingport forwarding
enables nodes on the Internet to connect to services such as DNS, e-mail or HTTP
through their respective ports on the router, while the router forwards the data-
grams in question to a node on the inside that performs the actual service.
AYou should resist the temptation of making your router simultaneously your
web, mail, or DNS server; the danger of an intruder compromising your
router through one of the large server programs and therefore, in the worst
case, getting access to all of your local network, is much too great.
BPort forwarding and masquerading are two examples of a concept that is
generally called NAT (network address translation). In particular, we canNAT
think of masquerading as “source NAT”, since the sender address of outgo-
ing datagrams is modified5, while port forwarding is an instance of “desti-
nation NAT”—since the destination address of datagrams addressed to us
is changed.
Exercises
C3.5 [1] Can the following IP addresses with the given network mask be used
as host addresses in the appropriate IP network? If not, why not?
IP Address Network mask
a)
172.55.10.3 255.255.255.252
b)
138.44.33.12 255.255.240.0
c)
10.84.13.160 255.255.255.224
C3.6 [2] Which reasons could you have to divide the address range your ISP
assigned to you into subnets?
C3.7 [T]he network at IP address
145.2.0.0
, with the network mask
255.255.
0.0
, was divided, using the subnet mask
255.255.240.0
, into the following
subnets:
•
145.2.128.0
•
145.2.64.0
5The fact that we also need to rewrite the recipient address of incoming datagrams will be ignored
for convenience.

3.5 IPv6 61
•
145.2.192.0
•
145.2.32.0
•
145.2.160.0
Which other subnets are also possible? Which subnet contains the station
145.2.195.13
?
3.5 IPv6
The most popular incarnation of IP is version 4, or “IPv4” for short. Due to the IPv4
explosive growth of the Internet, this version comes up against various limits—the
main problems are the increasing scarcity of addresses, the chaotic assignment of
addresses, and the highly complex routing resulting from this, as well as a fairly
sketchy support of security mechanisms and tools for ensuring quality of service.
IPv6 is supposed to sort this out. IPv6
The most important properties of IPv6 include: properties
• The length of addresses was increased from 32 to 128 bits, resulting in a
total of 3.4 ⋅ 1038 addresses. This would suffice to assign approximately
50.000 quadrillion6IP addresses (a 28-digit number) to each living person
on Earth. That should be enough for the foreseeable future.
• IPv6 stations can automatically obtain configuration parameters from a
router when they are connected to a network. If necessary, there is still a
DHCPv6 protocol.
• There are only 7 fields in an IP header, so routers can process datagrams
more quickly. You get get to use several headers if necessary.
• Extended support for options and extensions, which also contributes to
router processing speed.
• Improved transmission of audio and video data and better support for re-
altime applications.
• Increased security by means of secured data transmission and mechanisms
for authentication and integrity protection.
• Extensibility to ensure the future of the protocol. The protocol does not try
to cover all possiblities, since the future brings new ideas that cannot be
foreseen today. Instead, the protocol is open to the integration of additional
functionality in a backwards-compatible manner.
Even though the standardisation of IPv6 has been finished for some time, the gen-
eral implementation leaves much to be desired. In particular the service providers implementation
are still acting coyly. Linux already supports IPv6, so the conversion of a Linux-
based infrastructure to the new standard will not present big problems. You can
also transport IPv6 datagrams via IPv4 for testing purposes, by embedding them
into IPv4 datagrams (“tunnelling”). Thus a company could base its internal net-
work on IPv6 and even connect several premises via a “virtual” IPv6 network
within the traditional IPv4 network.
We should also stress that IPv6 is a targeted replacement for IPv4. Most IP-
based protocols—starting with TCP and UDP—remain unchanged. Only at the
“infrastructure level” will some protocols become extraneous or be replaced by
IPv6-based versions.
6What our American friends would call a “septillion”

62 3 TCP/IP Fundamentals
3.5.1 IPv6 Addressing
IPv6 supports 2128 distinct addresses—an unimaginably large number. Essen-
tially, every grain of sand on Earth could be assigned several addresses, but that
isn’t even the goal: The large address space enables much more flexible address
assignment for various purposes, as well as much simplified routing.
Unlike IPv4 addresses, IPv6 addresses are not notated as decimal numbers, butNotation
instead as hexadecimal (base-16) numbers. Four hexadecimal digits are grouped
and these groups are separated by colons. For example, an IPv6 address might
look like
fe80:0000:0000:0000:025a:b6ff:fe9c:406a
Leading zeroes in a group may be omitted, and (at most) one run of “zero blocks”
may be replaced by two colons. Hence, an abbreviated rendition of the address
from the previous example might be
fe80::25a:b6ff:fe9c:406a
The IPv6 address
::1
—an abbreviation of
0000:0000:0000:0000:0000:0000:0000:0001
—corresponds to the IPv4 loopback address,
127.0.0.1
. IPv6 does not support
“broadcast addresses” à la
192.168.1.255
—of which more anon.
IPv6 addresses may be divided into a 64-bit “network” part and a 64-bit “sta-
tion” part. This implies that every IPv6 subnet contains 264 addresses, i. e.,
232 times as many as the whole IPv4 internet! Subnetting using variable pre-Subnetting
fix lengths, as used in IPv4 (Section 3.4.4), is not supposed to be part of IPv6.
However, it is assumed that your ISP will provide you with a “
/56
” address prefix
so that you can use 256 subnets with 264 addresses each, which shouldn’t really
cramp your style. (You can specify network prefixes by appending a slash and
the decimal prefix length to an address—an address like
fe80::/16
describes the
network where addresses start with
fe80
and then continue arbitrarily.)
There are three basic types of IPv6 addresses:types of IPv6 addresses
• “Unicast” addresses apply to one particular network interface (a station may
be equipped with several network interfaces, which will each have their own
addresses).
• “Anycast” addresses refer to a group of network interfaces. These typically
belong to different stations, and the “closest” station is supposed to answer.
For example, you may address all routers in an IPv6 network by using the
address resulting from appending an all-zero station part to the (64-bit) ad-
dress prefix of the network.
• “Multicast” addresses are used to deliver the same packets to several net-
work interfaces. As we said, IPv6 does not use broadcast; broadcast is a
special case of multicast. The address
ff02::1
, for example, refers to all sta-
tions on the local network.
In addition, we can distinguish various scopes:scopes
• “Global” scope applies to addresses that are routed within the whole (IPv6)
internet.
• “Link-local” scope applies to addresses that are not routed and are only
valid within the same network. Such addresses are commonly used for
internal administrative purposes. Link-local addresses are always located
within the
fe80::/64
network; the other 64 bits are, in the most straightfor-
ward instance, derived from the MAC address of the interface.

3.5 IPv6 63
• “Site-local” scope applies to addresses that are only routed within one
“site”. Nobody knows exactly what this is supposed to mean, and site-local
addresses have accordingly been deprecated (again). Site-local addresses
use the
fec0::/10
prefix.
• “Unique-local” addresses are similar to site-local addresses and correspond
roughly to the RFC 1918 addresses (
192.168.
𝑥.𝑦etc.) of IPv4. However, IPv6
does make it easy to use “proper”, i. e., globally visible, addresses, so you
do not have to resort to using unique-local addresses in order to assign your
stations any addresses at all. Hence there is no compelling reason to use
unique-local addresses in the first place, other than as a fallback position if
something is terribly wrong with your “real” prefix. Unique-local addresses
use the
fd00::/8
prefix, and you are allowed to pick your own next 40 bits
for a
/48
network (but don’t pick
fd00::/48
).
It is important to stress that, with IPv6, every network interface can have several several addresses
addresses. It gets an automatic link-local address, but can have several unique-
local or global addresses on top of that with no problems whatsoever. All of these
addresses carry equal weight.
BA useful command for the harried IPv6 administrator is
ipv6calc
, which
ipv6calc
makes handling IPv6 addresses easier. For instance, it will output infor-
mation about an address:
$ipv6calc --showinfo fe80::224:feff:fee4:1aa1
No input type specified, try autodetection... found type: ipv6addr
No output type specified, try autodetection... found type: ipv6addr
Address type: unicast, link-local
Error getting registry string for IPv6 address:
reserved(RFC4291#2.5.6)
Interface identifier: 0224:feff:fee4:1aa1
EUI-48/MAC address: 00:24:fe:e4:1a:a1
MAC is a global unique one
MAC is an unicast one
OUI is: AVM GmbH
The address in question is a link-local unicast address whose station part
hints at a device manufactured by AVM GmbH (in point of fact a FRITZ!Box,
a type of DSL router/PBX/home server very popular in Germany).
B
ipv6calc
also serves to convert addresses from one format into another. For
example, you might simulate the method used to derive the station part of
an IPv6 address (also called “EUI-64”) from a MAC address:
$ipv6calc --in mac --out eui64 00:24:fe:e4:1a:a1
No action type specified, try autodetection... found type: geneui64
0224:feff:fee4:1aa1
Commands in this Chapter
arp
Allows access to the ARP cache (maps IP to MAC adresses)
arp
(8) 50
inetd
Internet superserver, supervises ports and starts services
inetd
(8) 54
ipv6calc
Utility for IPv6 address calculations
ipv6calc
(8) 63
xinetd
Improved Internet super server, supervises ports and starts services
xinetd
(8) 54

64 3 TCP/IP Fundamentals
Summary
• The Internet has its roots in the initial ARPAnet of the 1960s, was put on its
present technological basis in the early 1980s, and experienced incredible
growth in the 1980s and 1990s.
• The ISO/OSI reference model serves to provide terminology for the struc-
ture of computer communications.
• Today TCP/IP is the most popular protocol family for data transmission
across computer networks.
• ICMP is used for network management and problem reporting.
• TCP provides a connection-oriented and reliable transport service based on
IP.
• Like IP, UDP is connectionless and unreliable, but much simpler and faster
than TCP.
• TCP and UDP use port numbers to distinguish between different connec-
tions on the same computer.
• Different TCP/IP services have fixed port numbers assigned for them. This
assignment may be inspected in the
/etc/services
file.
• IP addresses identify nodes world-wide. They are 32 bits long and consist
of a network and a host part. The network mask specifies the split between
these.
• In former times, the available IP addresses were divided into classes. Today
we use classless routing with variable-length network masks.
• IP networks can be further subdivided into subnetworks by adjusting the
network mask.
• Some IP address ranges are reserved for use in local networks. They will
not be routed by ISPs.
• IPv6 lifts various restrictions of the IPv4 common today, but so far has not
been widely adopted.
Bibliography
IPv6-HOWTO05 Peter Bieringer. “Linux IPv6 HOWTO”, October 2005.
http://www.tldp.org/HOWTO/Linux+IPv6-HOWTO/
RFC0768 J. Postel. “User Datagram Protocol”, August 1980.
http://www.ietf.org/rfc/rfc0768.txt
RFC0791 Information Sciences Institute. “Internet Protocol”, September 1981.
http://www.ietf.org/rfc/rfc0791.txt
RFC0793 Information Sciences Institute. “Transmission Control Protocol”,
September 1981.
http://www.ietf.org/rfc/rfc0793.txt
RFC0826 David C. Plummer. “An Ethernet Address Resolution Protocol – or –
Converting Network Protocol Addresses to 48.bit Ethernet Addresses for
Transmission on Ethernet Hardware”, November 1982.
http://www.ietf.org/rfc/rfc0826.txt
RFC1519 V. Fuller, T. Li, J. Yu, et al. “Classless Inter-Domain Routing (CIDR): an
Address Assignment and Aggregation Strategy”, September 1993.
http://www.ietf.org/rfc/rfc1519.txt
RFC1918 Y. Rekhter, B. Moskowitz, D. Karrenberg, et al. “Address Allocation for
Private Internets”, February 1996.
http://www.ietf.org/rfc/rfc1918.txt
RFC4291 R. Hinden, S. Deering. “IP Version 6 Addressing Architecture”, Febru-
ary 2006.
http://www.ietf.org/rfc/rfc4291.txt
Ste94 W. Richard Stevens. TCP/IP Illustrated, Volume 1: The Protocols. Addison-
Wesley Professional Computing Series. Boston etc.: Addison-Wesley, 1994.

3.5 Bibliography 65
Tan02 Andrew S. Tanenbaum. Computer Networks. Prentice Hall PTR, 2002, third
edition.

$ echo tux
tux
$ ls
hallo.c
hallo.o
$ /bin/su -
Password:
4
Linux Network Configuration
Contents
4.1 Network Interfaces . . . . . . . . . . . . . . . . . . . 68
4.1.1 Hardware and Drivers . . . . . . . . . . . . . . . . 68
4.1.2 Configuring Network Adapters Using
ifconfig
.......69
4.1.3 Configuring Routing Using
route
............70
4.1.4 Configuring Network Settings Using
ip
..........72
4.2 Persistent Network Configuration . . . . . . . . . . . . . . 73
4.3 DHCP........................76
4.4 IPv6 Configuration . . . . . . . . . . . . . . . . . . . 77
4.5 Name Resolution and DNS . . . . . . . . . . . . . . . . 78
Goals
• Knowing the network configuration mechanisms of the most important dis-
tributions
• Being able to configure network interfaces
• Being able to set up static routes
• Being able to configure Linux as a DHCP and DNS client
Prerequisites
• Knowledge about Linux system administration
• Knowledge about TCP/IP fundamentals (Chapter 3)
adm2-netconf.tex
(
0cd20ee1646f650c
)

68 4 Linux Network Configuration
4.1 Network Interfaces
4.1.1 Hardware and Drivers
Depending on the technology and medium access scheme used, Linux computers
access the network by means of modems, ISDN adapters, Ethernet or WLAN cards
or similar devices. The following sections concentrate mostly on the configuration
of Ethernet adapters.
Like other hardware, a network interface on Linux is controlled by the kernel—
today usually by means of modular drivers that are loaded dynamically on de-
mand. Unlike, for example, hard disk partitions or printers, network interfaces do
not appear as device files in the
/dev
directory, but are accessed via “interfaces”.interfaces
These interfaces are “virtual” in the sense that the kernel makes them available af-
ter a suitable driver has been loaded, and that a network interface can be accessed
through more than one (mostly) independent interface. The interfaces are named;
a typical name for an Ethernet interface would be
eth0
.
Nowadays network adapters are recognised by the kernel when the system is
booted; it can identify the correct driver by means of the adapter’s PCI ID. It is up
to the
udev
infrastructure to name the device and actually load the driver.
One obstacle that modern Linux distributions present here is that the interface
name is tied to the adapter’s MAC address. (Every network adapter has a globally
unique MAC address which is set by the manufacturer.) Thus if you replace the
network adapter inside a computer without resetting the information
udev
keeps
about network adapters it has seen, chances are that your new adapter will be
called
eth1
, and the configuration, which is based on an adapter called
eth0
, will
not apply.
BA typical place where such information ends up is the
/etc/udev/rules.d
di-
rectory. In a file like
70-persistent-net.rules
there might be lines such as
SUBSYSTEM=="net", DRIVERS=="?*",
ATTRS{address}=="00:13:77:01:e5:4a", NAME="eth0"
which assign the name
eth0
to the adapter with the MAC address
00:13:77:01:e5:4a
.
You can fix the MAC address by hand, or remove the line completely and
have
udev
adapt the entry to the changed reality during the next system
boot.
BDon’t tie yourself in knots if you are running Linux in a virtual machine
and can’t find the
70-persistent-net.rules
file. For most “virtual” network
interfaces, it may not be created in the first place.
BFormerly (before
udev
) it was up to the installation procedures provided by
the distribution to come up with the correct drivers for network adapters,
and to make these known to the system. Typically this was done by means
of the
/etc/modules.conf
file, where entries such as
alias eth0 3c59x
needed to be placed—this would tell the kernel to load the driver module
3c59x.o
upon the first access to the
eth0
interface. But no more …
BOf course the Linux kernel is not necessarily modular, even though the stan-
dard kernels in most distributions can’t do without modules. If you compile
your own kernel (see, for example, Linux System Configuration), you can put
the drivers for your network interfaces directly into the kernel.
BFor special requirements, typically for computers with increased security
needs such as packet-filtering routers or servers that are exposed to the In-
ternet, you can even remove the module-loading infrastructure from the
kernel completely. This makes it harder (albeit not impossible) for crackers
to take over the system without being noticed.

4.1 Network Interfaces 69
4.1.2 Configuring Network Adapters Using
ifconfig
Before you can use a network interface to access the network, it must be assigned
an IP address, a network mask, and so on. Traditionally, this is done by hand
using the
ifconfig
command:
#ifconfig eth0 192.168.0.75 up
#ifconfig eth0
eth0 Link encap:Ethernet HWaddr 00:A0:24:56:E3:73
inet addr:192.168.0.75 Bcast:192.168.0.255 Mask:255.255.255.0
inet6 addr: fe80::2a0:24ff:fe56:e373/64 Scope:Link
UP BROADCAST RUNNING MULTICAST MTU:1500 Metric:1
RX packets:0 errors:0 dropped:0 overruns:0 frame:0
TX packets:6 errors:0 dropped:0 overruns:0 carrier:6
collisions:0 txqueuelen:100
RX bytes:0 (0.0 b) TX bytes:460 (460.0 b)
Interrupt:5 Base address:0xd800
After an IP address has been assigned, you can view the status of an interface by
invoking the same command without specifying an IP address. This displays not
only the current IP address but also the hardware type, the MAC (or hardware)
address, the broadcast address, the network mask, the IPv6 address, and many
other data. In the example you can see that the kernel will set items such as the
network mask and broadcast address to default values (here those of a class C
network, according to the first octet of the IP address) if no explicit values are
given. Should the desired values deviate from the default you must specify them
explicitly.
#ifconfig eth0 192.168.0.75 netmask 255.255.255.192 textbackslash
>broadcast 192.168.0.64
#ifconfig eth0
eth0 Link encap:Ethernet HWaddr 00:A0:24:56:E3:73
inet addr:192.168.0.75 Bcast:192.168.0.64 Mask:255.255.255.192
inet6 addr: fe80::2a0:24ff:fe56:e373/64 Scope:Link
BUsing the parameters
up
and
down
, you can switch individual interfaces on
and off with
ifconfig
.
BBy convention, the loopback interface has the IP address
127.0.0.1
and will loopback interface
be configured automatically. Should this not happen for some reason, or
should the configuration be lost, you can do it yourself using
#ifconfig lo 127.0.0.1 up
For testing or for special requirements it may make sense to define an alias for alias
an interface, using a different IP address, network mask, etc. This is no problem
using
ifconfig
:
#ifconfig eth0:0 192.168.0.111
#ifconfig eth0:0
eth0:0 Link encap:Ethernet HWaddr 00:A0:24:56:E3:72
inet addr:192.168.0.111 Bcast:192.168.0.255 Mask:255.255.255.0
UP BROADCAST MULTICAST MTU:1500 Metric:1
Interrupt:5 Base address:0xd800
The alias name is constructed from the interface name by adding an extension
separated by a colon. What the extension looks like is immaterial (there is nothing
wrong with
eth0:Mr.X
), but by convention alias names are numbered sequentially:
eth0:0
,
eth0:1
, …

70 4 Linux Network Configuration
Exercises
C4.1 [1] Which kernel module applies to your network adapter? Is it loaded?
C4.2 [!1] Check whether your network adapter is running, and which IP ad-
dress is assigned to it.
C4.3 [!2] Assign a new IP address to your network adapter (possibly accord-
ing to your instructor’s directions). Check whether you can still reach other
computers on the network.
4.1.3 Configuring Routing Using
route
Every computer in a TCP/IP network requires routing, since even the simplest
node contains at least two network interfaces—the loopback interface and the in-
terface leading to the rest of the network, like an Ethernet or WLAN card or an
Internet connection. The routes for the loopback interface and the networks that
are directly connected to the network adapters are set up automatically by current
Linux kernels when the adapters are initialised. Other routes—in particular, the
“default route” which specifies where datagrams are sent in the absence of more
specific instructions—must be configured explicitly.
BIn principle we are distinguishing between static and dynamic routing. With
the former, routes are set up manually and seldom if ever changed. With the
latter, the system talks to other routers in its vicinity and adapts its routes to
the current state of the network. Dynamic routing requires the installation
of a “routing daemon” such as
gated
or
routed
and will not be discussed fur-
ther here. The rest of this section confines itself to explaining static routing.
The kernel maintains a routing table summarising the current routing config-routing table
uration. It contains rules (the routes) that describe which datagrams should be
sent where, based on their destination address. You can inspect the routing table
using the
route
command:
#ifconfig eth0 192.168.0.75
#route
Kernel IP routing table
Destination Gateway Genmask Flags Metric Ref Use Iface
192.168.0.0 * 255.255.255.0 U 0 0 0 eth0
The columns in this table have the following meaning:
• The first column contains the destination address. This can be network or
node addresses or the entry for the default route (called
default
). The defaultdefault route
route gives the address for all datagrams to which no other routes apply.
• The second column defines a router that the datagrams in question will be
passed to. Valid entries at this point include node addresses or the “
*
” entry
if the datagrams do not need to go to another router.
• The third column contains the network mask for the destination address. If
the destination address is a single node, the value
255.255.255.255
appears.
The default route has the value
0.0.0.0
.
• The fourth column contains flags describing the route in more detail, in-
cluding:
U
The route is active (“up”)
G
The route is a “gateway route”, that is, it points to a router (rather than a
network that is connected directly, as in “
*
”).

4.1 Network Interfaces 71
H
The route is a “host route”, that is, the destination is a specific node.
G
and
H
are not mutually exclusive and may occur together.
• The fifth and sixth columns contain data which is important for dynamic
routing: The “metric” in the fifth column gives the number of “hops” to the
destination; it is not evaluated by the Linux kernel, but mostly useful for
programs such as
gated
. The value in the sixth column is not used on Linux.
• The seventh column details how often the route has been used.
• Finally, the eighth column optionally contains the name of the interface that
should be used to forward the datagrams. This mostly applies to routers
that contain several interfaces, such as Ethernet adapters in different net-
work segments or an Ethernet adapter and an ISDN adapter.
The example illustrates that, when
ifconfig
is used to assign an IP address, the
kernel not only sets up the network mask and broadcast address, but also assigns
at least one route—that which forwards all datagrams whose destination address
is within the network that is directly connected to that interface.
A more complicated example for a routing table might look like
#route
Kernel IP Routentabelle
Ziel Router Genmask Flags Metric Ref Use Iface
192.168.0.0 * 255.255.255.0 U 0 0 0 eth0
192.168.2.0 * 255.255.255.0 U 0 0 0 eth1
10.10.3.0 192.168.0.1 255.255.255.0 UG 0 0 0 eth0
112.22.3.4 * 255.255.255.255 UH 0 0 0 ppp0
default 112.22.3.4 0.0.0.0 UG 0 0 0 ppp0
The computer in this example is apparently a router containing three network
interfaces. The first three routes are network routes, and according to their des-
tination addresses datagrams will be routed either via
eth0
,
eth1
, or the router
192.168.0.1
(which may be reached via the first route). The fourth route is a “host
route” enabling a point-to-point connection to an ISP’s computer via the modem,
ppp0
. The fifth route is the corresponding default route forwarding all datagrams
not addressed to the local networks
192.168.0.0/24
,
192.168.2.0/24
, or
10.10.3.0/24
to
the world via the modem.
The
route
command serves not just to inspect but also to manipulate the rout-
ing table. To establish the example above (three local Ethernet segments and the
PPP connection) the routing table must be constructed according to the following
commands:
#route add -net 192.168.0.0 netmask 255.255.255.0 dev eth0
#route add -net 192.168.2.0 netmask 255.255.255.0 dev eth1
#route add -net 10.10.3.0 netmask 255.255.255.0 gw 192.168.0.1
#route add -host 112.22.3.4 dev ppp0
#route add default dev ppp0
BThe first two lines in the example are not strictly necessary, as the corre-
sponding routes will be set up automatically when the interfaces are as-
signed their addresses.
More generally,
route
supports the following syntax to add and delete routes:
route add
[
-net
|
-host
] ⟨destination⟩ [
netmask
⟨netmask⟩]
[
gw
⟨gateway⟩] [[
dev
] ⟨interface⟩]
route del
[
-net
|
-host
] ⟨destination⟩ [
netmask
⟨netmask⟩]
[
gw
⟨gateway⟩] [[
dev
] ⟨interface⟩]

72 4 Linux Network Configuration
To add a route, you must specify the corresponding parameter (
add
); then you
specify whether the route is a host or network route (
-host
or
-net
), followed by
the destination. For a network route, a netmask must be specified either via the
netmask
⟨netmask⟩option or by appending a CIDR-style netmask to the destination
address. For each route there must be either a router (⟨gateway⟩) or a destination
interface covering the next hop.
The example routes could be deleted like this:
#route del -net 192.168.0.0 netmask 255.255.255.0
#route del -net 192.168.2.0 netmask 255.255.255.0
#route del -net 10.0.3.0 netmask 255.255.255.0
#route del -host 112.22.3.4
#route del default
To delete a route you need to specify the same parameters as when adding it—only
the gateway or interface specifications may be left off. With duplicate destinations,
e. g., the same destination network via two different interfaces, the newest (least
recently inserted) route will be removed.
BIf a station is to be used as a gateway between several networks (as in the
example), the kernel should forward incoming IP datagrams not intended
for the station itself according to the routing table. This feature, known as
IP forwarding, is disabled by default. Its current state can be inspectedIP forwarding
and changed using the
/proc/sys/net/ipv4/ip_forward
(pseudo) file. It con-
tains only one character—a zero (disabled) or one (enabled)—, and is usu-
ally written to using
echo
:
#cat /proc/sys/net/ipv4/ip_forward
0
#echo 1 > /proc/sys/net/ipv4/ip_forward
#cat /proc/sys/net/ipv4/ip_forward
1
AAttention: Like the other command-based settings, this is lost when the
computer is shut down. (Distributions have ways of making this setting per-
manent; for Debian GNU/Linux, include a line containing “
ip_forward=yes
”
in the
/etc/network/options
file, for the Novell/SUSE distributions, put
“
IP_FORWARD="yes"
” in
/etc/sysconfig/sysctl
. For Red Hat distributions, add a
line containing
net.ipv4.ip_forward = 1
to the
/etc/sysctl.conf
file.)
4.1.4 Configuring Network Settings Using
ip
The
ip
command can be used to set up both network interfaces and routes. It is
the designated successor to the commands described above. Its syntax is roughly
like
ip
[⟨options⟩] ⟨object⟩ [⟨command⟩ [⟨parameters⟩]]
Possible ⟨object⟩s include
link
(parameters of a network interface),
addr
(IP address
and other addresses of a network interface), and
route
(querying, adding, and
deleting routes). There are specific commands for each object type.
If no command is given, the current settings are displayed according to the
list
and
show
commands. Other typical commands are
set
for
link
objects as well as
add
and
del
for
addr
and
route
objects.

4.2 Persistent Network Configuration 73
Most commands require additional parameters, since if you want to assign an
IP address using “
ip addr add
”, you will have to specify what address you are talk-
ing about.
You can find out more about the requisite syntax by invoking
ip
using the
help
subcommand. Thus, “
ip help
” displays all possible objects, while “
ip link help
”
shows all parameters pertaining to
link
objects including their syntax. Unfortu-
nately the syntax is not always straightforward.
BIf you know your way around Cisco routers you will have noted a certain
similarity to the Cisco
ip
command. This similarity is deliberate.
For example: If you wanted to assign an IP address to a network interface, you
might use the following command:
#ip addr add local 192.168.2.1/24 dev eth0 brd +
Unlike
ifconfig
,
ip
requires the netmask and broadcast address to be present (even
if specified indirectly using
brd +
). The
local
parameter is used to specify that an IP
address for a local interface is forthcoming, but since this is the default parameter
for “
ip addr add
”, the
local
may also be left off. You can find out about default
parameters from the
ip
(8) manual page.
Caution: Unlike
ifconfig
, after having been assigned an IP address, the interface
is not yet activated. This must be done separately:
#ip addr show dev eth0
2: eth0: <BROADCAST,MULTICAST> mtu 1500 qdisc pfifo-fast qlen 100
link/ether 00:a0:24:56:e3:72 brd ff:ff:ff:ff:ff:ff
inet 192.168.2.1/24 brd 192.168.2.255 scope global eth0
#ip link set up dev eth0
#ip addr show dev eth0
2: eth0: <BROADCAST,MULTICAST,UP> mtu 1500 qdisc pfifo-fast qlen 100
link/ether 00:a0:24:56:e3:72 brd ff:ff:ff:ff:ff:ff
inet 192.168.2.1/24 brd 192.168.2.255 scope global eth0
inet6 fe80::2a0:24ff:fe56:e372/64 scope link
You can also assign interface aliases using
ip
:
#ip addr add 192.168.0.222/24 dev eth0 brd + label eth0:0
It is useful to learn about
ip
, not only because it is the upcoming standard,
but also because it is often more straightforward to use than the alternatives. For
example, setting and deleting routes is easier than it is with
route
:
#ip route add 192.168.2.1 via 192.168.0.254
#ip route del 192.168.2.1
4.2 Persistent Network Configuration
One thing is for sure: Once you have figured out the correct network configuration
for your system, you do not want to set it up over and over again. Unfortunately,
though, the Linux kernel forgets all about it when it is shut down.
The various Linux distributions have solved this problem in different ways:
On Debian GNU/Linux and its derivatives, the network configuration is
stored in the
/etc/network/interfaces
file. This file is mostly self-explanatory:

74 4 Linux Network Configuration
#cat /etc/network/interfaces
auto lo eth0
iface lo inet loopback
iface eth0 inet static
or ‘‘…
inet dhcp
’’
address 192.168.0.2
netmask 255.255.255.0
network 192.168.0.0
broadcast 192.168.0.255
up route add -net 10.10.3.0/24 gw 192.168.0.1
down route del -net 10.10.3.0/24 gw 192.168.0.1
In the file there is an entry for each interface. Using the
ifup
and
ifdown
com-
mands, the interfaces can be activated or deactivated individually or (with
the
-a
) collectively; when the system is booted, the
/etc/init.d/networking
script takes care of initialising the interfaces. (Alternatively,
udev
will do
it, provided the interfaces in question are listed in a line like “
allow-hotplug
eth0
”. This is mostly interesting for network adapters that are not always
available, like USB-based Ethernet or UMTS adapters.)—Lines starting with
up
contain commands that will be run when the interface is being brought
up (in the order they are in the file); conversely, lines startign with
down
give commands to be executed when the interface is being shut down.
You can find more examples for the strange and wonderful things that are
possible with the Debian network configuration mechanism by looking at
interfaces
(5) and the
/usr/share/doc/ifupdown/examples/network-interfaces.gz
file.
YaST, the central configuration tool for the Novell/SUSE distributions, natu-
rally contains modules to configure network adapters. Settings made using
YaST are commonly stored as variables in files below
/etc/sysconfig
, where
init scripts or the
SuSEconfig
program can pick them up. Network configura-
tion settings in particular are stored in the
/etc/sysconfig/network
directory,
and you can even modify the files in there manually. There is a file called
ifcfg-
⟨interface⟩for each interface (e.g.,
ifcfg-eth0
) which contains the set-
tings for that particular interface. This could look like
BOOTPROTO='static'
or
dhcp
(among others)
BROADCAST='192.168.0.255'
ETHTOOL_OPTIONS=''
IPADDR='192.168.0.2'
MTU=''
NAME='79c970 [PCnet32 LANCE]'
Name inside YaST
(VMware says hello)
NETMASK='255.255.255.0'
Or
PREFIXLEN=24
NETWORK='192.168.0.0'
REMOTE_IPADDR=''
Remote peer with PPP
STARTMODE='auto'
or
manual
,
hotplug
, …
USERCONTROL='no'
(a more detailed explanation can be found in
ifcfg
(5)). More general net-
work settings go into
/etc/sysconfig/network/config
.—The SUSE distribu-
tions, too, support commands called
ifup
and
ifdown
, whose function, how-
ever, is subtly different from those on Debian GNU/Linux. At least the basic
invocations like “
ifup eth0
” are the same, but even “
ifup -a
” doesn’t work—
to start or stop all interfaces, you must call “
rcnetwork start
” or “
rcnetwork
stop
”. (As a consolation prize, “
rcnetwork start eth0
” also works.) Typically

4.2 Persistent Network Configuration 75
for SUSE,
rcnetwork
is nothing but a symbolic link to the
/etc/init.d/network
init script.
On the Novell/SUSE distributions you can configure routes using the
/etc/
sysconfig/network/routes
file. The content of this file (shown here to match
the example above) resembles the output of the
route
command:
#cat /etc/sysconfig/network/routes
10.10.3.0 192.168.0.1 255.255.255.0 eth0
112.22.3.4 0.0.0.0 255.255.255.255 ppp0
default 112.22.3.4 - -
If no gateway is to be used, the correct value is “
0.0.0.0
”, unset network
masks or interface names are represented by a “
-
” character. Routes, too,
are set by means of the “
rcnetwork restart
” command. As far as the last two
routes in the example are concerned, it turns out that point-to-point routes
for dialup connections are usually set up dynamically by the daemons in
question (such as
pppd
).—If you want to define routes for specific interfaces,
you can also put the lines in question into a file called
ifroute-
⟨interface⟩
(such as
ifroute-eth0
) rather than the
routes
file. The fourth column (the one
containing the interface names) will then be replaced by the interface name
if you leave it blank in the file.
Like SUSE, Fedora and the other Red Hat distributions use files inside a
/etc/sysconfig
directory to set various variables. As on SUSE, there are files
like
ifcfg-eth0
for the configuration of each interface, but they are stored in a
directory called
/etc/sysconfig/network-scripts
. However, SUSE files are not
directly transferable, since their internal structure differs from the Red Hat
files. On Red Hat, you might implement our example configuration for
eth0
as follows: The
/etc/sysconfig/network-scripts/ifcg-eth0
file contains
DEVICE=eth0
BOOTPROTO=none
ONBOOT=yes
NETWORK=192.168.0.0
NETMASK=255.255.255.0
IPADDR=192.168.0.2
USERCTL=no
The
ifup
and
ifdown
commands exist on Fedora, too, but as on SUSE you can
only bring up or shut down one interface at any one time.
On Red Hat, static routes can be placed in a file inside
/etc/sysconfig/network-
scripts
called
route-
⟨interface⟩(for example,
route- eth0
). In this case, the for-
mat is like
ADDRESS0=10.10.3.0
NETMASK0=255.255.255.0
GATEWAY0=192.168.0.1
(additional routes use
ADDRESS1
,
NETMASK1
, …,
ADDRESS2
and so on). There is an
older file format according to which every line of the file is simply appended
to “
ip route add
”, which lends itself to lines like
10.10.3.0/24 via 192.168.0.1
Finally, you can define static routes in
/etc/sysconfig/static-routes
without
having to refer to individual interfaces. Lines in this file are only taken into
account if they start with the
any
keyword; the remainder of the line is ap-
pended to “
route add -
” (Consistency? We don’t need no steenkin’ consis-
tency!), such that a line like

76 4 Linux Network Configuration
any net 10.10.3.0 netmask 255.255.255.0 gw 192.168.0.1
executes the
route add -net 10.10.3.0 netmask 255.255.255.0 gw 192.168.0.1
command.
4.3 DHCP
DHCP, the “Dynamic Host Configuration Protocol” is used to save you as the ad-
ministrator from having to define network parameters on every single host in the
network. Instead, a Linux machine fetches its network parameters—apart from
its IP address and accessories, typically the address of a default router and one
or more DNS servers—from a remote DHCP server when the network adapter is
brought up.
BThe prerequisite for this to work is, of course, an existing DHCP server. Ex-
plaining the installation and maintenance of a DHCP server is, sadly, be-
yond the scope of this manual, but if you are using one of the common DSL
routers for Internet access or, at work, can avail yourself of the services of a
competent IT department, this isn’t really your problem—the required func-
tionality will be readily available and/or can be straightforwardly activated.
Most Linux distributions make it very easy to use DHCP for configuration:
On Debian GNU/Linux or Ubuntu, simply replace, in
/etc/network/interfaces
,
the line
iface eth0 inet static
and any following lines containing address or routing information by the
line
iface eth0 inet dhcp
This causes the computer to obtain its address, network mask, and default
route from the DHCP server. You can still use
up
and
down
to execute com-
mands once the link has been brought up or before it is torn down.
On the Novell/SUSE distributions, change the
BOOTPROTO='static'
parameter in the file containing the configuration for the interface in ques-
tion (
ifcfg-eth0
or whatever) to
BOOTPROTO='dhcp'
You may leave the
BROADCAST
,
IPADDR
,
NETMASK
, and
NETWORK
settings empty.
To use DHCP on Fedora and the other Red Hat distributions, change the
configuration file of the interface to read
BOOTPROTO=none
instead of

4.4 IPv6 Configuration 77
BOOTPROTO=dhcp
You can simply omit the address parameters.
Generally, the distribution-specific network configuration methods support
various other options such as VLAN (several “virtual” networks on the same wire
that cannot see one another), encryption, or bonding (several network adapters
work in parallel, for more capacity and/or fault tolerance). Another important
use case is for a mobile computer to take part in several networks, such as at home
and at the office. The options actually offered differ greatly between distributions
and cannot be discussed here in detail.
4.4 IPv6 Configuration
To integrate your computer into an IPv6 network, in the ideal case you need to do
nothing at all: The mechanism of “stateless address autoconfiguration” (SLAAC) SLAAC
makes it possible for everything to take place automatically. With IPv6, SLAAC
plays approximately the role that DHCP would in IPv4, at least for simple appli-
cations.
If a new IPv6 network interface is activated, the station first generates the ap- Procedure
propriate link-local address. This assumes the
fe80::/64
prefix and derives the
station part from the MAC address of the interface in question1. After that, the
station sends a link-local “router solicitation” (RS) on that interface to the mul-
ticast address,
ff02::2
, which refers to all routers in the subnet. This causes the
router (or routers) on the physical network of the interface to emit “router adver-
tisements” (RA) containing the prefixes they are routing. On that basis, the station
constructs additional (possibly globally visible) addresses for the interface.—RS
and RA are part of the “Neighbor Discovery Protocol” (NDP), which in turn be-
longs to ICMPv6, the IPv6 counterpart to ICMP. RAs and the IPv6 addresses de-
rived from them only remain valid for a certain time if they are not refreshed.
Hence, routers send unsolicited RAs every so often; the RS only serves to avoid
having to wait for the next unsolicited RA when a new interface is brought up, by
making it possible to obtain the necessary information at once.
The advantage of this approach is that it does not require explicit configuration Advantages
within a DHCP server. It is also straightforward to obtain redundancy by config-
uring several routers within the same subnet. In addition, routers do not need to
remember (as they would with DHCP) which station is currently using which IP
address (hence, “stateless”). All of this does not mean, however, that in IPv6 you
can do without DHCP altogether (there is DHCPv6), since there are important bits
of information that can’t be obtained via SLAAC (think “DNS server”—although
there is a new, not yet widely supported, standard to fix that).
You can check the addresses the system has assigned to an interface: Querying addresses
#ip addr show eth0
2: eth0: <BROADCAST,MULTICAST,UP,LOWER_UP> mtu 1500
qdisc pfifo_fast state UP qlen 1000
link/ether 70:5a:b6:9c:40:6a brd ff:ff:ff:ff:ff:ff
inet 192.168.178.130/24 brd 192.168.178.255 scope global eth0
inet6 2001:db8:56ee:0:725a:b6ff:fe9c:406a/64 scope global dynamic
valid_lft 6696sec preferred_lft 3096sec
inet6 fe80::725a:b6ff:fe9c:406a/64 scope link
valid_lft forever preferred_lft forever
1The method for this is as follows: Consider the MAC address, 𝑚𝑛:𝑜𝑝:𝑞𝑟:𝑠𝑡:𝑢𝑣:𝑤𝑥. The 3rd bit of 𝑛
(counting from the left), which in a MAC address is always zero, is set to one (we shall call the result 𝑛′),
and the station address is then 𝑚𝑛′𝑜𝑝:𝑞𝑟
ff:fe
𝑠𝑡:𝑢𝑣𝑤𝑥. The MAC address
70:5a:b6:9c:40:6a
, for example,
becomes the station address
725a:b6ff:fe9c:406a
.

78 4 Linux Network Configuration
This contains both the link-local address (“
scope link
”, starting with
fe80::
) and a
globally visible address (“
scope global dynamic
”, beginning with
2001:
) which the
interface has obtained via SLAAC. If you look closely, you can also correlate the
MAC address (in the
link/ether
line) with the station parts of the IPv6 addresses.
Incidentally, the station parts of your IPv6 addresses, which are derived from
your MAC addresses, are a potential problem for your privacy. If you always useprivacy
the same source address to surf the ’net, it is trivial to correlate your activities (web
sites visited and so on) with that address. Even if, as people will say, you have
nothing to hide, nobody can fault you for the queasy feeling this might give you
as a matter of principle. One way of ameliorating the problem are the “privacy
extensions”, which add a random, otherwise unused, station part for outgoing
traffic and pick a new one every so often. The privacy extensions can be activated
for an interface (here
eth0
) using
sysctl
:
#sysctl -w net.ipv6.conf.eth0.use_tempaddr=2
#ip link set dev eth0 down
#ip link set dev eth0 up
To make this setting permanent, enter it in
/etc/sysctl.conf
.
Finally, it is still possible to assign IP adresses manually. You can do this eitherManual configuration
using
ifconfig
:
#ifconfig eth0 inet6 add 2001:db8:abcd::1/64
or using
ip
:
#ip addr add 2001:db8:abcd::1/64 dev eth0
How to make this configuration permanent will depend on your distribution; the
techniques for this largely correspond to those discussed in Section 4.2.
4.5 Name Resolution and DNS
The DNS or “Domain Name System” is one of the fundamental ingredients for the
scalability of the Internet. Its job is to assign human-readable names to network
nodes and to find the corresponding IP addresses (or vice versa). It does this by
means of a worldwide distributed “database” of DNS servers.
BBy now, DNS takes care of many other jobs, from figuring out the mail
servers for a domain to helping with spam avoidance.
Programs on a Linux machine usually do not talk to the DNS directly, but avail
themselves of the services of a “resolver”. This is usually part of the C runtimeresolver
library. The central configuration file for the resolver is called
/etc/resolv.conf
. It
is used, e. g., to define the DNS servers that the resolver is to consult. There are
five main directives:
domain
⟨Name⟩(local domain) This is the domain name that the resolver tries to
append to incomplete names (typically, those that do not contain a period).
BExactly which names are considered incomplete is governed by the
ndots
option (see table 4.1).
search
⟨Domain1⟩ ⟨Domain2⟩
…
(search list) As an alternative to a single entry us-
ing
domain
, you can specify a list of several domain names to be appended to
incomplete names. The entries in the list are separated by spaces. At first
the resolver tries the unchanged name. If this fails, the list entries are ap-
pended in order and these names are tried.
domain
and
search
are mutually
exclusive; if both occur in a configuration, whichever line is last in the file
wins.

4.5 Name Resolution and DNS 79
Table 4.1: Options within
/etc/resolv.conf
Option Result
debug
Regular log messages are output to
stdout
(commonly
unimplemented).
ndots
⟨n⟩The minimum number of dots within a name which
will cause the resolver to perform a direct query with-
out accessing the search list.
attempts
⟨n⟩The number of times the resolver will query a server
before giving up. The maximum value is 5.
timeout
⟨n⟩The initial time out for query attempts in seconds. The
maximum value is 30.
rotate
Not only the first, but all specified servers will be
queried in rotation.
no-check-names
Deactivates the standard check whether returned host
names only contain allowable characters.
nameserver 192.168.10.1
nameserver 192.168.0.99
search foo.example.com bar.example.com example.com
Figure 4.1:
/etc/resolv.conf
example
nameserver
⟨IP address⟩(local DNS server) The local resolver will consult the DNS
server given here. You may define up to three name servers in separate
nameserver
directives, which will be consulted in sequence if required.
sortlist
⟨IP address⟩[
/
⟨network mask⟩] (sort order) If several addresses are re-
turned for a name, the one matching the specification here will be preferred.
In the sort list there is room for up to ten entries.
options
⟨Option⟩(options) This is used for specific resolver settings which are de-
tailed (together with their default values) in table 4.1. In practice these are
seldom, if ever, changed.
You can see a typical
/etc/resolv.conf
file in Figure 4.1.
An alternative to DNS is the “local” resolution of host names and IP addresses
by means of the
/etc/hosts
file. As the sole method for name resolution this is
only of interest for small networks that are not connected to the Internet, but we
should mention it nevertheless—if you only need to deal with a few computers, it
is conceivably more straightforward to simply configure the DNS client side and
assign names and addresses to your own computers using
/etc/hosts
. You do have
to take care that the file is the same on all your computers.
BFor small networks we recommend the
dnsmasq
program, which makes the
content of an
/etc/hosts
file available via DNS, while passing all other DNS
queries on to the “real” DNS. It even works as a DHCP server on the side.
The content of the
/etc/hosts
file is plain ASCII text which may contain line-
based entries as well as comments starting with “
#
”. These entries contain an IP
address in the first column and the “fully qualified domain name” (FQDN) of a
host in the second. It is also permissible to add more names on the same line.
Spaces or tabs can be used to separate columns. Figure 4.2 shows the content of a
typical
/etc/hosts
file.
BWhen the Internet was new—until the early 1980s—there was essentially
one big
/etc/hosts
file for everybody, and domains hadn’t been invented yet.
At that time the Internet consisted of fewer nodes (thousands instead of

80 4 Linux Network Configuration
#
# hosts This file describes a number of hostname-to-address
# mappings for the TCP/IP subsystem. It is mostly
# used at boot time, when no name servers are running.
# On small systems, this file can be used instead of a
# "named" name server.
# Syntax:
#
# IP-Address Full-Qualified-Hostname Short-Hostname
#
# special IPv6 addresses
127.0.0.1 localhost
192.168.0.99 linux.example.com linux
Figure 4.2: The
/etc/hosts
file (SUSE)
gazillions), but the maintenance and distribution of current versions of the
file came to be a growing problem. Hence, DNS.
The exact mechanisms the C library uses for name resolution are controlled
by means of a file called
/etc/nsswitch.conf
. This determines, for example, which
name resolution services are used in which order. In addition there are rules forname resolution services
the resolution of user names, groups, etc., which will not concern us at this point.
You can refer to
nsswitch.conf
(5) for a detailed description of its syntax and func-
tion.
The part of
/etc/nsswitch.conf
pertinent to host name resolution could look like:
hosts: files dns
This means that the C library will try to resolve host names based on the local files
(namely,
/etc/hosts
). Only if this fails will it query DNS.
Commands in this Chapter
dnsmasq
A lightweight DHCP and caching DNS server for small installations
dnsmasq
(8) 79
ifconfig
Configures network interfaces
ifconfig
(8) 68
ifdown
Shuts down a network interface (Debian)
ifdown
(8) 74
ifup
Starts up a network interface (Debian)
ifup
(8) 74
ip
Manages network interfaces and routing
ip
(8) 72
route
Manages the Linux kernel’s static routing table
route
(8) 70

4.5 Name Resolution and DNS 81
Summary
• Nowadays the Linux kernel loads networking drivers on demand using the
udev
infrastructure.
• The
ifconfig
command is used for low-level configuration of network inter-
face parameters. You can use it to configure the loopback interface and to
assign alias names for interfaces.
• Routes specify how IP datagrams should be forwarded to their destinations.
• The
route
command is used to configure routes.
• The
ip
command is a convenient replacement for
ifconfig
and
route
.
• The various Linux distributions offer different methods of persistent net-
work configuration
• DHCP lets Linux hosts obtain networking parameters dynamically from a
central server.
• Common name resolution mechanisms are based on DNS or local configu-
ration files.
• The order of name resolution is specified in the
/etc/nsswitch.conf
file.

$ echo tux
tux
$ ls
hallo.c
hallo.o
$ /bin/su -
Password:
5
Network Troubleshooting
Contents
5.1 Introduction. . . . . . . . . . . . . . . . . . . . . . 84
5.2 Local Problems. . . . . . . . . . . . . . . . . . . . . 84
5.3 Checking Connectivity With
ping
..............84
5.4 Checking Routing Using
traceroute
And
tracepath
........87
5.5 Checking Services With
netstat
And
nmap
...........90
5.6 Testing DNS With
host
And
dig
...............93
5.7 Other Useful Tools For Diagnosis . . . . . . . . . . . . . . 95
5.7.1
telnet
and
netcat
..................95
5.7.2
tcpdump
......................97
5.7.3
wireshark
.....................97
Goals
• Knowing strategies for network troubleshooting
• Being able to use tools like
ping
,
traceroute
, and
netstat
for problem analysis
• Being able to fix simple network configuration errors
Prerequisites
• Knowledge about Linux system administration
• Knowledge about TCP/IP fundamentals (Chapter 3)
• Knowledge about Linux network configuration (chapter 4)
adm2-netprobleme.tex
(
0cd20ee1646f650c
)

84 5 Network Troubleshooting
5.1 Introduction
System administrators love this: No sooner have you settled in comfortably in
front of your computer with a nice cup of coffee or tea, looking forward to perus-
ing the newest news on LWN.net, that a noxious person stands in the doorway: “I
can’t get on the network!” Alas for the peace and quiet. But what to do?
Computer networking is a difficult topic, and therefore you should not be sur-
prised when All Sorts Of Things Go Wrong. In this chapter we show you the most
important tools and strategies to find and iron out problems.
5.2 Local Problems
The first order of the day is to convince yourself that the network adapter is present
and recognised. (For starters, do take a discreet look at the back of the computer
to ascertain that the cable is still sitting in the correct socket, and that the ladies
and gentlemen of the cleaning squad have not played “creative reconfiguration”.)
Check the output of “
ifconfig -a
”. With this parameter, the program gives you
an overview of all network interfaces inside the computer, even the ones that are
not currently configured. At least
lo
and
eth0
(if the computer is networked using
Ethernet) should be visible. If this isn’t the case, you have already found the first
problem: Possibly there is something wrong with the driver, or the adapter is not
being recognised.
BIf, instead of
eth0
, you only see something like
eth1
, it is possible that the
network card was replaced, and
udev
assigned a new interface name to the
card on account of its new MAC address. This shouldn’t really happen
with network cards that are reasonably firmly attached to the computer
(or, if it does, it should happen because you, being the administrator, did it
yourself), but perhaps your colleagues have surreptitiously swapped their
PC(MCIA) network adapters or USB-based UMTS dongles. The remedy is
to delete the line referring to the old device from the
/etc/udev/rules.d/70-
persistent-net.rules
(or some such), and to correct the interface name in the
line referring to the new device. Restart
udev
afterwards.
BIf the output of
ifconfig
shows nothing remotely resembling your network
adapter, then check, using
lsmod
, whether the driver module in question was
loaded at all. If you do not know what the driver module in question is to
begin with, you can search the output of “
lspci -k
” for the stanza pertaining
to your network adapter. This might look like
02.00.0 Ethernet controller: Broadcom Corporation NetXtreme
BCM5751 Gigabit Ethernet PCI Express (rev 01)
Kernel driver in use: tg3
Kernel modules: tg3
In this case you should ascertain that the
tg3
module has been loaded.
5.3 Checking Connectivity With
ping
If the output of
ifconfig
shows the interface and the parameters displayed with it
look reasonable, too (check the IP address, the network mask—very important—
, and the broadcast address, in particular), then it is time for some connectivity
tests. The simplest tool for this is a program called
ping
, which takes an IP address
(or a DNS name) and tries to send an ICMP
ECHO REQUEST
datagram to the host in
question. That host should reply with an ICMP
ECHO REPLY
datagram, which
ping
receives and reports.
First, you should check whether the computer can talk to itself:

5.3 Checking Connectivity With
ping
85
#ping 127.0.0.1
PING 127.0.0.1 (127.0.0.1) 56(84) bytes of data.
64 bytes from 127.0.0.1: icmp_seq=1 ttl=64 time=0.039 ms
64 bytes from 127.0.0.1: icmp_seq=2 ttl=64 time=0.039 ms
64 bytes from 127.0.0.1: icmp_seq=3 ttl=64 time=0.032 ms
64 bytes from 127.0.0.1: icmp_seq=4 ttl=64 time=0.040 ms
Interrupt using Ctrl +c…
--- 127.0.0.1 ping statistics ---
4 packets transmitted, 4 received, 0% packet loss, time 2997ms
rtt min/avg/max/mdev = 0.032/0.037/0.040/0.006 ms
The output tells you that the “other host” (in this case merely the loopback inter-
face on
127.0.0.1
) can be reached reliably (no packets were lost).
BWhat about “
56(84) bytes of data
”? Easy: An IP datagram header with-
out options is 20 bytes long. Added to that is the header of an ICMP
ECHO
REQUEST
datagram at 8 bytes. This explains the difference between 56 and 84.
The magic number 56 results from the fact that
ping
normally ensures that
exactly 64 bytes of payload data are transmitted inside each IP datagram,
namely the 8-byte ICMP header and 56 bytes of “padding”. If “enough”
padding is available, namely at least the size of a
struct timeval
in C (eight
bytes or so),
ping
uses the start of the padding for a timestamp to measure
the packet round-trip time.
The next step should be to “ping” your network card interface. The output
there should look approximately like the other one.
BIf you have arrived here without running into error messages, chances are
that the basic networking functionality of your computer is working. The
remaining possible sources of trouble rest elsewhere in the network or else
farther up your computer’s protocol stack.
The next ping goes to the default gateway (or another host on the local net-
work). If this does not work at all, the network mask might be set up wrong (pos-
sibly on the other host!?). Other possibilities include hardware trouble, such as a
kink in the cable or a broken plug—which would also explain a connection that
sometimes works and sometimes doesn’t.
BThe common rectangular plugs for Ethernet cables are kept in place using
a plastic thingamajig which likes to break off, in which case contact is often
flaky to impossible.
B“Free-flying” cables are prone to accidents with sharp implements and do
not like being run over with office chairs. If you suspect that a cable is faulty
you can corroborate or deny that by exchanging it for a known-working one
or testing it using an Ethernet cable tester. Of course cables should really
be strung inside a proper conduit, on top of the false ceiling, or below the
raised floor.
Now you can continue pinging hosts outside your local network. If this works
this is a good sign; if you get no answers at all, you might be dealing with a rout-
ing problem or else an overzealous firewall that filters ICMP traffic à la
ping
at
least partly (which it shouldn’t, but some people do throw out the baby with the
bathwater).
ping
supports a great number of options that extend the testing possibilities
or change the way the program works. The most important options for the pur-
poses of testing are probably
-f
(flood ping) for quickly checking out intermittent
network problems, and
-s
to specify a size for the datagrams.

86 5 Network Troubleshooting
Table 5.1: Important
ping
options
Option Meaning
-a
Audible pings
-b
⟨network address⟩Broadcast ping
-c
⟨count⟩Number of datagrams to be sent (
ping
will exit
afterwards)
-f
“Flood ping”: A dot is output for every
ECHO
REQUEST
datagram sent, and a backspace charac-
ter for every
ECHO REPLY
received. The result is a
row of dots that tells you how many datagrams
have been dropped during transmission. If you
haven’t simultaneously specified the
-i
option,
ping
transmits at least 100 datagrams per second
(more if the network can handle more). Only
root
may do that, though; normal users are limited to
a minimum interval of 0.2 seconds.
-i
⟨time⟩Waits for ⟨time⟩seconds between sending two
datagrams. The default is one second, except
when flood pinging as
root
.
-I
⟨sender⟩Sets the sender address for the datagrams. The
⟨sender⟩may be an IP address or the name of an
interface (in which case the IP address of that in-
terface will be used).
-n
Display without DNS name resolution
-s
⟨size⟩Determines the size of the “padding” in bytes;
the default value is 56. Sometimes there are
problems with very large datagrams that must
be fragmented, and
ping
can help diagnose these
by means of this option. (Long ago it used to be
possible to crash computers using very large
ping
datagrams—the dreaded “ping of death”.)

5.4 Checking Routing Using
traceroute
And
tracepath
87
B
-a
can come in useful if you have to creep around under a table to find a
loose cable.
The corresponding command to test IPv6 is called
ping6
and is invoked in a
ping6
manner very similar to that of
ping
. You just need to take care to specify the inter-
face you want to use. Watch for the “
%eth0
” at the end of the IPv6 address:
$ping6 fe80::224:feff:fee4:1aa1%eth0
PING fe80::224:feff:fee4:1aa1%eth0(fe80::224:feff:fee4:1aa1)
56 data bytes
64 bytes from fe80::224:feff:fee4:1aa1: icmp_seq=1 ttl=64 time=3.65 ms
64 bytes from fe80::224:feff:fee4:1aa1: icmp_seq=2 ttl=64 time=4.30 ms
With link-local addresses, in particular, it is possible for several interfaces to use
the same address, and ambiguities must thus be avoided. Other than that, the
options of
ping6
correspond for the most part to those of
ping
.
Exercises
C5.1 [!2] Compare the packet round-trip times of a
ping
to
127.0.0.1
to those
of a
ping
to a remote host (another computer on the LAN or the default gate-
way/DSL router/…).
C5.2 [2] How long does your system take to send a million datagrams to itself
in flood-ping mode?
C5.3 [2] (If your local network supports IPv6.) Use
ping6
to check the connec-
tivity to any IPv6 routers on your LAN (multicast address
ff02::2
). What
answers do you receive?
5.4 Checking Routing Using
traceroute
And
tracepath
If you cannot reach a station outside your local network using
ping
, this could be
due to a routing problem. Programs like
traceroute
and
tracepath
help you pinpoint
these problems.
BThe typical case is that you can in fact reach all hosts on the local network but
none beyond. The usual suspects are your defaultroute on the one hand and
the host the default route points to on the other. Make sure that the output
of
route
(or “
ip route list
”) shows the correct default route. If a
ping
to the de-
fault gateway works but a
ping
to a host beyond the default gateway doesn’t,
then something may be wrong with the gateway. Check whether another
host can reach other hosts beyond the gateway, and whether your host is
reachable from the gateway. (Also keep in mind that the default router may
be running a packet filter that blocks ICMP.)
BA different sort of problem can arise if you are not connected directly to
the router that in turn connects you to the internet, but must go across a
different router. In that case it is possible that you can send
ping
datagrams
to the Internet router, but that its replies cannot reach you because it does not
have a route that will direct traffic for “your” network to the intermediate
router.
traceroute
is basically an extended form of
ping
. This does not merely check a
remote node for signs of life, but displays the route that datagrams take through
the network. It keeps track of the routers the datagram passes through and the
quality of the connection to the routers in question.

88 5 Network Troubleshooting
Unlike
ping
, this is not based on ICMP, but (traditionally) on UDP.
traceroute
sends three UDP datagrams to arbitrary ports on the destination node (one hopes
that not all three of these have servers listening on them). The first three data-
grams have a TTL of 1, the next three a TTL of 2, and so on. The first router on
the way to the destination decrements the TTL by 1. For the first round of data-
grams, which only had a TTL of 1in the first place, this means curtains—they
are dropped, and the sender gets an ICMP
TIME EXCEEDED
message, which (being
an IP datagram) contains the router’s IP address. The second three datagrams
are dropped by the second router and so on. That way you can follow the exact
route of the datagrams towards the destination. Of course, the destination node
itself doesn’t send
TIME EXCEEDED
but
PORT UNREACHABLE
, so
traceroute
can notice that it
is done.
The procedure looks roughly like this:
$traceroute www.linupfront.de
traceroute to www.linupfront.de (31.24.175.68), 30 hops max,
60 byte packets
1 fritz.box (192.168.178.1) 5.959 ms 5.952 ms 5.944 ms
2 217.0.119.34 (217.0.119.34) 28.889 ms 30.625 ms 32.575 ms
3 87.186.202.242 (87.186.202.242) 35.163 ms 36.961 ms 38.551 ms
4 217.239.48.134 (217.239.48.134) 41.413 ms 43.002 ms 44.908 ms
5 xe-11-0-1.fra29.ip4.gtt.net (141.136.101.233) 46.769 ms
49.231 ms 51.282 ms
6 xe-8-1-2.fra21.ip4.gtt.net (141.136.110.101) 53.412 ms
xe-0-2-3.fra21.ip4.gtt.net (89.149.129.37) 49.198 ms
xe-8-1-2.fra21.ip4.gtt.net (141.136.110.101) 52.314 ms
7 21cloud-gw.ip4.gtt.net (77.67.76.90) 52.547 ms 30.822 ms
30.018 ms
8 s0a.linupfront.de (31.24.175.68) 38.127 ms 38.406 ms 38.402 ms
The output consists of several numbered lines. One line corresponds to a group
of three datagrams. It shows the node sending the
TIME EXCEEDED
message as well
as the transmission time of the three datagrams.
BAsterisks in the output mean that there was no answer for one of the data-
grams within (usually) five seconds. That happens.
BMaybe you are wondering why the output finishes with
s0a.linupfront.de
even though we wanted to reach
www.linupfront.de
. This is not a problem;
the
www.linupfront.de
web site—together with a few other useful services—is
hosted on a machine we call
s0a.linupfront.de
, and that happens to be the
answer that DNS provides if you ask it for the name belonging to the IP
address,
31.24.175.68
.
AThe fact that IP networks use packet switching implies, theoretically, that
the output of
traceroute
is just a momentary snapshot. If you try it again,
the new datagrams might in principle take a completely different route to
the destination. However, this does not occur very often in practice.
The traditional technique based on UDP datagrams doesn’t work in all cases
today, as there are overzealous firewalls that drop datagrams addressed to “un-
likely” UDP ports. You can use the
-I
option to get
traceroute
to use ICMP instead
of UDP (it then works essentially like
ping
). If you need to deal with an especially
overzealous firewall that filters ICMP as well, you can use a TCP-based technique
by means of the
-T
option (short for “
-M tcp
”). This tries to address port 80 on the
destination node and recommends itself particularly if the destination node is a
web server. (You can request a different port by means of the
-p
option.)
BThe “TCP-based technique” does not actually open a connection to the
destination node and thus stays invisible to application programs there.
traceroute
also offers some other methods.

5.4 Checking Routing Using
traceroute
And
tracepath
89
BYou can use
traceroute
with IPv6 by giving the
-6
option. A convenient ab-
breviation for this is
traceroute6
. Everything else stays the same.
traceroute6
The
tracepath
program does basically the same thing as
traceroute
, but does not
tracepath
offer most of the tricky options and can be invoked by regular users (without
root
privileges). In addition, it determines the “path MTU” (of which more anon).
Here is some exemplary output produced by
tracepath
:
$tracepath www.linupfront.de
1?: [LOCALHOST] pmtu 1500
1: fritz.box 13.808ms
1: fritz.box 5.767ms
2: p5B0FFBB4.dip0.t-ipconnect.de 11.485ms pmtu 1492
2: 217.0.119.34 48.297ms
3: 87.186.202.242 46.817ms asymm 4
4: 217.239.48.134 48.607ms asymm 5
5: xe-11-0-1.fra29.ip4.gtt.net 47.635ms
6: xe-7-1-0.fra21.ip4.gtt.net 49.070ms asymm 5
7: 21cloud-gw.ip4.gtt.net 48.792ms asymm 6
8: s0a.linupfront.de 57.063ms reached
Resume: pmtu 1492 hops 8 back 7
Just like
traceroute
,
tracepath
outputs the addresses of all routers on the route to the
destination node. The remainder of the line shows the time the datagrams took
as well as additional iinformation; “
asymm 5
”, for example, means that the router’s
answer took 5 hops instead of the 4 hops of the request, but this information isn’t
always reliable.
This brings us to the “path MTU” problem, which can be explained as follows:
Fundamentally, IP allows datagrams of up to 65535 bytes, but not every medium
access scheme can actually transmit these datagrams in one piece. Ethernet, for
example, allows frames of at most 1518 bytes, including 14 bytes for the frame
header and 4 bytes for a checksum at the end of the frame. This means that an
Ethernet frame can carry at most 1500 bytes of payload, and if the IP layer above
wants to transmit a larger datagram, that datagram must be “fragmented”, that
is, split across several frames. We say that the “maximum transmission unit”, or
MTU, for Ethernet is 1500.
Of course the IP implementation of the sending node cannot foresee which
medium access schemes will be used on the way to the destination and whether
fragmentation will be necessary (and, if so, how large the fragments may be). This
only comes out when data are actually transmitted. Routers should really be han-
dling this transparently—if a datagram arrives at one end that is too big to be
sent out in its entirety at the other end, the router could fragment it—, but router
manufacturers like to shirk this resource-intensive work. Instead, datagrams are
typically sent with the “don’t fragment” bit in the header switched on, which for-
bids other routers to break them up further. If such a datagram arrives at a point
where it is too big for the next hop, the router in question uses ICMP to send a
“destination unreachable; fragmentation needed but forbidden; MTU would be
𝑛” message. In this case the sending node can try again using smaller fragments.
This method is called “path MTU discovery”.
The whole thing can still go gloriously wrong, namely if an overzealous firewall
along the way blocks ICMP traffic. In this case the error messages concerning the
required MTU never reach the sender of the datagrams, who consequently hasn’t
the faintest idea of what is going on. In practice this leads to web pages not being
displayed correctly, and/or connections that simply “hang”. The problem arises
most conspicuously where “Deutsche Telekom”-style ADSL is in use, since that
uses a protocol called “PPP over Ethernet” (PPPoE), which subtracts 8 bytes from
the usual 1500-byte Ethernet MTU for management purposes. The problems nor-
mally disappear if you set the MTU for the interface in question to 1492 manually.
The remote node then adheres to that value.
90 5 Network Troubleshooting
On Debian GNU/Linux (and Ubuntu) you can set the MTU for a statically
configured interface by adding a
mtu
clause to the interface definition in
/etc/
network/interfaces
:
iface eth0 inet static
mtu 1492
This value should then become effective the next time the interface is started.
If your interface is configured via DHCP and the DHCP server sends the
wrong MTU (which might happen), then you can remove the
interface-mtu
clause from the
request
entry in the
/etc/dhcp/dhclient.conf
file. This will
make Linux default to the standard value of 1500 during the next DHCP
negotiation. You can specify a different value explicitly using
iface eth0 inet dhcp
post-up /sbin/ifconfig eth0 mtu 1492
The alternative command
iface eth0 inet dhcp
post-up /sbin/ip link set dev eth0 mtu 1492
also works.
On the SUSE distributions you can set the MTU in the
ifcfg-
file corre-
sponding to the interface in question (there is an
MTU=
line). Alternatively
you can use the “
/etc/sysconfig
editor” offered by YaST, under “Hardware/
Network”. You then need to restart the network interface manually (using
ifdown
/
ifup
) or reboot the computer.
Like SUSE, the Red Hat distributions allow an MTU setting in the
ifcfg-
file
of the interface in question. Here, too, you need to restart the interface to
make the new setting effective.
If you’re using IPv6:
tracepath6
is to
tracepath
what
traceroute6
is to
traceroute
.
5.5 Checking Services With
netstat
And
nmap
If you would like to run a service but client hosts cannot connect to it, being re-
jected with error messages like
Unable to connect to remote host: Connection refused
you should ensure that the service actually “listens” for connections as it should.
You can do this, for example, with the
netstat
program:
$netstat -tul
Active Internet connections (only servers)
Proto Recv-Q Send-Q Local Address Foreign Address State
tcp 0 0 red.example.com:www *:* LISTEN
tcp 0 0 red.example.com:ftp *:* LISTEN
tcp 0 0 red.example.com:ssh *:* LISTEN

5.5 Checking Services With
netstat
And
nmap
91
The
-l
option causes
netstat
to display “listening” programs only. With the
-t
and
-u
options you can confine
netstat
’s output to TCP-based and UDP-based services,
respectively.
In the output, the columns have the following meanings:
Proto
The protocol (
tcp
,
udp
,
raw
, …) used by the socket.
Recv-Q
The number of bytes of data that have been received but not been picked
up by the application program.
Send-Q
The number of bytes sent out that have not yet been acknowledged by the
remote host.
Local Address
Local address and port number of the socket. An asterisk (“
*
”) in
this place for “listening” sockets means they are listening on all available
addresses, e. g., on
127.0.0.1
and the IP address of the Ethernet card.
Foreign Address
The address and port number of the socket on the remote host.
State
The state of the socket.
raw
sockets do not have states and
udp
sockets usually
not either. States defined for
tcp
sockets include the following:
ESTABLISHED
A connection is established.
SYN_SENT
The socket tries to establish a connection and has sent the first
packet of the three-way handshake, but not yet received a reply.
SYN_RECV
The socket (a “listening” one) has received and acknowledged a
connection request.
FIN_WAIT1
The socket is closed, the connection is in the process of being torn
down.
FIN_WAIT2
The connection is torn down and the socket waits for confirmation
from the remote host.
TIME_WAIT
After the connection has been torn down, the socket waits to pro-
cess packets that may still remain in the network.
CLOSE
The socket is not being used.
CLOSE_WAIT
The remote host has closed the connection and waits for the local
host to close it too.
LISTEN
The socket “listens” for incoming connections. Such sockets are only
displayed if you have specified the
-l
or
-a
options.
BWithout
-t
or
-u
,
netstat
, in addition to its TCP and UDP listings, outputs
information about active Unix domain sockets. These are largely uninter-
esting.
BIf you leave off the
-l
option, you get a list of active network connections
instead (those where your computer operates as a server as well as those
where it acts as the client).
If your service does not show up in the output of “
netstat -tul
”, this indicates
that the program in question isn’t running. If the service does occur in the list,
one possibility is that clients are rejected by a firewall configuration before they
even reach it. On the other hand, it is possible that the port in question is blocked
by another program which for some reason does not work correctly. In this case
you can use “
netstat -tulp
” to display the process ID and name of the the program
serving the port. This takes
root
privileges, however.
netstat
assumes that you have at least shell access, if not
root
privileges, on
the computer where you want to execute the program. But what about check-
ing “from outside” which ports are available on a host? There are solutions for
this, too. The
nmap
program is a port scanner which checks for open, filtered, and port scanner
unused TCP and UDP ports on a computer over the network. Of course the “com-
puter” can just as well be a firewall infrastructure, thus
nmap
can help you uncover
gaps in your security strategy.

92 5 Network Troubleshooting
B
nmap
is not automatically part of a Linux installation. You will probably have
to install it manually.
BThe scanning of computers that are not part of your immediate jurisdiction
can be a crime! (In some places—like Germany—, even owning “hacker”
tools like
nmap
can get you in trouble if you are unlucky and/or make some
bad moves.) Therefore do restrict yourself to computers where it is abun-
dantly clear that you are allowed to use
nmap
. For additional security, get
your client or sufficiently exalted boss to sign off on it in writing.
In the simplest case you give
nmap
the name or IP address of the computer to be
examined (be prepared for a certain delay):
#nmap blue.example.com
Starting Nmap 4.68 ( http://nmap.org ) at 2009-02-04 00:09 CET
Interesting ports on blue.example.com (172.16.79.2):
Not shown: 1710 closed ports
PORT STATE SERVICE
22/tcp open ssh
25/tcp open smtp
53/tcp open domain
80/tcp open http
443/tcp open https
MAC Address: 00:50:56:FE:05:04 (VMWare)
Nmap done: 1 IP address (1 host up) scanned in 9.751 seconds
nmap
considers ports “open” if a service can be reached. Ports for which the target
host returns an error message are marked “closed”, while ports where there is
no reaction at all (e. g., because the inquiry packets are simply thrown away by
the target host or a firewall, and not even an error message is sent in reply) are
designated “filtered”.
BIf you do not specify otherwise,
nmap
analyses the target host’s TCP ports
using a “SYN scan”. For each of the ports under consideration, the pro-
gram sends a TCP segment with the SYN flag set (as if it wanted to start a
new connection). If the target host answers with a TCP segment that has
the SYN and ACK flags set,
nmap
assumes that the port is in use. However,
it takes no further action (in particular, it does not acknowledge the seg-
ment), so the “half-open” connection is thrown out by the target host after
the statutory timeouts have occurred. If instead the target host answers with
a segment with the RST flag set, the port is “closed”. If after several tries
there is no answer or only ICMP unreachability messages, the port is set to
“filtered”.—SYN scans require
root
privileges.
BOther techniques that
nmap
offers include the “TCP connect scan” (which
does not require special privileges but is clumsy and easily recognised by
the target host), the “UDP scan” and several other variants of TCP-based
scans, e. g., to discover firewall rulesets. Consult the documentation in
nmap
(1).
B
nmap
can not only identify the active ports on a host, but can in many cases
even tell you which software is used to serve the ports. For this, you need
to specify the
-A
option and be very patient indeed. For this,
nmap
relies on a
database of “signatures” of diverse programs that comes with the software.
BThe features of
nmap
surpass by far what we can present in this training man-
ual. Read the documentation (in
nmap
(1)) and at all times be aware on the
legal restriction mentioned earlier.

5.6 Testing DNS With
host
And
dig
93
5.6 Testing DNS With
host
And
dig
If connections to hosts addressed by name take ages to set up or fail to be estab-
lished after some delay, while trying to make the same connection based on the
IP address is as quick as usual, the DNS may be to blame. Conversely, your com-
puter may take a long time to connect because the remote host tries to find a name
for your IP address and runs into some problem or other there. To test DNS, you
can, for instance, use the
host
and
dig
programs.
B“And what about
nslookup
?” we hear you say. Sorry, but
nslookup
has been
deprecated for a while and is only still supported for compassionate reasons.
host
is a very simple program, which in the most straightforward case accepts
a DNS name and outputs the IP address(es) that derive from it:
$host www.linupfront.de
www.linupfront.de is an alias for s0a.linupfront.de.
s0a.linupfront.de has address 31.24.175.68
And it also works the other way round:
$host 193.99.144.85
85.144.99.193.in-addr.arpa domain name pointer www.heise.de
(Don’t ask.)
You can compare the output of several DNS servers by specifying the IP ad-
dress (or the name, but the IP address is safer) as part of your query:
$host www.linupfront.de 127.0.0.1
Using domain server:
Name: 127.0.0.1
Address: 127.0.0.1#53
Aliases:
www.linupfront.de is an alias for s0a.linupfront.de.
s0a.linupfront.de has address 31.24.175.68
In this way you can check whether a DNS server gives the correct answers.
BYou can request particular types of DNS record by using the
-t
option, as in
$host -t mx linupfront.de
MX record desired
linupfront.de mail is handled by 10 s0a.linupfront.de
BWith
-l
you can obtain a list of the most important names in a domain—at
least if you’re allowed. Together with the
-a
option, this gives you a list of
all names.
The
dig
program does essentially what
host
does, but allows for more detailed
analysis. It provides more extensive output than
host
:
$dig www.linupfront.de
; <<>> DiG 9.9.5-10-Debian <<>> www.linupfront.de
;; global options: +cmd
;; Got answer:
;; ->>HEADER<<- opcode: QUERY, status: NOERROR, id: 1443
;; flags: qr rd ra; QUERY: 1, ANSWER: 2, AUTHORITY: 0, ADDITIONAL: 0

94 5 Network Troubleshooting
;; QUESTION SECTION:
;www.linupfront.de. IN A
;; ANSWER SECTION:
www.linupfront.de. 3600 IN CNAME s0a.linupfront.de.
s0a.linupfront.de. 3600 IN A 31.24.175.68
;; Query time: 51 msec
;; SERVER: 127.0.0.1#53(127.0.0.1)
;; WHEN: Wed Jul 22 18:00:34 CEST 2015
;; MSG SIZE rcvd: 69
To resolve IP addresses into names, you must specify the
-x
option:
$dig -x 31.24.175.68
; <<>> DiG 9.9.5-10-Debian <<>> -x 31.24.175.68
;; global options: +cmd
;; Got answer:
;; ->>HEADER<<- opcode: QUERY, status: NOERROR, id: 63823
;; flags: qr rd ra; QUERY: 1, ANSWER: 1, AUTHORITY: 0, ADDITIONAL: 0
;; QUESTION SECTION:
;68.175.24.31.in-addr.arpa. IN PTR
;; ANSWER SECTION:
68.175.24.31.in-addr.arpa. 86400 IN PTR s0a.linupfront.de.
;; Query time: 50 msec
;; SERVER: 127.0.0.1#53(127.0.0.1)
;; WHEN: Wed Jul 22 18:01:31 CEST 2015
;; MSG SIZE rcvd: 74
To query a specific DNS server, give its address after a
@
:
$dig www.linupfront.de @192.168.20.254
BYou can specify a DNS record type after the name you’re looking for:
$dig linupfront.de mx
; <<>> DiG 9.9.5-10-Debian <<>> linupfront.de mx
;; global options: +cmd
;; Got answer:
;; ->>HEADER<<- opcode: QUERY, status: NOERROR, id: 15641
;; flags: qr rd ra; QUERY: 1, ANSWER: 1, AUTHORITY: 0, ADDITIONAL: 0
;; QUESTION SECTION:
;linupfront.de. IN MX
;; ANSWER SECTION:
linupfront.de. 3600 IN MX 10 s0a.linupfront.de.
;; Query time: 49 msec
;; SERVER: 127.0.0.1#53(127.0.0.1)
;; WHEN: Wed Jul 22 17:59:36 CEST 2015
;; MSG SIZE rcvd: 51

5.7 Other Useful Tools For Diagnosis 95
In principle, you can also use the
getent
command to test name resolution:
getent
$getent hosts www.linupfront.de
31.24.175.68 s0a.linupfront.de www.linupfront.de
The difference between
host
and
dig
on the one side and
getent
on the other side
is that the former two query the DNS directly. The latter command, however,
queries the C library. This means on the one hand that the lookup order given in
/etc/nsswitch.conf
is obeyed. On the other hand you will receive the answer in the
form that you would otherwise encounter in
/etc/hosts
.
BIn
/etc/nsswitch.conf
there is usually a line like
hosts: files dns
This means that
/etc/hosts
will be looked at first, then DNS. The advantage is
that you get to see exactly what application programs using the C library get
to see. For example, for some reason there might be a definition in
/etc/hosts
for some name, which then has precedence over the DNS (because the DNS
will no longer be consulted after a match in
/etc/hosts
).
BFrom other
getent
applications, you may be used to something like
$getent passwd
giving you a list of all users known to the system, in
/etc/passwd
format, even
if the users aren’t all listed in the local password file. This may work for
users but doesn’t have to (if you are working in a large enterprise, your user
database administrators may have prevented this). For DNS, a command
like
$getent hosts
will definitely not lead to all names in the worldwide DNS being listed.
(Which is probably for the best, all things considered.)
DNS is a very intricate topic with ample room for mistakes. However, the
detailed diagnosis of DNS problems requires considerable knowledge. DNS is
treated in detail in the Linup Front training manual, The Domain Name System.
5.7 Other Useful Tools For Diagnosis
5.7.1
telnet
and
netcat
The
telnet
command is used to log on to a remote host using the TELNET pro-
tocol or—more generally—to contact an arbitrary TCP port. TELNET should no
longer be used for remote access, as no strong authentication is used and data is
transmitted in the clear (without encryption). The Secure Shell (
ssh
, chapter 10) is
a reasonable alternative.
The
telnet
client program, however, is very suitable to test many other ser-
vices. With “
telnet
⟨address⟩ ⟨service⟩
''
, a connection to any port can be estab-
lished (“⟨service⟩” is either a port number or a service name from “
/etc/services
”).
Therefore “
telnet 192.168.0.100 80
” opens a connection to a web server. In this
case it would even be possible to request resources from the server using suitable
HTTP commands. Here’s a different example:

96 5 Network Troubleshooting
$telnet 192.168.0.1 22
Trying 192.168.0.1...
Connected to 192.168.0.1.
Escape character is ']̂'.
SSH-2.0-OpenSSH_6.7p1 Debian-6
In this case,
telnet
connects to the SSH port on a remote host, the remote
sshd
answers with its protocol and program version.
BThe “escape character” lets you take a “time-out” from the TCP connection
in order to enter
telnet
commands. The most interesting commands are
probably
close
(terminates the connection),
status
(displays the connection
status), and
!
(can be used to execute commands on the local computer
while the connection is ongoing):
$telnet 192.168.0.1 22
Trying 192.168.0.1...
Connected to 192.168.0.1.
Escape character is ']̂'.
SSH-2.0-OpenSSH_6.7p1 Debian-6
Ctrl
+
Esc
telnet> status
Connected to 192.168.0.1.
Operating in obsolete linemode
Local character echo
Escape character is ']̂'.
_
BThe “
!
” command may be deactivated in your copy of
telnet
. In that case
you can still suspend the
telnet
program to the background using the
z
com-
mand (think “shell job control”), and reactivate it again later with the shell’s
fg
command.
An alternative to the TELNET client,
telnet
, is the
netcat
program. In the sim-
plest case,
netcat
behaves like
telnet
(even though it is much less chatty):
$netcat 192.168.0.1 22
SSH-2.0-OpenSSH_6.7p1 Debian-6
BThe command is frequently called
nc
instead of (or in addition to)
netcat
.
The rest stays the same, though.
BThere are two popular versions of
netcat
in circulation, a “traditional” ver-
sion (by somebody called “Hobbit”) and one from the OpenBSD system.
The latter has many more features (such as support for IPv6 or Unix do-
main sockets). For the rest of this section we are assuming the OpenBSD
netcat
.
On Debian GNU/Linux, the default
netcat
is the traditional version (from
the
netcat-traditional
package). If you want to use the souped-up version,
you need to install the
netcat-openbsd
package. The OpenBSD
netcat
installs
itself under the
nc
name only; the traditional version remains accessible as
netcat
unless you deinstall that package.
In addition to the client side of a TCP connection,
netcat
also implements the
server side if desired (it doesn’t do anything particularly useful by itself, though).
For example, you can make it listen to a connection on port 4711 using the

5.7 Other Useful Tools For Diagnosis 97
$nc -l 4711
command. You can then, in a different window, use
$nc localhost 4711
to connect to your “server”. Whatever you type on the client side appears on the
server and vice-versa. The poor person’s file transfer works as follows: On the poor person’s file transfer
target host, type
$nc -l 4711 >myfile
and on the source host, type
$nc red.example.com 4711 <myfile
5.7.2
tcpdump
The
tcpdump
program is a network sniffer which analyses the packets moving network sniffer
through a network interface. The network adapter is switched to “promiscuous
mode”, where it reads and reports all packets (and not, as usual, only those ad-
dressed to the local interface). Therefore the command can only be used by the
root
user.
Here is a brief example of its use:
#tcpdump -ni eth0
tcpdump: listening on eth0
14:26:37.292993 arp who-has 192.168.0.100 tell 192.168.0.1
14:26:37.293281 arp reply 192.168.0.100 is-at 00:A0:24:56:E3:75
14:26:37.293311 192.168.0.1.35993 > 192.168.0.100.21: S 140265170:
140265170(0) ...
14:26:37.293617 192.168.0.100.21 > 192.168.0.1.35993: S 135130228:
135130228(0) ack 140265171 ...
14:26:37.293722 192.168.0.1.35993 > 192.168.0.100.21: . ack 1 ...
Program interrupted
5 packets received by filter
0 packets dropped by kernel
This example shows how a connection to an FTP server is assembled. The “
-ni
eth0
” parameters switch off DNS and port name resolution and involve the
eth0
interface only. For each packet, the program displays the exact time, source and
destination hosts, any flags in the TCP header (S:
SYN
bit), the sequence number of
the data, a possibly-set
ACK
bit, the expected sequence number of the next segment,
and so on.
The first packet shown here does not contain a destination address, it is an
ARP query: The computer with the
192.168.0.100
address is asked for its MAC
address—which it presents in the second packet. The next few packets show a
typical three-way handshake.
5.7.3
wireshark
wireshark
is a network sniffer like
tcpdump
. However,
wireshark
comes with a much
more impressive feature set. It is a GUI program which allows for detailed analy-
sis of all network packets. Its output consists of three window panes: The topmost
displays incoming packets, the bottommost decodes the data in hexadecimal nota-
tion, and the center pane allows the convenient and detailed dissection of header
information (and payload data).

98 5 Network Troubleshooting
Like
nmap
,
wireshark
is not a standard Unix tool and usually needs to be installed
specifically. Both
tcpdump
and
wireshark
must be used with care, since it is easy to
break existing law even within a LAN. After all, there might be data displayed
which are nobody’s business.
BUntil some years ago, the
wireshark
program was called
ethereal
and may
conceivably be found under this name on older machines.
Commands in this Chapter
getent
Gets entries from administrative databases
getent
(1) 94
host
Searches for information in the DNS
host
(1) 93
nmap
Network port scanner, analyses open ports on hosts
nmap
(1) 91
ping
Checks basic network connectivity using ICMP
ping
(8) 84
ping6
Checks basic network connectivity (for IPv6)
ping
(8) 85
tcpdump
Network sniffer, reads and analyzes network traffic
tcpdump
(1) 97
telnet
Opens connections to arbitrary TCP services, in particular TELNET (re-
mote access)
telnet
(1) 95
tracepath
Traces path to a network host, including path MTU discovery
tracepath
(8) 89
tracepath6
Equivalent to
tracepath
, but for IPv6
tracepath
(8) 90
traceroute
Analyses TCP/IP routing to a different host
traceroute
(8) 87
Summary
• Programs like
netstat
,
telnet
,
nmap
,
tcpdump
or
wireshark
provide powerful tools
to diagnose problems with network services.

$ echo tux
tux
$ ls
hallo.c
hallo.o
$ /bin/su -
Password:
6
inetd
and
xinetd
Contents
6.1 Offering Network Services with
inetd
.............100
6.1.1 Overview . . . . . . . . . . . . . . . . . . . . 100
6.1.2
inetd
Configuration . . . . . . . . . . . . . . . . . 100
6.2 The TCP Wrapper—
tcpd
.................101
6.3
xinetd
........................104
6.3.1 Overview . . . . . . . . . . . . . . . . . . . . 104
6.3.2
xinetd
Configuration. . . . . . . . . . . . . . . . . 104
6.3.3 Launching
xinetd
..................105
6.3.4 Parallel Processing of Requests . . . . . . . . . . . . . 106
6.3.5 Replacing
inetd
by
xinetd
...............106
Goals
• Knowing how services can be started using
inetd
and
xinetd
• Controlling access using the TCP wrapper and
xinetd
Prerequisites
• Knowledge about Linux system administration
• Knowledge about TCP/IP fundamentals (Chapter 3)
• Knowledge about Linux network configuration (chapter 4)
adm2-inetd.tex
(
0cd20ee1646f650c
)

100 6
inetd
and
xinetd
6.1 Offering Network Services with
inetd
6.1.1 Overview
A Linux system as a network server can offer a wealth of services—TELNET, FTP,
POP3, IMAP, … Each of these services is accessed by means of a specific TCP or
UDP port. There are basically two methods of offering such a service: One is by
running a specialised process (a daemon) that listens to connections to the port in
question. A web server, for example, accepts and processes connections to TCP
port 80, while a DNS server takes charge of UDP port 53.
Another possibility is to delegate listening to many ports to a program that
will, if a connection comes in on any of these ports, start another program that will
perform the actual service. The
inetd
, or “Internet daemon”, is such a program.
Why would you want to use a program like
inetd
? There are some obvious
advantages:
• Many services are very seldom used. However, a specialised daemon for
such a service would tie up system resources even when the service is not
in use (if only swap space). On current machines this is less of a problem
than it used to be, but the principle stays the same.
• The development of simple network services is simplified radically. While
you need considerable expertise to write free-standing daemons that adhere
to all the rules and, for example, do not gobble up all the free memory in
the computer over time, with
inetd
-based services you can confine yourself
to reading from standard input and writing to standard output.
inetd
takes
care of passing data sent by the remoteclient to the server on standard input,
and routes its standard output back to the client. This does not at all involve
network programming in the proper sense of the word. Also, your server
will terminate after the session and free all of its resources.
inetd
also (or particularly) lends itself to implementing services involving long-
lived “sessions” such as FTP or SMTP (on less frequented hosts). This makes it
possible to amortise the cost of starting the serving process over a longer period
of time. It would be an exceedingly stupid idea to run, say, a web server via
inetd
,
since the cost of starting and initialising the complete HTTP server for every single
HTTP request bears no relation to the actual work to be done.
6.1.2
inetd
Configuration
inetd
’s configuration settings are contained in the
/etc/inetd.conf
file. Every line of
the configuration file that is not either empty or a comment describes one service.
A line might, for example, look like this:
ftp stream tcp nowait root /usr/sbin/ftpd ftpd
The first word on the line identifes the service by name or port number; a serviceservice name
name must correspond to an entry in the
/etc/services
file which gives the port
number assigned to the service. The second entry on the line specifies the socketsocket type
type used by the service. Possible values include
stream
(like here),
dgram
,
raw
,
rdm
,
and
seqpacket
. In practice, you are only likely to encounter
stream
and
dgram
.
Next there is the protocol to be used to access the service. Protocol names mustprotocol
be defined in the
/etc/protocols
file. Typical values include
tcp
or
udp
, where
stream
in the preceding column rather forces
tcp
. The same applies to
dgram
and
udp
.
The fourth field contains either
wait
or
nowait
. This entry controls how
dgram
parallelism
sockets (a. k. a. UDP) are used; for other socket types,
nowait
should be specified.
wait
implies that once a service is accessed, the port in question is considered “oc-
cupied” until the incoming request has been completely taken care of. Only after
that can new requests be considered.
nowait
means that the port is freed immedi-
ately, so that new requests can be handled at once.

6.2 The TCP Wrapper—
tcpd
101
BInstead of just
nowait
, you can also put
nowait.
𝑛, where the integer 𝑛speci-
fies the maximum number of server processes that
inetd
will create within
60 seconds. If .𝑛 is omitted, a default value of 40 applies.
The next entry gives the user name with whose permissions the service is to user name
run, while the remainder of the line specifies the command to start the service command
including any parameters. The first “word” is the name of the program file to
be executed, and the second a string that is to be passed to the process in ques-
tion as the “program name”. Only then do the usual command line parameters
start. Hence, in the example above, the word
ftpd
is not the
/usr/sbin/ftpd
com-
mand’s first parameter, but the name of the process whose code is taken from
/usr/sbin/ftpd
! In other words: The program file
/usr/sbin/ftpd
is executed without
parameters, but the resulting FTP server process thinks its name was
ftpd
rather
than
/usr/sbin/ftpd
.
It is easy to add services to
inetd
’s configuration or remove them again—you Adding services
just need to come up with a suitable line for the
inetd.conf
file. Existing services can
easily be removed by “commenting out” the lines in question with a “
#
” character Removing services
in the first column.
After any changes to the
inetd
configuration file, you need to tell
inetd
to reread reread configuration
its configuration by sending it a
SIGHUP
signal. With most distributions, this is
conveniently done by invoking
inetd
’s init script with the
reload
parameter.
Exercises
C6.1 [!1] Enable the
echo
service within
inetd.conf
and reload the configura-
tion. Check the service using the “
telnet localhost echo
” command.
C6.2 [2] Why does an FTP server lend itself better to being invoked by
inetd
than a WWW server?
C6.3 [3] (For programmers.) Write and install a service implementing Julius
Caesar’s cipher: Every letter is replaced by the letter 3 positions on in the
alphabet, thus
A
by
D
,
B
by
E
, and so on. Replace
X
by
A
,
Y
by
B
, and
Z
by
C
:
$telnet localhost caesar
Trying 127.0.0.1...
Connected to linux.example.com.
Escape character is '^]'.
GALLIA OMNIS DIVISA EST IN PARTES TRES
JDOOLD RPQLV GLYLVD HVW LQ SDUWHV WUHV
Ctrl
+
]
telnet> close
Connection closed.
For simplicity, you may restrict yourself to encrypting the 26 uppercase let-
ters and pass all other characters through verbatim. Test your solution using
telnet
.
6.2 The TCP Wrapper—
tcpd
One problem with
inetd
consists of intruders trying to access services. Every ser-
vice ought to check its own requests to find which ones considers acceptable and
which ones to refuse. Since many of today’s services do not feature this type of ac- access control
cess control, a central service was created to make it available to all services. This is
the “TCP wrapper”,
tcpd
. If a service is accessed,
inetd
first starts the TCP wrapper
instead of the actual service. The TCP wrapper logs the connection attempt using
syslog
. After that, it checks (by means of the
/etc/hosts.allow
and
/etc/hosts.deny
files) whether the client host is allowed to use the service in question.

102 6
inetd
and
xinetd
Table 6.1: Text substitutions in command entries in
/etc/hosts.allow
and
/etc/hosts.deny
Key Meaning
%a
The client’s IP address
%c
“Client information”: As much information as the client will provide, for example ⟨user⟩
@
⟨host⟩,
⟨user⟩
@
⟨address⟩,⟨host⟩oder ⟨address⟩
%d
The name of the desired service
%h
The client’s name (or its IP address, if the name cannot be determined)
%n
The client’s name (or
unknown
or
paranoid
, if the actual name cannot be determined)
%p
The spawned process’s PID
%s
“Server information”: ⟨service⟩
@
⟨host⟩,⟨service⟩
@
⟨address⟩or simply ⟨service⟩
%u
The client-side user name or
unknown
%%
A single percent sign
tcpd
first checks
/etc/hosts.allow
for an entry explicitly whitelisting the current
/etc/hosts.allow
attempt. If there is one, access is granted. Otherwise, it searches the
/etc/hosts.deny/etc/hosts.deny
file for an entry forbidding the current attempt. If there is one, access is refused.
Otherwise it is finally granted. If either
/etc/hosts.allow
or
/etc/hosts.deny
do not
exist at all, they are considered empty.
BThe usual and probably “more secure” philosophy would be to deny all
access that is not explicitly permitted. However this does not agree with
the idea that an unconfigured TCP wrapper should behave as if it wasn’t
present at all.
The
/etc/hosts.allow
and
/etc/hosts.deny
files look substantially the same. Ba-
sically, entries in these files consist of fields separated by colons and look rougly
like
pop3d : 192.168.10.0/24
The first entry contains the name of a daemon to be started (the second field fromdaemon name
the command in
/etc/inetd.conf
) or a number of daemon names separated by com-
mas.
BIf the entry is supposed to apply to all programs, then put the
ALL
keyword;
if it is supposed to apply to all but a few programs, then put “
ALL EXCEPT …
”
(again with a comma-separated list of daemon names).
The second field gives the hosts the entry should apply to. In the simplest case
this is a host’s name or IP address. Here, too,
ALL
stands for all possible clients.
There are also the keywords
KNOWN
(all hosts whose names
tcpd
can determine from
their IP address),
LOCAL
(all hosts whose names do not contain a dot),
UNKNOWN
(all
hosts whose names
tcpd
cannot determine from their IP address), and
PARANOID
(all
hosts whose name and address resolution via DNS gives conflicting answers).
Complete IP networks can be specified by means of their network address and
mask.
Therefore, the line in the example allows or forbids all stations on the
192.168.
10.0/24
network from accessing the POP3 daemon, depending on whether it oc-
curs in
/etc/hosts.allow
or
/etc/hosts.deny
.
After the client specification there may be more comma-separated fields giving
options for processing the connection, likeoptions
ALL: ALL: spawn echo "Access by %u@%h to %d" >>/var/log/net.log
You can use
spawn
to specify a shell command that is executed in a child process.
That command’s standard input, output, and error output are connected to
/dev/

6.2 The TCP Wrapper—
tcpd
103
null
so the input and output of the actual command (specified in
/etc/inetd.conf
)
are not interfered with. Before the command is executed, “
%
” expressions in the
command string will be replaced according to the connection request; the possible
replacements are given in table 6.1. In our example, information on the attempted
access is logged to the
/var/log/net.log
file.
Here are some more options for access rules:
twist
(followed bya shell command) replaces the current process by the command
(again after replacing “
%
” expressions), where standard input, output, and
error output will be connected to the remote client. This allows you to “take
over” a connection.
in.ftpd : 10.0.0.0/8 : twist /bin/echo 421 Go away.
rejects incoming FTP connections from the
10.0.0.0/8
network with the spec-
ified message without having to trouble the FTP server. This option must
be placed at the end of an entry.
allow
and
deny
accept or refuse a connection request, no matter what file the entry
occurs in. This makes it possible to keep all of the configuration in
/etc/
hosts.allow
(for example) instead of distributing it across both files. These
options must be placed at the end of an entry.
umask
corresponds to the
umask
command of the shell.
setenv
sets an environment variable (including “
%
” replacement), as in
in.ftpd : 10.0.0.0/8 : setenv HOME /tmp
Do note, however, that many daemons “sanitise” their environment and re-
move entries that look strange to them.
user
sets the user or the user and group for the process:
user nobody
Set user to
nobody
user nobody.nogroup
Set user to
nobody
, group
nogroup
This is useful because
inetd
will otherwise execute all daemons as
root
.
banners
(followed by a directory name) (Only for TCP services.) Checks whether
the specified directory contains a file named like the daemon process in
question, and, if so, copies that file’s content to the client. “
%
” expressions
will be replaced.
BAs a matter of fact, this is the “extended” command language of the TCP
wrapper as per
host_options
(5). The standard version (which you are not
going to run into on Linux) confines itself to allowing a shell command as
the third field of an entry. It is documented in
host_access
(5).
Since
inetd
, together with
tcpd
, does not start the actual service when a con-
nection is attempted, but merely invokes the wrapper with a suitable set of argu-
ments, entries in the
/etc/inetd.conf
file look somewhat different in this case.
ftp stream tcp nowait root /usr/sbin/tcpd ftpd -l -a
This means that, in fact, the
/usr/sbin/tcpd
program (the TCP wrapper) is invoked
but it is passed “
ftpd -l -a
” as the command line. Here,
ftpd
is the command name
from the point of view of
tcpd
, which it uses to locate the actual command—the
FTP server—to be started when access is granted. The same name is used to find
corresponding entries (if any) in
/etc/hosts.allow
and
/etc/hosts.deny
.
BNowadays many files are linked to
libwrap
directly, which is the part of
tcpd
that does the actual work. These programs do not need to be launched via
inetd
and
tcp
to benefit of the TCP wrapper’s access control features.

104 6
inetd
and
xinetd
Exercises
C6.4 [!2] The configuration line
ps stream tcp nowait root /bin/ps ps auxw
defines a service that produces a process list when the
ps
port (freely in-
vented) is accessed. Use the TCP wrapper to limit access to this service to
the local host.
C6.5 [2] Cause a message to be written to the
syslog
when the service from
Exercise 6.4 is accessed—for example, using the
local0
category and
info
priority.
6.3
xinetd
6.3.1 Overview
Some modern distributions include a possible replacement for the
inetd
-
tcpd
com-
bination,
xinetd
(extended Internet daemon).
xinetd
brings together all features—extended Internet daemon
port supervision, access control, and logging—and uses a single centralised con-
figuration file.
6.3.2
xinetd
Configuration
xinetd
’s configuration file is usually called
/etc/xinetd.conf
. In this file, blank lines
/etc/xinetd.conf
or lines beginning with a “
#
” character are ignored. The configuration settings are
collected in sections, every one of which begins with a keyword corresponding tosections
a service name from
/etc/services
, and which contains assignments of values to
attributes, like
default
{
⟨attribute⟩ ⟨operator⟩ ⟨parameter⟩ [⟨parameter⟩
…
]
…
}
service
⟨service name⟩
{
⟨attribute⟩ ⟨operator⟩ ⟨parameter⟩ [⟨parameter⟩
…
]
…
}
In practice, the most important operator is “
=
”, which assigns a specific set of val-
ues to an attribute. Attributes that can have several values at once also support the
“
+=
” and “
-=
” operators to add or remove values. The “
default
” section contains
default settings that apply to all services as long as their sections do not containdefault settings
more specific values. If they do, the default values are either replaced by or com-
bined with the more specific ones. Each additional section gives more detailed in-specific sections
formation for a specific service. Table 6.2 shows some important attributes.—The
exact syntax as well as more attributes may be found in the documentation for the
xinetd.conf
file. A
/etc/xinetd.conf
file might, for example, look like this:
defaults
{
log_type = FILE /var/log/xinetd.log
log_on_success = HOST EXIT DURATION
log_on_failure = HOST ATTEMPT RECORD

6.3
xinetd
105
Table 6.2: Attributes in the
/etc/xinetd.conf
file
Attribute Meaning
type
Allows specifications like
INTERNAL
(i. e., the service is implemented by
xinetd
directly), or
UNLISTED
(i. e., the service has no entry in
/etc/services
).
socket_type
Includes values like
stream
,
dgram
or
raw
.
protocol
The protocol used by the service, must be in
/etc/protocols
.
wait
If
yes
, it is a single-threaded service;
no
allows
xinetd
to start the service several times simul-
taneously.
user
The user whose privileges are used to execute the service; this must be a valid system user.
instances
Maximum number of simultaneous instances of the service (if “
wait = no
”)
server
File name of the actual server program
server_args
Invocation parameters for the server program
interface
IP address for the interface used by
xinetd
to listen for service requests
only_from
Only the specified clients (as DNS names, IP addresses or network addresses) may access the
service.
no_access
These clients may not access the service.
access_times
The service is only available at the given times.
log_type
Determines the type of logging done by
xinetd
—
SYSLOG
or
FILE
.
log_on_success
Determines what information to log on a successful connection attempt, e. g.,
HOST
(the client’s
name),
USERID
(the client user according to [RFC1413]) etc.
log_on_failure
Defines what information to log on an unsuccessful connection attempt, such as
ATTEMPT
(the
failed attempt) etc.
disable
Deactivates the service (corresponds to “commenting out” a line in
/etc/inetd.conf
)
disabled
Can be set in the
defaults
section to disable a number of services, such as “
disabled finger ftp
”
instances = 2
}
service telnet
{
socket_type = stream
protocol = tcp
wait = no
user = root
server = /usr/sbin/in.telnetd
server_args = -n
only_from = localhost
no_access =
}
First, this example sets up default values for some attributes. Afterwards, some
more specific definitions for the
telnet
service are given. The set of attributes al-
lowable in a section depends on the service to be configured.
On SUSE distributions, the
/etc/xinetd.conf
file often merely contains the
defaults
section. Another line containing “
includedir /etc/xinetd.d
” causes
all the files in the
/etc/xinetd.d
directory to be read as if they were part of
/etc/xinetd.d
the
/etc/xinetd.conf
file. These files then contain the configurations for indi-
vidual services.
6.3.3 Launching
xinetd
xinetd
can be passed a number of options controlling the way it works: options
-syslog
⟨category⟩Causes
xinetd
to send its log messages to the
syslog
daemon
within the given ⟨category⟩. Possible categories include
daemon
,
auth
,
user
, and

106 6
inetd
and
xinetd
Table 6.3:
xinetd
and signals
Signal Effect
SIGHUP
Causes a “hard reconfiguration”:
xinetd
rereads its configuration file
and terminates the servers which are no longer enabled in the new
configuration. For all other servers, access control is redone and all
connections that do not pass are reset. If there are more connections
to a service than allowed by
instances
, a random set of servers is ter-
minated until the limit is observed again.
SIGQUIT
Terminates
xinetd
SIGTERM
Terminates all active services, then
xinetd
SIGUSR1
Creates a memory dump in file
/var/run/xinetd.dump
SIGIOT
Causes
xinetd
to perform an internal consistency check in order to en-
sure that its data structures have not been damaged
the eight categories
local0
to
local7
.
-filelog
⟨file⟩Determines the file name used by
xinetd
to write its log messages
to. This option and the
-syslog
are mutually exclusive.
-f
⟨file⟩Causes
xinetd
to read ⟨file⟩as its configuration file. The default value is
/etc/xinetd.conf
.
-inetd_compat
Causes
xinetd
to read
inetd
’s configuration file,
/etc/inetd.conf
, in ad-
dition to its own configuration file.
To start
xinetd
using these parameters, you should (on a SUSE distribution) extend
the
XINETD_BIN
variable in the
/etc/init.d/xinetd
script by the desired options (the
variable’s value will have to be enclosed in quotes).
It is also possible to control
xinetd
by means of signals. The most important
signals and their effects are summarised in Table 6.3.
6.3.4 Parallel Processing of Requests
Services started by
xinetd
can be subdivided in two groups (see the
wait
and
instances
attributes). If a new process is started for each access to the service,
the service is called “multithreaded”. If a service only accepts a new request
after the preceding one has been finished, the service is called “single-threaded”.
Datagram-based services (i. e., those based on UDP) are frequently single-threaded,
while TCP-based services are always multithreaded.
6.3.5 Replacing
inetd
by
xinetd
There is nothing that prevents you from using
inetd
and
xinetd
in parallel on the
same system (other than that the distribution’s package management system may
balk at the idea). You should, however, ensure that the two do not try to manage
the same ports!
If you want to replace an existing
inetd
by
xinetd
on a system, you can use some
tools that make
inetd
’s configuration usable for
xinetd
. By default, the
xinetd
pack-tools
age contains the
itox
program. Using the
# itox </etc/inetd.conf >/etc/xinetd.conf
command, you can create a
xinetd
configuration file from your
inetd
configuration
file. It is important to note that only enabled services will be taken over into the
new configuration file. If you want to keep all entries in your old file, you should
activate them first (by un-commenting them) and then disable them again in the
new file.

6.3 Bibliography 107
Exercises
C6.6 [!2] Enable the
echo
service in
xinetd.conf
(or the corresponding file in
/etc/xinetd.d
) and reload the configuration. Check the service using the
“
telnet localhost echo
” command.
C6.7 [3] Define a
ps
service along the lines of Exercise 6.4 and restrict access
to this service to local processes.
C6.8 [2] Configure
xinetd
such that the
ps
service is only available on the loop-
back interface (
127.0.0.1
).
C6.9 [3] Which of the two methods to limit a service to the local host—TCP
wrappers or binding to
127.0.0.1
—is preferable?
Commands in this Chapter
inetd
Internet superserver, supervises ports and starts services
inetd
(8) 100
tcpd
“TCP wrapper”, permits or denies access depending on the client’s IP
address
tcpd
(8) 101
xinetd
Improved Internet super server, supervises ports and starts services
xinetd
(8) 104
Summary
•
inetd
observes the ports for a set of services whose serving processes need
only be started on request, instead of having to run in the background at all
times.
•
inetd
is configured by means of the
/etc/inetd.conf
file.
• The TCP wrapper,
tcpd
, can limit access to specific network services to spe-
cific computers.
•
xinetd
is a more modern implementation of
inetd
’s and
tcpd
’s functionality—
port supervision, access control, and logging.
Bibliography
RFC1413 M. St. Johns. “Identification Protocol”, February 1993.
http://www.ietf.org/rfc/rfc1413.txt

$ echo tux
tux
$ ls
hallo.c
hallo.o
$ /bin/su -
Password:
7
Network services with systemd
Contents
7.1 Introductory Remarks . . . . . . . . . . . . . . . . . . 110
7.2 Persistent Network Services . . . . . . . . . . . . . . . . 110
7.3 Socket Activation . . . . . . . . . . . . . . . . . . . . 112
Goals
• Understanding the activation of persistent services using systemd
• Understanding socket activation for services based on systemd
• Being able to integrate network services into systemd targets
Prerequisites
• Linux system administration knowledge
• Knowledge about TCP/IP basics (chapter 3)
• Knowledge about Linux network configuration (Chapter 4)
• Knowledge about systemd
adm2-systemd.tex
(
0cd20ee1646f650c
)

110 7 Network services with systemd
7.1 Introductory Remarks
Systemd is now a very popular alternative to the traditional System-V init system.
For this reason it makes sense to explain about network services with systemd.
BA more complete introduction to systemd may be found in the Linup Front
training manual, Linux Administration I (ADM1).
As far as network services are concerned, we may distinguish between “persis-
tent” services which are started when the system is booted, and services that are
started on demand by means of socket activation. The former correspond to ser-
vices that on System-V init are typically started using init scripts, while the latter
correspond to services managed by
inetd
or
xinetd
.
7.2 Persistent Network Services
From systemd’s point of view, persistent network services do not differ greatly
from other persistent services that are started and managed by systemd. They take
care of their own network connections, and systemd has nothing to do with them.
Systemd’s only job consists of starting the service at the correct time (like System-V
init would) and potentially keeping an eye on the service in case it crashes before
its time (which System-V wouldn’t do, at least not unless you have installed addi-
tional software that manages this.)
You therefore need to provide a unit file for your service and make this known
to systemd (using “
systemctl enable
”). After that, everything should happen auto-
matically. You can of course elect to manage the service manually using “
systemctl
start
” and friends.
BIf you don’t have a unit file for your service, but do have an init file for
System-V init, you can use this with impunity—after all, systemd is com-
patible.
Many services expect to be started “when the network is available”. The prob-
lem with this is that this is a very vague concept. Will it be enough if at least one
network interface is up and has an IP address? Do other hosts need to be actually
reachable? The standard gateway? The DNS server? Google? What about WLAN
or cellular interfaces that are sometimes active and sometimes aren’t? One of the
shortcomings of System-V init is that this complexity is completely swept under
the rug—the init script for “the network” is executed, and then we postulate that
the computer is networked and that that will not change until it is shut down
again.
Systemd uses three different targets to handle the “network is available” con-
cept:
network-pre.target
is a goal that is used by services that need to be started before the
network is activated. For the most part, this includes services that configure
a firewall, such that it is available before network interfaces are brought up,
and thus there is no “vulnerable phase” between the start of networking and
the initialisation of the firewall. This target cannot be activated manually.
BNetwork management software should depend on
network-pre.target
,
but only in the temporal sense with
[Unit]
After=network-pre.target
You should avoid an explicit dependency using
Requires
or
Wants
.
BServices that are to be started before the network is activated should
have

7.2 Persistent Network Services 111
[Unit]
Wants=network-pre.target
Before=network-pre.target
in their configuration.
network.target
only stipulates that the local network software was initialised. It
does not make any assumptions as to whether actual network interfaces
have been configured. The main purpose of this target is to provide a syn-
chronisation point during a shutdown of the system—if all services that
presume availability of “the network” are started after
network.target
was
reached, then that implies that on shutdown they will be deactivated before
network.target
is deactivated. This means that no network service has its
connection forcibly severed.
BYou may not start
network.target
manually, and neither is the target pre-
supposed by network services using
Requires
or
Wants
. Such a clause
should only occur in the configuration of the network management
software. Services that need to be shut down before the network is
brought down should have
[Unit]
After=network.target
in their systemd configuration.
network-online.target
explicitly waits for the network to become available, where
the exact meaning of “becoming available” is determined by the network
management software. (A configured external IP address, for example,
would be an obvious prerequisite.) In principle, services that depend on
the network can have a
Requires
or
Wants
for this target.
BThe recommendation is not to overdo this. Many network services
have no problem serving local clients, even though no external network
connection is available. The dependency is more useful for clients that
want to access remote services and do not work without a network con-
nection.
BA typical example for this are remote file systems. For this reason, sys-
temd ensures that, for each remote file system in
/etc/fstab
, a depen-
dency on
network-online.target
will be generated. If you do not have a
remote file system in
/etc/fstab
and no service otherwise depends on
network-online.target
, the target will not be taken into account on boot—
which is a good idea, since unnecessary delays will be avoided in case
no network is available.
Systemd interprets a
$network
dependency in a System-V init script as
[Unit]
Wants=network-online.target
After=network-online.target
Exercises
C7.1 [2] Find out which service on your system depends on
network.target
via
either
Requires
or
Wants
. How does your system define an “active network”?
C7.2 [2] Which services on your system depend on an “active network”?

112 7 Network services with systemd
7.3 Socket Activation
“Socket activation” is the idea of starting a service only when connection requests
to it are received. Traditionally, this used to be handled by
inetd
(later
xinetd
), a
daemon that listens to a number of ports and, on noticing any activity, activates
the background service corresponding to the port in question. Systemd extends
this notion and uses it for other services as well.
BSystemd recommends socket activation for Unix domain sockets in particu-
lar, but there is no problem whatever with using it for TCP or UDP sockets,
too.
There are three basic scenarios where socket activation is worthwhile:
1. When the system is booting, socket activation can enhance parallelism and
avoid explicit dependencies. Systemd initialises the required communica-
tion channels and orchestrates the launch, in parallel, of the corresponding
services when requests are received. This is useful for services that are used
often and permanently and that should be started as soon as possible, such
as syslog or D-Bus.
2. Rarely used services are started on demand, by means of systemd open-
ing the known port associated with the service and listening for connection
requests. If connection requests do arrive, systemd launches the actual ser-
vice and passes the listening socket to the service. The service can then han-
dle further requests on its own. One example of this is the printer service,
CUPS.
3. Rarely used services are started on demand, by means of systemd open-
ing the known port associated with the service and listening for connection
requests. If connection requests do arrive, systemd launches the actual ser-
vice and passes it the socket for the actual connection. The service handles
that specific connection and then terminates again. This is less efficient than
the other two scenarios, but such services are very convenient to implement
since systemd takes care of all the networking requirements. Services where
this approach makes sense include, for example, FTP or SSH, especially on
hosts where they are used infrequently. This avoids having daemons sleep
idly in the background.
BThis flavour is the one most often associated with
inetd
.
inetd
can also
handle the second scenario in our list, but that is only used extremely
rarely.
To enable socket activation with systemd for a service like the Secure Shell
chapter 10), we first take a look at how the respective configuration would look
like in
inetd
or
xinetd
—namely, for
inetd
:
ssh stream tcp nowait root /usr/sbin/sshd sshd -i
(the “
-i
” option ensures that the SSH daemon,
ssd
, works with
inetd
rather than
as a free-standing service). And for
xinetd
:
service ssh {
socket_type = stream
protocol = tcp
wait = no
user = root
server = /usr/sbin/sshd
server_args = -i
}

7.3 Socket Activation 113
Of course you also need to know that the Secure Shell uses TCP port 22. In the
inetd
configuration, this is denoted implicitly by the
ssh
in the first column; this is
a reference to the
/etc/services
file, which contains the actual port number.
To construct an equivalent configuration for systemd, you need two files. First,
you must describe the port that systemd listens on (on behalf of the Secure Shell).
This is done in a file called
sshd.socket
1:
# sshd.socket
[Unit]
Description=Secure Shell service (socket for socket activation)
[Socket]
ListenStream=22
Accept=yes
[Install]
WantedBy=sockets.target
Here,
ListenStream=22
is the moral equivalent to “
ssh stream tcp
” with
inetd
, and
Accept=yes
corresponds to
nowait
—systemd is supposed to accept individual con-
nection requests on the Secure Shell’s behalf and pass them on.
A second unit file is used to actually start instances of the SSH daemon if they
are required. Since several SSH connections may be active at the same time, we
define this unit file as a “template”,
sshd@.service
:
# sshd@.service
[Unit]
Description=Secure Shell service (per-connection server)
[Service]
ExecStart=-/usr/sbin/sshd -i
StandardInput=socket
In
ExecStart
we specify how the daemon is to be started (the minus sign at the
start declares that exit codes other than zero should be considered successful).
StandardInput=socket
ensures that the daemon can actually talk to the client side
(standard output and standard error output tag along with this).
BYou may now ask yourself why systemd needs two files to do something that
inetd
manages in a single line. The answer to that is that this makes systemd
a lot more flexible than
inetd
. In particular, the “listening” port and the ac-
tual connections are cleanly separated from one another, and you could, for
example, stop the unit responsible for the port (and thereby inhibit further
connections) without influencing existing connections. (Of course that also
works without systemd, but then you have to figure out by yourself which
processes are doing what.)
Using these two files we can reload systemd and launch the service:
#systemctl daemon-reload
#systemctl start sshd.socket
Do note that we started the
sshd.socket
file rather than the
sshd@.service
file. Due
to the former, systemd is now waiting for connections:
1A port in TCP (and UDP) is a communication end point, while a socket describes an active con-
nection, or combination of two ports (client and server). This admittedly subtle difference apparently
didn’t quite make it to the systemd developers.

114 7 Network services with systemd
[Unit]
Description=OpenBSD Secure Shell server
After=network.target auditd.service
ConditionPathExists=!/etc/ssh/sshd_not_to_be_run
[Service]
EnvironmentFile=-/etc/default/ssh
ExecStart=/usr/sbin/sshd -D $SSHD_OPTS
ExecReload=/bin/kill -HUP $MAINPID
KillMode=process
Restart=on-failure
[Install]
WantedBy=multi-user.target
Alias=sshd.service
Figure 7.1: Unit file for Secure Shell daemon (Debian 8)
#systemctl status sshd.socket
● mysshd.socket - Secure Shell service (socket for socket activation)
Loaded: loaded (/etc/systemd/system/sshd.socket; disabled)
Active: active (listening) since Di 2015-07-28 13:12:45 CEST; 2s ago
Listen: [::]:22 (Stream)
Accepted: 1; Connected: 0
BTo enable the service on a permanent basis you would use “
systemctl enable
sshd.socket
”. This isn’t really required for our little experiment.
If you then invoke
ssh
(possibly in a different window) to connect to the com-
puter, this should work. The systemd status should be something like
#systemctl --full | grep ssh
sshd@1-192.168.56.101:22-192.168.56.1:46618.service
loaded active running Secure Shell service (per-connection
server) (192.168.56.1:46618)
sshd.socket
loaded active running Secure Shell service (socket for socket
activation)
You could now stop the client connection if required using something like
#systemctl kill sshd@1-192.68.56.101:22-192.168.56.1:46618
.service
(don’t be scared—systemd does command line completion for service names, so
you don’t need to type all of this yourself).
It is not a stupid idea at all to configure the Secure Shell for systemd in this
way. Many distributions, however, still rely on a SSH daemon that is running per-
manently in the background. Figure 7.1 shows a unit file for that (from Debian 8).
BSystemd replaces
inetd
but not necessarily
xinetd
, as the latter contains a few
built-in conveniences that systemd does not offer. You can very probably
do without the standard services
ECHO
,
DISCARD
,
TIME
, and
DAYTIME
, and various
service options are no longer relevant today (cue “TCPMUX”). You might
possibly miss the TCP Wrappers, although it must be said that (a) you may
be better served by an actual firewall, and (b) nobody prevents you from
using the
tcpd
program with systemd, much like we used to do with
inetd
.

7.3 Bibliography 115
BBy way of compensation, systemd can do many nice things that neither
inetd
nor
xinetd
will touch. In addition, having to not learn two additional formats
for configuration files shoudl also be worth something.
(This section is inspired in part by [Poe11].)
Exercises
C7.3 [!2] Install and launch a socket-activated Secure Shell server as shown
above. Try a few connections and also try terminating specific connections.
(In the—likely—case that there is an active Secure Shell server on your sys-
tem already: Call the files
mysshd.socket
and
mysshd.service
and pick another
port, such as 10022.)
C7.4 [2] Create systemd
.socket
and
.service
files which implement the classic
DAYTIME service. This provides the current date and time on TCP port 13:
$telnet localhost 13
Trying ::1...
Connected to localhost.
Escape character is '^]'.
Tue 28 Jul 13:56:14 CEST 2015
Connection closed by foreign host.
Summary
• With systemd, persistent network services do not differ greatly from other
persistent services.
• Systemd manages service activation depending on network availability
based on the
network-pre.target
,
network.target
, and
network-online.target
tar-
gets.
• Systemd offers flexible and powerful capabilities for “socket activation” of
services on demand.
Bibliography
Poe11 Lennart Poettering. “Converting inetd Services (systemd for Administra-
tors, Part XI)”, September 2011.
http://0pointer.de/blog/projects/inetd.html

$ echo tux
tux
$ ls
hallo.c
hallo.o
$ /bin/su -
Password:
8
System Time
Contents
8.1 Introduction. . . . . . . . . . . . . . . . . . . . . . 118
8.2 Clocks and Time on Linux. . . . . . . . . . . . . . . . . 118
8.3 Time Synchronisation with NTP . . . . . . . . . . . . . . 120
Goals
• Learning how Linux manages the time and date
• Being able to maintain the time on a computer by means of NTP
Prerequisites
• Knowledge about Linux system administration
• Knowledge about TCP/IP fundamentals (Chapter 3)
• Knowledge about Linux network configuration (chapter 4)
adm2-time.tex
(
0cd20ee1646f650c
)

118 8 System Time
8.1 Introduction
The concept of “time” is really quite a complex topic. Our “civil” time, that is, the
time that is announced by telephone, that trains, buses, and planes run by and that
governs the television programme, derives predominantly from two sources. The
clocks of the world run according to the so-called “coordinated universal time” (or
UTC), typically with a fixed offset for the time zone—”Central European time”,UTC
or CET, for example, is calculated by adding one hour to UTC. UTC in turn de-
pends essentially on the “international atomic time” (TAI), a weighted average of
approximately 300 atomic clocks in more than 50 national laboratories through-
out the world, in the sense that one second of UTC is equivalent to one second of
TAI.
BThe atomic clocks synchronise themselves to one another via satellite to a
deviation of about 0.1 milliseconds (there are some outliers that only man-
age roughly 10 milliseconds).
UTC is also adjusted to the mean solar time at the meridian of Greenwich (also
called UT1). Since the Earth’s rotation decelerates slowly due to influences suchUT1
as tidal friction and plate tectonics, UT1 seconds are minimally longer than those
of UTC. Hence every so often UTC must put in a “leap second” so the atomic UTCleap second
and the astronomical UT1 do not drift apart too much. The rule is that UTC and
UT1 should not differ by more than 0.9 seconds.
BLeap seconds can potentially happen twice a year, typically at the end of
the months of June and December. They are usually announced 6 months
ahead. Since the concept was introduced in 1972 until July 2015 there have
been 26 leap seconds. (In 1972, UTC already differed from TAI by 10 sec-
onds, so the difference is now 36 seconds altogether.)
BLeap seconds are increasingly considered a nuisance. The leap second of 30
June 2012, for example, triggered a bug in the Linux kernel which in extreme
cases could lead to computers locking up completely. Hence, since several
years the ITU, the international body in charge, has been dealing with a
proposal to do away with leap seconds altogether. Opinions on this vary
vehemently; a decision has for now been postponed until November, 2015.
ADo not confuse leap seconds with the leap days of the Gregorian or the leap
months of the Islamic calendar. While the latter are based on the defini-
tion of the calendar and are—barring calendrical reforms—predictable, leap
seconds derive from astronomical observations and are inserted as needed
(albeit with some advance warning).
For people in real life like ourselves, UTC and the “zone times” derived from
it, such as CET, are most important. The emphasis Linux places on time manage-
ments takes this into account.
8.2 Clocks and Time on Linux
Every PC has a battery-operated hardware or CMOS clock which is set via theCMOS clock
firmware and keeps running even if the computer is switched off. Linux uses the
CMOS clock only during system boot, to set the internal kernel clock.kernel clock
The kernel clock counts time in consecutive seconds since 1 January 1970, 00:00
UTC. When the system is booted, the current date and time are read from the
CMOS clock, converted to kernel time, and used to initialise the kernel clock. This
is done using the
hwclock
program. The system needs to know whether the CMOS
hwclock
clock is set to UTC or the local “zone time” (such as CET/CEST); the latter may
be necessary for the sake of other operating systems on the computer:

8.2 Clocks and Time on Linux 119
#hwclock --hctosys -u
CMOS clock in UTC
#hwclock --hctosys
CMOS clock in local time
The kernel clock is used, e. g., for file system time stamps. You can query it using
the
date
command, while
hwclock
without arguments outputs the time according
to the CMOS clock.
BLinux on 32-bit systems uses a signed 32-bit integer variable to store the
time. The latest point in time that can be represented is thus 231 − 1 =
2,147,483,647 seconds from 1 January 1970, midnight UTC, in other words
19 January 2038, 3 hours, 14 minutes, 7 seconds1. By that time we’ll all be
using if not 64-bit machines then hopefully a patched Linux kernel …
BIf you require a time representation for your own software, you should not
necessarily use that of the Linux kernel, since it is mostly geared towards the
internal use of the operating system (such as the aforementioned file time
stamps). As a programmer for a bank or insurance company—just for the
sake of discussion—you could be required to deal with post-2038 dates even
today, for example if you want to sell capital life insurance to someone who
is 30 years old today, to be paid out when they retire at 65 (or presumably 75).
Conversely, many of your customers will be born before 1 January 1970, and
negative Linux time stamps aren’t really defined (even though the C library
usually does the Right Thing with them).
The time zone is set in
/etc/timezone
; this contains an entry like “
Europe/Berlin
”
naming a file below
/usr/share/zoneinfo
. This (unreadable) file contains time zone
data such as the offset from UTC, the daylight saving time rules, and similar de-
tails.
/etc/localtime
is a copy of the file named by
/etc/timezone
. Users can pick an
arbitrary time zone by means of the
TZ
environment variable.
BLinux provides various tools to manage time zone files: The “time zone
compiler”,
zic
lets you create your own time zone files and convert them to
the format required by the C library;
zdump
outputs a time zone file (or most
of its content, anyway) in a readable format. The manual pages,
tzset
(3) and
tzfile
(5), are also worth reading.
BYou can find out more about time zones on Linux from the Linup Front
training manual, Advanced Linux.
The kernel clock can be set using the
date
command, by passing the desired Setting the kernel clock
date and time as a parameter (administrator privileges are required):
#date 020318012009.30
sets the clock to 18:01:30 on 3 February 2009 (we shall leave it to you as an exercise
to figure out exactly how the parameter is constructed). As a minimum you need
to pass the day, month, hour, and minute:
#date 02031801
Use the
-u
option to set the clock in UTC.
BThe GNU
date
program common on Linux lets you use a somewhat more
intuitive syntax to set the clock:
#date --set --date="2015-07-20 18:01:30 +0100"
BYour graphical desktop environment may allow you to set the clock in a
more convenient manner, too.

120 8 System Time
To set the CMOS clock while the system is running, first set the kernel clockSettting the CMOS clock
using
date
. Then you can transfer the kernel time to the CMOS clock using “
hwclock
--systohc
”. Alternatively, the
--date
to
hwclock
option lets you set the CMOS clock
directly (without the kernel clock noticing). In any case,
hwclock
tries to store data
concerning the systematic deviation of the CMOS clock to
/etc/adjtime
. CMOS
clocks are, as a rule, terribly inexact.
BCommon Linux distributions transfer the kernel clock’s time to the CMOS
clock on system shutdown. This is based on the premise that the kernel
time can be kept very exact using the methods described in the next section,
while the CMOS time drifts off to who knows where—hence it is not a bad
idea to get it back on the straight and narrow every so often.
Exercises
C8.1 [1] Linux for stock brokers: State the commands necessary to display
three clocks (e. g., using
xclock
) that show the time of the major stock ex-
changes (New York, Frankfurt, Tokyo).
C8.2 [2] During which periods since the start of Linux time zone information
did daylight saving time apply in Germany? (Hint:
zdump
)
8.3 Time Synchronisation with NTP
It is often important for all hosts on a computer network to use approximately the
same system time. Network file systems like NFS or authentication infrastruc-
tures like Kerberos can get more than miffed at computers whose time deviates
noticeably from that of the server, and stable system operation cannot be assured
in that way. Hence it is a very sensible idea to synchronise the clocks of all hosts on
the local network as far as possible, and doing that automatically would of course
be best.
BThe traditional program for time synchronisation is called
netdate
, but you
should give it a wide berth because it does not work correctly.
It also makes a lot of sense to synchronise the clocks of all computers on the
network not only to one another, but to tie it to an accurate external time base like
an atomic clock. Since you are probably not among those fortunate (?) enough
to keep one sitting in your cellar, you will have to resort either to a receiver for a
radio time signal (such as DCF77 in Germany, or GPS satellites) or a time server
accessible via the Internet. Publically-available time servers are often operated by
universities or ISPs.
It is clumsy to set the clock “by leaps” since specific points in time may be
passed by, or they may occur twice. This may lead to problems with programs
like
cron
. It is better to keep the kernel time accurate during system operation
by making it run faster or slower in a controlled fashion, in order to even out
differences without interrupting the sequence of seconds since 1 January 1970.
You should use the “Network Time Protocol” (NTP) to do so. More informationNTP
about the protocol is available in [RFC1305] or on
http://www.ntp.org/
.
A very popular daemon for time synchronisation is called
ntpd
. It can act as a
ntpd
client and communicate via NTP with radio-controlled clocks or time servers, or
act as a server and pass its synchronised time on to other hosts.
ntpd
is configured
by means of the
/etc/ntp.conf
file, which could contain something like
# Local clock -- not a good time source
server 127.127.1.0
1Or thereabouts—since the odd leap second will be introduced in the meantime.

8.3 Time Synchronisation with NTP 121
fudge 127.127.1.0 stratum 10 # unsynchronised
# Time servers from the public pool
server 0.de.pool.ntp.org iburst
server 1.de.pool.ntp.org iburst
server 2.de.pool.ntp.org iburst
# Miscellaneous
driftfile /var/lib/ntp/ntp.drift
logfile /var/log/ntp
The first
server
entry relates to the local clock, which is not considered reliable
and will be used only in emergencies (e. g., if no time server can be reached). The
stratum
value describes the “distance” of the clock from the official atomic time; a
computer that is connected directly to the atomic clock is at
stratum
1, a computer
that gets its time from that computer is at
stratum
2, and so on.
BFinding a time server isn’t all that easy. NTP with many clients can tax a
network or a time server fairly heavily, which is why institutions like the
German Federal Physical-Technical Institute in Brunswick, Germany, which
used to operate public time servers, have gone off the idea. The best ap-
proach if you do not have a time server accessible directly is to use the “NTP
pool”.
BIn networks based on Microsoft’s Active Directory, the domain controllers
also serve as time servers. This makes sense since Active Directory, being
based on Kerberos, requires a reasonably accurate common time within the
network.
BThe NTP pool consists of various publically available time servers which are
accessed by clients by means of a DNS “round-robin” scheme. This means
that an address like
0.pool.ntp.org
points fairly randomly to one of several
thousand public time servers anywhere in the world. Since all provide
roughly the same time, this isn’t a big problem for clients—but for server
operators this means that the load is shared equally, rather than being con-
centrated on a few time servers merely because their names are especially
well-known.
BThe
iburst
option on the
server
lines ensures that your
ntpd
will very quickly
acquire the current time when it is starting up.
BIn practice you should specify three time servers from the NTP pool, as in
the example above:
server 0.pool.ntp.org iburst
Anywhere in the world
server 1.pool.ntp.org iburst
server 2.pool.ntp.org iburst
You may get a better-quality time by concentrating on geographic “partial
pools”:
server 0.europe.pool.ntp.org
Anywhere in Europe
server 0.de.pool.ntp.org
Anywhere in Germany
This helps keep the network load low. If your ISP offers a time server you
can also use that and two time servers from the pool.
BNewer versions of
ntpd
support the
pool
directive, which is optimised for the
use of NTP pools:
pool de.pool.ntp.org

122 8 System Time
You can specify more than one
pool
directive (duplicate servers will be re-
moved), but one is basically enough.
BIf you consider synchronising the time for a complete network to the NTP
pool, you should make one of the computers on your network an NTP server
and synchronise only this one to the NTP pool. The other hosts on your
network should obtain their time from your local time server.
BIn that situation you should probably not confine yourself to a single time
server. Configure at least two (e. g.,
ntp1.example.com
and
ntp2.example.com
)
and point from one to the other with
peer ntp2.example.com # on ntp1, the other way round on ntp2
This means that the two time servers can synchronise to each other. On the
clients, use
server ntp1.example.com iburst
server ntp2.example.com iburst
Do note that this lets you tolerate losing one time server, but your Internet
connection to the external time servers remains a reliability bottleneck. If
you want to be sure, you need several independent Internet connections
(and ideally ones that don’t leave the building through the same cable duct
where they can fall prey to an over-eager backhoe). If you don’t have these
already because of other considerations, then at this point it may be cheaper
to buy a few DCF77 or GPS receivers.
BIf you have a large local network, the constant synchronisation messages of
the various
ntpd
s can create a considerable load on the network. In such a
situation it is cleverer to configure the server as a “broadcast server” that
periodically sends unsolicited time announcements to “everyone”. With a
directive like
broadcast 192.168.0.255
you can turn your
ntpd
into a broadcast server that will send time announce-
ments to the
192.168.0.0/24
network. (Of course the broadcast server must
get its own time from somewhere; therefore you will still need the
server
or
pool
directives.) On the clients, you should use the
broadcastclient
directive—
server
or
pool
are not required there.
BWith the broadcast approach, an attacker can easily impersonate a broadcast
server in order to distribute spurious time announcements. To avoid this,
time announcements should be cryptographically authenticated. (This is in
fact the default, and must be deactivated explicitly in case it is not desired.)
In the simplest case, you can generate a set of symmetric keys using the
ntp-keygen
command:
#mkdir /etc/ntp-keys
#cd /etc/ntp-keys
#ntp-keygen -M
Using OpenSSL version OpenSSL 1.0.1k 8 Jan 2015
Using host blue group blue
Generating new md5 file and link
ntpkey_md5_blue->ntpkey_MD5key_blue.3646747865

8.3 Time Synchronisation with NTP 123
This generates a key file
/etc/ntp-keys/ntpkey_MD5key_blue.3646747865
as well as
a symbolic link
ntpkey_md5_blue
in the same directory. The file contains ten
MD5 keys and ten SHA1 keys that you get to pick from:
#cat /etc/ntp-keys/ntpkey_md5_blue
# ntpkey_MD5key_blue.3646747865
# Fri Jul 24 19:31:05 2015
1 MD5 hPQB+WrQH|XwILq!Na, # MD5 key
2 MD5 devt/tV(zTA@_w5EG6; # MD5 key 3 MD5 Evk8O2ylOEySK4[C@&g # MD5 key
10 MD5 $&,7*SQGITy-t?B/8pb& # MD5 key
11 SHA1 92fc0c06cfe754a949ee79497d59c378878c4ac1 # SHA1 key
12 SHA1 a300fe27c8765a96139ac7f4dcc3f65c78e7c341 # SHA1 key
The index (left-hand column) of the desired key must then be specified in
the
/etc/ntp.conf
file:
keys /etc/ntp-keys/ntpkey_md5_blue
broadcast 192.168.0.255 key 1
The key file must also be available on the clients. There you need to enter
the following lines in
/etc/ntp.conf
:
keys /etc/ntp-keys/ntpkey_md5_blue
trustedkey 1
broadcastclient
AImportant: The symmetric keys should not be readable for ordinary users.
BNewer versions of
ntpd
also support an asymmetric encryption scheme. The
details for that are part of
ntpd
’s documentation.
The
ntp.drift
file is used to store the systematic drift of the CMOS clock.
ntpd ntp.drift
must observe it for some time to do so, but then works without constantly referring
back to the time servers.
BThere are no manual pages for
ntpd
. Documentation is only available in
HTML format, e. g., on
http://doc.ntp.org/
.
You can set the clock “approximately” by using the
ntpdate
program, which you
ntpdate
can invoke simply be giving one or more time servers as arguments. This sets the
time once, which is of course not as nice as having it constantly corrected using
ntpd
, but may at times be sufficient (especially if you repeat it periodically using
cron
):
#ntpdate 0.de.pool.ntp.org 1.de.pool.ntp.org
#hwclock --systohc
This approach is also necessary if you have an older version of
ntpd
that does not
support the
iburst
option for servers. This is because for
ntpd
to be able to do
its fine-tuning, its time must be at least approximately correct, and
ntpdate
helps
ensure this.
ntpd
can keep a dialup connection to the Internet fairly busy. You should not
use it to synchronise to remote time servers without a leased line (or flat rate). An
alternative for users of dialup connections that are charged based on time is
chrony chrony
(not part of LPIC-1); see
http://chrony.sunsite.dk/
.
You can use the
ntpq
command to control NTP servers. It supports a number
ntpq

124 8 System Time
of commands that you can either specify on the command line or else enter at
an interactive prompt. For example, you can look at the time servers that are
currently being used:
$ntpq -c peers
remote refid st t when poll reach delay offset jitter
======================================================================
+panel1.web2.c 5.9.80.113 3 u 7 64 17 33.347 -78.427 1.152
+alvo.fungus.a 91.195.238.4 3 u 7 64 17 32.989 -84.727 2.352
*ntp3.kashra-s .PPS. 1 u 3 64 17 61.659 -80.267 1.383
liste.cc 192.53.103.104 2 u 2 64 17 34.967 -78.630 1.063
(“
ntpq -p
” would do the same thing.)
BBy way of a brief explanation:
remote
is the (possibly remote) time server.
refid
is the source that the time server obtains its time from.
st
is the stra-
tum, or the time server’s distance from the atomic clock.
t
specifies which
role your host plays with regard to the remote host—
u
stands for “unicast
client”, other possible values include
b
for “broadcast or multicast client”,
l
for a local reference clock,
s
for a symmetric peer, and so on.
when
denotes
the period of time since the last contact with the remote server—a number
without a unit refers to minutes,
h
and
d
after the number stand for hours
and days, respectively.
poll
specifies the polling frequency; officially, the
values range from 4 to 17 (24= 16 seconds to 217 = 131072 seconds, or ap-
proximately 36.4 hours), but in real life you are more likely to encounter
values (in seconds) from 64 to 1024.
reach
intimates how successful recent
queries to the server were: Interpret the value as the octal representation
of an 8-bit shift register, where the least significant bit represents the most
recent query. Therefore the value 17 stands for four successful queries (un-
successful queries are represented as value-zero bits). Finally,
delay
lists the
time for a “round trip” of a datagram to the remote host in milliseconds,
offset
the mean difference between the times on this host and those on the
remote host (again in milliseconds)2, and
jitter
the mean fluctuation in the
remote host’s time signals, or the RMS of the difference of successive time
announcements (again in milliseconds).
BThe first character of each line denotes the status of the remote host:
Space
The remote host does not talk to this host, is this host, or uses this host
as a time source.
x
(or “
-
”) This remote host is ignored because its time does not appear ac-
curate enough.
#
Good remote host, but it is still being ignored (because there are six better
ones); qualifies as a stand-in.c
+
Good remote host that is being taken into account.
*
Currently the preferred (“primary”) remote host.
BThe
refid
can assume any out of a large set of values. You are most likely to
see either an IP address or one of the common abbreviations:
.LOCL.
Local clock of the unreliable kind (with a very high stratum value).
.PPS.
(“pulse per second”) A very accurate time signal such as an atomic
clock or a GPS receiver. GPS satellites are considered atomic clocks3; a
host with a GPS receiver is therefore considered to be on stratum 1. The
maximum inaccuracy can be measured in microseconds per second.
The PPS signal only provides a very precise sequence of seconds, sim-
ilar to a metronome; you need to get the actual time from elsewhere.
2This uses root-mean-square (RMS), which for 𝑛values corresponds to (𝑥2
0+𝑥2
1+…+𝑥2
𝑛−1)/𝑛. This
means that larger differences carry a greater weight.
3Which is even technically accurate.

8.3 Time Synchronisation with NTP 125
.DCFa.
(and
.DCFp.
) The DCF77 time signal, which is broadcast from a
long-wave radio transmitter in Mainflingen (south-east of Frankfurt
am Main, Germany) and can be received throughout most of Europe.
The possible accuracy depends on the amount of trouble you want
to go to on the receiving side; very simple and cheap receivers like
those in popular radio-controlled clocks and watches synchronise
to a precision of ±0.1 second, while more accurate receivers use the
amplitude-modulated signal (
.DCFa.
) to achieve practical low-single-
digit millisecond precision. If you use the phase-modulated time
signal (
.DCFp.
) and really take pains, you can get to precisions of a few
microseconds, depending on the time of day and year.
.BCST.
The remote end is a network where this host serves as a broadcast
server.
The
ntpq
program supports a large number of commands which you can use to
talk to NTP servers and query data or even (if you have appropriate access rights)
change their configuration. Here are a few more examples:
$hostname
blue
$ntpq
ntpq> peers
remote refid st t when poll reach delay offset jitter
======================================================================
*red.example.com 129.70.132.37 3 u 1 64 377 1.375 -0.074 0.482
ntpq> associations
ind assid status conf reach auth condition last_event cnt
===========================================================
1 3445 765a no yes ok sys.peer sys_peer 5
ntpq> readvar 3445
associd=3445 status=765a authenb, auth, reach, sel_sys.peer, 5 events,
sys_peer,
srcadr=red.example.com, srcport=123, dstadr=192.168.56.102,
dstport=123, leap=00, stratum=3, precision=-23, rootdelay=37.216,
rootdisp=40.298, refid=129.70.132.37,
reftime=d95fc8c2.3be84526 Sun, Jul 26 2015 22:59:46.234,
rec=d95fc9d8.309cefd3 Sun, Jul 26 2015 23:04:24.189, reach=376,
unreach=0, hmode=6, pmode=5, hpoll=6, ppoll=6, headway=0, flash=00 ok,
keyid=1, offset=0.245, delay=1.375, dispersion=0.960, jitter=0.524,
xleave=0.273,
filtdelay= 1.38 1.38 1.38 1.38 1.38 1.38 1.38 1.38,
filtoffset= 0.24 0.47 -0.07 0.56 0.04 -0.31 -0.06 -0.86,
filtdisp= 0.00 1.01 2.00 2.96 3.95 4.95 5.94 6.92
ntpq> readvar 3445 stratum
stratum=3
Exercises
C8.3 [2] Discuss the advantages and disadvantages of the various time
sources available to
ntpd
—radio-controlled clock or time server on the In-
ternet.
C8.4 [1] Use
ntpdate
to synchronise your computer’s clock to a time server on
the Internet.
C8.5 [!2] Configure an NTP server on your computer to synchronise its time
with that of one or more appropriate time servers. Ensure that the NTP
server sets the clock on startup, even if prior to that the time was really

126 8 System Time
wildly wrong (Hint: Stop
ntpd
, change the clock using
date
, and then restart
ntpd
.)
C8.6 [3] Use a suitable testing environment (lab or classroom network, or a
virtualised LAN) to configure a local NTP server and client(s). The latter
should fetch their time from the local server (not the Internet). Also exper-
iment with several NTP servers on the network.
C8.7 [2] (Building on the previous exercise.) Try the distribution of time an-
nouncements by broadcast. Configure a computer as a broadcast server
(generate a set of keys to enable this) and another one as a broadcast client.
Change the clock on the client and restart
ntpd
there. Observe, using Wire-
shark, how the client resets its clock. How long does that take? What hap-
pens if you subsequently reset the clock again without restarting
ntpd
?
Commands in this Chapter
date
Displays the date and time
date
(1) 118
hwclock
Controls a PC’s CMOS clock
hwclock
(8) 118
ntp-keygen
Generates key material for
ntpd ntp-keygen
(8) 122
ntpq
Controls NTP servers
ntpq
(8) 123
zdump
Outputs the current time or time zone definitions for various time zones
zdump
(1) 119
zic
Compiler for time zone data files
zic
(8) 119
Summary
• A PC-based Linux system has two clocks: The kernel clock and a battery-
driven CMOS clock. Linux uses the CMOS clock only to set the kernel clock
when the system is started.
• Linux uses an internal clock that counts seconds in sequence.
• The
hwclock
program is used to manage the CMOS clock.
• With
ntpd
, you can synchronise the clock of your Linux computer to an offi-
cial time base using NTP.
Bibliography
Clock-Mini-HOWTO00 Ron Bean. “The Clock Mini-HOWTO”, November 2000.
http://www.tldp.org/HOWTO/Clock.html
RFC1305 David L. Mills. “Network Time Protocol (Version 3) – Specification, Im-
plementation and Analysis”, March 1992.
http://www.ietf.org/rfc/rfc1305.txt

$ echo tux
tux
$ ls
hallo.c
hallo.o
$ /bin/su -
Password:
9
Printing on Linux
Contents
9.1 Overview. . . . . . . . . . . . . . . . . . . . . . . 128
9.2 Commands for Printing . . . . . . . . . . . . . . . . . 129
9.3 CUPS Configuration. . . . . . . . . . . . . . . . . . . 133
9.3.1 Basics . . . . . . . . . . . . . . . . . . . . . . 133
9.3.2 Installing and Configuring a CUPS Server . . . . . . . . . 135
9.3.3 Miscellaneous Hints . . . . . . . . . . . . . . . . . 139
Goals
• Understanding the basic processing of print jobs on Linux
• Knowing the CUPS printing system
• Being able to use CUPS user commands for printing
• Being able to administer CUPS printer queues
• Knowing how to install and configure a CUPS server for local, remote
and/or network printers
Prerequisites
• Basic knowledge of shell-level I/O
• Editing of text files
• Use of a web browser
• TCP/IP basics (for network printing)
adm2-drucken.tex
(
0cd20ee1646f650c
)

128 9 Printing on Linux
9.1 Overview
In spite of all “paperless office” dreams, most of the work done on a computer
ends up on paper sooner or later. Good printing support is therefore mandatory
for a modern operating system like Linux—and, with hindsight, not to be taken
for granted.
In a multi-user system like Linux, printing is a much more complex task than
in traditional “single-user systems” such as DOS or Windows (where it only be-
comes more complicated if you want to make system 𝑥’s printer available to users
on systems 𝑦,𝑧, …). On a Linux system, several logged-in users may “print” a
document at the same time, but somehow these jobs must be ordered and printed
one after the other. There is nothing wrong in principle with opening the printer
like a file (the device is usually called “
/dev/lp0
”) and writing data to it, which the
Linux kernel will pass on to the actual printer. Only this might lead to several
printing processes’ output being mixed up. Additionally, this approach would
link application programs very closely to the printer model in use and its inter-
face (the parallel port). This is why it is preferable to send printer output to a
program that will buffer the printer data until the printer is “free”, rather than
to the printer itself. Furthermore, this gives an opportunity to, e. g., transpar-
ently translate PostScript data produced by the application to a printer-specific
language. Such a program (system), which will buffer printer data until they can
be printed and then forward them to the printer, is called a spooler1.spooler
The most common abstraction is that of a queue: Print jobs are not sent to aqueue
printer directly, but to a queue, where they wait to be processed. Several queues
can be assigned to a single “physical” printer, for example one for jobs on normal
paper and another for jobs on glossy paper. Similarly, jobs sent to one queue can
be passed on to a queue on another computer that organises the actual printing.
BThe “traditional” Unix/Linux spooler system goes back to BSD and is called
Berkeley LPD (short for “line printer daemon”). Berkeley LPD supportsBerkeley LPD
locally connected printers (e.g., via parallel or serial interfaces) and printers
connected to other hosts.
BBerkeley LPD is well suited to drive simple daisy-wheel or matrix print-
ers (page printers, too, with some restrictions), but is not quite up to theLPD problems
manifold features of modern printing technology. Nowadays, even simple
printers offer simplex and duplex printing, various resolutions, colour or
black-and-white printing, economy modes, and many other options that
in principle can be enabled or disabled independently of each other. The
only way of modelling this in Berkeley LPD is to define different queues,
which will lead to a combinatorial explosion even for a single printer. Other
weaknesses of Berkeley LPD include the facts that only system administra-
tors may configure printers, that it is tedious to configure all hosts on the
network identically, and that Berkeley LPD supports neither printer classes
(i. e., several printers being served from the same queue) nor accounting for
print jobs.
BWith Berkeley LPD, the
/etc/printcap
file is used to define the queues avail-
/etc/printcap
able on computer.
Nowadays, the default printing package on almost all common Linux distribu-
tions is the Common Unix Printing System or CUPS. This is a newly conceivedCommon Unix Printing System
CUPS printing system, which does offer user commands that are largely compatible to
those of Berkeley LPD but functions in a wholly different manner. The same ap-
plies to its administration.
CUPS is based on the Internet Printing Protocol, which is standardisedInternet Printing Protocol
1The popular etymology is “SPOOL”, an acronym of “Simultaneous Peripheral Operation On-
Line”. According to [Jargon], however, this is a “backronym”, i. e., a post-hoc interpretation of a word
as an acronym.

9.2 Commands for Printing 129
in [RFC2910, RFC2911] and intended to replace the old Berkeley LPD proto-
col [RFC1179]. Mostly, IPP provides standard operations that can be used to
query a printer—in a loose sense, this includes not only “genuine” printers but
also printer servers driving one or more non-IPP printers—for its capabilities and
feed jobs to it. This includes a type of “negotiation”; a print job may contain a
“laundry list” of features such as “two-sided”, “toner-saving”, etc., which will
be matched as closely as possible. You can specify whether, if a desired feature
cannot be provided, the job should be rejected or whether the printer should try
to approximate what is wanted.
IPP itself makes no assumptions as to how, i. e., using what type of protocol or
connection, you want to talk to a printer. The canonical transport protocol sug-
gested for IPP, though, is HTTP (see [RFC2910]). This approach has various ad-
vantages:
• HTTP is an established and well-understood protocol
• You get various desirable protocol features such as encryption (SSL), proxy
support, user authentication, virtually for free, since suitable support exists
in HTTP
• Users and system administrators may use standard Web browsers to com-
municate with IPP servers (a. k. a. printers). Web browser are available on
every platform of consequence, starting with PDAs, so that a CUPS-based
printing system may be administered from virtually anywhere
• It is easy for printer manufacturers to offer IPP support, since today’s high
end printers often support a web-based configuration interface, anyway.
Nowadays there are many freely available HTTP servers which are suitable
as the basis of an IPP implementation within a printer or printer server.
Furthermore, IPP is being developed under the auspices of the Internet Engineer- IETF
ing Task Force and as such enjoys widespread manufacturer support. It is to be
assumed that IPP will emerge as an operating-system independent standard solu-
tion for network printing. Even half-way current versions of Microsoft Windows
(Windows 2000 and Windows ME or later) can access IPP-based printers by de-
fault; support can be retro-fitted to older Windows versions—the package is called
“Internet Printing Support for Windows” and can be found on Microsoft’s web
site.
CUPS is an IPP implementation for various Unix version (including Linux)
which is developed and distributed under the GPL by a US company called Easy
Software Products.
BESP was recently acquired by Apple—not an entirely unreasonable move
given that MacOS X uses CUPS for printer control, too. So far the freedom
of the code has not been called into question.
At the heart of the system there is an HTTP server (called the “scheduler” by
CUPS), which not only accepts and processes IPP requests, but also provides the
online documentation and allows status queries for printers and jobs. In addition,
it keeps and updates a list of available printers. Access to the HTTP server is pos-
sible either via HTTP or via a programming interface, the “CUPS API”, and CUPS
uses the latter to provide user-level commands similar to those of BSD (
lpr
,
lpq
,
lprm
, …) and those of Unix System V (
lp
,
lpstat
, …). Furthermore, CUPS includes
various filters for different input data formats as well as some back ends to drive filters
back ends
printers using different connections such as the parallel and serial interfaces, USB,
SMB, AppDirect (as used for HP JetDirect-enabled printers) or LPD. In any event,
the user sees just the IPP-capable “printer” implemented by CUPS.
9.2 Commands for Printing
Printing Files:
lpr
,
lp
, and
mpage
In principle, you can print data directly by simply “direct” printing

130 9 Printing on Linux
sending them to the interface that the printer is connected to:
#cat data.txt >/dev/lp0
(depending on the permissions you may have to have administrator privileges to
do so). This presupposes that nobody else is just then printing something else the
same way, and the data must be in a format that the printer understands. More
expensive printers, for example, require PostScript input (if not some proprietary
format) and perhaps cannot handle plain-text data at all. We still mention this
method because it may be useful for troubleshooting; if you can get your printer totroubleshooting
print something this way, then at least the hardware, cabling, and other essentials
are all right, and you can search the problem within the print system software on
your Linux system.
In daily life you should rather be using one of the system programs that dosystem programs
not access the printer interface directly but talk to the local printing system (such
as CUPS). This way, you will achieve clean sequential job processing, and data
conversion into a format suitable for the printer is also arranged much easier.
The most common program for printing is
lpr
. You can use it to either print
lpr
another program’s standard output or the result of a pipeline:
$pr -l50 manual.txt | lpr
Or you pass the program a list of files to be printed:
$lpr file1.txt file2.ps
When invoking
lpr
you can pass various options: With
$lpr -#3 -Plaser file1.txt
for example, three copies of
file1.txt
will be printed to printer
laser
(strictly speak-
ing, submitted to the
laser
queue).
Unless you specify otherwise,
lpr
submits jobs to the
lp
queue (Attention: Someselecting a queue
distributions, such as those by SUSE, enable the administrator to change this glob-
ally). If you do not want to give a queue name with each job, using the
-P
option,
you can set the
PRINTER
environment variable to the name of the desired queue.
Besides the
lpr
command, which derives from the Berkeley LPD tradition,
many systems support a nearly-equivalent program called
lp
. This comes from
lp
Unix System V and is familiar to many users of proprietary Unix systems. The
lp
command
$lp -n 3 -d color file.txt
is equivalent to the last
lpr
example shown above.
BThe CUPS version of
lp
allows a few things that don’t work with
lpr
, like
retroactive modification of jobs after they have been spooled (as long as they
have not yet been printed). This makes it possible to delay print jobs or
“freeze” them for an indeterminate period of time before being re-enabled.
The CUPS versions of
lpr
and
lp
support various options that influence the
printed output. For example you can request duplex (double-sided) printing us-
ing
$lpr -o sides=two-sides-long-edge manual.pdf
or print two reduced pages on one by means of
$lpr -o number-up=2 manual.pdf

9.2 Commands for Printing 131
Something like
$lpr -o landscape sign.ps
prints in landscape format (the long edge of the paper is at the top and bottom).
The options that are permissible in each specific case depend on the abilities of
the printer in question, but here are some common CUPS options:
media=
⟨type⟩Specifies the paper size and source. Valid values for the paper size
include
A4
or
Letter
, a paper source might be given by the tray names
Upper
or
Lower
. The exact values for various printers can be derived from the cor-
responding PPD files.
landscape
Prints in landscape format
sides={one-sided,two-sided-short-edge,two-sided-long-edge}
Controls two-sided print-
ing.
two-sides-short-edge
is useful for landscape pages,
two-sided-long-edge
for
portrait pages.
one-sided
causes one-sided printing on queues that use two-
sided printing by default.
jobsheets=
⟨start⟩[
,
⟨end⟩] Determines whether a “banner” or “burst” page will be
printed at the beginning or end of the job. This page contains information
about the submitter of the job, date, time, and, e. g., a classification level.
The available banner pages depend on the system in question; the standard
options include
none
(no banner page),
standard
(no classification), and vari-
ous pages à la
unclassified
,
confidential
,
topsecret
.
page-ranges=
⟨list⟩Prints only part of the job’s pages. The ⟨list⟩is a comma-
separated sequence of page numbers or ranges of pagenumbers, such as
“
1-4,7,9-12
”.
page-set={even,odd}
Prints only even-numbered (
even
) or odd-numbered (
odd
)
pages.
outputorder={normal,reverse}
Prints the job’s pages in normal or reverse order.
number-up={1,2,4,6,9,16}
Prints 1, 2, 4, 6, … pages of the job scaled down on one
physical page.
page-border={none,single,single-thick,double,double-thick}
When printing “n-up”,
no frame will be drawn around each scaled-down page (
none
), a single or
double thick or thin frame …
number-up-layout={btlr,btrl,lrbt,lrtb,rlbt,rltb,tblr,tbrl}
The order of pages for
“n-up” printing:
btlr
stands for “bottom to top, left to right”,
rltb
for “right to
left, top to bottom” and so on.
prettyprint
(For text printing.) Outputs a header line on each page containing the
page number, the job name (usually the name of the file being printed), and
the date. Also attempts syntax highlighting for C and C++ programs, and
prints comment lines in italics.
A more extensive list of options is part of the CUPS documentation, which a CUPS
server makes available via HTTP on port 631, on the computer with the CUPS
server itself, for example, as
http://localhost:631/help/options.html?TOPIC=Getting+
Started
.
Tracking Print Jobs Even as a normal user, you may want to figure out the state
of the printer queues: Is it worth getting up and walking over to the printer room
at the other end of the corridor, or does Mr. Jones from accounting still print his
500-page report for the board while your letter is queued behind that?
The
lpq
command is useful to do this: Called without parameters, it displays
the contents of the default queue:

132 9 Printing on Linux
$lpq
lp is ready and printing
Rank Owner Job Files Total Size
active hugo 333 report.ps 1112942 bytes
As with
lpr
, you can specify the name of another queue using the
-P
option, oth-
erwise the value of the
PRINTER
environment variable, alternatively
lp
, applies.
B
lpq
with the
-a
option displays the jobs in all queues, and
-l
displays a “long”
list (with more information). If ⟨interval⟩is given, the list is redisplayed ev-
ery ⟨interval⟩seconds until the queue is empty.
The
lpstat
program works quite differently. It uses options to determine what
sort of status is to be displayed:
-a
Shows whether the queues accept jobs
-c
Displays printer classes and corresponding printers
-d
Display the current default printer
-o
[⟨queue⟩] Displays the content of ⟨queue⟩(or all queues if none was specified)
-p
Displays all printers (queues) and show whether they are currently enabled for
printing
-r
Display whether the CUPS server is running
-s
Displays a status summary (equivalent to “
lpstat -dcp
”)
-t
Displays all status information (equivalent to “
lpstat -rdcvapo
”)
-v
Displays the printers (queues) and the corresponding interfaces and locations
(again, this is just an excerpt from the full list of options).
Cancelling Jobs If you change your mind after submitting a print job, you can
cancel it using
lprm
. You will need the job number that
lpq
outputs in the “
Job
”
column:
$lprm 333
Since job numbers are assigned per queue, you may have to specify a queue name
by means of the
-P
option. You can get rid of all your pending print jobs using
$lprm -
As a normal user, you can only cancel your own print jobs (Mr. Jones wouldCancelling others’ jobs
not be amused). To cancel other users’ print jobs using
lprm
, you must assume
administrator privileges.
You can only use
lprm
to cancel jobs that have not been sent to the printer. To-Limitations
day’s printers often sport large internal memories which can hold one jobs or
many that are still far from actually being printed, and your computer cannot
usually influence these jobs any longer. Whether a big job can be cancelled that is
currently half-way through being sent to the printer depends on the system.
The System-V-like command,
cancel
, expects a combination of the queue name
and job number:
cancel
⟨queue name⟩
-
⟨job number⟩

9.3 CUPS Configuration 133
application/pdf pdf string(0,%PDF)
application/postscript ai eps ps string(0,%!) string(0,<04>%!) \
contains(0,128,<1B>%-12345X) + \
(contains(0,1024,"LANGUAGE=POSTSCRIPT") \
contains(0,1024,"LANGUAGE = Postscript") \
contains(0,1024,"LANGUAGE = POSTSCRIPT"))
image/gif gif string(0,GIF87a) string(0,GIF89a)
image/png png string(0,<89>PNG)
image/jpeg jpeg jpg jpe string(0,<FFD8FF>) &&\
(char(3,0xe0) char(3,0xe1) char(3,0xe2) char(3,0xe3)\
char(3,0xe4) char(3,0xe5) char(3,0xe6) char(3,0xe7)\
char(3,0xe8) char(3,0xe9) char(3,0xea) char(3,0xeb)\
char(3,0xec) char(3,0xed) char(3,0xee) char(3,0xef))
image/tiff tiff tif string(0,MM) string(0,II)
Figure 9.1: The
mime.types
file (excerpt)
Default Values for Printing Options The printing options that you can specify
using the
-o
option with
lpr
and
lp
have certain system-wide defaults which were
established when the queue was first installed. Later on, it is possible to change
these defaults either as the administrator (so they will apply to all users) or as a
user (so they will apply for oneself). Of course this does not keep users from being
able to use command-line options to set up different options on a job-by-job basis.
Printing options are set using the
lpoptions
command, which accepts the same
-o
options as
lpr
and
lp
. These options are applied to all queues or, if a particular
queue was selected using the
-p
options, that queue only.
lpoptions
enters the op-
tions in question into the
~/.lpoptions
file, where
lpr
and
lp
can pick them up later.
“
lpoptions -l
” displays the option names, their possible values, and the current
values (labelled using an asterisk).
If the system administrator invokes
lpoptions
as user
root
, the options apply to
all users as the system-wide default. There are no printer options for
root
.
Exercises
C9.1 [2] Check out some of CUPS’s printing options: Try, for example, to
print a job scaled down, backwards or two-sided, or to select particular page
ranges.
C9.2 [2] Set up a queue as a “normal” user such that normally two pages of
a job will be scaled down and printed alongside each other on a landscape
page. Ensure that jobs with no particular options are really printed like
that. Then print a non-scaled job without permanently changing the default
settings.
9.3 CUPS Configuration
9.3.1 Basics
If a user submits a print job on CUPS—either via one of the BSD- or System-V- print job
like programs provided with CUPS, or a program that uses the CUPS API directly,
such as KDE’s
kprinter
—, the job is stored in the appropriate queue first. In addi- queue
tion to the actual print data, this includes “metadata” such as the submitter’s user
name or the desired options for the print-out (two-sided, …). The scheduler re-
moves the job from the queue and tries first to convert the print data to PostScript.

134 9 Printing on Linux
application/pdf application/postscript 33 pdftops
application/postscript application/vnd.cups-postscript 66 pstops
application/vnd.hp-HPGL application/postscript 66 hpgltops
application/x-shell application/postscript 33 texttops
text/plain application/postscript 33 texttops
text/html application/postscript 33 texttops
image/gif application/vnd.cups-postscript 66 imagetops
image/png application/vnd.cups-postscript 66 imagetops
image/jpeg application/vnd.cups-postscript 66 imagetops
Figure 9.2: The
/etc/cups/mime.convs
file (excerpt)
To do so, it consults the
/etc/cups/mime.types
file (see Figure 9.1) in order to deter-
mine the data type in question.
mime.types
contains the names of MIME types and,
with each MIME type, a set of criteria used to recognise files of that type. For
example, the rule
image/gif gif string(0,GIF87a) string(0,GIF89a)
identifies a file as a GIF image if its name ends in “
gif
”, or the content starts with
either of the strings “
GIF87a
” or “
GIF89a
”. (The exact rules for criteria are stated in
detail at the beginning of the
mime.types
file.)
Once the MIME type of the print file is known, CUPS can try to convert this to
a printable format, namely
application/vnd.cups-postscript
. Various filter programsfilter programs
are provided to help with this, and their use is described within the
/etc/cups/mime.
convs
file (Figure 9.2). This lists various programs (at the right-hand side of a line)
that are able to convert data from the type given in the leftmost column to that
given in the second column. Every conversion is assigned a “cost” which can be
used to prefer direct conversions to indirect ones. For example, HPGL data can be
converted to the CUPS PostScript format via
application/postscript
, which incurs
a “cost” of 99 units; if there was a direct converter, it would be preferred if its cost
was less than 99.
Most formats are converted to “generic” PostScript first, while the
pstops
pro-
pstops
gram is used to convert it to CUPS-specific PostScript. This is quite an important
step, since the
pstops
program used for this will, e. g., determine and log the num-
ber of pages in the job (which is not immediately obvious from the PostScript file
without executing it at least rudimentarily). In addition,
pstops
provides some
other very useful extras that were not usual at all for Unix printing systems in theextras
pre-CUPS era—for example, several pages can be scaled down and output on a
single physical sheet (
ps-n-up
), or particular pages can be selected from a larger
job for actual printing (
psselect
), without the application having to support this
feature at all.
The CUPS-specific PostScript file will then be either passed on directly (if the
job is to end up on a genuine PostScript printer) or translated to a printer-specific
language such as PCL or ESC/P with GhostScript. The actual printer output (orPCL
ESC/P transfer to another print server) will be performed by one of the “back ends” in
/usr/lib/cups/backend
.
The most important element of the CUPS configuration for a certain printer
are PPD files (short for “PostScript Printer Description”). A printer’s PPD file de-PPD files
scribes which special options (resolution, duplexing, various paper feeding meth-
ods, …) the printer supports, and CUPS can pass this information on to applica-
tion programs that then allow the user convenient access to each printer’s capa-
bilities. For a PostScript printer, a PPD file should be furnished (or made available
on the Web) by the manufacturer; for many—even non-PostScript—printers, PPD
files as well as many other hints can be found on
http://www.linuxprinting.org
. PPD
files are useful for PostScript as well as non-PostScript printers and thus can be
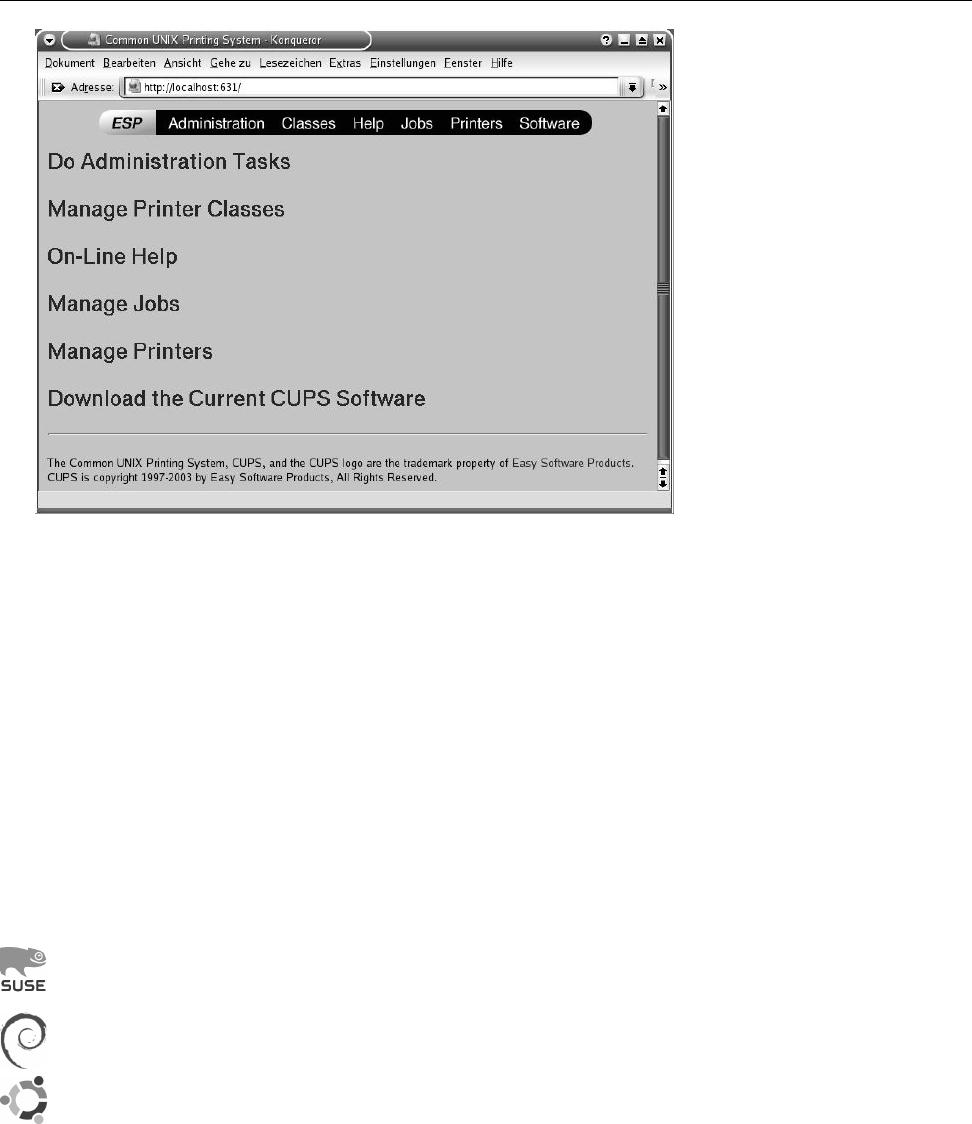
9.3 CUPS Configuration 135
Figure 9.3: The CUPS web interface
found somewhere for nearly all printers. There is a reasonable chance that ei-
ther CUPS or the Linux distribution will contain PPD files for all but the most
extraordinary printer models; if necessary, an additional software package from
the distribution may have to be installed.
Exercises
C9.3 [2] Check on
http://www.linuxprinting.org
whether your printer is sup-
ported by Linux, and download a PPD file for it if one exists.
9.3.2 Installing and Configuring a CUPS Server
Today, CUPS is part of all important Linux distributions or can at least be installed
straightforwardly.
The Novell/SUSE distributions have been using CUPS as the default print-
ing system for a very long time.
For Debian GNU/Linux and Ubuntu, CUPS is available as the packages
cups
(Server),
cups-bsd
(LPD-like commands), and
cups-client
(System-V-like
commands). On top of that there is a whole lot of other support packages
(try “
apt-cache search cups
”).
CUPS allows various methods for printer configuration. The CUPS web server
lets you create printer queues using a WWW browser, and there are also command
line tools to do so. The Novell/SUSE distributions contain a CUPS module for
SUSE’s system administration tool, YaST2.
Configuration Using a Web Browser To configure printer queues using a web
browser, invoke the
http://localhost:631/
URL on the CUPS machine (631 is
the TCP port assigned to IPP). The CUPS interface should be displayed (Fig-
ure 9.3).—In principle, this can be accessed from any computer, but in the default
configuration, IPP operations are only accepted from the same host. Via the
Printers button you can reach the printer administration page (Figure 9.4 shows
an example with two printers already installed), and by means of the Add Printer
button there you will obtain the page to add new printers (Figure 9.5).
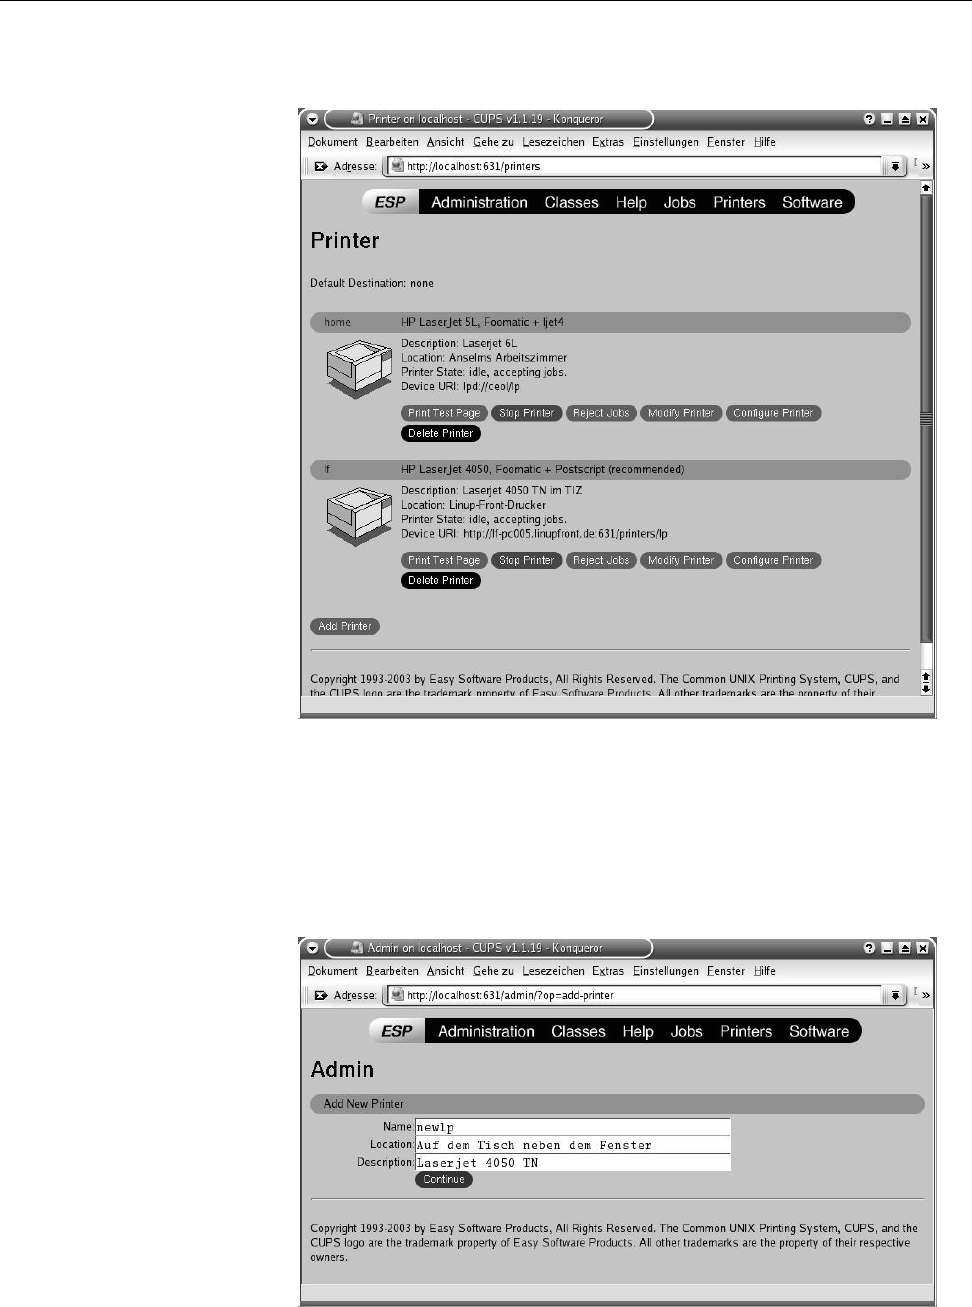
136 9 Printing on Linux
Figure 9.4: The CUPS web interface: Printer management
Figure 9.5: The CUPS web interface: Adding a printer

9.3 CUPS Configuration 137
Here you will have to enter a name for the printer (actually the queue) first; the
other two fields (“Location” and “Description”) are not strictly necessary but may
help users to relate the queue name to an actual printer (they need to know where
to collect their print-outs).
The next dialog is used to select a back end. This includes options such as par-
allel or serial interfaces, USB, or various networked options such as LPD, IPP, Jet-
Direct, or Windows printers (via Samba). Depending on what you select here, you
will have to enter a URL for the printer (e. g.,
lpd://lpdserver/lp
or
ipp://ippserver/
printers/myprinter
) which determines how the printer is really supposed to be ac-
cessed; for printers connected directly to interfaces or the USB this is very straight-
forward.
Finally, you need to pick a particular printer model. CUPS offers you the PPD
files stored below
/usr/share/cups/model
—with the GPL version, these are just a few
for the most common printers, but on the one hand manufacturers such as SUSE
may have increased the number of options somewhat, and on the other hand you
are free to download a matching PPD file from
www.linuxprinting.org
and put it
there. After the final confirmation, your new printer is available below Printers
and may be used. It is probably best to begin by printing a test page (“Print Test
Page”) in order to check whether the creation really did work.
The SUSE distributions’ YaST2 administration tool provides a printer con-
figuration GUI which is about as convenient as CUPS’s own web interface.
Unlike vanilla CUPS, YaST contains a vastly more extensive database of PPD
files and also tries to recognise the printer type automatically. After the
printer has successfully been recognised, YaST allows either a “fast auto-
matic setup”, where several queues, e. g., for colour and black-and-white
printing, will be set up, or a “normal setup” where you will be expected to
enter queue names, printer locations and types, etc., manually. Within the
normal setup, you can also specify options for the queue such as the pa-
per size and resolution, burst pages (if desired) or access control for specific
users, which are not accessible via the CUPS web interface but must be set
up using command line tools or configuration files.
BFinally, it is also possible to install new printers using the
lpadmin
command-
line tool.
lpadmin
is based on the eponymous System V tool, but not com-
pletely compatible. You could, for example, configure a Laserjet printer
connected to the parallel interface as follows:
#lpadmin -p newlp -E -v parallel:/dev/lp0 -m laserjet.ppd
Here,
newlp
is the new queue’s name, the
-E
option enables the queue so it
will accept jobs, the
-v
option specifies the connection details for the printer,
and the
-m
option names the printer’s PPD file (which must be located within
/usr/share/cups/model
). A description and location as in the web interface can
be specified using the
-D
and
-L
options. More information can be found in
lpadmin
(8).
The
lpinfo
command may be handy for printer installation. “
lpinfo -v
” outputs
a list of available connection types, and “
lpinfo -m
” provides a list of PPD files (and
thus printer types).
“
lpadmin -p
” also lets you modify existing printer configurations. “
lpadmin -x
”
removes a printer that is no longer required.
In any case, the installed printers’ configuration is placed in the
/etc/cups/
printers.conf
file. For every installed printer there is a PPD file in
/etc/cups/ppd
(Figure 9.6).
General configuration settings for the CUPS scheduler can be found in the
/etc/cups/cupsd.conf
file. This file’s syntax is very like that of the Apache web
server’s configuration file. Most important are the settings for access permissions
and authentication. By default, the CUPS scheduler may only be accessed from

138 9 Printing on Linux
# Printer configuration file for CUPS v1.1.19
# Written by cupsd on Thu Jul 31 23:51:00 2003
<DefaultPrinter newlp>
Info Laserjet 4050 TN
Location Auf dem Tisch neben dem Fenster
DeviceURI lpd://localhost/lp
State Idle
Accepting Yes
JobSheets none none
QuotaPeriod 0
PageLimit 0
KLimit 0
</Printer>
<Printer home>
Info Laserjet 6L
Figure 9.6: An
/etc/cups/printers.conf
file (excerpt)
the local host (the IP address
127.0.0.1
). To use CUPS as a printer server in a local
network, this restriction must be relaxed somewhat. This can be done by means
of definitions such as
<Location /printers>
Order Deny,Allow
Deny from all
Allow from 127.0.0.1
Allow from 192.168.123.0/24
</Location>
or
<Location /printers/newlp>
Order Allow,Deny
Allow from 127.0.0.1
Allow from 192.168.123.0/24
Deny from 192.168.123.45
</Location>
The first example restricts access to all printers to the local system and the comput-
ers within network
192.168.123.0/24
; in the second example, access to printer
newlp
only is enabled for the local system and the computers within the
192.168.123.0/24
network, except that host
192.168.123.45
is excluded. Access to the CUPS web ad-
ministration interface can be controlled in a similar manner.
Besides this authentication based on IP addresses, user-based authentication
via user names and passwords is also possible, as is using SSL or TLS to secure
IPP operations, where the CUPS server and (possibly) the user are authenticated
using X.509 certificates. In effect, this makes it possible to use CUPS as a secure,
efficient “fax” service on the Internet.
Exercises
C9.4 [1] Which different back ends does your CUPS implementation provide?
C9.5 [2] Install a printer. If no printer is connected directly to your system,
specify a network printer as the destination for print jobs (your trainer will
provide you with any required information).

9.3 CUPS Configuration 139
C9.6 [2] Make your printer queue accessible to the other systems within the
local network. Assure yourself that these systems may submit print jobs
and that these will be printed.
C9.7 [2] Why can it make sense to install several queues for the same printer?
9.3.3 Miscellaneous Hints
T-Shirts and Such To print images in mirror image from arbitrary application
commands—e. g., on t-shirt transfer paper—, the
mirror
option can be used:
$lpr -o mirror mypic.jpg
Troubleshooting When CUPS printing does not work like it should, you should
inspect the CUPS log first. CUPS logs details of its work to
/var/log/cups/error_log
(the location may vary between distributions). The amount of log data written
depends on the
LogLevel
directive in the
/etc/cups/cupsd.conf
file; the
debug2
value
writes the most extensive protocol.
Commands in this Chapter
cancel
Cancels a submitted print job
cancel
(1) 132
lp
Submits a print job
lp
(1) 130
lpadmin
Manages printer job queues
lpadmin
(8) 137
lpinfo
Displays available printer devices and drivers
lpinfo
(8) 137
lpoptions
Manages default settings for printer queues
lpoptions
(1) 133
lpq
Displays a printer queue’s status
lpq
(1) 131
lpr
Submits a print job
lpr
(1) 130
lprm
Cancels a print job
lprm
(1) 132
pstops
Prepares PostScript print jobs for CUPS 134
Summary
• Printing on Linux is a complex task.
• CUPS is an implementation of the “Internet Printing Protocol”, an HTTP-
based industry standard for accessing network printers.
• CUPS allows the customisation of the system for given printers using PPD
files. It supports filter programs for various data formats and can handle
different types of printer connection.
• Printers for CUPS can be configured via the CUPS internal web server, the
command line, or distribution-specific tools such as “YaST” on the SUSE
distributions.

140 9 Printing on Linux
Bibliography
Jargon Eric S. Raymond. “The Jargon File”. Also published as The Hacker’s Dic-
tionary.
http://www.jargon.org/
RFC1179 L. McLaughlin III. “Line Printer Daemon Protocol”, August 1990.
http://www.ietf.org/rfc/rfc1179.txt
RFC2910 R. Herriot, S. Butler, P. Moore, et al. “Internet Printing Protocol/1.1:
Encoding and Transport”, September 2000.
http://www.ietf.org/rfc/rfc2910.txt
RFC2911 T. Hastings, R. Herriot, R. deBry, et al. “Internet Printing Protocol/1.1:
Model and Semantics”, September 2000.
http://www.ietf.org/rfc/rfc2911.txt

$ echo tux
tux
$ ls
hallo.c
hallo.o
$ /bin/su -
Password:
10
The Secure Shell
Contents
10.1 Introduction. . . . . . . . . . . . . . . . . . . . . . 142
10.2 Logging Into Remote Hosts Using
ssh
............142
10.3 Other Useful Applications:
scp
and
sftp
............145
10.4 Public-Key Client Authentication . . . . . . . . . . . . . . 146
10.5 Port Forwarding Using SSH . . . . . . . . . . . . . . . . 148
10.5.1 X11 Forwarding . . . . . . . . . . . . . . . . . . 148
10.5.2 Forwarding Arbitrary TCP Ports . . . . . . . . . . . . 149
Goals
• Knowing how to use and configure the Secure Shell (SSH)
Prerequisites
• Knowledge about Linux system administration
• Knowledge about TCP/IP fundamentals (Chapter 3)
• Knowledge about Linux network configuration (chapter 4)
• A basic awareness of cryptography is helpful
adm2-ssh.tex
(
0cd20ee1646f650c
)

142 10 The Secure Shell
10.1 Introduction
SSH (“Secure Shell”) is a TCP/IP-based networking protocol. It provides data
transmission in a public network using strong authentication and encryption. Its
applications include interactive sessions, file transfer, and the secure forwarding
of other protocols (“tunneling”).
BEncryption is important to keep unauthorised people listening to the net-
work traffic from being able to read the content being transferred. Authen-
tication ensures one the one hand that you as the user are talking to the
correct server, and on the other hand that the server lets you access the cor-
rect user account.
OpenSSH, which comes with most Linux distributions, is a freely availableOpenSSH
implementation of this protocol. This implementation contains some SSH clients
as well as an SSH server (
sshd
).
Used properly, SSH can prevent the following attacks:attacks
• “DNS spoofing”, i. e., forged or adulterated DNS entries.
• “IP spoofing”, where an attacker sends datagrams from one host which pre-
tend that they come from another (trusted) host.
• IP source routing, where a host can pretend that datagrams come from an-
other (trusted) host.
• Sniffing of passwords and content transmitted in the clear on hosts along
the transmission path.
• Manipulation of transmitted data by hosts along the transmission path.
• Attacks on the X11 server by means of sniffed authentication data and
spoofed connections to the X11 server.
BSSH offers a complete replacement for the insecure TELNET, RLOGIN andUse
RSH protocols. In addition, it enables users to copy files from or to remote
hosts and is thus a secure replacement for RCP and many applications of
FTP.
AThere are two versions of the SSH protocol, 1 and 2. Most servers can ac-protocol versions
cept connections using both versions. Still, please do avoid version 1, which
exhibits various security vulnerabilities.
10.2 Logging Into Remote Hosts Using
ssh
To log into a remote host using SSH, you need to invoke the
ssh
command, for
example like
$ssh blue.example.com
hugo@blue.example.com's password: geHe1m
Last login: Mon Feb 2 10:05:25 2009 from 192.168.33.1
Debian GNU/Linux (etch/i686) blue.example.com
hugo@blue:~$ _
ssh
assumes that your user name on the remote host is the same as the local one.
If this isn’t the case, you can set your remote user name like
$ssh hschulz@blue.example.com

10.2 Logging Into Remote Hosts Using
ssh
143
Under the hood, approximately the following steps take place to establish the con-
nection:
• Client and server send each other information about their host keys, sup-
ported cryptographic schemes, and so on. The client checks whether the
server’s public key is the same as it used to (see below for more informa-
tion) and negotiates a shared secret with the server, which then serves as
the (symmetric) key to encrypt the connection. At the same time the client
checks the server’s authenticity and breaks the connection if there is any
doubt. The (gory) details are in [RFC4253].
• The server checks the client’s authenticity using one of several different
methods (in this case it asks for a password). The password is already sent
over the encrypted connection and, unlike other protocols like FTP or TEL-
NET, cannot be “sniffed” by people who listen in.
The first step is quite important. The following example shows what happens if
you contact the remote host for the first time:
$ssh blue.example.com
The authenticity of host 'blue.example.com (192.168.33.2)' can't be
established.
RSA key fingerprint is 81:24:bf:3b:29:b8:f9:f3:46:57:18:1b:e8:40:5a
:09.
Are you sure you want to continue connecting (yes/no)? _
The host
blue.example.com
is still unknown here, and
ssh
asks you to verify its host
key. This is to be taken seriously. If you skip this verification step, you lose the
guarantee that nobody is listening in to your connection.
BThe danger is here that somebody will intercept your connection request
and pretend that they are
blue.example.com
. Behind the scenes they can estab-
lish their own connection to
blue.example.com
and pass everything along that
you (naively) send to them, and conversely forward
blue
’s answers back to
you. You don’t see the difference, but the attacker can read everything that
you transmit. This is called a “man-in-the-middle attack”.
BTo check, you need to contact the remote system’s administrator (e. g., by
telephone) and ask them to read their public host key’s “fingerprint”. This
can be displayed using “
ssh-keygen -l
” and must be identical to the “
RSA key
fingerprint
” from the SSH login dialogue.
BThe SSH key pairs of a host can be found in the
ssh_host_
𝑥
_key
and
ssh_
SSH key pairs
host_
𝑥
_key.pub
files within the
/etc/ssh
directory. 𝑥stands for a specific cryp-
tographic method which clients can use to check the server’s authenticity.
BPossible values for 𝑥include (July 2015):
rsa
The RSA algorithm. This is secure (according to the current state of the
art), as long as you use keys that are longer than 1024 bits. (2048 bits
sound good. Use 4096 bits if you’re Edward Snowden or are oth-
erwise assuming that organisations like the NSA have it in for you
specifically—and not only accidentally at random.)
dsa
The DSA algorithm. This only allows 1024-bit keys and should be
avoided today, also because it is susceptible to weaknesses in random
number generation.
ecdsa
The DSA algorithm based on elliptic curves. This lets you pick be-
tween 256, 384, and 521 bits1. (Elliptic curves do not need as many
bits, so the lower numbers are unproblematic.)
1Yes, indeed 521, this is not a typo for 512. (2521 −1 is a Mersenne prime number, and that makes
the implementation faster. 521 bits are pretty much overkill, though.

144 10 The Secure Shell
ed25519
A fast and (according to current knowledge) very secure method
invented by Daniel J. Bernstein. Within the Secure Shell context this is
still fairly new.
You probably won’t go wrong with 2048-bit RSA, at least for the next few
years. If you’re sure that your clients and servers support Ed25519, then
that is a suitable alternative.
BA “key pair”, just so we mention this, is a set of two matching keys (!), one
private and one public. The public key may be told to everyone as long as
the private key stays confidential. Whatever is encrypted using the public
key can only be decrypted using the private key from the same pair, and vice
versa.
If the remote host’s public key is authentic, then reply to the question with
“
yes
”.
ssh
then stores the public key in the
~/.ssh/known_hosts
file to use as a base
for comparison during future connection requests.
Should you ever see a message like
$ssh blue.example.com
@@@@@@@@@@@@@@@@@@@@@@@@@@@@@@@@@@@@@@@@@@@@@@@@@@@@@@@@@@@
@ WARNING: REMOTE HOST IDENTIFICATION HAS CHANGED! @
@@@@@@@@@@@@@@@@@@@@@@@@@@@@@@@@@@@@@@@@@@@@@@@@@@@@@@@@@@@
IT IS POSSIBLE THAT SOMEONE IS DOING SOMETHING NASTY!
Someone could be eavesdropping on you right now (man-in-the-middle
attack)!
It is also possible that the RSA host key has just been changed.
The fingerprint for the RSA key sent by the remote host is
38:fa:2e:d3:c7:c1:0f:26:2e:59:e8:16:a4:0a:0b:94.
Please contact your system administrator.
Add correct host key in /home/hugo/.ssh/known_hosts to get rid of
this message.
Offending key in /home/hugo/.ssh/known_hosts:4
RSA host key for blue.example.com has changed and you have requested
strict checking.
Host key verification failed.
when trying to establish an
ssh
connection, you may be about to become the victim
of a man-in-the-middle attack—the public key that the server presents does not
equal the one stored for the server in the
known_hosts
file. You should contact the
remote host’s administrator to find out what is going on—perhaps the host key
needed to be changed for other reasons.
BYou can change this behaviour by changing the appropriate setting in the
~/.ssh/config
file:
StrictHostKeyChecking ask
default setting
StrictHostKeyChecking no
always accept everything
StrictHostKeyChecking yes
never accept anything new
When “
StrictHostKeyChecking yes
” is set, you can only establish connections
to hosts that are already in your
known_hosts
file. All others will be refused.
After having established a connection using
ssh
, you can use the remote host
as if you sat in front of it. You can close the connection using
exit
or Ctrl +d.
BUnless you specify otherwise, during interactive
ssh
sessions the tilde (“
~
”)
will be considered a special “escape character” if it occurs immediately after
a newline character. This lets you control
ssh
during an ongoing session. In
particular, the “
~.
” sequence will close the connection, which may come in
useful if a program has become stuck at the “other end”. You can do other
interesting things—look at the “ESCAPE CHARACTERS” section of
ssh
(1).

10.3 Other Useful Applications:
scp
and
sftp
145
Incidentally,
ssh
does not restrict you to interactive sessions, but lets you execute
single commands on the remote host:
$ssh blue.example.com hostname
hugo@blue.example.com's password: geHe1m
blue.example.com
$ _
Of course you need to take into account that the shell on your computer will try to
process the command line in order to replace shell wildcard patterns etc. before
it is transmitted to the remote host. Use backslashes or quotes if you are in doubt.
Exercises
C10.1 [!1] Use the
ssh
command to log in to another host (if necessary, your
instructor will tell you which one). What happens? Log out and log in again
to the same host. What is different?
C10.2 [2] Remove the remote host’s entry created during Exercise 10.1 from
the
~/.ssh/known_hosts
file and set the
StrictHostKeyChecking
parameter in the
~/.ssh/ssh_config
file to
yes
. Try logging in to the remote host again. What
happens? What happens if the option
StrictHostKeyChecking
is set to
no
?
C10.3 [2] Must the
~/.ssh/known_hosts
file be readable for the user only and if
so, why? (If not, why not?)
C10.4 [!2] Execute the
hostname
and
date
commands on the remote host, using
a single invocation of the
ssh
command.
10.3 Other Useful Applications:
scp
and
sftp
Using
scp
you can copy files between two hosts via an SSH connection:
$scp blue.example.com:hello.c .
hugo@blue.example.com's password: geHe1m
hello.c 100% |***********************| 33 KB 00:01
The syntax is based on the
cp
command: Just like with
cp
, you can specify two file
names (source and destination) or a list of file names and a destination directory.
With the
-r
option,
scp
copies directory contents recursively.
BYou may even copy files between two different remote hosts:
$scp hugo@blue.example.com:hello.c \
>hschulz@pink.example.com:hello-new.c
The
sftp
command is inspired loosely by common FTP clients, but needs an
SSH connection. It has nothing whatsoever to do with FTP otherwise—in partic-
ular, you cannot use it to communicate with an FTP server.
After having established a connection using a command like
$sftp hugo@blue.example.com
you can use commands such as
get
,
put
, or
mget
to transfer files between your local
host and the remote host, inspect the contents of a directory on the remote host us-
ing
ls
, and change into different directories there by means of
cd
. At the beginning
of a session you will be placed in your home directory on the remote computer.

146 10 The Secure Shell
10.4 Public-Key Client Authentication
Normally the SSH server will authenticate you as a user by means of a pasword
that is assigned to your account on the server (usually in
/etc/passwd
or
/etc/shadow
).
Since the password is queried only after the encrypted connection has already
been established, this is in principle safe from unwanted listeners. However, you
may be bothered by the fact that your password itself is stored on the server—even
though it is encrypted, the password file could fall in the hands of crackers who
then apply “John the Ripper” to it. It would be better if nothing secret about you
would be stored on the remote host at all.
You can achieve this by using public-key client authentication instead of the
simple password-based client authentication. In a nutshell, you create a key pair
consisting of a public and a private key and deposit the public key on the SSH
server. The public key does not need to be specially protected (it is a public key,
after all); you will need to sit on the private key, but it will never leave your own
computer (which you never let out of your sight, don’t you?).
BYou can also put your private key on an USB stick if you think that will be
more secure.
The server can authenticate you as the rightful owner of the private key match-
ing the deposited public key by generating a random number, encrypting it using
the public key, and sending it to you. You decrypt (or rather, your
ssh
decrypts)
the encrypted random number using the private key. The result is returned to the
server, which compares it to its original random number, and if the two match it
believes you that you are yourself.
BOf course all of this takes place across the encrypted connection and is there-
fore secure from unwanted listeners and scumbags that want to mess with
your data.
To use public-key client authentication, you first need to generate a key pair.
This is done using the
ssh-keygen
command:
$ssh-keygen -t rsa -b 2048
or
ed25519
Generating public/private rsa key pair.
Enter file in which to save the key (/home/hugo/.ssh/id_rsa):
↩
Created directory '/home/hugo/.ssh'.
Enter passphrase (empty for no passphrase): secret
Enter same passphrase again: secret
Your identification has been saved in /home/hugo/.ssh/id_rsa.
Your public key has been saved in /home/hugo/.ssh/id_rsa.pub.
The key fingerprint is:
39:ab:15:f4:2f:c4:e6:21:26:c4:43:d7:27:22:a6:c4 hugo@blue
The key's randomart image is:
+---[RSA 2048]----+
| . . .. |
| Eoo.. o . |
| . o+... o |
| .. o + |
| . S * |
| o O o |
| o o . |
| o . |
| . |
+-----------------+
The command first asks where you would like the key pair to be stored. The
default is reasonable and you should simply confirm it.

10.4 Public-Key Client Authentication 147
Next,
ssh-keygen
asks for a “passphrase”. This is used to encrypt the private
key in order to prevent somebody who happens to find your private key from
impersonating you to the SSH server.
BYou can (and should) really use a longer sentence here. A shorter password
from a variegated mixture of letters, digits, and special caharacter is proba-
bly O.K., too. The usual rules for that kind of secret apply.
You must use keys without a passphrase for non-interactive SSH connections, e. g.,
for shell scripts and
cron
jobs. In this case you just press ↩when you are asked
for the passphrase.
BIt is possible to connect a public key on the server with a particular com-
mand. Client connections using this public key will then not launch a shell
session; instead, the command in question will be started directly. This can
significantly mitigate the security risk connected with unencrypted private
keys for the use of scripts.
The result of
ssh-keygen
are the two files
id_rsa
and
id_rsa.pub
in the
~/.ssh
direc-
tory. The former contains the private and the latter the public key.
BIf you have specified “
-t ed25519
” during the key generation, the files are, of
course, called
id_ed25519
and
id_ed25519.pub
.
BThe
ssh-keygen
command also shows you the fingerprint of the public key
and a “randomart image”. The latter is a graphical representation of the
public key, a kind of graphical fingerprint. Theoretically this should enable
you to tell at a glance whether a public key has changed or not. The idea is,
with all due respect, debatable.
BOf course nobody prevents you from invoking
ssh-keygen
multiple times
in order to generate several key pairs with different encryption methods.
(Or several key pairs with the same encryption method for use with differ-
ent servers. You will naturally need to ensure that these use different file
names.)
The next step is to deposit the public key, i. e., the content of the
id_rsa.pub
file,
in the
~/.ssh/authorized_keys
file in your user account on the remote host. This is
most easily done using the
ssh-copy-id
command:
$ssh-copy-id hugo@blue.example.com
hugo@blue.example.com's password: geHe1m
Ein letztes Mal
Now try logging into the machine, with "ssh 'hugo@blue.example.com'",
and check in:
.ssh/authorized_keys
to make sure we haven't added extra keys that you weren't expecting.
$ _
BOf course you could just as well do that “the hard way” using
scp
and/or
ssh
. Just make sure not to overwrite any keys that may already exist in
~/
.ssh/authorized_keys
and that you would want to hang on to.
BIf you set the
PasswordAuthentication
entry in the
/etc/ssh/sshd_config
file on
the server to
no
and
PubkeyAuthentication
to
yes
, then users can only authen-
ticate via the public key method. This is basically a good idea since crack-
ers enjoy running automatic programs that try obvious passwords on SSH
servers.

148 10 The Secure Shell
Public-key authentication, if you are using a passphrase, is not more convenient
than password authentication, but considerably more secure. If you want to log
in to the same host as the same user several times in a row, constantly re-entering
the passphrase can be a nuisance, though. The
ssh-agent
was developed to help
with this.
The
ssh-agent
program remembers the passphrase and passes it to SSH client
ssh-agent
programs as needed. The program is started using, e. g., “
ssh-agent bash
”. This
opens a new
bash
, in which you must add the passphrase using
ssh-add
:
ssh-add
$ssh-add
Enter passphrase for /home/test/.ssh/id_rsa: Quoth the raven
Identity added: /home/test/.ssh/id_rsa (/home/test/.ssh/id_rsa)
Every instance of
ssh
,
scp
, or
sftp
started from the new shell gets the passphrase
from the SSH agent. The agent “forgets” the passphrase once you leave the shell
using
exit
or instruct it, using “
ssh-add -D
”, to forget all stored identities..
With Debian GNU/Linux, the login shell/GUI may be started with the
ssh-agent
active right away, so you can
ssh-add
your passphrase at the very
beginning of your session.
BTo be fair, we ought to mention that
ssh-agent
increases convenience to the
detriment of security. If you leave your computer unattended (or if you lose
your “suspended” laptop), an unauthorised person might be able to use the
SSH programs without being asked for a passphrase. The same applies to
programs that somehow get access to your session, such as viruses, worms
and other vermin …
Exercises
C10.5 [!2] Using
ssh-keygen
, create an RSA key pair for SSH version 2. (Re-
member, at least 2048 bits!) Install the public key on the remote host and
check that you are no longer asked for the remote password upon login.
What do you need to enter instead?
C10.6 [!1] Determine your public key’s “fingerprint”.
C10.7 [2] Under what circumstances might you want to refrain from using a
passphrase for your private key?
10.5 Port Forwarding Using SSH
10.5.1 X11 Forwarding
Using X11 forwarding, you can execute graphical programs on a remote host,executing GUI programs
where graphics output and keyboard/mouse input take place on your local com-
puter. You merely need to use
ssh
to log in to the remote host, giving the
-X
(up-
percase X!) option. On the server side, X11 forwarding (parameter
X11Forwarding
in
/etc/ssh/sshd_config
) must be enabled.
After logging in using “
ssh -X
[⟨user name⟩
@
]⟨host⟩” you may execute arbitrary
X clients whose input and output are directed to the local X server. This is due to
several factors:
• When logging in using
-X
, the
DISPLAY
variable is set up to point to a “proxy”
X server provided by
sshd
. This directs X clients started on the remote host
to this server.
• Everything a remote X client sends to the proxy X server is sent to the (real)
X server on the SSH client.

10.5 Port Forwarding Using SSH 149
• All the X11 traffic is encrypted so eavesdroppers cannot listen in (tunneling).
BYou can also enable X11 forwarding globally in order to avoid having to type
the
-X
option. You just need to add “
ForwardX11 yes
” to your
~/.ssh_config
(or
/etc/ssh/ssh_config
for a system-wide default).
X11 forwarding is preferable to the standard X packet redirection (using
DISPLAY
)
not only because of its increased security but also because it is much more conve-
nient. You pay for this with some extra effort for encryption, which on modern
hardware ought to be barely noticeable.
BEven X11 forwarding is not without its security risks. Users who can cir-
cumvent file access rights on the remote host (e. g., because they are
root
)
may access your local X11 display. For this reason you should probably
avoid enabling X11 forwarding globally. The same risk exists, of course,
with “conventional” X11 redirection using
DISPLAY
.
10.5.2 Forwarding Arbitrary TCP Ports
SSH can forward and tunnel not only the X protocol, but also nearly every other Port forwarding
TCP-based protocol. This can be set up using the
-R
and
-L
options. The following
command tunnels connections to the local TCP port 10110 first via an SSH con-
nection to the computer
blue.example.com
. From there it continues (unencrypted)
to the TCP port 110 (POP3) on the
mail.example.com
host:
$ssh -L 10110:mail.example.com:110 hugo@blue.example.com
The benefit of this approach is approximately as follows: Imagine your firewall
blocks POP3 but passes SSH. By means of the port redirection you can enter the
internal network via SSH and then connect from the
blue.example.com
host to the
mail server on the internal network. In your mail program you need to specify
localhost
and the local TCP port 10110 as the “POP3 server”.
BYou could theoretically forward the local TCP port 110, but you need to be
root
to do it.
BThe name of the forwarding destination host (here
mail.example.com
) is re-
solved from the perspective of the SSH server (here
blue.example.com
). This
means that a redirection of the form
$ssh -L 10110:localhost:110 hugo@blue.example.com
connects you to port 110 on
blue.example.com
rather than your own computer.
BA port forwarding like
-L 10110:mail.example.com:10
opens port 10110 on all IP addresses on your computer. This opens the redi-
rection, in principle, to all other hosts that can reach this port over the net-
work. To prevent this you can use the fact that
ssh
allows you to specify a
local address for the redirected port: With
-L localhost:10110:mail.example.com:110
the redirection only applies to the local interface.

150 10 The Secure Shell
If you invoke
ssh
as shown, you get an interactive session on top of the port
forwarding. If you do not need this—because the forwarding takes place within a
cron
job—you can specify the
-N
option, which restricts
ssh
to do the port forward-
ing and not establish an interactive session.
Another (possibly better) technique for automatically forwarding services uses
a
ssh
invocation like
$ssh -f -L 10110:mail.example.com:110 blue sleep 10
$getmail_fetch -p10110 localhost hugomail MaIl123 Maildir/
The
-f
option causes the
ssh
process to go to the background immediately before
the “
sleep 10
” command is executed. This means that a command that you execute
immediately after the
ssh
command (here
getmail_fetch
, which retrieves e-mail via
POP3) has 10 seconds to establish a connection to the local port 10110. The
ssh
process exits either after 10 seconds or else when the (last) connection via the
local port 10110 is torn down, whichever occurs later.
Port forwarding also works the other way round:
$ssh -R 10631:localhost:631 hugo@blue.example.com
opens the TCP port 10631 on the SSH server, and connections that programs there
make with that port will be redirected across the SSH connection to your local
host. Your local host then takes care of redirecting the decrypted data to the des-
tination, here port 631 on your local host itself. (This type of port forwarding is
considerably less important than the one using
-L
.)
BThe
-R
port forwarding usually binds the remote port to the
localhost
inter-
face on the SSH server. In principle you can pick another interface as shown
above (“
*
” implies “all”), but whether that works depends on the configu-
ration of the SSH server.
You can also add port forwarding after the fact. Do this using the “
~C
” key
combination (it must be an uppercase C), which gives you a “command line”:
An SSH session is in progress here
remote$
↩
remote$
~ C
ssh> -L 10025:localhost:25
Forwarding port.
SSH session goes on
On the “command line” you can add
-L
and
-R
options (among other things), as if
you had typed them directly on the
ssh
command line. Using
-KR
, followed by the
port number, you can also cancel an
-R
port forwarding (unfortunately there is no
-KL
). With the “
~#
” command you can check the currently active connections:
remote$ ~#
The following connections are open:
#2 client-session (t4 r0 i0/0 o0/0 fd 6/7 cfd -1)
#3 direct-tcpip: listening port 10025 for localhost port 25,
connect from 127.0.0.1 port 57250
(t4 r1 i0/0 o0/0 fd 9/9 cfd -1)
AAs you have undoubtedly gleaned from the preceding sections,
ssh
provides
the opportunity for all sorts of shenanigans that would bring tears to the
eyes of a corporate IT security officer. Please do consider this chapter a pre-
sentation of some of the features of
ssh
, not a recommendation to actually

10.5 Bibliography 151
use as many of them as possible (at least not without a sound reason). As
the operator of an SSH server you should, in particular, study its documen-
tation (such as
sshd_config
(5)) in order to find out how to suppress use of the
more dangerous options. Unfortunately there is not enough room in this
manual for a complete treatment of the SSH server configuration.
Exercises
C10.8 [!1] How can you use
ssh
to conveniently start X11 clients as
root
from
an unprivileged user account on the same host?
C10.9 [3] Use
ssh
to forward port 4711 (or some other suitable local port) to
the
echo
port (port 7) of a remote host. Check using a packet sniffer (
tcpdump
or
wireshark
) that a connection to the local port 4711, e. g. using “
telnet
localhost 4711
”, actually causes an encrypted data transfer to the remote host
and is decrypted only there.
Commands in this Chapter
scp
Secure file copy program based on SSH
scp
(1) 145
sftp
Secure FTP-like program based on SSH
sftp
(1) 145
ssh
”‘Secure shell”’, creates secure interactive sessions on remote hosts
ssh
(1) 142
ssh-add
Adds private SSH keys to
ssh-agent ssh-add
(1) 148
ssh-agent
Manages private keys and pass phrases for SSH
ssh-agent
(1) 148
ssh-copy-id
Copies public SSH keys to other hosts
ssh-copy-id
(1) 147
ssh-keygen
Generates and manages keys for SSH
ssh-keygen
(1) 146
sshd
Server for the SSH protocol (secure interactive remote access)
sshd
(8) 142
Summary
• The Secure Shell allows convenient and secure interactive sessions on re-
mote hosts (and thus replaces TELNET, RSH and RLOGIN) as well as the
secure transmission of files similar to RCP or FTP.
• OpenSSH is a powerful, freely available Secure Shell implementation.
• The user may choose from password authentication and public key authen-
tication. The latter is more secure but more difficult to set up.
• The Secure Shell can forward X11 graphics display and interaction as well
as arbitrary TCP connections across the encrypted channel.
Bibliography
BS01 Daniel J. Barrett, Richard Silverman. SSH, The Secure Shell: The Definitive
Guide. Sebastopol, CA: O’Reilly & Associates, 2001. ISBN 0-596-00011-1.
http://www.oreilly.com/catalog/sshtdg/
RFC4253 T. Ylonen, C. Lonvick. “The Secure Shell (SSH) Transport Layer Proto-
col”, January 2006.
http://www.ietf.org/rfc/rfc4253.txt

$ echo tux
tux
$ ls
hallo.c
hallo.o
$ /bin/su -
Password:
11
Electronic Mail
Contents
11.1 Fundamentals . . . . . . . . . . . . . . . . . . . . . 154
11.2 MTAs for Linux . . . . . . . . . . . . . . . . . . . . 154
11.3 Basic Functionality . . . . . . . . . . . . . . . . . . . 155
11.4 Managing The Mail Queue . . . . . . . . . . . . . . . . 156
11.5 Local Delivery, Aliases And User-Specific Forwarding . . . . . . 156
Goals
• Knowing the most common mail server programs on Linux by name
• Being able to configure basic mail forwarding and aliases
• Knowing the most important commands for mail server management
Prerequisites
• Kenntnisse über Linux”=Systemadministration
• Kenntnisse über TCP/IP”=Grundlagen (Chapter 3)
• Kenntnisse über Linux”=Netzkonfiguration (Chapter 4)
adm2-email.tex
(
0cd20ee1646f650c
)

154 11 Electronic Mail
11.1 Fundamentals
Electronic mail is one of the most popular services on the Internet. Mail trans-
fer agents, or MTAs—programs that forward or receive electronic mail—, play a
central role in this. While users interact directly with mail user agents, or MUAs—
programs such as KMail, Mutt, or Outlook Express—, to read, compose, reply to,
sort, or delete messages, MUAs avail themselves of the services of MTAs to trans-
port messages to their recipients. MTAs can be located with ISPs or be installed
locally. Tasks performed by MTAs also include address rewriting to “canonical”
form or one suitable for replying to, retrying mail deliveries that failed, notifying
the sender of errors during delivery, or optimising for delivery time, network load,
or cost. Among themselves, MTAs on the Internet communicate using SMTP (the
“Simple Mail Transfer Protocol”).
BIn the context of electronic mail, other protocols such as POP3 or IMAP are
also important, but not for LPIC-1 certification. The topic is treated in detail
in the Linup Front training manual, Linux Mail Servers.
11.2 MTAs for Linux
One common MTA for Unix and Linux systems is the Sendmail program, whichSendmail
was originally implemented by Eric Allman at the University of California in
Berkeley in the early 1980s. In spite of its extremely complex configuration and
a long history of security vulnerabilities Sendmail still commands a large com-
munity of devoted users (even among Linux distributors). Other popular MTAs
include Postfix by Wietse Venema, Exim by Philip Hazel, and Qmail by Dan J.Postfix
Exim
Qmail
Bernstein.
In a vicious fit of “design by committee”, the developers of the LPIC-1
certification have decreed that candidates must know all of these MTAs—
fortunately only on a very basic level. Just as fortunately, at least Postfix and
Exim make efforts to be compatible with Sendmail as far as certain aspects
of their configuration and command structure are concerned; only Qmail
actively tries to be different. We shall be explaining the most important
properties of all these MTAs on a fundamental level as required for LPIC-1.
Generally speaking, Sendmail and Exim resemble each other closest as far as
their architecture is concerned. With both, the complete MTA is running as onearchitecture
single process. Postfix and Qmail, on the other hand, separate the MTA func-
tionality into a whole family of processes, mostly for security. The advantage of
this approach is that every process can concentrate on one part of the task, com-
munication between the individual processes is only possible across well-defined
interfaces, and every process can run with the minimal set of privileges required.
While, at least potentially, all parts of Sendmail and Exim have access to adminis-
trator privileges, with Postfix and Qmail this is restricted to the “foreman process”
as well as (typically) those processes that deliver mail to users and hence need to
be able to assume their identities (which requires administrator privileges). Qmail
deliberately offers only restricted functionality, also for security reasons (features
that are not there cannot have vulnerabilities); this omits many features that other
MTAs provide out of the box and which must be added explicitly to Qmail. Of
the MTAs mentioned here, Sendmail and Qmail are most difficult to maintain by
far.
BIf you are in a position to pick your own MTA, then absolutely do go for
Postfix.

11.3 Basic Functionality 155
11.3 Basic Functionality
An MTA like Sendmail has two major jobs to perform:
• It listens on the SMTP port, TCP port 25, for connections from other MTAs Receiving messages
that want to deliver mail to local recipients. These messages are written to
users’ mailboxes by means of an MDA or “mail delivery agent” or else for- MDA
warded, e. g., to other addresses according to their preferences. To receive
messages on TCP port 25, the MTA must either run permanently as a free-
standing daemon or be started on demand by a “super server” such as
inetd
or
xinetd
. The latter is only worthwhile if there is very little mail to process.
• It sends messages that have been submitted for delivery by local MUAs and Sending messages
other programs either by calling the MTA directly or by sending it via SMTP
and port 25. Since these messages may be addressed to local users as well
as remote ones, this function cannot be separated from mail reception.
BYou do not need to make use of both functions at once. For example, if
you do not foresee receiving messages from the Internet—say, because your
computer isn’t connected to the Net directly—you do not need to run an
MTA on TCP port 25, at least not on other IP addresses than
localhost
.
BConversely, you can allow sending local mail without delivering it; in local
area networks it is common to just designate one host as the mail server and,
on the other hosts, to install a minimally configured MTA that just forwards
all submitted mail to the mail server, which then delivers it locally or sends
it to the Internet.
Usually, Sendmail delivers messages to local users to their mailboxes in the mailboxes
/var/mail
directory (on many systems the officially deprecated
/var/spool/mail
di-
rectory is still in use, often mapped to
/var/mail
using a symbolic link), where
MUAs, or IMAP or POP servers can pick them up. Every mailbox is a file whose
name corresponds to that of the user it belongs to; new messages are simply ap-
pended to that file. For this to work reliably, all programs using the mailbox must
be able to lock it, so the MUA does not try to delete messages while the MTA ap-
pends new ones; the absence of standardised and reliable file locking methods on
Linux sometimes makes this a risky endeavour.
BUnlike Sendmail, Qmail uses its own mailbox format called “Maildir”,
which instead of one large file for all messages uses an intricate arrange-
ment of directories where each message occupies its own file. This obviates
most problems with locking. By convention, Maildir-style mailboxes are not
located in
/var/mail
but in a user’s home directory, which makes backups
and quota management easier.
BBy default, Postfix and Exim operate like Sendmail, but optionally also allow
the delivery of mail to Qmail-style Maildir files.
Sendmail tries to get rid of messages to remote recipients as soon as possible; if Queue
this does not work outright, e. g., if the receiving station is not available, or if you
are on a dial-up connection and want to delay the actual sending until a worth-
while number of messages has been queued, any undelivered messages are stored
in the
/var/spool/mqueue
directory. The other MTAs also use similar directories to
store undelivered messages and other internal data—
/var/spool/postfix
for Postfix,
/var/spool/exim
(or something like this) for Exim, or
/var/qmail
for Qmail.
BIt is usually a good idea not to place such directories—
/var/mail
and
/var/
spool/mqueue
& co.—on the
/
partition, so eager mail senders or recipients
cannot fill up all of the disk space there and thereby put the system as a
whole into jeopardy.

156 11 Electronic Mail
11.4 Managing The Mail Queue
The MTAs store undelivered messages—due to errors at the other end or local
thriftiness with dialup access—in queues. If you want to check what is actually in
the queue, you can use the
mailq
command on Sendmail (which is an abbreviation
for “
sendmail -bp
”).
BThe same applies to Exim and Postfix, which deliberately come with Sendmail-
compatible programs for this purpose; only with Qmail do you have to
resort to its own software such as
qmail-qread
or
qmail-stat
.
A daemonised Sendmail can process the queue at given fixed intervals. This isProcessing the queue
a good idea so delivery attempts can be retried later if the destination MTAs could
not be reached. You can arrange for Sendmail to do this by passing the
-q
option
on the command line, immediately followed by a time specification:
#sendmail -bd -q30m
starts Sendmail as a daemon and causes it to run through its queue every 30 min-
utes.
You can get Sendmail to process its queue immediately by invoking it with
-q
(without an interval):
#sendmail -q
Sendmail then tries to deliver all the messages in the queue. You can execute this
command automatically after your computer has established a dialup connection,
or use
cron
to make a connection to the Net at appropriate times and deliver mail.
Here, too, Postfix and Exim work substantially the same; to get Qmail to process
its queue, you need to send
SIGALRM
to the
qmail-send
process.
11.5 Local Delivery, Aliases And User-Specific Forward-
ing
Usually, Sendmail & co. write messages to local recipients to their mailbox in
/var/
mail
(Qmail uses the
Maildir
directory in their home directories instead). However,
there are several methods of changing this default:
The
/etc/aliases
file (possibly also
/etc/mail/aliases
) allows you to configure a
/etc/aliases
different delivery method for certain local addresses: An entry like
Forwarding
root: hugo
forwards messages addressed to
root
to the local user
hugo
instead—a very sensible
approach, since you should not read mail as
root
for security reasons. You can also
forward messages to several destination addresses:
hugo: \hugo, hschulz@example.net
This forwards messages addressed to
hugo
both to the
hschulz@example.net
address
and
hugo
’s local mailbox. The backslash is necessary to avoid an endless loop.
The following example illustrates some other features of
/etc/aliases
:
file: /tmp/mailfile.txt
program: "|/usr/local/bin/program foo"
list: :include:/var/lib/list.txt

11.5 Local Delivery, Aliases And User-Specific Forwarding 157
Messages to
file
are simply appended to
/tmp/mailfile.txt
. The format is iden-
tical to that of the mailboxes in
/var/mail
. Messages to
program
are passed to the
“
/usr/local/bin/program foo
” command on its standard input. And messages to
list
, finally, cause the
/var/lib/list.txt
file to be consulted; every line in this file
may be another forwarding instruction in the same format as used on the right-
hand side of
/etc/aliases
. (This is particularly useful for “mailing lists”, which
can store their subscriber lists in such files so mailing list software can manipu-
late them easily.)
BPostfix and Exim understand this sort of alias file as well, sometimes with
additional features; for example, it may be possible to control whether
message forwarding to files or programs is allowed in
/etc/aliases
only, in
:include:
lists, or combinations of these.
BTo configure forwarding with Qmail, you must create a file for the address Mail forwarding with Qmail
in question in
/var/qmail/alias
:
echo &hugo >/var/qmail/alias/.qmail-root
forwards all mail to
root
to
hugo
instead. (The “
&
” at the start indicates that
the rest of the line is an e-mail address.) In Qmail’s alias files you can do
approximately what you can do with Sendmail and friends; the only feature
not supported directly are
:include:
lists.
Sendmail & co. do not read
/etc/aliases
directly but use a binary database for- Binary format
mat which allows quicker access. The details are system-dependent! For your
changes to
/etc/aliases
to become effective, you must transform the file to the bi-
nary format using the
newaliases
command (short for “
sendmail -bi
”).
BHere, too, Postfix and Exim behave roughly in the same manner; Postfix also
comes with a program called
postalias
which does the same thing. Qmail,
as mentioned above, does its own thing and does not use a binary format,
so the problem does not come up.
Users can make their own arrangements by putting the same style of forward-
~/.forward
ing specification allowed on the right-hand side of
/etc/aliases
into a file called
.forward
inside their home directories. Sendmail observes these settings when a
message is to be delivered to the user in question. The most popular example may
well be
$cat /home/hugo/.forward
\hugo, "|/usr/bin/vacation hugo"
BThe
vacation
program is an automatic “mail answering service” which
replies to incoming messages using the content of the
~/.vacation.msg
file.
You can use this to inform your correspondents that you are unavailable for
a prolonged period of time because of a vacation or other absence.
BPostfix and Exim can also handle
.forward
files. Qmail supports a moral
equivalent under the name of
.qmail-default
(the possible entries are sub-
tly different, check
dot-qmail
(5)).
The delivery of messages to arbitrary programs and thus the remote invocation
of arbitrary programs via the Internet by people without actual access privileges
to the system does present a security risk. Many system administrators confine the security risk
choice of programs allowed in
~/.forward
to a few selected ones that are considered
safe.

158 11 Electronic Mail
Commands in this Chapter
mailq
Displays the state of the mail queue (Sendmail & co.)
sendmail
(1) 155
newaliases
Updates a mail server’s alias database (Sendmail/Postfix)
newaliases
(1) 157
sendmail
MTA administrative command (Sendmail, but also other – compatible
– MTAs)
sendmail
(1) 155
vacation
Automatic e-mail responder, e. g., for longer absences
vacation
(1) 157

$ echo tux
tux
$ ls
hallo.c
hallo.o
$ /bin/su -
Password:
12
Introduction to GnuPG
Contents
12.1 Asymmetric Cryptography and the “Web of Trust” . . . . . . . 160
12.2 Generating and Managing GnuPG Keys. . . . . . . . . . . . 163
12.2.1 Generating Key Pairs . . . . . . . . . . . . . . . . 163
12.2.2 Publishing a Public Key . . . . . . . . . . . . . . . 165
12.2.3 Importing and Signing Public Keys . . . . . . . . . . . 166
12.3 Encrypting and Decrypting Data . . . . . . . . . . . . . . 169
12.4 Signing Files and Verifying Signatures . . . . . . . . . . . . 171
12.5 GnuPG Configuration . . . . . . . . . . . . . . . . . . 173
Goals
• Understanding GnuPG
• Generating and managing GnuPG keys
• Encrypting and decrypting files
• Signing files and verifying signatures
Prerequisites
• Working with files on Linux
• Basic text editing
• Cryptography knowledge is a plus
adm2-gpg.tex
(
0cd20ee1646f650c
)

160 12 Introduction to GnuPG
12.1 Asymmetric Cryptography and the “Web of Trust”
GnuPG allows you to encrypt and sign files and email messages. An encryptedencryption
file is a file containing data that is scrambled in such a way that only authorised
persons can view or process it. Authorised persons have to decrypt the file with
the correct key in order to access it. By signing some data, you can documentsigning
the fact that you created or approved of the data. When the data are changed
afterwards, the signature becomes invalid. GnuPG signatures are an inherent part
of package management tools like
apt
or RPM. They play an important role in the
verification of package data in Linux distributions.
BThe encryption performed by GnuPG cannot be broken easily. Even mod-
ern and well-equipped intelligence organizations lack the computing power
to retrieve the plain text from a GnuPG-encrypted file without knowing the
key. This is why there are countries where the use of cryptographic soft-
ware like GnuPG is illegal1. One country that used to regulate the use of
cryptographic software is France, where encryption was forbidden in 1996.
In the meantime the government yielded to reason, though. In 1999, the ban
was lifted.
BIt is up to you to assess the value of digital GnuPG signatures. Developers of
Debian GNU/Linux software packages have to sign their packages before
uploading them to the Debian FTP server, where they are accessible by the
public. The signature does not tell you anything about the quality of the
package. Its only purpose is to make sure that the developers themselves
uploaded the packages and no malicious packages were introduced to the
software collection by third parties.
In order to explain the principles behind GnuPG, we will have to digress a little
bit.There are basically two approaches to cryptography. Cryptography is a
method for encrypting and decrypting data. The first approach is called “sym-symmetric cryptography
metric cryptography”. It uses the same key for encrypting and decrypting data.
When Alice and Bob2wish to exchange private data using a symmetric method,
they have to invent a key first. The same key has to be known to both of them.
When Charlie enters the game, three different keys are needed: one for the com-
munication between Alice and Bob, one for Alice and Charlie, and one for Bob
and Charlie. Four parties need six keys, ten parties need 55 keys, 100 parties need
5050 keys, etc. The number of keys grows geometrically in relation to the number
of parties involved. All the keys are secrets, so they have to be distributed in such
a way that no third party can come to know them.
The major issue with symmetric cryptography is not cryptography itself but
key distribution. First, keys have to be transmitted in a secure way, so cryptog-
raphy would be useful for distributing them in the first place. Second, on the
Internet with millions of potential users the number of keys required for every
user to be able to communicate confidentially with every other would be so astro-
nomical that probably no other data could be stored. Both of these problems are
solved by “asymmetric cryptography”.
Asymmetric cryptography uses different keys for encrypting and decryptingasymmetric cryptography
data. A set of asymmetric keys is called a key pair. Each key pair consists of
key pairs a “public key” and a “private key”. The public key can safely be made public,
while the private key must be kept secret. Now Alice can send a private message
to Bob by encrypting it with Bob’s public key. Bob then uses his private key to
decrypt the message. Because only Bob knows his private key, the message is safe
during transmission.
1However: “If cryptography is outlawed, only outlaws will have cryptography”.
2Cryptographers invariably refer to two parties who want to exchange private data as “Alice” and
“Bob”.

12.1 Asymmetric Cryptography and the “Web of Trust” 161
BWe ignore a few details here, the most import one being that virtually all
known asymmetric cryptograhic methods are too slow and too cumbersome
to use to transfer large amounts of private data. This is why asymmetric
methods are often used to exchange the keys used to encrypt and decrypt
data symmetrically. (Symmetric cryptography is fast and efficient and can
easily process vast amounts of data.)
BHere is a concrete example: When Alice wants to communicate with Bob
confidentially, she first generates a random key for a symmetric cryptosys- “hybrid” encryption
tem, encrypts this key—call it 𝑆—with Bob’s public key and sends the result
to Bob. Bob uses his private key to decrypt Alice’s message and thus obtains
the key, 𝑆. Now Alice and Bob can use 𝑆in their symmetric cryptosystem
to exchange confidential messages to their heart’s content.
Signatures work exactly the other way around. Alice signs a file by encrypting Signatures
it with her private key. Bob can verify that Alice signed a file by decrypting it with
Alice’s public key (which he can easily obtain because it is public, after all). When
the decryption results in consistent data, the file must have been signed using
Alice’s private key.
BIn practice, you would not encrypt the entire file using an asymmetric
method because, as we said, they are too cumbersome and slow. Instead,
you would generate a “cryptographic message digest” of the file instead cryptographic message digest
and sign that. Common methods for computing such digests include MD5
and SHA-1. Using a digest is about as safe as encypting the entire file,
because whenever the file changes the value of the digest changes, too.
Asymmetric cryptography solves the problem of key distribution, but intro-
duces another problem. How does Bob know that the key which he uses to verify key authenticity
Alice’s signature is really Alice’s public key? Maybe a malicious person (cryptog-
raphers call this person “Mallory”) foisted the wrong key on him. What is missing
in this process is some means of verifying the authenticity of public keys.
BThe Secure Shell sidesteps this problem by letting the user authenticate the
keys. Whenever the
ssh
program contacts an unknown server, it asks you
whether you want to include its public key in your list of known hosts. (This
is explained in detail in Chapter 10.) At this point it is completely up to you
to verify the authenticity of the key presented to you.
The SSL and TLS infrastructures, as used, for example, by “secure” web sites,
solve this problem by introducing a hierarchy of so-called certification authorities. certification authorities
The entire construct is called a “public key infrastructure” (PKI). The certification
authorities assert that a specific key “belongs” to a specific person and attest to this
claim by means of a digital signature. A set consisting of a public key, the owner
of a digital signature, and the signature and name of the certification authority is
called a certificate. As a user you can verify the signature on the certificate us- certificate
ing the certification authority’s public key (which you have obtained from a trust-
worthy source—typically the more important ones come with your web browser).
When the technical details have been worked out, the question whether you trust
the signature on a given certificate boils down to the question whether you trust
the people and the work of the certification authority.
GnuPG deliberately does not use the hierarchical structure explained above,
but an approach that is known as the “web of trust”. There are no central certi- web of trust
fication authorites that all users must trust no matter if they want to (of course,
people who do not trust the certification authorities would not use their services).
Instead, the concept assumes that users of GnuPG sign the public keys of peo-
ple they know personally, thereby documenting that the key belongs to a specific
person. Assume you want to send a private message to Charlie, whom you do
not know in person. Somewhere in the depths of the Internet you dig up a public

162 12 Introduction to GnuPG
GnuPG key that claims to be Charlie’s. Whether you can trust this key or not de-
pends on the question whether you (or your GnuPG program) can form a “chain
of trust” from yourself to the key in question. Maybe you have signed Alice’s pub-
lic key, and Alice used her public key to sign Bob’s public key. Bob, in turn, may
be an old buddy of Charlie’s, and so he has signed Charlie’s public key. In other
words, Bob’s signature on Charlie’s key says “This key belongs to Charlie”, so if
Bob’s signature is correct then everything is fine. Bob’s signature on Charlie’s key
can be verified using Bob’s public key, and the authenticity of Bob’s public key is
documented by Alice’s signature on Bob’s key. Alice’s signature, in turn, can be
verified with her public key. The fact that Alice’s public key really belongs to Al-
ice, finally, has been signed by yourself. When all signatures in a chain of trust are
valid, you can assume with reasonable certainty that the key of Charlie actually
belongs to Charlie—it is “valid”.
BIn practice, the method described here is a bit too naive. This is why GnuPG
supports a concept called owner trust: For each public key that you haveowner trust
available you can remember the degree of pedantry their owners apply
when they are dealing with GnuPG keys. Owner trust levels range from
“full” (their signature on a key is as good as your own) to “marginal” (the
owner uses her keys quite carefully) to “none” (the owner uses her keys
rather sloppily). You can also assign an “unknown” trust level to an owner.
Note that trust levels should not depend on how much you care for a person,
but only on how much they care about GnuPG keys.
BGnuPG will consider a public key “valid” if
• the chain of trust connecting you to the owner of the key has no more
than 5 links, and
• it has been signed by a sufficient number of keys that you consider trust-
worthy. More specifically:
–you have signed the key yourself, or
–it is signed with a key that you trust “fully”, or
–it is signed with three keys that you trust “marginally”.
(These parameters can be adjusted, though. The above are the default val-
ues.)
As a GnuPG user who wants to take part in the web of trust, you will have to
abide by a few rules. Most importantly, you should sign other people’s keys only
if you are absolutely positive about their identity. When in doubt, ask the person
for a piece of official photo identification (or even two)—nobody will resent this
degree of diligence. Never sign keys based on hearsay!
Exercises
C12.1 [!2] Which advantages does the “web of trust” have over the PKI ap-
proach? Which advantages does PKI have over the “web of trust”?
C12.2 [2] Imagine the following model: A GnuPG key is “valid”, if the chain
of trust connecting you to the owner of the key has no more than three links
or it has been signed by yourself, with a “fully” trusted key, or with at least
two “marginally” trusted keys. We use a simplified model here to make
things more obvious.
Now consider the following: Alice has herself signed Bob’s and Carla’s pub-
lic keys. Bob and Carla have both signed Doris’s public key. Carla and Doris
have also signed Eric’s public key.
1. When Alice trusts Bob “fully” and Carla “marginally”, which keys are
valid from Alice’s point of view?

12.2 Generating and Managing GnuPG Keys 163
2. What changes if Alice trusts Doris “marginally”?
3. Eric signs Fiona’s public key. What needs to happen to make Fiona part
of Alice’s web of trust?
12.2 Generating and Managing GnuPG Keys
12.2.1 Generating Key Pairs
In principle you do not need your own GnuPG key pair in order to send encrypted
messages to other people or to verify their signatures. All you have to do is to
obtain the public keys in question. However, a successful signature check merely
indicates that a file has not been tampered with—to verify that the signature was
really generated by the person who claims to have created it, you have to take part
in the web of trust. This is the only way to make sure that a signature is “valid”
according to the rules outlined in the previous section. So the first step to seriously
using GnuPG is the generation of your own key pair.
BWhen you use GnuPG to check the integrity of distribution packages, your
distributor normally ships a set of public keys that can be used for verifica-
tion. When these keys are contained on a pressed CD-ROM (as opposed to
a burned one) that you bought in a shop and that was contained in some
kind of decorative wrapper with a company logo on it, then chances are
good that these keys will be trustworthy. With CD-ROMs burned by one of
your “buddies”, though, things well be different.
A key pair is generated by running the
gpg
program with the
--gen-key
option: Generating a key pair
$gpg --gen-key
This program comes with ABSOLUTELY NO WARRANTY.
This is free software, and you are welcome to redistribute it
under certain conditions. See the file COPYING for details.
Please select what kind of key you want:
(1) DSA and Elgamal (default)
(2) DSA (sign only)
(5) RSA (sign only)
Your selection? 1
DSA keypair will have 1024 bits.
ELG-E keys may be between 1024 and 4096 bits long.
What keysize do you want? (2048) 2048
Requested keysize is 2048 bits
The default option, “DSA and Elgamal” actually generates two key pairs: a DSA
key pair for signing data and an inferior Elgamal key pair for encrypting and de-
crypting data.32048 bits are a resonable value these days. 1024 bits are a bit shaky
while 4096 bits sound rather paranoid (and both the computing effort and sizes
of signatures increase with growing key sizes).
Next you have to assign a life time to the key. Private users can safely choose
the option “key does not expire”:
Please specify how long the key should be valid.
0 = key does not expire
<n> = key expires in n days
3“DSA” and “Elgamal” are the cryptographic algorithms that GnuPG uses by default. The first one
is the “Digital Signature Algorithm”, which cannot be used to encrypt data. The latter is a method first
described by Taher Elgamal in 1984. The algorithm is based on the observation that discrete logarithms
are hard to compute in cyclic groups. This conjecture is not proven, though.

164 12 Introduction to GnuPG
<n>w = key expires in n weeks
<n>m = key expires in n months
<n>y = key expires in n years
Key is valid for? (0) 0
Key does not expire at all
Is this correct? (y/N) y
BYou can still change the life time of the key afterwards, but in this case you
will have to redistribute the key in order to make this change known to the
public.
The next step is to assign a “User ID” to your key. This ID consists of a name,
an email address, and an (optional) comment:
You need a user ID to identify your key; the software constructs
the user ID from the Real Name, Comment and Email Address in
this form:
"Heinrich Heine (Der Dichter) <heinrichh@duesseldorf.de>"
Real name: Moh Kohn
Email address: mkohn@example.org
Comment: sample key
You selected this USER-ID:
"Moh Kohn (sample key) mkohn@example.org"
Change (N)ame, (C)omment, (E)mail or (O)kay/(Q)uit? O
Finally you have to specify a “passphrase” that will be used to encrypt your
private key. Best choose a long text with no obvious meaning:
You need a Passphrase to protect your secret key.
Enter passphrase: Three! @pes eat 96,547 dumplings?
Repeat passphrase: Three! @pes eat 96,547 dumplings?
A good passphrase is essential to the security of GnuPG! It is your only protection
should the key pair—especially the private key—ever fall into the wrong hands.
In the last step the key pairs themselves will be generated. This step requires
high-quality random numbers. Linux typically generates those by measuring the
times between I/O events, like key presses, movements of the mouse, etc:
We need to generate a lot of random bytes. It is a good idea
to perform some other action (type on the keyboard, move the mouse,
utilize the disks) during the prime generation; this gives the random
number generator a better chance to gain enough entropy.
+++++++++....++++++++++..++++++++++.+++++++++++++++++++++++++++++++++
gpg: key 7AA07E27 marked as ultimately trusted
public and secret key created and signed.
gpg: checking the trustdb
gpg: 3 marginal(s) needed, 1 complete(s) needed, PGP trust model
gpg: depth: 0 valid: 4 signed: 0 trust: 0-, 0q, 0n, 0m, 0f, 4u
pub 1024D/7AA07E27 2009-02-18
Key fingerprint = 3934 663E 7C0F 42F0 0085 5D73 4F82 971E
7AA0 7E27
uid Moh Kohn (sample key) <mkohn@example.org>
sub 2048g/DDC38B28 2009-02-18

12.2 Generating and Managing GnuPG Keys 165
At this point you are almost done.
You should consider creating a “revocation certificate”, too. You can use a revo- revocation certificate
cation certificate to declare your public key invalid in case your private key should
get compromised or become lost. It states that the key that it invalidates should
not longer be used to encrypt data. The revoked key can still be used for verifying
existing signatures, though. A revocation certificate is created this way:
$gpg --output revoke.asc --gen-revoke "Moh Kohn"
sec 1024D/7AA07E27 2009-02-18 Moh Kohn (sample key)
<mkohn@example.org>
Create a revocation certificate for this key? (y/N) y
Please select the reason for the revocation:
0 = No reason specified
1 = Key has been compromised
2 = Key is superseded
3 = Key is no longer used
Q = Cancel
(Probably you want to select 1 here)
Your decision? 1
Enter an optional description; end it with an empty line:
>My private key was compromised or became lost.
>
Reason for revocation: Key has been compromised
My private key was compromised or became lost.
Is this okay? (y/N) y
At this point you will be asked for your passphrase. After entering it, the revoca-
tion certificate will be stored in the file
revoke.asc
.
BThe revocation certificate generated here is intended for use in a worst-case
scenario, that is, for the case that your key becomes permanently unusable.
Should you decide to revoke your key for a different reason some day (like
item two or three in the above menu), feel free to create a fresh revocation
certificate that reflects your reason better.
The revocation certificate should be stored on a medium that you can lock away,
and not on your computer. When an attacker gets their hands on the certificate,
they can use it to make your key unusable. Best store a printed copy of the certifi-
cate, too, so you can type it in by hand in the worst case (it is not too long).
12.2.2 Publishing a Public Key
The next step would be to publish your public key in order to make it available
to your family, friends, enemies, etc. To do so, you will have to “export” the key exporting keys
first. The
--list-keys
option makes GnuPG list all public keys that you can use so
far (at this point, this will most probably just be your freshly generated key):
$gpg --list-keys
/home/mkohn/.gnupg/pubring.gpg
------------------------------
pub 1024D/7AA07E27 2009-02-18
uid Moh Kohn (sample key) <mkohn@example.org>
sub 2048g/DDC38B28 2009-02-18
Your public key is exported by the
--export
option of GnuPG. As in the com-
mand creating the revocation certificate, the
--output
option can be used to specify

166 12 Introduction to GnuPG
a file name to which the output will be written. The
--armor
option generates out-
put in ASCII format, so it can be sent via email or published on a web site:
$gpg --output moh.gpg --armor --export "Moh Kohn"
$cat moh.gpg
-----BEGIN PGP PUBLIC KEY BLOCK-----
Version: GnuPG v1.4.7 (FreeBSD)
mQGiBEmb8M0RBAC19ul+0kPiqMvg3LDwVUWAwonYQhBM5mv1nnyQQAHMkMYmnsqO
WTKSFFtnS09rHMrSdB6kcIz1qa422W/pz7UbZeYyjtWUeSStXF8Gz6K408wjnx1R
8E1bS03W6OnIcLw5NyFKGWl7ASEvD+BFi6Irfd8ZuI57YmeloqWLtE2xkwCgvIph
rhi11eaDcz3HAzvyEN1EkVkD/0Aw2VgacyBeyepqSwDrspYvLpxa/awkkvK7DUoD
BA more efficient way of publishing your public key is to upload it to a “keykey servers
server”. This is also done with the help of the
gpg
program:
$gpg --keyserver hkp://subkeys.pgp.net --send-keys 7AA07E27
Most key servers synchronise their data, so it is normally sufficient to upload
your key to only one of them. The magic ID
7AA07E27
is the “key ID”—it can
be found in the output of “
gpg --list-keys
”.
12.2.3 Importing and Signing Public Keys
When you find a public key in an email message or on a web site, you will have to
import it into your “key ring” before you can use it. This is how it works:
$gpg --import /tmp/jane.gpg
gpg: key 5526DE34: "Jane Loopy (no comment!)
<jloopy@example.net>" imported
gpg: Total number processed: 1
gpg: imported: 1
$gpg --list-keys
/home/mkohn/.gnupg/pubring.gpg
------------------------------
pub 1024D/7AA07E27 2009-02-18
uid Moh Kohn (sample key) <mkohn@example.org>
sub 2048g/DDC38B28 2009-02-18
pub 1024D/5526DE34 2009-01-04
uid Jane Loopy (no comment!) <jloopy@example.net>
sub 2048g/045B6B4F 2009-01-04
Now the new key is part of your key ring, but you are not done yet. How do you
know that the key you just imported really is the public key of Jane Loopy? You
should better verify that it is authentic. Best generate the “fingerprint” of the keyfingerprint
and ask Jane personally whether it is correct:
$gpg --fingerprint "Jane Loopy"
pub 1024D/5526DE34 2009-01-04
Key fingerprint = D533 80FD B930 1BCD 2F6B 4C25 F92F 82B0
5526 DE34
uid Jane Loopy (no comment!) <jloopy@example.net>
sub 2048g/045B6B4F 2009-01-04

12.2 Generating and Managing GnuPG Keys 167
BTo verify the authenticity of the key you could, for example, call Jane (if you
are 100% positive that you can identify her by her phone voice). Of course,
this works best if the phone number does not originate from the same source
(email message, web site, etc.) as the key in question.
BYou may consider printing the fingerprint of your GnuPG key on your call-
ing card or prepare some slips of paper containing the key data. Prepared
in this way, when you meet a person and want to swap signatures, you can
hand them a copy of the fingerprint and—if necessary—identify yourself.
So the other person can fetch your public key from a key server and use the
fingerprint to make sure that the key really belongs to you. They can then
sign the key and send you a copy, so you can integrate the signature into
your “official” public key.
BAnother popular means of verifying keys are so-called “key signing par- key signing parties
ties”, where, for example, members of open-source projects such as Debian
perform mutual mass verification of their GnuPG keys: The user IDs and
public key fingerprints of all participants are collected and distributed to
all persons taking part in the event. Then every participant checks the ID
of each person on the list and marks the keys that they are willing to trust.
Once the lists are complete, the keys can be signed later, when things wind
down.
Let us say that you have successfully verified the authenticity of Jane Loopy’s
public key (the details are left to your imagination). Now you can sign Jane’s Signing a Key
key. Jane obviously benefits from your signing her key, because her key is now
considered to be valid by all people who consider your key to be valid (modulo
the constraints of Section 12.1). But you benefit from signing the key, too, because
you are now connected to Jane’s Web of Trust. You can assume that keys which
have been signed by Jane are valid, too.
BOf couse, “owner trust” plays a role, too. In your key ring you can make a
note of the degree to which you trust Jane’s knowledge of GnuPG and her
diligence in handling keys. This note affects the validity of keys signed by
Jane. When you are not sure about Jane’s skills, keys signed by Jane will
have to be signed by other people in your web of trust in order to become
valid. When you trust Jane fully, though, her signature alone is sufficient.
You can sign Jane’s key as follows:
$gpg --sign-key "Jane Loopy"
pub 1024D/5526DE34 created: 2009-02-18 expires: never
usage: SC
trust: unknown validity: unknown
sub 2048g/045B6B4F created: 2009-02-18 expires: never
usage: E
[unknown] (1). Jane Loopy (no comment!) <jloopy@example.net>
pub 1024D/5526DE34 created: 2009-02-18 expires: never
usage: SC
trust: unknown validity: unknown
Primary key fingerprint: D533 80FD B930 1BCD 2F6B 4C25 F92F
82B0 5526 DE34
Jane Loopy (no comment!) <jloopy@example.net>
Are you sure that you want to sign this key with your
key "Moh Kohn <mkohn@example.org>" (7AA07E27)
Really sign? (y/N) y

168 12 Introduction to GnuPG
At this point the program once more prompts for your passphrase.
The signatures on a key can be listed and checked at the same time by usingChecking signatures
the
--check-sigs
option:
$gpg --check-sigs "Jane Loopy"
pub 1024D/5526DE34 2009-01-04
uid Jane Loopy (no comment!) <jloopy@example.net>
sig!3 5526DE34 2009-01-04 Jane Loopy (no comment!)
<jloopy@example.net>
sig! 7AA07E27 2009-01-04 Moh Kohn (sample key)
<mkohn@example.org>
sub 2048g/045B6B4F 2009-01-04
sig! 5526DE34 2009-01-04 Jane Loopy (no comment!)
<jloopy@example.net>
Here you see the signature of Jane herself (which is automatically created when
the key is generated) and your own one. The exclamation mark after the
sig
at the
beginning of the line indicates that the signature could be verified successfully.
When a signature is “bad”, there would be a minus sign (“
-
”) instead.
BAll the above signatures can be checked by you, because you own copies of
all of the required public keys (yes, this is a cycle). When a signature cannot
be checked because a public key is lacking, that signature will be ignored.
BThe “
gpg --list-sigs
” command lists all signatures without checking them.
Signatures with missing public keys will appear as “
[User-ID not found]
”.
For managing keys, you would use the
--edit-key
option of
gpg
:
$gpg --edit-key "Jane Loopy"
gpg (GnuPG) 1.4.7; Copyright (C) 2006 Free Software Foundation, Inc.
This is free software: you are free to change and redistribute it.
There is NO WARRANTY, to the extent permitted by law.
pub 1024D/5526DE34 created: 2009-02-18 expires: never
usage: SC
trust: unknown validity: ultimate
sub 2048g/045B6B4F created: 2009-02-18 expires: never
usage: E
[ultimate] (1). Jane Loopy (no comment!) <jloopy@example.net>
Command> _
You can now enter commands. “
fpr
” lists the fingerprint of a key and “
sign
” signs a
key. There are lots of of other commands. “
help
” prints a summary. An important
command is “
trust
”. It changes the owner trust level:
Command> trust
pub 1024D/5526DE34 created: 2009-02-18 expires: never
usage: SC
trust: unknown validity: ultimate
sub 2048g/045B6B4F created: 2009-02-18 expires: never
usage: E
[ultimate] (1). Jane Loopy (no comment!) <jloopy@example.net>
Please decide how far you trust this user to correctly verify other
users' keys (by looking at passports, checking fingerprints from
different sources, etc.)

12.3 Encrypting and Decrypting Data 169
1 = I don't know or won't say
Default case
2 = I do NOT trust
That person is a bungler
3 = I trust marginally
So, so, but fundamentally OK
4 = I trust fully
Is knowledgeable and careful
5 = I trust ultimately
Only yourself
m = back to the main menu
Your decision? 4
The difference between “full” and “ultimate” is the difference between yourself
and other persons. You might trust other people’s keys “fully” but should only
trust your own keys “ultimately”.
BThe “trust database” of GnuPG is updated only when the program is started
for the next time (this is a complex process), so when you plan to change
multiple trust levels, you should do this in a single session and then restart
gpg
.
If you should ever want to revoke your public key (you did create a revocation
certificate, didn’t you?), you have to import the revocation certificate to your key
ring first:
$gpg --import revoke.asc
You can then send the revoked key to the usual key servers.
Exercises
C12.3 [!2] Create a key pair as described in Section 12.2.1. Make sure that the
public key exists and is signed with itself. This should happen automatically
when the key pair is generated.
C12.4 [!2] Log in to a different account and create another key pair. Export
its public key, log in to your account and import that public key. Make sure
the key is now part of your key ring. (In a course: You do not have to create
a new key pair. Just swap keys with another participant.)
C12.5 [2] Sign the key imported in Exercise 12.4 by running “
gpg --sign-key
”
or “
gpg --edit-key
”. Check the signatures on the public key. Export the key,
log in to the other account and import it there. (In a course: Swap signed
keys.)
C12.6 [3] Use just one more account (you will thank us later!) in order to
create a third key pair. Import the key generated in Exercise 12.5 to the key
ring of that third account. What does “
gpg --check-sigs
” say about it? Is the
key valid in that account? If not, how can you make it valid?
C12.7 [2] Assign “full owner trust” to the key you have just imported (use the
“
gpg --edit-key
” command). How does this modification affect the “validity”
of the key?
12.3 Encrypting and Decrypting Data
In order to encrypt a file using GnuPG, you need the public key of the recipient
of the file. A public key can be thought of as an open safe. You encrypt data by
putting them into the safe, closing the door and turning the wheels of the com-
bination lock. The only person who can access the data now is the person who

170 12 Introduction to GnuPG
knows the combination of the safe. The private key is the “combination” needed
to access the encrypted data.
So if you want to send some sensitive data to Jane Loopy, you need her public
key. Jane needs her private key in order to decrypt your message. If she wants to
send you an encrypted reply, she needs your public key, and you need your own
private key to decrypt it.
This is how it works:
$gpg --output text.txt.gpg --encrypt
--recipient "Jane Loopy" text.txt
This command encrypts the file
text.txt
such that only Jane Loopy can read it.
The encrypted version is stored in the file
text.txt.gpg
. The output file is specified
with the
--output
option, as usual.
BEven here you can use the
--armor
option to create an ASCII version of the
encrypted message. Such a version can be sent via email, for example.
BYou can encrypt a message in such a way that multiple recipients can read
it. Just specify one
--recipient
option for each recipient. Note, though, that
this is implemented by including an individually encrypted copy for each
recipient in the output file.
Jane Loopy can decrypt the received message by using her private key:
jane$ gpg --output text.txt --decrypt text.txt.gpg
You need a passphrase to unlock the secret key for
user: "Jane Loopy (no comment!) <jloopy@example.net>"
2048-bit ELG-E key, ID 045B6B4F, created 2009-02-18
(main key ID 5526DE34)
Enter passphrase: DonauDampfSchiff
gpg: encrypted with 2048-bit ELG-E key, ID 045B6B4F,
created 2009-01-04
"Jane Loopy (no comment!) <jloopy@example.net>"
If you wish to encrypt a file that you just want to to keep to yourself, you do not
need asymmetric cryptography. The “
gpg --symmetric
” command uses a key that
will be derived from a passphrase. The same passphrase is used to decrypt the
file:
$echo "Hello World!" | gpg --output hw.gpg --symmetric
Enter passphrase: foobar
Repeat passphrase: foobar
$gpg --decrypt hw.gpg
gpg: CAST5 encrypted data
Enter passphrase: foobar
gpg: encrypted with 1 passphrase
Hello World!
gpg: WARNING: message was not integrity protected
(Of course you should not use the same passphrase that you use for protecting
your private GnuPG keys.)
BAbove example also demonstrates how GnuPG reads encrypted data from
the standard input stream (first command) and writes decrypted data to the
standard output stream (second command).

12.4 Signing Files and Verifying Signatures 171
Exercises
C12.8 [!2] Pick a file and encrypt it in such a way that in can be decrypted with
the private key generated in Exercise 12.4. Make sure that the file really can
be decrypted.
C12.9 [1] Use symmetric encryption to encrypt a file of your choice. Decrypt
the file and make sure that the decrypted output is equal to the original file.
12.4 Signing Files and Verifying Signatures
You can also use your key pair to sign a file. Signing a file annotates the content of
the file with a time stamp and a “digest”. When the file is modified after signing
it, verifying the signature will fail. This mechanism is used, for example, to sign
software packages of distributions, thereby allowing you to verify that it was the
maintainer of a package who uploaded it—and not some malicious cracker. You
can be pretty sure that properly signed packages will not introduce any malware,
like viruses or trojans. You can also use a signature to sign a manuscript when
sending it to your publisher, so they can be sure that they receive the original
work and not a copy that has been tampered with.
BA side effect of this approach is that it is very difficult for you to claim that
a document with your digital signature was not signed by yourself—this
would imply that your private key has been compromised.
BThere is a certain tendency toward giving digital signatures as created by
GnuPG the same legal status as a signature on a sheet of paper. This is un-
fortunate or even dangerous, though, because there is a considerable differ- Difference between digital signa-
tures and real-life signatures
ence between the act of signing your name on a piece of paper and the act
of typing a passphrase and pressing ↩. On a sheet of paper, you sign ex-
actly what is written on that sheet and nothing else. In cases of doubt there
is a strong presumption that you really meant what you signed. However,
when signing a digital document, there is (given the current state of art)
absolutely no guarantee beyond a warm fuzzy feeling in your stomach that
the computer really signs exactly the intended document (and only that doc-
ument and not simultaneously, say, a purchase agreement for an industrial
dishwasher). This is why in a legal dispute, destroying the claim that a dig-
ital signature is equal to a real-life signature will be a walk in the park for
an competent expert. This is not a desirable situation.
To sign a file with GnuPG, run
gpg
with the
--sign
option:
$gpg --output text.txt.sig --sign text.txt
(Because the file is signed with your private key, you have to enter your passphrase.)
The signed file will be compressed as well. It is written to the output file in binary
format.
You can verify a signature with “
gpg --verify
”:
$gpg --verify text.txt.sig
gpg: Signature made Fri Feb 20 10:25:44 2009 CET
using DSA key ID 5526DE34
gpg: Good signature from "Jane Loopy (no comment!)
<jloopy@example.net>"
“
gpg --decrypt
” not only checks the signature but also decompresses the file and
writes it to the standard output stream:

172 12 Introduction to GnuPG
$gpg --decrypt text.txt.sig
Hello World!
gpg: Signature made Fri Feb 20 10:25:44 2009 CET
using DSA key ID 5526DE34
gpg: Good signature from "Jane Loopy (no comment!)
<jloopy@example.net>"
As usual the
--output
option can be used to write the decompressed data directly
to a file.
The compressed binary format is not practicable for including it in email mes-
sages. In this case you would use the
--clearsign
option instead, which generates
a plain text version of its output. The resulting file contains both the signed dataplain-text signature
and the signature in ASCII format:
$gpg --clearsign text.txt
Such a file looks like this:
-----BEGIN PGP SIGNED MESSAGE-----
Hash: SHA1
Hello World!
-----BEGIN PGP SIGNATURE-----
Version: GnuPG v1.4.7 (FreeBSD)
iD8DBQFJnnknT4KXHnqgficRAi4hAKChHaGsOGcY0XPAyvjiX8dYajKjSQCgtPcf
ofupzVXHGmgugA1n5yp2uls=
=UH8U
-----END PGP SIGNATURE-----
BPlain-text signatures are used, for example, in the Debian project. The
.dsc
files which accompany source code packages contain the MD5 checksums
of the original source code (typically a
.tar.gz
file) and the patch containing
Debian-specific changes, and are signed by the package maintainer. This
allows you to check, upon installing a package, that the version you have
was in fact created by the package maintainer. Similarly, a new version of
a package that is to be made available on the Debian servers as part of a
distribution must be accompanied by GnuPG-signed
.changes
file listing the
files the package consist of together with their MD5 checksums. Files that
are uploaded without a
.changes
file signed by a Debian developer will be
discarded.
BIncidentally, the “
PGP
” in the ASCII output of GnuPG is not a typo. GnuPG is
an implementation of the “OpenPGP” standard [RFC4880], which is based
on a program called “Pretty Good Privacy” (PGP) by Phil Zimmermann.
“GnuPG” is short for “GNU Privacy Guard”—one of the usual GNU puns.
Sometimes you may want to sign a file without changing it by adding the sig-
nature. This is necessary, for example, when submitting a package to a Linux dis-
tributor or when you want to guarantee the authenticity of a source code archive
that you are publishing. When annotating a
tar
archive with a signature, it would
no longer be a valid
tar
archive, so you have to keep the signature in a separate
file. This is called a “detached signature”. In order to create a detached signature,Detached Signature
use the
--detach-sign
option of
gpg
:
$gpg --output text.txt.sig --detach-sign text.txt

12.5 GnuPG Configuration 173
To verify a file using a detached signature, you need (of course) the signature
and the file that is being signed by that signature. The
--verify
option of
gpg
also
verifies detached signatures:
$gpg --verify text.txt.sig text.txt
The first file name following
--verify
is the name of the file containing the sig-
nature and the second one specifies the signed file. When only one file name is
passed to
--verify
, the program assumes that the name specifies the signature file
and the name of the content file is the same name but with the
.sig
part removed.
When the
--armor
option is used,
gpg
removes the
.asc
suffix instead of
.sig
.
Exercises
C12.10 [!1] Sign an arbitrary file using GnuPG. Then verify the authenticity
of the signature.
C12.11 [!2] Use the key generated in Exercise 12.5 to sign a file. Copy the
signed file to your own account and use your own key ring to check the
signature. What happens?
C12.12 [2] Repeat Exercise 12.11 using the account and key ring from Exer-
cise 12.6. What happens now?
12.5 GnuPG Configuration
GnuPG keeps its configuration files in the directory
~/.gnupg
. Some of the files that
~/.gnupg
can typically be found in that directory include:
pubring.gpg
The ring of public keys. This file contains the public keys which you
have generated or imported.
secring.gpg
The ring of secret keys. This file contains the private keys of your key
pairs.
trustdb.gpg
This file contains the owner trust levels of the keys on your public key
ring. Because these are private data reflecting your personal views, they
are kept in a separate file and not in the public key ring file (which you may
want to make available to others).
random_seed
This file is used by GnuPG to keep track of the state of the random
number generator.
gpg.conf
This file contains various options and parameters used by
gpg
. The file is
documented very well.
Some parameters that you might want to tweak in
gpg.conf
include the follow-
gpg.conf
ing:
keyserver
Specifies you favorite keyserver, e.g.:
keyserver hkp://keys.gnupg.net
no-greeting
Supresses the copyright notice that is printed initially by
gpg
.
group
Defines “groups” that save you some typing when encrypting files. Imagine groups
the following entry in your
gpg.conf
file:
group beatles = john paul 0x12345678 ringo

174 12 Introduction to GnuPG
When you specify the “
--recipient beatles
” option, GnuPG interprets this as
three individual
--recipient
options with names and one with a key ID.
BGroups only work one level deep. Thus you cannot have groups that
contain other groups.
GnuPG is an important program, but it is not really straightforward. This is
why you may want to study its documentation in depth. A good starting point
would be the
gpg
(1) man page. More extensive documentation can be found on
http://www.gnupg.org/
.
Exercises
C12.13 [2] Add a group consisting of the keys generated in Exercise 12.5 and
Exercise 12.6 to your
gpg.conf
file. Encrypt a file by sending it to that group.
Make sure that both of the recipients are capable of decrypting the file.
C12.14 [5] Read [Keysigning-Party-HOWTO08] and organise a key sign-
ing party with a suitable group of people (course participants, colleagues,
friends). (What to make of the word “party” is up to you, but whatever you
do should at least involve some key signing.)
Commands in this Chapter
gpg
Encrypts and signs files
gpg
(1) 163
Summary
• GnuPG allows you to encrypt and sign files and email messages.
• The authenticity of a GnuPG key is guaranteed by the “web of trust”.
Bibliography
Ash99 John Michael Ashley. “The GNU Privacy Handbook”, 1999.
http://www.gnupg.org/gph/de/manual.pdf
Keysigning-Party-HOWTO08 V. Alex Brennen. “The Keysigning Party HOWTO”,
January 2008.
http://www.cryptnet.net/fdp/crypto/keysigning_party/en/keysigning_party.html
RFC4880 J. Callas, L. Donnerhacke, H. Finney, et al. “OpenPGP Message Format”,
November 2007.
http://www.ietf.org/rfc/rfc4880.txt

$ echo tux
tux
$ ls
hallo.c
hallo.o
$ /bin/su -
Password:
13
Linux and Security: An
Introduction
Contents
13.1 Introduction. . . . . . . . . . . . . . . . . . . . . . 176
13.2 File System Security . . . . . . . . . . . . . . . . . . . 176
13.3 Users and Files. . . . . . . . . . . . . . . . . . . . . 179
13.4 Resource Limits . . . . . . . . . . . . . . . . . . . . 182
13.5 Administrator Privileges With
sudo
..............186
13.6 Basic Networking Security . . . . . . . . . . . . . . . . 190
Goals
• Searching the file system for security-related entries (device files, SUID and
SGID bits, etc.)
• Understanding and using resource limits
• Configuring and using
sudo
• Understanding fundamental problems of network security
Prerequisites
• Linux system configuration
• Linux network configuration (Chapter 4)
adm2-security.tex
(
0cd20ee1646f650c
)

176 13 Linux and Security: An Introduction
13.1 Introduction
“Security” is an important topic for everyone who operates a computer. In the age
of the Internet, this topic is no longer in the domain of system administrators of
big companies, universities, and Internet service providers exclusively. Unfortu-
nately, even your personal computer at home, which is just used by yourself and
maybe your family, can be used as a stepping stone by crackers who want to make
use of your fast DSL connection to flood the Internet with spam or malware, mak-
ing themselves (and, in the process, you) quite unpopular. By choosing Linux as
your operating system, you already reduced the dangers significantly, but this is
not a reason to to rest on one’s laurels1
Security on Linux systems is a complex and ambitious topic, so we will only
be able to cover it in the broadest sense in this chapter. If you are administering
a critical system that provides Internet or intranet services for an enterprise, we
would like to recommend the Linup Front document Linux Security, which offers
a much more in-depth discussion of the topic. In the meantime, the following
sections provide a summary of some fundamental aspects.
13.2 File System Security
If one wanted to summarise the properties of the Linux file system in a few sen-
tences, the following two conclusions would become obvious (among others):
1. Everything is a file (even “devices”);
2. There is a system of access permissions which is fairly simple yet sufficient
for most purposes.
This has various very useful and convenient consequences, but also some conse-
quences that you as a security-conscious administrator should watch out for:
• Device files work anywhere in the file system, not just in
/dev
. If an attackerDevice files
manages to create a device file of the proper type (e. g., that of
/dev/hda
or
/dev/kmem
), you are toast. The file does not even have to have the same name
as the “official” device file, it just needs to have the correct type and major
and minor device numbers.
• Users can make any of their own files executable by setting their
x
bits. ThisExecutable files
is not a problem in most cases (it is even an advantage compared to other
operating systems that will execute any file whose name has a particular
extension), but not an insurmountable obstacle. Every so often problems
are found in Linux that enable an unprivileged user to gain administrator
privileges by executing a “normal” program, and that path is also available
to programs that a user downloaded from somewhere on the Net.
• The set-UID and set-GID mechanisms allow “ordinary” users to run pro-Set-UID and set-GID
grams with the permissions of other users (preferably
root
). Set-UID and
set-GID programs, too, can be located anywhere in the file system.
As an administrator you can attempt to minimise the risk by restricting “unusual”
file types to areas of the file system where such files are to be expected. However,
you should also actively look out for possibly problematic files. Here are a few
clues:
Removable media are the most obvious way to introduce unusual files to theRemovable media
system. This includes files of types that a user would not be allowed to create using
their local account. For instance, an unprivileged user may not run a command
like
1Your author’s old physics teacher used to say that “he who rests on his laurels is wearing them in
the wrong place.”

13.2 File System Security 177
#mknod /home/hugo/vacation.jpg c 1 2
See
/dev/kmem
but if they manage to mount a USB stick that contains an ext3 file system with
such a file, then they have hit the jackpot. (It is easy to prepare such a USB stick
on your own Linux machine at home.)
Linux avoids this scenario by not letting ordinary users mount removable me-
dia at all. The only secure way to allow this is to add specific mount points to
/etc/fstab
that contain the
user
or
users
option. Both of these options imply the
nodev
option, which makes the system ignore device files on the mounted media.
nodev
At this point we could consider the problem solved, but we would like to remind
you that an
/etc/fstab
entry like
/dev/sda1 /media/usbstick auto noauto,user,dev 0 0
should not be created without pondering its implications.
Set-UID programs pose a similar problem. Just as ordinary users may not cre-
ate device files, they may not create set-UID files owned by
root
, either—and this
is fine the way it is. However, just as a user might introduce a device file on a
removable medium, they might introduce a small set-UID
root
program that will
launch a shell.
BCommon shells like bash are reluctant to let themselves be started as set-
UID
root
processes. At least somewhat. However, an attacker will not be
stopped by such minor annoyances. They can also bring in their own shell
that they compiled themselves with the set-UID detection code removed.
(Or they can consult the Bash manual and read up on the
-p
option.)
The way in which Linux avoids this issue is basically the same as the one that
is used to handle device files. The
user
and
users
options to
mount
also imply the
nosuid
option, which prevents the execution of set-UID programs on the file system
nosuid
in question.
BTo be precise,
nosuid
does not prevent the programs from being executed, it
just makes the system ignore the set-UID and set-GID bits.
B
nosuid
is without effect, and hence dangerous, if you have the
suidperl
pro-
gram installed on your system. This is a special interpreter for the Perl pro-
gramming language that is intended for the execution of set-UID scripts on
systems that normally do not allow the execution of set-UID scripts (like
Linux).
suidperl
is itself a set-UID program owned by
root
. It does for Perl
scripts what the kernel does for native executables: before executing the
program, it changes the identity of the user running the program to the
identity of the user owning the program. Stupid. Very stupid indeed. (See,
for example, [McC08].)
BThe
noexec mount
option can prevent the execution of programs (including
noexec
scripts) from the file system in question. This option, too, is implied by the
user
and
users
options. However, it does not present a big obstacle because a
user can still copy the file to their home directory and execute it from there.
(In earlier Linux versions, you could even run programs on
noexec
file sys-
tems by typing something like
$/lib/ld-linux.so.2 /mnt/program
—but as of kernel version 2.6 this is no longer possible. Whew.)
Of course the
nosuid
and
nodev
options protect only against suspicious files on
removable media (at first). It does not help against files created by clever crackers
who exploited a security hole in a network service and want to create a convenient
back door so they can come back later. A set-UID shell with an innocuous name
like
.foobarrc
would be just fine.

178 13 Linux and Security: An Introduction
BThere is nothing to keep you from enabling the
nosuid
and
nodev
options ex-
plicitly for all file systems where users can create files. Besides removable
media, this applies mainly to
/home
,
/tmp
, and
/var/tmp
.
For all the prevention, as a system administrator you could do worse than scan-
ning your system for such files on a regular basis (preferably at night when then
system is not so busy). The tool of choice for this task is
find
.
To find all set-UID and set-GID files on your system, you would use
find
’s
-perm
Finding Set-UID files
option. The full command would look like this:
#find / -perm /06000 -type f -print
(Remember that
find
combines multiple criteria with an implicit logical AND.)
BThe “
-perm /06000
” part is specific to GNU
find
, which is popular on Linux
systems. Traditional Unix versions of
find
require you to use the more te-
dious
\( -perm -04000 -o -perm -02000 \)
instead.
BWithout the “
-type f
” part, the output would include directories with the
set-GID bit set. However, such directories are not interesting from a security
administrators point of view.
BPrinting full information in the style of “
ls -l
” for each file found instead of
just its name may save you some work. Just use the
-ls
action in place of
-print
.
You should be aware of all the set-UID and set-GID programs on your systems—
it is best to prepare a list that you check manually and later compare automaticallyList of set-UID programs
(e. g., using
cron
) to the list of actual set-UID and set-GID programs on the system.
Have yourself be notified if a program on the list is missing from the system,
or—more importantly—a program appears on the system that is not on the list.
Some distributions do this by default.
Device files can be located in a similar way. Just scan your system for files thatFinding device files
are block or character devices:
#find / \( -type b -o -type c \) -ls
Of course it makes little sense to include the
/dev
directory in the search. Unfortu-
nately, it cannot be excluded explicitly. All you can do is to tell
find
to stop when
it encounters the
/dev
directory:
#find / -path /dev -prune -o \( -type b -o -type c \) -ls
Or, of course, you could pipe the output of
find
through “
grep -v ^/dev
” to exclude
the
/dev
entries from the result.
BThe auditing of your file system can be implemented much more efficently:
Tools like Tripwire or AIDE are used to detect and report changes to im-Tripwire
AIDE portant system file (both programs and configuration). Such modifications
typically happen when “root kits” are installed on a system. The details of
these tools are beyond the scope of this document. Please refer to the Linup
Front document, Linux Security, for a detailed discussion.

13.3 Users and Files 179
Exercises
C13.1 [!1] Why is it a problem for an ordinary user to have direct access to the
/dev/hda
file (or an equivalent file with a different name)?
C13.2 [!2] Make sure that the
nodev
,
nosuid
, and
noexec
options of
mount
really
do what they are supposed to do. You can use the
/tmp
file system for your
test, if it is a separate file system; it is best to set the options by means of
something like
#mount -o remount,nodev /tmp
(If
/tmp
is not a separate file system, you can, through something like
#dd if=/dev/zero of=/tmp/testfs bs=1M count=32
#mke2fs -F /tmp/testfs
#mount -o loop,nodev /tmp/testfs /mnt
create a file system in a file for testing.)
C13.3 [2] Create a comprehensive list of all set-UID and set-GID programs
that are installed on your system. (For extra credit: Consider why these pro-
grams need to have their set-UID and set-GID bits set.)
C13.4 [2] Check whether the above method for finding device files outside of
/dev
works. Create a few device files anywhere on your system (and remove
them again afterwards).
13.3 Users and Files
Sometimes it is useful to find out who is currently logged on to a computer. The
simplest command to do so is called
who
:
who
$who
hugo :0 2015-07-27 13:39 (:0)
hugo pts/0 2015-07-27 13:56 (red.example.com)
The first column shows the user name and the second the terminal on which the
user is logged in. “
:0
” there denotes the X11 server with that display name; other
names (such as
pts/0
) refer to a device file below
/dev
.
BTerminal names of the form
pts/
… denote “pseudo-terminals”, typically ter-
minal windows in a graphical environment or secure-shell sessions.
The remainder of the line shows the date and time at which the session started.
After that, the remote end of the session may be listed in parentheses; in the ex-
ample, the user
hugo
on
pts/0
comes from a host called
red.example.com
.
If you have several terminal windows or one terminal window with several
subwindows, it is very likely that all these sessions will be counted as separate
“users”. Don’t let yourself be confused by that.
B
who
supports a few command-line options of further interest:
-H
causes a
header line with column titles to be output;
-b
outputs the date and time of
the last system reboot, and
-r
the current runlevel (if appropriate).
-a
dis-
plays everything that
who
can output. With
-m
, only the user whose terminal
is connected to
who
’s standard input will be displayed.
BIf you invoke
who
with two parameters that are not options, that will be in-
terpreted as “
who -m
”. The actual parameter text is immaterial. This enables
the classic

180 13 Linux and Security: An Introduction
$who am i
hugo pts/0 2015-07-27 13:56 (red.example.com)
but all sorts of other possibilities also exist:
$who is cool
$who wants icecream
BThis is not to be confused with the
whoami
command (without spaces), which
outputs the effective user name:
$whoami
hugo
The
w
command is a close relative of
who
’s:
w
command
#w
18:06:32 up 4:29, 2 users, load average: 0,01, 0,02, 0,05
USER TTY FROM LOGIN@ IDLE JCPU PCPU WHAT
hugo :0 :0 13:39 ?xdm? 40.21s 0.06s /usr/bin
/lxsession -s
hugo pts/0 red.example.com 13:56 0.00s 0.11s 0.00s w
The first line shows the current time and the “uptime”, namely the time the com-
puter has been running since the last boot, the number of active users, and the
system load. Then there is one line for every logged-in user, in the manner of
who
. The
LOGIN@
shows when the user has logged on (as a wall-clock time or—if the
log-on is farther in the past—a date).
IDLE
is the amount of time the user has been
doing nothing.
JCPU
is the total CPU time used by all processes in this session (ex-
cluding finished background jobs, but including currently-running background
jobs) and
PCPU
is the CPU time used so far by the currently-running process.
WHAT
is the current command line.
B
w
’s options aren’t as interesting:
-h
suppresses the header line and
-s
the
LOGIN
column. The other options are even more boring.
BIf you specify a user name, then only information about that user will be
output.
While
who
and
w
are concerned with the present, you can use
last
to look back
last
on the past and check who was logged on when:
#last
hugo pts/0 red.example.com Mon Jul 27 13:56 still logged in
hugo :0 :0 Mon Jul 27 13:39 still logged in
reboot system boot 3.16.0-4-amd64 Mon Jul 27 13:37 - 18:20 (04:43)
hugo :0 :0 Sun Jul 26 17:43 - crash (19:53)
reboot system boot 3.16.0-4-amd64 Sun Jul 26 17:43 - 18:20 (1+00:37)
hugo pts/2 red.example.com Fri Jul 24 20:00 - crash (1+21:42)
hugo :0 :0 Fri Jul 24 19:15 - crash (1+22:27)
hugo :0 :0 Fri Jul 10 14:19 - 19:15 (14+04:55)
hugo :0 :0 Fri Jul 10 13:22 - 14:19 (00:56)
reboot system boot 3.16.0-4-amd64 Fri Jul 10 12:46 - 18:20 (17+05:33)
Here, too, you have the user, the terminal (or
:0
), the remote end, the start date
and time, the end time, and the session duration for every session. If the session
end time is
crash
, then the computer didn’t have the opportunity to log the actual
end of the session (which may happen with virtual machines). The
reboot
lines

13.3 Users and Files 181
Table 13.1: Access codes for processes with
fuser
Code Description
c
Used as current directory
e
Used as executable program text
f
Opened as file (for reading)*
F
Opened as file (for writing)*
r
Used as root directory
m
Used as shared library or memory-mapped file
* = The
f
and
F
codes are not displayed in ordinary output.
refer to system reboots, and in those cases the third column (where the remote
end of the session would otherwise be displayed) gives the name of the operating
system kernel being booted.
B
last
looks at the
/var/log/wtmp
file (unless you use the
-f
option to specify
another file). If you give one or more user or terminal names, then only the
activities of those users (or terminals) will be displayed.
AThe information output by
last
can, with a certain amount of justification,
be viewed as sensitive. After all, they let you retroactively check who was
logged on where and when—which is sometimes useful for debugging, but
could also get you on the wrong side of your corporate data-protection offi-
cer or staff representative. Be circumspect, and do not keep this data for too
long without discussing this with somebody in charge.
Sometimes you want to find out which process or user is currently using some
resource on the system (the typical example is when you want to unmount a file
system, but the system won’t let you because some process is still using a file or
directory on that file system). This is what the
fuser
command2is for—it takes as
fuser
its parameter the name of a file or a file system (or several files/filesystems) and
lists all processes “using” these objects:
$cd /home/hugo
$(echo hello; sleep 600) >test.txt
# In a different window:
$fuser /home/hugo /home/hugo/test.txt
/home/hugo: 767c 1360c 1465c 1467c 1488c 1489c
/home/hugo/test.txt: 1488 1489
fuser
’s output is, by default, a list of PIDs followed by a letter that specifies how
the process in question is using the resource. The possible letters are in Table 13.1.
BThe
-v
option gives you more complete output:
#fuser -v /home/hugo/test.txt
USER PID ACCESS COMMAND
/home/hugo/test.txt: hugo 1488 F.... bash
hugo 1489 F.... sleep
(The
ACCESS
column uses the codes from Table 13.1 once more.)
BThe
-m
option widens the search from “the named file or directory” to “some
file or directory on the same file system as the named file or directory”. The
#fuser -m /srv
2We read that as “eff user” rather than “fyooser”.

182 13 Linux and Security: An Introduction
command, for example, will list all processes that access any file (or direc-
tory) on the file system where
/srv
resides. This is, of course, extremely
useful if, on your system,
/srv
is on its own file system and you would like
to unmount it.
BTo be able to sort out the “I want to unmount this file system but Linux
won’t let me” case even more efficiently, you can use the
-k
option to send a
signal (
SIGKILL
by default, unless you specify otherwise) to the processes in
question:
#fuser -mk -TERM /srv; sleep 10; fuser -mk /srv
leaves the processes 10 seconds to put their affairs in order, after which they
(or whichever ones are left) will get the axe. If you add the
-w
option, only
those processes who write to the resource(s) will be terminated. With
-i
,
you will be asked for every process whether you really want to kill it.
fuser
will not only identify the users of files, but also those of TCP and UDP
ports:
#fuser -n tcp ssh
ssh/tcp: 428 912 914
The
-n
option chooses the “namespace” (
file
—the default—,
tcp
, or
udp
), and after
that you may specify port numbers or symbolic port names (from
/etc/services
).
BAs long as there is no ambiguity, you may specify port numbers also in the
ssh/tcp
format, and leave off the
-n
option.
B
fuser
for TCP or UDP ports works best as
root
. Ordinary users usually do
not have access to the required data structures.
Exercises
C13.5 [!2] Check out the
who
and
w
commands. Convince yourself that terminal
session in the graphical environment count as separate user sessions.
C13.6 [1] Use
who
to display the date and time of the last system boot.
C13.7 [3] (For your
sed
and
awk
-fu.) Write a script that calculates how long a
user was logged on in total (within the horizon of
last
).
13.4 Resource Limits
When multiple users share the same system (be it through terminals or logging in
via the network using
ssh
), it is important that no single user be able to monopolise
the system’s resources to the detriment of the others. Even if you are the only
user on a system, it may make sense to rein in single processes if they appear too
greedy. To facilitate this, Linux offers a mechanism called “resource limits”.
Resource limits let you specify upper bounds for various resources that users
(or single processes belonging to them) may consume. With the
ulimit
shell com-
mand you can get an overview of the resources in question—the
-a
option of the
command lists all resource limits and their current settings:
$ulimit -a
core file size (blocks, -c) 0
data seg size (kbytes, -d) unlimited
dynamic memory
scheduling priority (-e) 0
nice value (quirky)

13.4 Resource Limits 183
file size (blocks, -f) unlimited
pending signals (-i) 8181
max locked memory (kbytes, -l) 32
max memory size (kbytes, -m) unlimited
ignored
open files (-n) 1024
pipe size (512 bytes, -p) 8
POSIX message queues (bytes, -q) 819200
real-time priority (-r) 0
stack size (kbytes, -s) 8192
cpu time (seconds, -t) unlimited
max user processes (-u) 8181
virtual memory (kbytes, -v) unlimited
file locks (-x) unlimited
For each of these resource limits there is a “soft limit” and a “hard limit”. The soft limit
hard limit
difference is that it takes administrator privileges to raise the hard limit (you may
always lower it). Users can set arbitrary soft limits but only up to the current hard
limit. In the shell, hard limits are modified using “
ulimit -H
” and soft limits using
“
-S
”; when neither one or the other are specified, both the hard and soft limit are
set to the same value.
BWhen no value is specified for a resource limit, its current value is displayed:
$ulimit -n 512
Allow 512 open files per process
$ulimit -n
What limit did I set?
512
Resource limits are process attributes (just like the current working directory or Resource limits are process at-
tributes
the process environment) and are handed down by a process to its child processes.
Some resource limits deserve a few special remarks:
core file size
This is most interesting to developers—“core dumps” are created
when a program is stopped unexpectedly by a signal and allow you to in-
vestigate the cause. The default value of 0means that no core dumps will
be created at all; if you need them, you should use a command like
$ulimit -c unlimited
data seg size
When the soft limit of this resource is reached, a process will not be
able to obtain more memory from the operating system. It may scrape by if
it releases some memory that it no longer requires.
scheduling priority
This is the lower (!) limit for the “nice value” of a process.
Since
ulimit
does not accept negative parameters, the actual value that will
be used when you type “
ulimit -e
𝑛” is 20 − 𝑛. This way of specifying a nice
value is a bit contorted, but it lets you allow ordinary users to lower the nice
value of a process below 0:
#ulimit -e 30
actually −10
#/bin/su - hugo
$nice --5 /bin/sleep 10
works; new nice value is −5
$nice --15 /bin/sleep 10
nice: cannot set niceness: Permission denied
file size
When a process attemps to increase the size of a file to a value above this
limit, it is sent a
SIGXFSZ
signal. This signal normally terminates the process,
but if the process catches it, the write operation merely results in an error
code , and the process can try to come up with something different.

184 13 Linux and Security: An Introduction
max memory size
This may sound tempting, but as of Linux 2.4.30 this value is being
ignored. Even earlier on it probably didn’t do what you might have wanted
it to do, anyway.
open files
The number of file descriptors that a process may keep open at the same
time. When the limit is reached and a process attempts to open another file,
that attempt will fail.
stack size
The size of the process stack in Kibibytes.
BAlso, as of Linux 2.6.23, the size of the space used for command-line
arguments and environment variables. Linux allocates one quarter of
the given limit to each process initially—at least 32 memory pages,
which on architectures like the x86 PC, where Linux uses 4-KiB pages,
amounts to 128 KiB (the value used before Linux 2.6.23). With the de-
fault value for this resource limit, the usual amout is now 2 MiB.
cpu time
When a process reaches the soft value of this resource limit, it is sent a
SIGXCPU
signal. This signal is repeated once per second until the hard limit is
reached, at which point
SIGKILL
is sent.
max user processes
This limit differs from the others in that it applies per user, not
per process or file. It specifies the maximum number of parallel processes
that a user can have running on their behalf. If it is reached, any attempts
to create more processes will fail.
All resource limits can be set interactively using the
ulimit
shell command.
ulimit
They then apply to the shell in which the command was entered as well as all
processes that will be started by that shell (and their childrens).
BA classic of the genre is the “fork bomb” à lafork bomb
:(){ :|:& };:
(or, written down more readably)
f() {
f | f &
}
f
This small shell command line launces a process that forks two copies of its
own as child processes and puts them in the background. Each of the child
processes creates two new child processes and so on … you can see what
goes on here. The problem is that this type of program, if left to run uncon-
trolledly, occupies all of the system’s process table so you as the administra-
tor cannot launch new processes to get the situation under control. (When-
ever some process terminates, the fork bomb will likely be there ahead of
you to take advantage of the free slot in the process table.)—You can try to
not have the problem arise in the first place by preventing users from gen-
erating enough processes to fill the process table. Something like
ulimit -u 128
(as opposed to the default value of 8191) should stop such shenanigans in
their tracks without cramping your users’ style too much. (Incidentally, you
can check the
/proc/sys/kernel/threads-max
for the size of your system’s pro-
cess table.)

13.4 Resource Limits 185
BIf your system should ever be infested by a fork bomb while you have a root
shell running, you could attempt to terminate its processes even so. You
have to be a bit careful, though, because, if you just say
kill
, each killed
process will be replaced by a new one immediately. Instead, try to stop
(rather than terminate) all the fork bomb processes. This keeps them from
multiplying. Only then kill them off:
#killall -STOP process-name
#killall -KILL process-name
(Do not try this on a Solaris or BSD machine.)
BWhen your Windows-using buddies laugh at how easily a Linux computer Windows
can be stopped dead with a single command line: A batch file containing
%0|%0
works just as well on Windows—and one can do even less about it. Five
characters versus thirteen.
In order to impose restrictive resource limits on your users, you have to set Resource limits for users
them before the users get to take control, and such that they can’t change the
ulimit
commands in question themselves (so
~/.bash_profile
is not really an option). An
obvious alternative would be
/etc/profile
, but it assumes that all of your users use
Bash as their login shell.
BA more elegant solution would be to use a PAM module named
pam_limits
.
pam_limits
This module is part of the login process and allows you to configure detailed
resource limits for single users and groups in the
/etc/security/limits.conf
file. Further details can be found in the
pam_limits
(8) and
limits.conf
(5) man-
ual pages.
Exercises
C13.8 [!2] Choose some interesting resource limits (
file size
and
open files
come to mind) and write some shell scripts that test whether these resource
limits actually apply. (You may set the resource limits to a ridiculously low
value at the start of a script to make their effects more evident.)
C13.9 [!2] Insert some interesting resource limits into
/etc/profile
and make
sure that these limits actually affect users who log in freshly. How can you
restrict the limits to specific groups of users?
C13.10 [2] Add some interesting resource limits to the
/etc/security/limits.
conf
file, and make sure that these limits take effect. Verify the limits by
logging in as one of the affected users. (In order for this exercise to work,
pam_limits
need to be configured on your system. Check whether the
/etc/
pam.d/login
file contains a line approximately like
session required pam_limits.so
If such a line exists,
pam_limits
is available on your system.)
C13.11 [2] Experiment with the fork bomb by starting a “weakened” version
looking approximately like
#!/bin/sh
# forkbomb.sh
f() {
sleep 5

186 13 Linux and Security: An Introduction
f | f &
}
f
Trace the number of fork bomb processes with a command like
#watch 'ps auxw | grep forkbomb.sh | grep -v "\(watch\|egrep\)''
Finally kill the fork bomb as described in the text by using
killall
.
C13.12 [2] (Not for the faint of heart.) Run the fork bomb without the addi-
tional
sleep
command. To avoid the system reboot that would probably be
necessary otherwise, run the following command beforehand:
#(sleep 15 && exec /usr/bin/killall -STOP forkbomb.sh) &
(Or try the experiment in a virtual machine.)
13.5 Administrator Privileges With
sudo
The
su
command allows ordinary users to assume the identity of
root
(if they know
the correct password). The system does log that
su
was used3, but afterwards the
user in question has full administrator privileges—if it is just the intern who is
supposed to start the weekly backup, this may be too much of a good thing. It
would be nicer if certain users could be allowed to execute certain commands as
root
.
This is exactly what
sudo
is for. Using this command, the
root
account is not re-
ally used directly any longer. Instead, suitably privileged users can use something
like
$sudo passwd sue
to execute commands as
root
.
sudo
prompts for the user’s (rather than
root
’s)
password—a correct answer is remembered for a certain amount of time—or
even dispenses with asking for a password altogether.
BSome distributions—Ubuntu, Debian GNU/Linux optionally, and inciden-
tally MacOS X—extend
sudo
privileges to the first user account created dur-
ing installation and disable log-ins to the
root
account completely. This pre-
vents naive users from working as
root
all the time, “because one can do
everything”.
BIn fact, you can configure
sudo
to expect either the password of the request-
ing user or that of the
root
account. However, the latter is a stupid idea on
the whole. (Of course this did not stop the developers of the Novell/SUSE
distributions from making it the default.) See also exercise 13.14.
BBy default a correctly entered password remains valid for 15 minutes (the
time is configurable). The “
sudo -k
” command (which does not require a
password), though, can be used to reset the remembered password, so the
next time you run
sudo
, it will prompt for it again.
BDisabling password requests completely is a two-edged sword. It is very
convenient but the accounts of users who may do this are effectively made
into
root
accounts that must be secured accordingly.

13.5 Administrator Privileges With
sudo
187
All commands executed through
sudo
are logged using the syslog mechanism logging
(see Chapter 1). Entries look like this:
Feb 05 22:13:15 red sudo: hugo : TTY=pts/5 ; PWD=/home/hugo ;
USER=root ; COMMAND=/usr/bin/passwd
The
/etc/sudoers
file controls who gets to use
sudo
and for what. The format of
/etc/sudoers
the file is fairly baroque and the possibilities defy description. We explain only
the very simplest usage here.
BYou should use the
visudo
command to edit the
/etc/sudoers
file. It drops you
visudo
into your preferred editor to edit the file (it checks the
VISUAL
environment
variable first, then the
EDITOR
environment variable, and finally the
editor
setting in
/etc/sudoers
before falling back to good old
vi
) and does a syntax
check immediately after you have saved the file, before putting your new
configuration into effect. This is very important because in case of an error
you do not want to end up with a configuration file that will cause
sudo
to
throw a fit, which may result in your having sawn off the branch on which
you have been sitting. In addition, it makes sure that only one user is editing
the file at any one time.
The heart of the
/etc/sudoers
file is formed by lines containing rules of the form rules
hugo ALL = /usr/bin/cancel [a-z]*
The above rule allows user
hugo
to run the
cancel
command like
$sudo cancel lp-123
The “
[a-z]*
” makes sure that the parameter of the command begins with a letter, parameter
so no options can be injected.
B“
ALL
” means that this rule applies to all hosts. On a network this makes it
ALL
easier to configure
sudo
in a single file for all hosts: If
hugo
is only allowed to
cancel print jobs on the
red
host, then write
hugo red = /usr/bin/cancel [a-z]*
If the command is issued on host
blue
, for example, it would be rejected,
even if submitted using
sudo
.
BThat a
sudoers
file may potentially contain rules for all hosts on a network by
no means implies that the file only needs to be kept on a single host. Far from
it: You as the administrator are responsible for making the file available on
any host where it is supposed to be in force.
When you specify just a command (without parameters), arbitrary parameters arbitrary parameters
are allowed:
hugo ALL = /usr/bin/cancel
BWhen no parameters should be allowed at all, the only parameter specified
in the
sudoers
file must be an empty string:
hugo ALL = /usr/bin/passwd ""
3… which of course helps you only if the log is kept on a different computer, as the user could alter
or remove a local log after a successful
su
.

188 13 Linux and Security: An Introduction
In this case,
hugo
would only be allowed to change the password of
root
.
(Hang on …)
ABe careful about commands like
vi
that allow users to execute shell com-
mands. These commands are also executed with
root
privileges! To prevent
this, you could add a rule like
hugo ALL = NOEXEC: /usr/bin/vi
This line stops
vi
from running child processes. (An even better approach
for including editors is explained at the end of this section.)
You can also specify multiple commands:multiple commands
hugo ALL = /usr/bin/cancel [a-z]*, /usr/bin/cupsenable [a-z]*
allows “
sudo cancel
” as well as “
sudo cupsenable
”, both with (at least) one parameter.
BWhen you specify a directory name (as an absolute path name with a trailing
slash), this stands for all executable files in that directory (but not subdirec-
tories):
hugo ALL = /usr/bin/
Everything in
/usr/bin
It is often more convenient to collect commands into groups. You can do this
using command aliases:command aliases
Cmnd_Alias PRINTING = /usr/bin/cancel [a-z]*, \
/usr/bin/cupsenable [a-z]* \
/usr/bin/cupsdisable [a-z]*
hugo ALL = PRINTING
Command aliases can be mixed with literal commands in the same rule:
hugo ALL = PRINTING, /usr/bin/accept [a-z]*
The “
ALL
” alias stands for “all commands”:
hugo ALL = ALL
effectively gives
hugo
full administrator privileges.
A leading “
!
” character can be used to exclude commands that would other-excluding commands
wise be allowed by a configuration:
hugo ALL = /usr/bin/passwd [a-z]*, !/usr/bin/passwd root
allows
hugo
to change any password except
root
’s.
ADo not try to be too clever with “
!
”. In particular, keep away from rules like
hugo ALL = /bin/, !/bin/sh, !/bin/bash
—if
hugo
may run any command in
/bin
as
root
, nobody prevents him from
doing something like
$sudo cp /bin/sh /bin/mysh
$sudo mysh

13.5 Administrator Privileges With
sudo
189
sudo
is not cynical enough to be able to detect this kind of hanky-panky. Also
watch out for combinations with
ALL
.
All barriers are finally dropped by a rule like
hugo ALL = NOPASSWD: ALL
which allows
hugo
to execute all commands as
root
without even being prompted
for a password.
By default
sudo
runs all commands as
root
, but you can also specify another alternative users
user. With
hugo ALL = (mysql) /usr/bin/mysqladmin
hugo
can run the
mysqladmin
command as the
mysql
user. To do so, he must say some-
thing like
$sudo -u mysql mysqladmin flush-privileges
There are not just alias names for commands, but also for users and hosts, so user and host aliases
you can specify rules like this:
User_Alias WEBMASTERS = hugo sue
Host_Alias WEBHOSTS = www1 www2
WEBMASTERS WEBHOSTS = NOPASSWD: /usr/sbin/apache2ctl graceful
BValues of host aliases may contain IP addresses and network addresses
(with an optional netmask):
Host_Alias FILESERVERS = red, 192.168.17.1
Host_Alias DEVNET = 192.168.17.0/255.255.255.0
Host_Alias FINANCENET = 192.168.18.0/24
BWherever a user name is expected, you may specify a group, too. Just prefix
the group’s name with a percent sign:
%operators ALL = /usr/local/bin/do-backup
In addition to alias names and rules, the
/etc/sudoers
supports a multitude of
options that control the function of
sudo
. Read
sudo
(8) and
sudoers
(5). options
BA nice extra gimmick is “
sudo -e
” (or
sudoedit
). The command
sudoedit
$sudo -e /etc/hosts
is essentially equivalent to
$sudo cp /etc/hosts /tmp/hosts.$$
$sudo chown $USER /tmp/hosts.$$
$vi /tmp/hosts.$$
in fact:
VISUAL
and friends
$if ! sudo cmp --quiet /etc/hosts /tmp/hosts.$$ \
>then \
>sudo cp /tmp/hosts.$$ /etc/hosts && rm -f /tmp/hosts.$$ \
>fi

190 13 Linux and Security: An Introduction
This means that the command creates a temporary copy of the file to be
edited and then passes that copy to your favorite editor. Afterwards it
checks whether the copy has been changed compared to the original, and,
if so, the copy replaces the original file. This method has some convenient
advantages, not least that the editor runs with the ordinary user’s privileges
only, so they cannot spawn a
root
shell from the editor.—Incidentally, the
/etc/sudoers
file will be searched for
sudoedit
when deciding whether a user
gets to use this feature.
Exercises
C13.13 [!1] Configure a
sudo
rule that allows you to create new users, using
the
useradd
command, from your ordinary user account.
C13.14 [2] (“[!2]” for users of Novell/SUSE Distributions.) At the beginning
of the previous section we noted that
sudo
may prompt for the
root
password
instead of the password of the requesting user. We also called this a stupid
idea. What do you think could be our reasons for this assessment?
C13.15 [2] The following configuration is intended to allow the users speci-
fied in
ADMINS
to run all commands with
root
privileges, except for changing
the root password.
ADMINS ALL = NOPASSWD: ALL, !/usr/bin/passwd, \
/usr/bin/passwd [A-z]*, \
!/usr/bin/passwd root
Why does it not work as intended?
13.6 Basic Networking Security
On computer systems without any network connections, security is an important
yet manageable topic. Unfortunately, nowadays this restriction applies to very
few computers, in particular when we consider an operating system like Linux
which essentially grew up on the Internet and helps define the “state of the art”
of computer networking.
Therefore, as the administrator of a computer that is connected to the Inter-
net, you have a special responsibility. Not only do you have to make sure that all
services provided by your system (no matter whether these are restricted to your
employer’s LAN or available to the Internet at large) are provided reliably, but
you must also ensure that your machine is not used as a stepping stone to hurt
other Internet users—be it through sending spam or distributed denial-of-service
attacks. You cannot hide behind excuses like “I am so small and insignificant,
nobody will look at me”, because they are demonstrably false—many crackers en-
joy systematically checking the IP addresses used by ISPs for their customers for
insecure hosts.
How do you deal with this situation? The first basic principle consists in pre-
senting the smallest area to be attacked. Make sure that your host does not provide
any services on the Internet that you do not even know exist, let alone are active.
This is most easily checked using a command like
#netstat -tulp
which presents you with a list of all “open ports”, i. e., the services that your com-
puter provides, together with the IP addresses it provides them on and the pro-
cesses responsible for them. If you have access to a suitably equipped host out-
side your own local network, you can also use
nmap
to check how your computer
presents itself to the Internet.

13.6 Basic Networking Security 191
BIn earlier times Linux distributors tended to activate all kinds of services
with only cursory configurations. This is no longer the case today, but
Lenin’s maxim of “Trust is good, control is better” is still a highly recom-
mended position as far as network security is concerned.
You should be able to justify every line that the
netstat
and
nmap
programs out-
put. If anything appears that means nothing to you, then go and find out.
Deactivate all services that you do not need by removing the corresponding Deactivating Services
programs from the list of daemons to be started when the system comes up or
commenting them out in the
/etc/inetd.conf
file. If you are using
xinetd
, add the
following line to the configuration sections of any services you do not want to run:
disable = yes
Services that are not obviously superfluous can often be limited to the local host
or the local network. You should make use of the option to provide a service only
on the loopback interface ((
localhost
,
127.0.0.1
) whenever possible. For example, Loopback Interface
it makes sense to allow local programs to submit e-mail messages via the SMTP
service of your host, but it is not necessary to allow the entire LAN or even the
entire Internet to do so. All common MTAs can be configured such that they
accept connections only on IP address
127.0.0.1
, port 25.
Alternatively, you can use the “TCP wrapper” to provide a service to all hosts
of your LAN.
ANote that authentication based on IP addresses is generally not secure—it IP Address-based Authentication
is easy for an attacker to send datagrams with arbitrary IP addresses (es-
pecially if receiving results is not essential). What does work reasonably
reliably is to use the TCP wrapper to restrict a service to the IP addresses
used by the local network, when you simultaneously ensure, e. g., through
a suitable configuration of your firewall’s packet filter, that datagrams from
outside that claim sender addresses within your network are dropped.
There will be much to be said about the secure configuration of various network
services elsewhere in the Linup Front training materials line—up to here, network
services have not really been an important topic. Security in general is the focus
of the Linup Front training manual, Linux Security, which explains, among other
things, how to configure Linux-based packet filters and firewalls.
Exercises
C13.16 [2] Check which services your system provides to the outside. Are all
of these services necessary?

192 13 Linux and Security: An Introduction
Commands in this Chapter
fuser
Identifies processes owning given files or sockets
fuser
(8) 181
last
List recently-logged-in users
last
(1) 180
sudo
Allows normal users to execute certain commands with administrator
privileges
sudo
(8) 186
sudoedit
Allows normal users to edit arbitrary files (equivalent to “
sudo -e
”)
sudo
(8) 189
ulimit
Sets resource limits for processes
bash
(1) 182
visudo
Allows exclusive editing of
/etc/sudoers
, with subsequent syntax check
visudo
(8) 187
w
Displays the currently active users (and more)
w
(1) 180
who
Displays the names of currently logged-in users
who
(1) 179
whoami
Outputs the current (effective) user name
whoami
(1) 180
Summary
• Security is an important topic for everyone who operates a computer.
• Users should not be allowed to mount arbitrary removable media in an un-
restricted fashion. The
user
and
users
mount options imply that device files
and SUID/SGID files on a medium will not be functional.
• As a system administrator you should proactively search your system for
device files and SUID/SGID files that do not belong there.
• The
who
and
w
commands allow you to view the users currently using the
system, while the
last
command displays historical session information.
• You can use
fuser
to identify the users of files, directories, file systems, or
TCP and UDP ports.
• Resource limits can be used to keep users or system processes from monop-
olising resources to the detriment of other users.
• With
sudo
, individual users can be allowed to execute particular commands
with administrator privileges. However, configuring the program is not ex-
actly straightforward.
• Basic network security implies not providing superfluous services and re-
stricting the services that are offered to the smallest possible set of users.
Bibliography
McC08 Matt McCutchen. “The suidperl Story”, March 2008.
http://mattmccutchen.net/suidperl.html
$ echo tux
tux
$ ls
hallo.c
hallo.o
$ /bin/su -
Password:
A
Sample Solutions
This appendix contains sample solutions for selected exercises.
1.1 Such events are customarily logged by
syslogd
to the
/var/log/messages
file.
You can solve the problem most elegantly like
#grep 'su: (to root)' /var/log/messages
1.2 Insert a line
*.* -/var/log/test
anywhere in
/etc/syslog.conf
. Then tell
syslogd
using “
kill -HUP …
” to re-read its
configuration file. If you check
/var/log
afterwards, the new file should already be
there and contain some entries (which ones?).
1.3 On the receiving system,
syslogd
must be started using the
-r
parameter (see
p. 16). The sending system needs a configuration line of the form
local0.* @blue.example.com
(if the receiving system is called “
blue.example.com
”).
1.4 The only safe method consists of putting the log out of the attacker’s reach.
Therefore you must send the messages to another host. If you don’t want the
attacker to be able to compromise that host, too, then you should connect the log-
ging host to the one storing the log by means of a serial interface, and configure
syslogd
such that it sends the messages to the corresponding device (
/dev/ttyS0
or
something). On the storing host, a simple program can accept the messages on the
serial interface and store them or process them further. Alternatively, you could
of course also use an (old-fashioned) dot-matrix printer with fan-fold paper.
1.5 You can, among other things, expect information about the amount and us-
age of RAM, available CPUs, disks and other mass storage devices (IDE and SCSI),
USB devices and network cards. Of course the details depend on your system and
your Linux installation.

194 A Sample Solutions
1.10 Versuchen Sie etwas wie
# We assume a suitable source definition.
filter login_hugo {
facility(authpriv)
and (match("session opened") or match("session closed"))
and match("user hugo");
};
destination d_root { usertty("root"); };
log { source(...);
filter(login_hugo);
destination(d_root);
};
1.14 In
/etc/logrotate.d
, create an arbitrarily-named file containing the lines
/var/log/test {
compress
dateext
rotate 10
size 100
create
}
2.1 Text files are, in principle, amenable to the standard Unix tools (
grep
etc.)
and, as such, ideologically purer. They can be inspected without specialised soft-
ware. In addition, the concept is very well understood and there are gazillions of
tools that help evaluate the traditional log files. Disadvantages include the fact
that text files are difficult to search, and any sort of targeted evaluation is either
extremely tedious or else requires additional (non-standardised) software. There
is no type of cryptographic protection against the manipulation of log entries, and
the amount of information that can be written to the log is limited.
3.2 ISO/OSI layer 2 describes the interaction between two nodes that are con-
nected directly (e.g., via Ethernet). Layer 3 describes the interaction among
nodes that are not networked directly, and thus includes routing and media-
independent addressing (e. g., IP over Ethernet or Token-Ring or …).
3.3 You can look to the
/etc/services
and (possibly)
/etc/protocols
files for inspi-
ration. You will have to assign the protocols to layers by yourself. Hint: Practically
everything mentioned in
/etc/services
belongs to the application layer.
3.4 It is, of course, impossible to give a specific answer, but usually a TTL of
30–40 should be more than sufficient. (The default value is 64.) You can determine
the minimal TTL by means of sending successive packets with increasing TTL
(starting at TTL 1) to the desired target. If you receive an ICMP error message
from some router telling you that the packet was discarded, the TTL is still too
low. (The
traceroute
program automates this procedure.) This “minimal” TTL
is naturally not a constant, since IP does not guarantee a unique path for packet
delivery.
3.5
1. The
127.55.10.3
address cannot be used as a host address since it is that net-
work’s broadcast address.
2. The
138.44.33.12
address can be used as a host address.

A Sample Solutions 195
3. The
10.84.13.160
address is the network address of the network in question
and is thus unavailable as a host address.
3.6 For example, to implement certain network topologies or assign parts of the
address range to computers in different providers.
3.7 There are 16 subnets altogether (which is obvious from the fact that the sub-
net mask has four more bits set than the original netmask). Further subnets are
145.2.0.0
,
145.2.16.0
,
145.2.48.0
,
145.2.80.0
,
145.2.96.0 145.2.112.0
,
145.2.144.0
,
145.2.
176.0
,
145.2.208.0
,
145.2.224.0
, and
145.2.240.0
. The node with the IP address
145.2.
195.13
is part of the
145.2.192.0
subnet.
4.1
lsmod
displays all loaded modules. “
rmmod
⟨module name⟩” tries to unload a
module, which will fail when the module is still in use.
4.2 This is done most easily with
ifconfig
.
4.3 Use “
ifconfig
⟨interface⟩ ⟨IP address⟩”. To check whether other computers
can be reached, use the
ping
command.
5.1 The former should be on the order of tens of microseconds, the latter—
depending on the networking infrastructure—in the vicinity of milliseconds.
5.2 Try something like
#ping -f -c 1000000 localhost
The total running time is at the end of the penultimate line of output from
ping
.
(On the author’s system it takes approximately 13 seconds.)
5.3 For example:
$ping6 ff02::2%eth0
PING ff02::2%eth0(ff02::2) 56 data bytes
64 bytes from fe80::224:feff:fee4:1aa1: icmp_seq=1 ttl=64 time=12.4 ms
64 bytes from fe80::224:feff:fee4:1aa1: icmp_seq=2 ttl=64 time=5.27 ms
64 bytes from fe80::224:feff:fee4:1aa1: icmp_seq=3 ttl=64 time=4.53 ms
Ctrl
+
c
--- ff02::2%eth0 ping statistics ---
3 packets transmitted, 3 received, 0% packet loss, time 2003ms
rtt min/avg/max/mdev = 4.531/7.425/12.471/3.581 ms
6.2 FTP is a protocol using fairly long-lived “sessions”: You log in, send various
FTP commands, receive files in return (or send some to the server, too), and finally
log out again. All these actions use the same TCP connection; when the connec-
tion is started,
inetd
can launch the FTP server, which continues running until the
connection is taken down again at the very end of the session. The HTTP proto-
col forming the basis of the WWW, however, uses the “request-reply” scheme: A
browser asks for a resource such as
http://www.example.com/test.html
. It establishes
a TCP connection to the WWW server, which sends the desired resource (or an
error message) and then takes down the connection again. This implies that
inetd
would have to start a WWW server for this single resource request. Now imag-
ine what it means to retrieve a longish HTML page with 50 embedded pictures:
inetd
would need to start 51 WWW server processes, all of which would have to
independently run through a possibly complicated initialisation sequence before

196 A Sample Solutions
sending 100 bytes of GIF data to the client. This is far too inefficient even for test-
ing purposes.—
inetd
is only suitable for services which are either fairly trivial (so
that no extensive initialisation is necessary) or use long-lived sessions. Even for
SMTP, it often makes sense to use a standalone server, instead of starting a new
mail server from
inetd
for every single incoming message.
6.3 For your solution, you should first pick a suitable port number and add it to
/etc/services
, for example
caesar 9999/tcp
for port 9999. After this, a line like
caesar stream tcp nowait root /usr/bin/tr tr A-Z D-ZA-C
in
/etc/inetd.conf
basically suffices. The problem with this deceptively simple so-
lution is only the fact that
tr
buffers its output—so you will see the cipher text
only after your program has finished. A simple C program such as
#include <stdio.h>
#include <ctype.h>
const char code[] = "DEFGHIJKLMNOPQRSTUVWXYZABC";
int
main (void)
{
int c;
setvbuf(stdout, (char *)NULL, _IOLBF, 0);
while ((c = getchar()) != EOF) {
putchar('A' <= c && c <= 'Z' ? code[c - 'A'] : c);
}
return 1;
}
could use “line buffering” instead, which is much more fun.
6.4 Replace the line in
/etc/inetd.conf
by something like
ps stream tcp nowait root /usr/sbin/tcpd /bin/ps auxw
(the actual path names may differ). After that, you must suitably configure
tcpd
,
for example using a line like
ps : ALL EXCEPT 127.0.0.1
in the
/etc/hosts.deny
file. Alternatively, you could add
ps : 127.0.0.1
to
/etc/hosts.allow
and
ps : ALL
to
/etc/hosts.deny
, which is more work. If you are really paranoid, put “
ALL : ALL
”
into
/etc/hosts.deny
and explicitly enable specific clients and services in
/etc/hosts.
allow
.

A Sample Solutions 197
6.5 You could extend the
/etc/hosts.allow
entry like
ps : 127.0.0.1 : spawn /usr/bin/logger -p local0.info -t ps "%c"
6.7 You can define something like
service ps
{
socket_type = stream
protocol = tcp
wait = no
user = root
server = /bin/ps
server_args = auxw
only_from = localhost
no_access =
}
6.8 The
interface
attribute is handy.
6.9 The latter method has the advantage that access is definitely restricted to
local processes, while the former allows, in principle, manipulations to packets’
source addresses that will allow remote hosts to launch services (and thus trigger
a “denial of service” attack). In this sense, the
127.0.0.1
method is safer. Of course
you need to ensure that local processes do try to contact
localhost
instead of the
host’s FQDN. Inconvenient, but security does have its price …
7.4 This is
daytime.socket
:
[Unit]
Description=DAYTIME service socket
[Socket]
ListenStream=13
Accept=yes
[Install]
WantedBy=sockets.target
And here is
daytime@.service
:
[Unit]
Description=DAYTIME service (per-connection server)
[Service]
ExecStart=-/bin/date
StandardInput=socket
Note that this file is a “template” and hence needs to be called
daytime@.service
—otherwise
systemd will not find it when
daytime.socket
is activated.
How would you ensure that the date appears in the standardised English-
language (rather than, e. g., localised German if that is the system default) format?
8.1 Try something like

198 A Sample Solutions
for tz in America/New_York Europe/Berlin Asia/Tokyo
do
TZ=$tz xclock -title "$(basename $tz | tr _ ' ')" -update 1 &
done
8.2 According to “
zdump -v /usr/share/zoneinfo/Europe/Berlin
” during the years of
1916–18, 1940–49 (with “double daylight saving time” in 1945 and 1947), and from
1980 onwards.
8.3 Using a time server on the Internet means not having to set up and maintain
additional hardware, but there can be noticeable network load. We recommend
against using a time server on dial-up connections to the internet that are charged
based on time, since the connection will be kept open pretty much all the time. It
is also necessary to configure a firewall such that your NTP client (which then can
act as a time server on the next-higher stratum inside you network) can contact the
time server on the Internet. This means another possible attack vector for crack-
ers.—The radio-controlled clock is another peripheral which can develop faults
and must be maintained; fortunately, radio-controlled clocks are very cheap so
you can operate two or three for redundancy … In a security-minded environ-
ment, a radio-controlled clock on a time server inside the DMZ is the method of
choice since firewall security is not compromised. Besides, the DCF77 (or similar)
signal is probably less easy to spoof than NTP packets.
8.6 Do note that you can’t use a container-based virtualisation system because
the clock is usually not virtualised (containers cannot set their own clock indepen-
dently from that of the host kernel, and they can for sure not have it run fast or
slow the way
ntpd
likes to do it).
8.7 By default, the broadcast server sends a datagram containing the current
time every 64 seconds. If a freshly started
ntpd
on a broadcast client receives such
a datagram, it waits for a random (brief) interval and then starts a number of
direct queries to the broadcast server, in order to set its clock and calibrate the
connection. After that, it listens only for further broadcast datagrams and slows
down or speeds up the clock to reconcile any differences. If the running clock
of the host differs too crassly from the time available via NTP, it prefers doing
nothing over setting the time with a large jump; you need to restart
ntpd
in order
to activate the automatic clock setting mechanism.
9.2 You can set the default using something like
$lpoptions -d lp -o number-up=2
Afterwards, commands like
lp
will print scaled-down pages by default. If you do
want to print something at its original size, try
$lp -o number-up=1 foo.txt
9.7 CUPS does allow specifying various print options, but some options require
manual intervention at the printer. For example, for a simple colour printer with
one paper tray it might be useful to create separate print queues for “normal” jobs
and for jobs to be printed on high-grade glossy paper for photographs. Normally
the printer is provided with plain paper, jobs submitted to the “normal” queue are
printed immediately, and photo jobs collect in the “photo” queue. Later on, you
can disable the “normal” queue (jobs will still be accepted but not printed), change
the paper, and enable the “photo” queue. Once all photographs have been printed,

A Sample Solutions 199
you suspend the “photo” queue again, change the paper back, and re-enable the
“normal” queue.
10.1 During the first login procedure,
ssh
should ask you to confirm the remote
host’s public server key. During the second login procedure, the public server key
is already stored in the
~/.ssh/known_hosts
file and does not need to be reconfirmed.
10.2 In the first case, the connection is refused, since no public server key for the
remote host is available from
~/.ssh/known_hosts
. In the second case, the connection
is established without a query.
10.3 The file contains public keys only and thus does not need to be kept secret.
10.6 Use something like
$ssh-keygen -l -f ~/.ssh/id_rsa.pub
(Does it make a difference whether you specify
id_rsa.pub
or
id_rsa
?)
10.7 Noninteractive programs that need to use an SSH connection are often un-
able to enter a passphrase. In restricted cases like these, it is conceivable to use
a private key without a passphrase. You should then make use of the possibility
to make a public key on the remote host useable for specific commands only (in
particular the ones that the noninteractive program needs to invoke). Details may
be found in
sshd
(8).
10.8 Try “
ssh -X root@localhost
”.
10.9 One possible command line might be
#ssh -L 4711:localhost:7 user@remote.example.com
Do consider that
localhost
is evaluated from the perspective of the
remote
host.
Unfortunately,
ssh
does not allow symbolic names of well-known ports (as per
/etc/services
).
12.2
1. Alice herself has signed Bob’s and Carla’s keys, so these keys are obviously
valid. Doris’s key has been signed by Bob. Alice trusts Bob “fully” and has
signed his key herself, so Doris’s key is also “valid”. Alice’s “marginal” trust
in Carla is not sufficient to make Eric’s key “valid”.
2. When Alice truts both Carla and Doris “marginally”, Eric’s key becomes
“valid” because both Carla and Doris have signed it. There is a chain of two
links from Alice to Carla to Eric and a chain of three links from from Alice
to Bob to Doris to Eric.
3. Eric’s key is “valid” and so Fiona’s key is at the end of a chain of three links
(Alice, Carla, and Eric), so the first condition is met. However, the trust level
is problematic. Since all paths from Alice to Fiona include Eric as a link,
only “full” trust in Eric can make Fiona’s key “valid”, at least until either
Bob or both Carla and Doris have signed Fiona’s key. As long as this does
not happen, though, Alice needs to have herself be convinced by Eric that
he is competent and diligent about GnuPG, and to trust him “fully”.

200 A Sample Solutions
13.1 With direct read permission to the device file of a file system (or even an
entire disk), you can read all data stored there, no matter what the access permis-
sions for individual files say. You just need some knowledge of the structure of
the file system in question or a large USB stick and another Linux system.—With
write permission to a file system’s device file, you have what amounts to admin-
istrator privileges on the system concerned, since you can set arbitrary programs
set-UID
root
(to mention just one obvious thing to do).
13.6 Use “
who -b
”.
13.7 One solution (not the only conceivable one) would be something like
#!/bin/sh
last $1 \
| sed -n '/(/{s/^.*(//; s/).*$//; p}' \
| tr -c '[0-9\n]' ' ' \
| awk 'NF == 2 { m += $1; s += $2 }
NF == 3 { h += $1; m += $2; s += $3 }
END { m += int(s/60); s %= 60;
h += int(m/60); m %= 60;
printf "%d:%02d:%02d\n", h, m, s }'
13.9 Code like this may help:
if [ "$USER" = "hugo" ]; then
ulimit ...
fi
Or this:
if [ $(id -g) = 1000 ]; then
ulimit ...
fi
When the limits are to be applied to lots of users, try:
if grep "^$USER$" /etc/limitusers; then
ulimit ...
fi
and store the user names in the file
/etc/limitusers
, one per line.
Finally, you can reinvent
pam_limits
by creating the file
/etc/userlimits
with con-
tent of the following form:
hugo -c unlimited -s 16384
susi -u 128
All you need is something like
eval ulimit $(grep "^$USER$" /etc/userlimits \
| while read U LIMITS; do echo $LIMITS; done)
to enforce the resource limits.

A Sample Solutions 201
13.14 Shared passwords are a bad idea in principle—a password that only you
know can be changed whenever you want and for whatever reason, but chang-
ing a shared
root
password tends to be a big deal. This in particular because the
probability for a shared password to be compromised rises exponentially in the
number of people knowing it. One of the advantages of
sudo
is that you can get
by 95% (or so) of the time without a generally known
root
password; it suffices to
assign one specifically for that computer when it is installed, and to keep it in a
safe place.
Here is the qualitative difference: While prompting for the
root
password is
supposed to ensure that the user in question may use
sudo
, prompting for their
own password is supposed to ensure that, in fact, the privileged user is invok-
ing
sudo
rather than somebody who just happened to come across an unattended
computer. This implies that this solves a completely different problem, namely
that you can mostly rely on the
sudo
log. (If you check only the
root
password, the
sudo
-privileged user 𝑋can still use the
sudo
-privileged user 𝑌’s unattended com-
puter to execute iffy commands under 𝑌’s name, which are marked as such int
he log.) Whether the user gets to use
sudo
at all is a decision that you make at the
moment when you enter the user into the
sudoers
file, and that does not need to
be double-checked in every case by assuring the user knows the
root
password.
Finally: If users need to know the
root
password in order to use
sudo
, you must
take steps to prevent these users from using
su
or log in as
root
directly, which
would on the one hand completely sidestep
sudo
’s logging and on the other hand
enable them to do things that the
sudo
configuration might not have allowed.
If you are suffering from this particular misconfiguration as a SUSE distribu-
tion user, search your
sudoers
file for a string like
Defaults rootpw
and place an exclamation point in front of the “
rootpw
” keyword to switch back to
the normal behaviour. (The SUSE distribution tries to justify itself by claiming that
the default behaviour is necessary so the new user can access
sudo
after installation.
If that were actually the case, one ought to ask how Ubuntu, Debian, and Apple
manage otherwise. In addition, it would be no skin off SUSE’s nose to point this
out to users in a more visible place than a comment in
/etc/sudoers
.)
13.15 All the attempts to enforce the correct usage of
passwd
are futile because
users can just copy
/usr/bin/passwd
to a different file and run that file as a com-
mand instead. (Incidentally, this example used to be presented in official SUSE
training manuals, in exactly the manner displayed, as a worthwhile example to be
imitated.)

$ echo tux
tux
$ ls
hallo.c
hallo.o
$ /bin/su -
Password:
B
LPIC-1 Certification
B.1 Overview
The Linux Professional Institute (LPI) is a vendor-independent non-profit organi-
zation dedicated to furthering the professional use of Linux. One aspect of the
LPI’s work concerns the creation and delivery of distribution-independent certi-
fication exams, for example for Linux professionals. These exams are available
world-wide and enjoy considerable respect among Linux professionals and em-
ployers.
Through LPIC-1 certification you can demonstrate basic Linux skills, as re-
quired, e. g., for system administrators, developers, consultants, or user support
professionals. The certification is targeted towards Linux users with 1 to 3 years
of experience and consists of two exams, LPI-101 and LPI-102. These are offered
as computer-based multiple-choice and fill-in-the-blanks tests in all Pearson VUE
and Thomson Prometric test centres. On its web pages at
http://www.lpi.org/
, the
LPI publishes objectives outlining the content of the exams. objectives
This training manual is part of Linup Front GmbH’s curriculum for preparation
of the LPI-101 exam and covers part of the official examination objectives. Refer
to the tables below for details. An important observation in this context is that
the LPIC-1 objectives are not suitable or intended to serve as a didactic outline for
an introductory course for Linux. For this reason, our curriculum is not strictly
geared towards the exams or objectives as in “Take classes 𝑥and 𝑦, sit exam 𝑝,
then take classes 𝑎and 𝑏and sit exam 𝑞.” This approach leads many prospective
students to the assumption that, being complete Linux novices, they could book
𝑛days of training and then be prepared for the LPIC-1 exams. Experience shows
that this does not work in practice, since the LPI exams are deviously constructed
such that intensive courses and exam-centred “swotting” do not really help.
Accordingly, our curriculum is meant to give you a solid basic knowledge of
Linux by means of a didactically reasonable course structure, and to enable you as
a participant to work independently with the system. LPIC-1 certification is not a
primary goal or a goal in itself, but a natural consequence of your newly-obtained
knowledge and experience.
B.2 Exam LPI-102
The following table displays the objectives for the LPI-102 exam and the materials
covering these objectives. The numbers in the columns for the individual manuals
refer to the chapters containing the material in question.
adm2-objs-102.tex
(
0cd20ee1646f650c
)

204 B LPIC-1 Certification
No Wt Title ADM1 GRD2 ADM2
105.1 4 Customize and use the shell environment – 1–2 –
105.2 4 Customize or write simple scripts – 2–5 –
105.3 2 SQL data management – 8 –
106.1 2 Install and configure X11 – 11 –
106.2 1 Setup a display manager – 11 –
106.3 1 Accessibility – 12 –
107.1 5 Manage user and group accounts and related system files 2 – –
107.2 4 Automate system administration tasks by scheduling jobs – 9 –
107.3 3 Localisation and internationalisation – 10 –
108.1 3 Maintain system time – – 8
108.2 3 System logging – – 1–2
108.3 3 Mail Transfer Agent (MTA) basics – – 11
108.4 2 Manage printers and printing – – 9
109.1 4 Fundamentals of internet protocols – – 3–4
109.2 4 Basic network configuration – – 4–5, 7
109.3 4 Basic network troubleshooting – – 4–5, 7
109.4 2 Configure client side DNS – – 4
110.1 3 Perform security administration tasks 2 – 4–5, 13
110.2 3 Setup host security 2 – 4, 6–7, 13
110.3 3 Securing data with encryption – – 10, 12
B.3 LPI Objectives In This Manual
108.1 Maintain system time
Weight 3
Description Candidates should be able to properly maintain the system time
and synchronize the clock via NTP.
Key Knowledge Areas:
• Set the system date and time
• Set the hardware clock to the correct time in UTC
• Configure the correct timezone
• Basic NTP configuration
• Knowledge of using the pool.ntp.org service
• Awareness of the ntpq command
The following is a partial list of the used files, terms and utilities:
•
/usr/share/zoneinfo/
•
/etc/timezone
•
/etc/localtime
•
/etc/ntp.conf
•
date
•
hwclock
•
ntpd
•
ntpdate
•
pool.ntp.org
108.2 System logging
Weight 3
Description Candidates should be able to configure the syslog daemon. This
objective also includes configuring the logging daemon to send log output to a
central log server or accept log output as a central log server. Use of the systemd

B LPIC-1 Certification 205
journal subsystem is covered. Also, awareness of rsyslog and syslog-ng as alter-
native logging systems is included.
Key Knowledge Areas
• Configuration of the syslog daemon
• Understanding of standard facilities, priorities and actions
• Configuration of
logrotate
• Awareness of rsyslog and syslog-ng
The following is a partial list of the used files, terms and utilities:
•
syslog.conf
•
syslogd
•
klogd
•
/var/log/
•
logger
•
logrotate
•
/etc/logrotate.conf
•
/etc/logrotate.d/
•
journalctl
•
/etc/systemd/journald.conf
•
/var/log/journal/
108.3 Mail Transfer Agent (MTA) basics
Weight 3
Description Candidates should be aware of the commonly available MTA pro-
grams and be able to perform basic forward and alias configuration on a client
host. Other configuration files are not covered.
Key Knowledge Areas
• Create e-mail aliases
• Configure e-mail forwarding
• Knowledge of commonly available MTA programs (postfix, sendmail,
qmail, exim) (no configuration)
The following is a partial list of the used files, terms and utilities:
•
~/.forward
• sendmail emulation layer commands
•
newaliases
•
mail
•
mailq
• postfix
• sendmail
• exim
• qmail
108.4 Manage printers and printing
Weight 2
Description Candidates should be able to manage print queues and user print
jobs using CUPS and the LPD compatibility interface.
Key Knowledge Areas
• Basic CUPS configuration (for local and remote printers)
• Manage user print queues
• Troubleshoot general printing problems

206 B LPIC-1 Certification
• Add and remove jobs from configured printer queues
The following is a partial list of the used files, terms and utilities:
• CUPS configuration files, tools and utilities
•
/etc/cups/
• lpd legacy interface (
lpr
,
lprm
,
lpq
)
109.1 Fundamentals of internet protocols
Weight 4
Description Candidates should demonstrate a proper understanding of TCP/IP
network fundamentals.
Key Knowledge Areas
• Demonstrate an understanding of network masks and CIDR notation
• Knowledge of the differences between private and public »dotted quad« IP
addresses
• Knowledge about common TCP and UDP ports and services (20, 21, 22, 23,
25, 53, 80, 110, 123, 139, 143, 161, 162, 389, 443, 465, 514, 636, 993, 995)
• Knowledge about the differences and major features of UDP, TCP and ICMP
• Knowledge of the major differences between IPv4 and IPv6
• Knowledge of the basic features of IPv6
The following is a partial list of the used files, terms and utilities:
•
/etc/services
• IPv4, IPv6
• Subnetting
• TCP, UDP, ICMP
109.2 Basic network configuration
Weight 4
Description Candidates should be able to view, change and verify configuration
settings on client hosts.
Key Knowledge Areas
• Manually and automatically configure network interfaces
• Basic TCP/IP host configuration
• Setting a default route
The following is a partial list of the used files, terms and utilities:
•
/etc/hostname
•
/etc/hosts
•
/etc/nsswitch.conf
•
ifconfig
•
ifup
•
ifdown
•
ip
•
route
•
ping
109.3 Basic network troubleshooting
Weight 4
Description Candidates should be able to troubleshoot networking issues on
client hosts.
Key Knowledge Areas

B LPIC-1 Certification 207
• Manually and automatically configure network interfaces and routing ta-
bles to include adding, starting, stopping, restarting, deleting or reconfig-
uring network interfaces
• Change, view, or configure the routing table and correct an improperly set
default route manually
• Debug problems associated with the network configuration
The following is a partial list of the used files, terms and utilities:
•
ifconfig
•
ip
•
ifup
•
ifdown
•
route
•
host
•
hostname
•
dig
•
netstat
•
ping
•
ping6
•
traceroute
•
traceroute6
•
tracepath
•
tracepath6
•
netcat
109.4 Configure client side DNS
Weight 2
Description Candidates should be able to configure DNS on a client host.
Key Knowledge Areas
• Query remote DNS servers
• Configure local name resolution and use remote DNS servers
• Modify the order in which name resolution is done
The following is a partial list of the used files, terms and utilities:
•
/etc/hosts
•
/etc/resolv.conf
•
/etc/nsswitch.conf
•
host
•
dig
•
getent
110.1 Perform security administration tasks
Weight 3
Description Candidates should know how to review system configuration to
ensure host security in accordance with local security policies.
Key Knowledge Areas
• Audit a system to find files with the suid/sgid bit set
• Set or change user passwords and password aging information
• Being able to use nmap and netstat to discover open ports on a system
• Set up limits on user logins, processes and memory usage
• Determine which users have logged in to the system or are currently logged
in

208 B LPIC-1 Certification
• Basic sudo configuration and usage
The following is a partial list of the used files, terms and utilities:
•
find
•
passwd
•
fuser
•
lsof
•
nmap
•
chage
•
netstat
•
sudo
•
/etc/sudoers
•
su
•
usermod
•
ulimit
•
who
,
w
,
last
110.2 Setup host security
Weight 3
Description Candidates should know how to set up a basic level of host security.
Key Knowledge Areas
• Awareness of shadow passwords and how they work
• Turn off network services not in use
• Understand the role of TCP wrappers
The following is a partial list of the used files, terms and utilities:
•
/etc/nologin
•
/etc/passwd
•
/etc/shadow
•
/etc/xinetd.d/
•
/etc/xinetd.conf
•
/etc/inetd.d/
•
/etc/inetd.conf
•
/etc/inittab
•
/etc/init.d/
•
/etc/hosts.allow
•
/etc/hosts.deny
110.3 Securing data with encryption
Weight 3
Description The candidate should be able to use public key techniques to secure
data and communication.
Key Knowledge Areas
• Perform basic OpenSSH 2 client configuration and usage
• Understand the role of OpenSSH 2 server host keys
• Perform basic GnuPG configuration, usage and revocation
• Understand SSH port tunnels (including X11 tunnels)
The following is a partial list of the used files, terms and utilities:
•
ssh
•
ssh-keygen
•
ssh-agent

B LPIC-1 Certification 209
•
ssh-add
•
~/.ssh/id_rsa
and
id_rsa.pub
•
~/.ssh/id_dsa
and
id_dsa.pub
•
/etc/ssh/ssh_host_rsa_key
and
ssh_host_rsa_key.pub
•
/etc/ssh/ssh_host_dsa_key
and
ssh_host_dsa_key.pub
•
~/.ssh/authorized_keys
•
ssh_known_hosts
•
gpg
•
~/.gnupg/

$ echo tux
tux
$ ls
hallo.c
hallo.o
$ /bin/su -
Password:
C
Command Index
This appendix summarises all commands explained in the manual and points to
their documentation as well as the places in the text where the commands have
been introduced.
arp
Allows access to the ARP cache (maps IP to MAC adresses)
arp
(8) 50
cancel
Cancels a submitted print job
cancel
(1) 132
date
Displays the date and time
date
(1) 118
dnsmasq
A lightweight DHCP and caching DNS server for small installations
dnsmasq
(8) 79
fuser
Identifies processes owning given files or sockets
fuser
(8) 181
getent
Gets entries from administrative databases
getent
(1) 94
gpg
Encrypts and signs files
gpg
(1) 163
host
Searches for information in the DNS
host
(1) 93
hwclock
Controls a PC’s CMOS clock
hwclock
(8) 118
ifconfig
Configures network interfaces
ifconfig
(8) 68
ifdown
Shuts down a network interface (Debian)
ifdown
(8) 74
ifup
Starts up a network interface (Debian)
ifup
(8) 74
inetd
Internet superserver, supervises ports and starts services
inetd
(8) 100, 54
ip
Manages network interfaces and routing
ip
(8) 72
ipv6calc
Utility for IPv6 address calculations
ipv6calc
(8) 63
klogd
Accepts kernel log messages
klogd
(8) 14, 18
last
List recently-logged-in users
last
(1) 180
logger
Adds entries to the system log files
logger
(1) 16
logrotate
Manages, truncates and “rotates” log files
logrotate
(8) 26
logsurfer
Searches the system log files for important events
www.cert.dfn.de/eng/logsurf/
17
lp
Submits a print job
lp
(1) 130
lpadmin
Manages printer job queues
lpadmin
(8) 137
lpinfo
Displays available printer devices and drivers
lpinfo
(8) 137
lpoptions
Manages default settings for printer queues
lpoptions
(1) 133
lpq
Displays a printer queue’s status
lpq
(1) 131
lpr
Submits a print job
lpr
(1) 130
lprm
Cancels a print job
lprm
(1) 132
mailq
Displays the state of the mail queue (Sendmail & co.)
sendmail
(1) 155
newaliases
Updates a mail server’s alias database (Sendmail/Postfix)
newaliases
(1) 157
nmap
Network port scanner, analyses open ports on hosts
nmap
(1) 91
ntp-keygen
Generates key material for
ntpd ntp-keygen
(8) 122
ntpq
Controls NTP servers
ntpq
(8) 123

212 C Command Index
ping
Checks basic network connectivity using ICMP
ping
(8) 84
ping6
Checks basic network connectivity (for IPv6)
ping
(8) 85
pstops
Prepares PostScript print jobs for CUPS 134
route
Manages the Linux kernel’s static routing table
route
(8) 70
scp
Secure file copy program based on SSH
scp
(1) 145
sendmail
MTA administrative command (Sendmail, but also other – compatible
– MTAs)
sendmail
(1) 155
sftp
Secure FTP-like program based on SSH
sftp
(1) 145
ssh
”‘Secure shell”’, creates secure interactive sessions on remote hosts
ssh
(1) 142
ssh-add
Adds private SSH keys to
ssh-agent ssh-add
(1) 148
ssh-agent
Manages private keys and pass phrases for SSH
ssh-agent
(1) 148
ssh-copy-id
Copies public SSH keys to other hosts
ssh-copy-id
(1) 147
ssh-keygen
Generates and manages keys for SSH
ssh-keygen
(1) 146
sshd
Server for the SSH protocol (secure interactive remote access)
sshd
(8) 142
sudo
Allows normal users to execute certain commands with administrator
privileges
sudo
(8) 186
sudoedit
Allows normal users to edit arbitrary files (equivalent to “
sudo -e
”)
sudo
(8) 189
syslogd
Handles system log messages
syslogd
(8) 14
tail
Displays a file’s end
tail
(1) 17
tcpd
“TCP wrapper”, permits or denies access depending on the client’s IP
address
tcpd
(8) 101
tcpdump
Network sniffer, reads and analyzes network traffic
tcpdump
(1) 97
telnet
Opens connections to arbitrary TCP services, in particular TELNET (re-
mote access)
telnet
(1) 95
tracepath
Traces path to a network host, including path MTU discovery
tracepath
(8) 89
tracepath6
Equivalent to
tracepath
, but for IPv6
tracepath
(8) 90
traceroute
Analyses TCP/IP routing to a different host
traceroute
(8) 87
ulimit
Sets resource limits for processes
bash
(1) 182
vacation
Automatic e-mail responder, e. g., for longer absences
vacation
(1) 157
visudo
Allows exclusive editing of
/etc/sudoers
, with subsequent syntax check
visudo
(8) 187
w
Displays the currently active users (and more)
w
(1) 180
who
Displays the names of currently logged-in users
who
(1) 179
whoami
Outputs the current (effective) user name
whoami
(1) 180
xconsole
Displays system log messages in an X window
xconsole
(1) 14
xinetd
Improved Internet super server, supervises ports and starts services
xinetd
(8) 104, 54
xlogmaster
X11-based system monitoring program
xlogmaster
(1),
www.gnu.org/software/xlogmaster/
17
zdump
Outputs the current time or time zone definitions for various time zones
zdump
(1) 119
zic
Compiler for time zone data files
zic
(8) 119

$ echo tux
tux
$ ls
hallo.c
hallo.o
$ /bin/su -
Password:
Index
This index points to the most important key words in this document. Particu-
larly important places for the individual key words are emphasised by bold type.
Sorting takes place according to letters only; “
~/.bashrc
” is therefore placed under
“B”.
Allman, Eric, 154
apt
, 160
apt-cache
, 135
arp
, 50
awk
, 182
back ends, 129
bash
, 148
-p
(option), 177
~/.bash_profile
, 185
Berkeley LPD, 128
Bernstein, Dan J., 154
Bernstein, Daniel J., 143
broadcast address, 56
cancel
, 132
cd
, 145
certificate, 161
chrony
, 123
Common Unix Printing System, 128
connectionless protocol, 48
cp
, 145
cron
, 26, 120, 123, 147, 149, 156, 178
CUPS, 128
datagrams, 48
date
, 118–119, 125
-u
(option), 119
definitions, 12
/dev
, 68, 176, 178
/dev/hda
, 178
/dev/klog
, 37
/dev/kmem
, 176
/dev/log
, 14, 23, 32
/dev/lp0
, 128
/dev/null
, 102
/dev/xconsole
, 16
dig
, 92–93, 95
-x
(option), 94
DISPLAY
(environment variable), 148–149
dmesg
, 18
-c
(option), 18
-n
(option), 18
dnsmasq
, 79
domain
(
/etc/resolv.conf
), 78
echo
, 72
EDITOR
(environment variable), 187
Elgamal, Taher, 163
environment variable
DISPLAY
, 148–149
EDITOR
, 187
PAGER
, 34
PRINTER
, 130, 132
SYSTEMD_LESS
, 34
SYSTEMD_PAGER
, 34
TZ
, 119
VISUAL
, 187, 189
XINETD_BIN
, 106
/etc/adjtime
, 119
/etc/aliases
, 156–157
/etc/cups/cupsd.conf
, 137, 139
/etc/cups/mime.convs
, 134
/etc/cups/mime.types
, 133
/etc/cups/ppd
, 137
/etc/cups/printers.conf
, 137
/etc/fstab
, 111, 177
/etc/hosts
, 79–80, 95
/etc/hosts.allow
, 101–103, 196
/etc/hosts.deny
, 101–103, 196
/etc/inetd.conf
, 100, 102–104, 106, 191,
196
/etc/init.d/network
, 74
/etc/init.d/networking
, 74
/etc/init.d/xinetd
, 106
/etc/localtime
, 119
/etc/logrotate.conf
, 26–27
/etc/logrotate.d
, 26, 194
/etc/machine-id
, 37
/etc/mail/aliases
, 156
/etc/modules.conf
, 68
/etc/network/interfaces
, 73, 76, 89
/etc/network/options
, 72

214 Index
/etc/nsswitch.conf
, 80, 95
/etc/ntp.conf
, 120
/etc/pam.d/login
, 185
/etc/passwd
, 95, 145
/etc/printcap
,128
/etc/printcap
, 128, 213
/etc/profile
, 185
/etc/protocols
, 100, 104, 194
/etc/resolv.conf
, 78
domain
, 78
nameserver
, 78
options
, 79
search
, 78
sortlist
, 79
/etc/rsyslog.conf
, 14, 19, 21
/etc/security/limits.conf
, 185
/etc/services
, 54, 95, 100, 104, 112, 182,
194, 199
/etc/shadow
, 145
/etc/ssh
, 143
/etc/ssh/ssh_config
, 148
/etc/ssh/sshd_config
, 147–148
/etc/sudoers
, 187, 189, 201
/etc/sysconfig
, 74–75
/etc/sysconfig/network
, 74
/etc/sysconfig/network-scripts
, 75
/etc/sysconfig/network-scripts/ifcg-eth0
,
75
/etc/sysconfig/network/config
, 74
/etc/sysconfig/network/routes
, 75
/etc/sysconfig/static-routes
, 75
/etc/sysconfig/sysctl
, 72
/etc/sysctl.conf
, 72, 78
/etc/syslog-ng/syslog-ng.conf
, 22
/etc/syslog.conf
, 14, 16, 19, 25, 193
/etc/systemd/journald.conf
, 33–35
/etc/timezone
, 119
/etc/udev/rules.d
, 68
/etc/udev/rules.d/70-persistent-
net.rules
, 84
/etc/xinetd.conf
, 104–106
/etc/xinetd.d
, 105
ethereal
, 98
ethernet, 42
Exim, 154
extended Internet daemon,104
fg
, 96
filters, 129
find
, 178
-ls
(option), 178
-perm
(option), 178
-print
(option), 178
-type
(option), 178
flags, 52
~/.forward
, 157
fragmentation, 49
fuser
, 181–182, 192
-i
(option), 182
-k
(option), 182
-m
(option), 181
-n
(option), 182
-v
(option), 181
-w
(option), 182
gated
, 70
Gerhards, Rainer, 18
getent
, 94–95
getmail_fetch
, 150
~/.gnupg
, 173
gpg
, 163, 166, 168–173
--armor
(option), 165, 170, 173
--check-sigs
(option), 168
--clearsign
(option), 172
--decrypt
(option), 171
--detach-sign
(option), 172
--edit-key
(option), 168
--export
(option), 165
--gen-key
(option), 163
--list-keys
(option), 165–166
--list-sigs
(option), 168
--output
(option), 165, 170, 172
--recipient
(option), 170, 173
--sign
(option), 171
--symmetric
(option), 170
--verify
(option), 171–173
gpg.conf
, 173
grep
, 178, 194
-v
(option), 178
gzip
, 28
-6
(option), 28
Hazel, Philip, 154
host
, 92–93, 95
-a
(option), 93
-l
(option), 93
-t
(option), 93
hugo
, 188
hwclock
, 118–119
--date
(option), 119
--systohc
(option), 119
IANA, 53
id_ed25519
, 147
id_ed25519.pub
, 147
id_rsa
, 147
id_rsa.pub
, 147
ifconfig
, 68–69, 71, 73, 78, 84, 195
-a
(option), 84
ifdown
, 74–75, 90
-a
(option), 74
ifup
, 74–75, 90
-a
(option), 74
inetd
, 54, 100–101, 103–104, 106,
110–114, 155, 195
inetd.conf
, 101
Internet Printing Protocol, 128
ip
, 72–73, 78, 87

Index 215
addr
(option), 72
addr add
(option), 73
brd +
(option), 73
help
(option), 72
link
(option), 72
local
(option), 73
route
(option), 72
IP forwarding, 72
ipv6calc
, 63
itox
, 106
journalctl
, 33–39
-b
(option), 36–37
-f
(option), 36
-k
(option), 36
--list-boots
(option), 37
-n
(option), 36
--no-pager
(option), 34
--output=verbose
(option), 37
-p
(option), 36
--since
(option), 36
-u
(option), 36
--until
(option), 36
journald
, 39
kill
, 184
killall
, 186
klogd
, 14, 18, 22–23
kprinter
, 133
last
, 180–182, 192
-f
(option), 180
less
, 17, 34
Local area networks, 44
logger
, 16, 22, 26, 35
logrotate
, 26–29, 35
-f
(option), 26
--force
(option), 26
logsurfer
, 17
lp
, 129–130, 132–133, 198
-o
(option), 132
lpadmin
, 137
-D
(option), 137
-E
(option), 137
-L
(option), 137
-m
(option), 137
-p
(option), 137
-v
(option), 137
-x
(option), 137
lpinfo
, 137
-m
(option), 137
-v
(option), 137
~/.lpoptions
, 133
lpoptions
, 133
-l
(option), 133
-o
(option), 133
-p
(option), 133
lpq
, 129, 131–132
-a
(option), 132
-l
(option), 132
-P
(option), 132
lpr
, 129–130, 132–133
-o
(option), 132
-P
(option), 130
lprm
, 129, 132
-P
(option), 132
lpstat
, 129, 132
ls
, 178
-l
(option), 178
lsmod
, 84, 195
lspci
, 84
-k
(option), 84
mailq
, 155
mime.types
, 133
minsize
, 28
mount
, 177–178
nodev
(option), 178
noexec
(option), 178
nosuid
(option), 178
mpage
, 129
mysqladmin
, 189
nameserver
(
/etc/resolv.conf
), 78
NAT, 60
nc
, 96
netcat
, 96
netdate
, 120
netstat
, 90–91, 191
-l
(option), 90–91
-t
(option), 90–91
-u
(option), 90–91
network address, 56
network classes, 58
network mask, 56
newaliases
, 157
nmap
, 90–92, 97, 190–191
-A
(option), 92
NSA, 143
nslookup
, 93
ntp-keygen
, 122
ntpd
, 120–123, 125–126, 198
ntpdate
, 123, 125
ntpq
, 123–125
-p
(option), 124
objectives, 203
OpenSSH, 142
options
(
/etc/resolv.conf
), 79
PAGER
(environment variable), 34
passwd
, 201
ping
, 50, 84–85, 87–88, 195
-a
(option), 85
-b
(option), 85
-c
(option), 85
-f
(option), 85
-I
(option), 85

216 Index
-i
(option), 85
-n
(option), 85
-s
(option), 85
ping6
, 85, 87
port numbers, 51
port scanner, 91
ports, 53
postalias
, 157
Postfix, 154
PPD files, 134
pppd
, 75
PRINTER
(environment variable), 130, 132
printing options, 132
/proc/kmsg
, 18
/proc/sys/kernel/threads-max
, 184
pstops
, 134
Qmail, 154
qmail-qread
, 156
qmail-send
, 156
qmail-stat
, 156
queue, 128
rcnetwork
, 74
Receiving messages, 155
registered ports, 53
rm
, 18
rmmod
, 195
root
, 92
route
, 70–71, 73, 75, 87
-host
(option), 71
-net
(option), 71
netmask
⟨netmask⟩(option), 71
routed
, 70
Routing, 51
/run/log/journal
, 33
Scheidler, Balazs, 22
scp
, 145, 147–148
-r
(option), 145
search
(
/etc/resolv.conf
), 78
sed
, 182
Sending messages, 155
sendmail
, 155, 157
-bi
(option), 157
-bp
(option), 155
-q
(option), 156
sftp
, 145, 148
sleep
, 150, 186
Snowden, Edward, 143
sort
, 52
sortlist
(
/etc/resolv.conf
), 79
spooler, 128
ssd
, 112
~/.ssh
, 147
ssh
, 52, 95, 114, 142–151, 161, 199
-f
(option), 150
-KR
(option), 150
-L
(option), 149–150
-N
(option), 149
-R
(option), 149–150
-X
(option), 148
ssh-add
, 148
-D
(option), 148
ssh-agent
, 147–148
ssh-copy-id
, 147
ssh-keygen
, 143, 146–148
-l
(option), 143
-t ed25519
(option), 147
~/.ssh/authorized_keys
, 147
~/.ssh/config
, 144
~/.ssh/known_hosts
, 144–145, 199
~/.ssh/ssh_config
, 145
~/.ssh_config
, 148
sshd
, 95, 142, 148
-i
(option), 112
sshd@.service
, 113
su
, 16, 186
subnetting
, 58
sudo
, 186–189, 191, 200–201, 212
-e
(option), 189
-k
(option), 186
sudo cupsenable
, 188
sudoedit
, 189
suidperl
, 177
SuSEconfig
, 74
sysctl
, 78
Syslog-NG, 22
syslog-ng
, 22
syslog.conf
, 17
syslogd
, 14, 16–20, 22–27, 35, 193
-r
(option), 16, 23, 193
systemctl
, 32, 110, 114
-l
(option), 32
systemd-journald
, 33–35
SYSTEMD_LESS
(environment variable), 34
SYSTEMD_PAGER
(environment variable), 34
tail
, 17, 35–36
-f
(option), 17, 35
tar
, 172
tcp
, 103
tcpd
, 101–104, 114, 196
tcpdump
, 97, 151
telnet
, 95–96, 101
tr
, 196
tracepath
, 87, 89–90
tracepath6
, 90
traceroute
, 87–90, 194
-6
(option), 88
-I
(option), 88
-M tcp
(option), 88
-p
(option), 88
-T
(option), 88
traceroute6
, 88, 90
TZ
(environment variable), 119
ulimit
, 182–185

Index 217
-a
(option), 182
-e
(option), 183
-H
(option), 183
-S
(option), 183
umask
, 103
useradd
, 190
/usr/bin
, 188
/usr/lib/cups/backend
, 134
/usr/share/cups/model
, 137
/usr/share/zoneinfo
, 119
UTC, 118
vacation
, 157
~/.vacation.msg
, 157
/var/log
, 17, 32, 39
/var/log/cups/error_log
, 139
/var/log/journal
, 33
/var/log/messages
, 34, 193
/var/log/wtmp
, 180
/var/mail
, 155–156
/var/qmail
, 155
/var/qmail/alias
, 157
/var/run/xinetd.dump
, 106
/var/spool/exim
, 155
/var/spool/mail
, 155
/var/spool/mqueue
, 155
/var/spool/postfix
, 155
Venema, Wietse, 154
vi
, 187–188
VISUAL
(environment variable), 187, 189
visudo
, 187
w
, 180, 182, 192
-h
(option), 180
-s
(option), 180
well-known ports, 53
who
, 179–180, 182, 192, 200
-a
(option), 179
-b
(option), 179, 200
-H
(option), 179
-m
(option), 179
-r
(option), 179
whoami
, 180
wide area networks, 44
wireshark
, 97–98, 151
xclock
, 120
xconsole
, 14
xinetd
, 54, 104–107, 110–112, 114, 155,
191
-syslog
(option), 106
xinetd.conf
, 104
XINETD_BIN
(environment variable), 106
xlogmaster
, 17
zdump
, 119–120
zic
, 119
Zimmermann, Phil, 172
