ManageEngine Self Service Password Pelco DVR C2619M Admin Guide
User Manual: Pelco DVR C2619M
Open the PDF directly: View PDF ![]() .
.
Page Count: 126 [warning: Documents this large are best viewed by clicking the View PDF Link!]
- Welcome to ADSelfService Plus
- Self-Service Features
- Getting Started
- Domain Configuration
- Rolling out ADSelfService Plus
- Know Your Product
- Support
- Troubleshooting Tips
- adssp-admin-guide.pdf
- Welcome to ADSelfService Plus
- Self-Service Features
- Getting Started
- Domain Configuration
- Rolling out ADSelfService Plus
- Know Your Product
- Support
- Troubleshooting Tips
- ADSelfService_Plus-Help.pdf
- Welcome to ADSelfService Plus
- Getting Started
- How ADSelfService Plus Works
- ADSelfService Plus Admin Portal
- Domain User Web Portal
- ADSelfService Plus Deployment Scenarios
- Troubleshooting Tips
- ADSelfService Plus Frequently Asked Questions

ManageEngine ADSelfSerivce Plus – Admin Guide
ZOHO Corp.
1
Table of Contents
WELCOME TO ADSELFSERVICE PLUS ............................................................4
SELF-SERVICE FEATURES ................................................................................5
GETTING STARTED ............................................................................................6
System Requirements for ADSelfService Plus ............................................................. 7
Installing ADSelfService Plus ....................................................................................... 8
Working with ADSelfService Plus................................................................................. 9
Licensing ................................................................................................................... 11
DOMAIN CONFIGURATION .............................................................................. 12
ROLLING OUT ADSELFSERVICE PLUS .......................................................... 14
Password Self-Service Deployment ........................................................................... 15
Policy Configuration: ............................................................................................................... 17
Identity Verification .................................................................................................................. 18
Enrollment & Invitation ............................................................................................................ 19
Security Settings: (Features Under Advance Tab) ................................................................. 20
Taking The Features To The End-Users ................................................................................ 21
Implementing Password Reset/ Account Unlock process:.................................................. 22
Implementing Self-Update Feature ..................................................................................... 23
Implementing Change Password Feature ........................................................................... 24
Employee Search Deployment ................................................................................... 25
Password Notification Deployment ............................................................................. 26
KNOW YOUR PRODUCT ................................................................................... 27
Dashboard ................................................................................................................. 28
Reports ...................................................................................................................... 30
User Reports ........................................................................................................................... 31
Enrollment Reports ................................................................................................................. 33
Audit Reports .......................................................................................................................... 35
Configuration ............................................................................................................. 36
Self-Service ............................................................................................................................. 37
Policy Configuration ............................................................................................................ 38
Identity Verification .......................................................................................................... 39
Configuring Security Question and Answers ............................................................... 40
Verification Codes ........................................................................................................ 42

ManageEngine ADSelfSerivce Plus – Admin Guide
ZOHO Corp.
2
Advanced Configuration .................................................................................................. 44
BLOCK USERS............................................................................................................ 45
RESET AND UNLOCK ................................................................................................ 46
Q & A SETTINGS......................................................................................................... 47
ENROLLMENT............................................................................................................. 49
Notification ................................................................................................................... 50
GENERAL .................................................................................................................... 51
Automatic Rest and Unlock .......................................................................................... 52
Password / Account Expiry Notification ............................................................................... 54
Employee Search ................................................................................................................ 56
Administrative Tools ................................................................................................................ 57
Quick Enrollment ................................................................................................................. 58
Enrollment Notification ..................................................................................................... 59
Auto Enrollment ............................................................................................................... 60
Enrollment Reminder ....................................................................................................... 62
Self-Update Layout .............................................................................................................. 63
Field Customization ......................................................................................................... 65
Attribute List ..................................................................................................................... 66
How To ............................................................................................................................ 70
Gina Installation ................................................................................................................... 79
Client Software Installation From The ADSelfService Plus Console ............................... 80
Client Software Installation via GPO (Group Policy Object) ............................................ 82
Client Software Installation Via System Center Configuration Manager ......................... 83
Manual Installation Of Client Software ............................................................................ 86
Gina/CP Customization ....................................................................................................... 87
Gina/CP Schedulers ............................................................................................................ 88
Technician ........................................................................................................................... 89
External Data Sources ........................................................................................................ 90
Security Center ....................................................................................................................... 92
Password Strengtheners ..................................................................................................... 93
Security Q & A Strengtheners ............................................................................................. 94
Anti-Hacking System ........................................................................................................... 95
Brute Force/Dictionary Attack Preventers ....................................................................... 96
Man-In-The-Middle Attack Preventers ............................................................................. 97
Safe-Guard Inactive Account Loopholes ......................................................................... 98

ManageEngine ADSelfSerivce Plus – Admin Guide
ZOHO Corp.
3
Admin ........................................................................................................................ 99
Customize ............................................................................................................................. 100
Logon Settings .................................................................................................................. 101
Customize User Logon Page ......................................................................................... 102
Rebranding ........................................................................................................................ 104
Personalize ........................................................................................................................ 106
System Utilities ..................................................................................................................... 107
Dashboard Updater ........................................................................................................... 108
Automatic DB Backup ....................................................................................................... 110
Product Settings .................................................................................................................... 111
Connection ........................................................................................................................ 112
Entrusting 'SSL Certification' with SSL Certification Tool .............................................. 113
Server Settings .................................................................................................................. 115
Windows Service ............................................................................................................... 116
License Management............................................................................................................ 117
Restrict Users .................................................................................................................... 118
SUPPORT ......................................................................................................... 120
TROUBLESHOOTING TIPS ............................................................................. 121

ManageEngine ADSelfSerivce Plus – Admin Guide
ZOHO Corp.
4
Welcome to ADSelfService Plus
ADSelfService Plus is a web based product which allows end users to reset forgotten passwords
securely, allowing administrators to implement stronger password policies while reducing help-desk
workload. It provides a simple, secure web based solution that allows end users to reset forgotten
passwords and unlock their user accounts themselves by answering configured preset question and
answers.
It helps to generate comprehensive reports on Locked Out Users, Soon-to-Expire-Password-Users,
Password Expired Users which provides a clear picture on the status of users and accounts present
in the Domain. Also the above reports can be scheduled on a monthly, weekly, daily or hourly basis
providing administrators control and end-users with the most needed notification on soon to expire
passwords.
It also provides a detailed audit feature on when, by whom and which user password or accounts
was modified. Further a Self Update feature where a user can update his/her own personal
information from the web based console is bundled with the product. The Administrator can give
controlled access to users for updating their personal contact details by themselves which may
include available attributes present in the Active Directory like given name, sAM Account name etc.,
as well as custom Attributes based on LDAP attribute value as employeeid etc.,
The Admin Function of ADSelfService Plus allows the users with privileges to General Attributes,
Exchange Attributes, Account Attributes, Terminal Attributes and Custom Attributes. The end user can
have one or more of these privileges to be modified by himself as it is delegated by the Administrator.
The Following Sections will help you get familiar with the product:
Getting Started: Provides you the details of system requirements, product installation and startup .

ManageEngine ADSelfSerivce Plus – Admin Guide
ZOHO Corp.
5
Self-Service Features
ADSelfService Plus offers the end-users with four Self-Service features: Self-Password Reset, Self-
Account Unlock, Change Password & Self-Update.
Self-Password Reset: The highlight of this application which ensures that the helpdesk
officials no longer attend to password reset calls.
Self-Account Unlock: Allows the end-users to self-unlock their locked down accounts.
Change Password: Grants end-users the permission to change their logon passwords.
Self-Update: Allows the end-users to self-update their profile.
Other Add-On Features:
Employee Search: Provides the end-users with the facility of performing quick search for
fellow employees (along with Organizational Chart)
Password Notification: Notify the end-users about their expiring passwords so that they can
change it.
The services offered by ADSelfService Plus can be split into two categories:
Enrollment Requiring Services
Non-Enrollment Services
Enrollment Requiring Services:
A user has to enroll with ADSelfService Plus in order to avail himself of the 'Self-Password Reset' &
'Self-Account Unlock' features.
Non-Enrollment Services:
These services do not require 'User Enrollment'.
The various services that fall under this category are:
Change Password
Self-Update
Employee Search
Password Notification

ManageEngine ADSelfSerivce Plus – Admin Guide
ZOHO Corp.
6
Getting Started
The following sections describes how to get started with ADSelfService Plus.
System Requirements
Installing ADSelfService Plus
Working with ADSelfService Plus
Licensing of ADSelfService Plus
ManageEngine ADSelfSerivce Plus – Admin Guide
ZOHO Corp.
7
System Requirements for ADSelfService Plus
Hardware Requirements
Software Requirements
Hardware Requirements
Hardware
Recommended
Processor
P4 - 1.0 GHz
RAM
512 MB
Disk Space
1 GB
Software Requirements
Supported Platforms
ManageEngine ADSelfService Plus supports the following Microsoft Windows operating system
versions:
Windows Server 2000
Windows Server 2003
Windows Server 2008
Windows Server 2008 R2
Windows Server 2012
Windows XP
Windows Vista
Windows 7
Windows 8
Supported Browsers
ManageEngine ADSelfService Plus requires one of the following browsers to be installed in the
system for working with the client.
Internet Explorer 5.5 and above
Netscape 7.0 and above
Mozilla 1.5 and above
Firefox 1.5 and above
Preferred screen resolution 1024 x 768 pixels or higher.

ManageEngine ADSelfSerivce Plus – Admin Guide
ZOHO Corp.
8
Installing ADSelfService Plus
ManageEngine ADSelfService Plus can be installed on any machine in the domain, if the computer
meets the desired system requirements for the installation of ADSelfService Plus.
To install ManageEngine ADSelfService Plus,
Download the executable from the website http://www.adselfserviceplus.com.
Click on the Downloaded file "ManageEngine_ADSelfService_Plus.exe"
Follow the install shield wizard to complete the installation of ADSelfService Plus.
ADSelfService Plus can be run as:
An Application
A Windows Service
To run ADSelfService Plus as an Application
By Default ADSelfService Plus will be installed as an application, run the self-extracting
EXE(ManageEngine_ADSelfService_Plus.exe) downloaded from the website and follow the wizard to
completion. This will install the ADSelfService Plus application.
The application can be launched on a web browser by clicking on the Desktop Icon of ADSelfService
Plus
ADSelfService Plus runs with the privileges of the user who has logged on to the computer .
To run ADSelfService Plus as a Windows Service
To run ADSelfService Plus as a service, install ADSelfService Plus as Service. To install
ADSelfService Plus as Service.
Go to Start Menu -->>All Programs
Select "ADSelfService Plus"-->>"NT Service"
Click on "Install ADSelfService Plus as Service"
Once the "ADSelfService Plus Service" is installed you can start the product as "Windows
service".ADSelfService Plus runs with the privileges of the system account.
ManageEngine ADSelfSerivce Plus – Admin Guide
ZOHO Corp.
9
Working with ADSelfService Plus
Starting ADSelfService Plus
Launching ADSelfService Plus Client
Stopping ADSelfService Plus
Starting ADSelfService Plus
ADSelfService Plus can be started either in the system account (when run as service) or in user
account (when run as application).
When ADSelfService Plus is installed as a Service
Option to install ADSelfService Plus as a service is available in the installation wizard.
To start ADSelfService Plus in the system account, select Start --> Programs -->
ADSelfService Plus--> Start ADSelfService Plus
To start ADSelfService Plus in the user account, double-click the ADSelfService Plus desktop
icon.
When ADSelfService Plus is not installed as a Service
In this case, ADSelfService Plus can only be started in the user account. To start the product, select
Start --> Programs --> ADSelfService Plus --> Start ADSelfService Plus
On starting the ADSelfService Plus, the client is automatically launched in the default browser.
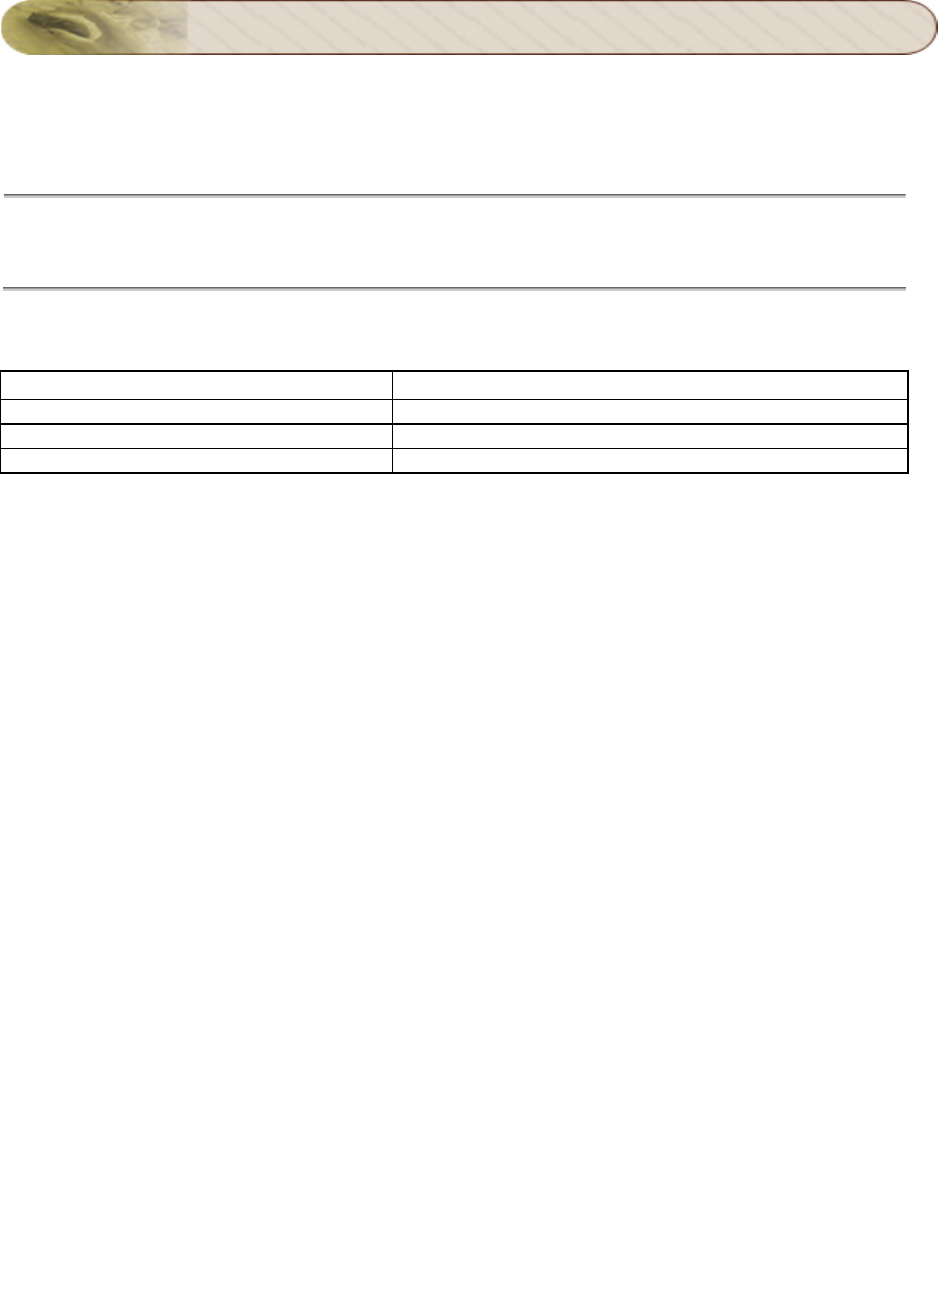
When ADSelfService Plus is started in Windows XP / Windows 2003 machines with firewall enabled,
Windows may pop up security alerts asking whether to block or unblock the following programs as
shown in the images below:
mysqld-nt - Database server.
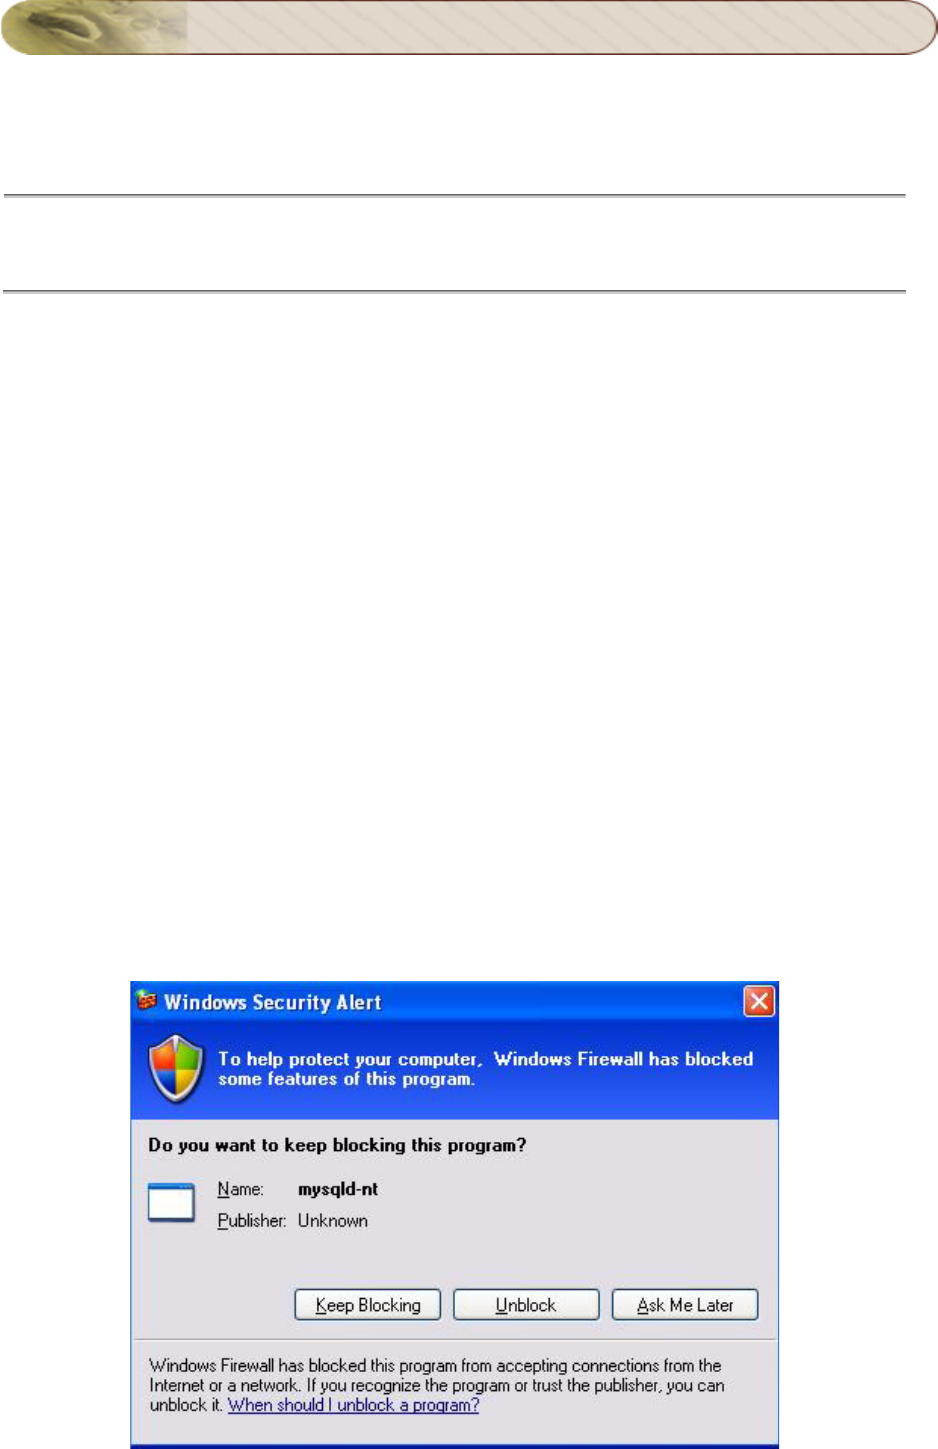
Java(TM) 2 Platform Standard Edition binary - Java.
You should Unblock these programs to start ADSelfService Plus
Fig: MySQL Alert
ManageEngine ADSelfSerivce Plus – Admin Guide
ZOHO Corp.
10
Fig: Java Alert
Launching ADSelfService Plus Client
To launch the ADSelfService Plus client, open a Web browser and type http://hostname:8888 in the
address bar. Here the hostname refers to the DNS name of the machine where ADSelfService Plus is
running.
Specify the user name and password as admin (for first time users) in the respective fields and click
Login. If you have changed the password, you should use the changed password to login.
Stopping ADSelfService Plus
To stop ADSelfService Plus, select Start --> Programs --> ADSelfService Plus--> Stop ADSelfService
Plus

ManageEngine ADSelfSerivce Plus – Admin Guide
ZOHO Corp.
11
Licensing
ADSelfService Plus is available in 3 editions - Free, Standard and Professional Editions.
The Free, Standard and Professional Edition, all come packaged as a single download. During the
evaluation phase, the Professional Edition is installed and can be evaluated for 30 days. After 30
days, it is automatically converted to the Free Edition, unless the Standard or Professional Edition
license is purchased.
For purchasing the license or any queries, please contact sales@manageengine.com.The license file
will be sent through e-mail.
To upgrade from a Trial Edition or Free Edition to Standard or Professional Edition
1. Click the License link available in the top right corner of the ADSelfService Plus client. This
opens the License details of the product.
2. Click the Upgrade Now link and select the license file received from ZOHO Corp using the
Browse button.
3. Click Upgrade button to upgrade from Trial or Free Edition to Standard or Professional
Edition.
Trial Version of ADSelfService Plus
The Trial edition of ADSelfService Plus provides access to 50 users to be enrolled with
ADSelfService Plus.
The 50 users will be able to have complete functionality the trial version is valid for a period of
30 days after which it becomes a free edition.
During the evaluation period ADSelfService Plus will provide mail and phone support.

ManageEngine ADSelfSerivce Plus – Admin Guide
ZOHO Corp.
12
Domain Configuration
Using the 'Domain Settings' feature,you can configure 'New Domains' as well as 'Revamp' various
settings of the 'Existing Domain(s)'.
During startup,ADSelfService Plus adds all the domains that could be discovered.If you wish to 'add
more domains' (or) incase of 'domains not being discovered',you would have to 'add them manually'
with the help of this feature.
Steps To Be Followed Inorder 'To Add A Domain' Using The 'Domain Settings' Feature:
1 Click on the 'Domain Settings' tab (available on the top right corner of the application)
2 To add a 'New Domain',click on the 'Click here to add a new domain' button
3 The 'Add Domain Details' pop-up box appears on screen
4 In the 'Add Domain Details' pop-up box,you would have to specify the various 'Domain Details'
'Adding A Domain' is a three-step process:
1. Provide the 'Domain Name'
2. Specify the 'Domain Controller(s)'
Adding Domain Controllers:
To add 'Domain Controllers',click on the 'Discover' button which is available in the 'Add
Domain Details' pop-up box.
Select the 'domain controller' from the list of available choices(which are discovered from
the DNS)
In case of 'Domain Controller not being found' ('Domain Controller(s) cannot be
discovered.Please specify the Domain Controller(s) below' message will be displayed)
You would have to add the 'Domain Controller' manually (specify the 'Domain Controller
Name' in the respective textbox provided)
Click on 'ADD' to add the 'Domain Controller'.
3. Follow it up with the 'Domain Username & Password'
4. Authentication:
When a user is included in the 'Domain Admin' group,then he/she will be given the rights to
'Query the Active Directory' & 'Perform Various Self-Service Operations' in ADSelfService
Plus.The users who are not included in the 'Domain Admin' group, require the following
'Permission(s)' to perform the corrosponding actions.
1 To perform the 'Reset Password' action,a user should have 'Reset Password' permission
2 To perform the 'Unlock Account' action, a user should have 'Read & Write LockOut time '
permission
3 To perform the 'Self Update' action, a user should have 'Read & Write' permission for the
corresponding attributes
4 To install GINA client software,a user should belong to 'Domain Admin' group.
5 Click on 'ADD' to add the 'Newly Configured Domain'

ManageEngine ADSelfSerivce Plus – Admin Guide
ZOHO Corp.
13
Various Actions That Can Be Performed On The 'Configured Domains':
Make It Default Option:
Clicking on this option would make that particular domain as the 'Default Domain' in the Domain User
Login Page( of the ADSelfService Plus application).
Edit Domain Details Option:
To 'Reconfigure the existing domain details',click on the 'Edit Domain Details Option'.You can bring
about the changes through the 'Edit Domain Details' pop-up box (which appears on clicking the 'Edit'
icon)
Update Domain Objects Option:
Clicking on this option would update the 'Domain Objects' of that particular domain.This 'Update
Action' brings about synchronization between ADSelfService Plus & the Active Directory(in case of a
lag existing between the two).
'Update Details Of XYZ Domain' dialog box would appear when you click on the 'Update Domain
Objects' icon.
You can update the 'Domain Objects' with respect to the fields - present in the 'Update Domain
Objects' pop-up box - that are mentioned below:
Exchange Servers & Domain Policies
Organizational Units(OUs)
Groups
Users
Computers
Select the 'Desired Options' and click on 'OK'.The 'Domain Objects' would get updated.
Delete Domain Option:
To delete a 'domain from the available list',click on the 'Delete Domain Option' of that respective
domain.
Other Attributes Of The Domain Settings Layout:
Domain Display Name:
This is the 'Name of the Domain' given by you for 'display purpose'.It has no connection to the
'Configured Domain Name'.It's sole purpose is to 'display the domain name' - on the User Logon Page
- in a way which would be 'easy for the user to comprehend'.
Status:
This 'Status' feature sheds light on the 'Rights Associated with the Users of a Domain'.
A 'Success' status indicates that the Domain Users have the 'Admin' privilege.
'The User/System has no Admin Privilege' status would be displayed incase of 'Domain Users' not
being granted with the 'Admin' rights.

ManageEngine ADSelfSerivce Plus – Admin Guide
ZOHO Corp.
14
Rolling out ADSelfService Plus
ADSelfServide Plus has a plethora of services to offer to its users.Of the many services that it
has,the ones that hog the limelight are:
Self-Service Options (Password Reset,Account Unlock,Self-Update & Change Password)
Employee Search
Password Expiry Notification
This part of the guide deals with the mechanism involved in deploying the above mentioned features.
Deploying The Features: ( General Info)
Self-Service Options: A very easy task.All you have to do is select the features that you want to
provide to a particular domain (or OU).Give a name to this setting (policy) & save it.
Read Policy Configuration for further details
Employee Search: Enable the Employee Search feature (under the Configuration tab) to scout for
fellow employees.
For more info, read on Employee Search
Password Expiry Notification: Select this feature (under the Configuration tab) to notify users about
their expiring passwords.
For more info, reaad on Password Expiry Notification
ManageEngine ADSelfSerivce Plus – Admin Guide
ZOHO Corp.
15
Password Self-Service Deployment
Learn how to implement the Password Resettask onto end-users.
Requirements For Deploying The Password Self-Service Task:
1
Install & Register Your
Domains
Click on " Domain Configuration " for further details.
2
Self-Service Policy
Configuration:
Tell ADSelfService
Plus what self-service
feature should be
made available to a
domain (or OU).
Very simple! Just
enable the feature you
want to award to a
domain (or OU), give a
name to this setting
(policy) and save it.
That’s it!
Click on Policy Configuration ' for further details.
3
Configure Identity
Verification Info and its
depth
* Determine how users
of this policy should
authenticate
themselves while
requesting for
password self-service.
Eg: Whether user
should answer
Security question, or
enter verification code,
or do both to establish
identity.
* Decide the depth of
users’
authentication info
Eg: Configure details
such as the number of
questions a user
should answer, length
of the answer, etc.
For More Details: Click on 'Identity Verification '
Note: This setting will be applied uniformly to the entire domain or OU as covered by
the self-service policy. You can set separate Identity Verification settings for every
self-service policy you create.
4
Password Reset
Modality:
Determine the mode
through which users of
a selected domain or
OU should reset their
passwords.
ADSelfService Plus offers 3 modes.
Via A Web Portal
Gina/CP
Gina Free
Click on Password Reset Modality for further details.

ManageEngine ADSelfSerivce Plus – Admin Guide
ZOHO Corp.
16
5
Configure AD Self
Update portal:
If you had enabled
“Self
Update” for a
domain or OU, then it
would do good to
choose a layout
through which users
can update their
information. If you
don’t choose,
the default layout
would be assigned.
Configuring a "Self Update" layout
Why a customized layout is better than the default? What is the advantage of a
customized layout?
The layout that we provide is very basic. On the other hand, when you customize it,
you have the full potential to make the user update directory info just as you desired!
For more details follow the link "Configuring Self Update Layout".
6
Post-Installation
Security Settings
Make use of the
security settings
offered by
ADSelfService Plus
and reinforce your
password self-service
implementation against
any threats.
Click on " Security Settings " for further details
7
Publish ADSelfService
Plus Web Port
Make ADSelfService
Plus accessible to the
end-users.
The url would follow the naming pattern mentioned below:
http://servername:port
8
Enrollment Invitation &
Product Adoption
Now, tell the users
about ADSelfService
Plus. Send a mail right
from ADSelfService
Plus!
Ask them to enroll for
password self-service.
Or rather MAKE them
enroll! Check out your
options on the right!
Enrollment Notification
Auto Enrollment
External Data Source
Enrollment Reminder
Click on Enrollment & Invitation for further details
ManageEngine ADSelfSerivce Plus – Admin Guide
ZOHO Corp.
17
Policy Configuration:
ADSelfService Plus offers 4 self-service functions to domain users: ability to self reset passwords, self
unlock account, self update information into Active Directory and change password. As an
administrator, you can decide whether users of a domain or selected organizations unit(s) (OU) will
avail themselves of any or all of these functions. In other words, you set a "self-service policy" for the
users and define the extent they can use ADSelfService Plus.
The "Policy Configuration" tab provides all the functionalities for you to define/edit/delete policies.
ADSelfService Plus allows you to define any number of "self-service policies" in a given domain,
provided there is no OU duplication in the policies; that is, an OU which is already a part of a policy
cannot be subjected to another policy.
By default, ADSelfService Plus sets a policy for the entire domain, when it discovers DCs of a
domain. Thus when you log in for the first time (as an administrator) this default policy will be shown
to you. Conventionally, every self-service feature is selected. If it fits your requirement, you can retain
it; else, you can edit it.
Click on ‘Steps To Create A Policy ’ for further details.

ManageEngine ADSelfSerivce Plus – Admin Guide
ZOHO Corp.
18
Identity Verification
ADSelfService Plus screens for privileged users (aka enrolled users) via an authentication method by
name Identity Verification.
Privileged users of this application have the rights to perform the self-password reset & self-account
unlock operations.
Identity Verification has two modes:
Security Ques & Ans
Verification Code
Security Ques & Ans: Authenticate users by forcing them to answer to a set of security questions.
Verification Code:Authenticate users by forcing them to reproduce a code sent by ADSelfService
Plus.
You can send the Verification Code to:
E-mail address of the user
Mobile number of the user
Choose the option that suits your requirement.
Note:
I You are provided with the rights to configure both modes of Identity Verification simultaneously.
II The details that a user provides via Security Ques & Ans should match his/her enrollment
information, only then he/she would be granted the rights to access the privilege services.
Click on 'Steps Involved In Configuring Identity Verification' for further details.

ManageEngine ADSelfSerivce Plus – Admin Guide
ZOHO Corp.
19
Enrollment & Invitation
ADSelfService Plus allows you to perform the task of ‘inviting’ & ‘enrolling’ in unison.
It offers you with a feature known as ‘Enrollment Notification’ using which you can perform the above
mentioned task.
Enrollment Notification:
ADSelfService Plus allows you to send automated mails to the users requesting them to enroll with
this application. These notification mails that you send would contain a link that directs the end-users
to the logon page of this application, thus enticing them to enroll.
Click on Enrollment Notification for further details.
Enrollment:
ADSelfService Plus provides you with following methods for enrolling users:
Identity Verification
Auto Enrollment
External Data Sources
Identity Verification:
It is a simple process. There are two ways to bring about Enrollment via this process.
Security Question & Answer: Configure a set of security questions that will be put forth to the end-
users. Users can get themselves enrolled by answering to these security questions.
Verification Code: Send a code to the end-user’s mobile/e-mail address. Enrollment happens when
users reproduce this verification code.
Read Identity Verification for further details.
Auto Enrollment:
This process is employed in the case of ‘bulk-user enrollment’, since it becomes a tedious task to
configure the Security Questions (or) the Verification Code for each & every user when the number is
more.
Auto Enrollment allows the admin to ‘feed the system’ with the ‘data to build user profiles’. Thus the
enrollment data of all the domain users can be built in a few minutes.
Read ‘Auto Enrollment’ for further details.
External Data Sources:
\Another way of bulk user enrollment. Using this method, you can enroll users by connecting to other
databases & importing their enrollment details.
Read External Data Sources for further details.
Enrollment Reminder:
As the name suggests, this feature helps you to display a reminder to end-users incase they haven't
heeded to the notification mails. This reminder is brought about via a ‘Logon Script’ which pops up
automatically when a non-enrolled user logs onto the machine.
Read Enrollment Reminder for further details.

ManageEngine ADSelfSerivce Plus – Admin Guide
ZOHO Corp.
20
Security Settings: (Features Under Advance Tab)
Once you configure a policy, the next step would be to secure the user accounts of that policy by
enforcing the security features available under the Advanced tab(available to you on successfully
completing the Policy Configuration process)
Under the Advance tab, you are provided with the following options using which you can enhance the
security of the end-user account.
Block User
Reset & Unlock
Question & Answer Settings
Enrollment
Notification
General
Automation
Click on Advanced Policy Configuration Options for further details.
For more details on Security Options in ADSelfService Plus - Check the Security Center.

ManageEngine ADSelfSerivce Plus – Admin Guide
ZOHO Corp.
21
Taking The Features To The End-Users
Preparing The Features
This is a part of the policy configuration process - preparing the features that you desire to implement
onto the end-users.
Since ADSelfService Plus is an entirely customizable application,you have the choice of selecting the
features from the 'default list' that
ADSelfService Plus has to offer.
By default,ADSelfService Plus provides you with the following features:
Password Reset / Account Unlock
Self-Update
Change Password
You have the choice of selecting all the above mentioned features (or) can go for specific feature
selection.
Feature Selection:
A very simple task! All you have to do is enable the feature that you wish to provide to the end-users
while carrying out the Policy Configuration process.
Methodology Involved In Preparing The Features
Read Password Reset/Account Unlock for further details
Read on Self-Update for further details
Read Change Password for further details.

ManageEngine ADSelfSerivce Plus – Admin Guide
ZOHO Corp.
22
Implementing Password Reset/ Account Unlock process:
The privilege services – Password Reset & Account Unlock – of ADSelfService Plus can be
implemented onto the end-users in the following ways:
Via a Web Portal
Via Gina/CP
Via Gina Free
Via A Web Portal:
Allow users to perform the password reset/account unlock operation by accessing ADSelfService Plus
via a web portal.
Via Gina/CP:
Let the users to perform password reset/account unlock operation by accessing ADSelfService from
the logon prompt of their respective systems.
Requisite: Installation of Gina/CP on the user machines.
For further info, read Gina/CP Installation
Via Gina Free:
Similar to Gina/CP method, that is, lets user to perform password reset/account unlock operation from
their respective systems. Unlike Gina/CP, this method does not require Gina installation onto the user
systems.
For further info, read on Gina Free.
Password Reset / Account Unlock Task:
For all the above mentioned methods, the methodology involved in performing 'password
reset/account unlock' task is the same - that is - Identity Verification.
Read Identity Verification for further details.
Note:
Once the user logs into ADSelfService Plus, he can reset password (or) unlock his account by clicking
on the respective button & responding to a series of steps laid down by ADSelfService Plus.

ManageEngine ADSelfSerivce Plus – Admin Guide
ZOHO Corp.
23
Implementing Self-Update Feature
Imposing the Self-Update feature onto the end-users can be done as follows:
To begin with, you would have to select the Self-Update option while performing Policy Configuration.
As aforementioned, ADSelfService Plus lets you to customize its features.
Customizing Self-Update:
Decide the fields that you wish to provide to the users. Select them & save the new self-update layout.
Highlights:
Lets you configure new fields as per your specifications
Allows you to declare important fields (like address, phone no) as mandatory for users
Facilitates easy updation of data for users by allowing you to configure drop-down boxes,
check boxes & radio buttons
Assists you in setting up help cards - for better understanding of user – beside substantial
fields
Click on Steps to configure Self-Update for further details.

ManageEngine ADSelfSerivce Plus – Admin Guide
ZOHO Corp.
24
Implementing Change Password Feature
Enforcing the Change Password feature onto the users can be done as follows:
Select the Change Password option while performing the Policy Configuration process.
By doing so, you provide users - of the specified policy – the rights to change their logon
passwords whenever desired.
Finally, click on Save to store the configured policy.
ManageEngine ADSelfSerivce Plus – Admin Guide
ZOHO Corp.
25
Employee Search Deployment
Learn how to implement the employee search feature onto the end-users.
Steps Involved: (At A Glance)
Domain Selection: Select the domains (or OUs) on which this feature is to be implemented.
Search Specifications: Specify what exactly you are searching for.
Available Options:
Users (To search for Users)
Contacts (To search for Contacts)
Groups (To search for Groups)
Enable the options that you desire.
You have the right to select all three options simultaneously.
Refining The Search Process: Select the elements which will aid the user to narrow down
the scope of the search operation.
Example: "Full Name", "E-mail address" & "Telephone Number" of a user
Configuring The Layout: Decide the fields that would appear when the user carries out the
search operation.
Click on Steps to Configure Employee Search for further details.

ManageEngine ADSelfSerivce Plus – Admin Guide
ZOHO Corp.
26
Password Notification Deployment
Learn how to deploy the "password notification" feature onto the end-users.
Steps Involved: (At A Glance)
Domain Selection: Select the domains (or OUs) on which this feature is to be implemented.
Specify Supplementary Features like
Notification Frequency
Scheduling Time For Sending Notifications
Receiving Status Mails Concerning ‘Delivery Of Notifications To Users’
Mail Server Configuration (for receiving Status Mails)
Configure the feature as per your requirements & save it.
Read Steps Involved In Configuring Password Notifications for further details

ManageEngine ADSelfSerivce Plus – Admin Guide
ZOHO Corp.
27
Know Your Product
This section helps you to get acquainted with various features that ADSelfService Plus has to offer.
It do so by providing you with answers to the following questions:
What are the features of this application?
How can they be implemented?
What are your rights as an administrator?
How can you ensure the safety of user accounts?
And many more.......
'Know Your Product' comprises of the following features:
Dashboard
Reports
Configuration
Admin
Support

ManageEngine ADSelfSerivce Plus – Admin Guide
ZOHO Corp.
28
Dashboard
This presents an overview of "what ADSelfService Plus application is all about". It highlights each &
every important aspect of this application
The dashboard comprises of the following features:
Reports:
The dashboard is replenished with new set of reports at regular intervals.These reports provide a
comprehensive study of user actions within the ADSelfService Plus application.
The Reports listed under the Dashboard are:
User Reports
Enrollment Reports
Audit Reports
User Reports:
These are reports that focus on the 'status of the user account'.It puts light on the issue of
'Account Lockout' & 'Password Expiry'.
The various reports available under this category are:
Locked Out Users Report
Soon-to-expire User Password Report
Password Expired Users Report
Enrollment Reports:
As the name suggests,these reports - besides providing information on the enrolled users -
focus on the various features that accompany the 'Enrollment' process of this application.
It lists the following reports:
Non-Enrolled Users Report
Enrolled Users Report
Audit Reports:
The Audit reports provide an account of the 'user actions within this application' which serve
for the auditing purpose.
The reports listed under this category are:
Reset Password Audit Report
Unlock Account Audit Report
Self-Update Audit Report
Failed Attempts At Security Questions Report
Change Password Audit Report

ManageEngine ADSelfSerivce Plus – Admin Guide
ZOHO Corp.
29
Click on 'Reports' for further details.
Highlights Of The ADSelfService Plus Application:
Besides providing you with "reports", the dashboard offers you with 'links to the services' that this
application has to offer.
The dashboard provides you with links to the following features:
Self-Service Features (Password Reset, Account Unlock, Self-Update & Change Password)
Identity Verification (User Authentication Process)
Add On Features (Employee Search & Password Expiry Notification)
Gina ( Installation, Customization & Scheduling)
Dashboard provides you with information on all the domains that are configured in the
ADSelfService Plus application.
ManageEngine ADSelfSerivce Plus – Admin Guide
ZOHO Corp.
30
Reports
The ADSelfService Plus feature generates several reports all of which are placed under the "Reports"
tab.
These reports are classified into three different categories:
User Reports
Audit Reports
Enrollment Reports

ManageEngine ADSelfSerivce Plus – Admin Guide
ZOHO Corp.
31
User Reports
These are reports that focus on the 'User Details' that provide you with information on the 'Status of
the User's Password & Account'.Issues like 'Locked Out Accounts','Password Expired Accounts' are
brought into light under these reports. The ultimate goal of these reports is to allow the users to
successfully carry out the Self Password Reset & Self Account Unlock operations.
Types Of User Reports.
User Reports Generation.
Other Available Options.
Types Of User Reports:
1. Locked Out Users.
2. Soon-To-Expire User Passwords.
3. Password Expired Users.
I Locked-Out Users:
This report provides a survey of those users who failed to logon owing to typing incorrect
passwords.A user's account gets locked out when he/she exceeds the "threshold set for incorrect
logins" based on the domain policy. This report helps you to identify such 'Locked Out Users'.
II Soon-To-Expire User Passwords:
"Soon-To-Expire User Passwords" report puts light on the list of users whose passwords are "about to
expire" in a few days. This report helps you to take "proactive measures" while dealing with the
"expiry of the user's password" issue.
III Password-Expired Users:
A user's password expires after a certain period of time due to the regulations imposed by the
'Domain Policy' onto the user's 'password settings' process. This report contains the list of such
password expired users.
User Reports Generation:
1. Select "Reports" tab (Reports --> User Reports)
2. Select the "Desired Domain" from the drop down box
3. For "OU" based selection, click on "ADD OUs" link (Select the "Desired OUs" & click "ok")
4. In the case of 'Soon -To-Expire User Password' reports, specify the "Number of Days" in
which the 'User's Password is Going to Expire'
5. Click on "Generate" button.
The 'Specified List of Users' would be generated.
You can re-frame the Report Layout Template - By clicking on Add/Remove Columns link
(to add or remove columns)
ManageEngine ADSelfSerivce Plus – Admin Guide
ZOHO Corp.
32
Other Available Options:
Quick Search.
Export & Printable.
Quick Search:
As the name suggests,this option is used to perform 'Quick Search' for users (by using their names)
instead of executing the tedious task of going through the entire user list.
Export & Printable:
Using this 'Export' option, you can export the 'list of users in bulk' in various formats like
'CSV,HTML,PDF & XLS'.This process is usually carried out for auditing purposes,while the 'Printable'
option is used to view the printable version of the 'list of users'.

ManageEngine ADSelfSerivce Plus – Admin Guide
ZOHO Corp.
33
Enrollment Reports
These are reports that are concerned with the 'Enrollment of the Users'.The 'Enrollment Reports' are
classified into three different categories. These reports help you to bring about 'effective enrollment of
end-users' by providing you with information about the 'non-enrolled users'
Types Of Enrollment Reports.
Enrollment Report Generation.
Other Available Options.
Types Of Enrollment Reports:
1. Enrolled Users Report.
2. Non-Enrolled Users Report.
3. Licensed Users Report.
4. Security Ques & Ans Report.
I Enrolled Users Report:
This report provides you with the list of users who have enrolled themselves by undertaking the
'Identity Verification' process (Security Q & A (or) Authentication via E-mail/SMS).The 'Enrolled Users'
are provided with the rights to the 'Reset/Unlock' self-service feature.
II Non-Enrolled Users Report:
The Non-Enrolled Users’ report highlights the list of users who are yet to enroll with the
ADSelfService Plus application (users who have not undertaken the 'Identity Verification'
feature).These users are not provided with the rights to the 'Reset/Unlock' self-service feature.
III Licensed Users Report:
This report lists the users who have been allotted with the licenses provided by the ADSelfService
Plus application. The information provided by this report is helpful for the 'effective management of the
users licenses'.
This report keeps track of the 'Licenses-In-Use' in the form of the 'License Count Feature'.It provides
various statistics - regarding license - like the 'Total,Used & Free' licenses.
Users who are taken into consideration for the 'License Count' feature are 'Enrolled Users','Non-
Enrolled Users'(users who have logged into the application but are yet to enroll) & the 'Technicians'
It also provides you with the option of 'Deleting Users'(who no longer are in need of the license) from
the 'Licensed Users List'.This process is accomplished by generating the 'Inactive Users List' &
'deleting their licenses' with the help of the 'Restrict Users' feature.
You can also 'Filter Out The List Of Licensed Users'(Enrolled/Non-Enrolled/Technician) using the
'Filter' option.
IV Security Ques & Ans Report:
This report generates the list of enrolled users along with their respective security question(s) &
answer(s).It helps you to keep track of the details provided by the users via the 'security que & ans'
process.
The information provided by these reports serve for assisting the helpdesk officials and also for
auditing purposes.

ManageEngine ADSelfSerivce Plus – Admin Guide
ZOHO Corp.
34
Enrollment Report Generation:
1. Select the "Reports" tab (Reports --> Enrollment Reports)
2. Select the "Domain" from the drop down box
3. For "OU" based selection, click on "ADD OUs" link (Select the "Desired OUs" & click "ok")
4. Click on "Generate" button.
The "Specified List Of Users" would be generated
Other Available Options:
Quick Search
Export & Printable
Quick Search:
As the name suggests,this option is used to perform 'Quick Search' for users (by using their names)
instead of executing the tedious task of going through the entire user list.
Export & Printable:
Using this 'Export' option, you can export the 'list of users in bulk' in various formats like
'CSV,HTML,PDF & XLS'.This process is usually carried out for auditing purposes,while the 'Printable'
option is used to view the printable version of the 'list of users'.

ManageEngine ADSelfSerivce Plus – Admin Guide
ZOHO Corp.
35
Audit Reports
Under this tab,you would find a plethora of reports that centralize on the 'Self-Service operations
carried out by the end-users'.
Besides auditing the self-service operations,these reports provide you with an account of various
'Notification Deliveries' & the 'Security Que & Ans' process.
It lists the following reports:
1. Self-Service Audit Reports.
2. Notification Delivery Reports.
3. Failed Attempts At Security Questions Report.
4. Audit Report Generation.
Self-Service Audit Reports:
As the name suggests,these are reports that generate the list of users who availed themselves of the
'self-service features'(Reset Password,Account Unlock,Self-Update & Change Password) over a
specified period of time.
Notification Delivery Reports:
These reports focus on the 'Delivery Status' of the various notifications that this application has to
offer.
The notifications offered by this application are:
Enrollment Notification
Password Expiry Notification
Notifications Sent On Execution Of Self-Service Operations
As mentioned earlier,you have to specify the time period for generating these Notification Delivery
reports.
Failed Attempts At Security Questions Report:
This report provides you with the account of the 'number of unsuccessful attempts' produced by the
end-users while undertaking the 'Security Que & Ans' process.Again,you would have to specify the
time period for generating these reports.
Audit Report Generation:
1. Select the 'Reports' tab ( Reports --> Audit Reports)
2. Specify the 'Start Date'
3. Follow it up with the End Date'
4. Click on 'Generate'

ManageEngine ADSelfSerivce Plus – Admin Guide
ZOHO Corp.
36
Configuration
The 'Configuration' tab allows you to configure the various services - of the ADSelfService Plus
application - that you wish to provide to the end-users.
The Configuration tab is further classified into three different fields:
Self-Service
Administrative Tools &
Security Center

ManageEngine ADSelfSerivce Plus – Admin Guide
ZOHO Corp.
37
Self-Service
The "Self-Service" section of allows an administrator to configure all features that ADSelfService Plus
has to offer. This includes
1. Self Service features delegated to end-users like Password Reset, Account Unlock, Self
Update Active Directory and Change Password.
2. Email Notification features that allow administrators to alert users of Password Expiry.
3. Employee Search capabilities.
The below links provide detailed walk-through on how to configure various features that
ADSelfService Plus has to offer.
1. Configuring Self Service Policies
Configuring Identity verification techniques.
Security Questions and Answers.
Email and SMS Verification codes.
2. Configuring Password Expiry Notification.
3. Configuring Employee Search.
ManageEngine ADSelfSerivce Plus – Admin Guide
ZOHO Corp.
38
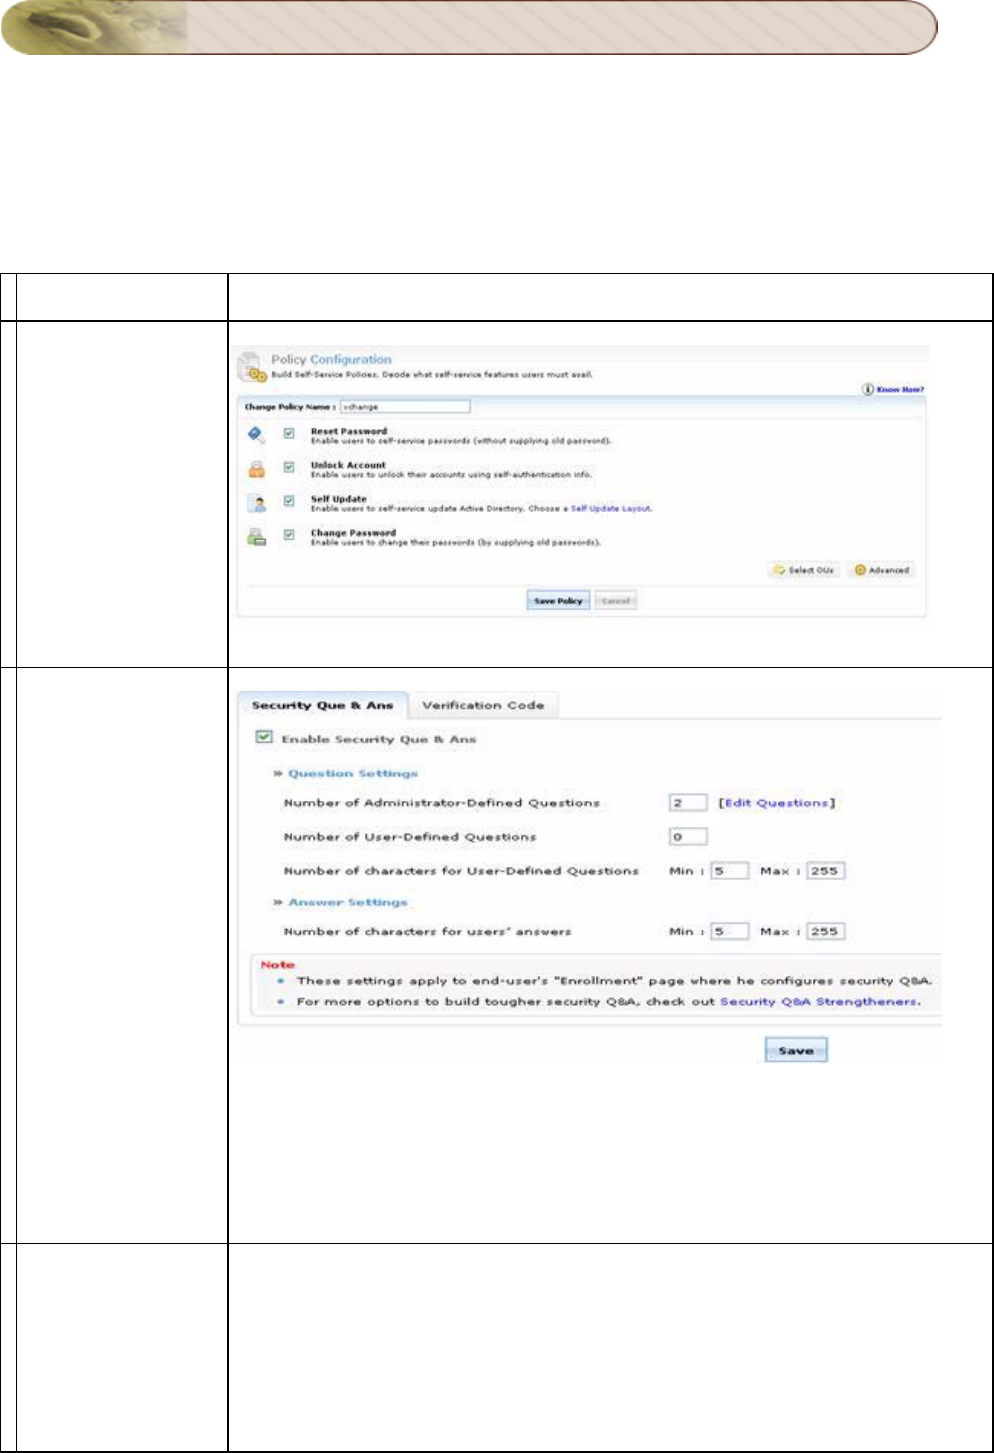
Policy Configuration
ADSelfService Plus offers 4 self-service features to domain users:
1. Self Reset Passwords.
2. Self Unlock Accounts.
3. Update Personal Info / Self Update of AD Accounts.
4. Change Passwords.
As an administrator, you can decide whether users of a domain or selected organizations unit(s) (OU)
will avail themselves of any or all of these functions. In other words, you set a "self-service policy" for
the users and define the extent they can use ADSelfService Plus.
The "Policy Configuration" section provides all the functionalities for you to define/edit/delete policies.
To Configure a Self Service Policy
By default, ADSelfService Plus sets a policy for the entire domain, when it discovers DCs of a
domain. Thus when you log in for the first time (as an administrator) this default policy will be shown
to you. Conventionally, every self-service feature is selected. If it fits your requirement, you can retain
it; else, you can edit it. Furthermore, you can configure the 4 self-service features too.
1. Click on the "Configuration" Tab.
2. Enter a Policy Name in the Text box provided.
3. Provide a check against one or all self service features that you wish to delegate to users.
Reset Password
Unlock Account
Self Update (Change the default layout)
Change Password
4. Click on "Select OUs" button.
5. This will "Pop-up" the list of all OUs in the configured Domains in a "Tree View" or "List View".
6. Select "Domain" from the dropdown this will list OUs in the selected Domain.
7. Provide a check against one or all OUs to select OUs for policy application.
8. Click on "OK" button.
9. Click on "Save" button this will save the configured settings.
This will allow users in the selected OUs to enjoy the Self Service features that are checked in the
policy.
ADSelfService Plus allows you to define any number of "self-service policies" in a given
domain, provided there is no OU duplication in the policies.( i.e an OU which is already a part
of a policy cannot be subjected to another policy).
ManageEngine ADSelfSerivce Plus – Admin Guide
ZOHO Corp.
39
Identity Verification
The identity verification options provided by ADSelfService Plus allows you to determine what and
how end-users' authentication info (used to reset password or unlock account) should be.
1. The Identity verification techniques can be configured from the "Configuration" Tab of
ADSelfService Plus
2. Choose the Policy from the drop down.
3. You have two Tabs to choose from to configure Identity Verification techniques for your End-
Users.
4. Security Question & Answers.
5. Verification Code.
It is essential to select at-least one of the two tabs (Security Q & A (or) Verification
Code) for configuring the Identity Verification process.

ManageEngine ADSelfSerivce Plus – Admin Guide
ZOHO Corp.
40
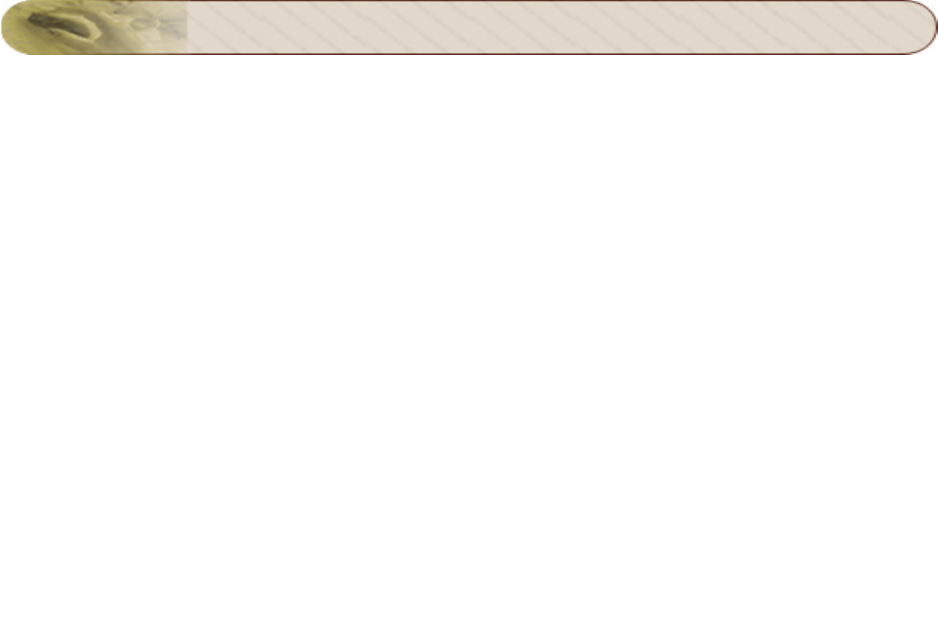
Configuring Security Question and Answers
To Configure Security Question and Answers for identity verification follow the steps provided below.
This page also provides information on various options ADSelfService Plus provides for for an
administrator to configure while security questions and answers are defined.
1. Click on "Configuration" Tab -->>"Security Ques & Ans" (from the "Self-Service" section)
2. Check the "Enable Security Q & A" option (for enabling "Security Q & A" feature)
3. The "Question & Answer Settings" would get enabled
The "Question Settings" will allow you to define the following:
Number of Administrator-Defined Questions
Number of user-defined questions
Number of characters for user-defined questions
The "Answer Settings" will allow you to define the following:
Number of characters for answers
Number of Administrator-defined questions:
These are the questions that you, as an administrator, wish to ask the user during the Identity
Verification Process.
Enter the number of questions you desire to force on the users in the text box.
Click the link "Edit Questions" beside the text box to define a new question or edit an existing
one.
Adding a question: In this pop-up, just besides "Add a new question", you will find a text
box. Type in the question that you want to ask the user and then click the button "Add".
Once you are done with this, your question will be listed below.
Modifying/deleting an existing question
Click the edit icon to edit a question - You can modify an existing question or create a
new question of your own.
Click the star icon to make a question mandatory - Making a question mandatory will
force the user to provide an answer for this question.
Click the delete icon to delete a question - Deleting a question here will remove the
question from the end-users selection list while enrollment. In other words, mandatory
question does not give the user the freedom to choose from a set of questions; instead he
has to answer what he is asked.
ManageEngine ADSelfSerivce Plus – Admin Guide
ZOHO Corp.
41
Number of user-defined questions:
User-defined questions are questions that users will set themselves during enrollment process. You
can set a number limit on this.
Number of characters for user-defined questions:
Through this option, you can set the limit on number of characters for user-defined questions. Enter
the minimum and maximum values.
Number of characters for answers:
Set limits for an 'answer the user can give' during enrollment process. Enter minimum and maximum
values as desired.

ManageEngine ADSelfSerivce Plus – Admin Guide
ZOHO Corp.
42
Verification Codes
Identity Verification codes provide additional security, when Users Reset their Password / Unlock
Locked out accounts. The identity of a user is verified through verification codes sent as a notification
to the users Configured Communication Medium - "Email address" or "Mobile Number".
The selected communication medium would receive a code from ADSelfService Plus server, which
the user should reproduce in-order to establish his identity at the time of password reset / account
unlock.
Configure Email Verification Codes
Configure Mobile Number Verification Codes
Configure both "Email" and "Mobile Number" Verification Codes
Configuration of mail server is a must for both e-mail notification & mail
notification. If not configured, then click the "click here" link to go to the "Mail
Server" configuration page.
To Configure Notification of Verification Code to a user Email address:
1. Click on the "Configuration" Tab -->>Verification Code (Under "Self Service" section)
2. Select the "Policy" for which Verification Code is to be configured.
3. Click on the "Verification Code" Tab
4. Provide a Check against Enable Verification Code and a Check against "E-mail Address"
checkbox
5. Enter the Subject in the text box provided
6. Enter the "Message".
7. Click on "Save" to Save the settings.
ADSelfService Plus stores user's email addresses in its database. The email address
is collected at the time of user enrollment.
The existing message can be modified to provide any user defined message.
%username% is a custom attribute used to send a customized message to the end-
user. You can also provide other LDAP attributes to address a user %givenName%,
%sn%, %initials%, %displayName%, %userPrincipalName%,
%sAMAccountName%, %mail%, %distinguishedName% or any other naming format.
%confirmCode% is the Custom Attribute for the code generated by ADSelfService
Plus at the time of notification. We recommend not to modify the attribute when
editing the message.
To Configure Notification of Verification Code to a user Mobile Number:
1. Click on the "Configuration" Tab -->>Verification Code (Under "Self Service" section)
2. Select the "Policy" for which Verification Code is to be configured.
3. Click on the "Verification Code" Tab
4. Provide a Check against Enable Verification Code and a Check against "Mobile Number"
checkbox
5. Enter the "Message" in the text box provided.
6. Click on "Save" to Save the settings.
ManageEngine ADSelfSerivce Plus – Admin Guide
ZOHO Corp.
43
ADSelfService Plus stores user's mobile numbers in Active Directory's "otherMobile"
attribute.
%confirmCode% is the Custom Attribute for the code generated by ADSelfService
Plus at the time of notification. We recommend not to modify the attribute when
editing the message.
Click on the "Macros" link to view supported LDAP and Custom Attributes when
sending Notification to a mobile numbers.
Configure both "Email" and "Mobile Number" Verification Codes
When you check both "Email" and "Mobile Number" check boxes. The user is provided a choice of
medium to get notified of the confirmation / verification code.
1. Click on the "Configuration" Tab -->>Verification Code (Under "Self Service" section)
2. Select the "Policy" for which Verification Code is to be configured.
3. Click on the "Verification Code" Tab
4. Provide a Check against Enable Verification Code and a Check against "Mobile Number" and
"E-mail Address" checkboxes.
5. Enter the Message.
6. Click on "Save" to Save the settings.

ManageEngine ADSelfSerivce Plus – Admin Guide
ZOHO Corp.
44
Advanced Configuration
The Advanced configuration options in ADSelfService Plus provides additional features for an
administrator. These features enhances the security of enrolled users and also allows the
administrator to have better control over users who access self service features.
The Advanced Policy Configurations enhances the Self Service Policy.
To configure Advanced features in a Self Service Policy
1. Click on "Configuration" tab -->> Self Service
2. Edit the Desired Policy
3. Click on the "Advanced" button
This will Pop-Up the Advanced Configuration options.
The various tabs available under the Advance Policy Configuration feature are listed below:
Block User
Enrollment
General
Automation
Q & A Settings
Notification
Reset & Unlock
ManageEngine ADSelfSerivce Plus – Admin Guide
ZOHO Corp.
45
BLOCK USERS
The "Block Users" feature is available as a Tab on clicking the "Advanced" configuration button
against each Self Service Policy. This Advanced option in ADSelfService Plus enhances the security
of an end-user's Active Directory account by blocking illegitimate users.
Using this feature,the administrator can block end-users from accessing the software for a defined
time interval, when they do not satisfy conditions set here (fail the "security question" authentication) .
What limits can be set to Block Users
A blocked user does not have the access to "Reset Password" or "Unlock Account" features
of this application.
Illustration: If you set the following limits
Maximum invalid attempts '3' within '5' minutes
Block user for '30' minutes
The above illustration implies - if a user fails to answer security questions 3 times in a 5-minute
interval,then he would be prevented (blocked) from using ADSelfService Plus for 30 minutes.
This feature helps to "Block Users" who
Are not enrolled with ADSelfService Plus.
Are not pertinent to the corresponding domain.
Guess security answers by using scripts.(Automated guessing attacks).
It allows an administrator to block user (s) who fail the "security question" authentication.
ManageEngine ADSelfSerivce Plus – Admin Guide
ZOHO Corp.
46
RESET AND UNLOCK
The Reset & Unlock tab provides you with the following features:
Unlock Account during Password Reset
Upon Password Reset, Force Users To Change Password At Next Logon
Password Reset/Unlock Account Session Should Last For _ Mins
Enable Password Strength Analyzer
Unlock Account During Password Reset
Selecting this option would automatically unlock 'the locked-down user accounts'.This event takes
place simultaneously as the end-users perform the 'Password Reset' task.
Upon Password Reset,Force Users To Change Password At Next Logon
This option,when selected,would force the end-users to 'change their passwords' as they try to login
to ADSelfService Plus after undertaking the 'Password Reset' operation.
Password Reset/Unlock Account Session Should Last For _ Mins
You - the admin- are provided with the rights to 'configure the time period' for the 'Password
Reset/Unlock Account' sessions.
Enable Password Strength Analyzer:
As the name suggests,this option,when selected,will enable the 'Password Strength Analyzer' feature.
Password Strength Analyzer: A feature that assists the end-users to view the strength of the
password as they are configure the same. Enabling the 'Password Strength Analyzer' would bring to
light, 'a set of standards' that can be imposed onto the passwords that the end-users configure.
The various standards listed under the this feature are: Provide a check against "Enforce Password
Strength Level" to enforce desired Password Strength.
Strong
Good
Weak
Too Short
'Strong' & 'Good' are the two ideal standards that can be imposed onto the passwords that the
end-users configure..
ManageEngine ADSelfSerivce Plus – Admin Guide
ZOHO Corp.
47
Q & A SETTINGS
Under the 'Q & A Settings' tab,you can configure the display settings of the 'Security Q & A'
feature,which serves for the purpose of 'User Authentication'.
The Q & A Settings tab has two sections
1. Question Settings
2. Answer Settings
Question Settings:
From the "Question Settings" section you can define the number of questions displayed to the End-
User. And also the format in which the questions are to be displayed.
Options available under the 'Question Settings' are listed below:
Display a finite number of questions out of the Available list
Display Security Questions One by One
Display all Security Questions
An administrator can select any of these options based on the level of security or convenience that he
likes to provide his users.
Display a finite number of questions out of the Available list:
Display _ Questions Out Of (Available list of Security Questions) at Random
With this option,you can define the number of questions to be displayed to the End-User. The
questions will be randomly selected by the application from the 'available list of security questions'
configured under Security Question and Answer Settings.
Display Security Questions One by One
Checking this option will display the security questions one by one (ie., one question per page).
Display all Security Questions
Selecting this option will display all the security questions on a single page. The questions are listed
parallel.
Display of Security Questions One by One or All in a Single Page is based on
1. 'Available list of security questions' configured under Security Question and Answer
Settings.
2. Questions selected to be displayed.
Answer Settings:
An administrator can select any of these 'Answer Settings' options based on the level of security or
convenience that he likes to provide his users.
Under the 'Answer Settings' option,you are provided with the following 'Self-Explanatory' settings.
Prevent an User From Providing The Same Answer To Multiple Questions.
Prevent an User From Using any Word of a Question in his Answers.
Verify whether the Security Question (s) are Case Sensitive.
ManageEngine ADSelfSerivce Plus – Admin Guide
ZOHO Corp.
48
Other Settings for Securing The User-Account:
In addition to various "Answer Settings" features, ADSelfService Plus also provides other settings that
aid in securing an User account by not letting the security answers be compromised.
Store Security Answers Using Reversible Encryption.
Hide Security Answers During Reset / Unlock Operations.
Store Security Answers Using Reversible Encryption:
When an administrator checks this option, the answers provided by End-Users to validate Security
Questions at Enrollment are stored in the product database using a Reversible Encryption. This
information can be viewed as a report "Security Questions and Answers Report".
By default answers are stored using irreversible encryption. The administrator can
view the questions Enrolled but answers will remain encrypted in the report.
Only the Answers of users who Enroll after this option is checked can be viewed.
Only Security answers can be viewed and ADSelfService Plus does not show end-
users passwords.
Hide Security Answers During Reset / Unlock Operations:
When an administrator checks this option, Answers to Security Questions are hidden to the End-users
when they use the application to attempt a Password Reset / Account Unlock operation.
This lets a user reset his password even when a colleague is besides him.

ManageEngine ADSelfSerivce Plus – Admin Guide
ZOHO Corp.
49
ENROLLMENT
The check boxes available under Enrollment Tab are advanced configuration options of
ADSelfService Plus during and after User Enrollment.
This feature presents two check boxes::
1. Force Users to Enroll.
2. Hide "Enrollment" tab from end-users page once they enrolled.
Force Users to Enroll
This feature allows an administrator to make enrollment mandatory for End-users. In other
words,whenever a non-enrolled user logs into ADSelfService Plus. A message which 'prompts the
user to enroll' will be displayed.
Once the user enrolls himself with ADSelfService Plus ,he would be granted with the rights to access
other features of this application.
Hide "Enrollment" tab from end-users page once they enrolled
This feature will prevent users from modifying the security questions. Prominently used in a scenario
where an administrator "Auto Enrolls" users with pre-configured security Question and Answers. He
denies users the privileges to change Security Question and Answers.
ManageEngine ADSelfSerivce Plus – Admin Guide
ZOHO Corp.
50
Notification
The feature allows you to send acknowledgements to users, once they manage to successfully reset
or change password or unlock account.
How to use:
1. Click on the desired tab : Reset Password (or) Unlock Account (or) Change Password
2. Check the "Enable" check box. You will be able to enter text into the "subject" and "message"
fields
3. Type in the desired acknowledgement & click "OK" to save them.
Configuration of a mail server/modem is a must in order to access this service. If not
configured , click the "click here" link available in this feature.
Messages provided in the text boxes can be modified as desired. Users can be send
a notification by addressing them with any of the listed LDAP attributes. This list
can be viewed on clicking on the "Macros" link.
%givenName%,
%sn%,
%initials%,
%displayName%,
%userPrincipalName%,
%sAMAccountName%,
%mail%,
%distinguishedName%
ManageEngine ADSelfSerivce Plus – Admin Guide
ZOHO Corp.
51
GENERAL
Under the General tab,you are provided with the following options:
Hide CAPTCHA (Word Verification Image) Checkbox
Hide Personalize tab from End-Users Page Checkbox
Hide CAPTCHA (Word Verification Image)
As the name suggests,by enabling this checkbox,you can hide the CAPTCHA feature from the
following pages:
Verification Code Page
Reset Password & Unlock Account Page
Security Question(s) Page
The above mentioned options come into focus when you enable the 'Hide CAPTCHA' checkbox..
You - as the administrator - are provided with the option of 'selecting the pages' from which
the 'CAPTCHA' feature would be removed.
Hide Personalize tab from End-Users Page:
By enabling this checkbox,you can hide the 'Personalize' tab from the end-user page.

ManageEngine ADSelfSerivce Plus – Admin Guide
ZOHO Corp.
52
Automatic Rest and Unlock
The "Automation" tab provides you with the following features:
1. Automatic Reset & Unlock
2. Run Custom Script Upon Successful Password Reset/Change
3. Update Reset Passwords and Account Unlock status on all Domain Controllers
Automatic Reset & Unlock:
The Automatic Reset & Unlock feature provides three options to choose from. You can either choose
one or all of the options provided here.
Automatically Reset Domain Users' Passwords When They Expire
Automatically Unlock Locked-Down Accounts In Your Domain
Text/Mail Auto Generated Password to End-User
Automatically Reset Domain Users' Passwords When They Expire
Choosing this option will bring into focus several other underlying options which assist you(admin) to
create a scheduler to automatically 'reset the passwords' of the end-users'
Steps Involved In Resetting A Domain User's Password :
1. Enable the "Automatically resets domain users' passwords when they expire" checkbox.
2. Select the type of "Password Reset Scheduler" from the available options.
3. The available options are : DAILY, WEEKLY, MONTHLY, HOURLY
Choose the option that suits your requirement.
Click 'Password Reset Scheduler Features' to view the configuration of the above mentioned
options..
4. Set the "Reset The Password To" an entity that will serve as the "New Password"
5. Click on "OK" to save the settings
Password Reset Scheduler Features:
Daily - using this option, a user's password can be reset on "daily basis".You (admin) would have to
mention the "time"(using the AT drop-down box) at which this password reset process will take place.
The "new password" which is to be assigned to the user should be specified in the "Reset The
Password To" textbox. The usual practice is to reset the password to the user's logon name.
Weekly - This feature provides you the option of resetting the user's password on "weekly basis".You
have to 'choose the day' at which the password would be reset.
As mentioned above,the 'time and the new password' also have to be specified for this feature to be
deployed onto the end-users.
Monthly - To reset a user's password on monthly basis,you can use the "MONTHLY" option. Here
you have to 'specify the date at which the password would be changed,along with the time & the new
password'.
Hourly - Choosing this option would enable you (admin) to reset the user's password on "hourly
basis".The time intervals at which the password would be reset has to be specified in "Once
In Every"
drop-down box. Along with this,you would have to 'specify the new password' which is going to be
assigned to the user.
ManageEngine ADSelfSerivce Plus – Admin Guide
ZOHO Corp.
53
Automatically Unlock Locked-Down Accounts In Your Domain
Choosing this option would automatically unlock the 'locked down user accounts'.Therefore,by
checking this option,you would prevent the user from going through the hassle of 'remembering the
date at which his/her account would get locked up'.
Steps Involved In Unlocking A User's Account In A Domain:
1. Enable the "Automatically Unlocks Locked Down Accounts In Your Domain" checkbox.
2. Select the type of "Account Unlock Scheduler" from the options available.
3. The available options as shown below:
4. DAILY, WEEKLY, MONTHLY,HOURLY
Configuring the above mentioned options involves the same steps as in configuring the "reset
password scheduler"; the only difference is that there is no need for specifying the "new
password" as you are dealing with unlocking of the user accounts.
4. Choose the appropriate fields required for the respective option chosen.
5. Click on "OK" to save the settings
Text/Mail Auto Generated Password to End-User:
You have to enable this checkbox in order to dispatch the newly created passwords ( via.
Automatically Reset Password feature) to the end-user accounts.
II Run Custom Script Upon Successful Password Reset/change:
As the name suggests,this feature,when enabled,would run a script relevant to 'successful password
reset/change operation'.
You - as the administrator - are provided with the rights to configure the Script that would be displayed
when the user 'resets/changes' his password.
III Update Reset Passwords and Account Unlock status on all Domain Controllers:
Enabling this option would update the current status of the user 'passwords & accounts' on all domain
controller machines.

ManageEngine ADSelfSerivce Plus – Admin Guide
ZOHO Corp.
54
Password / Account Expiry Notification
Notify End-Users of Password / Account Expiry via an email. This tab allows you to configure
Password Expiry notification for
Soon to Expire Password Users
Account Expired Users
Steps to Configure a Account Expiry / Soon-to-Expire Password Notification:
With ADSelfService Plus the administrator will be able to schedule reports for Soon to Expire
Password Users in his Domain.
In-order to Schedule Reports for Soon to Expire Password Users the administrator has to configure
settings on when the reports are to be scheduled and preset a time when the LockedOut Users report
is to be scheduled.
1. Select "Configuration" tab --->> "Self-Service" -->> "Password Expiry Notification"
2. Click on "Add New Notification"
3. Enter the "Scheduler Name" and "Description" for the schedule.
4. Select the desired Domain(s) or OU(s).
5. Enable the "Notify Enrolled Users Only"
6. Select the "Notification Type" from the Drop Down List box ( "Password Expiry Notification" or
"Account Expiry Notification")
7. Set the "Notification Frequency"
8. Daily AT - Specify time of Day
9. Weekly ON and AT - Specify the day of week and time of the day
10. On Specific Days - Multiple days can be entered.
11. 'Enter the date / day (s)' based on which the user will be notified of his/her password/account
expiry.
12. Type the "Subject" of the mail in their respective box.
13. Then type the "Mail Content" in the space provided for it.
14. Click on "Schedule Time" to specify the time at which the mail will be delivered.
15. Click on "Mail Admin The Notification Status" to enable the administrator to view the status of
notification reports.
16. Click 'Save' to store the configure settings.
Enable Password Expiry Notification:
ADSelfService will be able to send e-mail notification to all members enrolled in
ADSelfService Plus to notify them on a Soon To Expire Password.
ADSelfService Plus sends a message on password expiry notification with a preset Subject
and Message that is configured by the administrator.
While sending a password expiry notification to Domain Users. The notification message can be
changed as desired by the administrator. Also the administrator can email a user either by his
"initials", "displayName" or any of the below supported attributes.
This can be done by Replacing the variable held within the % symbol with a desired variable.
ManageEngine ADSelfSerivce Plus – Admin Guide
ZOHO Corp.
55
Eg: %user% can be replaced by %sn%
Also multiple instances of supported attributes in the message, is supported while notifying users.
Eg: FirstName_LastName can be specified as %initial%_%sn%
The list of LDAP attributes and Custom Attributes supported can be viewed by clicking on the
Macros link.
Supported Attributes while notifying users
{"givenName", "sn", "initials", "displayName", "userPrincipalName",
"sAMAccountName", "name", "mail", "distinguishedName" }
ManageEngine ADSelfSerivce Plus – Admin Guide
ZOHO Corp.
56
Employee Search
Summary:
With the Employee Search feature, you can do the following:
1. Provide end users with an option to search and view information about themselves as well as
other domain users
2. Help yourself (administrator) to search and locate users or retrieve any information about
them
How to configure the AD search:
1. Click on "Configuration --> Self-Service --> Employee Search".
2. Select the "Enable Employee Search" checkbox
3. Select the "Domain"
1. Click on the "Add OUs" link to perform "OU based Selection"
2. Select the OU's from the Pop-Up and Click on OK
4. You would be provided with 3 tabs:
1. Users
2. Contacts
3. Groups
Employee Search is a 'criteria based search'.You enable anyone or all of the above
mentioned options.
5. Enabling the "Users/Contacts/Groups" check boxes
Select the desired "Display Columns'
You can 'Configure the Order' in which the Display Columns appear by clicking on the
'UP' & 'DOWN' buttons
Configure the "Search Criteria"
Choose the desired "Search Criteria Options"
You can "Configure the Order" of the "Search Criteria Options" using the "Up" & "Down"
buttons
6. Select the "Enable Organization Chart" checkbox (in-order to view the "Searched Account"s
Position" in the Organizational Hierarchy)
7. Check the "Show On Login Page Also" checkbox (in-order to place the "Employee Search"
feature on the login page of this application)
8. Click on "Save" button to store the configured settings

ManageEngine ADSelfSerivce Plus – Admin Guide
ZOHO Corp.
57
Administrative Tools
Under this tab, you are allowed to configure the following features:
Quick Enrollment
Self-Update Layout
Gina (CTRL + ALT + DEL)
Technician
External Data Sources
ManageEngine ADSelfSerivce Plus – Admin Guide
ZOHO Corp.
58
Quick Enrollment
As the name suggests, under this tab, you are allowed to configure various features with the help of
which the 'user enrollment process' can be brought about effectively.
The features available under this tab are:
Enrollment Notification.
Auto Enrollment.
Enrollment Reminder.
ManageEngine ADSelfSerivce Plus – Admin Guide
ZOHO Corp.
59
Enrollment Notification
On configuring Enrollment Notification an administration can "Notify domain users via email to enroll
with ADSelfService Plus to avail themselves of password self-service" features.
1. Click on Configuration -->>Administrative Tools -->> Quick Enrollment -->>Enrollment
Notification.
2. Select the "Domain / OU","Policies" or "Manual" from the drop-down box.
3. In the "Mail Server" textbox, the "Mail Server" that has been configured in the "Server
Settings" would be available.
To modify the Mail Server or Configure a new server, click on the "Configure Mail Server".
4. Provide the "Subject" for the "Mail" ( Eg. Enrollment Invitation).
5. Follow it up with the "Mail Content".
6. Click on "Send Mail".
Selecting Manual will allow the administrator to send email to all users entered in the text box
provided.
(or)
Selecting Domain / OU will allow the administrator to notify via. email all the users that fall in
the selected container (Domain/OU).
(or)
Selecting the Policy will allow the administrator to notify via email to all users who are part of
the Policy.
ManageEngine ADSelfSerivce Plus – Admin Guide
ZOHO Corp.
60
Auto Enrollment
Auto Enrollment Through "Importing Answers" Option
Auto Enrollment Through "Import Question & Answers" Option
CSV File with Security Answers
CSV file (with Security Question and Answer)
Auto Enrollment Through "Importing Answers" Option:
1. Click on Configuration Tab --->>Administrative Tools --> Quick Enrollment -->Auto Enrollment
2. Choose the desired Policy
3. Select the 'Import Type' as 'Answer'
4. Choose the 'Security Question'
5. Click on 'Browse' and 'import the CSV file'(Format should be "SamAccountName,Answer".
View the sample CSV file for reference)
6. Enable the "Overwrite Answer, If Already Enrolled" checkbox, inorder to overwrite the existing
answer (in the case of same question)
7. Click on Enroll button.
The first line of the CSV file will be taken as the header.
Auto Enrollment Through "Import Question & Answers" Option:
1. Click on Configuration Tab --->>Administrative Tools --> Quick Enrollment -->Auto Enrollment
2. Choose the desired Policy
3. Select the 'Import type' as 'Question & Answer'
4. User gets to frame his\her own 'Question & Answer'
5. Click on browse and import the CSV file(Format should be
"SamAccountName,Question,Answer". View the sample CSV file for reference)
6. Enable the "Overwrite Answer, If Already Enrolled" checkbox, inorder to overwrite the
existing answer (in the case of same question)
7. Click on Enroll button.
The imported question from the CSV file, if different from the existing ones, will get added to
the Security Question list
CSV File:
It is a file via which the administrators import the user details (Security Question and Answer).During
the auto enrollment of the users, the administrator has to specify the header for these CSV files.
The first line of the CSV file will be taken as the header.
ManageEngine ADSelfSerivce Plus – Admin Guide
ZOHO Corp.
61
Creating A CSV File:
Creating a CSV file is a very easy task. Open any text editor, type the text and save it with the .CSV
extension.
An administrator can choose between two different types of CSV files:
CSV file (with Security Answer):
This file will contain the "Username" and "his \ her answer" to the Security Question put forth by the
administrator.
CSV file (with Security Question and Answer):
This file will contain the "Username", along with the "Security Question and Answer", which is framed
by the user himself.
ManageEngine ADSelfSerivce Plus – Admin Guide
ZOHO Corp.
62
Enrollment Reminder
An administrator can configure Enrollment Reminders to users in the domain, or Users who are part
of the Password Policy. Configuring Enrollment reminder allows ADSelfService Plus to Search for
non-enrolled users and associate their accounts with a Logon Script, which prompts them to enroll
whenever they log in to the network
1. Click on Configuration -->>Administrative Tools -->> Quick Enrollment -->>Enrollment
Reminder.
2. Provide a check against the "Enable Enrollment Reminder" option
3. In the "Message To Be Conveyed" textbox, specify the message for the 'Non-Enrolled Users'
4. Specify the "Server Access URL For Enrollment" - URL configured for accessing the server -
in the respective textbox
5. Select the 'Desired Policy (s)' (Policies to which these reminders would be sent)
6. Configure the Scheduler (in order to search for the non-enrolled users & assign their
accounts with the "Logon Script" )
7. Options available for Scheduling are:
8. Daily
9. Weekly (specify the Day)
10. Monthly (specify the Date)
11. Hourly
Select any one of the above mentioned options
8. Select the "Time" - at which the notification would be displayed - from the drop-down list box
9. Click on "Save" to store the configured setting.
The default location for the 'Logon Script'(ADSelfService_Enroll.vbs) is the 'SYSVOL' folder.
In some cases, the 'ADSelfService_Enroll.vbs' might not be stored in the 'SYSVOL', owing to
some permission issues concerning the Domain Controller. Under such circumstances, make
sure to 'copy & paste' the 'ADSelfService_Enroll.vbs' ( located at <ADSelfService Plus
Installation Directory>\Bin ) onto the 'SYSVOL' folder.
Already Using A Logon Script ?
Incase of running some other logon script, you have to call CheckEnrollment.vbs ( located at
<ADSelfService Plus Installation Directory>\Bin ) from your script to ensure that the script functions
the way it has been programmed.
Steps To Be Followed:
(i) If the logon script is a batch file
Add the following line at the end of your logon script
start CheckEnrollment.vbs
(ii) If the logon script is vb script
Copy the content of CheckEnrollment.vbs ( located at <ADSelfService Plus Installation
Directory>\Bin)
Append it at the end of your logon script
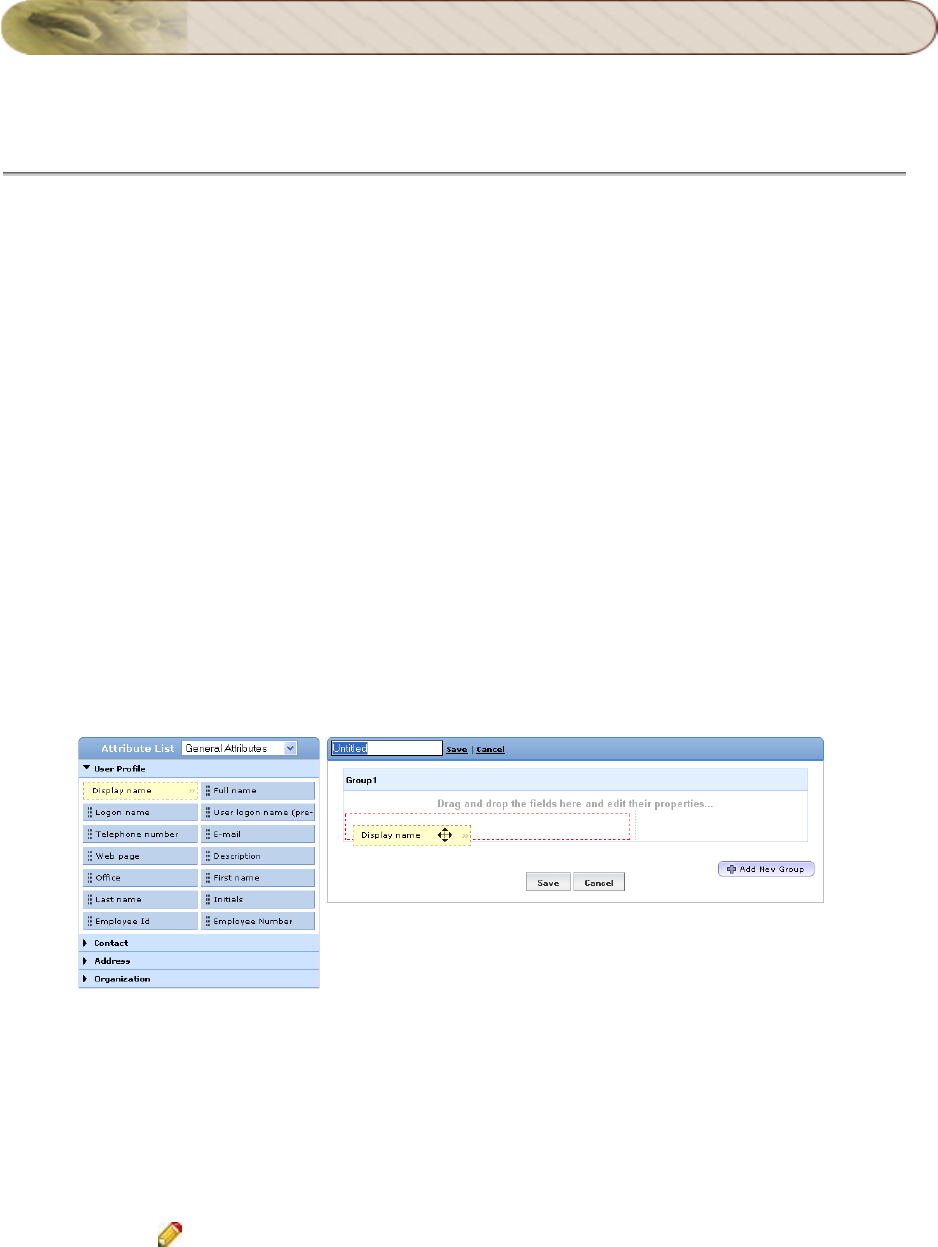
ManageEngine ADSelfSerivce Plus – Admin Guide
ZOHO Corp.
63
Self-Update Layout
Customized Interface
An administrator can create self update layouts with the simple "drag & drop" approach and choose
from multiple field types for an end user to self update. The administrator can provide controlled
access to one or more of all the attributes from the available fields for an end user to self update.
By default, ADSelfService Plus sets a policy for the entire domain, when it discovers DCs of a
domain. Thus when you log in for the first time (as an administrator) this default policy will be shown
to you. Conventionally, every self-service feature is selected. If it fits your requirement, you can retain
it; else, you can edit it. Furthermore, you can configure the 4 self-service features too.
Creating a Layout
1. Click on Configuration -->>Administrative Tools -->> Self Update Layout
2. Click on "Create New Layout" Link.
3. Enter the Layout name in the text box and Click Save.
4. Click on the Drop-Down menu and select "General Attributes" or "Custom Attributes".
5. Choose any/all of the fields displayed below the selected attribute.
6. Click on any field on the left and drag & drop in to the layout page on the right.
7. Instantly a "Field Selection" popup will appear. Administrator can work on Field Customization
of the field properties.
8. Optional : Click on "Add New Group" to create new groups.
9. Click on Save.
Modifying a Layout
1. Click on Configuration -->>Administrative Tools -->> Self Update Layout
2. Click the Modify Icon next to the desired layout.
3. To rename the "Layout" / "Group", move the mouse pointer over the layout name / group
name. Click on the Edit Icon and enter the desired layout name / group name.
4. Make your changes and Click on "Save".
5. "Successfully Saved" message is displayed. Note: The Modified Layout will be displayed
under "Available Layouts" and the changed details are listed.
ManageEngine ADSelfSerivce Plus – Admin Guide
ZOHO Corp.
64
Deleting a Layout
1. Click on Configuration -->>Administrative Tools -->> Self Update Layout
2. Click the Delete Icon next to the layout to be deleted.
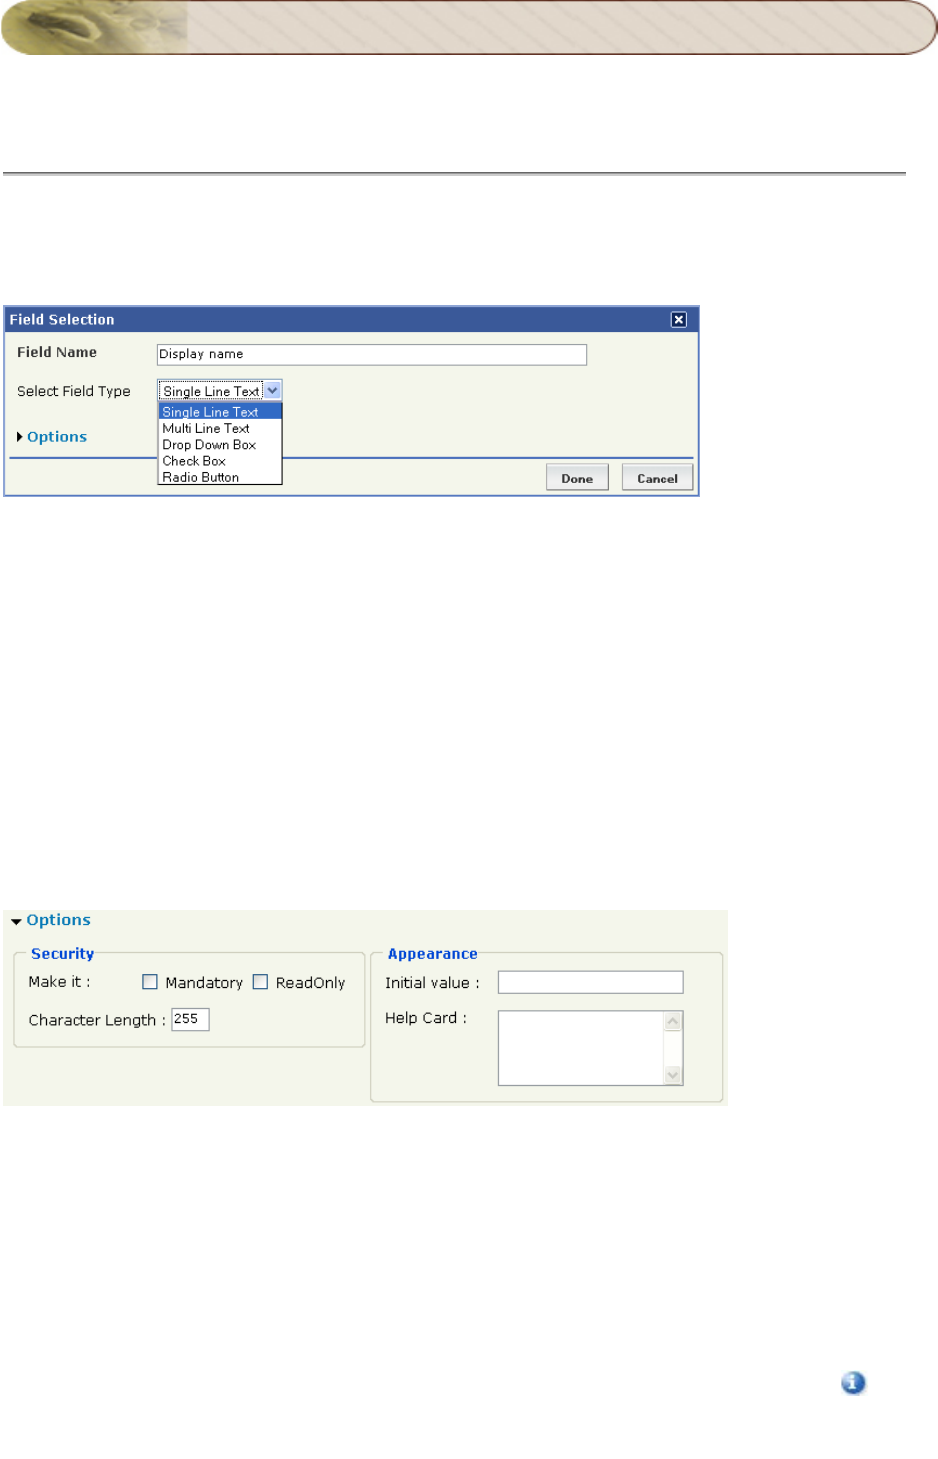
ManageEngine ADSelfSerivce Plus – Admin Guide
ZOHO Corp.
65
Field Customization
An administrator can customize the fields for the end user self update layout. Administrator can now
not only select from the various fields under General Attributes but also create custom fields under
Custom Attributes with the LDAP name of choice and choose from the various data types.
Single Line Text (Field type is suitable for character entry below 255.)
Multi Line Text (Field type is suitable for manifold character entry.)
Drop-Down Box (Field type is suitable, when an end user has to select from the available
options.)
Check Box (Field type is suitable, when an end user has to select any/all of the available
options.)
Radio Button (Field type is suitable, when an end user has to select from the available
options.)
Options
Administrator can click on the "Options" link within the field selection window and configure the
Security and Appearance of the field.
Security
The administrator can make the field entry mandatory or as a read only (administrator to fill-in the
information). Ex: Employee number.
Appearance
Initial Value: Administrator can set the initial value for the field. Ex: For mobile field the initial
value can be +91.
Help Card: Text entered acts as a tool-tip when the end user moves the mouse on the
Help Card Icon.
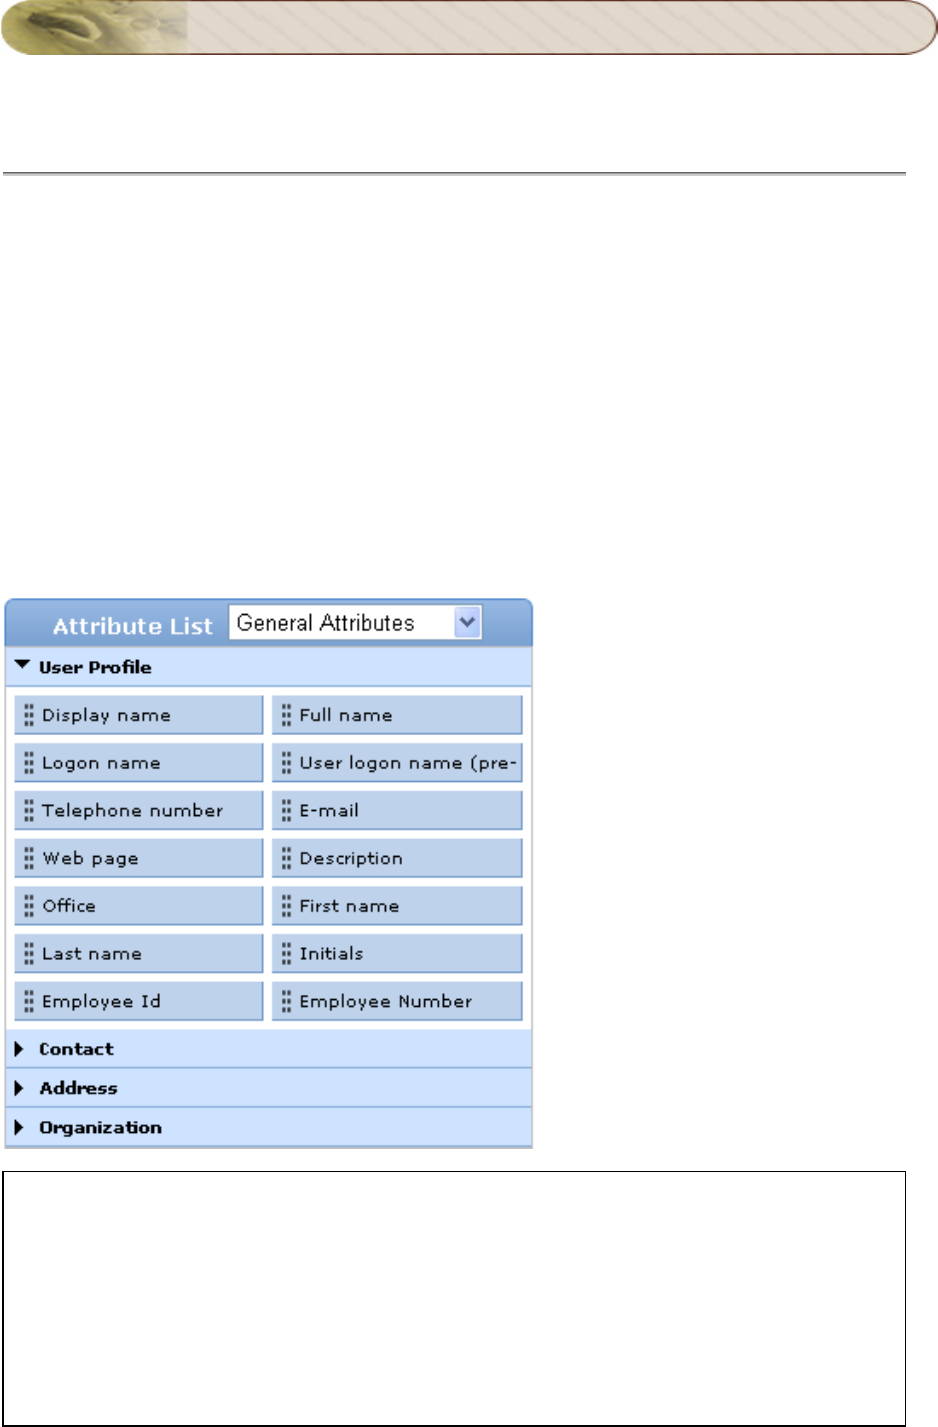
ManageEngine ADSelfSerivce Plus – Admin Guide
ZOHO Corp.
66
Attribute List
The Attributes list contains the various fields under various fields with different field types for the
broadest assortment of end user self update layout creation. With Custom Attributes, an administrator
can create custom fields and add in to the layout along with the General Attributes.
The Self Update layout configured with
General Attributes
Custom Attributes
Let us list the default fields under each attribute:
General Attributes
User Profile:
Ex:
Display name:
Enter the desired profile name to be displayed.
User logon name (pre-Windows 2000):
The name must be within 20 characters and the following characters are not allowed for usage: \
/ [
] : ; | = , + * ? @ "
Display name; Full name; Logon name; User logon name (pre-Windows 2000); Telephone number;
E-mail; Web page; Description; Office; First name; Last name; Initials; Employee Id; Employee
Number
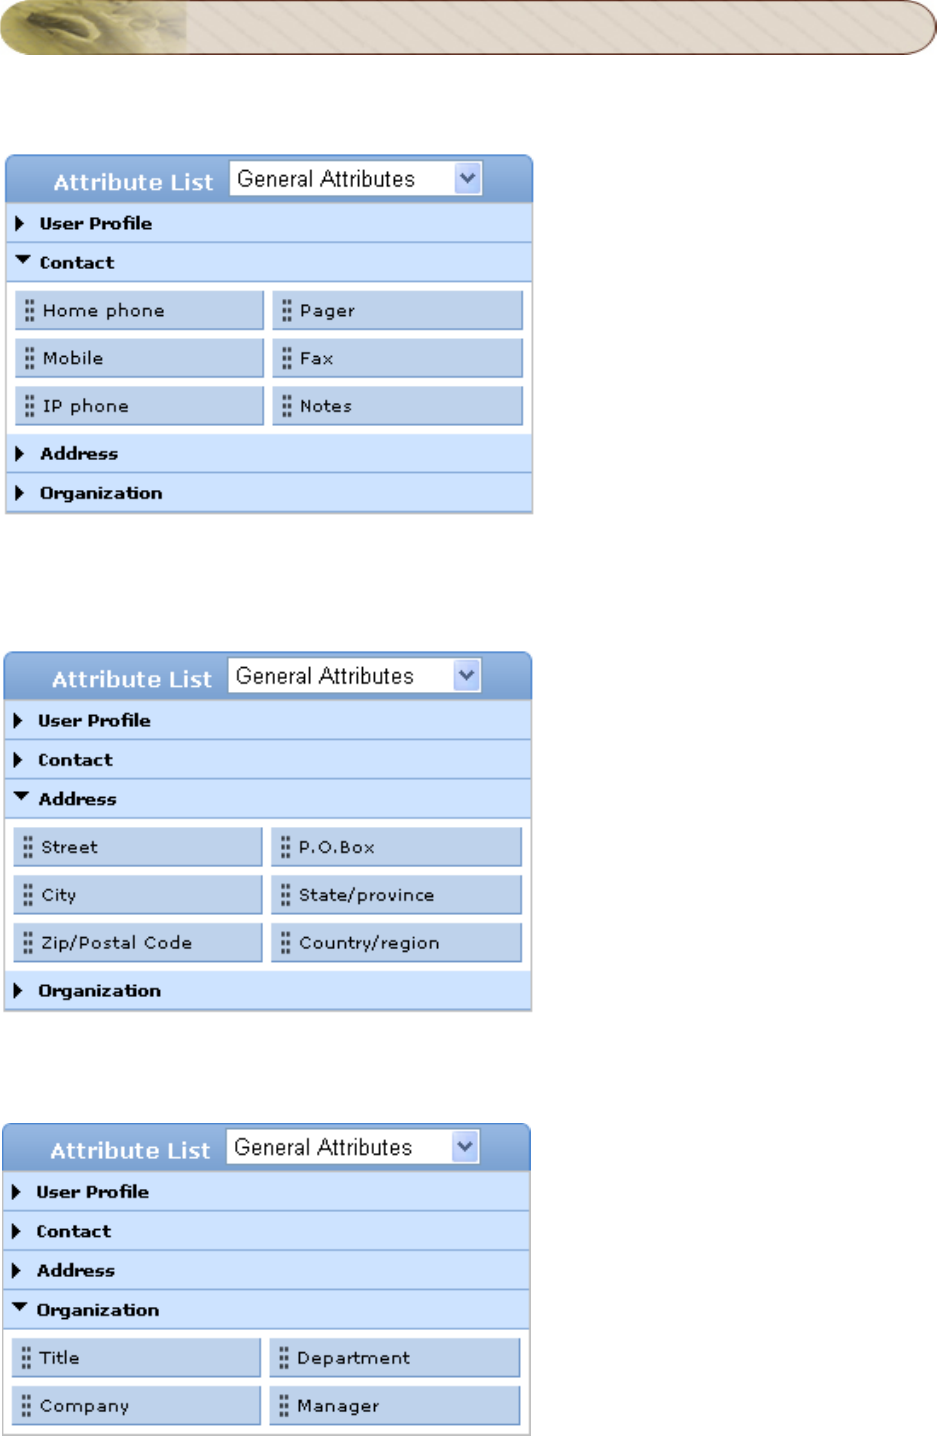
ManageEngine ADSelfSerivce Plus – Admin Guide
ZOHO Corp.
67
Contact:
Home Phone; Pager; Mobile; Fax; IP phone; Notes
Address:
Street; P.O.Box; City; State/Province; Zip/Postal Code; Country/Region
Organization:
Title; Department; Company; Manager
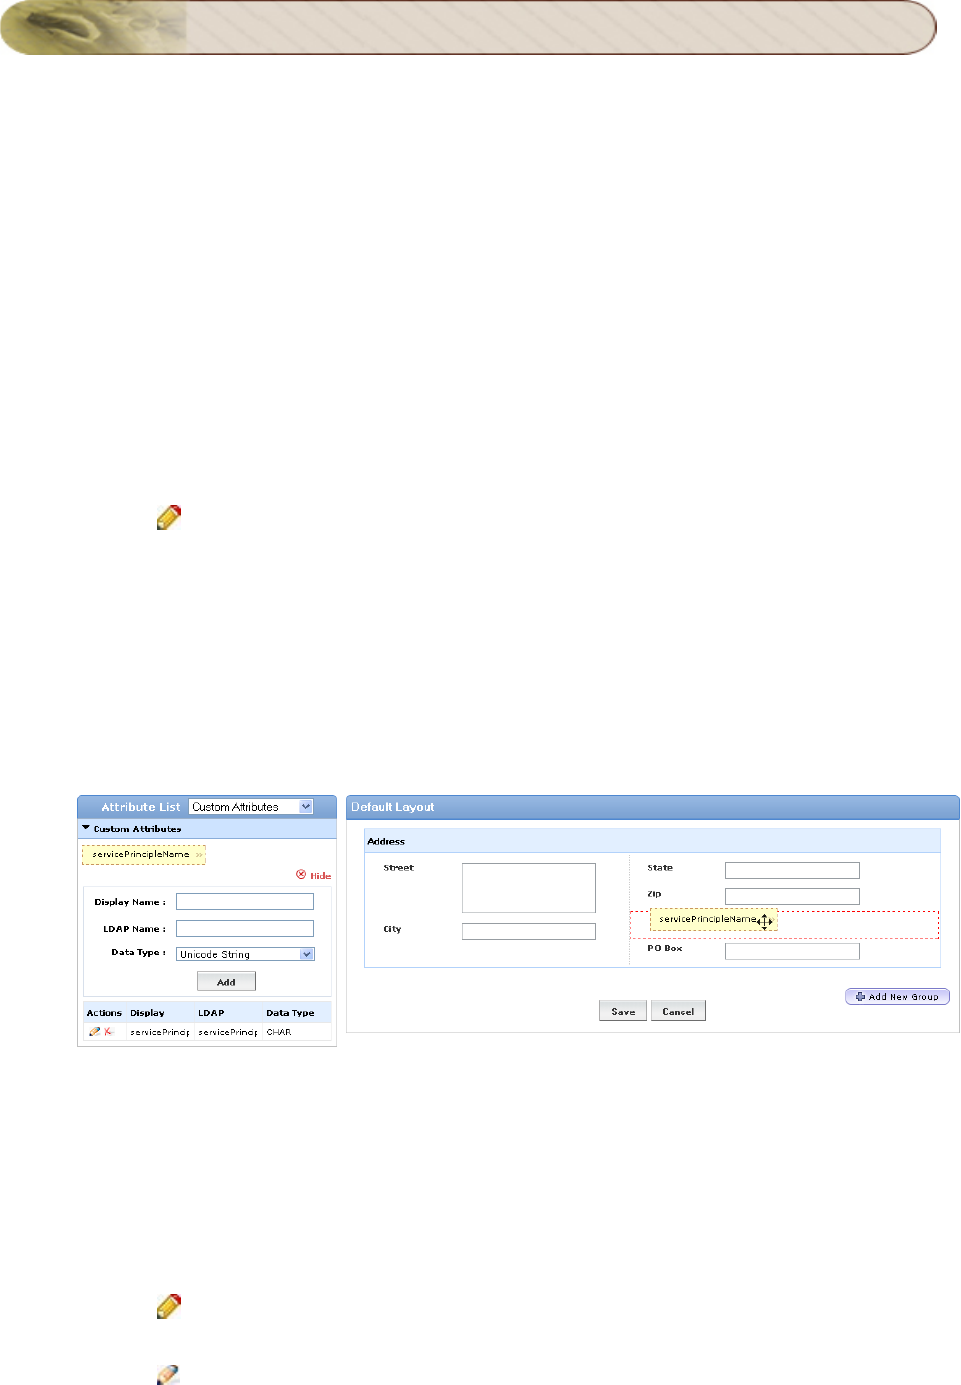
ManageEngine ADSelfSerivce Plus – Admin Guide
ZOHO Corp.
68
Custom Attributes
Administrator can create custom fields under "Custom Attributes" along with the available fields under
"General Attributes" with the LDAP name of choice and choose from the following Data Types:
Unicode String
Integer
Boolean
Large Integer
How to create a custom field with custom attributes?
Creating a Field
1. Click on Configuration -->>Administrative Tools -->> Self Update Layout
2. Click the Edit Icon next to the desired layout to add a custom field.
3. Select "Custom Attributes" from the "Attribute List" Drop-Down menu.
4. Enter the "Display Name" of the attribute in the Display Name box.
5. Enter the "LDAP Name" of the attribute in LDAP Name box.
6. Select the "Data Type" from the drop down menu.
7. Click on Add.
8. The custom field is displayed under Custom Attributes.
9. Click the custom field on the left and drag & drop in to the layout page on the right.
10. Instantly a "Field Selection" popup will appear. Administrator can customize the field
properties.
11. Click on Save.
Modifying a Field
1. Click on Configuration -->>Administrative Tools -->> Self Update Layout
2. Click the Edit Icon next to the desired layout to modify a custom field.
3. Select "Custom Attributes" from the "Attribute List" Drop-Down menu.
4. Click the Modify Icon next to the desired custom field.
5. Make your changes and Click on "Update".
ManageEngine ADSelfSerivce Plus – Admin Guide
ZOHO Corp.
69
Deleting a Field
1. Click on Configuration -->>Administrative Tools -->> Self Update Layout
2. Click the Edit Icon next to the desired layout to delete a custom field.
3. Select "Custom Attributes" from the "Attribute List" Drop-Down menu.
4. Click the Delete Icon next to the custom field to be deleted.
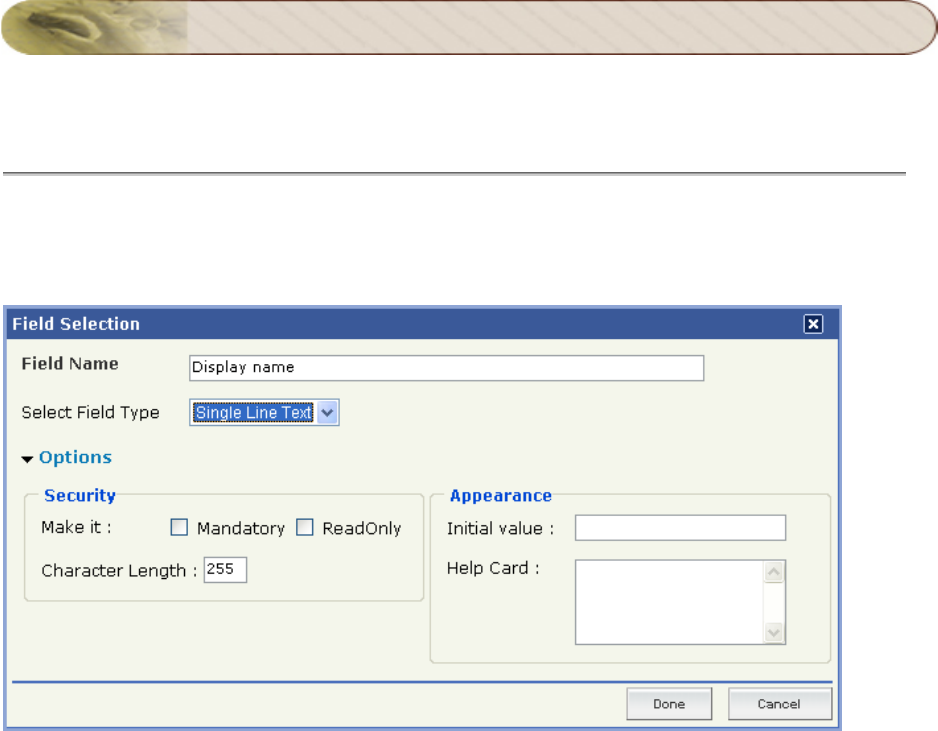
ManageEngine ADSelfSerivce Plus – Admin Guide
ZOHO Corp.
70
How To
Examples
How to set a field as Single Line Text?
1. "Drag and Drop" the desired field into the layout creation area.
2. Select "Single Line Text" field type from the Drop-Down menu.
3. To set Security, check against "Mandatory" or "Read only".
4. Set Character Length.
5. Set Appearance
Initial Value (Provide input that will appear as default text).
Help Card(Text you enter acts as a tooltip, when the end user moves the mouse on the
icon).
6. Click on Done.
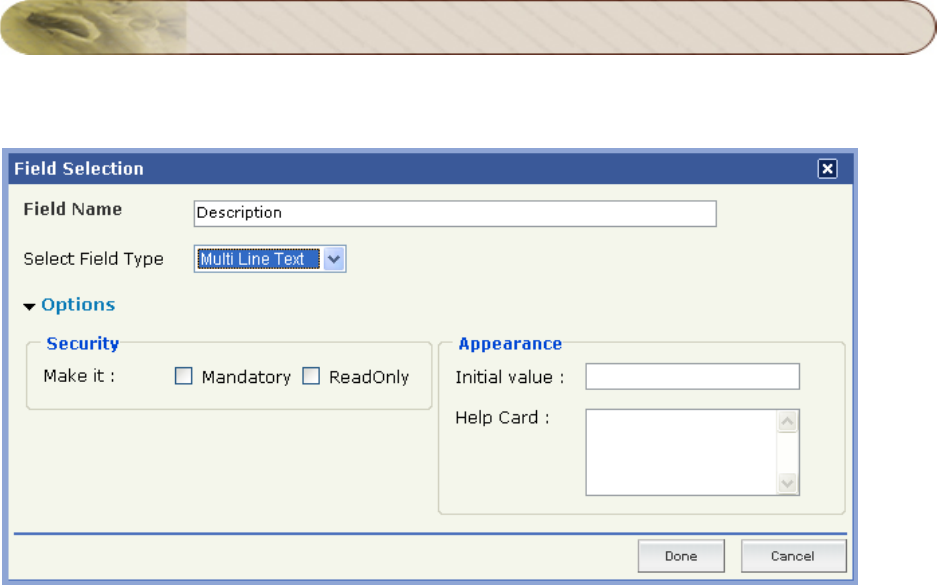
ManageEngine ADSelfSerivce Plus – Admin Guide
ZOHO Corp.
71
How to set a field as Multi Line Text?
1. "Drag and Drop" the desired field into the layout creation area.
2. Select "Multi Line Text" field type from the Drop-Down menu.
3. To set Security, check against "Mandatory" or "Read only".
4. Set Appearance
Initial Value (Provide input that will appear as default text).
Help Card(Text you enter acts as a tooltip, when the end user moves the mouse on the
icon).
5. Click on Done.
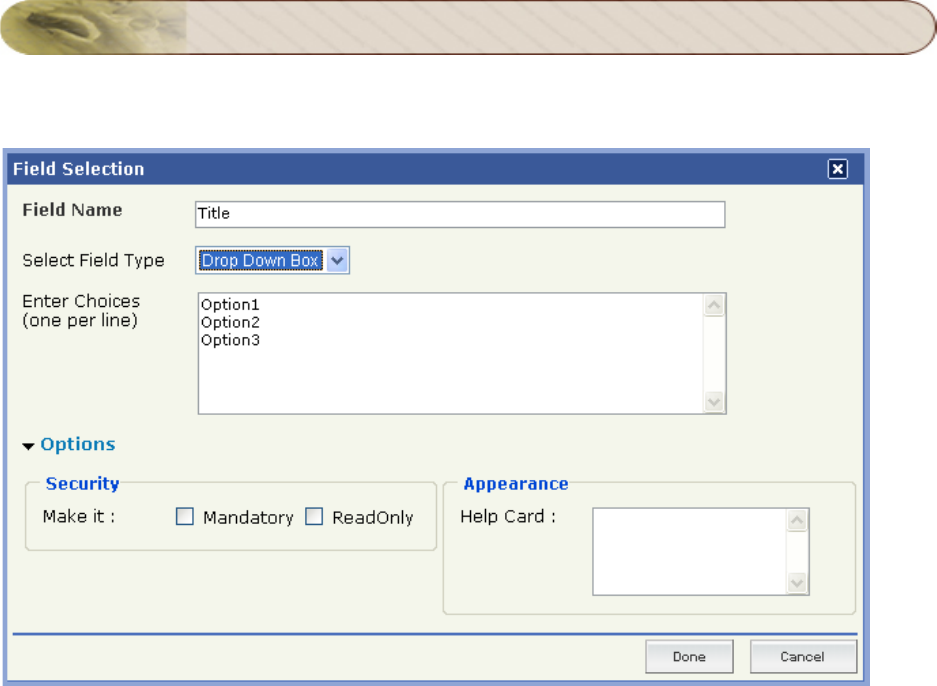
ManageEngine ADSelfSerivce Plus – Admin Guide
ZOHO Corp.
72
How to set a field as Drop-Down Box?
1. "Drag and Drop" the desired field into the layout creation area.
2. Select "Drop-Down Box" field type from the Drop-Down box.
3. Enter your options in "Enter Choices" field.
4. To set Security, check against "Mandatory" or "Read only".
5. Set Appearance
Help Card(Text you enter acts as a tooltip, when the end user moves the mouse on the
icon).
6. Click on Done.
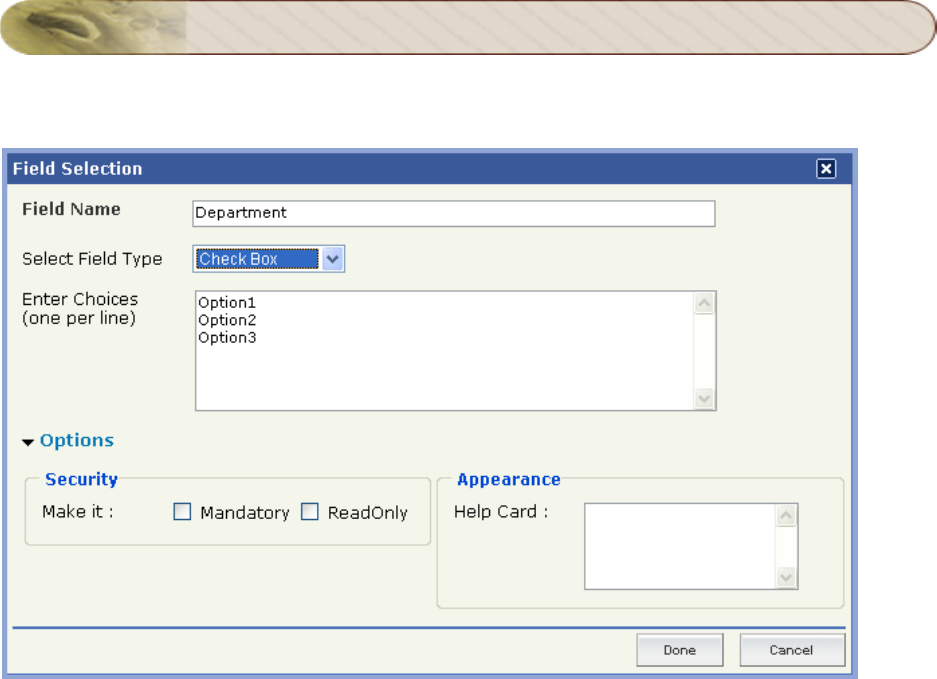
ManageEngine ADSelfSerivce Plus – Admin Guide
ZOHO Corp.
73
How to set a field as Check Box?
1. "Drag and Drop" the desired field into the layout creation area.
2. Select "Check Box" field type from the Drop-Down menu.
3. Enter your options in "Enter Choices" field.
4. To set Security, check against "Mandatory" or "Read only".
5. Set Appearance
Help Card(Text you enter acts as a tooltip, when the end user moves the mouse on the
icon).
6. Click on Done.
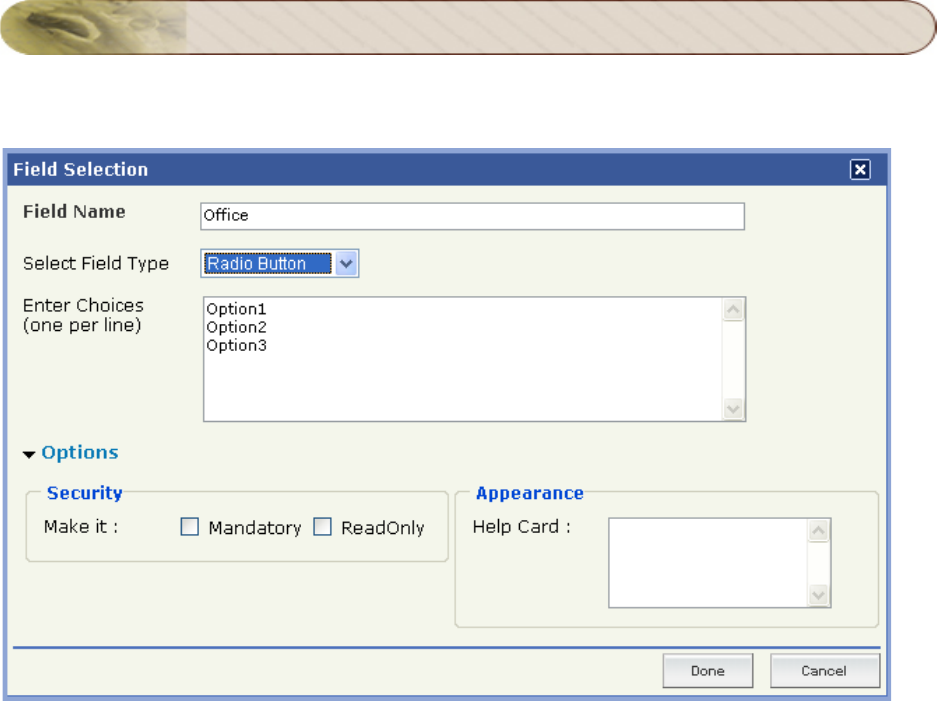
ManageEngine ADSelfSerivce Plus – Admin Guide
ZOHO Corp.
74
How to set a field as Radio Button?
1. "Drag and Drop" the desired field into the layout creation area.
2. Select "Radio Button" field type from the Drop-Down menu.
3. Enter your options in "Enter Choices" field.
4. To set Security, check against "Mandatory" or "Read only".
5. Set Appearance
Help Card(Text you enter acts as a tooltip, when the end user moves the mouse on the
icon).
6. Click on Done.
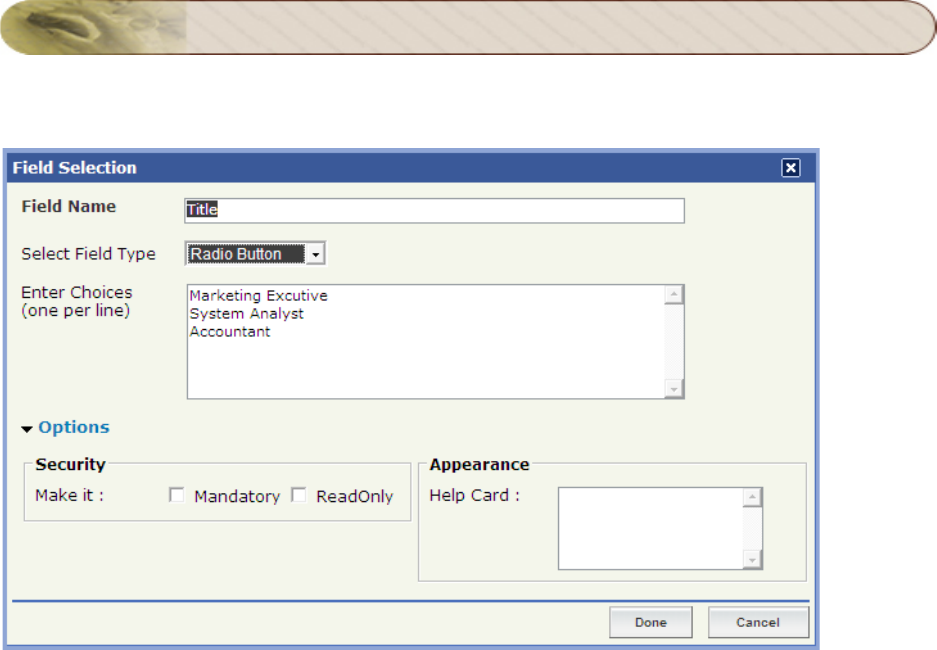
ManageEngine ADSelfSerivce Plus – Admin Guide
ZOHO Corp.
75
Example to Customize the Title Attribute:
1. "Drag and Drop" the Title attribute into the layout creation area.
2. Select "Radio Button" field type from the Drop-Down menu.
3. Enter your options in the "Enter Choices" field (as shown in the above figure).
4. To set Security, check against "Mandatory" or "Read only".
5. Set Appearance
Help Card(Text you enter acts as a tooltip, when the end user moves the mouse on the
icon).
6. Click on Done.
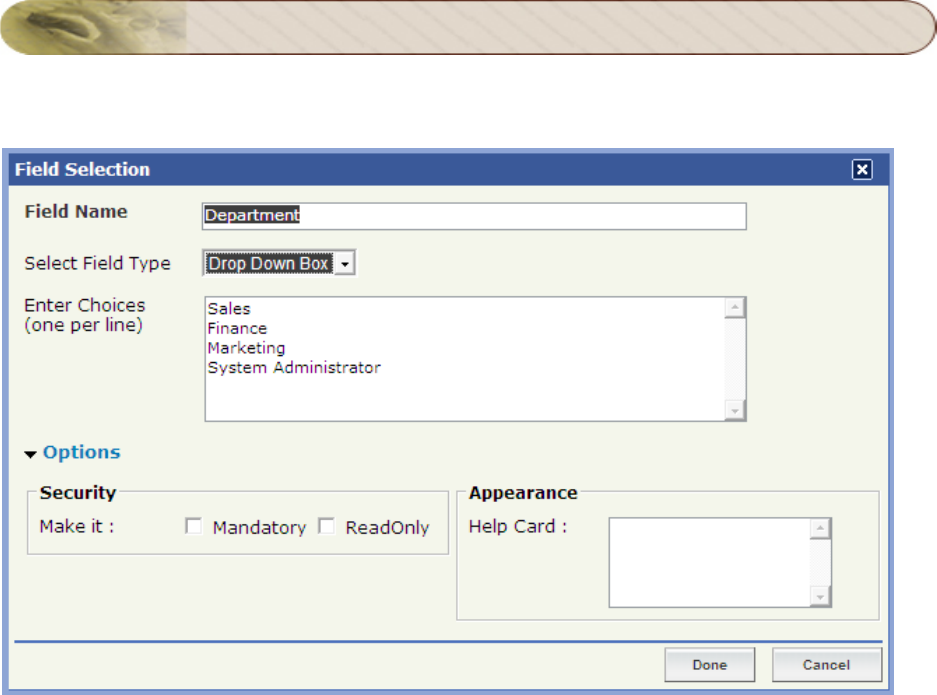
ManageEngine ADSelfSerivce Plus – Admin Guide
ZOHO Corp.
76
Example to Customize the Department Attribute:
1. "Drag and Drop" the Department attribute into the layout creation area.
2. Select "Drop Down Box" field type from the Drop-Down menu.
3. Enter your options in the "Enter Choices" field (as shown in the above figure).
4. To set Security, check against "Mandatory" or "Read only".
5. Set Appearance
Help Card(Text you enter acts as a tooltip, when the end user moves the mouse on the
icon).
6. Click on Done.
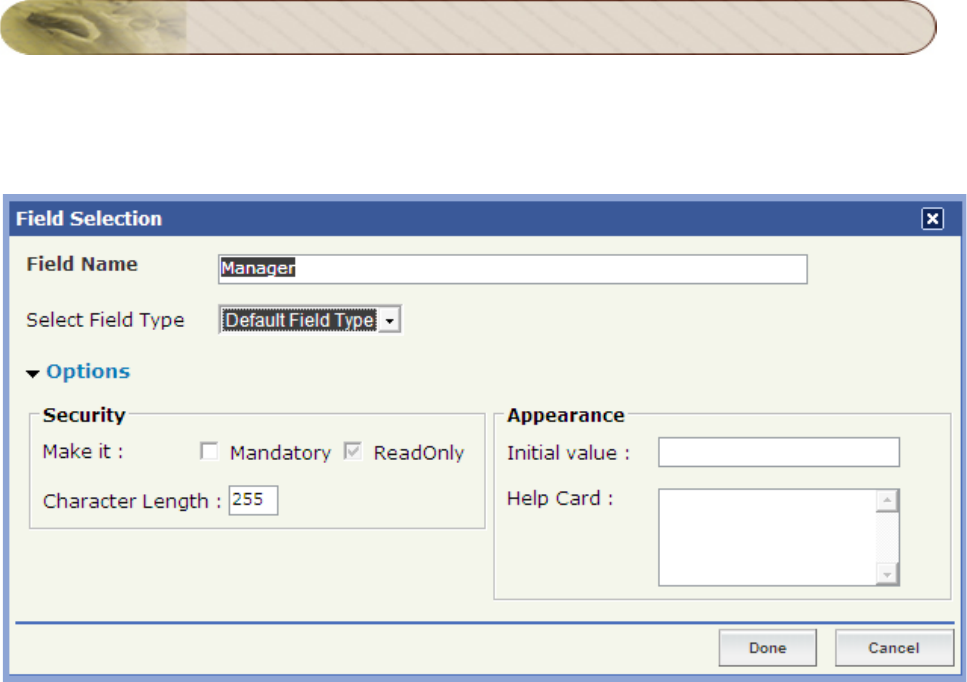
ManageEngine ADSelfSerivce Plus – Admin Guide
ZOHO Corp.
77
Example to Customize the Manager Attribute:
Default Field Type:
1. "Drag and Drop" the Manager attribute into the layout creation area.
2. "Default Field Type" option is preselected in the Drop Down menu.
3. To set Security, check against "Mandatory" or "Read only".
4. Set Appearance
Initial Value (Provide input that will appear as default text).
Help Card(Text you enter acts as a tooltip, when the end user moves the mouse on the
icon).
5. Click on Done.
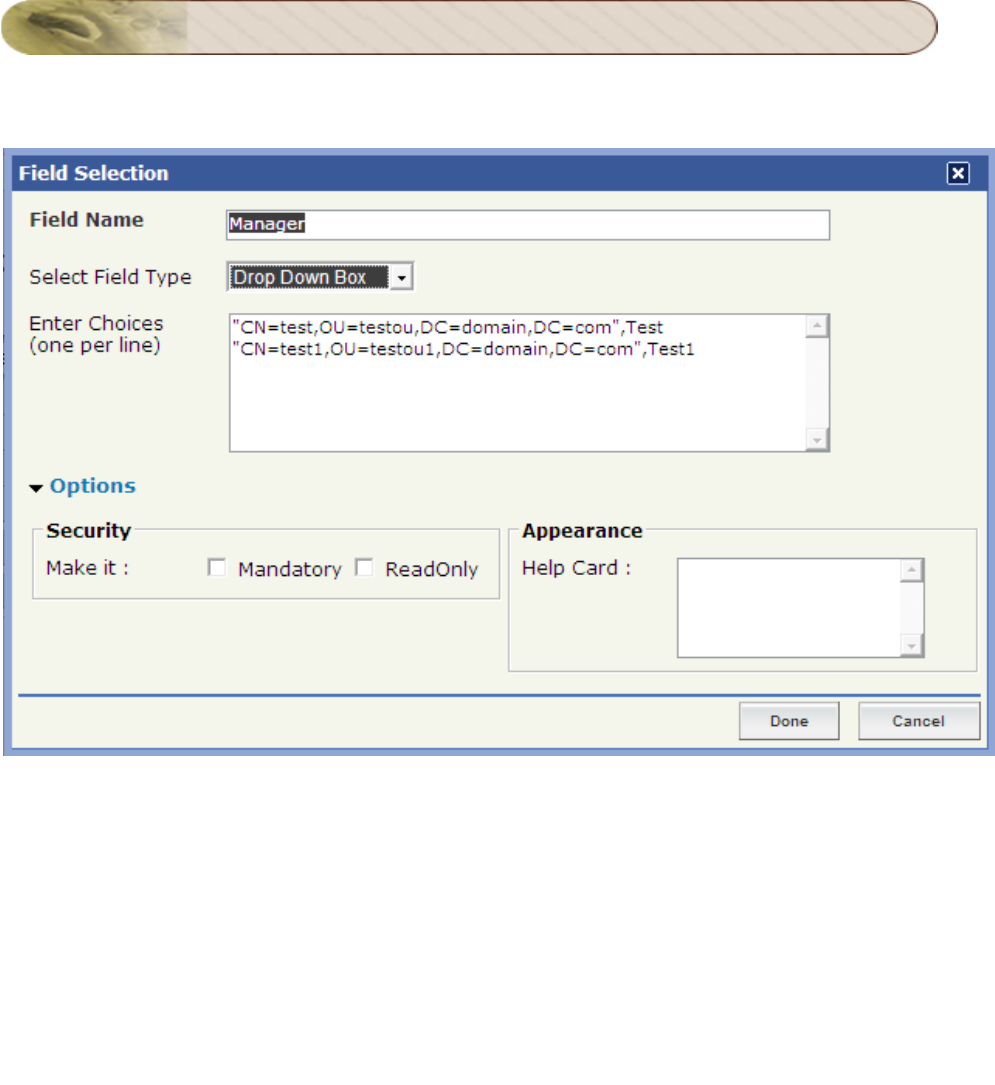
ManageEngine ADSelfSerivce Plus – Admin Guide
ZOHO Corp.
78
Drop Down Box:
1. "Drag and Drop" the Manager attribute into the layout creation area.
2. Select "Drop Down Box" field type from the Drop-Down menu.
3. Enter your options in the "Enter Choices" field (as shown in the above figure).
4. To set Security, check against "Mandatory" or "Read only".
5. Set Appearance
Help Card(Text you enter acts as a tooltip, when the end user moves the mouse on the
icon).
6. Click on Done.
ManageEngine ADSelfSerivce Plus – Admin Guide
ZOHO Corp.
79
Gina Installation
ADSelfService Plus application allows you to configure Gina/CP (Ctrl + Alt+ Del) which enables the
end-users to reset passwords/unlock accounts from "winlogon
screen".
Gina / CP Installation:
This feature is an extension of the standard "Microsoft GINA", which comes with the additional
functionality of displaying the "Reset/Unlock' button in the"WinLogon"(CTRL + ALT + DEL)screen.
For the users to "Reset/Unlock" their "Passwords/Accounts" at the press of "CTRL+ ALT+ DEL" keys,
the Client Software(MSI package) must be installed in their respective systems.
In ADSelfService Plus , the "Client Software" installation process can be effected in the following
ways:
1. Client Software Installation from the ADSelfService Plus Console.
2. Client Software Installation via GPO (Group Policy Object).
3. Client Software Installation via SCCM (System Center Configuration Manager).
4. Manual Installation Of Client Software.

ManageEngine ADSelfSerivce Plus – Admin Guide
ZOHO Corp.
80
Client Software Installation From The ADSelfService Plus
Console
It is possible to perform "Bulk Installation of the Client Software" onto the user machines (of the entire
domain (or) the selected computers) from a centralized ADSelfService Plus console.
The two different methods used for such a "Client Software Installation" are:
1. Domain Based Installation
2. Organizational Unit(OU) Based Installation
Domain Based Installation
1. Click on Configuration -->Administrative Tools --> GINA (Ctrl+Alt+Del) --> GINA/CP
Installation
2. Click on "New Installation"
3. Select "Domain" from the drop down list
4. Select the computers from the available list
5. Click on "Install"
Organizational Unit(OU) Based Installation:
1. Click on "Configuration --> Administrative Tools --> Gina (Ctrl+Alt+Del) --> GINA / CP
Installation"
2. Click on "New Installation"
3. "Select Domain" from the Drop Down list
4. Click on "OU Based Filter"(present at the top right corner)
5. Select "List View" or "Tree View" to view the List of Organizational Units (OUs) in the Domain
6. Check against the desired "OU" and click on "Get Computers"
7. This will 'display' the 'list of computers' in the selected OU
8. Check against the 'desired computers' and click on 'Install'
The Installation process would be completed in a short time and the message "Process Is Completed"
would be displayed. Click on "OK" button to return to the GINA/CP installation screen.
Import Computers:
The "Import Computers" link is used to import computers via CSV file for the purpose of "Client
Software " installation.
To import computers for "Client Software" installation
Click on "Import Computers" link
Click on "Browse" and "Select" the CSV file
Hit the "Install" button
View Installed Machines:
All the "Client Software" installed machines are listed under the "Installed Machines" tab. To view all
the"Client Software Installed Machines" in the Domain
ManageEngine ADSelfSerivce Plus – Admin Guide
ZOHO Corp.
81
Click on the Installed Machines tab
Select the Domain from the Drop Down Box
This lists all the Computers in which "Client Software" has been installed
View Error Occurred Machines:
Error might occur while installing the "Client Software".The computers that are subjected to such
errors are listed under the "Error Occurred Machines" tab.
To list all the "Error Occurred Machines" in the Domain
Click on the Error Occurred Machines tab
Select the Domain from the Drop Down Box
This action lists all the Machines where 'GINA/CP' installation could not be completed
Remove / Re-install Client Software :
Click on Un-install (This will remove the Client Software from all the Machines one selects
from the available list).
Click on Re-install (This will re-install Client Software onto machines where installation could
not be completed but gets displayed under "Installed Machines" List)
NOTE:
The 'Reason' behind the failure of 'GINA/CP' installation will also get listed when you
view the list of 'Error Occurred Machines'
"Remove/Re-Install" buttons would appear only when you click on the "Installed
Machines" or "Error Occurred Machines" tab .
"Export " & "Printable View" Options:
The "Export As"option is used to export the list of "Client Software Installed' & 'Error Occurred"
computers in different file formats like CSV,HTML,PDF & XLS. This process is usually carried out for
auditing purposes. "The Printable View" option is used to preview the printable version of the "Client
Software Installation" feature.
1. You have the option of performing a quick search for "filtering and finding the
desired computers" using the "Quick Search" option instead of going through all the
computers one by one.
ManageEngine ADSelfSerivce Plus – Admin Guide
ZOHO Corp.
82
Client Software Installation via GPO (Group Policy Object)
For complete information on Client Software Installation via GPO refer the link provided here.
http://www.manageengine.com/products/self-service-password/gina-gpo-installation-guide.pdf

ManageEngine ADSelfSerivce Plus – Admin Guide
ZOHO Corp.
83
Client Software Installation Via System Center
Configuration Manager
System Center Configuration Manager:
System Center Configuration Manager is one of the methods of client software installation used to
distribute the client software over a given domain. System Center Configuration
Manager is a systems management software product by Microsoft for managing large groups of
Windows-based Computer Systems. The SCCM offers remote control, patch management, software
distribution, operating system deployment, network access protection and hardware & software
inventory. To make use of the SCCM feature, it must be installed in your system.
Steps To Be Followed To Create A Package:
1. Start up your 'Configuration Manager Console' and click on the 'Site Database->Computer
Management ->Software Distribution' and then Select Packages' in the left pane.
2. Right click on the 'Packages' and select 'New -> Package'( A 'New Package Wizard' will open
up)
3. Fill in the 'General Package' properties (as you desire)
4. In the 'Data Source' tab, select the 'This Page Contains Source Files' checkbox and click on
'Set' to specify the source of the 'SCCM' package.
5. Change the 'Source Directory' location to 'Local drive' on 'Site Server' and browse to the path
of your package
6. Click 'OK' & Set the 'Schedule to update the Distribution Points'
7. Set the 'Data Access' Options or 'Revert to the Default Settings'
8. In the 'Distribution Settings' tab, 'Set the Priority of the Package' to 'high'
9. Under the 'Reporting' tab, set the MIF(Management Information Format) properties as
'Default' .
10. Set the 'Security Rights' for the package
11. Review the 'Summary of the Selected Choices'
12. Click on 'Next' to install the 'Package'
13. A confirmation message will appear that the 'Package has been Installed'
Creating A Program For The Package:
1. In Configuration Manager Console,expand the newly 'Added Package' & right click on
'Program'
2. Choose 'New -> Program'
3. Fill in the Program Details (under the 'General' tab) Provide the 'Command Line' as
follows:"msiexec /i ADSelfServicePlusClientSoftware.msi
SERVERNAME=selfservice.xyz.com PORTNO=8888 /qn".
4. In the 'Requirements' tab,select the 'The Program can run on Specified Client Platforms'
option & choose the 'desired operating systems'
5. Under the 'Environment' tab,choose 'Program Can Run Whether Or Not The User Is Logged
In' option
6. In the 'Advanced Settings' tab,leave all the settings as they are (that is,'default settings')

ManageEngine ADSelfSerivce Plus – Admin Guide
ZOHO Corp.
84
7. Ignore the 'Windows Installer Package' tab
8. Under the 'MOM Maintenance' tab,select 'Generate Operations Manager alert if this program
fails' option
9. Review the 'Summary Of The Program' and then click 'Next'
10. Click 'Close' to finish
Advertising The Package:
Once the package has been created along with the programs,the next step is to 'Advertise the
Package'(specifying the programs that you want your clients to run).This can be done as follows:
1. In the 'Configuration Manager Console', select 'System Center Configuration Manager ->Site
Database ->Computer Management -> Software Distribution ->Advertisements'
2. Right click on 'Advertisement' & select 'New -> Advertisement'
3. Fill in the details for the 'Advertisement' as follows:
Under the 'General' tab,provide the various details of the Advertisement as follows:
Name' (of the program)
Comment (regarding the program)
Click on 'Browse' buttons to choose the 'Package,Program & Collection'
When prompted about 'Distribution Points',click 'Yes' (the updation of the 'Distribution Point'
would be done at the end)
In the 'Schedule' tab,set the schedule for the 'Advertisement' as follows:
Set the 'Date' & 'Time' for the Advertisement
Click on the 'Yellow Star' to set the 'Mandatory Settings'
Set the 'Priority' to 'High'
Review the changes.
Under the 'Distribution Points' tab,
Provide the necessary information
Review your distribution point settings on fast or slow LAN
Under the 'Interaction' tab,
Set the Time Interval to 15 minutes
Under the 'Security' tab,
Review the 'Security' settings
4. Summary Of The Advertisement' would be displayed,click on 'Next' to finish
Creating The Distribution Points
In the SCCM Configuration Manager Console
1. Select the 'Configured Package' & right click on it .Select 'New Distribution Points'
2. 'New Distribution Points' wizard opens up
3. Click 'Next' to continue
4. Select the 'SCCM Server' from the available list & click 'Next'
5. Under the 'Confirmation' tab,review the 'Summary Of Selected Choices' & click 'Close'
ManageEngine ADSelfSerivce Plus – Admin Guide
ZOHO Corp.
85
Updating The Distribution Points
1. 1 Right click on the 'Distribution Points' & choose 'Update Distribution Points' option
2. A dialog box would appear stating that 'Are You Sure You Want To Update All Distribution
Points?'
3. Click 'Yes'
Distributing The Created Package:
In the SCCM Configuration Manager Console,
1. Select the 'Configured Package' & right click on it.
2. Select 'Distribute -> Software' the 'Distribute Package Wizard' will open up
3. Under the 'Distribution Points' tab,select the 'Distribution Points' option & click on 'Next'
4. Under the 'Advertise Program' tab,select 'Yes' for 'Do you want to advertise a Program from
this Package' option
5. In the 'Select Program' tab,select the 'Program that you want to Advertise to the members of
a Collection'
6. Click on 'Next'
7. Specify various details concerning the 'Advertisement of the Program' as mentioned below:
Specify the 'Collection' that should receive the 'Package'
You can either specify 'An Existing Collection' (or) 'Create A New Collection'
Specifying An Existing Collection:
Click on 'Browse' & Select the 'Desired Collection'
Click on 'Next'
Specifying A New Collection
Give the 'Name & Comment' for the 'New Collection'
Provide atleast 'One Membership Rule' & click on 'Next'
8. Provide the 'Advertisement Name & Comment' in the respective textboxes.
9. Click on 'Next'
10. Under the 'Advertisement Subcollections' tab,specify 'Whether the Advertisement should be
made available to Subcollections or not' & click 'Next'
11. Configure a 'Scheduler' for the Advertisement under the 'Advertisement Scheduler' tab & click
'Next'
12. Under the 'Assign Programs' tab,provide the necessary specifications & click on 'Next'
13. A 'Summary of the Advertisement'(with the specified requirements) would appear
14. Clicking on 'Next' would 'Distribute the Package' successfully
You can speed up the 'Distribution of Advertisements' by initiating the 'User Policy Retrieval
& Evaluation' and 'Machine Policy Retrieval & Evaluation' cycles respectively. These cycles
can be initiated from the 'Action Tab' of the 'Configuration Manager Properties' in the control
panel (on your client computers).

ManageEngine ADSelfSerivce Plus – Admin Guide
ZOHO Corp.
86
Manual Installation Of Client Software
An alternative method for the "Client Software Installation" is to manually install the software onto the
client machines with the help of the "MSI package"
To view the "MSI package", navigate to the location where the ADSelfService Plus has been installed
and select the "Bin" folder.
.
Steps To Be Followed For The Manual Installation Of The Client Software :
Copy & paste the 'MSI package' onto the computers (where the Client Software is to be installed),
then
1. Right click on the 'MSI package' & click on 'Install'
2. The "ADSelfService Plus Client Software Setup Wizard" will appear. Click
3. "Next" to continue
4. Select Installation Folder" page would appear
5. To select the "location of your choice" - for the installation of the Client Software - click on
"Browse" and select the desired location
6. Click on "Next" to continue "ADSelfService Plus Server Details" page would open up
Provide the "Name of the ADSelfService Plus Server" in the respective text box provided
Follow it up with the "Port Number of the ADSelfService Plus Server".Declare the port number
in the "HTTP" mode ( this version is also compatible with the "HTTPS" mode)
7. Click on "Next" to continue
8. "Confirm Installation" page would appear, click on "Next" to go ahead with the installation
9. This would lead you to the "Installation Complete" page, where the message "ADSelfService
Plus Client Software has been successfully installed" would be displayed
10. Click on "Close" button to exit the "GINA/CP Client Software Setup Wizard".
Manual Installation Via Command Prompt:
It is also possible to install the "GINA/CP Client Software" with the help of "Command Prompt" instead
of using the "GINA/CP Client Software Setup Wizard".
The command which is executed for the Installation process is "msiexec
/iADSelfServicePlusClientSoftware.msi SERVERNAME=selfservice.xyz.com PORTNO=8888 /qn".
ManageEngine ADSelfSerivce Plus – Admin Guide
ZOHO Corp.
87
Gina/CP Customization
'GINA/CP Customization' is a feature of ADSelfService Plus which assists you in revamping the
'GINA/CP' layout based on your requirements. Using this feature,aspects like the 'Gina/CP icon' and
the 'Text on & above the Reset/Unlock button' can be customized.
Steps To Be Followed Inorder To Customize The Gina/CP :
1. Click on 'Configuration -->Administrative Tools --> Gina (Ctrl + Alt + Del) --> Gina/CP
Customization'.
2. In the 'Frame Text' textbox,enter the 'appropriate text' (which will 'Direct the User' to click on
the 'Reset/Unlock' button).The default text is 'Please Click On Reset/Unlock Button to
reset/unlock your account with ADSelfService Plus'.
3. Follow it up by 'Configuring the Text' for the 'Reset/Unlock Button'(the text which will be
displayed on the 'Reset/Unlock Button').
4. To select the 'Icon' for the 'Gina/CP feature',click on 'Browse' & select the 'desired icon' (Only
BMP files (with size 48 * 48) can be used as the 'Gina/CP Icon')
5. Specify the 'Name of the Machine' where the ADSelfService Plus has been installed in the
'Server Name' textbox
6. Provide the 'Port Number' in the respective box.Declare the port number in 'HTTP' mode (also
compatible with the 'HTTPS' mode)
7. Click on 'Save' to store the configured settings.
Only the 'Future Gina/CP Installations' will be affected by this 'Gina/CP
Customization' process
For an already 'Deployed Gina/CP',customization can be done with the help of the
'Gina/CP Customization Scheduler'
ManageEngine ADSelfSerivce Plus – Admin Guide
ZOHO Corp.
88
Gina/CP Schedulers
The 'Gina/CP Schedulers' is a feature of ADSelfService Plus using which you can create 'Schedulers'
for the Gina/CP 'Installation & Customization'.
'Gina/CP Schedulers' are used to automate the 'Gina/CP installation' process over a domain.During
manual installation of Gina/CP,it is possible that a few computers might be left uninstalled (due to
some technical issues).To elude such sticky situations,the 'Scheduling' process is deployed - which
ensures that all the computers within a domain get installed with the 'Gina/CP' client software .
To re-configure an already deployed Gina/CP,the 'Customization Scheduler' feature is used.
Steps To Be Followed Inorder To Configure The Gina/CP Schedulers:
1. Select 'Configuration Administrative Tools --> Gina(Ctrl + Alt + Del ) --> Gina/CP Schedulers'
2. Click on the 'Edit' icon (inorder to alter the default settings of the 'Gina/CP Installation (or)
Customization' scheduler)
3. Select the 'Domain'(for which the Scheduler is to be configured)
4. For OU based selection,click on the 'Add OUs' link & Select the 'Desired OU(s)'
4. Set the 'Frequency for the Schedulers' Options available for scheduling are:
5. Daily
6. Weekly ( specify the Day )
7. Monthly ( specify the Date)
8. Hourly
Select any one of the above mentioned options.
5. Set the 'Time' at which the 'Scheduling' would occur
6. Click on 'Save' to store the configured settings.
You can Enable/Disable the 'GINA/CP scheduler' using the 'Enable/Disable' icon

ManageEngine ADSelfSerivce Plus – Admin Guide
ZOHO Corp.
89
Technician
Technician is a status that you can assign to the end-users. When a user is declared as a technician,
then he will be provided with the rights to configure the various settings of the
ADSelfService Plus application.
This application allows you to configure technicians of two types:
Super Admin.
Operator.
Steps to Configure a Technician.
Super Admin:
When you declare an end-user as a Super Admin, then he will be provided with the full control over
the entire application.A Super Admin has the right to re-configure the entire layout of the
ADSelfService Plus.
Operator:
Declaring an end-user as the operator would provide him with the rights to perform the auditing
operations for this application.
A Technician is provided only with the information that appertains to the domain to which he
belongs.
Configuring Technician Settings
1. Select 'Configuration --> Administrative Tools --> Technician'
2. Click on 'Add New Technician' button
3. Choose the 'Domain' from the Drop Down box
4. Incase of selecting 'Domains' other than the 'ADSelfService Plus' application:
5. Click on the 'Choose' link
6. Select the 'User' from the available list & click 'Ok'
7. Select the 'Role' for the 'Technician' (Super Admin/Operator)
8. Click on 'ADD'
The 'Technician' would be created. These technicians can logon using their 'Windows Logon'
credentials.
5. Incase of selecting the 'ADSelfService Plus' domain:
6. Provide the Login Name
7. Specify the Password & Confirm it
8. Select the 'Role' for the 'Technician'(Super Admin/Operator)
9. Click on 'ADD'
The 'Technician' would be created. These technicians (ADSelfService Plus domain)
are the ones who have no Active Directory accounts and therefore have to use the
credentials that are configured by you.
A message would be displayed stating that 'the technician was successfully created'.

ManageEngine ADSelfSerivce Plus – Admin Guide
ZOHO Corp.
90
External Data Sources
This is a feature of ADSelfService Plus using which you the admin - to connect with in-house data
sources like Oracle, MS SQL and MY SQL and with the other external data sources. These data
sources can be utilized in ADSelfService Plus.
Establishing Connection.
Fetching the Security Q & A from an External Database.
Fetch Again.
Establishing Connection:
The first step is to "establish connection with an external data base" from where the data is going to
be fetched.
1. Select Configuration -->Administrative Tools --> External Data Sources.
2. Click on 'Add New Data Source' to create a new data base Connection.
3. "Data Base Connection" page appears on screen.
4. Enter the "Connection Name" in the textbox provided.
5. Select the 'Data Base Server' from the 'Select DB Server' drop down list box.
6. Specify your "Hostname/IP Address" in the respective box provided.
7. Give the 'Port Address' as well.
8. Choose a suitable Data Base to which the connection is to be made.
9. Mention the "username".
10. Follow it up with the password (if the password has not been configured, then the respective
textbox can be left empty).
11. Select "SAVE" to save the settings that were configured.
The user should have the privileges to execute basic commands in the database
server.
The ADSelfService Plus installed machine must be granted the permission to access
the database server.
Once the connection has been established, the next step is to fetch the "Security Q & A" from the
external database.
Fetching the Security Q & A from an External Database:
1. Select Admin -->> External Data Sources.
2. Click on ADD to create a new Q & A fetcher.
3. Enter an apt "Title".
4. Select the "Connection" that you just created.
5. Choose the "Policy" to which this "Security Q & A" will apply.
6. Type the appropriate "Query" to fetch data from the external database table .
7. Click on Save to save the configured settings.
The general form used while formatting a "Query" is "Select Username, Question,
Answer from TableName;"
"Conditions/Join Queries" too can be used.
In the case of Oracle Server, avoid "semicolon"(;) at the end of the "Query"
ManageEngine ADSelfSerivce Plus – Admin Guide
ZOHO Corp.
91
Fetch Again:
Updating an existing data source can be done with the help of a process called "Fetch Again" option.
Eg. Let's say about "100 new users" are added to an "already connected data source" then these
users can be easily "updated" using the "Fetch Again" option.
The "Fetch Again" option is indicated by an upward pointed arrow. Clicking on this arrow would
update the database with the newly added entities.

ManageEngine ADSelfSerivce Plus – Admin Guide
ZOHO Corp.
92
Security Center
As the name suggests, under this tab, you are provided with the features using which you can beef up
the security of the end-user’s account.
Features available under this tab are mentioned below:
Password Strengtheners
Security Q & A Strengtheners
Anti-Hacking System

ManageEngine ADSelfSerivce Plus – Admin Guide
ZOHO Corp.
93
Password Strengtheners
This feature provides you with a set of rules that you can impose onto the end-users while they
configure their passwords. These rules are intended to increase the security of the user passwords.
Features:
Enforce Password Strength Level
Force Users To Change Password At Next Logon.
Configuring Password Strengtheners
Enforce Password Strength Level :
As the name suggests, this feature apprizes the end-users of their password strength. It does
so with the help of a feature by name Password Strength Analyzer.
While working with Password Strength Analyzer, you are granted with the option of choosing the
password strength level from the list of available choices (strong, good, weak & too short)
Force Users To Change Password At Next-Logon:
Another way of securing a user's password is to force them to change it at regular intervals. A
user would be required to change his password whenever he avails himself of the "Password
Reset" service, that is, on his next logon into the application following the Password Reset
operation.
Configuring Password Strengtheners
Password Strengtheners listed above can be configured by
1. Clicking on the "Advanced" icon against a Self-Service policy.
2. From the Pop-Up click on the "Reset & Unlock" tab

ManageEngine ADSelfSerivce Plus – Admin Guide
ZOHO Corp.
94
Security Q & A Strengtheners
Using this feature, you can secure the 'Security Q & A' process which serves for the purpose of user
authentication. This feature offers you with a "set of self-explanatory rules" which can be imposed
onto the user - in order to maintain the confidentiality of the user account - while he undertakes the
Security Q & A process.
The rules under this feature are listed below:
Prevent a user from providing the same answer to multiple questions
Prevent a user from using any word of a question in their answers
Display security questions one by one
Display only a random subset from a user's security questions
Make security answers case-sensitive
Hide answers during reset/unlock operations
To Configure Security Question and Answer Strengtheners click here.
ManageEngine ADSelfSerivce Plus – Admin Guide
ZOHO Corp.
95
Anti-Hacking System
This feature is a compilation of several services which assist you in securing the user's account from
various hacking threats. It does so by allowing you to impose a set of rules onto the user accounts
that provide resistance against cyber-crimes, eaves-dropping or sneaking.
It offers you with the following services:
Brute Force/Dictionary Attack Preventers.
Man-In-The-Middle Attack Preventers.
Safeguard Inactive-Account Loopholes.

ManageEngine ADSelfSerivce Plus – Admin Guide
ZOHO Corp.
96
Brute Force/Dictionary Attack Preventers
"Guessing" is one of the easiest forms of hacking. So, in order to keep this malign craft at bay,
ADSelfService Plus provides you with the following features:
Block User Accounts Failing At Security Q &A
Session Time-out
CAPTCHA
Block User Accounts Failing At Security Q & A:
The probability of a user failing at the Security Q & A process is limited, as he would be well aware of
the details provided by him.
As a protective measure against hacking, this feature blocks users who fail the Security Q & A test for
a definite time period (the ideal value being 5 attempts but can be changed to any desired value; as
there is always a possibility of a user forgetting his Security Q & A details). To Block User Accounts
Failing at Security Ques and Ans Click here.
Session Time-out :
Password Reset & Account Unlock are two very delicate tasks which should be carried out with
utmost care. To do so, this feature helps you to preclude any leak out of confidential user information
by allowing you to set a time limit for the "Password Reset/Unlock Account" sessions, thus preventing
any "user idle time".
Whenever the user happens to exceed the time limit set for performing the 'password reset or unlock
account task', the whole process will get locked out & the user has to start all over again. To
Configure Session Time-Out click here.
CAPTCHA :
More popularly known as the word verification image, this feature when enabled would help you to
beef up the security of the user. To Configure CAPTCHA feature click here.

ManageEngine ADSelfSerivce Plus – Admin Guide
ZOHO Corp.
97
Man-In-The-Middle Attack Preventers
Whenever a transaction happens between two extremities, the possibility of some source getting hold
of the information while on its way to its destination is huge. To avoid such incidents, this application
provides you with two features that are listed below:
E-mail Notification Upon Password Self-Service
Secure Connections
ManageEngine ADSelfSerivce Plus – Admin Guide
ZOHO Corp.
98
Safe-Guard Inactive Account Loopholes
Inactive accounts have always been a nuisance while managing user accounts. You cannot discard
the information pertaining to these inactive accounts since there is always a possibility of these users
returning back to the application.
Maintaining such inactive accounts might lead to various problems with the issue of 'License
Management' topping the list.
To counteract the problems that arise from the such Inactive User Accounts,the ADSelfService Plus
application provides you with a feature by name 'Restrict Inactive Users'.
Restrict Inactive Users:
Using this feature,you can strip the licenses of the Inactive Users and provide it to the newly added
accounts of this application.
Besides effective License Management,this feature provides you with the option of 'restricting inactive
users' from logging into this application.
ADSelfService Plus brings about the process of 'restricting inactive users' without discarding the
information pertaining to their accounts. For more on Restricting Inactive Users and its configuration
click here.
This application provides you - the administrator - with the rights to change the status of
these 'Inactive Accounts'.

ManageEngine ADSelfSerivce Plus – Admin Guide
ZOHO Corp.
99
Admin
Under this tab,you are provided with features via which you can configure the settings of the
ADSelfService Plus to suit your requirements.
The features available under this tab are:
Customize: Configure an environment of your own within this application using the features
available under this option
System Utilities:Provides you with features necessary for the functioning of ADSelfService
Plus application.
Product Settings:Configure the settings of the ADSelfService Plus application via this
feature
License Management: Manage user licenses effectively with the help of this 'License
Management' feature.

ManageEngine ADSelfSerivce Plus – Admin Guide
ZOHO Corp.
100
Customize
Under this tab,you are provided with features using which you can customize the various settings of
the ADSelfService Plus application .
The 'Customize' tab hosts three different features:
Logon Settings
Re-branding
Personalize

ManageEngine ADSelfSerivce Plus – Admin Guide
ZOHO Corp.
101
Logon Settings
As the name suggests,the 'logon settings' feature of the ADSelfService Plus assists you in configuring
the logon page of this application.
By default,the ADSelfService Plus application provides you with two different modes of logging into
this application:
As an Administrator &
As an End-User
You - as the administrator - get to decide whether the end-users would be availed
with the 'Admin Login' option.
In any case,it is advisable to prevent the end-users from making use of the 'Admin
Login' portal.(By enabling the 'Hide Self-Service Admin Login' option.For further
details click on 'Configuration').
Enabling the 'Hide Self-Service Admin Login' option requires you to specify the
'url(s)/DNS names' that would be allowed to access the admin portal in the 'Make
Admin Login Page Accessible Only from' textbox
Features:
Single Sign-On :
Enable the end-users to login into this ADSelfService Plus application using their respective domain
credentials instead of configuring a new set of login credentials.
Customizing The End-User Logon Page:
As an administrator,you are provided with the rights to customize the logon page of the end-users.To
do so,click on the 'Customize User Logon Page' link available under this 'Logon Settings' feature.
Configuration:
1. Click on Logon Settings (Admin --> Customize --> Logon Settings)
2. Enable the 'Hide Self-Service Admin Login' checkbox.
3. Check the 'Single Sign-On' option
4. Enable the 'Show Log Onto' option in order to allow the end-users to select the domain to
which they belong.(This option is required in the case of ADSelfService Plus lodging multiple
domains)
While selecting the 'Show Log Onto' option,you are provided with the choice of setting the
'Select Domain' as the 'default value' in the 'Show Log Onto' drop-down box.
To do so,enable the 'Show Select Domain As The Default Value' checkbox
5. Click on 'Save' to store the configured settings.
ManageEngine ADSelfSerivce Plus – Admin Guide
ZOHO Corp.
102
Customize User Logon Page
Using this feature of ADSelfService Plus,you can customize the user logon page.The process of
customization is brought about using the "drag and drop" method.
This feature comprises of two different fields.They are:
Pre -Defined Field
Custom Field
Pre-Defined Field:
These are the default elements that are provided to you (admin).There are five different fields
available.
Reset Password
Unlock Account
Enrollment
Change Password
Self Update
Operations That Can Be Performed On The Pre-Defined Elements:
Though the Pre-Defined elements are default ones,you have the right to 'edit or delete' these options
from the user logon page.To modify the pre-defined elements,you are provided with the following
options:
EDIT - Clicking on icon - which appears on mouseover the pre-defined element - would
pop up a dialog box via which you can edit the contents of these pre-defined elements
DELETE - Click on the icon in order to delete the predefined elements from the user logon
page.
The deleted element can be re-enabled by clicking and dragging the same from the 'Pre-
Defined Elements Area' available on the left side of the Logon Page Customizer.
Custom Field:
You can add new attributes onto the user logon page using this custom field. The elements that can
be added are
Text
Link
Image
Horizontal Line
Vertical Line
To view the working of the above mentioned options, click "CUSTOM FIELD ATTRIBUTES"

ManageEngine ADSelfSerivce Plus – Admin Guide
ZOHO Corp.
103
User Logon Dialog Box:
Just as you can reposition various fields on the user logon page,you can also re-map the 'user logon
box'.Moving the mouse pointer over this dialog box enables "Hide" button,which when clicked leads to
another dialog box.
The newly popped-up dialog box contains "Keep The Logon Form Hidden By Default" checkbox.
Checking this option would disable the user logon box.
Enabling The User Logon Box:
To enable the User Logon Box ,click on 'Show' icon (which appears when the logon box is in a
disabled state).
Steps Involved In Configuring The User Logon Page:
1. Click on "Customize User Logon Page" link on the 'Logon Settings' page (Admin -->
Customize --> Logon Settings)
2. Drag and position the "Pre Defined Elements" in the desired locations
3. Click on "Custom Fields" and add the fields of your choice from the options available.
4. Click on "Preview This Settings" to view the page before being saved
5. Hit the "SAVE" button to save the configured settings.
CUSTOM FIELD ATTRIBUTES:
ADD TEXT ATTRIBUTE:
Using this attribute you can add ( as well as format) the text on the user logon page.Clicking this
option would pop up a window via which you can configure the text to be displayed on the user logon
page.
ADD LINK ATTRIBUTE:
Create links to other web pages with the help of this Add Link Attribute. Clicking on this option would
pop up another window which contains the following two fields:
Name - specify the name of the web site
Target URL - mention the URL of the page (which is to be linked)
ADD IMAGE ATTRIBUTE:
Add images onto the 'User Logon Page' with the help of this 'Add Image Attribute'.
ADD LINE:(Horizontal & Vertical)
Using this 'Add Line' option,you can add lines onto the 'User Logon Page'. The lines that you create
can be moved as well as resized as you desire.

ManageEngine ADSelfSerivce Plus – Admin Guide
ZOHO Corp.
104
Rebranding
"Rebranding" is a feature using which you can customize the ADSelfService Plus display settings
"based on the environment" in which it is deployed.
Steps Involved In Configuring The "Rebranding" Feature:
1. Click on 'Rebranding' (Admin --> Customize --> Rebranding)
2. Browse and Select the desired image ( logo for your application) via "Change Image/Logo"
field
3. Select the "Desired Color" from the "Change Theme Color" field
4. Pick the "Font Style" from the "Font Family" drop down box
5. Select the "Font Size" from the "Font Size" drop down box
6. Specify an appropriate 'Browser Title'
7. Choose the 'Browser Title Image'
8. Enable the "Customize Password Policy Messages" checkbox to re-configure the standard
"Domain Password Policy" regulations (displayed in the pages that a user goes through
while "resetting/changing" his password)
This process of re-configuring can be done by editing the "html"
file found at the location specified below:
<installation_directory>\webapps\adssp\html\<your_domain_nam
e>_PasswordPolicy.html
To restore the 'Default Domain Policy' settings,disable the 'Customize Password Policy
Messages' checkbox & click on the 'Update Domain Objects' button (Refresh Icon) in the
Domain Settings feature.
9. Hit the "SAVE" button to store the configured settings
Change Image / Logo for Admin Users:
An administrator can replace the default ADSelfService Plus logo with his corporate logo or an image
of his choice. The modified image present at the top left corner of the Application will then be viewed
by all Self-Service Users.
To replace the default ADSelfService Plus logo
1. Login ADSelfService Plus
2. Click on the "Admin Tab"
3. Click on "Rebranding"
4. Click on "Browse" and provide a check against the "Change Image / Logo" box provided
and select your corporate image or logo.
5. Click on "Save" to save the changes.
Customize messages at Reset Password /Unlock Account pages
An Administrator can customize the header and footer messages on one or all pages in
ADSelfService Plus, directing a user to perform a password reset (Using "Forgot your Password" link)
or account unlock (Using "Unlock your Account" link). Customization of header and footer is done by
providing links, or text messages within a HTML Table element.

ManageEngine ADSelfSerivce Plus – Admin Guide
ZOHO Corp.
105
To customize the Header and Footer Messages in one or all the pages edit the file
"CustomLayout.txt" from the location provided below,
<installation_directory>\webapps\adssp\html\
Each page directing to Password Reset or Unlock Account has different names as described below.
"url-reset" : "Reset Your Password" Page where users enter their name & select their domain. Enter
your text messages in the file "CustomLayout.txt" within the open and close Tags provided below.
<url-reset-header>Enter Message or Link </url-reset-header>
<url-reset-footer> Enter Message or Link </url-reset-footer>
"url-validateuser" : "Security Questions" Page where users answer secret questions. Enter your text
messages in the file "CustomLayout.txt" within the open and close Tags providded below.
<url-validateuser-header> Enter Message or Link </url-validateuser-header>
<url-validateuser-footer>Enter Message or Link </url-validateuser-footer>
"url-resetpassword" : This is the Page which provides "Domain Password Policy requirements" for
users when Password Reset / Unlock Accounts. Enter your text messages in the file
"CustomLayout.txt" within the open and close Tags providded below.
<url-resetpassword-header> Enter Message or Link </url-resetpassword-header>
<url-resetpassword-footer> Enter Message or Link </url-resetpassword-footer>
"url-resetresult" : This page shows the status of a "password reset" or "account unlock". Enter your
text messages in the file "CustomLayout.txt" within the open and close Tags provided below.
<url-resetresult-header>Enter Message or Link </url-resetresult-header>
<url-resetresult-footer> Enter Message or Link </url-resetresult-footer>
Example:
<url-reset-header>
<table>
<tr>
<td class = "blacktxt">Enter your text message</td>
</tr>
</table>
</url-reset-header>
(Note: Save a BackUp copy of the existing file CustomLayout.txt before editing.)

ManageEngine ADSelfSerivce Plus – Admin Guide
ZOHO Corp.
106
Personalize
ADSelfService Plus offers you with a feature by name 'Personalize' using which you can modify the
settings of this application to suit your requirements.In other words,you can create your own
environment within this application via this 'Personalize' feature.
Features:
This feature:
Allows you to change the 'default login credentials' provided to you by this application at the
time of purchase.
Allows you to view this application in the language that you prefer.
Lets you to set the 'time zone' of your choice
Lets you to choose the 'Date' & 'Time' formats as per your requirements.
Configuration:
Changing The Logon Credentials:
1. Enter the 'Old Password' in the specified box.
2. Follow it up with the 'New Password' & confirm the same in the succeeding field.
Creating An Enviroment Of Your Own Within ADSelfService Plus:
1. Choose the 'language' that you desire
2. Select the 'Time Zone'
3. Choose the 'Date & Time' formats
4. Click on 'Save' to store the configured settings
ManageEngine ADSelfSerivce Plus – Admin Guide
ZOHO Corp.
107
System Utilities
Under this tab,you are provided with the features via which you can 'update' as well as 'secure' the
settings of the ADSelfService Plus application.
The features listed under this tab are:
Dashboard Updater
Automatic DB Backup
ManageEngine ADSelfSerivce Plus – Admin Guide
ZOHO Corp.
108
Dashboard Updater
Update the dashboard of the ADSelfService Plus application with the help of the Dashboard Updater
feature available under the System Utilities tab. Besides dashboard updation, this tab also provides
you with the option of synchronizing ADSelfService Plus with your organization's Active Directory.
Features available under this tab:
AD Synchronizer.
Locked Out Users.
Password Expired Users.
Soon-To-Expire User Passwords.
All the above mentioned features can be updated via this "Dashboard Updater" feature .
The updation is brought about by configuring 'schedulers at regular intervals' which perform the task
of updating the features available under this tab.
You are also provided with the option of editing the schedulers that bring about the updation
process. To do so,click on the 'Edit' icon.
AD Synchronizer
The AD Synchronizer synchronises the ADSelfService Plus database with your Organization's Active
Directory. Scheduling ADSelfService Plus synchronization with your organization’s Active Directory
helps in the update of Application dashboard reports. Users will be able to view an updated
Dashboard and latest reports from the Active Directory.
The Synchronization is based on the Schedule frequency which is editable and displayed on the
Table.
To modify the Schedule Frequency:
1. Click on "Admin" Tab -->>"Dashboard Updater"
2. From the Actions column of the "Dashboard Updater" table click on the edit icon.
3. This Pops-Up the "AD Synchronizer" where you can set the "Schedule Duration"
4. The "AD Synchronizer" schedules a report depending on any of the frequency listed below
based on User selection.
1. Daily - A Report will be scheduled once a day at the time selected.
2. Weekly - A report will scheduled once a week on "selected day from Drop Down" at
"Selected time of that Day"
3. Monthly - A report will be scheduled once every month at a "selected time from drop" on
a "selected date from drop down"
4. Hourly - A report will be scheduled once in every "selected from drop down" hours.
The "Dashboard Updater" table lists the "Schedule Frequency" and the Schedule for the
"Next Run". Any fresh data updated in Active Directory will be synchronized with
ADSelfService Plus at the time displayed under the "Next Run" column.
ManageEngine ADSelfSerivce Plus – Admin Guide
ZOHO Corp.
109
Locked Out Users
From the "Actions" column of the "Dashboard Updater" table, click on the edit icon to schedule an
update of the ADSelfService Plus dashboard. The dashboard will display the latest data about
Locked-Out Users.
Password Expired Users
From the "Actions" column of the "Dashboard Updater" table, click on the edit icon to schedule an
update of the ADSelfService Plus dashboard. The dashboard will display the latest data about
Password Expired Users.
Soon-To-Expire User Passwords
From the "Actions" column of the "Dashboard Updater" table, click on the edit icon to schedule an
update of the ADSelfService Plus dashboard. The dashboard will display the latest data about Soon-
to-Expire User Passwords.
ManageEngine ADSelfSerivce Plus – Admin Guide
ZOHO Corp.
110
Automatic DB Backup
As a proactive measure against the loss of data,the ADSelfService Plus application provides you with
a feature by name Automatic DB Backup.This feature assists you in creating 'schedulers for data
backups' at regular intervals,thereby precluding any chance of losing data.
Configuration:
1. Select the frequency (daily,weekly,monthly or hourly) for scheduling.
2. In case of selecting the Weekly (or) Monthly option,you have to specify the 'time' & 'date' at
which the scheduling will take place.
3. In case of selecting the Daily (or) Hourly option,you have to specify the 'time' at which the
scheduling will take place
2. In the 'Back-up Storage Path' text box,provide the path name for these 'Back-Up' files.
3. Click on 'Save' to store the configured settings.
If the specified path is wrong or unavailable, the database will be stored in the default backup
folder under the product installation directory

ManageEngine ADSelfSerivce Plus – Admin Guide
ZOHO Corp.
111
Product Settings
This tab offers you with features via which you can establish the software settings of the
ADSelfService Plus application.
The utilities available under this tab are:
Connection
Server Settings
Windows Service

ManageEngine ADSelfSerivce Plus – Admin Guide
ZOHO Corp.
112
Connection
The 'Connection' feature is used to configure the 'Port Settings' of the ADSelfService Plus application.
It is also used for 'establishing connections' with other 'Manage Engine' products.
Configuring Port Settings
Establishing Connection with other ManageEngine Products
Configure The Port Settings :
Steps to be Followed In-order To Configure The Port Settings :
1. Click on 'Connection' (Admin --> Product Settings --> Connection)
2. Specify the 'Default Port Number'(8888) (OR) Specify the 'Port Number' - of your choice- in
the respective box provided
3. Check the 'Enable SSL Port' checkbox for 'safe transfer of data' via encryption ( Click on 'SSL
Certification Tool' for further details )
4. Check the 'Enable LDAP SSL' checkbox (for secure communication between Active Directory
& ADSelfService Plus)
5. Select the 'Session Expiry Time' - time for which the user session would last - from the drop-
down box
6. Click on 'Save' to store the configured settings
Establish Connection with other ManageEngine Products:
Steps to be Followed to establish Connection with other ManageEngine Products:
1. Enter the 'Server Details'
2. The 'Application Name' (with which the connection is to be established)
3. The 'Server Name'(the 'Manage Engine Product Installed Machine' which is to be connected)
4. The 'Port Number' of the 'Server'
5. Configure the 'Protocol'(http/https)
2. Under the 'Authentication Details' option enter
3. The 'Login Name' &
4. The Password
3. Click on 'Test Connection & Save' button ( to test the 'Established Connection')

ManageEngine ADSelfSerivce Plus – Admin Guide
ZOHO Corp.
113
Entrusting 'SSL Certification' with SSL Certification Tool
Entrusting this 'SSL Certificate' upon an ADSelfService Plus ensures 'safe transfer of data' between
this application & various others.
The SSL Tool brings about data security via 'encryption' process.
This page provides you with the 'Guidelines for Installing the SSL certificate' along with a 'CSR
Generator form'.
Guidelines For Installing The SSL Certificate On The ADSelfService Plus Application:
Installing the 'SSL certificate onto the ADSelfService Plus' application is a 'three-step process':
1. SSL Certficate Request
2. Generating The Keystore File &
3. Embedding the SSL Certificate With ADSelfService Plus
SSL Certificate Request:
Before requesting for a certificate from any certifying authority,one needs to create a tomcat specific
'.csr file' & a '.keystore file'.These two files should be named as 'selfservice.csr' &
'selfservice.keystore' respectively.
Generating The 'csr' file:(with the help of the 'CSI GENERATOR' form)
Steps To Be Followed:
1. In the 'Common Name' textbox,provide the 'domain name' for accessing the 'Server'(eg.
www.example.com)
2. Specify the 'Organizational Unit'(OU) in the respective textbox provided
3. In the 'Organization' textbox,provide the 'Legal Name' of your organization.
4. Specify the 'City'(in which your organization is located) in the textbox provided
5. Mention the 'State/Province' (in which your organization is located) in the respective textbox
provided
6. Provide the 'Country Code'(of the country where your organization is located)
7. In the 'Password' textbox,specify the 'Password'(minimum 6 characters in length) that you will
be asked while installing the certificate
Optional Features:
8. In the 'Validity' textbox, set the 'Validity Period' for the certificate(by default,it is 90 days)
9. Public Key Length
10. Click on the 'Generate CSR' button to generate the CSR file.
Generating The Keystore File (and associating it to the CA signed certificates):
1. Unzip & extract all the certificates received from the CA to the <installation directory>\jre\bin
2. To generate keystore and add signed certificates,follow the below mentioned instructions:
ManageEngine ADSelfSerivce Plus – Admin Guide
ZOHO Corp.
114
Directions to generate keystore for 'Go Daddy' certificates:
keytool -import -alias root keystore selfservice.keystore -trustcacerts -file gd_bundle.crt
keytool -import -alias cross -keystore selfservice.keystore -trustcacerts -file gd_cross.crt
keytool -import -alias intermed -keystore selfservice.keystore -trustcacerts -file gd_intermed.crt
keytool -import -alias tomcat -keystore selfservice.keystore -trustcacerts -file selfservice.crt
Directions to generate keystore for 'Verisign' certificates:
keytool -import -alias intermediateCA -keystore selfservice.keystore -trustcacerts -file < your
intermediate certificate > .cer
keytool -import -alias tomcat -keystore selfservice.keystore -trustcacerts -file selfservice.cer
Directions to generate keystore for 'Comodo' certificates:
keytool -import -trustcacerts -alias root -file AddTrustExternalCARoot.crt -keystore
selfservice.keystore
keytool -import -trustcacerts -alias addtrust -file UTNAddTrustServerCA.crt -keystore
selfservice.keystore
keytool -import -trustcacerts -alias ComodoUTNServer -file ComodoUTNServerCA.crt -keystore
selfservice.keystore
keytool -import -trustcacerts -alias essentialSSL -file essentialSSLCA.crt -keystore
selfservice.keystore
Embedding The SSL Certificate into ADSelfService Plus:
1. Ensure that Enable SSL Port is checked in the product.
2. Login in to "ADSelfService Plus"
3. Click on Admin -->>Product Settings -->>'Connection'
4. Provide check against 'Enable SSL Port' option
5. Click on Save (This will "Enable SSL Port")
2. Copy SelfService.keystore from <InstallDir>\jre\bin to <InstallDir>\conf
3. Edit "server.xml"(at <InstallDir>\conf) by replacing the value of:
4. "keystoreFile" with "./conf/SelfService.keystore"
5. "keystorePass" with whatever password you entered into the CSR generator. Save the
server.xml
4. Restart ADSelfService Plus.
If the browser presents no warning,then you have installed the SSL certificate successfully.
You are provided with the option of 'editing' an 'already configured connection' by
clicking on the 'Edit' icon.
Changes in the 'Port Number' will come into effect only at the 'Restart of the
ADSelfService Plus application'
Incase you want to refer to the 'Server' with the 'Machine Name' instead of using the
'Port Address',then it can be done so by declaring the 'Port Number' as '80'.

ManageEngine ADSelfSerivce Plus – Admin Guide
ZOHO Corp.
115
Server Settings
Configuring Mail Server Settings
Configuring SMS Server Settings
Steps Involved In Configuring The Modem Port & Modem Speed
Requirements For Establishing SMS Server Connection
Configuring Mail Server Settings
1. Click on "Server Settings" (Admin --> Product Settings --> Server Settings)
2. Specify the "Mail Server" and "Mail Port" in the respective boxes provided.
3. In the "From" Address field enter the e-mail address from which you are likely to receive the
report mails.
4. Check against the "Authentication" option,enter the 'Username' and 'Password' of the Mail
Server to avoid anonymous login.
5. Enable 'Use Secure Connection' (SSL/TLS) checkbox (for securing the data transmission
between ADSelfService Plus & other applications)
6. Check the 'Send E-mails In HTML format' option
7. Click on "Save" button
To verify your 'Mail Server Settings', send a test email via the "Send Test Mail" Link. A 'Test Mail' will
be sent to the specified e-mail id's.
Configuring SMS Server Settings
1. Click on "Server Settings" (Admin --> Product Settings --> Server Settings)
2. Specify the "Modem Port" in the respective box
3. Click on "Save" button
To verify your 'SMS Server Settings', send a test message via the "Send Test Message" Link. A 'Test
Message' will be sent to the specified Mobile Number.
Steps Involved In Configuring The Modem Port & Modem Speed:
Connect your GSM Modem to the Serial Communication Port.
Only a serial cable must be used for connectivity.
The port number for
Window Devices: Will be comx. Eg. com7 or com8
Enter the Port Number to which the modem is connected :eg.(COM 1)
Requirements For Establishing SMS Server Connection
Modem/ Mobile must have GSM functionality with a provision to insert the SIM card.
Should support 7bit (GSM default alphabet), 8bit and Unicode (UCS2) encoding.
- Matching these criterias allows, ADSelfService Plus to support your modem/ mobile phone.

ManageEngine ADSelfSerivce Plus – Admin Guide
ZOHO Corp.
116
Windows Service
Whenever an application is declared as a NT Service,then it can be accessed from any
system,irrespective of it's location(the server in which it is installed).To declare the ADSelfService
Plus as a NT Service follow the steps given below:
Steps To Be Followed Inorder To Install & Start ADSelfService Plus As A Service:
1. Please stop the ADSelfService Plus,if it is running(Start --> Programs -->ADSelfService Plus -
-> Stop ADSelfService Plus)
2. Install as a Service(Start --> All Programs --> ADSelfService Plus --> NT Service --> Install
ADSelfService Plus as a Service)
3. Start as a service
4. Start -->Run and type 'services.msc'
5. Right-click on "ManageEngine ADSelfService Plus" and Click on Properties.
6. Go to Logon Tab and choose "This Account" option. Enter an Administrative credential and
click OK.
7. Right click on Manage Engine ADSelfService Plus and Click on Start
Now it would be possible to access the ADSelfService Plus application,even if the system - in which
ADSelfService Plus has been installed - is in a 'logged off' state.

ManageEngine ADSelfSerivce Plus – Admin Guide
ZOHO Corp.
117
License Management
As the name suggests, this feature enables you to manage licenses – that of ADSelfService Plus.
Since ADSelfService Plus is a "per user" license product, this feature bears a huge significance.
When users enroll with ADSelfService Plus, they are provided with the access rights termed as the
"license". In more simple terms, just as you need a license to drive a car, you need a license to use
the services of ADSelfService Plus.
Why Do We Need License Management Feature?
What Exactly Is License Management?
Let's us assume an organization comprises of 5000 users and it purchases 5000 user licenses.
Gradually, over the years, about 1000 employees drop out of the organization. Then, it means 1000
licenses, for which the organization made a payment, is being wasted! Now, what if the product offers
the organization a chance to reuse these licenses,by giving it to new arrivals?! After all, an
organization is a place where there will be steady influx and efflux of employees!
Well, this is "license management" in a nutshell - as simple as that! Manage user licenses, so as to
provide the organization maximum benefit.
Advantages:
Clients get their money's worth. No wastage of licenses = no wastage of money.
Since old licenses are reused, there is no need to buy new licenses for new arrivals. More
savings.
Everything is organized.
In short,"license management" performs a sort of "drain the swamp" work for keeping an organization
in an orderly manner.
Restricting inactive users from accessing ADSelfService Plus is a part of effective license
management.
Click on Restrict Users for further details.
ManageEngine ADSelfSerivce Plus – Admin Guide
ZOHO Corp.
118
Restrict Users
In this page we discuss
The users who can be restricted from using the License
Configuring The License Management Feature
Enabling a Restricted User
The users who can be restricted from using the License
License management involves the process of restricting users who fall under the following four
categories:
1. Account Expired Users
2. Account Disabled Users
3. Inactive Users &
4. Deleted Users.
1. Account Expired Users:
This happens for user accounts that are created for a shorter time duration (eg.in the case of a
temporary employee).As the account's time duration elapses,the user account gets expired - as there
is no point in maintaining a disembodied account. A user with an expired account will be stripped of
his license.
2. Account Disabled Users:
The rights for disabling a user account is in the hands of the administrator. By disabling a user
account,the administrator denies user the access to ADSelfService portal.This usually happens when
a user retires from an organization.
3. Inactive Users:
License Management feature allows the administrator to block users who have been inactive for a
specified time period.The time period can be set to any number of days (your choice).Using this
feature you - the administrator - can take precautionary steps inorder to prevent any disarray in an
organization.
4. Deleted Users:
Just as the license management feature restricts the inactive users,it can also forbid the deleted users
from accessing the ADSelfService portal.As in most cases,there is no need of licenses for users who
have been deleted from an organization.
When a user gets restricted,then the entire database related to that particular user is
lost.Therefore,the future report generations would not contain the details of this restricted
user.

ManageEngine ADSelfSerivce Plus – Admin Guide
ZOHO Corp.
119
Configuring The License Management Feature:
The license management feature can be configured as follows:
1. Click on Restrict Users (Admin --> License Management --> Restrict Users)
2. Select the required Domain,then
3. Choose the desired OUs (in which you are going to restrict users)
4. Click on Add Users
5. "Add Users For Restriction" windows appears.It contains four different options.They are:
6. Account Expired
7. Account Disabled
8. Inactive Users
9. Deleted Users
6. Select anyone of the above mentioned options & generate the respective User Report.
7. A 'User Report' can be generated by clicking on Generate button.(To stop the 'Account
Expired' & 'Account Disabled' report generation,click on the "Stop" button.)
8. Once the report is generated,select the user to be "restricted" by "Enabling the Checkbox"
beside the "desired Username".
9. After user selection,click on the 'Add User' button.
10. A pop up window will appear bearing a warning message that the 'user to be restricted would
be denied access to the ADSelfService Plus portal'.
11. Click OK to restrict the user.
Enabling A Restricted User:
1. A Restricted User can be reinstated by enabling the checkbox beside that particular
username on the Restrict Users page.
2. Click on 'Allow Access' tab.
3. A message box will appear stating that the user was successfully reinstate
When a user gets reinstated,the administrator has to re-enroll that particular user (since the
information associated with the restricted users gets lost)

ManageEngine ADSelfSerivce Plus – Admin Guide
ZOHO Corp.
120
Support
The one place you should turn to for all the guidance you need while working with the ADSelfService
Plus application.
It provides you with the following features:
E- Mail Tech Support:
You can submit your queries regarding this application to the Tech Support team that will report back
to you as soon as possible.
ADSelfService Plus application provides you with a Toll-Free number (1-888-720-9500) to which you
can contact in case of requiring any guidance.
User Forums:
A place where the end-users can discuss various issues regarding this application.
You - the admin - too can gain an insight on how to better this application based on the views of the
end-users posted under these forums.
Subscribing To ADSelfService Plus:
Subscribing to this application is a very easy task. To do so,the ADSelfService Plus provides you with
the following details:
I The 'Get Quote' Option:
You can gain information about the 'price quotes' of this application by submitting the 'ADSelfService
Plus Get Quote form' which requires you to fill in some personal details.
II The 'Pricing Details' Option:
You can also view the pricing details of ADSelfService Plus based on your requirements by clicking
the 'Pricing Details' option.
III The 'Buy Now' Option:
Subscribe to ADSelfService Plus by clicking onto the 'Buy Now' option. It puts light onto the following
features:
'Terms & Conditions' to be followed while making use of ADSelfService Plus.
Two versions of ADSelfService Plus (Standard & Professional)
Licensing Fee ( in accordance with your requirements)
IV Compare Editions Option:
The ADSelfService Plus application is available in two different formats:
Standard
Professional
The 'Compare Editions' option provides a comparison between the two available versions,thereby
providing you with a clear idea about the version that would suit you the best.
ManageEngine ADSelfSerivce Plus – Admin Guide
ZOHO Corp.
121
Troubleshooting Tips
Domain Settings
Active Directory Self Update
Active Directory Reports
GINA
Domain Settings
1. When I start ADSelfService Plus, none of my domains are discovered. It says "No Domain
Configuration available". Why?
2. When I add my domains manually, the Domain Controllers are not resolved. Why?
3. When I add the Domain Controller, I get an error as "The Servers are not operational". What
does it mean?
4. When I add the Domain Controller, I get an error as "Unable to get domain DNS / FLAT
name". What does it mean?
5. The status column in the domain settings says that the user do not have Admin Privilege?
1. When I start ADSelfService Plus, none of my domains are discovered. It says "No Domain
Configuration available". Why?
ADSelfService Plus, upon starting, discovers the domains from the DNS Server associated with the
machine running the product. If no domain details are available in the DNS Server, it shows this
message.
2. When I add my domains manually, the Domain Controllers are not resolved. Why?
When the DNS associated with the machine running ADSelfService Plus do not contain the
necessary information. You need to add the Domain Controllers manually.
3. When I add the Domain Controller, I get an error as "The Servers are not operational". What
does it mean?
This means that either the specified Domain Controller is invalid or it could no be contacted at present
due to network unavailability. Questions
4. When I add the Domain Controller, I get an error as "Unable to get domain DNS / FLAT
name". What does it mean?
This error could be due to any of the following reasons:
1. When the specified user name or the password is invalid.
2. Anonymous login (when no user name and password is provided)
3. When IP Address of the Domain Controller is specified instead of its name.
5. The status column in the domain settings says that the user do not have Admin Privilege?
This is a warning message to indicate that the specified user do not have administrator privileges i.e,
the user is not a member of Domain Admins Group. Hence permissions applicable to Administrator
may not be available to this user.

ManageEngine ADSelfSerivce Plus – Admin Guide
ZOHO Corp.
122
Active Directory Self Update
1. Error Code - 80070005 / Error Code - 5 : Error In Setting Attributes, Access is denied
2. While user password reset, I get the following error "Error in setting the Password. The
network path not found - Error Code: 80070035"
3. While user password reset, I get the following error "Error in setting the Password. There is a
naming violation - Error Code : 80072037"
4. While updating the user information, I get the following error "The server is unwilling to
process the request - Error Code : 80072035"
5. While updating the user information, I get the following error " Error In Setting Terminal
service Properties. The specified user does not exist - Error Code : 525"
6. I have updated the exchange attributes using ADSelfService Plus, but the properties are not
updated in the Exchange Server yet.
7. I am not able to set the Terminal Services properties for the user?
8. When I modify an user, I get the following error "A device attached to the system is not
functioning - Error Code : 8007001f "
9. Email address for user not showing up or not set properly?
10. Error - The server is unwilling to process the request while resetting Password, which did not
match password complexity
11. Error code: 8007052e
12. Error code: 80070775
13. Error code: 800708c5
14. No such user matched. Verify the LDAP attribute in search query
1. Error Code - 80070005 / Error Code - 5 : Error In Setting Attributes, Access is denied
Cause : User account do not have enough privilege over the object.
Solution :
1. Login to ADSelfService Plus with the "admin" credential.
2. Click on the "Domain Settings" found at the right top corner.
3. Click on the edit image to "Edit Domain Details".
4. Check the "Authentication" and provide the privileged "Domain User Name" and "Domain
Password".
5. Save the Changes and continue with the operations.
2. While user password reset, I get the following error "Error in setting the Password. The
network path not found - Error Code: 80070035"
While setting the password for the user if the target machine could not be contacted, this error is
shown. This could happen when the DNS associated with the machine running ADSelfService Plus
do not point to the Domain Controller where the user account is being created (possibly both are in
different domains).
3. While user password reset, I get the following error "Error in setting the Password. There is
a naming violation - Error Code : 80072037"
One possible reason for this error could be that the password contains some special characters that
are not allowed.

ManageEngine ADSelfSerivce Plus – Admin Guide
ZOHO Corp.
123
4. While updating the user information, I get the following error "The server is unwilling to
process the request - Error Code : 80072035"
One possible reasons for this error could be:
1. When modifying the SAM Account Name format for multiple users and when more than one
user happen to have the same SAM Account Name.
5. While updating the user information, I get the following error " Error In Setting Terminal
service Properties. The specified user does not exist - Error Code : 525"
One possible reason could be that the user or the system account as which the product is run do not
have an account in the target domain. Terminal Service properties can only be set if the user account
or the system account (applies when ADSelfService Plus is run as a service) that runs ADSelfService
Plus has an account on the target domain.
6. I have updated the exchange attributes using ADSelfService Plus, but the properties are not
updated in the Exchange Server yet.
ADSelfService Plus modifies the exchange properties in the Active Directory. The changes may not
immediately reflect in the Exchange Server. It will get updated after some time.
7. I am not able to set the Terminal Services properties for the user?
One possible reason could be that the user or the system as which the product is run do not have an
account in that domain.
Refer to here for starting ADSelfService Plus in User or System account.
8. When I modify an user, I get the following error " A device attached to the system is not
functioning - Error Code : 8007001f "
The possible reasons for this error could be:
1. When modifying an user, if an unacceptable format is chosen for the naming attributes. For
example, if the format chosen for the Logon Name is LastName.FirstName.Initials and if the
user do not have any one of these attributes specified, this error will occur.
9. Email address for user not showing up or not set properly?
The possible reason could be:
1. Email may Not be set as per Recipient Policy. check whether all ldap attributes in recipient
ploicy query are set to specific value.
2. Check in the user account properties whether you entered the attribute for email. Ex:
xyz@company.com. The company should be entered to the users.
10. Error-The server is unwilling to process the request while resetting Password which not
maches to password complexity
The possible reason could be:
You may not have specified or opt for any options in 'Password Complexity' while creating user
account.
Ex: There will be options for password complexity like length of password, Characters that can be
used or number of bad login attempts etc. You need to select any degree of complexity, ignoring so
will throw above error.

ManageEngine ADSelfSerivce Plus – Admin Guide
ZOHO Corp.
124
11. Error code: 8007052e
The reason is, the Supplied credentials are invalid.
12. Error code: 80070775
Reason: The referenced account is currently locked out and may not be logged on.
13. Error code: 800708c5
Reason: The password does not meet the password policy requirements. Check the minimum
password length, password complexity and password history requirements.
14.No such user matched. Verify the LDAP attribute in search query
Reason: No Users in AD matches with the criteria provided by you.Try choosing the correct matching
attributes by checking with the query provided in the "Match criteria for Users in AD",this is obtained
by clicking on "Update in AD" button and expanding "Select Attributes" box.
Active Directory Reports
1. When I specify the details and generate the report, it says "No Result available" or incomplete
data
2. AD Reports shows an object that do not exist in the Active Directory?
1. When I specify the details and generate the report, it says "No Result available" or
incomplete data
It could be because of any of the following reasons:
1. When ADSelfService Plus could not contact the Domain Controller as it is not operational or
due to network unavailability.
2. In case of multiple Domain Controllers, when the data is not replicated in all the Domain
Controllers.
3. The LastLogonTime that is used to determine the inactive users and computers is not
replicated in all the Domain Controllers. Hence, you need to specify all the Domain
Controllers in the Domain Settings to enable ADSelfService Plus to retrieve the data from all
the Domain Controllers.
4. When the password policy is not set (i.e., Max Password Age is set to zero), the Password
Expired Users report and Soon to Password Expiry users report will not show any data.
2. AD Reports shows an object that do not exist in the Active Directory?
This mismatch could occur when the data is not synchronized with the Active Directory. The data
synchronization with the Active Directory happens everyday at 1.00 hrs. If ADSelfService Plus is not
running at that time, you can initiate the data synchronization manually by clicking the icon of that
domain from the Domain Settings.
Troubleshooting GINA
1. I receive the error message "Initiating Connection to Remote Service . . . Failed" why?
2. I receive the error message "Network path not found/Invalid Credential".
3. I receive the error message "The network path was not found".
4. Not able to copy ADSelfServicePlusClientSoftware.msi to the client machines. Why?
5. Couldn't connect to the machine, ADMIN$. Access is denied

ManageEngine ADSelfSerivce Plus – Admin Guide
ZOHO Corp.
125
6. Logon Failure: The target account name is incorrect.
7. Logon failure: unknown user name or bad password
8. I receive the message "Another installation is already in progress".
1. I receive the error message "Initiating Connection to Remote Service . . . Failed" why?
Ensure if such a computer really exists. If so, ensure it is well connected to the network.
To check for connectivity, ping this computer only from the server where ADSelfService Plus
has been installed.
2, I receive the error message "Network path not found/Invalid Credential". Why?
Ensure if such a computer really exists. if it exists, ensure it is well connected to the network.
To check for connectivity, ping this computer only from the server where ADSelfService Plus
has been installed.
3. I receive the error message "The network path was not found". Why?
Ensure if such a computer really exists. If so, ensure it is well connected to the network.
To check for connectivity, ping this computer only from the server where ADSelfService Plus
has been installed.
4.Couldn't copy the MSI file "ADSelfServicePlusClientSoftware.msi" to the client machine.
Why?
Reason : Insufficient privilege to access the client machine.
Solution: Update the credential provided under the "Domain Settings" of ADSelfService Plus if Self
Service Product is running as an application.
When ADSelfService Plus is running as service, update service account's credential from the "Logon"
Tab editing the properties of "Services.msc"
5.Couldn't connect to the Client Machine, ADMIN$.Access is denied
Reason : Admin share might not be enabled.
Solution: Enable Admin Share permissions for the client machine. Configure Domain Settings(When
Run As Console) / Logon Tab(When Run As Service) with Administrative Credentials
6.Logon Failure: The target account name is incorrect.
1.This error message can occur if two computers have the same computer name. One computer is
located in the child domain; the other computer is located in the parent domain.
7.Logon failure: unknown user name or bad password
Reason:.Admin share might not be enabled.
Solution:.Configure Domain Settings(When Run As Console) / Logon Tab(When Run As Service)
with Administrative Credentials
8.Another installation is already in progress.
Solution : Try to install after few minutes
